

Page 1

Instructions for Installation and Use
GW81
The cooker must be installed in accordance with the regulations in
force and only used in a well ventilated space.
To the Installer
Before installation fill in the product details on the back cover of this
booklet. The information can be found on the rating plate.
To the User
You must read the instructions prior to using the appliance and then
retain them for future reference.
Page 2

CONTENTS
PAG E
Introduction 3
For Your Safety 4 & 5
Oven Timer Operation 6
Hotplate 12
Grill 13
Main Oven 15
The “E” Setting 19
Top Oven 20
Care and Cleaning 23
Something Wrong ? 26
Installation Instructions 28
Service 36 & Back Cover
2
Page 3
INTRODUCTION
To help you make the best use of your cooker, PLEASE READ THIS BOOKLET
CAREFULLY.
Your new cooker is guaranteed and will give lasting service. The guarantee is
only applicable if the cooker has been installed in accordance with the Installation
Instructions.
The cooker is designed specifically for domestic use and responsibility will not be
accepted for use in any other installation.
When first using the cooker ensure that the room is well ventilated (e.g. open a
window or use an extractor fan) and that persons who may be sensitive to the
odour avoid any fumes. It is suggested that any pets be removed from the room
until the smell has ceased. This odour is due to any temporary finish and also
any moisture absorbed by the insulation.
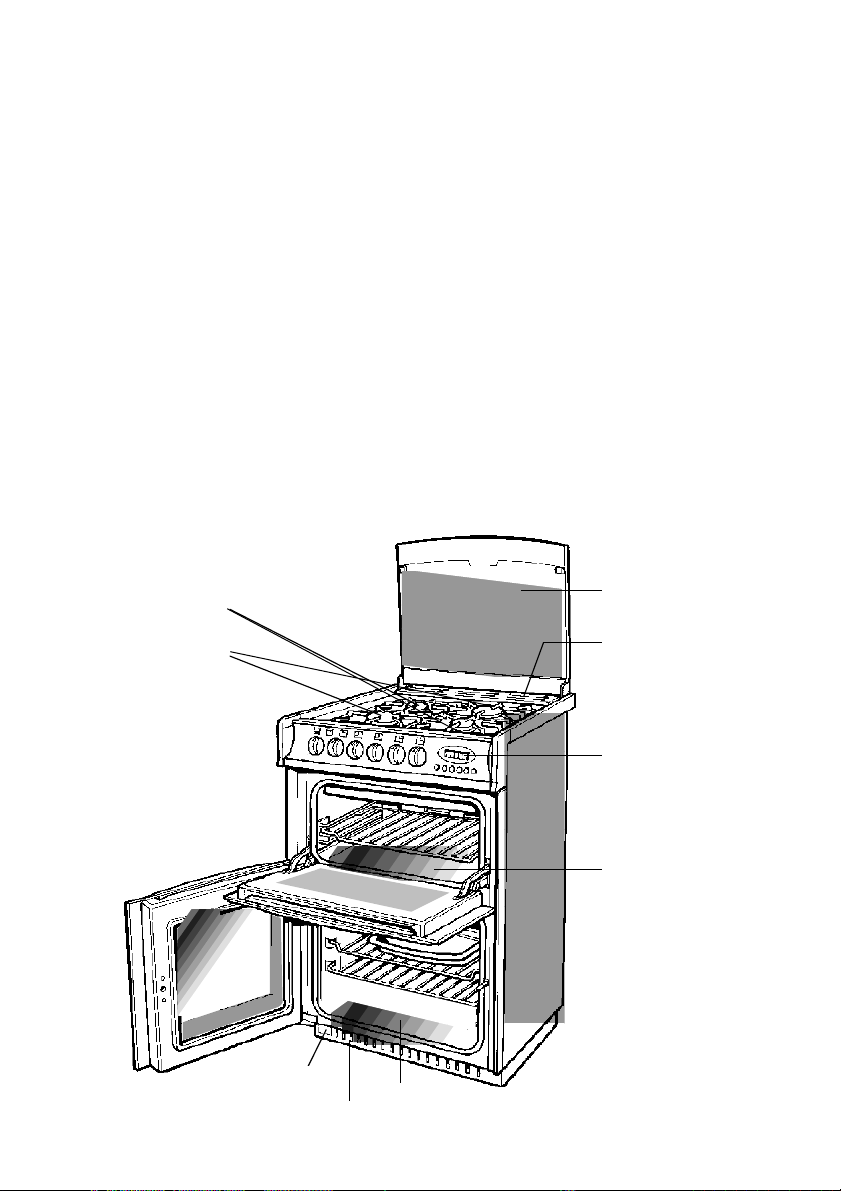
FEATURES
GLASS LID WITH CUT OFF
SIMMERING BURNERS
VALV E
HIGH SPEED BURNERS
DATA BADGE
VENTILATION SLOTS
VENTILATION SLOTS
AUTOMATIC OVEN TIMER
TOP OVEN AND GRILL
MAIN
OVEN
3
Page 4

FOR YOUR SAFETY
Please read the precautions below before using your cooker.
ALWAYS . . .
ALWAYS make sure you understand the controls before using the cooker.
ALWAYS check that all controls on the cooker are turned off after use.
ALWAYS stand back when opening an oven door to allow heat to disperse.
ALWAYS use dry, good quality oven gloves when removing items from the ovens.
ALWAYS take care when removing items from the top oven/grill when the main
oven is on, as the contents may be hot.
ALWAYS keep the oven and grill doors closed when the cooker is not in use.
ALWAYS place pans centrally over the hotplate burners and position them so
that the handles cannot accidentally be caught or knocked or become
heated by other burners.
ALWAYS keep the cooker clean, as a build up of grease or fat from cooking can
cause a fire.
ALWAYS allow the cooker to cool before cleaning.
ALWAYS follow the basic principles of food handling and hygiene to prevent the
possibility of bacterial growth.
ALWAYS keep ventilation slots clear of obstructions.
ALWAYS turn off the electricity supply before cleaning or replacing the oven
lamp.
ALWAYS refer servicing to CORGI registered appliance service engineers.
4
Page 5

FOR YOUR SAFETY
NEVER . . .
NEVER leave children unsupervised where the cooker is installed as all surfaces
will get hot during and after use.
NEVER allow anyone to sit or stand on any part of the cooker.
NEVER store items that children may attempt to reach above the cooker.
NEVER heat up unopened food containers as pressure can build up causing
the container to burst.
NEVER
NEVER fill a deep fat frying pan more than 1/3 full of oil, or use a lid.
NEVER place flammable or plastic items on or near the hotplate.
NEVER use proprietary spillage collectors on the hotplate.
NEVER use the cooker as a room heater.
NEVER dry clothes or place other times over or near to the hotplate or oven/
NEVER wear garments with long flowing sleeves whilst cooking.
NOTE: The use of a gas cooking appliance results in the production of heat and
moisture in the room in which it is installed. Ensure that the kitchen is well ventilated; keep natural ventilation holes open or install a mechanical ventilation
device (mechanical extractor hood).
Prolonged intensive use of the appliance may call for additional ventilation, for
example opening of a window, or more effective ventilation, for example
increasing the level of mechanical ventilation where present.
store chemicals, food stuffs, pressurised containers in or on the cooker,
or in cabinets immediately above or next to the cooker.
DO NOT LEAVE UNATTENDED WHILE COOKING.
grill doors.
5
Page 6

OVEN TIMER OPERATION
The oven timer offers you the following features:
1. Time of Day
2. Automatic Cooking
3. Minute Minder
AUTOMATIC COOKING
The Top Oven and Main Oven can be controlled automatically. When the
timer control has been set for one oven it is possible to use the other oven
only on the same automatic cooking programme.
GUIDANCE ON AUTOMATIC COOKING
1. Select foods which will take the same time to cook.
2. Set the oven timer so that the food has just finished or is just about to
finish cooking on your return to the oven. This will ensure the food has
not cooled down and does not require reheating before serving.
3. Food should be as cold as possible when it goes into the oven, ideally
straight from the refrigerator. Frozen meat and poultry should be
thawed thoroughly before it is put in the oven.
4. Warm food should never be placed in the oven if there is to be a
delay period. Stews prepared by frying the meat and vegetables should
be cooked as soon as possible.
5. Dishes containing left-over cooked poultry or meat, for example
Shepherds Pie, should not be cooked automatically if there is to be a
delay period.
6. Stews and joints should be cooked by the long slow method, so that the
delay period is kept to a minimum.
7. On warm days, to prevent harmful bacterial growth in certain foods (ie
poultry, joints, etc) the delayed start should be kept to a minimum.
8. Wine or beer may ferment and cream may curdle during the delay
period, so it is best to add these ingredients just before serving.
9. Foods which discolour should be protected by coating in fat or tossing in
water to which lemon juice has been added, prior to placing food in the
oven.
10. Dishes containing liquid should not be filled too full to prevent boiling
over.
11. Food should be well sealed (but not airtight) in a container to prevent the
loss of liquid during cooking. Aluminium foil gives a good seal.
12. Ensure food is cooked thoroughly before serving.
TIMER OPERATION
1. Make sure all oven controls are turned Off.
2. Check that the electricity supply to the cooker is turned On.
3. Check that the timer is set to the right time of day.
6
Page 7
Minute
Minder
Cook
Period
End
Time
Manual
A
U
T
O
A
U
T
O
Minute
Minder
Cook
Period
End
Time
Manual
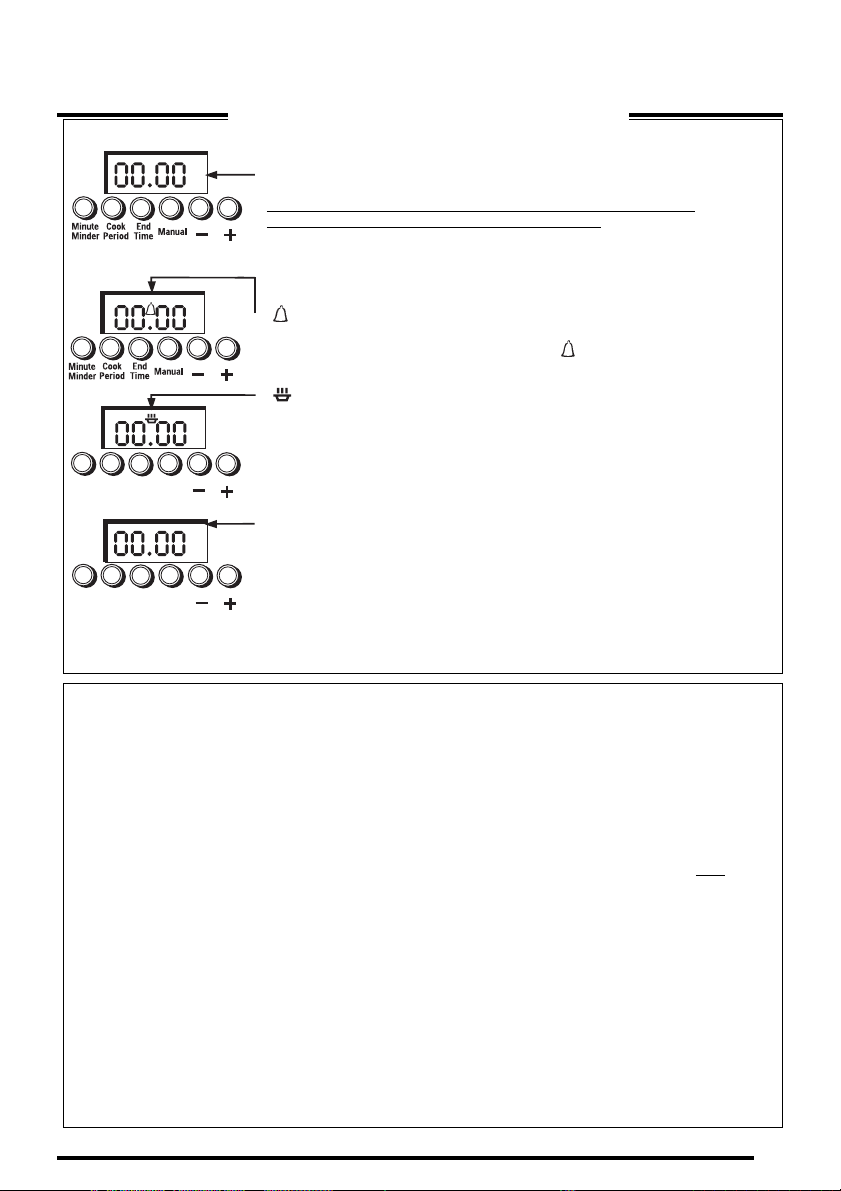
KNOW YOUR TIMER
CLOCKFACE
The timer incorporates a 24 hour clock.
Ensure correct time of day is always set, before using your cooker.
PLEASE NOTE THAT THE DISPLAY WILL DIM BETWEEN 22.00
HOURS AND 06.00 HOURS TO PREVENT GLARE.
However, should you operate the timer during these hours the display will
return to normal brightness for a few seconds and then dim again.
SYMBOLS
will light up when you select a Minute Minder Period and will remain
lit for the period set. At the end of the Minute Minder Period, the timer
will emit an audible tone for 2 minutes, the symbol will start to flash
and will continue to flash until the Minute Minder function is cancelled.
This “Cookpot” symbol will light up either:–
– When you press the Cook Period Button and set a length of time for
an Auto Cooking Programme. (It will go out again a few seconds after
you release the timer buttons).
– During the actual Cook Period.
“AUTO” will light up:–
– When the timer is first turned on it will flash. (It will go out when a
time of day is set.
– When an Auto Cooking Programme has been set.
The “Auto” symbol will flash at the end of an Auto Cooking programme
to indicate that the programme has finished.
(When the “Auto” symbol is flashing, to return the oven to Manual
operation, turn the oven controls off, ensure that the correct time
of day is set, and press the “Manual” button twice – The “Auto”
symbol will go out.
TIMER FUNCTION BUTTONS
Minute Minder
Button
AUTO COOKING PROGRAMME
Cook Period Button
End Time Button
Manual Button
“+” and “–” Buttons
Here you can set a time period of up to 23 hours 59 minutes, that will count down.
When it reaches zero, the timer will emit an audible tone.
For Example: If you set 20 minutes, the audible tone will occur 20 minutes later.
Cook Period is the actual length of time for which, the timer will switch the oven(s)
on as part of an “Auto Cooking” programme.
(e.g. If you set 2 hours, the food will be cooked for 2 hours).
The time of day at which you want an “Auto Cooking” programme to end.
For Example: If you set a “Cook Period” for 2 hours, and “End Time” of 11:00. The
timer will switch the oven(s) on at 9:00 and turn the oven(s) off at 11:00. You will
hear a audible tone at 11:00, to indicate that the Auto
Cooking Programme has finished.
Notes:
– When setting an Auto Cooking programme you will need to set the oven controls(s) to the required temperature(s) when you set the timer.
_ If an Auto Cooking programme has been set the oven(s) will only operate during
the pre-programmed time.
Needs to be pressed to cancel an Auto Cooking programme and return the
ovens(s) to Manual operation.
Used to adjust the various timer function settings.
7
Page 8
A
U
T
O
Minute
Minder
Cook
Period
End
Time
Manual
Minute
Minder
Cook
Period
End
Time
Manual
Bell Symbol
Minute
Minder
Cook
Period
End
Time
Manual
Minute
Minder
Cook
Period
End
Time
Manual
ELECTRONIC CLOCK & AUTOMATIC OVEN
TIMER OPERATION
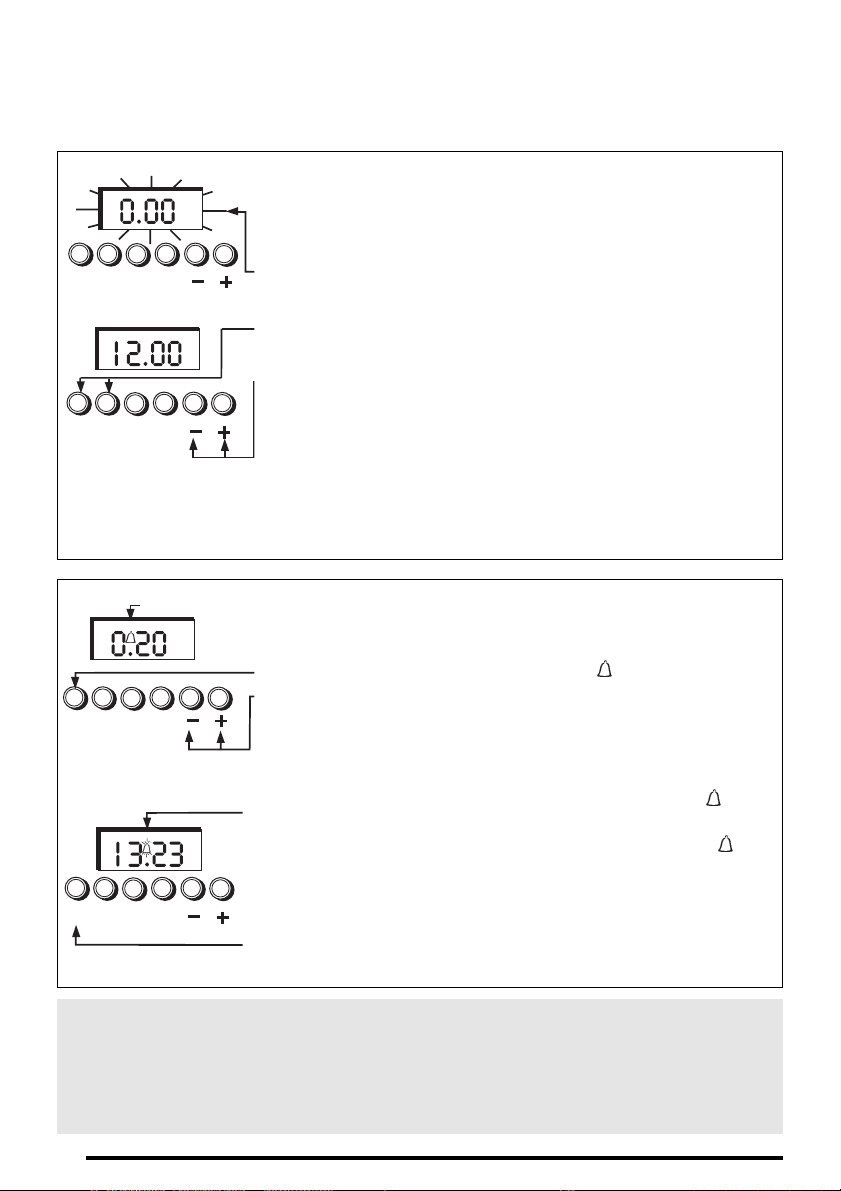
SETTING THE TIME OF DAY
Step 1 Make sure all oven controls are turned Off.
Step 2 Check the electricity supply to the cooker is turned on.
Step 3 When switched on the display will show 0.00 and Auto symbol
will be flashing intermittently.
Step 4 Press & hold in both the “Minute Minder” & “Cook Period” button
together.
Step 5 With the “Minute Minder” & “Cook Period” buttons still held in,
press either the “+” or “–” buttons to set the correct time of day.
Step 6 Release all the buttons simultaneously.
THE TIME OF DAY IS NOW SET.
To change the time of day repeat Steps 4, 5 & 6 above.
Note: You cannot adjust the time of day if the timer has been set
for an Auto Cooking Programme.
SETTING THE MINUTE MINDER
Step 1 Ensure the time of day is set correctly.
Step 2
Press and hold the Minute Minder Button, a symbol will light up.
Step 3 With the “Minute Minder” button held in, set the required Minute
Minder time using the “+” and “–” buttons.
Release all buttons and the timer display will revert back to the time of day.
Bell symbol will remain lit to signify that a Minute Minder period has been set.
At the end of the set time a bleeping sound will be heard, and the
symbol will flash for approximately 2 minutes.
After approximately 2 minutes the bleeping sound will stop and the
symbol will go out automatically.
Note 1 When the Minute Minder has been set, the time remaining can be
checked at any time by simply pressing the Minute Minder button.
Step 4 To cancel the bleeping sound within the two minutes press the
Minute Minder button.
Note 2 If necessary the Minute Minder can be cancelled before the tone sounds
by pressing and holding the Minute Minder button and then at the same
8
time pressing the “–” button until 0.00 appears in the display window.
Page 9
Minute
Minder
Cook
Period
End
Time
Manual
Cooktop Symbol
A
U
T
O
A
U
T
O
Minute
Minder
Cook
Period
End
Time
Manual
A
U
T
O
Minute
Minder
Cook
Period
End
Time
Manual
Minute
Minder
Cook
Period
End
Time
Manual
ELECTRONIC CLOCK & AUTOMATIC OVEN
TIMER OPERATION
AUTO COOKING PROGRAMMES
There are two Auto Cooking programmes that can be selected using your timer:–
(a) To set the timer to switch the oven(s) On and Off Automatically
(b) To set timer to switch on immediately and OFF automatically after a set cook period.
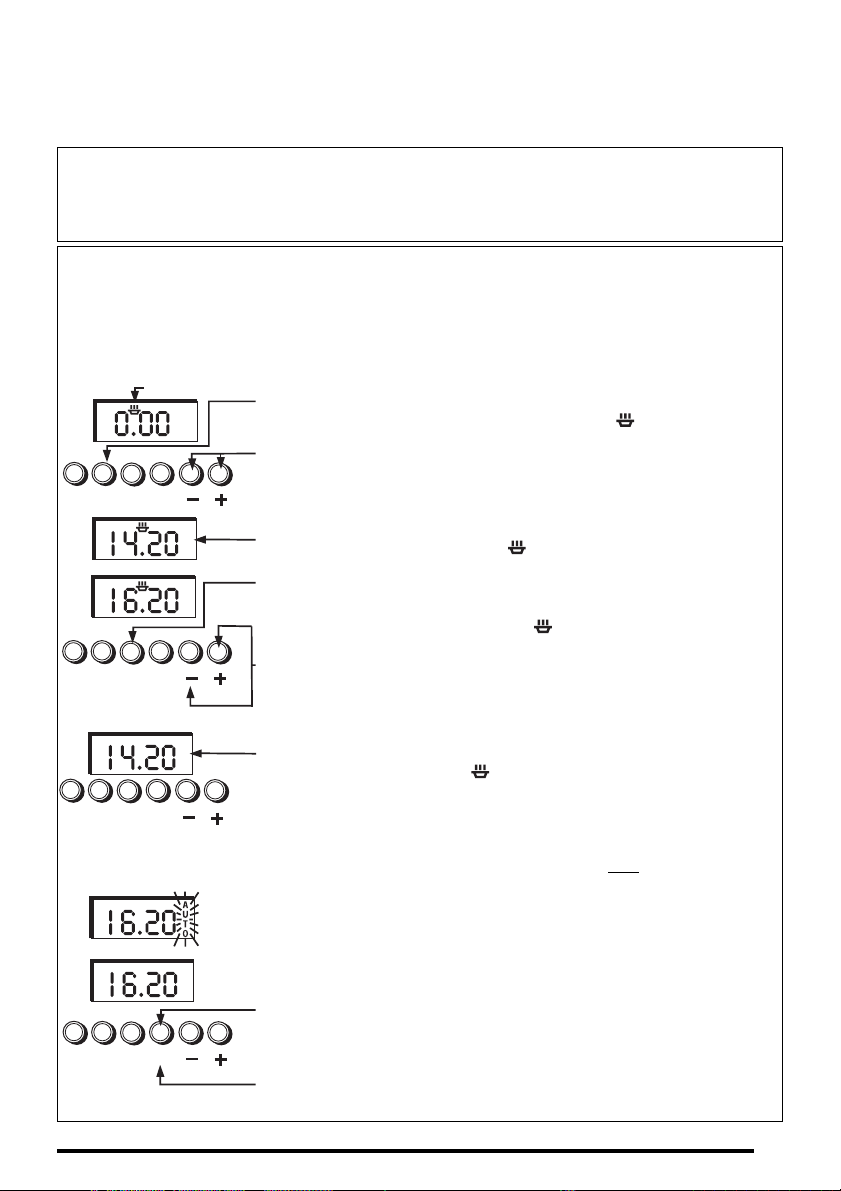
a) TO SET THE TIMER TO SWITCH THE OVEN(S) ON AND OFF AUTOMATICALLY
This allows you to cook at a specified time for a chosen period before the oven
switches off Automatically.
Step 1 Check that the correct time of day is set, if not follow instructions for setting the
time of day.
Step 2 Place food onto the correct shelf position in the oven and close the oven door(s).
Step 3 Press and hold in the Cook Period button.
The display will read 0.00 with the cookpot ( ) symbol lit.
Step 4 With the Cook Period button still held in, set the required Cook
Period using the “+” and “–” buttons.
Release the buttons and the timer display will revert to the time of day
with the Auto symbol and Cookpot ( ) symbol lit.
Step 5 Press and hold in the “End Time” button.
The display will read the earliest possible end time for the Cook
Period that you have set above.
The Auto symbol and Cookpot ( ) symbol lit.
Step 6 With the End Time button still held in, use the “+” and “–”
buttons to set the “End Time” (i.e. The time you require the oven
to switch off).
Release all the buttons and the timer will revert back to the time of day.
The “Auto” symbol will remain lit to signify that an Auto Cooking
Programme has been set. The ( ) symbol will go out.
Step 7 Turn the oven control(s) to the required temperature, and if
necessary select the appropriate oven function.
Note: If your appliance has two ovens: When the timer has been
set for one oven it is possible to use the other oven only during the same
Automatic programme.
At the end of the Automatic Cook Period the Auto Symbol will flash and
an intermittent bleeping sound will be heard.
The bleeping sound will continue for approximately 2 minutes unless
cancelled. The “Auto” symbol will continue to flash until the timer is
returned to Manual operation (see below).
Step 8 Press the Manual button to cancel the bleeping sound. (If 2
minutes has not elapsed).
Step 9 Turn the oven control(s) to the OFF position.
Step 10 Press the manual button again to return the oven(s) to Manual
Operation. (The Auto symbol will go out)
9
Page 10

ELECTRONIC CLOCK & AUTOMATIC OVEN
A
U
T
O
Minute
Minder
Cook
Period
End
Time
Manual
Cookpot Symbol
A
U
T
O
A
U
T
O
Minute
Minder
Cook
Period
End
Time
Manual
A
U
T
O
Minute
Minder
Cook
Period
End
Time
Manual
TIMER OPERATION
Note 1 When cooking automatically the Cook Period can be checked at any time
by simply pressing the Cook Period button.
Note 2 When cooking automatically the End Time can be checked at any time by
simply pressing the End Time button.
b) TO SET TIMER TO SWITCH ON IMMEDIATELY AND OFF AUTOMATICALLY
AFTER A SET COOK PERIOD
Step 1Check that the correct time of day is set, if not follow instructions for setting the time of day.
Step 2Place food onto the correct shelf position in the oven and close the oven door(s).
Step 3Turn the oven control(s) to the required temperature, and if necessary select the appropriate
oven function.
Step 4 Press & hold in the “Cook Period” button, the display will read
0.00 and the cookpot ( ) symbol will light up.
With the Cook Period button still held set the required Cook Period
using the “+” and “–” buttons. Example: 1hr 30 minutes (as shown).
Note: Cook Period is the length of time the food requires to cook.
Step 5 Release all buttons.
The timer display will revert to the time of day with the Auto symbol lit &
Cookpot symbol remaining lit.
Note: Cookpot symbol disappears
At the end of the Cook Period the “Auto” symbol will flash and an
intermittent bleeping sound will be heard.
The bleeping sound will continue for approximately 2 minutes unless
cancelled. The “Auto” symbol will continue to flash until the timer is
returned to Manual operation (see below).
Step 6 Press the manual button to cancel the bleeping.
(If 2 minutes has not elapsed)
10
Step 7 Turn the oven control(s) to the OFF position.
Step 8 Press the “Manual” button again to return the cooker to Manual
operation. (The Auto symbol will go out).
Page 11
ELECTRONIC CLOCK & AUTOMATIC OVEN
A
U
T
O
Minute
Minder
Cook
Period
End
Time
Manual
A
U
T
O
Minute
Minder
Cook
Period
End
Time
Manual
TIMER OPERATION
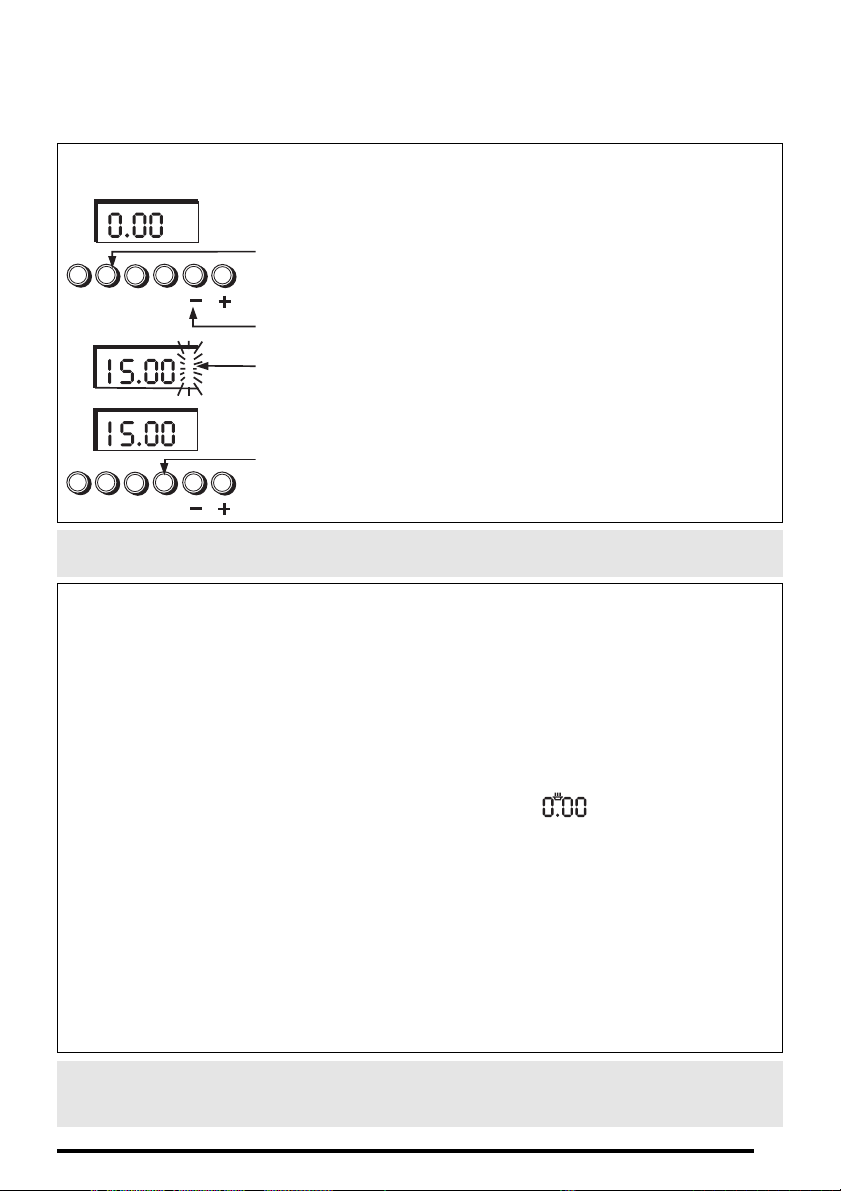
TO CANCEL AN AUTO COOKING PROGRAMME BEFORE
THE COOK PERIOD HAS FINISHED.
Step 1 Turn the oven control(s) to the OFF position.
Step 2 Press and hold in the “Cook Period” button.
Step 3 With the “Cook Period” button still held in, return the display to
0.00 by pressing the “–” button.
Step 4 Release the “Cook Period” and “–” buttons and the display will
revert to the time of day and the “Auto” symbol will flash.
Step 5 Press the “Manual” button to return the oven(s) to “Manual”
operation. The “Auto” symbol will go out.
Note 1 When cooking automatically the Cook Period can be checked at any time by
simply pressing the Cook Period button.
OTHER NOTES ON TIMER OPERATION
1. When cooking Automatically the Cook Period can be checked at any time simply by pressing the
Cook Period button.
2. When cooking Automatically the End Time can be checked at any time by simply pressing the
End Time button.
3. Having set a Cook Period and End Time an electronic device stores the information. The device
within the timer will switch the oven(s) on and off at the required times.
4. When setting an Auto Cooking Programme and a mistake is made, to clear:–
(a) Press and hold in the “Cook Period” button.
(b) With the Cook Period button still held in, return the display to by pressing the “–”
button.
(c) Release the “Cook Period” & “–” buttons, and the display will revert to the time of day and
the “Auto” symbol will flash.
(d) Press & release the “Manual” button.
(e) Start the sequence again.
5. If at any time the display shows three flashing zero’s 0.00. It is likely that the electricity supply
to the oven has been interrupted. Reset the timer to the correct time of day.
Food in the oven may, therefore, not have been cooked, before serving check food is
thoroughly heated and completely cooked.
6. To set each function always press and hold the required function button and at the
same time press “+” or “–” buttons.
Note: Between the hours of 22.00 & 06.00 the display dims to prevent glare.
However, if you should operate a button during this period, the timer will return to
normal brightness for a few seconds and then dim again.
11
Page 12

HOTPLATE
The hotplate lid is fitted with a safety device which cuts off the gas supply to the
hotplate burners unless the lid is fully open. Do not use the safety device as a
means of controlling the hotplate burners.
The hotplate has two high speed burners and two simmering burners which will
accommodate pans between 100mm (4”) and 230mm (9”) diameter. All pans
should be positioned centrally over the burners.
Simmering aids such as steel plates should not be used because they can cause
damage to the pan supports.
TO USE THE HOTPLATE
1. Check that the electricity supply is switched on.
2. Push in and turn the control knob of the chosen burner anti-clockwise
to the large flame symbol. Press the ignition button until the spark lights
the gas.
3. Turn the control knob anti-clockwise to the desired setting. Only turn
the control knob between the large flame symbol and the small flame
symbol for adjusting the setting.
4. To turn off, turn the control knob fully clockwise.
DO NOT use mis-shapen pans which may be unstable.
DO NOT use round base woks directly on the pan supports.
DO NOT use the glass lid as a working surface.
RELIGHTING THE BURNER
In the event of the burner flames being accidentally extinguished, turn off the
burner control and do not attempt to re-ignite the burner for at least one minute.
SAFETY REQUIREMENTS FOR DEEP FAT FRYING
1. Never fill chip pans more than one third full with oil or fat.
2. Never leave oil or fat unattended during the heating or cooling period.
3. Never heat fat or fry with a lid on the pan.
4. Always dry food thoroughly before frying, and lower it slowly into the
hot oil or fat. Frozen foods in particular will cause frothing and spitting if
added too quickly.
5. Always keep the outside of the pan clean and free from streaks of oil or
fat.
HOW TO DEAL WITH A FAT FIRE
1. Do not move the pan.
2. Turn off the hotplate burners.
3. Smother the flames with a fire blanket or damp cloth to extinguish the
fire. Do not use water or a fire extinguisher as the force of it may
spread the burning fat or oil over the edge of the pan.
4. Leave the pan for at least 60 minutes before moving it.
12
Page 13
GRILL
CAUTION – ACCESSIBLE PARTS MAY BECOME HOT WHEN THE GRILL IS USED.
YOUNG CHILDREN SHOULD BE KEPT AWAY.
GRILL PAN AND HANDLE
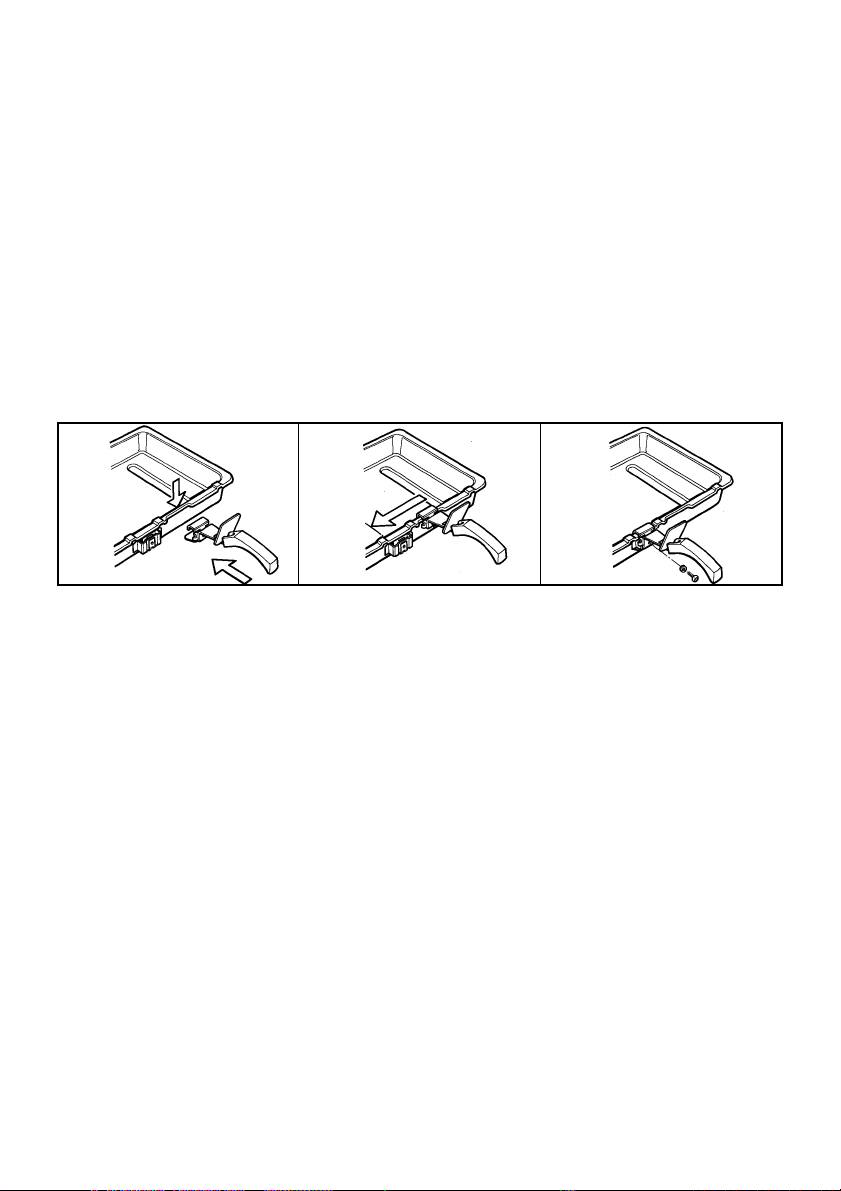
The grill pan handle is detachable from the pan to facilitate cleaning and storage.
The handle can be fixed as follows :
1. Remove the screw and washer from the grill pan bracket.
2. Tilt the handle over the recess. (A)
3. Slide the handle towards the centre of the pan. (B)
4. Locate the handle over the bracket. (C)
or a fixed handle, replace the screw and washer and ensure they are fully
tighened.If a detachable handle is required, do not replace the screw and
washer. Warning : Ensure when using the grill pan handle in the detachable
manner it is centralised and secure.
The grill pan can be stored in the top compartment with the handle attached
by placing the shelf in the middle or lower position and tilting the grill pan
over the rear edge of the shelf.
ABC
TO USE THE GRILL
1. Check that the electricity supply is switched on.
2. Open the top oven/grill door and remove the grill pan.
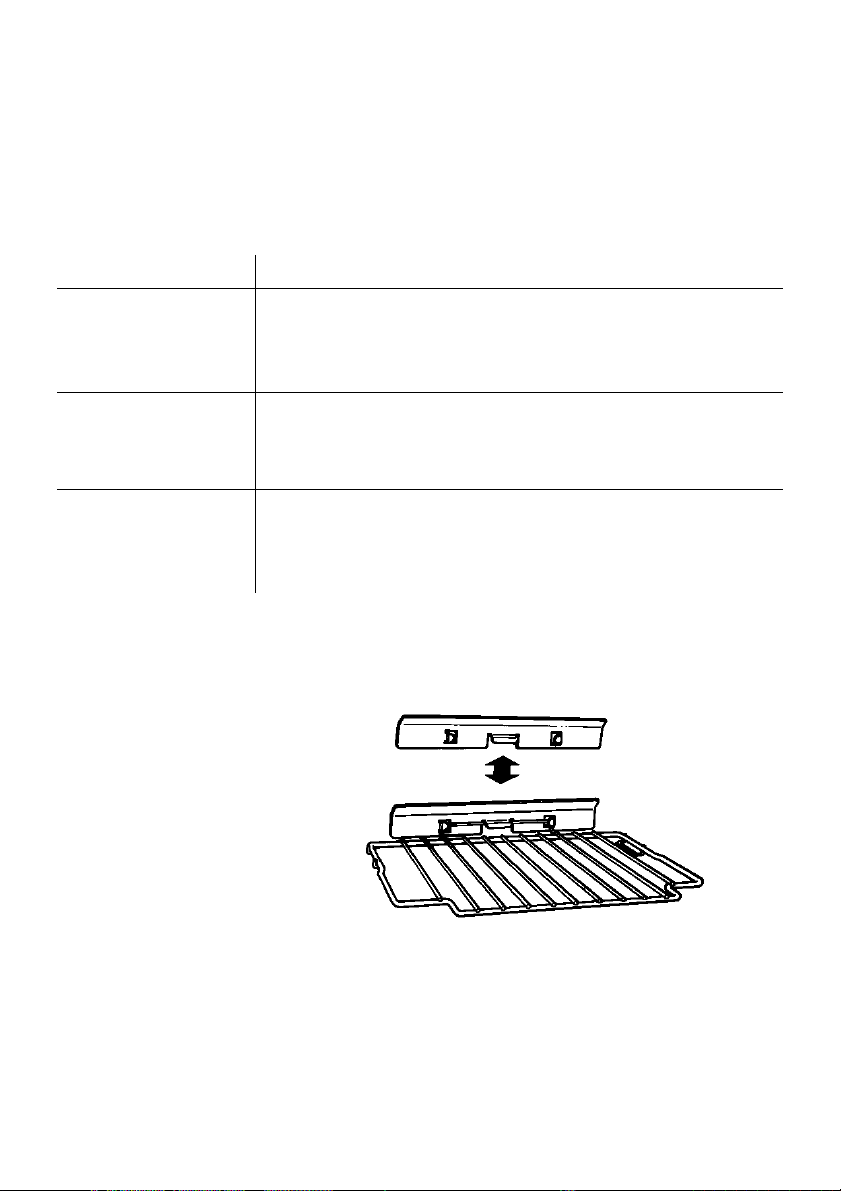
3. Remove the heat shield from the rear of the shelf for maximum grilling
area.
4. Place shelf in chosen position. Refer to grilling chart.
5. Push in and turn the control knob clockwise to the large flame symbol.
Press the ignition button until the spark lights the gas.
6. Slide the grill pan along the shelf towards the rear of the grill
compartment until it stops.
7. Turn the control knob clockwise to the desired setting. Only turn the
control knob between the large flame symbol and the small flame
symbol when adjusting the setting.
8. To turn off, turn the control knob anti-clockwise to the symbol ●.
The grill cannot be used at the same time as the top oven.
An odour may be noticed when first using the grill – this should cease after a
short period of use.
DO NOT
DO NOT
use the grill with the door closed.
cover the grill pan or grid with aluminium foil as this can hold fat,
intensify the heat and create a fire hazard.
RELIGHTING THE BURNER
In the event of the burner flames being accidentally extinguished, turn off
the burner control and do not attempt to re-ignite the burner for at least
one minute.
13
Page 14
GRILL
The following chart is a guide. Grilling can be started from cold but for best
results preheat for approximately two minutes. Most cooking is done with the
heat on full, but it may be desirable to reduce it for thicker pieces of meat or for
keeping food warm.
Shelf Position Food
HIGH POSITION
CENTRE POSITION
LOW POSITION
Toast, pikelets/crumpets, bacon, thin sausages,
beefburgers, tomato halves, steak (rare and medium),
kippers, gammon, kidneys and toasted snacks.
Toast, toasted snacks, thick sausages, beefburgers,
fish fingers, steak (well done) and gammon, chops (with
heat turned down for part of cooking time).
Whole fish, fish fillets and fish steaks (on base of pan).
Chicken portions (with heat turned down for part of
cooking time).
For au gratin dishes eg. Macaroni Cheese and meringue toppings eg. Baked
Alaska, place the dish on the floor of the grill compartment. The base of the grill
pan can be used for warming fruit garnishes on the reduced setting.
REMOVE HEAT SHIELD
FROM SHELF WHEN
GRILLING FOR MAXIMUM
GRILLING AREA.
NOTE: Strong detergents used in dishwashers may damage the grill pan grid
finish; clean in soapy water as described in CARE AND CLEANING section.
Always ensure that the grill pan handle is correctly fitted to the grill pan.
If necessary tighten any loose screws with a screwdriver.
14
Page 15

MAIN OVEN
The oven has different heat zones – the thermostat settings refer to the
temperature on the middle shelf; above this shelf it is hotter and below it is
cooler. Two shelves provide six possible cooking levels enabling full use of the
different temperatures inside the oven.
Each shelf has a safety stop to prevent if from being pulled out too far when
attending to food. Shelves are removed from the oven by pulling them out to the
stop and then lifting them at the front to withdraw.
The baking dish and grill pan without the handle can be used in the oven. The
maximum size of baking tray that should be used is 300mm x 350mm (12” x 14”).
TO USE THE MAIN OVEN
1. Check that the electricity supply is switched on and the timer is set to
manual mode.
2. Place oven shelves in the chosen positions (refer to cooking charts).
3. Push in and turn the oven control knob fully anti-clockwise. Sparking
will continue until the burner is lit.
4. Turn the control knob clockwise to the required setting (refer to
cooking chart). There is a delay of about one minute whilst the safety
device operates before the burner comes on full.
5. To turn off, turn the control knob fully clockwise the the symbol ●.
Never place dishes on the oven base over the burner.
An odour may be noticed when first using the oven – this should cease after a
short period of use.
15
Page 16

MAIN OVEN
COLD START COOKING
Anything requiring long slow cooking such as casseroles and rich fruit
cakes can be put into a cold oven. Satisfactory results can also be
obtained with creamed mixture, rich pastries or yeast mixtures, but for
perfection we recommend preheating the oven for about 15 minutes at the
gas mark you require for cooking.
ROASTING OF LARGE POULTRY
The maximum weight of poultry that can be accommodated is 11.5kg
(25 lbs) of suitable shape.
It is important to check that the bird DOES NOT overhang the burner at
the back of the oven.
STORAGE AND RE-HEATING OF FOOD
It is vitally important to strictly adhere to the basic principles of food
handling and hygiene to prevent the possibility of bacterial growth.
1. If food is to be frozen or not served immediately, cool it in a clean
container as quickly as possible.
2. Completely thaw frozen food in the refrigerator before re-heating.
3. Re-heat food thoroughly and quickly either on the hotplate or in a hot
oven, Mk. 6, and then serve immediately.
4. Only re-heat food once.
‘COOK CHILL’ DISHES
These should always be placed in a pre-heated oven ideally on the first or
second shelf position. Follow the packet instructions for cooking time.
ALUMINIUM FOIL
If using Aluminium Foil:
1. Remember that it is important to increase the cooking time by one
third.
2. Never allow the foil to touch the sides of the oven.
3. Never cover the oven interior with foil.
4. Never cover the oven shelves with foil.
16
Page 17
MAIN OVEN COOKING CHART
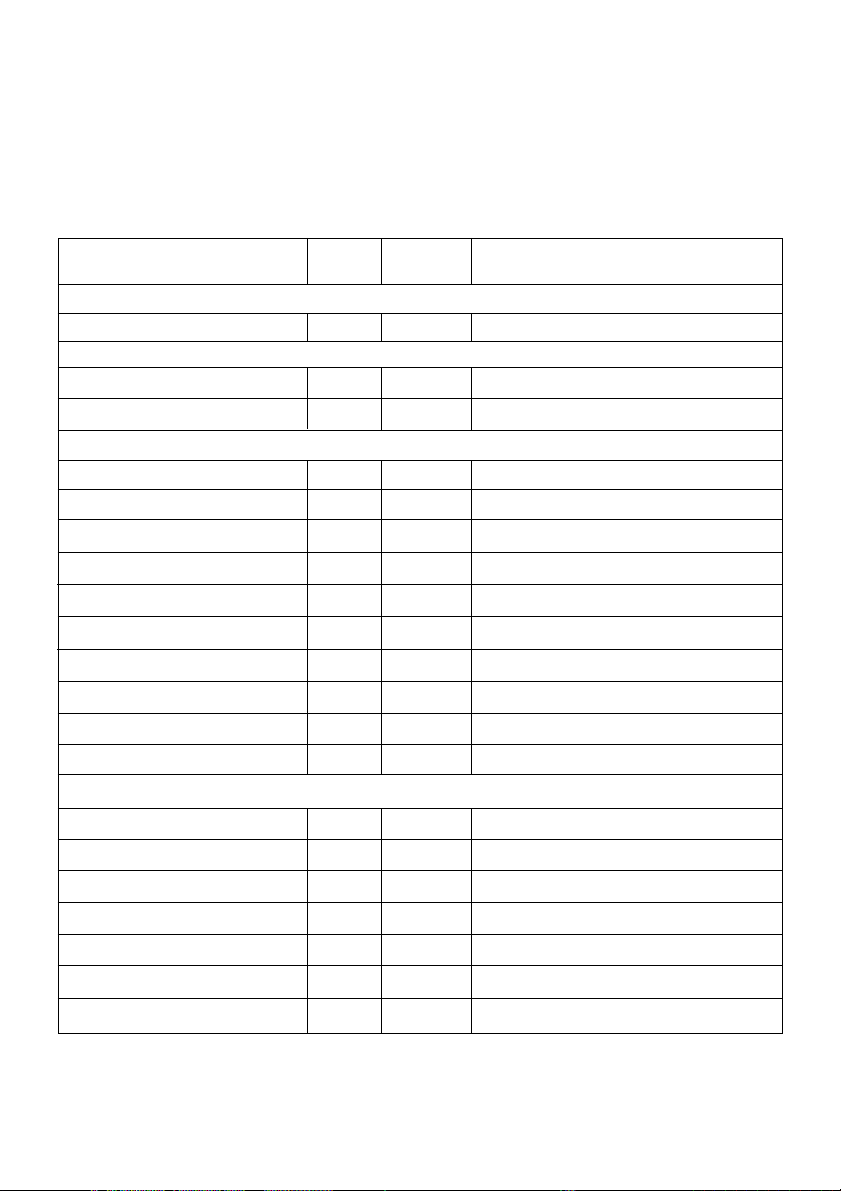
The following times and setting are for guidance only. You may wish to alter the setting to give a
result more to your satisfaction. When a different setting to that shown below is given in a
recipe, the recipe instructions should be followed. Allow 15 minutes preheat for best results.
Always turn the thermostat knob to Mark 9 before selecting the required Gas Mark.
Shelf position 1 is the highest.
Food Mark Positions Approx. Cooking Time and Comments
STARTERS
Patés and Terrines 3 or 4 4 11/2- 2 hrs
FISH
Oily Fish (whole) 4 or 5 3
White Fish (fillets & steaks) 4 or 5 3 25 - 30 mins.
MEAT AND POULTRY
Veal 5 4 25 mins per lb + 25 mins
Beef 4 or 5 4 25 - 30 mins per lb + 25 mins
Ham 5 4
Lamb 5 4 30 - 35 mins per lb + 30 mins
Pork 5 4 40 mins per lb + 40 mins
Chicken 5 4 25 mins per lb + 25 mins
Duckling & gosling 5 4 25 mins per lb + 25 mins
Turkey 4 or 5 4 or 5 15 - 20 mins per lb + 20 mins
Game birds 6 4
Casseroles 3 3 or 4 11/2- 6 hrs. (depending on type of meat)
PUDDINGS
Milk Puddings 3 3 or 4
Baked Custard 3 3 or 4 45 mins in bain-marie
Baked sponges 4 3 40 - 50 mins
Baked Apples 3 4
Meringue puddings 1 4 or 5 15 mins or until 'tinged' with brown
Apple Pie 1x9" (230mm) 6 3 45 - 55 mins stand dish on a baking tray
Fruit crumbles 5 or 6 3 35 - 45 mins
Gas Shelf
25 mins - 1 hr, depending on recipe
and size of fish
40 mins per lb covered in foil
+ 40 mins per lb uncovered
50 mins. Remove bacon for last 15 mins.
Add extra 15 mins if roasting brace
1
2
/4- 21/2hrs stand dish on a baking tray and
started with warm milk
30 - 45 mins depending on the size
and type of apples
17
Page 18
MAIN OVEN COOKING CHART
Food Mark Positions Approx. Cooking Time and Comments
Gas Shelf
CAKES, PASTRIES AND BISCUITS
Small cakes - 2 trays 5 2 & 4 17 - 25 mins
- 1 tray 5 2 or 3 only "
Victoria sandwich 2x8" (205mm) 4 2 & 4 25 - 35 mins
Fatless sponge 2x7" (180mm) -
3 egg mix
Christmas cake 2 3 or 4 4 - 6
Madeira cake 7" (180mm) 4 3 1
Rich Fruit cake 9" (230mm) 2 3 3 - 3
5 2 20 - 25 mins. 2 tins side by side
1
/2hrs depending on recipe
1
/4- 11/2hrs
1
/2hrs.
Shortcrust pastry 6 2 or 3 15 mins - 1 hr depending on recipe
Rich Shortcrust pastry - 1 tray 5 2 20 - 40 mins depending on recipe
Flaky & puff pastry - 2 trays 7 1 & 3 10 - 30 mins depending on recipe
- 1 tray 2 or 3 " " " "
Choux pastry - éclairs 1 tray 6 2 35 - 40 mins
Scones - 2 trays 7 2 & 4 10 - 15 mins
- 1 tray 2 or 3 "
Shortbread - 7" (180mm) round 2 4 55 - 1hr depending on thickness
Biscuits - 2 trays 4 1 and 3 15 - 20 mins depending on recipe
- 1 tray 2 or 3 " " " "
YEAST MIXTURES
Bread 7 or 8 3 or 4 45 - 50 mins
Rolls 7 or 8 2 or 3 15 - 20 mins
Chelsea buns 5 2 or 3 30 - 40 mins
MISCELLANEOUS
Yorkshire Pudding - large 7 1 or 2 45 - 50 mins
- individual 7 1 or 2 25 - 30 mins
Soufflés 4 3 30 mins
Meringues 'E'
4 &
baseplate
Baked Potatoes 4 or 5 3 1
When baking with two trays or tins on two levels, the top tray is removed first and the lower
tray moved up to the top position for a few minutes longer.
Soft Margarine – Use the oven settings recommended by the margarine manufacturer and
not those indicated on the cooking chart.
2 - 5 hrs starting on shelf 4 until 'set'
and then on the baseplate until dried
out - turn when necessary.
1
/2- 3 hrs until soft, depending on size
18
Page 19

THE ‘E’ SETTING
The ‘E’ setting on the main oven thermostat is used for slow cooking, keeping
food warm and warming plates for short periods.
USING THE ‘E’ SETTING FOR SLOW COOKING
1. All dishes cooked by the ‘E’ setting should be cooked for a minimum 6
hours. They will ‘hold’ at this setting for a further hour but marked
deterioration in appearance will be noticed in some cases.
2. Joints of meat and poultry should be cooked at Mk. 6 for 30 minutes
before turning to the ‘E’ setting and never be cooked lower than the
middle shelf position.
3. Joints of meat over 6 lbs (2.7kg) and poultry over 4 lbs 8oz (2 kg)
should not be cooked using the ‘E’ setting.
4. Always stand covered joints on a rack over the meat tin to allow good
air circulation.
5. A meat thermometer should be used when cooking pork joints and
poultry. The internal temperature of the food should reach at least 88oC.
6. This method is unsuitable for stuffed meat and stuffed poultry.
7. Always bring soups, casseroles and liquids to the boil before putting in
the oven.
8. Cover casseroles with foil and then the lid to prevent loss of moisture.
9. Always thaw frozen food completely before cooking.
10. Root vegetables will cook better if cut into small pieces.
11. Adjust seasonings and thickenings at the end of the cooking time.
12. Use the zones of heat in the oven, e.g. meringues and milk puddings
can be cooked lower in the oven whilst other dishes requiring greater
heat can be cooked above them.
13. Egg and fish dishes need only 1-5 hours cooking and should be
included in day cooking sessions, when they can be observed from
time to time.
14. Dried red kidney beans must be boiled for a minimum of ten minutes
after soaking, before inclusion in any dish.
19
Page 20
TOP OVEN
The top oven can be used to cook small quantities of food or used in conjunction
with the main oven to provide additional cooking space.
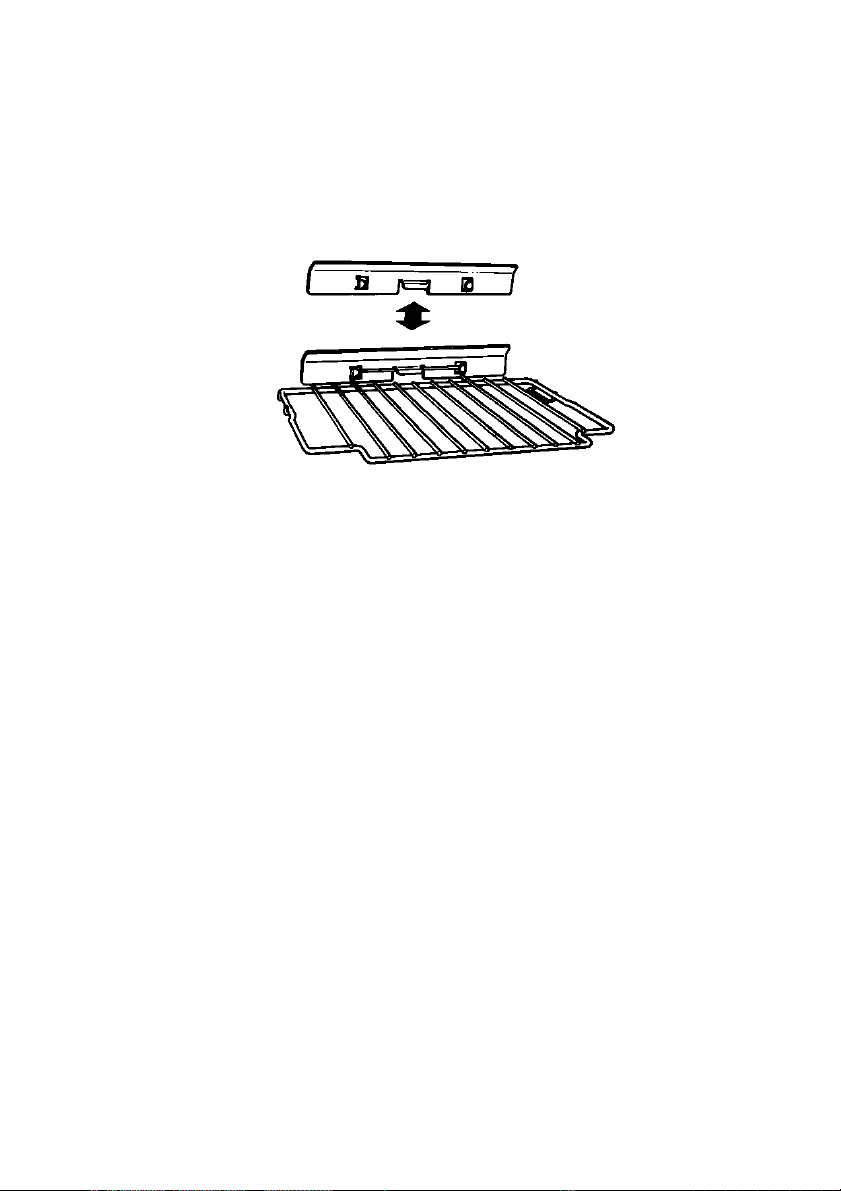
The shelf in the top oven has a heat shield fitted at the rear. The shield can be
removed for cleaning and grilling, but must be replaced when using the oven.
The shelf can be used in three different positions. It has a safety stop to prevent
it from being pulled out too far when attending to food. The shelf is removed from
the oven by pulling it out to the stop and then lifting at the front to withdraw.
The baking dish and grill pan without the handle can be used in the oven. The
maximum size of baking tray that should be used is 300mm x 350mm (12” x 14”).
TO USE THE TOP OVEN
1. Check that the electricity is switched on and that the timer is set in
manual mode.
2. Check that the heat shield is fitted to the shelf.
3. Place the top oven shelf in the chosen position. (refer to cooking chart).
4. Push in and turn the top oven/grill control knob fully anti-clockwise.
Sparking will continue until the burner has lit.
5. Turn the control knob clockwise to the required setting. (refer to cooking
chart).
6. There is a delay of about one minute whilst the safety device operates
before the burner comes on full.
7. To turn off, turn the control knob clockwise to the symbol ●.
NOTE: It is normal for a slight resistance to be felt to be felt when turning
the control knob to the oven settings.
GUIDANCE ON USING THE TOP OVEN
1. Best results are obtained by pre-heating the oven for about 15 minutes.
2. The tray or dish on which the food is to be cooked, should be pushed
to the back of the shelf.
3. Food which is higher than or will rise above 125mm (5”) cannot be
cooked in the top oven.
Never place dishes on the oven base over the burner.
An odour may be noticed when first using the oven – this should cease after a
short period of use.
20
Page 21
TOP OVEN COOKING CHART
The following times and setting are for guidance only. You may wish to alter the setting to give a
result more to your satisfaction. When a different setting to that shown below is given in a
recipe, the recipe instructions should be followed. Allow 15 minutes preheat for best results.
Always turn the thermostat knob to Mark 1 before selecting the required gas Mark.
Shelf position 1 is the highest.
Food Mark Position Approx. Cooking Time and Comments
FISH
Oily and white fish 5 2 20-30 mins.
MEAT AND POULTRY
Beef (medium) 4 or 5 3 25-30 mins per lb + 25-30 mins
Ham (covered in foil) 5 3 40 mins per lb + 40 mins
Lamb 5 3 30-35 mins per lb + 30 mins
Pork 5 3 40 mins per lb + 40 mins
Chicken 5 3 25 mins per lb + 25 mins
Duckling & Goose 5 3 25 mins per lb + 25 mins
Tu r ke y 4 3 15-20 mins per lb + 15-20 mins
Casseroles 3 3 2-4 hrs. depending on meat used.
VEGETABLES
Baked jacket potatoes 5 2 11/2 - 2 hrs.
PUDDINGS
Milk Puddings (500ml/1pt) 3 2 11/2 - 2 hrs.
Baked Custard (500ml/1pt) 3 2
Baked Sponge Puddings 4 2 30 - 45 mins
Baked Apples 3 2 45 mins - 1 hr. depending on size
Meringue Topped Puddings 1 2 25 mins until tinged with brown
Apple Tart (1 x 205mm/8”) 6 2 60 mins
Fruit Crumble 5 2 45 - 50 mins
Gas Shelf
Push dish right to
back of shelf.
45 mins - 1 hr. in bain-marie of cold water.
If using aluminium foil:
1. Remember it is important to increase the cooking time by one third.
2. Do not allow the foil to touch the sides of the oven.
3. Do not cover the oven interior with foil.
4. Do not cover the oven shelves with foil.
21
Page 22
TOP OVEN COOKING CHART
Food Mark Positions Approx. Cooking Time and Comments
CAKES, PASTRIES AND BISCUITS
Small Cakes (16 per tray) 5 2 20 - 25 mins.
Victoria sandwich (2 x 180mm / 7”)
Swiss Roll (3 egg quantity) 6 2 10 - 12 mins.
Christmas cake (1 x 205mm / 8”) 2 2 4 - 5 hrs depending on recipe
Madeira cake (1 x 180mm / 7”) 4 2 1 hr.
Rich Fruit cake (1 x 180mm / 7”) 2 2 21/4- 21/2hrs.
Gingerbread 3 2 11/2- 13/4hrs.
Scones - 16 per tray 7 2 12 - 15 mins.
Shortbread (1 x 180mm / 7”) 2 2 45 mins. – 1 hr. depending on thickness
Biscuits 4-6 2 15 - 25 mins.
Shortcrust Pastry 6 2 15 mins. – 1 hr. depending on recipe
Rich Short Crust 5 2 20 - 30 mins.
Flaky/Puff Pastry 7 2 10 - 30 mins. depending on recipe
Choux Pastry 6 2 25 - 35 mins.
YEAST MIXTURES
Bread - rolls, plait 7 2 or 3 25 - 35 mins
Tea breads etc. 5 2 25 - 30 mins
MISCELLANEOUS
Yorkshire Pudding - small 7 2 20 - 25 mins
- large 7 2 30 - 40 mins
Meringues 1 3 21/2- 4 hrs. turn when necessary
Gas Shelf
4 2 25 - 30 mins.
Soft Margarine – Use the oven settings recommended by the margarine manufacturer and not
those indicated on the cooking chart.
22
Page 23

CARE AND CLEANING
Switch off the electricity supply and allow to cool before cleaning the
cooker.
Clean the cooker regularly and wipe up spills soon after they occur to
prevent them from becoming burnt on. Never use biological washing
powder, caustic cleaners, harsh abrasives, scouring pads, aerosol cleaners
or oven chemical cleaners of any kind.
Before moving your cooker ensure that it is cool and note that it is heavy
(approximately 70 kg 155 lbs), so you may require assistance. To move the
cooker forward, open the top oven/grill door and with both hands positioned
under the roof of the compartment, lift and pull forward. Replace by pushing the
cooker backwards. Check that the cooker is level. Take care to ensure that any
floor covering is not damaged.
MAIN OVEN HEAT CLEAN LININGS
The oven back and side linings are coated with a special enamel
which has a continuous cleaning action. The higher the oven temperature
the more effective the action. In most cases this cleaning operation will
proceed during normal cooking. However, if roasting is done frequently, or
high temperatures are not used regularly, it may be necessary to run the
oven empty at Mark 8 for about two hours.
It should not normally be necessary to clean the linings with water, but if
desired, wipe them over with a soapy cloth, followed by a wipe with a
damp clean cloth.
REPLACEMENT OF OVEN LIGHT BULB
CAUTION: DISCONNECT THE APPLIANCE FROM THE ELECTRICITY
SUPPLY BEFORE REPLACING THE LAMP
Light bulbs are not covered by the manufacturer’s guarantee.
A new 25W, 300oC rated SES bulb can be obtained from your cooker supplied or
any major electrical retailer.
1. Remove the shelves from the oven.
2. Unscrew the lens using a thick cloth to protect your fingers in the
unlikely event of a lens fracture.
3. Unscrew bulb.
4. Fit new bulb and refit lens.
23
Page 24

CARE AND CLEANING
COOKER FINISH CLEANING METHOD
Vitreous Enamel
Hotplate, hotplate front trim,
burner caps, roasting dish,
grill pan, main oven base,
inside of grill compartment,
inside of doors.
Paint
Side trims, plinth, fascia
bottom trim, fascia end
caps, side panels.
Aluminium
Hotplate side trims, hotplate
burner bodies, lid rear trim,
rear flue grille.
Glass As for enamel cleaning. Polish with a clean dry
Chromium Plating
Oven shelves, grill pan grid,
grill pan handle support
Plastic
Grill pan handle, door
handles, control knobs
Cloth wrung out in hot soapy water. Stubborn
stains can be removed with a cream paste,
liquid cleaner or by rubbing with fine steel wool
soap pads.
Check that the cleaning agent is approved by the
Vitreous Enamel Development Council.
Wash with a cloth wrung out in hot soapy water
only.
DO NOT USE ABRASIVES.
Similar to paint cleaning above. Use a nylon
brush to remove any cleaning materials, water or
dirt from the hotplate burner bodies.
cloth or kitchen roll.
Wipe with a cloth wrung out in hot soapy water.
A fine steel wool soap pad e.g. Brillo, Ajax, or a
chrome or stainless steel cleaner may be used.
Wipe with a cloth wrung out in hot soapy water.
Stubborn stains can be removed with a cream
cleaner.
24
Page 25

CARE AND CLEANING
Take particular care not to damage the inner surface of the door inner
glass that is coated with a heat reflective layer. Do not use scouring pads,
or abrasive powder, which will scratch the glass. Ensure that the glass
panel is not subjected to any sharp mechanical blows.
Stubborn stains can be removed by using a fine steel wool pad.
the inner glass panel may be cleaned, while still warm, without removing it from
the door. After cleaning, rinse and dry with a soft cloth.
CLEANING THE DOORS
SIDE OPENING DOORS
Cleaning the door glass is the same as the drop down doors, except take
care to support the weight of the inner glass when removing and refitting.
DROP DOWN DOORS
Remove the door inner glass as follows.
1. Open the door fully and unscrew the two screws securing the glass panel so
that the securing brackets can be turned. There is no need to remove the screws
completely.
2. Turn the brackets so that the glass can be
removed and cleaned at the sink (Fig. 1.)
Fig. 1.
For slight soiling
Glass
3. The inside of the outer door glass can now be cleaned while still fitted to the
cooker.
NEVER OPERATE THE COOKER WITHOUT THE INNER DOOR
GLASS IN POSITION.
Refit the door inner glass as follows.
1. NOTE: The inner door glass has a special reflective coating on one side.
Replace the door inner glass so that the statement: “IMPORTANT THIS FACE
TOWARDS THE OVEN” can be read from the inner side of the door.
2. Turn the two securing brackets back to their
original position to retain the glass and tighten
the screws. (Fig. 2.)
Fig. 2.
Glass
25
Page 26

SOMETHING WRONG ?
Before contacting your Service Centre or Installer, check the problem guide
below, there may be nothing wrong with your cooker.
PROBLEM
Slight odour or small
amount of smoke when
grill / oven used first
time
Oven cooks too fast or
too slow
Ignition does not work
Timer Display shows "0:00"
with "Auto" Flashing.
CHECK
This is normal and should cease after a short period.
Check that the gas mark and shelf positions are as
recommended in the Oven Cooking Charts. However,
it may be necessary to increase or decrease the recommended setting slightly to suit your taste.
If all burners fail to ignite, check that sparks appear at
the burners; a clicking noise should be heard.
If not:
(i) Check that the electricity to the cooker is turned on.
If only one hotplate burner fails to ignite check the
following:
(i) The burner cap is seated correctly.
(ii) The slots in the burner bodies are not blocked with
any soap residue or cooking soil. (See care and
cleaning).
(iii) If the burners have recently been cleaned using
a wire wool pad, e.g. “Brillo pad”, ensure that
there are no stray strands caught on the igniter
or burner body.
NOTE!! Satisfactory ignition will only be achieved if all
the hotplate burners are fitted.
In the event of an electricity failure, the hotplate and
grill burners can be lit with a match.
The electricity supply to the cooker may have been
been interrupted, but has now come back on again.
set the correct time of day by following the instructions
given in the timer section of this book.
Main and Top oven do not
work, but the grill and hotplate burners work.
26
The timer may be set for an Auto Cooking Programme.
Check the timer to see if “AUTO” is illuminated. If it is,
follow the instructions given in the timer section of this
book to cancel the Auto Cooking Programme.
Page 27

SOMETHING WRONG ?
PROBLEM CHECK
Cannot set an “Auto Cook”
programme or
cannot get the timer to turn
the oven on or off at the
required times.
Oven lamp does not
work
DISPOSAL OF YOUR PRODUCT:
To minimise the risk to injury to children please dispose of your product carefully and
safely. Remove all doors and lids (where fitted). Remove the mains cable (where fitted) by
cutting off flush with the appliance and always ensure that no plug is left in a condition
where it could be connected to the electricity supply.
To help the enviroment, Local Authority instructions should be followed for the disposal of
your product.
Read the Timer instructions in this book carefully
remembering that the Cook period is the length of time
that the timer will switch the oven(s) on as part of an
Auto Cooking Programme.
The oven lamp is not covered by the guarantee. The
part is easily changed (see the section on oven lamp
replacement) A new lamp may be obtained from our
Spare Parts department by calling: 0541 530530
27
Page 28

INSTALLATION INSTRUCTIONS
Prior to installation, ensure that the local distribution conditions (nature of the gas
and gas pressure) and the adjustment conditions are compatible. The adjustment
conditions for this appliance are stated on the data badge which is fitted behind
the bottom of the main oven door seal.
This appliance is not designed to be connected to a combustion products
evacuation device. It must be installed and connected in accordance with current
installation regulations. Particular attention should be given to the relevant
requirements regarding ventilation.
MODEL NUMBERS GW81
Category I2H (GB. IE)
These models are set to burn NATURAL GAS (G20) at 20 mbar ONLY and
can not be used on any other gas.
GAS SAFETY (INSTALLATION & USE) REGULATIONS
It is the law that all gas appliances are installed by competent persons in
accordance with the current edition of the above regulations. It is in your
interest and that of safety to ensure compliance with the law.
In the UK, CORGI registered installers work to safe standards of practice.
The cooker must also be installed in accordance with BS 6172: 1990.
Failure to install the cooker correctly could invalidate the warranty liability claims
and could lead to prosecution.
LOCATION
The cooker may be located in a kitchen, kitchen/diner or a bed-sitting
room, but not in a room containing a bath or shower. The cooker must not
be installed in a bed-sitting room of less than 20m3.
PROVISION FOR VENTILATION
The room containing the cooker should have an air supply in accordance
with BS 5440: Part 2: 1989.
The room must have an opening window or equivalent; some rooms may also
require a permanent vent. If the room has a volume between 5 and 10m3, it will
require an air vent of 50cm2effective area unless it has a door which opens
directly to outside. If the room has a volume of less than 5m3, it will require an air
vent of 100cm2effective area. If there are other fuel burning appliances in the
same room, BS 5440: Part 2: 1989 should be consulted to determine air vent
requirements.
28
Page 29

INSTALLATION INSTRUCTIONS
TECHNICAL DATA
DIMENSIONS
Height 900 - 915mm
Width 600mm
Depth 595mm (excluding door handles)
GENERAL
Gas connection Rp 1/2(1/2” BSP female)
Gas Supply G20 at 20 mbar
Pressure test point Grill injector
Gas rate adjustment None
Aeration adjustment None
Electrical connection Flexible cord fitted with a 3 pin 13 amp plug
230/240V a.c. 50Hz. 3A fuse.
BURNER
HOTPLATE
Front left and rear right
HOTPLATE
Front right and rear left
GRILL
MAIN OVEN
TOP OVEN
HEAT
INPUT
3.0 kW
1.9 kW
3.7 kW
2.7 kW
2.0 kW
INJECTOR
136
102
150
120
100
29
Page 30
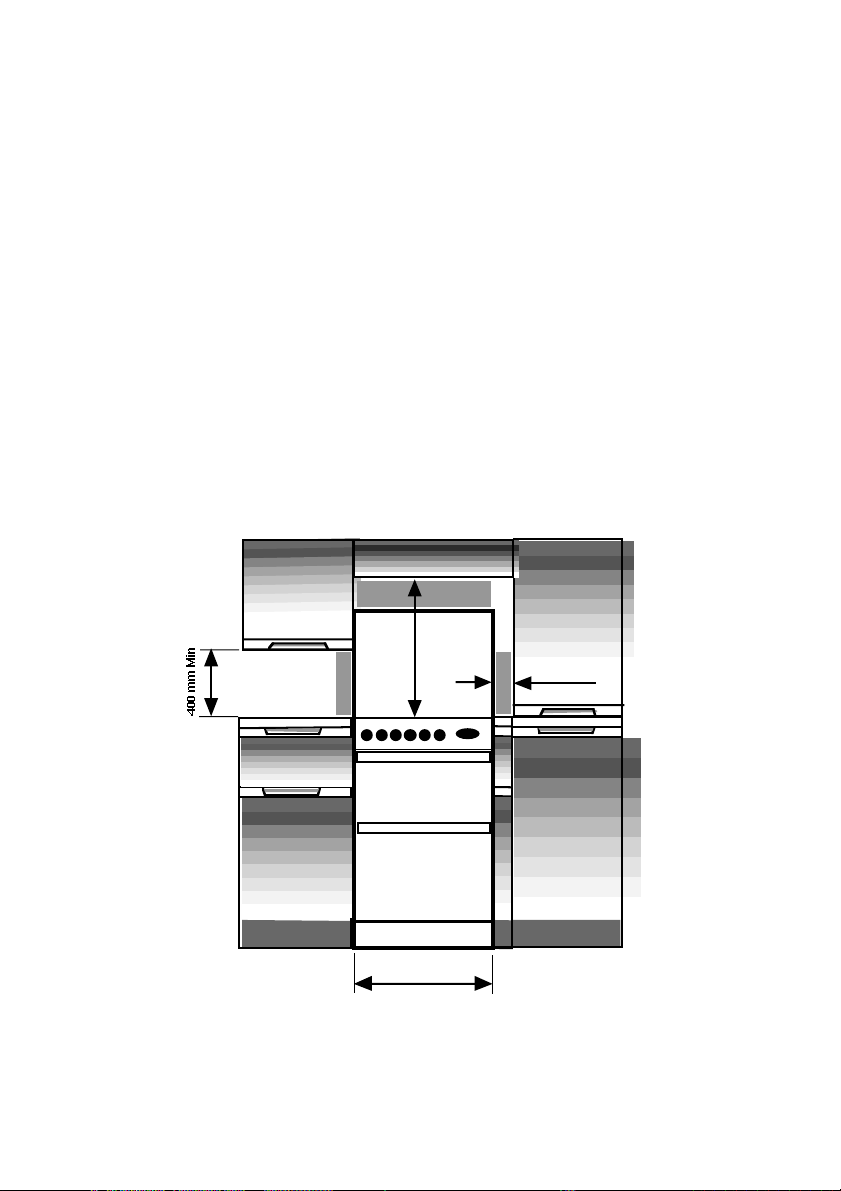
INSTALLATION INSTRUCTIONS
65 m
600 mm
SPACE FOR FIXING
The cooker is of type X with regard to protection against overheating of
surrounding surfaces as defined in BS EN60 335 - 2 - 6: 1991
The cooker can be close fitted below hotplate level. This requires a minimum
distance of 600mm between cupboard units of hotplate height.
When installing next to a tall cupboard, partition or wall, for a minimum distance
of 400mm above hotplate level, allow a side clearance of at least 65mm.
The diagram below illustrates the minimum clearance between the cooker and
adjacent walls, cupboards etc.
The wall behind the cooker between the hotplate and 450mm above, and the
width of the cooker, must be a non-combustible material such as ceramic wall
tiles.
If the cooker is to be fitted close to a corner on the left hand side, ensure that
there is a clearance of at least 50mm to allow the main oven door to open fully
for when removing oven shelves.
750mm min
COOKER HOODS
If a cooker hood is to be installed, refer to the cooker hood manufacturers’
instructions regarding fixing height.
30
Page 31
INSTALLATION INSTRUCTIONS
UNPACKING THE COOKER
Unpack the components from inside the grill and oven: Check that the
following parts are present.
Grill pan and grid Top oven/grill shelf heat shield
Baking dish Pan supports (4)
Main oven shelves (2) Enamelled discs (4)
Top oven/grill shelf (1) Literature
LEVELLING
Two rear wheels and two front feet are fitted which can be adjusted up or
down to level the cooker. The front feet can be screwed in or out and the
rear wheels raised or lowered from the front of the cooker by adjusting the
levelling screws in the front of the plinth.
CAUTION: Some soft floor coverings may get damaged if the cooker is not
moved carefully.
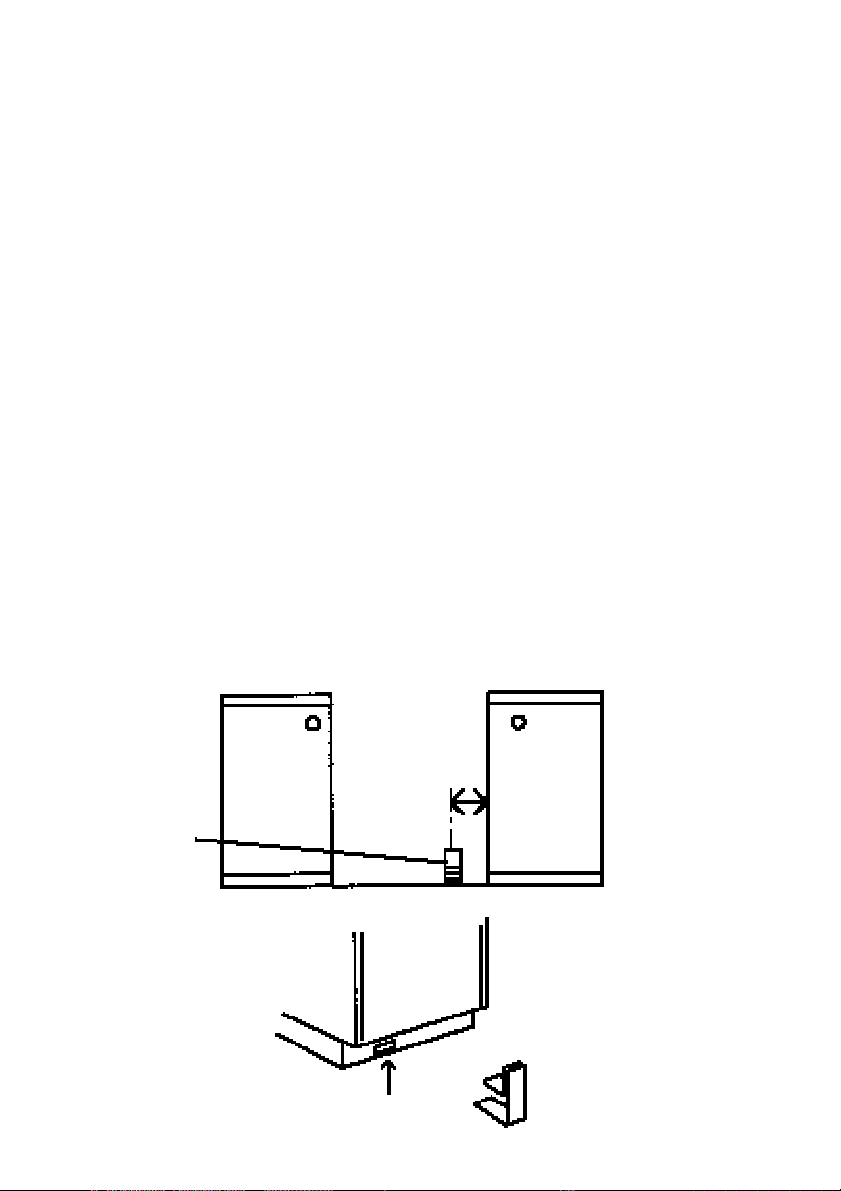
STABILITY BRACKET
The cooker must be fitted with a stability device firmly secured to the fabric
of the building. The back of the cooker has a slot for engagement of a
stability bracket, which can be obtained, as an extra, from your cooker
supplier.
STABILITY
BRACKET
POSITION
125mm
REAR OF
COOKER
SLOT FOR STABILITY BRACKET
31
Page 32
INSTALLATION INSTRUCTIONS
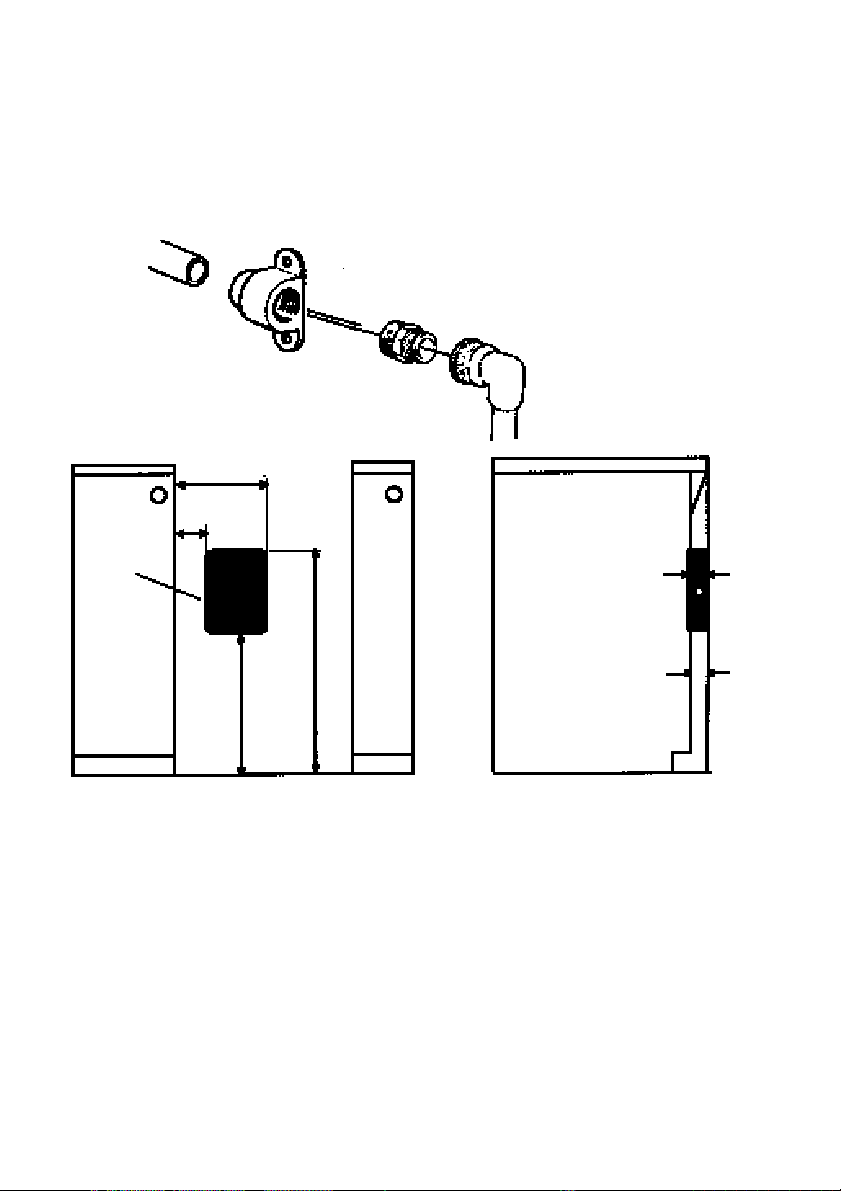
CONNECTING TO GAS SUPPLY
The cooker is designed to match the depth of standard 600mm worktops.
An adapter backplate should, therefore, be fitted within the shaded area
shown to allow the cooker to be pushed fully to the wall.
220mm
70mm
GAS
BACKPLATE
POSITION
635mm
450mm
40mm
30mm
Connection to the cooker should be made with an approved appliance flexible
connection to BS 669. A length of 0.9 to 1.25m is recommended. The length of
hose chosen should be such that when the cooker is in situ, the hose does not
touch the floor.
The temperature rise of areas at the rear of the cooker that are likely to come in
contact with the flexible hose do not exceed 70oC.
32
Page 33
ELECTRICAL CONNECTION
WARNING – THIS APPLIANCE MUST BE EARTHED.
CONNECT TO A 230-240V A.C. SUPPLY ONLY.
Connection to the electricity supply should be made via a properly earthed, readily
accessible wall socket which is adjacent to, and not more than 1.25m away from the
appliance and capable of electrical isolation.
The mains lead should be routed such that it cannot touch hot parts of the cooker i.e. the
back panel above a height of 650mm from the floor; the main oven burner bracket under
the plinth
Should this plug not fit the socket outlet in your home it should be cut off and replaced
with a suitable plug as outlined below.
NOTE: The removed plug cannot be used for any other appliance and should therefore be
properly disposed of and not left where children might find it and plug it into a supply
socket – with the obvious consequent danger.
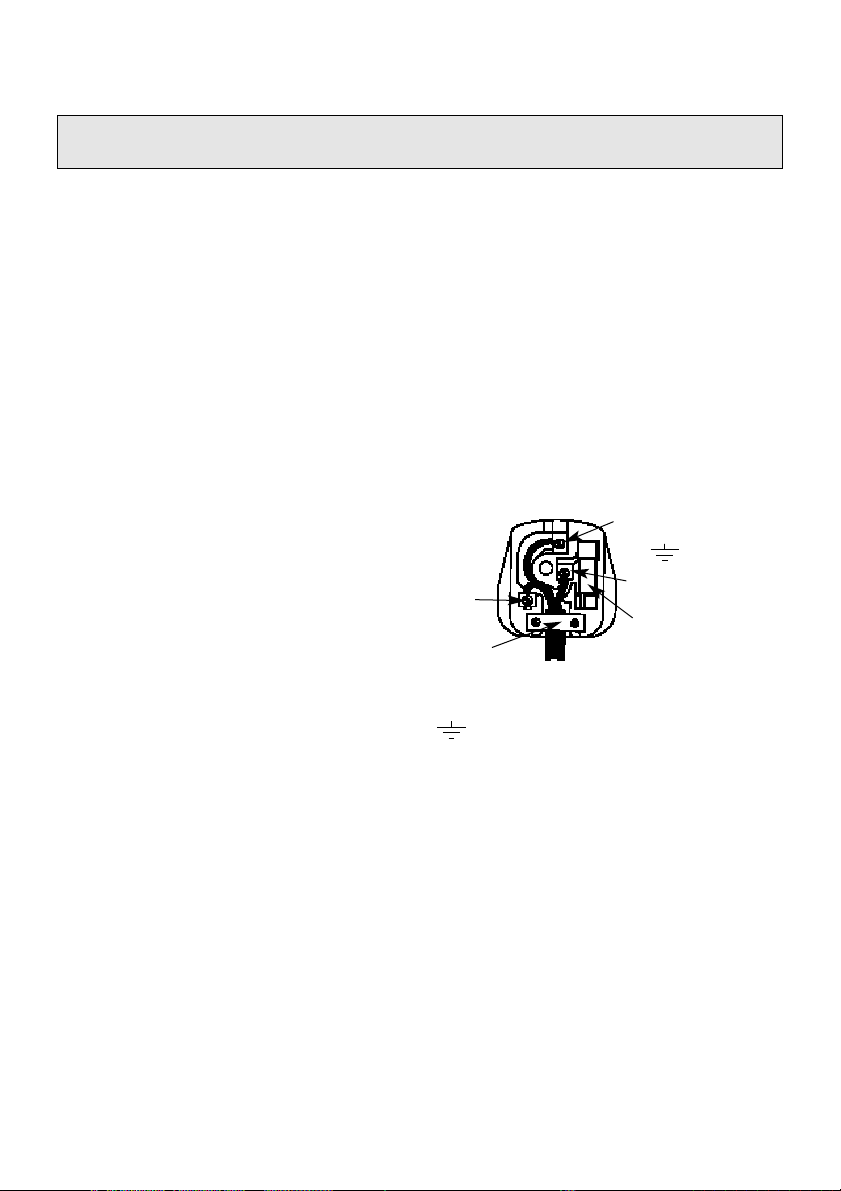
IF THE FITTED PLUG IS REMOVED
The flexible mains lead must be correctly connected as below to a three pin plug of not
less than 13 amp capacity. If a B.S. 1363 fused plug is used, it must be fitted with a 3 amp
fuse which is approved to B.S. 1362.
IMPORTANT: The wires in the mains lead fitted
to this appliance are coloured in
accordance with the following code:
GREEN AND YELLOW – EARTH
BLUE – NEUTRAL
BROWN – LIVE
Blue to
Neutral
Cord Clamp
Green &
Yellow to
Earth
Brown to
Live
3 Amp
Fuse
As the colours of the wires in the mains lead of this appliance may not correspond with
the coloured markings identifying the terminals in your plug, proceed as follows:– The wire
which is coloured green and yellow must be connected to the terminal in the plug which is
marked with the letter E or by the earth symbol or coloured green or green and yellow.
The wire which is coloured blue must be connected to the terminal which is marked with
the N or coloured black. The wire which is coloured brown must be connected to the
terminal which is marked with the letter L or coloured red. When wiring the plug, ensure
that all strands of wire are securely retained in each terminal. Do not forget to tighten the
mains lead clamp on the plug. As the appliance must be earthed, do not use 2-pin
sockets outlets, if you are in doubt, consult a qualified electrician.
Should the mains lead ever require replacement, it is essential that this operation be
carried out by a qualified electrician and should only be replaced with a flexible cord of the
same size i.e. 0.75mm
2
cross sectional area and temperature rating of 850 C e.g. heat
resisting PVC.
IF A MOULDED PLUG IS FITTED
In the event of replacing a fuse in the plug supplied a 3 amp ASTA approved fuse to
BS1362 must be fitted.
NOTE: The fuse cover must be refitted when changing the fuse. In the event of losing the
fuse cover the plug must not be used until a replacement fuse cover has been obtained
and fitted. A new fuse cover can be obtained from your local Electricity Board. The colour
of the correct replacement fuse cover is that of the coloured marks or inserts in the base
of the plug.
33
Page 34

INSTALLATION INSTRUCTIONS
INSTALLATION AND OPERATIONAL CHECKS
After installation, check for gas soundness. The supply pressure can be
checked at the grill injector. Access to the injector is by first removing the
baffle at the front of the grill fastened by two screws. Then remove the
fastening screw on the right hand side of the burner and slide the burner
off the injector. Ensure that the grill burner is correctly located under the
fixing screw on reassembly.
Fit the hotplate burner caps, pan supports and shelf shield(s) referring to the
instructions for use where necessary.
1. Check that the hotplate and grill burners ignite correctly and burn with a
steady flame. Check for a steady flame on the low setting.
2. Check that with the main oven set to mark 9, the burner ignites at low
rate, and then increases to full rate within 60 seconds. Leave the oven
full on with the door closed for 10 minutes, and check that when the
control is turned to the ‘E’ setting that the flame reduces.
3. Check that with the top oven set to mark 8, the burner ignites at low
rate, and then increases to full rate within 60 seconds. Leave the oven
full on with the door closed for 10 minutes, and check that when the
control is turned to mark 1 that the flame reduces.
4. Check the operation of the oven timer and oven light.
Instruct the user on operation of the cooker.
NOTE: It is normal for a slight resistance to be felt when turning the Top Oven/
Grill control to the oven settings, as the control operates a flap at the rear of the
cooker.
34
Page 35

Our policy is one of continual improvement in design and development,
therefore strict accuracy of illustrations and descriptions cannot be
guaranteed.
This appliance conforms to the following EEC Directives:
Gas Appliances
90/396/EEC
Low Voltage Equipment
72/23/EEC
93/68/EEC
Electromagnetic Compatibility
89/336/EEC
92/31/EEC
93/68/EEC
35
Page 36

HOTPOINT SERVICE COVER
Satisfaction Guaranteed or Your
Money Back
Hotpoint gives you a unique ‘Satisfaction
Guaranteed’ promise – valid for ninety days after
you have purchased your Hotpoint product. If there is a
technical problem with your Hotpoint appliance, just call
Hotpoint Service (see back page). If necessary we will
arrange for an engineer to call. If the technical problem is
not resolved under this Guarantee, Hotpoint will replace
your appliance or, if you prefer, give you your money
back. Your statutory rights are not affected, and the
Guarantee is additional and subject to the terms of
Hotpoint’s Five Year Parts Guarantee.
Hotpoint’s Free Five Year Guarantee
From the moment your appliance is delivered
Hotpoint guarantees it for FIVE YEARS.
• In the Five Years all replacement parts are FREE
provided that they are fitted by our own
Service Engineer. During the first year our
Engineer’s time and labour is also free.
• Our guarantee covers loss of food in our
refrigeration and freezer products up to £250
during the first year, subject to verification by
one of our engineers.
• After the first year we will charge for our
Engineer’s time and labour. We do, however,
operate a range of Service Plans (see
opposite) which, for an annual payment,
enables you to cover any repair costs which
may be necessary.
• All our service repairs are guaranteed for
twelve months in respect of our labour and any
parts fitted.
• The appliance must be used in the United
Kingdom, and must not be tampered with or
taken apart by anyone other than our own
Service Engineers.
• You may, however, buy parts which can be
safely fitted without specialist knowledge or
equipment. The correct fitting of such parts,
provided they are genuine Hotpoint spares, will
not affect your Guarantee. Parts are available
from our Hotpoint Spares order hotline (see
back page).
• Our guarantee does not cover the cost of any
repair, or loss of food in refrigeration products,
due to power failure, accidents or misuse. Nor
does it cover the cost of any visits to advise
you on the use of your appliance. Please read
thoroughly the instruction book supplied with
this appliance.
• If at any time during the Guarantee period we
are unable to repair your appliance, we will
refund any repair costs paid to us in the
previous twelve months. We will also offer you
a new appliance at a reduced charge instead of
a repair.
• Our Guarantee is in addition to and does not
affect your legal rights.
• Should you need independent advice on your
consumer rights, help is available from your
Consumer Advice Centre, Law Centre, Trading
Standards Department and Citizens Advice
Bureau.
• All Hotpoint servicing is carried out by our own
Service Organisation located throughout the
United Kingdom and Eire. We will be happy to
deal with any problems which you may have.
Hotpoint’s Extended Warranties
Whether you have just one or a number of Hotpoint
appliances in your kitchen, Hotpoint has a range of
Service Plans to give you complete peace of mind.
They enable you to extend your one year labour
guarantee so that you can have repairs completed
FREE during the membership period.
Service Cover
We offer a number of payment methods; cheque,
credit card or you can spread the cost and pay by
direct debit (full details can be obtained on Free
phone 0800 716356). This covers you for all repairs
during the period of cover, which can be from 1 to 4
years. Service Cover also includes loss of food, up
to the value of £250, in refrigeration appliances.
There is also an option of Service Cover with
Maintenance at an additional cost. This includes an
annual Electrical and Safety check and replacement
of any parts as necessary.
Kitchen Cover
An annual payment covers you for all repairs for all
your Hotpoint appliances which are less than ten
years old. It also covers the cost of loss of food up
to £250 in our refrigeration and freezer products.
There is also the option of Kitchen Cover with
Maintenance at an additional cost. Any additional
Hotpoint appliances purchased after you have
joined Hotpoint Kitchen Cover will automatically be
included during the annual period of cover without
further charge.
Appliance Registration
To ensure that you have the opportunity to benefit
from any of the above Service Schemes and other
offers you should complete and return immediately
the Appliance Registration Form/Questionnaire
supplied with this appliance. Full details and costs
of our Service Schemes, together with an
application form, will be sent to you at the end of the
first year of the guarantee.
Annual Safety/Maintenance Checks
Hotpoint strongly recommends that all its
appliances are regularly checked for electrical and
mechanical safety, whether or not they are covered
by a Service Plan. Worn door gaskets or hoses may
cause a leak on an appliance, which could become
dangerous if neglected.
Proof of Purchase
For future reference please attach your purchase
receipt to this booklet and keep it in a safe place.
Spares and Accessories
Spares and accessories can be ordered from our
Spares accessories order hotline (see back page),
using the order form enclosed.
NOTE: Our Engineers will use every effort to avoid
damage to floor coverings and adjacent units when
carrying out repairs/service work, but in locations
where the Engineer advises you that it will be
impossible to move appliances without risk of
damage, he will only proceed with your approval
that no liability is accepted.
36
Page 37

Page 38

Page 39

Page 40

Key Contacts
Service
Hotpoint has the largest appliance manufacturer’s service team in Europe,
trained specialists directly employed by us to ensure your complete
confidence.
Repair Service
UK: 08709 066 066
Republic of Ireland: 1850 302 200
You will be asked for the following information:-
Name, address and postcode.
Telephone number
Model / Serial number of the appliance
Clear and concise details of the query or fault
Place and Date of purchase
(Please keep the receipt as evidence will be required when the engineer calls).
Extended Warranty
To join: UK 08709 088 088
Republic of Ireland: 1850 502 200
Genuine Parts & Accessories
Mail Order Hotline
UK: 08709 077 077
Republic of Ireland: (01) 842 6836
For further product information
All Hotpoint Services are offered as an extra benefit and do not affect your statutory rights.
General Domestic Appliances Limited, Morley Way, Peterborough, PE2 9JB
PRINTED BY SIMLEX.FOUR ASHES, WOLVERHAMPTON. June 1999 Part No. 102800092-01
08701 506070
 Loading...