

Page 1

Installation and User
Handbook
Freestanding Frost Free Freezer
Model FZ92P
It is essential that you read through this instruction book carefully
before you first use your appliance.
Page 2

2
Contents
Page
Electrical Supply 3
Get to know your Appliance / Checklist / How Frost Free Works 4
Installation 5
Door Reversal 6
The Controls 7
Storing Food 8
Caring for your Appliance 9
Troubleshooting 10
Service Cover / Guarantee 11
Key Contacts Back Cover
For details of spares,service and guarantee see separate service leaflet.
Retention of the Instruction Book
This Instruction Book must be kept handy for reference as it contains important details on the safe and
proper use of the appliance.
If you sell or pass the appliance to someone else,or move house and leave it behind,make sure this Book is
also provided so the new owner can become familiar with the appliance and safety warnings.
Technical Safety
The refrigerant R600a is environmentally friendly but flammable, tak e care not to damage the refrigerant circuit pipes.If refrigerant does escape,immediately ensure that the area is well ventilated.
Do not use electrical appliances;i.e ice makers, inside the appliance.
In the event that the appliance is damaged,contact the supplier immediately before connecting to the
mains.
To guarantee safe operation,ensure that the appliance is set up and connected as described in these operating instructions,and that any repairs and work on the appliance are only carried out by an authorised service
office.
Disposal Notes:
The packaging is designed to protect the appliance and individual components during transport and is
made of recyclable materials.
Corrugated board/board
Moulded polystyrene (foamed,CFC-free polystyrene.
Polythene bags and sheets
Polyproplene straps
Keep packaging materials away from children - polythene sheets and bags can suffocate!.
Please return packaging material to your nearest official collection point so that the various materials can be
reused or recycled as far as possible.
Ensure that the refrigerant circuit is not damaged,before the appliance that is no longer needed is taken
away for disposal. In this way the refrigerant will not escape into the environment.
Exact details of the refrigerant used can be found on the type plate.The heat insulator is PU with Pentane.
Information on collection dates or collection points can be obtained from the waste disposal authorities or
local council.
WARNING:AVOID ACCIDENTS TO CHILDREN. WHEN DISCARDING AN OLD FRIDGE OR
FREEZER BE CERTAIN TO MAKE THE LOCK UNUSABLE. IF POSSIBLE, REMOVE THE DOOR
AND DISCARD SEPERATELY.
DO NOT AT TEMPT TO SIT ON TOP OF YOUR APPLIANCE.IT IS NOT DESIGNED FOR SUCH
USE AND YOU COULD INJURE YOURSELF OR DAMAGE THE APPLIANCE BY SUCH ABUSE.
Page 3
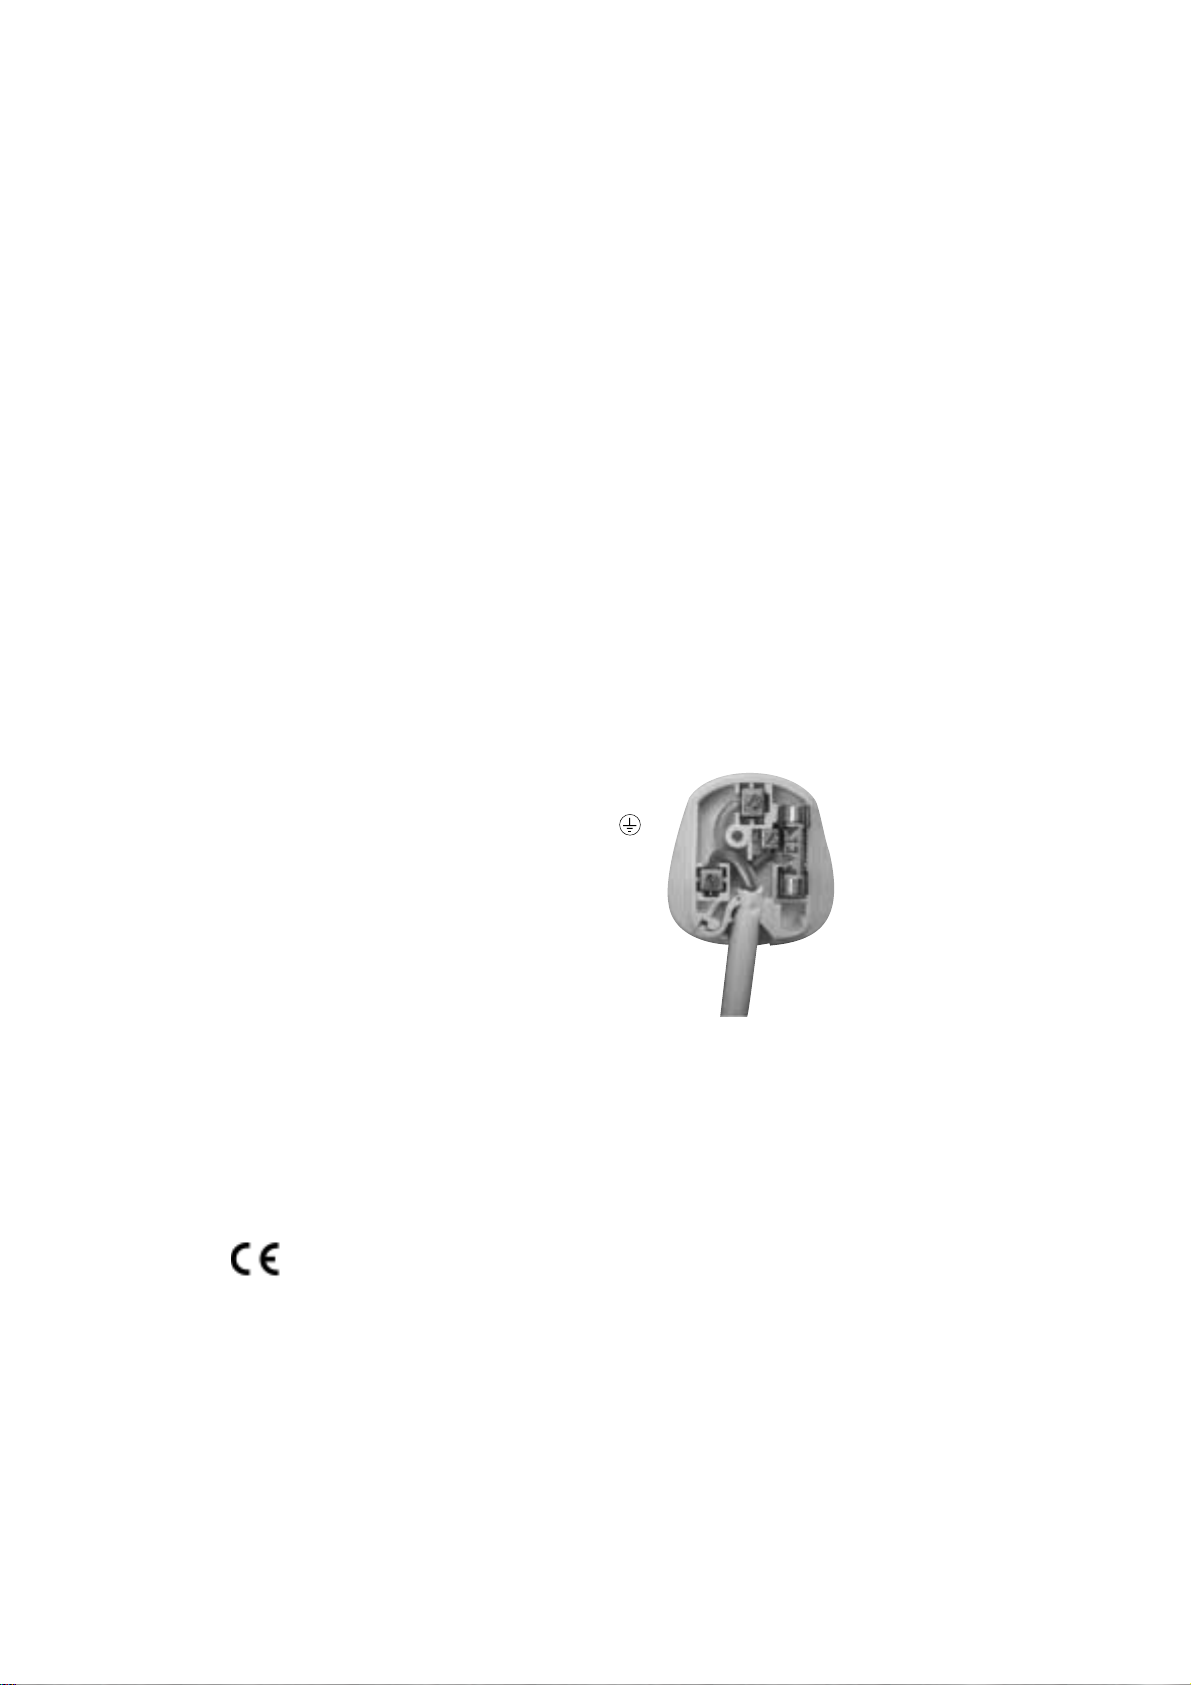
WARNING:This appliance must be earthed.
Fuses
Your appliance comes fitted with a plug and a 13A fuse.If you need to replace the fuse,only
those rated at 13A and ASTA approved to BS1362 should be used.If you lose the fuse cover,
a replacement may be obtained from your local Electricity company.
Correct replacement is identified by colour coding or the marking on base of plug.
WARNING:Do not use plug unless fuse cover is fitted.
Changing the Plug
Cut off and dispose of the supplied plug if it does not fit your socket.
WARNING:To avoid a shock hazard do not insert the discarded plug into a socket
anywhere else.
IMPORTANT:WIRES IN THE
MAINS LEAD ARE COLOURED
IN ACCORDANCE WITH THE
FOLLOWING CODE:
Green/Yellow - Earth
Blue - Neutral
Brown - Live
If you change the plug,the colour of
wires in the mains lead may not
correspond with the colour of the
markings identifying terminals in the
plug. You should therefore wire it as
shown.
Changing the Mains Lead
A special lead can be ordered from our Service Department UK:08709 066 066 or
Republic of Ireland:1850 302 200
If you have damaged the existing lead or require a longer one a charge will be made.It is
strongly advised that this work is carried out by a qualified electrician.
CE marking certifies that this appliance conforms to the following EEC directives:Low Voltage Equipment - 72/23/EEC & 93/68 EEC
Electromagnetic Compatibility - 89/336/EEC,92/31/EEC & 93/68/EEC
3
Electrical Supply
Green and yellow (Earth)
wire to terminal
marked ‘E’ ,
symboL, or
coloured green
and yellow.
Blue (Neutral)
wire to terminal
marked ‘N’or
coloured black.
13A ASTAapproved
fuse to BS1362.
Brown (Live)
wire to terminal
marked ‘L’or
coloured red.
Cord clamp
Page 4
4
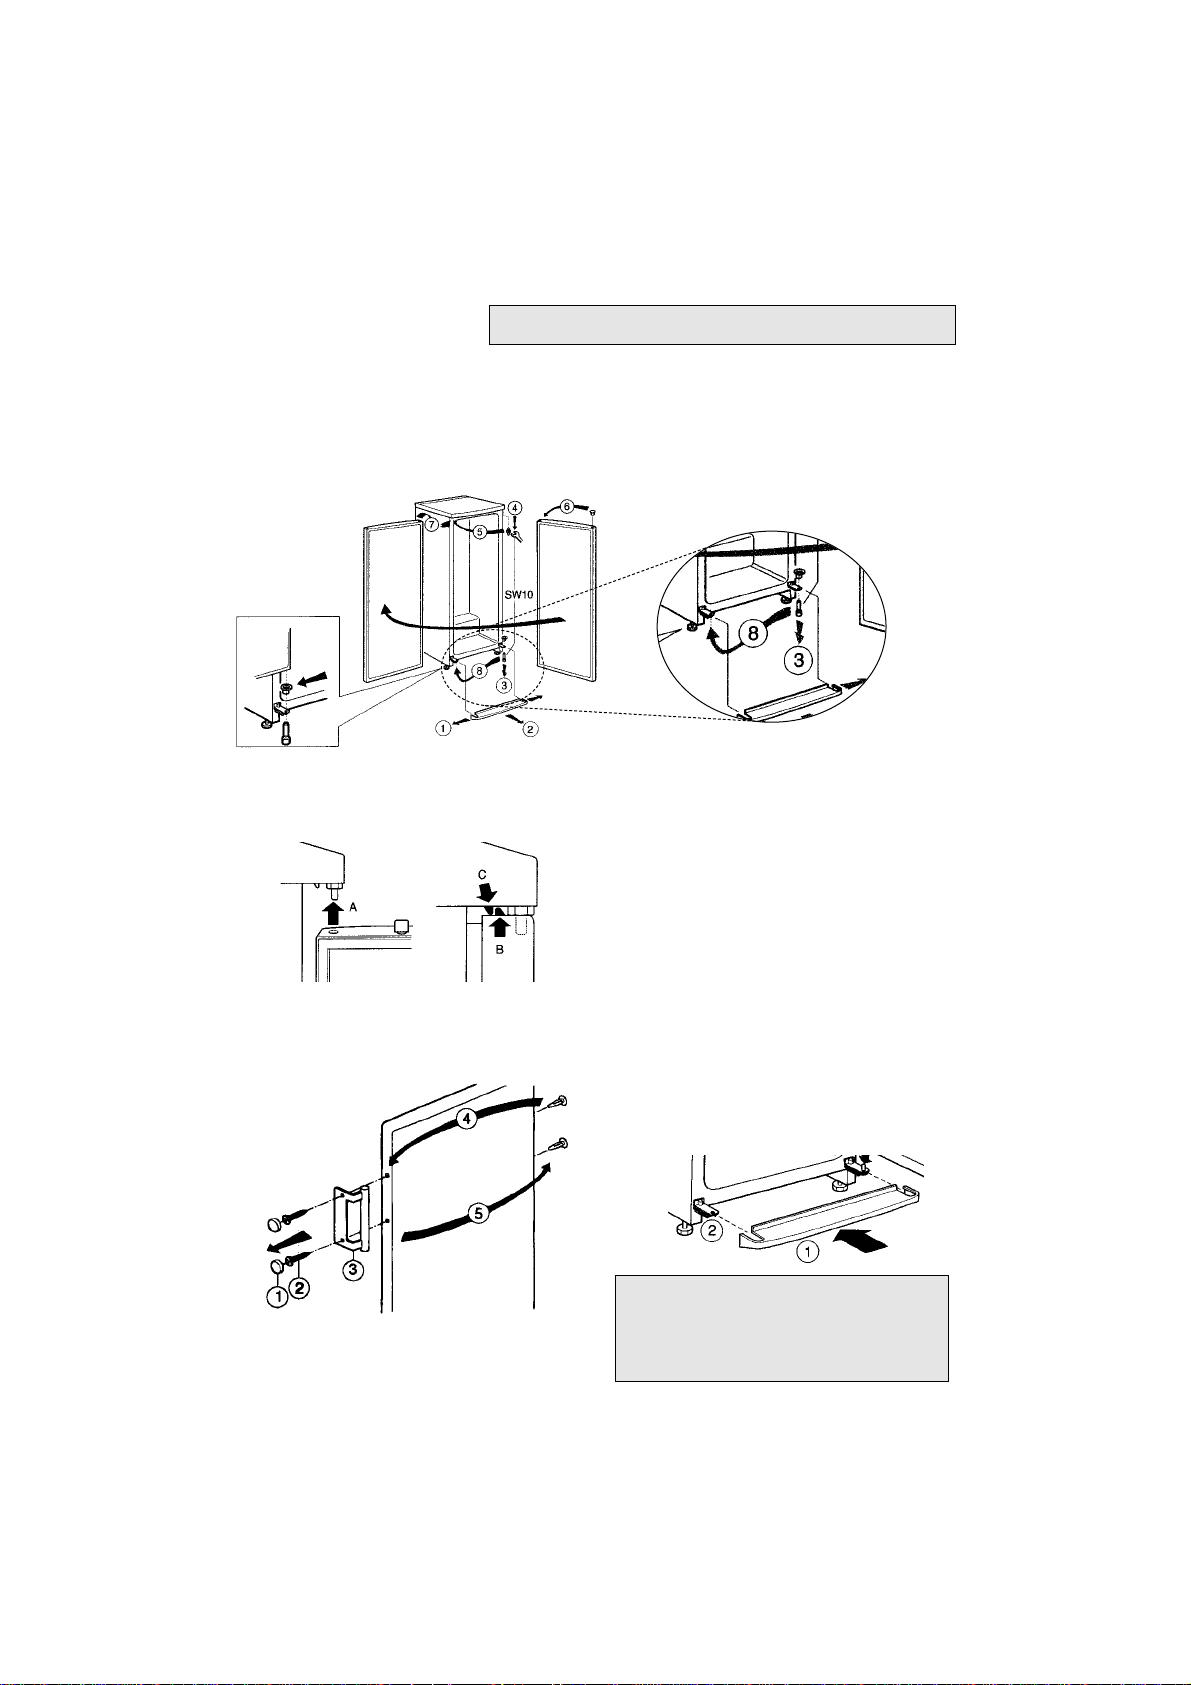
Door Reversal
If you need to change the door opening side,
lower the appliance onto its back and follow
the pictorial instructions below,in numerical
order,to ensure doors function properly.
Note:You may require assistance to carefully lay
the appliance onto it’s back, onto a suitable
protective material (ie.the original packaging).
Insert the open door into the door bearing (A)
IMPORTANT:The door journal (B) must be in
front of the door switch (C)
Changing the door handle
Follow the pictorial instruction below, in
numerical order:
Attaching the base panel
The base panel (1) is enclosed with the
appliance and can be found,either within the
appliance itself or at the rear of the condenser
(black grille).
●
Slide the base panel (1) onto the plastic
guides (2),until it locks into position.
WARNING:Switch off electrical supply and pull out mains
plug.
Alternatively you may wish our Service
Department to quote for an Engineer to
carry out the conversion for you, call
UK:08709 066 066 or
Republic of Ireland:1850 302 200
Page 5

Where to put your appliance.
Climatic Class can be found on the Rating
Plate and this specifies the ambient
temperatures at which the appliance may be
operated.
Climatic Class Permitted Ambient
Temperature
SN +10˚C to 32˚C
ST +18˚C to 38˚C
Avoid locating near anything which gives off
heat,a cooker or radiator for example or in a
position where sunlight is liable to shine
directly onto the appliance.In such a position
your appliance will have to work harder and
will cost more to run and may be damaged by
the heat.
If installation next to a heat source is
unavoidable,use a suitable insulating plate,or
comply with the following minimum
distances:
3cm to an electric cooker,
30cm to an oil or coal-fired cooker.
If the appliance is installed next to another
freezer or refrigerator,observe a minimum
distance of 2cm between the appliances to
prevent condensation.
Appliances with handles must be positioned
55mm,from the wall on the hinge side,so that
the door can be opened by 90˚.
Make sure that the electrical socket is easily
accessible,the best position is at the side of or
above the appliance.
Air Circulation
The heated air must be able to escape
through the rear of the appliance. If the air
flow is obstructed,the refrigerating unit must
work harder,which increases the power
consumption. Therefore NEVER cover the
ventilation slots.
Adjusting the Feet
Note:An unsteady appliance can cause
problems.
The height adjustable feet have been fully
screwed in at the factory. When installing the
appliance use a screwdriver to adjust the feet.
Unscrew the feet initially by 5mm,place the
appliance in its final position and continue to
adjust the feet until the appliance is standing
firm and is level (use a spirit level to check).
Securing the Appliance
Once in its final position and level,the
appliance must be fixed to the wall to prevent
it from tilting forward.
●
Place the metal lug (2) on the left or right
side of the air grid and mark the fixing
hole on the wall.
●
Drill the hole and insert a wall plug (1).
●
Insert the metal lug (2) into the air grid
and screw to the wall (3).
(Size 5 wall plugs and screws are available
from DIY stores).
Clean before Using
We recommend before using your appliance
that you clean the interior and exterior (see
page 9).
Final check
Before you start using your appliance,check:
1. It is thoroughly dry inside,
2. Air can circulate freely,
3. The feet have been adjusted,ie.all four
are firmly on the ground
5
Installing your Appliance
Page 6

Get to know your Appliance
6
CHILDREN SHOULD NOT BE ALLOWED TO PLAY WITH THE
APPLIANCE OR TAMPER WITH THE CONTROLS
Controls
No Frost System
Freezer Tr ay
Frozen food
baskets (small)
Frozen food
basket (large)
Frozen food
calender
Base Panel
Adjustable Feet
Control Panel...
1 Mains On / Off Switch
2 Temperature Display
3 The ‘ Alarm ’Display
4 Fast freeze Display
5 Temperature Selec tion Button
6 Fast Freeze Button
7 Alarm Cancel Button
Maximum Freezer Capacity:
Food should be frozen right through as
quickly as possible.Only in this way are
vitamins,nutritional values,appearance
and taste retained.
Therefore,you should not exceed the
maximum freezing capacity of the
appliance.
The following quantities of food may be
frozen at any one time:
20kg / 24h
Page 7

Leave the appliance to stand upright in its
required location for at least 15 minutes
before you plug in and switch on the
electricity supply.
WARNING:Ensure the mains cable is not
trapped underneath or behind the
appliance. Plug in and switch on...
●
Press the mains on/off switch (1).
The warning tone sounds and the
temperature display (2) flashes,the alarm
display (3) illuminates.
●
Press the Alarm Cancel button.
The warning tone is cancelled and the
temperature display (2) stops flashing.
At internal cabinet temperatures warmer than
+19˚C,"-" is displayed. Only at lower
temperatures are the values displayed with
"˚C".
The appliance left the factory with a pre-set
temperature of -18˚C.
Pre-set temperatures can be altered by
following instructions under,‘Temperature
Selection Button’.
Note:When the operating temperature is
reached,the alarm display (3) will go out.
Running-in the Compressor
Your appliance is operated by a compressor,
which maintains the appliances internal
temperature.For the first two months the
compressor has to work a little harder and
may result in more noise than usual.
Temperature Display (2):
(displays 3 different temperatures)
a. Current temperature in the freezer
compartment,without any buttons having
been pressed.
b. When Temperature Selection Button (5) is
pressed,the temperature selection for the
freezer compartment is displayed for five
seconds. Then the ‘current temperature in
the freezer compartment’is redisplayed.
c. If the temperature display (2) flashes,the
freezer compartment became too warm.
When the Alarm Cancel button is pressed,
the warmest temperature reached in the
freezer compartment is displayed for five
seconds. The display will then return to
show the ‘current temperature in the
freezer compartment’,without flashing.
The Alarm Display (3):
This will illuminate and the warning tone
sounds simultaneously when it becomes too
warm in the freezer compartment.
It will go out when the freezer compartment
has reached its operational temperature.
Fast Freeze Display (4):
This will only illuminate when ‘Fast Freeze’is
on.
Temperature Selection Button (5):
Setting the temperature in the freezer
compartment:
●
Press the temperature selection button (5).
The pre-set temperature is displayed for
five seconds in the temperature display (2).
●
Press the temperature selection button (5)
repeatedly until the desired temperature is
displayed. The value last selected is stored.
(The temperature selection is displayed
consecutively from -18˚C to -26˚C,returning
to -18˚C after -26˚C).
Fast Freeze Button (6):
Switches ‘Fast Freeze’on and off. Fast Freeze
Display (4) indicates that ‘Fast Freeze’is on.
Alarm Cancel Button (7):
Press to stop Temperature Display (2) flashing
and cancel any warning tones:
- when the appliance is first switched on.
- if it becomes too warm in the freezer
compartment,ie.frozen food could begin
to thaw.
- when large quantities of fresh food are
placed in the appliance.
- if the door has been left open for too long.
Also,when pressed,the warmest temperature
reached in the freezer compartment is shown
in the temperature display (2).
7
The Controls
WARNING:Appliances must NOT be placed
in a room where the temperature goes
below the minimum or above the
maximum specified,for prolonged
periods (see page 5).
WARNING: When checking temperatures
DO NOT use a mercury filled thermometer
as breakage would cause a health hazard.
Whether the compressor is running or
not,it is normal to hear sounds created by
the liquid and gases sealed within the
refrigeration system
˚C
Page 8

Storing Food
Your appliance has been designed for the
storage of edible foodstuffs only,do not
use to store poisonous,flammable or
dangerous substances.
To ensure your appliance operates as
efficiently as possible:
● Avoid opening the doors unnecessarily or
for longer than needed.
● Allow hot or warm food to cool down
before placing in the appliance,as placing
hot food in the appliance reduces
efficiency.
● Follow packaging “best by/use by”
instructions or your suppliers advice on
suitable maximum storage time.
● Pack foods airtight,to retain moisture and
prevent flavour / odour transference.
Plastic bags,aluminium foil,plastic stretch
wrap and containers with lids are ideal.
Storing Food in your Freezer
Follow these recommendations when storing
food in your freezer compartment:
● Freeze and store either fresh food or long
term commercially frozen foods.
● Generally speaking long term storage
means up to 3 months but this can vary,
so always follow your supplier’s
recommendations otherwise refer to the
pictorial guide on the drawer fronts.
● Store and defrost commercially frozen
food in accordance with the instructions of
the manufacturer.
● Always defrost frozen food before cooking
unless instructions on the packet state
otherwise.
● Refer to the storage life pictorial guides,
which are on the drawer fronts,when
freezing fresh food (Time in months).
● Select frozen food last when shopping,
transport in a cool bag and place in the
freezer compartment as soon as possible
on arriving home.
● Label and date food before placing in
freezer.
● Thawed food should be either cooked and
eaten or re-frozen within 24 hours.
● Liquid filled bottles or sealed fizzy drinks
must not be stored in the freezer or chiller
compartment,as they may burst.
● Lollipops and water ices should not be
given to children directly from the freezer.
The low temperature may cause ‘freezer
burns’on their lips.
● Store ice cream towards the top of the
freezer and remove from the freezer 15-30
minutes before serving.
"Fast Freeze"
Several hours before placing fresh food in the
freezer compartment,Press the ‘Fast Freeze’
button (6)
4-6 hours is usually adequate. If the maximum
freezing capacity is used,24 hours is required.
(Small quantities of fresh food,up to 2kg,can
be frozen without ‘Fast Freeze’).
‘Fast Freeze’display (4) indicates that ‘Fast
Freeze’is on. After being switched on,the
refrigerating unit runs constantly and the
freezer compartment drops to a very low
temperature.
‘Fast Freeze’switched off automatically when
the fresh food has frozen solid (after several
hours for small quantities,no more than two
days for large quantities).
Where ‘Fast Freeze’is selected but no food is in
the freezer,then ‘Fast Freeze’will automatically
cancel after 26 hours.
Freezer Drawers
Store all fresh food to be frozen and
commercially frozen food in the individual
baskets.
Use the large frozen food basket preferentially
for the freezing and storage of larger food
items,such as poultry etc.
Always make sure that the drawers have been
pushed back in as far as possible,to their stop
position.
Freezer Tray
The freezer tray can be used to freeze items
individually,such as fruit,herbs and
vegetables. Distribute the food items evenly
across the freezer tray and allow to freeze for
about 10 - 12 hours. When frozen place in
freezer bags or containers and store in the
baskets.
Ice Packs
In the event of a power failure or malfunction,
refreezable ice packs delay the thawing of the
frozen food being stored. This is most
effectively achieved and energy consumption
is minimized,by placing refreezable ice packs
in the top compartment directly on the food.
Refreezable ice packs can also be used to
temporarily keep food cool,eg.in a cooling
bag.
8
Page 9

Note: With the fully automatic No-Frost
system,the freezer compartment remains ice
free. Defrosting is no longer necessary.
Cleaning the Interior of your Appliance
We recommend that you clean your appliance
before using for the first time.
Remove food and wrap or cover to keep it
frozen.
Remove shelves,trays and baskets and wash
these in warm soapy water,dry thoroughly.
Wipe the freezer interior with a clean cloth
wrung out in either a solution of one
teaspoonful of bicarbonate of soda to one
pint of water or Milton sterilising fluid,diluted
according to manufacturers’instructions.
Dry the interior thoroughly with a clean cloth
before replacing fittings and food.
Cleaning the Door Seal
Use soap and water on a clean damp cloth to
wipe along and in between the creases of the
door seal,dry thoroughly.
WARNING:Do not use detergent,it will
damage the door seal.
Cleaning the Exterior of your Appliance
IMPORTANT: Never use a steam cleaner. If live
components come into contact with condensing
steam,they may short circuit or cause an electric
shock.
Use a small amount of detergent on a clean
damp cloth to wipe the exterior surface, dry
thoroughly.
Use a vacuum cleaner to remove dust from
underneath the appliance and around the air
grille at the base to prevent it becoming
blocked.You do not need to remove the air
grille for cleaning.
No water should be allowed into the control
panel during cleaning.
Reconnect the mains plug and switch on.
Going away
If you expect to be away and don’t want to
use your appliance, switch off electrical
power supply and pull out the mains plug.
Remove food,clean and dry the interior
thoroughly.
Note:Leave doors ajar to prevent the
accumulation of odours.
Spare Parts
Please remember your new appliance is a
complex piece of equipment.
‘DIY’repairs or unqualified and untrained
service people may put you in danger,could
damage the appliance and might mean you
lose cover under the Parts Guarantee.
If you do experience a problem with the
appliance don’t take risks;call in our Service
Engineer.
Our parts are designed exclusively to fit our
appliances.Do not use them for any other
purpose as you may create a safety hazard.
Caring for your Appliance
9
WARNING:Switch off electricity supply
and pull out mains plug before cleaning.
WARNING:Do not use any household
cleaner ,abrasive powders or wax polish.
These not only damage the surfaces,but
also leave a smell within the appliance.
Page 10

Troubleshooting.
PROBLEM.. .
The appliance won’t work.
None of the displays illuminate.
The appliance is making alot of noise.
There has been a power failure,the
Temperature Display (2) is flashing.
The freezer compartment door was
left open for a long time and the
freezer compartment no longer
reaches the selected temperature.
The freezer door is difficult to open.
The Alarm Display (3) illuminates,the
warning tone sounds.
The display shows "E1".
The electronics are defective,call for a
Service Engineer.
CHECK.. .
1. Check plug is firmly positioned in wall
socket and the power supply is switched
on.
2. Check the power supply with another
appliance.
3. Check fuse.
1. Check that the appliance is level.
2. Is the appliance overloaded? Do Not
exceed the Max. Freezer Capacity.
2. Ensure rear pipework is clear of wall and
skirting board.
The freezer compartment became too warm.
Press the Alarm Cancel button (7) to stop the
display from flashing. The warmest temperature reached in the freezer is displayed and
then clears. If it displays a temperature more
than +3˚C,the food must be used or cooked
and refrozen.
The refrigerating unit in the No-Frost system is
covered in so much ice that it can no longer
defrost automatically...
Remove all stored food, wrap and place in a
cool location.
Switch off and unplug the appliance.Put a
couple of bowls of hot water in baskets (on
heat resistant base) and close the door.
Defrost water will go into the evaporation pan
at the rear of the appliance,sponge this
several times to prevent overflowing.
After about 1 hour, when all the defrost water
has run into the evaporation pan,clean and
thoroughly dry the interior,plug in and switch
on.
A well sealed freezer door can be difficult to
open.This is partly due to the difference in
temperature between the room and internal
compartment.if you have just closed the
freezer door, it may be particularly difficult to
open immediately.Wait 5 minutes for the
internal and external pressure to equalise and
try again.
It is too warm in the freezer compartment.
Is there adequate air circulation? (see page 5)
Check all temperature settings (see page 7)
Have you observed maximum freezer
capacity (see page 6)
Has hot food recently been placed in the
appliance?
Is the air grille blocked?
Press the Alarm Cancel button (7) to cancel
the warning tone.
10
Page 11

After Sales Ser vice
11
Satisfaction Guaranteed or your money back...
Hotpoint gives you a unique ‘Satisfaction Guaranteed’
promise - valid for ninety days after you have
purchased your Hotpoint product. If there is a technical
problem with your Hotpoint appliance, call Hotpoint
Service. If necessary,we will arrange for an engineer to
call. If the technical problem is not resolved under this
Guarantee,Hotpoint will replace your appliance,or if
you prefer,give you your money back.
Hotpoint appliances carry,for the first 12 months,a fully
inclusive parts and labour guarantee plus FREE
replacement parts for the first five years provided that they
are fitted by our own Service Engineer.
When the 12 months parts and labour guarantee expires
we offer three after sales service options:
Repair Service
UK:08709 066 066 or Republic of Ireland:1850 302 200
Call our National Service Line and benefit from our additional 5 years FREE parts,although the engineers time and
labour is chargeable. All repairs carry a fully inclusive parts
and labour guarantee for 12 months from the date of
repair.
Note:Chargeable service is offered on the basis of payment on
completion to our Service Engineer,who will issue a receipt.
Extended Warranties
UK:08709 088 088 or Republic of Ireland:1850 502 200
Whether you have just one or a number of Hotpoint
appliances in your kitchen,Hotpoint offer two Service
Cover Plans to give you complete peace of mind. They
enable you to extend your first 12 months labour
guarantee by either 1 or 4 years,so that you can have FREE
repairs during the membership period.
Service Cover FREE service repairs for a single
Hotpoint appliance during the
period of cover.
At an additional cost Service Cover
with maintenance includes an
annual electrical and safety check
along with replacement of any
parts if necessary.
Kitchen Cover An annual payment covers repairs
for all your Hotpoint appliances
which are less than ten years old.
Additional Hotpoint appliances
purchased after you have joined
Hotpoint Kitchen Cover are
automatically included during the
annual period of cover without
further charge.
Easy payment methods
We offer a number of payment methods: cheque, credit
card,switch,cash or by taking advantage of one of our
Service Cover Plans you can spread the cost by direct debit.
For further details call:08709 088 088
Appliance registration
To benefit from the above options,complete and return the
Appliance Registration questionnaire supplied with this
appliance. Full details and costs of our Service/Kitchen
Cover options,together with an application form,will then
be sent to you towards the end of the 12 month guarantee
period.
Hotpoint Genuine Parts & Accessories
A wide range of parts and accessories are available from
Hotpoint Genuine Parts & Accessories Mail Order Hotline
UK:08709 077 077 or Republic of Ireland:01 842 6836
From the moment your appliance is delivered,Hotpoint
guarantees it for five years.
●
Hotpoint appliances carry a fully inclusive 12 months
parts and labour guarantee plus FREE replacement
parts for the first five years,provided that they are fitted
by our own Service Engineer (evidence will be required
of date and place of purchase).
●
All Hotpoint servicing is carried out by our own Service
Organisation located throughout the United Kingdom
and Republic of Ireland. We will be happy to deal with
any problems which you may have.
●
For Hotpoint Refrigeration and Freezer appliances,we
cover the loss of food up to £250 during the first year
guarantee period (subject to product malfunction).
Claims must be verified by a Hotpoint representative.
Our Engineers will use every effort to avoid damage to
floor coverings and adjacent units when carrying out
repairs/service work,but in locations where the
Engineer advises you that it will be impossible to move
appliances without risk of damage,he will only proceed
with your approval that no liability is accepted.
Guarantee terms and conditions...
Your guarantee is only applicable in the United Kingdom or
Republic of Ireland and is subject to provision(s) that you
appliance:
●
Has been used solely for domestic purposes and is on
domestic premises ie.not for commercial or trade use.
●
Has been used solely in accordance with the instruction
book.
●
Has been properly connected to a suitable electrical
supply voltage as stated on the appliance rating plate.
●
Has not been subject to misuse,accident,modified or
repaired by anyone other than our own Service
Engineers.
Hotpoint Guarantee
Page 12

Key Contacts
Service
With the largest appliance manufacturer’s service team in Europe and trained
specialists directly employed by us to ensure your complete confidence.
Repair Service
UK:08709 066 066
Republic of Ireland:1850 302 200
You will be asked for the following information:-
Name,address and postcode.
Telephone number
Model / Serial number of the appliance
Clear and concise details of the query or fault
Place and Date of purchase
(Please keep the receipt as evidence will be required when the engineer calls).
Extended Warran ty
To join:UK 08709 088 088
Republic of Ireland:1850 502 200
Genuine Parts & Accessories
Mail Order Hotline
UK:08709 077 077
Republic of Ireland:(01) 842 6836
For further product information
08701 50 60 70
All Hotpoint Services are offered as an extra benefit and do not affect your statutory rights.
General Domestic Appliances Limited,Morley Way,Peterborough,PE2 9J
FP066 - 03
 Loading...