

Page 1
Operating Instructions
Contents
Installation, 2-3
GB
English, 1
Türkçe,10
HU CZ
TR
DK
Dansk, 19
Positioning
Electrical connections
Data plate
Description of the appliance, 4
Overall view
Control panel
OVEN
GB
Magyar, 28 Cesky, 37
FZ 612 C.2
FZ 612 C.2 IX
Start-up and use, 5
Starting the oven
How to use the timer
Cooking modes, 6-7
Cooking modes
Practical cooking advice
Cooking advice table
Precautions and tips, 8
General safety
Disposal
Respecting and conserving the environment
Assistance
Maintenance and care, 9
Switching the appliance off
Cleaning the appliance
Cleaning the oven door
Replacing the light bulb
Sliding Rack Kit assembly
Page 2
Installation
GB
Before placing your new appliance into operation
please read these operating instructions carefully.
They contain important information for safe use, for
installation and for care of the appliance.
Please keep these operating instructions for future
reference. Pass them on to possible new owners of the
appliance.
Positioning
Keep packaging material out of the reach of children.
It can become a choking or suffocation hazard. see
Precautions and tips).
! The appliance must be installed by a qualified person
in compliance with the instructions provided. Incorrect
installation may cause harm to persons, animals or
may damage property.
Fitting the appliance
Use the appropriate cabinet to ensure that the
appliance functions properly.
The panels adjacent to the oven must be made of
heat-resistant material.
Cabinets with a veneer exterior must be assembled
with glues which can withstand temperatures of up
to 100°C.
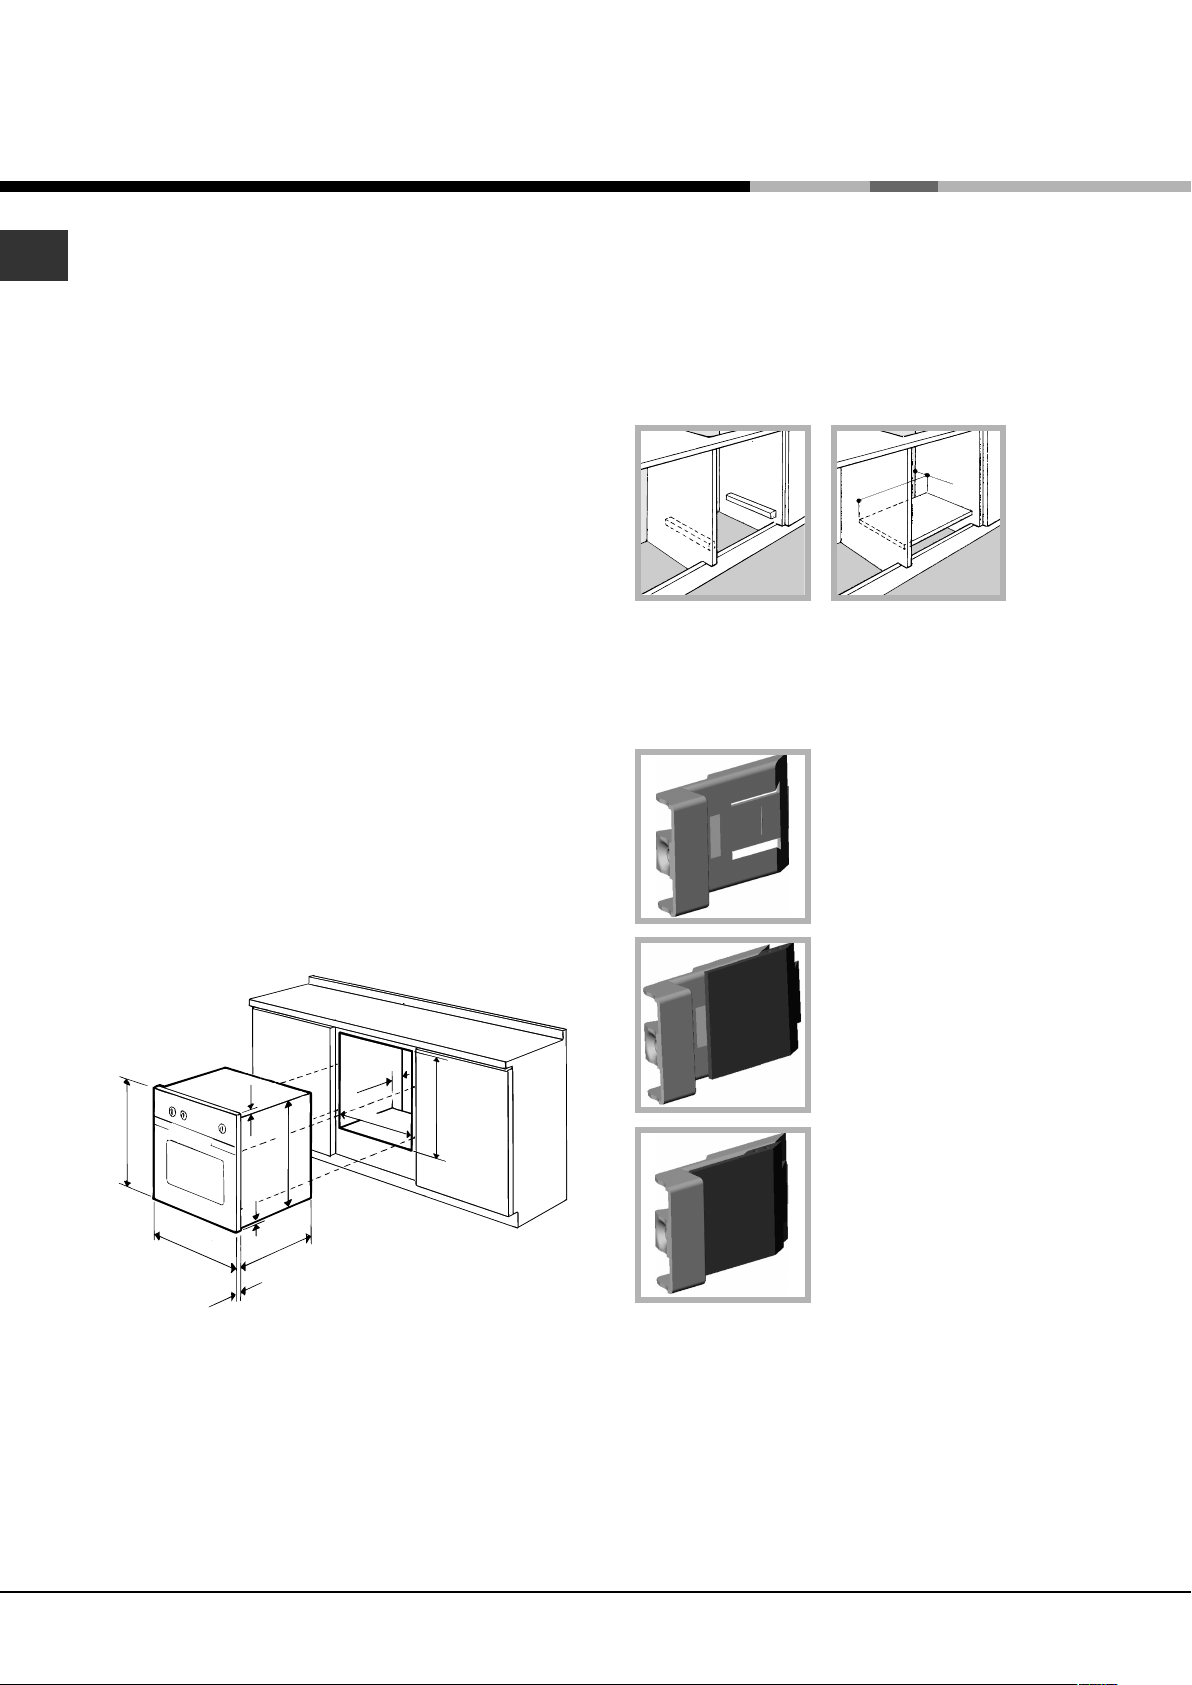
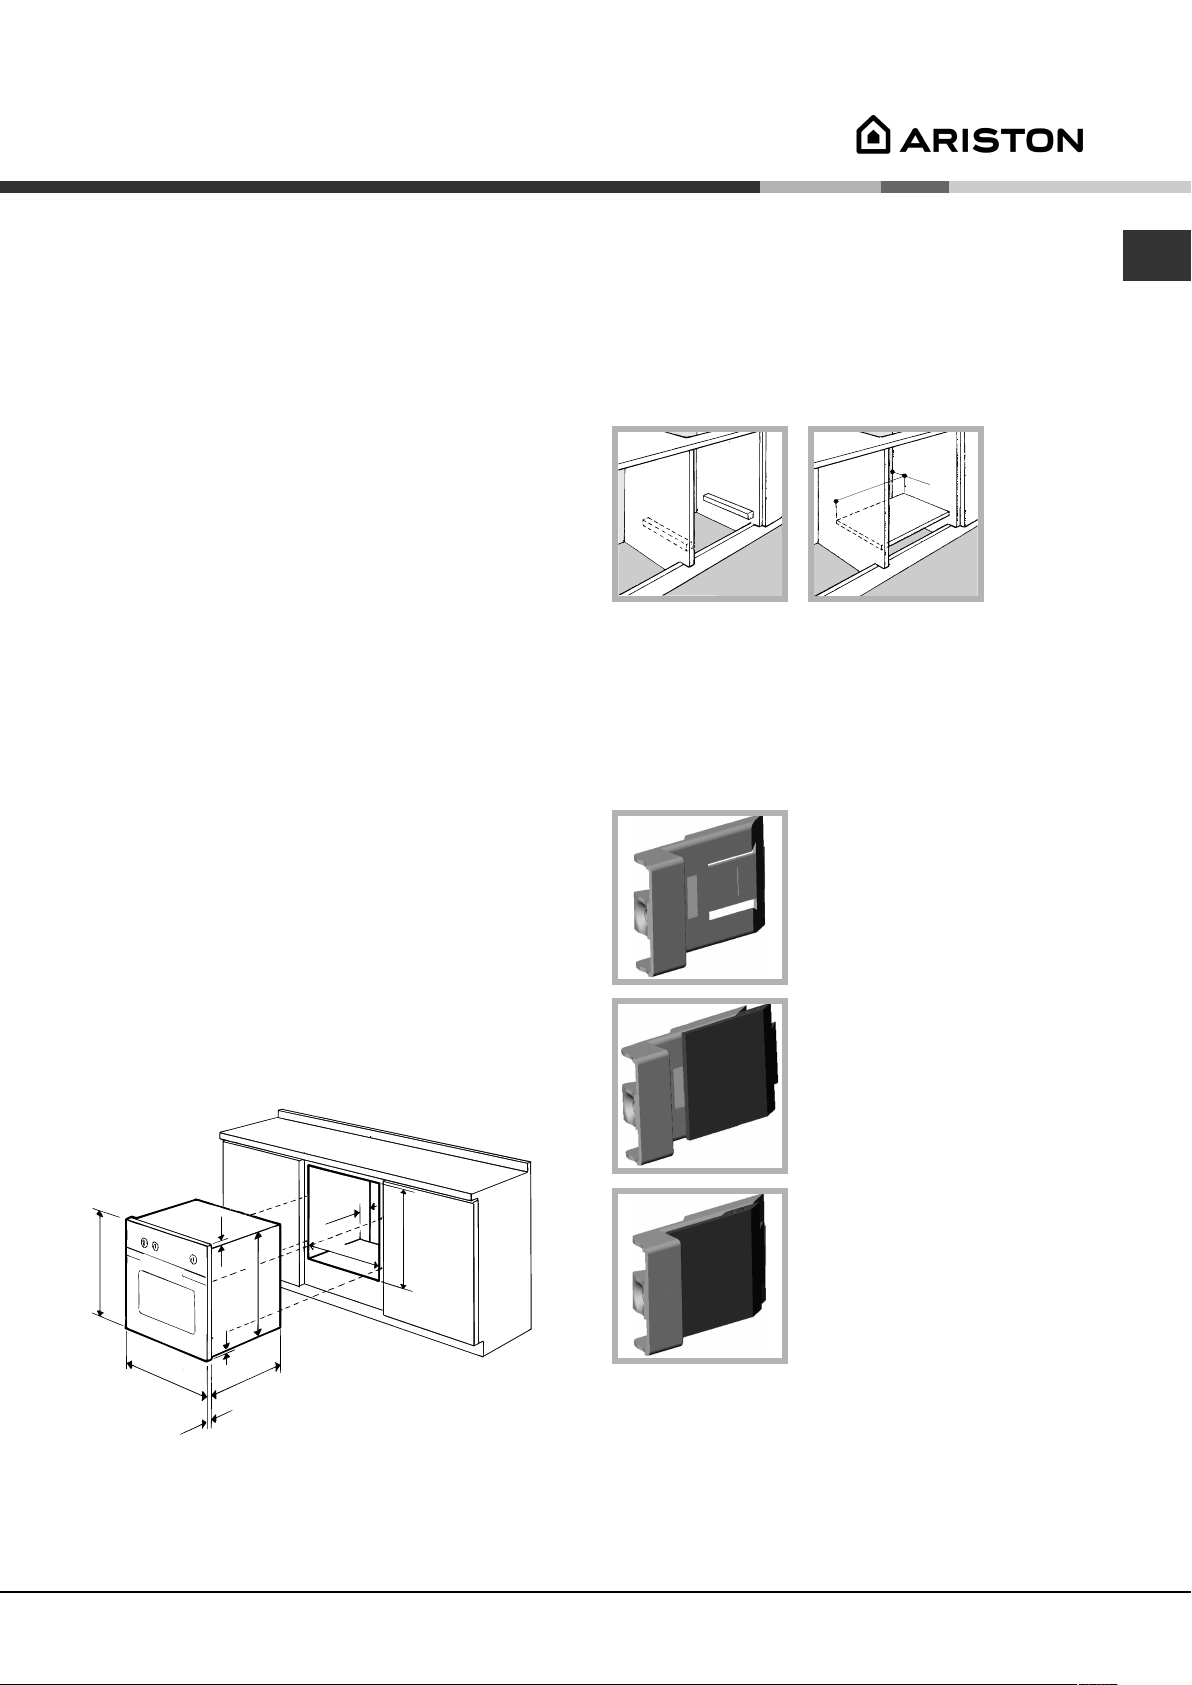
Ventilation
To ensure good ventilation, the back panel of the
cabinet must be removed. It is advisable to install the
oven so that it rests on two strips of wood, or on a
completely flat surface with an opening of at least 45 x
560 mm (see diagrams).
45 mm.
560 mm.
Centring and fastening
Position the 4 tabs on the side of the oven according
to the 4 holes of the outer frame. Adjust the tabs
according to the thickness of the cabinet side panel,
as shown below:
thickness of 20 mm: take off
the removable part of the tab
(see diagram)
To install the oven under the counter (see diagram)
and in a kitchen unit, the cabinet must have the
following dimensions:
567 mm.
45 mm.
558 mm.
593 mm.
23 mm.
595 mm.
5 mm.
595 mm.
545 mm.
24 mm.
! The appliance must not come into contact with
electrical parts once it has been installed.
The consumption indications on the data plate have
been calculated for this type of installation.
thickness of 18 mm: use the
first groove, which has already
been set in the factory (see
diagram)
thickness of 16 mm: use the
second groove (see diagram)
Secure the appliance to the cabinet by opening the
oven door and putting 4 screws into the 4 holes of the
outer frame.
! All parts which ensure the safe operation of the
appliance must not be removable without the aid of a
tool.
2
Page 3
Electrical connections
! Ovens equipped with a three-pole power supply
cable are designed to operate with alternating current
at the voltage and frequency indicated on the data
plate located on the appliance (see below).
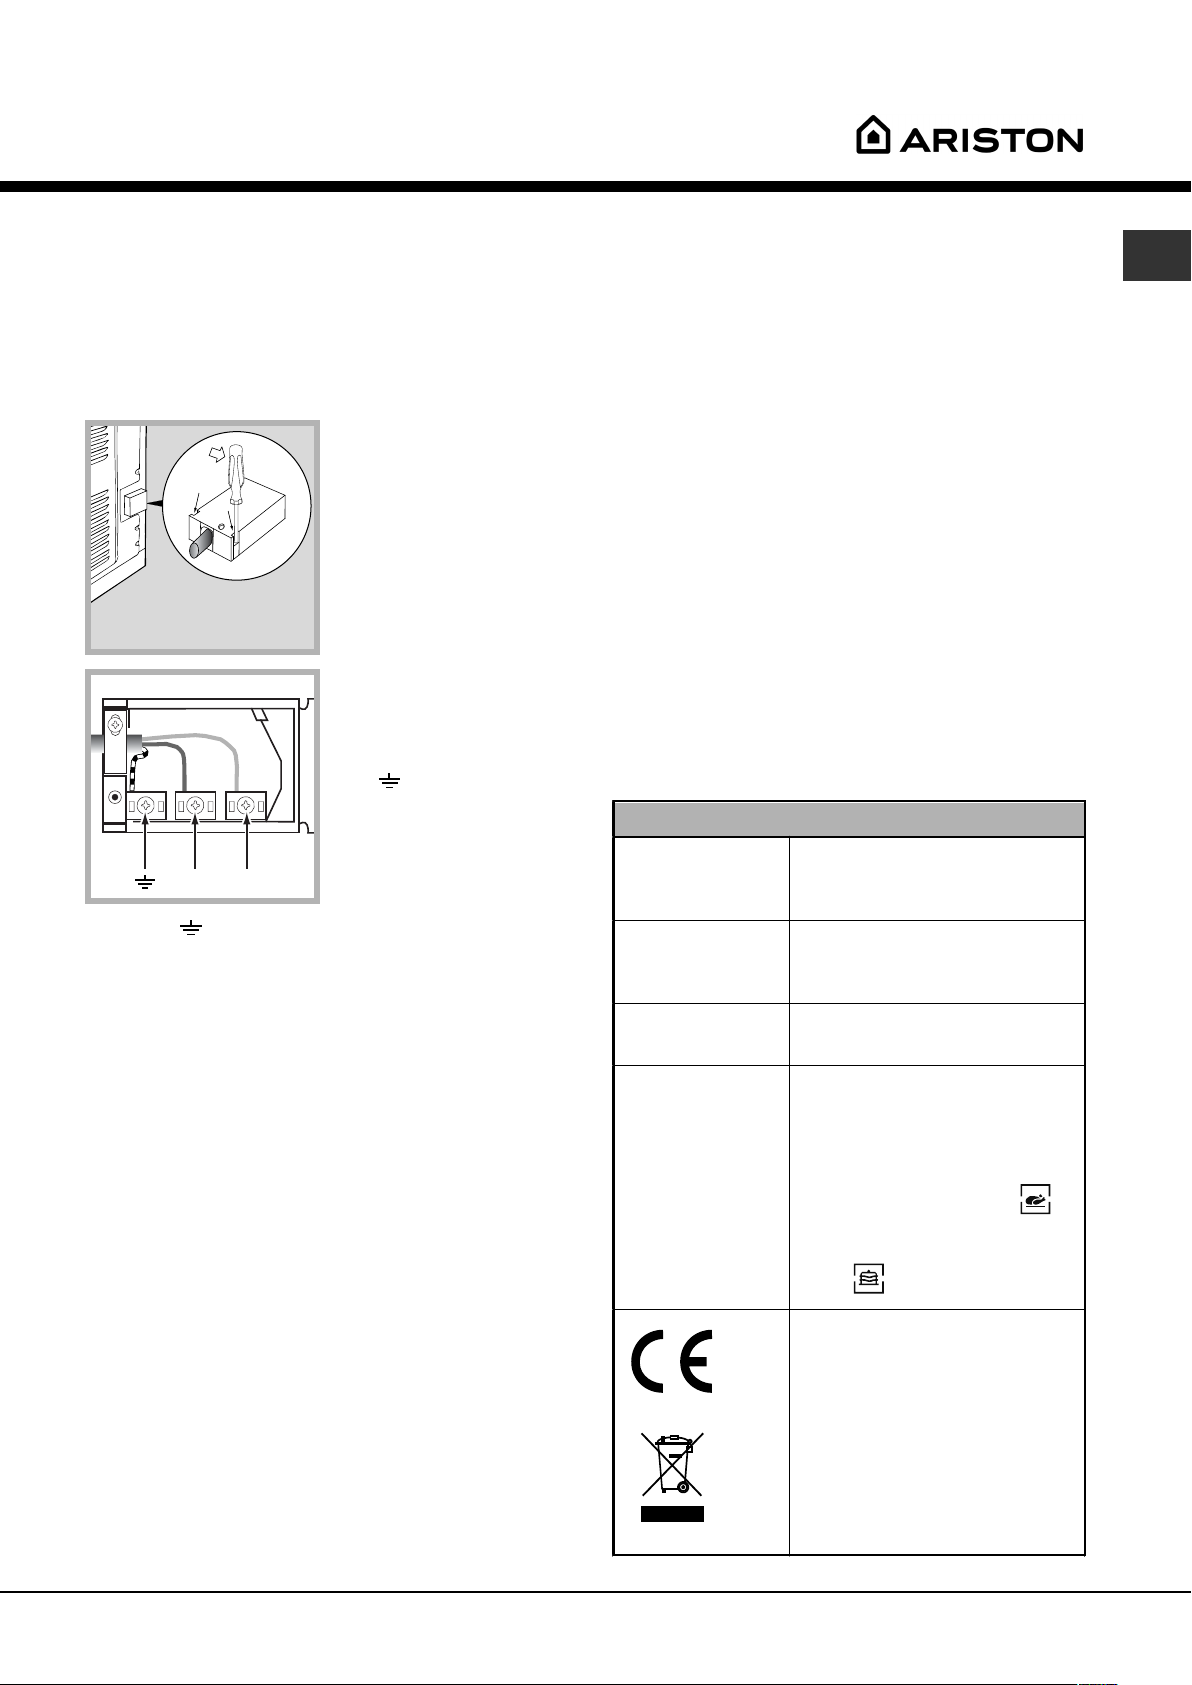
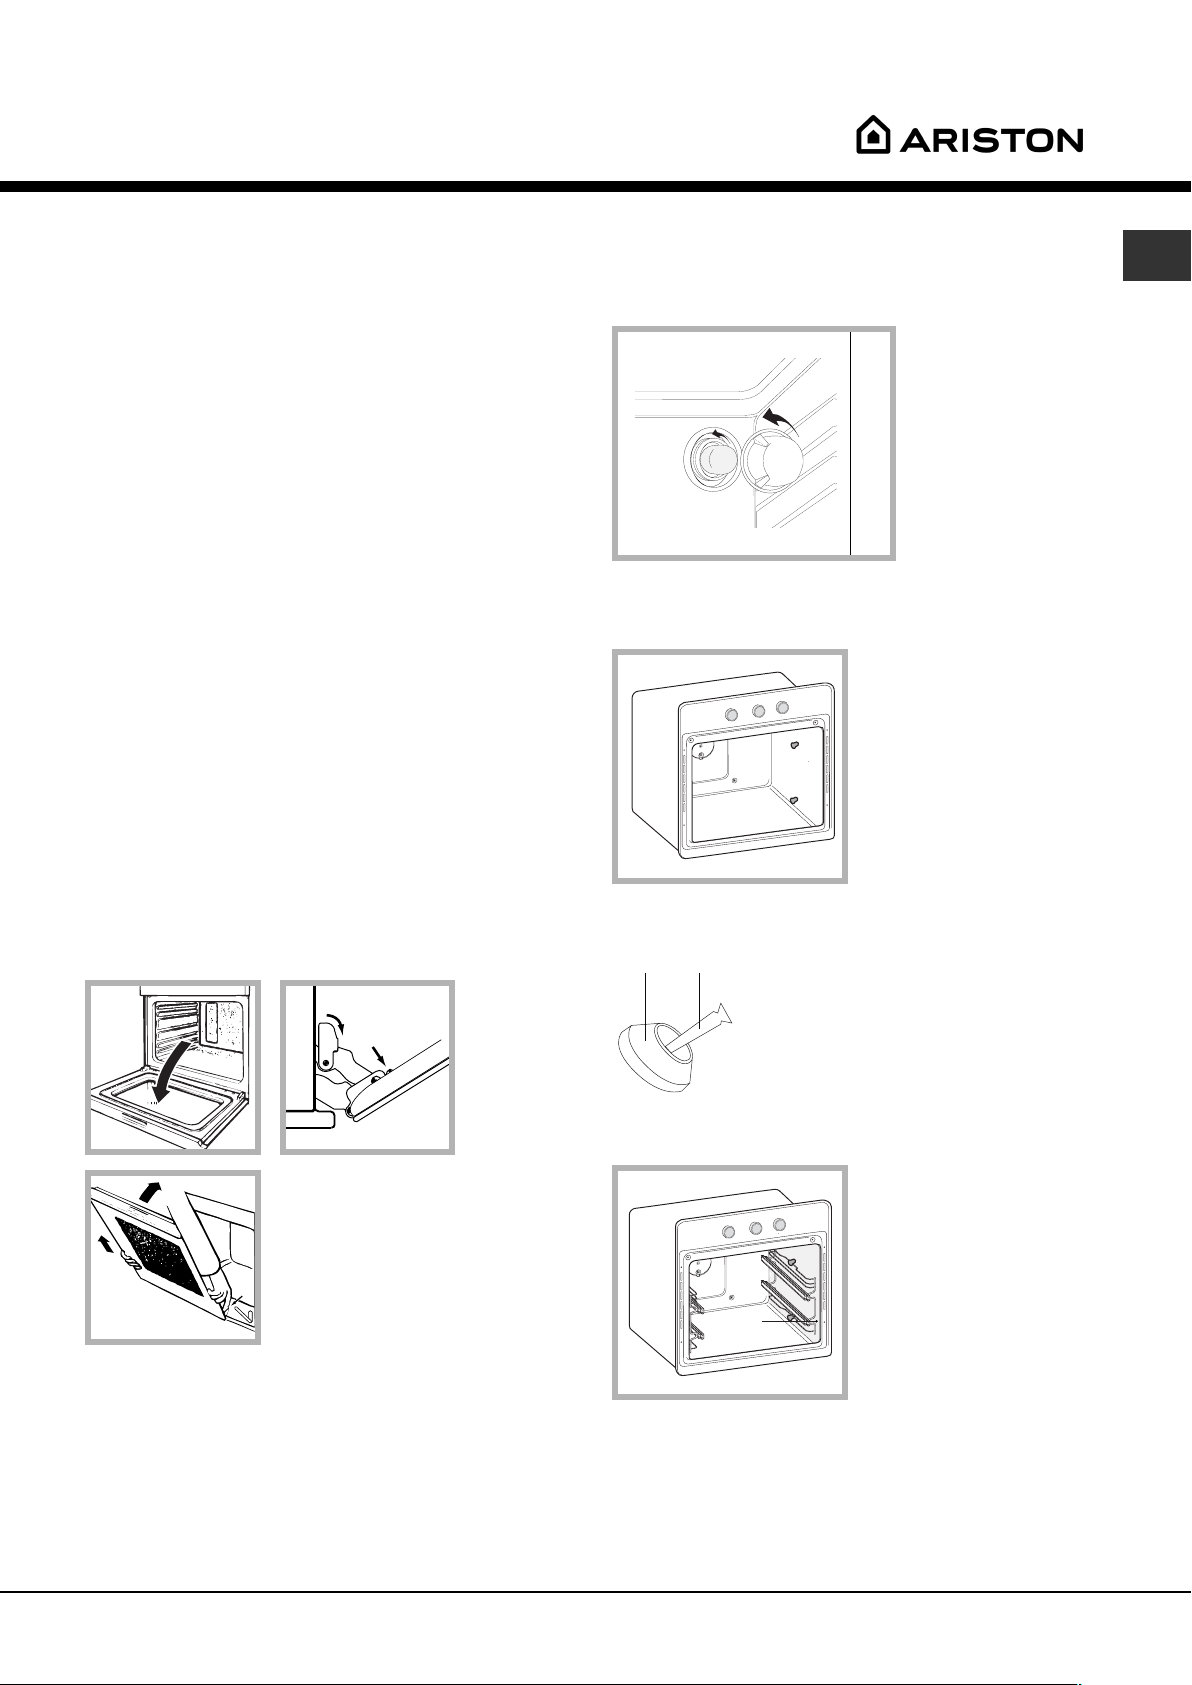
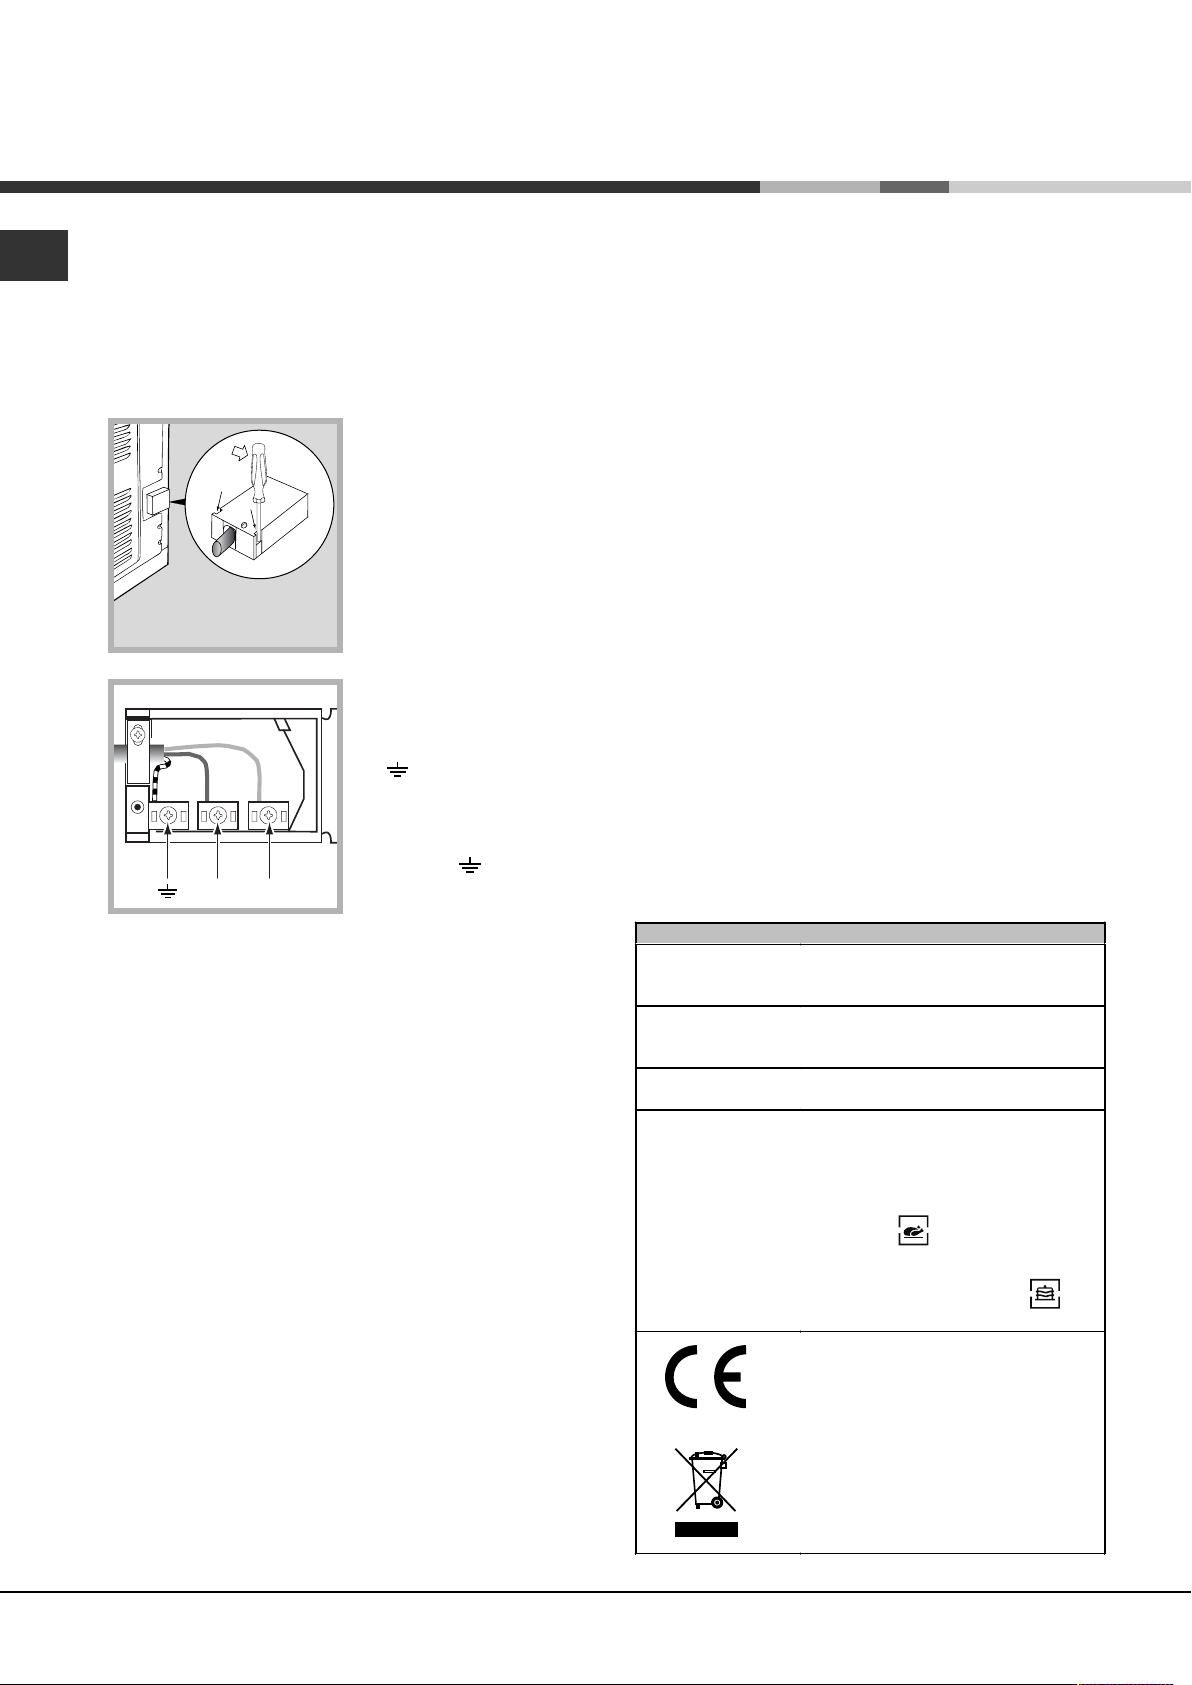
Fitting the power supply cable
1. Open the terminal
board by inserting a
screwdriver into the side
tabs of the cover. Use
the screwdriver as a
lever by pushing it down
to open the cover
(see diagram).
2. Install the power
supply cable by
loosening the cable
clamp screw and the
three wire contact screws
L-N-
. Connect the
wires to the
corresponding terminals:
the Blue wire to the
terminal marked (N), the
NL
Green wire
3. Secure the cable by fastening the clamp screw.
4. Close the cover of the terminal board.
Connecting the supply cable to the mains
Install a standardised plug corresponding to the load
indicated on the data plate (see side).
The appliance must be directly connected to the mains
using an omnipolar circuit-breaker with a minimum contact
opening of 3 mm installed between the appliance and the
mains, suitable for the load indicated and complying with
current electrical regulations (the earthing wire must not be
interrupted by the circuit-breaker). The supply cable must
not come into contact with surfaces with temperatures
higher than 50°C.
to the terminal marked (see diagram).
Brown wire to the terminal
marked (L) and the Yellow
The voltage must be in the range between the
values indicated on the data plate (see below).
The socket is compatible with the plug of the
appliance. If the socket is incompatible with the
plug, ask an authorised technician to replace it. Do
not use extension cords or multiple sockets.
! Once the appliance has been installed, the power
supply cable and the electrical socket must be easily
accessible.
! The cable must not be bent or compressed.
! The cable must be checked regularly and replaced
by authorised technicians only (see Assistance).
! The manufacturer declines any liability should
these safety measures not be observed.
DATA PLATE
Dimensions of
models with
removable racks
Volume of models
with removable
racks
Electrical
connections
ENERGY LABEL
width cm 37.5
height cm 32
depth cm 41.5
lt. 50
voltage: 230-240V ~ 50/60 Hz
maximum power absorbed 28003000W
Directive 2002/40/EC on the label
of electric ovens.
Norm EN 50304
Energy consumption for Natural
convection – heating mode:
Traditional mode
Declared energy consumption for
Forced convection Class – heating
mode: Baking
GB
! The installer must ensure that the correct electrical
connection has been made and that it is compliant with
safety regulations.
Before connecting to the power supply, make sure that:
The appliance is earthed and the plug is compliant
with the law.
The socket can withstand the maximum power of the
appliance, which is indicated on the data plate (see
below).
This appliance conforms to the
following European Economic
Community directives:
-73/23/EEC of 19/02/73 (Low
Voltage) and subsequent
amendments;
- 89/336/EEC of 03/05/89
(Electromagnetic Compatibility) and
subsequent amendments;
- 93/68/EEC of 22/07/93 and
subsequent amendments.
- 2002/96/EEC
3
Page 4
Description of the appliance
GB
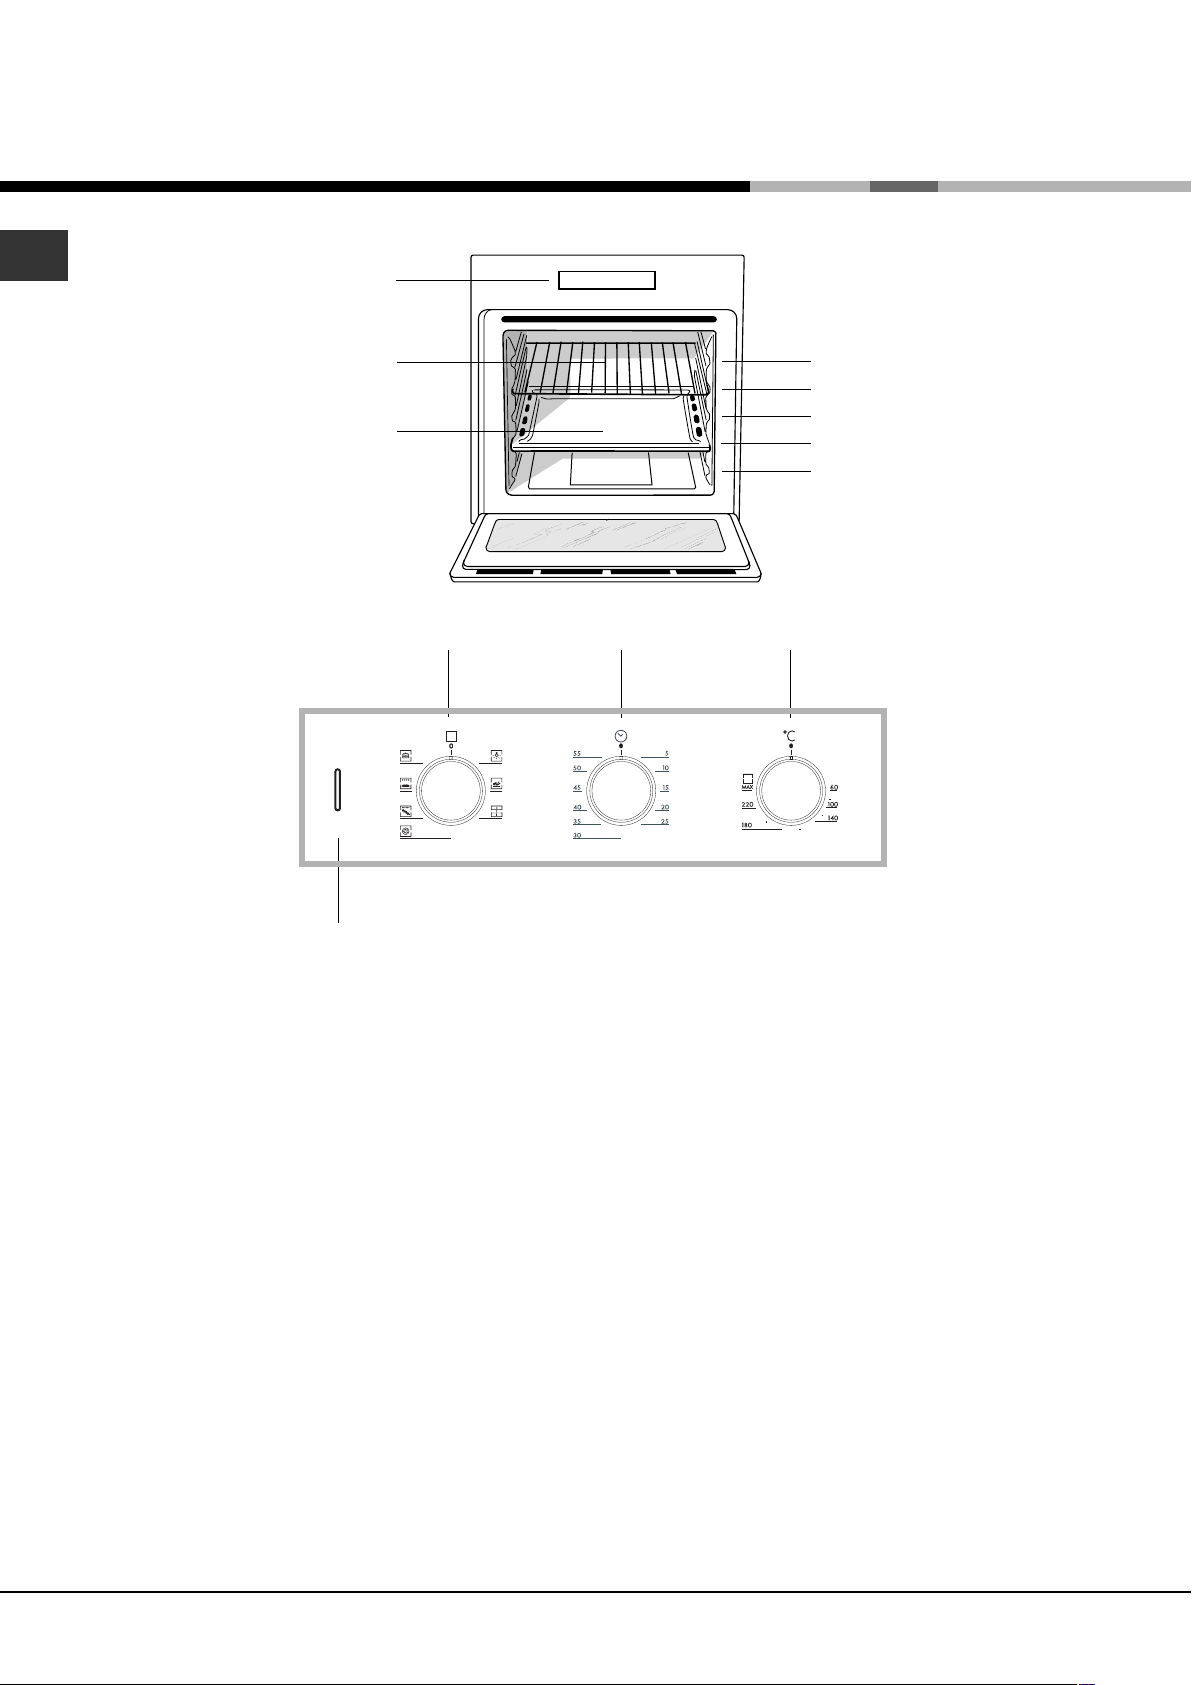
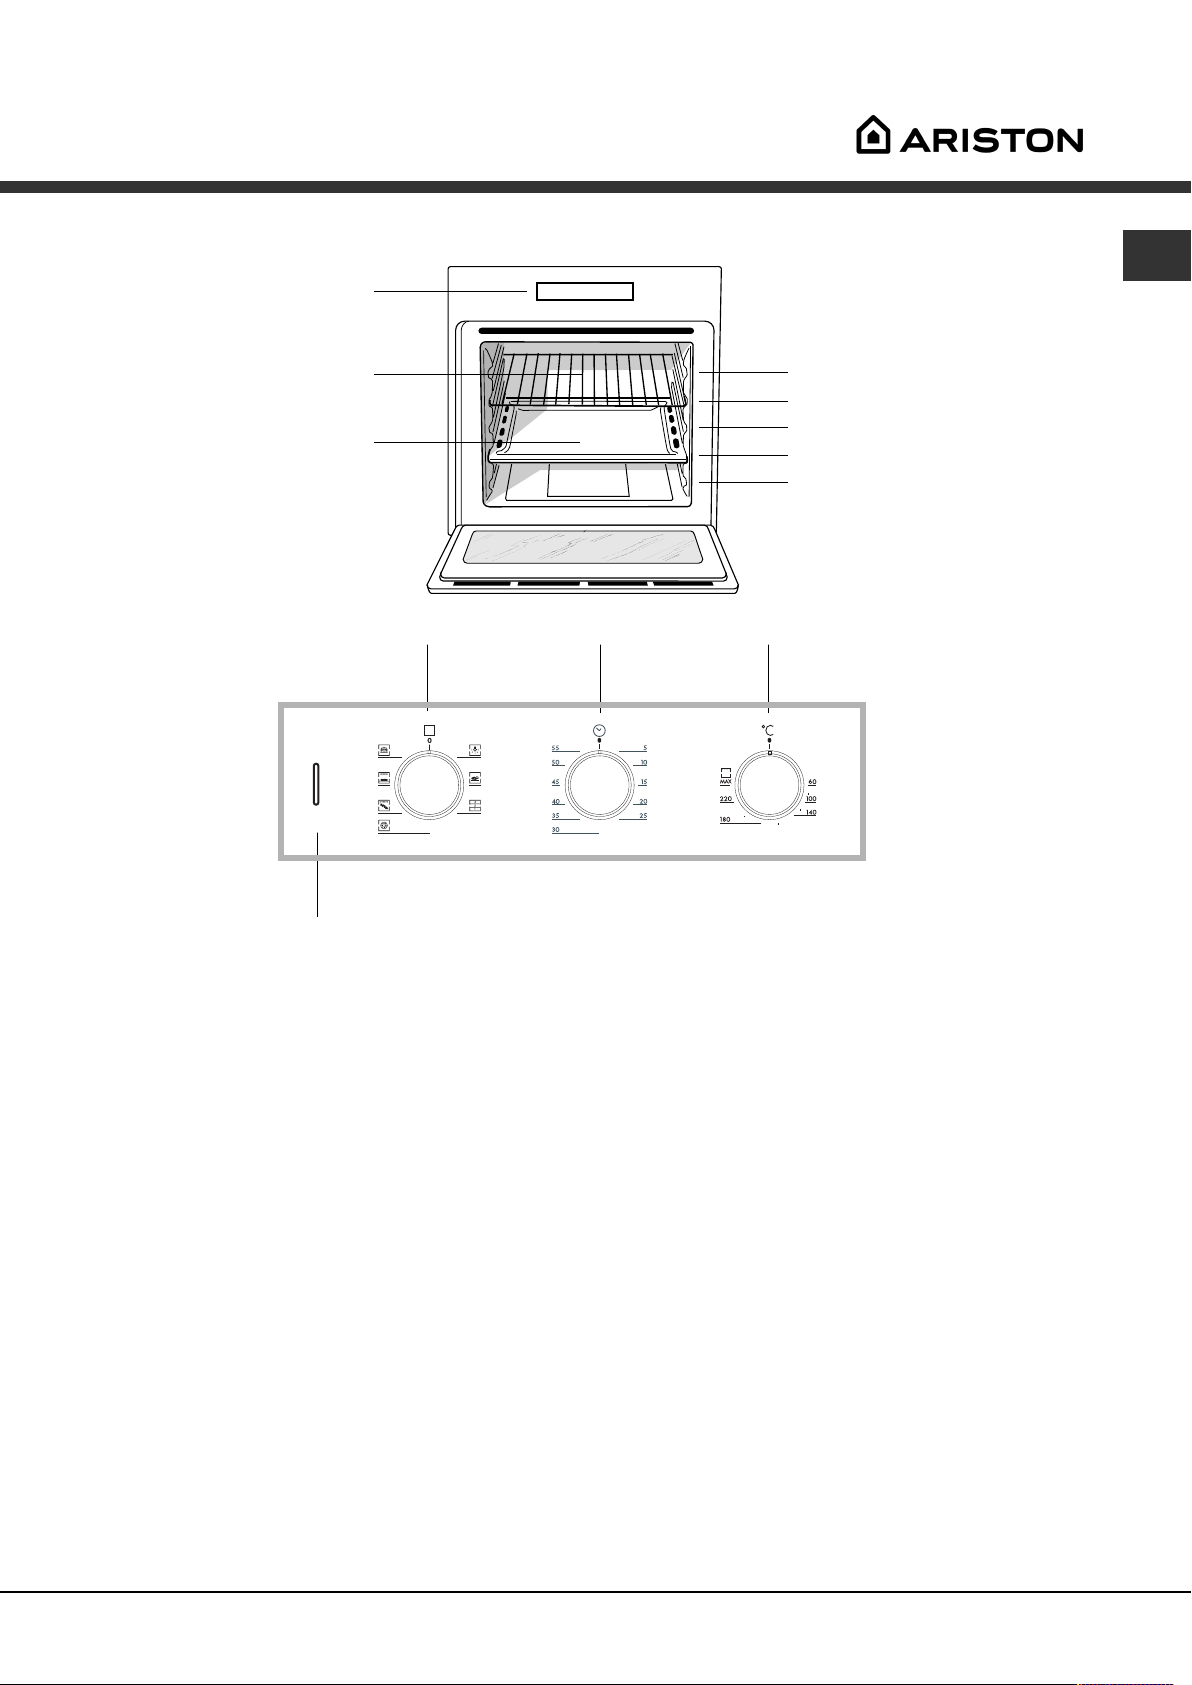
Overall view
Control panel
Control panel
GRILL
DRIPPING PAN
SELECTOR
Knob
TIMER
knob
*
GUIDES for the
sliding racks
position 5
position 4
position 3
position 2
position 1
THERMOSTAT Knob
Indicator light
THERMOSTAT
* Only on certain models.
4
Page 5
Start-up and use
! The first time you use your appliance, heat the empty
oven with its door closed at its maximum temperature
for at least half an hour. Ensure that the room is well
ventilated before switching the oven off and opening
the oven door. The appliance may produce a slightly
unpleasant odour caused by the burning away of
protective substances used during the manufacturing
process.
Starting the oven
1. Select the desired cooking mode by turning the
SELECTOR knob.
2. Select the desired temperature with the
THERMOSTAT knob. See the Cooking advice table for
cooking modes and the suggested cooking
temperatures (see Cooking Modes).
3. When lit, the THERMOSTAT indicator light indicates
that the oven is heating up to the temperature set.
4. You may do the following during cooking:
- change the cooking mode by turning the SELECTOR
knob.
- change the temperature by turning the THERMOSTAT
knob.
- stop cooking by turning the SELECTOR knob to the
0 position.
Oven light
It goes on when selecting
knob. It stays on when a cooking mode is selected.
How to use the timer
1. To set the buzzer, turn the TIMER knob clockwise
almost one complete revolution.
2. Turn the knob anticlockwise to set the desired time:
align the minutes shown on the TIMER knob with the
indicator on the control panel.
3. The timer operates in minutes: when the selected
time has elapsed, a buzzer will sound.
! The timer does not turn the oven on or off.
with the SELECTOR
*
GB
! Never put objects directly on the oven bottom to
avoid damaging the enamel coating.
! Always place cookware on the rack(s) provided.
Cooling ventilation
In order to cool down the external temperature of the
oven, some models are fitted with a cooling fan that
blows out air between the control panel and the oven
door.
! Once the cooking has been completed, the cooling
fan remains on until the oven has cooled down
sufficiently.
Only on certain models
*
5
Page 6

Cooking modes
GB
Cooking modes
! A temperature value can be set for all cooking modes
between 60°C and Max, except for
BARBECUE (recommended: set only to MAX power
level);
GRATIN (recommended: do not exceed 200°C).
TRADITIONAL OVEN mode
Both the top and bottom heating elements will come
on. With this traditional cooking mode, it is best to use
one cooking rack only: if more than one rack is used,
the heat will be distributed unevenly.
MULTI-COOKING mode
All the heating elements (top, bottom and circular), as
well as the fan, will come on. Since the heat remains
constant throughout the oven, the air cooks and
browns food uniformly. A maximum of two racks may
be used at the same time.
BARBECUE mode
The top heating element comes on.
The high and direct temperature of the grill is
recommended for food that requires high surface
temperature. Always cook in this mode with the oven
door closed.
GRATIN mode
The top heating element, as well as the fan, will come
on. This combination of features increases the
effectiveness of the unidirectional thermal radiation of
the heating elements through forced circulation of the
air throughout the oven. This helps prevent food from
burning on the surface, allowing the heat to penetrate
right into the food. Always cook in this mode with the
oven door closed.
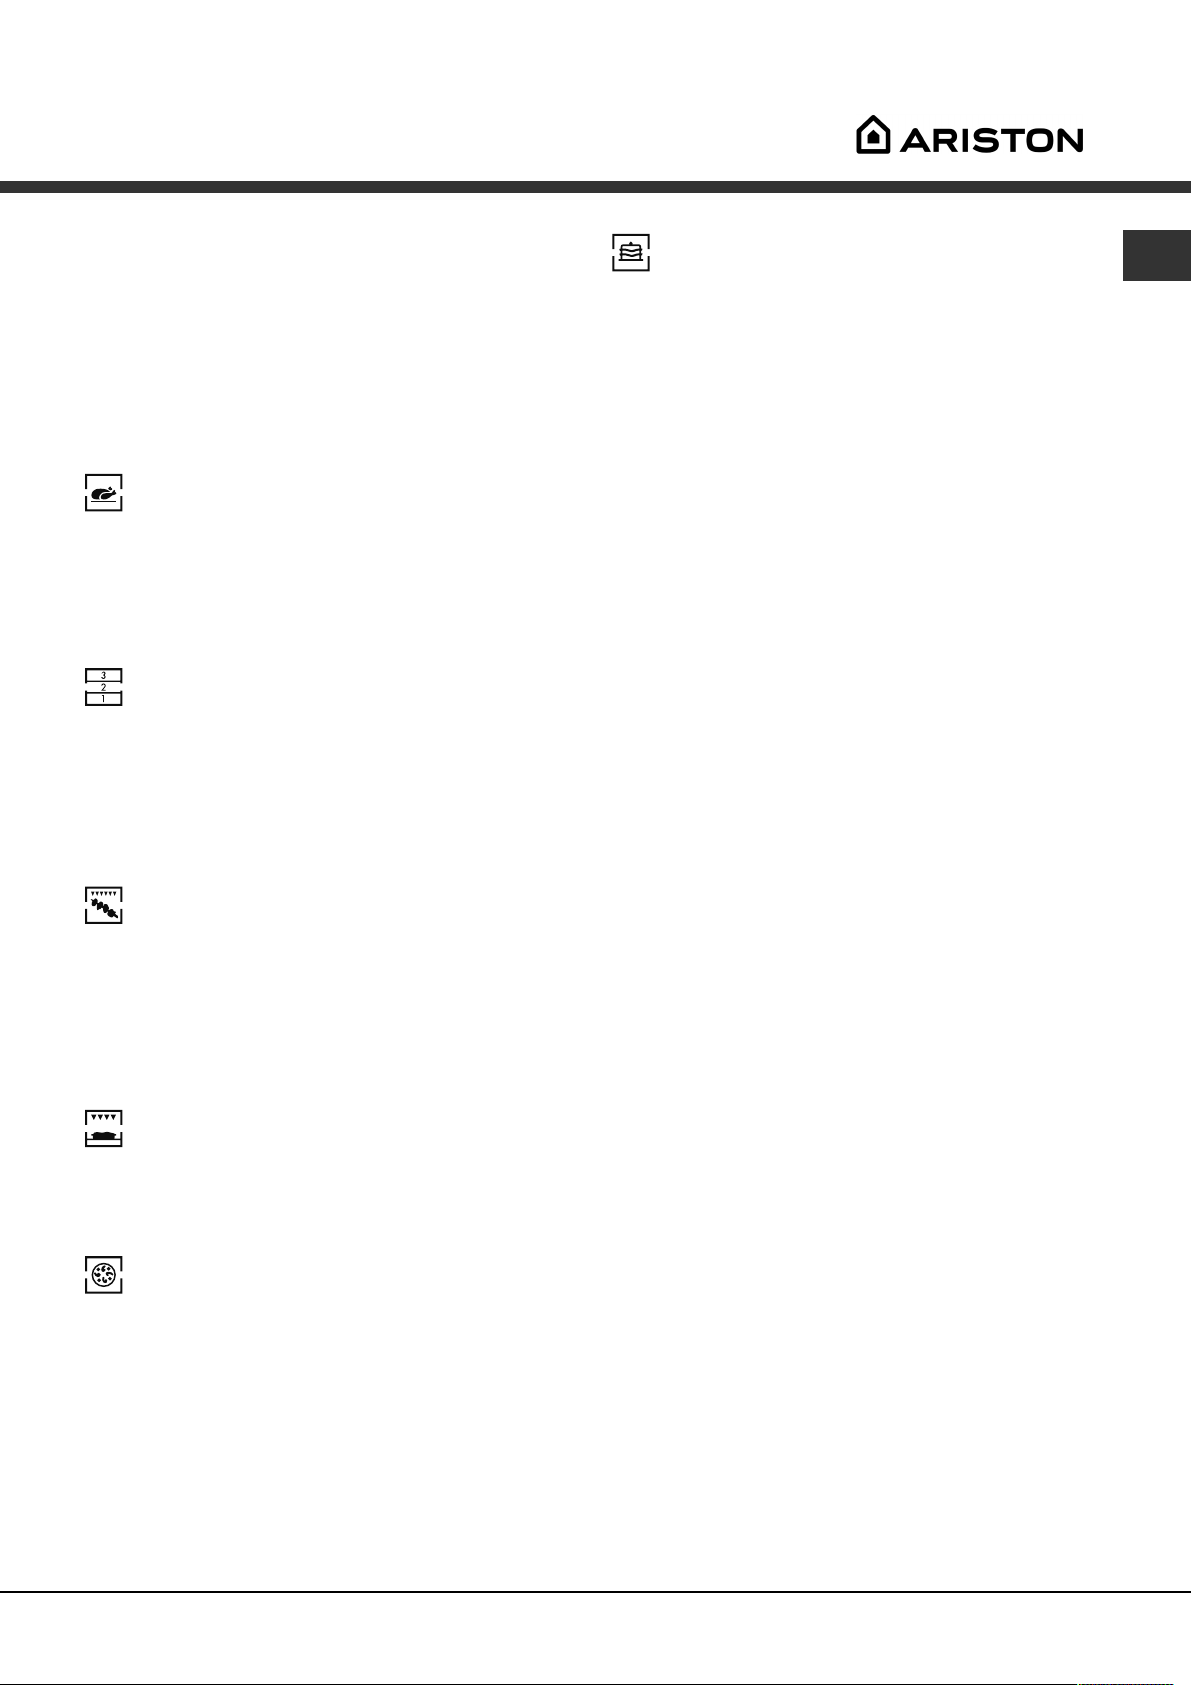
PIZZA mode
BAKING mode
The rear heating element and the fan come on,
guaranteeing the distribution of heat delicately and
uniformly throughout the oven. This mode is ideal for
baking and cooking temperature sensitive foods such
as cakes that need to rise and to prepare certain
tartlets on 3 shelves simultaneously.
Practical cooking advice
! Do not place racks in position 1 and 5 during fan-
assisted cooking. Excessive direct heat can burn
temperature sensitive foods.
! In the BARBECUE and GRATIN cooking modes,
place the dripping pan in position 1 to collect cooking
residues (fat and/or grease).
MULTI-COOKING
Use position 2 and 4, placing the food that requires
more heat on 2.
Place the dripping pan on the bottom and the rack
on top.
BARBECUE
Insert the rack in position 3 or 4. Place the food in
the centre of the rack.
We recommend that you set the maximum power
level. The top heating element is regulated by a
thermostat and may not always be on.
PIZZA MODE
Use a light aluminium pizza pan. Place it on the rack
provided.
For a crispy crust, do not use the dripping pan
(prevents crust from forming by extending cooking
time).
If the pizza has a lot of toppings, we recommend
adding the mozzarella cheese on top of the pizza
halfway through the cooking process.
The bottom and circular heating elements, as well as
the fan, will come on. This combination heats the oven
rapidly by producing a considerable amount of heat,
particularly from the bottom element. If you use more
than one rack simultaneously, switch the position of
the dishes halfway through the cooking process.
6
Page 7
Cooking advice table
)
Cooking
modes
Convection
Oven
Multi-cooking
Barbecue
Gratin
Pizza Mode
Baking Mode
Duck
Roast veal or beef
Pork roast
Biscuits (short pastry)
Tarts
Pizza (on 2 racks)
Lasagne
Lamb
Roast chicken + potatoes
Mackerel
Plum cake
Cream puffs (on 2 racks)
Biscuit s (o n 2 racks)
Sponge cake (on 1 rack)
Sponge cake (on 2 racks)
Savoury pies
Soles and cuttlefish
Squid and prawn kebabs
Cod filet
Grilled vegetables
Veal steak
Cutlets
Hamburgers
Mackerels
Toasted sandwiches
Grilled chicken
Cuttlefish
Pizza
Roast veal or beef
Chicken
Tarts
Fruit cakes
Plum cake
Sponge cake
Stuffed pancakes (on 2 racks)
Small cakes (on 2 racks)
Cheese puffs (on 2 racks)
Cream puffs (on 3 racks)
Biscuit s (o n 3 racks)
Meringues (on 3 racks)
Foods Weight
(in kg)
1
1
1
1
1
1
1
1+1
1
1
0.5
0.5
0.5
1
1.5
1
1
1
1
1
1
1
1
n.° 4
1.5
1.5
0.5
1
1
0.5
1
0.7
0.5
1.2
0.6
0.4
0.7
0.7
0.5
Rack position Pre-heating
time (min)
3
3
3
3
3
2 and 4
3
2
2 and 4
2
2
2 and 4
2 and 4
2
2 and 4
3
4
4
4
3 or 4
4
4
4
4
4
2
2
3
2
2 or 3
3
2 or 3
3
3
2 and 4
2 and 4
2 and 4
1 and 3 and 5
1 and 3 and 5
1 and 3 and 5
15
15
15
15
15
15
10
10
15
10
10
10
10
10
10
15
5
5
5
5
5
5
5
5
5
10
10
15
10
10
15
15
15
15
15
15
15
15
15
15
Recommended
temperature
200
200
200
180
180
230
180
180
200
180
170
190
180
170
170
200
MAX
MAX
MAX
MAX
MAX
MAX
MAX
MAX
MAX
200
200
220
220
180
180
180
180
160
200
190
210
180
180
90
GB
Cooking
time
(minutes
65-75
70-75
70-80
15-20
30-35
15-20
30-35
40-45
60-70
30-35
40-50
20-25
10-15
15-20
20-25
25-30
8-10
6-8
10
10-15
15-20
15-20
7-10
15-20
2-3
55-60
30-35
15-20
25-30
60-70
20-30
40-45
40-50
25-30
30-35
20-25
15-20
20-25
20-25
180
7
Page 8

Precautions and tips
GB
! The appliance was designed and manufactured in
compliance with international safety standards. The
following warnings are provided for safety reasons and
must be read carefully.
General safety
The appliance was designed for domestic use inside
the home and is not intended for commercial or
industrial use.
The appliance must not be installed outdoors, even in
covered areas. It is extremely dangerous to leave the
appliance exposed to rain and storms.
When handling the appliance, always use the handles
provided on the sides of the oven.
Do not touch the appliance with bare feet or with wet or
moist hands and feet.
The appliance must be used to cook food by adults
only and according to the instructions in this manual.
When the appliance is in use, the heating elements
and some parts of the oven door become extremely
hot. Make sure you don't touch them and keep
children well away.
Do not rest heavy objects on the open oven door.
Disposal
Observe local environmental standards when disposing
packaging material for recycling purposes. Observe
existing legislation when disposing of the old
appliance.
The European Directive 2002/96/EC on Waste Electrical
and Electronic Equipment (WEEE), requires that old
household electrical appliances must not be disposed
of in the normal unsorted municipal waste stream. Old
appliances must be collected separately in order to
optimise the recovery and recycling of the materials
they contain and reduce the impact on human health
and the environment. The crossed out wheeled bin
symbol on the product reminds you of your obligation,
that when you dispose of the appliance it must be
separately collected.
Consumers may take their old appliance to public
waste collection areas, other communal collection
areas, or if national legislation allows return it to a
retailer when purchasing a similar new product.
All major household appliance manufacturers are active
in the creation of systems to manage the collection and
disposal of old appliances.
Ensure that the power supply cable of other electrical
appliances does not come into contact with the hot
parts of the oven.
The openings used for ventilation and dispersion of
heat must never be covered.
Always grip the oven door handle in the centre: the
ends may be hot.
Always use oven gloves to place cookware in the oven
or when removing it.
Do not use aluminium foil to line the bottom of the oven.
Do not place flammable materials in the oven: if the
appliance is switched on by mistake, it could catch
fire.
Always make sure the knobs are in the l/
when the appliance is not in use.
When unplugging the appliance always pull the plug
from the mains socket, do not pull on the cable.
Never carry out any cleaning or maintenance work
without having unplugged the plug from the mains.
¡ position
Respecting and conserving the environment
By using the appliance in the hours between late
afternoon and early morning, you can help reduce the
work load placed on electrical companies.
Always keep the oven door closed when using the
BARBECUE and GRATIN modes: to attain best
results and to save energy (approximately 10%).
Regularly check the door seals and wipe clean to
ensure they are free of debris so that they stick
properly to the door and do not allow heat to disperse.
Assistance
Communicating:
appliance model (Mod.)
serial number (S/N)
This information is found on the data plate located on the
appliance and/or on the packaging.
In the case of a malfunction, under no circumstances
should you attempt to repair the appliance yourself.
Repairs carried out by inexperienced persons may
cause injury or further malfunctioning of the appliance.
Contact a Service Centre (see Assistance).
8
Page 9
Maintenance and care
F
Switching the appliance off
Disconnect your appliance from the electricity supply
before carrying out any work on it.
Cleaning the appliance
The stainless-steel or enamel-coated external parts as
well as the rubber seals may be cleaned using a
sponge that has been soaked in lukewarm water and
neutral soap. If these stains are difficult to remove,
use only specialised products. After cleaning, rinse
and dry thoroughly. Do not use abrasive powders or
corrosive substances.
Ideally, the inside of the oven should be cleaned after
each use, when it is still lukewarm. Use hot water and
detergent, rinse and dry with a soft cloth. Do not use
abrasive products.
All accessories - with the exception of the sliding
racks - can be washed like everyday crockery, and
are even dishwasher safe.
Never use steam cleaners or pressure cleaners on the
appliance.
Cleaning the oven door
Clean the glass part of the oven door using a sponge
and a non-abrasive cleaning product, then dry
thoroughly with a soft cloth. Do not use rough abrasive
material or sharp metal scrapers as these could scratch
the surface and cause the glass to crack. To clean more
thoroughly, you can remove the oven door.
1. Open the oven door fully (see diagram).
2. Lift up and turn the small levers located on the two
hinges (see diagram).
Replacing the light bulb
To replace the oven light bulb:
1. Remove the glass cover of the lamp-holder.
2. Remove the
light bulb and
replace it with a
similar one:
Wattage 25 W, cap
E 14.
3. Replace the
glass cover (see
diagram).
Sliding Rack Kit assembly
To assemble the sliding racks:
1. Loosen the two
screws A (see diagram).
If the oven is fitted with
self-cleaning panels,
these will have to be
temporarily
disassembled.
2. Replace the screws A with the screws and spacers
(B + C) supplied with the kit.
B
C
GB
F
3. Grip the door on the two
external sides and close it
approximately half way. Unlock
the door by pressing on the
clamps F, then pull the door
towards you lifting it out of its
seat (see diagram).
To replace the door, reverse this
sequence.
Inspecting the seals
Check the door seals around the oven periodically. If
the seals are damaged, please contact your nearest
After-sales Service Centre (see Assistance). We
recommend not using the oven until the seals have
been replaced.
3. Tighten the new screws B and the corresponding
spacers C, fitting the self-cleaning panels on again.
4. Secure the two joints
D of the guide rail in the
holes provided on the
oven walls (see
diagram). The holes for
the left guide rail are
situated at the top, while
the holes for the right one
are at the bottom.
5. Finally, fit the guide rail on the spacer C.
6. Do not place the sliding racks in position 5.
9
Page 10
Kullanma talimatlarý
FIRIN
TR
DK
English, 1 Dansk, 19
TR
Türkçe,10
HU CZ
Magyar, 28 Cesky, 37
FZ 612 C.2
FZ 612 C.2 IX
DK
Özet
Montaj, 11-12
Konumlandýrma
Elektrik baðlantýsý
Özellikler etiketi
Cihazýn tanýmlanmasý, 13
Toplu görünüþ
Kontrol paneli
Çalýþtýrma ve kullaným, 14
Fýrýný çalýþtýrýnýz
Timerý kullanýnýz
Programlar, 15-16
Piþirme programlarý
Pratik piþirme önerileri
Piþirme çizelgesi
Önlemler ve öneriler, 17
Genel güvenlik
Atýklarýn elimine edilmesi
Tasarrufa yöneliniz ve çevreye saygýlý olunuz
Teknik Servis
Bakým ve özen, 18
Elektrik akýmýný kesiniz
Cihazý temizleyiniz
Kapaðý temizleyiniz
Ampulü deðiþtiriniz
Sürgülü kýzaklar setinin montajý
Page 11

Montaj
Her istenildiðinde inceleyebilmek için bu kitapçýðý
saklamak önemlidir. Satýþ, devir, yada taþýnma halinde,
çalýþma sistemi ve bununla ilgili uyarýlar konusunda
yeni sahibinin bilgilenmesi için cihazla beraber
býrakýlmalýdýr.
Talimatlarý dikkatlice okuyunuz: montaj, kullaným ve
güvenlik konusunda önemli bilgiler mevcuttur.
Konumlandýrma
Ambalajlar çocuklar için oyuncak olmadýklarýndan
ayrýþtýrýlmýþ atýklar hakkýndaki kurallar çerçevesinde
elimine edilmelidir (bkz. Önlemler ve Öneriler).
Montaj bu talimatlara uyarak ve vasýflý personel
tarafýndan yapýlmalýdýr. Hatalý bir montaj insanlara,
hayvanlara ve eþyalara zarar verebilir.
Ankastre (gömme)
Cihazýn doðru çalýþmasýný saðlamak için mobilyasý
uygun özelliklere sahip olmalýdýr:
fýrýna yapýþýk konumdaki paneller ýsýya dayanýklý
malzemeden olmalýdýr;
Havalandýrma
TR
Ýyi bir havalandýrma saðlamak için bölmenin arka cidarý
elimine edilmelidir. Fýrýný iki ahþap pervaza, yada en az
45 x 560 mm ebadýnda açýklýða sahip kesintisiz düz bir
yüzeye yaslanacak þekilde monte etmek tercih nedeni
olmalýdýr (bkz. þekiller)
45 mm.
560 mm.
Merkezleme ve sabitleme
Fýrýnýn yan tarafýnda, çerçevedeki 4 adet deliðin
yakýnýnda bulunan 4 adet týrnaðý mobilyanýn yan
cephesinin kalýnlýðýna göre ayarlayýnýz.
kalýnlýk 20 mm: týrnaðýn
hareketli kýsmýný çýkarýnýz (bkz.
þekil);
kaplama-sunta mobilyalar bulunmasý halinde,
bunlarýn tutkalý 100ºC ýsýya dayanýklý olmalýdýr;
Fýrýnýn tezgah altýna (bkz. þekil) yada sütun
þeklinde ankastre montajlarýnda mobilya þu ebatlara
sahip olmalýdýr:
567 mm.
45 mm.
558 mm.
593 mm.
23 mm.
595 mm.
5 mm.
595 mm.
545 mm.
24 mm.
Cihaz yerine yerleþtirildikten sonra elektrikli
kýsýmlarýyla temas mümkün olmamalýdýr.
Özellikler etiketinde tüketimle ilgili olarak yer alan
veriler bu tipte montaja göre hesaplanmýþtýr.
kalýnlýk 18 mm: imalatçý
tarafýndan hazýrlanan birinci
kanalý (yivi) kullanýnýz (bkz.
þekil);
kalýnlýk 16 mm: ikinci kanalý
(yivi) kullanýnýz (bkz. þekil).
Cihazý mobilyaya sabitlemek için: fýrýnýn kapaðýný
açýnýz ve 4 adet ahþap vidasýný çerçevenin üzerinde
bulunan 4 deliðe vidalayýnýz.
Koruyucu tüm aksam herhangi bir alet kullanmadan
sökülemeyecek þekilde sabitlenmelidir.
11
Page 12
TR
medellerin ebatlar
Elektrik baðlantýsý
Üç kutuplu besleme kablosuna sahip fýrýnlar dalgalý akýmla
ve özellikler etiketinde belirtilen gerilim ve frekansla
çalýþacak þekilde ayarlanmýþtýr (alt kýsma bakýnýz).
Besleme kablosunun montajý
1. Bir tornavida ile
kapaðýn yan
kýsýmlarýndaki týrnaklara
müdahale ederek
terminali açýnýz: kapaðý
çekiniz ve açýnýz (bkz.
þekil).
2. Besleme kablosunu þu
þekilde devreye alýnýz:
Kablo tutucu vidayý ve L-
temaslarýna ait üç
Nadet vidayý gevþetiniz,
daha sonra ince kablolarý
Mavi (N), Kahverengi (L),
Sarý-Yeþil (
NL
uyarak vida kafalarýna
sabitleyiniz (bkz. þekil).
3. Kabloyu kablo tutucuya sabitleyiniz.
4. Terminalin kapaðýný kapatýnýz.
Besleme kablosunun þebekeye baðlanmasý
Kabloya özellikler etiketinde belirtilen yüke uygun bir
fiþ monte ediniz (bkz. yan tarafta).
Þebekeye doðrudan baðlantý yapýlmasý halinde, cihaz
ile þebeke arasýna minimum temas aralýðý 3 mm olan
ve yürürlükteki normlara uygun nitelikte çok kutuplu bir
anahtar koymak gerekir (toprak kablosu anahtar
tarafýndan kesintiye uðratýlmamalýdýr). Besleme
kablosu hiç bir noktasý ortam sýcaklýðýnýn 50ºC üzerine
çýkmayacak þekilde yerleþtirilmelidir.
) renklere
Baðlantýyý yapmadan önce þunlardan emin olunmasý
gerekir:
Prizin toprak baðlantýsý bulunmalý ve yasalara uygun
olmalýdýr;
Priz cihazýn özellikler etiketinde belirtilen maksimum
gücünü kaldýrabilecek kapasitede olmalýdýr (bkz. alt
kýsým);
Besleme gerilimi özellikler tabelasýndaki deðerler
arasýnda olmalýdýr (bkz. alt kýsým);
Priz cihazýn fiþi ile uyumlu olmalýdýr. Aksi takdirde ya
prizi, yada fiþi deðiþtiriniz; uzatma kablosu veya
çoklu prizler kullanmayýnýz.
Cihaz monte edildikten sonra elektrik kablosu ve priz
kolayca eriþilebilir durumda olmalýdýrlar.
Kablo kývrýlmalara, bükülmelere ve ezilmelere maruz
býrakýlmamalýdýr.
Kablo periyodik olarak kontrol edilmeli ve sadece
yetkili personel tarafýndan deðiþtirilmelidir.(bkz. Teknik
Servis)
Bu kurallara uyulmamasý halinde firma hiç bir
sorumluluk üstlenmeyecektir.
ÖZELLÝKLERÝ GÖSTEREN ETÝKET
Sökülebilir
kýlavuzlu
Sökülebilir
kýlavuzlu
medellerin hacmi
Elektrik
baðlantýlarý
ENERGY LABEL
(enerjiye dair
etiket)
geniºlik 37,5 cm
yükseklik 32 cm
ý
derinlik 41,5 cm
lt. 50
gerilim 230-240V ~ 50/60Hz
emilen maksimum güç 2800-3000 W
Elektrikli fýrýn etiketleri üzerinde
2002/40/CE sayýlý yönerge
EN 50304 normu
Doðal yayýlým enerji tüketimi ýsýtma
fonksiyonu Geleneksel;
Güçlendirilmiþ yayýlým sýnýfýnda enerji
tüketimi – ýsýtma fonksiyonu:
Hamur iºleri.
Monütör elektrik baðlantýsýnýn doðru yapýlmasýndan
ve güvenlik kurallarýna uyulmasýndan sorumludur.
12
Bu cihaz aþaðýdaki AB yönergelerine
uygundur:
- 19/02/73 tarih 73/23/CEE sayýlý
(Düºük Gerilim hk.) yönerge ve
sonraki tadilleri
- 03/05/89 tarih 89/336/CEE sayýlý
(Elektromanyetik Uyum hk.) yönerge
ve sonraki tadilleri
- 22/07/93 tarih 93/68/CEE sayýlý
yönerge ve sonraki tadiller
- 2002/96/CEE
Page 13
Tanýmýcihazýn
Toplu görünüþ
Yað toplama kabý katý
Kontrol paneli
Kontrol paneli
Izgara katý
PROGRAM
düðmesi
TIMER
düðmesi
TR
KATLARÝN sürgü
kýzaklarý
pozisyon 5
pozisyon 4
pozisyon 3
pozisyon 2
pozisyon 1
TERMOSTAT
düðmesi
TERMOSTAT
uyarý lambasý
Sadece bazý modellerde mevcuttur.
*
13
Page 14

Çalýþtýrma ve
kullanma
TR
Ýlk kez çalýþtýrýldýðýnda fýrýný boþ olarak, kapýsý kapalý
ve termostat maksimumda iken en az bir saat
çalýþtýrýnýz. Daha sonra söndürünüz ve fýrýn kapaðýný
açýnýz
sonrada mekaný havalandýrýnýz. Duyacaðýnýz koku fýrýný
korumak için kullanýlmýþ olan bazý malzemelerin
buharlaþmasý neticesinde ortaya çýkan kokudur.
Fýrýnýn çalýþtýrýlmasý
1. PROGRAM düðmesini döndürerek istenilen piþirme
programýný seçiniz.
2. TERMOSTAT düðmesini döndürerek sýcaklýðý
seçiniz. Piþirme Tablosunda piþirilecek yemek türleri
ile bunlar için önerilen sýcaklýklar mevcuttur (bkz.
Programlar).
3. TERMOSTAT uyarý lambasý yanýkken, ayarlanan
sýcaklýða eriþilene kadar geçen ýsýnma aþamasýnda
olunduðunu gösterir.
4. Piþirme sürereken þunlarý yapmak mümkündür:
- PROGRAM düðmesine müdahale ederek piþirme
programýný deðiþtirmek;
- TERMOSTAT düðmesi vasýtasýyla sýcaklýðý
deðiþtirmek;
- PROGRAM düðmesini 0 pozisyonuna getirerek
piþirme sürecini durdurmak.
Fýrýn lambasý
PROGRAM düðmesi ile
piþirme programý seçildiðinde yanýk kalýr.
Timerýn kullanýlmasý
1. TIMER düðmesini saat yönünde hemen hemen bir
tam tur döndürerek önce zili kurmak gerekir.
2. Saat yönü aksine geri dönerek, TIMER düðmesi
üzerindeki dakikalarý kontrol panelindeki sabit referans
noktasý ile çakýþtýrmak suretiyle istenilen zamaný
ayarlayýnýz.
3. Timer dakikalarý sayan bir sayaçtýr: vakit dolduðunda
sesli bir uyarý sinyali verir.
Timer fýrýnýn yakýlmasý yada söndürülmesini kontrol
etmez.
seçilerek yakýlýr. Bir
*
Fýrýn tabanýna asla herhangi bir cisim koymayýnýz,
emayesine zarar verebilirsiniz.
Piþirme kaplarýný daima ýzgara üzerine koyunuz
mevcut olan (*üst cümleye baðlý-ýzgara kelimesinden
önce).
Soðutma faný
Dýþ sýcaklýðý bir miktar azaltabilmek için bazý modeller
soðutma faný ile donatýlmýþtýr. Bu fan kontrol paneli ile
fýrýn kapaðý arasýndan çýkan bir havanýn
püskürtülmesini saðlar.
Piþirme sonunda fýrýn yeterince soðuyana kadar bu
fan çalýþýr durumda kalýr.
14
Sadece bazý modellerde mevcuttur.
*
Page 15
Programlar
Piþirme programlarý
MAX arasýnda bir sýcaklýk ayarý yapýlabilir
tüm programlar için 60°C ile:
BARBECUE hariçtir (bunun için sadece MAX
konumunu ayarlamanýz önerilir);
GRATIN (200ºC sýcaklýðýn aþýlmamasý önerilir).
GELENEKSEL FIRIN programý
Alt ve üstteki ýsýtýcý elemanlar devreye girer. Bu
geleneksel piþirme yöntemiyle sadece tek katta
piþirme yapýlmasý daha uygundur: birden fazla katta
piþirme yapýlýrsa sýcaklýðýn daðýlýmý iyi olmaz.
ÇOKLU PÝÞÝRME programý
Tüm ýsýtýcý elemanlar (alttaki, üstteki ve yuvarlak ýsýtýcý)
devreye girer, fan da çalýþmaya baþlar. Sýcaklýk tüm
fýrýnda sabit olduðundan, sýcak hava yemeði eþ
daðýlýmlý olarak piþirir ve kýzartýr. Ayný anda en fazla iki
kat kullanýlabilir.
BARBEKÜ programý
Üstteki ýsýtýcý eleman devreye girer.
Grillin doðrudan gelen yüksek sýcaklýðý yüzey
kýsýmlarýnda yüksek sýcaklýk gerektiren yemekler için
uygundur. Piþirme yaparken fýrýn kapaðý kapalý
olmalýdýr.
GRATIN programý
HAMUR ÝÞLERÝ programý
Arka ýsýtýcý elemanla fan devreye girerek fýrýn içinde
yumuþak ve eþ daðýlýmlý bir ýsý temin edilir. Bu program
hassas-narin yemeklere (örneðin mayalý tatlýlar) ve
ayný anda üç katta minyon türünden yiyecekler
hazýrlanmasýna uygundur.
Pratik piþirme önerileri
Fan çalýþýrken yapýlan piþirmelerde 1 ve 5. kat
pozisyonlarýný kullanmayýnýz. buralarý direkt sýcak
havanýn etkisindedir ve hassas yiyeceklerin yanmasýna
neden olabilirler.
BARBEKÜ ve GRATÝN türü piþirme yaparken yað
toplama tepsisini 1 poziyona alýnýz (akan yað ve/veya
soslar için).
ÇOKLU PÝÞÝRME
2 ile 4. katlarý kullanýnýz ve daha fazla ýsý gerektiren
yemekleri 2. kata koyunuz.
Yað toplama tepsisini aþaðý, ýzgarayý yukarý
koyunuz.
BARBEKÜ
Izgarayý 3 yada 4 kata yerleþtiriniz, yemekleri de
ýzgaranýn ortasýna koyunuz.
Sýcaklýk seviyesini maksimuma ayarlamanýz önerilir.
Üstteki rezistans sürekli olarak yanýk kalmýyorsa
merak etmeyiniz: bunun çalýþmasý bir termostat
tarafýndan kontrol edilmektedir.
TR
Üstteki ýsýtýcý eleman devreye girer, fan da çalýþmaya
baþlar.
PÝZZA FIRINI programý
Alttaki ve yuvarlak ýsýtýcý devreye girer, fan da
çalýþmaya baþlar. Bu kombinasyon fýrýnýn hýzlý þekilde
ýsýnmasýný ve öncelikli olarak alttan ýsý yayýlmasýný
saðlar. Biden fazla katta ayný anda piþirme yapýlmasý
durumunda, piþirme iþleminin yarýsýna gelindiðinde
katlarýn yerini deðiþtirmek gerekir.
PÝZZA FIRINI
Hafif bir alüminyum sahan kullanýnýz ve bunu fýrýnýn
ýzgarasý üzerine koyunuz.
Yað toplama tepsisi kullanýldýðýnda piþirme süreleri
uzar ve kýtýr kýtýr bir pizza elde etmek zorlaþýr.
Üzeri çok malzemeli pizzalarda mozzarella peynirini
piþirme iþlemi yarýya geldiðinde koymak uygun olur.
15
Page 16

TR
Pi
)
Piþirme çizelgesi
Programlar Yemekler Aðýrlýk
Ördek
Geleneksel
fýrýn
Çoklu piºirme
Barbekü
Gratin
Pizza Fýrýný
Fýrýn
Hamur iºleri
Dana yada sýðýr rosto
domuz rosto
Biküvit türü (çýrpýlmýþ)
Turtalar
Pizza (2 katta)
Lazanya
Kuzu
Kýzarmýþ tavuk + patates
Uskumru
Plum-cake
Ekler pasta (2 katta)
Bisküvitler (2 katta)
Pandispanya (1 katta)
Pandispanya (2 katta)
Tuzlular
Dil-mürekkep balýðý
Kalamar ve karides ºiº
Mezgit fileto
Izgara sebze
Dana biftek
Pirzola
Hamburger
Uskumru
Tost
Izgara piliç
Mürekkep balýðý
Pizza
Dana yada sýðýr rosto
Piliç
Turtalar
Meyveli tart
Plum-cake
Pandispanya
Soslu krepler (2 katta)
Küçük kekler (2 katta)
Peynirli tuzlu milföyler (2 katta)
Ekler pasta (3 katta)
Bisküvitler (3 katta)
Kurabiye le r (3 katta)
1+1
n. 4
1
1
1
1
1
1
1
1
1
0.5
0.5
0.5
1
1.5
1
1
1
1
1
1
1
1
1.5
1.5
0.5
1
1
0.5
1
0.7
0.5
1.2
0.6
0.4
0.7
0.7
0.5
Katlarýn
konumu
3
3
-
3
3
3
2 ve 4
3
2
2 ve 4
2
2
2 ve 4
2 ve 4
2
2 ve 4
3
4
4
4
3 yada 4
4
4
4
4
4
2
2
3
2
2 yada 3
3
2 yada 3
3
3
2 ve 4
2 ve 4
2 ve 4
1 ve 3 ve 5
1 ve 3 ve 5
1 ve 3 ve 5
Ön ýsýtma
(dakika)
15
15
15
15
15
15
10
10
15
10
10
10
10
10
10
15
5
5
5
5
5
5
5
5
5
5
5
15
10
10
15
15
15
15
15
15
15
15
15
15
Önerilen
sýcaklýk
200
200
200
180
180
230
180
180
200
180
170
190
180
170
170
200
MAX
MAX
MAX
MAX
MAX
MAX
MAX
MAX
MAX
200
200
220
220
180
180
180
180
160
200
190
210
180
180
90
ºirme
süresi
(dakika
65-75
70-75
70-80
15-20
30-35
15-20
30-35
40-45
60-70
30-35
40-50
20-25
10-15
15-20
20-25
25-30
8-10
6-8
10
10-15
15-20
15-20
7-10
15-20
2-3
55-60
30-35
15-20
25-30
60-70
20-30
40-45
40-50
25-30
30-35
20-25
15-20
20-25
20-25
180
16
Page 17

Önlemler ve öneriler
Cihaz uluslararasý güvenlik normlarýna uygun þekilde
tasarlanmýþ ve imal edilmiþtir. Bu uyarýlar güvenlik
amaçlý olup dikkatlice okunmalarý gerekir.
Genel güvenlik
Bu cihaz profesyonel amaçlý deðil, meskenlerde
kullanýlmak üzere tasarlanmýþtýr.
Cihaz, üzeri kapalý bile olsa açýk alanlara kurulmaz,
zira yaðmur ve fýrtýnaya maruz býrakýlmasý son
derece tehlikelidir.
Cihazý yerinden hareket ettirirken daima fýrýnýn yan
taraflarýnda bulunan tutma kulplarýndan yararlanýnýz.
Cihaza ayaklarýnýz çýplakken yada ýslak el ayaklarla
dokunmayýnýz.
Cihaz sadece yemek piþirmek için, yetiþkinler
tarafýndan ve bu kitapçýktaki talimatlar çerçevesinde
kullanýlmalýdýr.
Cihazýn kullanýmý sýrasýnda ýsýtýcý elemanlar ile
fýrýnýn bazý kýsýmlarý çok sýcak duruma gelirler.
Bunlara dokunmamaya dikkat ediniz ve çocuklarý
uzak tutunuz.
Arýza halinde onarmak amacýyla iç mekanizmalarý
kurcalamayýnýz. Teknik servise haber veriniz.(bkz.
Teknik Servis)
Fýrýn kapaðý açýkken kapak üzerine aðýr cisimler
koymayýnýz.
Atýklarýn elimine edilmesi
Ambalaj malzemelerinin yok edilmesi: yerel yasalara
uyunuz, bu þekilde ambalajlarýn geri dönüþümü
mümkün olur.
Eski cihazýn yok edilmesi: bu konuda hizmet veren
yerel kuruma baþvurunuz.
Eski cihazý hurdaya ayýrmadan önce elektrik
kablosunu keserek kullanýlmaz hale getiriniz.
Tasarrufa yöneliniz ve çevreye saygýlý
olunuz
Fýrýn ikindi vakitleri ile sabahýn ilk saatleri arasýnda
kalan zaman diliminde çalýþtýrýldýðýnda elektrik
þirketlerinin emilim yükünün azaltýlmasýna katký
saðlanýr.
TR
Mekandaki diðer beyaz eþyaya ait kablolarýn fýrýnýn
sýcak kýsýmlarýna temas etmesini önleyiniz.
Havalandýrma ve ýsý daðýlma noktalarýný týkamayýnýz.
Fýrýn kapaðý açma kulpunu tam ortasýndan tutunuz:
yan taraflarý sýcak olabilir.
Yemek kaplarýný fýrýna sürerken ve çýkarýrken daima
fýrýn eldivenleri kullanýnýz.
Fýrýnýn zeminini alüminyum folyo ile kaplamayýnýz.
Fýrýn içine tutuþur nitelikte malzeme koymayýnýz.
içinde böyle malzemeyle bilmeden yakýlýrsa alev
alabilir.
Cihazýn kullanýlmadýðý zamanlarda düðmelerin
daima l/
olunuz.
Fiþi prizden çekerken kablosundan deðil fiþin
kendisinden tutarak çekiniz.
Fiþi prizden çekmeden temizlik ve abkým iþlemleri
yapmayýnýz.
¡ pozisyonunda olduklarýndan emin
BARBEKÜ ve GRATIN türü piþirmeleri daima fýrýn
kapaðý kapalýyken yapýnýz: bu hem daha iyi sonuç
almak, hem de enerjiden tasarruf etmek içindir
(yaklaþýk %10).
Contalarý temiz ve bakýmlý tutunuz, böylelikle
kapaða tam yapýþarak ýsý kaybýný önlerler.
Teknik Servis
Þunlarý iletiniz:
cihazýn modeli (Mod.)
seri numarasý (S/N)
Bu son bilgi cihaz yada ambalajý üzerinde bulunan
özellikler etiketinde yazýlýdýr.
17
Page 18

F
Bakým ve özen
TR
Elektrik akýmýný kesiniz
Her türlü iþlemi yapmadan önce cihazýn elektrik
þebekesiyle baðlantýsýný kesiniz.
Cihazý temizleyiniz
Emayeli veya inox dýþ kýsýmlar ile lastik contalar ýlýk
su ve nötr sabunlu bir süngerle temizlenebilir. Lekeler
çok zor çýkan türdense özel ürünler kullanýnýz. Bol su
ile durulayýp temizlikten sonra kurulayýnýz. Çizici
tozlar ve aþýndýrýcý maddeler kullanmayýnýz.
Fýrýnýn içi mümkünse her kullanýmdan sonra, daha
henüz ýlýkken temizlenmelidir. Sýcak su ve deterjan
kullanýnýz ve yumuþak bir bezle kurulayýnýz. Çizici
maddelerden kaçýnýnýz.
Sürgülü kýzaklar hariç aksesuarlar normal bulaþýk
yýkama sistemiyle ve bulaþýk makinasýnda bile
yýkanabilirler.
Cihazý temizlerken asla buharlý yada yüksek basýnçlý
temizleyiciler kullanmayýnýz.
Kapaðý temizleyiniz
Cam aþýndýrýcý olmayan ürün ve sünger kullanýlarak
temizlenmeli ve yumuþak bir bezle kurutulmalýdýr. Camý
çizebilecek ya da camýn kýrmasýna neden olabilecek
aþýndýrýcý pürüslü malzeme veya keskin madeni kazýyýcý
kullanýlmamalýdýr.
Daha özenli bir temizlik için fýrýn kapaðý sökülebilir:
1. kapaðý tamamen açýnýz (bkz. þekil);
2. menteþeler üzerindeki kollarý yukarý kaldýrýp
döndürünüz (bkz. þekil);
Ampulü deðiþtiriniz
Fýrýnýn aydýnlatma lambasýný deðiþtirmek için:
1. Duyun cam kapaðýný gevþetip alýnýz.
2. ampulü sökünüz
ve aynýsýyla
deðiþtiriniz: gücü
25 W, baðlantý E
14.
3. kapaðý tekrar
takýnýz (bkz. þekil).
Sürgülü kýlavuzlar setinin montajý
Sürgü kýzaklarý (kýlavuzlarý) monte etmek için:
1. Ýki adet A vidasýný
sökünüz (bkz. þekil).
Fýrýn kendinden
A
A
2. A vidalarýný sette yer alan vidalar ve ara parçalarla
(B+C) deðiþtiriniz.
B
C
temizlenir panellere
sahipse bunlarýn geçici
olarak sökülmesi gerekir.
F
3. kapaðý iki dýþ yanýndan
tutunuz, yavaþça kapatýnýz ama
tamamen deðil. Tutucu klipslere
bastýrýnýz,F sonra kapaðý
kendinize doðru çekip
menteþelerinden çýkartýnýz (bkz.
þekil). Bu prosedürü tam tersine
uygulayarak kapýyý yerine
takýnýz.
Contalarý kontrol ediniz
Fýrýn kapaðýný çevreleyen contanýn durumunu periyodik
olarak kontrol ediniz. Hasarlý olmasý halinde en yakýn
Teknik Servise baþvurunuz (bkz. Teknik Servis). Bu
durumda fýrýný kullanmanýzý onarým gerçekleþene kadar
tavsiye etmeyiz.
3. Yeni B vidalarýný ve C ara parçalarýný sýkýnýz,
kendinden temizlenir panelleri tekrar takýnýz.
4. Kýlavuzun iki adet D
ankastresini fýrýn cidarý
üzerindeki deliklerine
sabitleyiniz (bkz. þekil).
Sol kýlavuzun delikleri
D
5. Son olarak da kýlavuzu C ara parçasý üzerine
ankastre olarak takýnýz.
6. Sürgülü kýzaklarý 5. konuma takmayiniz.
yukarda, sað
kýlavuzunkiler aþaðýdadýr.
18
Page 19

Brugervejledning
OVN
TRGB
English, 1
Türkçe,10
HU CZ
Magyar, 28 Cesky, 37
FZ 612 C.2
FZ 612 C.2 IX
DK
Dansk, 19
Oversigt
DK
Installation, 20-21
Placering
Elektrisk tilslutning
Typeskilt
Beskrivelse af ovnen, 22
Samlet illustration
Betjeningspanel
Start og brug, 23
Sådan tændes for ovnen
Brug af timerfunktion
Programmer, 24-25
Tilberedningsprogrammer
Praktiske råd til tilberedning
Skema over tilberedning
Forskrifter og råd, 26
Generelt om sikkerheden
Bortskaffelse
Energibesparelse og miljøvenlighed
Service
Vedligeholdelse, 27
Afbrydelse af strømmen
Rengøring af ovn
Rengøring af ovndør
Udskiftning af pære
Montering af glideskinner
Page 20

Installation
DK
Det er vigtigt at opbevare dette hæfte et sted, så det
nemt kan konsulteres. Hvis ovnen sælges, overdrages
eller flyttes, skal man sørge for, at brugervejledningen
følger med, så den nye ejer kan få oplysninger om
ovnens funktion og eventuelle advarsler.
Læs omhyggeligt instruktionerne: De indeholder
vigtige oplysninger om installation, anvendelse og
sikkerhed.
Placering
Emballagen må ikke betragtes som legetøj til børn, og
den skal bortskaffes i henhold til bestemmelserne om
sortering af affald (se afsnittet Forskrifter og råd).
Installationen skal udføres i overensstemmelse med
instruktionerne og af en kvalificeret tekniker. En
fejlagtig installation kan medføre personskade, skader
på dyr samt materielle skader.
Indbygning
For at ovnen skal kunne fungere korrekt, skal
indbygningsskabet være egnet dertil:
Ventilation
For at sikre en god ventilation, er det nødvendigt at
afmontere den bageste væg på indbygningsskabet.
Det tilrådes at installere ovnen, så den støtter på to
trælister eller på en plan overflade med en åbning på
minimum 45 x 560 mm (se figuren).
45 mm.
560 mm.
Centrering og fastgørelse
Placér de 4 stifter på siden af ovnen ud for de 4 huller
på omkredsrammen, idet der tages hensyn til
køkkenelementets tykkelse:
Tykkelse på 20 mm: Fjern den
bevægelige del af den
udragende stift (se figuren).
Panelerne på skabene ved siden af ovnen skal
være lavet af materialer, der er modstandsdygtige
over for varme.
På skabe af finerplader skal limen være
modstandsdygtig over for temperaturer på 100 ºC.
Hvis ovnen indbygges i et skab, både ved montering
under en bordplade (se figuren) og ved
søjleopbygning, skal skabet have følgende mål:
567 mm.
45 mm.
558 mm.
593 mm.
23 mm.
595 mm.
5 mm.
595 mm.
545 mm.
24 mm.
Når ovnen er blevet indbygget, må der ikke være
mulighed for eventuelt kontakt med de elektriske dele.
Oplysningerne om energiforbrug, angivet på
typeskiltet, er målt på denne type installation.
Tykkelse på 18 mm: Brug den
første rille, som allerede findes
ved levering fra fabrikken (se
figuren).
Tykkelse på 16 mm: Brug den
anden rille (se figuren).
Sådan fastgøres ovnen til køkkenelementet: Åbn
ovndøren, og skru de 4 skruer i de 4 passende huller
på omkredsrammen.
Alle sikkerhedsdele skal være monteret på en sådan
måde, at de ikke kan fjernes uden brug af værktøj.
20
Page 21

Elektrisk tilslutning
Ovne, der er udstyret med et trepolet
forsyningskabel er klargjort til funktion med
vekselstrøm ved den spænding og frekvens, der er
anført på ovnens typeskilt (se herunder).
Montering af forsyningskabel
1. Åbn klemrækken ved
at stikke en
skruetrækker ned i
klapperne på siden af
dækslet. Træk og åbn
dækslet (se figuren).
2. Tilslutning af
forsyningskablet: Drej
skruen af kabelklemmen
og de tre skruer af
kontakterne L-Nfastgør de små ledninger
under skruehovederne i
overensstemmelse med
NL
farverne Blå (N) Brun (L)
Gul-grøn
(se figuren).
3. Spænd ledningen fast i den passende kabelklemme.
4. Luk dækslet på kabelrækken.
Tilslutning af strømforsyningskablet til nettet
og
Inden tilslutningen udføres, skal man kontrollere
følgende:
at stikkontakten har jordforbindelse og er i
overensstemmelse med loven,
at stikkontakten kan bære ovnens maksimale
spændingsbelastning, som angivet på typeskiltet
(se herunder),
at forsyningsspændingen ligger inden for
værdierne, som angivet på typeskiltet (se
herunder),
at stikkontakten passer til ovnens stik. I modsat fald
skal man udskifte stikkontakten eller stikket. Undgå
anvendelse af forlængerledninger eller flerdobbelte
stikdåser.
Når ovnen er installeret, skal man nemt kunne nå ind
til både ledning og stikkontakt.
Ledningen må ikke bøjes eller trykkes sammen.
Ledningen skal regelmæssigt kontrolleres og må kun
udskiftes af autoriserede teknikere (se afsnittet
Service).
Virksomheden fralægger sig ethvert ansvar,
såfremt disse regler ikke overholdes.
TYPESKILT
Størrelse modeller
med glideskinner
Volumen modeller
med glideskinner
bredde cm 37,5
højde cm 32
dybde cm 41,5
lt. 50
DK
Anvend et standardstik på kablet til den belastning,
der er anført på typeskiltet (se her ved siden af).
Hvis man ønsker en direkte forbindelse til el-nettet,
skal man indsætte en flerpolet afbryder med en
minimumsåbning mellem kontakterne på 3 mm. i
overensstemmelse med belastningen og i
overensstemmelse med de gældende regler (der skal
ikke være en afbryder på jordforbindelsen).
Forsyningskablet skal være placeret på en sådan
måde, at det ikke når en temperatur på 50º C over
omgivelsestemperaturen på noget punkt.
Installatøren er ansvarlig for en korrekt elektrisk
tilslutning samt overholdelse af sikkerhedsreglerne.
Elektriske
tilslutninger
ENERGI
MÆRKNING
spænding 230-240V ~ 50/60Hz
maks. optaget effekt 2800-3000W
Direktiv 2002/40/CE på de
elektriske ovnes etikette
Standard EN 50304
Energiforbrug naturlig luftcirkulation
- opvarmningsfunktion:
Traditionel
Energiforbrug forceret luftcirkulation
- opvarmningsfunktion Fint
bagværk.
Dette apparat er i
overensstemmelse med følgende
EU-direktiver: 73/23/EC af 19/02/73
(Lavspænding) og efterfølgende
ændringer - 89/336/EC af 03/05/89
(Elektromagnetisk kompatibilitet) og
efterfølgende ændringer - 93/68/EC
af 22/07/93 og efterfølgende
ændringer.
2002/96/ EC
21
Page 22

Beskrivelse af ovnen
DK
Samlet illustration
Betjeningspanel
BRADEPANDE
Betjeningspanel
RIST
Knap
PROGRAMMER
Knap til
TIMER
GLIDESKINNER
til pladerne
position 5
position 4
position 3
position 2
position 1
Knap til TERMOSTAT
*
Kontrollampe
TERMOSTAT
Kun til stede på nogle modeller.
*
22
Page 23

Start og brug
Når ovnen tændes første gang, anbefales det at lade
ovnen være i funktion i tom tilstand i mindst en time
med termostaten indstillet på maksimum og ovndøren
lukket. Herefter skal man åbne ovndøren og udlufte
lokalet. Lugten, der opstår, skyldes fordampning af
beskyttelsesmidlerne i ovnen.
Sådan tændes for ovnen
1. Vælg det ønskede tilberedningsprogram ved at
dreje på knappen PROGRAMMER.
2. Indstil temperaturen ved at dreje på knappen
TERMOSTAT. Der findes en liste over tilberedninger
og de anbefalede temperaturer i tilberedningsskemaet
(se afsnittet Programmer).
3. Kontrollampen TERMOSTAT angiver, at ovnen er i
gang med at varme op til den valgte temperatur
4. Under tilberedningen er det altid muligt at:
- ændre programmet ved at dreje på knappen
PROGRAMMER,
- ændre temperaturen ved hjælp af knappen
TERMOSTAT,
- afbryde tilberedningen ved at dreje knappen
PROGRAMMER over på position 0.
Ovnlys
Lyset tændes ved at vælge
PROGRAMMER. Den bliver ved med at lyse, når der
vælges et tilberedningsprogram.
Brug af timerfunktion
1. Man skal først og fremmest aktivere alarmen ved at
dreje knappen TIMER næsten en hel omgang i urets
retning.
2. Drej derefter knappen tilbage igen og indstil den
ønskede tid ved at stille knappen TIMER ud for det
ønskede antal minutter, der står skrevet på
betjeningspanelet.
3. Timeren er et minutur. Når tiden er gået, høres et
lydsignal.
Timeren styrer ikke tænding og slukning af ovnen.
med knappen
*
DK
Undgå at placere genstande i bunden af ovnen, da
det kan beskadige ovnens lakering.
Placér altid beholderne på den medfølgende rist.
Afkølingsventilation
For at mindske den udvendige temperatur, er nogle
modeller udstyret med en afkølingsblæser. Blæseren
skaber en luftstråle, der blæses ud gennem
betjeningspanelet og ovndøren.
Ved afsluttet tilberedning fortsætter blæseren med at
være tændt, indtil ovnen er passende afkølet.
Kun til stede på nogle modeller.
*
23
Page 24

Programmer
DK
Tilberedningsprogrammer
For alle programmer kan man indstille en temperatur
på mellem 60 °C og MAX, undtagen:
BARBECUE (det anbefales kun at indstille til MAX).
GRATIN (det anbefales ikke at indstille en
temperatur på over 200 °C).
Programmet TRADITIONEL OVN
Det nederste og det øverste varmeelement tændes.
Med traditionel tilberedning anbefales det kun at
anvende én plade. Hvis der anvendes flere plader,
fordeles temperaturen ikke korrekt.
Programmet MULTITILBEREDNING
Alle varmeelementer (det øverste, det nederste og de
runde) tændes, og blæseren starter. Da varmen er
konstant og jævn i hele ovnen, tilbereder og steger
luften maden jævnt overalt. Der kan maks. anvendes
to plader samtidig.
Programmet FINT BAGVÆRK
Det bageste varmeelement tændes, og blæseren
startes, således at der fås en delikat og jævn varme
internt i ovnen. Programmet er egnet til tilberedning af
mere ømtålelige madvarer (f.eks. kager, der kræver
hævning) samt bagning af små kager på tre plader
samtidigt.
Praktiske råd til tilberedning
Ved tilberedning med varmluft skal man undgå at
anvende rillerne 1 og 5. De rammes direkte af den
varme luft, hvilket kan medføre forbrænding af
ømtålelige madvarer.
Ved brug af programmerne BARBECUE og GRATIN,
skal man placere en bradepande i nederste rille til
opsamling af madrester (sovs og/eller fedt).
MULTITILBEREDNING
Brug rillerne 2 og 4, og placér de madvarer, der
kræver størst varme i rille 2.
Programmet BARBECUE
Det øverste varmeelement tændes.
Det anbefales at anvende grillfunktionen med en
højere og mere direkte temperatur til madvarer, der
kræver en høj overfladetemperatur. Udfør
tilberedningen med ovndøren lukket.
Programmet GRATIN
Det øverste varmeelement tændes, og blæseren
starter. Denne funktion forener den ensrettede
varmeudsendelse med forceret luftcirkulation i ovnen.
Dette forhindrer forbrænding af overfladen på maden,
således at varmeindtrængningen bliver større. Udfør
tilberedningen med ovndøren lukket.
Programmet PIZZA
Det nederste varmeelement og det runde
varmeelement tændes, og blæseren starter. Denne
kombination giver en hurtig opvarmning af ovnen med
en stærk varmetilførsel, der hovedsageligt kommer fra
neden. Hvis man anvender flere plader, skal de byttes
rundt midtvejs gennem tilberedningen.
Placér bradepanden nederst og risten øverst.
BARBECUE
Placér risten i rille 3 eller 4, og placér madvarerne
midt på risten.
Det anbefales at indstille energiniveauet på maks.
Bliv ikke bekymret, hvis det øverste varmeelement
ikke bliver ved med at være tændt. Funktionen
styres af en termostat.
PIZZA
Benyt en let aluminiumsbeholder, der skal stilles på
den medfølgende rist.
Hvis der benyttes en bradepande, tager bagningen
længere tid, og det vil være svært at få en sprød
pizza.
Ved pizza med meget tilbehør anbefales det at
tilføje mozzarellaosten midtvejs i tilberedningen.
24
Page 25

Skema over tilberedning
Programmer Madvarer
And
Traditionel
ovn
Multi-
tilberedning
Barbecue
Gratin
Ovn til pizza
Traditionel
ovn
Kalve- eller oksesteg
Flæskesteg
Småkager (af mørdej)
Tærter
Pizza (på 2 plader)
Lasagne
Lammekød
Stegt kylling + kartofler
Makrel
Plum-cake
Vandbakkelser (på 2 plader)
Småkager (på 2 plader)
Sukkerbrødskage (på 1 plade)
Sukkerbrødskage (på 2 plader)
Saltede tærter
Søtunger og blæksprutter
Rejespid
Torskefilet
Grillede grøntsager
Kalvesteak
Koteletter
Hamburger
Makreller
Toast
Grill-kylling
Blæksprutte
Pizza
Kalve- eller oksesteg
Kylling
Tærter
Frugtkage
Plum-cake
Sukkerbrødskage
Fyldte crepes (på 2 plader)
Små kager (på 2 plader)
Saltstænger af butterdej med ost
(på 2 plader)
Vandbakkelser (på 3 plader)
Småkager (på 3 plader)
Marengs (på 3 plader)
Vægt
(kg)
1
1
1
1
1
1
1
1+1
1
1
0.5
0.5
0.5
1
1.5
1
1
1
1
1
1
1
1
n. 4
1.5
1.5
0.5
1
1
0.5
1
0.7
0.5
1.2
0.6
0.4
0.7
0.7
0.5
Placering
af plader
3
3
3
3
3
2 og 4
3
2
2 og 4
2
2
2 og 4
2 og 4
2
2 og 4
3
4
4
4
3 eller 4
4
4
4
4
4
2
2
3
2
2 eller 3
3
2 eller 3
3
3
2 og 4
2 og 4
2 og 4
1 og 3 og 5
1 og 3 og 5
1 og 3 og 5
Forvarmning
(minutter)
15
15
15
15
15
15
10
10
15
10
10
10
10
10
10
15
5
5
5
5
5
5
5
5
5
5
5
15
10
10
15
15
15
15
15
15
15
15
15
15
Anbefalet
temperatur
200
200
200
180
180
230
180
180
200
180
170
190
180
170
170
200
MAX
MAX
MAX
MAX
MAX
MAX
MAX
MAX
MAX
200
200
220
220
180
180
180
180
160
200
190
210
180
180
90
DK
Tilberedningstid
(minutter)
65-75
70-75
70-80
15-20
30-35
15-20
30-35
40-45
60-70
30-35
40-50
20-25
10-15
15-20
20-25
25-30
8-10
6-8
10
10-15
15-20
15-20
7-10
15-20
2-3
55-60
30-35
15-20
25-30
60-70
20-30
40-45
40-50
25-30
30-35
20-25
15-20
20-25
20-25
180
25
Page 26

Forskrifter og råd
DK
Ovnen er udviklet og konstrueret i overensstemmelse
med internationale sikkerhedsbestemmelser. Disse
advarsler gives af sikkerhedsmæssige årsager og skal
læses omhyggeligt.
Generelt om sikkerheden
Denne ovn er udviklet til ikke professionel brug i
almindelige hjem.
Ovnen må ikke installeres udendørs, heller ikke på
et sted med læ, da det er farligt at lade den stå
udsat under regn og uvejr.
Ved flytning af ovnen skal man benytte håndtagene
på siden af ovnen.
Undgå at røre ved ovnen, hvis du har bare fødder
eller våde eller fugtige hænder eller fødder.
Ovnen må kun anvendes til tilberedning af mad og
af voksne personer i henhold til anvisningerne
beskrevet i dette hæfte.
Under brug af ovnen bliver varmelegemerne og
nogle steder på ovndøren meget varme. Pas på
ikke at røre ved dem, og hold børn på afstand.
Sørg for at forsyningsledningerne fra andre
husholdningsapparater ikke kommer i kontakt med
ovnens varme dele.
Ved fejlfunktion må man aldrig skille ovnen ad for at
forsøge at reparere de indvendige mekanismer.
Kontakt serviceafdelingen (se afsnittet Service).
Lad ikke tunge genstande hvile på den åbne
ovndør.
Bortskaffelse
Bortskaffelse af emballagematerialet: Emballagen
skal bortskaffes i overensstemmelse med lokale
regler, så det kan genbruges.
Det Europæiske Direktiv 2002/96/EC angående
Waste Eelectrical and Electronic Equipment (WEEE
Affaldshåndtering af Elektriske og Elektroniske
udstyr), kræver at når gamle elektronisk
husholdningsudstyr skal udskilles må dette ikke ske
på en usorteret måde. Gamle elektroniske
apperater skal indsamles seperat for at optimere
genbrugligheden af de materialer apperaterne
besidder. Derved reduceres den skadelig
påvirkning på mennesker og miljø mest mulig.
Symbolet med krydset over skallespanden på
produktet, vil påminde dig om dit ansvar til at
indsamle disse produkter seperat.
Forbruger kan bringe deres gamle elektroniske
apperater til den oftenlig genbrugstation, andre
oftenlige indsamlingsområder, eller hvis national lov
tillader det, returnerer gamle apperater til en
forhandler når nyt elektronisk apperat købes.
Undgå at blokere for ventilationsåbningerne og
varmeudledningen.
Tag altid fat i lågens håndtag i midten, da ovnens
sider kan være varme.
Benyt altid grillhandsker ved indsættelse og
udtagning af varme beholdere.
Læg ikke sølvpapir i bunden af ovnen.
Sæt ikke brandbart materiale i ovnen. Hvis ovnen
utilsigtet tændes, kan materialet antænde.
Kontrollér altid, at knapperne er i positionen l/
¡, når apparatet ikke anvendes.
Træk ikke stikket ud af stikkontakten ved at hive i
ledningen, men tag derimod fat om selve stikket.
Afbryd strømforsyningen ved at trække stikket ud,
inden der udføres rengøring eller vedligeholdelse.
Energibesparelse og miljøvenlighed
Ved at tænde for ovnen i timerne fra sen
eftermiddag til de tidlige morgentimer bidrager man
til, at belastningen for el-selskaberne reduceres.
Det anbefales altid at anvende programmerne
BARBECUE og GRATIN med lukket ovndør. Ovnen
skal være lukket for at sikre optimale resultater og en
betydelig energibesparelse (cirka 10 %).
Hold gummilisterne i god stand og rene, så de
slutter helt tæt mod ovndøren og varmen ikke siver
ud.
Service
Oplys om:
ovnens model (Mod.)
serienummer (S/N)
Disse oplysninger findes på typeskiltet på ovnen og/
eller på emballagen.
26
Page 27

F
Vedligeholdelse
Afbrydelse af strømmen
Inden der udføres rengøring eller vedligeholdelse
skal den elektriske strømforsyning afbrydes.
Rengøring af ovn
De ydre overflader med lakering eller i rustfrit stål
samt gummilisterne skal rengøres med en svamp
opblødt i lunken vand og neutral sæbe. Hvis
pletterne er svære at fjerne, skal man anvende
specialprodukter. Efter rengøring anbefales det,
at delene af rustfrit stål skylles og aftørres
omhyggeligt. Anvend ikke slibende midler eller
korroderende produkter.
Ovnen skal helst rengøres indvendigt efter hver
brug, mens den stadig er lun. Brug koldt vand og
et rengøringsmiddel og skyl og tør efter med en
blød klud. Undgå brug af slibende midler.
Tilbehøret kan vaskes af som alt andet normalt
opvask, også i opvaskemaskinen, undtagen
glideskinnerne.
Benyt aldrig rengøringsapparater med damp eller
højt tryk til rengøring af bordkomfuret.
Rengøring af ovndør
Ovndøren skal rengøres med en svamp og et ikkeslibende rengøringsmiddel og skal tørres efter med
en blød klud. Undgå brug af ru og slibende
materialer eller metalspartler, som kan ridse
overfladen og medføre, at glasset revner.
henvende sig til det nærmeste servicecenter (se
afsnittet Service). Det tilrådes ikke at anvende
ovnen, før den er blevet repareret.
Udskiftning af pære
Sådan udskiftes lyspæren i ovnen:
1. Skru
pæreholderens
glaslåg af.
2. Tag pæren
ud, og udskift den
med en af samme
type: Effekt 25 W,
fatning E 14.
3. Sæt låget på
igen (se figuren).
Montering af glideskinner
Sådan monteres glideskinnerne:
1. Løsn de to skruer A
(se figuren). Hvis ovnen
er udstyret med
A
A
selvrensende paneler,
afmonteres de
midlertidigt.
DK
For bedre at kunne rengøre ovndøren, er det muligt
at afmontere den.
1. Åbn ovndøren helt op (se figuren).
2. Løft og drej stifterne på de to hængsler (se figuren).
F
3. Tag fat i ovndøren i de to
ydersider, og luk langsomt,
men uden at lukke helt. Tryk
på stopanordningerne F, og
træk ovndøren udad, så den
frigøres af hængslerne (se
figuren). Montér døren igen
ved at følge fremgangsmåden
i omvendt rækkefølge.
Kontrol af gummilister
Gummilisterne omkring ovndøren skal kontrolleres
jævnligt. Hvis listerne er ødelagt, bedes man
2. Udskift skruerne A med de medfølgende skruer
og afstandsstykker (B+C).
B
C
3. Spænd de nye skruer B og afstandsstykker C,
og montér også de selvrensende paneler.
4. Fastgør skinnen D i
de passende huller i
siden af ovnen (se
figuren). Hullerne til
venstre skinne er
D
5. Fastgør til sidst skinnen på afstandsstykket C.
6. Sæt ikke glideskinnerne i rille 5.
placeret øverst, mens
hullerne til højre skinne
er placeret nederst.
27
Page 28

Használati útmutató
SÜTÕ
HU
GB
HU
Magyar, 28 Cesky, 37
TR DK
Türkçe,10
CZ
FZ 612 C.2
FZ 612 C.2 IX
Tartalomjegyzék
Üzembe helyezés, 29-30
Elhelyezés
Elektromos csatlakoztatás
Dansk, 19English, 1
Típuscímke
A készülék leírása, 31
A készülék áttekintése
Kezelõpanel
Bekapcsolás és használat, 32
A sütõ bekapcsolása
Az idõzítõ használata
Programok, 33-34
Sütési programok
Praktikus sütési tanácsok
Sütési táblázat
Óvintézkedések és tanácsok, 35
Általános biztonság
Hulladékkezelés
Takarékosság és környezetvédelem
Szerviz
Karbantartás és kezelés, 36
Áramtalanítás
A készülék tisztítása
Az ajtó tisztítása
Lámpa csere
A gördülõ sín készlet összeszerelése
Page 29
Üzembe helyezés
Fontos, hogy megtartsa ezt a kézikönyvet, hogy
szükség esetén bármikor belenézhessen. Ha a
készüléket eladja, elajándékozza vagy áthelyezi,
gyõzõdjön meg róla, hogy a kézikönyvet is átadja vele,
hogy az új tulajdonos tájékozódhasson a készülék
mûködésérõl és az azzal kapcsolatos
figyelmeztetésekrõl.
Olvassa el figyelmesen az utasításokat: fontos
információkat tartalmaznak az üzembe helyezésrõl, a
használatról és a biztonságról.
Elhelyezés
A csomagolóanyag nem játékszer! A szelektív
hulladékgyûjtés szabályainak megfelelõen semmisítse
meg (lásd Óvintézkedések és tanácsok)!
Az üzembe helyezést szakembernek kell elvégeznie
az itt található utasításoknak megfelelõen. A helytelen
üzembe helyezés személyi sérülést és anyagi károkat
okozhat!
Beépítés
A készülék jó mûködésének biztosítása érdekében
szükséges, hogy a bútor megfelelõ tulajdonságokkal
rendelkezzen:
a sütõ melletti paneleknek hõálló anyagból kell
készülniük;
Szellõztetés
HU
A jó szellõztetés garantálása érdekében a sütõnek
helyet adó bútorrész hátlapját le kell venni. A sütõt
lehetõleg úgy helyezzék le, hogy két fa alátétre vagy
egy olyan folytonos felületre támaszkodjon, ami
rendelkezik egy legalább 45 x 560 mm nagyságú
nyílással (lásd ábra).
45 mm.
560 mm.
Középre állítás és rögzítés
Állítsa be a sütõtõl oldalirányban elhelyezkedõ 4
ütközõlécet, a külsõ kereten lévõ 4 nyílásnak
megfelelõen, a bútor oldallemezének vastagsága
alapján:
20 mm vastagság: távolítsa el
az ütközõléc mozgatható részét
(lásd ábra);
furnérlemezbõl készült bútorok esetén a
ragasztóanyagnak ki kell bírnia a 100°C
hõmérsékletet;
a sütõ beépítéséhez, legyen az elhelyezve
munkalap alá (lásd ábra) vagy állványra, a bútornak
az alábbi méretekkel kell rendelkeznie:
567 mm.
45 mm.
558 mm.
593 mm.
23 mm.
595 mm.
5 mm.
595 mm.
545 mm.
24 mm.
A készüléket úgy kell beépíteni, hogy utána ne
lehessen az elektromos alkatrészekhez hozzáérni.
A típuscímkén jelzett fogyasztási értékeket a fenti
beszerelés mellett mérték.
18 mm vastagság: használja az
elsõ vájatot, ahogy azt a gyártó
már elõre elkészítette (lásd
ábra);
16 mm vastagság: használja a
második vájatot (lásd ábra).
A készülék rögzítése a bútorhoz: nyissa ki a sütõ
ajtaját és csavarozza a 4 facsavart a külsõ kereten
lehelyezkedõ 4 lyukba.
Minden védelmet biztosító alkatrészt rögzíteni kell oly
módon, hogy azokat szerszám nélkül ne lehessen
kivenni.
29
Page 30

HU
Elektromos csatlakoztatás
A hárompólusú kábellel ellátott sütõket a típuscímkén
jelzett (lásd alább) váltakozó áramú, feszültségû és
frekvenciájú használatra szánták.
Az elektromos kábel beszerelése
1. Nyissa ki a
csatlakozót a fedõ
oldalsó nyelvecskéinek
felemelésével egy
csavarhúzó
segítségével: húzza
meg és nyissa ki a fedõt
(lásd ábra).
2. Helyezze üzembe az
elektromos kábelt:
csavarozza ki a
kábelszorító csavarjait
és a három L-Nérintkezõcsavart, majd
rögzítse a csavarok feje
alatt a huzalokat,
NL
3. Rögzítse a kábelt a megfelelõ kábelrögzítõbe.
4. Zárja le a csatlakozó fedõjét.
Az elektromos kábel hálózatba kötése
Szereljen a kábelre a típuscímkén feltüntetett
terhelésnek megfelelõ szabványos csatlakozó dugót
(lásd oldalt).
Amennyiben a kábelt közvetlenül a hálózathoz kívánja
csatlakoztatni, úgy a készülék és a hálózat közé a
terhelésnek és az érvényben lévõ szabványoknak
megfelelõ legalább 3mm-es multipoláris kapcsolót kell
beszerelni (a föld huzalt nem kell megszakítóval
ellátni). A hálózati kábelt úgy kell elhelyezni, hogy
sehol ne érjen szobahõmérséklethez képest 50°C-nál
magasabb részhez.
A készülék beszerelõje felelõs a megfelelõ
elektromos csatlakoztatásért és a biztonsági elõírások
betartásáért.
ügyelve a kék (N), barna
(L), sárga-zöld színekre
(lásd ábra).
A csatlakoztatás elõtt ellenõrizze, hogy:
az aljzat rendelkezzen földeléssel és feleljen meg a
szabványnak;
az aljzat képes legyen elviselni a készülék
típuscímkéjén feltüntetett maximális teljesítmény
terhelését (lásd alább);
a tápfeszültség feleljen meg a típuscímkén
feltüntetett értékeknek (lásd alább);
az aljzat legyen kompatibilis a készülék
villásdugójával. Ha nem, cserélje ki az aljzatot vagy
a dugót; ne használjon hosszabbítót vagy elosztót!
A beszerelt készülék elektromos kábelének és a fali
csatlakozónak könnyen hozzáférhetõnek kell lennie.
A kábel nem hajolhat meg és nem lehet
összenyomva!
A kábelt rendszeresen ellenõrizni kell, és cseréjét
kizárólag engedéllyel rendelkezõ szerelõ végezheti el
(lásd Szerviz).
Amennyiben ezeket az elõírásokat nem tartják be, a
gyártó elhárít minden felelõsséget.
TÍPUSCÍMKE
Kihúzható s ínnel
rendelkezõ
modellek méretei
Kihúzható s ínnel
rendelkezõ
modellek térfogata
Elektromos
csatlakoztatások
hossz: 37,5 cm
magasság: 32 cm
mélység: 41,5 cm
50
liter
feszültség: 230-240V ~ 50/60Hz;
maximális elnyelt teljesítmény:
2800-3000W
Elektromos tûzhelyek besorolására
vonatkozó 2002/40/C E irány elv
EN 50304 szabvány
Természetes hõáramlás
ENERGIA
BESOROLÁS
névleges energiafogyasztása
melegítõ funkció:
Hagyományos;
–
Kényszer hõáramlási osztály
névleges energiafogyasztása
melegítõ funkció: Cukrászati.
A készülék megfelel az alábbi uniós
irányelveknek: 73/02/19-es
73/23/CEE (
Alacsony feszültség)
és az azt kö vetõ módosítások
89/05/03-as 89/336/CEE
(
Elektromágneses
–
–
kompatibilitás) és az azt követõ
módosítások
93/68/CEE és az azt követõ
módosítások.
2002/96/CEE
– 93/07/22-es
30
Page 31

A készülék leírása
A készülék áttekintése
Kezelõpanel
Rács GRILL
Rács ZSÍRFOGÓ
Kezelõpanel
Tekerõgomb
PROGRAMOK
Tekerõgomb
IDÕZÍTÕ*
HU
SÍN a rácsok
kihúzásához
5. szint
4. szint
3. szint
2. szint
1. szint
Tekerõgomb
HÕFOKSZABÁLYZÓ
Lámpa
TERMOSZTÁT
* Csak néhány modellnél.
31
Page 32

Bekapcsolás és használat
HU
Elsõ bekapcsoláskor mûködtesse a sütõt üresen
legalább egy óra hosszat maximumra állított
termosztáttal és csukott ajtó mellett. Ezután kapcsolja
ki a sütõt, nyissa ki az ajtaját, és szellõztesse ki a
helyiséget. A keletkezett szag a sütõ védelmére
használt anyagok elpárolgásából származik.
A sütõ bekapcsolása
1. A PROGRAMOK tekerõgomb elforgatásával
válassza ki a kívánt sütõprogramot.
2. A HÕFOKSZABÁLYZÓ tekerõgomb elcsavarásával
válassza ki a hõmérsékletet. A Sütési táblázatban talál
egy listát a különbözõ sütési módokkal és az azokhoz
tartozó javasolt hõmérsékletekkel (lásd Programok).
3. A világító TERMOSZTÁT lámpa jelzi a melegítési
fázist a beállított hõmérséklet eléréséig.
4. Sütés alatt mindig megteheti az alábbiakat:
- módosíthatja a sütési programot a PROGRAMOK
tekerõgomb segítségével;
- módosíthatja a hõmérsékletet a HÕFOKSZABÁLYZÓ
tekerõgomb segítségével;
- megszakíthatja a sütést a PROGRAMOK gomb 0
helyzetbe állításával.
A sütõ megvilágítása
A PROGRAMOK tekerõgomb
kapcsolódik fel. Ha bekapcsol egy sütési programot,
továbbra is világít.
állásra tekerésével
Az idõzítõ használata*
1. Húzza fel a berregõt az idõzítõ (TIMER) tekerõgomb
óramutató járásával megegyezõ irányba való majdnem
teljes elforgatásával.
2. Az óramutató járásával ellentétes irányba forgatva
állítsa be a kívánt idõpontot úgy, hogy az idõzítõn
szereplõ perc a kezelõpanelen rögzített mutatóval
egybe essen.
3. Az idõzítõ a perceket számolja: az idõ letelésekor
hangjelet ad.
Az idõzítõ nem szabályozza a sütõ be- és
kikapcsolását.
Soha ne támasszon semmit a sütõ aljának, mert a
zománc megsérülhet!
A sütõedényeket mindig a mellékelt rácsokra tegye!
Hûtõventillátor
A külsõ hõmérséklet csökkentésének eléréséhez
néhány modellt hûtõventillátorral láttak el. A
hûtõventillátor a kontrollpanel és a sütõ ajtaja között
kilépõ levegõáramlatot hoz létre.
A sütés végén a ventillátor mindaddig mûködik, amíg
a sütõ nem elég hideg.
32
Csak néhány modellnél.
*
Page 33

Programok
Sütési programok
A hõmérsékletet minden programnál 60°C és a MAX
jelzés közé lehet beállítani, kivéve:
GRILL (javasoljuk, hogy csak a MAX állásra állítsa);
GRATINÍROZÁS (javasoljuk, hogy ne használjon
200°C-nál magasabb hõmérsékletet).
Program HAGYOMÁNYOS SÜTÉS
A két alsó és felsõ fûtõszál mûködik. Ennél a
hagyományos sütési módnál inkább csak egy szintet
használjon: ha több szinten süt, a hõeloszlás nem
megfelelõ.
Program LÉGKEVERÉSES SÜTÉS
Bekapcsolnak a fûtõszálak (felsõ, alsó és körkörös) és
a ventilátor mûködni kezd. Mivel a hõ az egész
sütõben állandó, a levegõ egyenletesen süti és pirítja
az ételt. Egyidejûleg maximum két szintet lehet
használni.
Program GRILL
Program SÜTEMÉNY SÜTÉS
HU
Mûködni kezd az alsó fûtõszál és bekapcsol a
ventillátor, ami finom és egyenletes hõeloszlást biztosít
a sütõ belsejében. Ez a program kíméletes sütést
igénylõ ételek (például kelt tészták) sütéséhez,
valamint egyszerre három szinten mignon
elkészítéséhez javasolt.
Praktikus sütési tanácsok
Légkeveréses sütésnél ne használja az 1. és az 5.
szintet: ezeket a helyeket közvetlenül éri a meleg
levegõ, ami a kíméletes sütést igénylõ ételek
odaégését eredményezheti.
GRILLEZÉSKOR és GRATINÍROZÁSKOR a sütés
melléktermékeinek (szaft és/vagy zsír)
összegyûjtéséhez a zsírfogót helyezze az 1. szintre.
LÉGKEVERÉSES ÜZEMMÓD
Használja a 2. és a 4. szintet, a 2. szintre tegye a
magasabb hõmérsékletet igénylõ ételeket.
Bekapcsol a felsõ fûtõszál.
A grill magasabb és közvetlen hõmérséklete olyan
ételekhez javasolt, melyek magasabb felületi
hõmérsékletet igényelnek. A sütést csukott sütõajtó
mellett végezze.
Program GRATINÍROZÁS
Mûködésbe lép a felsõ fûtõszál és bekapcsol a
ventillátor. Ez a sütési mód egyesíti az egyirányú
hõsugárzással a levegõ keringtetését a sütõ
belsejében. Így a hõ áthatolóképességének
növelésével segíti megakadályozni, hogy az ételek
felülete megégjen. A sütést csukott sütõajtó mellett
végezze.
Program PIZZA SÜTÉS
Bekapcsol az alsó és a körkörös fûtõszál és a
ventilátor mûködni kezd. Ez a kombináció lehetõvé
teszi a sütõ gyors felmelegedését, túlsúlyban alulról
érkezõ erõteljes hõárammal. Ha egyszerre egynél több
szintet használ, a sütés felénél cserélje meg a tepsik
helyét.
Helyezze a zsírfogót alulra, a rácsot felülre.
GRILL
Tegye a rácsot a 3. vagy a 4. szintre, az ételeket a
rács közepén helyezze el.
Javasoljuk, hogy maximumra állítsa a
hõmérsékletet. Ne aggódjon, ha a felsõ fûtõszál
nem marad állandóan bekapcsolva: funkcióját
hõfokszabályzó szabályozza.
PIZZA SÜTÉS
Használjon könnyû alumínium tepsit a mellékelt
rácsra helyezve.
Zsírfogóval elhúzódik a sütési idõ és nehéz ropogós
pizzát kapni.
Sok feltétet tartalmazó pizzáknál javasoljuk, hogy a
mozzarellát a sütés felénél tegye a tésztára.
33
Page 34

HU
Süt
Sütési táblázat
Programok Ételek
Hagyományos
sütés
Légkeveréses
mód
Grill
Gratinírozás
Pizza sütés
Sütemény
sütés
Kacsa
Borjú vagy marhasült
Sertéssült
Keksz (omlós)
Aprósütemény
Pizza (2 szinten)
Lasagne
Bárány
Sült csirke + burgonya
Makrahal
Gyümölcsös sütemény
Fánk (2 szinten)
Keksz (2 szinten)
Piskóta (1 szinten)
Piskóta (2 szinten)
Sós és édes sütemény
Nyelvhal és tintahal
Tintahal és rák ny árson
Tõkehal filé
Grillezett zöldségek
Borjúsült
Karaj
Hamburger
Makréla
Melegszendvics
Grill csirke
Tintahal
Pizza
Borjú vagy marhasült
Sült csirke
Aprósütemény
Gyümölcstorta
Gyümölcsös sütemény
Piskóta
Töltött palacsinták (2 szinten)
Kis kekszek (2 szinten)
Sajtos-sós aprósütemény (2
szinten)
Fánk (3 szinten)
Keksz (3 szinten)
Indiáner (3 szinten )
Súly
(kg)
1
1
1
1
1
1
1
1+1
1
1
0.5
0.5
0.5
1
1.5
1
1
1
1
1
1
1
1
4 db
1.5
1.5
0.5
1
1
0.5
1
0.7
0.5
1.2
0.6
0.4
0.7
0.7
0.5
õ aljától
számított
magassági szint
3
3
3
3
3
2 és 4
3
2
2 és 4
2
2
2 és 4
2 és 4
2
2 és 4
3
4
4
4
3 vagy 4
4
4
4
4
4
2
2
3
2
2 vagy 3
3
2 vagy 3
3
3
2 és 4
2 és 4
2 és 4
1 és 3 és 5
1 és 3 és 5
1 és 3 és 5
Elõmelegítés
(perc)
15
15
15
15
15
15
10
10
15
10
10
10
10
10
10
15
5
5
5
5
5
5
5
5
5
5
5
15
10
10
15
15
15
15
15
15
15
15
15
15
Javasolt
hõmérséklet
200
200
200
180
180
230
180
180
200
180
170
190
180
170
170
200
MAX
MAX
MAX
MAX
MAX
MAX
MAX
MAX
MAX
200
200
220
220
180
180
180
180
160
200
190
210
180
180
90
Sütési idõ
(perc)
65-75
70-75
70-80
15-20
30-35
15-20
30-35
40-45
60-70
30-35
40-50
20-25
10-15
15-20
20-25
25-30
8-10
6-8
10
10-15
15-20
15-20
7-10
15-20
2-3
55-60
30-35
15-20
25-30
60-70
20-30
40-45
40-50
25-30
30-35
20-25
15-20
20-25
20-25
180
34
Page 35
Óvintézkedések és tanácsok
A készülék a nemzetközi biztonsági szabványokkal
összhangban lett tervezve és gyártva. Ezen
figyelmeztetéseket biztonsági megfontolásból közöljük,
kérjük olvassa el õket figyelmesen!
Általános biztonság
A készüléket otthoni, háztartási használtra szánták.
A sütõ nem helyezhetõ üzembe nyitott térben, még akkor
sem, ha a terület védett helyen van, mivel rendkívül
veszélyes a készüléket esõnek, viharnak kitenni!
A készülék elmozdításához mindig használja a sütõ
oldalain található megfelelõ fogantyúkat!
Ne érjen a készülékhez mezítláb, illetve vizes vagy
nedves kézzel vagy lábbal!
A készüléket kizárólag felnõttek használhatják ételek
sütésére a kézikönyvben található útmutatásoknak
megfelelõen.
A készülék használata közben a felmelegedõ részek
és a sütõ ajtajának néhány része forróvá válik.
Ügyeljen rá, hogy ezekhez ne érjen és a gyermekeket
tartsa távol!
Kerülje el, hogy más elektromos háztartási készülékek
vezetéke hozzáérjen a sütõ meleg részeihez!
Meghibásodás esetén semmilyen körülmények között ne
próbálja megjavítani a belsõ szerkezeteket! Hívja a
Szervizet (lásd Szerviz).
Ne tegyen nehéz tárgyakat a nyitott sütõajtóra!
Hulladékkezelés
A csomagolóanyag megsemmisítésre: tartsa be a helyi
elõírásokat, így a csomagolóanyag újra felhasználásra
kerülhet!
Az elektromos készülékek megsemmisítésérol szóló
európai direktíva 2002/96/EC eloírja, hogy a régi
háztartási gépeket nem szabad a normál nem szelektív
hulladékgyujtési folyamat során összegyujteni. A régi
gépeket szelektíven kell összegyujteni, hogy optimalizálni
lehessen a bennük lévo anyagok újrahasznosítását és
csökkenteni lehessen az emberi egészségre és
környezetre gyakorolt hatásukat. Az áthúzott
szemeteskuka jele emlékezteti Önt arra, hogy
kötelessége ezeket a termékeket szelektíven
összegyujteni.
A fogyasztók elvihetik régi készülékeiket a nyilvános
hulladékgyujto helyekre, vagy más közös gyujtohelyekre,
vagy ha a nemzeti törvénykezés engedi, visszavihetik az
eladóhoz új termék vásárlásakor.
A legfobb háztartásigép gyártók együtt vesznek részt egy
olyan rendszer megteremtésében, mely a régi termékek
begyujtésével és megsemmisítésével fog foglalkozni.
HU
Ne takarja el a szellõzésre és a hõ elosztására szolgáló
nyílásokat!
Az ajtó fogantyúját középen fogja meg: a szélein meleg
lehet!
Az edények behelyezéséhez vagy kivételéhez mindig
használjon sütõkesztyût!
A sütõ aljára ne tegyen alumíniumfóliát!
A sütõbe ne tegyen gyúlékony anyagot: meggyulladhat,
ha a készülék véletlenül mûködni kezd!
Ha a készüléket nem használja, mindig ellenõrizze, hogy
a gombok l/
A csatlakozót az elektromos hálózatból ne a kábelnél,
hanem a villásdugónál fogva húzza ki!
A készülék tisztítását vagy karbantartását azután kezdje
el, hogy kihúzta a villásdugót az elektromos hálózatból!
¡ állásban legyenek.
Takarékosság és környezetvédelem
Ha a sütõt késõ esti vagy a kora reggeli órákban
mûködteti, hozzájárul az elektromos mûvek
terheltségének csökkentéséhez.
Javasoljuk, hogy GRILLEZÉSKOR és
GRATINÍROZÁSKOR mindig csukja be a sütõ ajtaját:
ezzel kitûnõ eredményeket kap, ugyanakkor jelentõs
energiát takarít meg (kb. 10%).
A tömítéseket tartsa tisztán és õrizze meg
hatékonyságukat oly módon, hogy jól illeszkedjenek az
ajtóhoz és ne engedjék kijutni a hõt!
Szerviz
Adja meg az alábbiakat:
a készülék modellje (Mod.)
szériaszáma (S/N)
Ez utóbbi információkat a készüléken és/vagy a
csomagoláson elhelyezett típuscímkén találja meg.
35
Page 36

F
Karbantartás és kezelés
HU
Áramtalanítás
Minden mûvelet elõtt áramtalanítsa a készüléket!
A készülék tisztítása
A külsõ zománc vagy inox alkatrészek és a
gumitömítések tisztíthatóak langyos vízzel átitatott
szivaccsal és semleges szappannal. Ha a foltokat
nehéz eltávolítani, használjon speciális
tisztítószereket. Javasoljuk, hogy tisztítás után
alaposan öblítse le és törölje szárazra a készüléket.
Ne használjon súrolóport vagy maró anyagot!
A sütõ belsejét lehetõleg minden használat után,
még langyos állapotban tisztítsa meg. Használjon
meleg vizet és mosogatószert, öblítse le és puha
ruhával törölje szárazra. Kerülje a súrolószerek
használatát!
A tartozékok, a gördülõ sínektõl eltekintve a normál
edényekhez hasonlóan, akár mosogatógépben is,
elmoshatók.
A készülék tisztításához soha ne használjon
gõztisztítót, illetve nagynyomású tisztítót!
Az ajtó tisztítása
Az ajtóüveget tisztítsa meg szivaccsal és nem
dörzshatású tisztítószerrel, majd puha ruhával törölje
szárazra; ne használjon durva dörzshatású anyagokat
és éles fém kaparókéseket, melyek megkarcolhatják a
felületet és az üveg törését is okozhatják!
Alaposabb tisztításhoz a sütõ ajtaja levehetõ.
1. nyissa ki teljesen az ajtót (lásd ábra);
2. emelje meg és forgassa el a két csuklós pánton
lehelyezkedõ kallantyút (lásd ábra);
nem végzik el.
A lámpa cseréje
A sütõt megvilágító lámpa kicseréléséhez:
1. Csavarozza ki a lámpatartó üveg fedelét.
2. Csavarja ki a
lámpát és cserélje
ki egy
ugyanolyanra:
teljesítmény: 25
W, típus: E14.
3. Szerelje vissza
a fedelet (lásd
ábra).
A gördülõ sín készlet összeszerelése
A gördülõ sínek összeszereléséhez:
1. Csavarozza ki a két A
csavart (lásd ábra). Ha a
sütõ öntisztuló
panelekkel van ellátva,
A
A
2. Cserélje ki az A csavarokat a készletben található
csavarokkal és ékekkel (B+C).
azokat most szét kell
szednie.
F
3. fogja meg az ajtót a két
külsõ szélén, lassan, nem
teljesen csukja vissza. Nyomja
le a kallantyúkat F, majd húzza
maga felé az ajtót leemelve a
pántokról (lásd ábra). Helyezze
vissza az ajtót a fenti folyamatot
visszafele elvégezve.
A tömítések ellenõrzése
Rendszeresen ellenõrizze a sütõajtó körüli tömítések
állapotát. Ha sérülést vesz észre, forduljon a
legközelebbi márkaszervizhez (lásd Szerviz)!
Javasoljuk, hogy ne használja a sütõt, amíg a javítást
B
C
3. Csavarozza be az új B csavarokat és a hozzátartozó
C ékeket, szerelje vissza az öntisztuló paneleket is.
4. Rögzítse a vezetõsín
két D tartófoglalatát a
sütõ falain elhelyezkedõ
megfelelõ lyukakba (lásd
ábra). A bal
vezetõsínhez tartozó
D
5. Végül illessze a vezetõsínt a C ékre.
6. Ne helyezze be a gördülõ síneket az 5-ös helyzetbe!.
lyukak fent
helyezkednek el, míg a
jobb oldalihoz tartozó
lyukak alul.
36
Page 37

Pokyny pro pouití
TROUBA
GB
HU
Magyar, 28 Cesky, 37
TR
Türkçe,10
CZ
FZ 612 C.2
FZ 612 C.2 IX
DK
Dansk, 19English, 1
Obsah
CZ
Instalace, 38-39
Uloení do provozní polohy
Elektrické zapojení
títek sjmenovitými údaji
Popis zarízení, 40
Celkový pohled
Ovládací panel
Sputení a pouití, 41
Sputení trouby
Pouití casovace
Programy, 42-43
Pecicí programy
Praktické rady pro pecení
Tabulka pecení
Opatrení a rady, 44
Základní bezpecnost
Likvidace
Úspora energie a ohled na ivotní prostredí
Servisní sluba
Údrba a péce, 45
Vypnutí elektrického proudu
Citení zarízení
Citení dvírek
Výmena árovky
Montá sady vodicích lit
Page 38

Instalace
CZ
Je velice duleité tento návod uschovat, aby mohl být
kdykoli konzultován. Vprípade prodeje, odevzdání
zarízení nebo pri stehování se ujistete, e návod
zustane spolu se zarízením, aby mohl informovat
nového vlastníka o cinnosti a prísluných
upozorneních.
Pozorne si prectete uvedené pokyny: Jsou zdrojem
duleitých informací týkajících se instalace, pouití a
bezpecnosti.
Uloení do provozní polohy
Obaly nejsou hrackami pro deti a je treba je odstranit
vsouladu snormami pro separovaný sber odpadu (viz
Opatrení a rady).
Instalace musí být provedena odborne kvalifikovaným
personálem podle uvedených pokynu. Nesprávne
provedená instalace mue zpusobit kody na majetku
a ohroení zdraví osob a zvírat.
Vestavení
K zajitení správné cinnosti zarízení je treba, aby mel
nábytek, do kterého bude zarízení vestaveno, vhodné
vlastnosti:
Ventilace
Aby byla zajitena vhodná ventilace, je treba odstranit
zadní stenu úloného prostoru. Doporucuje se
nainstalovat troubu tak, aby se opírala o dve drevené
lity nebo o rovnou plochu sotvorem nejméne 45 x
560 mm (viz obrázky).
45 mm.
560 mm.
Vystredení a upevnení
Seridte 4 patky umístené na bocních stranách trouby,
vblízkosti 4 otvoru na obvodovém rámu, podle tloutky
bocního panelu nábytku.
tloutka 20 mm: Odstrante
odnímatelnou cást patky (viz
obrázek);
Panely sousedící stroubou musí být zmateriálu
odolného vuci teplu;
vprípade nábytku zdýhovaného dreva musí být
pouité lepy odolné vuci teplotám do 100 °C;
pri vestavení trouby pod stul (viz obrázek) nebo do
skrínového sloupu je treba, aby mel nábytek, do
kterého bude zarízení vestaveno, následující
rozmery:
567 mm.
45 mm.
558 mm.
593 mm.
23 mm.
595 mm.
5 mm.
595 mm.
545 mm.
24 mm.
Po vestavení zarízení nesmí být umonen dotek
elektrických cástí.
Údaje o spotrebe, uvedené na títku sjmenovitými
údaji, byly namereny pri tomto druhu instalace.
tloutka 18 mm: Pouijte
drákování pripravené
výrobcem (viz obrázek);
tloutka 16 mm: Pouijte
druhou dráku (viz obrázek).
Upevnení zarízení knábytku: Otevrete dvírka trouby a
zaroubujte 4 rouby do dreva do 4 otvoru
vobvodovém rámu.
Vechny soucásti, které zarucují bezpecnost, je treba
upevnit tak, aby je nebylo moné odstranit bez pouití
nástroje.
38
Page 39

Elektrické zapojení
Trouby vybavené trojilovým napájecím kabelem jsou
uzpusobeny pro cinnosti se strídavým proudem,
napetím a frekvencí uvedenými na títku sjmenovitými
údaji (viz pod).
Montá napájecího kabelu
1. Otevrete svorkovnici,
a to tak, e
roubovákem
nadzvednete bocní
lamely krytu: potáhnete
a otevrete kryt
(viz obrázek).
2. Príprava napájecího
kabelu: Odroubujte
roub kabelové
príchytky a tri rouby
kontaktu L-Nupevnete vodice pod
hlavy roubu. Dodrujte
pritom barevné oznacení
NL
vodicu modrý (N),
hnedý (L), lutozelený
(viz obrázek).
3. Upevnete kabel do prísluné kabelové príchytky.
4. Zavrete kryt svorkovnice.
Pripojení napájecího kabelu doelektrické síte
Na kabel namontujte normalizovanou zástrcku,
vhodnou pro proudový odber, který je uveden na títku
sjmenovitými údaji (viz na boku).
Vprípade prímého zapojení do síte je treba mezi
zarízení a sít zapojit omnipolární stykac sminimální
rozpínací vzdáleností kontaktu 3 mm, vhodný pro daný
proudový odber a vyhovující platným normám (zemnicí
vodic nesmí být stykacem preruen). Napájecí kabel
musí být umísten tak, aby teplota ádné jeho cásti
nepresáhla teplotu prostredí o 50 °C.
Pracovník, který provádí instalaci, odpovídá za
správnost elektrického zapojení a za dodrení
bezpecnostních norem.
a poté
Pred zapojením se ujistete, e:
Je zásuvka rádne uzemnena a odpovídá zákonným
predpisum;
je zásuvka schopna snáet proudový odber
odpovídající maximálnímu výkonu zarízení,
uvedenému na títku sjmenovitými údaji (viz níe);
se napájecí napetí pohybuje vrozmezí uvedeném
na títku sjmenovitými údaji (viz níe);
je zásuvka kompatibilní se zástrckou zarízení.
Vopacném prípade vymente zásuvku nebo
zástrcku; nepouívejte prodluovací kabely ani
rozvodky.
Po ukoncení instalace zarízení musí zustat elektrický
kabel a elektrická zásuvka snadno prístupné.
Kabel se nesmí ohýbat ani stlacovat.
Kabel musí být pravidelne kontrolován a dle potreby
vymenen výhradne autorizovanými techniky (viz
Servisní sluba).
Firma neponese ádnou odpovednost za
nedodrení techto predpisu.
ŠTÍTEK S JMENOVITÝMI ÚDAJI
Rozmìry modelù
s vyjímatelnými
vodicími lištami
Kapacita modelù
s vyjímatelnými
vodicími lištami
Elektrické zapojení
ENERGETICKÝ
ŠTÍTEK
šíøka 37,5 cm
výška 32 cm
hloubka 41,5 cm
50 l
napìtí 230-240V ~ 50/60Hz
maximáln í p øíkon 2800-3000W
Smìrnice 2002/40/ES o
oznaèování elektrických trub.
Norma EN 50304
Energetická spotøeba Pøirozená
konvekce – funkce ohøevu:
Klasický ohøev; Energetická
spotøeba
Prohlášení o tøídì Nucená
konvekce – funkce ohøevu:
Trouba na mouèníky.
Toto zaøízení je ve shodì
s následujícími smìrnicemi
Evropské unie: 73/23/EC
z 19.02.73 (Nízké napìtí) ve
smyslu následných úprav 89/336/EC z 03.05.89
(Elektromagnetická kompatibilita)
ve smyslu následných úprav 93/68/EC z 22.07.93 ve smyslu
následných úprav.
2002/96/EC
CZ
39
Page 40

Popis zarízení
CZ
Celkový pohled
Ovládací panel
Úroven ROTU
Úroven SBERNÉ NÁDOBY
Ovládací panel
Otocný knoflík
VOLBY
PROGRAMU
Otocný
knoflík
CASOVACE*
Vodicí LITY
jednotlivých úrovní
poloha 5
poloha 4
poloha 3
poloha 2
poloha 1
Otocný knoflík
TERMOSTATU
Kontrolka
TERMOSTATU
Je soucástí pouze nekterých modelu.
*
40
Page 41

Sputení a pouití
Pri prvním zapnutí vám doporucujeme, abyste nechali
troubu beet naprázdno pribline na pul hodiny s
termostatem nastaveným na maximu a se zavrenými
dvírky. Poté vypnete troubu, zavrete dvírka trouby a
vyvetrejte místnost. Zápach, který ucítíte, je zpusoben
vyparováním látek pouitých na ochranu trouby.
Sputení trouby
1. Zvolte poadovaný pecicí program prostrednictvím
otocného knoflíku VOLBY PROGRAMU.
2. Zvolte poadovanou teplotu otácením otocného
knoflíku TERMOSTATU. Seznam druhu pecení a
prísluných doporucených teplot je moné konzultovat
vTabulce pecení (viz Programy).
3. Rozsvícená kontrolka TERMOSTATU poukazuje na
to, e probíhá ohrev na nastavenou teplotu.
4. Behem pecení je stále moné:
- Menit pecicí program prostrednictvím otocného
knoflíku VOLBY PROGRAMU;
- menit teplotu prostrednictvím otocného knoflíku
TERMOSTATU;
- preruit pecení pretocením otocného knoflíku
PROGRAMU do polohy 0.
Osvetlení trouby
Rozsvecuje se otocením otocného knoflíku VOLBY
PROGRAMU do polohy
výberu pecicího programu.
. Zustane rozsvíceno po
Pouití casovace*
1. Predevím je treba natáhnout bzucák, a to otocením
otocného knoflíku CASOVACE témer o jednu celou
otácku ve smeru hodinových rucicek.
2. Poadovaná doba se nastavuje jeho pootocením
smerem zpet, proti smeru hodinových rucicek, do
polohy, ve které bude poadovaný pocet minut na
otocném knoflíku CASOVACE odpovídat pevné rysce
na ovládacím panelu.
3. Casovac slouí jako pocitadlo minut: Po uplynutí
nastavené doby vydá akustický signál.
Casovac neslouí kovládání zapínání a vypínání
trouby.
CZ
Nikdy nepokládejte na dno trouby ádné predmety,
protoe by mohlo dojít kpokození smaltu.
Nádoby kladte pokadé na dodaný rot.
Chladicí ventilace
Nekteré modely jsou vybaveny ventilátorem,
umonujícím sníit okolní teplotu. Tento vytvárí proud
vzduchu, který vystupuje mezi ovládacím panelem a
dvírky trouby.
Po ukoncení pecení zustane ventilátor vprovozu a
do úplného vychlazení trouby.
Je soucástí pouze nekterých modelu.
*
41
Page 42

Programy
CZ
Pecicí programy
U vech programu je moné nastavit teplotu
vrozmezí od 60 °C do MAX., svýjimkou:
GRILU (doporucuje se pouze nastavení na hodnotu
MAX.);
GRATINOVÁNÍ (doporucuje se neprekrocit teplotu
200 °C).
Program KLASICKÁ TROUBA
Budou aktivovány dva topné clánky, spodní a horní. Pri
klasickém pecení je lépe pouívat pouze jednu úroven:
Výsledkem pouití více úrovní je nerovnomerné
rozloení teploty.
Program MULTIFUNKCNÍ OHREV
Dojde kaktivaci topných clánku (horní, spodní a
kruhový) a zapnutí ventilátoru. Vzhledem ktomu, e je
teplo stálé vcelé troube, vzduch jídlo propéká a pece
do ruova rovnomerne na vech místech. Je moné
pouít a dve úrovne soucasne.
Program TROUBA NA MOUCNÍKY
Slouí kzapnutí zadního topného clánku a kesputení
ventilátoru scílem zajistit uvnitr trouby jemné a
rovnomerné teplo. Tento program je vhodný pro pecení
jemných jídel (napr. moucníku, které potrebují
vykynout) a kpríprave cajového peciva na trech
úrovních soucasne.
Praktické rady pro pecení
Pri pecení sventilací nepouívejte úrovne 1 a 5: Jsou
toti vystaveny prímému pusobení teplého vzduchu a
mohla by se na nich spálit jemná jídla.
Pri pouití pecicích programu GRIL a GRATINOVÁNÍ
umístete na úroven 1 sbernou nádobu na zachycení
zbytku zpecení (omácek a/nebo tuku).
MULTIFUNKCNÍ OHREV
Pouijte úrovne 2 a 4 a na úroven 2 umístete jídla,
která vyadují více tepla.
Sbernou nádobu umístete dolu a rot nahoru.
Program GRIL
Slouí kzapnutí horního topného clánku.
Vysoká teplota a prímý ohrev grilu se doporucují pri
pecení potravin, které vyadují vysokou povrchovou
teplotu. Grilujte pri zavrených dvírkách.
Program GRATINOVÁNÍ
Slouí kzapnutí horního topného clánku a ke sputení
ventilátoru. Pøedstavuje spojení jednosmìrného
vyzaøování tepla svynuceným obìhem vzduchu uvnitø
trouby. Díky tomu je moné dosáhnout vyího
prùniku tepla bez spálení povrchu potravin. Grilujte pøi
zavøených dvíøkách.
Program TROUBA NA PIZZU
Slouí kzapnutí spodního a kruhového topného clánku
a ke sputení ventilátoru. Tato kombinace umonuje
rychlý ohrev trouby svelkým prísunem tepla, preváne
zespodu. Vprípade pouití více úrovní najednou je
treba vpolovine pecení vzájemne vymenit jejich
polohu.
GRIL
Umístete rot na úroven 3 nebo 4 a potraviny ulote
do stredu rotu.
Doporucuje se nastavit maximální energetickou
úroven. Nelekejte se, kdy si povimnete, e horní
topný clánek nezustává nepretrite zapnutý: Jeho
cinnost je ovládána termostatem.
TROUBA NA PIZZU
Pouijte lehkou hliníkovou pánev a ulote ji na rot z
prísluenství.
Pri pouití sberné nádoby se doba pecení prodlouí,
a proto steí pripravíte krupavou pizzu.
Pri príprave pizzy svelkým mnostvím sloek
doporucujeme pridat mozzarellu a vpolovine doby
pecení.
42
Page 43

Tabulka pecení
Programy Potraviny
Kachna
Klasická
trouba
Multifunkèní
ohøev
Gril
Gratinování
Trouba na
pizzu
Trouba na
mouèníky
Peèené telecí nebo hovìzí
Peèené vepøové
Sušenky (z køehkého tìsta)
Koláèe
Pizza (na 2 úrovních)
Lasagne
Jehnìèí
Peèené kuøe + brambory
Makrela
Chlebíèek s rozinkami
Vìtrníky (na 2 úrovních)
Sušenky (na 2 úrovních)
Jemný piškot (na 1 úrovni)
Jemný piškot (na 2 úrovních)
Slané peèivo
Platýzi a sépie
Šašliky z kalamárù a krevet
Filé z tresky
Grilovaná zel e nin a
Telecí biftek
Kotlety
Hamburger
Makrely
Toast
Grilované kuøe
Sépie
Pizza
Peèené telecí nebo hovìzí
Kuøe
Koláèe
Ovocný koláè
Chlebíèek s rozinkami
Piškotové tìsto
Plnìné palaèinky (na 2 úrovních)
Chlebíèky (na 2 úrovních)
Slané peèivo z lístkového
sýrového tìsta (na 2 úrovních)
Vìtrníky (na 3 úrovních)
Sušenky (na 3 úrovních)
Snìhové pusinky (na 3 úrovních)
Hmotnost
(kg)
1
1
1
1
1
1
1
1+1
1
1
0.5
0.5
0.5
1
1.5
1
1
1
1
1
1
1
1
è. 4
1.5
1.5
0.5
1
1
0.5
1
0.7
0.5
1.2
0.6
0.4
0.7
0.7
0.5
Poloha
úrovní
3
3
3
3
3
2 a 4
3
2
2 a 4
2
2
2 a 4
2 a 4
2
2 a 4
3
4
4
4
3 nebo 4
4
4
4
4
4
2
2
3
2
2 nebo 3
3
2 nebo 3
3
3
2 a 4
2 a 4
2 a 4
1 a 3 a 5
1 a 3 a 5
1 a 3 a 5
Pøedehøátí
(minuty)
15
15
15
15
15
15
10
10
15
10
10
10
10
10
10
15
5
5
5
5
5
5
5
5
5
5
5
15
10
10
15
15
15
15
15
15
15
15
15
15
Doporuèená
teplota
200
200
200
180
180
230
180
180
200
180
170
190
180
170
170
200
MAX
MAX
MAX
MAX
MAX
MAX
MAX
MAX
MAX
200
200
220
220
180
180
180
180
160
200
190
210
180
180
90
CZ
Doba
peèení
(minuty)
65-75
70-75
70-80
15-20
30-35
15-20
30-35
40-45
60-70
30-35
40-50
20-25
10-15
15-20
20-25
25-30
8-10
6-8
10
10-15
15-20
15-20
7-10
15-20
2-3
55-60
30-35
15-20
25-30
60-70
20-30
40-45
40-50
25-30
30-35
20-25
15-20
20-25
20-25
180
43
Page 44

Opatrení a rady
CZ
Zarízení bylo navreno a vyrobeno vsouladu
smezinárodními bezpecnostními normami. Tato upozornení
jsou uvádena zbezpecnostních duvodu a je treba si je
pozorne precíst.
Základní bezpecnost
Toto zarízení bylo navreno pro neprofesionální pouití
uvnitr bytu/domu.
Zarízení nesmí být nainstalováno vexteriéru, a to ani
vprípade, kdy se jedná o chránený prostor, protoe jeho
vystavení deti nebo bouri je mimorádne nebezpecné.
Pri manipulaci se zarízením pokadé pouívejte prísluné
rukojeti umístené po bocích trouby.
Nedotýkejte se zarízení bosýma nohama ani mokrýma
nebo vlhkýma rukama ci nohama.
Zarízení se musí pouívat kpecení potravin dospelými
osobami, a to dle pokynu uvedených vtomto návodu.
Behem pouití zarízení se topné clánky a nekteré
cásti dvírek trouby zahrívají na vysokou teplotu.
Dávejte pozor, abyste se jich nedotkli, a udrujte
vdostatecné vzdálenosti deti.
Zabrante tomu, aby se napájecí kabely dalích
elektrospotrebicu dostaly do styku steplými soucástmi
trouby.
Vprípade poruchy se vádném prípade nepokouejte
dostat kvnitrním cástem ve snaze je opravit. Obratte se
na servisní slubu (viz Servisní sluba).
Nepokládejte na otevrená dvírka trouby teké predmety.
Likvidace
Likvidace obalového materiálu: Obaly zlikvidujte vsouladu
smístními predpisy za úcelem jejich recyklace.
Evropská smìrnice 2002/96/EC o odpadních elektrických
a elektronických zaøízeních (OEEZ) stanovuje, e staré
domácí elektrické spotøebièe nesmí být odkládány do
bìného netøídìného domovního odpadu. Staré
spotøebièe musí být odevzdány do oddìleného sbìru, a
to za úèelem recyklace a optimálního vyuití materiálù,
které obsahují, a z dùvodu pøedcházení negativním
dopadùm na lidské zdraví a ivotní prostøedí. Symbol
pøekrtnuté popelnice na výrobku vás upozoròuje na
povinnost odevzdat zaøízení po skonèení jeho ivotnosti
do oddìleného sbìru.
Spotøebitelé mohou stará zaøízení odevzdávat na
veøejných nebo jiných obecních sbìrných místech, nebo,
pokud tak umoòuje národní legislativa, vracet je prodejci,
kde si kupují podobný nový výrobek.
Vichni vìtí výrobci domácích elektrospotøebièù se
aktinì podílejí na budování systému sbìru a odstraòování
elektroodpadu.
Úspora energie a ohled na ivotní prostredí
Nezakrývejte ventilacní otvory a otvory pro únik tepla.
Pri otevírání dvírek uchopte rukojet uprostred: Na krajích
by mohla být horká.
Pri vkládání nebo vyjímání nádob pouívejte pokadé
ochranné rukavice urcené k pouití pri pecení.
Nevystýlejte dno trouby hliníkovou fólií.
Nevkládejte do trouby horlavý materiál: Vprípade
náhodného uvedení zarízení do cinnosti by se mohl
zapálit.
Kdy se zarízení nepouívá, pokadé se ujistete, e se
otocné knoflíky nacházejí vpoloze l/
Nevytahujte zástrcku ze zásuvky taháním za kabel, ale
tak, e uchopíte zástrcku.
Necistete troubu ani neprovádejte údrbu dríve, ne
vytáhnete zástrcku zelektrické síte.
¡.
Pri pouití trouby vobdobí od pozdního odpoledne a do
casných ranních hodin se podílíte na optimalizaci
spotreby elektrické energie.
Pri pecení vreimu GRIL a GRATINOVÁNÍ
doporucujeme péct pokadé pri zavrených dvírkách:
Výsledkem je krome lepího upecení také významná
úspora energie (pribline 10%).
Udrujte tesnení vcistém a funkcním stavu, aby dokonale
priléhala kdvírkum a nezpusobovala únik tepla.
Servisní sluba
Uvedte:
model zarízení (Mod.)
výrobní císlo (S/N)
Tyto informace jsou uvedeny na títku sjmenovitými údaji,
nacházejícím se na zarízení a/nebo na obalu.
44
Page 45

F
Údrba a péce
Vypnutí elektrického proudu
Pred jakoukoli operací odpojte zarízení ze síte
elektrického napájení.
Citení zarízení
Vnejí smaltované nebo nerezové cásti a pryová
tesnení je moné cistit houbou namocenou ve
vlané vode a neutrálním mýdlem. Vprípade
odstranování úporných skvrn pouijte specifické
cisticí prostredky. Doporucujeme po ocitení
opláchnout vetím mnostvím vody a vysuit.
Nepouívejte abrazivní prákové prostredky ani
korozivní látky.
Vnitrek trouby je treba vycistit po kadém pouití,
kdy je jete vlaný. Pouívejte teplou vodu a
cisticí prostredek a na záver osute jemným
hadrem. Vyhnete se pouití abrazivních
prostredku.
Pøísluenství se mùe umývat jako bìné nádobí i
vmyèce nádobí, svýjimkou vodicích lit.
Nikdy nepouívejte kèitìní zaøízení vysokotlaký
parní èistiè.
Citení dvírek
Dvíøka trouby èistìte houbou a neabrazivními
prostøedky a osute je jemným hadøíkem;
nepouívejte drsné abrazivní materiály ani zahrocené
kovové krabky, které by mohly pokrábat povrch a
zpùsobit prasknutí skla. Za úcelem dokonalejího
vycitení je moné provést demontá dvírek:
1. Úplne otevrete dvírka (viz obrázek);
2. nadzvednete a pootocte pácky nacházející se na
obou závesech (viz obrázek);
Servisní stredisko (viz Servisní sluba). Doporucuje
se nepouívat troubu a do provedení opravy.
Výmena árovky
Postup pri výmene árovky osvetlení trouby:
1. Zdráku árovky odroubujte sklenený kryt.
2. Vyroubujte
árovku a
nahradte ji jinou,
obdobnou: výkon
25 W, závit E 14.
3. Namontujte
zpet kryt (viz
obrázek).
Montá sady vodicích lit
Montá vodicích lit:
1. Odroubujte dva
rouby A (viz obrázek).
Kdy je trouba
A
A
2. Vymente rouby A za rouby a rozperky (B+C),
které jsou soucástí sady.
B
C
vybavena samocistícími
panely, nyní budou
docasne odmontovány.
CZ
F
3. uchopte dvírka na vnejích
bocních stranách a pomalu je
zavrete, ne vak úplne. Stlacte
dorazy F, poté potáhnete
dvírka smerem kvám a
vytáhnete je ze závesu (viz
obrázek). Pri zpetné montái
dvírek postupujte obrácene.
Kontrola tesnení
Pravidelne kontrolujte stav tesnení po obvodu dverí.
Vprípade jeho pokození se obratte na nejblií
3. Zaroubujte nové rouby B a prísluné rozperky C
a namontujte zpet také samocisticí panely.
4. Upevnete dve pera D
lity do prísluných
otvoru ve stenách
trouby (viz obrázek).
Otvory levé lity jsou
D
5. Na záver zastrcte litu do rozperky C.
6. Nevkládejte vodicí lity do polohy 5.
umísteny v horní cásti,
zatímco otvory pravé
lity se nacházejí
vespod.
45
Page 46

CZ
46
Page 47

CZ
47
Page 48

CZ
07/2006 - 195047991.01
XEROX BUSINESS SERVICES
48
 Loading...