

Page 1
Instruction booklet
GB
English, 1
FTCF 87B
P
Português, 19
Contents
Installation, 2
Where to put your dryer
Ventilation
Water drain
Electrical connection
Before you start using your dryer
Warnings, 3-4
General safety
To minimise the risk of fire
Maintenance and Care, 5-6
Switching off the electricity
Cleaning the filter after each cycle
Empty the water container after each cycle
Cleaning the condenser unit
Check the drum after each cycle
Cleaning the dryer
Dryer description, 7
The features
Control panel
GB
TUMBLE DRYER
This symbol reminds you to read this
This symbol reminds you to read this
booklet.
booklet.
! Keep this instruction booklet on hand in order to refer
! Keep this instruction booklet on hand in order to refer
to it when necessary. Take it with you when you
to it when necessary. Take it with you when you
move, and should you sell this appliance or pass it
move, and should you sell this appliance or pass it
on to another party, make sure that this booklet is
on to another party, make sure that this booklet is
supplied along with the dryer so that the new owner
supplied along with the dryer so that the new owner
may be informed about warnings and suggestions on
may be informed about warnings and suggestions on
how the appliance works.
how the appliance works.
! Read these instructions carefully; the following
! Read these instructions carefully; the following
pages contain important information on installation
pages contain important information on installation
and suggestions on how the appliance works.
and suggestions on how the appliance works.
The Display, 8
Start and programmes, 9-13
Choosing a programme
Programmes Table
The Controls
Laundry, 14
Sorting your laundry
Wash care labels
Drying times
Troubleshooting, 15
Service, 16
Spare Parts
Recycling and Disposal
Product data, 17
www.hotpoint.eu
1
Page 2
Installation
GB
Where to put your dryer
●
Place your dryer at a distance from gas
ranges, stoves, heaters, or cook tops
because flames can damage the
appliance.
Minimum gap 10mm
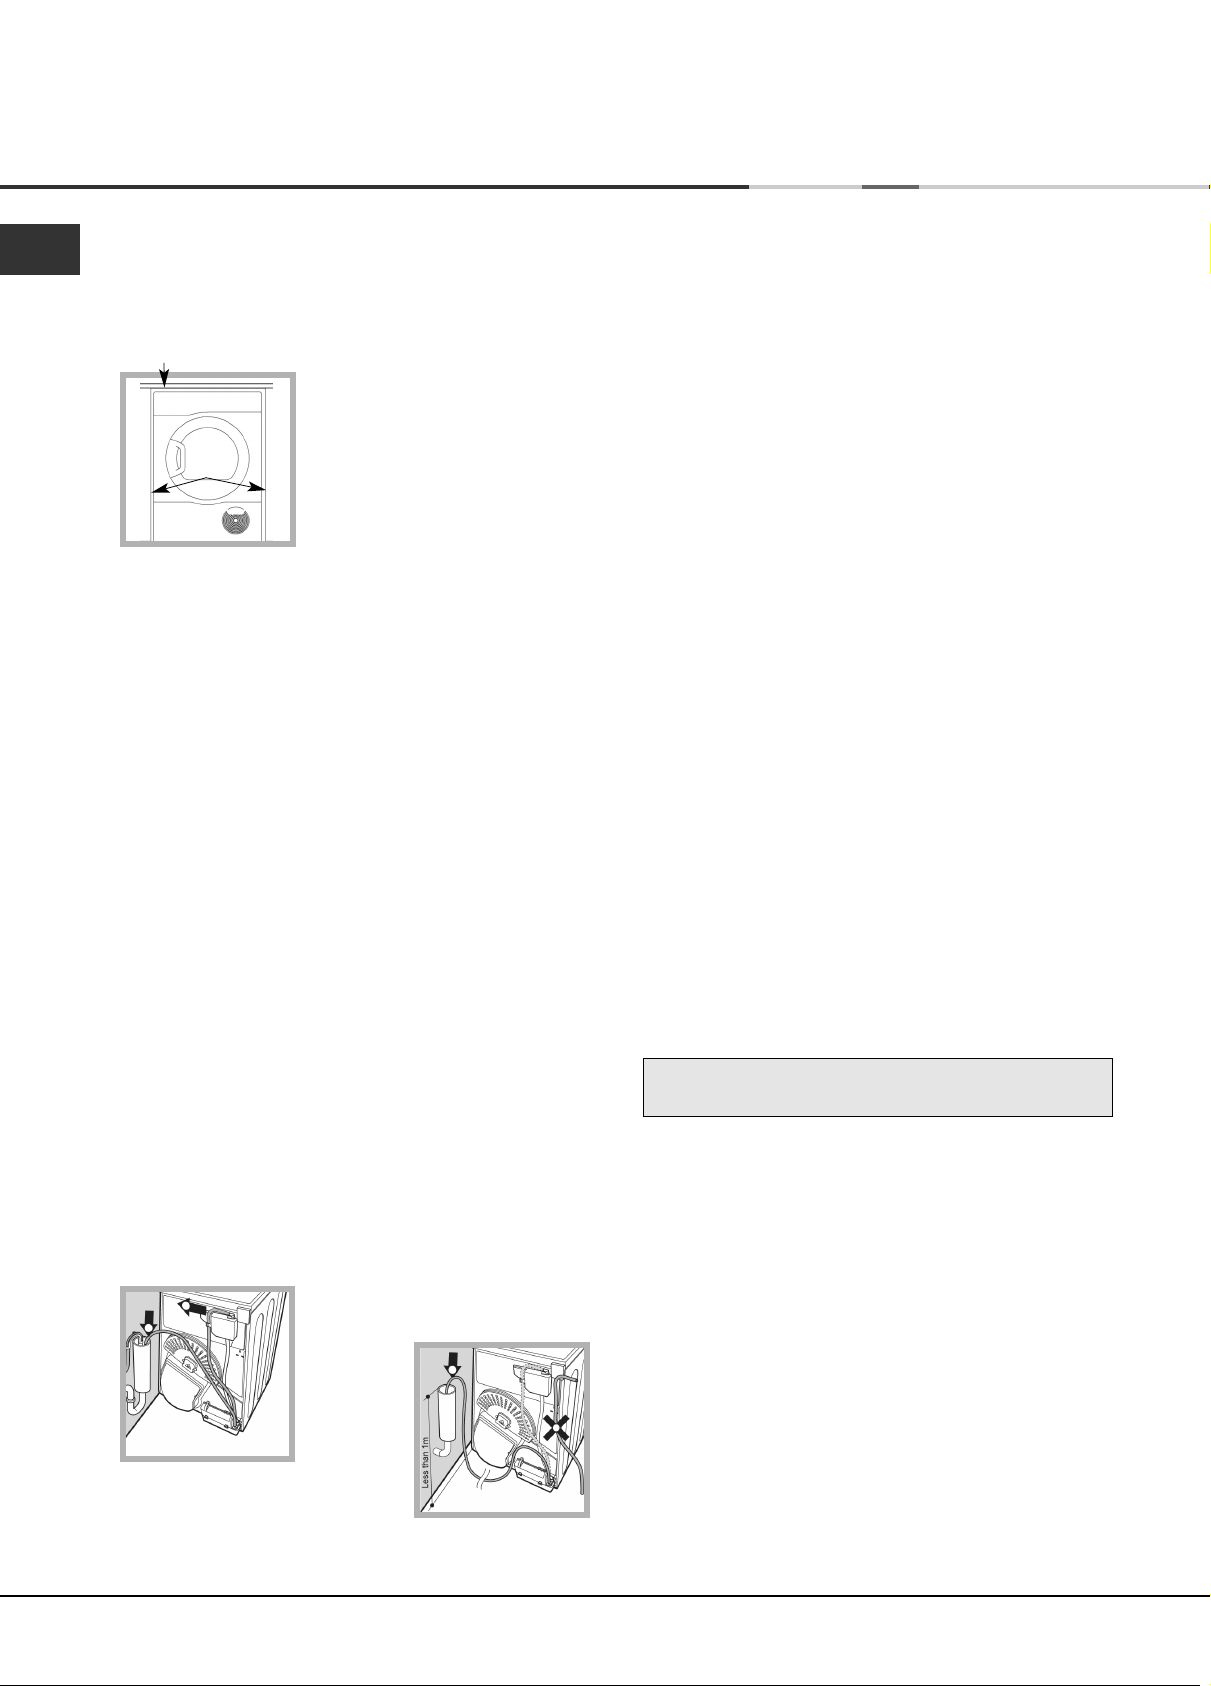
●
If you are going to
install the appliance
under a work counter,
be sure to leave a
Minimum gaps
15mm
10mm space between
the top and any other
objects on or above
the machine and a
15mm space between
the sides and lateral furnishings or walls. This
is to ensure proper air circulation.
The appliance must be installed with the
rear surface placed against a wall.
Ventilation
When the dryer is in use, there has to be adequate
ventilation. Make sure you put your dryer in an
environment that is not damp and has proper air
circulation throughout. Airflow around the dryer is
essential to condense the water produced during the
washing, the dryer will not operate efficiently in an
enclosed space or cupboard.
! If using the dryer in a small or cold room some
condensation could be experienced.
! We do not recommend that the dryer is
installed in a cupboard but the dryer must
never be installed behind a lockable door,
a sliding door or a door with a hinge on
the opposite side to that of the dryer door.
Electrical connections
Make sure of the following before you
insert the plug into the the electrical socket:
●
Make sure your hands are dry.
●
The socket must have an earth connection.
●
The socket must be able to sustain the
machines maximum power, which is
indicated on the rating label (see Dryer
Description).
●
Power voltage must be within the values
indicated on the rating label (see Dryer
Description).
●
The socket must be compatible with the
dryers plug. Should this not be the case,
replace the plug or the socket.
! The dryer must not be installed outdoors,
even if the space is sheltered. It can be
very dangerous if it is exposed to rain or
storms.
! Once installed, the dryers electrical wire
and plug must be within easy reach.
! Do not use extension cords.
! The power cord must not be bent or
squashed.
! The power cord should be regularly
checked. If the supply cord is damaged, it
must be replaced by the manufacturer, its
service agent or similarly qualified
persons in order to avoid a hazard. New or
longer power cords are supplied at an extra
charge by authorised dealers.
! The manufacturer denies any responsibility
should any of these rules not be followed.
Water drain
If your dryer is installed next to a drain the water can be
plumbed into this drain. This does away with the need to
empty the water container. If the dryer is stacked onto or
installed next to a washing machine it can share the same
drain.
The height of the drain must be less than 3' (1m) from the
bottom of the dryer.
Remove the existing hose from
position shown in picture A.
picture A
Then fit a suitable length of hose to
position shown in picture B.
! Make sure that the hose is not squashed or kinked when
the dryer is in its final location.
2
picture B
! If in doubt about any of the above consult a
qualified electrician.
Before you start using your dryer
Once you have installed your dryer and before you
use it, clean the inside of the drum to remove any dust
that could have accumulated during transport.
Maximum load
Natural fibres : 8 kg
Page 3
Warnings
! The appliance has been designed and
built according to international safety
standards.
These warnings are given for safety
reasons and must be followed carefully.
General safety
●
This appliance can be used by children
aged from 8 years and above and
persons with reduced physical, sensory
or mental capabilities, or lack of
knowledge if they are given supervision
or instruction concerning use of the
appliance in a safe way and understand
the hazards involved.
●
This tumble dryer has been designed for
home, and not professional use.
●
Do not touch the appliance while bare
foot or with wet hands or feet.
●
Unplug the machine by pulling on the
plug, not the cord.
●
After using the dryer, turn it off and
unplug it. Keep the door closed to make
sure that children do not use it as a toy.
●
Children should be supervised to ensure
that they do not play with the dryer.
●
Cleaning and user maintenance should
not be made by children without
supervision.
●
Children of less than 3 years should be
kept away from the appliance unless
continuously supervised.
●
The appliance must be installed
correctly and have proper ventilation.
The air intake at the front of the dryer
should never be obstructed (see
Installation).
●
Never use the dryer on carpeting where
the pile height would prevent air from
entering the dryer from the base.
●
Check to see if the dryer is empty before
loading it.
●
The back of the dryer could
become very hot. Never touch it
while in use.
●
Do not use the dryer unless the filter,
water container and condenser are
securely in place (see Maintenance).
●
Do not overload the dryer (see Laundry
for maximum loads).
●
Do not load items that are dripping wet.
●
Carefully check all instructions on
clothing labels (see Laundry).
●
Do not tumble dry large, very bulky
items.
●
Do not tumble dry acrylic fibres at high
temperatures.
●
Do not turn off the dryer when there are
still warm items inside.
●
Clean the filter after each use (see
Maintenance).
●
Empty the water container after each
use (see Maintenance).
●
Clean the condenser unit at regular
intervals (see Maintenance).
●
Do not allow lint to collect around the
dryer.
●
Never climb on top of the dryer. It could
result in damage.
●
Always follow electrical standards and
requirements (see Installation).
●
Always buy original spare parts and
accessories (see Service).
GB
3
Page 4

Warnings
GB
To minimise the risk of fire in your
tumble dryer, the following should be
observed:
●
Tumble dry items only if they have been
washed with detergent and water, rinsed
and been through the spin cycle. It is a
fire hazard to dry items that HAVE NOT
been washed with water.
●
Do not dry garments that have been
treated with chemical products.
●
Do not tumble dry items that have been
spotted or soaked with vegetable or
cooking oils, this constitutes a fire hazard.
Oil-affected items can ignite spontaneously,
especially when exposed to heat sources
such as a tumble dryer. The items become
warm, causing an oxidisation reaction with
the oil, Oxidisation creates heat. If the heat
cannot escape, items can become hot
enough to catch fire. Piling, stacking or
storing oil-effected items can prevent heat
from escaping and so create a fire hazard.
If it is unavoidable that fabrics containing
vegetable or cooking oil or those that have
been contaminated with hair care products
be placed in a tumble dryer they should
first be washed with extra detergent - this
will reduce, but not eliminate the hazard.
They should not be removed from the dryer
and piled or stacked while hot.
●
Do not tumble dry items that have
previously been cleaned in or washed in,
soaked in or soiled with petrol/gasoline,
dry cleaning solvents or other flammable
or explosive substances. Highly flammable
substances commonly used in domestic
environments including cooking oil,
acetone, denatured alcohol, kerosene,
spot removers, turpentine, waxes and
wax removers. Ensure these items have
been washed in hot water with an extra
amount of detergent before being dried
in the tumble dryer.
●
Do not tumble dry items containing foam
rubber (also known as latex foam), or
similarly textured rubber like materials.
Foam rubber materials can, when
heated, produce fire by spontaneous
combustion.
●
Fabric softener or similar products
should not be used in a tumble dryer to
eliminate the effects of static electricity
unless the practice is specifically
recommended by the manufacturer of
the fabric softener product.
●
Do not tumble dry undergarments that
contain metal reinforcements eg. bras
with metal reinforcing wires. Damage to
the tumble dryer can result if the metal
reinforcements come loose during drying.
●
Do not tumble dry rubber, plastic articles
such as shower caps or babies water
proof covers, polythene or paper.
●
Do not tumble dry rubber backed
articles, clothes fitted with foam rubber
pads, pillows, galoshes and rubber
coated tennis shoes.
●
Remove all objects from pockets, such
as lighters and matches.
! WARNING: Never stop the dryer before the end of the drying cycle unless all items are
quickly removed and spread out so that the heat is dissipated.
4
Page 5
Maintenance and Care
Switching off the electricity
! Unplug your dryer when not using it,
when cleaning it and during all
maintenance operations.
Clean the filter after each cycle
The filter is an important part of your dryer:
it accumulates lint and fluff that is formed
while drying.
When finished drying, clean the filter by
rinsing it under running water or with your
vacuum cleaner.
Should the filter become clogged up, the
airflow inside the dryer will be seriously
compromised: drying times lengthen and
you will consume more energy. It may also
damage your dryer.
The filter is found in front of the dryer trim
(see diagram on next page).
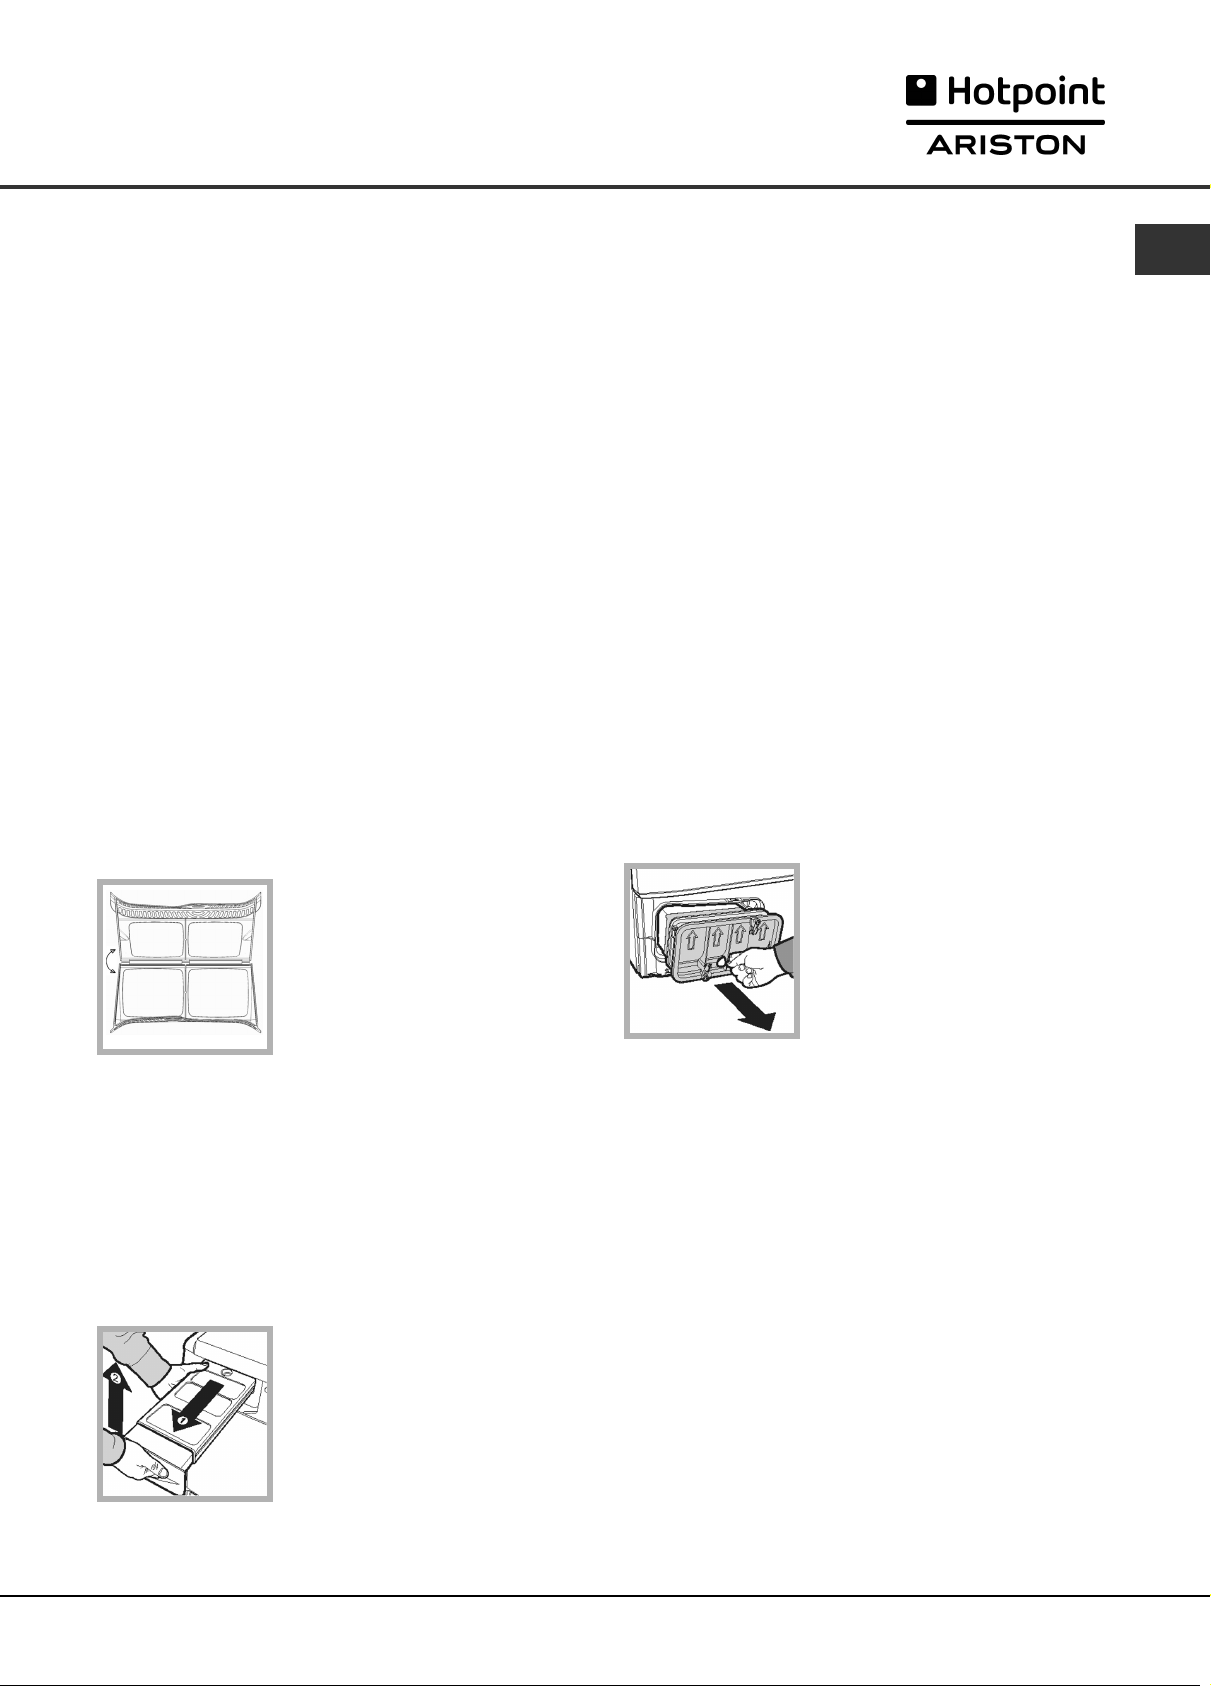
Removing the filter:
1. Pull the plastic grip of the filter upwards.
2. Open the filter and
clean the lint from the
inside.
3. Replace it correctly.
Ensure the filter is fully
located flush into the
tumble dryer trim.
4. Remove any lint that has built up on the
inside of the door and around the door
seal.
! Failure to empty the water container may cause
the following:
- The dryer will stop heating (so the load may still
be damp at the end of the drying cycle) (see The
Controls).
●
Priming the water collection system
When your dryer is new, the water container will not
collect water until the system is primed.
This will take 1 or 2 drying cycles. Once primed it will
collect water during every drying cycle.
Cleaning the condenser unit
Periodically (every month) remove the
condenser unit and clean any build up of
fluff from between the plates by rinsing it
under the tap with cold water.
This should be done with cold water from
the rear of the condenser.
Removing the condenser:
1.Unplug the dryer and open the door.
2.Pull open the condenser cover (see
diagram).
Release the three
catches by turning 90˚
counter-clockwise
then pull on the grip and
remove from the dryer.
Clean the surface of the seals and replace,
with the arrows pointing upwards making
sure that the catches have been secured.
GB
! Do not use the dryer without replacing
the filter.
Empty the water container after each
cycle
Pull the container out of the dryer
and remove either the small or
large cap and empty it into a
sink or other suitable drain.
Refit the cap and replace the
container securely.
! Always check and empty the container before you
start a new drying programme.
5
Page 6
GB
Maintenance and Care
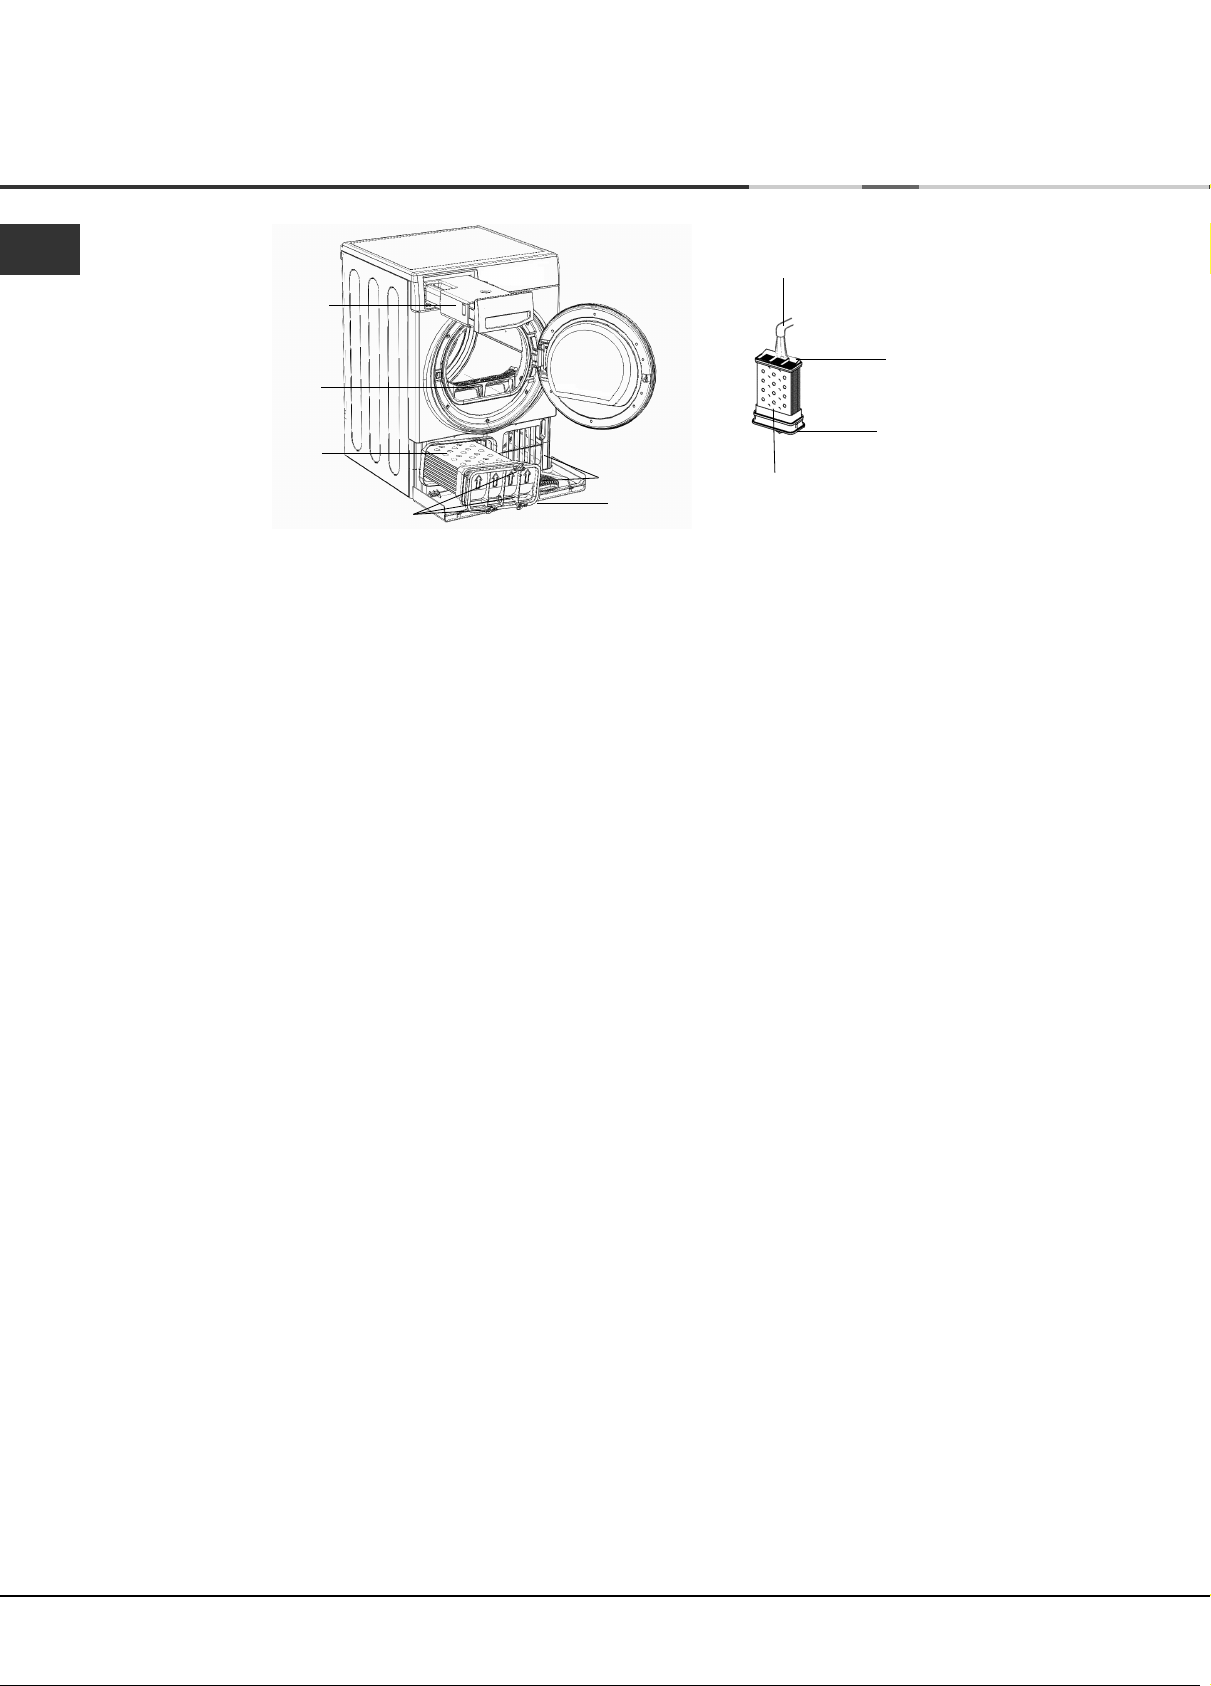
Water container
Filter
Condenser unit
Catches
Check the drum after each cycle
Turn the drum manually in order to remove small items
(handkerchiefs) that could have been left behind.
Cleaning the drum
! Do not use abrasives, steel wool or stainless steel
cleaning agents to clean the drum.
Ta p
Rear
Front
Air intake
Condenser cover
Condenser unit
Quick Tips
●
Remember to clean the door filter and
the condenser filter after each load.
●
Remember to empty the water container
after each load.
! Doing BOTH the above will keep your
appliance working at its BEST.
A coloured film may start to appear on the stainless
steel drum, this may be caused by a combination of
water and, or cleaning agents such as fabric conditioner
from the wash. This coloured film will not affect the
dryer performance.
Cleaning the dryer
●
External parts in metal or plastic and rubber parts
can be cleaned with a damp cloth.
●
Periodically (every 6 months) vacuum the front air
intake grille, to remove any build up of fluff, lint or
dust. Also to remove accumulation of fluff from the
front of the condenser and filter areas, clean
occasionally with a vacuum cleaner.
! Do not use solvents or abrasives.
! Have your dryer checked regularly by authorised
technicians to ensure electrical and mechanical safety
(see Service).
6
Page 7
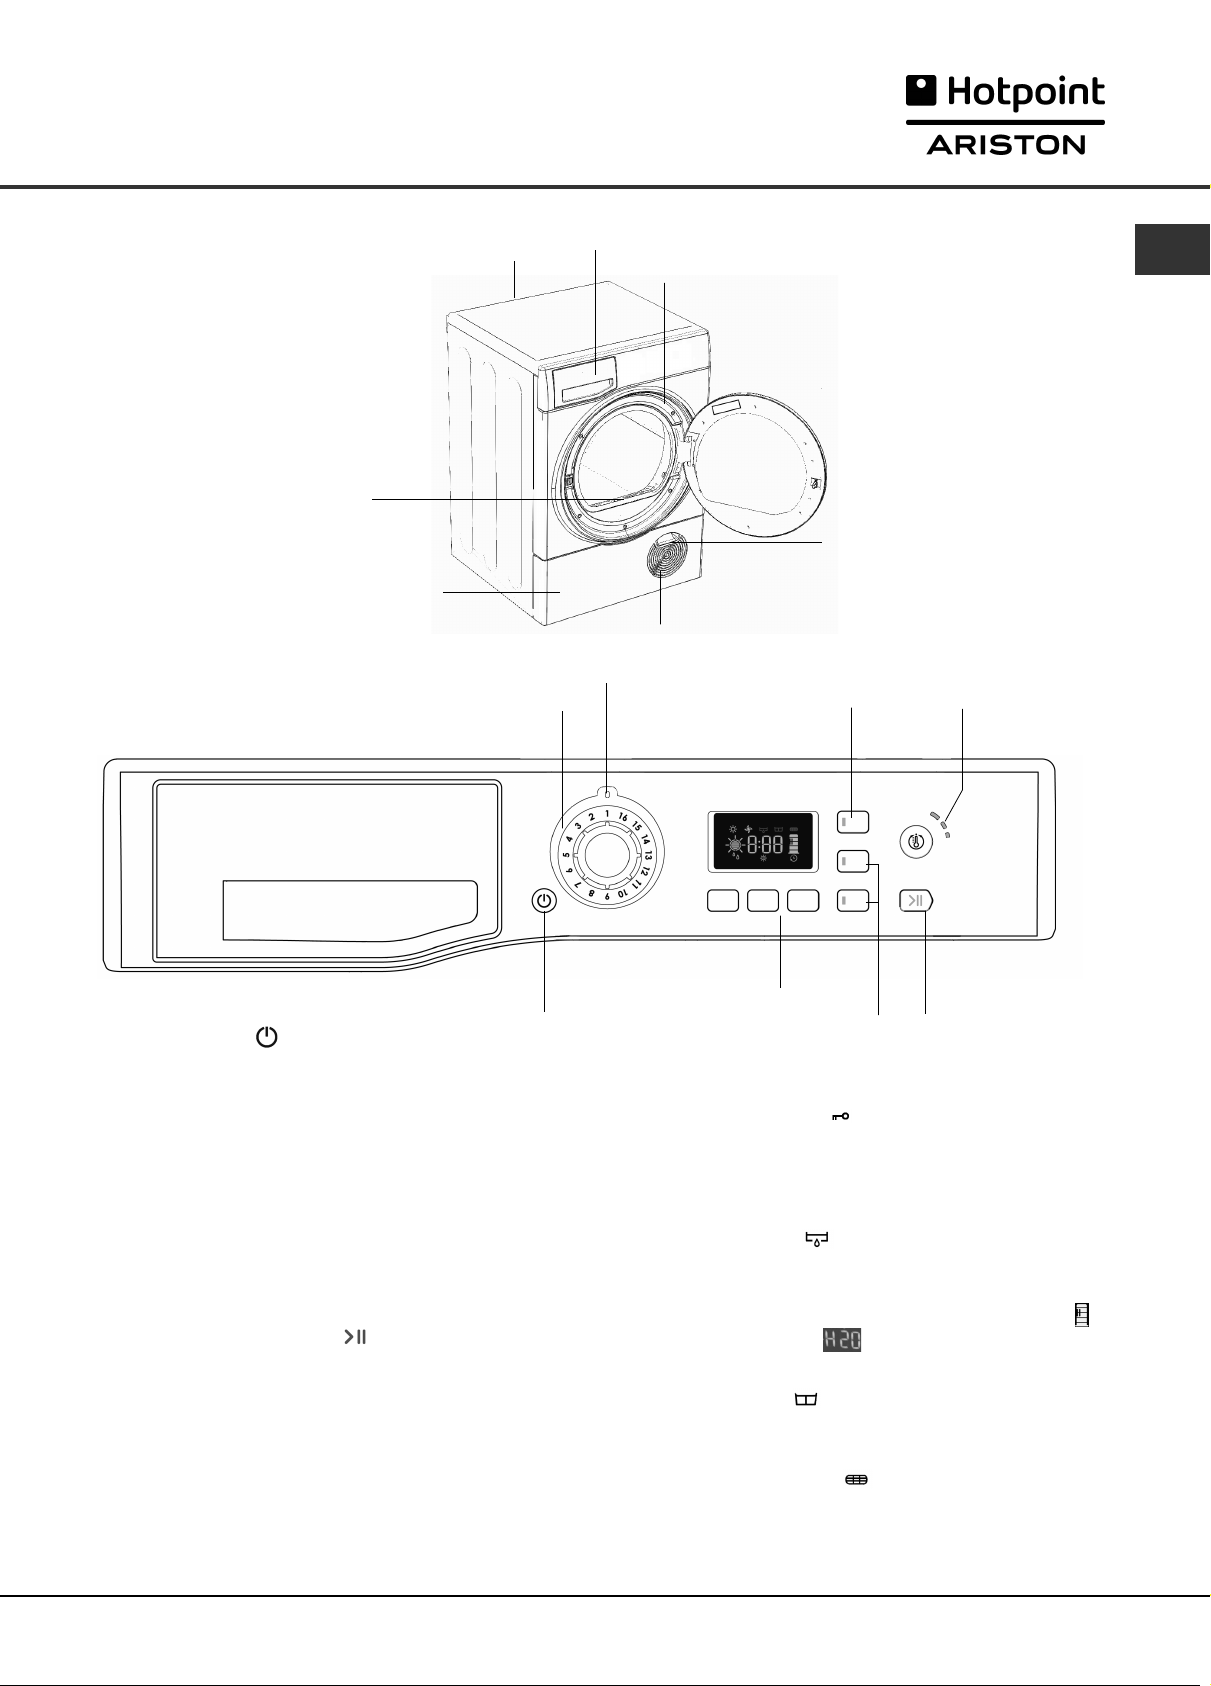
Dryer Description
The features
Control panel
Rating plate
Filter
Condenser cover
Indicator
PROGRAMME
knob
Water container
Model & Serial numbers
Air intake grille
Key Lock
Button & Light
GB
Condenser cover handle
(Pull to open)
HEAT LEVEL
Button & Lights
ON/OFF
Button
The ON/OFF button : If the dryer is running and this
button is pressed and held for more that 3 seconds the dryer
is turned off, it counts down 3, 2, 1, Off and the programme
is then cancelled.
Press and hold for more than 3 seconds and the dryer
reactivates.
The PROGRAMMES knob sets the programme: rotate it until
the indicator is pointing to the programme you want to select
(see Start and Programmes).
The OPTION buttons select available options for your
selected programme. The lights indicate that the option has
been selected (see Start and Programmes).
The START/PAUSE button/light starts a selected
programme. When you press this button there will be one
beep and the progress lights will flash to confirm the action.
When a programme is running, pressing this button in pauses
the programme and stops the dryer.
The light is green when programme is running, flashing amber
if the programme has been paused or flashing green if on
standby waiting to start a programme (see Start and
Programmes).
The Display Unit gives an indication of the drying or delay
time together with icons that light to give warning information
and show the status of your programmes progress.
Display Unit &
Selection Buttons
OPTION
Buttons & Lights
The three buttons below the display select ‘Automatic’ or
‘Timed Dry’ and if required a delayed start (see Start and
Programmes or The Display).
The Key Lock button/light : Press and hold this
button after selecting your programme and any options, the
light turns on. This prevents the programme settings from
being changed. When the light is lit, the other buttons are
disabled. Hold the button to cancel and the light will go out.
The Empty Water icon : signals that the water container
should be emptied. The display will take a few seconds to
update after replacing the empty water container, the dryer
must be running for this to happen (see The Controls).
Note: If the water container fills the ‘water container full ‘icon
flashes, the display shows , the heat is turned off and
your clothes will not dry.
The Clean Filter icon : gives a reminder before every
programme, that it is essential to clean the filter every time
the dryer is used (see Maintenance and Care).
The Clean Condenser icon : gives a reminder that it is
essential to clean the condenser at regular intervals (see
Maintenance and Care).
START/PAUSE
Button & Light
7
Page 8
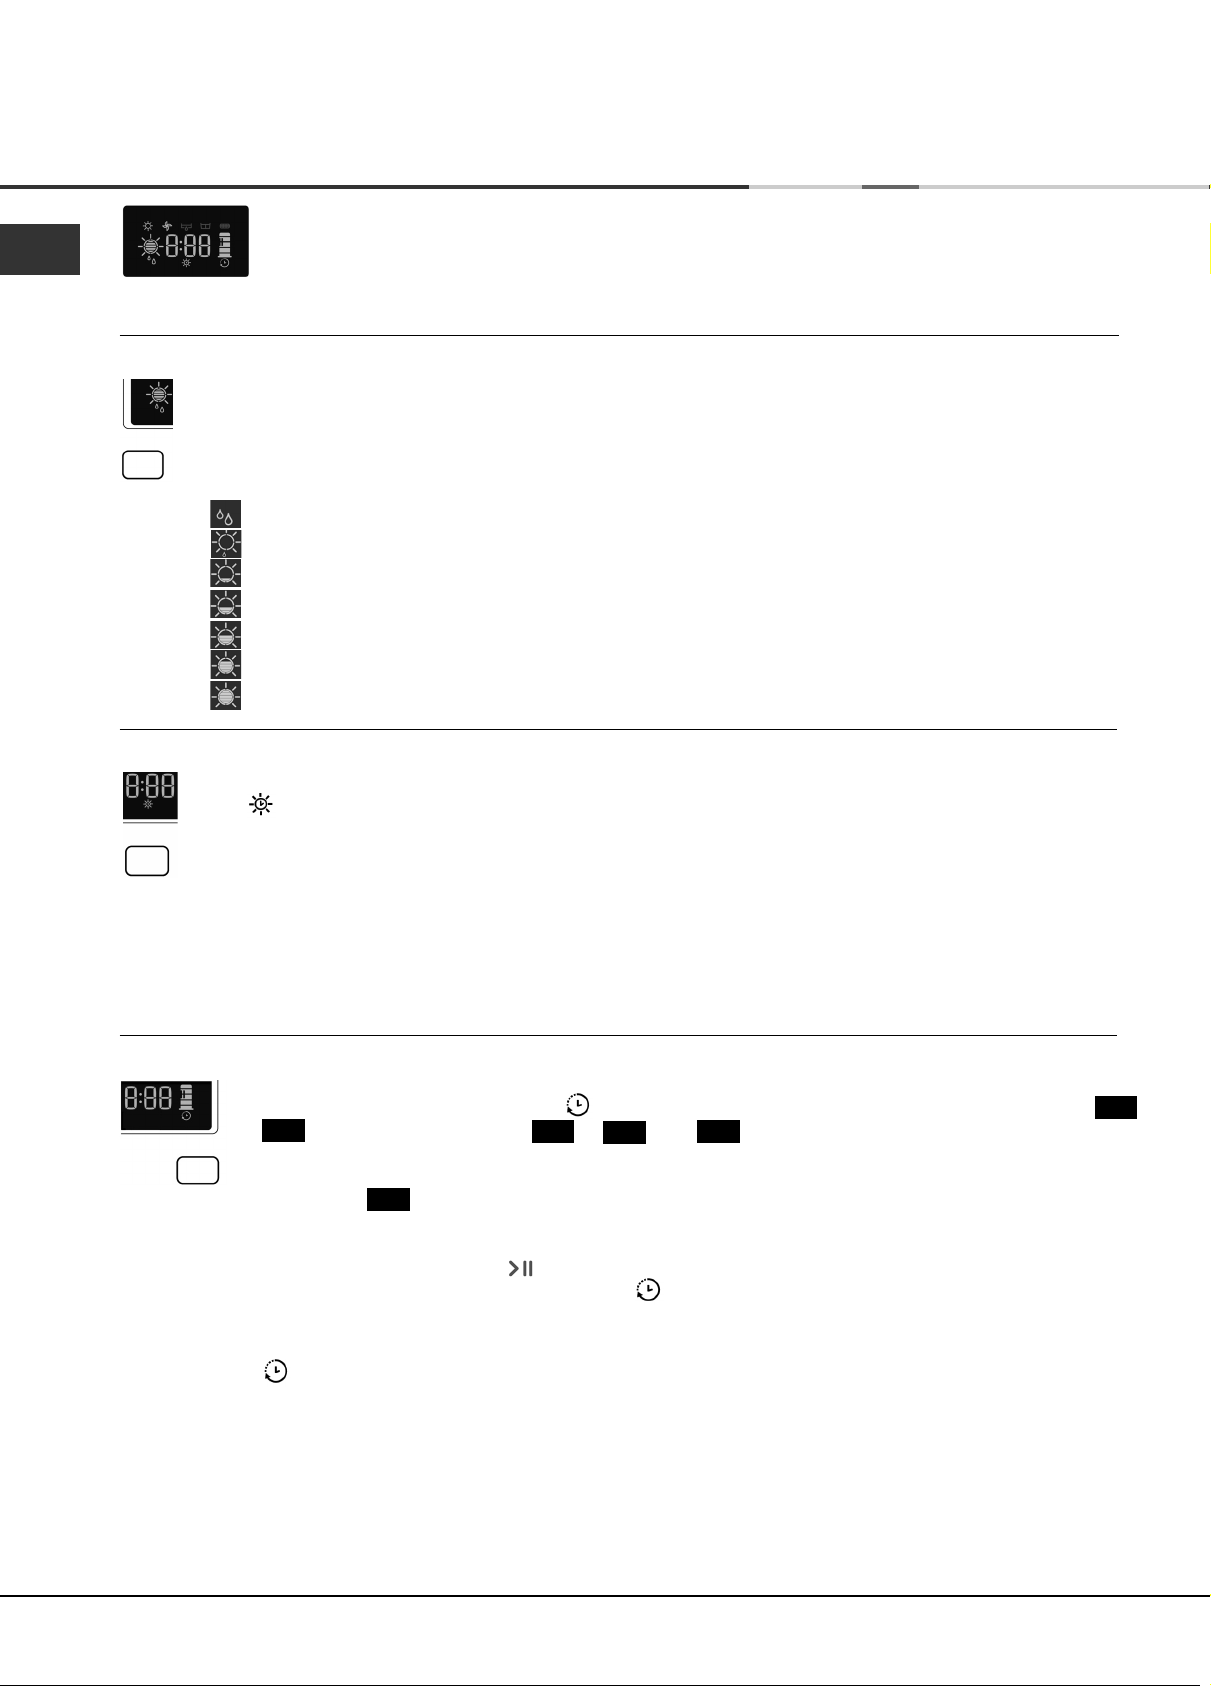
The Display
GB
The Display has three main functions, each with its corresponding button.
Dryness Sensing Levels
After selecting a programme that has a Sensor Dry option, press and release the button until the required
dryness sensing level is displayed. If the sensing option is not available with your selected programme, the
display will flash and the buzzer will beep three times.
! Some sensing programmes do not have all seven dryness level options available.
Dryness levels:
Damp Dry: Dries your items ready to be ironed using a machine or rotary ironer.
Iron Dry: Dries your items ready to be ironed with a hand iron.
Hanger Dry Plus: Dries your delicate items ready to be hanged for final drying.
Hanger Dry: Dries your items ready to be hanged for final drying.
Light Dry: Dries your delicate items ready to be put away.
Cupboard Dry: Dries your items ready to be put away.
Extra Dry: Dries your items ready to be worn.
Timed Dry
After selecting a programme that has a Timed Dry option, press the Timed Dry button and the Timed Dry
icon will light, the display will reduce the selected time each time you press and release this button
(see Start and Programmes). Each programme that has a timed option has different times available and
the selection of up to 11 drying times will also depend on the heat setting that you have selected.
Each press of the button decreases the drying time.
If you change your mind, press the Sensor Dry button and the sensing level options are available.
If the Timed Dry option is not available the display will flash and the buzzer will beep three times.
The selected time remains displayed after the programme starts and can be changed during the
programme if you wish.
Delay Timer
After selecting a programme that has a Delay Timer option, a delay start time can be selected.
Each press of the Delay Timer button advances the delay setting in 30 minutes increments from
to and then increments from to then and then after five seconds cancels the
9:30
delay.
For delays of 10 hours or more the display counts down the time in hours until 10 hours, then the
display shows and then continues to count down in minutes.
For delays 9 hours or less the display shows hours and minutes and then counts down in minutes for
all of the delay.
After the START/PAUSE button is pressed the delay time can be changed or cancelled.
When the delay period finishes the delay icon is off and the Time to End is displayed.
Note: During this period the clothes will tumble occasionally to help prevent creases developing.
9.59
10h
24h
OFF
Time to End
If the delay icon is off the time displayed is the Time to End for the programme running.
When timed programmes are selected the time displayed throughout the cycle is the actual time remaining.
When Automatic programmes are selected the time displayed is an estimate of the time remaining: When the
programme is selected the display shows the time required to dry a full load. The time remaining is constantly
monitored during the drying cycle and is updated to show the best forecast.
The Time to End is displayed in hours and minutes and counts down each minute.
The colons between the hours and minutes in the display flash to show the time is counting down.
The display also shows if there is a problem with your dryer, if this occurs the display will show F followed by a fault
code number, the three option lights and the START/PAUSE light will also flash amber (see Troubleshooting).
0:30
8
Page 9

Start and Programmes
Choosing a programme
1. Plug the dryer into the electrical socket.
2. Sort your laundry according to fabric type (see
Laundry).
3. Open the door and make sure the filter is clean
and in place and the water container is empty and
in place (see Maintenance).
4. Load the machine and make sure items are not
in the way of the door seal. Close the door.
5. If none of the lights are on: Press the ON/OFF
button .
6. Choose a programme by checking the Programmes
Guide (see Programmes) as well as the indications
for each type of fabric (see Laundry).
- Select a programme by rotating the
PROGRAMMES knob.
7. Choose Timed Drying or Dryness Levels option:
- If Timed Dry press and release the Timed
button until the required time is displayed.
or - To change from default dryness setting, press
and release the Sensor Dry button until the
required level is indicated (see The Display).
! For full details of selections available for each
programme see the Programme Tables.
Note: This tumble dryer, in compliance with new energy saving regulations, is fitted with an automatic standby
system which is enabled after about 30 minutes if no activity is detected.. Press and hold the ON/OFF button until
the dryer reactivates.
8. Set a delay time and other options if necessary.
9. The START/PAUSE light is flashing green:
- press the START/PAUSE button to begin.
The green light stops flashing.
During the drying programme, you can check on
your laundry and take out items that are dry
while others continue drying. When you close
the door again, press the START/PAUSE button in
order to resume drying.
(When the door is opened the START/PAUSE light
will flash Amber, after the door is closed and the
START/PAUSE button pressed, the START/PAUSE
light will stop flashing and show green.)
10. To let you know that your programme is complete
the buzzer will beep 3 times. (Note: If the SOUND
option was selected the buzzer beeps 3 times
every 30 seconds for 5 minutes).
Open the door, take the laundry out, clean the filter
and replace it. Empty the water container and
replace it (see Maintenance).
11. Unplug the dryer.
GB
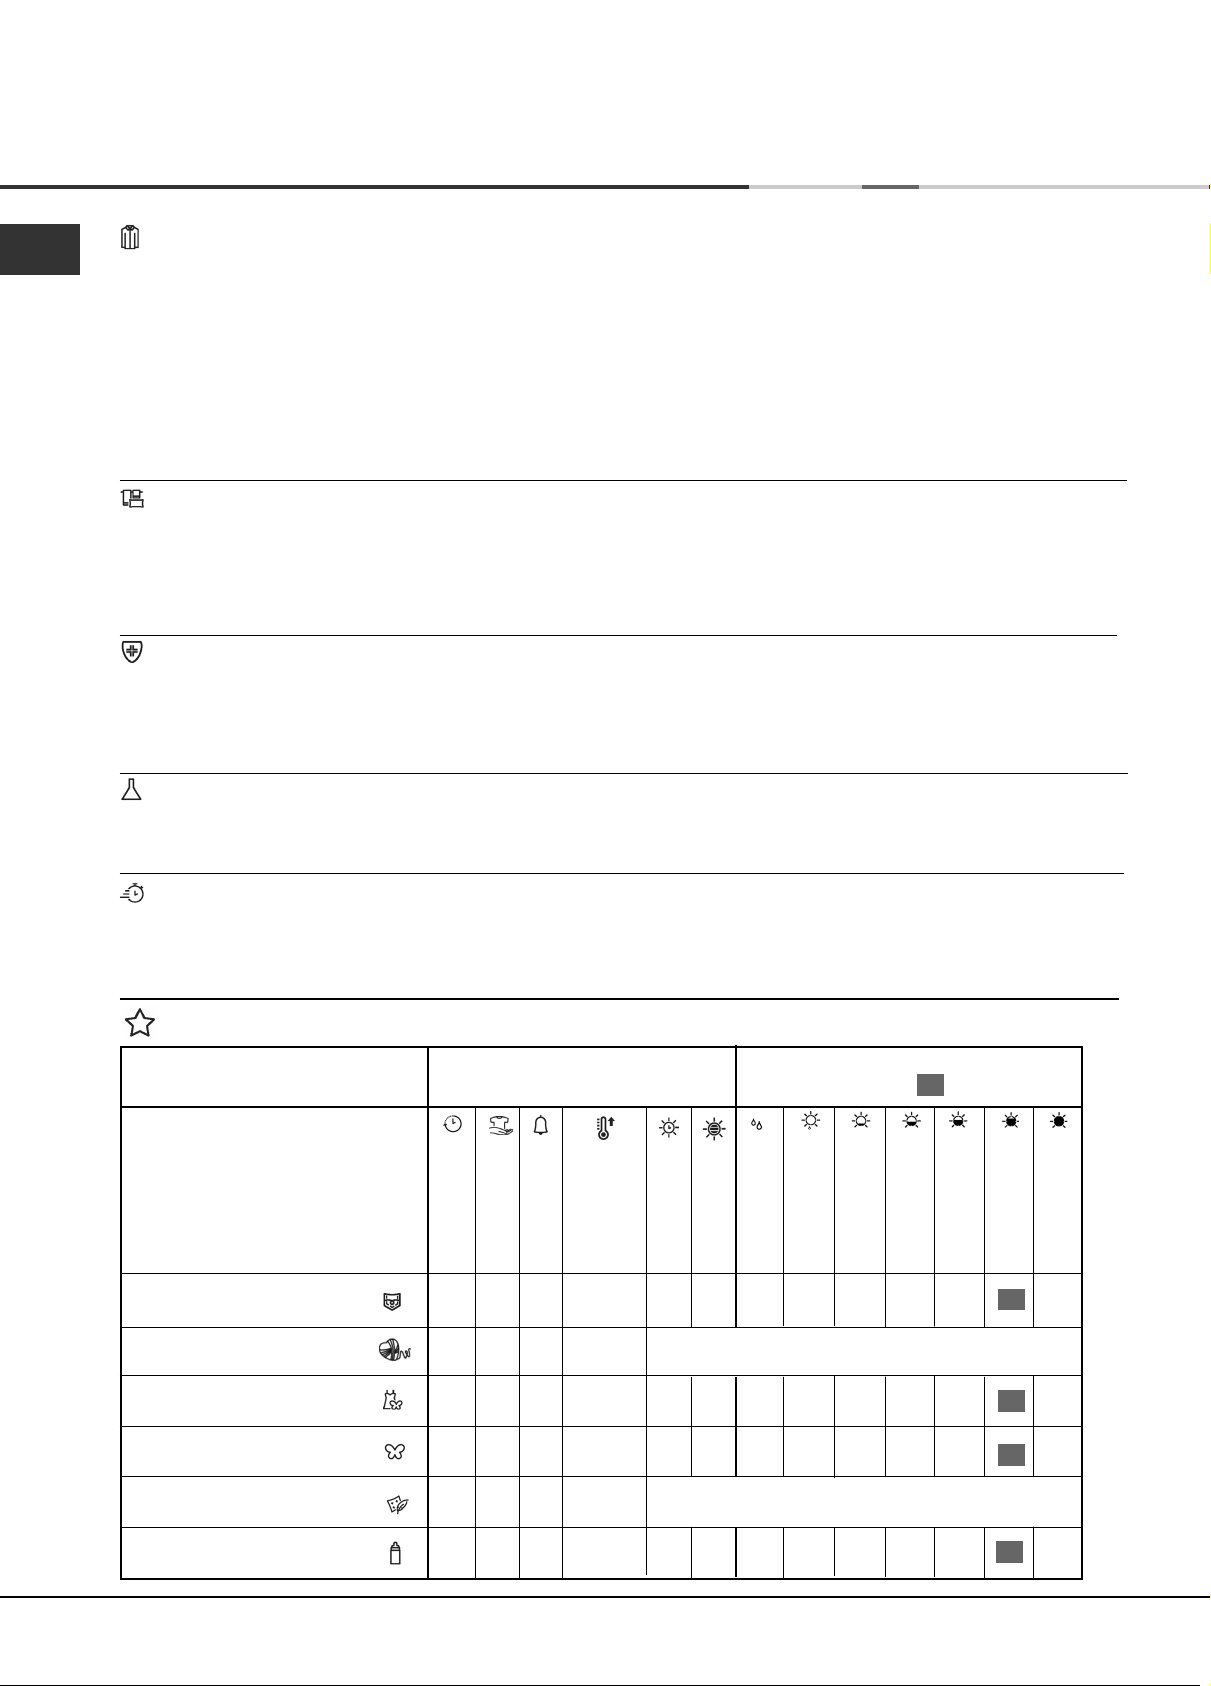
ESSENTIAL PROGRAMMES - Programmes Table
Programme Options available
Delay Timer
Extra Care
Sound
- High
1 Standard Cotton
2
Shirts
3 Bed & Bath
4 Anti Allergy
5 Synthetics
6 Quick Dry
✓
✓
✓
✓
✓
✓
✓
✓
✗ ✗
✓
✗
✗
✗
✓
✓
✓
✓
✓
- Medium
- Low
- High
- Medium
- High
- Medium
✗
- Medium
- Low
- High
- Medium
Heat Level
Timed Dry
Sensor Dry
✓
✓
✓
✓
✓
✓
✗
✓
✗
✓
●
An Automatic programme
✓
✓
●
An Automatic programme
Dryness Levels available
(default highlighted )
Damp Dry
Iron Dry
✓
✓
✓
✓
✓
✓
✓
✓
✓
✓
✓
✓
✓
✓
✓
✓
✓
✓
Hanger Dry Plus
✓
✓
✓
✓
✓
✓
✓
Hanger Dry
✓
✓
✓
✓
✓
✓
Light Dry
Cupboard Dry
Extra Dry
✓
✓
✗
✓
✓
✓
✓
✗
✓
✗
✓
Standard Cotton
●
This is a programme for cotton items.
●
The duration of this programme will depend on the size of the load, the dryness setting selected and the spin
speed used in your washer (see Laundry).
●
The Standard Cotton programme to EU Regulation 392/2012 is Programme 1 selection with High Heat and
Dryness Level Cupboard Dry
of energy consumption (to EU.392/2012).
(the standard/default starting configuration). It is the most efficient programme in terms
9
Page 10
Start and Programmes
GB
Shirts
High heat option
●
This is a programme for shirts made from cotton.
●
It can be used for load sizes up to 3kg (approximately 10 shirts).
Medium heat option
●
This is a programme for shirts made from synthetic materials or a mixture of natural and synthetic materials, such
as polyester and cotton.
●
It can be used for load sizes up to 3kg (approximately 14 shirts).
The duration of this programme will depend on the size of the load, the dryness setting selected and the spin
speed used in your washer.
Loads dried using the Cupboard Dry setting are usually ready to wear, the edges or seams may be slightly damp. If
this is the case, try turning the shirts inside out and running the programme again for a short period.
Bed & Bath
●
This is a programme for cotton towels and sheets.
●
The duration of this programme will depend on the size of the load, the dryness setting selected and the spin
speed used in your washer (see Laundry).
●
Loads dried using the Extra Dry setting are usually ready to use, the edges or seams may be slightly damp
especially on large items. If this is the case, try opening them out and running the programme again for a short
period.
Anti Allergy Programme
This programme has the ‘Seal of Approval’ endorsement from Allergy UK, which reflects the effective reduction and
elimination of allergens from the clothes with the special Anti Allergy cycle. With this programme, thanks to the
achievement of constant temperature for an extended period of time, the effects of the most common allergens
(including House Mites and Pollen) are neutralised.
Can be used on a full size wet load to dry and treat, or on a 4kg dry load just to treat your laundry.
Synthetics
●
This is a programme for items of Synthetic or Synthetic/Cotton mixtures.
●
The duration of this programme will depend on the size of the load, the dryness setting selected and the spin
speed used in your washer (see Laundry).
Quick Dry
This programme is for small loads maximum 1kg. Note: can only be used with the Cupboard Dry setting.
Your drying time is very much reduced with a huge time saving up to 53% on cottons (with High Heat option) and
50% on synthetics (with Medium Heat option).
EXCLUSIVE PROGRAMMES - Programmes Table
Programme Options available
Delay Timer
Extra Care
Sound
7 Jeans
8
Wool
9 Silk
10 Delicates
✓
✗
✗
✓
✓
✗
✓
✗
✓
✗
✗
✓
Heat Level
✗
✗
✗
✗
Timed Dry
✗
●
An Automatic programme
✗
✓
Dryness Levels available
(default highlighted )
Sensor Dry
Damp Dry
Iron Dry
Hanger Dry Plus
✓
✓
✓
✓
✓
✓
✓
✓
✓
✓
✓
✓
✓
✓
✓
✓
Hanger Dry
Light Dry
Cupboard Dry
Extra Dry
✓
✓
✓
✓
✓
✓
✓
✗
✗
11 Duvet
12 Baby cycle
10
✓
✓
✗
✗
- Medium
✓
- High
✓
●
An Automatic programme
✓
✓
✗
✗
✓
✓
✓
✓
✓
✗
Page 11
Start and Programmes
Jeans
●
This is a programme for jeans made from denim cotton. Before drying your jeans turn the front pockets inside out.
●
It can be used for load sizes up to 3kg (approximately 4 pairs).
●
Do not mix dark and light coloured items.
●
It can also be used on other garments made from the same material, such as jackets.
●
The duration of this programme will depend on the size of the load and the spin speed used in your washer.
●
Loads dried using this programme are usually ready to wear, the edges or seams may be slightly damp. If this is
the case, try turning the jeans inside out and running the programme again for a short period.
! We do not recommend that you use this programme if your jeans have elastic waist bands, studs or embroidery.
Wool Programme
●
This is a programme for tumble dryer safe garments marked with the symbol .
●
It can be used for load sizes up to 1kg (approximately 3 sweaters).
●
We recommend that garments are turned inside out before drying.
●
The duration of this programme will depend on the size of the load and the spin speed used in your washer.
●
Loads dried using this programme are usually ready to wear, but on some heavier garments the edges may be
slightly damp. Allow these to dry naturally as over-drying could damage garments.
! Unlike other materials, the mechanism of wool shrinkage is irreversible; i.e. it will not stretch back to original size and
shape.
! This programme is not suitable for Acrylic garments.
Silk
●
This is a programme for drying your delicate silk.
●
It can be used for load sizes up to 0.5kg.
●
The duration of this programme will depend on the size of the load and the spin speed used in your washer.
●
Loads dried using this programme are usually ready to use, but on some heavier garments the edges may be
slightly damp. If this is the case, remove the load and open them out and then run the programme again for a short
period.
GB
Baby cycle
●
This is a programme for drying your baby’s small delicate items of clothing and bedding (Cotton and Chenille)
and for drying your delicate clothes.
●
DO NOT dry items such as bibs and nappy pants with plastic coverings.
●
It can be used for load sizes up to 2kg.
●
The duration of this programme will depend on the size of the load and the spin speed used in your washer.
●
Loads dried using this programme are usually ready to use, but on some garments the edges may be slightly
damp. If this is the case, try opening them out or turn items inside out and running the programme again for a short
period.
Delicates
●
This is a programme for drying your delicate clothes ie. Acrylics.
●
It can be used for load sizes up to 2kg.
●
The duration of this programme will depend on the size of the load and the spin speed used in your washer.
●
Loads dried using this programme are usually ready to use, but on some garments the edges may be slightly
damp. If this is the case, try opening them out or turn items inside out and running the programme again for a short
period.
Duvet
! Take care with this programme DO NOT dry any items that are damaged which could result in the filling blocking
the filter and air vent resulting in a fire hazard.
●
Must only be used on single size duvets: NOT suitable for double or king size items.
●
Loads dried using this programme are usually ready to use, but may be slightly damp in places. If this is the case,
try opening them out and shaking them and running the programme again for a short period.
●
Also suitable for down filled jackets.
●
Select high heat for Cotton Duvets and medium heat for Synthetic duvets
●
The duration of this programme will depend on the size and density of the load and the spin speed used in your
washer.
11
Page 12

Start and Programmes
GB
EXTRA PROGRAMMES - Programmes Table
Programme Options available
Delay Timer
Extra Care
Sound
13 Cuddly Toys
14 Heat & Enjoy
15 Easy Iron
16 Refresh
Cuddly Toy Programme
With this programme you can remove dust easier and wash the cuddly toys more often because the drying time is
very much reduced compared to drying in the open air. It is a delicate drying cycle that dries at low temperature
and with soft mechanical action to maintain at best the original look and shine of the fur.
Note: For allergy protection, just freeze cuddly toys for 24 hours then wash and dry them. Repeat every 6 weeks.
Before drying remove accessories such as clothes, collars or sound boxes and protect plastic eyes with masking
tape after drying them with a cloth.
The programme time will vary dependant on the exact make up of the load.
The maximum load should not exceed 2.5kg and no individual item should be greater than 600g.
✓
✗
✗
✗
✓
✗
✗
✗
✓
✗
✗
✓
Heat Level
✗
✗
✗
✗
Timed Dry
●
An Automatic programme
●
An Automatic programme
●
An Automatic programme
●
An Automatic programme
Dryness Levels available
(default highlighted )
Sensor Dry
Damp Dry
Iron Dry
Hanger Dry Plus
✓
Hanger Dry
Light Dry
Cupboard Dry
Extra Dry
Heat & Enjoy
This programme helps to heat towels & bathrobes for a warm sensation after a bath or shower. It is also useful for
warming clothes before dressing during winter. The cycle heats clothes to 37°C (Body Temperature) and runs at this
temperature for a maximum of 4 hours or until you stop the cycle by opening the door.
Maximum load 3kg.
Note: During this programme a icon rotates in the display until the target temperature is reached, at which point
the icon flashes.
Easy Iron Programme
‘Easy Iron’ is a short 10 minute programme (8 minutes of heat followed by a 2 minute cool tumble period) which
fluffs the fibres of clothing that have been left in the same position/location for an extended period of time. The cycle
relaxes the fibres and makes them easier to iron and fold.
! ‘Easy Iron’ is not a drying programme and should not be used for wet articles of clothing.
For best results: 1. Do not load more than the maximum capacity. These numbers refer to the dry weight:
The ‘Easy Iron’ effect varies from one fabric to the next. It works well on traditional fabrics like Cotton or Cotton mix,
and less well on acrylic fibres and on materials such as Tencel®.
Refresh
! ‘Refresh’ is not a drying programme and should not be used for wet articles of clothing.
●
It can be used on any load size but is more effective on smaller loads.
●
Do not overload your dryer (see Laundry).
●
This is a 20 minute programme that airs your clothes with cool air. Also use to cool warm clothes.
Fabric Maximum load
Cotton and Cotton mixtures 2.5kg
Synthetics 2kg
Denim 2kg
2. Unload the dryer immediately after the end of the programme, hang, fold or iron the articles
and put them away in the closet. Should this not be possible repeat the programme.
12
Page 13

Start and Programmes
The Controls
●
Programmes knob
! Warning, if after pressing the START/PAUSE button
the programme knob position has changed, the new
position will NOT change the programme selected.
To change a selected programme, press the
START/PAUSE button , the light flashes Amber to
indicate the programme is paused. Select the new
programme and any options required, the light will then
flash green. Press the START/PAUSE button again
and the new programme will start.
●
OPTION buttons / lights
These buttons are used to customise the selected
programme to your requirements. A programme must
have been selected on the programme knob before an
option can be selected. Not all options are available for all
programmes (see Start and Programmes). If an option is
not available and you press the button, the buzzer will
beep three times. If the option is available the option light
in the button lights to confirm the selection.
After the START/PAUSE button has been pressed only the
Sound option (where available) can be changed.
Progress ( Drying, Cool Tumble) icons
These are part of the Display, they indicate the progress
of the dryer. Each icon comes on as the corresponding
phase starts.
Time Delay (Delay Timer)
The start of some programmes (see Start and
Programmes) can be delayed for up to 24 hours. Ensure
the water container is emptied before setting a delayed
start. During this period the clothes are tumbled to help
prevent creases developing.
Extra Care
This Anti-Ageing function for Cottons helps to maintain the
brightness of your laundry for a long time, thanks to the
correct drum rotation (reduced in the last part of the cycle)
and the correct temperature.
Note: It cannot be used with the ‘Extra Dry’, ‘Cupboard Dry’
and ‘Light Dry’ dryness levels.
Heat Level buttons and lights
Not all programmes allow you to change the heat level
and some programmes allow all three heat level options:
Low, Medium and High.
When the heat level options are available pressing this
button changes the heat level and the light corresponding
to the selection is lit.
Sound
If selected, gives a signal at the end of the drying cycle,
to remind you that the clothes are ready to be removed.
Not available with the Heat & Enjoy programme.
●
DISPLAY
8:88
The display shows either the amount of time delay
remaining or an indication of the amount of time left for a
drying programme (see The Display).
The colons between the hours and minutes in the display
flash to show that the time is counting down.
When the programme finishes its cool tumble phase the
display will show ‘End’.
●
Empty Water Icon / Container
(If you have plumbed your dryer to a drain this icon can
be ignored, as there is no need to empty the water
container).
When this icon is on ( ) it reminds you to empty the
water container.
If the water container fills during a programme, the
heater turns off and the dryer does a period of Cool
Tumble then the buzzer sounds, the ‘water container
full’ icon flashes, the display shows and the
‘empty water’ icon is on.
You must empty the water container and restart the
dryer or the clothes will not dry. After re-starting the
dryer the display will take a few seconds to refresh.
To avoid this always empty the water container each
time you use the dryer (see Maintenance).
●
Door Opening
Opening the door (or pressing the Start/Pause button)
during a programme will stop the dryer and have the
following effects:
●
The START/PAUSE light flashes Amber.
●
During a delay phase the delay will continue to
count down. The START/PAUSE button must be
pressed to resume the delay programme.
●
The START/PAUSE button must be pressed to
resume programme. The progress lights will change
to show the current status and the Start/Pause light
will stop flashing and turn green.
●
Changing the programmes knob will select a new
programme and the START/PAUSE light will flash
green. You can use this to select the Refresh
programme to cool the clothes, if you find them
dry enough. Press the START/PAUSE button to
begin a new programme.
●
Note
If you have a power cut, switch off the power or remove
the plug. When power is restored, press and hold the
ON/OFF button until the dryer reactivates, then press the
Start/Pause button.
GB
13
Page 14

Laundry
GB
Sorting your laundry
●
Check symbols on clothing labels to make sure
that the articles can be tumble dried.
●
Sort laundry by fabric type.
●
Empty pockets and check buttons.
●
Close zippers and hooks and tie loose belts and
strings.
●
Wring out each item in order to eliminate as much
excess water as possible.
! Do not load dripping wet clothes into the dryer.
Maximum load size
Do not load more than maximum capacity.
These numbers refer to dry weight:
Natural fibres: 8kg max (18lb)
Synthetic fibres: 3kg max (6.6lb)
! DO NOT overload the dryer as this could result in
reduced drying performance.
Wash Care Labels
Look at the labels on your garments, especially when
tumble drying for the first time. The following symbols
are the most common:
Drying times
The table (see below) presents APPROXIMATE drying
times in Minutes. Weights refer to dry garments.
Times are approximate and can vary depending
upon:
●
Amount of water retained in clothes after spin
cycle: towels and delicates retain a lot of water.
●
Fabrics: items that are the same type of fabric but
different textures and thicknesses may not have
the same drying time.
●
Quantity of laundry: single items or small loads
may take longer to dry.
●
Dryness: If you are going to iron some of your
clothes, they can be taken out while still a bit
damp. Others can be left longer if you need them
to be completely dry.
●
Heat setting.
●
Room temperature: if the room where the dryer is
located is cold, it will take longer for the dryer to
dry your clothes.
●
May be tumble dried
Bulk: some bulky items can be tumble dried with
care. We suggest that you remove these items
Do not tumble dry
several times, shake them out, and return them to
the dryer until finished.
Tumble dry at high heat setting
! Do not over-dry your clothes.
Tumble dry at low heat setting
All fabrics contain a little natural moisture, which
keeps them soft and fluffy.
Cottons
High/Full Heat
Load size
Drying times, in minutes
Synthetics
Gentle/Low Heat
Load size
Drying times, in minutes
●
Note: At the end of a drying cycle, cottons could still be damp if you grouped cottons and synthetics together. If
- spin speed 800-1000 rpm in washing machine.
1 kg
30 - 40
2 kg
40 - 55
3 kg
55 - 70
4 kg
70 - 80
- on reduced spin in washing machine.
1 kg
40 - 50
2 kg
50 - 70
5 kg
80 - 90
6 kg
95 - 120
7 kg
120 - 140
3 kg
70 - 90
this is the case, simply give the damp cotton items an additional short period of drying.
8 kg
130 - 150
14
Page 15

Troubleshooting
One day your dryer seems not to be working. Before you call your Service Centre (see Service), go through the
following troubleshooting suggestions:
Problem:
The tumble dryer won’t start.
Possible causes / Solution:
●
The plug is not plugged into the socket, or not making contact.
●
There has been a power failure.
●
The fuse has blown. Try to plug another appliance into the socket.
●
You are using an extension cord? Try to plug the dryer’s power cord
directly into the socket.
●
The door is not closed securely?
●
The PROGRAMMES knob has not been set properly (see Start and
Programmes).
●
The START/PAUSE button has not been pressed (see Start and Programmes).
●
Drying cycle will not begin.
Its taking a long time to dry.
You have set a delayed time (see Start and Programmes).
●
The filter has not been cleaned (see Maintenance).
●
The water container needs emptying... The ‘water container full’ icon
is flashing, the display shows and the ‘empty water’ icon is on
(see Maintenance).
●
The condenser needs cleaning? (see Maintenance).
●
The temperature setting is not ideal for the type of fabric you are drying
(see Start and Programmes, and see Laundry).
●
The correct drying time has not been selected for the load (see Laundry).
●
The air intake grille is obstructed (see Installation, and see
Maintenance).
●
The items were too wet (see Laundry).
●
The dryer was overloaded (see Laundry).
GB
The ‘water container full’ icon
is flashing and displayed
but the dryer has only been
running for a short period.
Empty water icon is on and
the water container is not full.
Programme finishes and
clothes are damper than
expected.
The display shows a fault
code F followed by one or two
numbers
●
The water container was probably not emptied at the start of the
programme. Do not wait for the empty water signal, always check and
empty the container before starting a new drying programme (see
Maintenance).
●
This is normal. If the icon is on it is just a reminder to empty the container
(see Start and Programmes).
! For safety the dryer has a maximum programme time of 5 hours. If an
automatic programme has not sensed the required final moisture in this time
the dryer will complete the programme and stop. Check the above points
and run the programme again, if the results are still damp, contact the
Service Centre (see Service).
●
If the display shows a fault:
- Turn off and remove the plug. Clean the filter and the condenser
unit (see Maintenance). Then replace the plug, turn on and start
another programme. If a fault is then displayed: Note down the
code and contact the Service Centre (see Service).
15
Page 16

Service
GB
Before calling the Service Centre:
●
Use the troubleshooting guide to see if you can
solve the problem yourself (see Troubleshooting).
●
If not, turn off the dryer and call the Service Centre
closest to you.
Spare Parts
This dryer is a complex machine. Repairing it yourself
or having a non-authorised person try to repair it could
cause harm to one or more persons, could damage
the machine and could invalidate the spare parts
warranty.
What to tell the Service Centre:
●
name, address and post code.
●
telephone number.
●
the type of problem.
●
the date of purchase.
●
the appliance model (Mod.).
●
the serial number (S/N).
Call an authorised technician if you experience problems
while using the machine.
This information can be found on the data label inside
the door of the machine.
Save energy and respect the environment
●
Wring out items to eliminate excess water before tumble drying (if you use a washing machine first, select a high
spin cycle). Doing this will save time and energy during drying.
●
Always dry full loads - you save energy: single items or small loads take longer to dry.
●
Clean the filter after each use to contain energy consumption costs (see Maintenance).
Recycling and Disposal Information
As part of our continued commitment to helping
the environment, we reserve the right to use
quality recycled components to keep down customer
costs and minimise material wastage.
●
Disposing of the packaging material: follow local
regulations, so the packaging can be recycled.
●
To minimise risk of injury to children, remove the
door and plug - then cut off mains cable, flush
with the appliance. Dispose of these parts separately
to ensure that the appliance can no longer be
plugged into a mains socket.
Disposal of old electrical appliances
The European Directive 2012/19/EC on Waste Electrical
and Electronic Equipment (WEEE), requires that old
household electrical appliances must not be disposed
of in the normal unsorted municipal waste stream. Old
appliances must be collected separately in order to
optimise the recovery and recycling of the materials
they contain and reduce the impact on human health
and the environment.
The crossed out “wheeled bin” symbol on the
product reminds you of your obligation, that
when you dispose of the appliance it must be
separately collected.
Consumers should contact their local authority or
retailer for information concerning the correct disposal
of their old appliance.
16
Page 17

Product Data... (EU Regulation 392/2012)
Brand Hotpoint Ariston Models TCF87B
FTCF87B
Rated capacity of Cotton laundry for the standard programme at full load 8 kg Energy efficiency class B
The weighted Annual Energy Consumption (AE
) 559.8 kWh
c
Consumption per year, based on 160 drying cycles of the standard cotton programme at full and partial load, and the
consumption of the low-power modes. Actual energy consumption per cycle will depend on how the appliance is used.
This household tumble dryer is an Automatic Condenser Dryer
Energy consumption : full load E
Power consumption : off-mode (P
4.70 kWh, partial load E
dry
) 0.14 W, left-on mode (Pl) 2.77 W
o
dry1/2
2.59 kWh
Duration of the ‘left-on mode’ for power management systems 30 minutes
The ‘standard cotton programme’ suitable for drying normal wet cotton laundry that is the most efficient programme in
terms of energy consumption for cotton used at full and partial load is
Programme 1 - Standard Cotton, High Heat, Cupboard Dry
Programme time (minutes) : weighted (T
) full & partial load 95, full load (T
t
) 127, partial load (T
dry
dry1/2
) 71
Condensation efficiency class B
Average condensation efficiency (%) : full load (C
) 84, partial load (C
dry
) 78, weighted (Ct) full & partial load 81
dry1/2
Airborne acoustical noise emissions 69 dB(A) re 1 pW
GB
* “consumer information in compliance with EU Regulation 932/2012”.
Typical energy used - Synthetics full load 1.38 kWh, partial load not applicable
Typical drying time - Synthetics full load 65 minutes, partial load not applicable
This appliance conforms to the following EC Directives:
- 2006/95/EC (Low Voltage Equipment)
- 2004/108/EC (Electromagnetic Compatibility)
Indesit Company, Viale Aristide Merloni 47, 60044 Fabriano (AN), Italy
17
Page 18

18
Page 19

Folheto de instruções
GB
English, 1
P
Português, 69
FTCF 87B
MÁQUINA DE SECAR ROUPA
Índice
Instalação, 20
Onde colocar a sua máquina de secar roupa
Ventilação
Drenagem da água
Ligação eléctricas
Antes de iniciar a utilização da sua máquina
de secar roupa
Avisos, 21-22
Segurança Geral
Para reduzir o risco de ocorrência de incêndios
Manutenção e cuidado, 23-24
Desligar a electricidade
Limpar o filtro depois de cada ciclo
Verificar o tambor depois de cada ciclo
Limpar a unidade do condensador
Esvazie o recipiente de água após cada ciclo
Limpar a máquina
Descrição da máquina, 25
Características
Painel de controlo
P
! Tenha este folheto de instruções à mão para
consultá-lo sempre que necessário. Leve-o consigo
se mudar de casa e, caso venda este aparelho,
passe o folheto ao novo proprietário, de modo a
certificar-se de que este folheto permanece com o
equipamento e de que o novo proprietário pode estar
informado acerca dos avisos e sugestões sobre o
respectivo funcionamento.
! Leia cuidadosamente as instruções; as páginas
que se seguem contêm informações importantes
acerca da instalação, bem como sugestões sobre o
funcionamento da máquina.
Este símbolo serve para lembrar-te
de ler este manual de instruções.
Visor, 26
Arranque e programas, 27-31
Escolher um programa
Tabela de programas
Controlos
Roupa, 32
Escolher a sua roupa
Etiquetas de cuidado na lavagem
Tempos de secagem
Resolução de problemas, 33
Reparações, 34
Peças sobressalentes
Reciclagem e Eliminação
Dados do produto, 35
www.hotpoint.eu
19
Page 20

Instalação
!
Onde colocar a sua máquina
●
P
Instale a sua máquina a alguma distância
de ligações de gás, fogões, aquecedores
e placas de cozinha, uma vez que as
chamas podem danificar o aparelho.
mínima espaço 10 mm
●
Se pretende instalar o
aparelho por baixo de
uma bancada ou de
mínima espaço
15 mm
um balcão, não se
esqueça de deixar um
espaço de 10 mm
entre a bancada e
quaisquer objectos ou
acima do tampo da
máquina e um espaço de 15 mm entre as
partes laterais da máquina e mobiliário ou
paredes. Assegura assim a correcta
circulação do ar.
O aparelho deve ser instalado com a
superfície traseira posicionada contra uma
parede.
Certifique-se de que o tubo não fica obstruído ou
dobrado quando a secadora estiver na sua posição
final.
Ligações eléctricas
Certifique-se do seguinte antes de
introduzir a ficha numa tomada de
corrente eléctrica:
●
Certifique-se de que as suas mãos
estão secas.
●
A tomada tem de ter uma ligação à
terra.
●
A tomada deve ter capacidade para suster
a potência máxima de máquinas, que
está indicada na chapa de classificação
(ver Descrição da máquina de secar).
●
A tensão deve encontrar-se dentro dos
valores indicados na chapa de
classificação (ver Descrição da máquina
de secar).
●
A tomada deve ser compatível com a
ficha da máquina. Se não for este o
caso, substitua a ficha ou a tomada.
Ventilação
Quando a secadora estiver em utilização, tem de
existir uma ventilação adequada. Certifique-se de que
coloca a sua máquina num ambiente que não seja
húmido e de que existe uma ventilação adequada. O
fluxo de ar em torno da secadora é essencial para
condensar a água produzida durante a lavagem; a
secadora não funciona em perfeitas condições se
encerrada no espaço fechado ou armário.
! Se utilizar a secadora numa sala pequena e fria,
pode gerar-se alguma condensação.
! Não recomendamos a instalação da
secadora num armário, mas o aparelho
nunca deve ser instalado por trás de uma
porta que se possa trancar, uma porta
deslizante ou com uma dobradiça instalada
no lado oposto à porta da máquina.
Drenagem da água
Se a sua secadora estiver instalada junto a um ponto
de canalização, a água pode ser canalizada para este
sistema. Isto afasta a necessidade de esvaziar o
recipiente de água. Se a secadora estiver empilhada
sobre ou instalada junto à máquina de lavar roupa,
pode partilhar o mesmo ponto de canalização.
altura do cano deve ser inferior a 1m
inferior da secadora.
Retire a mangueira existente da
posição indicada na imagem A.
A partir da parte
A
! A secadora não deve ser instalada ao ar
livre, mesmo que seja num espaço abrigado.
Pode ser extremamente perigosa a
exposição à chuva ou tempestades.
! Depois de instalada, a cablagem eléctrica
e ficha da máquina deve estar facilmente
alcançável.
! Não utilize cabos de extensão.
! O cabo de alimentação não deve ser
dobrado ou pisado.
! O cabo eléctrico deve ser verificado
periodicamente. Se o cabo de alimentação
estiver danificado, deve ser substituído
pelo fabricante, pelo seu serviço de
assistência ou por pessoal qualificado,
para evitar perigos. Os cabos eléctricos
novos ou mais compridos são fornecidos
por revendedores autorizados por um
custo adicional.
! O fabricante recusa qualquer
responsabilidade caso estas regras não
seja seguidas.
! Se tiver dúvidas sobre o mencionado acima
consulte um electricista qualificado.
Antes de iniciar a utilização da sua
máquina de secar roupa
Depois de instalar a sua máquina e antes de iniciar a
sua utilização, limpe o interior do tambor para
remover qualquer pó que se tenha acumulado
durante o transporte.
imagem A
Em seguida, encaixe um
comprimento adequado de
mangueira na posição indicada na figura B.
20
imagem B
Dimensões máximas de carga
Fibras naturais : 8 kg
Page 21

Avisos
! O equipamento foi concebido e
construído de acordo com normas de
segurança internacionais. Estes avisos são
apresentados por razões de segurança e
devem ser seguidos minuciosamente.
Segurança Geral
●
A presente máquina de secar roupa pode
ser utilizada por pessoas (incluindo
crianças com mais de 8 anos) com
capacidades físicas, sensoriais ou
mentais reduzidas ou sem experiência
e conhecimentos, caso sejam
supervisionadas ou se tiverem recebido
instruções sobre a utilização do dispositivo
por parte de uma pessoa responsável
pela sua segurança.
●
Esta secadora foi concebida para
utilização doméstica e não utilização
profissional.
●
Não toque no equipamento com os pés
descalços, nem com as mãos ou pés
molhados.
●
Desligue a máquina retirando a ficha e
não puxando o fio.
●
Depois da utilização da secadora,
desligue-a no botão e da corrente
eléctrica. Mantenha a porta fechada de
modo que as crianças não utilizem a
máquina como um brinquedo.
●
As crianças não devem ser deixadas
sozinhas para se garantir que não
brincam com a secadora.
●
A manutenção e limpeza não devem ser
efectuadas por crianças sem supervisão.
●
As crianças com menos de 3 anos
devem ser mantidas afastadas da
máquina de secar roupa se não forem
constantemente vigiadas.
●
O aparelho deve ser instalado
correctamente com a ventilação
adequada. A entrada de ar na parte
frontal da máquina de secar nunca deve
estar obstruída (ver Instalação).
●
Nunca utilize a secadora em carpetes,
cuja altura impeça o ar de entrar na
secadora a partir da base.
●
Verifique se a secadora está vazia antes de
carregá-la.
●
O painel traseiro da secadora pode
ficar muito quente. Nunca toque
neste painel durante a utilização.
●
Não utilize a secadora sem que o filtro, o
recipiente de água e o condensador
estejam seguramente afixados nas
respectivas posições (ver Manutenção).
●
Não sobrecarregue a secadora (ver
Roupa para além das cargas máximas).
●
Não carregue peças que estejam a
pingar.
●
Verifique cuidadosamente todas as
instruções nas etiquetas das roupas (ver
Roupa).
●
Não seque artigos grandes e muito
volumosos.
●
Não seque fibras acrílicas a altas
temperaturas.
●
Não desligue a máquina quando ainda
existirem artigos quentes no interior.
●
Limpe o filtro após cada utilização (ver
Manutenção).
●
Esvazie o recipiente de água e
coloque-o novamente (ver Manutenção).
●
Limpe a unidade do condensador após
intervalos regulares (ver Manutenção).
●
Não permita a acumulação de resíduos na
secadora.
●
Nunca suba para cima da secadora.
Pode resultar em ferimentos.
●
Siga sempre as normas e requisitos
eléctricos (ver Instalação).
●
Compre sempre peças sobressalentes e
acessórios originais (ver Reparação).
P
21
Page 22

Avisos
P
Para reduzir o risco de ocorrência de
incêndios na máquina de secar roupa,
deve ter em conta os seguintes aspectos:
●
Seque apenas artigos que tenham sido
lavados com água e detergente,
enxaguados e centrifugados.
Existe um risco de incêndio se secar
peças que NÃO tenham sido lavadas
com água.
●
Não seque peças de vestuário que
tenham sido tratadas com produtos
químicos.
●
Não seque peças de roupa que tenham
sido manchadas ou impregnadas com
óleo ou azeite, uma vez que isto
representa um perigo de incêndio. As
peças de roupa contaminadas com óleo
podem inflamar espontaneamente,
sobretudo quando são expostas a fontes
de calor, como uma máquina de secar
roupa. As peças de roupa podem ficar
quentes, provocando uma reacção de
oxidação com o óleo. A oxidação gera
calor. Se não for o possível evacuar o
calor, as peças de roupa podem ficar
quentes o suficiente para se incendiarem.
Amontoar, empilhar ou guardar peças
de roupa contaminadas com óleo pode
impedir a evacuação do calor, causando
o perigo de incêndio.
Se for inevitável que os tecidos
contaminados com óleo ou azeite, ou
outros que tenham sido contamina dos
com produtos para o cabelo sejam
colocados numa máquina de secar
roupa, devem, em primeiro lugar, ser
lavados com detergente extra – isto irá
diminuir, mas não eliminar, o perigo.
Estas não devem ser retiradas da
máquina de secar e colocadas umas
sobre as outras ou guardadas enquanto
estão quentes.
●
Não seque peças de roupa que foram
anteriormente lavadas ou limpas com,
ou impregnadas ou sujas com, gasolina,
solventes para lavagem a seco ou outras
substâncias inflamáveis ou combustíveis.
Substâncias altamente inflamáveis
habitualmente utilizadas em ambientes
domésticos, incluindo óleo alimentar,
acetona, álcool desnaturado, querosene,
anti-nódoas, terebintina, ceras e
decapantes de cera. Certifique-se de
que estas peças de roupa foram
lavadas em água quente com uma
quantidade extra de detergente antes
de serem secas na máquina de secar.
●
Não seque peças de roupa contendo
espuma de borracha (também conhecida
como espuma de látex) ou materiais de
textura semelhante a borracha. Os
materiais de espuma de borracha
podem, quando aquecidos, incendiar
por combustão espontânea.
●
Amaciadores para a roupa ou produtos
semelhantes não devem ser utilizados
na máquina de secar para eliminar os
efeitos de electricidade estática excepto
se este método for especificamente
recomendado pelo fabricante do produto
amaciador para a roupa.
●
Não seque peças de roupa interior que
contenham reforços de metal, por
exemplo, sutiãs com aros de metal.
No caso de os reforços de metal se
soltarem durante a secagem, podem
ocorrer danos na máquina de secar.
●
Não seque na máquina artigos de
borracha ou plástico como toucas de
banho ou coberturas impermeáveis para
bebés, polieteno ou papel.
●
Não seque na máquina artigos com
componentes de borracha, peças de
roupa com almofadas de espuma de
borracha, almofadas, galochas e
calçado de desporto com revestimento
de borracha.
●
Retirar todos os objectos dos bolsos,
como isqueiros e fósforos.
! AVISO: Nunca parar a secadora antes do fim do ciclo de secagem, a menos que todos os
artigos sejam rapidamente retirados e espalhados de modo a dissipar o calor.
22
Page 23

Manutenção e Cuidado
Desligar a electricidade
! Desligue a secadora quando não estiver
em utilização, durante tarefas de limpeza e
durante todas as operações de
manutenção.
Limpar o filtro depois de cada ciclo
O filtro é uma parte importante da sua
secadora: acumula restos de fibras e
resíduos que se formam durante a
secagem.
Assim, após a secagem, limpe o filtro,
lavando-o debaixo de água corrente ou
limpe com o seu aspirador.
Caso o filtro fique entupido, o fluxo de ar
no interior da secadora fica seriamente
comprometido: os tempos de secagem
prolongam-se e consome mais energia.
Também pode danificar a sua secadora.
O filtro encontra-se na grelha frontal da
secadora (ver o diagrama na pàgina
seguinte).
Remoção do filtro:
1.Puxe a pega de plástico do filtro para
cima.
2. Abra o filtro e limpe o
cotão do interior.
3. Volte a colocá-lo
correctamente.
Certifique-se de
que o filtro está
completamente
encaixado na grelha
da máquina.
4.Remova quaisquer vestígios de cotão
acumulados na parte interior da porta e
em volta dos vedantes da porta.
! Não utilize a máquina sem colocar
novamente o filtro.
Esvazie o recipiente de água após cada
ciclo
! O não esvaziamento do recipiente de recolha da
água pode causar:
- A paragem do aquecimento da máquina (o que
faria com que a roupa continuasse húmida no fim
do ciclo de secagem) (ver Controlos).
●
Primeira Utilização do Sistema de
Recolha de Água
Quando a sua secadora é nova, o recipiente de
água não recolhe a água sem que seja
devidamente preparado para a primeira utilização;
é um processo que demora 1 ou 2 ciclos de
secagem. Depois de previamente preparada, o
recipiente recolhe água durante cada ciclo de
secagem.
Limpar a unidade do condensador
Periodicamente (todos os meses), retire a
unidade do condensador e limpe qualquer
acumulação de cotão que se encontre
entre as placas, enxaguando por baixo de
água corrente fria. Este procedimento
deve ser concluído com água fria a partir
da parte traseira do condensador.
Remoção do condensador:
1. Desligue a secadora e
abra a porta.
2. Abra a tampa do
condensador (ver
diagrama).
Solte os três suportes,
rodando-os da direita
para a esquerda a 90°
e, em seguida, puxando
a pega para removê-los
da secadora.
Limpe a superfície dos vedantes e
substitua, com as setas para cima,
certificando-se de que os suportes estão
seguros.
P
Retire o reservatório da máquina
de secar e retire a tampa grande
ou a pequena e esvazie-o numa
banca ou outro dispositivo de
drenagem adequado. Volte a
colocar a tampa e instale novamente o reservatório no devido
lugar.
! Verifique sempre o recipiente de água e esvazie-o
antes de iniciar um programa de secagem novo.
23
Page 24

Manutenção e Cuidado
P
Recipiente de
água
Filtro
Unidade do
condensador
Suportes
Verificar o tambor depois de cada ciclo
Rode o tambor manualmente, de modo a remover
pequenos objectos (lenços) que podem ter ficado na
máquina.
Limpar o tambor
! Não utilize agentes de limpeza de aço inoxidável ou
palha de aço, abrasivos, para limpar o tambor.
Torneira
Traseira
Frente
Entrada de ar
Tampa do condensador
Unidade do condensador
Conselhos rápidos
●
Deve limpar a filtro porta e o filtro
condensador depois de cada secagem.
●
Relembramos que deve esvaziar o
recipiente de recolha da água após
cada carga.
! Desta forma, opterá sempre o melhor
desempenho.
É possível que uma película colorida comece a
aparecer no tambor de aço inoxidável. Tal poderá ser
causado por uma combinação de água e/ou agentes
de limpeza como, por exemplo, amaciador de tecido
da lavagem. Esta película colorida não afectará o
desempenho do secador.
Limpeza
●
As partes externas de metal ou em plástico e
borracha podem ser limpas com um pano húmido.
●
Periodicamente (de 6 em 6 meses), aspire a grelha
da entrada de ar frontal para retirar qualquer
acumulação de cotão, linho ou pó. Remova também
a acumulação de cotão da parte frontal do
condensador e áreas dos filtros e limpe
ocasionalmente com um aspirador.
! Não utilize solventes nem produtos abrasivos.
! Verifique a sua secadora regularmente por técnicos
autorizados, de modo a certificar-se da segurança
eléctrica e mecânica (ver Reparação).
24
Page 25

Descrição da máquina
de secar
Características
Tampa do condensador
Painel de controlo
Filtro
Chapa de
classificação
botão dos
PROGRAMAS
Recipiente de água
Números de modelo e de série
Entrada de ar
Indicador
Botão e luz
BLOQUEIO
P
Pega da tampa do
condensador
(Puxar para abrir)
NÍVEL DE CALOR
Botão e Luzes
Botão
LIGAR/DESLIGAR
O botão LIGAR/DESLIGAR : Se a máquina de secar
estiver a funcionar, este botão for premido e mantido por
mais de 3 segundos e a máquina de secar for desligada,
ocorre uma contagem decrescente de 3, 2, 1, Desligar e o
programa é então cancelado. Prima e mantenha por mais
de 3 segundos e a máquina de secar irá reactivar.
O botão dos PROGRAMAS define o programa: rode-o até
que o indicador esteja a apontar para o programa que
pretende seleccionar (ver Arranque e Programas).
Os botões/luzes de OPÇÃO seleccionam as opções
disponíveis para o programa seleccionado. As luzes indicam
que a opção foi seleccionada (ver Arranque e Programas).
O botão INICIAR/PAUSA inicia um programa
seleccionado. Quando pressionar este botão, é emitido um
sinal sonoro e as luzes de progresso ficam intermitentes
para confirmarem a acção. Quando um programa estiver a
ser executado, premir este botão irá pausar o programa e
parar a máquina de secar. A luz fica verde quando o
programa está em funcionamento, laranja e intermitente se o
programa estiver em pausa ou verde e intermitente se
estiver á espera para iniciar um programa (ver Arranque e
Programas).
O Visor indica o tempo de secagem ou de atraso em
conjunto com ícones que acendem para apresentar
informações de aviso e mostrar o estado de progresso do
Visor e
Botões de selecção
Botões e luzes de
botão e luz
INICIAR/PAUSA
OPÇAO
seu programa. Os três botões abaixo do visor seleccionam
“Automático” "Secagem Temporizada” e, se necessário, um
arranque atrasado (ver Arranque e Programas ou O Visor).
Botão/Luz BLOQUEIO : Ao premir e manter este botão
após seleccionar o seu programa e quaisquer opções, a luz
irá acender. Isto impede que as definições do programa
sejam alteradas. Quando a luz estiver acesa, os outros
botões estarão desactivados. Mantenha o botão premido
para cancelar e a luz irá desligar.
Ícone Esvaziar Água : assinala que o recipiente de
água deve ser esvaziado. O visor irá demorar alguns
segundos para actualizar após voltar a colocar o recipiente
de água vazio; o secador deve estar ligado para que tal
aconteça (ver Controlos).
Nota: Caso o recipiente de água fique cheio, o ícone
"recipiente de água cheio" pisca, o visor apresenta
, o aquecimento é desligado e as roupas não serão
secas.
Ícone Limpar Filtro (Pulire il Filtro) lembra, de cada
programa, que é essencial limpar o filtro de cada vez que a
secadora é utilizada (ver Manutenção e cuidado).
Ícone Limpar condensador (Pulire il Condensatore)
relembra que é essencial limpar o condensador em intervalos
regulares (ver Manutenção e cuidado).
25
Page 26

O Visor
P
O Visor possui três funções principais, cada uma com o seu botão correspondente.
Níveis de Medição da Secagem
Após seleccionar um programa que possua a opção de Secagem por sensor, prima o botão e solte-o até
ser apresentado o nível de medição da secagem apropriado. Se a opção de medição não se encontrar
disponível com o programa seleccionado, o visor irá piscar e o alarme sonoro irá tocar três vezes.
! Alguns programas de medição não possuem as cinco opções de nível de secagem disponíveis.
Níveis de secagem:
Secagem com humidade: Seca os seus itens até estarem prontos a serem passados por
Secagem para passagem a ferro: Seca os seus itens até estes estarem prontos a serem passados
(Engomar): por um ferro manual.
Secagem para pendurar (extra): Seca os seus itens delicados até ficarem prontos para serem
Secagem para pendurar: Seca as suas roupas até estas estarem prontos a serem
Secagem suave: Seca os seus itens delicados até ficarem prontos para guardar.
Secagem para armário: Seca os seus itens até que fiquem prontos a serem guardados.
Secagem Extra (Extra Seco): Seca as suas roupas até que estas fiquem prontas a serem vestidas.
uma máquina de passar a ferro normal ou rotativa.
pendurados para secagem final.
penduradas para a secagem final.
Secagem Temporizada
Após seleccionar um programa que possua uma opção de Secagem Temporizada, prima o botão e o
ícone da Secagem Temporizada irá acender, o visor irá reduzir o tempo seleccionado de cada vez que
premir e soltar o botão (ver Arranque e Programas). Cada programa que possua uma opção temporizada
terá diferentes tempos disponíveis e a selecção de até 11 tempos de secagem irá também depender da
definição de aquecimento que tiver seleccionado.
Cada vez que premir o botão irá diminuir o tempo de secagem.
Se mudar de ideias, prima o botão de Secagem por Sensor e as opções de nível de medição ficarão
disponíveis.
Se a opção de Secagem Temporizada não estiver disponível, o visor irá piscar e o alarme sonoro irá tocar
três vezes.
O tempo seleccionado permanece apresentado após o programa iniciar e pode ser alterado durante o
programa se assim desejar.
Temporizador de Atraso
Após seleccionar um programa que possua uma opção de Temporizador de Atraso, poderá seleccionar
um tempo de início do atraso.
Cada vez que premir o botão do Temporizador de Atraso irá fazer avançar a definição de atraso
em incrementos de 30 minutos de a , depois em incrementos de a , em seguida a
OFF
e após cinco segundos irá cancelar o atraso.
Para atrasos de 10 horas ou mais, o visor faz a contagem decrescente do tempo em horas até 10
horas, depois apresenta e continua a contagem decrescente em minutos.
Para atrasos de 9 horas ou inferiores, o visor apresenta as horas e os minutos e depois efectua a
contagem decrescente em minutos para todo o atraso.
Após o botão de INICIAR/PAUSA ser premido, o tempo de atraso poderá ser alterado ou cancelado.
Quando o período de atraso for concluído, o ícone de atraso desliga e é apresentado o Tempo até
Conclusão.
Nota: Durante este período, as roupas irão circular de forma ocasional para evitar o aparecimento de
rugas.
9.59
0:30
9:30
10h
24h
Tempo até Conclusão
Se o ícone de atraso estiver desligado, o tempo apresentado será o do Tempo até Conclusão do programa que
se encontrar a ser executado.
Quando os programas temporizados forem seleccionados, o tempo apresentado durante o ciclo será o tempo real
restante.
Quando forem seleccionados programas Automáticos, o tempo apresentado será uma estimativa do tempo restante.
Quando o programa for seleccionado, o visor irá apresentar o tempo necessário para secar uma carga completa. O
tempo restante é constantemente monitorizado durante o ciclo de secagem e o tempo é alterado para apresentar a
melhor estimativa possível.
O Tempo até Conclusão é apresentado em horas e minutos e faz a contagem decrescente de cada minuto.
Os dois pontos entre as horas e os minutos no visor piscam para mostrar que o tempo está em contagem decrescente.
Caso se verifique alguna anomalia, o visor indicará “F”, seguido de um número de código de erro, as três luzes de
opção e a luz INICIAR/PAUSA irão também piscar em laranja (ver Resolução de Problemas).
26
Page 27

Arranque e Programas
Escolher um programa
1. Ligue a secadora a uma tomada de corrente eléctrica.
2. Escolha a sua roupa de acordo com o tipo de tecido
(ver Roupa).
3. Abra a porta e certifique-se de que o filtro está
limpo e bem colocado e de que o recipiente da
água está vazio e na respectiva posição (ver
Manutenção).
4. Carregue a máquina e certifique-se de que nenhuma
peça fica presa no fecho da porta. Feche a porta.
5. Se nenhuma das luzes estiver acesa: Pressione o
botão LIGAR/DESLIGAR
6. Escolha o programa de secagem após consulta da
Guia de Programas (ver Programas) bem como as
indicações para cada tecido (ver Roupa).
- Seleccione um programa, rodando o botão
PROGRAMAS.
7. Escolha as opções Secagem Temporizada ou Níveis
de Secagem:
- Se optar por Secagem Temporizada, prima e
solte o botão até visualizar o período de tempo
pretendido.
ou - Para alterar a definição de secagem predefinida,
prima e solte o botão Secagem por Sensor até
ver indicado o nível pretendido (ver O Visor).
! Para todas as informações sobre as selecções
disponíveis para cada programa, ver a Tabela de
Programas.
Nota: Esta máquina de secar roupa, em conformidade com as novas normas sobre a economia energética, dispõe de
um sistema de desligação automática (stand by) que entra em função aproximadamente 30 minutos depois, no caso de
inutilização. Prima e mantenha o botão LIGAR/DESLIGAR até que a máquina de secar reactive.
8. Defina um tempo de atraso, bem como outras
opções, conforme necessário.
9. A luz INICIAR/PAUSA está verde intermitente:
rima o botão INICIAR/PAUSA para iniciar.
- p
A luz verde deixa de piscar.
Durante o programa de secagem, pode verificar
a sua roupa e retirar peças que já estejam secas
enquanto as restantes continuam a secar.
Quando fechar novamente a porta, prima o
botão INICIAR de modo a retomar a secagem.
(Quando a porta está aberta, a luz INICIAR/PAUSA
fica laranja intermitente. Depois de fechar a porta
e premir o botão INICIAR/PAUSA, a luz
INICIAR/PAUSA deixa de piscar e fica verde).
10. Para o informar da conclusão do programa, o
sinal sonoro irá tocar 3 vezes (Nota: se a opção
de SOM for seleccionada, o sinal sonoro irá tocar
3 vezes cada 30 Segundos durante 5 minutos).
Abra a porta, retire a roupa, limpe o filtro e
coloque-o novamente. Esvazie o recipiente de
água e coloque-o novamente (ver Manutenção).
11. Desligue a secadora.
P
DIARIAMENTE / PROGRAMAS ESSENCIAIS (ESSENTIALS) – Tabela de Programas
Programa
1 Algodão padrão
Camisas
2
3 Cama e Banho
4 Antialérgico
5 Sintéticos
Secagem Rápida
6
Algodão padrão
●
Este é um programa para itens em algodão.
●
A duração do programa irá depender da dimensão da carga, da definição de secagem seleccionada e da
velocidade de rotação utilizada na sua máquina de lavar (ver Roupa).
●
O programa de algodão padrão consoante o Regulamento EU 392/2012 é a selecção do Programa 1 com o Calor Alto
e Nível de Secagem ‘Secagem para armário’ (Configuração standard/predefinida inicial). Este é o programa mais
eficiente em termos de sonsumo de energia (UE 392/2012).
Opções disponíveis:
Temporizado
Cuidado Extra
Som
- Alto (High)
✓
✓
✓
✓
✓
✓
✓
✓
✗ ✗
✓
✗
✗
✗
- Médio (Medium)
- Baixo (Low)
- Alto (High)
✓
- Médio (Medium)
- Alto (High)
✓
- Médio (Medium)
✓
- Médio (Medium)
✓
- Baixo (Low)
- Alto (High)
✓
- Médio (Medium)
Nivel de calor
✗
Secagem
✓
✓
✓
✗
✗
●
Um programa Automático
✓
●
Um programa Automático
Níveis de Secagem disponíveis
(predefinição destacada )
Temporizada
Secagem por
Sensor
Secagem com
humidade
Secagem para
passagem a ferro
(Engomar)
Secagem para
pendurar (extra)
✓
✓
✓
✓
✓
✓
✓
✓
✓
✓
✓
✓
✓
✓
✓
✓
✓
✓
✓
✓
✓
✓
✓
✓
Secagem para
pendurar
✓
✓
✓
✓
✓
✓
✓
✓
✓
✓
✓
✓
✓
Secagem suave
Secagem para
armário
✓
✓
✓
✓
✓
✓
✓
✗
✓
✗
✗
Secagem Extra
(Extra Seco)
27
Page 28

Arranque e Programas
P
Camisas
Opção Calor Alto
●
Este programa foi concebido para camisas de algodão.
●
Pode ser utilizado para cargas até 3 kg (aproximadamente 10 camisas).
Opção de Calor Médio
●
Este programa foi concebido para camisas feitas a partir de materiais sintéticos ou de uma mistura de materiais
sintéticos e naturais, como poliéster e algodão.
●
Pode ser utilizado para cargas até 3 kg (aproximadamente 14 camisas).
A duração do programa irá depender da dimensão da carga, da definição de secagem seleccionada e da
velocidade de rotação utilizada na sua máquina de lavar.
Geralmente, as peças de roupa secas com a definição de Secagem para armário estão prontas a vestir. As
extremidades ou costuras poderão estar ligeiramente húmidas. Se isto acontecer, vire as camisas do avesso e
execute novamente o programa por um curto período de tempo.
Cama e Banho
●
Este é um programa para toalhas e lençóis em algodão.
●
A duração do programa irá depender da dimensão da carga, da definição de secagem seleccionada e da
velocidade de rotação utilizada na sua máquina de lavar (ver Roupa).
●
As cargas que tenham sido secas utilizando a definição de Secagem Extra (Extra Seco) estarão geralmente
prontas a serem utilizadas, mas as extremidades ou costuras poderão estar ligeiramente húmidas, especialmente
em itens mais volumosos. Se isto acontecer, tente abri-las e execute novamente o programa por um curto período
de tempo.
Programa Antialérgico
Este programa possui o "Selo de Aprovação" da Allergy UK que reflecte a redução e eliminação eficaz de
alergénios da roupa com o ciclo especial Antialérgico. Com este programa e graças a uma temperatura
constante alcançada durante um período de tempo prolongado, os efeitos da maioria dos alergénios (incluindo os
ácaros domésticos e o pólen) são neutralizados.
Pode ser utilizado com uma carga molhada total para secagem e tratamento ou com uma carga seca de 4 kg
apenas para o tratamento da roupa.
Sintéticos
●
Este é um programa para itens sintéticos ou misturas sintéticas/algodão.
●
A duração do programa irá depender da dimensão da carga, da definição de secagem seleccionada e da
velocidade de rotação utilizada na sua máquina de lavar (ver Roupa).
Secagem Rápida
Programa para cargas pequenas até 1 kg. Nota: só pode ser utilizado com a definição "Secagem para armário.
O tempo de secagem é substancialmente reduzido, com uma enorme poupança de tempo até 53% para Algodões (com
a opção calor alto) e 50% para Sintéticos (com a opção de calor médio).
PROGRAMAS EXCLUSIVOS (EXCLUSIVE) – Tabela de Programas
Programa
7 Calças de ganga
8
Lã
9 Seda
10 Delicados
11 Edredão
12 Bebé
Opções disponíveis:
Temporizado
Cuidado Extra
Som
✓
✗
✗
✓
✓
✓
✓
✗
✓
✗
✓
✗
✗
✓
✓
✓
- Alto (High)
- Médio (Medium)
✗
✗
Nivel de calor
✗
✗
✗
✗
✓
✗
Secagem
✗
●
Um programa Automático
✗
●
Um programa Automático
✗
Níveis de Secagem disponíveis
(predefinição destacada )
Temporizada
Secagem por
Sensor
Secagem com
humidade
Secagem para
passagem a ferro
✓
✓
✓
✓
✓
✓
✓
✓
✓
✓
✓
✓
(Engomar)
Secagem para
pendurar (extra)Secagem para
✓
✓
✓
✓
✓
✓
✓
✓
✓
pendurar
Secagem suave
✓
✓
✓
✓
Secagem para
armário
Secagem Extra
✓
✓
✗
✓
✗
✓
✗
✓
(Extra Seco)
28
Page 29

Arranque e Programas
Calças de ganga
●
Este programa foi concebido para calças de ganga. Antes de secar as calças de ganga, vire os bolsos da
frente do avesso.
●
Pode ser utilizado para cargas até 3 kg (aproximadamente 4 pares).
●
Não misture peças de roupa escuras e claras.
●
Pode também ser utilizado com outras peças de roupa feitas a partir do mesmo material, como casacos.
●
A duração do programa irá depender da dimensão da carga e da velocidade de rotação utilizada na sua
máquina de lavar.
●
Geralmente, as peças de roupa secas com este programa estão prontas a vestir. As extremidades ou bainhas
podem estar ligeiramente húmidas. Se isto acontecer, vire as calças de ganga do avesso e execute novamente
o programa por um curto período de tempo.
! Não se recomenda a utilização deste programa se as calças de ganga tiverem cós elástico, tachas ou bordados.
Programa de Lãs
●
Este programa destina-se a roupas delicadas que possam ser utilizadas na máquina de secar e que estejam
marcadas com o símbolo .
●
Pode ser utilizado em cargas máximas de 1kg (aproximadamente 3 camisolas).
●
Recomendamos que volte estas peças do avesso antes de colocar na máquina.
●
A duração do programa irá depender da dimensão da carga e da velocidade de rotação utilizada na sua
máquina de lavar.
●
As cargas secas através da utilização deste programa, normalmente, ficam prontas a vestir, mas em peças
mais pesadas, as pontas podem ficar húmidas. Permita que sequem naturalmente uma vez que a secagem
artificial em demasia pode danificar as peças.
! Ao contrário de outros materiais, o mecanismo de encolhimento da lã é irreversível, ou seja, não volta ao
tamanho, nem à forma original.
! Este programa não é adequado a roupas acrílicas.
Seda
●
Este programa foi concebido para secar sedas delicadas.
●
Pode ser utilizado para cargas até 0,5 kg.
●
A duração do programa irá depender da dimensão da carga e da velocidade de rotação utilizada na sua
máquina de lavar.
●
Geralmente, as peças de roupa secas com este programa estão prontas a vestir, mas, em algumas peças mais
pesadas, as extremidades podem estar ligeiramente húmidas. Se isto acontecer, retire a roupa, abra-a e, em
seguida, execute novamente o programa por um curto período de tempo.
Programa Bebé
●
Este programa foi concebido para secar as peças de roupa pequenas e delicadas e a roupa de cama do seu
bebé (Algodão e Veludo) e para secar as suas peças de roupa delicadas.
●
NÃO seque peças de roupa como babetes ou fraldas com coberturas de plástico.
●
Pode ser utilizado para cargas até 2 kg.
●
A duração do programa irá depender da dimensão da carga e da velocidade de rotação utilizada na sua
máquina de lavar.
●
Geralmente, as cargas secas utilizando este programa estão prontas a vestir, mas em algumas peças as
extremidades podem estar ligeiramente húmidas. Se isto acontecer, tente abrir ou virar as peças de roupa do
avesso e execute novamente o programa por um curto período de tempo.
Delicados
●
Este programa foi concebido para secar as suas roupas mais delicadas, por exemplo Acrílicos.
●
Pode ser utilizado para cargas até 2 kg.
●
A duração do programa irá depender da dimensão da carga e da velocidade de rotação utilizada na sua
máquina de lavar.
●
Geralmente, as cargas secas utilizando este programa estão prontas a vestir, mas em algumas peças as
extremidades podem estar ligeiramente húmidas. Se isto acontecer, tente abrir ou virar as peças de roupa do
avesso e execute novamente o programa por um curto período de tempo.
Edredão
! Tenha cuidado com a utilização deste programa. NÃO seque quaisquer itens que se encontrem danificados e
que possam resultar na obstrução do filtro ou do ventilador, resultando num perigo de incêndio.
●
Deve apenas ser utilizado para edredões de solteiro: NÃO adequado para itens com dimensões de casal ou
"king size".
●
Geralmente, as cargas secas utilizando este programa estão prontas a vestir, podendo estar ligeiramente húmi
das em determinadas zonas. Se isto acontecer, tente abrir ou sacudir os itens e execute novamente o programa
por um curto período de tempo.
●
Igualmente disponível para casacos de penas.
●
Seleccione aquecimento elevado para Edredões de Algodão e aquecimento médio para Edredões Sintéticos.
●
A duração do programa irá depender da dimensão e densidade da carga e da velocidade de rotação utilizada
na sua máquina de lavar.
P
29
Page 30

Arranque e Programas
P
PROGRAMAS EXTRA (EXTRA_ – Tabela de Programas
Programa
13 Peluche
14 Calor & Conforto
15 Engomar fácil
16 Refrescante
Programa para Peluches
Com este programa, é possível remover mais facilmente as poeiras e lavar os peluches com mais frequência, uma
vez que o tempo de secagem é substancialmente reduzido em comparação com a secagem ao ar. É um ciclo de
secagem delicado, de baixa temperatura e com uma acção mecânica suave para manter o mais possível o
aspecto e o brilho originais do pêlo.
Nota: Para protecção contra as alergias, congele os peluches durante 24 horas e, em seguida, lave e seque-os.
Repita esta operação a cada 6 semanas. Antes de secar, remova acessórios como roupa, coleiras ou dispositivos
de som e proteja os olhos de plástico com fita adesiva depois de os secar com um pano.
O tempo do programa irá variar consoante a constituição exacta da carga.
A carga máxima não deverá ultrapassar os 2,5 kg e um item individual não deverá ter um peso superior a 600 g.
Opções disponíveis:
Temporizado
Cuidado Extra
Som
✓
✗
✗
✗
✓
✗
✗
✗
✓
✗
✗
✓
Nivel de calor
✗
✗
✗
✗
Secagem
Temporizada
●
Um programa Automático
●
Um programa Automático
●
Um programa Automático
●
Um programa Automático
Níveis de Secagem disponíveis
Secagem por
Sensor
Secagem com
humidade
Secagem para
passagem a ferro
(Engomar)
Secagem para
pendurar (extra)
Secagem para
pendurar
Secagem suave
Secagem para
armário
Secagem Extra
(Extra Seco)
Calor & Conforto
Este programa aquece toalhas e roupões para proporcionar uma sensação reconfortante após o banho. É também
útil para aquecer a roupa antes de a vestir durante o Inverno. O ciclo aquece a roupa até 37 °C (temperatura
corporal) e é executado a esta temperatura durante um máximo de 4 horas ou até interromper o ciclo abrindo a porta.
Carga máxima de 3 kg.
Nota: durante este programa, um ícone roda no ecrã até que seja atingida a temperatura alvo. Nesse momento,
o ícone do nível de secagem pisca.
Programa Engoma fácil
O ‘Engoma fácil’ é um programa breve de 10 minutos (8 minutos de calor, seguidos de 2 minutos de um período de
rotação a frio), que ventila as fibras das roupas que foram deixadas na mesma posição/Local durante um período
de tempo prolongado. O ciclo relaxa as fibras e facilita a passagem a ferro.
! O ‘Engoma fácil’ não é um programa de secagem e não deve ser utilizado com peças de roupa molhadas.
Para obter os melhores resultados:
1. Não carregue mais do que a capacidade máxima. Estes números referem-se ao peso em seco:
Tecido Carga máxima
Algodão e Misturas de algodão 2,5 kg
Sintéticos 2 kg
Gangas 2 kg
2. Descarregue a secadora imediatamente após o fim do programa, pendure, dobre ou engome as peças
de roupa e guarde-as no armário. Caso isto não seja possível, repita o programa.
O efeito ‘Engoma fácil’ varia de tecido para tecido. Funciona bem com tecidos tradicionais como algodão e
misturas de algodão e menos bem em fibras acrílicas e em materiais como Tencel®.
Refrescante
! "Refrescante" não é um programa de secagem e não deve ser utilizado com peças de roupa molhadas.
●
Pode ser utilizado com cargas de qualquer dimensão mas é mais eficaz com cargas mais pequenas.
●
Não sobrecarregue a sua máquina de secar (ver Roupa).
●
Este é um programa com uma duração de 20 minutos que areja a sua roupa com ar fresco. Utilize-o também
para arrefecer peças de roupa quentes.
30
Page 31

Arranque e Programas
Controlos
●
Botão dos PROGRAMAS
! Cuidado, se a posição do botão os PROGRAMAS
fôr alterada após premir o botão INICIAR/PAUSA , a
nova posição NÃO alterará o programa seleccionado.
Para alterar um programa seleccionado, prima o
botão INICIAR/PAUSA ; a luz fica laranja e intermitente
para indicar que o programa está em pausa.
Seleccione o novo programa e quaisquer opções
necessárias e, de seguida, a luz ficará verde
novamente o botão INICIAR/PAUSA
programa é iniciado.
●
Botões / Luzes OPÇÃO
Estes botões são utilizados para personalizar o
programa seleccionado para os seus requisitos. Terá
de seleccionar um programa no respectivo interruptor
antes de seleccionar uma opção. Nem todas as
opções são possíveis para todos os programas (ver
Arranque e Programas). Se uma opção não fôr
possível e caso prima o botão, será emitido um sinal
sonoro por três vezes. Se a opção estiver disponível,
a luz de opção no botão acende para confirmar a
selecção.
Após o botão INICIAR/PAUSA ser premido, apenas
pode alterar a opção de Som (quando disponíveis).
Ícones de Progresso ( Secagem, Rotação a Frio)
Estes fazem parte do Visor, indicando o progresso da
máquina de secar. Cada ícone é apresentado quando
inicia a fase correspondente.
Temporizador (Atraso de Tempo)
O início de alguns programas (ver Arranque e
Programas
de 24 horas.
está esvaziada antes de definir um início atrasado.
e O Visor) pode ser atrasado num máximo
Certifique-se de que o recipiente de água
este período, as roupas irão circular para evitar o
aparecimento de rugas.
Cuidado extra
A função Anti-Envelhecimento para Materiais de
Algodão ajuda a prolongar o brilho da sua roupa,
graças à correcta rotação do tambor (reduzida na
fase final do ciclo) e à correcta temperatura.
Nota: Não pode ser utilizada com os níveis de
secagem "Secagem extra (Extra Seco)", "Secagem
para armário" e "Secagem suave".
Botões e luzes de nível de calor
Nem todos os programas permitem que altere o nível
de calor e alguns programas permitem as três
opções do nível de calor:
Baixo (Low), Médio (Medium) e Alto (High).
Quando as opções do nível de calor estão
disponíveis, premir este botão altera o nível de calor e
a luz correspondente à selecção acende.
Som
Se seleccionada, emite um sinal no fim do ciclo de
secagem para o lembrar que as roupas estão prontas
a serem removidas.
Indisponível com o programa de Calor & Conforto.
. Prima
e o novo
Durante
●
DISPLAY
O visor apresenta a duração do tempo de atraso ainda por
decorrer ou uma indicação do tempo restante do
programa de secagem. (ver O Visor).
Os sinais de dois pontos entre as horas e os minutos no
visor passam a intermitente para indicar que o tempo
entrou em contagem decrescente.
Quando o programa conclui a sua fase “Rotação a Frio”,
o visor indicará ‘End’.
●
Ícone Esvaziar água / recipiente de água
(Se esvaziou o secador, este ícone poderá ser ignorada,
uma vez que não há necessidade de esvaziar o recipiente
de água).
Quando este ícone encontra-se aceso ( ) avisa-o que
tem de esvaziar o recipiente de água.
8:88
Caso o recipiente de água fique cheio durante o
programa, o aquecimento é desligado e o secador activa
um período de Rotação a Frio e soa o alarme sonoro,
o ícone "recipiente da água cheio" pisca, o visor
apresenta e o ícone "esvaziar água" está
ligado.
Deverá esvaziar o recipiente de água e reiniciar o
secador, caso contrário, a roupa não ficará seca.
Após
reiniciar o secador, o visor irá demorar alguns
segundos até actualizar.
Para evitar este procedimento, esvazie sempre o
recipiente de água cada vez que utilizar o secador (ver
Manutenção).
●
Abertura da Porta
A abertura da porta (ou premir o botão INICIAR/PAUSA)
durante um programa provoca a interrupção do secador
e os seguintes efeitos:
●
A luz INICIAR/PAUSA fica laranja e intermitente.
●
Durante uma fase de atraso, o mesmo
prosseguirá com a contagem decrescente. O
botão INICIAR/PAUSA terá de ser premido para
retomar o programa de atraso.
●
O botão INICIAR/PAUSA terá de ser premido
para retomar o programa de atraso. As luzes de
progresso serão alteradas para indicar o estado
actual e a luz INICIAR/PAUSA deixa de piscar e
ficará verde.
●
A alteração do botão dos PROGRAMAS seleccionará
um novo programa e a luz INICIAR/PAUSA fica
verde e intermitente. Tal poderá ser utilizado para
seleccionar o programa “Refrescante” para
arrefecer as peças, caso considere que estejam
demasiado secas. Prima o botão INICIAR/PAUSA
para iniciar o novo programa.
●
Nota
Em caso de corte de electricidade, desligue a
alimentação ou remova a ficha. Quando a
electricidade for reposta, prima e mantenha o botão
LIGAR/DESLIGAR até que a máquina de secar
reactive, em seguida prima o botão Iniciar/Pausa.
P
31
Page 32

Roupa
P
Escolher a sua roupa
• Consulte os símbolos nas etiquetas das roupas,
de modo a certificar-se de que os artigos podem
ser utilizados na secadora.
• Escolha a roupa por tipo de tecido.
• Esvazie os bolsos e verifique os botões.
• Feche os fechos de correr e desaperte cintos e
correias.
• Torça cada peça de modo a eliminar o máximo de
água possível.
! Não carregue peças a pingar na secadora.
Carga máxima
Não carregue mais do que a capacidade máxima.
Estes números referem-se ao peso em seco:
Fibras naturais: 8 kg máx.
Fibras sintéticas: 3 kg máx.
! NÃO sobrecarregue a máquina, uma vez que pode
resultar num desempenho de secagem reduzido.
Etiquetas de cuidado na lavagem
Observe as etiquetas nas suas peças de roupa,
especialmente se está a utilizar a secadora pela
primeira vez. Os símbolos que se seguem são os
mais comuns:
Pode ser seco na máquina
Não pode ser seco na máquina
Seque com a temperatura máxima
Seque com a temperatura mínima
Tempos de secagem
O quadro que se segue apresenta os tempos de
secagem APROXIMADOS em minutos. Os pesos
referem-se a artigos secos:
Estes tempos são aproximados e podem variar
dependendo de:
• Quantidade de água mantida nas roupas após o
ciclo de centrifugação: as toalhas e peças
delicadas retêm muita água.
• Tecidos: artigos que sejam do mesmo tipo de
tecido, mas que sejam de texturas e espessuras
diferentes poderão não ter o mesmo tempo de
secagem.
• Quantidade de roupa: artigos únicos ou pequenas
cargas podem demorar mais tempo a secar.
• Secagem: Se pretender engomar algumas das
suas roupas, podem ser retiradas da máquina
ainda um pouco húmidas. As restantes poderão
ficar mais tempo, se precisar delas
completamente secas.
• Definição de temperatura.
• Temperatura ambiente: se o espaço em que a
máquina está instalada estiver frio, poderá
demorar mais tempo a secar as suas roupas.
• Volumes: alguns artigos mais volumosos devem ser
secos na máquina com cuidado. Sugerimos que
remova estes artigos várias vezes, sacuda-os e
volte a colocá-los na máquina até que estejam
completamente secos.
! Não seque em demasiado as suas roupas.
Todos os tecidos contêm um pouco de humidade
natural, que os mantêm suaves e macios.
Algodões
Carga
Tempos de secagem,
em minutos
Sintéticos
Carga
Tempos de secagem,
em minutos
●
Nota: No fim de um ciclo de secagem, os algodões ainda devem estar húmidos caso tenha agrupado algodões
e sintéticos. Se isto acontecer, basta aplicar mais um breve período de secagem.
32
Calor Alto
1 kg
30 - 40
Baixo Calor
- velocidade de rotação de 800-1000 rpm na máquina de lavar.
2 kg
40 - 55
- em rotação reduzida na máquina de lavar.
1 kg
40 - 50
3 kg
55 - 70
4 kg
70 - 80
2 kg
50 - 70
5 kg
80 - 90
6 kg
95 - 120
7 kg
120 - 140
3 kg
70 - 90
8 kg
130 - 150
Page 33

Resolução de problemas
Um dia a sua máquina parece não querer funcionar. Antes de contactar o seu Centro de Serviços (ver
Reparação), analise as seguintes sugestões de resolução de problemas:
Problema:
A secadora não inicia.
Causas possíveis / Solução:
●
A ficha não está ligada à tomada, ou não está a fazer contacto.
●
Ocorreu uma falha de energia.
●
Há um fusível queimado. Experimente ligar outro aparelho à tomada.
●
Está a utilizar um cabo de extensão? Experimente ligar o fio de
alimentação da secadora directamente à tomada.
●
A porta está bem fechada?
●
O botão PROGRAMAS não foi posicionado correctamente (ver Arranque
e Programas).
●
O botão Iniciar/Pausa não foi posicionado correctamente (ver
Arranque e Programas).
O ciclo de secagem não inicia.
Demora muito tempo a secar.
●
Definiu um atraso do tempo (ver Arranque e Programas).
●
O filtro não foi limpo (ver Manutenção).
●
O recipiente de água tem de ser esvaziado... O ícone "recipiente de
água cheio" está a piscar, o visor apresenta e o ícone "esvaziar
água" está ligado (ver Manutenção).
●
O condensador tem de ser limpo? (ver Manutenção).
●
A definição de temperatura não é ideal para o tipo de tecido que está a
secar (ver Arranque e Programas, e ver Roupa).
●
O tempo de secagem correcto não foi seleccionado para a carga (ver
Roupa).
●
A grelha de entrada de ar está obstruída (ver Instalação, e ver
Manutenção).
●
As peças estavam demasiado molhadas (ver Roupa).
●
A secadora foi sobrecarregada (ver Roupa).
P
O ícone "recipiente de água
cheio" está a piscar e é
apresentado , mas o
secador apenas esteve em
funcionamento durante um
curto período.
O ícone "Esvaziar Água"
está ligado e o recipiente de
água não está cheio.
O programa acaba e as
roupas estão mais húmidas
do que deviam.
O visor mostra um código de
avaria F seguido de um ou
dois números.
●
É provável que o recipiente de água não tenha sido esvaziado no início
do programa. Não espere pelo sinal esvaziar água. Verifique sempre o
recipiente e esvazie-o antes de iniciar um programa de secagem novo
(ver Manutenção).
●
Isto é normal. Se o ícone está ligado, serve apenas para o relembrar de
esvaziar o recipiente (ver Arranque e Programas).
! Por razões de segurança, a secadora tem um tempo de programa máximo
de 5 horas. Se um programa automático não detectar a humidade final
necessária durante este tempo, a secadora conclui o programa e pára.
Verifique os pontos anteriores e execute novamente o programa; se os resultados
continuarem húmidos, contacte o Centro de Serviço (ver Reparação).
●
Se o visor apresentar uma falha:
- Desligue e retire a ficha. Limpe o filtro e o condensador (ver
Manutenção). Em seguida substitua a ficha, ligue e inicie outro
programa. Se uma falha for apresentada: Anote o código e
contacte o Centro de Serviços (ver Reparação).
33
Page 34

Reparação
P
Antes de contactar o Centro de
Serviços:
●
Utilize o guia de resolução de problemas para ver
se consegue resolver o problema (ver Resolução
de problemas).
●
Caso contrário, desligue a secadora e contacte o
Centro de Serviço mais próximo.
O que dizer ao Centro de Serviço:
●
nome, morada e código postal.
●
número de telefone.
●
o tipo de problema.
●
a data de compra.
●
o modelo do aparelho (Mod.).
●
o número de série (S/N).
Estas informações podem ser encontradas na
etiqueta de dados, no interior da porta da máquina.
Peças sobressalentes
Esta secadora é uma máquina complexa. Repará-la
sozinha ou através de um técnico não autorizado
pode provocar danos a uma ou mais pessoas, pode
danificar a máquina e pode invalidar a garantia das
peças sobressalentes.
Contacte um técnico autorizado se tiver problemas
durante a utilização da máquina.
Poupar energia e respeitar o ambiente
●
Torça as peças de vestuário para eliminar o excesso de água antes de colocá-las na máquina de secar (se
primeiro utilizar uma máquina de lavar, seleccione um ciclo de centrifugação elevado).Ao fazer isto, poupa tempo e
energia durante a secagem.
●
Seque sempre com cargas completas – assim, poupa energia: artigos únicos ou pequenas cargas podem
demorar mais tempo a secar.
●
Limpe o filtro após cada utilização para cortar nos custos de consumo de energia (ver Manutenção).
Informações Acerca de Reciclagem
e Eliminação de Resíduos
Como parte do nosso continuado empenho
em ajudar o ambiente, reservamo-nos o
direito de utilizar componentes de qualidade, de
modo a manter os custos baixos para os clientes e
minimizar o desperdício de material.
●
Eliminação do material da embalagem: siga os
regulamentos locais, de modo que a embalagem
possa ser reciclada.
●
De modo a minimizar o risco de lesões para crianças,
remova a porta e a ficha e corte o fio eléctrico do
aparelho. Elimine estas peças separadamente a
fim de assegurar que o aparelho não possa mais
ser ligado a uma tomada eléctrica.
Recolha dos electrodomésticos
A directiva Europeia 2012/19/CE referente à gestão de
resíduos de aparelhos eléctricos e electrónicos (RAEE),
prevê que os electrodomésticos não devem ser escoados
no fluxo normal dos resíduos sólidos urbanos. Os
aparelhos desactualizados devem ser recolhidos
separadamente para optimizar a taxa de recuperação e
reciclagem dos materiais que os compõem e impedir
potenciais danos para a saúde humana e para o ambiente.
O símbolo constituído por um contentor de lixo
barrado com uma cruz deve ser colocado em
todos os produtos por forma a recordar a
obrigatoriedade de recolha separada.
Os consumidores devem contactar as autoridades locais
ou os pontos de venda para solicitar informação
referente ao local apropriado onde devem depositar os
electrodomésticos velhos.
34
Page 35

Dados do produto…
(Regulamento da UE 392/2012)
Marca Hotpoint Ariston Modelos TCF87B
FTCF87B
Capacidade nominal da lavagem de algodão para o programa padrão com carga máxima 8 kg Eficácia energética de classe B
Consumo de energia anual ponderado (AEc) 559.8 kWh
Consumo por ano, com base em 160 ciclos de secagem do programa para algodões padrão com cargas totais e parciais e o
consumo dos modos de baixo consumo. O consumo de energia real por ciclo depende do modo de utilização do aparelho.
Esta secadora doméstica é uma Secadora condensadora automática
Consumo de energia: carga máxima E
Consumo de energia: modo desligado (P
4.70 kWh, carga parcial E
dry
) 0.14 W, modo de suspensão (Pl) 2.77 W
o
dry1/2
2.59 kWh
A duração do “modo de suspensão” para sistema de gestão de energia é de 30 minutos
O “programa de algodão padrão” adequado para peças de algodão molhadas para secagem normal que é o programa
mais eficaz em termos de consumo de energia para algodões utilizados com cargas máximas e parciais é o modo
Algodão padrão - Programa 1, Calor Alto, Secagem para armário
Tempo do programa (minutos): ponderado (Tt) carga máxima e parcial 95, carga máxima (T
) 127, carga parcial (T
dry
dry1/2
) 71
Eficácia de condensação de classe B
Eficácia de condensação media (%) : carga máxima (C
) 84, carga parcial (C
dry
) 78, ponderado (Ct) carga máxima e parcial 81
dry1/2
Emissões de ruído acústico aéreas 69 dB(A) re 1 pW
P
* “informação ao consumidor em conformidade com o regulamento EU 932/2012”.
Energia utilizada normalmente - Sintéticos
Tempo de secagem normal - Sintéticos
carga máxima 1.38 kWh, carga parcial não aplicável
carga máxima 65 minutos, carga parcial não aplicável
Este equipamento está em conformidade com as seguintes directivas da UE:
- 2006/95/EC (Equipamento de Baixa Tensão)
- 2004/108/EEC (Compatibilidade Electromagnética)
Indesit Company, Viale Aristide Merloni 47, 60044 Fabriano (AN), Italy
35
Page 36

195129104.00 N
12/2014 - LION fpg . Four Ashes, Wolverhampton
36
 Loading...