

Page 1
Instruction booklet
GB
English, 1
E
Español, 55
F
Français, 19
P
Português, 73
D
Deutsch, 37
FTCD 97B
First time you turn on your dryer
you must select your preferred
language see page 8
Contents
Installation, 2
Where to put your dryer
Ventilation
Water drain
Electrical connection
Before you start using your dryer
Warnings, 3-4
General safety
To minimise the risk of fire
Maintenance and Care, 5-6
Switching off the electricity
Cleaning the filter after each cycle
Empty the water container after each cycle
Cleaning the condenser unit
Check the drum after each cycle
Cleaning the dryer
Dryer description, 7
The features
Control panel
GB
TUMBLE DRYER
This symbol reminds you to read this
booklet.
! Keep this instruction booklet on hand in order to refer
to it when necessary. Take it with you when you move,
and should you sell this appliance or pass it on to
another party, make sure that this booklet is supplied
along with the dryer so that the new owner may be
informed about warnings and suggestions on how the
appliance works.
! Read these instructions carefully; the following
pages contain important information on installation
and suggestions on how the appliance works.
The Display, 8-10
Start and programmes, 10-14
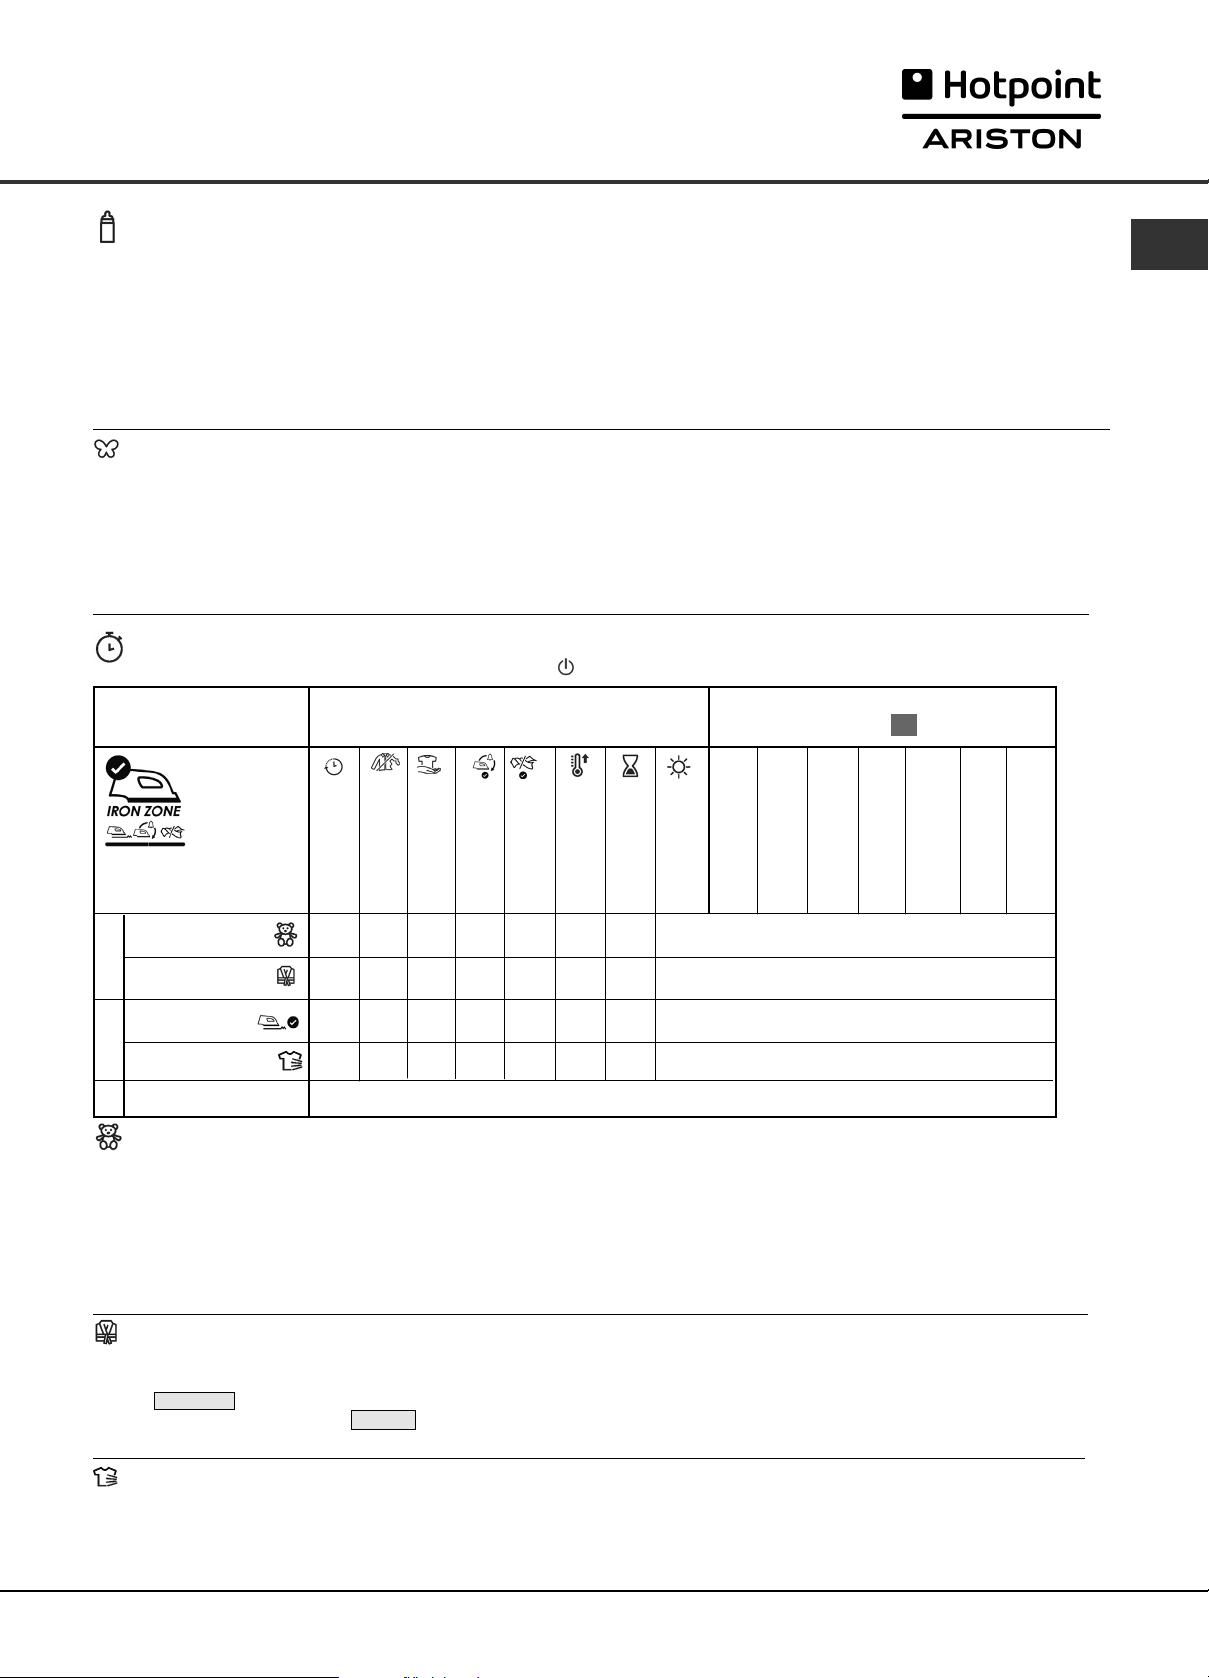
Choosing a programme
Programmes Table
The Controls
Laundry, 15
Sorting your laundry
Wash care labels
Drying times
Troubleshooting, 16
Service, 17
Spare Parts
Recycling and Disposal
Product data, 18
www.hotpoint.eu
1
Page 2
Installation
GB
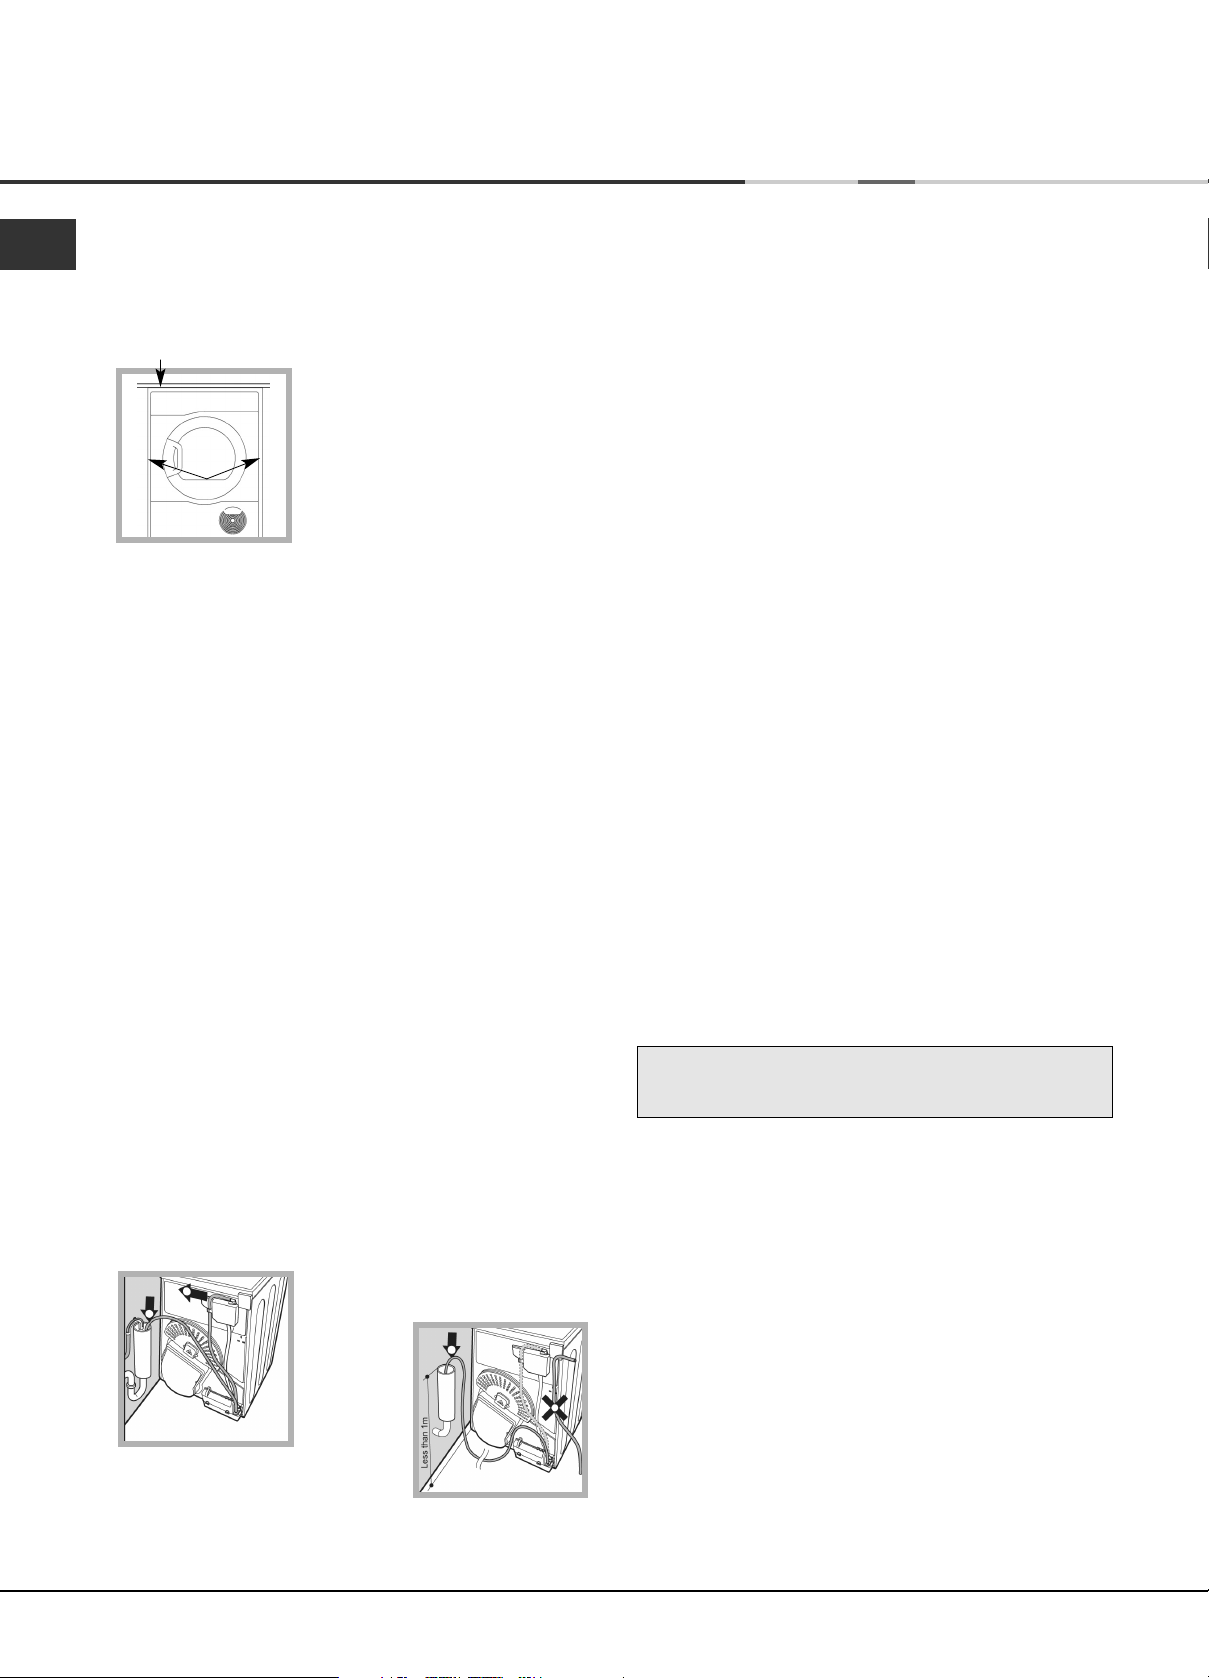
Where to put your dryer
●
Place your dryer at a distance from gas
ranges, stoves, heaters, or cook tops
because flames can damage the
appliance.
●
Minimum gap 10mm
If you are going to
install the appliance
under a work counter,
be sure to leave a
10mm space between
Minimum gaps
15mm
the top and any other
objects on or above
the machine and a
15mm space between
the sides and lateral furnishings or walls. This
is to ensure proper air circulation.
The appliance must be installed with the
rear surface placed against a wall.
Ventilation
When the dryer is in use, there has to be adequate
ventilation. Make sure you put your dryer in an
environment that is not damp and has proper air
circulation throughout. Airflow around the dryer is
essential to condense the water produced during the
washing, the dryer will not operate efficiently in an
enclosed space or cupboard.
! If using the dryer in a small or cold room some
condensation could be experienced.
! We do not recommend that the dryer is
installed in a cupboard but the dryer must
never be installed behind a lockable door,
a sliding door or a door with a hinge on
the opposite side to that of the dryer door.
Electrical connections
Make sure of the following before you
insert the plug into the the electrical socket:
●
Make sure your hands are dry.
●
The socket must have an earth connection.
●
The socket must be able to sustain the
machines maximum power, which is
indicated on the rating label (see Dryer
Description).
●
Power voltage must be within the values
indicated on the rating label (see Dryer
Description).
●
The socket must be compatible with the
dryers plug. Should this not be the case,
replace the plug or the socket.
! The dryer must not be installed outdoors,
even if the space is sheltered. It can be
very dangerous if it is exposed to rain or
storms.
! Once installed, the dryers electrical wire
and plug must be within easy reach.
! Do not use extension cords.
! The power cord must not be bent or
squashed.
! The power cord should be regularly
checked. If the supply cord is damaged, it
must be replaced by the manufacturer, its
service agent or similarly qualified
persons in order to avoid a hazard. New or
longer power cords are supplied at an extra
charge by authorised dealers.
! The manufacturer denies any responsibility
should any of these rules not be followed.
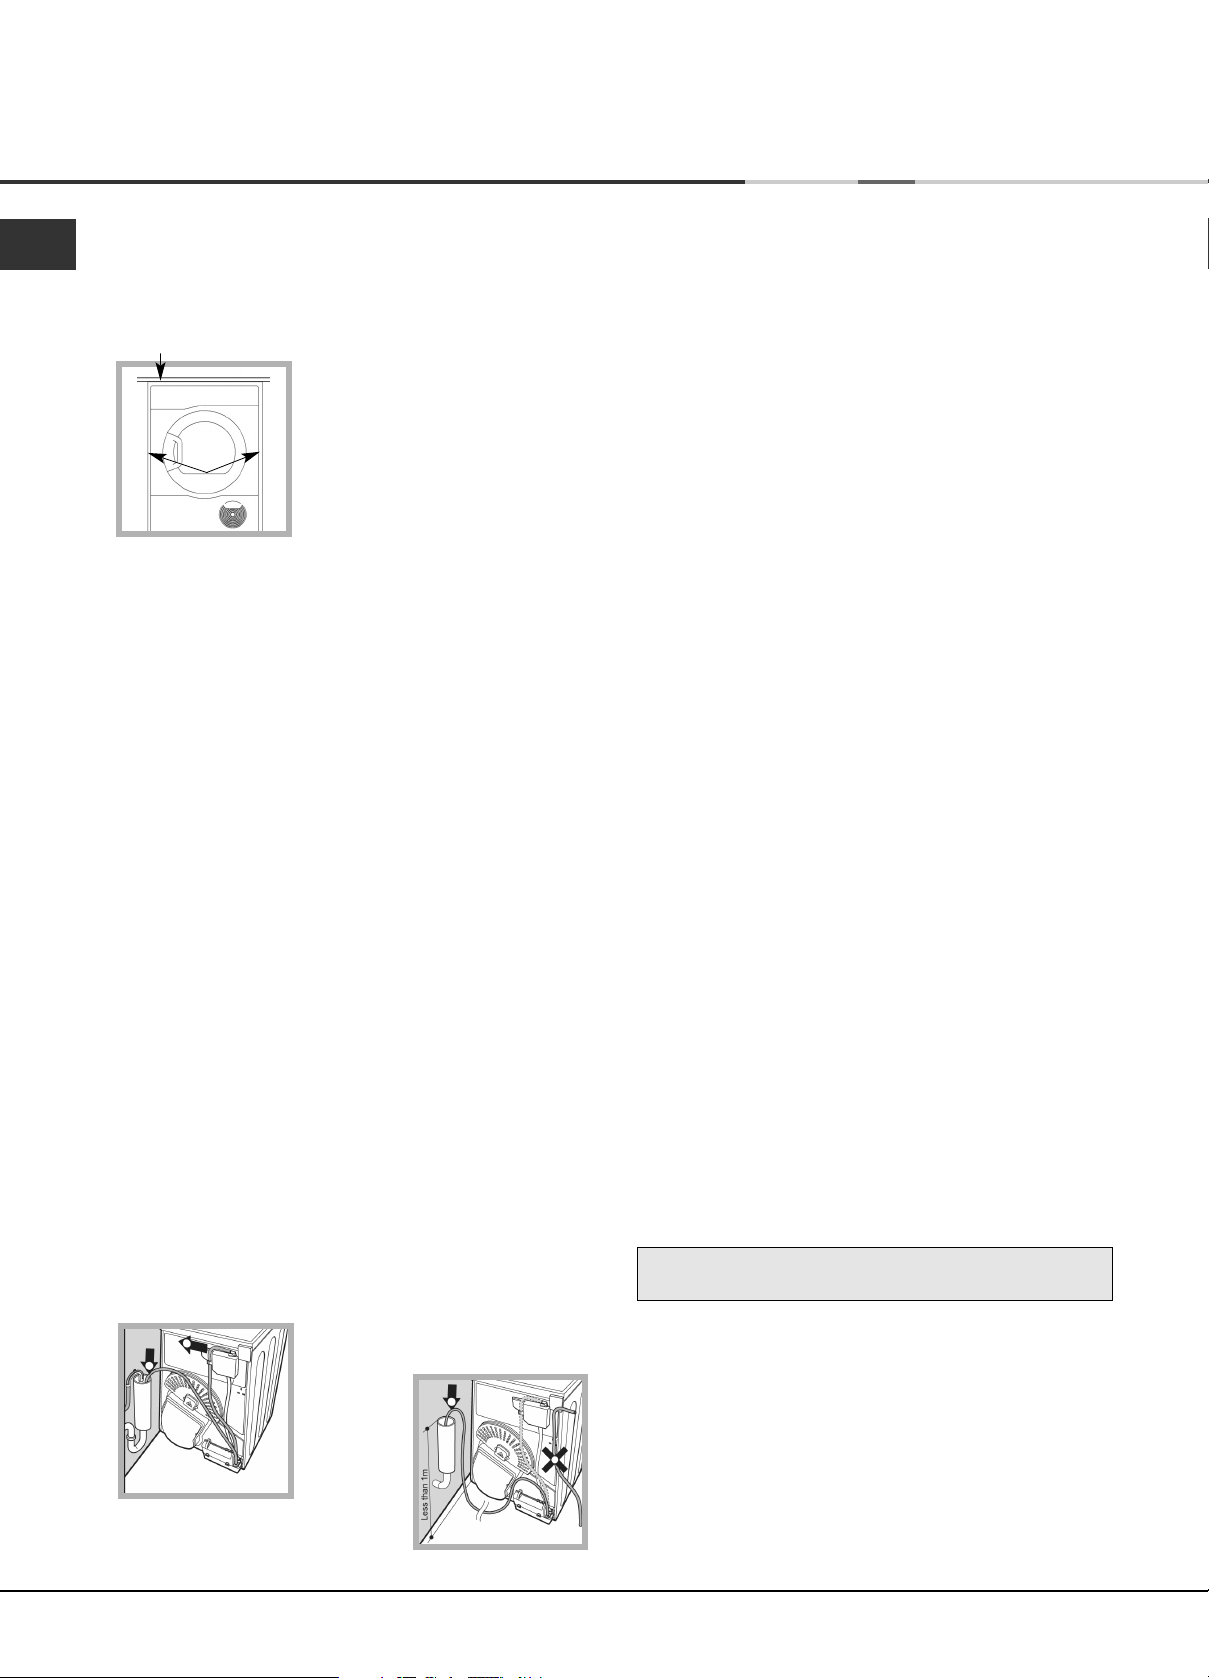
Water drain
If your dryer is installed next to a drain the water can be
plumbed into this drain. This does away with the need to
empty the water container. If the dryer is stacked onto or
installed next to a washing machine it can share the same
drain.
The height of the drain must be less than 3' (1m) from the
bottom of the dryer.
Remove the existing hose from
position shown in picture A.
picture A
Then fit a suitable length of hose to
position shown in picture B.
! Make sure that the hose is not squashed or kinked when
the dryer is in its final location.
2
picture B
! If in doubt about any of the above consult a
qualified electrician.
Before you start using your dryer
Once you have installed your dryer and before you
use it, clean the inside of the drum to remove any dust
that could have accumulated during transport.
Maximum load
Natural fibres : 9 kg
Page 3

Warnings
! The appliance has been designed and
built according to international safety
standards.
These warnings are given for safety
reasons and must be followed carefully.
General safety
●
This appliance can be used by children
aged from 8 years and above and
persons with reduced physical, sensory
or mental capabilities, or lack of
knowledge if they are given supervision
or instruction concerning use of the
appliance in a safe way and understand
the hazards involved.
●
This tumble dryer has been designed for
home, and not professional use.
●
Do not touch the appliance while bare
foot or with wet hands or feet.
●
Unplug the machine by pulling on the
plug, not the cord.
●
After using the dryer, turn it off and
unplug it. Keep the door closed to make
sure that children do not use it as a toy.
●
Children should be supervised to ensure
that they do not play with the dryer.
●
Cleaning and user maintenance should
not be made by children without
supervision.
●
Children of less than 3 years should be
kept away from the appliance unless
continuously supervised.
●
The appliance must be installed
correctly and have proper ventilation.
The air intake at the front of the dryer
should never be obstructed (see
Installation).
●
Never use the dryer on carpeting where
the pile height would prevent air from
entering the dryer from the base.
●
Check to see if the dryer is empty before
loading it.
●
The back of the dryer could
become very hot. Never touch it
while in use.
●
Do not use the dryer unless the filter,
water container and condenser are
securely in place (see Maintenance).
●
Do not overload the dryer (see Laundry
for maximum loads).
●
Do not load items that are dripping wet.
●
Carefully check all instructions on
clothing labels (see Laundry).
●
Do not tumble dry large, very bulky
items.
●
Do not tumble dry acrylic fibres at high
temperatures.
●
Do not turn off the dryer when there are
still warm items inside.
●
Clean the filter after each use (see
Maintenance).
●
Empty the water container after each
use (see Maintenance).
●
Clean the condenser unit at regular
intervals (see Maintenance).
●
Do not allow lint to collect around the
dryer.
●
Never climb on top of the dryer. It could
result in damage.
●
Always follow electrical standards and
requirements (see Installation).
●
Always buy original spare parts and
accessories (see Service).
GB
3
Page 4

Warnings
GBI
To minimise the risk of fire in your
tumble dryer, the following should be
observed:
●
Tumble dry items only if they have been
washed with detergent and water, rinsed
and been through the spin cycle. It is a
fire hazard to dry items that HAVE NOT
been washed with water.
●
Do not dry garments that have been
treated with chemical products.
●
Do not tumble dry items that have been
spotted or soaked with vegetable or
cooking oils, this constitutes a fire hazard.
Oil-affected items can ignite spontaneously,
especially when exposed to heat sources
such as a tumble dryer. The items become
warm, causing an oxidisation reaction with
the oil, Oxidisation creates heat. If the heat
cannot escape, items can become hot
enough to catch fire. Piling, stacking or
storing oil-effected items can prevent heat
from escaping and so create a fire hazard.
If it is unavoidable that fabrics containing
vegetable or cooking oil or those that have
been contaminated with hair care products
be placed in a tumble dryer they should
first be washed with extra detergent - this
will reduce, but not eliminate the hazard.
They should not be removed from the dryer
and piled or stacked while hot.
●
Do not tumble dry items that have
previously been cleaned in or washed in,
soaked in or soiled with petrol/gasoline,
dry cleaning solvents or other flammable
or explosive substances. Highly flammable
substances commonly used in domestic
environments including cooking oil,
acetone, denatured alcohol, kerosene,
spot removers, turpentine, waxes and
wax removers. Ensure these items have
been washed in hot water with an extra
amount of detergent before being dried
in the tumble dryer.
●
Do not tumble dry items containing foam
rubber (also known as latex foam), or
similarly textured rubber like materials.
Foam rubber materials can, when
heated, produce fire by spontaneous
combustion.
●
Fabric softener or similar products
should not be used in a tumble dryer to
eliminate the effects of static electricity
unless the practice is specifically
recommended by the manufacturer of
the fabric softener product.
●
Do not tumble dry undergarments that
contain metal reinforcements eg. bras
with metal reinforcing wires. Damage to
the tumble dryer can result if the metal
reinforcements come loose during drying.
●
Do not tumble dry rubber, plastic articles
such as shower caps or babies water
proof covers, polythene or paper.
●
Do not tumble dry rubber backed
articles, clothes fitted with foam rubber
pads, pillows, galoshes and rubber
coated tennis shoes.
●
Remove all objects from pockets, such
as lighters and matches.
! WARNING: Never stop the dryer before the end of the drying cycle unless all items are quickly
removed and spread out so that the heat is dissipated.
4
Page 5

Maintenance and Care
Switching off the electricity
! Unplug your dryer when not using it,
when cleaning it and during all
maintenance operations.
Clean the filter after each cycle
The filter is an important part of your dryer:
it accumulates lint and fluff that is formed
while drying.
When finished drying, clean the filter by
rinsing it under running water or with your
vacuum cleaner.
Should the filter become clogged up, the
airflow inside the dryer will be seriously
compromised: drying times lengthen and
you will consume more energy. It may also
damage your dryer.
The filter is found in front of the dryer trim
(see diagram on next page).
Removing the filter:
1. Pull the plastic grip of the filter upwards.
2. Open the filter and
clean the lint from the
inside.
3. Replace it correctly.
Ensure the filter is fully
located flush into the
tumble dryer trim.
4. Remove any lint that has built up on the
inside of the door and around the door
seal.
! Failure to empty the water container may cause
the following:
- The dryer will stop heating (so the load may still
be damp at the end of the drying cycle) (see The
Controls).
●
Priming the water collection system
When your dryer is new, the water container will not
collect water until the system is primed.
This will take 1 or 2 drying cycles. Once primed it will
collect water during every drying cycle.
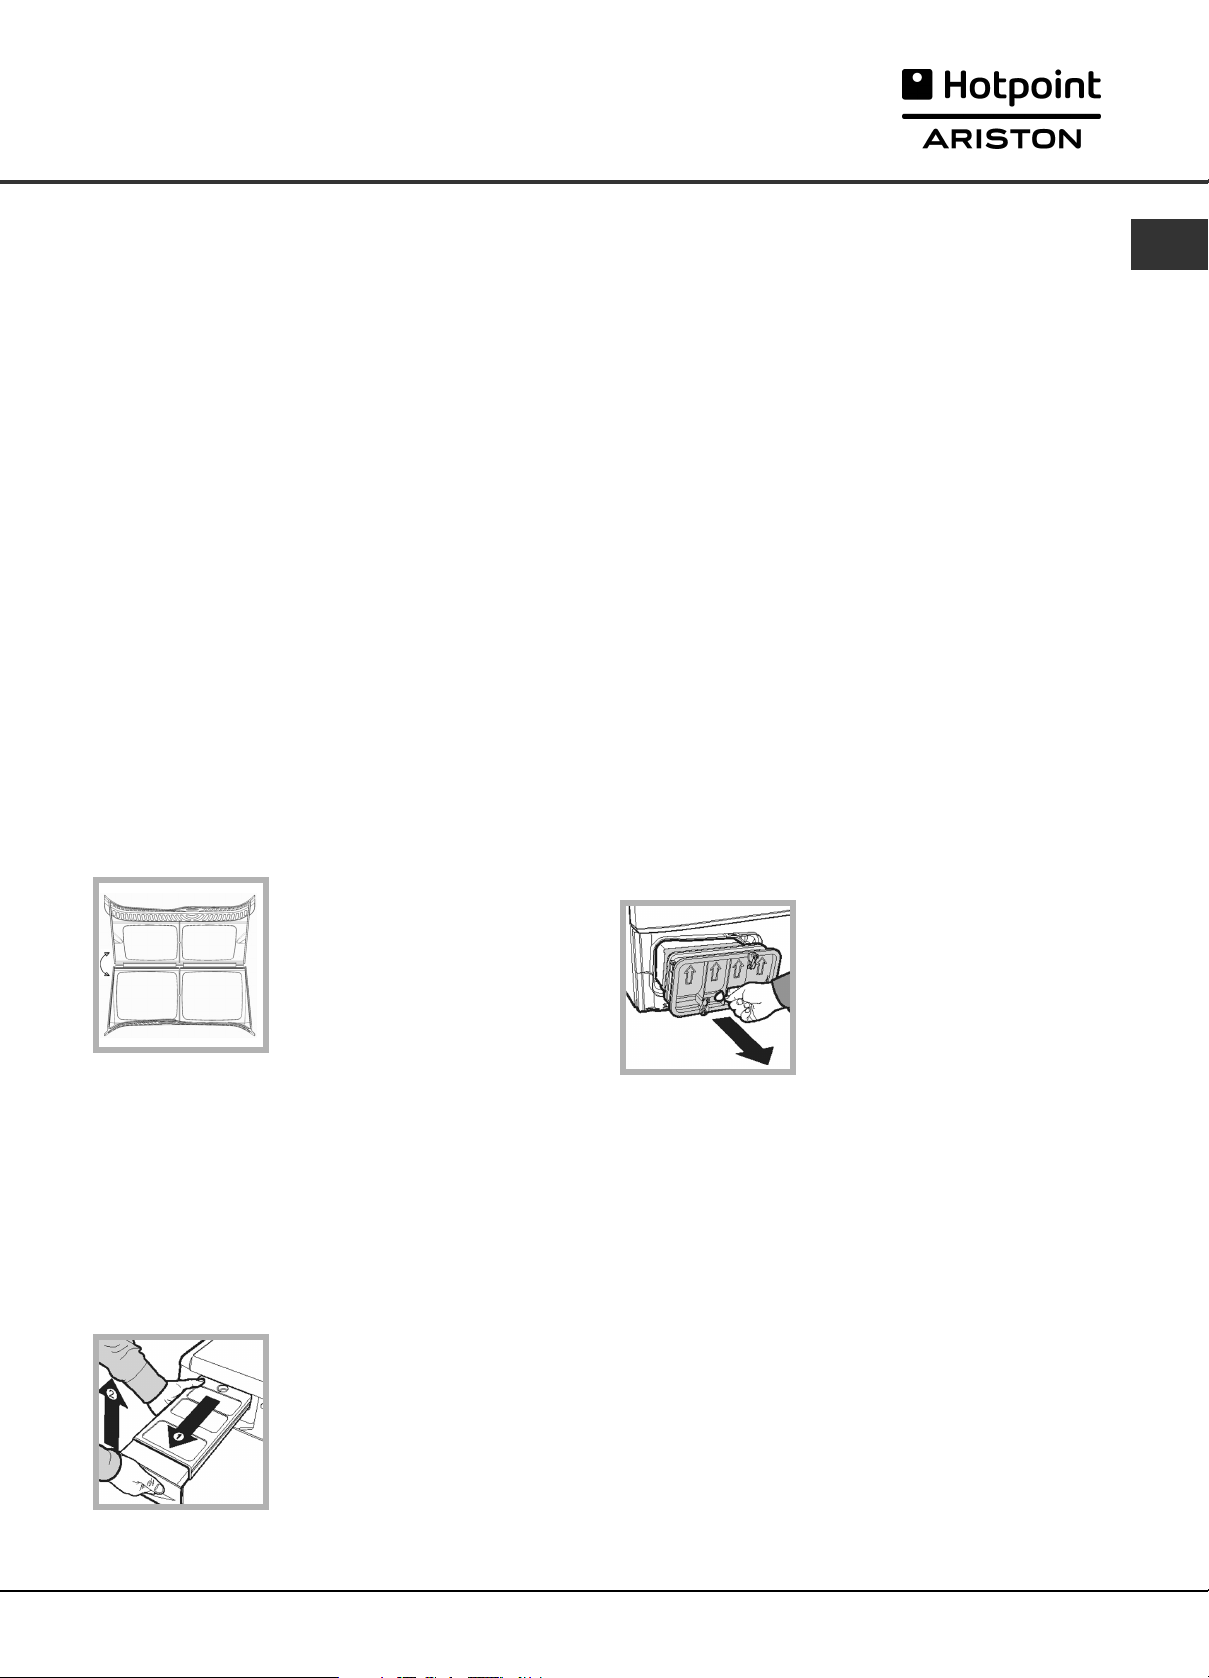
Cleaning the condenser unit
Periodically (every month) remove the
condenser unit and clean any build up of
fluff from between the plates by rinsing it
under the tap with cold water.
This should be done with cold water from
the rear of the condenser.
Removing the condenser:
1.Unplug the dryer and open the door.
2.Pull open the condenser cover (see
diagram).
Release the three
catches by turning 90˚
counter-clockwise
then pull on the grip and
remove from the dryer.
Clean the surface of the seals and replace,
with the arrows pointing upwards making
sure that the catches have been secured.
GB
! Do not use the dryer without replacing
the filter.
Empty the water container after each
cycle
Pull the container out of the dryer
and remove either the small or
large cap and empty it into a
sink or other suitable drain.
Refit the cap and replace the
container securely.
! Always check and empty the container before you
start a new drying programme.
5
Page 6

GB
Maintenance and Care
Water container
Filter
Condenser unit
Catches
Check the drum after each cycle
Turn the drum manually in order to remove small items
(handkerchiefs) that could have been left behind.
Cleaning the drum
! Do not use abrasives, steel wool or stainless steel
cleaning agents to clean the drum.
Ta p
Rear
Front
Air intake
Condenser cover
Condenser unit
Quick Tips
●
Remember to clean the door filter and
the condenser filter after each load.
●
Remember to empty the water container
after each load.
! Doing BOTH the above will keep your
appliance working at its BEST.
A coloured film may start to appear on the stainless
steel drum, this may be caused by a combination of
water and, or cleaning agents such as fabric conditioner
from the wash. This coloured film will not affect the
dryer performance.
Cleaning the dryer
●
External parts in metal or plastic and rubber parts
can be cleaned with a damp cloth.
●
Periodically (every 6 months) vacuum the front air
intake grille, to remove any build up of fluff, lint or
dust. Also to remove accumulation of fluff from the
front of the condenser and filter areas, clean
occasionally with a vacuum cleaner.
! Do not use solvents or abrasives.
! Have your dryer checked regularly by authorised
technicians to ensure electrical and mechanical safety
(see Service).
6
Page 7
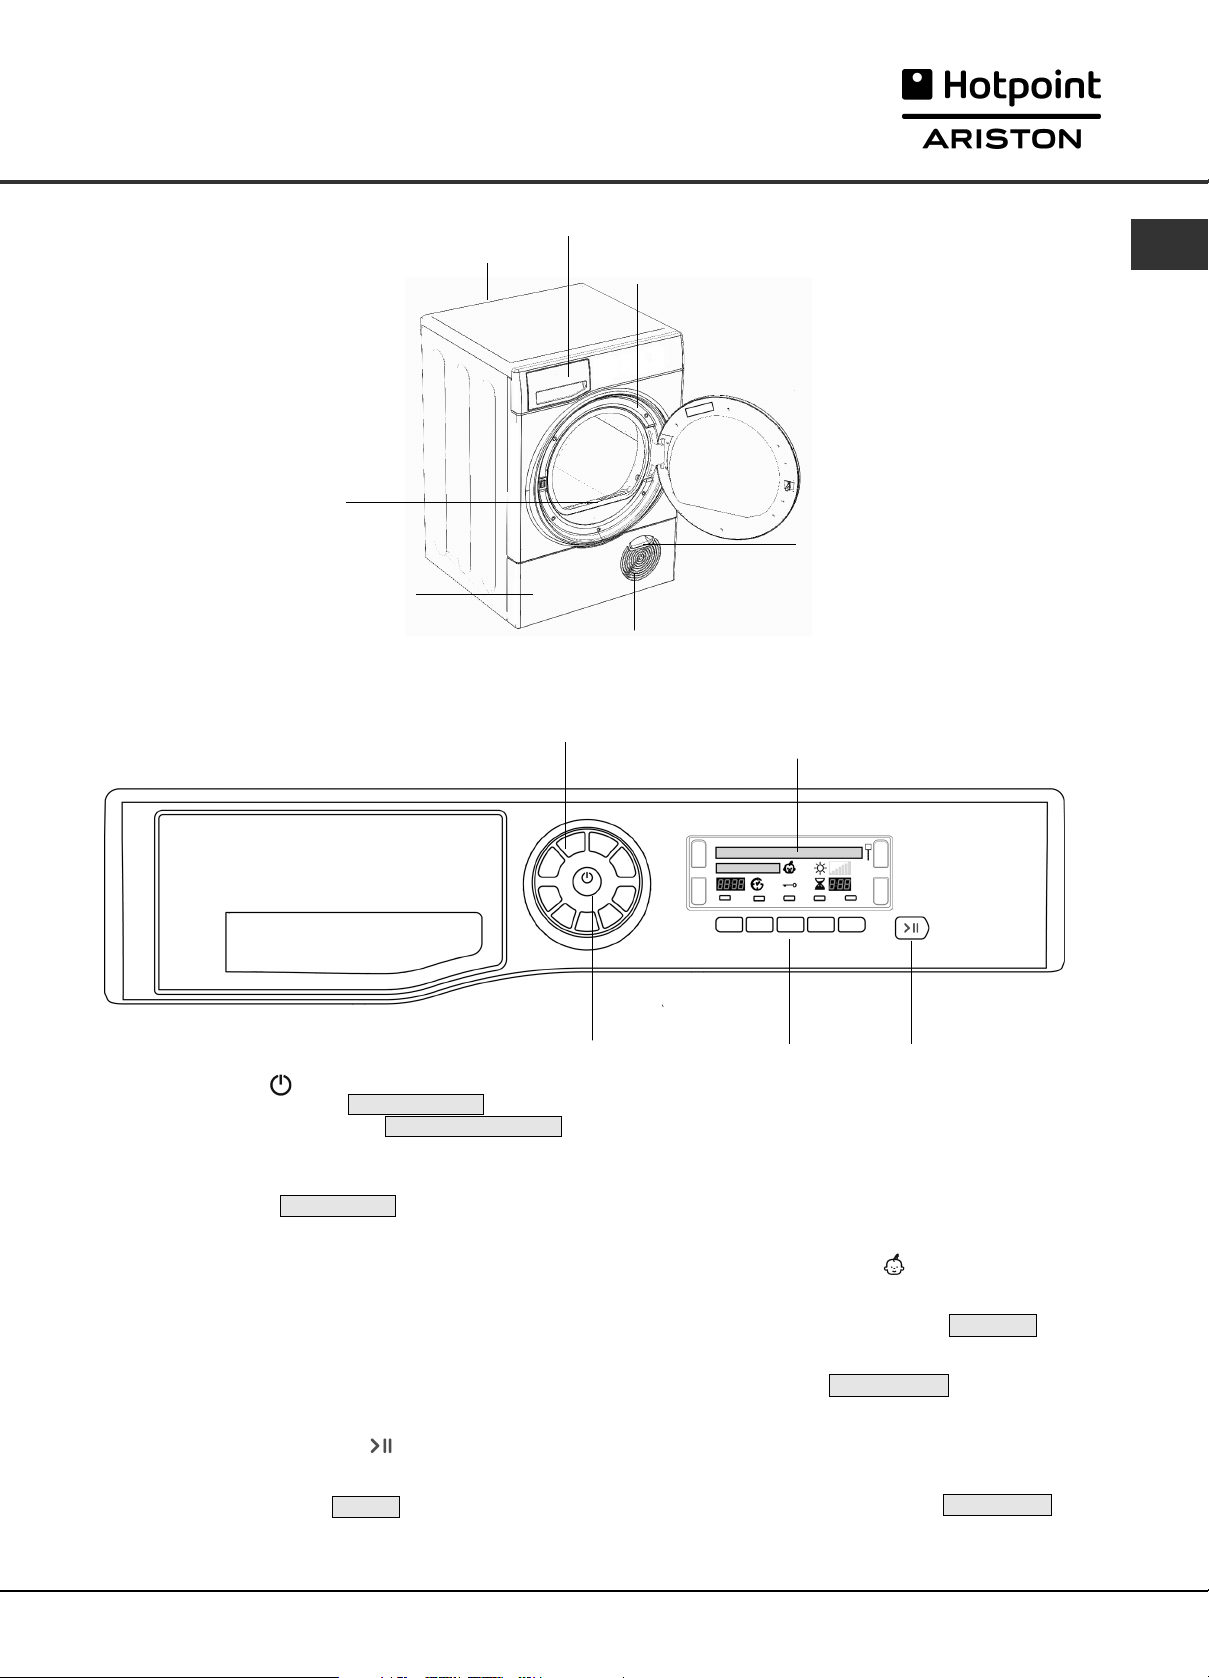
Dryer Description
The features
Control panel
Rating plate
Filter
Condenser cover
PROGRAMME
Selection Buttons
Water container
Model & Serial numbers
Air intake grille
Display Unit
GB
Condenser cover handle
(Pull to open)
ON/OFF
Button
The ON/OFF button - if pressed when the dryer is
running: If the display shows TURNING OFF the
dryer stops. If the display shows PRESS AND HOLD
hold the botton and the display counts down 3, 2, 1
and then stops.
Press and hold again for more than 3 seconds, the
display briefly shows POWER ON .
The PROGRAMME selection buttons set the programme:
press the button corresponding to the programme you
want to select (see Start and Programmes).
The OPTION buttons/indicators: these buttons select
available options for your selected programme (see
The Controls). The indicators on the display unit next
to the bottom buttons light to show that the option has
been selected.
The START/PAUSE button/light starts a selected
programme. When a programme is running, pressing
this button in pauses the programme, there will be one
beep, the display will show PAUSE and the dryer
stops.
The light is green when the programme is running,
flashing amber if the programme has been paused or
CHILD LOCK &
OPTIONS
Buttons & Lights
flashing green if on standby waiting to start a programme
(see Start and Programmes).
Note: This light also flashes amber during the Post
Care phase of a programme.
The Display Unit gives warnings and information
about the programme selected and its progress (see
next page).
The CHILD LOCK button/icon : Press and hold this
button after selecting your programme and any options,
this prevents the programme settings from being
changed, the display will briefly show LOCKED .
When the icon is lit, the other buttons are disabled.
Hold the button to cancel and the icon will go out, the
display will briefly show UNLOCKED .
Note: This tumble dryer, in compliance with new energy
saving regulations, is fitted with an automatic standby
system which is enabled after about 30 minutes if no
activity is detected. Press and hold the ON-OFF
button until the display briefly shows POWER ON
and the dryer then reactivates.
START/PAUSE
Button & Light
7
Page 8
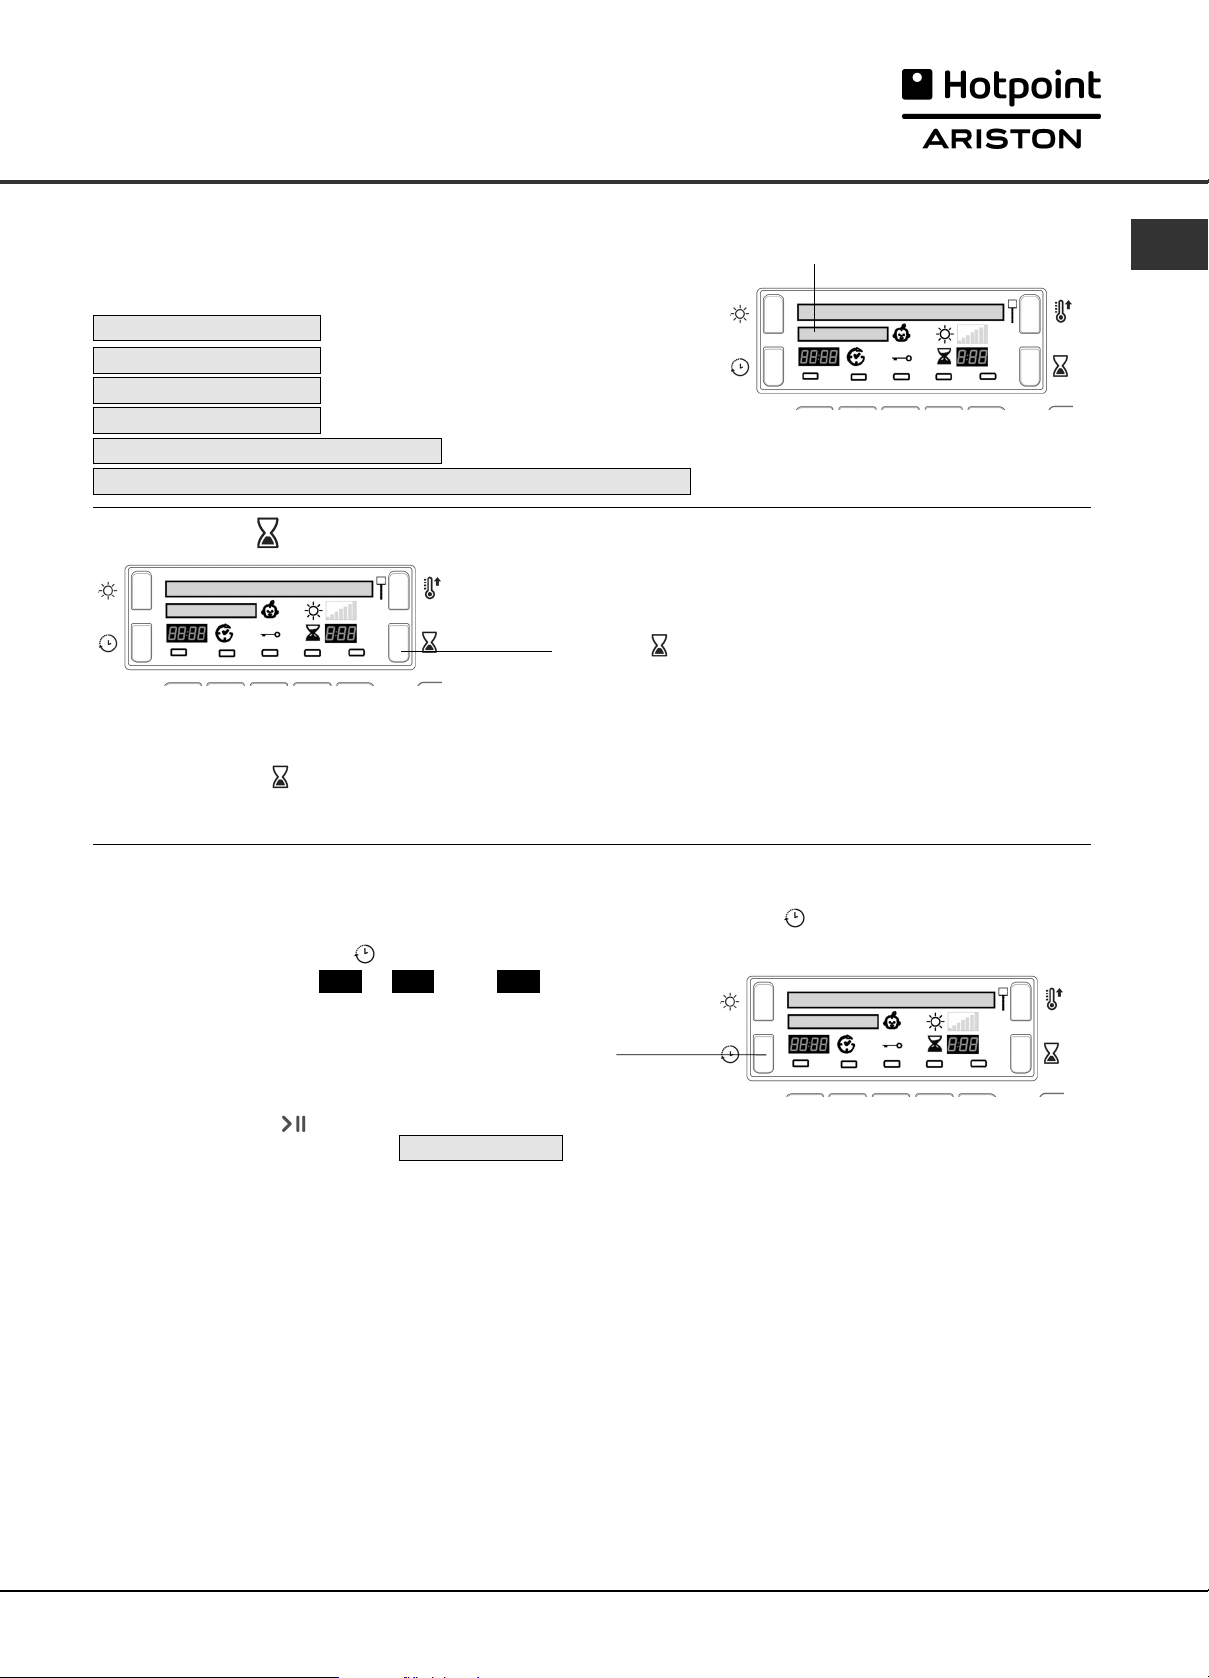
The Display
Selecting your language
GB
The first time you turn on your dryer you should select your preferred language from the available list.
To change: the language current selection must flash, on
the first line of the display.
- Press the On/Off button to turn off the display then press
and hold all 3 buttons: Heat Level, Timed Dry
and Dryness Level for 5 seconds.
- Press the Heat Level or the Timed Dry button to
scroll up or down through the list.
- When your required language is flashing on the top line
of the display, pressing the Dryness Level button will
select your choice.
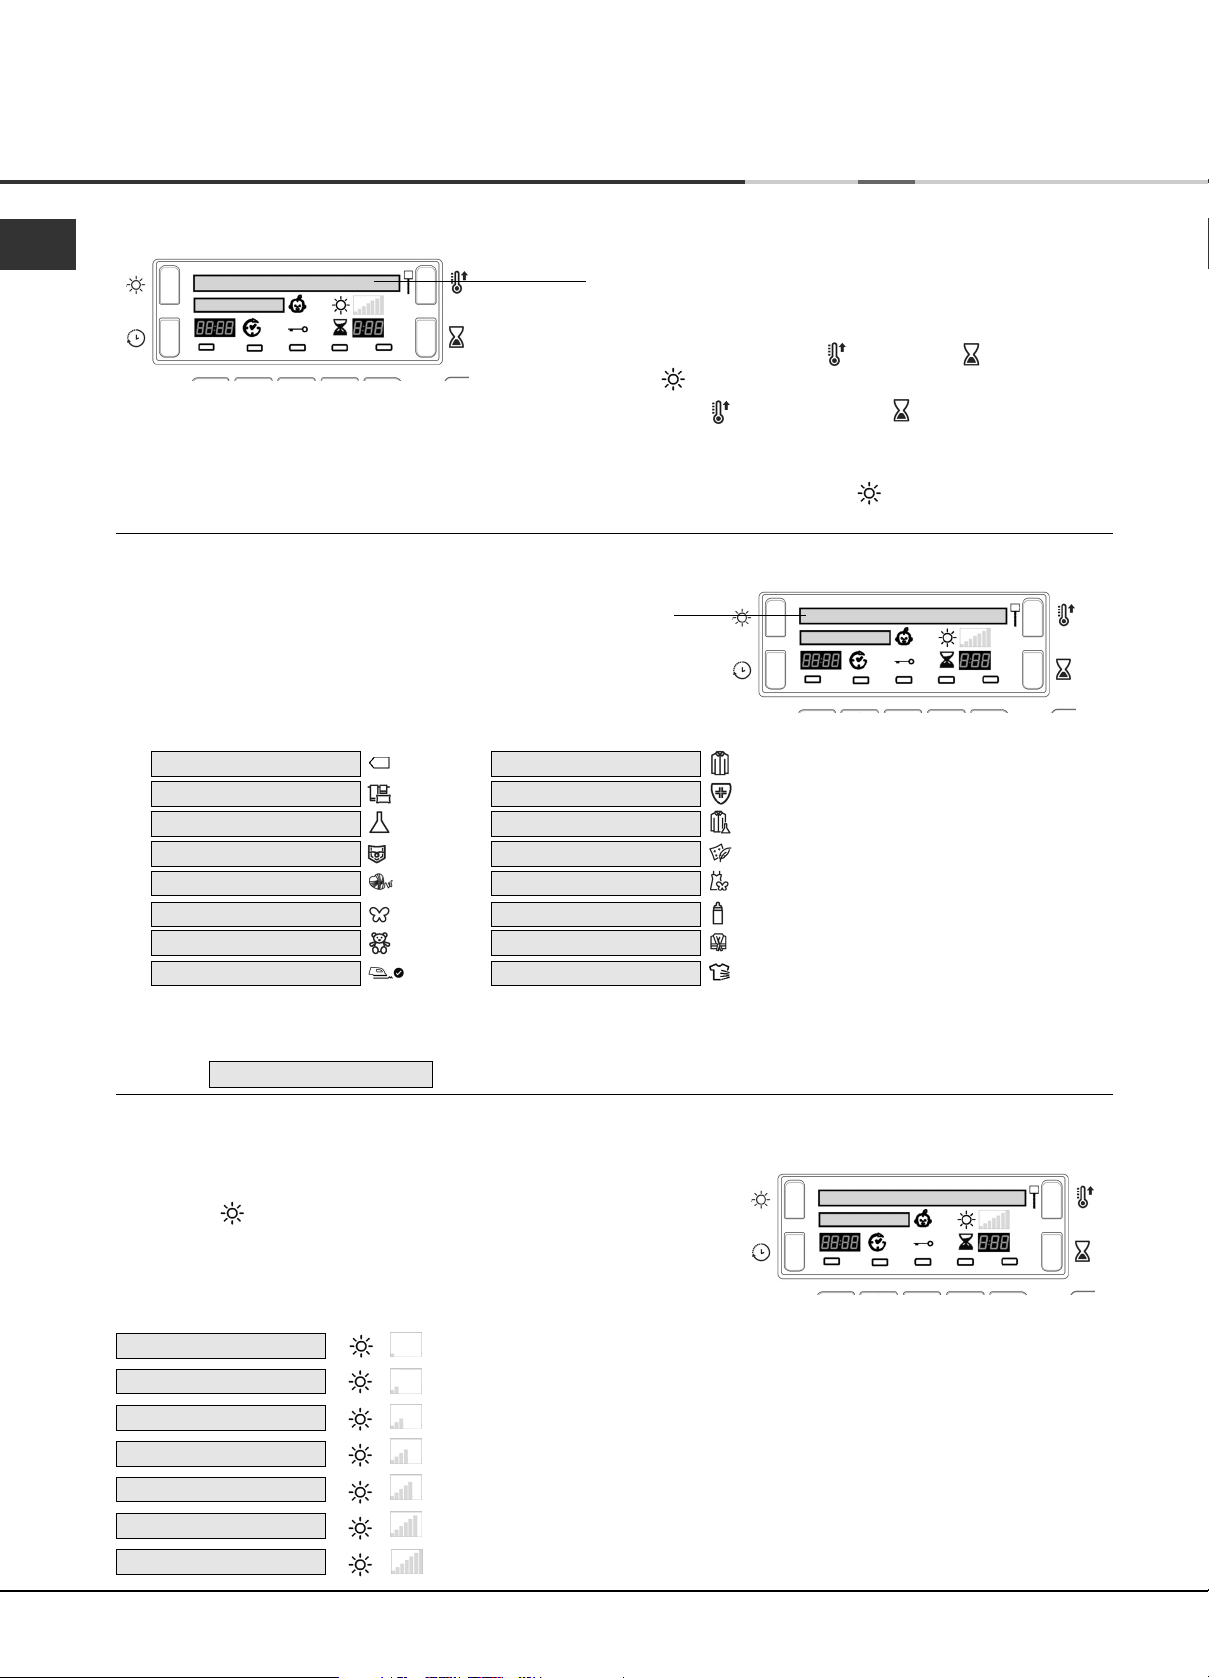
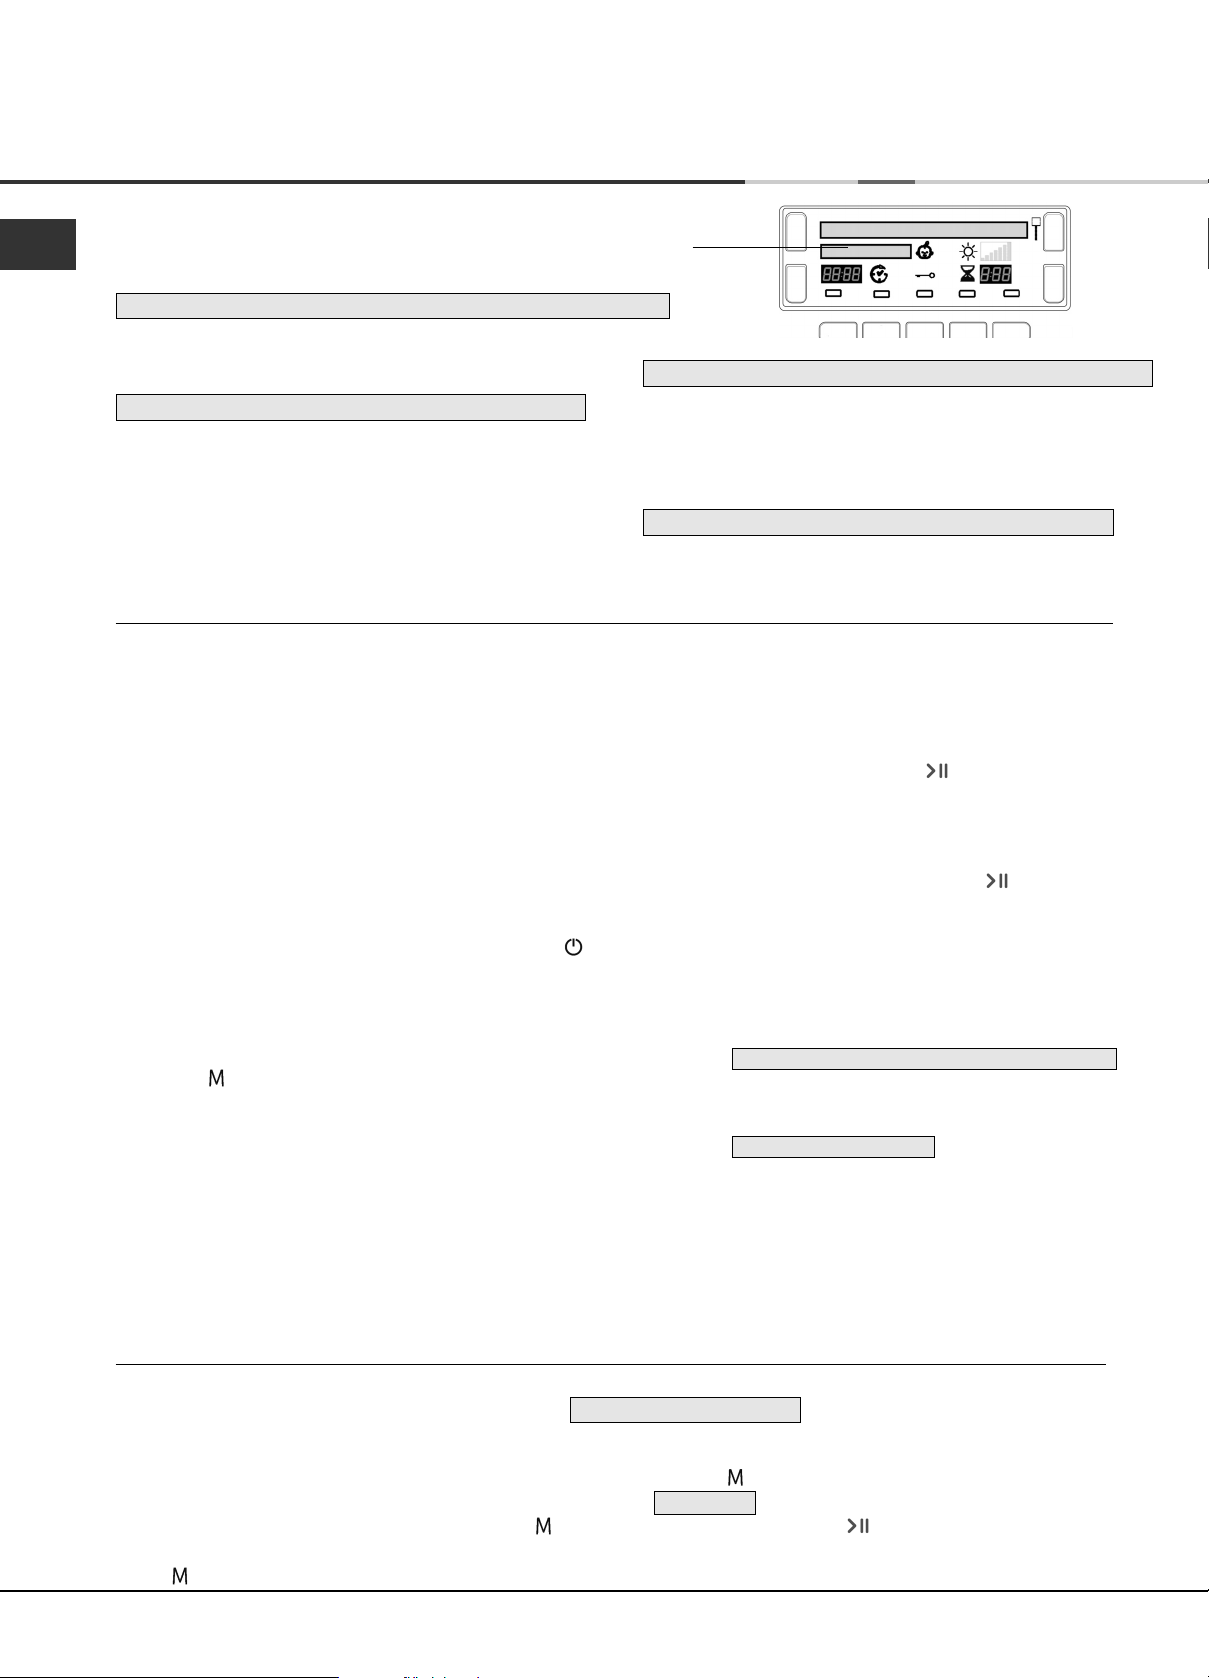
Understanding the display
Programme selection and display
The selected programme is shown on the first line of the display,
this message is shown while the programme is running.
Eight of the buttons have two selections, press the button once for the
first choice and press again for the second choice, your selected
programme is displayed. The final button selects My Cycle.
First Press Second Press
1
STANDARD COTTON
2
BED & BATH
3
SYNTHETICS
4
JEANS
5
WOOL
6
DELICATES
7
CUDDLY TOYS
8
PRE IRON
9 MY CYCLE (see below)
SHIRTS COTTONS
ANTI ALLERGY
SHIRTS SYNTHETICS
DUVET
SILK
BABY
HEAT & ENJOY
REFRESH
My Cycle When you select the My Cycle button the Display will show your selected programme with ‘M’ before its
name. ie. M STANDARD COTTON (see Start and Programmes).
Dryness levels
During programme selection for an automatic programme that has different dryness levels available (see Programmes
Ta b l e).
The second line of the display shows the dryness level you require, for each
press of the Dryness Level button the next option from the list below is
selected and displayed. The display also shows 1 to 7 bars depending on
your selection and these are displayed during the programmes progress.
! Some automatic programmes do not allow the dryness level to be changed
or do not have all the dryness level options.
DAMP Dries your items ready to be ironed using a machine or rotary ironer.
IRON DRY Dries your items ready to be ironed with a hand iron.
HANGER PLUS Dries your delicate items ready to be hanged for final drying.
HANGER DRY Dries your items ready to be hanged for final drying.
LIGHT DRY Dries your delicate items ready to be put away.
CUPBOARD DRY Dries your items ready to be put away.
EXTRA DRY Dries your clothes ready to be worn.
8
Page 9
The Display
Programme progress
The second line of the display shows the status of the programme as it progresses:
(long messages scroll across the line)
DRY
COOL TUMBLE
HEATING
READY
END OF CYCLE, CREASE CARE
END OF CYCLE, CLEAN FILTER AND EMPTY WATER BOTTLE
Heat & Enjoy programme
(if option Crease Care selected).
Timed drying
After selecting a programme that has a Timed Dry option,
press the Timed button and the display will increment the
selected time, each time you press and release the button
(see Start and Programmes).
Each press reduces the time duration and number of available time options depending on the programme/material
selected.
The Timed Dry icon is displayed next to the time.
GB
The selected time remains displayed after the programme starts, but can be changed anytime you wish.
Delay and Time to End
Some programmes can have a delayed start (see Start and Programmes). Press the Delay button and the icon flashes.
Each press of the Delay button advances the delay setting
in 1 hour increments, from: to , then and
then after a couple of seconds cancels the delay.
The delay time is shown on the display next to the Delay button.
The display counts down the minutes of the delay period after
the Start/Pause button is pressed.
The second line of the display shows STARTS IN
You can change or cancel the delay time selected anytime if
you wish.
After the Start/Pause button is pressed the Delay or Time to End is displayed in hours and minutes and counts down each
minute.
1h 24h
OFF
Time to End
After the delay period finishes, or for all the programme if delay not selected, this part of the display will show:
- the estimated time to the end of the programme, for automatic programmes
- the actual time remaining during a timed programme
When timed programmes are selected the time displayed throughout the cycle is the actual time remaining.
When Automatic programmes are selected the time displayed is an estimate of the time remaining. When the
programme is selected the display shows the time required to dry a full load. The time remaining is constantly
monitored during the drying cycle and is updated to show the best forecast.
The colons between the hours and minutes in the display flash to show the time is counting down.
9
Page 10
The Display
Warnings
GB
The second line of the display also gives warnings and reminders:
(reminders occur at the end of the programme)
END OF CYCLE, CLEAN FILTER AND EMPTY WATER BOTTLE
●
Reminder that the water container should be
emptied and the filter cleaned every time you use the
dryer (see Maintenance).
EMPTY WATER BOTTLE
●
Indicates that the water container is full. The
message will take a few seconds to go out after
replacing the empty water container; the dryer
must be running for this to happen (see The
Controls).
Note: If the water container fills and this message
is displayed, the heat is turned off and your
clothes will not dry.
CLEAN CONDENSER, FILTER AND EMPTY WATER BOTTLE
●
This message indicates that you must clean the
Condenser unit (see Maintenance) and will occur
at intervals depending how much you have used
the dryer. When you finish the next programme the
message is cancelled. You must also clean the filter.
CLEAN FILTER TO ENSURE ANTI ALLERGY ACTION
●
Shown during the Anti-Allergy programme and
indicates that the filter needs cleaning to complete
the full anti-allergy cycle (see Maintenance).
Start and Programmes
Choosing a programme
1. Plug the dryer into the electrical socket.
2. Sort your laundry according to fabric type (see
Laundry).
3. Open the door and make sure the filter is clean
and in place and the water container is empty and
in place (see Maintenance).
4. Load the machine and make sure items are not
in the way of the door seal. Close the door.
5. If the Display is not lit: Press the ON/OFF button
6. Press the Programmes Selection button that
corresponds with the type of fabric being dried by
checking the Programmes Table (see Programmes)
as well as the indications for each type of fabric (see
Laundry).
- If the button is selected; steps 7 and 8 are not
required (see below).
7. Choose Timed Drying or Dryness Levels option:
- If Timed Drying press and release the Timed
button until the required time is displayed.
or - To change from default dryness setting, press
and release the Dryness Levels button until
required level is indicated.
! See Programmes Table, for more details:
availability of Dryness Levels, Timed Dry and
Options.
8. Set a delay time and other options if necessary
(see The Display).
9. Press the Start/Pause button to begin.
The display will show the estimated time to end.
During the drying programme, you can check on
your laundry and take out items that are dry while
others continue drying. When you close the door
again, press the Start/Pause button in order to
resume drying.
10. During the last few minutes of Drying Programmes,
before the programme is completed, the final COOL
TUMBLE phase is entered (fabrics are cooled),
this phase should always be allowed to complete.
11. At the end of the drying cycle a message is
displayed:
- If
- If
12. Open the door, take the laundry out, clean the filter
and replace it. Empty the Water Container and
replace it (see Maintenance).
13. Unplug the dryer.
END OF CYCLE, CLEAN FILTER AND EMPTY WATER BOTTLE
is shown, the buzzer will beep 3 times (Note: If
the SOUND option was selected the buzzer
beeps 3 times every 30 seconds for 5 minutes).
END OF CYCLE, CREASE CARE is shown, Crease
Care option has been selected and if you do
not remove the laundry immediately, the
dryer will tumble occasionally for 10 hours or
until you open the door, the buzzer will beep
3 times to confirm the programme is completed.
My Cycle button:
First time you press this button the display will show PRESS AND HOLD TO STORE
After selecting your favorite programme and options you can save these settings by pressing and holding in the
My Cycle button for at least 5 seconds, the top line will show a flashing followed by the selected programme. The
buzzer will then beep and the second line of the display shows
The next time you need this programme press the button, then the Start/Pause button and this programme will run.
If you wish, you can change your stored favorite, by selecting a new programme and/or options and press and hold
in the button (as above).
10
MEMORY
Page 11
Start and Programmes
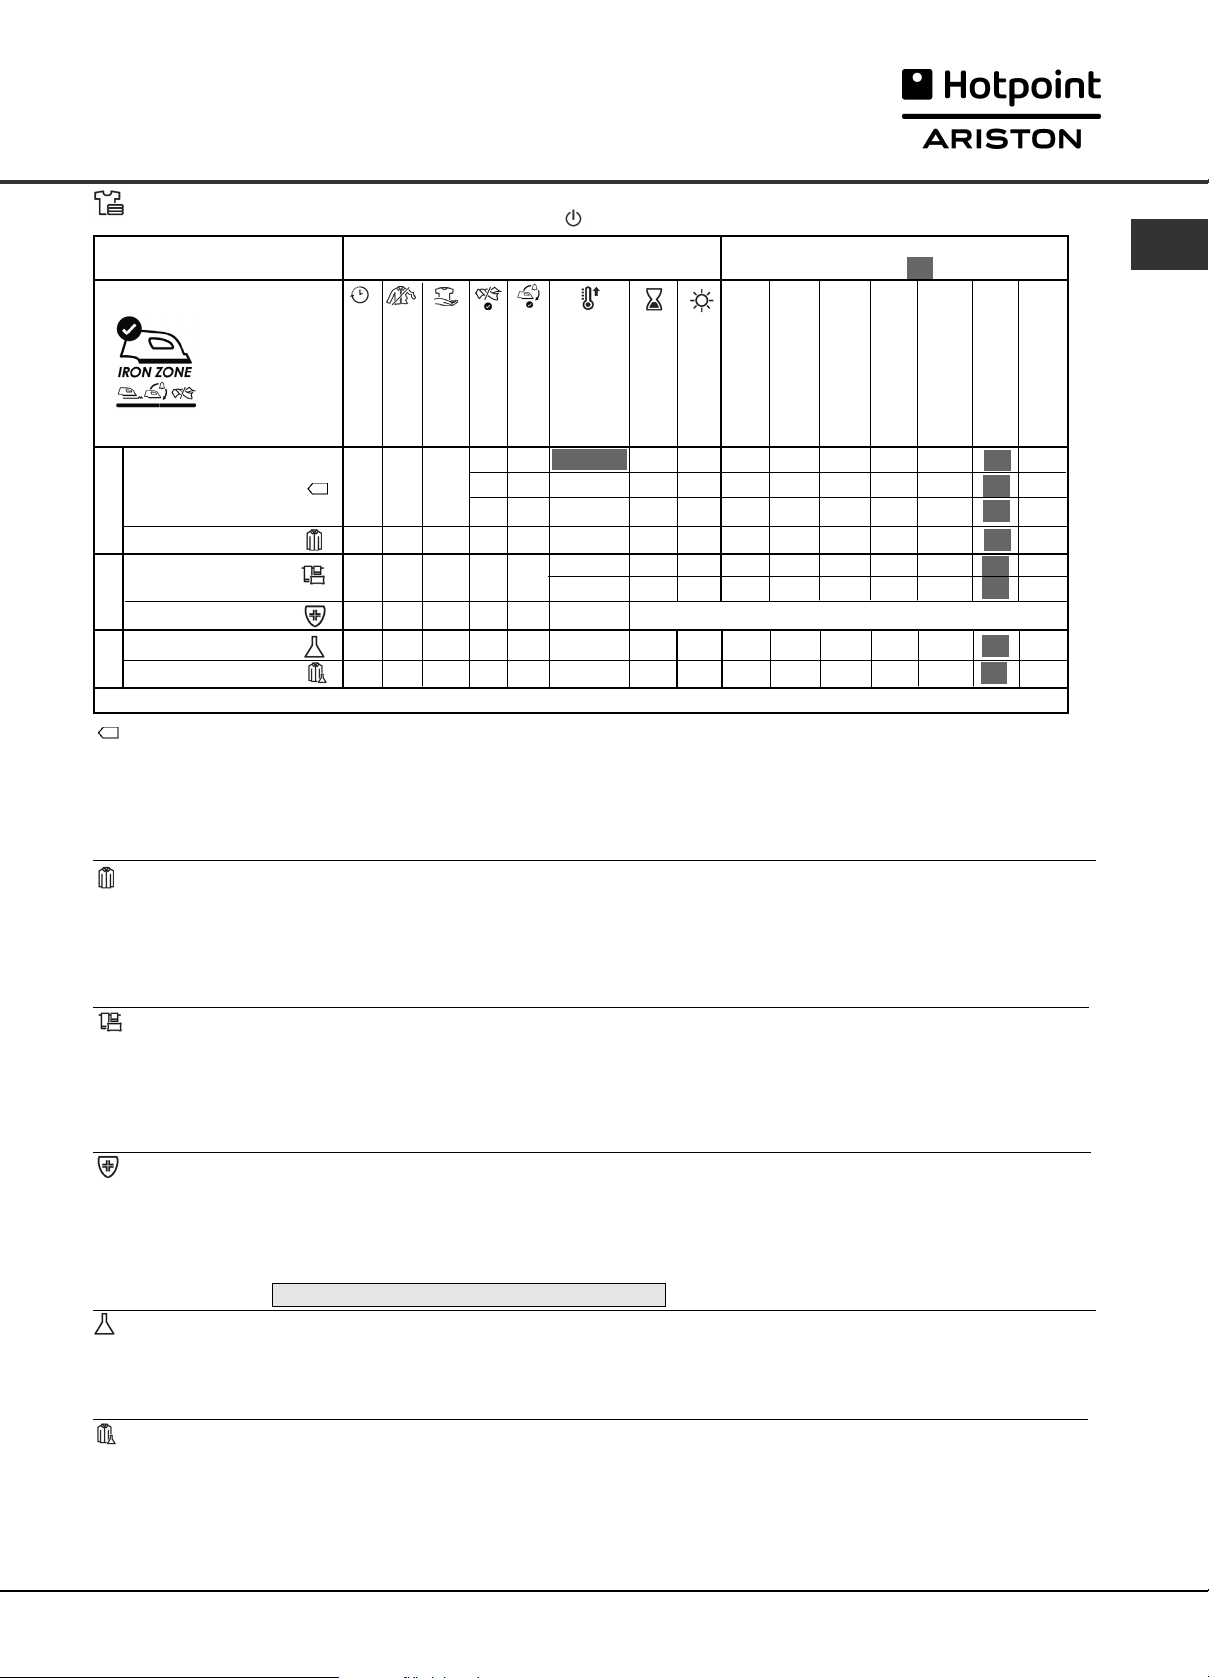
ESSENTIAL PROGRAMMES - Programmes Table
! If the Display is not lit; Press the ON/OFF button and then select programme.
Programme Options available
Delay Timer
Crease Care
Extra Care
Less Tangled
Ready to Iron*
✗
✓
Standard Cotton
1
Shirts Cotton
Bed & Bath
2
Anti-Allergy
Synthetics
3
Shirts Synthetic
*Note : This option is not available with Dryness Levels ‘Iron Dry’ and ‘Damp Dry’.
Standard Cotton
●
This is a programme for cotton items.
●
The duration of this programme will depend on the size of the load, the dryness setting selected and the spin
speed used in your washer (see Laundry).
●
The Standard Cotton programme to EU Regulation 392/2012 is Programme 1 selection with High Heat and
Dryness Level Cupboard Dry
of energy consumption (to EU.392/2012).
Shirts Cotton
●
This is a programme for shirts made from cotton.
●
It can be used for load sizes up to 3kg (approximately 10 shirts).
The duration of this programme will depend on the size of the load, the dryness setting selected and the spin
speed used in your washer.
Loads dried using the Cupboard Dry setting are usually ready to wear, the edges or seams may be slightly damp. If
this is the case, try turning the shirts inside out and running the programme again for a short period.
Bed & Bath
●
This is a programme for cotton towels and sheets.
●
The duration of this programme will depend on the size of the load, the dryness setting selected and the spin
speed used in your washer (see Laundry).
●
Loads dried using the Extra Dry setting are usually ready to use, the edges or seams may be slightly damp
especially on large items. If this is the case, try opening them out and running the programme again for a short
period.
Anti Allergy Programme
This programme has the ‘Seal of Approval’ endorsement from Allergy UK, which reflects the effective reduction and
elimination of allergens from the clothes with the special Anti Allergy cycle. With this programme, thanks to the
achievement of constant temperature for an extended period of time, the effects of the most common allergens
(including House Mites and Pollen) are neutralised.
Can be used on a full size wet load to dry and treat, or on a 4kg dry load just to treat your laundry.
If the display shows
Synthetics
●
This is a programme for items of Synthetic with low heat setting or Synthetic/Cotton mixtures with medium heat
setting.
●
The duration of this programme will depend on the size of the load, the dryness setting selected and the spin
speed used in your washer (see Laundry).
CLEAN FILTER TO ENSURE ANTI ALLERGY ACTION : Clean the filter and re-start the programme.
✓
✓
✓
✓
✓
✓
✓
✓
✓
✗
✗
✗
✓
✓
✓
✓
✓
✓
(the standard/default starting configuration). It is the most efficient programme in terms
✓
✓
✓
✓
✗
✗
✗
✗
✗
✗ ✗
✗
✗
✗
✗
Heat Level
- High
- High
- Medium
- Low
- High
- Medium
✗
- Medium
- Low
✗
Timed Dry
✓
✓
✓
✗
✗
●
An Automatic programme
✓
✗
Dryness Levels available
(default highlighted )
Sensor Dry
Damp Dry
Iron Dry
Hanger Dry Plus
✓
✓
✓
✓
✓✗ ✓
✓
✓
✓
✓
✓
✓
✓
✓
✓
✓
✓
✓
✓
✓
✓
✓
✓
✓
✓
✓
✓
✓
✓
✓
✓
✓
✓
✓
✓
✓
✓
✓
✓
✓
✓
✓
Hanger Dry
Light Dry
Cupboard Dry
✓
✓
✓
✓
✓
✓
✓
✓
✓
✓
✓
✓
✓
✓
✓
✓
✓
✗
✗
✗
✗
Extra Dry
✗
✗
GB
Shirts Synthetic
●
This is a programme for shirts made from synthetic materials or a mixture of natural and synthetic materials, such
as polyester and cotton.
●
It can be used for load sizes up to 3kg (approximately 14 shirts).
The duration of this programme will depend on the size of the load, the dryness setting selected and the spin
speed used in your washer.
Loads dried using the Cupboard Dry setting are usually ready to wear, the edges or seams may be slightly damp. If
this is the case, try turning the shirts inside out and running the programme again for a short period.
11
Page 12
Start and Programmes
GB
EXCLUSIVE PROGRAMMES - Programmes Table
! If the Display is not lit; Press the ON/OFF button and then select programme.
Programme Options available
Delay Timer
Crease Care
Extra Care
Ready to Iron
Less Tangled
Jeans
4
Duvet
Wool
5
Silk
Baby
6
Delicate
Jeans
●
This is a programme for jeans made from denim cotton. Before drying your jeans turn the front pockets inside out.
●
It can be used for load sizes up to 3kg (approximately 4 pairs).
●
Do not mix dark and light coloured items.
●
It can also be used on other garments made from the same material, such as jackets.
●
The duration of this programme will depend on the size of the load, the dryness setting selected and the spin
speed used in your washer.
●
Loads dried using the Extra Dry programme are usually ready to wear, the edges or seams may be slightly
damp. If this is the case, try turning the jeans inside out and running the programme again for a short period.
! We do not recommend that you use this programme if your jeans have elastic waist bands, studs or embroidery.
✓
✓
✓
✗
✗
✓
✓
✓
✗
✗
✓
✓
✗
✗
✗
✗
✗
✗
✗
✗
✗
✗
✗
✗
✗
✗
✗
✗
✗
✗
Heat Level
✗
- High
- Medium
✗
✗
✗
✗
Timed Dry
✗
✗
✗
✗
✗
✓
Dryness Levels available
(default highlighted )
Damp Dry
✓
✓
✓
✓
Iron Dry
✓
✓
✓
✓
Sensor Dry
✓
✓
●
An Automatic programme
●
An Automatic programme
✓
✓
✓
✓
✓
✓
Hanger Dry Plus
✓
✓
✓
✓
✓
Hanger Dry
Light Dry
Cupboard Dry
✓
✓
✓
✓
✓
✓
✓
✓
✓
✗
✗
✗
Extra Dry
Duvet
! Take care with this programme DO NOT dry any items that are damaged which could result in the filling blocking
the filter and air vent resulting in a fire hazard.
●
Must only be used on single size duvets: NOT suitable for double or king size items.
●
Loads dried using this programme are usually ready to use, but may be slightly damp in places. If this is the case,
try opening them out and shaking them and running the programme again for a short period.
●
Also suitable for down filled jackets.
●
Select high heat for Cotton Duvets and medium heat for Synthetic duvets
●
The duration of this programme will depend on the size and density of the load and the spin speed used in your
washer.
Wool Programme
●
This is a programme for tumble dryer safe garments marked with the symbol .
●
It can be used for load sizes up to 1kg (approximately 3 sweaters).
●
We recommend that garments are turned inside out before drying.
●
This programme will take about 60 minutes, but may take longer depending on the size and density of the load
and the spin speed used in your washer.
●
Loads dried using this programme are usually ready to wear, but on some heavier garments the edges may be
slightly damp. Allow these to dry naturally as over-drying could damage garments.
! Unlike other materials, the mechanism of wool shrinkage is irreversible; i.e. it will not stretch back to original size and
shape.
! This programme is not suitable for Acrylic garments.
Silk
●
This is a programme for drying your delicate silk.
●
It can be used for load sizes up to 0.5kg.
●
The duration of this programme will depend on the size of the load, the dryness setting selected and the spin
speed used in your washer.
●
Loads dried using the Cupboard Dry setting are usually ready to use, but on some garments the edges may be
slightly damp. If this is the case, try opening them out or turn items inside out and running the programme again for
a short period.
12
Page 13
Start and Programmes
Baby cycle
●
This is a programme for drying your baby’s small delicate items of clothing and bedding (Cotton and Chenille)
and for drying your delicate clothes.
●
DO NOT dry items such as bibs and nappy pants with plastic coverings.
●
It can be used for load sizes up to 2kg.
●
The duration of this programme will depend on the size and density of the load and the spin speed used in your
washer.
●
Loads dried using this programme are usually ready to use, but on some garments the edges may be slightly
damp. If this is the case, try opening them out or turn items inside out and running the programme again for a short
period.
Delicates
●
This is a programme for drying your delicate clothes ie. Acrylics.
●
It can be used for load sizes up to 2kg.
●
The duration of this programme will depend on the size and density of the load and the spin speed used in your
washer.
●
Loads dried using this programme are usually ready to use, but on some garments the edges may be slightly
damp. If this is the case, try opening them out or turn items inside out and running the programme again for a short
period.
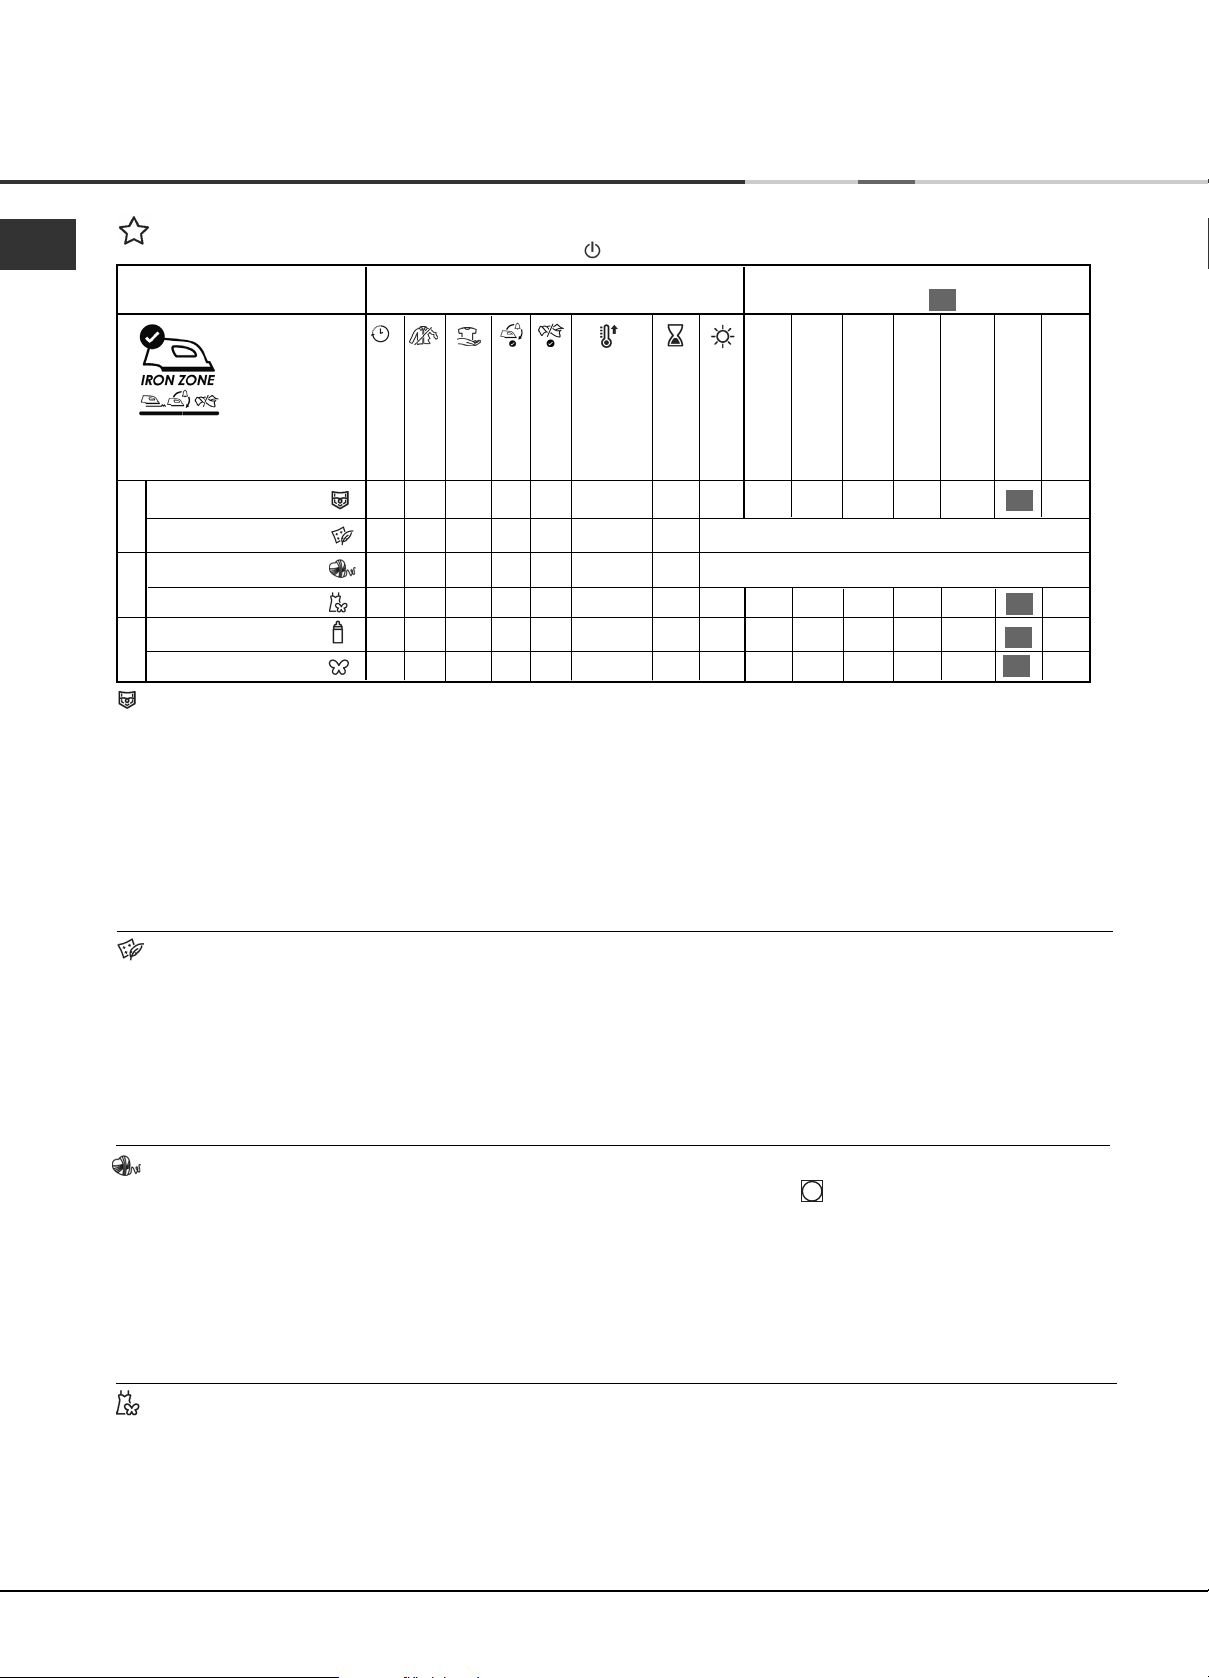
EXTRA PROGRAMMES - Programmes Table
! If the Display is not lit; Press the ON/OFF button and then select programme.
Programme Options available
Dryness Levels available
(default highlighted )
✓
GB
Delay Timer
Crease Care
Extra Care
Ready to Iron
Less Tangled
Heat Level
Timed Dry
Sensor Dry
Damp
Iron Dry
Hanger Plus
Hanger Dry
Light Dry
Cupboard Dry
Extra Dry
Cuddly Toys
7
Heat & Enjoy
Pre Iron
8
Refresh
9
My Cycle M
Cuddly Toy Programme
With this programme you can remove dust easier and wash the cuddly toys more often because the drying time is
very much reduced compared to drying in the open air. It is a delicate drying cycle that dries at low temperature
and with soft mechanical action to maintain at best the original look and shine of the fur.
Note: For allergy protection, just freeze cuddly toys for 24 hours then wash and dry them. Repeat every 6 weeks.
Before drying remove accessories such as clothes, collars or sound boxes and protect plastic eyes with masking
tape after drying them with a cloth.
The programme time will vary dependant on the exact make up of the load. The maximum load should not exceed
2.5kg and no individual item should be greater than 600g.
Heat & Enjoy
This programme helps to heat towels & bathrobes for a warm sensation after a bath or shower. It is also useful for
warming clothes before dressing during winter. The cycle heats clothes to 37°C (Body Temperature), the display
shows
door when the display shows READY . Maximum load 3kg.
Note : The Start/Pause button is disabled during this programme.
! ‘Refresh’ is not a drying programme and should not be used for wet articles of clothing.
●
●
●
HEATING and runs at this temperature for a maximum of 4 hours or until you stop the cycle by opening the
Refresh
It can be used on any load size, but is more effective on smaller loads.
Do not overload your dryer (see Laundry).
This is a 20 minute programme that airs your clothes with cool air. Also use to cool warm clothes.
✓
✗
✗
✗
Depends on your chosen programme. See previous details.
✗
✗
✗
✗
✗
✗
✗
✗
✗
✗
✗
✗
✗
✗
✗
✗
✗
✗
✗
✗
●
✗
✗
✗
✗
An Automatic programme
●
An Automatic programme
●
An Automatic programme
●
An Automatic programme
13
Page 14
GB
Start and Programmes
Pre Iron Programme
‘Pre Iron’ is a treatment cycle for use with dry clothes and reduces creases in order to facilitate ironing and folding,
it has a maximum duration of 15 minutes.
! ‘Pre Iron’ is not a drying programme and should not be used for wet articles of clothing.
For best results: 1. Do not load more than the maximum capacity.
The Controls
! Warning, after pressing the Start/Pause button , the
programme cannot be changed.
To change a selected programme, press the Start/Pause
button , the light flashes Amber to indicate the
programme is paused. Select the new programme and
any options required, the light will then flash green. Press
the Start/Pause button again and the new programme
will start.
●
Option buttons
These buttons are used to customise the selected
programme to your requirements. A programme must
have been selected, by pressing a programme selection
button, before an option can be selected. Not all options
are available for all programmes (see Programmes
Ta b le ). If an option is not available and you press the button,
the buzzer will beep 3 times. If the option is available the
indicator, on the display unit next to the bottom buttons,
lights to show that the option has been selected.
Delay Timer (Time Delay)
The start of some programmes (see The Display and
Programmes tables) can be delayed for up to 24 hours.
Ensure the water container is emptied before setting a
delayed start.
Crease Care
The pre-care option is only available if a delayed start has
been selected. It tumbles the clothes occasionally during the
delayed period to help prevent creases developing.
The post-care option occasionally tumbles the clothes after
end of the drying and cool tumble cycles to prevent creases
developing, should you not be available to remove the load
immediately the programme is complete.
Note: The Start/Pause light flashes Amber during this phase.
Selecting this option enables both the pre and post care
functions if appropriate.
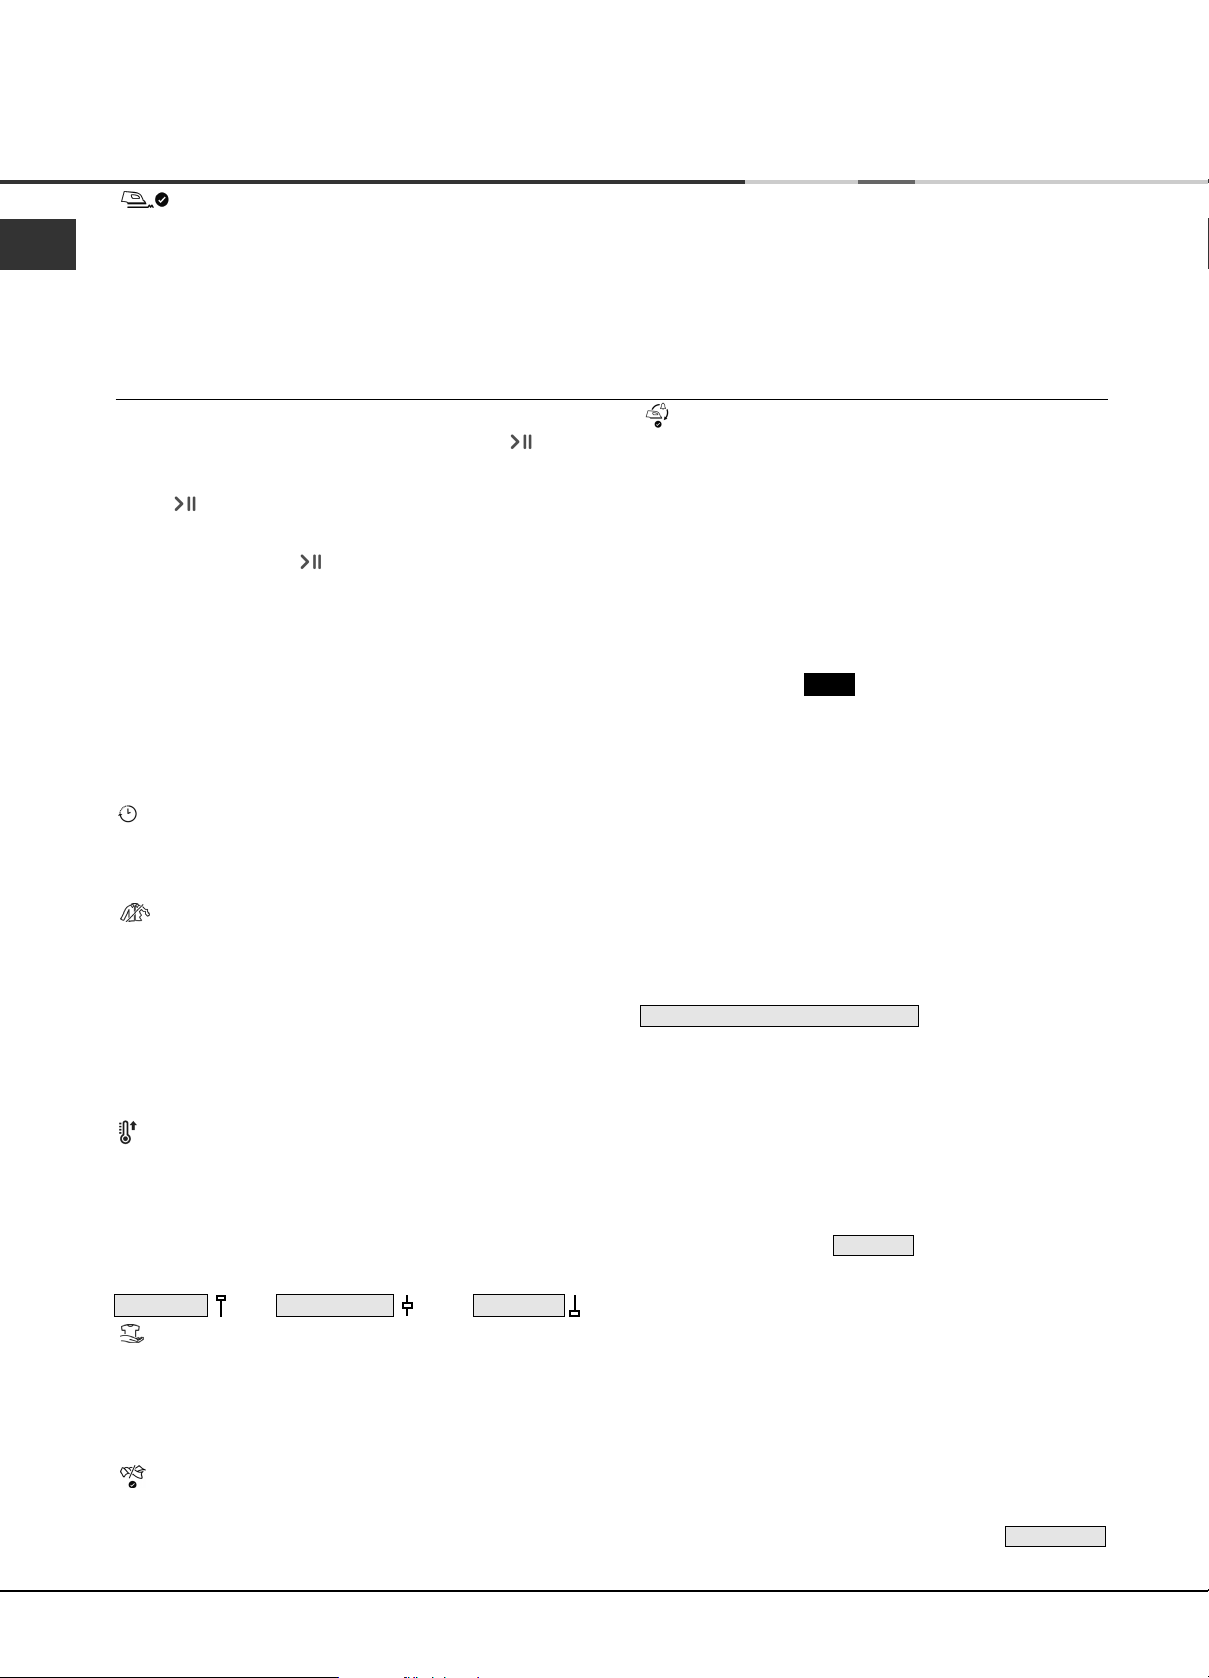
Heat Level button, Display and Icons
Not all programmes allow you to change the heat level
and some programmes allow all three heat level options:
Low, Medium and High.
When the heat level options are available pressing this
button changes the heat level and the display briefly shows
the selected heat level, along with a display of the selected
level icon:
HIGH HEAT MEDIUM HEAT LOW HEAT
Extra Care
This Anti-Ageing function for Cottons helps to maintain
the brightness of your laundry for a long time, thanks to
the correct drum rotation (reduced in the last part of the
cycle) and the correct temperature.
Note: It cannot be used with the ‘Extra Dry’, ‘Cupboard Dry’
and ‘Light Dry’ dryness levels.
Less Tangled
This option has the drum movement modified to give a
tumbling action that reduces tangling and knotting of
your clothes.
The Less Tangled option gives best results when used
with smaller loads.
These numbers refer to the dry weight:
Fabric Maximum load
Cotton and Cotton mixtures 2.5kg
Denim 2kg
2. Unload the dryer immediately after the end of the programme, hang, fold or iron the articles
and put them away in the closet. Should this not be possible repeat the programme.
Ready to Iron
This option allows you to dry loads where only some of
the items need ironing and you do not wish to fully dry
those items.
When Iron Dry level is reached, a buzzer sounds to let
you know that the items that need ironing can be removed.
The dryer then stops and the Start/Pause light flashes
orange. Remove the items you wish to iron, close the
door and press the Start/Pause button, the dryer continues
until the remaining items reach the selected dryness level.
It can be used for load sizes up to 3kg.
Note: This option is not available with the ‘Iron Dry’ and
‘Damp Dry’ dryness levels.
●
TIME DISPLAY
88:88
The display shows either the amount of time delay
remaining or an indication of the amount of time left for a
drying programme (see The Display).
The display also shows if there is a problem with your
dryer, if this occurs the display will show F followed by a
fault code number (see Troubleshooting).
●
Empty Water Container
(Messages about emptying can be ignored if you have
plumbed your dryer into a drain as there is no need to
empty the water container).
Messages are displayed to reminds you to empty the
water container (see The Display).
If the water container fills during a programme, the heater
turns off and the dryer does a period of Cool Tumble.
After this it stops and a message tells you to
EMPTY THE WATER CONTAINER .
You must empty the water container and restart the dryer
or the clothes will not dry. After re-starting the dryer the
message will take a few seconds to go out.
To avoid this always empty the water container each time
you use the dryer (see Maintenance).
●
Door Opening
Opening the door during a programme will stop the dryer
and have the following effects:
Note: The Start/Pause light flashes Amber during the Post
Care phase of a programme.
●
The display shows PAUSED .
●
During a delay phase the delay will continue to count
down. The Start/Pause button must be pressed to
resume the delay programme.
The display will change to show current status.
●
The Start/Pause button must be pressed to resume
the programme. The display will change to show the
current status.
●
During the Post Care phase, the programme ends.
Pressing the Start/Pause button will restart a new
programme from the beginning.
●
Note
If you have a power cut, switch off the power or remove
the plug. When power is restored, press and hold the
On/Off button until the display briefly shows
POWER ON
and the dryer reactivates. Then press the Start/Pause
button and the programme will resume.
14
Page 15
Laundry
Sorting your laundry
●
Check symbols on clothing labels to make sure
that the articles can be tumble dried.
●
Sort laundry by fabric type.
●
Empty pockets and check buttons.
●
Close zippers and hooks and tie loose belts and
strings.
●
Wring out each item in order to eliminate as much
excess water as possible.
! Do not load dripping wet clothes into the dryer.
Maximum load size
Do not load more than maximum capacity.
These numbers refer to dry weight:
Natural fibres: 9kg max (20lb)
Synthetic fibres: 3kg max (6.6lb)
! DO NOT overload the dryer as this could result in
reduced drying performance.
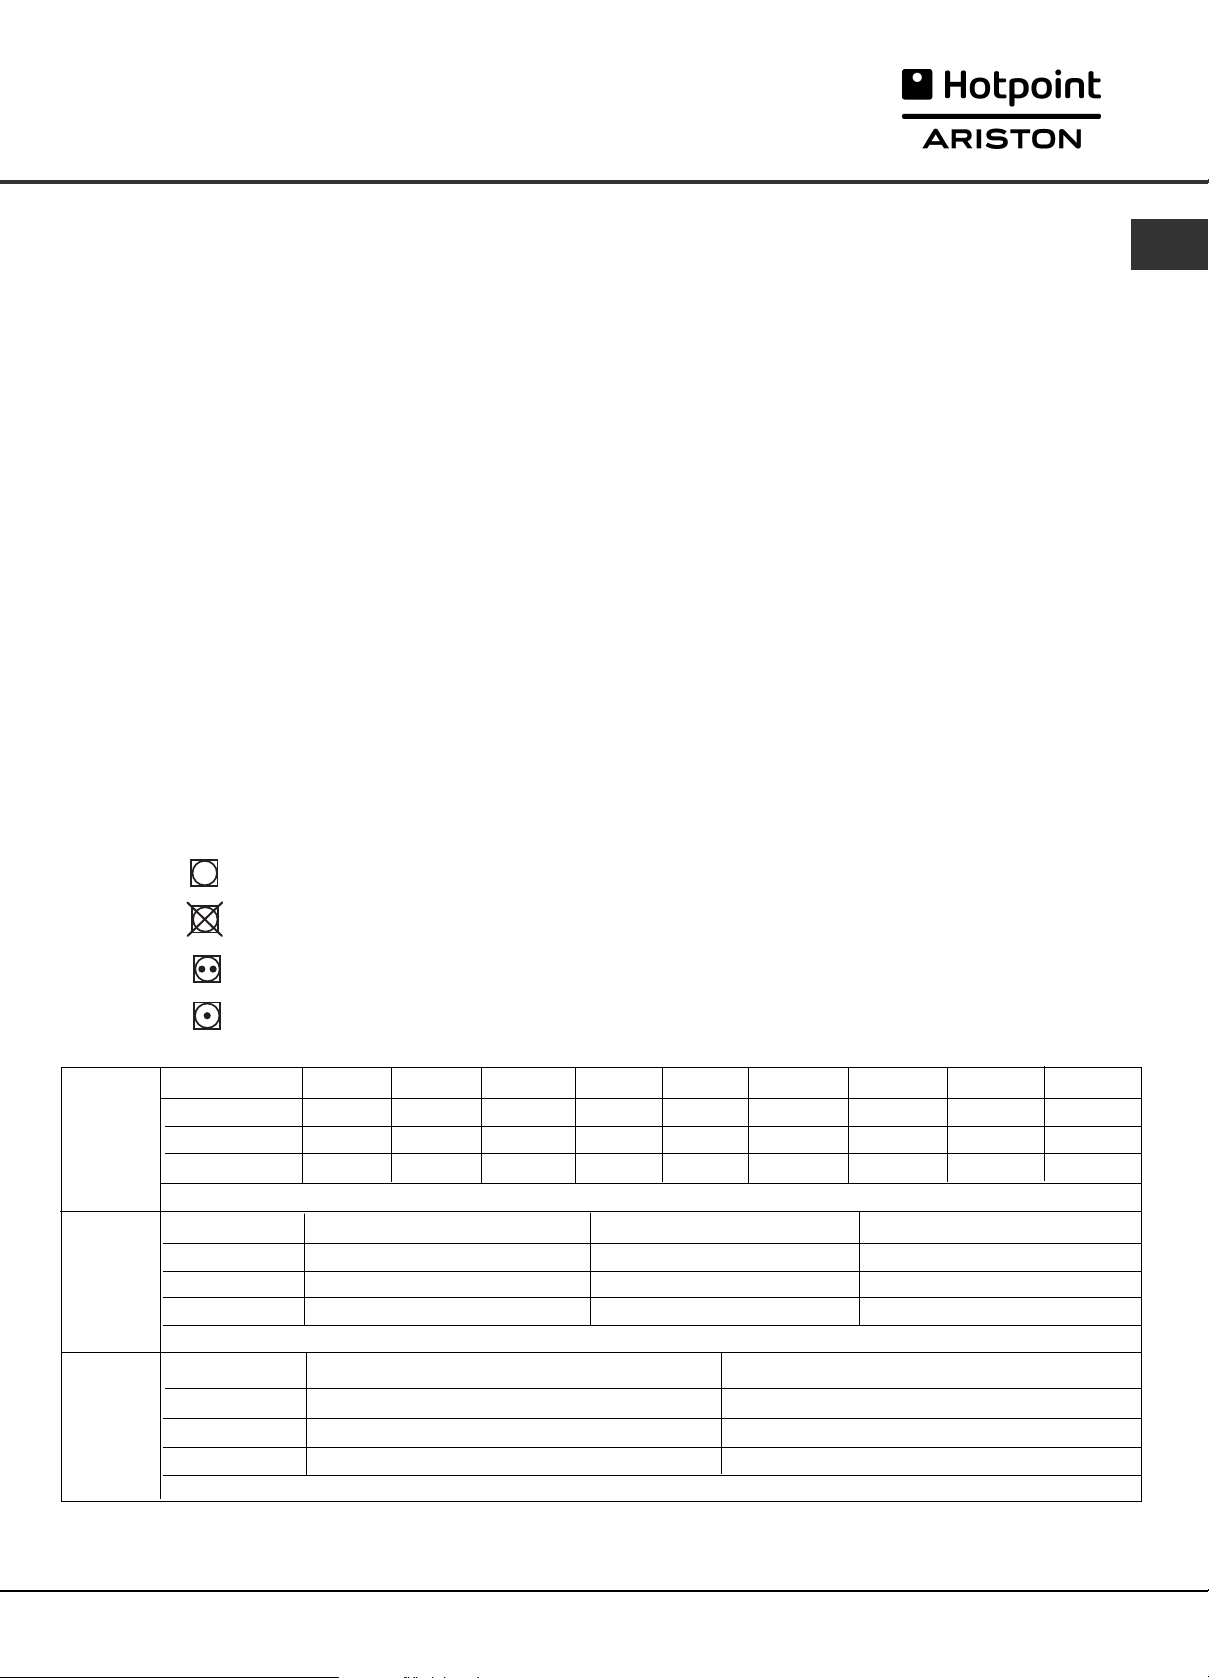
Wash Care Labels
Look at the labels on your garments, especially when
tumble drying for the first time. The following symbols
are the most common:
Drying times
The table (see below) presents APPROXIMATE drying
times in Minutes. Weights refer to dry garments.
Times are approximate and can vary depending
upon:
●
Amount of water retained in clothes after spin
cycle: towels and delicates retain a lot of water.
●
Fabrics: items that are the same type of fabric but
different textures and thicknesses may not have
the same drying time.
●
Quantity of laundry: single items or small loads
may take longer to dry.
●
Dryness: If you are going to iron some of your
clothes, they can be taken out while still a bit
damp. Others can be left longer if you need them
to be completely dry.
●
Heat setting.
●
Room temperature: if the room where the dryer is
located is cold, it will take longer for the dryer to
dry your clothes.
GB
Cottons
High
Heat
Synthetics
Medium
Heat
Delicates
(Acrylics)
Low
Heat
May be tumble dried
Do not tumble dry
Tumble dry at high heat setting
Tumble dry at low heat setting
Automatic duration
Automatic minutes
Timed Dry setting
1 kg
0:30 - 0:40
30 - 40
0
:30
2 kg
0:40 - 0:55
40 - 55
1:00
3 kg
0:55 - 1:10
55 - 70
1:00 or 1:30
Drying times 800-1000 rpm in washing machine.
1 kg
Automatic duration
Automatic minutes
Timed Dry setting
0:40 - 0:50
40 - 50
1:00
Drying times on reduced spin in washing machine.
1 kg
Automatic duration
Automatic minutes
Timed Dry setting
0:40 - 1:20
40 - 80
0:40 or 1:00 or 1:20 1:20 or 1:40
Drying times on reduced spin in washing machine.
●
Bulk: some bulky items can be tumble dried with
care. We suggest that you remove these items
several times, shake them out, and return them to
the dryer until finished.
! Do not over-dry your clothes.
All fabrics contain a little natural moisture, which
keeps them soft and fluffy.
4 kg
1:10 - 1:20
70 - 80
1:30
5 kg
1:20 - 1:30
80 - 90
1:30
6 kg
1:35 - 2:00
95 - 120
1:30 or 2:00
7 kg
2:00 - 2:20
120 - 140
2:00 or 2:40
2 kg
0:50 - 1:10
50 - 70
1:00
2 kg
1:20 - 2:20
80 - 140
8 kg
2:00 - 2:40
130 - 160
2:00 or 2:40
3 kg
1:00 - 1:30
70 - 90
1:00 or 1:30
9 kg
2:30 - 2:50
140 - 170
2:40 or 3:00
●
Note: At the end of a drying cycle, cottons could still be damp if you grouped cottons and synthetics together.
If this is the case, simply give the damp cotton items an additional short period of drying.
15
Page 16

Troubleshooting
GB
One day your dryer seems not to be working. Before you call your Service Centre (see Service), go through the
following troubleshooting suggestions:
Problem:
The tumble dryer won’t start.
Possible causes / Solution:
●
The plug is not plugged into the socket, or not making contact.
●
There has been a power failure.
●
The fuse has blown. Try to plug another appliance into the socket.
●
You are using an extension cord? Try to plug the dryer’s power cord
directly into the socket.
●
The door is not closed securely?
●
The programme has not been set properly (see Start and Programmes).
●
The Start/Pause button has not been pressed (see Start and Programmes).
Drying cycle will not begin.
Its taking a long time to dry.
●
You have set a delayed time (see Start and Programmes).
●
The filter has not been cleaned (see Maintenance).
●
The water container needs emptying? The empty water message is
displayed? (see Maintenance).
●
The condenser needs cleaning? (see Maintenance).
●
The temperature setting is not ideal for the type of fabric you are drying
(see Start and Programmes, and see Laundry).
●
The correct drying time has not been selected for the load (see Laundry).
●
The air intake grille is obstructed (see Installation, and see
Maintenance).
●
The items were too wet (see Laundry).
●
The dryer was overloaded (see Laundry).
Empty water message is
displayed but the dryer has
only been running for a short
period.
Empty water message is
displayed and the water
container is not full.
Programme finishes and
clothes are damper than
expected.
The display shows a fault
code F followed by one or two
numbers.
The display briefly shows
DEMO ON every 6 seconds.
●
The water container was probably not emptied at the start of the
programme. Do not wait for the empty water signal, always check and
empty the container before starting a new drying programme (see
Maintenance).
●
This is normal, the: END OF CYCLE, CLEAN FILTER AND EMPTY WATER BOTTLE
message is shown as a reminder to empty the container (see The Display
and Start and Programmes).
! For safety the dryer has a maximum programme time of 5 hours. If an
automatic programme has not sensed the required final moisture in this time
the dryer will complete the programme and stop. Check the above points
and run the programme again, if the results are still damp, contact the
Service Centre (see Service).
●
If the display shows a fault:
- Turn off and remove the plug. Clean the filter and the condenser
(see Maintenance). Then replace the plug, turn on and start another
programme. If a fault is then displayed note down the code and
contact the Service Centre (see Service).
●
The dryer is in ‘Demo’ mode. Press and hold both the On/Off and
Start/Pause buttons for 3 seconds. The display will show
DEMO OFF for
3 seconds and then the dryer will resume normal operation.
The lights on the dryer control
panel are off although the
dryer is switched on.
16
●
The dryer has gone into standby mode to save power. This occurs if you
have had a power cut or leave your dryer either without starting a
programme or after your drying programme has finished.
- Press and hold the On/Off button and the lights will come on.
Page 17
Service
Before calling the Service Centre:
●
Use the troubleshooting guide to see if you can
solve the problem yourself (see Troubleshooting).
●
If not, turn off the dryer and call the Service Centre
closest to you.
Spare Parts
This dryer is a complex machine. Repairing it yourself
or having a non-authorised person try to repair it could
cause harm to one or more persons, could damage
the machine and could invalidate the spare parts
warranty.
What to tell the Service Centre:
●
name, address and post code.
●
telephone number.
●
the type of problem.
●
the date of purchase.
●
the appliance model (Mod.).
●
the serial number (S/N).
Call an authorised technician if you experience problems
while using the machine.
This information can be found on the data label inside
the door of the machine.
Save energy and respect the environment
●
Wring out items to eliminate excess water before tumble drying (if you use a washing machine first, select a high
spin cycle). Doing this will save time and energy during drying.
●
Always dry full loads - you save energy: single items or small loads take longer to dry.
●
Clean the filter after each use to contain energy consumption costs (see Maintenance).
GB
Recycling and Disposal Information
As part of our continued commitment to help-
ing the environment, we reserve the right to use
quality recycled components to keep down customer
costs and minimise material wastage.
●
Disposing of the packaging material: follow local
regulations, so the packaging can be recycled.
●
To minimise risk of injury to children, remove the
door and plug - then cut off mains cable, flush
with the appliance. Dispose of these parts separately
to ensure that the appliance can no longer be
plugged into a mains socket.
Disposal of old electrical appliances
The European Directive 2012/19/EC on Waste Electrical
and Electronic Equipment (WEEE), requires that old
household electrical appliances must not be disposed
of in the normal unsorted municipal waste stream. Old
appliances must be collected separately in order to
optimise the recovery and recycling of the materials
they contain and reduce the impact on human health
and the environment.
The crossed out “wheeled bin” symbol on the
product reminds you of your obligation, that
when you dispose of the appliance it must be
separately collected.
Consumers should contact their local authority or
retailer for information concerning the correct disposal
of their old appliance.
17
Page 18
Product Data... (EU Regulation 392/2012)
GB
Brand Hotpoint Ariston Models TCD97B
FTCD 97B
Rated capacity of Cotton laundry for the standard programme at full load 9 kg Energy efficiency class B
The weighted Annual Energy Consumption (AE
) 615.9 kWh
c
Consumption per year, based on 160 drying cycles of the standard cotton programme at full and partial load, and the
consumption of the low-power modes. Actual energy consumption per cycle will depend on how the appliance is used.
This household tumble dryer is an Automatic Condenser Dryer
Energy consumption : full load E
Power consumption : off-mode (P
5.20 kWh, partial load E
dry
) 0.14 W, left-on mode (Pl) 3.36 W
o
dry1/2
2.82 kWh
Duration of the ‘left-on mode’ for power management systems 30 minutes
The ‘standard cotton programme’ suitable for drying normal wet cotton laundry that is the most efficient programme in
terms of energy consumption for cotton used at full and partial load is Standard Cotton, High Heat, Cupboard Dry
Programme time (minutes) : weighted (T
) full & partial load 110, full load (T
t
) 147, partial load (T
dry
dry1/2
) 82
Condensation efficiency class B
Average condensation efficiency (%) : full load (C
) 83, partial load (C
dry
) 79, weighted (Ct) full & partial load 81
dry1/2
Airborne acoustical noise emissions 69 dB(A) re 1 pW
* “consumer information in compliance with EU Regulation 932/2012”.
Typical energy used - Synthetics full load 1.38 kWh, partial load not applicable
Typical drying time - Synthetics full load 65 minutes, partial load not applicable
This appliance conforms to the following EC Directives:
- 2006/95/EC (Low Voltage Equipment)
- 2004/108/EC (Electromagnetic Compatibility)
Indesit Company, Viale Aristide Merloni 47, 60044 Fabriano (AN), Italy
18
Page 19
Notice d’utilisation et
installation
GB
English, 1
E
Español, 55
F
Français, 19
P
Português, 73
D
Deutsch, 37
FTCD 97B
La première fois que vous allumez
votre sèche-linge, vous devez
choisir la langue.
Voir page 26.
Table des Matières
Installation, 20
Où installer votre sèche-linge
Ventilation
Vidange de l’eau
Connexions électriques
Avant de commencer à utiliser votre sèche-linge
Avertissements, 21-22
Sécurité Générale
Pour minimiser les risques d'incendie
Entretien et Nettoyage, 23-24
Éteindre l’électricité
Nettoyer le filtre après chaque cycle
Videz le réservoir d’eau après chaque cycle
Nettoyage du groupe condenseur
Vérifier le tambour après chaque cycle
Nettoyer le sèche-linge
Description du sèche-linge, 25
Caractéristiques
Panneau de commandes
F
SÈCHE-LINGE
! Conservez cette notice d’utilisation et d’installation à
portée de main de manière à pouvoir vous y référer si
nécessaire. Emmenez-la avec vous si vous déménagez, et,
si vous vendez cet appareil ou que vous le donniez à un
tiers, faites en sorte que cette notice accompagne le
sèche-linge de manière à ce que le nouveau propriétaire
soit informé des avertissements et suggestions
concernant le fonctionnement de ce sèche-linge.
! Lisez attentivement ce mode d’emploi; les pages
suivantes contiennent des informations importantes
concernant l’installation et des suggestions relatives
au fonctionnement de cet appareil.
Ce symbole vous rappele de lire le
livret d’instructions.
L’affichage, 26-28
Démarrage et programmes, 28-32
Choisir un programme
Tableau des programmes
Les commandes
Linge, 33
Trier votre linge
Étiquettes d’entretien
Temps de séchage
Que faire en cas de panne, 34
Service Après-vente, 35
Pièces de Rechange
Recyclage et enlèvement
Données relatives au produit, 36
www.hotpoint.eu
19
Page 20
Installation
Assurez-vous que le tuyau n’est pas écrasé ou plié
Où installer votre sèche-linge
●
F
Placez votre sèche-linge à une certaine
distance des cuisinières, fourneaux,
radiateurs, ou plaques de cuisson à gaz,
car les flammes peuvent endommager
cet appareil.
minimale espace 10mm
●
Si vous installez cet
appareil sous un plan
de travail, faites en
sorte de laisser un
espace de 10 mm
minimale
espace 15mm
entre le dessus de
l’appareil et tout autre
objet sur ou au-dessus
de la machine, et un
espace de 15 mm entre les côtés et les
éléments d’ameublement ou les murs
latéraux. Ceci a pour objectif d’assurer
une ventilation convenable.
La surface arrière de l’appareil doit être
placée contre un mur.
Ventilation
Lorsque le sèche-linge est en marche, une aération
adéquate est nécessaire. Faites en sorte d’installer
votre sèche-linge dans un environnement qui n’est
pas humide et qui est doté d’une bonne circulation
d’air dans toute la pièce. La circulation d’air autour du
sèche linge est essentielle pour condenser l’eau
produite au cours du lavage, le sèche linge ne
fonctionnera pas efficacement dans un espace clos
ou dans un placard.
! Si l’on utilise le sèche linge dans une pièce froide ou
petite, on rencontrera un certain degré de condensation.
! Nous vous déconseillons d’installer votre
sèche-linge dans un placard. En revanche,
le sèche-linge ne doit en aucun cas être
placé derrière une porte fermant à clé, une
porte coulissante ou une porte montée sur
des gonds du côté opposé à la porte de
chargement du sèche-linge.
Vidange de l’eau
Si votre sèche-linge est installé à proximité d’une
évacuation, l’eau peut être vidangée dans ce tuyau.
Cela évite de vider le réservoir d’eau. Si vous installez
le sèche-linge au-dessus ou à côté d’un lave-linge, il
pourra partager la même vidange.
vidange doit être inférieure à
du sèche-linge.
Repérez la position du tuyau,
illustrée sur l'image A. Retirez le
tuyau.
image A
Puis fixez un tuyau suffisamment
long selon la position illustrée sur
l'image B.
La hauteur de la
1 m en partant du bas
image B
!
une fois le sèche-linge placé dans sa position définitive
Connexions électriques
Assurez-vous des points suivants avant de
brancher la fiche de l’appareil dans la
prise de courant:
●
Assurez-vous que vos mains sont séches.
●
La prise de courant doit être reliée à la
terre.
●
La prise de courant doit pouvoir supporter
la puissance maximale de la machine,
qui est indiquée sur la plaque signalétique
de l’appareil (voir la Description du
Sèche-linge).
●
La tension électrique doit appartenir à la
gamme de valeurs indiquée sur la plaque
signalétique de l’appareil (voir la
Description du Sèche-linge).
●
La prise de courant doit être compatible
avec la fiche du sèche-linge. Si ce n’est
pas le cas, remplacez la fiche ou la
prise de courant.
! Le sèche-linge ne doit pas être utilisé à
l’extérieur, même si l’espace en question est
abrité. Cela peut être dangereux si l’appareil
est exposé à la pluie ou à des orages.
! Une fois installés, le cordon d’alimentation
et la fiche du sèche-linge doivent être
d’accès facile.
! N’utilisez pas de rallonges.
! Le cordon d’alimentation ne doit pas être
courbé ou écrasé.
! Le câble électrique doit être contrôlé
périodiquement. Si le câble est endommagé,
il faut le faire remplacer par le fabricant,
par son service après-vente ou par tout
autre personnel qualifié afin d’éviter tout
risque de danger. Des cordons d’alimentation
neufs ou plus longs sont fournis par les
revendeurs agréés contre un supplément.
! Le fabricant rejète toute responsabilité en
cas de non-respect de toutes ou partie de
ces règles.
! En cas de doute au sujet des points
precedents, consultez un electricien qualfie.
Avant de commencer à utiliser votre
sèche-linge
Une fois que vous avez installé votre sèche-linge, et
avant de l’utiliser, nettoyez l’intérieur du tambour pour
retirer les poussières qui pourraient s’y être
accumulées durant le transport.
Capacités maximales de chargement
Fibres naturelles : 9 kg
.
20
Page 21

Avertissements
! Cet appareil a été conçu et construit
conformément à des normes de sécurité
internationales.
Ces avertissements sont donnés pour des
raisons de sécurité et doivent être suivis
attentivement.
Sécurité Générale
●
Ce sèche-linge peut étré utilisé par des
personnes (notamment des enfants de
plus 8 ans) présentant des capacités
physiques, motrices ou mentales réduites,
ou manquant d’expérience et de
connaissances, si elles sont placées sous
surveillance ou ont reçu les instructions
nécessaires à l’utlilisation de l’appareil
de la part d’une personne responsable
de leur sécurité.
●
Ce sèche-linge a été conçu pour un
usage domestique, et non professionnel.
●
Ne touchez pas cet appareil lorsque vous
êtes pieds nus ou avec des mains ou
des pieds humides.
●
Débranchez cette machine en tirant sur
la fiche et non sur le cordon.
●
Après avoir utilisé ce sèche-linge,
éteignez-le et débranchez-le. Tenez la
porte fermée pour assurer que les
enfants ne jouent pas avec.
●
Surveillez les enfants de façon à ne pas
les laisser jouer avec le sèche-linge.
●
Le nettoyage et l’entretien ne doivent pas
être effectués par des enfants non
surveillés.
●
Les enfants de moins de 3 ans doivent
être tenus à bonne distance du sèchelinge s’ils ne sont pas sous surveillance
constante.
●
Cet appareil doit être installé correctement
et avoir une ventilation convenable.
L’arrivée d’air sur le devant du sèchelinge ne doit jamais être obstruée (voir
Installation).
●
N’utilisez jamais le sèche-linge sur de la
moquette où la hauteur des poils
empêcherait l’air d’entrer dans la sèchelinge à partir de la base.
●
Vérifiez que le sèche-linge est bien vide
avant de le charger.
●
L’arrière du sèche-linge peut devenir
très chaud. Ne le touchez jamais en
cours d’utilisation.
●
N’utilisez pas le sèche-linge si le filtre, le
réservoir d’eau et le condenseur ne sont
pas bien en place (voir Entretien).
●
Ne surchargez pas le sèche-linge (voir
Linge pour les charges maximales).
●
Ne chargez pas d’articles qui dégouttent
d’eau.
●
Vérifiez avec soin toutes les instructions
sur les étiquettes des vêtements (voir
Linge).
●
Ne séchez pas d’articles de grande taille,
très volumineux.
●
Ne séchez pas de fibres acryliques à
hautes températures.
●
N’éteignez pas le sèche-linge s’il
contient encore des articles chauds.
●
Nettoyez le filtre après chaque utilisation
(voir Entretien).
●
Videz le réservoir d’eau après chaque
utilisation (voir Entretien).
●
Nettoyez le groupe condenseur à
intervalles réguliers (voir Entretien).
●
Ne laissez pas s’accumuler de peluches
autour du sèche-linge.
●
Ne montez jamais sur le sèche-linge.
Cela pourrait l’endommager.
●
Respectez toujours les normes et
exigences électriques (voir Installation).
●
Achetez toujours des pièces de
rechange et accessoires d’origine (voir
Service Après-vente).
F
21
Page 22

Avertissements
F
Vous devez observer les consigne
suivantes pour réduire tout risque
d'incendie dans votre sèche-linge :
inflammables ou explosives. Les substances
hautement inflammables couramment
utilisées dans l'environnement
domestique sont notamment l'huile de
●
Ne séchez que des articles qui ont été
lavés avec de l’eau et un détergent,
rincés et essorés. Le fait de sécher des
articles qui N’ONT PAS été lavés avec
de l’eau constitue un danger d’incendie.
●
Ne séchez pas des vêtements qui ont
été traités avec des produits chimiques.
●
Ne placez pas d'articles tachés ou
imbibés d'huile végétale ou de cuisson,
ils risqueraient de provoquer un
incendie. Les articles contenant de
l'huile peuvent prendre feu spontanément,
particulièrement lorsqu'ils sont exposés
à des sources de chaleur comme un
sèche-linge. En chauffant, les articles
provoquent une réaction d'oxydation
avec l'huile générant alors de la chaleur.
Si la chaleur ainsi générée ne peut pas
être évacuée, les articles peuvent
devenir suffisamment chauds pour
prendre feu. Le fait d'empiler, de
superposer ou de stocker des articles
contenant de l'huile peut empêcher la
chaleur d'être évacuée et donc provoquer
un incendie.
Si vous ne pouvez pas faire autrement
que de placer des articles contenant de
l'huile végétale ou de l'huile de cuisson
ou ayant été en contact avec des
produits coiffants dans le sèche-linge, il
convient de les laver au préalable à
l'aide d'une dose supplémentaire de
détergent. Cette précaution minimise,
sans toutefois l'éliminer, le risque
d'incendie. Les articles ne doivent pas
être retirés du sèche-linge et empilés ou
superposés lorsqu'ils sont chauds.
●
Ne placez pas d'articles ayant été
préalablement nettoyés ou lavés,
imbibés ou tachés avec du pétrole/de
l'essence, des solvants de nettoyage à
sec ou d'autres substances
cuisson, l'acétone, l'alcool dénaturé, la
kérosène, les détachants, la térébenthine,
les cires et les produits permettant
d'éliminer la cire. Assurez-vous que ces
articles ont été lavés à l'eau chaude à
l'aide d'une dose supplémentaire de
détergent avant de les mettre à sécher
dans le sèche-linge.
●
Ne placez pas d'articles contenant du
caoutchouc mousse (également connu
sous l'appellation mousse de latex) ou
des matériaux similaires renfermant du
caoutchouc dans le sèche-linge. Les
matériaux contenant du caoutchouc
mousse peuvent, lorsqu'ils sont chauffés,
s'enflammer par combustion spontanée.
●
Les produits assouplissants ou les
produits similaires ne doivent pas être
utilisés dans un sèche-linge en vue
d'éliminer es effets de l'électricité
statique sauf si leur emploi est
spécifiquement recommandé par le
fabricant du produit assouplissant.
●
Ne placez pas de sous-vêtements
contenant des renforts en métal comme
les soutiens-gorge à armature dans le
sèche-linge. Si les renforts en métal
venaient à se détacher pendant le
séchage, ils pourraient endommager le
sèche-linge.
●
Ne placez pas d'articles en caoutchouc
ou en plastique dans le sèche-linge,
comme des bonnets de douche ou des
couvertures étanches pour bébé, des
articles en polyéthylène ou en papier.
●
Ne placez pas d'articles contenant des
pièces de caoutchouc plaquées, des
vêtements présentant des pièces en
mousse de caoutchouc, des oreillers,
des bottes en caoutchouc et des tennis
recouvertes de caoutchouc dans le
sèche-linge.
●
Enlever tous les objets des poches,
notamment les briquets et les allumettes.
! AVERTISSEMENT : N’arrêtez pas le sèche-linge avant la fin du cycle de séchage si vous
n’avez pas la possibilité de retirer rapidement tous les articles et de les étendre pour
évacuer la chaleur.
22
Page 23
Entretien et Nettoyage
Éteignez l’électricité
! Débranchez votre sèche-linge lorsque
vous ne l’utilisez pas, lorsque vous le
nettoyez et durant toutes les opérations
d’entretien.
Nettoyez le filtre après chaque cycle
Le filtre est une pièce importante de votre
sèche-linge: il accumule des peluches qui
se forment durant le séchage.
Fois le séchage terminé, nettoyez le filtre
en le rinçant sous l’eau courante ou avec
votre aspirateur.
Si le filtre devient bloqué, le flux d’air à
l’intérieur du sèche-linge est sérieusement
compromis : les temps de séchage sont
allongés et vous consommez davantage
d’énergie. Cela peut aussi endommager
votre sèche-linge.
Le filtre se trouve devant la garniture du
sèche-linge (voir schéma en page
suivante).
Pour retirer le filtre :
1. Tirez la poignée en plastique du filtre
vers le haut .
2. Ouvrez le filtre et
nettoyez les peluches
qui se seraient
déposées au fond.
3. Repositionnez-le
correctement.
Assurez-vous que le
filtre soit bien inséré à
fond dans la garniture
du sèche-linge.
4. Retirez toutes les peluches qui se sont
accumulées sur l'intérieur de la porte et
autour du joint de la porte.
! N’utilisez pas le sèche-linge sans avoir
remis le filtre en place.
! Si le réservoir d’eau n’est pas vidé, les problèmes
suivants peuvent se vérifier:
- L’arrêt du chauffage de l’appareil (le linge pourrait
donc être encore humide à la fin du cycle de
séchage) (voir Les Commandes).
●
Amorçage du système de récupération d’eau
Sur un sèche-linge neuf, le réservoir d’eau ne
récupérera pas l’eau tant que le système n’aura
pas été amorcé... ceci nécessitera 1 ou 2 cycles de
séchage. Une fois amorcé, il récupérera l’eau à
chaque cycle de séchage.
Nettoyage du groupe condenseur
Périodiquement (chaque mois) retirez le
groupe condenseur et nettoyez toute
accumulation de peluche entre les
plaques en le rinçant sous le robinet à
l’eau froide. Ceci devrait être effectué avec
l’eau froide de l’arrière du condenseur.
Pour retirer du groupe condenseur :
1. Débranchez le sèche-linge et ouvrezz
la porte.
2. Tirez sur le couvercle du condenseur
pour l’ouvrir (voir schéma). Dégagez les
trois loquets en tournant à 90° dans le
sens anti-horaire puis tirez
sur la poignée et retirez-le
du sèche-linge.
Nettoyez la surface des joints et remettez
le condenseur en place : les flèches
doivent être orientées vers le haut.
Assurez-vous que les loquets sont bien
clipsés.
F
Videz le réservoir d’eau après chaque
cycle
Tirez le réservoir pour l'extraire
du sèche-linge et retirez le petit
capot ou le grand capot, videz-le
dans un évier ou autre, pour en
éliminer le contenu. Remettez en
place le capot et remettez le
réservoir bien en place.
! Toujours vérifier et vider le récipient avant de
commencer un nouveau programme de séchage.
23
Page 24
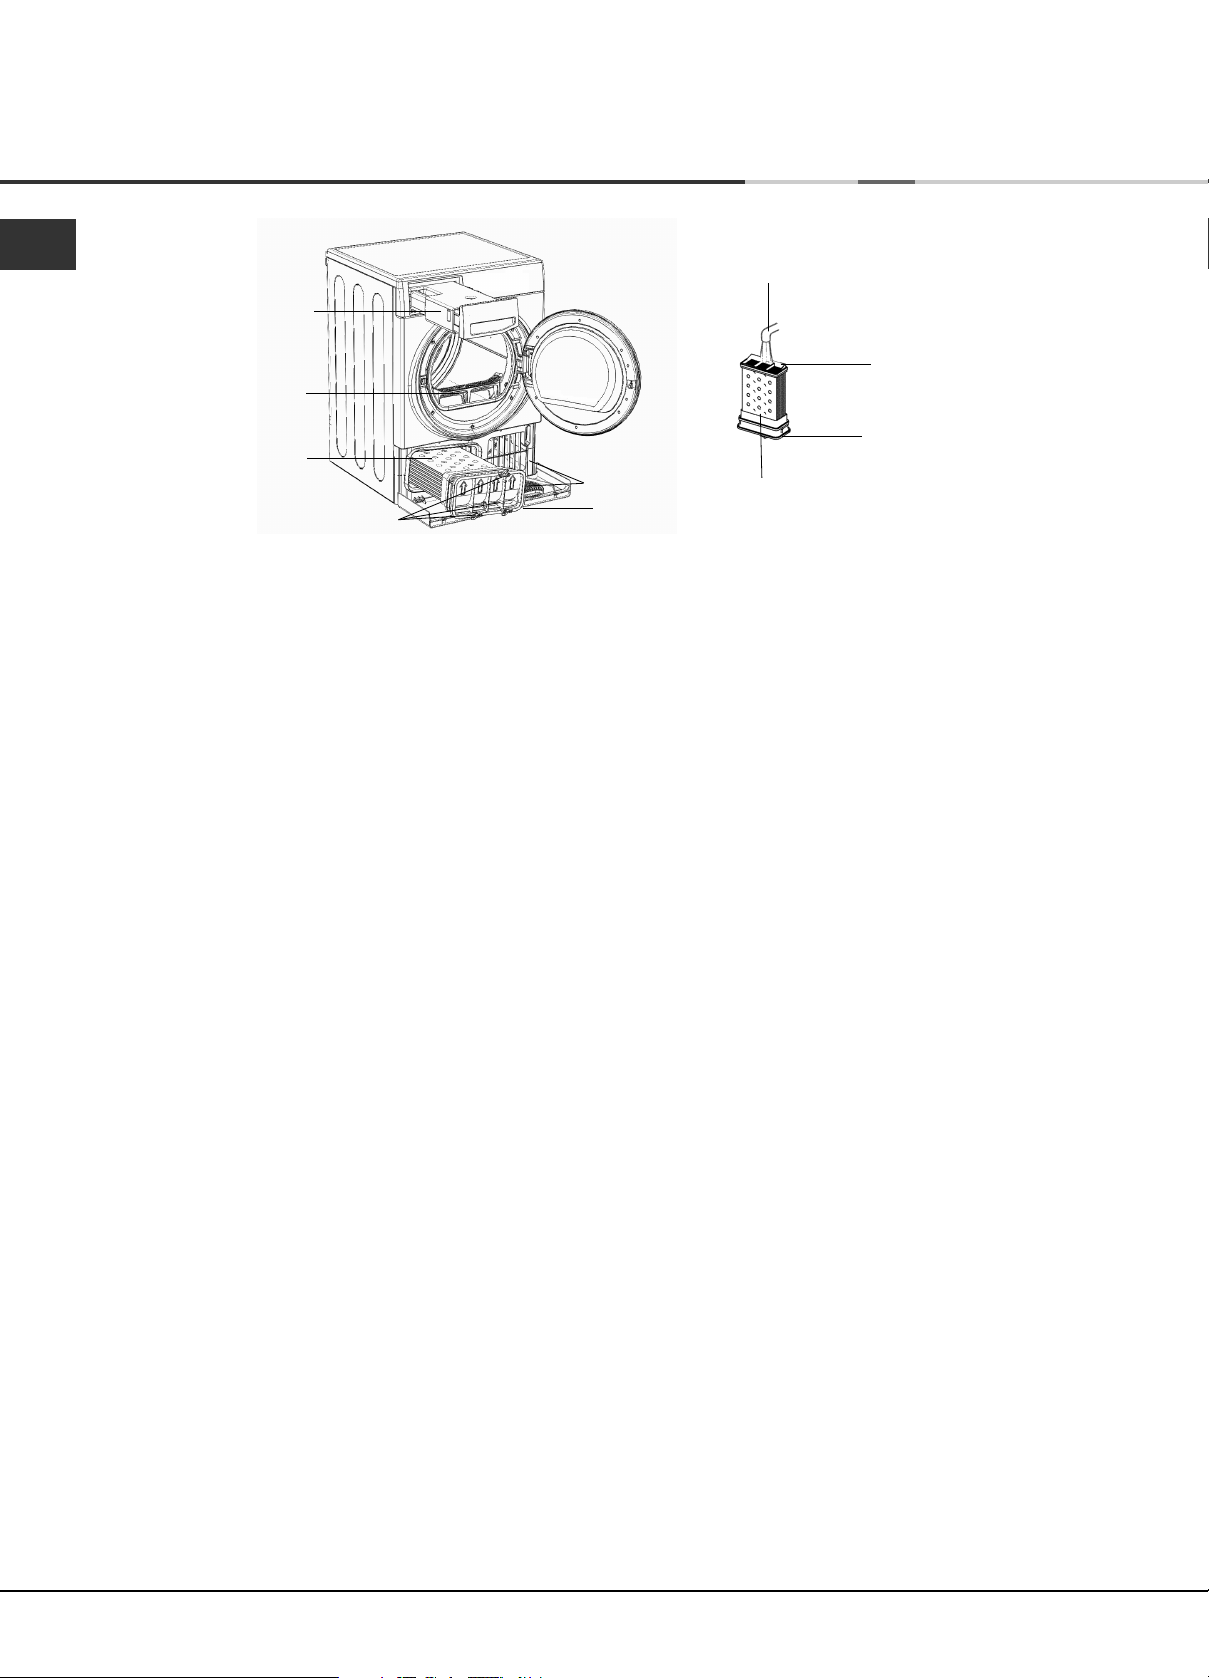
Entretien et Nettoyage
F
Réservoir d’eau
Filtre
Groupe condenseur
Loquets
Vérifiez le tambour après chaque cycle
Tournez le tambour à la main afin de retirer les petits
articles (mouchoirs) qui pourraient y avoir été oubliés.
Nettoyage du tambour
! Pour nettoyer le tambour, ne pas utiliser d’abrasifs,
de laine d’acier ni de produits de nettoyage pour
acier inoxydable.
Robinet
l’arrière
avant
Grille d’entrée d’air
Couvercle de condenseur
Groupe condenseur
Conseils rapides
●
N’oubliez pas de nettoyer le filtre de la
porte et le filtre du condenseur après
chaque séchage.
●
N’oubliez pas de vider le réservoir
d’eau après chaque séchage.
! Vous obtiendrez ainsi, des performances
optimales.
Un film coloré peut parfois apparaître à la surface du
tambour en acier inoxydable. Il peut être dû à une
combinaison de l’eau et/ou des produits de nettoyage
(ex. adoucissant textile provenant du lavage). Ce film
coloré n’affecte pas la performance du sèche-linge.
Nettoyage
●
Les parties externes en métal ou en plastique et les
pièces en caoutchouc peuvent être nettoyées avec
un chiffon humide.
●
Périodiquement (tous les 6 mois), aspirez la grille
d’entrée d’air de devant, pour retirer toute
accumulation de peluche ou poussière. En outre,
pour retirer l’accumulation de peluche de l’avant du
condenseur et de la zone du filtre, nettoyez
occasionnellement avec un aspirateur.
! N’utilisez pas de solvants ou d’abrasifs.
! Faites vérifier régulièrement votre sèche-linge par
des techniciens agréés pour assurer une sécurité
électrique et mécanique (voir Service d’Entretien).
24
Page 25
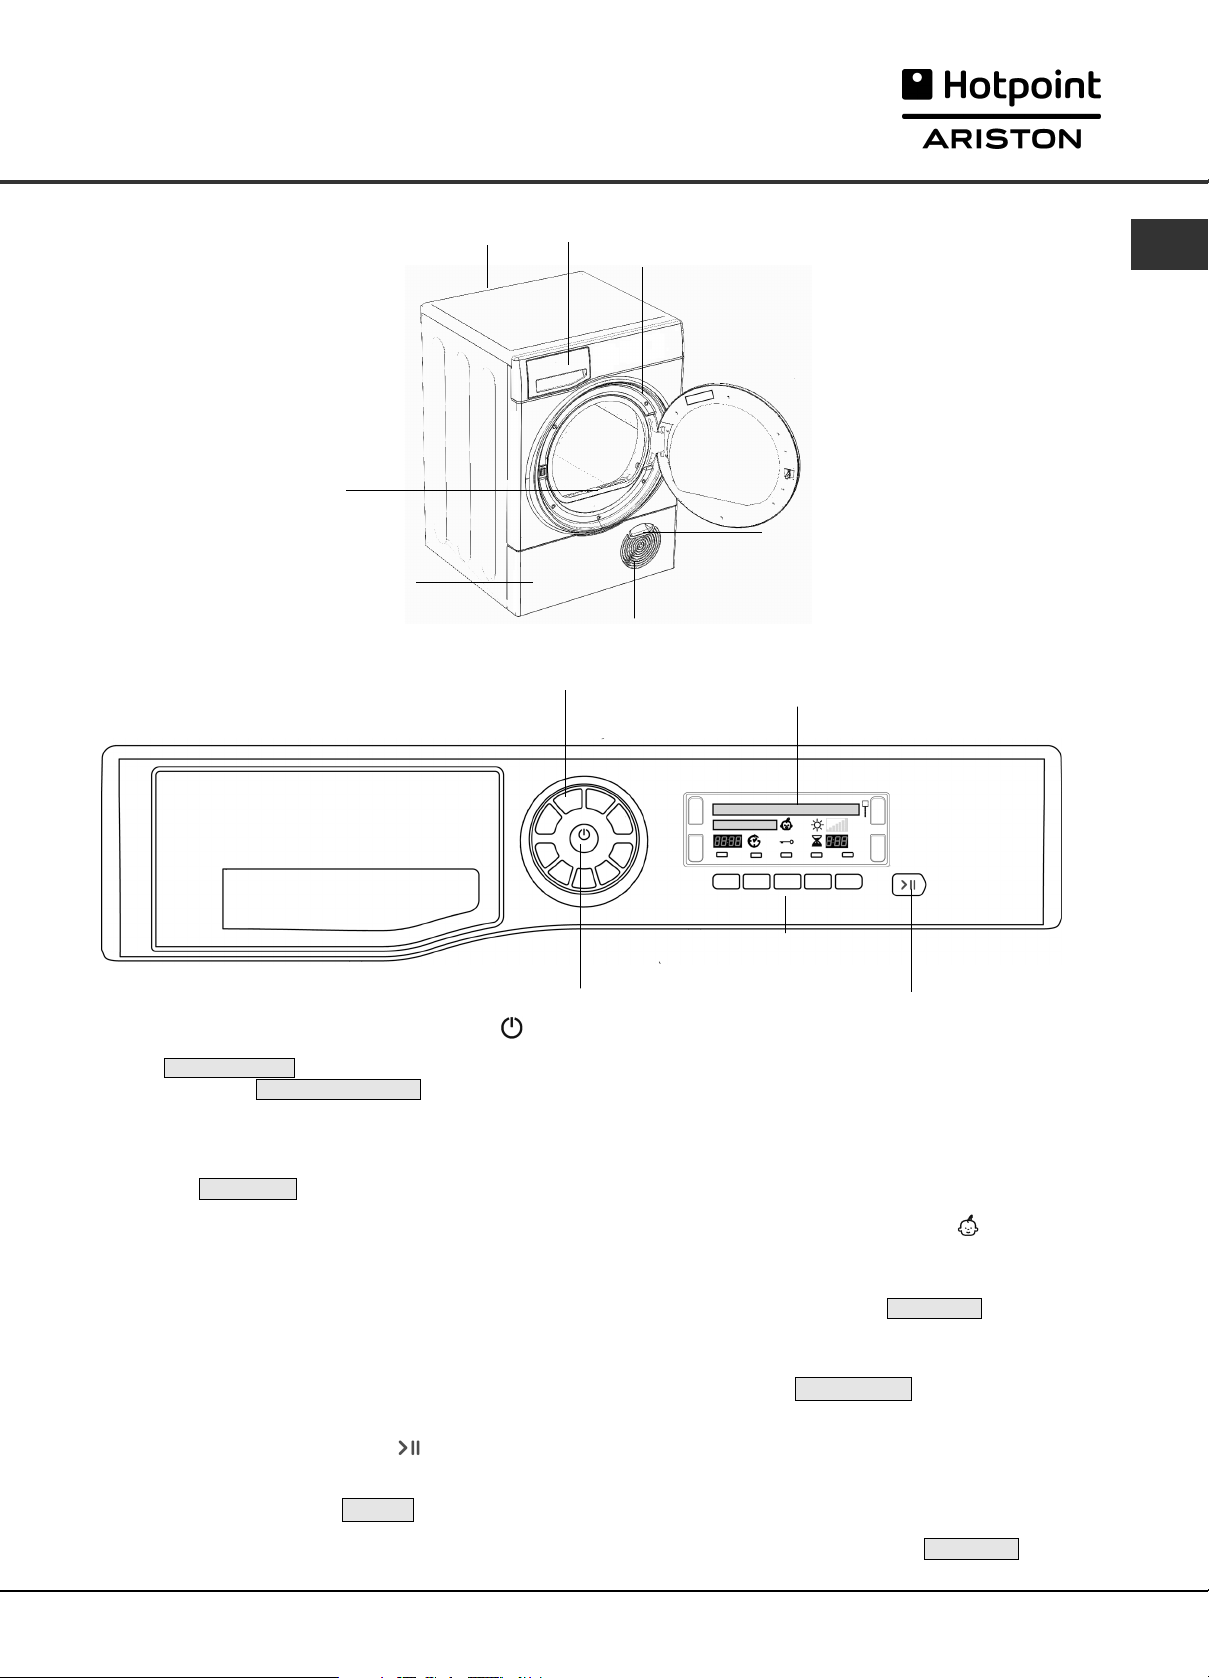
Description du sèche-linge
Caractéristiques
Filtre
Couvercle de condenseur
Panneau de commandes
Boutons de Sélection de
Plaque
signalétique
PROGRAMME
Réservoir d’eau
Numéro du Modèle et
Numéro de Série
Grille d’entrée d’air
L’Affichage
F
Poignée de couvercle de condenseur
(Tirer ou ouvrir)
Bouton
MARCHE/ARRÊT
Vous appuyez sur le bouton MARCHE/ARRÊT
lorsque le sèche-linge fonctionne : si l'affichage
indique
l'affichage indique
bouton appuyé et l'affichage indique un compte à
rebours : 3, 2,1 et s'arrête.
Appuyez de nouveau sur le bouton et maintenez-le
enfoncé pendant 3 secondes, l'affichage indique
rapidement
Les boutons de Sélection de PROGRAMME
permettent de choisir un programme : appuyez sur
le bouton correspondant au programme que vous
souhaitez sélectionner (voir Démarrage et Programmes).
Les boutons/témoins OPTION : ces boutons
sélectionnent les options disponibles pour votre
programme sélectionné (voir Les Commandes). Les
témoins situés à côté des boutons sur l’affichage
s’allument pour indiquer que l’option a été
sélectionnée.
Le bouton/témoin DÉPART/PAUSE démarre un
programme sélectionné. Quand un programme est en
cours, appuie sur ce bouton en pause le programme.
Le sèche-linge émet un bip,
sèche-linge s'arrête.
Le témoin est vert lorsque le programme fonctionne,
orange clignotant si le programme a été mis en pause
DÉCONNEXION , le sèche-linge s'arrête. Si
MAINTENIR APPUYÉ , maintenez le
ALLUMAGE .
PAUSE s'affiche et le
Boutons et témoins
de SÉCURITÉ ENFANTS
et Options
ou vert clignotant si le sèche-linge est en attente du
lancement d’un programme (voir Démarrage et
Programmes). Remarque : ce voyant clignote orange
pendant toute la durée du programme Douche Chaleur
et pendant la phase Après séchage.
L’Affichage fournit des recommandations et des
renseignements sur le programme en cours et son
avancement (voir page suivante).
Bouton et icône
sur ce bouton pendant quelques instants après avoir
sélectionné votre
Ceci empêche toute modification des réglages,
l’affichage indique brièvement
cette icône est allumée, les autres boutons ne sont
plus actifs. Appuyez sur le bouton et maintenez
appuyé pour annuler. L'icône s'éteint. L’affichage
indique brièvement
Remarque: ce sèche-linge, conformément aux
nouvelles normes en vigueur dans le domaine de
l’économie d’énergie, est équipé d’un système
d’extinction automatique (veille) activé après environ
30 minutes d’inutilisation. Appuyez sur le bouton
MARCHE/ARRÊT et maintenez-le enfoncé jusqu'à ce
que l'affichage indique rapidement
redémarre.
SÉCURITÉ ENFANTS : appuyez
programme et d’éventuelles options.
DÉBLOQUÉE .
Bouton et Témoin
DÉPART/ PAUSE
BLOQUÉE . Lorsque
ALLUMAGE et qu'il
25
Page 26
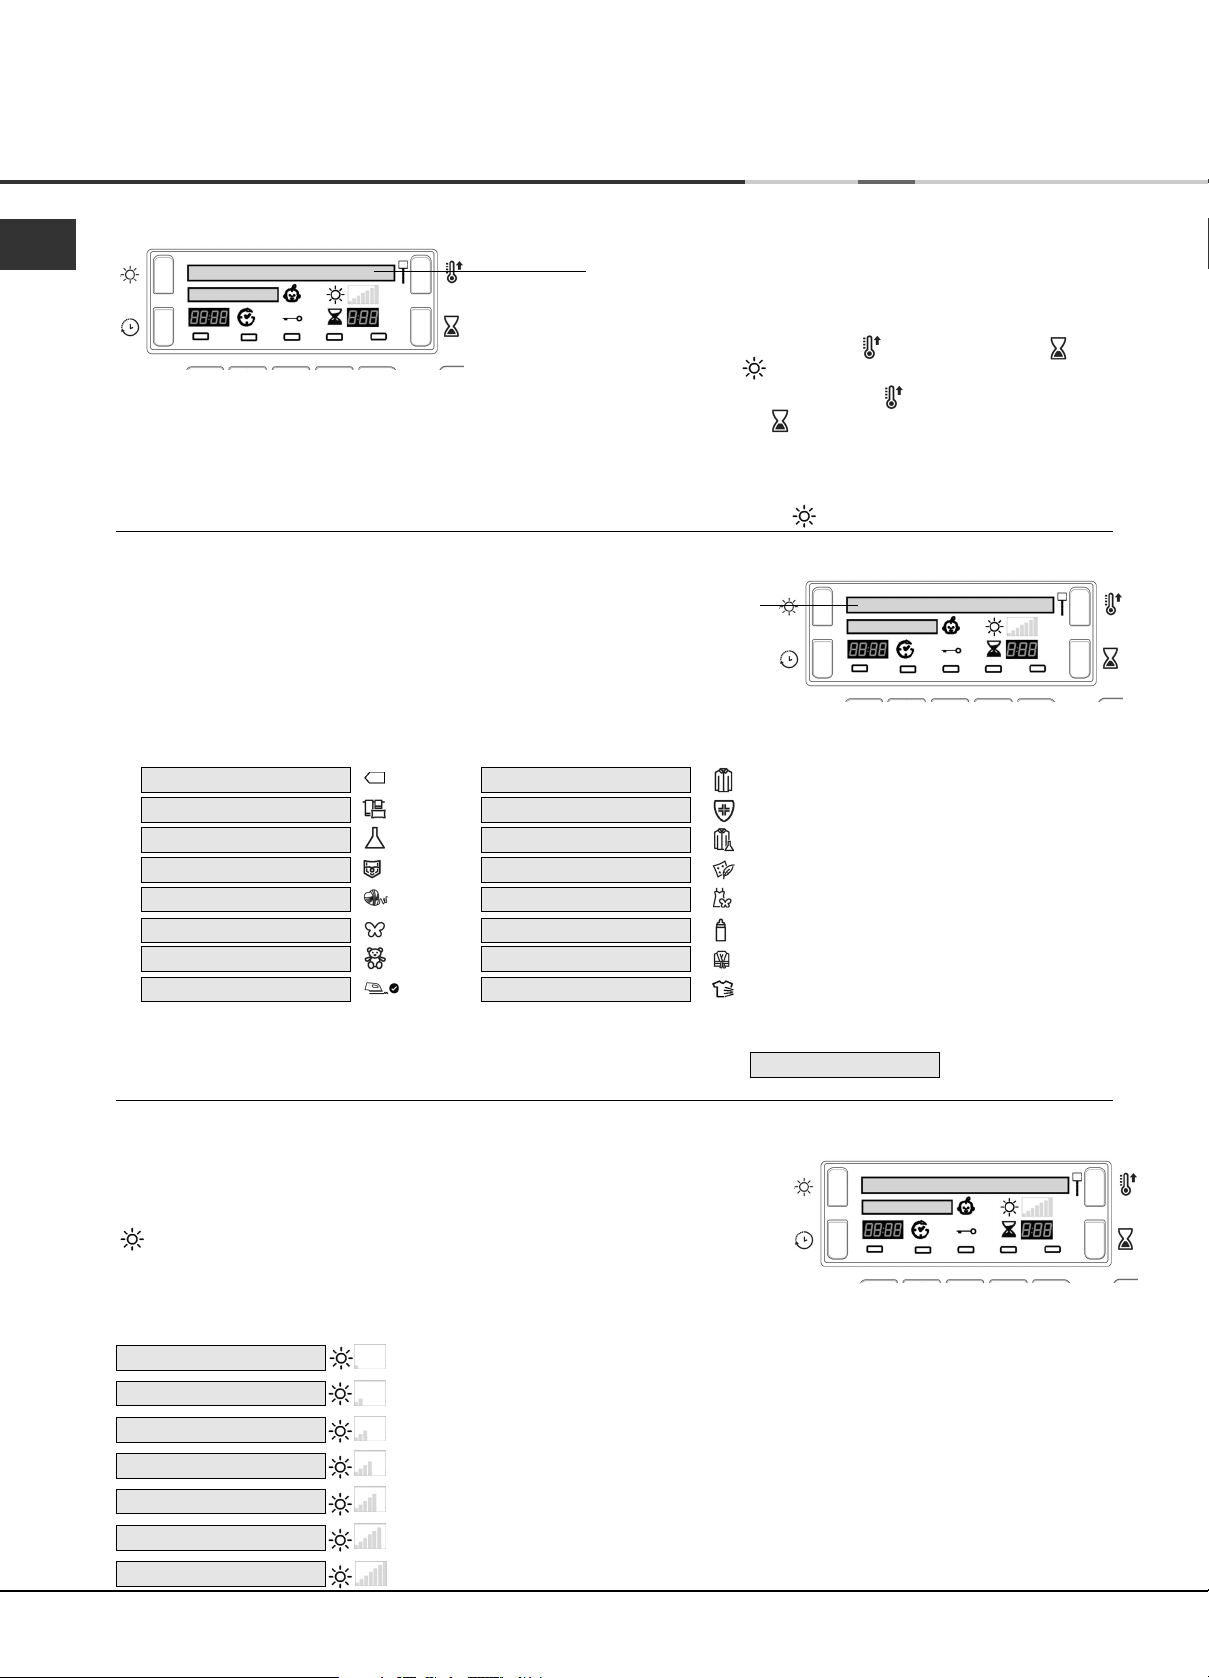
Affichage
Choix de la langue
F
À la première mise en route de votre sèche-linge, vous allez devoir choisir la langue préférée dans la liste proposée.
Pour changer : la langue actuellement sélectionnée doit
clignoter sur la première ligne de l’affichage.
- Appuyez sur le bouton MARCHE/ARRÊT pour éteindre
l'affichage puis appuyez simultanément sur les 3 boutons
et maintenez-les enfoncés : Niveau de chaleur, Durée
de séchage et Niveau de séchage pendant 5 secondes.
- Appuyez sur sur le bouton de Niveau de chaleur ou
sur le bouton de Durée de séchage pour faire défiler
la liste vers le haut ou vers le bas.
- Lorsque la langue dont vous avez besoin clignote sur la
ligne du haut de l'affichage, appuyez sur le bouton de
Niveau de séchage pour valider votre choix.
Comprendre l’affichage
Sélection et affichage des programmes
Le programme sélectionné est indiqué sur la première ligne de l’affichage
lorsque vous appuyez sur le bouton correspondant.
Ce message reste visible tant que le programme est en cours.
Huit boutons ont une double fonction : appuyez une fois sur le bouton pour
accéder à la première fonction et appuyez une nouvelle fois pour accéder à
la seconde. Le programme sélectionné s'affiche. Le dernier bouton permet de
sélectionner Mon Programme.
Première fonction (1 appui) Deuxième fonction (2 appuis)
1
COTON STANDARD
2
LIT & BAIN
3
SYNTHÉTIQUES
4
JEANS
5
LAINE
6
DÉLICATS
7
PELUCHES
8
REPASSAGE FACILE
9
MON PROGRAMME M My Cycle (voir ci-dessus)
CHEMISE COTON
ANTIALLERGIQUE
CHEMISE SYNTHÉTIQUE
DUVET
SOIE
BÉBÉ
DOUCE CHALEUR
RAFRAÎCHISSEMENT
Mon Programme : Cuando seleccione el botón de Mon Programme, l’affichage indique le programme que vous avez
sélectionné en plaçant la lettre ‘M’ devant le nom du programme. Exemple :
M COTON STANDARD (voir Démarrage et
Programmes).
Niveaux de séchage
Lorsque vous sélectionnez un programme automatique qui dispose de différents niveaux de séchage (voir Tableau
des programmes).
La deuxième ligne de l’affichage indique le niveau de séchage dont vous
avez besoin. Chaque fois que vous appuyez sur le bouton Niveau de séchage
, l’option suivante de la liste ci-après est sélectionnée et s'affiche.
L'affichage indique également 1 à 7 bâtons en fonction du niveau de séchage
sélectionné. Ces bâtons s'affichent au fur et à mesure du déroulement du programme.
! Certains programmes automatiques ne permettent pas de modifier le niveau de séchage ou ne peuvent pas être
associés à toutes les options de niveau de séchage.
HUMIDE
À REPASSER
DÉLICAT CINT
SUR CINTRE
Linge humide : sèche vos articles pour qu'ils soient prêts à être repassés à l'aide d'une centrale
ou d'une presse.
Sec pour repassage : sèche vos articles pour qu'ils soient prêts à être repassés à l'aide d'un fer.
Sec pour cintre Plus : sèche vos articles délicats pour qu'ils soient prêts à être mis sur cintre apour
finir de sécher.
Sec pour cintre : sèche vos vêtements pour qu'ils soient prêts à être mis sur cintre pour finir de sécher.
DÉLICAT RANG
À RANGER
À PORTER
26
Séchage léger : sèche vos articles délicats pour qu'ils soient prêts à être rangés.
Sec pour placard (À Ranger) : sèche vos articles pour qu'ils soient prêts à être rangés.
Sec extra : sèche vos vêtements pour qu'ils soient prêts à être portés.
Page 27
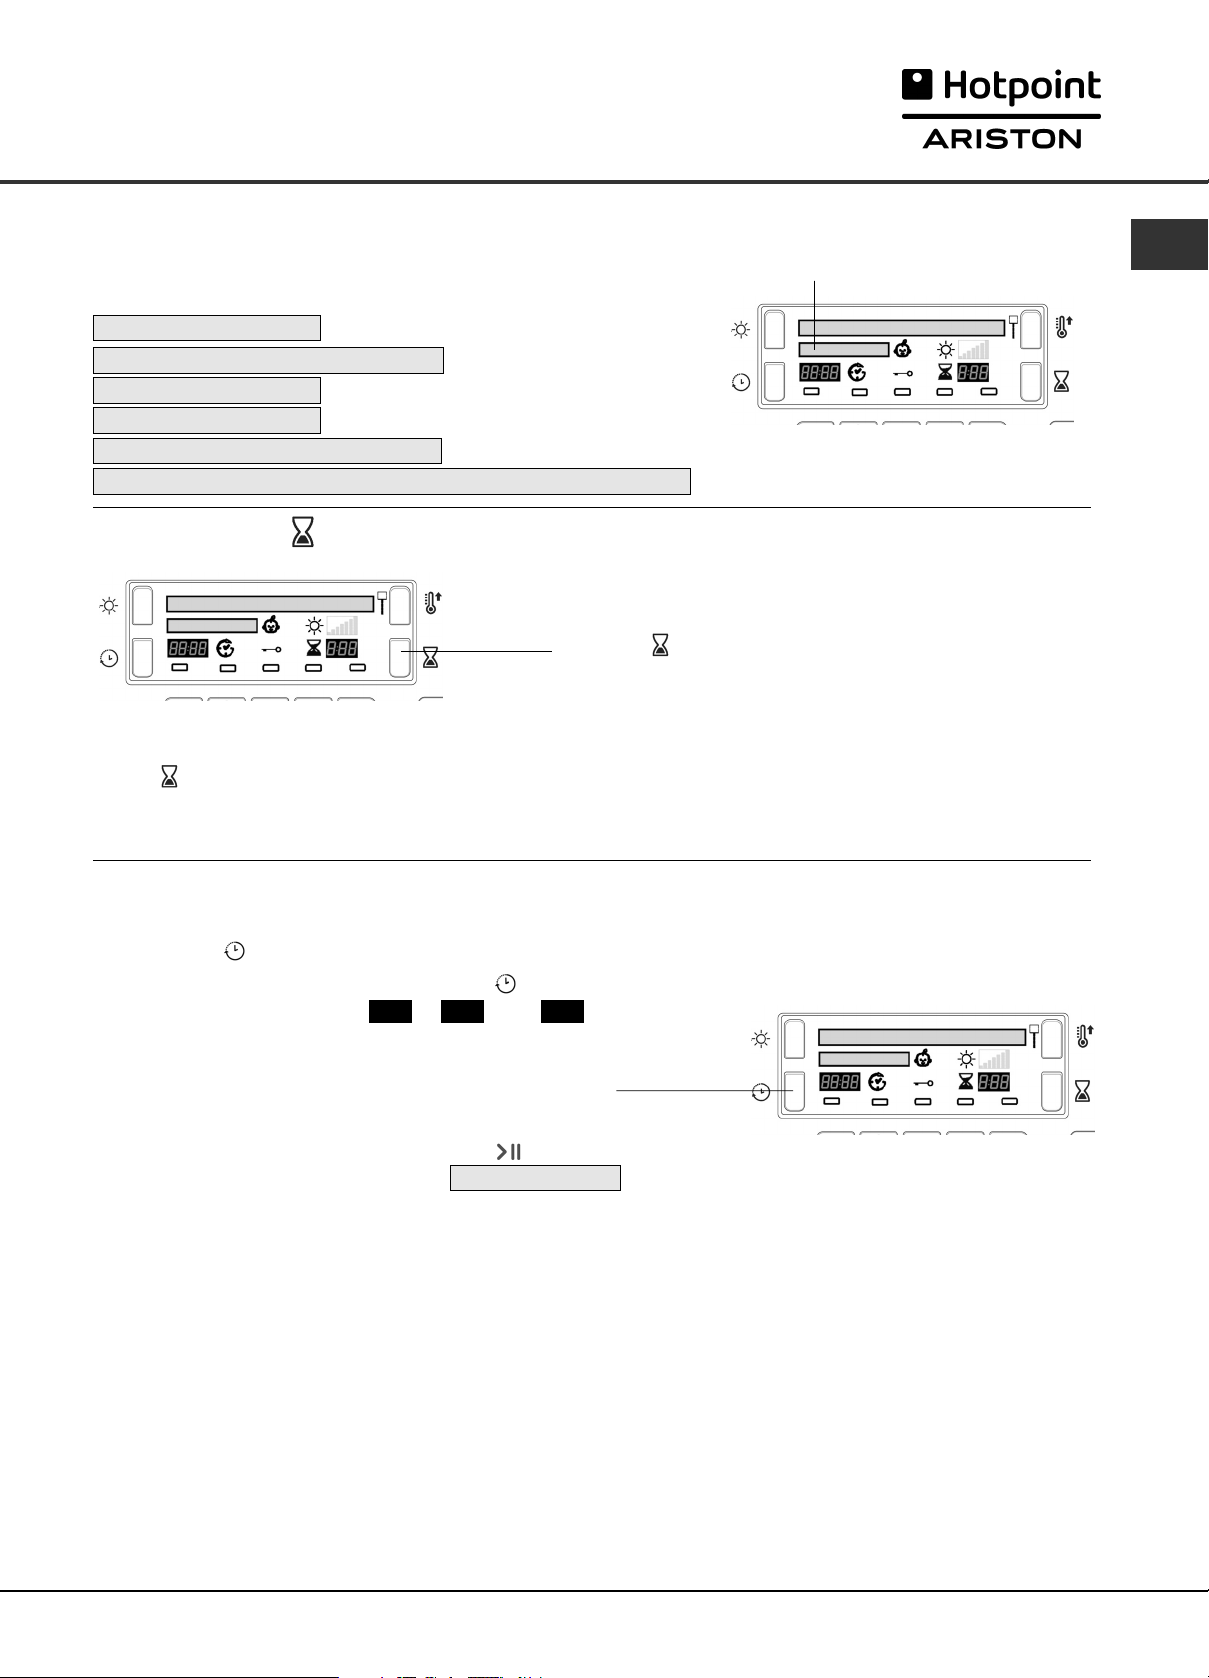
Affichage
Avancement du programme
La deuxième ligne de l’affichage indique l’état du programme au fur et à mesure qu’il avance :
(les messages longs défilent sur la ligne.)
SÉCHAGE
REFROIDISSEMENT TAMBOUR
EN CHAUFFE
PRÊT
FIN DE CYCLE, ANTIFROISSAGE
FIN DE CYCLE, NETTOYER LE FILTRE ET VIDER LE RÉSERVOIR
Programme Douce Chaleur
(si l'option Défroissage est sélectionnée).
Séchage minuté
Après avoir sélectionné un programme comportant une
option Séchage minuté, appuyez sur le bouton de durée de
séchage : le temps sélectionné augmente sur l’affichage
chaque fois que vous appuyez brièvement sur le bouton
(voir Démarrage et Programmes).
La durée et le nombre d'options de durée disponibles diminuent chaque fois que vous appuyez sur le bouton en
fonction du programme/de la matière sélectionné(e).
L'icône Séchage minuté s'affiche à côté du temps.
F
Le temps sélectionné reste affiché après le départ du programme mais peut être modifié à tout moment, si vous le
souhaitez.
Départ différé et Temps restant
Certains programmes peuvent avoir un départ différé (voir Démarrage et Programmes). Appuyez sur le bouton
Départ différé , l'icône se met à clignoter.
Chaque pression sur le bouton Départ différé avance le
départ différé
avant
d'annuler le départ différé après deux secondes.
Le retard s’affiche à côté du bouton Départ différé.
L’affichage décompte les minutes avant le départ une fois
que l’on a appuyé
La deuxième ligne de l’affichage indique
Vous pouvez modifier ou annuler le retard sélectionné à tout moment, si vous le souhaitez.
Après avoir appuyé sur le bouton Départ/Pause, le Retard ou le Temps restant s'affiche en heures et minutes et un
compte à rebours s'effectue par minute.
d’une heure, de : à
sur le bouton Départ/Pause
1h 24h
, puis
OFF
.
DÉMARRE DANS
Temps restant
Quand la durée d'attente s'est écoulée et si aucun retard n'est sélectionné, pour tous les programmes, cette partie
de l'affiche indique :
- la durée restante estimée avant la fin du programme, pour les programmes automatiques
- la durée restante effective pour un programme temporisé
Quand un programme temporisé est sélectionné, la durée affichée pendant le cycle correspond au temps effectif
restant.
Quand un programme Automatique est sélectionné, la durée affichée correspond à une estimation de la durée
restante. Quand un programme est sélectionné, l'Affichage indique la durée nécessaire au séchage d'une charge
pleine. Le temps restant est contrôlé constamment pendant le cycle de séchage et est modifié au fur et à mesure
pour afficher l’estimation la plus précise possible.
Les deux points séparant les heures et les minutes, sur l'Affichage, clignotent. Ceci signifie que la durée est
décomptée.
27
Page 28
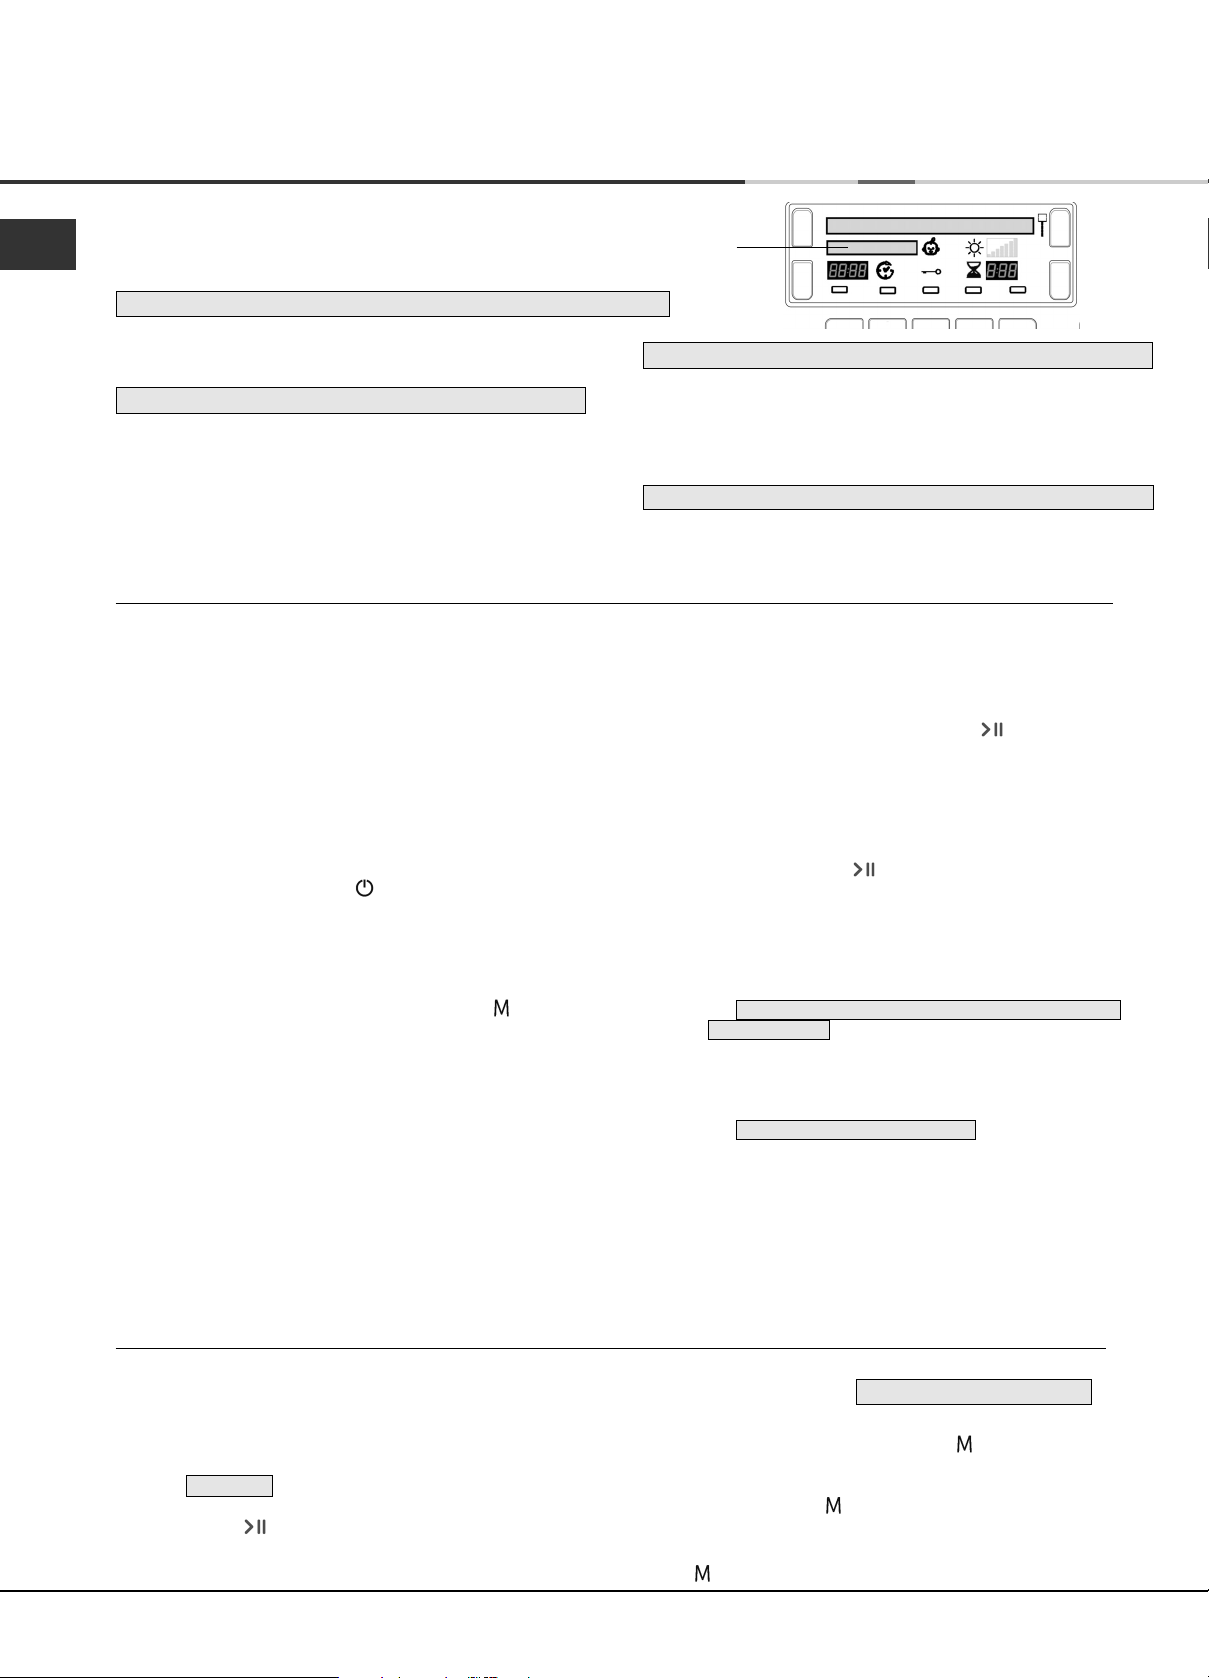
Affichage
Recommandations
F
La deuxième ligne de l’affichage fournit également des recommandations
et des rappels : (les rappels interviennent en fin de programme)
FIN DE CYCLE, NETTOYER LE FILTRE ET VIDER LE RÉSERVOIR
●
Rappel : vous devez vider le réservoir d’eau et
nettoyer le filtre chaque fois que vous utilisez le
sèche-linge (voir Entretien).
VIDER LE RÉSERVOIR
●
Indique que le réservoir d’eau est plein. Après avoir
remis en place le réservoir vidé, il faut quelques
secondes avant que le message ne disparaisse; le
sèche-linge doit fonctionner pour que ceci se
produise (voir Les Commandes).
Remarque: Si le réservoir d’eau se remplit et que
ce message s’affiche, le chauffage est désactivé
et vos vêtements ne sèchent pas.
NETTOYER LE CONDENSEUR, LE FILTRE ET VIDER LE RÉSERVOIR
●
Ce message indique que vous devez nettoyer le
condenseur (voir Entretien) et il interviendra à intervalles
dépendant selon la fréquence d’utilisation du sèchelinge. À la fin du programme suivant, le message
disparaît. Vous devez également nettoyer le filtre.
ACTION ANTIALLERGIQUE NON GARANTIE, NETTOYER LE FILTRE
●
Ce message apparaît au cours du programme
Antiallergique et indique que le filtre doit être nettoyé
pour terminer complètement le cycle antiallergique
(voir Entretien).
Démarrage et Programmes
Choisir un programme
1. Branchez la fiche du sèche-linge dans la prise électrique.
2. Triez votre linge en fonction du type de textiles (voir
Linge).
3. Ouvrez la porte et en assurant-vous que le filtre soit
propre et en place et le réservoir d’eau est vide et en
place (voir Entretien).
4. Chargez la machine et assurez-vous que des articles
ne bloquent pas le joint de la porte. Fermez la porte.
5. Si l’affichage n’est pas allumé : appuyez sur le
bouton MARCHE/ARRET
6. Appuyez sur le bouton de sélection de programme
qui correspond au type de tissu que l’on sèche ;
après avoir vérifie le Tableau des Programmes
(voir Programmes) ainsi que les indications pour
chaque type de tissu (voir Linge).
Si vous avez appuyé sur le bouton ; les
-
étapes 7 et 8 ne sont pas nécessaires
ci-dessous).
7.
Choisissez l'option Durée de séchage ou Intensité
de séchage.
- Pour l'option Durée de séchage, appuyez sur le
bouton Durée de séchage et relâchez-le jusqu'à
faire apparaître la durée de séchage souhaitée, ou…
- Pour sélectionner les paramètres de séchage
proposés par défaut, appuyez sur le bouton
Intensité de séchage et relâchez-le jusqu'à faire
apparaître l'intensité souhaitée.
! Reportez-vous au tableau des programmes pour
plus de précisions : possibilité de sélectionner les
Niveaux de séchage, le Séchage minuté et les
Options.
(voir
8. Réglez le depart différé de temporisation et
d’autres options si nécessaire
9.
Appuyez sur le bouton Départ/Pause pour
commencer
jusqu’à la fin.
Au cours d’un programme de séchage, vous pouvez
vérifier votre linge et sortir les articles qui sont secs
pendant que les autres continuent à sécher.
Lorsque vous refermez la porte, appuyez sur le
bouton
10. Pendant les quelques dernières minutes des
programmes de séchage, avant de terminer le
programme, celui-ci entre dans la phase finale de
REFROIDISSEMENT (les textiles sont refroidis), que
vous devez toujours laisser se terminer.
11. À la fin du cycle de séchage, un message s'affiche :
- si
- si
12. Ouvrez la porte, sortez votre linge, nettoyez le
filtre et remettez-le en place. Videz le réservoir
d’eau et replacez-le (voir Entretien).
13. Débranchez le sèche-linge.
. L’affichage indiquera le temps qu’il reste
Départ/Pause afin de continuer le séchage.
FIN DE CYCLE, NETTOYER LE FILTRE ET VIDER LE
RÉSERVOIR s'affiche, l'alarme sonore émet
3 bips (Remarque: si l'option SIGNAL
SONORE a été sélectionnée, l'alarme sonore
émet trois bips toutes les 30 secondes
pendant 5 minutes).
FIN DE CYCLE, ANTIFROISSAGE s'affiche, ceci
signifie que l'option Défroissage été sélectionnée.
Si vous ne retirez pas immédiatement le linge
du tambour, le sèche-linge tournera de temps
à autres pendant 10 heures ou jusqu'à ce que
vous ouvriez la porte. L'alarme sonore émet 3
bips pour confirmer la fin du programme.
(voir Affichage).
Bouton Mon Programme:
La première fois que vous appuyez sur ce bouton, la deuxième ligne de l’affichage indique : PRESSION POUR VALIDER
Après avoir sélectionné votre programme et vos options préférés, vous pouvez sauvegarder ces paramètres :
appuyez sur le bouton Mon Programme et maintenez-le enfoncé pendant au moins 5 secondes. clignote sur la
première ligne suivi du programme sélectionné. L’alarme sonore émet alors un bip et la deuxième ligne de l'affichage
indique
La prochaine fois que vous aurez besoin de ce programme, appuyez sur le bouton , puis sur le bouton
Départ/Pause . Le sèche-linge exécutera alors ce programme
Si vous le souhaitez, vous pouvez modifier le programme mémoire en sélectionnant un nouveau programme ou de
nouvelles options puis en appuyant de façon continue sur le bouton (comme indiqué ci-dessus).
28
MÉMOIRE .
.
Page 29

Démarrage et Programmes
PROGRAMMES BASIQUES - Tableau des programmes
! Si l’affichage n’est pas allumé ; appuyez sur le bouton MARCHE/ARRÊT et sélectionnez ensuite le programme.
Programme Options disponibles
Départ Différé
Défroissage
Délicat plus
Moins emmêlé
Repassage
optimisé*
Niveau de
chaleur
Séchage
✗
Coton Standard
1
Chemise Coton
Lit & Bain
2
Anti Allergique
Synthétiques
3
Chemise Synthétique
*Remarque : cette option n'est pas disponible avec les niveaux de séchage "Sec pour repassage" et "Linge humide".
Coton Standard
●
Ce programme est destiné aux articles en coton.
●
La durée de ce programme est fonction de la quantité de linge, de l'intensité de séchage sélectionnée et de la
vitesse d'essorage utilisée dans votre lave-linge (voir Linge).
●
Le programme Coton standard correspondant à la réglementation UE 392/2012 est le Programme 1 avec la
chaleur haute et niveau de séchage Sec pour placard
le plus efficace en termes de consommation d’énergie (UE 392/2012).
Chemise Coton
●
Ce programme est particulièrement adapté aux chemises en coton.
●
Il peut être utilisé pour des charges jusqu'à 3 kg (environ 10 chemises).
La durée de ce programme est fonction de la quantité de linge, de l'intensité de séchage sélectionnée et de la
vitesse d'essorage utilisée dans votre lave-linge.
Les charges séchées avec l'intensité Sec pour placard sont normalement prêtes à être portées. Mais les bords ou
les coutures peuvent être légèrement humides. Vous pouvez alors essayer de retourner les chemises, puis de
relancer le programme, pour une courte durée.
Lit et Bain
●
Ce programme est destiné aux serviettes et aux draps en coton.
●
La durée de ce programme est fonction de la quantité de linge, de l'intensité de séchage sélectionnée et de la
vitesse d'essorage utilisée dans votre lave-linge (voir Linge).
●
Les charges séchées avec Sec Extra sont généralement prêtes à être utilisées. Mais les bords ou les coutures
peuvent être légèrement humides notamment pour les grands articles. Vous pouvez alors essayer d'écarter les
articles, puis de relancer le programme pour une courte durée.
Programme Antiallergique
Ce programme bénéficie de l'homologation d'Allergy UK. Ce cycle spécial Antiallergique garantit la réduction et l'élimination
efficaces des allergènes dans les vêtements. Ce programme permet de neutraliser l'action des allergènes les plus courants
(notamment les acariens dermatophagoides) grâce au maintien d'une température constante pendant une durée prolongée.
Ce programme peut être utilisé pour sécher et traiter une charge de linge humide pleine, ou simplement pour traiter une
charge de 4 kg de linge sec.
Si l'affichage indique
Synthétiques
●
Ce programme est destiné au séchage à basse température des articles synthétiques ou au séchage à
moyenne température des articles en fibres mélangées en synthétique et coton.
●
La durée de ce programme est fonction de la quantité de linge, de l'intensité de séchage sélectionnée et de la
vitesse d'essorage utilisée dans votre lave-linge (voir Linge).
Chemise Synthétique
●
Ce programme est particulièrement adapté aux chemises en synthétique ou en fibres naturelles et synthétiques
mélangées, comme le polyester et le coton.
●
Il peut être utilisé pour des charges jusqu'à 3 kg (environ 14 chemises).
La durée de ce programme est fonction de la quantité de linge, de l'intensité de séchage sélectionnée et de la
vitesse d'essorage utilisée dans votre lave-linge.
Les charges séchées avec l'intensité Sec pour placard sont normalement prêtes à être portées. Mais les bords ou
les coutures peuvent être légèrement humides. Vous pouvez alors essayer de retourner les chemises, puis de
relancer le programme, pour une courte durée.
ACTION ANTIALLERGIQUE NON GARANTIE, NETTOYER LE FILTRE : nettoyez le filtre et redémarrez le programme.
✓
✓
✓
✓
✓
✓
✓
✓
✓
✓
✓
✓
✓
✓
✓
✓
✓
✓
✓
✗
✗
✗
✗
✗
✗
- HAUTE
✓
- HAUTE
✗
- MOYENNE
✗
- BASSE
✗
✗
- HAUTE
✗
- MOYENNE
✗
✗
- MOYENNE
✗
- BASSE
✗
✗
(Configuration standard/ prédéfinie initiale). Ce programme est
minuté
✓
✓
✓
✗
✗ ✓
✗
●
Un programme Automatique
✓
✗
Niveaux de séchage disponibles
(par défaut repérée par une )
Linge humide
Sec pour
repassage
Sec pour cintre
✓
✓
✓
✓
✓
✓
✓
✓
Plus
✓
✓
✓
✓
✓
✓
✓
✓
L’option de
détection
✓
✓
✓
✓
✓
✓
✓
✓
✓
✓
✓
✓
✓
✓
✓
✓
✓
✓
✓
✓
✓
✓
✓
✓
✓
Sec pour cintre
Séchage léger
Sec pour placard
✓
✓
✓
✓
✓
✓
✓
✓
✓
✓
✓
✓
✓
✓
✓
✓
Sec extra
✓
✗
✗
✗
✗
✗
✗
F
29
Page 30

Démarrage et Programmes
PROGRAMMES SPÉCIAUX- Tableau des programmes
! Si l’affichage n’est pas allumé ; appuyez sur le bouton MARCHE/ARRÊT et sélectionnez ensuite le programme.
F
Programme Options disponibles
Départ Différé
Défroissage
Délicat plus
Repassage
optimisé
Moins emmêlé
Niveau de
chaleur
Séchage
minuté
Jeans
4
Duvet
Laine
5
Soie
Bébé
6
Délicats
Jeans
●
Ce programme est particulièrement adapté aux jeans en denim. Avant de faire sécher vos jeans, retournez les
poches avant.
●
Il peut être utilisé pour des charges jusqu'à 3 kg (environ 4 pantalons).
●
Ne mélangez pas les articles de couleur sombre et de couleur claire.
●
Ce programme peut également être utilisé pour d'autre articles du même matériau comme les vestes.
●
La durée de ce programme est fonction de la quantité de linge, de l'intensité de séchage sélectionnée et de la
vitesse d'essorage utilisée dans votre lave-linge.
●
Les charges séchées avec Sec Extra plus sont normalement prêtes è être portées. Mais les bords ou les coutures
peuvent être légèrement humides. Vous pouvez alors essayer de retourner les jeans, puis de relancer le
programme, pour une courte durée.
! L'utilisation de ce programme est déconseillée si vos jeans comportent des ceintures élastiquées, des clous ou des broderies.
Couette (DUVET)
! ATTENTION ! Lorsque vous sélectionnez ce programme, ne mettez pas à sécher des articles endommagés pouvant
s'effilocher et ainsi obstruer le filtre et les grilles d'aération. Vous risqueriez de provoquer un incendie.
●
Ce programme ne permet de sécher que des couettes une personne : ne convient PAS pour le séchage des couettes
deux personnes ou des très grandes couettes.
●
Les charges séchées dans ce programme sont normalement prêtes à être utilisées, mais les articles peuvent être
légèrement humides par endroits. Vous pouvez alors essayer d'écarter les articles, de les secouer, puis de relancer le
programme pour une courte durée.
●
Convient également pour le séchage des vestes matelassées.
●
Sélectionnez l'intensité de chaleur élevée (température élevée) pour les couettes en coton et l'intensité de chaleur
moyenne (température moyenne) pour les couettes synthétiques.
●
La durée de ce programme est fonction de la quantité de linge, et de sa densité, et de la vitesse d'essorage utilisée
dans votre lave-linge.
Programme Lainage (LAINE)
●
Il s’agit d’un programme pour faire tourner les vêtements tolérant le sèche-linge et marqués du symbole .
●
Le programme peut être utilisé pour des charges jusqu’à 1kg (environ 3 pull-overs).
●
Nous recommandons de retourner les vêtements avant de les sécher.
●
Ce programme mettra environ 60 minutes, mais peut prendre plus longtemps en fonction de la taille et de la
densité de la charge et de la vitesse d’essorage utilisée dans votre lave-linge.
●
Les charges séchées dans ce programme sont normalement prêtes à porter, mais pour certains vêtements
plus lourds, les bords peuvent être légèrement humides. Laissez sécher naturellement car un séchage
excessif pourrait les endommager.
! Au contraire des autres matières, le mécanisme du rétrécissement de la laine est irréversible ; c’est-à-dire qu’elle
ne reviendra pas à sa taille et à sa forme d’origine.
! Ce programme ne convient pas pour les vêtements acryliques.
✓
✓
✓
✗
✗
✓
✓
✓
✗
✗
✓
✓
✗
✗
✗
✗
✗
✗
✗
✗
✗
✗
✗
✗
✗
✗
✗
✗
✗
✗
✗
- HAUTE
- MOYENNE
✗
✗
✗
✗
✗
✗
✗
✗
✗
✓
Niveaux de séchage disponibles
(par défaut repérée par une )
L’option de
détection
Linge humide
Sec pour
repassage
Sec pour cintre
Plus
✓
✓
✓
✓
✓
✓
✓
✓
✓
✓
✓
●
Un programme Automatique
●
Un programme Automatique
✓
✓
✓
✓
✓
✓
✓
✓
✓
✓
Sec pour cintre
Séchage léger
Sec pour placard
✓
✓
✓
✓
✓
✓
✓
✓
Sec extra
✓
✗
✗
✗
Programme Soie
●
Ce programme est particulièrement adapté au séchage des articles en soie délicate.
●
Il peut être utilisé pour des charges jusqu'à 0,5 kg.
●
La durée de ce programme est fonction de la quantité de linge, de l'intensité de séchage sélectionnée et de la
vitesse d'essorage utilisée dans votre lave-linge.
●
Les charges séchées avec l'intensité Sec pour placard sont normalement prêtes à être utilisées, mais pour
certains vêtements, les bords peuvent être légèrement humides. Vous pouvez alors essayer d'écarter les articles
ou de les retourner, puis de relancer le programme, pour une courte durée.
30
Page 31

Démarrage et Programmes
Programme Bébé
●
Ce programme permet de sécher les petits articles délicats de votre bébé : vêtements et linge de lit (en coton et chenille)
et vos vêtements délicats.
●
NE placez PAS d'articles comme des bavoirs et des couches-culottes comportant du plastique dans le sèche-linge.
●
Il peut être utilisé pour des charges jusqu'à 2 kg.
●
La durée de ce programme est fonction de la quantité de linge, et de sa densité, et de la vitesse d'essorage utilisée
dans votre lave-linge.
●
Les charges séchées dans ce programme sont normalement prêtes à être utilisées, mais pour certains vêtements, les
bords peuvent être légèrement humides. Vous pouvez alors essayer d'écarter les articles ou de les retourner, puis de
relancer le programme, pour une courte durée.
Programme Délicat
●
Ce programme est particulièrement adapté au séchage de vos vêtements délicats comme les articles en
acrylique.
●
Il peut être utilisé pour des charges jusqu'à 2 kg.
●
La durée de ce programme est fonction de la quantité de linge, et de sa densité, et de la vitesse d'essorage utilisée
dans votre lave-linge.
●
Les charges séchées dans ce programme sont normalement prêtes à être utilisées, mais pour certains vêtements, les
bords peuvent être légèrement humides. Vous pouvez alors essayer d'écarter les articles ou de les retourner, puis de
relancer le programme, pour une courte durée.
PROGRAMMES SUPPLÉMENTAIRES - Tableau des programmes
! Si l’affichage n’est pas allumé ; appuyez sur le bouton MARCHE/ARRÊT et sélectionnez ensuite le programme.
Programme Options disponibles
Niveaux de séchage disponibles
(par défaut repérée par une )
✓
F
Départ Différé
Défroissage
Délicat plus
Repassage
optimisé
Moins emmêlé
Niveau de
chaleur
Séchage
minuté
L’option de
détection
Linge humide
Sec pour
repassage
Sec pour cintre
Plus
Sec pour cintre
Séchage léger
Sec pour placard
Sec extra
Peluches
7
Douce Chaleur
Repassage Facile
8
Rafraîchissement
Mon Programme
9
My Cycle
✗
✗
✓
✗
✗
✗
Fonction du programme que vous avez sélectionné. Voir aux détails ci-dessus.
M
✗
✗
✗
✗
✗
✗
✗
✗
✗
✗
✗
✗
✗
✗
✗
✗
✗
✗
●
Un programme Automatique
✗
●
Un programme Automatique
✗
●
Un programme Automatique
✗
●
Un programme Automatique
✗
Programme Peluches
Ce programme permet d'éliminer plus facilement la poussière et de laver les peluches de bébé plus souvent. En effet, le
temps de séchage est fortement réduit par rapport à un séchage à l'air libre. Il s'agit d'un cycle de séchage délicat basse
température à action mécanique douce, afin de conserver au mieux l'aspect et la brillance d'origine des poils.
Remarque : pour une protection anti-allergique, placez les peluches de bébé au frais pendant 24 heures avant de les
laver et de les mettre à sécher. Renouvelez l'opération toutes les 6 semaines.
Avant le séchage, retirez les accessoires comme les vêtements, les colliers ou les éléments musicaux et protéger les yeux
en plastique en les recouvrant de ruban adhésif après les avoir séchés à l'aide d'un chiffon.
Le temps du programme varie en fonction du contenu exact de la charge. La charge maximale ne doit pas dépasser
2,5 kg. Chaque article ne doit pas peser plus de 600 g.
Programme Douce Chaleur
Ce programme permet de chauffer les serviettes de toilette et les peignoirs pour une agréable sensation de chaleur à la
sortie du bain ou après la douche. Il permet également de réchauffer les vêtements avant de s'habiller en hiver.
Ce cycle sèche les articles à 37°C (température du corps). L'affichage indique
à cette température pendant 4 heures maximum ou jusqu'à ce que vous arrêtiez le cycle en ouvrant la porte lorsque
l'affichage indique
Remarque : Le voyant Départ/Pause est désactivé pendant ce programme.
PRÊT . Charge maximale : 3 kg.
EN CHAUFFE et le sèche-linge fonctionne
Refresh
"Rafraîchissement" n'est pas un programme de séchage et ne doit pas être utilisé pour des vêtements humides.
!
●
Il peut être utilisé pour toute charge, mais il est plus efficace sur des charges peu importantes.
●
Ne surchargez pas le sèche-linge (voir Linge).
●
Ce programme de 20 minutes aère vos vêtements à l'air froid. Il peut également être utilisé pour refroidir vos vêtements chauds.
31
Page 32

Démarrage et Programmes
Programme pré-repassage (Repassage Facile)
Le cycle "Pré-repassage" (Repassage Facile) traite les vêtements secs. Il défroisse pour faciliter le repassage et le pliage. Ce
F
cycle dure 15 minutes maximum.
! "Pré-repassage" (Repassage Facile) n'est pas un programme de séchage et ne doit pas être utilisé pour des vêtements humides.
Pour des résultats impeccables:
1. Ne chargez pas plus que la capacité maximum. Les chiffres suivants font référence au poids sec:
Textile Charge maximum
Coton et cotons mélangés 2,5 kg
Jeans 2 kg
2. Videz le sèche-linge aussitôt le programme terminé, suspendez, pliez ou repassez les articles et rangez-les dans
l’armoire. Si cela n’est pas possible, répétez le programme.
Les commandes
! Attention, après avoir appuyé sur le bouton Départ/Pause
le programme ne peut pas être changé.
Pour modifier un programme sélectionné, appuyez sur le
bouton Départ/Pause .
indiquer que le programme e
nouveau programme et les éventuelles options nécessaires. Le
témoin clignote alors en vert. Appuyez une nouvelle fois sur
le bouton Départ/Pause
●
Boutons OPTIONS
Ces boutons sont utilisés pour adapter le programme sélectionné
à vos besoins. Il faut sélectionner un programme en appuyant
sur un bouton de sélection de programme avant de pouvoir
sélectionner une option. Les options ne sont pas toutes
disponibles pour tous les programmes (voir Démarrage et
Programmes).Si une option n’est pas disponible et si vous
appuyez sur le bouton, l’avertisseur émet un bip sonore trois
fois. Si l’option est disponible, le témoin situé sur l’afficheur
au-dessus des boutons du bas s’allume pour indiquer que
l’option a été sélectionnée.
Départ Différé
Le départ de certains programmes (voir Affichage et voir
Démarrage et Programmes) peut être retardé d’un délai
pouvant aller jusqu’à 24heures. Assurez-vous que le réservoir
d’eau est vidé avant de régler le départ différé.
Défroissage
L'option Avant séchage est disponible uniquement si un
départ différé a été sélectionné. Le tambour tourne de
temps à autre pendant la période d'attente avant le départ,
afin d'éviter la formation de plis.
Avec l'option Aprés séchage, le tambour tourne de temps à
autre après la fin des cycles de séchage et de séchage à
froid pour éviter la formation de plis si vous n'étiez pas
disponible pour retirer la charge immédiatement après la fin
du programme. Remarque : le voyant Marche/Pause clignote
orange pendant cette phase.
Lorsque cette option est sélectionnée, les fonctions avant
séchage et après séchage peuvent être sélectionnées
également, si nécessaire.
Bouton de Niveau de chaleur, affichage et icônes
Vous ne pouvez pas modifier l'intensité de chaleur de tous
les programmes. Certains programmes peuvent être
associés aux trois options d'intensité de chaleur :
Basse, Moyenne et Élevée
Quand les options de niveau de chaleur sont disponibles,
appuyez sur ce bouton pour modifier le niveau de chaleur.
L'affichage indique alors rapidement le niveau de chaleur
sélectionnée ainsi que l'icône correspondante à cette intensité :
TEMPÉRATURE HAUTE TEMPÉRATURE MOYENNE TEMPÉRATURE BASSE
Délicat plus
Cette fonction anti-âge, pour le coton, contribue à
conserver l'éclat de vos articles pendant longtemps grâce à
la sélection de la vitesse d'essorage (réduction de la rotation
du tambour lors de la dernière phase du cycle) et de la
température adaptées.
Remarque : cette fonction ne peut pas être utilisée en
association avec les intensités de séchage "Sec extra",
"Sec pour placard" et "Séchage léger".
Moins emmêlé
Cette option permet de modifier les mouvements du
tambour. Il tourne de façon à limiter l'enchevêtrement des
vêtements et la formation de nœuds.
L'option ‘Moins emmêlé’ donne de meilleurs résultats sur de
plus petites charges.
Le témoin clignote en orange pour
st suspendu. Sélectionnez le
. Le nouveau programme démarre
.
Repassage optimisé
Cette option vous permet de faire sécher des charges de
linge contenant uniquement quelques articles à repasser et
que vous ne souhaitez pas faire sécher complètement.
Quand le niveau de séchage Sec pour repassage est atteint,
une alarme retentit pour vous indiquer que les articles
devant être repassés peuvent être retirés. Le sèche-linge
s'arrête et le voyant Départ/Pause clignote orange. Vous
pouvez alors retirer les articles que vous souhaitez repasser.
Fermez la porte et appuyez sur le bouton Départ/Pause : le
sèche-linge poursuit son cycle jusqu'à ce que les autres
articles soient secs conformément au niveau sélectionné.
Il peut être utilisé pour des charges jusqu'à 3 kg.
Remarque : cette option n'est pas disponible avec les
niveaux de séchage "Sec pour repassage" et "Linge humide".
●
AFFICHAGE DU TEMPS
88:88
L’affichage indique soit le temps restant pour les
programmes différés, ou bien la quantité de temps restant
pour un programme de séchage (voir Affichage).
L’affichage indique aussi si votre sèche-linge présente un
problème ; si c’est le cas, l’affichage indique F suivi d’un
numéro de code d’erreur (voir Que faire en cas de panne).
●
Vider le réservoir d’eau
(Ne tenez pas compte des messages vous indiquant de
vider le réservoir si vous avez raccordé votre sèche-linge à
une évacuation. Il n'est alors pas nécessaire de vider le
réservoir d'eau).
Ce message s’affiche pour vous rappeler de vider le
réservoir d’eau.
Si le réservoir d’eau se remplit pendant un programme, le
chauffage s’éteint et le sèche-linge entre dans une période
de Refroidissement. Ensuite, il s’arrête et un message vous
indique
VIDER LE RÉSERVOIR .
Vous devez vider le réservoir d’eau puis redémarrer le
sèche-linge sinon le linge ne sèchera pas. Après le
redémarrage du sèche-linge le message prend quelque
secondes avant de s’effacer.
Pour éviter cela, videz le réservoir d’eau à chaque fois que
vous utilisez le sèche-linge (voir Entretien).
●
Ouverture de la Porte
Le fait d’ouvrir la porte durant un programme arrête le
sèche-linge et a les effets suivants :
Remarque : le voyant Marche/Pause clignote orange
pendant la phase Après-Defroissage d'un programme.
●
L’afficheur indique PAUSE .
●
Durant une phase de délai, celui-ci continue à être
décompté. Le bouton de Départ/Pause doit être appuyé
pour reprendre le programme concerné.
L’affichage change et indique l’état actuel de la machine.
●
Le bouton de Départ/Pause doit être appuyé pour
reprendre le programme
l’état actuel de la machine..
●
Pendant la phase Défroissage (le fonction après
. L’affichage change et indique
séchage), le programme se termine.
Le fait d’appuyer sur le bouton de Départ/Pause
redémarre un nouveau programme depuis le début.
●
Remarque :
En cas de coupure de courant, éteignez le sèche-linge ou
débranchez-le. Quand le courant revient, appuyez sur le
bouton MARCHE/ARRÊT et maintenez-le enfoncé jusqu'à ce
que l'affichage indique rapidement
ALLUMAGE et que le
sèche-linge redémarre. Puis appuyez sur le bouton
Départ/Pause, le programme reprend.
32
Page 33

Linge
Trier votre linge
●
Vérifiez les symboles sur les étiquettes des vêtements
pour vous assurer que les articles peuvent être
passés au sèche-linge.
●
Triez votre linge par type de textile.
●
Videz les poches et vérifiez les boutons.
●
Fermez les fermetures Éclair et les crochets et
attachez les ceintures et les cordons.
●
Essorez chaque article de manière à éliminer
autant d’eau que possible.
! Ne chargez pas de vêtements mouillés qui
dégouttent dans le sèche-linge.
Taille maximale de la charge
Ne chargez pas plus que la capacité maximale.
Les chiffres suivants font référence au poids sec :
Fibres naturelles : 9 kg max.
Fibres synthétiques : 3 kg max
! NE surchargez PAS le sèche-linge car cela pourrait
réduire ses performances de séchage.
Étiquettes d’Entretien
Regardez les étiquettes sur vos vêtements, en
particulier lorsque vous les séchez pour la première
fois au sèche-linge. Les symboles suivants sont les
plus courants:
Séchage en machine
Pas de séchage en machine
Séchage à température normale
Séchage à basse température
Coton
Température
Élevée
(HAUTE)
Synthétiques
Température
Moyenne
(MOYENNE)
Acryliques
Basse
température
(BASSE
1 kg
Durée Automatique
Minutes Automatiques
SéchageTemporisé
0:30 - 0:40
30 - 40
0
:30
Temps de séchage après 800-1000trs/mn dans la machine à laver
Durée Automatique
Minutes Automatiques
SéchageTemporisé
Temps de séchage après essorage réduit dans la machine à laver
Durée Automatique
Minutes Automatiques
SéchageTemporisé
Temps de séchage après essorage réduit dans la machine à laver
2 kg
0:40 - 0:55
40 - 55
1:00
1 kg
0:40 - 0:50
40 - 50
1:00
0:40
Temps de séchage
Le tableau (voir ci-dessous) présente les temps de
séchage APPROXIMATIFS en minutes. Les poids font
référence aux vêtements secs.
Ces temps sont approximatifs et peuvent varier en
fonction des paramètres suivants :
• La quantité d’eau retenue dans les vêtements
après le cycle d’essorage : les serviettes éponge
et les textiles délicats retiennent une quantité
importante d’eau.
• Les textiles : des articles qui sont constitué par le
même type de textile mais qui ont des textures et
des épaisseurs différentes peuvent ne pas avoir le
même temps de séchage.
• La quantité de linge : les articles uniques ou les petites
charges peuvent prendre plus longtemps à sécher.
• La sécheresse : Si vous avez l’intention de repasser
certains de vos vêtements, vous pouvez les sortir de
la machine alors qu’ils sont encore un peu humides.
Les autres vêtements peuvent y rester plus longtemps
si vous voulez qu’ils en sortent entièrement secs.
• Le réglage de la température.
• La température ambiante : si la pièce dans laquelle
le sèche-linge est installé est froide, cela prendra plus
longtemps à l’appareil pour sécher vos vêtements.
• Le volume : certains articles volumineux peuvent
être séchés en machine avec quelques
précautions. Nous vous suggérons de retirer
plusieurs fois ces articles de la machine, de les
secouer et de les remettre dans le sèche-linge
jusqu’à ce que celui-ci ait terminé de les sécher.
! Ne séchez pas excessivement vos vêtements.
Tous les issus contiennent une certaine quantité
d’humidité naturelle, ce qui les rend doux et gonflants.
3 kg
0:55 - 1:10
55 - 70
ou 1:30
1:00
4 kg
1:10 - 1:20
70 - 80
1:30
5 kg
1:20 - 1:30
80 - 90
1:30
0:50 - 1:10
50 - 70
1 kg
0:40 - 1:20
40 - 80
ou 1:00 ou 1:20 1:20 ou 1:40
2 kg
1:00
6 kg
1:35 - 2:00
95 - 120
1:30
ou 2:00
7 kg
2:00 - 2:20
120 - 140
2:00
ou 2:40
2 kg
1:20 - 1:40
80 - 140
8 kg
2:00 - 2:40
130 - 160
2:00 ou 2:40
3 kg
1:10 - 1:30
70 - 90
ou 1:30
1:00
F
9 kg
2:30 - 2:50
140 - 170
2:40 ou 3:00
Remarque : À la fin d’un cycle de séchage, il se peut que les cotons soient toujours humides si vous les avez
regroupés avec les synthétiques. Si cela se produit, faites-leur simplement subir une petite période de séchage
supplémentaire.
33
Page 34

Que faire en cas de panne
Votre sèche-linge semble ne pas fonctionner. Avant d’appeler votre Centre de Service d’Entretien (voir Service
d’Entretien), passez en revue les suggestions de dépannage suivantes :
F
Problème :
Le sèche-linge ne démarre
pas.
Le cycle de séchage ne
démarre pas.
L’appareil met longtemps à
sécher.
Causes possibles / Solution :
●
La fiche n’est pas branchée dans la prise de courant, ou ne fait pas contact.
●
Il y a eu une coupure de courant.
●
Le fusible a sauté. Essayez de brancher un autre appareil dans la prise
électrique.
●
Utilisez-vous une rallonge ? Essayez de brancher le cordon d’alimentation
du sèche-linge directement dans la prise.
●
La porte n’est pas bien fermée ?
●
Le PROGRAMME n’a pas été réglé convenablement (voir Démarrage et
Programmes).
●
Le bouton Départ/Pause n’est pas enfoncé (voir Démarrage et Programmes).
●
Vous avez réglé l’appareil sur un temps de délai (voir Démarrage et
Programmes).
●
Le filtre n’a pas été nettoyé (voir Entretien).
●
Le réservoir d’eau a-t-il besoin d’être vidé ? Le message ‘vider l’eau’ est-il
affiché ? (voir Entretien).
●
Le condenseur a-t-il besoin d’être nettoyé ? (voir Entretien).
●
La température choisie n’est pas idéale pour le type de textile que vous
séchez (voir Démarrage et Programmes, et voir Linge).
●
La durée de séchage correcte n’a pas été sélectionnée pour la charge
(voir Linge).
●
La grille d’entrée d’air est obstruées (voir Installation, et voir Entretien).
●
Le linge était trop mouillé (voir Linge).
●
Le sèche-linge était surchargé (voir Linge).
Le message ‘vider l’eau’ est
affiché mais le séchoir n’a
fonctionné que pendant une
courte période.
Le message ‘vider l’eau’ est
affiché et le récipient d’eau
n’est pas plein.
Le programme se termine et le
linge est plus humide que la
normale
L’affichage indique un
disfonctionnement code F
suivi de un ou deux chiffres.
L’affichage indique brièvement
DEMO ON toutes les 6
secondes.
●
Le récipient d’eau n’a probablement pas été vidé au début du
programme. Ne pas attendre le signal de vidage d’eau, toujours vérifier
et vider le récipient avant de commencer un nouveau programme de
séchage (voir Entretien).
●
C’est normal, le message :
FIN DE CYCLE, NETTOYER LE FILTRE ET VIDER LE RÉSERVOIR
s’affiche à titre de rappel de la nécessité de vider le récipient (voir
Affichage et voir Démarrage et Programmes).
! par mesure de sécurité, le sèche-linge a un temps maximum de programme
de 5 heures. Si le programme automatique n’a pas détecté l’humidité finale
requise dans le temps prévu, le sèche-linge terminera le programme et s’arrêtera.
Vérifiez les points ci-dessus et lancez le programme à nouveau, si le linge
est encore humide, contactez le Centre de service après-vente (voir Service
Après-vente).
●
Si l'affichage indique un dysfonctionnement :
- éteignez le sèche-linge et débranchez la prise électrique.
Nettoyez le filtre et le condenseur (voir Entretien). Rebranchez la prise
électrique, mettez le sèche-linge en marche puis lancez un autre
programme. si un dysfonctionnement s'affiche, relevez le code et
contactez le centre de service d'entretien (voir Service Après-vente).
●
Le sèche-linge est en mode ‘Démo’. Appuyez sur les boutons
Marche/Arrêt et Départ/Pause simultanément et maintenez-les enfoncés
pendant 3 secondes. L’affichage indique
DEMO OFF pendant 3
secondes puis le sèche-linge repasse en fonctionnement normal.
Les témoins du panneau de
commande du sèche-linge
sont éteints alors qu'il est
allumé.
34
●
Le sèche-linge est passé en mode Veille pour économiser de l'énergie.
Le sèche-linge passe en mode Veille en cas de coupure de courant ou
quand vous n'avez démarré aucun programme ou après la fin d'un
programme de séchage.
- Appuyez sur le bouton MARCHE/ARRÊT et maintenez-le enfoncé,
les témoins doivent se rallumer.
Page 35

Service Après-Vente
Avant d’appeler le Centre de Service
Pièces de Rechange
Après-Vente :
●
Utilisez le guide de dépannage pour voir si vous
pouvez résoudre le problème vous-même (voir Que
faire en cas de panne).
●
Si non, éteignez le sèche-linge et appelez le Centre
de Service Après-Vente le plus proche.
Quelles informations donner au Centre de Service
Après-Vente :
●
Vos nom, adresse et code postal.
●
Votre numéro de téléphone.
●
Le type de problème.
●
La date d’achat.
●
Le modèle de l’appareil (Mod.).
●
Le numéro de série (S/N).
Ce sèche-linge est une machine complexe. Le réparer
vous-même ou essayer de le faire réparer par une
personne non agréée pourrait entraîner des
dommages corporels pour une ou plusieurs
personnes, cela pourrait endommager la machine et
cela pourrait rendre invalide la garantie des pièces de
rechange.
Appelez un technicien agréé si vous avez des
problèmes lors de l’utilisation de ce sèche-linge.
Vous trouverez ces informations sur la fiche
signalétique située à l’intérieur de la porte de la
machine.
Économiser de l’énergie et respecter l’environnement
●
Essorez les articles pour éliminer l’eau en excès avant de les passer au sèche-linge (si vous utilisez une machine à
laver, sélectionnez un cycle d’essorage à grande vitesse). Ceci vous permettra d’économiser du temps et de
l’énergie durant le séchage.
●
Séchez toujours des charges complètes – vous économiserez de l’énergie : les articles uniques ou les petites
charges prennent plus longtemps à sécher.
●
Nettoyez le filtre après chaque utilisation pour limiter les coûts de consommation d’énergie (voir Entretien).
F
Information recyclage et enlèvement de nos produits
Dans le cadre de notre engagement envers la
protection de l’environnement, nous nous
réservons le droit d’utiliser des pièces recyclées de
qualité afin de réduire les coûts pour notre clientèle et
de limiter les gaspillages de matières premières.
●
Élimination du matériau d’emballage: respectez les
réglementations locales, de manière à ce que
’emballage puisse être recyclé.
●
Pour éviter que des enfants se blessent, ôtez la porte
et la prise et puis coupez le câble secteur au ras de
l’appareil. Jetez ces pièces séparément de sorte
que l’appareil ne puisse plus être branché sur une
prise de secteur.
Enlèvement des appareils ménagers usagés
La Directive Européenne 2012/19/EC sur les Déchets
des Equipements Electriques et Electroniques (DEEE),
exige que les appareils ménagers usagés ne soient
pas jetés dans le flux normal des déchets
municipaux. Les appareils usagés doivent être
collectés séparément afin d’optimiser le taux de
récupération et le recyclage des matériaux qui les
composent et réduire l’impact sur la santé humaine et
l’environnement.
Le symbole de la ‘‘poubelle barrée’’ est apposée
sur tous les produits pour rappeler les
obligations de collecte séparée.
Les consommateurs devront contacter les autorités
locales ou leur revendeur concernant la démarche à
suivre pour l’enlèvement de leur vieil appareil.
35
Page 36

Données relatives au produit...
(règlement UE n°392/2012)
Marque Hotpoint Ariston Modèles TCD97B
F
FTCD 97B
Capacité nominale pour le programme standard coton à pleine charge 9 kg Classe d'efficacité énergétique B
Consommation d'énergie annuelle pondérée (AEc) 615.9 kWh
Consommation annuelle sur la base de 160 cycles de séchage pour le programme coton standard à pleine et à demicharge, et de la consommation des modes à faible puissance. La consommation réelle d'énergie par cycle dépend des
conditions d'utilisation de l'appareil.
Ce sèche-linge domestique à tambour est un Sèche-linge automatique à condensation
Consommation d'énergie : pleine charge E
Consommation d'électricité : mode arrêt (Po) 0.14 W, mode laissé sur marche (Pl) 3.36 W
Durée du mode laissé sur marche pour le système de gestion de la consommation d'électricité 30 minutes
Programme coton standard convenant au séchage des articles en coton normalement humides offrant le meilleur
rendement en termes de consommation électrique pour les articles en coton à pleine et à demi-charge
Coton standard, Chaleur haute, Sec pour placard
5.20 kWh, demi-charge E
dry
dry1/2
2.82 kWh
Durée du programme (minutes) : pondérée (Tt) à pleine et demi-charge 110, à pleine charge (T
Classe de rendement de condensation B
Rendement moyen de condensation (%) : à pleine charge (C
Niveau de puissance acoustique 69 dB(A) re 1 pW
* “Information à l'attention des consommateurs conforme à la réglementation EU 932/2012”.
Énergie généralement consommée Temps de séchage moyen -
Synthétiques à pleine charge 1.38 kWh, à demi-charge Sans objet
Synthétiques à pleine charge 65 minutes, à demi-charge Sans objet
) 83, à demi-charge (C
dry
) 79, pondérée (Ct) à pleine et demi-charge 81
dry1/2
) 147, à demi-charge (T
dry
dry1/2
) 82
Cet appareil est conforme aux Directives Européennes suivantes:
- 2006/95/EC (Équipement Basse Tension)
- 2004/108/EEC (Compatibilité Électromagnétique)
Indesit Company, Viale Aristide Merloni 47, 60044 Fabriano (AN), Italy
36
Page 37

Bedienungsanleitung
GB
English, 1
E
Español, 55
F
Français, 19
P
Português, 73
D
Deutsch, 37
FTCD 97B
Wenn Sie den Wäschetrockner das
erste Mal einschalten, müssen Sie die
von Ihnen bevorzugte
Bedienungssprache wählen – siehe
Seite 44
Inhaltsverzeichnis
Installierung, 38
Aufstellung Ihres Wäschetrockners
Belüftung
Wasserabfluss
Stromanschluss
Vor der Inbetriebsetzung Ihres Wäschetrockners
Warnhinweise, 39-40
Allgemeine Sicherheitshinweise
Hinweise zur Minimierung des Brandrisikos im
Wäschetrockner
Wartung und Pflege, 41-42
Stromversorgung abschalten
Filter nach jedem Zyklus reinigen
Wasserbehälter nach jedem Zyklus leeren
Trommelinspektion nach jedem Zyklus
Kondensatoreinheit reinigen
Reinigung
Beschreibung Ihres Wäschetrockners, 43
Aufbau
Bedienblende
D
WÄSCHETROCKNER
! Bewahren Sie diese Bedienungsanleitung an einem
sicheren Ort auf, um sie bei Bedarf als Bezug
verwenden zu können. Nehmen Sie sie bei einem
Umzug mit und stellen Sie bei einem Verkauf oder der
Weitergabe an eine andere Person sicher, dass diese
Bedienungsanleitung zusammen mit dem
Wäschetrockner abgegeben wird, damit sich der
neue Eigentümer ausreichend über die Bedienung
und mögliche Vorsichtsmaßnahmen bei der
Verwendung des Wäschetrockners informieren kann.
! Lesen Sie diese Bedienungsanleitung sorgfältig
durch. Die nachfolgenden Seiten enthalten wichtige
Informationen zur Installierung und Funktionsweise
dieser Gerätes.
Dieses Symbol erinnert Sie daran,
das vorliegende Handbuch zu lesen.
Digital Anzeige, 44-46
Start und Programme, 46-50
Programmauswahl
Programmtabelle
Die Bedienelemente
Gewebeart, 51
Tipps zum Sortieren Ihrer Wäsche
Artikel, bei denen besondere Sorgfalt erforderlich ist
Trocknungszeiten
Fehlersuche, 52
Kundendienst, 53
Ersatzteile
Recycling- & Entsorgungsinformationen
Produktdaten, 54
www.hotpoint.eu
37
Page 38

Installierung
Aufstellung des Wäschetrockners
●
D
Den Wäschetrockner so aufstellen, dass
ausreichend Abstand zu Gasherden,
Öfen, Heizungen oder Kochplatten
vorhanden ist, da das Geräte
beschädigt werden könnte.
●
Mindestabstand 10 mm
Wird der Wäschetrockner
untergebaut, muss
zwischen der
Geräteoberseite und der
Mindestabstände
15 mm
Arbeitsplatte (auch
andere Gegenstände)
ein Mindestabstand
von 10mm eingehalten
werden. Um die
Luftzirkulation zu
gewährleisten muss ferner zwischen den
Seitenwänden des Gerätes und den
angrenzenden Möbelschränken oder
Wänden ein Mindestabstand von 15mm
berücksichtigt werden.
Das Gerät muss mit der Rückseite gegen
eine Mauer installiert werden.
Belüftung
Während des Betriebs des Wäschetrockners muss eine
ausreichende Belüftung sichergestellt sein. Es muss
sichergestellt sein, dass der Wäschetrockner in einem
Raum mit nicht zu hoher Luftfeuchtigkeit und ausreichender
Luftzirkulation aufgestellt wird. Eine ausreichende
Luftströmung um den Trockner ist unerlässlich, um eine
Kondensation des während des Waschens angefallenen
Wassers, zu ermöglichen. In engem Raum oder einem
Schrank ist kein effizienter Betrieb des Trockners möglich.
! Wenn der Trockner in einem kleinen oder kalten Raum
verwendet wird, kann es zu Kondensatansammlungen
kommen.
! Wir raten davon ab, den Wäschetrockner
in einem Schrank zu installieren. Beachten
Sie bitte, dass der Wäschetrockner
niemals hinter einer abschließbaren
Tür, einer Schiebetür oder einer Tür, bei
der sich das Scharnier auf der
gegenüberliegenden Seite zur Trocknertür
befindet, installiert werden darf.
Wasserabfluss
Wenn Ihr Wäschetrockner neben einem Abfluss installiert
ist, kann das Wasser in diesen Abfluss geleitet werden.
Dies macht ein Entleeren des Wasserbehälters
überflüssig. Wenn der Wäschetrockner über oder
neben einer Waschmaschine positioniert ist, kann für
beide Maschinen derselbe Abfluss verwendet werden.
Es muss darauf geachtet werden, dass der Abfluss
weniger als 1 m über dem
Wäschetrocknerboden liegt.
Entfernen Sie den vorhandenen
Schlauch von seiner Position,
die in Abbildung A gezeigt wird.
Abbildung A
Bringen Sie dann einen
Schlauch passender Länge an
die Postion, die in Abbildung B
gezeigt ist, an.
! Sicherstellen, dass der Schlauch nicht
zusammengedrückt wird oder Knickstellen bekommt,
wenn sich der Wäschetrockner an seinem
vorgesehenen Standort befindet.
Abbildung B
Stromanschluss
Stellen Sie folgende Punkte sicher, bevor
Sie die Maschine an die Steckdose
anschließen:
●
Vergewissern Sie sich, dass Ihre Hände
trocken sind.
●
Die Steckdose muss geerdet sein.
●
Die Steckdose muss für die maximale
Leistungsaufnahme gemäß Typenschild
ausgelegt sein (siehe Beschreibung Ihres
Wäschetrockners).
●
Die Netzspannung muss der auf dem
Typenschild entsprechen (siehe
Beschreibung Ihres Wäschetrockners).
●
Die Steckdose muss mit dem Stecker
des Wäschetrockners kompatibel sein.
Sollte dies nicht der Fall sein, muss
entweder der Stecker oder die
Steckdose ausgetauscht werden.
! Der Wäschetrockner darf nicht im Freien
installiert werden, selbst wenn der
entsprechende Bereich überdacht ist. Es
kann sehr gefährlich sein, wenn das Gerät
Regen oder starkem Wind ausgesetzt wird.
! Nach der Installierung müssen sich
Kabel und Stecker des Wäschetrockners
leicht erreichen lassen.
! Kein Verlängerungskabel verwenden.
! Das Stromkabel darf keine Biege- oder
Quetschstellen aufweisen.
! Das Stromkabel ist regelmäßig zu
überprüfen. Sollte das Stromkabel
beschädigt sein, muss es vom Herstelle,
dessen Kundendienst oder von anderem,
qualifizierten Fachpersonal ersetzt werden,
um Gefahren zu vermeiden. Neue oder
längere Stromkabel sind von
konzessionierten Service- Partnern erhältlich.
! Der Hersteller übernimmt keinerlei
Haftung, sollten diese Regeln nicht genau
beachtet werden.
! Sollten sie sich über einen der obigen
Punkte nicht ganz im klaren sein, dann
ziehen sie bitte einen qualifizierten
Elektriker zu Rate.
Vor der Inbetriebsetzung Ihres
Wäschetrockners
Nach der Installierung des Wäschetrockners und vor
dessen Verwendung muss die Innenfläche der Trommel
gesäubert werden, um Staub, der sich während des
Transports angesammelt haben könnte, zu entfernen.
Maximale Lademengen
Naturfasern : 9 kg
38
Page 39

Warnhinweise
! Diese Maschine wurde gemäß
internationaler Sicherheitsnormen
entworfen und hergestellt.
Die Warnhinweise dienen Ihrer Sicherheit
und müssen unbedingt befolgt werden.
Allgemeine Sicherheitshinweise
●
Dieser Wäschetrockner darf von
Personen (einschließlich Kinder ab 8
Jahren) mit eingeschränkten körperlichen,
geistigen oder sensoriellen Fähigkeiten
oder ohne ausreichende Erfahrung und
Kenntnis verwendet werden,
vorausgesetzt, sie werden durch eine für
ihre Sicherheit verantwortliche Person
beaufsichtigt und eingewiesen.
●
Dieser Wäschetrockner ist nur für den
Privatgebrauch vorgesehen.
●
Die Maschine nicht mit nassen Händen
oder Füßen berühren.
●
Netzstecker nur per Hand von der
Steckdose trennen und nicht am
Netzkabel ziehen.
●
Nach der Verwendung des Trockners,
diesen ausschalten und den Netzstecker
herausziehen. Die Tür nicht offen lassen,
damit der Trockner von Kindern nicht als
Spielzeug verwendet werden kann.
●
Sicherstellen, dass Kinder nicht
unbeaufsichtigt bleiben und mit dem
Wäschetrockner spielen könnten.
●
Wartung und Reinigung dürfen nicht von
unbeaufsichtigten Kindern ausgeführt
werden.
●
Kinder unter 3 Jahren müssen von dem
Wäschetrockner ferngehalten werden,
wenn sie nicht ständig beaufsichtigt
werden.
●
Die Maschine muss korrekt installiert
werden und über ausreichend Belüftung
verfügen. Der vorn am Trockner
befindliche Lufteinlass darf niemals auf
irgendeine Weise behindert oder
blockiert werden (siehe Installierung).
●
Den Trockner niemals auf einen
Teppichboden stellen, bei dem die
Florhöhe verhindern würde, dass Luft von
unten in den Trockner einströmen kann.
●
Vor dem Beladen sicherstellen, dass der
Trockner leer ist.
●
Die Rückseite des Trockners kann
sehr heiß werden.
Deshalb diesen Bereich während des
Betriebs nicht berühren.
●
Den Wäschetrockner nur verwenden,
wenn Filter, Wasserbehälter und
Kondensator sicher und korrekt
angebracht sind (siehe Wartung).
●
Die maximale Ladekapazität des
Trockners niemals überschreiten (siehe
Gewebeart).
●
Nicht tropfend nasse Artikel in den
Trockner legen.
●
Alle an den Pflegeetiketten gemachten
Anweisungen genau durchlesen (siehe
Gewebeart).
●
Den Trockner nicht für große und
übermäßig sperrige Artikel verwenden.
●
Acrylfasern nicht bei hoher Temperatur
trocknen.
●
Den Trockner nicht ausschalten,
während die Artikel darin noch warm
sind.
●
Den Filter nach jeder Verwendung reinigen
(siehe Wartung).
●
Den Wasserbehälter nach jeder
Verwendung leeren (siehe Wartung).
●
Die Kondensatoreinheit in regelmäßigen
Abständen reinigen (siehe Wartung).
●
Die Ansammlung von Flusen im Trockner
verhindern.
●
Niemals auf den Trockner steigen. Dies
kann zu einer Beschädigung führen.
●
Immer die für die Stromversorgung
geltenden Normen und Anforderungen
erfüllen (siehe Installierung).
●
Nur Originale-Ersatzteile und zubehöre
verwenden (siehe Kundendienst).
D
39
Page 40

Warnhinweise
D
Hinweise zur Minimierung des
Brandrisikos im Wäschetrockner:
●
Nur solche Artikel in den Trockner legen,
die mit Waschmittel und Wasser
gewaschen und danach gründlich gespült
und geschleudert wurden. Artikel, die
NICHT mit Wasser gewaschen wurden,
stellen ein Brandrisiko dar.
●
Keine Wäsche trocknen, die mit
Chemikalien behandelt wurde.
●
Keine Wäsche trocknen, die mit
Gemüse- oder Speiseöl verschmutzt
oder vollgesogen ist, da dies ein
Brandrisiko darstellt. Mit Öl verschmutzte
Wäschestücke können sich selbst
entzünden, besonders, wenn sie einer
Wärmequelle wie einem Wäschetrockner
ausgesetzt werden. Die Wäschestücke
werden erwärmt, was zu einer
Oxidationsreaktion mit dem Öl führt,
wobei die Oxidation weitere Hitze
erzeugt. Wenn die Hitze nicht entweichen
kann, können die Wäschestücke so heiß
werden, dass sie sich entzünden. Durch
Aufschichten, Stapeln oder
Übereinanderliegen von ölverschmutzten
Wäschestücken kann die Wärme nicht
entweichen und dies führt zu einem
Brandrisiko.
Wenn unbedingt Wäsche, die mit
Gemüse- oder Speiseöl oder mit
Haarpflegeprodukten verunreinigt ist, im
Wäschetrockner getrocknet werden
muss, dann sollte sie zunächst mit
besonders viel Waschmittel gewaschen
werden - dies reduziert das Risiko,
beseitigt es aber nicht. Sie sollte nicht
aus dem Trockner entnommen und in
heißem Zustand gestapelt bzw.
übereinan dergelegt werden.
●
Keine Wäsche trocknen, die zuvor mit
Benzin, chemischen Lösungsmitteln oder
anderen brennbaren oder explosiven
Substanzen gereinigt, gewaschen,
eingeweicht oder verschmutzt worden
ist. Leichtentzündliche Stoffe, die häufig
im häuslichen Umfeld verwendet werden
sind: Speiseöl, Aceton, Spiritus,
Petroleum, Fleckenentferner, Terpentin,
Wachse und Wachs-Entferner. Stellen
Sie sicher, dass solche Wäschestücke in
heißem Wasser mit einer zusätzlichen
Menge an Waschmittel gewaschen
worden sind, bevor sie im Trockner
getrocknet werden.
●
Im Trockner darf keine Wäsche
getrocknet werden, die Schaumgummi
(auch Latex-Schaum genannt) oder
ähnlich strukturierte gummiartige
Materialien enthält. SchaumstoffMaterialien können, wenn sie erhitzt
werden, durch Selbstentzündung Brände
auslösen.
●
Weichspüler oder ähnliche antistatische
Produkte dürfen nicht in einem
Wäschetrockner benutzt werden, es sei
denn, die Verwendung ist vom Hersteller
des Weichspüler-Produktes ausdrücklich
empfohlen.
●
Keine Unterwäsche trocknen, die
Metallverstärkungen enthält z.B. BHs,
die mit Metalldrähten verstärkt sind. Dies
kann Schäden am Wäschetrockner
verursachen, wenn die
Metallverstärkungen sich während des
Trocknens lockern sollten.
●
Keine Artikel aus Gummi, Kunststoff (z.B.
Duschhauben oder Wickelunterlagen),
Polyethylen oder Papier trocknen.
●
Keine gummibeschichteten Artikel,
Kleidung mit Schaumgummi-Pads,
Kissen, Galoschen oder GummiTurn-/Tennisschuhe trocknen.
●
Leeren Sie komplett alle Taschen
(Feuerzeuge, Streichhölzer, etc).
! ACHTUNG: Den Wäschetrockner niemals vor Ablauf des Trocknungszyklus anhalten.
Lässt sich dies nicht vermeiden, sämtliche Artikel schnell aus dem Trockner nehmen und
zur Abkühlung ausbreiten.
40
Page 41

Wartung und Pflege
Stromversorgung abschalten
! Den Trockner bei Nichtverwendung,
während der Reinigung und allen
Wartungsarbeiten vom Stromnetz trennen.
Filter nach jedem Zyklus reinigen
Der Filter stellt einen wichtigen Bestandteil
Ihres Trockners dar: Er nimmt Flusen und
Fasern auf, die sich während des
Trocknens ansammeln.
Deshalb muss der Filter nach jedem
Zyklus gereinigt werden. Dazu den Filter
unter laufendes Wasser halten oder mit
einem Staubsauger reinigen. Wenn der
Filter verstopft ist, wird sich dies in großem
Maße auf die Luftzirkulation im Trockner
auswirken. Dies bedeutet längere
Trocknungszeiten und einen höheren
Energieverbrauch. Außerdem kann dies
auch zu einer Beschädigung des
Trockners führen.
Der Filter befindet sich vor der
Trocknerverkleidung (Siehe Zeichnung auf
nächster Seite).
Filter herausnehmen:
1.Den Plastikgriff des Filters nach oben
ziehen.
2. Öffnen Sie den Filter
und entfernen Sie die
Flusen von der
Innenseite.
3. Setzen Sie ihn wieder
korrekt ein.
Dabei sicherstellen,
dass der Filter
vollständig bündig in
der Trocknerverkleidung platziert ist.
! Prüfen und entleeren Sie den Behälter vor Beginn
jedes Trocknenprogramms.
! Die ausbleibende Entleerung des
Wasserbehälters verursacht:
- Die Deaktivierung der Heizung (die Wäschefüllung
könnte somit bei Beendigung des Trockenzyklus
noch feucht sein) (siehe Die Bedienelemente).
●
Anlauf des Wassersammelsystems
Wenn Ihr Trockner neu ist, sammelt der
Wasserbehälter bis zum Anlauf des Systems kein
Wasser ... für den Anlauf werden 1 bis 2
Trocknungszyklen benötigt. Danach sammelt der
Trockner bei jedem Trocknungszyklus Wasser.
Kondensatoreinheit reinigen
Die Kondensatoreinheit regelmäßig (einmal
im Monat) ausbauen und
Flusenansammlungen zwischen den
Platten entfernen, indem die Einheit unter
kaltem Wasser abgespült wird. Während
des Ausspülens sollte die Rückseite der
Kondensatoreinheit nach oben zeigen.
Kondensator ausbauen:
1.Den Netzstecker aus der Steckdose
ziehen und die Tür öffnen.
2.Die Kondensatorabdeckung durch
Ziehen öffnen (siehe Abbildung).
Die beiden
Befestigungsvorrichtungen
durch Drehen um 90°
gegen den Uhrzeigersinn
lösen, dann am Griff
ziehen und den
Kondensator vom
Trockner ausbauen.
D
4.Entfernen Sie alle Flusen, die sich auf
der Türinnenseite und im Bereich der
Türdichtung angesammelt haben sollten.
! Den Trockner nicht ohne eingebauten Filter
verwenden.
Wasserbehälter nach jedem Zyklus leeren
Ziehen Sie den Behälter aus
dem Trockner und
entfernen Sie entweder die
kleine oder große Kappe und
entleeren Sie ihn in ein
Waschbecken oder einen
anderen geeigneten Abfluss.
Setzen Sie die Kappe wieder auf
und setzen Sie den Behälter
wieder sicher ein.
Reinigen Sie die Oberfläche der
Dichtungen und setzen Sie mit den Pfeilen
nach oben zeigend wieder ein und
vergewissern Sie sich, dass die
Befestigungsvorrichtungen eingerastet sind.
41
Page 42

Wartung und Pflege
D
Wasserbehälter
Filter
Kondensatoreinheit
Befestigungsvorrichtungen
Trommelinspektion nach jedem Zyklus
Die Trommel mit der Hand drehen, um kleine Artikel,
die im Trockner zurückgeblieben sein können (wie
zum Beispiel Taschentücher) zu entfernen.
Trommelreinigung
! Keine Scheuermittel, Stahlwolle oder
Edelstahlreiniger zum Säubern der Trommel verwenden.
Wasserhahn
Rückseite
Vorderseite
Lufteinlass
Kondensatorabdeckung
Kondensatoreinheit
Kurzempfehlungen
●
Denken Sie daran, den Türfilter und
den Kondensatorfilter nach jedem
Trockengang zu reinigen.
●
Denken Sie daran, den Wässerbehälter
nach jeder Füllung zu leeren.
! Auf diese Weise erhalten Sie die besten
Leistungen.
An der Edelstahltrommel kann sich mit der Zeit ein
farbiger Film bilden. Dies kann durch Wasser
und/oder Waschmittel- oder Weichspülerrückstände
verursacht werden, beeinträchtigt jedoch auf keinerlei
Weise die Leistung des Trockners.
Reinigung
●
Externe Teile aus Metall oder Kunststoff sowie Gummiteile
können mit einem feuchten Tuch gereinigt werden.
●
Das vordere Lufteinlassgitter regelmäßig (alle 6
Monate) mit einem Staubsauger reinigen, um
Ansammlungen von Fasern, Flusen oder Staub zu
entfernen. Außerdem müssen die Filterbereiche und
die Vorderseite des Kondensators gelegentlich mit
einem Staubsauger gereinigt werden, um
Flusenansammlungen zu entfernen.
! Keine Lösungs- oder Scheuermittel verwenden.
! Den Trockner regelmäßig von einem zugelassenen
Monteur überprüfen lassen, um einen sicheren Betrieb
der Maschine in elektrischer und mechanischer
Hinsicht sicherstellen zu können (siehe Kundendienst).
42
Page 43

Beschreibung Ihres
Wäschetrockners
Aufbau
Kondensatorabdeckung
Bedienblende
Filter
Typenschild
PROGRAMME
Auswahltasten
Wasserbehälter
Modell- und Seriennummer
Belüftungsschlitze
D
Griff der Kondensatorabdeckung
(zum Öffnen ziehen)
Display
EIN/AUS-
Taste
Die EIN/AUS-Taste - falls diese gedrückt wird,
während der Trockner läuft: Falls das Display
AUSSCHALTEN anzeigt, hält der Trockner an. Falls das
Display
Taste gedrückt. Das Display zählt nun 3, 2, 1
rückwärts und der Trockner hält dann an.
Falls Sie die Taste erneut drücken und für mehr als 3
Sekunden gedrückt halten, zeigt das Display kurzzeitig
EINSCHALTEN an.
Mit den Progamm-Auswahltasten wird das Programm
eingerichtet. Drücken Sie die zum auszuwählenden
Programm zugehörige Taste (siehe Start und
Programme).
Mit der OPTIONS-Tasten/-Anzeigen wählen Sie die
verfügbaren Optionen für Ihr ausgewähltes Programm
(siehe Die Bedienelemente). Die Leuchten auf der
Displayeinheit neben den unteren Tasten leuchten
auf, um die ausgewählte Option anzuzeigen.
Mit der START/PAUSE-Taste wird ein gewähltes
Programm gestartet. Wenn diese Taste während
eines laufenden Programms gedrückt gehalten wird,
wird das Programm angehalten. Nach Ertönen eines
Pieptons zeigt das Display PAUSE an und der
Trockner stoppt.
Bei laufendem Programm leuchtet das Licht grün, bei
unterbrochenem Programm blinkt es gelb und vor
DRÜCKEN + HALTEN anzeigt, halten Sie die
KINDERSICHERUNG
UND OPTIONEN
Tasten und Leuchten
Programm blinkt es gelb und vor Programmstart
blinkt es grün (siehe Start und Programme).
Hinweis: Diese Leuchte blinkt auch gelb während der
Nachbehandlungsphase eines Programms.
Das Display zeigt Warnungen und Informationen
über das gewählte Programm und seinen Verlauf an
(siehe nächste Seite).
KINDERSICHERUNG-Taste/icon : Wenn diese
Taste nach Auswahl des Trockenprogramms und
der entsprechenden Optionen länger gedrückt
wird
. Die Programmeinstellungen können dann
nicht mehr geändert werden und das Display zeigt
kurz
VERSCHLIEßEN . Wenn das Symbol leuchtet
sind alle anderen Tasten gesperrt. Zur Beseitigung
der Sperre halten Sie die Taste gedrückt. Die
Anzeige des Symbols erlischt und das Display
zeigt kurz
Hinweis: Zur Erfüllung der neuen Richtlinien zum
Energieverbrauch ist diese Waschetrockner mit einem
automatischen Ausschaltsystem (Standby) ausgestattet,
das nach 30 Minuten des Nichtgebrauchs in Funktion
tritt. Drücken Sie die EIN/AUS-Taste und halten Sie sie
gedrückt, bis das Display kurzzeitig
anzeigt und der Trockner
ENTRIEGELN an.
START/PAUSE
Taste/Leuchte
EINSCHALTEN
-
43
Page 44

Display
Auswahl Ihrer Sprache
D
Beim ersten Einschalten Ihres Wäschetrockners sollten Sie die von Ihnen bevorzugte Sprache aus der
Verfügbarkeitsliste auswählen.
Zur Änderung: muss die gegenwärtig ausgewählte Sprache
auf der ersten Displayzeile blinken.
-
Drücken Sie die EIN/AUS-Taste, um das Display auszuschalten,
und drücken Sie dann alle 3 Tasten und halten Sie sie
gedrückt: Temperaturoptionen
, Zeitgesteuert,
Trocknungsoptionen 5 Sekunden lang gedrückt.
Drücken Sie die Taste
-
Temperatur-optionen oder
Zeitgesteuert , um in der Liste nach oben oder unten
zu blättern.
- Wenn die von Ihnen gewünschte Sprache auf der
obersten Displayzeile blinkt, wird durch Drucken der
Taste Trocknungsoptionen Ihre Auswahl übernommen.
Verstehen des Displays
Programmauswahl und Anzeige
Das ausgewählte Programm wird in der ersten Displayzeile angezeigt,
und dann wird diese Meldung während des Programmablaufs angezeigt.
Acht der Tasten sind mit jeweils zwei Optionen belegt. Wenn Sie die Taste
das erste Mal betätigen, wählen Sie die erste Option aus; betätigen Sie sie
erneut, wird die zweite Option ausgewählt. Ihre Programmauswahl wird
jeweils angezeigt. Die letzte Taste wählt das Programm „Mein Waschgang“ aus.
Erstes Drücken Zweites Drücken
1
STANDARD BAUMWOLLE
2
BED & BATH
3
KUNSTFASERN
4
JEANS
5
WOLLE
6
FEINWÄSCHE
7
KUSCHELTIERE
8
BÜGELLEICHT
9
MEIN WASCHGANG M My Cycle (siehe unten)
SHIRTS BAUMWOLLE
ANTIALLERGEN
SHIRTS SYNTHETIK
DAUNEN
SEIDE
BABY
HEAT & ENJOY
AUFFRISCHEN
Mein Waschgang : Wenn Sie die Mein Waschgang-Taste wählen, erscheint im Display vor dem Namen des
ausgewählten Programms ein ‘ M ’. Beispielsweise
M STANDARD BAUMWOLLE
(siehe Start und Programme).
Trocknungsoptionen
Auswahlmöglichkeiten bei der Wahl eines automatischen Programms, das über verschiedene Trocknungsgrade
verfügt (siehe Programmtabelle).
Die zweite Displayzeile zeigt den von Ihnen gewünschten
Trocknungsgrad an. Mit jedem Drücken der Trocknungsoptionen-Taste
wird die nächste Option aus der Liste unten ausgewählt und angezeigt.
Das Display weist außerdem je nach Auswahl 1-7 Balken auf, die
während des Programmfortschritts angezeigt werden.
! Einige automatische Programme lassen keine Änderung des Trocknungsgrades zu oder bieten nicht alle
Trocknungsgrade an.
FEUCHT
BÜGELTROCKEN
AUFHÄNGEN +
AUFHÄNGEN
LEICHT
Dampftrocken: Trocknet Ihre Wäsche, sodass sie für das Bügeln mit einem Bügelautomaten
bereit ist.
Bügeltrocken: Trocknet Ihre Wäsche, sodass sie für das Bügeln per Hand bereit ist.
Kleiderbügeltrocken plus: Trocknet Ihre Feinwäsche soweit, dass sie zum Endtrocknen
aufgehängt werden kann.
Kleiderbügeltrocken: Trocknet Ihre Wäsche soweit, dass sie zum Endtrocknen aufgehängt werden kann.
Leicht trocken: Trocknet Ihre Feinwäsche soweit, dass sie eingeräumt werden kann.
SCHRANK
TROCKNEN +
44
Schranktrocken: Trocknet Ihre Wäsche soweit, dass sie eingeräumt werden kann.
Extratrocken: Trocknet Ihre Wäsche soweit, dass sie sofort getragen werden kann.
Page 45

Display
Programmfortschritt
Die zweite Displayzeile zeigt den Status des Programms während des Fortschritts an (lange Meldungen rollen
quer über die Zeile ab).
TROCKNEN
KALTTROCKNEN
AUFWÄRMEN
FERTIG
ENDE DES TROCKENGANGS, KNITTERSCHUTZ
ENDE DES TROCKENGANGS, FILTER REINIGEN UND WASSERBEHÄLTER LEEREN
Das Programm Heat & Enjoy (Erwärmen und Wohlfühlen)
(bei Auswahl der Option Knitterschutz)
Zeitgesteuertes Trocken
Nach der Auswahl eines Programms, dass die Option
Zeitgesteuertes Trocknen hat, drücken Sie die
Zeitdauer-Taste und die Anzeige schaltet die Zeitauswahl
mit jedem Drücken und Freigeben der Taste schrittweise
weiter (siehe Start und Programme).
Jedes Drücken reduziert die Zeitdauer und die Anzahl der verfügbaren Zeitoptionen, je nach gewähltem
Programm/Material.
Das Symbol Zeitgesteuert wird neben der Zeitangabe angezeigt.
Die ausgewählte Zeit wird nach Programmstart weiter angezeigt, aber kann auf Wunsch jederzeit geändert werden.
D
Verzögerungszeit und Zeitdauer bis zum Ende
Manche Programme haben einen verzögerten Start (siehe Start und Programme). Drücken Sie die Verzögerungstaste
und das Symbol blinkt.
Mit jedem Drücken der Verzögerungstaste schaltet die
Verzögerungseinstellung in Stundenschritten weiter von:
bis , dann auf und
24h
Sekunden die Verzögerung ab.
Die Verzögerungszeit wird auf dem Display neben der
Verzögerungstaste angezeigt.
Auf dem Display werden die Minuten der
Verzögerungsdauer nach dem Drücken der Start/PauseTaste
Die zweite Displayzeile zeigt
Sie können die ausgewählte Verzögerungsdauer auf Wunsch jederzeit ändern oder stornieren.
Nach Drücken der Taste Start/Pause wird die Zeit bis Programmende in Stunden und Minuten angezeigt, wobei
minutenweise rückwärts gezählt wird.
heruntergezählt.
OFF
danach nach einigen
BEGINNT IN an.
1h
Zeit bis Programmende
Nach Ablauf der Verzögerungsphase oder, falls keine Verzögerung ausgewählt wurde, für die Dauer des gesamten
Programms zeigt dieser Bereich des Displays Folgendes an:
- die geschätzte Zeit bis zum Programmende (bei automatischen Programmen), oder
- die tatsächlich verbleibende Zeit (bei Programmen mit Zeitvorgabe)
Bei Auswahl von Programmen mit Zeitvorgabe ist die angezeigte Zeit die tatsächlich verbleibende Zeit.
Bei Auswahl von Automatik-Programmen spiegelt die angezeigte Zeit die geschätzte Restlaufzeit wieder: Wenn das
Programm ausgewählt wird, zeigt das Display die zum Trocknen einer vollen Ladung erforderliche Zeit an. Die Restzeit
wird während des Trockenzyklus konstant überwacht und variiert, um Ihnen einen möglichst genauen Schätzwert zu
liefern.
Der Doppelpunkt zwischen den auf dem Display angezeigten Stunden und Minuten blinkt, um zu zeigen, dass die Zeit läuft.
45
Page 46

Display
Warnungen
D
Die zweite Displayzeile zeigt auch Warn- und Erinnerungsmeldungen an:
(Erinnerungen erscheinen am Programmende)
ENDE DES TROCKENGANGS, FILTER REINIGEN UND WASSERBEHÄLTER LEEREN
●
Erinnerung, dass bei jedem Einsatz des Trockners der
Wasserbehälter geleert und der Filter gereinigt werden
sollten (siehe Wartung).
WASSERBEHÄLTER LEEREN
●
Zeigt an, dass der Wasserbehälter voll ist. Die
Meldung benötigt einige Sekunden, bis Sie nach
dem Entleeren des Wasserbehälters erlischt, hierzu
muss der Trockner laufen (siehe Die Bedienelemente).
Hinweis: Wenn der Wasserbehälter voll ist und
die Meldung angezeigt wird, wird die Heizung
abgestellt und Ihre Wäsche trocknet nicht.
KONDENSATOR UND FILTER REINIGEN UND WASSERBEHÄLTER LEEREN
●
Diese Meldung zeigt an, dass Sie die
Kondensatoreinheit reinigen müssen (siehe Wartung)
und erscheint entsprechend der Verwendungshäufigkeit
des Trockners in Intervallen. Wenn Sie das nächste
Programm beendet haben, wird die Meldung
aufgehoben. Sie müssen außerdem den Filter reinigen.
ANTIALLERGEN NICHT AKTIV - FILTER REINIGEN
●
Wird während des Anti-Allergen-Programms angezeigt
und weist darauf hin, dass der Filter gereinigt werden
muss, um den vollständigen Anti-Allergen-Zyklus
abzuschließen (siehe Wartung).
Start und Programme
Programmauswahl
1. Den Wäschetrockner an die Steckdose anschließen.
2. Die Wäsche je nach Gewebeart sortieren (siehe
Gewebeart).
3. Die Tür öffnen und sicherstellen, dass der Filter
sauber ist und korrekt eingesetzt wurde und der
Wasserbehälter leer und korrekt positioniert ist (siehe
Wartung).
4. Die Maschine beladen und dabei sicherstellen,
dass keine Wäschestücke zu nah an der Türdichtung
sind. Die Tür schließen.
5. Wenn das Display nicht leuchtet: Die EIN-/AUS-Taste
drücken
6. Die richtige Programmwahltaste für das zu trocknende
Material drücken. Dazu die Programmtabelle (siehe
Programme) sowie die Angaben zu jedem Material
beachten (siehe Gewebeart).
- Wenn die Taste ausgewählt wurde, sind die
Schritte 7 und 8 nicht erforderlich (siehe unten).
7. Zeitgesteuert oder Trocknungsoptionen auswählen.
- Falls Zeitgesteuert gewünscht wird, die Taste
Zeitgesteuert drücken und loslassen, bis im Display
die gewünschte Einstellung angezeigt wird, oder...
- Zur Änderung der vorgegebenen Trocknungseinstellung
die Taste für Trocknungsoptionen so lange drücken
und loslassen, bis die gewünschte Einstellung
angezeigt wird.
! Für weitere Einzelheiten siehe Programmetabelle:
Verfügbarkeit von Trocknungsoptionen, Zeitgesteuert
und Optionen.
8. Falls erforderlich eine Startverzögerung und andere
Optionen einstellen (siehe Display).
Mein Waschgang-Taste
Nach dem ersten Drücken dieser Taste zeigt die zweite Displayzeile DRUECKEN - SPEICHERN an.
Nachdem Sie das gewünschte Programm und die gewünschten Optionen ausgewählt haben, können Sie diese
Einstellungen speichern, indem Sie die Taste Mein Waschgang drücken und mindestens 5 Sekunden gedrückt halten.
Die oberste Zeile zeigt jetzt ein blinkendes gefolgt vom ausgewählten Programm an. Dann hören Sie einen
Signalton und das Display zeigt
zum Starten des Programms die Taste
Wenn Sie wollen, können Sie Ihr gespeichertes Programm ändern, indem Sie ein neues Programm und/oder neue
Optionen auswählen und dann die Taste
MEMORY an. Wenn Sie das Programm beim nächsten Mal benötigen, drücken Sie
und die Start/Pause-Taste
wie oben gedrückt halten.
9. Die Start/Pause-Taste zur Inbetriebsetzung des
Wäschetrockners drücken. Auf der Anzeige erscheint
die geschätzte Zeit bis zum Programmende.
Während eines Trocknungszyklus kann die Wäsche
überprüft und einzelne Wäschestücke, die schon trocken
sind, entnommen werden. In diesem Fall muss nach dem
Schließen der Tür zum Fortsetzen des Programmes
erneut die Start/Pause-Taste gedrückt werden.
10. In den letzten Minuten der Trocknerprogramme
erfolgt vor Programmende die ABKÜHL-Phase
(Wäsche wird gekühlt). Diese Phase sollte immer
vollständig ausgeführt werden.
11. Am Ende des Trockenzyklus wird eine Nachricht
angezeigt:
- Falls
- Falls
12. Nun können Sie die Tür öffnen, die Wäsche
herausnehmen, den Filter säubern und wieder
einsetzen. Den Wasserbehälter leeren und wieder
einsetzen (siehe Wartung).
13. Den Netzstecker aus der Steckdose ziehen.
ENDE DES TROCKENGANGS, FILTER REINIGEN
UND WASSERBEHÄLTER LEEREN angezeigt wird,
ertönt der Summer dreimal (Hinweis: Falls die
Option SIGNAL ausgewählt wurde, ertönt der
Summer 5 Minuten lang alle 30 Sekunden
jeweils dreimal.)
ENDE DES TROCKENGANGS, KNITTERSCHUTZ
angezeigt wird, wurde die Option Knitterschutz
ausgewählt, und falls Sie die Wäsche nicht
sofort entnehmen, wird die Wäsche zehn
Stunden lang oder bis Sie die Tür öffnen gele
gentlich in der Trommel bewegt. Der Summer
ertönt dreimal, um zu bestätigen, dass das
Programm abgeschlossen ist.
.
46
Page 47

Start und Programme
KERNPROGRAMME - Programmtabelle
! Wenn das Display nicht leuchtet; die Taste EIN/AUS drücken und anschließend das Programm wählen.
Programme
Standard Baumwolle
1
Shirts Baumwolle
Bed & Bath
2
Anti-Allergen
Kunstfasern
3
*Hinweis: Diese Option kann nicht mit den Trocknungsgraden ‘Bügeltrocken’ und ‘Dampftrocken’ verwendet werden.
●
Dies ist ein Programm für Baumwollartikel.
●
Die Laufzeit dieses Programms ist vom Ladevolumen, der ausgewählten Trocknungseinstellung und der von Ihrer
Wachmaschine verwendeten Umdrehungszahl abhängig (siehe Gewebeart).
●
Das Programm „Standard Baumwolle“ nach EU Richtlinie 392/2012 ist das Programm1 mit Hochtemperatur und
Trocknungsgrad Schranktrocken (Standard-/Vorgegebene Anfangskonfiguration). Dies ist das effizienteste Programm
im Hinblick auf den Energieverbrauch (EU 392/2012).
●
Dies ist ein Programm für Baumwollhemden.
●
Es kann für Ladungen bis zu 3 kg (etwa 10 Hemden) verwendet werden.
Die Laufzeit dieses Programms ist vom Ladevolumen, der ausgewählten Trocknungseinstellung und der von Ihrer
Wachmaschine verwendeten Umdrehungszahl abhängig.
Ladungen, die die Einstellung Schranktrocken verwenden, können normalerweise gleich getragen werden. Allerdings
können die Ränder oder Nähte ggf. noch leicht feucht sein. Probieren Sie in diesem Fall, die Hemden zu wenden und das
Programm für kurze Zeit erneut laufen zu lassen.
●
Dies ist ein Programm für Baumwollhandtücher und -bettwäsche.
●
Die Laufzeit dieses Programms ist vom Ladevolumen, der ausgewählten Trocknungseinstellung und der von Ihrer
Wachmaschine verwendeten Umdrehungszahl abhängig (siehe Gewebeart).
●
Ladungen, die die Einstellung Extratrocken verwenden, können normalerweise gleich verwendet werden. Allerdings
können die Ränder oder Nähte ggf. noch leicht feucht sein. Probieren Sie in diesem Fall, sie zu öffnen und das
Programm für kurze Zeit erneut laufen zu lassen.
Dieses Programm wurde mit dem Gütesiegel von Allergy UK ausgezeichnet. Dieses Gütesiegel spiegelt die
effektive Minderung und Eliminierung von Allergenen von Kleidungsstücken mithilfe des speziellen Anti-AllergenDurchlaufs wider. Dank der Einhaltung einer für einen geraumen Zeitraum beständigen Temperatur werden die
Auswirkungen der häufigsten Allergene (einschließlich Hausstaubmilben und Pollen) mit diesem Programm neutralisiert.
Kann für eine volle Ladung nasser Wäsche verwendet werden, um diese zu trocknen und zu behandeln, oder für eine
Trockenladung von 4 kg, um diese lediglich zu behandeln.
Falls das Display ANTIALLERGEN NICHT AKTIV - FILTER REINIGEN anzeigt:
Säubern Sie den Filter und starten Sie das Programm erneut.
Kunstfasern (Synthetik)
●
Dies ist ein Programm für Synthetikwäsche (niedrige Temperatureinstellung) oder Mischgewebe aus Synthetik und
Baumwolle (mittlere Temperatureinstellung).
●
Die Laufzeit dieses Programms ist vom Ladevolumen, der ausgewählten Trocknungseinstellung und der von Ihrer
Wachmaschine verwendeten Umdrehungszahl abhängig (siehe Gewebeart).
●
Dies ist ein Programm für Hemden aus synthetischen Materialien oder einer Mischung aus Natur- und
Kunstfasermaterialien wie Polyester und Baumwolle.
●
Es kann für Ladungen bis zu 3 kg (etwa 14 Hemden) verwendet werden.
Die Laufzeit dieses Programms ist vom Ladevolumen, der ausgewählten Trocknungseinstellung und der von Ihrer
Wachmaschine verwendeten Umdrehungszahl abhängig.
Ladungen, die die Einstellung Schranktrocken verwenden, können normalerweise gleich getragen werden. Allerdings
können die Ränder oder Nähte ggf. noch leicht feucht sein. Probieren Sie in diesem Fall, die Hemden zu wenden und das
Programm für kurze Zeit erneut laufen zu lassen.
Synthetik
Shirts
Standard Baumwolle
Shirts Baumwolle
Bed & Bath
Anti-Allergen-Programm
Shirts Synthetik
Verfügbare Optionen:
Einschalt-
verzögerung
Knitterschutz
Extrapflege
✗
✓
✓
✓
✓
✓
✓
✓
✓
✓
✓
✓
✓
✓
✓
✓
✓
✓
✓
✓
✗
✗
✗
✗
✗
✗
Knitterschutz
✓
✗
✗
✗
✗
✗
✗
✗
Bügelfertig*
Temperatur-
- Hoch
- Hoch
- Mittel
- Niedrig
✗
- Hoch
- Mittel
✗
- Mittel
- Niedrig
✗
optionen
Zeitgesteuerter
Trocken
✓
✓
✓
✗
✗
●
Automatisches Programm
✓
✗
Mögliche Trocknungsgrade
(Standardeinstellung )
Dampftrocken
Bügeltrocken
✓
✓
✓
✓
✓
✓
✓
✓
Kleiderbügel-
✓
✓
✓
✓
✓
✓
✓
✓
Sensorgesteuertes
Trocknen
✓
✓
✓
✓
✓
✓
✓
✓
✓
✓✗ ✓
✓
✓
✓
✓
✓
✓
✓
trocken plus
Kleiderbügel-
trocken
✓
✓
✓
✓
✓
✓
✓
✓
✓
✓
✓
✓
✓
✓
✓
✓
Leicht trocken
✓
✓
✓
✓
✓
✓
✓
✓
Schranktrocken
✓
✗
✗
✗
✗
✗
Extratrocken
✗
D
47
Page 48

Start und Programme
D
EXKLUSIVPROGRAMME - Programmtabelle
! Wenn das Display nicht leuchtet; die Taste EIN/AUS drücken und anschließend das Programm wählen.
Programme
Jeans
Bettdecken
4
(DAUNEN)
Wolle
5
Seide
Baby
6
Feinwäsche
Jeans
●
Dies ist ein Programm für Jeans aus Denim-Baumwolle. Vor dem Trocknen der Jeans stülpen Sie bitte die
vorderen Taschen von innen nach außen.
●
Es kann für Ladungen bis zu 3 kg (etwa 4 Hosen) verwendet werden.
●
Mischen Sie keine dunklen und hellen Wäschestücke.
●
Dieses Programm kann auch für andere Kleidungsstücke aus dem gleichen Material, wie z.B. Jacken, verwendet
werden.
●
Die Laufzeit dieses Programms ist vom Ladevolumen, der ausgewählten Trocknungseinstellung und der von Ihrer
Waschmaschine verwendeten Umdrehungszahl abhängig
●
Ladungen, die die Einstellung „Extratrocken“ verwenden, können normalerweise gleich getragen werden. Allerdings
können die Ränder oder Nähte ggf. noch leicht feucht sein. Probieren Sie in diesem Fall, die Jeans zu wenden und das
Programm für kurze Zeit erneut laufen zu lassen.
! Dieses Programm eignet sich nicht für Jeans mit Gummizugbändern, Spikes oder Stickereien.
Verfügbare Optionen:
Einschalt-
verzögerung
Knitterschutz
Extrapflege
✓
✓
✗
✗
✓
✓
✗
✗
✗
✗
✗
✗
✗
✗
✗
✗
✗
✗
✓
✓
✗
✗
✓
✓
Bügelfertig
✗
✗
✗
✗
✗
✗
Knitterschutz
- Hoch
- Mittel
Temperatur-
optionen
✗
✗
✗
✗
✗
✗
✗
✗
✓
Zeitgesteuerter
✗
✗
Trocken
Mögliche Trocknungsgrade
(Standardeinstellung )
Dampftrocken
Bügeltrocken
✓
✓
✓
✓
Kleiderbügel-
✓
✓
✓
✓
Sensorgesteuertes
Trocknen
✓
✓
●
Automatisches Programm
●
Automatisches Programm
✓
✓
✓
✓
✓
✓
✓
trocken plus
Kleiderbügel-
trocken
✓
✓
✓
✓
✓
✓
✓
✓
Leicht trocken
Schranktrocken
✓
✓
✓
✓
Extratrocken
✓
✗
✗
✗
Bettdecken (DAUNEN)
! Achten Sie darauf, mit diesem Programm KEINE beschädigten Wäschestücke zu trocknen, da dies dazu führen
könnte, das die Füllung den Filter und das Lüftungsventil verstopft, was zu einem Brandrisiko führen könnte.
●
Nur zur Verwendung mit normalgroßen Decken: NICHT geeignet für Decken, die ein Doppelbett abdecken.
●
Mittels dieses Programms getrocknete Ladungen können normalerweise gleich verwendet werden, können
jedoch an bestimmten Stellen noch leicht feucht sein. Probieren Sie in diesem Fall, sie zu öffnen und
auszuschütteln und das Programm dann für kurze Zeit erneut laufen zu lassen.
●
Auch für Daunenjacken geeignet.
●
Wählen Sie für Baumwolldecken die hohe und für Synthetikdecken die mittlere Temperatureinstellung.
●
Die Laufzeit dieses Programms ist vom Ladevolumen und der Ladungsdichte sowie der von Ihrer
Waschmaschine verwendeten Umdrehungszahl abhängig.
Wollprogramm (WOLLE)
●
Dies ist ein Programm für trocknergeeignete Wäschestücke, die folgendes Symbol tragen .
●
Es kann für Ladungen bis zu 1 Kilogramm (etwa 3 Pullover) verwendet werden.
●
Wir empfehlen, die Kleidungsstücke vor dem Trocknen auf links zu drehen.
●
Dieses Programm läuft etwa 60 Minuten lang, kann jedoch je nach Größe und Dichte der Ladung und der
Schleuderdrehzahl der Waschmaschine länger laufen.
●
Wäsche, die mit diesem Programm getrocknet wurde, kann normalerweise gleich getragen werden. Bei schwereren
Stücken können die Kanten jedoch noch leicht feucht sein. Diese Restfeuchtigkeit sollte an der Luft getrocknet werden,
da übermäßiges Trocknen das Kleidungsstück schädigen kann.
! Im Gegensatz zu anderen Materialien kann ein Einlaufen bei Kleidungsstücken aus Wolle nicht rückgängig gemacht werden,
d.h. das Kleidungsstück dehnt sich nicht auf seine ursprüngliche Form und Größe aus.
! Dieses Programm eignet sich nicht für Kleidungsstücke aus Acryl.
Seide
●
Dies ist ein Programm zum Trocknen von zarter Seide.
●
Es kann für Ladungen bis 0,5 kg verwendet werden.
●
Die Laufzeit dieses Programms ist vom Ladevolumen und der Ladungsdichte sowie der von Ihrer
Waschmaschine verwendeten Umdrehungszahl abhängig.
●
Mittels der Einstellung „Schranktrocken“ getrocknete Ladungen können normalerweise gleich verwendet werden, aber
bei einigen Kleidungsstücken kann es vorkommen, dass die Ränder noch leicht feucht sind. Probieren Sie in diesem
Fall, die betreffenden Wäschestücke zu öffnen oder zu wenden und das Programm für kurze Zeit erneut laufen zu
lassen.
48
Page 49

Start und Programme
Baby-Zyklus
●
Dies ist ein Programm zum Trocknen von kleinen, empfindlichen Babysachen und Babybettwäsche (Baumwolle und
Chenille) und zum Trocknen empfindlicher Kleidungstücke.
●
Trocknen Sie KEINE Wäsche wie Lätzchen oder Windelhosen mit Kunststoffbeschichtungen.
●
Das Programm kann für Ladungen bis 2 kg verwendet werden.
●
Die Laufzeit dieses Programms ist vom Ladevolumen und der Ladungsdichte sowie der von Ihrer Wachmaschine
verwendeten Umdrehungszahl abhängig.
●
Mittels dieses Programms getrocknete Ladungen können normalerweise gleich verwendet werden, aber bei
einigen Kleidungsstücken kann es vorkommen, dass die Ränder noch leicht feucht sind. Probieren Sie in diesem
Fall, die betreffenden Wäschestücke zu öffnen oder zu wenden und das Programm für kurze Zeit erneut laufen zu
lassen.
Feinwäsche-Programm
●
Dies ist ein Programm zum Trocknen von Feinwäsche, d.h. Acrylgewebe.
●
Das Programm kann für Ladungen bis 2 kg verwendet werden.
●
Die Laufzeit dieses Programms ist vom Ladevolumen und der Ladungsdichte sowie der von Ihrer Wachmaschine
verwendeten Umdrehungszahl abhängig.
●
Mittels dieses Programms getrocknete Ladungen können normalerweise gleich verwendet werden, aber bei
einigen Kleidungsstücken kann es vorkommen, dass die Ränder noch leicht feucht sind. Probieren Sie in diesem
Fall, die betreffenden Wäschestücke zu öffnen oder zu wenden und das Programm für kurze Zeit erneut laufen zu
lassen.
EXTRAPROGRAMME - Programmtabelle
! Wenn das Display nicht leuchtet; die Taste EIN/AUS drücken und anschließend das Programm wählen.
Programme
Verfügbare Optionen:
Mögliche Trocknungsgrade
(Standardeinstellung )
✓
D
Einschalt-
verzögerung
Knitterschutz
Extrapflege
Bügelfertig
Knitterschutz
Temperatur-
optionen
Zeitgesteuerter
Trocken
Sensorgesteuertes
Trocknen
Dampftrocken
Bügeltrocken
Kleiderbügel-
trocken plus
Kleiderbügel-
trocken
Leicht trocken
Schranktrocken
Extratrocken
Kuscheltiere
7
Heat & Enjoy
Bügelleicht
8
Auffrischen
Mein Waschgang
9
My Cycle
Plüschtier-Programm (KUSCHILTIERE)
✓
✗
✗
✗
✗
✗
✗
✗
Ist vom ausgewählten Programm abhängig. Siehe vorherige Angaben.
M
✗
✗
✗
✗
✗
✗
✗
✗
✗
✗
✗
✗
✗
✗
✗
✗
●
Automatisches Programm
✗
●
Automatisches Programm
✗
●
Automatisches Programm
✗
●
Automatisches Programm
✗
Mit diesem Programm können Sie einfacher Staub entfernen und die Plüschtiere häufiger waschen, da die
Trocknungszeit wesentlich kürzer ist als beim Trocknen im Freien. Es ist ein sanftes Trocknungsprogramm, das mit
niedrigen Temperaturen und mit sanfter mechanischer Einwirkung trocknet, um das ursprüngliche Aussehen und
den Glanz des Fells zu erhalten.
Hinweis: Zum Schutz vor Allergien die Plüschtiere einfach für 24 Stunden einfrieren und dann waschen und trocknen.
Wiederholen Sie das alle 6 Wochen. Entfernen Sie Accessoires wie Kleidung, Kragen oder Musikmodule und
schützen Sie Plastikaugen mit Abdeckband, nachdem Sie sie mit einem Tuch abgetrocknet haben.
Die Programmdauer hängt von der jeweiligen Beladung ab. Die maximale Beladung sollte jedoch 2,5 kg nicht
überschreiten und kein Plüschtier sollte schwerer als 600 g sein.
Erwärmen und Wohlfühlen (HEAT & ENJOY)
Mit diesem Programm können Sie Handtücher und Bademäntel für ein warmes Gefühl nach dem Baden oder Duschen
erwärmen. Es kann auch dazu verwendet werden, im Winter die Kleidung vor dem Anziehen anzuwärmen. Dieses
Programm erwärmt Kleidungsstücke auf 37 °C (Körpertemperatur), das Display zeigt
läuft bei dieser Temperatur maximal 4 Stunden, wenn das Display
Hinweis: Die Start/Pause-Taste kann während dieses Programms nicht bedient werden.
FERTIG . Maximale Beladung: 3 kg.
AUFWÄRMEN an und das Gerät
Erfrischen (AUFFRISCHEN)
! „Auffrischen“ ist kein Trocknungsprogramm und darf nicht für feuchte Kleidungsstücke verwendet werden.
●
Es kann mit jeder Ladungsgröße verwendet werden, ist jedoch effektiver bei kleineren Ladungen.
●
Achten Sie darauf, Ihren Trockner nicht zu überladen (siehe Gewebeart).
●
Dies ist ein 20-minütiges Programm, das die Kleidung mit kalter Luft durchlüftet. Kann auch verwendet werden,
um warme Kleidung abzukühlen.
49
Page 50

Start und Programme
Bügelleicht-Programm
D
„Bügelleicht“ ist ein Gang zur Anwendung mit trockener Wäsche und vermindert die Faltenbildung für einfacheres Bügeln und
Zusammenfalten, er dauert maximal 15 Minuten.
! „Bügelleicht“ ist kein Trocknungsprogramm und darf nicht mit feuchten Wäschestücken verwendet werden.
Es soll deshalb nicht für nasse Wäsche verwendet werden.
1. Die maximale Beladung darf nicht überschritten werden.
Die nachstehenden Gewichtsangaben beziehen sich auf reine Trockenwäsche:
Gewebeart Maximale Ladekapazität
Baumwolle und Baumwoll-Mischgewebe 2,5 kg
Jeans 2 kg
2. Die Wäsche unmittelbar nach Abschluss eines Programms aus dem Trockner nehmen. Wäschestücke aufhängen, falten
oder bügeln und in den dafür vorgesehenen Schrank legen. Sollte dies nicht möglich sein, das Programm wiederholen.
Die Bedielemente
! Warnung : Nach dem Drücken der Start/Pause-Taste
kann das Programm nicht mehr geändert werden.
Zum Ändern eines Programms ist die Start/Pause-Taste
zu drücken. Die Leuchte blinkt daraufhin gelb, um anzuzeigen,
dass das Programm unterbrochen wurde. Nun kann ein neues
Programm mit den gewünschten Optionen gewählt werden.
Daraufhin blinkt die Leuchte grün. Durch erneutes Drücken
der Start/Pause-Taste wird das neue Programm gestartet.
●
Optionstasten/-symbole
Mit diesen Tasten lässt sich das gewählte Programm an den
eigenen Bedarf anpassen. Bevor eine Option gewählt werden
kann, muss ein Programm mithilfe der Programmwahltaste
eingeschaltet worden sein. Bei manchen Programmen stehen
nicht alle Optionen zur Verfügung (siehe Start und Programme).
Wenn eine bestimmte Option nicht zur Verfügung steht und
der taste wird betätigt, ertönt der Summer dreimal. Wenn die
Option verfügbar ist, leuchten die Anzeigeleuchten auf der
Displayeinheit neben den unteren Tasten auf, um die Auswahl
der Option anzuzeigen.
Einschaltverzögerung
Der Start bestimmter Trocknerprogramme (siehe Digital
Anzeige und Start und Programme) kann um bis zu 24 Stunden
nach hinten verschoben werden. Die Wasserbehälter muss vor
Einstellung einer Startzeitvorwahl entleert werden.
Knitterschutz
Die Option Vorbehandlungsknitterschutz ist nur verfügbar,
wenn Einschaltverzögerung ausgewählt wurde. Dabei wird
die Wäsche bis zum Programmstart durch leichte
Trommelbewegungen aufgelockert, damit sie nicht verknittert.
Die Option Nachbehandlungsknitterschutz sorgt dafür, dass
nach dem Trocknen und Abkühlen der Wäsche diese durch
leichte Trommelbewegungen aufgelockert wird, damit sie
nicht verknittert, wenn sie nach Programmende nicht gleich
aus der Trommel genommen wird. Hinweis: Die Start/PauseLeuchte blinkt gelb während dieser Phase.
Bei Auswählen dieser Option stehen gegebenenfalls sowohl
Vor- wie auch Nachbehandlungsknitterschutz zur Auswahl.
Temperatur-Taste, Display und Symbole
Nicht alle Programme erlauben Ihnen, die Temperatur zu
wechseln, und einige Programme bieten Ihnen alle drei
Temperaturoptionen:
Niedrig, mittel und hoch.
Wenn die Temperaturoptionen zur Verfügung stehen, ändern
Sie mit dieser Taste die Temperatur, und das Display zeigt
dann kurzzeitig die ausgewählte Temperatur zusammen mit
dem Symbol für diese an:
HOHE TEMPERATUR MITTLERE TEMPERATUR NIEDRIGE TEMPERATUR
Extrapflege
Diese Schonfunktion für Baumwoll- hilft, die Leuchtkraft Ihrer
Wäsche dank der richtigen Trommelrotation (wird im letzten
Teil des Zyklus verringert) und der richtigen Temperatur lange
zu erhalten.
Hinweis: Kann nicht mit den Trocknungsgraden „Trocken+“,
„Schranktrocken“ und „Leicht trocken“ verwendet werden.
Weniger Knäuelbildung (Knitterschutz)
Bei dieser Option wird die Trommelbewegung modifiziert,
um weniger Knäuelbildung und Verknoten Ihrer
Wäschestücke zu erreichen.
Bei dieser Option werden die besten Ergebnisse erzielt,
wenn sie für kleinere Ladungen angewandt wird.
Bügelbereit (Bügelfertig)
Diese Option ermöglicht Ihnen, Ladungen zu trocknen, bei
denen nur einige der Wäschestücke gebügelt werden
müssen, die Sie nicht vollständig trocknen möchten.
Wenn der Grad „bügeltrocken" erreicht ist, werden Sie durch
einen Summer darüber informiert, dass die Wäschestücke,
die gebügelt werden sollen, herausgenommen werden können.
Der Trockner stoppt dann und die Start/Pause-Leuchte
leuchtet orange auf. Nehmen Sie die Wäschestücke, die Sie
bügeln möchten, heraus, schließen Sie die Tür wieder und
drücken Sie die Start/Pause-Taste. Der Trockner trocknet
dann die verbleibenden Wäschestücke bis zu dem
voreingestellten Grad.
Es kann für Ladungen bis 3 kg verwendet werden.
Hinweis: Diese Option kann nicht mit den
Trocknungsgraden „Bügeltrocken“ und „Dampftrocken“
verwendet werden.
●
Digital ANZEIGE
88:88
Im Display wird entweder die noch verbleibende Startzeitvorwahl
oder die noch verbleibende Dauer eines Trockenprogramms
angezeigt (siehe Digital Anzeige).
Aus dem Display geht auch hervor, ob ein technisches
Problem am Trockner aufgetreten ist. In einem solchen Fall
ist im Display der Vermerk “ F ” gefolgt von einem
Fehlercode zu sehen (siehe Fehlersuche).
●
Behälter leeren
(Meldungen über das Leeren können ignoriert werden, wenn
Ihr Trockner an einen Abfluss angeschlossen ist, da dann
keine Notwendigkeit besteht, den Wasserbehälter zu leeren).
Eine Meldung wird angezeigt, um Sie an das Leeren des
Wasserbehälters zu erinnern.
Wenn der Wasserbehälter während eines Programms gefüllt
is, schaltet die Heizung ab und der Trockner geht in die
Abkühlphase. Danach stoppt er und die Meldung
WASSERBEHÄLTER LEEREN macht Sie darauf aufmerksam.
Der Wasserbehälter muss entleert und der Trockner erneut
gestartet werden, da sonst die Kleidungsstücke nicht
getrocknet werden können. Wenn der Trockner erneut gestarten
wird, dauert es einige Sekunden, bevor das Symbol erlischt.
Um dies zu verhindern, sollte der Wasserbehälter nach jedem
Gebrauch des Trockners entleert werden (siehe Wartung).
●
Öffnen der Tür
Durch das Öffnen der Tür bei laufendem Trockenprogramm wird
der Wäschetrockner angehalten. Anschließend passiert folgendes:
Hinweis: Die START/PAUSE-Leuchte blinkt gelb während
der Nachbehandlungsphase eines Programms.
●
Das Display zeigt
●
Während einer Startzeitvorwahl wird die Verzögerung
PAUSE an.
weiter gegen Null gezählt. Der Start/Pause-taste muss
gedrückt werden, damit das verzögerte Programm wieder
fortgesetzt werden kann.
Die Anzeige ändert sich und zeigt den gegenwärtigen
Status an.
●
Der Start/Pause Taste muss gedrückt werden, um das
Programm fortzusetzen. Die Anzeige ändert sich und
zeigt den gegenwärtigen Status an.
●
Während einer Nachbehandlungsknitterschutz endet
das Programm. Drücken der Start/Pause-Taste startet ein
neues Programm ab dem Beginn.
●
Hinweis
Falls es zu einem Stromausfall kommt, schalten Sie den Strom
ab oder ziehen Sie den Netzstecker. Wenn der Strom wieder
da ist, drücken Sie die EIN/AUS-Taste und halten Sie sie
gedrückt, bis das Display kurzzeitig EINSCHALTEN
anzeigt und sich der Trockner wieder einschaltet. Drücken
Sie dann die Taste Start/Pause, und das Programm wird
fortgesetzt.
50
Page 51

Gewebeart
Tipps zum Sortieren Ihrer Wäsche
Trocknungszeiten
• Symbole auf den Etiketten überprüfen, um
sicherstellen zu können, dass die entsprechenden
Wäschestücke trocknergeeignet sind.
• Die Wäsche nach Gewebearten sortieren.
In der nachfolgenden Tabelle werden UNGEFÄHRE
Trocknungszeiten in Minuten angegeben. Die
Gewichtsangaben beziehen sich dabei auf trockene
Wäsche:
• Taschen leeren und Knöpfe überprüfen.
• Reißverschlüsse und Haken schließen und lose
Gürtel und längere Schnüre zusammenbinden.
• Jedes Wäschestück auswringen, um schon im
Voraus möglichst viel Wasser zu entfernen.
! Keine tropfend nasse Wäsche in den Trockner legen.
Hierbei handelt es sich nur um ungefähre
Zeitangaben, die von folgenden Faktoren abhängen
können:
• Menge des nach dem Schleudergang in der
Wäsche zurückbleibenden Wassers. In
Handtüchern und Feinwäsche bleibt zum Beispiel
Maximale Beladungskapazität
Die maximale Beladungskapazität sollte nicht
überschritten werden. Die nachfolgenden Gewichte
beziehen sich auf Trockenwäsche:
Naturfasern: max. 9 kg
Kunststofffasern: max. 3 kg
! Den Trockner NICHT überladen, da dies die
Trocknungsleistung beeinträchtigt.
mehr Wasser zurück.
• Stoffbeschaffenheit: Artikel aus derselben Qualität
jedoch mit anderer Beschaffenheit oder Dicke
können länger oder kürzer zum Trocknen
brauchen.
• Menge: Einzelne Wäschestücke oder kleine
Ladungen können unter Umständen länger zum
Trocknen brauchen.
• Trockenheit: Wenn die Wäsche später gebügelt
werden soll, kann sie in einem noch leicht feuchten
Zustand aus dem Trockner genommen werden.
Pflegeetiketten
Prüfen Sie die Etiketten an Ihren Kleidungsstücken,
insbesondere dann, wenn für ein bestimmtes
Kleidungsstück das erste Mal im Trockner verwendet
wird. Typische Symbole sind:
Andere Wäschestücke können so lange im
Trockner bleiben, bis sie vollkommen trocken sind.
• Temperatureinstellung.
• Raumtemperatur: Wenn sich der Trockner in einem
kalten Raum befindet, dauert es länger, bis die
Wäsche trocken ist.
• Sperrige Artikel: Der Trockner kann auch für
Kann im Wäschetrockner getrocknet
werden
Nicht geeignet für Wäschetrockner
sperrige Artikel verwendet werden. Dabei
empfiehlt es sich jedoch, diese mehrmals aus dem
Trockner zu nehmen und kräftig zu schütteln,
bevor der Trocknungszyklus fortgesetzt wird.
! Wäsche niemals übermäßig trocknen.
Bei hoher Temperatur im
Wäschetrockner trocknen
Alle Gewebe enthalten eine geringe Menge an
natürlicher Feuchtigkeit, wodurch sie weich und
flauschig bleiben.
Bei niedriger Temperatur im
Wäschetrockner trocknen
Baumwolle
Hohe
Temperatur
Synthetik
Mittlere
Temperatur
Empfindliches
/ Feines
(Acrylfasern)
Niedrige
temperatur
●
Hinweis: Am Ende eines Trocknungszyklus kann Wäsche aus Baumwolle noch feucht sein, falls Artikel aus
1 kg
Elektronisch gestauert
Minuten automatisch
Zeitgesteuert
Trocknungszeiten - bei einem Schleudern mit 800-1000 Umdrehungen pro Minute in der Waschmaschine
Elektronisch gestauert
Minuten automatisch
Zeitgesteuert
Trocknungszeiten - bei reduziertem Schleudern in der Waschmaschine
Elektronisch gestauert
Minuten automatisch
Zeitgesteuert
Trocknungszeiten - bei reduziertem Schleudern in der Waschmaschine
0:30 - 0:40
30 - 40
0:30
2 kg
0:40 - 0:55
40 - 55
1:00
1 kg
0:40 - 0:50
40 - 50
1:00
3 kg
0:55 - 1:10
55 - 70
oder 1:30
1:00
1 kg
0:40 - 1:20
40 - 80
0:40
oder 1:00 oder 1:20
4 kg
1:10 - 1:20
70 - 80
1:30
5 kg
1:20 - 1:30
80 - 90
1:30
2 kg
0:50 - 1:10
50 - 70
1:00
6 kg
1:35 - 2:00
95 - 120 120 - 140
1:30
oder 2:00
7 kg
2:00 - 0:20
2:00
oder 2:40
1:20 - 1:40
80 - 100
1:20 oder 1:40
Baumwolle und Synthetik zusammen in den Trockner gelegt wurden. In diesem Fall kann die Wäsche einfach
noch etwas länger in der Maschine getrocknet werden.
8 kg
2:00 - 2:40
130 - 160
2:00
3 kg
1:10 - 1:30
70 - 90
1:00
2 kg
oder 2:40
oder 1:30
D
9 kg
2:30 - 2:50
140 - 170
2:40 oder 3:00
51
Page 52

Fehlersuche
D
Bei einer Gerätestörung bitte zunächst folgende, mögliche Ursachen überprüfen, bevor Sie sich an unseren
autorisierten Kundendienst werden:
Problem:
Trockner startet nicht.
Mögliche Ursache / Lösung:
●
Der Netzstecker ist nicht eingesteckt oder es ist kein richtiger Kontakt
zwischen Netzstecker und der Steckdose vorhanden.
●
Stromausfall.
●
Durchgebrannte Sicherung. Schließen Sie ein anderes Gerät an die
Steckdose an.
●
Wird ein Verlängerungskabel verwendet? Versuchen Sie, das Stromkabel
des Trockners direkt an die Steckdose anzuschließen.
●
Ist die Tür nicht richtig zu?
●
Der PROGRAMME wurde nicht richtig eingestellt (siehe Start und
Programme).
●
Die Start/Pause-Taste wurde nicht gedrückt (siehe Start und Programme).
●
Trocknungszyklus startet nicht.
Wäsche trocknet nur langsam.
Es wurde eine Startzeitverzögerung eingestellt (siehe Start und Programme).
●
Der Filter wurde nicht gereinigt (siehe Wartung).
●
Muss der Wasserbehälter geleert werden? Die Meldung Wasser leeren
wird angezeigt? (siehe Wartung).
●
Muss der Kondensator gereinigt werden? (siehe Wartung).
●
Die Temperatureinstellung eignet sich nicht für die zu trocknende
Gewebeart (siehe Start und Programme, und siehe Gewebeart).
●
Es wurde nicht die für die Ladung korrekte Trocknungszeit ausgewählt
(siehe Gewebeart).
●
Lufteinlassgitter ist blockiert (siehe Installierung, und siehe Wartung).
●
Die Wäsche war zu nass (siehe Gewebeart).
●
Der Trockner wurde überladen (siehe Gewebeart).
Die Meldung Wasser leeren
wird angezeigt, obwohl der
Trockner noch nicht lange
läuft.
Die Meldung Wasser leeren
wird angezeigt, der
Wasserbehälter ist nicht voll.
Die Wäsche ist nach
Programmende feuchter als
erwartet.
Auf das Display erscheint
Fehlercode F und eine oder
zwei Zahlen.
Auf der Anzeige erscheint alle
6 Sekunden für kurze Zeit
DEMO ON
●
Der Wasserbehälter wurde vor dem Start des Programms nicht entleert.
Nicht warten, bis Wasser leeren angezeigt wird, sondern prüfen und
entleeren Sie den Behälter vor Beginn jedes Trocknenprogramms (siehe
Wartung).
●
Es ist normal, dass die Meldung
ENDE DES TROCKENGANGS, FILTER REINIGEN UND WASSERBEHÄLTER LEEREN
zur Erinnerung erscheint, um den Behälter zu leeren (siehe Display und
Start und Programme).
! Aus Sicherheitsgründen beträgt die maximale Programmlaufzeit des
Trockners 5 Stunden. Wenn ein Automatikprogramm innerhalb dieses
Zeitraums nicht die gewünschte Trockenstufe erreicht, beendet der Trockner
das Programm. Oben angeführte Punke überprüfen und Programm erneut
starten. Wenn die Wäsche immer noch feucht ist, Kundendienststelle
benachrichtiten (siehe Kundendienst).
●
Falls das Display einen Fehler anzeigt:
- die Maschine ausschalten und den Stecker herausziehen. Den
Filter und Kondensator reinigen (siehe Wartung). Dann den Stecker
wieder einstecken, die Maschine einschalten und ein neues
Programm starten. Falls eine Fehlermeldung angezeigt wird,
notieren Sie sich den Code und wenden Sie sich an das
Servicecenter (siehe Kundendienst).
●
Der Trockner befindet sich im Demomodus. Bei gleichzeitigem
3 sekündigen Drücken der Ein/Aus- und der Start/Pause-Taste erscheint
3 Sekunden lang DEMO OFF auf der Anzeige. Daraufhin wird der
Demomodus deaktiviert und der normale Trocknerbetrieb wieder
aufgenommen
.
Die Leuchten im Bedienfeld
des Trockners sind aus,
obwohl der Trockner
eingeschaltet ist.
52
●
Der Trockner hat in den Standby-Betrieb gewechselt, um Strom zu
sparen. Dies passiert nach einem Stromausfall oder wenn Sie Ihren
Trockner angeschaltet lassen, ohne ein Programm auszuwählen oder
nachdem ein Programm beendet wurde.
- Drücken Sie die EIN/AUS-Taste und halten Sie sie gedrückt. Die
Leuchten sollten jetzt angehen.
Page 53

Kundendienst
Bevor Sie den autorisierten
Ersatzteile
Kundendienst anrufen:
●
Versuchen Sie, mit Hilfe der Fehlersuchtabelle das
Problem selbst zu lösen (siehe Fehlersuche).
●
Falls Sie das Problem nicht selbst lösen können,
schalten Sie den Trockner aus und rufen Sie den
Kundendienst in Ihrer Nähe an.
Vom Kundendienst benötigte
Information:
●
Name, Adresse und Postleitzahl
●
Telefonnummer
●
Kurze Beschreibung des Problems
●
Kaufdatum
●
Trocknermodell (Mod.)
●
Seriennummer (S/N)
Wenn Sie versuchen, den Trockner selbst zu
reparieren oder von einer nicht dafür autorisierten
Person reparieren zu lassen, kann dies zu
Verletzungen und einer Beschädigung des Gerätes
sowie zum Erliegen der Herstellergewährleistung
führen.
Wenden Sie sich bei Störungen ausschließlich an
einen autorisierten Vertragskundendienst.
Diese Informationen können Sie dem Typenschild an
der Türinnenseite der Maschine entnehmen.
Energiesparender Betrieb und Umweltschutz
●
Wäsche auswringen, um überschüssiges Wasser vor dem Beladen in den Trockner zu entfernen (wird zuvor eine
Waschmaschine verwendet, einen Zyklus mit hoher Schleuderzahl auswählen).
Dadurch kann während des Trocknens nicht nur Zeit, sondern auch wertvolle Energie gespart werden.
●
Um Energie sparen zu können, die Maschine möglichst immer vollladen. Einzelne Artikel oder kleinere
Ladungen brauchen länger zum Trocknen.
●
Den Filter nach jeder Verwendung reinigen, um den Energieverbrauch möglichst gering zu halten (siehe
Wartung).
D
Recycling- & Entsorgungsinformationen
Aufgrund unseres fortwährenden Engagements für
Umweltschutz behalten wir uns das Recht vor,
hochwertige recycelte Komponenten zu verwenden, durch
die die Kosten für unsere Kunden sowie der
Materialverbrauch möglichst gering gehalten werden
können.
●
Entsorgung des Verpackungsmaterials: Befolgen Sie
örtliche Vorschriften, damit das Verpackungsmaterial
recycelt werden kann.
●
Um das Verletzungsrisko für Kinder möglichst gering
halten zu können, sollten Tür und Stecker entfernt und
das Netzkabel bündig mit dem Gerät abgeschnitten
werden. Diese Teile sollten separat entsorgt werden, um
sicherstellen zu können, dass das Gerät nicht mehr an
die Stromversorgung angeschlossen werden kann.
Entsorgung von Elektroaltgeräten
Gemäß der Europäischen Richtlinie 2012/19/EC über Elektround Elektronik-Altgeräte (WEEE) dürfen ElektrohaushaltsAltgeräte nicht über den herkömmlichen Haushaltsmüllkreislauf
entsorgt werden. Altgeräte müssen separat gesammelt
werden, um die Wiederverwertung und das Recycling der
beinhalteten Materialien zu optimieren und die Einflüsse auf
die Umwelt und die Gesundheit zu reduzieren.
Das Symbol „durchgestrichene Mülltonne“ auf
jedem Produkt erinnert Sie an Ihre Verpflichtung,
dass Elektrohaushaltsgeräte gesondert entsorgt
werden müssen.
Endverbraucher können sich an Abfallämter der Gemeinden
wenden, um mehr Informationen über die korrekte
Entsorgung ihrer Elektrohaushaltsgeräte zu erhalten.
53
Page 54

Produktdaten ...
(Delegierte Verordnung (EU) 392/2012)
D
Marke Hotpoint Ariston Modelle TCD97B
FTCD97B
Nennleistung von Baumwollwäsche für das Standardprogramm bei voller Beladung 9 kg Energieeffizienzklasse B
Gewichteter jährlicher Energieverbrauch (AE
) 615.9 kWh
c
Verbrauch pro Jahr, basierend auf 160 Trockenzyklen des Standard-Baumwollprogramms bei Voll- und Teilbeladung, und der
Verbrauch der Stromsparmodi. Der tatsächliche Stromverbrauch pro Zyklus ist abhängig davon, wie das Gerät verwendet wird.
Dieser Haushaltswäschetrockner ist ein automatischer Kondensationstrockner
Energieverbrauch: bei Vollbeladung E
5.20 kWh, bei Teilbeladung E
dry
Stromverbrauch: ausgeschalteter Zustand (P
) 0.14 W, unausgeschalteter Zustand (Pl) 3.36 W
o
dry1/2
2.82 kWh
Laufzeit des „unausgeschalteten Zustands“ für Stromverwaltungssysteme 30 Minuten
Das zum Trocknen normaler nasser Baumwollwäsche geeignete „Standard-Baumwollprogramm“, das vom Energieverbrauch
her das effizienteste Programm für Baumwolle bei Voll- und Teilbeladung ist, ist
Standard Baumwolle, Hohetemperatur, Schranktrocken
Programmdauer (in Minuten): gewichtete (T
) Voll- und Teilbeladung 110, Vollbeladung (T
t
) 147, Teilbeladung (T
dry
dry1/2
) 82
Kondensationseffizienzklasse B
Durchschnittliche Kondensationseffizienz (%) : Vollbeladung (C
) 83, Teilbeladung (C
dry
) 79, gewichtete (Ct) Voll- und Teilbeladung 81
dry1/2
Luftschallemissionen 69 dB(A) re 1 pW
* ‘Verbraucherinformationen gemäß EU-Verordnung 932/2012’.
Typischer Energieverbrauch Typische Trocknungszeit -
Synthetik Vollbeladung 1.38 kWh, Teilbeladung nicht zutreffend
Synthetik Vollbeladung 65 Minuten, Teilbeladung nicht zutreffend
Diese Maschine erfüllt folgende EG-Direktiven:
-2006/95/EG (Niederspannungsausrüstung)
-2004/108/EG (Elektromagnetische Störfreiheit)
Indesit Company, Viale Aristide Merloni 47, 60044 Fabriano (AN), Italy
54
Page 55

Folleto de instrucciones
GB
English, 1
E
Español, 55
Français, 19
P
Português, 73
DF
Deutsch, 37
FTCD 97B
Cuando encienda la secadora por
primera vez podrá elegir el idioma que
prefiere. Ver página 62
SECADORA
¡Guarde este manual de instrucciones a mano a fin
de consultarlo cuando sea necesario. Llévelo con
usted cuando se traslade, y, si vendiera este
electrodoméstico o si lo pasa a terceros compruebe
que este manual se incluya con la secadora de forma
que el nuevo propietario quede informado acerca de
las advertencias y recomendaciones, además del
funcionamiento de la secadora.
¡Lea estas instrucciones detenidamente; las páginas
que aparecen a continuación contienen información
importante sobre la instalación, además de
recomendaciones sobre el funcionamiento del
electrodoméstico.
Este símbolo te recuerda que debes
leer este manual de instrucciones.
Índice de materias
Instalación, 56
Dónde instalar la secadora
Ventilación
Evacuación del agua
Nivelar su secadora
Conexiones eléctrica
Antes de empezar a utilizar la secadora
Advertencias, 57-58
Seguridad general
Para minimizar el riesgo de incendio
Mantenimiento y cuidados, 59-60
Desconectar la electricidad
Limpiar el filtro después de cada ciclo
Vaciar el recipiente de agua después de cada
ciclo
Limpieza de la unidad de filtrado de la bomba de
calor
Comprobar el tambor después de cada ciclo
Limpiar la secadora
Descripción de la secadora, 61
Para abrir la puerta
Características
El panel de control
La pantalla, 62-64
Comienzo y programas, 64-68
Seleccionar un programa
Tabla de programas
Controles
La colada, 69
Clasificar la colada
Etiquetas de recomendaciones durante el lavado de
la ropa
Tiempos de secado
E
www.hotpoint.eu
Resolución de problemas, 70
Servicio, 71
Piezas de repuesto
Datos del Producto, 72
Reciclado y disposición
55
Page 56

Instalación
E
Dónde instalar la secadora
●
Instale la secadora lejos de estufas,
¡ Asegúrese de que la manguera no queda aplastada
o retorcida cuando la secadora esté en su ubicación final.
calentadores o cocinas, ya que las
llamas pueden dañar el electrodoméstico.
●
espacio mínima 10mm
Si va a instalar el
electrodoméstico
debajo de una
encimera, asegúrese
de dejar un espacio
de 10 mm entre la
espacio mínima
15mm
parte superior y
cualquier otro objeto
que vaya encima o
sobre la máquina y un espacio de 15 mm
entre los costados y el mobiliario lateral o
paredes. Esto asegura la correcta
circulación de aire.
El aparato debe instalarse con la superficie
trasera colocada contra una pared.
Conexiones eléctricas
Compruebe lo siguiente antes de
introducir el enchufe en la toma eléctrica:
●
Asegúrese de tener las manos secas.
●
El enchufe debe llevar conexión a tierra.
●
El enchufe debe tener la capacidad
suficiente para soportar la máxima
potencia de los electrodomésticos, lo que
se indica en la matrícula (véase
Descripción de la secadora).
●
El voltaje de potencia debe encontarse
dentro de los valores indicados en la
matrícula (véase Descripción de la
secadora).
●
La toma debe ser compatible con el
enchufe de la secadora. Si este no es el
caso, cambie el enchufe o la toma.
Ventilación
Cuando la secadora está en uso, debe haber una
ventilación adecuada. Asegúrese que coloca la
secadora en un lugar que no tenga humedad y con
una circulación de aire adecuada. El flujo de aire
alrededor de la secadora es esencial para condensar
el agua producida durante el lavado, la secadora no
funcionará eficazmente en un espacio cerrado armario.
¡ Si utiliza la secadora en un cuarto pequeño o frío
podría experimentarse condensación !
¡ No es aconsejable instalar la secadora en
un armario y bajo ningún concepto debe
instalarse detrás de una puerta con un
mecanismo de seguridad con bloqueo, una
puerta corredera o una puerta con una
bisagra colocada en el lado opuesto a la
de la puerta de la secadora !
¡ La secadora no debe instalarse en el
exterior, incluso si el espacio destinado a
estos efectos está resguardado. Puede ser
muy peligroso si está expuesta a la lluvia o
tormentas !
¡ Una vez instalada, el cable eléctrico y el
enchufe de la secadora deben estar al
alcance de la mano !
¡ No utilice cables alargadores !
¡ El cable de alimentación no debe estar
ni doblado ni torcido !
! El cable eléctrico debe controlarse
periódicamente. Si está dañado, el cable
de alimentación debe sustituirse por el
fabricante, su servicio de asistencia u otro
personal calificado con el fin de evitar
peligros. Los cables de alimentación
Evacuación del agua
Si la secadora está instalada cerca de un desagüe, el
agua puede evacuarse por este desagüe. Esto evita la
necesidad de vaciar el recipiente de agua. Si la secadora
se apila sobre una lavadora o se instala junto a ella puede
compartir el mismo desagüe. El desagüe debe estar
a menos de 1 m desde la parte inferior de la secadora.
Extraiga la manguera existente
de la posición que se muestra
en la imagen A.
nuevos o más largos pueden adquirirse
adicionalmente de distribuidores
autorizados !
¡ El fabricante declina toda
responsabilidad en caso de no seguirse
alguna de estas normas !
¡ En caso de cualquier duda consulte con
un electricista cualificado !
Antes de empezar a utilizar la secadora
Una vez haya instalado la secadora y
antes de utilizarla, limpie el interior del
imagen A
tambor para retirar el polvo que haya podido
acumularse durante el transporte.
A continuación instale una
manguera con una longitud
adecuada en la posición que se
muestra en la imagen B.
56
Máximas dimensiones de carga
Fibras naturales : 9 kg
imagen B
Page 57

Advertencias
¡ El electrodoméstico ha sido diseñado y
fabricado según las normas
internacionales de seguridad.
Por razones de seguridad le comunicamos
las siguientes advertencias. Por favor,
léalas con atención !
Seguridad general
●
La presente secadora puede utilizarse
por personas (incluidos los niños a partir
de 8 años) con capacidad física,
sensorial o mental reducida o sin
experiencia y conocimiento, a condición
de que sean vigiladas o reciban las
instrucciones de uso del dispositivo por
parte de una persona responsable de su
seguridad.
●
Esta secadora ha sido diseñada para uso
doméstico y no profesional.
●
No tocar el electrodoméstico con los pies
descalzos o con las manos o pies
mojados.
●
Desenchufar la máquina tirando del
enchufe, no del cable.
●
Después de utilizar la secadora,
desenchúfela. Mantenga la puerta
cerrada a fin de asegurar que los niños
no puedan utilizarla como un juguete.
●
Los niños deberán vigilarse para
asegurarse de que no jueguen con la
secadora.
●
El mantenimiento y la limpieza no deben
ser realizados por niños sin vigilancia.
●
Los niños de edad inferior a 3 años
deben mantenerse alejados de la
secadora en ausencia de vigilancia
constante.
●
El aparato debe instalarse correctamente
y disponer de la ventilación adecuada.
La entrada de aire de la parte delantera
de la secadora nunca debe estar
obstruida (véase Instalación).
●
Nunca utilice la secadora sobre
alfombras en las que la altura del pelo
evitaría que el aire se introdujera en la
secadora por la base.
●
Compruebe que la secadora esté vacía
antes de cargar la colada.
●
La parte de atrás de la secadora
puede estar muy caliente. Nunca la
toque mientras está funcionando.
●
No utilice la secadora a menos que el
filtro, el recipiente de agua y el
condensador estén correctamente
instalados (véase Mantenimiento).
●
No cargue la secadora demasiado (véase
La colada) para las cargas máximas.
●
No cargue prendas que estén muy
mojadas.
●
Compruebe detenidamente todas las
instrucciones que se ofrecen en las
etiquetas de las prendas (véase La
colada).
●
No seque artículos grandes o muy
voluminosos.
●
No seque fibras acrílicas a altas
temperaturas.
●
No desconecte la secadora cuando los
artículos en su interior están todavía
calientes.
●
Limpie el filtro cada vez que use la
secadora (véase Mantenimiento).
●
Vacíe el recipiente de agua después de
cada uso (véase Mantenimiento).
●
Limpie la unidad del condensador
después de intervalos periódicos (véase
Mantenimiento).
●
No permita que se acumulen pelusas
cerca de la secadora.
●
Nunca suba encima de la secadora ya
que podría ocasionar daños.
●
Siga siempre las normas y los
requerimientos eléctricos (véase
Instalación).
●
Compre siempre piezas de repuesto y
accesorios originales (véase Servicio).
E
57
Page 58

Advertencias
E
Para minimizar el riesgo de incendio
en la secadora, deberá seguir las
siguientes precauciones:
●
Seque las prendas únicamente si se han
lavado con detergente y agua, se han
aclarado y centrifugado.
Existe el peligro de incendio si se secan
artículos que NO se han lavado con
agua.
●
No seque prendas que hayan sido
tratadas con productos químicos.
●
No seque prendas que se hayan
manchado o empapado con aceites
vegetales o aceites de cocina, ya que
constituyen un peligro de incendio. Las
prendas manchadas de aceite pueden
inflamarse de forma espontánea,
especialmente cuando están expuestas
a fuentes de calor como una secadora.
Las prendas se calientan, causando una
reacción de oxidación con el aceite, y a
su vez, la oxidación crea calor. Si el
calor no puede escapar, las prendas
pueden calentarse lo suficiente para
arder. Apilar o guardar prendas
manchadas de aceite puede evitar que
el calor escape y constituir un peligro de
incendio.
Si es inevitable meter en la secadora
tejidos que contienen aceite vegetal o
de cocina o prendas manchadas con
productos de cuidado capilar, dichas
prendas deberán lavarse primero con
detergente extra; de este modo se
reducirá el peligro, aunque no se
eliminará del todo. No deberán sacarse
de la secadora y apilarse mientras estén
calientes.
●
No seque prendas que se hayan limpiado
o lavado en, o empapado con o
manchado de petróleo o gasolina,
disolventes de limpieza en seco u otras
sustancias inflamables o explosivas. Las
sustancias altamente inflamables
utilizadas comúnmente en entornos
domésticos, como el aceite para
cocinar, la acetona, el alcohol
desnaturalizado, el queroseno, los
quitamanchas, el aguarrás, las ceras y
los limpiadores de cera. Compruebe
que estas prendas se hayan lavado en
agua caliente con una cantidad extra de
detergente antes de secarlas en la
secadora.
●
No seque prendas que contengan goma
espuma (también conocida como
espuma látex), o materiales de textura
similar. Al calentarse, los materiales de
goma espuma producen fuego por
combustión espontánea.
●
No deben utilizarse en la secadora
suavizantes o productos similares para
eliminar los efectos de la electricidad
estática, a menos que lo haya
recomendado específicamente el
fabricante del suavizante.
●
No seque ropa interior que contenga
refuerzos metálicos, por ejemplo,
sujetadores con varillas de refuerzo
metálicas.
La secadora puede dañarse si los
refuerzos metálicos salen durante el
secado.
●
No seque prendas de caucho o plástico
como gorros de ducha o que contengan
goma espuma (también conocida como
espuma látex), o protecciones
impermeables para bebés, polietileno o
papel.
●
No seque prendas con refuerzo de
caucho, con almohadillas de goma
espuma, cojines, chanclas y zapatillas
de tenis revestidas de caucho.
●
Vaciar los bolsillos de todos los objetos,
como encendedores o fósforos.
¡ ADVERTENCIA: Nunca pare la secadora antes de terminar el ciclo de secado a menos
que saque inmediatamente todos los artículos y los extienda para que se disipe el calor !
58
Page 59

Mantenimiento y cuidados
Desconectar la electricidad
¡ Desenchufe la secadora mientras no la
esté utilizando, cuando la limpie y durante
los trabajos de mantenimiento !
Limpiar el filtro después de cada ciclo
El filtro es una pieza importante de la
secadora: acumula las pelusas y los hilos
que se forman mientras se seca la ropa.
Cuando termine de secar, por lo tanto,
limpie el filtro aclarándolo debajo del grifo
o con la aspiradora. Si el filtro se obstruye,
el flujo de aire en el interior de la secadora
se verá seriamente afectado: los tiempos
de secado se alargarán y consumirá más
energía. Asimismo, podría ocasionar
daños a la secadora.
El filtro se encuentra delante del remate de
la secadora (véase el diagrama en la
siguiente página).
Quitar el filtro:
1. Tire del asa de plástico del filtro hacia
arriba
2. Abra el filtro y limpie
las pelusas del interior.
3. Vuelva a colocar el filtro
correctamente.
Asegúrese que el filtro
se ha colocado
completamente a ras
con el remate de la
secadora.
4.Elimine cualquier pelusa presente en el
interior de la puerta y alrededor del sello
de la puerta.
! Si el recipiente de agua no se vacía, el agua
podría ocasionar que:
- Se detenga el calentamiento de la máquina (por
lo tanto la carga podría estar todavía húmeda al
finalizar el ciclo de secado) (véase Controles).
●
Cebado del sistema de recogida de agua
Cuando la secadora es nueva, el recipiente del
agua no recogerá agua hasta que el sistema esté
cebado. Esto llevará 1 o 2 ciclos de secado. Una
vez cebado recogerá agua durante todos los ciclos
de secado.
Limpiar la unidad del condensador
Periódicamente (cada mes) retire la
unidad del condensador y limpie la
acumulación de pelusas de entre las
placas, aclarándolo debajo del grifo de
agua fría. Esto debe hacerse con agua fría
desde la parte trasera del condensador.
Quitar el condensador:
1.Desenchufe la secadora y abra la puerta.
2.Abra la cubierta del condensador
(véase el diagrama).
Suelte los tres pestillos
haciéndolos girar 90°
grados hacia la derecha y
tirando del mango para
separarlo de la secadora.
Limpie la superficie de los sellos y vuelva
a colocarlos con las flechas apuntando
hacia arriba asegurándose de que estén
sujetos.
E
¡ No utilice la secadora sin haber colocado
el filtro !
Vaciar el recipiente de agua después de
cada ciclo
Extraiga el depósito de la
secadora, retire el tapón grande
o pequeño y vacíe el depósito
en un fregadero u otro desagüe
adecuado. Vuelva a colocar el
tapón y coloque el depósito con
firmeza.
¡ Compruebe siempre el contenedor y vacíelo antes de
iniciar un nuevo programa de secado !
59
Page 60

Mantenimiento y cuidados
E
Recipiente de
agua
Filtro
Unidad del
condesador
Pestillos
Comprobar el tambor después de cada
ciclo
Girar el tambor manualmente para retirar las prendas
pequeñas (pañuelos) que pudieran dejarse atrás.
Limpieza del tambor
¡ No utilice productos de limpieza abrasivos, lana de
acero o acero inoxidable para limpiar el tambor.
grifo
trasera
delantera
Entrada de aire
Cubierta del condesador
Unidad del condesador
Consejos Rápidos
●
Recuerda limpiar el filtro puerta y el filtro
condensador tras cada secado.
●
Recuerda vaciar el recipiente de agua
tras cada carga.
! Procediendo de esta manera podrás
obtener el máximo de prestaciones !
Es posible que comience a formarse una capa de
color en el tambor de acero inoxidable, esto puede
deberse a la combinación de agua y, o, productos de
limpieza como suavizante de ropa. Esta capa de color
no afecta el rendimiento de la secadora.
Limpieza
●
Las piezas externas de metal, plástico o goma
pueden limpiarse con un paño húmedo.
●
De forma periódica (cada 6 meses) se recomienda
pasar el aspirador
delantera
pelusa o polvo. También es aconsejable pasar el
aspirador en la parte delantera donde se ubica el
condensador y los filtros para eliminar cualquier
acumulación de pelusas.
¡ No utilice disolventes ni abrasivos.
¡ Revise la secadora periódicamente por técnicos
autorizados a fin de asegurar la seguridad eléctrica y
mecánica de la misma (véase Servicio).
para eliminar cualquier acumulación de
por la rejilla de la entrada de aire
60
Page 61

Descripción de la secadora
Características
Cubierta del condensador
Panel de control
Matrícula
Filtro
Botones de
SELECCIÓN de PROGRAMAS
Recipiente de agua
Modelo y número de serie
Respiradero de entrada de aire
Pantalla de visualización
E
Mango de la cubierta del
condensador
(Tirar para abrir)
Botón de
ENCENDIDO/APAGADO
Si se pulsa el botón ENCENDIDO/APAGADO
cuando la secadora está en funcionamiento: Si la
pantalla indica
Si la pantalla indica
botón y en la pantalla se observará una cuenta atrás
3, 2, 1 y la secadora se parará.
Pulse y mantenga pulsado de nuevo el botón durante
más de 3 segundos: la pantalla mostrará brevemente
ENCENDIDO .
Los botones de SELECCIÓN de PROGRAMAS
configuran el programa: pulse el botón correspondiente
al programa que desea seleccionar (véase
Comienzo y Programas).
Botones e indicadores de OPCIÓN: estos botones
permiten elegir las opciones disponibles del
programa seleccionado (véase Controles). Los
indicadores de la pantalla situada junto a los botones
se encienden para mostrar la opción seleccionada.
El botón/luz INICIO/PAUSA inicia un programa
seleccionado. Cuando se ejecuta un programa, al
pulsar este botón se pausa el programa, se oirá un
pitido, la pantalla mostrará PAUSA y la secadora
se detendrá.
La luz se muestra en verde cuando el programa está
en marcha, parpadea en ámbar si el programa está
DESCONEXIÓN , la secadora se para.
PULSAR Y MANTENER , pulse el
BLOQUEO INFANTIL
y OPCIONES –
Botones y luces
en pausa o parpadea en verde si está en modo de
espera para iniciar un programa (véase Comienzo y
Programas).
Nota: esta luz también parpadea de color ámbar
durante la fase de Cuidado posterior de un programa.
En la pantalla se muestran advertencias e información
sobre el programa seleccionado y su progreso (véase
la página siguiente).
Botón
pulsado este botón después de seleccionar el programa
y las opciones deseadas para evitar que otra persona
cambie el programa
durante unos instantes.
Cuando el icono esté encendido, los demás botones
se desactivarán. Mantenga el botón pulsado para
cancelar la opción. El icono se apagará y en pantalla
aparecerá brevemente el mensaje
Nota: Esta secadora está en conformidad con las
nuevas normativas vinculadas al ahorro energético.
Está dotada de un sistema de auto-apagado (stand
by) que, en caso de no funcionamiento, se activa
pasados aproximadamente 30 minutos. Mantenga
pulsado el botón ENCENDIDO/APAGADO hasta que
la pantalla muestre brevemente
secadora se reactiva.
de BLOQUEO : pulse y mantenga
/icono
. La pantalla mostrará
Botón y Luz de
INICIO/PAUSA
CERRADA
DESBLOQUEADA
ENCENDIDO ; la
61
Page 62

La pantalla
Selección de idioma
E
Cuando encienda por primera vez la secadora, elija el idioma que prefiere en la lista disponible.
Para cambiar el idioma: la selección del idioma actual debe
estar parpadeando en la primera línea de la pantalla.
- Pulse el botón ENCENDIDO/APAGADO para apagar la
pantalla; después, pulse y mantenga pulsados los 3
botones: Nivel de calor, Secado
temporizado y Nivel de secado durante 5 segundos.
- Pulse el botón Nivel de calor o Secado temporizado
para desplazarse arriba o abajo por la lista.
- Cuando el idioma que busca empiece a parpadear en la
línea superior de la pantalla, pulse el botón Nivel de
secado para seleccionarlo.
Descripción de la pantalla
Selección de programa y pantalla
El programa seleccionado se muestra en la primera línea de la pantalla,
el mensaje aparece mientras el programa se está ejecutando.
Ocho botones ofrecen dos opciones de lavado: pulse el botón una vez
para elegir la primera y púlselo de nuevo para la segunda opción.
Se visualizará el programa seleccionado. El último botón selecciona My Cycle.
Primera pulsación Segunda pulsación
1
ALGODÓN NORMAL
2
CAMA & BAÑO
3
SINTÉTICO
4
VAQUEROS
5
LANA
6
DELICADO
7
PELUCHES
8
FÁCIL PLANCHADO
9
MY CYCLE (véase más adelante)
CAMISA ALGODÓN
ANTI ALERGIAS
CAMISA SINTÉTICA
PLUMÓN
SEDA
BABY
HEAT & ENJOY
REFRESCO
My Cycle: Cuando seleccione el botón de My Cycle, en pantalla se mostrará el programa seleccionado con una
«M» delante del nombre: Por ejemplo
M ALGODÓN NORMAL (véase Comienzo y Programas).
Niveles de secado
Durante la selección de un programa automático que tenga varios niveles de secado (véase
La segunda línea de la pantalla muestra el nivel de secado que se
necesita. Cada vez que pulse el botón Nivel de secado se mostrará
la opción siguiente de la lista. La pantalla también muestra de 1 a 7
barras dependiendo de la selección que haga; se visualizan durante el
avance de los programas.
! Algunos programas automáticos no permiten cambiar el nivel de secado o no tienen todas las opciones de
nivel de secado.
HÚMEDO
PARA PLANCHA
COLGAR PLUS
PARA COLGAR
LIGERO
Secado húmedo: seca la ropa de manera que esté preparada para planchar con máquinas
o planchas de rodillo.
Secado listo para planchar: seca la ropa de manera que esté preparada para planchar con una
plancha de mano.
Secado a fondo para colgar: seca la ropa delicada y la deja preparada para colgar para el
secado final.
Secado para colgar: seca la ropa de manera que esté preparada para colgar para un
secado final.
Secado normal: seca la ropa delicada y la deja lista para guardar.
La tabla Programas).
ARMARIO
EXTRA SECO
62
Secado listo para guardar: seca la ropa de manera que esté preparada para guardar.
Extra Seco: seca la ropa de manera que esté preparada para ponerse.
Page 63

La pantalla
Progreso del programa
La segunda línea de la pantalla muestra el estado del programa:
(los mensajes más largos se desplazan por la línea de texto)
SECADO
SECADO EN FRÍO
CALENTANDO
LISTO
FIN DE CICLO
FIN DE CICLO, LIMPIAR FILTRO Y VACIAR DEPÓSITO
Programa Heat & Enjoy
(si se selecciona la opción Antiarrugas).
Secado temporizado
Después de seleccionar un programa con una opción de
Secado temporizado, pulse el botón Temporizado . Cada
vez que lo pulse, en la pantalla se irá aumentando el tiempo
seleccionado (véase Comienzo y Programas).
Cada pulsación reduce el tiempo de duración y el número de opciones de tiempo disponibles dependiendo del
programa/material seleccionado.
Junto al tiempo se visualiza el icono de Secado temporizado .
El tiempo seleccionado se sigue visualizando después de que se inicie el programa, pero se puede cambiar en
cualquier momento que lo desee.
E
Temporizador de retardo y tiempo de finalización
Algunos programas pueden tener un comienzo retardado (véase Comienzo y Programas). Pulse el botón Inicio
temporizado El icono parpadea.
Con cada pulsación del botón Inicio temporizado el
valor del retardo aumenta
desde
segundos, se anula el retardo.
El tiempo de retardo se muestra en la pantalla junto al botón
Inicio temporizado.
En pantalla se muestra una cuenta atrás de los minutos del
periodo de retardo después de
La segunda línea de la pantalla muestra COMENZADO
Si lo desea, en cualquier momento puede cambiar o cancelar el tiempo de retardo.
Después de pulsar el botón Inicio/Pausa se visualiza el Retardo o el Tiempo para finalizar en horas y minutos y se
inicia una cuenta atrás por minutos.
1h 24h
: a , después
en incrementos de 1 hora,
y
luego, tras unos
OFF
pulsar el botón Inicio/Pausa
Tiempo para finalizar
Cuando finaliza el periodo de retardo (o de todo el programa si no se ha seleccionado retardo), esta parte de la
pantalla mostrará:
- el tiempo estimado hasta el final del programa (programas automáticos)
- el tiempo efectivo restante durante un programa temporizado
Cuando se seleccionen los programas de tiempo, el tiempo mostrado durante el ciclo será el tiempo real restante.
Cuando se seleccionen los programas Automático, el tiempo mostrado será una estimación del tiempo restante.
Cuando se seleccione el programa, la pantalla mostrará el tiempo necesario para secar la carga completa. El
tiempo residual se monitorea constantemente durante el ciclo de secado y el tiempo es modificado para mostrar la
mejor estimación posible.
Los dos puntos entre las horas y los minutos de la pantalla parpadean para mostrar que se está realizando la cuenta
atrás.
63
Page 64

La pantalla
Advertencias La segunda línea de la pantalla también sirve para mostrar advertencias y recordatorios:
E
(Los recordatorios se muestran al final del programa).
FIN DEL CICLO, LIMPIAR FILTRO Y VACIAR DEPÓSITO
●
Recuerde que se debe vaciar el contenedor de agua
y limpiar el filtro cada vez que utilice la secadora
(véase Mantenimiento).
DEPÓSITO VACÍO
●
Indica que el contenedor de agua está lleno. El
mensaje tardará algunos segundos en desaparecer,
después de que se haya vaciado el contenedor
de agua. Es necesario que la secadora esté en
marcha para que esto ocurra (véase Controles).
Nota: Si el contenedor de agua se llena y se
muestra este mensaje, se desactiva el calor y la
ropa no se seca.
LIMPIAR CONDENSADOR, FILTRO Y VACIAR DEPÓSITO
●
Este mensaje indica que hay que limpiar la unidad
de condensación (véase Mantenimiento) y se emite
en intervalos, según la frecuencia de uso de la
secadora. Cuando acabe el siguiente programa, el
mensaje se cancela. También debe limpiar el filtro.
LIMP. FILTRO
●
Se muestra durante el programa Anti Alergia e indica
que el filtro necesita limpieza para completar todo el
ciclo anti alergia (véase Mantenimiento).
Comienzo y Programas
Seleccionar un programa
1. Enchufar la secadora a la toma eléctrica.
2. Clasifique la colada según la clase de tejido (véase
La colada).
3. Abra la puerta y asegúrese que el filtro está limpio y
en posición y que el recipiente de agua está vacío e
instalado (véase Mantenimiento).
4. Cargue la máquina y asegúrese que no haya
ninguna prenda atrapada en el cierre de la puerta.
Cierre la puerta.
5. Si la pantalla no está encendida:
Pulse el botón de Encendido/Apagado
6. Pulse el botón del Programa correspondiente al tipo
de tejido que vaya a secar. Consulte la tabla
Programas (véase Programas) y las indicaciones
para cada tipo de tejido (véase La colada).
- Si se selecciona el botón , los pasos 7 y 8
no son necesarios (véase abajo).
7. Elija la opción Secado temporizado o Niveles de
secado:
- Si elije Secado Temporizado, pulse y suelte el
botón Temporizado hasta que aparezca en la
pantalla el tiempo deseado
o - Para cambiar la opción predeterminada de secado,
pulse y suelte el botón Niveles de Secado
hasta que se indique el nivel deseado.
! Véase la Tabla de Programas para obtener más
información: disponibilidad de Niveles de secado,
Secado temporizado y Opciones.
Fije un tiempo de demora y otras opciones si
8.
fuera necesario
(véase La pantalla).
.
9. Pulse el botón de INICIO/PAUSA para empezar.
La pantalla indicará el tiempo estimado hasta el final
del programa.
Durante el programa de secado, usted puede
comprobar la colada y sacar las prendas que ya
se han secado mientras el resto continúa secándose.
Cuando vuelva a cerrar la puerta, pulse el botón de
INICIO/PAUSA a fin de Empezar a secar de nuevo
Durante los últimos minutos de los Programas de
10.
secado, antes de completarse el programa, la
secadora realiza una secuencia de enfriamiento
(los tejidos se enfrían), que siempre debe dejar que
termine.
11. Al acabar el ciclo de secado se visualiza un mensaje:
- Si se visualiza
VACIAR DEPÓSITO , el zumbador sonará 3
veces (Nota: Si se seleccionó la opción
SONIDO, el zumbador suena 3 veces cada
30 segundos durante 5 minutos).
- Si se visualiza
Antiarrugas ha sido seleccionada y si no retiran
inmediatamente las prendas, la secadora
funcionará ocasionalmente durante 10 horas
o hasta que se abra la puerta, el zumbador
sonará 3 veces para confirmar que el programa
ha finalizado.
12. Abra la puerta, saque la ropa, limpie el filtro y
vuelva a colocarlo. Vacíe el recipiente de agua y
vuelva a instalarlo (véase Mantenimiento).
13. Desenchufe la secadora.
FIN DEL CICLO, LIMPIAR FILTRO Y
FIN DE CICLO la opción
.
Botón My Cycle
La primera vez que se pulsa el botón, la segunda línea de la pantalla muestra PRES. Y ALMACENAR
Después de seleccionar su programa y opciones favoritas, puede guardar estos ajustes manteniendo pulsado el
botón My Cycle durante 5 segundos como mínimo; la línea superior mostrará un símbolo parpadeante seguido del
programa seleccionado. La alarma emitirá un pitido y en la segunda línea de la pantalla se mostrará
próxima vez que desee usar el programa, pulse el botón y después el botón Inicio/Pausa para ejecutar el programa
Si lo desea, puede cambiar el programa favorito, seleccionando otro programa y/u otras opciones y pulse y
mantenga pulsado el botón
64
:
MEMO
(como se indica anteriormente).
. La
.
Page 65

Comienzo y Programas
PROGRAMAS ESENCIALES - Tabla de programas
¡ Si la pantalla no está encendida; pulse el botón de ENCENDIDO/APAGADO y, a continuación, seleccione el programa.
Programa Opciones disponibles:
Temporizador
de retardo
Antiarrugas
Cuidado Extra
Menos
enredado
Listo para
planchar*
Nivel de calor
Secado
- Alto
✓
Algodón Normal
1
Camisa
Cama y baño
2
Anti Alergias
Sintético
3
Camisa Sintética
*Nota: Esta opción no está disponible con los niveles de secado "Secado listo para planchar" y "Secado húmedo".
Algodón Normal
●
Este es un programa para piezas de algodón.
●
La duración de este programa dependerá del tamaño de la carga, los ajustes de secado seleccionados y la
velocidad de centrifugado utilizada en su lavadora (véase La colada).
●
El programa Algodón Normal certificado por la regulación UE 392/2012 está compuesto por los dos ajustes de
secado: Alto calor y Nivel de Seco listo para guardar, del Programa 1 (Configuración estándar/predeterminada inicial).
Este es el programa más eficiente en términos de consumo de energía (UE 392/2012).
Camisa Algodón
●
Éste es un programa para camisas de algodón.
●
También puede utilizarse para cargas de hasta 3 kg (aproximadamente 10 camisas).
La duración de este programa dependerá del tamaño de la carga, los ajustes de secado seleccionados y la
velocidad de centrifugado utilizada en su lavadora.
Las cargas secadas con los ajustes de Secado listo para guardar normalmente se encuentran preparadas para su
uso, aunque puede que las esquinas o las costuras continúen un poco húmedas. En tal caso, ponga las camisas al
revés y ejecute de nuevo el programa durante un corto periodo de tiempo.
Cama y baño
●
Este es un programa para toallas y sábanas de algodón.
●
La duración de este programa dependerá del tamaño de la carga, los ajustes de secado seleccionados y la
velocidad de centrifugado utilizada en su lavadora (véase La colada).
●
Las cargas secadas con los ajustes de Extra seco normalmente se encuentran preparadas para su uso, aunque
puede que las esquinas o las costuras continúen un poco húmedas especialmente con prendas grandes. En tal
caso, despliéguelas y ejecute de nuevo el programa durante un corto periodo de tiempo.
Programa Anti Alergias
Este programa cuenta con el Sello de garantía de Allergic UK, que refleja la reducción y eliminación efectivas de alergénicos
de la ropa, con el ciclo especial Antialergia Con este programa, gracias al logro de una temperatura constante por un
periodo de tiempo extendido, se neutralizan los efectos de los alergénicos más comunes (incluyendo ácaros y polen).
Puede utilizarse para secar y tratar una carga húmeda de tamaño completo, o en una carga seca de 4 kg. solo para
tratar la colada.
Si la pantalla muestra el mensaje LIMP. FILTRO : Limpie el filtro y reinicie el programa.
Sintéticos
●
Este es un programa para prendas sintéticas a baja temperatura o prendas con mezclas sintética/algodón a temperatura
media.
●
La duración de este programa dependerá del tamaño de la carga, los ajustes de secado seleccionados y la
velocidad de centrifugado utilizada en su lavadora (véase La colada).
Camisa Sintética
●
Éste es un programa para camisas hechas de materiales sintéticos o mezclas de materiales naturales y
sintéticos, como poliéster y algodón.
●
También puede utilizarse para cargas de hasta 3 kg (aproximadamente 14 camisas).
La duración de este programa dependerá del tamaño de la carga, los ajustes de secado seleccionados y la
velocidad de centrifugado utilizada en su lavadora.
Las cargas secadas con los ajustes de Secado listo para guardar normalmente se encuentran preparadas para su
uso, aunque puede que las esquinas o las costuras continúen un poco húmedas. En tal caso, ponga las camisas al
revés y ejecute de nuevo el programa durante un corto periodo de tiempo.
Algodón
✓
✓
✓
✓
✓
✓
✓
✓
✓
✓
✓
✓
✓
✓
✓
✗
- Alto
✗
✓
✓
✓
✓
✗
✗
✗
✗
✗
✗
- Medio
✗
- Bajo
✗ ✗
- Alto
✗
- Medio
✗
- Medio
✗
- Bajo
✗
✗
✗
temporizado
✓
✓
✓
✗
✗
●
Un programa automático
✓
✗
Niveles de secado disponibles
(predeterminado marcado con )
Secado húmedo
Secado listo
para planchar
Secado a fondo
para colgar
✓
✓
✓
✓
✓
✓
✓
✓
Secado para
✓
✓
✓
✓
✓
✓
✓
✓
Sensor de
secado
✓
✓
✓
✓
✓
✓
✓
✓
✓
✓
✓
✓
✓
✓
✓
✓
✓
✓
✓
✓
✓✗ ✓
✓
✓
✓
✓
colgar
Secado normal
✓
✓
✓
✓
✓
✓
✓
✓
✓
✓
✓
✓
✓
✓
✓
✓
Secado listo
para guardar
Extra Seco
✓
✗
✗
✗
✗
✗
✗
E
65
Page 66

Comienzo y Programas
E
PROGRAMAS EXCLUSIVOS - Tabla de programas
¡ Si la pantalla no está encendida; pulse el botón de ENCENDIDO/APAGADO y, a continuación, seleccione el programa.
Programa Opciones disponibles:
Temporizador
de retardo
Antiarrugas
Cuidado Extra
Listo para
planchar
Menos
enredado
Nivel de calor
Secado
temporizado
Vaqueros
4
Edredones
Lana
5
Seda
Baby
6
Delicado
Vaqueros
●
Éste es un programa para vaqueros hechos de algodón de mezclilla. Antes de secar los vaqueros, saque los
bolsillos delanteros hacia fuera.
●
Este programa puede utilizarse para cargas de hasta 3 kg (aproximadamente 4 pares).
●
No mezcle prendas oscuras y claras.
●
Este programa también puede utilizarse en otras prendas hechas del mismo material, como chaquetas.
●
La duración de este programa dependerá del tamaño de la carga, los ajustes de secado seleccionados y la
velocidad de centrifugado utilizada en su lavadora.
●
Las cargas secadas con los ajustes de Extra seco normalmente se encuentran preparadas para su uso, aunque
puede que las esquinas o las costuras continúen un poco húmedas. En tal caso, ponga los vaqueros al revés y
ejecute de nuevo el programa durante un corto periodo de tiempo.
! No es recomendable utilizar este programa si los vaqueros tienen bandas elásticas en la cintura, tachuelas o bordados.
Edredones (PLUMÓN)
! NUNCA seque con este programa prendas dañadas que podrían bloquear el filtro y el orificio de ventilación,
provocando un riesgo de incendio.
●
Solo debe utilizarse en edredones individuales: NO es adecuado para edredones dobles o de cama de matrimonio.
●
Las cargas secadas con este programa normalmente se encuentran preparadas para su uso, pero puede que
algunas partes de las prendas continúen un poco húmedas. En tal caso, despliéguelas y sacúdalas, y ejecute
de nuevo el programa durante un corto periodo de tiempo.
●
También adecuado para chaquetas acolchadas.
●
Seleccione el nivel alta de calor para edredones de algodón y el nivel de calor medio para edredones sintéticos.
●
La duración de este programa dependerá del tamaño y la densidad de la carga y la velocidad de centrifugado
utilizada en su lavadora.
Programa de lana
●
Éste es un programa para secar de forma segura las prendas que llevan el símbolo .
●
Puede utilizarse para cargas de hasta 1 kg (aproximadamente 3 chalecos).
●
Recomendamos que dé la vuelta a las prendas del revés antes de secarlas.
●
Este programa tardará de 60 minutos, sin embargo, puede tardar más tiempo dependiendo del tamaño y de
la densidad de la carga y de la velocidad de centrifugado de la lavadora.
●
Las cargas que se secan utilizando este programa, normalmente están listas para usarlas, sin embargo, con
algunas prendas de más peso es posible que los extremos estén húmedos. Deje que estas prendas terminen
de secarse naturalmente ya que si se secan demasiado pudri’an estropearse.
! A diferencia de otros materiales, el mecanismo del encogimiento de la lana es irreversible, es decir, no volverá a
estirarse a su tamaño y forma original.
! Este programa no es apto para prendas acrílicas.
✓
✓
✓
✗
✗
✓
✓
✓
✗
✗
✓
✓
✗
✗
✗
✗
✗
✗
✗
✗
✗
✗
✗
✗
✗
✗
✗
✗
✗
✗
✗
- Alto
- Medio
✗
✗
✗
✗
✗
✗
✗
✗
✗
✓
Niveles de secado disponibles
(predeterminado marcado con )
Secado húmedo
Secado listo
para planchar
Secado a fondo
Sensor de
secado
✓
✓
✓
●
Un programa automático
●
Un programa automático
✓
✓
✓
✓
✓
✓
✓
✓
✓
para colgar
✓
✓
✓
✓
✓
✓
✓
✓
✓
Secado para
colgar
Secado normal
✓
✓
✓
✓
✓
✓
✓
✓
Secado listo
para guardar
Extra Seco
✓
✗
✗
✗
Seda
●
Éste es un programa para secar la seda delicada.
●
Puede utilizarse para cargas de hasta 0,5 kg.
●
La duración de este programa dependerá del tamaño de la carga, los ajustes de secado seleccionados y la
velocidad de centrifugado utilizada en su lavadora
●
Las cargas secadas con los ajustes de Secado listo para guardar normalmente se encuentran preparadas para
su uso, pero puede que algunas esquinas de las prendas continúen un poco húmedas. Si éste es el caso,
extraiga la carga, ábrala hacia fuera y vuelva a iniciar el programa durante un periodo corto.
66
Page 67

Comienzo y Programas
Programa Bebé
●
Éste es un programa para secar las prendas delicadas y pequeñas de su bebé y la ropa de cama (algodón y felpilla) y
para secar prendas delicadas.
●
NO seque prendas como baberos y bragas pañal con coberturas de plástico.
●
Puede utilizarse para cargas de hasta 2 kg.
●
La duración de este programa dependerá del tamaño y la densidad de la carga y la velocidad de centrifugado
utilizada en su lavadora.
●
Las cargas secadas con este programa normalmente se encuentran preparadas para su uso, pero puede que
algunas esquinas de las prendas continúen un poco húmedas. En tal caso, despliéguelas o vuélvalas del revés
y ejecute de nuevo el programa durante un corto periodo de tiempo.
Delicados
●
Este es un programa para secar sus prendas más delicadas, por ejemplo, de fibra acrílica.
●
Puede utilizarse para cargas de hasta 2 kg.
●
La duración de este programa dependerá del tamaño y la densidad de la carga y la velocidad de centrifugado
utilizada en su lavadora.
●
Las cargas secadas con este programa normalmente se encuentran preparadas para su uso, pero puede que
algunas esquinas de las prendas continúen un poco húmedas. En tal caso, despliéguelas o vuélvalas del revés
y ejecute de nuevo el programa durante un corto periodo de tiempo..
PROGRAMAS EXTRA - Tabla de programas
¡ Si la pantalla no está encendida; pulse el botón de ENCENDIDO/APAGADO y, a continuación, seleccione el programa.
Programa Opciones disponibles:
Niveles de secado disponibles
(predeterminado marcado con )
✓
E
Temporizador
de retardo
Antiarrugas
Cuidado Extra
Listo para
planchar
Menos
enredado
Nivel de calor
Secado
temporizado
Sensor de
secado
Secado húmedo
Secado listo
para planchar
Secado a fondo
para colgar
Secado para
colgar
Secado normal
Secado listo
para guardar
Extra Seco
Peluches
7
Heat & Enjoy
Pre planchado
8
Refresco
9
My Cycle M
✗
✗
✓
✗
✗
✗
●
Depende del programa que elija. Véase detalles anteriores.
✗
✗
✗
✗
✗
✗
✗
✗
✗
✗
✗
✗
✗
✗
✗
✗
✗
✗
●
Un programa automático
✗
●
Un programa automático
✗
●
Un programa automático
✗
●
Un programa automático
✗
Programa Peluches
Con este programa podrá eliminar el polvo más fácilmente y lavar los peluches más a menudo, ya que el tiempo de secado
se reduce considerablemente en comparación con el secado al aire. Es un ciclo de secado delicado que seca a temperatura
moderada y con una suave acción mecánica para mantener al máximo el aspecto original y el brillo del pelo.
Nota: Para prevenir las alergias, congele los peluches durante 24 horas, y a continuación, lávelos y séquelos. Repita el
proceso cada 6 semanas. Antes de secarlos, retire los accesorios como prendas de ropa, collares o cajas de sonido y
proteja los ojos con cinta adhesiva protectora después de secarlos con un trapo.
El tiempo de programa variará dependiendo de la composición exacta de la carga. La carga máxima no deberá superar
los 2,5 kg y ninguna prenda individual deberá pesar más de 600 g.
Heat & Enjoy
Este programa ayuda a calentar toallas y albornoces para tener una sensación cálida después de un baño o una ducha.
También se utiliza para calentar la ropa antes de vestirse en invierno. El ciclo calienta las prendas hasta 37 ºC (temperatura
corporal), la pantalla muestra CALENTANDO y funciona a esta temperatura durante un máximo de 4 horas o hasta que
detiene el ciclo abriendo la puerta cuando la pantalla indica LISTO . Carga máxima: 3 kg.
Note : El botón de Inicio/Pausa se deshabilita durante este programa.
Refresco
! “Refresco” no es un programa de secado y no debe utilizarse para prendas húmedas.
●
Puede utilizarse con cualquier tamaño de carga, pero es más efectivo con cargas pequeñas.
●
No sobrecargue su secadora (véase La colada).
●
Es un programa de 20 minutos que airea la ropa con aire fresco. Utilícelo también para refrescar ropa caliente.
67
Page 68

Comienzo y Programas
Programa de Pre Planchado
"Pre Planchado" es un ciclo de tratamiento para el uso con ropa seca que reduce las arrugas con el fin de facilitar el planchado
E
y plegado, con una duración máxima de 15 minutos.
! "Pre Planchado" no es un programa de secado y no debe utilizarse para prendas mojadas.
Para obtener los mejores resultados:
1. No cargue más que la capacidad máxima.
Estos números se refieren al peso de la ropa en seco:
Tejido Carga máxima
Algodón y mezclas de algodón 2,5 kg
Dril de algodón 2 kg
2. Vacíe la secadora inmediatamente después de que haya finalizado el programa, cuelgue, doble o planche las prendas
y guárdelas en el armario. Si esto no es posible repita el programa.
Controles
! Advertencia : tras pulsar el botón de Inicio/Pausa , es
posible cambiar el programa.
Para cambiar un programa seleccionado, pulse el botón
Inicio/Pausa . La luz parpadea de color ámbar para
indicar que el programa está en pausa. Seleccione el nuevo
programa y las opciones que desee. La luz parpadeará en
. Pulse el botón
verde
empiece el nuevo programa.
●
Botones de OPCIÓN
Estos botones se utilizan para ajustar el programa
seleccionado a sus necesidades. Antes de poder seleccionar
una opción, deberá previamente haber seleccionado un
programa utilizando un botó de selección de programa. No
todas las opciones están disponibles para todos los programas
(véase Comienzo y Programas). Si una opción no está
disponible y pulsa el botón correspondiente, el zumbador
emitirá 3 pitidos. Si la opción está disponible, el indicador
de la pantalla situado junto a los botones inferiores se
enciende para mostrar que se ha seleccionado la opción.
Temporización (Temporizador)
El inicio de algunos programas (véase La pantalla y véase
Comienzo y Programas) puede retrasarse hasta un máximo
de 24 horas.Asegúrese de que el depósito de agua está vacío
antes de programar un inicio con retardo.
Antiarrugas
La opción de cuidado previo solo podrá utilizarse si se ha
seleccionado el inicio retardado. Esta opción hace girar la
ropa ocasionalmente durante el periodo retardado para
evitar que se formen arrugas.
La opción de cuidado posterior hace girar la ropa cuando
han finalizado los ciclos de secado y giro en frío para evitar
que se formen arrugas si no es posible sacar la carga de
inmediato cuando acabe el programa. Nota: durante esta
fase la luz de Inicio/Pausa parpadeará de color ámbar.
Seleccionar esta opción permite utilizar las funciones de
cuidado previo y de cuidado posterior si procede.
Botón Nivel de calor, pantalla e iconos
Algunos programas le permiten modificar el nivel del calor, y
otros le permiten utilizar los tres niveles de calor:
Bajo, Medio y Alto
Cuando están disponibles las opciones de nivel de calor,
pulsando este botón cambia el nivel y la pantalla muestra
brevemente el nivel de calor seleccionado, junto con una
visualización del icono del nivel seleccionado:
CALOR ALTO CALOR MEDIO CALOR BAJO
Cuidado extra
Esta función antienvejecimiento para tejidos de algodón
ayuda a mantener el brillo de su colada durante mucho
tiempo, gracias a la correcta rotación del tambor (reducida
en la última parte del ciclo) y a la temperatura correcta.
Nota: no puede utilizarse con los niveles de secado "Extra
Seco", "Armario" y "Ligero".
Menos enredado
Esta opción modifica el movimiento del tambor para dar una
acción de volteo que reduce enredos y nudos en su ropa.
La opción ‘Menos enredado’ le ofrece mejores resultados
con cargas más pequenas.
Listo para planchar
Esta opción le permite secar cargas en las que sólo algunas
de las prendas necesitan planchado y usted no desea que
Inicio/Pausa otra vez para que
Cuando se alcance el nivel "secado listo para plancha",
sonará una alarma para avisarle de que las prendas que
necesitan planchado se pueden retirar. La secadora se
detiene y la luz de inicio/pausa parpadea en color naranja.
Retire las prendas que desea planchar, cierre la puerta y
pulse el botón inicio/pausa, la secadora continuará hasta
que el resto de prendas alcancen el nivel de secado
seleccionado.
Puede utilizarse para cargas de hasta 3 kg.
Nota: Esta opción no está disponible con los niveles de
secado "Secado listo para planchar" y "Secado húmedo".
●
PANTALLA
88:88
La pantalla indica cuánto tiempo falta para que se inicie un
programa (en el caso de un inicio temporizado), o bien cuánto
tiempo falta para que concluya un programa de secado
(véase La pantalla).
Asimismo, la pantalla indica si existe algún problema con la
secadora. En tal caso mostrará una F, seguida del número
de código de fallo (véase Resolución de problemas).
●
Vaciar el recipiente de agua
(Los mensajes sobre el vaciado pueden ignorarse si ha
conectado la secadora a un desagüe ya que de este modo
no hay necesidad de vaciar el recipiente de agua).
Se muestran mensajes para recordarle que hay que
vaciar el contenedor de agua.
Si el depósito del agua se llena durante un programa, el
calentador se apaga y la secadora realiza una fase de
Secado en frío. Después, se detiene y un mensaje le indica
que hay que DEPÓSITO VACÍO .
Debe vaciar el depósito de agua y reiniciar la secadora o la
ropa no se secará. Tras reiniciar la secadora el mensaje
tardará unos segundos en desaparecer.
Para evitarlo, vacíe siempre el depósito de agua cada vez
que utilice la secadora (véase Mantenimiento).
●
Apertura de la puerta
Si se abre la puerta durante un programa, la secadora
parará y se producirá lo siguiente:
Nota: la luz de Inicio/Pausa parpadea de color ámbar
durante la fase de post-antiarrugas de un programa.
●
La pantalla muestra PAUSA .
●
Durante una fase temporizada, la temporización
continuará su cuenta regresiva. Para reanudar el
programa temporizado debe pulsar el botón de
Inicio/Pausa.
La pantalla cambia para mostrar el estado actual.
●
Para reanudar el programa debe pulsar el botón
Inicio/Pausa. La pantalla cambia para mostrar el estado
actual.
●
Durante la fase antiarrugas (la funcione de cuidado
posterior), el programa finalizará. Pulsando el botón
de Inicio/Pausa se reiniciará un nuevo programa desde
el principio.
●
Nota
Si sufre un corte de fluido eléctrico, apague el aparato o
desenchúfelo. Cuando se restablezca el suministro eléctrico,
pulse y mantenga el botón ENCENDIDO/APAGADO hasta
que la pantalla muestre brevemente
secadora se reactive. Después, pulse el botón Inicio/Pausa
y el programa se reanudará.
ENCENDIDO y la
éstas se sequen completamente.
68
Page 69

La colada
Clasificar la colada
• Compruebe los símbolos en las etiquetas de la
ropa a fin de asegurar que los artículos pueden
secarse con calor.
• Clasificar la colada por tipo de tejido.
• Vaciar los bolsillos y comprobar los botones.
• Cerrar las cremalleras y los corchetes y atar los
cinturones y cordones sueltos.
• Escurra las prendas a fin de eliminar la mayor
cantidad agua como sea posible.
¡ No meter ropas muy mojadas en la secadora.
Tamaño máximo de la carga
No cargue más que la capacidad máxima. Estos
números se refieren al peso de la ropa en seco:
Fibras naturales: 9 kg máx.
Fibras sintéticas: 3 kg máx.
¡ NO cargar demasiado la secadora ya que esto
podría dar como resultado un rendimiento de secado
reducido.
Etiquetas de recomendaciones durante el lavado de
la ropa
Lea siempre las etiquetas de la prenda, especialmente
cuando se sequen con calor por primera vez. Los
símbolos que aparecen a continuación son los más
comunes:
Puede secarse con calor
Tiempos de secado
La tabla (véase abajo) indica el tiempo de secado
APROXIMADO en Minutos. Los pesos se refieren a
prendas secas:
Los tiempos son aproximados y pueden variar
dependiendo de:
• La cantidad de agua retenida en la ropa después
del ciclo de centrifugado: las toallas y las
prendas delicadas retienen mucha agua.
• Tejidos: las prendas del mismo tejido pero con
diferente textura y espesor es posible que no
tengan los mismos tiempos de secado.
• Cantidad de colada: las prendas sencillas o las
cargas pequeñas pueden tardar más tiempo en
secarse.
• Sequedad: Si va a planchar algunas de las
prendas, puede sacarlas mientras están un poco
húmedas. Otras pueden dejarse más tiempo si
necesita que se sequen completamente.
• Ajuste de calor.
• Temperatura de la habitación: Si la habitación en
la que se ha instalado la secadora es fría, la
secadora tardará más tiempo en secar la ropa.
• Volumen: algunos artículos voluminosos pueden
secarse con calor teniendo cuidado. Sugerimos
que saque estos artículos varias veces, los
sacuda y los vuelva a meter en la secadora hasta
que finalice el programa.
E
Algodón
Alto calor
Sintéticos
Calor
Medio
Delicados
(Acrílicos)
Bajo calor
No secar con calor
Secar con calor a una temperatura alta
Secar con calor a una temperatura baja
Duración automática
Minutos automática
Ajuste de Secado
temporizado
1 kg
0:30 - 0:40
30 - 40
0:30
2 kg
0:40 - 0:55
40 - 55
1:00
3 kg
0:55 - 1:10
55 - 70
1:00 ó 1:30
Tiempos de secado a 800-1000 rpm en la lavadora
1 kg
Duración automática
Minutos automática
Ajuste de Secado
temporizado
0:40 - 0:50
40 - 50
1:00
Tiempos de secado con centrifugado reducido en la lavadora
1 kg
Duración automática
Minutos automática
Ajuste de Secado
temporizado
0:40 - 1:20
40 - 80
0:40
ó 1:00 ó 1:20
Tiempos de secado con centrifugado reducido en la lavadora
¡ No seque la ropa en exceso.
Todos los tejidos contienen una cantidad pequeña de
humedad natural, lo que los mantiene suaves y
huecos.
4 kg
1:10 - 1:20
70 - 80
1:30
5 kg
1:20 - 1:30
80 - 90
1:30
2 kg
0:50 - 1:10
50 - 70
1:00
6 kg
1:35 - 2:00
95 - 120
1:30
ó 2:00
7 kg
2:00 - 2:20
120 - 140
2:00
ó 2:40
1:10 - 1:30
1:00 ó 1:30
8 kg
2:00 - 2:40
130 - 160
2:00 ó 2:40
3 kg
70 - 90
2 kg
1:20 - 1:40
80 - 100
ó 1:40
1:20
9 kg
2:30 - 2:50
140 - 170
2:40 ó 3:00
Nota: Al final de un ciclo de secado, es posible que las prendas de algodón estén todavía húmedas si agrupó
algodones y sintéticos juntos. Si sucediese esto, dele un tiempo corto de secado.
69
Page 70

Resolución de problemas
E
Si un día la secadora deja de funcionar. Antes de llamar al Centro de Servicio Técnico (véase Servicio), realice
las siguientes comprobaciones:
Problema:
La secadora no se pone en
marcha.
Posibles causas / Solución:
●
El enchufe no está enchufado en la toma, o no hace contacto.
●
Ha habido un fallo de potencia.
●
El fusible se ha fundido. Pruebe a enchufar otro electrodoméstico en la
toma.
●
¿Está utilizando un cable alargador? Pruebe enchufar el cable de
alimentación directamente en la toma.
●
¿Está la puerta bien cerrada?
●
El PROGRAMA no se ha seleccionado correctamente (véase Comienzo y
Programas).
●
No se ha pulsado el botón de INICIO/PAUSA (véase Comienzo y Programas).
●
No comienza el ciclo de secado.
Tarda mucho tiempo en secar.
Ha ajustado un tiempo con demora (véase Comienzo y Programas).
●
No se ha limpiado el filtro (véase Mantenimiento).
●
¿Necesita vaciar el recipiente de agua? ¿Aparece el mensaje Vaciar
depósito de agua? (véase Mantenimiento).
●
¿Necesita limpiar el condensador? (véase Mantenimiento).
●
El ajuste de temperatura no es ideal para el tipo de tejido que está
secando (véase Comienzo y Programas, y véase La colada).
●
No se ha seleccionado el tiempo de secado correcto para la carga
(véase La colada).
●
La rejilla de la entrada de aire está obstruida. (véase Instalación, y véase
Mantenimiento).
●
Las prendas no estaban mojadas (véase La colada).
●
La secadora está demasiado cargada (véase La colada).
Se muestra el mensaje
‘DEPÓSITO VACIAR’ pero la
secadora sólo ha estado
funcionando durante un breve
periodo de tiempo.
Se muestra el mensaje
‘DEPÓSITO VACIAR’ y el
depósito de agua no está lleno.
El programa termina y la ropa
está más húmeda de lo
esperado.
La pantalla muestra el código
de avería F, seguido de uno o
dos números.
En pantalla aparece brevemente
el mensaje DEMO ACTIVADO
durante 6 segundos.
●
Probablemente, no se vació el recipiente de agua al comienzo del
programa. No espere a la señal de vaciar el agua, compruebe siempre el
contenedor y vacíelo antes de iniciar un nuevo programa de secado
(véase Mantenimiento).
●
Esto es normal, el mensaje:
FIN DEL CICLO, LIMPIAR FILTRO Y VACIAR DEPÓSITO se muestra
para recordar que hay que vaciar el depósito (véase Comienzo y
Programas).
! Por seguridad, la secadora tiene una duración máxima de programa de 5
horas. Si no se ha detectado un programa automático, la humedad final
requerida en este tiempo, la secadora completará el programa y se parará.
Compruebe los puntos anteriores y vuelva a poner en marcha el programa,
si las prendas siguen estando húmedas, póngase en contacto con el
Centro de servicio (véase Servicio).
●
Si la pantalla muestra un fallo:
- apague la secadora y retire el enchufe. Limpie el filtro y el
condensador (véase Mantenimiento). Vuelva a poner el enchufe,
encienda y después inicie otro programa. Si se visualiza un fallo,
tome nota del código y póngase en contacto con el Centro de
Servicio Técnico (véase Servicio).
●
La secadora está en modo «Demostración». Pulse y mantenga pulsados
simultáneamente los botones Encendido/apagado e Inicio/pausa durante
3 segundos. La pantalla mostrará el mensaje DEMO DESACTIVADO
durante 3 segundos y la secadora volverá a funcionar normalmente.
Las luces del panel de control
de la secadora están
apagadas aunque la secadora
esté encendida.
70
●
La secadora ha pasado a modo Standby para ahorrar energía. Esto
ocurre si se sufre un corte de fluido eléctrico o se deja la secadora sin
iniciar un programa o después de que finalice un programa de secado.
- Mantenga pulsado el botón ENCENDIDO/APAGADO y las luces
se encenderán.
Page 71

Servicio
Antes de llamar al centro de servicio
Piezas de repuesto
técnico:
●
Utilice la guía de resolución de problemas para ver
si puede resolver el problema usted mismo (véase
Resolución de problemas).
●
Si no es así, desconecte la secadora y llame al
Centro de servicio técnico más cercano.
Qué información debe facilitar al centro de servicio
Esta secadora es una máquina compleja. Si intenta
repararla usted mismo o una persona no autorizada
puede ocasionar daños a la secadora, además de
invalidar la garantía de piezas de repuesto.
Llame a un técnico autorizado si experimenta algún
problema cuando utilice la máquina.
técnico:
●
nombre, dirección y código postal.
●
número de teléfono.
●
el problema.
●
la fecha de compra.
●
el modelo del electrodoméstico (Mod.).
●
el número de serie (N/S).
Esta información puede encontrarse en la placa
identificativa en el interior de la puerta de la máquina.
Ahorro energético y respeto del medio ambiente
●
Escurrir las prendas para eliminar el exceso de agua antes de secar con calor (si utiliza una lavadora primero,
seleccione un ciclo de centrifugado alto). Hacer esto ahorrará tiempo y energía durante el secado.
●
Seque siempre cargas completas – de esta forma ahorrará energía: una sola prenda o las cargas
pequeñas tardan más tiempo en secarse.
●
Limpie el filtros cada vez que utilice la secadora a fin de reducir el gasto energético (véase Mantenimiento).
E
Información sobre reciclado y disposición
Como parte de nuestro compromiso continuo
por ser responsables con el medio ambiente,
nos reservamos el derecho de utilizar
componentes reciclados de calidad para mantener
los costes de nuestros clientes bajos y reducir el
desperdicio de materiales.
●
Desechar el material de embalaje: siga las normativas
locales, de forma que el embalaje pueda reciclarse.
●
Para reducir al mínimo el riesgo de lesiones
personales a los niños, quite la puerta y el enchufe y
a continuación corte el cable de alimentación al ras
con el electrodoméstico. Deshágase de estas piezas
por separado a fin de asegurar que el electrodoméstico
no pueda volverse a enchufar al suministro.
Eliminación del electrodoméstico viejo
En base a la Norma europea 2012/19/CE de Residuos
de aparatos Eléctricos y Electrónicos (RAEE), los
electrodomésticos viejos no pueden ser arrojados en
los contenedores municipales habituales; tienen que
ser recogidos selectivamente para optimizar la
recuperación y reciclado de los componentes y
materiales que los constituyen, y reducir el impacto
en la salud humana y el medioambiente.
El símbolo del cubo de basura tachado se
marca sobre todos los productos para recordar al
consumidor la obligación de separarlos para la
recogida selectiva.
El consumidor debe contactar con la autoridad local o
con el vendedor para informarse en relación a la
correcta eleminación de su electrodoméstico viejo.
71
Page 72

Datos del Producto...
(Reglamento UE 392/2012)
Marca Hotpoint Ariston Modelo TCD97B
E
FTCD 97B
Capacidad nominal de ropa de algodón para el programa estándar a plena carga 9 kg Eficiencia energética clase B
Consumo anual ponderado de energía (AEc) 615.9 kWh
Consumo por año sobre la base de 160 ciclos de secado con el programa estándar de algodón a plena carga y carga parcial, y
el consumo de los modos de baja potencia. El consumo de energía real por ciclo dependerá de cómo se utilice el aparato.
Esta secadora doméstica es una Secadora automática de condensación
Consumo de energía: plena carga E
Consumo de potencia: apagado (P
Duración del ‘modo ‘encendido’ para sistemas de gestión de potencia 30 minutos
El ‘programa estándar de algodón’ apropiado para el secado normal de prendas de algodón húmedas es el programa más eficiente
en términos de consumo de energía para algodón utilizado a plena carga y carga parcial, que es
Estándar de algodón, Alto calor, Seco listo para guardar
5.20 kWh, carga parcial E
dry
) 0.14 W, encendido (Pl) 3.36 W
o
dry1/2
2.82 kWh
Duración del programa (minutos): ponderado (Tt) plena carga y carga parcial 110, plena carga (T
Eficiencia de condensación clase B
Eficiencia de condensación media (%) : plena carga (C
) 83, carga parcial (C
dry
) 79 ponderada (Ct) plena carga y carga parcial 81
dry1/2
Nivel sonoro: 69 dB(A) con referencia a 1 pW
* “información del consumidor conforme a la Regulación UE 932/2012”.
Energía típica usada - Sintéticos
Tiempo de secado tÌpico - Sintéticos
plena carga 1.38 kWh, carga parcial no se aplica
plena carga 65 minutos, carga parcial no se aplica
) 147, carga parcial (T
dry
dry1/2
) 82
Este electrodoméstico cumple las siguientes directivas de la CEE:
- 2006/95/CEE (Equipos de bajo voltaje)
- 2004/108/CEE (Compatibilidad electromagnética)
Indesit Company, Viale Aristide Merloni 47, 60044 Fabriano (AN), Italy
72
Page 73

Folheto de instruções
GB
English, 1
E
Español, 55
Français, 19
P
Português, 73
DF
Deutsch, 37
FTCD 97B
Quando utilizar o secador pela primeira
vez deverá seleccionar o idioma
preferido - consulte a
página 80
Índice
Instalação, 74
Onde colocar a sua máquina de secar roupa
Ventilação
Drenagem da água
Ligação eléctricas
Antes de iniciar a utilização da sua máquina
de secar roupa
Avisos, 75-76
Segurança Geral
Para reduzir o risco de ocorrência de incêndios
Manutenção e cuidado, 77-78
Desligar a electricidade
Limpar o filtro depois de cada ciclo
Verificar o tambor depois de cada ciclo
Esvazie o recipiente de água após cada ciclo
Limpar a unidade do condensador
Limpar a máquina
Descrição da máquina, 79
Características
Painel de controlo
P
MÁQUINA DE SECAR ROUPA
! Tenha este folheto de instruções à mão para
consultá-lo sempre que necessário. Leve-o consigo
se mudar de casa e, caso venda este aparelho,
passe o folheto ao novo proprietário, de modo a
certificar-se de que este folheto permanece com o
equipamento e de que o novo proprietário pode estar
informado acerca dos avisos e sugestões sobre o
respectivo funcionamento.
! Leia cuidadosamente as instruções; as páginas
que se seguem contêm informações importantes
acerca da instalação, bem como sugestões sobre o
funcionamento da máquina.
Este símbolo serve para lembrar-te
de ler este manual de instruções.
Visor, 80-82
Arranque e programas, 82-86
Escolher um programa
Tabela de programas
Controlos
Roupa, 87
Escolher a sua roupa
Etiquetas de cuidado na lavagem
Tempos de secagem
Resolução de problemas, 88
Reparações, 89
Peças sobressalentes
Reciclagem e Eliminação
Dados do produto, 90
www.hotpoint.eu
73
Page 74

Instalação
!
Onde colocar a sua máquina
●
P
Instale a sua máquina a alguma distância
de ligações de gás, fogões, aquecedores
e placas de cozinha, uma vez que as
chamas podem danificar o aparelho.
mínima espaço 10 mm
●
Se pretende instalar o
aparelho por baixo de
uma bancada ou de
mínima espaço
15 mm
um balcão, não se
esqueça de deixar um
espaço de 10 mm
entre a bancada e
quaisquer objectos ou
acima do tampo da
máquina e um espaço de 15 mm entre as
partes laterais da máquina e mobiliário ou
paredes. Assegura assim a correcta
circulação do ar.
O aparelho deve ser instalado com a
superfície traseira posicionada contra uma
parede.
Certifique-se de que o tubo não fica obstruído ou
dobrado quando a secadora estiver na sua posição
final.
Ligações eléctricas
Certifique-se do seguinte antes de
introduzir a ficha numa tomada de
corrente eléctrica:
●
Certifique-se de que as suas mãos
estão secas.
●
A tomada tem de ter uma ligação à
terra.
●
A tomada deve ter capacidade para suster
a potência máxima de máquinas, que
está indicada na chapa de classificação
(ver Descrição da máquina de secar).
●
A tensão deve encontrar-se dentro dos
valores indicados na chapa de
classificação (ver Descrição da máquina
de secar).
●
A tomada deve ser compatível com a
ficha da máquina. Se não for este o
caso, substitua a ficha ou a tomada.
Ventilação
Quando a secadora estiver em utilização, tem de
existir uma ventilação adequada. Certifique-se de que
coloca a sua máquina num ambiente que não seja
húmido e de que existe uma ventilação adequada. O
fluxo de ar em torno da secadora é essencial para
condensar a água produzida durante a lavagem; a
secadora não funciona em perfeitas condições se
encerrada no espaço fechado ou armário.
! Se utilizar a secadora numa sala pequena e fria,
pode gerar-se alguma condensação.
! Não recomendamos a instalação da
secadora num armário, mas o aparelho
nunca deve ser instalado por trás de uma
porta que se possa trancar, uma porta
deslizante ou com uma dobradiça instalada
no lado oposto à porta da máquina.
Drenagem da água
Se a sua secadora estiver instalada junto a um ponto
de canalização, a água pode ser canalizada para este
sistema. Isto afasta a necessidade de esvaziar o
recipiente de água. Se a secadora estiver empilhada
sobre ou instalada junto à máquina de lavar roupa,
pode partilhar o mesmo ponto de canalização.
altura do cano deve ser inferior a 1m
inferior da secadora.
Retire a mangueira existente da
posição indicada na imagem A.
A partir da parte
A
! A secadora não deve ser instalada ao ar
livre, mesmo que seja num espaço abrigado.
Pode ser extremamente perigosa a
exposição à chuva ou tempestades.
! Depois de instalada, a cablagem eléctrica
e ficha da máquina deve estar facilmente
alcançável.
! Não utilize cabos de extensão.
! O cabo de alimentação não deve ser
dobrado ou pisado.
! O cabo eléctrico deve ser verificado
periodicamente. Se o cabo de alimentação
estiver danificado, deve ser substituído
pelo fabricante, pelo seu serviço de
assistência ou por pessoal qualificado,
para evitar perigos. Os cabos eléctricos
novos ou mais compridos são fornecidos
por revendedores autorizados por um
custo adicional.
! O fabricante recusa qualquer
responsabilidade caso estas regras não
seja seguidas.
! Se tiver dúvidas sobre o mencionado acima
consulte um electricista qualificado.
Antes de iniciar a utilização da sua
máquina de secar roupa
Depois de instalar a sua máquina e antes de iniciar a
sua utilização, limpe o interior do tambor para
remover qualquer pó que se tenha acumulado
durante o transporte.
imagem A
Em seguida, encaixe um
comprimento adequado de
mangueira na posição indicada na figura B.
74
imagem B
Dimensões máximas de carga
Fibras naturais : 9 kg
Page 75

Avisos
! O equipamento foi concebido e
construído de acordo com normas de
segurança internacionais. Estes avisos são
apresentados por razões de segurança e
devem ser seguidos minuciosamente.
Segurança Geral
●
A presente máquina de secar roupa pode
ser utilizada por pessoas (incluindo
crianças com mais de 8 anos) com
capacidades físicas, sensoriais ou
mentais reduzidas ou sem experiência
e conhecimentos, caso sejam
supervisionadas ou se tiverem recebido
instruções sobre a utilização do dispositivo
por parte de uma pessoa responsável
pela sua segurança.
●
Esta secadora foi concebida para
utilização doméstica e não utilização
profissional.
●
Não toque no equipamento com os pés
descalços, nem com as mãos ou pés
molhados.
●
Desligue a máquina retirando a ficha e
não puxando o fio.
●
Depois da utilização da secadora,
desligue-a no botão e da corrente
eléctrica. Mantenha a porta fechada de
modo que as crianças não utilizem a
máquina como um brinquedo.
●
As crianças não devem ser deixadas
sozinhas para se garantir que não
brincam com a secadora.
●
A manutenção e limpeza não devem ser
efectuadas por crianças sem supervisão.
●
As crianças com menos de 3 anos
devem ser mantidas afastadas da
máquina de secar roupa se não forem
constantemente vigiadas.
●
O aparelho deve ser instalado
correctamente com a ventilação
adequada. A entrada de ar na parte
frontal da máquina de secar nunca deve
estar obstruída (ver Instalação).
●
Nunca utilize a secadora em carpetes,
cuja altura impeça o ar de entrar na
secadora a partir da base.
●
Verifique se a secadora está vazia antes de
carregá-la.
●
O painel traseiro da secadora pode
ficar muito quente. Nunca toque
neste painel durante a utilização.
●
Não utilize a secadora sem que o filtro, o
recipiente de água e o condensador
estejam seguramente afixados nas
respectivas posições (ver Manutenção).
●
Não sobrecarregue a secadora (ver
Roupa para além das cargas máximas).
●
Não carregue peças que estejam a
pingar.
●
Verifique cuidadosamente todas as
instruções nas etiquetas das roupas (ver
Roupa).
●
Não seque artigos grandes e muito
volumosos.
●
Não seque fibras acrílicas a altas
temperaturas.
●
Não desligue a máquina quando ainda
existirem artigos quentes no interior.
●
Limpe o filtro após cada utilização (ver
Manutenção).
●
Esvazie o recipiente de água e
coloque-o novamente (ver Manutenção).
●
Limpe a unidade do condensador após
intervalos regulares (ver Manutenção).
●
Não permita a acumulação de resíduos na
secadora.
●
Nunca suba para cima da secadora.
Pode resultar em ferimentos.
●
Siga sempre as normas e requisitos
eléctricos (ver Instalação).
●
Compre sempre peças sobressalentes e
acessórios originais (ver Reparação).
P
75
Page 76

Avisos
P
Para reduzir o risco de ocorrência de
incêndios na máquina de secar roupa,
deve ter em conta os seguintes aspectos:
●
Seque apenas artigos que tenham sido
lavados com água e detergente,
enxaguados e centrifugados.
Existe um risco de incêndio se secar
peças que NÃO tenham sido lavadas
com água.
●
Não seque peças de vestuário que
tenham sido tratadas com produtos
químicos.
●
Não seque peças de roupa que tenham
sido manchadas ou impregnadas com
óleo ou azeite, uma vez que isto
representa um perigo de incêndio. As
peças de roupa contaminadas com óleo
podem inflamar espontaneamente,
sobretudo quando são expostas a fontes
de calor, como uma máquina de secar
roupa. As peças de roupa podem ficar
quentes, provocando uma reacção de
oxidação com o óleo. A oxidação gera
calor. Se não for o possível evacuar o
calor, as peças de roupa podem ficar
quentes o suficiente para se incendiarem.
Amontoar, empilhar ou guardar peças
de roupa contaminadas com óleo pode
impedir a evacuação do calor, causando
o perigo de incêndio.
Se for inevitável que os tecidos
contaminados com óleo ou azeite, ou
outros que tenham sido contamina dos
com produtos para o cabelo sejam
colocados numa máquina de secar
roupa, devem, em primeiro lugar, ser
lavados com detergente extra – isto irá
diminuir, mas não eliminar, o perigo.
Estas não devem ser retiradas da
máquina de secar e colocadas umas
sobre as outras ou guardadas enquanto
estão quentes.
●
Não seque peças de roupa que foram
anteriormente lavadas ou limpas com,
ou impregnadas ou sujas com, gasolina,
solventes para lavagem a seco ou outras
substâncias inflamáveis ou combustíveis.
Substâncias altamente inflamáveis
habitualmente utilizadas em ambientes
domésticos, incluindo óleo alimentar,
acetona, álcool desnaturado, querosene,
anti-nódoas, terebintina, ceras e
decapantes de cera. Certifique-se de
que estas peças de roupa foram
lavadas em água quente com uma
quantidade extra de detergente antes
de serem secas na máquina de secar.
●
Não seque peças de roupa contendo
espuma de borracha (também conhecida
como espuma de látex) ou materiais de
textura semelhante a borracha. Os
materiais de espuma de borracha
podem, quando aquecidos, incendiar
por combustão espontânea.
●
Amaciadores para a roupa ou produtos
semelhantes não devem ser utilizados
na máquina de secar para eliminar os
efeitos de electricidade estática excepto
se este método for especificamente
recomendado pelo fabricante do produto
amaciador para a roupa.
●
Não seque peças de roupa interior que
contenham reforços de metal, por
exemplo, sutiãs com aros de metal.
No caso de os reforços de metal se
soltarem durante a secagem, podem
ocorrer danos na máquina de secar.
●
Não seque na máquina artigos de
borracha ou plástico como toucas de
banho ou coberturas impermeáveis para
bebés, polieteno ou papel.
●
Não seque na máquina artigos com
componentes de borracha, peças de
roupa com almofadas de espuma de
borracha, almofadas, galochas e
calçado de desporto com revestimento
de borracha.
●
Retirar todos os objectos dos bolsos,
como isqueiros e fósforos.
! AVISO: Nunca parar a secadora antes do fim do ciclo de secagem, a menos que todos os
artigos sejam rapidamente retirados e espalhados de modo a dissipar o calor.
76
Page 77

Manutenção e Cuidado
Desligar a electricidade
! Desligue a secadora quando não estiver
em utilização, durante tarefas de limpeza e
durante todas as operações de
manutenção.
Limpar o filtro depois de cada ciclo
O filtro é uma parte importante da sua
secadora: acumula restos de fibras e
resíduos que se formam durante a
secagem.
Assim, após a secagem, limpe o filtro,
lavando-o debaixo de água corrente ou
limpe com o seu aspirador.
Caso o filtro fique entupido, o fluxo de ar
no interior da secadora fica seriamente
comprometido: os tempos de secagem
prolongam-se e consome mais energia.
Também pode danificar a sua secadora.
O filtro encontra-se na grelha frontal da
secadora (ver o diagrama na pàgina
seguinte).
Remoção do filtro:
1.Puxe a pega de plástico do filtro para
cima.
2. Abra o filtro e limpe o
cotão do interior.
3. Volte a colocá-lo
correctamente.
Certifique-se de
que o filtro está
completamente
encaixado na grelha
da máquina.
4.Remova quaisquer vestígios de cotão
acumulados na parte interior da porta e
em volta dos vedantes da porta.
! Não utilize a máquina sem colocar
novamente o filtro.
Esvazie o recipiente de
água após cada ciclo
! O não esvaziamento do recipiente de recolha da
água pode causar:
- A paragem do aquecimento da máquina (o que
faria com que a roupa continuasse húmida no fim
do ciclo de secagem) (ver Controlos).
●
Primeira Utilização do Sistema de
Recolha de Água
Quando a sua secadora é nova, o recipiente de
água não recolhe a água sem que seja
devidamente preparado para a primeira utilização;
é um processo que demora 1 ou 2 ciclos de
secagem. Depois de previamente preparada, o
recipiente recolhe água durante cada ciclo de
secagem.
Limpar a unidade do condensador
Periodicamente (todos os meses), retire a
unidade do condensador e limpe qualquer
acumulação de cotão que se encontre
entre as placas, enxaguando por baixo de
água corrente fria. Este procedimento
deve ser concluído com água fria a partir
da parte traseira do condensador.
Remoção do condensador:
1. Desligue a secadora e
abra a porta.
2. Abra a tampa do
condensador (ver
diagrama).
Solte os três suportes,
rodando-os da direita
para a esquerda a 90°
e, em seguida, puxando
a pega para removê-los
da secadora.
Limpe a superfície dos vedantes e
substitua, com as setas para cima,
certificando-se de que os suportes estão
seguros.
P
Retire o reservatório da máquina
de secar e retire a tampa grande
ou a pequena e esvazie-o numa
banca ou outro dispositivo de
drenagem adequado. Volte a
colocar a tampa e instale novamente o reservatório no
devido lugar.
! Verifique sempre o recipiente de água e esvazie-o
antes de iniciar um programa de secagem novo.
77
Page 78

Manutenção e Cuidado
P
Recipiente de
água
Filtro
Unidade do
condensador
Suportes
Verificar o tambor depois de cada ciclo
Rode o tambor manualmente, de modo a remover
pequenos objectos (lenços) que podem ter ficado na
máquina.
Limpar o tambor
! Não utilize agentes de limpeza de aço inoxidável ou
palha de aço, abrasivos, para limpar o tambor.
Torneira
Traseira
Frente
Entrada de ar
Tampa do condensador
Unidade do condensador
Conselhos rápidos
●
Deve limpar a filtro porta e o filtro
condensador depois de cada secagem.
●
Relembramos que deve esvaziar o
recipiente de recolha da água após
cada carga.
! Desta forma, opterá sempre o melhor
desempenho.
É possível que uma película colorida comece a
aparecer no tambor de aço inoxidável. Tal poderá ser
causado por uma combinação de água e/ou agentes
de limpeza como, por exemplo, amaciador de tecido
da lavagem. Esta película colorida não afectará o
desempenho do secador.
Limpeza
●
As partes externas de metal ou em plástico e
borracha podem ser limpas com um pano húmido.
●
Periodicamente (de 6 em 6 meses), aspire a grelha
da entrada de ar frontal para retirar qualquer
acumulação de cotão, linho ou pó. Remova também
a acumulação de cotão da parte frontal do
condensador e áreas dos filtros e limpe
ocasionalmente com um aspirador.
! Não utilize solventes nem produtos abrasivos.
! Verifique a sua secadora regularmente por técnicos
autorizados, de modo a certificar-se da segurança
eléctrica e mecânica (ver Reparação).
78
Page 79

Descrição da
máquina de secar
Características
Chapa de classificação
Tampa do condensador
Painel de controlo
Filtro
Botões de
Selecção de PROGRAMA
Recipiente de água
Números de modelo e de série
Entrada de ar
P
Pega da tampa do
condensador
(Puxar para abrir)
Visor
Botão
LIGAR/DESLIGAR
O botão LIGAR/DESLIGAR - se premido com a
máquina de secar em funcionamento: Se o visor
mostrar
visor mostrar
mantenha o botão sob pressão e o visor inicia a
contagem decrescente 3, 2, 1 e, em seguida, pára.
Prima e mantenha sob pressão novamente por mais 3
segundos e o visor mostra
breves instantes.
Os botões de Selecção de PROGRAMA definem o
programa: prima o botão correspondente ao
programa que pretende seleccionar (ver Arranque e
Programas).
Botões/indicadores de OPÇAO : estes botões
seleccionam opções disponíveis para o programa
escolhido (ver Controlos). Os indicadores no visor
juntos aos botões acendem-se para mostrar que a
opção foi seleccionada.
O botão INICIAR/PAUSA inicia um programa
seleccionado. Quando um programa estiver a ser
executado, premir este botão, irá pausar o programa, o
sinal sonoro tocará uma vez, o visor irá apresentar
PAUSA e a máquina de secar irá parar.
A luz fica verde quando o programa está em
funcionamento, laranja e intermitente se o programa
estiver em pausa ou verde e intermitente se estiver á
espera para iniciar um programa (ver Arranque e
Programas).
DESLIGAR , a máquina de secar pára. Se o
PRESSIONE PARA MEMORIZAR ,
LIGAÇÃO EM CURSO por
BLOQUEIO INFANTIL e
Botões e Luzes
Nota: Esta luz também fica laranja e intermitente
durante a fase de Pós-tratamento de um programa.
O Visor apresenta avisos e informações sobre o
programa seleccionado e o respectivo progresso
(ver a página seguinte).
Botão
mantenha sob pressão este botão depois de
seleccionar o seu programa e quaisquer opções;
impede desta forma que as definições do programa
sejam alteradas
a indicação
aceso, os restantes botões estão desactivados.
Mantenha o botão sob pressão para cancelar e o
indicador apaga-se; o visor mostra por alguns
momentos
Nota: Esta máquina de secar roupa, em conformidade
com as novas normas sobre a economia energética,
dispõe de um sistema de desligação automática
(stand by) que entra em função aproximadamente 30
minutos depois, no caso de inutilização.
Prima e mantenha sob pressão o botão LIGAR/DESLIGAR
até que o visor mostre por breves instantes
LIGAÇÃO EM CURSO e, em seguida, a máquina de
secar retoma o seu funcionamento.
OPÇÕES
de Bloqueio Infantil : Prima e
/
ícone
, o visor mostra por breves momentos
BLOQUEADA . Quando o indicador está
DESBLOQUEADA .
Botão e Luz
INICIAR/PAUSA
79
Page 80

O Visor
Seleccionar o idioma
Da primeira vez que liga a sea secadora, deverá seleccionar o seu idioma favorito a partir da lista de idiomas
P
disponíveis.
Para mudar: a selecção do idioma actual deve estar
intermitente na primeira linha do visor.
- Prima o botão LIGAR/DESLIGAR para desactivar o visor
e, em seguida, prima e mantenha sob pressão os 3
botões: Nível de Temperatura
Secagem Temporizada e Nível de Secagem
durante 5 segundos.
- Prima o botão Nível de Temperatura ou Secagem
Temporizada para percorrer a lista.
- Quando o idioma que pretende estiver intermitente na
linha superior do visor, premir o botão Nível de
Secagem selecciona a sua opção.
Compreender o visor
Selecção e visualização do programa
O programa seleccionado é apresentado na primeira linha do visor
ao seleccionar o botão correspondente; a mensagem é apresentada
durante a execução do programa.
Oito dos botões têm duas selecções; pressione o botão uma vez para
a primeira selecção e pressione novamente para a segunda selecção;
será apresentada a sua selecção. O botão final selecciona Meu Ciclo.
Pressionar uma vez Pressionar duas vezes
1
ALGODÃO NORMAL
2
ROUPA 7 DIAS
3
SINTÉTICOS
4
CALÇAS DE GANGA
5
LÃ
6
DELICADOS
7
PELUCHE
8
PRÉ ENGOMAR
9
MEU CICLO M My Cycle (ver Arranque)
CAMISAS ALGODÃO
ANTIALÉRGICO
CAMISAS SINTÉTICOS
EDREDÕES
SEDA
BEBÉ
AQUECE E DESFRUTA
REFRESCANTE
,
Meu Ciclo Quando selecciona o botão de Meu Ciclo, o visor mostra o programa seleccionado com a indicação ‘M’
antes do respectivo nome, por exemplo.
M ALGODÃO NORMAL (ver Arranque e Programas).
Níveis de secagem
Durante a selecção de um programa para um programa automático que tenha diferentes níveis de secagem
disponíveis (ver Tabela Programas).
A segunda linha do visor mostra o nível de secagem que pretende, por
cada pressão no botão de Nível de Secagem a opção seguinte na lista
em baixo é seleccionada e apresentada. O visor também mostra 1 a 7
barras, dependendo da sua selecção e são apresentadas durante o
decorrer dos programas.
! Alguns programas automáticos não permitem que o nível de secagem seja alterado ou não incluem todas as
opções do nível de secagem.
HÚMIDO
ENGOMAR
PENDURAR +
PENDURAR
LIGEIRA
ARMÁRIO
EXTRA
Secagem com humidade: Seca os seus itens até estarem prontos a serem passados por
uma máquina de passar a ferro normal ou rotativa.
Secagem para passagem a ferro: Seca os seus itens até estes estarem prontos a serem passados
por um ferro manual.
Secagem para pendurar (extra): Seca os seus itens delicados até ficarem prontos para serem
pendurados para secagem final.
Secagem para pendurar: Seca as suas roupas até estas estarem prontos a serem penduradas
para a secagem final.
Secagem suave: Seca os seus itens delicados até ficarem prontos para guardar.
Secagem para armário: Seca os seus itens até que fiquem prontos a serem guardados.
Secagem Extra (Extra Seco): Seca as suas roupas até que estas fiquem prontas a serem vestidas.
80
Page 81

O Visor
Progresso do programa
A segunda linha do visor mostra o estado do programa e o seu progresso:
(mensagens longas ao longo da linha)
SECAR
ROTAÇÃO A FRIO
AQUECIMENTO
PRONTO
FIM DE CICLO, ANTIRRUGAS
FIM DE CICLO, LIMPAR FILTRO E ESVAZIAR RECIPIENTE ÁGUA
Programa Aquece e Desfruta
(se a opção Tratamento Antirrugas estiver seleccionada).
Secagem temporizada
Depois de seleccionar um programa que tenha a opção de
secagem temporizada, prima o botão e o visor aumenta
o tempo seleccionado por cada vez que prima e solta o
botão (ver Arranque e Programas).
Cada pressão reduz a duração de tempo e o número de opções de tempo disponíveis, dependendo do
programa/material seleccionado.
O ícone Secagem Temporizada é apresentado junto ao tempo.
O tempo seleccionado permanece no visor após o início do programa, mas se pretender, pode ser alterado a
qualquer momento.
P
Temporizador de atraso e tempo até conclusão
Alguns programas podem ter um início atrasado (ver Arranque e Programas). Prima o botão Atraso e o
indicador fica intermitente.
Cada pressão do botão Atraso avança a definição do
atraso em períodos de 1 hora, de: ao , em
em seguida, após alguns segundos cancela o atraso.
O tempo de atraso é apresentado no visor junto ao botão
Atraso.
O visor entra em contagem decrescente dos minutos
referentes ao período de atraso depois de premir o botão
Iniciar/Pausa .
A segunda linha do visor mostra INÍCIO
Pode alterar ou cancelar o tempo de atraso seleccionado a
qualquer momento.
Depois de premir o botão Início/Pausa, Atraso ou Tempo até Conclusão é apresentado em horas e minutos, com a
contagem decrescente de cada minuto.
1h 24h
OFF
Tempo até Conclusão
Quando o período de atraso chegar ao fim, ou quando o programa chegar ao fim se não tiver sido seleccionado um
atraso, esta parte do visor mostra:
- o tempo previsto para o fim do programa, para programas automáticos
- o tempo restante durante um programa temporizado
Quando os programas temporizados forem seleccionados, o tempo apresentado durante o ciclo será o tempo real
restante.
Quando forem seleccionados programas Automáticos, o tempo apresentado será uma estimativa do tempo restante.
Quando o programa for seleccionado, o visor irá apresentar o tempo necessário para secar uma carga completa. O
tempo restante é constantemente monitorizado durante o ciclo de secagem e o tempo é alterado para apresentar a
melhor estimativa possível.
Os dois pontos entre as horas e os minutos no visor piscam para mostrar que o tempo está em contagem decrescente.
81
Page 82

O Visor
Avisos
P
A segunda linha do visor também mostra avisos e lembretes:
(os lembretes ocorrem no fim de um programa)
FIM DE CICLO, LIMPAR FILTRO E ESVAZIAR RECIPIENTE ÁGUA
●
Lembrete de que o recipiente da água deve ser
esvaziado e o filtro limpo sempre que se utilize a
máquina de secar (ver Manutenção).
ESVAZIAR RECIPIENTE ÁGUA
●
Indica que o recipiente de água está cheio. A
mensagem demora alguns segundos a desaparecer
depois de colocar novamente o recipiente de água;
a máquina de secar tem de estar em funcionamento
para que isto aconteça (ver Controlos).
Nota: Se o recipiente de água estiver cheio e esta
mensagem for apresentada, a temperatura é
desligada e a sua roupa não seca.
LIMPAR FILTRO, CONDENSADOR E ESVAZIAR RECIPIENTE ÁGUA
●
Esta mensagem indica que tem de limpar a
Unidade do condensador (ver Manutenção) e
ocorre regularmente, dependendo da frequência
com que utiliza a secadora. Ao concluir o programa
seguinte, a mensagem é cancelada. Também deve
limpar o filtro.
ACÇÃO ANTIALÉRGICA NÃO GARANTIDA LIMPAR O FILTRO
●
Mostrado durante o programa Antialérgico e indica
que o filtro tem de ser limpo para concluir o ciclo
antialérgico completo (ver Manutenção).
Arranque e Programas
Escolher um programa
1. Ligue a secadora a uma tomada de corrente eléctrica.
2. Escolha a sua roupa de acordo com o tipo de
tecido (ver Roupa).
3. Abra a porta e certifique-se de que o filtro está
limpo e bem colocado e de que o recipiente da
água está vazio e na respectiva posição (ver
Manutenção).
4. Carregue a máquina e certifique-se de que
nenhuma peça fica presa no fecho da porta.
Feche a porta.
5. Se o Visor não estiver aceso: Pressione o botão
LIGAR/DESLIGAR
6. Prima o botão de selecção de Programa que
corresponde ao tipo de tecido a secar, verificando
a tabela de Programas (ver Programas) bem como
as indicações para cada tipo de tecido (ver Roupa).
Se o botão for seleccionado, não são
necess
7. Escolha as opções Secagem Temporizada ou
Níveis de Secagem:
- Se optar por Secagem Temporizada, prima e
solte o botão Secagem Temporizada até
visualizar o período de tempo pretendido.
ou - Para alterar a definição de secagem
predefinida, prima e solte o botão Níveis de
Secagem até ver indicado o nível pretendido.
! Consulte a Tabela de Programas para obter mais
detalhes: disponibilidade dos Níveis de Secagem,
Secagem Temporizada e Opções.
os passos 7 e 8
ários
ver em seguida).
(
8. Defina um tempo de atraso, bem como outras
opções, conforme necessário (ver O Visor).
9. Pressione o botão INICIAR/PAUSA para
começar. O visor mostra a hora prevista para terminar.
Durante o programa de secagem, pode verificar
a sua roupa e retirar peças que já estejam secas
enquanto as restantes continuam a secar.
Quando fechar novamente a porta, prima o
botão INICIAR/PAUSA de modo a retomar a
secagem.
10. Durante os últimos minutos dos Programas de
Secagem, antes do programa chegar ao fim,
entra na fase de Arrefecimento (os tecidos são
arrefecidos), que deve ser sempre concluída.
11. No fim do ciclo de secagem, é apresentada uma
mensagem:
- Se for apresentado
ESVAZIAR RECIPIENTE ÁGUA o sinal sonoro apita 3
vezes (Nota: Se a opção SOM for seleccionada,
o sinal sonoro apita 3 vezes a cada 30
segundos durante 5 minutos).
- Se for apresentado
opção Tratamento Antirrugas foi seleccionadas
e, se não tirar a roupa imediatamente, a
máquina de secar roda ocasionalmente o
tambor durante 10 horas ou até abrir a porta,
o sinal sonoro apita 3 vezes para confirmar
que o programa está concluído.
12. Abra a porta, retire a roupa, limpe o filtro e
coloque-o novamente. Esvazie o recipiente de
água e coloque-o novamente (ver Manutenção).
13. Desligue a secadora.
FIM DE CICLO, LIMPAR FILTRO E
FIM DE CICLO, ANTIRRUGAS a
Botão Meu Ciclo
Da primeira vez que prime este botão, a segunda linha do visor mostra PRESSIONE P/ MEMORIZAR
Depois de seleccionar o seu programa e opções favoritos, pode guardar estas opções, premindo e mantendo sob
pressão o botão Meu Ciclo durante, no mínimo, 5 segundos; a linha superior mostra um intermitente seguido do
programa seleccionado; é então emitido um sinal sonoro e a segunda linha do visor mostra a indicação MEMO
Da próxima vez que necessitar deste programa, prima o botão , e, em seguida, o botão Iniciar/Pausa e este
programa é executado
Se pretender, pode alterar os seus programas memorizados, seleccionando um novo programa e/ou opções e prima
e mantenha sob pressão o botão (
82
:
.
como acima
).
Page 83

Arranque e Programas
PROGRAMAS ESSENCIAIS (ESSENTIALS) – Tabela de Programas
! Se o Visor não estiver aceso; Prima o botão LIGAR/DESLIGADO e, em seguida, seleccione o programa.
Programa
Algodão padrão
1
Camisas Algodão
Roupa 7 Dias
2
Antialérgico
Sintéticos
3
Camisas Sintéticos
Nota: Esta opção não se encontra disponível nos níveis "Secagem para passagem a ferro (Engomar)" e
"Secagem com humidade".
Algodão padrão
●
Este é um programa para itens em algodão.
●
A duração do programa irá depender da dimensão da carga, da definição de secagem seleccionada e da velocidade
de rotação utilizada na sua máquina de lavar (ver Roupa).
●
O programa de algodão padrão consoante o Regulamento EU 392/2012 é a selecção do Programa 1 com o Calor Alto
e Nível de Secagem ‘Secagem para armário’ (Configuração standard/predefinida inicial). Este é o programa mais
eficiente em termos de sonsumo de energia (UE 392/2012).
Camisas Algodão
●
Este programa foi concebido para camisas de algodão.
●
Pode ser utilizado para cargas até 3 kg (aproximadamente 10 camisas).
A duração do programa irá depender da dimensão da carga, da definição de secagem seleccionada e da velocidade de
rotação utilizada na sua máquina de lavar.
Geralmente, as peças de roupa secas com a definição de Secagem para armário estão prontas a vestir. As extremidades
ou costuras poderão estar ligeiramente húmidas. Se isto acontecer, vire as camisas do avesso e execute novamente o
programa por um curto período de tempo.
Cama e Banho (Roupa 7 Dias)
●
Este é um programa para toalhas e lençóis em algodão.
●
A duração do programa irá depender da dimensão da carga, da definição de secagem seleccionada e da velocidade
de rotação utilizada na sua máquina de lavar (ver Roupa).
●
As cargas que tenham sido secas utilizando a definição de Secagem Extra (Extra Seco) estarão geralmente prontas a
serem utilizadas, mas as extremidades ou costuras poderão estar ligeiramente húmidas, especialmente em itens mais
volumosos. Se isto acontecer, tente abri-las e execute novamente o programa por um curto período de tempo.
Programa Antialérgico
Este programa possui o "Selo de Aprovação" da Allergy UK que reflecte a redução e eliminação eficaz de alergénios da
roupa com o ciclo especial Antialérgico. Com este programa e graças a uma temperatura constante alcançada durante
um período de tempo prolongado, os efeitos da maioria dos alergénios (incluindo os ácaros domésticos e o pólen) são
neutralizados. Pode ser utilizado com uma carga molhada total para secagem e tratamento ou com uma carga seca de
4 kg apenas para o tratamento da roupa.
Se o visor mostrar ACÇÃO ANTIALÉRGICA NÃO GARANTIDA LIMPAR O FILTRO : Limpe o filtro e reinicie o programa.
Sintéticos
●
Este é um programa para peças sintéticas da regulação de baixa temperatura ou misturas de sintéticos/algodões
para uma regulação de temperatura média.
●
A duração do programa irá depender da dimensão da carga, da definição de secagem seleccionada e da
velocidade de rotação utilizada na sua máquina de lavar (ver Roupa).
Camisas Sintéticos
●
Este programa foi concebido para camisas feitas a partir de materiais sintéticos ou de uma mistura de materiais
sintéticos e naturais, como poliéster e algodão.
●
Pode ser utilizado para cargas até 3 kg (aproximadamente 14 camisas).
A duração do programa irá depender da dimensão da carga, da definição de secagem seleccionada e da velocidade de
rotação utilizada na sua máquina de lavar.
Geralmente, as peças de roupa secas com a definição de Secagem para armário estão prontas a vestir. As extremidades
ou costuras poderão estar ligeiramente húmidas. Se isto acontecer, vire as camisas do avesso e execute novamente o
programa por um curto período de tempo.
Opções disponíveis:
Atraso de Tempo
(Temporizado)
Tratamento
Anti-rugas
Cuidado Extra
✓
✓
✓
✓
✓
✓
✓
✓
✓
✗
✗
✗
✓
✓
✓
✓
✓
✓
Menos
Embaraçado
Pronto a
✗
✓
✗
✓
✗
✓
✓
✗ ✗
✓
✗
✗
✗
✗
✗
✗
✗
*
Engomar
Nivel de
- Alta
- Alta
- Média
- Baixa
- Alta
- Média
✗
- Média
- Baixa
✗
Temperatura
Secagem
Temporizada
✓
✓
✓
✗
✗
●
Um programa Automático
✓
✗
Níveis de Secagem disponíveis
(predefinição destacada )
Secagem por
Sensor
Secagem com
humidade
Secagem para
passagem a ferro
(Engomar)
Secagem para
pendurar (extra)Secagem para
✓
✓
✓
✓
✓✗ ✓
✓
✓
✓
✓
✓
✓
✓
✓
✓
✓
✓
✓
✓
✓
✓
✓
✓
✓
✓
✓
✓
✓
✓
✓
✓
✓
✓
pendurar
✓
✓
✓
✓
✓
✓
✓
✓
✓
✓
✓
✓
✓
✓
✓
✓
✓
Secagem suave
Secagem para
armário
✓
✓
✓
✓
✓
✓
✓
✗
✓
✓
✗
✗
✗
Secagem Extra
(Extra Seco)
✗
✗
P
83
Page 84

Arranque e Programas
P
PROGRAMAS EXCLUSIVOS (EXCLUSIVES) – Tabela de Programas
! Se o Visor não estiver aceso; Prima o botão LIGAR/DESLIGADO e, em seguida, seleccione o programa.
Programa
Calças de ganga
Edredão
4
(EDREDÕES)
Lã
5
Seda
Bebé
6
Delicados
Calças de ganga
●
Este programa foi concebido para calças de ganga. Antes de secar as calças de ganga, vire os bolsos da frente do
avesso.
●
Pode ser utilizado para cargas até 3 kg (aproximadamente 4 pares).
●
Não misture peças de roupa escuras e claras.
●
Pode também ser utilizado com outras peças de roupa feitas a partir do mesmo material, como casacos.
●
A duração do programa irá depender da dimensão da carga, da definição de secagem seleccionada e da velocidade
de rotação utilizada na sua máquina de lavar.
●
Geralmente, as peças de roupa secas com a definição de Secagem Extra (Extra Seco) estão prontas a vestir. As
extremidades ou costuras poderão estar ligeiramente húmidas. Se isto acontecer, vire as calças de ganga do
avesso e execute novamente o programa por um curto período de tempo.
! Não se recomenda a utilização deste programa se as calças de ganga tiverem cós elástico, tachas ou bordados.
Opções disponíveis:
Atraso de Tempo
(Temporizado)
Tratamento
Anti-rugas
Cuidado Extra
✓
✓
✗
✗
✓
✓
✗
✗
✗
✗
✗
✗
✓
✓
✗
✗
✓
✓
Pronto a
Engomar
✗
✗
✗
✗
✗
✗
Menos
Embaraçado
✗
- Alta
✗
- Média
✗
✗
✗
✗
✗
✗
✗
✗
Nivel de
Temperatura
✗
✗
✗
Níveis de Secagem disponíveis
(predefinição destacada )
Secagem com
humidade
✓
✓
✓
✓
Secagem para
✓
✓
✓
✓
Secagem
Temporizada
Secagem por
Sensor
✗
✓
●
Um programa Automático
✗
●
Um programa Automático
✓
✗
✓
✓
✓
passagem a ferro
(Engomar)
Secagem para
✓
✓
✓
✓
✓
pendurar (extra)Secagem para
pendurar
✓
✓
✓
✓
✓
✓
✓
✓
Secagem suave
Secagem para
armário
✓
✓
✓
✓
Secagem Extra
(Extra Seco)
✓
✗
✗
✗
Edredão (EDREDÕES)
! Tenha cuidado com a utilização deste programa. NÃO seque quaisquer itens que se encontrem danificados e que
possam resultar na obstrução do filtro ou do ventilador, resultando num perigo de incêndio.
●
Deve apenas ser utilizado para edredões de solteiro: NÃO adequado para itens com dimensões de casal ou
"king size".
●
Geralmente, as cargas secas utilizando este programa estão prontas a vestir, podendo estar ligeiramente húmi das em
determinadas zonas. Se isto acontecer, tente abrir ou sacudir os itens e execute novamente o programa por um curto
período de tempo.
●
Igualmente disponível para casacos de penas.
●
Seleccione aquecimento elevado para Edredões de Algodão e aquecimento médio para Edredões Sintéticos.
●
A duração do programa irá depender da dimensão e densidade da carga e da velocidade de rotação utilizada
na sua máquina de lavar.
Programa de Lã
●
Este programa destina-se a roupas delicadas que possam ser utilizadas na máquina de secar e que estejam
marcadas com o símbolo .
●
Pode ser utilizado em cargas máximas de 1kg (aproximadamente 3 camisolas).
●
Recomendamos que volte estas peças do avesso antes de colocar na máquina.
●
Este programa demora cerca de 60 minutos, mas pode demorar mais tempo, dependendo do volume e densidade
da carga e a velocidade de rotação utilizada na sua máquina.
●
As cargas secas através da utilização deste programa, normalmente, ficam prontas a vestir, mas em peças
mais pesadas, as pontas podem ficar húmidas. Permita que sequem naturalmente uma vez que a secagem
artificial em demasia pode danificar as peças.
! Ao contrário de outros materiais, o mecanismo de encolhimento da lã é irreversível, ou seja, não volta ao tamanho,
nem à forma original.
! Este programa não é adequado a roupas acrílicas.
Seda
●
Este programa foi concebido para secar sedas delicadas.
●
Pode ser utilizado para cargas até 0,5 kg.
●
A duração do programa irá depender da dimensão da carga, da definição de secagem seleccionada e da velocidade
de rotação utilizada na sua máquina de lavar.
●
Geralmente, as cargas secas com a definição de Secagem para armário estão prontas a vestir, mas em algumas
peças as extremidades podem estar ligeiramente húmidas. Se isto acontecer, tente abrir ou virar as peças de roupa do
avesso e execute novamente o programa por um curto período de tempo.
84
Page 85

Arranque e Programas
Programa Bebé
●
Este programa foi concebido para secar as peças de roupa pequenas e delicadas e a roupa de cama do seu bebé
(Algodão e Veludo) e para secar as suas peças de roupa delicadas.
●
NÃO seque peças de roupa como babetes ou fraldas com coberturas de plástico.
●
Pode ser utilizado para cargas até 2 kg.
●
A duração do programa irá depender da dimensão e densidade da carga e da velocidade de rotação utilizada na sua
máquina de lavar.
●
Geralmente, as peças de roupa secas com este programa estão prontas a vestir, mas, em algumas peças mais
pesadas, as extremidades podem estar ligeiramente húmidas. Se isto acontecer, vire as peças de roupa do
avesso e execute novamente o programa por um curto período de tempo.
Delicados
●
Este programa foi concebido para secar as suas roupas mais delicadas, por exemplo Acrílicos.
●
Pode ser utilizado para cargas até 2 kg.
●
A duração do programa irá depender da dimensão e densidade da carga e da velocidade de rotação utilizada
na sua máquina de lavar.
●
Geralmente, as peças de roupa secas com este programa estão prontas a vestir, mas, em algumas peças mais
pesadas, as extremidades podem estar ligeiramente húmidas. Se isto acontecer, vire as peças de roupa do
avesso e execute novamente o programa por um curto período de tempo.
PROGRAMAS EXTRA (EXTRA) – Tabela de Programas
! Se o Visor não estiver aceso; Prima o botão LIGAR/DESLIGADO e, em seguida, seleccione o programa.
Programa
Opções disponíveis:
Níveis de Secagem disponíveis
(predefinição destacada )
✓
P
Atraso de Tempo
(Temporizado)
Tratamento
Anti-rugas
Cuidado Extra
Pronto a
Engomar
Menos
Embaraçado
Nivel de
Temperatura
Secagem
Temporizada
Secagem por
Sensor
Secagem com
humidade
Secagem para
passagem a ferro
(Engomar)
Secagem para
pendurar (extra)Secagem para
pendurar
Secagem suave
Secagem para
armário
Secagem Extra
(Extra Seco)
Peluches
7
Aquece e
Desfruta
Pré Engomar
8
Refrescante
9
Meu ciclo
(My Cycle) M
✗
✗
✓
✗
✗
✗
Depende do programa escolhido. Ver detalhes anteriores.
✗
✗
✗
✗
✗
✗
✗
✗
✗
✗
✗
✗
✗
✗
✗
✗
✗
✗
●
Um programa Automático
✗
●
Um programa Automático
✗
●
Um programa Automático
✗
●
Um programa Automático
✗
Programa para Peluches
Com este programa, é possível remover mais facilmente as poeiras e lavar os peluches com mais frequência, uma vez
que o tempo de secagem é substancialmente reduzido em comparação com a secagem ao ar. É um ciclo de secagem
delicado, de baixa temperatura e com uma acção mecânica suave para manter o mais possível o aspecto e o brilho
originais do pêlo.
Nota: Para protecção contra as alergias, congele os peluches durante 24 horas e, em seguida, lave e seque-os. Repita
esta operação a cada 6 semanas. Antes de secar, remova acessórios como roupa, coleiras ou dispositivos de som e
proteja os olhos de plástico com fita adesiva depois de os secar com um pano.
O tempo do programa irá variar consoante a constituição exacta da carga.
A carga máxima não deverá ultrapassar os 2,5 kg e um item individual não deverá ter um peso superior a 600 g.
Aquece e Desfruta
Este programa aquece toalhas e roupões para proporcionar uma sensação reconfortante após o banho. É também útil
para aquecer a roupa antes de a vestir durante o Inverno. O ciclo aquece as peças a 37° C (temperatura do corpo), o
visor mostra
abrindo a porta quando o visor mostrar PRONTO . Carga máxima de 3 kg.
Nota: O botão Iniciar/Pausa é apresentado durante este programa.
Refrescante
! "Refrescante" não é um programa de secagem e não deve ser utilizado com peças de roupa molhadas.
●
Pode ser utilizado com cargas de qualquer dimensão mas é mais eficaz com cargas mais pequenas.
●
Não sobrecarregue a sua máquina de secar (ver Roupa).
●
Este é um programa com uma duração de 20 minutos que areja a sua roupa com ar fresco. Utilize-o também para
arrefecer peças de roupa quentes.
AQUECIMENTO e funciona a esta temperatura por um período máximo de 4 horas ou até parar o ciclo
85
Page 86

Arranque e Programas
Programa Pré-Engomar
P
"Pré-Engomar" é um ciclo de tratamento para utilização com roupas secas e que reduz os vincos para facilitar o
processo de passagem a ferro e dobragem, com uma duração máxima de 15 minutos.
! "Pré-Engomar" não é um programa de secagem e não deve ser utilizado com peças de roupa molhadas.
Para obter os melhores resultados:
1. Não carregue mais do que a capacidade máxima.
Estes números referem-se ao peso em seco: Tecido Carga máxima
Algodão e Misturas de algodão 2,5 kg
Gangas 2 kg
2. Descarregue a secadora imediatamente após o fim do programa, pendure, dobre ou engome as peças
de roupa e guarde-as no armário. Caso isto não seja possível, repita o programa.
Controlos
! Atencão, se o programa não pode ser alterado depois de
premido o botão INICIAR/PAUSA .
Para alterar um programa seleccionado, prima o botão
INICIAR/PAUSA ; a luz fica laranja e intermitente para
indicar que o programa está em pausa. Seleccione o novo
programa e quaisquer opções necessárias e, de seguida, a
luz ficará verde
e o novo programa é iniciado.
●
Botões de OPÇÃO
Estes botões são utilizados para personalizar o programa
seleccionado para os seus requisitos. Antes de poder
seleccionar uma opção, terá de seleccionar um programa,
premindo o respectivo botão
encontram-se disponíveis para todos os programas (ver
Arranque e Programas). Se uma opção não se encontra
disponível e caso prima o botão, o sinal sonoro será emitido
3 vezes. Se a opção estiver disponível, o indicador no visor,
junto aos botões inferiores, acende-se para mostrar que a
opção foi seleccionada.
Atraso de Tempo (Temporizado)
O início de alguns programas (ver O Visor e ver Arranque e
Programas) pode ser atrasado num máximo de 24 horas.
Certifique-se de que o recipiente de água está esvaziada
antes de definir um início atrasado.
Tratamento Anti-rugas
A opção de pré-tratamento apenas está disponível se tiver
sido seleccionado um início diferido. Seca ocasionalmente a
roupa durante o período de atraso para ajudar a evitar o
aparecimento de rugas.
A opção pós-tratamento seca ocasionalmente a roupa após
a conclusão dos ciclos de secagem e refrescamento para
evitar o aparecimento de rugas, caso o utilizador não possa
retirar a roupa imediatamente após a conclusão do programa.
Nota: a luz de INICIAR/PAUSA fica laranja e intermitente
durante esta fase.
Caso seleccione esta opção, activa as funções de pré e
pós-tratamento, se adequado.
Botão Nível de temperatura, visor e ícones
Nem todos os programas permitem que altere o nível de
calor e alguns programas permitem as três opções do nível
de calor: Baixo, Médio e Alto.
Quando as opções do nível de temperatura estão
disponíveis, premir este botão altera o nível de temperatura
e o visor mostra por alguns instantes o nível seleccionado
juntamente com o ícone do nível seleccionado:
TEMPERATURA ALTA TEMPERATURA MÉDIA TEMPERATURA BAIXO
Cuidado extra
A função Anti-Envelhecimento para Materiais de Algodão ajuda
a prolongar o brilho da sua roupa, graças à correcta rotação do
tambor (reduzida na fase final do ciclo) e à correcta temperatura.
Nota: Não pode ser utilizada com os níveis de secagem
"Extra", "Armário" e "Ligeira".
Menos Embaraçado
Nesta opção, o movimento do tambor é modificado para
proporcionar uma acção de secagem que reduz os vincos e
o emaranhamento das suas roupas.
A opção ‘Menos Embaraçado’ proporciona melhores
resultados quando utilizada com cargas mais pequenas.
. Prima novamente o botão INICIAR/PAUSA
. Nem todas as opções
Pronto a Engomar
Esta opção permite-lhe secar roupa quando apenas é
necessário passar algumas peças a ferro e não pretende
secar totalmente essas peças de roupa.
Quando o nível Secagem para passagem a ferro (Engomar)
é alcançado, irá soar um sinal sonoro para o avisar de que
as peças de roupa que é necessário passar a ferro podem
ser retiradas. Em seguida, a máquina de secar pára e a luz
Iniciar/Pausa cintila a cor-de-laranja. Retire as peças de
roupa que pretende passar a ferro, feche a porta e carregue
no botão Iniciar/Pausa. A máquina de secar continua a
funcionar até que as restantes peças de roupa alcancem o
nível de secagem seleccionado.
Pode ser utilizado para cargas até 3 kg.
Nota: Esta opção não se encontra disponível nos níveis
"Secagem para passagem a ferro (Engomar)" e "Secagem
com humidade".
●
VISOR
O visor apresenta a duração do tempo de atraso ainda por
decorrer ou uma indicação do tempo restante para um
programa de secagem (ver O Visor).
O visor apresenta igualmente qualquer eventual problema
com o secador. Caso tal se verifique, o visor apresentará
“F”, seguido de um número de código de falha (ver
Resolução de Problemas).
●
Esvazie o recipiente de água
(As mensagens sobre o esvaziamento podem ser ignoradas se
a sua máquina de secar estiver ligada a um canal de drenagem,
visto não ser necessário esvaziar o reservatório da água).
As mensagens são apresentadas para Ihe lembrar de
esvaziar o recipiente da água.
Se o recipiente de água encher durante um programa, o
aquecimento desliga-se e o secador executa um período
Arrefecimento
ESVAZIAR RECIPIENTE ÁGUA .
Deverá esvaziar o recipiente de água e reiniciar o secador,
caso contrário, a roupa não ficará seca. Depois de reiniciar o
secador a mensagem demorará alguns segundos a desaparecer.
Para evitar este procedimento, esvazie sempre o recipiente
de água após cada utilização do secador (ver Manutenção).
●
Abertura da Porta
A abertura da porta durante um programa provoca a
interrupção do secador e os seguintes efeitos:
Nota: a luz de INICIAR/PAUSA fica laranja e intermitente
durante a fase de Pós-tratamento de um programa.
●
O visor mostra PAUSA .
●
Durante uma fase de atraso, o mesmo prosseguirá com
a contagem decrescente. O botão Iniciar/Pausa terá de
ser premido para retomar o programa de atraso.
O visor muda para mostrar o estado actual.
●
O botão Iniciar/Pausa terá de ser premido para retomar
o programa. O visor muda para mostrar o estado actual
●
Durante a fase de Pós-tratamento, o programa terminará.
Se premir o botão INICIAR/PAUSA, um novo programa
será reiniciado desde o princípio.
●
Nota
Se ocorrer um corte de energia, desligue a alimentação ou
retire a ficha da tomada. Quando a energia for reposta,
prima e mantenha sob pressão o botão Ligar/Desligar até
que o visor mostre
secar retome o seu funcionamento. Em seguida, prima o
botão Iniciar/Pausa e o programa é retomado.
88:88
. Em seguida, pára e uma mensagem indica
LIGAÇÃO EM CURSO e a máquina de
.
86
Page 87

Roupa
Escolher a sua roupa
• Consulte os símbolos nas etiquetas das roupas,
de modo a certificar-se de que os artigos podem
ser utilizados na secadora.
• Escolha a roupa por tipo de tecido.
• Esvazie os bolsos e verifique os botões.
• Feche os fechos de correr e desaperte cintos e
correias.
• Torça cada peça de modo a eliminar o máximo de
água possível.
! Não carregue peças a pingar na secadora.
Carga máxima
Não carregue mais do que a capacidade máxima.
Estes números referem-se ao peso em seco:
Fibras naturais: 9 kg máx.
Fibras sintéticas: 3 kg máx.
! NÃO sobrecarregue a máquina, uma vez que pode
resultar num desempenho de secagem reduzido.
Etiquetas de cuidado na lavagem
Observe as etiquetas nas suas peças de roupa,
especialmente se está a utilizar a secadora pela
primeira vez. Os símbolos que se seguem são os
mais comuns:
Pode ser seco na máquina
Não pode ser seco na máquina
Seque com a temperatura máxima
Seque com a temperatura mínima
Algodões
Calor
Alto
Sintéticos
Calor
Médio
Delicados
(Acrílicos)
Baixo
Calor
1 kg
Duração automática
Minutos automáticos
Definição Secagem
Temporizada)
Tempos de secagem de 800-1000rpm na máquina de lavar
Duração automática
Minutos automáticos
Definição Secagem
Temporizada)
Tempos de secagem em centrifugação reduzida na máquina de lavar
Duração automática
Minutos automáticos
Definição Secagem
Temporizada)
Tempos de secagem em centrifugação reduzida na máquina de lavar
0:30 - 0:40
30 - 40
0:30
2 kg
0:40 - 0:55
40 - 55
1:00
1 kg
0:40 - 0:50
40 - 50
1:00
0:40
3 kg
0:55 - 1:10
55 - 70
ou 1:30
1:00
1 kg
0:40 - 1:20
40 - 80
ou 1:00 ou 1:20
Tempos de secagem
A tabela (ver abaixo) apresenta tempos de secagem
APROXIMADOS em minutos. Os pesos referem-se a
artigos secos.
Estes tempos são aproximados e podem variar
dependendo de:
• Quantidade de água mantida nas roupas após o
ciclo de centrifugação: as toalhas e peças
delicadas retêm muita água.
• Tecidos: artigos que sejam do mesmo tipo de
tecido, mas que sejam de texturas e espessuras
diferentes poderão não ter o mesmo tempo de
secagem.
• Quantidade de roupa: artigos únicos ou pequenas
cargas podem demorar mais tempo a secar.
• Secagem: Se pretender engomar algumas das
suas roupas, podem ser retiradas da máquina
ainda um pouco húmidas. As restantes poderão
ficar mais tempo, se precisar delas
completamente secas.
• Definição de temperatura.
• Temperatura ambiente: se o espaço em que a
máquina está instalada estiver frio, poderá
demorar mais tempo a secar as suas roupas.
• Volumes: alguns artigos mais volumosos devem ser
secos na máquina com cuidado. Sugerimos que
remova estes artigos várias vezes, sacuda-os e
volte a colocá-los na máquina até que estejam
completamente secos.
! Não seque em demasiado as suas roupas.
Todos os tecidos contêm um pouco de humidade
natural, que os mantêm suaves e macios.
4 kg
1:10 - 12:20
70 - 80
1:30
5 kg
1:20 - 1:30
80 - 90
1:30
2 kg
0:50 - 1:10
50 - 70
1:00
6 kg
1:35 - 2:00
95 - 120
1:30
ou 2:00
7 kg
2:00 - 2:20
120 - 140
2:00 ou 2:40
1:20 - 1:40
80 - 100
1:20 ou 1:40
2:00 - 2:40
130 - 160
2:00 ou 2:40
1:10 - 1:30
1:00
2 kg
8 kg
3 kg
70 - 90
ou 1:30
9 kg
2:30 - 2:50
140 - 170
2:40
ou 3:00
P
●
Nota: No fim de um ciclo de secagem, os algodões ainda devem estar húmidos caso tenha agrupado algodões
e sintéticos. Se isto acontecer, basta aplicar mais um breve período de secagem.
87
Page 88

Resolução de problemas
P
Um dia a sua máquina parece não querer funcionar. Antes de contactar o seu Centro de Serviços (ver
Reparação), analise as seguintes sugestões de resolução de problemas:
Problema:
A secadora não inicia.
Causas possíveis / Solução:
●
A ficha não está ligada à tomada, ou não está a fazer contacto.
●
Ocorreu uma falha de energia.
●
Há um fusível queimado. Experimente ligar outro aparelho à tomada.
●
Está a utilizar um cabo de extensão? Experimente ligar o fio de
alimentação da secadora directamente à tomada.
●
A porta está bem fechada?
●
O programa não foi seleccionado correctamente (ver Arranque
e Programas).
●
O botão INICIAR/PAUSA não foi posicionado correctamente (ver
Arranque e Programas).
O ciclo de secagem não inicia.
Demora muito tempo a secar.
●
Definiu um atraso do tempo (ver Arranque e Programas).
●
O filtro não foi limpo (ver Manutenção).
●
O recipiente de água tem de ser esvaziado? A mensagem de esvaziar
água é apresentada? (ver Manutenção).
●
O condensador tem de ser limpo? (ver Manutenção).
●
A definição de temperatura não é ideal para o tipo de tecido que está a
secar (ver Arranque e Programas, e ver Roupa).
●
O tempo de secagem correcto não foi seleccionado para a carga (ver
Roupa).
●
A grelha de entrada de ar está obstruída (ver Instalação, e ver
Manutenção).
●
As peças estavam demasiado molhadas (ver Roupa).
●
A secadora foi sobrecarregada (ver Roupa).
A mensagem de ‘ESVAZIAR
RECIPIENTE ÁGUA’ é
apresentada, mas o secador
está a funcionar há pouco
tempo.
A mensagem de ‘ESVAZIAR
RECIPIENTE ÁGUA’ é
apresentada, mas o recipiente
de água não está cheio.
O programa acaba e as
roupas estão mais húmidas
do que deviam.
O visor mostra um código de
avaria F seguido de um ou
dois números.
O visor mostra por
breves momentos
DEMO ON a cada 6
segundos.
As luzes no painel de controlo
da máquina de secar estão
desligadas apesar da máquina
de secar estar ligada.
●
É provável que o recipiente de água não tenha sido esvaziado no início
do programa. Não espere pelo sinal esvaziar água. Verifique sempre o
recipiente e esvazie-o antes de iniciar um programa de secagem novo
(ver Manutenção).
●
Este procedimento é normal. A mensagem:
FIM DO CICLO, LIMPAR FILTRO E ESVAZIAR RECIPIENTE ÁGUA é
apresentada para Ihe lembrar de esvaziar o recipiente (ver O Visor e ver
Arranque e Programas).
! Por razões de segurança, a secadora tem um tempo de programa máximo
de 5 horas. Se um programa automático não detectar a humidade final
necessária durante este tempo, a secadora conclui o programa e pára.
Verifique os pontos anteriores e execute novamente o programa; se os resultados
continuarem húmidos, contacte o Centro de Serviço (ver Reparação).
●
Se o visor mostrar uma avaria:
- desligue a máquina e desligue a ficha. Limpe o filtro e o
condensador (ver Manutenção). Ligue novamente a ficha, ligue a
máquina e, em seguida, inicie outro programa. Se for apresentada
uma avaria, anote o código e contacte o Centro de Serviços (ver
Reparação).
●
A máquina de secar está no modo ‘Demo’. Prima e mantenha sob
pressão os botões Ligar/Desligar e Iniciar/Pausa durante 3 segundos. O
visor mostra DEMO OFF durante 3 segundos e, em seguida, retoma o
funcionamento normal.
●
A máquina de secar passou ao modo Standby para poupar energia. Isto
ocorre se tiver havido um corte de energia ou se tiver deixado a máquina
sem iniciar um programa ou depois de um programa de secagem ter sido
concluído.
- Prima e mantenha sob pressão o botão Ligar/Desligar e as luzes
acendem-se.
88
Page 89

Reparação
Antes de contactar o Centro de
Peças sobressalentes
Serviços:
Esta secadora é uma máquina complexa. Repará-la
●
Utilize o guia de resolução de problemas para ver
se consegue resolver o problema (ver Resolução
de problemas).
●
Caso contrário, desligue a secadora e contacte o
Centro de Serviço mais próximo.
O que dizer ao Centro de Serviço:
●
nome, morada e código postal.
●
número de telefone.
●
o tipo de problema.
●
a data de compra.
●
o modelo do aparelho (Mod.).
●
o número de série (S/N).
Estas informações podem ser encontradas na
etiqueta de dados, no interior da porta da máquina.
sozinha ou através de um técnico não autorizado
pode provocar danos a uma ou mais pessoas, pode
danificar a máquina e pode invalidar a garantia das
peças sobressalentes.
Contacte um técnico autorizado se tiver problemas
durante a utilização da máquina.
Poupar energia e respeitar o ambiente
●
Torça as peças de vestuário para eliminar o excesso de água antes de colocá-las na máquina de secar (se
primeiro utilizar uma máquina de lavar, seleccione um ciclo de centrifugação elevado).Ao fazer isto, poupa tempo e
energia durante a secagem.
●
Seque sempre com cargas completas – assim, poupa energia: artigos únicos ou pequenas cargas podem
demorar mais tempo a secar.
●
Limpe o filtro após cada utilização para cortar nos custos de consumo de energia (ver Manutenção).
P
Informações Acerca de Reciclagem
e Eliminação de Resíduos
Como parte do nosso continuado empenho
em ajudar o ambiente, reservamo-nos o
direito de utilizar componentes de qualidade, de
modo a manter os custos baixos para os clientes e
minimizar o desperdício de material.
●
Eliminação do material da embalagem: siga os
regulamentos locais, de modo que a embalagem
possa ser reciclada.
●
De modo a minimizar o risco de lesões para crianças,
remova a porta e a ficha e corte o fio eléctrico do
aparelho. Elimine estas peças separadamente a
fim de assegurar que o aparelho não possa mais
ser ligado a uma tomada eléctrica.
Recolha dos electrodomésticos
A directiva Europeia 2012/19/CE referente à gestão de
resíduos de aparelhos eléctricos e electrónicos (RAEE),
prevê que os electrodomésticos não devem ser escoados
no fluxo normal dos resíduos sólidos urbanos. Os
aparelhos desactualizados devem ser recolhidos
separadamente para optimizar a taxa de recuperação e
reciclagem dos materiais que os compõem e impedir
potenciais danos para a saúde humana e para o ambiente.
O símbolo constituído por um contentor de lixo
barrado com uma cruz deve ser colocado em
todos os produtos por forma a recordar a
obrigatoriedade de recolha separada.
Os consumidores devem contactar as autoridades locais
ou os pontos de venda para solicitar informação
referente ao local apropriado onde devem depositar os
electrodomésticos velhos.
89
Page 90

Dados do produto…
(Regulamento da UE 392/2012)
P
Marca Hotpoint Ariston Modelos TCD97B
FTCD 97B
Capacidade nominal da lavagem de algodão para o programa padrão com carga máxima 9 kg Eficácia energética de classe B
Consumo de energia anual ponderado (AEc) 615.9 kWh
Consumo por ano, com base em 160 ciclos de secagem do programa para algodões padrão com cargas totais e parciais e o
consumo dos modos de baixo consumo. O consumo de energia real por ciclo depende do modo de utilização do aparelho.
Esta secadora doméstica é uma Secadora condensadora automática
Consumo de energia: carga máxima E
Consumo de energia: modo desligado (P
5.20 kWh, carga parcial E
dry
) 0.14 W, modo de suspensão (Pl) 3.36 W
o
dry1/2
2.82 kWh
A duração do “modo de suspensão” para sistema de gestão de energia é de 30 minutos
O “programa de algodão padrão” adequado para peças de algodão molhadas para secagem normal que é o programa
mais eficaz em termos de consumo de energia para algodões utilizados com cargas máximas e parciais é o modo
Algodão padrão, Calor Alto, Secagem para armário
Tempo do programa (minutos): ponderado (Tt) carga máxima e parcial 110, carga máxima (T
) 147, carga parcial (T
dry
dry1/2
) 82
Eficácia de condensação de classe B
Eficácia de condensação media (%) : carga máxima (C
) 83, carga parcial (C
dry
) 79, ponderado (Ct) carga máxima e parcial 81
dry1/2
Emissões de ruído acústico aéreas 69 dB(A) re 1 pW
* “informação ao consumidor em conformidade com o regulamento EU 932/2012”.
Energia utilizada normalmente - Sintéticos
Tempo de secagem normal - Sintéticos
carga máxima 1.38 kWh, carga parcial não aplicável
carga máxima 65 minutos, carga parcial não aplicável
Este equipamento está em conformidade com as seguintes directivas da UE:
- 2006/95/EC (Equipamento de Baixa Tensão)
- 2004/108/EEC (Compatibilidade Electromagnética)
Indesit Company, Viale Aristide Merloni 47, 60044 Fabriano (AN), Italy
90
Page 91

91
Page 92

195128733.00 N
11/2014 - LION fpg . Four Ashes, Wolverhampton
92
 Loading...