

Page 1
Instruction booklet
TUMBLE DRYER
GB
English,1
IT
Italiano,17
FTCD 972
First time you turn on your dryer
you must select your preferred
language see Display
Contents
Installation, 2
Warnings, 4
Care and Maintenance, 6
Control Panel, 8
Laundry, 8
The Display, 9
Start and Programmes, 11
Troubleshooting, 15
Service, 16
www.hotpoint.eu
This symbol reminds you to read this
instruction manual.
! Keep this manual at hand for immediate reference whenever
necessary. Always store this manual close to the tumble dryer
and remember to pass it on to any new owners when selling
or transferring the appliance, so they may familiarise with the
warnings and suggestions herein contained.
! Read these instructions carefully: the following pages contain
important information on installation and useful suggestions for
operating the appliance.
1
Page 2
1
2
H<1m
1
2
Installation
GB
Where to put your dryer
• Place your dryer at a
distance from gas ranges,
stoves, heaters, or cooktops
because flames can damage
the appliance. The dryer
should be installed in an
ambient room temperature
of between 20 to 23°C
for optimum performance.
But will function if the room is between 14 and
30°C. If you are going to install the appliance
under a work counter, be sure to leave a 10 mm
space between the top and any other objects
on or above the machine and a 15 mm space
between the sides and lateral furnishings or
walls. This is to ensure proper air circulation.
The appliance must be installed with the rear
surface placed against a wall.
Ventilation
• When the dryer is in use, there has to be
adequate ventilation. Make sure you put your dryer
in an environment that is not damp and has proper
air circulation throughout. Airflow around the dryer
is essential to condense the water produced during
the washing, the dryer will not operate efficiently in
an enclosed space or cupboard.
! If using the dryer in a small or cold room
some condensation will be experienced.
!
We do not recommend that the dryer is
installed in a cupboard but the dryer must never
be installed behind a lockable door, a sliding
door or a door with a hinge on the opposite
side to that of the dryer door.
Fig. A Fig. B
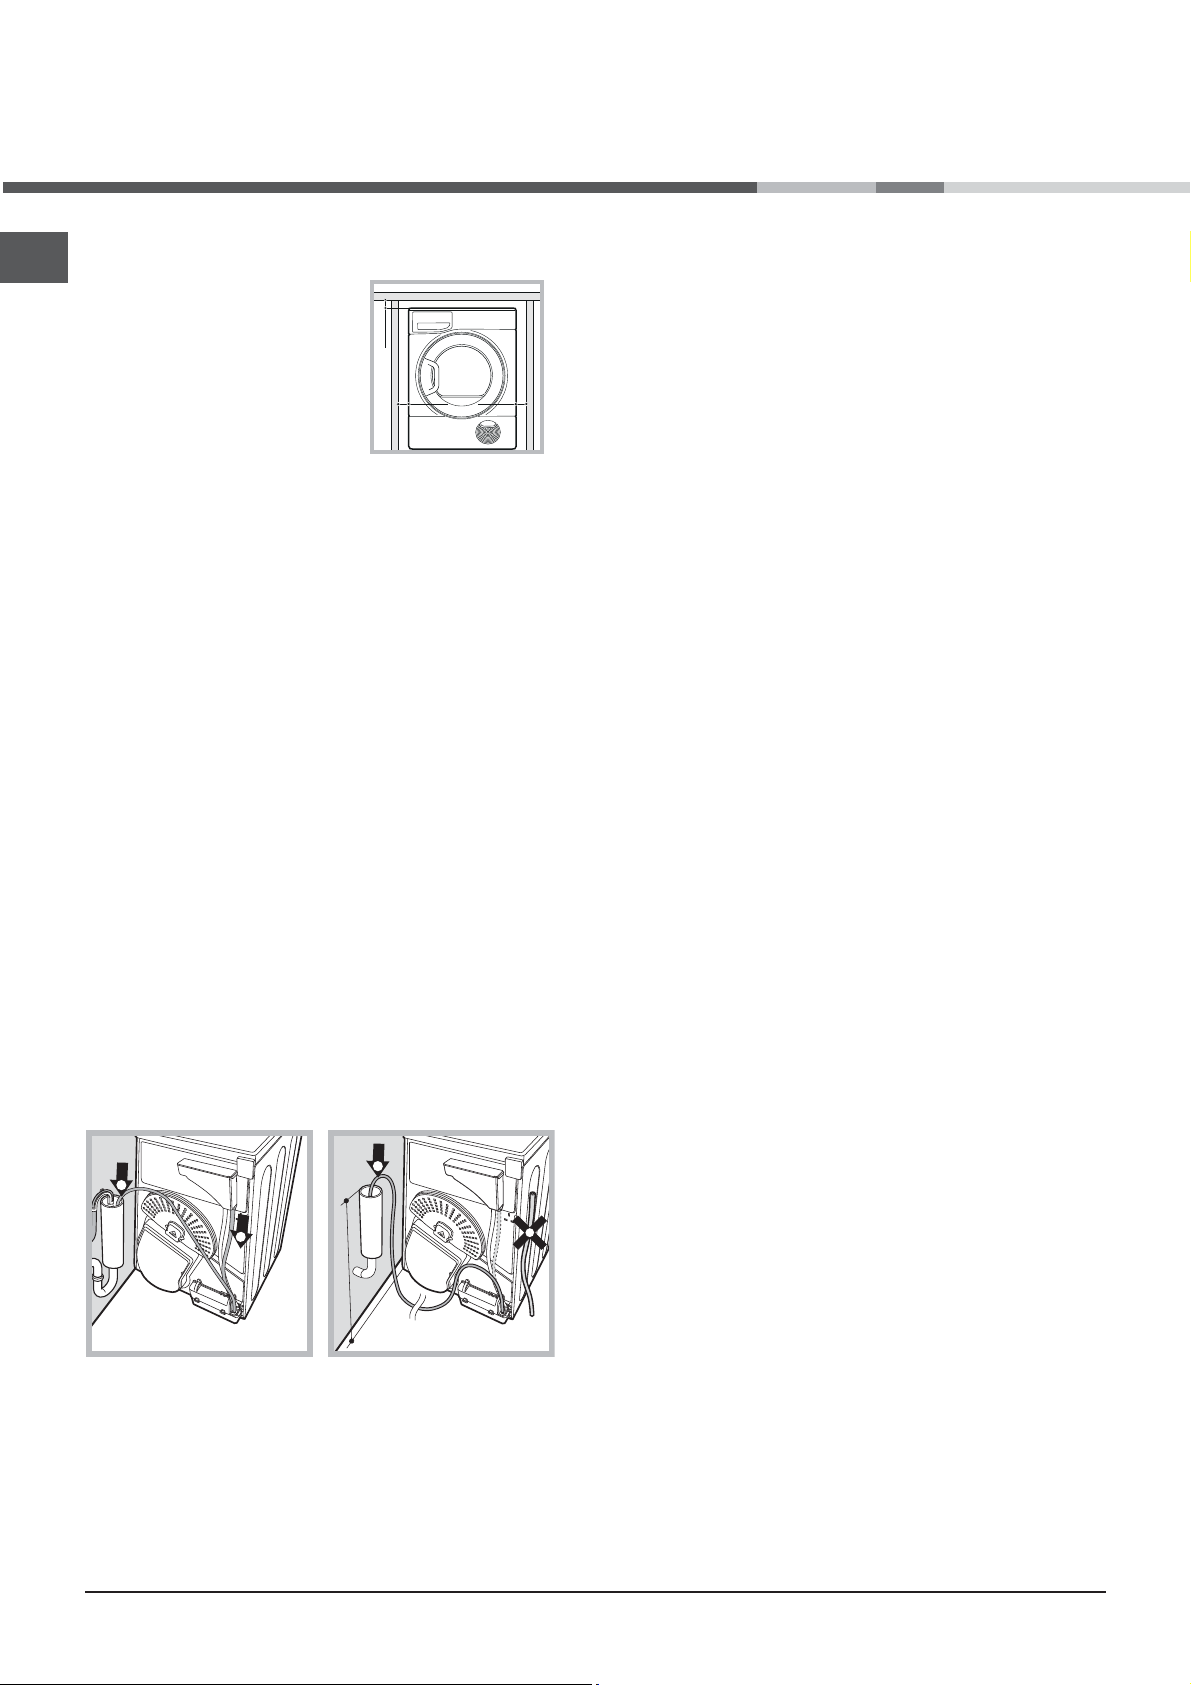
Water Drain
If the machine is positioned close to a drain it is possible to drain the
condensed water directly without using the waterbottle. In which
case it is no longer necessary to empty the water bottle at the end
of each cycle. If the Dryer is positioned above or close to a Washing
Machine the same drainage can be used. Just remove the tube
indicated in figure A and connect it to the drainage. If the drainage
10 mm
15 mm
15 mm
is further away than the length of the tube it is possible to buy and
connect a tube of the same diameter and the necessary length in
order to reach the drain. To install the new tube just substitute the
existing one as indicated in figure B inserting it in the same place.
! The drain tube has to be below 1 m from the bottom of
the Dryer.
! Once the Dryer has been installed please assure that
the drain tube is not bent or kinked.
Electrical connections
Before plugging the appliance into the socket,
check the following:
• Make sure your hands are dry.
• The socket must have an earth connection.
• The socket must be able to withstand
the machine’s maximum power output as
indicated on the rating plate.
• The power supply voltage must fall within
the values indicated on the data plate.
• The socket must be compatible with the
dryer’s plug. Should this not be the case,
replace the plug or the socket.
! DO NOT USE EXTENSION CORDS.
! The dryer must not be installed outdoors,
even if the space is sheltered. It can be very
dangerous if exposed to rain or storms.
! Once installed, the dryer’s electrical wire and
plug must be within reach.
! The power cord must not be bent or
squashed.
! If the plug being replaced is a non-rewirable
type, then the cut-off plug must be disposed of
safely. DO NOT leave it where it can be inserted
into a socket and create a shock hazard.
! The power must be regularly checked. If the
supply cord is damaged, it must be replaced
by the manufacturer, its service agent or
similarly qualified persons in order to avoid
a hazard. (see Assistance). New or longer
electric cords are supplied by authorised
dealers at a supplementary cost.
! The manufacturer denies any
responsibility should any of these rules
not be followed.
! If in doubt about any of the above
consult a qualified electrician.
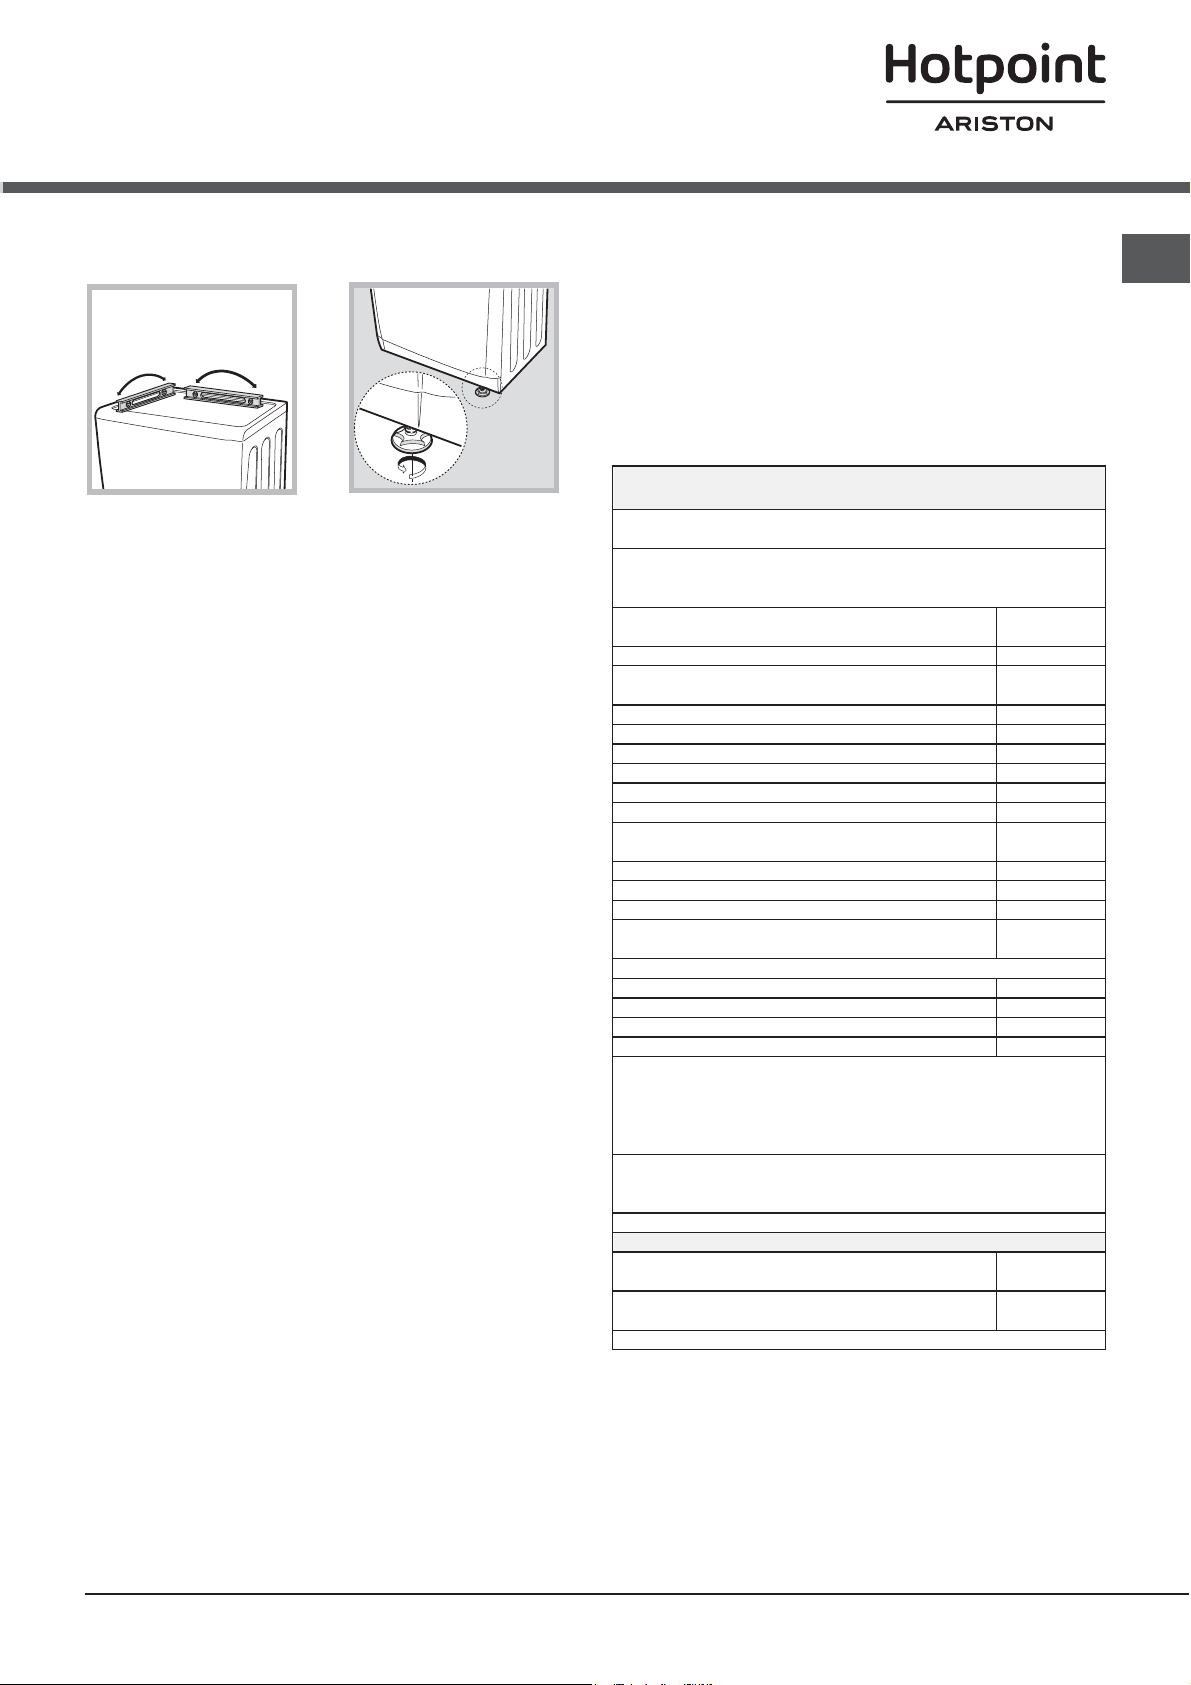
Levelling the tumble dryer
The dryer must be installed level for correct
operation.
When you have installed your dryer in its final
location check that it is level first side-to-side,
then front to back. If the dryer is not level,
2
Page 3
This household tumble drier is a Condenser
The weighted Annual Energy Consumption (AEc)* kWh 1) 259.3
This household tumble drier is a Automatic
Energy consumption full load; Edry - kWh 2) 2.19
Energy consumption partial load; Edry½ - kWh 2) 1.17
Power consumption: off-mode (Po) - Watts 0.17
Power consumption: left-on mode (Pl) - Watts 3.27
Prog. Time - weighted (Tt) full & partial load - minutes 3) 187
Full load (Tdry) - minutes 250
Partial load (Tdry½) - minutes 140
weighted (Ct) full & partial load 3) 81
full load (Cdry) 81
partial load (Cdry½) 81
Airborne acoustical noise emissions - dB(A) re 1 pW 70
Programme time in minute, for program “Synthetics” full load
85
Partial load for program “Synthetics” N/A
Average condensation efficiency - %
1) "Standard cotton” at full and partial load is the standard programme to which the
information in the label and the fiche relates. The standard cotton program is
suitable to dry at cupboard level (0%) cotton laundry and is the most efficient
programme in terms of energy consumption. Partial load is half the rated load.
2) based on 160 drying cycles of the standard cotton programme at full and partial
load, and the consumption of the low-power modes. Actual energy consumption
will depend on how the appliance is used.
3) Weighted average of 3 cycles at full load and 4 cycles at half load.
Regulation 932/2012.
Energy consumption in kWh, for program “Synthetics” full load
0.68
Energy efficiency class on a scale from A+++ (low consumption)
to D (high consumption)
A++
Duration of the 'left-on mode' for power management system minutes
30
Condensation efficiency class on a scale from G (least efficient) to
A (most efficient)
B
Product Data - Regulation 392/2012.
Brand
HOTPOINT/ARISTON
Model
FTCD 972 6HM1 (IT)
Rated capacity of cotton laundry for the "standard cotton
programme" at full load - kg
9.0
adjust the two legs up or down until your
dryer is level.
Preliminary information
Once you’ve installed your dryer and before you use it, clean
the inside of the drum to remove any dust that could have
accumulated during transportation.
Warning ! Before you use your dryer ensure that its has
been in a upright position for at least 6 hours.
Maximum load sizes: 9 kg
GB
3
Page 4

Warnings
! This appliance has been designed and built
according to international safety standards.
These warnings are given for safety reasons
and must be followed carefully.
General safety
• This appliance can be used by children
aged from 8 years and above and
persons with reduced physical, sensory or
mental capabilities or lack of experience
and knowledge if they have been given
supervision or instruction concerning use of
the appliance in a safe way and understand
the hazards involved.
• This tumble dryer has been designed for
home, and not professional, use.
• Do not touch the appliance while barefoot
or with wet hands or feet.
• Unplug the machine by pulling on the plug,
not the cord.
• After using the dryer, turn it off and unplug
it. Keep the door closed to make sure that
children do not use it as a toy.
• Children should be supervised to ensure
that they do not play with the dryer.
• Cleaning and user maintenance shall not be
made by children without supervision.
•Children of less than 3 years should be
kept away from the appliance unless
continuously supervised.
• The appliance must be installed correctly
and have proper ventilation. The air intake
at the front of the dryer should never be
obstructed (see Installation).
• Never use the dryer on carpeting where
the pile height would prevent air from
entering the dryer from the base.
• Check to see if the dryer is empty before
loading it.
•
The back of the dryer could become
very hot. Never touch it while in use.
•
Do not use the dryer unless the filter,
watercontainer and condenser are securely in
place (see Maintenance).
• Do not overload the dryer (see Laundry for
maximum loads).
• Do not load items that are dripping wet.
• Carefully check all instructions on clothing
labels (see Laundry).
• Do not tumble dry large, very bulky items.
• Do not tumble dry acrylic fibres at high
temperatures.
• Do not turn off the dryer when there are still
warm items inside.
• Clean the filter after each use (see
Maintenance).
• Empty the Water Container after each use
(see Maintenance).
• Clean the Heat Pump filter unit at regular
intervals (see Maintenance).
• Do not allow lint to collect around the dryer.
• Never climb on top of the dryer. It could
result in damage.
• Always follow electrical standards and
requirements (see Installation).
• Always buy original spare parts and
accessories (see Service).
To minimise the risk of fire in your tumble
dryer, the following should be observed:
• Tumble dry items only if they have been
washed with detergent and water, rinsed and
been through the spin cycle. It is a fire hazard
to dry items that HAVE NOT been washed
with water.
• Do not dry garments that have been treated
with chemical products.
• Do not tumble dry items that have been
spotted or soaked with vegetable or cooking
oils, this constitutes a fire hazard. Oil-affected
items can ignite spontaneously,especially
when exposed to heat sources such as
a tumble dryer. The items become warm,
causing an oxidisation reaction with the
oil, Oxidisation creates heat. If the heat
cannot escape, items can become hot
enough to catch fire. Piling, stacking or
storing oil-effected items can prevent heat
from escaping and so create a fire hazard.
If it is unavoidable that fabrics containing
vegetable or cooking oil or those that have
been contaminated withhair care products
be placed in a tumble dryer they should first
be washed with extra detergent - this will
reduce, but not eliminate the hazard. They
should not be removed from the dryer and
piled or stacked while hot.
• Do not tumble dry items that have previously
been cleaned in or washed in, soaked in
or soiled with petrol/gasoline, dry cleaning
solvents or other flammable or explosive
substances. Highly flammable substances
commonly used in domestic environments
including cooking oil, acetone, denatured
alcohol, kerosene, spot removers, turpentine,
GB
4
Page 5

waxes and wax removers. Ensure these
items have been washed in hot water with
an extra amount of detergent before being
dried in the tumble dryer.
• Do not tumble dry items containing foam
rubber (also known as latex foam), or
similarly textured rubber like materials.
Foam rubber materials can, when heated,
produce fire by spontaneous combustion.
• Fabric softener or similar products should
not be used in a tumble dryer to eliminate
the effects of static electricity unless the
practice is specifically recommended by
the manufacturer of the fabric softener
product.
• Do not tumble dry undergarments that
contain metal reinforcements eg. bras
with metal reinforcing wires. Damage to
the tumble dryer can result if the metal
reinforcements come loose during drying.
• Do not tumble dry rubber, plastic articles
such as shower caps or babies waterproof
covers, polythene or paper.
• Do not tumble dry rubber backed articles,
clothes fitted with foam rubber pads,
pillows, galoshes and rubber coated tennis
shoes.
•
Remove all objects from pockets such as
lighters and matches.
! WARNING: Never stop the dryer before
the end of the drying cycle unless all
items are quickly removed and spread
out so that the heat is dissipated.
Save energy and respect the environment
• Wring out all items to eliminate excess water before
tumble drying (if you use a washing machine first, select
a high spin cycle). Doing this will save time and energy
during drying.
• Always dry full loads - you save energy: single items or
small loads take longer to dry.
• Clean the filter after each use to contain energy
consumption costs (see Maintenance).
GB
5
Page 6
2
Care and maintenance
GB
Disconnecting the power supply
! Disconnect the dryer when not in use or
during cleaning and maintenance operations.
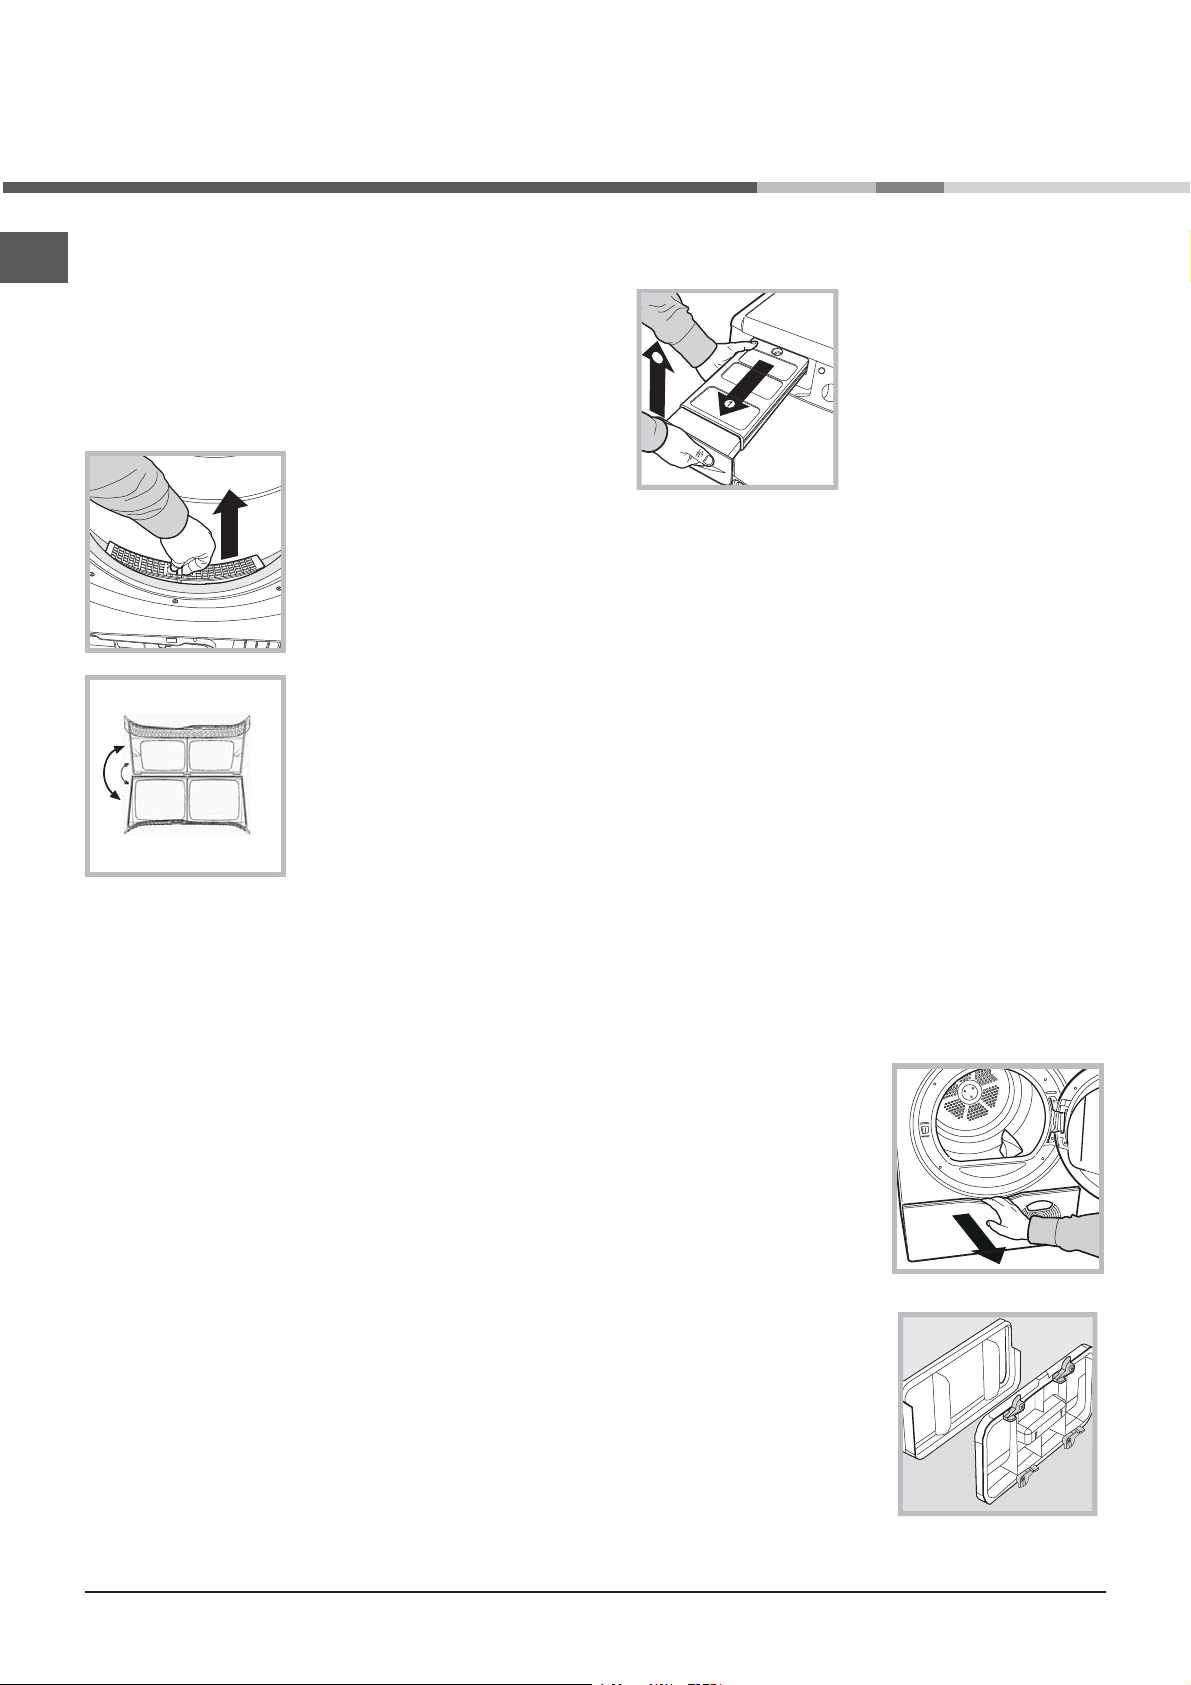
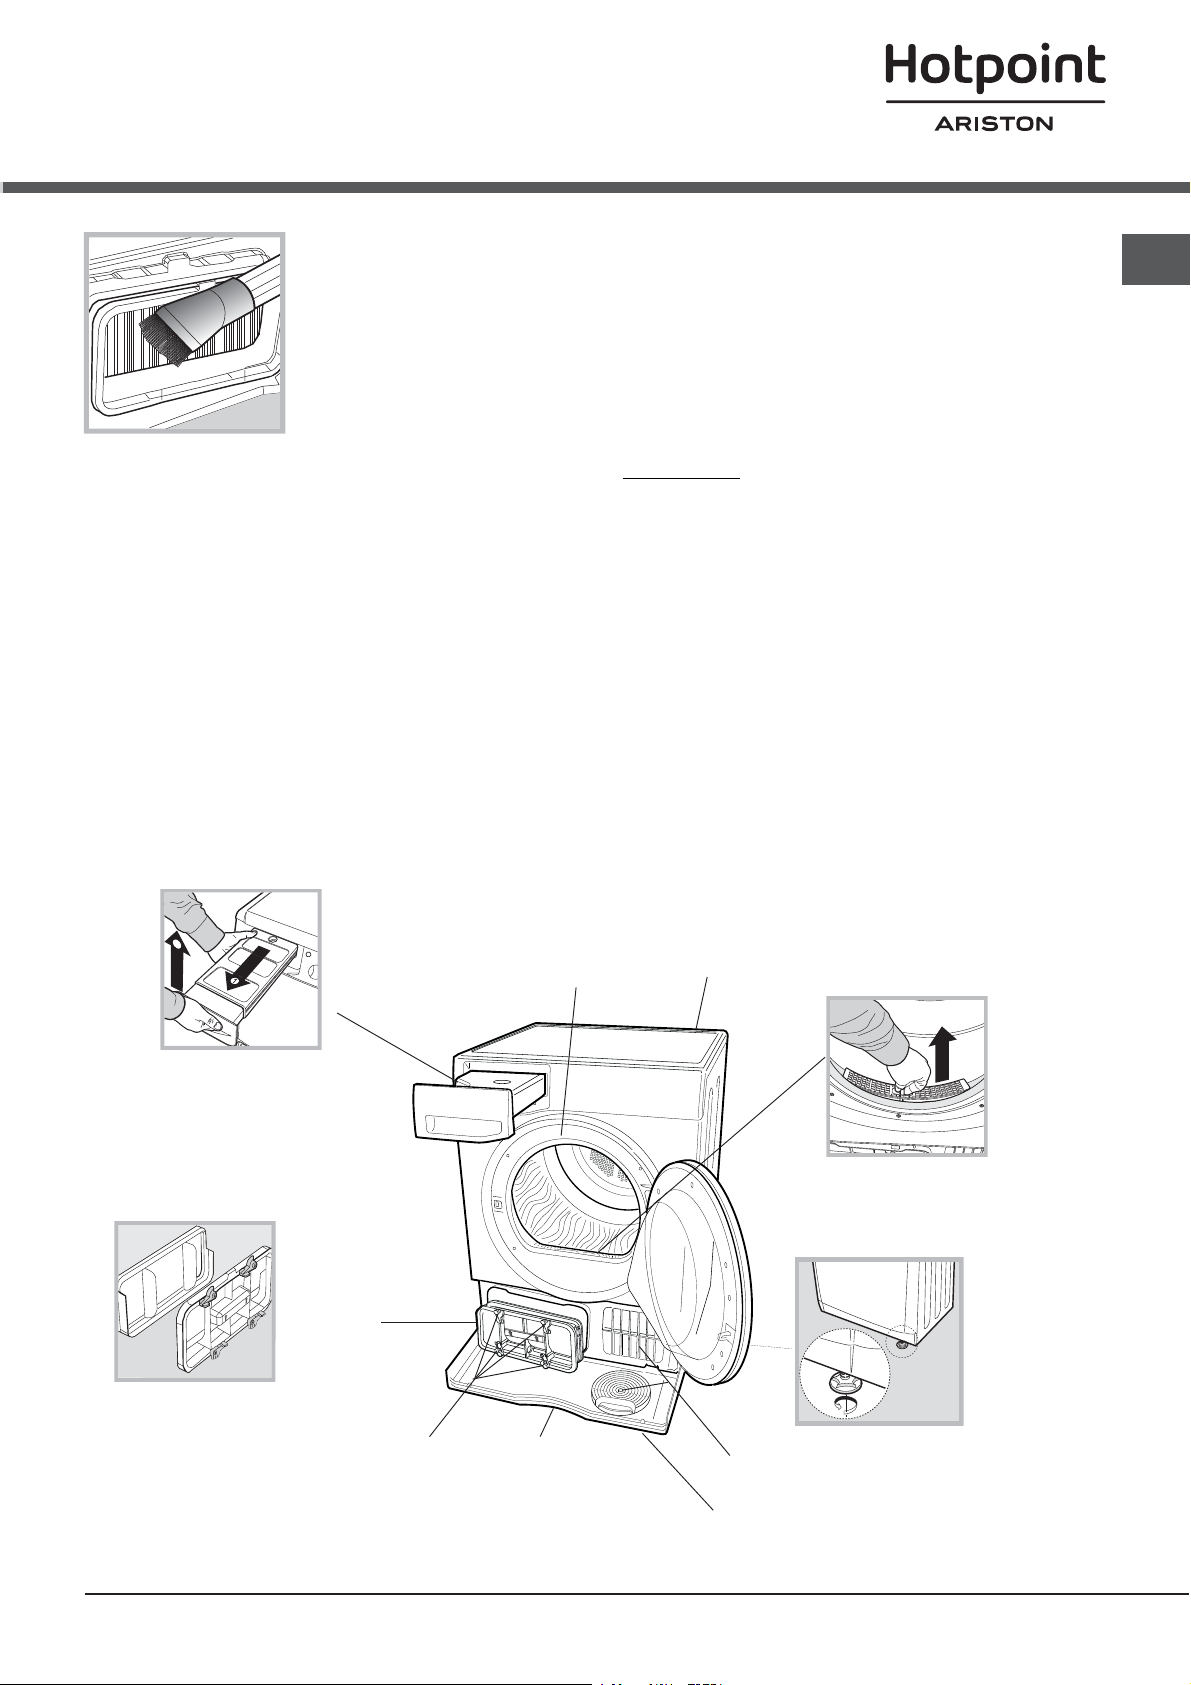
Cleaning the filter after each cycle
The filter is a fundamental component of the
dryer: its function is to collect lint and fluff that
form during drying.
Clean the filter once
drying is completed, by
rinsing it under running
water or cleaning it
with a vacuum cleaner.
Should the filter become
clogged, the flow of air
inside the dryer will be
seriously hampered:
drying times becomes
longer and more energy
is consumed. Moreover,
the dryer may become
damaged.
The filter is located in
front of the dryer seal
(see Picture).
Removing the filter:
1. Pull the filter’s plastic handle upwards (see
Picture).
2. Clean the fluff off the filter and replace it
correctly. Ensure that the filter is pushed fully
home.
! Do not use the dryer unless the filter has
been replaced in its holder.
Checking the drum after each cycle
Rotate the drum manually to remove smaller items
(handkerchiefs) that could have been left inside the dryer.
Cleaning the drum
! Avoid using abrasives, steel wool or stainless steel cleaning
agents to clean the drum. A coloured film may appear on the
stainless steel drum surface: it may be caused by a combination of water and/or cleaning agents such as wash-softeners.
This coloured film does not affect the dryer’s performance.
Emptying the water container after each
cycle
Remove the water container and
empty it into a sink or other
suitable drain outlet, then
replace it correctly.
Always check the water
container and empty it before
starting a new drying cycle.
-Failure to empty the water container may cause the
following:
- The dryer stops heating (thus the load may still be
damp at the end of the drying cycle).
Priming the Water Collection System
When your dryer is new, the Water Container will not
collect Water until the system is primed, this will take
1 or 2 drying cycles. Once primed it will collect Water
during every cycle.
Cleaning the Heat Pump Filter Unit
• Periodically (every 5 drying cycles) remove
Heat pump filter unit and clean any build up
of fluff from the surface of the filter by rinsing
it under running water or with your vacuum
cleaner.
We however recommend that you clean this
filter after every drying cycle to optimize the
dryers performance.
To remove Heat pump
filter unit:
1. Unplug the dryer and
open the door.
2. Remove the filter unit
by rotating the 4 clips
to the vertical position
then pulling the filter
unit towards you.
3. Separate the two
parts of the filter unit and clean the surface of
the filter.
! Warning: The front of
the heat pump is made
from thin metal plates.
Take care that you do
not damage these or cut
yourself when cleaning,
removing or replacing
the filter unit.
4.Whenever you clean the Heat pump filter
unit always clean any build up of fluff from
6
Page 7
the surface of the metal
2
plates. Carefully clean
this fluff off with a damp
h,sponge or vacuum
clot
cleaner. Never use your
Fingers.
5. Assemble the two
parts of the filter clean
the surface of the
seals and replace with the 4 clips into the
horizontal position, sure that the catches
have been secured.
Cleaning the tumble dryer
• The external metal, plastic and rubber parts can be
cleaned with a damp cloth.
• Clean the front air intake grille regularly (every 6 months)
with a vacuum cleaner to remove any lint, fluff or dust
deposits. Furthermore, remove any lint deposits from the
front part of the Heat pump filter unit and from the filter
area, using a vacuum cleaner every so often.
! Do not use solvents or abrasives.
! Have the dryer checked regularly by authorised technical
personnel in order to ensure that the electrical and
mechanical parts work safely (see Assistance).
Heat Pump Protection System
The heat pump system has a compressor protection
feature that operates if you open the door or there is a
power disruption or if you turn off the dryer. This system
will prevent the heat pump compressor from starting for
5 minutes after the door is closed and the programme is
started.
Quick Tips
!Remember to clean your filter and Heat
Pump filter unit after each load.
! Remember to empty your water container
after each load.
! Doing this will keep your machine working
at its BEST!
GB
Water container
Heat pump
filter unit
Catches
Model & Serial numbers
Handle
Rating plate
Cover
Filter
Adjustable feet
Air intake
7
Page 8

Control panel
GB
PROGRAMME
Selection Buttons
ON/OFF
The ON/OFF button : - if pressed when the dryer is
running: If the display shows
stops. If the display shows
botton and the display counts down 3, 2, 1 and then stops.
Press and hold again for more than 3 seconds, the display
briefl y shows
The PROGRAMME selection buttons set the programme:
press the button corresponding to the programme you
want to select (see Start and Programmes).
The OPTION buttons/indicators: these buttons select
available options for your selected programme (see The
Controls). The indicators on the display unit next to the
bottom buttons light to show that the option has been
selected.
The START/PAUSE button/light
programme. When a programme is running, pressing this
button in pauses the programme, there will be one beep,
the display will show
The light is green when the programme is running, fl ashing
POWER ON
PAUSE
TURNING OFF
PRESS AND HOLD
.
and the dryer stops.
the dryer
, hold the
starts a selected
Button
Display Unit
CHILD LOCK &
OPTIONS
Buttons & Lights
amber if the programme has been paused or fl ashing
green if on standby waiting to start a programme (see
Start and Programmes).
Note: This light also fl ashes amber during the Post
Care phase of a programme.
The Display Unit gives warnings and information about
the programme selected and its progress (see next page).
The CHILD LOCK button/icon
button after selecting your programme and any options,
this prevents the programme settings from being changed,
the display will briefl y show
is lit, the other buttons are disabled. Hold the button to
cancel and the icon will go out, the display will briefl y show
UNLOCKED
Note: This tumble dryer, in compliance with new energy
saving regulations, is fi tted with an automatic standby
system which is enabled after about 30 minutes if no
activity is detected. Press and hold the ON-OFF button
until the display briefl y shows
then reactivates.
.
START/PAUSE
Button & Light
: Press and hold this
LOCKED
. When the icon
POWER ON
, and the dryer
Laundry
Sorting laundry
• Check the symbols on the care labels of the various gar-
ments to verify whether the garments can be safely tumble
dried.
• Sort laundry according to the type of fabric.
• Empty all pockets and check for loose buttons.
• Close zips and hooks and fasten belts and strings without
tightening them.
• Wring out garments to remove the maximum amount of
water possible.
!
Do not load the dryer when garments are dripping wet.
Maximum load sizes
Do not overload the drum.
The following values indicate the weight of dry garments:
Natural fibres: maximum kg
Synthetic fibres: maximum kg
8
9
4
! Do not overload the dryer as this may result is reduced
drying performance.
Care labels
Always check the care labels, especially when placing
garments in the tumble dryer for the first time. Below are the
most commonly used symbols:
May be tumble dried.
Do not tumble dry.
Tumble dry – high heat.
Tumble dry – low heat.
Page 9
The Display
Selecting your language
The fi rst time you turn on your dryer you should select your preferred language
from the available list.
To change: the language current selection must fl ash, on the fi rst
line of the display.
- Press the On/Off button to turn off the display then press and hold
all 3 buttons:
5 seconds.
- Press the
down through the list.
- When your required language is fl ashing on the top line of the
display, pressing the
Understanding the display
Programme selection and display
The selected programme is shown on the fi rst line of the display, this message is shown while the programme is running.
Eight of the buttons have two selections, press the button once for the fi rst choice and press again for the second choice, your
selected programme is displayed. The fi nal button selects My Cycle.
My Cycle. When you select the My Cycle button the Display will show your selected programme with ‘M’ before its
name. ie.
M STANDARD COTTON (see Start and Programmes).
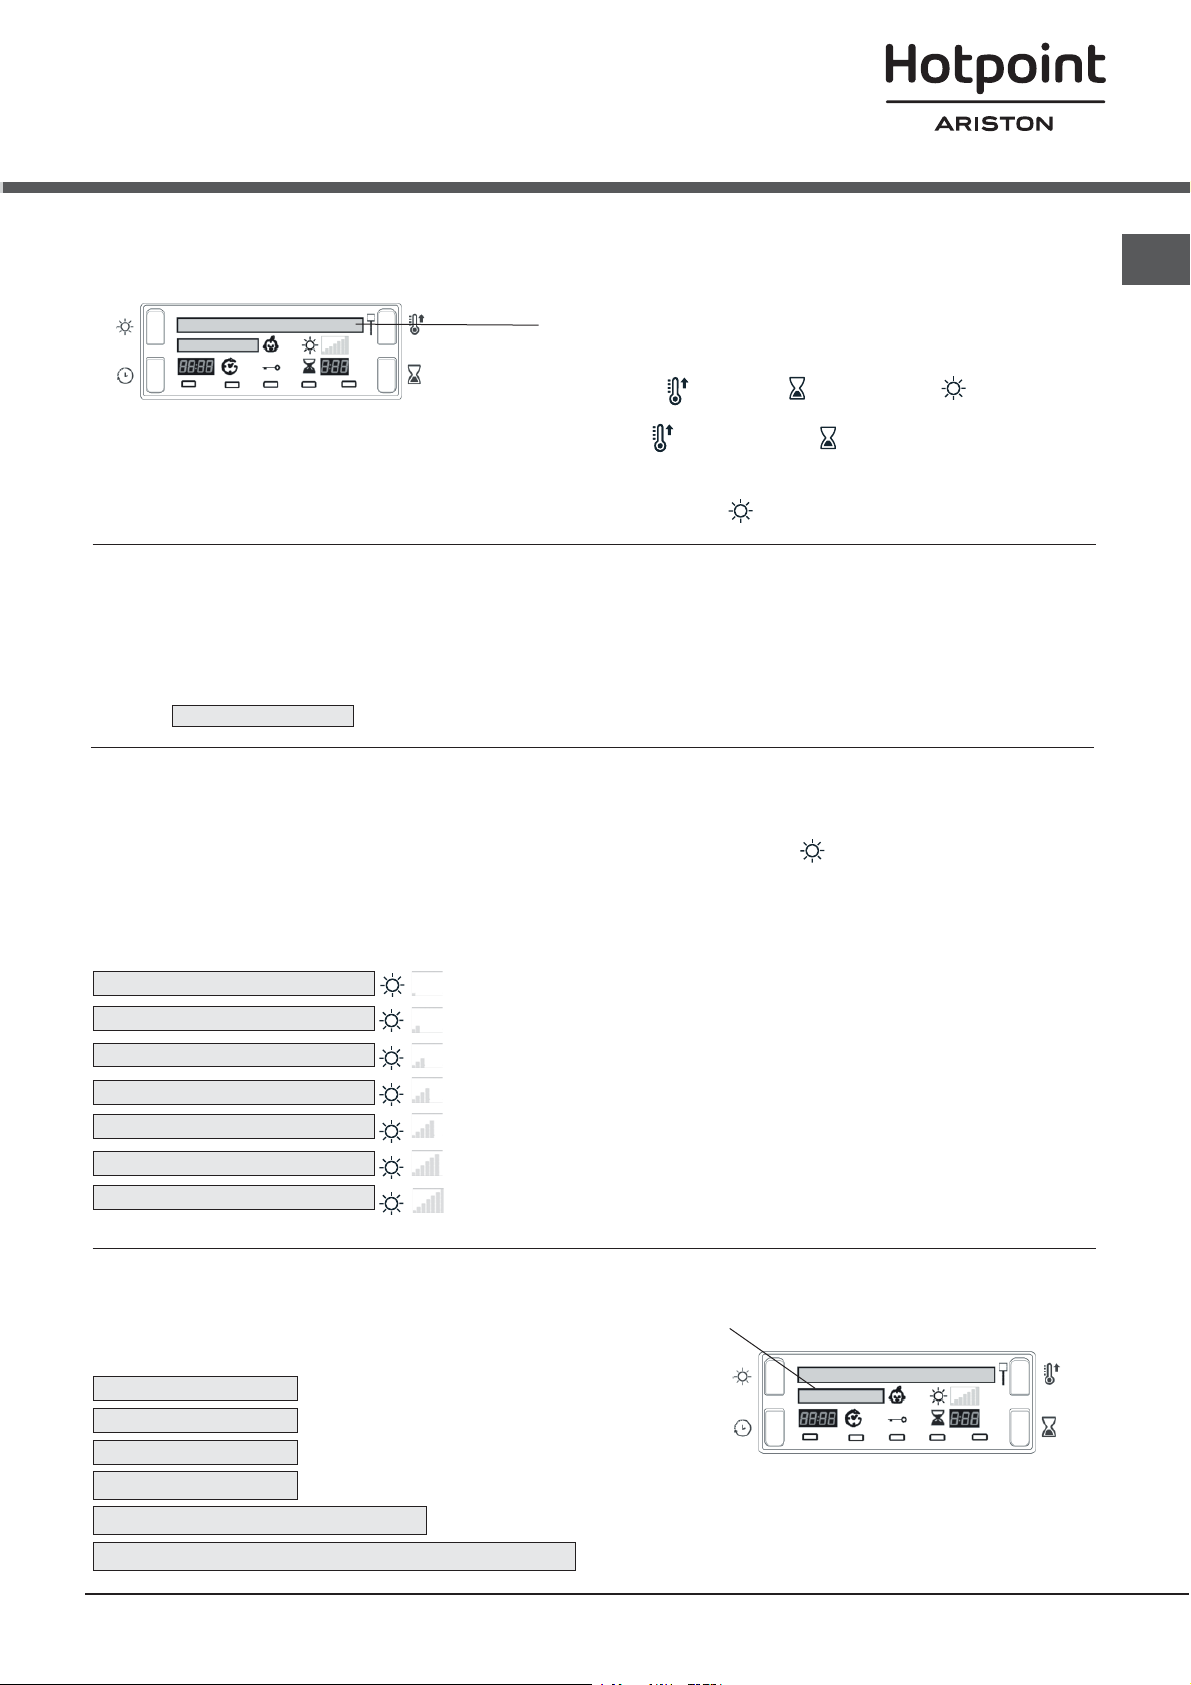
Heat Level, Timed Dry, and Sensor Dry for
Heat Level or the Timed Dry button to scroll up or
Sensor Dry button will select your choice.
GB
Dryness levels
During programme selection for an automatic programme that has different dryness levels available (see Programmes
Table).
The second line of the display shows the dryness level you require, for each press of the Dryness Level button the next
option from the list below is selected and displayed. The display also shows 1 to 7 bars depending on your selection and
these are displayed during the programmes progress.
! Some automatic programmes do not allow the dryness level to be changed or do not have all the dryness level options.
DAMP
IRON DRY
HANGER PLUS
HANGER DRY
LIGHT DRY
CUPBOARD DRY
EXTRA DRY
Dries your items ready to be ironed using a machine or rotary ironer.
Dries your items ready to be ironed with a hand iron.
Dries your delicate items ready to be hanged for fi nal drying.
Dries your items ready to be hanged for fi nal drying.
Dries your delicate items ready to be put away.
Dries your items ready to be put away.
Dries your clothes ready to be worn.
Programme progress
The second line of the display shows the status of the programme as it progresses:
(long messages scroll across the line)
DRY
COOL TUMBLE
HEATING
READY
END OF CYCLE, CREASE CARE
END OF CYCLE, CLEAN FILTER AND EMPTY WATER BOTTLE
(if option Crease Care selected)
9
Page 10
The Display
GB
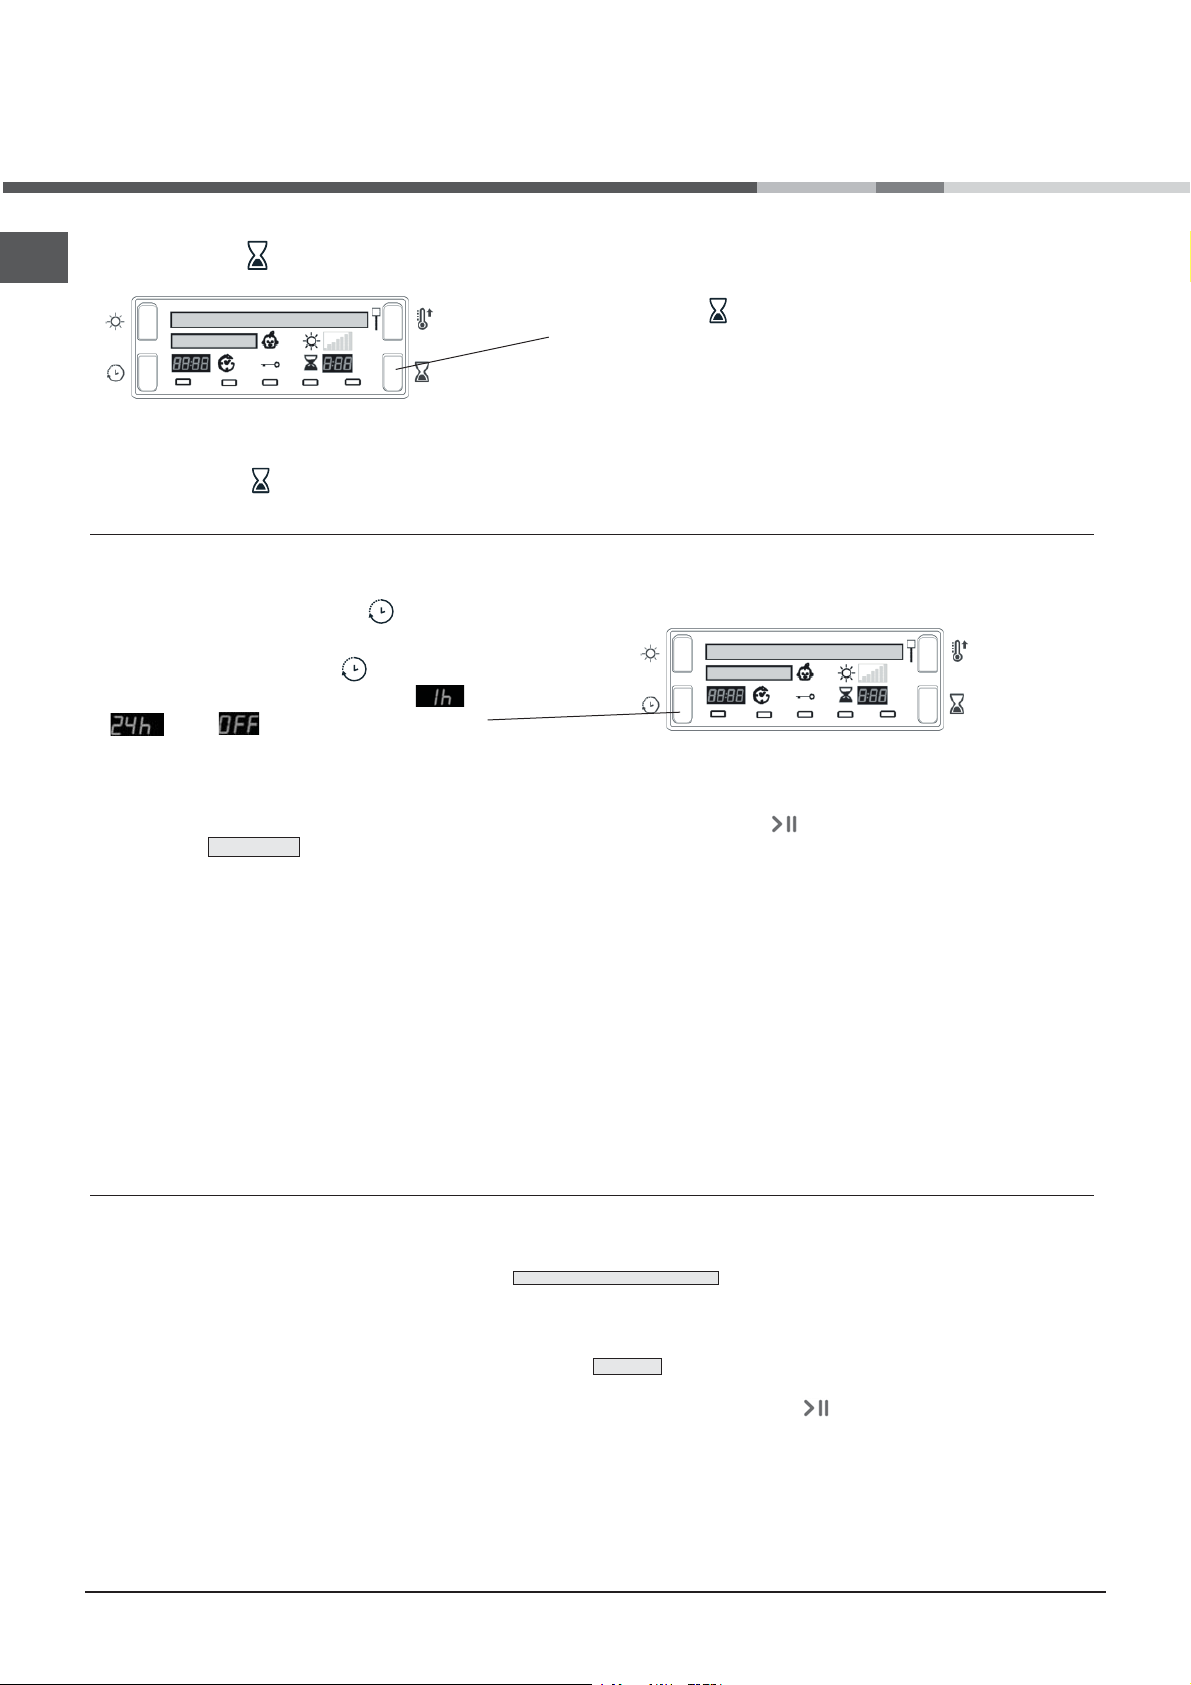
Timed drying
After selecting a programme that has a Timed Dry
option, press the
increment the selected time, each time you press and
release the button (see Start and Programmes).
Each press reduces the time duration and number of available time options depending on the programme/material
selected.
The Timed Dry icon
The selected time remains displayed after the programme starts, but can be changed anytime you wish.
is displayed next to the time..
Timed button and the display will
Delay and Time to End
Some programmes can have a delayed start (see
Start and Programmes). Press the
button and the icon fl ashes.
Each press of the Delay button
delay setting in 1 hour increments, from:
to
seconds cancels the delay.
The delay time is shown on the display next to the Delay button.
The display counts down the minutes of the delay period after the Start/Pause button
display shows
,then and then after a couple of
STARTS IN
, Delay
advances the
is pressed. The second line of the
You can change or cancel the delay time selected anytime if you wish.
After the Start/Pause button is pressed the Delay or Time to End is displayed in hours and minutes and counts down each
minute.
Time to End
After the delay period fi nishes, or for all the programme if delay not selected, this part of the display will show:
- the estimated time to the end of the programme, for automatic programmes
- the actual time remaining during a timed programme
When timed programmes are selected the time displayed throughout the cycle is the actual time remaining.
When Automatic programmes are selected the time displayed is an estimate of the time remaining. When the programme is
selected the display shows the time required to dry a full load. The time remaining is constantly monitored during the drying
cycle and is updated to show the best forecast.
The colons between the hours and minutes in the display fl ash to show the time is counting down.
My Cycle button:
First time you press this button the display will show
After selecting your favorite programme and options you can save these settings by pressing and holding in the My Cycle
button for at least 5 seconds, the top line will show a fl ashing M followed by the selected programme. The
buzzer will then beep and the second line of the display shows
The next time you need this programme press the M, button, then the Start/Pause button (and this programme will run.
If you wish, you can change your stored favorite, by selecting a new programme and/or options and press and hold
in the M button (as above).
PRESS AND HOLD TO STORE
MEMORY
10
Page 11

Start and Programmes
Choosing a programme
1. Plug the dryer into the electrical socket.
2. Sort your laundry according to fabric type (see Laundry).
3. Open the door and make sure the fi lter is clean and in
place and the water container is empty and in place (see
Maintenance).
4. Load the machine and make sure items are not in the way
of the door seal. Close the door.
5. If the Display is not lit: Press the ON/OFF button .
6. Press the Programmes Selection button that corresponds
with the type of fabric being dried by checking the
Programmes Table (see Programmes) as well as the
indications for each type of fabric (see Laundry).
- if the M button is selected; steps 7 and 8 are not required
(see below).
7. Choose Timed Drying or Dryness Levels option:
- If Timed Drying press and release the Timed button until
the required time is displayed
or - To change from default dryness setting, press and
release the Dryness Levels button until required level is
indicated.
! See Programmes Table, for more details: availability of
Dryness Levels, Timed Dry and Options.
8.Set a delay time and other options if necessary (see The
Display).
9.Press the Start/Pause button
will show the estimated time to end. During the drying
programme, you can check on your laundry and take out
items that are dry while others continue drying. When you
.
to begin. The display
close the door again, press the Start/Pause button in
order to resume drying.
If you open the door to check your laundry you will extend
the drying time as the heat pump compressor will not start for
5 minutes after you close the door and press the Start/Pause
button (see The Controls).
10. During the last few minutes of Drying Programmes,
before the programme is completed, the fi nal COOL
TUMBLE phase is entered (fabrics are cooled), this phase
should always be allowed to complete.
11. At the end of the drying cycle a message is displayed:
END OF CYCLE, CLEAN FILTER AND EMPTY WATER BOTTLE
- if
is shown, the buzzer will beep 3 times (Note: If the SOUND
option was selected the buzzer beeps 3 times every 30
seconds for 5 minutes).
END OF CYCLE, CREASE CARE
- if
option has been selected and if you do not remove the
laundry immediately, the dryer will tumble occasionally for 10
hours or until you open the door, the buzzer will beep 3 times
to confi rm the programme is completed.
12. Open the door, take the laundry out, clean the fi lter and
replace it. Empty the Water Container and replace it (see
Maintenance).
13. Unplug the dryer.
is shown, Crease Care
GB
Drying times
Drying times are approximate and may vary depending on the following:
• Amount of water retained by items after the spin cycle: towels and delicate items retain a lot of water.
• Fabrics: items of the same fabric, but with different texture and thickness may have different drying times.
• Amount of laundry: single items and small loads may take longer to dry.
• Drying: if items are to be ironed, they can be removed from the dryer while still slightly damp. Items that require complete
drying can be left longer.
• Heat setting.
• Temperature of the room: the lower the temperature of the room, the longer it will take for the dryer to dry clothing.
• Bulk: certain bulky items require special care during the drying process. We suggest removing these items and replacing them
in the dryer once they have been shaken out: repeat this procedure several times during the course of the drying cycle.
! Do not over-dry items.
All fabrics contain natural dampness which helps to keep them soft and fl uffy .
The drying times provided refer to the automatic Cupboard dry programmes.
The Timed drying settings are also indicated to enable you to select the most suitable timed option.
The weight refers to dry items.
11
Page 12

GB
n° Programme
Standard
Cotton
max
1
Shirts
3 kg
Bed & Bath
max
2
Easy Iron
-
Description of program
The duration of the drying cycles can be checked on the display1.
• This is a programme for cotton items.
• The Standard Cotton programme to EU Regulation 392/2012 is Programme 1 selection with High Heat and Dryness Level
Cupboard Dry (the standard/default starting configuration). It is the most efficient programme in terms of energy consumption
(to EU.392/2012).
High heat option
• This is a programme for shirts made from cotton.
Medium heat option
• This is a programme for shirts made from synthetic materials or a mixture of natural and synthetic materials, such as
polyester and cotton.
• Loads dried using the Cupboard Dry setting are usually ready to wear, the edges or seams may be slightly damp. If this
is the case, try turning the shirts inside out and running the programme again for a short period. This is a programme for
shirts made from cotton.
• This is a programme for cotton towels and sheets.
• Loads dried using the Extra Dry setting are usually ready to use, the edges or seams may be slightly damp especially on
1
large items. If this is the case, try opening them out and running the programme again for a short period.
• ‘Easy Iron’ is a short 10 minute programme (8 minutes of heat followed by a 2 minute cool tumble period) which fluffs the
fibres of clothing that have been left in the same position/location for an extended period of time. The cycle relaxes the fibres
and makes them easier to iron and fold.
! ‘Easy Iron’ is not a drying programme and should not be used for wet articles of clothing.
• For best results:
1. Do not load more than the maximum capacity. These numbers refer to the dry weight: (Fabric-Maximum load) Cotton and
Cotton mixtures-2.5 kg; Synthetics-2 kg; Denim-2 kg.
2. Unload the dryer immediately after the end of the programme, hang, fold or iron the articles and put them away in the closet.
Should this not be possible repeat the programme.
• This is a programme for items of Synthetic with low heat setting or Synthetic/Cotton mixtures with medium heat setting.
Synthetics
4 kg
3
! ‘Refresh’ is not a drying programme and should not be used for wet articles of clothing.
• It can be used on any load size, but is more effective on smaller loads.
Refresh
• Do not overload your dryer (see Laundry).
• This is a 20 minute programme that airs your clothes with cool air. Also use to cool warm clothes.
-
• This is a programme for jeans made from denim cotton. Before drying your jeans turn the front pockets inside out.
• Do not mix dark and light coloured items.
Jeans
3 kg
4
• It can also be used on other garments made from the same material, such as jackets.
• Loads dried using the Extra Dry setting are usually ready to wear, the edges or seams may be slightly damp. If this is the
case, try turning the jeans inside out and running the programme again for a short period.
! We do not recommend that you use this programme if your jeans have elastic waist bands, studs or embroidery.
! Take care with this programme DO NOT dry any items that are damaged which could result in the filling blocking the filter
and air vent resulting in a fire hazard.
Duvet
• Must only be used on single size duvets: NOT suitable for double or king size items.
• Loads dried using this programme are usually ready to use, but may be slightly damp in places. If this is the case, try
-
opening them out and shaking them and running the programme again for a short period.
• Also suitable for down filled jackets.
• Select high heat for Cotton Duvets and medium heat for Synthetic duvets.
Note:
1 - The duration of the program will depend on the size of the load, types of textiles, the spin speed used in your washer and any extra options
selected.
12
Page 13

n° Programme
Wool
1 kg
5
Silk
0,5 kg
Baby
Delicate
6
7
2 kg
Dark Cycle
3 kg
Anti
Allergy
max or 4 kg
Description of program
The duration of the drying cycles can be checked on the display1.
• This is a programme for tumble dryer safe garments marked with the symbol
• We recommend that garments are turned inside out before drying.
• Loads dried using this programme are usually ready to wear, but on some heavier garments the edges may be slightly
damp. Allow these to dry naturally as over-drying could damage garments.
! Unlike other materials, the mechanism of wool shrinkage is irreversible; i.e. it will not stretch back to original size and shape.
! This programme is not suitable for Acrylic garments.
• This is a programme for drying your delicate silk.
• Loads dried using the Cupboard Dry setting are usually ready to use, but on some garments the edges may be slightly
damp. If this is the case, try opening them out or turn items inside out and running the programme again for a short
period.
• This is a programme for drying your baby’s small delicate items of clothing and bedding (Cotton and Chenille) and for
drying your delicate clothes.
• DO NOT dry items such as bibs and nappy pants with plastic coverings.
• Loads dried using this programme are usually ready to wear, but on some heavier garments the edges may be slightly
damp. If this is the case, try turning items inside out and running the programme again for a short period.
• This programme helps to maintain your dark coloured Cotton clothes, by controlling the motor speed and drum rotation,
together with control of the lower drying temperature.
• The load must have been spun in the washing machine with a spin speed between 1200 - 1400 rpm.
• As this is a treatment programme aimed to protect your dark coloured clothes, the programme duration could be more
than 4 hours.
• It dries to Cupboard Dry level.
• This programme has the ‘Seal of Approval’ endorsement from Allergy UK, which reflects the effective reduction and
elimination of allergens from the clothes with the special Anti Allergy cycle. With this programme, thanks to the achievement of constant temperature for an extended period of time, the effects of the most common allergens (including
House Mites and Pollen) are neutralised.
• Can be used on a full size wet load to dry and treat, or on a 4 kg dry load just to treat your laundry. If the display shows
CLEAN FILTER TO ENSURE ANTI ALLERGY ACTION
: Clean the filter and re-start the programme.
.
GB
• This is a programme that has low temperatures and a special cycle for drying anti-allergy fibres like microfibre.
Microfibre
2 kg
• With this programme you can remove dust easier and wash the cuddly toys more often because the drying time is very
Cuddly Toy
2,5 kg
8
Mats
3 Kg
Note:
1 - The duration of the program will depend on the size of the load, types of textiles, the spin speed used in your washer and any extra options
selected.
much reduced compared to drying in the open air. It is a delicate drying cycle that dries at low temperature and with soft
mechanical action to maintain at best the original look and shine of the fur.
Note: For allergy protection, just freeze cuddly toys for 24 hours then wash and dry them. Repeat every 6 weeks.
• Before drying remove accessories such as clothes, collars or sound boxes and protect plastic eyes with masking tape
after drying them with a cloth.
• The programme time will vary dependant on the exact make up of the load. The maximum load should not exceed 2.5
kg and no individual item should be greater than 600 g.
• This is a programme for small bathroom or kitchen mats made from synthetic materials or a mixture of natural and synthetic
materials.
Note: Do not dry rubber backed mats as this is a fire hazard (see Warnings).
13
Page 14

GB
The Controls
! Warning, after pressing the START/PAUSE button ,
the programme cannot be changed. To change a selected
programme, press the START/PAUSE button
the light
flashes Amber to indicate the programme is paused. Select
the new programme and any options required, the light will
then flash green. Press the START/PAUSE button
again
and the new programme will start.
• Option buttons
These buttons serves to personalise the selected
programme according to personal requirements.
Not all options are available for all programmes.
Some options are incompatible with the ones
previously set. If the button of any unavailable option
is pressed, the buzzer will beep 3 times. If the option
is available, the option light will stay on.
• TIME DISPLAY
The display shows either the amount of time delay remaining or
an indication of the amount of time left for a drying programme
(see The Display). The display also shows if there is a problem
with your dryer, if this occurs the display will show F followed by
a fault code number (see Troubleshooting).
• Empty Water Container
(Messages about emptying can be ignored if you have plumbed
your dryer into a drain as there is no need to empty the water
container). Messages are displayed to reminds you to empty
the water container (see The Display). If the water container fills
during a programme, the heater turns off and the dryer does a
period of Cool Tumble. After this it stops and a message tells
EMPTY THE WATER CONTAINER
you to
. You must empty the water
container and restart the dryer or the clothes will not dry. After
re-starting the dryer the message will take a few seconds to go
out. To avoid this always empty the water container each time
you use the dryer (see Maintenance).
Delay Timer (Time Delay)
The start of some programmes (see The Display and
Programmes tables) can be delayed for up to 24 hours.
Ensure the water container is emptied before setting a
delayed start.
Heat Level button, Display and Icons
Not all programmes allow you to change the heat level and
some programmes allow all three heat level options:
Low, Medium and High.
When the heat level options are available pressing this
button changes the heat level and the display briefly shows
the selected heat level, along with a display of the selected
level icon:
HIGH HEAT
MEDIUM HEAT
LOW HEAT
Sound
Available on all programmes and allows the buzzer to give a
signal at the end of the drying cycle, to remind you that the
clothes are ready to be removed.
Note: If you have selected the Crease Care option this
option is not available.
Less Fluff
By reducing the mechanical action during the final drying
stage the amount of lint and fluff produced is substantially
reduced, protecting the fibres of your garments
• Door Opening
Opening the door during a programme will stop the dryer and
have the following effects:
Note: The START/PAUSE
Post Care phase of a programme
• The display shows
PAUSED
light flashes Amber during the
.
• During a delay phase the delay will continue to count down.
The START/PAUSE
button must be pressed to resume
the delay programme. The display will change to show current
status.
• The START/PAUSE
button must be pressed to resume
the programme. The display will change to show the
current status.
• During the Post Care phase, the programme ends. Pressing
the START/PAUSE
button will restart a new programme
from the beginning.
• Note
If you have a power cut, switch off the power or remove the
plug. When power is restored, press and hold the On/Off
button until the display briefly shows
reactivates. Then press the START/PAUSE
POWER ON
and the dryer
button and the
programme will resume.
Crease Care
The pre-care option is only available if a delayed start has
been selected. It tumbles the clothes occasionally during
the delayed period to help prevent creases developing. The
post-care option occasionally tumbles the clothes after end
of the drying and cool tumble cycles to prevent creases
developing, should you not be available to remove the load
immediately the programme is complete
Note: The START/PAUSE
this phas
post care functions i
Note:
e. Selecting this option enables both the pre and
f appropriate.
If you have selected the Sound option this option is
light flashes Amber during
not available.
Quick Dry
This option is for small loads up to 1kg.
Note: can only be used with the ‘Cupboard Dry’ setting.
14
The wool drying cycle of
this machine has been
tested and approved by The
Woolmark Company. The
cycle is suitable to dry wool
garments which are labeled
“hand wash” provided that
the garments are washed
in a Woolmark endorsed hand washing cycle and dried
according to the instruction issued by the manufacturer.
M1219.
In UK, Eire, Hong Kong and India the Woolmark trade mark is
a Certification trade mark.
Page 15

Troubleshooting
One day your dryer seems not to be working. Before you call your Service Centre (see Service), go through the following
troubleshooting suggestions:
Problem:
The tumble dryer won’t start.
Drying cycle will not begin.
Its taking a long time to dry.
Possible causes / Solution:
• The plug is not plugged into the socket, or not making contact.
• There has been a power failure.
• The fuse has blown. Try to plug another appliance into the socket.
• You are using an extension cord? Try to plug the dryer’s power cord directly into the
socket.
• The door is not closed securely?
• The programme has not been set properly (see Start and Programmes).
• The Start/Pause button has not been pressed (see Start and Programmes).
• You have set a delayed time (see Start and Programmes).
• The filter has not been cleaned (see Maintenance).
• The water container needs emptying? The empty water message is displayed? (see
Maintenance).
• The heat pump filter needs cleaning? (see Maintenance).
• The temperature setting is not ideal for the type of fabric you are drying (see Start
and Programmes, and see Laundry).
• The correct drying time has not been selected for the load (see Laundry).
• The air intake grille is obstructed (see Installation, and see Maintenance).
• The items were too wet (see Laundry).
• The dryer was overloaded (see Laundry).
GB
Empty water message is displayed but
the dryer has only been running for a
short period.
Empty water message is displayed and
the water container is not full.
Programme finishes and clothes are
damper than expected.
The display shows a fault
code F followed by one or two
numbers.
The display briefly shows
DEMO ON
every 6 seconds.
The water container was probably not emptied at the start of the programme. Do not
•
wait for the empty water signal, always check and empty the container before starting
a new drying programme (see Maintenance).
END OF CYCLE, CLEAN FILTER AND EMPTY THE WATER BOTTLE
• This is normal, the:
message is shown as a reminder to empty the container (see The Display and Start
and Programmes).
! For safety the dryer has a maximum programme time of 5 hours. If an automatic
programme has not sensed the required final moisture in this time the dryer will
complete the programme and stop. Check the above points and run the programme
again, if the results are still damp, contact the Service Centre (see Service).
• If the display shows a fault:
- Turn off and remove the plug. Clean the filter and the heat pump filter unit (see
Maintenance). Then replace the plug, turn on and start another programme. If a fault
is then displayed: Note down the code and contact the Service Centre (see Service).
• The dryer is in ‘Demo’ mode. Press and hold both the On/Off and Start/Pause
buttons for 3 seconds. The display will show
dryer will resume normal operation.
DEMO OFF
for 3 seconds and then the
The lights on the dryer control
panel are off although the
dryer is switched on.
• The dryer has gone into standby mode to save power. This occurs if you have had a
power cut or leave your dryer either without starting a programme or after your drying
programme has finished.
- Press and hold the On/Off button and the lights will come on.
15
Page 16

Service
GB
Heat Pump System
This dryer is fitted with a sealed heat pump system to dry
your clothes. To operate, the heat pump contains fluorinated
greenhouse gases ( F gases) which are covered by the Kyoto
Protocol. These F gases are contained in a hermetically
sealed unit. This sealed unit contains
R134a which acts as a refrigerant. GWP = 1430 (0.4 t C02). If
the sealed unit fails then it must be replaced by a new sealed
unit. Contact your nearest service centre for advise.
Note: The gases contained in the sealed unit are not
hazardous to health, but if they escape they will have an
impact on global warming.
0,29
kg of the F gas
Before calling the Service Centre:
• Use the troubleshooting guide to see if you can solve the
problem yourself (see Troubleshooting).
• If not, turn off the dryer and call the Service Centre closest
to you.
Spare Parts
This dryer is a complex machine. Repairing it yourself or
having a nonauthorised person try to repair it could cause
harm to one or more persons and to the machine, and could
invalidate the spare parts warranty.
Call an authorised technician if you experience problems
while using the machine.
Please note that it is an offence for an unqualified person
to undertaken any servicing or repair work that involves
breaking into the sealed heat pump unit.
Product Guarantee And Repair Information
Guarantee
12 Months Parts and Labour Guarantee
Y our appliance has the benefit of our manufactur er’s guarantee, which covers the cost of breakdown repairs for twelve months from the
date of purchase.
This gives you the reassurance that if, within that time, your appliance is proven to be defective because of either workmanship or
materials, we will, at our discretion, either repair or replace the appliance at no cost to you:
This guarantee is subject to the following conditions:
- The appliance has been installed and operated correctly and in accordance with our operating and maintenance instructions.
- The appliance is used only on the electricity or gas supply printed on the rating plate.
- The appliance has been used for normal domestic purposes only .
- The appliance has not been altered, serviced, maintained, dismantled, or otherwise interfered with by any person not authorised by us.
- Any repair work must be undertaken by us or our appointed agent.
- Any parts removed during repair work or any appliance that is replaced become our property.
- The appliance is used in the United Kingdom or Republic of Ireland.
The guarantee does not cover:
- Damage resulting from transportation, improper use, neglect or interference or as a r esult of impr oper installation.
- Replacement of any consumable item or accessory . These include but ar e not limited to: plugs, cables, batteries, light bulbs, fluor escent
tubes and starters, covers and filters.
- Replacement of any removable parts made of glass or plastic.
THIS GUARANTEE WILL NOT APPLY IF THE APPLIANCE HAS BEEN USED IN COMMERCIAL
Repairs and After Sales
For product help and advice, repairs, spare parts or accessories, we’re here to help.
For local repair engineers - 03448 111 606 ROI - 0818 313 413 UK standard local rate applies ROI local Irish rate applies
For Parts and Accessories visit: parts.hotpoint.co.uk/shop
Please remember to register your appliance at www.hotpointservice.co.uk to activate your 10 year parts guarantee.
Please note, our advisors will require the following information: model number, serial number
This information can be found on the data plate located behind the door.
OR NON-DOMESTIC PREMISES.
Information on recycling and disposal
As part of our continual commitment towards environmental protection, we reserve the right to use recycled quality components
to reduce costs for our customers and to minimise materials wastage.
• Disposing of the packaging materials: follow local regulations to allow for recycling of packaging materials.
• In order to minimise the risk of injury to children, remove the door and plug, then cut the power supply cord flush with the
appliance. Dispose of these parts separately to prevent the appliance from being connected to a power supply socket.
Disposal of old household appliances
The European Directive 2012/19/EC on Waste Electrical and Electronic Equipment (WEEE), requires that old household
electrical appliances must not be disposedof in the normal unsorted municipal waste stream. Old appliances must be
collected separately in order tooptimise the recovery and recycling of the materialsthey contain and reduce the impact on
human healthand the environment. This dryer has a sealed heat pump unit containing Fgases which should be recovered
and destroyed.The crossed out “wheeled bin” symbol on theproduct reminds you of your obligation,thatwhen you dispose of
the appliance it must beseparately collected.Consumers should contact their local authority orretailer for information concerning the correct disposalof their old appliance.
16
This appliance has been designed, constructed and distributed in compliance with the
requirements of European Directives:
- LVD 2014/35/EU, EMC 2014/30/EU and RoHS 2011/65/EU.
Page 17

Libretto di istruzioni
ASCIUGATRICE
IT
Italiano
FTCD 972
La prima volta che si accende
l’asciugatrice è necessario
selezionare la lingua preferita,
vedere Display
Indice
Installazione, 18
Avvertenze, 20
Cura e manutenzione, 22
Pannello di controllo, 24
Bucato, 24
Display, 25
Avvio e programmi, 27
Problemi e soluzioni, 31
Assistenza, 32
www.hotpoint.eu
! Questo simbolo ti ricorda di leggere
questo libretto istruzioni.
! Tenere a portata di mano il presente libretto così da poterlo
consultare facilmente a ogni evenienza. Tenere il libretto sempre
vicino all’asciugatrice; nel caso in cui l’apparecchio venga venduto
o ceduto ad altre persone, ricordarsi di consegnare loro questo
libretto, così da permettere anche ai nuovi possessori di conoscere le
avvertenze e i suggerimenti sull’utilizzo dell’asciugatrice.
! Leggere attentamente queste istruzioni: le pagine che seguono
contengono importanti informazioni sull’installazione e utili
suggerimenti sul funzionamento dell’elettrodomestico.
Registra il tuo prodotto
chiama gratuitamente il Numero Verde 800 894 056 oppure
compila e invia il form on line su www.hotpoint-ariston.it
17
Page 18

1
2
H<1m
1
2
Installazione
IT
Dove installare l’asciugatrice
•Le fiamme possono
danneggiare
l’asciugatrice, che deve
pertanto essere installata
10 mm
lontano da cucine a gas,
stufe, termosifoni o piani
di cottura. L’asciugatrice
15 mm
deve essere installata
in un ambiente con
temperatura compresa
tra 20 e 23 °C per ottenere prestazioni ottimali.
Il corretto funzionamento è comunque garantito
tra 14 e 30°C. Se l’elettrodomestico deve
essere installato sotto un banco da lavoro è
necessario lasciare uno spazio di 10 mm tra il
pannello superiore dell’elettrodomestico e altri
oggetti posti sopra di esso, e uno spazio di 15
mm tra i lati dell’elettrodomestico e le pareti
o gli arredi accanto a esso. In questo modo
viene garantita una sufficiente circolazione
d’aria. L’apparecchio deve essere installato con
la superficie posteriore posizionata contro un
muro
Aerazione
• Quando l’asciugatrice è attiva deve essere presente una
sufficiente aerazione. Assicurarsi di installare l’asciugatrice in
un ambiente non umido e dotato di un’adeguata circolazione
d’aria. Il flusso d’aria attorno all’asciugatrice è fondamentale
per consentire la condensazione dell’acqua prodotta durante
il lavaggio; l’asciugatrice non funziona correttamente se
posizionata in uno spazio chiuso o all’interno di un mobile.
! Se l’asciugatrice viene utilizzata in una stanza piccola o
fredda è possibile che si generi un po’ di condensa.
! Non è consigliabile installare l’asciugatrice in
un armadio; l’elettrodomestico non deve mai
essere installato dietro una porta chiudibile
a chiave, una porta scorrevole o una porta
con cardine sul lato opposto dello sportello
dell’asciugatrice.
Scarico dell’acqua
Se la macchina viene collocata vicino a un tubo di scarico è
possibile far defluire l’acqua condensata direttamente senza
dover impiegare il contenitore di raccolta dell’acqua. In
questo caso non è più necessario svuotare il contenitore di
raccolta dell’acqua dopo ogni ciclo.
Se l’asciugatrice viene posizionata sopra o di fianco a una
lavatrice può condividere lo stesso scarico. È sufficiente
scollegare il tubo indicato alla figura A e collegarlo allo
scarico.
Se lo scarico si trova più lontano della lunghezza del tubo,
per raggiungerlo è possibile acquistare e collegare un tubo di
diametro identico e della lunghezza necessaria.
Per installare il nuovo tubo è sufficiente sostituire quello
esistente come indicato alla figura B inserendolo nella stessa
posizione.
! Lo scarico deve trovarsi ad un’altezza inferiore ad
1 metro dal pavimento.
! Dopo avere installato l’asciugatrice accertarsi che il
tubo di scarico non sia piegato né contorto.
15 mm
Fig. A Fig. B
Collegamento elettrico
Prima di inserire la spina nella presa elettrica
verificare quanto segue:
• Accertarsi che le mani siano asciutte.
• La presa deve essere dotata di messa a
terra.
• La presa deve essere in grado di
supportare la potenza massima prevista per
la macchina, indicata sulla targhetta dei dati
di esercizio.
• La tensione di alimentazione deve essere
compresa nei valori indicati sulla targhetta dei
dati di esercizio.
• La presa deve essere compatibile con
il tipo di spina dell’asciugatrice. In caso
contrario, provvedere alla sostituzione della
presa o della spina.
! NON UTILIZZARE PROLUNGHE.
! L’asciugatrice non può essere installata
in ambienti esterni, anche se riparati. Può
essere infatti molto pericoloso esporre questo
elettrodomestico alla pioggia o a temporali.
! Dopo l’installazione dell’asciugatrice il cavo
elettrico e la spina devono rimanere a portata
di mano.
! Il cavo elettrico non deve essere né piegato
né schiacciato.
! Se la spina da sostituire è di tipo
incorporato, è necessario smaltirla in maniera
sicura. NON lasciarla dove può essere
inserita in una presa e provocare scosse
elettriche.
!Il cavo elettrico deve essere controllato
periodicamente. Se il cavo di alimentazione
è danneggiato, esso deve essere sostituito
dal produttore, dal suo servizio assistenza o
18
Page 19

Consumo annuo ponderato di energia (AEc)* kWh 1) 259.3
Durata per tessuti di cotone a pieno carico (Tdry) - minuti 250
Percentuale pieno carico e a carico parziale (Ct) 3) 81
Livello di potenza sonora in dB(A) re 1 pW 70
Consumo energetico in kWh del prog. Sintetici pieno carico 0.68
Durata per prog. Sintetici a pieno carico - minuti 85
Programma Sintetici carico parziale N/A
Percentuale di efficienza media di condensazione - carico
parziale (Cdry½)
81
1) Il "cotone standard" a carico pieno e parziale ed il "cotone standard" a carico
parziale sono i programmi standard ai quali fanno riferimento le informazioni
sull'etichetta e sulla scheda, questi programmi sono adatti per asciugare a livello
armadio (0%) capi di cotone e sono i programmi più efficienti in termini di consumo
di energia. Il carico parziale è la metà del carico nominale.
2) Consumo annuo basato su 160 cicli di asciugatura del programma “Cotone
Standard“ a carico pieno e parziale e nella modalità di basso consumo energetico.
Consumo effettivo di energia del ciclo dipenderà dall’utilizzo dell’apparecchio.
3) Media pesata di 3 cicli a pieno carico e 4 cicli a metà carico.
Regolamento n. 932/2012.
Durata per tessuti di cotone a carico parziale (Tdry½) - minuti
140
Classe di efficienza apparecchio a condensazione, su una scala
da G (efficienza minima) ad A (efficienza massima)
B
Efficienza di condensazione - %
Percentuale di efficienza media di condensazione - pieno carico
(Cdry)
81
Consumo di energia in Watts in modalità: lasciato acceso (Pl)
Watt
3.27
La durata del modo lasciato acceso se l'asciugatrice è dotata in
un sistema di gestione elettronico - minuti
30
Durata ponderata a pieno carico e carico parziale (Tt) - minuti 3)
187
Consumo energetico in kWh del prog. Cotone Standard pieno
carico (Edry) 2)
2.19
Consumo energetico in kWh del prog. Cotone Standard carico
parziale (Edry½) 2)
1.17
Consumo di energia in Watts in modalità: spento a pieno carico
(Po) Watt
0.17
Asciugatrice
Condens.
Classe di efficienza energetica su una scala da A+++ (basso
consumo) a D (alto consumo)
A++
Asciugatrice
Automatica
Scheda prodotto - Regolamento n . 392/2012.
Marchio
HOTPOINT/ARISTON
Modello
FTCD 972 6HM1 (IT)
Carico massimo in kg, "programma cotone standard" per i
tessuti di cotone
9.0
da altro personale qualificato al fine di evitare
pericoli.(vedi Assistenza). I cavi elettrici nuovi
o più lunghi vengono forniti dai rivenditori
autorizzati a un costo aggiuntivo.
! Il produttore declina qualsiasi
responsabilità qualora non ci si attenga a
queste regole.
! In caso di dubbio su quanto sopra
indicato, contattare un elettricista
qualificato.
Livellamento dell’asciugatrice
L’asciugatrice deve essere installata in piano per
funzionare correttamente.
Massime dimensioni di carico: 9 kg
IT
Dopo aver installato l’asciugatrice nella posizione
definitiva, controllare il suo livello prima da lato a
lato, quindi da davanti a dietro.
Se l’asciugatrice non è in piano, regolare i due
piedini anteriori in alto o in basso, finché non si
posiziona in piano.
Informazioni preliminari
Una volta installata l’asciugatrice, prima di metterla in
funzione pulire l’interno del cestello e rimuovere lo sporco
che può essersi accumulato durante il trasporto.
ATTENZIONE: prima di utilizzare la tua asciugatrice
assicurati che sia rimasta in posizione verticale per
almeno 6 ore.
19
Page 20

IT
! Questo elettrodomestico è stato progettato
e realizzato nel rispetto delle normative
internazionali in materia di sicurezza. Queste
avvertenze vengono fornite per motivi
di sicurezza e devono essere osservate
attentamente.
Sicurezza generale
• La presente asciugatrice può essere usata
da persone (compresi i bambini da 8 anni in
su) con capacità fisiche, sensoriali o mentali
ridotte o senza esperienza e conoscenza, se
sono sottoposte a supervisione o ricevano
istruzioni relative all’uso del dispositivo da
parte di una persona responsabile della loro
sicurezza.
• La presente asciugatrice è stata progettata
per uso domestico e non professionale.
• Non toccare l’elettrodomestico quando
si è a piedi nudi né con le mani o i piedi
bagnati.
• Scollegare l’elettrodomestico dalla rete di
alimentazione tirando la spina e non il cavo.
• Dopo l’uso, spegnere l’asciugatrice e
scollegarla dalla rete di alimentazione.
Tenere lo sportello chiuso onde evitare che
i bambini possano utilizzare l’asciugatrice
come un gioco.
• I bambini devono essere sorvegliati
per assicurarsi che non giochino con
l’asciugatrice.
• Pulizia e manutenzione non devono essere
eseguite dai bambini senza supervisione.
• I bambini di età inferiore a 3 anni devono
essere tenuti lontano dall’asciugatrice se
non sono costantemente sorvegliati.
• L’elettrodomestico deve essere installato
correttamente e deve avere un’adeguata
aerazione. La presa d’aria sulla parte
frontale dell’asciugatrice non deve mai
essere ostruita (vedi Installazione).
• Non utilizzare mai l’asciugatrice sulla
moquette nel caso in cui l’altezza del pelo
sia tale da impedire l’ingresso dell’aria
attraverso la base dell’asciugatrice.
• Verificare che l’asciugatrice sia vuota prima
di caricarla.
•
La parte posteriore dell’asciugatrice
può diventare molto calda:
non toccarla mai quando la macchina è
in funzione.
• Non utilizzare l’asciugatrice se il filtro,
il contenitore di raccolta dell’acqua e
il condensatore non sono posizionati
correttamente (vedi Manutenzione).
• Non sovraccaricare l’asciugatrice (vedi
Bucato per le massime dimensioni di
carico).
• Non inserire capi completamente bagnati.
• Seguire sempre con attenzione tutte le
istruzioni riportate sulle etichette per il
lavaggio dei capi (vedi Bucato).
• Non caricare capi grandi, eccessivamente
voluminosi.
• Non asciugare fibre acriliche ad alte
temperature.
• Non spegnere l’asciugatrice quando
contiene ancora capi caldi.
• Pulire il filtro dopo ogni uso (vedi
Manutenzione).
• Svuotare il contenitore di raccolta
dell’acqua dopo ogni uso (vedi
Manutenzione).
• Pulire regolarmente l’unità di
condensazione (vedi Manutenzione).
• Evitare l’accumulo di laniccio intorno
all’asciugatrice.
• Non salire sul pannello superiore
dell’asciugatrice, poiché si potrebbe
danneggiare la macchina.
• Rispettare sempre le norme e le
caratteristiche elettriche (vedi Installazione).
• Acquistare sempre accessori e ricambi
originali (vedi Assistenza).
Per ridurre il rischio di incendo
dell’asciugatrice, è necessario
osservare i seguenti punti:
• Prima di essere caricati nell’asciugatrice, i capi
devono essere lavati con acqua e sapone,
risciacquati e infine centrifugati. L’asciugatura
di capi che NON siano stati precedentemente
lavati con acqua, determina il pericolo di
incendio.
• Non caricare nell’asciugatrice capi
precedentemente trattati con prodotti
chimici.
• Non asciugare articoli macchiati o imbevuti
di olio vegetale o da cucina, ciò costituisce
un rischio di incendio. Gli articoli sporchi di
olio possono infiammarsi spontaneamente,
specialmente quando vengono esposti a
fonti di calore come l’asciugatrice. Gli articoli
possono diventare caldi, causando una
reazione di ossidazione con l’olio, l’ossidazione
crea calore. Se il calore non è in grado di
fuoriuscire, gli articoli possono scaldarsi tanto
da prendere fuoco. L’accumulo, l’impilamento
o il deposito di capi sporchi/imbevuti di
olio può impedire la fuoriuscita del calore e
causare un incendio.
Se non è possibile evitare di porre
nell’asciugatrice articoli sporchi/imbevuti
di olio vegetale, olio da cucina o lacca,
Avvertenze
20
Page 21

IT
è prima necessario lavarli con detergente
supplementare, ciò ridurrà, ma non eliminerà
il rischio di incendio. Gli articoli non devono
essere rimossi dall’asciugatrice e impilati o
ammucchiati quando sono ancora caldi.
• Non inserire nell’asciugatrice capi che sono
stati precedentemente lavati, puliti, imbevuti
o lasciati in ammollo in benzina, solventi
a secco o altre sostanze infiammabili
o esplosive, le sostanze altamente
infiammabili usate comunenmente negli
ambienti domestici, compresi olio da cucina,
acetone, alcol denaturato, cherosene,
sostanze antimacchia, trementina, cere
e sostanze di rimozione cere. Assicurarsi
che questi capi vengano lavati in acqua
calda con una quantità supplementare
di detergente prima di essere inseriti
nell’asciugatrice.
• Non inserire nell’asciugatrice articoli
contenenti schiuma di gomma (detta
anche schiuma di lattice), o materiali simili.
I materiali in schiuma di lattice quando
vengono riscaldati possono incendiarsi
mediante la combustione spontanea.
• Non utillizzare ammorbidenti o prodotti
simili nell’asciugatrice per eliminare
gli effetti dell’elettricità statica, se non
consigliato espressamente dal produttore
dell’ammorbidente.
• Non inserire nell’asciugatrice indumenti
intimi che contengono rinforzi in metallo, es.
reggiseni con ferretti in metallo.
Se i ferretti si staccano durante
l’asciugatura, possono danneggiare
l’asciugatrice.
• Non inserire nell’asciugatrice articoli in
gomma solida, in plastica, come cuffie per la
doccia o teli impermeabili di protezione per
bambini, polietilene o carta.
• Non inserire nell’asciugatrice articoli foderati
in gomma solida, capi con imbottiture in
schiuma di gomma, cuscini, galosce e
scarpe da tennis rivestite in gomma.
• Togliere tutti gli oggetti dalle tasche,
specialmente accendini e fiammiferi.
ATTENZIONE: non arrestare mai l’asciugatrice
prima della fine del ciclo di asciugatura a meno
che tutti i capi non siano rimossi velocemente
e stesi in modo da dissipare il calore.
Risparmio energetico e rispetto per l’ambiente
• Prima di asciugare i capi, strizzarli per eliminare la maggiore
quantità di acqua possibile (se viene prima utilizzata una
lavatrice impostare un ciclo di centrifuga). In questo modo
si risparmia energia durante l’asciugatura.
• Utilizzando sempre l’asciugatrice a pieno carico si
risparmia energia: capi singoli e piccoli carichi impiegano
più tempo per asciugarsi.
• Pulire il filtro alla fine di ogni ciclo in modo da contenere i
costi connessi al consumo energetico (vedi Manutenzione).
! AVVERTENZA: non arrestare mai
l’asciugatrice prima della fine del ciclo di
asciugatura, a meno che tutti gli articoli non
siano stati rimossi velocemente e stesi, così
da dissipare il calore.
21
Page 22

2
Cura e manutenzione
Interruzione dell’alimentazione
IT
elettrica
! Scollegare l’asciugatrice quando non è in
funzione, nonché durante le operazioni di
pulizia e di manutenzione.
Pulizia del filtro dopo ogni
ciclo
Il filtro è un componente fondamentale
dell’asciugatura: la sua funzione è quella
di raccogliere il laniccio e la lanugine
che si formano durante l’asciugatura. Al
termine dell’asciugatura pulire quindi il filtro
sciacquandolo sotto acqua corrente o
pulendolo con l’aspirapolvere. Nel caso in
cui il filtro si dovesse
intasare il flusso
d’aria all’interno
dell’asciugatrice
verrebbe gravemente
compromesso: i
tempi di asciugatura
si allungano e
si consuma più
energia. Inoltre,
possono verificarsi
danni all’asciugatrice.
Il filtro si trova davanti
alla guarnizione
dell’asciugatrice (vedi
fi gura).
Rimozione del filtro:
1. Tirare verso l’alto il
manico in plastica del
filtro (vedi fi gura).
2. Pulire il filtro dal laniccio e riposizionarlo
correttamente. Assicurarsi che il filtro
sia inserito completamente a filo con
la guarnizione dell’asciugatrice. ! Non
utilizzare l’asciugatrice senza avere prima
reinserito il filtro in sede.
Controllo del cestello dopo ogni ciclo
Ruotare il cestello manualmente per rimuovere i capi
più piccoli (fazzoletti) che potrebbero essere rimasti
all’interno dell’asciugatrice.
Pulizia del cestello
! Per la pulizia del cestello non usare abrasivi, lana di
acciaio o agenti di pulizia per acciaio inossidabile.
Potrebbe formarsi una patina colorata sul cestello in
acciaio inossidabile, fenomeno che potrebbe essere
causato da una combinazione di acqua e/o agenti
di pulizia quali l’ammorbidente del lavaggio. Questa
patina colorata non ha alcun effetto sulle prestazioni
dell’asciugatrice.
Svuotamento del contenitore di raccolta dell’acqua
dopo ogni ciclo
Estrarre il contenitore
dall’asciugatrice e svuotarlo in un
lavandino o in altro scarico adatto,
quindi riposizionarlo correttamente.
Controllare sempre il contenitore di
raccolta e svuotarlo prima dell’avvio
di un nuovo programma di
asciugatura.
Il mancato svuotamento del contenitore di raccolta
dell’acqua potrebbe causare:
- L’arresto del riscaldamento della macchina (quindi il
carico potrebbe essere ancora umido alla fine del ciclo
di asciugatura).
Caricamento del sistema di raccolta dell’acqua
Quando l’asciugatrice è nuova, il contenitore di raccolta
dell’acqua non raccoglie finché il sistema non viene
caricato. Questa operazione può impiegare 1 o 2 cicli
di asciugatura. Una volta caricato, il sistema raccoglie
acqua a ogni ciclo.
Pulizia dell’unità Filtro del
Condensatore (Pompa di calore)
• Periodicamente, ogni 5 cicli, estrarre il
Filtro del Condensatore e pulirlo eliminando
eventuali residui di lanugine dalla superficie
del filtro lavandolo sotto acqua corrente o
aspirando con aspirapolvere.
Si raccomanda tuttavia di pulire questo filtro
dopo ogni ciclo per ottimizzare le prestazioni
di asciugatura.
Come rimuovere l’unita Filtro Condensatore:
1. Scollegare la spina di
alimentazione ed aprire
lo sportello.
2. Estrarre il coperchio
del Filtro del
Condensatore ruotare
le 4 clip portandole in
posizione verticale ed
estrarre l’unità del filtro.
3. Separare le due parti
del filtro e rimuovere
l’eventuale lanugine
dalla superficie interna
della retina.
ATTENZIONE: la
parte frontale del
condensatore è
realizzata con sottili
piastre metalliche.
22
Page 23

Quando lo pulisci, rimuovi o riposizioni l’unità
2
filtrante per la pulizia, fai attenzione a non
danneggiarlo e a non tagliarti.
4. Insieme alla pompa di
calore, bisogna sempre
pulire con attenzione,
gli accumuli di lanugine
sulle piastre metalliche,
utilizzando un panno
umido, una spugna o
l’aspirapolvere. Non
utilizzare le dita.
5. Riassemblare le due parti del filtro, pulire la
superficie della guarnizione ed inserire il filtro
nella sua sede ruotando le 4 clip nella posizione
orizzontale assicurandosi che le clip siano ben
agganciate.
•Protezione del sistema Pompa
di Calore (Condensatore)
Il sistema a pompa di calore funziona attraverso un
compressore munito di una protezione che interviene
se apri lo sportello, o se avviene una improvvisa
interruzione di tensione. Questa protezione impedirà
il riavvio del compressore per 5 minuti dopo che
sarà stato richiuso lo sportello e dopo che sarà stato
riavviato il ciclo.
Pulizia dell’asciugatrice
• Le parti esterne in metallo e in plastica e le parti in gomma
possono essere pulite con un panno umido.
• Periodicamente (ogni 6 mesi) pulire con l’aspirapolvere
la griglia della presa d’aria frontale e gli sfiati sul retro
dell’asciugatrice per rimuovere eventuali accumuli di
lanugine, laniccio e polvere. Inoltre, rimuovere gli accumuli
di lanugine dalla parte frontale del condensatore e delle
aree del filtro utilizzando occasionalmente l’aspirapolvere.
! Non usare solventi o abrasivi.
! Far controllare regolarmente l’asciugatrice da personale
tecnico autorizzato onde garantire la sicurezza delle parti
elettriche e meccaniche (vedi Assistenza
).
Consigli Rapidi
! Ricorda di pulire il filtro porta ed il condensator e
dopo ogni asciugatura.
! Ricorda di svuotare il recipiente di raccolta
dell’acqua dopo ogni carico.
! Così facendo, avrai il massimo delle prestazioni!
IT
Contenitore di raccolta dell’acqua
Condensatore
Fermi
Modello e
Numero di serie
Maniglia
Targhetta dei dati di
esercizio
Filtro
Piedini regolabili
Presa
d’aria
Coperchio
23
Page 24

Pannello di controllo
IT
Selezione Programmi
Il pulsante ON/OFF : se premuto quando
l’asciugabiancheria è in esecuzione il display visualizza
SPEGNIMENTO IN CORSO
Se il display visualizza
tenere premuto il bottone e il conteggio del display esegue
un conto alla rovescia 3, 2, 1 e poi si ferma. Premere e
tenere premuto per più di 3 secondi, sul display appare
brevemente
I pulsanti Selezione PROGRAMMA impostano il
programma: premere il pulsante corrispondente al
programma che si desidera selezionare (vedere la sezione
Avvio e programmi).
I pulsanti/spie OPZIONE : questi pulsanti selezionano le
opzioni disponibili per il programma selezionato (vedere
la sezione I Comandi). Le spie sull’unità display vicine ai
pulsanti si illuminano per indicare che l’opzione è stata
selezionata.
Il pulsante START/PAUSA (AVVIO/PAUSA)
un programma selezionato. Premendo questo pulsante
quando un programma è in esecuzione, il programma
viene sospeso, si sente un segnale acustico e il display
visualizza
ferma. La spia è verde quando il programma è in funzione,
lampeggia di giallo se il programma è in pausa, lampeggia
di verde se è in attesa di avviare un programma (vedere la
sezione Avvio e programmi).
Nota: questa spia lampeggia di giallo anche durante la
fase Post-antipiega di un programma.
L’unità display fornisce avvertenze e informazioni sul
programma selezionato e il suo andamento (vedere alla
pag. seguente).
Pulsante/icona BLOCCO SICUREZZA BAMBINI
Premere e tenere premuto questo pulsante dopo aver
selezionato il programma desiderato e altre opzioni,
ciò evita che le impostazioni del programma vengano
cambiate, il display mostrerà brevemente
. Quando l’icona è accesa, gli altri pulsanti sono disabilitati.
Tenere premuto il pulsante per cancellare, l’icona
scomparirà, il display mostrerà brevemente
ACCENSIONE IN CORSO
PAUSA
,l’asciugabiancheria si arresta.
TIENI PREMUTO PER SPEGNERE
.
avvia
dopodiché l’asciugabiancheria si
BLOCCO TASTI
SBLOCCATI
Pulsanti
pulsante
ON/OFF
,
:
.
Unità display
BLOCCO BAMBINI
& OPZIONI
Pulsanti e spie
Nota bene. Questa asciugatrice, in conformità alle
nuove normative legate al risparmio energetico, è
dotata di un sistema di autospegnimento (standby)
che entra in funzione dopo circa 30 minuti nel caso di
non utilizzo. Premere e tenere premuto il pulsante ONOFF fi no a quando il display visualizza brevemente
ACCENSIONE IN CORSO
riaccende l'asciugabiancheria.
e poi si
pulsante e spia
START/PAUSE
(AVVIO/PAUSA)
Bucato
Suddivisione del bucato
• Controllare i simboli riportati sulle etichette dei vari capi
per verificare che i capi possano essere sottoposti ad
asciugatura a tamburo.
• Dividere il bucato in base al tipo di tessuto.
• Svuotare le tasche e controllare i bottoni.
• Chiudere le lampo e i ganci e allacciare cinture e lacci
senza stringere.
• Strizzare i capi per eliminare la maggior quantità di acqua
possibile.
! Non caricare l’asciugatrice con capi totalmente pieni
d’acqua.
Massime dimensioni di carico
Non caricare il cestello oltre la capacità massima.
I seguenti valori si riferiscono al peso dei capi asciutti:
Fibre naturali: massimo kg
Fibre sintetiche: massimo kg
! Per evitare un calo delle prestazioni dell’asciugatrice, non
sovraccaricarla.
Etichette di manutenzione
Controllare le etichette dei capi, specialmente quando questi
vengono inseriti per la prima volta in asciugatrice. Di seguito
sono riportati i simboli più comuni:
Può essere inserito nell’asciugatrice.
Non asciugabile in asciugatrice
Asciugare ad alta temperatura.
Asciugare a bassa temperatura.
9
4
24
Page 25

Il Display
Selezione della lingua
La prima volta che si accende l'asciugatrice è necessario selezionare la lingua preferita dall'elenco disponibile.
Per modifi care: la selezione attuale della lingua deve lampeggiare
sulla prima riga del display.
- Premere il pulsante On/Off per spegnere il display, quindio
premere e tenere premuto tutti e 3 i tasti:
asciugatura temporizzata, e livello di asciugatura per 5 secondi.
- Premere il pulsante
asciugatura temporizzata e scorrere in alto o in basso nell'elenco.
- Quando la propria lingua lampeggia nella riga superiore del
display, premendo il pulsante
selezionata la propria preferenza.
livello di calore o il pulsante
livello di asciugatura verrà
Capire il display
Selezione dei programmi e display
Il programma selezionato è indicato nella prima riga del display quando si seleziona il pulsante corrispondente, questo
messaggio viene mostrato quando il programma è in funzione.
Otto dei pulsanti hanno due selezioni, premere il pulsante una volta per la prima selezione e premere di nuovo per la seconda,
il programma selezionato viene visualizzato. L'ultimo pulsante seleziona MEMO.
Memo. Quando si selezione il pulsante Memo, il Display mostrarà il programma selezionato con 'M' prima del nome
es.
M COTONE STANDARD (vedere la sezione Avvio e programmi).
livello di calore,
IT
Livelli di asciugatura
Durante la selezione di un programma automatico che ha diversi livelli di asciugatura disponibili (vedere la tabella dei
programmi).
La seconda riga del display mostra il livello di asciugatura richiesto, ad ogni pressione del pulsante livello di asciugatura
l'opzione successiva dall'elenco seguente viene selezionata e visualizzata. Il display visualizza anche 1-7 barre a seconda
della selezione e queste vengono visualizzate durante lo stato di avanzamento dei programmi.
! Alcuni programmi automatici non consentono di modifi care il proprio livello di asciugatura o non hanno tutte le opzioni dei
livelli di asciugatura.
UMIDO
STIRARE
APPENDERE+
APPENDERE
RIP. DELICATI
RIPIEGARE
INDOSSARE
Asciugatura a umido: asciuga i capi pronti per essere stirati con una macchina stiratrice
o rotante
Asciugatura per stiratura: asciuga i capi pronti per essere stirati con un ferro a mano.
Asciugatura extra in gruccia: asciuga i capi delicati rendendoli pronti per essere
appesi per l'asciugatura fi nale.
Asciugatura in gruccia: asciuga i capi rendendoli pronti per essere appesi per
l'asciugatura fi nale.
Asciugatura leggera: asciuga i capi delicati di modo che sono pronti per essere riposti
Asciugatura capi pronti per l'armadio: asciuga i capi in modo che sono pronti per
essere riposti.
Asciugatura extra: asciuga i capi in modo che sono pronti per essere indossati.
Avanzamento del programma
La seconda riga del display mostra lo stato del programma nel corso del suo avanzamento: (I messaggi lunghi scorrono nella
riga).
ASCIUGATURA
RAFFREDDAMENTO
RISCALDAMENTO
PRONTO
FINE CICLO, TRATTAMENTO ANTIPIEGA
FINE CICLO, PULIRE FILTRO SVUOTARE BOTTIGLIA
(Se l'opzione Post-trattamento antipiega è selezionata)
25
Page 26

Il Display
IT
Asciugatura temporizzata
Dopo aver selezionato un programma con un'opzione
di asciugatura temporizzata, premere il pulsante
temporizzato
selezionato, ogni volta che si preme e si rilascia il
pulsante (vedere la sezione Avvio e programmi)
Ogni pressione riduce la durata e il numero di opzioni temporali disponibili a seconda del programma/
materiale selezionato.
L'icona asciugatura temporizzata
Il tempo selezionato rimane visualizzato dopo gli avvii del programma, ma può essere modifi cato in
qualsiasi momento.
viene visualizzata accanto all'ora.
e il display incrementerà il periodo
Ritardo e tempo rimanente
Alcuni programmi possono avere un avvio
ritardato (vedere la sezione Avvio e programmi).
Premere il pulsante ritardo
lampeggerà.
Ad ogni pressione del pulsante ritardo
l'impostazione di ritardo avanza di 1 ora, da
a
ritardo viene cancellato.
Il periodo del ritardo viene mostrato sul display vicino al pulsante ritardo.
Il display esegue il conto alla rovescia dei minuti del periodo di ritardo dopo che il pulsante START/PAUSE
PAUSA) è stato premuto.
La seconda riga del display mostra
E' possibile modifi care o nannullare il tempo di ritardo selezionato in quialsiasi momento.
Dopo che si preme il pulsante START/PAUSE (Avvio/Pausa) il Ritardo o Tempo rimanente viene visualizzato in ore e minuti
con conto alla rovescia per ogni minuto.
,quindi e dopo alcuni secondi il
, e l'icona
(AVVIO/
PARTE TRA
Tempo rimanente
Al termine del periodo di ritardo, o per tutto il programma, se non viene selezionato un ritardo, questa parte del display
visualizzerà:
- il tempo rimanente stimato per la fi ne del programma, per programmi automatici
- il tempo rimenente effettivo nel corso di un programma temporizzato
Quando sono selezionati programmi temporizzati, il tempo visualizzato durante il ciclo è il tempo rimanente attuale.
Quando viene selezionato un programma automatico, il tempo visualizzato è una previsione del tempo rimanente.
Quando il programma è selezionato, il display indica il tempo necessario per asciugareun carico pieno. Il tempo residuo viene
costantemente monitorato durante il ciclo di asciugatura e il tempo viene modifi cato per mostrare la migliore stima possibile.
I punti fra le ore ed i minuti nel display lampeggiano per indicare il tempo ch sta passando.
Pulsante Memo:
La prima volta che si preme questo pulsante, la seconda riga del display mostrerà
Dopo aver selezionato il programma e le opzioni preferite è possibile salvare queste impostazioni premendo e tenere premuto
il pulsante Memo per almeno 5 secondi, la riga superiore mostra un messaggio lampeggiante M seguito dal programma
selezionato. Il segnale acustico emette un suono e la seconda riga del display mostra
La prossima volta che che si ha bsogno di questo programma basta premere il pulsante M, quindi il pulsante START/PAUSE
(Avvio/Pausa) e questo programma sarà funzionante.
Se si desidera, è possibile cambiare le proprie impostazioni preferite selezionando un nuovo programma e/o opzioni tenendo
premuto il pulsante M (come sopra).
26
TENERE PREMUTO PER MEMO
MEMO
Page 27

Avvio e Programmi
Scelta del programma
1. Inserire la spina dell'asciugatrice nella presa di
alimentazione eletrrica.
2. Selezionare il bucato in base al tipo di tessuto (vedere la
sezione Bucato).
3. Tirare lo sposrtello per aprirlo e controllare la corretta
posizione e la pulizia del fi ltro ed accertarsi che il recipiente
di raccolta dell'accqua sia vuoto e posizionato correttamente
(
vedere la sezione Manutenzione).
4. Caricare l'asciugatrice, facendo attenzione ad evitare
che qualche indumento possa frapporsi tra lo sportello e la
relativa guarnizione. Chiudere lo sportello.
5. Se il display non è acceso: Premere il pulsante ON/OFF .
6. Premere il pulsante di selezione Programma che
corrisponde al tipo di tessuto da asciugare, controllando la
tabella dei programmi (vedere Programmi) come pure le
indicazioni per ciascuno tessuto (vedere Bucato)
- Se il pulsante M è selezionato; le frasi 7 e 8 non sono
necessarie (vedere sotto).
7. Scegliere l'opzione temporizzata o livelli di asciugatura:
- Se si seleziona asciugature temporizzata
rilasciare il pulsante temporizzato fi nchè non appare il tempo
desiderato.
o - per cambiare dall'impostazione di asciugatura default,
premere e rilasciare il pulsante livelli di asciugatura fi nchè
non viene visualizzato il livello desiderato.
! Vedere la tabella programmi, per ulteriori dettagli:
la disponibilità dei livelli di asciugatura Asciugatura
temporizzata e Opzioni.
8. Impostare un tempo di ritardo e altre opzioni, se
necessario (vedere la sezione Display).
9. Premere il pulante START/PAUSE
per avviare il programma. il display indica una previsione
del tempo rimanente. Durante il funzionamento, è possibile
aprire lo sportello per estrarre i capi che nel frattempo si
(Avvio/Pausa),
.
premere e
sono asciugati e lasciare asciugare gli altri. Dopo aver
richiuso lo sportello, è necessario ripremere il pulsante
START/PAUSE
nuovamente l'asciugatrice.
Se si apre lo sposrtello per verifi care il bucato, si allungherà
il tempo di asciugatura poichè il compressore della pompa di
calore non verrà avviato per 5 minuti dopo che lo sportello è
chiuso e si preme il pulsante Start/Pause (vedere la sezione
Comandi).
10. Durante gli ultimi minuti dei programmi di asciugatura,
prima del termine del programma, viene inserita la fase
ASCIUGATURA A FREDDO (i tessuti vengono raffreddati),
questa fase deve sempre essere attivata per terminare il
ciclo.
11. Al termine del ciclo di asciugatura viene visualizzato un
messaggio:
- Se viene visualizzato
FINE CICLO, PULIRE FILTRO SVUOTARE BOTTIGLIA
il segnale acustico suona per 3 volte (Nota: se è stata
selezionata l'opzione SUONO il segnalatore acustico emette
un suono 3 volte ogni 30 secondi per 5 minuti)
- Se viene visualizzato
FINE CICLO, TRATTAMENTO ANTIPIEGA
è stata selezionata l'opzione Anti-piega, se non si rimuove
il bucato immediatamente, avolte l'asciugatrice esegue il
programma di asciugatura per 10 ore fi no a quando si apre
l'oblò, il segnale acustico suona 3 volte per confermare che il
programma è completato.
12. Aprire lo sportello, estrarre il bucato, pulire il fi ltro e
metterlo nuovamente in posizione. Svuotare il recipiente
di raccolta dell'acqua e rimetterlo al suo posto (vedere la
sezione Manutenzione).
13. Scollegare l'asciugatrice dalla rete elettrica.
(Avvio/Pausa) per mettere in funzione
IT
Tempi di asciugatura
I tempi sono approssimativi e possono variare in base a:
• Quantità di acqua trattenuta dai capi dopo la centrifuga: gli asciugamani e i capi delicati trattengono molta acqua.
• Tessuti: i capi dello stesso tessuto, ma con trama e spessore differenti possono presentare tempi di asciugatura diversi.
• Quantità di bucato: capi singoli e piccoli carichi possono impiegare più tempo per asciugarsi.
• Asciugatura: se i capi devono essere stirati possono essere estratti dalla macchina quando sono ancora un po’ umidi. I capi
che devono essere completamente asciutti possono invece essere lasciati più a lungo.
• Temperatura impostata.
• Temperatura della stanza: più è bassa la temperatura della stanza in cui si trova l’asciugatrice più tempo sarà necessario per
l’asciugatura dei capi.
• Volume: alcuni capi voluminosi richiedono particolare cura nel processo di asciugatura. Si consiglia di estrarre questi capi,
scuoterli e inserirli nuovamente nell’asciugatrice: questa operazione deve essere ripetuta più volte durante il ciclo di asciugatura.
! Non asciugare troppo i capi.
Tutti i tessuti contengono umidità naturale che serve a conservarne la morbidezza e la vaporosità.
27
Page 28

IT
n° Programma
Cotone
Standard
max
1
Camicie
3 kg
Biancheria
max
2
Stira Facile
-
Sintetici
4 kg
3
Rinfresca
-
Jeans
3 kg
4
Piumini
-
Tabella dei programmi
E’ possibile controllare la durata dei programmi sul display1.
• Questo è un programma per capi in cotone.
• Il programma Cotone standard di cui al regolamento UE 392/2012 è una selezione Programma 1 con Alto Calore e il livello
di asciugatura Asciugatura capi pronti per l’armadio (Configurazione standard/predefinita iniziale). Questo è il programma più
efficiente in termini di consumo di energia (UE 392/2012).
Opzione Alta temperatura
• Questo è un programma per camicie in cotone.
Opzione Media temperatura
• Questo è un programma per camicie in materiale sintetico o un misto di materiali naturali e sintetici, come poliestere e
cotone.
• I carichi asciugati con l’impostazione Asciugatura capi pronti per l’armadio sono di solito pronti da indossare, i bordi o
le cuciture possono essere leggermente umidi. In questo caso, provare a rigirare le camicie ed eseguire nuovamente il
• Si tratta di un programma per gli asciugamani e lenzuola in cotone.
• Carichi asciugati con l’impostazione Asciugatura Extra di solito sono pronti per l’uso, i bordi o le cuciture possono
essere leggermente umidi soprattutto per capi di grandi dimensioni. In questo caso, provare ad aprire per bene il capo
ed eseguire nuovamente il programma per un breve periodo.
• “Stiratura facile” è un breve programma di 10 minuti (8 minuti di riscaldamento seguiti da 2 minuti di asciugatura a
freddo) che tratta le fibre dei tessuti rimasti immobili per un lungo periodo di tempo. Il ciclo distende le fibre dei capi in
modo da agevolarne la stiratura e la piegatura.
! Questo non è un programma di asciugatura e non va quindi utilizzato con capi ancora bagnati.
• Per risultati ottimali:
1. Non caricare il cestello oltre la capacità massima. I seguenti valori si riferiscono al peso degli indumenti asciutti: (TessutoCarico massimo) Cotone e Misto cotone-2.5 kg; Sintetico-2 kg; Jeans-2 kg.
2. Svuotare l’asciugatrice subito dopo la fine del programma; appendere, piegare o stirare i capi per poi riporli nell’armadio.
Se ciò non fosse possibile, ripetere il programma.
• Si tratta di un programma per capi sintetici a bassa temperatura o misto cotone/sintetici per una quantità media di
calore.
! ‘Rinfresca’ non è un programma di asciugatura e non va utilizzato per capi bagnati.
• Può essere utilizzato su qualsiasi dimensione di carico, ma è più efficace sui piccoli carichi.
• Non sovraccaricare l’asciugabiancheria (vedere la sezione Bucato).
• Questo programma dura 20 minuti e arieggia i capi con aria fredda. Da utilizzare anche per raffreddare i capi caldi.
• Questo è un programma per jeans in cotone denim. Prima di asciugare i jeans rovesciare le tasche.
• Non mescolare articoli colorati scuri e chiari.
• Può essere usato anche per altri capi dello stesso materiale, come giacche/giubbini.
• I capi asciugati con l’impostazione Asciugatura extra di solito sono pronti per essere indossati, anche se cuciture o bordi
possono essere leggermente umidi. In questo caso, provare a rivoltare i jeans ed eseguire nuovamente il programma per
un breve periodo.
! Non è consigliabile usare questo programma con jeans con fasce elastiche, borchie o ricami.
! Fare attenzione, questo programma NON asciuga capi danneggiati dato che si potrebbero bloccare i fori del filtro dell’aria
con conseguente rischio di incendio.
• Deve essere utilizzato solo per piumini per letti singoli: NON adatto per piumini di letti matrimoniali o a due piazze.
• I capi asciugati con questo programma di solito sono pronti per essere usati, anche se possono essere leggermente
umidi in alcuni punti. In questo caso, provare a distenderli, scuoterli ed eseguire nuovamente il programma per un breve
periodo.
• Adatto anche per giacche imbottite con piuma d’oca.
• Selezionare un calore elevato per piumini in cotone e medio per piumini sintetici.
Nota bene:
1 - La durata di questi programmi dipende dall’entità del carico, dal tipo di tessuti, dalla velocità per la centrifuga usata sulla vostra lavatrice e da
altre ulteriori opzioni selezionate.
28
Page 29

n° Programma
Tabella dei programmi
E’ possibile controllare la durata dei programmi sul display1.
IT
Programma
5
Programma
6
scuri (NERI)
Programma
Anti Allergy
7
Lana
1 kg
Seta
0,5 kg
Baby
2 kg
Ciclo capi
3 kg
max
or
4 kg
• Questo è un programma per preservare nell’asciugatrice gli indumenti contrassegnati con il simbolo
• Consigliamo di rovesciare gli indumenti prima dell’asciugatura.
• I carichi che vengono asciugati con questo programma sono di solito pronti da indossare, ma con alcuni indumenti più
pesanti i bordi potrebbero essere leggermente umidi. Fare asciugare questi naturalmente, poiché un’ulteriore processo
di asciugatura potrebbe danneggiare gli indumenti.
! Al contrario di altri materiali, il meccanismo di restringimento della lana è irreversibile; cioè non ritorna alla dimensione e alla
forma originale
! Questo programma non è indicato per gli indumenti acrilici.
• Questo è un programma per asciugare capi delicati di seta.
• I capi asciugati con l’impostazione Asciugatura capi pronti per l’armadio di solito sono pronti per essere utilizzati, anche
se alcuni capi possono presentare bordi leggermente umidi. In questo caso, provare a distenderli o rivoltarli ed eseguire
nuovamente il programma per un breve periodo.
• Questo è un programma per l’asciugatura dei capi delicati e della biancheria da letto del neonato (Cotone e ciniglia) e
per l’asciugatura di capi delicati.
• NON asciugare capi come bavaglini e pannolini a mutandina con rivestimenti in plastica.
• Carichi asciugati con questo programma sono di solito pronti per l’uso, ma in alcuni capi i bordi potrebbero essere
leggermente umidi. In questo caso, provare ad aprire e a rigirare i capi ed eseguire nuovamente il programma per un
breve periodo.
• Questo programma aiuta a mantenere inalterati i capi di cotone scuri, controllando la velocità del motore e la rotazione
del tamburo nonché la temperatura di essiccazione più bassa.
• Il carico deve essere centrifugato in lavatrice ad una velocità di rotazione tra i 1200 - 1400 giri al minuto.
• Poiché si tratta di un programma di trattamento mirato a proteggere i vostri vestiti di colore scuro, la durata del
programma potrebbe essere superiore alle 4 ore.
• Asciuga al livello di Capi asciutti pronti per l’armadio.
• Questo ciclo vanta l’approvazione “Allergy UK” rilasciata dalla “The British Allergy Foundation” che comprova l’effettiva
riduzione ed eliminazione degli allergeni (inclusi acari e pollini) dai capi trattati grazie al mantenimento della temperatura
costante per tutta la durata del trattamento antiallergico.
• Può essere utilizzato su un carico umido completo per asciugare e trattare, o su un carico secco da 4 kg solo per
trattare il bucato. Se il display mostra
riavviare il programma.
• Questo programma utilizza le basse temperature per uno speciale ciclo di asciugatura per fibre anti allergiche; come la
microfibra.
AZIONE ANTIALLERGICA NON GARANTITA, PULIRE FILTRO
.
: pulire il filtro e
Microfibra
2 kg
• Con questo programma è possibile rimuovere più facilmente la polvere e lavare più spesso iI peluche perché il tempo
di asciugatura è molto ridotto rispetto all’essiccazione all’aria aperta. Si tratta di un ciclo di asciugatura delicato, che
Programma
per peluche
8
2,5 kg
Tappeti
3 kg
Nota bene:
1 - La durata di questi programmi dipende dall’entità del carico, dal tipo di tessuti, dalla velocità per la centrifuga usata sulla vostra lavatrice e da
altre ulteriori opzioni selezionate.
asciuga a bassa temperatura e con una morbida azione meccanica per mantenere al meglio l’aspetto originale e la
lucentezza del pelo.
Nota bene: per la protezione contro le allergie, mettere nel freezer il proprio peluche per 24 ore e poi lavarlo e asciugarlo.
Ripetere l’operazione ogni 6 settimane.
• Prima dell’asciugatura rimuovere gli accessori come vestiti, colletti o carillon dal peluche e proteggere gli occhi con
nastro adesivo dopo averli asciugati con un panno.
• La durata del programma varia a seconda della quantità e caratteristica del carico. Il carico massimo non dovrebbe
superare 2,5 kg e il singolo peluche non dovrebbe superare i 600 g.
• Questo è un programma per i piccoli tappeti da bagno o da cucina, realizzati con materiali sintetici o misto cotone/
sintetici.
Note: Non asciugare tappetini con parti in plastifica, può causare pericolo di incendio (vedere avvertenze)
29
Page 30

IT
I Comandi
! Avvertenza, Se dopo aver premuto il pulsante START/
PAUSE (Avvio/Pausa)
programmi è cambiata, la nuova posizione NON modifica
il programma selezionato. Per cambiare un programma
selezionato, premere il pulsante START/PAUSE (Avvio/
Pausa)
programma è in pausa. Selezionare il nuovo programma e le
opzioni, la luce lampeggerà di verde. Premere nuovamente
il pulsante START/PAUSE (Avvio/Pausa)
programma verrà avviato.
, la spia lampeggia di giallo per indicare che il
la posizione della manopola
il nuovo
• Pulsanti Opzione
Questi pulsanti vengono usati per personalizzare il
programma selezionato secondo le proprie esigenze.
Non tutte le opzioni sono disponibili per tutti i
programmi. Alcune opzioni sono incompatibili con altre
precedentemente impostate. Se un’opzione non è
disponibile e si preme il relativo pulsante, il segnalatore
acustico suonerà 3 volte. Se l’opzione è disponibile, la
spia dell’opzione selezionata resterà accesa.
Partenza Ritardata
L’avvio di alcuni programmi (vedere la sezione Il Display
e Avvio e programmi) può essere ritardato fino a 24 ore.
Accertarsi che il recipiente dell’acqua sia vuoto prima di
impostare un avvio ritardato.
Livello pulsante di calore, Display e Icone
Non tutti i programmi consentono di modificare il livello di
calore e alcuni programmi permettono tutte e tre le opzioni
del livello di calore: Bassa, Media e Alta.
Quando le opzioni di calore di livello sono disponibili
premendo questo pulsante si cambia il livello di calore e il
display mostra brevemente il livello selezionato di calore,
insieme a una visualizzazione dell’icona livello selezionato:
ALTA TEMPERATURA
Suono
Quando disponibile e selezionato, il segnalatore acutico
segnala la fine del ciclo di asciugatura per ricordare che i
capi sono pronti per essere rimossi.
Nota: se è stata selezionata l’opzione post Anti-piega
questa opzione non è disponibile.
Meno lanugine
Riducendo l’azione meccanica durante la fase di asciugatura
finale, la quantità di pelucchi e lanugine prodotti è
sostanzialmente ridotta, proteggendo quindi le fibre dei
vostri indumenti.
Anti-Piega
Questa opzione attiva automaticamente un trattamento
Anti-piega pre e post asciugatura. L’Anti-piega mediante
la rotazione alternata del cesto previene la formazione delle
pieghe facendo ruotare ripetutamente i capi. L’opzione
prevede una fase pre Anti-piega, attivabile solo quando è
selezionato l’avvio ritardato e una fase post Anti-piega al
termine del ciclo di asciugatura. L’Anti-Piega è pertanto
la soluzione ottimale per evitare la formazione di pieghe
quando si attiva la partenza ritardata e quando non si
ha la possibilità di rimuoverei capi non appena terminata
l’asciugatura.
Nota: la spia START/PAUSE
lampeggia di giallo durante una fase post Anti-piega.
Selezionando questa opzione si attivano enttrambe le
funzioni di pre e post-antipiega, se appropriate.
MEDIA TEMPERATURA
BASSA TEMPERATURA
(AVVIO/PAUSA)
Asciugatura rapida
Questo opzione è per piccoli carichi fino a 1kg. Nota bene:può
essere utilizzato solo con l’impostazione’Ripiegare’
• DISPLAY TEMPO
Il display mostra sia il periodo di tempo di avvio ritardato
rimanente, che il periodo di tempo rimasto per un programma
di asciugatura (vedere la sezione Il Display). Il display indica
inoltre se c’è un problema con l’asciugatrice, se ciò si verifica,
il display indicherà F seguito da un numero di codice di guasto
(vedere la sezione Ricerca guasti).
• Svuotare il recipiente di raccolta dell’acqua
(I messaggi sullo svuotamento possono essere ignorati se
l’asciugatrice è collegata ad uno scarico in quanto non vi
è alcuna necessità di svuotare il contenitore dell’acqua).
I messaggi sono visualizzati per ricordarvi di svuotare il
contenitore dell’acqua (vedere la sezione Il Display). Se il
recipiente si riempie nel corso di un programma, il riscaldatore
si spegne e l’asciugatrice avvia una fase di Asciugatura ad
Aria Fredda. Dopo ciò si ferma e un messagio vi informa
SVUOTARE BOTTIGLIA
di
dell’acqua e riavviare l’asciugatrice, altrimenti i capi non si
asciugheranno. Dopo aver riavviato l’asciugatrice, l’icona
impiegherà alcuni secondi per uscire dalla funzione. Per
evitare questo procedimento svuotare sempre il recipiente
dell’acqua, ad ogni utilizzo dell’asciugatrice (vedere la sezione
Manutenzione).
• Apertura dello sportello
Aprendo lo sportello durante il funzionamento di un programma,
l’asciugatrice si arresterà e si avranno le seguenti conseguenze:
Nota: la spia START/PAUSE
di giallo durante la fase Post-trattamento antipiega di un
programma.
• Il display indica
• Nel caso in cui sia impostata la partenza ritardata, il ritardo
continuerà ad essere conteggiato. Il pulsante START/PAUSE
(AVVIO/PAUSA) deve essere premuto per ripristinare il
programma preimpostato. Il display cambia per mostrare lo
stato corrente.
• Il pulsante START/PAUSE
essere premuto per ripristinare il programma. Il display cambia
per mostrare lo stato corrente.
• Durante la fase Post-antipiega, il programma termina.
Premendo il pulsante START/PAUSE
verrà riavviato un nuovo programma dall’inizio.
• Nota
Qualora avvenisse una interruzione di corrente, spegnere
l’alimentazione o rimuovere la spina. Quando viene ripristinata
l’alimentazione, premere e tenere premuto il pulsante On/
Off finché il display mostra brevemente
l’asciugabiancheria si riaccende. Quindi, premere il pulsante
START/PAUSE
riprenderà.
. È necessario svuotare il recipiente
(AVVIO/PAUSA) lampeggia
PAUSA
.
(AVVIO/PAUSA) deve
ACCENSIONE IN CORSO
(AVVIO/PAUSA) e il programma
.
(AVVIO/PAUSA)
e
Il programma “ciclo lana”
di questa macchina è stato testato e approvato da
The Woolmark Company.
Il ciclo è adatto ad asciugare capi in lana etichettati
“lavare a mano”, purchè
i capi siano lavati utilizzando un ciclo di “lavaggio a
mano” approvato da Woolmark e asciugati seguendo
le istruzioni fornite dal fabbricante della macchina.
M1219.
Nel Regno Unito, nell’Eire, a Hong Kong e in India il
marchio Woolmark è un marchio certificato.
30
Page 31

Problemi e Soluzioni
Potrebbe accadere che l’sciugatrice sembri fuori uso. Prima di contattare il centro assistenza (vedere la sezione Assistenza),
analizzare i seguenti suggerimenti per la soluzione dei problemi:
Problema:
L’asciugatrice non si accende.
Cause probabili / Soluzioni:
• La spina potrebbe non essere inserita oppure potrebbe non riuscire a fare contatto.
• Potrebbe essersi verificata una mancanza di corrente.
• Il fusibile potrebbe essersi bruciato. Provare a collegare un altro elettrodomestico alla
stessa presa.
• Se si utilizza una prolunga, provare a inserire la spina dell’asciugatrice direttamente
nella presa.
• Lo sportello potrebbe non essere chiuso correttamente.
• Il programma non è stato impostato correttamente (vedere la sezione Avvio e
programmi).
• Potrebbe non essere stato premuto il pulsante START/PAUSE
(vedere la sezione Avvio e programmi).
(AVVIO/PAUSA)
IT
Il ciclo di asciugatura non viene avviato.
L’asciugatura impiega troppo tempo.
Viene visualizzato il messaggio
svuotare acqua ma l’asciugatrice sta
funzionando da poco tempo.
Viene visualizzato il messaggio svuotare
acqua e il contenitore d’acqua è pieno.
• Potrebbe essere stato impostato un intervallo di tempo di attesa (vedere la sezione
Avvio e programmi).
• Il filtro potrebbe non essere stato pulito correttamente (vedere la sezione
Manutenzione).
• Potrebbe essere necessario svuotare il recipiente di raccolta dell’acqua? Il
messaggio ‘svuotare acqua’ lampeggia? (vedere la sezione Manutenzione).
• Il filtro della pompa deve essere pulito? (vedere la sezione Manutenzione).
• La temperatura impostata potrebbe non essere adatta al tipo di tessuto da
asciugare (vedere la sezione Avvio e programmi, e vedere Bucato).
• Potrebbe non essere stato selezionato il tempo di asciugatura corretto per il tipo di
carico (vedere la sezione Bucato).
• La griglia della presa d’aria potrebbe essere ostruita (vedere la sezione
Installazione e la sezione Manutenzione).
• Gli indumenti erano forse troppo bagnati (vedere la sezione Bucato).
• L’asciugatrice potrebbe essere sovraccarica (vedere la sezione Bucato).
• Il recipiente dell’acqua probabilmente non è stato svuotato all’avvio del programma.
Non attendere il segnale di svuotamento dell’acqua, ma controllare sempre il recipiente
e svuotarlo prima dell’avvio di un nuovo programma di asciugatura (vedere la sezione
Manutenzione).
È normale, il messaggio:
•
FINE CICLO, PULIRE FILTRO E SVUOTARE BOTTIGLIA
viene indicato come promemoria per svuotare il contenitore (vedere la sezione Il
Display e vedere Avvio e programmi).
Il programma termina e i capi sono più
umidi del previsto.
Sul Display viene visualizzato il codice
F seguito da uno o due numeri.
Sul Display viene visualizzato
DEMO ON
Le spie del pannello di controllo
dell’asciugatrice sono spente, anche
se l’asciugatrice è accesa.
ogni 6 secondi.
! Per motivi di sicurezza i programmi dell’asciugatrice hanno una durata massima di 5
ore. Se un programma automatico non ha rilevato l’umidità finale richiesta entro questo
intervallo, l’asciugatrice completerà il programma e si arresta. Controllare i punti sopra
indicati e far funzionare nuovamente il programma. Se i capi risultano ancora umidi
contattare il Centro di assistenza (vedere la sezione Assistenza).
• Se il display visualizza un errore:
- Spregnere l’apparecchio e togliere la spina. Pulire il filtro e l’unità filtro della pompa di
calore (vedere la sezione Manutenzione).
Riposizionare la spina, accendere e avviare un altro programma. Se viene
visualizzato un errore: annotare il codice e contattare il Centro Assistenza (vedere la
sezione Assistenza).
• L’asciugatrice è in modalità ‘Demo’. Tenere premuti conntemporaneamente i tasti
On / Off e START/PAUSE
DEMO OFF
• L’asciugatrice è entrata in stand-by per risparmiare energia. Questo avviene
quando si è verificata un’interruzione dell’alimentazione elettrica o qualora si è lasciata
l’asciugatrice senza avviare un programma o dopo che il programma di asciugatura
ha finito.Tenere premuto il pulsante ON/OFF fino a quando l’asciugatrice non riprende a
funzionare.
per 3 secondi e poi l’asciugatrice riprenderà a funzionare normalmente.
(AVVIO/PAUSA) per 3 secondi. Il display mostrerà
31
Page 32

Assistenza
07/2016 - Xerox Fabriano
IT
Sistema a Condensatore
Questo asciugature è dotato di un sistema a Condensatore
per asciugare i tuoi capi. Per consentire il suo
funzionamento, il Condensatore utilizza gas ad effetto serra
(gas fluorurati), che sono contemplati dal protocollo di Kyoto.
I gas F sono contenuti in una unità sigillata ermeticamente.
Questa unità sigillata contiene kg di gas R134a F che
agisce come refrigerante. GWP = 1430 (0.4 t C02). Se l’unità
di condensazione è danneggiata deve essere sostituita
con una nuova unità di condensazione. Per avere maggiori
informazioni contattare il centro assistenza più vicino. Nota:
I gas contenuti in un’unità sigillata non sono pericolosi
per la salute, ma se fuoriescono avranno un impatto sul
riscaldamento globale.
Prima di telefonare al Centro di assistenza:
• Seguire la guida alla risoluzione dei problemi per vedere
se è possibile porre rimedio al guasto personalmente (vedi
Problemi e soluzioni).
• In caso contrario, spegnere l’asciugatrice e chiamare il più
vicino Centro di assistenza.
0,29
Dati da comunicare al Centro di assistenza:
• Nome, indirizzo e codice postale;
• numero di telefono;
• il tipo di guasto;
• la data di acquisto;
• il modello dell’apparecchio (Mod.);
• il numero di serie (S/N) dell’asciugatrice.
Queste informazioni si trovano sull’etichetta dati applicata
dietro l’oblò.
Ricambi
Questa asciugatrice è una macchina complessa. Tentando
di ripararla personalmente o affidandone la riparazione a
personale non qualificato si rischia di mettere a repentaglio
l’incolumità delle persone, di danneggiare la macchina e
di far decadere la garanzia sui ricambi. In caso di problemi
con l’utilizzo di questa macchina, rivolgersi sempre a un
tecnico autorizzato. E’ reato per una persona non qualificata
effettuare qualsiasi assistenza o riparazione che comporta il
danneggiamento del Condensatore sigillato.
Assistenza Attiva 7 giorni su 7
Se hai necessità di un intervento chiama il Numero Unico Nazionale 199.199.199*.
Grazie ad uno staff di collaboratori sempre disponibile che garantisce un servizio rapido ed efficiente e ad una rete di assistenza
composta da oltre 600 tecnici specializzati, costantemente formati dall’azienda, potrai avere un supporto di qualità in qualsiasi momento tu ne abbia bisogno, anche se il tuo elettrodomestico non è più coperto dalla garanzia convenzionale.
Assistenza Estesa
La conformità dei prodotti Hotpoint-Ariston ai più elevati standard qualitativi permette di offrirti, ad integrazione della garanzia convenzionale, programmi di assistenza innovativi. Formule esclusive che rispondono ad ogni problema di manutenzione ed includono
gratuitamente il contributo di trasferimento del tecnico a domicilio, la manodopera e le parti di ricambio originali.
Per aderire è sufficiente contattare il Numero Unico Nazionale 199.199.199*, oppur e online sul sito www.hotpoint-ariston.it/assistenza-estesa.
Linea Accessori Professionali
Scopri la vasta gamma di accessori e detergenti raccomandata da Hotpoint-Ariston.
Una linea di prodotti pensata per migliorare la performance dei tuoi elettrodomestici e garantirne una perfetta manutenzione.
http://eshop.hotpoint.it/eshop/
Informazioni per riciclaggio e smaltimento
Nell’ambito del nostro costante impegno in difesa dell’ambiente ci riserviamo il diritto di utilizzare componenti riciclati di qualità per
ridurre i costi del cliente e minimizzare lo spreco di materiali.
• Smaltimento dei materiali di imballaggio: seguire le normative locali, così da permettere di riciclare l’imballaggio.
• Per ridurre il rischio di incidenti ai bambini, rimuovere lo sportello e la spina, quindi tagliare il cavo di alimentazione a filo con
l’apparecchio. Smaltire queste parti separatamente per assicurarsi che l’elettrodomestico non possa più essere collegato a una
presa di corrente.
Smaltimento
La direttiva Europea 2012/19/CE sui rifiuti di apparecchiature elettriche ed elettroniche (RAEE), prevede che gli
elettrodomestici non debbano essere smaltiti nel normale flusso dei rifiuti solidi urbani. Gli apparecchi dismessi devono essere
raccolti separatamente per ottimizzare il tasso di recupero e riciclaggio dei materiali che li compongono ed impedire potenziali
danni per la salute e l’ambiente.
Questo asciugatore utilizza una pompa di calore sigillata contenente gas fluorurati che devono essere recuperati e smaltiti.
Il simbolo del cestino barrato è riportato su tutti i prodotti per ricordare gli obblighi di raccolta separata.
Quando si acquista una nuova apparecchiatura equivalente si può consegnare il RAEE al negoziante, che è tenuto a ritirarlo
gratuitamente; i RAEE di “piccolissime dimensioni” (nessun lato sopra i 25 cm) possono essere consegnati gratuitamente ai
negozianti anche se non si acquista nulla (solo nei negozi con superficie di vendita superiore a 400 mq).
sulla corretta dismissione degli elettrodomestici, i detentori potranno rivolgersi al servizio pubblico preposto o ai rivenditori.
Questo apparecchio è stato progettato, fabbricato e distribuito in conformità alle seguenti
Direttive:
- LVD 2014/35/UE, EMC 2014/30/UE e RoHS 2011/65/UE.
32
Per ulteriori informazioni,
 Loading...