

Page 1
Instruction booklet
GB
English, 1
CZ
58
F
Français, 20
SK
NL
Nederlands, 39
77
FTCD 872
First time you turn on your dryer
you must select your preferred
language see page 9
Contents
Installation, 2-3
Where to put your dryer
Ventilation
Water drain
Levelling
Electrical connection
Before you start using your dryer
Warnings, 4-5
General safety
To minimise the risk of fire
Maintenance and Care, 6-7
Switching off the electricity
Cleaning the filter after each cycle
Cleaning the heat pump filter unit
Empty the water container after each cycle
Check the drum after each cycle
Cleaning the dryer
Dryer description, 8
The features
Control panel
GB
TUMBLE DRYER
This symbol reminds you to read this
This symbol reminds you to read this
booklet.
booklet.
! Keep this instruction booklet on hand in order to refer
! Keep this instruction booklet on hand in order to refer
to it when necessary. Take it with you when you
to it when necessary. Take it with you when you
move, and should you sell this appliance or pass it
move, and should you sell this appliance or pass it
on to another party, make sure that this booklet is
on to another party, make sure that this booklet is
supplied along with the dryer so that the new owner
supplied along with the dryer so that the new owner
may be informed about warnings and suggestions on
may be informed about warnings and suggestions on
how the appliance works.
how the appliance works.
! Read these instructions carefully; the following
! Read these instructions carefully; the following
pages contain important information on installation
pages contain important information on installation
and suggestions on how the appliance works.
and suggestions on how the appliance works.
The Display, 9-11
Start and programmes, 11-15
Choosing a programme
Programmes Table
The Controls
Laundry, 16
Sorting your laundry
Wash care labels
Drying times
Troubleshooting, 17
Service, 18
Spare Parts
Product data, 19
Recycling and Disposal
www.hotpoint.eu
1
Page 2
Installation
GB
Where to put your dryer
●
Place your dryer at a distance from gas
ranges, stoves, heaters, or cook tops
because flames can damage the
appliance.
●
The dryer should be installed in an
ambient room temperature of between
20 to 23˚C for optimum performance.
But will function if the room is between
14 and 30˚C.
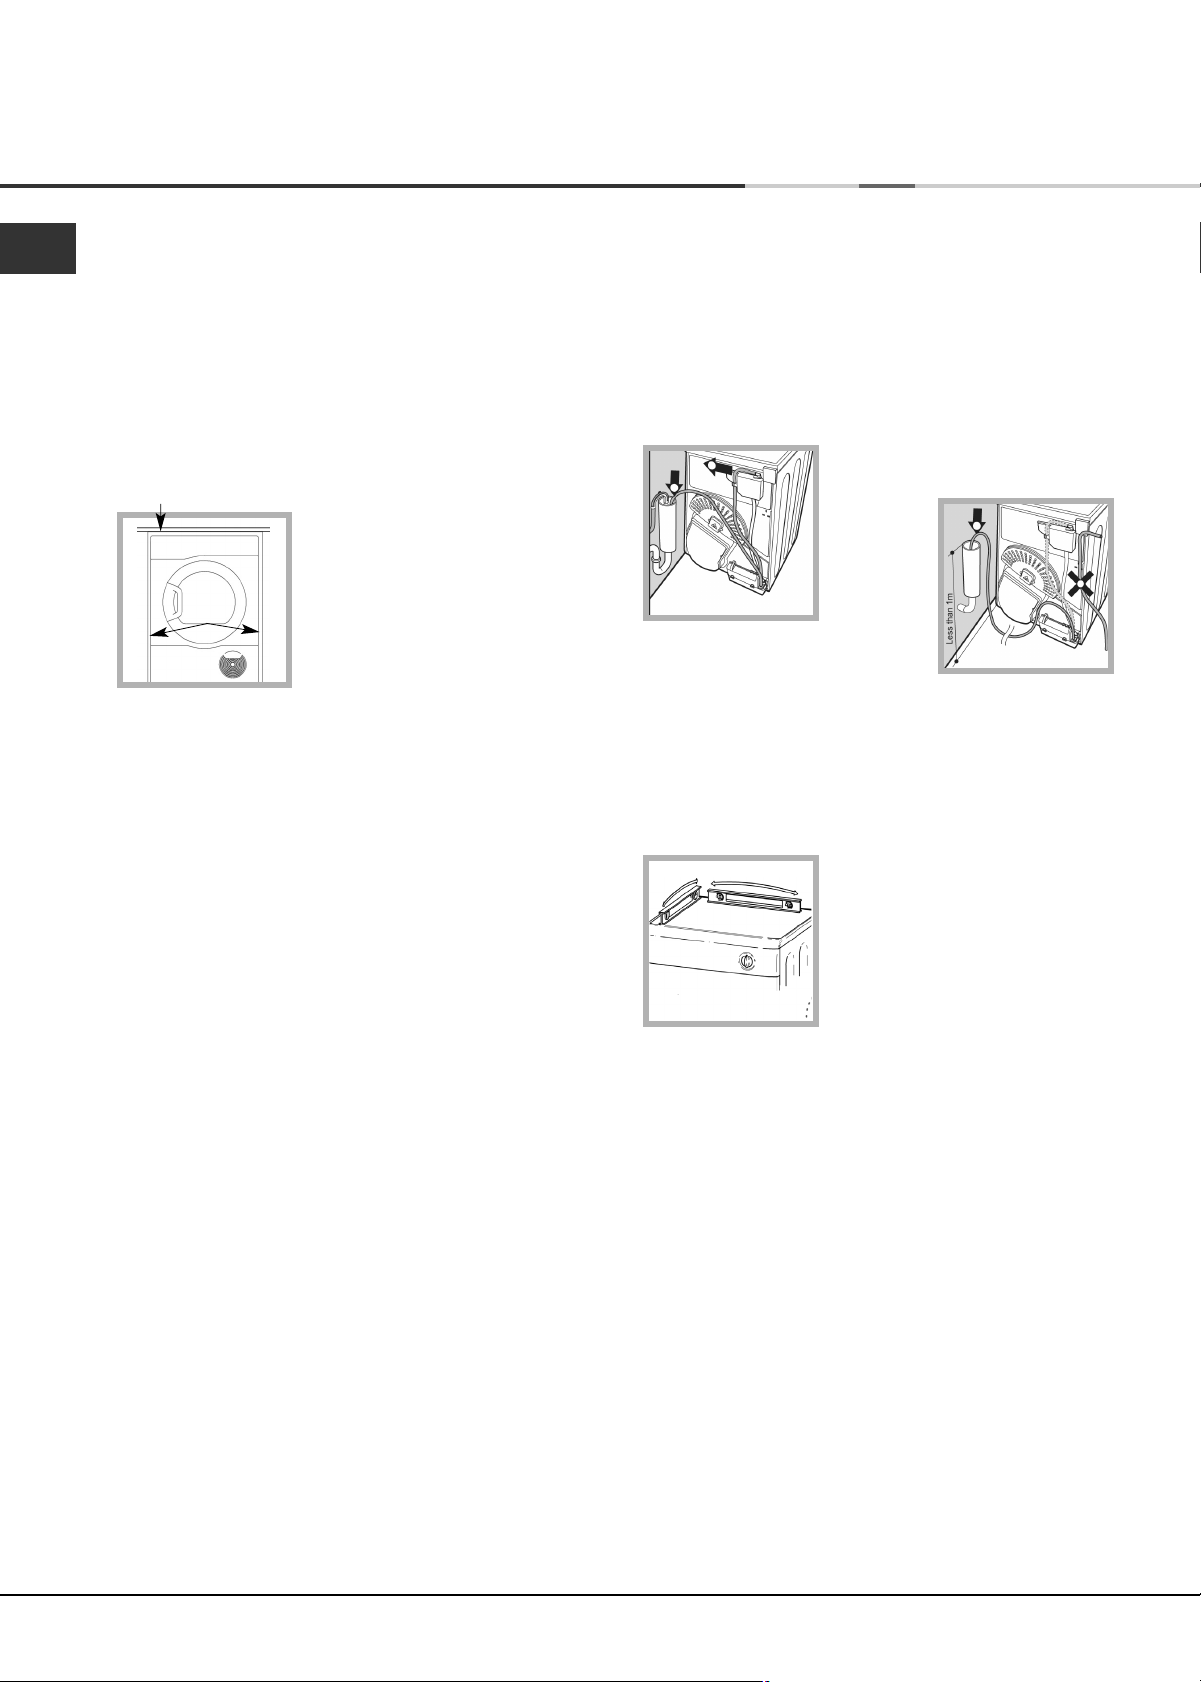
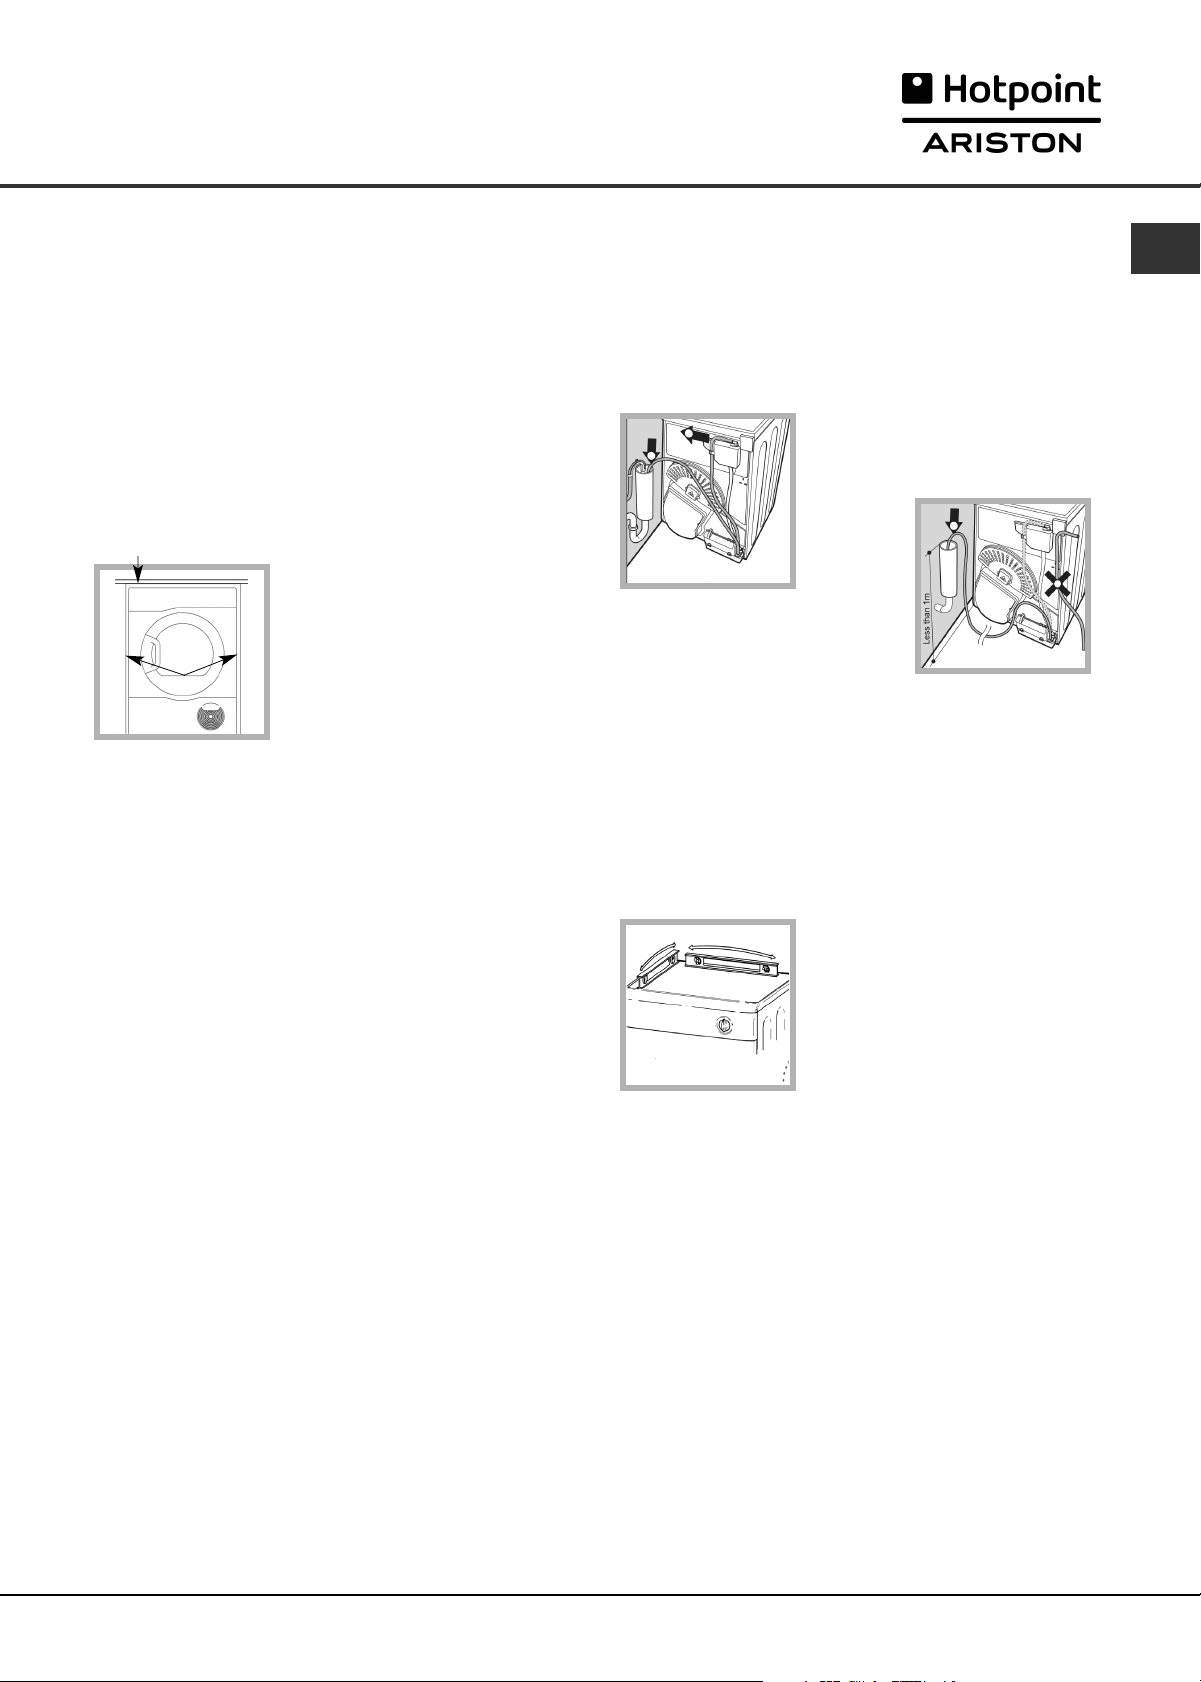
Minimum gap 10mm
●
If you are going to
install the appliance
under a work counter,
be sure to leave a
Minimum gaps
15mm
10mm space between
the top and any other
objects on or above
the machine and a
15mm space between
the sides and lateral furnishings or walls.
This is to ensure proper air circulation.
The appliance must be installed with the
rear surface placed against a wall.
! Make sure that the back vents are not
obstructed.
Ventilation
When the dryer is in use, there has to be adequate
ventilation. Make sure you put your dryer in an
environment that is not damp and has proper air
circulation throughout. Airflow around the dryer is
essential to condense the water produced during the
washing, the dryer will not operate efficiently in an
enclosed space or cupboard.
! If using the dryer in a small or cold room some
condensation could be experienced.
! We do not recommend that the dryer is
installed in a cupboard but the dryer must
never be installed behind a lockable door,
a sliding door or a door with a hinge on
the opposite side to that of the dryer door.
Water drain
If your dryer is installed next to a drain the water can be
plumbed into this drain. This does away with the need to
empty the water container. If the dryer is stacked onto or
installed next to a washing machine it can share the same
drain.
The height of the drain must be less than 3' (1m) from the
bottom of the dryer.
Remove the existing hose from
position shown in picture A.
picture A
Then fit a suitable length of hose to
position shown in picture B.
! Make sure that the hose is not squashed or kinked when
the dryer is in its final location.
picture B
Levelling your dryer
The dryer must be installed level for correct operation.
When you have installed your
dryer in its final location check
that it is level first side to side,
then front to back.
If the dryer is not level, adjust
the two front legs up or down,
until your dryer is level.
! WARNING: Before you use your dryer ensure that
it has been in an upright position for at least 6 hours.
2
Page 3

Installation
Electrical connections
Make sure of the following before you
insert the plug into the the electrical socket:
●
Make sure your hands are dry.
●
The socket must have an earth connection.
●
The socket must be able to sustain the
machines maximum power, which is
indicated on the rating label (see Dryer
Description).
●
Power voltage must be within the values
indicated on the rating label (see Dryer
Description).
●
The socket must be compatible with the
dryers plug. Should this not be the case,
replace the plug or the socket.
! The dryer must not be installed outdoors,
even if the space is sheltered. It can be
very dangerous if it is exposed to rain or
storms.
! Once installed, the dryers electrical wire
and plug must be within easy reach.
! Do not use extension cords.
! The power cord must not be bent or
squashed.
! The power cord should be regularly
checked. If the supply cord is damaged, it
must be replaced by the manufacturer, its
service agent or similarly qualified
persons in order to avoid a hazard. New or
longer power cords are supplied at an extra
charge by authorised dealers.
! The manufacturer denies any responsibility
should any of these rules not be followed.
Before you start using your dryer
Once you have installed your dryer and before you
use it, clean the inside of the drum to remove any dust
that could have accumulated during transport.
Maximum load
Natural fibres : 8 kg
GB
! If in doubt about any of the above consult a
qualified electrician.
3
Page 4

GB
Warnings
! The appliance has been designed and
built according to international safety
standards.
These warnings are given for safety
reasons and must be followed carefully.
General safety
●
This appliance can be used by children
aged from 8 years and above and
persons with reduced physical, sensory
or mental capabilities, or lack of
knowledge if they are given supervision
or instruction concerning use of the
appliance in a safe way and understand
the hazards involved.
●
This tumble dryer has been designed for
home, and not professional use.
●
Do not touch the appliance while bare
foot or with wet hands or feet.
●
Unplug the machine by pulling on the
plug, not the cord.
●
After using the dryer, turn it off and
unplug it. Keep the door closed to make
sure that children do not use it as a toy.
●
Children should be supervised to ensure
that they do not play with the dryer.
●
Cleaning and user maintenance should
not be made by children without
supervision.
●
Children of less than 3 years should be
kept away from the appliance unless
continuously supervised.
●
The appliance must be installed correctly
and have proper ventilation. The air
intake at the front of the dryer and rear
vent behind the dryer should never be
obstructed (see Installation).
●
Never use the dryer on carpeting where
the pile height would prevent air from
entering the dryer from the base.
●
Check to see if the dryer is empty before
loading it.
●
The back of the dryer could
become very hot. Never touch it
while in use.
●
Do not use the dryer unless the filter,
water container and heat pump filter unit
are securely in place (see Maintenance).
●
Do not overload the dryer (see Laundry
for maximum loads).
●
Do not load items that are dripping wet.
●
Carefully check all instructions on
clothing labels (see Laundry).
●
Do not tumble dry large, very bulky
items.
●
Do not tumble dry acrylic fibres at high
temperatures.
●
Do not turn off the dryer when there are
still warm items inside.
●
Clean the filter after each use (see
Maintenance).
●
Empty the water container after each
use (see Maintenance).
●
Clean the heat pump filter unit at regular
intervals (see Maintenance).
●
Do not allow lint to collect around the
dryer.
●
Never climb on top of the dryer. It could
result in damage.
●
Always follow electrical standards and
requirements (see Installation).
●
Always buy original spare parts and
accessories (see Service).
4
Page 5

Warnings
To minimise the risk of fire in your
tumble dryer, the following should be
observed:
●
Tumble dry items only if they have been
washed with detergent and water, rinsed
and been through the spin cycle. It is a
fire hazard to dry items that HAVE NOT
been washed with water.
●
Do not dry garments that have been
treated with chemical products.
●
Do not tumble dry items that have been
spotted or soaked with vegetable or
cooking oils, this constitutes a fire hazard.
Oil-affected items can ignite spontaneously,
especially when exposed to heat sources
such as a tumble dryer. The items become
warm, causing an oxidisation reaction with
the oil, Oxidisation creates heat. If the heat
cannot escape, items can become hot
enough to catch fire. Piling, stacking or
storing oil-effected items can prevent heat
from escaping and so create a fire hazard.
If it is unavoidable that fabrics containing
vegetable or cooking oil or those that have
been contaminated with hair care products
be placed in a tumble dryer they should
first be washed with extra detergent - this
will reduce, but not eliminate the hazard.
They should not be removed from the dryer
and piled or stacked while hot.
●
Do not tumble dry items that have
previously been cleaned in or washed in,
soaked in or soiled with petrol/gasoline,
dry cleaning solvents or other flammable
or explosive substances. Highly flammable
substances commonly used in domestic
environments including cooking oil,
acetone, denatured alcohol, kerosene,
spot removers, turpentine, waxes and
wax removers. Ensure these items have
been washed in hot water with an extra
amount of detergent before being dried
in the tumble dryer.
●
Do not tumble dry items containing foam
rubber (also known as latex foam), or
similarly textured rubber like materials.
Foam rubber materials can, when
heated, produce fire by spontaneous
combustion.
●
Fabric softener or similar products
should not be used in a tumble dryer to
eliminate the effects of static electricity
unless the practice is specifically
recommended by the manufacturer of
the fabric softener product.
●
Do not tumble dry undergarments that
contain metal reinforcements eg. bras
with metal reinforcing wires. Damage to
the tumble dryer can result if the metal
reinforcements come loose during drying.
●
Do not tumble dry rubber, plastic articles
such as shower caps or babies water
proof covers, polythene or paper.
●
Do not tumble dry rubber backed
articles, clothes fitted with foam rubber
pads, pillows, galoshes and rubber
coated tennis shoes.
●
Remove all objects from pockets, such
as lighters and matches.
GB
! WARNING: Never stop the dryer before the end of the drying cycle unless all items are
quickly removed and spread out so that the heat is dissipated.
5
Page 6
Maintenance and Care
GB
Switching off the electricity
! Unplug your dryer when not using it,
when cleaning it and during all
maintenance operations.
Clean the filter after each cycle
The filter is an important part of your dryer:
it accumulates lint and fluff that is formed
while drying.
When finished drying, clean the filter by
rinsing it under running water or with your
vacuum cleaner.
Should the filter become clogged up, the
airflow inside the dryer will be seriously
compromised: drying times lengthen and
you will consume more energy. It may also
damage your dryer.
The filter is found in front of the dryer trim
(see diagram on next page).
Removing the filter:
1. Pull the plastic grip of the filter upwards.
2. Open the filter and
clean the lint from the
inside.
3. Replace it correctly.
Ensure the filter is fully
located flush into the
tumble dryer trim.
4. Remove any lint that has built up on the
inside of the door and around the door
seal.
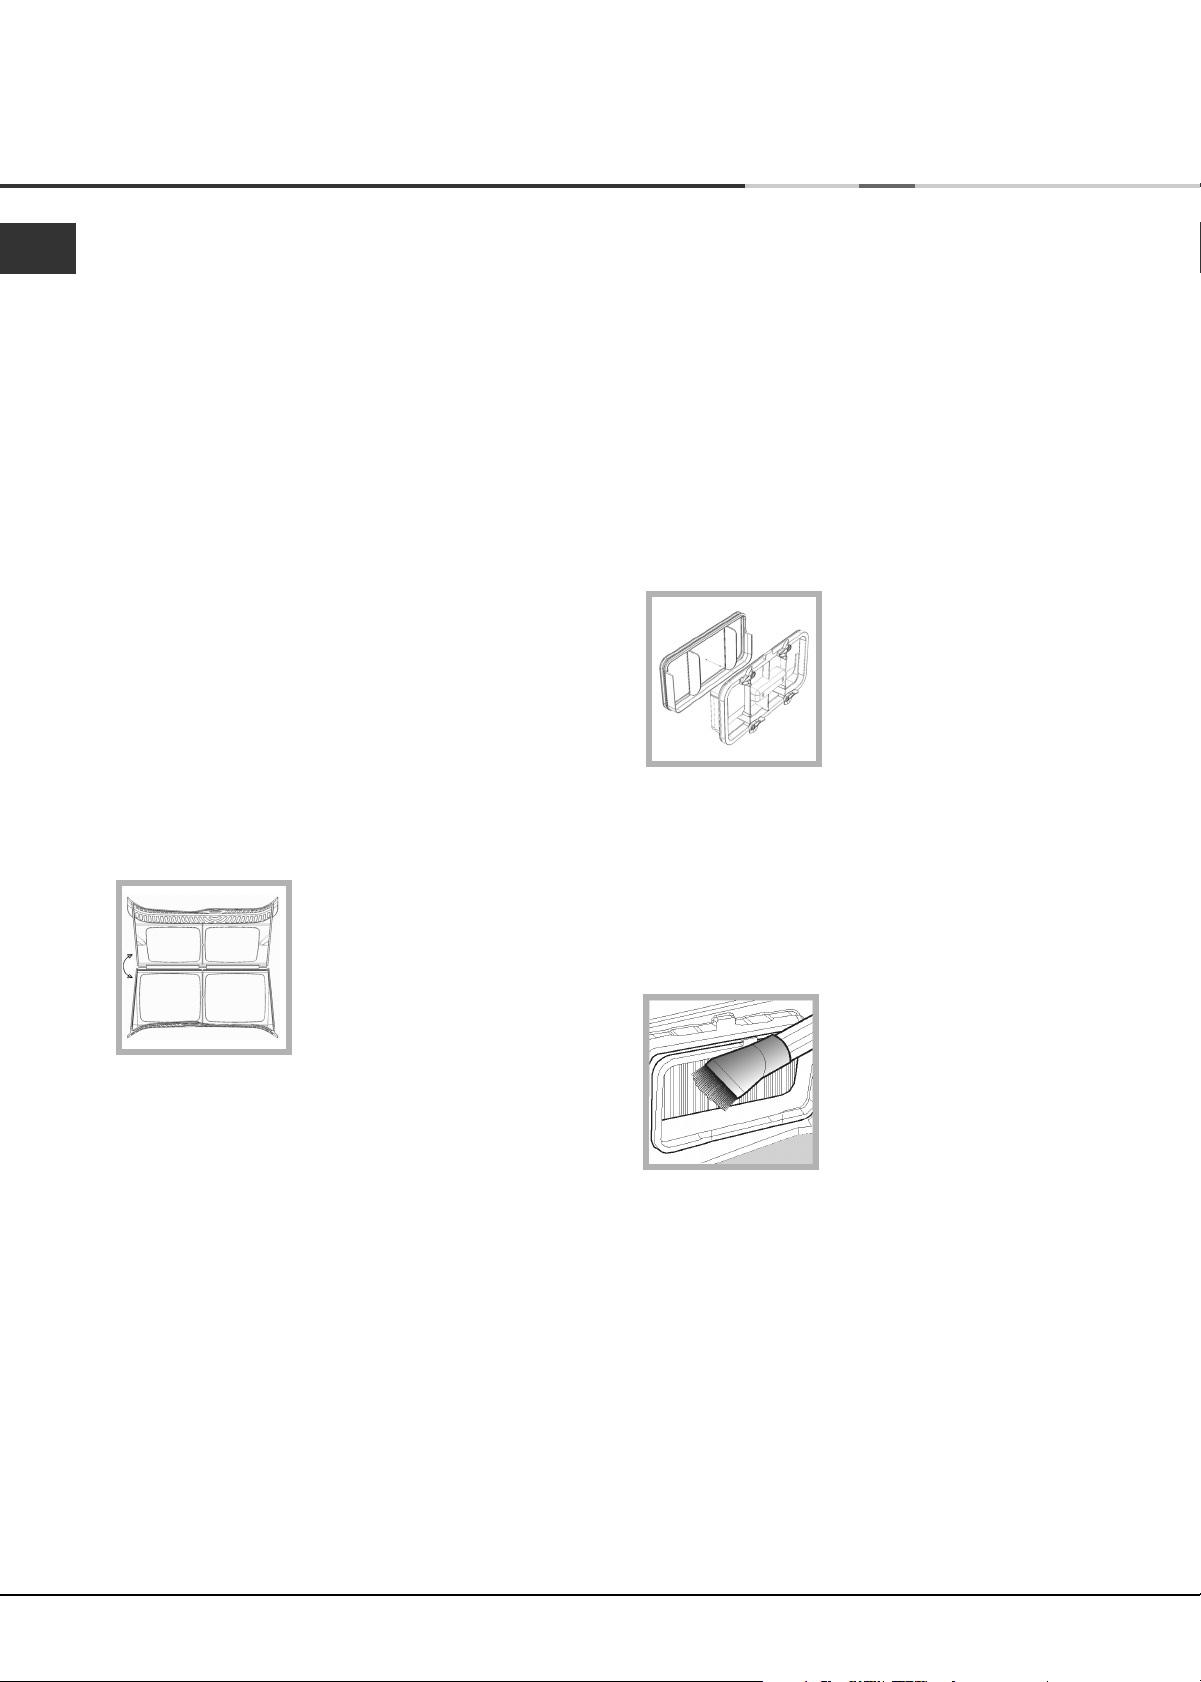
Cleaning the heat pump filter unit
Periodically (every 5 drying cycles) remove
the heat pump filter unit and clean any
build up of fluff from the surface of the filter.
However, we recommend that you clean
this filter after EVERY drying cycle to
optimise the dryers performance.
To removing the heat pump filter unit:
1. Unplug the dryer and open the door.
2. Pull open the heat pump filter unit cover
(see diagram on next page).
Release the 4 clips to the vertical position
then pull the filter unit towards you.
3. Separate the two parts
of the filter and clean
the surface of the filter.
! The front of the heat pump is made
from thin metal plates. Take care that you
do not damage these or cut yourself when
cleaning, removing or replacing the heat
pump filter unit.
Whenever you clean the heat pump filter
unit always clean any build up of fluff from
the surface of the metal plates.
4. Carefully clean this fluff
off with a damp cloth,
sponge or a vacuum
cleaner.
Never use your fingers.
! Do not use the dryer without replacing
the filter.
6
5.Reassemble the two parts of the filter,
clean the seals and replace with the 4
clips in the horizontal position, make
sure that the catches are secure.
Page 7
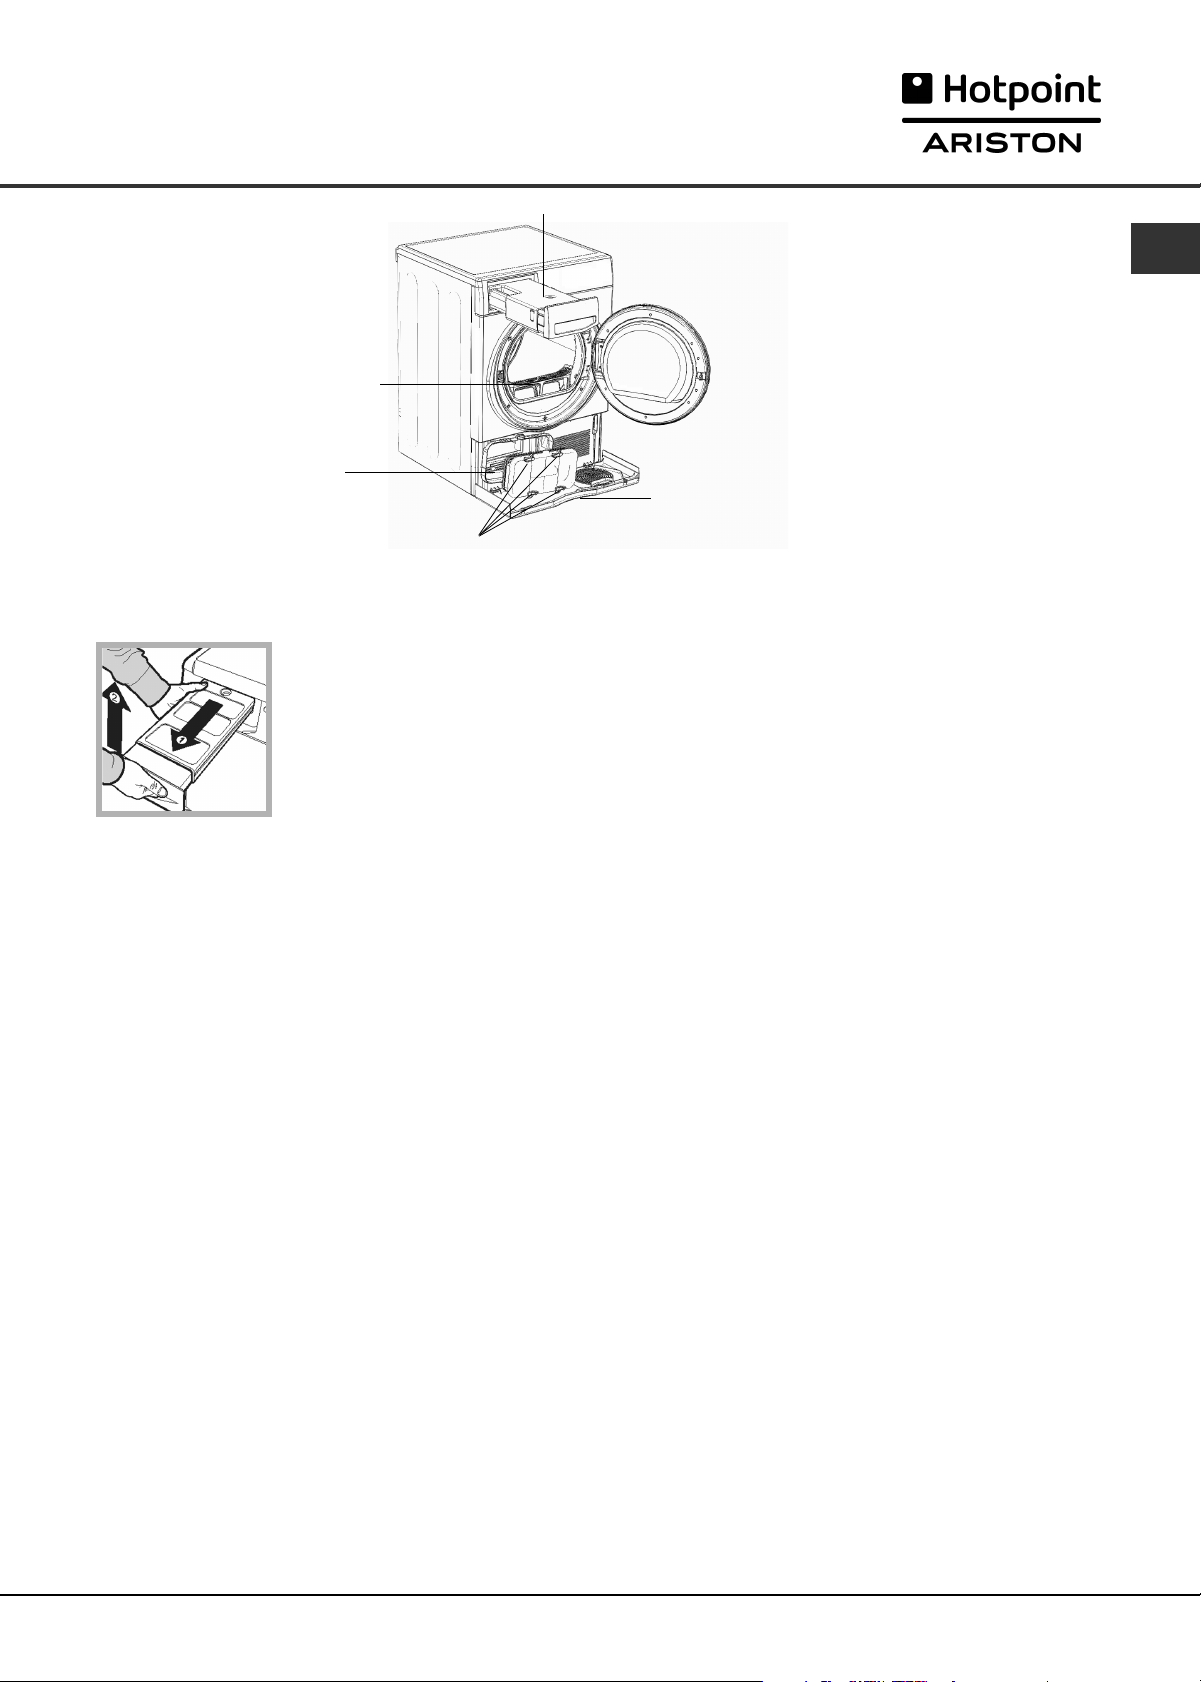
Maintenance and Care
Water container
Filter
Heat pump
filter unit
Clips
Heat pump
filter unit cover
GB
Empty the water container after each
cycle
Pull the container out of the dryer
and remove either the small or
large cap and empty it into a
sink or other suitable drain.
Refit the cap and replace the
container securely.
! Always check and empty the container before you
start a new drying programme.
! Failure to empty the water container may cause
the following:
- The dryer will stop heating (so the load may still
be damp at the end of the drying cycle).
●
Priming the water collection system
When your dryer is new, the water container will not
collect water until the system is primed.
This will take 1 or 2 drying cycles. Once primed it will
collect water during every drying cycle.
Check the drum after each cycle
Cleaning the dryer
●
External parts in metal or plastic and rubber parts
can be cleaned with a damp cloth.
●
Periodically (every 6 months) vacuum the front air
intake grille and vents at the rear of the dryer, to
remove any build up of fluff, lint or dust. Also to
remove accumulation of fluff from the front of the
heat pump and filter areas, clean occasionally with
a vacuum cleaner.
! Do not use solvents or abrasives.
! Have your dryer checked regularly by authorised
technicians to ensure electrical and mechanical safety
(see Service).
Quick Tips
●
Remember to clean the door filter and
heat pump filter after each load.
●
Remember to empty the water container
after each load.
! Doing BOTH the above will keep your
appliance working at its BEST.
Turn the drum manually in order to remove small items
(handkerchiefs) that could have been left behind.
Cleaning the drum
! Do not use abrasives, steel wool or stainless steel
cleaning agents to clean the drum.
A coloured film may start to appear on the stainless
steel drum, this may be caused by a combination of
water and, or cleaning agents such as fabric conditioner
from the wash. This coloured film will not affect the
dryer performance.
7
Page 8
Dryer Description
GB
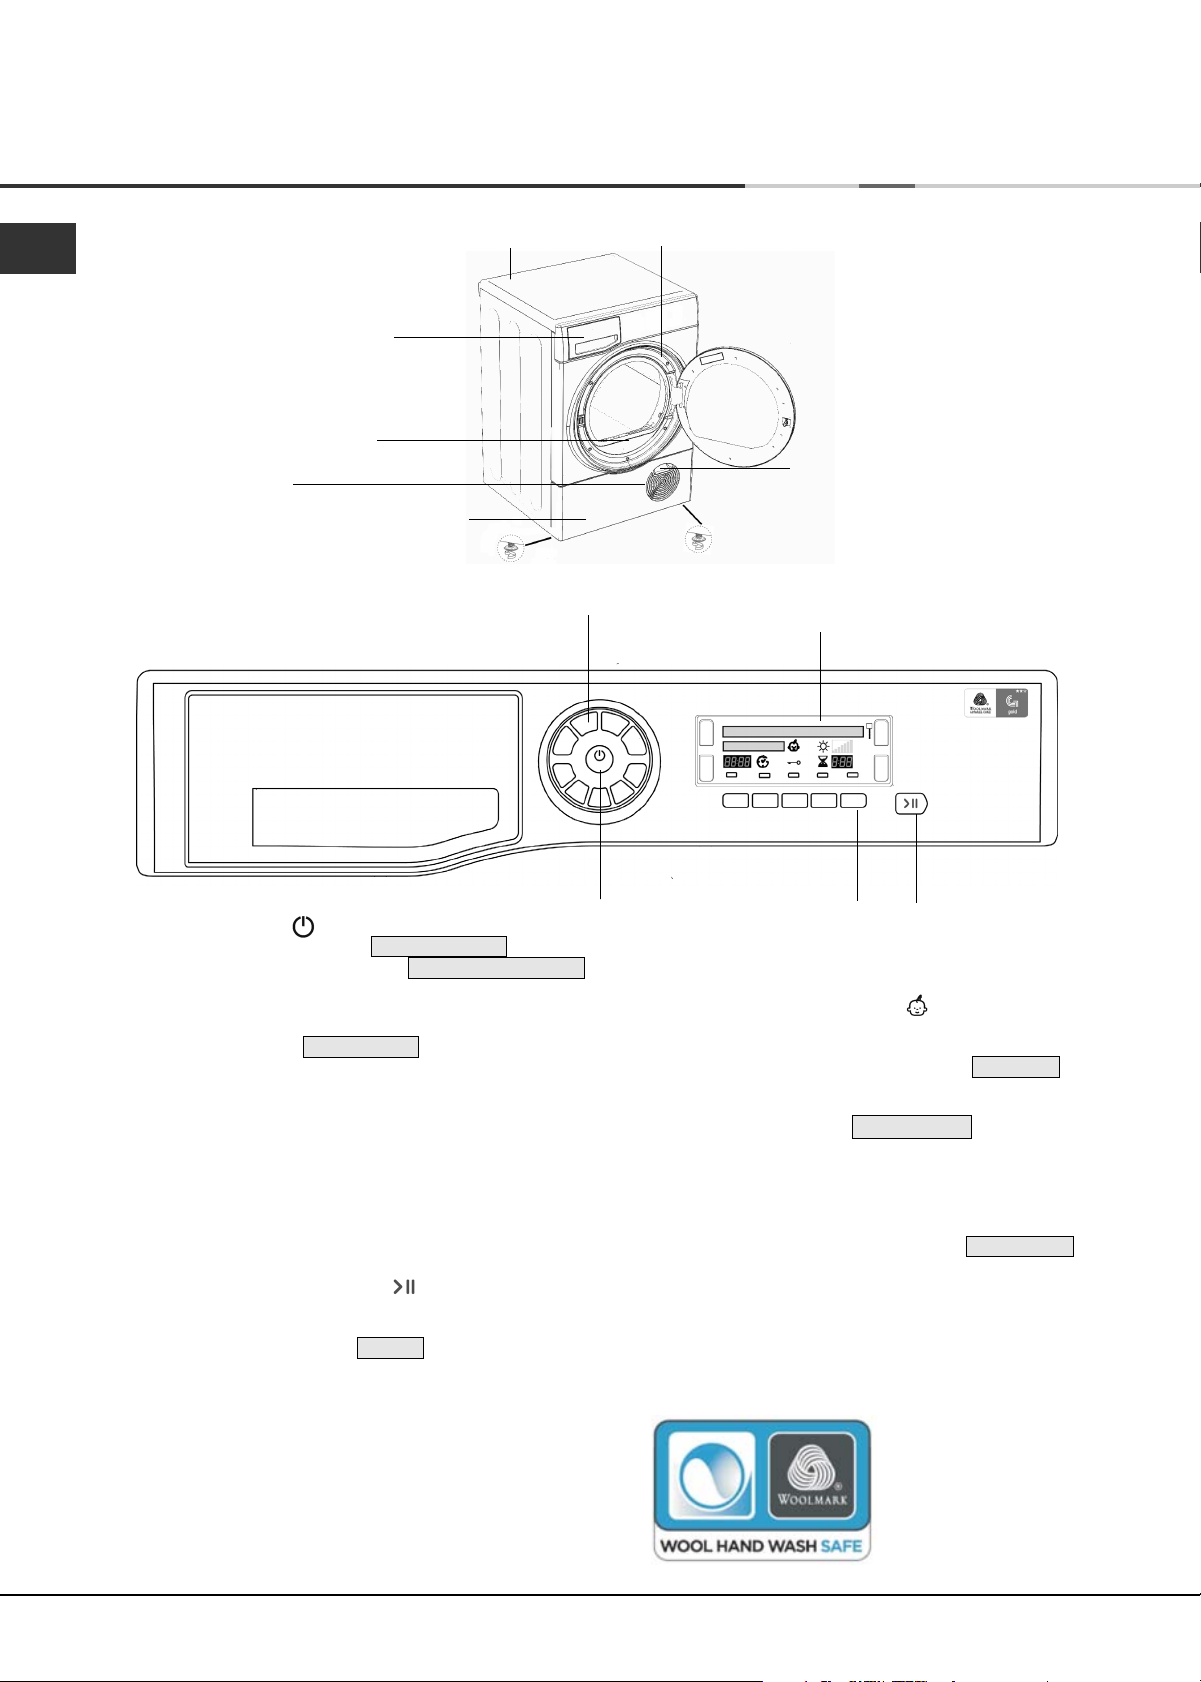
The features
Air intake grille
Control panel
Water container
Filter
Heat pump
filter unit cover
Rating plate
PROGRAMME
Selection Buttons
Model & Serial numbers
Heat pump filter unit cover handle
(Pull to open)
Adjustable feet
Display Unit
ON/OFF
Button
The ON/OFF button - if pressed when the dryer is
running: If the display shows TURNING OFF the
dryer stops. If the display shows PRESS AND HOLD
hold the botton and the display counts down 3, 2, 1
and then stops.
Press and hold again for more than 3 seconds, the
display briefly shows POWER ON .
The PROGRAMME selection buttons set the programme:
press the button corresponding to the programme you
want to select (see Start and Programmes).
The OPTION buttons/indicators: these buttons select
available options for your selected programme (see
The Controls). The indicators on the display unit next
to the bottom buttons light to show that the option has
been selected.
The START/PAUSE button/light starts a selected
programme. When a programme is running, pressing
this button in pauses the programme, there will be one
beep, the display will show PAUSE and the dryer
stops.
The light is green when the programme is running,
flashing amber if the programme has been paused or
flashing green if on standby waiting to start a programme
(see Start and Programmes).
Note: This light also flashes amber during the Post
Care phase of a programme.
CHILD LOCK & OPTIONS
Buttons & Lights
The Display Unit gives warnings and information
about the programme selected and its progress (see
next page).
The CHILD LOCK button/icon : Press and hold this
button after selecting your programme and any options,
this prevents the programme settings from being
changed, the display will briefly show LOCKED .
When the icon is lit, the other buttons are disabled.
Hold the button to cancel and the icon will go out, the
display will briefly show UNLOCKED .
Note: This tumble dryer, in compliance with new energy
saving regulations, is fitted with an automatic standby
system which is enabled after about 30 minutes if no
activity is detected. Press and hold the ON-OFF
button until the display briefly shows POWER ON
and the dryer then reactivates.
The Wool drying cycle of this machine has been tested
and approved by The Woolmark Company. The cycle
is suitable to dry wool garments which are labelled
‘hand wash’ provided the garments are washed in a
Woolmark endorsed hand washing cycle and dried
according to the instructions issued by the manufacturer.
START/PAUSE
Button & Light
M1219 in UK, Eire,
Hong Kong and India
The Woolmark symbol is
a certification trademark
©The Woolmark
Company Pty Ltd
8
Page 9
The Display
Selecting your language
The first time you turn on your dryer you should select your preferred language from the available list.
To change: the language current selection must flash, on
the first line of the display.
- Press the On/Off button to turn off the display then press
and hold all 3 buttons: Heat Level, Timed Dry
and Dryness Level for 5 seconds.
- Press the Heat Level or the Timed Dry button to
scroll up or down through the list.
- When your required language is flashing on the top line
of the display, pressing the Dryness Level button will
select your choice.
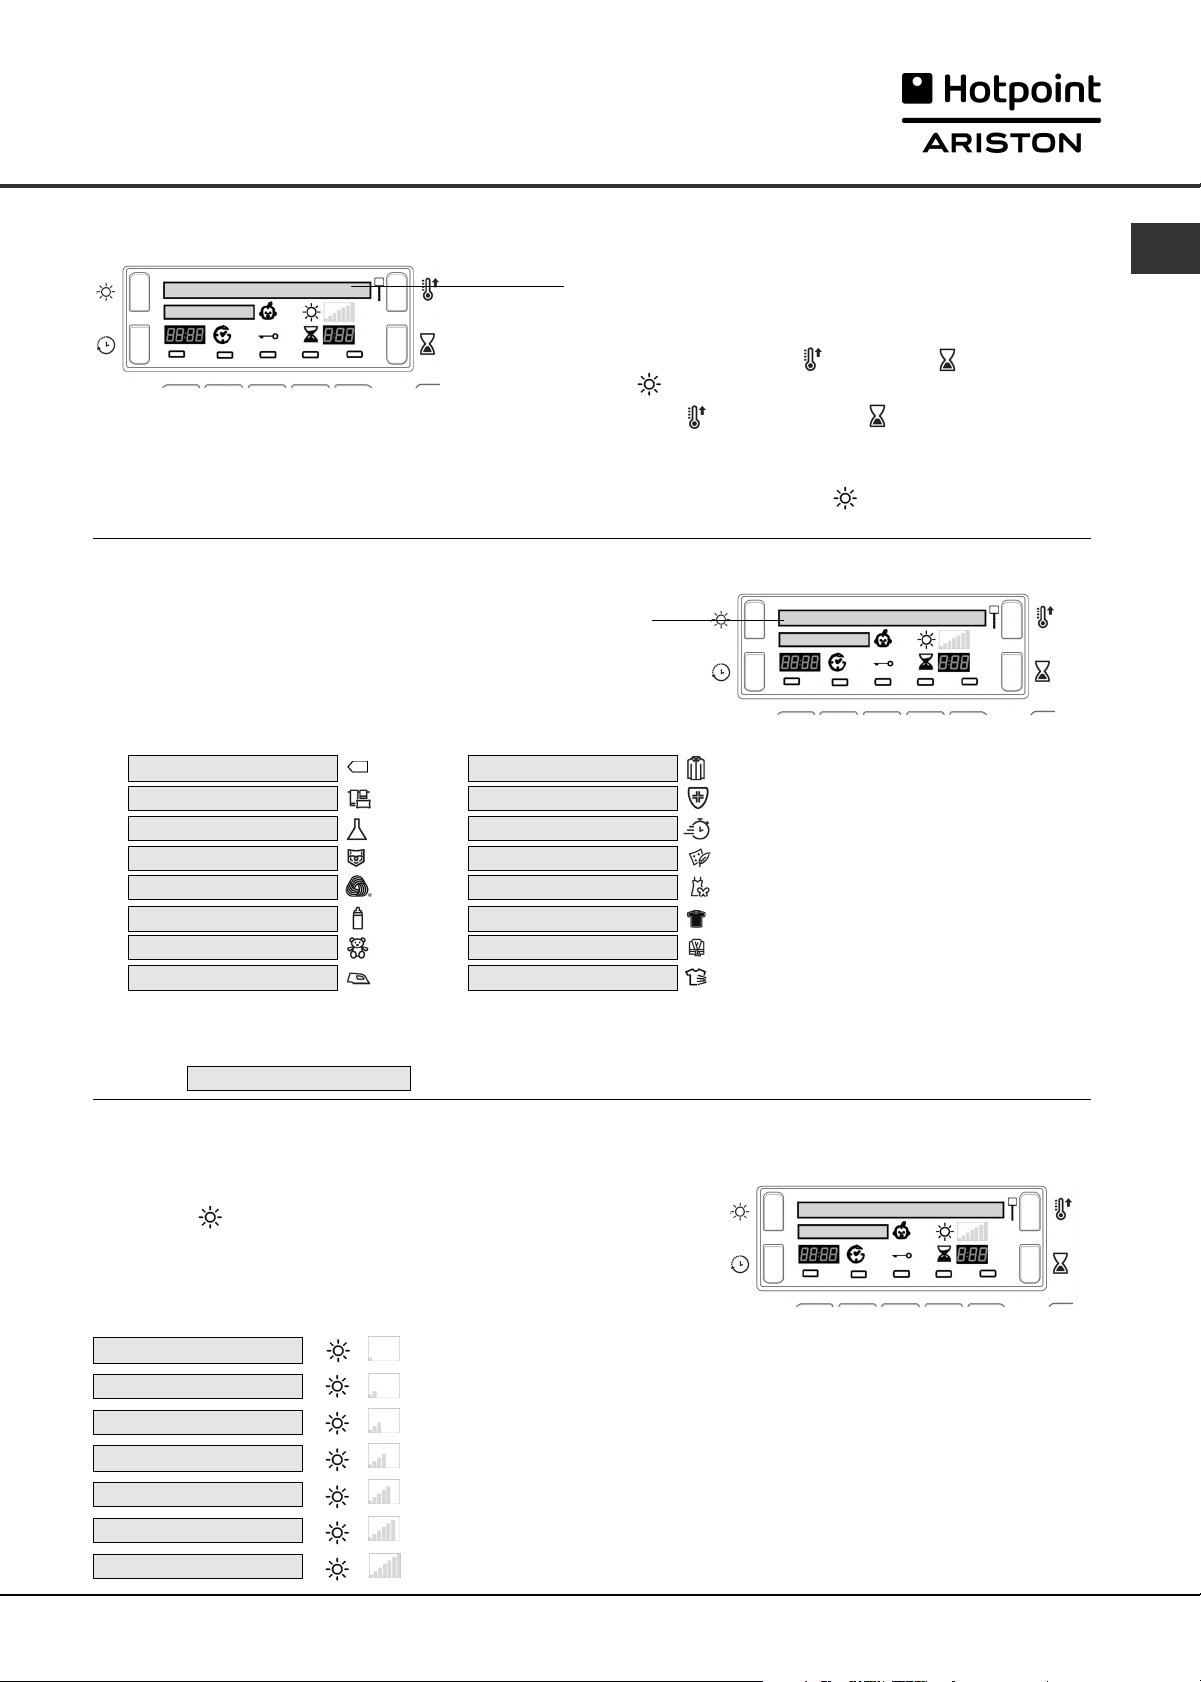
Understanding the display
Programme selection and display
The selected programme is shown on the first line of the display,
this message is shown while the programme is running.
Eight of the buttons have two selections, press the button once for the
first choice and press again for the second choice, your selected
programme is displayed. The final button selects My Cycle.
First Press Second Press
STANDARD COTTON
1
BED & BATH
2
SYNTHETICS
3
JEANS
4
WOOL
5
BABY DELICATES
6
CUDDLY TOYS
7
EASY IRON
8
9 MY CYCLE (see below)
SHIRTS
ANTI ALLERGY
QUICK DRY
DUVET
SILK
DARK
HEAT & ENJOY
REFRESH
M
GB
My Cycle When you select the My Cycle button the Display will show your selected programme with ‘M’ before its
name. ie. M STANDARD COTTON (see Start and Programmes).
Dryness levels
During programme selection for an automatic programme that has different dryness levels available (see Programmes
Ta b l e).
The second line of the display shows the dryness level you require, for each
press of the Dryness Level button the next option from the list below is
selected and displayed. The display also shows 1 to 7 bars depending on
your selection and these are displayed during the programmes progress.
! Some automatic programmes do not allow the dryness level to be changed
or do not have all the dryness level options.
DAMP Dries your items ready to be ironed using a machine or rotary ironer.
IRON DRY Dries your items ready to be ironed with a hand iron.
HANGER PLUS Dries your delicate items ready to be hanged for final drying.
HANGER DRY Dries your items ready to be hanged for final drying.
LIGHT DRY Dries your delicate items ready to be put away.
CUPBOARD DRY Dries your items ready to be put away.
EXTRA DRY Dries your clothes ready to be worn.
9
Page 10
The Display
GB
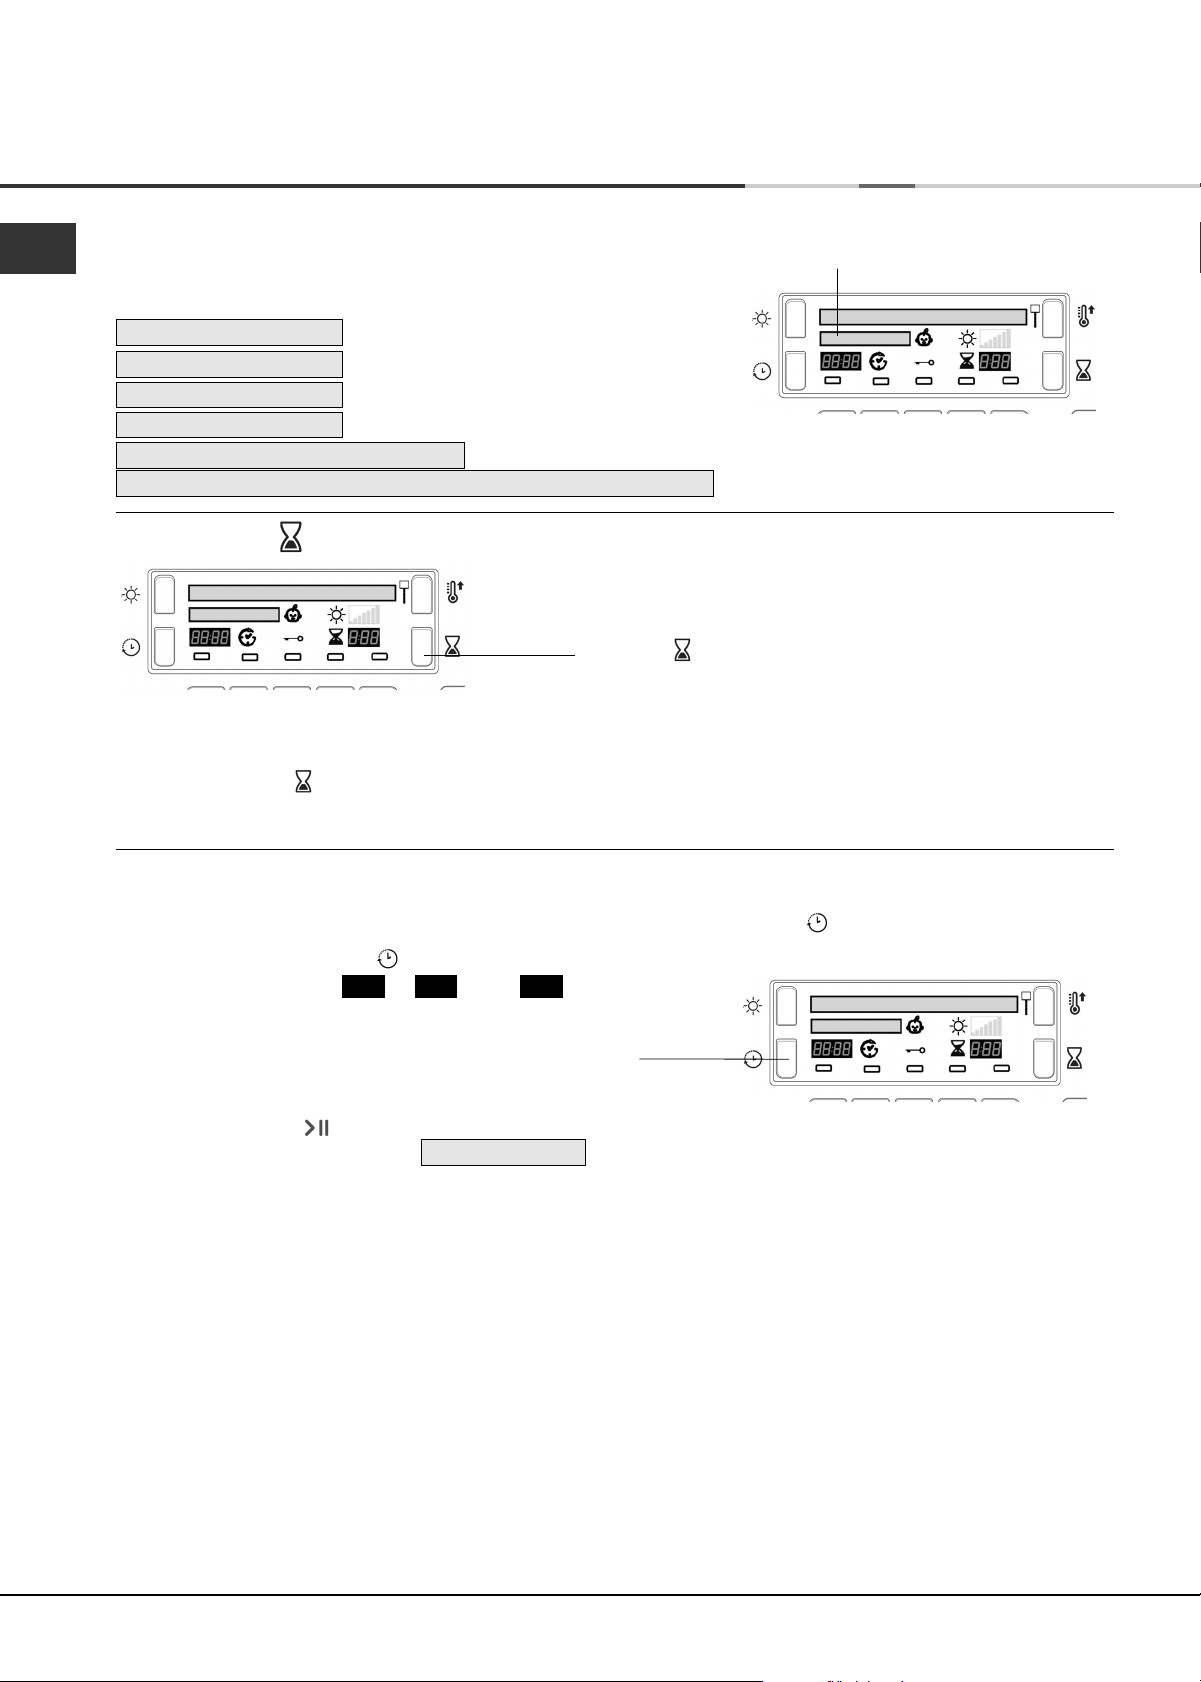
Programme progress
The second line of the display shows the status of the programme as it progresses:
(long messages scroll across the line)
DRY
COOL TUMBLE
HEATING
READY
END OF CYCLE, CREASE CARE
END OF CYCLE, CLEAN FILTER AND EMPTY WATER BOTTLE
Heat & Enjoy programme
(if option Post Care selected).
Timed drying
After selecting a programme that has a Timed Dry option,
press the Timed button and the display will increment the
selected time, each time you press and release the button
(see Start and Programmes).
Each press reduces the time duration and number of available time options depending on the programme/material
selected.
The Timed Dry icon is displayed next to the time.
The selected time remains displayed after the programme starts, but can be changed anytime you wish.
Delay and Time to End
Some programmes can have a delayed start (see Start and Programmes). Press the Delay button and the icon flashes.
Each press of the Delay button advances the delay setting
in 1 hour increments, from: to , then and
then after a couple of seconds cancels the delay.
The delay time is shown on the display next to the Delay button.
The display counts down the minutes of the delay period after
the Start/Pause button is pressed.
The second line of the display shows STARTS IN
You can change or cancel the delay time selected anytime if
you wish.
After the Start/Pause button is pressed the Delay or Time to End is displayed in hours and minutes and counts down each
minute.
1h 24h
OFF
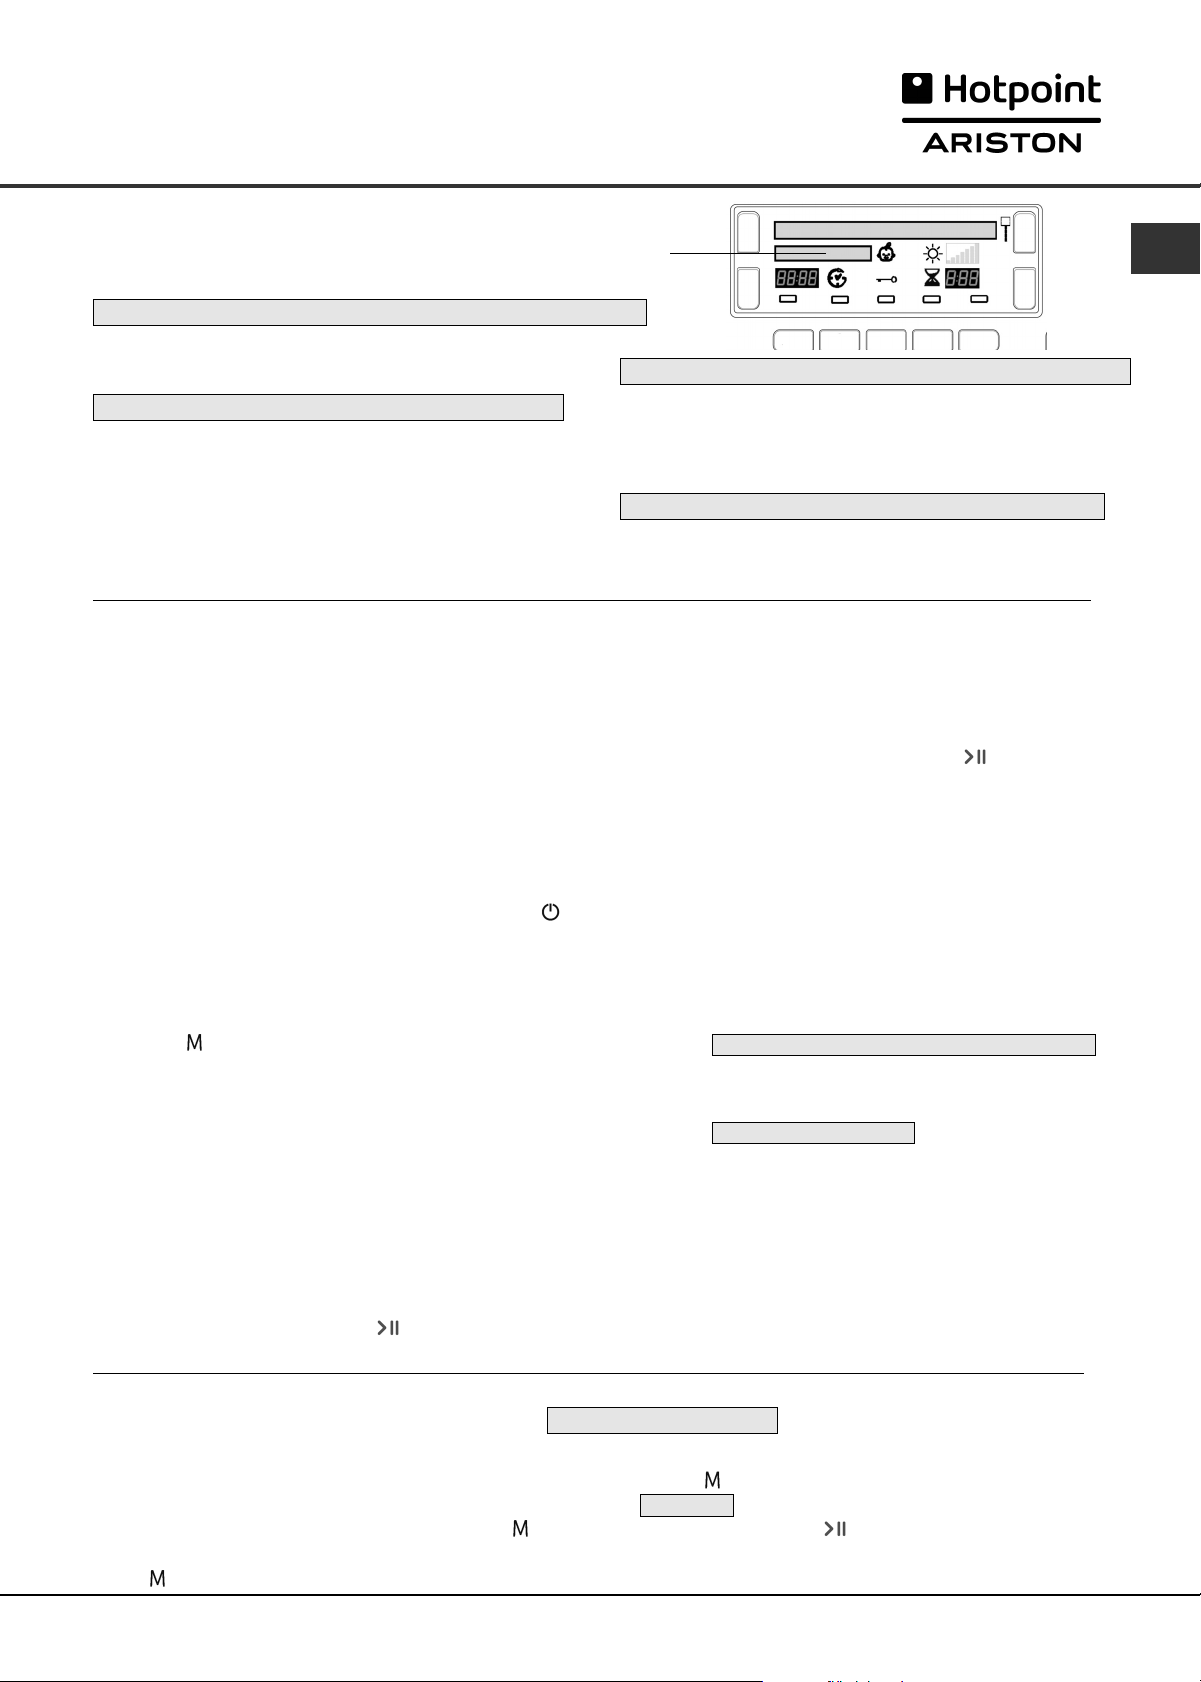
Time to End
After the delay period finishes, or for all the programme if delay not selected, this part of the display will show:
- the estimated time to the end of the programme, for automatic programmes
- the actual time remaining during a timed programme
When timed programmes are selected the time displayed throughout the cycle is the actual time remaining.
When Automatic programmes are selected the time displayed is an estimate of the time remaining. When the
programme is selected the display shows the time required to dry a full load. The time remaining is constantly
monitored during the drying cycle and is updated to show the best forecast.
The colons between the hours and minutes in the display flash to show the time is counting down.
10
Page 11
The Display
Warnings
The second line of the display also gives warnings and reminders:
(reminders occur at the end of the programme)
END OF CYCLE, CLEAN FILTER AND EMPTY WATER BOTTLE
●
Reminder that the water container should be
emptied and the filter cleaned every time you use the
dryer (see Maintenance).
EMPTY WATER BOTTLE
●
Indicates that the water container is full. The
message will take a few seconds to go out after
replacing the empty water container; the dryer
must be running for this to happen (see The
Controls).
Note: If the water container fills and this message
is displayed, the heat is turned off and your
clothes will not dry.
CLEAN CONDENSER, FILTER AND EMPTY WATER BOTTLE
●
This message indicates that you must clean the Heat
pump Condenser filter unit (see Maintenance) and
will occur at intervals depending how much you have
used the dryer. When you finish the next programme
the message is cancelled. You must also clean the filter.
CLEAN FILTER TO ENSURE ANTI ALLERGY ACTION
●
Shown during the Anti-Allergy programme and
indicates that the filter needs cleaning to complete
the full anti-allergy cycle (see Maintenance).
Start and Programmes
GB
Choosing a programme
1. Plug the dryer into the electrical socket.
2. Sort your laundry according to fabric type (see
Laundry).
3. Open the door and make sure the filter is clean
and in place and the water container is empty and
in place (see Maintenance).
4. Load the machine and make sure items are not
in the way of the door seal. Close the door.
5. If the Display is not lit: Press the ON/OFF button
6. Press the Programmes Selection button that
corresponds with the type of fabric being dried by
checking the Programmes Table (see Programmes)
as well as the indications for each type of fabric (see
Laundry).
- If the button is selected; steps 7 and 8 are not
required (see below).
7. Choose Timed Drying or Dryness Levels option:
- If Timed Drying press and release the Timed
button until the required time is displayed.
or - To change from default dryness setting, press
and release the Dryness Levels button until
required level is indicated.
! See Programmes Table, for more details:
availability of Dryness Levels, Timed Dry and
Options.
8. Set a delay time and other options if necessary
(see The Display).
9. Press the Start/Pause button to begin.
The display will show the estimated time to end.
During the drying programme, you can check on
your laundry and take out items that are dry while
others continue drying. When you close the door
again, press the Start/Pause button in order to
resume drying.
If you open the door to check your laundry you
will extend the drying time as the heat pump
compressor will not start for 5 minutes after you
close the door and press the Start/Pause button
(see The Controls).
10. During the last few minutes of Drying Programmes,
before the programme is completed, the final COOL
TUMBLE phase is entered (fabrics are cooled),
this phase should always be allowed to complete.
11. At the end of the drying cycle a message is
displayed:
END OF CYCLE, CLEAN FILTER AND EMPTY WATER BOTTLE
- If
is shown, the buzzer will beep 3 times (Note: If
the SOUND option was selected the buzzer
beeps 3 times every 30 seconds for 5 minutes).
END OF CYCLE, CREASE CARE is shown, Crease
- If
Care option has been selected and if you do
not remove the laundry immediately, the
dryer will tumble occasionally for 10 hours or
until you open the door, the buzzer will beep
3 times to confirm the programme is completed.
12. Open the door, take the laundry out, clean the filter
and replace it. Empty the Water Container and
replace it (see Maintenance).
13. Unplug the dryer.
My Cycle button:
First time you press this button the display will show PRESS AND HOLD TO STORE
After selecting your favorite programme and options you can save these settings by pressing and holding in the
My Cycle button for at least 5 seconds, the top line will show a flashing followed by the selected programme. The
buzzer will then beep and the second line of the display shows
The next time you need this programme press the button, then the Start/Pause button and this programme will run.
If you wish, you can change your stored favorite, by selecting a new programme and/or options and press and hold
in the button (as above).
MEMORY
11
Page 12
GB
Start and Programmes
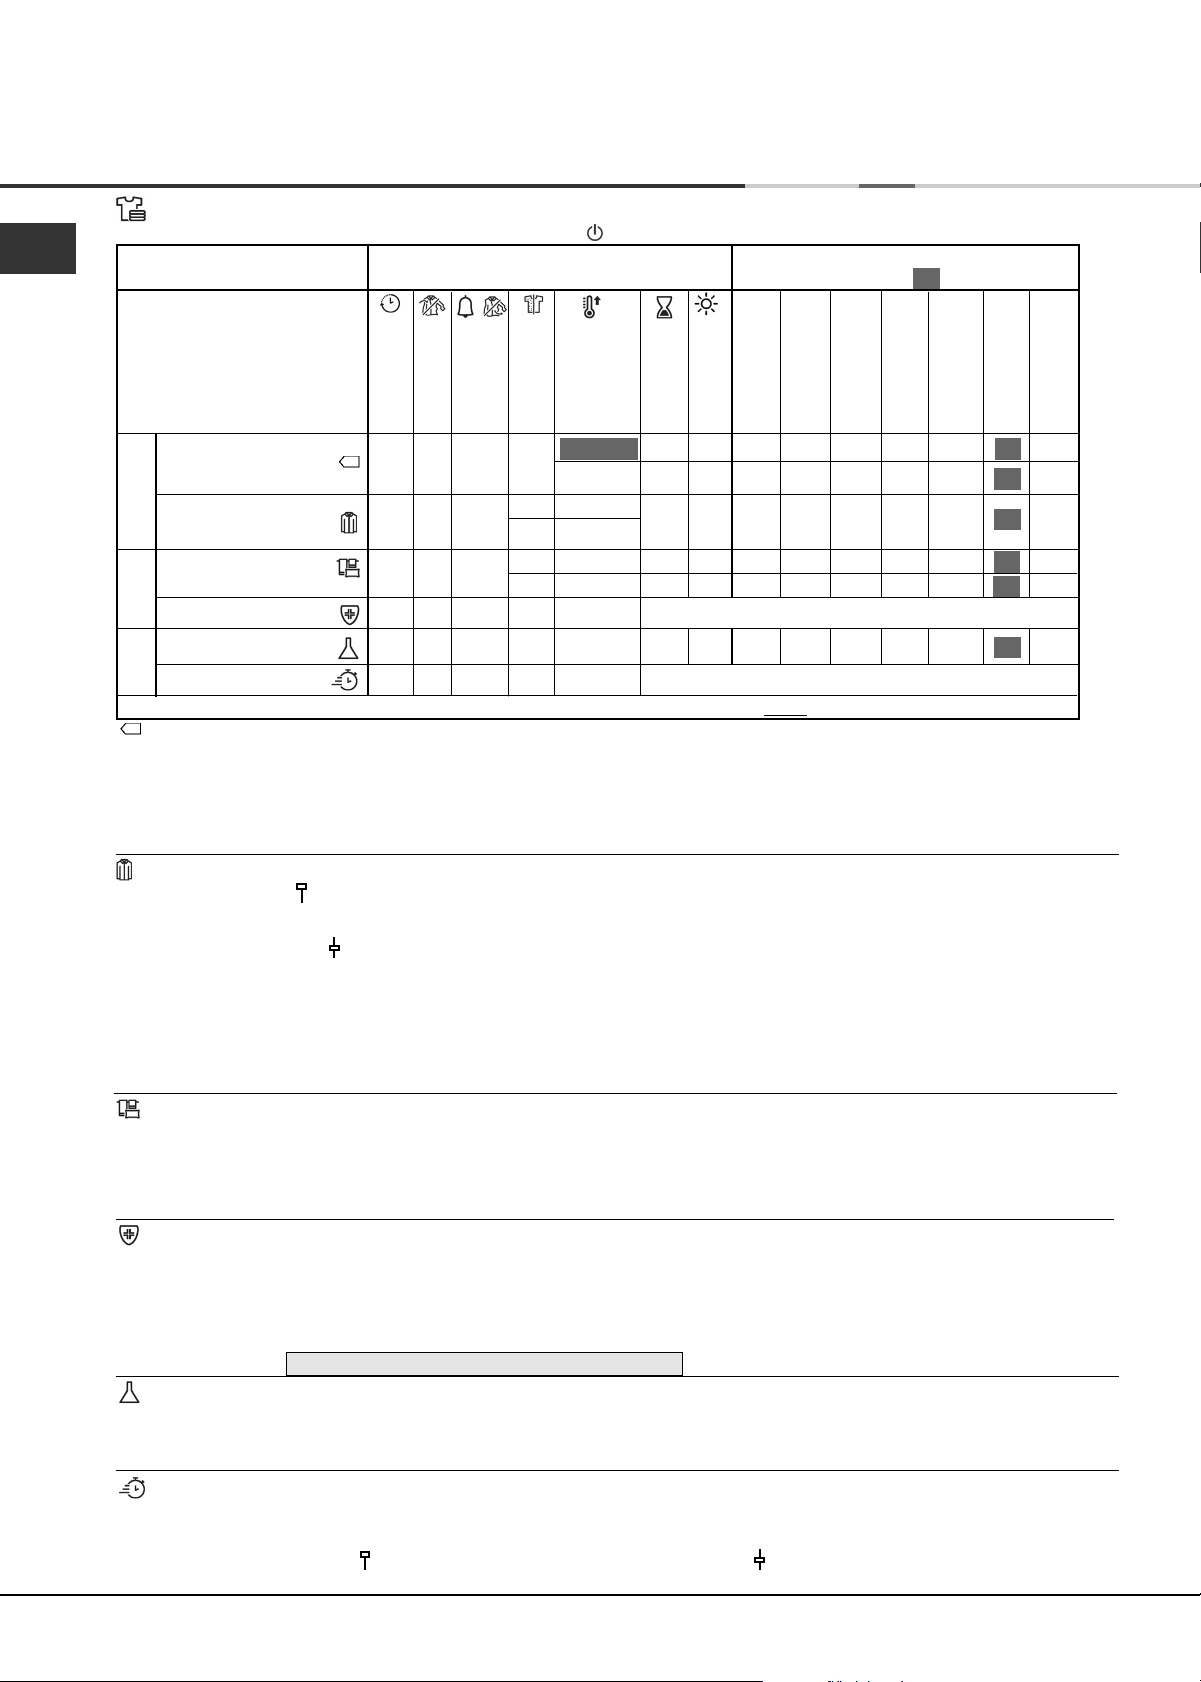
ESSENTIALS Programmes Table
! If the Display is not lit; Press the ON/OFF button and then select programme.
Programme Options available
Dryness Levels available
(default highlighted )
✓
Pre Care
Sound or
✓
✓
✓
✓
✓
✓
*Post Care
Less Fluff
✓
✓
✗
✓
✗
✗
✗
✗
●
Heat Level
- High
- Medium
- Low
- High
- High
- Medium
- High
- Medium
✗
- Medium
- Low
- Medium
- Low
*YOU CANNOT SELECT BOTH POST CARE AND SOUND OPTIONS
Medium heat option
Timed Dry
Sensor Dry
Damp Dry
✓
✓
✓
✓
✗
✓
✗
✓
✗
✓
●
An Automatic programme
✓
✓
●
An Automatic programme
✓
✓
✓
✓
✓
✓
✓
✓
✓
✓
✓
✓
Iron Dry
Hanger Dry Plus
Hanger Dry
Light Dry
Cupboard Dry
✓
✓
✓
✓
✓
✓
✓
✓
✓
✓
✓
✓
✓
✓
✓
✓
✓
✓
✓
✓
✓
✓
✓
✓
Extra Dry
✓
✗
✗
✓
✗
✗
Delay Timer
Standard Cotton
1
Shirts
Bed & Bath
2
Anti Allergy
Synthetics
3
Quick Dry
Standard Cotton
●
This is a programme for cotton items.
●
The duration of this programme will depend on the size of the load, the dryness setting selected and the spin speed
used in your washer (see Laundry).
●
The Standard Cotton programme to EU Regulation 392/2012 is Programme 1 selection with High Heat and Dryness
Level Cupboard Dry (the standard/default configuration). This is the most efficient programme in terms of energy
consumption (EU 392/2012).
Shirts
High heat option
●
This is a programme for shirts made from cotton.
●
It can be used for load sizes up to 3kg (approximately 10 shirts).
Medium heat option
●
This is a programme for shirts made from synthetic materials or a mixture of natural and synthetic materials, such
as polyester and cotton.
●
It can be used for load sizes up to 3kg (approximately 14 shirts).
The duration of this programme will depend on the size of the load, the dryness setting selected and the spin speed used
in your washer.
Loads dried using the Cupboard Dry setting are usually ready to wear, the edges or seams may be slightly damp. If this is
the case, try turning the shirts inside out and running the programme again for a short period.
Bed & Bath
●
This is a programme for cotton towels and sheets.
●
The duration of this programme will depend on the size of the load, the dryness setting selected and the spin speed
used in your washer (see Laundry).
●
Loads dried using the Extra Dry setting are usually ready to use, the edges or seams may be slightly damp especially
on large items. If this is the case, try opening them out and running the programme again for a short period.
Anti Allergy Programme
This programme has the ‘Seal of Approval’ endorsement from Allergy UK, which reflects the effective reduction and
elimination of allergens from the clothes with the special Anti Allergy cycle. With this programme, thanks to the
achievement of constant temperature for an extended period of time, the effects of the most common allergens (including
House Mites and Pollen) are neutralised.
Can be used on a full size wet load to dry and treat, or on a 4kg dry load just to treat your laundry.
If the display shows
Synthetics
●
This is a programme for items of Synthetic with low heat setting or Synthetic/Cotton mixtures with medium heat setting.
●
The duration of this programme will depend on the size of the load, the dryness setting selected and the spin speed
used in your washer (see Laundry).
Quick Dry
This programme gives a reduced drying time for small loads, up to 1kg.
Note: Dries your load to the cupboard dry setting.
●
High heat option
CLEAN FILTER TO ENSURE ANTI ALLERGY ACTION : Clean the filter and re-start the programme.
Use for Cottons up to 1kg Use for Synthetics up to 1kg
✓
✓
✓
✓
✓
✓
✓
✓
✓✓
✓
✓
12
Page 13
Start and Programmes
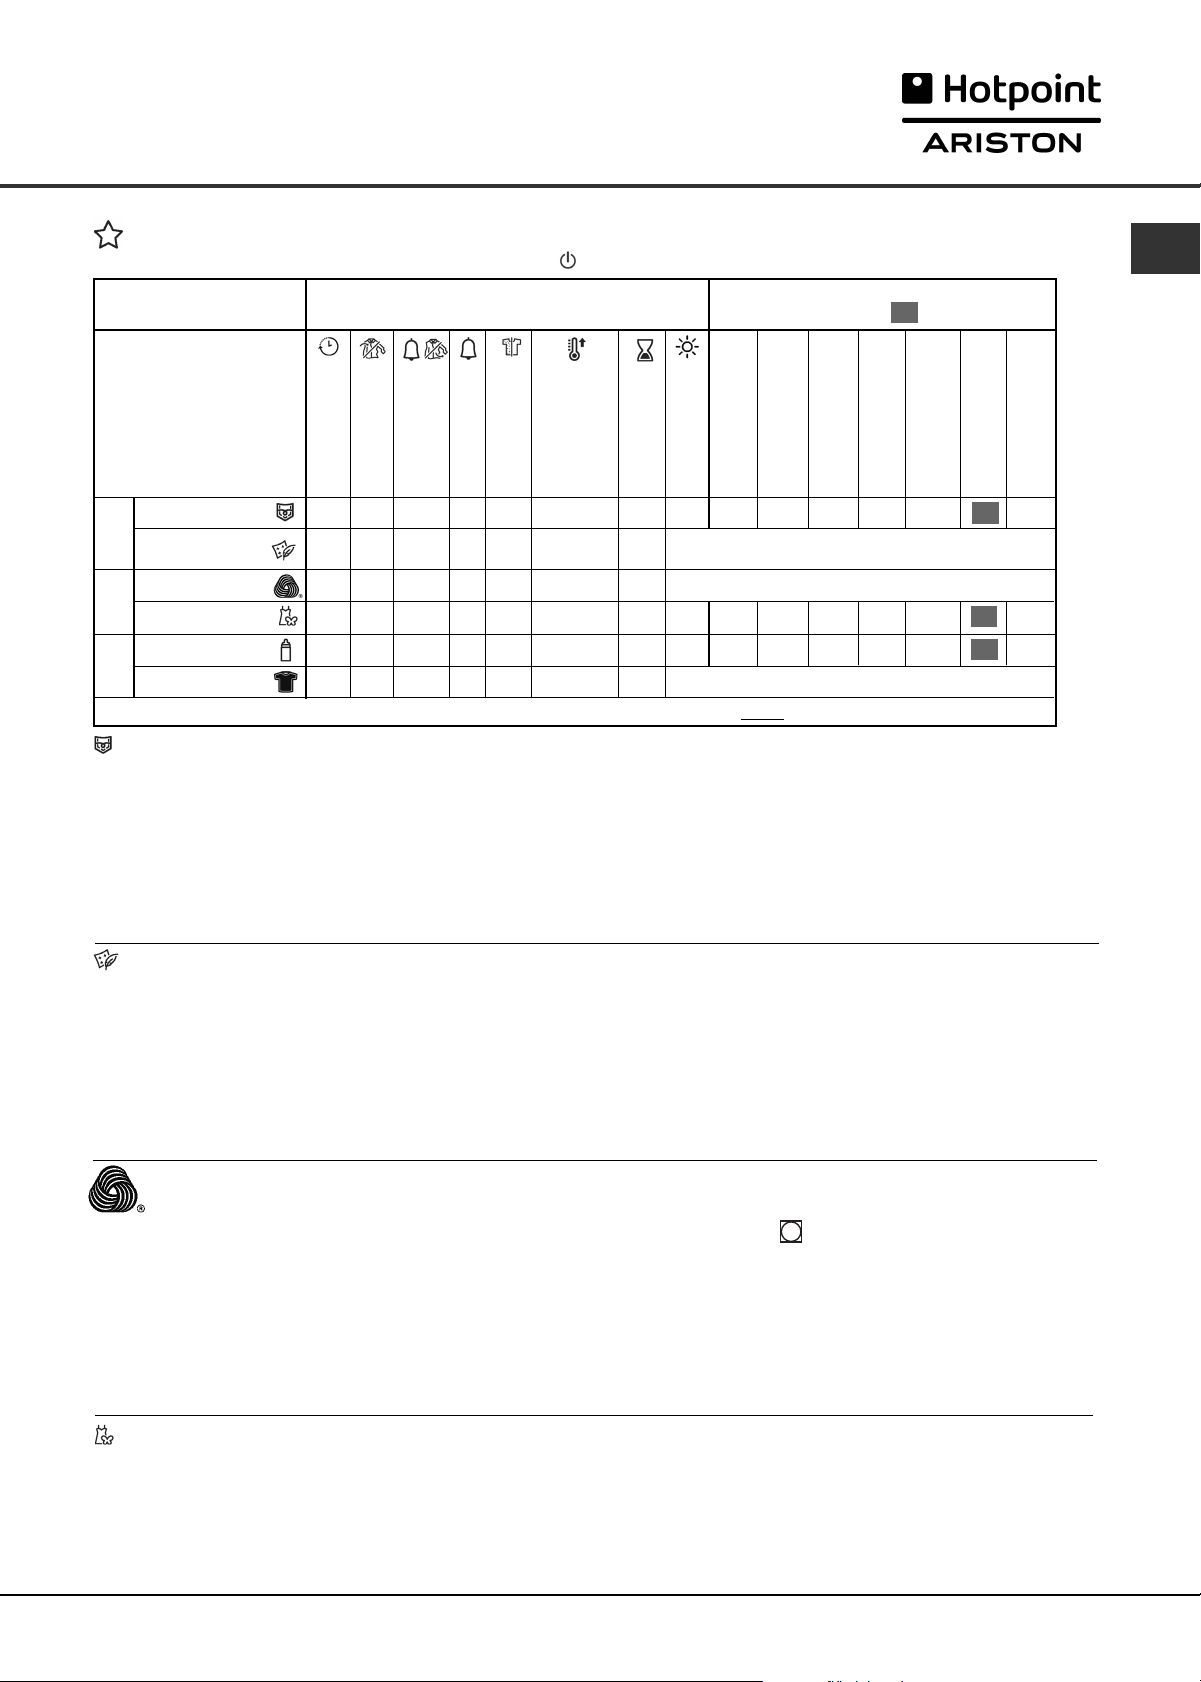
EXCLUSIVES Programmes Table
! If the Display is not lit; Press the ON/OFF button and then select programme.
Programme Options available
Delay Timer
Pre Care
Jeans
4
Duvet
Wool
5
Silk
Baby Delicates
6
Dark
Jeans
●
This is a programme for jeans made from denim cotton. Before drying your jeans turn the front pockets inside out.
●
It can be used for load sizes up to 3kg (approximately 4 pairs).
●
Do not mix dark and light coloured items.
●
It can also be used on other garments made from the same material, such as jackets.
●
The duration of this programme will depend on the size of the load, the dryness setting selected and the spin
speed used in your washer.
●
Loads dried using the Extra Dry setting are usually ready to wear, the edges or seams may be slightly damp. If
this is the case, try turning the jeans inside out and running the programme again for a short period.
! We do not recommend that you use this programme if your jeans have elastic waist bands, studs or embroidery.
✓
✓
✗
✓
✓
✓
✓
✗
✗
✗
✓
✗
*Post Care
Sound or
✓
*
✓
*
✓
✗
✗
✗
✓
*
✓
✗
Sound
Less Fluff
✗
✗
✗
✗
✗
✗
Heat Level
✗
- High
- Medium
✗
✗
✗
✗
*YOU CANNOT SELECT BOTH POST CARE AND SOUND OPTIONS
Timed Dry
✗
✗
✗
✗
✓
✗
Dryness Levels available
(default highlighted )
Sensor Dry
Damp Dry
Iron Dry
✓
✓
✓
●
An Automatic programme
●
An Automatic programme
✓
✓
✓
✓
●
An Automatic programme
✓
✓
✓
✓
✓
Hanger Dry Plus
✓
✓
✓
✓
Hanger Dry
Light Dry
Cupboard Dry
Extra Dry
✓
✓
✓
✓
✓
✗
✗
✓
✓
GB
Duvet
! Take care with this programme DO NOT dry any items that are damaged which could result in the filling blocking
the filter and air vent resulting in a fire hazard.
●
Must only be used on single size duvets: NOT suitable for double or king size items.
●
Loads dried using this programme are usually ready to use, but may be slightly damp in places. If this is the case,
try opening them out and shaking them and running the programme again for a short period.
●
Also suitable for down filled jackets.
●
Select high heat for Cotton Duvets and medium heat for Synthetic duvets
●
The duration of this programme will depend on the size and density of the load and the spin speed used in your
washer.
Wool Programme
●
This is a programme for tumble dryer safe garments marked with the symbol .
●
It can be used for load sizes up to 1kg (approximately 3 sweaters).
●
We recommend that garments are turned inside out before drying.
●
The duration of this programme will depend on the size of the load, the dryness setting selected and the spin
speed used in your washer.
●
Loads dried using this programme are usually ready to wear, but on some heavier garments the edges may be
slightly damp. Allow these to dry naturally as over-drying could damage garments.
! Unlike other materials, the mechanism of wool shrinkage is irreversible; i.e. it will not stretch back to original size and
shape.
! This programme is not suitable for Acrylic garments.
Silk
●
This is a programme for drying your delicate silk.
●
It can be used for load sizes up to 0.5kg.
●
The duration of this programme will depend on the size of the load, the dryness setting selected and the spin
speed used in your washer.
●
Loads dried using the Cupboard Dry setting are usually ready to use, but on some garments the edges may be
slightly damp. If this is the case, try opening them out or turn items inside out and running the programme again for
a short period.
13
Page 14
Start and Programmes
GB
Baby Delicates Programme
●
This is a programme for drying your baby’s small delicate items of clothing and bedding (Cotton and Chenille)
and for drying your delicate clothes.
●
DO NOT dry items such as bibs and nappy pants with plastic coverings.
●
It can be used for load sizes up to 2kg.
●
The duration of this programme will depend on the size of the load, the dryness setting selected and the spin
speed used in your washer.
●
Loads dried using this programme are usually ready to wear, but on some heavier garments the edges may be
slightly damp. If this is the case, try turning items inside out and running the programme again for a short period.
Dark cycle
This programme helps to maintain your dark coloured Cotton clothes, by controlling the motor speed and drum
rotation, together with control of the lower drying temperature.
●
It can be used for cottons loads and jeans loads, up to a maximum of 3kg.
●
The load must have been spun in the washing machine with a spin speed between 1200 - 1400 rpm.
●
The duration of this programme will depend on the size of the load and the spin speed used in your washer.
●
As this is a treatment programme aimed to protect your dark coloured clothes, the programme duration could be
more than 4 hours.
●
It dries to Cupboard Dry level.
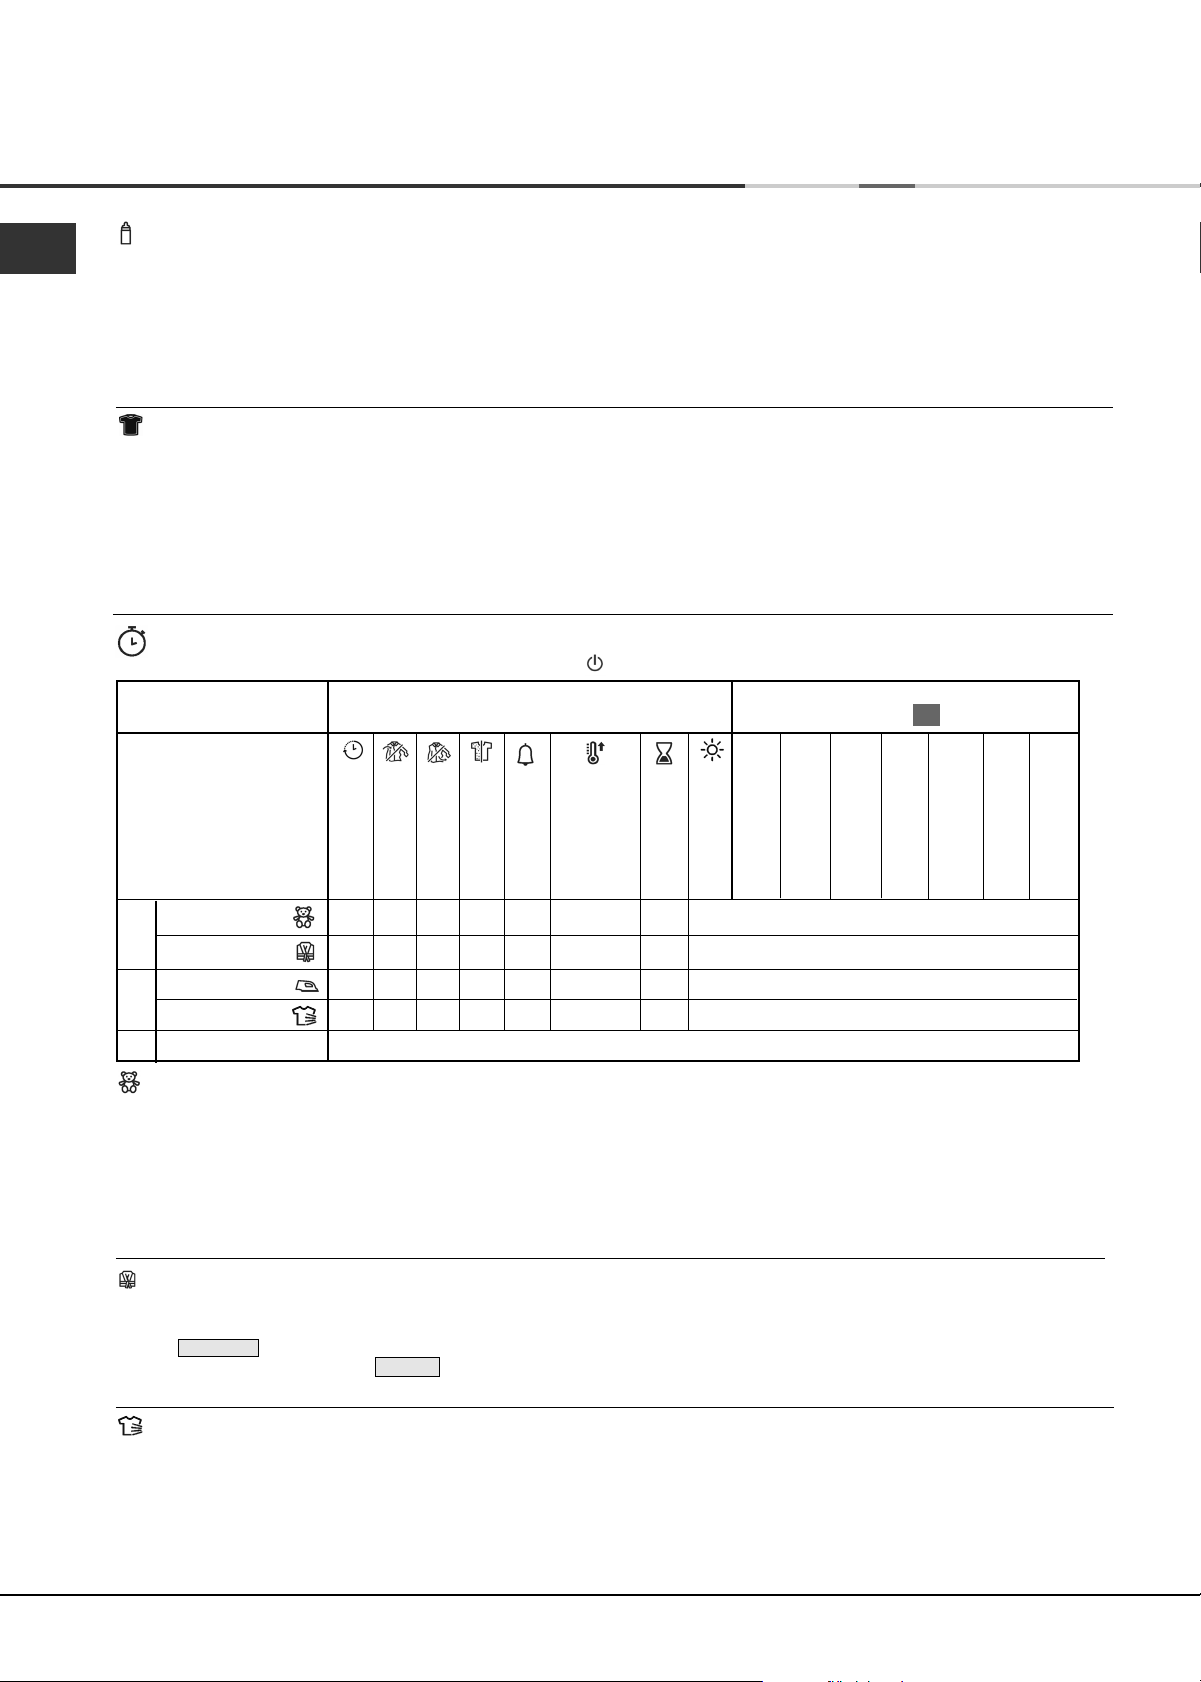
EXTRA Programmes Table
! If the Display is not lit; Press the ON/OFF button and then select programme.
Programme Options available
Dryness Levels available
(default highlighted )
✓
Delay Timer
Pre Care
Post Care
Less Fluff
Cuddly Toys
7
Heat & Enjoy
Easy Iron
8
Refresh
9
My Cycle
Sound
✓
✗
✗
✗
✗
✗
✗
✗
Depends on your chosen programme. See previous details.
M
✗
✗
✗
✗
✗
✓
✗
✗
✗
✓
✓
✗
Heat Level
✗
✗
✗
✗
Timed Dry
Sensor Dry
Damp Dry
●
An Automatic programme
✗
●
An Automatic programme
✗
●
An Automatic programme
✗
●
An Automatic programme
✗
Iron Dry
Hanger Dry Plus
Hanger Dry
Light Dry
Cupboard Dry
Extra Dry
Cuddly Toy Programme
With this programme you can remove dust easier and wash the cuddly toys more often because the drying time is
very much reduced compared to drying in the open air. It is a delicate drying cycle that dries at low temperature
and with soft mechanical action to maintain at best the original look and shine of the fur.
Note: For allergy protection, just freeze cuddly toys for 24 hours then wash and dry them. Repeat every 6 weeks.
Before drying remove accessories such as clothes, collars or sound boxes and protect plastic eyes with masking
tape after drying them with a cloth.
The programme time will vary dependant on the exact make up of the load. The maximum load should not exceed
2.5kg and no individual item should be greater than 600g.
Heat & Enjoy
This programme helps to heat towels & bathrobes for a warm sensation after a bath or shower. It is also useful for
warming clothes before dressing during winter. The cycle heats clothes to 37°C (Body Temperature), the display
shows
door when the display shows
HEATING and runs at this temperature for a maximum of 4 hours or until you stop the cycle by opening the
READY . Maximum load 3kg.
Note: The Start/Pause button is disabled during this programme.
Refresh
! ‘Refresh’ is not a drying programme and should not be used for wet articles of clothing.
●
It can be used on any load size, but is more effective on smaller loads.
●
Do not overload your dryer (see Laundry).
●
This is a 20 minute programme that airs your clothes with cool air. Also use to cool warm clothes.
14
Page 15
Start and Programmes
Easy Iron Programme
‘Easy Iron’ is a short 10 minute programme (8 minutes of heat followed by a 2 minute cool tumble period) which fluffs the
fibres of clothing that have been left in the same position/location for an extended period of time. The cycle relaxes the
fibres and makes them easier to iron and fold.
! ‘Easy Iron’ is not a drying programme and should not be used for wet articles of clothing.
For best results: 1. Do not load more than the maximum capacity. These numbers refer to the dry weight:
The ‘Easy Iron’ effect varies from one fabric to the next. It works well on traditional fabrics like Cotton or Cotton mix, and
less well on acrylic fibres and on materials such as Tencel®.
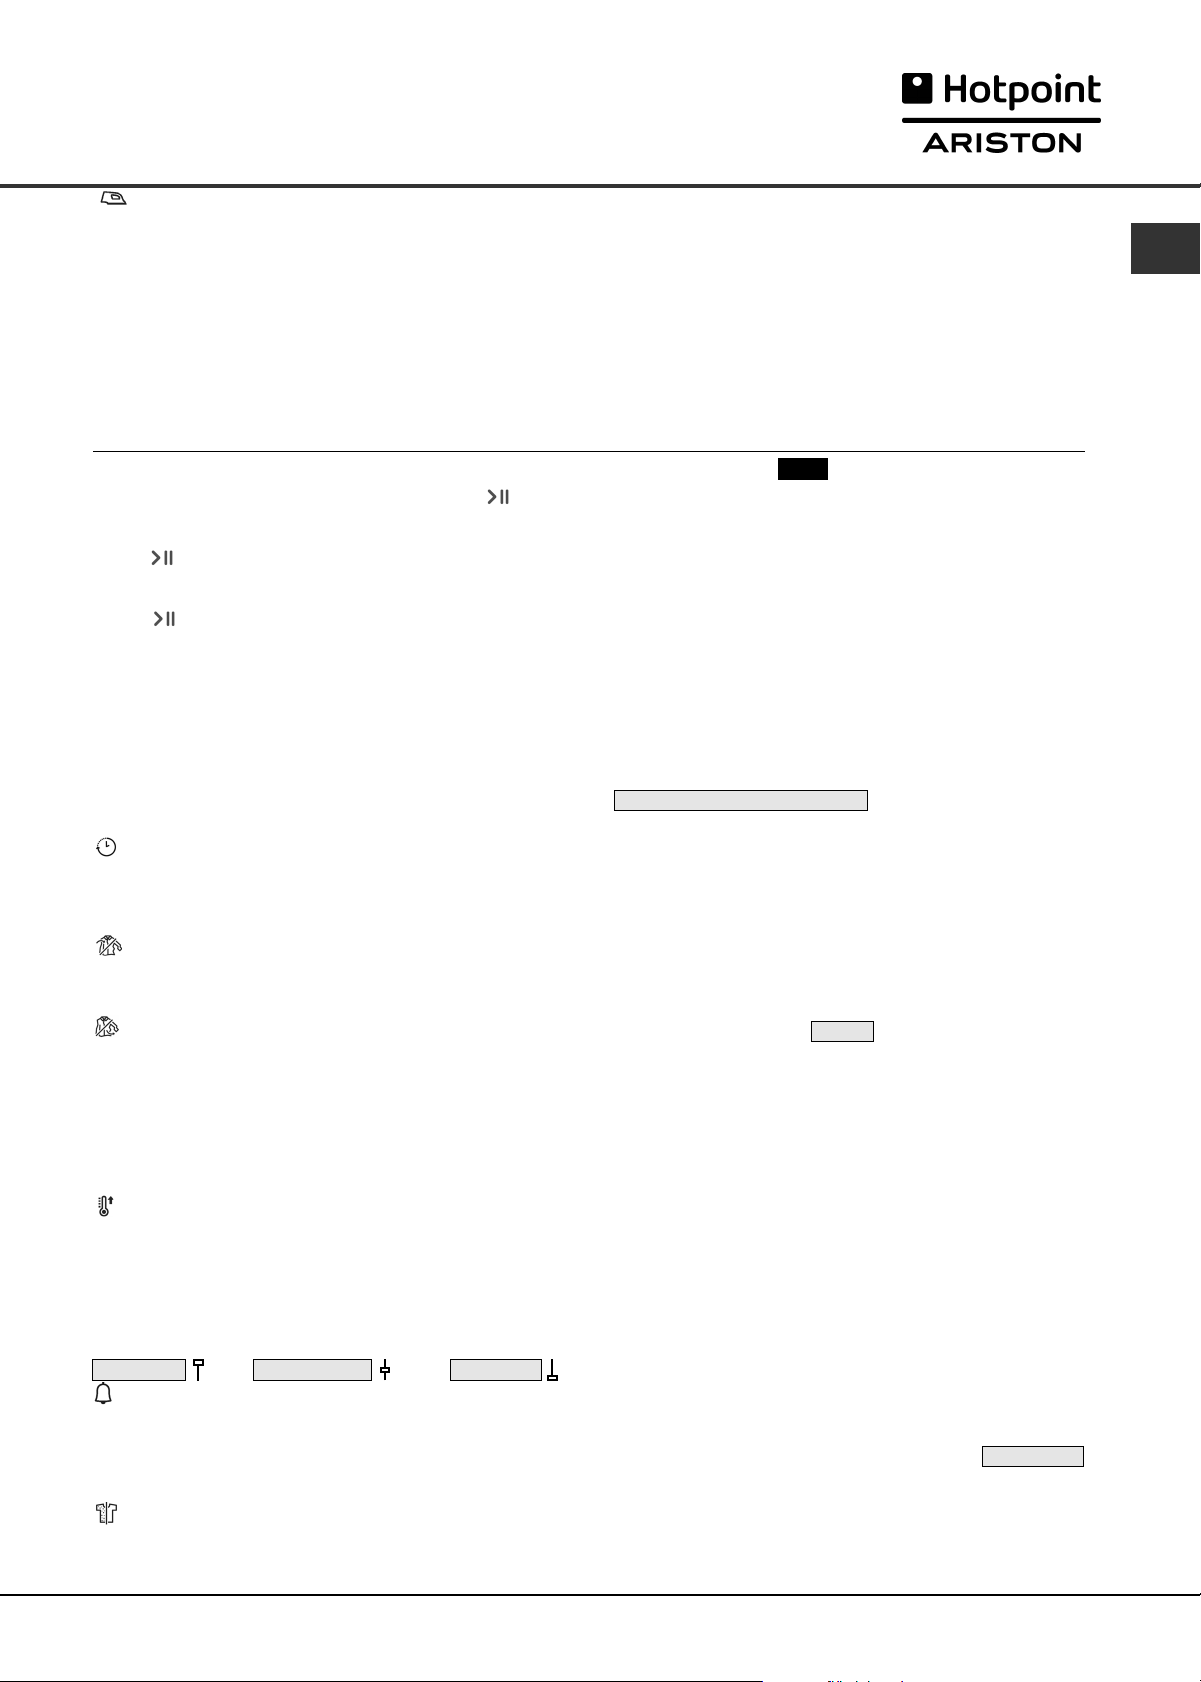
The Controls
! Warning, after pressing the Start/Pause button , the
programme cannot be changed.
To change a selected programme, press the Start/Pause
button , the light flashes Amber to indicate the programme
is paused. Select the new programme and any options
required, the light will then flash green. Press the Start/Pause
button again and the new programme will start.
●
Option buttons
These buttons are used to customise the selected
programme to your requirements. A programme must
have been selected, by pressing a programme selection
button, before an option can be selected. Not all options
are available for all programmes (see Programmes
Ta b le ). If an option is not available and you press the button,
the buzzer will beep 3 times. If the option is available the
indicator, on the display unit next to the bottom buttons,
lights to show that the option has been selected.
Delay Timer (Time Delay)
The start of some programmes (see The Display and
Programmes tables) can be delayed for up to 24 hours.
Ensure the water container is emptied before setting a
delayed start.
Pre Care
This option is only available if a delayed start has been
selected. It tumbles the clothes occasionally during the
delayed period to help prevent creases developing.
Post Care
When available and selected, the clothes are
occasionally tumbled after the end of the drying and cool
tumble cycles, to help prevent creases developing
should you not be available to remove the load
immediately the programme is complete.
Note: The Start/Pause light flashes Amber during this phase.
Note: If you have selected the Sound option this option is
not available.
Heat Level button, Display and Icons
Not all programmes allow you to change the heat level
and some programmes allow all three heat level options:
Low, Medium and High.
When the heat level options are available pressing this
button changes the heat level and the display briefly shows
the selected heat level, along with a display of the selected
level icon:
HIGH HEAT MEDIUM HEAT LOW HEAT
Sound
When available and selected, a buzzer gives a signal at
the end of the drying cycle, to remind you that the
clothes are ready to be removed.
Note: If you have selected the Post Care option this
option is not available.
Less Fluff
By reducing the mechanical action during the final drying
stage the amount of lint and fluff produced is substantially
reduced, protecting the fibres of your garments.
Fabric Maximum load
Cotton and Cotton mixtures 2.5kg
Synthetics 2kg
Denim 2kg
2. Unload the dryer immediately after the end of the programme, hang, fold or iron the articles
and put them away in the closet. Should this not be possible repeat the programme.
●
TIME DISPLAY
88:88
The display shows either the amount of time delay
remaining or an indication of the amount of time left for a
drying programme (see The Display).
The display also shows if there is a problem with your
dryer, if this occurs the display will show F followed by a
fault code number (see Troubleshooting).
●
Empty Water Container
(Messages about emptying can be ignored if you have
plumbed your dryer into a drain as there is no need to
empty the water container).
Messages are displayed to reminds you to empty the
water container (see The Display).
If the water container fills during a programme, the heater
turns off and the dryer does a period of Cool Tumble.
After this it stops and a message tells you to
EMPTY THE WATER CONTAINER .
You must empty the water container and restart the dryer
or the clothes will not dry. After re-starting the dryer the
message will take a few seconds to go out.
To avoid this always empty the water container each time
you use the dryer (see Maintenance).
●
Door Opening
Opening the door during a programme will stop the dryer
and have the following effects:
Note: The Start/Pause light flashes Amber during the Post
Care phase of a programme.
●
The display shows PAUSE .
●
During a delay phase the delay will continue to count
down. The Start/Pause button must be pressed to
resume the delay programme.
The display will change to show current status.
●
The Start/Pause button must be pressed to resume
the programme. The display will change to show the
current status.
●
During the Post Care phase, the programme ends.
Pressing the Start/Pause button will restart a new
programme from the beginning.
●
Heat Pump Protection System
The heat pump system has a compressor protection
feature that operates if you open the door or there is a
power disruption or if you turn off the dryer. This system
will prevent the heat pump compressor from starting for 5
minutes after the door is closed and the programme is
started.
●
Note
If you have a power cut, switch off the power or remove
the plug. When power is restored, press and hold the
On/Off button until the display briefly shows
POWER ON
and the dryer reactivates. Then press the Start/Pause
button and the programme will resume.
GB
15
Page 16
Laundry
GB
Sorting your laundry
●
Check symbols on clothing labels to make sure
that the articles can be tumble dried.
●
Sort laundry by fabric type.
●
Empty pockets and check buttons.
●
Close zippers and hooks and tie loose belts and
strings.
●
Wring out each item in order to eliminate as much
excess water as possible.
! Do not load dripping wet clothes into the dryer.
Maximum load size
Do not load more than maximum capacity.
These numbers refer to dry weight:
Natural fibres: 8kg max (18lb)
Synthetic fibres: 4kg max (9lb)
! DO NOT overload the dryer as this could result in
reduced drying performance.
Wash Care Labels
Look at the labels on your garments, especially when
tumble drying for the first time. The following symbols
are the most common:
Drying times
The table (see below) presents APPROXIMATE drying
times in Minutes. Weights refer to dry garments.
Times are approximate and can vary depending
upon:
●
Amount of water retained in clothes after spin
cycle: towels and delicates retain a lot of water.
●
Fabrics: items that are the same type of fabric but
different textures and thicknesses may not have
the same drying time.
●
Quantity of laundry: single items or small loads
may take longer to dry.
●
Dryness: If you are going to iron some of your
clothes, they can be taken out while still a bit
damp. Others can be left longer if you need them
to be completely dry.
●
Heat setting.
●
Room temperature: if the room where the dryer is
located is cold, it will take longer for the dryer to
dry your clothes.
Cottons
High
Heat
Synthetics
Medium
Heat
Delicates
(Acrylics)
Low
Heat
May be tumble dried
Do not tumble dry
Tumble dry at high heat setting
Tumble dry at low heat setting
Automatic duration
Automatic minutes
Timed Dry setting
1 kg
1:00 - 1:30
60 - 90
1:00 or 1
:30
2 kg
1:20 - 1:40
80 - 100
1:30
3 kg
1:40 - 2:10
120 - 130
1:30 or 2:00
Drying times 800 -1000 rpm in washing machine.
1 kg
Automatic duration
Automatic minutes
Timed Dry setting
0:40 - 0:50
40 - 50
0:40 or 1:00
Drying times on reduced spin in washing machine.
1 kg
Automatic duration
Automatic minutes
Timed Dry setting
0:40 - 1:20
40 - 80
0:40 or 1:00 or 1:30
Drying times on reduced spin in washing machine.
●
Bulk: some bulky items can be tumble dried with
care. We suggest that you remove these items
several times, shake them out, and return them to
the dryer until finished.
! Do not over-dry your clothes.
All fabrics contain a little natural moisture, which
keeps them soft and fluffy.
6 kg
2:30 - 3:10
150 - 190
2:30 or 3:00
3 kg
60 - 90
2:00 - 2:20
120 - 140
2:00 or 2:30
2 kg
0:50 - 1:00
50 - 60
0:40 or 1:00
4 kg
5 kg
2:20 - 3:00
140 - 180
2:30
1:00 - 1:30
1:00 or 1:30
2 kg
1:20 - 2:20
80 - 140
1:30 or 2:00 or 2:30
7 kg
2:50 - 3:20
170 - 200
3:00 or 3:40
3:20 - 4:00
4 kg
1:20 - 2:00
80 - 120
1:00 or 1:30 or 2:00
8 kg
200 - 240
3:40
●
Note: At the end of a drying cycle, cottons could still be damp if you grouped cottons and synthetics together.
If this is the case, simply give the damp cotton items an additional short period of drying.
16
Page 17
Troubleshooting
One day your dryer seems not to be working. Before you call your Service Centre (see Service), go through the
following troubleshooting suggestions:
Problem:
The tumble dryer won’t start.
Possible causes / Solution:
●
The plug is not plugged into the socket, or not making contact.
●
There has been a power failure.
●
The fuse has blown. Try to plug another appliance into the socket.
●
You are using an extension cord? Try to plug the dryer’s power cord
directly into the socket.
●
The door is not closed securely?
●
The programme has not been set properly (see Start and Programmes).
●
The Start/Pause button has not been pressed (see Start and Programmes).
Drying cycle will not begin.
Its taking a long time to dry.
●
You have set a delayed time (see Start and Programmes).
●
The filter has not been cleaned (see Maintenance).
●
The water container needs emptying? The empty water message is
displayed? (see Maintenance).
●
The heat pump filter needs cleaning? (see Maintenance).
●
The temperature setting is not ideal for the type of fabric you are drying
(see Start and Programmes, and see Laundry).
●
The correct drying time has not been selected for the load (see Laundry).
●
The air intake grille is obstructed (see Installation, and see Maintenance).
●
The items were too wet (see Laundry).
●
The dryer was overloaded (see Laundry).
GB
Empty water message is
displayed but the dryer has
only been running for a short
period.
Empty water message is
displayed and the water
container is not full.
Programme finishes and
clothes are damper than
expected.
The display shows a fault
code F followed by one or two
numbers.
The display briefly shows
DEMO ON every 6 seconds.
The lights on the dryer control
panel are off although the
dryer is switched on.
●
The water container was probably not emptied at the start of the
programme. Do not wait for the empty water signal, always check and
empty the container before starting a new drying programme (see
Maintenance).
●
This is normal, the:
END OF CYCLE, CLEAN FILTER AND EMPTY THE WATER BOTTLE
message is shown as a reminder to empty the container (see The Display
and Start and Programmes).
! For safety the dryer has a maximum programme time of 5 hours. If an
automatic programme has not sensed the required final moisture in this time
the dryer will complete the programme and stop. Check the above points
and run the programme again, if the results are still damp, contact the
Service Centre (see Service).
●
If the display shows a fault:
- Turn off and remove the plug. Clean the filter and the heat pump filter
unit (see Maintenance). Then replace the plug, turn on and start another
programme. If a fault is then displayed: Note down the
code and contact the Service Centre (see Service).
●
The dryer is in ‘Demo’ mode. Press and hold both the On/Off and
Start/Pause buttons for 3 seconds. The display will show DEMO OFF for
3 seconds and then the dryer will resume normal operation.
●
The dryer has gone into standby mode to save power. This occurs if you
have had a power cut or leave your dryer either without starting a
programme or after your drying programme has finished.
- Press and hold the On/Off button and the lights will come on.
17
Page 18

Service
GB
Heat Pump System
This dryer is fitted with a sealed heat pump system to
dry your clothes. To operate, the heat pump contains
fluorinated greenhouse gases (F gases) which are
covered by the Kyoto Protocol. These F gases are
contained in a hermetically sealed unit. This sealed
unit contains 0.29kg of the F gas R134a which acts as
a refrigerant.
If the sealed unit fails then it must be replaced by a
new sealed unit. Contact your nearest Service Centre
for advice.
●
Note: The gases contained in the sealed system
are not hazardous to health, but if they escape they
will have an impact on global warming.
Before calling the Service Centre:
●
Use the troubleshooting guide to see if you can
solve the problem yourself (see Troubleshooting).
●
If not, turn off the dryer and call the Service Centre
closest to you.
What to tell the Service Centre:
●
name, address and post code.
●
telephone number.
●
the type of problem.
●
the date of purchase.
●
the appliance model (Mod.).
●
the serial number (S/N).
This information can be found on the data label inside
the door of the machine.
Spare Parts
This dryer is a complex machine. Repairing it yourself
or having a non-authorised person try to repair it could
cause harm to one or more persons, could damage
the machine and could invalidate the spare parts
warranty.
Call an authorised technician if you experience problems
while using the machine.
●
Please note: it is an offence for an unqualified
person to undertake any servicing or repair work that
involves breaking into the sealed heat pump unit.
Save energy and respect the environment
●
Wring out items to eliminate excess water before tumble drying (if you use a washing machine first, select a high
spin cycle). Doing this will save time and energy during drying.
●
Always dry full loads - you save energy: single items or small loads take longer to dry.
●
Clean the filter after each use to contain energy consumption costs (see Maintenance).
18
Page 19
Product Data... (EU Regulation 392/2012)
Brand Hotpoint Ariston Models TCD872
FTCD872
Rated capacity of Cotton laundry for the standard programme at full load 8 kg Energy efficiency class A++
The weighted Annual Energy Consumption (AE
) 235.3 kWh
c
Consumption per year, based on 160 drying cycles of the standard cotton programme at full and partial load, and the
consumption of the low-power modes. Actual energy consumption per cycle will depend on how the appliance is used.
This household tumble dryer is an Automatic Condenser Dryer
Energy consumption : full load E
Power consumption : off-mode (P
1.96 kWh, partial load E
dry
) 0.17 W, left-on mode (Pl) 3.27 W
o
dry1/2
1.09 kWh
Duration of the ‘left-on mode’ for power management systems 30 minutes
The ‘standard cotton programme’ suitable for drying normal wet cotton laundry that is the most efficient programme in
terms of energy consumption for cotton used at full and partial load is Standard Cotton, High Heat, Cupboard Dry
Programme time (minutes) : weighted (T
) full & partial load 163, full load (T
t
) 213, partial load (T
dry
dry1/2
) 126
Condensation efficiency class B
Average condensation efficiency (%) : full load (C
) 81, partial load (C
dry
) 81, weighted (Ct) full & partial load 81
dry1/2
Airborne acoustical noise emissions 70 dB(A) re 1 pW
* “consumer information in compliance with EU Regulation 932/2012”.
Typical energy used - Synthetics full load 0.68 kWh, partial load not applicable
Typical drying time - Synthetics full load 85 minutes, partial load not applicable
GB
Recycling and Disposal Information
As part of our continued commitment to helping
the environment, we reserve the right to use
quality recycled components to keep down customer
costs and minimise material wastage.
●
Disposing of the packaging material: follow local
regulations, so the packaging can be recycled.
●
To minimise risk of injury to children, remove the
door and plug - then cut off mains cable, flush
with the appliance. Dispose of these parts separately
to ensure that the appliance can no longer be
plugged into a mains socket.
This appliance conforms to the following EC Directives:
- 2006/95/EC (Low Voltage Equipment)
- 2004/108/EC (Electromagnetic Compatibility)
Disposal of old electrical appliances
The European Directive 2012/19/EC on Waste Electrical
and Electronic Equipment (WEEE), requires that old
household electrical appliances must not be disposed
of in the normal unsorted municipal waste stream. Old
appliances must be collected separately in order to
optimise the recovery and recycling of the materials
they contain and reduce the impact on human health
and the environment.
This dryer has a sealed heat pump unit containing F
gases which should be recovered and distroyed.
The crossed out “wheeled bin” symbol on the
product reminds you of your obligation, that
when you dispose of the appliance it must be
separately collected.
Consumers should contact their local authority or
retailer for information concerning the correct disposal
of their old appliance.
Indesit Company, Viale Aristide Merloni 47, 60044 Fabriano (AN), Italy
19
Page 20

Notice d’utilisation
et installation
F
GB
English, 1
CZ
58
F
Français, 20
SK
NL
Nederlands, 39
77
Table des Matières
Installation, 21-22
Où installer votre sèche-linge
Ventilation
Vidange de l’eau
Mettre votre séchoir de niveau
Connexions électrique
Avant de commencer à utiliser votre sèche-linge
Avertissements, 23-24
Sécurité Générale
Pour minimiser les risques d'incendie
Entretien et Nettoyage, 25-26
Éteindre l’électricité
Nettoyer le filtre après chaque cycle
Videz le réservoir d’eau après chaque cycle
FTCD 872
Nettoyage du filtre de la pompe à chaleur
Vérifier le tambour après chaque cycle
Nettoyer le sèche-linge
La première fois que vous allumez
votre sèche-linge, vous devez
choisir la langue.
Voir page 28.
Description du sèche-linge, 27
Caractéristiques
Panneau de commandes
SÈCHE-LINGE
! Conservez cette notice d’utilisation et d’installation
à portée de main de manière à pouvoir vous y
référer si nécessaire. Emmenez-la avec vous si vous
déménagez, et, si vous vendez cet appareil ou que
vous le donniez à un tiers, faites en sorte que cette
notice accompagne le sèche-linge de manière à ce
que le nouveau propriétaire soit informé des
avertissements et suggestions concernant le
fonctionnement de ce sèche-linge.
! Lisez attentivement ce mode d’emploi; les pages
suivantes contiennent des informations importantes
concernant l’installation et des suggestions relatives
au fonctionnement de cet appareil.
Ce symbole vous rappele de lire le
livret d’instructions.
L’affichage, 28-30
Démarrage et programmes, 30-34
Choisir un programme
Tableau des programmes
Les commandes
Linge, 35
Trier votre linge
Étiquettes d’entretien
Temps de séchage
Que faire en cas de panne, 36
Service Après-vente, 37
Pièces de Rechange
Données relatives au produit, 38
Recyclage et enlèvement
www.hotpoint.eu
20
Page 21
Installation
Où installer votre sèche-linge
●
Placez votre sèche-linge à une certaine
distance des cuisinières, fourneaux,
radiateurs, ou plaques de cuisson à gaz,
car les flammes peuvent endommager
cet appareil.
●
Pour garantir un fonctionnement optimal,
installez votre sèche-linge dans une
pièce à température ambiante entre 20
et 23 ˚C. Cependant, l’appareil
fonctionnera si la température de la
pièce se situe entre 14 et 30 ˚C.
●
minimale espace 10mm
Si vous installez cet
appareil sous un plan
de travail, faites en
sorte de laisser un
espace de 10 mm
minimale
espace 15mm
entre le dessus de
l’appareil et tout autre
objet sur ou au-dessus
de la machine, et un
espace de 15 mm entre les côtés et les
éléments d’ameublement ou les murs
latéraux. Ceci a pour objectif d’assurer
une ventilation convenable.
La surface arrière de l’appareil doit être
placée contre un mur.
! Assurez-vous que les orifices de ventilation
situés à l’arrière ne soient pas obstrués.
Ventilation
Lorsque le sèche-linge est en marche, une aération
adéquate est nécessaire. Faites en sorte d’installer
votre sèche-linge dans un environnement qui n’est
pas humide et qui est doté d’une bonne circulation
d’air dans toute la pièce. La circulation d’air autour du
sèche linge est essentielle pour condenser l’eau
produite au cours du lavage, le sèche linge ne
fonctionnera pas efficacement dans un espace clos
ou dans un placard.
! Si l’on utilise le sèche linge dans une pièce froide ou
petite, on rencontrera un certain degré de condensation.
! Nous vous déconseillons d’installer votre
sèche-linge dans un placard. En revanche,
le sèche-linge ne doit en aucun cas être
placé derrière une porte fermant à clé, une
porte coulissante ou une porte montée sur
des gonds du côté opposé à la porte de
chargement du sèche-linge.
Vidange de l’eau
Si votre sèche-linge est installé à proximité d’une
évacuation, l’eau peut être vidangée dans ce tuyau.
Cela évite de vider le réservoir d’eau. Si vous installez
le sèche-linge au-dessus ou à côté d’un lave-linge, il
pourra partager la même vidange.
vidange doit être inférieure à
du sèche-linge.
Repérez la position du tuyau,
illustrée sur l'image A. Retirez le
tuyau.
image A
Puis fixez un tuyau suffisamment
long selon la position illustrée sur
l'image B.
Assurez-vous que le tuyau n’est pas écrasé ou plié
!
une fois le sèche-linge placé dans sa position définitive
La hauteur de la
1 m en partant du bas
image B
Mettre votre séchoir de niveau
Le séchoir doit être installé bien de niveau pour un
fonctionnement correct.
Quand vous avez installé votre
séchoir à son emplacement final,
contrôlez qu'il est de niveau
d’abord de chaque côté et
ensuite d’avant en arrière.
Si le séchoir n’est pas de niveau,
ajustez les deux pieds avant
vers le haut ou le bas, jusqu’à ce
que le séchoir soit de niveau.
! AVERTISSEMENT : Avant d’utiliser votre séchoir,
laissez-le en position debout pendant au moins 6
heures.
F
.
21
Page 22

Installation
F
Connexions électriques
Assurez-vous des points suivants avant de
brancher la fiche de l’appareil dans la
prise de courant:
●
Assurez-vous que vos mains sont séches.
●
La prise de courant doit être reliée à la
Avant de commencer à utiliser votre
sèche-linge
Une fois que vous avez installé votre sèche-linge, et
avant de l’utiliser, nettoyez l’intérieur du tambour pour
retirer les poussières qui pourraient s’y être
accumulées durant le transport.
terre.
●
La prise de courant doit pouvoir supporter
la puissance maximale de la machine,
Capacités maximales de chargement
Fibres naturelles : 8 kg
qui est indiquée sur la plaque signalétique
de l’appareil (voir la Description du
Sèche-linge).
●
La tension électrique doit appartenir à la
gamme de valeurs indiquée sur la plaque
signalétique de l’appareil (voir la
Description du Sèche-linge).
●
La prise de courant doit être compatible
avec la fiche du sèche-linge. Si ce n’est
pas le cas, remplacez la fiche ou la
prise de courant.
! Le sèche-linge ne doit pas être utilisé à
l’extérieur, même si l’espace en question est
abrité. Cela peut être dangereux si l’appareil
est exposé à la pluie ou à des orages.
! Une fois installés, le cordon d’alimentation
et la fiche du sèche-linge doivent être
d’accès facile.
! N’utilisez pas de rallonges.
! Le cordon d’alimentation ne doit pas être
courbé ou écrasé.
! Le câble électrique doit être contrôlé
périodiquement. Si le câble est endommagé,
il faut le faire remplacer par le fabricant,
par son service après-vente ou par tout
autre personnel qualifié afin d’éviter tout
risque de danger. Des cordons d’alimentation
neufs ou plus longs sont fournis par les
revendeurs agréés contre un supplément.
! Le fabricant rejète toute responsabilité en
cas de non-respect de toutes ou partie de
ces règles.
! En cas de doute au sujet des points
precedents, consultez un electricien qualfie.
22
Page 23
Avertissements
! Cet appareil a été conçu et construit
conformément à des normes de sécurité
internationales.
Ces avertissements sont donnés pour des
raisons de sécurité et doivent être suivis
attentivement.
Sécurité Générale
●
Ce sèche-linge peut étré utilisé par des
personnes (notamment des enfants de
plus 8 ans) présentant des capacités
physiques, motrices ou mentales réduites,
ou manquant d’expérience et de
connaissances, si elles sont placées sous
surveillance ou ont reçu les instructions
nécessaires à l’utlilisation de l’appareil
de la part d’une personne responsable
de leur sécurité.
●
Ce sèche-linge a été conçu pour un
usage domestique, et non professionnel.
●
Ne touchez pas cet appareil lorsque vous
êtes pieds nus ou avec des mains ou
des pieds humides.
●
Débranchez cette machine en tirant sur
la fiche et non sur le cordon.
●
Après avoir utilisé ce sèche-linge,
éteignez-le et débranchez-le. Tenez la
porte fermée pour assurer que les
enfants ne jouent pas avec.
●
Surveillez les enfants de façon à ne pas
les laisser jouer avec le sèche-linge.
●
Le nettoyage et l’entretien ne doivent pas
être effectués par des enfants non
surveillés.
●
Les enfants de moins de 3 ans doivent
être tenus à bonne distance du sèchelinge s’ils ne sont pas sous surveillance
constante.
●
Cet appareil doit être installé correctement
et avoir une ventilation convenable.
L’arrivée d’air sur le devant du sèchelinge et l’évent derrière le sèche-linge ne
doivent jamais être obstrués (voir
Installation).
●
N’utilisez jamais le sèche-linge sur de la
moquette où la hauteur des poils
empêcherait l’air d’entrer dans la sèchelinge à partir de la base.
●
Vérifiez que le sèche-linge est bien vide
avant de le charger.
●
L’arrière du sèche-linge peut devenir
très chaud. Ne le touchez jamais en
cours d’utilisation.
●
N’utilisez pas le séchoir si le filtre, le
conteneur d’eau et le filtre de la pompe
à chaleur ne sont pas correctement en
place (voir Entretien).
●
Ne surchargez pas le sèche-linge (voir
Linge pour les charges maximales).
●
Ne chargez pas d’articles qui dégouttent
d’eau.
●
Vérifiez avec soin toutes les instructions
sur les étiquettes des vêtements (voir
Linge).
●
Ne séchez pas d’articles de grande taille,
très volumineux.
●
Ne séchez pas de fibres acryliques à
hautes températures.
●
N’éteignez pas le sèche-linge s’il
contient encore des articles chauds.
●
Nettoyez le filtre après chaque utilisation
(voir Entretien).
●
Videz le réservoir d’eau après chaque
utilisation (voir Entretien).
●
Nettoyez l'unité filtre de pompe à chaleur
à des intervalles réguliers (voir Entretien).
●
Ne laissez pas s’accumuler de peluches
autour du sèche-linge.
●
Ne montez jamais sur le sèche-linge.
Cela pourrait l’endommager.
●
Respectez toujours les normes et
exigences électriques (voir Installation).
●
Achetez toujours des pièces de
rechange et accessoires d’origine (voir
Service Après-vente).
F
23
Page 24

Avertissements
F
Vous devez observer les consigne
suivantes pour réduire tout risque
d'incendie dans votre sèche-linge :
inflammables ou explosives. Les substances
hautement inflammables couramment
utilisées dans l'environnement
domestique sont notamment l'huile de
●
Ne séchez que des articles qui ont été
lavés avec de l’eau et un détergent,
rincés et essorés. Le fait de sécher des
articles qui N’ONT PAS été lavés avec
de l’eau constitue un danger d’incendie.
●
Ne séchez pas des vêtements qui ont
été traités avec des produits chimiques.
●
Ne placez pas d'articles tachés ou
imbibés d'huile végétale ou de cuisson,
ils risqueraient de provoquer un
incendie. Les articles contenant de
l'huile peuvent prendre feu spontanément,
particulièrement lorsqu'ils sont exposés
à des sources de chaleur comme un
sèche-linge. En chauffant, les articles
provoquent une réaction d'oxydation
avec l'huile générant alors de la chaleur.
Si la chaleur ainsi générée ne peut pas
être évacuée, les articles peuvent
devenir suffisamment chauds pour
prendre feu. Le fait d'empiler, de
superposer ou de stocker des articles
contenant de l'huile peut empêcher la
chaleur d'être évacuée et donc provoquer
un incendie.
Si vous ne pouvez pas faire autrement
que de placer des articles contenant de
l'huile végétale ou de l'huile de cuisson
ou ayant été en contact avec des
produits coiffants dans le sèche-linge, il
convient de les laver au préalable à
l'aide d'une dose supplémentaire de
détergent. Cette précaution minimise,
sans toutefois l'éliminer, le risque
d'incendie. Les articles ne doivent pas
être retirés du sèche-linge et empilés ou
superposés lorsqu'ils sont chauds.
●
Ne placez pas d'articles ayant été
préalablement nettoyés ou lavés,
imbibés ou tachés avec du pétrole/de
l'essence, des solvants de nettoyage à
sec ou d'autres substances
cuisson, l'acétone, l'alcool dénaturé, la
kérosène, les détachants, la térébenthine,
les cires et les produits permettant
d'éliminer la cire. Assurez-vous que ces
articles ont été lavés à l'eau chaude à
l'aide d'une dose supplémentaire de
détergent avant de les mettre à sécher
dans le sèche-linge.
●
Ne placez pas d'articles contenant du
caoutchouc mousse (également connu
sous l'appellation mousse de latex) ou
des matériaux similaires renfermant du
caoutchouc dans le sèche-linge. Les
matériaux contenant du caoutchouc
mousse peuvent, lorsqu'ils sont chauffés,
s'enflammer par combustion spontanée.
●
Les produits assouplissants ou les
produits similaires ne doivent pas être
utilisés dans un sèche-linge en vue
d'éliminer es effets de l'électricité
statique sauf si leur emploi est
spécifiquement recommandé par le
fabricant du produit assouplissant.
●
Ne placez pas de sous-vêtements
contenant des renforts en métal comme
les soutiens-gorge à armature dans le
sèche-linge. Si les renforts en métal
venaient à se détacher pendant le
séchage, ils pourraient endommager le
sèche-linge.
●
Ne placez pas d'articles en caoutchouc
ou en plastique dans le sèche-linge,
comme des bonnets de douche ou des
couvertures étanches pour bébé, des
articles en polyéthylène ou en papier.
●
Ne placez pas d'articles contenant des
pièces de caoutchouc plaquées, des
vêtements présentant des pièces en
mousse de caoutchouc, des oreillers,
des bottes en caoutchouc et des tennis
recouvertes de caoutchouc dans le
sèche-linge.
●
Enlever tous les objets des poches,
notamment les briquets et les allumettes.
! AVERTISSEMENT : N’arrêtez pas le sèche-linge avant la fin du cycle de séchage si vous
n’avez pas la possibilité de retirer rapidement tous les articles et de les étendre pour
évacuer la chaleur.
24
Page 25
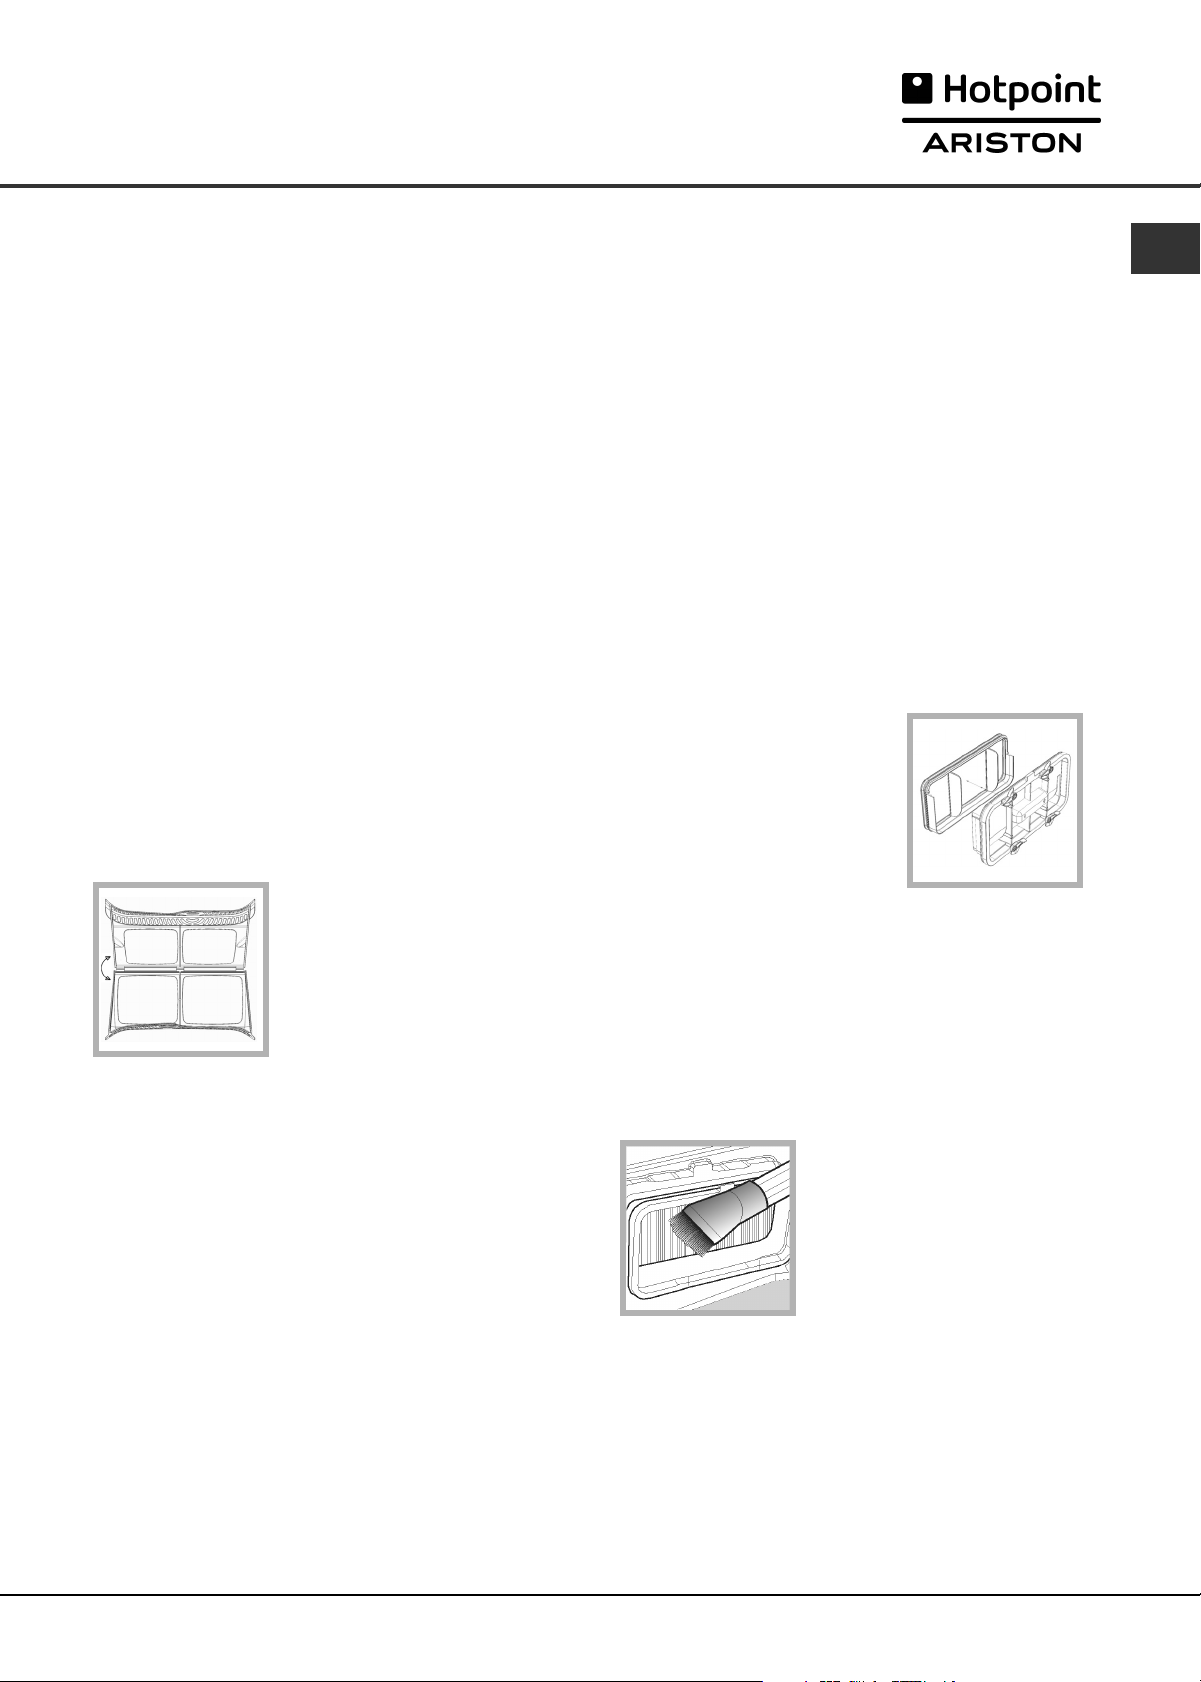
Entretien et Nettoyage
Éteignez l’électricité
! Débranchez votre sèche-linge lorsque
vous ne l’utilisez pas, lorsque vous le
nettoyez et durant toutes les opérations
d’entretien.
Nettoyez le filtre après chaque cycle
Le filtre est une pièce importante de votre
sèche-linge: il accumule des peluches qui
se forment durant le séchage.
Fois le séchage terminé, nettoyez le filtre
en le rinçant sous l’eau courante ou avec
votre aspirateur.
Si le filtre devient bloqué, le flux d’air à
l’intérieur du sèche-linge est sérieusement
compromis : les temps de séchage sont
allongés et vous consommez davantage
d’énergie. Cela peut aussi endommager
votre sèche-linge.
Le filtre se trouve devant la garniture du
sèche-linge (voir schéma en page
suivante).
Pour retirer le filtre :
1. Tirez la poignée en plastique du filtre
vers le haut .
2. Ouvrez le filtre et
nettoyez les peluches
qui se seraient
déposées au fond.
3. Repositionnez-le
correctement.
Assurez-vous que le
filtre soit bien inséré à
fond dans la garniture
du sèche-linge.
4. Retirez toutes les peluches qui se sont
accumulées sur l'intérieur de la porte et
autour du joint de la porte.
! N’utilisez pas le sèche-linge sans avoir
remis le filtre en place.
Nettoyage de l’unité filtre de la pompe à
chaleur
Périodiquement (tous les 5 cycles de
séchage), retirez l’unité filtre de la pompe
à chaleur et nettoyez toute accumulation
de pluches de la surface du filtre.
Pour conserver la performance de séchage,
nous recommandons cependant de
nettoyer ce filtre après CHAQUE cycle.
Pour retirer l’unité filtre de pompe à
chaleur :
1. Débranchez le séchoir et ouvrez la
porte.
2. Ouvrez le couvercle de l’unité filtre de
pompe à chaleur (voir schéma en page
suivante).
Retirez l’unité filtre en faisant tourner les
4 clips en position verticale et en
poussant ensuite le filtre vers vous.
3. Séparez les deux
parties du filtre et
nettoyez la surface du
filtre.
! L’avant de la pompe à chaleur est fait
de fines plaques métalliques. Veillez à ne
pas les endommager et à ne pas vous
couper lors du nettoyage, en retirant et en
remplaçant le filtre.
À chaque nettoyage de l'unité filtre de la
pompe à chaleur, retirez toujours toute
accumulation de peluches à la surface
des plaques métalliques.
4. Retirez soigneusement
ces peluches à l'aide
d'un linge humide,
d'une éponge ou d'un
aspirateur.
Ne JAMAIS utiliser vos
doigts.
F
5. Remontez les deux parties du filtre,
nettoyez les joints et replacez avec les 4
clips en position horizontale, veillez à ce
que les fermetures soient bien verrouillées.
25
Page 26
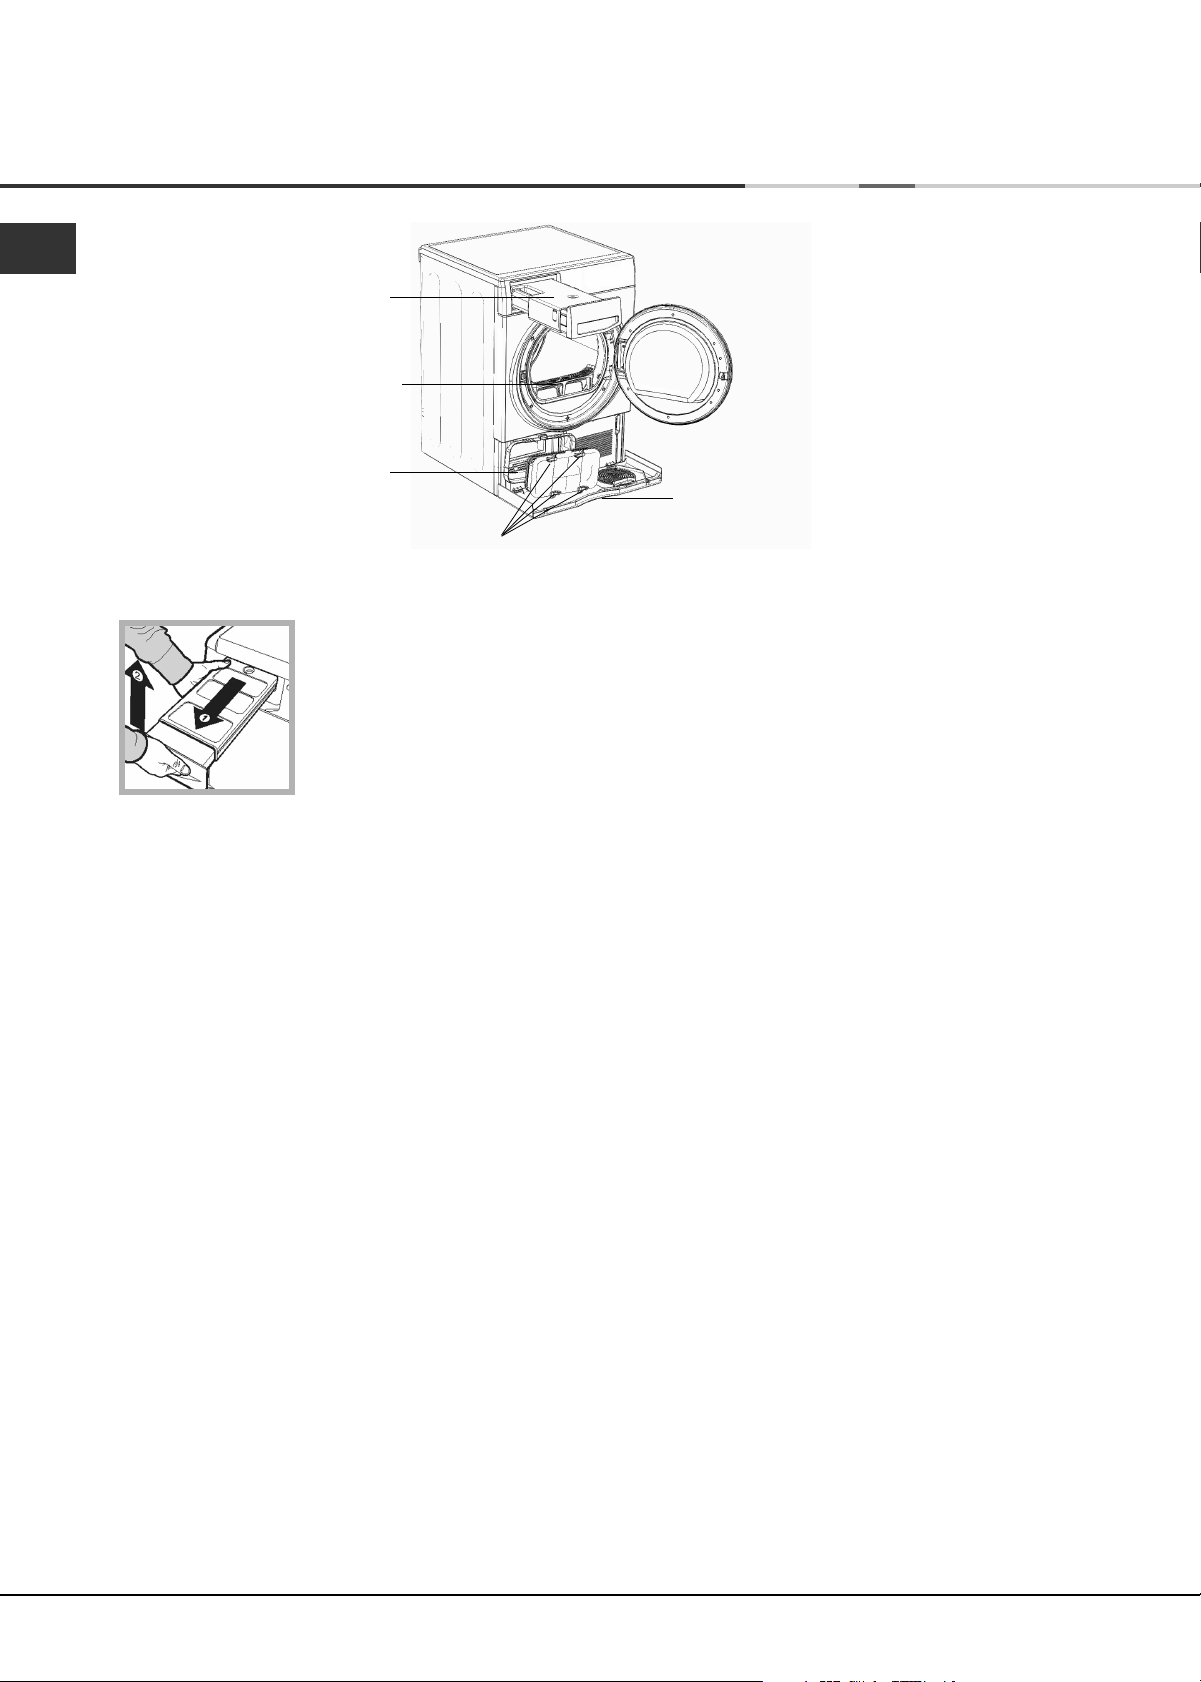
Entretien et Nettoyage
F
Réservoir d’eau
Filtre
Unité filtre de la
pompe à chaleur
Loquets
Couvercle de l'unité filtre de la
pompe à chaleur
Videz le réservoir d’eau après chaque
cycle
Tirez le réservoir pour l'extraire
du sèche-linge et retirez le petit
capot ou le grand capot, videz-le
dans un évier ou autre, pour en
éliminer le contenu. Remettez en
place le capot et remettez le
réservoir bien en place.
! Toujours vérifier et vider le récipient avant de
commencer un nouveau programme de séchage.
! Si le réservoir d’eau n’est pas vidé, les problèmes
suivants peuvent se vérifier:
- L’arrêt du chauffage de l’appareil (le linge pourrait
donc être encore humide à la fin du cycle de
séchage) (voir Les Commandes).
●
Amorçage du système de récupération d’eau
Sur un sèche-linge neuf, le réservoir d’eau ne
récupérera pas l’eau tant que le système n’aura
pas été amorcé... ceci nécessitera 1 ou 2 cycles de
séchage. Une fois amorcé, il récupérera l’eau à
chaque cycle de séchage.
Nettoyage
●
Les parties externes en métal ou en plastique et les
pièces en caoutchouc peuvent être nettoyées avec
un chiffon humide.
●
Périodiquement (tous les 6 mois), aspirez la grille
d’entrée d’air de devant, ainsi que les évents à l’arrière
du sèche-linge pour retirer toute accumulation de
peluche ou poussière. En outre, pour retirer
l’accumulation de peluche de l’avant des zones de
pompe à chaleur et de filtre, nettoyez
occasionnellement avec un aspirateur.
! N’utilisez pas de solvants ou d’abrasifs.
! Faites vérifier régulièrement votre sèche-linge par
des techniciens agréés pour assurer une sécurité
électrique et mécanique (voir Service d’Entretien).
Conseils rapides
●
N’oubliez pas de nettoyer le filtre de la
porte et la pompe à chaleur après
chaque charge.
●
N’oubliez pas de vider le réservoir
d’eau après chaque charge.
Vérifiez le tambour après chaque cycle
Tournez le tambour à la main afin de retirer les petits
articles (mouchoirs) qui pourraient y avoir été oubliés.
Nettoyage du tambour
! Pour nettoyer le tambour, ne pas utiliser d’abrasifs,
de laine d’acier ni de produits de nettoyage pour
acier inoxydable.
Un film coloré peut parfois apparaître à la surface du
tambour en acier inoxydable. Il peut être dû à une
combinaison de l’eau et/ou des produits de nettoyage
(ex. adoucissant textile provenant du lavage). Ce film
coloré n’affecte pas la performance du sèche-linge.
26
! Vous obtiendrez ainsi, des performances
optimales.
Page 27
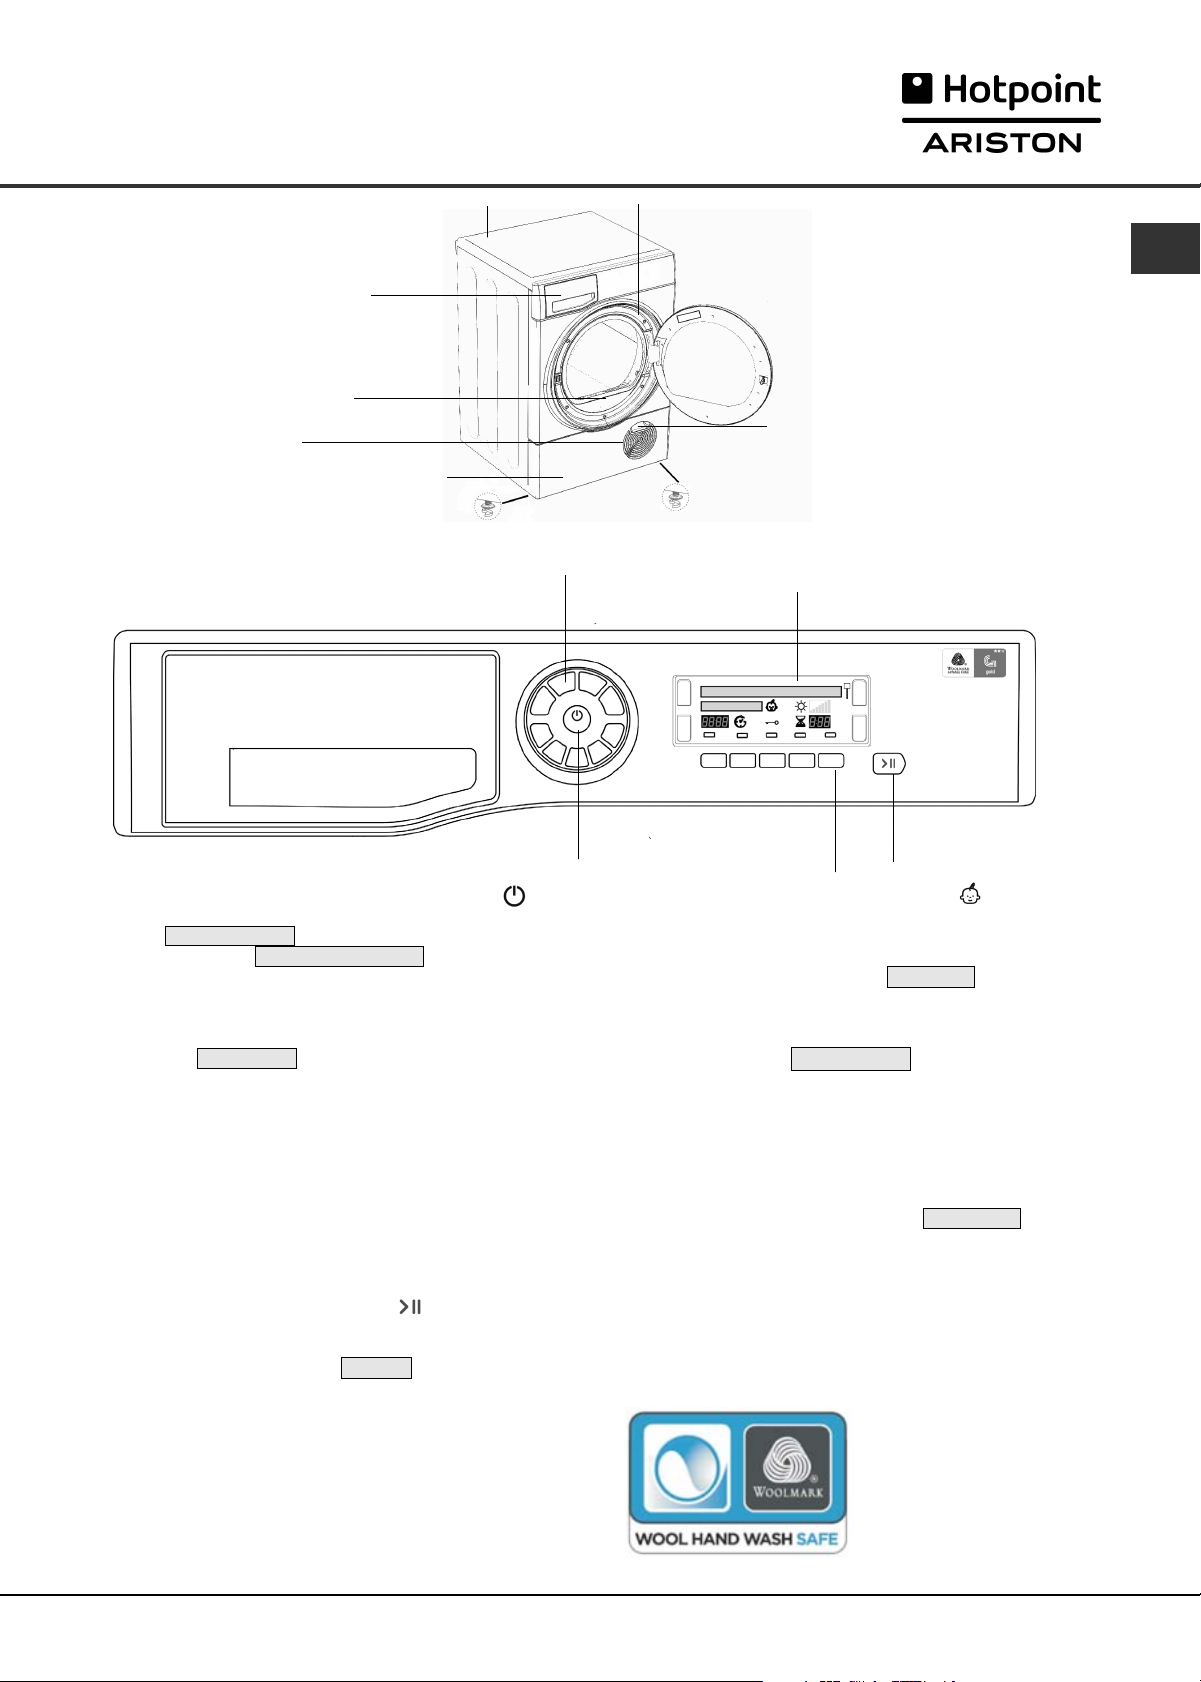
Description du sèche-linge
Caractéristiques
Réservoir d’eau
Grille d’entrée d’air
Couvercle du filtre de la
Plaque signalétique
Filtre
pompe à chaleur
Panneau de commandes
Boutons de Sélection de
Pied réglable
PROGRAMME
Numéro du Modèle et
Numéro de Série
Poignée du couvercle du
filtre de la pompe à chaleur
(pousser pour ouvrir)
L’Affichage
F
Bouton
MARCHE/ARRÊT
Vous appuyez sur le bouton MARCHE/ARRÊT
lorsque le sèche-linge fonctionne : si l'affichage
indique
l'affichage indique
bouton appuyé et l'affichage indique un compte à
rebours : 3, 2,1 et s'arrête.
Appuyez de nouveau sur le bouton et maintenez-le
enfoncé pendant 3 secondes, l'affichage indique
rapidement
Les boutons de Sélection de PROGRAMME
permettent de choisir un programme : appuyez sur
le bouton correspondant au programme que vous
souhaitez sélectionner (voir Démarrage et Programmes).
Les boutons/témoins OPTION : ces boutons
sélectionnent les options disponibles pour votre
programme sélectionné (voir Les Commandes). Les
témoins situés à côté des boutons sur l’affichage
s’allument pour indiquer que l’option a été
sélectionnée.
Le bouton/témoin DÉPART/PAUSE démarre un
programme sélectionné. Quand un programme est en
cours, appuie sur ce bouton en pause le programme.
Le sèche-linge émet un bip,
sèche-linge s'arrête.
Le témoin est vert lorsque le programme fonctionne,
orange clignotant si le programme a été mis en pause
ou vert clignotant si le sèche-linge est en attente du
lancement d’un programme (voir Démarrage et
Programmes). Remarque : ce voyant clignote orange
pendant la phase Après-Défroissage.
L’Affichage fournit des recommandations et des
renseignements sur le programme en cours et son
avancement (voir page suivante).
DÉCONNEXION , le sèche-linge s'arrête. Si
MAINTENIR APPUYÉ , maintenez le
ALLUMAGE .
PAUSE s'affiche et le
Boutons et témoins
de SÉCURITÉ ENFANTS
et Options
Bouton et icône
sur ce bouton pendant quelques instants après avoir
sélectionné votre
Ceci empêche toute modification des réglages,
l’affichage indique brièvement
cette icône est allumée, les autres boutons ne sont
plus actifs. Appuyez sur le bouton et maintenez
appuyé pour annuler. L'icône s'éteint. L’affichage
indique brièvement
Remarque: ce sèche-linge, conformément aux
nouvelles normes en vigueur dans le domaine de
l’économie d’énergie, est équipé d’un système
d’extinction automatique (veille) activé après environ
30 minutes d’inutilisation. Appuyez sur le bouton
MARCHE/ARRÊT et maintenez-le enfoncé jusqu'à ce
que l'affichage indique rapidement
redémarre.
Le cycle de séchage pour la laine de ce machine a
été testé et approuvé par The Woolmark Company. Le
cycle est adapté au séchage des vêtements en laine
portant la mention "lavage à la main" à condition que
les vêtements soient lavés en utilisant un cycle de
lavage à la main approuvé par Woolmark et séchés en
respectant les instructions indiquées par le fabricant.
SÉCURITÉ ENFANTS : appuyez
programme et d’éventuelles options.
DÉBLOQUÉE .
Bouton et Témoin
DÉPART/ PAUSE
BLOQUÉE . Lorsque
ALLUMAGE et qu'il
M1219
Au Royaume-Uni, en
Irlande, à Hong Kong et
en Inde, la marque
Woolmark est une
marque de certification.
27
Page 28
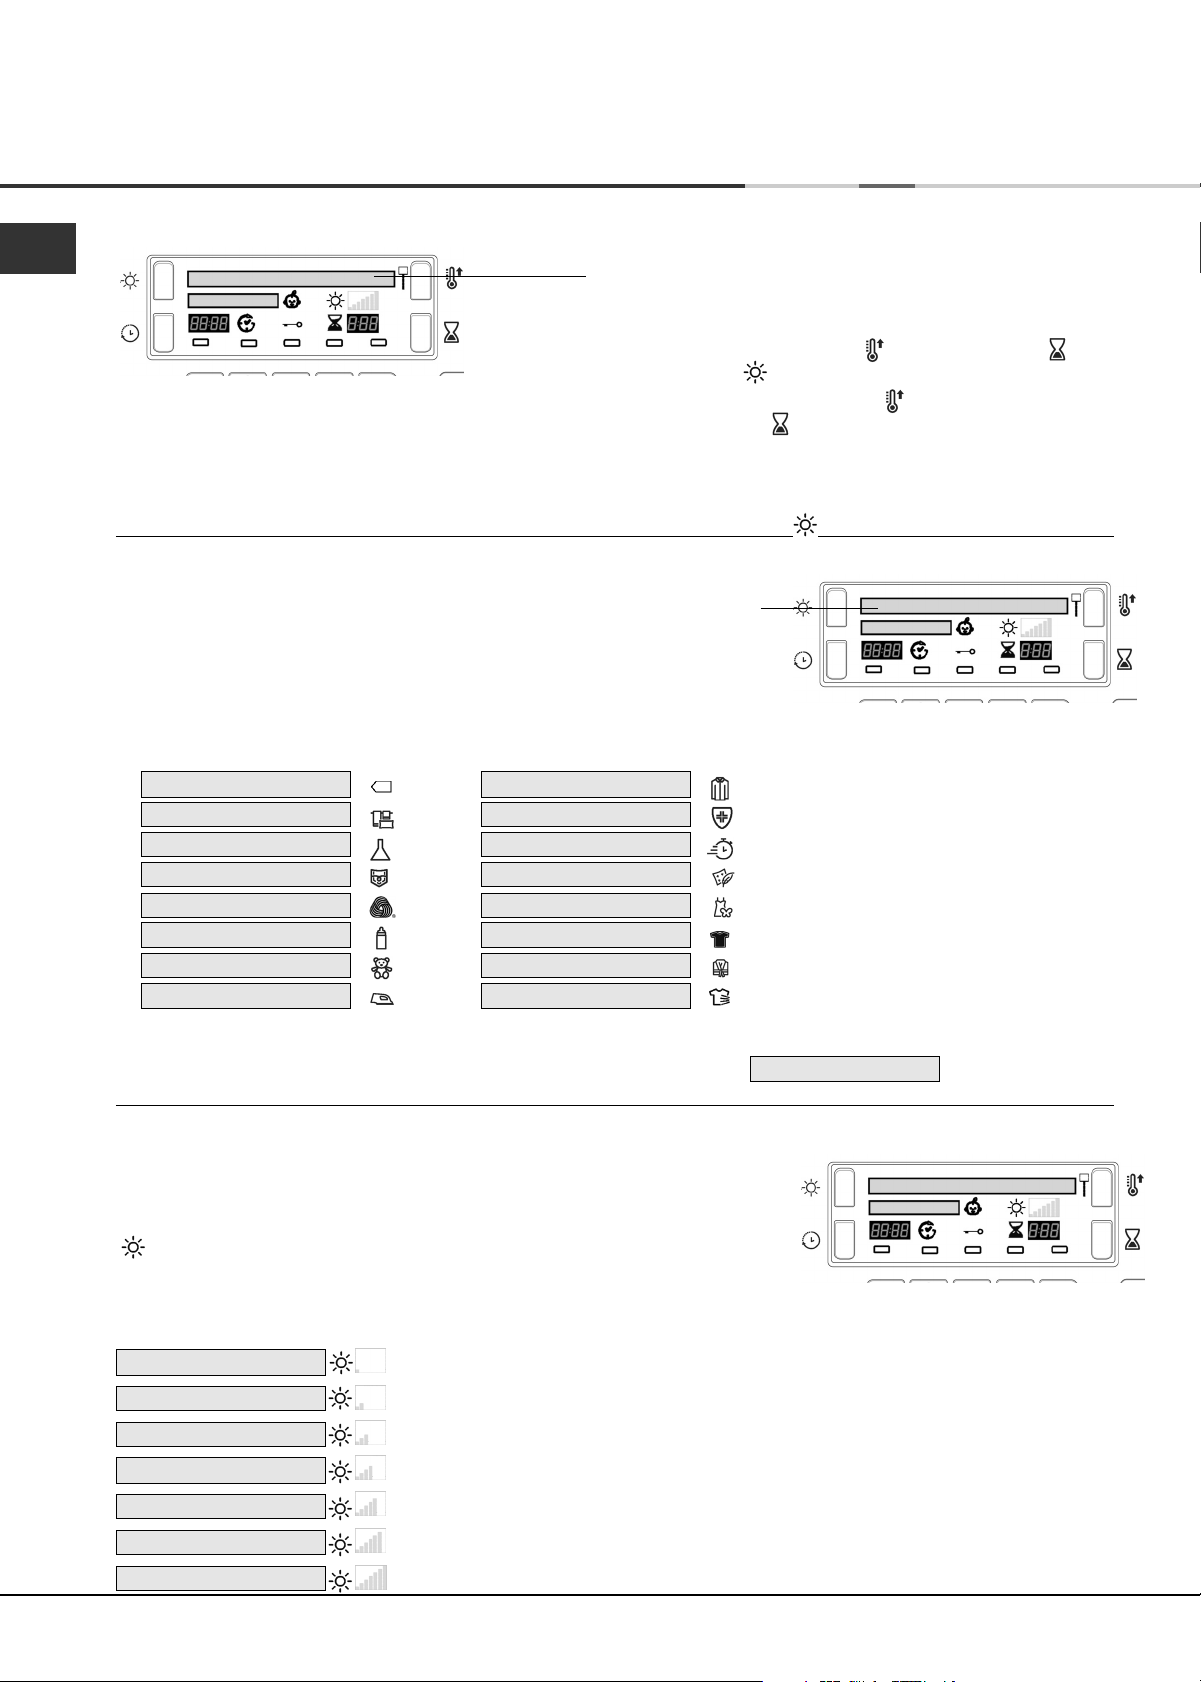
Affichage
Choix de la langue
F
À la première mise en route de votre sèche-linge, vous allez devoir choisir la langue préférée dans la liste proposée.
Pour changer : la langue actuellement sélectionnée doit
clignoter sur la première ligne de l’affichage.
- Appuyez sur le bouton MARCHE/ARRÊT pour éteindre
l'affichage puis appuyez simultanément sur les 3 boutons
et maintenez-les enfoncés : Niveau de chaleur, Durée
de séchage et Niveau de séchage pendant 5 secondes.
- Appuyez sur sur le bouton de Niveau de chaleur ou
sur le bouton de Durée de séchage pour faire défiler
la liste vers le haut ou vers le bas.
- Lorsque la langue dont vous avez besoin clignote sur la
ligne du haut de l'affichage, appuyez sur le bouton de
Niveau de séchage pour valider votre choix.
Comprendre l’affichage
Sélection et affichage des programmes
Le programme sélectionné est indiqué sur la première ligne de l’affichage
lorsque vous appuyez sur le bouton correspondant.
Ce message reste visible tant que le programme est en cours.
Huit boutons ont une double fonction : appuyez une fois sur le bouton pour
accéder à la première fonction et appuyez une nouvelle fois pour accéder à
la seconde. Le programme sélectionné s'affiche. Le dernier bouton permet de
sélectionner Mon Programme.
Première fonction (1 appui) Deuxième fonction (2 appuis)
1
COTON STANDARD
2
LIT & BAIN
3
SYNTHÉTIQUES
4
JEANS
5
LAINE
6
DÉLICATS BÉBÉ
7
PELUCHES
8
REPASSAGE FACILE
9
MON PROGRAMME (voir ci-dessus)
CHEMISES
ANTIALLERGIQUE
SECHAGE RAPIDE
DUVET
SOIE
FONCÉ
DOUCE CHALEUR
RAFRAÎCHISSEMENT
M
Mon Programme : Cuando seleccione el botón de Mon Programme, l’affichage indique le programme que vous avez
sélectionné en plaçant la lettre ‘M’ devant le nom du programme. Exemple :
M COTON STANDARD (voir Démarrage et
Programmes).
Niveaux de séchage
Lorsque vous sélectionnez un programme automatique qui dispose de différents niveaux de séchage (voir Tableau
des programmes).
La deuxième ligne de l’affichage indique le niveau de séchage dont vous
avez besoin. Chaque fois que vous appuyez sur le bouton Niveau de séchage
, l’option suivante de la liste ci-après est sélectionnée et s'affiche.
L'affichage indique également 1 à 7 bâtons en fonction du niveau de séchage
sélectionné. Ces bâtons s'affichent au fur et à mesure du déroulement du programme.
! Certains programmes automatiques ne permettent pas de modifier le niveau de séchage ou ne peuvent pas être
associés à toutes les options de niveau de séchage.
HUMIDE
À REPASSER
DÉLICAT CINT
SUR CINTRE
Linge humide : sèche vos articles pour qu'ils soient prêts à être repassés à l'aide d'une centrale
ou d'une presse.
Sec pour repassage : sèche vos articles pour qu'ils soient prêts à être repassés à l'aide d'un fer.
Sec pour cintre Plus : sèche vos articles délicats pour qu'ils soient prêts à être mis sur cintre apour
finir de sécher.
Sec pour cintre : sèche vos vêtements pour qu'ils soient prêts à être mis sur cintre pour finir de sécher.
DÉLICAT RANG
À RANGER
À PORTER
28
Séchage léger : sèche vos articles délicats pour qu'ils soient prêts à être rangés.
Sec pour placard (À Ranger) : sèche vos articles pour qu'ils soient prêts à être rangés.
Sec extra : sèche vos vêtements pour qu'ils soient prêts à être portés.
Page 29
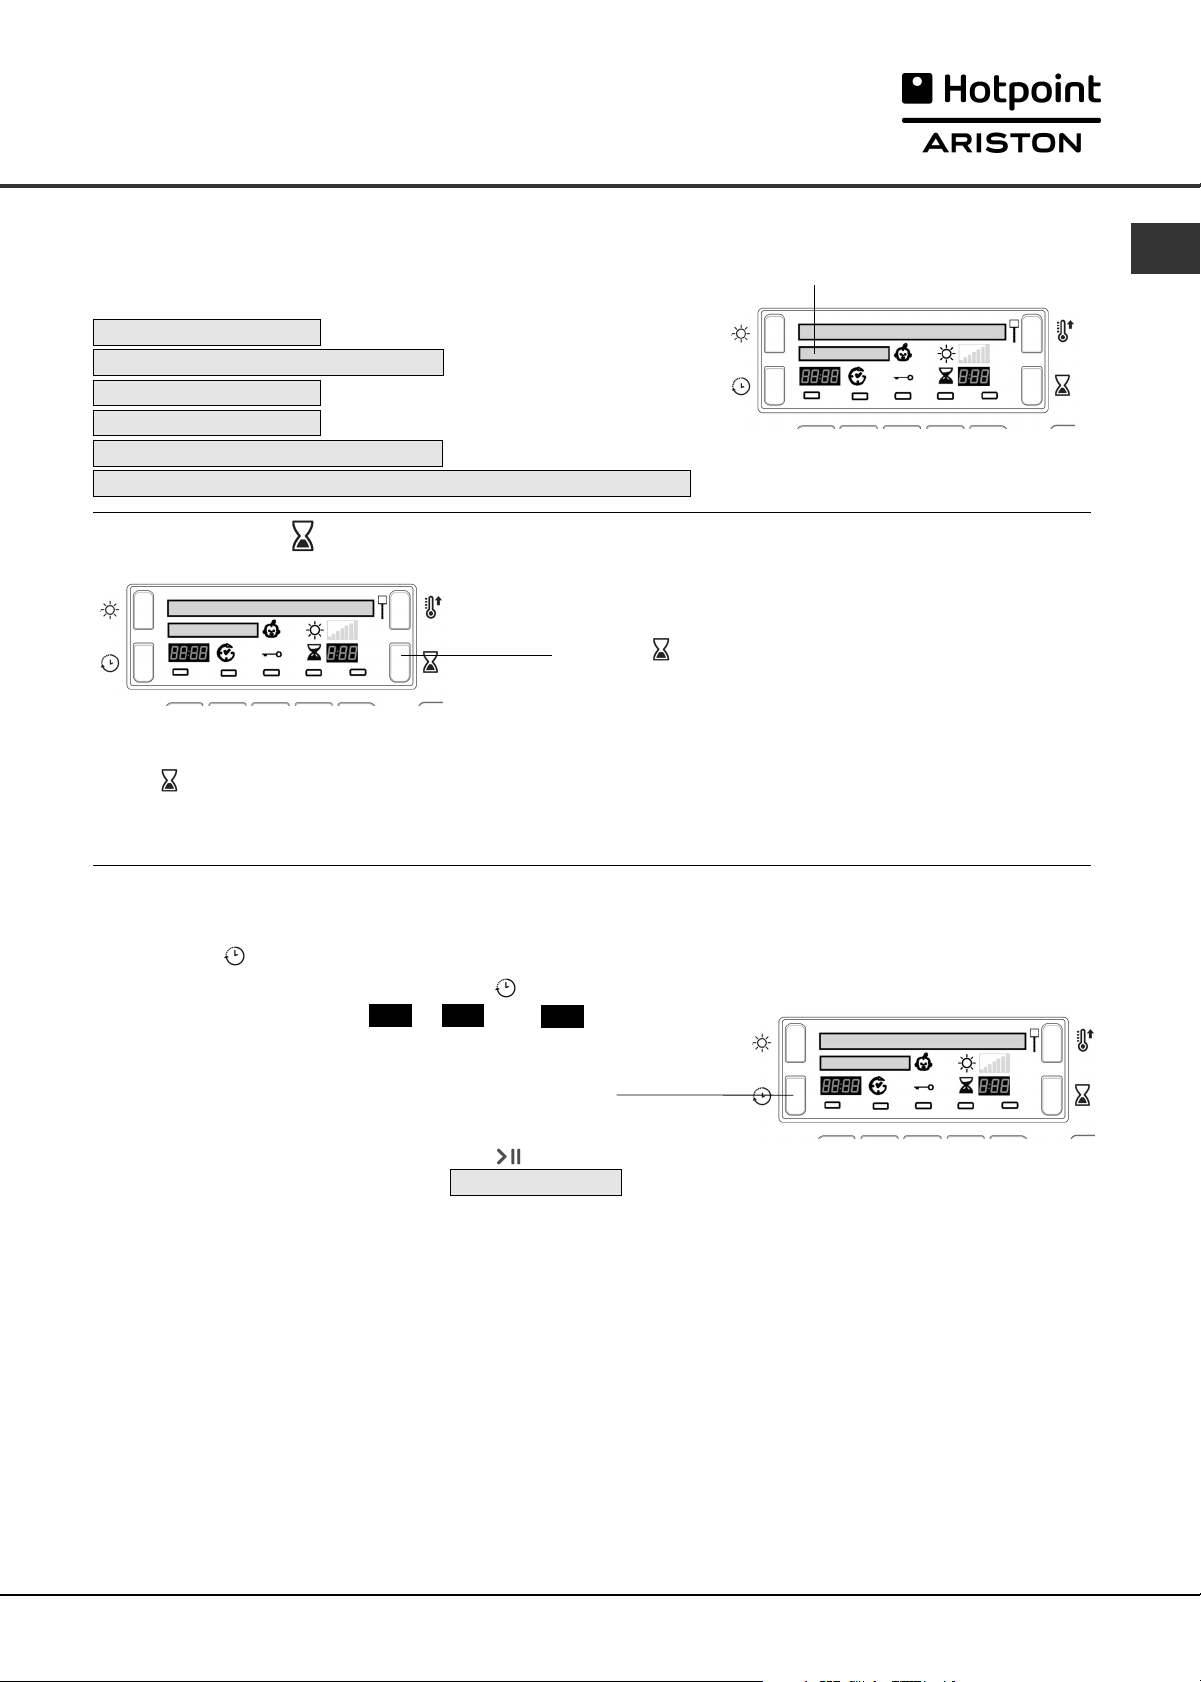
Affichage
Avancement du programme
La deuxième ligne de l’affichage indique l’état du programme au fur et à mesure qu’il avance :
(les messages longs défilent sur la ligne.)
SÉCHAGE
REFROIDISSEMENT TAMBOUR
EN CHAUFFE
PRÊT
FIN DE CYCLE, ANTIFROISSAGE
FIN DE CYCLE, NETTOYER LE FILTRE ET VIDER LE RÉSERVOIR
Programme Douce Chaleur
(si l'option Après Défroissage est sélectionnée).
Séchage minuté
Après avoir sélectionné un programme comportant une
option Séchage minuté, appuyez sur le bouton de durée de
séchage : le temps sélectionné augmente sur l’affichage
chaque fois que vous appuyez brièvement sur le bouton
(voir Démarrage et Programmes).
La durée et le nombre d'options de durée disponibles diminuent chaque fois que vous appuyez sur le bouton en
fonction du programme/de la matière sélectionné(e).
L'icône Séchage minuté s'affiche à côté du temps.
F
Le temps sélectionné reste affiché après le départ du programme mais peut être modifié à tout moment, si vous le
souhaitez.
Départ différé et Temps restant
Certains programmes peuvent avoir un départ différé (voir Démarrage et Programmes). Appuyez sur le bouton
Départ différé , l'icône se met à clignoter.
Chaque pression sur le bouton Départ différé avance le
départ différé
avant
d'annuler le départ différé après deux secondes.
Le retard s’affiche à côté du bouton Départ différé.
L’affichage décompte les minutes avant le départ une fois
que l’on a appuyé
La deuxième ligne de l’affichage indique
Vous pouvez modifier ou annuler le retard sélectionné à tout moment, si vous le souhaitez.
Après avoir appuyé sur le bouton Départ/Pause, le Retard ou le Temps restant s'affiche en heures et minutes et un
compte à rebours s'effectue par minute.
d’une heure, de : à
sur le bouton Départ/Pause
1h 24h
, puis
OFF
.
DÉMARRE DANS
Temps restant
Quand la durée d'attente s'est écoulée et si aucun retard n'est sélectionné, pour tous les programmes, cette partie
de l'affiche indique :
- la durée restante estimée avant la fin du programme, pour les programmes automatiques
- la durée restante effective pour un programme temporisé
Quand un programme temporisé est sélectionné, la durée affichée pendant le cycle correspond au temps effectif
restant.
Quand un programme Automatique est sélectionné, la durée affichée correspond à une estimation de la durée
restante. Quand un programme est sélectionné, l'Affichage indique la durée nécessaire au séchage d'une charge
pleine. Le temps restant est contrôlé constamment pendant le cycle de séchage et est modifié au fur et à mesure
pour afficher l’estimation la plus précise possible.
Les deux points séparant les heures et les minutes, sur l'Affichage, clignotent. Ceci signifie que la durée est
décomptée.
29
Page 30

Affichage
Recommandations
F
La deuxième ligne de l’affichage fournit également des recommandations
et des rappels : (les rappels interviennent en fin de programme)
FIN DE CYCLE, NETTOYER LE FILTRE ET VIDER LE RÉSERVOIR
●
Rappel : vous devez vider le réservoir d’eau et
nettoyer le filtre chaque fois que vous utilisez le
sèche-linge (voir Entretien).
VIDER LE RÉSERVOIR
●
Indique que le réservoir d’eau est plein. Après avoir
remis en place le réservoir vidé, il faut quelques
secondes avant que le message ne disparaisse; le
sèche-linge doit fonctionner pour que ceci se
produise (voir Les Commandes).
Remarque: Si le réservoir d’eau se remplit et que
ce message s’affiche, le chauffage est désactivé
et vos vêtements ne sèchent pas.
NETTOYER LE CONDENSEUR, LE FILTRE ET VIDER LE RÉSERVOIR
●
Ce message indique que vous devez nettoyer le
filtre de la pompe à chaleur (voir Entretien) et il
interviendra à intervalles dépendant selon la fréquence
d’utilisation du sèche-linge. À la fin du programme
suivant, le message disparaît. Vous devez également
nettoyer le filtre.
ACTION ANTIALLERGIQUE NON GARANTIE, NETTOYER LE FILTRE
●
Ce message apparaît au cours du programme
Antiallergique et indique que le filtre doit être nettoyé
pour terminer complètement le cycle antiallergique
(voir Entretien).
Démarrage et Programmes
Choisir un programme
1. Branchez la fiche du sèche-linge dans la prise électrique.
2. Triez votre linge en fonction du type de textiles (voir
Linge).
3. Ouvrez la porte et en assurant-vous que le filtre soit
propre et en place et le réservoir d’eau est vide et en
place (voir Entretien).
4. Chargez la machine et assurez-vous que des articles
ne bloquent pas le joint de la porte. Fermez la porte.
5. Si l’affichage n’est pas allumé : appuyez sur le
bouton MARCHE/ARRET
6. Appuyez sur le bouton de sélection de programme
qui correspond au type de tissu que l’on sèche ;
après avoir vérifie le Tableau des Programmes
(voir Programmes) ainsi que les indications pour
chaque type de tissu (voir Linge).
Si vous avez appuyé sur le bouton ; les
-
étapes 7 et 8 ne sont pas nécessaires
ci-dessous).
Choisissez l'option Durée de séchage ou Intensité
7.
de séchage.
- Pour l'option Durée de séchage, appuyez sur le
bouton Durée de séchage et relâchez-le jusqu'à
faire apparaître la durée de séchage souhaitée, ou…
- Pour sélectionner les paramètres de séchage
proposés par défaut, appuyez sur le bouton
Intensité de séchage et relâchez-le jusqu'à faire
apparaître l'intensité souhaitée.
! Reportez-vous au tableau des programmes pour
plus de précisions : possibilité de sélectionner les
Niveaux de séchage, le Séchage minuté et les
Options.
8. Réglez le depart différé de temporisation et
d’autres options si nécessaire (voir Affichage).
Appuyez sur le bouton Départ/Pause pour
9.
commencer. L’affichage indiquera le temps qu’il reste
jusqu’à la fin.
(voir
Au cours d’un programme de séchage, vous pouvez
vérifier votre linge et sortir les articles qui sont secs
pendant que les autres continuent à sécher.
Lorsque vous refermez la porte, appuyez sur le
bouton
Si vous ouvrez la porte pour contrôler le linge, vous
prolongez le temps de séchage car le compresseur
de la pompe à chaleur ne démarrera pas pendant
les 5 minutes suivant la fermeture de la porte et
appuyez sur le bouton Départ/Pause (voir Les
Départ/Pause afin de continuer le séchage.
Commandes).
10. Pendant les quelques dernières minutes des
programmes de séchage, avant de terminer le
programme, celui-ci entre dans la phase finale de
REFROIDISSEMENT (les textiles sont refroidis), que
vous devez toujours laisser se terminer.
11. À la fin du cycle de séchage, un message s'affiche :
- si
FIN DE CYCLE, NETTOYER LE FILTRE ET VIDER LE
RÉSERVOIR
s'affiche, l'alarme sonore émet
3 bips (Remarque: si l'option SIGNAL
SONORE a été sélectionnée, l'alarme sonore
émet trois bips toutes les 30 secondes
pendant 5 minutes).
- si
FIN DE CYCLE, ANTIFROISSAGE s'affiche, ceci
signifie que l'option Défroissage été sélectionnée.
Si vous ne retirez pas immédiatement le linge
du tambour, le sèche-linge tournera de temps
à autres pendant 10 heures ou jusqu'à ce que
vous ouvriez la porte. L'alarme sonore émet 3
bips pour confirmer la fin du programme.
12. Ouvrez la porte, sortez votre linge, nettoyez le
filtre et remettez-le en place. Videz le réservoir
d’eau et replacez-le (voir Entretien).
13. Débranchez le sèche-linge.
Bouton Mon Programme:
La première fois que vous appuyez sur ce bouton, la deuxième ligne de l’affichage indique : PRESSION POUR VALIDER
Après avoir sélectionné votre programme et vos options préférés, vous pouvez sauvegarder ces paramètres :
appuyez sur le bouton Mon Programme et maintenez-le enfoncé pendant au moins 5 secondes. clignote sur la
première ligne suivi du programme sélectionné. L’alarme sonore émet alors un bip et la deuxième ligne de l'affichage
indique
La prochaine fois que vous aurez besoin de ce programme, appuyez sur le bouton , puis sur le bouton
Départ/Pause . Le sèche-linge exécutera alors ce programme
Si vous le souhaitez, vous pouvez modifier le programme mémoire en sélectionnant un nouveau programme ou de
nouvelles options puis en appuyant de façon continue sur le bouton (comme indiqué ci-dessus).
30
MÉMOIRE .
.
Page 31

Démarrage et Programmes
PROGRAMMES BASIQUES (ESSENTIALS) - Tableau des programmes
! Si l’affichage n’est pas allumé ; appuyez sur le bouton MARCHE/ARRÊT et sélectionnez ensuite le programme.
Programme Options disponibles
✓
Signal sonore ou
✓
✓
✓
✓
✓
Moins de peluches
*Après-Defroissage
✓
✓
✗
✓
✗
✗
✗
✗
Départ Différé
Pré-Defroissage
Coton Standard
1
Chemises
Lit & Bain
2
Anti Allergique
Synthétiques
3
Sechage Rapide
*VOUS NE POUVEZ PAS SÉLECTIONNER ENSEMBLE LES OPTIONS APRÈS-DÉFROISSAGE ET SIGNAL SONORE
Coton Standard
●
Ce programme est destiné aux articles en coton.
●
La durée de ce programme est fonction de la quantité de linge, de l'intensité de séchage sélectionnée et de la
vitesse d'essorage utilisée dans votre lave-linge (voir Linge).
●
Le programme Coton standard correspondant à la réglementation UE 392/2012 est le Programme 1 avec la chaleur
haute et niveau de séchage Sec pour placard (Configuration standard/ prédéfinie initiale). Ce programme est le plus
efficace en termes de consommation d’énergie (UE 392/2012).
Chemises
Option Température Haute
Option Moyenne température
La durée de ce programme est fonction de la quantité de linge, de l'intensité de séchage sélectionnée et de la vitesse
d'essorage utilisée dans votre lave-linge.
Les charges séchées avec l'intensité Sec pour placard sont normalement prêtes à être portées. Mais les bords ou les
coutures peuvent être légèrement humides. Vous pouvez alors essayer de retourner les chemises, puis de
relancer le programme, pour une courte durée.
Lit et Bain
●
Ce programme est destiné aux serviettes et aux draps en coton.
●
La durée de ce programme est fonction de la quantité de linge, de l'intensité de séchage sélectionnée et de la
vitesse d'essorage utilisée dans votre lave-linge (voir Linge).
●
Les charges séchées avec Sec Extra sont généralement prêtes à être utilisées. Mais les bords ou les coutures peuvent
être légèrement humides notamment pour les grands articles. Vous pouvez alors essayer d'écarter les articles, puis de
relancer le programme pour une courte durée.
Programme Antiallergique
Ce programme bénéficie de l'homologation d'Allergy UK. Ce cycle spécial Antiallergique garantit la réduction et l'élimination
efficaces des allergènes dans les vêtements. Ce programme permet de neutraliser l'action des allergènes les plus courants
(notamment les acariens dermatophagoides) grâce au maintien d'une température constante pendant une durée prolongée.
Ce programme peut être utilisé pour sécher et traiter une charge de linge humide pleine, ou simplement pour traiter une
charge de 4 kg de linge sec.
Si l'affichage indique
Synthétiques
●
Ce programme est destiné au séchage à basse température des articles synthétiques ou au séchage à moyenne
température des articles en fibres mélangées en synthétique et coton.
●
La durée de ce programme est fonction de la quantité de linge, de l'intensité de séchage sélectionnée et de la
vitesse d'essorage utilisée dans votre lave-linge (voir Linge).
Séchage rapide
Ce programme permet des durées de séchage réduites pour les petites charges jusqu'à 1 kg.
Remarque : Le niveau de séchage de ce programme est Sec pour placard.
Option Température Haute Programme pour Cotons jusque 1 kg
Option Moyenne température Programme pour Synthétiques jusque 1 kg
ACTION ANTIALLERGIQUE NON GARANTIE, NETTOYER LE FILTRE : nettoyez le filtre et redémarrez le programme.
✓
✓
✓
✓
✓
✓
✓
✓
✓
✓
✓
✓
●
Ce programme est particulièrement adapté aux chemises en coton.
●
Il peut être utilisé pour des charges jusqu'à 3 kg (environ 10 chemises).
●
Ce programme est particulièrement adapté aux chemises en synthétique ou
en fibres naturelles et synthétiques mélangées, comme le polyester et le coton.
●
Il peut être utilisé pour des charges jusqu'à 3 kg (environ 14 chemises).
Niveau de chaleur
- HAUTE
- MOYENNE
- BASSE
- HAUTE
- HAUTE
- MOYENNE
- HAUTE
- MOYENNE
✗
- MOYENNE
- BASSE
- MOYENNE
- BASSE
Séchage
✓
✓
✗
✗
✗
●
Un programme Automatique
✓
●
Un programme Automatique
Niveaux de séchage disponibles
par défaut repérée par une )
(
Linge humide
Sec pour
repassage
Sec pour cintre
minuté
L’option de
détection
✓
✓
✓
✓
✓
✓
✓
✓
✓
✓
✓
✓
✓
✓
✓
✓
✓
✓
Plus
✓
✓
✓
✓
✓
✓
✓
Sec pour cintre
Séchage léger
✓
✓
✓
✓
✓
✓
✓
✓
✓
✓
✓
✓
✓
✓
✓
✓
✓
✓
Sec pour placard
Sec extra
✓
✗
✗
✓
✗
✗
F
31
Page 32

Démarrage et Programmes
PROGRAMMES SPÉCIAUX (EXCLUSIVES) - Tableau des programmes
F
! Si l’affichage n’est pas allumé ; appuyez sur le bouton MARCHE/ARRÊT et sélectionnez ensuite le programme.
Programme Options disponibles
ou
Signal sonore
✓
✗
✓
Moins de peluches
✗
*
✗
*
✗
✗
✗
*
✗
Départ Différé
Pré-Defroissage
Signal sonore
*Après-Defroissage
Jeans
4
Duvet
Laine
5
Soie
Délicats Bébé
6
Jeans
●
Ce programme est particulièrement adapté aux jeans en denim. Avant de faire sécher vos jeans, retournez les
poches avant.
●
Il peut être utilisé pour des charges jusqu'à 3 kg (environ 4 pantalons).
●
Ne mélangez pas les articles de couleur sombre et de couleur claire.
●
Ce programme peut également être utilisé pour d'autre articles du même matériau comme les vestes.
●
La durée de ce programme est fonction de la quantité de linge, de l'intensité de séchage sélectionnée et de la
vitesse d'essorage utilisée dans votre lave-linge.
●
Les charges séchées avec Sec Extra plus sont normalement prêtes è être portées. Mais les bords ou les coutures
peuvent être légèrement humides. Vous pouvez alors essayer de retourner les jeans, puis de relancer le
programme, pour une courte durée.
! L'utilisation de ce programme est déconseillée si vos jeans comportent des ceintures élastiquées, des clous ou des broderies.
! ATTENTION ! Lorsque vous sélectionnez ce programme, ne mettez pas à sécher des articles endommagés pouvant
s'effilocher et ainsi obstruer le filtre et les grilles d'aération. Vous risqueriez de provoquer un incendie.
●
Ce programme ne permet de sécher que des couettes une personne : ne convient PAS pour le séchage des couettes
deux personnes ou des très grandes couettes.
●
Les charges séchées dans ce programme sont normalement prêtes à être utilisées, mais les articles peuvent être
légèrement humides par endroits. Vous pouvez alors essayer d'écarter les articles, de les secouer, puis de relancer le
programme pour une courte durée.
●
Convient également pour le séchage des vestes matelassées.
●
Sélectionnez l'intensité de chaleur élevée (température élevée) pour les couettes en coton et l'intensité de chaleur
moyenne (température moyenne) pour les couettes synthétiques.
●
La durée de ce programme est fonction de la quantité de linge, et de sa densité, et de la vitesse d'essorage utilisée
dans votre lave-linge.
é
Fonc
*VOUS NE POUVEZ PAS SÉLECTIONNER ENSEMBLE LES OPTIONS APRÈS-DÉFROISSAGE ET SIGNAL SONORE
Couette (DUVET)
✓
✓
✗
✓
✓
✓
✓
✓
✓
✗
✗
✗
✗
✗
✓
✓
✗
✗
Niveau de chaleur
✗
- HAUTE
- MOYENNE
✗
✗
✗
✗
✗
✗
✗
✗
✓
✗
Séchage
minuté
Niveaux de séchage disponibles
(par défaut repérée par une )
L’option de
détection
Linge humide
Sec pour
repassage
Sec pour cintre
Plus
✓
✓
✓
●
Un programme Automatique
●
Un programme Automatique
✓
✓
✓
✓
✓
✓
●
Un programme Automatique
✓
✓
✓
✓
✓
✓
✓
Sec pour cintre
Séchage léger
Sec pour placard
✓
✓
✓
✓
✓
✓
Sec extra
✓
✗
✗
Programme Lainage (LAINE)
●
Il s’agit d’un programme pour faire tourner les vêtements tolérant le sèche-linge et marqués du symbole .
●
Le programme peut être utilisé pour des charges jusqu’à 1kg (environ 3 pull-overs).
●
Nous recommandons de retourner les vêtements avant de les sécher.
●
La durée de ce programme est fonction de la quantité de linge, de l'intensité de séchage sélectionnée et de la
vitesse d'essorage utilisée dans votre lave-linge.
●
Les charges séchées dans ce programme sont normalement prêtes à porter, mais pour certains vêtements
plus lourds, les bords peuvent être légèrement humides. Laissez sécher naturellement car un séchage
excessif pourrait les endommager.
! Au contraire des autres matières, le mécanisme du rétrécissement de la laine est irréversible ; c’est-à-dire qu’elle
ne reviendra pas à sa taille et à sa forme d’origine.
! Ce programme ne convient pas pour les vêtements acryliques.
Programme Soie
●
Ce programme est particulièrement adapté au séchage des articles en soie délicate.
●
Il peut être utilisé pour des charges jusqu'à 0,5 kg.
●
La durée de ce programme est fonction de la quantité de linge, de l'intensité de séchage sélectionnée et de la
vitesse d'essorage utilisée dans votre lave-linge.
●
Les charges séchées avec l'intensité Sec pour placard sont normalement prêtes à être utilisées, mais pour
certains vêtements, les bords peuvent être légèrement humides. Vous pouvez alors essayer d'écarter les articles
ou de les retourner, puis de relancer le programme, pour une courte durée.
32
Page 33

Démarrage et Programmes
Programme Délicats Bébé
●
Ce programme permet de sécher les petits articles délicats de votre bébé : vêtements et linge de lit (en coton et chenille)
et vos vêtements délicats.
●
NE placez PAS d'articles comme des bavoirs et des couches-culottes comportant du plastique dans le sèche-linge.
●
Il peut être utilisé pour des charges jusqu'à 2 kg.
●
La durée de ce programme est fonction de la quantité de linge, de l'intensité de séchage sélectionnée et de la
vitesse d'essorage utilisée dans votre lave-linge.
●
Les charges séchées dans ce programme sont normalement prêtes à être utilisées, mais pour certains vêtements, les
bords peuvent être légèrement humides. Vous pouvez alors essayer d'écarter les articles ou de les retourner, puis de
relancer le programme, pour une courte durée.
Programme pour linge foncé
Ce programme vous aide à entretenir vos vêtements en coton foncé, par le contrôle de la vitesse de moteur et de la
rotation du tambour, associé à une température de séchage réduite.
●
Il peut être utilisé pour les charges de coton ou de jeans jusqu'à un maximum de 3 kg.
●
La charge doit avoir été essorée en machine avec une vitesse d'essorage située entre 1200 - 1400 rpm.
●
La durée de ce programme dépendra du poids de la charge et de la vitesse d'essorage de votre machine à laver.
●
Ce programme étant un programme de soin pour la protection de vos vêtements foncés, sa durée pourrait être
supérieure à 4 heures.
●
Le niveau de séchage de ce programme est Sec pour placard.
PROGRAMMES SUPPLÉMENTAIRES (EXTRA) - Tableau des programmes
! Si l’affichage n’est pas allumé ; appuyez sur le bouton MARCHE/ARRÊT et sélectionnez ensuite le programme.
Programme Options disponibles
Niveaux de séchage disponibles
(par défaut repérée par une )
✓
F
Départ Différé
Pré-Defroissage
Après-Defroissage
Moins de peluches
Peluches
7
Douce Chaleur
Repassage Facile
8
Rafraîchissement
9
Mon Programme
Signal sonore
✓
✗
✗
✗
✗
✗
✗
✗
Fonction du programme que vous avez sélectionné. Voir aux détails ci-dessus.
M
✗
✗
✗
✗
✗
✓
✗
✗
✗
✓
✓
✗
Niveau de chaleur
✗
✗
✗
✗
Séchage
minuté
L’option de
détection
Linge humide
Sec pour
repassage
●
Un programme Automatique
✗
●
✗
Un programme Automatique
●
Un programme Automatique
✗
●
Un programme Automatique
✗
Sec pour cintre
Plus
Sec pour cintre
Séchage léger
Sec pour placard
Programme Peluches
Ce programme permet d'éliminer plus facilement la poussière et de laver les peluches de bébé plus souvent. En effet, le
temps de séchage est fortement réduit par rapport à un séchage à l'air libre. Il s'agit d'un cycle de séchage délicat basse
température à action mécanique douce, afin de conserver au mieux l'aspect et la brillance d'origine des poils.
Remarque : pour une protection anti-allergique, placez les peluches de bébé au frais pendant 24 heures avant de les
laver et de les mettre à sécher. Renouvelez l'opération toutes les 6 semaines.
Avant le séchage, retirez les accessoires comme les vêtements, les colliers ou les éléments musicaux et protéger les yeux
en plastique en les recouvrant de ruban adhésif après les avoir séchés à l'aide d'un chiffon.
Le temps du programme varie en fonction du contenu exact de la charge. La charge maximale ne doit pas dépasser
2,5 kg. Chaque article ne doit pas peser plus de 600 g.
Programme Douce Chaleur
Ce programme permet de chauffer les serviettes de toilette et les peignoirs pour une agréable sensation de chaleur à la
sortie du bain ou après la douche. Il permet également de réchauffer les vêtements avant de s'habiller en hiver.
Ce cycle sèche les articles à 37°C (température du corps). L'affichage indique
à cette température pendant 4 heures maximum ou jusqu'à ce que vous arrêtiez le cycle en ouvrant la porte lorsque
l'affichage indique
Remarque : Le voyant Départ/Pause est désactivé pendant ce programme.
Rafraîchissement
! "Rafraîchissement" n'est pas un programme de séchage et ne doit pas être utilisé pour des vêtements humides.
●
Il peut être utilisé pour toute charge, mais il est plus efficace sur des charges peu importantes.
●
Ne surchargez pas le sèche-linge (voir Linge).
●
Ce programme de 20 minutes aère vos vêtements à l'air froid. Il peut également être utilisé pour refroidir vos vêtements chauds.
PRÊT . Charge maximale : 3 kg.
EN CHAUFFE et le sèche-linge fonctionne
Sec extra
33
Page 34

Démarrage et Programmes
Programme de Repassage Facile
Le ‘Repassage Facile’ est un programme court de 10 minutes (8 minutes de chauffage suivies d’une période de refroidissement de 2
F
minutes) qui ‘ébouriffe’ les fibres de vêtements qui ont été laissés dans la même position/le même endroit pendant une durée de temps
prolongée. Ce cycle relâche les fibres et les rend plus faciles à repasser et à plier.
! ‘Repassage Facile’ n’est pas un programme de séchage et ne doit pas être utilisé pour des vêtements mouillés.
Pour des résultats impeccables:
1. Ne chargez pas plus que la capacité maximum. Les chiffres suivants font référence au poids sec:
Textile Charge maximum
Coton et cotons mélangés 2,5 kg
Synthétiques 2 kg
Jeans 2 kg
2. Videz le sèche-linge aussitôt le programme terminé, suspendez, pliez ou repassez les articles et rangez-les dans
L’effet ‘Repassage Facile’ varie d’un textile à l’autre. Il fonctionne bien sur les textiles traditionnels comme le Coton ou les Cotons
mélangés, et moins bien sur les fibres acryliques et sur les matériaux comme le Tencel®.
Les commandes
! Attention, après avoir appuyé sur le bouton Départ/Pause
le programme ne peut pas être changé.
Pour modifier un programme sélectionné, appuyez sur le bouton
Départ/Pause .
que le programme e
programme et les éventuelles options nécessaires. Le témoin
clignote alors en vert. Appuyez une nouvelle fois sur le bouton
Départ/Pause
●
Boutons OPTIONS
Ces boutons sont utilisés pour adapter le programme sélectionné à
vos besoins. Il faut sélectionner un programme en appuyant sur
un bouton de sélection de programme avant de pouvoir
sélectionner une option. Les options ne sont pas toutes
disponibles pour tous les programmes (voir Démarrage et
Programmes).Si une option n’est pas disponible et si vous
appuyez sur le bouton, l’avertisseur émet un bip sonore trois
fois. Si l’option est disponible, le témoin situé sur l’afficheur
au-dessus des boutons du bas s’allume pour indiquer que
l’option a été sélectionnée.
Départ Différé
Le départ de certains programmes (voir Affichage et voir
Démarrage et Programmes) peut être retardé d’un délai pouvant
aller jusqu’à 24heures. Assurez-vous que le réservoir d’eau est
vidé avant de régler le départ différé.
Pré-Defroissage
Cette option n’est disponible que si un départ retardé a été
sélectionné. Elle culbute les vêtements de temps à autre durant la
période de délai pour aider à éviter qu’ils ne se froissent.
Après-Defroissage
Lorsque cette option est disponible, et qu’elle est sélectionnée, les
vêtements sont basculés de temps à autre une fois les cycles
de séchage et de refroidissement achevés, pour aider à éviter
que les vêtements ne se froissent au cas où vous ne pourriez
pas les retirer de la machine immédiatement en fin de
programme.
Remarque : le voyant Marche/Pause clignote orange pendant
cette phase.
Remarque : si vous avez sélectionné l'option Signal sonore,
cette option n'est pas disponible.
Bouton de Niveau de chaleur, affichage et icônes
Vous ne pouvez pas modifier l'intensité de chaleur de tous les
programmes. Certains programmes peuvent être associés aux
trois options d'intensité de chaleur : Basse, Moyenne et Élevée
Quand les options de niveau de chaleur sont disponibles,
appuyez sur ce bouton pour modifier le niveau de chaleur.
L'affichage indique alors rapidement le niveau de chaleur
sélectionnée ainsi que l'icône correspondante à cette intensité :
TEMPÉRATURE HAUTE
TEMPÉRATURE MOYENNE
TEMPÉRATURE BASSE
Signal sonore
Si cette option est disponible et sélectionnée, un signal sonore
se déclenche à la fin du cycle de séchage pour vous rappeler
que les vêtements peuvent être retirés du tambour.
Remarque : si vous avez sélectionné l'option Après-Défroissage,
cette option n'est pas disponible.
l’armoire. Si cela n’est pas possible, répétez le programme.
Le témoin clignote en orange pour indiquer
st suspendu. Sélectionnez le nouveau
. Le nouveau programme démarre
.
●
AFFICHAGE DU TEMPS
L’affichage indique soit le temps restant pour les programmes
différés, ou bien la quantité de temps restant pour un
programme de séchage (voir Affichage).
L’affichage indique aussi si votre sèche-linge présente un
problème ; si c’est le cas, l’affichage indique F suivi d’un
numéro de code d’erreur (voir Que faire en cas de panne).
●
Vider le réservoir d’eau
(Ne tenez pas compte des messages vous indiquant de vider le
réservoir si vous avez raccordé votre sèche-linge à une évacuation.
Il n'est alors pas nécessaire de vider le réservoir d'eau).
Ce message s’affiche pour vous rappeler de vider le réservoir
d’eau.
Si le réservoir d’eau se remplit pendant un programme, le
chauffage s’éteint et le sèche-linge entre dans une période de
Refroidissement. Ensuite, il s’arrête et un message vous indique
VIDER LE RÉSERVOIR .
Vous devez vider le réservoir d’eau puis redémarrer le sèchelinge sinon le linge ne sèchera pas. Après le redémarrage du
sèche-linge le message prend quelque secondes avant de
s’effacer.
Pour éviter cela, videz le réservoir d’eau à chaque fois que vous
utilisez le sèche-linge (voir Entretien).
●
Ouverture de la Porte
Le fait d’ouvrir la porte durant un programme arrête le sèchelinge et a les effets suivants :
Remarque : le voyant Marche/Pause clignote orange
pendant la phase Après-Défroissage d'un programme.
●
L’afficheur indique PAUSE .
●
Durant une phase de délai, celui-ci continue à être
décompté. Le bouton de Départ/Pause doit être appuyé
pour reprendre le programme concerné.
L’affichage change et indique l’état actuel de la machine.
●
Le bouton de Départ/Pause doit être appuyé pour
reprendre le programme. L’affichage change et indique
l’état actuel de la machine.
●
Pendant la phase Après-Défroissage (le fonction après
séchage), le programme se termine.
Le fait d’appuyer sur le bouton de Départ/Pause
redémarre un nouveau programme depuis le début.
●
Système de protection de la pompe à chaleur
Le système de pompe à chaleur a un dispositif de protection du
compresseur qui fonctionne si vous ouvrez la porte ou en cas
d’interruption de l’alimentation électrique ou si vous arrêtez le
séchoir. Ce système évitera que le compresseur de la pompe à
chaleur ne démarre pendant les 5 minutes suivant la fermeture
de la porte et le démarrage du programme.
●
Remarque :
En cas de coupure de courant, éteignez le sèche-linge ou
débranchez-le. Quand le courant revient, appuyez sur le bouton
MARCHE/ARRÊT et maintenez-le enfoncé jusqu'à ce que
l'affichage indique rapidement ALLUMAGE et que le
sèche-linge redémarre. Puis appuyez sur le bouton
Départ/Pause, le programme reprend.
88:88
Moins de peluches
La réduction de l'action mécanique durant la dernière phase de
séchage permet de réduire considérablement les peluches,
protégeant ainsi les fibres de vos vêtements.
34
Page 35

Linge
Trier votre linge
●
Vérifiez les symboles sur les étiquettes des vêtements
pour vous assurer que les articles peuvent être
passés au sèche-linge.
●
Triez votre linge par type de textile.
●
Videz les poches et vérifiez les boutons.
●
Fermez les fermetures Éclair et les crochets et
attachez les ceintures et les cordons.
●
Essorez chaque article de manière à éliminer
autant d’eau que possible.
! Ne chargez pas de vêtements mouillés qui
dégouttent dans le sèche-linge.
Taille maximale de la charge
Ne chargez pas plus que la capacité maximale.
Les chiffres suivants font référence au poids sec :
Fibres naturelles : 8 kg max.
Fibres synthétiques : 4 kg max
! NE surchargez PAS le sèche-linge car cela pourrait
réduire ses performances de séchage.
Étiquettes d’Entretien
Regardez les étiquettes sur vos vêtements, en
particulier lorsque vous les séchez pour la première
fois au sèche-linge. Les symboles suivants sont les
plus courants:
Séchage en machine
Pas de séchage en machine
Séchage à température normale
Séchage à basse température
Coton
Température
Élevée
(HAUTE)
Synthétiques
Température
Moyenne
(MOYENNE)
Acryliques
Basse
température
(BASSE
1 kg
Durée Automatique
Minutes Automatiques
SéchageTemporisé
1:00 - 1:30
60 - 90
1:00
ou 1:30
Temps de séchage après 800-1000trs/mn dans la machine à laver
Durée Automatique
Minutes Automatiques
SéchageTemporisé
0:40 - 0:50
40 - 50
0:40 ou 1:00
Temps de séchage après essorage réduit dans la machine à laver
Durée Automatique
Minutes Automatiques
SéchageTemporisé
Temps de séchage après essorage réduit dans la machine à laver
2 kg
1:20 - 1:40
80 - 100
1:30
1 kg
0:40
Temps de séchage
Le tableau (voir ci-dessous) présente les temps de
séchage APPROXIMATIFS en minutes. Les poids font
référence aux vêtements secs.
Ces temps sont approximatifs et peuvent varier en
fonction des paramètres suivants :
• La quantité d’eau retenue dans les vêtements
après le cycle d’essorage : les serviettes éponge
et les textiles délicats retiennent une quantité
importante d’eau.
• Les textiles : des articles qui sont constitué par le
même type de textile mais qui ont des textures et
des épaisseurs différentes peuvent ne pas avoir le
même temps de séchage.
• La quantité de linge : les articles uniques ou les petites
charges peuvent prendre plus longtemps à sécher.
• La sécheresse : Si vous avez l’intention de repasser
certains de vos vêtements, vous pouvez les sortir de
la machine alors qu’ils sont encore un peu humides.
Les autres vêtements peuvent y rester plus longtemps
si vous voulez qu’ils en sortent entièrement secs.
• Le réglage de la température.
• La température ambiante : si la pièce dans laquelle
le sèche-linge est installé est froide, cela prendra plus
longtemps à l’appareil pour sécher vos vêtements.
• Le volume : certains articles volumineux peuvent
être séchés en machine avec quelques
précautions. Nous vous suggérons de retirer
plusieurs fois ces articles de la machine, de les
secouer et de les remettre dans le sèche-linge
jusqu’à ce que celui-ci ait terminé de les sécher.
! Ne séchez pas excessivement vos vêtements.
Tous les issus contiennent une certaine quantité
d’humidité naturelle, ce qui les rend doux et gonflants.
3 kg
1:40 - 2:10
120 - 130
1:30
ou 2:00
2 kg
0:50 - 1:10
50 - 70
0:40
ou 1:00
4 kg
2:00 - 2:20
120 - 140
ou 2:30
2:00
5 kg
2:20 - 3:00
140 - 180
2:30
3 kg
1:10 - 1:30
70 - 90
1:00
1 kg
0:40 - 1:20
40 - 80
ou 1:00 ou 1:30 1:30 ou 2:00 ou 2:30
2:30 - 3:10
2:30
ou 1:30
6 kg
150 - 190
ou 3:00
1:20 - 2:20
80 - 140
7 kg
2:50 - 3:20
170 - 200
3:00
2 kg
ou 3:40
4 kg
1:20 - 2:00
80 - 120
ou 1:30 ou 2:00
1:00
F
8 kg
3:20 - 4:00
200 - 240
3:40
Remarque : À la fin d’un cycle de séchage, il se peut que les cotons soient toujours humides si vous les avez
regroupés avec les synthétiques. Si cela se produit, faites-leur simplement subir une petite période de séchage
supplémentaire.
35
Page 36

Que faire en cas de panne
F
Votre sèche-linge semble ne pas fonctionner. Avant d’appeler votre Centre de Service d’Entretien (voir Service
d’Entretien), passez en revue les suggestions de dépannage suivantes :
Problème :
Le sèche-linge ne démarre
pas.
Causes possibles / Solution :
●
La fiche n’est pas branchée dans la prise de courant, ou ne fait pas contact.
●
Il y a eu une coupure de courant.
●
Le fusible a sauté. Essayez de brancher un autre appareil dans la prise
électrique.
●
Utilisez-vous une rallonge ? Essayez de brancher le cordon d’alimentation
du sèche-linge directement dans la prise.
●
La porte n’est pas bien fermée ?
●
Le PROGRAMME n’a pas été réglé convenablement (voir Démarrage et
Programmes).
●
Le bouton Départ/Pause n’est pas enfoncé (voir Démarrage et Programmes).
●
Le cycle de séchage ne
démarre pas.
L’appareil met longtemps à
sécher.
Vous avez réglé l’appareil sur un temps de délai (voir Démarrage et
Programmes).
●
Le filtre n’a pas été nettoyé (voir Entretien).
●
Le réservoir d’eau a-t-il besoin d’être vidé ? Le message ‘vider l’eau’ est-il
affiché ? (voir Entretien).
●
Le filtre de la pompe à chaleur a besoin d’être nettoyé ? (voir Entretien).
●
La température choisie n’est pas idéale pour le type de textile que vous
séchez (voir Démarrage et Programmes, et voir Linge).
●
La durée de séchage correcte n’a pas été sélectionnée pour la charge
(voir Linge).
●
La grille d’entrée d’air est obstruée (voir Installation, et voir Entretien).
●
Le linge était trop mouillé (voir Linge).
●
Le sèche-linge était surchargé (voir Linge).
Le message ‘vider l’eau’ est
affiché mais le séchoir n’a
fonctionné que pendant une
courte période.
Le message ‘vider l’eau’ est
affiché et le récipient d’eau
n’est pas plein.
Le programme se termine et le
linge est plus humide que la
normale
L’affichage indique un
disfonctionnement code F
suivi de un ou deux chiffres.
L’affichage indique brièvement
DEMO ON toutes les 6
secondes.
●
Le récipient d’eau n’a probablement pas été vidé au début du
programme. Ne pas attendre le signal de vidage d’eau, toujours vérifier
et vider le récipient avant de commencer un nouveau programme de
séchage (voir Entretien).
●
C’est normal, le message :
FIN DE CYCLE, NETTOYER LE FILTRE ET VIDER LE RÉSERVOIR
s’affiche à titre de rappel de la nécessité de vider le récipient (voir
Affichage et voir Démarrage et Programmes).
! par mesure de sécurité, le sèche-linge a un temps maximum de
programme de 5 heures. Si le programme automatique n’a pas détecté
l’humidité finale requise dans le temps prévu, le sèche-linge terminera le
programme et s’arrêtera. Vérifiez les points ci-dessus et lancez le
programme à nouveau, si le linge est encore humide, contactez le Centre
de service après-vente (voir Service Après-vente).
●
Si l'Affichage indique une erreur :
- éteignez le sèche-linge et débranchez la fiche. Nettoyez le filtre et
l’unité filtre de la pompe à chaleur (voir Entretien). Rebranchez la
prise électrique, mettez le sèche-linge en marche puis lancez un
autre programme. si un dysfonctionnement s'affiche, relevez le
code et contactez le centre de service d'entretien (voir Service
Après-vente).
●
Le sèche-linge est en mode ‘Démo’. Appuyez sur les boutons
Marche/Arrêt et Départ/Pause simultanément et maintenez-les enfoncés
pendant 3 secondes. L’affichage indique DEMO OFF pendant 3
secondes puis le sèche-linge repasse en fonctionnement normal.
Les témoins du panneau de
commande du sèche-linge
sont éteints alors qu'il est
allumé.
36
●
Le sèche-linge est passé en mode Veille pour économiser de l'énergie.
Le sèche-linge passe en mode Veille en cas de coupure de courant ou
quand vous n'avez démarré aucun programme ou après la fin d'un
programme de séchage.
- Appuyez sur le bouton MARCHE/ARRÊT et maintenez-le enfoncé,
les témoins doivent se rallumer.
Page 37

Service Après-Vente
Système de pompe à chaleur
Le séchoir est équipé d'un système de pompe à
chaleur scellé pour sécher vos vêtements. Pour
fonctionner, la pompe à chaleur contient des gaz à
effets de serre fluorés (gaz F) qui sont couverts par le
protocole de Kyoto. Ces gaz F se trouvent dans une
unité fermée hermétiquement. Cette unité scellée
contient 0.29 kg de gaz F R134a qui agit comme
réfrigérant.
Si l’unité scellée a une défaillance, elle doit être
remplacée. Contactez votre centre de service le plus
proche.
●
Remarque : Les gaz se trouvant dans le système
scellé ne sont pas dangereux pour la santé mais s'ils
s'échappent, ils auront un impact sur le réchauffement
mondial.
Avant d’appeler le Centre de Service
Après-Vente :
●
Utilisez le guide de dépannage pour voir si vous
pouvez résoudre le problème vous-même (voir Que
faire en cas de panne).
●
Si non, éteignez le sèche-linge et appelez le Centre
de Service Après-Vente le plus proche.
Pièces de Rechange
Ce sèche-linge est une machine complexe. Le réparer
vous-même ou essayer de le faire réparer par une
personne non agréée pourrait entraîner des
dommages corporels pour une ou plusieurs
personnes, cela pourrait endommager la machine et
cela pourrait rendre invalide la garantie des pièces de
rechange.
Appelez un technicien agréé si vous avez des
problèmes lors de l’utilisation de ce sèche-linge.
●
Veuillez noter : C’est un délit pour une personne
non qualifiée d’entreprendre un entretien ou une
réparation qui implique d'ouvrir l’unité de pompe à
chaleur scellée.
F
Quelles informations donner au Centre de Service
Après-Vente :
●
Vos nom, adresse et code postal.
●
Votre numéro de téléphone.
●
Le type de problème.
●
La date d’achat.
●
Le modèle de l’appareil (Mod.).
●
Le numéro de série (S/N).
Vous trouverez ces informations sur la fiche
signalétique située à l’intérieur de la porte de la
machine.
Économiser de l’énergie et respecter l’environnement
●
Essorez les articles pour éliminer l’eau en excès avant de les passer au sèche-linge (si vous utilisez une machine à
laver, sélectionnez un cycle d’essorage à grande vitesse). Ceci vous permettra d’économiser du temps et de
l’énergie durant le séchage.
●
Séchez toujours des charges complètes – vous économiserez de l’énergie : les articles uniques ou les petites
charges prennent plus longtemps à sécher.
●
Nettoyez le filtre après chaque utilisation pour limiter les coûts de consommation d’énergie (voir Entretien).
37
Page 38

Données relatives au produit...
(règlement UE n°392/2012)
F
Marque Hotpoint Ariston Modèles TCD 872
FTCD 872
Capacité nominale pour le programme standard coton à pleine charge 8 kg Classe d'efficacité énergétique A++
Consommation d'énergie annuelle pondérée (AEc) 235.3 kWh
Consommation annuelle sur la base de 160 cycles de séchage pour le programme coton standard à pleine et à demicharge, et de la consommation des modes à faible puissance. La consommation réelle d'énergie par cycle dépend des
conditions d'utilisation de l'appareil.
Ce sèche-linge domestique à tambour est un Sèche-linge automatique à condensation
Consommation d'énergie : pleine charge E
Consommation d'électricité : mode arrêt (Po) 0.17 W, mode laissé sur marche (Pl) 3.27 W
Durée du mode laissé sur marche pour le système de gestion de la consommation d'électricité 30 minutes
Programme coton standard convenant au séchage des articles en coton normalement humides offrant le meilleur
rendement en termes de consommation électrique pour les articles en coton à pleine et à demi-charge
Coton standard, Chaleur élevée, Sec pour placard
Durée du programme (minutes) : pondérée (Tt) à pleine et demi-charge 163 à pleine charge (T
Classe de rendement de condensation B
Rendement moyen de condensation (%) : à pleine charge (C
Niveau de puissance acoustique 70 dB(A) re 1 pW
* “Information à l'attention des consommateurs conforme à la réglementation EU 932/2012”.
1.96 kWh, demi-charge E
dry
) 81 à demi-charge (C
dry
1.09 kWh
dry1/2
) 213, à demi-charge (T
dry
) 81, pondérée (Ct) à pleine et demi-charge 81
dry1/2
dry1/2
) 126
Énergie généralement consommée Temps de séchage moyen -
Synthétiques à pleine charge 0.68 kWh, à demi-charge Sans objet
Synthétiques à pleine charge 85 minutes, à demi-charge Sans objet
Information recyclage et enlèvement de nos produits
Dans le cadre de notre engagement envers la
protection de l’environnement, nous nous
réservons le droit d’utiliser des pièces recyclées de
qualité afin de réduire les coûts pour notre clientèle et
de limiter les gaspillages de matières premières.
●
Élimination du matériau d’emballage: respectez les
réglementations locales, de manière à ce que
’emballage puisse être recyclé.
●
Pour éviter que des enfants se blessent, ôtez la porte
et la prise et puis coupez le câble secteur au ras de
l’appareil. Jetez ces pièces séparément de sorte
que l’appareil ne puisse plus être branché sur une
prise de secteur.
Enlèvement des appareils ménagers usagés
La Directive Européenne 2012/19/EC sur les Déchets
des Equipements Electriques et Electroniques (DEEE),
exige que les appareils ménagers usagés ne soient
pas jetés dans le flux normal des déchets
municipaux. Les appareils usagés doivent être
collectés séparément afin d’optimiser le taux de
récupération et le recyclage des matériaux qui les
composent et réduire l’impact sur la santé humaine et
l’environnement.
Ce séchoir a une unité de pompe à chaleur scellée
qui contient des gaz F qui doit être recouverte et
détruite.
Le symbole de la ‘‘poubelle barrée’’ est apposée
sur tous les produits pour rappeler les
obligations de collecte séparée.
Les consommateurs devront contacter les autorités
locales ou leur revendeur concernant la démarche à
suivre pour l’enlèvement de leur vieil appareil.
Cet appareil est conforme aux Directives Européennes suivantes:
- 2006/95/EC (Équipement Basse Tension)
- 2004/108/EEC (Compatibilité Électromagnétique)
Indesit Company, Viale Aristide Merloni 47, 60044 Fabriano (AN), Italy
38
Page 39

Gebruiksaanwijzing
GB
English, 1
CZ
58
F
Français, 20
SK
NL
Nederlands, 39
77
FTCD 872
De eerste keer dat u uw droger
gebruikt, dient u uw taal te kiezen, zie
pagina 47
Inhoud
Installatie, 40-41
Het plaatsen van de droger
Ventilatie
Waterafvoer
Uw droger waterpas zetten
Elektrische aansluitingen
Voor het eerste gebruik van de droger
Waarschuwingen, 42-43
Algemene veiligheid
Om het risico op brand in uw droogautomaat
Reiniging en onderhoud, 44-45
Haal de stekker uit het stopcontact
Reinig het pluizenfilter na elk gebruik
De warmtepompfiltereenheid reinigen
Leeg de waterbak na elk gebruik
Controleer de trommel na elk gebruik
Het reinigen van de droger
Beschrijving van de droogautomaat, 46
Kenmerken
Bedieningspaneel
NL
DROOGAUTOMAAT
! Bewaar deze gebruiksaanwijzing zodat u haar indien
nodig kunt raadplegen. Neem de gebruiksaanwijzing
mee als u verhuist en mocht u dit apparaat
verkopen of aan iemand anders geven, geef dit
boekje er dan bij, zodat de volgende eigenaar ook
kennis kan nemen van de veiligheidsvoorschriften en
aanbevelingen voor gebruik.
! Lees de instructies aandachtig door; op de
volgende bladzijden vindt u belangrijke informatie
over de installatie en aanbevelingen voor het
gebruik van het apparaat.
Dit symbool herinnert u eraan om
deze gebruikshandleiding te lezen.
De display, 47-49
Start en programma’s, 49-53
Een programma kiezen
Programmatabel
De bedieningen
Wasgoed, 54
Het wasgoed sorteren
Droogsymbolen
Droogtijden
Problemen oplossen, 55
Technische dienst, 56
Reserveonderdelen
Productgegevens, 57
Recyclage en verwijdering
www.hotpoint.eu
39
Page 40

Installatie
NL
Het plaatsen van de droogautomaat
●
Plaats de droogautomaat op voldoende
afstand van uw gasfornuis, kachel,
verwarming of gasstel; vlammen kunnen
schade toebrengen aan het apparaat.
●
Voor een optimale werking moet de
droogautomaat bij een kamertemperatuur
van 20 tot 23 ˚C worden geplaatst. Hij
werkt echter ook bij kamertemperatuur
tussen 14 en 30 ˚C.
Minimale spleet 10mm
●
Als u het apparaat
onder een werkblad wilt
plaatsen, zorg er dan
voor dat er tussen de
Minimale spleet
15mm
onderkant van het
werkblad en eventuele
andere voorwerpen op
of boven de machine
een spleet van 10 mm
zit en laat minstens 15 mm ruimte vrij
tussen de zijkanten van de machine en
zijwanden of muren. Zo kan er voldoende
lucht circuleren.
Het apparaat moet met de achterwand
tegen een muur aan worden geïnstalleerd.
! Zorg dat er niets voor de
afvoeropeningen aan de achterkant zit.
Ventilatie
Als de droger in gebruik is, dient er voldoende ventilatie
te zijn. Plaats de droger niet in een vochtige ruimte en
zorg ervoor dat er voldoende lucht kan circuleren. Om
het water wat tijdens het wassen gebruikt wordt te
laten condenseren, is het zeer belangrijk dat er
voldoende luchtstroom is rondom de droger. In een
afgesloten ruimte of kast werkt de droger niet efficiënt.
! Als de droger in een kleine of koude ruimte geplaatst
wordt, kan er condensatie plaatsvinden.
! Het is niet aan te bevelen de
droogautomaat te installeren in een kast.
De droogautomaat mag zeker nooit
worden geïnstalleerd achter een afsluitbare
deur, een schuifdeur of een deur met een
scharnier aan de tegenoverliggende zijde
van de deurscharnier van de
droogautomaat.
Waterafvoer
Als de droger naast een afvoer geplaatst wordt, kan
deze voor de afvoer van het water gebruikt worden. U
hoeft de waterbak dan niet te legen. Als de droger op
of naast een wasmachine wordt geïnstalleerd, kan
dezelfde afvoer worden gebruikt.
De afvoer moet minder dan 1 meter hoog zijn
onderkant van de droger.
Verwijder de bestaande slang
van de positie weergegeven in
afbeelding A.
Afbeelding A
Besvestig een slnag van een
geschikte lengte op de positie
weergegeven in afbeelding B.
! Let op dat de slang niet gekneld of geknikt zit als
droger op zijn definitieve plaats staat.
vanaf de
Afbeelding B
de
Uw droger waterpas zetten
Voor een correcte werking moet de droger waterpas
worden geplaatst.
Als u uw droger op zijn definitieve
locatie hebt geplaatst, moet u
controleren of de droger waterpas
staat, eerst langs de zijkanten,
vervolgens van voor naar achter.
Als de droger niet waterpas
staat, past u de twee voorpoten
aan tot dit wel het geval is.
! WAARSCHUWING: Zorg ervoor dat de droger
minstens 6 uur rechtop heeft gestaan voordat u
deze gebruikt.
40
Page 41

Installatie
Elektrische aansluitingen
Controleer de volgende punten voor u de
stekker in het stopcontact steekt.
●
Zorg voor droge handen.
●
Het stopcontact moet geaard zijn.
●
Het stopcontact moet geschikt zijn voor
de maximale stroom van het apparaat;
deze wordt aangegeven op het
typeplaatje (zie Beschrijving van de
droogautomaat).
●
Het voltage moet zich binnen de waarden
bevinden die op het typeplaatje zijn
vermeld (zie Beschrijving van de
droogautomaat).
●
Het stopcontact moet geschikt zijn voor
de stekker van de droogautomaat. Als dit
niet het geval is, dient de stekker of het
stopcontact te worden vervangen.
! De droger mag niet buiten geplaatst
worden, zelfs niet als de plaats overdekt is.
Het is zeer gevaarlijk om het apparaat aan
regen of storm bloot te stellen.
! De stroomkabel en de stekker moeten
zich na de installatie binnen handbereik
bevinden.
! Gebruik geen verlengsnoeren.
! De stroomkabel mag niet worden gebogen
of platgedrukt.
! De elektrische kabel moet regelmatig
worden gecontroleerd. Als de voedingskabel
beschadigd is, moet hij, teneinde gevaarlijk
situaties te voorkomen, worden vervangen,
ofwel door de fabrikant, of door de
servicedienst of door een andere
gekwalificeerde monteur. Nieuwe of
langere stroomkabels zijn tegen extra
kosten verkrijgbaar bij erkende dealers.
! De fabrikant stelt zich niet aansprakelijk
als deze regels niet worden nageleefd.
Voor het eerste gebruik
Na het installeren van de droger en voor het eerste
gebruik dient de binnenkant van de trommel te worden
schoongemaakt om eventueel stof dat door het transport
is ontstaan te verwijderen.
Maximale afmetingen van de lading
Natuurlijke vezels : 8 kg
NL
! Als u niet zeker bent over de
hierbovenvermelde informatie raden wij u
aan contact op te nemen met een
bevoegd elektricien.
41
Page 42

Waarschuwingen
NL
! Het apparaat voldoet aan internationale
veiligheidsvoorschriften.
Deze waarschuwingen zijn bedoeld voor
uw veiligheid en moeten strikt worden
opgevolgd.
Algemene veiligheidsinstructies
●
Deze droger mag niet worden gebruikt
door personen (kinderen van 8 jaar en
ouder inbegrepen) met beperkte fysieke,
gevoels- of mentale capaciteit, of zonder
ervaring of kennis, tenzij ze onder
toezicht staan of aanwijzingen
ontvangen over het gebruik van het
toestel van personen die
verantwoordelijk zijn voor hun veiligheid.
●
Deze droogautomaat is ontworpen voor
huishoudelijk gebruik en niet voor
professioneel gebruik.
●
Raak het apparaat niet aan als u geen
schoeisel draagt of natte handen of
voeten hebt.
●
Wanneer u de stekker uit het stopcontact
haalt, moet u altijd aan de stekker te
trekken, nooit aan het snoer.
●
Zet het apparaat na gebruik uit en
haal de stekker uit het stopcontact.
Houd de deur gesloten om te voorkomen
dat kinderen het apparaat als speelgoed
gebruiken.
●
Kinderen moeten onder toezicht worden
gehouden, zodat ze niet met de droger
kunnen spelen.
●
Onderhoud en reiniging mogen niet
worden uitgevoerd door kinderen zonder
supervisie.
●
Kinderen van 3 jaar of minder mogen
niet dicht bij de droger komen, tenzij
onder constant toezicht.
●
Het apparaat moet correct geïnstalleerd
worden en voldoende geventileerd zijn. De
luchtinvoeropeningen aan de voor- en
achterkant van de droger mogen nooit
worden afgedekt (zie Installatie).
●
Plaats de droger niet op tapijt als de
poolhoogte de luchtstroom onder het
apparaat belemmert.
●
Controleer voor het vullen altijd eerst of
de droogautomaat leeg is.
●
De achterkant van de droger kan
zeer heet worden. U mag deze dan
ook nooit aanraken aan als de machine
aanstaat.
●
Gebruik de droger enkel als de filter, de
waterbak en de en de
warmtepompfiltereenheden zijn
geplaatst (zie Reiniging en Onderhoud).
●
Overschrijd de maximale
beladingscapaciteit niet (zie Wasgoed).
●
Doe geen artikelen in de droger die
druipnat zijn.
●
Controleer de textielbehandelingssymbolen
zorgvuldig (zie Wasgoed).
●
Droog geen grote, zeer dikke artikelen in
de droger.
●
Droog geen acrylvezel op hoge
temperaturen.
●
Zet de droogtrommel niet uit als er nog
warm wasgoed in zit.
●
Reinig het pluizenfilter na elk gebruik
(zie Reiniging en Onderhoud).
●
Leeg de waterbak na elk gebruik (zie
Reiniging en Onderhoud).
●
Reinig de warmtepompfiltereenheid
regelmatig (zie Reiniging en Onderhoud).
●
Zorg dat er geen pluis ophoopt rondom
de droger.
●
Klim nooit op de droger. Dit kan schade
tot gevolg hebben.
●
Houd u altijd aan de elektrische vereisten
(zie Installatie).
●
Koop altijd originele reserveonderdelen
en toebehoren (zie Technische dienst).
42
Page 43

Waarschuwingen
Om het risico op brandontwikkeling in
uw droogautomaat te minimaliseren,
moeten de volgende instructies in acht
worden genomen:
●
Droog alleen artikelen in de
droogautomaat die gewassen zijn met
wasmiddel en water en die vervolgens
zijn afgespoeld en gecentrifugeerd.
Het drogen van artikelen die NIET met
water zijn gewassen kan brandgevaar
opleveren.
●
Droog geen kleding die behandeld is
met chemische middelen.
●
Stop geen items in de droogautomaat
die zijn bemorst of doordrenkt met
plantaardige olie of slaolie, aangezien dit
risico’s op brandontwikkeling
teweegbrengt. Oliebevattende items
kunnen spontaan ontbranden, in het
bijzonder wanneer ze worden
blootgesteld aan hittebronnen zoals een
droogautomaat. De items worden warm,
wat een oxidatiereactie met de olie
veroorzaakt. Door oxidatie ontstaat hitte.
Als de hitte niet kan ontsnappen, kunnen
de items zo warm worden dat ze vuur
vatten. Het opeenstapelen of opbergen
van oliebevattende items kan ertoe leiden
dat de hitte niet kan ontsnappen waardoor
er een risico op brandontwikkeling
ontstaat.
Als het onvermijdelijk is dat stoffen die
plantaardige olie of slaolie bevatten of die
vervuild zijn met haarverzorgingsproducten,
in een droogautomaat worden geplaatst,
moeten ze eerst worden gewassen met
extra wasmiddel – dit zal het risico
verminderen maar niet volledig
elimineren. De items mogen niet uit de
droogautomaat worden gehaald en
opeengestapeld wanneer ze nog warm
zijn.
●
Droog geen items die voordien zijn
gereinigd in, zijn gewassen in, zijn
doordrenkt met of zijn vervuild met
petrolium/benzine, solventen voor
chemische reiniging of andere
ontvlambare of explosieve substanties.
Erg ontvlambare stoffen die vaak worden
gebruikt in huishoudelijke omgevingen,
waaronder slaolie, aceton, gedena
tureerde alcohol, kerosine,
vlekverwijderaars ,terpentijn, was en
wasverwijderaars. Zorg ervoor dat deze
items zijn gewassen in warm water met
een extra hoeveelheid wasmiddel
alvorens ze worden gedroogd in de
droogautomaat.
●
Droog geen items die schuimrubber of
gelijkaardige rubberachtige materialen
met dezelfde structuur bevatten.
Schuimrubbermaterialen kunnen, wanneer
ze worden verwarmd, vuur produceren
door spontante ontbranding.
●
Wasverzachter of gelijkaardige producten
mogen niet worden gebruikt in een
droogautomaat om statische elektriciteit
te voorkomen, tenzij de praktijk specifiek
wordt aanbevolen door de fabrikant van
de wasverzachter.
●
Droog geen ondergoed dat metalen
verstevigingen bevat, zoals beha’s met
metalen beugels. Wanneer de metalen
beugels loskomen tijdens het drogen,
kan de droogautomaat worden
beschadigd.
●
Droog geen rubber, plastic items zoals
douchekapjes of waterdichte hoezen
voor babies, polyethyleen of papier.
●
Droog geen items met een rubberen
achterkant, kledij met schuimrubberen
vulkussentjes, kussens, overschoenen
en tennisschoenen met rubberen coating.
●
Verwijder alle voorwerpen, zoals
aanstekers en lucifers, uit de zakken.
NL
! WAARSCHUWING: Stop de droger nooit voor het einde van de droogcyclus, tezij u alle
artikelen snel uit de droger haalt en ze uitspreidt, zodat de warmte wordt afgevoerd.
43
Page 44

Reiniging en onderhoud
NL
Haal de stekker uit het stopcontact
! Haal de stekker uit het stopcontact als u
het apparaat niet gebruikt, tijdens het
schoonmaken ervan en tijdens elk onderhoud.
Reinig het pluizenfilter na elk gebruik
Het pluizenfilter is een belangrijk onderdeel
van uw droger: het verzamelt pluis en stof
dat ontstaat tijdens het drogen.
Reinig het pluizenfilter daarom na het drogen
door hem af te spoelen onder stromend
water of met uw stofzuiger.
Als het pluizenfilter verstopt raakt, wordt de
luchtstroom in de droger ernstig gehinderd:
droogtijden worden langer en u verbruikt
meer energie. Het kan uw droger ook
schade toebrengen.
Het pluizenfilter bevindt zich in de
deuropening van de droger (zie diagram
op de volgende pagina).
Het pluizenfilter verwijderen:
1. Trek het plastic handvat van het
pluizenfilter naar boven (zie diagram).
2. Open de filter en reinig
het lint langs de
binnenkant.
3. Vervang het op een
correcte manier.
Zorg ervoor dat het
filter helemaal naar
beneden in de houder
wordt geschoven.
4.Verwijder stof en pluis van de
binnenkant van de deur en bij de
deurafsluiting.
! Gebruik de droger niet zonder het
pluizenfilter terug te plaatsen.
De warmtepompfiltereenheid reinigen
Verwijder regelmatig (om de 5 droogcycli)
de warmtepompfiltereenheid en verwijder
opeengehoopte pluisjes van het
filteroppervlak.
We raden u echter aan om deze filter na
ELKE droogcyclus te reinigen om de
drogerprestaties te optimaliseren.
De warmtepompfiltereenheid verwijderen:
1. Trek de stekker van de droger uit het
stopcontact en open de deur.
2. Trek het deksel van de
warmtepompfiltereenheid
open (zie diagram op de
volgende pagina). Breng
de 4 klemmen in verticale
positie, trek vervolgens de
filtereenheid naar u toe.
3. Maak de twee delen van
de filter los en reinig het
filteroppervlak.
! De voorkant van de warmtepomp
bestaat uit dunne metalen plaatjes.
Zorg ervoor dat u deze niet beschadigt of
dat u zich niet snijdt als u de
warmtepompfiltereenheid reinigt, verwijdert
of vervangt.
Telkens wanneer u de
warmtepompfiltereenheid reinigt moet al
het vuil of pluis op het oppervlak van de
metalen plaatjes worden verwijderd.
4. Verwijder pluis
zorgvuldig met een
zachte doek, een
spons of een
stofzuiger.
Gebruik nooit uw
vingers.
5.Zet de twee delen van de filter weer
ineen, reinig de dichtingen en herplaats
de 4 klemmen in horizontale positie, zorg
ervoor dat de klemmen goed vergrendeld
zijn.
44
Page 45

Reiniging en onderhoud
Waterbak
Pluizenfilter
NL
Warmtepompfiltereenheid
klemmen
Leeg de waterbak na elk gebruik
Trek de container uit de
droogautomaat en verwijder
ofwel de kleine of de grote klep.
Giet de container leeg in een
wasbak of een andere geschikte
afvoer. Bevestig de klep terug,
plaats de container terug en
zorg ervoor dat hij goed vastzit.
! Controleer de waterbak altijd en leeg deze indien
nodig voordat u een nieuw droogprogramma start.
! Het gevolg van het niet legen van het watervat
kan zijn:
- De uitschakeling van de verwarming van de
machine (de was kan nog vochtig zijn aan het
einde van de droogcyclus) (zie De Bedieningen).
●
Waterinzamelsysteem voor het eerst vullen
Als uw droger nieuw is, kan er geen water in de
waterbak worden opgevangen zolang het systeem
niet voor het eerst gevuld is... dit duurt 1 of 2
droogcycli. Zodra het systeem gevuld is, komt er
tijdens elke droogcyclus water in de waterbak
terecht.
Deksel warmtepompfiltereenheid
Het reinigen van de droger
●
Externe onderdelen van metaal of plastic en rubber
onderdelen kunnen worden schoongemaakt met
een vochtige doek.
●
Verwijder stof en pluis regelmatig met de stofzuiger
(elke 6 maanden) van het rooster van de voorste
luchtinvoer. Stofzuig ook af en toe de voorkant van
de warmtepomp en rondom het pluizenfilter.
! Gebruik geen oplosmiddelen of schuurmiddelen.
! Laat uw droger regelmatig controleren door erkende
vakmensen om elektrische en mechanische veiligheid
te waarborgen (zie Technische dienst).
Kort advies
●
Vergeet niet het filter van de deur to
reinigen enhet filter van de warmtepomp
na elke droogcyclus.
●
Vergeet niet het waterreservoir te legen
na elke droogcyclus.
! Opdeze manier, zult u altijd de maximale
prestaties bereiken.
Controleer de trommel na elk gebruik
Draai de droogtrommel met de hand rond om klein
wasgoed (zakdoeken) uit de droger te halen dat
anders in de trommel zou kunnen achterblijven.
Trommel reinigen
! Gebruik geen schuurmiddelen, staalwol of
reinigingsmiddelen voor roestvrij staal om de trommel
te reinigen.
De roestvrij stalen trommel kan verkleuren. Dit kan
veroorzaakt worden door een combinatie van water
en/of reinigingsmiddelen zoals wasverzachters.
Deze verkleuring heeft geen invloed op het
droogresultaat.
45
Page 46

Beschrijving van de
droogautomaat
NL
Kenmerken
Waterbak
Pluizenfilter
Luchtinvoeropening
Warmtepompfilterdeksel
Bedieningspaneel
De toets AAN/UIT - als de droger in werking is en
u op deze knop drukt: Als
weergegeven op de display, dan stopt de droger. Als
INGEDRUKT HOUDEN wordt weergegeven op de
display, houdt dan de toets ingedrukt; de display zal
aftellen van 3 naar 2 naar 1 en zal dan stoppen.
Druk de toets opnieuw in en houdt hem meer dan 3
seconden ingedrukt, en dan zal er kort
worden weergegeven. .
Met de PROGRAMMA toetsen stelt u het
programma in: druk op de toets van het programma
dat u wilt selecteren (zie Start en programma’s).
De OPTIE toets/lampjes: met deze toetsen kunt u
de mogelijke voor het geselecteerde programma
kiezen geselecteerde programma (zie De
Bedieningen). De lampjes naast de toetsen worden
verlicht op de displayeenheid, om aan te geven dat
de optie is geselecteerd.
De START/PAUSE toets en lampje start een
gekozen programma. Door op deze toets te
drukken terwijl een programma loopt, wordt het
programma onderbroken, er zal een biep te horen
zijn, de display zal
droogtrommel stopt.
Het lampje is groen wanneer het programma draait,
het lampje knippert oranje als het programma
onderbroken is of het knippert groen als het
apparaat klaar is om een programma te starten (zie
Start en programma’s).
Opmerking: Dit oranje lampje knippert tijdens het
programmafase kreukels herstellen na het drogen.
De Displayeenheid geeft waarschuwingen en
informatie over het geselecteerde programma en de
voortgang (zie volgende pagina).
PAUZE weergeven en de
Typeplaatje
Programma
toetsen
AAN/UIT
toets
STAND BY wordt
INSCHAKELEN
Model- en serienummers
Stelvoetjes
KINDERSLOT en OPTIES
toetsen & lampjes
KINDERSLOT knop/pictogram
ingedrukt houden nadat u uw programma en
eventuele opties hebt geselecteerd. Uw
programmainstellingen blijven dan ongewijzigd; de
display zal kort
Wanneer het pictogram is verlicht, zijn de andere
knoppen uitgeschakeld.
Houdt de knop ingedrukt om de functie te
annuleren. Het pictogram dooft en de display zal
kort het volgende weergeven
Opmerking: Deze droger beschikt, in overeenkomst
met de nieuwe normen betreffende de
energiebesparing, over een systeem wat het
apparaat automatisch na 30 minuten uitschakelt
(stand-by) indien men het niet gebruikt. Druk op de
AAN/UIT-toets en houdt hem ingedrukt totdat op de
display kort
de droger weer begint.
Het droogprogramma voor wal van deze wasdroger
is getest en goedgekeurd door The Woolmark
Company. Het programma is geschikt voor het
drogen van wollen kleding met het “handwas” label,
op voorwaarde dat de kleding gewassen wordt in
een door Woolmark goedgekeurde
handwasprogramma en overeenkomstig de
aanwijzingen van de fabrikant in de machine
gedroogd wordt.
Hendel
warmtepompfilterdeksel
(trek om te openen)
Display
START/PAUSE
toets en lampje
Blijf deze knop
:
het volgende weergeven
VAN HET SLOT
INSCHAKELEN wordt weergegeven en
M1219
In het Verenigd
Koninkrijk, Ierland,
Hong Kong en India is
het Woolmark
handelsmerk een
Certificatie
handelsmerk.
GESLOTEN
46
Page 47

De display
Uw taal selecteren
De eerste keer dat u uw droger aanzet, dient u uw taal te kiezen uit de talenlijst.
De taal wijzigen: de huidige taalselectie knippert op de
eerste regel van de display.
- Druk op de Aan/Uit toets om de display uit te schakelen,
druk vervolgens alle 3 de toetsen in en houd deze 5
seconden lang ingedrukt: Temperatuurniveaus,
Drogen voor een bepaalde tijd en Droogteniveau .
- Druk op de knop Temperatuurniveaus of de knop
Drogen voor een bepaalde tijd om in de taallijst te
bladeren.
-
Wanneer de gewenste taal knippert op de bovenste
regel van de display
, drukt u op de knop
Droogteniveau om uw keuze vast te leggen.
De display begrijpen
Programmaselectie en display
Het geselecteerde programma wordt weergegeven op de eerste
regel van de display; dit bericht wordt weergegeven tijdens de duur
van het programma.
Er zijn acht knoppen die elk twee functies bevatten. Als u één keer op
de knop drukt, wordt de eerste functie geselecteerd, en als u twee keer
op de knop drukt, wordt de tweede functie geselecteerd. Het geselecteerde
programma wordt weergegeven. Als u op de laatste knop drukt, wordt Mijn cyclus geselecteerd.
Een keer drukken Twee keer drukken
1
STANDAARD KATOEN
2
BED & BAD
3
SYNTHETISCH
4
JEANS
5
WOL
6
BABY FIJNWAS
7
PLUCHE
8
MAKKELIJK STRIJKEN
9
MIJN CYCLUS M (zie hieronder)
OVERHEMDEN
ANTI-ALLERGISCH
SNEL DROOG
DONS
ZIJDE
DONKER
HEAT & ENJOY
OPFRISSEN
NL
Mijn Cyclus : Als u de knop Mijn cyclus selecteert, toont het display uw geselecteerde programma met ‘M’ voor de
naam. bijv.
M STANDAARD KATOEN (zie Start en programma’s).
Droogteniveaus
Bij de programmaselectie van een automatisch programma met diverse beschikbare droogteniveau’s (zie
Programmatabel).
De tweede regel van de display geeft het gewenste droogteniveau weer.
Telkens als u op de knop Droogteniveau drukt, wordt de volgende
optie uit de lijst geselecteerd en weergegeven.
De display geeft tevens 1 tot 7 balken weer, afhankelijk van uw selectie
en deze worden getoond om de voortgang van het programma weer te
geven.
! Bij sommige automatisch programma's kan het droogteniveau niet worden gewijzigd en niet alle automatische
programma's hebben alle droogteniveauopties.
VOCHTIG
STRIJKDROOG
HANGER PLUS
HANGERDROOG
BIJNA DROOG
KASTDROOG
EXTRA DROOG
Enigszins droog: Droogt uw items zodat deze kunnen worden gestreken met een machine of strijkpers.
Strijkdroog: Droogt uw items zodat deze kunnen worden gestreken met een strijkijzer.
Hangdroog plus: Droogt uw delicate items zodat deze kunnen worden opgehangen om verder te
laten drogen.
Ophangdroog: Droogt uw items zodat deze kunnen worden opgehangen om verder te laten drogen.
Lichtdroog: Droogt uw delicate items zodat deze kunnen worden opgeborgen.
Kastdroog: Droogt uw items zodat deze kunnen worden opgeborgen.
Extra droog: Droogt uw items zodat deze kunnen worden gedragen.
47
Page 48

De display
NL
Programmavoortgang
De tweede regel van de display geeft de voortgang van het programma aan:
(een lange boodschap schuift over het scherm)
DROOG
KOUDE CYCLUS
OPWARMEN
GEREED
EINDE CYCLUS, MINDER KREUK
EINDE CYCLUS, FILTER REINIGEN EN WATERBAK LEGEN
Heat & Enjoy programma
(als de optie Kreukels voorkomen is geselecteerd).
Drogen voor een bepaalde tijd
Nadat u een programma hebt geselecteerd met de optie
Drogen voor een bepaalde tijd, drukt u op de Tijdsknop
en de display zal de geselecteerde tijd doen verhogen,
telkens als u op de knop drukt en deze weer loslaat (zie
Start en programma’s).
De tijdsduur en het aantal beschikbare tijdsopties wordt door elke druk op de toets verlaagd, afhankelijk van het
geselecteerde programma/materiaal.
Het pictogram Drogen voor een bepaalde tijd wordt weergegeven naast de tijdsduur.
De geselecteerde tijd blijft op de display staan nadat het programma begint, maar kan te allen tijde worden
gewijzigd.
Uitstel en Tijd tot einde
Sommige programma’s kunnen worden uitgesteld (zie Start en programma’s). Druk op de uitstelknop en het
pictogram zal gaan knipperen.
Met elke druk op de uitstelknop wordt het uitstel met 1 uur
verhoogd, van
seconden wordt het uitstel geannuleerd.
De uitsteltijd wordt weergegeven op de display naast de uistelknop.
De display telt de minuten van de uitstelperiode af, nadat de
Start/Pause knop is ingedrukt.
De tweede regel van de display geeft het volgende weer:
U kunt de geselecteerde uitsteltijd te allen tijde wijzen of annuleren.
Nadat op de Start/Pause toets is gedrukt, wordt Uitstellen of Tijd tot einde weergegeven in uren en minuten; deze
tijd telt in minuten af.
tot ,
1h 24h
en daarna :
OFF
en na een paar
GESTART
Tijd tot einde
Nadat de uitsteltijd is verstreken, of voor alle programma's die niet zijn uitgesteld, wordt op dit gedeelte van de
display het volgende weergegeven:
- de geschatte tijd tot het einde van het programma, voor automatische programma's
- de daadwerkelijke tijd tot het einde, voor programma's met een bepaalde tijd
Als programma's op tijd zijn geselecteerd, is de weergegeven tijd tijdens de cyclus de werkelijk resterende tijd.
Als Automatische programma’s zijn geselecteerd, is de weergegeven tijd een schatting van de resterende tijd:
Als het programma wordt geselecteerd, toont de display de tijd die is vereist om een volle lading te drogen. De
resterende tijd is een waarde die voortdurend wordt berekend tijdens het drogen. Deze tijd wordt veranderd om de
best mogelijke schatting te geven.
De dubbele punt tussen de uren en minuten in de display knippert om aan te geven dat de tijd aftelt.
48
Page 49

De display
Waarschuwingen
De tweede regel van de display geeft tevens waarschuwingen en herinneringen
weer: (herinneringen verschijnen aan het einde van het programma)
EINDE CYCLUS, FILTER REINIGEN EN WATERBAK LEGEN
●
Herinnering dat de watertank dient te worden geleegd
en het pluizenfilter moet worden gereinigd na elk
gebruik van de droger (zie Onderhoud).
WATERBAK LEGEN
●
Geeft aan dat de waterbak vol is. Na het
terugplaatsen van de lege waterbak duurt het een
paar seconden voor het lampje uitgaat. De droger
moet hiervoor aan staan (zie De Bedieningen).
Opmerking: Als de waterbak vol loopt en dit
bericht wordt weergegeven, wordt de verwarming
uitgeschakeld en wordt uw wasgoed niet
gedroogd.
CONDENSER EN FILTER REINIGEN EN WATERBAK LEGEN
●
Dit bericht geeft aan dat u de warmtepompfilter
(zie Onderhoud) dient te reinigen en zal regelmatig
worden weergegeven, afhankelijk van hoe vaak u
de droger gebruikt. Wanneer u het volgende
programma beëindigd, wordt het bericht opgeheven.
U dient bovendien het pluizenfilter te reinigen.
ANTI-ALLERGIE ACTIE NIET GEGARANDEERD, FILTER REINIGEN
●
Wordt weergegeven tijdens het Anti-Allergie
programma en geeft aan dat de filter dient te worden
gereinigd om de volledige anti-allergiecyclus te
voltooien (zie Onderhoud).
Start en programma’s
Een programma kiezen
1. Steek de stekker van de droogtrommel in het
stopcontact.
2. Sorteer het wasgoed op stofsoort (zie Wasgoed).
3. Doe de deur open en zorg ervoor dat het
pluizenfilter schoon is en op zijn plaats zit en dat
de waterbak leeg is en op zijn plaats zit (zie
Reiniging en Onderhoud).
4. Vul de droogtrommel en zorg ervoor dat er geen
wasgoed tussen de deur zit. Sluit de deur.
5.
Als de display niet is verlicht:
Druk op de toets AAN/UIT
6. Raadpleeg de Programmatabel (zie Programma’s)
en de aanwijzingen voor elke stofsoort (zie Wasgoed)
en druk op de Programma toets voor het stoftype
dat u wilt drogen.
Als de knop geselecteerd is; zijn stappen 7 en
8 niet noodzakelijk
7. Selecteer Drogen voor een bepaalde tijd of
Droogopties:
- Als u Drogen voor een bepaalde tijd
selecteert, houdt u de bijbehorende toets
ingedrukt tot de gewenste tijd verschijnt.
of - Om de standaard droogtegraad te wijzigen,
houdt u de toets Droogteniveaus ingedrukt
tot het juiste niveau wordt aangegeven.
! Raadpleeg de programmatabel voor meer
informatie: beschikbaarheid van Droogteniveaus,
Drogen voor een bepaalde tijd en Opties.
8. Stel een uitgestelde droogtijd en eventuele
andere opties in (zie De display).
9. Druk op de START/PAUSE toets om het drogen
te beginnen. Het display toont de geschatte eindtijd.
Tijdens het droogprogramma kunt u het wasgoed
(zie onder).
controleren en was die al droog is eruit halen terwijl
u de rest van de was verder droogt in de machine.
Sluit de deur weer en druk op de START/PAUSE
toets om verder te gaan met drogen.
Als u de deur opent om uw wasgoed te
controleren, verlengt u de droogtijd omdat de
warmtepomp compressor pas start 5 minuten
nadat u de deur hebt gesloten en u op de knop
Start/Pause hebt gedrukt (zie De Bedieningen).
10. Tijdens de laatste minuten van droogprogramma’s,
voor het programma ten einde is, start de
KOUDE-LUCHTFASE (het wasgoed wordt afgekoeld).
Deze fase moet altijd worden doorlopen.
11. Aan het einde van de droogcyclus wordt een
bericht weergegeven:
- Als
LEGEN
3 keer. (Opmerking: als de optie ZOEMER
werd geselecteerd, klinkt de zoemer 5
minuten lang elke 30 seconden drie keer.)
- Als
weergegeven, is de optie Antikreukels
herstellen geselecteerd en als u het wasgoed
niet onmiddellijk uit de droger haalt, dan zal
de droogtrommel 10 uur lang af en toe rond
draaien, of zal de zoemer 3 keer klinken totdat
u de deur opent, om aan te geven dat het
programma is voltooid.
12. Doe de deur open, haal het wasgoed uit de
droger, reinig het pluizenfilter en plaats deze terug
in de houder. Leeg de waterbak en plaats hem
terug in de droger (zie Reiniging en Onderhoud).
13. Haal de stekker uit het stopcontact.
NL
EINDE CYCLUS, FILTER REINIGEN EN WATERBAK
wordt weergegeven, klinkt de zoemer
EINDE CYCLUS, MINDER KREUK wordt
Mijn Cyclus knop :
De eerste keer dat u op deze knop drukt, zal de tweede regel van de display het volgende weergeven:
INDRUKKEN: OPSLAAN
Na het selecteren van uw favoriete programma en gewenste opties, kunt u deze instellingen opslaan door de toets
Mijn cyclus 5 seconden lang ingedrukt te houden; op de bovenste regel zal knipperen, gevolgd door het
geselecteerde programma. De zoemer zal klinken en de tweede regel van de display zal het volgende weergeven
MEMO .
Start/Pause knop en dit programma zal gaan draaien
Desgewenst kunt u uw opgeslagen favoriete programma wijzigen door een nieuw programma en/of opties te
selecteren en de
De volgende keer dat u dit programma nodig hebt, drukt u op de knop en daarna drukt u op de
.
knop ingedrukt te houden (zoals hierboven)
.
49
Page 50

NL
Start en programma’s
ESSENTIËLE PROGRAMMA’S (ESSENTIALS) - Programmatabel
! Als de display niet is verlicht; Druk op de AAN/UIT toets en selecteer vervolgens het programma.
Programma Beschikbare opties:
Uitsteltimer
Kreukels
voorkomen
Geluid of
*Kreukels
herstellen
Minder pluis
Temperatuur-
niveaus
Drogen voor een
bepaalde tijd
✓
✓
✗
✗
✗
●
Een Automatisch programma
✓ ✓
●
Een Automatisch programma
Standaard katoen
1
Hemden
Bed & Bad
2
Anti-allergisch
Synthetics
3
Snel drogen
Standaard katoen
●
Dit is een programma voor katoenen artikelen.
●
De duur van dit programma hangt af van de omvang van de lading, de geselecteerde droogte-instelling en de
draaisnelheid in uw wasmachine (zie Wasgoed).
●
In overeenstemming met de EG-richtlijn 392/2012 is het programma Standaard katoen de programmakeuze 1
met Hoge temperatuur en droogteniveau Kastdroog (Standaard configuratie/ vastgesteld aan het begin). Dit is
het meest efficiente programma betreft het energiegebruik (UE 392/2012).
Hemden (Overhemden)
Optie Hoge Temperatuur
●
Dit is een programma voor katoenen hemden.
●
Dit programma kan worden gebruikt voor tot 3 kg wasgoed (ongeveer 10 hemden).
Gemiddelde (midden) temperatuuroptie
●
Dit is een programma voor hemden van synthetisch materiaal of een mengeling van natuurlijke en
synthetische materialen, zoals polyester en katoen.
●
Dit programma kan worden gebruikt voor tot 3 kg wasgoed (ongeveer 14 hemden).
De duur van dit programma hangt af van de omvang van de lading, de geselecteerde droogte-instelling en de
draaisnelheid in uw wasmachine.
Wasgoed dat met de instelling Kastdroog wordt gedroogd, kan doorgaans onmiddellijk worden gedragen. De
randen of naden kunnen wel nog een beetje vochtig zijn. Als dit het geval is, draait u de hemden binnenstebuiten
en herhaalt u het programma voor een korte periode.
Bed & Bad
●
Dit is een programma voor katoenen handdoeken en lakens.
●
De duur van dit programma hangt af van de omvang van de lading, de geselecteerde droogte-instelling en de
draaisnelheid in uw wasmachine (zie Wasgoed).
●
Wasgoed dat met de instelling Extra droog wordt gedroogd, kan doorgaans onmiddellijk worden gebruikt. De
randen of naden kunnen wel nog een beetje vochtig zijn, vooral bij grote artikelen. Als dit het geval is, vouwt u de
artikelen uit en herhaalt u het programma voor een korte periode.
Anti-allergischprogramma
Dit programma is goedgekeurd door Allergy UK, wat aangeeft dat het zorgt voor een effectieve verlaging en eliminatie van
allergenen uit kleding, dankzij de anti-allergie cyclus. Dankzij het programma worden de effecten van de meest voorkomende
allergenen (waaronder huisstofmijt en pollen) geneutraliseerd, door gedurende een lange periode een constant temperatuur
aan te houden.
Kan worden gebruikt op een volle lading nat wasgoed om te drogen en te behandelen, of op 4 kg droog wasgoed om het
enkel te behandelen.
Als op de display ANTI-ALLERGIE ACTIE NIET GEGARANDEERD, FILTER REINIGEN wordt weergegeven:
Reinig het pluizenfilter en start het programma weer.
Synthetisch
●
Dit is een programma voor items van de instelling Synthetisch lage temperatuur of synthetisch en katoenmengsels
op matige temperatuur.
●
De duur van dit programma hangt af van de omvang van de lading, de geselecteerde droogte-instelling en de
draaisnelheid in uw wasmachine (zie Wasgoed).
Snel drogen
Dit programma biedt een verminderde droogtijd voor kleine ladingen tot 1 kg.
Opmerking: Droogt uw wasgoed tot de instelling Kastdroog.
●
Optie Hoge Temperatuur Gebruiken voor ladingen katoenen wasgoed tot 1 kg
●
Gemiddelde (midden) temperatuuroptie Gebruiken voor ladingen synthetisch wasgoed tot 1 kg
✓
✓
✓
✓
✓
✓
✓
✓
✓✓
✓
✓
✓
✓
✓
✓
✓
✓
*U KUNT NIET ZOWEL KREUKELS HERSTELLEN ALS GELUIDOPTIES SELECTEREN
✓
✓
✗
✓
✗
✗
✗
✗
- Hoge
- Midden
- Lage
- Hoge
- Hoge
- Midden
- Hoge
- Midden
✗
- Midden
- Lage
- Midden
- Lage
Beschikbare droogteniveaus
(standaard gemarkeerd)
Sensor Droog
Enigszins droog
✓
✓
✓
✓
✓
✓
✓
✓
✓
✓✓✓✓✓
✓
✓
✓
✓
✓
Strijkdroog
✓
Hangdroog plus
✓
✓
✓
✓
✓
✓
✓
✓
✓
✓
✓
Ophangdroog
✓
✓
✓
✓
✓
Lichtdroog
✓
✓
✓
✓
✓
✓
Kastdroog
Extra droog
✓
✗
✗
✓
✗
✗
50
Page 51

Start en programma’s
EXCLUSIEVE PROGRAMMA’S - Programmatabel
! Als de display niet is verlicht; Druk op de AAN/UIT toets en selecteer vervolgens het programma.
Programma Beschikbare opties:
Uitsteltimer
Kreukels
voorkomen
Geluid of
*Kreukels
herstellen
Geluid
Minder pluis
Temperatuur-
niveaus
Drogen voor een
Jeans
4
Dekbed (DONS)
Wol
5
Zijde
Baby Fijnwas
6
Donker
Jeans
●
Dit is een programma voor jeans gemaakt van gekeperd katoen. Plooi de voorste zakken binnenstebuiten
alvorens uw jeans te drogen.
●
Dit programma kan worden gebruikt voor tot 3 kg wasgoed (ongeveer 4 paar).
●
Donkere en lichte kledingstukken niet mengen.
●
Dit programma kan ook worden gebruikt voor kledingstukken van hetzelfde materiaal, zoals vesten.
●
De duur van dit programma hangt af van de omvang van de lading, de geselecteerde droogte-instelling en de
draaisnelheid in uw wasmachine.
●
Wasgoed dat met de instelling Extra droog wordt gedroogd, kan doorgaans onmiddellijk worden gedragen. De
randen of naden kunnen wel nog een beetje vochtig zijn. Als dit het geval is, draait u de jeans binnenstebuiten
en herhaalt u het programma voor een korte periode.
! We raden aan dat u dit programma niet gebruikt als uw jeans elastische heupelastieken, knopen of borduurwerk
bevatten.
Dekbed (DONS)
! Let op: droog met dit programma GEEN items die beschadigd zijn, wat ertoe kan leiden dat de vulling de filter en
de luchtventilatie blokkeert en zo zorgt voor brandrisico.
●
Mag alleen worden gebruikt voor eenpersoonsdekbedden: NIET geschikt voor tweepersoons- of kingsize-
dekbedden.
●
Ladingen die worden gedroogd met dit programma zijn meestal klaar om te gebruiken, maar kunnen op
sommige plekken nog enigszins vochtig zijn. Als dit het geval is, vouwt u de artikelen uit, schudt u ze en herhaalt
u het programma voor een korte periode.
●
Ook geschikt voor jassen met donsvulling.
●
Selecteer de hoge temperatuur voor Katoenen dekbedden en gemiddelde temperatuur voor Synthetische
dekbedden.
●
De duur van dit programma hangt af van de omvang en de dichtheid van de lading en de draaisnelheid in uw
wasmachine.
✓
✓
✗
✓
✓
✓
✓
✗
✗
✗
✓
✗
✓
✓
✗
✗
✓
✗
*U KUNT NIET ZOWEL KREUKELS HERSTELLEN ALS GELUIDOPTIES SELECTEREN
✓
✓
✗
*
*
✗
- Hoge
- Midden
✗
✗
✗
✗
*
✗
✗
✗
✗
✗
✗
✗
✗
✓
✗
✗
✗
Beschikbare droogteniveaus
(standaard gemarkeerd)
bepaalde tijd
✓
●
●
●
Enigszins droog
Sensor Droog
✓
Een Automatisch programma
Een Automatisch programma
✓
✓
✓
✓
An Automatic programme
✓
✓
✓
Strijkdroog
✓
Hangdroog plus
✓
✓
✓
✓
✓
✓
Ophangdroog
✓
✓
✓
Lichtdroog
✓
✓
✓
Kastdroog
Extra droog
✓
✗
✗
NL
Wolprogramma
●
Dit is een programma voor kledingstukken die in de droogtrommel mogen en die voorzien zijn van het symbool .
●
Met dit programma kunt u tot 1 kg wasgoed (ongeveer 3 truien) drogen.
●
Het is aan te bevelen de kledingstukken binnenstebuiten te keren voor u ze in de droogtrommel plaatst.
●
De duur van dit programma hangt af van de omvang van de lading, de geselecteerde droogte-instelling en de
draaisnelheid in uw wasmachine .
●
Wasgoed dat met dit programma werd gedroogd, is meestal klaar voor gebruik, maar bij sommige zwaardere
kledingstukken kunnen de randen nog lichtjes vochtig zijn.
! In tegenstelling tot andere stoffen is het krimpen van wol onomkeerbaar; wol keert dus niet terug naar de
oorspronkelijke grootte en vorm.
! Dit programma is niet geschikt voor acryl-kledingstukken.
Zijde
●
Dit is een programma voor het drogen van uw delicate zijde.
●
Dit programma kan worden gebruikt voor tot 0,5 kg wasgoed.
●
De duur van dit programma hangt af van de omvang van de lading, de geselecteerde droogte-instelling en de
draaisnelheid in uw wasmachine .
●
Wasgoed dat met de instelling Kastdroog wordt gedroogd, is meestal droog genoeg om direct te gebruiken,
maar soms kunnen de naden of randen nog iets vochtig zijn. Keer in dit geval het wasgoed binnenstebuiten, of
open knopen of ritsen en laat het programma nog een korte tijd draaien.
51
Page 52

Start en programma’s
NL
Programma Baby Fijnwas
●
Dit is een programma voor het drogen van de kleine delicate kledingstukken en beddengoed van uw baby
(katoen en chenille) en voor het drogen van uw delicate kledij.
●
Droog GEEN items zoals slabbetjes en luierbroekjes die bedekt zijn met plastic.
●
Dit programma kan worden gebruikt voor tot 2 kg wasgoed.
●
De duur van dit programma hangt af van de omvang van de lading, de geselecteerde droogte-instelling en de
draaisnelheid in uw wasmachine
●
Het wasgoed dat met dit programma wordt gedroogd, kan doorgaans rechtstreeks worden gedragen. Bij dikkere
kledingstukken kunnen de randen nog een beetje vochtig zijn. Als dit het geval is, draait u de items binnenstebuiten en
herhaalt u het programma voor een korte periode.
Cyclus donkere was (DONKER)
Dit programma helpt de kleur van uw donker katoenen wasgoed te behouden door de motorsnelheid en de trommelrotatie
te controleren, samen met de controle van de lagere droogtemperatuur.
●
Het kan worden gebruikt voor katoenen wasgoed en jeans; ladingen tot maximum 3 kg.
●
De lading moet in de wasmachine zijn gecentrifugeerd aan een snelheid tussen 1200 - 1400 tpm.
●
De duur van dit programma hangt af van de grootte van de lading en de gebruikte draaisnelheid in uw wasmachine.
●
Omdat dit behandelingsprogramma is bedoeld om uw donker wasgoed te beschermen, kan het programma langer dan
4 uur duren.
●
Het droogt tot het niveau Kastdroog.
EXTRA PROGRAMMA’S - Programmatabel
! Als de display niet is verlicht; Druk op de AAN/UIT toets en selecteer vervolgens het programma.
Programma Beschikbare opties:
Beschikbare droogteniveaus
(standaard gemarkeerd)
✓
Uitsteltimer
Kreukels
voorkomen
Kreukels
herstellen
Minder pluis
Geluid
Temperatuur-
niveaus
Drogen voor een
bepaalde tijd
Sensor Droog
Enigszins droog
Strijkdroog
Hangdroog plus
Ophangdroog
Lichtdroog
Kastdroog
Extra droog
●
Een Automatisch programma
Pluche
7
Heat & Enjoy
Makkelijk Strijken
8
Opfrissen
9
Mijn Cyclus
✓
✗
✗
✗
✓
✗
✗
✗
✗
✗
✗
✗
✗
✗
Afhankelijk van het gekozen programma. Zie de vorige informatie.
M
✗
✗
✓
✓
✗
✗
✗
✗
✗
✗
✗
●
Een Automatisch programma
✗
●
Een Automatisch programma
✗
●
Een Automatisch programma
✗
Programma Pluche
Met dit programma kunt u het stof gemakkelijker verwijderen en de knuffelbeertjes vaker wassen omdat de droogtijd veel
korter is dan wanneer u ze zou drogen in de open lucht. Het is een delicate droogcyclus die droogt aan een lage temperatuur
en met een zachte mechanische werking om de originele vorm en glans van de vacht zo goed mogelijk te behouden.
Opmerking: Voor bescherming tegen allergie, de knuffelbeertjes gedurende 24 uren invriezen, vervolgens wassen en
drogen. Elke 6 weken herhalen. Alvorens het drogen, toebehoren zoals kledij, halsbanden of luidsprekers verwijderen en
de plastic ogen beschermen met afplakband na ze te hebben afgedroogd met een doek.
De tijd van het programma varieert afhankelijk van de precieze samenstelling van de lading.
De maximale lading mag niet meer wegen dan 2,5 kg en één stuk mag niet meer dan 600 g wegen.
Heat & Enjoy
Met dit programma kunnen handdoeken en badjassen worden opgewarmd voor een warm gevoel na een bad of een
douche. Het is ook handig om kledij op te warmen alvorens het aankleden tijdens de winter. Kleding wordt opgewarmd tot
37°C (lichaamstemperatuur), op de display wordt
behouden of totdat u de cyclus onderbreekt door de deur te openen, wanneer op de display
weergegeven. Maximale belading 3 kg.
Opmerking: De Start/Pause-knop is uitgeschakeld tijdens dit programma.
Opfrissen
! ‘Opfrissen’ is geen droogprogramma en mag niet worden gebruikt voor natte items of kledij.
●
Het kan worden gebruikt voor ladingen van iedere omvang, maar is doeltreffender bij kleinere hoeveelheden wasgoed.
●
Laad uw wasdroger niet te vol (zie Wasgoed).
●
Dit is een programma van 20 minuten dat uw kledij verlucht met een koele lucht. Kan ook worden gebruikt om warme
kledij af te koelen.
OPWARMEN weergegeven en deze temperatuur wordt maximaal 4 uur
GEREED wordt
52
Page 53

Start en programma’s
Programma Gemakkelijk strijken (MAKKELIJK STRIJKEN)
‘Gemakkelijk strijken’ is een kort programma van 10 minuten (8 minuten warmte, gevolgd door 2 minuten koude lucht) dat de vezels van
kleding verzacht die langer op dezelfde plek heeft gelegen. De cyclus ontspant de vezels waardoor ze gemakkelijker te strijken en op te
vouwen zijn.
! ‘Gemakkelijk strijken’ is geen droogprogramma en dient niet gebruikt te worden voor natte kleding.
Voor het beste resultaat
1. Overschrijd de maximale beladingscapaciteit niet. Deze aantallen verwijzen naar het droge gewicht.
Stof Maximale belading
Katoen en katoenmengsels 2,5 kg
Synthetische stoffen 2 kg
Spijkerstof 2 kg
2. Haal de droger onmiddellijk na het einde van het programma leeg, hang het wasgoed op of vouw of strijk het en berg het
Het ‘Gemakkelijk strijken’ effect varieert per stof. Het werkt goed voor traditionele stoffen als katoen of katoenmengsels en minder goed
voor synthetische vezels en materialen als Tencel®.
De Bedieningen
! Waarschuwing, het programma kan niet gewijzigd worden
na het indrukken van de START/PAUSE toets Druk op de
START/PAUSE toets om een
wijzigen. Het lampje knippert oranje om aan te geven dat
het programma onderbroken is.
programma en de gewenste opties. Het lampje zal dan
groen knipperen.
en het nieuwe programma zal worden gestart.
●
Deze toetsen worden gebruikt om het geselecteerde
programma aan uw wensen aan te passen. U dient eerst een
programma te selecteren met de programma toetsen voor u
een optie kunt kiezen. Niet alle opties zijn beschikbaar voor
alle programma’s (zie Start en Programma’s). Als de optie
niet beschikbaar is en u drukt op de toets, klinkt de zoemer
drie keer. Als de optie beschikbaar is, zal het indicatorlampje
op de displayeenheid naast de onderste knoppen oplichten
om aan te geven dat de optie is geselecteerd.
Van enkele programma’s (zie De display en Start en
Programma’s) kunt u de starttijd maximaal 24 uur uitstellen.
Leeg eerst de waterbak voor u een programma uitstelt.
Deze optie is alleen beschikbaar wanneer het programma is
uitgesteld. Het wasgoed wordt tijdens de uitstelperiode af en
toe rondgedraaid om kreuken te voorkomen.
Indien beschikbaar en geselecteerd wordt het wasgoed af
en toe rondgedraaid na het einde van het drogen en de
koude-luchtfase om te voorkomen dat het kreukt als u niet
direct na het afsluiten van het programma het wasgoed uit
de machine haalt.
Opmerking: Het oranje Start/Pause-lampje knippert tijdens
deze fase.
Opmerking: als u de optie geluid hebt geselecteerd, is
deze optie niet beschikbaar.
U kunt niet bij alle programma’s de temperatuur wijzigen en
sommige programma’s bieden alle drie de
temperatuuropties: Lage, Midden en Hoge.
Wanneer de temperatuurniveauopties beschikbaar zijn,
wordt het warmteniveau gewijzigd door op deze toets te
drukken; de display toont kort het geselecteerde
warmteniveau en een display van het pictogram van het
geselecteerde niveau:
HOGE TEMPERATUUR
MIDDEN TEMPERATUUR
LAGE TEMPERATUUR
Als deze optie beschikbaar en geselecteerd is: een signal wordt
er aan het einde van de droogcyclus een signaal gegeven
om u eraan te herinneren dat de kledingstukken klaar zijn om
te worden verwijderd. Opmerking: als u de optie kreukels
herstellen hebt geselecteerd, is deze optie niet beschikbaar.
Door de mechanische werking te verminderen tijdens het
finale droogstadium, wordt de hoeveelheid stof en pluis
aanzienlijk verminderd, waardoor de kledingvezels beter
worden beschermd.
wasgoed op in de kast. Als dit niet mogelijk is het programma herhalen.
geselecteerd programma te
Selecteer het nieuwe
Druk nogmaals op de START/PAUSE
toets
OPTIE toetsen
Uitsteltimer
Kreukels voorkomen
Kreukels herstellen
Temperatuurniveau knoppen, Display en icons
Geluid
Minder pluis
●
88:88
DISPLAY
Op het display ziet u ofwel de uitsteltijd of een indicatie
van de resterende droogtijd (zie De display).
Het display geeft ook eventuele problemen met de droger
weer. Als dit het geval is, ziet u op het display F, gevolgd door
een foutnummer (zie Problemen oplossen).
●
Water legen / Waterbak
(Als u uw droger op een afvoer hebt aangesloten kunt u dit
bericht negeren, omdat de waterbak dan niet geleegd hoeft
te worden).
Deze berichten worden weergegeven om u eraan te
herinneren de waterbak te legen (zie De display).
Als de waterbak tijdens een programma vult, wordt de
verwarming uitgeschakeld en gaat een Koude-luchtfase van
start. Hierna stopt de droger en wordt het volgende bericht
weergegeven
WATERBAK LEGEN
U moet de waterbak legen en de droger opnieuw starten,
anders droogt het wasgoed niet. Wanneer u de droger
opnieuw start, duurt het enkele seconden voor het bericht
verdwijnt. Om dit te voorkomen, is het verstandig om de
waterbak na elk gebruik te legen (zie Reiniging en Onderhoud).
●
Het openen van de deur
Als u tijdens een programma de deur opent, stopt het
droogprogramma en gebeurt er het volgende:
Opmerking: Het oranje Start/Pause-lampje knippert tijdens
de programmafase Kreukels herstellen na het drogen
●
De display geeft het volgende weer PAUZE
●
Tijdens een uitstelfase blijft de tijd tot de start van het
.
programma aftellen. De START/PAUSE toets moet
ingedrukt worden om het uitstelprogramma te hervatten.
De display zal dan de huidige status weergeven.
●
De START/PAUSE toets moet worden ingedrukt om het
programma voort te zetten. De display zal dan de huidige
status weergeven.
●
Tijdens de fase Kreukels herstellen na het drogen van
een droogprogramma, zal het programma stoppen.
Als u op de START/PAUSE toets drukt, begint een nieuw
programma vanaf het begin.
●
Warmtepompbeveiligingssysteem
Het warmtepompsysteem heeft een
compressorbeveiligingsfunctie die in werking treedt als u de
deur opent, als de stroom uitvalt of als u de droger uitschakelt.
Dit systeem zorgt ervoor dat de warmtepompcompressor
pas start 5 minuten nadat de deur werd gesloten en nadat
het programma werd gestart.
●
Opmerking
Als de stroom uitvalt, zet dan de machine uit en trek de
stekker uit het stopcontact. Wanneer er weer stroom is, drukt
u op de AAN/UIT-toets in en houd u deze ingedrukt totdat op
de display kort
INSCHAKELEN wordt weergegeven en de
droger weer begint. Druk vervolgens op de Start/Pause toets
om het programma te hervatten.
NL
53
Page 54

Wasgoed
NL
Het wasgoed sorteren
• Controleer de droogsymbolen om te zien of de
artikelen in de droogtrommel gedroogd kunnen
worden.
• Sorteer het wasgoed per stofsoort.
• Leeg de zakken en controleer de knopen.
• Sluit ritsen en haakjes en bind losse riemen en
ceinturen vast.
• Wring elk artikel uit om zoveel mogelijk water kwijt
te raken.
! Doe geen druipnatte kleding in de droogautomaat.
Maximale belading
Overschrijd de maximale beladingscapaciteit niet.
Deze aantallen verwijzen naar droog gewicht:
Natuurlijke vezels: max. 8 kg
Droogtijden
De onderstaande tabel geeft een RICHTLIJN van de
droogtijden in minuten. De gewichten verwijzen naar
droge kleding:
Deze tijden zijn richtlijnen en zijn afhankelijk van:
• Hoeveelheid water die zich na het centrifugeren
nog in de kleding bevindt: handdoeken en fijne
kleding houden veel water vast.
• Stof: artikelen van dezelfde soort stof maar met
verschillende textuur en dikte hebben mogelijk niet
dezelfde droogtijden.
• Hoeveelheid wasgoed: een kleine hoeveelheid
wasgoed of slechts een enkel kledingstuk heeft
vaak een langere droogtijd.
Synthetische vezels: max. 4 kg
• Droogheid: als u kleding strijkt, kunt u het uit de
! Doe NIET te veel wasgoed in de droger; dit kan het
droogresultaat beïnvloeden.
droogtrommel halen als het nog een beetje vochtig
is. Ander wasgoed kunt u in de droger laten tot
het helemaal droog is.
Droogsymbolen
Controleer de labels in uw kleding, vooral als u ze
voor het eerst droogt. De volgende symbolen worden
het meest gebruikt.
• Ingestelde warmte.
• Kamertemperatuur: als het koud is in de kamer
waar de droger staat, duurt het langer voor uw
kleding droog is.
• Grote hoeveelheden: bepaalde dikke artikelen kunnen
Drogen in de droogtrommel
voorzichtig in de droogautomaat gedroogd worden.
We raden u aan deze artikelen regelmatig uit de
Niet drogen in de droogtrommel
droogtrommel te halen, ze uit te schudden en
terug in de droger te doen tot ze droog zijn.
Droog op hoge stand
! Droog uw kleding niet te lang.
Droog op lage stand
Alle stoffen bevatten een klein beetje natuurlijk vocht
wat ze zacht en soepel houdt.
1:20 - 1:40
1 kg
40 - 50
2 kg
80 - 100
1:30
3 kg
1:40 - 2:10
120 - 130
1:30 of 2:00
0:50 - 1:00
0:40 of 1:00
2:00 - 2:20
120 - 140
2:00 of 2:30
2 kg
50 - 60
4 kg
5 kg
2:20 - 3:00
140 - 180
2:30
1:00 - 1:30
1:00 of 1:30
6 kg
2:30 - 3:10
150 - 190
2:30 of 3:00
3 kg
60 - 90
1 kg
0:40 - 1:20
40 - 80
0:40 of 1:00 of 1:30 1:30 of 2:00 of 2:30
1:20 - 2:20
80 - 140
2:50 - 3:20
170 - 200
3:00 of 3:40
1:00 of 1:30 of 2:00
2 kg
Katoen
Hoge
Temperatuur
Automatisch,
tijd in uren
Automatisch,
tijd in minuten
Instelling Drogen voor
een bepaalde tijd
Droogtijden bij centrifugetoerental van 800-1000 omw/min.
1 kg
1:00 - 1:30
60 - 90
1:00 of 1:30
Synthetisch
Midden
Temperatuur
Automatisch,
tijd in uren
Automatisch,
tijd in minuten
Instelling Drogen voor
een bepaalde tijd
Droogtijden bij minder snelle centrifuge
0:40 - 0:50
0:40 of 1:00
Acryl
Automatisch,
tijd in uren
Automatisch,
tijd in minuten
Lage
Temperatuur
●
Opmerking: Aan het einde van de droogcyclus kan katoen nog vochtig zijn als het samen met synthetische
Instelling Drogen voor
een bepaalde tijd
Droogtijden bij minder snelle centrifuge
stoffen is gedroogd. Als dit gebeurt, laat het katoenen wasgoed dan nog een korte periode drogen.
7 kg
1:20 - 2:00
80 - 120
8 kg
3:20 - 4:00
200 - 240
3:40
4 kg
54
Page 55

Problemen oplossen
Mocht u problemen ondervinden met uw droger controleer dan eerst het volgende voor u de technische dienst
belt (zie Technische dienst):
Probleem:
Mogelijke oorzaken / Oplossing
NL
Droger start niet.
Droogcyclus start niet.
Het duurt lang voor het
wasgoed droog is.
Bericht Waterbak legen wordt
weergegeven maar het
droogprogramma is nog
maar korte bezig.
●
De stekker zit niet in het stopcontact of maakt geen contact.
●
Er is een stroomstoring geweest.
●
De stop is gesprongen. Steek de stekker van een ander apparaat in het
stopcontact.
●
Gebruikt u een verlengsnoer? Probeer de stekker van de droger
rechtstreeks in het stopcontact te steken.
●
Is de deur niet helemaal afgesloten?
●
De PROGRAMMA is niet helemaal juist ingesteld (zie Start en programma’s).
●
De START/PAUSE toets is niet ingedrukt (zie Start en programma’s).
●
U hebt een latere starttijd ingesteld (zie Start en programma’s).
●
Het pluizenfilter is niet gereinigd (zie Reiniging en Onderhoud).
●
Dient de waterbak geleegd te worden? Pictogram Water legen knippert?
(zie Reiniging en Onderhoud).
●
Moet de warmtepompfilter worden gereinigd? (zie Reiniging en Onderhoud).
●
De temperatuurinstelling is niet ideaal voor het soort stof dat u droogt (zie
Start en programma’s, en zie Wasgoed)).
●
U hebt niet de juiste droogtijd ingesteld (zie Wasgoed).
●
Het luchtinvoerrooster is afgedekt (zie Installatie en zie Reiniging en
Onderhoud).
●
Het wasgoed is te nat (zie Wasgoed).
●
De droger is te vol (zie Wasgoed).
●
De waterbak was waarschijnlijk niet geleegd voor het begin van het
programma. Wacht niet op het signaal waterbak legen, controleer de
waterbak altijd en leeg deze indien nodig voor u een nieuw droogprogramma
start (zie Reiniging en Onderhoud).
Bericht Waterbak legen wordt
weergegeven en de waterbak
is niet vol.
Het programma is afgewerkt
en de kledingstukken zijn
vochtiger dan voorzien.
Op het display staat een
foutcode F gevolgd door één
of twee cijfers.
De display geeft elke 6
seconden kort
DEMO AAN
weer.
Hoewel de droger is
ingeschakeld, branden de
lampjes op het
bedieningspaneel van de
droger niet.
●
Dit is normaal, het:
EINDE CYCLUS, FILTER REINIGEN EN WATERBAK LEGEN
bericht wordt weergegeven om u eraan te herinneren om de waterbak te
legen (zie De display en Start en programma’s).
! Om veiligheidsredenen werkt de droogtrommel maximaal 5 uur. Als een
automatisch programma in die tijd niet de vereiste eindvochtigheid heeft
gedetecteerd, voert de droogtrommel het programma volledig uit en stopt.
Controleer bovenstaande punten en voer het programma opnieuw uit; als
de kledingstukken nog steeds vochtig zijn, dient u contact op te nemen met
de technische dienst (zie Technische dienst).
●
Als de display aangeeft dat er een storing is opgetreden:
- schakelt u het toestel uit en trekt u de stekker uit. Reinig de filter en
de warmtepompfiltereenheid (zie Reiniging en Onderhoud). Steek de
stekker weer in het stopcontact, schakel het toestel in en start dan
een ander programma. Als er vervolgens een storing wordt
weergegeven, noteer dan de storingscode en neem contact op
met Technische dienst (zie Technische dienst).
●
De droger functioneert in demonstratiemodus. Houd de Aan/Uit knop en
de Start/Pause knop 3 secondenlang ingedrukt. De display zal 3
secondenlang DEMO UIT weergeven en daarna zal de droger de
normale bediening hervatten.
●
De droger werd in de stand-bymodus gebracht om stroom te besparen.
Dit gebeurt na een stroomonderbreking of als u de droger aan laat staan
zonder een programma te starten of nadat uw droogprogramma is
beëindigd.
- Druk op de Aan/Uit toets (Aan/Uit) en de lampjes gaan weer branden.
55
Page 56

Technische dienst
NL
Warmtepompsysteem
De droger is uitgerust met een afgesloten
warmtepompsysteem om uw kleren te drogen. Om te
kunnen werken, bevat de warmtepomp gefluoreerde
broeikasgassen (F-gassen) die betrokken zijn door het
Kyoto-protocol. Deze F-gassen zitten in een hermetisch
afgesloten eenheid. Deze afgesloten eenheid bevat
0.29 kg van het F-gas R134a dat fungeert als koelmiddel.
Als de afgesloten eenheid defect is, moet deze worden
vervangen door een nieuwe afgesloten eenheid.
Neem contact op met uw dichtstbijzijnde servicecenter.
●
Opmerking: De gassen in het afgesloten systeem
zijn niet gevaarlijk voor de gezondheid, maar als ze
ontsnappen, zullen ze een invloed hebben op de
opwarming van de aarde.
Voor u de technische dienst belt:
●
gebruik de tabel van het onderdeel problemen
oplossen om te zien of u het probleem zelf kunt
verhelpen (zie Problemen oplossen).
●
Zo niet, zet de droger uit en bel de dichtstbijzijnde
technische dienst.
Informatie die de technische dienst nodig heeft:
●
uw naam, adres en postcode.
●
uw telefoonnummer.
●
het soort probleem.
●
de datum van aankoop.
●
het model van het apparaat (Mod.).
●
het serienummer (S/N).
Deze informatie vindt u op het etiket aan de binnenkant
van de deur van de machine
Reserveonderdelen
Deze droger is een gecompliceerd apparaat. Pogingen
dit apparaat zelf te repareren of onderhoud door hiervoor
niet erkende personen kan letsel toebrengen aan een
of meerdere personen, kan schade toebrengen aan de
machine en kan de garantie op reserveonderdelen
doen vervallen.
Bel een erkende vakman als u problemen ondervindt bij
het gebruik van deze machine.
●
Merk op: een niet-bevoegde persoon die
onderhouds- of herstellingswerken uitvoert waarbij hij
de afgesloten warmtepompeenheid beschadigt, is in
overtreding.
Energiebesparing en respect voor het milieu
●
Wring het wasgoed altijd eerst uit voor u het in de droger doet (als u het wasgoed in een wasmachine wast,
centrifugeer het wasgoed dan op een hoog toerental). Dit bespaart tijd en energie tijdens het drogen.
●
Droog altijd hele ladingen - dit bespaart energie: kleine ladingen of slechts een enkel kledingstuk hebben vaak
een langere droogtijd.
●
Reinig het pluizenfilter na elk gebruik om de kosten van energieverbruik te beperken (zie Reiniging en
Onderhoud).
56
Page 57

Productgegevens...(EU richtlijn 392/2012)
Merk Hotpoint Ariston Modellen TCD 872
FTCD 872
Droogcapaciteit van katoenen wasgoed voor het standaard programma met volle belading 8 kg Energie-efficiëntieklasse A++
Gewogen jaarlijks energieverbruik (AEc) 235.3 kWh
Energieverbruik per jaar, gebaseerd op 160 droogcycli van het standaard katoenprogramma bij volle en halfvolle belading en
het verbruik van de spaarstanden. Het werkelijke energieverbruik per cyclus hangt af van hoe het apparaat wordt gebruikt.
Deze gezinsdroogautomaat is een automatische condensdroger
Energieverbruik : volle belading E
Stroomverbruik : uit-stand (P
) 0.17 W, stand-by stand (Pl) 3.27 W
o
1.96 kWh, halfvolle belading E
dry
dry1/2
1.09 kWh
Tijdsduur van de stand-by stand voor stroombeheersysteem 30 minuten
Het ‘standaard katoenprogramma’ dat geschikt is voor het drogen van normaal, nat katoenen wasgoed dat het efficiëntst
is voor wat betreft het energieverbruik bij een volle of halfvolle belading is
Standaard katoen, Hoge Temperatuur, Kastdroog
Programmaduur (minuten) : gewogen (Tt) volle & halfvolle belading 163, volle belading (T
) 213, halfvolle belading (T
dry
dry1/2
) 126
Condensatie-efficiëntieklasse B
Gemiddelde condensatie-efficiëntie (%) : volle belading (C
) 81, halfvolle belading (C
dry
) 81, gewogen (Ct) volle & halfvolle belading 81
dry1/2
Lucht gedragen akoestische geluidsemissie 70 dB(A) re 1 pW
* “consumenteninformatie in overeenstemming met de EG-richtlijn 932/2012”.
NL
Nominaal energieverbruik - Synthetisch
Normale droogtijd - Synthetisch
volle belading 0.68 kWh, halfvolle belading niet van toepassing
volle belading 85 minuten, halfvolle belading niet van toepassing
Informatie over recyclage en verwijdering
Als onderdeel van onze voortdurende
toewijding aan de bevordering van het milieu,
behouden we ons het recht voor om
gerecycleerde kwaliteitsonderdelen te gebruiken om de
klantenkosten zo laag mogelijk te houden en
materiaalverspilling te minimaliseren.
●
Verpakkingsmateriaal: houd u aan de regels die
gelden voor uw gemeente, zodat het verpakkings
materiaal gerecycled kan worden.
●
Om het risico op verwondingen bij kinderen zoveel
mogelijk te beperken, moet de deur verwijderd worden
en dient het zichtbare deel van het netsnoer te
worden afgeknipt. Gooi deze delen afzonderlijk weg
om ervoor te zorgen dat de stekker van het toestel
niet langer in het stopcontact gestoken kan worden.
Vernietiging van oude electrische
apparaten
De Europese Richtlijn 2012/19/EC over Vernietiging van
Electrische en Electronische Apparatuur (WEEE), vereist
dat oude huishoudelijke electrische apparaten niet
mogen vernietigd via de normale ongesorteerde
afvalstroom. Oude apparaten moeten apart worden
ingezameld om zo het hergebruik van de gebruikte
materialen te optimaliseren en de negatieve invloed op
de gezondheid en het milieu te reduceren. Deze
condensdroger is voorzien van een verzegelde
warmtepomp met F-gassen die moeten worden
opgevangen en vernietigd.
Het symbool op het product van de
“afvalcontainer met een kruis erdoor” herinnert u
aan uw verplichting, dat wanneer u het apparaat
vernietigt, het apparaat apart moet worden
ingezameld.
Consumenten moeten contact opnemen met de locale
autoriteiten voor informatie over de juiste wijze van
vernietiging van hun oude apparaat.
Dit apparaat voldoet aan de volgende EC richtlijnen:
- 2006/95/EC (Richtlijn voor Lage Voltages)
- 2004/108/EEC (Electromagnetische compatibiliteit)
Indesit Company, Viale Aristide Merloni 47, 60044 Fabriano (AN), Italy
57
Page 58

C
Z
58
Obsah
FTCD 872
Při prvním zapnutí sušičky musíte
zvolit preferovaný jazyk, viz str. 66
BUBNOVÁ SUŠIČKA
Návod k použití
Instalace, 59-60
Kam umístit sušičku
Větrání
Odtoková trubka
Vyrovnání sušičky
Elektrické zapojení
Než začnete používat sušičku
Varování, 61-62
Všeobecná bezpečnost
Minimalizace nebezpečí požáru v sušičce
Údržba, 63-64
Vypínání napájení
Po každém cyklu vyčistěte filtr
Po každém cyklu vyprázdněte nádobu na vodu
Po každém cyklu zkontrolujte buben
Čištění filtrační jednotky tepelného čerpadla
Čištění sušičky
Popis sušičky, 65
Hlavní prvky
Ovládací panel
Displej, 66-68
Spouštění a programy, 68-72
Volba programu
Tabulka programů
Ovládací prvky
Prádlo, 73
Tfiídûní prádla
Štítky s údaji o praní
Doby sušení
Řešení problémů, 74
Servis, 75
Náhradní díly
Údaje o výrobku, 76
Recyklace a likvidace
GB
English, 1
Česky, 58
Slovenčina, 77
CZ
F
Français, 20
SK
NL
Nederlands, 39
Tento symbol připomíná, že si máte
přečíst návod.
! Uschovejte tento návod k použití na snadno dostupné
místo, abyste do něj mohli v případě potřeby nahlédnout.
Nezapomeňte na něj při stěhování a pokud spotřebič
prodáte nebo přenecháte jiné osobě, ujistěte se, že se
sušičkou předáte i tento návod, aby se mohl nový
vlastník seznámit s výstrahami a doporučeními týkajícími
se fungování spotřebiče.
! Pozorně si přečtěte tyto pokyny; na následujících
stranách najdete důležité informace o instalaci a
doporučení týkající se fungování spotřebiče.
www.hotpoint.eu
Page 59

CZ
59
Instalace
Kam umístit sušičku
• Umístěte sušičku dále od plynových
sporáků, kamen, ohřívačů nebo ploten,
protože plameny by mohly poškodit
spotřebič.
• V zájmu dosažení optimální účinnosti by
měla být sušička nainstalována v prostředí s
pokojovou teplotou 20 až 23 °C.
Ale bude fungovat i v případě, že pokojová
teplota je v rozsahu 14 až 30 °C.
• Pokud budete instalovat
spotřebič pod pracovní
pult, musíte nechat 10 mm
volný prostor mezi horní
stranou a všemi předměty
na sušičce nebo nad ní a
15 mm volný prostor mezi
bočními stranami a
zařízením na stěnách.
Je to nutné k zajištění správné cirkulace
vzduchu.
Zařízení musí být nainstalováno tak, aby byl
jeho zadní povrch přisunutý ke stěně.
!
Ujistěte se, že nejsou zakryté zadní větrací
otvory.
Větrání
Za provozu sušičky je nutné náležité větrání. Zajistěte, aby
byla sušička v prostředí, které není vlhké a má vhodnou
celkovou cirkulaci vzduchu. Proudění vzduchu kolem
sušičky má zásadní význam pro kondenzaci vody
zachycené během praní; v zavřeném prostoru nebo ve
skříni nebude sušička pracovat efektivně.
! Pokud se sušička používá v malé nebo chladné místnosti,
může se objevit jistá míra kondenzace.
!
Nedoporučujeme instalaci sušičky do skříně,
ale nikdy se nesmí instalovat za uzamykatelné
dveře, posuvné dveře nebo dveře se závěsem
na opačné straně, než je závěs dvířek sušičky.
O
dtoková trubka
Pokud je sušička nainstalována vedle odtokové trubky, lze
na ni napojit odvod vody. Pak nebude nutné vyprazdňovat
nádobu na vodu. Pokud sušička stojí na pračce nebo vedle
ní, oba spotřebiče mohou sdílet stejnou odtokovou trubku.
Odtok nesmí být výše než 3' (1 m) nad spodní stranou
s
ušičky.
Odstraňte stávající hadici z polohy
znázorněné na obrázku A.
Potom umístěte hadici vhodné délky
do polohy znázorněné na obrázku B.
! Ujistěte se, že když je sušička v cílové poloze, hadice není
přiskřípnutá nebo zauzlená.
Vyrovnání sušičky
Sušička vyžaduje ke správnému provozu instalaci na
vodorovný povrch.
Až ji nainstalujete na určené místo,
zkontrolujte, zda stojí rovně; nejprve
zkontrolujte příčné vyrovnání a
potom předozadní vyrovnání.
Pokud sušička nestojí rovně,
upravujte výšku obou předních noh,
dokud nedosáhnete vodorovného
umístění.
! VAROVÁNÍ: Před použitím sušičky se ujistěte, že již
alespoň šest hodin stojí ve svislé poloze.
Minimální vzdálenost 10 mm
M
inimální
v
zdálenost
1
5 mm
Obr. A
Obr. B
Page 60

CZ
60
Instalace
Elektrické zapojení
Než zapojíte zástrčku do síťové zásuvky,
ujistěte se, že jsou splněny následující
podmínky:
• Ujistěte se, že máte suché ruce.
• Zásuvka musí být uzemněná.
• Zásuvka musí být dimenzována na
maximální příkon spotřebiče, který je uveden
na typovém štítku (viz Popis sušičky).
• Síťové napětí musí odpovídat hodnotám
uvedeným na typovém štítku (viz Popis
sušičky).
• Zásuvka musí být kompatibilní se zástrčkou
sušičky. V opačném případě vyměňte
zástrčku nebo zásuvku.
!
Sušička se nesmí instalovat ve venkovním
prostředí, ani když je prostor zastřešený.
Účinky deště nebo bouřky by mohly mít velmi
nebezpečné následky.
!
Síťový kabel a zástrčka sušičky musí být po
instalaci snadno dosažitelné.
!
Nepoužívejte prodlužovací kabely.
!
Síťový kabel nesmí být ohnutý ani
přiskřípnutý.
!
Napájecí kabel elektrického napájení je třeba
pravidelně kontrolovat. Pokud je napájecí kabel
poškozen, musí být vyměněn výrobcem, jeho
servisní službou nebo jiným kvalifikovaným
personálem, aby se zabránilo nebezpečí. Nové
nebo delší síťové kabely dodávají za příplatek
autorizovaní prodejci.
!
Výrobce neponese žádnou odpovědnost za
nedodržení kteréhokoliv z těchto požadavků.
!
Máte-li pochybnosti tkající se kteréhokoliv z
výše uvedených požadavků, poraďte se s
kvalifikovaným elektrikářem.
N
ež začnete používat sušičku
Jakmile nainstalujete sušičku, před použitím vyčistěte
vnitřek bubnu, abyste odstranili veškerý prach, který se
mohl nahromadit během přepravy.
Maximální náplň
Přírodní materiály: 8 kg
Page 61

CZ
61
Varování
!
Spotřebič byl navržen a vyroben v souladu s
mezinárodními bezpečnostními normami.
Tato varování jsou uváděna z bezpečnostních
důvodů a musí se pečlivě dodržovat.
Všeobecná bezpečnost
• Tuto sušičku smí používat osoby (včetně dětí
starších 8 let) se sníženými fyzickými,
senzorickými nebo mentálními schopnostmi
nebo osoby bez zkušeností a znalostí, když
jsou pod dohledem nebo když dostanou
pokyny týkající se použití zařízení ze strany
osoby odpovědné za jejich bezpečnost.
• Tato bubnová sušička je určena k používání
v domácnostech, nikoliv k profesionálnímu
používání.
• Nedotýkejte se spotřebiče bosýma nohama
nebo mokrýma rukama či nohama.
• Při odpojování spotřebiče od sítě tahejte za
zástrčku, nikoliv za kabel.
• Po použití sušičku vypněte a odpojte od sítě.
Nechávejte zavřená dvířka, abyste zajistili, že
si s nimi děti nebudou hrát.
• Děti musí mít dozor, aby si nemohly hrát se
sušičkou.
• Operace údržby a čištění nesmějí provádět
děti bez dohledu.
• Pokud nejsou děti mladší 3 let pod
neustálým dozorem, musí být udržovány v
dostatečné vzdálenosti od sušičky.
• Spotřebič musí být správně nainstalován a
musí mít zajištěné vhodné větrání. Přívod
vzduchu na přední a zadní straně sušičky a
větrací otvor za sušičkou se nesmí nikdy
zakrývat (viz Instalace).
• Nikdy nepoužívejte sušičku na koberci, jehož
výška vlasu by mohla zabránit vnikání
vzduchu do sušičky skrz základnu.
• Před plněním zkontrolujte, zda je sušička
prázdná.
• Zadní strana sušičky může být velmi
horká. Za provozu se jí nikdy
nedotýkejte.
• Nepoužívejte sušičku, pokud nejsou filtr,
nádoba na vodu a filtrační jednotky
tepelného čerpadla pevně usazené na svých
místech (viz Údržba).
• Nepřeplňujte sušičku (viz maximální
hmotnosti náplně v oddílu Prádlo).
• Nevkládejte prádlo, ze kterého kape voda.
• Pečlivě zkontrolujte všechny pokyny na
štítcích oděvů (viz Prádlo).
• V sušičce nesušte velké, velmi objemné
kusy.
• Nesušte tkaniny s akrylátovými vlákny při
vysokých teplotách.
• Nevypínejte sušičku, dokud je uvnitř teplé
prádlo.
• Po každém použití vyčistěte filtr (viz Údržba).
• Po každém použití vyprázdněte nádobu na
vodu (viz Údržba).
• V pravidelných intervalech čistěte filtrační
jednotku tepelného čerpadla (viz Údržba).
• Zabraňte hromadění textilního prachu kolem
sušičky.
• Nikdy nelezte na sušičku. Mohli byste ji
poškodit.
• Vždy dodržujte normy a požadavky týkající
se elektrické instalace (viz Instalace).
• Vždy kupujte originální náhradní díly a
příslušenství (viz Servis).
Page 62

CZ
62
Varování
Musí se dodržovat následující pokyny
pro minimalizaci nebezpečí požáru v
sušičce:
• V sušičce sušte pouze prádlo, které bylo
vyprané pracím prostředkem a vodou,
vymáchané a odstředěné. Sušení prádla,
které NEBYLO prané vodou, představuje
nebezpečí požáru.
• Nesušte oděvy ošetřené chemickými
výrobky.
• V sušičce nesušte prádlo znečištěné nebo
nasáklé rostlinným nebo kuchyňským
olejem, mohlo by dojít k požáru. Kusy
znečištěné olejem se mohou spontánně
vznítit, zejména pokud jsou vystaveny
účinkům zdrojů tepla jako v sušičce. Jejich
zahřátí vyvolá oxidační reakci s olejem a při
oxidaci vzniká teplo. Nemůže-li teplo unikat,
kusy se mohou ohřát do takové míry, že
vzplanou. Skládání, kupení nebo ukládání
kusů znečištěných olejem může zabránit
úniku tepla, proto představuje nebezpečí
požáru. Pokud se nelze vyhnout sušení
tkanin obsahujících rostlinný nebo kuchyňský
olej nebo znečištěných kosmetickými
výrobky pro péči o vlasy nejprve se musí
vyprat s použitím většího množství pracího
prostředku – tím se nebezpečí zmenší, ale
nevyloučí. Kusy by se neměly vyjímat ze
sušičky a skládat nebo kupit, dokud jsou
horké.
• V sušičce nesušte prádlo, které bylo čištěné
nebo prané benzínem, chemickými čisticími
prostředky nebo jinými hořlavými či
výbušnými látkami, nebo je těmito látkami
nasycené či znečištěné. Mezi vysoce hořlavé
látky běžně používané v domácnostech patří
kuchyňský olej, aceton, denaturovaný
alkohol, petrolej, prostředky na čištění skvrn,
terpentýn, vosky a prostředky na
odstraňování vosku. Než vložíte takovéto
prádlo do sušičky, ujistěte se, že bylo
vyprané v horké vodě s větším množstvím
pracího prostředku.
• V sušičce nesušte prádlo obsahující molitan
(známý také pod označením pěnový latex)
nebo podobně strukturované pryžovité
materiály. Molitanové materiály se mohou při
ohřátí spontánně vznítit a způsobit požár.
• V sušičce se nesmí používat změkčovadla
nebo podobné výrobky na eliminaci účinků
statické elektřiny, pokud to výslovně
nedoporučuje výrobce příslušného výrobku.
• V sušičce nesušte spodní prádlo obsahující
kovové výztuhy, např. podprsenky s
výztužnými dráty. Kdyby se kovové výztuhy
během sušení uvolnily, mohlo by dojít k
poškození sušičky.
• V sušičce nesušte pryž, plastové tkaniny
jako sprchovací čepice nebo dětské
nepromokavé pokrývky, polyethylene ani
papír.
• V sušičce nesušte pogumované tkaniny,
oblečení vybavené molitanovými
vycpávkami, polštáře, galoše a pogumované
tenisky.
• Vyjměte z kapes všechny předměty, jako
jsou zapalovače a zápalky.
!
VAROVÁNÍ: Nikdy nezastavujte sušičku před dokončením sušicího cyklu, pokud rychle
nevyjmete všechny kusy prádla a nerozložíte je tak, aby mohlo uniknout teplo.
Page 63

CZ
63
Údržba
Vypínání napájení
!
Když se sušička nepoužívá, při čištění a
během veškeré údržby odpojte sušičku od sítě.
Po každém cyklu vyčistěte filtr
Filtr představuje důležitou součást sušičky.
Hromadí se v něm vlákna a textilní prach
vznikající při sušení.
Po skončení sušení vyčistěte filtr propláchnutím
pod tekoucí vodou nebo vysavačem.
Kdyby se filtr ucpal, vážně by to narušilo
proudění vzduchu uvnitř sušičky: doba sušení
by se prodloužila a spotřebovali byste vice
energie. Také by se mohla poškodit sušička.
Filtr se nachází na přední straně spodního dílce
(viz obrázek na další straně).
Vyjmutí filtru:
1. Vytáhněte plastový úchyt filtru nahoru.
2. Otevřete filtr a odstraňte z
něj textilní vlákna.
3. Vraťte ho přesně na
původní místo. Ujistěte
se, že filtr je zcela
zarovnaný s plochou
spodního dílce sušičky.
4. Odstraňte všechna textilní
vlákna, která se nahromadila na vnitřní straně
dvířek a kolem těsnění dvířek.
!
Nepoužívejte sušičku, dokud nevrátíte filtr.
Čištění filtrační jednotky tepelného
čerpadla
Pravidelně (po každých pěti cyklech sušení)
vyjímejte filtrační jednotku tepelného čerpadla a
odstraňujte nahromaděný textilní prach z
povrchu filtru.
Nicméně v zájmu optimalizace účinnosti
sušičky doporučujeme čistit tento filtr po
KAŽDÉM cyklu sušení.
Vyjmutí filtrační jednotky tepelného čerpadla:
1. Odpojte sušičku od sítě a otevřete dvířka.
2. Zatažením otevřete kryt filtrační jednotky
tepelného čerpadla (viz obrázek na další
straně). Uvolněte čtyři úchyty otočením do
svislé polohy a potom vytáhněte filtrační
jednotku směrem k sobě.
3. Oddělte obě části
jednotky a vyčistěte
povrch filtru.
!
Přední strana tepelného čerpadla je
vyrobena z tenkých plechů. Při čištění,
vyjímání nebo výměně filtrační jednotky
tepelného čerpadla dávejte pozor, abyste je
nepoškodili nebo se o ně nepořezali.
Při každém čištění filtrační jednotky tepelného
čerpadla vždy odstraňte nahromaděný textilní
prach z povrchu plechových ploch.
4. Opatrně ho odstraňte
vlhkou látkou, houbou
nebo vysavačem. Nikdy
ho neodstraňujte prsty.
5. Znovu smontujte obě části filtru, vyčistěte
těsnění, vraťte čtyři úchyty do vodorovné
polohy a ujistěte se, že pevně drží.
Page 64

CZ
64
Údržba
Nádoba na vodu
Kryt filtrační jednotky
tepelného čerpadla
Úchyty
Filtr
Filtrační jednotka
tepelného čerpadla
Čištění sušičky
• Vnější kovové nebo plastové součásti a pryžové součásti
lze čistit vlhkou látkou.
• V pravidelných intervalech (každých šest měsíců)
vyčistěte vysavačem mřížku přívodu vzduchu na přední
straně, abyste odstranili nahromaděná textilní vlákna a
prach. Občas také vysajte přední stranu tepelného
čerpadla a prostor s filtrem, abyste odstranili nános
textilního prachu.
! Nepoužívejte rozpouštědla ani brusné materiály.
! Pravidelně nechte sušičku zkontrolovat autorizovanými
techniky, abyste zajistili elektrickou a mechanickou
bezpečnost (viz Servis).
Rychlé rady
• Nezapomeňte vyčistit filtr dvířek tepelného čerpadla po
každém sušení.
• Nezapomeňte vyprázdnit nádobu na zachycování vody
po každém naplnění.
! Když budete postupovat uvedeným způsobem,
dosáhnete maximální výkonnosti!
Po každém cyklu vyprázdněte nádobu na
vodu
Vytáhněte nádobu ze sušičky,
odstraňte malé nebo velké víko a
vyprázdněte ji do výlevky nebo
jiného vhodného odtoku. Vraťte
víko a pevně usaďte nádobu zpět
na místo.
! Před zahájením nového cyklu vždy zkontrolujte a
vyprázdněte nádobu.
! Pokud se nádoba na vodu nevyprázdní, mohlo by to
mít následující následky:
- Sušička přestane topit (takže náplň bude na konci
sušicího cyklu stále vlhká) (viz Ovládací prvky).
• Plnění systému na zachycování vody
Když je sušička nová, v nádobě na vodu se nebude
shromažďovat voda, dokud se systém nenaplní; bude to
trvat jeden nebo dva cykly.
Jakmile se systém naplní, bude shromažďovat vodu
během každého sušicího cyklu.
Po každém cyklu zkontrolujte buben
Ručně otáčejte bubnem, abyste vyňali malé kusy prádla
(kapesníky), které mohly zůstat vzadu.
Čištění bubnu
! K čištění bubnu nepoužívejte brusné materiály, drátěnku
ani čisticí prostředky na nerezovou ocel.
Na nerezovém bubnu se může po jisté době objevit
barevný povlak vytvořený kombinací vody a/nebo čisticích
prostředků, například avivážních prostředků používaných při
praní. Tento povlak nemá vliv na účinnost sušičky.
Page 65

Tlačítko ZAPNOUT/VYPNOUT : pokud je stisknuto za
běhu sušičky: Pokud je na displeji zobrazeno VYPNUTÍ ,
sušička se zastaví. Pokud je na displeji zobrazeno
STISKNĚTE A PŘIDRŽTE , držte tlačítko, displej odpočítá 3,
2, 1 a potom se sušička zastaví. Znovu ho stiskněte a
podržte déle než tři sekundy; na displeji se na okamžik
zobrazí ZAPNUTO .
Volicími tlačítky PROGRAM se nastavuje program:
stiskněte tlačítko odpovídající programu, který chcete zvolit
(viz Spouštění a programy).
Tlačítka MOŽNOSTI s kontrolkami: těmito tlačítky se vybírají
dostupné možnosti pro zvolený program (viz Ovládací
prvky). Rozsvícené kontrolky na zobrazovací jednotce vedle
spodních tlačítek ukazují, která možnost byla vybrána.
Tlačítkem SPUSTIT/PAUZA s kontrolkou se spouští
zvolený program. Stisknutím tohoto tlačítka za běhu
programu se pozastaví program, ozve se jedno pípnutí,
na displeji se zobrazí PAUZA a sušička se zastaví.
Kontrolka svítí zeleně, když běží program, bliká žlutě, pokud
byl program pozastaven, nebo bliká zeleně, pokud se v
pohotovostním režimu čeká na spuštění programu
(viz Spouštění a programy).
Poznámka: Tato kontrolka bliká žlutě také během
programu ve fázi ochrany proti pokrčení (po skonceni).
Zobrazovací jednotka zobrazuje hlášení a informace o
zvoleném programu a jeho průběhu (viz další strana).
CZ
65
Popis sušičky
H
lavní prvky
Nádoba na vodu
Filtr
Kryt filtrační jednotky
tepelného čerpadla
Typový štítek
Číslo modelu a sériové číslos
Držadlo na krytu filtrační jednotky
tepelného čerpadla (otevřete zatažením)
Mrížka na prívodu vzduchu
Nastavitelné nohy
Ovládací panel
PROGRAM
Volicí tlačítka
Zobrazovací
jednotka
SPUSTIT/PAUZA
Tlačítko a kontrolka
ZAPNOUT/
VYPNOUT
Tlačítko
DĚTSKÝ ZÁMEK a
MOŽNOSTI
Tlačítka a kontrolky
Tlačítko DĚTSKÝ ZÁMEK s kontrolkou : když po volbě
programu a jakýchkoliv možností stisknete a podržíte toto
tlačítko, zabráníte změně programu; na displeji se na
okamžik zobrazí hlášení ZAMKNUTÉ .
Když svítí ikona, ostatní tlačítka jsou deaktivována. Chcete-li
tento režim zrušit, podržte tlačítko; ikona zhasne a na
displeji se na okamžik zobrazí hlášení ODEMKNUTÉ .
Poznámka: Tato bubnová sušička je v souladu s novými
předpisy o energetické úspornosti vybavena automatickým
systémem pohotovostního režimu, který se aktivuje přibližně
po 30 minutách nečinnosti. Stiskněte tlačítko
APNOUT/VYPNOUT a držte ho, dokud se na displeji krátce
nezobrazí ZAPNUTO a sušička se znovu nezapne.
Cyklus sušení vlny v této bubnové sušičce odzkoušela a
schválila společnost Woolmark. Tento cyklus je vhodý k
sušení vlněného prádla označeného visačkou „prát ručně“
za předpokladu, že bylo vypráno pracím cyklem pro ruční
praní, který schválila společnost Woolmark, a suší se v
bubnové sušičce v souladu s pokyny vydanými výrobcem.
M1219 ve Velké Británii,
Irsku, Hongkongu a Indii
představuje symbol
Woolmark ochrannou
známku certifikace
společnosti © The
Woolmark Company Pty
Ltd.
Page 66

Změna jazyka: aktuálně zvolený jazyk musí blikat na prvním řádku
displeje.
- Stisknutím tlačítka Zapnout/Vypnout vypněte displej, potom
stiskněte a pět sekund podržte všechna tři tlačítka: Stupeň
výkonu, Časované sušení a Stupeň vysušení.
- Pomocí tlačítka Stupeň výkonu nebo Časované sušení
procházejte seznamem nahoru nebo dolů.
- Až bude na horním řádku displeje blikat požadovaný jazyk,
zvolte ho stisknutím tlačítka Stupeň vysušení.
CZ
66
Volba jazyka
Displej
Na druhém řádku displeje se zobrazuje požadovaný stupeň vysušení; při
každém stisknutí tlačítka Stupeň vysušení se vybere a zobrazí další
položka z následujícího seznamu. Na displeji se zobrazuje také 1 až 7 dílků v
závislosti na vaší volbě; tyto dílky se zobrazují v průběhu programů.
BAVLNA STANDARD
POVLEČENÍ,RUČNÍKY
SYNTETIKA
JEANS
VLNA
DĚTSKÉ JEMNÉ
PLYŠÁCI
SNADNÉ ŽEHLENÍ
Při prvním zapnutí sušičky byste měli zvolit preferovaný jazyk z nabídky dostupných jazyků.
VLHKÉ Vlhké: Vysuší prádlo tak, aby bylo připravené k žehlení na žehlicím stroji nebo mandlu.
BEZ ŽEHLENÍ Vysušení pro žehlení: Vysuší prádlo tak, aby bylo připravené k ručnímu žehlení.
ZÁCLONY Vysušení pro zavěšení plus: Vysuší jemné prádlo tak, aby bylo připravené k zavěšení před konečným uschnutím.
NA RAMÍNKO Vysušení pro zavěšení : Vysuší prádlo tak, aby bylo připravené k zavěšení před konečným uschnutím.
LEHCE SUCHÉ Lehké vysušení: Vysuší jemné prádlo tak, aby bylo připravené k odložení.
DO SKŔÍNĚ Do skříně: Vysuší prádlo tak, aby bylo připravené k odložení.
EXTRA SUCHÉ Extra suché: Vysuší oděvy tak, aby byly připravené k oblečení.
! Některé automatické programy neumožňují změnit stupeň vysušení nebo
nemají všechny možnosti stupně vysušení.
Stupně vysušení
Během volby programu jsou k dispozici automatické volby pro různé stupně vysušení (viz Tabulka programů).
KOŠILE BAVLNA
ANTI ALLERGY
RYCHLÉ SUŠENÍ
PŘIKRÝVKY
HEDVÁBÍ
TMAVÉ PRÁDLO
ZAHŘÁTÍ RUČNÍKŮ
OSVĚŽENÍ
M
Pochopeni displeje
Volba a zobrazeni programu
Zvolený program je zobrazen na prvním řádku displeje; toto hlášení
se zobrazí za běhu programu. Osm tlačítek má dvě volby; jedním
stisknutím tlačítka vyberete první volbu, dalším stisknutím druhou
volbu a zobrazí se zvolený program. Posledním tlačítkem se vybírá
Můj program.
První stisknutí Druhé stisknutí
1
2
3
4
5
6
7
8
9 MŮJ PROGRAM (
viz níže
)
Můj program Když stisknete tlačítko Můj program, na displeji se zobrazí zvolený program, jehož názvu předchází písmeno
„M“,např. M BAVLNA STANDARD (viz Spouštění a programy).
Page 67

CZ
67
Displej
Každým stisknutím se sníží doba trvání a počet dostupných časových možností v závislosti na zvoleném programu/materiálu.
Vedle času se zobrazuje ikona časovaného sušení .
Po spuštění programu se nadále zobrazuje zvolená doba, ale můžete ji kdykoliv podle potřeby změnit.
Když zvolíte program, který má možnost Časované sušení, po
každém stisknutí a uvolnění tlačítka Časované se zvýší zvolená
doba (viz Spouštění a programy).
Průběh programu
Na druhém řádku displeje se zobrazuje stav probíhajícího programu:
(Dlouhá hlášení se posunují po řádku.)
SUŠENÍ
CHLADNÝ VZDUCH
OHŘEV
PŘIPRAVENO
KONEC PROGRAMU, NEMAČK. PÉČE
KONEC PROGRAMU, VYČISTIT FILTR A VYPRÁZDNIT ZÁSOBNÍK NA VODU
Program Příjemné zahřátí
(pokud byla zvolena možnost Po Skončení).
Časované sušení
Prodleva a zbývající čas
Některé programy mají zpožděné sušení (viz Spouštění a programy). Stiskněte tlačítko Prodleva a ikona bude blikat.
Každým stisknutím tlačítka Prodleva se zvýší doba prodlevy o
jednu hodinu od: do , potom a potom se po
několika sekundách prodleva zruší.
Doba prodlevy se zobrazuje na displeji vedle tlačítka Prodleva.
Po stisknutí tlačítka Spustit/Pauza začne displej odpočítávat
minuty prodlevy.
Na druhém řádku displeje se zobrazí hlášení ZAHÁJENO
Zvolenou dobu prodlevy můžete kdykoliv podle potřeby změnit nebo zrušit.
Po stisknutí tlačítka Spustit/Pauza se zobrazuje prodleva nebo zbývající čas v hodinách a minutách a odpočítává se po
minutách.
Zbývající čas
Po uplynutí doby prodlevy nebo ve všech programech, pokud nebyla zvolena prodleva, se bude v této části displeje
zobrazovat:
- odhadovaný zbývající čas do konce programu v případě automatických programů
- aktuální zbývající čas v případě časovaného programu
Při volbě časovaných programů se po celou dobu cyklu zobrazuje aktuální zbývající čas.
Při volbě automatických programů představuje zobrazovaný údaj odhadovaný zbývající čas. Po zvolení programu se na displeji
zobrazí potřebná doba pro vysušené plné dávky. Zbývající doba do konce cyklu sušení bude neustále kontrolována a měněna
kvůli co nejvěrnějšímu zobrazení.
Blikající dvojtečka mezi hodinami a minutami na displeji signalizuje odpočítávání času.
1h 24h OFF
Page 68

CZ
68
Displej
Spouštění a programy
Volba programu
1. Zapojte sušičku do síťové zásuvky.
2. Roztřiďte prádlo podle typu tkaniny (viz Prádlo).
3. Otevřete dvířka a ujistěte se, že je filtr čistý a na svém místě
a nádoba na vodu je prázdná a rovněž na svém místě
(viz Údržba).
4. Naplňte sušičku a ujistěte se, že kusy prádla nepřekážejí
těsnění dvířek. Zavřete dvířka.
5. Pokud se nerozsvítí displej: Stiskněte tlačítko
ZAPNOUT/VYPNOUT
6. Stiskněte volicí tlačítko programu, který odpovídá typu
tkaniny určené k sušení podle tabulky programů
(viz Programy) a rovněž podle indikátorů jednotlivých typů
tkaniny (viz Prádlo).
- Je-li zvoleno tlačítko ; kroky 7 a 8 nejsou nutné
(viz níže).
7. Zvolte možnost Časované sušení nebo Stupně vysušení.
- V případě časovaného sušení opakovaně stiskněte a
uvolněte tlačítko Časované, dokud se nezobrazí
požadovaný čas.
nebo - Chcete-li změnit výchozí nastavení stupně vysušení,
opakovaně stiskněte a uvolněte tlačítko Stupně
sušení, dokud nebude signalizován požadovaný
stupeň.
! Podrobnější informace najdete v oddílu Tabulka programů:
dostupnost stupňů sušení, časovaného sušení a možností.
8. Podle potřeby nastavte dobu prodlevy a další možnosti
(viz Displej).
9. Stisknutím tlačítka Spustit/Pauza zahajte vysoušení.
Na displeji se bude zobrazovat odhadovaný zbývající čas.
Během programu můžete zkontrolovat prádlo a vyjmout
kusy, které jsou již suché, zatímco ostatní se budou dále
sušit. Když opět zavřete dvířka, stiskněte tlačítko
Spustit/Pauza , aby sušička pokračovala v sušení.
Pokud otevřete dvířka, abyste zkontrolovali prádlo,
prodloužíte tím dobu sušení, protože kompresor tepelného
čerpadla se nespustí dříve než po pěti minutách od
zavření dvířek a stisknutí tlačítka Spustit/Pauza
(viz Ovládací prvky).
10. V několika posledních minutách sušení se před
dokončením programu zahájí konečná fáze STUDENÉ
SUŠENÍ (prádlo se ochlazuje); tuto fázi byste měli vždy
nechat proběhnout do konce.
11. Na konci sušicího cyklu se zobrazí hlášení:
- Pokud se zobrazuje KONEC PROGRAMU, VYČISTIT
FILTR A VYPRÁZDNIT ZÁSOBNÍK NA VODU , ozvou se
tři pípnutí. (Poznámka: Pokud byla zvolena možnost
ZVUK, budou se ozývat tři pípnutí každých 30 sekund
po dobu pěti minut.)
- Pokud se zobrazuje KONEC PROGRAMU, NEMAČK.
PÉČE , byla zvolena možnost Proti pokrčení a pokud
ihned nevyjmete prádlo, během následujících deseti hodin
se občas otočí buben, dokud neotevřete dvířka, a budou
se ozývat tři pípnutí jako upozornění, že program skončil.
12 Otevřete dvířka, vyjměte prádlo, vyčistěte filtr a vraťte ho
zpět. Vyprázdněte nádobu na vodu a vraťte ji zpět
(viz Údržba).
13. Odpojte sušičku od sítě.
Tlačítko Můj program:
Po prvním stisknutí tohoto tlačítka se na druhém řádku displeje zobrazí hlášení ULOŽIT: PŘIDRŽET .
Když zvolíte oblíbený program a možnosti, můžete toto nastavení uložit tak, že alespoň pět sekund podržíte stisknuté tlačítko
Můj program; na horním řádku bude blikat znak následovaný zvoleným programem. Potom se ozve zvukový signál a na
druhém řádku displeje se zobrazí hlášení PAMĚŤ
Až budete příště potřebovat tento program, stiskněte tlačítko , potom tlačítko Spustit/Pauza a program se spustí.
Budete-li chtít, můžete změnit uložené oblíbené nastavení tak, že zvolíte nový program a/nebo možnosti a podržíte stisknuté
tlačítko (jak je popsáno výše).
Varování
N
a druhém řádku displeje se také zobrazují varování a připomínky:
(Připomínky se objevují na konci programu.)
KONEC PROGRAMU, VYČISTIT FILTR A VYPRÁZDNIT
ZÁSOBNÍK NA VODU
• Připomíná, že po každém použití sušičky je třeba
vyprázdnit nádobu na vodu a vyčistit filtr (viz Údržba).
VYPRÁZDNIT ZÁSOBNÍK NA VODU
• Signalizuje, že nádoba na vodu je plná. Toto hlášení zmizí
několik sekund po vrácení prázdné nádoby na vodu za
předpokladu, že sušička běží (viz Ovládací prvky).
Poznámka: Pokud se nádoba na vodu naplní a zobrazí
se toto hlášení, vypne se ohřev a prádlo se nevysuší.
V
YČISTIT KONDENZÁTOR, FILTR A VYPRÁZDNIT ZÁSOBNÍK
NA VODU
• Toto hlášení signalizuje, že musíte vyčistit filtrační jednotku v
kondenzátoru tepelného čerpadla (viz Údržba) a objevuje se
v intervalech, jejichž délka závisí na tom, jak často používáte
sušičku. Po skončení dalšího programu toto hlášení zmizí.
Také musíte vyčistit filtr.
VYČISTIT FILTR PRO ZABEZPEČENÍ FUNKCE ANTI ALLERGY
• Zobrazuje se během programu Anti allergy a signalizuje, že k
provedení celého antialergického cyklu je nutné vyčistit filtr
(viz Údržba).
Page 69

CZ
69
Spous^te^ni\ a programy
Programy Dostupné možnosti
Bavlna Standard
Košile
Rychlé sušení
✓
✓
✓
✓
✓
✓
✓
✓
✓
✓
✓
✓
✓
✓
✓
✓
✓
✓
✓
✓
✓
✓
✓
✗
✗
✓
✓
✓
✓
✗
✓
✓
✓
✓
✓
✓
✓
✓
✓
✗
✓
✓
✓
✓
✓
✓
✓
✗
✗
✓
Dostupné stupně vysušení
(
výchozí je označen )
✓
-
Vysoký
-
Střední
- Vysoký
-
Vysoký
-
Střední
- Střední
- Nízký
- Střední
- Nízký
Vlhké
Vysušení pro
žehlení
Vysušení pro
zavěšení plus
Vysušení pro
zavěšení
Lehké vysušení
Do skříně
Extra suché
Bavlna Standard
• Toto je program pro bavlněné prádlo.
• Doba trvání tohoto programu bude závislá na velikosti náplně, zvoleném stupni vysušení a otáčkách bubnu při odstřeďování v pračce
(
viz Prádlo).
• Program pro standardní bavlnu je podle směrnice ES 392/2012 volbou č. 1 s vysokým výkonem a stupněm vysušení Do skříně
(počáteční standardní nastavení). Tento program je nejvýhodnější z hlediska spotřeby energie (ES 392/2012).
Košile
Volba Vysoký výkon
• Toto je program pro bavlněné košile.
• Lze ho používat s náplněmi o hmotnosti do 3 kg (přibližně 10 košil).
Volba Střední teplota
• Toto je program pro košile ze syntetických materiálů nebo ze směsi přírodních a syntetických materiálů, například polyesteru a bavlny.
• Lze ho používat s náplněmi o hmotnosti do 3 kg (přibližně 14 košil).
Doba trvání tohoto programu bude závislá na velikosti náplně, zvoleném stupni vysušení a otáčkách bubnu při odstřeďování v pračce.
Oděvy vysušené s nastavením Do skříně lze obvykle ihned obléci, ale okraje nebo švy mohou být trochu vlhké. V takovém případě
zkuste košile obrátit naruby a znovu na chvíli spustit program.
Povlečení, ručníky
• Toto je program pro bavlněné ručníky a ložní prádlo.
• Doba trvání tohoto programu bude závislá na velikosti náplně, zvoleném stupni vysušení a otáčkách bubnu při odstřeďování v
pračce (
viz Prádlo).
• Prádlo vysušené s nastavením Extra suché lze obvykle ihned použít, ale okraje nebo švy zejména větších kusů mohou být trochu
vlhké. V takovém případě zkuste prádlo rozevřít a znovu na chvíli spustit program.
Program Anti allergy
Tento program má osvědčení „Seal of Approval“ od organizace Allergy UK, které potvrzuje účinné snižování obsahu a eliminaci
alergenů z oděvů ve speciálním cyklu Anti Allergy. Tento program díky dlouhodobému působené konstantní teploty neutralizuje účinky
většiny známých alergenů (včetně roztočů a pylu).
Program lze používat k sušení a ošetřování plné mokré náplně nebo se suchou 4kg náplní prádla, které chcete pouze ošetřit.
Pokud je na displeji zobrazeno hlášení VYČISTIT FILTR PRO ZABEZPEČENÍ FUNKCE ANTI ALLERGY : vyčistěte filtr a znovu spusťte
program.
Syntetika
• Tento program je určen pro syntetiku s nastavením nízkého výkonu nebo pro směsi syntetiky/bavlny s nastavením středního výkonu.
• Doba trvání tohoto programu bude závislá na velikosti náplně, zvoleném stupni vysušení a otáčkách bubnu při odstřeďování v
pračce (
viz Prádlo).
Rychlé sušení
Tento program je určen pro malé náplně o hmotnosti maximálně 1 kg.
Poznámka: Lze ho používat pouze s nastavením Do skříně.
●
Volba Vysoký výkon
●
Volba Střední teplota
Použijte pro bavlnu o hmotnosti do 1 kg [Bavlna] Použijte pro syntetiku o hmotnosti do 1 kg [Syntetika]
*
NEMŮŽETE ZVOLIT SOUČASNĚMOŽNOSTI PO SKONČENÍ A ZVUK
-
Střední
-
Nízký
-
Vysoký
✓
✓
✓
✓
✓
✓
✓
✗
✓
✗
✓
✓
✓
✓
✓
✓
✗
✓
Časovač
prodlevy
Pr^ed
zahájením
Zvuk nebo
Po skončení
Méně textilního
prachu
Stupeň
výkonu
Časované
sušení
Sušení podle
snímače
1
2
3
Anti Allergy
✓
✗
✗
✓✓
• Automatický program
• Automatický program
Syntetika
✗
✓
✓
✓
✗
✓
✓
✓
ZA\KLADNI\ PROGRAMY (ESSENTIALS) – tabulka programu]
! Jestliže nesvítí displej, stiskněte tlačítko ZAPNOUT/VYPNOUT a potom zvolte program.
Povlečení, ručníky
Page 70

CZ
70
Spous^te^ni\ a programy
Programy Dostupné možnosti
Jeans
Přikrývky
Tmavé prádlo
Vlna
✓
✓
✗
✓
✓
✓
✓
✓
✓
✓
✓
✓
✓
✓
✗
✗
✗
✗
✗
✓
✓
✗
✓
✓
✓
✗
✓
✗
✓
✗
Dostupné stupně vysušení
(výchozí je označen )
✓
-
Vysoký
-
Střední
Vlhké
Vysušení pro
žehlení
Vysušení pro
zavěšení plus
Vysušení pro
zavěšení
Lehké vysušení
Do skříně
Extra suché
*
NEMŮŽETE ZVOLIT SOUČASNĚMOŽNOSTI PO SKONČENÍ A ZVUK
✗
✗
✓
✓
✓
✓
✓
✓
✗
✓
Časovač
prodlevy
Pr^ed
zahájením
Zvuk nebo
Po skončení
Zvuk
Méně textilního
prachu
Stupeň
výkonu
Časované
sušení
Sušení podle
snímače
4
5
6
Hedvábí
✗
✗
✗
✗
✗
✗
✗
✗
✗
• Automatický program
• Automatický program
• Automatický program
Dětské jemné
✗
✗
✓
✓
✗
*
*
✓
✓
✓
✓
✓
*
✗
✗
✓
Jeans
• Toto je program pro džíny z bavlněné džínoviny. Před sušením džínů obraťte přední kapsy naruby.
• Lze ho používat s náplněmi o hmotnosti do 3 kg (přibližně 4 páry).
• Nemíchejte tmavé a světlé kusy.
• Program lze použít také pro jiné oděvy ze stejného materiálu, například bundy.
• Doba trvání tohoto programu bude závislá na velikosti náplně, zvoleném stupni vysušení a otáčkách bubnu při odstřeďování v pračce.
• Oděvy vysušené s nastavením Extra suché lze obvykle ihned obléci, ale okraje nebo švy mohou být trochu vlhké. V takovém případě
zkuste džíny obrátit naruby a znovu na chvíli spustit program.
! Nedoporučujeme používat tento program v případě, že džíny mají elastické pásové díly, cvočky nebo výšivky.
Přikrývky
! Při použití tohoto programu dávejte pozor, abyste NESUŠILI žádné poškozené prádlo, které by mohlo ucpat filtr a zablokovat vývod
vzduchu, což by mohlo vést k požáru.
• Musí se používat pouze s přikrývkami pro jednu osobu; NENÍ vhodný pro přikrývky dvojnásobné velikosti nebo velmi velké přikrývky.
• Prádlo vysušené tímto programem lze obvykle ihned použít, ale na některých místech může být trochu vlhké. V takovém případě
zkuste prádlo rozevřít, vytřepat a znovu na chvíli spustit program.
• Vhodný také pro prošívané bundy.
• Pro bavlněné přikrývky zvolte vysokou teplotu a pro syntetické přikrývky střední teplotu.
• Doba trvání tohoto programu bude závislá na velikosti a hustotě náplně a na otáčkách bubnu při odstřeďování v pračce.
Program Vlna
• Jedná se o program na bezpečné sušení oděvů označených symbolem .
• Lze ho používat s náplněmi o hmotnosti do 1 kg (přibližně tři svetry).
• Doporučujeme před sušením obrátit oděvy na ruby.
• Oděvy vysušené tímto programem lze obvykle ihned obléci, ale může se stát, že některé těžší kusy oděvu budou na okrajích trochu
vlhké. Nechte je doschnout na vzduchu, protože přesušení by je mohlo poškodit.
! Na rozdíl od jiných materiálů je mechanismus srážení vlny nevratný; tzn. nelze ji natáhnout zpět do původní velikosti a původního tvaru.
! Tento program není vhodný pro oděvy z akrylátových vláken.
Hedvábí
• Toto je program na sušení jemného hedvábí.
• Lze ho používat s náplněmi o hmotnosti do 0,5 kg.
• Doba trvání tohoto programu bude závislá na velikosti náplně, zvoleném stupni vysušení a otáčkách bubnu při odstřeďování v pračce.
• Prádlo vysušené s nastavením Do skříně lze obvykle ihned použít, ale může se stát, že některé kusy oděvu budou na okrajích trochu
vlhké. V takovém případě zkuste prádlo rozevřít nebo obrátit naruby a znovu na chvíli spustit program.
EXKLUZIVNI\ PROGRAMY (EXCLUSIVES) – tabulka programu]
! Jestliže nesvítí displej, stiskněte tlačítko ZAPNOUT/VYPNOUT a potom zvolte program.
• Doba trvání tohoto programu bude závislá na velikosti náplně, zvoleném stupni vysušení a otáčkách bubnu při odstřeďování v pračce.
Page 71

CZ
71
Spous^te^ni\ a programy
Programy Dostupné možnosti
EXTRA\\ PROGRAMY (EXTRA) – tabulka programu]
! Jestliže nesvítí displej, stiskněte tlačítko ZAPNOUT/VYPNOUT a potom zvolte program.
✓
✗
✗
✗
✗
✗
✗
✓
✗
✗
✓
✗
✗
✗
✗
✗
✗
Dostupné stupně vysušení
(výchozí je označen )
✓
Vlhké
Vysušení pro
žehlení
Vysušení pro
zavěšení plus
Vysušení pro
zavěšení
Lehké vysušení
Do skříně
Extra suché
✗
✗
Časovač
prodlevy
Pr^ed
zahájením
Po skončení
Méně textilního
prachu
Zvuk
Stupeň
výkonu
Časované
sušení
Sušení podle
snímače
7
8
9
✓
✗
✗
✗
✗
✗
• Automatický program
• Automatický program
Závisí na zvoleném programu. Viz předchozí informace.
• Automatický program
• Automatický program
✗
✗
✗
Dětské jemné
• Tento program je určen k sušení malých kusů dětského prádla nebo oblečení a ložního prádla (z bavlny a žinylky) a k sušení jemného
prádla.
• NESUŠTE kusy jako bryndáky a plenkové kalhotky s plastovými potahy.
• Lze ho používat s náplněmi o hmotnosti do 2 kg.
• Doba trvání tohoto programu bude závislá na velikosti a hustotě náplně a na otáčkách bubnu při odstřeďování v pračce.
• Oděvy vysušené tímto programem lze obvykle ihned obléci, ale může se stát, že některé těžší kusy oděvu budou na okrajích troche
vlhké. V takovém případě zkuste tyto kusy obrátit naruby a znovu na chvíli spustit program.
Tmavé prádlo
Tento program pomáhá zachovat barvy tmavého bavlněného prádla prostřednictvím regulace otáček motoru a bubnu společně s
regulací nižší teploty sušení.
• Lze ho používat pro náplně barevného prádla a džínoviny do maximální hmotnosti 3 kg.
• Náplň se musí odstředit v pračce při otáčkách bubnu v rozsahu 1200–1400 ot/min.
• Doba trvání tohoto programu bude závislá na velikosti náplně a na otáčkách bubnu při odstřeďování v pračce.
• Vzhledem k tomu, že se jedná o program úpravy, který je určen k ochraně tmavého prádla, doba jeho trvání může být delší než čtyři
hodiny.
• Suší na stupeň vysušení Do skříně.
Program Plyšáci
Díky tomuto programu můžete snáze odstraňovat prach a prát plyšové hračky častěji, protože doba sušení je mnohem kratší než v
případě sušení na vzduchu. Jedná se o šetrný sušicí cyklus, který vysušuje za pomoci nižší teploty a jemného mechanického působení,
aby se co nejlépe zachovaly původní vzhled a lesk kožešiny.
Poznámka: Na ochranu proti alergiím stačí zmrazit plyšové hračky na 24 hodin a potom je vyprat a vysušit. Opakujte každých šest
týdnů.
Před sušením odstraňte příslušenství jako oblečení, límce nebo zvuková zařízení, osušte plastové oči a potom je přelepte lepicí páskou.
Doba programu se bude lišit v závislosti na přesném složení náplně.
Maximální hmotnost náplně by neměla překročit 2,5 kg a žádný jednotlivý kus prádla by neměl být těžší než 600 g.
Příjemné zahřátí (ZAHŘÁTÍ RUČNÍKŮ)
Tento program slouží k zahřívání utěrek a županů pro příjemný pocit tepla po koupeli nebo sprše. Také se hodí v zimě k ohřívání oděvů
před oblečením. Tento cyklus ohřeje oděv na 37 °C (teplotu těla), na displeji se zobrazuje OHŘEV a tato teplota se udržuje maximálně
4 hodiny nebo dokud cyklus nezastavíte otevřením dvířek, až se na displeji zobrazí PŘIPRAVENO . Maximální hmotnost náplně 3 kg.
Poznámka: Během tohoto programu je deaktivováno tlačítko Spustit/Pauza.
Osvěžení
! „Osvěžení“ není sušicí program a neměl by se používat pro mokré kusy prádla.
• Lze ho používat s jakoukoliv velikostí náplně, ale je účinnější při menších náplních.
• Nepřeplňujte sušičku (
viz Prádlo).
• Jedná se o 20minutový program, který provzdušní prádlo studeným vzduchem. Používá se také k ochlazení teplého oděvu.
M
Program Plyšáci
Příjemné zahřátí
Můj Program
Program
Snadné žehlení
Osvěžení
Page 72

CZ
72
Spous^te^ni\ a programy
Ovládací prvky
! Varování: Po stisknutí tlačítka Spustit/Pauza již nelze změnit
program.
Chcete-li změnit program, stiskněte tlačítko Spustit/Pauza ; žlutě
blikající kontrolka bude signalizovat pozastavení programu. Zvolte
nový program a jakékoliv požadované možnosti; potom bude
kontrolka blikat zeleně. Dalším stisknutím tlačítka Spustit/Pauza
spustíte nový program.
• Tlačítka možností
Tato tlačítka se používají k přizpůsobení zvoleného programu vašim
požadavkům. Než budete moci zvolit některou z možností, musíte
zvolit program stisknutím některého tlačítka pro volbu programu. Pro
některé programy nejsou k dispozici všechny možnosti (viz Tabulka
programů). Není-li určitá možnost k dispozici a stisknete její tlačítko,
ozvou se tři pípnutí. Je-li určitá možnost k dispozici, rozsvítí se
kontrolka na zobrazovací jednotce pod spodními tlačítky, která
signalizuje, že byla zvolena daná možnost.
Časová prodleva (Časovač prodlevy)
U některých programů (viz oddíly Displej a Tabulka programů) je
možné odložit spuštění až o 24 hodin. Před nastavením
zpožděného spuštění se ujistěte, že je vyprázdněná nádoba na
vodu.
Pr^ed zahájením
Možnost Proti pokrčení (před zahájením) je k dispozici pouze v
případě, že bylo zvoleno zpožděné spuštění. Během prodlevy se
občas otočí naplněný buben, což pomáhá zabránit pokrčení prádla.
Po skončení
Pokud je tato možnost k dispozici a zvolíte ji, po skončení sušicího
cyklu a studeného sušení se aktivuje občasné otočení naplněného
bubnu, aby se předešlo pokrčení prádla v případě, že nebudete
moci vyjmout náplň bezprostředně po skončení programu.
Poznámka: V této fázi bliká žlutě kontrolka Spustit/Pauza.
Poznámka: Pokud jste zvolili možnost Zvuk, tato možnost není k
dispozici.
Tlačítko, zobrazení a ikony stupně výkonu
V některých programech nelze měnit stupeň výkonu a některé
programy nabízejí všechny tři stupně výkonu: Nízký, Střední a
Vysoký.
Když jsou k dispozici možnosti stupně výkonu, stisknutím tohoto
tlačítka se změní aktuální stupeň výkonu a na displeji se na okamžik
zobrazí zvolený stupeň výkonu společně s ikonou zvoleného stupně:
VYSOKÁ TEPLOTA STŘEDNÍ TEPLOTA NÍZKÁ TEPLOTA
Zvuk
Tato funkce je k dispozici ve všech programech a umožňuje
aktivovat signál na konci sušicího cyklu, který vás upozorní, že
prádlo je připraveno k vyjmutí.
Poznámka: Pokud jste zvolili možnost Po skončení, tato možnost
není k dispozici.
Méně textilního prachu
Omezením mechanického působení v konečné fázi sušení se
podstatně sníží množství vytvářených vláken a textilního prachu,
čímž se chrání tkanina oděvů.
• ČASOVÝ DISPLEJ
Na displeji se zobrazuje buď zbývající čas prodlevy, nebo zbývající
čas do konce sušicího programu (viz Displej).
Displej se využívá také v případě problému se sušičkou; v takovém
případě se zobrazí písmeno F následované číslem chybového kódu
(viz Řešení problémů).
• Vyprázdnění nádoby na vodu
(Pokud jste připojili sušičku k odtokové trubce, můžete hlášení o
vyprázdnění ignorovat, protože není třeba vyprazdňovat nádobu na
vodu.)
Zobrazují se hlášení, která vám připomínají, že máte vyprázdnit
nádobu na vodu (viz Displej).
Pokud se během programu nádoba naplní, ohřívač se vypne a
sušička přejde do fáze studeného sušení. Potom se zastaví a
zobrazí se hlášení VYPRÁZDNIT ZÁSOBNÍK NA VODU .
Musíte vyprázdnit nádobu na vodu a znovu spustit sušičku, jinak se
prádlo nevysuší. Po několika sekundách od opětovného spuštění
sušičky toto hlášení zmizí.
Abyste se tomu vyhnuli, vyprazdňujte nádobu na vodu po každém
použití sušičky (viz Údržba).
• Otvírání dvířek
Otevření dvířek během programu bude mít za následek zastavení
sušičky a následující účinky:
Poznámka: Kontrolka Spustit/Pauza bliká žlutě ve fázi ochrany
proti pokrčení (po skončení programu).
• Na displeji se zobrazí hlášení PAUZA .
• Ve fázi prodlevy se bude nadále odpočítávat čas prodlevy.
Aby bylo možné pokračovat v programu s prodlevou, musí
se stisknout tlačítko Spustit/Pauza.
Údaj na displeji se změní na aktuální stav.
• Aby bylo možné pokračovat v programu, musí se stisknout
tlačítko Spustit/Pauza. Údaj na displeji se změní na aktuální
stav.
• Ve fázi ochrany proti pokrčení po skončení se program
ukončí. Po stisknutím tlačítka Spustit/Pauza se znovu spustí
nový program od začátku.
• Ochranný systém tepelného čerpadla
Systém tepelného čerpadla je vybaven ochranou kompresoru,
která se aktivuje při otevření dvířek, výpadku napájení nebo vypnutí
sušičky. Tento systém zabraňuje spuštění kompresoru tepelného
čerpadla dříve než po pěti minutách od zavření dvířek a spuštění
programu.
• Poznámka
Dojde-li k výpadku napájení, vypněte síťový vypínač nebo vytáhněte
zástrčku ze zásuvky. Až se obnoví napájení, stiskněte tlačítko
Zapnout/Vypnout a držte ho, dokud se na displeji krátce nezobrazí
ZAPNUTO a sušička se znovu nezapne. Potom stiskněte tlačítko
Spustit/Pauza a program bude pokračovat.
Program Snadné žehlení
„Snadné žehlení“ je krátký desetiminutový program (osm minut ohřevu následovaných dvěma minutami studeného sušení), který
provzdušňuje vlákna prádla ponechaného delší dobu ve stejné poloze/na stejném místě. Tento cyklus uvolňuje vlákna, aby se tkanina
snáze žehlila a skládala.
! „Snadné žehlení“ není sušicí program a neměl by se používat pro mokré kusy prádla.
A
byste dosáhli 1. Nepřekračujte maximální hmotnost náplně. Uvedená čísla představují hmotnost v suchém stavu:
nejlepších výsledků: Tkanina Maximální hmotnost náplně
Bavlna a směsi bavlny s jinými materiály 2,5kg
Syntetika 2kg
Džínovina 2kg
2. Ihned po skončení programu vyjměte náplň ze sušičky, pověste, složte nebo vyžehlete prádlo a uložte ho
do skříně. Není-li to možné, opakujte program.
Účinek programu „Snadné žehlení“ se liší v závislosti na typu tkaniny. Dobře působí na tradiční tkaniny jako bavlna nebo směs bavlny a
jiného materiálu a méně dobře na akrylátová vlákna a materiály jako Tencel®.
88:88
Page 73

CZ
73
1 kg
2 kg
4 kg
3 kg
1 kg
2 kg
1 kg
2 kg
3 kg
5 kg
6 kg
7 kg
1:00 - 1:30
1:20 - 1:40
2:00 - 2:20
1:40 - 2:10
2:20 - 3:00
2:30 - 3:10
2:50 - 3:20
60 - 90
80 - 100
120 - 140
120 - 130
140 - 180
150 - 190
170 - 200
1:00
nebo 1:30
0:40 - 0:50
40 - 50
0:40
nebo 1:00
0:40 nebo 1:00 nebo 1:30 1:30 nebo 2:00 nebo 2:30
0:50 - 1:10
50 - 70
40 - 80
80 - 140
0:40 - 1:20
1:20 - 2:20
0:40
nebo 1:00
1:10 - 1:30
1:00
nebo 1:30
4 kg
1:20 - 2:00
80 - 120
1:00
nebo 1:30 nebo 2:00
1:30
2:00
nebo 2:30
1:30 nebo 2:00
2:30
2:30
nebo 3:00
3:00 nebo 3:40
8 kg
3:20 - 4:00
200 - 240
3:40
• Poznámka: Pokud vložíte bavlnu společně se syntetikou, bavlna může být na konci sušicího cyklu stále vlhká. V takovém
případě jednoduše spusťte další, krátké sušení.
Prádlo
T
fiíduní prádla
• Zkontrolujte symboly na štítcích oděvů, abyste se ujistili,
ž
e jednotlivé kusy lze sušit v sušičce.
• Roztřiďte prádlo podle typu tkaniny.
• Vyprázdněte kapsy a zkontrolujte knoflíky.
• Zavřete zipy a háčky a uvažte volné pásky a šňůrky.
• Vyždímejte každý kus prádla, abyste odstranili co nejvíce
nadbytečné vody.
! Nevkládejte do sušičky prádlo, ze kterého kape voda.
Maximální velikost náplně
Nepřekračujte maximální hmotnost náplně.
Uvedená čísla představují hmotnost v suchém stavu:
Přírodní materiály: max. 8 kg
Syntetické materiály: max. 4 kg
! NEPŘEPLŇUJTE sušičku, mohlo by to mít za následek
snížení účinnosti.
Štítky s údaji o praní
Podívejte se na štítky na oděvech, zejména když je poprvé
vkládáte do bubnové sušičky. Nejčastěji se setkáte s
následujícími symboly:
Lze sušit v sušičce
Nesušte v sušičce
Sušte v sušičce při vysoké teplotě
Sušte v sušičce při nízké teplotě
Doby sušení
V následující jsou uvedeny PŘIBLIŽNÉ doby sušení v
minutách. Hmotnosti platí pro suché oděvy.
Uvedené doby jsou přibližné a mohou se lišit v závislosti na
následujících faktorech:
• Množství vody zadržené v prádle po vyždímání: ručníky a
jemné prádlo zadržují spoustu vody.
• Tkaniny: kusy, které jsou ze stejného typu tkaniny,
ale mají jinou strukturu a tloušťku, nemusí mít stejné
d
oby sušení.
• Množství prádla: sušení samotných kusů nebo malých
náplní může trvat déle.
• Stupeň vysušení: pokud hodláte některé kusy oděvu
žehlit, lze je vyjmout, i když jsou stále trochu vlhké.
Ostatní kusy mohou zůstat uvnitř déle, pokud
potřebujete, aby byly úplně suché.
• Nastavení výkonu.
• Pokojová teplota: pokud je sušička umístěna v místnosti
s nízkou teplotou, sušení prádla bude trvat déle.
• Objemné kusy: některé objemné kusy lze sušit v sušičce,
pokud je jim věnována zvýšená pozornost.
Doporučujeme takovéto kusy několikrát vyjmout,
vytřepat a vrátit do sušičky, dokud nebudou úplně
suché.
! Nepřesušujte oděvy.
Všechny tkaniny obsahují trochu přirozené vlhkosti, která je
udržuje v měkkém a nadýchaném stavu.
Bavlna
Vysoký
výkon
Syntetika
Střední
výkon
Delicates
(Akryláty)
Nízký
výkon
Doby schnutí pro odstřeďování v pračce při 800-1000 ot/min.
Doby schnutí pro snížené otáčky pračky.
Doby schnutí pro snížené otáčky pračky.
Doba, automaticky
Nastavení časovaného
sušení
Doba, automaticky
Minuty, automaticky
Nastavení časovaného
sušení
Doba, automaticky
Minuty, automaticky
Nastavení časovaného
sušení
Minuty, automaticky
60 - 90
Page 74

CZ
74
Řešení problémů
Jednoho dne se může stát, že sušička přestane fungovat. Než zavoláte servisní středisko (viz Servis), projděte si
následující doporučení pro řešení problémů:
Možná příčina/řešení:
• Zástrčka není zasunuta v zásuvce nebo nemá kontakt.
• Došlo k výpadku napájení.
• Spálila se pojistka. Zkuste do zásuvky zapojit jiný spotřebič.
• Používáte prodlužovací kabel? Zkuste zapojit síťový kabel sušičky přímo do zásuvky.
• Nejsou neúplně zavřená dvířka?
• Program nebyl nastaven správně (viz Spouštění a programy).
• Nebylo stisknuto tlačítko Spustit/Pauza (viz Spouštění a programy).
• Nastavili jste prodlevu (viz Spouštění a programy).
• Nebyl vyčištěn filtr (viz Údržba).
• Není třeba vyprázdnit nádobu na vodu? Není zobrazeno hlášení, že máte vyprázdnit
nádobu na vodu (viz Údržba)?
• Není třeba vyčistit filtr tepelného čerpadla (viz Údržba)?
• Nastavená teplota není ideální pro typ sušené tkaniny (viz oddíly Spouštění a
programy a Prádlo).
• Nebyla zvolena správná doba sušení pro danou náplň (viz Prádlo).
• Mřížka na přívodu vzduchu je zakrytá (viz oddíly Instalace a Údržba).
• Prádlo je příliš mokré (viz Prádlo).
• Sušička je přeplněná (viz Prádlo).
• Na začátku programu pravděpodobně nebyla vyprázdněna nádoba na vodu.
Nečekejte na signál k vyprázdnění; před spuštěním nového sušicího programu vždy
zkontrolujte a vyprázdněte nádobu na vodu (viz Údržba).
• Jedná se o běžný jev: hlášení KONEC PROGRAMU, VYČISTIT FILTR A
VYPRÁZDNIT ZÁSOBNÍK NA VODU se zobrazuje jako připomínka, že máte
vyprázdnit nádobu (viz oddíly Displej a Spouštění a programy).
! Z bezpečnostních důvodů má sušička nastavenou maximální dobu programu na 5
hodiny. Jestliže automatický program v tomto okamžiku nezjistí požadovanou konečnou
vlhkost, sušička dokončí program a zastaví se. Zkontrolujte výše uvedené body a znovu
spusťte program; pokud je na konci prádlo stále vlhké, obraťte se na servisní středisko
(viz Servis).
• Pokud se na displeji zobrazí chyba:
- Vypněte sušičku a odpojte zástrčku. Vyčistěte filtr a filtrační jednotku tepelného
čerpadla (viz Údržba). Potom opět zapojte zástrčku do zásuvky, zapněte
sušičku a spusťte jiný program. Pokud se opět zobrazí chyba, poznamenejte si
kód a obraťte se na servisní středisko ( viz Servis).
• Sušička je v režimu „Demo“. Stiskněte současně na tři sekundy tlačítka
Zapnout/Vypnout a Spustit/Pauza. Na displeji se na tři sekundy zobrazí hlášení
DEMO VYPNUTO a potom bude sušička pokračovat v normálním provozu.
• Sušička přešla do pohotovostního režimu, aby se šetřilo energií. To se stává v
případě, že dojde k výpadku napájení nebo opustíte sušičku bez spuštění programu,
případně po dokončení sušicího programu.
- Stiskněte a podržte tlačítko Zapnout/Vypnout a kontrolky se rozsvítí.
Problém:
Sušička se nespustí.
Nezahájí se sušicí cyklus.
Sušení trvá dlouho.
Je zobrazeno hlášení, že máte
vyprázdnit nádobu na vodu, ale
sušička běží teprve krátce.
Je zobrazeno hlášení, že máte
vyprázdnit nádobu na vodu, a
nádoba není plná.
Po skončení programu je prádlo
vlhčí, než jste očekávali.
Na displeji je zobrazen chybový
kód F následovaný jednou nebo
dvěma číslicemi.
Na displeji se každých šest
sekund na okamžik zobrazuje
hlášení DEMO ZAPNUTO .
Kontrolky na ovládacím panelu
sušičky nesvítí, i když je
sušička zapnutá.
Page 75

CZ
75
Servis
S
ystém tepelného čerpadla
Tato sušička je vybavena uzavřeným systémem tepelného
čerpadla, který vysouší prádlo. Tepelné čerpadlo potřebuje
ke své činnosti fluorované skleníkové plyny (F-plyny), na
které se vztahuje Kjótský protokol. F-plyny jsou uzavřené v
hermeticky utěsněné jednotce. Tato utěsněná jednotka
o
bsahuje 0,29 kg F-plynu R134a, který slouží jako chladivo.
Jestliže se utěsněná jednotka porouchá, musí se vyměnit za
novou. Obraťte na nejbližší servisní středisko, kde vám
poradí, jak postupovat.
• Poznámka: Plyny uvnitř uzavřeného systému neohrožují
lidské zdraví, ale v případě úniku budou mít nepříznivý
dopad na prostředí a podpoří globální oteplování.
Než zavoláte servisní středisko:
• Projděte si návod na řešení problémů, abyste zjistili, zda
nemůžete vyřešit problém sami (viz Řešení problémů).
• Není-li to možné, vypněte sušičku a zavolejte nejbližší
servisní středisko.
Co sdělit servisnímu středisku:
• jméno, adresu a PSČ;
• telefonní číslo;
• typ problému;
• datum koupě;
• model spotřebiče (Mod.);
• sériové ãíslo spotfiebiãe (S/N).
Tyto údaje lze zjistit z typového štítku na vnitřní straně
dvířek spotřebiče.
N
áhradní díly
Sušička je složitý stroj. Pokud se ji pokusíte opravit
vlastními silami nebo svěříte opravu neautorizované osobě,
mohlo by dojít k úrazu jedné nebo více osob, poškození
sušičky a zrušení platnosti záruky.
Jestliže se při práci se sušičkou setkáte s problémy,
z
avolejte autorizovaného technika.
• Upozornění: jakékoliv nekvalifikované servisní úkony
nebo opravy, které zahrnují vniknutí do utěsněné
jednotky tepelného čerpadla, jsou považovány za
porušení zákona.
Šetřete energii a mějte ohled na životní
prostředí
• Než vložíte prádlo do sušičky, vyždímejte ho, abyste odstranili nadbytečnou vodu (pokud ho předtím perete v pračce,
použijte odstřeďování s vysokými otáčkami). Ušetříte tím čas a energii během sušení.
• Vždy sušte plné náplně – ušetříte energii; sušení samotných kusů nebo malých náplní trvá déle.
• Po každém použití vyčistěte filtr, abyste snížili náklady na spotřebu energie (viz Údržba).
Page 76

76
CZ
Údaje o výrobku... (
směrnice EU 392/2012)
Tento spotřebič vyhovuje následujícím směrnicím ES:
- 2006/95/ES (Nízkonapěťová zařízení)
- 2004/108/EC (Elektromagnetická kompatibilita)
Značka Hotpoint Ariston Modely TCD 872
FTCD 872
Jmenovitá hmotnost bavlněného prádla pro standardní program při plné náplni 8 kg Třída energetické účinnosti A++
Vážená roční spotřeba energie (AE
c
) 235,3 kWh
Spotřeba za rok, vycházející ze 160 cyklů sušení se standardním programem pro bavlnu při plné a částečné náplni a ze spotřeby v
režimech nízké spotřeby. Skutečná spotřeba energie na cyklus bude záviset na způsobu používání spotřebiče.
Tato bubnová sušička pro domácnosti je automatická kondenzátorová sušička
Spotřeba energie: plná náplň E
s
uché
1,96 kWh, částečná náplň E
s
uché1/2
1,09 kWh
Příkon: režim vypnuto (P
o
) 0,17 W, režim zapnuto po skončení (Pl) 3,27 W
Délka „režimu zapnuto po skončení“ pro systémy řízení spotřeby 30 minut
„Standardní program pro bavlnu“, vhodný pro sušení normálního mokrého bavlněného prádla, který je nejúčinnějším programem ve
smyslu spotřeby energie při plné a částečné náplni bavlny, je Bavlna Standard, Vysoký výkon, Do Skříně.
Doba programu (minuty): vážená (T
t
) plná a částečná náplň 163, plná náplň (T
s
uché
) 213, částečná náplň (T
s
uché1/2
) 126
Třída účinnosti kondenzace B
Průměrná účinnost kondenzace (%): plná náplň (C
s
uché
) 81, částečná náplň (C
s
uché1/2
) 81, vážená (Ct) plná a částečná náplň 81
Emise hluku šířeného vzduchem 70 dB(A) re 1 pW
* „Informace pro spotřebitele v souladu se směrnicí EU 932/2012.“
Typická spotřeba energie - plná náplň syntetiky 0,68 kWh, částečná náplň nerelevantní
Typická doba sušení - plná náplň syntetiky 85 minut, částečná náplň nerelevantní
V rámci našeho nepřetržitého úsilí o zlepšování
stavu životního prostředí si vyhrazujeme právo
používat kvalitní recyklované součásti, abychom
udrželi nízké náklady ze strany zákazníků a
minimalizovali plýtvání materiálem.
• Likvidace obalového materiálu: dodržujte místní předpisy,
aby bylo možné recyklovat obalový material
• Odstraňte dvířka a zástrčku, abyste minimalizovali riziko
zranění dětí, a potom odřízněte síťový kabel od
spotřebiče. Tyto součásti zlikvidujte odděleně, abyste
zajistili, že již nebude možné znovu zapojit spotřebič do
síťové zásuvky.
Likvidace starých elektrických spotřebičů
Evropská směrnice 2012/19/EC o odpadních elektrických a
elektronických zařízeních (OEEZ) nařizuje, že staré elektrické
spotřebiče z domácností se nesmí vyhazovat do běžného
komunálního odpadu. Staré spotřebiče se musí
shromažďovat samostatně, aby se optimalizovala
regenerace a recyklace obsažených materiálů a snížily se
dopady na lidské zdraví a životní prostředí.
Tato sušička má utěsněnou jednotku tepelného čerpadla
obsahující F-plyny, které se musí odborně odstranit a
zlikvidovat.
Přeškrtnutý symbol „popelnice“ na výrobku
připomíná, že při vyhazování spotřebiče jste povinni
zajistit oddělený sběr.
Zákazníci by se měli obrátit na místní úřad nebo
maloobchodního prodejce, od něhož získají informace o
správné likvidaci starého spotřebiče.
Informace o recyklaci a likvidaci
Indesit Company, Viale Aristide Merloni 47, 60044 Fabriano (AN), Italy
Page 77

Brožúra s návodom
77
SK
FTCD 872
Po prvom zapnuti] sus^ic^ky musi]te
vybrat^ preferovany] jazyk –
pozri na strane 85
BUBNOVÁ SUŠIČKA
GB
English, 1
NL
Nederlands, 39
F
Français, 20
SK
CZ
Obsah
Inštalácia, 78-79
Kam umiestniť sušičku
Vetranie
Odtok vody
Vyrovnanie sušičky do vodorovnej polohy
Elektrické pripojenie
Skôr, ako začnete používať svoju sušičku
Varovania, 80-81
Všeobecná bezpečnosť
Minimalizácia rizika požiaru
Údržbu a starostlivosť, 82-83
Vypnutie elektriny
Čistenie filtra po každom cykle
Čistenie jednotky filtra tepelného čerpadla
Kontrola bubna po každom cykle
Vyprázdnenie nádoby na vodu po každom cycle
Čistenie sušičky
Popis sušičky, 84
Funkčné charakteristiky
Ovládací panel
Displej, 85-87
Zapnutie a programy, 87-91
Voľba programu
Tabuľka programov
Ovládacie prvky
Bielizeň na pranie, 92
Triedenie bielizne
Etikety s pokynmi na pranie
Časy sušenia
Hľadanie a odstraňovanie porúch, 93
Servis, 94
Náhradné diely
Údaje výrobku, 95
Recyklácia a likvidácia
Tento symbol vám pripomína, aby ste si
prečítali túto brožúru.
! Tento návod si odložte poruke, aby ste si ho v prípade
potreby mohli pozrieť. Vezmite si ho so sebou, ak sa
sťahujete, a odovzdajte ho pri odpredaní alebo darovaní
sušičky inej osobe spolu so sušičkou, aby bol nový
vlastník informovaný o spotrebiči a o varovaniach a
radách na jeho používanie.
! Pozorne si preštudujte návod. Nasledujúce stránky
obsahujú dôležité informácie o inštalácii a odporúčania na
používanie spotrebiča.
www.hotpoint.eu
Česky, 58
Slovenčina, 77
Page 78

78
SK
Inštalácia
Kam umiestniť sušičku
• Sušičku umiestňujte ďalej od plynových
sporákov, kachieľ, ohrievačov alebo varných
dosiek, pretože plamene môžu poškodiť
spotrebič.
• Aby sušička dosahovala optimálne výsledky,
musí byť nainštalovaná v miestnosti s
izbovou teplotou 20 až 23 °C. Funkčnosť je
však zaručená v rozsahu 14 až 30 °C.
• Ak spotrebič budete
inštalovať pod pracovnú
dosku, dbajte na
ponechanie 10 mm
odstupu medzi pracovnou
doskou a inými predmetmi
na alebo nad spotrebičom
a 15 mm odstupu medzi
bokmi a
bokmi susediaceho nábytku alebo stenami.
Zaistí sa tak dostatočná cirkulácia vzduchu.
Zariadenie musí byť nainštalované tak, aby
bola jeho zadná stena prisunutá k stene.
!
Skontrolujte, že zadné vetracie otvory nie sú
zakryté.
Vetranie
Keď sa sušička používa, musí mať dostatočné vetranie.
Dbajte, aby sa sušička nachádzala v prostredí, ktoré nie je
vlhké a kde je vždy zaručená dostatočná cirkulácia
vzduchu.
Prúdenie vzduchu okolo sušičky je nevyhnutným
predpokladom kondenzácie vody zostávajúcej po praní.
Sušička nebude pracovať efektívne v uzavretom priestore
alebo v skrinke.
! Ak sa sušička používa v malej alebo v chladnej miestnosti,
môže dochádzať k určitej kondenzácii.
!
Neodporúčame inštalovať sušičku do skrinky,
ale sušička sa nikdy nesmie inštalovať za dvere
zatvárané na zámok, posuvné dvere alebo
dvere so závesom na opačnej strane ako sú
dvierka sušičky.
Odtok vody
Ak je sušička nainštalovaná vedľa odtoku vody, môže sa
n
apojiť na tento odtok. Takto odpadá potreba vyprázdniť
nádobu na vodu. Ak sa sušička ukladá navrch na práčku
alebo vedľa nej, môžu mať spoločný odtok. Výška odtoku
musí byť menšia ako 1 m od spodku sušičky.
Odpojte dodanú hadicu podľa
ilustrácie na obrázku A.
Potom pripojte hadicu vhodnej dĺžky
podľa ilustrácie na obrázku B.
! Keď je sušička na jej definitívnom mieste skontrolujte, či
hadica nie je stlačená ani zohnutá.
Vyrovnanie sušičky do vodorovnej
polohy
Na zaručenie správnej funkcie sa sušička musí nainštalovať
vodorovne.
Po inštalácii sušičky na miesto
použitia skontrolujte, či je na
vodorovná, najprv v smere zo strany
na stranu, potom spredu dozadu.
Ak sušička nie je vo vodorovnej
polohe, prestavte dve predné
nožičky nahor alebo nadol, aby
sušička bola vodorovná.
! VAROVANIE: Sušičku môžete začať používať len
ak bola v stojacej polohe najmenej 6 hodín.
obrázok A
obrázok B
M
inimálny odstup 10 mm
Minimálne
odstupy 15 mm
Page 79

79
SK
Inštalácia
Elektrické pripojenia
Pred zasunutím vidlice do sieťovej zásuvky
skontrolujte:
• Uistite sa, že máte suché ruky.
• Zásuvka musí byť spojená s uzemnením.
• Zásuvka musí vydržať maximálny príkon
sušičky, uvedený na typovom štítku (pozri
Popis sušičky).
• Napätie v zásuvke sa musí pohybovať medzi
hodnotami uvedenými na typovom štítku
(pozri Popis sušičky).
• Zásuvka musí zodpovedať vidlici sušičky. Ak
to tak nie je, vymeňte vidlicu alebo zásuvku.
!
Sušička sa nesmie inštalovať vo vonkajšom
prostredí, ani pod prístreškom. Ak je vystavená
účinkom dažďa alebo búrky, môže byť veľmi
nebezpečná.
!
Po nainštalovaní musí byť elektrický kábel a
vidlica sušičky dobre prístupná.
!
Nepoužívajte predlžovacie káble.
!
Napájací kábel nesmie byť ohnutý ani
stlačený.
!
Napájací kábel elektrického napájania je
potrebné pravidelne kontrolovať. Ak je napájací
kábel poškodený, musí byť vymenený
výrobcom, jeho servisnou službou alebo iným
kvalifikovaným technikom, aby ste predišli
úrazu. Autorizovaní predajcovia dodávajú nové
alebo dlhšie napájacie káble za príplatok.
!
Výrobca odmieta akúkoľvek zodpovednosť,
ak niektorá z týchto pravidiel nebude
dodržané.
!
V prípade akýchkoľvek pochybností o vyššie
uvedených pravidlách sa poraďte s
kvalifikovaným elektrikárom.
Skôr, ako začnete používať svoju sušičku
Po nainštalovaní sušičky a pred jej použitím vyčistite vnútro
b
ubna, aby sa odstránil prach, ktoré sa mohol nahromadiť
počas prepravy.
Maximálne rozmery náplne
Prírodné vlákna: 8 kg
Page 80

80
SK
Varovania
!
Spotrebič bol navrhnutý a postavený v súlade
s medzinárodnými normami bezpečnosti.
Tieto varovania sú uvedené z bezpečnostných
dôvodov a musia sa striktne dodržiavať.
Všeobecné bezpečnostné pokyny
• Túto sušičku nesmú používať osoby (vrátane
detí starších ako 8 rokov) so zníženými
fyzickými, zmyslovými alebo mentálnymi
schopnosťami alebo osoby bez skúseností a
znalostí, ak nie sú pod dozorom, alebo ak
nedostali náležité pokyny o použití zariadenia
od osoby zodpovednej za ich bezpečnosť.
• Táto sušička bola navrhnutá na domáce, nie
na profesionálne použitie.
• Nedotýkajte sa spotrebiča, ak ste bosý, ani
mokrými rukami alebo nohami.
• Spotrebič odpájajte od siete ťahaním za
vidlicu, nie za kábel.
• Po použití sušičku vypnite ho a odpojte od
siete. Dvierka musia zostať zatvorené, aby
deti nemohli použiť sušičku ako hračku.
• Deti musia byť pod dohľadom, aby sa nehrali
so sušičkou.
• Operácie údržby a čistenia nesmú vykonávať
deti bez dohľadu.
• Deti mladšie ako 3 roky musia byť udržiavané
v dostatočnej vzdialenosti od sušičky, ak nie
sú pod neustálym dohľadom.
• Spotrebič musí byť správne nainštalovaný a
musí mať riadne vetranie. Prívod vzduchu v
prednej časti sušičky a zadný vetrací otvor v
zadnej časti sušičky nesmie byť upchatý
(pozri Inštalácia).
• Sušičku nikdy nepoužívajte na podlahovej
krytine, kde by výška vlasu mohla brániť
vstupu vzduchu do sušičky od základne.
• Pred vložením náplne skontrolujte, či je
sušička prázdna.
• Zadná strana sušičky sa môže veľmi
rozohriať. Nikdy sa jej nedotýkajte
počas používania.
• Sušičku nepoužívajte, ak filter, nádoby na
vodu a jednotka filtra tepelného čerpadla nie
sú spoľahlivo nasadené na svojom mieste
(pozri Údržba).
• Sušičku nepreťažujte (maximálne hmotnosti
náplne – pozri Bielizeň na pranie).
• Nevkladajte odevy, ktoré sú vlhké tak, že
odkvapkávajú.
• Starostlivo skontrolujte všetky pokyny na
etiketách odevov (pozri Bielizeň na pranie).
• V bubnovej sušičke nesušte veľké, veľmi
objemné kusy.
• V bubnovej sušičke nesušte akrylové vlákna
pri vysokých teplotách.
• Sušičku nevypínajte, pokiaľ sú ešte vnútri
teplé kusy.
• Po každom použití vyčistite filter (pozri
Údržba).
• Po každom použití vyprázdnite nádržku na
vodu (pozri Údržba).
• Jednotku filtra tepelného čerpadla čistite v
pravidelných intervaloch (pozri Údržba).
• Nedovoľte, aby sa okolo sušičky hromadili
žmolky.
• Nikdy nevyliezajte na sušičku. Mohli by ste ju
poškodiť.
• Vždy dodržiavajte elektrotechnické normy a
požiadavky (pozri Inštalácia).
• Vždy nakupujte originálne náhradné diely a
príslušenstvo (pozri Servis).
Page 81

SK
81
Varovania
Dodržiavajte tieto zásady, aby ste
minimalizovali riziko vzniku požiaru v sušičke:
• V sušičke sušte iba také kusy, ktoré boli
vyprané pracím prostriedkom a vodou,
vypláchané a absolvovali odstreďovanie.
Sušenie kusov, ktoré NEBOLI vyprané vodou
spôsobuje nebezpečenstvo požiaru.
• Nesušte suché odevy, ktoré boli ošetrené
chemickými prípravkami.
• Nesušte v sušičke suché kusy so škvrnami
alebo premočené rastlinnými alebo stolovými
olejmi, pretože to spôsobuje nebezpečenstvo
požiaru. Zaolejované kusy sa môžu
spontánne vznietiť, najmä ak sú vystavené
účinkom zdrojov tepla, akým je aj bubnová
sušička. Tieto kusy sa zohrievajú, čo
spôsobuje oxidačnú reakciu s olejom.
Oxidáciou vzniká teplo. Ak toto teplo nemá
kam uniknúť, sušené kusy sa môžu rozohriať
tak, že vzbĺknu. Hromadenie, stohovanie
alebo skladovanie zaolejovaných kusov môže
brániť odvodu tepla a spôsobiť tak požiar.
Ak je nevyhnutné, aby boli do sušičky
vložené látky s obsahom rastlinného alebo
stolového oleja, alebo kusy znečistené
prípravkami na starostlivosť o vlasy, mali by
byť najprv vyprané so zvýšenou dávkou
pracieho prípravku – nebezpečenstvo sa tak
zníži, ale úplne sa neeliminuje. Nemali by sa
vyberať zo sušičky a ukladať na kôpky ani
stohovať, kým sú horúce.
• V sušičke nesušte suché odevy, ktoré už boli
predčistené alebo predprané, namočené
alebo znečistené benzínom, rozpúšťadlami
na chemické čistenie, ani inými horľavými
alebo výbušnými látkami. Vysoko horľavé
látky bežne používané v domácnostiach,
vrátane stolového oleja, acetónu,
denaturovaného liehu, petroleju,
odstraňovačov škvŕn, terpentínu a
odstraňovačov vosku. Dbajte, aby sa tieto
kusy pred sušením v sušičke vyprali v
horúcej vode so zvýšenou dávkou pracieho
prípravku.
• V sušičke nesušte kusy obsahujúce penovú
gumu (známu aj pod názvom penový latex),
ani iné materiály so štruktúrou podobnou
gume. Gumové penové materiály môžu pri
zahriatí spôsobiť požiar samovznietením.
• V sušičke nepoužívajte aviváže ani iné
podobné prípravky na eliminovanie účinkov
statickej elektriny, ak takýto postup výslovne
neodporúča výrobca aviváže.
• V sušičke nesušte spodnú bielizeň s
kovovými výstuhami, napr. podprsenky s
kovovými výstužnými drôtmi. Kovový výstuž
uvoľnená pri sušení môže spôsobiť
poškodenie sušičky.
• V sušičke nesušte suché gumové, plastové
výrobky, ako sú kúpacie čiapky alebo
nepremokavé detské prikrývky, polyetylén
alebo papier.
• V sušičke nesušte pogumované výrobky,
oblečenie s vypchávkami z penovej gumy,
vankúše, prezuvky ani pogumované tenisky.
• Vyberte z vreciek všetky predmety, ako sú
zapaľovače a zápalky.
!
VAROVANIE: Sušičku nikdy nezastavujte pred skončením sušiaceho programu bez toho, že
všetky kusy rýchlo vyberiete a rozprestriete tak, aby sa teplo rozptýlilo.
Page 82

82
SK
Vypnutie elektriny
!
Sušičku odpojte, keď ju nepoužívate, pri
čistení, a počas každej údržby.
Vyčistite filter po každom programme
Filter je dôležitou súčasťou sušičky: zachytáva
žmolky a vlákna, tvoriace sa pri sušení.
Po dokončení sušenia filter vyčistite
opláchnutím pod tečúcou vodou alebo
vysávačom.
Ak sa filter upchá, prúdenie vzduchu vo vnútri
sušičky sa veľmi zhorší: časy sušenia sa
predlžujú a spotrebujete viac energie. Môže to
spôsobiť aj poškodenie sušičky.
Filter sa nachádza v prednej časti lemovania
sušičky (pozri obrázok na nasledujúcej strane).
Vybratie filtra:
1. Potiahnite plastovú úchytku filtra smerom
nahor.
2. Otvorte filter a vnútro
vyčistite od žmolkov.
3. Nasaďte ho správne späť.
Skontrolujte, či je filter v
rovine s lemovaním
sušičky.
4. Odstráňte všetky vlákna
usadené hore na
vnútornej strane dvierok a
okolo tesnenia dverí.
!
Nepoužívajte sušičku bez nasadeného filtra.
Starostlivosť a Údržba
Čistenie jednotky filtra tepelného
čerpadla
Pravidelne (po každom piatom sušiacom cykle)
vyberte jednotku filtra tepelného čerpadla a
vyčistite povrch filtra od všetkých
nahromadených chuchvalcov vlákien.
Odporúčame však vyčistiť tento filter po
KAŽDOM sušiacom cykle, aby bol výkon
sušičky optimálny.
Vyberanie jednotky filtra tepelného čerpadla:
1. Odpojte sušičku a otvorte dvierka.
2. Vytiahnite kryt jednotky filtra tepelného
čerpadla (pozri obrázok na ďalšej strane).
Uvoľnite 4 spony do zvislej polohy a
jednotku filtra vytiahnite k sebe.
3. Oddeľte od seba obe
časti filtra a vyčistite jeho
povrc.
! Predná strana tepelného čerpadla je
vyrobená z tenkých plechov. Dbajte, aby ste
ich nepoškodili a aby ste sa neporezali pri
čistení, vyberaní alebo výmene jednotky filtra
tepelného čerpadla.
Pri každom čistení filtra tepelného čerpadla
vždy vyčistite usadené chuchvalce vlákien z
povrchu kovových plechov.
4. Starostlivo vyčistite tieto
chuchvalce vlákien
vlhkou handričkou,
špongiou alebo
vysávačom.
Nikdy nepoužívajte prsty.
5. Znova zmontujte obe časti filtra, vyčistite
tesnenia a nasaďte späť 4 spony do
vodorovnej polohy. Uistite sa, že západky sú
spoľahlivo zaistené.
Page 83

83
SK
Starostlivosť a Údržba
Nádoba na vodu
Kryt jednotky filtra
tepelného čerpadla
Sponky
Filter
Jednotka filtra
tepelného čerpadla
Čistenie sušičky
• Vonkajšie plastové a kovové diely a gumové diely možno
vyčistiť navlhčenou handričkou.
• Pravidelne (každých 6 mesiacov) povysávajte prednú
mriežku nasávania vzduchu, aby sa odstránili splstnatené
vlákna, žmolky alebo prach. Odstráňte aj splstnatené
vlákna z prednej časti kondenzátora a priestorov filtra,
príležitostne ich vyčistite vysávačom.
! Nepoužívajte rozpúšťadlá ani abrazívne prostriedky.
! Svoju sušičku nechajte pravidelne skontrolovať
autorizovaným technikom, aby bola zaručená elektrická a
mechanická bezpečnosť (pozri Servis).
Rýchle tipy
• Nezabudnite vyčistiť filter dvierok a tepelné
čerpadlo po každej náplni.
• Nezabudnite vyprázdniť nádobu na vodu po
každej náplni.
!
Dodržiavaním OBOCH týchto rád zaručíte
najlepšie výsledky pri použití spotrebiča
Vyprázdnenie nádoby na vodu po každom
cycle
Vytiahnite nádobu zo sušičky, otvore
malý alebo veľký uzáver a
vyprázdnite ju do drezu alebo do
iného vhodného odtoku. Nasaďte
uzáver späť a spoľahlivo vráťte
nádobu na jej miesto.
! Nádobu skontrolujte a vyprázdnite vždy pred spustením
nového sušiaceho programu.
! Ak sa nevypustí voda z nádržky, môže to mať tieto
následky:
– Sušička preruší ohrev (preto môže byť náplň po
skončení sušiaceho cyklu ešte stále vlhká)
(pozri Ovládacie prvky).
• Naplnenie systému zberu vody
Keď je sušička nový, do nádoby na vodu sa voda nezbiera
až dovtedy, kým sa systém nenaplní... Bude to trvať 1 až 2
sušiace cykly.
Po naplnení už bude zbierať vodu pri každom sušiacom
cykle.
Kontrola bubna po každom cycle
Bubon ručne otočte, aby ste mohli vybrať drobné kusy
(vreckovky), ktoré by ste mohli prehliadnuť.
Čistenie bubna
! Na čistenie bubna nepoužívajte drsné čistiace prípravky,
drôtenku ani čistiace prípravky na nehrdzavejúcu oceľ.
Na antikorovom bubne sa môže začať tvoriť farebný film, čo
spôsobuje kombinovaný účinok vody a čistiaceho prípravku
s avivážou z bielizne. Takýto farebný film nemá vplyv na
funkčnosť sušičky.
Page 84

84
SK
Popis sušičky
Funkčné charakteristiky
Nádoba na vodu
Filter
Kryt jednotky filtra
tepelného čerpadla
Výrobný štítok
Číslo modelu a výrobné číslo
Rukoväť krytu jednotky filtra tepelného
č
erpadla (otvára sa potiahnutím)
Mriežka prívodu vzduchu
Nastaviteľné
nožičky
Ovládací panel
Tlačidlo ZAP/VYP : - ak sa stlačí počas chodu sušičky:
Ak sa na displeji zobrazí VYPNUTIE , sušička sa zastaví. Ak
sa na displeji zobrazí STISKNITE A DRŽTE , stlačte tlačidlo a
displej odrátava čas 3, 2, 1 a nakoniec sa zastaví.
Ak toto tlačidlo znova stlačíte a podržíte dlhšie ako 3 sekundy,
na displeji sa nakrátko zobrazí ZAPNUTÉ .
Tlačidlá výberu PROGRAM umožňujú nastavenie programu:
stlačte tlačidlo príslušného programu, ktorý chcete zvoliť
(pozri Zapnutie a programy).
Tlačidlá s kontrolkami MOŽNOSŤ: týmito tlačidlami sa volia
dostupné možnosti pre vybraný program (pozri Ovládacie
prvky). Rozsvietenie kontroliek na jednotke displeja vedľa
spodných tlačidiel indikuje, že voľba bola vybraná.
Tlačidlo/kontrolka ŠTART/PAUZA spúšťa vybraný
program. Stlačením tohto tlačidla počas behu programu sa
program preruší. Ozve sa jedno pípnutie, na displeji sa zobrazí
PAUZA a sušička sa zastaví.
Zelená svieti, keď beží program, oranžová bliká, ak bol
program pozastavený a zelená bliká v pohotovostnom režime
počas čakania na spustenie programu (pozri Zapnutie a
programy).
Poznámka: Táto kontrolka tiež bliká oranžovou farbou
počas Následné ošetrenie fázy programu.
Jednotka displeja vydáva varovania a informácie o
vybranom programe a jeho postupe (pozri na
nasledujúcej strane).
Tlačidlo/ikona DETSKÁ POISTKA : Toto tlačidlo
stlačte a podržte po výbere programu a prípadných
možností. Zabránite tak zmene nastavení programu, na
displeji sa nakrátko zobrazí ZAMKNUTÉ .
Ak táto ikona svieti, ostatné tlačidlá sú zablokované.
Podržaním tohto tlačidla sa blokovanie zruší a ikona
zhasne, na displeji sa nakrátko zobrazí ODEMKNUTÉ .
Poznámka: V súlade s novými predpismi o šetrení
energie je táto sušička vybavená automatickým systémom
prepnutia do pohotovostného režimu, ktorý sa aktivuje
približne po 30 minútach bez detegovania akejkoľvek
aktivity. Stlačte a podržte tlačidlo ZAP-VYP, kým sa na
displeji nakrátko zobrazí ZAPNUTÉ , a sušička sa znova
aktivuje.
Sušiaci cyklus Vlna tejto bubnovej sušičky bol odskúšaný
a schválený spoločnosťou The Woolmark Company. Tento
cyklus je vhodný na sušenie vlnených odevov označených
etiketou „na ručné pranie“ za predpokladu, že tieto odevy
sa budú prať cyklom ručného prania schváleným
spoločnosťou Woolmark a sušiť v bubnovej sušičke podľa
pokynov výrobcu. M1219 V Spojenom kráľovstve, Írsku,
Hong Kongu a Indii je
symbol Woolmark
certifikačná ochranná
známka: ©The Woolmark
Company Pty Ltd.
PROGRAM
Tlačidlá výberu
Jednotka displeja
ŠTART/PAUZA
Tlačidlo a osvetlenie
ZAP/VYP
Tlačidlo
DETSKÁ POISTKA
A MOŽNOSTI
Tlačidlá a kontrolky
Page 85

SK
85
Výber jazyka
Displej
Na druhom riadku displeja sa zobrazuje úroveň vysušenia, ktorú požadujete.
Pri každom stlačení tlačidla Úroveň vysušenia sa vyberie a zobrazí
ďalšia možnosť z nižšie uvedeného zoznamu. Na displeji sa v závislosti od
vášho výberu zobrazuje aj 1 až 7 segmentov. Segmenty sa zobrazujú počas
programu.
! Niektoré automatické programy neumožňujú zmenu úrovne vysušenia alebo
nemusia mať všetky možnosti vysušenia.
1 BAVLNA ŠTANDARD
2 POVLEČENIE,UTERAK
3 SYNTETIKA
4 JEANS
5 VLNA
6 DETSKÁ JEMNÁ
7 PLYŠÁCI
8 SNADNÉ ŽEHLENIE
9
Pri prvom zapnutí sušičky musíte vybrať preferovaný jazyk zo zoznamu dostupných jazykov.
VLHKÉ Vlhké vysušenie : vysuší bielizeň tak, aby bola pripravená na žehlenie žehličkou alebo mangľom.
BEZ ŽEHLENIA Suché na žehlenie : vysuší bielizeň tak, aby bola pripravená na žehlenie ručnou žehličkou.
ZÁCLONY
Sušenie plus na zavesenie : Vysuší vašu jemnú bielizeň tak, aby bola pripravená na zavesenie a dosušenie
.
NA RAMIENKO Sušenie na zavesenie : Vysuší vašu bielizeň tak, aby bola pripravená na zavesenie a dosušenie.
ĽAHKO SUCHÉ Ľahké sušenie : Vysuší vašu jemnú bielizeň tak, aby sa dala uložiť.
DO SKRINE Sušenie do skrine : Vysuší vašu bielizeň tak, aby sa dala uložiť.
EXTRA SUCHÉ Extra sušenie : vysuší vaše oblečenie tak, aby bolo pripravené na nosenie.
Úrovne vysušenia
Pri výbere programu automatického programu s možnosťou rôznych úrovní vysušenia (pozri Tabuľka programov).
Zmena jazyka: na prvom riadku displeja musí blikať aktuálny vybraný jazyk.
- Stlačte tlačidlo ZAP/VYP, aby sa vypol displej, a potom stlačte a podržte
všetky 3 tlačidlá: Úroveň ohrevu, Časované sušenie a
Úroveň vysušenia na 5 sekúnd.
- Stlačením tlačidla Úroveň ohrevu alebo Časované sušenie
prechádzate nahor alebo nadol po zozname.
- Keď v hornom riadku na displeji bliká požadovaný jazyk, stlačením
t
lačidla Úroveň vysušenia vyberiete svoju voľbu.
KOŠELE BAVLNA
ANTI ALLERGY
RÝCHLE SUŠENIE
PRIKRÝVKY
HODVÁB
TMAVÁ BIELIZEŇ
ZAHRATIE UTERAKOV
OSVIEŽENIE
M
Pochopenie displeja
Výber a zobrazenie programu
Zvolený program sa zobrazí v prvom riadku displeja. Táto správa
sa zobrazuje, kým beží program. Osem tlačidiel má dve možnosti na
výber, prvú voľbu vyberiete jedným stlačením tlačidla, druhú
voľbu opätovným stlačením tlačidla. Zobrazí sa váš vybraný program.
Posledným tlačidlom sa volí Môj cyklus.
Prvé stlačenie Druhé stlačenie
MÔJ PROGRAM
(pozri niz9s9ie)
Môj program Po výbere tlačidla Môj program sa na displeji zobrazí vybraný program, pred ktorým je „M“, napríklad
M BAVLNA ŠTANDARD (pozri Zapnutie a programy).
Page 86

86
SK
Každým stlačením tlačidla Oneskorenie sa nastavenia
oneskorenia zmení s krokom po 1 hodine od: do , potom
a následne sa po niekoľkých sekundách oneskorenie zruší.
Čas oneskorenia sa na displeji zobrazuje vedľa tlačidla Oneskorenie.
Po stlačení tlačidla Štart/Pauza sa na displeji odrátavajú minúty
času oneskorenia.
Na druhom riadku displeja sa zobrazuje ZAHÁJENO
Čas oneskorenia môžete kedykoľvek zmeniť alebo zrušiť.
OFF
1h 24h
Priebeh programu
Displej
Čas oneskorenia a Čas do ukončenia
Niektoré programy možno spustiť s oneskorením (pozri Zapnutie a programy). Stlačte tlačidlo Oneskorenie a rozbliká sa ikona.
V druhom riadku displeja sa zobrazuje stav priebehu programu:
(po riadku bežia dlhé správy)
Po stlačení tlačidla Štart/Pauza sa zobrazí čas oneskorenia alebo čas do konca v hodinách a minútach a po každej minúte sa zníži.
Čas do konca
Po uplynutí času oneskoreniaalebo celého programu, ak oneskorenie nebolo zvolené, sa zobrazí táto časť zobrazenia:
- Odhadovaný čas do konca programu, u automatických programov
- skutočný zostávajúci čas u časovaného programu
Ak sú vybrané časované programy, počas celého cyklu sa zobrazuje skutočný zvyšný čas.
Ak sú vybrané Automatické programy, zobrazený čas je odhadovaný zvyšný čas. Ak je vybraný program, na displeji sa
zobrazí čas potrebný na sušenie úplnej náplne. Zvyšný čas sa v priebehu sušiaceho cyklu neustále monitoruje a aktualizuje,
aby mohol byť zobrazený najlepší možný odhad.
Dvojbodky medzi hodinami a minútami na displeji blikajú a indikujú odrátavanie času.
S
UŠ
EN
I
E
C
H
L
A
DN
Ý
VZ
DUC
H
O
H
REV
P
RI
P
RA
VEN
É
K
O
N
I
EC
P
RO
G
RA
M
U,
N
EM
A
Č
K
.
P
ÉČ
E
K
O
N
I
EC
P
RO
G
RA
M
U,
VY
Č
I
S
T
I
Ť
F
I
L
T
ER
A
VY
P
RÁ
Z
DN
I
Ť
Z
Á
S
O
BN
Í
K
N
A
VO
DU
Každým stlačením sa znižuje čas trvania a počet dostupných časových možností v závislosti od vybraného programu a
materiálu. Vedľa času sa zobrazuje ikona Časované sušenie .
Vybraný čas zostáva zobrazený aj po spustení programu, môžeto ho však kedykoľvek zmeniť.
Po výbere programu s možnosťou Časované sušenie stlačte tlačidlo
Časované a na displeji sa pri každom stlačení a uvoľnení tlačidla
bude zvyšovať zvolený čas (pozri Zapnutie a programy).
Časované sušenie
Program Ohrev a pôžitok
(ak bola vybraná voľba Následné ošetrenie).
Page 87

87
SK
Displej
Zapnutie a programy
Varovania
Na druhom riadku displeja sa zobrazujú aj varovania a upozornenia:
(upozornenia sa zobrazia pri skončení programu)
KONIEC PROGRAMU, VYČISTIŤ FILTER A
VYPRÁZDNIŤ ZÁSOBNÍK NA VODU
●
P
ripomenutie, že nádoba na vodu by sa mala
vyprázdniť a filter vyčistiť pri každom použití sušičky
(pozri Údržba).
VYPRÁZDNIŤ ZÁSOBNÍK NA VODU
●
Signalizuje, že nádoba na vodu je plná. Správa sa
bude zobrazovať ešte niekoľko sekúnd po vložení
prázdnej nádoby na vodu späť, aby sa tak stalo,
sušička musí byť v činnosti (pozri Ovládacie prvky).
Poznámka: keď sa naplní nádoba na vodu a
zobrazuje sa táto správa, ohrev sa vypne a vaše
odevy neuschnú.
VYČISTIŤ KONDENZÁTOR, FILTER, A VYPRÁZDNIŤ
ZÁSOBNÍK NA VODU
●
Táto správa znamená, že je potrebné vyčistiť jednotku
jednotku filtra tepelného čerpadla (pozri Údržba) a
bude sa zobrazovať v pravidelných intervaloch podľa
toho, ako využívate sušičku. Po skončení ďalšieho
programu sa správa zruší. Musíte vyčistiť aj filter.
VYČISTIŤ FILTER PRE ZABEZPEČENIE FUNKCIE
ANTI ALLERGY
●
Zobrazuje sa počas antialergického programu a
indikuje, že filter si vyžaduje čistenie, aby sa dokončil
celý antialergický cyklus (pozri Údržba).
Voľba programu
1. Sušičku pripojte k sieťovej elektrickej zásuvke.
2. Bielizeň zotrieďte podľa druhu tkaniny (pozri Bielizeň
na pranie).
3. Otvorte dvierka a skontrolujte, či je filter čistý a na
svojom mieste a či je nádoba na vodu prázdna a na
svojom mieste (pozri Údržba).
4. Do sušičky vložte náplň a skontrolujte, či bielizeň
neprekáža uzavretiu tesneniu dvierok. Zatvorte dvierka
5. Ak displej nesvieti: Stlačte tlačidlo ZAP/VYP
6. Stlačte tlačidlo Výber programov zodpovedajúce
druhu sušenej tkaniny podľa pokynov uvedených v
Tabuľke programov (pozri Programy Bielizeň na
pranie) a na označení každého druhu tkaniny (pozri
Bielizeň na pranie).
- Ak je vybrané tlačidlo kroky 7 a 8 nie sú potrebné
(pozri nižšie).
7.
Vyberte možnosť Časované sušenie alebo Úrovne vysušenia:
- Počas časovaného sušenia stláčajte a uvoľňujte
tlačidlo Časované, kým sa nezobrazí
požadovaný čas.
alebo-
ak chcete zmeniť predvolené nastavenie
vysušenia, stláčajte a uvoľňujte tlačidlo Úrovne
vysušenia až dovtedy, kým nebude indikovaná
požadovaná úroveň..
! Ďalšie informácie nájdete v tabuľke Programy:
dostupnosť Úrovne vysušenia, Časované sušenie a
Možnosti
8. Nastavte čas oneskorenia a podľa potreby aj ďalšie
možnosti (pozri Displej).
9. Na zapnutie stlačte tlačidlo Štart/Pauza .
Na displeji sa zobrazí odhadovaný čas do konca.
V priebehu sušiaceho programu môžete bielizeň
skontrolovať a vybrať už suché kusy, zatiaľ čo ostatné sa
môžu ďalej sušiť. Po opätovnom zatvorení dvierok, stlačte
tlačidlo Štart/Pauza na pokračovanie v sušení.
Otváraním dvierok a kontrolou bielizne predĺžite čas
sušenia, pretože kompresor tepelného čerpadla sa
nespustí skôr ako o 5 minút po zatvorení dvierok a
stlačení tlačidla Štart/Pauza
(pozri Ovládacie prvky).
10.Počas posledných niekoľkých minút sušiacich programov,
skôr ako sa program dokončí, sa spúšťa záverečná fáza
STUDENÉ SUŠENIE (tkaniny sa ochladzujú). Túto fázu
treba vždy nechať dokončiť.
11.Na konci cyklu sušenia sa zobrazí správa:
- Ak sa zobrazuje KONIEC PROGRAMU, VYČISTIŤ
FILTER A VYPRÁZDNIŤ ZÁSOBNÍK NA VODU , bzučiak
3x zapípa (Pozn.: Ak bola zvolená možnosť ZVUK,
bzučiak pípne 3x každých 30 sekúnd po dobu 5 minút).
- Ak sa zobrazuje KONIEC PROGRAMU, NEMAČK. PÉČE ,
bola zvolená možnosť ošetrenie proti pokrčeniu a ak
bielizeň ihneď nevyberiete, sušička sa bude z času
pretáčať 10 hodín alebo kým neotvoríte dvierka, a bzučiak
pípne 3 krát na potvrdenie skončenia programu.
12.Otvorte dvere, vyberte bielizeň, vyčistite filter a vráťte ho
na pôvodné miesto. Vyprázdnite nádobu na vodu a vráťte
ju na svoje miesto (pozri Údržba).
13.Sušičku odpojte od elektrickej siete
Tlačidlo Môj program:
Pri prvom stlačení tohto tlačidla sa na druhom riadku displeja zobrazí ULOŽIŤ: PODRŽAŤ
Po výbere si nastavenia obľúbeného programu a možností môžete uložiť stlačením a podržaním tlačidla Môj cyklus aspoň na
5 sekúnd, horný riadok zobrazí blikajúci nasledovaný vybraným programom. Zaznie pípnutie a na druhom riadku displeja
sa zobrazí PAMÄŤ .
Keď budete nabudúce potrebovať tento program, stlačte tlačidlo , potom tlačidlo Štart/Pauza a tento program sa
spustí. Ak chcete, uložené obľúbené nastavenie môžete zmeniť voľbou nového programu alebo možností a stlačením a
podržaním tlačidla (ako vo vyššie uvedenom príklade).
Page 88

88
SK
Zapnutie a programy
Program Dostupné možnosti
Bavlna Štandard
Košele
Rýchle sušenie
Posteľ a kúpeľňa
✓
✓
✓
✓
✓
✓
✓
✓
✓
✓
✓
✓
✓
✓
✓
✓
✓
✓
✓
✓
✓
✓
✓
✗
✗
✓
✓
✓
✓
✗
✓
✓
✓
✓
✓
✓
✓
✓
✓
✗
✓
✓
✓
✓
✓
✓
✓
✗
✗
✓
Dostupné úrovne vysušenia
(predvolená je označená symbolom )
✓
- Vysoké
-
Stredné
- Vysoké
- Vysoké
- Stredné
-
Stredné
-
Nízke
- Stredné
- Nízke
Vlhké
Bez Žehlenia
Záclony
Na Ramienko
Ľahko Suché
Do Skrine
Extra Suché
Bavlna Štandard
• Tento program je určený na bavlnenú bielizeň.
• Doba trvania tohto programu závisí od veľkosti náplne, vybraného stupňa vysušenia a použitej rýchlosti odstreďovania práčky
(pozri Bielizeň).
• Program Bavlna Štandard podľa nariadenia EÚ 392/2012 je vybraný program 1 s vysokým ohrevom a úrovňou vysušenia Suchá do
skrine (štandardná/predvolená konfigurácia). Je to najefektívnejší program z hľadiska spotreby energie (EÚ 392/2012).
Košele
Možnosť vysoký ohrevu
• Tento program je určený na košele z bavlny.
• Môže sa používať pre náplne do 3 kg (približne 10 košieľ).
Možnosť stredného ohrevu
• Tento program je určený na košele zo syntetických materiálov alebo zo zmesí prírodného a syntetického materiálu, ako napr.
polyesteru a bavlny.
• Môže sa používať pre náplne do 3 kg (približne 14 košieľ).
Doba trvania tohto programu závisí od veľkosti náplne, vybraného stupňa vysušenia a použitej rýchlosti odstreďovania práčky.
Náplne vysušené použitím nastavenia Sušenie do skrine sú zvyčajne pripravené na nosenie, okraje alebo švy môžu byť mierne vlhké.
Ak je to tak, skúste obrátiť košele naruby a znova spustite program na krátky čas.
Posteľ a kúpeľňa (POVLEČENIE,UTERAK )
• Tento program je určený na bavlnené uteráky a posteľnú bielizeň.
• Doba trvania tohto programu závisí od veľkosti náplne, vybraného stupňa vysušenia a použitej rýchlosti odstreďovania práčky
(pozri Bielizeň).
• Náplne vysušené použitím nastavenia Extra suchá sú zvyčajne pripravené na použitie, okraje alebo švy môžu byť mierne vlhké, najmä
na veľkých kusoch. Ak je to tak, skúste ich otvoriť a znova spustite program na krátky čas.
Antialergický program (ANTI ALLERGY)
Tento program má potvrdenie „Schvaľovacia pečať“ združenia Allergy z Veľkej Británii, potvrdzujúcu skutočné zníženie a eliminácia
alergénov z odevov pri použití špeciálneho antialergického cyklu. Tento program, vďaka dosiahnutiu konštantnej teploty po dlhší čas,
neutralizuje účinky najrozšírenejších alergénov (vrátane domových roztočov a peľu).
Môže sa použiť na sušenie a úpravu plnej vlhkej náplne, alebo na 4 kg suchej náplne, ak len upravujete svoju bielizeň.
Ak sa na displeji zobrazí VYČISTIŤ FILTER PRE ZABEZPEČENIE FUNKCIE ANTI ALLERGY : Vyčistite filter a znova spustite program.
Syntetika (SYNTETIKA)
• Tento program je určený na syntetickú bielizeň pri nízkom ohreve alebo zmesi syntetickej a bavlnenej bielizne so stredným ohrevom.
• Doba trvania tohto programu závisí od veľkosti náplne, vybraného stupňa vysušenia a použitej rýchlosti odstreďovania
práčky (pozri Bielizeň).
Rýchle sušenie
Tento program je určený pre malé náplne max. do 1 kg.
Poznámka: môže sa použiť iba s nastavením „Suchá do skrine“.
• Možnosť vysoký ohrevu • Možnosť stredného ohrevu
Určený pre bavlnu do 1 kg Určený pre syntetiku do 1 kg
*NEMÔŽETE SI VYBRAŤ OBE MOŽNOSTI OŠETRENIA NÁSLEDNÉ OŠETRENIE I ZVUK
- Stredné
- Nízke
-
Vysoké
✓
✓
✓
✓
✓
✓
✓
✗
✓
✗
✓
✓
✓
✓
✓
✓
✗
✓
Časovač
oneskorenia
Predošetrenie
Zvuk alebo
Následné
ošetrenie
Menej
chuchvalcov
vlákien
Úroveň
ohrevu
Časované
sušenie
Senzorické
sušenie
1
2
3
Anti Allergy
✓
✗
✗
✓✓
●
Automatický program
●
Automatický program
Syntetika
✗
✓
✓
✓
✗
✓
✓
✓
ZÁKLADNÉ PROGRAMY (ESSENTIALS) – Tabuľka programov
! Ak displej nesvieti, stlačte tlačidlo ZAP/VYP a zvoľte program.
Page 89

89
SK
Zapnutie a programy
Program Dostupné možnosti
Džínsy
Paplón
Tmavá bielizeň
Vlna
✓
✓
✗
✓
✓
✓
✓
✓
✓
✓
✓
✓
✓
✓
✗
✗
✗
✗
✗
✓
✓
✗
✓
✓
✓
✗
✓
✗
✓
✗
Dostupné úrovne vysušenia
(
predvolená je označená symbolom )
✓
- Vysoké
- Stredné
Vlhké
Bez Žehlenia
Záclony
Na Ramienko
Ľahko Suché
Do Skrine
Extra Suché
*NEMÔŽETE SI VYBRAŤ OBE MOŽNOSTI OŠETRENIA NÁSLEDNÉ OŠETRENIE I ZVUK
✗
✗
✓
✓
✓
✓
✓
✓
✗
✓
Časovač
oneskorenia
Predošetrenie
Zvuk alebo
Následné
ošetrenie
Zvuk
Menej
chuchvalcov
vlákien
Úroveň ohrevu
Časované
sušenie
Senzorické
sušenie
4
5
6
Hodváb
✗
✗
✗
✗
✗
✗
✗
✗
✗
●
Automatický program
●
Automatický program
●
Automatický program
Detská jemná
✗
✗
✓
✓
✗
*
*
✓
✓
✓
✓
✓
*
✗
✗
✓
Džínsy (JEANS)
• Tento program je určený na džínsy z denimovej bavlny. Pred sušením džínsov si predné vrecká vyvráťte naruby.
• Môže sa používať pre náplne do 3 kg (približne 4 páry).
• Nemiešajte tmavé a svetlé farebné kusy.
• Môže sa použiť aj na iné odevy vyrobené z rovnakého materiálu, ako sú napríklad bundy.
• Doba trvania tohto programu závisí od veľkosti náplne, vybraného stupňa vysušenia a použitej rýchlosti odstreďovania práčky.
• Náplne vysušené použitím nastavenia Extra suché sú zvyčajne pripravené na nosenie, okraje alebo švy môžu byť mierne vlhké. Ak je
to tak, skúste obrátiť džínsy naruby a znova spustite program na krátky čas.
! Neodporúčame používať tento program, ak máte džínsy s elastickými pásmi, gombíkmi alebo výšivkami.
Paplón (PRIKRÝVKY)
! Pri používaní tohto programu buďte opatrní. NESUŠTE žiadne poškodené kusy, pretože to môže spôsobiť upchanie filtra a
odvzdušňovacieho ventilu páperím, následkom čoho hrozí nebezpečenstvo požiaru.
• Musí sa používať iba s paplónmi jednoduchej veľkosti: NIE JE vhodný pre dvojité paplóny ani pre veľkosť king size.
• Náplne vysušené použitím tohto programu sú zvyčajne pripravené na použitie, môžu však byť miestami mierne vlhké. Ak je to tak,
skúste ich otvoriť, zatriasť a znova spustiť program na krátky čas.
• Je vhodný aj na páperové bundy.
• Zvoľte intenzívny ohrev pre bavlnené paplóny a mierny ohrev pre syntetické paplóny
• Doba trvania tohto programu bude závisieť od veľkosti a hustoty náplne a od rýchlosti odstreďovania použitej v práčke.
Vlnený program (VLNA)
• Toto je program určený pre odevy, vhodné na sušenie v bubnových sušičkách, označených symbolom .
• Môže byť použitý pre náplne s hmotnosťou do 1 kg (približne 3 svetre).
• Pred sušením odporúčame vyvrátiť odevy naruby.
• Doba trvania tohto programu závisí od veľkosti náplne, vybraného stupňa vysušenia a použitej rýchlosti odstreďovania práčky.
• Náplň sušičky sušená pomocou tohto programu je spravidla vhodná na nosenie, ale okraje niektorých ťažších kusov môžu byť ešte
mierne vlhké. Nechajte ich prirodzene uschnúť, pretože nadmerné sušenie môže odevy poškodiť.
! Na rozdiel od iných materiálov, mechanizmus zrážania vlny je nevratný, t.j. vlákna sa nenapnú späť do pôvodnej veľkosti a tvaru.
! Tento program nie je vhodný pre akrylové odevy.
Hodváb (HODVÁB)
• Tento program je určený na sušenie jemného hodvábu.
• Môže sa používať pre veľkosti náplne do 0,5 kg.
• Doba trvania tohto programu závisí od veľkosti náplne, vybraného stupňa vysušenia a použitej rýchlosti odstreďovania práčky.
• Náplne vysušené použitím nastavenia Sušenie do skrine sú zvyčajne pripravené na použitie, na niektorých kusoch šatstva však okraje
alebo švy môžu byť mierne vlhké. Ak je to tak, skúste ich otvoriť alebo obrátiť a znova spustite program na krátky čas.
EXKLUZÍVNE PROGRAMY (EXCLUSIVES) – Tabuľka programov
! Ak displej nesvieti, stlačte tlačidlo ZAP/VYP a zvoľte program.
Page 90

90
SK
Zapnutie a programy
Program Dostupné možnosti
Plyšáci
Ohrev a
pôžitok
Môj Program
Ľahké
žehlenie
✓
✗
✗
✗
✗
✗
✗
✓
✗
✗
✓
✗
✗
✗
✗
✗
✗
Dostupné úrovne vysušenia
(predvolená je označená symbolom )
✓
Vlhké
Bez Žehlenia
Záclony
Na Ramienko
Ľahko Suché
Do Skrine
Extra Suché
✗
✗
Časovač
oneskorenia
Predošetrenie
Následné
ošetrenie
Menej
chuchvalcov
vlákien
Zvuk
Úroveň ohrevu
Časované
sušenie
Senzorické
sušenie
7
8
9
Osvieženie
✓
✗
✗
✗
✗
✗
●
Automatický program
●
Automatický program
Závisí od zvoleného programu. Pozri predchádzajúce informácie.
●
Automatický program
●
Automatický program
✗
✗
✗
Detská jemná
• Tento program je určený na sušenie drobných a jemných odevov vášho dieťaťa a posteľnej bielizne (bavlnenej a ženilkovej)
a na sušenie vašej jemnej bielizne.
• NESUŠTE také výrobky, ako sú podbradníky a plienkové nohavičky s plastovým poťahom.
• Môže byť použitý pre náplne s hmotnosťou do 2 kg.
• Doba trvania tohto programu bude závisieť od veľkosti a hustoty náplne a od rýchlosti odstreďovania použitej v práčke.
• Náplň sušičky sušená pomocou tohto programu je spravidla vhodná na nosenie, ale okraje niektorých ťažších kusov môžu byť ešte
mierne vlhké. Pokiaľ je to tak, skúste ich vyvrátiť naruby a znova spustiť program na krátky čas.
Tmavá bielizeň
Tento program šetrí bavlnené odevy tmavých farieb reguláciou otáčok motora a rotácie bubna spolu s reguláciou minimálnej sušiacej
teploty.
• Vhodný pre bavlnené a džínsové náplne maximálne do 3 kg.
• Náplň sa musí odstrediť v práčke pri 1200 - 1400 otáčkach za minútu.
• Dĺžka tohto programu bude závisieť od veľkosti náplne a od použitých otáčok odstreďovania práčky.
• Keďže tento program ošetrenia je určený na ochranu tmavých odevov, dĺžka programu môže byť aj viac ako 4 hodiny.
• Usuší do úrovne Suchá do skrine.
Program Plyšáci (PLYŠÁCI)
Týmto programom jednoduchšie odstránite prach a plyšové hračky môžete prať častejšie, pretože čas sušenia sa veľmi skracuje v
porovnaní so sušením na čerstvom vzduchu. Ide tu o jemný sušiaci program so sušením pri nízkej teplote a jemným mechanickým
pôsobením, aby sa čo najlepšie zachoval pôvodný vzhľad a lesk srsti.
Poznámka: Na ochranu alergikov stačí plyšové hračky zmraziť na 24 hodín, potom vyprať a vysušiť. Zopakujte vždy po 6 týždňoch.
Pred sušením odstráňte príslušenstvo, ako sú šaty, goliere alebo zvukové zariadenia a plastové oči chráňte maskovacou páskou po ich
vyutieraní handričkou.
Dĺžka trvania programu bude závisieť od konkrétnej značky a od hmotnosti náplne.
Maximálna hmotnosť náplne nesmie prekročiť 2,5 kg a žiadny kus bielizne nesmie byť väčší ako 600 g.
Ohrev a pôžitok (ZAHRATIE UTERAKOV)
Tento program pomáha nahriať uteráky a župany, aby vám dodali pocit tepla po kúpeli alebo sprche. Je to užitočné aj pri ohreve
odevov pred oblečením v zime. Tento cyklus zohreje oblečenie na 37 °C (teplota tela), na displeji sa zobrazí OHREV a udržiava túto
teplotu maximálne 4 hodiny, alebo kým cyklus neukončíte otvorením dverí, keď sa na displeji zobrazí PRIPRAVENÉ . Maximálna
hmotnosť náplne 3 kg.
Poznámka: V tomto programe je vypnuté tlačidlo Štart/Pauza.
Osvieženie (OSVIEŽENIE)
! „Osvieženie“ nie je sušiaci program a nemal by sa používať na vlhké kusy odevov.
• Môže sa používať pri akejkoľvek hmotnosti náplne, ale najúčinnejší je s menšou náplňou.
• Sušičku nepreťažujte (pozri Bielizeň).
• Je to 20-minútový program, ktorý prevzdušní vaše oblečenie chladným vzduchom. Používa sa aj na ochladenie teplého oblečenia.
M
EXTRA PROGRAMY (EXTRA) – Tabuľka programov
! Ak displej nesvieti, stlačte tlačidlo ZAP/VYP a zvoľte program.
Page 91

91
SK
Zapnutie a programy
Ovládacie prvky
! Varovanie, po stlačení tlačidla Štart/Pauza sa už program
nedá zmeniť.
Ak chcete zmeniť zvolený program, stlačte tlačidlo
Štart/Pauza . Svetlo bliká oranžovou a indikuje, že program bol
pozastavený. Zvoľte nový program a všetky potrebné možnosti.
Rozbliká sa zelené svetlo Opätovným stlačením tlačidla
Štart/Pauza sa spustí nový program.
• Tlačidlá Možnosti
Tieto tlačidlá slúžia na prispôsobenie zvoleného programu podľa
vašich požiadaviek. Skôr, ako si možno zvoliť niektorú možnosť,
stlačením tlačidla výberu programu sa musí vybrať program, alebo
už program bol vybraný. Nie všetky voľby sú k dispozícii pre všetky
programy (pozri Tabuľka programov). Ak niektorá voľba nie je k
dispozícii a stlačíte tlačidlo, bzučiak pípne 3 razy. Ak je možnosť k
dispozícii, kontrolka na displejovej jednotke nad spodnými
tlačidlami svieti a indikuje tak, že príslušnú možnosť si možno
vybrať.
Časové oneskorenie (časovač oneskorenia)
Spustenie niektorých programov (pozri Displej a Tabuľka
programov) možno odložiť až o 24 hodín.
Pred nastavením zapnutia s oneskorením skontrolujte, či je
vyprázdnená nádoba na vodu.
Predošetrenie
Možnosť pred nekrčivou fázou je k dispozícii, len ak bolo vybrané
oneskorené spustenie. Odevy sa z času na čas pootočia v
priebehu času oneskorenia, aby sa zabránilo pokrčeniu.
Následné ošetrenie
Ak je k dispozícii a vybraný, po skončení sušiacich a
ochladzovacích cyklov sa odevy v bubne príležitostne pretáčajú na
pomoc pri predchádzaní krčenia, ak nemôžete okamžite vybrať
náplň po dokončení programu.
Poznámka: Počas tejto fázy bliká oranžovou farbou kontrolka
Štart/Pauza.
Poznámka: Ak ste si vybrali voľbu Zvuk, táto možnosť nie je
dostupná.
Tlačidlo Úroveň ohrevu, displej a ikony
Zmeniť úroveň ohrevu vám neumožnia všetky programy, niektoré
zasa umožňujú všetky tri úrovne ohrevu: Nízke, Stredné a Vysoké.
Ak sú dostupné úrovne ohrevu, stlačením tohto tlačidla sa úroveň
ohrevu zmení a na displeji sa nakrátko zobrazí zvolená úroveň
ohrevu súčasne s ikonou zvolenej úrovne:
VYSOKÁ TEPLOTA STREDNÁ TEPLOTA NÍZKA TEPLOTA
Zvuk
K dispozícii pri všetkých programoch a umožňuje, aby bzučiak
vydal signál na konci sušiaceho programu ako upozornenie, že
odevy sú už pripravené na vybratie.
Poznámka: Ak ste si vybrali voľbu Ošetrenie proti pokrčeniu, táto
možnosť nie je dostupná.
Menej chuchvalcov vlákien
Obmedzením mechanických účinkov v záverečnej fáze sušenia sa
výrazne zmenšuje množstvo páperia a chuchvalcov vlákien, čo
chráni vlákna vašich odevov.
88:88
• ČASOVÝ DISPLEJ
Na displeji sa zobrazí buď zvyšný čas z časového oneskorenia,
alebo zvyšný čas sušiaceho programu (pozri Displej).
Displej indikuje aj prípadné problémy sušičky. Ak by k tomu došlo,
na displeji sa zobrazí F nasledované číselným kódom poruchy (pozri
Riešenie problémov).
• Vyprázdnite nádobu na vodu
(Ak máte sušičku pripojenú na odtok, tieto správy môžete
ignorovať, pretože nádoba na vodu sa nemusí vyprázdňovať).
Zobrazujú sa správy upozorňujúce, že máte vyprázdniť nádobu na
vodu(pozri Displej).
Ak sa nádoba na vodu naplní v priebehu programu, ohrev sa vypína
a sušička vykoná fázu Studeného sušenia.
Potom sa zastaví a správy vám povie, aby ste
VYPRÁZDNIŤ ZÁSOBNÍK NA VODU .
Nádobu na vodu musíte vyprázdniť a sušičku znova spustiť, inak sa
odevy neusušia. Niekoľko sekúnd po opätovnom spustení sušičky
správa zhasne.
Aby ste tomu zabránili, nádobu na vodu vyprázdnite pri každom
použití sušičky (pozri Údržba).
• Otvorenie dvierok
Otvorenie dvierok počas programu zastaví sušičku a spôsobí aj
nasledujúce účinky:
Poznámka: Kontrolka Štart/Pauza bliká oranžovou počas fázy
Následné ošetrenie úprave programu.
• Na displeji sa zobrazí PAUZA .
• Počas fázy oneskorenia pokračuje odrátavanie času do
zapnutia. Aby sa pokračovalo v odrátavaní oneskorenia
programu, musí byť stlačené tlačidlo Štart/Pauza.
Zobrazenie na displeji sa zmení na aktuálny stav.
• Aby sa pokračovalo v programe, musí byť stlačené
tlačidlo Štart/Pauza. Zobrazenie na displeji sa zmení na
zobrazenie aktuálneho stavu.
• Počas fázy Po nekrčivej úprave sa program skončí.
Stlačením tlačidla Štart/Pauza sa reštartuje nový program
od začiatku.
• Systém ochrany tepelného čerpadla
Systém tepelného čerpadla je vybavený funkciou ochrany
kompresora, ktorý sa aktivuje otvorením dvierok alebo výpadkom
napájania a vypnutím sušičky. Systém znemožní zapnutie
kompresora tepelného čerpadla do 5 minút po zatvorení dvierok a
spustení programu.
• Poznámka
Ak dôjde k výpadku sieťového napätia, vypnite napájanie alebo
vytiahnite vidlicu zo zásuvky. Po obnovení stlačte a podržte tlačidlo
ZAP-VYP, kým sa na displeji nakrátko zobrazí ZAPNUTÉ ,
a sušička sa znova aktivuje. Potom stlačte tlačidlo Štart/Pauza a
program bude pokračovať.
Program Ľahké žehlenie (SNADNÉ ŽEHLENIE)
„Ľahké žehlenie“ je krátky 10 minútový program (8 minút ohrevu nasledované 2-minútovou fázou studeného sušenia), ktorý načuchrá
vlákna oblečenia, ktoré boli v rovnakej polohe a na rovnakom mieste po dlhšiu dobu. Tento cyklus uvoľňuje vlákna a uľahčuje ich
žehlenie a skladanie.
! „Ľahké žehlenie“ nie je sušiaci program a nemal by sa používať na vlhké kusy oblečenia.
Aby ste dosiahli čo 1. Nevkladajte viac než je maximálna hmotnosť náplne. Nasledujúce čísla znamenajú suchú hmotnosť:
najlepšie výsledky: Tkanina Maximálna hmotnosť náplne
B
avlna a bavlnené zmesi 2,5 kg
Syntetika 2 kg
Denim 2 kg
2. Vyberte odevy zo sušičky okamžite po skončení programu. Zaveste ich, poskladajte alebo vyžehlite ich a
odložte ich do šatníka. Ak by to nebolo možné, program zopakujte.
Efekt „Ľahké žehlenie“ sa líši v závislosti od konkrétnej tkaniny. Funguje výborne s tradičnými tkaninami, ako je bavlna alebo bavlnené
zmesové tkaniny, a menej dobre s akrylovými vláknami a s materiálmi, ako je Tencel®.
Page 92

92
SK
Bielizeň na pranie
Triedenie bielizne
• Skontrolujte symboly na etikete odevov a uistite sa, že sú
vhodné na sušenie v sušičke.
• Bielizeň roztrieďte podľa druhu tkaniny.
•
Vyprázdnite vrecká a skontrolujte gombíky.
• Zatvorte zipsy a háčiky a uvoľnite opasky a šnúrky.
• Každý kus vyžmýkajte, aby ste odstránili čo najviac
prebytočnej vody.
! Nevkladajte do sušičky mokré kvapkajúce odevy.
Maximálna rozmery náplne
Nevkladajte viac než je maximálna hmotnosť náplne.
Nasledujúce čísla znamenajú suchú hmotnosť:
P
rírodné vlákna: max. 8 kg
Syntetické vlákna: max. 4 kg
! Sušičku NEPREŤAŽUJTE, pretože to môže spôsobiť
zníženie efektívnosti sušenia.
Etikety s pokynmi na pranie
Pozrite si štítky na odevoch, najmä pred prvým sušením v
sušičke. Najčastejšie sa používajú nasledujúce symboly:
Vhodné na sušenie v sušičke
Nevhodné na sušenie v bubnovej sušičke
Sušenie v sušičke pri intenzívnom ohreve
Sušenie v sušičke pri slabom ohreve
Časy sušenia
V tabuľke (pozri nižšie) sa uvádzajú PRIBLIŽNÉ časy
sušenia v minútach. Uvedené hmotnosti sú pre suché
o
devy.
Tieto časy sú orientačné a môžu sa líšiť v závislosti od:
• Množstva vody zostávajúcej v odevoch po odstreďovaní:
v uterákoch a jemnej bielizni zostáva veľa vody.
• Látky: bielizeň z rovnakého druhu látky, ale s rôznou
š
truktúrou a hrúbkou, nemusia mať rovnaký čas sušenia.
• Množstva bielizne: sušenie jednotlivých kusov alebo
malých hmotností náplne môže trvať dlhšie.
• Vysušenie: Ak niektoré kusy odevu chcete vyžehliť,
môžete ich vybrať ešte keď sú trocha vlhké. Iné môžete
nechať aj dlhšie, ak potrebujete, aby boli úplne suché.
• Nastavenia ohrevu.
• Izbovej teploty: ak je v miestnosti so sušičkou zima,
sušenie odevov v sušičke bude trvať dlhšie.
• Objem: niektoré objemné kusy sa môžu sušiť so
zvýšenou opatrnosťou. Odporúčame vám viackrát vybrať
tieto kusy, striasť ich a vrátiť ich späť do sušičky, až kým
sa sušenie neskončí.
! Odevy nadmerne nesušte.
Všetky látky obsahujú trocha prirodzenej vlhkosti,
uchovávajúcej ich jemnosť a našuchorenosť
• Poznámka: Na konci sušiaceho programu môžu byť bavlnené kusy stále vlhké, ak ste dali spolu bavlnu so syntetikou.
Ak by k tomu došlo, nechajte ich ešte chvíľu sušiť.
Bavlna
Vysoké
ohrev
Syntetika
Stredné
ohrev
Jemná
bielizeň
(akryl)
Nízke
ohrev
Časy sušenia po odstreďovaní v práčke pri 800-1000 ot/min.
Časy sušenia pri zníženom odstreďovaní v práčke.
Časy sušenia pri zníženom odstreďovaní v práčke.
Automatický čas trvania
Automatické minút
Nastavenie Časované sušenie
Automatický čas trvania
Automatické minút
Nastavenie Časované sušenie
Automatický čas trvania
Automatické minút
Nastavenie Časované sušenie
1 kg
2 kg
4 kg
3 kg
1 kg
2 kg
1 kg
2 kg
3 kg
5 kg
6 kg
7 kg
1:00 - 1:30
1:20 - 1:40
2:00 - 2:20
1:40 - 2:10
2:20 - 3:00
2:30 - 3:10
2:50 - 3:20
60 - 90
80 - 100
120 - 140
120 - 130
140 - 180
150 - 190
170 - 200
1:00
alebo
1:30
0:40 - 0:50
40 - 50
0:40 alebo 1:00
0:50 - 1:00
50 - 60
0:40 alebo 1:00
0:40 - 1:20
40 - 80
0:40 alebo 1:00 alebo 1:30
1:20 - 2:20
80 - 140
1:30 alebo 2:00 alebo 2:30
1:00 - 1:30
60 - 90
1:00 alebo 1:30
4 kg
1:20 - 2:00
80 - 120
1:00 alebo 1:30 alebo 2:00
1:30
2:00
alebo
2:30
1:30
alebo
2:00
2:30
2:30
alebo
3:00
3:00
alebo
3:40
8 kg
3:20 - 4:00
200 - 240
3:40
Page 93

93
SK
Odstraňovanie porúch
Jedného dňa sa zdá, že sušička nefunguje. Skôr, ako zavoláte do servisného strediska (pozri Servis), prejdite si
nasledujúce odporúčania na riešenie problémov:
Možné príčiny/riešenie:
●
Vidlica nie je zapojená do zásuvky alebo nemá spoľahlivý kontakt.
●
Došlo k výpadku sieťového napájania.
●
Prepálená poistka. Skúste pripojiť do zásuvky iný spotrebič.
●
Používate predlžovací kábel? Skúste pripojiť sieťový kábel sušičky priamo do
zásuvky.
●
Sú dvierka bezpečne uzavreté?
●
Nebol správne nastavený program (pozri Zapnutie a programy).
●
Nebolo stlačené tlačidlo Štart/Pauza (
pozri Zapnutie a programy)
.
●
Nastavili ste odložený čas (pozri Zapnutie a programy).
●
Filter nebol vyčistený (pozri Údržba).
●
Nie je potrebné vyprázdniť nádobu na vodu? Zobrazuje sa pokyn na
vyprázdnenie nádoby na vodu?
(pozri Údržba).
●
Filter tepelného čerpadla si vyžaduje čistenie? (pozri Údržba).
●
Nastavená teplota nie je ideálna pre druh tkaniny, ktorý sušíte
(pozri časti Zapnutie a programy, a Bielizeň na pranie).
●
Nebol vybraný správny čas sušenia pre danú hmotnosť náplne
(pozri Bielizeň na pranie).
●
Upchatá mriežka nasávania vzduchu (pozri Inštalácia, Údržba).
●
Kusy bielizne boli príliš mokré (pozri Bielizeň na pranie).
●
Sušička bola preťažená (pozri Bielizeň na pranie).
●
Nádoba na vodu pravdepodobne nebola vyprázdnená na začiatku
programu. Nečakajte na signál na vyprázdnenie nádoby s vodou, nádobu
vždy skontrolujte a vyprázdnite pred spustením nového sušiaceho programu
(pozri Údržba).
●
Je to normálne: KONIEC PROGRAMU, VYČISTIŤ FILTER A VYPRÁZDNIŤ
ZÁSOBNÍK NA VODU táto správa sa zobrazí ako upozornenie na
vyprázdnenie nádoby
(pozri Displej a Zapnutie a programy).
! Z bezpečnostných dôvodov je maximálna dĺžka programu sušičky 5 hodiny.
Ak ani po tomto čase automatický program nevyhodnotil požadovanú
konečnú vlhkosť, program sa dokončí a zastaví. Skontrolujte vyššie uvedené
body a znova spustite program. Ak sú kusy stále vlhké, obráťte sa na
servisné stredisko
(pozri Servis).
●
Ak sa na displeji zobrazí porucha:
- Vypnite sušičku a vytiahnite vidlicu zo zásuvky. Vyčistite filter a jednotku
filtra tepelného čerpadla
(pozri Údržba). Potom znova zasuňte vidlicu do
zásuvky, zapnite sušičku a spustite iný program. Ak sa potom zobrazí
porucha, poznamenajte si kód a obráťte sa na servisné stredisko
(pozri Servis).
●
Sušička je v „predvádzacom“ režime. Stlačte a podržte tlačidlá
Zap/Vyp a Štart/Pauza na 3 sekundy. Na displeji sa na 3 sekundy zobrazí
DEMO VYPNUTÉ a sušička pokračuje v normálnej prevádzke.
●
Sušička prešla do pohotovostného režimu úspory energie. Dochádza k tomu
po výpadku sieťového napätia alebo ak sušičku necháte bez spustenia
programu alebo po skončení sušiaceho programu.
- Stlačte a podržte tlačidlo ZAP/VYP a kontrolky sa rozsvietia.
Problém:
Sušička sa neuvádza do
činnosti.
Sušiace cyklus sa nespustí.
Sušenie trvá dlhý čas.
Zobrazuje sa správa
Vyprázdniť vodu, ale sušička
bežala len krátky čas.
Zobrazuje sa pokyn na
vyprázdnenie nádoby na vodu
a nádoba na vodu nie je plná.
Program sa skončil a odevy
sú vlhkejšie, než sa
očakávalo.
Na displeji sa zobrazí chybový
kód F nasledovaný jedným
alebo dvoma číslami.
Na displeji sa každých
6 sekúnd nakrátko zobrazuje
DEMO AKTIVOVANÉ .
Kontrolky na ovládacom
paneli sušičky sú vypnuté,
hoci sušička je zapnutá.
Page 94

94
SK
Servis
Náhradné diely
T
áto sušička je zložité zariadenie. Svojpomocná oprava
alebo pokus o opravu neautorizovanou osobou môže
spôsobiť ujmu jednej alebo viacerým osobám, môže dôjsť k
poškodeniu sušičky a stratu záruky na náhradné diely.
Ak máte problémy pri používaní spotrebiča, zavolajte
autorizovaného technika.
• Pripomíname, že nekvalifikovaná osoba, ktorá sa
podujme na servis alebo opravuzahŕňajúcu zásah do
hermeticky uzavretej jednotky tepelného čerpadla, sa
dopúšťa priestupku.
Systém tepelného čerpadla
S
ušička je vybavená hermeticky uzavretým systémom
tepelného čerpadla na sušenie oblečenia. Pri prevádzke
tepelného čerpadla sa využívajú fluórované skleníkové plyny
(F-plyny), na ktoré sa vzťahuje Kjótsky protokol. Tieto Fplyny sa nachádzajú v hermeticky uzavretej jednotke. Táto
uzavretá jednotka obsahuje 0,29 kg F-plynu R134a,
slúžiaceho ako chladivo.
Pri poruche sa hermeticky uzavretá jednotka musí vymeniť
za novú hermeticky uzavretú jednotku. So žiadosťou o radu
s
a obráťte na najbližšie servisné stredisko.
• Poznámka: Plyny v hermeticky uzavretom systéme nie
sú zdraviu škodlivé. V prípade úniku však majú vplyv na
globálne otepľovanie.
Skôr ako zavoláte do servisného strediska:
• Podľa príručky na riešenie problémov skúste vyriešiť
problém vlastnými silami (pozri Riešenie problémov).
• Ak sa vám to nepodarí, vypnite sušičku a zavolajte
najbližšie servisné stredisko.
Čo povedať servisnému stredisku:
• meno a priezvisko, adresa a PSČ.
• telefónne číslo.
• typ problému.
• dátum zakúpenia.
• model spotrebiča (Mod.).
• výrobné číslo (S/N).
Tieto informácie nájdete na štítku s údajmi vnútri dvierka
sušičky.
Úspora energie a ochrana životného prostredia
• Kusy bielizne pred sušením vyžmýkajte, aby sa odstránila prebytočná voda (ak predtým použijete práčku, zvoľte
odstreďovanie s vysokými otáčkami). Pri sušení tak ušetríte čas a energiu.
• Vždy sušte úplnú náplň – ušetríte energiu: sušenie jednotlivých kusov alebo malej náplne trvá dlhšie.
• Po každom použití vyčistite filter, aby ste obmedzili spotrebu energie (pozri Údržba).
Page 95

95
SK
Údaje výrobku... (
Nariadenie EÚ 392/2012)
Značka Hotpoint Ariston Modely TCD872
FTCD872
Menovitý výkon pri bavlnenej bielizni so štandardným programom pri plnom zaťažení 8 kg Trieda energetickej účinnosti A++
Vážená ročná spotreba energie (AEc) 235,3 kWh
Ročná spotreba, na základe 160 sušiacich cykloch štandardného programu pre bavlnu, s plnou a čiastočnou náplňou, a spotreba
režimov nízkej spotreby. Skutočná spotreba energie na jeden cyklus závisí od toho, ako sa spotrebič používa.
T
áto domáca sušička je automatická kondenzátorová sušička
Spotreba energie: plná náplň E
dry
1,96 kWh, čiastočná náplň E
dry1/2
1,09 kWh
Spotreba energie: režim vypnuté (P
o
) 0,17 W, pohotovostný režim (Pl) 3,27 W
Doba trvania „pohotovostného režimu“ pre systémy riadenia spotreby 30 minút
„Štandardný program na bavlnu“ vhodný na sušenie normálne vlhkej bavlnenej bielizne, ktorý je najúčinnejším programom z
hľadiska spotreby energie pre bavlnu používaným pri plnej a čiastočnej náplni, je Bavlna Standard, Vysoký ohrev, Do skrine.
Dĺžka programu (minút): vážená (T
t
) plná a čiastočný náplň 163, plná náplň (T
d
ry
) 213, čiastočná náplň (T
d
ry1/2
) 126
Trieda účinnosti kondenzácie B
Priemerná účinnosť kondenzácie (%): plná náplň (C
d
ry
) 81, čiastočná náplň (C
d
ry1/2
) 81, vážená (Ct) plná a čiastočná náplň 81
Vzduchom šírené hlukové emisií 70 dB(A) resp. 1 pW
* „Informácie pre spotrebiteľov v súlade s nariadením EÚ 932/2012.“
Typická spotreba energie – Syntetika plná náplň 0,68 kWh, čiastočná náplň neplatí
Typicky čas sušenia energie – Syntetika plná náplň 85 minút, čiastočná náplň neplatí
Tento spotrebič vyhovuje nasledujúcim smerniciam ES:
− 2006/95/ES (nízkonapäťové zariadenia)
− 2004/108/EC (Elektromagnetická kompatibilita)
Likvidácia starých elektrospotrebičov
Európska smernica 2012/19/EC o odpade z elektrických a
elektronických zariadení (WEEE) vyžaduje, že použité
domáce elektrické spotrebiče nesmú byť likvidovaný ako
bežný netriedený komunálny odpad. Použité spotrebiče sa
musia zbierať oddelene, aby sa optimalizovalo využitie a
recyklácia materiálov, ktoré obsahujú, a aby sa znížili
dopady na ľudské zdravie a životné prostredie.
Táto sušička má hermeticky uzavreté tepelné čerpadlo
obsahujúce fluorované skleníkové plyny, ktoré musia byť
spracované a zlikvidované.
Preškrtnutý symbol „kontajner na kolieskach“ na
výrobku vám pripomína váš záväzok odovzdať
spotrebič pri likvidácii do oddelenej zberne.
Spotrebitelia by sa mali obrátiť na miestny úrad
alebo na predajcu so žiadosťou o informácie o správnej
likvidácii ich starého spotrebiča.
V rámci našej trvalej snahy o ochranu životného
prostredia, si vyhradzujeme právo na používanie
kvalitných recyklovaných dielov, aby sme znížili
náklady pre zákazníkov a minimalizovali plytvanie
materiálom.
• Likvidácia obalového materiálu: dodržujte platné predpisy,
pretože obal je možné recyklovať.
• Aby sa minimalizovalo riziko poranenia detí, demontujte
dvierka a vidlicu – potom odrežte sieťový kábel hneď pri
spotrebiči. Tieto diely likvidujte oddelene, aby sa spotrebič
už nedal pripojiť do sieťovej zásuvky.
Informácie o recyklácii a likvidácii
Indesit Company, Viale Aristide Merloni 47, 60044 Fabriano (AN), Italy
Page 96

1
9 5 12 9 65 0 . 0 0 N
01/2015 - LION fpg . Four Ashes, Wolverhampton
96
 Loading...