

Page 1
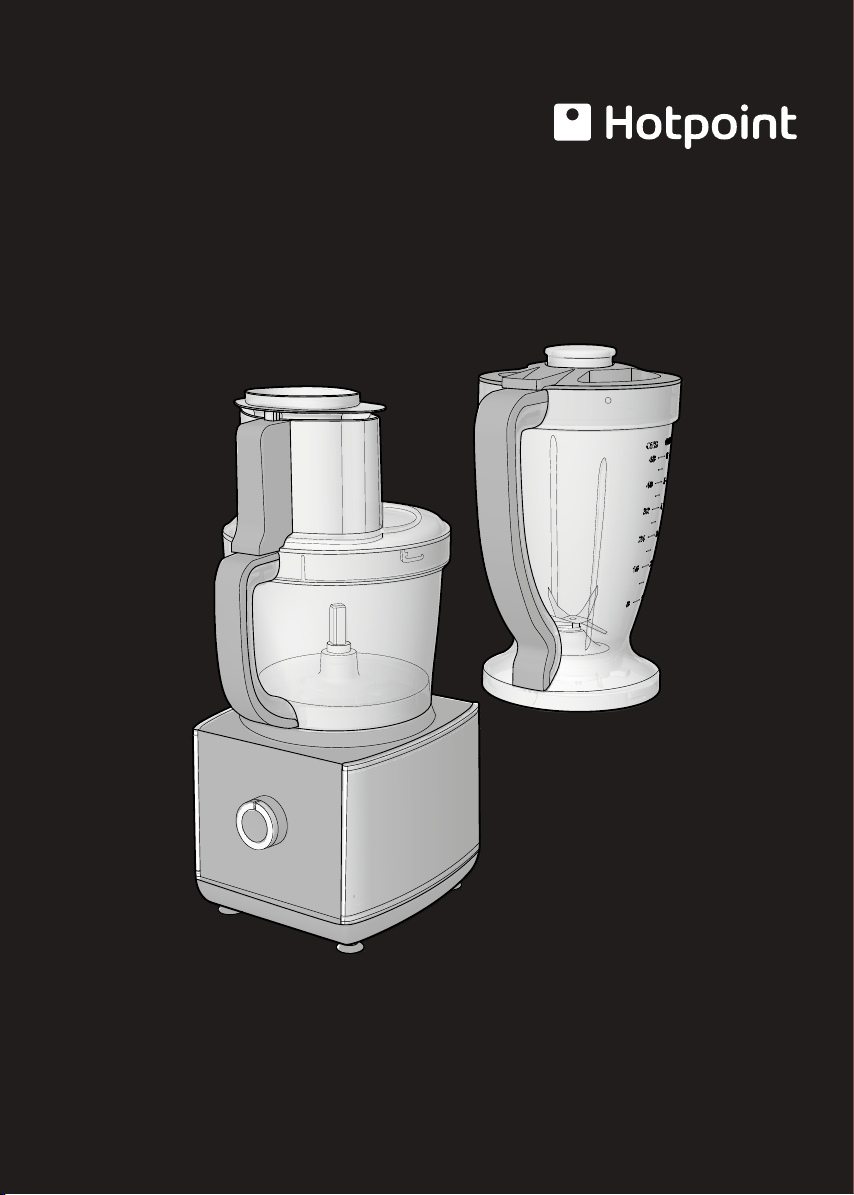
EN Operating Instructions
Page 2

11B
9B
11A
9A
12B
10
11
9
12A
4
12
15
6
7
8
3
16
5
5A5E5B 5C 5D
Off
2
Pulse
Min
Mid
Max
FP 100 UK
14
13
1
220-240V
1000W
Page 3
A C EB D F G
Page 4
Page 5
Page 6
3
12
16
6
FP 1005 AX0 UK FP 1009 AX0 UK
7
8
5A
5B
5C
5D
5E
9
10
Page 7

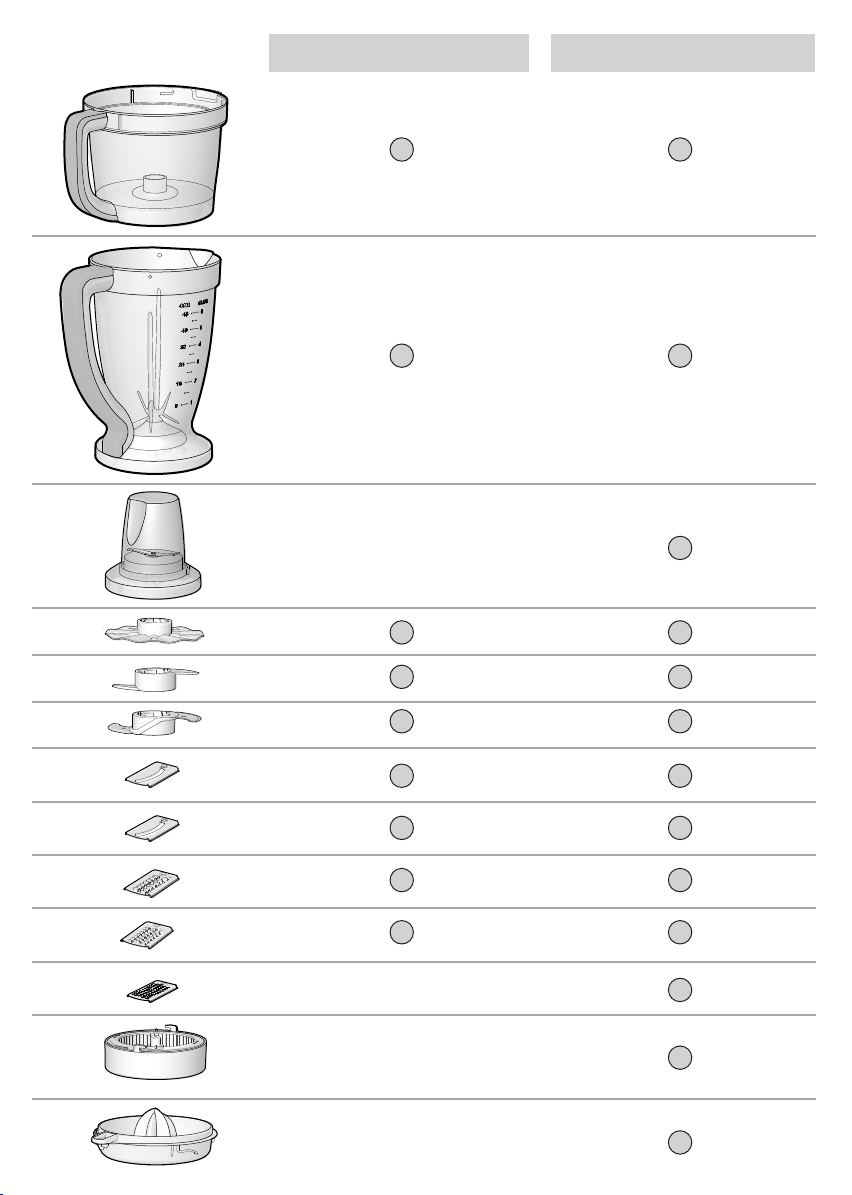
PARTS AND FEATURES
en
1. Base
2. Control knob
3. Bowl
4. Drive shaft
5. Insert carrier disc
5A. Fine slice insert
5B. Coarse slice insert
5C. Fine shredding insert
5D. Coarse shredding insert
5E. Grating blade
6. Beating disc
7. Kneading hook
8. Chopping Blade
9. Juice extractor
9A. Lid
9B. Pusher
10. Citrus Press
11. Bowl Lid
11A. Big Food Pusher
11B. Small Food Pusher
12. Jug Assembly
12A. Jug lid
12B. Measuring cup
13. Spatula
14. Accessories storage compartment
15. Milling cup jug
16. Blade unit
Knob
OFF — Processor should always be left in OFF position when unit is not in use.
FROM OFF TO HIGH — Operating speed, adjustable from minimum to maximum speed
PULSE — Turn the knob anticlockwise to “PULSE” and hold for unit to operate. When released, unit will
stop. Use PULSE for short
processing tasks, such as chopping nuts, raw meats, or vegetables.
The Pulse function allows you to check processed results and control the tininess continuously until the
knob turns to “OFF”.
INTRODUCTION
Thank you for purchasing our product.
In doing so, you have opted for an effective, high
performing appliance.
If the instructions for correct use of this appliance
are not observed, the manufacturer’s liability for
any resulting damage will be excluded.
Operating instructions may describe different mod-
els. Any difference is clearly identied.
IMPORTANT INFORMATION
FOR YOUR SAFETY
When using electrical appliances, basic safety precautions should always be followed, including the
following.
• Connect and operate the appliance only in
accordance with the specications on the rat-
ing plate.
• Read all instructions. Keep these instructions
for future use.
• To protect against risk of electrical shock, do
not immerse base, cord, or plug in water or
other liquid.
• Do not leave appliance unattended if in the
‘On’ or ‘Pulse’ positions.
• Keep children away from appliance.
• Supervise children to prevent them from play-
ing with the appliance.
• Do not allow persons with restricted physical,
sensory, perceptive or mental abilities, or with
lack of experience and knowledge to operate
the appliance unless they are supervised or
have been instructed in the use of the appliance by somebody who is responsible for
their safety.
• If the power is interrupted, the appliance
hotpoint.co.uk
55
Page 8

en
remains switched on and restarts when the
power is restored.
• Turn unit off and unplug from outlet when not
in use, before putting on or taking off parts,
and before cleaning. To disconnect, turn unit
off, grasp plug, and pull out from wall outlet.
Never yank on cord.
• Avoid contacting moving parts and keep ngers out of discharge opening.
• Do not operate any appliance with a damaged
cord or plug or after the appliance malfunctions or has been damaged in any manner.
Return the appliance to an authorized service
facility for examination, repair, or electrical or
mechanical adjustment.
• To prevent injury, repairs such as replacing a
damaged cord should only be carried out by
our customer service.
• The use of attachments not recommended
or sold by the appliance manufacturer may
cause re, electric shock, or injury.
• Do not use outdoors.
• Do not let cord hang over edge of table or
counter or touch hot surfaces.
• Keep hands and utensils away from moving
blades or Discs while processing food to prevent the possibility of severe personal injury
or damage to the food processor. A scraper
may be used but must be used only when the
food processor is not running.
• Blades are sharp. Handle carefully. Be sure to
insert or remove Chopping Blade and Slice/
Shred Disc by touching non-cutting edges to
avoid injuries.
• To avoid injury, never place Chopping Blade
or Slice/Shred Disc on Base without rst put-
ting Bowl properly in place. Make sure motor,
Disc, and/or Chopping Blade have stopped
completely before removing cover.
• Be certain cover is securely locked in place
before operating appliance.
• Never feed food into chute by hand. Always
use Food Pusher.
• Do not operate this appliance in the presence
of explosive and/or ammable fumes.
• This appliance is intended for household use
only, not for commercial or industrial use. Use
for anything other than intended will void the
warranty.
• Do not attempt to override the cover interlock
mechanism.
• Do not leave the appliance unattended while
it is running.
• To reduce the risk of electric shock, do not
attempt to remove the bottom cover. There
are no user serviceable parts inside. Repair
should be done only by authorized personnel.
• For your protection, this unit has an interlock
system so the processor won’t operate unless
the Bowl is locked onto the Base and the Cover is correctly locked onto the bowl. Be sure
the Big Food Pusher on the Bowl Lid is also
in the lock position. Do not attempt to operate the unit without the Bowl lid, Bowl and Big
Food Pusher being correctly in place. Be sure
the Base is on a at, dry and clean surface
before you begin processing.
BEFORE FIRST USE
• When unpacking the product and removing
packing material, handle the Chopping Blade,
and Slice/Shred Disc carefully; they are very
sharp.
• Wash all parts except the Base in hot, soapy
water. Rinse them dry. These parts can also
be placed in the dishwasher. Be sure to read
this Use & Care Book, paying special attention to the sections on “How to Use” and “Care
and Cleaning” to learn the correct methods
for taking the unit apart and cleaning.
USE YOUR FOOD
PROCESSOR
Please read “Important information and
safeguards” paragraph before using.
Tips and operating techniques
Be sure to process small amounts of liquids (about
2 cups or less) at a time. Larger amounts may leak
from the bowl.
CHOPPING BLADE/BEATING
DISC/KNEADING HOOK (A)
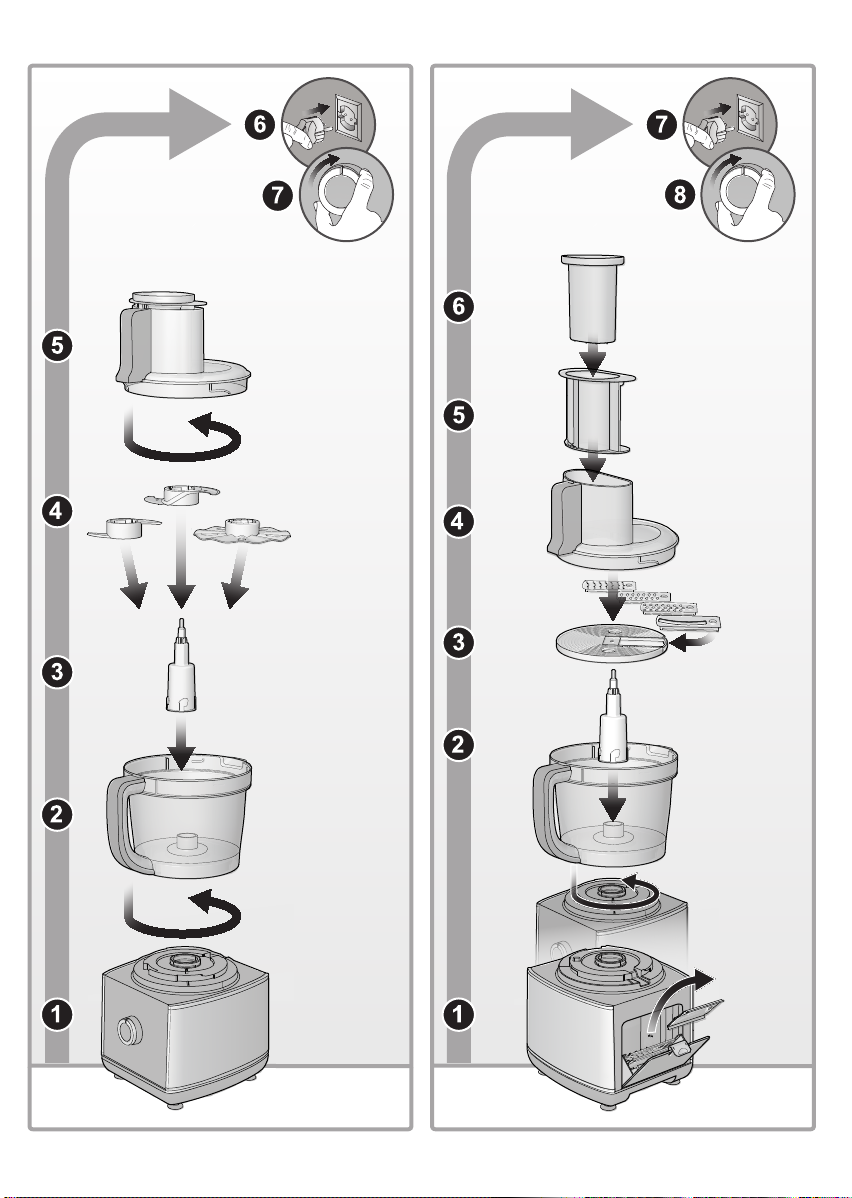
1. Place the unit base on a dry level surface.
2. Attach the bowl and snap the Bowl handle and rotate it anticlockwise until it is fully
locked on the Base.
3. Put down the Drive Shaft until it is correctly
66
Page 9

en
placed on the bowl.
4. Insert Chopping Blade / Beating disc/ Kneading hook into the drive shaft and release.
5. Add ingredients.
6. Attach lid with pusher and rotate it anticlockwise until it is fully locked into the bowl.
SLICING, SHREDDING AND
GRATING INSERTS
Be sure the unit is OFF and the cord is
unplugged before use.
Use Food Pusher when processing food - never
use hand to push food directly.
Let unit do the work, heavy pressure will not speed
operation. Do not use the processor continuously
for more than 3 minutes at a time, allow a rest period of 5 minutes between working cycles (when
mixing, the cycles can be longer, e.g. 5 minutes
on end).
The blade and grater attachments are not suitable for processing walnuts, nuts, horseradish and
similar foods. Use the grater attachment to process
hard cheeses.
How to process small or long pieces
of food (B)
1. Place the Bowl onto the Base.
2. Ensure the Drive shaft is placed in position.
3. Extract the required insert from the drawer.
4. Insert the required insert into the carrier disc.
5. Attach the carrier disc to the drive shaft.
6. Lock the cover with the big food pusher.
7. Put small, long food with the small food pusher. Use the Food Guide to help you prepare
food for slice/shred processing.
8. Rotate the knob clockwise until it is on
“LOW”/“HIGH” for continuous processing.
Put down the big food pusher with about 400500g force.
9. After processing food, rotate the knob anticlockwise until it is on “OFF ”, allow the disc to
stop rotating, twist the Cover towards unlock
to remove the cover.
How to process large pieces of
food (C)
2. Ensure the Drive shaft is placed in position.
3. Insert the required insert into the carrier disc.
4. Attach the carrier disc to the drive shaft.
5. Lock the cover with the big food pusher.
6. Put the large food into the big food chute on
the cover, then push the big and small food
pusher together. Use the Food Guide to help
you prepare food for slice/shred processing.
7. Rotate the knob clockwise until it is on
“MIN”/”MAX” for continuous processing, put
down the big food pusher with about 400500g force.
8. After processing food, rotate the knob anticlockwise until it is on “OFF ”, allow the disc to
stop rotating, twist the Cover towards unlock
to remove the cover.
Removing big food pusher will stop the
motor.
USE THE JUICE EXTRACTOR
ATTACHMENT (D)
Please read “Important information and
safeguards” paragraph before using.
Use this function to squeeze the juice out of pip
fruits (e.g. apples, pears), berries, pitted stone
fruits, vegetables (e.g. carrots, tomatoes).
1. Place the Bowl onto the Base.
2. Ensure the Drive shaft is placed in position.
3. To assemble the juice extractor attachment,
screw the grater with the lter basket in the
lock position in an anticlockwise direction.
4. Attach cover for juice centrifuge an rotate in
an anticlockwise direction.
5. Turn the rotary switch to a low speed setting.
6. Add fruit or vegetables through the feeding
tube and only gently push forward with the
pusher. Cut beforehand if necessary.
7. After processing, set the rotary switch briey
to high speed and leave the appliance running until all the fruit pulp has been squeezed
out.
Maximum processing quantity: 250g
fruit or vegetables.
1. Place the Bowl onto the Base.
hotpoint.co.uk
77
Page 10

en
USE THE CITRUS PRESS
ATTACHMENT (E)
Please read “Important information and
safeguards” paragraph before using.
Be sure the unit is OFF and the cord is
unplugged before use.
The pressure cone can not be removed from
the juice.
Halve the food/fruit in advance.
Let unit do the work, heavy pressure will not
speed operation. Do not use the processor
continuously for more than 30 minutes at a
time, allow a rest period of 1 minute between
working cycles.
1. Place the Bowl onto the Base.
2. Ensure the Drive shaft is placed in position.
3. Screw on the Citrus Press as far as possible
in an anticlockwise direction.
4. To extract juice from the fruit, set the rotary
switch to low speed and press the fruit onto
the pressing zone.
Do not exceed the max liquid level in
the bowl. Empty the bowl soon.
USE THE BLENDER
ATTACHMENT (F)
Please read “Important information and
safeguards” paragraph before using.
Before rst use, wash all parts except
the unit base: the Measuring cup, lid,
jug assembly (the jug assembly includes jug,
blade assembly, gasket and jug base). The
jug assembly is non- decomposable.
Blades are sharp. Handle carefully. Never
place blender motor base in water or other
liquids.
1. Place the jug assembly onto the Base. Put
down the jug assembly until it is correctly
placed on the Base, snap the jug assembly
handle and rotate it anticlockwise until it is
fully locked on the Base.
2. Place the food to be blended into the jug.
3. Put the lid on the jug and rotate it anticlock-
wise till lock position. Be sure the measuring
cup is in place.
4. Ensure the knob is on “OFF”. Plug the cord
into a standard electrical outlet.
5. For best results when crushing ice, use
“PULSE”. To activate it, rotate it anticlockwise
until it is on “PULSE”; to stop crushing, release the knob.
6. If you want to add ingredients while the blender is on, remove the measuring cup and feed
through the lid opening.
7. When nished blending, rotate the knob until
it is on the “OFF” position.
There is only one position for the jug
assembly to be locked onto the Base.
The unit won’t operate if the jug assembly is
not correctly placed onto the Base.
Tips and Techniques
• To avoid damage, do not process deep-fro-
zen ingredients (except ice cubes). Do not
operate when empty.
• Cut food into small pieces, about 2 in. (5 cm)
before adding to the blender. To chop, grate
or prepare fruit smoothies using fresh or frozen fruit, cut foods into 3/4 in. (2 cm.) pieces.
• For best circulation of foods that are to be
blended with some liquid, pour the liquid into
the jug rst, then add solids.
• Following items should never be placed in the
unit as they may cause damage: bones, large
pieces of solid frozen foods, or tough foods
such as turnips.
• To crush ice, ll blender jug half-full with cold
water. Add about 2 cups of ice cubes. Hold
one hand rmly on the lid and rotate the knob
on pulse position. If more ice is needed, remove the cap and add cubes one by one
through the hole in the lid. DO NOT CRUSH
ICE WITHOUT LIQUID. Failure to follow
these directions can result in damage to the
blades, jug, blender, and possibly result in
personal injury.
USE THE MILLING CUP
ATTACHMENT (G)
Use the milling cup for herbs, nuts and coffee
beans.
1. To open the cup, screw counter-clockwise the
blade unit (yy).
88
Page 11

en
2. Put your ingredients into the jug (xx). Fill it no
more than half full.
3. Screw the blade unit onto the jug clockwise,
until it is nger tight.
4. Place the milling cup onto the power unit and
turn to lock.
5. Switch on to maximum speed or use the
pulse control.
Safety
• Never t the blade unit to your machine without the jug tted.
• Never unscrew the jug while the mini chop-
per/mill is tted to your
• machine.
• Don’t touch the sharp blades. Keep the blade
unit away from
• children.
• Never remove the mini chopper/mill until the
blades have
• completely stopped.
Important
• To ensure long life of your mini chopper/mill,
never run for longer than 30 seconds.
• Switch off as soon as you’ve got the right
• consistency.
• Use for dry ingredients only.
Tips and Techniques
• Herbs are best milled when clean and dry.
CARE AND CLEANING
Please read “Important information and
safeguards” paragraph before using.
1. Before cleaning, be sure the unit is switched
off and the cord is unplugged.
2. Whenever possible, rinse parts immediately
after processing for easy cleanup.
3. Wipe the Base, Control knob, and feet with
a damp cloth and dry immediately and thoroughly. Stubborn spots can be removed by
rubbing with a damp cloth and a mild, nonabrasive cleaner. Do not immerse the Base
in liquid.
4. All removable parts can be washed in hot,
sudsy water; after washing rinse, and dry
thoroughly. If necessary, use a small nylon
bristle brush to thoroughly clean the Bowl and
Food Chute/Cover, this type of brush will also
help prevent cutting yourself on the Chopping
Blade , Slice/Shred Disc and blender Blade.
5. Do not use abrasive pads or cleansers on any
plastic or metal parts.
6. Do not ll the Bowl with boiling water or place
any of the parts in boiling water.
Tips and Techniques
Some foods, such as carrots, may temporarily
stain the Bowl. To remove stains, make a paste of
1 tablespoon of baking soda and two tablespoons
of warm water. Apply the paste to the stains and
rub with a cloth. Rinse in sudsy water and dry.
To clean bowls, ll the dirty bowl halfway with hot
water ad add a couple of drops of liquid dish soap.
With the top rmly in place, turn the knob to high
speed for about 30 seconds. Most of the debris
pour right out with the soapy water, and the bowl
need only to be rinsed or washed lightly by hand.
hotpoint.co.uk
99
Page 12

en
FOOD PREPARATION GUIDE
Chopping blade
FOOD AMOUNT DIRECTIONS SPEED
BABY FOOD
BREAD CRUMBS
COOKIE/
CRACKER
CRUMBS
CRANBERRIES,
MINCED
EGGS, CHOPPED
GARLIC, MINCED
MEAT,CHOPPED
(RAW OR
COOKED)
MUSHROOMS,
CHOPPED
NUTS, CHOPPED
ONIONS,
CHOPPED
PARMESAN
OR ROMANO
CHEESE,
GRATED
Up to 4 cups
(1000ml)
Up to 10 slices
Up to 5 cups
(1,250ml)
3 cups (750ml)
Up to 12
Up to 12
Up to 2.5 cups
(600ml)
Up to 12
2 cups
Up to 2 large
Up to 1-1/2
cups(375ml)
Add up to 4 cups(1000ml) cooked
vegetables and/or meat to Bowl,
along with 1/4 cup(60ml) liquid per
cup of solid food. Process continu-
ously to desired neness.
Cut either fresh or dry bread slices
into1 1/2-2 inch (3.5 and 5cm) piec-
es. Add to Bowl and process to ne
crumbs.
Use for crumbing crackers, chocolate or vanilla wafers. Break larger
crackers into 1 1/2-2 inch(3.5 and
5cm) pieces. Add to Bowl and pro-
cess to ne crumbs.
Pulse to chop to desired neness.
Can also add sugar to make cranberry relish.
Peel, dry and halve hard boiled
eggs. Add to Bowl. Pulse to chop,
checking neness after 4-5 pulses.
Be sure bowl is dry. Drop clove(s)
down food chute while unit is running.
Cut the meat into 1”(2.5 cm) cubes.
Add to bowl and pulse to chop.
Halve large ones and add to Bowl.
Pulse to desired neness.
Add to bowl and pulse to chop.
Quarter, and add to bowl. Pulse 1 or
2 times to coarsely chop. For green
onions, up to 2 cups (500ml) cut
into 1” (2.5 cm) pieces.
Allow cheese to reach room temperature. Cut the cheese into 1”(2.5
cm) cubes. Add to bowl and pulse
to coarse chop; process continu-
ously to nely grate.
mid/max
mid/max
mid/max
pulse
pulse
max
max
pulse
pulse
pulse
max
1010
Page 13

en
PARSLEY,
CHOPPED
PEPPER, GREEN,
RED, YELLOW
CHOPPED
SOUPS, PUREED
OR CREAMED
SQUASH
(BUTTERNUT),
PUMPKIN
OR SWEET
POTATOES
PUREED
STRAWBERRIES,
PUREED
TOMATOES,
CHOPPED
Shredding blades
Add to Bowl and Pulse to chop to
Up to 2 large
Up to 1 pepper
2 cups (500ml)
Up to 5 large
(1250ml),
1”(2.54cm) cubes
2 cups (500ml)
4 medium Quarter tomatoes. Add up to 4 and
desired neness, about 10-15 seconds. Process other herbs in same
manner (basil, coriander, mint).
Cut the meat into 1”(2 cm) cubes.
Add to bowl and pulse to chop.
Add up to 2 cups of hot (less than
80°C) vegetable soup for pureeing
and creaming. Process to desired
smoothness.
Add 1/4 cup(60ml) of cooking liquid
per cup of food. Pulse to nely chop
then process continuously to puree.
Halve large berries. Add to bowl
and pulse to chop. Process continuously to puree.
pulse to desired size.
pulse
pulse
mid/max
pulse/max
pulse/max
pulse
FOOD DIRECTIONS SPEED
Use shredding disc for very ne cabbage or coleslaw. Cut
CABBAGE
CARROTS
CHEESE,
CHEDDAR
CHEESE,
MOZZARELLA
POTATOES
COURGETTE
into pieces to t chute. Shred using light pressure. Empty
Bowl as cabbage reaches disc.
Position in chute and shred.
Cheese must be well chilled. Cut to t chute. mid
Cut to t chute. Cheese must be chilled in freezer for 30
minutes prior to shredding. Use light pressure.
Cut to t chute.
Cut to t chute, either lengthwise or horizontally.
hotpoint.co.uk
mid
mid
mid
mid
mid
1111
Page 14

en
Slicing blades
FOOD DIRECTIONS SPEED
APPLE
CABBAGE
LETTUCE
CARROTS
CELERY
CUCUMBER
MUSHROOMS
ONIONS
PEACHES PEARS
PEPPER, GREEN,
RED, YELLOW
CHOPPED
PEPPERONI
POTATOES
STRAWBERRIES
TOMATOES
TURNIPS
COURGETTE
Halve and stack horizontally in chute. Use light pressure.
Cut to t chute. mid/max
Cut to t chute. mid/max
Remove string. Pack chute for best results.
Cut to t chute.
Stack chute with mushrooms on their sides for lengthwise
slices.
Halve and ll chute, positioning onions upright for coarsely
chopped results.
Halve and core. Position upright in chute and slice using
light pressure.
Halve and core. Fit pepper up bottom of chute, squeezing
slightly to t if necessary. Cut large ones into quarters or
strips, depending on desired results. Slice using moderate
pressure.
Cut into 3”(8cm) lengths. Remove inedible casing.
Peel if desired. Position in chute, cutting large potatoes
in halves.
Hull. Arrange berries on their sides for lengthwise slices.
Use small tomatoes for whole slices, halve if necessary.
Use gentle, but rm pressure.
Peel. Cut to t chute.
Slice off ends. Use small squash for whole slices; halve
larger ones to t chute.
mid/max
mid/max
mid/max
mid/max
mid/max
mid/max
mid/max
mid/max
mid/max
mid/max
mid/max
mid/max
mid/max
Juice extractor attachment
FOOD DIRECTIONS
APPLE
CARROTS
CELERY
Cut to t chute. Use light pressure.
Cut to t chute.
Remove string. Pack chute for best results.
Citrus Press
FOOD DIRECTIONS
ORANGE
LEMONS
1212
Halve the fruit. Use rm pressure.
Halve the fruit. Use rm pressure.
Page 15

Beating disc
FOOD DIRECTIONS SPEED
EGG WHITES
WHIP CREAM
Blender
FOOD AMOUNT DIRECTIONS SPEED
CARROTS
STRAWBERRY
BANANA
SMOOTHIE
4 - 6 Egg Whites work 2 minute max
max
Cut the carrot into 0.6”(1.5cm)
Up to 5 cups
(1,250ml)
1/2 cup (120 ml)
orange juice 1 cup
(about 5 oz./140 g)
fresh strawberries,
washed and hulled
1 medium banana,
cut into 3 pieces
1 container
(8 oz./240 ml) vanilla
low-fat yogurt
1 Tbsp. honey
(15ml)
3 ice cubes
cubes. Add up to 5 cups(1250ml)
to jug, along with 1.5 cup(360ml)
liquid per cup of solid food, blending continuously to desired neness.
In blender jug add rst 5 ingredients in order. Cover and mix on
“Blend” (5) for 10 seconds. While
blender is running, remove the
cap. Add ice cubes and continue
to blend until mixture is thick,
smooth and creamy. pulse/mid/max
pulse/mid/max
en
Kneading hook
FOOD AMOUNT DIRECTIONS SPEED
LEAVENED
CAKES
SHORT PASTRY
Max 500 g our
Max 500 g our
Add the ingredients one at a
time until the mixture is wellblended.
Add the ingredients one at a
time until the mixture is thick
and well-blended.
hotpoint.co.uk
mid
mid/max
1313
Page 16

en
Grinding
FOOD AMOUNT DIRECTIONS SPEED
COFFEE BEANS
Half full
Grind using PULSE for no more
than 15 sec at a time until you
get the desired consistency.
pulse
NUTS/
ALMONDS
Half full
Grind using PULSE for no more
than 15 sec at a time until you
get the desired consistency.
pulse
1414
Page 17

en
RECIPE BOOK
FP 1005 AX0 UK
RUSSIAN SALAD
Ingredients for 4 servings: 250 g of tuna in oil, 8 anchovies in oil, 2 potatoes, 2 carrots, 300 g of peas,
2 eggs, mustard, 1 lemon, peanut oil, salt.
Install beater disc and place in the food processor bowl 2 eggs, a bit of mustard and 1 pinch of salt.
Beat while adding, little by little, approx. 2 dl of oil. When the mixture is light and smooth, add 4 table-
spoons of ltered lemon juice. Drain the tuna and chop it. Do the same with 8 anchovy llets. Peel the
potatoes, chop them coarsely using the chopper blade and immediately place them in water and lemon
juice to stop them from darkening. Wash the 2 carrots and slice them using the slicer blade. Bring to
the boil a pot full of water and blanch the potatoes for 5 minutes. Drain and soak them in icy water,
then nally drain them after 5 minutes. Do the same with the carrots, blanching them for 3 minutes. Do
the same with the peas, blanching them for 1 minute. Place in a bowl the potatoes, carrots, peas, tuna
and anchovies, add the mayonnaise and mix thoroughly, add salt to taste and some oil. Leave in the
fridge to stand for 2 hours.
TUNA TERRINE
Ingredients for 4 people: 800 g white potatoes, 300 g tuna in oil, anchovies in oil, pickled gherkins, pickled capers, 1 clove of garlic, 1 lemon, mayonnaise (see recipe waldorf salad), butter, salt and pepper.
Juice the lemon . Peel the potatoes and then boil for 40 minutes, mash and allow to cool. Mount the
chopper blade and whisk the drained tuna with 3 anchovy llets, 4 gherkins, 2 tablespoons of drained
capers, a clove of garlic, 20 g of butter and 8 tablespoons of mayonnaise. Replace the chopping blade
with the kneading blade and mix the mashed potatoes with the tuna and anchovy mixture. Season with
salt and pepper and avor with a teaspoon of grated lemon zest and a tablespoon of lemon juice. Pour
the mixture into a lightly greased mould with butter and press it well. Cover with foil, let it stand in the
refrigerator for about 3 hours then turn it out on a plate decorated with gherkins and capers. Serve with
plenty of mayonnaise.
HOMEMADE TAGLIATELLE WITH RAGÙ
Ingredients for 4 people. For the tagliatelle: 400 g of type 00 our, 4 eggs, extra virgin olive oil, salt. For
the sauce: 200 g of lean beef, 100 g of lean pork, 100 g bacon, garlic, 1 carrot, 1 onion, 1 stalk celery,
1 bunch of parsley, tomato puree, vegetable broth, dry white wine, extra virgin olive oil, salt and pepper.
For the sauce. Peel and wash the vegetables. Peel and wash the parsley, separate the stalks from
the leaves and tie the leaves with a twine. Attach the chopping blade in the processor robot and chop
2 cloves of garlic, the carrot, celery and onion. Wash the bowl , and chop the parsley. Remove the
parsley and keep aside in the refrigerator until ready to use. Wash the bowl again, insert the chopping
blade and chop the meat, one type at a time. Transfer the minced meat in a pan with 1 tablespoon of
oil and brown for 2 minutes. Add the chopped vegetables and cook for 5 minutes, then pour 1 glass of
wine. Add a generous tip of tomato puree (previously dissolved in a little water), the stalks of parsley,
a ladle of broth and cook gently for 2 hours, adding a little broth if necessary. When cooked, remove
the parsley stems and nally dress with salt, pepper and parsley.
For tagliatelle. Attach the kneading blade. Pour the our in the basket of the processor bowl. Break in
hotpoint.co.uk
1515
Page 18

en
the eggs, add a tablespoon of olive oil and a pinch of salt and start kneading. As soon as the dough is
smooth, supple yet rm, with a few bubbles on the surface, remove it from the basket, form a ball, cover
with plastic wrap and let it rest in a cool place for 30 minutes. Divide the dough into 8 pieces and stretch
them with a rolling pin. Roll each dough and cut into strips less than 1 cm with a sharp knife. Bring a
saucepan of water to a boil, add salt and cook the pasta. Drain “al dente”, and pan-fry with the sauce
over high heat for 1 minute, adding a cup of cooking broth. Pour the pasta into a serving dish, sprinkle
with chopped parsley and serve. If desired, insert the grate into the drum of the robot and grate 50 g
Parmesan cheese and sprinkle over noodles.
ONION SOUP
Ingredients for 4 servings: 1 kg of white onions, 40 g of our, 4 slices of bread, 100 g gruyère cheese,
vegetable stock, dry white wine, butter, salt and pepper.
Finely slice the onions using the slicer blade and sweat them over low heat, with the butter and a ladle
of vegetable stock for 20 minutes. Sprinkle with the sifted our and cook for another 2 minutes. Steam
with 1 glass of white wine and add stock to cover all onions. Bring to the boil and cook over a low heat
for 40 minutes, occasionally stirring and adding some hot stock if the mixture gets too dry. Add salt and
pepper to taste. Grate the cheese using the chopper blade. Serve the soup in 4 bowls, with a slice of
toasted bread cut in 3 parts. Sprinkle with cheese and grill for a few minutes.
HOMEMADE BISCUITS WITH FENNEL SEEDS
Ingredients for 24 biscuits: 600 g of type 00 our (nely ground), 200 g of sugar, 15 g of aniseeds, 1
sachet of baking powder, butter
Install the mixing blade in the food processor and mix the sifted our with sugar, 125 g of softened
butter and 1 pinch of salt. Add the aniseeds and some cold water to obtain a rm, yet soft, mixture.
Mix for 10 minutes, add the baking powder, quickly mix and form a long loaf. Using a bread knife cut
24 discs. Set them onto an oven plate lined with non-stick paper and cook in the oven at 200° C for 20
minutes, then allow to cool. Cut into 1.5 cm thick slices and grill in the oven at 200° C for 5 minutes.
CRÊPES WITH CHERRY SAUCE
Ingredients for 12 crêpes: 125 g our, 3 eggs, 1 lemon, 400 g stoned cherries, brown sugar, milk,
butter, salt.
Sift the our in the bowl of your food processor and install the beater disc. Add 1 pinch of salt, the eggs
and mix until obtaining a batter with no lumps. Then add 2.5 dl of milk little by little, carrying on mixing,
until obtaining a smooth and uid mixture. Add 30 g of melted butter. Cover the bowl and leave to stand
at room temperature for 1 hour. Meanwhile, prepare the jam by coarsely chopping the cherries using
the chopper blade. Weigh the chopped cherries and place them in a saucepan with half of their weight
of sugar and the ltered juice of half a lemon. Cook for 20 minutes. Use a non-stick frying pan with a
diameter of approx. 18 cm to melt a small quantity of butter and pour a ladle of batter. Tilt the pan to
spread the mixture all over and cook the crêpe over medium-high heat. As soon as the bottom side is
solid, use a spatula to detach it from the bottom of the pan and turn it over, then cook for another minute. Once ready, place the crêpes one on top of the other on a dish to keep them soft, and cover them
with a clean cloth. Take the cooked cherries with a strainer and spread them over the crêpes. Fold the
crêpes in four and place them on a large dish. With a ladle, take the cherry sauce left in the saucepan
and spread it onto the crêpes. Serve warm.
1616
Page 19

en
RECIPE BOOK
Blade 1 cuts thick slices; blade 2 cuts thinner slices.
FP 1009 AX0 UK
Hors d’oeuvres
TOMATO AND STRAWBERRY GAZPACHO
Ingredients for 4 servings: 400 g of tomatoes, 400g of strawberries, 1 bunch of basil, extra virgin olive
oil, Szechuan pepper, salt.
Wash the tomatoes, cut them coarsely and put them in the centrifuge. Clean and wash the strawberries and put them in the blender with the water drained from the tomatoes, 4 spoons of oil, a pinch of
pepper and one of salt. Add 4 ice cubes, blend and pour in 4 glasses. Decorate with some basil leaves
and serve.
Entrées
CHEESE GNOCCHI
Ingredients for 4 servings: 1 kg of white-eshed potatoes, 250 g type 00 our (nely ground), 1 egg,
nutmeg, 100 g toma cheese, 100 g fontina cheese, 60 g grana padano cheese, cream, salt and pepper.
Steam-cook the potatoes for 40 minutes, peel them and pass them in the potato masher when still
hot, letting them fall in a bowl. Install the mixing blade. Transfer the potatoes into the bowl of the food
processor, add the egg, a pinch of salt and grind some nutmeg. Start mixing, then add little by little the
sifted our until obtaining a soft and smooth mixture. Set it on a rolling board and form several cylinders
having 2 cm diameter. Using the blade of a knife slightly sprinkled with our, cut 2-3 cm thick smaller
cylinders. Using your oured ngers, roll one piece at a time on the back of a grater, sprinkled with our,
too, and slightly press as you roll them. When ready, set them well spaced on a cloth slightly sprinkled
with our. Install the grater in the processor and grate the grana padano cheese. Insert the chopper
blade and cut the other types of cheese into irregular chunks. Heat 4 dl of cream in a double boiler and
add the cheese chunks. Grind some nutmeg and mix until obtaining a smooth sauce. Cook the gnocchi
in a saucepan full of boiling water with some salt. As soon as they appear on the surface, then take
them out using a strainer. Place the gnocchi in an oven-proof dish and pour the cheese sauce on top.
Sprinkle with grana padano cheese and brown in the oven at 220° C for a few minutes.
Main courses
DUCK À L’ORANGE
Ingredients for 4 servings: 1 boned duck of 1.5 kg ready for cooking, 5 oranges, our, brown sugar,
apple vinegar, Grand Marnier, butter, salt and pepper.
Cut the duck into pieces and sprinkle it with salt and pepper. Heat up 50 g of butter in a large oval
pan, add the duck pieces and brown them all over, over high heat for 6 minutes. Add a glass of liquor
and ame. Put the lid on, decrease the heat to minimum level and cook for 40 minutes, mixing every
hotpoint.co.uk
1717
Page 20

en
once in a while. Drain the duck and keep it warm. Install the slicer blade 1 in the food processor. Peel
2 oranges and cut them in slices. Place the orange slices in a non-stick frying pan with some stock
made from cooking the duck and cook for 5 minutes. Peel the orange, removing any white esh and
cut the zest using slicer blade 2. Place the zest in a saucepan with some boiling water and blanch for 3
minutes. Install the squeezer and juice the remaining oranges. Filter and pour the juice in a saucepan,
add one tablespoon of vinegar, 2 tablespoons of sugar and a ladle of duck stock. Bring the contents of
the saucepan to the boil, add 30 g of butter sprinkled with our and stir over low heat for 10 minutes.
Add salt and pepper to taste, lter and add the drained zest. Place the duck on a large hot serving dish,
garnish with the braised orange slices and spoon the sauce onto the meat.
Main courses
MUSHROOM FRICASSEE
Ingredients for 4 servings: 600 g of champignon mushrooms, 4 egg yolks, 1 lime, chives, 1 clove of
garlic, vegetable stock, extra virgin olive oil, salt and pepper.
Juice half a lime using the squeezer. Install the chopper blade and chop a handful of chives. Clean the
mushrooms and slice them using the slicer blade 1. Brown the garlic with a little olive oil and a pinch
of chopped chives in a saucepan. Add the mushrooms and some vegetable stock, then cook over
high heat for 10 minutes, delicately turning the mushrooms over. Meanwhile, install the beater disc in
the food processor and beat the yolks with the ltered lime juice. Once cooked, add salt and pepper
to taste and turn the heat off. Add the mixture of yolks and lime juice to the mushrooms while mixing
rapidly. Sprinkle with chives and serve.
Desserts
COFFEE MUFFINS WITH ZABAGLIONE CREAM
Ingredients for 4 servings. For the mufns: 350 g of type 00 our (nely ground), 2 eggs, 180 g of sugar,
1 sachet of baking powder, 10 g of coffee beans, 70g of milk, 120 g of butter, salt. For the zabaglione
cream: 5 eggs, 120 g of sugar, dry Marsala wine.
For the mufns. Grind the coffee with the milling cup and prepare the coffee using a moka machine.
Install the beater disc and beat the eggs with sugar until obtaining a light and uffy mixture. Remove
the disc and install the mixing blade, then add the melted butter, milk, cold coffee, a pinch of salt and
baking powder sifted with our. Mix until obtaining a smooth mixture and place it into 4 silicone moulds
(grease the moulds with butter and sprinkle with our if they are made from aluminium). Bake in the
oven at 180° C for 15/18 minutes. For the zabaglione cream. Take the eggs out of the fridge 2 hours
before. Separate the yolks and beat them in the food processor using the beater disc together with
sugar until the mixture is clear and creamy. Pour 1.5 dl of Marsala wine little by little, mixing it perfectly.
Place the mixture in a deep mixing bowl and cook the zabaglione in a bain-marie while continuing to
beat it with a whisk for about 10 minutes. Never bring it to the boil. Once cooked, its volume should
have increased and the cream will be light and uffy. Let it cool down a bit. Turn out the mufns when
they are still hot and serve with the warm zabaglione cream.
1818
Page 21

en
hotpoint.co.uk
GUARANTEE
12 months Parts and Labour Guarantee
This certicate of guarantee represents the guarantee (“Guarantee” hereinafter) offered by Inde-
sit Company UK Limited with registered ofce at
Peterborough PE2 9JB in relation to products purchased in the United Kingdom and Indesit Ireland
Limited with registered ofce in Dublin 9, Ireland for
products purchased in the Republic of Ireland. This
Guarantee does not affect your statutory rights.
Your product has the benet of our manufacturer’s
Guarantee, which covers the product for twelve
months from the date of purchase.
This gives you the reassurance that if, within that
time, your product is proven to be defective because of either workmanship or materials, we will, at
our discretion, either repair or replace the product
at no cost to you.
This Guarantee is subject to the following conditions:
• Documentary proof of original purchase date
is provided.
• Cosmetic damage must be reported within
14 days from the date of purchase.
• The product has been installed and operated
correctly and in accordance with our operating and maintenance instructions.
• The product is used only on the electricity
supply printed on the rating plate.
• The product has been used for normal domestic purposes only.
• The product has not been altered, serviced,
maintained, dismantled, or otherwise interfered with by any person not authorised by us.
• Any repair work must be undertaken by us or
our appointed agent.
• Any parts removed during repair work or any
product that is replaced become our property.
• The product is used in the United Kingdom or
Republic of Ireland.
The Guarantee does not cover:
• Damage resulting from transportation, improper use, neglect or interference or as a result
of improper installation.
• Accidental damage, this includes but is not
limited to, damage which occurs as a result of
an external action.
• Replacement of any consumable item or accessory. These include but are not limited to:
• plugs, cables, light bulbs, hoses, brushes,
covers and lters.
• Replacement of any removable parts made of
glass or plastic.
After Sales Service
No one is better placed to care for your Hotpoint
product during the course of its working life than
us – the manufacturer.
Essential Contact Information
Advice Line
We have a dedicated team who can provide free
advice and assistance with your product if you ex-
perience any technical difculties. Simply call our
Hotpoint Service Hotline on 08448 240 055 (Republic of Ireland 0818 904 041) for telephone
assistance.
Please note:
Our advisors will require the following information:
Model number:
Serial number:
Consumables and Accessories
We supply a full range of consumables and acces-
sories to keep your product functioning efciently
throughout its life.
UK: 08448 225 225
Republic of Ireland: 0818 313 413
www.hotpoint.co.uk
Recycling and Disposal Information
As part of Hotpoint’s continued commitment to helping the environment, Hotpoint reserves the right
to use quality, recycled components to keep down
customer costs and minimise material wastage.
Please dispose of packaging and old products carefully.
1919
Page 22

en
stage.
Please dispose of packaging and old products carefully.
Register your new product and get a second
year FREE!
We want to give you additional benets of ownership of your product and offer you an additional free 1 year guarantee when you register your
product with Hotpoint within 28 days of purchase.
If you do not register your product with Hotpoint
within 28 days, your product is guaranteed for 1
year only.
To activate your 2 year guarantee register with us
online at www.hotpoint.co.uk. Please note that the
2 year guarantee is only available in UK and Ireland and is subject to the same conditions as the
1 year Guarantee. Please refer to the certicate of
guarantee for more information.
DISPOSAL OF OLD
ELECTRICAL APPLIANCES
The European Directive 2002/96/EC on
Waste Electrical and Electronic
Equipment (WEEE), requires that old
household electrical appliances must not
be disposed of in the normal unsorted
municipal waste stream.
Old appliances must be collected separa-
tely in order to optimise the recovery and
recycling of the materials they contain and reduce
the impact on human health and the environment.
The crossed out “wheeled bin” symbol on the product reminds you of your obligation, that when
you dispose of the appliance it must be separately
collected. Consumers should contact their local
authority or retailer for information concerning the
correct disposal of their old appliance.
2020
Page 23

Indesit Company UK Ltd
Morley Way,
Peterborough PE2 9JB
www.indesitcompany.com
FP 100 UK
02/2013 - ver.1.1
 Loading...