

Page 1

Instructions for use
WASHING MACHINE
GB
English,1
FMG 723
PT
Português,13
PL
Polski,25
Contents
Installation, 2-3
Unpacking and levelling
Connecting the electricity and water supplies
The first wash cycle
Technical data
Care and maintenance, 4
Cutting off the water and electricity supplies
Cleaning the washing machine
Cleaning the detergent dispenser drawer
Caring for the door and drum of your appliance
Cleaning the pump
Checking the water inlet hose
Precautions and tips, 5
General safety
Disposal
Description of the washing machine, 6-7
Control panel
Display
GB
Running a wash cycle, 8
Wash cycles and options, 9
Table of programmes and wash cycles
Wash options
Detergents and laundry, 10
Detergent dispenser drawer
Preparing the laundry
Special wash cycles
Load balancing system
Troubleshooting, 11
Service, 12
1
Page 2
Installation
GB
! This instruction manual should be kept in a safe
place for future reference. If the washing machine
is sold, transferred or moved, make sure that the
instruction manual remains with the machine so
that the new owner is able to familiarise himself/
herself with its operation and features.
! Read these instructions carefully: they
contain vital information relating to the safe
installation and operation of the appliance.
Unpacking and levelling
Unpacking
1. Remove the washing machine from its
packaging.
2. Make sure that the washing machine has
not been damaged during the transportation
process. If it has been damaged, contact the
retailer and do not proceed any further with
the installation process.
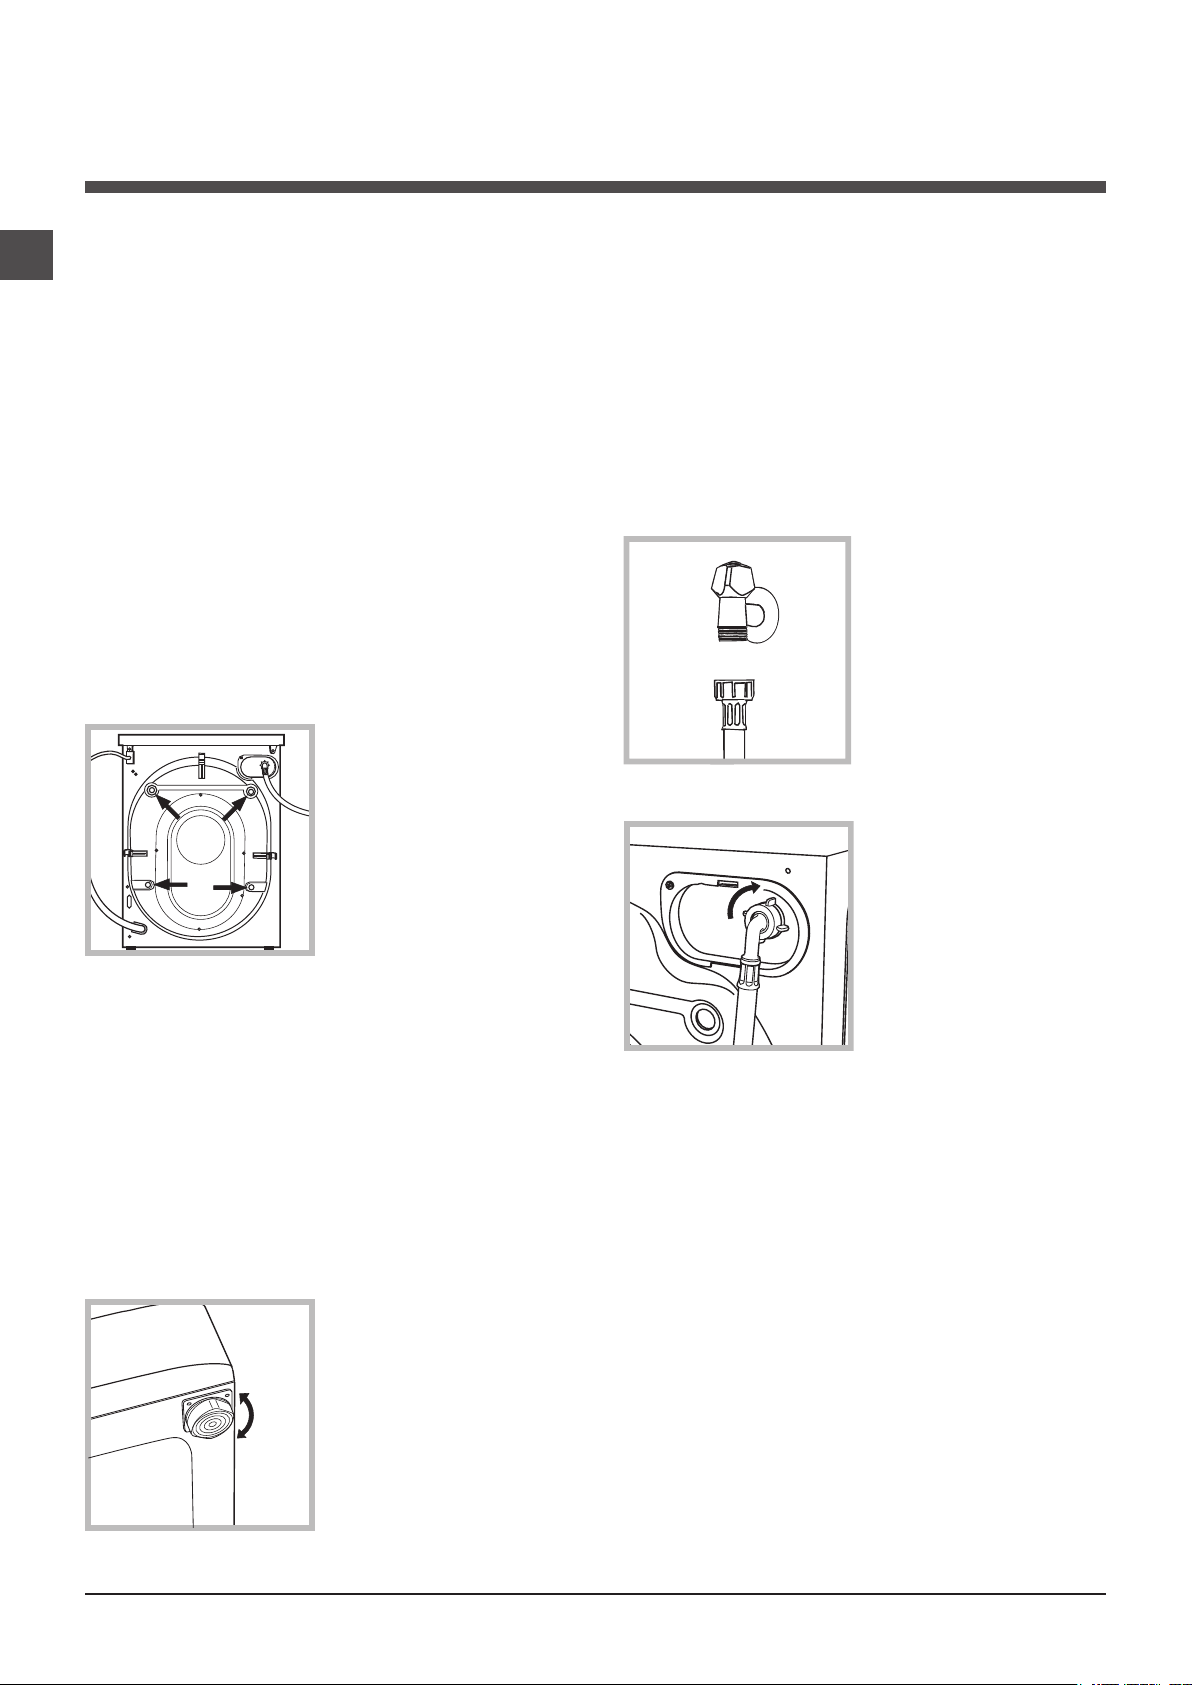
3. Remove the 4
protective screws
(used during
transportation)
and the rubber
washer with the
corresponding
spacer, located on
the rear part of the
appliance (see figure).
4. Close off the holes using the plastic plugs
provided.
5. Keep all the parts in a safe place: you will
need them again if the washing machine
needs to be moved to another location.
! Packaging materials should not be used as
toys for children.
Levelling the machine correctly will provide
it with stability, help to avoid vibrations and
excessive noise and prevent it from shifting
while it is operating. If it is placed on carpet or
a rug, adjust the feet in such a way as to allow
a sufficient ventilation space underneath the
washing machine.
Connecting the electricity and
water supplies
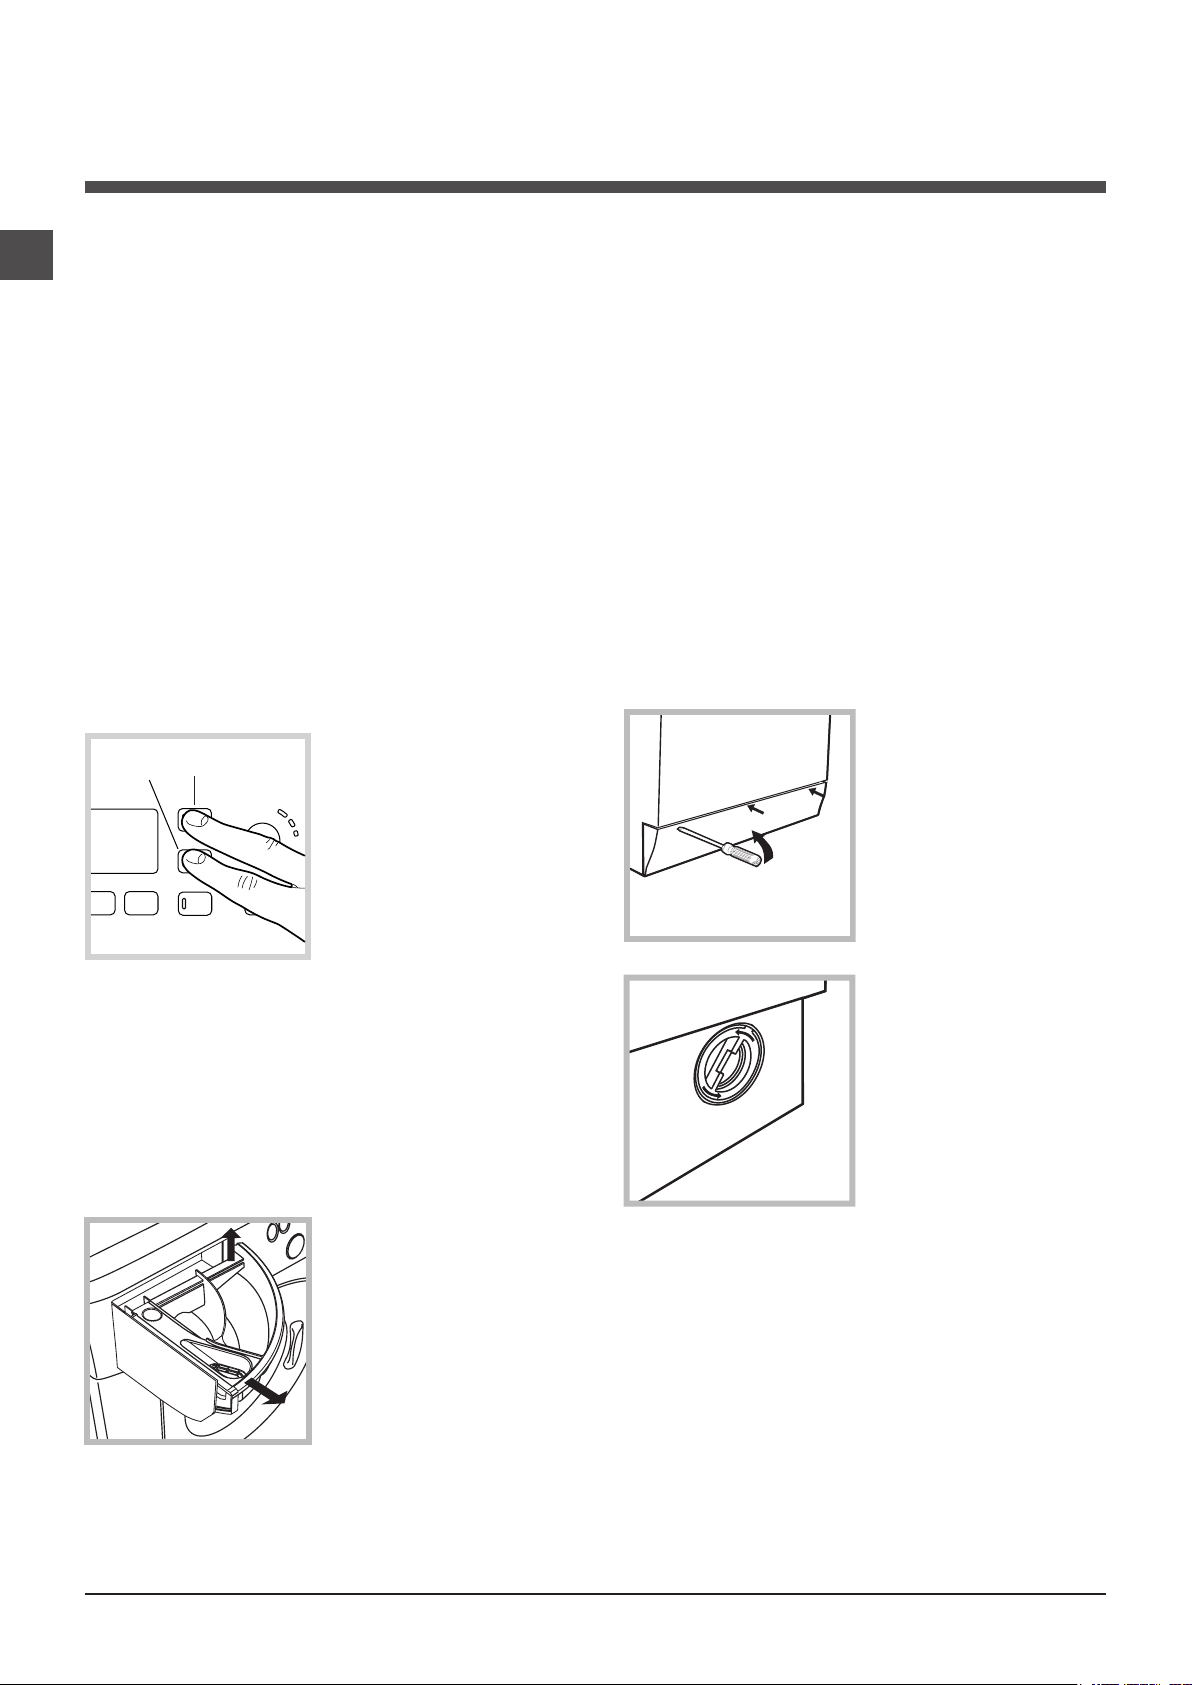
Connecting the water inlet hose
1. Connect the inlet
hose by screwing it to
a cold water tap using
a 3/4 gas threaded
connection (see
figure).
Before performing
the connection, allow
the water to run freely
until it is perfectly
clear.
2. Connect the
inlet hose to the
washing machine by
screwing it onto the
corresponding water
inlet of the appliance,
which is situated on
the top right-hand
side of the rear part
of the appliance (see
figure).
3. Make sure that the hose is not folded over
or bent.
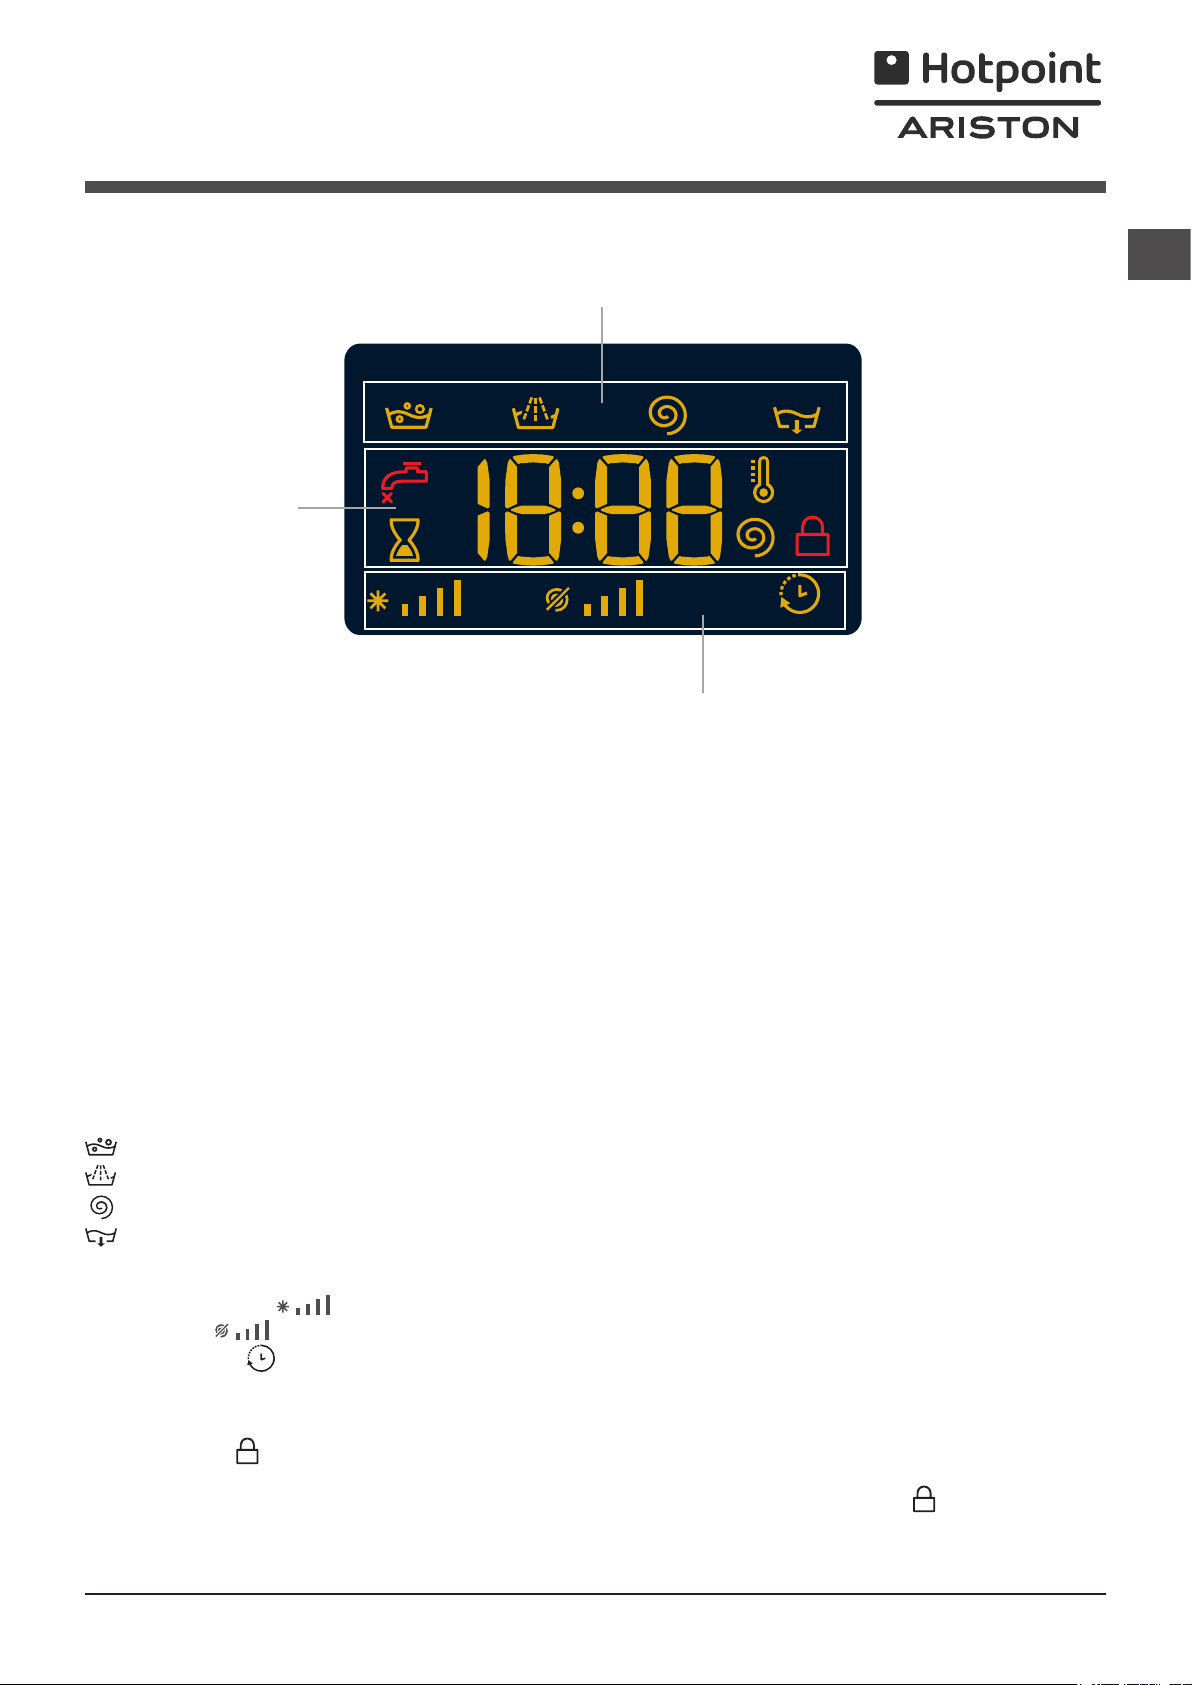
Levelling
1. Install the washing machine on a flat sturdy
floor, without resting it up against walls,
furniture cabinets or anything else.
2. If the floor is
not perfectly level,
compensate for
any unevenness
by tightening or
loosening the
adjustable front
feet (see figure); the
angle of inclination,
measured in relation
to the worktop, must
not exceed 2°.
2
! The water pressure at the tap must fall within
the range of values indicated in the Technical
data table (see next page).
! If the inlet hose is not long enough, contact a
specialised shop or an authorised technician.
! Never use second-hand hoses.
! Use the ones supplied with the machine.
Page 3

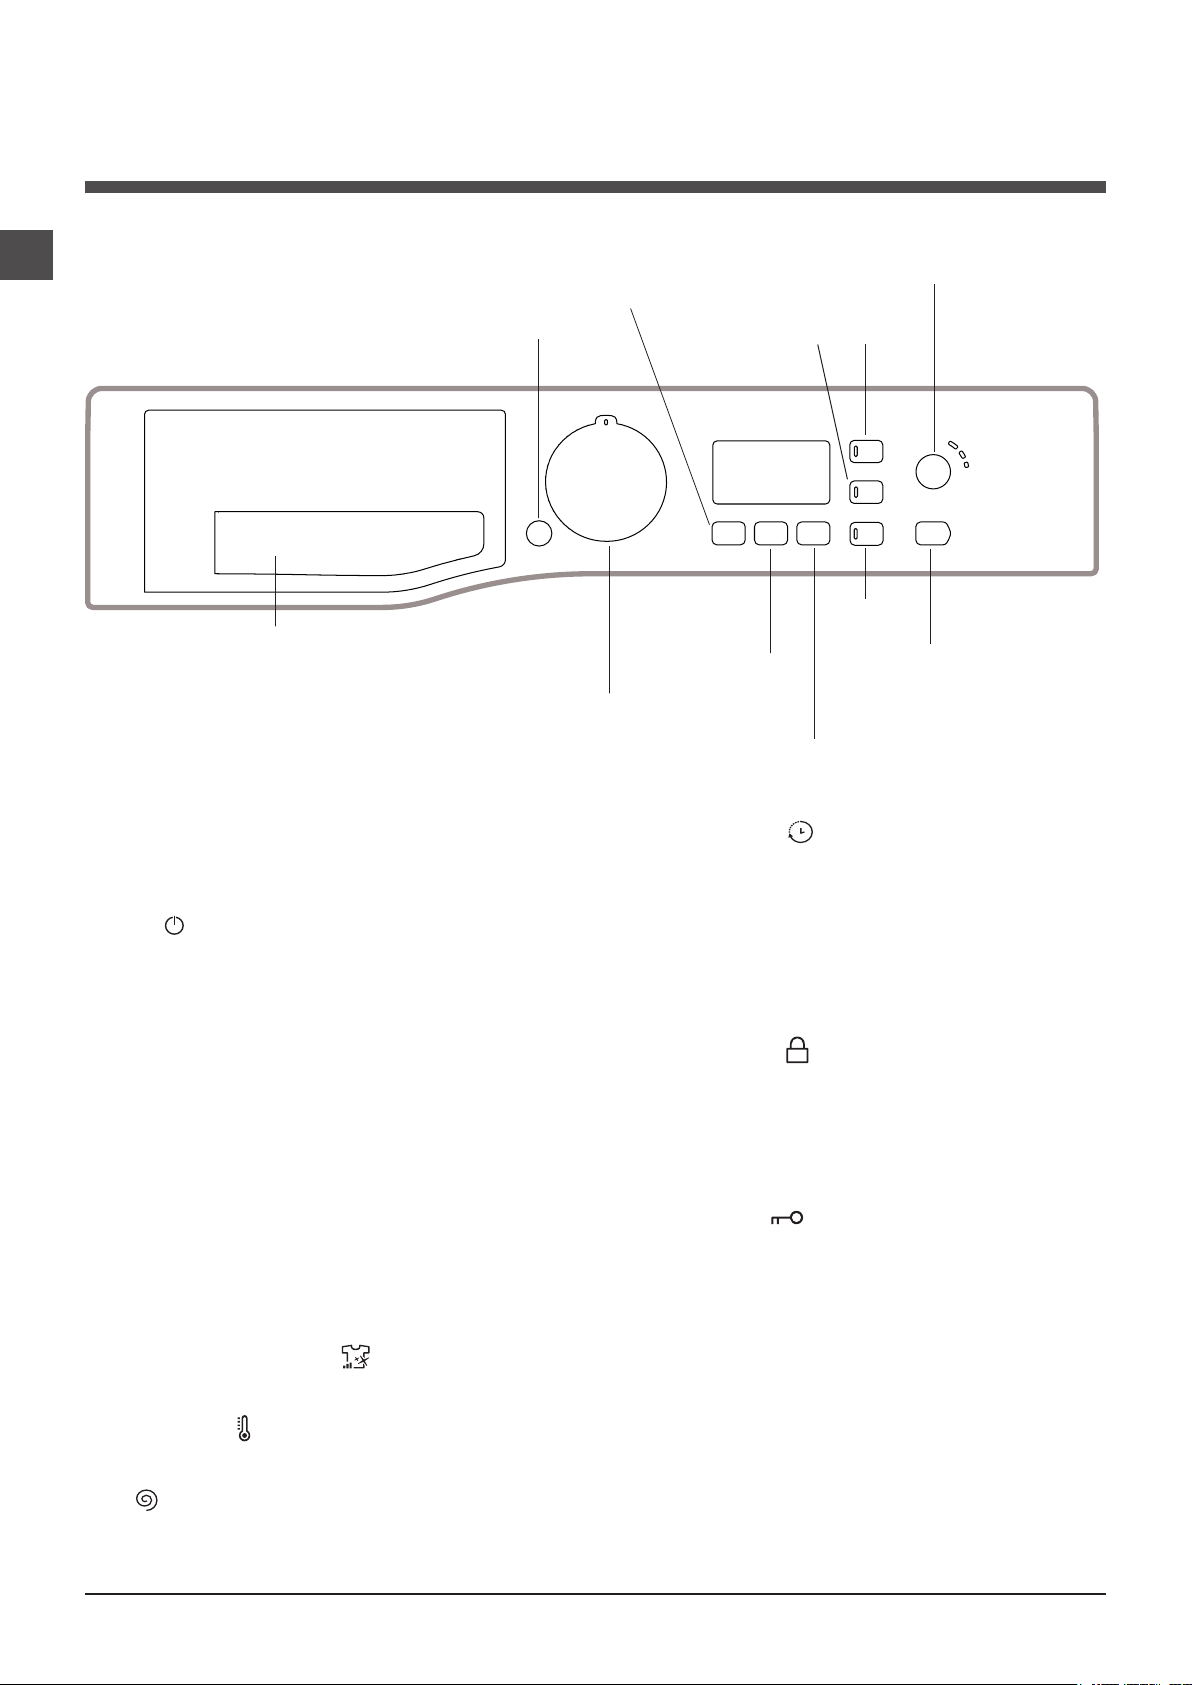
Connecting the drain hose
65 - 100 cm
Connect the drain
hose, without bending
it, to a drain duct or
a wall drain situated
between 65 and 100
cm from the floor;
alternatively, placed
it over the edge
of a basin, sink or
tub, fastening the
duct supplied to
the tap (see figure).
The free end of the
hose should not be
underwater.
! When the washing machine has been
installed, the electricity socket must remain
within easy reach.
! Do not use extension cords or multiple
sockets.
! The cable should not be bent or
compressed.
! The power supply cable must only be
replaced by authorised technicians.
Warning! The company shall not be held
responsible in the event that these standards
are not observed.
The first wash cycle
Once the appliance has been installed, and
before you use it for the first time, run a wash
cycle with detergent and no laundry, using
wash cycle number auto clean (see “Cleaning
the washing machine”).
Technical data
GB
! We advise against the use of hose
extensions; if it is absolutely necessary, the
extension must have the same diameter as the
original hose and must not exceed 150 cm in
length.
Electrical connections
Before plugging the appliance into the
electricity socket, make sure that:
• the socket is earthed and complies with all
applicable laws;
• the socket is able to withstand the
maximum power load of the appliance as
indicated in the Technical data table (see
opposite);
• the power supply voltage falls within the
values indicated in the Technical data table
(see opposite);
• the socket is compatible with the plug of
the washing machine. If this is not the case,
replace the socket or the plug.
! The washing machine must not be installed
outdoors, even in covered areas. It is
extremely dangerous to leave the appliance
exposed to rain, storms and other weather
conditions.
Model
Dimensions
Capacity
Electrical
connections
Water connections
Spin speed
Test wash
cycles in
accordance with
directives
1061/2010
1015/2010
FMG 723
width 59.5 cm
height 85 cm
depth 54 cm
from 1 to 7 kg
please refer to the technical
data plate fixed to the machine
maximum pressure
1 MPa (10 bar)
minimum pressure
0.05 MPa (0.5 bar)
drum capacity 52 litres
up to 1200 rotations per
minute
programme 4
;
Cotton Standard 60°C.
programme 5 ;
Cotton Standard 40°C.
This appliance conforms to
the following EC Directives:
- 2004/108/EC (Electromagnetic Compatibility)
- 2006/95/EC (Low Voltage)
- 2012/19/EU (WEEE)
3
Page 4
Care and maintenance
1
2
GB
Cutting off the water and
electricity supplies
• Turn off the water tap after every wash cycle.
This will limit wear on the hydraulic system
inside the washing machine and help to
prevent leaks.
• Unplug the washing machine when cleaning
it and during all maintenance work.
Cleaning the washing machine
• The outer parts and rubber components
of the appliance can be cleaned using a soft
cloth soaked in lukewarm soapy water. Do not
use solvents or abrasives.
• The washing machine has a auto clean
programme for its internal parts that must be
run with no load in the drum.
To help the wash cycle
B
A
cleaning programme every 40 wash cycles.
To start the programme press buttons A and
B simultaneously for 5 seconds (see figure).
The programme will start automatically and will
run for about 70 minutes. To stop the cycle
press the START/PAUSE button.
you may want to use
either the detergent
(i.e. a quantity 10%
the quantity specified
for lightly-soiled
garments) or special
additives to clean the
washing machine. We
recommend running a
Caring for the door and drum of
your appliance
• Always leave the porthole door ajar in order
to prevent unpleasant odours from forming.
Cleaning the pump
The washing machine is fitted with a selfcleaning pump which does not require any
maintenance. Sometimes, small items (such as
coins or buttons) may fall into the pre-chamber
which protects the pump, situated in its bottom
part.
! Make sure the wash cycle has finished and
unplug the appliance.
To access the pre-chamber:
1. using a
screwdriver, remove
the cover panel on
the lower front part of
the washing machine
(see figure);
2. unscrew the lid
by rotating it anticlockwise (see figure):
a little water may
trickle out. This is
perfectly normal;
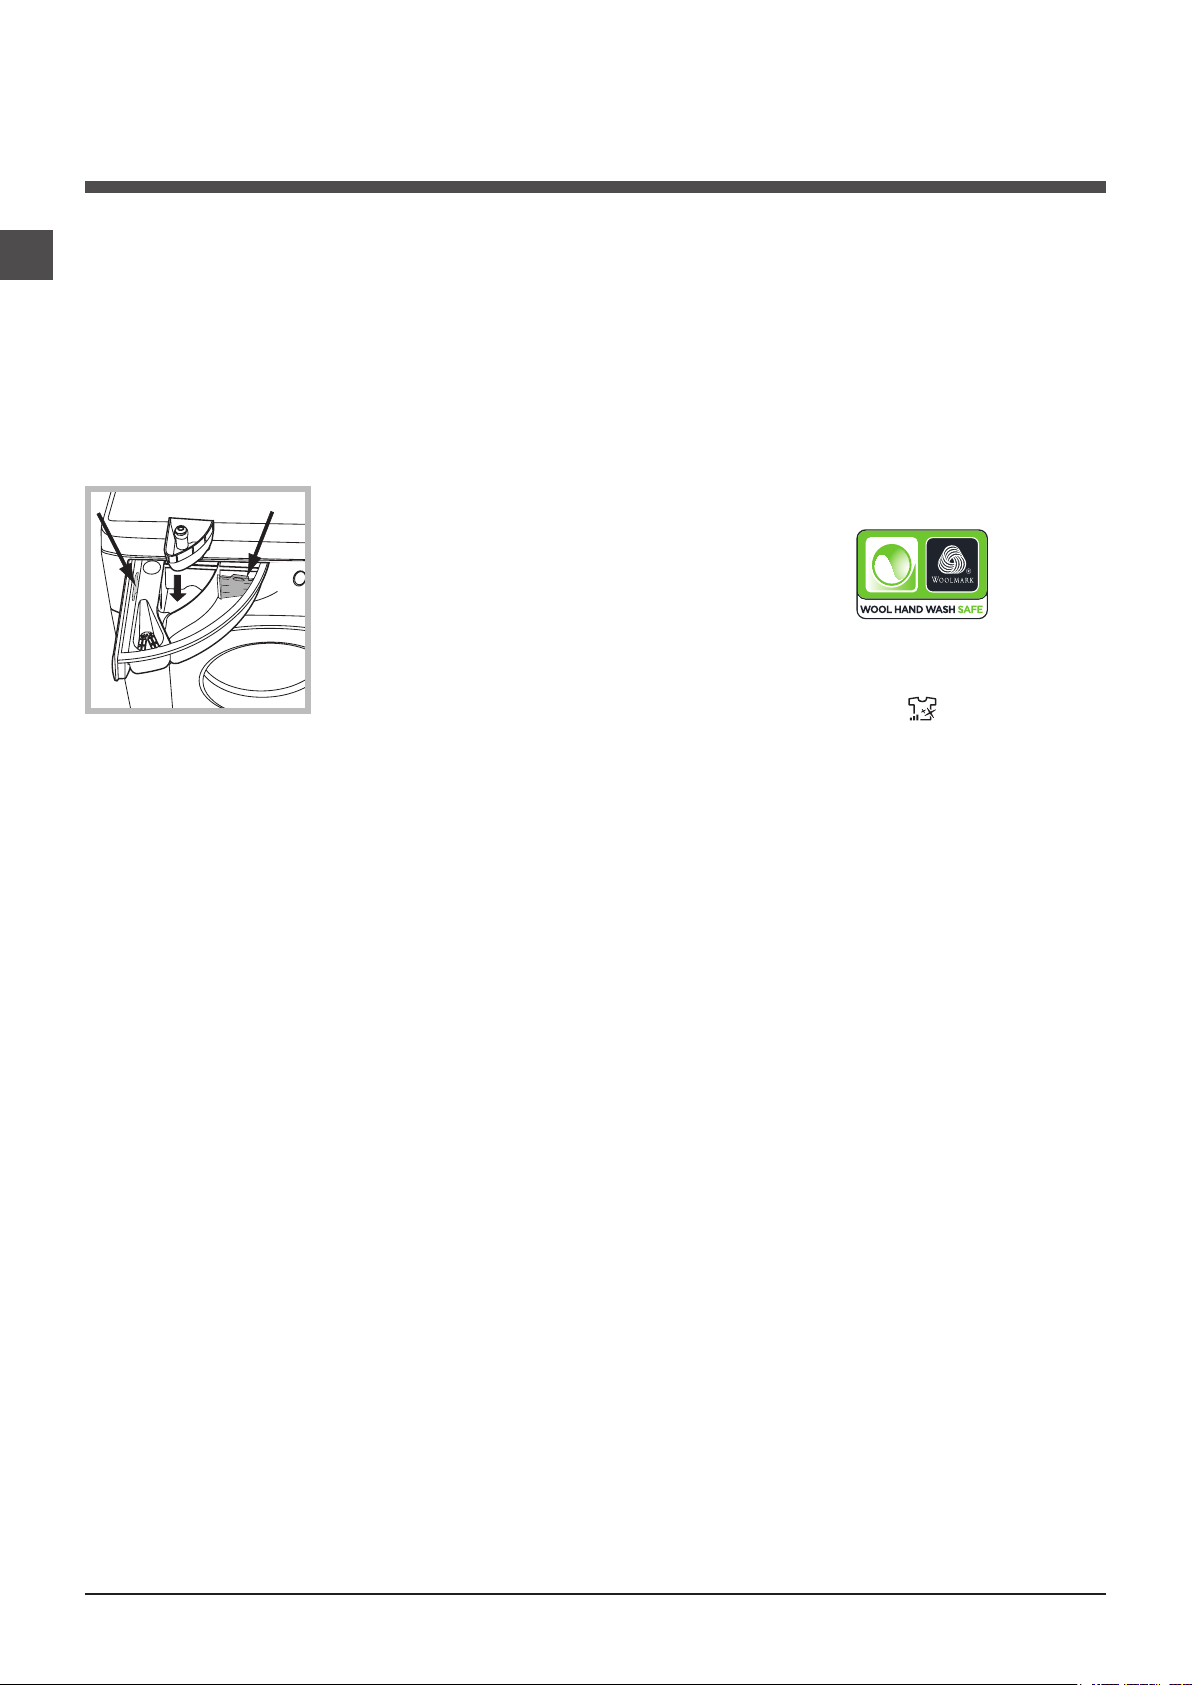
Cleaning the detergent dispenser
drawer
Remove the dispenser
by raising it and
pulling it out (see
figure).
Wash it under running
water; this operation
should be repeated
frequently.
4
3. clean the inside thoroughly;
4. screw the lid back on;
5. reposition the panel, making sure the hooks
are securely in place before you push it onto
the appliance.
Checking the water inlet hose
Check the inlet hose at least once a year. If
there are any cracks, it should be replaced
immediately: during the wash cycles, water
pressure is very strong and a cracked hose
could easily split open.
! Never use second-hand hoses.
Page 5

Precautions and tips
! This washing machine was designed and constructed
in accordance with international safety regulations. The
following information is provided for safety reasons and
must therefore be read carefully.
General safety
• This appliance was designed for domestic use only.
•
This appliance can be used by children
aged from 8 years and above and
persons with reduced physical, sensory or
mental capabilities or lack of experience
and knowledge if they have been given
supervision or instruction concerning use of
the appliance in a safe way and understand
the hazards involved. Children shall not
play with the appliance. Cleaning and user
maintenance shall not be made by children
without supervision.
• Do not touch the machine when barefoot or with wet or
damp hands or feet.
• Do not pull on the power supply cable when unplugging
the appliance from the electricity socket. Hold the plug
and pull.
• Do not open the detergent dispenser drawer while the
machine is in operation.
• Do not touch the drained water as it may reach
extremely high temperatures.
• Never force the porthole door. This could damage the safety
lock mechanism designed to prevent accidental opening.
• If the appliance breaks down, do not under any
circumstances access the internal mechanisms in an
attempt to repair it yourself.
• Always keep children well away from the appliance while
it is operating.
• The door can become quite hot during the wash cycle.
• If the appliance has to be moved, work in a group of two
or three people and handle it with the utmost care. Never
try to do this alone, because the appliance is very heavy.
• Before loading laundry into the washing machine, make
sure the drum is empty.
GB
Disposal
• Disposing of the packaging materials: observe local
regulations so that the packaging may be re-used.
• The European Directive 2012/19/EU on Waste Electrical
and Electronic Equipment, requires that old household
electrical appliances must not be disposed of in the
normal unsorted municipal waste stream. Old appliances
must be collected separately in order to optimise the
recovery and recycling of the materials they contain and
reduce the impact on human health and the environment.
The crossed out “wheeled bin” symbol on the product
reminds you of your obligation, that when you dispose of
the appliance it must be separately collected. Consumers
should contact their local authority or retailer for information
concerning the correct disposal of their old appliance.
5
Page 6
Description of the washing
machine
GB
Control panel
Detergent dispenser drawer
ON/OFF
button
SELECTOR
TEMPERATURE
button
WASH
CYCLE
KNOB
DISPLAY
SPIN
button
OPTION
buttons and
indicator lights
CHILD
LOCK
button
DELAY
TIMER
button
CLEANING
ACTION
button
START/PAUSE
button and indicator
light
Detergent dispenser drawer: used to dispense
detergents and washing additives (see “Detergents and
laundry”).
ON/OFF
machine on or off. The START/PAUSE indicator light which
flashes slowly in a green colour shows that the machine is
switched on. To switch off the washing machine during the
wash cycle, press and hold the button for approximately 3
seconds; if the button is pressed briefly or accidentally the
machine will not switch off.
If the machine is switched off during a wash cycle, this
wash cycle will be cancelled.
WASH CYCLE SELECTOR KNOB: used to set the
desired wash cycle (see “Table of programmes and wash
cycles”).
OPTION buttons and indicator lights: press to select the
available options. The indicator light corresponding to the
selected option will remain lit.
CLEANING ACTION
wash intensity.
TEMPERATURE
exclude the temperature; the value appears on the display.
SPIN
the spin cycle; the value appears on the display.
button: press this briefly to switch the
button : to select the desired
button: press to reduce or completely
button: press to reduce or completely exclude
DELAYED START
for the selected wash cycle; the delay period appears on
the display.
START/PAUSE button and indicator light: when the green
indicator light flashes slowly, press the button to start a
wash cycle. Once the cycle has begun the indicator light
will remain lit in a fixed manner. To pause the wash cycle,
press the button again; the indicator light will flash in an
amber colour. If the
may be opened (wait approximately 3 minutes). To start
the wash cycle from the point at which it was interrupted,
press the button again.
CHILD LOCK button: to activate the control panel lock,
press and hold the button for approximately 2 seconds.
When the symbol
is locked (apart from the ON/OFF button). This means it
is possible to prevent wash cycles from being modified
accidentally, especially where there are children in the
home. To deactivate the control panel lock, press and hold
the button for approximately 2 seconds.
Standby mode
This washing machine, in compliance with new energy
saving regulations, is fitted with an automatic standby
system which is enabled after about 30 minutes if no
activity is detected. Press the ON-OFF button briefly and
wait for the machine to start up again.
button: press to set a delayed start
symbol is not illuminated, the door
is illuminated, the control panel
6
Page 7
Display
GB
B
A
C
The display is useful when programming the machine and provides a great deal of information.
The duration of the available wash cycles and the remaining time of a running cycle appear in section A (the display will show
the maximum duration of the cycle chosen, which may decrease after several minutes, since the effective duration of the
programme varies depending on the wash load and the settings chosen); if the DELAYED START option has been set, the
countdown to the start of the selected wash cycle will appear.
Pressing the corresponding button allows you to view the maximum spin speed and temperature values attained by the
machine during the set wash cycle, or the values selected most recently, if these are compatible with the set wash cycle.
The “wash cycle phases” corresponding to the selected wash cycle and the “wash cycle phase” of the running wash cycle
appear in section B:
Main wash
Rinse
Spin
Pump out
The icons corresponding to “temperature”, “spin” and “delayed start” (working from the left) are displayed in section C.
The “temperature” bars
The “spin” bars
The “delay” symbol
indicate the maximum spin level which may be selected for the set cycle.
indicate the maximum temperature level which may be selected for the set cycle.
, when lit, indicates that the set “delayed start” value has appeared on the display.
DOOR LOCKED
The lit symbol indicates that the door is locked. To prevent any damage, wait until the symbol turns off before opening the door.
To open the door while a cycle is in progress, press the START/PAUSE button; if the DOOR LOCKED
off the door may be opened (wait approximately 3 minutes).
indicator light:
symbol is switched
7
Page 8
Running a wash cycle
GB
1. SWITCH THE MACHINE ON. Press the button;
the START/PAUSE indicator light will flash slowly in a
green colour.
2. LOAD THE LAUNDRY. Open the porthole door.
Load the laundry, making sure you do not exceed
the maximum load value indicated in the table of
programmes and wash cycles on the following page.
3. MEASURE OUT THE DETERGENT. Pull out the
detergent dispenser drawer and pour the detergent into
the relevant compartments as described in “Detergents
and laundry”.
4. CLOSE THE DOOR.
5. SELECT THE WASH CYCLE. Use the WASH CYCLE
SELECTOR knob to select the desired wash cycle. A
temperature and spin speed is set for each wash cycle;
these values may be adjusted. The duration of the cycle
will appear on the display.
6. CUSTOMISE THE WASH CYCLE. Use the relevant
buttons:
Modify the temperature and/or spin speed.
The machine automatically displays the maximum
temperature and spin speed values set for the selected
cycle, or the most recently-used settings if they are
compatible with the selected cycle. The temperature
can be decreased by pressing the
the cold wash “OFF” setting is reached. The spin
speed may be progressively reduced by pressing
the
button, until it is completely excluded (the
“OFF” setting). If these buttons are pressed again, the
maximum values are restored.
button, until
! Exception: if the 4 programme is selected, the
temperature can be increased up to a value of 90°C.
Setting a delayed start.
To set a delayed start for the selected cycle, press the
corresponding button repeatedly until the required delay
period has been reached. When this option has been
activated, the
remove the delayed start setting, press the button until
the text “OFF” appears on the display.
Set the desired wash intensity.
Option
on the level of soil in the fabrics and on desired wash
cycle intensity.
Select the wash programme: the cycle will be
automatically set to “Normal” as optimised for garments
with an average level of soil (this setting is not applicable
to the “Wool” cycle, which is automatically set to
“Delicate”).
For heavily-soiled garments press
the “Intensive” level is reached. This level ensures
a high-performance wash due to a larger quantity of
water used in the initial phase of the cycle and due to
increased drum rotation. It is useful when removing the
most stubborn stains.
symbol lights up on the display. To
makes it possible to optimise washing based
button until
It can be used with or without bleach. If you desire
bleaching, insert the extra tray compartment (4) into
compartment 1. When pouring in the bleach, be careful
not to exceed the “max” level marked on the central
pivot (see figure pag. 10).
For lightly-soiled garments or a more delicate treatment
of the fabrics, press
level is reached. The cycle will reduce drum rotation
to ensure washing results that are perfect for delicate
garments.
Modify the cycle settings.
• Press the button to enable the option; the indicator
light corresponding to the button will switch on.
• Press the button again to disable the option; the
indicator light will switch off.
! If the selected option is not compatible with the set
wash cycle, the indicator light will flash and the option
will not be activated.
! If the selected option is not compatible with a previously
selected one, the indicator light corresponding to the first
function selected will flash and only the second option will
be activated; the indicator light for the option which has
been activated will be illuminated.
! The options may affect the recommended load value
and/or the duration of the cycle.
7. START THE WASH CYCLE. Press the START/
PAUSE button. The corresponding indicator light will
turn green, remaining lit in a fixed manner, and the
door will be locked (the DOOR LOCKED
be lit). To change a wash cycle while it is in progress,
pause the washing machine using the START/PAUSE
button (the START/PAUSE indicator light will flash
slowly in an amber colour); then select the desired cycle
and press the START/PAUSE button again.
To open the door while a cycle is in progress, press
the START/PAUSE button; if the DOOR LOCKED
symbol is switched off the door may be opened (wait
approximately 3 minutes). Press the START/PAUSE
button again to restart the wash cycle from the point at
which it was interrupted.
8. THE END OF THE WASH CYCLE. This will be
indicated by the text “END” on the display; when the
DOOR LOCKED
be opened (wait approximately 3 minutes). Open the
door, unload the laundry and switch off the machine.
! If you wish to cancel a cycle which has already begun,
press and hold the
and the machine will switch off.
button until the “Delicate”
symbol will
symbol switches off the door may
button. The cycle will be stopped
8
Page 9
Wash cycles and options
Table of programmes and wash cycles
Description of the wash cycle
Wash cycles
CLEAN Plus
Anti Stain
1
Anti Stain Quick
2
Whites
3
4
Cotton Standard 60°C (1): heavily soiled whites and resistant colours.
5
Cotton Standard 40°C (2): lightly soiled resistant and delicate colours.
Synthetics: heavily soiled resistant colours.
6
Synthetics (4): lightly soiled resistant colours.
6
SPECIALS
Anti allergy Plus
7
Anti allergy Delicate
8
Wool: for wool, cashmere, etc.
9
Delicates
10
ECO
Cotton Standard 20°C: lightly soiled resistant and delicate colours.
11
Eco Cottons
12
Eco Synthetics
13
Eco Fast 30’
14
Partial Programmes
Rinse
Spin and Pump out
Pump out only *
Detergents
Max.
temp.
(°C)
40° 1200
40° 1200 60° 1200
60°
(Max. 90°)
40° 1200 60° 800
40° 800
60° 1200 40° 1200 40° 800 30° 0 -
20° 1200 -
Cold Water
Cold Water
Cold Water
Max.
speed
(rpm)
Wash
Prewash
(3)
1200
1200 -
800 800 -
- 1200 - - -
Bleach
-
-
-
-
-
-
-
-
Fabric
softener
3,5 - - - 60’
pness%
Energy con-
Max. load (kg)
sumptionkWh
Residual dam-
4 - - - 180’
4 - - - 180’
7 53 0.94 52.5 160’
7 53 0.93 77 140’
3,5 44 0.93 47 115’
3,5 44 0.57 46 100’
4 - - - 195’
4 - - - 195’
1,5 - - - 70’
1 - - - 80’
7 - - - 170’
7 53 0.17 63 80’
3 48 0.07 30 70’
3 71 0.04 34 30’
7 - - - 36’
- 1200 - - - - 7 - - - 10’
- OFF - - - - 7 - - - 3’
Total water lt
Cycle duration
GB
* If you select programme and exclude the spin cycle, the machine will drain only.
The length of cycle shown on the display or in this booklet is an estimation only and is calculated assuming standard working conditions. The actual duration can vary according to factors such as water temperature and pressure, the amount of detergent used, the amount and type of load inserted, load balancing and any wash options selected.
1) Test wash cycle in compliance with directive 1061/2010: set wash cycle 4 with a temperature of 60°C.
This cycle is designed for cotton loads with a normal soil level and is the most efficient in terms of both electricity and water consumption; it should be used for garments which can be washed at
60°C . The actual washing temperature may differ from the indicated value.
2) Test wash cycle in compliance with directive 1061/2010: set wash cycle 5 with a temperature of 40°C.
This cycle is designed for cotton loads with a normal soil level and is the most efficient in terms of both electricity and water consumption; it should be used for garments which can be washed at
40°C . The actual washing temperature may differ from the indicated value.
3) At 60 °C the “Prewash” function cannot be selected.
For all Test Institutes:
2) Long wash cycle for cottons: set wash cycle 5 with a temperature of 40°C.
4) Long wash cycle for synthetics: set wash cycle 6 with a temperature of 40°C.
Wash options
! If the selected option is not compatible with the set
wash cycle, the indicator light will flash and the option will
not be activated.
! If the selected option is not compatible with a previously
selected one, the indicator light corresponding to the first
function selected will flash and only the second option will be
activated; the indicator light for the option which has been
activated will be illuminated.
Extra Rinse
By selecting this option, the efficiency of the rinse is
increased and optimal detergent removal is guaranteed. It
is particularly useful for sensitive skin.
Prewash
If this function is selected, the pre-wash cycle will run; this
is useful for removing stubborn stains.
N.B.: Put the detergent in the relevant compartment.
9
Page 10
Detergents and laundry
M
AX
1
2
4
3
A
B
GB
Detergent dispenser drawer
Successful washing results also depend on the correct
dose of detergent: adding too much detergent will not
necessarily result in a more efficient wash, and may in
fact cause build up on the inside of your appliance and
contribute to environmental pollution.
! Use powder detergent for white cotton garments, for prewashing, and for washing at temperatures over 60°C.
! Follow the instructions given on the detergent packaging.
! Do not use hand washing detergents; they create too
much foam.
Open the detergent
dispenser drawer and pour
in the detergent or washing
additive, as follows.
compartment 1: Prewash detergent (powder)
Before pouring in the
detergent, make sure that
extra compartment 4 has
been removed.
compartment 2: Detergent for the wash cycle
(powder or liquid)
If liquid detergent is used, it is recommended that the
removable plastic partition A (supplied) be used for proper
dosage.
If powder detergent is used, place the partition into slot B.
compartment 3: Additives (fabric softeners, etc.)
The fabric softener should not overflow the grid.
extra compartment 4: Bleach
Preparing the laundry
• Divide the laundry according to:
- the type of fabric/the symbol on the label
- the colours: separate coloured garments from whites.
• Empty all garment pockets and check the buttons.
• Do not exceed the listed values, which refer to
the weight of the laundry when dry: see “Table of
programmes and wash cycles”.
How much does your laundry weigh?
1 sheet 400-500 g
1 pillow case 150-200 g
1 tablecloth 400-500 g
1 bathrobe 900-1,200 g
1 towel 150-250 g
Special wash cycles
Anti Stain: the programme 1 is suitable to heavily-soiled
garments with resistant colours. It ensures a washing class
that is higher than the standard class (A class).
When running the programme, do not mix garments of
different colours. We recommend the use of powder
detergent. Pre-treatment with special additives is
recommended if there are obstinate stains.
Anti Stain Quick: this programme is ideal for washing
the most difficult daily stains in 1 hour. It is ideal for mixed
fabrics and coloured garments, caring for your clothes as
it washes.
Whites: use this cycle 3 to wash white clothes. The
programme is designed to maintain the brightness of white
clothes over time. Use powder detergent for best results.
Anti allergy Plus: use programme 7 to remove major
allergens such as pollen, mites, cat’s and dog’s hair.
Anti allergy Delicate: cycle studied for cotton laundry and
other resistant fabrics to guarantee the removal of pollen and
cat and dog hair already at 40°.
Wool: the wool wash cycle of this machine has been
approved by The Woolmark Company for the washing of
wool garments labelled as “hand wash” provided that the
products are washed according to the instructions on the
garment label and those issued by the manufacturer of this
washing machine (M1126)
Delicates: use programme 10 to wash very delicate
garments having strasses or sequins.
To wash silk garments and curtains select the cycle 10 and
set the “Delicate” level from option
We recommend turning the garments inside out before
washing and placing small items into the special bag
for washing delicates. Use liquid detergent on delicate
garments for best results.
Eco cycles
The Eco Cycles assure energy saving by eliminating the
need of heating water and it’s an advantage both to your
energy bill and the environment! These innovative Eco
programmes (12 Eco Cottons, 13 Eco Synthetics and
14 Eco Fast 30’) are available for various fabrics and
different quantity of garment; they have been designed to
guarantee a high cleaning action even at low temperature
and can be used for lightly to medium soiled loads. Eco
Cycles give the best results thanks to an intensified wash
action, water optimization and are carried out in the same
average time of a standard cycle. For the best washing
results with Eco Cycles we recommend the usage of a
liquid detergent.
Cotton Standard 20°C ideal for lightly soiled cotton
loads. The effective performance levels achieved at cold
temperatures, which are comparable to washing at 40°,
are guaranteed by a mechanical action which operates at
varying speed, with repeated and frequent peaks.
.
Load balancing system
Before every spin cycle, to avoid excessive vibrations
before every spin and to distribute the load in a uniform
manner, the drum rotates continuously at a speed which
is slightly greater than the washing rotation speed. If,
after several attempts, the load is not balanced correctly,
the machine spins at a reduced spin speed. If the load is
excessively unbalanced, the washing machine performs
the distribution process instead of spinning. To encourage
improved load distribution and balance, we recommend
small and large garments are mixed in the load.
10
Page 11

Troubleshooting
Your washing machine could occasionally fail to work. Before contacting the Technical Assistance Service (see “ Service”),
make sure that the problem cannot be solved easily using the following list.
Problem:
The washing machine does not
switch on.
The wash cycle does not start.
The washing machine does not fill
with water (the text “H2O” flashes
on the display).
The washing machine
continuously takes in and drains
water.
Possible causes / Solutions:
• The appliance is not plugged into the socket fully, or not enough to make contact.
• There is no power in the house.
• The washing machine door is not closed properly.
• The ON/OFF button has not been pressed.
• The START/PAUSE button has not been pressed.
• The water tap has not been opened.
• A delayed start has been set.
• The water inlet hose is not connected to the tap.
• The hose is bent.
• The water tap has not been opened.
• There is no water supply in the house.
• The pressure is too low.
• The START/PAUSE button has not been pressed.
• The drain hose is not fitted at a height between 65 and 100 cm from the floor
(see “Installation”).
• The free end of the hose is under water (see “Installation”).
• The wall drainage system is not fitted with a breather pipe.
If the problem persists even after these checks, turn off the water tap, switch the
appliance off and contact the Technical Assistance Service. If the dwelling is on one
of the upper floors of a building, there may be problems relating to water drainage,
causing the washing machine to fill with water and drain continuously. Special antidraining valves are available in shops and help to prevent this inconvenience.
GB
The washing machine does not
drain or spin.
The washing machine vibrates a
lot during the spin cycle.
The washing machine leaks.
The “option” and START/PAUSE
indicator lights flash rapidly and
an error code appears on the
display (e.g.: F-01, F-..).
There is too much foam.
• The wash cycle does not include draining: some cycles require the draining
process to be enabled manually.
• The drain hose is bent (see “Installation”).
• The drainage duct is clogged.
• The drum was not unlocked correctly during installation (see “Installation”).
• The washing machine is not level (see “Installation”).
• The washing machine is trapped between cabinets and walls (see “Installation”).
• The water inlet hose is not screwed on properly (see “Installation”).
• The detergent dispenser drawer is blocked (for cleaning instructions, see “Care
and maintenance”).
• The drain hose is not fixed properly (see “Installation”).
• Switch off the machine and unplug it, wait for approximately 1 minute and then
switch it back on again.
If the problem persists, contact the Technical Assistance Service.
• The detergent is not suitable for machine washing (it should display the text “for
washing machines” or “hand and machine wash”, or the like).
• Too much detergent was used.
11
Page 12

Service
GB
Before contacting the Technical Assistance Service:
• Check whether you can solve the problem alone (see “Troubleshooting”);
• Restart the wash cycle to check whether the problem has been solved;
• If this is not the case, contact an authorised Technical Assistance Centre.
! Always request the assistance of authorised technicians.
Have the following information to hand:
• the type of problem;
• the appliance model (Mod.);
• the serial number (S/N).
This information can be found on the data plate applied to the rear of the washing machine, and can also be found on the
front of the appliance by opening the door.
12
Page 13

Instruções para a utilização
MÁQUINA DE LAVAR ROUPA
PT
Português
FMG 723
Sumário
Instalação, 14-15
Desembalar e nivelar
Ligações hidráulicas e eléctricas
Primeiro ciclo de lavagem
Dados técnicos
Manutenção e cuidados, 16
Interromper a alimentação de água e de corrente eléctrica
Limpar a máquina de lavar roupa
Limpar a gaveta dos detergentes
Cuidados com a porta de vidro e o tambor
Limpar a bomba
Verificar o tubo de alimentação de água
Precauções e conselhos, 17
Segurança geral
Eliminação
Descrição da máquina
de lavar roupa, 18-19
Painel de comandos
Visor
PT
Como efectuar um ciclo de lavagem, 20
Programas e opções, 21
Tabela dos programas
Opções de Lavagem
Detergentes e roupa, 22
Gaveta dos detergentes
Preparar a roupa
Programas especiais
Sistema de balanceamento da carga
Anomalias e soluções, 23
Assistência, 24
13
Page 14

Instalação
PT
! É importante guardar este livrete para
poder consultá-lo a qualquer momento. Se a
máquina for vendida, cedida ou transferida,
certifique-se que este livrete permaneça com
a máquina para informar o novo proprietário
acerca do seu funcionamento e das
respectivas advertências.
! Leia com atenção estas instruções: há
importantes informações acerca da instalação,
da utilização e da segurança.
Desembalar e nivelar
Desembalar
1. Tire a máquina de lavar roupa da
embalagem.
2. Verifique se a máquina de lavar roupa
sofreu danos no transporte. Se estiver
danificada não efectue a sua ligação e
contacte o revendedor.
3. Tire os 4 parafusos
de protecção para
o transporte e a
borrachinha com
o respectivo calço,
situados na parte
traseira (veja a figura).
4. Tape os furos com as tampas em plástico
fornecidas.
5. Guarde todas as peças: se for necessário
transportar a máquina de lavar roupa, terão de
ser montadas outra vez.
! Embalagens não são brinquedos para as
crianças!
Nivelamento
1. Instale a máquina de lavar roupa sobre um
pavimento plano e rígido, sem encostá-la em
paredes, móveis nem outro.
Um cuidadoso nivelamento dá estabilidade
à máquina e evita vibrações, ruídos e
deslocamentos durante o funcionamento.
Se houver tapete ou alcatifa, regule os pés
De modo a que debaixo da máquina de
lavar roupa haja um espaço suficiente para
ventilação.
Ligações hidráulicas e eléctricas
Ligação do tubo de alimentação da
água
1. Realize a ligação do
tubo de alimentação
parafusando-o a uma
torneira de água fria
com bocal de rosca
de 3/4 gás (veja a
figura).
Antes de realizar esta
ligação, haja a água
escorrer até estar
límpida.
2. Ligue o tubo de
alimentação na
máquina de lavar
roupa atarraxando-o
no apropriado
fornecimento da
água, na parte
traseira, em cima à
direita (veja a figura).
3. Tome cuidado para o tubo não ser dobrado
nem esmagado.
! A pressão hídrica da torneira deve ser entre
os valores da tabela dos Dados técnicos (veja
a página ao lado).
não deve ultrapassar 2°.
14
2. Se o pavimento
não for perfeitamente
horizontal, para
compensar qualquer
irregularidade,
desatarraxe ou
atarraxe os pés
dianteiros (veja a
figura); ; o ângulo de
inclinação, medido
no plano de trabalho,
! Se o comprimento do tubo de alimentação
não for suficiente, contacte uma oficina
especializada ou um técnico autorizado.
! Nunca utilize tubos já usados.
! Utilize aqueles fornecidos com a máquina.
Page 15

Ligação do tubo de descarga
65 - 100 cm
Ligue o tubo de
descarga, sem dobrálo, a uma conduta de
descarga ou a uma
descarga na parede
situada entre 65 e
100 cm de altura do
chão;
ou coloque na beira
de um lavabo ou
de uma banheira,
prenda na torneira
a guia fornecida
(veja a figura). A
ponta solta do tubo
de descarga não
deve permanecer
emergida na água.
! O cabo de alimentação deve ser substituído
somente por técnicos autorizados.
Atenção! O fabricante declina toda a
responsabilidade se estas regras não forem
respeitadas.
Primeiro ciclo de lavagem
Depois da instalação, antes de usar, efectue
um ciclo de lavagem com detergente mas
sem roupa, defina o programa “Auto Limpeza”
(veja “Limpar a máquina de lavar roupa”).
Dados técnicos
Modelo
Medidas
Capacidade
FMG 723
largura 59,5 cm
altura 85 cm
profundidade 54 cm
de 1 a 7 kg
PT
! É desaconselhado empregar tubos de
extensão; mas se for indispensável, a
extensão deve ter o mesmo diâmetro do
tubo original e não medir mais de 150 cm de
comprimento.
Ligação eléctrica
Antes de ligar a ficha na tomada eléctrica,
certifique-se que:
• a tomada tenha uma ligação à terra e seja
nos termos da legislação;
• a tomada tenha a capacidade para suportar
a carga máxima de potência da máquina,
indicada na tabela dos Dados técnicos (veja
ao lado);
• a tensão de alimentação seja entre os
valores indicados na tabela dos Dados
técnicos (veja ao lado);
• a tomada seja compatível com a ficha
da máquina de lavar roupa. Se não for,
substitua a tomada ou a ficha.
! Esta máquina de lavar roupa não deve ser
instalada ao aberto, nem mesmo abrigada,
porque é muito perigoso deixá-la exposta à
chuva e às tempestades.
! Depois de ter instalado a máquina de lavar
roupa, o acesso à tomada eléctrica deve ser
fácil.
! Não empregue extensões nem fichas
múltiplas.
! O cabo não deve ser dobrado nem apertado.
Ligações
eléctricas
Ligações
hídricas
Velocidade
da centrifu-
gação
Programas
de controlo
conforme as
directivas
1061/2010
1015/2010
veja a placa das características técnicas colocada na
máquina
pressão máxima
1 MPa (10 bars)
pressão mínima
0,05 MPa (0,5 bar)
capacidade do tambor
52 litros
até 1200 rotações por minuto
programa 4; programas de
lavagem normal de algodão
60ºC;
programa 5; programas de
lagem normal de algodão
40ºC.
Esta aparelhagem é em
conformidade com as
seguintes Directivas Comunitárias:
- 2004/108/CE (Compatibilidade Electromagnética)
- 2012/19/EU (WEEE)
- 2006/95/CE (Baixa Tensão)
15
Page 16

Manutenção e cuidados
1
2
A
B
PT
Interromper a alimentação de
água e de corrente eléctrica
• Feche a torneira da água depois de cada
lavagem. Desta maneira diminuiu-se o
desgaste do sistema hidráulico da máquina de
lavar roupa e elimina-se o risco de inundação.
• Tire a ficha da tomada eléctrica quando for
limpar a máquina de lavar roupa e durante os
trabalhos de manutenção.
Limpar a máquina de lavar roupa
• A parte externa e as peças em borracha
podem ser limpas com um pano molhado
com água morna e sabão. Não empregue
solventes nem abrasivos.
• A máquina de lavar roupa dispõe de um
programa de “Auto Limpeza” das suas partes
internas que deve ser efectuado sem carga
alguma dentro do tambor.
O detergente
(na quantidade
equivalente ao 10%
daquela recomendada
para peças pouco
sujas) ou aditivos
específicos para a
limpeza da máquina
de lavar roupa,
poderão ser utilizados
como coadjuvantes
no programa de lavagem. Recomenda-se
efectuar o programa de limpeza a cada 40
ciclos de lavagem.
Para activar o programa, pressione
contemporaneamente as teclas A e B por 5
segundos (ver figura).
O programa iniciará automaticamente e
terá uma duração de aproximadamente 70
minutos. Para terminar o ciclo, carregar no
botão START/PAUSE.
Limpar a gaveta dos detergentes
Cuidados com a porta de vidro e o
tambor
• Deixe a porta sempre entreaberta para evitar
que se formem odores desagradáveis.
Limpar a bomba
Esta máquina de lavar roupa é equipada com
uma bomba com limpeza automática que
não precisa de operações de manutenção.
Entretanto pode acontecer que pequenos
objectos (moedinhas, botões) caiam na précâmara que protege a bomba, situada na
parte inferior da mesma.
! Certifique-se que o ciclo de lavagem tenha
terminado e tire a ficha da tomada.
Para obter acesso à pré-câmara:
1. tire o painel de
cobertura da parte
dianteira da máquina
de lavar roupa com
ajuda de uma chave
de fendas (veja a
figura);
2. desenrosque a
tampa girando-a no
sentido anti-horário
(veja a figura). é
normal que perca um
pouco de água;
3. limpe o interior com cuidado;
4. enrosque outra vez a tampa;
5. monte outra vez o painel, certifique-se, antes
de empurrá-la na máquina, que os ganchos
foram colocados nas respectivas ranhuras.
16
Para tirar a gaveta,
erga-a e puxe-a para
fora (veja a figura).
Lave-a com água
corrente; esta limpeza
deve ser efectuada
frequentemente.
Verificar o tubo de alimentação
de água
Verifique o tubo de alimentação pelo menos
uma vez por ano. Se houver rachaduras ou
fendas, será necessário substitui-lo: durante
as lavagens as fortes pressões podem
provocar repentinas quebras.
! Nunca utilize tubos já usados.
Page 17

Precauções e conselhos
! Esta máquina de lavar roupa foi projectada e fabricada
em conformidade com os regulamentos internacionais de
segurança. Estas advertências são fornecidas por razões
de segurança e devem ser lidas com atenção.
Segurança geral
• Este aparelho foi projectado exclusivamente para um
uso doméstico.
•
Este aparelho pode ser utilizado por
crianças com mais de 8 anos e por pessoas
com capacidades físicas, sensoriais ou
mentais reduzidas ou com experiência e
conhecimentos insuficientes, caso sejam
supervisionadas ou caso tenham recebido
instruções adequadas em relação ao uso do
aparelho de forma segura, compreendendo
os perigos associados. As crianças não
devem brincar com o aparelho. A manutenção
e limpeza não devem ser efectuadas por
crianças sem supervisão.
• Não toque na máquina com os pés descalços nem
com as mãos ou os pés molhados ou húmidos.
• Não puxe o cabo eléctrico para tirar a ficha da tomada,
pegue a ficha mesmo.
• Não abra a gaveta dos detergentes enquanto a
máquina estiver a funcionar.
• Não toque a água de descarga, que poderá chegar a
temperaturas altas.
• Em nenhum caso force a porta para abri-la: poderá
danificar o mecanismo de segurança que a protege
contra aberturas acidentais.
• Se houver avarias, em nenhum caso mexa nos
mecanismos internos para tentar reparar.
• Verifique sempre que criança não se aproximem da
máquina a funcionar.
• Durante a lavagem a porta de vidro tende a aquecer-se.
• Se for preciso deslocá-la, são precisas pelo menos
duas ou três pessoas, com a máxima atenção. Nunca
sozinho porque a máquina é muito pesada.
• Antes de colocar a roupa controle que o tambor esteja
vazio.
informações sobre o correcto desmantelamento
dos electrodomésticos, contacte o serviço público
especializado ou os revendedores.
PT
Eliminação
• Eliminação do material de embalagem:
obedeça os regulamentos locais, de maneira que as
embalagens possam ser reutilizadas.
• A directiva Europeia 2012/19/EU relativa aos resíduos
de equipamentos eléctricos e electrónicos prevê
que os electrodomésticos não devem ser eliminados
no normal fluxo dos resíduos sólidos urbanos. Os
aparelhos que deixaram de ser utilizados devem
ser recolhidos separadamente para optimizar a taxa
de recuperação e reciclagem dos materiais que os
compõem e impedir potenciais danos à saúde e ao
meio ambiente. O símbolo do contentor de lixo barrado
com uma cruz está presente em todos os produtos
para lembrar o dever de recolha selectiva. Para mais
17
Page 18

Descrição da máquina
de lavar roupa
PT
Painel de comandos
Tecla ON/OFF
Selector de
PROGRAMAS
Gaveta dos detergentes
Gaveta dos detergentes: para colocar detergentes e
aditivos (veja “Detergentes e roupa”).
Tecla ON/OFF
ligar ou desligar a máquina. O indicador luminoso START/
PAUSE que pisca lentamente com a cor verde, indica
que a máquina está ligada. Para desligar a máquina de
lavar roupa durante a lavagem, é necessário manter
pressionado a tecla por mais tempo, aproximadamente 3
segundos; uma pressão breve ou acidental não anulará o
funcionamento da máquina. O desligar a máquina durante
uma lavagem em curso anula a própria lavagem.
Selector de PROGRAMAS: para seleccionar o programa
desejado (veja a “Tabela dos programas”).
Botões e indicadores luminosos OPÇÃO: para
seleccionar as opções disponíveis. O indicador luminoso
correspondente à opção seleccionada permanecerá
aceso.
: carregue brevemente na tecla para
Teclase indicadores
Tecla da
TEMPERATURA
luminosos de
OPÇÃO
Tecla
INTENSIDADE
LAVAGEM
Visor
Tecla
BLOQUEIO
CENTRIFUGAÇÃO
Tasto com indicador luminoso START/PAUSE: quando
o indicador luminoso verde, acender intermitentemente,
carregue na tecla para iniciar uma lavagem. Quando o
ciclo iniciar, o indicador permanecerá aceso fixo. Para
colocar em pausa a lavagem, carregar novamente no
botão; o indicador ficará intermitente com uma luz laranja.
Se o símbolo
abrir a porta de vidro (aguarde aproximadamente 3
minutos). Para fazer iniciar a lavagem do ponto em que foi
interrompida, carregar novamente na tecla.
Tecla BLOQUEIO DAS TECLAS: para activar o
bloqueio do painel de comandos, manter pressionada a
tecla durante aproximadamente 2 segundos. O símbolo
aceso indica que o painel de comandos está
bloqueado. Deste modo, impedem-se modificações
acidentais dos programas (à excepção da tecla ON/OFF),
sobretudo se houver crianças em casa. Para desactivar o
bloqueio do painel de comandos, mantenha pressionada a
tecla durante aproximadamente 2 segundos.
Tecla
não estiver iluminado, será possível
DAS
TECLAS
Tecla
INÍCIO
POSTERIOR
Tecla e indicador
luminoso
START/PAUSE
Tecla
INTENSIDADE LAVAGEM
seleccionar a intensidade de lavagem desejada.
Tecla TEMPERATURA
excluir a temperatura; o valor é indicado no visor.
Tecla CENTRIFUGAÇÃO
excluir completamente a centrifugação; o valor é indicado
no visor.
Tecla INÍCIO POSTERIOR
programar um início atrasado do programa escolhido; o
atraso é indicado no visor.
18
: pressionar para reduzir ou
: pressione para
: pressionar para reduzir ou
: pressionar para
Modalidade de Stand by
Esta máquina de lavar roupa, em conformidade com as
novas normas sobre a economia energética, dispõe de
um sistema de desligação automática (stand by) que entra
em função aproximadamente 30 minutos depois, no caso
de inutilização. Carregue brevemente no botão
aguarde até a reactivação da máquina.
ON/OFF e
Page 19

Visor
B
A
C
O visor é útil para programar a máquina e fornece muitas informações.
Na secção A é visualizada a duração dos vários programas à disposição e com o ciclo iniciado o tempo restante para o
fim do mesmo (no visor é visualizada a duração máxima do ciclo seleccionado, que pode diminuir após alguns minutos,
enquanto a duração efectiva do programa varia com base na carga de roupa e nas configurações realizadas); no caso
em que tenha sido programado um INÍCIO POSTERIOR, será visualizado o tempo Restante para o início do programa
seleccionado.
Além disto, ao carregar na respectiva tecla, serão visualizados os valores máximos da velocidade de centrifugação e
de temperatura que a máquina pode efectuar conforme o programa seleccionado ou os últimos valores seleccionados
compatíveis com o programa escolhido.
PT
Na secção B são visualizadas as “fases de lavagem” previstas para o ciclo seleccionado e com o programa iniciado a “fase
de lavagem” em curso.
Lavagem
Enxaguamento
Centrifugação
Descarga
Na secção C estão presentes, da esquerda para a direita, os ícones relativos à “temperatura”, à “centrifugação” e ao “Início
posterior”.
As barras da “temperatura”
As barras da “centrifugação”
programado.
O símbolo “INÍCIO POSTERIOR”
Indicador luminoso Porta bloqueada
O símbolo aceso indica que a porta está bloqueada. Para evitar danos é necessário aguardar que o símbolo apaga antes de
abrir a porta de vidro (aguarde aproximadamente 3 minutos).
Para abrir a porta durante a realização de um ciclo, carregar na tecla START/PAUSE; se o símbolo PORTA DE VIDRO
BLOQUEADA
estiver apagado será possível abrir a porta.
indicam o nível de temperatura relativo ao máximo seleccionável para o ciclo programado.
indicam o nível de centrifugação relativo ao máximo seleccionável para o ciclo
iluminado indica que no visor é visualizado o valor do “Início posterior” configurado.
19
Page 20

Como efectuar um ciclo de
lavagem
PT
1. LIGAR A MÁQUINA. Carregue na tecla ; o
indicador luminoso START/PAUSE piscará lentamente
na cor verde.
2. COLOCAR A ROUPA Abrir a porta de vidro. Coloque
a roupa dentro da máquina prestando atenção para
não superar a carga máxima indicada na tabela dos
programas na página seguinte.
3. DOSAGEM DO DETERGENTE.Extrair a gaveta e
deitar o detergente nos específicos recipientes como
explicado no parágrafo “Detergentes e roupa”.
4. FECHAR A PORTA DE VIDRO.
5. Escolha do programa. Seleccione com o selector
dos PROGRAMAS o programa desejado; ao mesmo
é associada uma temperatura e uma velocidade de
centrifugação que podem ser modificadas. No visor
aparecerá a duração do ciclo.
6. PERSONALIZAR O ciclo de lavagem. Utilizar as
específicas teclas:
Modificar a temperatura e/ou a centrifugação.
A máquina visualiza automaticamente a temperatura e a
centrifugação máximas para o programa seleccionado
ou as últimas seleccionadas se compatíveis com o
programa escolhido. Carregando no botão
reduzir a temperatura progressivamente até a lavagem
a frio “OFF”. Carregando no botão
a centrifugação progressivamente até a sua exclusão
“OFF”. Uma posterior pressão dos botões colocará os
valores novamente aos máximos previstos.
! Excepção: seleccionando o programa 4 a temperatura
pode ser aumentada até a 90ºC.
Programar um início posterior.
Para programar o início atrasado do programa
escolhido, carregue no botão relativo até alcançar o
tempo de atraso desejado. Quando a opção estiver
activa, no visor ilumina-se o símbolo
a opção de início posterior, carregue novamente na
tecla até que no visor apareça a escrita “OFF”.
Configurar a intensidade de lavagem desejada.
A opção
o grau de sujidade dos tecidos e à intensidade de
lavagem desejada.
Seleccionar o programa de lavagem, o ciclo será
configurado automaticamente no nível “Normal”,
optimizado para peças mediamente sujas (configuração
não válida para o ciclo “Lã” que configura-se
automaticamente no nível “Delicate”).
Para peças muito sujas, pressione a tecla
chegar ao nível “Intensive”. Este nível garante uma
lavagem de alto desempenho, graças ao uso de uma
permite optimizar a lavagem conforme
pode-se reduzir
pode-se
. Para cancelar
até
maior quantidade de água na fase inicial do ciclo e a
uma maior movimentação mecânica, útil para eliminar
as manchas mais resistentes. Pode ser utilizada com
ou sem lixívia.Se quiser efectuar o branqueamento,
coloque o recipiente adicional 4, fornecido com o
produto, no recipiente 1. Quando deitar a lixívia, não
ultrapasse o nível “máx” indicado no pino central (veja a
figura da pág. 22).
Para peças pouco sujas ou para um tratamento mais
delicado dos tecidos, pressione a tecla
o nível “Delicate”.
mecânica para garantir resultados de lavagem perfeitos
para as peças delicadas.
Modificar as características do ciclo.
• Pressionar o botão para activar a opção; o indicador
luminoso correspondente ao botão irá acender-se.
• Carregar novamente no botão para desactivar a opção;
o respectivo indicador luminoso irá apagar-se.
! Se a opção seleccionada não for compatível com o
programa definido, o indicador luminoso acender-se-á
intermitente e a opção não ficará activa.
! Se a opção seleccionada não for compatível com uma
outra programada anteriormente, o respectivo indicador
luminoso irá piscar e ficará activa somente a segunda, o
indicador luminoso do botão irá acender-se.
! As opções podem variar a carga recomendada e/ou a
duração do ciclo.
7. INICIAR O PROGRAMA. Carregar no botão START/
PAUSE. O respectivo indicador luminoso ficará azul
fixo e a porta de vidro irá bloquear-se (símbolo PORTA
BLOQUEADA
durante a realização de um ciclo, colocar a máquina
de lavar roupa em pausa carregando na tecla START/
PAUSE (o indicador luminoso START/PAUSE irá piscar
lentamente na cor laranja); seleccionar então o ciclo
desejado e carregar novamente no botão START/
PAUSE.
Para abrir a porta durante a realização de um ciclo,
carregar no botão START/PAUSE; se o símbolo PORTA
BLOQUEADA
porta (aguarde aproximadamente 3 minutos). Carregar
novamente no botão START/PAUSE para fazer iniciar o
programa do ponto em que foi interrompido.
8. FIM DO PROGRAMA. É indicado pela escrita “END”
no visor, quando o símbolo PORTA BLOQUEADA
irá apagar-se será possível abrir a porta (aguarde
aproximadamente 3 minutos). Abrir a porta, retirar a
roupa e desligar a máquina.
! Se desejar anular um ciclo já iniciado, carregue por
alguns segundos na tecla
máquina irá desligar-se.
O ciclo reduzirá a movimentação
aceso). Para modificar um programa
estiver apagado será possível abrir a
. O ciclo será interrompido e a
até alcançar
20
Page 21

Programas e opções
Tabela dos programas
Descrição do Programa
Programas
CLEAN Plus
Antimancha
1
Antimancha Ràpido
2
Brancos
3
Programas de lavagem normal de algodão 60ºC (1):
4
brancos e coloridos resistentes muito sujos.
Programas de lavagem normal de algodão 40ºC (2):
5
brancos e coloridos delicados pouco sujos.
Sintéticos: coloridos resistentes muito sujos.
6
Sintéticos (4): coloridos resistentes pouco sujos.
6
SPECIALS
Anti-alérgico Intensivo
7
Anti-alérgico Delicado
8
Lã: para lã, cashmere, etc.
9
Ultradelicado
10
ECO
Programas de lavagem normal de algodão 20ºC: brancos
11
e coloridos delicados pouco sujos.
Algodão
12
Sintéticos
13
Rápido 30’
14
Parciais
Enxaguamentos
Centrifugação e Descarga
Apenas descarga *
Velocità
Temp.
max. (°C)
max.
(rotações
minuto)
40° 1200
40° 1200 60° 1200
60°
(Max. 90°)
1200
40° 1200 -
60° 800
40° 800
60° 1200 40° 1200 40° 800 30° 0 -
20° 1200 -
água fria 1200 água fria 800 água fria 800 -
- 1200 - - -
Detergentes e aditivos
por
Pré-lava-
(3)
gem
Lavagem
Javel
Água de
-
-
-
-
-
-
-
-
(Kg)
Humidade
residual %
Amaciador
Carga max.
energia kWh
Consumo de
4 - - - 180’
3,5 - - - 60’
4 - - - 180’
7 53 0.94 52.5 160’
7 53 0.93 77 140’
3,5 44 0.93 47 115’
3,5 44 0.57 46 100’
4 - - - 195’
4 - - - 195’
1,5 - - - 70’
1 - - - 80’
7 - - - 170’
7 53 0.17 63 80’
3 48 0.07 30 70’
3 71 0.04 34 30’
7 - - - 36’
- 1200 - - - - 7 - - - 10’
- OFF - - - - 7 - - - 3’
Água total lt
Duração ciclo
PT
* Ao seleccionar o programa e excluindo a centrifugação, a máquina efectuará apenas a descarga.
A duração do ciclo indicada no visor ou no manual é uma estima calculada com base nas condições padrão. O tempo efectivo poderá variar a depender de vários factores, tais como a temperatura e a pressão da água em entrada, a temperatura ambiental, a quantidade de detergente, a quantidade e o tipo de carga, o balanceamento
da carga e as opções adicionais seleccionadas.
Para todos Test Institutes:
1) Programa de controlo segundo a directiva 1061/2010: configurar o programa 4 com uma temperatura de 60ºC.
Este ciclo é adapto para lavar uma carga de algodão normalmente suja e é o mais eficiente em termos de consumo combinado de energia e de água, para lavar a 60ºC. A temperatura efectiva de
lavagem pode ser diferente daquela indicada.
2) Programa de controlo segundo a directiva 1061/2010: configurar o programa 5 com uma temperatura de 40ºC.
Este ciclo é adapto para lavar uma carga de algodão normalmente suja e é o mais eficiente em termos de consumo combinado de energia e de água, para lavar a 40°C. A temperatura efectiva de
lavagem pode ser diferente daquela indicada.
3) À temperatura de 60 ºC, a função de “Pré-lavagem” não pode ser activada.
Para todos Test Institutes:
2) Programa longo para algodão: configurar o programa 5 com uma temperatura de 40ºC.
4) Programa longo para sintético: configurar o programa 6 com uma temperatura de 40ºC.
Opções de Lavagem
! Se a opção seleccionada não for compatível com o
programa definido, o indicador luminoso acender-se-á
intermitente e a opção não ficará activa.
! Se a opção seleccionada não for compatível com uma
outra programada anteriormente, o respectivo indicador
luminoso irá piscar e ficará activa somente a segunda, o
indicador luminoso do botão irá acender-se.
Enxaguamento Extra
Seleccionando esta opção aumenta-se a eficácia da
enxaguamento, e garante-se a máxima remoção do
detergente. É útil para quem tem a pele particularmente
sensível.
Pré-lavagem
Seleccionando esta função efectua-se a pré-lavagem, útil
para remover manchas resistentes.
Obs.: Acrescentar o detergente no específico
compartimento.
21
Page 22

Detergentes e roupa
M
AX
1
2
4
3
A
B
PT
Gaveta dos detergentes
O bom resultado da lavagem depende também do
emprego da dose certa de detergente: com excessos
não se lava de maneira mais eficaz, mas contribui-se para
formar crostas nas peças internas da máquina de lavar
roupa e poluir o meio ambiente.
! Usar detergentes em pó para roupas de algodão brancas
e para a pré-lavagem e para lavagens com temperatura
superior aos 60ºC.
! Seguir as indicações fornecidas pelo produtor na
embalagem do detergente.
! Não use detergentes para lavagem à mão, porque
formam demasiada espuma.
Tire a gaveta dos detergentes
e deite o detergente ou o
aditivo da seguinte maneira:
Gaveta 1: Detergente
para pré-lavagem (em pó)
Antes de deitar detergente
verifique se está colocada a
gaveta adicional 4.
Gaveta 2: Detergente
para lavagem (em pó ou
líquido)
No caso do uso de detergente líquido, aconselha-se
usar o recipiente A fornecido com o aparelho para uma
correcta dosagem. Para o uso do detergente em pó,
coloque o recipiente na cavidade B.
Gaveta 3: Aditivos (para amaciar etc.)
O aditivo para amaciar não deve ultrapassar a grade.
Gaveta adicional 4: Água de Javel
Preparar a roupa
• Divida a roupa em função:
- do tipo de tecido / do símbolo na etiqueta.
- as cores: separe as peças coloridas das brancas.
• Esvazie as algibeiras e verifique se há botões soltos.
• Não ultrapasse os valores indicados que se referem ao
peso da roupa enxuta: veja a “Tabela dos programas”.
Quanto pesa a roupa?
1 lençol 400 - 500 g.
1 fronha 150 - 200 g.
1 toalha de mesa 400 - 500 g.
1 roupão 900 - 1.200 g.
1 toalha de rosto 150 - 250 g.
Programas especiais
Antimancha: o programa 1 é adequado à lavagem de
peças muito sujas com cores resistentes. O programa
garante uma classe de lavagem superior à classe padrão
(classe A). Não misture roupas de cor diferente com este
programa. Aconselhamos a utilização de detergente
em pó. Para manchas resistentes recomenda-se prétratamento com aditivos específicos.
Antimancha Ràpido: o programa foi estudado para lavar
a roupa com manchas diárias, mesmo as mais difíceis,
numa hora. Adequado a roupa de cor de fibra mista,
garantindo o máximo cuidado.
Brancos: utilize o ciclo 3 para a lavagem de peças
brancas. O programa foi estudado para preservar no
tempo a luminosidade das peças brancas. Para obter
melhores resultados, recomenda-se o uso de detergente
em pó.
Anti-alérgico Intensivo: utilizar o programa 7 para
remover as principais causas de alergia, como pólen,
ácaros, pelos de gato e cão.
Anti-alérgico Delicado: ciclo estudado para roupas
em algodão e outros tecidos resistentes que garante a
remoção de pólenes e pêlos de cão e gato a 40º.
Lã: o ciclo de lavagem “Lã” desta máquina de lavar roupa
foi aprovado pela Woolmark Company para a lavagem
de vestuário em lã classificado como “lavável à mão”,
desde que a lavagem seja executada de acordo com
as instruções indicadas na etiqueta da peça e com as
indicações fornecidas pelo fabricante da máquina de lavar
roupa. (M1126)
Ultradelicado: utilize o programa 10 para a lavagem de
peças muito delicadas, que possuem aplicações como
aplicações ou brilhantes.
Para a lavagem de peças de seda e cortinas, seleccionar
o ciclo 10 e configurar o nível “Delicate” da opção
Recomenda-se virar do avesso as roupas antes de laválas e colocar as peças pequenas no saquinho específico
para a lavagem das peças delicadas.
Para obter melhores resultados, recomenda-se o uso de
detergente líquido para peças delicadas.
Programas Eco
Os programas Eco oferecem um bom desempenho de
lavagem já nas baixas temperaturas, permitindo um menor
gasto de energia eléctrica com benefícios para o meio
ambiente e maior economia.
Os programas Eco (12 Algodão, 13 Sintéticos e 14 Rápido
30’) foram criados para vários tipos de tecido e para
peças pouco sujas. Para garantir um resultado óptimo,
recomendamos usar detergente líquido; aconselha-se prétratar os punhos, colarinhos e manchas.
Programas de lagem normal de algodão 20ºC ideal
para cargas de algodão sujas. Os bons desempenhos
mesmo a frio, comparáveis a uma lavagem a 40º, são
garantidos por uma acção mecânica que trabalha
com alterações de velocidade em picos repetidos e
aproximados.
.
Sistema de balanceamento da carga
Antes de cada centrifugação, para evitar vibrações
excessivas e para distribuir a carga em modo uniforme,
o tambor efectua algumas rotações a uma velocidade
levemente superior àquela de lavagem. Se no fim
de repetidas tentativas a carga ainda não estiver
correctamente balanceada, a máquina efectuará a
centrifugação com uma velocidade inferior àquela
prevista. No caso de um excessivo desequilíbrio, a
máquina de lavar roupa efectuará a distribuição ao invés
da centrifugação. Para favorecer uma melhor distribuição
da carga e o seu correcto balanceamento, aconselha-se
misturar peças grandes com peças pequenas.
22
Page 23

Anomalias e soluções
Pode acontecer que a máquina de lavar roupa não funcione. Antes de telefonar para a Assistência Técnica (veja
“Assistência”), verifique se não se trata de um problema fácil de resolver com ajuda da seguinte lista.
Anomalias:
A máquina de lavar roupa não liga.
O ciclo de lavagem não inicia.
A máquina de lavar roupa
não carrega água (no visor é
visualizada a palavra “H2O”
intermitente).
A máquina de lavar roupa
carrega e descarrega água
continuamente.
A máquina de lavar roupa não
descarrega ou nem realiza
centrifugação.
Possíveis causas / Solução:
• A ficha não está colocada na tomada eléctrica, ou não o suficiente para haver
contacto.
• Em casa não há corrente.
• A porta de vidro não está bem fechada.
• O botão ON/OFF não foi pressionado.
• O botão START/PAUSE não foi pressionado.
• A torneira da água não está aberta.
• Foi programado um atraso de uma hora no início.
• O tubo de alimentação de água não está ligado na torneira.
• O tubo está dobrado.
• A torneira da água não está aberta.
• Está a faltar água em casa.
• Não há suficiente pressão.
• O botão START/PAUSE não foi pressionado.
• O tubo de descarga não está instalado entre 65 e 100 cm de altura do chão
(veja “Instalação”).
• A ponta do tubo de descarga está imersa na água (veja “Instalação”).
• Da descarga na parede não foi sangrado o ar.
Se depois destas verificações o problema não for resolvido, feche a torneira
da água, desligue a máquina de lavar roupa e chame a assistência técnica.
Se a morada encontrar-se nos últimos andares de um edifício, é possível que
aconteçam fenómenos de sifão por causa dos quais a máquina de lavar roupa
carrega e descarrega água continuamente. Para eliminar este inconveniente, há a
disposição no comércio apropriadas válvulas contra o efeito sifão.
• No programa não há descarga: com alguns programas será necessário iniciar a
descarga manualmente..
• O tubo de descarga está dobrado (veja “Instalação”).
• A conduta de descarga está entupida.
PT
A máquina de lavar roupa vibra
muito durante a centrifugação.
Da máquina de lavar roupa está a
vazar água.
Irão piscar os indicadores
luminosos das “Opções” e o
indicador de START/PAUSE e o
visor irá indicar um código de
anomalia (por ex.: F-01, F-..).
Está a formar-se demasiada
espuma.
• O tambor, no momento da instalação, não foi liberado correctamente (veja
“Instalação”).
• A máquina não está nivelada (veja “Instalação”).
• A máquina está apertada entre móveis e parede (veja “Instalação”).
• O tubo de alimentação da água não está bem enroscado (veja “Instalação”).
• O gaveta dos detergentes está entupida (para limpá-la veja “Manutenção e
cuidados”).
• O tubo de descarga não está fixado correctamente (veja “Instalação”).
• Desligue a máquina e tire a ficha da tomada, aguarde aproximadamente 1
minuto e volte a ligá-la.
Se a anomalia persistir, contacte a Assistência Técnica.
• O detergente não é específico para máquina de lavar roupa (deve haver a
escrita “para máquina de lavar”, “à mão e para máquina de lavar” ou similares).
• A dose foi excessiva.
23
Page 24

Assistência
PT
Antes de contactar a Assistência Técnica:
• Verifique se consegue resolver a anomalia sozinho (veja “Anomalias e soluções”);
• Reinicie o programa para verificar se o inconveniente foi resolvido;
• Em caso negativo, contacte um Centro de Assistência Técnica.
! Nunca recorra a técnicos não autorizados.
Comunique:
• o tipo de anomalia;
• o modelo da máquina (Mod.);
• o número de série (S/N)
Estas informações encontram-se na placa colocada na parte traseira da máquina de lavar roupa e na parte anterior abrindo
a porta de vidro.
24
Page 25

Instrukcja obsługi
PRALKA
PL
Polski
FMG 723
Spis treści
Instalacja, 26-27
Rozpakowanie i wypoziomowanie
Podłączenia hydrauliczne i elektryczne
Pierwszy cykl prania
Dane techniczne
Utrzymanie i konserwacja, 28
Odłączenie wody i prądu elektrycznego
Czyszczenie pralki
Czyszczenie szuadki na środki piorące
Konserwacja okrągłych drzwiczek i bębna
Czyszczenie pompy
Kontrola przewodu doprowadzającego wodę
Zalecenia i środki ostrożności, 29
Ogólne zasady bezpieczeństwa
Utylizacja
Opis pralki, 30-31
Panel sterowania
Wyświetlacz
PL
Jak wykonać cykl prania, 32
Programy i opcje, 22
Tabela programów
Opcje prania
Środki piorące i bielizna, 34
Szuadka na środki piorące
Przygotowanie bielizny
Programy specjalne
System równoważenia wsadu
Nieprawidłowości w
działaniu i sposoby ich usuwania, 35
Serwis Techniczny, 36
25
Page 26

Instalacja
PL
! Należy zachować niniejszą książeczkę,
aby móc z niej skorzystać w każdej chwili.
W przypadku sprzedaży, odstąpienia lub
przeniesienia pralki w inne miejsce należy
zadbać o przekazanie instrukcji wraz z nią,
aby nowy właściciel mógł się zapoznać z
działaniem urządzenia i z dotyczącymi go
ostrzeżeniami.
! Należy uważnie przeczytać instrukcję
obsługi: zawiera ona ważne informacje
dotyczące instalacji oraz właściwego i
bezpiecznego użytkowania pralki.
Rozpakowanie i wypoziomowanie
Rozpakowanie
1. Rozpakować pralkę.
2. Sprawdzić, czy nie doznała ona
uszkodzeń w czasie transportu. W przypadku
stwierdzenia uszkodzeń, nie podłączać pralki
i skontaktować się ze sprzedawcą.
3. Odkręcić 4 śruby
zabezpieczające
urządzenie na
czas transportu
oraz zdjąć gumowy
element z podkładką,
znajdujący się w
tylnej części pralki
(patrz rysunek).
4. Zatkać otwory przy pomocy plastikowych
zaślepek, znajdujących się w wyposażeniu
urządzenia.
5. Zachować wszystkie części: w razie
konieczności przewiezienia pralki w inne
miejsce, powinny one zostać ponownie
zamontowane.
! Części opakowania nie są zabawkami dla
dzieci.
Poziomowanie
1. Ustawić pralkę
na płaskiej i twardej
podłodze, nie
opierając jej o ściany,
meble itp.
2. Jeśli podłoga
nie jest idealnie
pozioma, należy
skompensować
nierówności, odkręcając lub dokręcając
przednie nóżki (patrz rysunek); kąt
nachylenia, zmierzony na górnym blacie
pralki, nie powinien przekraczać 2°.
Staranne wypoziomowanie pralki zapewnia
jej stabilność i zapobiega wibracjom,
hałasowi oraz przesuwaniu się urządzenia
w czasie pracy. W przypadku ustawienia na
dywanie lub wykładzinie dywanowej, należy
tak wyregulować nóżki, aby pod pralką
pozostawała wolna przestrzeń niezbędna dla
wentylacji.
Podłączenia hydrauliczne i
elektryczne
Podłączenie przewodu doprowadzającego
wodę
1. Podlacz przewód
zasilajacy poprzez
przykrecenie go do
zaworu zimnej wody z
koncówka gwintowana
(patrz rysunek):
Przed podłączeniem
spuszczać wodę do
momentu, aż stanie
się ona całkowicie
przezroczysta.
2. Podłączyć do
urządzenia przewód
doprowadzający
wodę, przykręcając
go do odpowiedniego
przyłącza wody,
znajdującego się w
tylnej części pralki, z
prawej strony u góry
(patrz rysunek).
3. Zwrócić uwagę, aby przewód nie był
pozaginany ani przygnieciony.
! Ciśnienie wody w kurku powinno mieścić
się w przedziale podanym w tabeli Danych
technicznych (patrz strona obok).
! Jeśli długość przewodu doprowadzającego
wodę jest niewystarczająca, należy zwrócić
się do specjalistycznego sklepu lub do
autoryzowanego technika.
! Nigdy nie instalować przewodów, które były
już używane.
! Stosować przewody znajdujące się w
wyposażeniu urządzenia.
26
Page 27

Podłączenie przewodu odpływowego
65 - 100 cm
Podłączyć przewód
odpływowy, nie
zginając go, do rury
ściekowej lub do
otworu odpływowego
w ścianie, które
powinny się
znajdować na
wysokości od 65 do
100 cm od podłogi;
albo oprzeć
go na brzegu
zlewu lub wanny,
przymocowując do
kranu prowadnik,
znajdujący się
w wyposażeniu
pralki (patrz
rysunek). Wolny
koniec przewodu
odpływowego nie
powinien być zanurzony w wodzie.
! Odradza się używanie rur przedłużających;
jednak jeśli jest to konieczne, przedłużacz
powinien mieć taki sam przekrój, jak
oryginalna rura, a jego długość nie powinna
przekraczać 150 cm.
Podłączenie elektryczne
Przed włożeniem wtyczki do gniazdka
elektrycznego należy się upewnić, czy:
• gniazdko posiada uziemienie i jest zgodne
z obowiązującymi przepisami;
• gniazdko jest w stanie wytrzymać
maksymalne obciążenie mocy urządzenia,
wskazane w tabeli Danych technicznych
(patrz obok);
• napięcie zasilania mieści się w wartościach
wskazanych w tabeli Danych technicznych
(patrz obok);
• gniazdko pasuje do wtyczki pralki. W
przeciwnym razie należy wymienić
gniazdko lub wtyczkę.
! Nie należy instalować pralki na otwartym
powietrzu, nawet w osłoniętym miejscu,
gdyż wystawienie urządzenia na działanie
deszczu i burz jest bardzo niebezpieczne.
! Po zainstalowaniu pralki gniazdko
elektryczne powinno być łatwo dostępne.
! Nie używać przedłużaczy ani
rozgałęźników.
! Kabel nie powinien być pozginany ani
przygnieciony.
! Przewód zasilania elektrycznego może być
wymieniany wyłącznie przez autoryzowanych
techników.
Uwaga! Producent nie ponosi żadnej
odpowiedzialności, jeśli powyższe zasady
nie będą przestrzegane.
Pierwszy cykl prania
Po zainstalowaniu pralki, przed
przystąpieniem do jej użytkowania, należy
wykonać jeden cykl prania ze środkiem
piorącym, ale bez wsadu, nastawiając
program opcja czyszczenia pralki (patrz
“Czyszczenie pralki”).
Dane techniczne
Model FMG 723
szerokość cm 59,5
Wymiary
Pojemność od 1 do 7 kg
Dane prądu
elektrycznego
Dane sieci
wodociągowej
Szybkość
wirowania
Programy
testowe
zgodnie z
dyrektywami
1061/2010 i
1015/2010
wysokość cm 85
głębokość cm 54
dane techniczne umieszczone są na tabliczce na
maszynie
Maksymalne ciśnienie
1 MPa (10 barów)
ciśnienie minimalne
0,05 MPa (0,5 barów)
pojemność bębna 52 litrów
do 1200 obrotów na minutę
Program 4;
Bawełna Standard 60°C.
Program 5;
Bawełna Standard 40°C.
Urządzenie to zostało wyprodukowane zgodnie z
następującymi przepisami CE:
- 2004/108/CE (o
Kompatybilności Elektromagnetycznej)
- 2012/19/EU (WEEE)
- 2006/95/CE (o Niskim
Napięciu)
PL
27
Page 28

Utrzymanie i konserwacja
1
2
A
B
PL
Odłączenie wody i prądu
elektrycznego
• Zamknąć kurek dopływu wody po każdym
praniu. W ten sposób zmniejsza się zużycie
instalacji hydraulicznej pralki oraz eliminuje
się niebezpieczeństwo wycieków.
• Przed przystąpieniem do czyszczenia pralki
oraz do czynności konserwacyjnych wyjąć
wtyczkę z gniazdka.
Czyszczenie pralki
• Obudowę zewnętrzną i gumowe części pralki
można myć ściereczką zmoczoną w letniej wodzie
z mydłem. Nie stosować rozpuszczalników ani
ściernych środków czyszczących.
• Pralka jest wyposażona w program opcja
czyszczenia pralki części wewnętrznych,
który należy przeprowadzać nie
wprowadzając niczego do kosza pralki.
Środek piorący (w ilości równej 10% ilości
zalecanej dla lekko zabrudzonej odzieży)
lub dodatki przeznaczone specjalnie do
czyszczenia pralek, mogą zostać użyte
jako środki pomocnicze podczas programu
czyszczenia. Zaleca się przeprowadzanie
programu czyszczenia co 40 cykli prania.
W celu uruchomienia
programu
należy nacisnąć
równocześnie
przyciski A i B przez
5 sek. (zob. rysunek).
Program rozpocznie
się automatycznie i
będzie trwał około
70 minut. W celu
zakończenia cyklu, należy nacisnąć przycisk
START/PAUSE.
Czyszczenie szuadki na środki
piorące
Wysunąć szuadkę,
unosząc ją lekko ku
górze i wyciągając
na zewnątrz (patrz
rysunek).
Wypłukać szuadkę
pod bieżącą wodą.
Czynność tę
należy wykonywać
stosunkowo często.
Konserwacja okrągłych drzwiczek i
bębna
• Drzwiczki pralki należy zawsze
pozostawiać uchylone, aby zapobiec
tworzeniu się nieprzyjemnych zapachów.
Czyszczenie pompy
Pralka wyposażona jest w pompę
samoczyszczącą, która nie wymaga
zabiegów konserwacyjnych. Może się
jednak zdarzyć, że drobne przedmioty
(monety, guziki) wpadną do komory wstępnej
zabezpieczającej pompę, która znajduje się
w jej dolnej części.
! Należy się upewnić, że cykl prania został
zakończony i wyjąć wtyczkę z gniazdka.
Aby dostać się do komory wstępnej:
1. zdjąć panel
pokrywy z przedniej
strony pralki przy
pomocy śrubokrętu
(patrz rysunek);
2. odkręcić pokrywę,
obracając ją w
kierunku przeciwnym
do ruchu wskazówek
zegara (patrz
rysunek): wypłynięcie
niewielkiej ilości
wody jest normalnym
zjawiskiem;
3. dokładnie wyczyścić wnętrze;
4. ponownie przykręcić pokrywę;
5. ponownie założyć panel upewniwszy
się, przed dociśnięciem go do maszyny,
czy zatrzaski zostały umieszczone w
odpowiednich otworach.
Kontrola przewodu
doprowadzającego wodę
Przynajmniej raz w roku należy sprawdzić
przewód doprowadzający wodę. Jeśli
widoczne są na nim pęknięcia i rysy, należy
go wymienić: w trakcie prania duże ciśnienie
może bowiem spowodować jego nagłe
rozerwanie.
! Nigdy nie instalować już używanych
przewodów.
28
Page 29

Zalecenia i środki
ostrożności
! Pralka została zaprojektowana i wyprodukowana
zgodnie z międzynarodowymi normami bezpieczeństwa.
Niniejsze ostrzeżenia zostały tu zamieszczone ze
względów bezpieczeństwa i należy je uważnie przeczytać.
Ogólne zasady bezpieczeństwa
• Urządzenie to zostało zaprojektowane wyłącznie do
użytkowania w warunkach domowych.
•
Z niniejszego urządzenia mogą korzystać
dzieci powyżej 8 roku życia i osoby o
ograniczonych zdolnościach zycznych,
zmysłowych bądź umysłowych, jak również
osoby nieposiadające doświadczenia lub
znajomości urządzenia, jeśli znajdują się one
pod nadzorem innych osób lub jeśli zostały
pouczone na temat bezpiecznego sposobu
użycia urządzenia oraz zdają sobie sprawę
ze związanych z nim zagrożeń. Dzieci nie
powinny bawić się urządzeniem. Prace
związane z czyszczeniem i konserwacją nie
mogą być wykonywane przez dzieci, jeśli nie
są one nadzorowane.
• Nie dotykać pralki stojąc przy niej boso lub mając
mokre lub wilgotne ręce albo stopy.
• Nie wyjmować wtyczki z gniazdka ciągnąc za kabel,
należy trzymać za wtyczkę.
• W trakcie pracy maszyny nie otwierać szuadki na
środki piorące.
• Nie dotykać odprowadzanej wody, gdyż może ona być
bardzo gorąca.
• W żadnym wypadku nie otwierać na siłę drzwiczek pralki:
grozi to uszkodzeniem mechanizmu zabezpieczającego
drzwiczki przed przypadkowym otwarciem.
• W razie wystąpienia usterki nie należy w żadnym
wypadku ingerować w wewnętrzne części pralki z
zamiarem samodzielnego dokonania naprawy.
• Zawsze uważać, aby dzieci nie zbliżały się do
pracującej pralki.
• W czasie prania drzwiczki pralki nagrzewają się.
• Jeśli trzeba przenieść pralkę w inne miejsce, należy to
robić bardzo ostrożnie, w dwie lub trzy osoby. Nigdy
nie należy samodzielnie przenosić urządzenia, gdyż
jest ono bardzo ciężkie.
• Przed włożeniem bielizny sprawdzić, czy bęben jest
pusty.
materiałów, z których są one zbudowane, oraz
aby zapobiec potencjalnym szkodom dla zdrowia
i środowiska. Symbol przekreślonego kosza jest
umieszczony na wszystkich produktach w celu
przypominania o obowiązku ich segregacji.
Właściciele urządzeń gospodarstwa domowego
mogą uzyskać dodatkowe informacje dotyczące ich
prawidłowej utylizacji, zwracając się do odpowiednich
służb publicznych lub do sprzedawców tych urządzeń.
PL
Utylizacja
• Utylizacja opakowania:
stosować się do lokalnych przepisów, dzięki temu
opakowanie będzie mogło zostać ponownie wykorzystane.
• Dyrektywa europejska 2012/19/EU dotycząca
odpadów urządzeń elektrycznych i elektronicznych
przewiduje, że elektryczne urządzenia gospodarstwa
domowego nie powinny być utylizowane w normalnym
ciągu utylizacji stałych odpadów miejskich. Stare
urządzenia powinny być zbierane oddzielnie, aby
zoptymalizować stopień odzysku i recyrkulacji
29
Page 30

Opis pralki
PL
Panel sterowania
Przycisk ON/OFF
POKRĘTŁO
Szuadka na środki piorące
Szuadka na środki piorące: do dozowania środków
piorących i dodatków (patrz “Środki piorące i bielizna”).
Przycisk ON/OFF
celu włączenia lub wyłączenia maszyny. Kontrolka
START/PAUSE, która pulsuje powoli w kolorze
zielonym wskazuje, że maszyna jest włączona. W celu
wyłączenia pralki podczas prania konieczne jest dłuższe
przytrzymanie naciśniętego przycisku, przez około 3
sek.; krótkie lub przypadkowe naciśnięcie nie wystarczy
do wyłączenia maszyny. Wyłączenie maszyny podczas
trwającego prania anuluje program prania.
POKRĘTŁO PROGRAMÓW: w celu ustawienia
żądanego programu (patrz “Tabela programów”).
Przyciski i kontrolki OPCJI: służą do wybierania
dostępnych funkcji. Kontrolka wybranej opcji pozostanie
włączona.
Przycisk
wybrania żądanego stopnia intensywności prania.
Przycisk TEMPERATURA
zmniejszenia lub całkowitego wyłączenia temperatury;
ustawiona wartość zostanie wskazana na wyświetlaczu.
Przycisk WIROWANIE
liczby obrotów lub całkowitego wyłączenia wirówki;
ustawiona wartość zostanie wskazana na wyświetlaczu.
SIŁA CZYSZCZENIA
: nacisnąć krótko przycisk w
: nacisnąć w celu
: naciskać w celu
: naciskać w celu zmniejszenia
PROGRAMÓW
Przycisk
Przycisk
TEMPERATURA
Przycisk
WIROWANIE
Przycisk z kontrolką START/PAUSE: kiedy zielona
kontrolka pulsuje powoli, nacisnąć przycisk w celu
uruchomienia prania. Po uruchomieniu cyklu kontrolka
świeci w sposób ciągły. W celu wybrania pauzy w praniu
należy nacisnąć ponownie przycisk, kontrolka zacznie
pulsować w kolorze pomarańczowym. Jeśli symbol
nie świeci się, można otworzyć drzwiczki (odczekać
około 3 minuty). W celu ponownego uruchomienia
prania od miejsca, w którym zostało przerwane, należy
ponownie nacisnąć przycisk.
Przycisk
wyłączenia blokady panelu sterowania należy
przytrzymać naciśnięty przycisk przez około 2 sekundy.
Podświetlony symbol
został zablokowany. W ten sposób uniemożliwia się
dokonywanie przypadkowych zmian w programach (z
wyjątkiem przycisk ON/OFF), zwłaszcza, jeśli w domu
obecne są dzieci.
W celu wyłączenia blokady panelu sterowania należy
przytrzymać naciśnięty przycisk przez około 2 sekundy.
Funkcja stand by
Pralka ta, w myśl nowych norm europejskich związanych
z oszczędnością elektryczną, posiada system auto
wyłączenia (stand by), który włącza się po 30 minutach
nie użytkowania. Ponownie lekko wcisnąć przycisk
ON-OFF i poczekać, aż pralka ponownie włączy się.
BLOKADA
Przyciski i
kontrolki OPCJI
WYŚWIETLACZ
Przycisk
BLOKADA
Przycisk
OPÓŹNIENIE
: w celu uruchomienia lub
wskazuje, że panel sterowania
SIŁA
CZYSZCZENIA
Przycisk i kontrolka
START/PAUSE
Przycisk
opóźnionego startu wybranego programu; opóźnienie
zostanie wskazane na wyświetlaczu.
30
OPÓŹNIENIE : naciskać w celu ustawienia
Page 31

Wyświetlacz
B
A
C
Wyświetlacz pomaga zaprogramować urządzenie i dostarcza wielu informacji.
W sekcji A wyświetla się czas trwania dostępnych programów, a po rozpoczęciu cyklu czas, jaki pozostaje do jego
zakończenia (na wyświetlaczu zostanie wyświetlony maksymalny czas trwania wybranego cyklu, który może ulec
skróceniu po kilku minutach, ponieważ rzeczywisty czas trwania cyklu zależy od wsadu i wprowadzonych ustawień);
natomiast jeśli została ustawiona funkcja
wybranego programu.
Ponadto, po naciśnięciu odpowiednich przycisków wyświetlają się maksymalne wartości szybkości wirowania i
temperatury dla ustawionego programu lub ostatnie zaprogramowane wartości, jeśli są one odpowiednie dla wybranego
programu.
OPÓŹNIENIE, wyświetla się czas pozostający do momentu rozpoczęcia
PL
W sekcji B wyświetlane są “fazy prania” przewidziane dla wybranego cyklu, a po rozpoczęciu programu aktualna “faza
prania”:
Pranie
Płukanie
Wirowanie
Odprowadzanie wody
W sekcji C są umieszczone, kolejno od lewej do prawej strony, ikony “temperatury”, “wirowania” i “Startu z opóźnieniem”.
Kreski “temperatura”
ustawiony dla wybranego cyklu.
Kreski “wirowanie”
ustawiony dla wybranego cyklu.
Świecący symbol “Startu z opóźnieniem”
opóźnieniem”.
Kontrolka BLOKADY DRZWICZEK
Jeśli symbol się świeci, oznacza to, że drzwiczki są zablokowane. Aby uniknąć uszkodzenia pralki, przed przystąpieniem
do otwierania drzwiczek należy odczekać, aż symbol ten zgaśnie. Aby otworzyć drzwiczki w trakcie trwania cyklu,
należy nacisnąć przycisk START/PAUSE; kiedy symbol BLOKADY DRZWICZEK
(odczekać około 3 minuty).
wskazują poziom temperatury w odniesieniu do maksymalnego poziomu, jaki może być
wskazują poziom wirowania w odniesieniu do maksymalnego poziomu, jaki może być
wskazuje, że na wyświetlaczu można odczytać ustawioną wartość “Startu z
zgaśnie, można otworzyć drzwiczki
31
Page 32

Jak wykonać cykl prania
PL
1. WŁĄCZENIE MASZYNY. Nacisnąć przycisk ,
kontrolka START/PAUSE zacznie powoli pulsować w
kolorze zielonym.
2. ZAŁADOWAĆ BIELIZNĘ. Otworzyć drzwiczki.
Włożyć bieliznę, uważając, aby nie przekroczyć
wielkości wsadu wskazanej w tabeli programów
znajdującej się na następnej stronie.
3. WSYPAĆ ŚRODEK PIORĄCY. Wysunąć szuadkę
i umieścić środek piorący w odpowiednich komorach
zgodnie ze wskazówkami zawartymi w rozdziale
“Środki piorące i bielizna”.
4. ZAMKNĄĆ DRZWICZKI.
5. WYBRAĆ PROGRAM. Przy pomocy pokrętła
PROGRAMY wybrać żądany program; ma on
wstępnie ustawioną temperaturę i prędkość
wirowania, jednak wartości te można zmienić. Na
wyświetlaczu pojawi się czas trwania cyklu.
6. SPERSONALIZOWAĆ CYKL PRANIA. Naciskać
odpowiednie przyciski:
Zmienić temperaturę i/lub prędkość wirowania.
Urządzenie automatycznie wyświetla maksymalne
wartości temperatury i prędkości wirowania dla
ustawionego programu lub ostatnie wybrane wartości,
jeśli są one zgodne z ustawionym programem.
Naciskając przycisk
temperaturę, aż do prania na zimno “OFF”. Naciskając
przycisk
wirowania, aż do jego wyłączenia “OFF”. Dodatkowe
naciśnięcie przycisków przywróci maksymalne
dostępne wartości.
! Wyjątek: wybierając program 4 temperaturę można
podnieść aż do 90°.
Ustawić start z opóźnieniem.
W celu ustawienia opóźnionego rozpoczęcia
wybranego programu należy naciskać odpowiedni
przycisk aż do osiągnięcia żądanego czasu
opóźnienia. Kiedy ta opcja jest aktywna, na
wyświetlaczu zaświeca się symbol
OPÓŹNIENIE, należy naciskać przycisk do momentu
pojawienia się na wyświetlaczu napisu “OFF”.
Ustawić żądany stopień intensywności prania.
Opcja
zależności od stopnia zabrudzenia tkanin oraz
żądanej intensywności prania.
Wybrać program prania, cykl zostanie automatycznie
ustawiony na poziomie „Normal”, przeznaczonym
dla średnio zabrudzonej odzieży, (ustawienie to
nie stosuje się dla cyklu „Wełna”, który ustawia się
automatycznie na poziomie „Delicate”).
W przypadku silnie zabrudzonej odzieży, należy
nacisnąć przycisk
„Intensive”. Poziom ten gwarantuje wysokiej
stopniowo zmniejsza się prędkość
umożliwia optymalizację prania w
stopniowo zmniejsza się
. Aby anulować
aż do przejścia do poziomu
jakości pranie, dzięki użyciu większej ilości wody w
początkowej fazie cyklu i intensywniejszym ruchom
mechanicznym służy do usuwania najoporniejszych
plam. Może być używany z wybielaczem i bez niego.
Jeśli chce się przeprowadzić wybielanie, należy
włożyć dodatkową szuadkę 4, znajdującą się
w wyposażeniu, do szuadki 1. Nie przekraczać
poziomu „max” wybielacza w płynie, podanej na
środkowym wskaźniku (zobacz rysunek na str. 34).
W przypadku lekko zabrudzonej odzieży lub w celu
delikatnego obchodzenia się z tkaninami, należy
nacisnąć przycisk
„Delicate”. Cykl zredukuje ruchy mechaniczne, aby
zagwarantować doskonały efekt prania delikatnej
odzieży.
Zmiana charakterystyki cyklu.
• Naciskać przycisk w celu włączenia opcji; zaświeci
się kontrolka odpowiadająca przyciskowi.
• Ponownie nacisnąć przycisk w celu wyłączenia
opcji; kontrolka zgaśnie.
! Jeśli wybrana opcja jest niezgodna z ustawionym
programem, kontrolka będzie pulsować i opcja nie
zostanie włączona.
! Jeśli wybrana opcja nie może być łączona z inną,
ustawioną wcześniej, kontrolka pierwszej wybranej
opcji będzie migać i włączona zostanie tylko druga
opcja, której kontrolka zaświeci się.
! W zależności od opcji może się zmieniać zalecana
objętość wsadu i/lub czas trwania cyklu.
7. URUCHOMIĆ PROGRAM. Nacisnąć przycisk START/
PAUSE. Odpowiednia kontrolka zaświeci się kolorem
zielonym i drzwiczki zostaną zablokowane (włączy się
symbol BLOKADY DRZWICZEK
programu w czasie trwania cyklu należy ustawić
pralkę w trybie pauzy, naciskając przycisk START/
PAUSE (kontrolka START/PAUSE zacznie powoli
pulsować bursztynowym światłem); następnie wybrać
żądany cykl i ponownie nacisnąć przycisk START/
PAUSE. W celu otwarcia drzwiczek w trakcie trwania
cyklu należy nacisnąć przycisk START/PAUSE;
kiedy symbol BLOKADY DRZWICZEK
można otworzyć drzwiczki (odczekać około 3 minuty).
Nacisnąć ponownie przycisk START/PAUSE, aby
uruchomić program od momentu, w którym został on
przerwany.
8. KONIEC PROGRAMU. Wskazywany jest przez
napis “END” na wyświetlaczu, kiedy symbol BLOKADY
DRZWICZEK
(odczekać około 3 minuty). Otworzyć drzwiczki, wyjąć
bieliznę i wyłączyć urządzenie.
! Aby anulować już rozpoczęty cykl, należy długo
przytrzymać wciśnięty przycisk
przerwany i urządzenie wyłączy się.
aż do przejścia do poziomu
). W celu zmiany
zgaśnie,
zgaśnie, można otworzyć drzwiczki
. Cykl zostanie
32
Page 33

Programy i opcje
Zużycie energii kWh
Tabela programów
Środki piorące i
Opis programu
Programy
CLEAN Plus
Odplamianie
1
Szybkie Odplamianie
2
Białe
3
Bawełna Standard 60°C (1):
4
wytrzymałe, mocno zabrudzone.
Bawełna Standard 40°C (2): tkaniny białe lekko zabrudzo-
5
ne i delikatne kolorowe.
Syntetyczne: tkaniny kolorowe, wytrzymałe, mocno zabrudzone
6
Syntetyczne (4): tkaniny kolorowe, wytrzymałe,
6
SPECIALS
Antyalergiczny Plus
7
Antyalergiczny Soft
8
Wełna: do wełny, kaszmiru, itp.
9
Delikatne
10
ECO
Bawełna Standard 20°C: tkaniny białe lekko zabrudzone i
11
delikatne kolorowe.
Bawełna Eco
12
Syntetyczne Eco
13
Szybki 30’
14
Częściowe
Płukanie
Wirowanie + Odprowadzanie Wody
Tylko Odprowadzanie wody *
* Po wybraniu programu i wyłączeniu wirowania maszyna wykona jedynie opróżnianie z wody.
Czas trwania cyklu wskazany na wyświetlaczu lub w instrukcji jest czasem oszacowanym dla standardowych warunków. Rzeczywisty czas trwania cyklu może się
zmieniać w zależności od wielu czynników, takich jak temperatura i ciśnienie wody na wlocie, temperatura otoczenia, ilość detergentu, ilość i rodzaj pranej odzieży,
wyważenie ładunku, wybrane opcje dodatkowe.
1) Program sterowania zgodny z normą 1061/2010:
Ten cykl jest odpowiedni do prania średnio zabrudzonej odzieży bawełnianej i jest najbardziej wydajnym cyklem pod względem łącznego zużycia energii elektrycznej i wody; należy go używać
do odzieży przeznaczonej do prania w 60°C. Rzeczywista temperatura prania może się różnić od podanej.
2) Program sterowania zgodny z normą 1061/2010:
Ten cykl jest odpowiedni do prania średnio zabrudzonej odzieży bawełnianej i jest najbardziej wydajnym cyklem pod względem łącznego zużycia energii elektrycznej i wody; należy go używać
do odzieży przeznaczonej do prania w 40°C. Rzeczywista temperatura prania może się różnić od podanej.
3) W temperaturze 60 °C nie można włączyć funkcji “Pranie wstępne”.
Dla wszystkich Test Institutes:
2) Program bawełna, długi:
4)
Program tkaniny syntetyczne długi: ustawić
ustawić
tkaniny białe i kolorowe,
lekko
zabrudzone.
ustawić
program 4 z temperaturą 60°C.
ustawić
program 5 z temperaturą 40°C.
program 5 z temperaturą 40°C.
program 6 z temperaturą 40°C.
Temp.
maks.
(Max. 90°)
zimna woda
zimna woda
zimna woda
Prędkość
maks.
(°C)
(obroty
na
minutę)
40° 1200
40° 1200
60° 1200
60°
1200
40° 1200 -
60° 800
40° 800
60° 1200 40° 1200 40° 800 30° 0 -
20° 1200 -
1200 -
800 800 -
- 1200 - - -
- 1200 - - - - 7 - - - 10’
- OFF - - - - 7 - - - 3’
dodatki
Pranie
Pranie wstępne
(3)
Wybielacz
-
-
-
-
-
-
-
-
Środek
zmiękczający
3,5 - - - 60’
sztkowa%
Wilgotność re-
Wsad maks. (kg)
4 - - - 180’
4 - - - 180’
7 53 0.94 52.5 160’
7 53 0.93 77 140’
3,5 44 0.93 47 115’
3,5 44 0.57 46 100’
4 - - - 195’
4 - - - 195’
1,5 - - - 70’
1 - - - 80’
7 - - - 170’
7 53 0.17 63 80’
3 48 0.07 30 70’
3 71 0.04 34 30’
7 - - - 36’
Czas trwania
Woda łącznie lt
PL
cyklu
Opcje prania
! Jeśli wybrana opcja jest niezgodna z ustawionym
programem, kontrolka będzie pulsować i opcja nie
zostanie włączona.
! Jeśli wybrana opcja nie może być łączona z inną,
ustawioną wcześniej, kontrolka pierwszej wybranej opcji
będzie migać i włączona zostanie tylko druga opcja,
której kontrolka zaświeci się.
Extra Płukanie
Wybierając tę opcję zwiększa się skuteczność płukania i
zapewnia się maksymalne usunięcie środka piorącego. Opcja
ta jest przydatna dla osób o szczególnie wrażliwej skórze.
Pranie Wstępne
W przypadku wyboru tej funkcji zostanie wykonane
pranie wstępne, które ułatwia usunięcie uporczywych
plam.
N.B.Należy umieścić środek piorący w odpowiedniej
przegródce.
33
Page 34

Środki piorące i bielizna
M
AX
1
2
4
3
A
B
PL
Szuadka na środki piorące
Dobry rezultat prania zależy również od prawidłowego
dozowania środka piorącego: użycie jego nadmiernej
ilości nie poprawia skuteczności prania, lecz przyczynia
się do powstawania nalotów na wewnętrznych częściach
pralki i do zanieczyszczania środowiska.
! piorące w proszku należy stosować do tkanin z
białej bawełny i do prania wstępnego oraz do prania w
temperaturze przekraczającej 60°C. Środki
! Należy stosować się do zaleceń podanych na
opakowaniu środka piorącego.
! Nie stosować środków do prania ręcznego, ponieważ
tworzą one za dużo piany.
Wysunąć szuadkę i
umieścić w niej środek
piorący lub dodatkowy w
następujący sposób.
Przegródka 1: Środek
piorący do prania
wstępnego
(w proszku)
Przed wsypaniem środka
piorącego należy sprawdzić,
czy nie jest włożony
dodatkowy pojemnik 4.
Przegródka 2: Środek piorący do prania
zasadniczego (w proszku lub w płynie)
W przypadku stosowania środka piorącego w
płynie, zaleca się użycie ścianki A dostarczonej na
wyposażeniu, która ułatwia prawidłowe dozowanie. W
celu użycia środka piorącego w proszku, należy wsunąć
ściankę w zgłębienie B.
Przegródka 3: Środki dodatkowe (zmiękczające, itp.)
Środek zmiękczający nie powinien wypływać poza kratkę.
Dodatkowy pojemnik 4: Wybielacz
Przygotowanie bielizny
• Podzielić bieliznę do prania według:
- rodzaju tkaniny / symbolu na etykiecie.
- kolorów: oddzielić tkaniny kolorowe od białych.
• Opróżnić kieszenie i sprawdzić guziki.
• Nie przekraczać wskazanego ciężaru suchej bielizny:
patrz “Tabela programów”.
Ile waży bielizna?
1 prześcieradło 400-500 gr.
1 poszewka 150-200 gr.
1 obrus 400-500 gr.
1 szlafrok 900-1.200 gr.
1 ręcznik 150-250 gr.
Programy specjalne
Odplamianie: program 1 odpowiedni do prania silnie
zabrudzonej odzieży o trwałych kolorach. Program
gwarantuje klasę prania wyższą od standardowej (klasa
A). Nie używać programu, gdy miesza się odzież w
różnych kolorach. Zalecamy stosowanie środka piorącego
w proszku. W przypadku szczególnie opornych plam,
zalecamy wcześniej zastosowanie specjalnych dodatków.
Szybkie Odplamianie: program został opracowany
do prania w jedną godzinę bielizny zabrudzonej
codziennymi plamami, nawet najbardziej uporczywymi.
Odpowiedni do tkanin kolorowych z włókien mieszanych,
gwarantuje ich maksymalną ochronę.
Białe: z cyklu 3 należy korzystać do prania białych
tkanin. Program został opracowany tak, aby chronił przed
szarzeniem białych tkanin.
W celu osiągnięcia najlepszych wyników zaleca się
stosowanie detergentu w proszku
Antyalergiczny Plus: programu
usuwania głównych alergenów, takich jak pyłki, roztocza,
sierść kotów i psów.
Antyalergiczne Soft: cykl opracowany do prania odzieży
bawełnianej i wytrzymałych tkanin, gwarantujący usunięcie
pyłków oraz psiej i kociej sierści już w 40°.
7
należy używać do
Wełna: cykl prania „Wełna” niniejszej pralki został
zatwierdzony przez Woolmark Company jako
odpowiedni do prania odzieży wełnianej i przeznaczonej
do prania ręcznego, pod warunkiem, że pranie jest
przeprowadzane zgodnie z instrukcjami podanymi na
etykiecie ubrania oraz ze wskazówkami dostarczonymi
przez producenta pralki. (M1126)
Delikatne: używać programu 10 do prania bardzo delikatnej
odzieży, ozdobionej cekinami lub koralikami.
Do prania jedwabiu i zasłon, należy wybrać cykl
ustawić poziom „
Zalecamy wywrócenie ubrań na lewą stronę i włożenie
małych części odzieży do woreczka przeznaczonego
specjalnie do prania delikatnych ubrań. Dla osiągnięcia
najlepszych efektów, zalecamy stosowanie środka
piorącego w płynie do tkanin delikatnych.
Programy Eco
Programy Eco dają dobre wyniki prania w niskich
temperaturach, umożliwiając mniejsze zużycie energii
elektrycznej, co przekłada się na korzyści dla środowiska
naturalnego oraz oszczędności pieniężne.
Programy Eco (12 Bawełna Eco, 13 Syntetyczne Eco i 14
Szybki 30’) zostały utworzone dla różnych rodzajów tkanin i
dla odzieży mało zabrudzonej. Dla osiągnięcia najlepszych
rezultatów zalecamy stosowanie środka piorącego w płynie;
przed praniem użyć odpowiedniego środka do czyszczenia
kołnierzyków, mankietów i usuwania plam.
Bawełna Standard 20°C: idealny do zabrudzonej bielizny
bawełnianej. Dobre wyniki prania w zimnej wodzie,
porównywalne z praniem w 40°, są gwarantowane dzięki
działaniu mechanicznemu, wykonywanemu ze zmienną
prędkością, której maksymalne wartości powtarzają się w
krótkich odstępach czasu.
Delicate” opcji .
10
i
System równoważenia wsadu
Przed każdym wirowaniem, aby uniknąć nadmiernych drgań
oraz jednorodnie rozłożyć wsad, bęben wykonuje obroty
z prędkością nieco większą niż podczas prania. Jeśli po
kilku próbach wsad nie zostanie prawidłowo zrównoważony,
urządzenie wykona wirowanie z prędkością mniejszą od
przewidywanej. W przypadku wystąpienia nadmiernego
niezrównoważenia wsadu pralka dokona jego rozłożenia
zamiast odwirowania. Aby zapewnić lepsze rozłożenie
wsadu oraz jego właściwe zrównoważenie zaleca się
mieszanie dużych i małych sztuk bielizny.
34
Page 35

Nieprawidłowości w działaniu
i sposoby ich usuwania
Może się zdarzyć, że pralka nie działa. Przed wezwaniem Serwisu Technicznego (patrz „Serwis Techniczny”) należy
sprawdzić, czy problemu nie da się łatwo rozwiązać korzystając z poniższego wykazu.
Nieprawidłowości w działaniu:
Pralka nie włącza się.
Cykl prania nie rozpoczyna się.
Pralka nie pobiera wody (Na
wyświetlaczu pulsuje napis H2O).
Pralka cały czas pobiera i
odprowadza wodę.
Pralka nie odprowadza wody i nie
odwirowuje prania.
Możliwe przyczyny / Rozwiązania:
• Wtyczka nie jest włączona do gniazdka lub jest wsunięta za słabo, w taki
sposób, że nie ma styku.
• W domu nie ma prądu.
• Drzwiczki nie są dokładnie zamknięte.
• Nie został wciśnięty przycisk ON/OFF.
• Nie został wciśnięty przycisk START/PAUSE.
• Kurek dopływu wody jest zamknięty.
• Zostało ustawione opóźnienie godziny rozpoczęcia prania.
• Przewód doprowadzający wodę nie jest podłączony do zaworu.
• Przewód jest pozaginany.
• Kurek dopływu wody jest zamknięty.
• W domu nastąpiła przerwa w dostawie wody.
• Ciśnienie wody nie jest wystarczające.
• Nie został wciśnięty przycisk START/PAUSE.
• Przewód odpływowy nie został zainstalowany na wysokości między 65 a 100
cm od podłogi (patrz “Instalacja”).
• Końcówka przewodu odpływowego jest zanurzona w wodzie (patrz “Instalacja”).
• Otwór odpływowy w ścianie nie posiada odpowietrznika.
Jeśli po sprawdzeniu tych możliwości problem nie zostanie rozwiązany, należy
zamknąć kurek dopływu wody, wyłączyć pralkę i wezwać Serwis Techniczny.
Jeśli mieszkanie znajduje się na najwyższych piętrach budynku, może wystąpić
efekt syfonu, w wyniku którego pralka cały czas pobiera i odprowadza wodę.
W celu wyeliminowania tej niedogodności należy zakupić specjalny zawór,
zapobiegający powstawaniu efektu syfonu.
• Program nie przewiduje odprowadzania wody: w przypadku niektórych
programów należy uruchomić je ręcznie.
• Przewód odpływowy jest pozaginany (patrz “Instalacja”).
• Instalacja ściekowa jest zatkana.
PL
Pralka mocno wibruje w fazie
wirowania.
Z pralki wycieka woda.
Kontrolki “Opcje” oraz START/
PAUSE szybko pulsują, a na
wyświetlaczu pojawia się kod
nieprawidłowości (np.: F-01, F-..).
Tworzy się zbyt duża ilość piany.
• Podczas instalacji pralki bęben nie został prawidłowo odblokowany (patrz
“Instalacja”).
• Pralka nie jest właściwie wypoziomowana (patrz “Instalacja”).
• Pralka, zainstalowana pomiędzy meblami a ścianą, ma za mało miejsca (patrz
“Instalacja”).
• Przewód doprowadzający wodę nie jest dobrze przykręcony (patrz “Instalacja”).
• Szuadka na środki piorące jest zatkana (w celu jej oczyszczenia patrz
“Utrzymanie i konserwacja”).
• Przewód odpływowy nie jest dobrze zamocowany(patrz “Instalacja”).
• Wyłączyć urządzenie i wyjąć wtyczkę z gniazdka, odczekać około 1 minuty,
następnie włączyć je ponownie.
Jeśli problem nie ustępuje, należy wezwać Serwis Techniczny.
• Środek piorący nie jest odpowiedni do pralek automatycznych (na opakowaniu
musi być napisane: “do pralek”, “do prania ręcznego i w pralce” itp.).
• Użyto za dużo środka piorącego.
35
Page 36

Serwis Techniczny
195128459.00
10/2014 - Xerox Fabriano
PL
Przed skontaktowaniem się z Serwisem Technicznym:
• Sprawdzić, czy problemu nie można rozwiązać samodzielnie (patrz “Nieprawidłowości w działaniu i sposoby ich
usuwania”);
• Ponownie uruchomić program i sprawdzić, czy problem nie zniknął;
• W przeciwnym wypadku skontaktować się z Serwisem Technicznym.
! Nigdy nie wzywać nieautoryzowanych techników.
Należy podać:
• rodzaj nieprawidłowości;
• model urządzenia (Mod.);
• numer seryjny (S/N).
Informacje te znajdują się na tabliczce umieszczonej w tylnej części pralki oraz widocznej z przodu po otwarciu drzwiczek.
Indesit Company
Viale Aristide Merloni, 47
60044 Fabriano (AN)
Italy
www.hotpoint.eu
36
 Loading...