Hotpoint FKQ 831 User Manual

Operating Instructions

GB FR ES

English,1

Français, 12

Espanol, 23

PT FA AR

Portuges, 35

FK 83

FK 83X

FKQ 831

OVEN

Contents

GB

Installation, 2-3

Positioning Electrical connection Data plate

Description of the appliance, 4

Overall view

Control panel

Start-up and use, 5

Starting the oven

The electronic cooking programmer, 6

Modes, 7-9

Cooking modes Practical cooking advice Cooking advice table

Precautions and tips, 10

General safety

Disposal

Respecting and conserving the environment

Care and maintenance, 11

Switching the appliance off

Cleaning the appliance

Cleaning the oven door

Replacing the light bulb

Sliding rack kit assembly

Assistance

Installation

! Please keep this instruction booklet in a safe place GB for future reference. If the appliance is sold, given

away or moved, please make sure the booklet is also passed on to the new owners so that they may benefit from the advice contained within it.

! Please read this instruction manual carefully: it contains important information on installation, operation and safety.

Positioning

!Do not let children play with the packaging material; it should be disposed of in accordance with local separated waste collection standards (see Precautions and tips).

!The appliance must be installed by a qualified professional in accordance with the instructions provided. Incorrect installation may damage property or cause harm to people or animals.

Built-in appliances

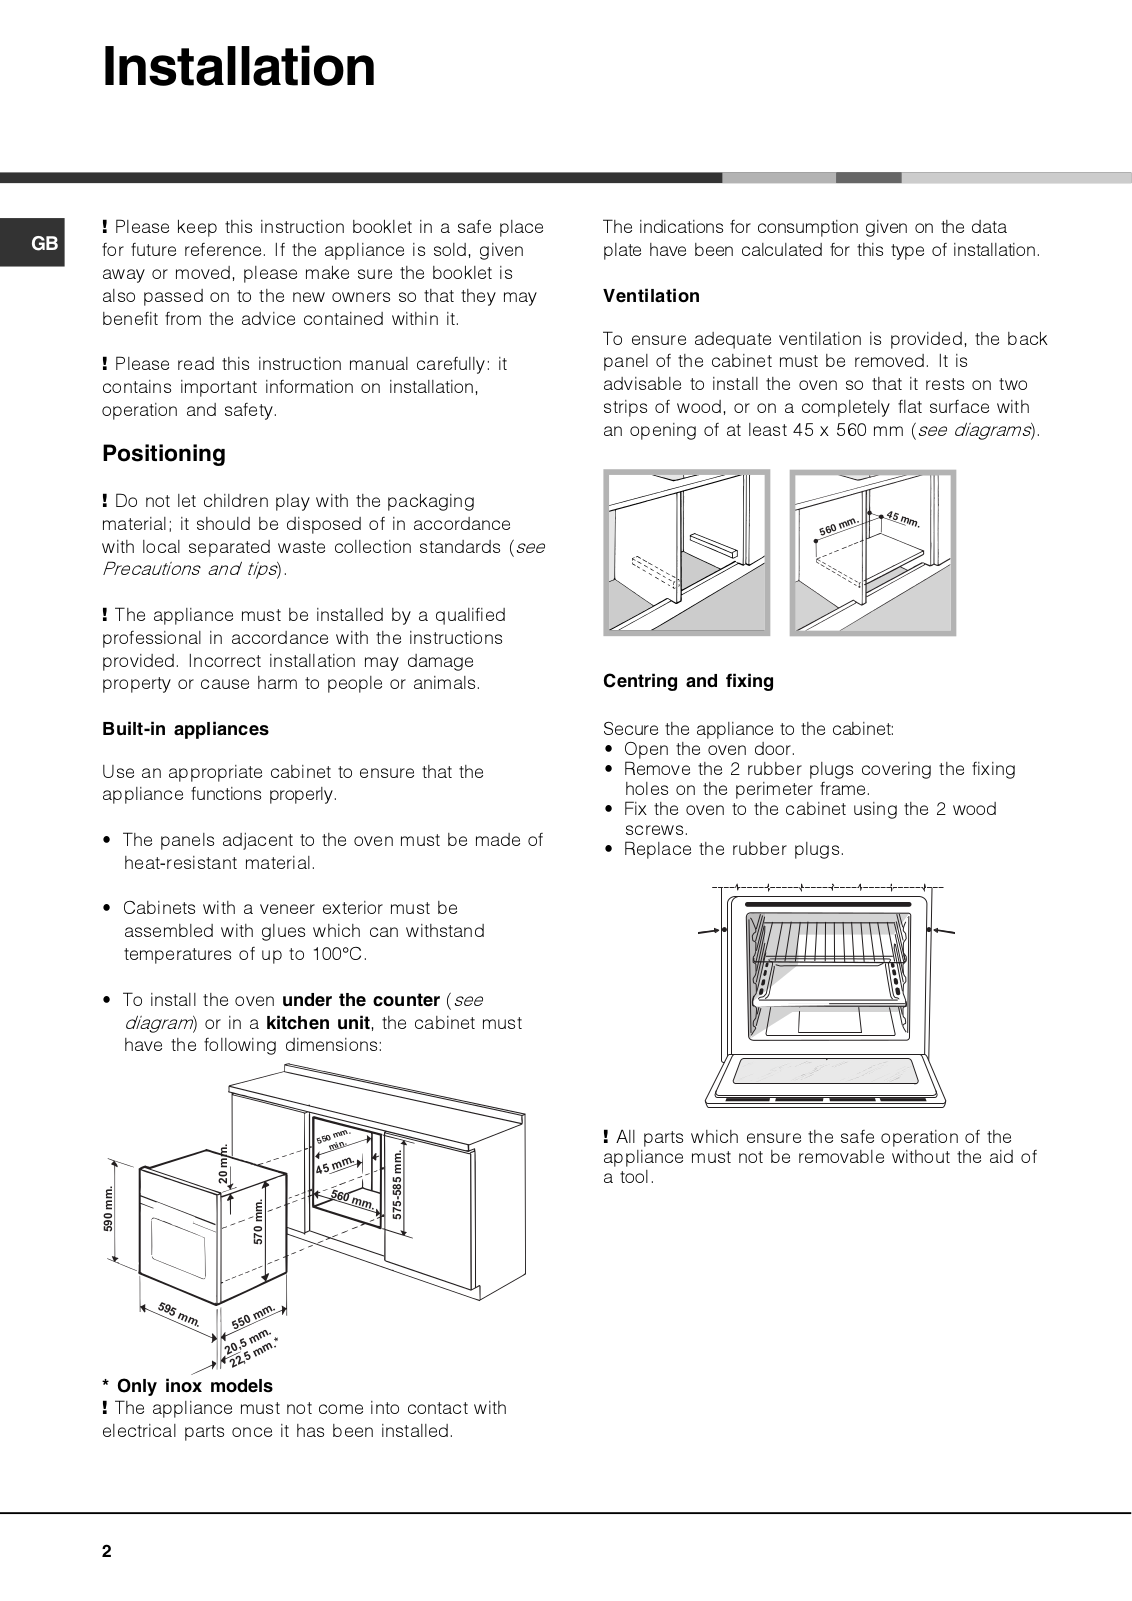
Use an appropriate cabinet to ensure that the appliance functions properly.

The panels adjacent to the oven must be made of heat-resistant material.

Cabinets with a veneer exterior must be assembled with glues which can withstand temperatures of up to 100°C.

To install the oven under the counter (see diagram) or in a kitchen unit, the cabinet must have the following dimensions:

590 mm.

20 mm.

570 mm.

.

mm


550 .


min


.

mm

45


560

mm.


575-585 mm.

595

mm.


.


mm


550

.


mm


.*


20,5 mm


22,5


* Only inox models

! The appliance must not come into contact with electrical parts once it has been installed.

The indications for consumption given on the data plate have been calculated for this type of installation.

Ventilation

To ensure adequate ventilation is provided, the back panel of the cabinet must be removed. It is advisable to install the oven so that it rests on two strips of wood, or on a completely flat surface with an opening of at least 45 x 560 mm (see diagrams).

.

45

mm

.

mm


560


Centring and fixing

Secure the appliance to the cabinet:

Open the oven door.

Remove the 2 rubber plugs covering the fixing holes on the perimeter frame.

Fix the oven to the cabinet using the 2 wood screws.

Replace the rubber plugs.

! All parts which ensure the safe operation of the appliance must not be removable without the aid of a tool.

2

Electrical connection

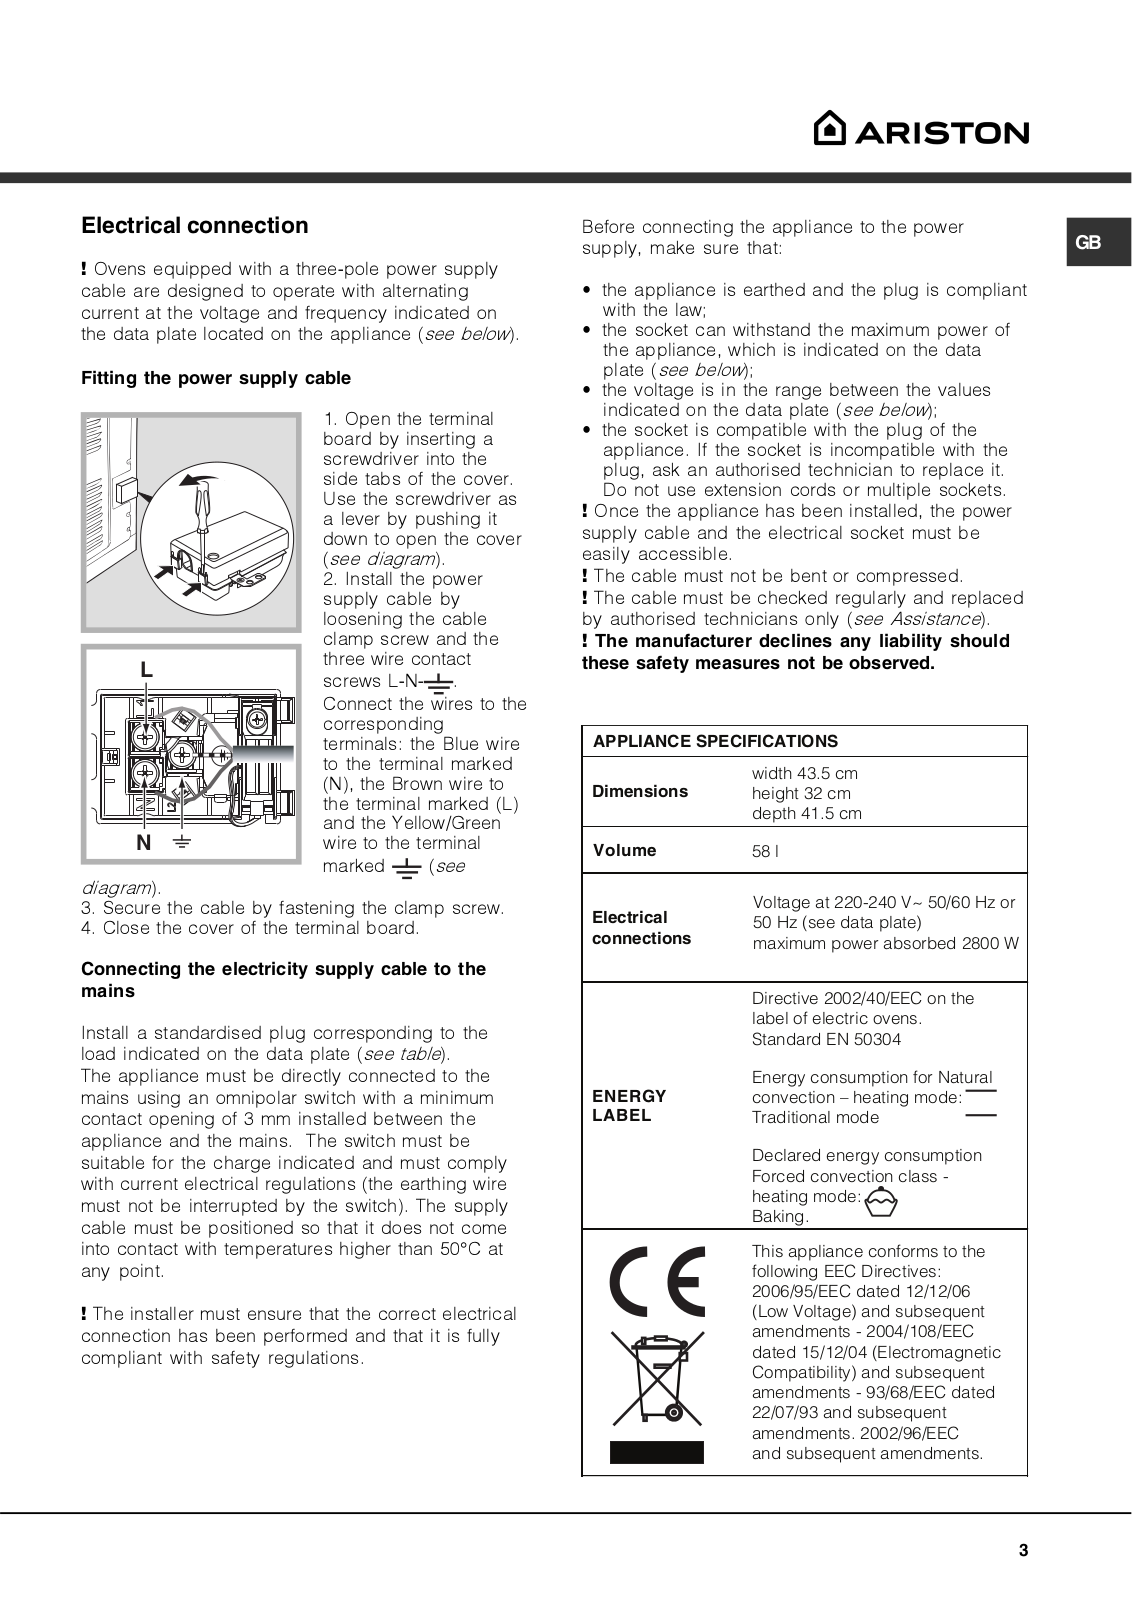
! Ovens equipped with a three-pole power supply cable are designed to operate with alternating current at the voltage and frequency indicated on the data plate located on the appliance (see below).

Fitting the power supply cable

L

N

1.Open the terminal board by inserting a screwdriver into the side tabs of the cover. Use the screwdriver as a lever by pushing it down to open the cover (see diagram).

2.Install the power supply cable by loosening the cable clamp screw and the three wire contact

screws L-N-. Connect the wires to the corresponding terminals: the Blue wire to the terminal marked (N), the Brown wire to the terminal marked (L) and the Yellow/Green wire to the terminal marked (see

diagram).

3.Secure the cable by fastening the clamp screw.

4.Close the cover of the terminal board.

Connecting the electricity supply cable to the mains

Install a standardised plug corresponding to the load indicated on the data plate (see table). The appliance must be directly connected to the

mains using an omnipolar switch with a minimum contact opening of 3 mm installed between the appliance and the mains. The switch must be suitable for the charge indicated and must comply with current electrical regulations (the earthing wire must not be interrupted by the switch). The supply cable must be positioned so that it does not come into contact with temperatures higher than 50°C at any point.

! The installer must ensure that the correct electrical connection has been performed and that it is fully compliant with safety regulations.

Before connecting the appliance to the power

supply, make sure that:

GB


the appliance is earthed and the plug is compliant with the law;

the socket can withstand the maximum power of the appliance, which is indicated on the data plate (see below);

the voltage is in the range between the values indicated on the data plate (see below);

the socket is compatible with the plug of the appliance. If the socket is incompatible with the plug, ask an authorised technician to replace it. Do not use extension cords or multiple sockets.

!Once the appliance has been installed, the power supply cable and the electrical socket must be easily accessible.

!The cable must not be bent or compressed.

!The cable must be checked regularly and replaced by authorised technicians only (see Assistance).

!The manufacturer declines any liability should these safety measures not be observed.

APPLIANCE SPECIFICATIONS

Dimensions

width 43.5 cm

height 32 cm


depth 41.5 cm

Volume

58 l

Electrical

Voltage at 220-240 V~ 50/60 Hz or

50 Hz (see data plate)

connections

maximum power absorbed 2800 W


Directive 2002/40/EEC on the


label of electric ovens.


Standard EN 50304

ENERGY

Energy consumption for Natural

convection – heating mode:

LABEL

Traditional mode


Declared energy consumption


Forced convection class -


heating mode:


Baking.


This appliance conforms to the


following EEC Directives:


2006/95/EEC dated 12/12/06


(Low Voltage) and subsequent


amendments - 2004/108/EEC


dated 15/12/04 (Electromagnetic


Compatibility) and subsequent


amendments - 93/68/EEC dated


22/07/93 and subsequent


amendments. 2002/96/EEC


and subsequent amendments.

3

Description of the appliance

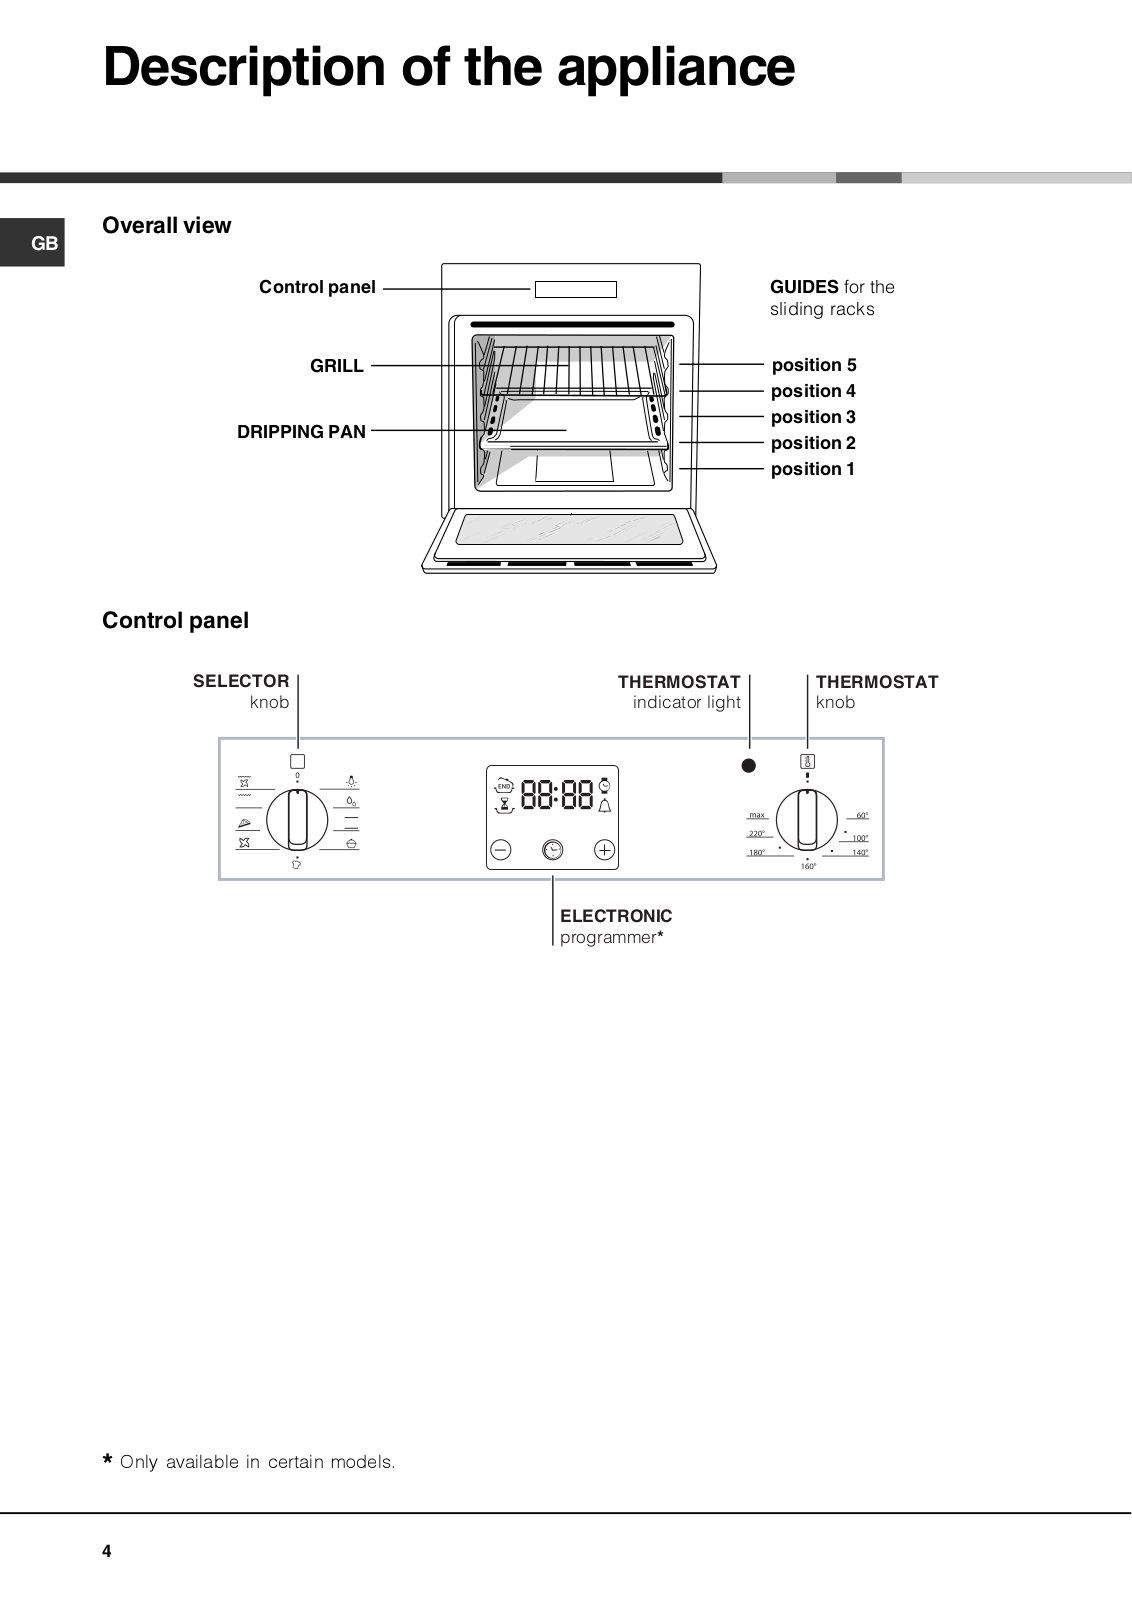
Overall view

GB

Control panel

GUIDES for the


sliding racks

GRILL

position 5


position 4

DRIPPING PAN

position 3

position 2


position 1

Control panel

SELECTOR


THERMOSTAT


THERMOSTAT


knob


indicator light


knob


ELECTRONIC programmer*

* Only available in certain models.

4

Start-up and use

! The first time you use your appliance, heat the empty oven with its door closed at its maximum temperature for at least half an hour. Make sure that the room is well ventilated before switching the oven off and opening the oven door. The appliance may emit a slightly unpleasant odour caused by protective substances used during the manufacturing process burning away.

Starting the oven

1.Select the desired cooking mode by turning the SELECTOR knob.

2.Select the desired temperature using the THERMOSTAT knob. A list detailing cooking modes and suggested cooking temperatures can be found in the Cooking advice table (see Cooking modes).

3.The THERMOSTAT indicator light indicates that the oven is heating up to the temperature set.

4.During cooking it is always possible to:

-change the cooking mode by turning the SELECTOR knob;

-adjust the temperature by turning the THERMOSTAT knob;

-stop cooking by turning the SELECTOR knob to the “0” position.

!Never put objects directly on the bottom of the oven; this will prevent the enamel coating from being damaged.

!Always place cookware on the rack(s) provided.

Cooling ventilation

GB

In order to cool down the external temperature of the oven, a cooling fan blows a stream of air between the control panel and the oven door, as well as towards the bottom of the oven door.

! Once cooking has been completed, the cooling fan continues to operate until the oven has cooled down sufficiently.

Oven light

When selecting with the SELECTOR knob the oven light goes on. It remains lit when a cooking mode is selected.

5

The electronic programmer

GB


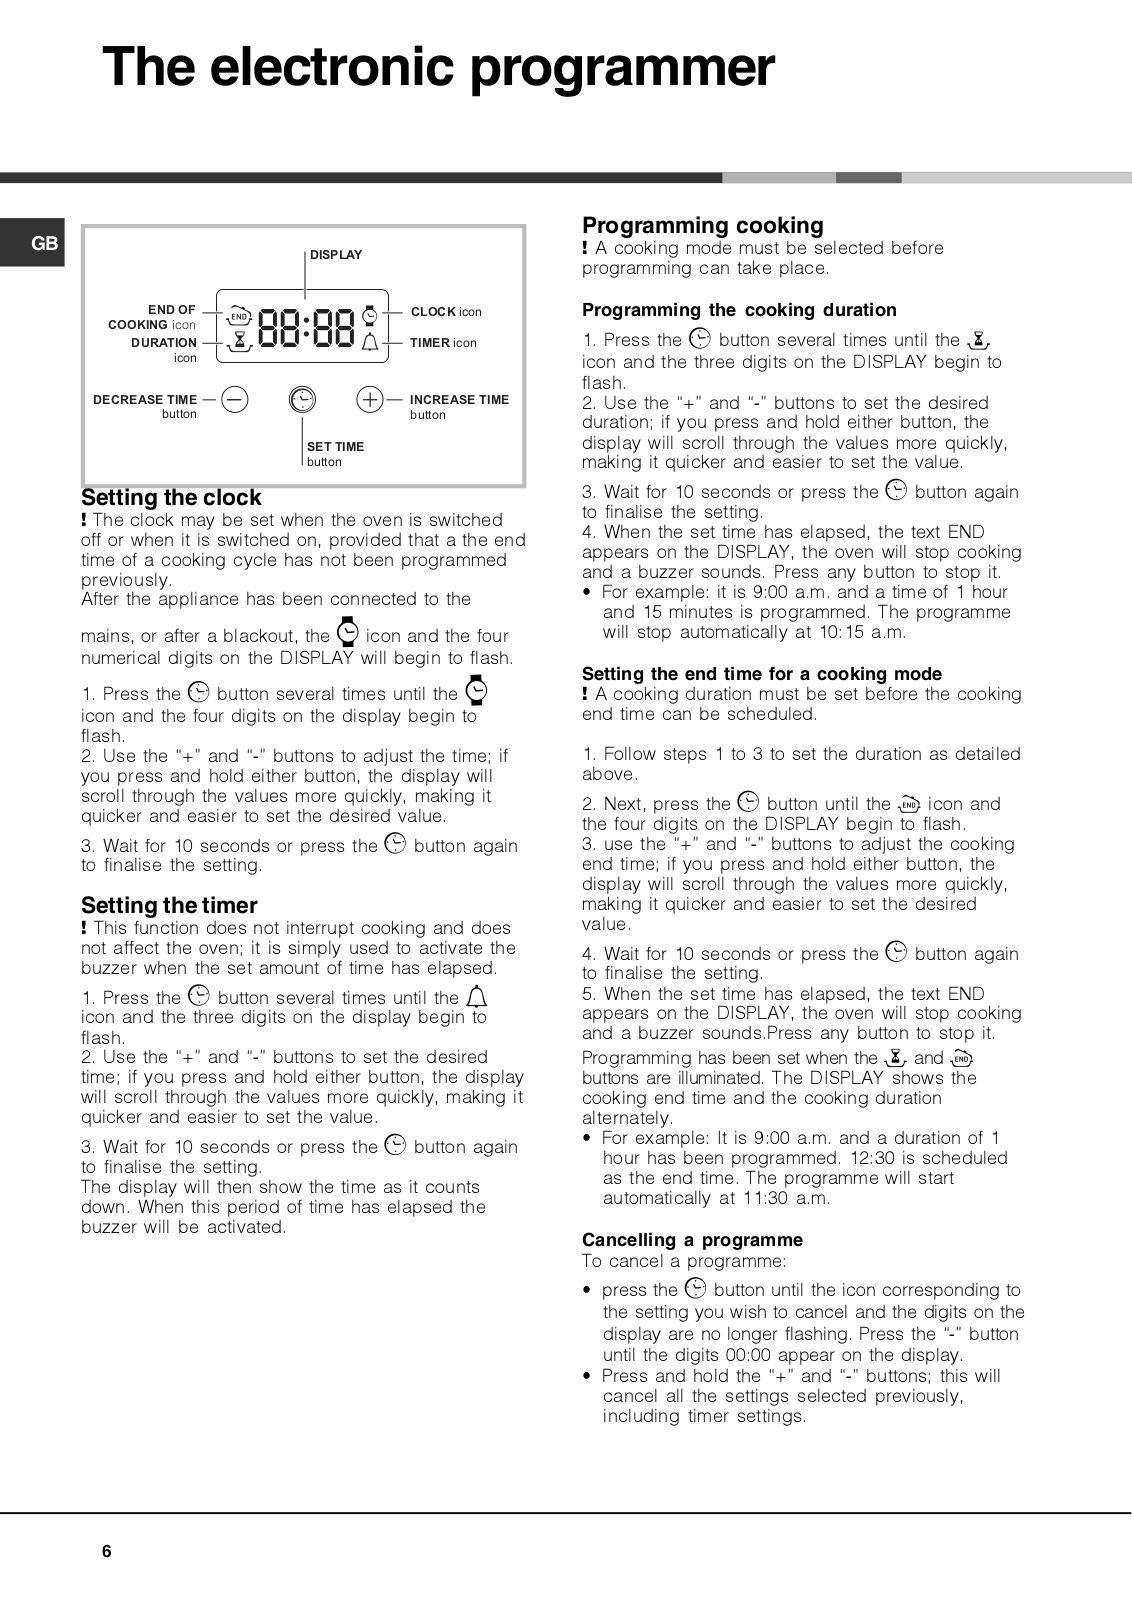
DISPLAY


END OF


•• ••


CLOCK icon

COOKING icon


DURATION


TIMER icon


icon


DECREASE TIME


INCREASE TIME


button


button

SET TIME button

Setting the clock

! The clock may be set when the oven is switched off or when it is switched on, provided that a the end time of a cooking cycle has not been programmed previously.

After the appliance has been connected to the

mains, or after a blackout, the icon and the four numerical digits on the DISPLAY will begin to flash.

1.Press thebutton several times until the icon and the four digits on the display begin to flash.

2.Use the “+” and “-” buttons to adjust the time; if you press and hold either button, the display will scroll through the values more quickly, making it quicker and easier to set the desired value.

3.Wait for 10 seconds or press thebutton again to finalise the setting.

Setting the timer

! This function does not interrupt cooking and does not affect the oven; it is simply used to activate the buzzer when the set amount of time has elapsed.

1.Press thebutton several times until the icon and the three digits on the display begin to flash.

2.Use the “+” and “-” buttons to set the desired time; if you press and hold either button, the display will scroll through the values more quickly, making it quicker and easier to set the value.

3.Wait for 10 seconds or press thebutton again to finalise the setting.

The display will then show the time as it counts down. When this period of time has elapsed the buzzer will be activated.

Programming cooking

! A cooking mode must be selected before programming can take place.

Programming the cooking duration

1.Press thebutton several times until the icon and the three digits on the DISPLAY begin to flash.

2.Use the “+” and “-” buttons to set the desired duration; if you press and hold either button, the display will scroll through the values more quickly, making it quicker and easier to set the value.

3.Wait for 10 seconds or press thebutton again to finalise the setting.

4.When the set time has elapsed, the text END appears on the DISPLAY, the oven will stop cooking and a buzzer sounds. Press any button to stop it.

• For example: it is 9:00 a.m. and a time of 1 hour and 15 minutes is programmed. The programme will stop automatically at 10:15 a.m.

Setting the end time for a cooking mode

! A cooking duration must be set before the cooking end time can be scheduled.

1.Follow steps 1 to 3 to set the duration as detailed above.

2.Next, press thebutton until the icon and the four digits on the DISPLAY begin to flash.

3.use the “+” and “-” buttons to adjust the cooking end time; if you press and hold either button, the display will scroll through the values more quickly, making it quicker and easier to set the desired value.

4.Wait for 10 seconds or press thebutton again to finalise the setting.

5.When the set time has elapsed, the text END appears on the DISPLAY, the oven will stop cooking and a buzzer sounds.Press any button to stop it.

Programming has been set when the and buttons are illuminated. The DISPLAY shows the cooking end time and the cooking duration alternately.

For example: It is 9:00 a.m. and a duration of 1 hour has been programmed. 12:30 is scheduled as the end time. The programme will start automatically at 11:30 a.m.

Cancelling a programme

To cancel a programme:

press thebutton until the icon corresponding to the setting you wish to cancel and the digits on the display are no longer flashing. Press the “-” button until the digits 00:00 appear on the display.

Press and hold the “+” and “-” buttons; this will cancel all the settings selected previously, including timer settings.

6

Modes

Cooking modes

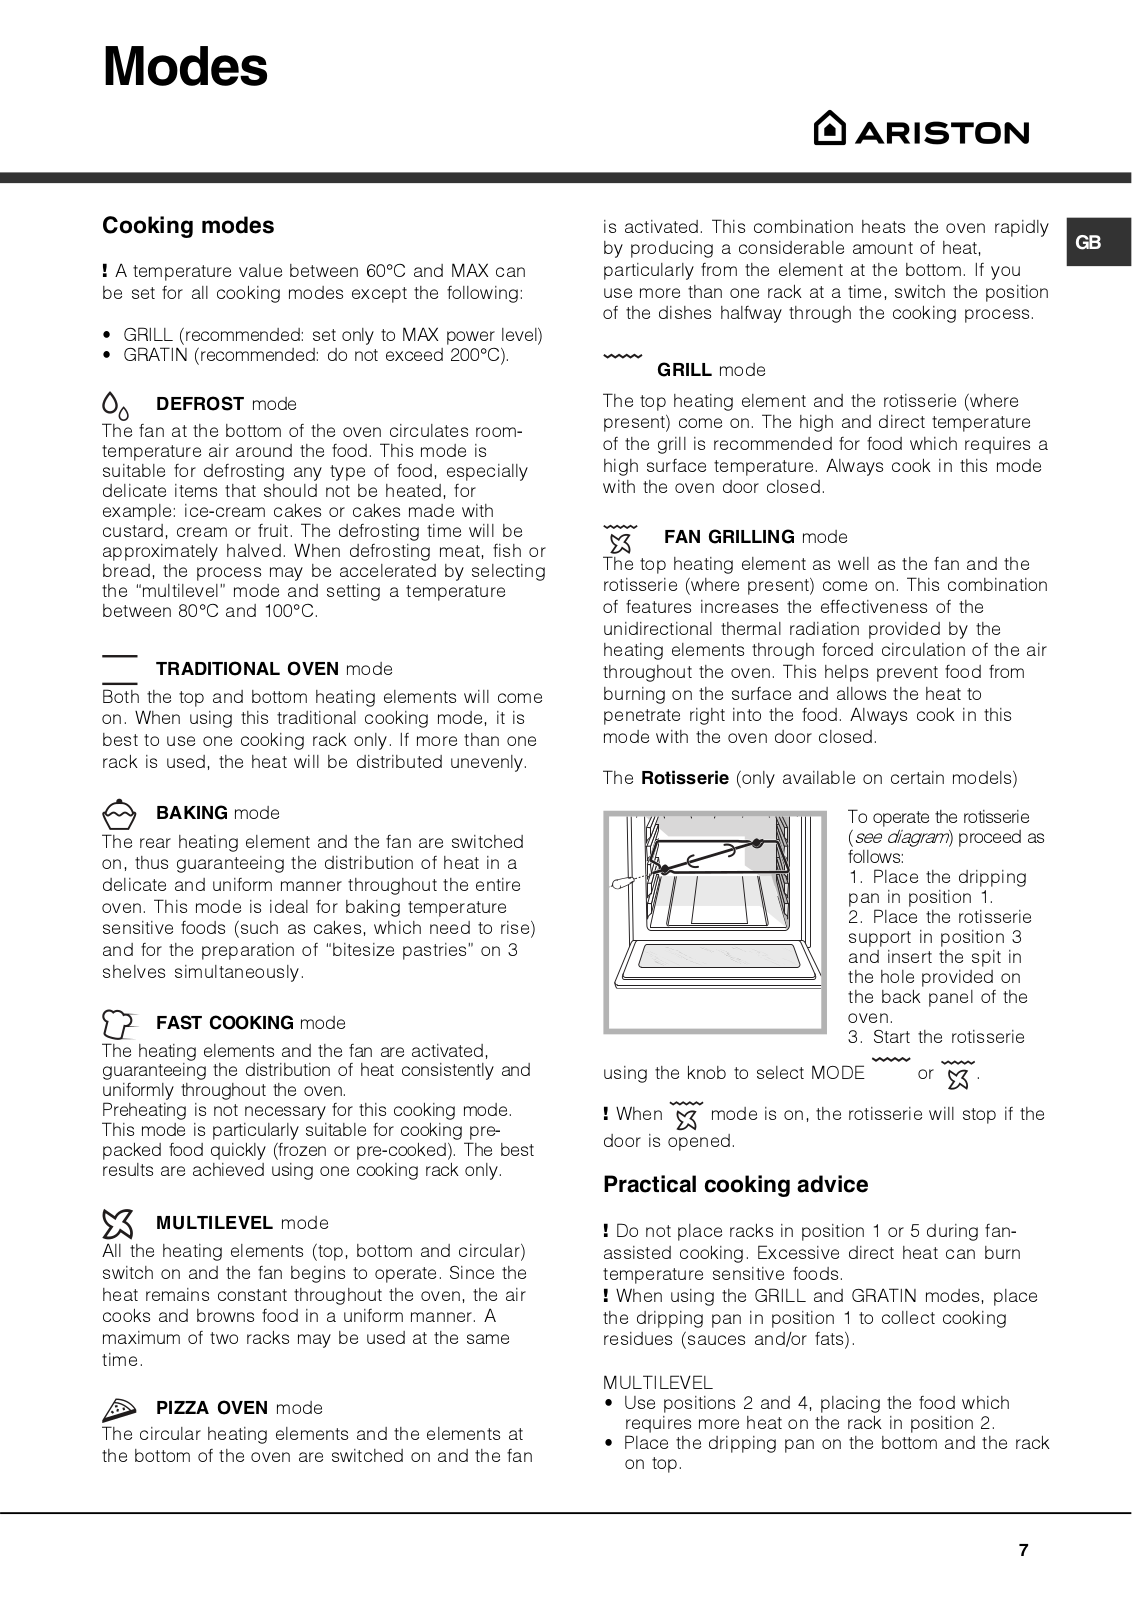
! A temperature value between 60°C and MAX can be set for all cooking modes except the following:

GRILL (recommended: set only to MAX power level)

GRATIN (recommended: do not exceed 200°C).

DEFROST mode

The fan at the bottom of the oven circulates roomtemperature air around the food. This mode is suitable for defrosting any type of food, especially delicate items that should not be heated, for example: ice-cream cakes or cakes made with custard, cream or fruit. The defrosting time will be approximately halved. When defrosting meat, fish or bread, the process may be accelerated by selecting the “multilevel” mode and setting a temperature between 80°C and 100°C.

TRADITIONAL OVEN mode

Both the top and bottom heating elements will come on. When using this traditional cooking mode, it is best to use one cooking rack only. If more than one rack is used, the heat will be distributed unevenly.

BAKING mode

The rear heating element and the fan are switched on, thus guaranteeing the distribution of heat in a delicate and uniform manner throughout the entire oven. This mode is ideal for baking temperature sensitive foods (such as cakes, which need to rise) and for the preparation of “bitesize pastries” on 3 shelves simultaneously.

FAST COOKING mode

The heating elements and the fan are activated, guaranteeing the distribution of heat consistently and uniformly throughout the oven.

Preheating is not necessary for this cooking mode. This mode is particularly suitable for cooking prepacked food quickly (frozen or pre-cooked). The best results are achieved using one cooking rack only.

MULTILEVEL mode

All the heating elements (top, bottom and circular) switch on and the fan begins to operate. Since the heat remains constant throughout the oven, the air cooks and browns food in a uniform manner. A maximum of two racks may be used at the same time.

PIZZA OVEN mode

The circular heating elements and the elements at the bottom of the oven are switched on and the fan

is activated. This combination heats the oven rapidly

by producing a considerable amount of heat, GB particularly from the element at the bottom. If you

use more than one rack at a time, switch the position of the dishes halfway through the cooking process.

GRILL mode

The top heating element and the rotisserie (where present) come on. The high and direct temperature of the grill is recommended for food which requires a high surface temperature. Always cook in this mode with the oven door closed.

FAN GRILLING mode

The top heating element as well as the fan and the rotisserie (where present) come on. This combination of features increases the effectiveness of the unidirectional thermal radiation provided by the heating elements through forced circulation of the air throughout the oven. This helps prevent food from burning on the surface and allows the heat to penetrate right into the food. Always cook in this mode with the oven door closed.

The Rotisserie (only available on certain models)

To operate the rotisserie (see diagram) proceed as follows:

1. Place the dripping pan in position 1.

2. Place the rotisserie support in position 3 and insert the spit in the hole provided on the back panel of the oven.

3. Start the rotisserie

using the knob to select MODE

or

.

! When mode is on, the rotisserie will stop if the door is opened.

Practical cooking advice

!Do not place racks in position 1 or 5 during fanassisted cooking. Excessive direct heat can burn temperature sensitive foods.

!When using the GRILL and GRATIN modes, place the dripping pan in position 1 to collect cooking residues (sauces and/or fats).

MULTILEVEL

Use positions 2 and 4, placing the food which requires more heat on the rack in position 2.

Place the dripping pan on the bottom and the rack on top.

7

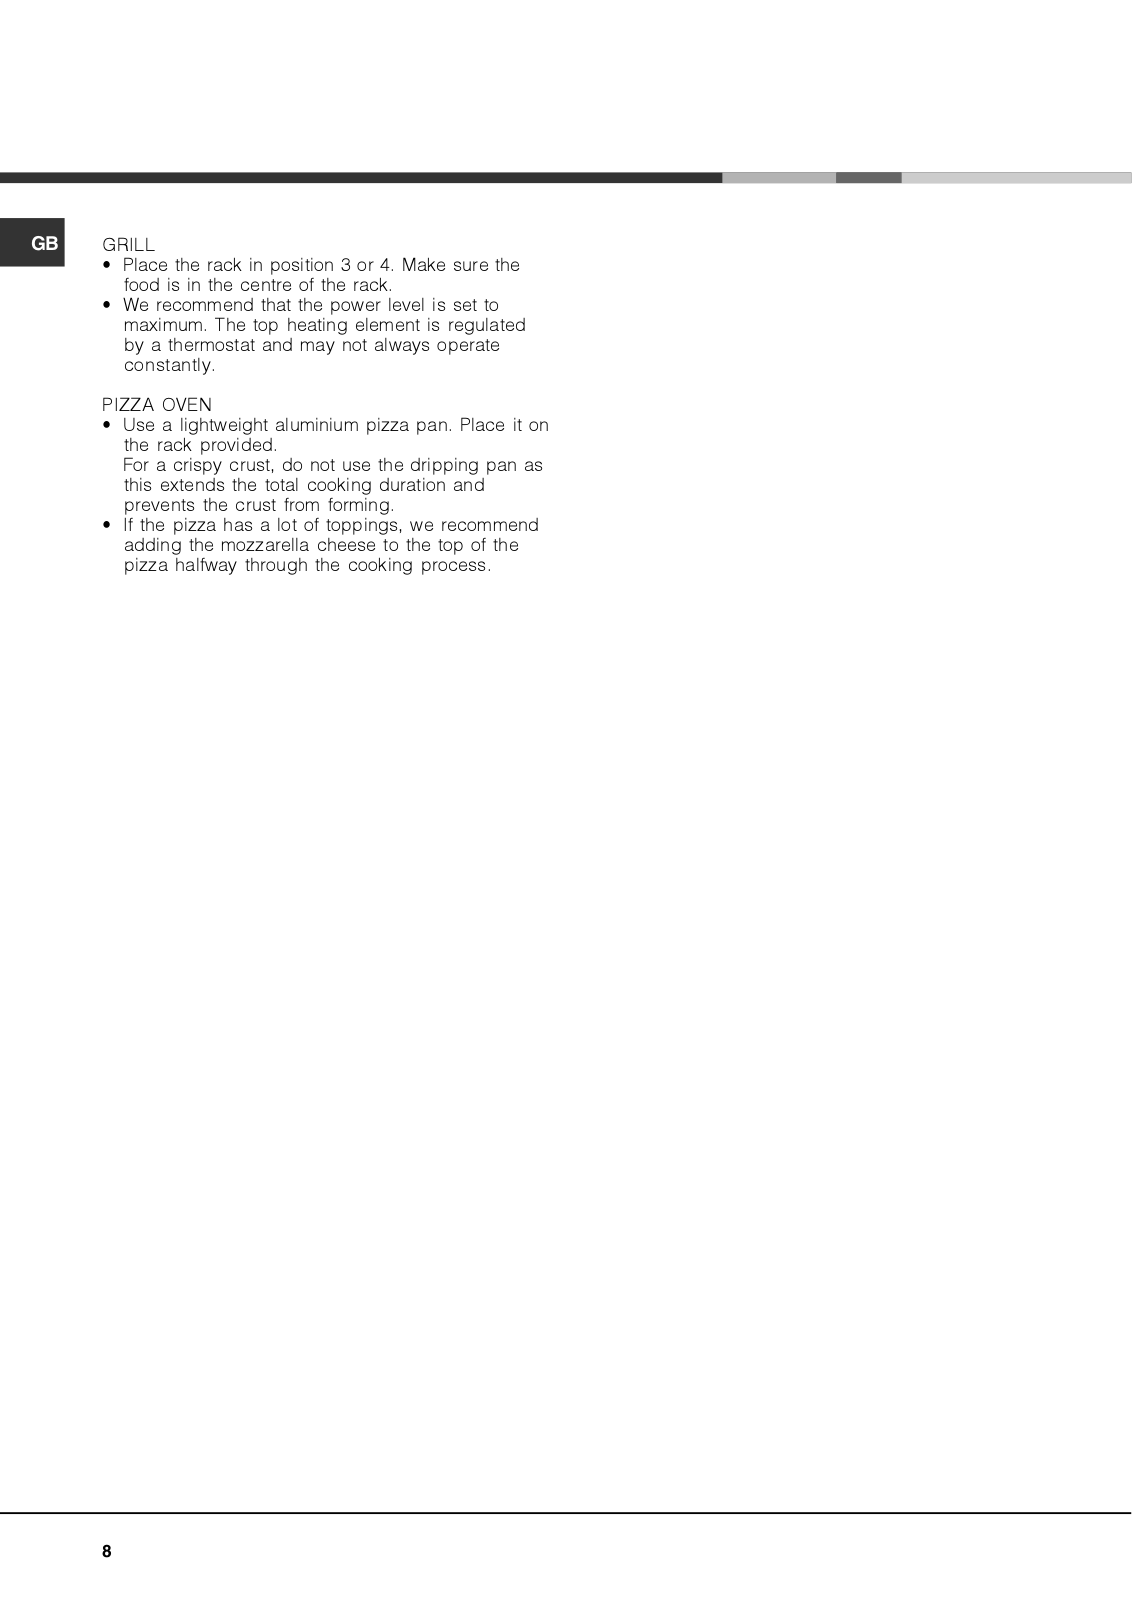
GB GRILL

Place the rack in position 3 or 4. Make sure the food is in the centre of the rack.

We recommend that the power level is set to maximum. The top heating element is regulated by a thermostat and may not always operate constantly.

PIZZA OVEN

Use a lightweight aluminium pizza pan. Place it on the rack provided.

For a crispy crust, do not use the dripping pan as this extends the total cooking duration and prevents the crust from forming.

If the pizza has a lot of toppings, we recommend adding the mozzarella cheese to the top of the pizza halfway through the cooking process.

8


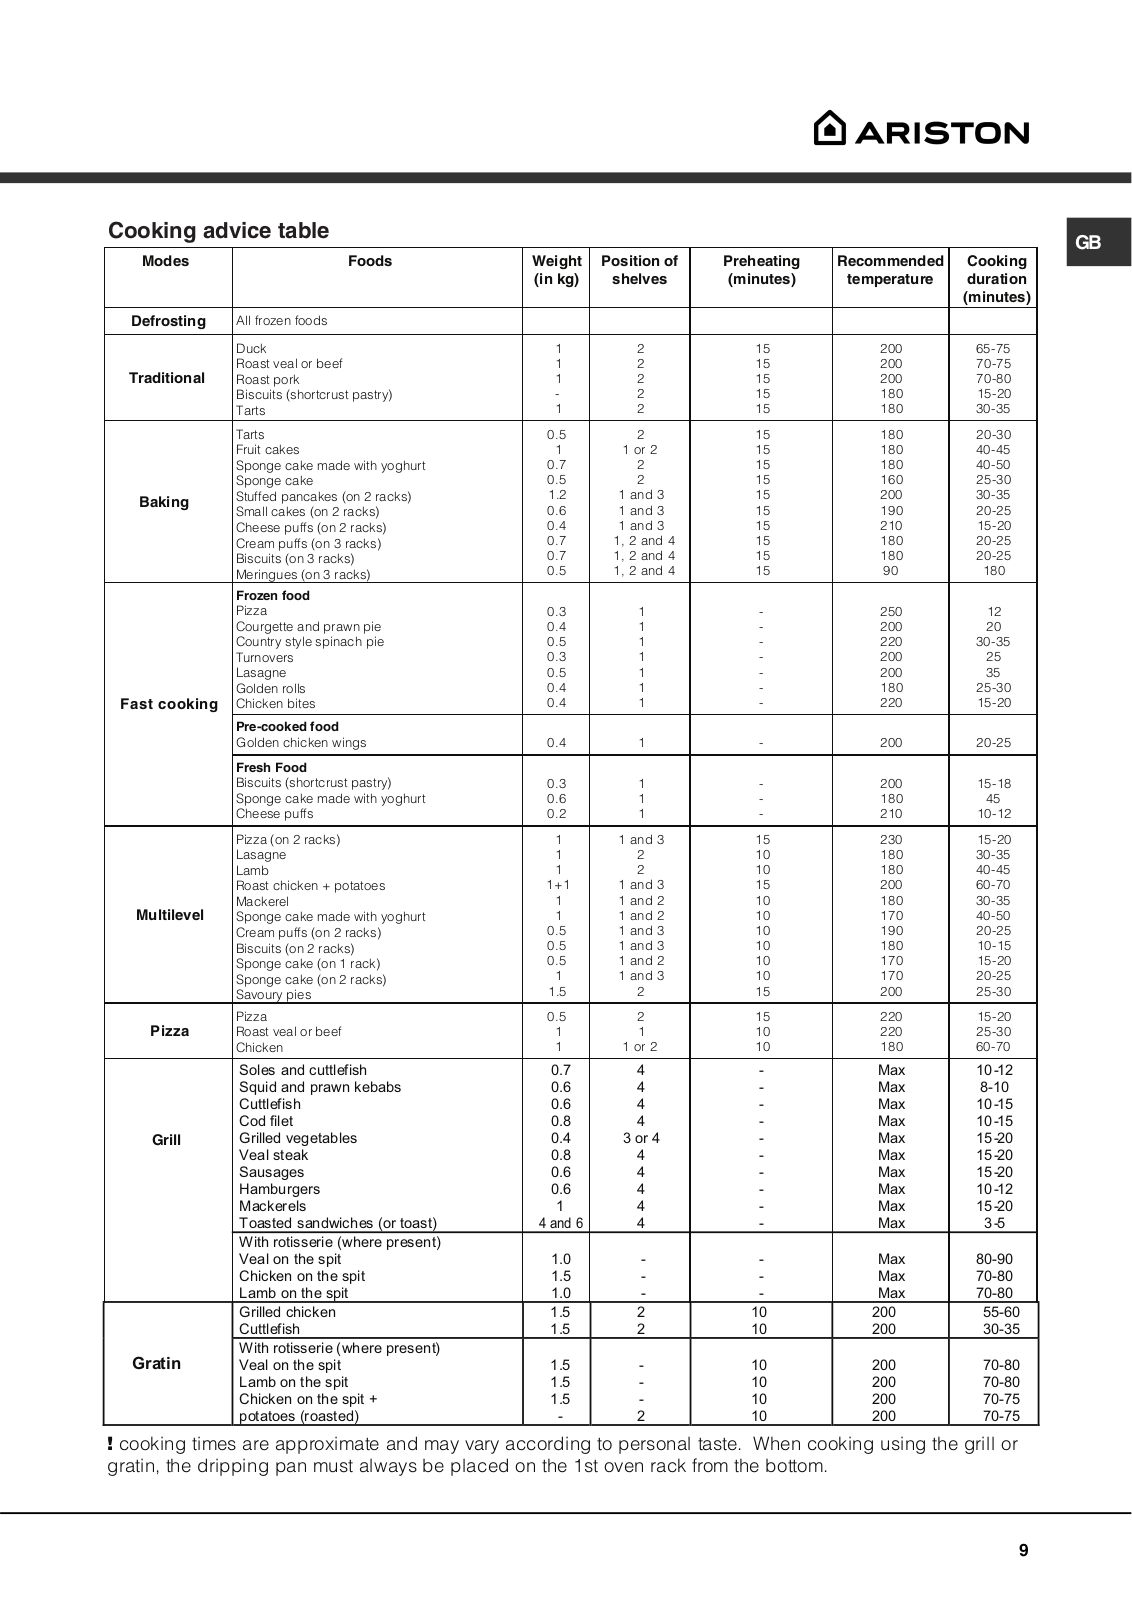
Cooking advice table


GB


Modes

Foods

Weight

Position of

Preheating

Recommended

Cooking


(in kg)

shelves

(minutes)

temperature

duration


(minutes)


Defrosting

All frozen foods


Duck

1

2

15

200

65-75


Traditional

Roast veal or beef

1

2

15

200

70-75


Roast pork

1

2

15

200

70-80


Biscuits (shortcrust pastry)

-

2

15

180

15-20


Tarts

1

2

15

180

30-35


Tarts

0.5

2

15

180

20-30


Fruit cakes

1

1 or 2

15

180

40-45


Sponge cake made with yoghurt

0.7

2

15

180

40-50


Sponge cake

0.5

2

15

160

25-30


Baking

Stuffed pancakes (on 2 racks)

1.2

1 and 3

15

200

30-35


Small cakes (on 2 racks)

0.6

1 and 3

15

190

20-25


Cheese puffs (on 2 racks)

0.4

1 and 3

15

210

15-20


Cream puffs (on 3 racks)

0.7

1, 2 and 4

15

180

20-25


Biscuits (on 3 racks)

0.7

1, 2 and 4

15

180

20-25


Meringues (on 3 racks)

0.5

1, 2 and 4

15

90

180


Frozen food


Pizza

0.3

1

-

250

12


Courgette and prawn pie

0.4

1

-

200

20


Country style spinach pie

0.5

1

-

220

30-35


Turnovers

0.3

1

-

200

25


Lasagne

0.5

1

-

200

35


Golden rolls

0.4

1

-

180

25-30


Fast cooking

Chicken bites

0.4

1

-

220

15-20


Pre-cooked food


Golden chicken wings

0.4

1

-

200

20-25


Fresh Food


Biscuits (shortcrust pastry)

0.3

1

-

200

15-18


Sponge cake made with yoghurt

0.6

1

-

180

45


Cheese puffs

0.2

1

-

210

10-12


Pizza (on 2 racks)

1

1 and 3

15

230

15-20


Lasagne

1

2

10

180

30-35


Lamb

1

2

10

180

40-45


Roast chicken + potatoes

1+1

1 and 3

15

200

60-70


Multilevel

Mackerel

1

1 and 2

10

180

30-35


Sponge cake made with yoghurt

1

1 and 2

10

170

40-50


Cream puffs (on 2 racks)

0.5

1 and 3

10

190

20-25


Biscuits (on 2 racks)

0.5

1 and 3

10

180

10-15


Sponge cake (on 1 rack)

0.5

1 and 2

10

170

15-20


Sponge cake (on 2 racks)

1

1 and 3

10

170

20-25


Savoury pies

1.5

2

15

200

25-30


Pizza

Pizza

0.5

2

15

220

15-20


Roast veal or beef

1

1

10

220

25-30


Chicken

1

1 or 2

10

180

60-70


Soles and cuttlefish

0.7

4

-

Max

10-12


Squid and prawn kebabs

0.6

4

-

Max

8-10


Cuttlefish

0.6

4

-

Max

10-15


Cod filet

0.8

4

-

Max

10-15


Grill

Grilled vegetables

0.4

3 or 4

-

Max

15-20


Veal steak

0.8

4

-

Max

15-20


Sausages

0.6

4

-

Max

15-20


Hamburgers

0.6

4

-

Max

10-12


Mackerels

1

4

-

Max

15-20


Toasted sandwiches (or toast)

4 and 6

4

-

Max

3-5


With rotisserie (where present)

1.0

-

-

Max

80-90


Veal on the spit


Chicken on the spit

1.5

-

-

Max

70-80


Lamb on the spit

1.0

-

-

Max

70-80


Grilled chicken

1.5

2

10

200

55-60


Cuttlefish

1.5

2

10

200

30-35


Gratin

With rotisserie (where present)

1.5

-

10

200

70-80


Veal on the spit


Lamb on the spit

1.5

-

10

200

70-80


Chicken on the spit +

1.5

-

10

200

70-75


potatoes (roasted)

-

2

10

200

70-75


! cooking times are approximate and may vary according to personal taste. When cooking using the grill or gratin, the dripping pan must always be placed on the 1st oven rack from the bottom.

9

Precautions and tips

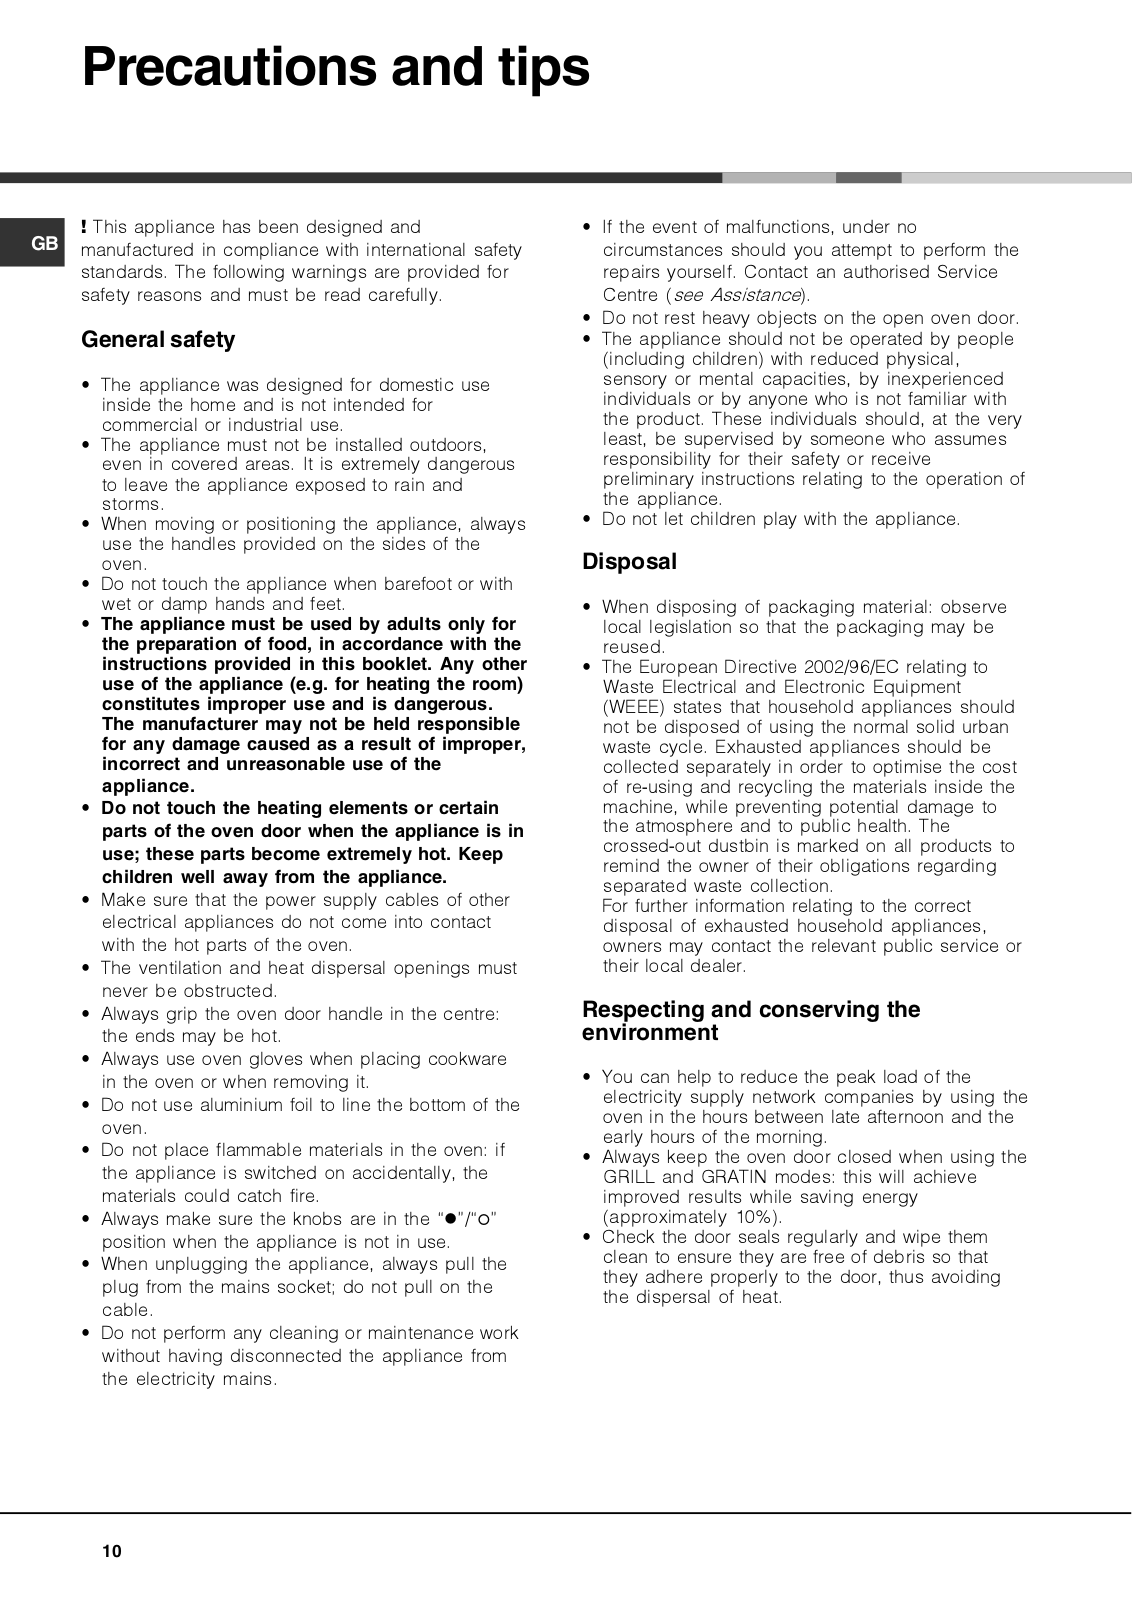
! This appliance has been designed and

GB manufactured in compliance with international safety standards. The following warnings are provided for safety reasons and must be read carefully.

General safety

The appliance was designed for domestic use inside the home and is not intended for commercial or industrial use.

The appliance must not be installed outdoors, even in covered areas. It is extremely dangerous to leave the appliance exposed to rain and storms.

When moving or positioning the appliance, always use the handles provided on the sides of the oven.

Do not touch the appliance when barefoot or with wet or damp hands and feet.

The appliance must be used by adults only for the preparation of food, in accordance with the instructions provided in this booklet. Any other use of the appliance (e.g. for heating the room) constitutes improper use and is dangerous.

The manufacturer may not be held responsible for any damage caused as a result of improper, incorrect and unreasonable use of the appliance.

Do not touch the heating elements or certain parts of the oven door when the appliance is in use; these parts become extremely hot. Keep children well away from the appliance.

Make sure that the power supply cables of other electrical appliances do not come into contact with the hot parts of the oven.

The ventilation and heat dispersal openings must never be obstructed.

Always grip the oven door handle in the centre: the ends may be hot.

Always use oven gloves when placing cookware in the oven or when removing it.

Do not use aluminium foil to line the bottom of the oven.

Do not place flammable materials in the oven: if the appliance is switched on accidentally, the materials could catch fire.

Always make sure the knobs are in the “ ”/“ ” position when the appliance is not in use.

When unplugging the appliance, always pull the plug from the mains socket; do not pull on the cable.

Do not perform any cleaning or maintenance work without having disconnected the appliance from the electricity mains.

If the event of malfunctions, under no circumstances should you attempt to perform the repairs yourself. Contact an authorised Service Centre (see Assistance).

Do not rest heavy objects on the open oven door.

The appliance should not be operated by people (including children) with reduced physical, sensory or mental capacities, by inexperienced individuals or by anyone who is not familiar with the product. These individuals should, at the very least, be supervised by someone who assumes responsibility for their safety or receive preliminary instructions relating to the operation of the appliance.

Do not let children play with the appliance.

Disposal

When disposing of packaging material: observe local legislation so that the packaging may be reused.

The European Directive 2002/96/EC relating to Waste Electrical and Electronic Equipment (WEEE) states that household appliances should not be disposed of using the normal solid urban waste cycle. Exhausted appliances should be collected separately in order to optimise the cost of re-using and recycling the materials inside the machine, while preventing potential damage to the atmosphere and to public health. The crossed-out dustbin is marked on all products to remind the owner of their obligations regarding separated waste collection.

For further information relating to the correct disposal of exhausted household appliances, owners may contact the relevant public service or their local dealer.

Respecting and conserving the environment

You can help to reduce the peak load of the electricity supply network companies by using the oven in the hours between late afternoon and the early hours of the morning.

Always keep the oven door closed when using the GRILL and GRATIN modes: this will achieve improved results while saving energy (approximately 10%).

Check the door seals regularly and wipe them clean to ensure they are free of debris so that they adhere properly to the door, thus avoiding the dispersal of heat.

10

Hotpoint FKQ 831 User Manual

Care and maintenance

Switching the appliance off

Disconnect your appliance from the electricity supply before carrying out any work on it.

Cleaning the appliance

The stainless steel or enamel-coated external parts and the rubber seals may be cleaned using a sponge that has been soaked in lukewarm water and neutral soap. Use specialised products for the removal of stubborn stains. After cleaning, rinse and dry thoroughly. Do not use abrasive powders or corrosive substances.

The inside of the oven should ideally be cleaned after each use, while it is still lukewarm. Use hot water and detergent, then rinse well and dry with a soft cloth. Do not use abrasive products.

All accessories - with the exception of the sliding racks - can be washed like everyday crockery, and are even dishwasher safe.

!Never use steam cleaners or pressure cleaners on the appliance.

Cleaning the oven door

Clean the glass part of the oven door using a sponge and a non-abrasive cleaning product, then dry thoroughly with a soft cloth. Do not use rough abrasive material or sharp metal scrapers as these could scratch the surface and cause the glass to crack.

For more thorough cleaning purposes, the oven door may be removed:

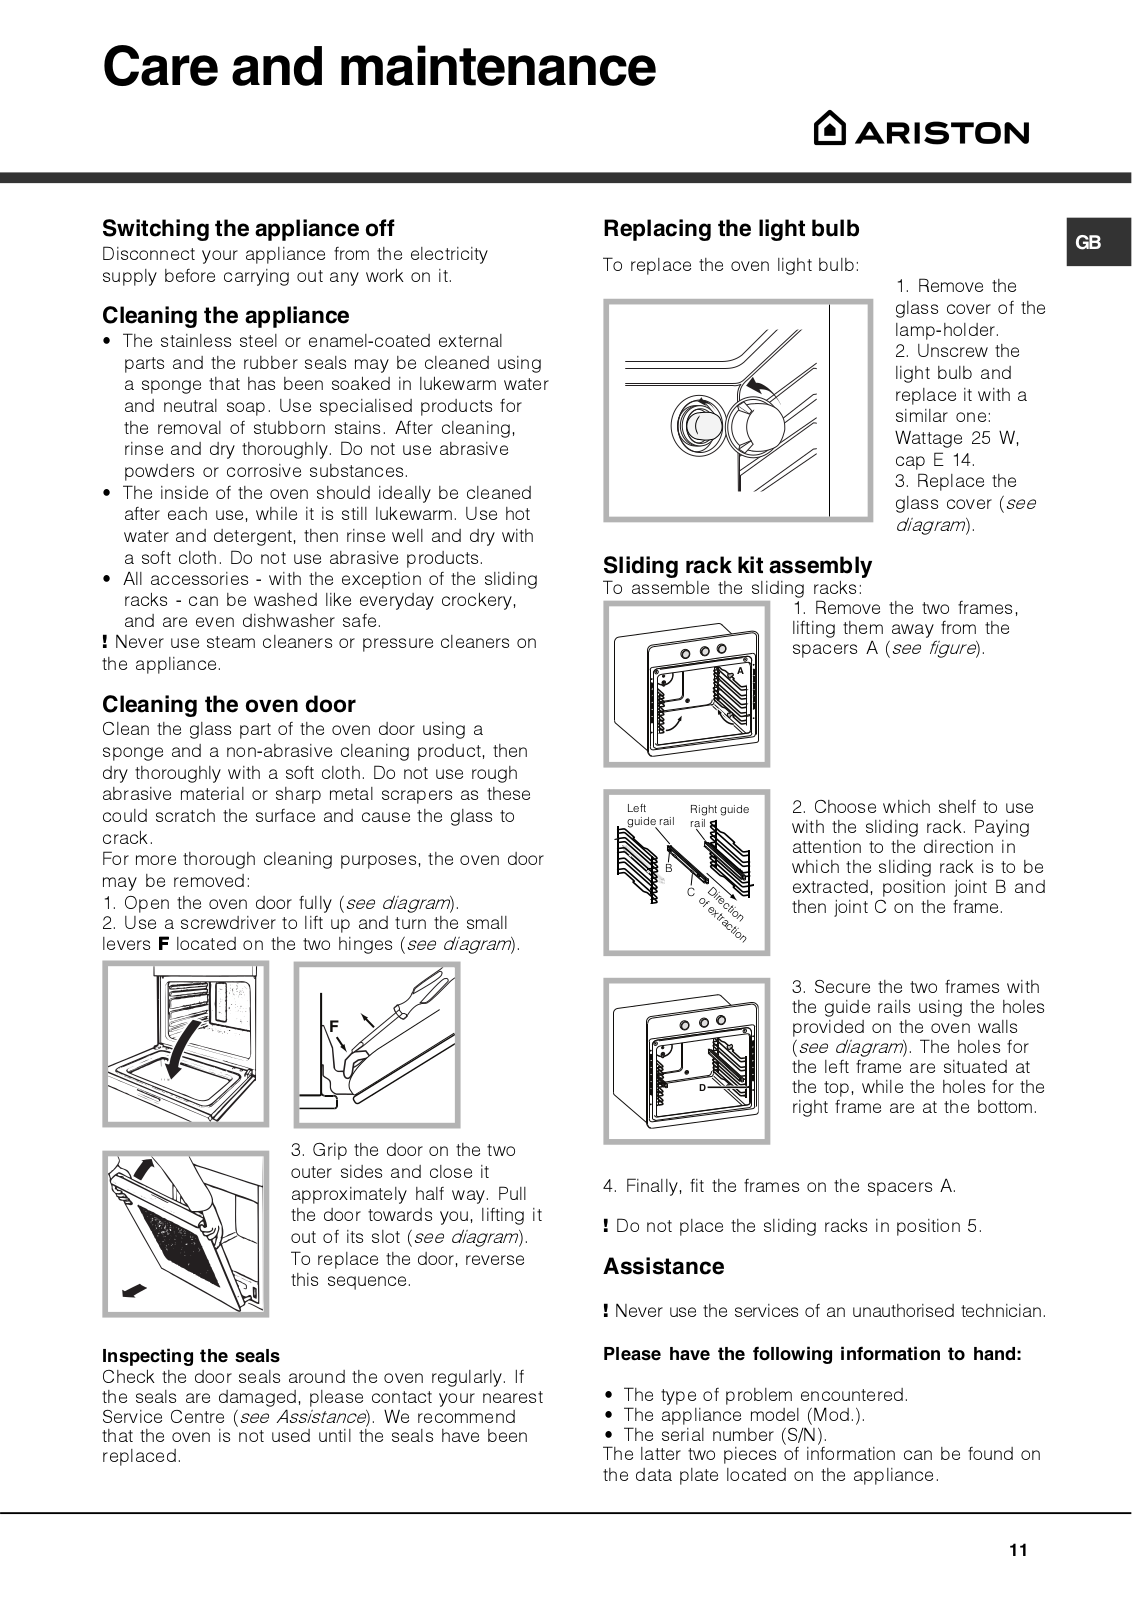
1.Open the oven door fully (see diagram).

2.Use a screwdriver to lift up and turn the small levers F located on the two hinges (see diagram).

Replacing the light bulb

GB

To replace the oven light bulb:

1. Remove the glass cover of the

lamp-holder. 2. Unscrew the light bulb and

replace it with a similar one:

Wattage 25 W, cap E 14.

3. Replace the glass cover (see diagram).

Sliding rack kit assembly

To assemble the sliding racks:

1. Remove the two frames, lifting them away from the

spacers A (see figure).

A

Left

Right guide

guide rail

rail


B


C


of


Direction


extraction

2. Choose which shelf to use with the sliding rack. Paying attention to the direction in which the sliding rack is to be extracted, position joint B and then joint C on the frame.

F

3. Grip the door on the two outer sides and close it approximately half way. Pull the door towards you, lifting it out of its slot (see diagram). To replace the door, reverse this sequence.

Inspecting the seals

Check the door seals around the oven regularly. If the seals are damaged, please contact your nearest Service Centre (see Assistance). We recommend that the oven is not used until the seals have been replaced.

D

3. Secure the two frames with the guide rails using the holes provided on the oven walls (see diagram). The holes for the left frame are situated at the top, while the holes for the right frame are at the bottom.

4. Finally, fit the frames on the spacers A.

! Do not place the sliding racks in position 5.

Assistance

! Never use the services of an unauthorised technician.

Please have the following information to hand:

The type of problem encountered.

The appliance model (Mod.).

The serial number (S/N).

The latter two pieces of information can be found on the data plate located on the appliance.

11

Mode d’emploi

FR

GB FR ES

English,1

Français, 12 Espanol, 23

PT FA AR

Portuges, 35

FK 83

FK 83X

FKQ 831

FOUR

Sommaire

Installation, 13-14

Positionnement

Raccordement électrique

Plaque signalétique

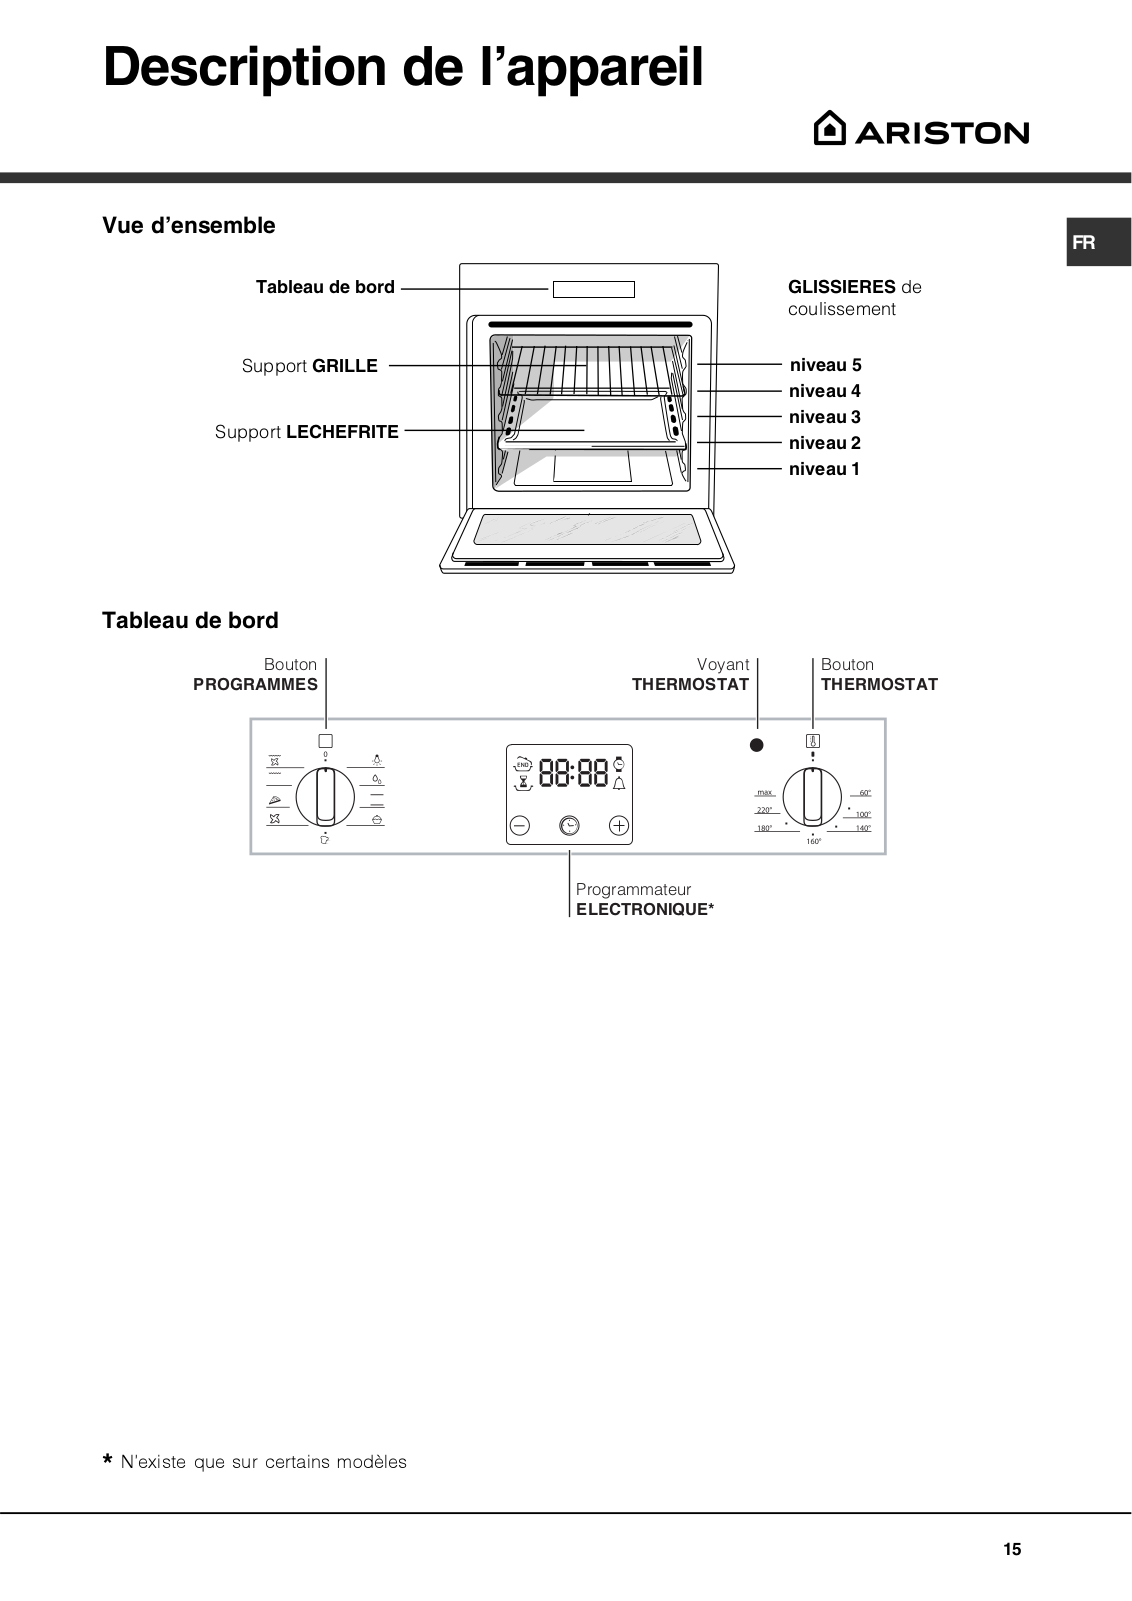
Description de l’appareil, 15

Vue d’ensemble

Tableau de bord

Mise en marche et utilisation, 16

Mise en marche du four

Le programmateur de cuisson électrique, 17

Programmes, 18-20

Programmes de cuisson Conseils de cuisson Tableau de cuisson

Précautions et conseils, 21

Sécurité générale

Mise au rebut

Economies et respect de l’environnement

Nettoyage et entretien, 22

Mise hors tension

Nettoyage de l’appareil

Nettoyage de la porte

Remplacement de l’ampoule d’éclairage

Montage du Kit glissières

Assistance

Installation

!Conserver ce mode d’emploi pour pouvoir le consulter à tout moment. En cas de vente, de cession ou de déménagement, veiller à ce qu’il suive l’appareil pour informer le nouveau propriétaire sur son fonctionnement et lui fournir les conseils correspondants.

!Lire attentivement les instructions : elles contiennent des conseils importants sur l’installation, l’utilisation et la sécurité de l’appareil.

Positionnement

!Les emballages ne sont pas des jouets pour enfants, il faut les mettre au rebut en respectant la réglementation sur le tri sélectif des déchets (voir Précautions et conseils).

!L’installation doit être effectuée par un professionnel du secteur conformément aux instructions du fabricant. Une mauvaise installation peut causer des dommages à des personnes, des animaux ou des biens.

Encastrement

Pour garantir le bon fonctionnement de l’appareil, il faut que le meuble possède des caractéristiques bien précises:

les panneaux adjacents doivent être fabriqués dans un matériau résistant à la chaleur;

dans le cas notamment de meubles plaqués bois, il faut que les colles résistent à une température de 100°C;

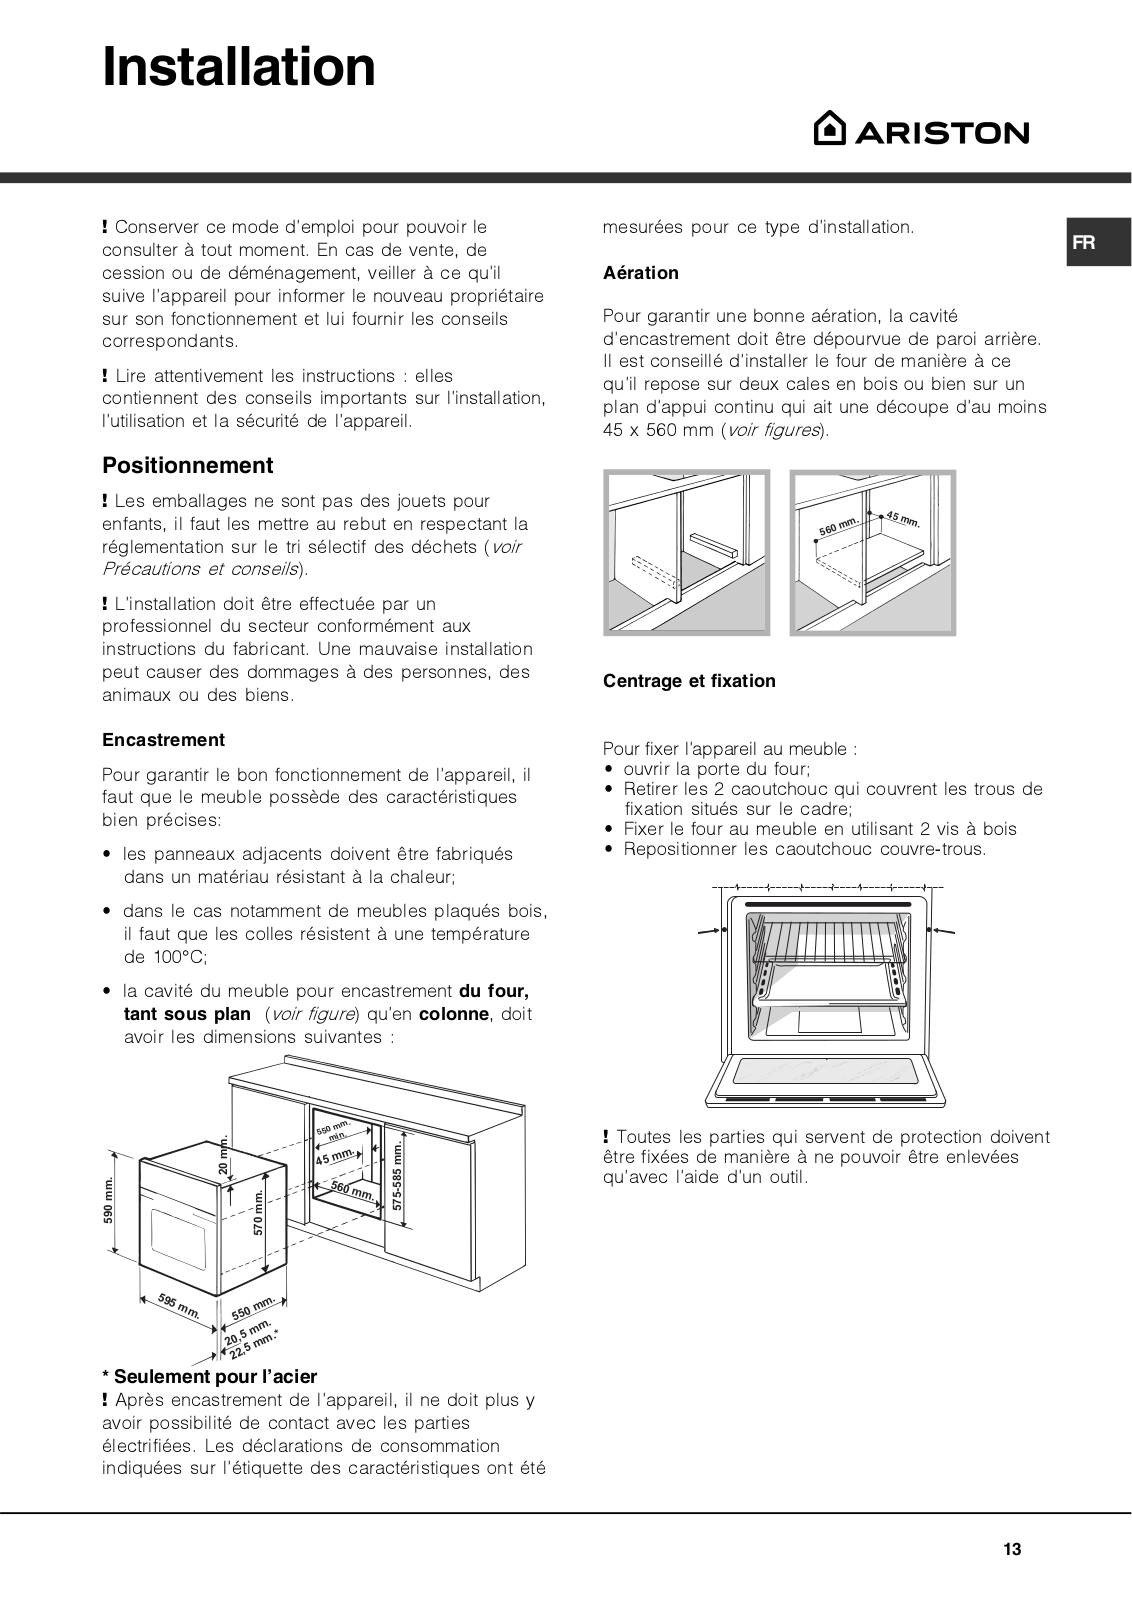
la cavité du meuble pour encastrement du four, tant sous plan (voir figure) qu’en colonne, doit avoir les dimensions suivantes :

mesurées pour ce type d’installation.

FR

Aération

Pour garantir une bonne aération, la cavité d’encastrement doit être dépourvue de paroi arrière. Il est conseillé d’installer le four de manière à ce qu’il repose sur deux cales en bois ou bien sur un plan d’appui continu qui ait une découpe d’au moins 45 x 560 mm (voir figures).

.

45

mm

.

mm


560


Centrage et fixation

Pour fixer l’appareil au meuble :

ouvrir la porte du four;

Retirer les 2 caoutchouc qui couvrent les trous de fixation situés sur le cadre;

Fixer le four au meuble en utilisant 2 vis à bois

Repositionner les caoutchouc couvre-trous.

590 mm.

20 mm.

570 mm.

.

mm


550 .


min


.

mm

45


560

mm.


575-585 mm.

595

mm.


.


mm


550

.


mm


.*


20,5 mm


22,5


* Seulement pour l’acier

! Après encastrement de l’appareil, il ne doit plus y avoir possibilité de contact avec les parties électrifiées. Les déclarations de consommation indiquées sur l’étiquette des caractéristiques ont été

! Toutes les parties qui servent de protection doivent être fixées de manière à ne pouvoir être enlevées qu’avec l’aide d’un outil.

13

Raccordement électrique

FR

! Les fours munis d’un câble d’alimentation tripolaire sont prévus pour un fonctionnement au courant alternatif à la tension et à la fréquence indiquées sur la plaque signalétique apposée sur l’appareil (voir ci-dessous).

Montage du câble d’alimentation

L

N

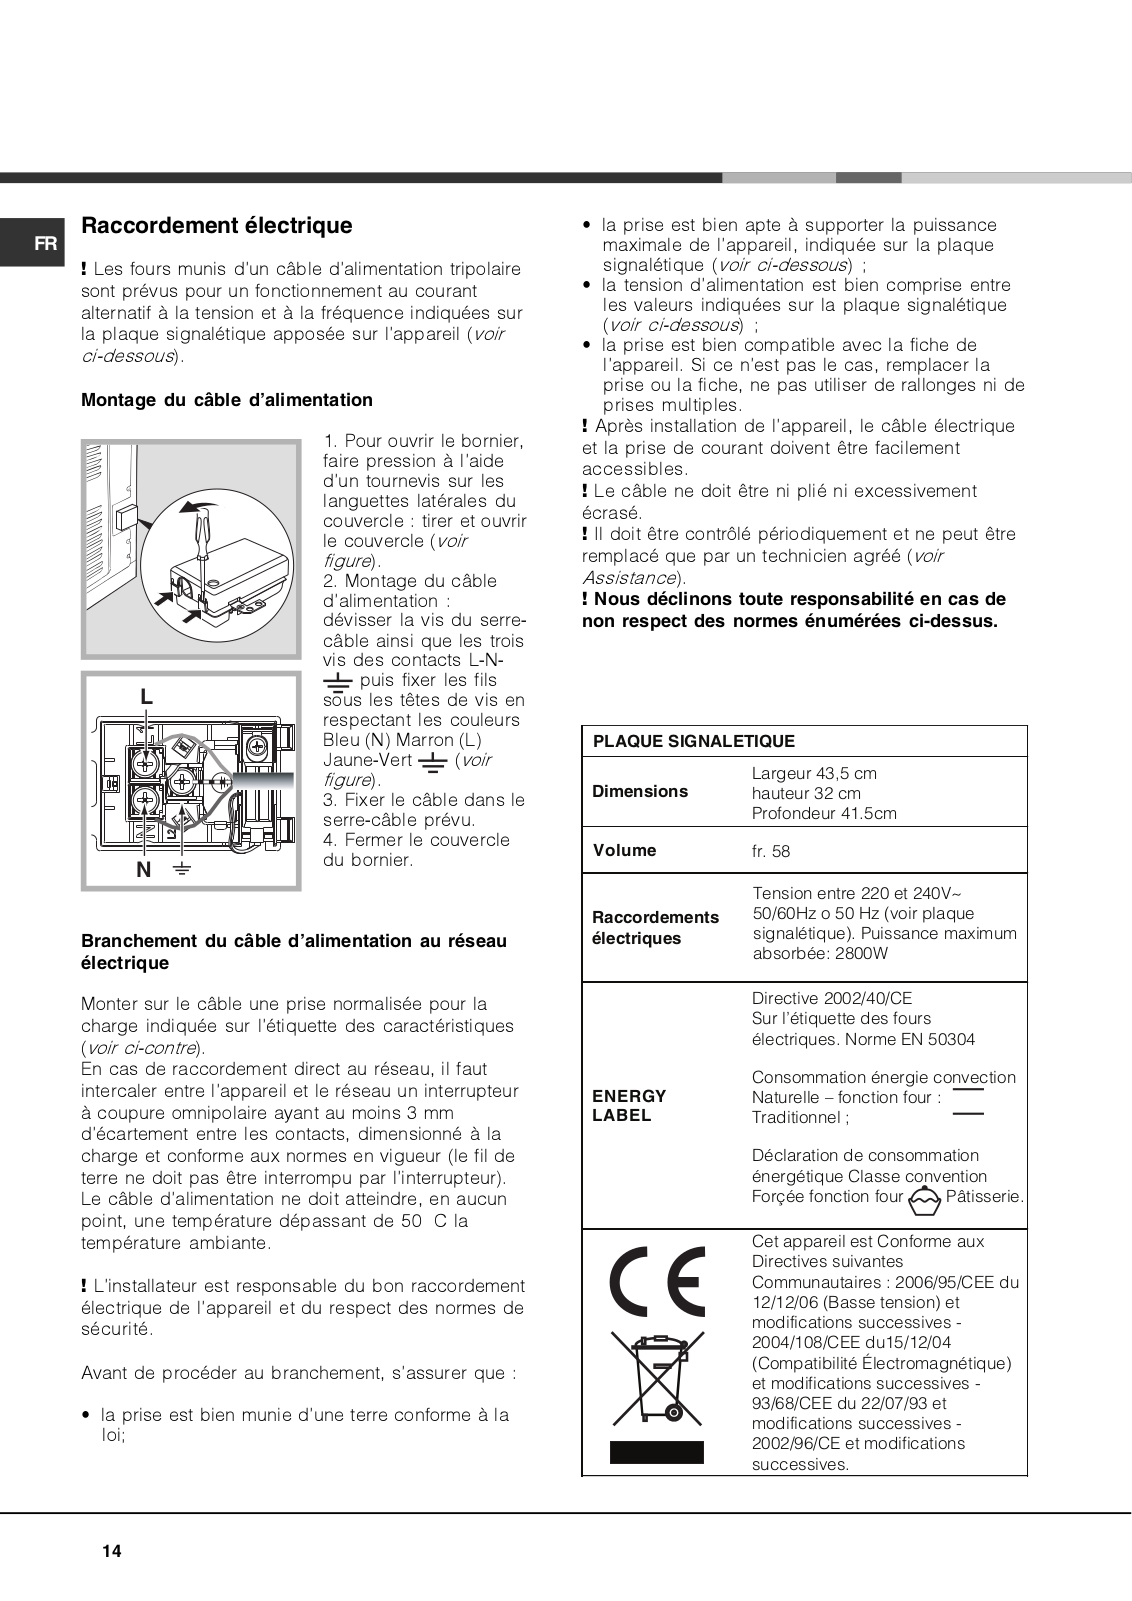
1.Pour ouvrir le bornier, faire pression à l’aide d’un tournevis sur les languettes latérales du couvercle : tirer et ouvrir le couvercle (voir figure).

2.Montage du câble d’alimentation : dévisser la vis du serrecâble ainsi que les trois vis des contacts L-N- puis fixer les fils sous les têtes de vis en respectant les couleurs Bleu (N) Marron (L) Jaune-Vert (voir figure).

3.Fixer le câble dans le serre-câble prévu.

4.Fermer le couvercle du bornier.

Branchement du câble d’alimentation au réseau électrique

Monter sur le câble une prise normalisée pour la charge indiquée sur l’étiquette des caractéristiques (voir ci-contre).

En cas de raccordement direct au réseau, il faut intercaler entre l’appareil et le réseau un interrupteur à coupure omnipolaire ayant au moins 3 mm d’écartement entre les contacts, dimensionné à la charge et conforme aux normes en vigueur (le fil de terre ne doit pas être interrompu par l’interrupteur). Le câble d’alimentation ne doit atteindre, en aucun point, une température dépassant de 50 C la température ambiante.

! L’installateur est responsable du bon raccordement électrique de l’appareil et du respect des normes de sécurité.

Avant de procéder au branchement, s’assurer que :

la prise est bien munie d’une terre conforme à la loi;

la prise est bien apte à supporter la puissance maximale de l’appareil, indiquée sur la plaque signalétique (voir ci-dessous) ;

la tension d’alimentation est bien comprise entre les valeurs indiquées sur la plaque signalétique (voir ci-dessous) ;

la prise est bien compatible avec la fiche de l’appareil. Si ce n’est pas le cas, remplacer la prise ou la fiche, ne pas utiliser de rallonges ni de prises multiples.

!Après installation de l’appareil, le câble électrique et la prise de courant doivent être facilement accessibles.

!Le câble ne doit être ni plié ni excessivement écrasé.

!Il doit être contrôlé périodiquement et ne peut être remplacé que par un technicien agréé (voir Assistance).

!Nous déclinons toute responsabilité en cas de non respect des normes énumérées ci-dessus.

PLAQUE SIGNALETIQUE

Largeur 43,5 cm

Dimensions hauteur 32 cm

Profondeur 41.5cm

Volume

fr. 58


Tension entre 220 et 240V~

Raccordements

50/60Hz o 50 Hz (voir plaque

électriques

signalétique). Puissance maximum


absorbée: 2800W


Directive 2002/40/CE


Sur l’étiquette des fours


électriques. Norme EN 50304

ENERGY

Consommation énergie convection

Naturelle – fonction four :


LABEL

Traditionnel ;


Déclaration de consommation


énergétique Classe convention


Forçée fonction four

Pâtisserie.


Cet appareil est Conforme aux


Directives suivantes


Communautaires : 2006/95/CEE du


12/12/06 (Basse tension) et


modifications successives -


2004/108/CEE du15/12/04


(Compatibilité Électromagnétique)


et modifications successives -


93/68/CEE du 22/07/93 et


modifications successives -


2002/96/CE et modifications


successives.


14

Description de l’appareil

Vue d’ensemble

FR

Tableau de bord

GLISSIERES de


coulissement

Support GRILLE

niveau 5


niveau 4

Support LECHEFRITE

niveau 3

niveau 2


niveau 1

Tableau de bord


Bouton


Voyant


Bouton

PROGRAMMES


THERMOSTAT


THERMOSTAT


Programmateur

ELECTRONIQUE*

* N’existe que sur certains modèles

15

Mise en marche et utilisation

! Lors de son premier allumage, faire fonctionner le FR four à vide, porte fermée, pendant au moins une

heure en réglant la température à son maximum. Puis éteindre le four, ouvrir la porte et aérer la pièce. L’odeur qui se dégage est due à l’évaporation des produits utilisés pour protéger le four.

Mise en marche du four

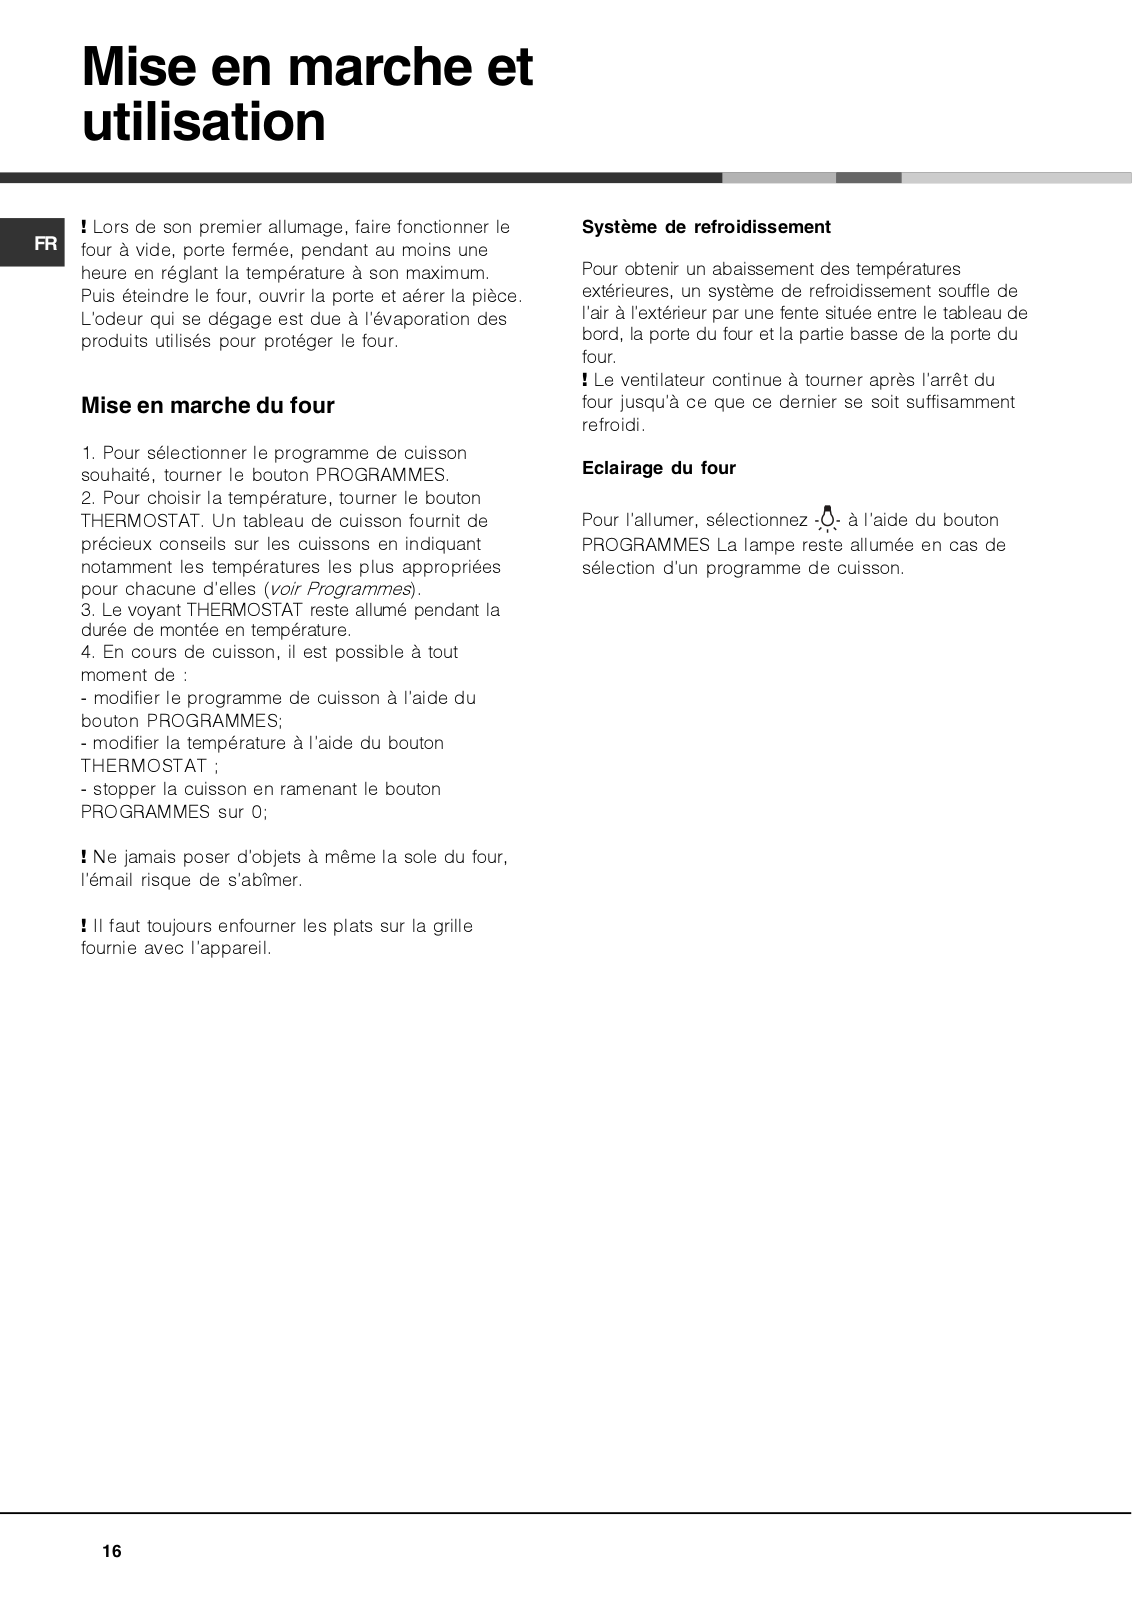
1.Pour sélectionner le programme de cuisson souhaité, tourner le bouton PROGRAMMES.

2.Pour choisir la température, tourner le bouton THERMOSTAT. Un tableau de cuisson fournit de précieux conseils sur les cuissons en indiquant notamment les températures les plus appropriées pour chacune d’elles (voir Programmes).

3.Le voyant THERMOSTAT reste allumé pendant la durée de montée en température.

4.En cours de cuisson, il est possible à tout

moment de :

-modifier le programme de cuisson à l’aide du bouton PROGRAMMES;

-modifier la température à l’aide du bouton THERMOSTAT ;

-stopper la cuisson en ramenant le bouton PROGRAMMES sur 0;

!Ne jamais poser d’objets à même la sole du four, l’émail risque de s’abîmer.

!Il faut toujours enfourner les plats sur la grille fournie avec l’appareil.

Système de refroidissement

Pour obtenir un abaissement des températures extérieures, un système de refroidissement souffle de l’air à l’extérieur par une fente située entre le tableau de bord, la porte du four et la partie basse de la porte du four.

! Le ventilateur continue à tourner après l’arrêt du four jusqu’à ce que ce dernier se soit suffisamment refroidi.

Eclairage du four

Pour l’allumer, sélectionnez à l’aide du bouton PROGRAMMES La lampe reste allumée en cas de sélection d’un programme de cuisson.

16

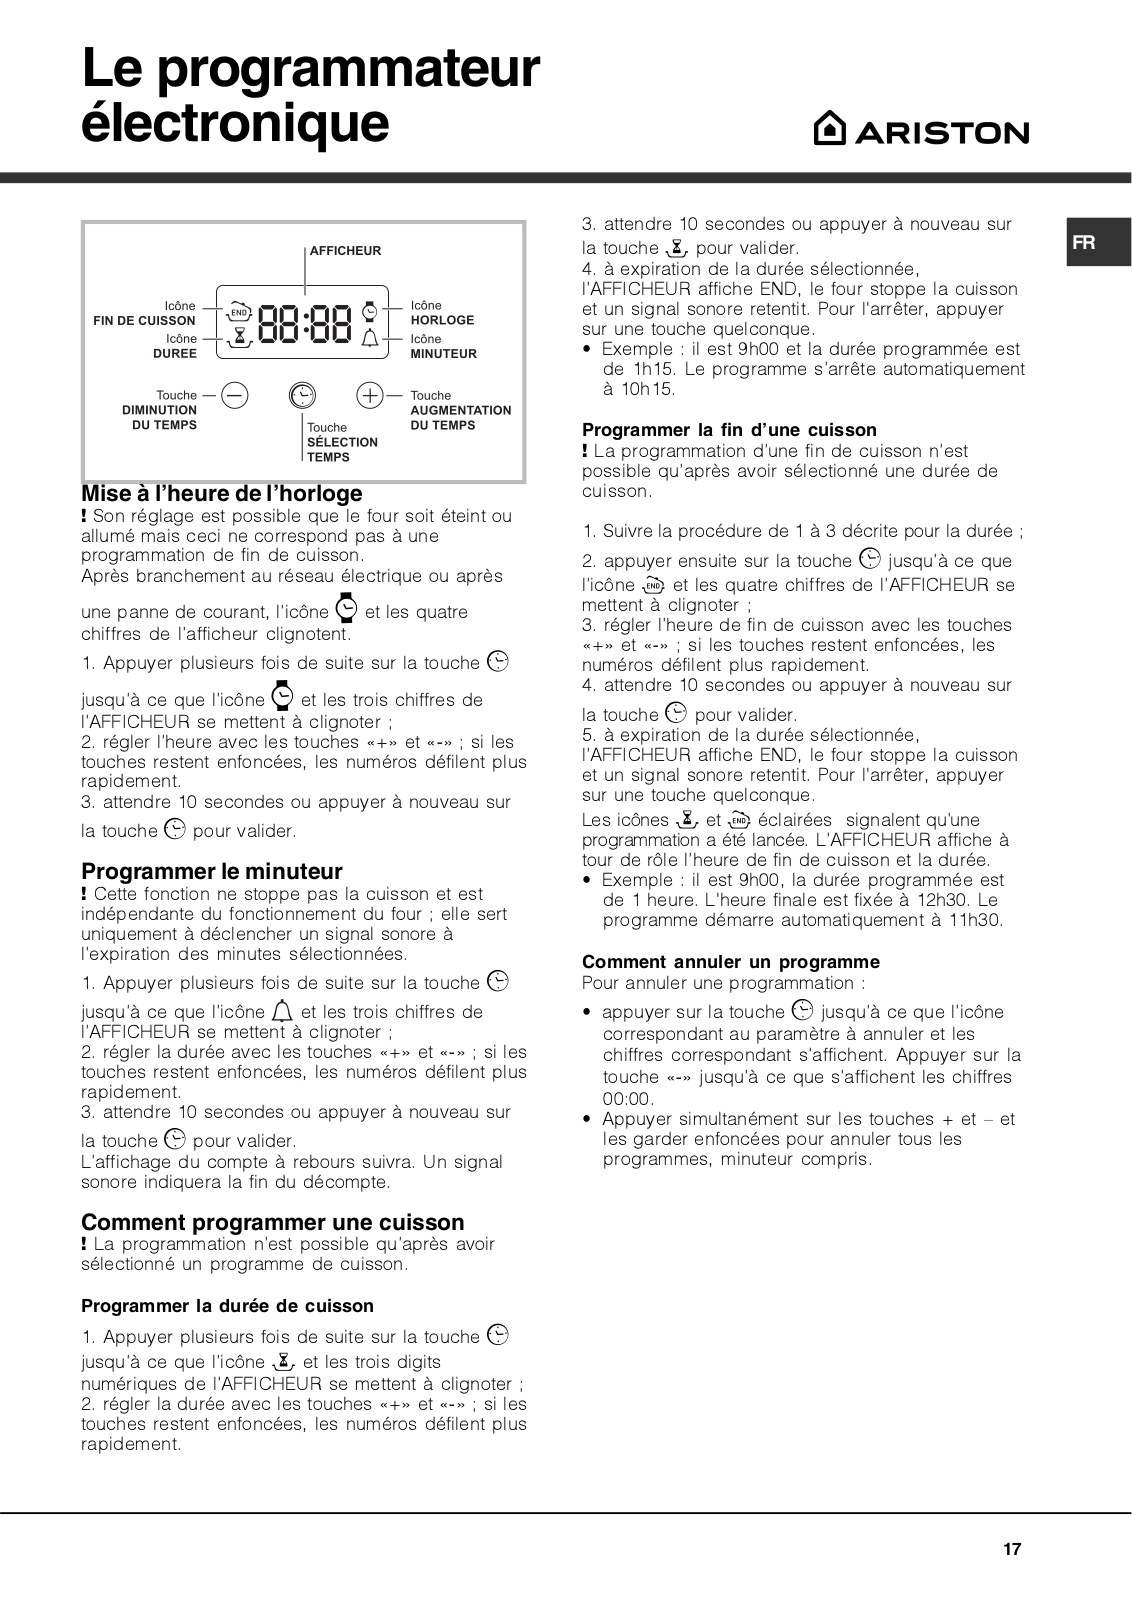
Le programmateur électronique

••••

Mise à l’heure de l’horloge

! Son réglage est possible que le four soit éteint ou allumé mais ceci ne correspond pas à une programmation de fin de cuisson.

Après branchement au réseau électrique ou après

une panne de courant, l’icône et les quatre chiffres de l’afficheur clignotent.

1. Appuyer plusieurs fois de suite sur la touche

jusqu’à ce que l’icône et les trois chiffres de l’AFFICHEUR se mettent à clignoter ;

2.régler l’heure avec les touches «+» et «-» ; si les touches restent enfoncées, les numéros défilent plus rapidement.

3.attendre 10 secondes ou appuyer à nouveau sur

la touchepour valider.

Programmer le minuteur

! Cette fonction ne stoppe pas la cuisson et est indépendante du fonctionnement du four ; elle sert uniquement à déclencher un signal sonore à l’expiration des minutes sélectionnées.

1. Appuyer plusieurs fois de suite sur la touche

jusqu’à ce que l’icône et les trois chiffres de l’AFFICHEUR se mettent à clignoter ;

2.régler la durée avec les touches «+» et «-» ; si les touches restent enfoncées, les numéros défilent plus rapidement.

3.attendre 10 secondes ou appuyer à nouveau sur

la touchepour valider.

L’affichage du compte à rebours suivra. Un signal sonore indiquera la fin du décompte.

Comment programmer une cuisson

! La programmation n’est possible qu’après avoir sélectionné un programme de cuisson.

Programmer la durée de cuisson

1. Appuyer plusieurs fois de suite sur la touche jusqu’à ce que l’icône et les trois digits numériques de l’AFFICHEUR se mettent à clignoter ; 2. régler la durée avec les touches «+» et «-» ; si les touches restent enfoncées, les numéros défilent plus rapidement.

3. attendre 10 secondes ou appuyer à nouveau sur

la touche pour valider. FR 4. à expiration de la durée sélectionnée,

l’AFFICHEUR affiche END, le four stoppe la cuisson et un signal sonore retentit. Pour l'arrêter, appuyer sur une touche quelconque.

Exemple : il est 9h00 et la durée programmée est de 1h15. Le programme s’arrête automatiquement à 10h15.

Programmer la fin d’une cuisson

! La programmation d’une fin de cuisson n’est possible qu’après avoir sélectionné une durée de cuisson.

1.Suivre la procédure de 1 à 3 décrite pour la durée ;

2.appuyer ensuite sur la touchejusqu’à ce que

l’icône et les quatre chiffres de l’AFFICHEUR se mettent à clignoter ;

3.régler l’heure de fin de cuisson avec les touches «+» et «-» ; si les touches restent enfoncées, les numéros défilent plus rapidement.

4.attendre 10 secondes ou appuyer à nouveau sur

la touchepour valider.

5. à expiration de la durée sélectionnée, l’AFFICHEUR affiche END, le four stoppe la cuisson et un signal sonore retentit. Pour l'arrêter, appuyer sur une touche quelconque.

Les icônes et éclairées signalent qu’une programmation a été lancée. L’AFFICHEUR affiche à tour de rôle l’heure de fin de cuisson et la durée.

Exemple : il est 9h00, la durée programmée est de 1 heure. L'heure finale est fixée à 12h30. Le programme démarre automatiquement à 11h30.

Comment annuler un programme

Pour annuler une programmation :

appuyer sur la touchejusqu’à ce que l’icône correspondant au paramètre à annuler et les chiffres correspondant s’affichent. Appuyer sur la touche «-» jusqu’à ce que s’affichent les chiffres 00:00.

Appuyer simultanément sur les touches + et – et les garder enfoncées pour annuler tous les programmes, minuteur compris.

17

Programmes

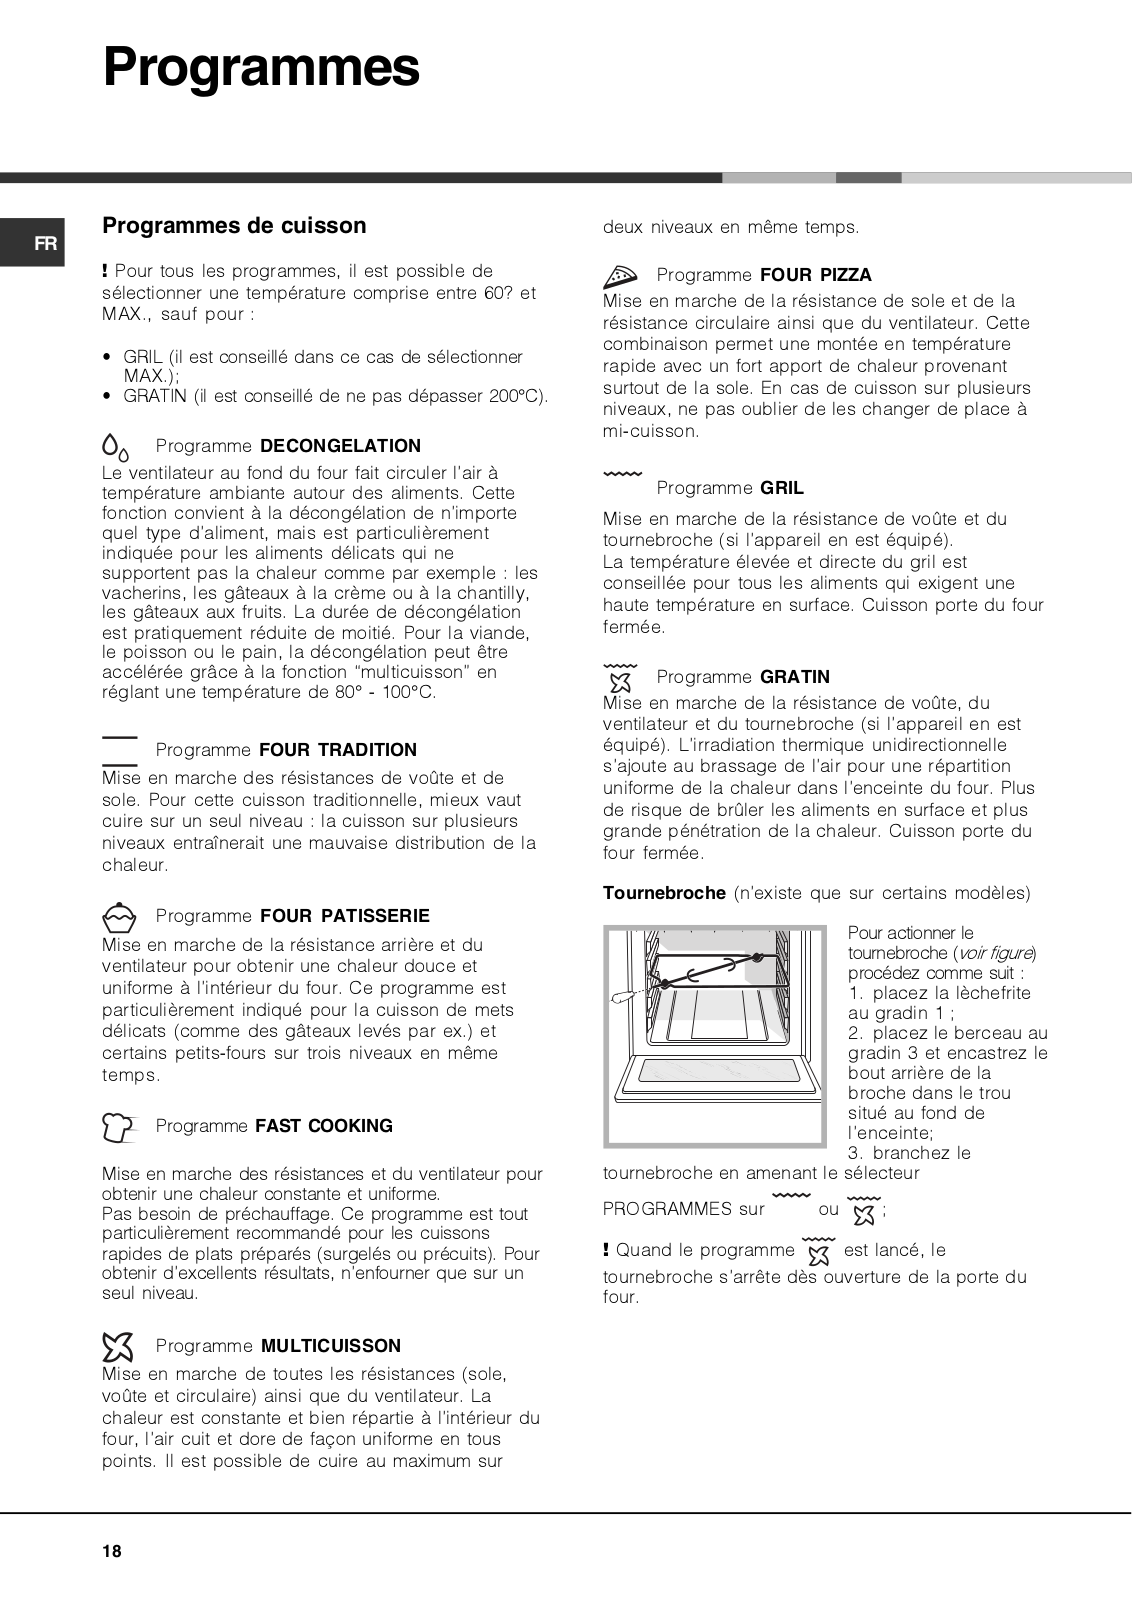
Programmes de cuisson

FR

! Pour tous les programmes, il est possible de sélectionner une température comprise entre 60? et MAX., sauf pour :

GRIL (il est conseillé dans ce cas de sélectionner MAX.);

GRATIN (il est conseillé de ne pas dépasser 200°C).

Programme DECONGELATION

Le ventilateur au fond du four fait circuler l’air à température ambiante autour des aliments. Cette fonction convient à la décongélation de n’importe quel type d’aliment, mais est particulièrement indiquée pour les aliments délicats qui ne supportent pas la chaleur comme par exemple : les vacherins, les gâteaux à la crème ou à la chantilly, les gâteaux aux fruits. La durée de décongélation est pratiquement réduite de moitié. Pour la viande, le poisson ou le pain, la décongélation peut être accélérée grâce à la fonction “multicuisson” en réglant une température de 80° - 100°C.

Programme FOUR TRADITION

Mise en marche des résistances de voûte et de sole. Pour cette cuisson traditionnelle, mieux vaut cuire sur un seul niveau : la cuisson sur plusieurs niveaux entraînerait une mauvaise distribution de la chaleur.

Programme FOUR PATISSERIE

Mise en marche de la résistance arrière et du ventilateur pour obtenir une chaleur douce et uniforme à l’intérieur du four. Ce programme est particulièrement indiqué pour la cuisson de mets délicats (comme des gâteaux levés par ex.) et certains petits-fours sur trois niveaux en même temps.

Programme FAST COOKING

Mise en marche des résistances et du ventilateur pour obtenir une chaleur constante et uniforme.

Pas besoin de préchauffage. Ce programme est tout particulièrement recommandé pour les cuissons rapides de plats préparés (surgelés ou précuits). Pour obtenir d’excellents résultats, n’enfourner que sur un seul niveau.

Programme MULTICUISSON

Mise en marche de toutes les résistances (sole, voûte et circulaire) ainsi que du ventilateur. La chaleur est constante et bien répartie à l’intérieur du four, l’air cuit et dore de façon uniforme en tous points. Il est possible de cuire au maximum sur

deux niveaux en même temps.

Programme FOUR PIZZA

Mise en marche de la résistance de sole et de la résistance circulaire ainsi que du ventilateur. Cette combinaison permet une montée en température rapide avec un fort apport de chaleur provenant surtout de la sole. En cas de cuisson sur plusieurs niveaux, ne pas oublier de les changer de place à mi-cuisson.

Programme GRIL

Mise en marche de la résistance de voûte et du tournebroche (si l’appareil en est équipé).

La température élevée et directe du gril est conseillée pour tous les aliments qui exigent une haute température en surface. Cuisson porte du four fermée.

Programme GRATIN

Mise en marche de la résistance de voûte, du ventilateur et du tournebroche (si l’appareil en est équipé). L’irradiation thermique unidirectionnelle s’ajoute au brassage de l’air pour une répartition uniforme de la chaleur dans l’enceinte du four. Plus de risque de brûler les aliments en surface et plus grande pénétration de la chaleur. Cuisson porte du four fermée.

Tournebroche (n’existe que sur certains modèles)


Pour actionner le


tournebroche (voir figure)


procédez comme suit :


1.

placez la lèchefrite


au gradin 1 ;


2.

placez le berceau au


gradin 3 et encastrez le


bout arrière de la


broche dans le trou


situé au fond de


l’enceinte;


3.

branchez le

tournebroche en amenant le sélecteur

PROGRAMMES sur

ou

;

! Quand le programme est lancé, le

tournebroche s’arrête dès ouverture de la porte du four.

18

Conseils de cuisson

FR

!Pour les cuissons ventilées ne pas utiliser les gradins 1 et 5 : ils sont directement frappés par l’air chaud qui pourrait brûler les préparations délicates.

!Pour vos cuissons GRIL et GRATIN, placez la lèche-frite au gradin 1 pour récupérer les fonds de cuisson (jus et/ou graisses).

MULTICUISSON

Utiliser les gradins 2 et 4 et placer au 2 les plats qui exigent davantage de chaleur.

Placer la lèchefrite en bas et la grille en haut.

GRIL

Placer la grille au gradin 3 ou 4, enfourner les plats au milieu de la grille.

Nous conseillons de sélectionner le niveau d’énergie maximum. Ne pas s’inquiéter si la résistance de voûte n’est pas allumée en permanence: son fonctionnement est contrôlé par un thermostat.

FOUR PIZZA

Utiliser un plat en aluminium léger et l’enfourner sur la grille du four.

En cas d’utilisation du plateau émaillé, le temps de cuisson sera plus long et la pizza beaucoup moins croustillante.

Si les pizzas sont bien garnies, n’ajouter la mozzarelle qu’à mi-cuisson.

19


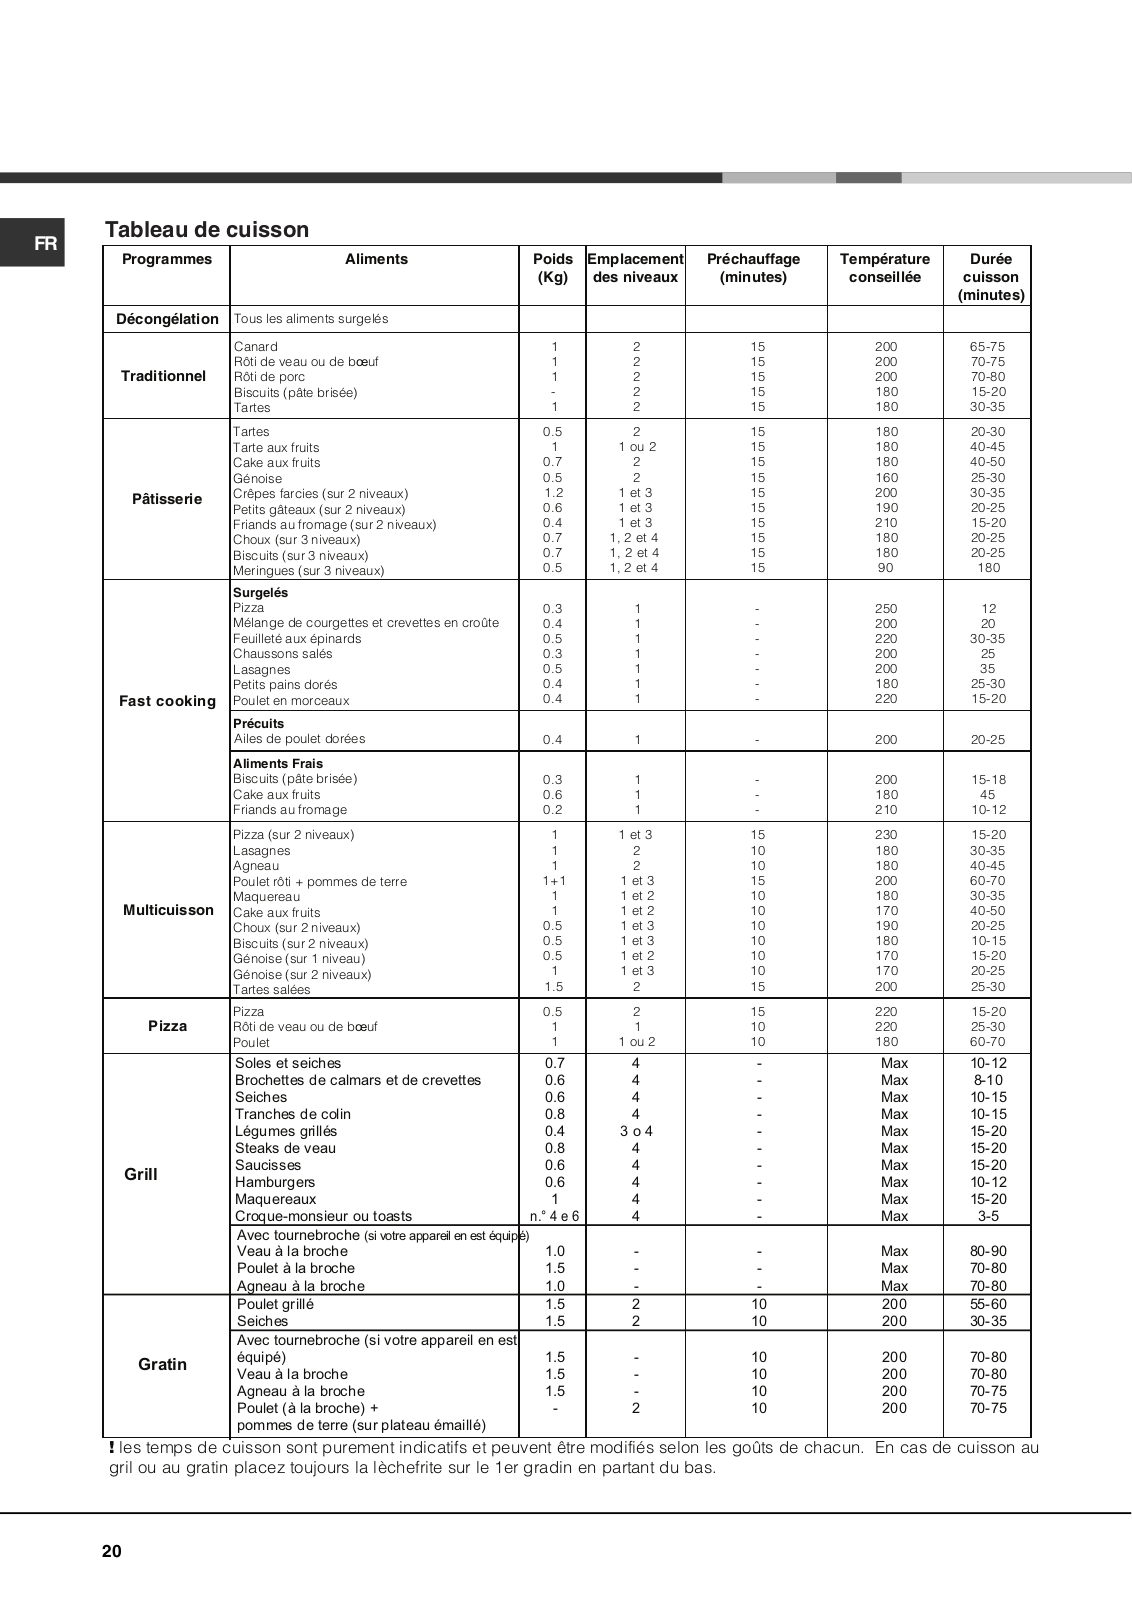
Tableau de cuisson


FR


Programmes

Aliments

Poids

Emplacement

Préchauffage

Température

Durée


(Kg)

des niveaux

(minutes)

conseillée

cuisson


(minutes)


Décongélation Tous les aliments surgelés


Canard

1

2

15

200


65-75


Traditionnel

Rôti de veau ou de bœuf

1

2

15

200


70-75


Rôti de porc

1

2

15

200


70-80


Biscuits (pâte brisée)

-

2

15

180


15-20


Tartes

1

2

15

180


30-35


Tartes

0.5

2

15

180


20-30


Tarte aux fruits

1

1 ou 2

15

180


40-45


Cake aux fruits

0.7

2

15

180


40-50


Génoise

0.5

2

15

160


25-30


Pâtisserie

Crêpes farcies (sur 2 niveaux)

1.2

1 et 3

15

200


30-35


Petits gâteaux (sur 2 niveaux)

0.6

1 et 3

15

190


20-25


Friands au fromage (sur 2 niveaux)

0.4

1 et 3

15

210


15-20


Choux (sur 3 niveaux)

0.7

1, 2 et 4

15

180


20-25


Biscuits (sur 3 niveaux)

0.7

1, 2 et 4

15

180


20-25


Meringues (sur 3 niveaux)

0.5

1, 2 et 4

15

90


180


Surgelés


Pizza

0.3

1

-

250


12


Mélange de courgettes et crevettes en croûte

0.4

1

-

200


20


Feuilleté aux épinards

0.5

1

-

220


30-35


Chaussons salés

0.3

1

-

200


25


Lasagnes

0.5

1

-

200


35


Petits pains dorés

0.4

1

-

180


25-30


Fast cooking

Poulet en morceaux

0.4

1

-

220


15-20


Précuits


Ailes de poulet dorées

0.4

1

-

200


20-25


Aliments Frais


Biscuits (pâte brisée)

0.3

1

-

200


15-18


Cake aux fruits

0.6

1

-

180


45


Friands au fromage

0.2

1

-

210


10-12


Pizza (sur 2 niveaux)

1

1 et 3

15

230


15-20


Lasagnes

1

2

10

180


30-35


Agneau

1

2

10

180


40-45


Poulet rôti + pommes de terre

1+1

1 et 3

15

200


60-70


Multicuisson

Maquereau

1

1 et 2

10

180


30-35


Cake aux fruits

1

1 et 2

10

170


40-50


Choux (sur 2 niveaux)

0.5

1 et 3

10

190


20-25


Biscuits (sur 2 niveaux)

0.5

1 et 3

10

180


10-15


Génoise (sur 1 niveau)

0.5

1 et 2

10

170


15-20


Génoise (sur 2 niveaux)

1

1 et 3

10

170


20-25


Tartes salées

1.5

2

15

200


25-30


Pizza

Pizza

0.5

2

15

220


15-20


Rôti de veau ou de bœuf

1

1

10

220


25-30


Poulet

1

1 ou 2

10

180


60-70


Soles et seiches

0.7

4

-

Max

10-12


Brochettes de calmars et de crevettes

0.6

4

-

Max

8-10


Seiches

0.6

4

-

Max

10-15


Tranches de colin

0.8

4

-

Max

10-15


Légumes grillés

0.4

3 o 4

-

Max

15-20


Steaks de veau

0.8

4

-

Max

15-20


Grill

Saucisses

0.6

4

-

Max

15-20


Hamburgers

0.6

4

-

Max

10-12


Maquereaux

1

4

-

Max

15-20


Croque-monsieur ou toasts

n.° 4 e 6

4

-

Max

3-5


Avec tournebroche (si votre appareil en est équipé)

1.0

-

-

Max

80-90


Veau à la broche


Poulet à la broche

1.5

-

-

Max

70-80


Agneau à la broche

1.0

-

-

Max

70-80


Poulet grillé

1.5

2

10

200

55-60


Seiches

1.5

2

10

200

30-35


Avec tournebroche (si votre appareil en est

1.5

-

10

200

70-80


Gratin

équipé)


Veau à la broche

1.5

-

10

200

70-80


Agneau à la broche

1.5

-

10

200

70-75


Poulet (à la broche) +

-

2

10

200

70-75


pommes de terre (sur plateau émaillé)


! les temps de cuisson sont purement indicatifs et peuvent être modifiés selon les goûts de chacun. En cas de cuisson au gril ou au gratin placez toujours la lèchefrite sur le 1er gradin en partant du bas.

20

Précautions et conseils

! Cet appareil a été conçu et fabriqué conformément aux normes internationales de sécurité. Ces consignes de sécurité sont très importantes et doivent être lues attentivement.

Sécurité générale

Cet appareil a été conçu pour un usage familial, de type non professionnel.

Cet appareil ne doit pas être installé en extérieur, même dans un endroit à l’abri, il est en effet très dangereux de le laisser exposé à la pluie et aux orages.

Pour déplacer le four, se servir des poignées prévues à cet effet sur les côtés de l’appareil.

Ne pas toucher à l’appareil si l’on est pieds nus ou si l’on a les mains ou les pieds mouillés ou humides.

Cet appareil qui sert à cuire des aliments ne doit être utilisé que par des adultes conformément aux instructions du mode d’emploi. Toute autre utilisation (comme par exemple le chauffage d’une pièce) est impropre et donc dangereux. Le fabricant décline toute responsabilité en cas de dommages provoqués par un usage impropre ou erroné.

En cours de fonctionnement, les éléments chauffants et certaines parties de la porte peuvent devenir très chauds. Attention à ne pas les toucher et à garder les enfants à distance.

Éviter que le cordon d’alimentation d’autres électroménagers touche à des parties chaudes du four.

Les orifices ou les fentes d’aération ou d’évacuation de la chaleur ne doivent pas être bouchés

Toujours saisir la poignée en son milieu : elle risque d’être très chaude à ses extrémités.

Utiliser toujours des gants de protection pour enfourner ou sortir les plats du four.

Ne jamais tapisser la sole du four de papier aluminium.

Ne pas ranger de matériel inflammable à l’intérieur du four : si l’appareil était par inadvertance mis en marche, il pourrait prendre feu.

Il faut toujours s’assurer que les boutons sont bien dans la position ““ ”/“ ” quand l’appareil n’est pas utilisé.

Ne pas tirer sur le cordon de l’appareil pour débrancher la fiche de la prise de courant.

N’effectuer aucune opération de nettoyage ou d’entretien sans avoir auparavant débranché la fiche de la prise de courant.

• En cas de panne, n’essayer en aucun cas

d’accéder aux mécanismes internes pour tenter

FR


de réparer l’appareil. Contacter le service


d’Assistance (voir Assistance).


Ne pas poser d’objets lourds sur la porte du four ouverte.

Il n’est pas prévu que cet appareil soit utilisé par des personnes (enfants compris) présentant des capacités physiques, sensorielles ou mentales réduites ou n’ayant pas l’expérience ou les connaissances indispensables, à moins qu’elles ne le fassent sous la surveillance de quelqu’un responsable de leur sécurité ou qu’elles aient été dûment formées sur l’utilisation de l’appareil.

Éviter que les enfants ne jouent avec l’appareil.

Mise au rebut

Mise au rebut du matériel d’emballage : se conformer aux réglementations locales, les emballages pourront ainsi être recyclés.

La directive européenne 2002/96/CE relative aux déchets d’équipements électriques et électroniques (DEEE), prévoit que les électroménagers ne peuvent pas être traités comme des déchets solides urbains courants. Les appareils usagés doivent faire l’objet d’une collecte séparée pour optimiser le taux de récupération et de recyclage des matériaux qui les composent et empêcher tout danger pour la santé et pour l’environnement. Le symbole de la poubelle barrée est appliqué sur tous les produits pour rappeler qu’ils font l’objet d’une collecte sélective.

Pour de plus amples renseignements sur la mise au rebut des électroménagers, les possesseurs peuvent s’adresser au service public prévu à cet effet ou aux commerçants.

Economies et respect de l’environnement

Pour faire des économies d’électricité, utiliser autant que possible le four pendant les heures creuses.

Pour les cuissons au GRIL et GRATIN, nous recommandons de garder la porte du four

fermée : les résultats obtenus sont meilleurs et la consommation d’énergie est moindre (environ 10% d’économie).

Garder les joints propres et en bon état pour qu’ils adhèrent bien à la porte et ne causent pas de déperdition de chaleur.

21

Loading...
+ 47 hidden pages