

FK897E.1 J P.20 X/HA
FK897E.1 J P.20 /HA
Español
Manual de instrucciones
HORNO
Sumario
Manual de instrucciones,1
Advertencias,4
Asistencia,8
Descripción del aparato,10
Descripción del aparato,13
Instalación,36
Puesta en funcionamiento y uso,38
Programas,39
Precauciones y consejos,43
Mantenimiento y cuidados,43
Anomalías y soluciones,45
English
Operating Instructions
OVEN
Contents
Operating Instructions,1
Warnings,3
Assistance,8
Description of the appliance,10
Description of the appliance,12
Installation,16
Start-up and use,18
Modes,19
Precautions and tips,23
Maintenance and care,23
Troubleshooting,25
Français
Mode d’emploi
FOUR
Sommaire
Portuges
Instruções para a utilização
FORNO
Índice
Instruções para a utilização,1
Advertências,4
Assistência,9
Descrição do aparelho,10
Descrição do aparelho,13
Instalação,46
Início e utilização,48
Programas,49
Precauções e conselhos,53
Manutenção e cuidados,53
Anomalias e soluções,55
Deutsch
Bedienungsanleitung
BACKOFEN
Inhaltsverzeichnis
Mode d’emploi,1
Avertissements,3
Assistance,8
Description de l’appareil,10
Description de l’appareil,12
Installation,26
Mise en marche et utilisation,28
Programmes,29
Précautions et conseils,33
Nettoyage et entretien,33
Anomalies et remèdes,35
Bedienungsanleitung,1
Hinweise,5
Kundendienst,9
Beschreibung Ihres Gerätes,10
Beschreibung Ihres Gerätes,14
Installation,56
Inbetriebsetzung und Gebrauch,58
Programme,59
Vorsichtsmaßregeln und Hinweise,63
Reinigung und Pege,63
Störungen und Abhilfe,66

Nederlands
Gebruiksaanwijzing
OVEN
Inhoud
Gebruiksaanwijzing,2
Belangrijk,6
Service,9
Beschrijving van het apparaat,11
Beschrijving van het apparaat,14
Het installeren,67
Starten en gebruik,69
Programma’s,70
Voorzorgsmaatregelen en advies,74
Onderhoud en verzorging,74
Storingen en oplossingen,76
Dansk
Brugervejledning
OVN
Oversigt
Brugervejledning,2
Advarsler,6
Assistance,9
Beskrivelse af apparatet,11
Beskrivelse af apparatet,15
Installation,77
Ibrugtagning,79
Funktioner,80
Forholdsregler og tips,84
Vedligeholdelse og pleje,84
Fejlnding,86
Warnings
WARNING: The appliance and its
accessible parts become hot during use.
Care should be taken to avoid touching
heating elements. Children less than 8
years of age shall be kept away unless
continuously supervised. This appliance
can be used by children aged from 8 years
and above and persons with reduced
physical, sensory or mental capabilities
or lack of experience and knowledge
if they have been given supervision
or instruction concerning use of the
appliance in a safe way and understand
the hazards involved. Children shall not
play with the appliance. Cleaning and
user maintenance shall not be made by
children without supervision.
Do not use harsh abrasive cleaners or
sharp metal scrapers to clean the oven door
glass since they can scratch the surface,
which may result in shattering of the glass.
Before initiating the automatic cleaning
cycle:
• clean the oven door;
• remove large or coarse food residues
from the inside of the oven using a
damp sponge. Do not use detergents;
• remove all accessories and the sliding
rack kit (where present);
• do not place tea towels”
! When you place the rack inside, make
sure that the stop is directed upwards and
in the back of the cavity.
Avertissements
ATTENTION : Cet appareil ainsi que
ses parties accessibles deviennent très
chauds pendant leur fonctionnement.
Il faut faire attention à ne pas toucher
les éléments chauffants. Ne pas faire
approcher les enfants de moins de 8 ans
à moins qu’ils ne soient sous surveillance
constante. Le présent appareil peut
être utilisé par des enfants de plus de
8 ans et par des personnes présentant
des capacités physiques, sensorielles
ou mentales réduites ou n’ayant pas
l’expérience ou les connaissances
indispensables, à condition qu’ils soient
sous bonne surveillance ou qu’ils aient
reçu les instructions nécessaires pour une
utilisation de l’appareil en toute sécurité
et à condition qu’ils se rendent compte
des dangers encourus. Les enfants ne
doivent pas jouer avec l’appareil. Les
opérations de nettoyage et d’entretien
ne doivent pas être effectuées par des
enfants non surveillés.
Ne pas utiliser de produits abrasifs ni
de spatules métalliques coupantes pour
nettoyer la porte du four en verre, sous peine
d’éraer la surface et de briser le verre.
Keep children away from the appliance
during the automatic cleaning cycle as
surfaces may become very hot.
Never use steam cleaners or pressure
cleaners on the appliance.
WARNING: Ensure that the appliance is
switched off before replacing the lamp to
avoid the possibility of electric shock.
Avant d’activer la fonction de nettoyage
automatique :
• nettoyer la porte du four
• enlever avec une éponge humide les
résidus les plus gros. Ne pas utiliser de
détergents ;
• sortir tous les accessoires ainsi que le
kit éventuel de glissières coulissantes ;
• ne pas placer de torchons ou de
maniques sur la poignée du four.
3
Lors du nettoyage automatique, les
surfaces peuvent devenir chaudes, c’est
pourquoi il convient d’éloigner les jeunes
enfants.
Ne jamais nettoyer l’appareil avec des
nettoyeurs vapeur ou haute pression.
ATTENTION : s’assurer que l’appareil est
éteint avant de procéder au remplacement
de l’ampoule, an d’éviter tout risque
d’électrocution.
! Lors de l’introduction de la grille,
s’assurer que l’arrêt est bien tourné vers
le haut et se trouve dans la partie arrière
de l’enceinte.
Advertencias
Antes de activar la función de limpieza
automática:
• limpie la puerta del horno
• con una esponja húmeda quite los
residuos más consistentes del interior
del horno. No utilice detergentes;
• quite todos los accesorios y el kit guías
deslizables (si existe);
• no deje paños de cocina o manoplas
en la manija.
Durante la limpieza automática, las
supercies pueden calentarse mucho:
mantenga alejados a los niños.
No utilice nunca limpiadores a vapor o de
alta presión para la limpieza del aparato.
ATENCIÓN: Antes de sustituir la lámpara
controle que el aparato esté apagado
para evitar la posibilidad de choques
eléctricos.
ATENCIÓN: Este aparato y sus partes
accesibles se vuelven muy calientes
durante el uso. Por lo tanto, es importante
evitar tocar los elementos calentadores.
Mantenga alejados a los niños menores de
8 años si no son continuamente vigilados.
El presente aparato puede ser utilizado por
niños mayores de 8 años y por personas
con capacidades físicas, sensoriales o
mentales disminuidas o sin experiencia ni
conocimientos, si se encuentran bajo una
adecuada vigilancia o si han sido instruidos
sobre el uso del aparato de modo seguro y
comprenden los peligros relacionados con
el mismo. Los niños no deben jugar con
el aparato. Las operaciones de limpieza y
de mantenimiento no deben ser realizadas
por niños sin vigilancia.
No utilice productos abrasivos ni espátulas
de metal cortantes para limpiar la puerta
de cristal del horno ya que podrían rayar
la supercie y quebrar el cristal.
! Cuando introduzca la parrilla, controle
que el tope esté dirigido hacia arriba y en
la parte posterior de la cavidad.
Advertências
ATENÇÃO: Este aparelho e as suas
partes acessíveis aquecem muito durante
a utilização. É preciso ter atenção e evitar
tocar os elementos que aquecem. Manter
afastadas as crianças com menos de 8
anos, caso não estejam a ser vigiadas.
O presente aparelho pode ser utilizado
por crianças com mais de 8 anos e
por pessoas com capacidades físicas,
sensoriais ou mentais reduzidas ou com
pouca experiência e conhecimentos,
caso sejam adequadamente vigiadas
ou caso tenham recebido instruções
em relação ao uso do aparelho de
forma segura e tenham conhecimento
dos perigos associados. As crianças
4

não devem brincar com o aparelho. As
operações de limpeza e manutenção não
devem ser efectuadas por crianças sem
vigilância.
Não utilizar produtos abrasivos nem
espátulas de metal cortantes para limpar
a porta em vidro do forno, uma vez que
pode riscar a superfície, provocando a
ruptura do vidro.
Antes de activar a função de limpeza
automática:
• limpe a porta do forno
• com uma esponja húmida retire do
interior do forno os resíduos maiores.
Não utilize detergentes;
• remova todos os acessórios e o kit de
guias corrediças (se presentes);
• não deixe panos de prato nem pegas
de tecido na maçaneta.
Durante a limpeza automática, as
superfícies podem car muito quentes:
mantenha as crianças afastadas.
werden. Kinder unter 8 Jahren, die nicht
ständig beaufsichtigt sind, von dem
Gerät fernhalten. Das Gerät darf von
Kindern ab 8 Jahren und Personen mit
eingeschränkten körperlichen, geistigen
oder Wahrnehmungsfähigkeiten oder
aber ohne ausreichende Erfahrung
und Kenntnis verwendet werden,
vorausgesetzt sie werden ausreichend
überwacht oder sie wurden in den sicheren
Gebrauch des Geräts eingewiesen und
haben eine ausreichende Wahrnehmung
der mit dem Gebrauch des Geräts
verbundenen Gefahren. Erlauben Sie
Kindern nicht, mit dem Gerät zu spielen.
Reinigungs- und Wartungsarbeiten
dürfen nicht von unbewachten Kindern
ausgeführt werden.
Verwenden Sie zur Reinigung der Glastür
des Backofens keine Scheuermittel
oder scharfkantige Metallspachtel, um
die Oberäche nicht zu zerkratzen und
so das Zerspringen des Glases zu
verursachen.
Nunca utilize equipamento de limpeza a
vapor ou de alta pressão para limpar o
aparelho.
ATENÇÃO: Assegure-se de que o
aparelho esteja desligado antes de
substituir a lâmpada, para evitar a
possibilidade de choques eléctricos.
! Quando inserir a grelha, assegure-se de
que o bloqueio esteja voltado para cima
e na parte posterior da cavidade.
Hinweise
ZUR BEACHTUNG: Bei Gebrauch wird
dieses Gerät und alle zugänglichen
Teile sehr heiß. Es ist darauf zu achten,
dass die Heizelemente nicht berührt
Verwenden Sie zur Reinigung des
Kochfeldes keine Dampf- oder
Hochdruckreinigungsgeräte.
ZUR BEACHTUNG: Versichern Sie
sich, dass das Gerät ausgeschaltet
ist, bevor Sie die Lampe austauschen.
Stromschlaggefahr.
Vor der Aktivierung der
Selbstreinigungsfunktion:
• Reinigen Sie die Backofentür
• Größere Speisereste aus dem
Backofeninneren mit einem feuchten
Schwamm entfernen. Keine
Reinigungsmittel verwenden.
• Entfernen Sie alle Zubehöre und
den Gleitschienen-Bausatz (wenn
vorhanden);
• Etwaige Geschirrtücher oder Topappen
vom Backofengriff entfernen.
5
Während der automatischen Reinigung
können einzelne Ofenteile sehr heiß
werden. Kinder sind daher vom Backofen
fernzuhalten.
! Beim Einsetzen des Rosts darauf achten,
dass die Arretierung nach oben zeigt und
sich im hinteren Bereich bendet.
Belangrijk
PAS OP: Dit apparaat en zijn bereikbare
onderdelen worden tijdens gebruik zeer
heet. Zorg ervoor de verwarmende
elementen niet aan te raken. Zorg ervoor
dat kinderen die kleiner dan 8 jaar oud zijn
niet dichtbij het apparaat kunnen komen,
tenzij onder constant toezicht. Het huidige
apparaat mag alleen door kinderen van
8 jaar en ouder en door personen met
een beperkt lichamelijk, sensorieel of
geestelijk vermogen, of zonder ervaring
en kennis worden gebruikt, mits ze onder
adequaat toezicht zijn, of mits ze zijn
onderricht m.b.t. het veilige gebruik van
het apparaat en zich bewust zijn van
de betreffende gevaren. Voorkom dat
kinderen met het apparaat spelen. De
reinigings- en onderhoudshandelingen
mogen niet door kinderen worden
uitgevoerd, tenzij onder toezicht.
Gebruik geen schurende producten,
noch snijdende metalen spatels om de
glazen deur van de oven te reinigen,
aangezien deze het oppervlak zouden
kunnen krassen, en als gevolg het glas
doen verbrijzelen.
schoonmaakmiddelen;
• verwijder alle accessoires en de kit met
de geleiders (indien aanwezig);
• laat geen keukendoeken of
pannenlappen aan het handvat hangen.
Gedurende de automatische reiniging
kunnen de oppervlakken zeer heet
worden: houd kinderen op afstand.
Gebruik nooit huishoudapparaten met
stoom of hoge druk voor het reinigen van
de kookplaat.
PAS OP: Controleer of het apparaat uit staat
voor u de lamp vervangt, om te voorkomen
dat u een elektrische schok krijgt.
! Bij het inbrengen van de grill erop letten
dat de bevestigingsklem omhoog gericht
is en zich achterin de oven bevindt.
Advarsler
ADVARSEL: Ovnen og dens tilgængelige
dele bliver varme under brug. Der skal
udvises forsigtighed for at undgå at berøre
varmeelementer. Børn under 8 år skal holdes
på afstand, medmindre de er under konstant
opsyn. Dette apparat kan anvendes af børn
i alderen fra 8 år og derover og personer
med nedsatte fysiske, sansemæssige eller
mentale evner eller mangel på erfaring og
viden, hvis de er under opsyn eller har fået
instruktion om brugen af apparatet på en
sikker måde og forstår de involverede farer.
Børn må ikke lege med apparatet. Rengøring
og brugervedligeholdelse må ikke foretages
af børn uden opsyn.
Voor het activeren van de functie
automatische reiniging:
• reinig de ovendeur
• verwijder met een natte spons het
ergste vuil uit de oven. Gebruik geen
6
Brug ikke skrappe slibende rengøringsmidler
eller skarpe metalskrabere til at rengøre
ovnlågens glas, da de kan ridse overaden,
hvilket kan resultere i at glasset går i stykker.

”Før den automatiske rengøring igangsættes:
• rengør ovnlågen;
• fjern store eller grove madrester fra
indersiden af ovnen med en fugtig svamp.
Brug ikke rengøringsmidler;
• fjern alt tilbehør og udtræksskinnerne (hvis
til stede);
• undlad at placere viskestykker eller
grydelapper på ovnens håndtag”
Hold børn væk fra apparatet under den
automatiske rengøring, da overaderne kan
blive meget varme.
Brug aldrig damprensere eller trykrensere
på apparatet.
ADVARSEL: Sørg for, at apparatet er slukket,
før du udskifter lampen for at undgå risikoen
for elektrisk stød.
! Når du sættet risten i, skal du sørge for, at
stoppet er rettet opad og i den bagerste del
i ovnrummet.
7
Assistance
Warning:
The appliance is tted with an automatic diagnostic system
which detects any malfunctions. Malfunctions are signalled
through messages of the following type: “F—” followed by
numbers.
Call for technical assistance in the event of a malfunction.
Before calling for Assistance:
• Check whether you can x the problem yourself.
• Restart the programme to check whether the malfunction
has disappeared.
• If it has not, contact the Authorised Technical Assistance
Service.
! Never use the services of an unauthorised technician.
Please have the following information to hand:
• The type of problem encountered.
• The message shown on the TEMPERATURE display.
• The appliance model (Mod.).
• The serial number (S/N).
The latter two pieces of information can be found on the
data plate located on the appliance.
Asistencia
Atención:
El aparato está dotado de un sistema de diagnóstico que
permite detectar problemas de funcionamiento. Los mismos
son comunicados en la pantalla mediante mensajes como:
“F—” seguido por números.
En esos casos es necesaria la intervención del servicio de
asistencia técnica.
Antes de llamar al Servicio de Asistencia Técnica:
• Verique que la anomalía no pueda ser resuelta por Ud.
mismo;
• Vuelva a poner en marcha el programa para controlar
si el inconveniente ha sido resuelto;
• Si no es así, llame al Servicio de Asistencia Técnica
Autorizado.
! Nunca solicite la asistencia de técnicos no autorizados.
Comunique:
• El tipo de anomalía;
• el mensaje que se observa en el display TEMPERATURA
• El modelo del aparato (Mod.)
• El número de serie (S/N)
Esta información se encuentra en la placa de características
colocada en el aparato.
Assistance
Attention :
L’appareil dispose d’un système d’autotest qui permet de
détecter toute anomalie de fonctionnement. Ces anomalies
sont afchées sous la forme: «F—» suivi de chiffres.
Contacter alors un service d’assistance technique.
Avant d’appeler le service de dépannage :
• Vérier s’il est possible de résoudre le problème soimême ;
• Redémarrer le programme pour contrôler si le problème
a été résolu;
• Si ce n’est pas le cas, contacter le service d’Assistance
technique agréé.
! Ne jamais faire appel à des techniciens non agréés.
Indiquer :
• le type d’anomalie;
• le code erreur afché sur l’écran TEMPERATURE
• le modèle de l’appareil (Mod.);
• son numéro de série (S/N).
Ces informations figurent sur la plaque signalétique
apposée sur l’appareil
La siguiente información es válida solo para España.
Para otros países de habla hispana consulte a su
vendedor.
Ampliación de garantía
Llame al 902.363.539 y le informaremos sobre el fantástico
plan de ampliación de garantía hasta 5 años.
Consiga una cobertura total adicional de
• Piezas y componentes
• Mano de obra de los técnicos
• Desplazamiento a su domicilio de los técnicos
Y NO PAGUE AVERIAS NUNCA MAS
Servicio de asistencia técnica (SAT)
Llame al 902.133.133 y nuestros técnicos intervendrán con
rapidez y ecacia, devolviendo el electrodoméstico a sus
condiciones óptimas de funcionamiento.
En el SAT encontrará recambios, accesorios y productos
específicos para la limpieza y mantenimiento de su
electrodoméstico a precios competitivos.
ESTAMOS A SU SERVICIO
8
Assistência
Atenção:
Este aparelho é equipado com um sistema de diagnóstico
que possibilita detectar eventuais mau funcionamentos.
Estes são comunicados no visor mediante mensagens do
seguinte tipo: “F—” seguido por números.
Nestes casos será necessária uma intervenção da
Assistência técnica.
Antes de contactar a Assistência:
• Verifique se a anomalia pode ser resolvida
autonomamente;
• Reiniciar o programa para controlar se o inconveniente
foi resolvido;
• Em caso negativo, contacte o Serviço de Assistência
Técnica Autorizado.
! Nunca recorra a técnicos não autorizados.
Comunique:
• o tipo de avaria;
• a mensagem visível no display da TEMPERATURA
• o modelo da máquina (Mod.)
• o número de série (S/N).
Estas últimas informações encontram-se na placa de
identicação situada no aparelho.
Service
Belangrijk:
Het apparaat is voorzien van een automatisch diagnostisch
systeem dat eventuele storingen opspoort. Deze kunt u
op het display aezen met berichten zoals: “F--” gevolgd
door cijfers.
In dit geval moet u de technische dienst inschakelen.
Voor u contact opneemt met de Technische Dienst:
• Controleer of u de storing niet zelf kunt oplossen;
• Start het programma opnieuw om te controleren of het
probleem is opgelost;
• Als dit niet het geval is, dient u contact op te nemen met
een Erkende Technische Servicedienst.
! Wendt u nooit tot niet erkende monteurs.
Dit dient u door te geven:
• Het soort storing;
• het bericht dat op het display TEMPERATUUR verschijnt
• Het model apparaat (Mod.)
• Het serienummer (S/N)
Deze informatie bevindt zich op het typeplaatje op het
apparaat.
Kundendienst
Achtung:
Das Gerät ist mit einem Diagnosesystem ausgestattet, dank
dem etwaige Betriebsstörungen erfasst werden können.
Diese werden auf dem Display durch Meldungen folgenden
Typs angezeigt: “F—“ gefolgt von Nummern.
In diesem Fall den Kundendienst anfordern.
Bevor Sie den Kundendienst anfordern:
• Vergewissern Sie sich bitte, ob die Störung nicht
eigenhändig behoben werden kann.;
• Starten Sie das Programm erneut, um sicher zu sein,
dass die Störung beseitigt wurde.
• Sollte dies nicht der Fall sein, wenden Sie sich bitte an
die autorisierte Kundendienststelle.
! Wenden Sie sich nur an autorisierte Techniker.
Geben Sie bitte Folgendes an:
• die genaue Beschreibung des Fehlers
• die auf dem Display TEMPERATUR angezeigte Meldung
• das Gerätemodell (Mod.)
• die Seriennummer (S/N).
Letztere Informationen können dem Typenschild, das sich
auf dem Gerät bendet, entnommen werden.
Assistance
Advarsel:
Apparatet er udstyret med et automatisk diagnostisk
system, som opdager eventuelle funktionsfejl. Funktionsfejl
signaleres gennem meddelelser af følgende type: “F—”
efterfulgt af tal.
Ring til teknisk assistance i tilfælde af en funktionsfejl.
Før du ringer efter assistance:
• Kontrollér om du selv kan løse problemet.
• Genstart programmet for at kontrollere, om funktionsfejlen
er forsvundet.
• Hvis det ikke er tilfældet, så kontakt den autoriserede
tekniske assistanceservice.
! Benyt aldrig en uautoriseret tekniker.
Hav venligst følgende oplysninger ved hånden:
• Typen af problem, der er opstået.
• Meddelelsen, der vises på TEMPERATUR-displayet.
• Apparatets model (Mod.).
• Serienummer (S/N).
De to sidstnævnte oplysninger kan ndes på typeskiltet
på apparatet.
9

Description of the appliance
Descrição do aparelho
Overall view
1 POSITION 1
2 POSITION 2
3 POSITION 3
4 POSITION 4
5 POSITION 5
6 GUIDES for the sliding racks
7 DRIPPING PAN
8 GRILL
9 Control panel
Description de l’appareil
Vue d’ensemble
1 NIVEAU 1
2 NIVEAU 2
3 NIVEAU 3
4 NIVEAU 4
5 NIVEAU 5
6 GLISSIERES de coulissement
7 Support LECHEFRITE
8 Support GRILLE
9 Tableau de bord
Vista de conjunto
1 POSIÇÃO 1
2 POSIÇÃO 2
3 POSIÇÃO 3
4 POSIÇÃO 4
5 POSIÇÃO 5
6 GUIAS de escorrimento das prateleiras
7 Prateleira BANDEJA PINGADEIRA
8 Prateleira GRADE
9 Painel de comandos
Beschreibung Ihres Gerätes
Geräteansicht
1 EINSCHUBHÖHE 1
2 EINSCHUBHÖHE 2
3 EINSCHUBHÖHE 3
4 EINSCHUBHÖHE 4
5 EINSCHUBHÖHE 5
6 GLEITFÜHRUNGEN für die Einschübe
7 Einschub FETTPFANNE
8 Einschub BACKOFENROST
9 Bedienfeld
Descripción del aparato
Vista en conjunto
1 POSICIÓN 1
2 POSICIÓN 2
3 POSICIÓN 3
4 POSICIÓN 4
5 POSICIÓN 5
6 GUÍAS de deslizamiento de las bandejas
7 Bandeja GRASERA
8 Bandeja PARRILLA
9 Panel de control
10
9 6
8
7
5
3
1
4
2

Beschrijving van het apparaat
Algemeen aanzicht
1 POSITIE 1
2 POSITIE 2
3 POSITIE 3
4 POSITIE 4
5 POSITIE 5
6 GLEUVEN om roosters in te schuiven
7 Rooster LEKPLAAT
8 Rooster GRILL
9 Bedieningspaneel
Beskrivelse af apparatet
Generel oversigt
1 POSITION 1
2 POSITION 2
3 POSITION 3
4 POSITION 4
5 POSITION 5
6 RILLER til udtræksplader
7 BRADEPANDE
8 GRILL
9 Betjeningspanel
9 6
8
5
4
7
3
2
1
11
Description of the appliance
Description de l’appareil
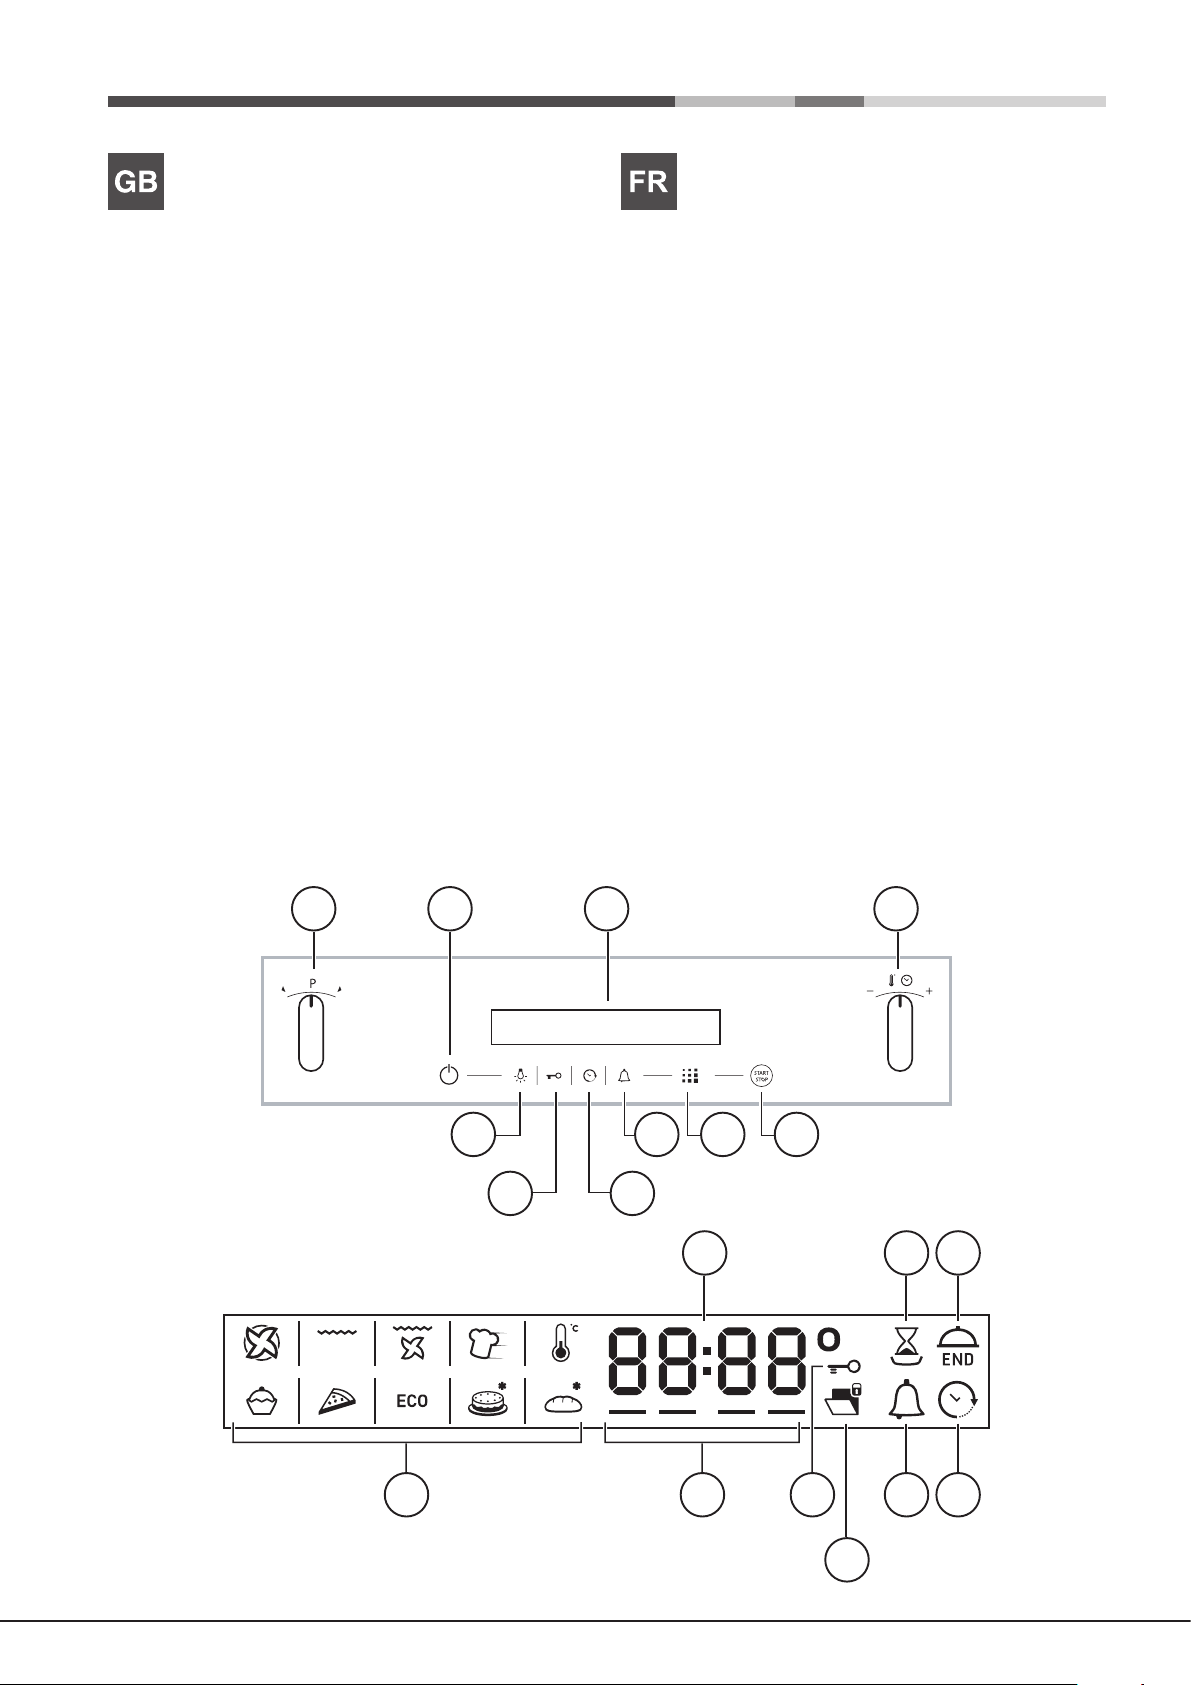
Control panel
1 SELECTOR knob
2 CONTROL PANEL POWER BUTTON
3 DISPLAY
4 THERMOSTAT / TIMER knob
5 START / STOP
6 FAST CLEAN Icon
7 MINUTE MINDER icon
8 TIMER icon
9 DOOR / CONTROL PANEL LOCK icon
10 LIGHT icon
Display
11 TEMPERATURE and TIME numerical digits
12 DURATION icon
13 END OF COOKING icon
14 CLOCK icon
15 MINUTE MINDER icon
16 DOOR LOCK indicator
17 CONTROL PANEL LOCK indicator
18 Preheating /Residual heat indicator
19 MODE icons
Tableau de bord
1 Manette PROGRAMMES
2 ALLUMAGE PANNEAU
3 AFFICHEUR
4 Manette THERMOSTAT/SÉLECTION TEMPS
5 PUESTA EN MARCHA / PARADA
6 Icône FAST CLEAN
7 Icône MINUTEUR
8 Icône SÉLECTION TEMPS
9 Icône VERROUILLAGE PORTE / COMMANDES
10 Icône ECLAIRAGE
Afcheur
11 Chiffres TEMPÉRATURE et TEMPS
12 Icône DURÉE
13 Icône FIN CUISSON
14 Icône HORLOGE
15 Icône MINUTEUR
16 Indicateur de PORTE VERROUILLÉ
17 Voyant CLAVIER VERROUILLÉ
18 Indicateur de Préchauffage / Chaleur résiduelle
19 Icônes PROGRAMMES
1 2
43
56710
89
11 12
13
12
19
16
151718
14

Descripción del aparato
Descrição do aparelho
Panel de control
1 Mando de PROGRAMAS
2 ENCENDIDO DEL PANEL
3 PANTALLA
4 Mando de TERMOSTATO/FIJACIÓN DE TIEMPOS
5 PUESTA EN MARCHA / PARADA
6 Icono FAST CLEAN
7 Icono CONTADOR DE MINUTOS
8 Icono FIJACIÓN DE TIEMPOS
9 Icono BLOQUEO DE PUERTA / MANDOS
10 Icono LUZ
Display
11 Cifras de TEMPERATURA y TIEMPOS
12 Icono de DURACIÓN
13 Icono de FIN DE COCCIÓN
14 Icono RELOJ
15 Icono CONTADOR DE MINUTOS
16 Indicador de PUERTA BLOQUEADA
17 Indicador de PANEL DE MANDOS BLOQUEADO
18 Indicador de Precalentamiento / Calor residual
19 Icono PROGRAMAS
Painel de comandos
1 Selector de PROGRAMAS
2 LIGAÇÃO PAINEL
3 DISPLAY
4 Selector de TERMOSTATO/PROGRAMAÇÃO dos TEMPOS
5 INÍCIO/PARAGEM
6 Ícone FAST CLEAN
7 Ícone do CONTADOR DE MINUTOS
8 Ícone CONFIGURAÇÃO DE TEMPOS
9 Ícone BLOQUEIO PORTA / COMANDOS
10 Ícone LUZ
Display
11 Dígitos numéricos de TEMPERATURAS e TEMPOS
12 Ícone DURAÇÃO
13 Ícone do FIM DA COZEDURA
14 Ícone RELÓGIO
15 Ícone CONTADOR DE MINUTOS
16 Indicador de PORTA BLOQUEADA
17 Indicador de TECLADO BLOQUEADO
18 Indicador do Pré-aquecimento / Calor resíduo
19 Ícone dos PROGRAMAS
1 2
43
56710
89
11 12
13
19
16
151718
14
13

Beschreibung Ihres Gerätes
Beschrijving van het apparaat
Bedienfeld
1 Drehschalter PROGRAMME
2 BEDIENFELD ON
3 DISPLAY
4 Drehknopf THERMOSTAT/ZEITEINSTELLUNG
5 START/STOPP
6 Symbol FAST CLEAN
7 Symbol KURZZEITWECKER
8 Symbol ZEITEINSTELLUNG
9 Symboltaste TÜR- / BEDIENTAFELSPERRE
10 Symbol LICHT
Display
11 Digit-Anzeige TEMPERATUR und ZEITEN
12 Symboltaste DAUER
13 Symboltaste GARENDE
14 Symbol UHR
15 Symbol KURZZEITWECKER
16 Anzeige TÜRSPERRE
17 Anzeige TASTATURSPERRE
18 Vorheizanzeige / Restwärmeanzeige
19 Symbole PROGRAMME
Bedieningspaneel
1 PROGRAMMAKNOP
2 INSCHAKELEN BEDIENINGSPANEEL
3 DISPLAY
4 Knop THERMOSTAAT / INSTELLEN TIJDEN
5 START / STOP
6 Symbool FAST CLEAN
7 Symbool TIMER
8 Symbool INSTELLEN TIJD
9 Symbool DEURBLOKKERING / BEDIENINGSPANEEL
10 Symbool LICHT
Display
11 Cijfers TEMPERATUREN en TIJDEN
12 Symbool DUUR
13 Symbool EINDE BEREIDING
14 Symbool KLOK
15 Symbool TIMER
16 Aanwijzer DEURBLOKKERING
17 Aanwijzer BLOKKERING BEDIENINGSPANEEL
18 Aanwijzer van de Voorverwarming / Resterende warmte
19 Symbolen PROGRAMMA’S
1 2
43
56710
89
11 12
13
14
19
16
151718
14
Beskrivelse af apparatet
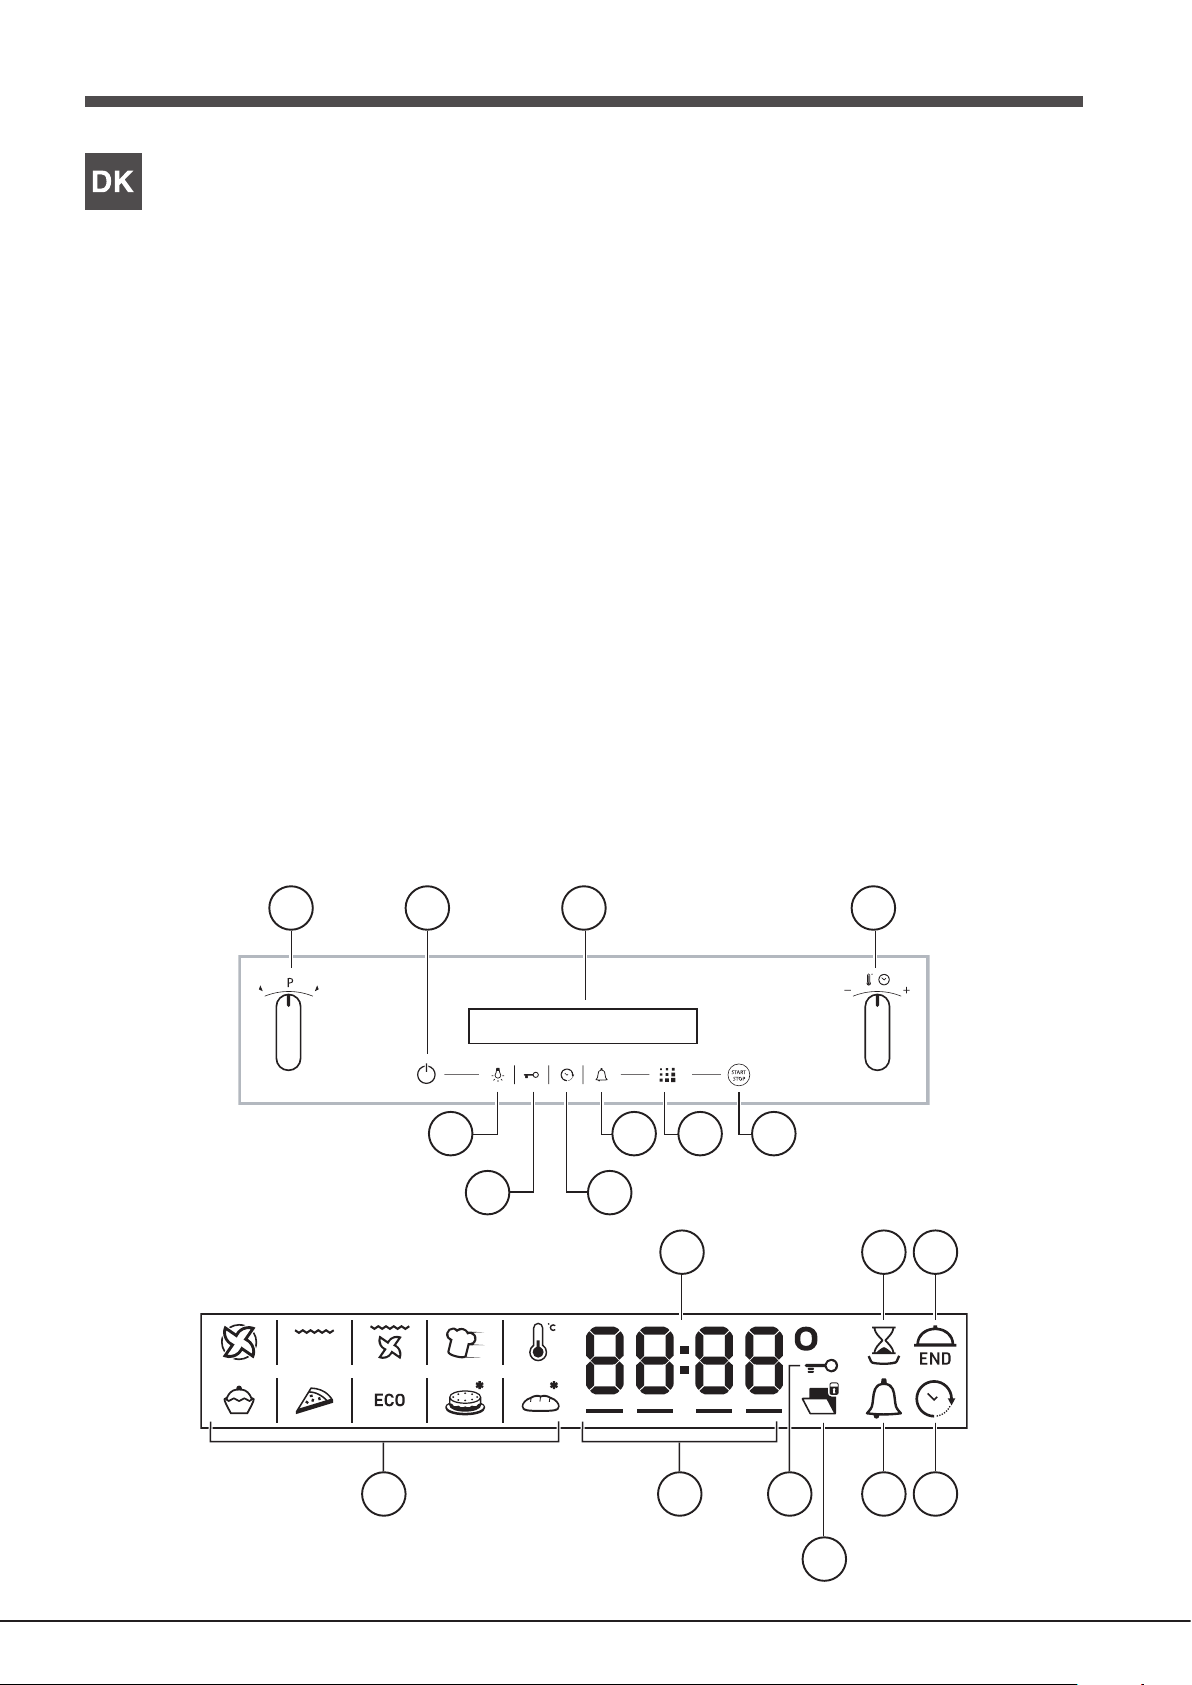
Betjeningspanel
1 VÆLGER-knap
2 BETJENINGSPANELETS STRØMKNAP
3 DISPLAY
4 TERMOSTAT/TIMER-knap
5 START/STOP
6 FAST CLEAN-ikon
7 MINUTUR-ikon
8 TIMER-ikon
9 OVNLÅGE/BETJENINGSPANELLÅS-ikon
10 LYS-ikon
Display
11 TEMPERATUR- og TIDS-tal
12 VARIGHED-ikon
13 SLUT PÅ TILBEREDNING-ikon
14 UR-ikon
15 MINUTUR-ikon
16 OVNLÅGELÅS-indikator
17 BETJENINGSPANELLÅS-indikator
18 Foropvarmning/restvarme-indikator
19 FUNKTION-ikoner
1 2
43
56710
89
11 12
13
19
16
151718
14
15
Installation
590 mm.
GB
! Please keep this instruction booklet in a safe place for
future reference. If the appliance is sold, given away or
moved, please make sure the booklet is also passed on to
the new owners so that they may benet from the advice
contained within it.
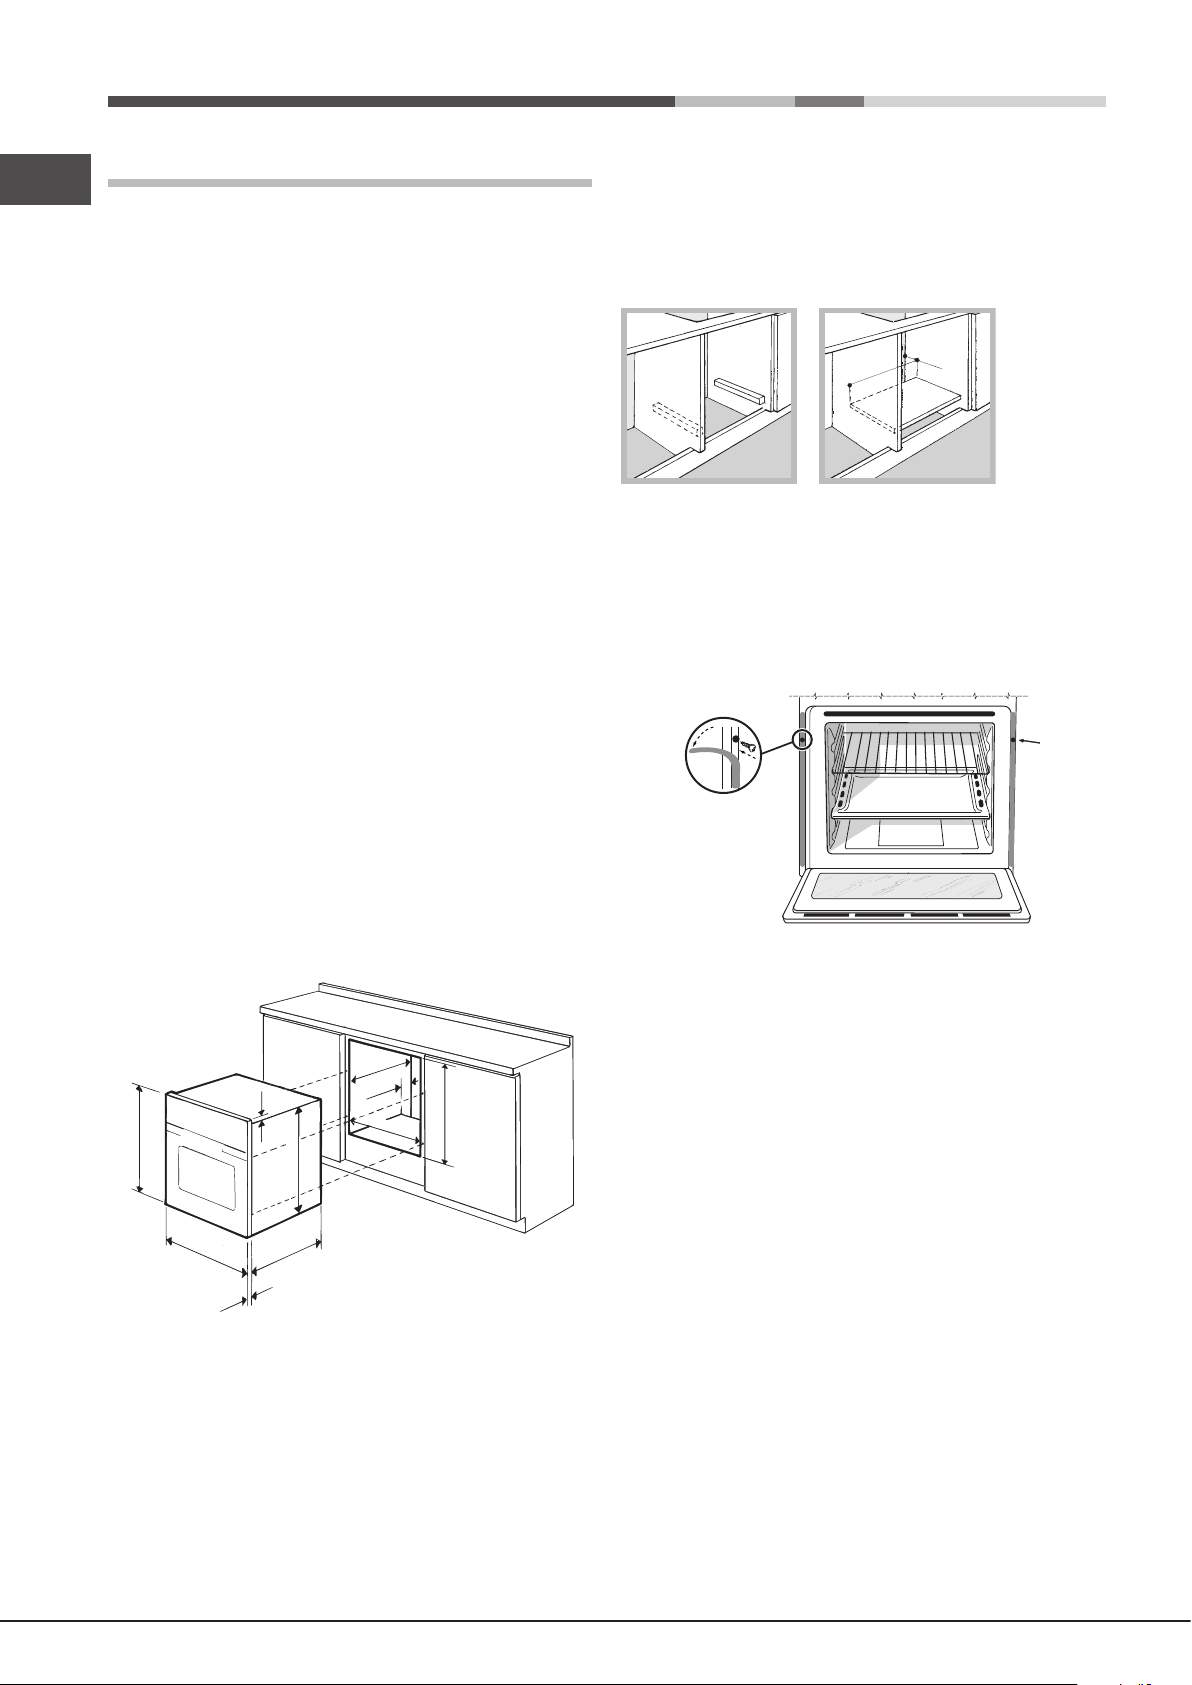
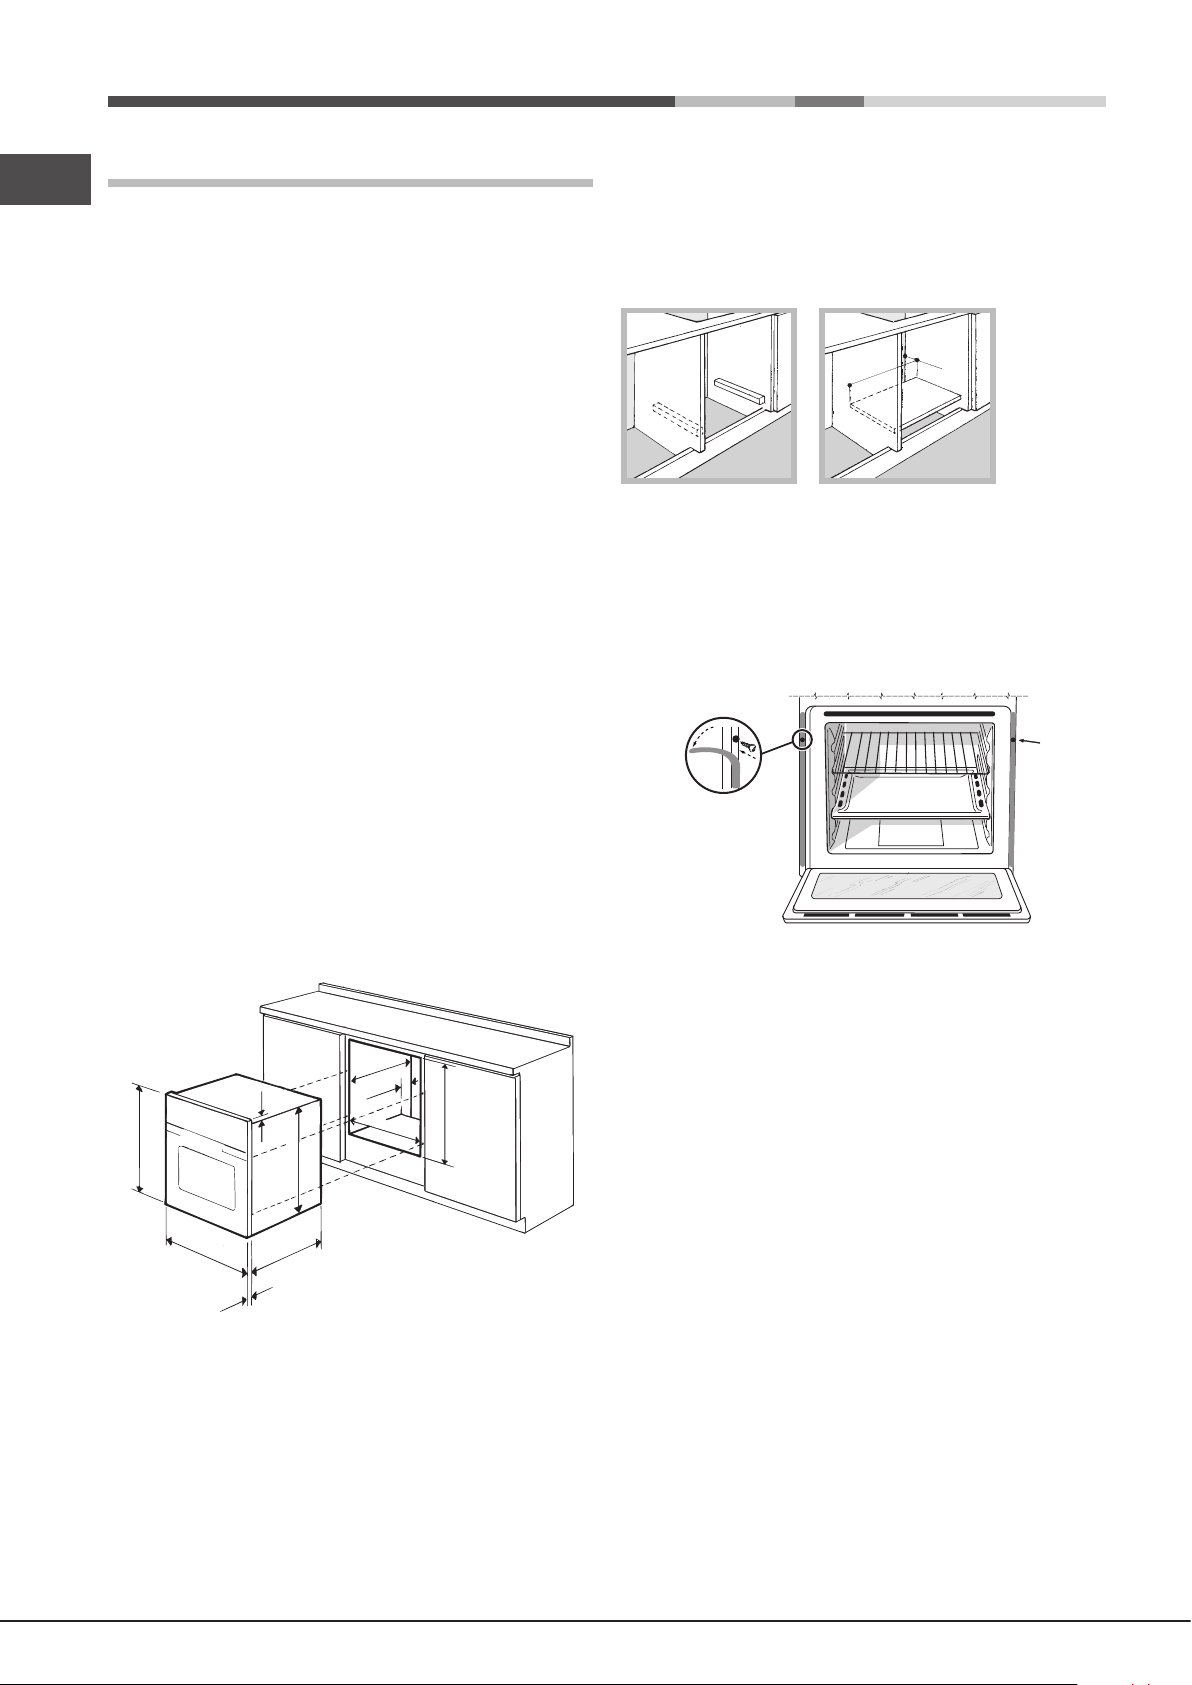
Ventilation
To ensure adequate ventilation, the back panel of the
cabinet must be removed. It is advisable to install the oven
so that it rests on two strips of wood, or on a completely
at surface with an opening of at least 45 x 560 mm (see
diagrams).
! Please read this instruction manual carefully: it contains
important information concerning the safe operation,
installation and maintenance of the appliance.
Positioning
! Do not let children play with the packaging material; it
should be disposed of in accordance with local separated
waste collection standards (see Precautions and tips).
! The appliance must be installed by a qualied professional
in accordance with the instructions provided. Incorrect
installation may damage property or cause harm to people
or animals.
Built-in appliances
Use an appropriate cabinet to ensure that the appliance
operates properly:
• The panels adjacent to the oven must be made of heat-
resistant material.
• Cabinets with a veneer exterior must be assembled with
glues which can withstand temperatures of up to 100°C.
• To install the oven under the counter (see diagram) or
in a kitchen unit, the cabinet must have the following
dimensions:
45 mm.
560 mm.
Centring and xing
Secure the appliance to the cabinet:
• Open the oven door.
• slide out the side gaskets at the top until the 2 xing holes
are exposed;
• Fix the oven to the cabinet using the 2 wood screws.
• reposition the 2 gaskets.
! All parts which ensure the safe operation of the appliance
must not be removable without the aid of a tool.
550 mm.
min.
45 mm.
560 mm.
575-585 mm.
570 mm.
595 mm.
20 mm.
550 mm.
20,5 mm.
22,5 mm.*
* Stainless steel models only
! The appliance must not come into contact with electrical
parts once it has been installed.
The indications for consumption given on the data plate
have been calculated for this type of installation.
16
Electrical connection
Ovens equipped with a three-pole power supply cable are
designed to operate with alternating current at the voltage
and frequency indicated on the data plate located on the
appliance (see below).
Fitting the power supply cable
• The socket is compatible with the plug of the appliance.
If the socket is incompatible with the plug, ask an
authorised technician to replace it. Do not use extension
cords or multiple sockets.
! Once the appliance has been installed, the power supply
cable and the electrical socket must be easily accessible.
GB
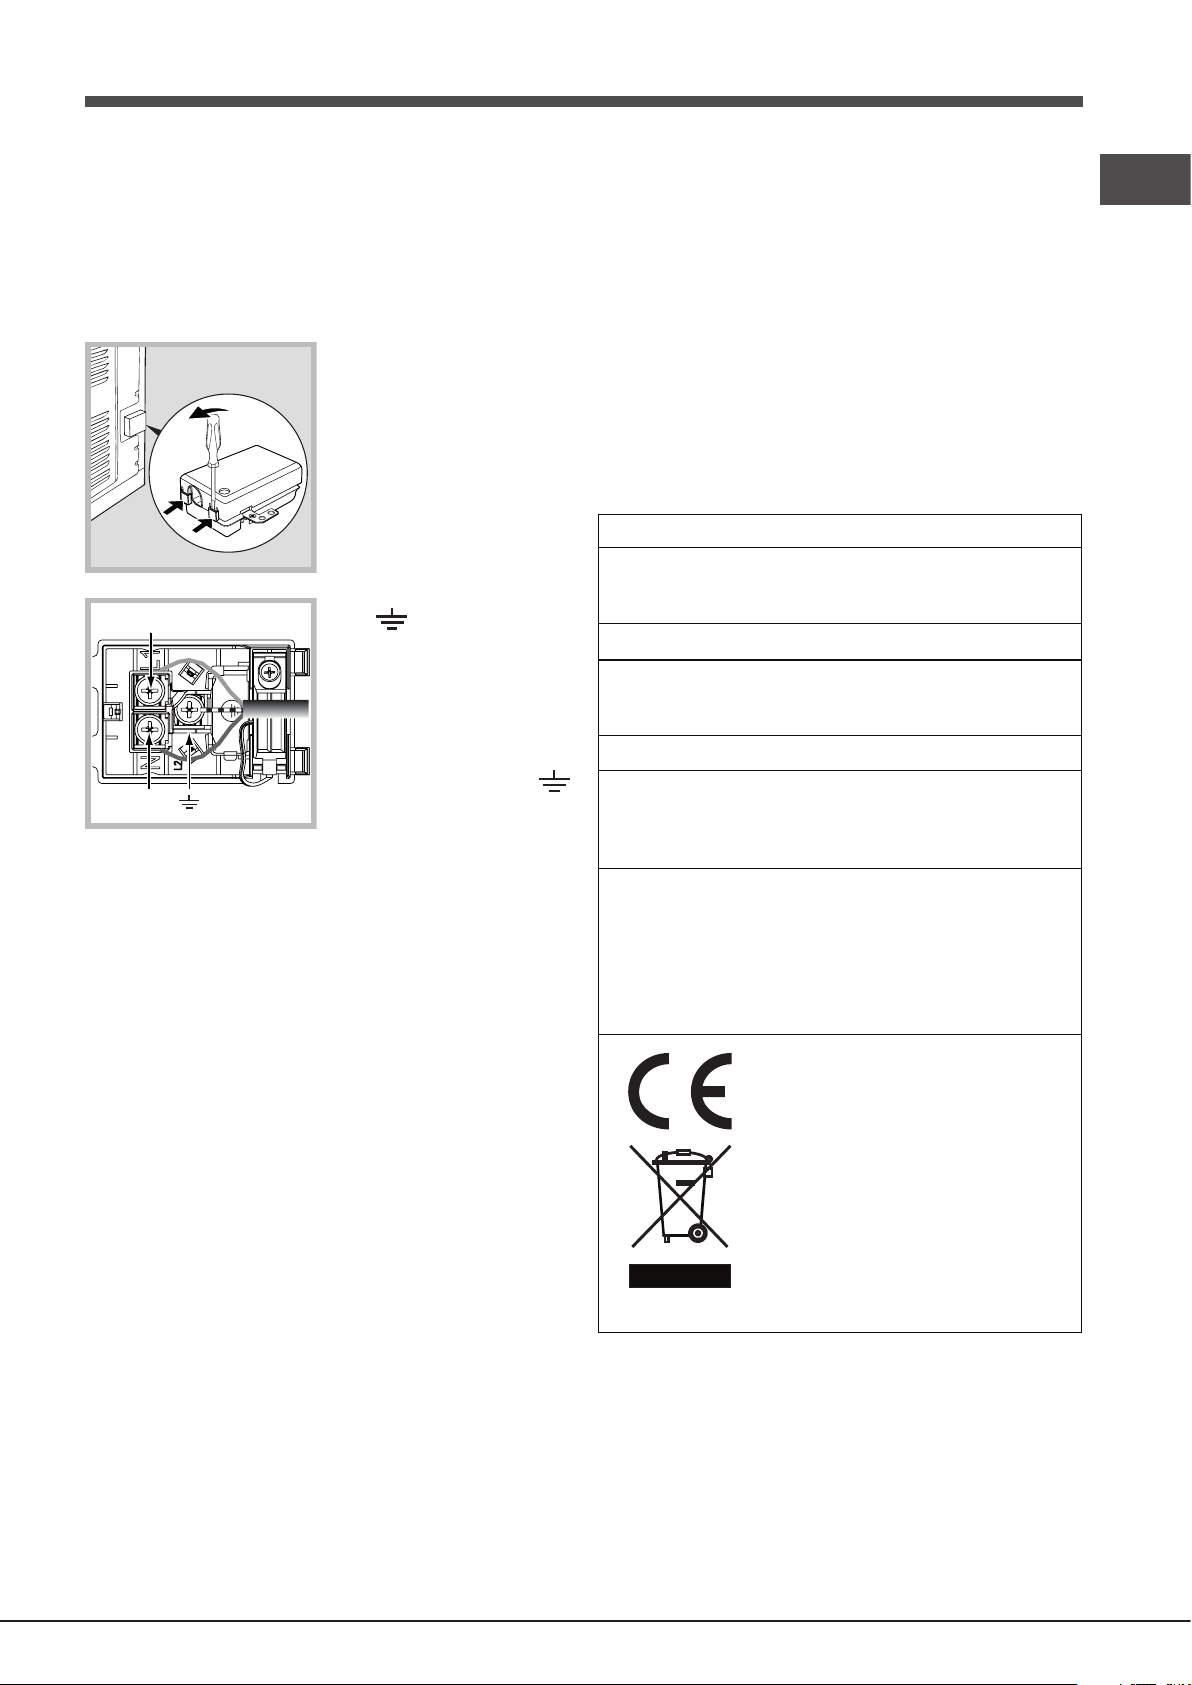
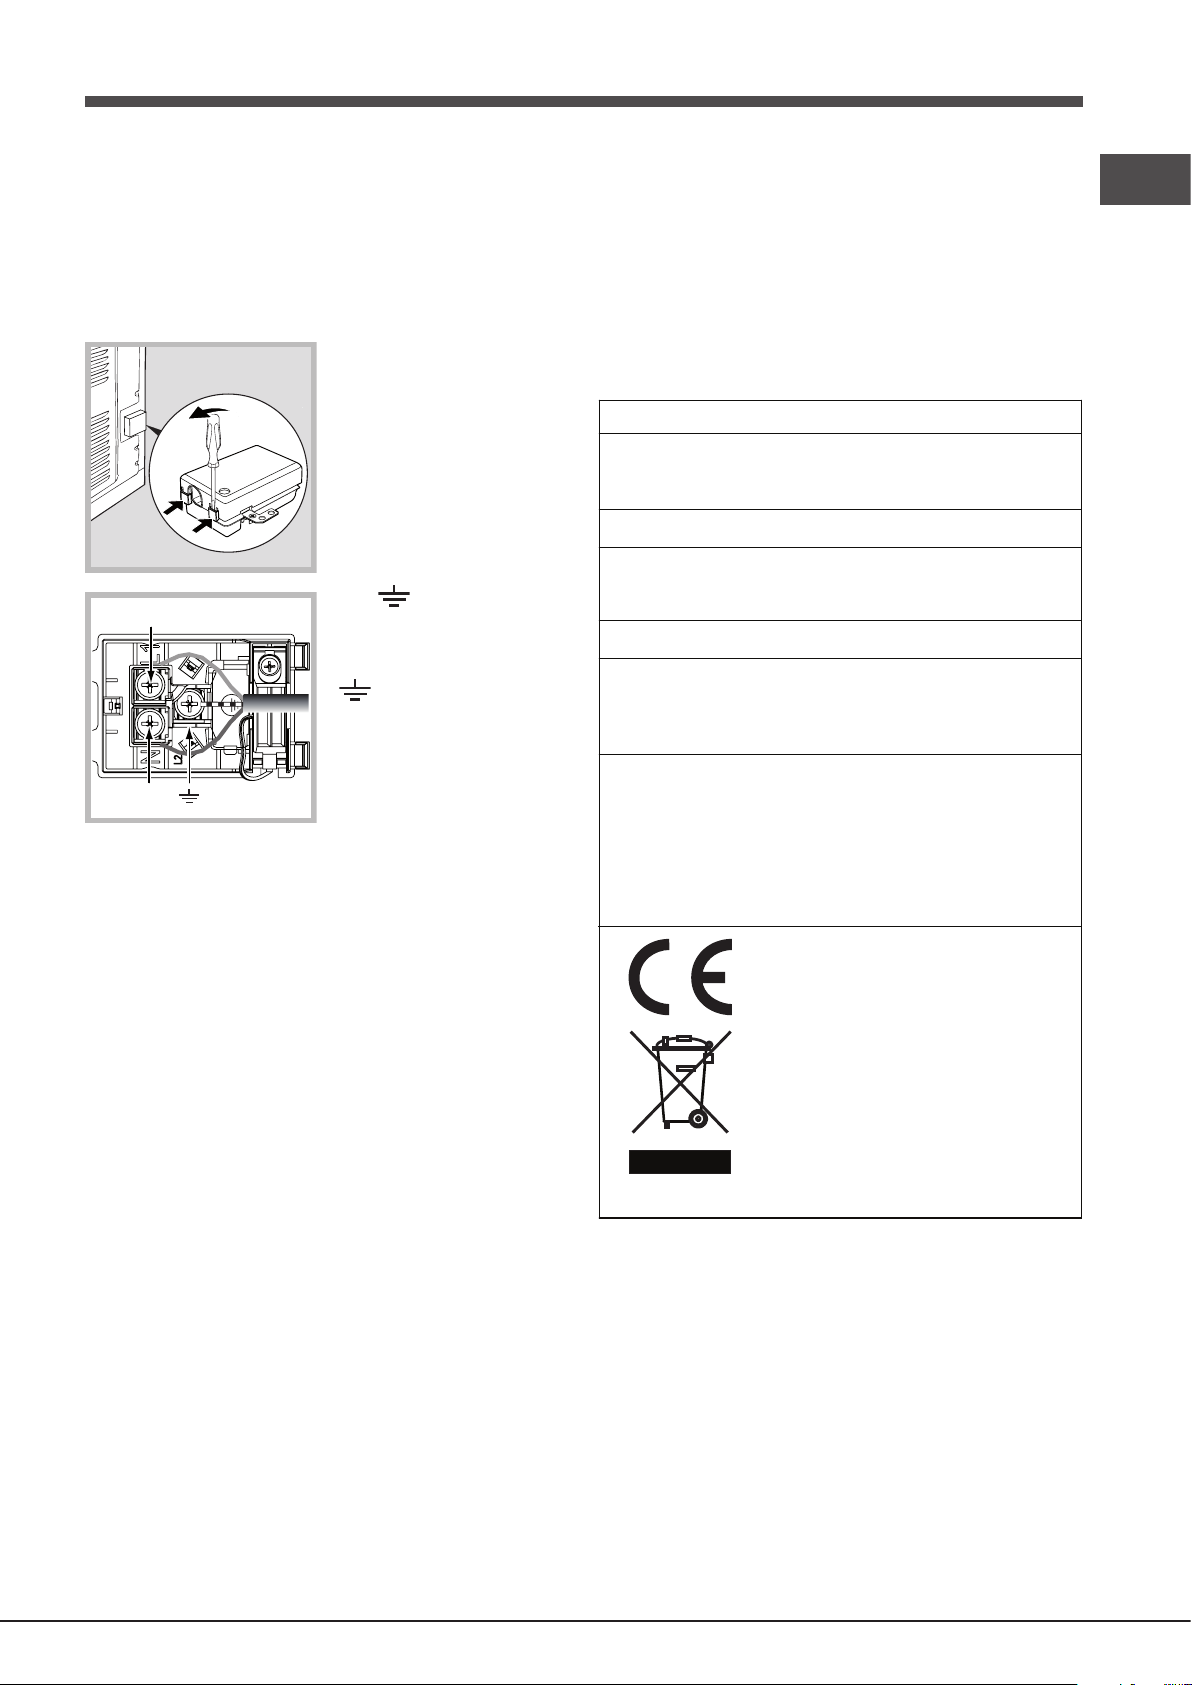
1. Open the terminal board
by inserting a screwdriver
into the side tabs of the
cover. Use the screwdriver
as a lever by pushing it
down to open the cover (see
diagram).
2. Install the power supply
cable by loosening the
cable clamp screw and the
three wire contact screws
L
L-N- .
Connect the wires to the
corresponding terminals:
the Blue wire to the terminal
marked (N), the Brown wire
to the terminal marked (L)
and the Yellow/Green wire
to the terminal marked
N
(see diagram).
3. Secure the cable by fastening the clamp screw.
4. Close the cover of the terminal board.
Connecting the supply cable to the mains
Install a standardised plug corresponding to the load
indicated on the data plate (see table).
The appliance must be directly connected to the mains using
an omnipolar switch with a minimum contact opening of 3
mm installed between the appliance and the mains. The
switch must be suitable for the charge indicated and must
comply with current electrical regulations (the earthing wire
must not be interrupted by the switch). The supply cable
must be positioned so that it does not come into contact
with temperatures higher than 50°C at any point (the back
panel of the oven, for example).
! The installer must ensure that the correct electrical
connection has been performed and that it is fully compliant
with safety regulations.
Before connecting the appliance to the power supply, make
sure that
• The appliance is earthed and the plug is compliant with
the law.
! The cable must not be bent or compressed.
! The cable must be checked regularly and replaced by
authorised technicians only (see Assistance).
! The manufacturer declines any liability should these
safety measures not be observed.
APPLIANCE SPECIFICATIONS
width 43.5 cm
Dimensions*
Volume*
Dimensions**
Volume**
Electrical
connections
ENERGY
LABEL
* Only for models with drawn rails.
** Only for models with wire rails.
height 32,4 cm
depth 41.5 cm
59 l
width 45.5 cm
height 32,4 cm
depth 41.5 cm
62 l
voltage: 220 - 240 V~ 50/60 Hz or
50 Hz (see data plate)
maximum power absorbed
2800 W
Directive 2002/40/EC on the label
of electric ovens. Standard EN 50304
Declared energy consumption
for Forced convection Class –
heating mode:
ECO.
This appliance conforms to the following
European Economic Community
directives:
- 2006/95/EEC dated 12/12/06 (Low
Voltage) and subsequent amendments.
- 2004/108/EEC dated 03/05/89
(Electromagnetic Compatibility) and
subsequent amendments.
- 93/68/EEC dated 22/07/93 and
subsequent amendments.
- 2012/19/EC and subsequent
amendments.
- 1275/2008 standby/off mode.
• The socket can withstand the maximum power of the
appliance, which is indicated on the data plate.
• The voltage is in the range between the values indicated
on the data plate.
17

Start-up and use
GB
WARNING! The oven is
provided with a stop system
to extract the racks and
prevent them from coming
out of the oven (1).
As shown in the drawing,
to extract them completely,
simply lift the racks, holding
them on the front part, and
pull (2).
! The rst time you use your appliance, heat the empty oven with
its door closed at its maximum temperature for at least half an
hour. Make sure that the room is well ventilated before switching
the oven off and opening the oven door. The appliance may emit
a slightly unpleasant odour caused by protective substances
used during the manufacturing process burning away.
! To make the setting process easier, keep the knob in
position: this will increase the scrolling speed of the numbers
on the display.
! Each setting will automatically be stored in the appliance
memory after 10 seconds.
! The touch controls cannot be activated if the user is
wearing gloves.
! In order to optimise the cooking performance, when
starting the selected function, product settings will be
applied that could cause a delayed start of the fan and
heating elements.
Some models are equipped with a system of hinges which
allows the door to close slowly, without the user having to
follow the movement through with his/her hand. To use the
system correctly, before closing the door:
• Open the door fully.
• Do not force the closing movement manually.
Control panel lock
! The control panel can be locked while the oven is off, once
cooking has started or nished and during programming.
Setting the clock
! The clock can only be set when the oven is switched off. If
the oven is in standby mode, pressing the button once will
display the current time setting. Press it again to set the time.
After connection to the power supply network or after a
blackout, the button and the digits on the display will
ash for 10 seconds.
To set the clock:
1. Press button .
2. Turn the TIMER knob towards “ ” and “ ” to adjust the
hour value.
3. Once you have reached the correct hour value, press
the button.
4. Repeat the above process to set the minutes.
If a blackout occurs, it will be necessary to reset the clock.
If the icon ashes on the display, this indicates that the
clock has not been set correctly.
Setting the minute minder
! The minute minder may still be set whether the oven is
switched on or off. It does not switch the oven on or off.
When the set time has elapsed, the timer emits a buzzer
that will automatically stop after 30 seconds or when any
active button on the control panel is pressed.
To adjust the timer proceed as follows:
1. Press button .
2. Adjust the time as desired by turning the TIMER knob
towards “ ” and “ ”.
3. Once you have reached the desired value, press the
button again.
The lit symbol will remind you that the minute minder
is on. The DISPLAY will show the countdown.
To cancel the minute minder, press the button and use
the knob to set the time to 00:00. Press button again.
The icon will switch off to indicate that the minute minder
has been disabled.
To lock the door and the oven controls, press and hold the
button for at least 2 seconds. A buzzer sounds and the
display shows the key symbol “n—O”. The and
icons, when lit, indicate lock function activation.
To deactivate the lock, press and hold the button again
for at least 2 seconds.
! When cleaning the appliance, the door lock may be closed
accidentally (there is an exposed spring). If this happens,
reopen it by turning the door lock upwards (see gure).
KO OK
18
Starting the oven
1. Switch the control panel on by pressing the button.
The appliance buzzer sounds three times (ascending) and
all buttons light up in sequence.
2. Select the desired cooking mode by turning the
SELECTOR knob. The display shows:
- the temperature associated with the mode, if programming
manually;
- “Auto” and the duration alternately, if programming is
automatic.
3. Press the button to begin cooking.
4. The oven will begin its preheating phase, the preheating
indicators will light up as the temperature rises.
5. When the preheating process has nished, a buzzer sounds
and all the preheating indicator lights show that this stage has
been completed: the food can then be placed in the oven.
6. During cooking it is always possible to:
- modify the temperature by turning the THERMOSTAT
knob (manual modes only);
- set the duration of a cooking mode (see Cooking Modes);
- press the button to stop cooking. In this case the
appliance stores the temperature modied previously in its
memory (manual modes only);
- switch off the oven by pressing the button for 3 seconds.
7. If a blackout occurs while the oven is already in operation,
an automatic system within the appliance will reactivate the
cooking mode from the point at which it was interrupted,
provided that the temperature has not dropped below a
certain level. Programmed cooking modes which have not
yet started will not be restored and must be reprogrammed
(for example: a cooking mode has been programmed to
start at 20:30. At 19:30 a blackout occurs. When the power
supply is restored, the mode will have to be reprogrammed).
activated, the appliance automatically reverts to standby
mode. The standby mode is visualised by the high luminosity
“Watch Icon”. As soon as interaction with the machine
resumes, the system’s operating mode is restored.
Modes
! In order to guarantee wonderfully soft and crunchy
foodstuffs, the oven releases – in the form of water vapour the humidity naturally withheld in the food itself. In this way,
optimal cooking results can be achieved for all types of food.
! Every time the oven is switched on, it suggests the rst
manual cooking mode.
GB
! There is no preheating stage for the GRILL mode.
! Never put objects directly on the bottom of the oven; this
will prevent the enamel coating from being damaged.
! Always place cookware on the rack(s) provided.
! The oven will begin its preheating phase after 2 seconds
from selecting the desired cycle.
Cooling ventilation
In order to cool down the external temperature of the oven,
a cooling fan blows a stream of air between the control
panel and the oven door, as well as towards the bottom
of the oven door.In the FAST COOKING mode, the fan is
activated automatically.
! Once cooking has been completed, the cooling fan
continues to operate until the oven has cooled down
sufciently.
Oven light
The light comes on when the oven door is opened or when
a cooking mode starts. When models featuring LED INSIDE
technology begin cooking, the LEDs on the door light up for
improved illumination of all cooking levels.
The button can be used to switch on the light at any time.
Residual heat indicators
The appliance is tted with a residual heat indicator. When
the oven is off, the “residual heat” bar on the display lights
up to indicate high temperatures inside the oven cavity. The
individual segments of the bar switch off one by one as the
temperature inside the oven falls.
Restoring the factory settings
The oven factory settings can be restored to reset all
selections made by the user (clock and customised
durations). To carry out a reset, switch off the oven, then keep
the SELECTOR knob turned while pressing the button
for 6 seconds. Once the restore procedure is complete, a
buzzer will sound. The rst time the button is pressed, the
oven will behave as if it is being switched on for the rst time.
Standby
This product complies with the requirements of the latest
European Directive on the limitation of power consumption
of the standby mode. If no buttons are pressed for 30
minutes and the control panel/door lock has not been
Manual cooking modes
! All cooking modes have a default cooking temperature
which may be adjusted manually to a value between
30°C and 250°C as desired (300°C for GRILL mode). Any
temperature adjustments will be stored in the appliance
memory and suggested again the next time this mode
is used. If the selected temperature is higher than the
temperature inside the oven, the text “Hot” appears on the
display. However, it will still be possible to start cooking.
MULTILEVEL mode
Since the heat remains constant throughout the oven, the
air cooks and browns food in a uniform manner. A maximum
of two racks may be used at the same time.
BARBECUE mode
The top heating element and the rotisserie spit (where
present) are activated. The high and direct temperature
of the grill is recommended for food which requires a high
surface temperature. Always cook in this mode with the oven
door closed (see “Practical cooking advice”).
FAN GRILLING mode
The top heating element and the rotisserie spit (where present)
are activated and the fan begins to operate. During part of
the cycle the circular heating element is also activated. This
combination of features increases the effectiveness of the
unidirectional thermal radiation provided by the heating elements
through the forced circulation of the air throughout the oven.
This helps prevent food from burning on the surface and allows
the heat to penetrate right into the food. Always cook in this
mode with the oven door closed (see “Practical cooking advice”).
FAST COOKING mode
This mode is particularly suitable for cooking pre-packed
food quickly (frozen or pre-cooked). The best results are
achieved using one cooking rack only.
LOW TEMPERATURE modes
This type of cooking can be used for proving, defrosting,
preparing yoghurt, heating dishes at the required speed and
slow cooking at low temperatures. The temperature options
are: 40, 65 and 90°C.
19
GB
BAKING mode
The rear heating element and the fan are switched on, thus
guaranteeing the distribution of heat in a delicate and uniform
manner throughout the entire oven. This mode is ideal for baking
temperature sensitive foods (such as cakes, which need to rise).
BAKED CAKES mode
This function is ideal for cooking desserts which are made
using natural yeast, baking powder and desserts which
contain no yeast. Place the dish in the oven while it is still
cold. The dish may also be placed in a preheated oven.
PIZZA modes
The top and circular heating elements switch on and the fan
begins to operate. This combination heats the oven rapidly.
If you use more than one rack at a time, switch the position
of the dishes halfway through the cooking process.
ECO mode
The rear heating element and the fan are switched on,
thus guaranteeing the distribution of heat in a delicate and
uniform manner throughout the entire oven.This energy
saving mode is recommended for small dishes, ideal for
heating foods and nishing off cooking.
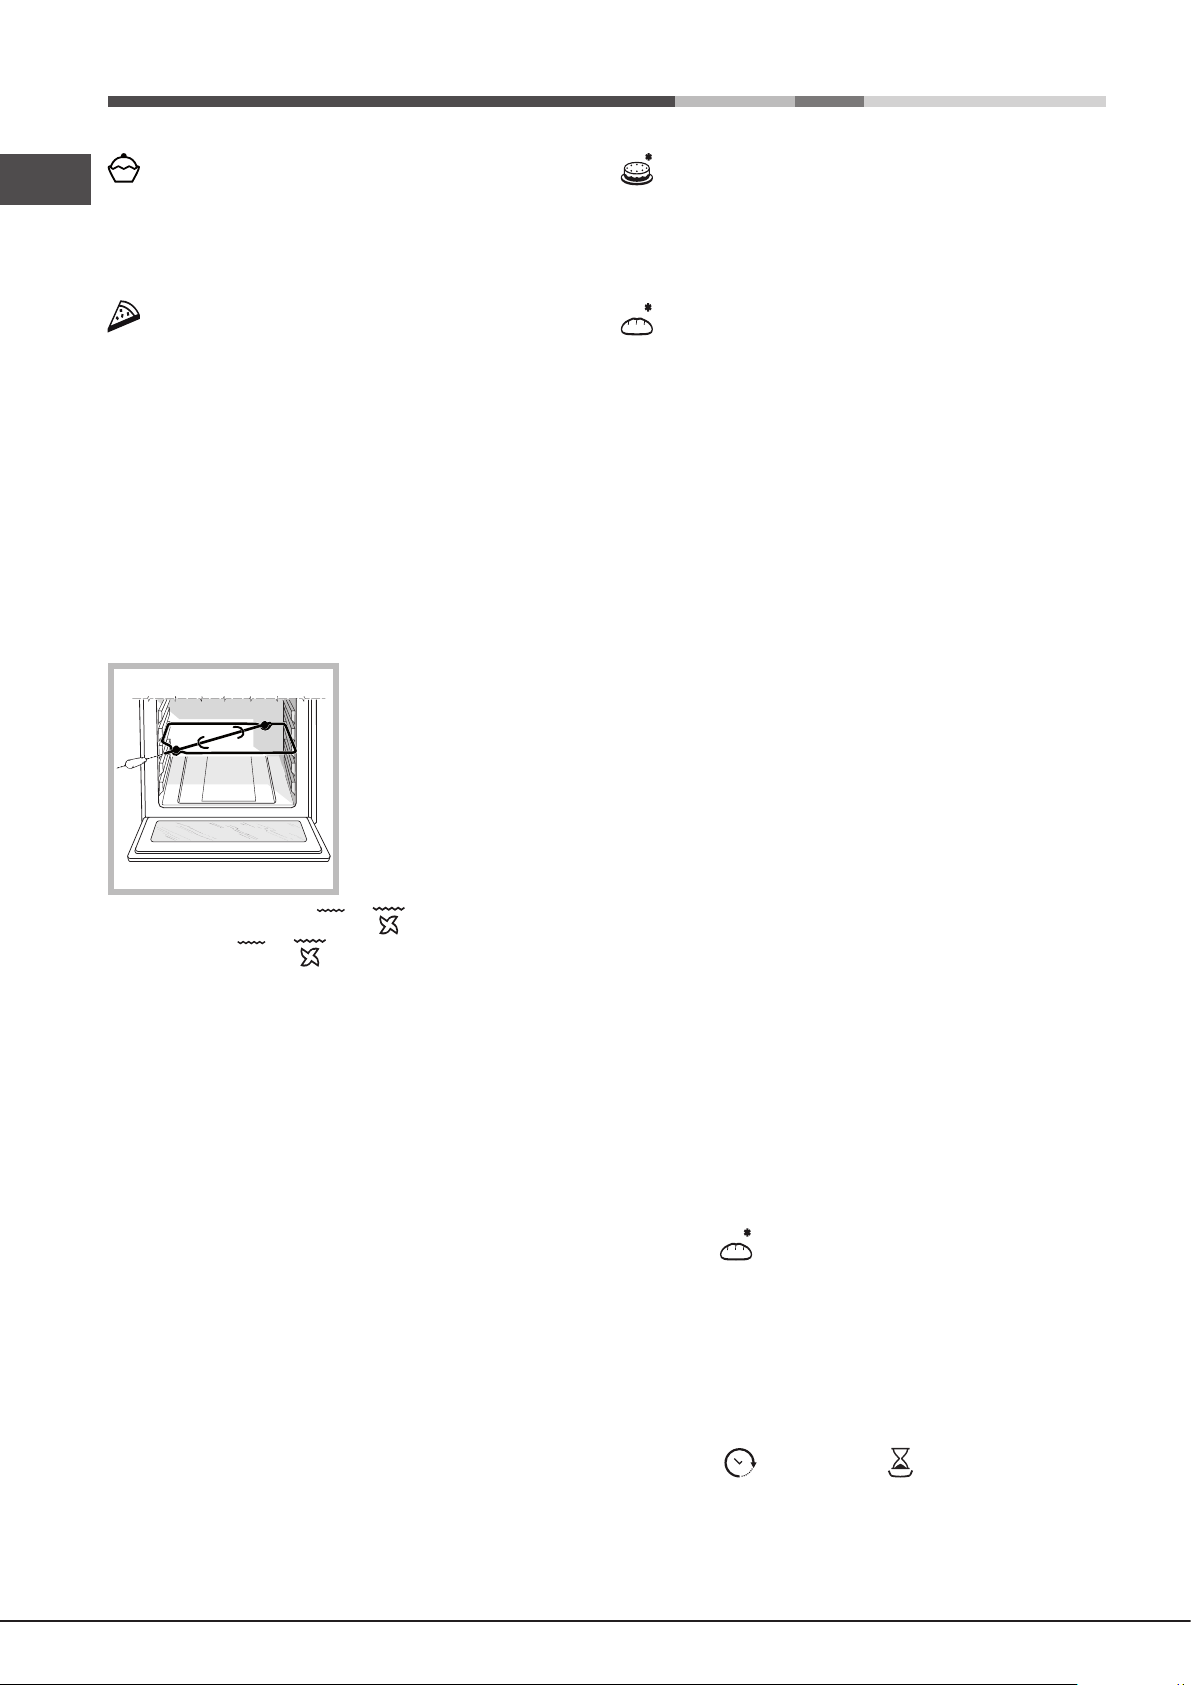
Rotisserie spit*
To operate the rotisserie
function (see diagram)
proceed as follows:
1. Place the dripping pan in
position 1.
2. Place the rotisserie
support in position 3 and
insert the spit in the hole
provided on the back panel
of the oven.
3. Start the rotisserie
function by selecting the or modes;
! When modes or are activated, the rotisserie will
stop if the door is opened.
Automatic cooking modes
! The temperature and cooking duration are pre-set values,
guaranteeing a perfect result every time - automatically. These
values are set using the C.O.P.® (Programmed Optimal
Cooking) system. The cooking cycle stops automatically and
the oven indicates when the dish is cooked. You may start
cooking whether the oven has been preheated or not. The
cooking duration can be customised according to personal
taste by modifying the relevant value - before cooking begins
- by ±5/20 minutes depending on the selected programme.
The duration can however be modied even once cooking has
begun. If the value is modied before the programme begins, it
is stored in the memory and suggested again by the appliance
when the programme is next used. If the temperature inside
the oven is higher than the suggested value for the selected
mode, the text “Hot” appears on the display and it will not be
possible to begin cooking; wait for the oven to cool.
BREAD mode
Use this function to bake bread. To obtain the best results, we
recommend that you carefully observe the instructions below:
• follow the recipe;
• do not exceed the maximum weight of the dripping pan;
• remember to pour 50 g (0,5 dl) of cold water into the
baking tray in position 5.
• The dough must be left to rise at room temperature for
1 – 1 ½ hours (depending on the room temperature) or
until the dough has doubled in size.
Recipe for BREAD:
1 Dripping pan holding 1000 g Max, lower level
2 Dripping pans each holding 1000 g Max, medium and
lower levels
Recipe for 1000 g of dough: 600 g our, 360 g water, 11g
salt, 25 g fresh yeast (or 2 sachets of powder yeast)
Method:
• Mix the our and salt in a large bowl.
• Dilute the yeast in lukewarm water (approximately 35
degrees).
• Make a small well in the mound of our.
• Pour in the water and yeast mixture.
• Knead the dough by stretching and folding it over itself
with the palm of your hand for 10 minutes until it has a
uniform consistency and is not too sticky.
• Form the dough into a ball shape, place it in a large bowl
and cover it with transparent plastic wrap to prevent the
surface of the dough from drying out. Select the manual
LOW TEMPERATURE function on the oven and set the
temperature to 40°C. Place the bowl inside and leave
the dough to rise for approximately 1 hour (the dough
should double in volume).
• Cut the dough into equal sized loaves.
• Place them in the dripping pan, on a sheet of baking
paper.
• Dust the loaves with our.
• Make incisions on the loaves.
• Place the food inside the oven while it is still cold.
• Start the BREAD cooking mode.
• Once baked, leave the loaves on one of the grill racks
until they have cooled completely.
Programming cooking
! A cooking mode must be selected before programming
can take place.
! When the cooking stage has been reached, the oven
buzzer sounds.
! Do not open the oven door as this will disrupt the cooking
time and temperature.
20
Programming the cooking duration
1. Press the button until the icon and the numerical
digits on the display begin to ash.
* Only available in certain models.
2. Turn the TIMER knob towards “ ” and “ ” to adjust the
time as desired; keep the knob in position to scroll through the
numbers more quickly and make the setting process easier.
3. Once you have reached the desired duration, press the
button again. The display will show the duration and
set temperature alternately.
4. Press the button to begin cooking.
5. When cooking has nished, “END” appears on the display
and a buzzer sounds.
• For example: it is 9:00 a.m. and a duration of 1 hour and
15 minutes is programmed. The programme will stop
automatically at 10:15 a.m.
Setting the end time for a cooking mode
! A cooking duration must be set before the cooking end
time can be scheduled.
! For the delayed programming to work properly, the clock
should be set to the correct time.
1. Follow steps 1 to 3 to set the duration as detailed above.
2. Press the button twice: the icon and the
numerical digits on the display will begin to ash.
3. Turn the TIMER knob towards “ ” and “ ” to adjust the
cooking end time value.
4. Once you have reached the desired end time, press the
button again. The display will show the duration, the
cooking end time and the set temperature alternately.
BARBECUE
GB
• Place the rack in position 3 or 4. Position the food in the
centre of the rack.
• We recommend that the temperature is set to its
maximum level. The top heating element is regulated by
a thermostat and may not always operate constantly.
PIZZA OVEN
• Use a lightweight aluminium pizza pan. Place it on the
rack provided.
For a crispy crust, do not use the dripping pan as this
extends the total cooking duration and prevents the crust
from forming.
• If the pizza has a lot of toppings, we recommend adding
the mozzarella cheese to the top of the pizza halfway
through the cooking process.
5. Press the button to activate the programmed mode.
Programming has been set when the and buttons
are illuminated. The DISPLAY shows the cooking end time
and the cooking duration alternately.
6. Once cooking has nished, “END” appears on the display
and a buzzer sounds.
• For example: it is 9:00 a.m. and a time of 1 hour and 15
minutes is programmed, while the end time is set to 12:30.
The programme will start automatically at 11:15 a.m.
To cancel programming press the button.
Practical cooking advice
! Do not place racks in position 1 and 5 during fan-assisted
cooking. This is because excessive direct heat can burn
temperature sensitive foods.
! In the GRILL and FAN GRILLING cooking modes,
particularly when using the rotisserie spit, place the dripping
pan in position 1 to collect cooking residues (fat and/or
grease).
MULTILEVEL
• Use positions 2 and 4, placing the food which requires
more heat on 2.
• Place the dripping pan on the bottom and the rack on
top.
21
GB
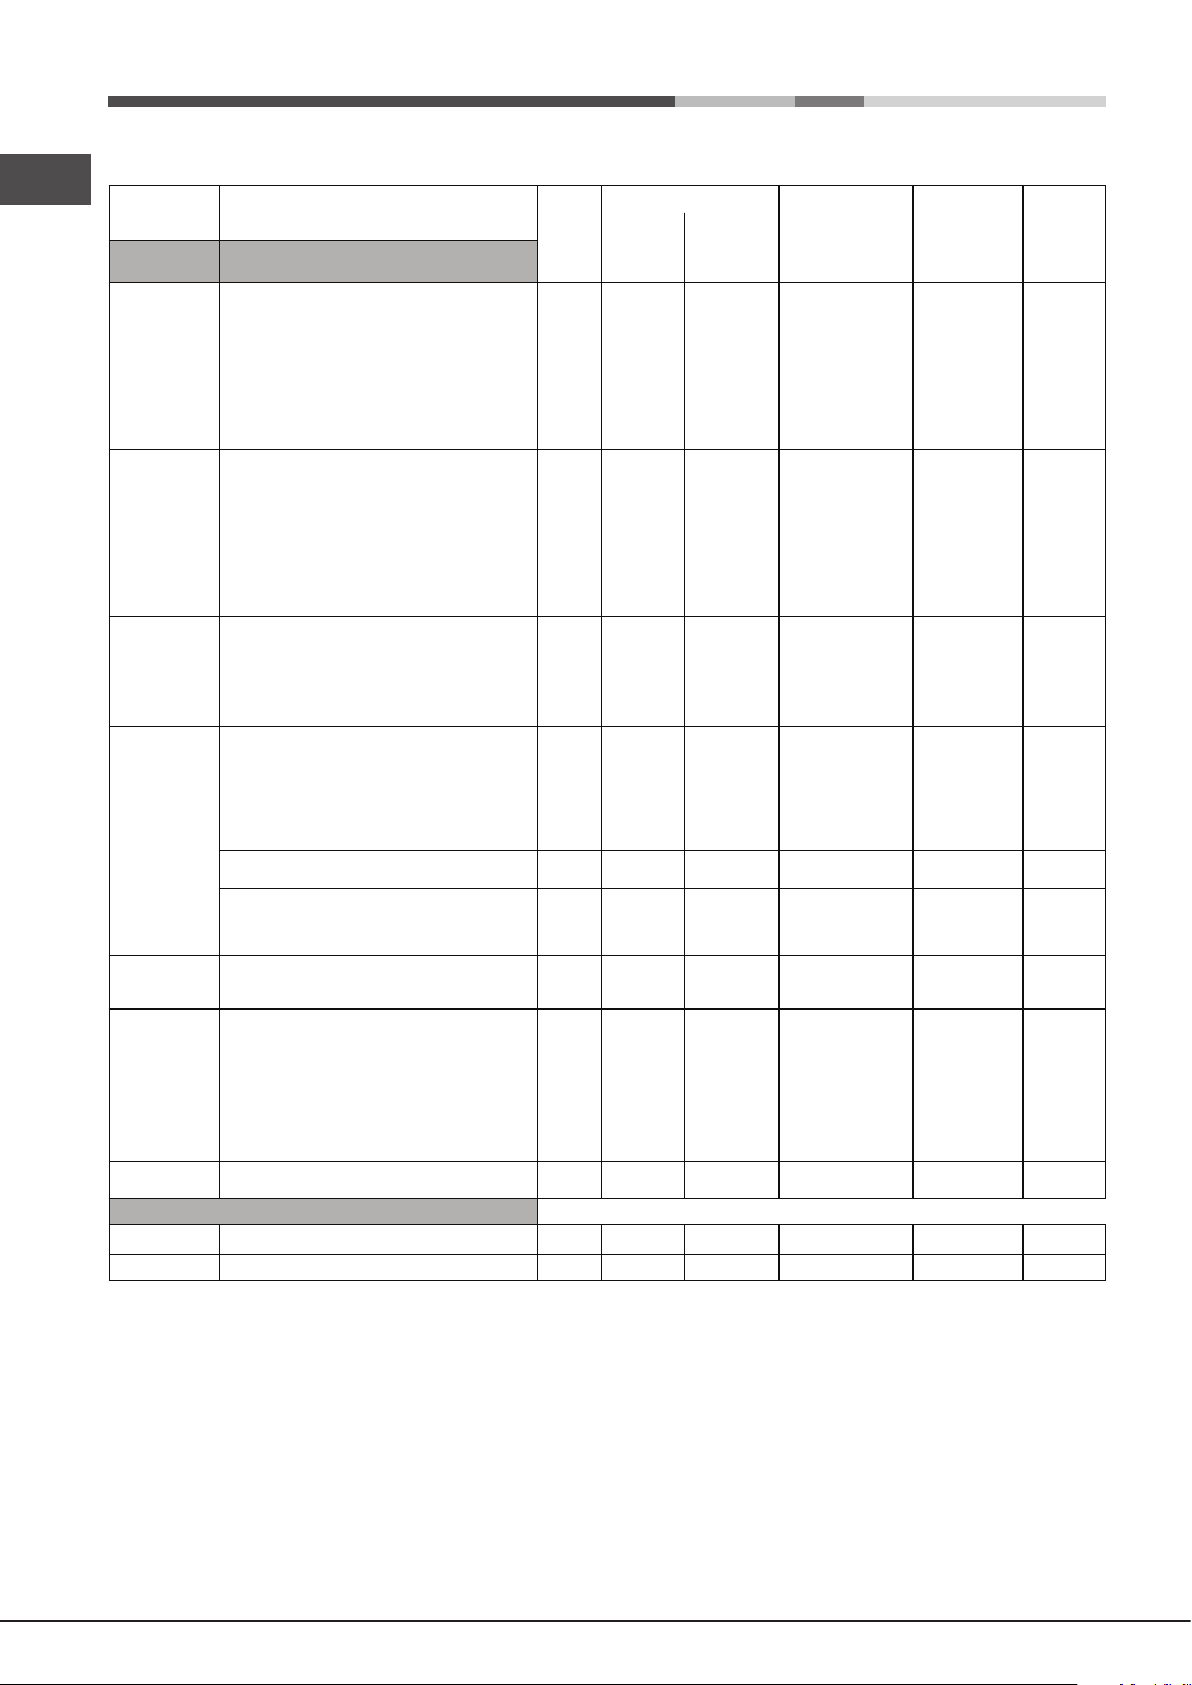
Cooking advice table
Modes Foods Weight
Multilevel*
Grill*
Fan grilling*
Fast cooking*
Low
temperature*
Baking*
Pizza*
Baked cakes
Bread***
* The cooking times listed above are intended as guidelines only and may be modified according to personal tastes. Oven preheating times are set as
standard and may not be modified manually.
** The duration of the automatic cooking functions are set by default. The values can be modified by the user, starting with the default duration.
*** As stated in the recipe, pour 50 g (0,5 dl) water into the dripping pan in position 5.
! ECO programme: This programme guarantees sensible energy saving – is recommended for dishes such as fish fillets, small pastries and vegetables.
It is also suitable for warming foodstuffs and for completing cooking.
Manual
Pizza on 2 racks
Pies on two racks/cakes on 2 racks
Sponge cake on 2 racks (on the dripping pan)
Roast chicken + potatoes
Lamb
Mackerel
Lasagne
Cream puffs on 3 racks
Biscuits on 3 racks
Cheese puffs on 2 racks
Savoury pies
Mackerel
Sole and cuttlefish
Squid and prawn kebabs
Cod fillet
Grilled vegetables
Veal steak
Sausages
Hamburgers
Toasted sandwiches (or toast)
Spit-roast chicken using rotisserie spit (where present)
Spit-roast lamb using rotisserie spit (where present)
Grilled chicken
Cuttlefish
Spit-roast chicken using rotisserie spit (where present)
Spit-roast duck using rotisserie spit (where present)
Roast veal or beef
Roast pork
Lamb
Frozen food
Pizza
Courgette and prawn pie
Country style spinach pie
Turnovers
Lasagne
Golden rolls
Chicken bites
Pre-cooked food
Golden chicken wings
Fresh Food
Biscuits (shortcrust pastry)
Sponge cake made with yoghurt
Cheese puffs
Proving / Defrosting
White meringues
Meat / Fish
Tarts
Fruit cakes
Sponge cake made with yoghurt
Small cakes on 2 racks
Sponge cake
Cream puffs on 3 racks
Biscuits on 3 racks
Filled pancakes
Meringues on 3 racks
Cheese puffs
Pizza
Focaccia bread
(Kg)
Rack position Recommended
standard
guide rails
2 and 4
2 and 4
1,5
1,5
1,5
1
1
1
1
1
1
1
1
1
1
-
-
-
1
2 and 4
1 and 2/3
2
1 or 2
2
1 and 3 and 5
1 and 3 and 5
2 and 4
1 and 3
4
4
4
4
3 or 4
4
4
4
4
-
-
2
2
-
2
2
2
2
2
2
2
2
2
2
2
2
2
2
2
2
2 or 3
2 or 3
2 or 3
2 and 4
2 or 3
1, 3 and 5
1, 3 and 5
2
1, 3 and 5
2
2
2
1+1
0,7
0,7
0,7
0,5
0,8
0,7
n° 4 or 5
n° 4 or 6
0.3
0.4
0.5
0.3
0.5
0.4
0.4
0.42 1- 200 20-25
0.3
0.6
0.2
0,5
0,7
0,7
0,6
0,7
0,7
0,8
0,5
0,5
0,5
0,5
sliding
guide rails
1 and 3
1 and 3
1 and 3
1 and 3
1
1
1
1 and 2 and 4
1 and 2 and 4
1 and 3
1 and 3
3
3
3
3
2 or 3
3
3
3
3
-
-
2
2
-
2
2
2
1
1
1
1
1
1
1
1
1
1
1
1
1
1 or 2
1 or 2
1 or 2
1 and 3
1 or 2
1, 2 and 4
1, 2 and 4
1
1, 2 and 4
1
1
1
Preheating
Automatic**
Baked cakes 12 or 32 no
Bread (see recipe) 11 or 21 no
yes
yes
yes
yes
yes
yes
yes
yes
yes
yes
yes
no
no
no
no
no
no
no
no
no
no
no
no
no
no
no
no
no
no
no
no
no
yes
yes
yes
yes
yes
yes
yes
yes
yes
yes
yes
yes
Temperature
(°C)
210-220
180
160-170
200-210
190-200
180
180-190
190
180
210
190-200
300
300
300
300
300
300
300
300
300
300
300
210
200
210
210
210
210
210
-
-
-
-
-
-
-
-
-
-
250
200
220
200
200
180
220
200
180
210
40
65
90
180
180
170-180
180-190
160-170
180-190
180
200
90
210
210-220
190-200
duration
(minutes)
20-25
30-35
20-25
65-75
45-50
30-35
35-40
20-25
10-20
20-25
20-30
15-20
10-15
8-10
10-15
15-20
15-20
15-20
10-12
3-5
70-80
70-80
55-60
30-35
70-80
60-70
60-75
70-80
40-45
12
20
30-35
25
35
25-30
15-20
15-18
45
10-12
-
8-12 ore
90-180
25-35
40-50
45-55
20-25
30-40
20-25
20-25
30-35
180
20-25
15-20
20-25
Cooking
22

Precautions and tips
! This appliance has been designed and manufactured
in compliance with international safety standards. The
following warnings are provided for safety reasons and
must be read carefully.
General safety
• The appliance was designed for domestic use inside the
home and is not intended for commercial or industrial use.
• The appliance must not be installed outdoors, even in
covered areas. It is extremely dangerous to leave the
appliance exposed to rain and storms.
• When moving or positioning the appliance, always use
the handles provided on the sides of the oven.
• Do not touch the appliance while barefoot or with wet or
damp hands and feet.
• The appliance must be used by adults only for
the preparation of food, in accordance with the
instructions provided in this booklet. Any other
use of the appliance (e.g. for heating the room)
constitutes improper use and is dangerous. The
manufacturer may not be held responsible for any
damage caused as a result of improper, incorrect
and unreasonable use of the appliance.
• Do not touch the heating elements or certain parts
of the oven door when the appliance is in use; these
parts become extremely hot. Keep children well away
from the appliance.
• Make sure that the power supply cables of other electrical
appliances do not come into contact with the hot parts of
the oven.
• The ventilation and heat dispersal openings must never
be obstructed.
• Always grip the oven door handle in the centre: the ends
may be hot.
• Always use oven gloves when placing cookware in the
oven or when removing it.
• Do not use aluminium foil to line the bottom of the oven.
• Do not place ammable materials in the oven: if the
appliance is switched on accidentally, the materials could
catch re.
• When unplugging the appliance, always pull the plug
from the mains socket; do not pull on the cable.
• Do not perform any cleaning or maintenance work without
having disconnected the appliance from the electricity
mains.
• If the event of malfunctions, under no circumstances
should you attempt to perform the repairs yourself.
Contact an authorised Service Centre (see Assistance).
• Do not rest objects on the open oven door.
• Do not let children play with the appliance.
• The appliance should not be operated by people (including
children) with reduced physical, sensory or mental
capacities, by inexperienced individuals or by anyone
who is not familiar with the product. These individuals
should, at the very least, be supervised by someone who
assumes responsibility for their safety or receive preliminary
instructions relating to the operation of the appliance.
• The appliance is not intended to be operated by
means of an external timer or separate remote-
control system.
Disposal
• When disposing of packaging material: observe local
legislation so that the packaging may be reused.
• The European Directive 2012/19/EC on Waste
Electrical and Electronic Equipment (WEEE), requires
that old household electrical appliances must not
be disposed of in the normal unsorted municipal
waste stream. Old appliances must be collected
separately in order to optimise the recovery and
recycling of the materials they contain and reduce
the impact on human health and the environment.
The crossed out “wheeled bin” symbol on the product
reminds you of your obligation, that when you dispose
of the appliance it must be separately collected.
Consumers should contact their local authority or retailer
for information concerning the correct disposal of their
old appliance.
Respecting and conserving the environment
• You can help to reduce the peak load of the electricity
supply network companies by using the oven in the
hours between late afternoon and the early hours of
the morning. The cooking mode programming options,
the “delayed cooking” mode (see Cooking modes) and
“delayed automatic cleaning” mode (see Care and
Maintenance) in particular, enable the user to organise
their time efciently.
• Always keep the oven door closed when using the GRILL
and FAN GRILLING modes: this will achieve improved
results while saving energy (approximately 10%).
• Check the door seals regularly and wipe them clean
to ensure they are free of debris so that they adhere
properly to the door, thus avoiding the dispersal of heat.
! This product complies with the requirements of the latest
European Directive on the limitation of power consumption
of the standby mode.
Maintenance and care
Switching the appliance off
Disconnect your appliance from the electricity supply before
carrying out any work on it.
Cleaning the appliance
• Slight differences in colour on the front of the oven are due
to the different materials used, i.e. glass, plastic or metal.
• Any shady areas resembling grooves on the oven door
glass are caused by reections from the oven light.
• The enamel is branded at very high temperatures. This
process may cause colour variations. This is normal and
will not affect appliance operation in any way. The thin
edges of the sheet metal cannot be entirely enamelled
and may therefore appear to be unnished. This will not
affect the rust protection.
• The stainless steel or enamel-coated external parts and
the rubber seals may be cleaned using a sponge that
has been soaked in lukewarm water and neutral soap.
Use specialised products for the removal of stubborn
stains. After cleaning, rinse and dry thoroughly. Do not
use abrasive powders or corrosive substances.
GB
23
• The inside of the oven should ideally be cleaned after
GB
each use, while it is still lukewarm. Use hot water and
detergent, then rinse well and dry with a soft cloth. Do
not use abrasive products.
• All accessories - with the exception of the sliding racks
- can be washed like everyday crockery, and are even
dishwasher safe.
• We recommend that detergents are not sprayed directly
onto the control panel, but that a sponge is used instead.
! Never use steam cleaners or pressure cleaners on the
appliance.
Cleaning the oven door
! The door of LED INSIDE models cannot be removed.
Clean the glass part of the oven door using a sponge and
a non-abrasive cleaning product, then dry thoroughly with
a soft cloth. Do not use rough abrasive material or sharp
metal scrapers as these could scratch the surface and cause
the glass to crack.
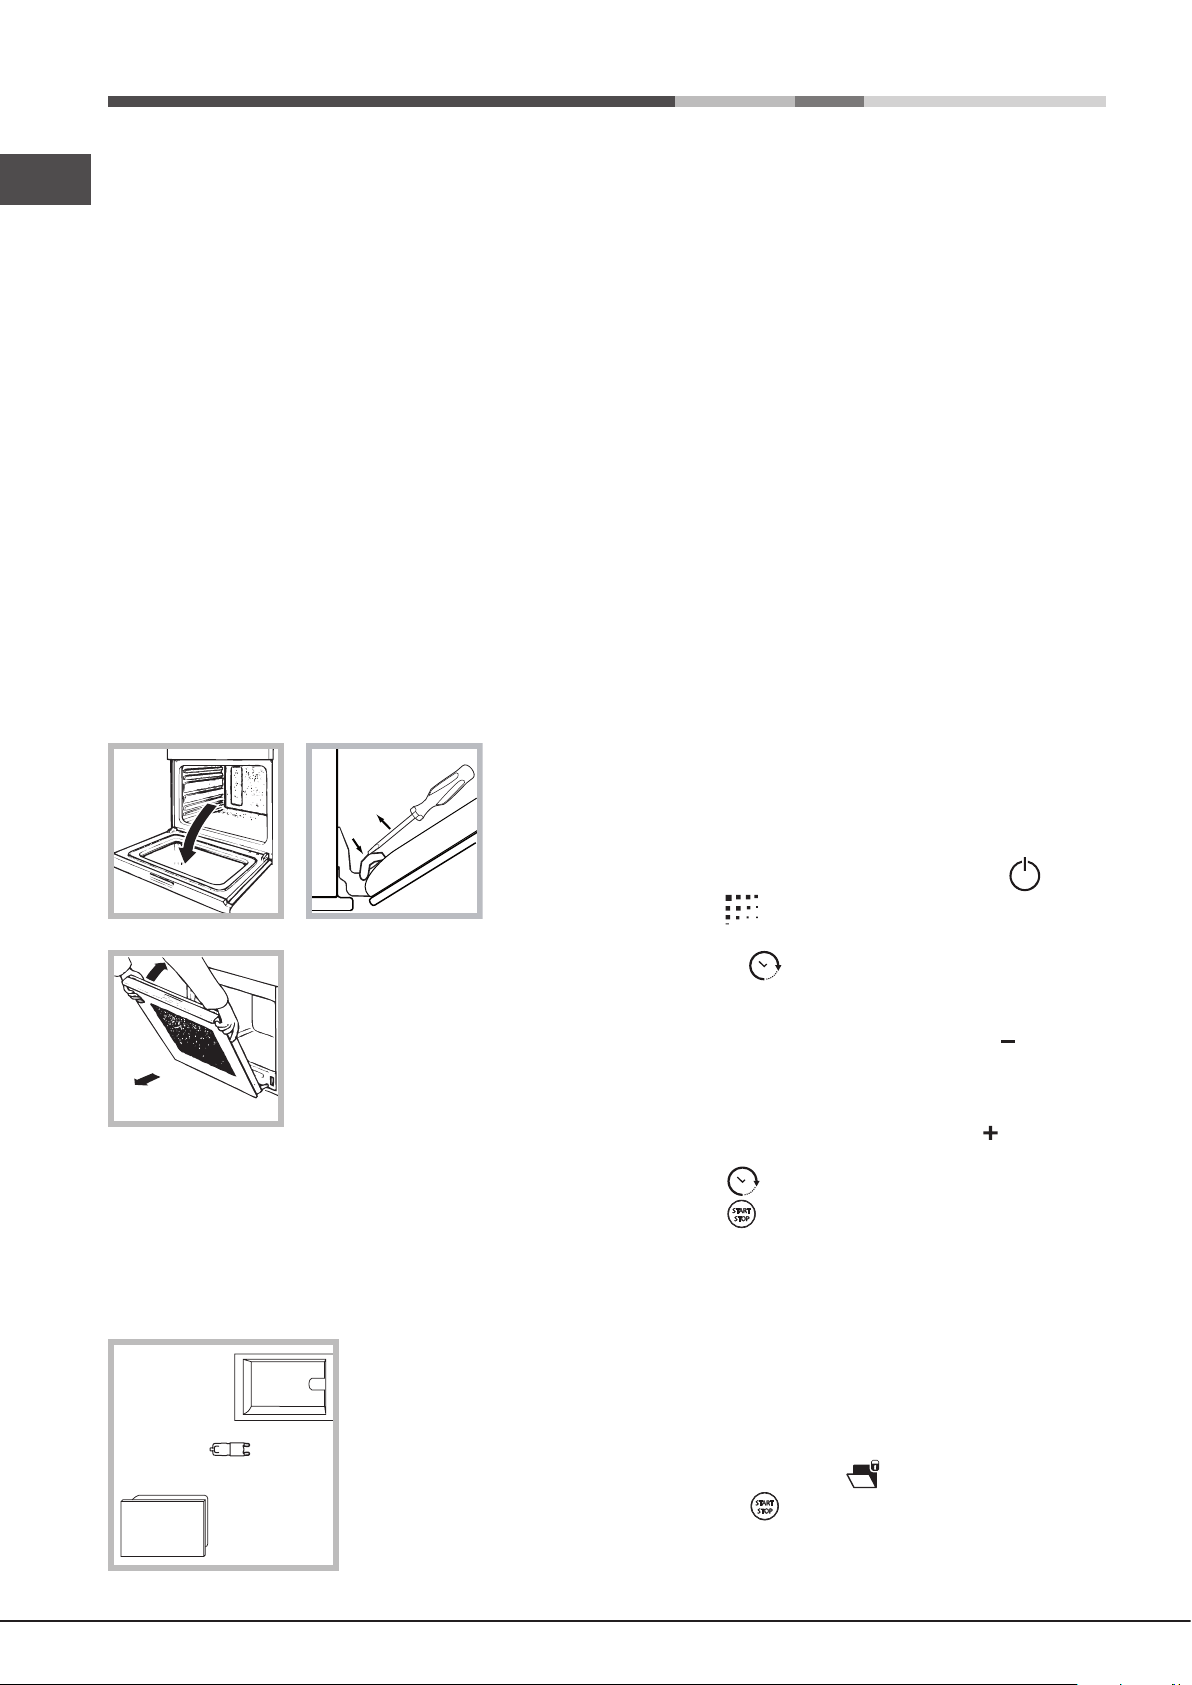
For more thorough cleaning purposes, the oven door may
be removed:
1. Open the oven door fully (see diagram).
2. Use a screwdriver to lift up and turn the small levers F
located on the two hinges (see diagram).
! Do not touch the light bulb directly with your hands.
! Do not use the oven lamp as/for ambient lighting.
Automatic cleaning with the FAST CLEAN
function
With the FAST CLEAN mode, the internal temperature of the
oven reaches 500°C. The pyrolytic cycle is activated, burning
away food and grime residues. Dirt is literally incinerated.
Keep children away from the appliance during the automatic
cleaning cycle as surfaces may become very hot. Particles
may ignite inside the oven as a result of the combustion
process. There is no cause for concern: this process is both
normal and hazard-free.
Before initiating the FAST CLEAN mode:
• clean the oven door;
• remove large or coarse food residues from the inside of
the oven using a damp sponge. Do not use detergents;
• remove all accessories and the sliding rack kit (where
present);
• do not place tea towels or pot holders over the oven
handle.
! If the oven is too hot, the pyrolytic cycle may not start.
Wait for the oven to cool down.
F
3. Grip the door on the two outer
sides and close it approximately
half way. Pull the door towards you,
lifting it out of its slot (see diagram).
To replace the door, reverse this
sequence.
Inspecting the seals
Check the door seals around the oven regularly. If the seals
are damaged, please contact your nearest Service Centre
(see Assistance). We recommend that the oven is not used
until the seals have been replaced.
Replacing the light bulb
Lamp
Holder
compartment
Lamp
Glass cover
To replace the oven light
bulb:
1. Remove the glass cover
of the lamp-holder.
2. Remove the light bulb and
replace it with a similar one:
halogen lamp voltage 230 V,
wattage 25 W, cap G 9.
3. Replace the glass cover
(see diagram).
! The programme may only be started once the oven door
has been closed.
To activate the Fast Clean programme:
1. Switch the control panel on by pressing the button.
2. Press the , the display will show the text “Piro”, “nor”
and the default duration of 1:30 h (normal cycle) alternately.
3. Press button , then turn the TIMER knob to adjust the
default cleaning level. There are 3 different levels to choose
from, each with a pre-set duration which cannot be modied:
1. Economy (ECO): turn the knob towards “ ”. Duration
1 hour.
2. Normal (NOR): initial level. Duration 1 hour and 30
minutes.
3. Intensive (INT): turn the knob towards “ ”. Duration 2
hours.
4. Press the button to conrm.
5. Press the button to begin the cleaning cycle.
An end time for the FAST CLEAN cycle (as for a normal
cooking cycle) may be programmed (see Programming the
automatic cleaning end time).
! The desired Fast Clean mode will be conrmed and started
automatically if the CLOCK icon button is not pressed within
10 seconds from selecting the cooking time.
Safety devices
• the door locks automatically as soon as the temperature
reaches a high value; the icon lights up on the display;
• pressing the button cancels the cleaning cycle t any
time;
• if a malfunction occurs, the heating elements will be
switched off;
24
• once the oven door has been locked, you cannot change
Problem
Possible cause
Solution
connected to the electricity mains
the duration and end time settings.
Programming the automatic cleaning end time
1. Press the button twice: the icon and the
numerical digits on the display will begin to ash.
2. Turn the TIMER knob towards “ ” and “ ” to adjust the
cleaning end time value.
3. Once you have reached the desired end time, press the
button again. The display will show the duration, the
cleaning end time and the set cleaning level alternately.
4. Press the button to activate the programmed mode.
Programming has been set when the and buttons
are illuminated.
5. Once cleaning has nished, “END” appears on the display
and a buzzer sounds.
• For example: it is 9:00 a.m. and the Economy (ECO)
FAST CLEAN level has been selected, with the default
duration of 1 hour. 12:30 is scheduled as the end time.
The programme will start automatically at 11:30 a.m.
To cancel programming press the button.
Once the automatic cleaning cycle is over
Before you can open the oven door, you will have to wait
GB
for the icon to switch off: this indicates the oven
temperature has dropped to an acceptable level. You will
notice some white dust deposits on the bottom and the sides
of your oven; remove these deposits with a damp sponge
once the oven has cooled down completely. Alternatively,
you can make use of the already heated oven, in which
case it is not necessary to remove the deposits, they are
completely harmless and will not affect your food in any way.
Troubleshooting
The “Clock button” and the
digits on the display flash.
A programmed cooking mode
does not start.
Only the high luminosity
“Clock button” is lit.
An automatic mode has been
selected. “Hot” appears on the
display and cooking does not
start.
Fan-assisted cooking has been
selected and the food looks burnt.
The appliance has just been
or there has been a blackout.
There has been a blackout. Reprogram the cooking mode.
The appliance is in standby mode Press any button to exit
The temperature inside the oven
is higher than the suggested
value for the selected mode.
Positions 1 and 5: the direct
heat could cause
temperature-sensitive
Set the clock.
standby mode.
Wait for the oven to cool down.
We recommend switching
dripping pan positions halfway
through cooking.
25
Installation
590 mm.
FR
! Conservez ce mode d’emploi pour pouvoir le consulter
à tout moment. En cas de vente, de cession ou de
déménagement, veillez à ce qu’il suive l’appareil pour
informer le nouveau propriétaire sur son fonctionnement
et lui fournir les conseils correspondants.
Aération
Pour garantir une bonne aération, la cavité d’encastrement
doit être dépourvue de paroi arrière. Il est conseillé
d’installer le four de manière à ce qu’il repose sur deux
cales en bois ou bien sur un plan d’appui continu qui ait une
découpe d’au moins 45 x 560 mm (voir gures).
! Lisez attentivement les instructions : elles contiennent
des conseils importants sur l’installation, l’utilisation et la
sécurité de votre appareil
Positionnement
! Les emballages ne sont pas des jouets pour enfants, il
faut les mettre au rebut en respectant la réglementation
sur le tri sélectif des déchets (voir Précautions et conseils).
! L’installation doit être effectuée par un professionnel du
secteur conformément aux instructions du fabricant. Une
mauvaise installation peut causer des dommages à des
personnes, des animaux ou des biens.
Encastrement
Pour garantir le bon fonctionnement de l’appareil, il faut
que le meuble possède des caractéristiques bien précises:
• les panneaux adjacents doivent être fabriqués dans un
matériau résistant à la chaleur;
• dans le cas de meubles en plaqués bois, les colles
doivent pouvoir résister à une température de 100 °C;
• la cavité du meuble pour encastrement du four, tant
sous plan (voir gure) qu’en colonne , doit avoir les
dimensions suivantes:
45 mm.
560 mm.
Centrage et xation
Pour xer l’appareil au meuble:
• ouvrir la porte du four;
• retirer le haut des joints latéraux pour dégager les 2 trous
de xation;
• Fixer le four au meuble en utilisant 2 vis à bois;
• remettre en place les 2 joints.
! Toutes les parties qui servent de protection doivent être
xées de manière à ne pouvoir être enlevées qu’avec l’aide
d’un outil.
550 mm.
min.
45 mm.
560 mm.
575-585 mm.
570 mm.
595 mm.
20 mm.
550 mm.
20,5 mm.
22,5 mm.*
* Seulement pour modèles inox
! Après encastrement de l’appareil, il ne doit plus y avoir
possibilité de contact avec les parties électriées.
Les déclarations de consommation indiquées sur la plaque
signalétique ont été mesurées pour ce type d’installation.
26
Raccordement électrique
Les fours munis d’un câble d’alimentation tripolaire sont prévus
pour un fonctionnement au courant alternatif à la tension et
à la fréquence indiquées sur la plaque signalétique apposée
sur l’appareil (voir ci-dessous).
Montage du câble d’alimentation
! Après installation de l’appareil, le câble électrique et la
prise de courant doivent être facilement accessibles
! Le câble ne doit être ni plié ni excessivement écrasé.
! Il doit être contrôlé périodiquement et ne peut être
remplacé que par un technicien agréé (voir Assistance).
FR
1. Pour ouvrir le bornier,
faire pression à l’aide d’un
tournevis sur les languettes
latérales du couvercle : tirer
et ouvrir le couvercle (voir
gure).
2. Montage du câble
d’alimentation : dévisser la
vis du serre-câble ainsi que
les trois vis des contacts
L
L-N- puis fixer les fils
sous les têtes de vis en
respectant les couleurs Bleu
(N) Marron (L) Jaune-Vert
(voir gure).
3. Fixer le câble dans le
serre-câble prévu.
4. Fermer le couvercle du
N
bornier.
Branchement du câble d’alimentation au réseau électrique
Montez sur le câble une prise normalisée adaptée à la
charge indiquée sur l’étiquette des caractéristiques.
En cas de raccordement direct au réseau, il faut intercaler entre
l’appareil et le réseau un interrupteur à coupure omnipolaire
ayant au moins 3 mm d’écartement entre les contacts,
dimensionné à la charge et conforme aux normes en vigueur
(le l de terre ne doit pas être interrompu par l’interrupteur).
Le câble d’alimentation ne doit atteindre, en aucun point, des
températures dépassant de 50°C la température ambiante.
! L’installateur est responsable du bon raccordement
électrique de l’appareil et du respect des normes de sécurité.
Avant de procéder au branchement, assurez-vous que :
• la prise est bien munie d’une terre conforme à la loi;
! Nous déclinons toute responsabilité en cas de non
respect des normes énumérées ci-dessus.
PLAQUE SIGNALETIQUE
largeur 43,5 cm
Dimensions*
Volume*
Dimensions**
Volume**
Raccordements
électriques
ENERGY
LABEL
(ETIQUETTE
ENERGIE )
* Uniquement pour les modèles avec glissières embouties.
** Uniquement pour les modèles avec glissières en fil.
hauteur 32,4 cm
profondeur 41,5 cm
L. 59
largeur 45,5 cm
hauteur 32,4 cm
profondeur 41,5 cm
L. 62
tension 220-240V~ 50/60Hz ou
50Hz (voir plaque signalétique)
puissance maximum absorbée
2800W
Directive 2002/40/CE sur l'étiquette
des fours électriques
Norme EN 50304
Consommation énergie déclaration
Classe convection Forcée –
fonction four: ECO.
Cet appareil est conforme aux
Directives Communautaires
suivantes : 2006/95/CEE du
12.12.06 (Basse Tension) et
modifications successives 2004/108/CEE du 15.12.04
(Compatibilité Électromagnétique)
et modifications successives 93/68/CEE du 22/07/93 et
modifications successives.
- 2012/19/CE et modifications
successives.
- 1275/2008 standby/off mode
• la prise est bien apte à supporter la puissance maximale
de l’appareil, indiquée sur la plaquette signalétique;
• la tension d’alimentation est bien comprise entre les
valeurs indiquées sur la plaquette signalétique;
• la prise est bien compatible avec la che de l’appareil.
Si ce n’est pas le cas, remplacez la prise ou la che,
n’utilisez ni rallonges ni prises multiples.
27
 Loading...