

Page 1
Operating Instructions
OVEN
GB FR ES
Français, 20 Espanol, 39English,1
FK 1041L X
FK 1041L
Contents
GB
Installation, 2-3
Positioning
Electrical connection
Data plate
Description of the appliance, 4
Overall view
Control panel
Display in programming mode
Display in cooking mode
Start-up and use, 5-7
Switching the oven on for the first time
Setings menu commands
Control panel lock
Setting the clock
Setting the minute minder
Starting the oven
DEMO mode
Restoring the factory settings
Standby
Modes, 8-14
Manual cooking modes
Automatic cooking modes
Programming cooking
Practical cooking advice
Cooking advice table
Precautions and tips, 15
General safety
Disposal
Respecting and conserving the environment
Care and maintenance, 16-17
Switching the appliance off
Cleaning the appliance
Cleaning the oven door
Replacing the light bulb
Assembling the sliding rack kit
Troubleshooting, 18
Assistance, 19
1
Page 2
560 mm.
45 mm.
Installation
GB
! Please keep this instruction booklet in a safe place
for future reference. If the appliance is sold, given
away or moved, please make sure the booklet is
also passed on to the new owners so that they may
benefit from the advice contained within it.
! Please read this instruction manual carefully: it
contains important information on installation,
operation and safety.
Positioning
! Do not let children play with the packaging material; it
should be disposed of in accordance with local separated
waste collection standards (see Precautions and tips).
! The appliance must be installed by a qualified
person in compliance with the instructions provided.
Incorrect installation may damage property or cause
harm to people or animals.
Built-in appliances
Use an appropriate cabinet to ensure that the
appliance functions properly.
• The panels adjacent to the oven must be made of
heat-resistant material.
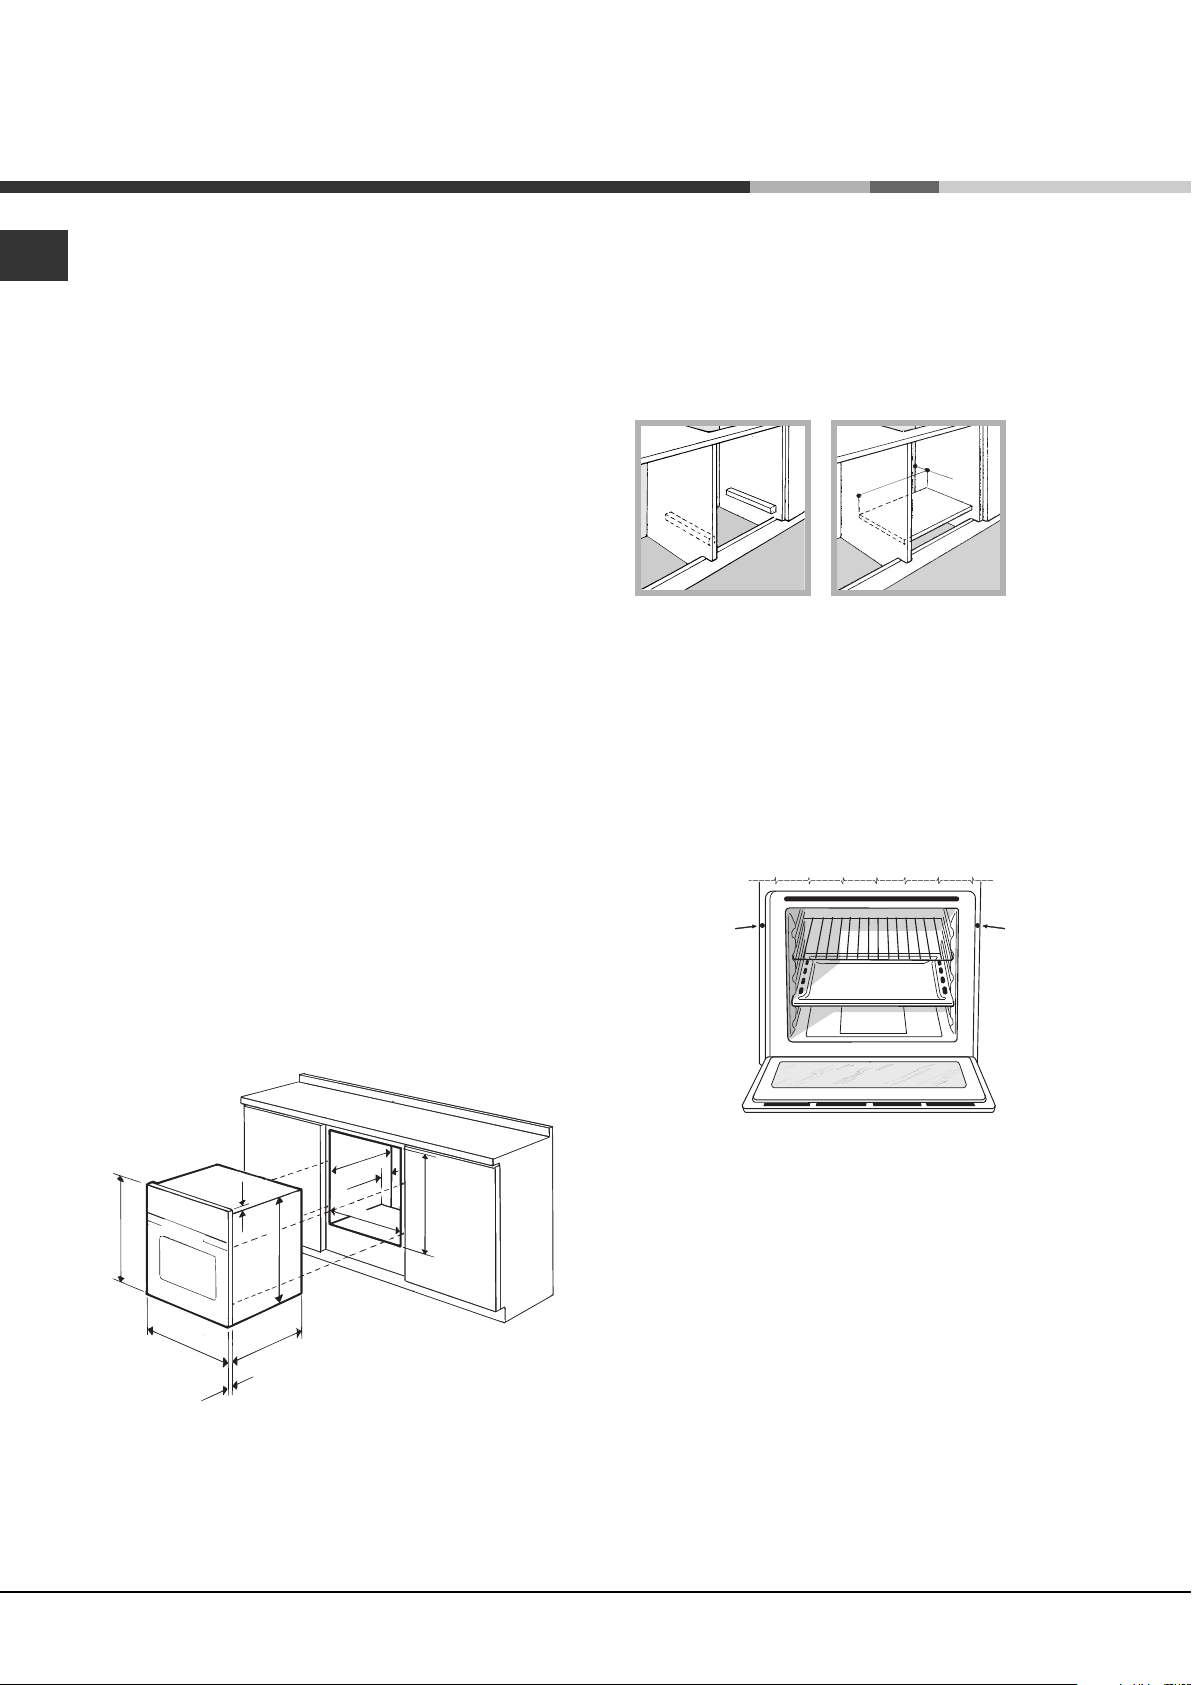
Ventilation
To ensure adequate ventilation is provided, the back
panel of the cabinet must be removed. It is
advisable to install the oven so that it rests on two
strips of wood, or on a completely flat surface with
an opening of at least 45 x 560 mm (see diagrams).
Centring and fixing
Secure the appliance to the cabinet:
• Open the oven door.
• Remove the 2 rubber plugs covering the fixing
holes on the perimeter frame.
• Fix the oven to the cabinet using the 2 wood
screws.
• Replace the rubber plugs.
• Cabinets with a veneer exterior must be
assembled with glues which can withstand
temperatures of up to 100°C.
• To install the oven under the counter (see
diagram) or in a kitchen unit, the cabinet must
have the following dimensions:
550 mm.
min.
45 mm.
560 mm.
575-585 mm.
570 mm.
590 mm.
595 mm.
20 mm.
550 mm.
20,5 mm.
22,5 mm.*
* Stainless steel models only
! The appliance must not come into contact with
electrical parts once it has been installed.
The indications for consumption given on the data
plate have been calculated for this type of
installation.
! All parts which ensure the safe operation of the
appliance must not be removable without the aid of
a tool.
2
Page 3
Electrical connection
! Ovens equipped with a three-pole power supply
cable are designed to operate with alternating
current at the voltage and frequency indicated on
the data plate located on the appliance (see below).
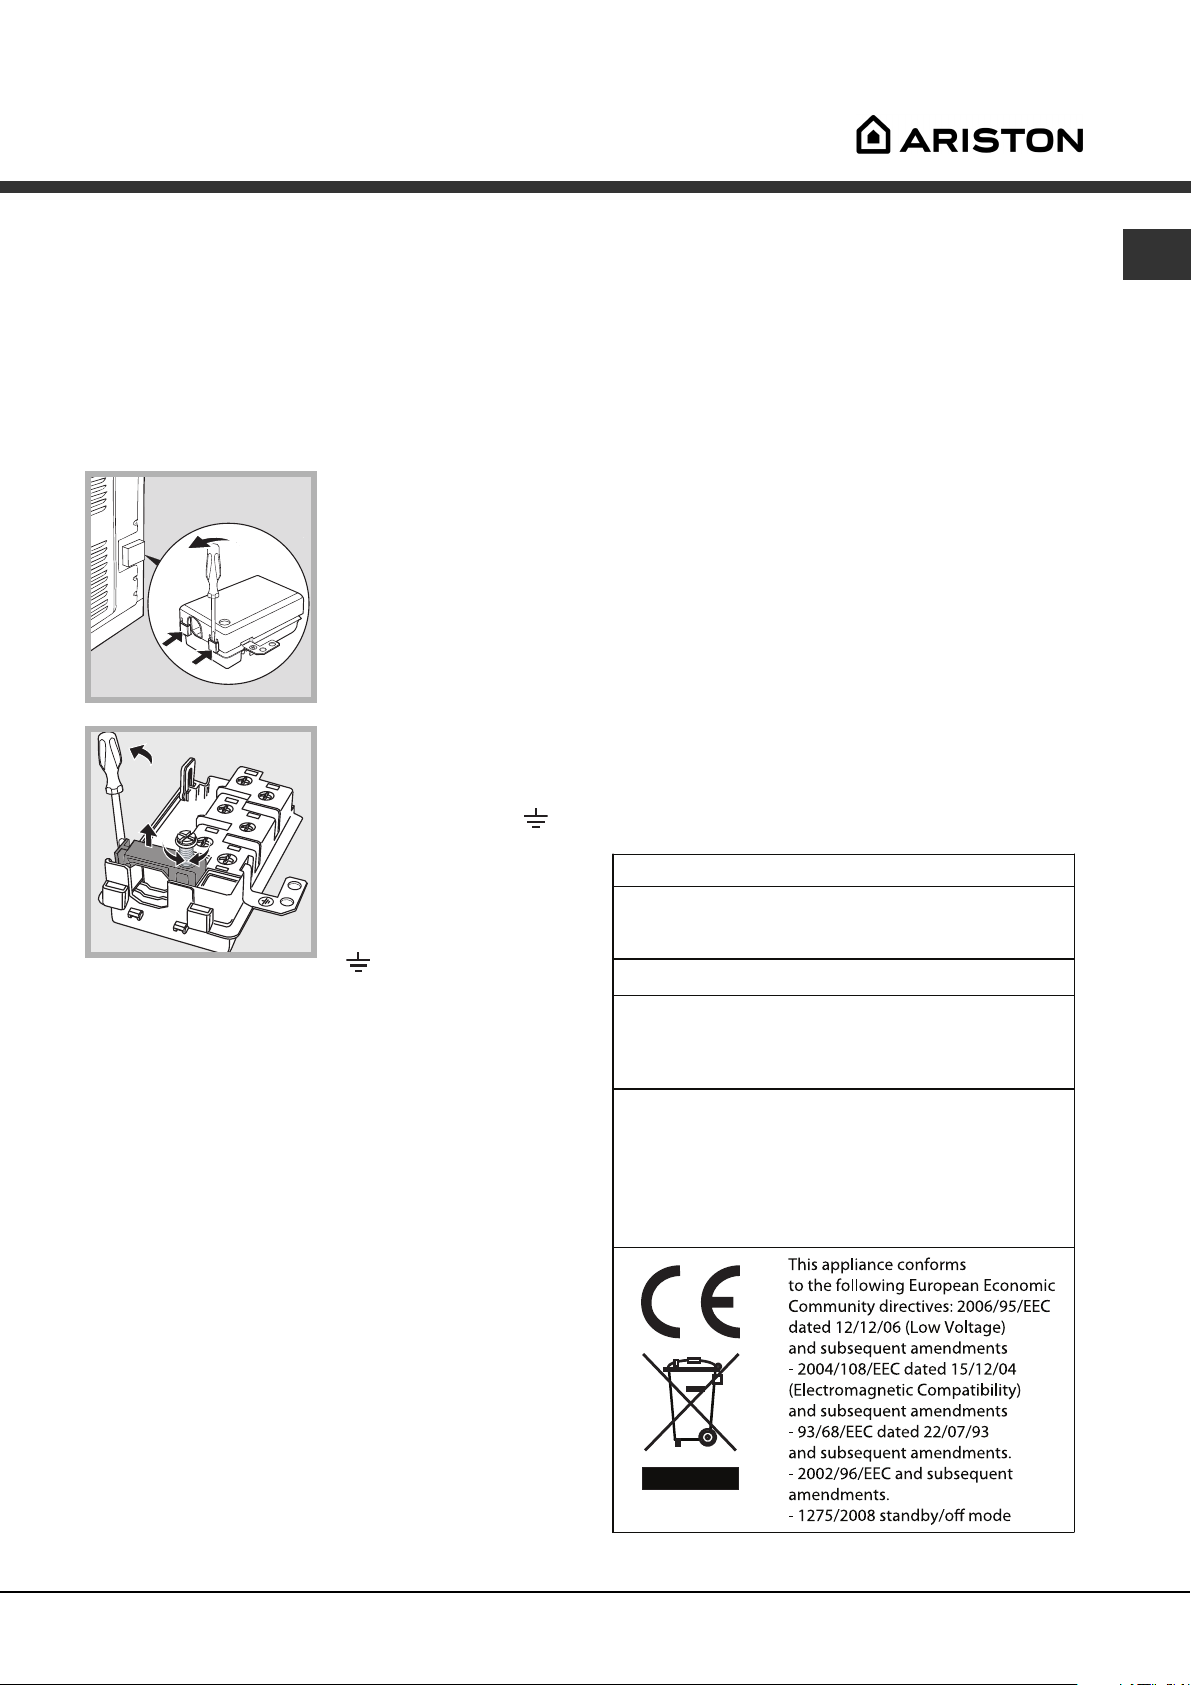
Fitting the power supply cable
1. Open the terminal board by inserting a
screwdriver into the
side tabs of the cover.
Use the screwdriver as
a lever by pushing it
down to open the cover
(see diagram).
2. Loosen the cable
clamp screw and
remove it, using a
screwdriver as a lever
(see figure).
3. Remove the wire
contact screws L-Nthen fasten the wires
under the screw heads,
observing the colour
code: Blue (N), Brown
(L) and Yellow-Green
).
(
Connecting the electricity supply cable to the
mains
Install a standardised plug corresponding to the
load indicated on the data plate (see table).
The appliance must be directly connected to the
mains using an omnipolar switch with a minimum
contact opening of 3 mm installed between the
appliance and the mains. The switch must be
suitable for the charge indicated and must comply
with current electrical regulations (the earthing wire
must not be interrupted by the switch). The supply
cable must be positioned so that it does not come
into contact with temperatures higher than 50°C at
any point (the back panel of the oven, for example).
Before connecting the appliance to the power
supply, make sure that:
GB
• the appliance is earthed and the plug is compliant
with the law;
• the socket can withstand the maximum power of
the appliance, which is indicated on the data
plate (see below);
• the voltage is in the range between the values
indicated on the data plate (see below);
• the socket is compatible with the plug of the
appliance. If the socket is incompatible with the
plug, ask an authorised technician to replace it.
Do not use extension cords or multiple sockets.
! Once the appliance has been installed, the power
supply cable and the electrical socket must be
easily accessible.
! The cable must not be bent or compressed.
! The cable must be checked regularly and replaced
by authorised technicians only (see Assistance).
! The manufacturer declines any liability
should these safety measures not be
observed.
,
APPLIANCE SPECIFICATIONS
Dimensions
Volume
Electrical
connections
ENERGY
LABEL*
width 43.5 cm
height 32 cm
depth 41.5 cm
58 l
voltage: 220 - 240 V~ 50/60 Hz
(see data plate)
maximum power absorbed
2800 W
Directive 2002/40/EC on the label
of electric ovens. Standard EN 50304
Declared energy consumption
for Forced convection Class –
heating mode:
ECO.
! The installer must ensure that the correct electrical
connection has been performed and that it is fully
compliant with safety regulations.
* Without removable guide rails
3
Page 4

Description of the appliance
/
GB
Overall view
Control panel
CONTROL PANEL
POWER BUTTON
Control panel
GRILL
DRIPPING PAN
SETTINGS
icon
MANUAL
COOKING
MODES icon
Display
TEMPERATURE
icon
GUIDES for the
sliding racks
position 5
position 4
position 3
position 2
position 1
DOOR /
CONTROL PANEL LOCK
icon
START
STOP
CONFIRM
SETTINGS
icon
Display in programming mode
Cooking mode number indicator
Selected cooking mode icon /
recommended rack position icon
indicator
Display in cooking mode
Selected menu
indicator
Animated
cooking icon
Cooking progress
indicator
AUTOMATIC
COOKING
MODES icon
Selected menu
indicator
TIME
Suggests a course of action or
displays the activity currently
being performed by the oven
END
OF COOKNG TIME
indicator
OF COOKNG TIME
SELECTOR
control dial
END
indicator
TIME
icon
MINUTE MINDER
icon
Temperature
indicator
COOKING DURATION
indicator
Suggests a course of action
or displays the activity currently
being performed by the oven
Temperature
indicator
Preheating /
Residual heat
indicators
COOKING
DURATION
indicator
4
Page 5
Start-up and use
! The first time you use your appliance, heat the
empty oven with its door closed at its maximum
temperature for at least half an hour. Make sure that
the room is well ventilated before switching the oven
off and opening the oven door. The appliance may
emit a slightly unpleasant odour caused by
protective substances used during the
manufacturing process burning away.
! Turn the control dial to adjust the parameter shown
on the display between the “<” and “>” symbols.
! To make the setting process easier, keep the
control dial in position: this will increase the scrolling
speed of the numbers on the display.
! Each setting will automatically be stored in the
appliance memory after 10 seconds.
! The touch controls cannot be activated if the user
is wearing gloves.
Some models are equipped with a system of hinges
which allows the door to close slowly, without the
user having to follow the movement through with his/
her hand. To use the system correctly, before
closing the door:
• Open the door fully.
• Do not force the closing movement manually.
Switching the oven on for the first time
After connecting the oven to the electricity supply,
the first time it is switched on the user should also
switch on the control panel by pressing the
button. The list of languages will appear in the
menu. To choose the desired language, select it
using the control dial. Confirm by pressing the
icon.
Once the selection has been made, the display will
show the settings menu. Press the
through using the control dial until you reach the
EXIT command and press the
using the oven.
icon or scroll
icon to begin
commands.
To modify the setting, press the
The following parameters are listed in the menu:
LANGUAGE: select the language shown on the
display.
CLOCK: set the exact time.
TONE: activate/deactivate keypad tone.
LIGHT: activate/deactivate the internal oven light
during cooking.
LOGO: activate/deactivate logo on start-up.
GUIDE: activate/deactivate operating tips.
EXIT: exit the menu.
! It is possible to exit the settings menu by pressing
the
icon.
icon.
Control panel lock
! The control panel can be locked while the oven is
off, once cooking has started or finished and during
programming.
The control panel lock can be used to lock the
controls.
To activate it, press the
desired command by pressing the control dial:
• NO LOCK: deactivate an active lock;
• BUTTONS: lock the controls;
Confirm by pressing the
A confirmation buzzer will sound and the
appear on the display.
The lock may be activated while the oven is in use,
or while it is switched off. It can also be deactivated
in all the above situations and after the oven has
finished cooking.
icon and select the
icon.
icon will
Setting the clock
To set the clock, switch on the oven by pressing the
icon, then press and follow the steps described.
1. Scroll through the menu commands using the
control dial, select CLOCK and press
2. Adjust the time using the control dial.
3. Once you have reached the correct hour value,
.
GB
! After choosing the language in the menu, if the
display is not used for another 30 seconds it will
automatically revert to programming mode.
Setings menu commands
To enter the settings menu, switch on the control
panel and press the
Use the control dial to highlight the individual menu
icon.
press the
4. Repeat steps 2 and 3 to set the minutes.
5. To exit adjustment mode, press the
use the control dial to scroll through the menu until
you reach EXIT, then press
! The clock can also be set while the oven is off, by
pressing the icon and carrying out steps 2 to 4
icon.
icon or
.
5
Page 6
GB
as described above.
After the appliance has been connected to the
mains, or after a blackout, the clock will need to be
reset.
can then be placed in the oven.
6. During cooking it is always possible to:
- adjust the temperature by pressing the
turning the control dial and confirming by pressing
icon,
Setting the minute minder
! The minute minder may be set regardless of
whether the oven is switched on or off. It does not
switch the oven on or off.
When the set time has elapsed, the minute minder
emits a buzzer that will automatically stop after 30
seconds or when any active button on the control
panel is pressed.
To adjust the minute minder, proceed as follows:
1. Press the
2. Set the desired time using the control dial.
3. Once you have reached the desired value, press
the
When the oven is switched off, the countdown appears
on the display. When the oven is on, the lit
will remind you that the minute minder is active.
To cancel the minute minder, press the
use the control dial to set the time to 00:00. Press
The
minute minder has been disabled.
icon again.
again.
icon will switch off to indicate that the
icon.
symbol
icon and
Starting the oven
1. Press to switch on the control panel. The
appliance buzzer sounds three times (ascending).
2. Press the
cooking mode. The cooking temperature and
duration may be set.
Press the
cooking mode. The cooking temperature and
duration are both set to default values. Only the
duration may be adjusted in accordance with the
selected mode. The text “AUTO” appears on the
display to indicate that the temperature is following
a precise cooking profile. A delayed cooking cycle
may be programmed.
3. Press
4. The oven will begin its preheating phase, the
preheating indicators will light up as the temperature
rises.
5. When the preheating process has finished, a
buzzer sounds and all the preheating indicator lights
show that this stage has been completed: the food
icon to select the desired manual
icon to select the desired automatic
to start the cooking mode.
again (manual modes only );
- set the duration of a cooking mode (see Cooking
Modes);
- stop cooking by pressing the
the appliance stores the temperature modified
previously in its memory (manual modes only);
- switch off the oven by pressing the
seconds.
7. If a blackout occurs while the oven is already in
operation, an automatic system within the appliance
will reactivate the cooking mode from the point at
which it was interrupted, provided that the temperature
has not dropped below a certain level. Programmed
cooking modes which have not yet started will not be
restored and must be reprogrammed (for example: a
cooking mode has been programmed to start at 20:30.
At 19:30 a blackout occurs. When the power supply is
restored, the mode will have to be reprogrammed).
! There is no preheating stage for the GRILL mode.
! Never put objects directly on the bottom of the oven;
this will prevent the enamel coating from being damaged.
! Always place cookware on the rack(s) provided.
Cooling ventilation
In order to cool down the external temperature of the
oven, a cooling fan blows a stream of air between
the control panel and the oven door, as well as
towards the bottom of the oven door. At the
beginning of the cleaning cycle, the cooling fan
operates at low speed.
! Once cooking has been completed, the cooling fan
continues to operate until the oven has cooled down
sufficiently.
Oven light
The light comes on when a cooking mode starts (if
enabled in the settings menu).
When models featuring LED INSIDE technology
begin cooking, the LEDs on the door light up for
improved illumination of all cooking levels.
Residual heat indicators
The appliance is fitted with a residual heat indicator.
When the oven is off, the “residual heat” bar on the
display lights up to indicate high temperatures
inside the oven cavity. The individual segments of
the bar switch off one by one as the temperature
icon. In this case
icon for 3
6
Page 7

inside the oven falls.
Demo mode
! The appliance will not enter DEMO mode if the
language has not been selected beforehand.
Restoring the factory settings
The oven factory settings can be restored to reset all
selections made by the user (language, tone,
customised durations, etc…). To carry out a reset,
switch off the oven, then press and hold 6
,
GB
The oven can operate in DEMO mode: all heating
elements are deactivated, and the controls remain
operative.
To activate DEMO mode, switch off the oven and
keep the control dial turned clockwise while pressing
for 10 seconds. A buzzer sounds and the
display shows “DEMO”.
To deactivate DEMO mode, keep the control dial
turned anticlockwise while pressing
seconds. A buzzer sounds to confirm deactivation.
for 3
and simultaneously for 6 seconds. Once the
restore procedure is complete, a buzzer will sound.
The first time the
behave as if it is being switched on for the first time.
icon is pressed, the oven will
Standby
This product complies with the requirements of the
latest European Directive on the limitation of power
consumption in standby mode. If no buttons are
pressed for 30 minutes and the control panel/door
lock has not been activated, the appliance
automatically reverts to standby mode. The ECO
Mode symbol appears on the display to indicate
standby mode. As soon as interaction with the
machine resumes, system operation is restored.
7
Page 8

Modes
GB
! In order to guarantee wonderfully soft and crunchy
foodstuffs, the oven releases – in the form of water
vapour - the humidity naturally withheld in the food
itself. In this way, optimal cooking results can be
achieved for all types of food.
! Every time the oven is switched on, it suggests the
first manual cooking mode.
Manual cooking modes
! All cooking modes have a default cooking temperature
which may be adjusted manually to a value between
40°C and 250°C as desired (270°C for GRILL mode).
Any temperature adjustments will be stored in the
appliance memory and suggested again the next time
this mode is used. If the selected temperature is lower
than the temperature inside the oven, the text “OVEN
TOO HOT” appears on the display. However, it will still
be possible to start cooking.
If cooking is started without a duration being set, the
display will show the elapsed time.
MULTILEVEL mode
All heating elements and the fan are activated. Since
the heat remains constant throughout the oven, the air
cooks and browns food in a uniform manner. A
maximum of two racks may be used at the same time.
GRILL mode
The top heating element and the rotisserie spit
(where present) are activated. The high and direct
temperature of the grill is recommended for food
which requires a high surface temperature. Always
cook in this mode with the oven door closed (see
“Practical cooking advice”).
FAN GRILLING mode
The top heating element and the rotisserie spit (where
present) are activated and the fan begins to operate.
During part of the cycle the circular heating element is
also activated. This combination of features increases
the effectiveness of the unidirectional thermal
radiation provided by the heating elements through
the forced circulation of the air throughout the oven.
This helps prevent food from burning on the surface
and allows the heat to penetrate right into the food.
Always cook in this mode with the oven door closed
(see “Practical cooking advice”).
ROAST mode
The top and circular heating elements switch on and the
fan begins to operate. This combination of features
increases the effectiveness of the unidirectional thermal
radiation provided by the heating elements through the
forced circulation of the air throughout the oven. This
helps prevent food from burning on the surface and
allows the heat to penetrate right into the food.
Always cook in this mode with the oven door closed.
FISH mode
The top and circular heating elements switch on and
the fan begins to operate. This combination is ideal
for cooking fish dishes gently.
PIZZA mode
The top and circular heating elements switch on and
the fan begins to operate. This combination heats
the oven rapidly. If you use more than one rack at a
time, switch the position of the dishes halfway
through the cooking process.
PROVING mode
The circular heating element will come on and the
fan will operate during the preheating stage only.
The oven temperature is ideal for activating the
rising process. Always cook in this mode with the
oven door closed.
PASTRY mode
The rear heating element and the fan are switched
on, thus guaranteeing the distribution of heat in a
delicate and uniform manner throughout the entire
oven. This mode is ideal for baking temperature
sensitive foods (such as cakes, which need to rise).
PASTEURISATION mode
This cooking mode is suitable for fruit, vegetables, etc...
Small containers may be positioned on 2 levels
(dripping pan on the 1st shelf and rack on the 3rd
shelf). Let the containers cool inside the oven. Place
the food inside the oven while it is still cold.
SLOW COOK MEAT/FISH/VEGETABLES
modes
This type of cooking mode, used for years by industry
professionals, enables food (meat, fish, fruit and
vegetables) to be cooked at very low temperatures (75,
85 and 110°C), thereby guaranteeing a perfect level of
cooking and enhancing the taste as much as possible.
The value of these advantages should not be
underestimated:
• as the cooking temperatures are very low (in general
they are lower than the temperature required for
evaporation), the dispersion of cooking sauces due
to evaporation is substantially reduced and the food
becomes softer;
8
Page 9

• when cooking meat, the muscle fibres contract
less than they would during a classic cooking
cycle. The result is a more tender meat which
does not need to be rested after it is cooked.
Meat should be browned before it is placed in the
oven.
Cooking foods which have been vacuum-packed at
low temperatures, a technique used for over 30
years by the most prestigious chefs, brings many
advantages:
• culinary: flavours are concentrated and the taste,
softness and tenderness of the food are
maintained;
• hygienic: provided that hygiene regulations are
respected, this type of cooking protects the food
from the harmful effects of oxygen, thus ensuring
that the dishes may be stored for longer in the
refrigerator;
• organisational: thanks to the longer storage
period, dishes may be prepared well in advance;
• diet-related: this type of cooking limits the amount
of fatty substances used and therefore means
that the food is lighter and easier to digest;
• financial: the food shrinks less so there is more of
the product left after it has been cooked.
To use this technique, you must use a vacuumpacking machine and the appropriate bags. Follow
the instructions supplied relating to vacuum-packing
food carefully.
The vacuum-packing technique may also be used
for raw products (fruit, vegetables, etc.) as well as
pre-cooked products (traditional cooking).
DEFROSTNG mode
The fan at the bottom of the oven circulates roomtemperature air around the food. This mode is suitable
for defrosting any type of food, especially delicate items
that should not be heated, for example: ice-cream
cakes or cakes made with custard, cream or fruit.
ECO mode
The rear heating element and the fan are switched on,
thus guaranteeing the distribution of heat in a delicate
and uniform manner throughout the entire oven.This
energy saving mode is recommended for small
dishes, ideal for heating foods and finishing off
cooking.
* Only available in certain models.
Rotisserie spit*
GB
To operate the
rotisserie function (see
diagram) proceed as
follows:
1. Place the dripping
pan in position 1.
2. Place the rotisserie
support in position 3
and insert the spit in
the hole provided on
the back panel of the oven.
3. Start the rotisserie function by selecting the
or modes.
Automatic cooking modes
! The temperature and cooking duration are pre-
set , guaranteeing a perfect result every time -
automatically. These values are set using the
C.O.P.® (Programmed Optimal Cooking)
system. The cooking cycle stops automatically and
the oven indicates when the dish is cooked. You may
start cooking whether the oven has been preheated
or not. The cooking duration can be customised
according to personal taste by modifying the relevant
value - before cooking begins - by ±5/20 minutes
depending on the selected programme. The duration
can however be modified even once cooking has
begun. If the value is modified before the programme
begins, it is stored in the memory and suggested
again by the appliance when the programme is next
used. If the temperature inside the oven is higher than
the suggested value for the selected mode, the text
“OVEN TOO HOT” appears on the display and it will
not be possible to begin cooking; wait for the oven to
cool.
The icon representing the selected mode and the
icon representing the recommended shelf position
appear on the display alternately.
! When the cooking stage has been reached, the
oven buzzer sounds.
! Do not open the oven door as this will disrupt the
cooking time and temperature.
BREAD mode
Use this function to bake bread. To obtain the best
results, we recommend that you carefully observe
the instructions below:
• Follow the recipe.
• Do not exceed the maximum weight of the
9
Page 10
GB
dripping pan.
• Remember to pour 50g (0,5 dl) of cold water
into the baking tray in position 5.
• The dough must be left to rise at room temperature
for 1 – 1 ½ hours (depending on the room
temperature) or until the dough has doubled in size.
Recipe for BREAD:
1 dripping pan holding 1000 g max, lower level
2 dripping pans each holding 1000 g max, medium
and lower levels
Recipe for 1000 g of dough: 600 g flour, 360 g water, 11g
salt, 25 g fresh yeast (or 2 sachets of powder yeast)
Method:
• Mix the flour and salt in a large bowl.
• Dilute the yeast in lukewarm water (approximately
35 degrees).
• Make a small well in the mound of flour.
• Pour in the water and yeast mixture.
• Knead the dough by stretching and folding it over
itself with the palm of your hand for 10 minutes until
it has a uniform consistency and is not too sticky.
• Form the dough into a ball shape, place it in a large
bowl and cover it with transparent plastic wrap to
prevent the surface of the dough from drying out.
Select the manual PROVING function on the oven.
Place the bowl inside and leave the dough to rise for
approximately 1 hour (the dough should double in
volume).
• Cut the dough into equal sized loaves.
• Place them in the dripping pan, on a sheet of
baking paper.
• Dust the loaves with flour.
• Make incisions on the loaves.
• Place the food inside the oven while it is still cold.
• Start the
• Once baked, leave the loaves on one of the grill
racks until they have cooled completely.
BREAD cooking mode.
CHICKEN mode
This function is ideal for cooking chicken (whole or in
pieces). Place the food inside the oven while it is still
cold. The dish may also be placed in a preheated oven.
FISH FILLET mode
This function is ideal for cooking small-medium fillets.
Place the food inside the oven while it is still cold.
FISH EN PAPILLOTE mode
Use this function to cook whole fish with a maximum
weight of 1 kg. The paper/foil package can be
placed directly on the dripping pan. Place the food
inside the oven while it is still cold.
TARTS mode
This function is ideal for all tart recipes (which
normally need to be heated well from underneath).
Place the food inside the oven while it is still cold.
The dish may also be placed in a preheated oven.
SHORTCRUST TARTS mode
This function is ideal for all recipes which require
shortcrust pastry (usually made without eggs) or
have a liquid or very soft filling. Place the food
inside the oven while it is still cold. The dish may
also be placed in a preheated oven.
BRIOCHE mode
This function is ideal for baked desserts (made
using natural yeast). Place the food inside the oven
while it is still cold; the dish may also be placed in a
preheated oven if desired.
CAKE mode
This function is ideal for all recipes made using baking
powder. Place the food inside the oven while it is still
cold. The dish may also be placed in a preheated oven.
BEEF/VEAL/LAMB mode
Use this function to cook beef, veal and lamb. Place the
food inside the oven while it is still cold. The dish may also
be placed in a preheated oven. Some of the ROAST modes
offer the option of selecting the desired cooking level:
1. Press the
2. Use the control dial to select “WELL DONE”,
“MEDIUM” or “RARE”.
3. Press
PORK mode
Use this function to cook pork. Place the food inside
the oven while it is still cold. The dish may also be
placed in a preheated oven.
10
icon.
again.
DESSERTS mode
This function is ideal for cooking desserts which are
made using natural yeast, baking powder and
desserts which contain no yeast. Place the dish in
the oven while it is still cold. The dish may also be
placed in a preheated oven.
PAELLA mode
This function was designed for quick and easy
paella preparation; all ingredients are placed inside
the oven while it is still cold. To obtain the best
results, we recommend that you carefully observe
the instructions below:
• The rice used must not be sticky: salad rice or
American long-grain rice are particularly suitable.
• The oven must not be preheated.
Page 11

• Position:
- the deep dripping pan on shelf level 1 (if
supplied as an accessory), or place the rack on
shelf level 1 and stand a dish measuring
approximately 35x30cm (height 5 cm) on it;
- the dripping pan on shelf level 3;
- the rack on shelf level 5;.
Recipe (serves 8):
In the deep dripping pan
• 1 onion, chopped
• 500 g rice
• 500 g frozen mixed seafood (shelled prawns,
mussels and clams, squid rings, etc.)
• 2 handfuls frozen peas
• ¼ chilli, diced
• Chorizo (spiced paprika sausage), sliced
• One tbsp fish stock powder
• 1 measure powdered saffron
• 700 g water
Cover the dripping pan with aluminium foil.
In the dripping pan
• 8 cod fillet portions
• 8 (or 16) king prawns (or scampi)
• 8 whole mussels, to garnish
Cover the dripping pan with aluminium foil.
On a tray standing on the rack
• 6-8 chicken thighs, marinated using paella spices
and a drizzle of olive oil
Once the cooking process is complete, finish with
more olive oil.
PILAU RICE mode
Use this function to cook rice. To obtain the best
results, we recommend that you observe the
instructions below:
• The rice used must not be sticky: salad rice or
American long-grain rice are particularly suitable.
• The oven must not be preheated.
• The deep dripping pan should be on shelf level 2
(if supplied as an accessory), or the rack placed
on shelf level 2 and a dish measuring
approximately 35x30cm (height 5 cm) stood on it.
Recipe (serves 4 - 6):
• 500 g rice
• 700 ml water or stock
Place the rice in the deep dripping pan without
soaking and cover with liquid. Cover the dripping
pan with the aluminium foil.
YOGHURT mode
The circular heating element will come on and the fan
will operate during the preheating stage only. The
temperature of 50°C is ideal for preparing yoghurt.
Basic recipe for one litre of yoghurt: one litre of
whole UHT milk, one pot of natural yoghurt
Method:
• Heat the milk in a steel pan until it reaches boiling
point.
• Remove the layer of cream on the surface and
leave to cool.
• Stir 3 or 4 tablespoons of milk into the yoghurt
and combine well.
• Add the mixture to the remaining milk and mix
thoroughly.
• Pour into airtight jars.
• Stand the jars on the dripping pan and place in
the oven, on level 2.
• At the end of this process, place the jars in the
refrigerator to chill for at least 12 hours. Store the
yoghurt in the refrigerator for up to one week.
• The recipe can be adjusted to taste.
GB
11
Page 12
GB
Programming cooking
! A cooking mode must be selected before
programming can take place.
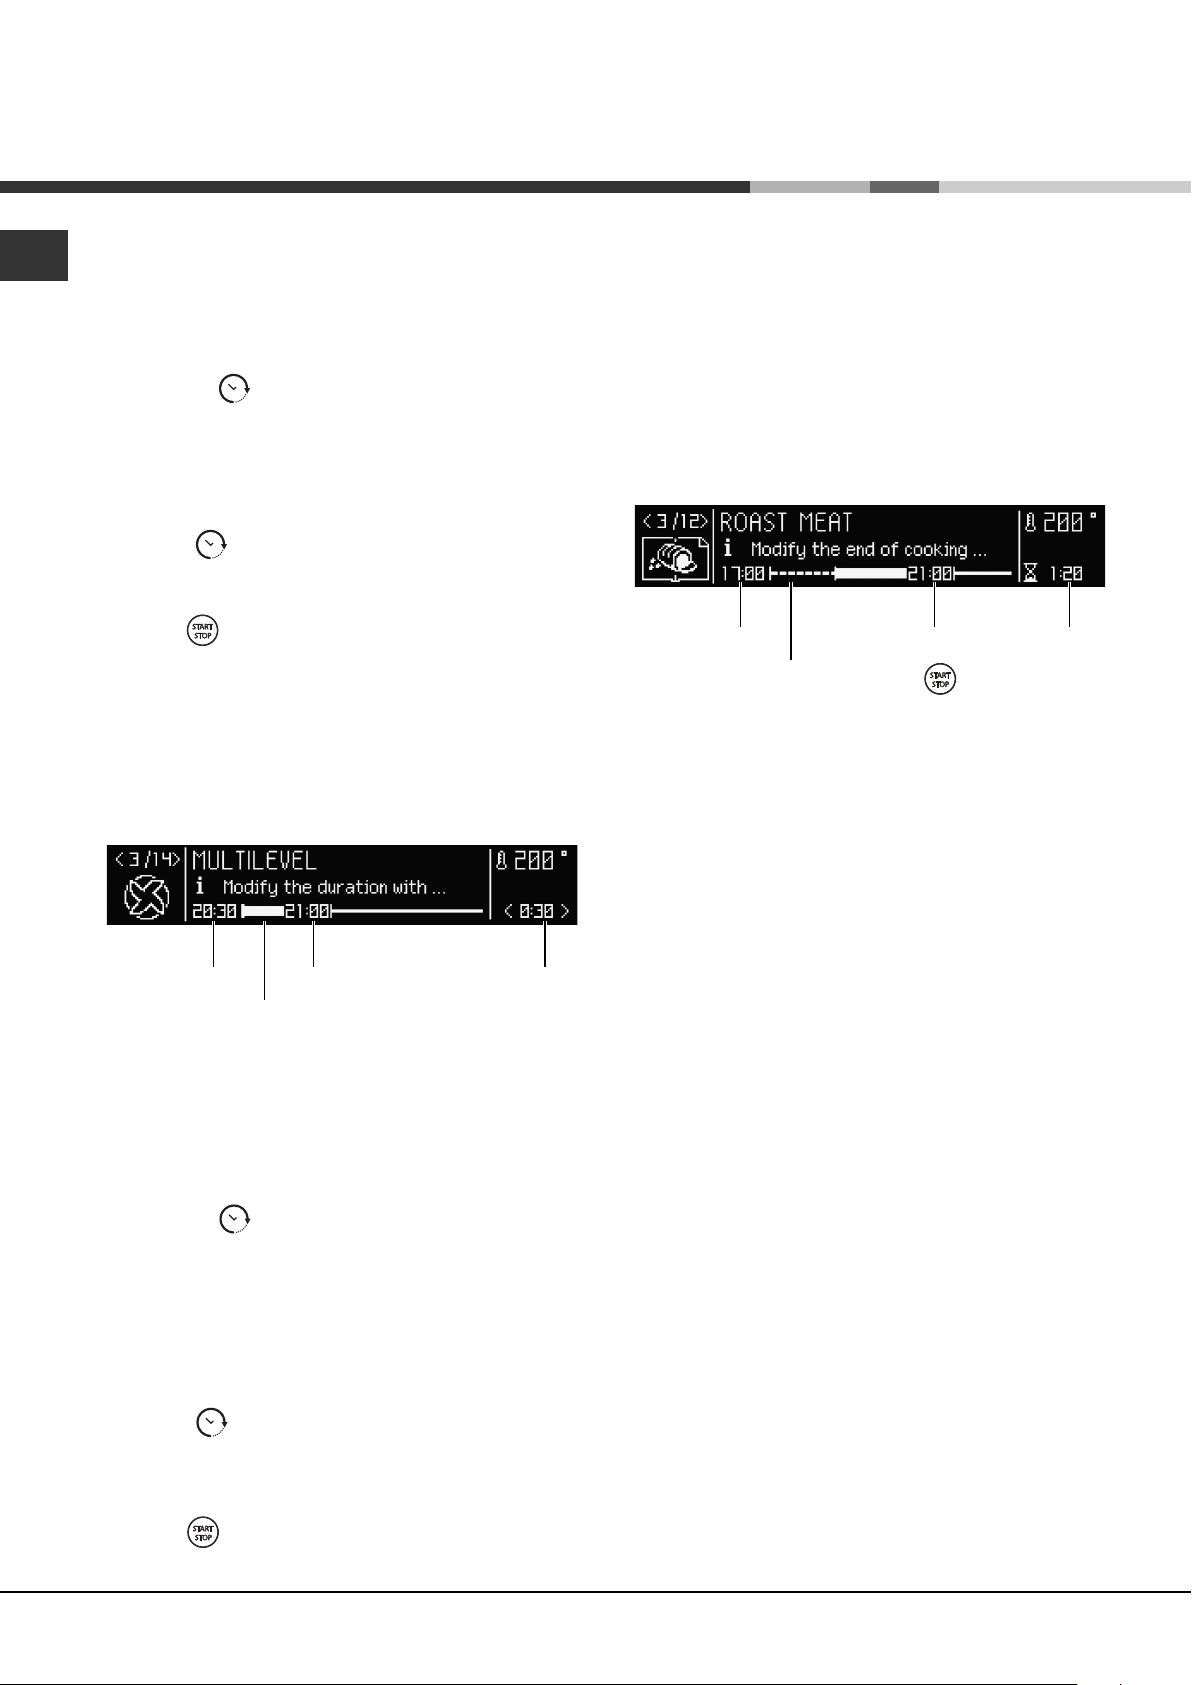
Programming the duration
1. Press the
2. Turn the control dial to set the duration; hold the dial in
this position to scroll through the numbers more quickly
and make the setting process easier. The display will
show a graphic indicating the duration in bar format.
3. Once you have reached the desired duration,
icon.
5. The text “POSTPONED COOKING START” and the
time remaining will appear on the display, moving
the delayed start bar backwards.
6. Once cooking has begun, the display will indicate
the remaining time by filling the duration bar.
7. When the time has elapsed, “COOKING FINISHED”
appears on the display and a buzzer sounds.
• For example: it is 9:00 a.m. and a time of 1 hour
and 15 minutes is programmed, while the end
time is set to 12:30. The programme will start
automatically at 11:15 a.m.
press the
icon again. The duration bar will show
the current time, the duration and the end of cooking
time as a graphic.
4. Press
to begin cooking.
5. The display will indicate the remaining time by
filling the duration bar.
6. When cooking has finished, “COOKING FINISHED”
appears on the display and a buzzer sounds.
• For example: it is 9:00 a.m. and a duration of 1
hour and 15 minutes is programmed. The
programme will stop automatically at 10:15 a.m.
Current time
indicator
Duration
bar
End
of cooking time
Cooking
duration
Programming delayed cooking
! A cooking duration must be set before the end of
cooking time can be scheduled.
! For the delayed programming to work properly, the
clock should be set to the correct time.
1. Follow steps 1 to 3 to set the duration as detailed
above.
2. Press the
icon twice; the end of cooking time
will begin to flash.
3. Turn the control dial to adjust the end of cooking
time; hold the dial in this position to scroll through
the numbers more quickly and make the setting
process easier. The display will show a graphic
indicating the delayed start in bar format.
4. Once you have reached the desired end time,
press the
icon again. The delayed start bar will
show the current time, the time remaining until the
start of cooking, the duration and the end of cooking
time as a graphic.
Current time
indicator
To cancel a schedule, press the
End of cooking
Delayed
start bar
time
Cooking
duration
icon.
Practical cooking advice
! Do not place racks in position 1 and 5 during fanassisted cooking. This is because excessive direct
heat can burn temperature sensitive foods.
! In the GRILL and FAN GRILLING cooking modes,
particularly when using the rotisserie spit, place the
dripping pan in position 1 to collect cooking
residues (fat and/or grease).
MULTILEVEL
• Use positions 2 and 4, placing the food which
requires more heat on 2.
• Place the dripping pan on the bottom and the rack
on top.
GRILL
• Place the rack in position 3 or 4. Position the food
in the centre of the rack.
• We recommend that the temperature is set to its
maximum level. The top heating element is
regulated by a thermostat and may not always
operate constantly.
PIZZA
• Use a lightweight aluminium pizza pan. Place it on
the rack provided.
For a crispy crust, do not use the dripping pan as
this extends the total cooking duration and
prevents the crust from forming.
• If the pizza has a lot of toppings, we recommend
adding the mozzarella cheese to the top of the
pizza halfway through the cooking process.
4. Press
12
to begin the pyrolysis schedule.
Page 13
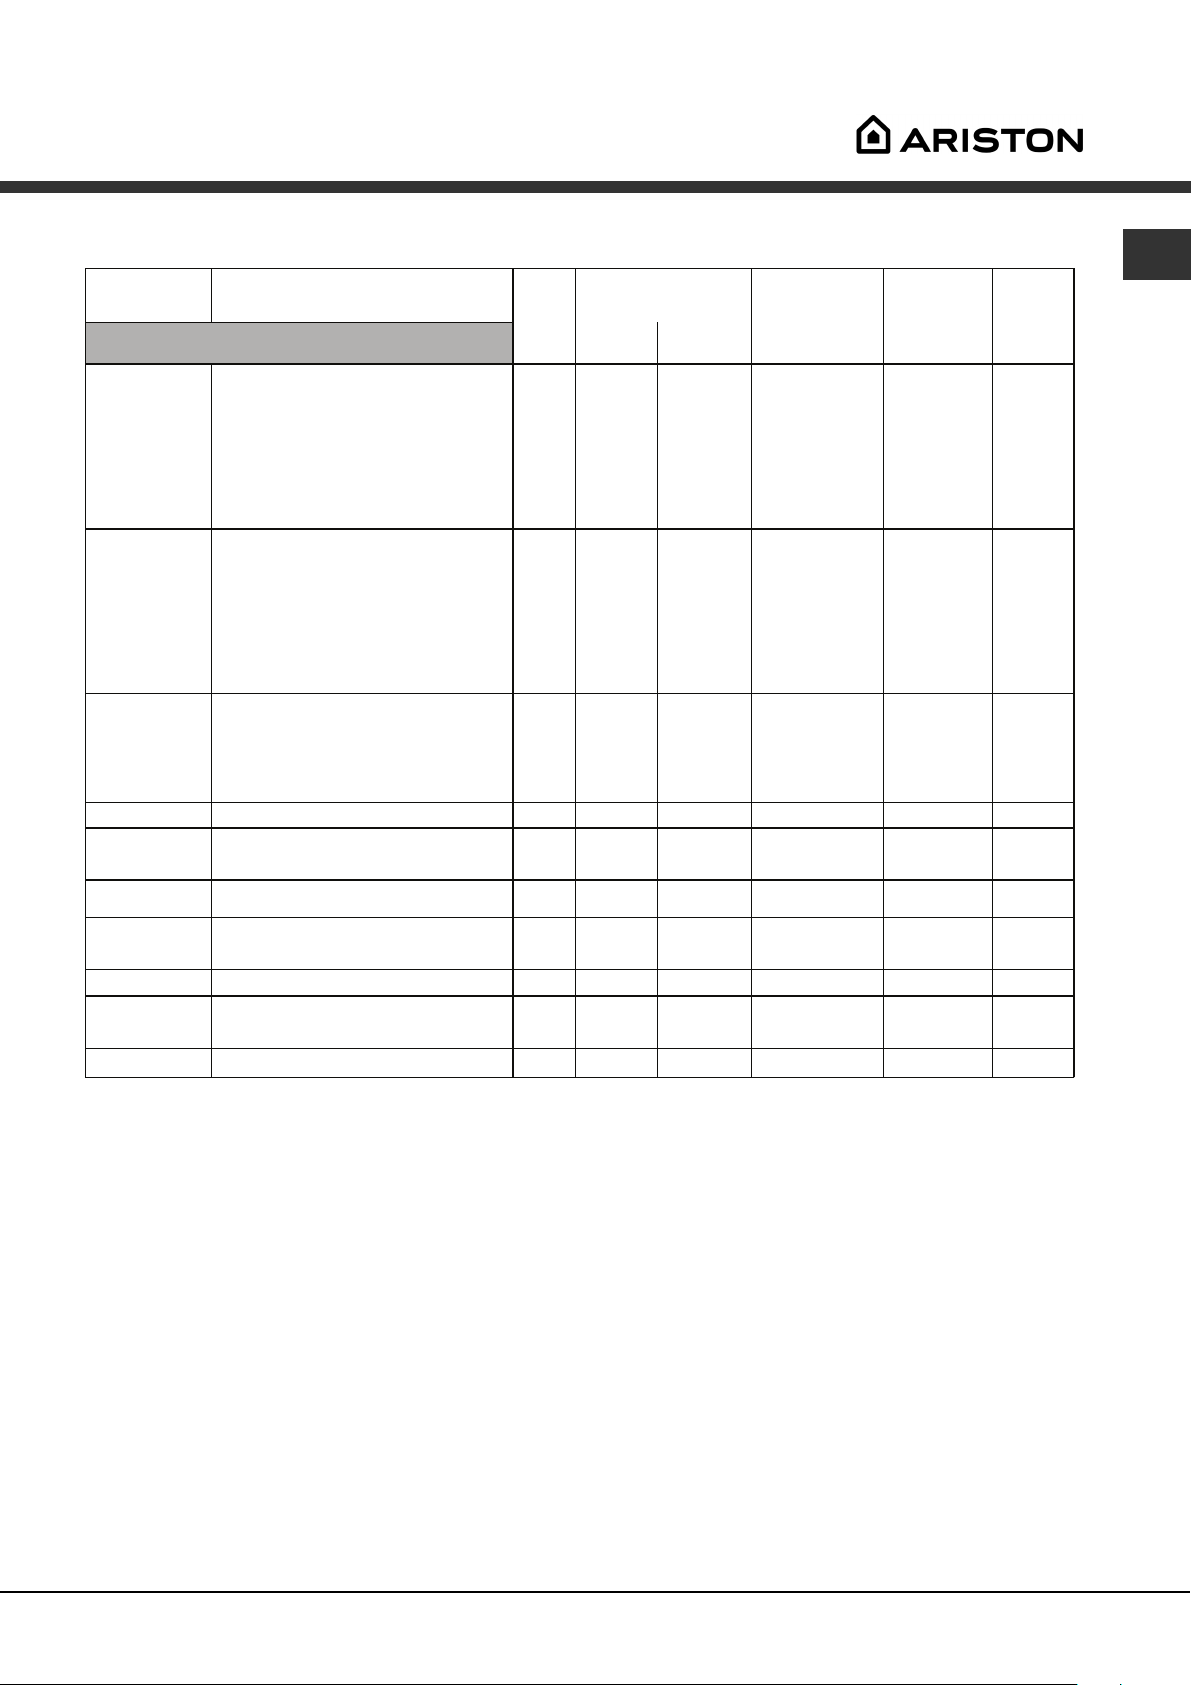
Cooking advice table
g
Modes Foods Weight
Manual
Multilevel*
Grill*
Fan grilling*
Roast*
Fish*
Pizza*
Proving*
Pizza on 2 racks
Pies on two racks/cakes on 2 racks
Sponge cake on 2 racks (on the dripping pan)
Roast chicken + potatoes
Lamb
Mackerel
Lasagne
Cream puffs on 3 racks
Biscuits on 3 racks
Cheese puffs on 2 racks
Savoury pies
Mackerel
Sole and cuttlefish
Squid and prawn kebabs
Cod fillet
Grilled vegetables
Veal steak
Sausages
Hamburgers
Toasted sandwiches (or toast)
Spit-roast chicken using rotisserie spit (where present)
Spit-roast lamb using rotisserie spit (where present)
Grilled chicken
Cuttlefish
Spit-roast chicken using rotisserie spit (where present)
Spit-roast duck using rotisserie spit (where present)
Roast veal or beef
Roast pork
Lamb
Roasts (white or red meat) 1 2 2 no 200 50-75
Bream
Fish fillets
Sea bass with potatoes
Pizza
Focaccia bread
Rising process for dough made with yeast
(brioches, bread, sugar pie, croissants, etc.).
(in kg)
1+1
1
1
1
1
0,7
0,7
0,7
0,5
0,8
0,7
n° 4 or 5
n° 4 or 6
1
1
1,5
1
1,5
1,5
1
1
1
0,7
1
0,5 + 0,5
0,5
0,5
Rack position Preheating Recommended
Temperature
Standard
guide rails
2 and 4
2 and 4
2 and 4
1 and 2/3
2
1 or 2
2
1 and 3 and 5
1 and 3 and 5
2 and 4
1 and 3
4
4
4
4
3 or 4
4
4
4
4
-
-
2
2
-
2
2
2
2
2
2
2
2
2 2 no 40
Sliding
guide rails
1 and 3
1 and 3
1 and 3
1 and 3
1
1
1
1 and 2 and 4
1 and 2 and 4
1 and 3
1 and 3
3
3
3
3
2 or 3
3
3
3
3
-
-
2
2
-
2
2
2
2
2
2
1
1
yes
yes
yes
yes
yes
yes
yes
yes
yes
yes
yes
no
no
no
no
no
no
no
no
no
no
no
no
no
no
no
no
no
no
yes
yes
yes
yes
yes
(°C)
210-220
180
160-170
200-210
190-200
180
180-190
190
180
210
190-200
300
300
300
300
300
300
300
300
300
300
300
210
200
210
210
210
210
210
180
170
190
210-220
190-200
Cooking
duration
(minutes)
20-25
30-35
20-25
65-75
45-50
30-35
35-40
20-25
10-20
20-25
20-30
10-20
10-15
10-15
10-15
15-20
10-20
10-20
10-12
3-5
70-80
70-80
55-60
30-35
70-80
60-70
60-75
70-80
40-45
20-25
12-15
60
15-20
20-25
GB
Pasteurisation*
Slow cook*
Defrosting*
Fruit, vegetables, etc. 2 2 yes 110
Meat
Fish
Vegetables
All frozen foods
2
2
2
1
1
1
no
no
no
75
85
110
90-180
90-180
90-180
* The cooking times listed above are intended as guidelines only and may be modified according to personal tastes. Oven preheating times are set as
standard and may not be modified manually.
! ECO programme: This programme – which has longer cooking times but guarantees sensible energy saving – is recommended for dishes such as fish fillets,
small pastries and ve
etables. It is also suitable for warming foodstuffs and for completing cooking.
13
Page 14
GB
Modes Foods Weight
(in kg)
Rack position Preheating
Bread**
Beef
Veal
Lamb
Pork
Chicken
Fish fillet
Fish en
papillote
Tarts
Shortcrust tarts
Brioche
Cake
Desserts
Paella
Pilau rice
Yoghurt
Automatic*
Bread (see recipe)
Roast beef
Roast veal
Leg of lamb
Roast pork
Roast chicken
Cod
Perch
Trout
Bream
Sea bass
Tarts
Apple flan
Desserts made with natural yeast (brioches, almond
cake, etc.)
Desserts made with baking powder
(marbled biscuits, pound cake, etc.)
Desserts
Paella (see recipe)
Pilau rice (see recipe)
Yoghurt 2 2 yes
1,2-1,5
0,4-0,5
0,4-0,5
0,4-0,5
0,4-0,5
0,4-0,5
Standard
guide rails
1 2 or 3 2 no
1-1,5
1-1,5
1-1,5
1-1,5 2 or 3 2 no
0,5 2 or 3 2 no
0,5 2 or 3 2 no
0,7 2 or 3 2 no
0,7 2 or 3 2 no
1 2 or 3 2 no
0,5 2 1 no
2 or 3 2 no
2 or 3 2 no
2 or 3 2 no
2 or 3 2 no
2 or 3
2 or 3
2 or 3
2 or 3
2 or 3
1-3-5 1-2-4 no
Sliding
guide rails
2
2
2
2
2
no
no
no
no
no
* The duration of the automatic cooking functions are set by default. The values can be modified by the user, starting with the default duration.
** As stated in the recipe, pour 50 g (0,5 dl) water into the dripping pan in position 5.
14
Page 15

Precautions and tips
! This appliance has been designed and
manufactured in compliance with international safety
standards. The following warnings are provided for
safety reasons and must be read carefully.
General safety
• The appliance was designed for domestic use
inside the home and is not intended for
commercial or industrial use.
• The appliance must not be installed outdoors, even
in covered areas. It is extremely dangerous to
leave the appliance exposed to rain and storms.
• When moving or positioning the appliance, always
use the handles provided on the sides of the oven.
• Do not touch the appliance while barefoot or with
wet or damp hands and feet.
• The appliance must be used by adults only
for the preparation of food, in accordance
with the instructions provided in this
booklet. Any other use of the appliance (e.g.
for heating the room) constitutes improper
use and is dangerous. The manufacturer
may not be held responsible for any damage
caused as a result of improper, incorrect
and unreasonable use of the appliance.
• Do not touch the heating elements or certain
parts of the oven door when the appliance is
in use; these parts become extremely hot.
Keep children well away from the appliance.
• Make sure that the power supply cables of other
electrical appliances do not come into contact
with the hot parts of the oven.
• The ventilation and heat dispersal openings must
never be obstructed.
• Always grip the oven door handle in the centre:
the ends may be hot.
• Always use oven gloves when placing cookware
in the oven or when removing it.
• Do not use aluminium foil to line the bottom of the
oven.
• Do not place flammable materials in the oven: if
the appliance is switched on accidentally, the
materials could catch fire.
• When unplugging the appliance, always pull the plug
from the mains socket; do not pull on the cable.
• Do not perform any cleaning or maintenance work
without having disconnected the appliance from
the electricity mains.
• If the event of malfunctions, under no circumstances
should you attempt to perform the repairs yourself.
Contact an authorised Service Centre (see
Assistance).
• Do not rest objects on the open oven door.
• Do not let children play with the appliance.
• The appliance should not be operated by people
(including children) with reduced physical,
sensory or mental capacities, by inexperienced
individuals or by anyone who is not familiar with
the product. These individuals should, at the very
least, be supervised by someone who assumes
responsibility for their safety or receive
preliminary instructions relating to the operation of
the appliance.
Disposal
• When disposing of packaging material: observe
local legislation so that the packaging may be
reused.
• The European Directive 2002/96/EC relating to
Waste Electrical and Electronic Equipment
(WEEE) states that household appliances should
not be disposed of using the normal solid urban
waste cycle. Exhausted appliances should be
collected separately in order to optimise the cost
of re-using and recycling the materials inside the
machine, while preventing potential damage to
the atmosphere and to public health. The
crossed-out dustbin is marked on all products to
remind the owner of their obligations regarding
separated waste collection.
For further information relating to the correct
disposal of exhausted household appliances,
owners may contact the relevant public service or
their local dealer.
Respecting and conserving the
environment
• You can help to reduce the peak load of the
electricity supply network companies by using the
oven in the hours between late afternoon and the
early hours of the morning. The cooking mode
programming options, the “delayed cooking”
mode (see Cooking modes) and “delayed
automatic cleaning” mode (see Care and
Maintenance) in particular, enable the user to
organise their time efficiently.
• Always keep the oven door closed when using the
GRILL and FAN GRILLING modes: this will
achieve improved results while saving energy
(approximately 10%).
• Check the door seals regularly and wipe them
clean to ensure they are free of debris so that
they adhere properly to the door, thus avoiding
the dispersal of heat.
! This product complies with the requirements of the
latest European Directive on the limitation of power
consumption in standby mode.
GB
15
Page 16
Care and maintenance
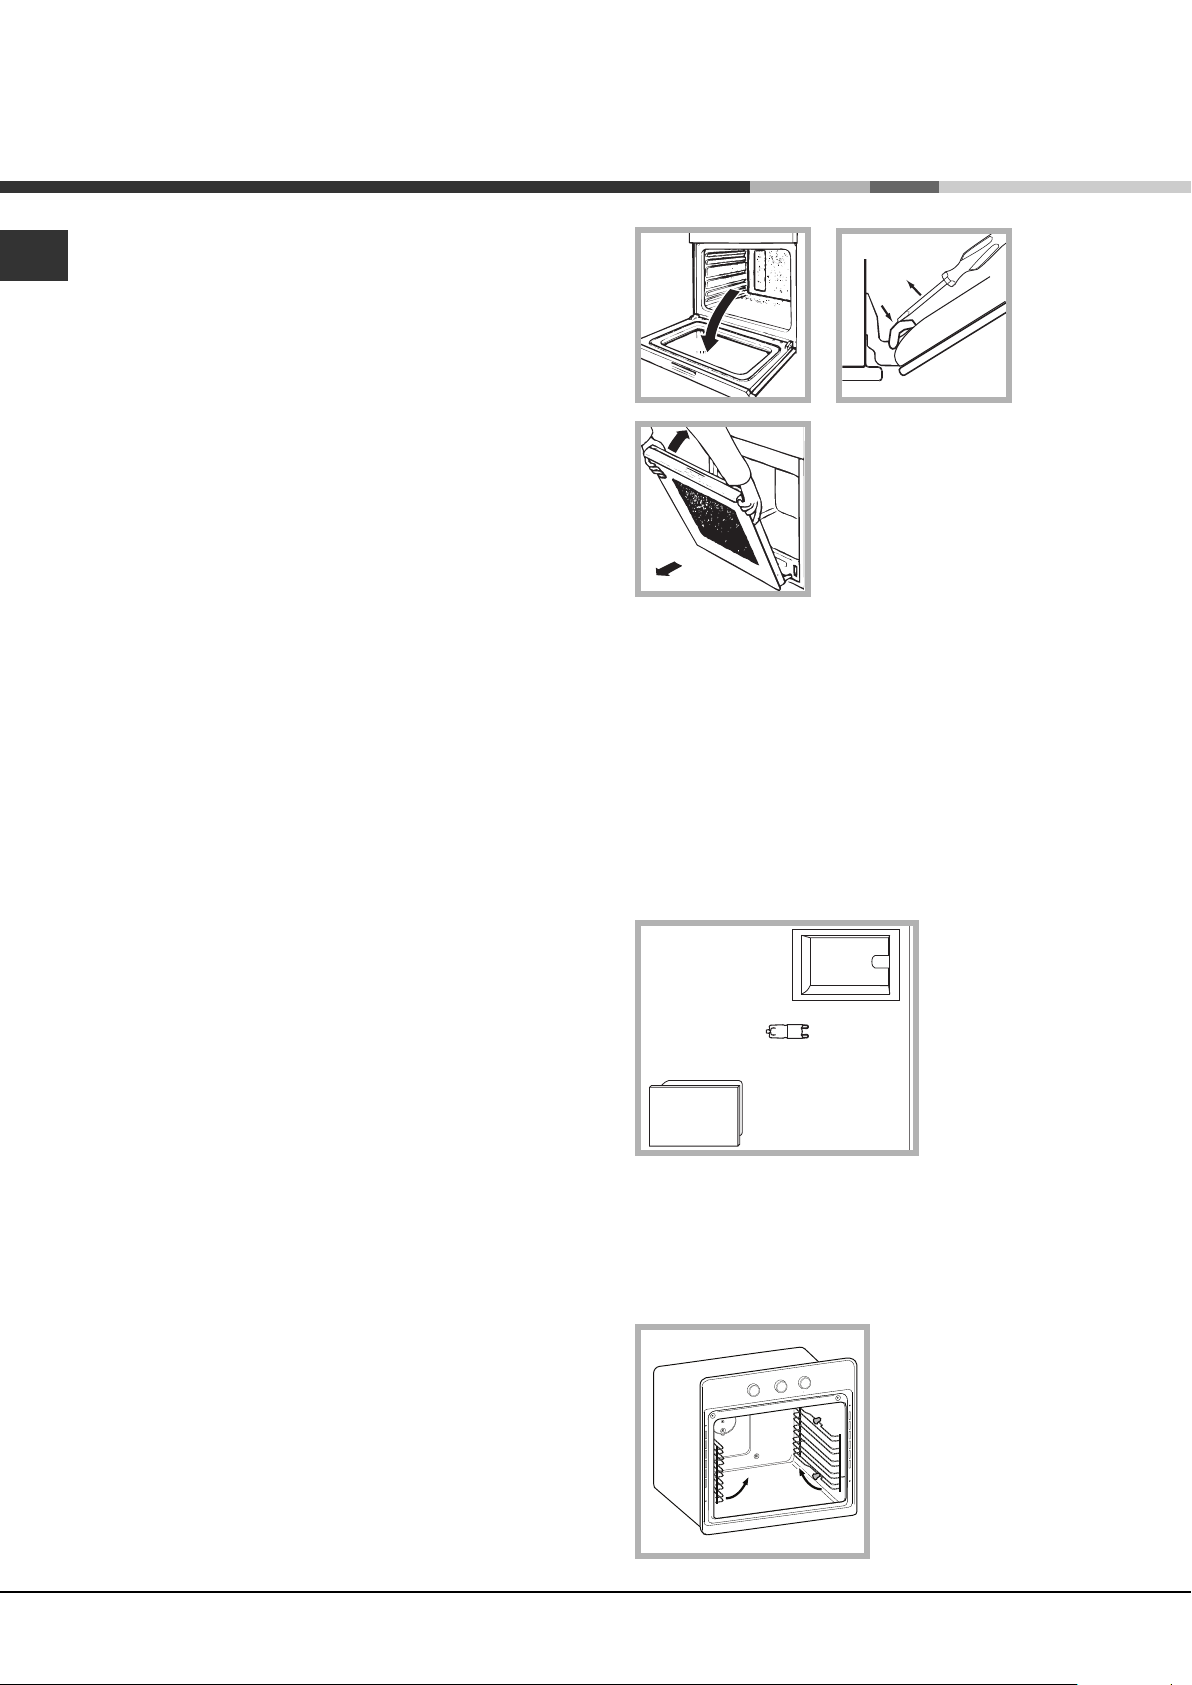
Glass cover
Lamp
Lamp Holder
compartment
F
GB
Switching the appliance off
Disconnect your appliance from the electricity
supply before carrying out any work on it.
Cleaning the appliance
• Slight differences in colour on the front of the oven
are due to the different materials used, i.e. glass,
plastic or metal.
• Any shady areas resembling grooves on the oven
door glass are caused by reflections from the
oven light.
• The enamel is branded at very high temperatures.
This process may cause colour variations. This is
normal and will not affect appliance operation in
any way. The thin edges of the sheet metal
cannot be entirely enamelled and may therefore
appear to be unfinished. This will not affect the
rust protection.
• The stainless steel or enamel-coated external
parts and the rubber seals may be cleaned using
a sponge that has been soaked in lukewarm water
and neutral soap. Use specialised products for
the removal of stubborn stains. After cleaning,
rinse and dry thoroughly. Do not use abrasive
powders or corrosive substances.
• The inside of the oven should ideally be cleaned
after each use, while it is still lukewarm. Use hot
water and detergent, then rinse well and dry with
a soft cloth. Do not use abrasive products.
• All accessories - with the exception of the sliding
racks - can be washed like everyday crockery,
and are even dishwasher safe.
• We recommend that detergents are not sprayed
directly onto the control panel, but that a sponge
is used instead.
! Never use steam cleaners or pressure cleaners on
the appliance.
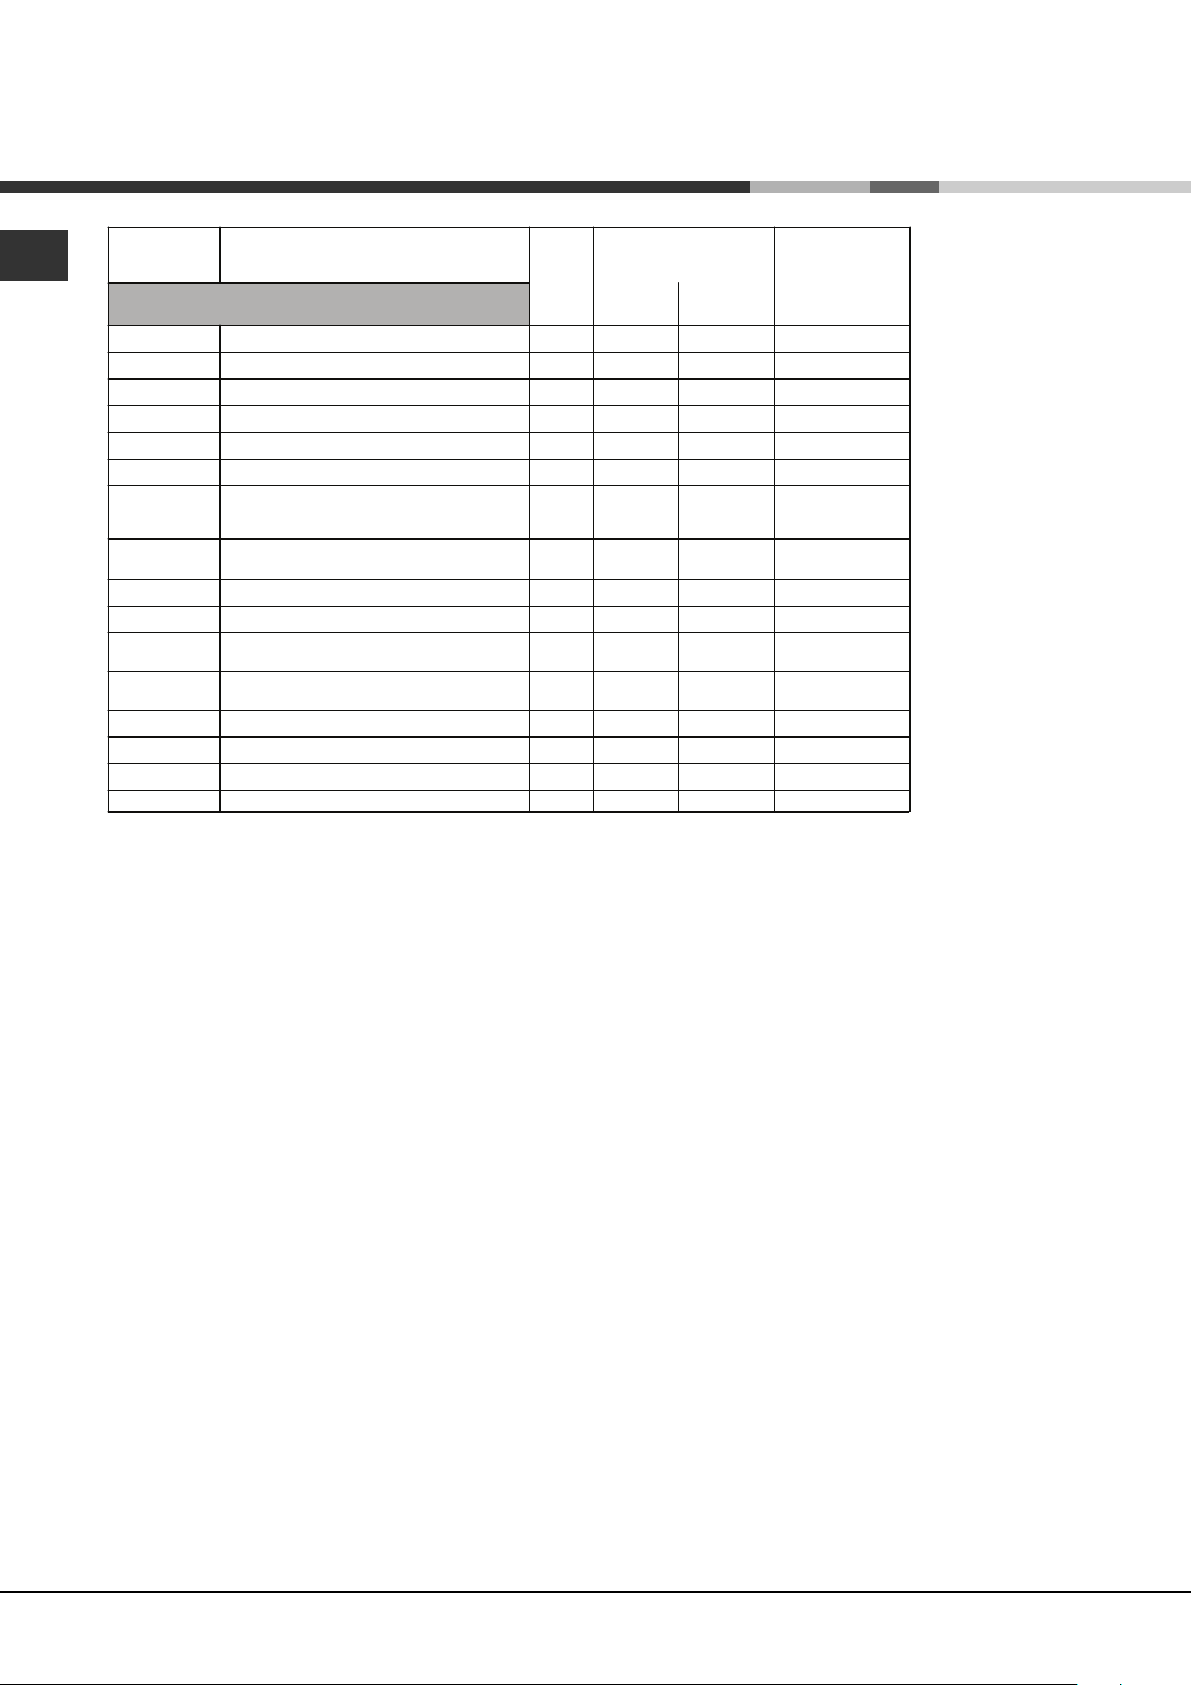
3. Grip the door on the two
outer sides and close it
approximately half way. Pull
the door towards you, lifting it
out of its slot (see diagram).
To replace the door, reverse
this sequence.
Inspecting the seals
Check the door seals around the oven regularly. If
the seals are damaged, please contact your nearest
Service Centre (see Assistance). We recommend
that the oven is not used until the seals have been
replaced.
Replacing the light bulb
To replace the oven light bulb:
1. Remove the glass cover of the lamp-holder.
2. Remove the
light bulb and
replace it with a
similar one:
halogen lamp
voltage 230 V,
wattage 25 W,
cap G 9.
3. Replace the
glass cover (see
diagram).
Cleaning the oven door
! The door of LED INSIDE models cannot be
removed.
! Do not touch the light bulb directly with your
hands.
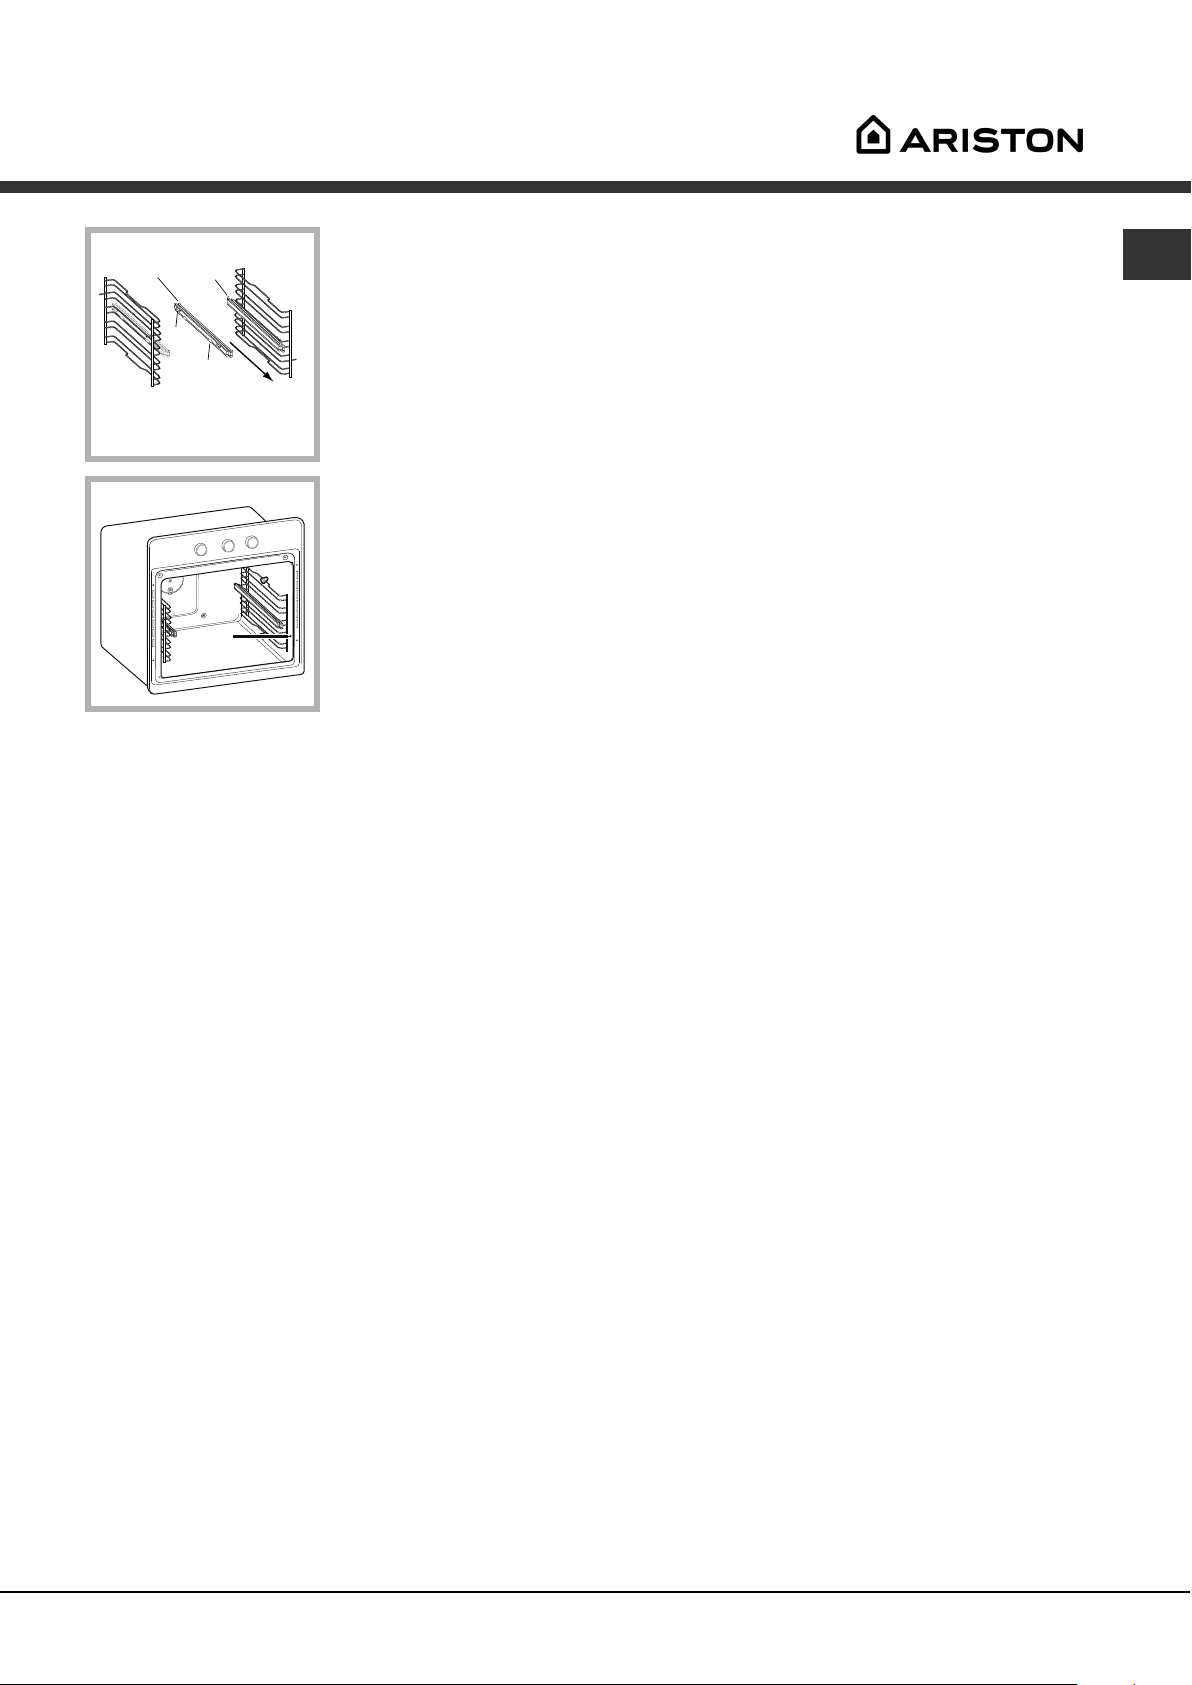
Sliding rack kit assembly
Clean the glass part of the oven door using a
sponge and a non-abrasive cleaning product, then
dry thoroughly with a soft cloth. Do not use rough
abrasive material or sharp metal scrapers as these
could scratch the surface and cause the glass to
crack.
For more thorough cleaning purposes, the oven door
may be removed:
1. Open the oven door fully (see diagram).
2. Use a screwdriver to lift up and turn the small
levers F located on the two hinges (see diagram).
16
A
To assemble the
sliding racks:
1. Remove the two
frames, lifting them
away from the spacers
A (see figure).
Page 17
Left
guide rail
Right guide
rail
2. Choose which shelf
to use with the sliding
rack. Paying attention
to the direction in which
B
Direction
C
of extraction
the sliding rack is to be
extracted, position joint
B and then joint C on
the frame.
3. Secure the two frames
with the guide rails using
the holes provided on
the oven walls (see
diagram). The holes for
the left frame are
D
situated at the top, while
the holes for the right
frame are at the bottom.
4. Finally, fit the frames
on the spacers A.
! Do not place the sliding racks in position 5.
Side and rear catalytic liners*
GB
These are panels coated with a special enamel,
which is able to absorb the fat released by food as it
cooks.
This enamel is quite strong, so that the various
accessories (racks, dripping pans, etc.) can slide
along them without damaging them. White marks
may appear on the surfaces; these are not a cause
for concern.
Nevertheless, the following should be avoided:
- scraping the enamel with sharp objects (a knife, for
example);
- using detergents or abrasive materials.
Only available in certain models.
*
17
Page 18

Troubleshooting
play
GB
Problem Possible cause Solution
A programmed cooking mode
does not start.
The display shows ECO Mode.
An automatic mode has been
selected. “Hot” appears on the
dis
Fan-assisted cooking has been
selected and the food looks
burnt.
and cooking does not start.
There has been a blackout. Reprogram the cooking mode.
The appliance is in standby
mode.
The temperature inside the oven
is higher than the suggested
value for the selected mode.
Positions 1 and 5: the direct
heat could cause
temperature-sensitive
foods to burn.
Press any button to exit standby
mode.
Wait for the oven to cool down.
We recommend switching
dripping pan positions halfway
through cooking.
18
Page 19

Assistance
Warning:
The appliance is fitted with an automatic diagnostic system which detects any malfunctions. Malfunctions are
signalled through messages of the following type: “F—” followed by numbers.
Call for technical assistance in the event of a malfunction.
Before calling for Assistance:
• Check whether you can fix the problem yourself.
• Restart the programme to check whether the malfunction has disappeared.
• If it has not, contact the Authorised Technical Assistance Service.
! Never use the services of an unauthorised technician.
Please have the following information to hand:
• The type of problem encountered.
• The message displayed.
• The appliance model (Mod.).
• The serial number (S/N).
The latter two pieces of information can be found on the data plate located on the appliance.
GB
19
Page 20

Mode d’emploi
FOUR
FR
FK 1041L X
FK 1041L
FRGB ES
Français, 20 Espanol, 39English,1
Sommaire
Installation, 21-22
Positionnement
Raccordement électrique
Plaque signalétique
Description de l’appareil, 23
Vue d’ensemble
Tableau de bord
Afficheur en mode programmation
Afficheur en mode cuisson
Mise en marche et utilisation, 24-26
Première mise en service
Paramètres du menu sélections
Verrouillage commandes
Réglage de l’horloge
Réglage du minuteur
Mise en marche du four
Mode DEMO
Rétablissement des réglages d’usine
Standby
Programmes, 27-33
Programmes de cuisson manuels
Programmes de cuisson automatiques
Programmation de la cuisson
Conseils de cuisson
Tableau de cuisson
Précautions et conseils, 34
Sécurité générale
Mise au rebut
Economies et respect de l’environnement
Nettoyage et entretien, 35-36
Mise hors tension
Nettoyage de l’appareil
Nettoyage de la porte
Remplacement de l’ampoule d’éclairage
Montage du Kit glissières coulissantes
Anomalies et remèdes, 37
Assistance, 38
20
Page 21

560 mm.
45 mm.
Installation
! Important : conserver ce mode d’emploi pour
pouvoir le consulter à tout moment. En cas de vente,
de cession ou de déménagement, veiller à ce qu’il
suive l’appareil pour informer le nouveau propriétaire
sur son fonctionnement et lui fournir les conseils
correspondants.
! Lire attentivement les instructions : elles
contiennent des conseils importants sur l’installation,
l’utilisation et la sécurité de l’appareil.
Positionnement
! Les emballages ne sont pas des jouets pour
enfants, il faut les mettre au rebut en respectant la
réglementation sur le tri sélectif des déchets (voir
Précautions et conseils).
! L’installation doit être effectuée par un
professionnel du secteur conformément aux
instructions du fabricant. Une mauvaise installation
peut causer des dommages à des personnes, des
animaux ou des biens.
* Uniquement pour modèles inox
! Après encastrement de l’appareil, il ne doit plus y
avoir possibilité de contact avec les parties
électrifiées.
Les déclarations de consommation indiquées sur
l’étiquette des caractéristiques ont été mesurées
pour ce type d’installation.
Aération
Pour garantir une bonne aération, la cavité
d’encastrement doit être dépourvue de paroi arrière.
Il est conseillé d’installer le four de manière à ce
qu’il repose sur deux cales en bois ou bien sur un
plan continu qui ait une découpe d’au moins 45 x
560 mm (voir figures).
FR
Encastrement
Pour garantir le bon fonctionnement de l’appareil il
faut que le meuble possède des caractéristiques bien
précises :
• les panneaux adjacents doivent être fabriqués
dans un matériau résistant à la chaleur ;
• dans le cas notamment de meubles plaqués bois,
il faut que les colles résistent à une température
de 100°C ;
• la cavité du meuble pour encastrement du four,
tant sous plan (voir figure) qu’en colonne , doit
avoir les dimensions suivantes :
550 mm.
min.
20 mm.
590 mm.
45 mm.
560 mm.
575-585 mm.
570 mm.
Centrage et fixation
Pour fixer l’appareil au meuble :
• ouvrir la porte du four;
• Retirer les 2 caoutchouc qui couvrent les trous de
fixation situés sur le cadre;
• Fixer le four au meuble en utilisant 2 vis à bois
• Repositionner les caoutchouc couvre-trous.
! Toutes les parties qui servent de protection doivent
être fixées de manière à ne pouvoir être enlevées
qu’avec l’aide d’un outil.
595 mm.
550 mm.
20,5 mm.
22,5 mm.*
21
Page 22

FR
Raccordement électrique
! Les fours munis d’un câble d’alimentation tripolaire
sont prévus pour un fonctionnement au courant
alternatif à la tension et à la fréquence indiquées sur
la plaque signalétique apposée sur l’appareil (voir ci-
dessous).
Montage du câble d’alimentation
1. Pour ouvrir le bornier,
faire pression à l’aide
d’un tournevis sur les
languettes latérales du
couvercle : tirer et ouvrir
le couvercle (voir
figure).
2. Dévisser la vis du
serre-câble et le retirer
en faisant levier à l’aide
d’un tournevis (voir
figure).
3. Retirer les vis des
contacts L-Nfixer les fils sous les
têtes de vis en
respectant les couleurs
Bleu (N) Marron (L)
Jaune-Vert (
puis
).
Avant de procéder au branchement, s’assurer que :
• la prise est bien munie d’une terre conforme à la loi ;
• la prise est bien apte à supporter la puissance
maximale de l’appareil, indiquée sur la plaque
signalétique (voir ci-dessous) ;
• la tension d’alimentation est bien comprise entre
les valeurs indiquées sur la plaque signalétique
(voir ci-dessous) ;
• la prise est bien compatible avec la fiche de
l’appareil. Si ce n’est pas le cas, remplacer la
prise ou la fiche, ne pas utiliser de rallonges ni de
prises multiples.
! Après installation de l’appareil, le câble électrique
et la prise de courant doivent être facilement
accessibles.
! Le câble ne doit être ni plié ni excessivement
écrasé.
! Il doit être contrôlé périodiquement et ne peut être
remplacé que par un technicien agréé (voir
Assistance).
! Nous déclinons toute responsabilité en cas de
non respect des normes énumérées ci-dessus.
PLAQUE SIGNALETIQUE
Dimensions
Volume
largeur 43,5 cm
hauteur 32 cm
profondeur 41,5cm
L. 58
Branchement du câble d’alimentation au secteur
Monter sur le câble une prise normalisée pour la
charge indiquée sur l’étiquette des caractéristiques
(voir ci-contre).
En cas de raccordement direct au réseau, il faut
intercaler entre l’appareil et le réseau un interrupteur
à coupure omnipolaire ayant au moins 3 mm
d’écartement entre les contacts, dimensionné à la
charge et conforme aux normes en vigueur (le fil de
terre ne doit pas être interrompu par l’interrupteur).
Le câble d’alimentation ne doit atteindre, en aucun
point, une température dépassant de 50°C la
température ambiante (par exemple le panneau
arrière du four).
! L’installateur est responsable du bon raccordement
électrique de l’appareil et du respect des normes de
sécurité.
tension 220-240V~ 50/60Hz
Raccordements
électriques
ENERGY
LABEL*
(ETIQUETTE
ENERGIE *)
* Sans glissières télescopiques
(voir plaque signalétique)
puissance maximum absorbée
2800W
Directive 2002/40/CE sur l'étiquette
des fours électriques
Norme EN 50304
Consommation énergie déclaration
Classe convection Forcée –
fonction four: ECO.
Cet appareil est conforme aux
Directives Communautaires
suivantes : 2006/95/CEE du
12.12.06 (Basse Tension) et
modifications successives 2004/108/CEE du 15.12.04
(Compatibilité Électromagnétique)
et modifications successives 93/68/CEE du 22/07/93 et
modifications successives.
- 2002/96/CE et modifications
successives.
- 1275/2008 standby/off mode
22
Page 23

Description de l’appareil
Vue d’ensemble
Support LECHEFRITE
Tableau de bord
Icône
SÉLECTIONS
ALLUMAGE
PANNEAU
Tableau de bord
Support GRILLE
Icône
PROGRAMMES
MANUELS
Afficheur
TEMPÉRATURE
Icône
FR
GLISSIERES de
coulissement
niveau 5
niveau 4
niveau 3
niveau 2
niveau 1
Icône
VERROUILLAGE PORTE /
COMMANDES
DÉPART/
ARRÊT
CONFIRMATION
Icône
SÉLECTIONS
PROGRAMMES
AUTOMATIQUES
Icône
Afficheur en mode programmation
Indication numéro cuisson
Icône de la cuisson sélectionnée/
icône du niveau d’enfournement
préconisé
Indication
HEURE
Afficheur en mode cuisson
Indication du
Menu sélectionné
Indication
Température
Indication état
avancement cuisson
Indique que faire ou ce que
le four est en train de faire
Manette
SÉLECTION
Indication du
Menu sélectionné
Indication
HEURE FIN DE
CUISSON
Indication
HEURE FIN DE CUISSON
Icône
TEMPS
Indique que
faire ou ce que le
four est en train de faire
Indication
Température
Indicateurs de
Préchauffage /
Chaleur résiduelle
Indication
DURÉE DE
CUISSON
Icône
MINUTEUR
Indication
Température
Indication
DURÉE DE
CUISSON
23
Page 24

Mise en marche et
utilisation
FR
! Lors de son premier allumage, faire fonctionner le
four à vide, porte fermée, pendant au moins une
heure en réglant le thermostat sur le maximum. Puis
éteindre le four, ouvrir la porte et aérer la pièce.
L’odeur qui se dégage est due à l’évaporation des
produits utilisés pour protéger le four.
! Il est possible de modifier en tournant la manette
les paramètres affichés entre les symboles « < » et
« > ».
! Pour simplifier les sélections, garder la manette
dans sa position : les chiffres défilent plus
rapidement.
! Toute sélection est automatiquement mémorisée au
bout de 10 secondes.
! Quand on porte les gants, il est impossible
d'actionner les touches.
Certains modèles sont équipés d’un système de
charnières permettant de ralentir la fermeture de la
porte sans qu’il faille accompagner son mouvement
de la main. Pour une utilisation correcte, avant de
fermer :
• ouvrir la porte complètement.
• éviter de forcer la fermeture manuellement.
Première mise en service
Après raccordement de l’appareil au secteur et à sa
première mise en service, allumer le tableau de bord
par pression sur l’icône
disponibles est affichée dans le menu. Sélectionner
la langue désirée à l’aide de la manette. Pour
confirmer appuyer sur l’icône
Une fois que le choix a été effectué, l’écran affiche
le menu sélections. Appuyer sur l’icône
à l’aide de la manette, faire défiler jusqu’à SORTIE
et appuyer sur l’icône
le four.
! Après la sélection de la langue dans le menu et si
aucune opération n’est effectuée dans les 30
secondes qui suivent, l’afficheur passe
automatiquement au mode programmation.
. La liste des langues
.
ou bien,
pour commencer à utiliser
Paramètres du menu sélections
Pour entrer dans le menu sélections, allumer le
tableau de commandes et appuyer sur l’icône
Utiliser la manette pour repérer les différents
paramètres du menu.
.
Pour modifier la sélection appuyer sur l’icône
Le menu contient les paramètres suivants :
LANGUE : le choix de la langue est affiché à l’écran.
HORLOGE : réglage de l’heure exacte.
SON : activation/désactivation du son du clavier.
LUMIÈRE : activation/désactivation de la lumière
interne du four pendant la cuisson.
LOGO : activation/désactivation du logo à l’allumage
MANUEL : activation/désactivation des conseils
d’utilisation.
SORTIE : sortie du menu.
! Il est possible de sortir du menu sélection en
appuyant sur l’icône
.
.
Verrouillage commandes
! Les commandes peuvent être verrouillées four
éteint, cuisson en cours, cuisson terminée ou en
cours de programmation.
La fonction verrouillage commandes permet de
verrouiller les commandes du four.
Pour l’activer, appuyer sur l’icône
le poste désiré en tournant la manette:
• NON VERROUILLÉ : désactive le verrouillage actif ;
• COMMANDES : ne verrouille que les commandes ;
et confirmer à l’aide de l’icône
Un signal sonore de confirmation retentit et l’écran
affiche le voyant
Activable quand le four fonctionne ou est éteint. Il
est désactivable dans tous les cas précédents et
quand la cuisson au four est terminée.
.
, sélectionner
.
Régler l’horloge
Pour régler l’horloge, allumer le four par pression sur
l’icône
procédure indiquée.
1. faire défiler les paramètres du menu à l’aide de la
manette, sélectionner HORLOGE et appuyer sur
l’icône
2. Régler l’heure à l’aide de la manette.
3. Une fois l’heure exacte atteinte, appuyer à
nouveau sur l’icône
4. pour les minutes aussi, procéder comme indiqué
plus haut aux points 2 et 3.
5. pour quitter le mode réglage, appuyer sur l’icône
jusqu’à SORTIE et appuyer sur l’icône
! L’horloge peut aussi être réglée four éteint en
; appuyer sur l’icône et suivre la
.
.
ou bien, à l’aide de la manette, faire défiler
.
24
Page 25

appuyant sur l’icône et en suivant les
indications des points 2 à 4 décrits plus haut.
Après branchement au réseau électrique ou après
une panne de courant, il faut remettre l’horloge à
l’heure.
Réglage du minuteur
! Le minuteur est toujours réglable tant four éteint
que four allumé. Il ne contrôle pas l’allumage et
l’arrêt du four.
Une fois le temps écoulé, le minuteur émet un signal
sonore qui s’arrête automatiquement au bout de 30
secondes ou après avoir appuyé sur une touche
active quelconque.
Pour régler le minuteur :
1. Appuyer sur l’icône
2. Régler le temps désiré à l’aide de la manette.
3. Une fois la sélection voulue atteinte, appuyer à
nouveau sur l’icône
Four éteint, le décompte est affiché. Four allumé,
l’icône
activé.
Pour annuler la sélection du minuteur, appuyer sur la
touche
temps à 00:00. Appuyer à nouveau sur l’icône
L’icône
désactivé.
allumée signale que le minuteur est
et à l’aide de la manette amener le
éteinte signale que le minuteur est
.
.
.
Mise en marche du four
1. Allumer le tableau de commandes en appuyant
sur l’icône
ascendant.
2. Appuyer sur l’icône
programme de cuisson manuelle souhaité.
Possibilité de sélectionner la température et la durée
de cuisson.
Appuyer sur l’icône
programme de cuisson automatique souhaité. La
durée et la température de cuisson sont
présélectionnées. Possibilité de ne modifier que la
durée selon le programme choisi. L’affichage du
message « AUTO » indique que la température suit
un profil de cuisson bien précis. Possibilité de
programmer une cuisson différée.
3. Appuyer sur l’icône
4. Le four se place en préchauffage, les indicateurs
de montée en température s’éclairent
progressivement au fur et à mesure que la
. L’appareil émet un triple son
pour sélectionner le
pour sélectionner le
pour démarrer la cuisson.
température augmente.
5. Un signal sonore suivi de l’allumage de tous les
indicateurs de préchauffage signale la fin du
préchauffage. Il est temps d’enfourner les plats.
6. En cours de cuisson, il est possible à tout
moment de :
- modifier la température par pression sur l’icône
tourner la manette et confirmer en appuyant à
nouveau sur l’icône
programmes manuels) ;
- programmer la durée d’une cuisson (voir
Programmes) ;
- stopper la cuisson par pression sur l’icône
Dans ce cas, l’appareil se rappelle de la
température éventuellement modifiée précédemment
(uniquement pour programmes manuels).
- éteindre le four en gardant l’icône
pendant 3 secondes.
7. En cas de coupure de courant, si la température
du four n’est pas trop redescendue, un dispositif
spécial fait repartir le programme à partir du moment
où il a été interrompu. Les programmations en
attente de démarrage ne sont par contre pas
rétablies et doivent être reprogrammées dès
rétablissement du courant (par exemple : un départ
de cuisson a été programmé à 20h30. A 19h30, il y
a une coupure de courant. Après rétablissement du
courant, il faut reprogrammer).
! Aucun préchauffage n’est prévu pour le
programme BARBECUE.
! Ne jamais poser d’objets à même la sole du four,
l’émail risque de s’abîmer.
! Il faut toujours enfourner les plats sur la grille
fournie avec l’appareil.
Ventilation de refroidissement
Pour obtenir un abaissement des températures
extérieures, un système de refroidissement souffle
de l’air à l’extérieur par une fente située entre le
tableau de bord, la porte du four et la partie basse
de la porte du four. Au début du cycle de nettoyage,
le ventilateur fonctionne à faible vitesse.
! Le ventilateur continue à tourner après l’arrêt du
four jusqu’à ce que ce dernier se soit suffisamment
refroidi.
Eclairage du four
L’éclairage s’allume au démarrage d’un programme
de cuisson (s’il est actif dans le menu sélections).
En cas de modèles équipés de LED INSIDE, au
démarrage de la cuisson les leds de la porte
s’allument afin d’avoir un meilleur éclairage de tous
les niveaux de cuisson.
(uniquement pour
.
enfoncée
FR
,
25
Page 26

FR
Indicateurs de chaleur résiduelle
Cet appareil est équipé d’un indicateur de chaleur
résiduelle. Four éteint, l’afficheur signale par
allumage de la barre de « chaleur résiduelle » la
présence de température à l’intérieur de l’enceinte.
Les éléments de la barre s’éteignent au fur et à
mesure que la température à l’intérieur du four
baisse.
Mode Demo
! L'appareil ne rentre pas en mode DEMO, si l'on n'a
pas auparavant choisi la langue.
Rétablissement des réglages d’usine
Le four peut retourner à ses paramètres de réglage
usine, il suffit pour cela de réinitialiser toutes les
sélections effectuées par l’utilisateur (langue, son,
durées personnalisées, etc.). Pour procéder à la
réinitialisation, éteindre le four, appuyer
simultanément et 6 secondes de suite sur les
touches
réinitialisation a eu lieu, un signal sonore retentit.
Dès la première pression sur l’icône
à la première mise en service.
, , . Une fois que la
il y a retour
Le four peut fonctionner en mode DEMO : dans ce
cas, tous les éléments chauffants sont désactivés et
seules les commandes fonctionnent.
Pour activer le mode de fonctionnement DEMO,
éteindre le four, continuer à tourner la manette dans
le sens des aiguilles d’une montre et appuyer en
même temps sur l’icône
Un signal sonore retentit et l’écran affiche « DEMO »
Pour désactiver le mode de fonctionnement DEMO,
continuer à tourner la manette dans le sens inverse
des aiguilles d’une montre et appuyer en même
temps sur l’icône
signal sonore retentit pour confirmer sa
désactivation.
pendant 3 secondes. Un
pendant 10 secondes.
Standby
Ce produit est conforme à la nouvelle Directive
européenne sur la réduction de la consommation
d’énergie en mode veille (standby). Sans opérations
pendant 30 minutes et si aucun verrouillage de
touches ou de porte n’a été sélectionné, l’appareil se
place automatiquement en mode veille (standby). Le
mode standby est signalé par l’affichage de l’image
ECO Mode. A la moindre intervention sur l’appareil, le
système se remet en mode de fonctionnement normal.
26
Page 27

Programmes
! Pour obtenir des aliments parfaitement moelleux et
croquants, l’humidité qu’ils dégagent est réutilisée
par le four sous forme de vapeur d’eau. Des résultats
de cuisson optimaux sont ainsi obtenus pour tous les
plats.
! A chaque allumage, le four propose le premier
programme de cuisson manuel.
Programmes de cuisson manuels
! Tous les programmes ont une température de
cuisson présélectionnée. Il est possible de la régler
manuellement, entre 40 et 250°C au choix (270°C
pour le programme BARBECUE). Toute modification
de la température sera mémorisée et reproposée
dès la prochaine utilisation du programme. Si la
température choisie est inférieure à la température
intérieure du four, l’écran affiche « FOUR TROP
CHAUD ». Il est toutefois possible de démarrer la
cuisson.
Si une cuisson est lancée sans que sa durée ait été
programmée, l’afficheur signale le temps qui s’est
écoulé depuis son démarrage.
Programme MULTINIVEAUX
Mise en marche de tous les éléments chauffants ainsi que
de la turbine. La chaleur est constante et bien répartie à
l’intérieur du four, l’air cuit et dore de façon uniforme en
tous points. Il est possible de cuire au maximum sur deux
niveaux en même temps.
Programme BARBECUE
Mise en marche de la résistance de voûte et du
tournebroche (si l’appareil en est équipé). La
température élevée et directe du gril est conseillée pour
tous les aliments qui exigent une haute température en
surface. La cuisson doit avoir lieu porte du four fermée
(voir « Conseils de cuisson »)
Programme GRATIN
Mise en marche de la résistance de voûte, de la
résistance circulaire (pendant un certain temps) et
de la turbine et du tournebroche (si l’appareil en est
équipé). L’irradiation thermique unidirectionnelle
s’ajoute au brassage de l’air pour une répartition
uniforme de la chaleur dans l’enceinte du four.
Plus de risque de brûler les aliments en surface et
plus grande pénétration de la chaleur. La cuisson
doit avoir lieu porte du four fermée (voir « Conseils de
cuisson »).
Programme RÔTISSERIE
Mise en marche de la résistance de voûte et de la
résistance circulaire ainsi que de la turbine. L’irradiation
thermique unidirectionnelle s’ajoute au brassage de l’air
pour une répartition uniforme de la chaleur dans l’enceinte
du four. Plus de risque de brûler les aliments en surface et
plus grande pénétration de la chaleur.
La cuisson doit avoir lieu porte du four fermée.
Programme POISSON
Mise en marche de la résistance de voûte et de la
résistance circulaire ainsi que de la turbine. Cette
combinaison permet de cuire avec délicatesse des
plats de poisson.
Programme PIZZA
Mise en marche de la résistance de voûte et de la
résistance circulaire ainsi que de la turbine. Cette
combinaison permet une montée en température
rapide du four. En cas de cuisson sur plusieurs
niveaux, ne pas oublier de les changer de place à
mi-cuisson.
Programme ÉTUVE
Mise en marche de l’élément chauffant circulaire et de la
turbine mais uniquement pendant la phase de
réchauffage. La température du four est idéale pour faire
lever les pâtes. Pendant la phase de levage, ne pas ouvrir
la porte du four.
Programme PÂTISSERIE
Mise en marche de la résistance arrière et de la
turbine pour obtenir une chaleur douce et uniforme à
l’intérieur du four. Cette fonction est particulièrement
indiquée pour la cuisson de mets délicats (comme,
par exemple, les gâteaux levés).
Programme PASTEURISATION
Ce type de cuisson est indiqué pour les fruits, les
légumes, etc....
Les bocaux de petites dimensions peuvent être
enfournés sur 2 niveaux (plateau émaillé au niveau 1
et grille au niveau 3). Laisser refroidir les bocaux à
l’intérieur du four. Enfourner à froid.
Programmes BASSE TEMPÉRATURE
VIANDE/POISSON/LÉGUMES
Ce type de cuisson, que les professionnels du
secteur ont adopté depuis des années, permet de
cuisiner (viandes, poissons, fruits, légumes) à des
températures très basses (75, 85 et 110 °C) et
d’obtenir une cuisson parfaite qui exalte au plus
haut point les qualités gustatives.
Des avantages à ne pas négliger:
• les températures de cuisson étant très basses
(inférieures en principe à la température
FR
27
Page 28

FR
d’évaporation), la dispersion des jus de cuisson
est considérablement réduite et l’aliment gagne
en moelleux ;
• les fibres musculaires des viandes rétrécissent
moins par rapport à une cuisson classique.
Résultat : la viande est plus tendre et n’a pas
besoin de reposer après sa cuisson. Il faut faire
dorer la viande avant de l’enfourner.
La cuisson à basse température sous vide,
adoptée depuis trente ans par les plus grands
chefs, présente de nombreuses qualités :
• gastronomiques : elle permet de maîtriser les
arômes tout en respectant les caractéristiques
gustatives de l’aliment qui maintient tout son
moelleux et sa tendresse.
• hygiéniques : les normes d’hygiène étant respectées,
ce type de cuisson protège les aliments contre les
effets nocifs de l’oxygène et prolonge la durée de
conservation au réfrigérateur des plats cuisinés.
• d’organisation : grâce au prolongement de leur
durée de conservation, les plats peuvent être
préparés longtemps à l’avance.
• diététiques : cette cuisson qui exige moins de
matières grasses permet d’obtenir des plats
légers et digestibles.
• économiques : elle réduit considérablement la perte de
poids des produits.
Pour utiliser cette technique, il faut disposer d’une
machine à faire le vide et de sachets spéciaux.
Suivre attentivement les instructions du fabricant
pour l’emballage sous vide des aliments.
La technique de mise sous vide permet de
conserver des produits crus (fruits, légumes, etc.) et
des produits déjà cuits (cuisson traditionnelle).
Programme DÉCONGÉLATION
La turbine au fond du four fait circuler l’air à
température ambiante autour des aliments. Cette
fonction convient à la décongélation de n’importe
quel type d’aliment, mais est particulièrement
indiquée pour les aliments délicats qui ne
supportent pas la chaleur comme par exemple : les
vacherins, les gâteaux à la crème ou à la chantilly,
les gâteaux aux fruits.
Programme ECO
Mise en marche de la résistance arrière et du
ventilateur pour obtenir une chaleur douce et uniforme
à l’intérieur du four. Ce mode peu énergétique est
recommandé pour les petits plats, il est idéal pour
chauffer les aliments et finir la cuisson.
N’existe que sur certains modèles
*
Tournebroche*
Pour actionner le
tournebroche (voir figure),
procéder comme suit :
1. placer la lèchefrite
au niveau 1 ;
2. placer le berceau au
niveau 3 et encastrer le
bout arrière de la
broche dans le trou
situé au fond de
l’enceinte ;
3. pour actionner le tournebroche sélectionner les
programmes
ou ;
Programmes de cuisson automatiques
températuretempérature
! La
température et la durée de cuisson sont
températuretempérature
présélectionnéesprésélectionnées
présélectionnées à l’aide du système
présélectionnéesprésélectionnées
Cuisson Optimale ProgramméeCuisson Optimale Programmée
(
Cuisson Optimale Programmée)qui garantit
Cuisson Optimale ProgramméeCuisson Optimale Programmée
automatiquement un résultat parfait. La cuisson
s’arrête automatiquement et le four signale que le
plat est cuit. Il est possible d’enfourner à
chaudchaud
chaud. Possibilité de personnaliser la durée de
chaudchaud
cuisson selon ses goûts personnels en la modifiant,
avant le démarrage, de ±5/20 minutes selon le
programme choisi. La modification de la durée est
également possible en cours de cuisson. Si cette
modification est effectuée avant le démarrage du
programme, elle est mémorisée et reproposée dès
la prochaine utilisation du programme. Si la
température intérieure du four est supérieure à celle
proposée par le programme choisi, l’écran affiche le
message « FOUR TROP CHAUD » et la cuisson ne
peut pas être lancée : il faut attendre que le four
refroidisse.
Sur l’afficheur, l’icône du programme choisi s’alterne
à celle du niveau d’enfournement conseillé.
! Un bip signale que la cuisson est terminée.
! Pour éviter de fausser les temps de cuisson et de
modifier les températures, ne pas ouvrir la porte du four.
Programme PAIN
C’est la fonction idéale pour la cuisson du pain. Pour
obtenir de meilleurs résultats, nous recommandons de
suivre attentivement les conseils suivants :
• suivre la recette à la lettre ;
• respecter le poids maximal pour chaque plaque ;
• ne pas oublier de verser 50g (0,5 dl) d’eau
froide dans la lèchefrite au niveau 5 ;
• faire lever la pâte à température ambiante
pendant 1 heure ou 1 heure et demie, selon la
température de la pièce et jusqu’à ce qu’elle ait
pratiquement doublé de volume.
C.O.P.®C.O.P.®
C.O.P.®
C.O.P.®C.O.P.®
froidfroid
froid ou à
froidfroid
28
Page 29

Recette du PAIN :
1 Plaque de 1000g Max., niveau du bas
2 Plaques de 1000g Maxi. niveaux du bas et du milieu
Recette pour 1000g de pâte : 600g de farine, 360g d’eau,
11g de sel, 25g de levure de boulanger fraîche (ou bien 2
sachets en poudre)
Procédé :
• Mélanger la farine et le sel dans un grand
récipient.
• Diluer la levure de boulanger dans de l’eau
légèrement tiède (35 degrés environ).
• Disposer la farine en fontaine.
• Verser le mélange d’eau et de levure
• Mélanger et pétrir jusqu’à obtenir une pâte
homogène et peu collante, l’étirer avec la paume
de la main et la replier sur elle-même pendant 10
minutes.
• Former une boule, la placer dans un saladier et
couvrir d’un film plastique pour éviter que la
surface de la pâte ne sèche. Glisser le saladier
dans le four, sélectionner la fonction manuelle
ÉTUVE et laisser lever environ 1 heure (la pâte doit
doubler de volume)
• Diviser la boule pour obtenir plusieurs pains.
• Les placer sur la plaque du four recouverte de
papier sulfurisé.
• Saupoudrer les pains de farine.
• Pratiquer des entailles sur les pains.
• Enfourner à froid.
• Démarrer la cuisson
• En fin de cuisson, laisser reposer les pains sur une
grille jusqu’à ce qu’ils aient complètement refroidi.
Programme BOEUF/VEAU/AGNEAU
Choisir cette fonction pour cuisiner de la viande de
bœuf, de veau et d’agneau. Enfourner à froid. Il est
aussi possible d’enfourner à chaud. Certains
programmes RÔTI permettent de sélectionner le
niveau de cuisson souhaité :
1. Appuyer sur l’icône
2. choisir avec la manette entre « BIEN CUIT », « À
POINT » ou « SAIGNANT » ;
3. appuyer une nouvelle fois sur l’icône
Programme PORC
Choisir cette fonction pour cuisiner de la viande de
porc. Enfourner à froid. Il est aussi possible
d’enfourner à chaud.
Programme POULET
C’est la fonction idéale pour cuisiner du poulet
(entier ou en morceaux). Enfourner à froid. Il est tout
PAIN
;
.
de même possible d’enfourner à chaud aussi.
FR
Programme FILET DE POISSON
C’est la fonction idéale pour cuisiner des filets de
petites-moyennes dimensions. Enfourner à froid.
Programme POISSON EN PAPILLOTE
Choisir cette fonction pour cuisiner des poissons
entiers pesant 1 kg maximum. Mettre la papillote
directement sur la lèchefrite. Enfourner à froid.
Programme TARTE SABLÉE
C’est la fonction idéale pour toutes les recettes de
tartes sablées (qui exigent une bonne cuisson du
dessous). Enfourner à froid. Il est tout de même
possible d’enfourner à chaud aussi.
Programme TARTE
C’est la fonction idéale pour toutes les recettes à
base de pâte brisée (habituellement préparée sans
œufs) ou qui prévoient une farce liquide ou très
molle. Enfourner à froid. Il est tout de même
possible d’enfourner à chaud aussi.
Programme BRIOCHE
C’est la fonction idéale pour des recettes de
pâtisserie à base de levure de boulanger. Enfourner
à froid, il est toutefois possible d’enfourner à chaud
aussi
Programme CAKE
C’est la fonction idéale pour toutes les recettes à
base de levure chimique. Enfourner à froid. Il est
tout de même possible d’enfourner à chaud aussi.
Programme GÂTEAU
Cette fonction est ce qu’il y a de mieux pour la
cuisson de gâteaux à base de levure de boulanger,
de levure chimique ou sans levure. Enfourner à froid.
Il est tout de même possible d’enfourner à chaud
aussi.
Programme PAELLA
Cette fonction a été spécialement conçue pour
réaliser la recette de la paella de façon simple et
rapide car tous les ingrédients sont enfournés à
froid. Pour obtenir de meilleurs résultats, nous
recommandons de suivre attentivement les conseils
suivants :
• Il faut choisir un riz qui ne colle pas : du genre spécial
salade ou du riz américain.
• Le four doit être froid.
• Placer :
- la lèchefrite profonde au niveau 1 (si elle est
29
Page 30

FR
disponible comme accessoire) ou bien placer la grille
au niveau 1 et poser dessus un plat d’environ
35x30x5cm de haut.
- la lèchefrite au niveau 3.
- la grille au niveau 5.
Programme YAOURT
Mise en marche de l’élément chauffant circulaire et de la
turbine mais uniquement pendant la phase de
réchauffage. Une température de 50 ° est idéale pour la
préparation de yaourt.
Recette pour 8 personnes :
Dans la lèchefrite profonde
• 1 oignon émincé
• 500 g de riz
• 500 g de fruits de mer surgelés (queues de crevettes,
moules et palourdes décoquillées, anneaux de
calmars, etc.)
• 2 poignées de petits pois surgelés
• ¼ de piment coupé en dés
• Chorizo (saucisse épicée et assaisonnée de paprika)
en rondelles
• Une cuillerée de fumet de poisson en poudre
• Une cuillerée de fumet de poisson en poudre
• 700 g d’eau
Couvrir la lèchefrite avec du papier alu.
Dans la lèchefrite
• 8 portions de filets de cabillaud
• 8 (ou 16) queues de crevettes (ou de langoustines)
• 8 moules entières pour la garniture
Couvrir la lèchefrite avec du papier alu.
Dans un plat posé sur la grille
• 6-8 cuisses de poulet assaisonnées avec des
épices pour paëlla et un filet d'huile d'olive.
En fin de cuisson assaisonner avec l'huile crue.
Recette pour un litre de yaourt : un litre de lait entier
UHT, un pot de yaourt nature
Procédé :
• Porter le lait à ébullition dans une petite casserole en acier.
• Eliminer la couche de crème qui se forme en surface et
laisser refroidir.
• Mélanger avec soin 3, 4 cuillerées de lait avec le
yaourt.
• Ajouter le reste du lait et bien mélanger.
• Verser dans des pots à fermeture étanche.
• Placer les pots sur la lèchefrite et enfourner au niveau 2.
• À la fin, mettre les pots dans le réfrigérateur au moins
pendant 12 heures. Conserver le yaourt dans le
réfrigérateur au maximum pendant une semaine.
• Cette recette peut être adaptée aux goûts de chacun.
Programme RIZ PILAF
C’est la fonction idéale pour la cuisson du riz. Pour
obtenir de meilleurs résultats, nous recommandons
de suivre les indications suivantes :
• Il faut choisir un riz qui ne colle pas : du genre spécial
salade ou du riz américain.
• Le four doit être froid.
• la lèchefrite profonde au niveau 2 (si elle est disponible
comme accessoire) ou bien placer la grille au niveau 2
et poser dessus un plat d’environ 35x30x5cm de haut.
Recette pour 4 - 6 personnes :
• 500 g de riz
• 7 dl d’eau ou de bouillon
Placer le riz dans la lèchefrite profonde sans le
mouiller et le couvrir d’eau ou de bouillon. Couvrir la
lèchefrite avec du papier alu.
30
Page 31

Programmation de la cuisson
! La programmation n’est possible qu’après avoir
sélectionné un programme de cuisson.
Programmation de la durée
1. Appuyer sur l’icône
2. tourner la manette pour sélectionner la durée ; si
la manette est maintenue en place, les chiffres
défilent plus rapidement pour simplifier la sélection.
L’écran affiche graphiquement le déplacement sur la
barre de durée.
3. Une fois la durée voulue atteinte, appuyer à
;
4. Appuyer sur l’icône
pour démarrer la
programmation.
5. L’écran affiche « DÉPART DIFFÉRÉ » et le temps
restant en déplaçant en arrière la barre de départ
différé.
6. Une fois la cuisson démarrée, l’écran affiche le
temps restant en remplissant la barre de durée.
7. Une fois le temps écoulé, un signal sonore retentit
et l’écran affiche « CUISSON TERMINÉE ».
• Exemple : il est 9h00, la durée programmée est
de 1h15 et l’heure finale est fixée à 12h30. Le
programme démarre automatiquement à 11h15.
FR
nouveau sur l’icône
. L’afficheur affiche
graphiquement sur la barre de durée les
informations sur l’heure courante, la durée et l’heure
de fin de cuisson.
4. Appuyer sur l’icône
pour démarrer la cuisson.
5. L’écran affiche le temps restant en remplissant la
barre de durée.
6. Un signal sonore indique que la cuisson est
terminée et l’écran affiche « CUISSON TERMINÉE ».
• Exemple : il est 9h00 et la durée programmée est
de 1h15. Le programme s’arrête automatiquement
à 10h15.
Indication
heure courante
Barre
de durée
Heure de
fin de cuisson
Durée
cuisson
Programmation d’une cuisson différée
! La programmation d’une fin de cuisson n’est
possible qu’après avoir sélectionné une durée de
cuisson.
! Pour utiliser au mieux la programmation différée, il
faut que l’horloge soit correctement réglée.
1. Suivre la procédure de 1 à 3 décrite pour la durée ;
2. Appuyer 2 fois sur l’icône
, l’heure de fin de
cuisson se mettra à clignoter ;
3. tourner la manette pour régler l’heure de fin de
cuisson ; si la manette est maintenue en place, les
chiffres défilent plus rapidement pour simplifier la
sélection. L’écran affiche graphiquement le
déplacement sur la barre du départ différé.
4. Une fois l’heure finale atteinte, appuyer à nouveau
sur l’icône
. L’afficheur affiche graphiquement sur
la barre de départ différé les informations sur l’heure
courante, le temps restant jusqu’au départ, la durée
et l’heure de fin de cuisson.
Indication
heure courante
Heure de fin
Barre
départ différé
de cuisson
Durée
cuisson
Pour annuler une programmation, appuyer sur l’icône
.
Conseils de cuisson
! Pour les cuissons ventilées ne pas utiliser les
niveaux 1et 5 : ils sont directement frappés par l’air
chaud qui pourrait brûler les mets délicats.
! Pour les cuissons BARBECUE et GRATIN,
notamment au tournebroche, placer la lèchefrite au
niveau 1 pour récupérer les graisses ou jus de
cuisson.
MULTINIVEAUX
• Utiliser les niveaux 2 et 4 et placer au 2 les plats
qui exigent davantage de chaleur.
• Placer la lèchefrite en bas et la grille en haut.
BARBECUE
• Placer la grille au niveau 3 ou 4, enfourner les
plats au milieu de la grille.
• Nous conseillons de sélectionner la température la
plus élevée. Ne pas s’inquiéter si la résistance de
voûte n’est pas allumée en permanence : son
fonctionnement est contrôlé par un thermostat.
PIZZA
• Utiliser un plat en aluminium léger et l’enfourner
sur la grille du four.
En cas d’utilisation du plateau émaillé, le temps
de cuisson sera plus long et la pizza beaucoup
moins croustillante.
• Si les pizzas sont bien garnies, n’ajouter la
mozzarelle qu’à mi-cuisson.
31
Page 32

FR
g
Tableau de cuisson
Programmes Aliments Poids
Manuels
Multiniveaux*
Barbecue*
Gratin*
Rôtisserie*
Poisson*
Pizza*
Etuve*
Pizza sur 2 niveaux
Tartes sur 2 niveaux/gâteaux sur 2 niveaux
Génoise sur 2 niveaux (sur plateau émaillé)
Poulet rôti + pommes de terre
Agneau
Maquereau
Lasagnes
Choux sur 3 niveaux
Biscuits sur 3 niveaux
Friands au fromage sur 2 niveaux
Tartes salées
Maquereaux
Soles et seiches
Brochettes de calmars et crevettes
Filet de cabillaud
Légumes grillés
Côte de veau
Saucisses
Hamburgers
Croque-monsieur ou toasts
Poulet rôti au tournebroche (si présent)
Agneau rôti au tournebroche (si présent)
Poulet grillé
Seiches
Poulet rôti au tournebroche (si présent)
Canard rôti au tournebroche (si présent)
Rôti de veau ou de bœuf
Rôti de porc
Agneau
Rôtis (viandes blanches ou rouges) 1 2 2 non 200 50-75
Daurade
Filets de poisson
Bar aux pommes de terre
Pizza
Fougasses
Levage de pâtes à base de levure de boulanger
(brioches, pain, tarte au sucre, croissants, etc.)
(Kg)
1+1
1
1
1
1
0,7
0,7
0,7
0,5
0,8
0,7
n° 4 ou 5
n° 4 ou 6
1
1
1,5
1
1,5
1,5
1
1
1
0,7
1
0,5 + 0,5
0,5
0,5
Niveau
Préchauffage Température
enfournement
glissières
standard
2 et 4
2 et 4
2 et 4
1 et 2/3
1 ou 2
1 et 3 et 5
1 et 3 et 5
2 et 4
1 et 3
3 ou 4
glissières
coulissantes
1 et 3
1 et 3
1 et 3
2
2
4
4
4
4
4
4
4
4
-
-
2
2
-
2
2
2
2
2
2
2
2
2 2 non 40
1 et 3
1
1
1
1 et 2 et 4
1 et 2 et 4
1 et 3
1 et 3
3
3
3
3
2 ou 3
3
3
3
3
-
-
2
2
-
2
2
2
2
2
2
1
1
oui
oui
oui
oui
oui
oui
oui
oui
oui
oui
oui
non
non
non
non
non
non
non
non
non
non
non
non
non
non
non
non
non
non
oui
oui
oui
oui
oui
préconisée
(°C)
210-220
180
160-170
200-210
190-200
180
180-190
190
180
210
190-200
300
300
300
300
300
300
300
300
300
300
300
210
200
210
210
210
210
210
180
170
190
210-220
190-200
Durée
cuisson
(minutes)
20-25
30-35
20-25
65-75
45-50
30-35
35-40
20-25
10-20
20-25
20-30
10-20
10-15
10-15
10-15
15-20
10-20
10-20
10-12
3-5
70-80
70-80
55-60
30-35
70-80
60-70
60-75
70-80
40-45
20-25
12-15
60
15-20
20-25
Pasteurisation*
Basse
température*
Décongélation*
Fruits, légumes, etc. 2 2 oui 110
Viande
Poisson
Légumes
Tous les aliments surgelés
2
2
2
1
1
1
non
non
non
75
85
110
90-180
90-180
90-180
* Les temps de cuisson sont purement indicatifs et peuvent être modifiés selon les goûts de chacun. Les temps de préchauffage du four sont présélectionnés
et ne sont pas modifiables manuellement.
! Programme ECO: ce programme, qui prévoit des temps de cuisson plus longs mais permet de réaliser une sensible économie d’énergie, est idéal pour la
cuisson de filets de poisson, de petites pâtisseries et de lé
umes. Il est tout aussi idéal pour réchauffer les plats et parachever les cuissons.
32
Page 33

Programmes Aliments Poids
(Kg)
Niveau
enfournement
Préchauffage
FR
Pain**
Boeuf
Veau
Agneau
Porc
Poulet
Filets de
poisson
Poisson
en papillotte
Tarte sablée
Tarte
Brioche
Cake
Gâteaux
Paella
Riz pilaf
Yaourt
Automatiques*
Pain (voir recette)
Rôti de boeuf
Rôti de veau
Gigot d’agneau
Rôti de porc
Poulet rôti
Cabillaud
Mérou
Truite
Daurade
Bar
Tarte sablée
Gâteau aux pommes
Préparations à base de levure de boulanger
(brioche, gâteau aux amandes, etc.)
Préparations à base de levure chimique
(quatre-quarts, marbrés, etc.)
Gâteaux
Paella (voir recette)
Riz Pilaf (voir recette)
Yaourt 2 2 oui
1,2-1,5
0,4-0,5
0,4-0,5
0,4-0,5
0,4-0,5
0,4-0,5
glissières
standard
1 2 ou 3 2 non
1-1,5
1-1,5
1-1,5
1-1,5 2 ou 3 2 non
0,5 2 ou 3 2 non
0,5 2 ou 3 2 non
0,7 2 ou 3 2 non
0,7 2 ou 3 2 non
1 2 ou 3 2 non
0,5 2 1 non
2 ou 3 2 non
2 ou 3 2 non
2 ou 3 2 non
2 ou 3 2 non
2 ou 3
2 ou 3
2 ou 3
2 ou 3
2 ou 3
1-3-5 1-2-4 non
glissières
coulissantes
2
2
2
2
2
non
non
non
non
non
* Les durées des cuissons automatiques sont présélectionnées. Ces valeurs peuvent être modifiées par l’utilisateur à partir de la durée présélectionnée.
** Comme indiqué dans la recette, ajouter 50 g (0,5 dl) d'eau dans la lèchefrite placée au niveau 5.
33
Page 34

Précautions et conseils
FR
! Cet appareil a été conçu et fabriqué conformément
aux normes internationales de sécurité. Ces consignes
de sécurité sont très importantes et doivent être lues
attentivement.
Sécurité générale
• Cet appareil a été conçu pour un usage familial, de
type non professionnel.
• Cet appareil ne doit pas être installé en extérieur,
même dans un endroit à l’abri, il est en effet très
dangereux de le laisser exposé à la pluie et aux
orages.
• Pour déplacer le four, se servir des poignées
prévues à cet effet sur les côtés de l’appareil.
• Ne pas toucher à l’appareil si l’on est pieds nus ou
si l’on a les mains ou les pieds mouillés ou
humides.
• Cet appareil qui sert à cuire des aliments ne doit
être utilisé que par des adultes conformément
aux instructions du mode d’emploi. Toute autre
utilisation (comme par exemple : le chauffage
d’une pièce) est impropre et donc dangereux. Le
fabricant décline toute responsabilité en cas de
dommages provoqués par un usage impropre ou
erroné.
• En cours de fonctionnement, les éléments
chauffants et certaines parties de la porte
peuvent devenir très chauds. Attention à ne pas
les toucher et à garder les enfants à distance.
• Éviter que le cordon d’alimentation d’autres
électroménagers touche à des parties chaudes du
four.
• Les orifices ou les fentes d’aération ou d’évacuation
de la chaleur ne doivent pas être bouchés
• Toujours saisir la poignée en son milieu : elle risque
d’être très chaude à ses extrémités.
• Utiliser toujours des gants de protection pour
enfourner ou sortir les plats du four.
• Ne jamais tapisser la sole du four de papier
aluminium.
• Ne pas ranger de matériel inflammable à l’intérieur
du four : si l’appareil était par inadvertance mis en
marche, il pourrait prendre feu.
• Ne pas tirer sur le cordon de l’appareil pour
débrancher la fiche de la prise de courant.
• N’effectuer aucune opération de nettoyage ou
d’entretien sans avoir auparavant débranché la fiche
de la prise de courant.
• En cas de panne, n’essayer en aucun cas d’accéder
aux mécanismes internes pour tenter de réparer
l’appareil. Contacter le service d’Assistance (voir
Assistance).
• Ne pas poser d’objets sur la porte du four ouverte.
• Éviter que les enfants ne jouent avec l’appareil.
• Il n’est pas prévu que cet appareil soit utilisé par
des personnes (enfants compris) présentant des
capacités physiques, sensorielles ou mentales
réduites ou n’ayant pas l’expérience ou les
connaissances indispensables, à moins qu’elles ne
le fassent sous la surveillance de quelqu’un
responsable de leur sécurité ou qu’elles aient été
dûment formées sur l’utilisation de l’appareil.
Mise au rebut
• Mise au rebut du matériel d’emballage : se
conformer aux réglementations locales, les
emballages pourront ainsi être recyclés.
• La directive européenne 2002/96/CE relative aux
déchets d’équipements électriques et électroniques
(DEEE), prévoit que les électroménagers ne peuvent
pas être traités comme des déchets solides urbains
courants. Les appareils usagés doivent faire l’objet
d’une collecte séparée pour optimiser le taux de
récupération et de recyclage des matériaux qui les
composent et empêcher tout danger pour la santé
et pour l’environnement. Le symbole de la poubelle
barrée est appliqué sur tous les produits pour
rappeler qu’ils font l’objet d’une collecte sélective.
Pour de plus amples renseignements sur la mise au
rebut des électroménagers, les possesseurs
peuvent s’adresser au service public prévu à cet
effet ou aux commerçants.
Economies et respect de l’environnement
• Pour faire des économies d’électricité, utiliser autant
que possible le four pendant les heures creuses.
Les options de programmation des cuissons et plus
particulièrement la « cuisson différée » (voir
Programmes) et le « nettoyage automatique différé »
(voir Nettoyage et entretien), permettent de
s’organiser en ce sens.
• Pour les cuissons au BARBECUE et au GRATIN,
nous conseillons de garder la porte du four fermée :
les résultats obtenus sont meilleurs et la
consommation d’énergie est moindre (environ 10%
d’économie).
• Garder les joints propres et en bon état pour qu’ils
adhèrent bien à la porte et ne causent pas de
déperdition de chaleur.
! Ce produit est conforme à la nouvelle Directive
européenne sur la réduction de la consommation
d’énergie en mode standby.
34
Page 35

Nettoyage et entretien
hublot
lampe
cavité
F
Mise hors tension
Avant toute opération de nettoyage ou d’entretien,
couper l’alimentation électrique de l’appareil.
Nettoyage de l’appareil
• De légères différences de couleur à l’avant du four
sont dues aux différents matériaux utilisés à
savoir verre, plastique ou métal.
• Des ombres éventuelles sur la vitre du four,
semblables à des stries, sont dues au reflet de la
lumière de la lampe du four.
• L’émail grand feu est traité à des températures
très élevées. Pendant ce processus, des
modifications chromatiques pourraient se
produire. C’est tout à fait normal et cela
n’influence en aucune manière sur le
fonctionnement. Les bords des tôles minces ne
peuvent pas être intégralement émaillés et
peuvent par conséquent sembler bruts. Ceci ne
compromet en aucun cas la protection
anticorrosion.
• Nettoyer l’extérieur émaillé ou inox et les joints en
caoutchouc à l’aide d’une éponge imbibée d’eau
tiède additionnée de savon neutre Si les taches
sont difficiles à enlever, utiliser des produits
spéciaux. Il est conseillé de rincer abondamment
et d’essuyer après le nettoyage. Ne pas utiliser
de poudres abrasives ni de produits corrosifs.
• Nettoyer l’enceinte après toute utilisation, quand
le four est encore tiède. Utiliser de l’eau chaude et
du détergent, rincer et essuyer avec un chiffon
doux. Eviter tout produit abrasif.
• Tous les accessoires peuvent être lavés
normalement comme de la vaisselle courante et
passent au lave-vaisselle, sauf les glissières
coulissantes.
• Nous conseillons de ne pas vaporiser le produit
de nettoyage directement sur le bandeau de
commandes mais de se servir d’une éponge.
! Ne jamais nettoyer l’appareil avec des nettoyeurs
vapeur ou haute pression.
FR
3. saisir la porte par les côtés,
la refermer lentement mais
pas complètement. Tirer
ensuite la porte vers soi en la
dégageant de son logement
(voir figure). Remonter la porte
en refaisant en sens inverse
les mêmes opérations.
Contrôle des joints
Contrôler périodiquement l’état du joint autour de la
porte du four. S’il est abîmé, s’adresser au service
après-vente le plus proche de son domicile (voir
Assistance). Mieux vaut ne pas utiliser le four tant
qu’il n’est pas réparé.
Remplacement de l’ampoule d’éclairage
Pour changer
l’ampoule
d’éclairage du
four :
1. Retirer le
couvercle en verre
du boîtier de la
lampe.
2. Retirer
l’ampoule et la
remplacer par une
autre de même type : ampoule halogène tension
230V, puissance 25 W, culot G 9.
3. Remettre le couvercle à sa place (voir figure).
! Ne surtout pas toucher à l’ampoule les mains nues.
Nettoyage de la porte
! Sur les modèles équipés de LED INSIDE, il est
impossible de démonter la porte
Nettoyer la vitre de la porte à l’aide d’éponges et de
produits non abrasifs ; essuyer ensuite avec un
chiffon doux. Ne pas utiliser de matériaux abrasifs
ou de racloirs métalliques pointus qui risquent de
rayer la surface et de briser le verre.
Pour nettoyer plus à fond, il est possible de
démonter la porte du four :
1. ouvrir la porte complètement (voir figure) ;
2. à l’aide d’un tournevis, soulever et faire pivoter les
leviers
F F
F situés sur les deux charnières (voir figure) ;
F F
Montage du Kit glissières coulissantes
Pour monter les
glissières coulissantes :
1. Retirer les deux
A
cadres en les
dégageant des
entretoises A (voir
figure).
35
Page 36

FR
Glissière
gauche
Glissière
droite
2. Choisir le niveau sur
lequel monter la
glissière coulissante.
Positionner sur le cadre
B
Sens
C
d'extraction
d’abord le dispositif de
fixation B puis le C en
veillant à bien
respecter le sens
d’extraction de la
glissière.
3. Fixer les deux
cadres avec glissières
assemblées dans les
trous prévus sur les
parois du four (voir
figure). Les trous pour
D
le cadre de gauche
sont placés en haut
tandis que les trous
pour celui de droite
sont placés en bas.
4. Emboîter enfin les cadres sur les entretoises A.
! Ne pas introduire les glissières coulissantes au
niveau 5.
Panneaux catalytiques latéraux et postérieurs*
Panneaux recouverts d’un vernis spécial en mesure
d’absorber le gras qui se dépose au cours de la
cuisson.
Ce vernis est suffisamment résistant pour permettre
le coulissement des divers accessoires (grilles,
lèchefrite etc.) sans se détériorer. Les petites traces
blanches qui pourraient se former sur les surfaces
ne doivent pas vous inquiéter.
Cependant, il faut éviter de :
- racler le vernis avec des objets coupants (par
exemple un couteau);
- utiliser des détergents ou produits abrasifs.
N’existe que sur certains modèles
*
36
Page 37

Anomalies et remèdes
p
p
Problème Cause possible Remède
Le programme de cuisson n'a
pas démarré.
L’écran affiche ECO Mode.
J’ai choisi un programme automatique.
L’écran affiche « HOT » et la cuisson
ne démarre
J’ai choisi la cuisson ventilée et
les aliments ont des traces de
brûlures.
as.
Il y a eu une panne de courant. Reprogrammer.
L’appareil est en mode veille
(standby).
La température à l’intérieur du four
est supérieure à celle proposée
our le programme choisi.
Les positions 1 et 5: sont
directement frappées par l’air
chaud qui pourrait brûler les
préparations délicates.
Utiliser une touche quelconque
pour quitter le mode standby.
Attendre que le four refroidisse.
Il est recommandé de tourner
les lèchefrites à mi-cuisson.
FR
37
Page 38

Assistance
FR
Attention :
L’appareil dispose d’un système d’autotest qui permet de détecter toute anomalie de fonctionnement. Ces
anomalies sont affichées sous la forme : « F-- » suivi de chiffres.
Contacter alors un service d’assistance technique.
Avant d’appeler le service de dépannage :
• Vérifier s’il est possible de résoudre le problème soi-même ;
• Redémarrer le programme pour contrôler si le problème a été résolu ;
• Si ce n’est pas le cas, contacter le service d’Assistance technique agréé.
! Ne jamais faire appel à des techniciens non agréés.
Indiquer :
• le type d’anomalie ;
• le code erreur affiché
• le modèle de l’appareil (Mod.) ;
• son numéro de série (S/N).
Ces informations figurent sur la plaque signalétique apposée sur l’appareil
38
Page 39

Instrucciones para el uso
HORNO
FK 1041L X
FK 1041L
Índice
ES
Instalación, 40-41
ESFRGB
Français, 20 Espanol, 39English,1
Montaje
Conexión eléctrica
Placa de características
Descripción del aparato, 42
Vista de conjunto
Panel de control
Pantalla en programación
Pantalla en cocción
Puesta en funcionamiento y uso, 43-45
Primer encendido
Opciones del menú programaciones
Bloqueo mandos
Programar el reloj
Programar el contador de minutos
Poner en funcionamiento el horno
Modo DEMO
Restablecimiento de las configuraciones de fábrica
Espera (Standby)
Programas, 46-52
Programas de cocción manuales
Programas de cocción automáticos
Programar la cocción
Consejos prácticos para cocinar
Tabla de cocción
Precauciones y consejos, 53
Seguridad general
Eliminación
Ahorrar y respetar el medio ambiente
Mantenimiento y cuidados, 54-55
Interrumpir el suministro de corriente eléctrica
Limpiar el aparato
Limpiar la puerta
Sustituir la bombilla
Montaje del Kit Guías Deslizantes
Anomalías y soluciones, 56
Asistencia, 57
39
Page 40

560 mm.
45 mm.
Instalación
ES
! Es importante conservar este manual para poder
consultarlo en cualquier momento. En el caso de
venta, de cesión o de mudanza, verifique que
permanezca junto al aparato para informar al nuevo
propietario sobre su funcionamiento y sobre las
advertencias correspondientes.
! Lea atentamente las instrucciones: contienen
información importante sobre la instalación, el uso y
la seguridad.
Montaje
! Los embalajes no son juguetes para niños y se
deben eliminar según las normas para la recolección
diferenciada de desechos (ver Precauciones y
consejos).
! La instalación se debe realizar siguiendo estas
instrucciones y por personal profesionalmente
calificado. Una instalación incorrecta puede producir
daños a personas, animales o cosas.
Empotramiento
Para garantizar un buen funcionamiento del aparato
es necesario que el mueble tenga las características
adecuadas:
• los paneles adyacentes al horno deben ser de
materiales resistentes al calor;
• en el caso de muebles de madera chapeada, las
colas deben ser resistentes a una temperatura de
100°C;
* Sólo para modelos en acero inoxidable
! Una vez empotrado el aparato no se deben
permitir contactos con las partes eléctricas.
El consumo declarado en la placa de características
ha sido medido en una instalación de este tipo.
Aireación
Para garantizar una buena aireación es necesario
eliminar la pared posterior del compartimiento. Es
preferible instalar el horno apoyado sobre dos
listeles de madera o sobre una superficie continua
que tenga una abertura de 45 x 560 mm. como
mínimo (ver las figuras).
Centrado y fijación
Para fijar el aparato al mueble:
• abra la puerta del horno;
• extraiga los 2 tapones de goma que cubren los
orificios de fijación ubicados en el marco;
• fije el horno al mueble utilizando los 2 tornillos
para madera;
• vuelva a colocar los tapones de goma que cubren
los orificios.
• para empotrar el horno, ya sea cuando se instala
bajo encimera (ver la figura) o en columna, el
mueble debe tener las siguientes dimensiones:
550 mm.
min.
45 mm.
560 mm.
575-585 mm.
570 mm.
40
590 mm.
595 mm.
20 mm.
550 mm.
20,5 mm.
22,5 mm.*
! Todas las partes que garantizan la protección se
deben fijar de modo tal que no puedan ser quitadas
sin la ayuda de una herramienta.
Page 41

Conexión eléctrica
! Los hornos que poseen cable de alimentación
tripolar, son fabricados para funcionar con corriente
alterna a la tensión y frecuencia indicadas en la
placa de características que se encuentra en el aparato
(ver más adelante).
Montaje del cable de alimentación eléctrica
1. Abrir el panel de
bornes haciendo palanca
con un destornillador
sobre las lengüetas
laterales de la tapa: tirar
y abrir (ver la figura).
2. Desenroscar el tornillo
de la mordaza del terminal
del cable y extraerlo
haciendo palanca con un
destornillador (ver la
figura).
3. Quitar los tornillos de los
contactos L-Nfijar los cables debajo de
las cabezas de los
tornillos respetando los
colores Azul (N), Marrón
(L) y Amarillo-Verde (
Conexión del cable de alimentación eléctrica a la red
Instale en el cable un enchufe normalizado para la
carga indicada en la placa de características (ver al
costado).
En el caso de conexión directa a la red, es
necesario interponer entre el aparato y la red, un
interruptor omnipolar con una distancia mínima entre
los contactos de 3 mm., dimensionado para esa
carga y que responda a las normas vigentes (el
cable de tierra no debe ser interrumpido por el
interruptor). El cable de alimentación eléctrica se
debe colocar de modo tal que no alcance en ningún
punto una temperatura que supere en 50°C la
temperatura ambiente (por ejemplo, la parte
posterior del horno).
! El instalador es responsable de la correcta
conexión eléctrica y del cumplimiento de las normas
de seguridad.
y luego
).
Antes de efectuar la conexión verifique que:
• la toma tenga conexión a tierra y que esté en
conformidad con las normas legales;
• la toma sea capaz de soportar la carga máxima
de potencia de la máquina indicada en la placa
de características (ver más abajo);
• la tensión de alimentación eléctrica esté
comprendida dentro de los valores indicados en
la placa de características (ver más abajo);
• la toma sea compatible con el enchufe del
aparato. Si no es así, cambie la toma o el
enchufe; no utilice prolongaciones ni conexiones
múltiples.
! Una vez instalado el aparato, el cable eléctrico y la
toma de corriente deben ser fácilmente accesibles.
! El cable no debe doblarse ni comprimirse.
! El cable debe ser revisado periódicamente y
sustituido sólo por técnicos autorizados (ver
Asistencia).
! La empresa declina toda responsabilidad
cuando estas normas no sean respetadas.
PLACA DE CARACTERÍSTICAS
Dimensiones
Volumen
Conexiones
eléctricas
ENERGY
LABEL*
* Sin guías extraíbles
ancho 43,5 cm.
altura 32 cm.
profundidad 41,5 cm.
litros 58
voltaje 220-240V~ 50/60Hz (ver la
placa de características)
potencia máxima absorbida
2800W
Norma 2002/40/CE en la etiqueta
de los hornos eléctricos.
Norma EN 50304
Clase Consumo de energía para
funcionamiento por convección
Forzada - función
de calentamiento: ECO.
Este aparato es conforme con las
siguientes Normas Comunitarias:
2006/95/CEE del 12.12.06
(Baja Tensión) y posteriores
modificaciones - 2004/108/CEE del
15/12/04 (Compatibilidad
Electromagnética) y posteriores
modificaciones - 93/68/CEE del
22/07/93 y posteriores
modificaciones.
- 2002/96/CE y posteriores
modificaciones.
- 1275/2008 modos "preparado" y
"desactivado"
ES
41
Page 42

Descripción del aparato
ES
Vista de conjunto
Panel de control
Bandeja PARRILLA
Bandeja GRASERA
Panel de control
Icono
PROGRAMACIONES
ENCENDIDO
DEL PANEL
Icono de
PROGRAMAS
MANUALES
Pantalla
TEMPERATURA
Icono
GUÍAS de
deslizamiento de
las bandejas
posición 5
posición 4
posición 3
posición 2
posición 1
Icono
BLOQUEO DE PUERTA / MANDOS
PUESTA
EN MARCHA /
PARADA
Icono
CONFIRMA
PROGRAMACIONES
Pantalla en programación
Indicación
Menú seleccionado
Icono animado
de cocción
Indicación
Avance de cocción
Pantalla en cocción
Indicación
Menú seleccionado
Icono animado
de cocción
Indicación
Avance de cocción
Icono de
PROGRAMAS
AUTOMÁTICOS
Sugiere qué hacer o qué
está haciendo el horno
Sugiere qué hacer o qué
está haciendo el horno
Icono
TIEMPOS
Mando
SELECCIÓN
Indicación
FINAL
DE COCCIÓN
Indicación
FINAL
DE COCCIÓN
Icono
CONTADOR DE MINUTOS
Indicación de
Temperatura
Indicadores de
Precalentamiento /
Calor residual
Indicación
DURACIÓN
DE COCCIÓN
Indicación de
Temperatura
Indicadores de
Precalentamiento /
Calor residual
Indicación
DURACIÓN
DE COCCIÓN
42
Page 43

Puesta en
funcionamiento y uso
! La primera vez que encienda el horno, hágalo
funcionar vacío, durante una hora aproximadamente,
con el termostato al máximo y con la puerta cerrada.
Luego apáguelo, abra la puerta y airee el ambiente
en el que se encuentra. El olor que se advierte se
debe a la evaporación de las sustancias utilizadas
para proteger el horno.
! Girando el mando es posible modificar los
parámetros visualizados en la pantalla entre los
símbolos “<“ y “>”.
! Para facilitar las programaciones, mantenga el
mando en su posición: los números se desplazarán
en la pantalla más rápidamente.
! Cada selección se memoriza automáticamente
después de 10 segundos.
! No se pueden activar las teclas touch si no se
calzan los guantes.
Algunos modelos están dotados de un sistema de
bisagras que permite que la puerta se cierre
lentamente sin que sea necesario acompañar su
recorrido con la mano. Para un uso correcto, antes
de cerrar:
• abra completamente la puerta.
• evite forzar el cierre manualmente.
Primer encendido
Después que se conecta a la red eléctrica por
primera vez, encienda el panel de control pulsando
el ícono
menú. Para elegir el idioma deseado, selecciónelo
utilizando el mando. Para confirmar, pulse el icono
.
Una vez realizada la elección, en la pantalla se
visualizará el menú de configuraciones: Pulsar el
ícono
. Aparecerá la lista de los idiomas en el
o desplazarse con el mando hasta la
RELOJ: programación de la hora exacta.
TONOS: activación/desactivación del tono del teclado.
LUZ: activación/desactivación de la luz interna del
horno durante la cocción.
LOGO: activación/desactivación del logo con el
encendido.
GUÍA: activación/desactivación de sugerencias de uso.
SALIDA: salida del menú.
! Es posible salir del menú de programación
pulsando el ícono
.
Bloqueo de mandos
! Es posible bloquear los mandos cuando el horno
está apagado, cuando ya ha comenzado o finalizado
una cocción y durante la programación.
La función bloqueo de mandos permite bloquear los
mandos del horno.
Para la activación pulse el ícono
opción deseada girando el mando:
• SIN BLOQUEO: desactiva el bloqueo activo;
• MANDOS: bloquea los mandos;
y confirme con el ícono
Después de confirmado se emite una señal sonora y
en la pantalla se visualiza la luz testigo
Se puede activar cuando el horno está en
funcionamiento o cuando está apagado. Se puede
desactivar en todos los casos precedentes y
también cuando ha finalizado la cocción.
.
, seleccione la
.
Programar el reloj
Para programar el reloj, encienda el horno pulsando
el ícono
procedimiento indicado.
1. Desplácese por el menú utilizando el mando,
; pulse luego el ícono y siga el
ES
opción SALIDA o pulsar el ícono
a utilizar el horno.
! Después de haber elegido el idioma en el menú, si
transcurren unos 30 segundos durante los que no se
utiliza, la pantalla pasa automáticamente al modo de
programación.
para comenzar
Opciones del menú programaciones
Para entrar en el menú programaciones, encienda el
panel de control y pulse el ícono
Utilice el mando para destacar cada opción del
menú.
Para modificar la programación, pulse el ícono
El menú está formado por los siguientes
parámetros:
IDIOMA: selección del idioma visualizado en la pantalla.
.
.
seleccione la opción RELOJ y pulse el ícono
2. Programe la hora utilizando el mando.
3. Una vez alcanzada la hora exacta, pulse
nuevamente el ícono
4. para los minutos, repita los puntos 2 y 3 descriptos.
5. para salir de la programación, pulse el ícono
o desplácese con el mando hasta la opción SALIDA
y pulse el ícono
! El reloj se puede programar aún con el horno
apagado pulsando el ícono
puntos de 2 a 4 descriptos .
Después de la conexión a la red eléctrica o después
de un corte de corriente, es necesario volver a
programar el reloj.
.
.
y siguiendo los
.
43
Page 44

ES
Programar el cuentaminutos
! Puede programar el cuentaminutos con el horno
apagado o encendido. No controla el encendido ni el
apagado del horno.
Cuando se ha cumplido el tiempo, el cuentaminutos
emite una señal sonora que se detiene después de
30 segundos o pulsando cualquier tecla activa.
Para programar el cuentaminutos:
1. Pulse el ícono
2. Programe el tiempo deseado utilizando el mando.
3. Una vez lograda la programación deseada, pulse
nuevamente el ícono
Cuando el horno está apagado, en la pantalla se
visualiza la cuenta al revés. Cuando el horno está
encendido, el ícono
cuentaminutos está funcionando.
Para anular el cuentaminutos, pulse el ícono
con el mando lleve el tiempo hasta 00:00. Pulse
nuevamente el ícono
Si el ícono
cuentaminutos no está funcionando.
.
.
encendido indica que el
y
.
está apagado indica que el
Poner en funcionamiento el horno
1. Encienda el panel de control pulsando el icono
. El aparato emite un triple sonido ascendente.
2. Pulse el ícono
de cocción manual deseado. Se pueden programar
la temperatura y la duración de la cocción.
Pulse el ícono
cocción automático deseado. La temperatura y la
duración de la cocción están prefijadas. Es posible
modificar sólo la duración según el programa elegido.
La palabra “AUTO” que aparece en la pantalla indica
que la temperatura sigue un perfil de cocción preciso.
Se puede programar una cocción retrasada.
3. Pulse el ícono
4. El horno entrará en la fase de precalentamiento y
los indicadores de precalentamiento se iluminarán a
medida que la temperatura sube.
5. Una señal sonora y el encendido de todos los
indicadores de precalentamiento indicarán que el
precalentamiento ha finalizado. A partir de ese
momento, es posible hornear los alimentos
6. Durante la cocción es posible:
- modificar la temperatura pulsando el ícono
girar el mando y confirmar pulsando nuevamente el
ícono
- programar la duración de una cocción (ver
(solo para programas manuales);
para seleccionar el programa
para seleccionar el programa de
para que comience la cocción.
,
Programas);
- interrumpir la cocción pulsando el ícono
este caso, el aparato recuerda la temperatura
eventualmente modificada anteriormente (solo para
programas manuales).
- apagar el horno manteniendo presionado el ícono
durante 3 segundos.
7. El aparato posee un sistema que, cuando se
interrumpe la corriente eléctrica y la temperatura del
horno no descendió demasiado, reanuda el
programa desde el punto en el cual fue
interrumpido. En cambio, las programaciones que
están esperando comenzar, no se restablecen
cuando retorna la corriente y deben volver a ser
programadas (por ejemplo: se ha programado el
comienzo de una cocción para las 20:30 hs. A las
19:30 hs se interrumpe la corriente. Cuando se
restablece el paso de corriente, se debe volver a
realizar la programación).
! En el programa BARBACOA no está previsto el
precalentamiento.
! No apoye nunca objetos en el fondo del horno
porque se puede dañar el esmalte.
! Coloque siempre los recipientes de cocción sobre
la parrilla suministrada con el aparato.
Ventilación de enfriamiento
Para lograr una disminución de la temperatura
externa, un ventilador de enfriamiento genera un
chorro de aire que sale entre el panel de control y la
puerta del horno y también de la parte inferior de la
puerta. Al comienzo del ciclo de limpieza, el
ventilador funciona a baja velocidad.
! Al final de la cocción, el ventilador permanece en
funcionamiento hasta que el horno esté
suficientemente frío.
Luz del horno
La luz se enciende en el momento en el que
comienza un programa de cocción (se activa en el
menú programaciones).
En los modelos que poseen LED INSIDE cuando
comienza la cocción se encienden los led de la
puerta para lograr una mejor iluminación de todos
los niveles de cocción.
Indicadores de calor residual
El aparato está dotado de un indicador de calor
residual. Con el horno apagado, en la pantalla se
indica que la temperatura en el interior de la cavidad
es elevada a través del encendido de la barra de
“calor residual”. Los elementos que forman la barra
se irán apagando a medida que la temperatura en el
interior del horno disminuye.
. En
44
Page 45

Modo Demo
! El aparato no entra en modo DEMO, si primero no
se elige el idioma.
El horno tiene la posibilidad de funcionar en modo
DEMO: Se desactivan todos los elementos
calentadores pero los mandos permanecen
operativos.
Para activar el modo DEMO, apague el horno,
mantenga girado el mando en sentido horario y
Restablecimiento de las programaciones
de fábrica
Existe la posibilidad de que el horno vuelva a
funcionar con los valores definidos en fábrica
reinicializando todas las programaciones realizadas
por el usuario (idioma, tonos, duraciones
personalizadas, etc.). Para realizar la reinicialización,
apague el horno y mantenga presionadas
simultáneamente durante 6 segundos las teclas
ES
,
pulse simultáneamente el ícono
segundos. Se emitirá una señal sonora y en la
pantalla se visualizará “DEMO”
Para desactivar el modo DEMO, mantenga girado el
mando en sentido antihorario y pulse
simultáneamente el ícono
Se emitirá una señal sonora para confirmar la
desactivación.
durante 10
durante 3 segundos.
, . Una vez producido el restablecimiento,
se emitirá una señal sonora. La primera vez que se
pulse el ícono
se vuelve al primer encendido.
Espera (Stand by)
Este producto satisface los requisitos impuestos por la
nueva Directiva Europea sobre la limitación del
consumo de energía en modo de espera o stand by.
Si no se efectúan operaciones durante 30 minutos y no
se ha realizado un bloqueo de mandos o de la puerta,
el aparato automáticamente se ubica en modo de
espera o stand by. El modo de espera se indica con la
visualización de la imagen ECO Mode en la pantalla.
Apenas se interactúa nuevamente con el aparato, el
sistema retorna al modo operativo.
45
Page 46

Programas
ES
! Para garantizar que los alimentos sean suaves y
crocantes, el horno lanza como vapor de agua la
humedad que naturalmente proviene de los
alimentos. De este modo se pueden obtener
excelentes resultados de cocción en todos los
platos.
! Cada vez que se enciende el horno se propone el
primer programa de cocción manual.
Programas de cocción manuales
! Todos los programas tienen una temperatura de
cocción prefijada. La misma se puede modificar
manualmente eligiendo un valor entre 40 y 250°C
(270ºC para el programa BARBACOA). Las
modificaciones de la temperatura se memorizarán y se
propondrán la próxima vez que se utilice el programa.
Si la temperatura elegida es inferior a la temperatura
interna del horno, en la pantalla se visualizará el
mensaje “HORNO DEMASIADO CALIENTE”. De todos
modos, es posible comenzar la cocción.
Si una cocción comienza sin haber programado su
duración, en la pantalla se visualiza el tiempo
transcurrido desde que comenzó.
Programa MULTINIVEL
Se encienden todos los elementos calentadores y se
pone en funcionamiento el ventilador. Debido a que el
calor es constante en todo el horno, el aire cocina y dora
la comida de modo uniforme. Es posible utilizar hasta un
máximo de dos niveles simultáneamente.
Programa BARBACOA
Se enciende el elemento calentador superior y el asador
automático (si está presente). La temperatura elevada
y directa del grill es aconsejada para los alimentos que
necesitan una temperatura superficial alta. Realice las
cocciones con la puerta del horno cerrada (ver “Consejos
prácticos para cocinar”).
Programa GRATINADO
Se enciende el elemento calentador superior y,
durante una parte del ciclo, también se ponen en
funcionamiento el elemento calentador circular, el
ventilador y el asador automático (cuando existe).
Une a la irradiación térmica unidireccional la
circulación forzada de aire en el interior del horno.
Esto impide que se quemen superficialmente los
alimentos aumentando el poder de penetración del
calor. Realice las cocciones con la puerta del horno
cerrada (ver “Consejos prácticos para cocinar”).
Programa ASADO
Se encienden los elementos calentadores superior y
circular y se pone en funcionamiento el ventilador. Une a
la irradiación térmica unidireccional la circulación forzada
de aire en el interior del horno. Esto impide que se
quemen superficialmente los alimentos aumentando el
poder de penetración del calor.
Utilice el horno con la puerta cerrada.
Programa PESCADO
Se encienden los elementos calentadores inferior y
circular y se pone en funcionamiento el ventilador.
Esta combinación permite cocinar en forma ligera
los platos de pescado.
Programa PIZZA
Se encienden los elementos calentadores inferior y
circular y se pone en funcionamiento el ventilador.
Esta combinación permite un rápido calentamiento
del horno. Cuando utilice más de un nivel a la vez,
en la mitad de la cocción es necesario intercambiar
sus posiciones.
Programa SUBIDA DE MASA
Se enciende el elemento calentador circular y se pone en
funcionamiento el ventilador sólo durante la fase de
calentamiento. La temperatura del horno es ideal para
activar el proceso de subida de masa. Durante la subida
de masa mantenga la puerta del horno cerrada.
Programa REPOSTERÍA
Se enciende el elemento calentador posterior y se
pone en funcionamiento el ventilador garantizando
un calor suave y uniforme en el interior del horno.
Este programa es adecuado para la cocción de
alimentos delicados (por ej. tortas que necesitan
subida de masa).
Programa PASTEURIZACIÓN
Este tipo de cocción es ideal para frutas, verduras, etc.
Los recipientes de pequeñas dimensiones pueden
colocarse en 2 niveles (bandeja 1º nivel y parrilla 3º
nivel) Deje enfriar los recipientes en el interior del
horno. Hornee cuando el horno está frío.
Programas CARNE/PESCADO/VERDURAS A
BAJA TEMPERATURA
Este tipo de cocción, utilizado durante años por
profesionales del sector, permite cocinar los
alimentos (carnes, pescados, fruta y verdura) a
temperaturas muy bajas ( 75, 85 y 110ºC),
garantizando una cocción perfecta y exaltando al
máximo las cualidades gustativas.
Las ventajas son importantes:
46
Page 47

• siendo las temperaturas de cocción muy bajas (en
general, menores que la temperatura de evaporación),
la dispersión de los jugos de cocción debida a la
evaporación es notablemente menor y el alimento se
vuelve más blando;
• en la cocción de carnes, las fibras musculares se
contraen menos que en la cocción clásica. El resultado
es una carne más tierna que no necesita de una fase
de reposo después de la cocción. El dorado de la
carne deberá realizarse antes de colocarla en el horno.
La cocción a baja temperatura bajo vacío,
utilizada desde hace 30 años por los más grandes
chef, presenta numerosas cualidades:
• gastronómicas: permite concentrar los aromas
respetando las características gustativas del alimento
y manteniéndolos tiernos.
• higiénicas: debido a que se respetan las normas de higiene,
este tipo de cocción protege a los alimentos contra los
efectos nocivos del oxígeno y garantiza una conservación
más prolongada de las comidas en el frigorífico.
• organizativas: gracias a que el tiempo de conservación
es mayor, es posible preparar los platos con mucha
anticipación.
• dietéticas: esta cocción limita el uso de las sustancias
grasas y, por lo tanto, permite realizar una cocción
ligera y digerible.
• económicas: reduce notablemente la disminución de
peso de los productos.
Para utilizar esta técnica, es necesario poseer una
máquina de vacío que posea bolsas especiales.
Siga atentamente las instrucciones indicadas para
envasar bajo vacío los alimentos.
La técnica del vacío permite la conservación de
productos crudos (fruta, verdura, etc.) y de
productos ya cocidos (cocción tradicional).
Programa DESCONGELACIÓN
El ventilador colocado en el fondo del horno, hace
circular el aire a temperatura ambiente alrededor de
la comida. Es aconsejable para la descongelación
de cualquier tipo de alimentos, pero en particular
para alimentos delicados que no deben recibir calor,
por ejemplo: tortas heladas, dulces con crema,
dulces de fruta.
Programa ECO
Se enciende el elemento calentador posterior y se
pone en funcionamiento el ventilador garantizando un
calor suave y uniforme en el interior del horno. Este
modo de ahorro de energía está recomendado para
pequeños platos, ideal para calentar comida y
terminar platos a medio cocinar.
Presente sólo en algunos modelos.
*
Asador rotativo*
Para accionar el asador
rotativo (ver la figura)
proceder del siguiente
modo:
1. coloque la bandeja
en la posición 1;
2. coloque el soporte
del asador rotativo en la
posición 3 e introduzca
el espetón en el orificio
correspondiente ubicado en la pared posterior del
horno;
3. accione el asador rotativo seleccionando los
programas
o ;
Programas de cocción automáticos
temperaturatemperatura
! La
temperatura y la duración de la cocción están
temperaturatemperatura
preestablecidaspreestablecidas
preestablecidas por el sistema
preestablecidaspreestablecidas
Óptima ProgramadaÓptima Programada
Óptima Programada) que garantiza automáticamente un
Óptima ProgramadaÓptima Programada
resultado perfecto. La cocción se interrumpe
automáticamente y el horno avisa cuando la comida está
lista. La cocción se puede realizar horneando en
calientecaliente
caliente. Se puede personalizar la duración de la
calientecaliente
cocción antes de que comience, en base a los
gustos personales, modificándola en ±5/20 minutos
según el programa elegido. De todos modos, una
vez comenzada la cocción, también es posible
modificar su duración. Si la modificación se realiza
antes del comienzo del programa, se memoriza y se
vuelve a proponer la próxima vez que se utiliza el
programa. Si la temperatura interna del horno es superior
a la propuesta por el programa elegido, en la pantalla se
visualiza el mensaje “HORNO DEMASIADO CALIENTE”
y no es posible comenzar la cocción; espere hasta que
el horno se enfríe.
En la pantalla se alterna el ícono del programa elegido
con el ícono de sugerencia del nivel adecuado.
! Una vez finalizada la fase de cocción, el horno emite una
señal sonora.
! No abra la puerta del horno para evitar que se alteren los
tiempos y las temperaturas de ejecución de las cocciones.
Programa PAN
Utilice esta función para cocinar pan. Para obtener los
mejores resultados, le aconsejamos seguir atentamente
las siguientes indicaciones:
• seguir los pasos de la receta;
• respetar el peso máximo por bandeja;
• no olvidar colocar 50g (0,5 dl) de agua fría en
la bandeja en la posición 5;
• la subida de la masa se realiza a temperatura
C.O.P.®C.O.P.®
C.O.P.® (
C.O.P.®C.O.P.®
CocciónCocción
Cocción
CocciónCocción
frío o en
fríofrío
fríofrío
ES
47
Page 48

ES
ambiente durante 1 hora o 1 hora y media según
la temperatura de la habitación y hasta que
alcance el doble de la masa inicial.
Receta para el PAN :
1 Bandeja de 1000g como máximo, Nivel bajo
2 Bandejas de 1000g como máximo, Niveles bajo y medio
Receta para 1000g de masa: 600g de Harina, 360g de
Agua, 11g de Sal, 25g de levadura fresca (o 2 sobrecitos
de levadura en polvo)
Proceso:
• Mezcle la harina y la sal en un recipiente grande.
• Diluya la levadura en el agua ligeramente tibia
(aproximadamente 35 grados).
• Realice un hueco en el medio de la harina.
• Vierta en él la mezcla de agua y levadura
• Trabaje la masa hasta obtenerla homogénea y poco
pegajosa, estirándola con la palma de la mano y
volviendo a plegarla sobre sí misma durante 10 minutos.
• Forme una bola, coloque la masa en una
ensaladera y cúbrala con una película transparente
para evitar que la superficie de la misma se seque.
Coloque la ensaladera en el horno con la función
manual SUBIDA DE MASA y deje subir la masa
durante 1 hora aproximadamente (el volumen de la
masa debe crecer hasta el doble).
• Divida la bola para obtener varios panes.
• Colóquelos en la bandeja sobre papel para horno.
• Eche harina sobre los panes.
• Realice cortes en los panes.
• Hornee con el horno frío.
• Dé comienzo al programa de cocción
• Al final de la cocción, deje reposar los panes sobre una
parrilla hasta que estén completamente fríos.
Programa BUEY/TERNERA/CORDERO
Utilice esta función para cocinar carnes de buey,
ternera y cordero. Hornee cuando el horno está frío.
También es posible hornear cuando está caliente.
En algunos programas ASADO, se puede
seleccionar el nivel de cocción deseado:
1. Pulse el ícono
2. con el mando elija entre “BIEN HECHO”, “MEDIO”
y “POCO HECHO”;
3. pulse nuevamente el icono
Programa CERDO
Utilice esta función para cocinar carnes de cerdo.
Hornee cuando el horno está frío. También es
posible hornear cuando está caliente.
Programa POLLO
Esta función es ideal para cocinar carne de pollo
(entero o en trozos). Hornee cuando el horno está
;
.
PAN
frío. También es posible hornear cuando está
caliente.
Programa FILETE DE PESCADO
Esta función es adecuada para cocinar filetes de
pequeñas-medianas dimensiones. Hornee cuando el
horno está frío.
Programa PAPILLOTE DE PESCADO
Utilice esta función para cocinar pescados enteros
de un peso máximo de 1Kg. El envoltorio se puede
colocar directamente en la bandeja. Hornee cuando
el horno está frío.
Programa HOJALDRE
Esta función es ideal para todas las recetas de
hojaldre (que normalmente necesitan una buena
cocción abajo). Hornee cuando el horno está frío.
También se puede hacerlo cuando está caliente.
Programa TARTA
Esta función es ideal para todas las recetas que utilizan
pastaflora (normalmente preparada sin huevo) o prevén un
relleno líquido o muy blando. Hornee cuando el horno está
frío. También es posible hornear cuando está caliente.
Programa BRIOCHE
Esta función es ideal para repostería a base de
levadura natural. Hornee cuando el horno está frío,
también puede hacerlo cuando está caliente.
Programa PLUM-CAKE
Esta función es ideal para todas las recetas a base
de levadura química. Hornee cuando el horno está
frío. También se puede hacerlo cuando está
caliente.
Programa BIZCOCHO
Esta función es ideal para cocinar bizcochos, ya sea
los que contienen levadura natural como los que
contienen levadura química o no contienen levadura.
Hornear cuando el horno está frío. También es
posible colocar en el horno cuando está caliente.
Programa PAELLA
Esta función ha sido estudiada para preparar la
receta de la paella de modo simple y rápido porque
todos los ingredientes se introducen fríos en el
horno. Para obtener los mejores resultados, le
aconsejamos seguir atentamente las siguientes
indicaciones:
• El arroz que utilice debe ser un arroz que no se pega:
se puede utilizar el arroz para ensaladas o el tipo
americano.
• El horno debe estar frío.
• Colocar:
48
Page 49

- la bandeja profunda en el 1º nivel (si disponible como
accesorio) o introducir la parrilla en el 1º nivel y apoyar
en ella una fuente para horno de aproximadamente
35x30x5 cm de altura.
- la bandeja en el 3º nivel.
- la parrilla en el 5º nivel.
Receta para 4 - 6 personas:
• 500 gr de arroz
• 7 dl de agua o caldo
Coloque el arroz en la bandeja profunda sin mojarlo
y cúbralo con el líquido. Cubra la bandeja con el
papel de aluminio.
ES
Receta para 8 personas:
En la bandeja profunda
• 1 cebolla picada
• 500 gr de arroz
• 500 gr de frutos de mar congelados (colas de
camarones, mejillones y almejas peladas, anillos de
calamares, etc.)
• 2 puñados de guisantes congelados
• ¼ de ají picante (peperoncino) cortado en cubitos
• Chorizo (salchicha especiada y condimentada con
páprika) en fetas
• Una cucharada de caldo de pescado en polvo
• 1 dosis de azafrán en polvo
• 700 gr de agua
Cubra la bandeja con papel de aluminio.
En la bandeja
• 8 porciones de filetes de merluza
• 8 (o16) colas de camarones (o langostinos)
• 8 Mejillones enteros para decorar
Cubra la bandeja con papel de aluminio.
En una bandeja para horno apoyada en la parrilla
• 6-8 muslos de pollo precedentemente condimentados
con especias para paella y un chorrito de aceite de oliva.
Al finalizar la cocción, condimentar con aceite crudo.
Programa YOGUR
Se enciende el elemento calentador circular y se pone en
funcionamiento el ventilador sólo durante la fase de
calentamiento. La temperatura de 50 °C es ideal para
preparar yogur.
Receta básica para un litro de yogur: un litro de
leche entera UHT, un vaso de yogur blanco
Proceso:
• Calentar la leche en una olla pequeña de acero hasta
que hierva.
• Quitar la capa de crema superficial y dejar enfriar.
• Mezclar 3 o 4 cucharaditas de leche con el yogur hasta
que se incorpore completamente.
• Unir al resto de la leche y mezclar bien.
• Verter en vasos con cierre hermético.
• Colocar los vasos en la bandeja e insertarla en el nivel
2.
• Al finalizar, coloque los vasos en el frigorífico durante
12 horas como mínimo. Conserve el yogur en el
frigorífico una semana como máximo.
• Es posible variar la receta adaptándola al gusto
personal.
Programa ARROZ PILAF
Use esta función para cocinar el arroz. Para obtener
los mejores resultados, le aconsejamos seguir las
siguientes indicaciones:
• El arroz que utilice debe ser un arroz que no se pega:
se puede utilizar el arroz para ensaladas o el tipo
americano.
• El horno debe estar frío.
• la bandeja profunda en el 2º nivel (si disponible como
accesorio) o introducir la parrilla en el 2º nivel y apoyar
en ella una fuente para horno de aproximadamente
35x30x5 cm de altura.
49
Page 50

ES
Programar la cocción
! La programación es posible sólo después de
haber seleccionado un programa de cocción.
Programar la duración
1. Pulse el ícono
2. Gire el mando para programar la duración; si se
mantiene la posición del mando los números se
desplazan más velozmente para facilitar la
programación. En la pantalla se visualiza gráficamente
el desplazamiento en la barra de la duración.
3. Una vez alcanzada la duración deseada, pulse
nuevamente el ícono
gráficamente en la barra de la duración, la
información sobre la hora actual, la duración y la
hora de final de cocción.
.
. En la pantalla se visualiza
diferido, la información sobre la hora actual, el
tiempo que falta para el comienzo, la duración y la
hora de final de cocción.
4. Pulse el ícono
para que comience la programación.
5. En la pantalla se visualiza el mensaje “INICIO DE
COCCIÓN DIFERIDA” y el tiempo restante
desplazando hacia atrás la barra de comienzo diferido.
6. Una vez que ha comenzado la cocción, en la
pantalla se visualiza el tiempo restante con el
llenado de la barra de la duración.
7. Cumplido el tiempo, en la pantalla aparece el mensaje
“COCCIÓN TERMINADA” y se emite una señal sonora.
• Ejemplo: son las 9:00 horas, se programa una
duración de 1 hora y 15 minutos y las 12:30 como
hora de finalización. El programa comenzará
automáticamente a las 11:15 horas.
4. Pulse el ícono
para que comience la cocción.
5. En la pantalla se visualiza el tiempo restante con
el llenado de la barra de la duración.
6. Una vez finalizada la cocción, en la pantalla
aparece el mensaje “COCCIÓN TERMINADA” y se
emite una señal sonora.
• Ejemplo: son las 9:00 horas y se programa una
duración de 1 hora y 15 minutos. El programa se
detiene automáticamente a las 10:15 horas.
Indicación
hora actual
Final
de cocción
Barra
de la duración
Duración
de la cocción
Programar una cocción retrasada
! La programación del final de una cocción es posible
sólo después de haber fijado la duración de la cocción.
! Para utilizar mejor la programación retrasada, es
necesario que el reloj esté correctamente programado.
1. Siga el procedimiento de 1 a 3 descrito para la
duración;
2. Pulse 2 veces el ícono
, centelleará la hora de
final de cocción;
3. gire el mando para programar la hora de final de
cocción; si se mantiene la posición del mando los
números se desplazan más velozmente para facilitar
la programación. En la pantalla se visualiza
gráficamente el desplazamiento en la barra del
comienzo diferido.
4. Una vez alcanzada la hora de final deseada,
presione nuevamente el ícono
. En la pantalla se
visualiza gráficamente en la barra del comienzo
Indicación
hora actual
Barra
de comienzo
diferido
Para anular una programación pulse el icono
Final
de cocción
Duración
de la cocción
.
Consejos prácticos para cocinar
! En las cocciones ventiladas no utilice las posiciones
1 y 5: son las que reciben directamente el aire
caliente lo cual podría quemar las comidas delicadas.
! En las cocciones BARBACOA y GRATINADO, si
se utiliza el asador giratorio, coloque la bandeja en
la posición 1 para recoger los residuos de cocción
(jugos y/o grasas).
MULTINIVEL
• Utilice las posiciones 2 y 4 colocando en la 2 los
alimentos que requieren mayor calor.
• Coloque la bandeja abajo y la parrilla arriba.
BARBACOA
• Introduzca la parrilla en la posición 3 o 4 y
coloque los alimentos en el centro de la parrilla.
• Se aconseja fijar la temperatura en el valor
máximo. No se alarme si la resistencia superior
no permanece constantemente encendida: su
funcionamiento es controlado por un termostato.
PIZZA
• Utilice una bandeja para pizza de aluminio liviano
apoyándola sobre la parrilla suministrada con el horno.
Utilizando la bandeja aumenta el tiempo de cocción
y difícilmente se obtiene una pizza crocante.
• En el caso de pizzas muy condimentadas, es
aconsejable colocar la mozzarella (queso típico
de Italia) en la mitad de la cocción.
50
Page 51

Tabla de cocción
Programas Alimentos Peso
Manuales
Multinivel*
Barbacoa*
Gratinado*
Asador*
Pescado*
Pizza*
Subida
de masa*
Pizza en 2 niveles
Hojaldre en 2 niveles/tortas en 2 niveles
Bizcocho en 2 niveles (sobre una bandeja)
Pollo asado + patatas
Cordero
Caballa
Lasañas
Petisús en 3 niveles
Bizcochos en 3 niveles
Bizcochitos salados de hojaldre y queso en 2 niveles
Tortas saladas
Caballa
Lenguados y sepias
Broquetas de calamares y cangrejos
Filete de merluza
Verduras a la parrilla
Bistec de ternera
Salchichas
Hamburguesas
Bocadillo caliente con jamón y queso (o pan tostado)
Pollo asado con asador giratorio (cuando existe)
Cordero asado con asador giratorio (cuando existe)
Pollo a la parrilla
Sepias
Pollo asado con asador giratorio (cuando existe)
Pato asado con asador giratorio (cuando existe)
Asado de ternera o de buey
Asado de cerdo
Cordero
Asados (carnes blancas o rojas) 1 2 2 no 200 50-75
Dorada
Filetes de pescado
Róbalo con patatas
Pizza
Hogazas
Subida de las masas con levadura natural (brioche,
pan, torta de azúcar, croissant, etc.)
(Kg)
1+1
1
1
1
1
0,7
0,7
0,7
0,5
0,8
0,7
n° 4 o 5
n° 4 o 6
1
1
1,5
1
1,5
1,5
1
1
1
0,7
1
0,5 + 0,5
0,5
0,5
Posiciones Precalentamiento Temperatura
guías
estándar
2 y 4
2 y 4
2 y 4
1 y 2/3
2
1 o 2
2
1 y 3 y 5
1 y 3 y 5
2 y 4
1 y 3
4
4
4
4
3 o 4
4
4
4
4
-
-
2
2
-
-
2
2
2
2
2
2
2
2
2 2 no 40
guías
deslizantes
1 y 3
1 y 3
1 y 3
1 y 3
1
1
1
1 y 2 y 4
1 y 2 y 4
1 y 3
1 y 3
3
3
3
3
2 o 3
3
3
3
3
-
-
2
2
-
-
2
2
2
2
2
2
1
1
si
si
si
si
si
si
si
si
si
si
si
no
no
no
no
no
no
no
no
no
no
no
no
no
no
no
no
no
no
si
si
si
si
si
aconsejada
(°C)
210-220
180
160-170
200-210
190-200
180
180-190
190
180
210
190-200
300
300
300
300
300
300
300
300
300
300
300
210
200
210
210
210
210
210
180
170
190
210-220
190-200
Duración
de la
cocción
(minutos)
20-25
30-35
20-25
65-75
45-50
30-35
35-40
20-25
10-20
20-25
20-30
10-20
10-15
10-15
10-15
15-20
10-20
10-20
10-12
3-5
70-80
70-80
55-60
30-35
70-80
60-70
60-75
70-80
40-45
20-25
12-15
60
15-20
20-25
ES
Pasteurización*
Baja
temperatura*
Descongelación*
Fruta, verdura, etc. 2 2 si 110
Carne
Pescado
Verduras
Todos los alimentos congelados
2
2
2
1
1
1
no
no
no
110
75
85
90-180
90-180
90-180
* Los tiempos de cocción son indicativos y se pueden modificar en base a sus gustos personales. La duración del precalentamiento del horno está prefijada
y no se puede modificar manualmente.
! Programa ECO : Este programa, con mayor tiempo de cocción pero con un notable ahorro energético, es adecuado para platos como filetes de pescado,
pequeña pastelería o verduras. Se adapta también para calentar alimentos y completar cocciones.
51
Page 52

ES
Programas Alimentos Peso
(Kg)
Posiciones Precalentamiento
Pan**
Buey
Ternera
Cordero
Cerdo
Pollo
Filete
de pescado
Papillote
de pescado
Hojaldre
Tarta
Brioche
Plum-cake
Bizcochos
Paella
Arroz Pilaf
Yogur
Automáticos*
Pan (ver la receta)
Asado de buey
Asado de ternera
Cordero asado
Asado de cerdo
Pollo asado
Merluza
Mero
Trucha
Dorada
Lubina
Hojaldre
Torta de manzanas
Pasteles a base de levadura natural (brioche,
pastel de almendras, etc.)
Pasteles a base de levadura (cuatro cuartos,
bizcochos de dos colores, etc.)
Bizcochos
Paella (ver la receta)
Arroz Pilaf (ver la receta)
Yogur 2 2 si
1-1,5
1-1,5
1-1,5
1,2-1,5
1-1,5 2 o 3 2 no
0,4-0,5
0,4-0,5
0,4-0,5
0,4-0,5
0,4-0,5
0,5 2 o 3 2 no
0,5 2 o 3 2 no
0,7 2 o 3 2 no
0,7 2 o 3 2 no
0,5 2 1 no
guías
estándar
1 2 o 3 2 no
2 o 3 2 no
2 o 3 2 no
2 o 3 2 no
2 o 3 2 no
2 o 3
2 o 3
2 o 3
2 o 3
2 o 3
1 2 o 3 2 no
1-3-5 1-2-4 no
guías
deslizantes
2
2
2
2
2
no
no
no
no
no
* La duración de una cocción automática se programa. Los valores pueden ser modificados por el usuario a partir de la duración prefijada.
** Según la receta, añadir 50 gr (0,5 dl) de agua en la bandeja colocada en la posición 5.
52
Page 53

Precauciones y consejos
! El aparato ha sido proyectado y fabricado en
conformidad con las normas internacionales sobre
seguridad. Estas advertencias se suministran por
razones de seguridad y deben ser leídas atentamente.
Seguridad general
• El aparato ha sido fabricado para un uso de tipo no
profesional en el interior de una vivienda.
• El aparato no se debe instalar al aire libre, tampoco
si el espacio está protegido porque es muy
peligroso dejarlo expuesto a la lluvia y a las
tormentas.
• Para mover el aparato utilice siempre las manijas
correspondientes ubicadas en los costados del
horno.
• No toque el aparato descalzo o con las manos y
pies mojados o húmedos.
• El aparato debe ser utilizado para cocinar
alimentos, sólo por personas adultas y
siguiendo las instrucciones contenidas en este
manual. Cualquier otro uso (como por ejemplo:
calefacción de ambientes) se debe considerar
impropio y, por lo tanto, peligroso. El fabricante
no puede ser considerado responsable por
eventuales daños derivados de usos impropios,
erróneos e irracionales.
• Mientras se utiliza el aparato, los elementos
calentadores y algunas partes de la puerta del
horno se calientan mucho. Tenga cuidado de no
tocarlos y mantenga a los niños alejados de
ellos.
• Evite que el cable de alimentación eléctrica de otros
electrodomésticos entre en contacto con partes
calientes del horno.
• No obstruya las aberturas de ventilación y de
eliminación del calor.
• Tome la manija de apertura de la puerta en el
centro: en los costados podría estar caliente.
• Utilice siempre guantes para horno para introducir o
extraer recipientes.
• No cubra el fondo del horno con hojas de aluminio.
• No coloque materiales inflamables en el horno: si el
aparato se pone en funcionamiento
inadvertidamente, podría incendiarse.
• No desconecte el aparato de la toma de corriente
tirando del cable sino sujetando el enchufe.
• No realice la limpieza o el mantenimiento sin haber
desconectado primero el aparato de la red eléctrica.
• En caso de avería, no acceda nunca a los
mecanismos internos para intentar una reparación.
Llame al Servicio de Asistencia Técnica (ver
Asistencia).
• No apoye objetos sobre la puerta del horno abierta.
• Evite que los niños jueguen con el aparato.
• No está previsto que el aparato sea utilizado por
personas (incluidos los niños) con capacidades
físicas, sensoriales o mentales disminuidas, por
personas inexpertas o que no tengan familiaridad
con el producto, salvo que estén vigiladas por una
persona responsable de su seguridad, o que hayan
recibido instrucciones preliminares sobre el uso del
aparato.
Eliminación
• Eliminación del material de embalaje: respete las
normas locales, de esta manera los embalajes
podrán ser reutilizados.
• La norma europea 2002/96/CE sobre la eliminación
de aparatos eléctricos y electrónicos (RAEE),
establece que los electrodomésticos no se deben
eliminar de la misma manera que los desechos
sólidos urbanos. Los aparatos en desuso se deben
recoger separadamente para optimizar la tasa de
recuperación y reciclaje de los materiales que los
componen e impedir potenciales daños para la
salud y el medio ambiente. El símbolo de la
papelera tachada se encuentra en todos los
productos para recordar la obligación de
recolección separada.
Para obtener mayor información sobre la correcta
eliminación de electrodomésticos, los poseedores
de los mismos podrán dirigirse al servicio público
responsable o a los revendedores.
Ahorrar y respetar el medioambiente
• Utilizando el horno en los horarios que van desde
las últimas horas de la tarde hasta las primeras
horas de la mañana, se colabora en la reducción de
la carga de absorción de las empresas eléctricas.
Las opciones de programación, en especial, la
“cocción retrasada” (ver Programas) y la “limpieza
automática retrasada” (ver Mantenimiento y
cuidados), le permitirán organizarse en ese sentido.
• Se recomienda efectuar siempre las cocciones en
BARBACOA y GRATINADO con la puerta cerrada:
se obtendrán así mejores resultados y también un
sensible ahorro de energía (10% aproximadamente).
• Mantenga las juntas en buen estado y limpias para
que se adhieran bien a la puerta y no provoquen
dispersión del calor.
!Este producto satisface los requisitos impuestos por
la nueva Directiva Europea sobre la limitación del
consumo de energía en modo de espera o stand by.
ES
53
Page 54

Mantenimiento y cuidados
Vidrio
Lampara
Horno
F
ES
Interrumpir el suministro de corriente
eléctrica
Antes de realizar cualquier operación, desconecte el
aparato de la red de alimentación eléctrica.
Limpiar el aparato
• Las pequeñas diferencias de color en la parte
delantera del horno son debidas a los distintos
materiales como vidrio, plástico o metal.
• Las posibles sombras que se puedan advertir en
el vidrio de la puerta, similares a estrías, son
debidas al reflejo de la luz de la lámpara del horno.
• A temperaturas muy elevadas el esmalte se marca
a fuego. Durante este proceso podrían producirse
variaciones cromáticas. Esto es normal y no influye
de ninguna manera en el funcionamiento del horno.
Los bordes de las chapas delgadas no pueden ser
esmaltados completamente y, por lo tanto, pueden
parecer toscos. Esto no perjudica la protección
anticorrosiva.
• Las partes externas esmaltadas o de acero
inoxidable y las juntas de goma se pueden limpiar
con una esponja empapada en agua tibia y jabón
neutro. Si las manchas son difíciles de eliminar use
productos específicos. Se aconseja enjuagar
abundantemente y secar después de la limpieza.
No utilice polvos abrasivos ni sustancias corrosivas.
• El interior del horno se debe limpiar
preferentemente cada vez que se utiliza, cuando
todavía está tibio. Utilice agua caliente y
detergente, enjuague y seque con un paño suave.
Evite el uso de productos abrasivos.
• Los accesorios se pueden lavar como cualquier
vajilla, incluso en lavavajillas, con excepción de
las guías deslizables.
• Se aconseja no rociar con detergentes directamente
sobre la zona de mandos, sino utilizar una esponja.
! No utilice nunca limpiadores a vapor o de alta
presión para la limpieza del aparato.
Limpiar la puerta
! En los modelos que poseen LED INSIDE no se
puede desmontar la puerta.
Limpie el vidrio de la puerta con esponjas y
productos no abrasivos y séquelo con un paño
suave; no utilice materiales ásperos abrasivos o
raederas metálicas afiladas que puedan rayar la
superficie y quebrar el vidrio.
Para realizar una limpieza más profunda es posible
extraer la puerta del horno:
1. Para ello, abra completamente la puerta (ver la figura);
2. utilizando un destornillador, levante y gire las palancas
F F
F ubicadas en las dos bisagras (ver la figura);
F F
3. Sujete la puerta de los
costados y ciérrela lenta pero no
completamente. Luego tire la
puerta hacia sí, extrayéndola de
su lugar (ver la figura). Vuelva a
colocar la puerta siguiendo el
mismo procedimiento pero en
sentido contrario.
Controlar las juntas
Controle periódicamente el estado de la junta que
rodea la puerta del horno. Si se encontrara dañada
llame al Centro de Asistencia Técnica más cercano
(ver Asistencia). Es aconsejable no usar el horno
hasta que no haya sido reparada.
Sustituir la bombilla
Para sustituir la bombilla de iluminación del horno:
1. Quite la tapa de vidrio del portalámpara.
2. Extraiga la bombilla y sustitúyala con una similar:
Lámpara halógena
tensión 230V,
potencia 25 W,
casquillo G 9.
3. Vuelva a
colocar la tapa
(ver la figura).
! No toque la
lámpara
directamente con
las manos.
Montaje del Kit Guías Deslizables
Para montar las guías deslizables:
1. Quite los dos
bastidores
extrayéndolos de los
distanciadores A (ver la
A
figura).
54
Page 55

Guía
izquierda
Guía
derecha
2. Elija el nivel en el que
va a introducir la guía
deslizable. Prestando
atención al sentido de
B
Sentido de
C
extracción
extracción de dicha guía,
coloque sobre el bastidor
la ensambladura B
primero y luego la C.
3. Fije los dos bastidores,
con las guías montadas,
en los orificios
correspondientes
ubicados en las paredes
del horno (ver la figura).
Los orificios para el
bastidor izquierdo están
ubicados arriba, mientras
D
que los orificios para el
derecho están abajo.
4. Por último, encastre
los bastidores en los
distanciadores A.
! No coloque las guías deslizables en la posición 5.
Paneles catalíticos laterales y posterior*
ES
Son paneles recubiertos por un esmalte especial
capaz de absorber la grasa que se desprende en
las cocciones.
Este esmalte es lo suficientemente resistente como
para permitir el deslizamiento de los distintos
accesorios (parrillas, bandejas, etc.) sin
deteriorarse. No debe ser motivo de preocupación la
aparición de pequeñas trazas blancas en las
superficies.
No obstante, se debe evitar:
- rayar el esmalte con objetos cortantes (por
ejemplo: un cuchillo);
- Utilizar detergentes o sustancias abrasivas.
Presente sólo en algunos modelos.
*
55
Page 56

Anomalías y soluciones
y
p
ES
Problema Causa posible Solución
La programación de una cocción
no se ha ejecutado.
En la pantalla se visualiza ECO
Mode.
Se ha elegido un programa
automático. En la pantalla se visualiza
“Hot”
la cocción no comienza.
Se ha elegido la cocción
ventilada y el alimento presenta
quemaduras.
Se ha producido una interrupción
de corriente.
El aparato está en modo de
espera.
La temperatura interna en el
horno es superior a la propuesta
or el programa elegido.
Las posiciones 1 y 5: son las
que reciben directamente el
aire caliente que podría generar
quemaduras en los alimentos
delicados.
Volver a realizar las
programaciones.
Toque una tecla cualquiera para
salir del modo de espera.
Espere hasta que el horno se
enfríe.
Se aconseja girar las graseras
en la mitad de la cocción.
56
Page 57

Asistencia
Atención:
El aparato está dotado de un sistema de diagnóstico que permite detectar problemas de funcionamiento. Los
mismos son comunicados en la pantalla mediante mensajes como: “F—” seguido por números.
En esos casos es necesaria la intervención del servicio de asistencia técnica.
Antes de llamar al Servicio de Asistencia Técnica:
• Verifique que la anomalía no pueda ser resuelta por Ud. mismo;
• Vuelva a poner en marcha el programa para controlar si el inconveniente ha sido resuelto;
• Si no es así, llame al Servicio de Asistencia Técnica Autorizado.
! Nunca solicite la asistencia de técnicos no autorizados.
Comunique:
• El tipo de anomalía;
• el mensaje que se observa en la pantalla
• El modelo del aparato (Mod.)
• El número de serie (S/N)
Esta información se encuentra en la placa de características colocada en el aparato.
La siguiente información es válida solo para España
Para otros países de habla hispana consulte a su vendedor
Ampliación de garantía
Llame al 902.363.539 y le informaremos sobre el fantástico plan de ampliación de garantía hasta 5 años.
Consiga una cobertura total adicional de
· Piezas y componentes
· Mano de obra de los técnicos
· Desplazamiento a su domicilio de los técnicos
Y NO PAGUE AVERIAS NUNCA MAS
ES
Servicio de asistencia técnica (SAT)
Llame al 902.133.133 y nuestros técnicos intervendrán con rapidez y eficacia, devolviendo el electrodoméstico
a sus condiciones óptimas de funcionamiento.
En el SAT encontrará recambios, accesorios y productos específicos para la limpieza y mantenimiento de su
electrodoméstico a precios competitivos.
ESTAMOS A SU SERVICIO
57
Page 58

ES
58
Page 59

ES
59
Page 60

ES
05/2011 - 195090728.00
XEROX FABRIANO
60
 Loading...