

Page 1
FK 1041L .20 X/HA @
English
Operating Instructions
OVEN
Contents
Operating Instructions,1
Warnings,2
Assistance,5
Description of the appliance,7
Description of the appliance,9
Installation,26
Start-up and use,28
Modes,29
Precautions and tips,37
Maintenance and care,37
Troubleshooting,39
Italiano
Istruzioni per l’uso
FORNO
Sommario
Istruzioni per l’uso,1
Avvertenze,2
Assistenza,5
Descrizione dell’apparecchio,7
Descrizione dell’apparecchio,8
Installazione,12
Avvio e utilizzo,14
Programmi,15
Precauzioni e consigli,23
Manutenzione e cura,23
Anomalie e rimedi,25
Nederlands
Gebruiksaanwijzing
OVEN
Gebruiksaanwijzing,1
Belangrijk,3
Service,6
Beschrijving van het apparaat,7
Beschrijving van het apparaat,10
Het installeren,40
Starten en gebruik,42
Programma’s,44
Voorzorgsmaatregelen en advies,51
Onderhoud en verzorging,51
Storingen en oplossingen,53
Română
Inhoud
Instrucţiuni de folosire
CUPTOR
Instrucţiuni de folosire,1
Avertizări,3
Asistenţă,6
Descrierea aparatului,7
Descrierea aparatului,11
Instalare,54
Pornire şi utilizare,56
Programe,57
Măsuri de precauţie şi recomandări,64
Întreţinerea şi îngrijirea aparatului,64
Anomalii şi remedii,66
Sumar
Page 2

Avvertenze
ATTENZIONE: Assicurarsi che
l’apparecchio sia spento prima di sostituire
la lampada per evitare la possibilità di
scosse elettriche.
ATTENZIONE: Questo apparecchio e le
sue parti accessibili diventano molto caldi
durante l’uso. Bisogna fare attenzione ed
evitare di toccare gli elementi riscaldanti.
Tenere lontani i bambini inferiori agli 8
anni se non continuamente sorvegliati.
Il presente apparecchio può essere
utilizzato dai bambini a partire dagli 8
anni e da persone con ridotte capacità
siche, sensoriali o mentali oppure con
mancanza di esperienza e di conoscenza
se si trovano sotto adeguata sorveglianza
oppure se sono stati istruiti circa l’uso
dell’apparecchio in modo sicuro e se
si rendono conto dei pericoli correlati.
I bambini non devono giocare con
l’apparecchio. Le operazioni di pulizia
e di manutenzione non devono essere
effettuate dai bambini senza sorveglianza.
Non utilizzare prodotti abrasivi né spatole
di metallo taglienti per pulire lo sportello
in vetro del forno in quanto potrebbero
grafare la supercie, provocando, così,
la frantumazione del vetro.
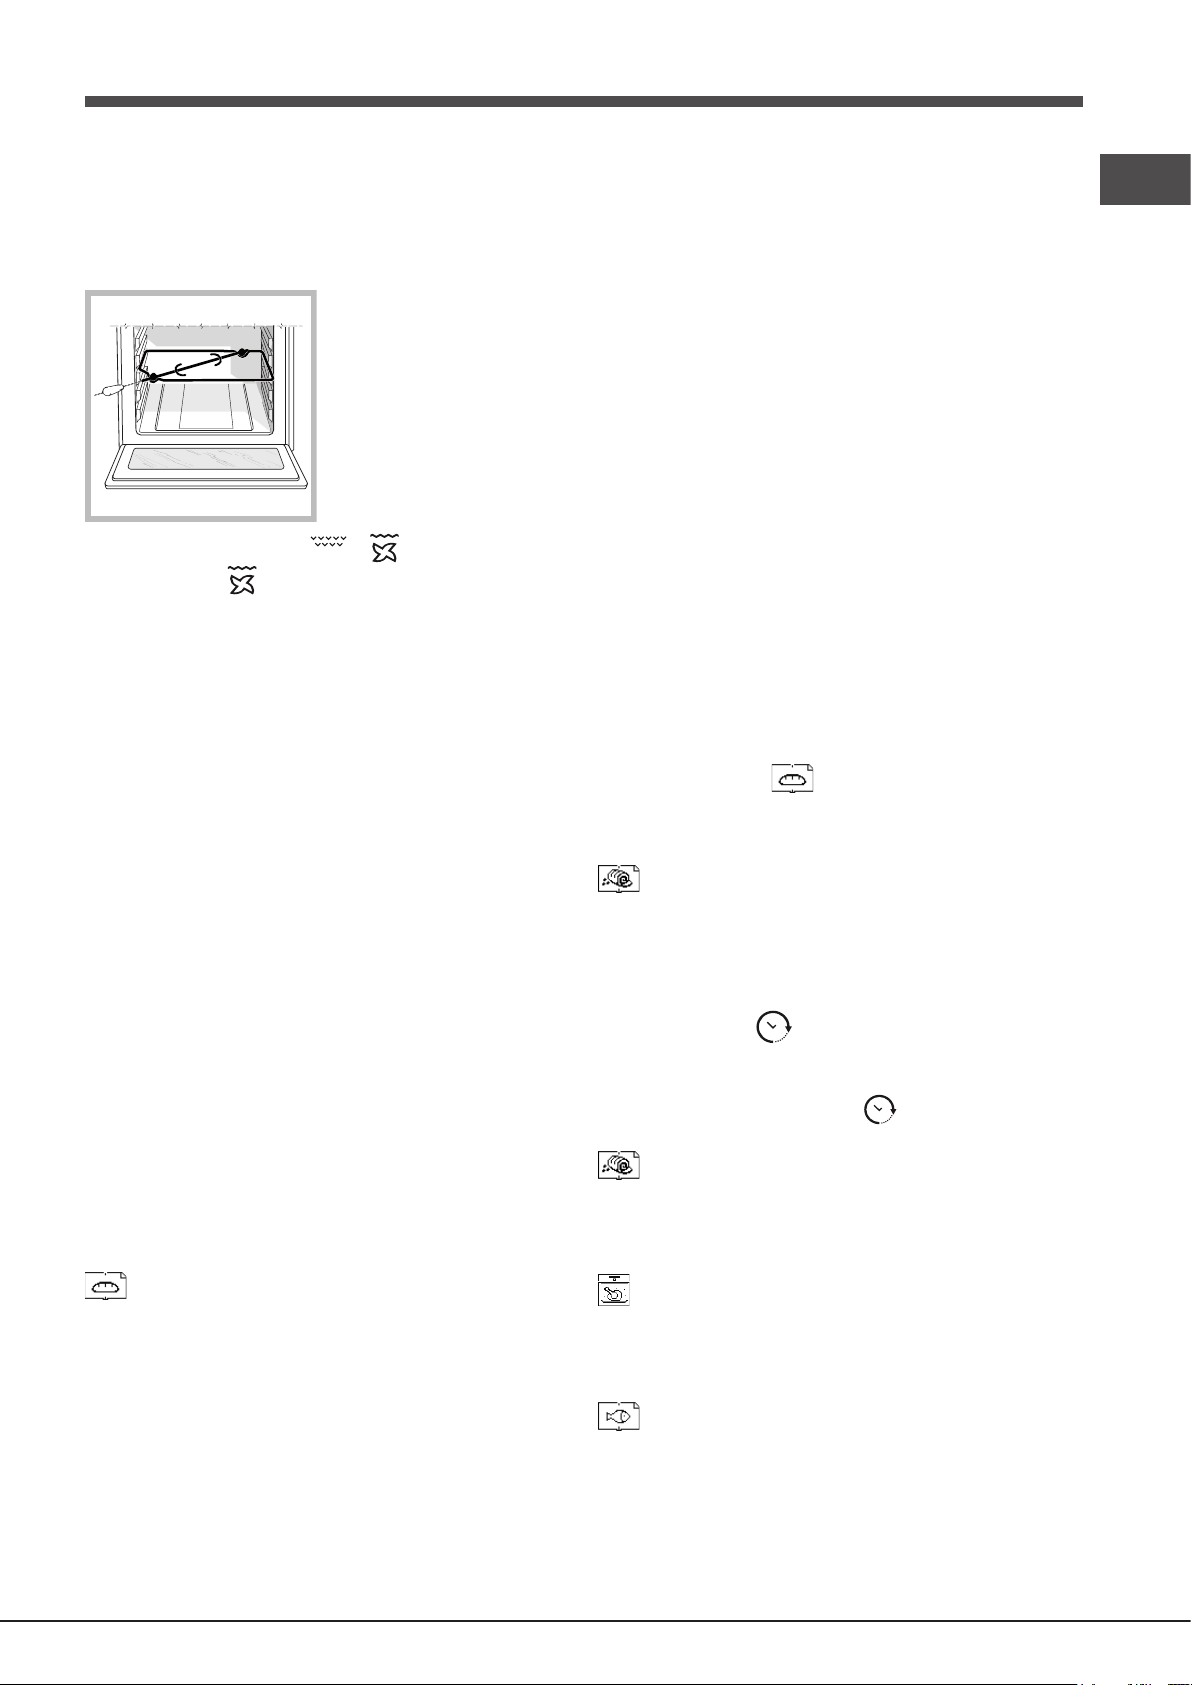
! Quando si inserisce la griglia assicurarsi
che il fermo sia rivolto verso l’alto e nella
parte posteriore della cavità.
Warnings
WARNING: The appliance and its
accessible parts become hot during use.
Care should be taken to avoid touching
heating elements. Children less than 8
years of age shall be kept away unless
continuously supervised. This appliance
can be used by children aged from 8 years
and above and persons with reduced
physical, sensory or mental capabilities
or lack of experience and knowledge
if they have been given supervision
or instruction concerning use of the
appliance in a safe way and understand
the hazards involved. Children shall not
play with the appliance. Cleaning and
user maintenance shall not be made by
children without supervision.
“Prima di attivare la funzione di pulizia
automatica:
• pulire la porta del forno
• con una spugna umida togliere
dall’interno del forno i residui più
consistenti. Non usare detergenti;
• estrarre tutti gli accessori e il kit guide
scorrevoli (se presente);
• non lasciare stronacci o presine sulla
maniglia.”
Durante la pulizia automatica, le superci
possono diventare molto calde: tenere i
bambini a distanza.
Non utilizzare mai pulitori a vapore o ad alta
pressione per la pulizia dell’apparecchio.
2
Do not use harsh abrasive cleaners or
sharp metal scrapers to clean the oven door
glass since they can scratch the surface,
which may result in shattering of the glass.
“Before initiating the automatic cleaning
cycle:
• clean the oven door;
• remove large or coarse food residues
from the inside of the oven using a
damp sponge. Do not use detergents;
• remove all accessories and the sliding
rack kit (where present);
• do not place tea towels”
Page 3

Keep children away from the appliance
during the automatic cleaning cycle as
surfaces may become very hot.
Never use steam cleaners or pressure
cleaners on the appliance.
WARNING: Ensure that the appliance is
switched off before replacing the lamp to
avoid the possibility of electric shock.
! When you place the rack inside, make
sure that the stop is directed upwards and
in the back of the cavity.
Voor het activeren van de functie
automatische reiniging:
• reinig de ovendeur
• verwijder met een natte spons het
ergste vuil uit de oven. Gebruik geen
schoonmaakmiddelen;
• verwijder alle accessoires en de kit met
de geleiders (indien aanwezig);
• laat geen keukendoeken of
pannenlappen aan het handvat hangen.
Gedurende de automatische reiniging
kunnen de oppervlakken zeer heet
worden: houd kinderen op afstand.
Gebruik nooit huishoudapparaten met
stoom of hoge druk voor het reinigen van
de kookplaat.
Belangrijk
PAS OP: Dit apparaat en zijn bereikbare
onderdelen worden tijdens gebruik zeer
heet. Zorg ervoor de verwarmende
elementen niet aan te raken. Zorg ervoor
dat kinderen die kleiner dan 8 jaar oud zijn
niet dichtbij het apparaat kunnen komen,
tenzij onder constant toezicht. Het huidige
apparaat mag alleen door kinderen van
8 jaar en ouder en door personen met
een beperkt lichamelijk, sensorieel of
geestelijk vermogen, of zonder ervaring
en kennis worden gebruikt, mits ze onder
adequaat toezicht zijn, of mits ze zijn
onderricht m.b.t. het veilige gebruik van
het apparaat en zich bewust zijn van
de betreffende gevaren. Voorkom dat
kinderen met het apparaat spelen. De
reinigings- en onderhoudshandelingen
mogen niet door kinderen worden
uitgevoerd, tenzij onder toezicht.
Gebruik geen schurende producten,
noch snijdende metalen spatels om de
glazen deur van de oven te reinigen,
aangezien deze het oppervlak zouden
kunnen krassen, en als gevolg het glas
doen verbrijzelen.
PAS OP: Controleer of het apparaat uit staat
voor u de lamp vervangt, om te voorkomen
dat u een elektrische schok krijgt.
! Bij het inbrengen van de grill erop letten
dat de bevestigingsklem omhoog gericht
is en zich achterin de oven bevindt.
Avertizări
ATENŢIE: Acest aparat şi părţile sale
accesibile devin foarte calde în timpul
folosirii.
Trebuie să ţi atenţi şi să nu atingeţi
elementele de încălzire.
Îndepărtaţi copiii sub 8 ani dacă nu sunt
supravegheaţi continuu.
Acest aparat poate utilizat de copiii de
peste 8 ani şi de persoane cu capacităţi
zice, senzoriale sau mentale reduse sau
fără experienţă şi cunoştinţe dacă se aă
sub o supraveghere corespunzătoare
sau dacă au fost instruiţi cu privire la
folosirea aparatului în mod sigur şi dacă
îşi dau seama de pericolele corelate.
Copiii nu trebuie să se joace cu aparatul.
Page 4

Operaţiunile de curăţare şi de întreţinere
nu trebuie să e efectuate de copii fără
supraveghere.
Nu folosiţi produse abrazive, nici perii de
metal tăioase pentru a curăţa uşa de sticlă
a cuptorului, deoarece ar putea zgâria
suprafaţa, provocând astfel spargerea
geamului.
Nu folosiţi niciodată aparate cu aburi sau
sub presiune pentru a curăţa aparatul.
ATENŢIE: Asiguraţi-vă că aparatul este
stins înainte de a înlocui lampa pentru a
evita posibilitatea electrocutărilor.
!Când introduceţi grătarul, asiguraţi-vă că
opritorul este îndreptat în sus şi în partea
din spate a cavităţii.
Page 5
Assistenza
Attenzione:
L’apparecchio è dotato di un sistema di diagnostica automatica
che consente di rilevare eventuali malfunzionamenti. Questi
vengono comunicati dal display tramite messaggi del tipo:
“F--” seguito da numeri.
In questi casi è necessario l’intervento dell’assistenza
tecnica.
Prima di contattare l’Assistenza:
• Verificare se l’anomalia può essere risolta
autonomamente;
• Riavviare il programma per controllare se l’inconveniente
è stato ovviato;
• In caso negativo, contattare il Servizio Assistenza
Tecnico Autorizzato.
! Non ricorrere mai a tecnici non autorizzati.
Comunicare:
• Il tipo di anomalia;
• il messaggio visibile sul display TEMPERATURA
• Il modello della macchina (Mod.)
• Il numero di serie (S/N)
Queste ultime informazioni si trovano sulla targhetta
caratteristiche posta sull’apparecchio
Assistenza Attiva 7 giorni su 7
• il trasporto dell’elettrodomestico non riparabile in loco.
Inoltre, qualora l’elettrodomestico non sia riparabile la
garanzia prevede la sostituzione a prezzo agevolato in
funzione dell’anzianità del prodotto.
* Al costo di 14,25 centesimi di Euro al minuto (iva inclusa)
dal Lun. al Ven. dalle 08:00 alle 18:30, il Sab. dalle 08:00
alle 13:00 e di 5,58 centesimi di Euro al minuto (iva inclusa)
dal Lun. al Ven. dalle 18:30 alle 08:00, il Sab. dalle 13:00
alle 08:00 e i giorni festivi, per chi chiama dal telefono sso.
Per chi chiama da radiomobile le tariffe sono legate al piano
tariffario dell’operatore telefonico utilizzato.
Le suddette tariffe potrebbero essere soggette a variazione
da parte dell’operatore telefonico; per maggiori informazioni
consultare il sito www.indesit.com.
Assistance
Warning:
The appliance is tted with an automatic diagnostic system
which detects any malfunctions. Malfunctions are signalled
through messages of the following type: “F—” followed by
numbers.
Call for technical assistance in the event of a malfunction.
Before calling for Assistance:
• Check whether you can x the problem yourself.
• Restart the programme to check whether the malfunction
has disappeared.
• If it has not, contact the Authorised Technical Assistance
Service.
Se nasce il bisogno di assistenza o manutenzione basta
chiamare il Numero Unico Nazionale 199.199.199* per
essere messi subito in contatto con il Centro Assistenza
Tecnica più vicino al luogo da cui si chiama.
È attivo 7 giorni su 7, sabato e domenica compresi, e non
lascia mai inascoltata una richiesta.
Estensione di garanzia Airbag
Airbag è il servizio esclusivo creato da Ariston che integra e
prolunga nel tempo i contenuti della garanzia standard: con una
modica cifra protegge il cliente da ogni imprevisto riguardante
l’assistenza e la manutenzione dell’elettrodomestico. Per i 5
anni successivi alla data di acquisto il cliente che aderisce al
programma Airbag avrà diritto gratuitamente a:
• l’intervento entro 48 ore dalla chiamata;
• il contributo per spese di trasferta del Tecnico (diritto di
chiamata);
• la manodopera;
• le parti di ricambio originali;
! Never use the services of an unauthorised technician.
Please have the following information to hand:
• The type of problem encountered.
• The message shown on the TEMPERATURE display.
• The appliance model (Mod.).
• The serial number (S/N).
The latter two pieces of information can be found on the
data plate located on the appliance.
5
Page 6

Service
Belangrijk:
Het apparaat is voorzien van een automatisch diagnostisch
systeem dat eventuele storingen opspoort. Deze kunt u
op het display aezen met berichten zoals: “F--” gevolgd
door cijfers.
In dit geval moet u de technische dienst inschakelen.
Voor u contact opneemt met de Technische Dienst:
• Controleer of u de storing niet zelf kunt oplossen;
• Start het programma opnieuw om te controleren of het
probleem is opgelost;
• Als dit niet het geval is, dient u contact op te nemen met
een Erkende Technische Servicedienst.
! Wendt u nooit tot niet erkende monteurs.
Dit dient u door te geven:
• Het soort storing;
• het bericht dat op het display TEMPERATUUR verschijnt
• Het model apparaat (Mod.)
• Het serienummer (S/N)
Deze informatie bevindt zich op het typeplaatje op het
apparaat.
Asistenţă
! Nu apelaţi niciodată la personal tehnic neautorizat.
Comunicaţi:
• tipul de anomalie;
• modelul aparatului (Mod.)
• numărul de serie (S/N)
Aceste informaţii se găsesc pe tăbliţa cu caracteristici lipită
de aparat.
6
Page 7
Descrizione dell’apparecchio
7
1
3
4
5
Beschrijving van het apparaat
Vista d’insieme
1 POSIZIONE 1
2 POSIZIONE 2
3 POSIZIONE 3
4 POSIZIONE 4
5 POSIZIONE 5
6 GUIDE di scorrimento dei ripiani
7 Ripiano LECCARDA
8 Ripiano GRIGLIA
9 Pannello di controllo
Description of the appliance
Overall view
1 POSITION 1
2 POSITION 2
3 POSITION 3
4 POSITION 4
5 POSITION 5
6 GUIDES for the sliding racks
7 DRIPPING PAN
8 GRILL
9 Control panel
Algemeen aanzicht
1 POSITIE 1
2 POSITIE 2
3 POSITIE 3
4 POSITIE 4
5 POSITIE 5
6 GLEUVEN om roosters in te schuiven
7 Rooster LEKPLAAT
8 Rooster GRILL
9 Bedieningspaneel
Descrierea aparatului
Vedere de ansamblu
1 POZITIA 1
2 POZITIA 2
3 POZITIA 3
4 POZITIA 4
5 POZITIA 5
6 GHIDAJE culisare rafturi
7 Raft TAVĂ
8 Raft GRĂTAR
9 Panou de control
9 6
8
2
7
Page 8
1
2
5
6
12
7
11
10
8913
14
17
18
19
20
21
22
Descrizione dell’apparecchio
25
26
27
28
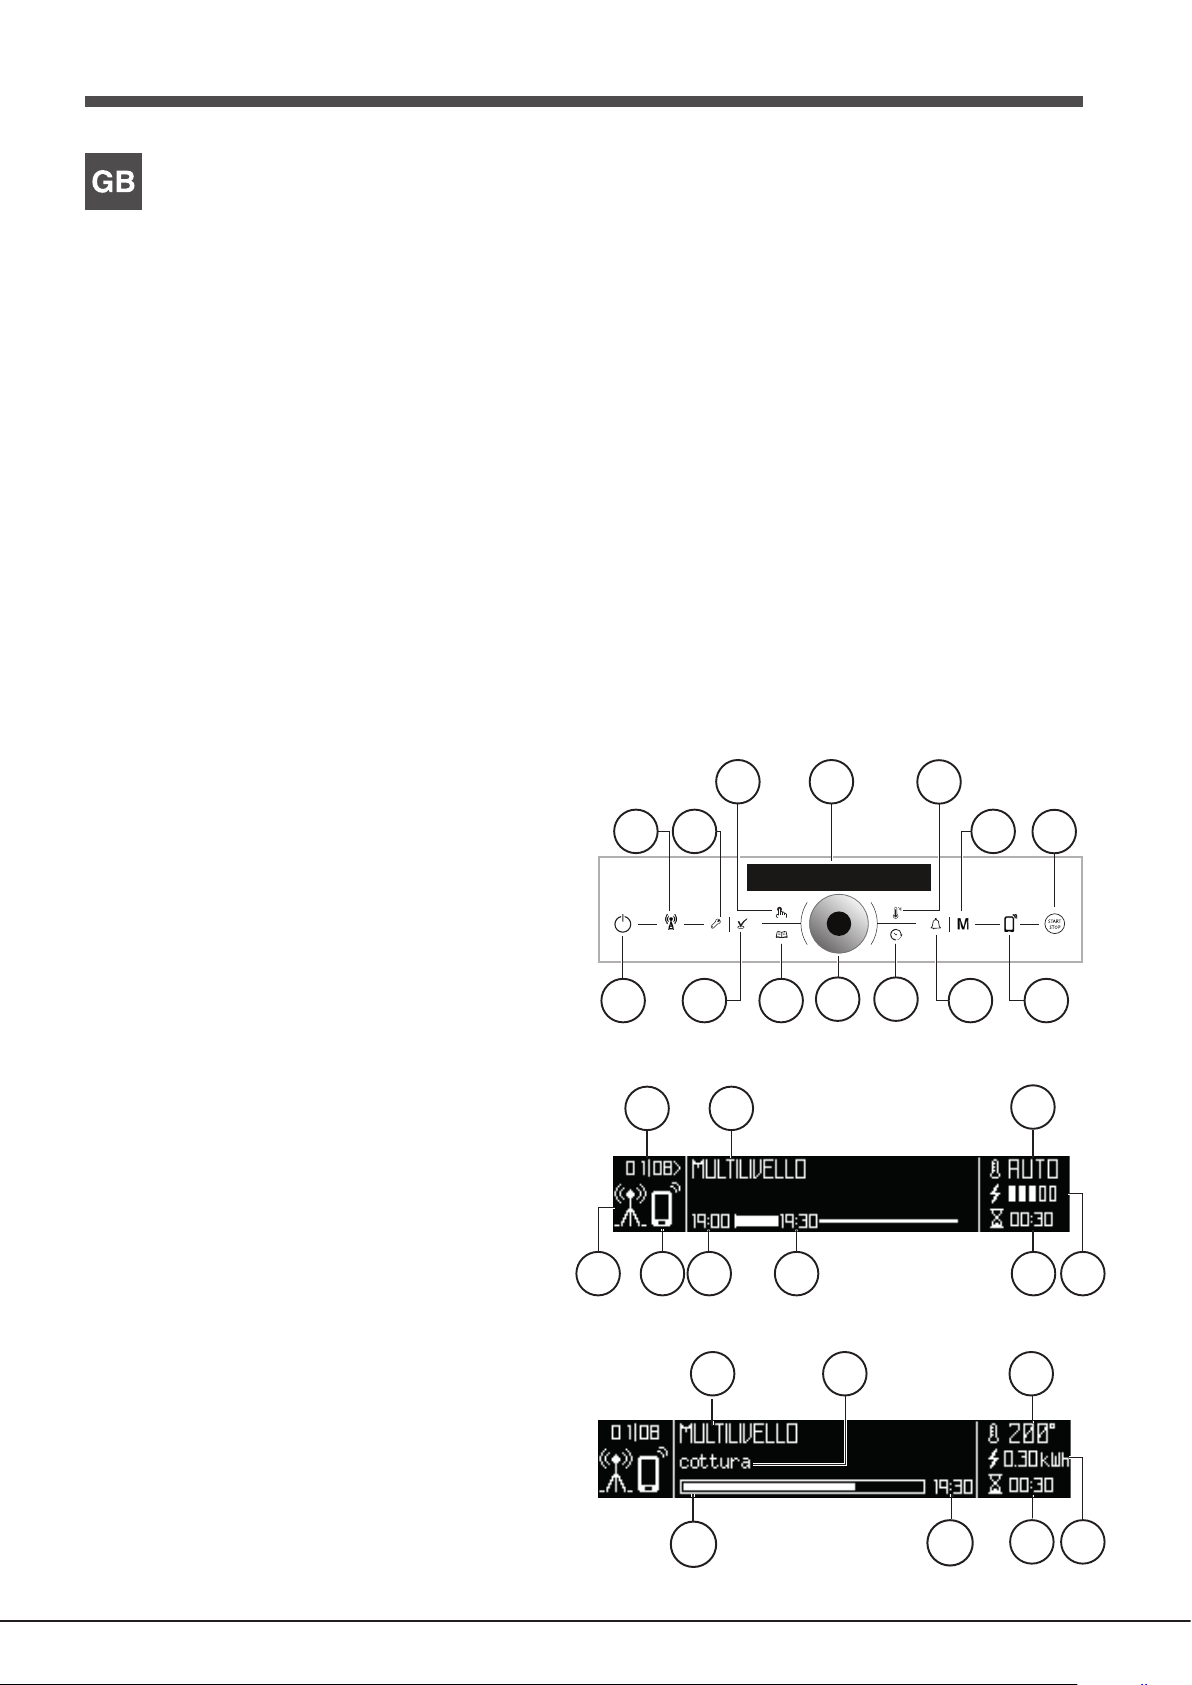
Pannello di controllo
1 Icona JOIN/LEAVE
2 Icona IMPOSTAZIONI
3 Icona PROGRAMMI MANUALI
4 Display
5 Icona TEMPERATURA
6 Icona COTTURA MEMO
7 AVVIO/ARRESTO
8 Icona CONTROLLO REMOTO
9 Icona CONTAMINUTI
10 Icona TEMPI
11 Manopola SELEZIONE
12 Icona PROGRAMMI AUTOMATICI
13 Icona CONFERMA IMPOSTAZIONI
14 ACCENSIONE PANNELLO
Display in programmazione
15 Indicazione numero cottura
16 Indicazione Menù selezionato
17 Indicazione Temperatura
18 Indicazione Stima consumo forno per ciclo automatico
impostato
19 Indicazione DURATA COTTURA
20 Indicazione ORA FINE COTTURA
21 Indicazione ORA
22 Indicatore CONTROLLO REMOTO ABILITATO
23 Indicatore forno CONNESSO ALLA RETE/NON
CONNESSO ALLA RETE
3
4
Display in cottura
24 Indicazione Menù selezionato
25 Suggerisce cosa fare o cosa sta facendo il forno
26 Indicazione Temperatura
27 Indicazione Consumo effettivo forno
28 Indicazione DURATA COTTURA
29 Indicazione ORA FINE COTTURA
30 Indicazione Avanzamento cottura
15 16
23
30
24
29
8
Page 9
1
2
5
6
12
7
11
10
8913
14
17
18
19
202122
Description of the appliance
25
26
27
28
Pannello di controllo
1 JOIN/LEAVE icon
2 SETTINGS icon
3 MANUAL COOKING MODES icon
4 Display
5 TEMPERATURE icon
6 COOKING MEMO Icon
7 START / STOP
8 REMOTE CONTROL Icon
9 MINUTE MINDER icon
10 TIME icon
11SELECTOR control dial
12 AUTOMATIC COOKING MODES icon
13 CONFIRM SETTINGS icon
14 CONTROL PANEL POWER BUTTON
Display in programming mode
15 Cooking mode number indicator
16 Selected menu indicator
17 Temperature indicator
18 Indication Estimated consumption oven for automatic
cycle set
19 COOKING DURATION indicator
20 END OF COOKNG TIME indicator
21 TIME indicator
22 Indicator REMOTE CONTROL ENABLED
23 Indicator oven CONNECTED TO THE NETWORK / NOT
CONNECTED TO THE NETWORK
3
4
Display in cooking mode
24 Selected menu indicator
25 Suggests a course of action or displays the activity
currently being performed by the oven
26 Temperature indicator
27 Consumption actual oven indication
28 COOKING DURATION indicator
29 END OF COOKNG TIME indicator
30 Cooking progress indicator
15 16
23
30
24
29
9
Page 10
1
2
5
6
12
7
11
10
8913
14
17
18
19
20
21
22
252627
28
Beschrijving van het apparaat
Bedieningspaneel
1 Symbool JOIN/LEAVE
2 Symbool INSTELLINGEN
3 Symbool HANDMATIGE PROGRAMMA’S
4 Display
5 Symbool TEMPERATUUR
6 Symbool KOKEN MEMO
7 START / STOP
8 Symbool AFSTANDSBEDIENING
9 Symbool KOOKWEKKER
10 Symbool TIJDEN
11 SELECTIEKNOP
12 Symbool AUTOMATISCHE PROGRAMMA’S
13 Symbool BEVESTIG INSTELLINGEN
14 INSCHAKELEN BEDIENINGSPANEEL
Display wordt geprogrammeerd
15 Aanwijzer nummer bereiding
16 Aanwijzer geselecteerd menu
17 Aanwijzer temperatuur
18 Indicazione Stima consumo forno per ciclo automatico
impostato
19 Aanwijzer DUUR BEREIDING
20 Aanwijzer TIJDSTIP EINDE KOOKTIJD
21 Aanwijzer TIJD
22 Aanwijzer AFSTANDSBEDIENING INGESCHAKELD
23 Indicator oven OP HET NETWERK AANGESLOTEN /
NIET AANGESLOTEN OP HET NETWERK
3
4
Display tijdens bereidingen
24Aanwijzer GESELECTEERD MENU
25 Geeft suggesties over hoe de oven te gebruiken of geeft
aan wat de oven aan het doen is
26 Aanwijzer temperatuur
27 Aanwijzer werkelijke verbruik oven
28 Aanwijzer TIJDSTIP EINDE KOOKTIJD
29 Aanwijzer verloop bereiding
30 Bewegend symbool bereiding
15 16
23
30
24
29
10
Page 11
Descrierea aparatului
1
2
5
6
12
7
11
10
8913
14
17
18
19
20
21
22
25
26
27
28
Panoul de control
1 Pictograma JOIN/LEAVE
2 Pictograma SETARE
3 Pictograma PROGRAME DE MANUALE
4 Display
5 Pictograma TEMPERATURĂ
6 Pictograma COACERE MEMO
7 PORNIRE / OPRIRE
8 Pictograma TELECOMANDA
9 Pictograma CONTOR MINUTE
10 Pictograma TIMP
11 Buton SELECȚIE
12 Pictograma PROGRAME AUTOMAT
13 Pictograma CONFIRMARE SETARE
14 APRINDERE PANOU
Display în programare
15 indicație număr coacere
16 indicație Meniul selectat
17 indicație Temperatură
18 indicație Cuptor consumul estimat pentru set ciclu
automat
19 indicație DURATĂ COACERE
20 indicație ACUM SFÂRŞIT COACERE
21 indicație ACUM
22 indicație TELECOMANDA ACTIVAT
23 indicație cuptor CONECTAT LA REȚEA / NU CONECTAT
LA REȚEA
3
4
Display în bucătărie
24 indicație Meniul selectat
25 Sugerează ce să facă sau ceea ce se face la cuptor
26 indicație Temperatură
27 indicație Cuptor consumul real
28 indicație DURATĂ COACERE
29 indicație ACUM SFÂRŞIT COACERE
30 indicație Progresul coacere
15 16
23
30
24
29
11
Page 12
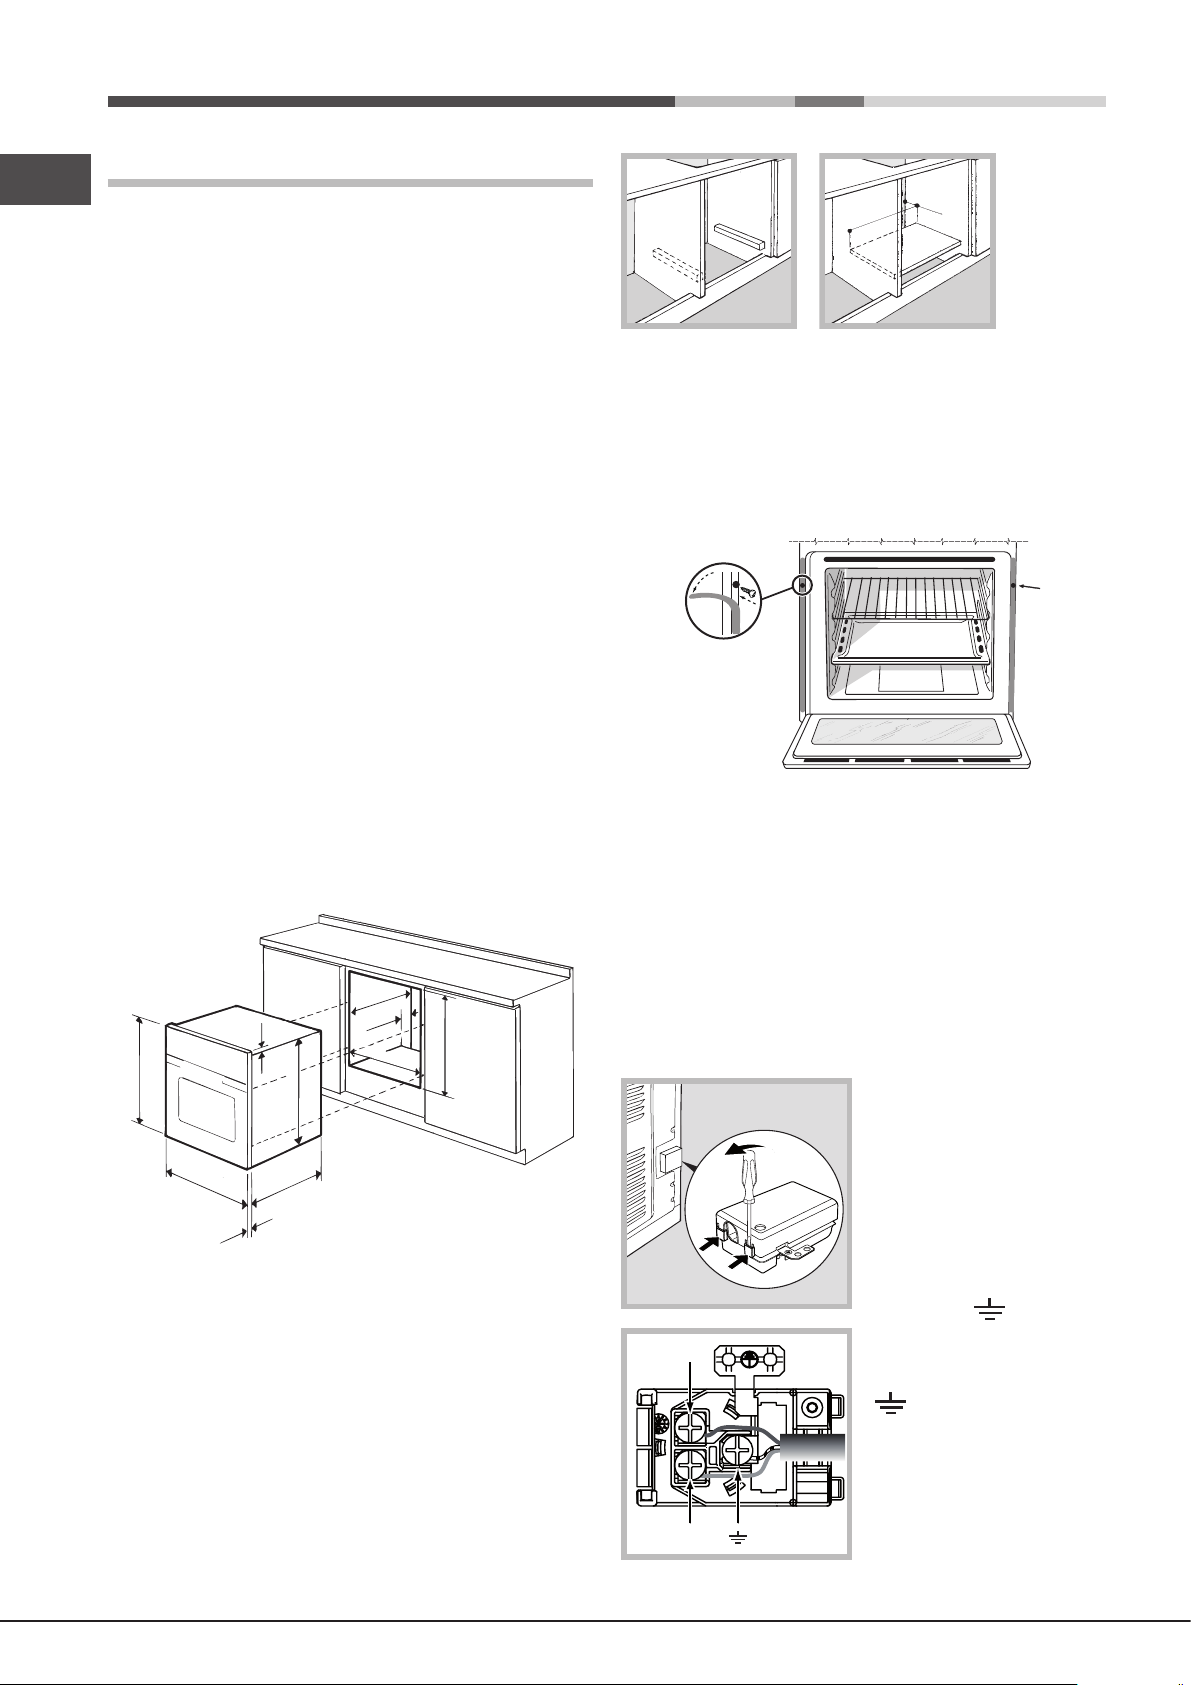
Installazione
590 mm.
IT
! È importante conservare questo libretto per poterlo consultare
in ogni momento. In caso di vendita, di cessione o di trasloco,
assicurarsi che resti insieme all’apparecchio per informare il
nuovo proprietario sul funzionamento e sui relativi avvertimenti.
45 mm.
560 mm.
! Leggere attentamente le istruzioni: ci sono importanti
informazioni sull’installazione, sull’uso e sulla sicurezza.
Posizionamento
! Gli imballaggi non sono giocattoli per bambini e vanno
eliminati secondo le norme per la raccolta differenziata (vedi
Precauzioni e consigli).
! L’installazione va effettuata secondo queste istruzioni e
da personale professionalmente qualicato. Una errata
installazione può causare danni a persone, animali o cose.
Incasso
Per garantire un buon funzionamento dell’apparecchio è
necessario che il mobile abbia le caratteristiche adatte:
• i pannelli adiacenti il forno devono essere di materiale
resistente al calore;
• nel caso di mobili in legno impiallacciato, le colle devono
essere resistenti alla temperatura di 100°C;
• per l’incasso del forno, sia nel caso di inserimento
sottotavolo (vedi gura) che a colonna, il mobile deve
avere le seguenti dimensioni:
550 mm.
min.
20 mm.
595 mm.
550 mm.
20,5 mm.
22,5 mm.*
* Solo per modelli inox
! Una volta incassato l’apparecchio non debbono essere
possibili contatti con le parti elettriche.
Le dichiarazioni di consumo indicate in targhetta caratteristiche
sono state misurate con questo tipo di installazione.
Aerazione
Per garantire una buona aerazione è necessario eliminare
la parete posteriore del vano. È preferibile installare il forno
in modo che appoggi su due listelli in legno oppure su un
piano continuo che abbia un’apertura di almeno 45 x 560
mm (vedi gure).
45 mm.
560 mm.
575-585 mm.
570 mm.
Centraggio e ssaggio
Per ssare l’apparecchio al mobile:
• aprire la porta del forno;
• slare le guarnizioni laterali nella parte alta no a scoprire
i 2 fori di ssaggio;
• ssare il forno al mobile utilizzando 2 viti a legno;
• riposizionare le 2 guarnizioni.
! Tutte le parti che assicurano la protezione debbono essere
ssate in modo tale da non poter essere tolte senza l’aiuto
di qualche utensile.
Collegamento elettrico
I forni dotati di cavo di alimentazione tripolare, sono
predisposti per il funzionamento con corrente alternata alla
tensione e frequenza di alimentazione indicate nella targhetta
caratteristiche posta sull’apparecchio (vedi sotto).
Montaggio del cavo di alimentazione
1. Aprire la morsettiera
facendo leva con un
cacciavite sulle linguette
laterali del coperchio: tirare
e aprire il coperchio (vedi
gura).
2. Mettere in opera il cavo di
alimentazione: svitare la vite
del serracavo e le tre viti dei
contatti L-N- e poi ssare
N
i cavetti sotto le teste delle
viti rispettando i colori Blu
(N) Marrone (L) Giallo-Verde
N
(vedi gura).
3. Fissare il cavo
nell’apposito fermacavo.
L
4. Chiudere il coperchio
della morsettiera.
L
12
Page 13
Allacciamento del cavo di alimentazione alla rete
Montare sul cavo una spina normalizzata per il carico
indicato nella targhetta caratteristiche (vedi a anco).
In caso di collegamento diretto alla rete è necessario
interporre tra l’apparecchio e la rete un interruttore
onnipolare con apertura minima fra i contatti di 3 mm
dimensionato al carico e rispondente alle norme in vigore
(il lo di terra non deve essere interrotto dall’interruttore). Il
cavo di alimentazione deve essere posizionato in modo tale
che in nessun punto superi di 50°C la temperatura ambiente
(per esempio lo schienale del forno).
! L’installatore è responsabile del corretto collegamento
elettrico e dell’osservanza delle norme di sicurezza.
Prima di effettuare l’allacciamento accertarsi che:
• la presa abbia la messa a terra e sia a norma di legge;
• la presa sia in grado di sopportare il carico massimo
di potenza della macchina, indicato nella targhetta
caratteristiche (vedi sotto);
• la tensione di alimentazione sia compresa nei valori nella
targhetta caratteristiche (vedi sotto);
• la presa sia compatibile con la spina dell’apparecchio. In
caso contrario sostituire la presa o la spina; non usare
prolunghe e multiple.
! Ad apparecchio installato, il cavo elettrico e la presa della
corrente devono essere facilmente raggiungibili.
! Il cavo non deve subire piegature o compressioni.
! Il cavo deve essere controllato periodicamente e sostituito
solo da tecnici autorizzati (vedi Assistenza).
! L’azienda declina ogni responsabilità qualora queste
norme non vengano rispettate.
TARGHETTA CARATTERISTICHE
larghezza cm 43,5
Dimensioni*
Volume*
Dimensioni**
Volume**
Collegamenti
elettrici
ENERGY
LABEL
altezza cm 32,4
profondità cm 41,5
lt. 59
larghezza cm 45,5
altezza cm 32,4
profondità cm 41,5
lt. 62
tensione a 220-240V~ 50/60Hz o
50Hz(vedi targhetta caratteristiche)
potenza massima assorbita
2800W
Direttiva 2002/40/CE sull’etichetta
dei forni elettrici. Norma EN 50304
Consumo energia dichiarazione
Classe convezione Forzata funzione di riscaldamento:
ECO.
Questa apparecchiatura è
conforme alle seguenti Direttive
Comunitarie: 2006/95/CEE del
12/12/06 (Bassa Tensione) e
successive modificazioni
- 2004/108/CEE del15/12/04
(Compatibilità Elettromagnetica) e
successive modificazioni
- 93/68/CEE del 22/07/93 e
successive modificazioni.
- 2012/19/CE e successive
modificazioni.
1275/2008 standby/off mode
-
- Direttiva 1999/05/CE
(Apparecchiature radio e
Apparecchiature terminali di
telecomunicazione)
e successive modifiche
IT
* Solo per modelli con guide imbutite.
** Solo per modelli con guide in filo.
13
Page 14
Avvio e utilizzo
IT
ATTENZIONE! Il forno
è dotato di un sistema di
arresto griglie che consente
di estrarle senza che queste
fuoriescano dal forno. (1)
Per estrarre completamente
le griglie è sufficiente,
come indicato sul disegno,
alzarle, prendendole dalla
parte anteriore e tirarle. (2)
! Alla prima accensione fare funzionare il forno a vuoto
per almeno un’ora con il termostato al massimo e a porta
chiusa. Poi spegnere, aprire la porta del forno e aerare il
locale. L’odore che si avverte è dovuto all’evaporazione
delle sostanze usate per proteggere il forno.
Voci del menù impostazioni
Per entrare nel menù impostazioni accendere il pannello di
controllo e premere l’icona .
Utilizzare la manopola per evidenziare le singole voci del
menù.
Per modicare l’impostazione premere l’icona .
Nel menù sono presenti i seguenti parametri:
LINGUA: scelta della lingua visualizzata sul display.
OROLOGIO: impostazione dell’ora esatta.
TONI: attivazione/disattivazione del tono della tastiera.
LUCE: attivazione/disattivazione della luce interna del
forno durante la cottura.
LOGO: attivazione/disattivazione logo all’accensione
GUIDA: attivazione/disattivazione suggerimenti d’uso.
ESCI: uscita dal menù.
! E’ possibile uscire dal menù impostazione premendo
! Ruotando la manopola è possibile modicare i parametri
evidenziati sul display tra i simboli “<“ e “>”.
! Per facilitare le impostazioni, mantenere in posizione la
manopola: i numeri sul display scorrono più velocemente.
! Ogni impostazione viene memorizzata automaticamente
dopo 10 secondi.
! Non è possibile attivare i tasti touch se si indossano dei guanti.
Alcuni modelli sono dotati di un sistema di cerniere che
permette alla porta di chiudersi lentamente senza che sia
richiesto di accompagnarne la corsa con la mano. Per un
corretto utilizzo, prima di chiudere:
• aprire completamente la porta.
• evitare di forzare la chiusura manualmente.
! Per ottimizzare le performance di cottura, al momento
dell’attivazione della funzione selezionata viene effettuato
un settaggio dei parametri del prodotto, che potrebbe
comportare il ritardo dell’accensione della ventola e degli
elementi riscaldanti.
Prima accensione
Dopo l’allacciamento alla rete elettrica, alla prima
alimentazione, accendere il pannello di controllo premendo
l’icona .
Impostare il contaminuti
! Il contaminuti è sempre impostabile sia a forno spento
che acceso. Non controlla l’accensione e lo spegnimento
del forno.
Il contaminuti a tempo scaduto emette un segnale acustico,
che si arresta dopo 30 secondi o premendo un qualsiasi
tasto attivo.
Per regolare il contaminuti:
1. Premere l’icona .
2. Regolare il tempo desiderato tramite la manopola.
3. Raggiunta l’impostazione desiderata, premere
nuovamente l’icona .
A forno spento il display visualizza il conto alla rovescia. A
forno acceso l’icona accesa segnala che il contaminuti
è attivo.
Per annullare il contaminuti, premere l’icona e con
la manopola portare il tempo no a 00:00. Premere
nuovamente l’icona .
Lo spegnimento dell’icona segnala che il contaminuti
è disattivo.
l’icona . Compare la lista delle lingue nel menù. Per
scegliere la lingua desiderata selezionarla tramite la
manopola. Per confermare premere l’icona .
Una volta effettuata la scelta, il display visualizzerà il
menù impostazioni. Premere l’icona oppure scorrere
con la manopola no alla voce ESCI e premere l’icona
per iniziare ad utilizzare il forno.
! Dopo aver impostato la lingua nel menù, trascorso
un tempo di 30 secondi di non utilizzo il display passa
automaticamente alla modalità di programmazione.
14
Avviare il forno
1. Accendere il pannello di controllo premendo l’icona .
L’apparecchio emette un triplice suono ascendente.
2. Premere l’icona per selezionare il programma
di cottura manuale desiderato. Si possono impostare
temperatura e durata di cottura.
Premere l’icona per selezionare il programma di
cottura automatico desiderato. Temperatura e durata di
cottura sono pre-impostate. E’ possibile modicare solo la
durata a seconda del programma scelto. La scritta “AUTO”
che compare sul display indica che la temperatura segue
un preciso prolo di cottura. Si può programmare una
cottura ritardata.
3. Premere l’icona per avviare la cottura.
Page 15
4. Il forno entra nella fase di preriscaldamento, gli indicatori
di preriscaldamento si illuminano man mano che la
temperatura sale.
5. Un segnale acustico e l’accensione di tutti gli indicatori
di preriscaldamento segnalano che il preriscaldamento è
completo. E’ possibile infornare gli alimenti da cuocere
6. Durante la cottura è sempre possibile:
- modicare la temperatura premendo l’icona , ruotare
la manopola e confermare premendo nuovamente l’icona
(solo per programmi manuali);
- programmare la durata di una cottura (vedi Programmi);
- interrompere la cottura premendo l’icona . In questo
caso l’apparecchio ricorda la temperatura eventualmente
modicata in precedenza (solo per programmi manuali).
- spegnere il forno tenendo premuto l’icona per 3
secondi.
7. In caso di black-out, se la temperatura del forno non si
è abbassata troppo, l’apparecchio è dotato di un sistema
che riattiva il programma dal punto in cui è stato interrotto.
Le pianicazioni in attesa di avvio, invece, non vengono
ripristinate al ritorno della corrente e devono essere
riprogrammate (per esempio: è stata programmata l’inizio di
una cottura per le 20:30. Alle 19:30 ce un black-out. Al ritorno
della corrente bisogna reimpostare la programmazione).
! Nel programma BARBECUE non è previsto il
preriscaldamento.
! Non appoggiare mai oggetti sul fondo del forno perché si
rischiano danni allo smalto.
! Porre sempre i recipienti di cottura sulla griglia
in dotazione.
contemporaneamente l’icona per 10 secondi. Viene
emesso un segnale acustico e il display visualizza
“DEMO”
Per disattivare la modalità DEMO, mantenere
girata la manopola in senso antiorario e premere
contemporaneamente l’icona per 3 secondi. Viene
emesso un segnale acustico a conferma della disattivazione.
Ripristino delle impostazioni di fabbrica
Il forno ha la possibilità di essere riportato ai valori di
fabbrica, resettando tutte le impostazioni scelte dall’utente
(lingua, toni, durate personalizzate, ecc...). Per eseguire
il reset spegnere il forno, tenere premuti per 6 secondi
contemporaneamente i tasti , , . Ad avvenuto
ripristino viene emesso un segnale acustico. Alla prima
pressione dell’icona si è riportati alla prima accensione.
Standby
Questo prodotto soddisfa i requisiti imposti dalla nuova
Direttiva Europea sulla limitazione dei consumi energetici
in standby. Se non si eseguono operazioni per 30 minuti
e non è stato impostato nessun blocco di tasti o porta,
l’apparecchio si dispone automaticamente in modalità
standby. La modalità standby è visualizzata con l’immagine
ECO Mode sul display. Non appena si interagisce
nuovamente con l’apparecchio, il sistema ritorna in modalità
operativa.
IT
Ventilazione di raffreddamento
Per ottenere una riduzione delle temperature esterne, una
ventola di raffreddamento genera un getto d’aria che esce
tra il pannello di controllo, porta del forno ed anche nella
parte inferiore della porta forno. All’inizio del ciclo di pulizia
la ventola funziona a bassa velocità.
! A ne cottura la ventola rimane attiva nché il forno non
è sufcientemente freddo.
Luce del forno
La luce si accende aprendo la porta del forno o al momento
dell’avvio di un programma di cottura (se attiva nel menù
impostazioni).
Nei modelli dotati di LED INSIDE all’avvio della cottura si
accendono i led sulla porta per una migliore illuminazione
di tutti i livelli di cottura.
Modalità Demo
! L’apparecchio non entra in modalità DEMO, se prima non
viene scelta la lingua.
Il forno ha la possibilità di funzionare in modalità DEMO:
si disattivano tutti gli elementi riscaldanti, lasciando però
operativi i comandi.
Per attivare la modalità DEMO spegnere il forno,
mantenere girata la manopola in senso orario e premere
Programmi
! Per garantire la perfetta morbidezza e croccantezza dei
cibi il forno rilascia sotto forma di vapore acqueo l’umidità
che proviene naturalmente dal cibo. In questo modo si
possono avere dei risultati di cottura ottimali su tutte le
pietanze.
! Ad ogni accensione il forno propone il primo programma
di cottura manuale.
! In caso di non perfetta chiusura della porta, il display
visualizza “PORTA APERTA”. Rimuovere la causa di non
chiusura della porta per ottenere i migliori risultati di cottura.
Programmi di cottura manuali
! Tutti i programmi hanno una temperatura di cottura
preimpostata. Essa può essere regolata manualmente,
impostandola a piacere tra 40°C e 250°C (270°C per
il programma BARBECUE ). Eventuali modiche della
temperatura veranno memorizzate e riproposte al
successivo utilizzo del programma. Se la temperatura
scelta è inferiore alla temperatura interna nel forno, il
display visualizza la scritta “FORNO TROPPO CALDO”.
E’ comunque possibile avviare la cottura.
Se si avvia una cottura senza averne impostato la durata,
il display visualizza il tempo trascorso dalla partenza.
15
Page 16
IT
Programma MULTILIVELLO
Si attivano tutti gli elementi riscaldanti ed entra in funzione
la ventola. Poiché il calore è costante in tutto il forno, l’aria
cuoce e rosola il cibo in modo uniforme. È possibile utilizzare
no a un massimo di 3 ripiani contemporaneamente.
Programma BARBECUE
Si attiva l’elemento riscaldante superiore e il girarrosto
(ove presente). La temperatura elevata e diretta del grill
è consigliata per gli alimenti che necessitano di un’alta
temperatura superciale. Effettuare le cotture con la porta
del forno chiusa (vedere “Consigli pratici di cottura”).
Programma GRATIN
Si attiva l’elemento riscaldante superiore e durante una
parte del ciclo anche l’elemento riscaldante circolare,
entrano in funzione la ventola e il girarrosto (ove presente).
Unisce all’irradiazione termica unidirezionale la circolazione
forzata dell’aria all’interno del forno.
Ciò impedisce la bruciatura superciale degli alimenti
aumentando il potere di penetrazione del calore. Effettuare
le cotture con la porta del forno chiusa (vedere “Consigli
pratici di cottura”).
Programma ROSTICCERIA
Si attivano gli elementi riscaldanti superiore e circolare ed
entra in funzione la ventola. Unisce all’irradiazione termica
unidirezionale la circolazione forzata dell’aria all’interno del
forno. Ciò impedisce la bruciatura superciale degli alimenti
aumentando il potere di penetrazione del calore.
Effettuare le cotture con la porta del forno chiusa.
Programma PESCE
Si attivano gli elementi riscaldanti superiore e circolare ed
entra in funzione la ventola. Questa combinazione consente
di cuocere con leggerezza piatti di pesce.
Programma PIZZA
Si attivano gli elementi riscaldanti superiore e circolare ed
entra in funzione la ventola. Questa combinazione consente
un rapido riscaldamento del forno. Nel caso si utilizzi più
di un ripiano alla volta, è necessario cambiarli di posizione
tra loro a metà cottura.
Programma LIEVITAZIONE
Si attiva l’elemento riscaldante circolare ed entra in funzione
la ventola solo in fase di riscaldamento. La temperatura del
forno è ideale per l’attivazione del processo di lievitazione.
Durante la lievitazione tenere la porta del forno chiusa.
Programma PASTICCERIA
Si attiva l’elemento riscaldante posteriore ed entra in
funzione la ventola, garantendo un calore delicato e
uniforme all’interno del forno. Questo programma è indicato
per la cottura dei cibi delicati (ad es. dolci che necessitano
di lievitazione).
Programma PASTORIZZAZIONE
Questo tipo di cottura è indicata per la frutta, verdure, ecc....
I contenitori di piccole dimensioni possono essere
posizionati su 2 livelli (leccarda 1° ripiano e griglia 3°
ripiano). Lasciare raffreddare i contenitori all’interno del
forno. Infornare a forno freddo.
Programmi BASSA TEMPERATURA CARNE/
PESCE/VERDURE
Questo tipo di cottura, utilizzato da anni dai professionisti
del settore, consente di cucinare gli alimenti (carni, pesci,
frutta, verdura) a temperature molto basse (75,85 e 110 °C),
garantendo una cottura perfetta ed esaltando al massimo
le qualità gustative.
I vantaggi non sono da sottovalutare:
• essendo le temperature di cottura molto basse (in genere,
inferiori alla temperatura d’evaporazione), la dispersione
dei sughi di cottura dovuta all’evaporazione viene
notevolmente ridotta e l’alimento acquista morbidezza;
• nella cottura di carni, le bre muscolari si ritirano meno
rispetto a una cottura classica. Il risultato è una carne più
tenera che non necessita di una fase di riposo dopo la
cottura. La doratura della carne dovrà essere effettuata
prima di infornare.
La cottura a bassa temperatura sottovuoto, utilizzata
da 30 anni dai più grandi chef, presenta numerose qualità:
• gastronomiche: consente di concentrare gli aromi
rispettando la caratteristiche gustative dell’alimento e
mantenendone la morbidezza e la tenerezza.
• igieniche: poiché vengono rispettate le norme d’igiene,
questo tipo di cottura protegge gli alimenti contro gli effetti
nocivi dell’ossigeno e garantisce una conservazione più
prolungata delle pietanze nel frigorifero.
• organizzative: grazie al prolungamento della durata di
conservazione, è possibile preparare i piatti con largo
anticipo.
• dietetiche: questa cottura limita l’utilizzo delle sostanze
grasse e permette quindi di realizzare una cottura leggera
e digeribile.
• economiche: riduce notevolmente il calo di peso dei
prodotti.
Per utilizzare questa tecnica, è necessario possedere una
macchina sottovuoto dotata di appositi sacchetti. Seguire
attentamente le istruzioni indicate per il confezionamento
sottovuoto degli alimenti.
La tecnica del sottovuoto permette anche la conservazione
dei prodotti crudi (frutta, verdura, ecc.) e dei prodotti già
cotti (cottura tradizionale).
Programma SCONGELAMENTO
La ventola posta sul fondo del forno fa circolare l’aria a
temperatura ambiente attorno al cibo. E’ indicato per lo
scongelamento di qualsiasi tipo di cibo, ma in particolare
per cibi delicati che non vogliono calore come ad esempio:
torte gelato, dolci alla crema o con panna, dolci di frutta.
Programma ECO
Si attiva l’elemento riscaldante posteriore ed entra in funzione la ventola, garantendo un calore delicato e uniforme
16
Page 17
all’interno del forno. Questo programma a risparmio energetico è indicato per la cottura di piccole pietanze, adatto per
riscaldare vivande e completare cotture.
Girarrosto*
Per azionare il girarrosto (vedi
figura) procedere come
segue:
1. mettere la leccarda in
posizione 1;
2. mettere il sostegno del
girarrosto in posizione
3 e inserire lo spiedo
nell’apposito foro posto sulla
parete posteriore del forno;
3. azionare il girarrosto
selezionando i programmi o ;
! Col programma avviato, se si apre la porta il girarrosto
si arresta.
Programmi di cottura automatici
! La temperatura e la durata di cottura sono prestabilite
tramite il sistema C.O.P.® (Cottura Ottimale Programmata)
che garantisce automaticamente un risultato perfetto.
La cottura si interrompe automaticamente e il forno
avvisa quando la pietanza è cotta. La cottura può essere
effettuata infornando a freddo o a caldo. E’ possibile
personalizzare la durata di cottura in base ai propri gusti
personali modicandola, prima dell’avvio, di ±5/20 minuti
a seconda del programma scelto. A cottura avviata è
comunque possibile modicarne la durata. Se la modica
viene effettuata prima dell’avvio del programma, questa
viene memorizzata e riproposta al successivo utilizzo
del programma. Se la temperatura interna nel forno è
superiore a quella proposta per il programma scelto, il
display visualizza la scritta “FORNO TROPPO CALDO” e
non è possibile avviare la cottura; attendere che il forno si
raffreddi.
Il display alterna l’icona del programma scelto con l’icona
di suggerimento del ripiano consigliato.
Ricetta per il PANE :
1 Leccarda di 1000g Max, Ripiano basso
2 Leccarde di 1000g Max, Ripiani basso e medio
Ricetta per 1000g d’impasto : 600g Farina, 360g Acqua,
11g Sale, 25g lievito fresco (oppure 2 bustini in polvere)
Processo:
• Mescolare la farina ed il sale in un grande recipiente.
• Diluire il lievito nell’acqua leggermente tiepida (circa 35
gradi).
• Aprite la farina a fontana.
• Versare il miscuglio di acqua e lievito
• Lavorare no ad ottenimento di un impasto omogeneo
e poco colloso, stirandolo col palmo della mano e
ripiegandolo su se stesso per 10 minuti.
• Formare una palla, mettere l’impasto in un’insalatiera
e ricoprirla con pellicola trasparente per evitare che la
supercie dell’impasto si secchi. Mettere l’insalatiera nel
forno alla funzione manuale LIEVITAZIONE e lasciar
lievitare per circa 1 ora (il volume dell’impasto deve
raddoppiare)
• Dividere la palla per ottenere i diversi pani.
• Disporli sulla leccarda su una carta forno.
• Cospargere i pani di farina.
• Fare dei tagli sui pani.
• Infornare a forno freddo.
• Avviare la cottura PANE
• Alla ne della cottura, lasciare riposare i pani su una
griglia no a completo raffreddamento.
Programma MANZO/VITELLO/AGNELLO
Utilizzare questa funzione per cuocere carni di manzo,
vitello e agnello. Infornare a forno freddo. E’ comunque
possibile infornare anche a forno caldo. Su alcuni
programmi ARROSTO è possibile selezionare il livello di
cottura desiderato:
1. Premere l’icona
2. con la manopola scegliere tra “BEN COTTO”, “MEDIO”
e “AL SANGUE”.
3. premere nuovamente l’icona .
IT
! Al raggiungimento della fase di cottura il forno emette un
segnale acustico.
! Non aprite la porta forno per evitare di falsare i tempi e le
temperature di esecuzione delle cotture.
Programma PANE
Utilizzare questa funzione per cuocere il pane. Per ottenere
i migliori risultati vi consigliamo di seguire attentamente le
indicazioni sotto riportate:
• rispettare la ricetta;
• il peso massimo per leccarda;
• non dimenticare di mettere 50g (0,5 dl) di acqua
fredda sulla leccarda alla posizione 5;
• la lievitazione del impasto va fatto a temperatura
ambiante per 1 ora o 1 ora e mezzo, in funzione della
temperatura della stanza, e in pratica, no al raddoppio
del impasto.
* Presente solo in alcuni modelli.
Programma MAIALE
Utilizzare questa funzione per cuocere carni di maiale.
Infornare a forno freddo. E’ comunque possibile infornare
anche a forno caldo.
Programma POLLO
Questa funzione è ideale per cuocere carne di pollo (intero
o a pezzi). Infornare a forno freddo. È comunque possibile
infornare anche a forno caldo.
Programma FILETTO DI PESCE
Questa funzione è adatta per cuocere letti di piccole-medie
dimensioni. Infornare a forno freddo.
17
Page 18
IT
Programma PESCE AL CARTOCCIO
Utilizzare questa funzione per cuocere pesci interi del peso
massimo di 1Kg. Si può sistemare il cartoccio direttamente
sulla leccarda. Infornare a forno freddo.
Programma CROSTATE
Questa funzione é ideale per tutte le ricette di crostate
(che normalmente necessitano di una buona cottura sotto).
Infornare a forno freddo. E’ comunque possibile infornare
a anche forno caldo.
Programma TORTA BRISE’
Questa funzione è ideale per tutte le ricette che prevedono
l’utilizzo di pastafrolla (di solito preparata senza uova) o che
prevedono un ripieno liquido o molto morbido. Infornare
a forno freddo. È comunque possibile infornare anche a
forno caldo.
Programma BRIOCHE
Questa funzione é ideale per dolci di pasticceria a base
di lievito naturale. Infornare a forno freddo, è comunque
possibile di infornare a forno caldo
Programma PLUM-CAKE
Questa funzione é ideale per tutte le ricette a base di lievito
chimico. Infornare a forno freddo. E’ comunque possibile
infornare a forno caldo.
Programma DOLCI
Questa funzione è ideale per la cottura di dolci sia a base di
lievito naturale, sia a base di lievito chimico e senza lievito.
Infornare a forno freddo. E’ comunque possibile infornare
anche a forno caldo.
e vongole sgusciate, anelli di calamari, ecc)
• 2 manciate di piselli surgelati
• ¼ di peperoncino tagliato a dadini
• Chorizo (salsiccia speziata e condita con paprica) a fette
• Un cucchiaio di brodo di pesce in polvere
• 1 dose di zafferano in polvere
• 700 gr di acqua
Coprire la leccarda con carta di alluminio.
Nella leccarda
• 8 porzioni di letti di merluzzo
• 8 (o 16) code di gamberi (o scampi)
• 8 Cozze intere per guarnire
Coprire la leccarda con carta d’alluminio.
Su una teglia appoggiata sulla griglia
• 6-8 cosce di pollo precedentemente condite con spezie
per paella e un lo d’olio d’oliva.
Al termine della cottura condire con olio a crudo.
Programma RISOPILAF
Usare questa funzione per cuocere del riso. Per ottenere
i migliori risultati vi consigliamo di seguire le indicazioni:
• Il riso da utilizzare deve essere un riso che non attacca:
è adatto quello per le insalate o il tipo americano.
• Il forno deve essere freddo.
• la leccarda profonda al 2° ripiano (se disponibile in
accessorio) oppure inserire la griglia al 2° ripiano
ed appoggiarci una pirola delle dimensioni di circa
35x30x5cm di altezza.
Ricetta per 4 - 6 persone:
• 500 gr di riso
• 7 dl di acqua o brodo
Porre il riso sulla leccarda profonda senza bagnarlo e
coprirlo con il liquido. Coprire la leccarda con la carta
alluminio.
Programma PAELLA
Questa funzione è stata studiata per preparare la ricetta
della paella in modo semplice e veloce perché tutti gli
ingredienti vengono inseriti a freddo nel forno. Per ottenere
i migliori risultati vi consigliamo di seguire attentamente le
indicazioni sotto riportate:
• Il riso da utilizzare deve essere un riso che non attacca:
è adatto quello per le insalate o il tipo americano.
• Il forno deve essere freddo.
• Posizionare:
- la leccarda profonda al 1° ripiano (se disponibile
in accessorio) oppure inserire la griglia al 1° ripiano
ed appoggiarci una pirola delle dimensioni di circa
35x30x5cm di altezza.
- la leccarda al 3° ripiano.
- la griglia al 5° ripiano.
Ricetta per 8 persone:
Nella leccarda profonda
• 1 cipolla tritata
• 500 gr di riso
• 500 gr di frutti di mare surgelati (code di gamberetti, cozze
Programma PIZZERIA (solo sui modelli dotati di
pietra pizza)
! Non è possibile modicare la durata nè impostare una
cottura ritardata.
Utilizzare questa funzione per realizzare della pizza
(impasto sottile). Usare la pietra refrattaria per pizza in
dotazione posizionandola sulla griglia sul ripiano 4. Il
programma PIZZERIA guida l’utente, tramite messaggi e
segnali acustici, durante tutta la cottura.
1. Il display visualizza “INSERISCI LA PIETRA” e “PREMI
START PER AVVIARE”
2. Una volta premuto l’icona inizia il preriscaldamento
della pietra indicato dal riempimento della barra e dal
messaggio “PRERISCALDAMENTO DELLA PIETRA” sul
display
3. Terminata la fase precedente il forno emette alcuni
segnali acustici per avvisare che è possibile infornare
la pizza e viene visualizzato il messaggio “INFORNA LA
PIZZA”.
4. Aprire la porta del forno ed infornare la pizza. Inizia
18
Page 19
la cottura e sul display viene visualizzato il messaggio
della durata
inizio ritardato
“COTTURA IN CORSO”. Viene anche visualizzato il conto
alla rovescia di 4 minuti.
5. Terminato il tempo di cottura il display visualizza
“SFORNA A DORATURA DESIDERATA” e vengono emessi
alcuni segnali acustici per avvisare di estrarre la pizza
appena si giudica la cottura superciale soddisfacente.
6. Premere l’icona ed estrarre la pizza.
7. L’eventuale pressione dell’icona riporta il forno alla
fase di preriscaldamento della pietra. Se la temperatura
della pietra è sufcientemente alta, questa fase viene saltata
e si passa subito alla fase di infornatura.
Programma YOGURT
Si attiva l’elemento riscaldante circolare ed entra in funzione
la ventola solo in fase di riscaldamento. La temperatura di
50 °C è ideale per preparazione di yogurt.
Ricetta base per un litro di yogurt: un litro di latte intero
UHT, un vasetto di yogurt bianco
Processo:
• Scaldare il latte in un pentolino di acciaio fino ad
ebollizione.
• Eliminare lo strato di panna superficiale e lasciare
raffreddare.
• Mescolare 3, 4 cucchiai di latte con lo yogurt no a
completa miscelazione.
• Unire il composto al resto del latte e mescolare bene.
• Versare in vasetti a chiusura ermetica.
• Porre i vasetti sulla leccarda e inserire al livello 2.
• Al termine, porre i vasetti in frigorifero per almeno 12 ore.
Conservare lo yogurt in frigo per massimo una settimana.
• E’ possibile variare la ricetta adattandola al proprio gusto
personale.Programmare la cottura
Programmare la cottura
! La programmazione è possibile solo dopo aver selezionato
un programma di cottura.
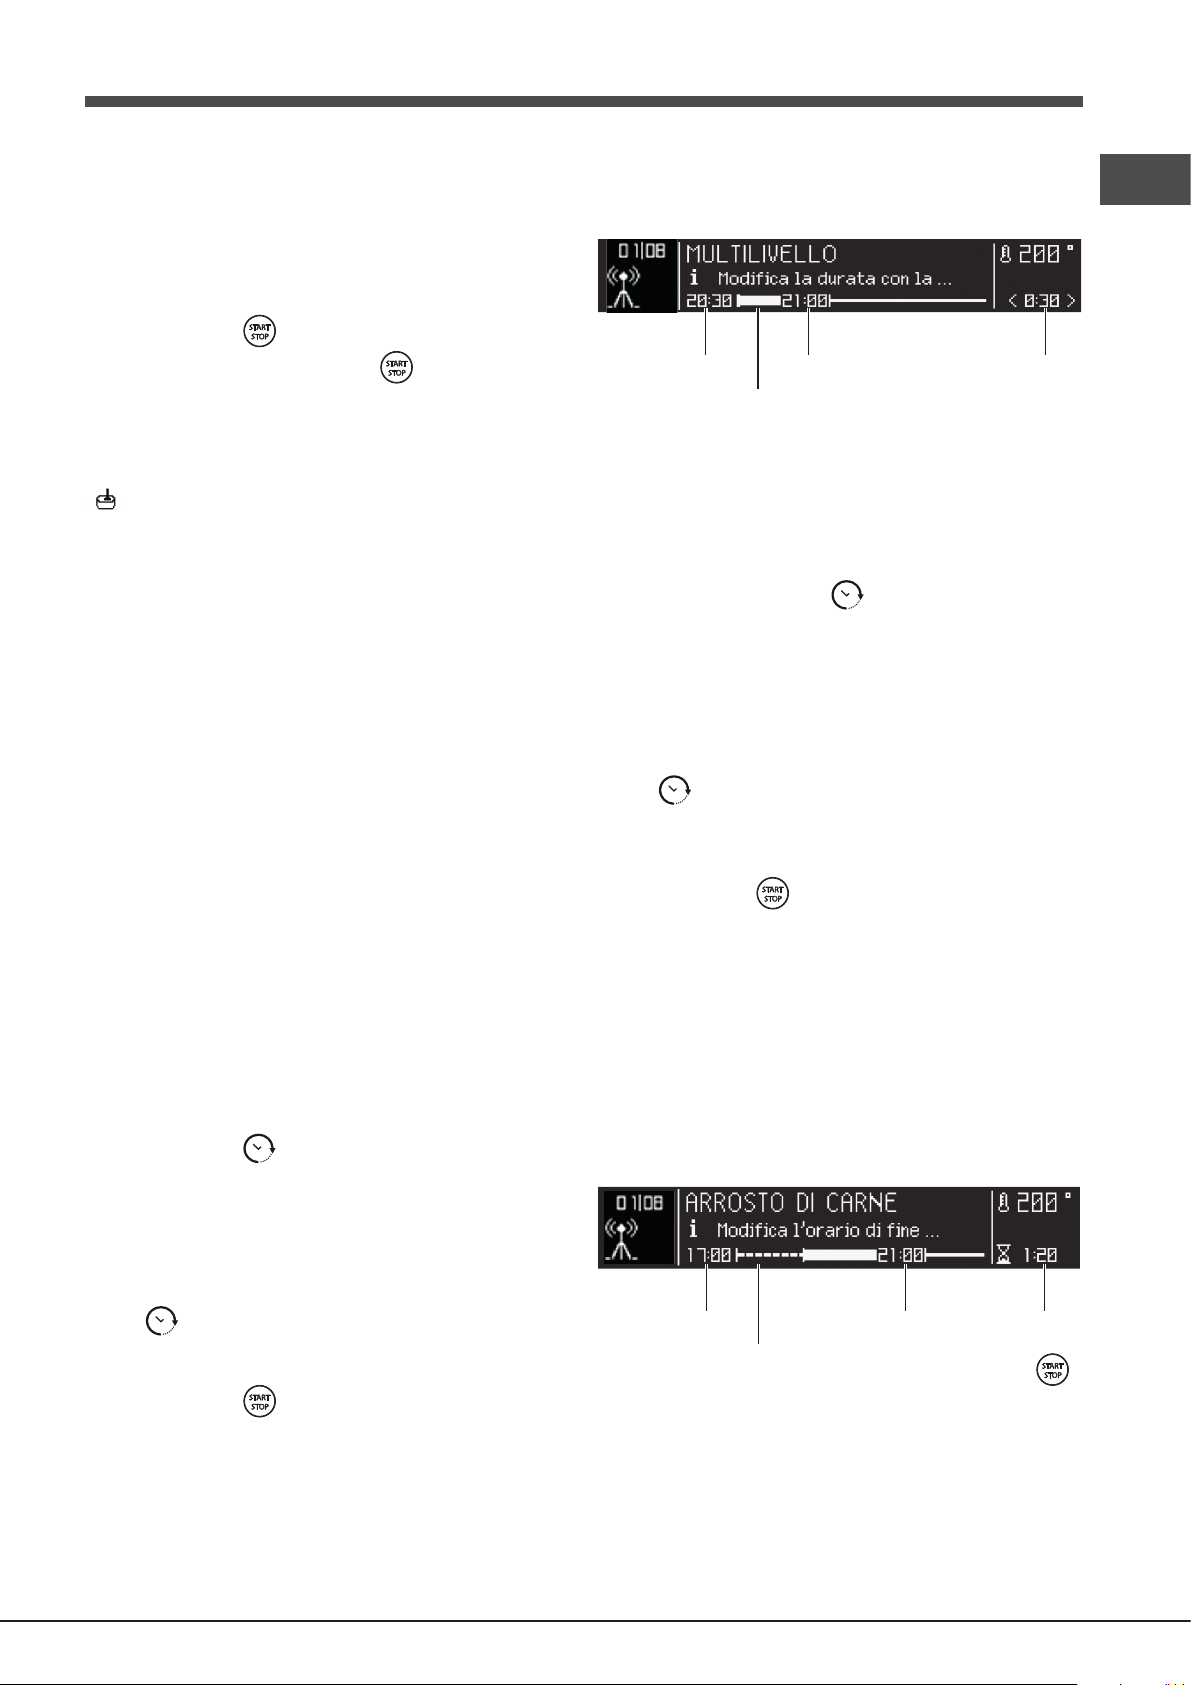
Programmare la durata
1. Premere l’icona
2. Ruotare la manopola per impostare la durata; se si
mantiene in posizione la manapola i numeri scorrono
più velocemente per facilitare l’impostazione. Il display
visualizza gracamente lo spostamento sulla barra della
durata.
3. Raggiunta la durata desiderata, premere nuovamente
l’icona . Il display visualizza gracamente sulla barra
della durata le informazioni di ora attuale, della durata e
dell’ora di ne cottura.
4. Premere l’icona per avviare la cottura.
5. Il display visualizza il tempo restante riempiendo la barra
della durata.
6. A cottura terminata, sul display compare la scritta
“COTTURA TERMINATA” e viene emesso un segnale
acustico.
• Esempio: sono le 9:00 e viene programmata una
durata di 1 ora e 15 minuti. Il programma si arresta
automaticamente alle 10:15.
Indicazione
ora attuale
Barra
Ora di
fine cottura
Durata
cottura
Programmare una cottura ritardata
! La programmazione della ne di una cottura è possibile
solo dopo aver impostato una durata di cottura.
! Per utilizzare al meglio la programmazione ritardata è
necessario che l’orologio sia correttamente impostato.
1. Seguire la procedura da 1 a 3 descritta per la durata;
2. Premere 2 volte l’icona , lampeggerà l’ora di ne
cottura;
3. Ruotare la manopola per regolare l’ora di ne cottura;
se si mantiene in posizione la manapola i numeri scorrono
più velocemente per facilitare l’impostazione. Il display
visualizza graficamente lo spostamento sulla barra
dell’inizio ritardato.
4. Raggiunta l’ora di ne desiderata, premere nuovamente
l’icona . Il display visualizza gracamente sulla barra
di inizio ritardato le informazioni di ora attuale, del tempo
mancante alla partenza, della durata e dell’ora di ne
cottura.
5. Premere l’icona per avviare la programmazione.
6. Il display visualizza la scritta “INIZIO COTTURA
POSTICIPATA” e il tempo restante spostando indietro la
barra di inizio ritardato.
7. Avviata la cottura, il display visualizza il tempo restante
riempiendo la barra della durata.
8. A tempo scaduto, sul display compare la scritta
“COTTURA TERMINATA” e viene emesso un segnale
acustico.
• Esempio: sono le ore 9:00, viene programmata una
durata di 1 ora e 15 minuti e le 12:30 come ora di ne.
Il programma inizia automaticamente alle ore 11:15.
Indicazione
ora attuale
Barra
Ora di
fine cottura
Durata
cottura
Per annullare una programmazione premere l’icona .
IT
19
Page 20

Consigli pratici di cottura
IT
! Nelle cotture ventilate non utilizzare le posizioni
1 e 5: sono investite direttamente dall’aria calda che
potrebbe provocare bruciature sui cibi delicati.
! Nelle cotture BARBECUE e GRATIN, in particolare
se praticate col girarrosto, disporre la leccarda in posizione
1 per raccogliere i residui di cottura (sughi e/o grassi).
MULTILIVELLO
• Utilizzare le posizioni 2 e 4, mettendo alla 2 i cibi che
richiedono maggior calore.
• Disporre la leccarda in basso e la griglia in alto.
BARBECUE
• Inserire la griglia in posizione 3 o 4, disporre
gli alimenti al centro della griglia.
• Si consiglia di impostare la temperatura al massimo.
Non allarmarsi se la resistenza superiore non resta
costantemente accesa: il suo funzionamento è controllato
da un termostato.
PIZZA
• Utilizzare una teglia in alluminio leggero, appoggiandola
sulla griglia in dotazione.
Con la leccarda si allungano i tempi di cottura
e difcilmente si ottiene una pizza croccante.
• Nel caso di pizze molto farcite è consigliabile inserire la
mozzarella a metà cottura.
20
Page 21

Programmi Alimenti Peso
05
piccola pasticceria e verdure. E' adatto anche per riscaldare vivande e completare cotture.
Tabella cottura
Multilivello*
Barbecue*
Gratin*
Rosticceria*
Pesce*
Pizza*
Lievitazione*
Pastorizzazione*
Bassa
temperatura*
Scongelamento*
* I tempi di cottura sono indicativi e possono essere modificati in base ai proprio gusti personali. I tempi di preriscaldamento del forno sono
preimpostati e non modificabili manualmente.
! Programma ECO : Questo programma, con maggiori tempi di cottura ma con un sensibile risparmio energetico, è indicato per pietanze quali filetti di pesce,
(Kg)
Posizione
dei ripiani
PreriscaldamentoTemperatura
consigliata
(°C)
1,5
1,5
1,5
1
1
1
1
1
1
1
1
1
1
1
guide
standard
2 e 4
2 e 4
2 e 4
1 e 2/3
2
1 o 2
2
1 e 3 e 5
1 e 3 e 5
2 e 4
1 e 3
4
4
4
4
3 o 4
4
4
4
4
-
-
2
2
-
-
2
2
2
2
2
2
2
2
22 no 40
2
2
2
Manuali
Pizza su 2 ripiani
Crostate su 2 ripiani/torte su 2 ripiani
Pan di spagna su 2 ripiani (su leccarda)
Pollo arrosto + patate
Agnello
Sgombro
Lasagne
Bignè su 3 ripiani
Biscotti su 3 ripiani
Salatini di sfoglia al formaggio su 2 ripiani
Torte salate
Sgombri
Sogliole e seppie
Spiedini di calamari e gamberi
Filetto di merl uzzo
Verdure alla griglia
Bistecca di vitello
Salsicce
Hamburger
Toast (o pane tostato)
Pollo allo spiedo con girarrosto (o ve presente)
Agnello allo spiedo con girarrosto (ove presente)
Pollo alla griglia
Seppie
Pollo allo spiedo con girarrosto (o ve presente)
Anatra allo spiedo con girarrosto (ove presente)
Arrosto di vitello o manzo
Arrosto di maiale
Agnello
Arrosti (c arni bianche o rosse)122 no 20
Orata
Filetti di pesce
Branzino con patate
Pizza
Focacce
Lievitazione degli impasti con lievito naturale
(brioche, pane, torta allo zucchero, croissant,
ecc.)
Frutta, verd ura, ecc. 22 si 110
Carne
Pesce
Verdure
Tutti i cibi surgelati
1+1
0,7
0,7
0,7
0,5
0,8
0,7
n° 4 o 5
n° 4 o 6
0,7
0,5 + 0,5
0,5
0,5
guide
scorrevoli
1 e 3
1 e 3
1 e 3
1 e 3
1
1
1
1 e 2 e 4
1 e 2 e 4
1 e 3
1 e 3
3
3
3
3
2 o 3
3
3
3
3
-
-
2
2
-
2
2
2
2
2
2
1
1
1
1
1
si
si
si
si
si
si
si
si
si
si
si
no
no
no
no
no
no
no
no
no
no
no
no
no
no
no
no
no
no
si
si
si
si
si
no
no
no
210-220
180
160-170
200-210
190-200
180
180-190
190
180
210
190-200
300
300
300
300
300
300
300
300
300
300
300
210
200
210
210
210
210
210
180
170
190
210-220
190-200
75
85
110
Durata
cottura
(minuti)
20-25
30-35
20-25
65-75
45-50
30-35
35-40
20-25
10-20
20-25
20-30
10-20
10-15
10-15
10-15
15-20
10-20
10-20
10-12
3-5
70-80
70-80
55-60
30-35
70-80
60-70
60-75
70-80
40-45
0-75
20-25
12-15
60
15-20
20-25
90-180
90-180
90-180
IT
21
Page 22

IT
Programmi Alimenti Peso
(Kg)
Posizione
dei ripiani
Preriscaldamento
Automatici**
guide
standard
guide
scorrevoli
Pane***
Pane (vedi ricetta)
12 o 32 no
Manzo
Arrosto di manzo
1-1,5
1-1,5
2 o 32 no
Vitello
Arrosto di vitello
2 o 32 no
Agnello
Coscia d'agnello
1-1,5 2 o 32 no
Maiale
Arrosto di maiale
1,2-1,5 2 o 32 no
Pollo
Pollo arrosto
1-1,52 o 32 no
Filetto di
pesce
Merluzzo
Cernia
Trota
0,4-0,5
0,4-0,5
0,4-0,5
2 o 3
2 o 3
2 o 3
2
2
2
no
no
no
Pesce al
cartoccio
Orata
Spigola
0,4-0,5
0,4-0,5
2 o 3
2 o 3
2
2
no
no
Crostate
Crostate
0,52 o 32 no
Torta Brisè
Torta di mele
0,52 o 32 no
Brioche
Dolci a base di lievito naturale (brioche, dolce
alle mandorle,ecc.)
0,72 o 32 no
Plum cake
Dolci a base di lievito chimico (quattro quarti,
biscotti marezzati, ecc.)
0,72 o 32 no
Dolci
Dolci
12 o 32 no
Paella
Paella (vedi ricetta)
1-3-51-2-4 no
Riso Pilaf
Riso Pilaf (vedi ricetta)
0,52 1no
Pizzeria*
Pizze molto sottili (impasto di pane) 4(pietra
pizza su
griglia)
* (solo sui modelli dotati di pietra pizza)
** Le
durate delle cotture automati che sono preimpostate. I valori sono modificabili dall'utente a partire dalla
durata preimpostata.
*** Come da ricetta, aggiungere 50 gr (0,5 dl) di acqua nella leccarda in posizione 5.
Yogurt
Yogurt 22 si
Tabella cottura
22
Page 23

Precauzioni e consigli
! L’apparecchio è stato progettato e costruito in conformità
alle norme internazionali di sicurezza.
Queste avvertenze sono fornite per ragioni di sicurezza e
devono essere lette attentamente.
Sicurezza generale
• L’apparecchio è stato concepito per un uso di tipo non
professionale all’interno dell’abitazione.
• L’apparecchio non va installato all’aperto, nemmeno se
lo spazio è riparato, perché è molto pericoloso lasciarlo
esposto a pioggia e temporali.
• Per movimentare l’apparecchio servirsi sempre delle
apposite maniglie poste sui anchi del forno.
• Non toccare l’apparecchio a piedi nudi o le mani o i piedi
bagnati o umidi.
• L’apparecchio deve essere usato per cuocere
alimenti, solo da persone adulte e secondo le
istruzioni riportate in questo libretto. Ogni altro
uso (ad esempio: riscaldamento di ambienti) è
da considerarsi improprio e quindi pericoloso. Il
costruttore non può essere considerato responsabile
per eventuali danni derivanti da usi impropri, erronei
ed irragionevoli.
• Durante l’uso dell’apparecchio gli elementi riscaldanti
e alcune parti della porta forno diventano molto
calde. Fare attenzione a non toccarle e tenere i
bambimi a distanza.
• Evitare che il cavo di alimentazione di altri elettrodomestici
entri in contatto con parti calde del forno.
• Non ostruire le aperture di ventilazione e di smaltimento
di calore.
• Impugnare la maniglia di apertura della porta al centro:
ai lati potrebbe essere calda.
• Utilizzare sempre guanti da forno per inserire o estrarre
recipienti.
• Non rivestire il fondo del forno con fogli di alluminio.
• Non riporre materiale infiammabile nel forno: se
l’apparecchio viene messo inavvertitamente in funzione
potrebbe incendiarsi.
• Non staccare la spina dalla presa della corrente tirando
il cavo, bensì afferrando la spina.
• Non fare pulizia o manutenzione senza aver prima
staccato la spina dalla rete elettrica.
• In caso di guasto, in nessun caso accedere ai
meccanismi interni per tentare una riparazione.
Contattare l’Assistenza (vedi Assistenza).
• Non appoggiare oggetti sulla porta del forno aperta.
• Evitare che i bambini giochino con l’apparecchio.
• Non è previsto che l’apparecchio venga utilizzato
da persone (bambini compresi) con ridotte capacità
siche, sensoriali o mentali, da persone inesperte o
che non abbiano familiarità con il prodotto, a meno che
non vengano sorvegliate da una persona responsabile
della loro sicurezza o non abbiano ricevuto istruzioni
preliminari sull’uso dell’apparecchio.
• L’apparecchio non è destinato a essere messo in
funzione per mezzo di un temporizzatore esterno
oppure di un sistema di comando a distanza separato.
Smaltimento
• Smaltimento del materiale di imballaggio: attenersi alle
norme locali, così gli imballaggi potranno essere riutilizzati.
• La direttiva Europea 2012/19/CE sui riuti di apparecchiature
elettriche ed elettroniche (RAEE), prevede che gli
elettrodomestici non debbano essere smaltiti nel normale
usso dei riuti solidi urbani. Gli apparecchi dismessi
devono essere raccolti separatamente per ottimizzare
il tasso di recupero e riciclaggio dei materiali che li
compongono ed impedire potenziali danni per la salute
e l’ambiente. Il simbolo del cestino barrato è riportato su
tutti i prodotti per ricordare gli obblighi di raccolta separata.
Per ulteriori informazioni, sulla corretta dismissione degli
elettrodomestici, i detentori potranno rivolgersi al servizio
pubblico preposto o ai rivenditori.
Risparmiare e rispettare l’ambiente
• Azionando il forno negli orari che vanno dal tardo
pomeriggio no alle prime ore del mattino si collabora a
ridurre il carico di assorbimento delle aziende elettriche.
Le opzioni di programmazione dei programmi, in
particolar modo la “cottura ritardata” (vedi Programmi),
permettono di organizzarsi in tal senso.
• Si raccomanda di effettuare sempre le cotture al
BARBECUE e GRATIN a porta chiusa: sia per ottenere
migliori risultati che per un sensibile risparmio di energia
(10% circa).
• Mantenere efcienti e pulite le guarnizioni, in modo che
aderiscano bene alla porta e non procurino dispersioni
di calore.
! Questo prodotto soddisfa i requisiti imposti dalla nuova
Direttiva Europea sulla limitazione dei consumi energetici
in standby.
Manutenzione e cura
Escludere la corrente elettrica
Prima di ogni operazione isolare l’apparecchio dalla rete di
alimentazione elettrica.
Pulire l’apparecchio
• Lievi differenze di colore sul lato anteriore del forno sono
dovute a diversi materiali quali vetro, plastica o metallo.
• Eventuali ombreggiature sul vetro della porta, simili a
striature, sono dovute al riesso della luce della lampada
del forno.
• A temperature molto elevate lo smalto viene marcato a
fuoco. Durante questo processo potrebbero generersi
variazioni cromatiche. Questo è normale e non inuisce
in alcun modo sul funzionamento. I bordi delle lamiere
sottili non possono essere smaltati integralmente e
possono pertanto apparire grezzi. Questo non pregiudica
la protezione anticorrosione.
• Le parti esterne smaltate o inox e le guarnizioni in gomma
possono essere pulite con una spugnetta imbevuta di
acqua tiepida, e sapone neutro. Se le macchie sono
difcili da asportare usare prodotti specici. Si consiglia
di sciacquare abbondantemente e di asciugare dopo la
pulizia. Non usare polveri abrasive o sostanze corrosive.
IT
23
Page 24

• L’interno del forno va pulito preferibilmente ogni volta
IT
dopo l’uso, quando è ancora tiepido. Usare acqua calda e
detersivo, risciaquare e asciugare con un panno morbido.
Evitare gli abrasivi.
• Gli accessori possono essere lavati come normali stoviglie,
anche in lavastoviglie ad eccezione delle guide scorrevoli.
• Si consiglia di non spruzzare detergenti direttamente
sulla zona comandi ma di utilizzare una spugnetta.
! Non utilizzare mai pulitori a vapore o ad alta pressione
per la pulizia dell’apparecchio.
Pulire la porta
! Nei modelli dotati di LED INSIDE non è possibile
smontare la porta.
Pulire il vetro della porta con spugne e prodotti non abrasivi
e asciugare con un panno morbido; non usare materiali
ruvidi abrasivi o raschietti metallici aflati che possono
grafare la supercie e causare la frantumazione del vetro.
Per una pulizia più accurata è possibile smontare
la porta del forno:
1. aprire completamente la porta (vedi gura);
2. servendosi di un cacciavite, alzare e ruotare le levette F
poste sulle due cerniere (vedi gura);
! Non toccare direttamente con le mani la lampadina.
! Non utilizzare la lampada forno per e come illuminazione
di ambienti.
Montaggio del Kit Guide Scorrevoli
Per montare le guide
scorrevoli:
1. Togliere i due telai
estraendoli dai distanzieri
A (vedi gura).
2. Scegliere il ripiano in cui
inserire la guida scorrevole.
Facendo attenzione al verso
di estrazione della guida
stessa, posizionare sul
telaio prima l’incastro B e poi
l’incastro C.
Guida
sinistra
B
Guida
destra
C
A
Verso di
estrazione
F
3. afferrare la porta ai due lati
esterni, richiudendola lentamente
ma non del tutto. Poi tirare la porta
verso di sé estraendola dalla sua
sede (vedi gura). Rimontare la
porta seguendo il procedimento in
senso contrario.
Controllare le guarnizioni
Controllare periodicamente lo stato della guarnizione attorno
alla porta del forno. In caso risulti danneggiata rivolgersi
al Centro Assistenza più vicino (vedi Assistenza). È
consigliabile non usare il forno no all’avvenuta riparazione.
Sostituire la lampadina
Per sostituire la lampadina
cavità
lampadina
coperchio
di illuminazione del forno:
1. Togliere il coperchio in
vetro del portalampada.
2. Estrarre la lampadina e
sostituirla con una analoga:
lampada alogena tensione
230V, potenza 25 W, attacco
G 9.
3. Rimontare il coperchio
(vedi gura).
3. Fissare i due telai con le
guide montate negli appositi
fori posti sulle pareti del forno
(vedi gura). I fori per il telaio
sinistro sono posizionati in
alto, mentre i fori per quello
D
destro sono in basso.
4. Inne incastrare i telai sui
distanzieri A.
! Non inserire le guide scorrevoli alla posizione 5.
24
Page 25

Anomalie e rimedi
ProblemaPossibile causa Rimedio
p
IT
La programmazione di una
cottura non si è avviata.
Il display visualizza ECO Mode.
Ho scelto un programma
automatico. Il display visualizza
“Hot” e la cottura non si avvia.
Ho scelto la cottura ventilata e il
cibo presenta delle bruciature.
C’è stato un black-out.Reimpostare le programmazioni.
L’apparecchio è in modalità
standby.
La temperatura interna nel forno
è superiore a quella proposta
er il programma scelto.
Le posizioni 1 e 5: sono
investite direttamente dall’aria
calda che potrebbe provocare
bruciature sui cibi delicati.
Toccare un tasto qualsiasi per
uscire dalla modalità standby.
Attendere che il forno si
raffreddi.
Si consiglia di ruotare le leccarde
a metà cottura.
25
Page 26

Installation
590 mm.
GB
! Please keep this instruction booklet in a safe place for
future reference. If the appliance is sold, given away or
moved, please make sure the booklet is also passed on to
the new owners so that they may benet from the advice
contained within it.
Ventilation
To ensure adequate ventilation, the back panel of the
cabinet must be removed. It is advisable to install the oven
so that it rests on two strips of wood, or on a completely
at surface with an opening of at least 45 x 560 mm (see
diagrams).
! Please read this instruction manual carefully: it contains
important information concerning the safe operation,
installation and maintenance of the appliance.
Positioning
! Do not let children play with the packaging material; it
should be disposed of in accordance with local separated
waste collection standards (see Precautions and tips).
! The appliance must be installed by a qualied professional
in accordance with the instructions provided. Incorrect
installation may damage property or cause harm to people
or animals.
Built-in appliances
Use an appropriate cabinet to ensure that the appliance
operates properly:
• The panels adjacent to the oven must be made of heatresistant material.
• Cabinets with a veneer exterior must be assembled with
glues which can withstand temperatures of up to 100°C.
• To install the oven under the counter (see diagram) or
in a kitchen unit, the cabinet must have the following
dimensions:
45 mm.
560 mm.
Centring and xing
Secure the appliance to the cabinet:
• Open the oven door.
• slide out the side gaskets at the top until the 2 xing holes
are exposed;
• Fix the oven to the cabinet using the 2 wood screws.
• reposition the 2 gaskets.
! All parts which ensure the safe operation of the appliance
must not be removable without the aid of a tool.
550 mm.
min.
45 mm.
560 mm.
575-585 mm.
570 mm.
595 mm.
20 mm.
550 mm.
20,5 mm.
22,5 mm.*
* Stainless steel models only
! The appliance must not come into contact with electrical
parts once it has been installed.
The indications for consumption given on the data plate
have been calculated for this type of installation.
26
Page 27

Electrical connection
Ovens equipped with a three-pole power supply cable are
designed to operate with alternating current at the voltage
and frequency indicated on the data plate located on the
appliance (see below).
Fitting the power supply cable
• The socket is compatible with the plug of the appliance.
If the socket is incompatible with the plug, ask an
authorised technician to replace it. Do not use extension
cords or multiple sockets.
! Once the appliance has been installed, the power supply
cable and the electrical socket must be easily accessible.
GB
1. Open the terminal board
by inserting a screwdriver
into the side tabs of the
cover. Use the screwdriver
as a lever by pushing it
down to open the cover (see
diagram).
2. Install the power supply
cable by loosening the
cable clamp screw and the
three wire contact screws
N
L-N- .
Connect the wires to the
N
corresponding terminals:
the Blue wire to the terminal
marked (N), the Brown wire
to the terminal marked (L)
L
and the Yellow/Green wire
to the terminal marked
L
(see diagram).
3. Secure the cable by fastening the clamp screw.
4. Close the cover of the terminal board.
Connecting the supply cable to the mains
Install a standardised plug corresponding to the load
indicated on the data plate (see table).
The appliance must be directly connected to the mains using
an omnipolar switch with a minimum contact opening of 3
mm installed between the appliance and the mains. The
switch must be suitable for the charge indicated and must
comply with current electrical regulations (the earthing wire
must not be interrupted by the switch). The supply cable
must be positioned so that it does not come into contact
with temperatures higher than 50°C at any point (the back
panel of the oven, for example).
! The installer must ensure that the correct electrical
connection has been performed and that it is fully compliant
with safety regulations.
Before connecting the appliance to the power supply, make
sure that
• The appliance is earthed and the plug is compliant with
the law.
! The cable must not be bent or compressed.
! The cable must be checked regularly and replaced by
authorised technicians only (see Assistance).
! The manufacturer declines any liability should these
safety measures not be observed.
APPLIANCE SPECIFICATIONS
width 43.5 cm
Dimensions*
Volume*
Dimensions**
Volume**
Electrical
connections
ENERGY
LABEL
height 32,4 cm
depth 41.5 cm
59 l
width 45.5 cm
height 32,4 cm
depth 41.5 cm
62 l
voltage: 220 - 240 V~ 50/60 Hz or
50 Hz (see data plate)
maximum power absorbed
2800 W
Directive 2002/40/EC on the label
of electric ovens. Standard EN 50304
Declared energy consumption
for Forced convection Class –
heating mode:
ECO.
This appliance conforms to the following
European Economic Community
directives:
- 2006/95/EEC dated 12/12/06 (Low
Voltage) and subsequent amendments.
- 2004/108/EEC dated 03/05/89
(Electromagnetic Compatibility) and
subsequent amendments.
- 93/68/EEC dated 22/07/93 and
subsequent amendments.
- 2012/19/EC and subsequent
amendments.
- 1275/2008 standby/off mode.
- directive 1999/05/EC
(Radio and Terminal equipment
telecommunications)
and subsequent amendments
• The socket can withstand the maximum power of the
appliance, which is indicated on the data plate.
• The voltage is in the range between the values indicated
on the data plate.
* Only for models with drawn rails.
** Only for models with wire rails.
27
Page 28

Start-up and use
GB
WARNING! The oven is
provided with a stop system
to extract the racks and
prevent them from coming
out of the oven (1).
As shown in the drawing,
to extract them completely,
simply lift the racks, holding
them on the front part, and
pull (2).
! The rst time you use your appliance, heat the empty oven
with its door closed at its maximum temperature for at least
half an hour. Make sure that the room is well ventilated
before switching the oven off and opening the oven door.
The appliance may emit a slightly unpleasant odour caused
by protective substances used during the manufacturing
process burning away.
! Turn the control dial to adjust the parameter shown on the
display between the “<” and “>” symbols.
Setings menu commands
To enter the settings menu, switch on the control panel and
press the icon.
Use the control dial to highlight the individual menu
commands.
To modify the setting, press the icon.
The following parameters are listed in the menu:
LANGUAGE: select the language shown on the display.
CLOCK: set the exact time.
TONE: activate/deactivate keypad tone.
LIGHT: activate/deactivate the internal oven light during
cooking.
LOGO: activate/deactivate logo on start-up.
GUIDE: activate/deactivate operating tips.
EXIT: exit the menu.
! It is possible to exit the settings menu by pressing the
icon.
Setting the clock
To set the clock, switch on the oven by pressing the icon,
! To make the setting process easier, keep the knob in
position: this will increase the scrolling speed of the numbers
on the display.
! Each setting will automatically be stored in the appliance
memory after 10 seconds.
! The touch controls cannot be activated if the user is
wearing gloves.
Some models are equipped with a system of hinges which
allows the door to close slowly, without the user having to
follow the movement through with his/her hand. To use the
system correctly, before closing the door:
• Open the door fully.
• Do not force the closing movement manually.
In order to optimise the cooking performance, when starting
the selected function, product settings will be applied that
could cause a delayed start of the fan and heating elements.
Switching the oven on for the rst time
After connecting the oven to the electricity supply, the
rst time it is switched on the user should also switch on
the control panel by pressing the button. The list of
languages will appear in the menu. To choose the desired
language, select it using the control dial. Confirm by
pressing the icon.
Once the selection has been made, the display will show
the settings menu. Press the icon or scroll through
using the control dial until you reach the EXIT command
and press the icon to begin using the oven.
! After choosing the language in the menu, if the display is
not used for another 30 seconds it will automatically revert
to programming mode.
then press and follow the steps described.
1. Scroll through the menu commands using the control
dial, select CLOCK and press .
2. Adjust the time using the control dial.
3. Once you have reached the correct hour value, press
the icon.
4. Repeat steps 2 and 3 to set the minutes.
5. To exit adjustment mode, press the icon or use the
control dial to scroll through the menu until you reach EXIT,
then press .
! The clock can also be set while the oven is off, by pressing
the icon and carrying out steps 2 to 4 as described above.
After the appliance has been connected to the mains, or
after a blackout, the clock will need to be reset.
Setting the minute minder
! The minute minder may be set regardless of whether the
oven is switched on or off. It does not switch the oven on
or off.
When the set time has elapsed, the minute minder emits a
buzzer that will automatically stop after 30 seconds or when
any active button on the control panel is pressed.
To adjust the minute minder, proceed as follows:
1. Press the icon.
2. Set the desired time using the control dial.
3. Once you have reached the desired value, press the
icon again.
When the oven is switched off, the countdown appears on the
display. When the oven is on, the lit symbol will remind
you that the minute minder is active.
To cancel the minute minder, press the icon and use
28
Page 29

the control dial to set the time to 00:00. Press again.
The icon will switch off to indicate that the minute minder
has been disabled.
Starting the oven
1. Press to switch on the control panel. The appliance
buzzer sounds three times (ascending).
2. Press the icon to select the desired manual cooking
mode. The cooking temperature and duration may be set.
Press the icon to select the desired automatic cooking
mode. The cooking temperature and duration are both
set to default values. Only the duration may be adjusted
in accordance with the selected mode. The text “AUTO”
appears on the display to indicate that the temperature is
following a precise cooking prole. A delayed cooking cycle
may be programmed.
3. Press to start the cooking mode.
4. The oven will begin its preheating phase, the preheating
indicators will light up as the temperature rises.
5. When the preheating process has nished, a buzzer
sounds and all the preheating indicator lights show that this
stage has been completed: the food can then be placed in
the oven.
6. During cooking it is always possible to:
- adjust the temperature by pressing the icon, turning the
control dial and conrming by pressing again (manual
modes only );
- set the duration of a cooking mode (see Cooking Modes);
- stop cooking by pressing the icon. In this case the
appliance stores the temperature modied previously in its
memory (manual modes only);
- switch off the oven by pressing the icon for 3 seconds.
7. If a blackout occurs while the oven is already in operation,
an automatic system within the appliance will reactivate the
cooking mode from the point at which it was interrupted,
provided that the temperature has not dropped below a certain
level. Programmed cooking modes which have not yet started
will not be restored and must be reprogrammed (for example:
a cooking mode has been programmed to start at 20:30. At
19:30 a blackout occurs. When the power supply is restored,
the mode will have to be reprogrammed).
Oven light
The light comes on when the oven door is opened or when
a cooking mode starts (if enabled in the settings menu).
When models featuring LED INSIDE technology begin
cooking, the LEDs on the door light up for improved
illumination of all cooking levels.
Demo mode
! The appliance will not enter DEMO mode if the language
has not been selected beforehand.
The oven can operate in DEMO mode: all heating elements
are deactivated, and the controls remain operative.
To activate DEMO mode, switch off the oven and keep
the control dial turned clockwise while pressing for 10
seconds. A buzzer sounds and the display shows “DEMO”.
To deactivate DEMO mode, keep the control dial turned
anticlockwise while pressing for 3 seconds. A buzzer
sounds to conrm deactivation.
Restoring the factory settings
The oven factory settings can be restored to reset all
selections made by the user (language, tone, customised
durations, etc…). To carry out a reset, switch off the oven,
then press and hold 6 , and simultaneously
for 6 seconds. Once the restore procedure is complete, a
buzzer will sound. The rst time the icon is pressed, the
oven will behave as if it is being switched on for the rst time.
Standby
This product complies with the requirements of the latest
European Directive on the limitation of power consumption
in standby mode. If no buttons are pressed for 30 minutes
and the control panel/door lock has not been activated, the
appliance automatically reverts to standby mode. The ECO
Mode symbol appears on the display to indicate standby
mode. As soon as interaction with the machine resumes,
system operation is restored.
GB
! There is no preheating stage for the GRILL mode.
! Never put objects directly on the bottom of the oven; this
will prevent the enamel coating from being damaged.
! Always place cookware on the rack(s) provided.
Cooling ventilation
In order to cool down the external temperature of the oven,
a cooling fan blows a stream of air between the control
panel and the oven door, as well as towards the bottom of
the oven door. At the beginning of the cleaning cycle, the
cooling fan operates at low speed.
! Once cooking has been completed, the cooling fan
continues to operate until the oven has cooled down
sufciently.
Modes
! In order to guarantee wonderfully soft and crunchy foodstuffs, the oven releases – in the form of water vapour the humidity naturally withheld in the food itself. In this way,
optimal cooking results can be achieved for all types of food.
! Every time the oven is switched on, it suggests the rst
manual cooking mode.
! If the door is not shut properly, the text “DOOR OPEN” will
appear on the display. Make sure the door is shut properly
to achieve optimal cooking results.
29
Page 30

Manual cooking modes
GB
! All cooking modes have a default cooking temperature which
may be adjusted manually to a value between 40°C and
250°C as desired (270°C for GRILL mode). Any temperature
adjustments will be stored in the appliance memory and
suggested again the next time this mode is used. If the selected
temperature is lower than the temperature inside the oven, the
text “OVEN TOO HOT” appears on the display. However, it will
still be possible to start cooking.
If cooking is started without a duration being set, the display
will show the elapsed time.
MULTILEVEL mode
All heating elements and the fan are activated. Since the
heat remains constant throughout the oven, the air cooks and
browns food in a uniform manner. A maximum of 3 racks may
be used at the same time.
will operate during the preheating stage only. The oven
temperature is ideal for activating the rising process. Always
cook in this mode with the oven door closed.
PASTRY mode
The rear heating element and the fan are switched on,
thus guaranteeing the distribution of heat in a delicate and
uniform manner throughout the entire oven. This mode is
ideal for baking temperature sensitive foods (such as cakes,
which need to rise).
PASTEURISATION mode
This cooking mode is suitable for fruit, vegetables, etc...
Small containers may be positioned on 2 levels (dripping
pan on the 1st shelf and rack on the 3rd shelf). Let the
containers cool inside the oven. Place the food inside the
oven while it is still cold.
GRILL mode
The top heating element and the rotisserie spit (where
present) are activated. The high and direct temperature
of the grill is recommended for food which requires a high
surface temperature. Always cook in this mode with the oven
door closed (see “Practical cooking advice”).
FAN GRILLING mode
The top heating element and the rotisserie spit (where
present) are activated and the fan begins to operate.
During part of the cycle the circular heating element is
also activated. This combination of features increases the
effectiveness of the unidirectional thermal radiation provided
by the heating elements through the forced circulation of
the air throughout the oven.
This helps prevent food from burning on the surface and allows
the heat to penetrate right into the food. Always cook in this
mode with the oven door closed (see “Practical cooking advice”).
ROAST mode
The top and circular heating elements switch on and the fan
begins to operate. This combination of features increases the
effectiveness of the unidirectional thermal radiation provided by
the heating elements through the forced circulation of the air
throughout the oven. This helps prevent food from burning on
the surface and allows the heat to penetrate right into the food.
Always cook in this mode with the oven door closed.
FISH mode
The top and circular heating elements switch on and the
fan begins to operate. This combination is ideal for cooking
sh dishes gently.
PIZZA mode
The top and circular heating elements switch on and the fan
begins to operate. This combination heats the oven rapidly.
If you use more than one rack at a time, switch the position
of the dishes halfway through the cooking process.
PROVING mode
The circular heating element will come on and the fan
SLOW COOK MEAT/FISH/VEGETABLES modes
This type of cooking mode, used for years by industry
professionals, enables food (meat, sh, fruit and vegetables)
to be cooked at very low temperatures (75, 85 and 110°C),
thereby guaranteeing a perfect level of cooking and enhancing
the taste as much as possible.
The value of these advantages should not be underestimated:
• as the cooking temperatures are very low (in general they
are lower than the temperature required for evaporation),
the dispersion of cooking sauces due to evaporation is
substantially reduced and the food becomes softer;
• when cooking meat, the muscle bres contract less than
they would during a classic cooking cycle. The result is
a more tender meat which does not need to be rested
after it is cooked. Meat should be browned before it is
placed in the oven.
Cooking foods which have been vacuum-packed at low
temperatures, a technique used for over 30 years by the
most prestigious chefs, brings many advantages:
• culinary: avours are concentrated and the taste, softness
and tenderness of the food are maintained;
• hygienic: provided that hygiene regulations are respected,
this type of cooking protects the food from the harmful
effects of oxygen, thus ensuring that the dishes may be
stored for longer in the refrigerator;
• organisational: thanks to the longer storage period,
dishes may be prepared well in advance;
• diet-related: this type of cooking limits the amount of fatty
substances used and therefore means that the food is
lighter and easier to digest;
• nancial: the food shrinks less so there is more of the
product left after it has been cooked.
To use this technique, you must use a vacuum-packing
machine and the appropriate bags. Follow the instructions
supplied relating to vacuum-packing food carefully.
The vacuum-packing technique may also be used for raw
products (fruit, vegetables, etc.) as well as pre-cooked
products (traditional cooking).
DEFROSTNG mode
The fan at the bottom of the oven circulates room-temperature
air around the food. This mode is suitable for defrosting any type
30
Page 31

of food, especially delicate items that should not be heated, for
example: ice-cream cakes or cakes made with custard, cream
or fruit.
ECO mode
The rear heating element and the fan are switched on,
thus guaranteeing the distribution of heat in a delicate and
uniform manner throughout the entire oven.This energy
saving mode is recommended for small dishes, ideal for
heating foods and nishing off cooking.
• Do not exceed the maximum weight of the dripping pan.
• Remember to pour 50g (0,5 dl) of cold water into the
baking tray in position 5.
• The dough must be left to rise at room temperature for 1 – 1
½ hours (depending on the room temperature) or until the
dough has doubled in size.
Recipe for BREAD:
1 dripping pan holding 1000 g max, lower level
2 dripping pans each holding 1000 g max, medium and
lower levels
GB
Rotisserie spit*
To operate the rotisserie
function (see diagram)
proceed as follows:
1. Place the dripping pan in
position 1.
2. Place the rotisserie
support in position 3 and
insert the spit in the hole
provided on the back panel
of the oven.
3. Start the rotisserie
function by selecting the or modes.
! When mode is on, the rotisserie will stop if the door
is opened.
Automatic cooking modes
! The temperature and cooking duration are pre-set,
guaranteeing a perfect result every time - automatically.
These values are set using the C.O.P.® (Programmed
Optimal Cooking) system. The cooking cycle stops
automatically and the oven indicates when the dish is
cooked. You may start cooking whether the oven has been
preheated or not. The cooking duration can be customised
according to personal taste by modifying the relevant value -
before cooking begins - by ±5/20 minutes depending on the
selected programme. The duration can however be modied
even once cooking has begun. If the value is modified
before the programme begins, it is stored in the memory and
suggested again by the appliance when the programme is
next used. If the temperature inside the oven is higher than
the suggested value for the selected mode, the text “OVEN
TOO HOT” appears on the display and it will not be possible
to begin cooking; wait for the oven to cool.
The icon representing the selected mode and the icon
representing the recommended shelf position appear on
the display alternately.
! When the cooking stage has been reached, the oven
buzzer sounds.
! Do not open the oven door as this will disrupt the cooking
time and temperature.
BREAD mode
Use this function to bake bread. To obtain the best results,
we recommend that you carefully observe the instructions
below:
• Follow the recipe.
Recipe for 1000 g of dough: 600 g our, 360 g water, 11g salt,
25 g fresh yeast (or 2 sachets of powder yeast)
Method:
• Mix the our and salt in a large bowl.
• Dilute the yeast in lukewarm water (approximately 35
degrees).
• Make a small well in the mound of our.
• Pour in the water and yeast mixture.
• Knead the dough by stretching and folding it over itself with
the palm of your hand for 10 minutes until it has a uniform
consistency and is not too sticky.
• Form the dough into a ball shape, place it in a large bowl and
cover it with transparent plastic wrap to prevent the surface
of the dough from drying out. Select the manual PROVING
function on the oven. Place the bowl inside and leave
the dough to rise for approximately 1 hour (the dough
should double in volume).
• Cut the dough into equal sized loaves.
• Place them in the dripping pan, on a sheet of baking
paper.
• Dust the loaves with our.
• Make incisions on the loaves.
• Place the food inside the oven while it is still cold.
• Start the BREAD cooking mode.
• Once baked, leave the loaves on one of the grill racks
until they have cooled completely.
BEEF/VEAL/LAMB mode
Use this function to cook beef, veal and lamb. Place the
food inside the oven while it is still cold. The dish may also
be placed in a preheated oven. Some of the ROAST modes
offer the option of selecting the desired cooking level:
1. Press the icon.
2. Use the control dial to select “WELL DONE”, “MEDIUM”
or “RARE”.
3. Press again.
PORK mode
Use this function to cook pork. Place the food inside the
oven while it is still cold. The dish may also be placed in a
preheated oven.
CHICKEN mode
This function is ideal for cooking chicken (whole or in pieces).
Place the food inside the oven while it is still cold. The dish may
* Only available in certain models.
31
Page 32

also be placed in a preheated oven.
GB
FISH FILLET mode
This function is ideal for cooking small-medium llets. Place
the food inside the oven while it is still cold.
FISH EN PAPILLOTE mode
Use this function to cook whole sh with a maximum weight
of 1 kg. The paper/foil package can be placed directly on the
dripping pan. Place the food inside the oven while it is still cold.
TARTS mode
This function is ideal for all tart recipes (which normally need
to be heated well from underneath). Place the food inside
the oven while it is still cold. The dish may also be placed
in a preheated oven.
SHORTCRUST TARTS mode
This function is ideal for all recipes which require shortcrust
pastry (usually made without eggs) or have a liquid or very
soft lling. Place the food inside the oven while it is still cold.
The dish may also be placed in a preheated oven.
BRIOCHE mode
This function is ideal for baked desserts (made using natural
yeast). Place the food inside the oven while it is still cold;
the dish may also be placed in a preheated oven if desired.
CAKE mode
This function is ideal for all recipes made using baking powder.
Place the food inside the oven while it is still cold. The dish may
also be placed in a preheated oven.
DESSERTS mode
This function is ideal for cooking desserts which are made
using natural yeast, baking powder and desserts which
contain no yeast. Place the dish in the oven while it is still
cold. The dish may also be placed in a preheated oven.
PAELLA mode
This function was designed for quick and easy paella
preparation; all ingredients are placed inside the oven while
it is still cold. To obtain the best results, we recommend that
you carefully observe the instructions below:
• The rice used must not be sticky: salad rice or American
long-grain rice are particularly suitable.
• The oven must not be preheated.
• Position:
- the deep dripping pan on shelf level 1 (if supplied as an
accessory), or place the rack on shelf level 1 and stand
a dish measuring approximately 35x30cm (height 5 cm)
on it;
- the dripping pan on shelf level 3;
- the rack on shelf level 5;.
Recipe (serves 8):
In the deep dripping pan
• 1 onion, chopped
• 500 g rice
• 500 g frozen mixed seafood (shelled prawns, mussels
and clams, squid rings, etc.)
• 2 handfuls frozen peas
• ¼ chilli, diced
• Chorizo (spiced paprika sausage), sliced
• One tbsp sh stock powder
• 1 measure powdered saffron
• 700 g water
Cover the dripping pan with aluminium foil.
In the dripping pan
• 8 cod llet portions
• 8 (or 16) king prawns (or scampi)
• 8 whole mussels, to garnish
Cover the dripping pan with aluminium foil.
On a tray standing on the rack
• 6-8 chicken thighs, marinated using paella spices and a
drizzle of olive oil
Once the cooking process is complete, nish with more
olive oil.
PILAU RICE mode
Use this function to cook rice. To obtain the best results,
we recommend that you observe the instructions below:
• The rice used must not be sticky: salad rice or American
long-grain rice are particularly suitable.
• The oven must not be preheated.
• The deep dripping pan should be on shelf level 2 (if
supplied as an accessory), or the rack placed on shelf
level 2 and a dish measuring approximately 35x30cm
(height 5 cm) stood on it.
Recipe (serves 4 - 6):
• 500 g rice
• 700 ml water or stock
Place the rice in the deep dripping pan without soaking
and cover with liquid. Cover the dripping pan with the
aluminium foil.
PIZZA WITH STONE (models with pizza stone only)
mode
! The duration cannot be modied and delayed cooking
cannot be selected.
Use this function to make pizza (thin dough). Use the
rebrick pizza stone supplied, positioning it on the rack in
shelf position 4. The PIZZA WITH STONE mode guides
the user through the entire cooking process by means of
messages and buzzers.
1. “INSERT THE PIZZA STONE” and “PRESS START TO
BEGIN” appear on the display.
2. Once the icon has been pressed, pizza stone
preheating begins (indicated by the progress bar and the
message “PREHEATING PIZZA STONE” on the display).
3. Once the above step has been completed, the oven
buzzer sounds to indicate that the pizza can now be
placed inside; the message “PUT PIZZA IN THE OVEN”
is displayed.
4. Open the oven door and place the pizza inside. Cooking
begins; the message “COOKING” appears on the display. A
countdown of 4 minutes also appears.
32
Page 33

5. Once the cooking time has elapsed, “REMOVE FROM
Current time
indicator
End
of cooking time
Duration
bar
Cooking
duration
start bar
OVEN WHEN READY” appears on the display and the
buzzer sounds several times, prompting the user to remove
the pizza as soon as the surface has reached a satisfactory
level of browning.
6. Press and remove the pizza.
7. Pressing returns the oven to stone preheating mode.
If the stone temperature is high enough, this step is skipped
and it will be possible to place the food in the oven.
YOGHURT mode
The circular heating element will come on and the fan will
operate during the preheating stage only. The temperature
of 50°C is ideal for preparing yoghurt.
Basic recipe for one litre of yoghurt: one litre of
whole UHT milk, one pot of natural yoghurt
Method:
• Heat the milk in a steel pan until it reaches boiling point.
• Remove the layer of cream on the surface and leave to
cool.
• Stir 3 or 4 tablespoons of milk into the yoghurt and
combine well.
• Add the mixture to the remaining milk and mix thoroughly.
• Pour into airtight jars.
• Stand the jars on the dripping pan and place in the oven,
on level 2.
• At the end of this process, place the jars in the refrigerator
to chill for at least 12 hours. Store the yoghurt in the
refrigerator for up to one week.
• The recipe can be adjusted to taste.
Programming cooking
! A cooking mode must be selected before programming
can take place.
GB
Programming delayed cooking
! A cooking duration must be set before the end of cooking
time can be scheduled.
! For the delayed programming to work properly, the clock
should be set to the correct time.
1. Follow steps 1 to 3 to set the duration as detailed above.
2. Press the icon twice; the end of cooking time will
begin to ash.
3. Turn the control dial to adjust the end of cooking time; hold
the dial in this position to scroll through the numbers more
quickly and make the setting process easier. The display will
show a graphic indicating the delayed start in bar format.
4. Once you have reached the desired end time, press the
icon again. The delayed start bar will show the current
time, the time remaining until the start of cooking, the
duration and the end of cooking time as a graphic.
5. Press to begin the pyrolysis schedule.
6. The text “POSTPONED COOKING START” and the time
remaining will appear on the display, moving the delayed
start bar backwards.
7. Once cooking has begun, the display will indicate the
remaining time by lling the duration bar.
8. When the time has elapsed, “COOKING FINISHED”
appears on the display and a buzzer sounds.
• For example: it is 9:00 a.m. and a time of 1 hour and 15
minutes is programmed, while the end time is set to 12:30.
The programme will start automatically at 11:15 a.m.
Programming the duration
1. Press the icon.
2. Turn the control dial to set the duration; hold the dial in this
position to scroll through the numbers more quickly and make the
setting process easier. The display will show a graphic indicating
the duration in bar format.
3. Once you have reached the desired duration, press the
the duration and the end of cooking time as a graphic.
4. Press to begin cooking.
5. The display will indicate the remaining time by lling the
duration bar.
6. When cooking has finished, “COOKING FINISHED”
appears on the display and a buzzer sounds.
• For example: it is 9:00 a.m. and a duration of 1 hour and
icon again. The duration bar will show the current time,
15 minutes is programmed. The programme will stop
automatically at 10:15 a.m.
Current time
indicator
End of cooking
Delayed
time
Cooking
duration
To cancel a schedule, press the icon.
Practical cooking advice
! Do not place racks in position 1 and 5 during fan-assisted
cooking. This is because excessive direct heat can burn
temperature sensitive foods.
! In the GRILL and FAN GRILLING cooking modes,
particularly when using the rotisserie spit, place the dripping
pan in position 1 to collect cooking residues (fat and/or
grease).
MULTILEVEL
• Use positions 2 and 4, placing the food which requires
more heat on 2.
• Place the dripping pan on the bottom and the rack on
33
Page 34

GB
top.
GRILL
• Place the rack in position 3 or 4. Position the food in the
centre of the rack.
• We recommend that the temperature is set to its
maximum level. The top heating element is regulated by
a thermostat and may not always operate constantly.
PIZZA
• Use a lightweight aluminium pizza pan. Place it on the
rack provided.
For a crispy crust, do not use the dripping pan as this
extends the total cooking duration and prevents the crust
from forming.
• If the pizza has a lot of toppings, we recommend adding
the mozzarella cheese to the top of the pizza halfway
through the cooking process.
34
Page 35

Modes Foods Weight
05
small pastries and vegetables. It is also suitable for warming foodstuffs and for completing cooking.
Cooking advice table
Multilevel*
Grill*
Fan grilling*
Roast*
Fish*
Pizza*
Proving*
(in kg)
1+1
0,7
0,7
0,7
0,5
0,8
0,7
1,5
1,5
1,5
0,7
0,5
0,5
1
1
1
1
1
1
1
1
1
1
1
Standard
guide rails
2 and 4
2 and 4
2 and 4
1 and 2/3
2
1 or 2
2
1 and 3 and 5
1 and 3 and 5
2 and 4
1 and 3
4
4
4
4
3 or 4
4
4
4
4
-
-
2
2
-
2
2
2
2
2
2
2
2
22 no 40
Manual
Pizza on 2 racks
Pies on two racks/cakes on 2 racks
Sponge cake on 2 racks (on the dripping pan)
Roast chicken + potatoes
Lamb
Mackerel
Lasagne
Cream puffs on 3 racks
Biscuits on 3 racks
Cheese puffs on 2 racks
Savoury pies
Mackerel
Sole and cuttlefish
Squid and prawn kebabs
Cod fillet
Grilled vegetables
Veal steak
Sausages
Hamburgers
Toasted sandwiches (or toast)
Spit-roast chicken using rotisserie spit (where present)
Spit-roast lamb using rotisserie spit (where present)
Grilled chicken
Cuttlefish
Spit-roast chicken using rotisserie spit (where present)
Spit-roast duck using rotisserie spit (where present)
Roast veal or beef
Roast pork
Lamb
Roasts (white or red meat)122 no 20
Bream
Fish fillets
Sea bass with potatoes
Pizza
Focaccia bread
Rising process for dough made with yeast
(brioches, bread, sugar pie, croissants, etc.).
n° 4 or 5
n° 4 or 6
0,5 + 0,5
Sliding
guide rails
1 and 3
1 and 3
1 and 3
1 and 3
1
1
1
1 and 2 and 4
1 and 2 and 4
1 and 3
1 and 3
3
3
3
3
2 or 3
3
3
3
3
-
-
2
2
-
2
2
2
2
2
2
1
1
yes
yes
yes
yes
yes
yes
yes
yes
yes
yes
yes
no
no
no
no
no
no
no
no
no
no
no
no
no
no
no
no
no
no
yes
yes
yes
yes
yes
Temperature
210-220
160-170
200-210
190-200
180-190
190-200
210-220
190-200
Rack position Preheating Recommended
(°C)
180
180
190
180
210
300
300
300
300
300
300
300
300
300
300
300
210
200
210
210
210
210
210
180
170
190
Cooking
duration
(minutes)
20-25
30-35
20-25
65-75
45-50
30-35
35-40
20-25
10-20
20-25
20-30
10-20
10-15
10-15
10-15
15-20
10-20
10-20
10-12
3-5
70-80
70-80
55-60
30-35
70-80
60-70
60-75
70-80
40-45
0-75
20-25
12-15
60
15-20
20-25
GB
Pasteurisation*
Slow cook*
Defrosting*
Fruit, vegetables, etc.22yes 110
Meat
Fish
Vegetables
All frozen foods
2
2
2
1
1
1
no
no
no
75
85
110
90-180
90-180
90-180
* The cooking times listed above are intended as guidelines only and may be modified according to personal tastes. Oven preheating times are set as
standard and may not be modified manually.
! ECO programme: This programme – which has longer cooking times but guarantees sensible energy saving – is recommended for dishes such as fish fillets,
35
Page 36

GB
Modes Foods Weight
(in kg)
Rack position Preheating
Automatic**
Standard
guide rails
Sliding
guide rails
Bread***
Bread (see recipe)
12 or 32 no
Beef
Roast beef
1-1,52 or 32 no
Veal
Roast veal
1-1,52 or 32 no
Lamb
Leg of lamb
1-1,52 or 32 no
Pork
Roast pork
1,2-1,5 2 or 32 no
Chicken
Roast chicken
1-1,52 or 32 no
Fish fillet
Cod
Perch
Trout
0,4-0,5
0,4-0,5
0,4-0,5
2 or 3
2 or 3
2 or 3
2
2
2
no
no
no
Fish en
papillote
Bream
Sea bass
0,4-0,5
0,4-0,5
2 or 3
2 or 3
2
2
no
no
Tarts
Tarts
0,52 or 32 no
Shortcrust tarts
Apple flan
0,52 or 32 no
Brioche
Desserts made with natural yeast (brioches, almond
cake, etc.)
0,72 or 32 no
Cake
Desserts made with baking powder
(marbled biscuits, pound cake, etc.)
0,72 or 32 no
Desserts
Desserts
12 or 32 no
Paella
Paella (see recipe)
1-3-51-2-4 no
Pilau rice
Pilau rice (see recipe)
0,52 1no
Pizza
with stone*
Very thin pizza (bread dough) 4 (place
pizza stone
on shelf)
* (models with pizza stone only)
** The duration of the automatic cooking functions are set by default. The values can be modified by the user, starting with
the default duration.
*** As stated in the recipe, pour 50 g (0,5 dl) water into the dripping pan in position 5.
Yoghurt
Yoghurt 22 yes
Cooking advice table
36
Page 37

Precautions and tips
! This appliance has been designed and manufactured
in compliance with international safety standards. The
following warnings are provided for safety reasons and
must be read carefully.
General safety
• The appliance was designed for domestic use inside the
home and is not intended for commercial or industrial use.
• The appliance must not be installed outdoors, even in
covered areas. It is extremely dangerous to leave the
appliance exposed to rain and storms.
• When moving or positioning the appliance, always use
the handles provided on the sides of the oven.
• Do not touch the appliance while barefoot or with wet or
damp hands and feet.
• The appliance must be used by adults only for
the preparation of food, in accordance with the
instructions provided in this booklet. Any other
use of the appliance (e.g. for heating the room)
constitutes improper use and is dangerous. The
manufacturer may not be held responsible for any
damage caused as a result of improper, incorrect
and unreasonable use of the appliance.
• Do not touch the heating elements or certain parts
of the oven door when the appliance is in use; these
parts become extremely hot. Keep children well away
from the appliance.
• Make sure that the power supply cables of other electrical
appliances do not come into contact with the hot parts of
the oven.
• The ventilation and heat dispersal openings must never
be obstructed.
• Always grip the oven door handle in the centre: the ends
may be hot.
• Always use oven gloves when placing cookware in the
oven or when removing it.
• Do not use aluminium foil to line the bottom of the oven.
• Do not place ammable materials in the oven: if the
appliance is switched on accidentally, the materials could
catch re.
• When unplugging the appliance, always pull the plug
from the mains socket; do not pull on the cable.
• Do not perform any cleaning or maintenance work without
having disconnected the appliance from the electricity
mains.
• If the event of malfunctions, under no circumstances
should you attempt to perform the repairs yourself.
Contact an authorised Service Centre (see Assistance).
• Do not rest objects on the open oven door.
• Do not let children play with the appliance.
• The appliance should not be operated by people (including
children) with reduced physical, sensory or mental
capacities, by inexperienced individuals or by anyone
who is not familiar with the product. These individuals
should, at the very least, be supervised by someone who
assumes responsibility for their safety or receive preliminary
instructions relating to the operation of the appliance.
• The appliance is not intended to be operated by
means of an external timer or separate remote-
control system.
Disposal
• When disposing of packaging material: observe local
legislation so that the packaging may be reused.
• The European Directive 2012/19/EC on Waste
Electrical and Electronic Equipment (WEEE), requires
that old household electrical appliances must not
be disposed of in the normal unsorted municipal
waste stream. Old appliances must be collected
separately in order to optimise the recovery and
recycling of the materials they contain and reduce
the impact on human health and the environment.
The crossed out “wheeled bin” symbol on the product
reminds you of your obligation, that when you dispose
of the appliance it must be separately collected.
Consumers should contact their local authority or retailer
for information concerning the correct disposal of their
old appliance.
Respecting and conserving the environment
• You can help to reduce the peak load of the electricity
supply network companies by using the oven in the
hours between late afternoon and the early hours of
the morning. The cooking mode programming options,
the “delayed cooking” mode (see Cooking modes) and
“delayed automatic cleaning” mode (see Care and
Maintenance) in particular, enable the user to organise
their time efciently.
• Always keep the oven door closed when using the GRILL
and FAN GRILLING modes: this will achieve improved
results while saving energy (approximately 10%).
• Check the door seals regularly and wipe them clean
to ensure they are free of debris so that they adhere
properly to the door, thus avoiding the dispersal of heat.
! This product complies with the requirements of the latest
European Directive on the limitation of power consumption
of the standby mode.
Maintenance and care
Switching the appliance off
Disconnect your appliance from the electricity supply before
carrying out any work on it.
Cleaning the appliance
• Slight differences in colour on the front of the oven are due
to the different materials used, i.e. glass, plastic or metal.
• Any shady areas resembling grooves on the oven door
glass are caused by reections from the oven light.
• The enamel is branded at very high temperatures. This
process may cause colour variations. This is normal and
will not affect appliance operation in any way. The thin
edges of the sheet metal cannot be entirely enamelled
and may therefore appear to be unnished. This will not
affect the rust protection.
• The stainless steel or enamel-coated external parts and
the rubber seals may be cleaned using a sponge that
has been soaked in lukewarm water and neutral soap.
Use specialised products for the removal of stubborn
stains. After cleaning, rinse and dry thoroughly. Do not
use abrasive powders or corrosive substances.
GB
37
Page 38

• The inside of the oven should ideally be cleaned after
GB
each use, while it is still lukewarm. Use hot water and
detergent, then rinse well and dry with a soft cloth. Do
not use abrasive products.
• All accessories - with the exception of the sliding racks
- can be washed like everyday crockery, and are even
dishwasher safe.
• We recommend that detergents are not sprayed directly
onto the control panel, but that a sponge is used instead.
! Never use steam cleaners or pressure cleaners on the
appliance.
Cleaning the oven door
! The door of LED INSIDE models cannot be removed.
Clean the glass part of the oven door using a sponge and
a non-abrasive cleaning product, then dry thoroughly with
a soft cloth. Do not use rough abrasive material or sharp
metal scrapers as these could scratch the surface and cause
the glass to crack.
For more thorough cleaning purposes, the oven door may
be removed:
1. Open the oven door fully (see diagram).
2. Use a screwdriver to lift up and turn the small levers F
located on the two hinges (see diagram).
! Do not touch the light bulb directly with your hands.
! Do not use the oven lamp as/for ambient lighting.
Sliding rack kit assembly
To assemble the sliding
racks:
1. Remove the two frames,
lifting them away from the
spacers A (see gure).
2. Choose which shelf to use
with the sliding rack. Paying
attention to the direction in
which the sliding rack is to
be extracted, position joint B
and then joint C on the
frame.
Left
guide rail
B
Right guide
rail
Direction
C
of extraction
A
F
3. Grip the door on the two outer
sides and close it approximately
half way. Pull the door towards you,
lifting it out of its slot (see diagram).
To replace the door, reverse this
sequence.
Inspecting the seals
Check the door seals around the oven regularly. If the seals
are damaged, please contact your nearest Service Centre
(see Assistance). We recommend that the oven is not used
until the seals have been replaced.
Replacing the light bulb
Lamp
Holder
compartment
Lamp
Glass cover
To replace the oven light
bulb:
1. Remove the glass cover
of the lamp-holder.
2. Remove the light bulb and
replace it with a similar one:
halogen lamp voltage 230 V,
wattage 25 W, cap G 9.
3. Replace the glass cover
(see diagram).
3. Secure the two frames
with the guide rails using the
holes provided on the oven
walls (see diagram). The
holes for the left frame are
situated at the top, while the
D
holes for the right frame are
at the bottom.
4. Finally, t the frames on
the spacers A.
! Do not place the sliding racks in position 5.
38
Page 39

Troubleshooting
Problem Possible cause Solution
play
GB
A programmed cooking mode
does not start.
The display shows ECO Mode.
An automatic mode has been
selected. “Hot” appears on the
dis
Fan-assisted cooking has been
selected and the food looks
burnt.
and cooking does not start.
There has been a blackout. Reprogram the cooking mode.
The appliance is in standby
mode.
The temperature inside the oven
is higher than the suggested
value for the selected mode.
Positions 1 and 5: the direct
heat could cause
temperature-sensitive
foods to burn.
Press any button to exit standby
mode.
Wait for the oven to cool down.
We recommend switching
dripping pan positions halfway
through cooking.
39
Page 40

Het installeren
590 mm.
NL
! Bewaar dit boekje zorgvuldig voor eventuele verdere
raadpleging. Wanneer u het product weggeeft, verkoopt,
of wanneer u verhuist, dient u dit boekje bij het apparaat
te bewaren zodat alle nodige informatie voorhanden blijft.
45 mm.
560 mm.
! Lees de gebruiksaanwijzingen zorgvuldig door: er staat
belangrijke informatie in over installatie, gebruik en veiligheid.
Plaatsing
! Het verpakkingsmateriaal is niet bestemd voor kinderen
en dient daarom te worden weggegooid volgens de
geldende normen voor gescheiden afvalverzameling ( zie
Voorzorgsmaatregelen en advies).
! De installatie moet worden uitgevoerd door een bevoegde
installateur en volgens de instructies van de fabrikant. Een
verkeerde installatie kan schade berokkenen aan personen,
dieren of dingen.
Inbouw
Voor een goede werking van het apparaat moet het
keukenmeubel de juiste kenmerken hebben:
• de zijkanten van de kastjes die aan de oven grenzen
moeten hittebestendig zijn;
• in het bijzonder moet, in geval van meubels met neer,
de lijm bestand zijn tegen temperaturen van 100°C;
• voor het inbouwen van de oven, zowelonder het aanrecht
(zie figuur) alsin stapelbouw, dient het meubel de
volgende afmetingen te hebben:
Centreren en bevestigen
Om het apparaat aan het keukenkastje te bevestigen:
• open de ovendeur;
• haal de zijdelingse afdichtingen aan de bovenzijde los
totdat de 2 bevestigingsopeningen verschijnen;
• bevestig de oven aan het meubel met behulp van de 2
houtschroeven;
• doe de 2 afdichtingen op hun plaats.
! Alle beschermende onderdelen moeten zodanig worden
bevestigd dat ze niet kunnen worden verwijderd zonder
gereedschap te gebruiken.
Elektrische aansluiting
De ovens met driepolige voedingskabel functioneren met de
wisselstroom, spanning en frequentie die aangegeven staan
op het typeplaatje op het apparaat ( zie onder).
550 mm.
min.
45 mm.
560 mm.
575-585 mm.
570 mm.
595 mm.
20 mm.
550 mm.
20,5 mm.
22,5 mm.*
* Alleen voor roestvrijstalen modellen
! Nadat het apparaat is ingebouwd, mag er geen contact
meer mogelijk zijn met de elektrische onderdelen.
Het energieverbruik dat staat aangegeven op het typeplaatje
is gebaseerd op dit soort installatie.
Ventilatie
Om een goede ventilatie te kunnen garanderen is het
noodzakelijk de achterkant van het meubel te verwijderen.
Het verdient de voorkeur de oven op twee houten balken te
plaatsen, of eventueel op een enkele plank die een opening
heeft van tenminste 45 x 560 mm (zie afbeeldingen).
Monteren voedingskabel
N
N
L
L
1. Licht de lipjes aan de
zijkant van het deksel van
het klemmenbord op met een
schroevendraaier: trek het
deksel van het klemmenbord
open (zie afb.).
2. De voedingskabel in
werking stellen: draai de
schroef van de kabelklem
en de drie schroeven van de
contacten L-N- los, en
bevestig de draden onder de
schroeven met inachtneming
van de kleuren: Blauw (N)
Bruin (L) Geel-Groen
(zie afbeelding).
3. Maak de kabel vast aan
de daarvoor bestemde
kabelklem.
4. Sluit het deksel van het
klemmenbord.
40
Page 41

Het aansluiten van de voedingskabel aan het
elektrische net
Gebruik voor de voedingskabel een stekker die genormaliseerd
is voor de lading aangegeven op het typeplaatje.
Wanneer het apparaat rechtstreeks op het net wordt
aangesloten moet u tussen het apparaat en het net een
meerpolige schakelaar aanbrengen met een afstand
tussen de contacten van minstens 3mm, aangepast aan
het elektrische vermogen en voldoend aan de geldende
normen (de aarding mag niet worden onderbroken door
de schakelaar). De voedingskabel moet zodanig worden
geplaatst dat hij nergens een temperatuur bereikt van 50°C
hoger dan de kamertemperatuur.
! De installateur is verantwoordelijk voor een correcte
elektrische aansluiting en het in acht nemen van de
veiligheidsnormen.
Voor het aansluiten moet u controleren dat:
• het stopcontact geaard is en voldoet aan de geldende
normen;
• het stopcontact in staat is het maximale vermogen
van het apparaat te dragen, zoals aangegeven op het
typeplaatje;
• de spanning zich bevindt tussen de waarden die staan
aangegeven op het typeplaatje;
• het stopcontact en de stekker overeenkomen. Als
dat niet zo is, dient u ofwel de stekker ofwel het
stopcontact te vervangen; gebruik geen verlengsnoeren
of dubbelstekkers.
! Wanneer het apparaat geïnstalleerd is moeten het snoer
en het stopcontact gemakkelijk te bereiken zijn.
! De kabel mag niet worden gebogen of samengedrukt.
TYPEPLAATJE
Afmetingen*
Inhoud*
Afmetingen**
Inhoud**
Elektrische
aansluitingen
ENERGY
LABEL
NL
breedte 43,5 cm
hoogte 32,4 cm
diepte 41,5 cm
liter 59
breedte 43,5 cm
hoogte 32,4 cm
diepte 41,5 cm
liter 62
spanning 220-240V ~ 50/60 Hz
of 50Hz (zie typeplaatje) maximaal
opgenomen vermogen 2800W
Richtlijn 2002/40/EG op het etiket
van elektrische ovens.
Norm EN 50304
Energieverbruikverklaring Klasse
geforceerde convectie verwarmingsfunctie: ECO.
Deze apparatuur voldoet aan de
volgende EU voorschriften:
2006/95/EEG van 12/12/06
(Laagspanning) en daaropvolgende
wijzigingen - 2004/108/EEG van
15.12.04 (Elektromagnetische
Compatibiliteit) en daaropvolgende
wijzigingen - 93/68/EEG van
22/07/93 en daaropvolgende
wijzigingen.
-2012/19/CE en daaropvolgende
wijzigingen.
- 1275/2008 standby/off mode
- richtlijn 1999/05/EG
(Radio-en Eindapparatuur
telecommunicatie) en latere
wijzigingen
! De kabel moet van tijd tot tijd worden gecontroleerd en
mag alleen door erkende monteurs worden vervangen (zie
Service).
! De fabrikant kan nergens aansprakelijk voor worden
gesteld als deze normen niet worden nageleefd.
* Alleen voor modellen met diepgetrokken geleiders.
** Alleen voor modellen met uitstekende geleiders.
41
Page 42

Starten en gebruik
NL
BELANGRIJK! De oven
is uitgerust met een
blokkeringssysteem voor
de grill dat het mogelijk
maakt om de gril naar
buiten te trekken zonder
dat deze buiten de oven
komt (1).
Om de grill volledig te
verwijderen, de grill aan de voorkant optillen en naar buiten
trekken, zoals op de tekening afgebeeld is (2).
! Wij raden u aan bij het eerste gebruik de oven minstens
een uur leeg te laten functioneren, op maximum temperatuur
en met de deur dicht. Nadat u de oven heeft uitgeschakeld,
opent u de ovendeur en lucht u het vertrek. De lucht die u
ruikt komt door het verdampen van de middelen die worden
gebruikt om de oven te beschermen.
Elementen van het menu instellingen
Om toegang te krijgen tot het menu instellingen schakelt
u het bedieningspaneel in en drukt u op het symbool .
Gebruik de knop om de verschillende elementen van het
menu te tonen.
Om de instelling te wijzigen drukt u op het symbool .
In het menu verschijnen de volgende parameters:
TAAL: keuze van de taal die op het display wordt getoond.
KLOK: instellen van de exacte tijd.
GELUID: in-/uitschakelen geluid van het toetsenbord.
LICHT: in-/uitschakelen verlichting in de oven tijdens het
koken.
SYMBOOL: in-/uitschakelen symbool bij ontsteking
INSTRUCTIE: in-/uitschakelen tips.
UIT: het menu verlaten.
! U kunt het menu instellingen verlaten door te drukken op
het symbool .
! Als u aan de knop draait kunt u de parameters op het
display, tussen de symbolen “<“ e “>” wijzigen.
! Om de instellingen te vergemakkelijken houdt u de knop
vast: de cijfers of het display gaan sneller vooruit.
! Elke instelling wordt automatisch na 10 seconden
opgeslagen.
! Het is niet mogelijk de touch toetsen te activeren als u
handschoenen draagt.
Enkele modellen beschikken over een scharnierensysteem
waarmee de deur langzaam dichtvalt zonder dat u hem
met de hand hoeft te begeleiden. Voor een juist gebruik,
vóór u hem sluit:
• open de deur helemaal.
• vermijd de deur met de hand te forceren.
! Als u de gekozen functie activeert worden de parameters
van het apparaat afgesteld om de kookprestaties te
optimaliseren. Dit kan een vertraging in de ontsteking van
de ventilator en de verwarmingselementen teweegbrengen.
Eerste ontsteking
Na het aansluiten aan het elektrische net doet u het
bedieningspaneel aan door te drukken op het symbool .
In het menu verschijnt een talenlijst. Selecteert de gewenste
taal met behulp van de knop. Druk op het symbool om
te bevestigen.
Zodra u een keuze heeft gemaakt toont het display het
menu instellingen. Druk op het symbool of draai aan
de knop tot aan het element UIT. Druk op het symbool
om de oven te gaan gebruiken.
De klok instellen
Om de klok in te stellen doet u de oven aan door op het
symbool te drukken. Druk op het symbool en volg
de aangegeven procedure.
1. ga m.b.v. de knop langs de elementen van het menu, kies
het element KLOK en druk op het symbool .
2. Regel de tijd m.b.v. de knop.
3. Als u het juiste uur heeft bereikt drukt u nogmaals op
het symbool .
4. herhaal de handelingen 2 en 3 voor de minuten.
5. druk om het menu instellingen te verlaten op het symbool
of draai aan de knop tot aan het element UIT. Druk op
het symbool .
! U kunt de klok ook instellen als de oven uit is door op het
symbool te drukken en bovenstaande punten 2 en 4
na te volgen.
Na aansluiting op het elektriciteitsnet of na een black-out
dient u de klok opnieuw in te stellen.
De kookwekker instellen
! U kunt de kookwekker zowel met de oven aan als met de
oven uit instellen. De kookwekker heeft geen invloed op
het in- of uitschakelen van de oven.
Als de tijd verstreken is laat de kookwekker een
geluidssignaal horen dat ofwel vanzelf na 30 seconden
uitgaat, of kan worden afgezet door op een willekeurige
actieve toets te drukken.
De kookwekker instellen:
1. Druk op het symbool .
2. Regel de gewenste tijd m.b.v. de knop.
3. Als u de juiste tijd heeft bereikt drukt u nogmaals op het
! Nadat u de taal heeft gekozen in het menu, en nadat er
30 seconden zijn verstreken sinds u hem niet meer heeft
gebruikt, zal het display automatisch overgaan naar de
programmeringsmodus.
42
symbool .
Als de oven uit is toont het display dat het aftellen is
Page 43

begonnen. Als de oven aan is toont het symbool dat
de kookwekker actief is.
Om de kookwekker te annuleren drukt u op het symbool
en zet u m.b.v. de knop de tijd op 00:00. Druk nogmaals
op het symbool .
Als het symbool uitgaat betekent dit dat de kookwekker
uitgeschakeld is.
De oven starten
1. Doe het bedieningspaneel aan door te drukken op het
symbool . Het apparaat laat een drievoudige, oplopende
toon horen.
2. Druk op het symbool om het gewenste handmatige
kookprogramma te selecteren. U kunt de temperatuur en
de duur van de bereiding instellen.
Druk op het symbool om het gewenste automatische
kookprogramma te selecteren. De duur en de temperatuur
van de bereiding zijn vooringesteld. Het is mogelijk alleen
de duur te wijzigen, op basis van het gekozen programma.
De tekst “AUTO” die op het display verschijnt geeft aan dat
de temperatuur een speciek kookproel volgt. U kunt een
uitgestelde bereiding programmeren.
3. Druk op het symbool om de bereiding te starten.
4. De oven begint voor te verwarmen, de aanwijzers van
voorverwarming gaan naarmate de temperatuur stijgt aan.
5. Een geluidssignaal en de ontsteking van alle aanwijzers
van de voorverwarming geven aan dat de voorverwarming
compleet is. Zet de etenswaren in de oven
6. Tijdens het koken kunt u nog altijd:
Ventilator
Om de oven van buiten niet te heet te laten worden, brengt
een verkoelingsventilator een luchtstroom teweeg die
tussen het bedieningspaneel en de ovendeur naar buiten
komt, alsmede aan de onderzijde van de ovendeur. Aan
het begin van de pyrolysereiniging draait de ventilator op
lage snelheid.
! Aan het einde van de kooktijd blijft de ventilator draaien
totdat de oven voldoende is afgekoeld.
Ovenverlichting
Het licht gaat aan als u de ovendeur opent of op het moment
dat een bereiding van start gaat (als deze actief is in het
menu instellingen).
In de modellen die beschikken over een LED INSIDE zullen,
bij het starten van de bereiding, alle leds op de deur aangaan
voor een betere verlichting van alle bereidingsniveaus.
Demomodus
! Als u niet eerst de taal kiest, schakelt het apparaat niet
over naar de DEMOMODUS.
De oven kan in demomodus werken: alle verwarmingselementen
worden uitgeschakeld, maar de bediening blijft actief.
Om de demomodus te activeren moet u de oven uitschakelen
door de knop met de klok mee te draaien en tegelijkertijd
10 seconden lang op het symbool te drukken. U hoort
een geluidssignaal en op het display verschijnt “DEMO”
Om de demomodus uit te schakelen moet u de knop tegen
de klok in draaien en tegelijkertijd 3 seconden lang op
het symbool drukken. U hoort een geluidssignaal ter
bevestiging van de uitschakeling.
NL
- de temperatuur wijzigen door op het symbool te
drukken. Draai aan de knop en bevestig door nogmaals
op het symbool te drukken (alleen voor handmatige
programma’s);
- de duur van de bereiding programmeren ( zie Programma’s);
- de bereiding onderbreken door op het symbool te
drukken. In dit geval onthoudt het apparaat de temperatuur
die eventueel daarvoor is gewijzigd (alleen voor handmatige
programma’s).
- schakel de oven uit door 3 seconden lang te drukken op
het symbool .
7. Indien de stroom uitvalt en de oventemperatuur niet te
laag is geworden, gaat de oven automatisch terug naar het
punt waar het koken is onderbroken. De geprogrammeerde
functies worden echter niet onthouden. U dient ze daarom
bij het terugkeren van de stroom opnieuw te programmeren
(bv.: u heeft een start van de bereiding ingesteld om 20:30.
Om 19:30 vindt er een black-out plaats. Als de stroom
terugkeert dient u de programmering opnieuw in te stellen).
! Bij het programma GRILL is geen voorverwarming
voorzien.
! Zet nooit voorwerpen op de bodem van de oven; u riskeert
hiermee het email te beschadigen.
! Plaats de ovenschalen altijd op bijgeleverde roosters.
Herstellen fabriekswaarden
U kunt de oven terugbrengen naar de fabriekswaarden en
alle gebruikersinstellingen resetten (taal, geluid, persoonlijke
bereidingen, enz…). Om een reset uit te voeren schakelt
u de oven uit en houdt u 6 seconden lang de toetsen ,
, tegelijkertijd ingedrukt. Bij het herstellen van de
fabriekswaarden, hoort u een geluidssignaal. Zodra u weer op
het symbool drukt, keert u terug naar de eerste ontsteking.
Stand-by
Dit product voldoet aan de eisen die gesteld worden door
de nieuwe Europese Richtlijn voor energiebesparing van
apparaten in de stand-by stand. Wanneer er 30 minuten
lang geen handelingen worden uitgevoerd, en er geen
deurblokkering of blokkering van het bedieningspaneel
is ingesteld, gaat het apparaat automatisch over naar de
stand-by stand. De stand-by modus wordt weergegeven
d.m.v. het symbool ECO Mode op het display. Wanneer
weer een handeling op het apparaat wordt uitgevoerd, gaat
het systeem onmiddellijk over naar de operationele stand.
43
Page 44

Programma’s
NL
! Om te zorgen dat de gerechten perfect krokant en zacht
uit de oven komen, laat de oven het vocht dat op natuurlijke wijze uit het voedsel vrijkomt wegvloeien in de vorm
van waterdamp. Op deze manier kunnen alle gerechten
een optimaal kookresultaat bereiken.
! Bij elke ontsteking stelt de oven als eerste het programma
van handmatige bereiding voor.
! Als u de deur niet volledig afsluit toont het display de tekst
“DEUR OPEN”. Verwijder de oorzaak van het niet goed afsluiten
van de deur om optimale bereidingsresultaten te bereiken.
Handmatige kookprogramma’s
! Alle programma’s hebben een vooringestelde
kooktemperatuur. Deze kan handmatig worden aangepast,en
naar wens worden ingesteld tussen de 40°C en de 250°C
(270°C voor het programma GRILL). Eventuele wijzigingen
van de temperatuur worden opgeslagen en bij een volgend
gebruik van het programma voorgesteld. Als de gekozen
temperatuur lager is dan de interne temperatuur van de
oven, toont het display de tekst “OVEN TE WARM”.
U kunt de bereiding in ieder geval laten starten.
Als u een bereiding start zonder de duur in te stellen, toont
het display de tijd die is verstreken vanaf het begin.
Programma MULTINIVEAU
Alle verwarmingselementen gaan aan en de ventilator treedt
in werking. Aangezien de warmte in de hele oven constant
is, zorgt de lucht dat de gerechten op gelijkmatige wijze
gekookt en gebakken worden. Het is mogelijkmaximaal 3
roosters tegelijk te gebruiken.
Programma GRILL
Het bovenste verwarmingselement gaat aan en het draaispit
(waar aanwezig) begint te draaien. De hoge temperatuur
en directe straling van de grill is vooral aan te raden voor
gerechten die een hoge temperatuur aan de buitenkant
nodig hebben. Kook met de ovendeur dicht (zie “Praktische
kooktips”).
Programma GRATINEREN
Het bovenste verwarmingselement gaat aan, en tijdens
een deel van de cyclus treden ook het cirkelvormige
verwarmingselement, de ventilator en het draaispit (waar
aanwezig) in werking. Hiermee wordt de rechtstreekse
bovenhitte van de grill gecombineerd met de geforceerde
luchtcirculatie in de oven.
Eventueel verbranden van de buitenkant wordt zo
vermeden. De warmte dringt gemakkelijker door naar de
binnenkant. Kook met de ovendeur dicht (zie “Praktische
kooktips”).
Programma BAKKEN
De bovenste en cirkelvormige verwarmingselementen
44
gaan aan en de ventilator gaat draaien. Hiermee wordt
de rechtstreekse bovenhitte van de grill gecombineerd
met de geforceerde luchtcirculatie in de oven. Eventueel
verbranden van de buitenkant wordt zo vermeden. De
warmte dringt gemakkelijker door naar de binnenkant.
Kook met de ovendeur dicht.
Programma VIS
De bovenste en cirkelvormige verwarmingselementen gaan
aan en de ventilator gaat draaien. Met deze combinatie kunt
u zeer lichte visgerechten bereiden.
Programma PIZZA
De bovenste en cirkelvormige verwarmingselementen gaan
aan en de ventilator gaat draaien. Door deze combinatie
van elementen wordt de oven snel warm. Indien u meerdere
roosters gebruikt moet u de gerechten halverwege de
kooktijd omwisselen.
Programma RIJZEN
Het bovenste cirkelvormige verwarmingselement gaat aan
en de ventilator gaat pas in de verwarmingsfase draaien.
De oventemperatuur is ideaal voor de activering van het
rijsproces. Houd tijdens het rijzen de ovendeur dicht.
Programma GEBAK/KOEKJES
Het achterste verwarmingselement gaat aan en de ventilator
gaat werken, zodat een gelijkmatige, zachte warmte wordt
gecreëerd. Dit programma is aanbevolen voor het bakken
van jne gerechten (bijvoorbeeld taarten die moeten rijzen).
Programma PASTEURISEREN
Dit soort bereiding is geschikt voor groenten, fruit, enz…
Kleine bakjes kunnen op 2 niveaus worden geplaatst
(bakplaat 1e niveau en rooster 3e niveau). Laat de bakjes
in de oven afkoelen. Plaats het gerecht in de koude oven.
Programma’s LAGE TEMPERATUUR VLEES/VIS/
GROENTE
Deze bereidingen, die al jaren door vakmensen worden
gebruikt, maken het mogelijk de gerechten (vlees, vis,
fruit, groente) op zeer lage temperaturen (van 75, 85 en
110 °C) te koken. Hiermee wordt een perfecte bereiding
gegarandeerd die de smaak op zijn best doet uitkomen.
De voordelen moeten niet worden onderschat:
• aangezien de temperaturen van de bereiding zeer laag
zijn (meestal lager dan de verdampingstemperatuur),
wordt het verlies van kooksappen, te wijten aan de
verdamping, aanzienlijk beperkt en wordt het gerecht
mals en zacht.
• bij het bereiden van vlees krimpen de spiervezels minder
in dan bij een traditionele bereidingswijze. U krijgt dus
mals vlees dat niet hoeft te ‘rusten’ na het koken. U moet
het vlees bruinbakken voordat u het in de oven plaatst.
Het luchtdicht bereiden op lage temperatuur, dat al sinds
30 jaar door de beroemdste koks wordt gedaan, biedt vele
voordelen:
• gastronomische voordelen: de geuren worden
geconcentreerd voor het behoud van de kenmerkende
smaken terwijl het gerecht zacht en mals blijft.
• hygiënische voordelen: aangezien de hygiënische
normen worden gerespecteerd beschermt deze
Page 45

kookwijze de etenswaren tegen de schadelijke effecten
van zuurstof en garandeert hij een langere houdbaarheid
in de koelkast.
• organisatorische voordelen: dankzij de lange
houdbaarheid kunt u gerechten lange tijd van tevoren
klaarmaken.
• diëtetische voordelen: deze bereidingswijze beperkt
het gebruik van vetten waardoor u licht verteerbare
gerechten klaar kunt maken.
• economische voordelen: het gewichtsverlies van de
producten wordt aanzienlijk beperkt.
Voor gebruik van deze techniek moet u dus beschikken over
een vacuümmachine voorzien van de nodige zakjes. Volg
de instructies voor het luchtdicht verpakken van etenswaren
aandachtig.
De vacuümtechniek maakt ook het bewaren van rauwe
producten mogelijk (fruit, groente, enz.) en van voorgekookte
producten (traditionele bereiding).
Programma ONTDOOIEN
De ventilator achterin de oven doet de lucht op
kamertemperatuur rondom de gerechten circuleren. Dit is
ideaal voor het ontdooien van iedere soort etenswaar, maar
speciaal voor jne gerechten die geen hitte verdragen zoals
bijvoorbeeld: ijstaarten, crèmetaarten, slagroomtaarten,
vruchtentaarten.
Programma ECO
Het achterste verwarmingselement gaat aan en de ventilator gaat werken zodat een gelijkmatige, zachte warmte
wordt gecreëerd. De energiebesparende stand wordt
aanbevolen voor kleine gerechten. Het is ideaal voor het
opwarmen of afbakken van gerechte.
Draaispit*
Voor het activeren van het
draaispit ( zie afbeelding)
gaat u als volgt te werk:
1. plaats de lekplaat op
stand 1;
2. zet de steun van het
draaispit op de 3e stand
en steek de vleespen in de
speciale opening achterin
de oven;
3. activeer het draaispit door
de programma’s of te selecteren;
! Wanneer u de ovendeur opent als het programma is
gestart, zal het draaispit stoppen met draaien.
Automatische kookprogramma’s
! De temperatuur en de duur van de bereiding zijn
vooringesteld d.m.v. het systeem C.O.P.® (Optimale
Geprogrammeerde Bereiding) dat automatisch een
perfect resultaat garandeert. De bereiding wordt automatisch
gestopt en de oven geeft aan wanneer het gerecht gaar is.
U kunt het gerecht in een koude of warme oven zetten.
Het is mogelijk de duur van de bereiding, voor de start, naar
smaak ±5/20 minuten te wijzigen, op basis van het gekozen
programma. Als de bereiding reeds is gestart, kunt u in ieder
geval de duur wijzigen. Als de wijziging wordt uitgevoerd
vóór de start van het programma wordt deze opgeslagen en
bij het eerstvolgende gebruik van het programma opnieuw
voorgesteld. Als de interne temperatuur van de oven hoger
is dan degene die wordt voorgesteld voor het gekozen
programma, toont het display de tekst “OVEN TE WARM”
en is het niet mogelijk de bereiding uit te voeren. Wacht tot
de oven afkoelt.
Het display toont om en om het symbool van het gekozen
programma en het symbool van het aanbevolen rooster.
! Als de kookfase is bereikt laat de oven een geluidssignaal
horen.
! Open de ovendeur niet om te vermijden dat de tijdsduur
en de kooktemperatuur worden ontregeld.
Programma BROOD
Gebruik deze functie voor het bakken van brood. Voor een
optimaal resultaat raden wij u aan de volgende aanwijzingen
nauwkeurig op te volgen:
• houdt u aan het recept;
• het maximum gewicht per bakplaat;
• vergeet niet 50g (0,5 dl) koud water te gieten in de
bakplaat op stand 5;
• het deeg moet circa 1 tot 1½ uur op kamertemperatuur
rijzen. De exacte duur hangt af van de kamertemperatuur.
Het deeg is voldoende gerezen als het volume is
verdubbeld.
Recept voor BROOD:
1 bakplaat van 1000 g max, onderste ovenstand
2 bakplaten van 1000 g max, onderste en middelste stand
Recept voor 1000 g deeg: 600 g meel, 360 g water, 11 g
zout, 25 g bakkersgist (of 2 zakjes gedroogde gist)
Procedure:
• Meng het meel en het zout in een grote kom.
• Los de gist op in lauw water (circa 35 graden).
• Maak een kuiltje in het meel.
• Giet er het mengsel van water en gist in
• Kneed het geheel totdat een homogeen deeg is gevormd
dat niet plakkerig is, door het deeg 10 minuten lang met
de palm van de hand plat te drukken en vervolgens weer
dicht te vouwen.
• Maak een bal van het deeg, doe het in een kom en
bedek het met plastic folie om te voorkomen dat de
buitenkant ervan uitdroogt. Doe de kom in de oven op de
handmatige functie RIJZEN en laat het ongeveer 1 uur
lang rijzen (het volume van het deeg moet verdubbelen).
• Verdeel de bal om verschillende broden te maken.
• Leg ze op ovenpapier op de bakplaat.
• Bestrooi de broden met meel.
• Maak sneden in de broden.
• Plaats het brood in de koude oven.
NL
* Slechts op enkele modellen aanwezig.
45
Page 46

• Start het programma BROOD
NL
• Aan het einde van de kooktijd laat u de broden rusten
op een rooster totdat ze volledig zijn afgekoeld.
Programma RUNDVLEES/KALFSVLEES/
LAMSVLEES
Gebruik deze functie voor het braden van rund-, kalfs-, en
lamsvlees. Plaats het gerecht in de koude oven. U kunt
de gerechten eventueel ook in de warme oven plaatsen.
Bij enkele programma’s BAKKEN kan het gewenste
bereidingsniveau worden gekozen:
1. Druk op het symbool ;
2. kies met de knop tussen “GAAR”, “MEDIUM” en “ROOD”.
3. druk nogmaals op het symbool .
Programma VARKENSVLEES
Gebruik deze functie voor het braden van varkensvlees.
Plaats het gerecht in de koude oven. U kunt de gerechten
eventueel ook in de warme oven plaatsen.
Programma CAKE
Deze functie is ideaal voor het bereiden van zowel taarten
met bakkersgist als met gedroogde gist, of zonder gist.
Plaats in de koude oven. U kunt de gerechten eventueel
ook in de warme oven plaatsen.
Programma PAELLA
Deze functie is ontwikkeld voor een eenvoudige en snelle
bereiding van paella, aangezien alle ingrediënten koud in de
oven worden geplaatst. Voor een optimaal resultaat raden wij
u aan de volgende aanwijzingen nauwkeurig op te volgen:
• Gebruik alleen anti-kleefrijst: u kunt het beste gewone
witte rijst gebruiken.
• De oven moet koud zijn.
• Plaats:
- de diepe lekplaat op de 1ste stand (als u deze als
accessoire heeft) of plaats het rooster op de 1ste stand
en plaats er een ovenschaal van circa 35x30x5cm op.
- de lekplaat op de 3e stand.
- het rooster op de 5e stand.
Programma KIP/GEVOGELTE
Deze functie is ideaal voor alle recepten met kip (heel of
in stukken). Plaats het gerecht in de koude oven. U kunt
de gerechten eventueel ook in de warme oven plaatsen.
Programma VISFILET
Deze functie is ideaal voor het koken van kleine of
middelmatige vislets. Plaats het gerecht in de koude oven.
Programma VIS IN FOLIE
Gebruik deze functie voor het bereiden van hele vissen met
een maximum gewicht van 1 kg. U kunt de vis in de folie direct
op de lekplaat plaatsen. Plaats het gerecht in de koude oven.
Programma TAARTEN
Deze functie is ideaal voor alle taartrecepten (die
normaalgesproken aan de onderkant goed gaar moeten
worden). Plaats het gerecht in de koude oven. U kunt de
gerechten eventueel ook in de warme oven plaatsen.
Programma VLAAI
Deze functie is ideaal voor alle recepten waarbij kruimeldeeg
(gewoonlijk bereid zonder eieren) gebruikt wordt, of taarten
met een vloeibaar of zeer zachte vulling. Plaats het gerecht
in de koude oven. U kunt de gerechten eventueel ook in de
warme oven plaatsen.
Programma BRIOCHE
Deze functie is ideaal voor gebak en taarten op basis van
bakkersgist. In de koude oven plaatsen. U kunt de gerechten
echter ook in een warme oven plaatsen.
Programma PLUM-CAKE
Deze functie is ideaal voor alle recepten op basis van
chemisch gist. Plaats het gerecht in de koude oven. U kunt
de gerechten eventueel ook in de warme oven plaatsen.
Recept voor 8 personen:
In de diepe lekplaat
• 1 jngehakte ui
• 500 g rijst
• 500 g fruits de mer (garnalen, mosselen, venusschelpen,
calamarisringen, enz.)
• 2 handjes doperwten
• ¼ Spaanse peper in blokjes gesneden
• Plakjes chorizo (pikante worst met paprika)
• Een lepel visbouillon poeder
• 1 dosis saffraan in poeder
• 700 g water
Bedek de lekplaat met aluminiumfolie.
In de lekplaat
• 8 porties kabeljauwlet
• 8 (of 16) gepelde grote garnalen (of langoustines)
• 8 Hele mosselen ter decoratie
Bedek de lekplaat met aluminiumfolie.
Op een ovenschaal op het rooster
• 6-8 reeds met paellakruiden en olijfolie gemarineerde
kippenbouten.
Maak het gerecht aan het einde van de bereiding af met
een beetje verse olie.
Programma RIJST/PILAF
Gebruik deze functie voor het koken van rijst. Voor een
optimaal resultaat raden wij u aan de volgende aanwijzingen
op te volgen:
• Gebruik alleen anti-kleefrijst: u kunt het beste gewone
witte rijst gebruiken.
• De oven moet koud zijn.
• de diepe lekplaat op de 2e stand (als u deze als
accessoire heeft) of plaats het rooster op de 2e stand
en plaats er een ovenschaal van circa 35x30x5cm op.
Recept voor 4 - 6 personen:
• 500 g rijst
• 7 dl water of bouillon
46
Page 47

Plaats de rijst op de diepe lekplaat zonder hem eerst te
wassen en bedek hem met het vocht. Bedek de lekplaat
met aluminiumfolie.
Programma PIZZERIA (alleen voor modellen die
beschikken over een pizzasteen)
! U kunt de duur niet wijzigen noch een uitgestelde kooktijd
programmeren.
Gebruik deze functie voor het bereiden van pizza’s (dun
deeg). Gebruik de bijgeleverde vuurvaste steen voor pizza
en plaats deze op het rooster op stand 4. Het programma
PIZZERIA begeleidt de gebruiker tijdens de bereiding d.m.v.
berichten en geluidssignalen.
1. Het display toont “PLAATS PIZZASTEEN” en “DRUK
START OM TE BEGINNEN”
2. Zodra u op het symbool heeft gedrukt begint
het voorverwarmen van de pizzasteen. De aanwijzer
wordt opgevuld en op het display verschijnt de tekst
“VOORVERWARMEN PIZZASTEEN”
3. Als de voorgaande fase is beëindigd hoort u enkele
geluidssignalen die aangeven dat u de pizza in de oven
kunt plaatsen en verschijnt het bericht “PLAATS PIZZA IN
OVEN”.
4. Open de ovendeur en plaats de pizza in de oven. De
bereiding begint en op het display verschijnt het bericht
“KOKEN IN VOORTGANG”. Het display toont ook dat het
aftellen van de 4 minuten is begonnen.
5. Zodra de bereidingstijd verstreken is toont het display
het bericht “NEEM PIZZA UIT DE OVEN” en hoort u enkele
geluidssignalen die aangeven dat u de pizza uit de oven
kunt halen zodra u vindt dat hij goed gebakken is.
6. Druk op het symbool , en haal de pizza uit de oven.
7. Als u op het symbool zou drukken wordt de oven
teruggebracht naar de fase van de voorverwarming van de
pizzasteen. Als de temperatuur van de pizzasteen hoog
genoeg is wordt deze fase overgeslagen en gaat u direct
over naar de fase waarop u de pizza in de oven plaatst.
Programma YOGHURT
Het bovenste cirkelvormige verwarmingselement gaat aan
en de ventilator gaat pas in de verwarmingsfase draaien.
Een temperatuur van 50°C is ideaal voor het bereiden van
yoghurt.
Basisrecept voor een liter yoghurt: een liter volle,
houdbare, melk, een klein bakje yoghurt naturel
Procedure:
• Verwarm de melk in een roestvrijstalen pan totdat hij
kookt.
• Verwijder het bovenste laagje room en laat hem afkoelen.
• Roer 3 of 4 lepels melk met de yoghurt totdat ze goed
zijn gemengd.
• Voeg het mengsel toe aan de rest van de melk en roer
goed door.
• Schenk het mengsel in hermetisch afgesloten bakjes.
• Zet de bakjes op de lekplaat op niveau 2.
• Doe de potjes aan het einde minstens 12 uur in de
koelkast. Bewaar de yoghurt maximaal een week in de
koelkast .
• Het is mogelijk het recept aan te passen op uw
persoonlijke smaak.
De bereiding programmeren
! De programmering is alleen mogelijk wanneer een
kookprogramma is geselecteerd.
De duur programmeren
1. Druk op het symbool ;
2. draai de knop om de duur in te stellen. Als u de knop
ingedrukt houdt zullen de nummers sneller lopen en kunt u
de tijd sneller instellen. Het display toont op grasche wijze
hoe de staaf van de duur beweegt.
3. Als u de juiste duur heeft bereikt drukt u nogmaals op het
symbool . Het display toont op de staaf van de duur de
informatie betreffende het huidige tijdstip, de duur en het
tijdstip van einde bereiding.
4. Druk op het symbool om de bereiding te starten.
5. Het display toont de resterende tijd door de staaf
langzaamaan te vullen.
6. Als de bereiding is beëindigd verschijnt op het display de
tekst “KOKEN BEËINDIGD” en hoort u een geluidssignaal.
• B.v.: het is 9:00 uur en u programmeert een duur van 1
uur en 15 minuten. Het programma stopt automatisch
om 10:15.
Aanwijzer
huidige tijd
Programmeren van een uitgestelde bereiding
! Het programmeren van het einde van de kooktijd is alleen
mogelijk nadat u een kookduur heeft geselecteerd.
! Om de uitgestelde bereiding goed te programmeren is het
van fundamenteel belang dat de klok goed staat.
1. Volg de voor de tijdsduur beschreven procedure van
punt 1 t/m 3;
2. Druk tweemaal op het symbool . Het tijdstip van einde
kooktijd zal gaan knipperen.
3. draai de knop om het tijdstip van einde kooktijd in te
stellen. Als u de knop ingedrukt houdt zullen de nummers
sneller lopen en kunt u de tijd sneller instellen. Het display
toont op grasche wijze hoe de staaf van de uitgestelde
bereiding beweegt.
4. Als u de gewenste eindtijd heeft bereikt drukt u nogmaals
op het symbool . Het display toont op de staaf van de
uitgestelde bereiding de informatie betreffende het huidige
tijdstip, de resterende duur tot aan de start, de duur en het tijdstip
van einde bereiding.
5. Druk op het symbool om de programmering te starten.
6. Het display toont de tekst “STEL DE START VAN HET
KOKEN UIT” en de resterende tijd door de staaf van de
uitgestelde start terug te draaien.
Tijdstip
einde kooktijd
Staaf
van de duur
Duur
bereiding
NL
47
Page 48

7. Zodra de bereiding is gestart toont het display de
uitgestelde start
NL
resterende tijd door de staaf langzaamaan te vullen.
8. Als de tijd verstreken is verschijnt op het display de
tekst “KOKEN BEËINDIGD” en hoort u een geluidssignaal.
• B.v.: het is 9:00 uur, u programmeert een duur van 1 uur
en 15 minuten en de eindtijd om 12:30. Het programma
zal automatisch om 11:15 beginnen.
Aanwijzer
huidige tijd
Staaf
Tijdstip einde
kooktijd
Duur
bereiding
Om een programmering te onderbreken drukt u op het
symbool .
Praktische kooktips
! Gebruik voor het koken met de heteluchtoven nooit de
standen 1 en 5: in deze standen zou de hete lucht de jne
gerechten kunnen verbranden.
! Bij de functies GRILL of GRATINEREN, in het bijzonder
wanneer u het draaispit gebruikt, raden wij u aan de lekplaat
op stand 1 te zetten om eventueel vet of jus op te vangen.
MULTINIVEAU
• Gebruik de standen 2 en 4, en plaats de gerechten die
meer warmte nodig hebben op stand 2.
• Plaats de lekplaat op de onderste stand en het rooster
op de hoogste.
GRILL
• Plaats de grill op stand 3 of 4, plaats de gerechten op
het midden van de grill.
• Wij raden u aan de temperatuur op maximum te zetten.
Het is normaal dat het bovenste verwarmingselement
niet constant aan blijft: zijn werking wordt geregeld door
een thermostaat.
PIZZA
• Gebruik een lichte aluminium ovenschaal en zet hem op
het bijgeleverde ovenrooster.
Bij gebruik van de lekplaat is de bereidingstijd langer en
krijgt u waarschijnlijk geen krokante pizza.
• Bij zeer gevulde pizza’s raden wij aan de mozzarella of
andere kaas pas halverwege de kooktijd toe te voegen.
48
Page 49

visfilets, klein gebak en groente. Het is ook geschikt om gerechten op te warmen of bereidingen af te maken.
Kooktabel
Programma'sGerechtenGewicht
(kg)
Handmatig
Multiniveau*
Grill*
Gratineren*
Bakken*
Vis*
Pizza*
Rijzen*
Pasteuriseren*
Lage
temperatuur*
Ontdooien*
Pizza op 2 roosters
Taarten op 2 roosters
Cake op 2 roosters (op lekplaat)
Gebraden kip + aardappels
Lamsvlees
Makreel
Lasagne
Soesjes op 3 roosters
Koekjes op 3 roosters
Kaaskoekjes op 2 roosters
Hartige taarten
Makreel
Tong en inktvis
Calamari- en garnalenspiesjes
Kabeljauwfilet
Gegrilde groenten
Kalfsbiefstuk
Saucijzen
Hamburgers
Tosti (of geroosterd brood)
Kip aan het spit (indien draaispit aanwezig)
Lamsvlees aan het spit (indien draaispit aanwezig)
Gegrilde kip
Inktvis
Kip aan het spit (indien draaispit aanwezig)
Eend aan het spit (indien draaispit aanwezig)
Gebraden kalfs- of rundvlees
Gebraden varkensvlees
Lamsvlees
Braadstukken (wit of rood vlees)122 nee 200 50-75
Goudbrasem
Visfilets
Zeebaars met aardappels
Pizza
Focaccia-brood
Rijzen van deeg met bakkersgist (brioche, brood,
taarten, croissants, enz.)
Fruit, groente, enz. 22 ja 110
Vlees
Vis
Groente
Alle diepvriesproducten
1+1
1
1
1
1
0,7
0,7
0,7
0,5
0,8
0,7
n° 4 of 5
n° 4 of 6
1
1
1,5
1
1,5
1,5
1
1
1
0,7
1
0,5 + 0,5
0,5
0,5
Roosterstanden VoorverwarmenAanbevolen
temperatuur
standaard
geleiders
1 en 2/3
1 en 3 en 5
1 en 3 en 5
verschuifbare
geleiders
2 en 4
2 en 4
2 en 4
2
1 of 2
2
2 en 4
1 en 3
4
4
4
4
3 of 4
4
4
4
4
-
-
2
2
-
2
2
2
2
2
2
2
2
22 nee 40
2
2
2
1 en 3
1 en 3
1 en 3
1 en 3
1
1
1
1 en 2 en 4
1 en 2 en 4
1 en 3
1 en 3
3
3
3
3
2 of 3
3
3
3
3
-
-
2
2
-
2
2
2
2
2
2
1
1
1
1
1
ja
ja
ja
ja
ja
ja
ja
ja
ja
ja
ja
nee
nee
nee
nee
nee
nee
nee
nee
nee
nee
nee
nee
nee
nee
nee
nee
nee
nee
ja
ja
ja
ja
ja
nee
nee
nee
(°C)
210-220
180
160-170
200-210
190-200
180
180-190
190
180
210
190-200
300
300
300
300
300
300
300
300
300
300
300
210
200
210
210
210
210
210
180
170
190
210-220
190-200
75
85
110
Duur
bereiding
(minuten)
20-25
30-35
20-25
65-75
45-50
30-35
35-40
20-25
10-20
20-25
20-30
10-20
10-15
10-15
10-15
15-20
10-20
10-20
10-12
3-5
70-80
70-80
55-60
30-35
70-80
60-70
60-75
70-80
40-45
20-25
12-15
60
15-20
20-25
90-180
90-180
90-180
* De kooktijden dienen slechts als indicatie en kunnen naar eigen smaak worden aangepast. De voorverwarming van de oven is door de fabriek ingesteld en
kan niet handmatig worden gewijzigd.
! Programma ECO: Dit programma heeft langere bereidingstijden maar garandeert een aanzienlijke energiebesparing. Het is ideaal voor gerechten zoals
NL
49
Page 50

NL
Programma's Gerechten Gewicht
(kg)
RoosterstandenVoorverwarmen
Automatisch**
standaard
geleiders
verschuifbare
geleiders
Brood***
Brood (zie recept)
12 of 32 nee
Rundvlees
Gebraden rundvlees
2 of 32 nee
Kalfsvlees
Gebraden kalfsvlees
2 of 32 nee
Lamsvlees
Lamspoot
2 of 32 nee
Varkensvlees
Gebraden varkensvlees
2 of 32 nee
Kip/gevogelte
Gebraden kip
1-1,52 of 32 nee
Visfilet
Kabeljauw
Zaagbaars
Forel
0,4-0,5
0,4-0,5
0,4-0,5
2 of 3
2 of 3
2 of 3
2
2
2
nee
nee
nee
Vis in folie
Goudbrasem
Zeebaars
0,4-0,5
0,4-0,5
2 of 3
2 of 3
2
2
nee
nee
Taarten
Taarten
0,52 of 32 nee
Vlaai
Appeltaart
0,52 of 32 nee
Brioche
Cake met bakkersgist (brioche, amandeltaart enz.)
0,72 of 32 nee
Plumcake
Cake met gedroogde gist (pound cake, gemarmerde
koekjes, enz.)
0,72 of 32 nee
Cake
Cake
12 of 32 nee
Paella
Paella (zie recept)
1-3-51-2-4 nee
Rijst/pilaf
Rijst/pilaf (zie recept)
0,52 1 nee
Pizzeria*
Dunne pizza’s (brooddeeg) 4
(pizzasteen
op rooster)
* (alleen voor modellen die beschikken over pizzasteen)
** De duur van de automatische bereidingen is van te voren ingesteld. De waarden kunnen door de gebruiker worden
aangepast, om te beginnen met de
vooringestelde duur.
*** Zoals het recept aangeeft, dient u 50 gr (0,5 dl) water in de lekplaat op stand 5 toe te voegen.
Yoghurt
Yoghurt 22 ja
1-1,5
1-1,5
1-1,5
1,2-1,5
Kooktabel
50
Page 51

Voorzorgsmaatregelen en
advies
! Dit apparaat is ontworpen en vervaardigd volgens de
geldende internationale veiligheidsvoorschriften. Deze
aanwijzingen zijn geschreven voor uw veiligheid en u dient
ze derhalve goed door te nemen.
Algemene veiligheidsmaatregelen
• Dit apparaat is vervaardigd voor niet-professioneel
gebruik binnenshuis.
• Het apparaat dient niet buitenshuis te worden geplaatst,
ook niet in overdekte toestand. Het is erg gevaarlijk als
het in aanraking komt met regen of als het onweert.
• Maak gebruik van de handgrepen aan de zijkant van de
oven om het apparaat te verplaatsen.
• Raak het apparaat niet aan als u blootsvoets bent of met
natte of vochtige handen of voeten.
• Het apparaat dient om gerechten te koken. Het mag
uitsluitend door volwassenen worden gebruikt en alleen
volgens de instructies die beschreven staan in deze
handleiding. Ieder ander gebruik (b.v.: verwarming van
de vertrekken) is niet aangewezen en dus gevaarlijk.
De fabrikant kan niet aansprakelijk worden gesteld voor
eventuele schade die te wijten is aan onjuist, verkeerd
en onredelijk gebruik.
• Tijdens het gebruik van de oven worden de
verwarmingselementen en enkele delen van de ovendeur
zeer heet. Raak ze niet aan en houd kinderen op een afstand.
• Voorkom dat elektrische snoeren van andere kleine
keukenapparaten op warme delen van de oven
terechtkomen.
• Laat de ventilatieopeningen en warmteafvoer vrij.
• Pak het handvat van de ovendeur alleen in het midden
vast: aan de zijkant zou het heet kunnen zijn.
• Gebruik altijd ovenwanten om gerechten in de oven te
zetten en eruit te halen.
• Plaats geen aluminiumfolie op de bodem van de oven.
• Plaats geen brandbaar materiaal in de oven: als de oven
plotseling aan zou worden gezet zou dit materiaal vlam
kunnen vatten.
• Trek nooit de stekker aan het snoer uit het stopcontact,
maar pak altijd de stekker direct beet.
• Maak het apparaat niet schoon of voer geen onderhoud
uit als de stekker nog in het stopcontact zit.
• Probeer in geval van storingen nooit zelf de interne
mechanismen van het apparaat te repareren. Neem
contact op met de Technische Dienst (zie Service).
• Plaats geen voorwerpen op de open ovendeur.
• Voorkom dat kinderen met het apparaat spelen.
• Dit apparaat mag niet worden gebruikt door personen
(kinderen inbegrepen) met een beperkt lichamelijk,
sensorieel of geestelijk vermogen of personen die niet de
nodige ervaring of kennis hebben met het apparaat, tenzij
onder toezicht van een persoon die verantwoordelijk is
voor hun veiligheid of nadat hun is uitgelegd hoe het
apparaat werkt.
• Het apparaat is niet geschikt om te worden
ingeschakeld m.b.v. een externe timer ofwel door
een gescheiden afstandsbedieningssysteem.
Afvalverwijdering
• Verwijdering van het verpakkingsmateriaal: houd u aan
de plaatselijke normen, zodat het verpakkingsmateriaal
hergebruikt kan worden.
• De Europese Richtlijn 2012/19/EC over Vernietiging
van Electrische en Electronische Apparatuur (WEEE),
vereist dat oude huishoudelijke electrische apparaten
niet mogen vernietigd via de normale ongesorteerde
afvalstroom. Oude apparaten moeten apart worden
ingezameld om zo het hergebruik van de gebruikte
materialen te optimaliseren en de negatieve invloed op
de gezondheid en het milieu te reduceren. Het symbool
op het product van de “afvalcontainer met een kruis
erdoor” herinnert u aan uw verplichting, dat wanneer u
het apparaat vernietigt, het apparaat apart moet worden
ingezameld.
Consumenten moeten contact opnemen met de locale
autoriteiten voor informatie over de juiste wijze van
vernietiging van hun oude apparaat.
Energiebesparing en milieubehoud
• Door de oven te gebruiken vanaf het late middaguur
tot aan de vroege ochtend zorgt u ervoor dat de
elektriciteitscentrales minder worden belast tijdens
het ‘spitsuur’. De optie waarmee u programma’s
voorprogrammeert, in het bijzonder de “uitgestelde
bereiding” (zie Programma’s) en de “vertraagde
automatische reiniging” (zie Onderhoud en verzorging),
kunnen u hierbij helpen.
• Houd bij de functies BARBECUE en GRATINEREN altijd
de ovendeur dicht: u bereikt betere kookresultaten en
een aanzienlijke energiebesparing (circa 10%).
• Houd de afdichtingen altijd schoon zodat ze goed
aansluiten op de deur en er geen hitte vrij kan komen.
! Dit product voldoet aan de eisen die gesteld worden door
de nieuwe Europese Richtlijn voor energiebesparing van
apparaten in de stand-by stand.
Onderhoud en verzorging
De elektrische stroom afsluiten
Sluit altijd eerst de stroom af voordat u tot enige handeling
overgaat.
Schoonmaken van het apparaat
• Lichte kleurverschillen aan de voorzijde van de oven zijn
te wijten aan het gebruik van verschillende materialen
zoals glas, plastic en metaal.
• Eventuele schaduwpartijen, lijkend op strepen, op
het glas van de ovendeur, zijn het gevolg van de
weerkaatsing van het ovenlicht.
• Bij zeer hoge temperaturen wordt het email gebrandmerkt.
Tijdens dit proces zouden er verschillende kleurvariaties
kunnen worden gecreëerd. Dit is normaal en heeft geen
enkele invloed op de werking. De randen van de dunne
staalplaten kunnen niet volledig worden gelakt en kunnen
dus grof lijken. Dit heeft geen enkele negatieve invloed
op de anti-corrosie bescherming.
NL
51
Page 52

• De buitenkant, dus zowel het email en het roestvrij
NL
staal als de rubberen afdichtingen, kunnen met een
spons en een neutrale zeep worden afgenomen. Als de
vlekken moeilijk te verwijderen zijn, kunt u een speciaal
reinigingsmiddel gebruiken. Na het reinigen dient u
alles goed af te spoelen en te drogen. Gebruik geen
schuurmiddelen of bijtende producten.
• De binnenkant van de oven kunt u het beste direct na
gebruik schoonmaken, als hij nog lauw is. Gebruik warm
water en een schoonmaakmiddel, spoel vervolgens
af en droog met een zachte doek. Gebruik geen
schuurmiddelen.
• De accessoires kunnen gewoon worden afgewassen
(eventueel ook in de vaatwasser), met uitzondering van
de geleiders.
• We raden u aan de schoonmaakmiddelen niet direct op
het bedieningspaneel te spuiten maar een sponsje te
gebruiken.
! Gebruik nooit stoom- of hogedrukreinigers voor het
reinigen van het apparaat.
De ovendeur reinigen
! Bij de modellen die uitgerust zijn met LED INSIDE kan
de deur uit elkaar gehaald worden.
Reinig het glas van de deur met een spons en niet
schurende producten. Droog met een zachte doek. Gebruik
geen ruwe schurende materialen of scherpe schrapertjes
die het oppervlak zouden kunnen krassen waardoor als
gevolg het glas zou kunnen barsten.
U kunt voor een grondige reiniging de ovendeur verwijderen:
1. open de deur volledig (zie afbeelding).
2. til de hendeltjes F die zich aan de twee scharnieren
bevinden, op met behulp van een schroevendraaier en
draai ze (zie afbeelding);
Vervangen van het lampje
Voor het vervangen van het
Ovenruimte
ovenlampje:
1. Verwijder het glazen
lampenkapje.
Lamp
2. Verwijder het lampje en
vervang het met eenzelfde
soort lampje: halogene lamp
spanning 230 V, vermogen
Glasplaat
25 W, tting G 9.
3. Doe het deksel weer op
zijn plaats (zie afbeelding).
! Raak de lamp niet direct met uw handen aan.
! Gebruik de ovenlamp nooit om een vertrek te verlichten.
Montage van de Geleiders Kit
Zo monteert u de geleiders:
1. Verwijder de twee
draagrekken door ze uit de
afstandleiders A te trekken
(zie afbeelding).
2. Kies het niveau waarop u
de geleiders wilt plaatsen.
Plaats eerst de drukknop B
op het draagrek en
vervolgens de drukknop C.
Let goed op de uittrekrichting
van de geleider.
Linker
glijder
Rechter
glijder
B
Uittrekrichting
C
A
F
3. pak de deur aan de zijkanten
beet en sluit hem langzaam, maar
niet helemaal. Trek dan de deur
naar u toe en haal hem uit zijn
voegen (zie afbeelding). Zet de
deur weer op zijn plaats door
deze handelingen in omgekeerde
volgorde uit te voeren.
Het controleren van de afdichtingen
Controleer regelmatig de staat van de afdichtingen rondom
de ovendeur. In het geval de afdichtingen beschadigd zijn,
dient u zich tot de dichtstbijzijnde Technische Dienst te
wenden ( zie Service). Gebruik de oven niet voordat de
reparatie is uitgevoerd.
52
3. Bevestig de twee
draagrekken, met de
geleiders al op hun plaats,
in de speciale gaten op de
wanden van de oven (zie
afbeelding). De gaten voor
D
het linker draagrek bevinden
zich aan de bovenkant,
terwijl de gaten voor het
rechter draagrek zich aan de
onderkant bevinden.
4. Zet tenslotte de draagrekken vast op de afstandleiders A.
! Plaats de geleiders nooit in stand 5.
Page 53

Storingen en oplossingen
Probleem Mogelijke oorzaak Oplossing
g g
NL
De programmering van een
bereiding is niet van start gegaan.
Het display toont ECO Mode.
Ik heb een automatisch programma
gekozen. Het display toont “Hot” en
de bereidin
Ik heb een geventileerde
bereiding gekozen en het eten is
enigszins verbrand.
aat niet van start.
Er is een black-out geweest. Herhaal de programmering.
Het apparaat staat in de
stand-by modus.
De interne temperatuur van de oven
is hoger dan die wordt aangeraden
voor het gekozen programma.
Standen 1 en 5: bij deze standen
is de hete lucht direct op de
gerechten gericht, en zou delicate
gerechten kunnen verbranden.
Druk op een willekeurige toets om
uit de stand-by modus te treden.
Wacht tot de oven is afgekoeld.
Het wordt aangeraden om de
ovenschalen op de helft van de
kooktijd te draaien.
53
Page 54

Instalare
590 mm.
RO
! Este importantă păstrarea acestui manual pentru a putea
consultat în orice moment. În caz de vânzare, de închiriere
sau de schimbare a locuinţei, acesta trebuie să e înmânat
împreună cu cuptorul, pentru a informa noul proprietar cu
privire la funcţionare şi la respectivele avertismente.
! Citiţi cu atenţie instrucţiunile: ele conţin informaţii
importante privind instalarea, utilizarea şi siguranţa.
Amplasare
! Ambalajele nu sunt jucării pentru copii; eliminarea lor se
va face conform normelor privind colectarea separată a
deşeurilor (vezi Măsuri de precauţie şi recomandări).
! Instalarea se va face conform prezentelor instrucţiuni,
numai de persoane calicate. Instalarea greşită a aparatului
poate cauza daune persoanelor, animalelor sau bunurilor.
Montarea în mobilier
Pentru a garanta buna funcţionare a aparatului este necesar
ca mobilierul să aibă caracteristicile adecvate:
• panourile de lângă cuptor trebuie să e dintr-un material
rezistent la căldură;
• dacă mobilierul este din lemn îmbrăcat în furnir, cleiurile
utilizate trebuie să reziste la temperatura de 100°C;
45 mm.
560 mm.
Centrare şi xare
Pentru a xa aparatul pe mobilier: deschideţi uşa cuptorului
şi înşurubaţi cele 4 şuruburi pentru lemn în cele 4 găuri ale
ramei perimetrale.
• pentru încastrarea cuptorului, atât în cazul montării sub
blat (vezi gura) cât şi al montării pe coloană, mobilierul
trebuie să aibă următoarele dimensiuni:
550 mm.
min.
45 mm.
560 mm.
575-585 mm.
570 mm.
595 mm.
20 mm.
550 mm.
20,5 mm.
22,5 mm.*
* Modele de oţel inoxidabil
! După montarea încastrată a aparatului, persoanele nu
trebuie să intre în contact cu componentele electrice.
Declaraţiile de consum indicate pe plăcuţa de caracteristici
au fost măsurate cu acest tip de montaj.
Aerisire
Pentru a garanta o mai bună aerisire, este necesar să
îndepărtaţi peretele din spate al compartimentului. Se
recomandă instalarea cuptorului astfel încât acesta să se
sprijine pe două bare de lemn sau pe un blat cu deschiderea
de cel puţin 45 x 560 mm (vezi guri).
! Toate componentele care asigură protecţia aparatului
trebuie să e xate în aşa fel încât să nu poată scoase
cu mâna liberă.
Branşamentul electric
Cuptoarele dotate cu un cablu de alimentare tripolar sunt
predispuse pentru funcţionarea în curent alternativ; tensiunea
şi frecvenţa sunt indicate pe plăcuţa de caracteristici de pe
aparat (vezi mai jos).
Montarea cablului de alimentare
1. Deschideţi cutia de borne
cu o şurubelniţă, apăsând
pe proeminenţele laterale
ale capacului: trageţi şi
deschideţi capacul (vezi
gura).
2. Punerea în funcţiune
a cablului de alimentare:
deşurubaţi şurubul
presetupei şi cele 3 şuruburi
L
N
corespunzătoare contactelor
L-N- , apoi xaţi cablurile
sub capul şuruburilor, ind
atenţi la culori - Albastru (N)
Maro (L) Galben-Verde
(vezi gura).
3. Fixaţi cablul în presetupa
specială.
4. Închideţi capacul cutiei
cu borne.
54
Page 55

Racordarea cablului de alimentare la reţea
Montaţi pe cablu un ştecher normalizat pentru sarcinile
indicate pe plăcuţa de caracteristici (vezi alături).
În cazul branşamentului direct la reţea, este necesar să se
monteze între aparat şi reţea un întrerupător omnipolar cu
deschiderea minimă a contactelor de 3 mm, dimensionat la
sarcină, conform normelor în vigoare (rul de împământare nu
trebuie să e întrerupt de întrerupător). Cablul de alimentare
trebuie să e poziţionat astfel încât să nu atingă în nici un punct
o temperatură cu 50°C peste temperatura mediului ambiant.
! Singurul responsabil pentru corectitudinea executării
branşamentului electric şi pentru respectarea normelor de
siguranţă este instalatorul.
Înainte de a efectua branşamentul, asiguraţi-vă că:
• priza are împământare şi corespunde prevederilor legale în
vigoare;
• priza poate suporta sarcina maximă de putere a
aparatului, indicată pe plăcuţa de caracteristici (vezi mai
jos);
• tensiunea de alimentare este cuprinsă în valorile indicate
pe plăcuţa cu caracteristici (vezi mai jos);
• priza este compatibilă cu ştecherul aparatului. În
caz contrar, înlocuiţi priza sau ştecherul; nu folosiţi
prelungitoare sau prize multiple.
! După instalarea aparatului, cablul de alimentare şi priza
de curent trebuie să e uşor accesibile.
! Cablul nu trebuie să e îndoit sau comprimat.
! Cablul trebuie să e controlat periodic şi înlocuit de
electricieni autorizaţi (vezi Asistenţa).
! Producătorul îşi declină orice responsabilitate în cazul
nerespectării acestor norme.
PLĂCUŢA DE CARACTERISTICI
lăţime cm 43,5
Dimensiuni*
Volum*
Dimensiuni**
Volum**
Conexiuni
electrice
ENERGY
LABEL
înălţime cm 32,4
adâncime cm 41,5
litri 59
lăţime cm 45,5
înălţime cm 32,4
adâncime cm 41,5
litri 62
tensiune la 220-240V~ 50/60Hz sau 50Hz
putere maximă absorbită 2800W
(vezi plăcuţa cu caracteristici)
Directiva 2002/40/CE pe eticheta
cuptoarelor electrice.
Norma EN 50304
Consum de energie declaraţie
Clasă convecţie forţată –
funcţia de încălzire:
ECO
Acest aparat este conform cu
următoarele Directive Comunitare:
- 2006/95/CEE din 12/12/06
(Tensiune Joasă) cu modificările
ulterioare
- 2004/108/CEE din 15/12/04
(Compatibilitate Electromagnetică)
cu modificările ulterioare
- 93/68/CEE din 22/07/93 cu
modificările ulterioare.
- 2012/19/CE cu modificările ulterioare.
- 1275/2008 stand-by/off mode
- Directiva 1999/05/CE
(Radio și Echipamentelor terminale
telecomunicații) și modificările ulterioare
RO
* Numai pentru modelele cu şine matriţate.
** Numai pentru modelele cu şine de sârmă.
55
Page 56

Pornire şi utilizare
RO
ATENŢIE! Cuptorul este
prevăzut cu un sistem
de oprire a grătarelor
care permite extragerea
acestora fără ca ele să iasă
din cuptor (1).
Pentru a extrage complet
grătarele este suficient,
astfel cum se arată în
desen, să le ridicaţi, prinzându-le din partea din faţă şi să
le trageţi (2).
! La prima aprindere, vă recomandăm să lăsaţi cuptorul să
funcţioneze în gol timp de aproximativ o oră, cu termostatul
la maxim şi uşa închisă. Stingeţi apoi cuptorul, deschideţi
uşa şi aerisiţi camera. Mirosul care se degajă este datorat
evaporării substanţelor folosite pentru realizarea protecţiei
cuptorului.
Articole din meniul de reglaje
Pentru a introduce setările de comutare meniul de pe panoul
de control și apăsați pictograma .
Utilizați butonul pentru a evidenția elementele individuale
de meniu.
Pentru a modica setarea apăsați pictograma .
Meniul include următorii parametri:
LIMBA: selectarea limbii pe ecran.
CEAS: setarea ceasului.
TONI: activa / dezactiva tonul tastaturii.
LIGHT: activarea / dezactivarea lumina din interiorul
cuptorului în timpul coacerii.
LOGO: on / off logo putere
GHID: activa / dezactiva instrucțiuni și sfaturi.
EXIT: Ieșire din meniu.
! E “poate ieși din meniul de congurare apăsând pe
pictograma .
! Rotirea butonului puteți modica parametrii așate pe
ecran dintre simbolurile “<” și “>”.
! Pentru facilitarea setărilor, ţineţi butonul pe poziţie:
numerele de pe display se derulează mai rapid.
! Fiecare setare este memorizată automat după 10 secunde.
! Nu puteţi activa tastele touch dacă purtaţi mănuşi.
Unele modele sunt dotate cu un sistem de balamale care
permite uşii să se închisă încet fără să e necesară însoţirea
cursei acesteia cu mâna. Pentru folosirea corectă, înainte
de a închide:
• deschideţi complet uşa.
• nu forţaţi manual închiderea.
! Pentru a optimiza performanţele de coacere, în momentul
activării funcţiei selectate se efectuează o setare a
parametrilor produsului, care ar putea determina întârzierea
pornirii ventilatorului şi a elementelor de încălzire.
Pìrimul Turn
După conectarea la sursa de alimentare, primul comutatorul
de alimentare de pe panoul de control apăsând pe
pictograma . Apare în lista de limbi din meniu. Pentru
a selecta limba dorită se selectează cu ajutorul butonului.
Pentru a conrma apăsați pictograma .
După ce ați făcut selecția, pe ecran apare meniul de
setări.Apăsați pictograma .sau alerga cu butonul
până vocea EXIT și apăsați pe pictograma .pentru a
începe utilizarea cuptorului.
! După setarea limbii din meniul, după un timp de 30 de
secunde de neutilizare, așajul comută automat în modul
de programare.
Setarea cronometrului
! Cronometrul poate reglat întotdeauna atât cu cuptorul
stins, cât şi aprins. Nu comandă aprinderea sau stingerea
cuptorului.
La încheiere, cronometrul emite un semnal acustic care
se opreşte după 30 secunde sau prin apăsarea oricărui
buton activ.
Pentru a regla cronometrul:
1. Apăsaţi pictograma .
2. Reglați timpul dorit cu ajutorul butonului.
3. După ce aţi ajuns la reglarea dorită, apăsaţi din nou
pictograma .
Când cuptorul este oprit, pe ecran apare numărătoarea
inversă. Un cuptor pe pictograma ON indică faptul că
cronometrul este activ.
Pentru a anula cronometrul, apăsaţi pictograma şi, cu
selectorul, duceţi timpul până la 00:00. Apăsaţi din nou
pictograma .
Stingerea pictogramei arată că este dezactivat
cronometrul.
Pornirea cuptorului
1. Aprindeţi panoul de control prin apăsarea pictograma
. Aparatul emite un triplu sunet ascendent şi se aprind
în ordine toate tastele.
2. Apăsați pe pictograma pentru a selecta manual
dorită program de preparare. Puteți seta temperatura si
timpul de gatire.
Apăsați pe pictograma pentru a selecta programul de
gătire automată dorit. Temperatura și timpul de gătire sunt
pre-stabilite. E “se poate schimba doar lungimea în funcție
de programul ales. Cuvântul “AUTO” apare pe ecran indică
faptul că temperatura urmează un prol exact de gătit. Puteți
programa un gătit întârziată.
56
Page 57

3. Apăsaţi pictograma pentru a porni procesul de
coacere.
4. Cuptorul intră în faza de pre-încălzire, indicatorii de preîncălzire se luminează pe măsură ce creşte temperatura.
5. Un semnal acustic, împreună cu aprinderea tuturor
indicatorilor de pre-încălzire, semnalează terminarea
procesului de pre-încălzire. Puteţi introduce alimentele pe
care doriţi să le gătiţi.
6. În timpul de gătit este întotdeauna posibil:
Pentru a activa modul DEMO, opriți cuptorul, țineți
butonul întors sensul acelor de ceasornic și apăsați
simultan pe pictograma timp de 10 secunde. Auzi un
bip și pe display apare “DEMO”
Pentru a dezactiva modul demonstrativ, țineți butonul
întors invers acelor de ceasornic și apăsați simultan pe
pictograma de 3 secunde. Veți auzi un ton pentru a
conrma dezactivarea.
RO
- modicarea temperaturii prin apăsarea pe pictograma
, rotiți butonul și conrmați apăsând din nou pictograma
(numai pentru programele manual);
- programa timpul de preparare (vezi Programe);
- opri prepararea prin apăsarea pe pictograma . În acest
caz, dispozitivul amintește temperatura eventual schimbat
anterior (numai pentru programe manuale).
- opri cuptorul prin apăsarea pe pictograma timp de 3
secunde.
7. În cazul unei căderi de tensiune, dacă temperatura
cuptorului nu a scăzut prea mult, programul va reluat de
unde a fost întrerupt, datorită unui sistem de repornire cu
care este dotat aparatul. În schimb, planicările de pornire
în aşteptare nu sunt reactivate la restabilirea curentului
electric şi trebuie reprogramate (de exemplu, a fost
programat începutul coacerii la 20:30. La 19:30 are loc o
pană de curent. La revenirea curentului trebuie resetată
programarea).
! În programul BARBECUE nu este prevăzută pre-încălzirea.
! Nu aşezaţi niciodată obiecte pe fundul cuptorului, pentru
că riscaţi să deterioraţi smalţul.
Revenirea la setările din fabrică
Cuptorul are o șansă de a revenit la setările din fabrică,
resetarea toate setările alese de utilizator (limba, ton,
duratele personalizate, etc ...).
Pentru a reseta opri cuptorul, apăsați și țineți apăsat
butoanele timp de 6 secunde , , . Când sistemul
este resetat, veți auzi un semnal sonor. Prima de presă al
pictograma este așată când porniți prima.
Standby
Acest produs satisface cerinţele impuse de noua Directivă
Europeană cu privire la limitarea consumurilor energetice
în standby. Dacă nu se efectuează operaţiuni timp de 30
de minute şi nu s-a setat nicio blocare a tastelor sau a uşii,
aparatul intră automat în modalitatea standby.Modul de
așteptare este așat cu imaginea de pe ecran Modul ECO.
De îndată interacţionaţi din nou cu aparatul, sistemul revine
la modalitatea operativă.
! Aşezaţi întotdeauna recipientele/vasele cu mâncare pe
grătarul din dotare.
Sistemul de răcire
Pentru a obține o reducere a temperaturii exterioare, un
ventilator de răcire generează un jet de aer care se scurg
între panoul de control, ușa cuptorului și, de asemenea, în
partea inferioară a ușii cuptorului. La începutul ciclului de
curățare ventilatorul funcționează la viteză mică.
! Atunci cand este gatita, ventilatorul va rămâne pe până
când cuptorul sa racit sucient.
Becul cuptorului
Lumina se aprinde în momentul pornirii unui program de
coacere.(Dacă este activată în meniul de setări).
La modelele dotate cu LED INSIDE la pornirea coacerii se
aprind ledurile de pe uşă pentru o mai bună iluminare a
tuturor nivelurilor de coacere.
Mod Demo
! Aparatul nu intră în modul DEMO excepția cazului în care
se alege limba.
Cuptorul are capacitatea de a rula in modul DEMO: se pe
toate elementele de încălzire, controalele rămân operative.
Programe
! Pentru a garanta că alimentele vor moi şi crocante,
cuptorul eliberează sub formă de aburi umiditatea care
provine în mod natural din alimente. În acest fel, se
pot obţine rezultate excelente de coacere pentru toate
mâncărurile.
! La ecare aprindere, cuptorul propune primul program de
coacere manuală.
! În cazul închiderii imperfectă a ușii, pe ecran apare
“UȘILOR DESCHISE”. Elimina cauza de a nu închide ușa
pentru a obține cele mai bune rezultate de gătit.
Programe manuale de coacere
! Toate programele au o temperatură de coacere prestabilită.
Aceasta poate modicată manual şi reglată, după plac,
între 40°C şi 250°C (270°C pentru programul BARBECUE).
Eventualele modicări ale temperaturii sunt memorizate
şi repropuse la următoarea utilizare a programului. Dacă
temperatura aleasă este mai mare de temperatura internă
a cuptorului, pe display apare scris “CUPTOR TOO HOT”.
Coacerea poate pornită oricum.
Dacă începe de gătit fără a seta durata, așajul va indica
timpul scurs de la început.
57
Page 58

RO
Programul MULTI-NIVEL
Mod tuturor elementelor de încălzire și ventilator.Căldura
ind constantă în tot cuptorul, aerul coace şi rumeneşte
alimentul în mod uniform.Se pot utiliza maxim trei rafturi
simultan.
Programul PASTEURIZARE
Acest tip de gătit este indicat pentru fructe, legume, etc ....
Containerele mici pot plasate pe 2 nivele (1 tava de
scurgere și grila treilea nivel). Răcirea recipientelor din
interiorul cuptorului. Coaceți în cuptorul rece.
Programul BARBECUE
Se activează elementul încălzitor superior şi rotisorul (dacă
e în dotare). Temperatura ridicată şi directă a grătarului este
recomandată pentru alimentele care necesită o temperatură
ridicată la suprafaţă. Coacerea se va face cu uşa cuptorului
închisă (a se vedea „Sfaturi practice de coacere“).
Programul GRATIN
Intră în funcţiune elementul de încălzire superior şi, pe
parcursul unei anumite părţi a programului, şi elementul
de încălzire circular, ventilatorul şi rotisorul (dacă este în
dotare). Uneşte la radiaţia termică unidirecţională circulaţia
forţată a aerului în interiorul cuptorului.
Acest lucru nu permite arderile de la suprafaţa alimentelor,
mărind puterea de pătrundere a căldurii. Coacerea se va
face cu uşa cuptorului închisă (a se vedea „Sfaturi practice
de coacere“).
Programul FURNIZOR
Activează elementele de încălzire superior și circulară ca
ventilator. Acesta combină radiații unidirecțional circulație
forțată a aerului termic din interiorul cuptorului. Aceasta
previne arderea pe suprafața crește ecacitatea penetrării
căldurii.
Gătiți întotdeauna cu ușa cuptorului închisă.
Programul PEŞTE
Activează elementele de încălzire superior și circulară ca
ventilator. Această combinație vă permite să gătesc cu
mâncăruri ușoare, din pește.
Programul de TEMPERATURĂ SCĂZUTĂ CARNE
/ PEȘTE / LEGUME
Acest tip de gătit, folosit de ani de zile de către profesioniștii
din industrie, permițându-vă pentru a găti alimente (carne,
pește, fructe, legume), la temperaturi foarte scăzute (75,85
și 110 ° C), asigurând gătit perfectă și creșterea cea mai
mare a muguri de calitate.
Avantajele care nu trebuie neglijat sunt:
• ind temperaturile de ardere foarte scăzute (de obicei
sub temperatura de evaporare), dispersia sucurile datorită
evaporării este redus foarte mult și alimente devine mai
moale;
• în gătit din carne, brele musculare se contracta mai puțin
de un clasic gătit.Rezultatul este o carne mai oferta care nu
necesită o fază de odihnă după gătire.Browning de carne
ar trebui să e efectuate înainte de coacere.
Gătit la temperatură scăzută sub vid, utilizat timp de 30
de ani de către cei mai mari bucătari, are multe calități:
• alimentare: vă permite să se concentreze aromele care
respectă caracteristicile de gust ale produselor alimentare
și menținerea moliciunea și sensibilitate.
• Igiena: Pentru ca conforme cu standardele de igiena, acest
tip de produse alimentare de gătit protejeaza impotriva
efectelor nocive ale oxigenului și garantează stocarea mai
mare a alimentelor în frigider.
• organizare: datorită prelungirea termenului de valabilitate,
puteți pregăti masa în avans.
• alimentare: acest gatit restricționează utilizarea
substanțelor grase și, prin urmare, permite de a realiza o
lumină de gătit și de digerat.
• economic: reduce considerabil produse pierdere în
greutate.
Programul PIZZA
Se activează elementele de încălzire superior şi circular şi
intră în funcţiune ventilatorul. Această combinaţie permite
o încălzire rapidă a cuptorului. În cazul în care folosiţi mai
mult de un etaj deodată, trebuie să le schimbaţi poziţia între
ele la jumătatea coacerii.
Programul DOVEDIND
Activați elementul de încălzire circulatorii vine pe și
ventilatorul doar încălzirea.Temperatura cuptorului este
ideal pentru activarea procesului de dospire. În timpul
dospire ține ușa cuptorului închisă.
Programul PATISERIE
Acesta activează elementul de spate de încălzire și
începe să lucreze ventilator, asigurând o căldură blândă
și uniformă în interiorul cuptorului. Acest mod este ideal
pentru prepararea alimentelor delicate (ex. Torturi care
trebuie să crească).
58
Pentru a utiliza această tehnică, trebuie să dețină o mașină
echipată cu pungi speciale de vacuum. Urmați cu atenție
instrucțiunile de ambalare în vid a alimentelor.
Tehnica de vid permite, de asemenea, de stocare a
produselor prime (fructe, legume, etc.) Și produse deja
preparate (gătit tradițional).
Programul DECONGELARE
Ventilatorul de pe fundul cuptorului circulă aer, la temperatura
ambiantă în apropiere de hrană. E “potrivit pentru topirea
orice tip de hrană, dar în special pentru alimente delicate
care nu au nevoie de căldură, cum ar : prăjituri cu cremă
de gheață, crema sau cu cremă, deserturi din fructe.
Programul ECO
Se activează elementul de încălzire posterior şi intră în
funcţiune ventilatorul, asigurând o căldură delicată şi
uniformă în interiorul cuptorului. Acest program cu economie
de energie este indicat pentru coacerea mâncărurilor mici,
adecvat pentru încălzirea mâncărurilor şi pentru terminarea
coacerii.
Page 59

Rotisor *
Pentru a pune în funcţiune rotisorul (vezi gura) procedaţi astfel:
1. Aşezaţi tava în poziţia 1;
2. Puneţi suportul rotisorului
în poziţia 3 şi introduceţi
ţepuşa în orificiul de pe
peretele din spate al
cuptorului;
3. Puneţi în funcţiune
rotisorul, selectând cu
butonul PROGRAME
sau ;
Cu ambele programe pornite, rotisorul se va opri dacă
deschideţi uşa.
Programe automate de coacere
! Temperatura şi durata coacerii sunt presetate
prin intermediul sistemului C.O.P.® (Coacere Optimă
Programată) care garantează în mod automat un rezultat
perfect. Coacerea se întrerupe automat, iar cuptorul
avertizează când mâncarea este gata. Coacerea poate
efectuată cu cuptorul rece sau cald. Durata coacerii poate
personalizată pe baza gusturilor personale, modicând-o,
înainte de pornire, cu ± 5/20 de minute, în funcţie de
programul ales. După ce a fost pornită coacerea, se
poate modica oricum durata acesteia. Dacă modicarea
se efectuează înainte de pornirea programului, aceasta
este memorizată şi repropusă la următoarea utilizare a
programului. Dacă temperatura internă a cuptorului este
mai mare decât cea propusă pentru programul ales, pe
display apare scris “CUPTOR TOO HOT” şi nu se poate
porni coacerea; aşteptaţi răcirea cuptorului.
• Amestecaţi făina cu sarea într-un vas mare.
• Diluaţi drojdia în apă călduţă (circa 35 de grade).
• Faceţi o grămăjoară din făină, cu o adâncitură la mijloc.
• Vărsaţi amestecul de apă şi făină.
• Frământaţi până când obţineţi un aluat omogen şi puţin
lipicios, prin tragere şi pliere timp de 10 minute.
• Daţi aluatului forma unei mingi, puneţi-l într-un castron
şi acoperiţi-l cu o folie de plastic pentru a evita uscarea
suprafeţei. Puneţi castronul în cuptor la funcţia manuală
DOVEDIND la 40°C şi lăsaţi să dospească timp de o oră
circa (volumul aluatului trebuie să se dubleze).
• Împărţiţi aluatul pentru a obţine mai multe pâini.
• Puneţi-le pe tavă pe hârtie de cuptor.
• Daţi bucăţile de aluat prin făină.
• Faceţi mici incizii pe pâini.
• nu uitaţi să vărsaţi 1dl de apă rece în tava introdusă în
poziţia 5; Pentru curăţire vă sfătuim să folosiţi apă şi oţet.
• Introduceţi în cuptorul rece.
• Porniţi coacerea PÂINE
• La sfârşitul coacerii, aşezaţi pâinile pe un grătar până se
răcesc complet.
Programul CARNE DE VITĂ / VIȚEL / LAMB
Utilizați această funcție pentru a găti carnea de vită,
mânzat și carne de miel. Coaceți în cuptorul rece. E ‘, cu
toate acestea, se pot coace de asemenea, într-un cuptor
erbinte. De unele programe de FRIPTURĂ puteti selecta
doneness dorit:
1. Apăsați pe pictograma
2. cu butonul de a alege între “BINE”, “MEDIU” și
“SÂNGELE”.
3. apăsați din nou pictograma .
RO
Așajul alternează între icoana a programului selectat cu
pictograma de sugestia Runner recomandate.
! Când se termină la faza de coacere, cuptorul emite un
semnal acustic.
! Nu deschideţi uşa pentru a evita producerea erorilor în
privinţa timpului şi a temperaturii de coacere.
Program PÂINE
Pentru obţinerea celor mai bune rezultate, vă sfătuim să
urmaţi cu atenţie indicaţiile de mai jos:
• respectaţi reţeta;
• greutatea maximă pentru o tavă;
• nu uitaţi să vărsaţi 50gr (0,5dl) de apă rece în tavă
introdusă în poziţia 5;
• aluatul trebuie să dospească la temperatura camerei 1 oră
sau 1 oră şi jumătate, în funcţie de temperatura camerei,
până la dublarea aluatului.
Reţetă pentru PÂINE:
1 tavă de maxim 1000 gr., raftul de jos
2 tăvi de maxim 1000 gr, raftul de jos şi raftul din mijloc
Reţetă pentru un aluat de 1 kg: 600gr. făină, 360gr. apă,
11gr. sare, 25gr. drojdie proaspătă (sau 2 pliculeţe praf)
Proces:
*Disponibil numai pe anumite modele.
Programul CARNE DE PORC
Utilizați această funcție pentru a găti carnea de porc.
Coaceți în cuptorul rece. E ‘, cu toate acestea, se pot coace
de asemenea, într-un cuptor erbinte.
Programul GĂINĂ
Această funcție este ideală pentru pui gătit (întregi sau
bucăți). Coaceți în cuptorul rece. Cu toate acestea, se poate
coace, de asemenea, într-un cuptor erbinte.
Programul FILE DE PEȘTE
Această funcție este potrivit pentru gratar le de mici
dimensiuni medii. Coaceți în cuptorul rece.
Programul PEȘTE LA CUPTOR
Utilizați această funcție pentru a găti pește întreg greutate
de până la 1 kg. Puteți plasa folia direct de pe tigaie. Coaceți
în cuptorul rece.
Programul PRĂJITURI
Această funcție este ideală pentru toate retetele plăcinte
(care in mod normal au nevoie de o bună pregătire a
mâncării de mai jos). Coaceți în cuptorul rece. E “se poate
coace încă într-un cuptor erbinte asemenea.
59
Page 60

RO
Programul TORT BRISÈ
Această caracteristică este ideal pentru toate rețetele care
necesită utilizarea de patiserie scurt (de obicei pregătite fără
ouă), sau oferind un lichid de umplere sau foarte moale.
Coaceți în cuptorul rece. Cu toate acestea, se poate coace,
de asemenea, într-un cuptor erbinte.
Programul BRIOŞE
Această funcție este ideală pentru produse de patiserie
dulci făcute cu drojdie naturala. Cuptorul coace sa răcit,
este posibil să se coace într-un cuptor erbinte
Programul PRĂJITURĂ CU PRUNE
Această funcție este ideală pentru toate retetele cu praf
de copt. Coaceți în cuptorul rece. E “se poate coace încă
într-un cuptor erbinte.
Programul DULCE
Această caracteristică este ideală pentru coacerea
prajiturilor se face cu drojdie naturala, produse chimice pe
bază de drojdie si nu contin drojdie de bere în cuptorul rece.
E ‘, cu toate acestea, se pot coace de asemenea, într-un
cuptor erbinte.
Odihnindu-se pe o foaie de copt pe gratar
• 6-8 pulpe de pui condimentate în prealabil cu condimente
pentru paella și o burniță de ulei de măsline.
După gătit, sezonul cu ulei de masline.
Programul PILAF DE OREZ
Utilizați această funcție pentru a găti orez. Pentru cele mai
bune rezultate, vă recomandăm să urmați instrucțiunile:
• orezul utilizată trebuie să e un orez care nu se lipește:
care este potrivit pentru salate sau de tip american.
• Cuptorul trebuie să e rece.
• tavă adâncă de pe raft 2 (dacă accesoriu disponibil) sau
plasați grătarul pe 2 raft și odihnă un vas termorezistent
de măsurare despre 35x30x5cm mare.
Rețetă pentru 4-6 persoane:
• 500 de grame de orez
• 7 litri de apă sau bulion
Puneți orezul pe ud fără tavă adâncă și se acoperă cu lichid.
Acoperiti tava cu folie de aluminiu.
Programul PIZZERIE (doar pentru modelele cu o
piatra pizza)
! Nu se poate modica durata sau stabilit un gătit întârziată.
Programul PAELLA
Această funcție este conceput pentru a pregăti paella în mod
rapid și simplu, deoarece toate ingredientele sunt plasate
într-un cuptor rece. Pentru cele mai bune rezultate vă
recomandăm să urmați cu atenție instrucțiunile de mai
jos:
• orezul utilizată trebuie să e un orez care nu se lipește:
care este potrivit pentru salate sau de tip american.
• Cuptorul trebuie să e rece.
• Locul:
- Tavă adâncă de pe raft 1 (dacă accesoriu disponibil) sau
amplasați grătarul în rack primul cuptor si se odihnească
un vas termorezistent de măsurare despre 35x30x5cm
mare.
- Tava de scurgere de pe al 3-lea raft.
- Gratar pe raft 5-a.
Rețetă pentru 8 persoane:
În tavă adâncă
• 1 ceapa, tocata
• 500 de grame de orez
• 500 de grame de fructe de mare congelate (cozi de creveți,
midii și scoici, inele de calmar, etc)
• 2 pumni de mazăre congelată
• ¼ ardei rosu, cuburi
• Chorizo (cârnați picant și condimentat cu boia de ardei)
feliate
• O lingura de praf de supa de pește
• 1 doză pulbere șofran
• 700 de grame de apă
Acoperiti tava cu folie de aluminiu.
în tava de scurgere
• 8 portii de le de cod
• 8 (sau 16), creveți (sau creveti)
• 8 Midii întregi pentru garnitura
Acoperiti tava cu folie de aluminiu.
Utilizați această funcție pentru a face pizza (crustă subțire).
Folosiți pizza piatra inclus plasându-l pe gratar pe raft 4.
Programul PIZZERIE ghidul utilizatorului, prin mesaje și
semnale acustice, pe tot parcursul gătit.
1. Pe ecran se afișează “INTRODUCEȚI PIATRĂ” și
“PRESS START PENTRU A ÎNCEPE”
2. După ce apăsați pe pictograma începe preîncălzirea
piatra indicată de umplerea bar și mesajul “SE INCALZESTE
PIATRĂ” pe ecran
3. Odată ce faza anterioară cuptorul emite câteva semnale
sonore pentru a vă avertiza că puteți coace pizza și mesajul
“FOCURILE PIZZA.”
4. Deschideți ușa cuptorului și se coace pizza. Începe de
gătit iar pe display apare “GĂTIT ÎN PROGRESS” mesajul.
Acesta arată, de asemenea, numărătoarea inversă până
la 4 minute.
5. După ce timpul de preparare pe ecran apare “IESE
BROWNING A DORIT” și veți auzi câteva semnale sonore
pentru a vă avertiza pentru a extrage doar suprafața de
gătit pizza este considerată satisfăcătoare.
6. Apăsați pictograma și scoateți pizza.
7. Eventuala presiunea pictograma arată cuptorul la
faza de preîncălzire a pietrei. Dacă temperatura de piatra
este sucient de mare, acest pas este omis și va trece
imediat la faza de infornatura.
Programul IAURT.
Activați elementul de încălzire circulatorii vine pe și
ventilatorul doar încălzirea.Temperatura de 50 ° C este
ideal pentru prepararea de iaurt.
60
Page 61

Rețeta de bază pentru un litru de iaurt: un litru de lapte
della durata
inizio ritardato
UHT, un borcan de iaurt simplu
Procesul:
• Se încălzește laptele intr-o cratita pana oțel erbere.
• Îndepărtați suprafața stratului de cremă și se lasă să se
răcească.
• Se amestecă 3, 4 linguri de lapte, cu iaurt până
amestecarea completă.
• Combină amestecul la restul de lapte și se amestecă bine.
• Se toarnă în borcane și sigilate.
• Puneți borcanele pe tavă de copt și locul în Nivelul 2.
• Când ați terminat, pune borcanele în frigider pentru cel
puțin 12 ore. Păstrați iaurt în frigider timp de până la o
săptămână.
• E “este posibil pentru a varia rețeta, adaptându-l la gătit
lor personale.Programmare gust
Gătit de programare
! Programarea este posibilă numai atunci când ați selectat
un program de gătit.
Programarea duratei
1. Apăsați pe pictograma
2. Rotiți butonul pentru a seta durata, în cazul în care acesta
nu vă relaxați manapola Numerele se derulează mai repede
pentru a facilita setarea. Pe ecran se așează grac bara
durata schimbare.
3. Timpul necesar, apăsați din nou pictograma .
Așajul grac așează informațiile de pe bara de durata de
timp curent, durata și sfârșitul de gătit.
4. Apăsați pe pictograma pentru a începe de gătit.
5.Pe ecran se așează timpul rămas de umplere bara de
durata.
6. După preparare, asajul va arata “SFÂRȘITUL ANULUI
DE GĂTIT”, și veți auzi un semnal sonor.
• Exemplu: 9:0 și este programat pentru o perioadă de 1 oră
și 15 minute. Programul se va opri automat la ora 10:15.
4.După atingerea timpului de oprire dorit, apăsați din nou
pictograma . Pe ecran se așează grac pe bara de
informații cu întârziere de timp curent, numărătoarea inversă
a început, durata și sfârșitul de gătit.
5. Apăsați pictograma pentru a porni programul.
6. Pe display apare “COOKING START AMÂNAT” și timpul
rămas se deplasează înapoi bara de târziu.
7. A început gătit, așajul indică timpul rămas de umplere
bara de durata.
8. Timpul sa scurs, ecranul va așa “sfârșitul anului de gătit”,
și veți auzi un semnal sonor.
• De exemplu: 09:00 și este programat o durată de 1 oră și
15 minute și 12:30 ca ora de terminare. Programul pornește
automat la 11:15.
Indicazione
ora attuale
Barra
Ora di
fine cottura
Durata
cottura
Pentru a anula programarea, apăsați pictograma .
Sfaturi practice pentru coacere
! Pentru coacerile ventilate, nu utilizaţi poziţiile de pe rafturile
1 şi 5: aerul cald direct ar putea arde alimentele delicate.
! La coacerile BARBECUE şi GRATIN, aşezaţi vasul de
scurgere a grăsimii în poziţia 1 pentru a colecta reziduurile
de coacere (sucuri şi/sau grăsimi).
COACERE PE MAI MULTE RAFTURI
• Utilizaţi rafturile 2 şi 4, punând pe raftul 2 alimentele care
necesită mai multă căldură.
• Puneţi tava jos şi grătarul sus.
RO
Indicazione
ora attuale
Barra
Ora di
fine cottura
Durata
cottura
Programare de cocsare
! Programarea de la sfârșitul unui gătit este posibilă numai
după ce ați stabilit un timp de preparare.
! Pentru a prota de programarea întârziată este necesar
ca ceasul este setat corect.
1. Urmați pașii de la 1 la 3 descrise pentru durata;
2. Apăsați de 2 ori simbolul se va aprinde la sfârșitul
timpului de preparare;
3. Rotiți butonul pentru a regla sfârșitul timpului de gătit,
dacă vă păstrați în loc manapola Numerele se derulează
mai repede pentru a facilita setarea. Pe ecran se așează
grac mișcarea a început târziu pe bara.
BARBECUE
• Inseraţi grătarul pe raftul 3 sau 4, puneţi alimentele în
centrul grătarului.
• Se recomandă alegerea nivelului maxim de energie.
Nu vă alarmaţi dacă rezistenţa de sus nu rămâne
permanent aprinsă: funcţionarea sa este comandată de
un termostat.
CUPTOR PIZZA
• Utilizaţi o tavă uşoară din aluminiu, şi sprijiniţi-o pe
grătarul din dotare.
Tava de colectare prelungeşte timpul de coacere şi în
acest fel pizza nu va crocantă.
• Dacă vă plac pizzele foarte garnisite, vă recomandăm să
introduceţi mozzarella la jumătatea timpului de coacere.
61
Page 62

RO
Programe AlimenteGreutate
(Kg)
Poziţia
rafturilor
Pre-încălzire
Temperatură
recomandată
(°C)
Durata
coacerii
(minute)
Manuale
glisiere
standard
glisiere
alunecare
Mai multe
rafturi*
1+1
1
1
1
2 e 4
2 e 4
2 e 4
1 e 2/3
2
1 o 2
2
1 e 3 e 5
1 e 3 e 5
2 e 4
1 e 3
1 e 3
1 e 3
1 e 3
1 e 3
1
1
1
1 e 2 e 4
1 e 2 e 4
1 e 3
1 e 3
da
da
da
da
da
da
da
da
da
da
da
210-220
180
160-170
200-210
190-200
180
180-190
190
180
210
190-200
20-25
30-35
20-25
65-75
45-50
30-35
35-40
20-25
10-20
20-25
20-30
Barbecue*
1
0,7
0,7
0,7
0,5
0,8
0,7
n° 4 o 5
n° 4 o 6
1
1
4
4
4
4
3 o 4
4
4
4
4
-
-
3
3
3
3
2 o 3
3
3
3
3
-
-
nu
nu
nu
nu
nu
nu
nu
nu
nu
nu
nu
300
300
300
300
300
300
300
300
300
300
300
10-20
10-15
10-15
10-15
15-20
10-20
10-20
10-12
3-5
70-80
70-80
Gratin* 1,5
1
1,5
1,5
1
1
1
2
2
-
2
2
2
2
2
-
2
2
2
nu
nu
nu
nu
nu
nu
nu
210
200
210
210
210
210
210
55-60
30-35
70-80
60-70
60-75
70-80
40-45
Furnizor*
Fripturi (carne albă sau roșie) 12 2nu200 50-75
Pește
*
0,7
1
0,5 + 0,5
2
2
2
2
2
2
da
da
da
180
170
190
20-25
12-15
60
Pizza*
0,5
0,5
2
2
1
1
da
da
210-220
190-200
15-20
20-25
Dovedind* 22 nu 40
Pasteurizare*
Fruct, legume, ecc. 22 da 110
Temperatură
scăzută*
Carne
Pește
Legume
2
2
2
1
1
1
nu
nu
nu
75
85
110
90-180
90-180
90-180
Decongelare
*
*
Timpul de coacere este orientativ şi poate fi modificat în funcţie de cerinţele personale.
Timpul de pre-încălzire al cuptorului esteprestabilit şi nu poate fi modificat manual.
! Programul ECO : Acest program, cu un timp mai mare de coacere, dar cu o economie considerabilă de energie, este indicat pentru mâncăruri precum
filetele de peşte pateuri mici şi legume. Este adecvat şi pentru încălzirea mâncărurilor şi pentru completarea coacerii.
Pui la grătar
Sepie
Pui la rotisor cu frigăruia (dacă este în dotare)
Raţă la rotisor cu frigăruia (dacă este în dotare)
Friptură de viţel sau vită
Friptură de porc
Miel
plătică
File de pește
Biban de mare cu cartofi
Toate alimentele congelate
Tabel timp coacere
Pizza pe 2 rafturi
Plăcinte pe 2 rafturi/ tarte pe 2 rafturi
Pandişpan pe 2 rafturi (pe tava cuptorului)
Pui fript + cartofi
Miel
Gabarit
Lasagne
Vol au vents pe 3 rafturi
Biscuiţi pe 3 rafturi
Saleuri din foietaj cu brânză pe 2 rafturi
Tarte sărate
Scrumbie
Limbă de mare şi sepie
Rotisor cu calamari şi creveţi
Filet de cod
Legume la grătar
Cotlet de viţel
Cârnaţi
Hamburgeri
Pâine prăjită
Pui la rotisor cu frigăruia (dacă este în dotare)
Miel la rotisor cu frigăruia (dacă este în dotare)
Pizza
Plăcinte
Dospirea aluaturilor cu drojdie naturală
(brioşe, tort cu zahăr, croissant etc.)
62
Page 63

Programe Alimente Poziţia rafturilor Pre-încălzire
Automate
**
glisiere
alunecare
Pâine (a se vedea reţeta)
12 sau 32 nu
Friptură de vită
1-1,5
1-1,5
2 sau 32 nu
Viţel
Friptură de viţel
2 sau 32 nu
Miel
Picior de miel
1-1,5 2 sau 32 nu
Carne de Porc
Friptură de porc
1,2-1,5 2 sau 32 nu
Găină
Priptură de pui
1-1,52 sau 32 nu
0,4-0,5
0,4-0,5
0,4-0,5
2 sau 3
2 sau 3
2 sau 3
2
2
2
nu
nu
nu
Pește în folie de
Plătică
Bas
0,4-0,5
0,4-0,5
2 sau 3
2 sau 3
2
2
nu
nu
0,52 sau 32 nu
Tort Brisè
Plăcintă cu mere
0,52 sau 32 no
Brioşe
Dulciuri făcute cu drojdie naturala (brioșe, dulce
migdale, etc.)
0,72 sau 32 nu
Prjitură cu pune
Prajituri facute cu praf de copt (patru trimestre,
cookie-uri pătat, etc.)
0,72 sau 32 nu
12 sau 32 nu
Paella
Orez cu carne, pește și legume
(a se vedea reţeta)
1-3-51-2-4 nu
Pilaf de Orez
Pilaf de Orez
(a se vedea reţeta)
0,52 1nu
Pizzerie*
Pizza foarte subțiri (aluat de pâine)
(piatra pizza
la grătar)
* (doar pentru modelele cu o piatra pizza)
** Duratele coacerilor automate sunt presetate. Valorile pot fi modificate de utilizator începând de la durata presetată.
*** Potrivit reţetei, adăugaţi 50 gr (0,5 dl) de apă în tavă în poziţia 5.
glisiere
standard
Greutate
(Kg)
Pâine***
PrăjituriPrăjituri
TarteTarte
Filet de peşte
Cod
Biban
Păstrăv
4
Iaurt
iaurt 22 da
Tabel timp coacere
Vită
RO
63
Page 64

Măsuri de precauţie şi
RO
recomandări
! Aparatul a fost proiectat şi construit în conformitate cu
normele internaţionale de siguranţă. Recomandările sunt
furnizate pentru siguranţa dvs. şi vă recomandăm să le
citiţi cu atenţie.
Siguranţă generală
• Aparatul a fost creat pentru a fi destinat utilizării
neprofesionale, în mediul casnic.
• Aparatul nu se va instala niciodată în aer liber, nici măcar
în cazul în care spaţiul se aă la adăpostul unui acoperiş;
de asemenea, este foarte periculos să îl lăsaţi expus la
ploi sau intemperii.
• Pentru a mişca aparatul, folosiţi mânerele aplicate pe
părţile laterale ale cuptorului.
• Nu atingeţi aparatul când sunteţi desculţi sau cu mâinile
sau picioarele ude sau umede.
• Aparatul trebuie sa e utilizat numai pentru coacerea
alimentelor si numai de persoane adulte, conform
instructiunilor din manual. Orice alta utilizare (de
exemplu: încalzirea locuintei) este considerata
improprie si deci periculoasa. Fabricantul nu va
putea considerat responsabil pentru eventuale
daune provenite din utilizarea improprie, gresita sau
irationala a aparatului.
• În timpul folosirii aparatului, elementele de încălzire
şi unele zone ale uşii cuptorului devin foarte calde.
Fiţi atenţi să nu le atingeţi; îndepărtaţi copiii de
aragaz.
• Evitaţi ca şi cablurile de alimentare ale altor aparate
electrocasnice să atingă părţile încălzite ale cuptorului.
• Nu astupaţi fantele de aerisire sau de ieşire a căldurii.
• Pentru a deschide usa cuptorului, prindeti mânerul de
mijloc: spre margini, mânerul poate prea cald.
• Utilizaţi întotdeauna mănuşi speciale pentru a introduce
sau scoate recipientele din cuptor.
• Nu puneţi folie de aluminiu pe fundul cuptorului.
• Nu aşezaţi materiale inamabile în cuptor: dacă cuptorul
se aprinde din greşeală, materialele depozitate pot lua foc.
• Nu scoateţi ştecherul din priză trăgând de cablu.
• Nu executaţi nici o operaţie de curăţire sau întreţinere
înainte să scos ştecherul din priză.
• În caz de defecţiune, nu interveniţi în niciun caz la
mecanismele din interiorul aparatului şi nu încercaţi
să îl reparaţi singuri. Apelaţi Centrul de Asistenţă (vezi
Asistenţa).
• Nu aşezaţi obiecte grele pe uşa cuptorului, când este
deschisă.
• Este interzisă utilizarea aparatului de persoanele (inclusiv
copiii) care au o redusă capacitate zică, senzorială
sau mentală, precum şi de cele fără experienţă sau
care nu s-au familiarizat cu produsul, dacă nu sunt
supravegheate de un responsabil sau dacă nu au primit
în prealabil instrucţiuni asupra modului de folosire a
aparatului.
• Nu lăsaţi copiii să se joace cu aparatul.
Eliminarea deşeurilor
• Eliminarea ambalajelor: respectaţi reglementările locale;
astfel, ambalajele ar putea reutilizate.
• Directiva Europeană 2012/19/CE cu privire la deşeurile
care provin de la aparatura electrică sau electronică
(RAEE) prevede ca aparatele electrocasnice să nu e
colectate împreună cu deşeurile urbane solide, obişnuite.
Aparatele scoase din uz trebuie să e colectate separat
atât pentru a optimiza rata de recuperare şi de reciclare a
materialelor componente, cât şi pentru a evita pericolele
care pot duce la dăunarea sănătăţii omului sau poluarea
mediului înconjurător. Simbolul tomberonului tăiat care
apare pe toate produsele vă aminteşte tocmai obligaţia
de a le colecta separat.
Pentru informaţii suplimentare cu privire la scoaterea din
uz a aparatelor electrocasnice, deţinătorii acestora se vor
putea adresa serviciului public respectiv sau agenţilor de
vânzare.
Protejarea şi respectarea mediului înconjurător
• Utilizând aragazul între orele serale şi primele ore ale
dimineţii, colaboraţi la reducerea sarcinii întreprinderilor
de electricitate. Opţiunile de planicare a programelor,
îndeosebi “gătire cu pornire întârziată” (vezi Programe)
şi “curăţarea automată întârziată” (vezi Întreţinerea şi
îngrijirea), permit organizarea în acest sens.
• Se recomandă să efectuaţi întotdeauna coacerea
BARBECUE şi GRATIN cu uşa cuptorului închisă: acest
lucru este util atât pentru a obţine rezultate mai bune, cât
şi pentru a economisi energie (10% aprox).
• Asiguraţi-vă că garniturile sunt curate şi eciente, că
aderă bine pe uşa cuptorului şi nu provoacă pierderi de
căldură.
! Acest produs îndeplinește cerințele din noua directivă
europeană privind limitarea consumului de energie în
standby.
Întreţinerea şi îngrijirea
aparatului
Debranşarea de la reţeaua electrică
Înainte de orice operaţie, debranşaţi aparatul de la reţeaua
de alimentare cu curent electric.
Curăţarea aparatului
• Diferenţele uşoare de culoare pe partea anterioară a
cuptorului se datorează materialelor diferite, precum
sticla, plasticul sau metalul.
• Eventualele umbre de pe geamul uşii, asemănătoare
striaţiilor, se datorează reexului luminii lămpii din cuptor.
• La temperaturi foarte ridicate, emailul este marcat prin
foc. În timpul acestui proces, s-ar putea crea variaţii
cromatice. Acest lucru este normal şi nu inuenţează în
niciun fel funcţionarea. Marginile tablelor subţiri nu pot
emailate integral şi, deci, pot părea brute. Acest lucru
nu afectează protecţia împotriva coroziunii.
64
Page 65

• Părţile externe, smălţuite sau din inox, precum şi
garniturile din cauciuc pot fi curăţate cu un burete
îmbibat în apă călduţă şi săpun neutru. Dacă petele
sunt persistente, folosiţi produse speciale. După ecare
spălare, se recomandă să clătiţi bine şi să ştergeţi. Nu
folosiţi prafuri abrazive sau substanţe corozive.
• Interiorul cuptorului se va spăla, de preferinţă, după
ecare utilizare, când este călduţ. Folosiţi apă caldă şi
detergent; clătiţi bine şi ştergeţi cu o cârpă moale. Evitaţi
substanţele abrazive.
• Accesoriile pot spălate ca orice alt vas, chiar şi în
maşina de spălat vase.
Înlocuirea becului
cavitate
bec
capac
RO
Pentru a înlocui becul
cuptorului:
1. Îndepărtaţi capacul din
sticlă care acoperă becul.
2. Scoateţi becul şi înlocuiţi-l
cu unul asemănător: lampă
halogenă tensiune 230V,
putere 25 W, racord G 9.
3. Montaţi la loc capacul
(vezi gura).
! Nu folosiţi niciodată aparate cu aburi sau sub presiune,
pentru a curăţa aparatul.
Curăţarea uşii
! La modelele cu LED INSIDE în interior nu se poate elimina
ușa.
Curăţaţi geamul uşii cu un burete şi produse neabrazive
şi ştergeţi-l cu o cârpă moale; nu folosiţi materiale aspre,
abrazive sau raclete metalice, ascuţite, care pot zgâria
suprafaţa sau cauza crăparea geamului.
Pentru curăţarea minuţioasă a cuptorului, demontaţi uşa
acestuia:
1. deschideţi uşa la maxim (vezi gura);
2. cu ajutorul unei şurubelniţe, ridicaţi şi rotiţi levierele F
amplasate pe cele două balamale (vezi gura);
F
3. apucaţi bine uşa de părţile
laterale şi apropiaţi-o fără a o
închide complet. Trageţi apoi uşa
spre voi, extrăgând-o din balamale
(vezi gura). Montaţi la loc uşa,
urmând acelaşi procedeuîn sens
invers.
Controlarea garniturilor
Controlaţi periodic garnitura din jurul uşii cuptorului. Dacă
este deteriorată, adresaţi-vă celui mai apropiat Centru de
Asistenţă (vezi Asistenţa). Se recomandă să nu folosiţi
cuptorul până la înlocuirea garniturii.
! Nu atingeți becul cu mâinile goale.
! Nu folosiţi lampa cuptorului pentru şi ca iluminare a
încăperilor.
Montarea kitului de glisiere
Pentru a monta glisierele:
1. Îndepărtaţi cele două cadre,
scoţându-le din distanţierele
A (a se vedea gura)
2. Alegeţi raftul pe care să
introduceţi glisiera. Acordaţi
atenţie direcţiei de detaşare
a glisierei, poziţionaţi pe
cadru mai întâi cavitatea B,
după care cavitatea C.
3. Fixaţi cele două cadre cu
ajutorul ghidajelor în oriciile
situate pe pereţii cuptorului
(a se vedea gura). Oriciile
corespunzătoare cadrului
din stânga sunt poziţionate
sus, în timp ce orificiile
pentru cel din dreapta sunt
poziţionate jos.
4. La nal poziţionaţi cadrele
pe distanţierele A.
Ghidaj
Stânga
Ghidaj
Dreapta
B
C
D
A
Sens de
extragere
! Nu introduceţi glisiere la poziţia 5.
65
Page 66

Anomalii şi remedii
Problemă Cauza posibilă Remediu
RO
Programarea unei coaceri
nu a pornit.
Modul ECO ecran.
Pe display se afişează „Hot“ şi
coacerea nu porneşte.
Am ales coacerea ventilată, iar
alimentele prezintă arsuri.
A fost o pană de curent. Resetaţi programările.
Aparatul este în modalitatea
standby.
Temperatura internă a cuptorului
este mai mare decât cea propusă
pentru programul ales.
Poziţiile 1 şi 5: aerul cald ar putea
provoca arderi alimentelor delicate
Atingeţi o tastă oarecare pentru a
ieşi din modalitatea standby.
Aşteptaţi răcirea cuptorului.Am ales un program automat.
Se recomandă rotirea tăvilor
la jumătatea coacerii.
.
66
Page 67

RO
67
Page 68

RO
195115534.00
08/2013 - XEROX FABRIANO
68
 Loading...