

Page 1
FH 83 AG S
FH 83 IX AG S
Portuges
Instruções para a utilização
FORNO
Índice
Instruções para a utilização,1
Advertências,3
Assistência,4
Descrição do aparelho,5
Descrição do aparelho,6
Instalação,23
Início e utilização,25
O programador electrónico*,25
Programas,26
Precauções e conselhos,29
Manutenção e cuidados,29
English
Operating Instructions
OVEN
Contents
Operating Instructions,1
Warnings,2
Assistance,4
Description of the appliance,5
Description of the appliance,6
Installation,7
Start-up and use,9
The electronic programmer,9
Cooking modes,10
Precautions and tips,13
Maintenance and care,13
Español
Manual de instrucciones
HORNO
Sumario
Manual de instrucciones,1
Advertencias,2
Asistencia,4
Descripción del aparato,5
Descripción del aparato,6
Instalación,15
Puesta en funcionamiento y uso,17
El programador electrónico*,17
Programas,18
Precauciones y consejos,21
Mantenimiento y cuidados,21
Page 2
Warnings
Advertencias
WARNING: The appliance and its
accessible parts become hot during use.
Care should be taken to avoid touching
heating elements. Children less than 8
years of age shall be kept away unless
continuously supervised. This appliance
can be used by children aged from 8 years
and above and persons with reduced
physical, sensory or mental capabilities
or lack of experience and knowledge
if they have been given supervision
or instruction concerning use of the
appliance in a safe way and understand
the hazards involved. Children shall not
play with the appliance. Cleaning and
user maintenance shall not be made by
children without supervision.
Do not use harsh abrasive cleaners or
sharp metal scrapers to clean the oven door
glass since they can scratch the surface,
which may result in shattering of the glass.
Never use steam cleaners or pressure
cleaners on the appliance.
WARNING: Ensure that the appliance is
switched off before replacing the lamp to
avoid the possibility of electric shock.
! When you place the rack inside, make
sure that the stop is directed upwards and
in the back of the cavity.
ATENCIÓN: Este aparato y sus partes
accesibles se vuelven muy calientes
durante el uso. Por lo tanto, es importante
evitar tocar los elementos calentadores.
Mantenga alejados a los niños menores de
8 años si no son continuamente vigilados.
El presente aparato puede ser utilizado por
niños mayores de 8 años y por personas
con capacidades físicas, sensoriales o
mentales disminuidas o sin experiencia ni
conocimientos, si se encuentran bajo una
adecuada vigilancia o si han sido instruidos
sobre el uso del aparato de modo seguro y
comprenden los peligros relacionados con
el mismo. Los niños no deben jugar con
el aparato. Las operaciones de limpieza y
de mantenimiento no deben ser realizadas
por niños sin vigilancia.
No utilice productos abrasivos ni espátulas
de metal cortantes para limpiar la puerta
de cristal del horno ya que podrían rayar
la supercie y quebrar el cristal.
No utilice nunca limpiadores a vapor o de
alta presión para la limpieza del aparato.
ATENCIÓN: Antes de sustituir la lámpara
controle que el aparato esté apagado
para evitar la posibilidad de choques
eléctricos.
! Cuando introduzca la parrilla, controle
que el tope esté dirigido hacia arriba y en
la parte posterior de la cavidad.
2
Page 3

Advertências
ATENÇÃO: Este aparelho e as suas
partes acessíveis aquecem muito durante
a utilização. É preciso ter atenção e evitar
tocar os elementos que aquecem. Manter
afastadas as crianças com menos de 8
anos, caso não estejam a ser vigiadas.
O presente aparelho pode ser utilizado
por crianças com mais de 8 anos e
por pessoas com capacidades físicas,
sensoriais ou mentais reduzidas ou com
pouca experiência e conhecimentos,
caso sejam adequadamente vigiadas
ou caso tenham recebido instruções
em relação ao uso do aparelho de
forma segura e tenham conhecimento
dos perigos associados. As crianças
não devem brincar com o aparelho. As
operações de limpeza e manutenção não
devem ser efectuadas por crianças sem
vigilância.
Não utilizar produtos abrasivos nem
espátulas de metal cortantes para limpar
a porta em vidro do forno, uma vez que
pode riscar a superfície, provocando a
ruptura do vidro.
Nunca utilize equipamento de limpeza a
vapor ou de alta pressão para limpar o
aparelho.
ATENÇÃO: Assegure-se de que o
aparelho esteja desligado antes de
substituir a lâmpada, para evitar a
possibilidade de choques eléctricos.
! Quando inserir a grelha, assegure-se de
que o bloqueio esteja voltado para cima
e na parte posterior da cavidade.
3
Page 4
Assistance
Assistência
! Never use the services of an unauthorised technician.
Please have the following information to hand:
• The type of problem encountered.
• The appliance model (Mod.).
• The serial number (S/N).
The latter two pieces of information can be found on the
data plate located on the appliance.
Asistencia
! No llame nunca a técnicos no autorizados.
Comunique:
• El tipo de anomalía;
• El modelo de la máquina (Mod.)
• El número de serie (S/N)
Esta información se encuentra en la placa de características
colocada en el aparato.
La siguiente información es válida solo para España.
Para otros países de habla hispana consulte a su
vendedor.
! Nunca recorra a técnicos não autorizados.
Comunique:
• o tipo de avaria;
• o modelo da máquina (Mod.);
• o número de série (S/N);
Estas últimas informações encontram-se na placa de
identicação situada no aparelho.
Ampliación de garantía
Llame al 902.363.539 y le informaremos sobre el fantástico
plan de ampliación de garantía hasta 5 años.
Consiga una cobertura total adicional de
• Piezas y componentes
• Mano de obra de los técnicos
• Desplazamiento a su domicilio de los técnicos
Y NO PAGUE AVERIAS NUNCA MAS
Servicio de asistencia técnica (SAT)
Llame al 902.133.133 y nuestros técnicos intervendrán con
rapidez y ecacia, devolviendo el electrodoméstico a sus
condiciones óptimas de funcionamiento.
En el SAT encontrará recambios, accesorios y productos
específicos para la limpieza y mantenimiento de su
electrodoméstico a precios competitivos.
ESTAMOS A SU SERVICIO
4
Page 5
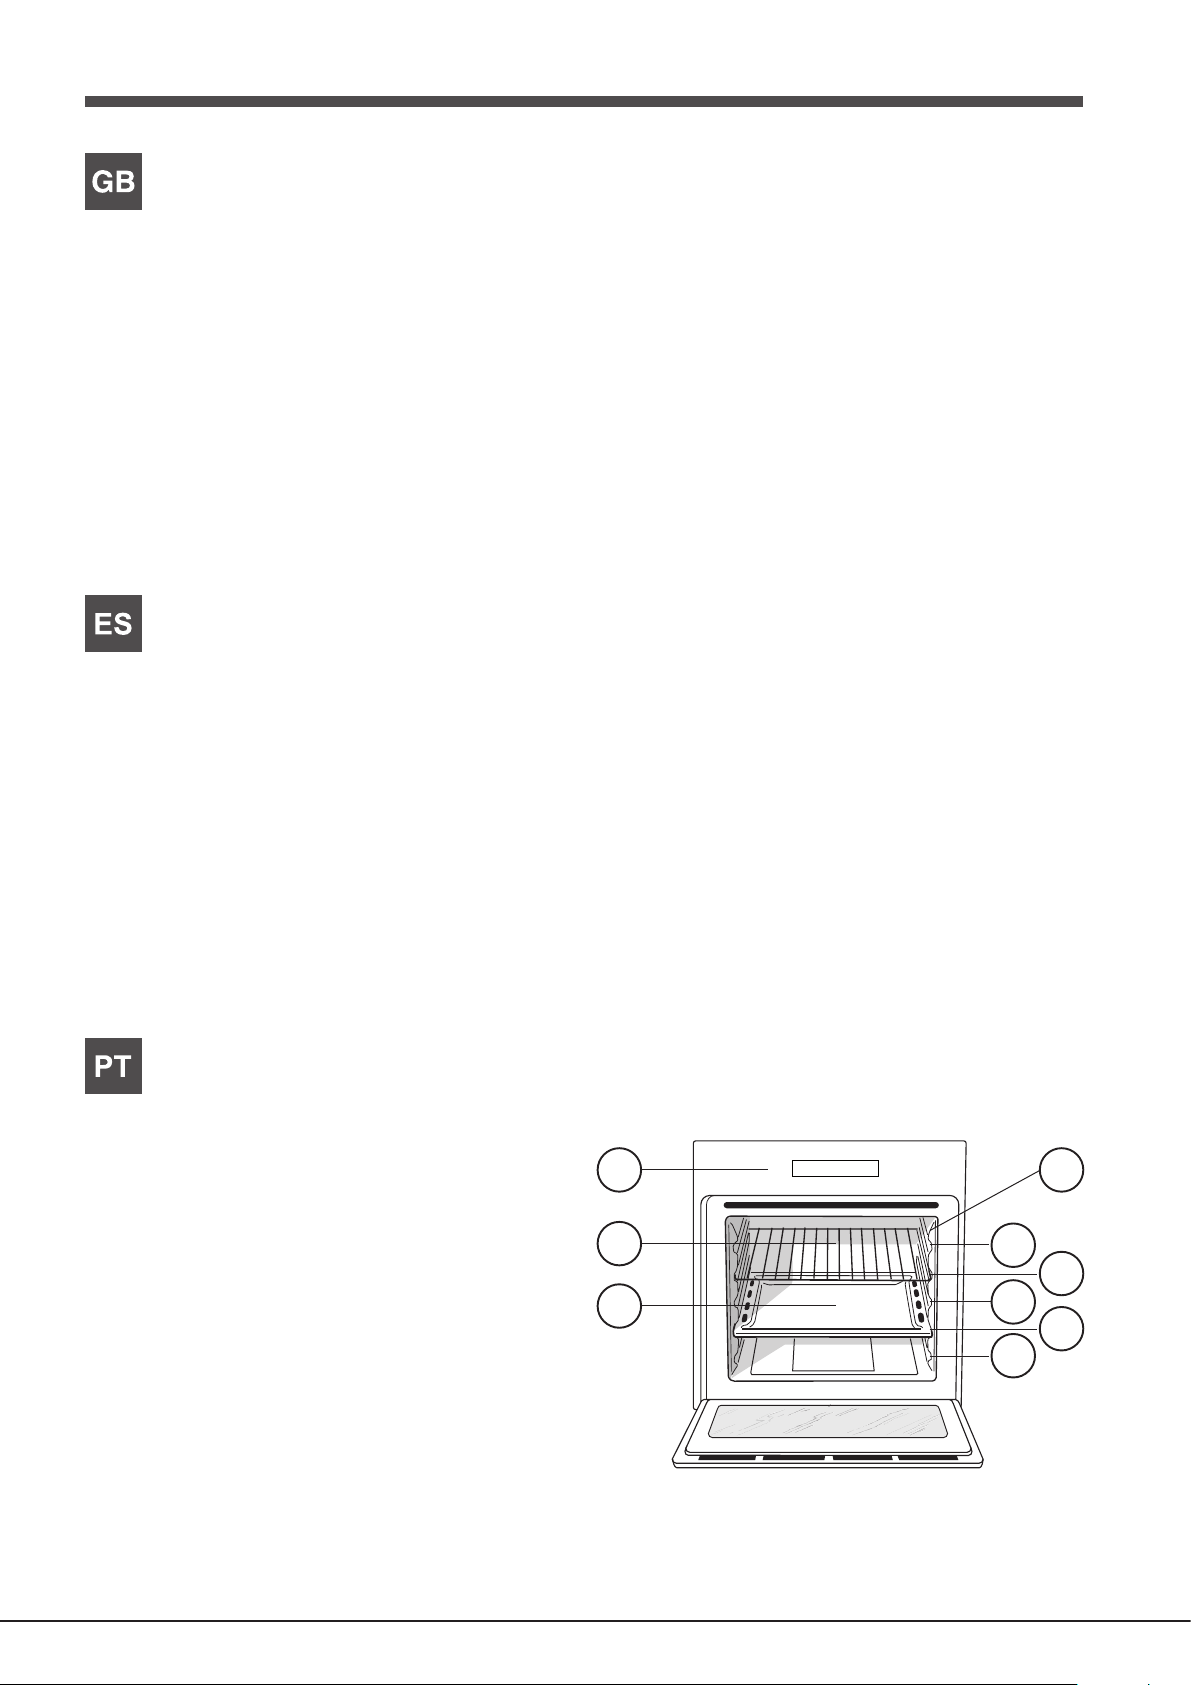
Description of the appliance
Overall view
1 POSITION 1
2 POSITION 2
3 POSITION 3
4 POSITION 4
5 POSITION 5
6 GUIDES for the sliding racks
7 DRIPPING PAN
8 GRILL
9 Control panel
Descripción del aparato
Vista en conjunto
1 POSICIÓN 1
2 POSICIÓN 2
3 POSICIÓN 3
4 POSICIÓN 4
5 POSICIÓN 5
6 GUÍAS de deslizamiento de las bandejas
7 Bandeja GRASERA
8 Bandeja PARRILLA
9 Panel de control
Descrição do aparelho
Vista de conjunto
1 POSIÇÃO 1
2 POSIÇÃO 2
3 POSIÇÃO 3
4 POSIÇÃO 4
5 POSIÇÃO 5
6 GUIAS de escorrimento das prateleiras
7 Prateleira BANDEJA PINGADEIRA
8 Prateleira GRADE
9 Painel de comandos
9 6
8
7
5
3
1
4
2
5
Page 6
Description of the appliance
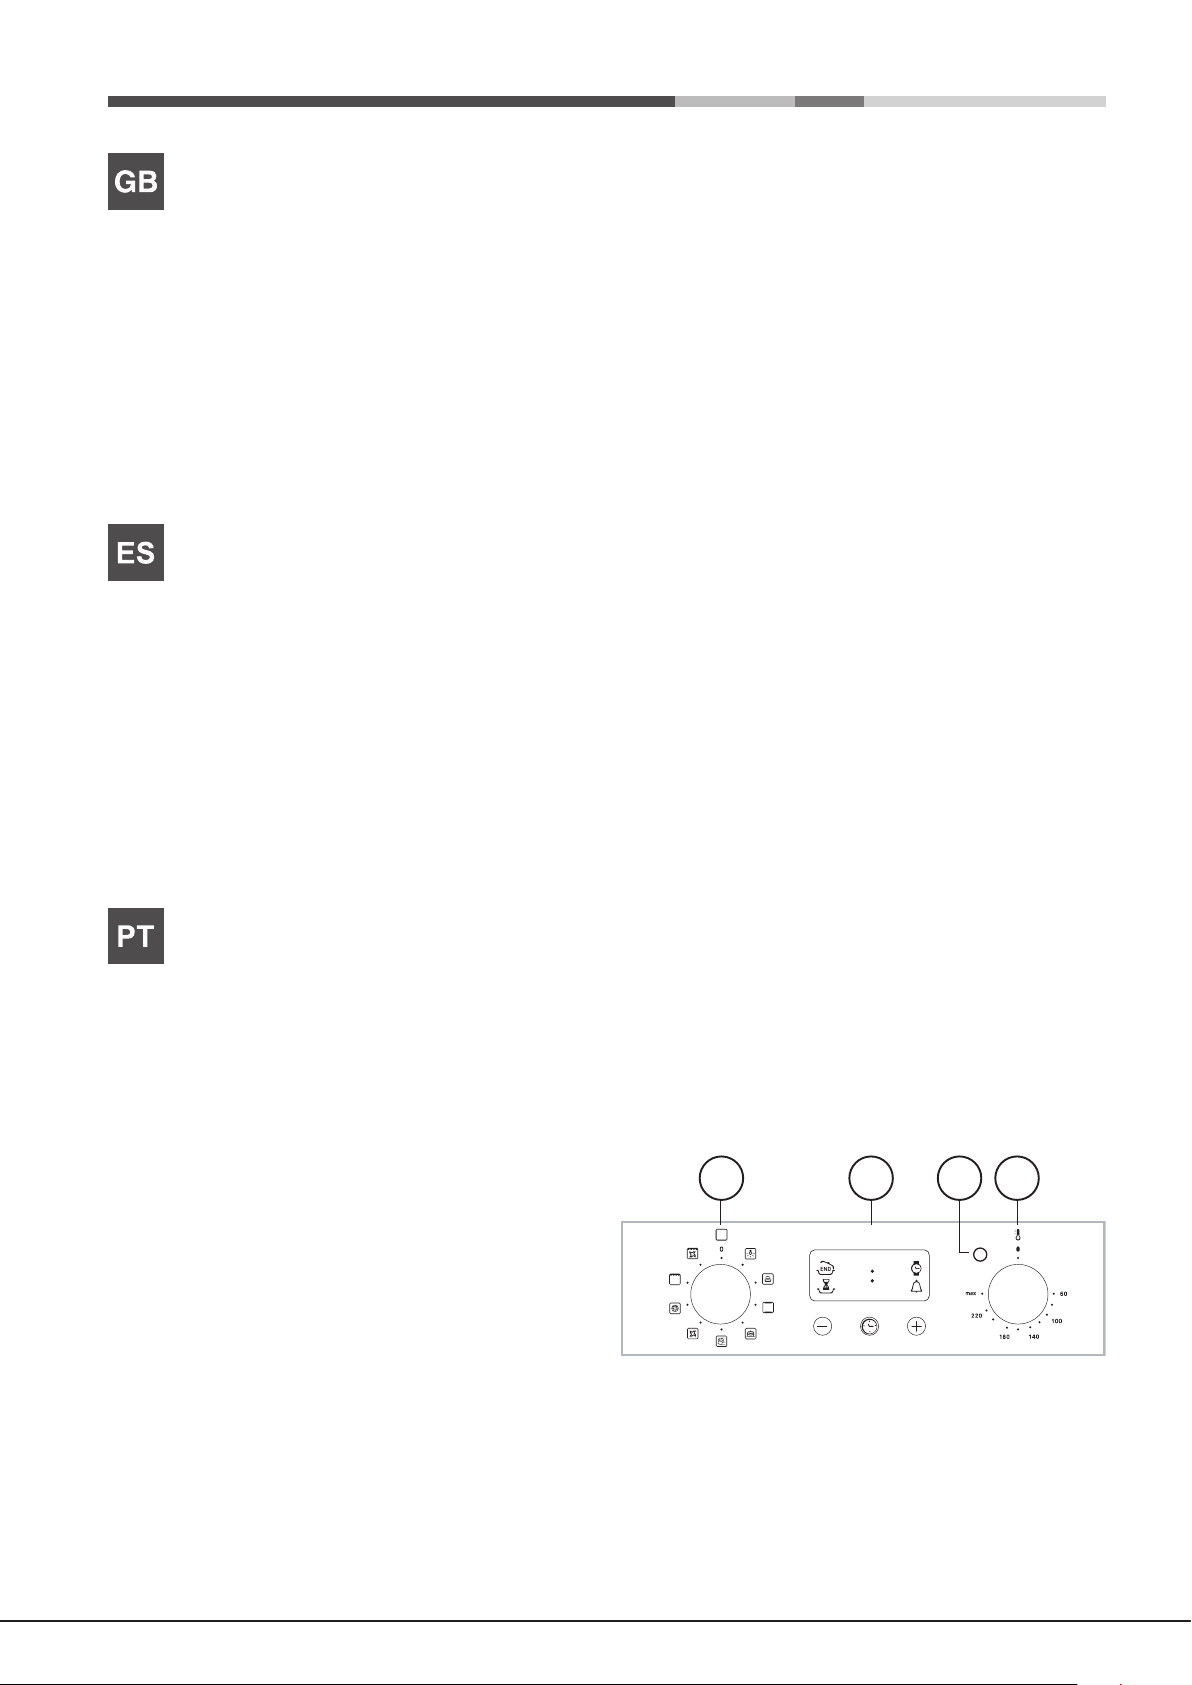
Control panel
1 THERMOSTAT indicator light
2 SELECTOR knob
3 ELECTRONIC programmer *
4 THERMOSTAT knob
* Only available in certain models.
Descripción del aparato
Panel de control
1 Spia TERMOSTATO
2 Mando PROGRAMAS
3 Programador ELECTRÓNICO *
4 Piloto TERMOSTATO
* Presente sólo en algunos modelos.
Descrição do aparelho
Painel de comandos
1 Indicador luminoso TERMOSTATO
2 Selector PROGRAMAS
3 Programador ELECTRÓNICO *
4 Selector do TERMÓSTATO
* Há somente em alguns modelos.
•• ••
12
43
6
Page 7
Installation
595 mm.
! Please keep this instruction booklet in a safe place for
future reference. If the appliance is sold, given away or
moved, please make sure the booklet is also passed on to
the new owners so that they may benet from the advice
contained within it.
! Please read this instruction manual carefully: it contains
important information concerning the safe operation,
installation and maintenance of the appliance.
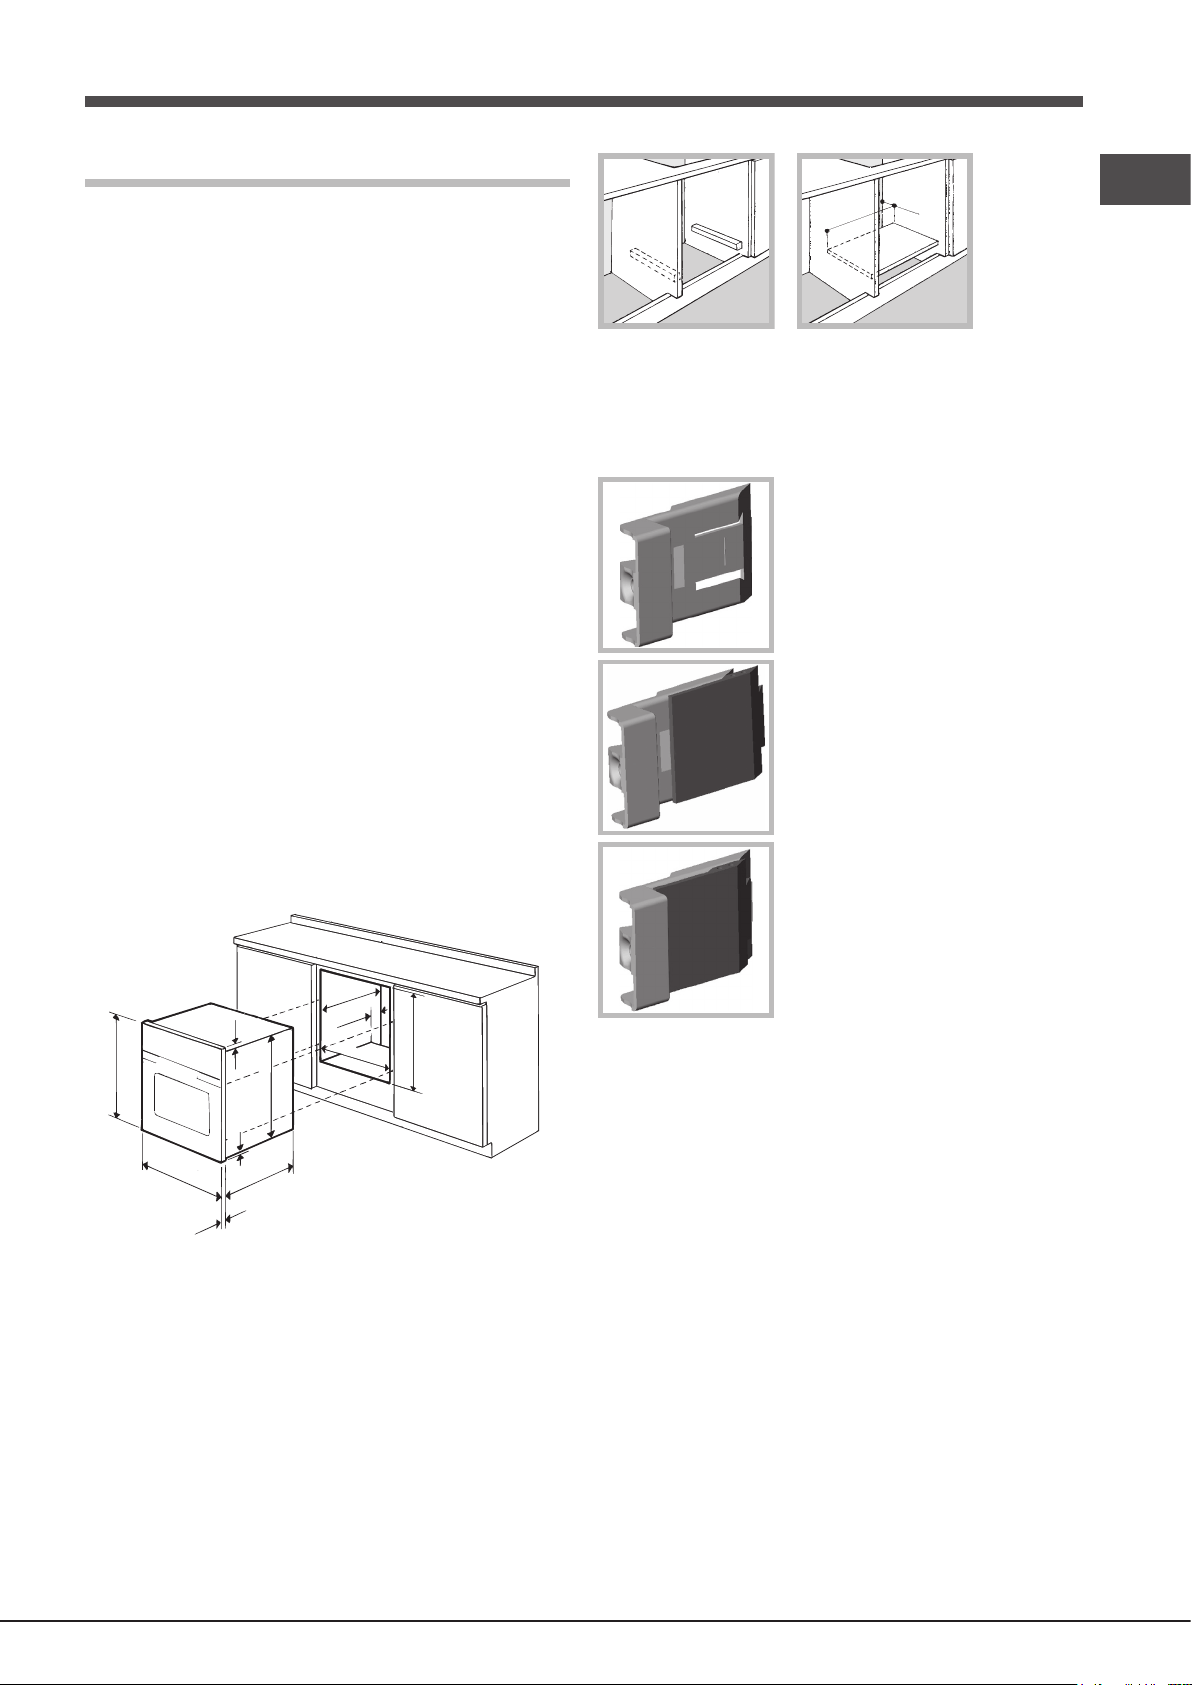
Positioning
! Do not let children play with the packaging material; it
should be disposed of in accordance with local separated
waste collection standards (see Precautions and tips).
! The appliance must be installed by a qualied professional in
accordance with the instructions provided. Incorrect installation
may damage property or cause harm to people or animals.
GB
45 mm.
560 mm.
Centring and xing
Position the 4 tabs on the side of the oven, in line with the
4 holes on the outer frame. Adjust the tabs according to
the thickness of the cabinet side panel, as shown below:*
20 mm thick: take off the removable
part of the tab
(see diagram);
Built-in appliances
Use an appropriate cabinet to ensure that the appliance
operates properly:
• The panels adjacent to the oven must be made of heat-
resistant material.
• Cabinets with a veneer exterior must be assembled with
glues which can withstand temperatures of up to 100°C.
• To install the oven under the counter (see diagram) or
in a kitchen unit, the cabinet must have the following
dimensions:
547 mm. min.
23 mm.
5 mm.
595 mm.
545 mm.
25 mm.
45 mm.
558 mm.
575-585 mm.
567 mm.
* Stainless steel models only
! The appliance must not come into contact with electrical
parts once it has been installed.
The indications for consumption given on the data plate
have been calculated for this type of installation.
Ventilation
To ensure adequate ventilation, the back panel of the
cabinet must be removed. It is advisable to install the oven
so that it rests on two strips of wood, or on a completely
at surface with an opening of at least 45 x 560 mm (see
diagrams).
18 mm thick: use the rst groove,
which has already been set in the
factory
(see diagram);
16 mm thick: use the second
groove (see diagram).
Secure the appliance to the cabinet by opening the oven
door and inserting 4 screws into the 4 holes on the outer
frame.
! All parts which ensure the safe operation of the appliance
must not be removable without the aid of a tool.
Centring and xing *
1. Position brackets “A” against oven support “B”.
2. Position tabs “C” against brackets “A”. If the thickness
of the cabinet side panel:
• is 16 mm thick: place the tab so that the number 16
written on it is facing you;
• is 18 mm thick: place the tab so that the part without
any text is facing you;
• is 20 mm thick: do not t the tab.
3. Fix the brackets and tabs onto the edge of the cabinet
side panel using screws “D”.
4. Fix the oven to the cabinet using the screws and plastic
washers “E”.
* Only available on certain models.
7
Page 8
GB
16
16
D
C
16
16
C
D
A
C
D
B
E
E
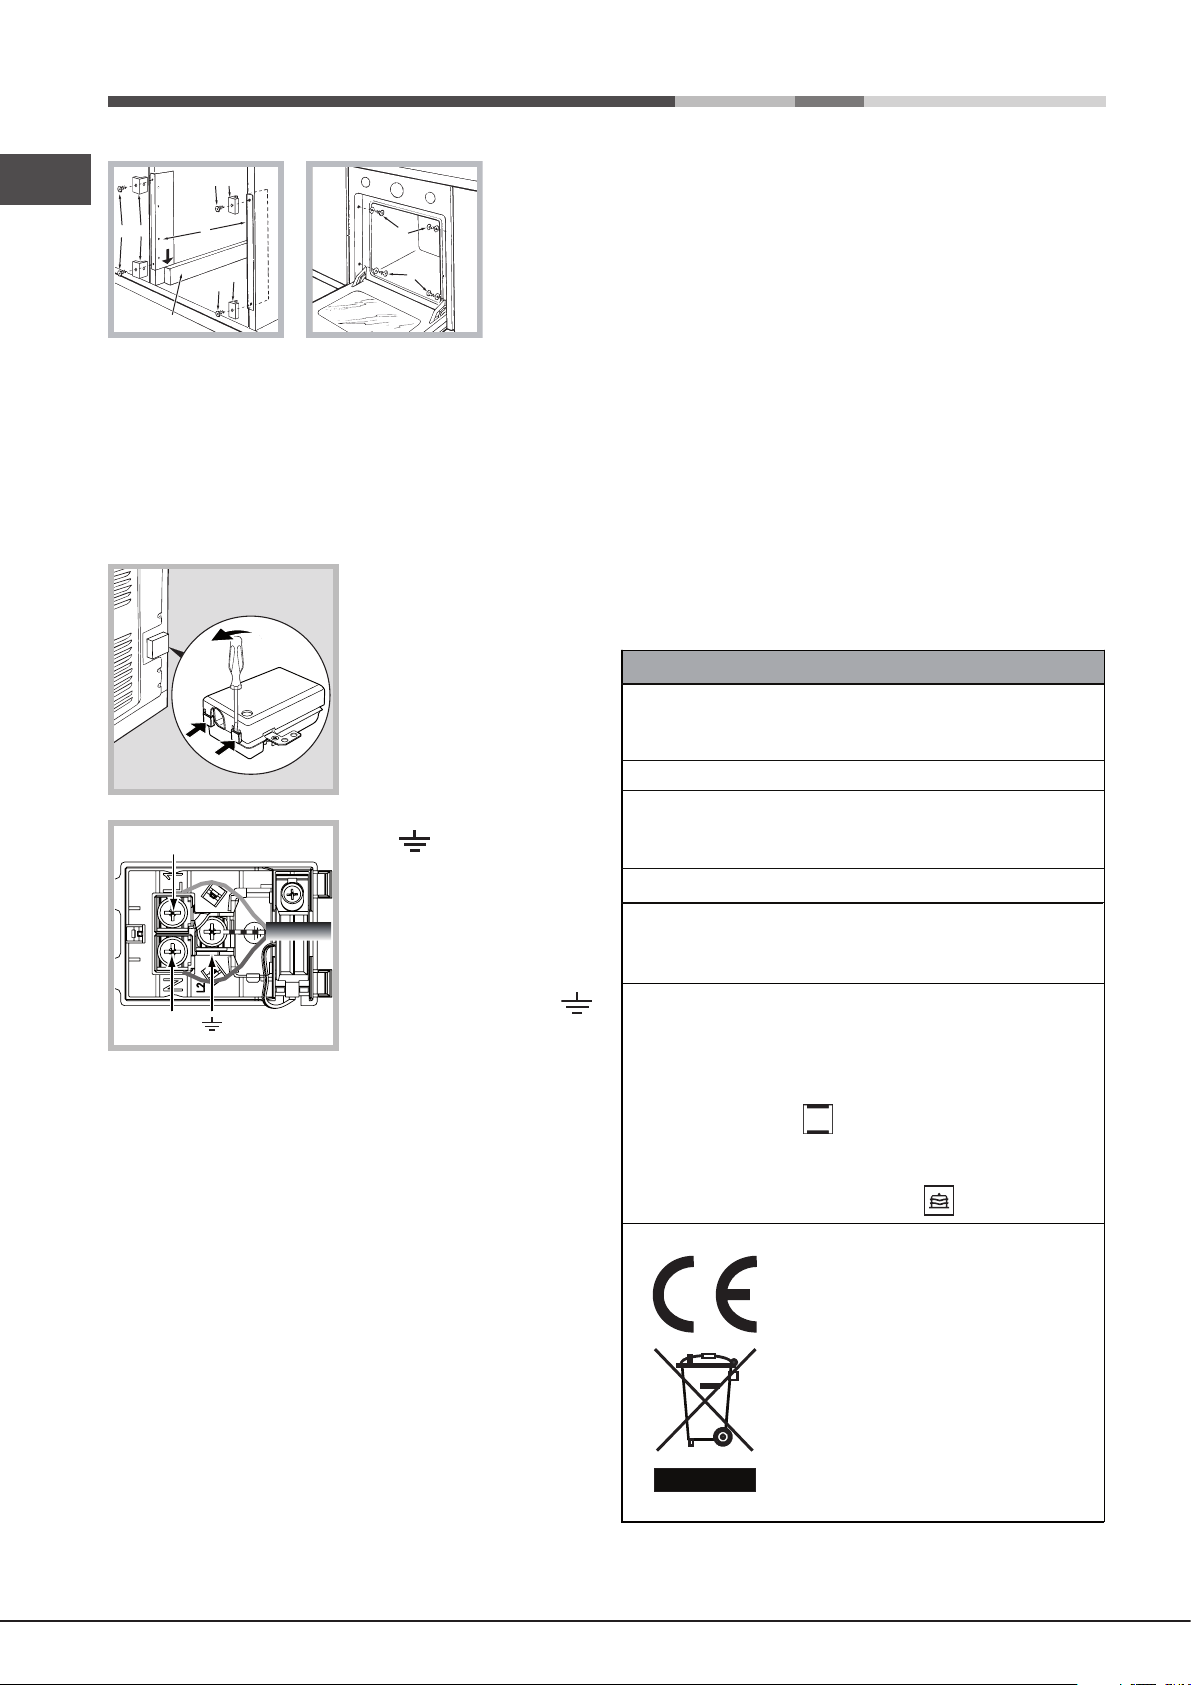
Electrical connection
Ovens equipped with a three-pole power supply cable are
designed to operate with alternating current at the voltage
and frequency indicated on the data plate located on the
appliance (see below).
• The appliance is earthed and the plug is compliant with
the law.
• The socket can withstand the maximum power of the
appliance, which is indicated on the data plate.
• The voltage is in the range between the values indicated
on the data plate.
• The socket is compatible with the plug of the appliance.
If the socket is incompatible with the plug, ask an
authorised technician to replace it. Do not use extension
cords or multiple sockets.
! Once the appliance has been installed, the power supply
cable and the electrical socket must be easily accessible.
! The cable must not be bent or compressed.
Fitting the power supply cable
1. Open the terminal board
by inserting a screwdriver
into the side tabs of the
cover. Use the screwdriver
as a lever by pushing it
down to open the cover (see
diagram).
2. Install the power supply
cable by loosening the
cable clamp screw and the
three wire contact screws
L
L-N- .
Connect the wires to the
corresponding terminals:
the Blue wire to the terminal
marked (N), the Brown wire
to the terminal marked (L)
and the Yellow/Green wire
to the terminal marked
N
(see diagram).
3. Secure the cable by fastening the clamp screw.
4. Close the cover of the terminal board.
Connecting the supply cable to the mains
Install a standardised plug corresponding to the load
indicated on the data plate (see table).
The appliance must be directly connected to the mains using
an omnipolar switch with a minimum contact opening of 3
mm installed between the appliance and the mains. The
switch must be suitable for the charge indicated and must
comply with current electrical regulations (the earthing wire
must not be interrupted by the switch). The supply cable
must be positioned so that it does not come into contact
with temperatures higher than 50°C at any point (the back
panel of the oven, for example).
! The installer must ensure that the correct electrical
connection has been performed and that it is fully compliant
with safety regulations.
Before connecting the appliance to the power supply, make
sure that
! The cable must be checked regularly and replaced by
authorised technicians only (see Assistance).
! The manufacturer declines any liability should these
safety measures not be observed.
APPLIANCE SPECIFICATIONS
width 43,5 cm
Dimensions*
height 32,4 cm
depth 40,6 cm
Volume*
58 lt.
width 45,5 cm
Dimensions**
height 32,4 cm
depth 40,6 cm
Volume**
Electrical
connections
60 lt.
voltage:
220-240V~ 50Hz
(see data plate) maximum power
absorbed 2800W
Directive 2002/40/EC on the label
of electric ovens.
Standard EN 50304
Energy consumption for Natural
convection – heating mode:
ENERGY
LABEL
Traditional
Declared energy consumption for
Forced convection Class –
heating mode: Baking
This appliance conforms to the
following European Economic
Community directives:
- 2006/95/EEC dated 12/12/06
(Low Voltage) and subsequent
amendments
- 2004/108/EEC dated 03/05/89
(Electromagnetic Compatibility)
and subsequent amendments
- 93/68/EEC dated 22/07/93 and
subsequent amendments.
- 2012/19/EC and subsequent
amendments.
* Only for models with drawn rails.
** Only for models with wire rails.
8
Page 9
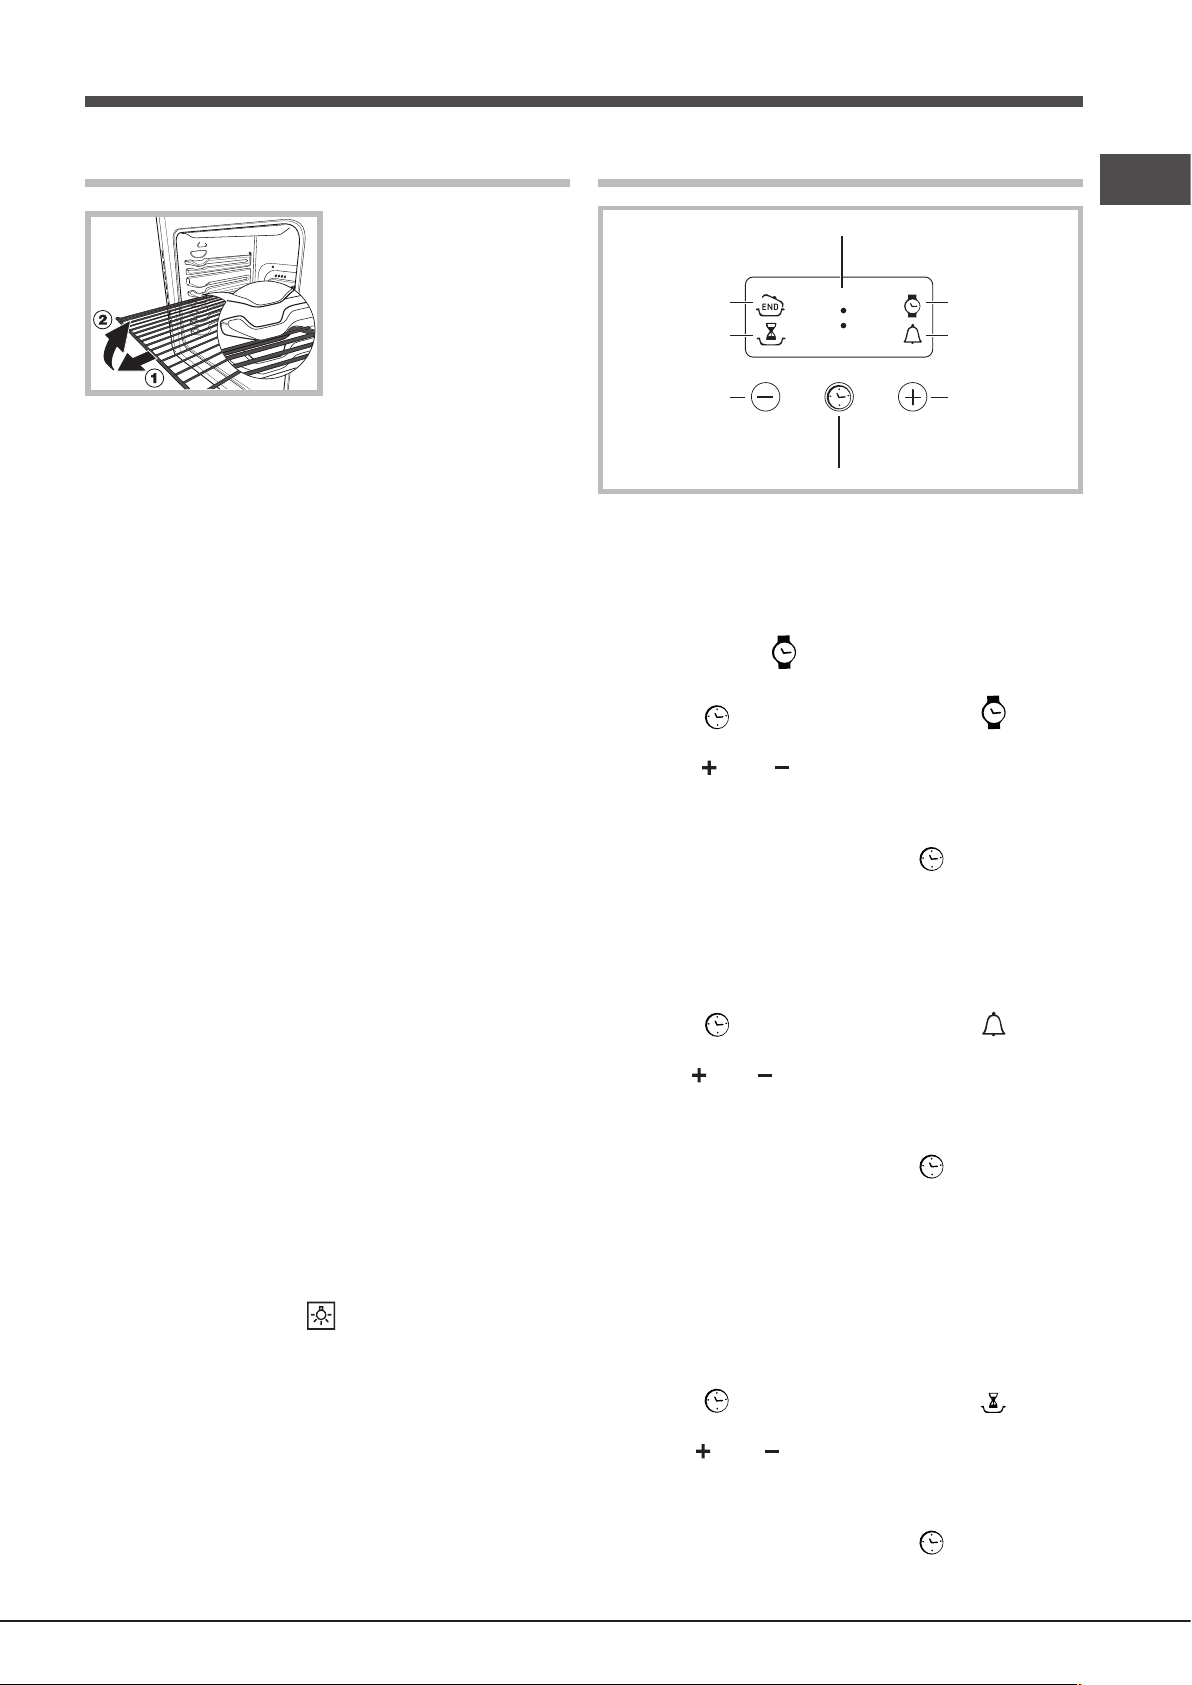
Start-up and use
DISPLAY
SET TIME
button
END OF
COOKING icon
CLOCK icon
DURATION
icon
TIMER icon
DECREASE TIME
button
INCREASE TIME
button
•• ••
WARNING! The oven is
provided with a stop system
to extract the racks and
prevent them from coming
out of the oven (1).
As shown in the drawing,
to extract them completely,
simply lift the racks, holding
them on the front part, and
pull (2).
! The rst time you use your appliance, heat the empty
oven with its door closed at its maximum temperature for
at least half an hour. Ensure that the room is well ventilated
before switching the oven off and opening the oven door.
The appliance may emit a slightly unpleasant odour caused
by protective substances used during the manufacturing
process burning away.
Starting the oven
1. Select the desired cooking mode by turning the
SELECTOR knob.
2. Select the desired temperature with the THERMOSTAT
knob. See the Cooking advice table for cooking modes and
the suggested cooking temperatures (see Cooking Modes).
3. When lit, the THERMOSTAT indicator light indicates that
the oven is heating up to the temperature set.
4. You may do the following during cooking:
- change the cooking mode by turning the SELECTOR knob.
- change the temperature by turning the THERMOSTAT
knob.
- stop cooking by turning the SELECTOR knob to the “0”
position.
! Never put objects directly on the bottom of the oven; this
will avoid the enamel coating being damaged.
! Always place cookware on the rack(s) provided.
Cooling ventilation
In order to cool down the external temperature of the oven,
some models are tted with a cooling fan that blows out air
between the control panel and the oven door.
! Once cooking has been completed, the cooling fan
continues to operate until the oven has cooled down
sufciently.
The electronic programmer
Setting the clock
! The clock may be set when the oven is switched off or
when it is switched on, provided that a the end time of a
cooking cycle has not been programmed previously.
After the appliance has been connected to the mains, or
after a blackout, the icon and the four numerical digits
on the DISPLAY will begin to ash.
1. Press the button several times until the icon and
the four digits on the display begin to ash.
2. Use the “ ” and “ ” buttons to adjust the time; if you
press and hold either button, the display will scroll through
the values more quickly, making it quicker and easier to set
the desired value.
3. Wait for 10 seconds or press the button again to
nalise the setting.
Setting the timer
! This function does not interrupt cooking and does not affect
the oven; it is simply used to activate the buzzer when the
set amount of time has elapsed.
1. Press the button several times until the icon and
the three digits on the display begin to ash.
2. Use the “ ” and “ ” buttons to set the desired time; if you
press and hold either button, the display will scroll through
the values more quickly, making it quicker and easier to
set the value.
3. Wait for 10 seconds or press the button again to
nalise the setting.
The display will then show the time as it counts down. When
this period of time has elapsed the buzzer will be activated.
GB
Oven light
It goes on when selecting with the SELECTOR knob.
It stays on when a cooking mode is selected.
Programming cooking
! A cooking mode must be selected before programming
can take place.
Programming the cooking duration
1. Press the button several times until the icon and
the three digits on the DISPLAY begin to ash.
2. Use the “ ” and “ ” buttons to set the desired duration;
if you press and hold either button, the display will scroll
through the values more quickly, making it quicker and
easier to set the value.
3. Wait for 10 seconds or press the button again to
nalise the setting.
9
Page 10
4. When the set time has elapsed, the text END appears
GB
on the DISPLAY, the oven will stop cooking and a buzzer
sounds. Press any button to stop it.
• For example: it is 9:00 a.m. and a time of 1 hour and
15 minutes is programmed. The programme will stop
automatically at 10:15 a.m.
Setting the end time for a cooking mode
! A cooking duration must be set before the cooking end
time can be scheduled.
1. Follow steps 1 to 3 to set the duration as detailed above.
2. Next, press the button until the icon and the four
digits on the DISPLAY begin to ash.
3. use the “ ” and “ ” buttons to adjust the cooking end
time; if you press and hold either button, the display will
scroll through the values more quickly, making it quicker
and easier to set the desired value.
4. Wait for 10 seconds or press the button again to
nalise the setting.
5. When the set time has elapsed, the text END appears
on the DISPLAY, the oven will stop cooking and a buzzer
sounds.Press any button to stop it.
Programming has been set when the and buttons
are illuminated. The DISPLAY shows the cooking end time
and the cooking duration alternately.
• For example: It is 9:00 a.m. and a duration of 1 hour has
been programmed. 12:30 is scheduled as the end time.
The programme will start automatically at 11:30 a.m.
Cancelling a programme
To cancel a programme:
• press the button until the icon corresponding to the
setting you wish to cancel and the digits on the display
are no longer ashing. Press the “ ” button until the digits
00:00 appear on the display.
• Press and hold the “ ” and “ ” buttons; this will cancel all
the settings selected previously, including timer settings.
BAKING mode
The rear heating element and the fan come on, guaranteeing
the distribution of heat delicately and uniformly throughout
the oven. This mode is ideal for baking and cooking
temperature sensitive foods such as cakes that need to rise
and to prepare certain tartlets on 3 shelves simultaneously.
FAST COOKING mode
The heating elements and the fan come on, guaranteeing
the distribution of heat consistently and uniformly throughout
the oven.
Pre-heating is not necessary for this cooking mode. This
mode is especially recommended for cooking pre-packed
food quickly (frozen or pre-cooked). The best results are
obtained if you use one cooking rack only.
MULTI-COOKING mode
All the heating elements (top, bottom and circular), as
well as the fan, will come on. Since the heat remains
constant throughout the oven, the air cooks and browns
food uniformly. A maximum of two racks may be used at
the same time.
PIZZA mode
The heating elements (bottom and circular) and the fan
come on. This combination heats the oven rapidly by
producing a considerable amount of heat, particularly
from the bottom element. If you use more than one rack
simultaneously, switch the position of the dishes halfway
through the cooking process.
BARBECUE mode
The top heating element and the rotisserie (where
present) come on. The high and direct temperature of the
grill is recommended for food that requires high surface
temperature. Always cook in this mode with the oven door
closed.
Cooking modes
! A temperature value can be set for all cooking modes
between 60°C and Max, except for
• BARBECUE (recommended: set only to MAX power
level);
• GRATIN (recommended: do not exceed 200°C).
LEAVENING mode
The oven reaches and maintains a temperature of 40°C
irrespective of the position of the THERMOSTAT knob. This
mode is ideal for leavening dough made with yeast.
TRADITIONAL OVEN mode
Both the top and bottom heating elements will come on.
With this traditional cooking mode, it is best to use one
cooking rack only: if more than one rack is used, the heat
distribution will be uneven.
10
GRATIN mode
The top heating element as well as the fan and the rotisserie
(where present) come on. This combination of features
increases the effectiveness of the unidirectional thermal
radiation of the heating elements through forced circulation
of the air throughout the oven.
This helps prevent food from burning on the surface,
allowing the heat to penetrate right into the food. Always
cook in this mode with the oven door closed.
Page 11

Practical cooking advice
! Do not place racks in position 1 and 5 during fan-assisted
cooking. This is because excessive direct heat can burn
temperature sensitive foods.
BARBECUE
GB
• Place the rack in position 3 or 4. Position the food in the
centre of the rack.
! In the BARBECUE and GRATIN cooking modes, particularly
when using the rotisserie spit, place the dripping pan in
position 1 to collect cooking residues (fat and/or grease).
MULTI-COOKING
• Use positions 2 and 4, placing the food which requires
more heat on 2.
• Place the dripping pan on the bottom and the rack on
top.
• We recommend that the power level is set to maximum.
The top heating element is regulated by a thermostat
and may not always operate constantly.
PIZZA OVEN
• Use a light aluminium pizza pan. Place it on the rack
provided.
For a crispy crust, do not use the dripping pan as it
prevents the crust from forming by extending the total
cooking time.
• If the pizza has a lot of toppings, we recommend adding
the mozzarella cheese on top of the pizza halfway
through the cooking process.
11
Page 12

GB
Cooking advice table
Cooking
modes
Leavening
Traditional
Oven
Baking
Mode
Fast
cooking
Multi-
cooking
Pizza Mode
Barbecue
Gratin
Foods Weight
(in kg)
Leavening pr ocess of dough made with
yeas t or baking powder (brioches, bread,
sugar pie, croissants, etc.)
Duck
Roast veal or beef
Pork roast
Biscuits (short pastry)
Tarts
Tarts
Fruit cakes
Plum cake
Sponge cake
Stuffed pancakes (on 2 racks)
Small cakes (on 2 racks)
Cheese puffs (on 2 racks)
Cream puffs (on 3 racks)
Biscuits (on 3 racks)
Meringues (on 3 racks)
Frozen food
Pizza
Courgette and prawn pie
Country style spinac h pie
Turnovers
Lasagne
Golden Rolls
Chicken morsels
Pre-cooked food
Golden chicken wings
Fresh Food
Biscuits (short pastry)
Plum cake
Cheese puffs
Pizza (on 2 racks)
Lasagne
Lamb
Roast chicken + potatoes
Mackerel
Plum cake
Cream puffs (on 2 racks)
Biscuits (on 2 racks)
Sponge cake (on 1 rack)
Sponge cake (on 2 racks)
Savoury pies
Pizza
Roast veal or beef
Chicken
Soles and cuttlefish
Squid and prawn kebabs
Cuttlefish
Cod filet
Grilled vegetables
Veal steak
Sausages
Hamburgers
Mackerels
Toasted sandwiches (or toast)
With rotisser ie (where pres ent)
Veal on the spit
Chicken on the spit
Lamb on the spit
Grilled chicken
Cuttlefish
With rotisser ie (where pres ent)
Veal on the spit
Lamb on the spit
Chicken on the spit +
potatoes (roasted)
1
1
1
-
1
0.5
1
0.7
0.5
1.2
0.6
0.4
0.7
0.7
0.5
0.3
0.4
0.5
0.3
0.5
0.4
0.4
0.4
0.3
0.6
0.2
1
1
1
1+1
1
1
0.5
0.5
0.5
1
1.5
0.5
1
1
0.7
0.6
0.6
0.8
0.4
0.8
0.6
0.6
1
4 and 6
1.0
1.5
1.0
1.5
1.5
1.5
1.5
1.5
-
Rack Position Pre-heating
time
(minutes)
3
3
3
3
3
3
2 or 3
3
3
2 and 4
2 and 4
2 and 4
1 and 3 and 5
1 and 3 and 5
1 and 3 and 5
2
2
2
2
2
2
2
2
2
2
2
2 and 4
3
2
2 and 4
2
2
2 and 4
2 and 4
2
2 and 4
3
3
2
2 or 3
4
4
4
4
3 or 4
4
4
4
4
4
-
-
2
2
-
-
2
15
15
15
15
15
15
15
15
15
15
15
15
15
15
15
-
-
-
-
-
-
-
-
-
-
-
15
10
10
15
10
10
10
10
10
10
15
15
10
10
-
-
-
-
-
-
-
-
-
-
-
-
10
10
10
10
10
10
Recommended
temperature
200
200
200
180
180
180
180
180
160
200
190
210
180
180
90
250
200
220
200
200
180
220
200
200
180
210
230
180
180
200
180
170
190
180
170
170
200
220
220
180
Max
Max
Max
Max
Max
Max
Max
Max
Max
Max
Max
Max
Max
200
200
200
200
200
200
Cooking
time
(minutes)
65-75
70-75
70-80
15-20
30-35
20-30
40-45
40-50
25-30
30-35
20-25
15-20
20-25
20-25
180
12
20
30-35
25
35
25-30
15-20
20-25
15-18
45
10-12
15-20
30-35
40-45
60-70
30-35
40-50
20-25
10-15
15-20
20-25
25-30
15-20
25-30
60-70
10-12
8-10
10-15
10-15
15-20
15-20
15-20
10-12
15-20
3-5
80-90
70-80
70-80
55-60
30-35
70-80
70-80
70-75
70-75
12
Page 13

Precautions and tips
! This appliance has been designed and manufactured
in compliance with international safety standards. The
following warnings are provided for safety reasons and
must be read carefully.
General safety
• The appliance was designed for domestic use inside the
home and is not intended for commercial or industrial use.
• The appliance must not be installed outdoors, even in
covered areas. It is extremely dangerous to leave the
appliance exposed to rain and storms.
• When moving or positioning the appliance, always use
the handles provided on the sides of the oven.
• Do not touch the appliance while barefoot or with wet or
damp hands and feet.
• The appliance must be used by adults only for
the preparation of food, in accordance with the
instructions provided in this booklet. Any other
use of the appliance (e.g. for heating the room)
constitutes improper use and is dangerous. The
manufacturer may not be held responsible for any
damage caused as a result of improper, incorrect
and unreasonable use of the appliance.
• Do not touch the heating elements or certain parts
of the oven door when the appliance is in use; these
parts become extremely hot. Keep children well away
from the appliance.
• Make sure that the power supply cables of other electrical
appliances do not come into contact with the hot parts of
the oven.
• The ventilation and heat dispersal openings must never
be obstructed.
• Always grip the oven door handle in the centre: the ends
may be hot.
• Always use oven gloves when placing cookware in the
oven or when removing it.
• Do not use aluminium foil to line the bottom of the oven.
• Do not place ammable materials in the oven: if the appliance
is switched on accidentally, the materials could catch re.
• Always make sure the knobs are in the “●”/“○” position
when the appliance is not in use.
• When unplugging the appliance, always pull the plug
from the mains socket; do not pull on the cable.
• Do not perform any cleaning or maintenance work without
having disconnected the appliance from the electricity mains.
• If the event of malfunctions, under no circumstances
should you attempt to perform the repairs yourself.
Contact an authorised Service Centre (see Assistance).
• Do not rest objects on the open oven door.
• Do not let children play with the appliance.
• The appliance should not be operated by people (including
children) with reduced physical, sensory or mental
capacities, by inexperienced individuals or by anyone
who is not familiar with the product. These individuals
should, at the very least, be supervised by someone who
assumes responsibility for their safety or receive preliminary
instructions relating to the operation of the appliance.
• The appliance is not intended to be operated by means
of an external timer or separate remote-control system.
Disposal
• When disposing of packaging material: observe local
legislation so that the packaging may be reused.
• The European Directive 2012/19/EC on Waste
Electrical and Electronic Equipment (WEEE), requires
that old household electrical appliances must not
be disposed of in the normal unsorted municipal
waste stream. Old appliances must be collected
separately in order to optimise the recovery and
recycling of the materials they contain and reduce
the impact on human health and the environment.
The crossed out “wheeled bin” symbol on the product
reminds you of your obligation, that when you dispose
of the appliance it must be separately collected.
Consumers should contact their local authority or retailer
for information concerning the correct disposal of their
old appliance.
Respecting and conserving the
environment
• You can help to reduce the peak load of the electricity
supply network companies by using the oven in the
hours between late afternoon and the early hours of
the morning. The cooking mode programming options,
the “delayed cooking” mode (see Cooking modes) and
“delayed automatic cleaning” mode (see Care and
Maintenance) in particular, enable the user to organise
their time efciently.
• Always keep the oven door closed when using the
BARBECUE and GRATIN modes: This will achieve
improved results while saving energy (approximately 10%).
• Regularly check the door seals and wipe clean to ensure
they are free of debris so that they stick properly to the
door and do not allow heat to disperse.
Maintenance and care
Switching the appliance off
Disconnect your appliance from the electricity supply before
carrying out any work on it.
Cleaning the appliance
• The stainless steel or enamel-coated external parts and
the rubber seals may be cleaned using a sponge that
has been soaked in lukewarm water and neutral soap.
Use specialised products for the removal of stubborn
stains. After cleaning, rinse and dry thoroughly. Do not
use abrasive powders or corrosive substances.
• The inside of the oven should ideally be cleaned after
each use, while it is still lukewarm. Use hot water and
detergent, then rinse well and dry with a soft cloth. Do
not use abrasive products.
• All accessories - with the exception of the sliding racks
- can be washed like everyday crockery, and are even
dishwasher safe.
! Never use steam cleaners or pressure cleaners on the
appliance.
GB
13
Page 14

Cleaning the oven door
GB
Clean the glass part of the oven door using a sponge and
a non-abrasive cleaning product, then dry thoroughly with a
soft cloth. Do not use rough abrasive material or sharp metal
scrapers as these could scratch the surface and cause the
glass to crack. For more thorough cleaning purposes, the
oven door may be removed:
1. Open the oven door fully (see
diagram);
2. Use a screwdriver to lift up and
turn the small levers F located on
the two hinges (see diagram).
F
Replacing the light bulb
To replace the oven light
bulb:
1. Remove the glass cover
of the lamp-holder.
2. Remove the light bulb and
replace it with a similar one:
Wattage 25 W, cap E 14.
3. Replace the glass cover
(see diagram).
! Do not use the oven lamp as/for ambient lighting.
3. Grip the door on the two outer
sides and close it approximately
half way. Pull the door towards you,
lifting it out of its seats (see
diagram). *
To replace the door, reverse this sequence.
Inspecting the seals
Check the door seals around the oven regularly. If the seals
are damaged, please contact your nearest Service Centre
(see Assistance). We recommend that the oven is not used
until the seals have been replaced.
* Only available on certain models.
14
Page 15

Instalación
595 mm.
595 mm.
25 mm.
545 mm.
5 mm.
567 mm.
23 mm.
575-585 mm.
45 mm.
558 mm.
547 mm. min.
! Es importante conservar este manual para poder
consultarlo en todo momento. En caso de venta, de cesión
o de mudanza, verique que permanezca junto al aparato
para informar al nuevo propietario sobre su funcionamiento
y sobre las advertencias correspondientes.
! Lea atentamente las instrucciones: contienen importante
información sobre la instalación, el uso y la seguridad.
Colocación
! Los embalajes no son juguetes para niños y se deben
eliminar respetando las normas para la recolección de
residuos (ver Precauciones y consejos).
! La instalación se debe realizar siguiendo estas instrucciones
y por personal profesionalmente calicado. Una instalación
incorrecta puede producir daños a personas, animales o cosas.
Positionnement
! Les emballages ne sont pas des jouets pour enfants, il
faut les mettre au rebut en respectant la réglementation
sur le tri sélectif des déchets (voir Précautions et conseils).
! L’installation doit être effectuée par un professionnel du
secteur conformément aux instructions du fabricant. Une
mauvaise installation peut causer des dommages à des
personnes, des animaux ou des biens.
Aireación
Para garantizar una buena aireación es necesario eliminar
la pared posterior del hueco para el horno. Es preferible
instalar el horno apoyado sobre dos listeles de madera o
sobre una supercie continua que tenga una abertura de
45 x 560 mm. como mínimo (ver las guras).
45 mm.
560 mm.
Centrado y jación
Regule los 4 tacos ubicados en la parte lateral del horno
en coincidencia con los 4 oricios que se encuentran en el
marco, según el espesor del costado del mueble:*
espesor de 20 mm: quite la parte
móvil del taco
(ver la gura);
ES
Empotramiento
Para garantizar un buen funcionamiento del aparato es
necesario que el mueble tenga las características adecuadas:
• Los paneles adyacentes al horno deben ser de materiales
resistentes al calor
• En el caso de muebles de madera chapeada, las colas
deben ser resistentes a una temperatura de 100°C
• para empotrar el horno, ya sea cuando se instala bajo
encimera (ver la gura) o en columna, el mueble debe
tener las siguientes dimensiones:
! Una vez empotrado el aparato no se deben permitir
contactos con las partes eléctricas.
El consumo declarado en la placa de características ha sido
medido en una instalación de este tipo.
* Presente sólo en algunos modelos.
espesor de 18 mm: utilice la
primera ranura, ya predispuesta
por el fabricante (ver la gura);
espesor de 16 mm: utilice la
segunda ranura (ver la gura).
Para jar el aparato al mueble: abra la puerta del horno y
enrosque 4 tornillos para madera en los 4 oricios del marco.
Centrado y jación *
1. Coloque las abrazaderas “A” hasta el tope en el apoyo
del horno “B”.
2. Coloque los tacos “C” a presión, en las abrazaderas “A”.
En particular, si el espesor del costado del mueble es:
• de 16 mm: coloque el taco de modo tal, que el número
16 que contiene dicho taco quede dirigido hacia Ud.:
• de 18 mm: coloque el taco de modo tal, que la parte
sin escritura quede dirigida hacia Ud.:
• de 20 mm: no coloque el taco.
3. Fije las abrazaderas y los tacos al borde del costado del
mueble mediante los tornillos “D”.
4. Fije el horno al mueble con los tornillos y las arandelas
de plástico “E”.
15
Page 16

ES
16
16
D
C
16
16
C
D
A
C
D
E
E
• la tensión de alimentación eléctrica esté comprendida
dentro de los valores indicados en la placa de
características;
• la toma sea compatible con el enchufe del aparato.
Si no es así, sustituya la toma o el enchufe; no utilice
prolongaciones ni conexiones múltiples.
B
! Todas las partes que garantizan la protección se deben
jar de modo tal que no puedan ser quitadas sin la ayuda
de una herramienta.
Conexión eléctrica
Los hornos que poseen cable de alimentación tripolar, son
fabricados para funcionar con corriente alterna a la tensión
y frecuencia indicadas en la placa de características que se
encuentra en el aparato (ver más adelante).
Montaje del cable de alimentación eléctrica
1. Abrir el panel de bornes
haciendo palanca con un
destornillador sobre las
lengüetas laterales de la tapa:
tirar y abrir (ver la gura).
2. Instalar el cable de
alimentación eléctrica: Aojar
el tornillo de la mordaza de
terminal de cable y los tres
tornillos de los contactos
L
N
L-N- y luego fijar los
cables debajo de las cabezas
de los tornillos respetando
los colores Azul (N), Marrón
(L) y Amarillo-Verde (ver
la gura).
3. Fijar el cable en el
correspondiente sujetacable.
4. Cerrar la tapa del panel
de bornes.
! Una vez instalado el aparato, el cable eléctrico y la toma
de corriente deben ser fácilmente accesibles.
! El cable no debe sufrir pliegues ni compresiones.
! El cable debe ser revisado periódicamente y sustituido
sólo por técnicos autorizados (ver Asistencia).
! La empresa declina toda responsabilidad cuando
estas normas no sean respetadas.
DATOS TÉCNICOS
ancho 43,5 cm
Dimensiones*
altura 32,4 cm
profundidad 41,5 cm
Volumen*
litros 59
ancho 45,5 cm
Dimensiones**
altura 32,4 cm
profundidad 41,5 cm
Volumen**
Conexiones
eléctricas
litros 62
voltaje 220-240V~ 50Hz potencia
máxima absorbida 2800W
(ver la placa de características)
Norma 2002/40/CE en la etiqueta
de los hornos eléctricos.
Norma EN 50304
Consumo de energía por
ENERGY
LABEL
convección Natural – función de
calentamiento: Tradicional;
Conexión del cable de alimentación eléctrica a la red
Instale en el cable un enchufe normalizado para la carga
indicada en la placa de características (ver al costado).
En el caso de conexión directa a la red, es necesario interponer
entre el aparato y la red, un interruptor omnipolar con una
distancia mínima entre los contactos de 3 mm., dimensionado
para esa carga y que responda a las normas vigentes (el cable
a tierra no debe ser interrumpido por el interruptor). El cable
de alimentación eléctrica se debe colocar de modo tal que no
alcance en ningún punto una temperatura que supere en 50°C la
temperatura ambiente (por ejemplo, la parte posterior del horno).
! El instalador es responsable de la correcta conexión
eléctrica y del cumplimiento de las normas de seguridad.
Antes de efectuar la conexión verique que:
• la toma tenga conexión a tierra y que sea conforme con
la ley;
• la toma sea capaz de soportar la carga máxima de potencia
de la máquina indicada en la placa de características;
16
Clase Consumo de energía para
funcionamiento por convección
Forzada - función de calentamiento:
Pastelería
Este aparato es conforme con las
siguientes Normas Comunitarias:
- 2006/95/CEE del 12/12/06
(Baja Tensión) y posteriores
modificaciones
- 2004/108/CEE del 15/12/04
(Compatibilidad Electromagnética)
y posteriores modificaciones
- 93/68/CEE del 22/07/93 y
posteriores modificaciones.
- 2012/19/CE y posteriores
modificaciones.
* Sólo para modelos con guías embutidas.
** Sólo para modelos con guías a ras.
Page 17

Puesta en funcionamiento y uso
•• ••
ATENCIÓN! El horno está
dotado de un sistema de
bloqueo de las parrillas que
permite quitarlas sin que
sobresalgan del horno (1).
Para quitar completamente
las parrillas, como se indica
en el dibujo, es suciente
levantarlas cogiéndolas de
la parte delantera y tirar (2).
! La primera vez que encienda el horno, hágalo funcionar
vacío, durante una hora aproximadamente, con el
termostato al máximo y con la puerta cerrada. Luego
apáguelo, abra la puerta del horno y airee el ambiente.
El olor que se advierte es debido a la evaporación de las
sustancias utilizadas para proteger el horno.
Poner en funcionamiento el horno
1. Seleccione el programa de cocción deseado girando el
mando PROGRAMAS.
2. Elija la temperatura girando el mando TERMOSTATO.
La Tabla de cocción (ver Programas) contiene una lista
con las cocciones y las correspondientes temperaturas
aconsejadas.
3. El piloto TERMOSTATO encendido indica la fase de
calentamiento hasta la temperatura seleccionada
4. Durante la cocción es posible:
- modificar el programa de cocción con el mando
PROGRAMAS;
- modicar la temperatura con el mando TERMOSTATO;
- interrumpir la cocción llevando el mando PROGRAMAS
hasta la posición “0”.
! No apoye nunca objetos en el fondo del horno porque se
puede dañar el esmalte.
! Coloque siempre los recipientes de cocción sobre la
parrilla suministrada con el aparato.
Ventilación de enfriamiento
Para disminuir la temperatura externa, algunos modelos poseen
un ventilador de enfriamiento. El mismo genera un chorro de
aire que sale entre el panel de control y la puerta del horno.
! Al final de la cocción, el ventilador permanece en
funcionamiento hasta que el horno esté sucientemente frío.
Luz del horno
Se enciende seleccionando con el mando PROGRAMAS.
Permanece encendida cuando se selecciona un programa
de cocción.
El programador electrónico*
Poner en hora el reloj
! Se puede realizar con el horno encendido o apagado, pero
no, si se ha programado el nal de una cocción.
Después de la conexión a la red eléctrica o después de un
corte de corriente, el icono y los cuatro dígitos numéricos
del DISPLAY centellean.
1. Presione varias veces el botón hasta que centelleen
el icono y las cuatro cifras en el DISPLAY;
2. con los botones “ ” y “ ” regular la hora; si se mantienen
presionados, los números deslizan mas velozmente para
facilitar la jación.
3. Esperar 10 seg. o bien presionar nuevamente el botón
para jar la programación.
Programar el contador de minutos
! Esta función no interrumpe la cocción y prescinde del uso
del horno; permite sólo accionar la señal sonora cuando se
cumplen los minutos jados.
1. Presione varias veces el botón hasta que centelleen
el icono y las tres cifras en el DISPLAY;
2. con los botones “ ” y “ ” regular el tiempo deseado;
si se mantienen presionados, los números deslizan mas
velozmente para facilitar la jación.
3. Esperar 10 seg. o bien presionar nuevamente el botón
para jar la programación.
Continuará la visualización de la cuenta atrás, al nal de la
cual se accionará la señal sonora.
Programar la cocción
! La programación es posible sólo después de haber
seleccionado un programa de cocción.
Programar la duración de la cocción
1. Presione varias veces el botón hasta que centelleen
el icono y las tres cifras en el DISPLAY;
2. 2. con los botones “ ” y “ ” regular la duración deseada;
si se mantienen presionados, los números deslizan mas
velozmente para facilitar la jación.
3. Esperar 10 seg. o bien presionar nuevamente el botón
para jar la programación.
ES
17
Page 18

4. Una vez cumplido ese tiempo, en el DISPLAY aparecerá
ES
la palabra END, la cocción nalizará y se emitirá una señal
sonora. Para detenerlo presionar un botón cualquiera.
• Ejemplo: son las 9:00 horas y se programa una duración
de 1 hora y 15 minutos. El programa se detiene
automáticamente a las 10:15 horas.
Programa HORNO TRADICIÓNAL
Se encienden los dos elementos calentadores inferior y
superior. Con esta cocción tradicional es mejor utilizar un
solo estante: si se utilizan varios estantes se produce una
mala distribución de la temperatura.
Programar el nal de una cocción
! La programación del nal de una cocción es posible sólo
después de haber jado la duración de la cocción.
1. Siga el procedimiento de 1 a 3 descrito para la duración;
2. luego presione el botón hasta que centelleen el icono
y las dos cifras en el DISPLAY;
3. 2. con los botones “ ” y “ ” regular la hora de cocción
deseada; si se mantienen presionados, los números
deslizan mas velozmente para facilitar la jación.
4. Esperar 10 seg. o bien presionar nuevamente el botón
para jar la programación.
5. Una vez cumplido ese tiempo, en el DISPLAY aparecerá
la palabra END, la cocción nalizará y se emitirá una señal
sonora. Para detenerlo presionar un botón cualquiera.
Los iconos y encendidos indican que se ha realizado una
programación. En el DISPLAY se visualizan alternativamente
la hora de nalización de la cocción y la duración.
• Ejemplo: son las 9:00 horas, se programa una duración
de 1 hora. Se programa las 12:30 como hora de
nalización. El programa comenzará automáticamente
a las 11:30 horas.
Anular una programación
Para anular una programación:
• Presionar el botón hasta que centellee el icono de la
programación a anular y las cifras en el display. Presionar el
botón “ ” hasta que en el display aparezcan las cifras 00:00.
• mantener presionados al mismo tiempo los botones “ ” y
“ ”; de este modo se anulan todas las programaciones
efectuadas incluido el contador de minutos.
Programa HORNO PASTELERÍA
Se enciende el elemento calentador posterior y se pone
en funcionamiento el ventilador garantizando un calor
suave y uniforme en el interior del horno. Este programa es
aconsejable para la cocción de alimentos delicados (por ej.
las tortas que necesitan leudado) y algunas preparaciones
“mignon” en 3 niveles simultáneamente.
Programa COCCIÓN RÁPIDA
Se encienden los elementos calentadores y se pone en
funcionamiento el ventilador ofreciendo un calor constante
y uniforme. El programa no necesita precalentamiento.
Este programa es particularmente indicado para cocciones
veloces de alimentos congelados o precocidos. Los mejores
resultados se obtienen utilizando un solo estante.
Programa MULTICOCCIÓN
Se encienden todos los elementos calentadores (superior,
inferior y circular) y se pone en funcionamiento el ventilador.
Debido a que el calor es constante en todo el horno, el aire
cocina y tuesta la comida de modo uniforme. Es posible
utilizar hasta un máximo de dos estantes simultáneamente.
Programa HORNO PIZZA
Se encienden los elementos calentadores inferior y circular
y se pone en funcionamiento el ventilador. Esta combinación
permite un rápido calentamiento del horno, con un fuerte
aporte de calor preferentemente desde abajo. Cuando se
utilice más de un estante a la vez, en la mitad de la cocción
es necesario intercambiar su posición .
Programas
! En todos los programas se puede jar una temperatura
entre 60ºC y MAX, excepto en:
• BARBACOA (se aconseja elegir sólo MAX);
• GRATIN (se aconseja no superar una temperatura de
200ºC).
Programa LEUDADO
El horno alcanza y mantiene una temperatura de 40ºC
independientemente de la posición en la que se encuentra
la perilla TERMOSTATO. Este programa es ideal para
leudar los amasijos que contienen levadura natural.
18
Programa BARBACOA
Se enciende el elemento calentador superior y se pone en
funcionamiento el asador automático (cuando existe). La
temperatura elevada y directa del grill es aconsejada para
los alimentos que necesitan de una temperatura supercial
alta. Realice las cocciones con la puerta del horno cerrada.
Programa GRATIN
Se enciende el elemento calentador superior y se ponen
en funcionamiento el ventilador y el asador automático
(cuando existe). Une a la irradiación térmica unidireccional,
la circulación forzada del aire en el interior del horno.
Esto impide que se quemen supercialmente los alimentos
aumentando el poder de penetración del calor. Realice las
cocciones con la puerta del horno cerrada.
Page 19

Consejos prácticos para cocinar
! En las cocciones ventiladas no utilice las posiciones 1 y
5: son las que reciben directamente el aire caliente lo cual
podría producir quemaduras de las comidas delicadas.
! En las cocciones BARBACOA y GRATIN, si se utiliza el
asador automático, coloque la grasera en la posición 1 para
recoger los residuos de cocción (jugos y/o grasas).
MULTICOCCIÓN
• Utilice las posiciones 2 y 4 colocando en la 2 los
alimentos que requieren mayor calor.
• Coloque la grasera abajo y la parrilla arriba.
BARBACOA
• Introduzca la parrilla en la posición 3 o 4 y coloque los
alimentos en el centro de la parrilla.
• Se aconseja jar el nivel de energía en el valor máximo.
No se alarme si la resistencia superior no permanece
constantemente encendida: su funcionamiento está
controlado por un termostato.
ES
HORNO PIZZA
• Utilice una bandeja para pizza de aluminio liviano
apoyándola sobre la parrilla suministrada con el horno.
Utilizando la grasera aumenta el tiempo de cocción y
difícilmente se obtiene una pizza crocante.
• En el caso de pizzas muy condimentadas es aconsejable
colocar la mozzarella (queso típico de Italia) en la mitad
de la cocción.
19
Page 20

ES
Tabla de cocción
Programas Alimentos Peso
Leudado
Horno
Tradiciónal
Horno
Pastelería
Cocción
rápida
Multicocción
Horno Pizza
Barbacoa
Gratin
Leudado de los amasijos con levadura
natural (brioche, pan, torta de azúcar,
croissant, etc.
Pato
Asado de ternera o de vaca
Asado de cerdo
Bizcochos (de pastaflora)
Tortas glaseadas
Tortas glaseadas
Torta de fruta
Plum-cake
Bizcocho
Creps rellenos (en 2 niveles)
Tortas pequeñas (en 2 niveles)
Bizcochitos salados de hojaldre y queso
(en 2 niveles)
Hojaldre relleno con crema (en 3 niveles)
Bizcochos (en 3 niveles)
Merengue (en 3 niveles)
Alimentos congelados
Pizza
Mixto de calabacín y cangrejos
Torta rústica de espinaca
Panzerotti (ravioles grandes italianos)
Lasañas
Panecillos dorados
Bocaditos de pollo
Precocidos
Alas de pollo do radas
Alimentos Frescos
Bizcochos (de pastaflora)
Plum-cake
Bizcochitos salados de hojaldre y queso
Pizza (en 2 niveles)
Lasañas
Cordero
Pollo asado + patatas
Caballa
Plum-cake
Hojaldre relleno con crema (en 2 niveles)
Bizcochos (en 2 niveles)
Bizcocho (en 1 nivel)
Bizcocho (en 2 niveles)
Tortas saladas
Pizza
Asado de ternera o de vaca
Pollo
Lenguados y sepias
Broquetas de calamares y cangrejos
Sepias
Filete de merluza
Verduras a la parrilla
Bistec de ternera
Salchichas
Hamburguesas
Caballa
Bocadillo caliente con jamón y queso (o
pan tostado)
Con asador automático (cuando existe)
Asado de ternera
Pollo asado
Cordero asado
Pollo a la parrilla
Sepias
(Kg)
Posición de
los estantes
Precalenta-
miento
Temperatura
aconsejada
(minutos)
1
1
1
-
1
0.5
1
0.7
0.5
1.2
0.6
0.4
0.7
0.7
0.5
0.3
0.4
0.5
0.3
0.5
0.4
0.4
0.4
0.3
0.6
0.2
1
1
1
1+1
1
1
0.5
0.5
0.5
1
1.5
0.5
1
1
0.7
0.6
0.6
0.8
0.4
0.8
0.6
0.6
1
n.° 4 y 6
1.0
1.5
1.0
1.5
1.5
3
3
3
3
3
3
2 o 3
3
3
2 y 4
2 y 4
2 y 4
1 y 3 y 5
1 y 3 y 5
1 y 3 y 5
2
2
2
2
2
2
2
2
2
2
2
2 y 4
3
2
2 y 4
2
2
2 y 4
2 y 4
2
2 y 4
3
3
2
2 o 3
4
4
4
4
3 o 4
4
4
4
4
4
-
-
2
2
15
15
15
15
15
15
15
15
15
15
15
15
15
15
15
-
-
-
-
-
-
-
-
-
-
-
15
10
10
15
10
10
10
10
10
10
15
15
10
10
-
-
-
-
-
-
-
-
-
-
-
-
10
10
200
200
200
180
180
180
180
180
160
200
190
210
180
180
90
250
200
220
200
200
180
220
200
200
180
210
230
180
180
200
180
170
190
180
170
170
200
220
220
180
Max
Max
Max
Max
Max
Max
Max
Max
Max
Max
Max
Max
Max
200
200
Duración
de la
cocción
(minutos)
65-75
70-75
70-80
15-20
30-35
20-30
40-45
40-50
25-30
30-35
20-25
15-20
20-25
20-25
180
12
20
30-35
25
35
25-30
15-20
20-25
15-18
45
10-12
15-20
30-35
40-45
60-70
30-35
40-50
20-25
10-15
15-20
20-25
25-30
15-20
25-30
60-70
10-12
8-10
10-15
10-15
15-20
15-20
15-20
10-12
15-20
3-5
80-90
70-80
70-80
55-60
30-35
20
Page 21

Precauciones y consejos
! El aparato ha sido proyectado y fabricado en conformidad
con las normas internacionales de seguridad.
Estas advertencias se suministran por razones de seguridad
y deben ser leídas atentamente.
Seguridad general
• El aparato ha sido fabricado para un uso de tipo no
profesional en el interior de una vivienda.
• El aparato no se debe instalar al aire libre, tampoco si el
espacio está protegido porque es muy peligroso dejarlo
expuesto a la lluvia y a las tormentas.
• Para mover el aparato utilice siempre las manijas
correspondientes ubicadas en los costados del horno.
• No toque el aparato descalzo o con las manos y pies
mojados o húmedos.
• El aparato debe ser utilizado para cocinar alimentos,
sólo por personas adultas y siguiendo las instrucciones
contenidas en este manual. Cualquier otro uso (como por
ejemplo: calefacción de ambientes) se debe considerar
impropio y, por lo tanto, peligroso. El fabricante no puede
ser considerado responsable por eventuales daños
derivados de usos impropios, erróneos e irracionales.
• Mientras se utiliza el aparato, los elementos calentadores
y algunas partes de la puerta del horno se calientan
mucho. Tenga cuidado de no tocarlos y mantenga a los
niños alejados de ellos.
• Evite que el cable de alimentación eléctrica de otros
electrodomésticos entre en contacto con partes calientes
del horno.
• No obstruya las aberturas de ventilación y de eliminación
del calor.
• Tome la manija de apertura de la puerta en el centro: en
los costados podría estar caliente.
• Utilice siempre guantes para horno para introducir o
extraer recipientes.
• No cubra el fondo del horno con hojas de aluminio.
• No coloque materiales inamables en el horno: si el
aparato se pone en funcionamiento inadvertidamente,
podría incendiarse.
• Cuando el aparato no se utiliza, controle siempre que
los mandos estén en la posición “●”/“○”.
• No desconecte el aparato de la toma de corriente tirando
del cable sino sujetando el enchufe.
• No realice la limpieza o el mantenimiento sin haber
desconectado primero el aparato de la red eléctrica.
• En caso de avería, no acceda nunca a los mecanismos
internos para intentar una reparación. Llame al Servicio
de Asistencia Técnica (ver Asistencia).
• No apoye objetos sobre la puerta del horno abierta.
• Evite que los niños jueguen con el aparato.
• No está previsto que el aparato sea utilizado por personas
(incluidos los niños) con capacidades físicas, sensoriales
o mentales disminuidas, por personas inexpertas o que
no tengan familiaridad con el producto, salvo que estén
vigiladas por una persona responsable de su seguridad,
o que hayan recibido instrucciones preliminares sobre
el uso del aparato.
• El aparato no se debe poner en funcionamiento a
través de un temporizador externo o de un sistema
de mando a distancia.
Eliminación
• Eliminación del material de embalaje: respete las normas
locales, de esta manera los embalajes podrán ser
reutilizados.
• En base a la Norma europea 2012/19/CE de Residuos
de aparatos Eléctricos y Electrónicos (RAEE), los
electrodomésticos viejos no pueden ser arrojados en
los contenedores municipales habituales; tienen que ser
recogidos selectivamente para optimizar la recuperación
y reciclado de los componentes y materiales que los
constituyen, y reducir el impacto en la salud humana y el
medioambiente. El símbolo del cubo de basura tachado
se marca sobre todos los productos para recordar al
consumidor la obligación de separarlos para la recogida
selectiva.
El consumidor debe contactar con la autoridad local o
con el vendedor para informarse en relación a la correcta
eleminación de su electrodoméstico viejo.
Ahorrar y respetar el medioambiente
• Utilizando el horno en los horarios que van desde las
últimas horas de la tarde hasta las primeras horas de
la mañana, se colabora en la reducción de la carga de
absorción de las empresas eléctricas. Las opciones de
programación, en especial, la “cocción retrasada” (ver
Programas) y la “limpieza automática retrasada” (ver
Mantenimiento y cuidados), le permitirán organizarse
en ese sentido.
• Se recomienda efectuar siempre las cocciones en
BARBACOA y GRATIN con la puerta cerrada: se
obtendrán así mejores resultados y también un sensible
ahorro de energía (10% aproximadamente).
• Mantenga las juntas en buen estado y limpias para que
se adhieran bien a la puerta y no provoquen dispersión
del calor.
Mantenimiento y cuidados
Cortar la corriente eléctrica
Antes de realizar cualquier operación, desconecte el
aparato de la red de alimentación eléctrica.
Limpiar el aparato
• Las partes externas esmaltadas o de acero inoxidable y
las juntas de goma se pueden limpiar con una esponja
empapada en agua tibia y jabón neutro. Si las manchas son
difíciles de eliminar use productos especícos. Se aconseja
enjuagar abundantemente y secar después de la limpieza.
No utilice polvos abrasivos ni sustancias corrosivas.
• El interior del horno se debe limpiar preferentemente
cada vez que se utiliza, cuando todavía está tibio. Utilice
agua caliente y detergente, enjuague y seque con un
paño suave. Evite el uso de productos abrasivos.
• Los accesorios se pueden lavar como cualquier vajilla, incluso
en lavavajillas, con excepción de las guías deslizables.
! No utilice nunca limpiadores a vapor o de alta presión
para la limpieza del aparato.
ES
21
Page 22

Limpiar la puerta
ES
Limpie el vidrio de la puerta con esponjas y productos
no abrasivos y séquelo con un paño suave; no utilice
materiales ásperos abrasivos o raederas metálicas aladas
que puedan rayar la supercie y quebrar el vidrio.
Para lograr una limpieza más profunda es posible
desmontar la puerta del horno:
1. para ello, abra completamente
la puerta (ver la gura);
2. utilizando un destornillador,
levante y gire las palancas F
ubicadas en las dos bisagras (ver
F
la gura);
Sustituir la bombilla
Para sustituir la bombilla de
iluminación del horno:
1. Desenrosque la tapa de
vidrio del portalámpara.
2. Extraiga la bombilla y
sustitúyala con una análoga:
potencia de 25 W, casquillo
E 14.
3. Vuelva a colocar la tapa
(ver la gura).
! No utilice la lámpara del horno para iluminar ambientes.
3. sujete la puerta de los costados
externos y cerrarla lenta pero no
completamente. Luego tire la
puerta hacia afuera, sacándola de
la bisagra (ver la gura). *
Vuelva a colocar la puerta siguiendo el mismo procedimiento
pero en sentido contrario.
Controlar las juntas
Controle periódicamente el estado de la junta que rodea la
puerta del horno. Si se encontrara dañada llame al Centro
de Asistencia Técnica más cercano (ver Asistencia). Es
aconsejable no usar el horno hasta que no haya sido reparada.
* Presente sólo en algunos modelos.
22
Page 23

Instalação
595 mm.
! É importante guardar este folheto para poder consultá-lo a
qualquer momento. No caso de venda, cessão ou mudança,
assegure-se que o mesmo permanece com o aparelho para
informar o novo proprietário sobre o funcionamento e sobre
as respectivas advertências.
! Leia com atenção as instruções: há informações
importantes sobre a instalação, a utilização e a segurança.
Posicionamento
! As embalagens não são brinquedos para as crianças e
devem ser eliminadas em conformidade com as regras de
colecta diferenciada (veja em Precauções e Conselhos).
! A instalação deve ser realizada segundo estas instruções e
por pessoal prossional qualicado. Uma instalação errada
pode causar danos a pessoas, animais ou objectos.
! Este aparelho pode ser instalado e funcionar somente em local
permanentemente ventilado segundo a posição de Normas em
vigor. Devem ser observados os seguintes requisitos:
PT
45 mm.
560 mm.
Colocar no centro e prender
Regule os 4 calços situados aos lados do forno, em
correspondência aos 4 furos na moldura ao redor, em
função da espessura da lateral do móvel:*
20 mm de espessura: retire a parte
móvel do calço
(veja a gura);
Encaixe
Para garantir um bom funcionamento do aparelho é
necessário que o móvel seja de características adequadas:
• os painéis adjacentes ao forno devem ser de material
resistente ao calor;
• no caso de móveis de madeira contraplacada, as colas
devem ser resistentes à temperatura de 100°C.
• para encaixar o forno, quer no caso de instalação sob
uma banca (veja a gura) quer em coluna, o móvel deve
ter as seguintes medidas:
547 mm. min.
23 mm.
5 mm.
595 mm.
545 mm.
45 mm.
558 mm.
575-585 mm.
567 mm.
18 mm de espessura: utilize a
primeira cavidade, da maneira já
preparada pelo fabricante (veja a
gura);
16 mm de espessura: utilize a
segunda cavidade (veja a gura).
Para prender o aparelho no móvel: abra a porta do forno e
atarraxe 4 parafusos na madeira, nos 4 furos situados na
moldura ao redor.
! Todos os componentes de garantia da protecção precisam
estar presos de modo que não possam ser tirados sem o
emprego de uma ferramenta.
25 mm.
! Depois de ter encaixado o aparelho, não deve ser possível
contacto com as partes eléctricas.
As declarações de consumo indicadas na placa das
características foram medidas com este tipo de instalação.
Ventilação
Para garantir uma boa ventilação é necessário eliminar
a parede traseira do vão. É preferível instalar o forno de
maneira que apoie-se sobre duas ripas de madeira, ou
sobre uma tábua com uma abertura de pelo menos 45 x
560 mm. (veja as guras).
* Há somente em alguns modelos.
Colocar no centro e prender *
1. Posicione os suportes “A” encostados nas tiras do
suporte “B” do forno.
2. Posicione os taquinhos “C” encostados nos suportes “A”.
Especialmente se a espessura do painel lateral do móvel:
• for de 16 mm.: monte o taquinho de maneira que o
número 16 marcado no mesmo que virado para o
seu lado;
• for de 18 mm.: monte o taquinho de maneira que a
parte sem escritas que virada para o seu lado;
• for de 20 mm.: não monte o taquinho.
3. Prenda os suportes e os taquinhos na beira da lateral
do móvel mediante os parafusos “D”.
4. Prenda o forno no móvel mediante os parafusos e as
anilhas em plástico “E”.
23
Page 24

PT
16
16
D
C
16
16
C
D
A
C
D
B
E
E
Ligação eléctrica
Os fornos equipados com cabo de fornecimento com três
pólo, são preparados para funcionar com corrente alternada
na tensão e frequência de fornecimento indicadas na placa
de identicação situada no aparelho (veja a seguir).
Montagem do cabo de fornecimento
1. Para abrir a caixa de
terminais faça alavanca com
uma chave de parafuso nas
linguetas aos lados da tampa:
puxe e abra a tampa (veja a
gura).
2. Instale o cabo de
alimentação: desatarraxe o
parafuso do grampo do cabo e
os três parafusos dos contactos
L
N
Ligação do cabo de fornecimento à rede eléctrica
Monte no cabo uma cha em conformidade com as normas
para a carga indicada na placa de identicação (veja ao lado).
No caso de uma ligação directa à rede, será necessário
interpor, entre o aparelho e a rede, um interruptor omnipolar
com abertura mínima entre os contactos de 3 mm. na dimensão
certa para a carga e em conformidade com as normas em vigor
(a ligação à terra não deve ser interrompida pelo interruptor).
O cabo de alimentação deve ser colocado de maneira que em
nenhum ponto ultrapasse de 50°C a temperatura do ambiente
(por exemplo, a parte traseira do forno).
! O técnico instalador é responsável pela realização certa da
ligação eléctrica e da obediência das regras de segurança.
Antes de efectuar a ligação, certique-se que:
• a tomada tenha uma ligação à terra e seja em
conformidade com a legislação;
• a tomada tenha a capacidade de suportar a carga
máxima de potência da máquina, indicada na placa de
identicação;
L-N- e, em seguida, prenda
os os embaixo das cabeças
dos parafusos a obedecer as
cores: Azul (N) Castanho (L)
Amarelo-Verde (veja a
gura).
3. Prenda o cabo no
respectivo grampo.
4. Feche a tampa da caixa
dos terminais.
• a tensão de alimentação seja entre os valores da placa
de identicação;
• a tomada seja compatível com a cha do aparelho.
Em caso contrário, substitua a tomada ou a cha; não
empregue extensões nem tomadas múltiplas.
! Depois de ter instalado o aparelho, o acesso ao cabo
eléctrico e à tomada da corrente deve ser fácil.
! O cabo não deve ser dobrado nem comprimido.
! O cabo deve ser vericado periodicamente e substituído
somente por técnicos autorizados (veja a Assistência Técnica).
! A empresa exime-se de qualquer responsabilidade se
estas regras não forem obedecidas.
PLACA DAS CARACTERÍSTICAS
largura cm 43,5
Medidas
Volume*
*
altura cm 32,4
profundidade
cm 41,5
lt. 59
largura cm 45,5
Medidas
Volume**
**
altura cm 32,4
profundidade
cm 41,5
lt. 62
Tensão de 220/240V~ 50Hz
Ligações
eléctricas
potência máxima absorvida 2800W
(ver quadro das características)
Directiva 2002/40/CE acerca dos
fornos eléctricos.
Norma EN 50304
Consumo de energia com
convecção Natural - função de
ETIQUETA DE
aquecimento: Tradicional;
ENERGIA
Consumo de energia da declaração
de Classe com convecção Forçada -
função de
aquecimento:
Pastéis.
Este aparelho é em conformidade
com as seguintes Directivas da
Comunidade Europeia:
- 2006/95/CEE de 12/12/06
(Baixa Tensão) e posteriores
modificações
- 2004/108/CEE de 15/12/04
(Compatibilidade Electromagnética)
e posteriores modificações
- 93/68/CEE de 22/07/93 (Gás) e
posteriores modificações.
- 2012/19/CEE e posteriores
modificações.
* Apenas para modelos com guias integradas.
** Apenas para modelos com guias em fio.
24
Page 25

Início e utilização
•• ••
ATENÇÃO! O forno está
equipado com um sistema
de bloqueio das grelhas
que permite retirá-las sem
que estas ressaiam do
forno (1).
Para retirar completamente
as grelhas, tal como
indicado no desenho, basta
levantá-las, segurando-as pela parte da frente, e puxá-las
(2).
! Quando o acender pela primeira vez, aconselhamos de
fazer funcionar o forno vazio pelo menos durante uma hora,
com o termóstato posto à temperatura máxima e a porta
fechada. Pode apagar, abrir a porta do forno e ventilar
a sala. O odor que se sente deve-se à evaporação das
substâncias empregadas para proteger o forno.
Início do forno
1. Para seleccionar o programa de cozedura que desejar,
rode o selector dos PROGRAMAS.
2. Para escolher a temperatura rode o selector do
TERMOSTATO. Uma lista com as cozeduras e as
respectivas temperaturas aconselhadas pode ser
consultada na Tabela de cozedura (veja os Programas).
3. O indicador luminoso do TERMOSTATO acesa indica a
fase de aquecimento até a temperatura denida.
4. Durante a cozedura é sempre possível:
- modicar o programa de cozedura mediante o selector
dos PROGRAMAS;
- modificar a temperatura mediante o selector do
TERMÓSTATO;
- interromper a cozedura se recolocar o selector dos
PROGRAMAS na posição “0”.
! Nunca encoste objectos no fundo do forno, para evitar
riscos de danos ao esmalte.
! Coloque sempre os recipientes de cozedura sobre a
grade fornecida.
Ventilação de arrefecimento
Para obter uma redução das temperaturas externas,
alguns modelos são equipados com uma ventoinha de
arrefecimento. Esta gera um jacto de ar que sai entre o
painel de comandos e a porta do forno.
! No nal da cozedura, a ventoinha continua a funcionar
até o forno arrefecer sucientemente.
O programador electrónico*
Regule o relógio
! Pode-se congurar, quando o forno estiver apagado, ou
mesmo quando estiver aceso, mas não programar o m
de uma cozedura.
Depois de ligar à rede eléctrica ou depois de um corte
de corrente o ícone e os quatro algarismos do VISOR
piscam.
1. Premir várias vezes a tecla até o ícone e os três
algarismos do VISOR piscarem;
2. com as teclas “ ” e “ ” regule a hora; se manter
pressionadas as teclas, os números passarão mais
rapidamente para facilitar a conguração.
3. Aguarde 10 segundos ou carregue novamente na tecla
para xar a programação.
Programe o contador de minutos
! Esta função não interrompe a cozedura e prescinde do uso
do forno; permite apenas accionar o sinal acústico quando
terminarem os minutos programados.
1. Premir várias vezes a tecla até o ícone e os três
algarismos do VISOR piscarem;
2. com as teclas “ ” e “ ” regule o tempo desejado; se
manter pressionadas as teclas, os números passarão mais
rapidamente para facilitar a conguração.
3. Aguarde 10 segundos ou carregue novamente na tecla
para xar a programação.
Em seguida será mostrada a contagem regressiva no nal
da qual tocará o sinal acústico.
Programação da cozedura
! É possível programar somente depois de ter seleccionado
um programa de cozedura.
PT
Luz do forno
Acende-se se for seleccionado / mediante o
selector dos PROGRAMAS. Permanece acesa quando se
seleccionar um programa de cozedura.
Programação da duração da cozedura
1. Carregue várias vezes na tecla até o ícone e os
primeiros três algarismos piscarem no VISOR;
2. com as teclas “ ” e “ ” regule a data desejada; se
manter pressionadas as teclas, os números passarão mais
rapidamente para facilitar a conguração.
3. Aguarde 10 segundos ou carregue novamente na tecla
para xar a programação.
4. depois que terminar o prazo, no VISOR aparecerá
escrito END e tocará um sinal acústico. Para interrompê-lo,
carregue numa tecla qualquer.
25
Page 26

• Exemplo: São 9:00 horas e é programada uma duração
PT
de cozedura de 1 hora e 15 minutos. O programa irá
terminar automaticamente às 10:15.
Programar o m de uma cozedura
! A programação do m da cozedura é possível somente
depois de ter denido uma duração para a cozedura.
1. Realize as operações de 1 a 3 descritas para a duração;
2. em seguida premir a tecla até o ícone e os quatro
algarismos do VISOR piscarem;
3. com as teclas “ ” e “ ” regule a hora do m da cozedura
desejada; se manter pressionadas as teclas, os números
passarão mais rapidamente para facilitar a conguração.
4. Aguarde 10 segundos ou carregue novamente na tecla
para xar a programação.
5. depois que terminar o prazo, no VISOR aparecerá
escrito END e tocará um sinal acústico. Para interrompê-lo,
carregue numa tecla qualquer.
Os ícones e acesos avisam que foi realizada uma
programação. No DISPLAY são mostradas a hora de nal
de cozedura e a duração alternadas.
• Exemplo: são 9:00 horas e é programada uma duração
de 1 hora. Planeia-se as 12:30 como hora de nal. O
programa iniciará automaticamente às 11:30.
Como anular uma programação
Para anular uma programação:
• em seguida premir a tecla até o ícone da conguração
a ser anulada e os algarismos do VISOR piscarem;
Carregue na tecla “ ” até que no visor apareçam os
valores 00:00.
• mantenha pressionadas contemporaneamente as teclas
“ ” e “ ”; deste modo anulam-se todas as programações
efectuadas, inclusive o contador de minutos.
Programa do FORNO PARA PASTÉIS
Liga-se o elemento aquecedor traseiro e entra em
funcionamento a ventoinha para garantir um calor suave e
uniforme no interior do forno. Esta função é indicada para
a cozedura de comidas delicadas, (especialmente doces
que necessitarem de levitação) e algumas preparações
“mignon” em 3 prateleiras simultaneamente.
Programa de FAST COOKING
Activam-se os elementos aquecedores e entra em
funcionamento a ventoinha para proporcionar um calor
constante e uniforme.
Este programa não necessita de aquecimento prévio. Este
programa é especicamente indicado para cozeduras
rápidas de alimentos previamente preparados (congelados
ou previamente cozidos). Os melhores resultados são
obtidos se utilizar apenas uma prateleira.
Programa de COZEDURA MÚLTIPLA
Activam-se todos os elementos aquecedores (superior,
inferior e circular) e entra em funcionamento a ventoinha.
Como o calor é constante e uniforme em todo o forno,
o ar coze e cora os alimentos de maneira uniforme.
É possível utilizar até duas prateleiras no máximo
contemporaneamente.
Programa do FORNO PARA PIZZA
Activam-se os elementos aquecedores inferior e circular
e entra em funcionamento a ventoinha. Esta combinação
possibilita um aquecimento rápido do forno, com um grande
uxo de calor principalmente por baixo. Se utilizar mais
de uma prateleira de cada vez, será necessário trocar a
posição das mesmas na metade da cozedura.
Programas
! Para todos os programas pode ser definida uma
temperatura entre 60°C e MÁX., excepto:.
• BARBECUE (é aconselhável congurar somente em
MÁX.);
• GRATIN (é aconselhável não ultrapassar a temperatura
de 200°C).
Programa de FERMENTAÇÃO
O forno chega à uma temperatura de 40°C que mantémse independentemente da posição do selector do
TERMÓSTATO. Este programa é ideal para a fermentação
de massas que contêm lêvedo natural.
Programa de FORNO TRADIÇÃO
Activam-se os dois elementos aquecedores inferior e
superior. Com esta cozedura tradicional é melhor utilizar
uma única prateleira: com mais de uma prateleira haverá
má distribuição da temperatura.
Programa de BARBECUE
Activa-se o elemento aquecedor superior e começa a
funcionar o espeto rotatório (se houver). Uma temperatura
alta e directa do grill é aconselhada para os alimentos que
necessitarem de uma alta temperatura supercial. Coza
com a porta do forno fechada.
Programa de GRATIN
Activa-se o elemento aquecedor superior e começam a
funcionar a ventoinha e o espeto rotatório (se houver). Une
a irradiação térmica unidirecional com a circulação forçada
do ar no interior do forno.
Deste modo impede-se a queimadura da superfície dos
alimentos ao aumentar-se o poder de penetração do calor.
Coza com a porta do forno fechada.
26
Page 27

Conselhos práticos para cozedura
! Nas cozeduras ventiladas não utilize as posições 1 e 5:
recebem directamente ar quente que poderia provocar
queimaduras em alimentos delicados.
! Nas cozeduras de BARBECUE e GRATIN, principalmente
se realizadas com o espeto rotatório, coloque a bandeja
pingadeira na posição 1 para recolher os resíduos de
cozedura (molhos e/ou gordura).
COZEDURA MÚLTIPLA
• Utilize as posições 2 e 4, coloque na 2 os alimentos que
necessitarem de mais calor.
• Coloque a bandeja pingadeira embaixo e a grade em
cima.
BARBECUE
• Coloque a grade na posição 3 ou 4, disponha os
alimentos no centro da grade.
• É aconselhável congurar o nível de energia no máximo.
Não se alarme se a resistência superior não permanecer
constantemente acesa: o seu funcionamento é
controlado por um termóstato.
PT
FORNO para PIZZA
• Utilize uma forma de alumínio leve, apoie-a na grelha
do forno.
Se utilizar a bandeja pingadeira aumentará os tempos de
cozedura e dicilmente será obtida uma pizza crocante.
• No caso de pizzas com muita cobertura é aconselhável
colocar o queijo mozzarella na metade da cozedura.
27
Page 28

PT
Tabela de cozedura
Programmas
Alimentos
Peso
Posição das
Pré
Temperatura
Duração
(minutos)
etc.)
Tortas doces
1
3
15
180
30-35
Merengues (em 3 prateleiras)
0.5
n°1,3 e 5
15
90
180
Levitação
Forno
Tradicional
Forno para
Pastéis
Cozinha
Rápida
Cozedura
Múltipla
Forno para
Pizza
Barbecue
Gratinado
Fermentação das massas com lêvedo
natural (bolos, pão, tortas doces, croissant
Pato
Carne de vitela ou vaca assada
Carne de porco assada
Biscoitos (de massa tenra)
Tortas doces
Torta de fruta
Plum cake
Pão-de-ló
Crêpes recheadas (em 2 prateleiras)
Queques pequenos (em 2 prateleiras)
Salgadinhos folhados como queijo (em 2
prateleiras)
Bignés (em 3 prateleiras)
Biscoitos (em 3 prateleiras)
Congelados
Pizza
Misto abóbora e camarão panado
Torta rústica de espinafre
Panzerotte
Lasanha
Pãezinhos doirados
Bolinhos de frango
Pré-cozidos
Asas de frango doiradas
Comidas Frescas
Biscoitos (de massa tenra)
Plum cake
Salgadinhos folhados de queijo
Pizza (em 2 prateleiras)
Lasanha
Cordeiro
Frango assado com batatas
Cavala
Plum cake
Bignés (em 2 prateleiras)
Biscoitos (em 2 prateleiras)
Pão-de-ló (em 1 prateleira)
Pão-de-ló (em 2 prateleiras)
Tortas salgadas
Pizza
Carne de vitela ou vaca assada
Frango
Linguado e chocas
Espetinhos de calamares e camarão
Chocas
Filé de bacalhau
Verduras na grelha
Bife de vitela
Chouriças
Hambúrgueres
Cavala
Tostas
Com espeto giratório (se houver)
Vitela no espeto
Frango no espeto
Cordeiro no espeto
Frango na grelha
Chocas
Com espeto giratório (se houver)
Vitela no espeto
Cordeiro no espeto
Frango (no espeto) com
batatas (na bandeja pingadeira)
(Kg)
1
1
1
-
0.5
1
0.7
0.5
1.2
0.6
0.4
0.7
0.7
0.3
0.4
0.5
0.3
0.5
0.4
0.4
0.4
0.3
0.6
0.2
1
1
1
1+1
1
1
0.5
0.5
0.5
1
1.5
0.5
1
1
0.7
0.6
0.6
0.8
0.4
0.8
0.6
0.6
1
n.° 4 e 6
1.0
1.5
1.0
1.5
1.5
1.5
1.5
1.5
-
prateleiras
3
3
3
3
3
2 o 3
3
3
2 e 4
2 e 4
2 e 4
n°1,3 e 5
n°1,3 e 5
2
2
2
2
2
2
2
2
2
2
2
2 e 4
3
2
2 e 4
2
2
2 e 4
2 e 4
2
2 e 4
3
3
2
2 o 3
4
4
4
4
3 ou 4
4
4
4
4
4
-
-
-
2
2
-
-
-
2
aquecimento
(minutos)
15
15
15
15
15
15
15
15
15
15
15
15
15
-
-
-
-
-
-
-
-
-
-
-
15
10
10
15
10
10
10
10
10
10
15
15
10
10
-
-
-
-
-
-
-
-
-
-
-
-
-
10
10
10
10
10
10
aconselhada
200
200
200
180
180
180
180
160
200
190
210
180
180
250
200
220
200
200
180
220
200
200
180
210
230
180
180
200
180
170
190
180
170
170
200
220
220
180
Max
Max
Max
Max
Max
Max
Max
Max
Max
Max
Max
Max
Max
200
200
200
200
200
200
da
cozedura
65-75
70-75
70-80
15-20
20-30
40-45
40-50
25-30
30-35
20-25
15-20
20-25
20-25
12
20
30-35
25
35
25-30
15-20
20-25
15-18
45
10-12
15-20
30-35
40-45
60-70
30-35
40-50
20-25
10-15
15-20
20-25
25-30
15-20
25-30
60-70
10-12
8-10
10-15
10-15
15-20
15-20
15-20
10-12
15-20
3-5
80-90
70-80
70-80
55-60
30-35
70-80
70-80
70-75
70-75
28
Page 29

Precauções e conselhos
! Este aparelho foi projectado e fabricado em conformidade
com as normas internacionais de segurança. Estas
advertências são fornecidas por razões de segurança e
devem ser lidas com atenção.
Segurança geral
• Este aparelho foi concebido para utilização de tipo não
prossional no âmbito de moradas.
• Este aparelho não deve ser instalado ao ar livre, mesmo
num sítio protegido, porque é muito perigoso deixá-lo
exposto a chuva e temporais.
• Para deslocar o aparelho pegue-o sempre pelos
especícos manípulos, situados aos lados do forno.
• Não toque no aparelho se estiver descalço, ou com as
mãos ou os pés molhados ou húmidos.
• Este aparelho deve ser empregado para cozer alimentos,
somente por pessoas adultas e segundo as instruções
apresentadas neste folheto. Qualquer outro uso (como por
exemplo, aquecedor de ambientes) deve ser considerado
impróprio e portanto perigoso. O fabricante não poderá
ser considerado responsável pelos danos que houver
derivantes de usos impróprios, errados ou irracionais.
• Durante o uso deste aparelho, os elementos aquecedores
e algumas das partes da porta do forno esquentam-se
muito. Tome cuidado para não tocar nos mesmos e
mantenha as crianças afastadas.
• Evite que o cabo de alimentação de outros
electrodomésticos encoste-se em partes quentes do forno.
• Não tape as aberturas de ventilação e de eliminação de
calor.
• Pegue pelo centro a maçaneta de abertura da porta: os
lados podem estar quentes.
• Utilize luvas de forno para colocar e tirar recipientes.
• Não forre o fundo do forno com folhas de alumínio.
• Não guarde material inamável no forno: se o aparelho
for inadvertidamente colocado a funcionar, poderia
incendiar-se.
• Assegure-se sempre que os selectores estejam na
posição “●”/“○” quando não estiver a utilizar o aparelho.
• Não puxe pelo cabo para desligar a cha da tomada
eléctrica, pegue pela cha.
• Não realize limpeza nem manutenção sem antes ter
desligado a cha da rede eléctrica.
• Se houver avarias, em nenhum caso mexa nos
mecanismos internos para tentar repará-las. Contacte
a Assistência Técnica (veja a Assistência técnica).
• Não coloque objectos sobre a porta do forno aberta.
• Evite que as crianças brinquem com o aparelho.
• Não é previsto que este aparelho seja utilizado por
pessoas (incluso crianças) com reduzidas capacidades
físicas, sensoriais ou mentais, por pessoas inexperientes
ou que não tenham familiaridade com o produto, a não
ser que seja vigiadas por uma pessoa responsável
pela sua segurança ou que tenham recebido instruções
preliminares sobre o uso do aparelho.
• O aparelho não é destinado a ser colocado em
funcionamento por meio de um temporizador externo
ou por um sistema de comando à distância separado.
Eliminação
• Eliminação do material de embalagem: obedeça as
regras locais, de maneira que as embalagens possam
ser reutilizadas.
• A directiva Europeia 2012/19/CE relativa aos resíduos
de equipamentos eléctricos e electrónicos (REEE) prevê
que os electrodomésticos não devem ser eliminados
no normal fluxo dos resíduos sólidos urbanos. Os
aparelhos não mais utilizados devem ser recolhidos
separadamente para optimizar a taxa de recuperação
e reciclagem dos materiais que os compõem e impedir
potenciais danos à saúde e ao meio ambiente. O símbolo
da lixeira cancelada está indicado em todos os produtos
para lembrar o dever de colecta selectiva.
Para maiores informações sobre a correcta eliminação
dos electrodomésticos, os proprietários poderão contactar
o serviço de colecta público ou os revendedores.
Economia e respeito do meio ambiente
• Utilizando o forno nos horários a partir do m da tarde,
até as primeiras horas da manhã, estará contribuindo
para reduzir a carga de absorção das empresas de
fornecimento de electricidade. As opções de denição
dos programas, especialmente a “cozedura posterior”
(veja os Programas) e a “limpeza automática posterior”
(veja a Manutenção e cuidados), possibilitam organizar-
se para isto.
• É recomendável realizar as cozeduras de BARBECUE
e GRATIN sempre com a porta fechada: quer para obter
melhores resultados, quer para uma sensível economia
de energia (aproximadamente 10%).
• Mantenha as guarnições eficientes e limpas, para
poderem aderir bem na porta e não causar dispersão
de calor.
Manutenção e cuidados
Desligar a corrente eléctrica
Antes de realizar qualquer operação, desligue o aparelho
da alimentação eléctrica.
Limpeza do aparelho
• As partes externas esmaltadas ou inoxidáveis e as
guarnições de borracha podem ser limpas com uma
esponja molhada com água morna e sabão neutro.
Se for difícil remover as manchas, empregue produtos
específicos. É aconselhado enxaguar com água
abundante e enxugar depois da limpeza. Não empregue
pós abrasivos nem substâncias corrosivas.
• O interior do forno deve ser sempre limpo de preferência
depois de cada utilização, enquanto ainda estiver morno.
Utilize água quente e detergente, enxagúe e enxugue
com um pano macio. Evite abrasivos.
• Os acessórios podem ser lavados como quaisquer
utensílios, inclusive numa máquina de lavar loiça,
excepto as guias corrediças.
! Nunca utilize equipamento de limpeza a vapor ou de alta
pressão para limpar a aparelhagem.
PT
29
Page 30

Limpeza da porta
PT
Limpe o vidro da porta com esponjas e produtos não
abrasivos e enxugue com um pano macio; não use
materiais ásperos, abrasivos ou espátulas metálicas aadas
que podem arranhar a superfície e quebrar o vidro.
Para uma limpeza mais cuidadosa é possível desmontar
a porta do forno:
1. abra a porta inteiramente (veja
a gura);
2. utilizando uma chave de fendas,
levante e rode as alavancas F
situadas nas duas dobradiças (veja
F
a gura);
Substituição da lâmpada
Para substituir a lâmpada de
iluminação do forno:
1. Desatarraxe a tampa em
vidro do bocal da lâmpada.
2. Desenrosque a lâmpada e
troque-a por outra análoga:
potência 25 W, engate E 14.
3. Retire a tampa (veja a
gura).
! Não utilizar a lâmpada do forno como iluminação de
ambientes.
3. segure a porta dos dois lados
exteriores e feche-a novamente
devagar mas não inteiramente; Em
seguida puxe a porta para a frente
e retire-a das dobradiças (veja a
gura). *
Vuelva a colocar la puerta siguiendo el mismo procedimiento
pero en sentido contrario.
Vericação das guarnições
Verique periodicamente o estado da guarnição ao redor
da porta do forno. Se houver danos, contacte o Centro
de Assistência Técnica mais próximo (veja a Assistência
técnica). É aconselhável não usar o forno antes do mesmo
ter sido reparado.
* Há somente em alguns modelos.
30
Page 31

PT
31
Page 32

PT
195102354.00
11/2012 - XEROX FABRIANO
32
 Loading...