

Page 1
FFIAA52P
English
Operating Instructions
REFRIGERATOR/FREEZER COMBINATION
Contents
Operating Instructions, 1
Assistance, 2
Description of the appliance, 3
Description of the appliance, 4
Reversible doors, 5
Installation, 6
Accessories, 7
Start-up and use, 7
Maintenance and care, 8
Precautions and tips, 8
Troubleshooting 9
Register your
appliance now on
08448 24 24 24
Page 2
Assistance
12 months Parts and Labour Guarantee
Your appliance has the benefit of our manufacturer’s guarantee,
which covers the cost of breakdown repairs for twelve months
from the date of purchase.
This gives you the reassurance that if, within that time,
your appliance is proven to be defective because of either
workmanship or materials, we will, at our discretion, either repair or
replace the appliance at no cost to you.
This guarantee is subject to the following conditions:
- The appliance has been installed and operated correctly and in
accordance with our operating and maintenance instructions.
- The appliance is used only on the electricity or gas supply
printed on the rating plate.
- The appliance has been used for normal domestic purposes
only.
- The appliance has not been altered, serviced, maintained,
dismantled, or otherwise interfered with by any person not
authorised by us.
- Any repair work must be undertaken by us or our appointed
agent.
- Any parts removed during repair work or any appliance that is
replaced become our property.
- The appliance is used in the United Kingdom or Republic of
Ireland.
The guarantee does not cover:
- Damage resulting from transportation, improper use, neglect or
interference or as a result of improper installation.
- Replacement of any consumable item or accessory. These
included but not limited to: plugs, cables, batteries, light bulbs,
fluorescent tubes and starters, covers and filters.
- Replacement of any removable parts made of glass or plastic.
THIS GUARANTEE WILL NOT APPLY IF THE APPLIANCE HAS
BEEN USED IN COMMERCIAL OR NON-DOMESTIC PREMISES.
Hotpoint also offers you a free 5 year parts guarantee. This
additional guarantee is conditional on you registering your
appliance with us and the parts being fitted by one of our
authorised engineers. There will be a charge for our engineer’s
time. To activate the extra parts warranty on your appliance,
simply call our registration line on 08448 242424 (Republic of
Ireland 01 230 0233).
We offer a selection of protection plans that enable you to fully
cover yourself against the expense of repair bills for the life of your
policy. To find the ideal plan for you please call our advice line on
08448 226 226 (Republic of Ireland 01 230 0233).
We have a dedicated team who can provide free advice and
assistance with your appliance if you experience any technical
difficulties within the first 90 days of ownership. Simply call our
Hotypoint Service Hotline on 08448 224 224 (Republic of Ireland
0818 313 413) for telephone assistance, or, where necessary, to
arrange for an engineer to call.
Guarantee
5 Year Parts Guarantee
Extended Guarantees
Helpdesk Service
Our operators are on hand to answer your call every day including
weekends and bank holidays.
Our team of 1000 technicians are the largest white goods service
organisation in the UK and Ireland available to provide fast,
reliable and local service. They have all undergone extensive
training at our Training Centre of Excellence and are equipped
with the latest diagnostic tools to deliver expert servicing of your
Hotpoint appliance.
UK: 08448 224 224
Republic of Ireland: 0818 313 413
or visit
www.hotpointservice.co.uk
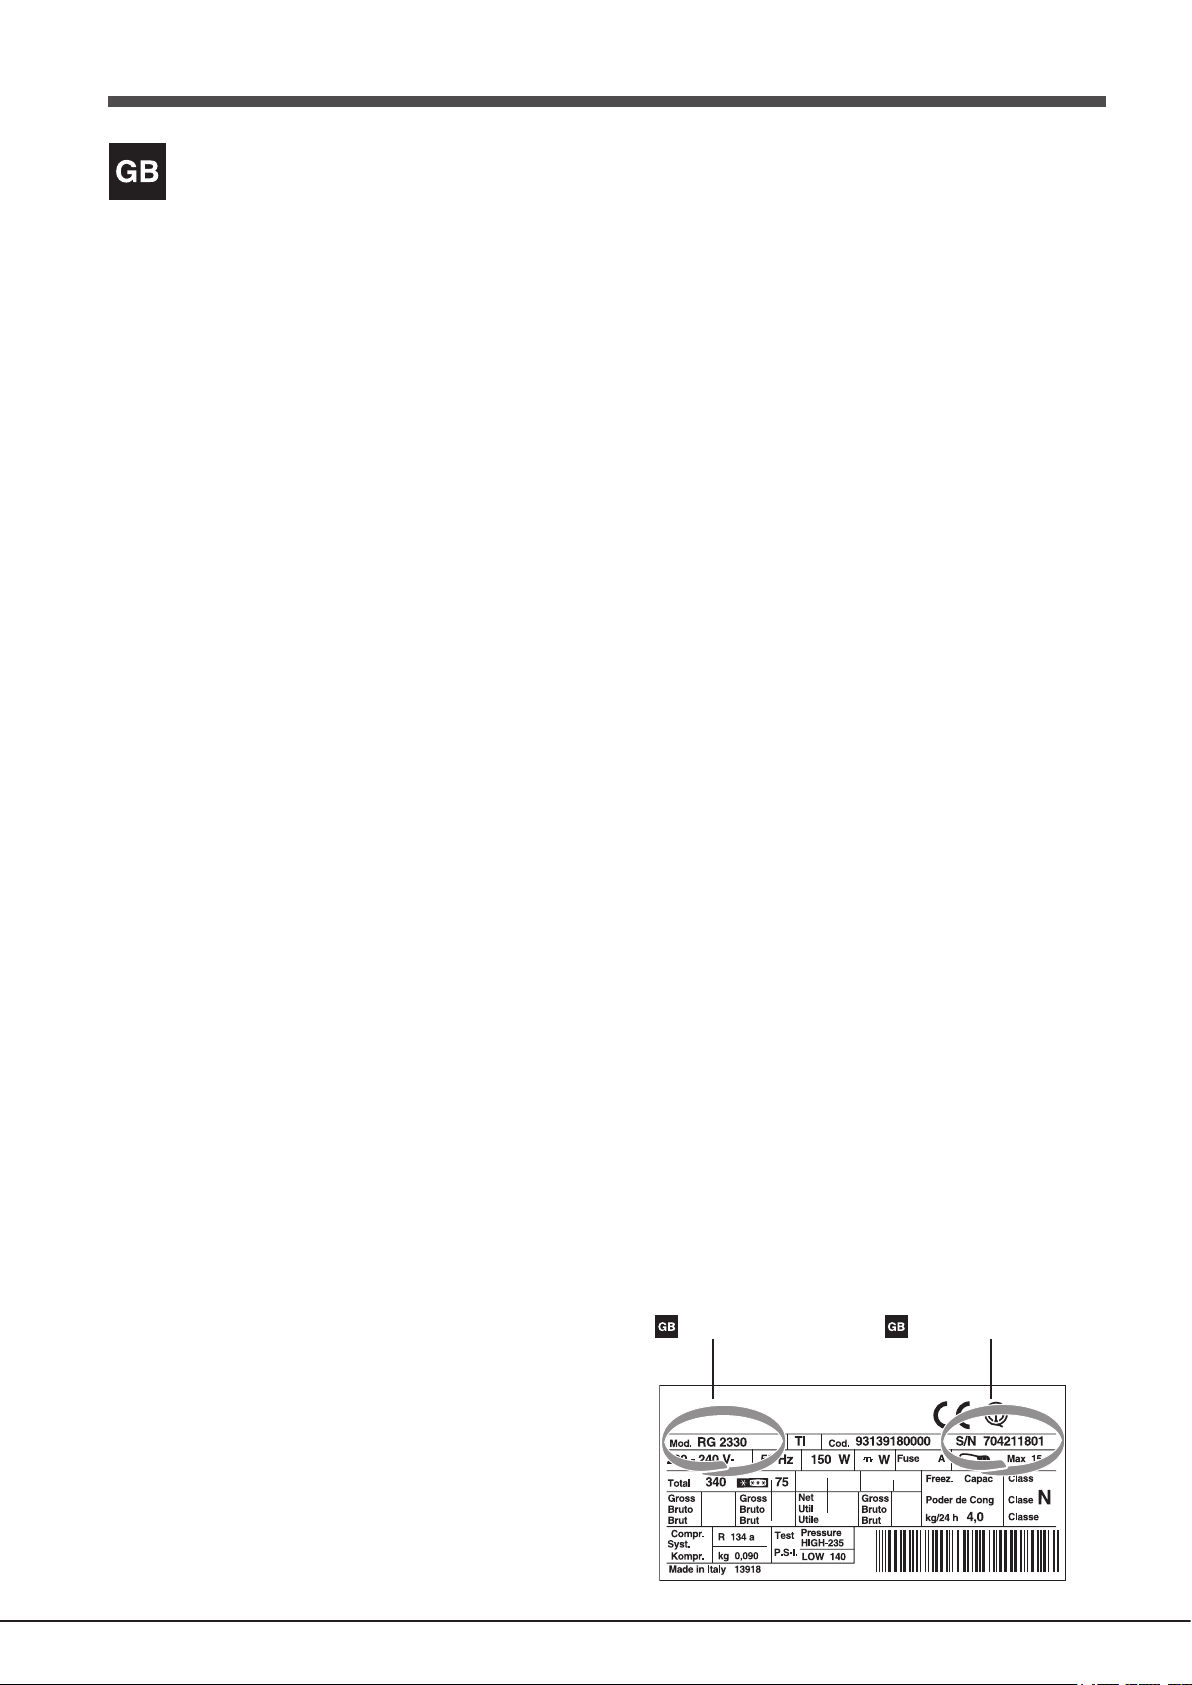
Model number: _______________________________________
Serial number: _______________________________________
Parts and Accessories
We supply a full range of genuine replacement parts as well as
accessory products that protect and hygienically clean your
appliance to keep it looking good and functioning efficiently
throughout its life.
UK: 08448 225 225
Republic of Ireland: 0818 313 413
or visit
www.hotpointservice.co.uk
Appliance Registration
We want to give you additional benefits of Hotpoint ownership. To
activate your free 5 year parts guarantee you must register your
appliance.
By registering your appliance with us not only do you do you
activate the guarantee all your information will be logged onto our
repair system. In the unfortunate event that you need assistance
we will have your appliance details to hand when you call us.
UK: 08448 24 24 24
Republic of Ireland: 01 230 0800
or visit
www.hotpointservice.co.uk
Indesit Company UK Ltd. Morley Way, Peterborough, PE2 9JB
Indesit Ireland Ltd. The Crescent Building, Northwood Park,
Santry, Dublin 9.
Recycling and Disposal Information
As part of Hotpoint’s continued commitment to helping the
environment, Hotpoint reserves the right to use quality, recycled
components to keep down customer costs and minimise material
wastage.
Please dispose of packaging and old appliances carefully. To
minimise the risk of injury to children, remove the door, plug, and cut
the mains cable off flush with the appliance. Dispose of these parts
separately to ensure that the appliance can no longer be plugged
into mains socket, and the door cannot be locked shut.
- model - serial number
We pride ourselves on ensuring that you and your Hotpoint
After Sales Service
appliance receive the very highest level of service. No one
understands Hotpoint appliances like we do, so for service from the
people that know your appliance best, simply call 08448 224 224.
PLEASE PHONE US TO REGISTER YOUR APPLIANCE AND ACTIVATE YOUR 5 YEAR PARTS GUARANTEE ON 08448 24 24 24
2
Page 3
Description of the appliance
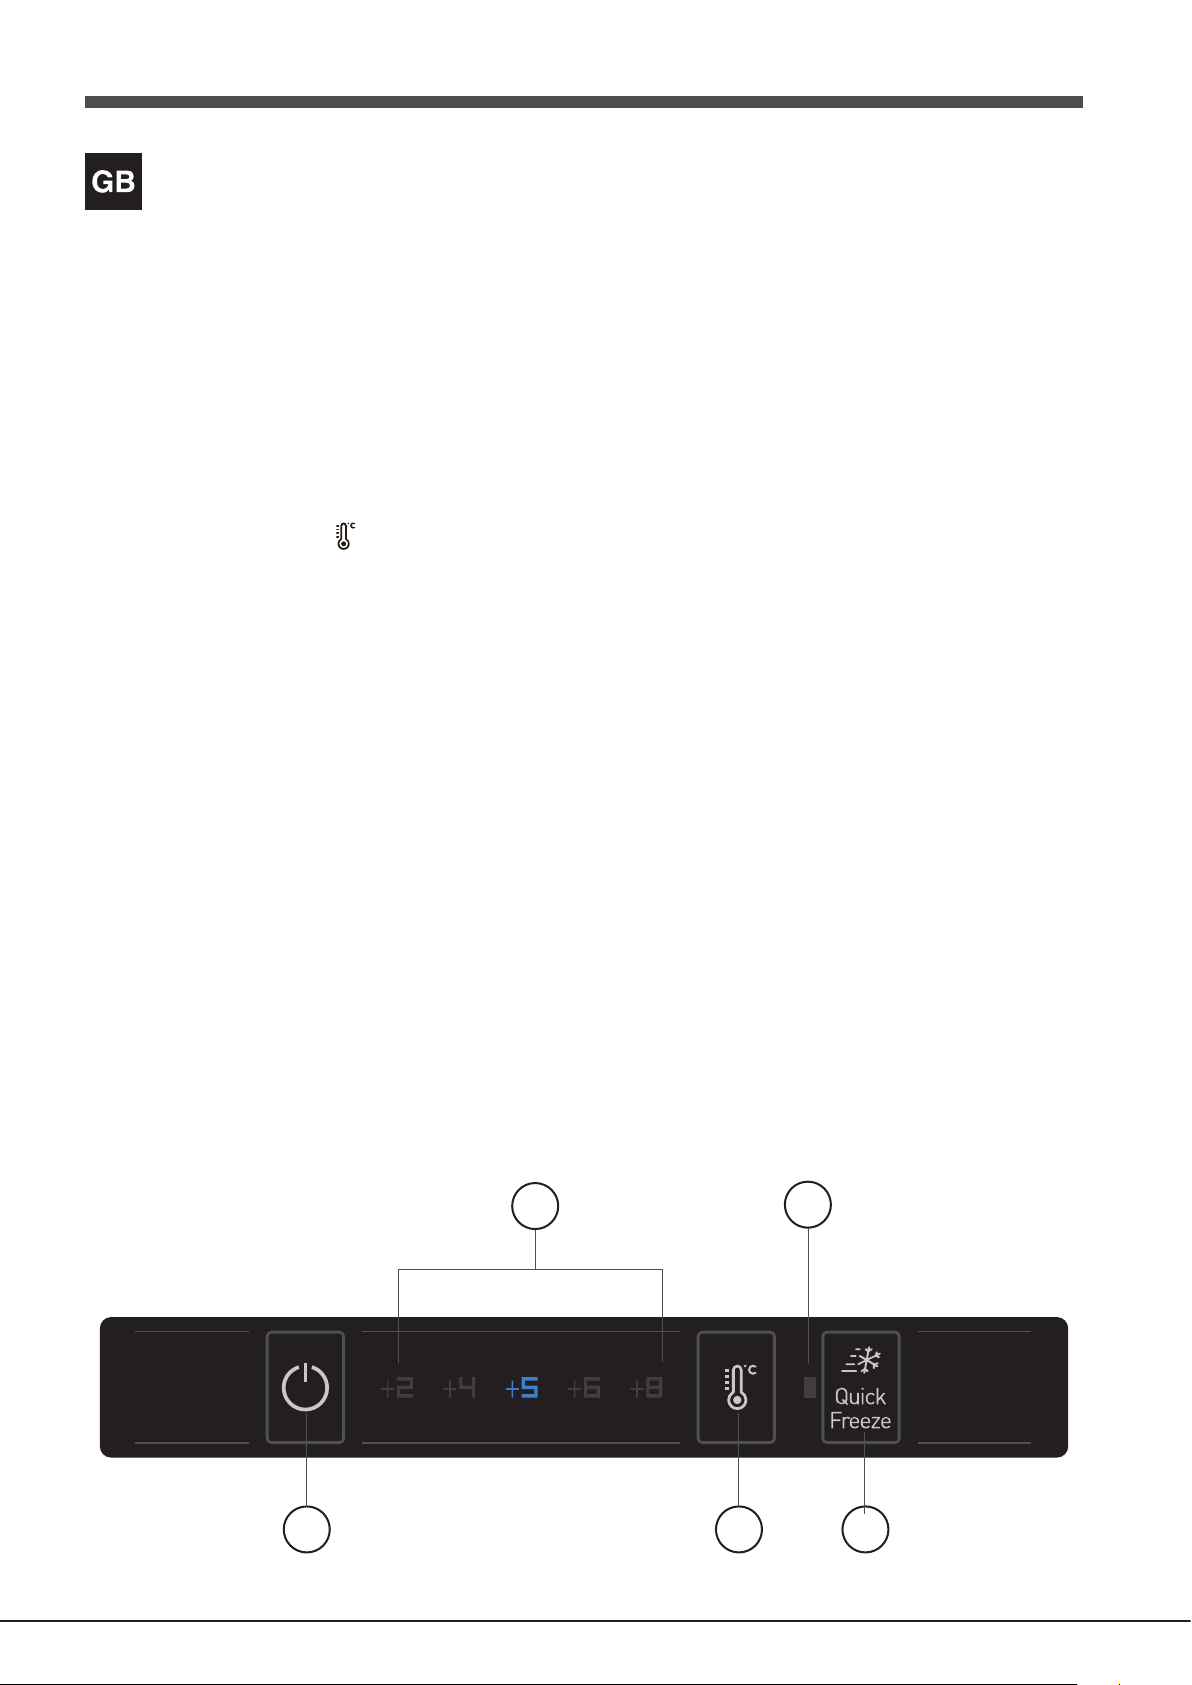
Control panel
1. ON/OFF
The whole product (both fridge and freezer compartments)
can be turned on by pressing this button for 2 seconds.
The last set value is indicated on the interface. Press this
button to turn off the device. An audible signal will confirm
the “off commutation of the product”.
2. FRIDGE temperature indicator
It shows the temperature of the fridge compartment.
3. FRIDGE temperature setting
It allows you to change the fridge temperature value, in a
cyclical way; it also confirms the selected temperature on
the interface.
4 QUICK FREEZE indicator light (rapid freezing)
illuminates when the QUICK FREEZE button is pressed.
5 QUICK FREEZE button (rapid freezing)
To be used to freeze fresh foods. When it is pressed, the
QUICK FREEZE indicator light illuminates (see Start-up and
use).
2
1
PLEASE PHONE US TO REGISTER YOUR APPLIANCE AND ACTIVATE YOUR 5 YEAR PARTS GUARANTEE ON 08448 24 24 24
4
53
3
Page 4
Description of the appliance
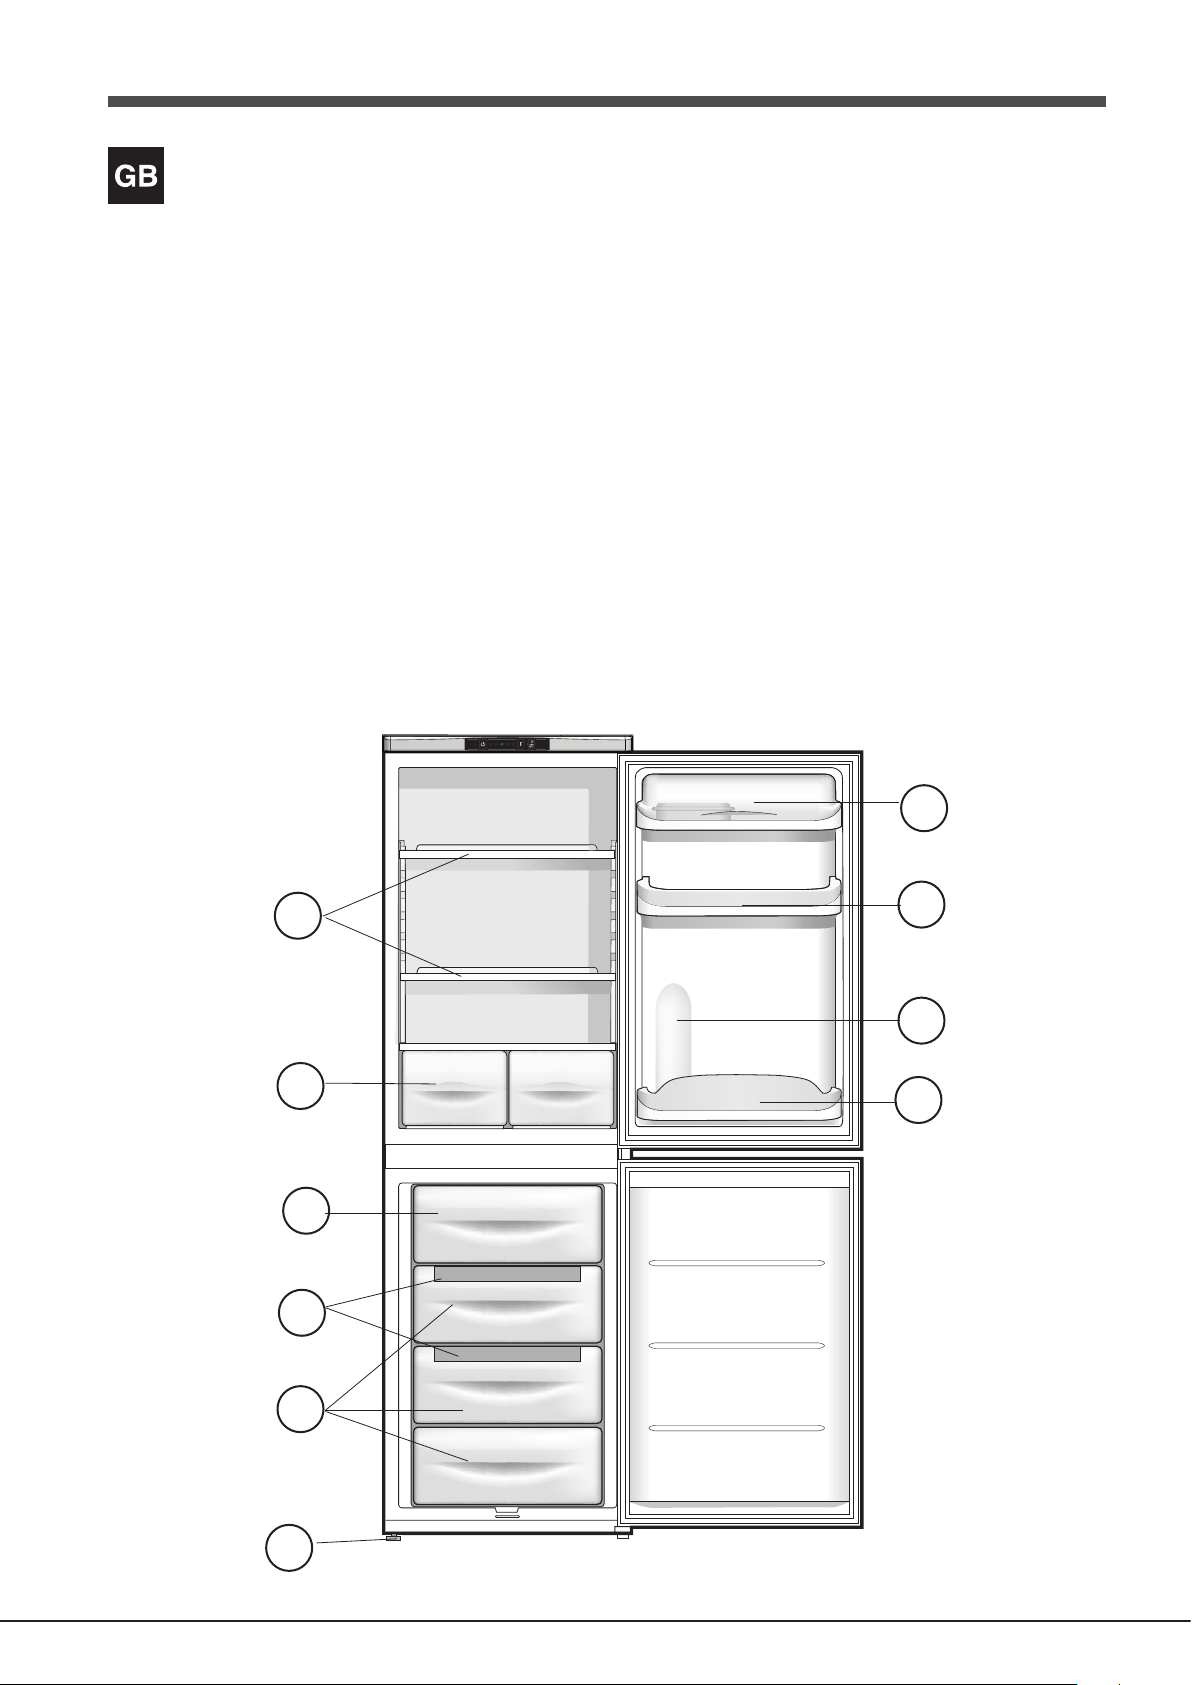
Overall view
The instructions contained in this manual are applicable to
different model refrigerators. The diagrams may not directly
represent the appliance purchased. For more complex
features, consult the following pages.
1 Levelling FEET
2 STORAGE compartment*.
3 ICE TRAY*
4 FREEZER and STORAGE compartment *.
5 FRUIT and VEGETABLE bin
6 SHELVES*.
7 Removable lidded shelf with EGG TRAY and BUTTER DISH
8 Removable multipurpose SHELVES*.
9 Compartment for a 2 LITRE BOTTLE
10 BOTTLE shelf
* Varies by number and/or position, available only on certain
models.
*
7
6
8
9
5
10
4
3
2
1
PLEASE PHONE US TO REGISTER YOUR APPLIANCE AND ACTIVATE YOUR 5 YEAR PARTS GUARANTEE ON 08448 24 24 24
4
Page 5

Reversible doors
If it is necessary to change the direction in which the doors
open, please contact the Technical Assistance Centre.
PLEASE PHONE US TO REGISTER YOUR APPLIANCE AND ACTIVATE YOUR 5 YEAR PARTS GUARANTEE ON 08448 24 24 24
5
Page 6
GB
Installation
! Before placing your new appliance into operation please read
these operating instructions carefully. They contain important
information for safe use, for installation and for care of the
appliance.
! Please keep these operating instructions for future reference.
Pass them on to possible new owners of the appliance.
Positioning and connection
Positioning
1. Place the appliance in a well-ventilated humidity-free room.
2. Do not obstruct the rear fan grills. The compressor and
condenser give off heat and require good ventilation to
operate correctly and save energy.
3. Leave a space of at least 10 cm between the top part of
the appliance and any furniture above it, and at least 5 cm
between the sides and any furniture/side walls.
4. Ensure the appliance is away from any sources of heat
(direct sunlight, electric stove, etc.).
5. In order to maintain the correct distance between the
appliance and the wall behind it, fit the spacers supplied in
the installation kit, following the instructions provided.
Levelling
1. Install the appliance on a level and rigid floor.
2. If the floor is not perfectly horizontal, adjust the refrigerator
by tightening or loosening the front feet.
Electrical connections
After the appliance has been transported, carefully place it
vertically and wait at least 3 hours before connecting it to the
electricity mains. Before inserting the plug into the electrical
socket ensure the following:
Replacement fuse covers:
If a replacement fuse cover is fitted, it must be of the correct colour as
indicated by the coloured marking or the colour that is embossed in
words on the base of the plug.
Changing the plug:
Removing the plug
If your appliance has a non-rewireable moulded plug and you should
wish to remove it to add a longer cable or to re-route the mains cable
through partitions, units etc. please ensure that either:
- The plug is replaced by a fused 13amp re-wireable plug bearing
the BSI mark of approval.
or
- The mains cable is wired directly into a 13amp cable outlet,
controlled by a switch (in compliance with BS 5733) which is
accessible without moving the appliance.
Disposing of the plug
Cut off and dispose of the supplied plug if it does not fit your socket. The
cable should be cut as close as possible to the moulded plug.
Remove the fuse.
WARNING:
To avoid a shock hazard do not insert the discarded plug into a
socket anywhere else.
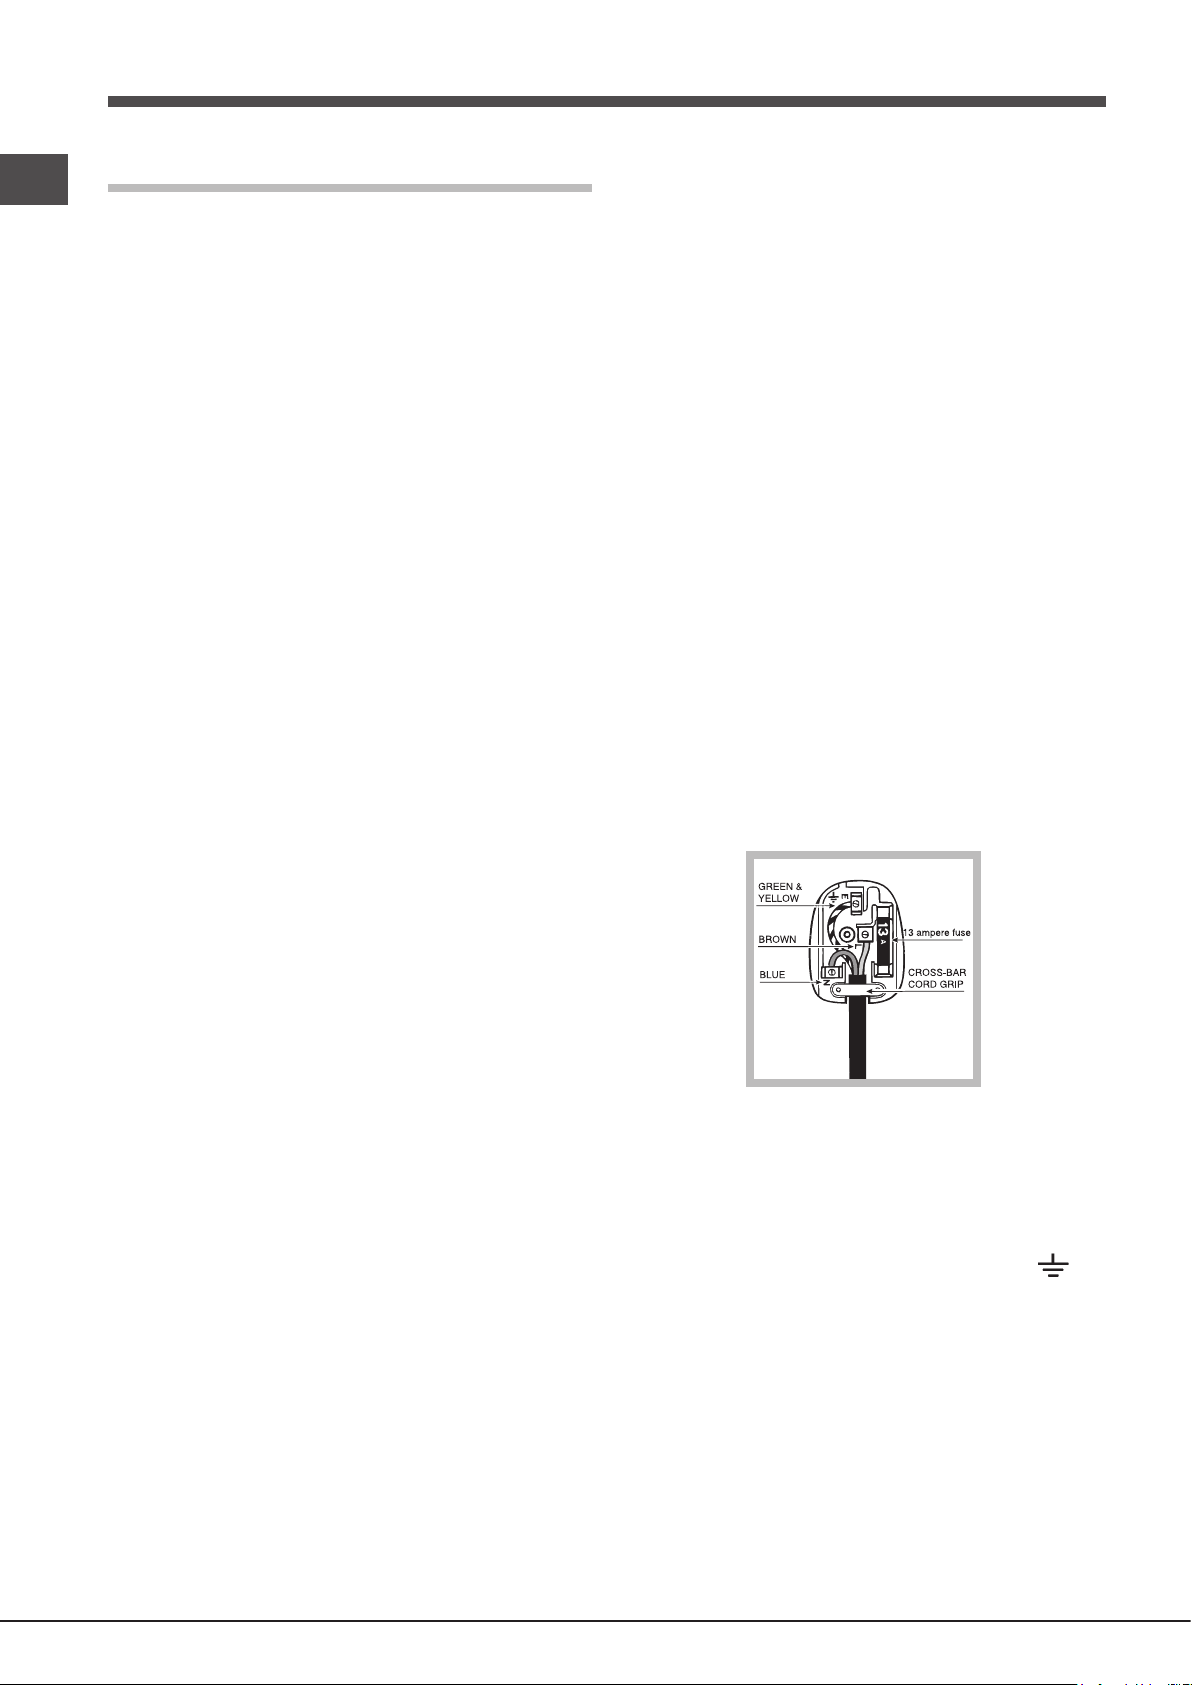
Fitting a new plug
IMPORTANT:
WIRES IN THE MAINS LEAD ARE COLOURED IN ACCORDANCE
WITH THE FOLLOWING CODE...
• The appliance is earthed and the plug is compliant with the law.
• The socket can withstand the maximum power of the
appliance, which is indicated on the data plate located on
the bottom left side of the fridge (e.g. 150 W).
• The voltage must be in the range between the values indicated
on the data plate located on the bottom left side (e.g. 220-240V).
• The socket is compatible with the plug of the appliance. If
the socket is incompatible with the plug, ask an authorised
technician to replace it (see Assistance). Do not use
extension cords or multiple sockets.
! Once the appliance has been installed, the power supply
cable and the electrical socket must be easily accessible.
! The cable must not be bent or compressed.
! The cable must be checked regularly and replaced by
authorised technicians only (see Assistance).
! The manufacturer declines any liability should these safety
measures not be observed.
Your appliance is supplied with a 13amp fused plug that can
be plugged into a 13amp socket for immediate use. Before
using the appliance please read the instructions below.
WARNING:
THIS APPLIANCE MUST BE EARTHED.
Replacing fuse covers:
When replacing a faulty fuse, a 13amp ASTA approved fuse to
BS 1362 should always be used and the fuse cover re-fitted.
If the fuse cover is lost, the plug must not be used until a
replacement is obtained.
Green and Yellow - Earth
Blue - Neutral
Brown - Live
As the colours of the wires in the mains lead may not correspond with
the coloured markings identifying the terminals in your plug, proceed
as follows:
- Connect Green and Yellow wire to terminal marked ‘E’ or
coloured Green and Yellow.
- Connect Brown wire to terminal marked ‘L’ or coloured red or
brown.
- Connect Blue wire to terminal marked ‘N’ or coloured Black or Blue.
If a 13amp plug (BS 1363) is used it must be fitted with a 13amp fuse.
If you are in any doubt about the electrical supply to your machine,
consult a qualified electrician before use.
CE Marking certifies that this appliance conforms to the following
EEC directives:
Low Voltage Equipment - 73/23/EEC & 93/68 EEC
Electromagnetic Compatibility 89/336/EEC, 92/31/EEC & 93/68/EEC
or
PLEASE PHONE US TO REGISTER YOUR APPLIANCE AND ACTIVATE YOUR 5 YEAR PARTS GUARANTEE ON 08448 24 24 24
6
Page 7
Accessories
MAX
WATER LEVEL
MAX
WATER LEVEL
SHELVES* : with or without grill.
Due to the special guides the shelves are removable and
the height is adjustable (see diagram), allowing easy storage
of large containers and food. Height can be adjusted without
complete removal of the shelf.
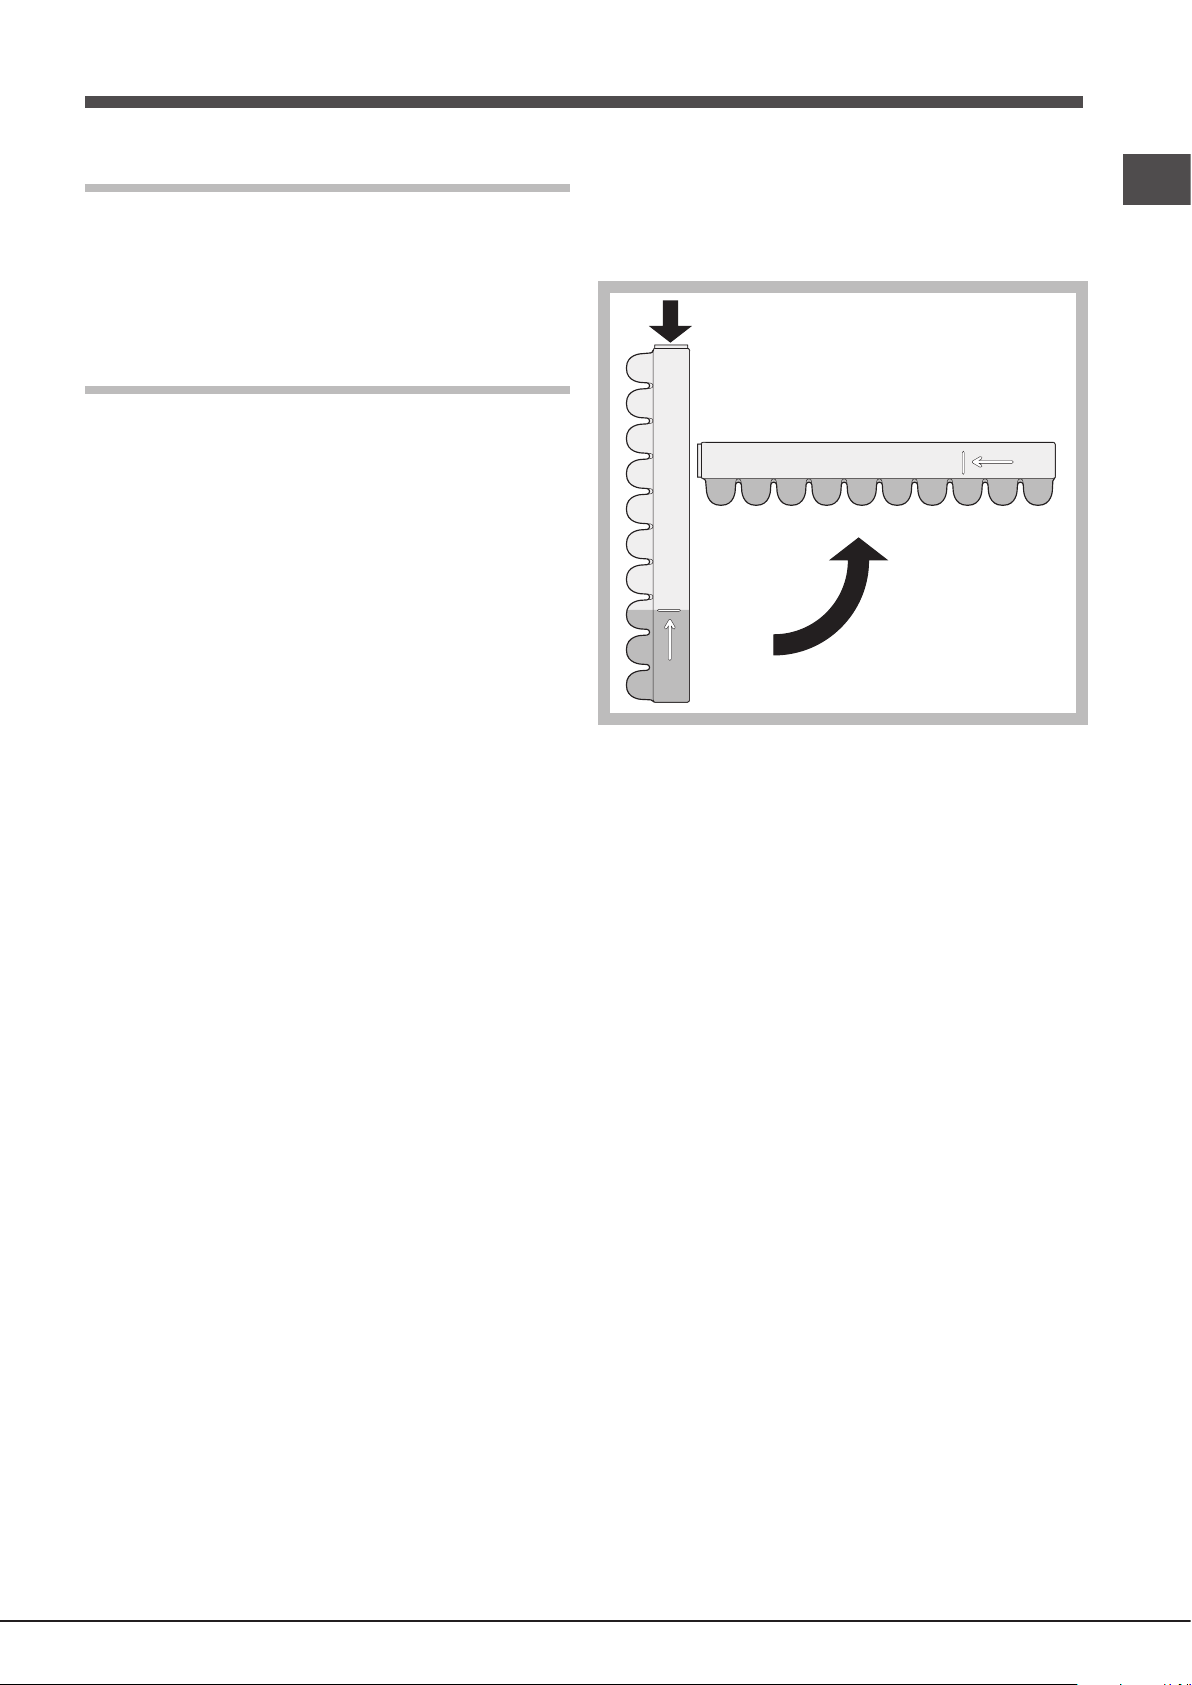
back, placing the top part in the corresponding housing and
allowing it to drop in again.
5. When the ice has formed (minimum time approximately 8
hours) knock the tray against a hard surface and wet the
outside so that the ice cubes come loose and take them out
through the opening.
Start-up and use
Starting the appliance
! Before starting the appliance, follow the installation
instructions (see Installation).
! Before connecting the appliance, clean the compartments
and accessories well with lukewarm water and bicarbonate.
! The appliance comes with a motor protection control system
which makes the compressor start approximately 8 minutes
after being switched on. The compressor also starts each time
the power supply is cut off whether voluntarily or involuntarily
(blackout).
1. Insert the plug into the socket and make sure that the
TEMPERATURE indicator light illuminates. If the temperature
indicator light doesn’t illuminate, press the ON/OFF button.
2. Set the TEMPERATURE indicator lights to an average value .
Using the refrigerator to its full potential
• Place only cold or lukewarm foods in the compartment, never
hot foods (see Precautions and tips).
• Remember that cooked foods do not last longer than raw
foods.
• Do not store liquids in open containers: they will increase the
level of humidity in the refrigerator and cause condensation to
form.
In static appliances, the air circulates in a natural way: the
colder air tends to move downwards as it is heavier. The food
should be stored as follows:
• Place only cold or lukewarm foods in the compartment, not
hot foods (see Precautions and tips).
• Remember that cooked foods do not last longer than raw
foods.
• Do not store liquids in open containers. They will increase
humidity in the refrigerator and cause condensation to form.
Ice tray
The fact that they are situated on the top part of the freezer
drawers ensures greater cleanliness: the ice no longer
comes into contact with the food placed inside the freezer
compartment; furthermore, the dripping of the water during
filling is avoided (a lid to cover up the hole after filling with
water is also provided).
1. Pull out the tray by pushing it up.
Check that the tray is completely empty and fill it with water
through the opening provided.
2. Take care not to exceed the level indicated (MAX WATER
LEVEL). Excess water prevents the ice cubes from
dispensing (if this happens, wait for the ice to melt and
empty the tray).
3. Turn the tray 90°: due to the connected compartments each
mould fills with water (see diagram).
4. Close the opening with the lid provided and put the tray
PLEASE PHONE US TO REGISTER YOUR APPLIANCE AND ACTIVATE YOUR 5 YEAR PARTS GUARANTEE ON 08448 24 24 24
Using the freezer to its full potential
• Use the TEMPERATURE CONTROL button to set the
temperature value.
We recommend, however, a medium position.
• Do not re-freeze food that is defrosting or that has
already been defrosted. These foods must be cooked
and eaten (within 24 hours).
• Fresh food that needs to be frozen must not come into
contact with food that has already been defrosted.
Fresh food must be stored in the FREEZER and
STORAGE compartment.
• Do not place glass bottles which contain liquids, and
which are corked or hermetically sealed in the freezer
because they could break.
• The maximum quantity of food that may be frozen daily is
indicated on the plate containing the technical properties
located within the freezer (for example: Kg/24h: 4).
• To freeze (if the freezer is already operating):
- for small quantities which are less than those
indicated on the data plate, press the rapid freezing
QUICK FREEZE button (corresponding indicator light
illuminates), insert the food and close the door. The
function is disabled automatically after 24 hours.
• In order to obtain a greater amount of space in
the freezer compartment, you may remove the
bins (except the lowest bin and the special COOL
CARE ZONE bin (if exists), which has an adjustable
temperature) and place the food directly onto the
supplied rack.
! To avoid blocking the air circulation inside the
freezer compartment, it is advisable not to obstruct the
ventilation holes with food or containers.
GB
7
Page 8
GB
A
B
! Do not open the door during freezing.
! If there is a power cut or malfunction, do not open the freezer
door. This will help maintain the temperature inside the freezer,
ensuring that foods are conserved for at least 9 -14 hours.
! If the room temperature drops below 14°C for an extended
period of time, the ideal temperature will not be reached in the
freezer compartment and food preservation will be reduced.
Maintenance and care
Switching the appliance off
During cleaning and maintenance it is necessary to disconnect
the appliance from the electricity supply:
1. Press the ON/OFF button to turn off the device
2. pull the plug out of the socket
Cleaning the appliance
• The external and internal parts, as well as the rubber seals
may be cleaned using a sponge that has been soaked in
lukewarm water and bicarbonate of soda or neutral soap. Do
not use solvents, abrasive products, bleach or ammonia.
• The removable accessories may be soaked in warm water
and soap or dishwashing liquid. Rinse and dry them
carefully.
• The back of the appliance may collect dust which can be
removed by delicately using the hose of a vacuum cleaner
set on medium power. The appliance must be switched
off and the plug must be pulled out before cleaning the
appliance.
Avoiding mould and unpleasant odours
• The appliance is manufactured with hygienic materials which
are odour free. In order to maintain an odour free refrigerator
and to prevent the formation of stains, food must always be
covered or sealed properly.
• If you want to switch the appliance off for an extended
period of time, clean the inside and leave the doors open.
Defrosting the appliance
! Follow the instructions below.
Do not speed up the defrosting process by using any devices
or tools other than the scraper provided, you may damage the
refrigeration circuit.
Defrosting the refrigerator compartment
The refrigerator has an automatic defrosting function: water is
ducted to the back of the appliance by a special discharge
outlet (see diagram) where the heat produced by the
compressor causes it to evaporate. It is necessary to clean the
discharge hole regularly so that the water can flow out easily.
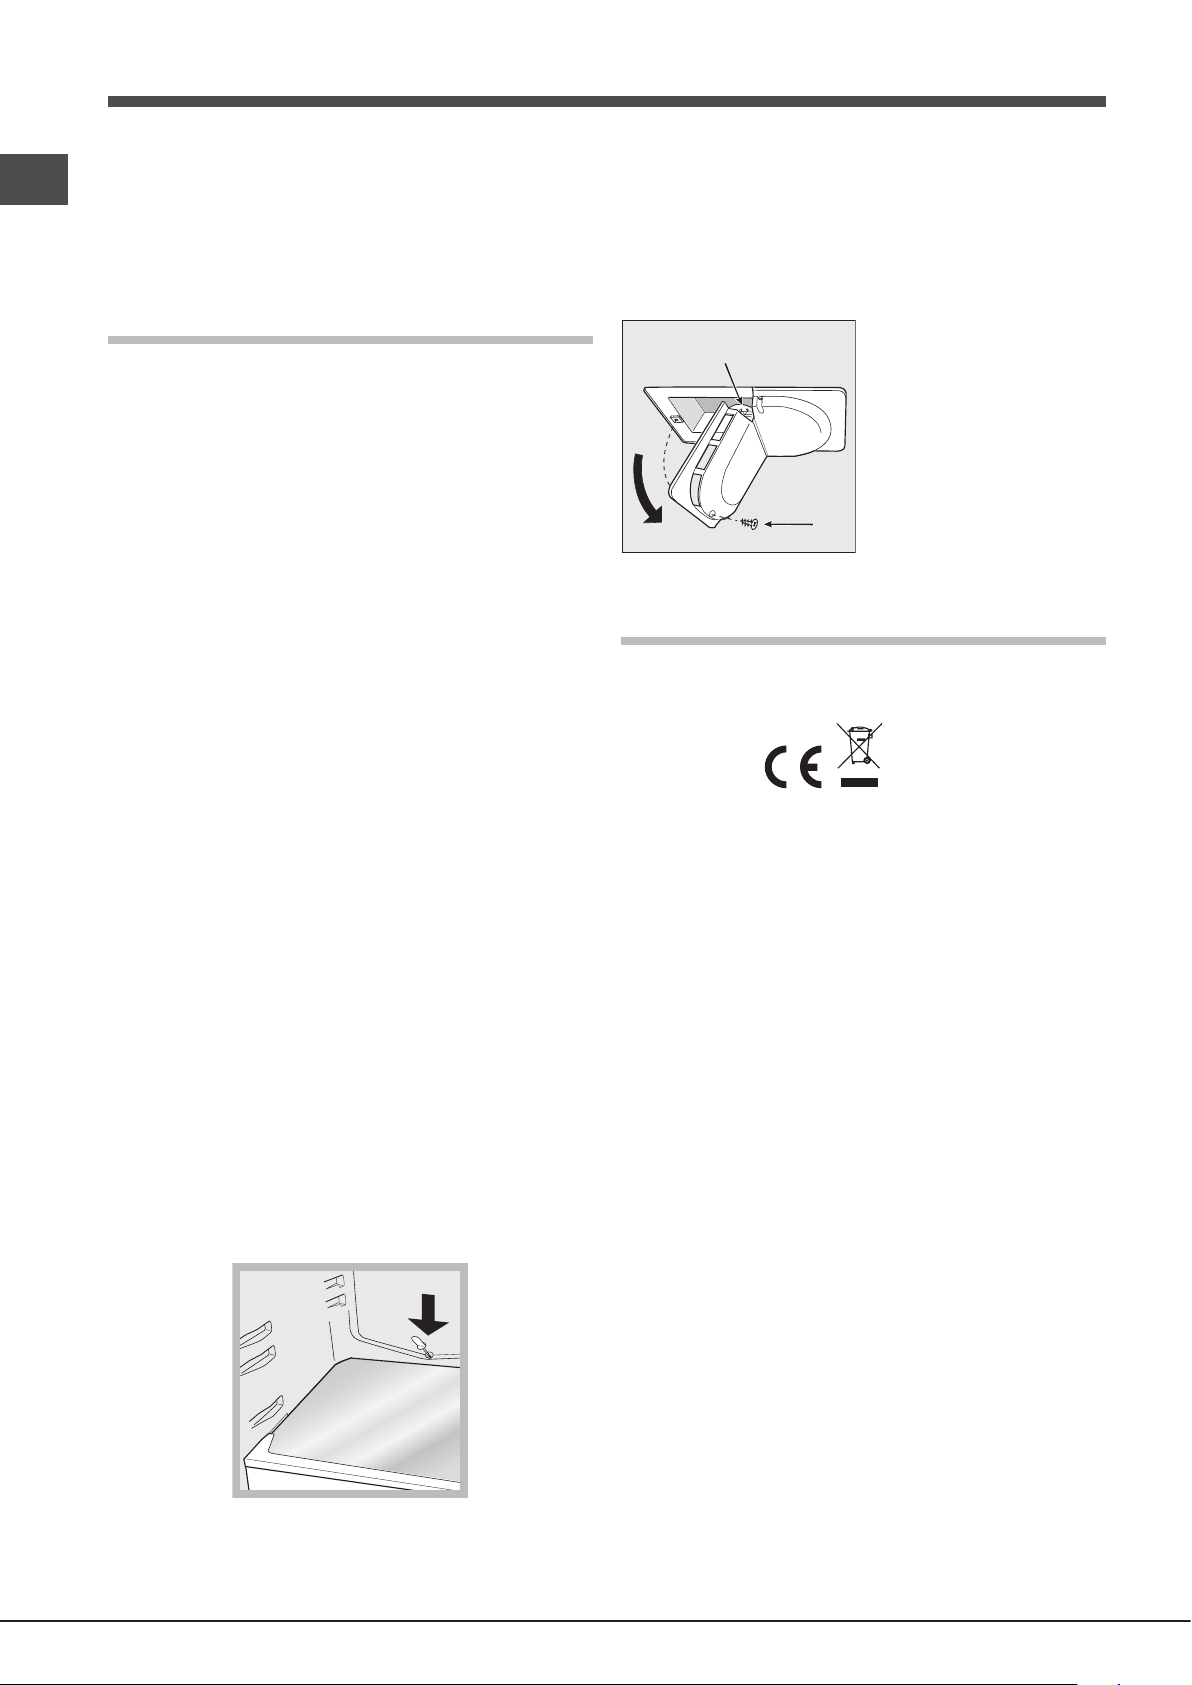
Replacing the light bulb
To replace the light bulb in the refrigerator compartment, pull
out the plug from the electrical socket. Follow the instructions
below.
Access the light bulb by removing the cover as indicated in the
diagram. Replace it with a similar light bulb within the power
range indicated on the cover (15W or 25W).
Precautions and tips
! The appliance was designed and manufactured in
compliance with international safety standards.
The following warnings are provided for safety reasons and
must be read carefully.
This appliance complies with the following Community
Directives:
- 73/23/EEC of 19/02/73 (Low Voltage) and subsequent
amendments;
-89/336/EEC of 03.05.89 (Electromagnetic Compatibility) and
subsequent amendments;
- 2002/96/CE..
General safety
• The appliance was designed for domestic use inside the
home and is not intended for commercial or industrial use.
• The appliance must be used to store and freeze food
products by adults only and according to the instructions in
this manual.
• The appliance must not be installed outdoors, even in
covered areas. It is extremely dangerous to leave the
appliance exposed to rain and storms.
• Do not touch the appliance with bare feet or with wet or
moist hands and feet.
• Do not touch the internal cooling elements: this could cause
skin abrasions or frost/freezer burns.
• When unplugging the appliance always pull the plug from
the mains socket, do not pull on the cable.
• Before cleaning and maintenance, always switch off the appliance and
disconnect it from the electrical supply. It is not sufficient to press the
ON/OFF button (appliance off) to eliminate all electrical contact
• In the case of a malfunction, under no circumstances should
you attempt to repair the appliance yourself. Repairs carried
out by inexperienced persons may cause injury or further
malfunctioning of the appliance.
• Do not use any sharp or pointed utensils or electrical
equipment - other than the type recommended by the
manufacturer - inside the frozen food storage compartments.
• Do not put ice cubes taken directly from the freezer into your
mouth.
• This appliance is not intended for use by persons (including
children) with reduced physical, sensory or lack of
* Varies by number and/or position, available only on certain models.
PLEASE PHONE US TO REGISTER YOUR APPLIANCE AND ACTIVATE YOUR 5 YEAR PARTS GUARANTEE ON 08448 24 24 24
8
Page 9

experience and knowledge unless they have been given
supervision or instruction concerning use of the appliance
by a person responsible for their safety. Children should
be supervised to ensure that they do not play with the
appliance.
• Keep packaging material out of the reach of children! It can
become a choking or suffocation hazard.
Disposal
• Observe local environmental standards when disposing
packaging material for recycling purposes.
• The European Directive 2002/96/EC on Waste Electrical and
Electronic Equipment (WEEE), requires that old household
electrical appliances must not be disposed of in the normal
unsorted municipal waste stream. Old appliances must
be collected separately in order to optimise the recovery
and recycling of the materials they contain and reduce the
impact on human health and the environment. The crossed
out “wheeled bin” symbol on the product reminds you of
your obligation, that when you dispose of the appliance it
must be separately collected. Consumers should contact
their local authority or retailer for information concerning the
correct disposal of their old appliance.
• The doors do not close properly or the seals are damaged.
• The doors are opened too frequently.
• The FRIDGE TEMPERATURE is not correct (see Description).
• The refrigerator or the freezer have been over-filled.
The food inside the refrigerator is beginning to freeze.
• The FRIDGE TEMPERATURE is not correct (see Description).
• The food is in contact with the back inside wall of the
refrigerator.
The motor runs continuously.
• The QUICK FREEZE button was pressed: the yellow QUICK
FREEZE indicator is on (see Description).
• The door is not closed properly or is continuously opened.
• The outside ambient temperature is very high.
The appliance makes a lot of noise.
• The appliance has not been installed on a level surface (see
Installation).
• The appliance has been installed between cabinets that
vibrate and make noise.
• The internal refrigerant makes a slight noise even when the
compressor is off. This is not a defect, it is normal.
GB
Respecting and conserving the
environment
• Install the appliance in a fresh and well-ventilated room.
Ensure that it is protected from direct sunlight and do not
place it near heat sources.
• Try to avoid keeping the door open for long periods or
opening the door too frequently in order to conserve energy.
• Do not fill the appliance with too much food: cold air
must circulate freely for food to be preserved properly.
If circulation is impeded, the compressor will work
continuously.
• Do not place hot food directly into the refrigerator. The
internal temperature will increase and force the compressor
to work harder and will consume more energy.
• Defrost the appliance if ice forms (see Maintenance). A thick
layer of ice makes cold transference to food products more
difficult and results in increased energy consumption.
• Regularly check the door seals and wipe clean to ensure
they are free of debris and to prevent cold air from escaping
(see Maintenance).
Troubleshooting
If the appliance does not work, before calling for Assistance
(see Assistance), check for a solution from the following list.
The interface is off.
• The plug is not inserted in the outlet, or it is not powerful
enough to create a contact, or there is no electricity in the
house.
The back wall of the refrigerator unit is covered in frost or
droplets of water
• This shows the appliance is operating normally.
The motor does not start.
• The appliance comes with a motor protection control (see
Start-up and use).
The interface is weakly on.
• Pull out and reverse the plug before putting it back in the
socket.
a) The alarm sounds.
a) The refrigerator door has remained open for more than two
minutes (the buzzer will stop sounding when you shut the door)
or the correct switching-off procedure was not followed (see
Maintenance).
The refrigerator and the freezer do not cool well.
PLEASE PHONE US TO REGISTER YOUR APPLIANCE AND ACTIVATE YOUR 5 YEAR PARTS GUARANTEE ON 08448 24 24 24
9
Page 10

GB
10
Page 11

GB
11
Page 12

GB
19512568000
06/2014
12
 Loading...