

Page 1

Operating Instructions
REFRIGERATOR/FREEZER COMBINATION
Contents
Installation, 2-3
GB
English
FF7190TA
FF7190TX
Positioning and connection
Reversible doors
Description of the appliance, 4-5
Control panel
Overall view
Accessories, 6
Refrigerator compartment
Freezer compartment
Start-up and use, 7-10
Starting the appliance
Using the display
Chiller system
Ever Fresh
Using the refrigerator to its full potential
Using the freezer to its full potential
Maintenance and care, 11
Switching the appliance off
Cleaning the appliance
Ever Fresh
Avoiding mould and unpleasant odours
Replacing the light bulb
Changing the odour filter
GBGB
GB
GBGB
Precautions and tips, 12
General safety
Disposal
Respecting and conserving the environment
Troubleshooting, 13
Guarantee, 14
After Sales Service, 15
Page 2

Installation
! Before placing your new appliance into operation
GB
please read these operating instructions carefully. They
contain important information for safe use, for installation
and for care of the appliance.
! Please keep these operating instructions for future
reference. Pass them on to possible new owners of the
appliance.
Positioning and connection
Positioning
1. Place the appliance in a well-ventilated humidity-free
room.
2. Do not obstruct the rear fan grills. The compressor and
condenser give off heat and require good ventilation to
operate correctly and save energy.
3. Leave a space of at least 10 cm between the top part of
the appliance and any furniture above it, and at least 5
cm between the sides and any furniture/side walls.
4. Ensure the appliance is away from any sources of heat
(direct sunlight, electric stove, etc.).
5. In order to maintain the correct distance between the
appliance and the wall behind it, fit the spacers supplied
in the installation kit, following the instructions provided.
Levelling
1. Install the appliance on a level and rigid floor.
2. If the floor is not perfectly horizontal, adjust the
refrigerator by tightening or loosening the front feet.
Electrical connections
After the appliance has been transported, carefully
place it vertically and wait at least 3 hours before
connecting it to the electricity mains. Before inserting
the plug into the electrical socket ensure the following:
The appliance is earthed and the plug is compliant with
the law.
The socket can withstand the maximum power of the
appliance, which is indicated on the data plate located
on the bottom left side of the fridge (e.g. 150 W).
The voltage must be in the range between the values
indicated on the data plate located on the bottom left
side (e.g. 220-240V).
The socket is compatible with the plug of the appliance.
If the socket is incompatible with the plug, ask an
authorised technician to replace it (see Assistance). Do
not use extension cords or multiple sockets.
! Once the appliance has been installed, the power supply
cable and the electrical socket must be easily accessible.
! The cable must not be bent or compressed.
! The cable must be checked regularly and replaced by
authorised technicians only (see Assistance).
! The manufacturer declines any liability should these
safety measures not be observed.
Connection of the water supply
To carry this out, use the kit provided which contains all
the necessary elements for connection to the water
supply.
To improve the performance of the Aqua Care, we
recommend that you fit a tap with a filter on the pipe for
the connection to the water system: in this way it will be
possible to manually interrupt the water supply during
long periods in which Aqua Care is not used.
! The water pressure inside the water system must be
between 0.8 bar and 8 bar.
! The appliance must only be connected to a water
supply suitable for drinking.
Your appliance is supplied with a 13amp fused plug that
can be plugged into a 13amp socket for immediate use.
Before using the appliance please read the instructions
below.
WARNING:
THIS APPLIANCE MUST BE EARTHED.
Replacing fuse covers:
When replacing a faulty fuse, a 13amp ASTA approved
fuse to BS 1362 should always be used and the fuse
cover re-fitted.
If the fuse cover is lost, the plug must not be used until
a replacement is obtained.
Replacement fuse covers:
If a replacement fuse cover is fitted, it must be of the
correct colour as indicated by the coloured marking or the
colour that is embossed in words on the base of the plug.
Changing the plug:
Removing the plug
If your appliance has a non-rewireable moulded plug
and you should wish to remove it to add a longer cable
or to re-route the mains cable through partitions, units
etc. please ensure that either:
- The plug is replaced by a fused 13amp rewireable plug bearing the BSI mark of
approval.
or
- The mains cable is wired directly into a
13amp cable outlet, controlled by a
switch (in compliance with BS 5733)
which is accessible without moving the
appliance.
2
Page 3
Disposing of the plug
Cut off and dispose of the supplied plug if it does not fit
your socket. The cable should be cut as close as
possible to the moulded plug.
Remove the fuse.
WARNING:
To avoid a shock hazard do not insert the discarded
plug into a socket anywhere else.
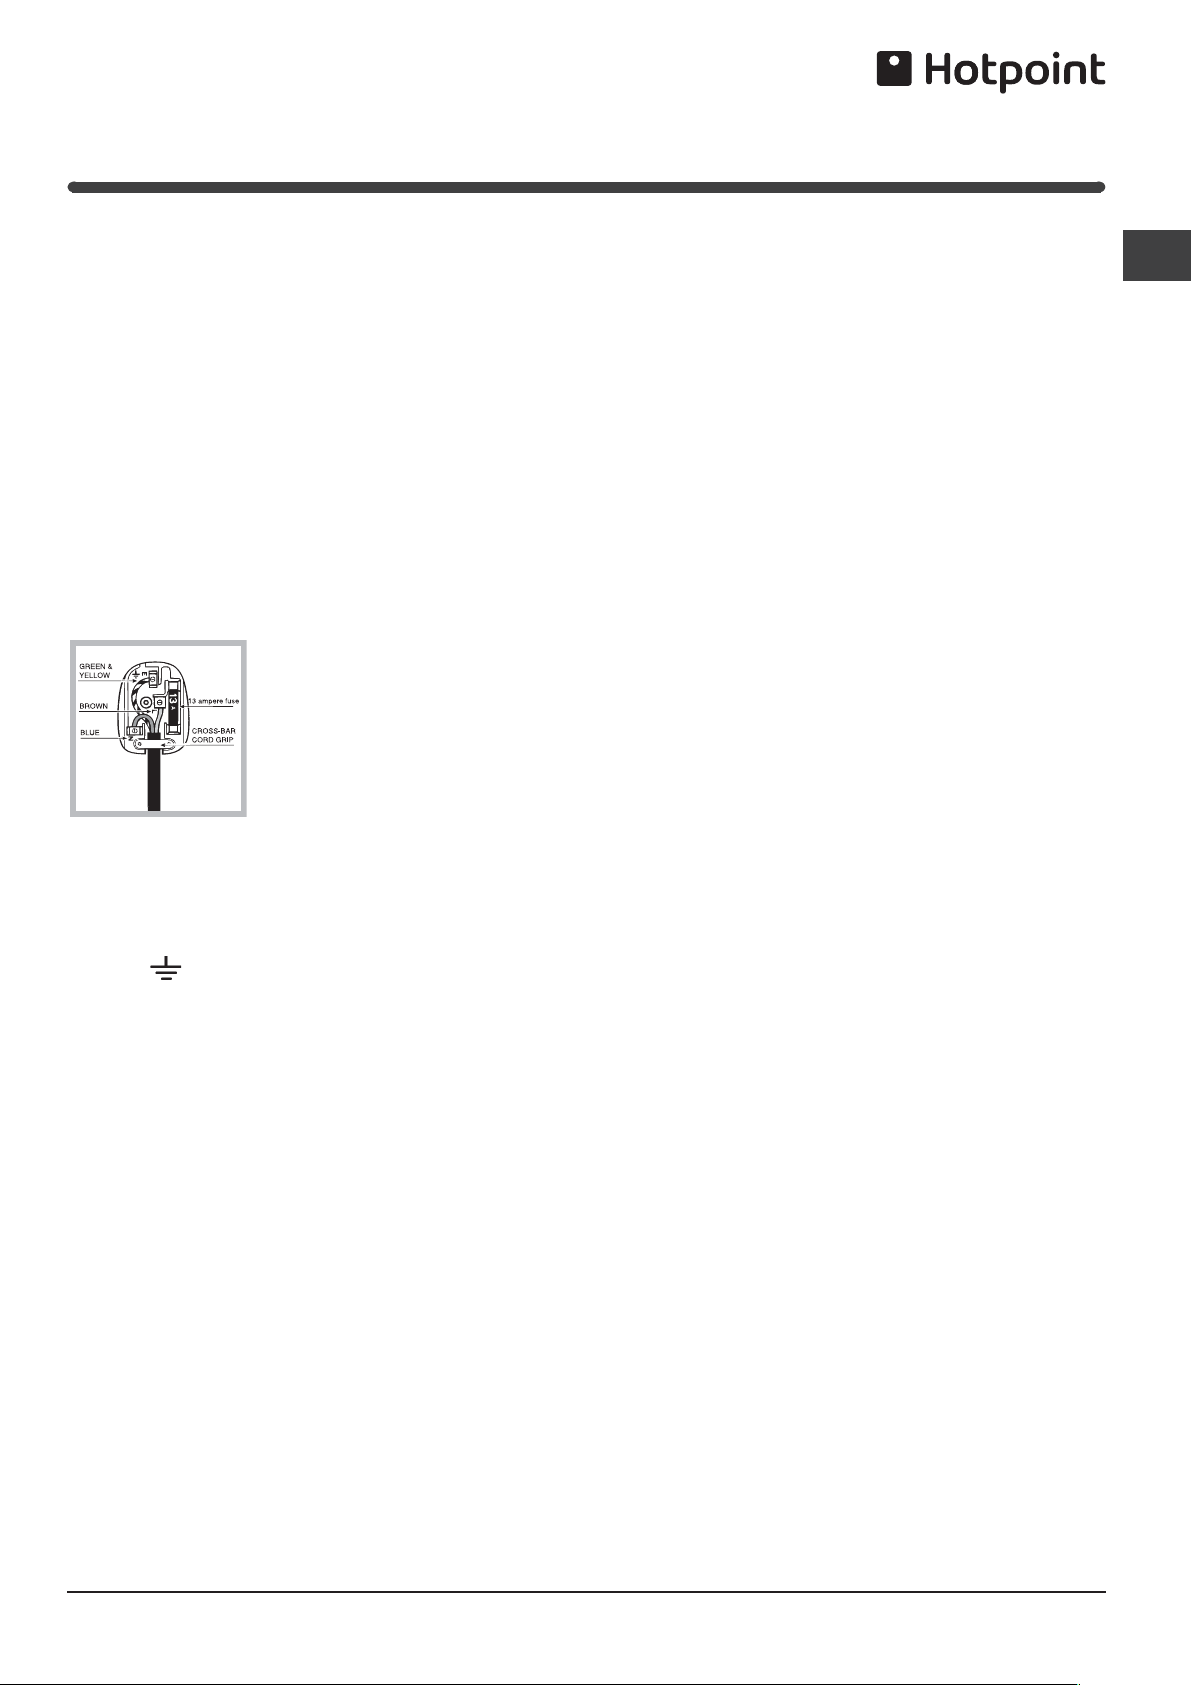
Fitting a new plug
IMPORTANT:
WIRES IN THE MAINS LEAD ARE COLOURED IN
ACCORDANCE WITH THE FOLLOWING CODE...
Green and Yellow - Earth
Blue - Neutral
Brown - Live
Reversible doors
GB
If it is necessary to change the direction in which the
doors open, please contact the Technical Assistance
Centre.
As the colours of the wires in the mains lead may not
correspond with the coloured markings identifying the
terminals in your plug, proceed as follows:
- Connect Green and Yellow wire to terminal marked
'E' or
- Connect Brown wire to terminal marked 'L' or
coloured red or brown.
- Connect Blue wire to terminal marked 'N' or
coloured Black or Blue.
If a 13amp plug (BS 1363) is used it must be
fitted with a 13amp fuse. A 15amp plug must be
protected by a 15amp fuse, either in the plug or adaptor
or at the distribution board.
If you are in any doubt about the electrical
supply to your machine, consult a qualified
electrician before use.
CE Marking certifies that this appliance conforms to
the following EEC directives :
Low Voltage Equipment - 73/23/EEC & 93/68 EEC
Electromagnetic Compatibility 89/336/EEC, 92/31/EEC
& 93/68/EEC
or coloured Green and Yellow.
3
Page 4
Description of the
appliance
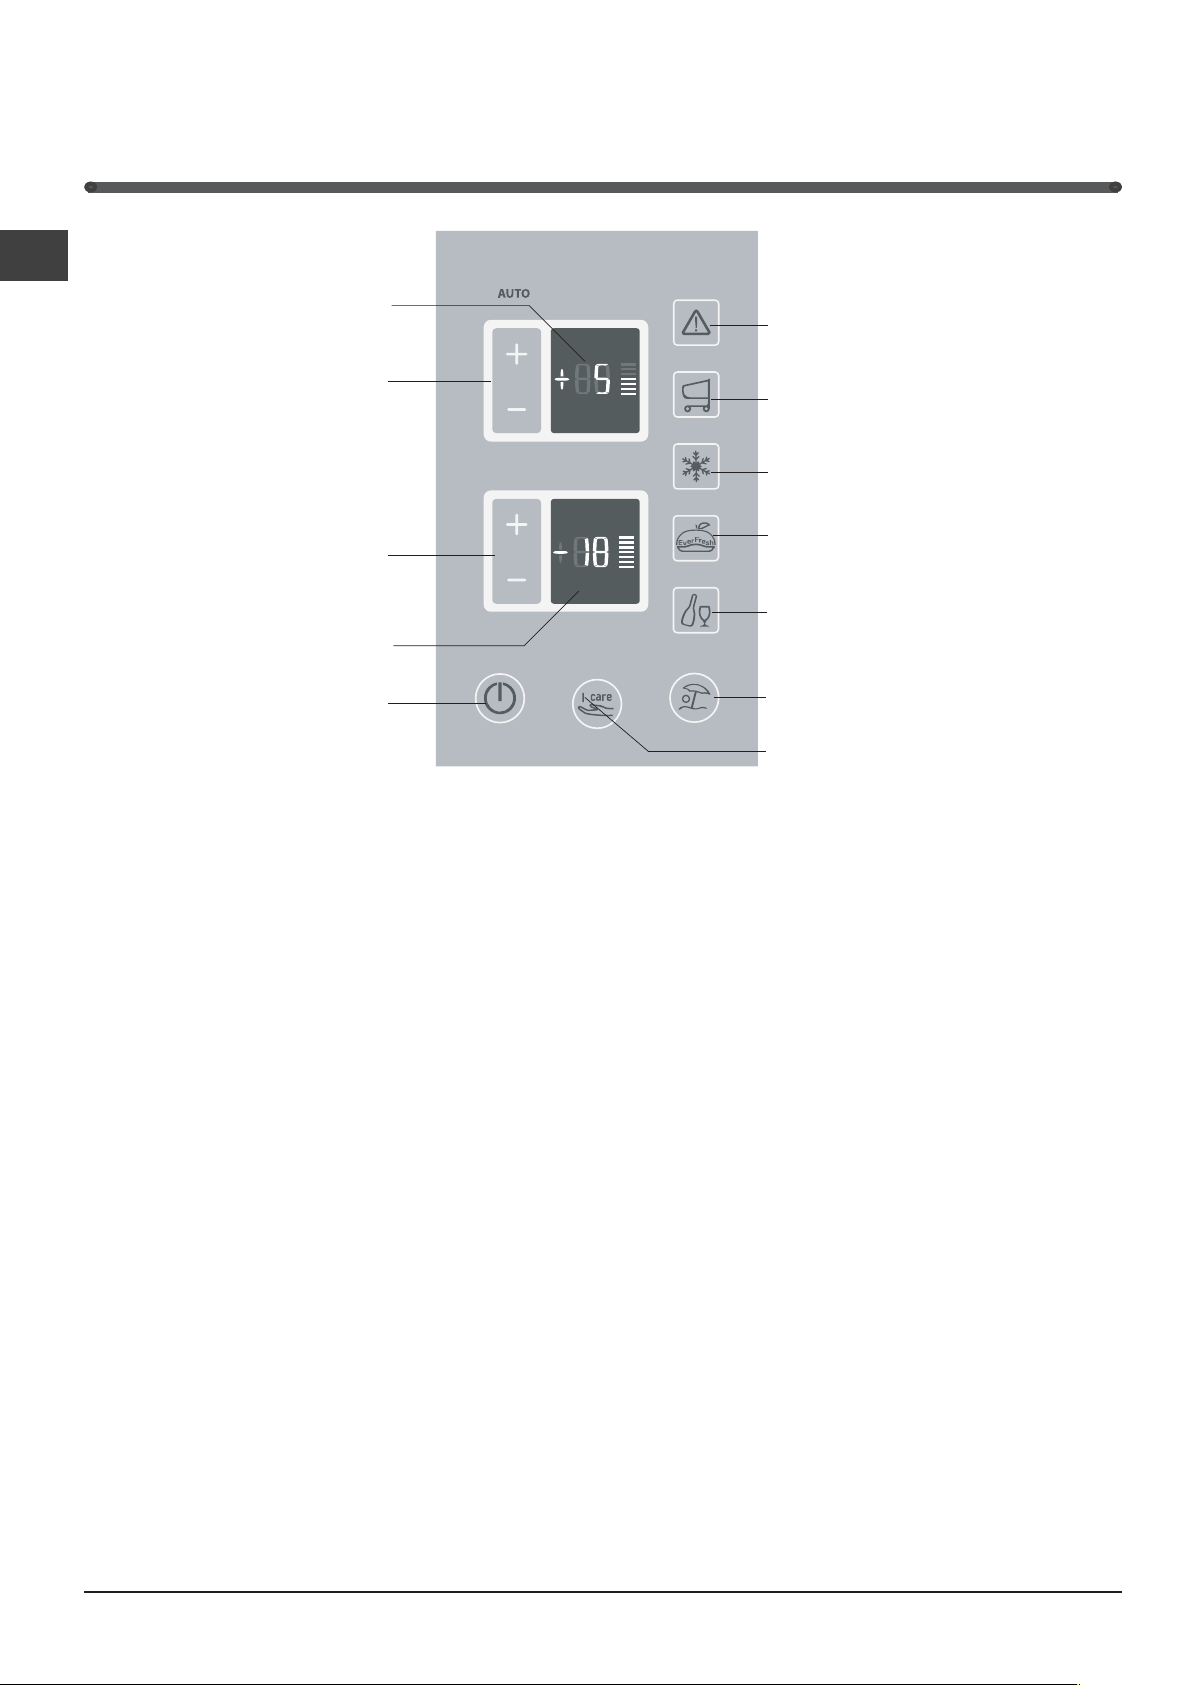
Control panel
GB
REFRIGERATOR
Display
ALARMS
REFRIGERATOR
Temperature
Adjustment
FREEZER
Temperature
Adjustment
FREEZER
Display
ON/OFF
ON/OFF
It is possible to switch the whole product (both the
refrigerator and freezer compartments) on by pressing
this button. The red LED indicates that the product is
switched off, while the green LED shows that it is
operating. To switch the product off, press and hold the
ON/OFF button for at least two seconds.
I CARE
This is used to activate and deactivate the I Care
function (the optimal temperature for energy saving
levels). When activated, the AUTO LED and the I Care
LED illuminate simultaneously.
ALARMS
This controls all the alarm signals connected to product
operation.
Child Lock
Enables the buttons on the control panel to be locked in
order to avoid various functions being activated accidentally
by children. To enable the Child Lock function, the ALARM
button must be pressed for 2 seconds.
REFRIGERATOR + and - Temperature Adjustment
Enable the temperature setting of the refrigerator to be
modified, with the relative confirmation of the
temperature selected shown on the display.
SUPER COOL
SUPER FREEZE
EVER FRESH
ICE PARTY
HOLIDAY
I CARE
FREEZER Display
Shows the set temperature relating to the freezer
compartment.
SUPER COOL
Activates or deactivates the SUPER COOL function (rapid
cooling). The refrigerator display shows the text SC).
SUPER FREEZE
Activates or deactivates the SUPER FREEZE function
(rapid freezing), The freezer display shows the text SF).
EVER FRESH
Activates or deactivates the Ever Fresh function. When
the LED is illuminated, the vacuum-packing system is
operating; when the LED switches off the operation is
complete and the container airtight. A red LED signals
that a problem has been encountered.
HOLIDAY
Activates or deactivates the HOLIDAY function (the
AUTO LED and HOLIDAY LED illuminates).
ICE PARTY
Activates or deactivates the ICE PARTY function (It
reduces the temperature of the freezer for the period of
time required to cool a bottle.).
FREEZER + and - Temperature Adjustment
Enable the temperature setting of the freezer to be
modified, with the relative confirmation of the
temperature selected shown on the display.
REFRIGERATOR Display
Indicates the set temperature relating to the refrigerator
compartment or shows that it has been deactivated (in
this case the display shows - -).
4
Page 5
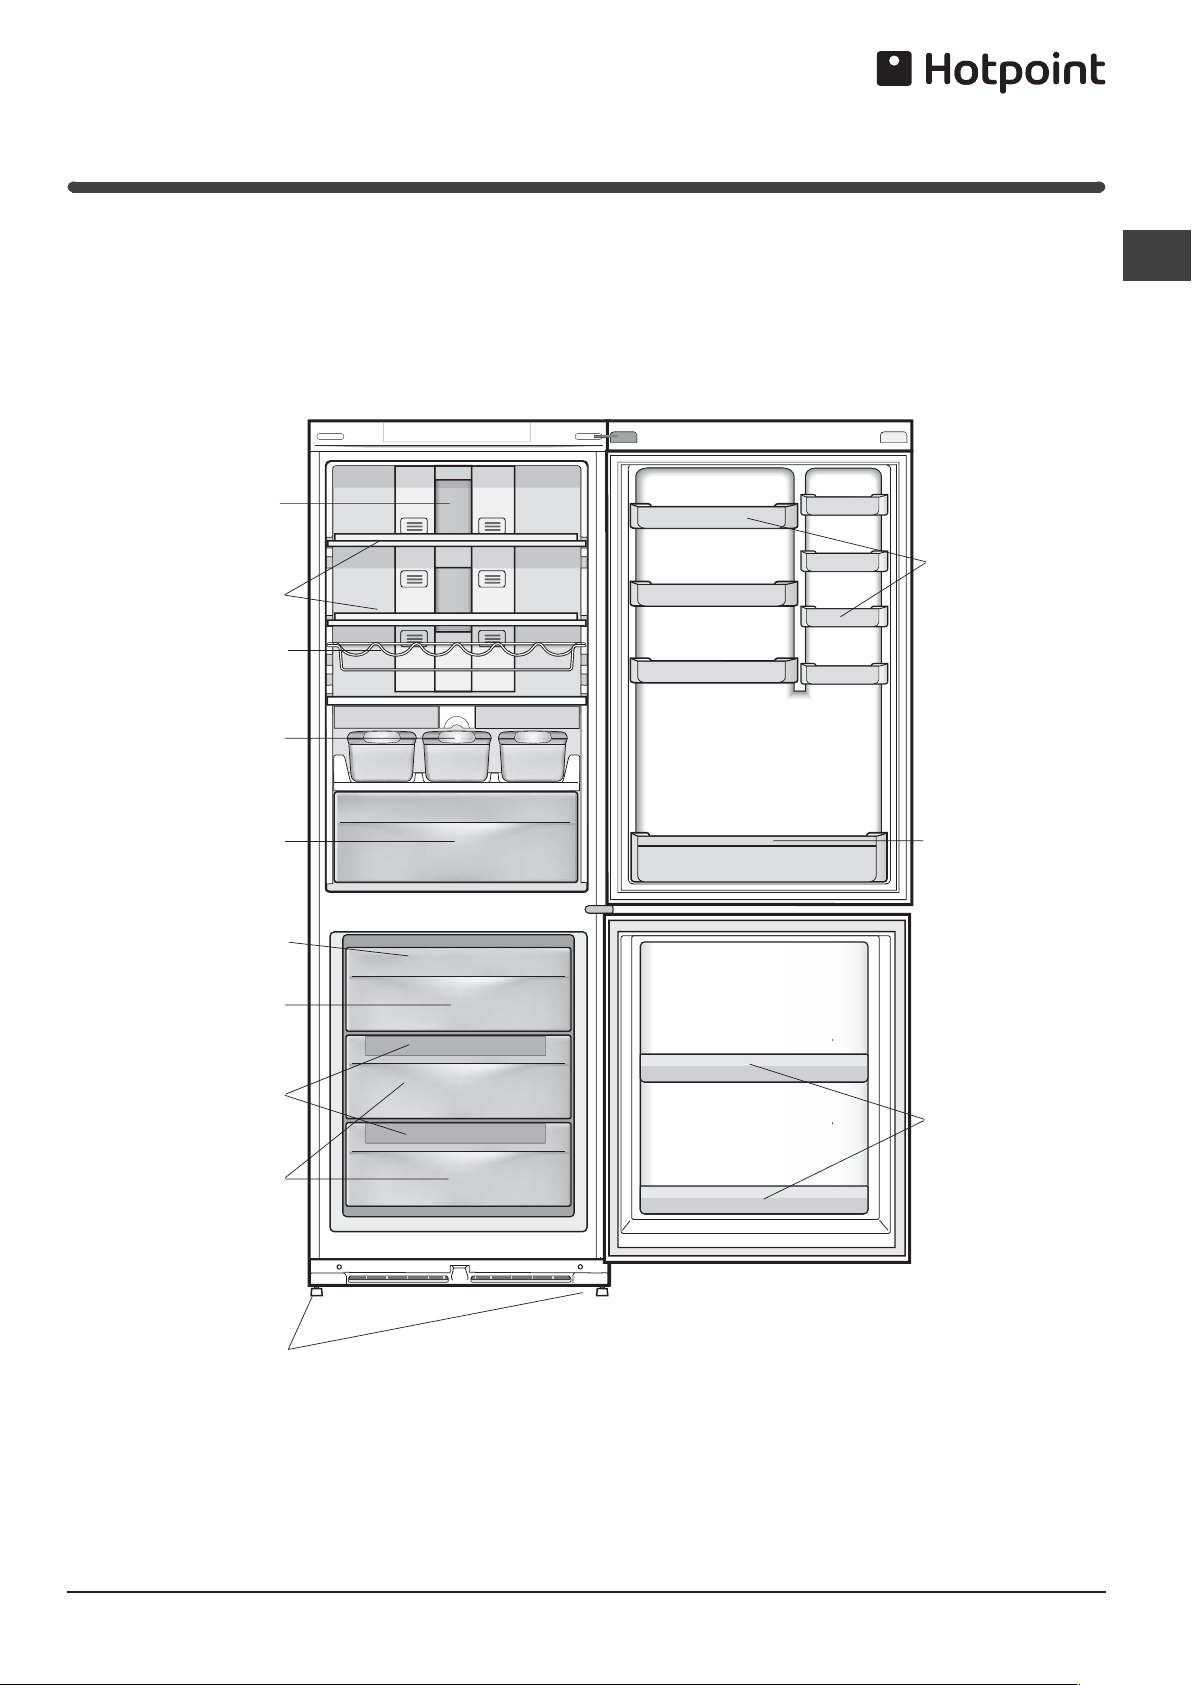
Overall view
(see Maintenance)
SHELVES
LAMP
GB
Storage SHELF
WINE RACK
EVER FRESH
FRUIT and
VEGETABLE
compartment
ICE TRAYS Ice
Care
FREEZER and
STORAGE
compartment
ICE TRAYS Ice
Care
STORAGE
compartments
*
BOTTLE shelf
Storage SHELF
Levelling FEET
Varies by number and/or position.
Available only on certain models.
*
5
Page 6
Accessories
WATER LEVEL
MAX
WATER LEVEL
MAX
WATER LEVEL
MAX
Refrigerator compartment
GB
1
2
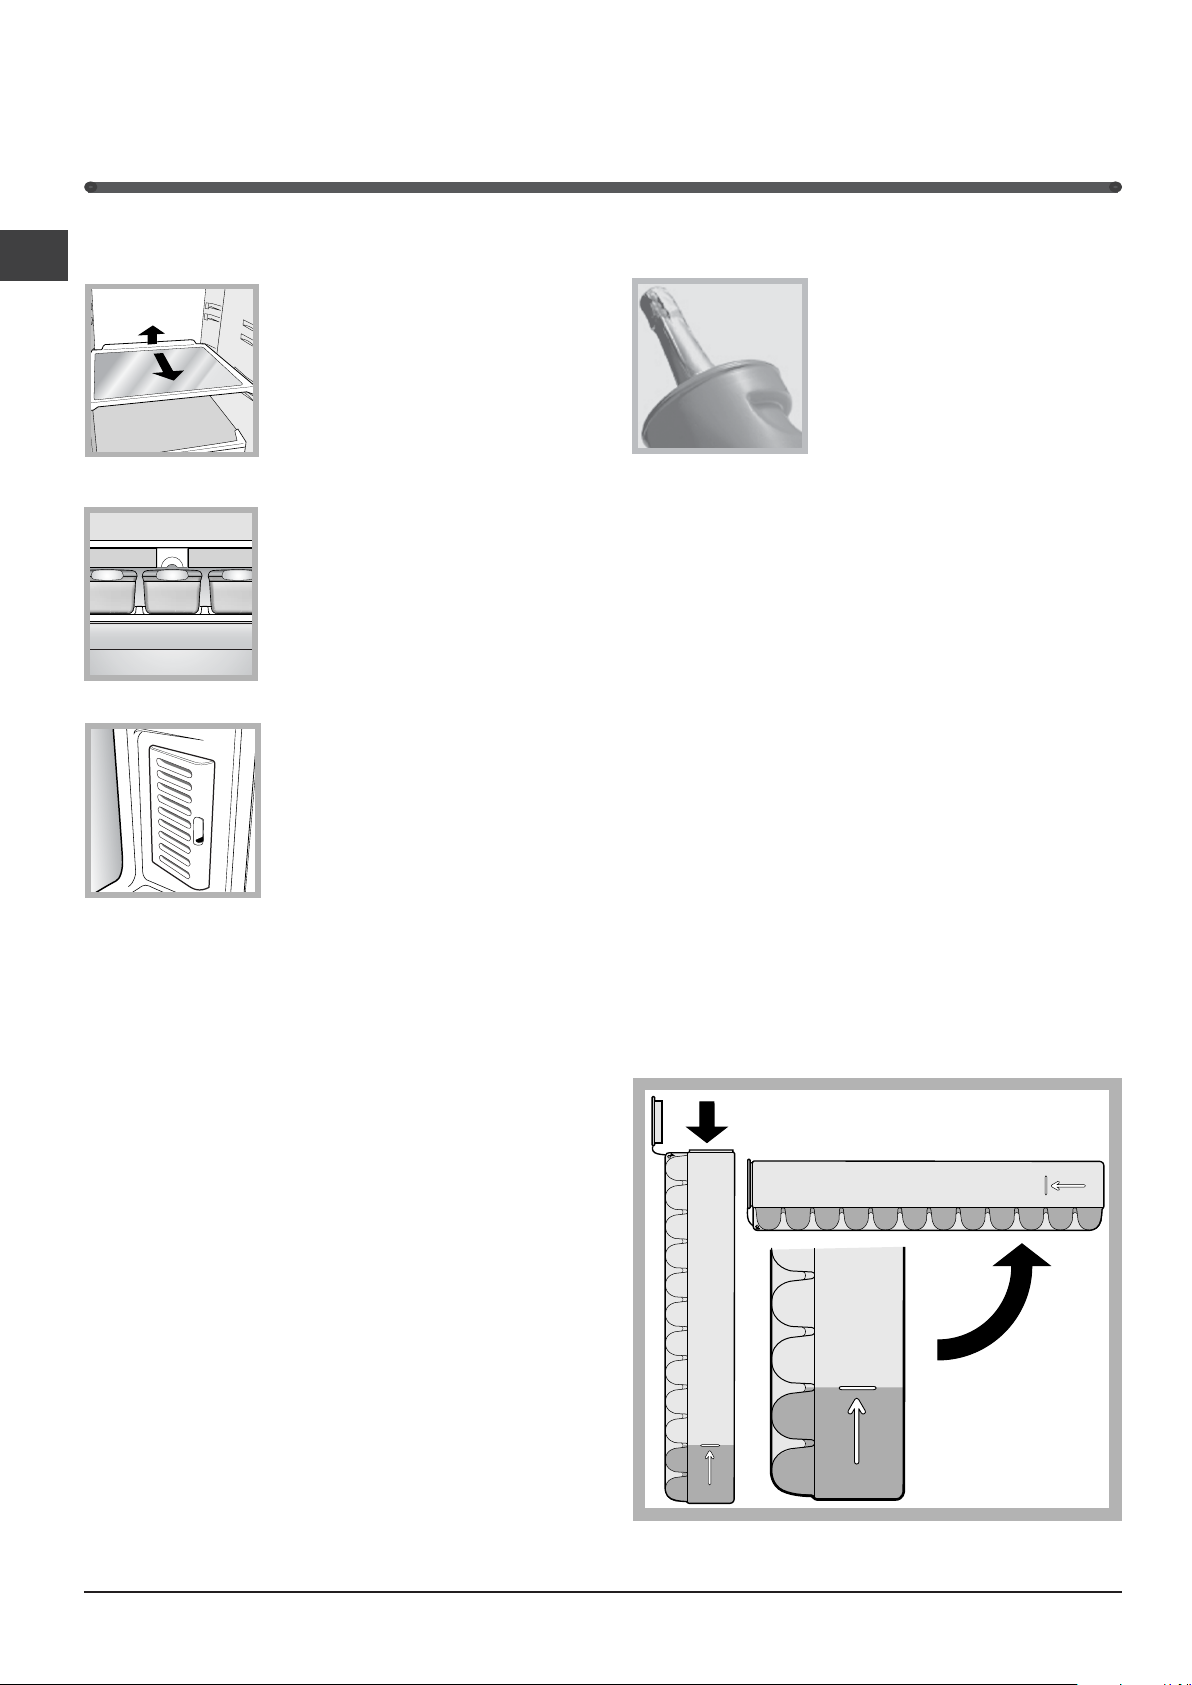
SHELVES: the shelves are
removable and their height may
be adjusted thanks to special
rails (see diagram), allowing easy
storage of large containers and
bulky food. The height may be
adjusted without removing the
shelf completely.
EVER FRESH: shelf dedicated to
storing food in vacuum-packed
containers. Food keeps for longer
when stored in the containers
provided.
ODOUR FILTER: some models
are fitted with a new active
carbon odour filter, which
ensures better air quality inside
the refrigerator.
The filter is located on the bottom
right-hand side, inside the
ventilation opening.
Freezer compartment
ICE PARTY: ensures bottles of
sparkling wine or champagne
reach the right temperature. Place
the bottle in the bucket provided
inside the FREEZER and
STORAGE compartment. The
bucket may be used to serve the
bottle and keeps it cool outside the
appliance.
ICE CARE tray
The fact that they are situated on the top part of the
freezer drawers ensures greater cleanliness: the ice no
longer comes into contact with the food placed inside
the freezer compartment; furthermore, the dripping of
the water during filling is avoided (a lid to cover up the
hole after filling with water is also provided).
1. Pull out the tray by pushing it up.
Check that the tray is ompletely empty and fill it with
water through the opening provided.
2. Take care not to exceed the level indicated (MAX
WATER LEVEL). Excess water prevents the ice cubes
from dispensing (if this happens, wait for the ice to
melt and empty the tray).
3. Turn the tray 90°: due to the connected compartments
each mould fills with water (see diagram).
4. Close the opening with the lid provided and put the
tray back.
5. When the ice has formed (minimum time
approximately 8 hours) knock the tray against a hard
surface and wet the outside so that the ice cubes
come loose and take them out through the opening.
6
Page 7

Start-up and use
Starting the appliance
! After transportation of the appliance, carefully place it in
an upright position and wait at least 3 hours before
connecting it to the electricity mains, to make sure it
operates as it should.
Clean the inside of the refrigerator well using warm
water and bicarbonate of soda before placing food
inside it.
The appliance comes with a motor protection control
system which makes the compressor start
approximately 8 minutes after being switched on. The
compressor also starts each time the power supply is
cut off whether voluntarily or involuntarily (blackout).
Freezer Compartment
When the product is switched on (the ON/OFF button is
pressed for more than two seconds) the freezer
compartment is set to its default value of -18°C. We
recommend that the SUPER FREEZE function is set (the
freezer display shows the text SF) in order to accelerate
the cooling process of the compartment; when the inside
of the compartment has reached its optimal temperature
the function will be deactivated and the food may be
placed inside.
Refrigerator Compartment
When the appliance is switched on the refrigerator
compartment is set to its default value of +5°C. We
recommend that the SUPER COOL function is set (the
refrigerator display shows the text SC) in order to
accelerate the cooling process of the compartment. After a
few hours it will be cool enough for food to be placed
inside.
Navigating the display
Setting the temperatures:
If the product is switched on, the refrigerator and freezer
displays will indicate the temperatures set at that moment.
To change them, simply press the + and - buttons
corresponding to the compartment for which you wish to
change the set temperature. To be specific, each time one
of the buttons is pressed the temperature is increased or
decreased by 1°, and the number of illuminated horizontal
bars is adjusted accordingly. The temperature values that
may be selected for the refrigerator compartment are
+8°C, +7°C, +6°C, +5°C, +4°C, +3°C and +2°C, while the
values that may be set for the freezer are -18°C, -19°C, 120°C, -21°C, -22°C, -24°C and -26°C.
The temperatures are automatically set to +5°C for the
refrigerator compartment and -18°C for the freezer
compartment (these are standard food storage values).
When the I Care function is active, the appliance
automatically adjusts the temperatures according to the
conditions inside and outside the refrigerator; the operation
of this function is signalled by the text AUTO.
Whenever it is necessary to activate the I Care function
at temperatures that are different to the standard storage
values, the I Care button must be pressed as soon as the
function is activated and held down while the new
temperatures are set using the + and - buttons. Under
these conditions, the temperatures may be set to 4°C, 5°C
and 6°C for the refrigerator compartment and -18°C, -19°C
and -20°C for the freezer compartment.
When the HOLIDAY function is active the temperature may
not be adjusted, however the appliance adjusts itself
automatically so that the optimal settings for the situation
are used: +12°C for the refrigerator compartment and 18°C for the freezer compartment. This function is
indicated by the text.
To activate and deactivate the functions simply press the
relevant button and the function status will be signalled by
the corresponding LED switching on or off.
Several functions (SUPER COOL, SUPER FREEZE, ICE
PARTY, I CARE) are incompatible with others
(HOLIDAY,...); remember that there is a pre-set order of
priority which will help you to use the product in the best
possible way.
When the Ice Party function has finished, press the ICE
PARTY button to stop the relevant LED from flashing. This
flashing indicates that the function is complete and that the
bottle should be removed from the freezer compartment.
Child Lock
To enable the Child Lock function, the ALARM button must
be pressed for 2 seconds; the button lock activation is
confirmed by a short beep and the text LO CH appears
on the refrigerator and freezer displays. This text is then
replaced by the refrigerator and freezer temperatures set
prior to when the child lock function was enabled.
To deactivate the function, press the ALARM button or 2
seconds; deactivation will be confirmed by a short beep
and the text CH OF will appear on the refrigerator and
freezer displays for 1 second.
GB
7
Page 8
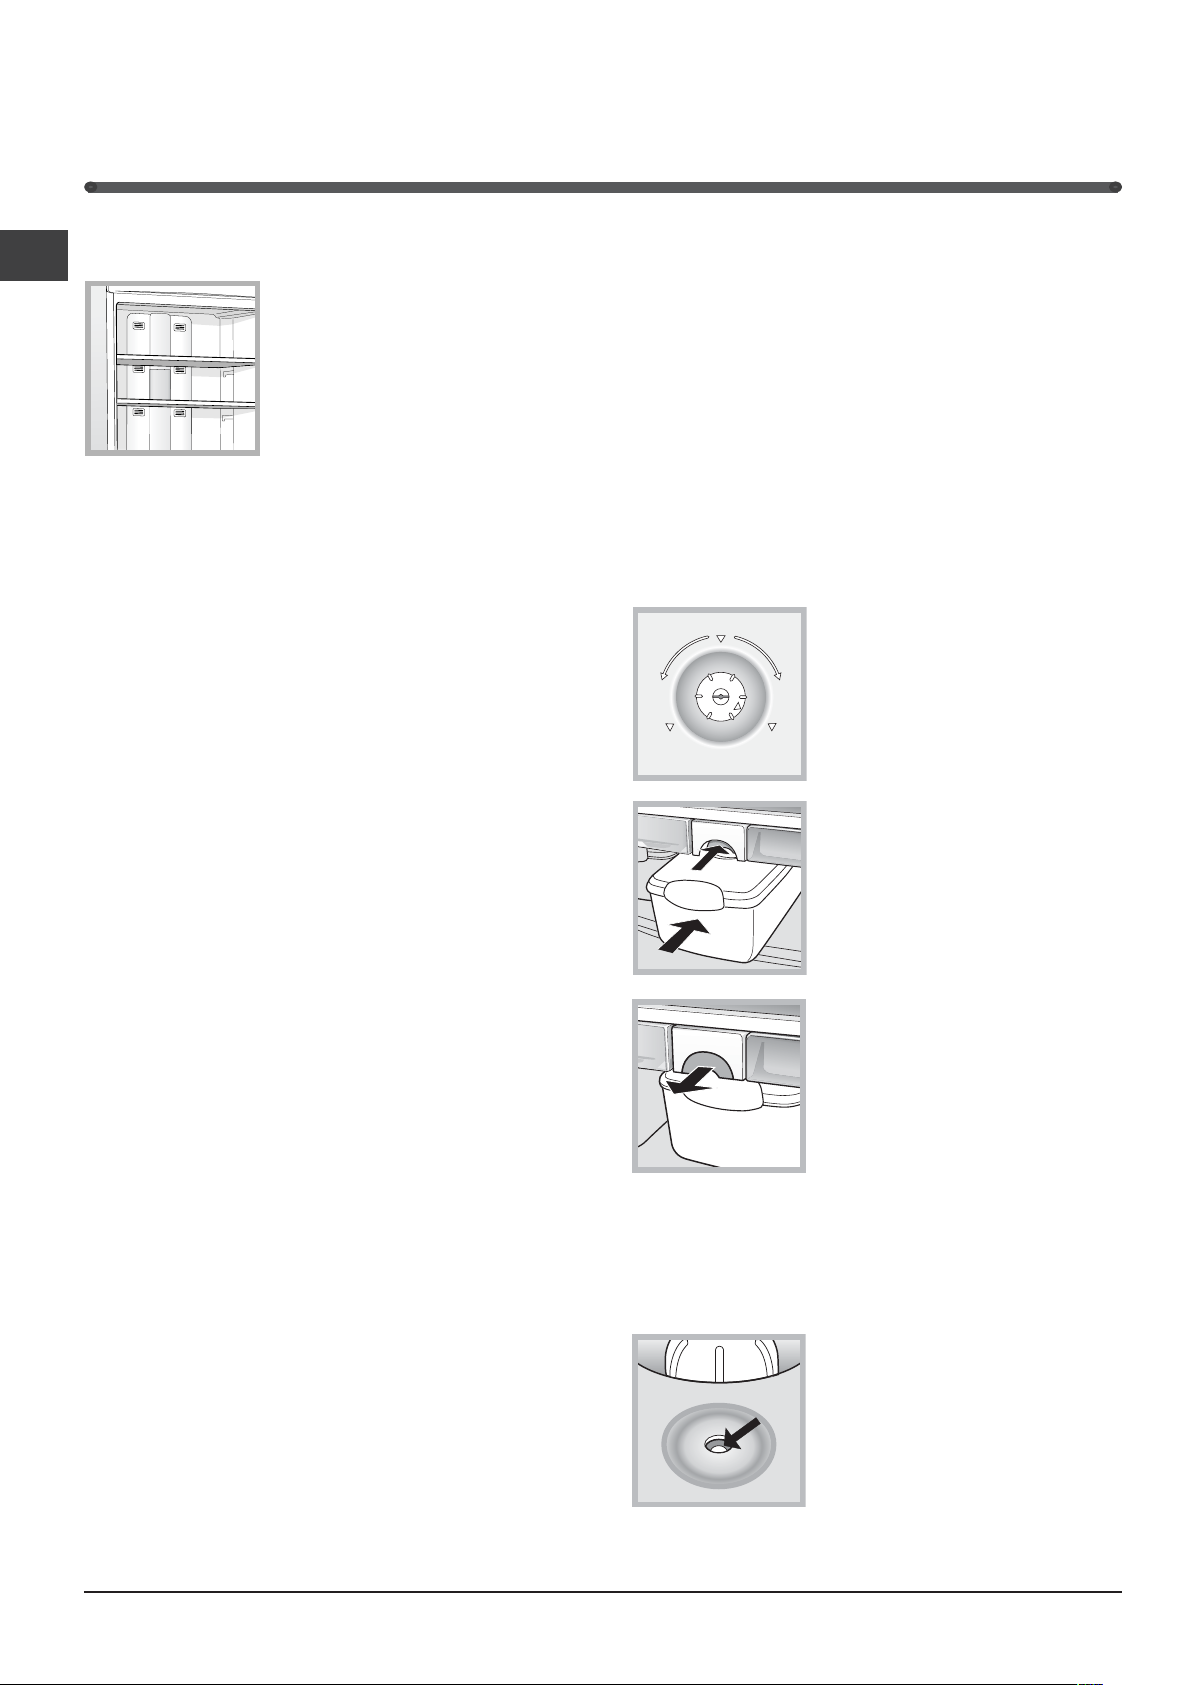
Chiller system
GB
No Frost
This system can be recognised
by the aeration cells located on
the back walls of each
compartment.
The No Frost system circulates
cold air continuously to collect
humidity and prevent ice and frost
formation. The system maintains
an optimal humidity level in the compartment,
preserving the original quality of the food, preventing the
food from sticking together and making defrosting a
thing of the past.
! Do not block the aeration cells by placing food or
containers in direct contact with the refrigerating back
panel.
! Close bottles and wrap food tightly.
Ever Fresh
Ever Fresh system
The Ever Fresh system is activated and deactivated by
means of a button on the refrigerator shelf, an external
button on the display and a knob on the cover of each
container.
! There is a pump in the centre of the Ever Fresh shelf
which sucks the air out of the containers.
Activating and deactivating Ever Fresh
1. Fill the container. Make sure that the food inside
leaves room for the container to be closed properly.
2. Put the lid on the container.
U
U
C
M
A
V
O
T
O
U
A
V
3. Close the handles on either
side of the container and turn the
knob on the lid of the container
all the way to the CLOSE
O
T
N
R
E
E
P
P
A
O
C
H
C
position. Then turn the knob
I
L
U
O
S
S
O
E
anticlockwise to the VACUUM
position (see figure A).
The absence of air inside the containers ensures that
food is preserved for longer periods of time while
maintaining its original appearance, taste and nutritional
characteristics.
Food
In
normal
conditions
With
EVER
FRESH*
General cooked dish 2 days 10 days
Ready-made rice or pasta dish 2 days 10 days
Fresh fish 2-3 days 4-5 days
Fresh raw meat 3 days 9 days
Hard cheese 15 days 60 days
Raw vegetables 5 days 21 days
Fresh fruit 10 days 21 days
Dry biscuits 180 days 365 days
Pastries with cream/custard 2 days 10 days
Other desserts/pastries 5 days 20 days
* The above table is indicative and refers to food
storage in the refrigerator at temperatures ranging
between 3°C and 5°C. The length of time food lasts for
will, however, depend on the initial freshness of the
products, preparation and storage methods, and correct
use of the Ever Fresh function.
! The foods tendency to spoil and use-by date must
always be borne in mind when using the Ever Fresh food
storage system. This method of storing food does not
change any of the characteristics of the food.
! Use only the containers that come with the product to
store food in the Ever Fresh system. Do not use any
other type of container.
B
4. Press the button on the shelf
and place the container in the
1
central position (see figure B).
5. Lock the container into
position by pulling the button on
2
C
the shelf (see figure C).
6. Activate the Ever Fresh
function by pressing the relevant
button on the external display
(the Ever Fresh icon will light up).
A slight noise can be heard while
the Ever Fresh system is in
operation.
7. Wait for the signal that the operation has finished (the
Ever Fresh icon will switch off).
8. Unlock the container from its position by pressing the
button on the shelf.
D
9. Take it out of the refrigerator
and turn the knob clockwise to
the CLOSE position to avoid
accidental opening (see figure
A). The absence of air inside the
container is indicated by the
valve at the bottom (see figure
D).
8
Page 9
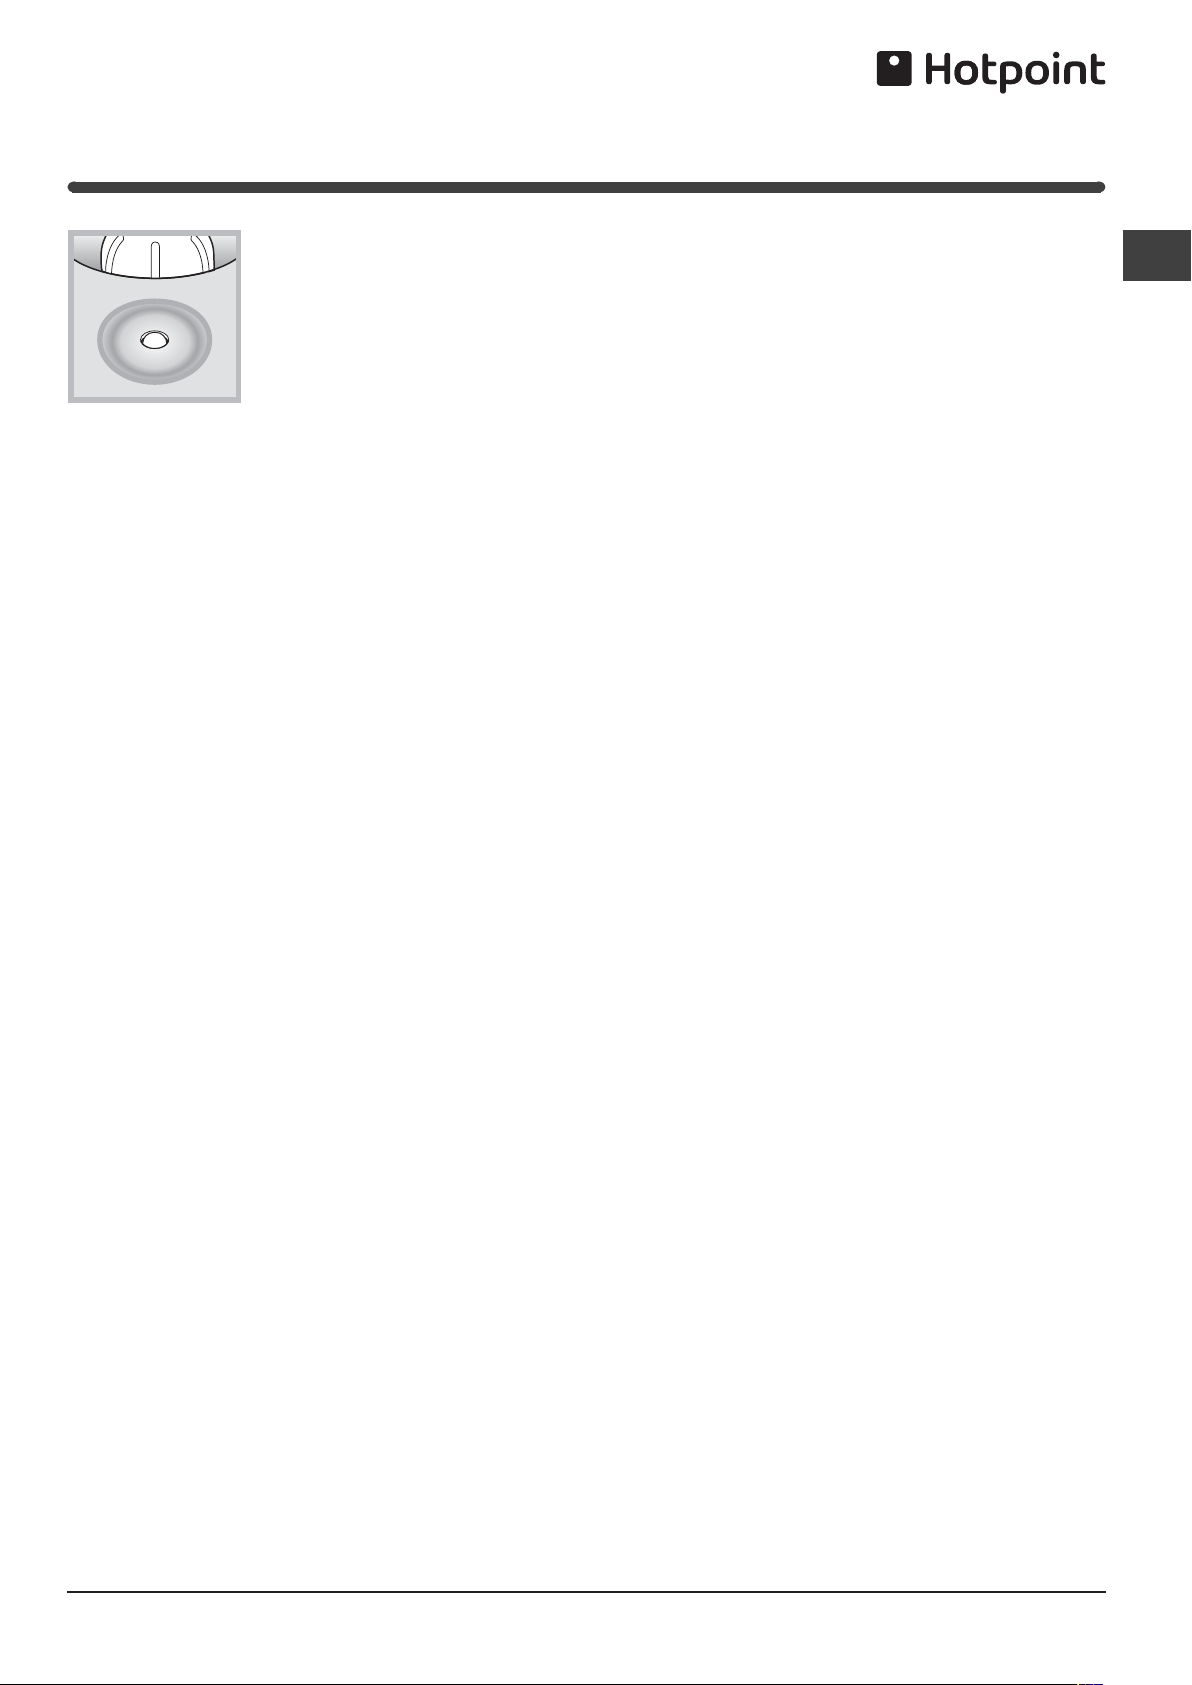
E
! The lid of the container is provided with a circular
valve. When the valve is low (figure D) there is no air
inside the container. When the valve is high (figure E) air
is present inside the container.
! If, after you have created a vacuum (instructions
1-9), the valve moves upward (see figure E) within three
days, check the lid has been put on the container
properly and/or that the container is intact. Check the
storage status of the food before repeating the vacuum
storage operation.
! The Ever Fresh function is equipped with a safety
device that switches off the pump in case of malfunction
(if the container is missing or incorrectly positioned, for
example). If the safety device is activated, the Ever
Fresh button must be pressed to restore normal
operation.
10. To open the container, turn
the knob anticlockwise to the
OPEN position (see figure A): this
will allow air to enter the container
and make it easy to open. The
valve will move upwards as air
enters the container (see figure
E).
Do not use the containers for any type of cooking (in the
microwave or oven, on an electric plate, over a flame,
etc.).
Do not put the containers in the freezer.
Do not clean the lids in a dishwasher.
Vacuum storage
Pre-packed foods stored using the vacuum system
must still be consumed before the use-by date.
Repeatedly storing these vacuum-packed foods does
not change their natural tendency to spoil.
Do not store defrosted foods using the vacuum system
unless they have been cooked already.
Stored food should be prepared while fresh (chopped,
sliced, peeled, cooked) and should be in perfect
condition.
Perishable foods stored using the vacuum system
must still be stored inside the refrigerator.
Cooked foods must be left to cool before being stored
using the vacuum system.
Using the refrigerator to its full potential
Adjust the temperature using the display.
GB
Using Ever Fresh to its full potential
The following information is a guide on how to get the
best from the Ever Fresh system and the food it stores.
Ever Fresh containers
The maximum fill level marked on the container must
be respected when storing liquids of any kind.
Vacuuming actual liquid from the container may
damage the Ever Fresh pump.
Repeated opening of the vacuumed containers may
disturb the storage conditions of the food inside.
Before using the system, make sure there is no visible
damage on any part of the container.
The container valve has a built-in security system. If,
after you have created a vacuum, the valve moves
upward within three days, check the lid has been put
on the container properly and/or that the container is
intact. Check the storage status of the food before
repeating the vacuum storage operation. See
Activating and deactivating Ever Fresh.
The containers were designed to come into direct
contact with food.
Activate the SUPER COOL function to lower the
temperature quickly, for example, when you place a
large number of new food items inside a fridge and
the internal temperature rises slightly. This function
quickly cools the groceries by temporarily reducing
the temperature until it reaches the ideal level.
Place only cold or lukewarm foods in the
compartment, never hot foods (see Precautions and
tips).
Remember that cooked foods do not last longer than
raw foods.
Do not store liquids in open containers: they will
increase the level of humidity in the refrigerator and
cause condensation to form.
9
Page 10

Using the freezer to its full potential
GB
Adjust the temperature using the display.
To freeze foods in safely and correctly, follow the
instructions below: place the food in the FREEZER
and STORAGE compartment, making sure that it
does not come into contact with any food that has
already been frozen; press the rapid-freezing
SUPER FREEZE button (the corresponding LED
lights up) and close the door. The function
deactivates automatically after 24 hours or when
the inside of the compartment has reached the
optimal temperature (the LED switches off).
Do not re-freeze food that is defrosting or that has
already been defrosted. These foods must be
cooked and eaten (within 24 hours).
Fresh food that needs to be frozen must not come
into contact with food that has already been
defrosted.
Do not place glass bottles which contain liquids,
and which are corked or hermetically sealed in the
freezer because they could break.
The maximum quantity of food that may be frozen daily
is indicated on the plate containing the technical
properties located on the bottom left side of the
refrigerator compartment (for example: Kg/24h: 4).
! Do not open the door during freezing.
! If there is a power cut or malfunction, do not open the
freezer door. This will help maintain the temperature
inside the freezer, ensuring that foods are conserved for
at least 9 -14 hours.
! To avoid blocking the air circulation inside the freezer,
it is advisable not to obstruct the ventilation holes with
food or containers.
10
Page 11
Maintenance and care
Switching the appliance off
During cleaning and maintenance it is necessary to
disconnect the appliance from the electricity supply:
1. Hold the ON/OFF button down for more than two
seconds until OFF appears on both indicator displays
(refrigerator and freezer).
2. Pull the plug out of the socket.
! If this procedure is not followed, the alarm may sound.
This alarm does not indicate a malfunction. To restore
normal operation, hold the ON/OFF button down for
more than two seconds. To disconnect the appliance,
follow points 1 and 2 above.
Cleaning the appliance
The external and internal parts and the rubber seals
may be cleaned using a sponge that has been
soaked in lukewarm water and bicarbonate of soda or
neutral soap. Do not use solvents, abrasive products,
bleach or ammonia.
The removable accessories may be soaked in warm
soapy water or dishwashing liquid. Rinse and dry
them carefully.
The back of the appliance may collect dust. This can
be removed by carefully using the hose of a vacuum
cleaner set on medium power. The appliance must be
switched off and the plug disconnected from the
electricity mains before it is cleaned.
Ever Fresh
Use a clean dry cloth to clean the opening of the
vacuum system in the centre of the Ever Fresh shelf.
Do not use water or solvents.
The opening in the centre of the Ever Fresh shelf should
not come into contact with water or any other liquids.
Wash and dry the containers before using them.
Do not clean the lids in a dishwasher.
Before closing the containers make sure that the
edges are clean. Traces of dirt may affect the sealing
process and consequently the length of time food may
be stored.
If the knob on the cover needs to be cleaned, turn it
anticlockwise until it comes off and wash it using water
and neutral detergent. After drying it thoroughly, screw
it back on.
If you wish to take the Ever Fresh shelf out and clean it,
you must first disconnect the tube at the back of the
shelf. Make sure it is reattached properly in order to
avoid blockages and system malfunctions. The Ever
Fresh shelf should not come into contact with water or
other liquids as these may damage the system.
Avoiding mould and unpleasant odours
The appliance is manufactured with hygienic, odour
free materials. Food should be wrapped well and
containers closed properly in order to maintain this
hygiene. This will also prevent the formation of stains.
If you wish to switch the appliance off for an extended
period of time, clean the inside and leave the doors
open.
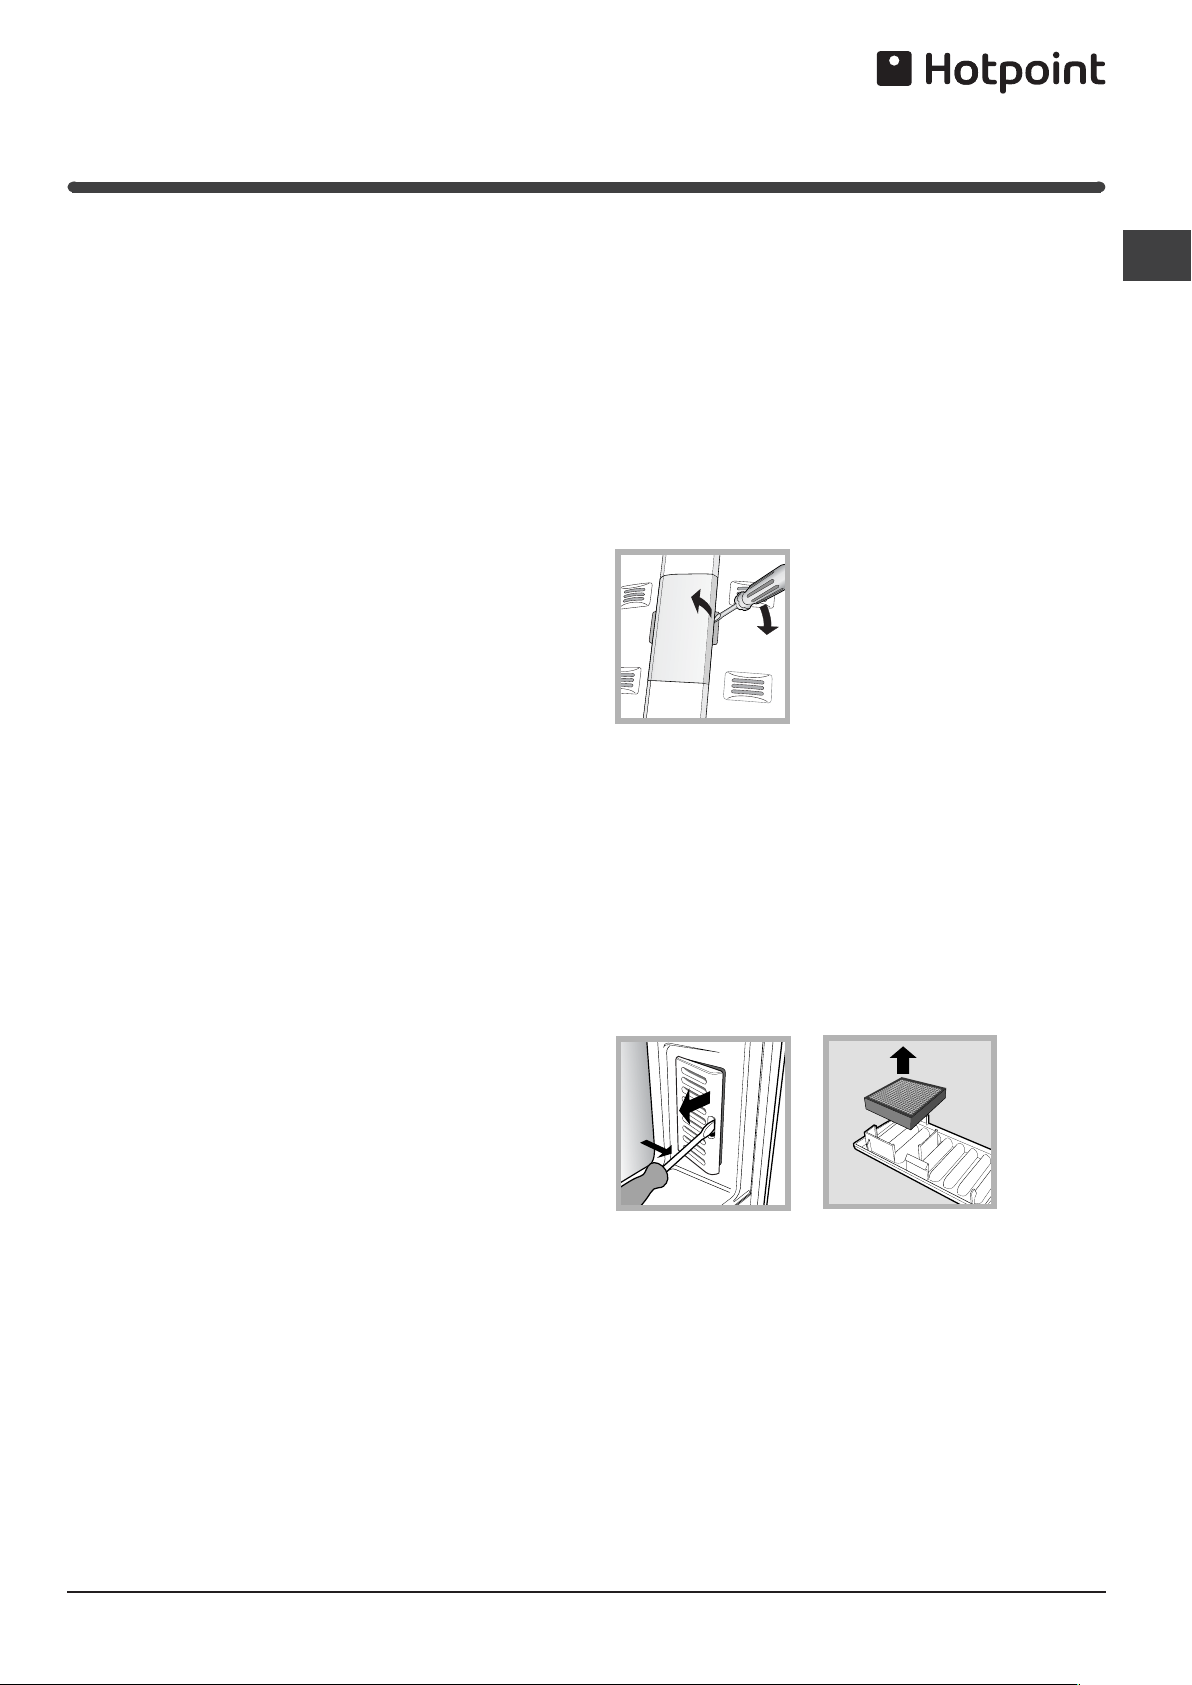
Replacing the light bulb
To replace the light bulb in the
refrigerator compartment,
disconnect the plug from the
electricity mains.
Access the light bulb as shown
(see diagram) and replace it with
a similar light bulb, the power of
which should not exceed 10 W.
Changing the odour filter
The filter should be replaced approximately 6-8 months
after it has been activated. This period may vary
depending on the type of food stored inside the
refrigerator. For information on where a replacement filter
may be purchased, contact Assistance (see
Assistance). To replace the filter, follow the instructions
(see diagrams A and B).
A
B
GB
11
Page 12
Precautions and tips
! The appliance was designed and manufactured in
GB
compliance with international safety standards. The
following warnings are provided for safety reasons and
must be read carefully.
This appliance complies with the following
European Community Directives:
- 73/23/EEC dated 19/02/73 (Low Voltage) and
subsequent amendments;
-89/336/EEC dated 03.05.89 (Electromagnetic
Compatibility) and subsequent amendments;
- 2002/96/CE.
General safety
The appliance was designed for domestic use inside
the home and is not intended for commercial or
industrial use.
The appliance must be used by adults only to store
and freeze food products according to the
instructions in this manual.
The appliance must not be installed outdoors, even in
covered areas. It is extremely dangerous to leave the
appliance exposed to rain and storms.
Do not touch the appliance when barefoot or with wet
or damp hands and feet.
Do not touch the internal cooling elements: this could
cause skin abrasions or frost/freezer burns.
When unplugging the appliance always pull the plug
from the mains socket, do not pull on the cable.
Always switch the appliance off and disconnect it
from the electrical supply before cleaning it or
carrying out maintenance work. It is NOT sufficient to
hold the ON/OFF button down for more than two
seconds to eliminate all electrical contact.
In case of malfunction, under no circumstances should
you attempt to repair the appliance yourself. Repairs
carried out by inexperienced persons may cause injury
or further malfunctioning of the appliance.
Do not use utensils other than the scraper provided,
or electrical equipment which is not of the type
specified by the manufacturer, inside the frozen food
storage compartments.
Disposal
Observe local environmental standards when
disposing of packaging material as some of this
material may be recycled.
The European Directive 2002/96/EC on Waste
Electrical and Electronic Equipment (WEEE), requires
that old household electrical appliances must not be
disposed of in the normal unsorted municipal waste
stream. Old appliances must be collected separately
in order to optimise the recovery and recycling of the
materials they contain and reduce the impact on
human health and the environment. The crossed out
wheeled bin symbol on the product reminds you of
your obligation, that when you dispose of the
appliance it must be separately collected.
Consumers should contact their local authority or
retailer for information concerning the correct disposal
of their old appliance.
Respecting and conserving the
environment
Install the appliance in a cool, well-ventilated room.
Ensure that it is protected from direct sunlight and do
not place it near sources of heat.
Try to avoid keeping the door open for long periods.
A significant amount of energy is used every time the
door is opened.
Do not over-fill the appliance: cold air must circulate
freely for food to be preserved properly. If air
circulation is impeded, the compressor will work
continuously.
Do not place hot food in the refrigerator. The internal
temperature will increase, forcing the compressor to
work harder and consume more energy.
Regularly check the door seals and wipe clean to
ensure they are free of debris and to prevent cold air
from escaping (see Maintenance).
Do not put ice cubes taken directly from the freezer
into your mouth.
Do not allow children to tamper with the controls or
play with the appliance. Under no circumstances
should they be allowed to sit on the bins or to hang
from the door.
Keep packaging material out of reach of children.
12
Page 13

Troubleshooting
Assistance
If the appliance does not work, before calling for Assistance (see Assistance), check for a solution from the following list.
Malfunctions:
Possible causes / Solutions:
GB
The display is completely switched off.
The motor does not start.
The display is on but it is dim.
The alarm sounds, a message
appears on the display, the ALARM
LED lights up and the refrigerator
light flashes.
The alarm sounds, the ALARM LED
lights up and a message appears on
the display.
The alarm sounds, the ALARM LED
flashes and a message appears on
the display.
The plug has not been inserted into the electrical socket, or not far enough
to make contact, or there is no power in the house.
The appliance comes with a motor protection control (see Start-up and use).
Pull out and reverse the plug before putting it back in the socket.
The refrigerator door has been open for more than two minutes.
The buzzer stops when the door is closed or when the RESET ALARM
button is pressed.
The temperature inside the freezer is too high.
The freezer will maintain a temperature of around 0°C so that the food will
not refreeze, allowing you to eat it within 24 hours or to refreeze it after it
has been cooked.
To switch off the buzzer, press the RESET ALARM button. Press again to
delete the message on the display, switch off the ALARM LED and
restore normal operation.
The temperature of the freezer is dangerously high: the food inside must not
be eaten. The freezer will maintain a temperature of approximately -18°C.
To switch off the buzzer, press the RESET ALARM button. Press again to
delete the message on the display, switch off the ALARM LED and restore
normal operation.
The refrigerator and the freezer do not
cool well.
The food inside the refrigerator is
beginning to freeze.
The motor runs continuously.
The Aircooler fan does not rotate
The appliance makes a lot of noise.
Early ending of functions
The doors do not close properly or the seals are damaged.
The doors are opened too frequently.
The temperature that has been set is too high (see Start-up and use).
The refrigerator or the freezer have been over-filled.
The temperature that has been set is too low (see Start-up and use).
The SUPER FREEZE button has been pressed (rapid freezing): the yellow
SUPER FREEZE light is on or flashing (see Description).
The door is not closed properly or is continuously opened.
The outside ambient temperature is very high.
The thickness of the frost exceeds 2-3 mm (see Maintenance).
The refrigerator door is open.
The Aircooler system is only activated automatically when it becomes
necessary to restore perfect operational conditions inside the refrigerator
compartment.
The appliance has not been installed on a level surface (see Installation).
The appliance has been installed between cabinets that vibrate and make
noise.
The internal refrigerant makes a slight noise even when the compressor is
off. This is not a defect, it is normal.
Electrical disturbance on the network or brief interruptions of the power supply
A message appears on the display
(e.g. F01)
The water discharge hole is blocked (see Maintenance).
13
Page 14

GB
Guarantee
12 Months Parts and Labour Guarantee
Your appliance has the benefit of our manufacturers guarantee, which covers the cost of breakdown
repairs for twelve months from the date of purchase.
This gives you the reassurance that if, within that time, your appliance is proven to be defective because
of either workmanship or materials, we will, at our discretion, either repair or replace the appliance at no
cost to you.
This guarantee is subject to the following conditions:
- The appliance has been installed and operated correctly and in accordance with our
operating and maintenance instructions.
- The appliance is used only on the electricity or gas supply printed on the rating plate.
- The appliance has been used for normal domestic purposes only.
- The appliance has not been altered, serviced, maintained, dismantled, or otherwise
interfered with by any person not authorised by us.
- Any repair work must be undertaken by us or our appointed agent.
- Any parts removed during repair work or any appliance that is replaced become our property.
- The appliance is used in the United Kingdom or Republic of Ireland.
The guarantee does not cover:
- Damage resulting from transportation, improper use, neglect or interference or as a result
of improper installation.
- Replacement of any consumable item or accessory . These include but are not limited to: plugs,
cables, batteries, light bulbs, fluorescent tubes and starters, covers and filters.
- Replacement of any removable parts made of glass or plastic.
THIS GUARANTEE WILL NOT APPLY IF THE APPLIANCE HAS BEEN USED IN COMMERCIAL OR
NON-DOMESTIC PREMISES.
5 Year Parts Guarantee
Hotpoint also offers you a free 5 year parts guarantee. This additional guarantee is conditional on you
registering your appliance with us and the parts being fitted by one of our authorised engineers. There
will be a charge for our engineer's time. To activate the extra parts warranty on your appliance, simply
call our registration line on 0870 6092094 (ROI 01 230 0800).
Extended Guarantees
We offer a selection of repair protection plans that enable you to fully cover yourself against the expense
of repair bills for the life of your policy. To find the ideal plan for you please call our advice line on 08709
088 088 (ROI 01 230 0233).
Free Helpdesk Service
We have a dedicated team who can provide free advice and assistance with your appliance if you
experience any technical difficulties within the first 90 days of ownership. Simply call our Hotpoint
Service Hotline on 08709 066 066 (ROI 0818 313 413) for telephone assistance, or, where necessary, to
arrange for an engineer to call. If we cannot resolve the technical problem we will replace your machine
or, if you prefer, give you your money back.
14
Page 15
After Sales Service
No one is better placed to care for your Hotpoint appliance during the course of its working life than us -
the manufacturer.
Essential Contact Information
Hotpoint Service
We are the largest service team in Europe offering you access to 400 skilled telephone advisors and
1100 fully qualified engineers on call to ensure you receive fast, reliable, local service.
UK: 08709 066 066
Republic of Ireland: 0818 313 413
www.hotpointservice.co.uk
Please note: Our advisors will require the following information:
Model number:
Serial number:
Parts and Accessories
GB
We supply a full range of genuine replacement parts as well as accessory products that protect and
hygienically clean your appliance to keep it looking good and functioning efficiently throughout its life.
UK: 08709 077 077
Republic of Ireland: 0818 313 413
www.hotpointservice.co.uk
Appliance Registration
We want to give you additional benefits of Hotpoint ownership. To activate your free 5 year parts guarantee
you must register your appliance with us.
UK: 0870 6092094
Republic of Ireland: 01 230 0800
www.hotpointservice.co.uk
Indesit Company UK Ltd. Morley Way, Peterborough, PE2 9JB
Indesit Company Unit 49 Airways Industrial Estate,Dublin 17
Recycling & Disposal Information
As part of Hotpoint's continued commitment to helping the environment, Hotpoint reserves the right to use
quality, recycled components to keep down customer costs and minimise material wastage.
Please dispose of packaging and old appliances carefully.
details about disposal legislation. To minimise the risk of injury to children, remove the door, plug and cut
the mains cable off flush with the appliance. Dispose of these parts separately to ensure that the appliance
can no longer be plugged into a mains socket, and the door cannot be locked shut.
Please see section Precautions and tips for
15
Page 16

GB
195071968.00
06/2008
16
 Loading...