

Page 1
INSTRUCTIONS on INSTALLATION & USE for the FIRST EDITION RANGE
FEW14, FEW12, FEW10
Hotpoint recommends, for your own safety and to ensure you get the best possible results from your
Washing Machine, you read through this booklet and follow these steps thoroughly.
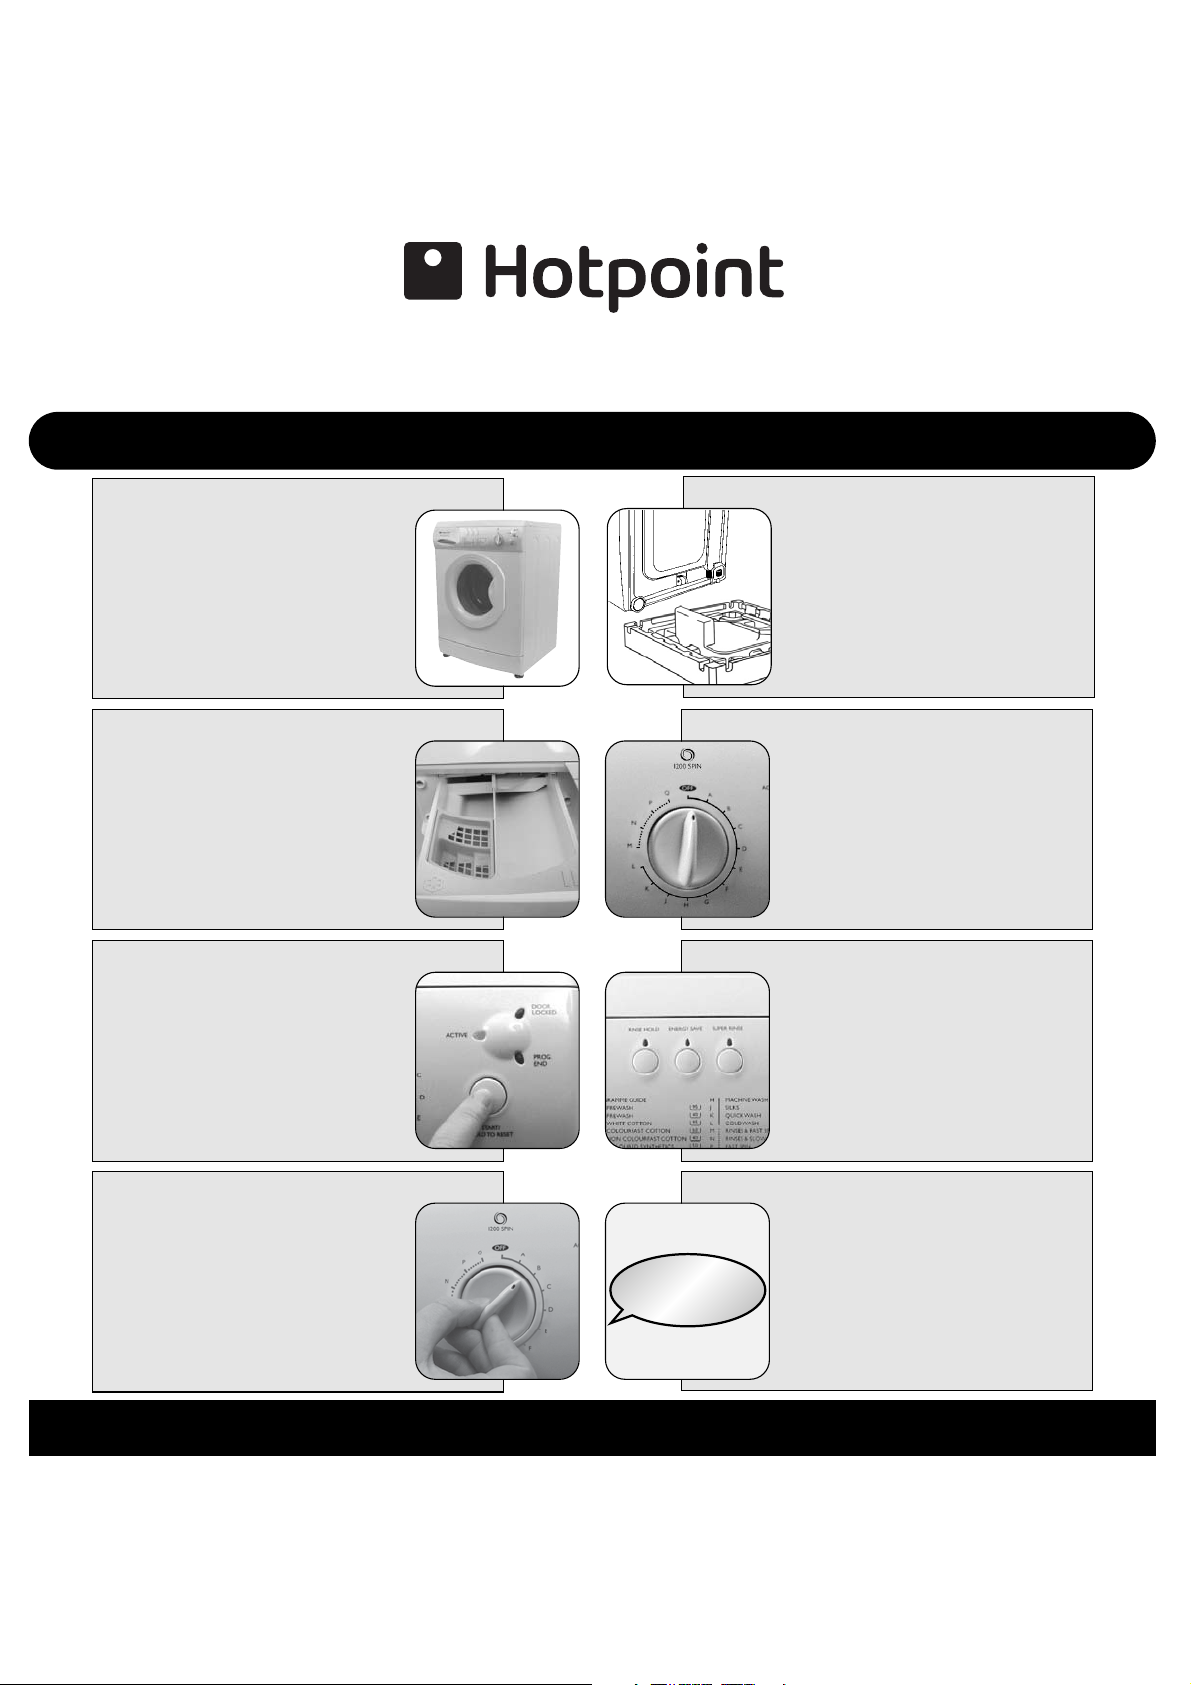
STEP 1
machine where possible on a solid floor,
STEP 3
Read through this section to familiarise
STEP 5
How to start your selected programme
Electrical Guide
Choose a location for your washing
with the electrical sockets and water
supply tap easily accessible.
Allow sufficient space: 600mm width,
600m depth and 900mm height.
DO NOT install in a bath or shower
room.
WARNING: This appliance must be earthed.
Dispenser Drawer
yourself with the different
compartments within the dispenser
drawer.
NOTE: Always follow manufacturer’s dosage
recommendations.
Using your Machine
and how to stop or change the
programme if so required.
STEP 2
STEP 4
STEP 6
Installation Guide
Dispose of packaging material in a safe
place and remove any labels.
Please read instructions thoroughly to
ensure you understand each stage
before you begin.
Remember you may be charged for a service call if a
problem with your washing machine is caused by
incorrect installation or misuse.
Programme Selector Dial
A wash chart is provided to help you to
select your required programme.
Examples given for the maximum washing load
weight for different fabric types.
Options Guide
All available optional wash features are
explained within this section - These
allow you to adjust your selected wash
programme to suit your needs.
NOTE: Progress indicator lights show what stage in
STEP 7
DO NOT overload the washing machine.
the programme cycle has been reached.
A Typical Wash Programme
A picture guide provides a clear
explanation how to set a wash
programme.
NOTE: Hotpoint recommend, on completion of
your programme, that you switch off both the
electricity and water supply to the appliance.
STEP 8
READ BEFORE
CONTACTING
SERVICE!
NOTE: In addition to the temperature of the
incoming water,the selec tion of optional wash
features will affect the programme times.
Troubleshooting
Please refer to the Troubleshooting
section if you have any problems when
using your washing machine.
There may be nothing wrong!
Read the rest of these instructions to get the best from your appliance, remember to fill in your guarantee registration.
Keep this Book in a safe place for quick reference.
Page 2
Getting to Know your Appliance
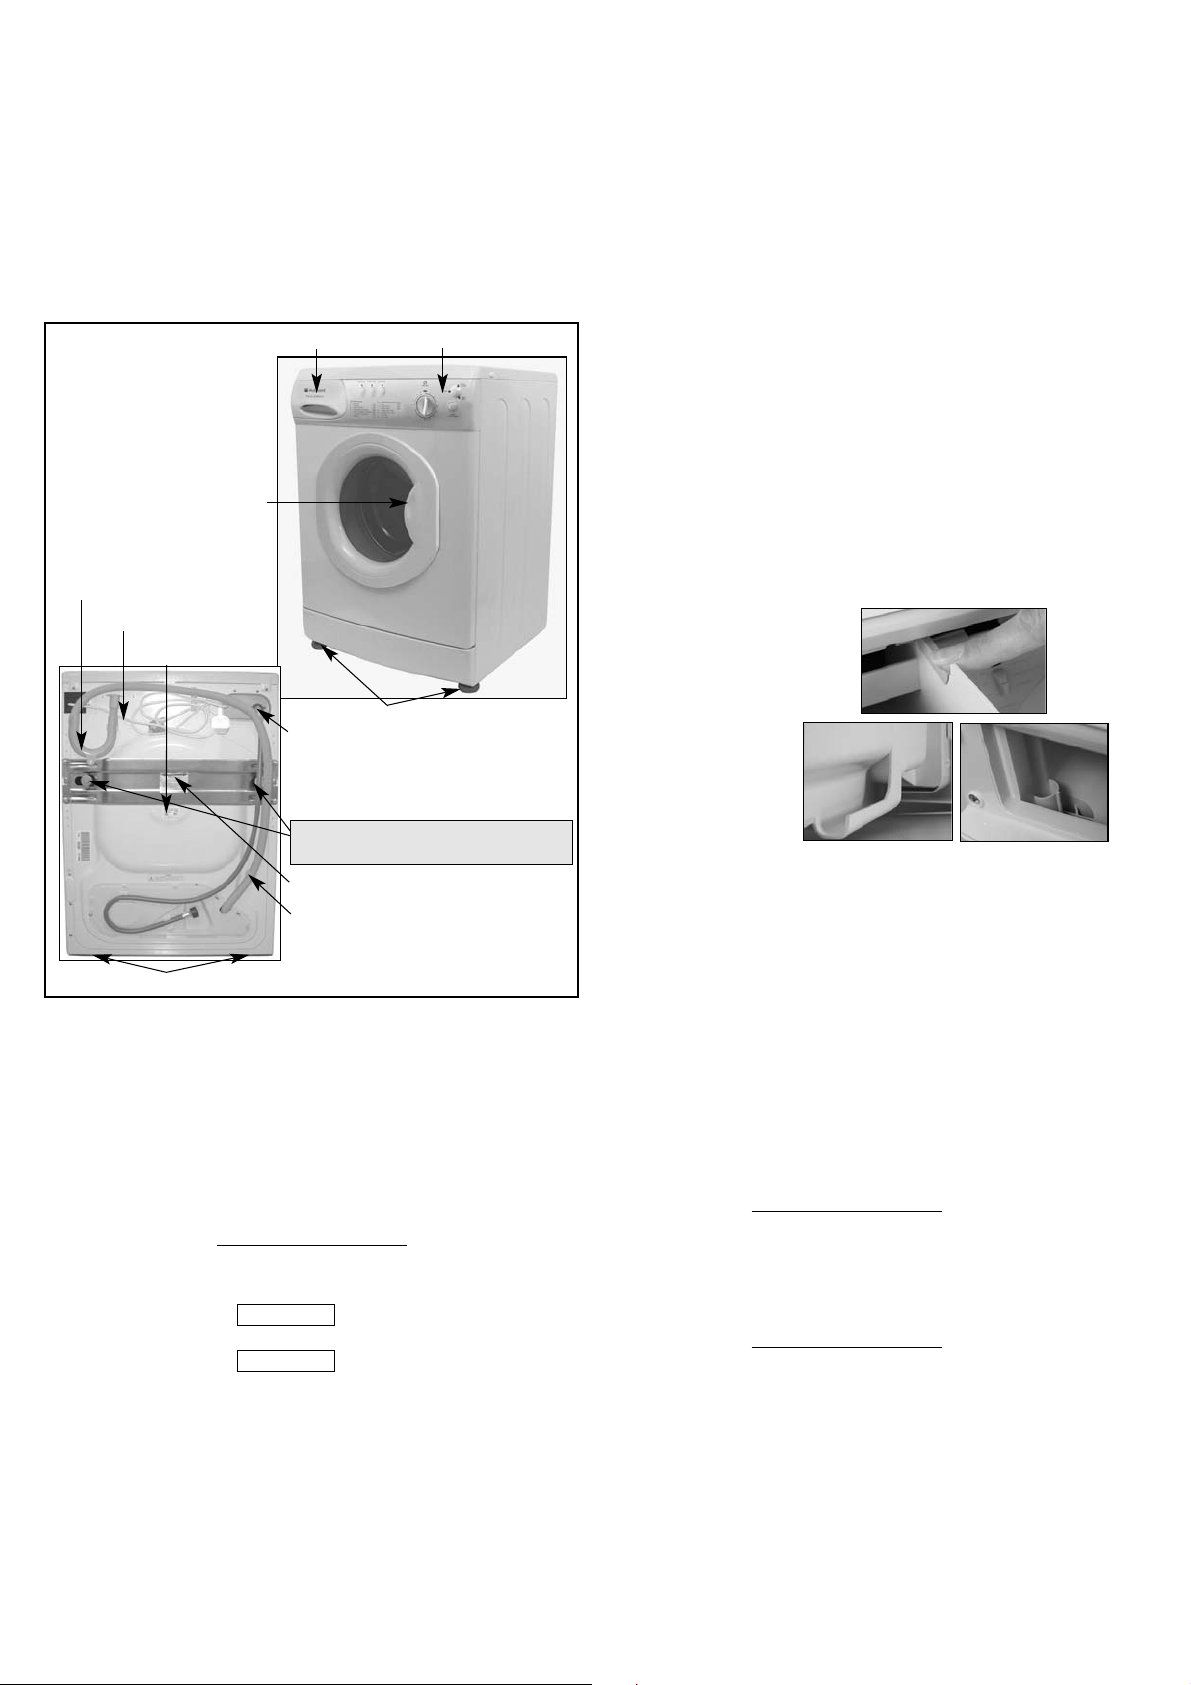
Plumbing Indicator Line label
Cold Water inlet point and attached
Fill Hose (Blue connector)
Control Panel
Interlocking door
and release lever
Rating Plate
Mains Cable
Drainage Hose
Hooked End Support
Dispenser Drawer
Front Adjustable Feet
Back Feet
Cleaning the Exterior:
Use a damp cloth or silicon polish to clean the exterior surfaces of the
appliance.
Cleaning the Door Bowl:
Clean the internal surface of the door bowl regularly with a soft cloth.
A build up of soap powder and water hardness residue may result in
water leaking from the door.
Cleaning the Dispenser Drawer & Compartments:
It is advisable to clean the dispenser drawer regularly:
1
Pull the drawer out until it reaches its stop.
2
Press the drawer release latch
down to remove the dispenser
drawer.
4
Relocate the dispenser drawer and push it
firmly back into place.
3
A
B
Clean and dry the
dispenser drawer,
syphons, grate and
fabric conditioner exit
channel (A).
Also, regularly clean the
outlet pipe area (B).
● Do not try to clean any
part of the dispenser
drawer while the machine
is working.
WARNINGS:
● Do not clean any part of the
machine with abrasive cleaners,
scouring agents, acids,any
bleaches or metal polish, as
they may cause damage.
Key Contacts
After Sales Service
Over 1100 trained specialists, directly employed by us,ensure that you can have complete confidence in both the appliances and
services we offer.
Extended Warranties
UK: 08709 088 088
Monday to Sunday, 8am to 8pm
www
.hotpointservice.co.uk
Republic of Ireland: 1850 502 200
Genuine Parts and Accessories
UK: 08709 077 077
Monday to Friday, 8.30am to 5pm
Saturday,8.30am to 12 noon
www
.hotpointservice.co.uk
Republic of Ireland: (01) 842 6836
Repair Service and Information Desk
UK: 08709 066 066
Monday to Friday, 8am to 7.30pm
Saturday,8.30am to 5.30pm
Sunday,9.30am to 3.30pm
www
.hotpointservice.co.uk
Republic of Ireland: 1850 302 200
Note: Our operators will require the following information:
The Model number (which can be found on
the control panel)
The Serial number (which can be found on the
inner door trim)
Two Transit Fixings (! BOTH must be
removed before you use your machine).
Page 3
R
L
T
D
H
U
E
O
F
V
STEP 1 STEP 2
n
f
e
s
h
Electricity Supply
WARNING:
The appliance must be earthed.
Fuses
Your appliance comes fitted with a plug and a 13 amp (13A) fuse. If
you need to replace the fuse,use only those rated at 13 amp (13A)
and ASTA approved to BS1362. To change the fuse lift the holder to
vertical position and lift the fuse out. To replace the fuse, insert the
fuse and push fuse holder down into the locked position. Correct
replacement is identified by colour coding or the marking on base of
plug.
WARNING: Do not use the plug unless the fuse holder is in the locked
position and the top cover firmly replaced.
Changing the Mains Lead
If you have damaged the existing lead and need a new one,contact
Hotpoint Service UK on: 08709 066 066 or
www.theservicecentre.co.uk (or in the Republic of Ireland on: 1850
302 200). A charge will be made.
We strongly advise that fitting a new lead is carried out by a qualified
electrician.
Seek professional advice if you need to use an extension lead.
Changing the Plug
If you need to change your plug, if it does not fit your socket: isolate
the machine from the mains supply.Cut off the supplied plug and
safely dispose of the discarded plug. DO NOT plug into any other
socket.
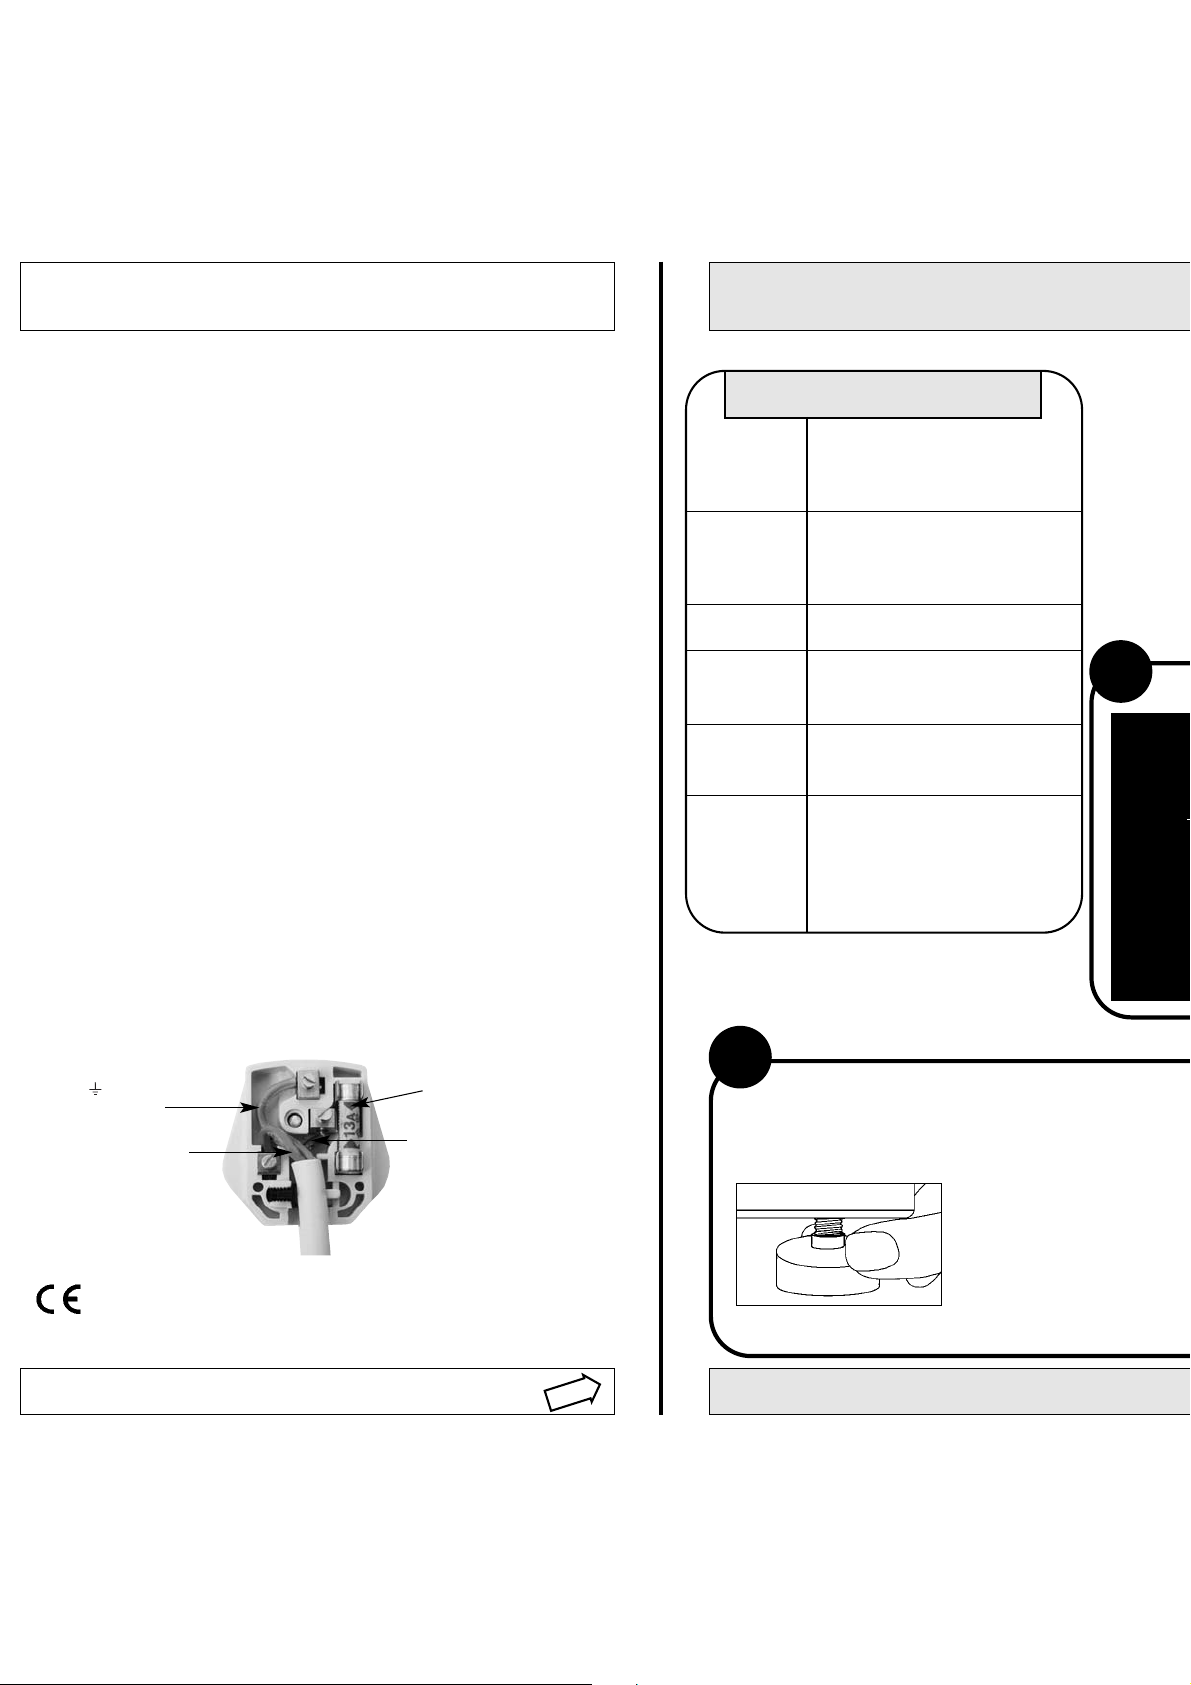
NOTE: If you change the plug, the colour of wires in the mains lead
may not match the colour of the markings which show the different
terminals in the plug.You must wire it as shown below:
Green and yellow (Earth)
wire to terminal marked ‘E’,
symbol , or coloured
green and yellow.
Blue (Neutral) wire to
terminal marked ‘N’ or
coloured black.
CE marking certifies that this appliance conforms to the following
EEC directives:
Low Voltage Equipment - 72/23/EEC & 93/68/EEC
Electromagnetic Compatibility - 89/336/EEC, 92/31/EEC & 93/68/EEC
13A ASTA approved fuse to
BS1362.
Brown (Live) wire to terminal
marked ‘L’ or coloured red.
TECHNICAL DETAILS
FEW14
Models
Dimensions
Capacity
Electric
Connections
Spin Speed
Control
programmes
according to
IEC456
directive
FEW12
FEW10
59.5cm wide
85cm high
60cm deep
from 1 to 5.5kg
voltage 220/240 Volts 50Hz
maximum absorbed power:
1700W-2100W
up to 1400rpm - FEW14
up to 1200rpm - FEW12
up to 1000rpm - FEW10
programme D
temperature 60˚C
run with a 5.5kg load
4
LEVEL?...
YOUR MACHINE WILL BE NOISY IF THE TWO FRONT
ADJUSTED SO THE MACHINE STANDS FIRM AND LE
When adjusting the feet, use a spirit level to check the machi
side to side and from front to back.
- Move your machine into its
(take care not to trap or kink
- Turn one or both front feet a
hand, until the feet cannot b
- The spring on each foot will
loose.
If it is placed on a fitted carpet, adjust the feet to ensure t
ventilation beneath the washing machine.
3
NOTE: A
MOVE T
ALONG
WHIC
YOU
HOOK
LEVEL T
(*see Ge
D
Page 4
Installation
F
O
(
O
W
OX
1
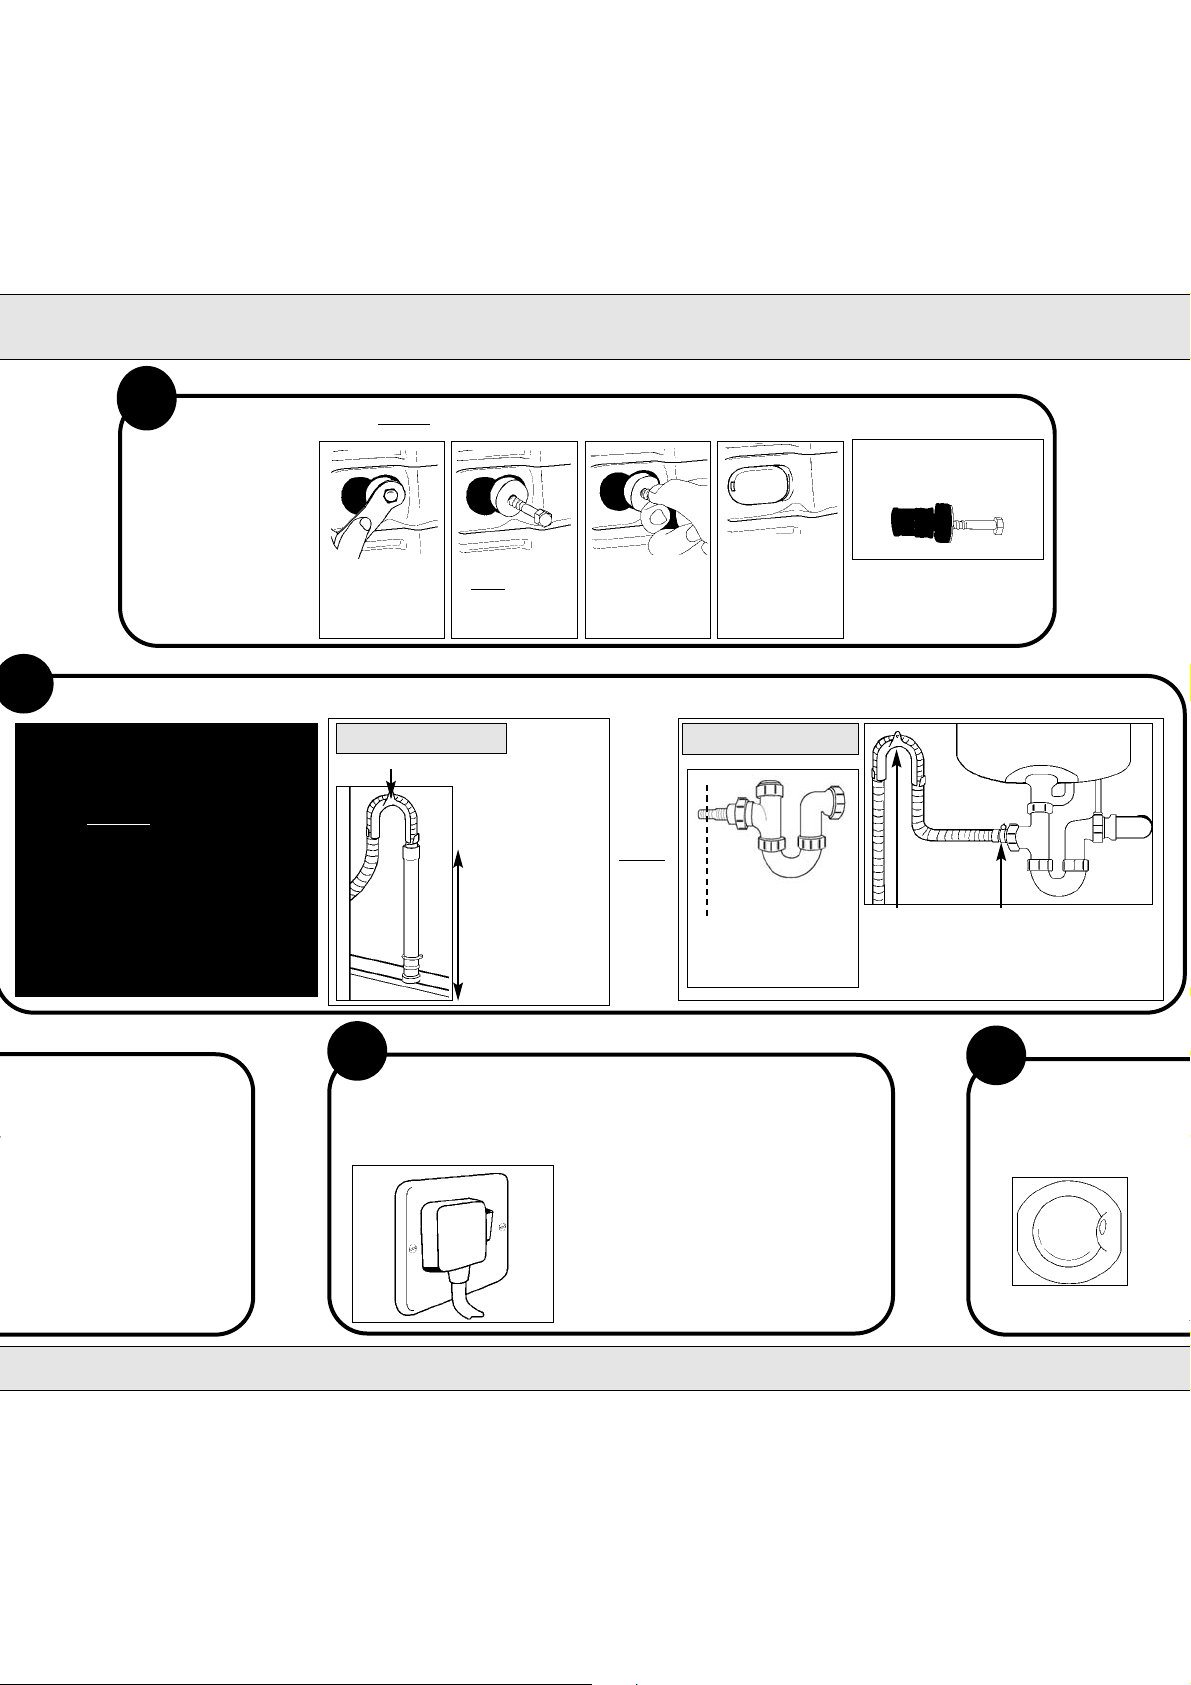
REMOVE TWO TRANSIT FIXINGS... Follow these instructions to remove the TWO transit fixings.
IMPORTANT:
Situated, one either
side of the rear panel,
BOTH transit bolts
(complete with
spacers) MUST be
removed before use...
Failure to do so may
cause damage to
your machine!
3
DRAINAGE SYSTEM...we recommend one of the following:
NOTE: ALTHOUGH YOU MAY NEED TO
MOVE THE HOOKED END SUPPORT
ALONG THE GREY DRAINAGE HOSE,
T REMOVE IT.
DO NO
WHICHEVER DRAINAGE METHOD
YOU USE,MAKE SURE THAT THE
HOOKED END SUPPORT IS FIXED
LEVEL TO,OR ABOVE THE ‘PLUMBING
INDICATOR LINE’*
(*see Getting to Know your Appliance)
Unscrew the
bolt using a
13mm spanner.
STANDPIPE METHOD
Hooked End Support
threads can be
Insert drainage hose
approximately 100mm
into the standpipe.
.............................
Standpipe height:
minimum 500mm
from the floor.
OP when 3
ST
seen.
Hold, slide
sideways and
pull to remove.
OR
For safety,insert
one of the
plastic covers
(supplied with
your machine)
over the hole.
UNDER SINK METHOD
cut off the blocked
end of the under sink
drainage unit.
It is important the transit
bolt and spacer come out
intact (see pic).
! Repeat steps to remove
the second transit bolt.
800mm
from floor
Fix the hooked
end support at
a minimum
800mm from
the floor.
Attach the GREY
drainage hose to the
under sink drainage
unit securely,using a
hose clip.
O FRONT FEET ARE NOT
AND LEVEL.
k the machine stands level...from
ine into its final location
trap or kink the hoses.
front feet anti-clockwise by
et cannot be turned any more.
ch foot will stop them coming
to ensure that there is adequate
5
CONNECT TO THE POWER SUPPLY...
PLUG YOUR MACHINE INTO AN ELECTRICAL SOCKET WHICH IS
EASILY ACCESSIBLE. SWITCH ON.
NOTE: Hotpoint recommend
extension leads are not used.
Move your machine into position,
take care not to trap or kink the
hoses.
6
READY...
TO CHECK ALL PARTS O
CLEAN THE INSIDE OF Y
RUN PROGRAMME ‘C’
WITH
✗
THIS WILL TAKE APPR
Page 5
2
CONNECT TO THE COLD
WATER SUPPLY...
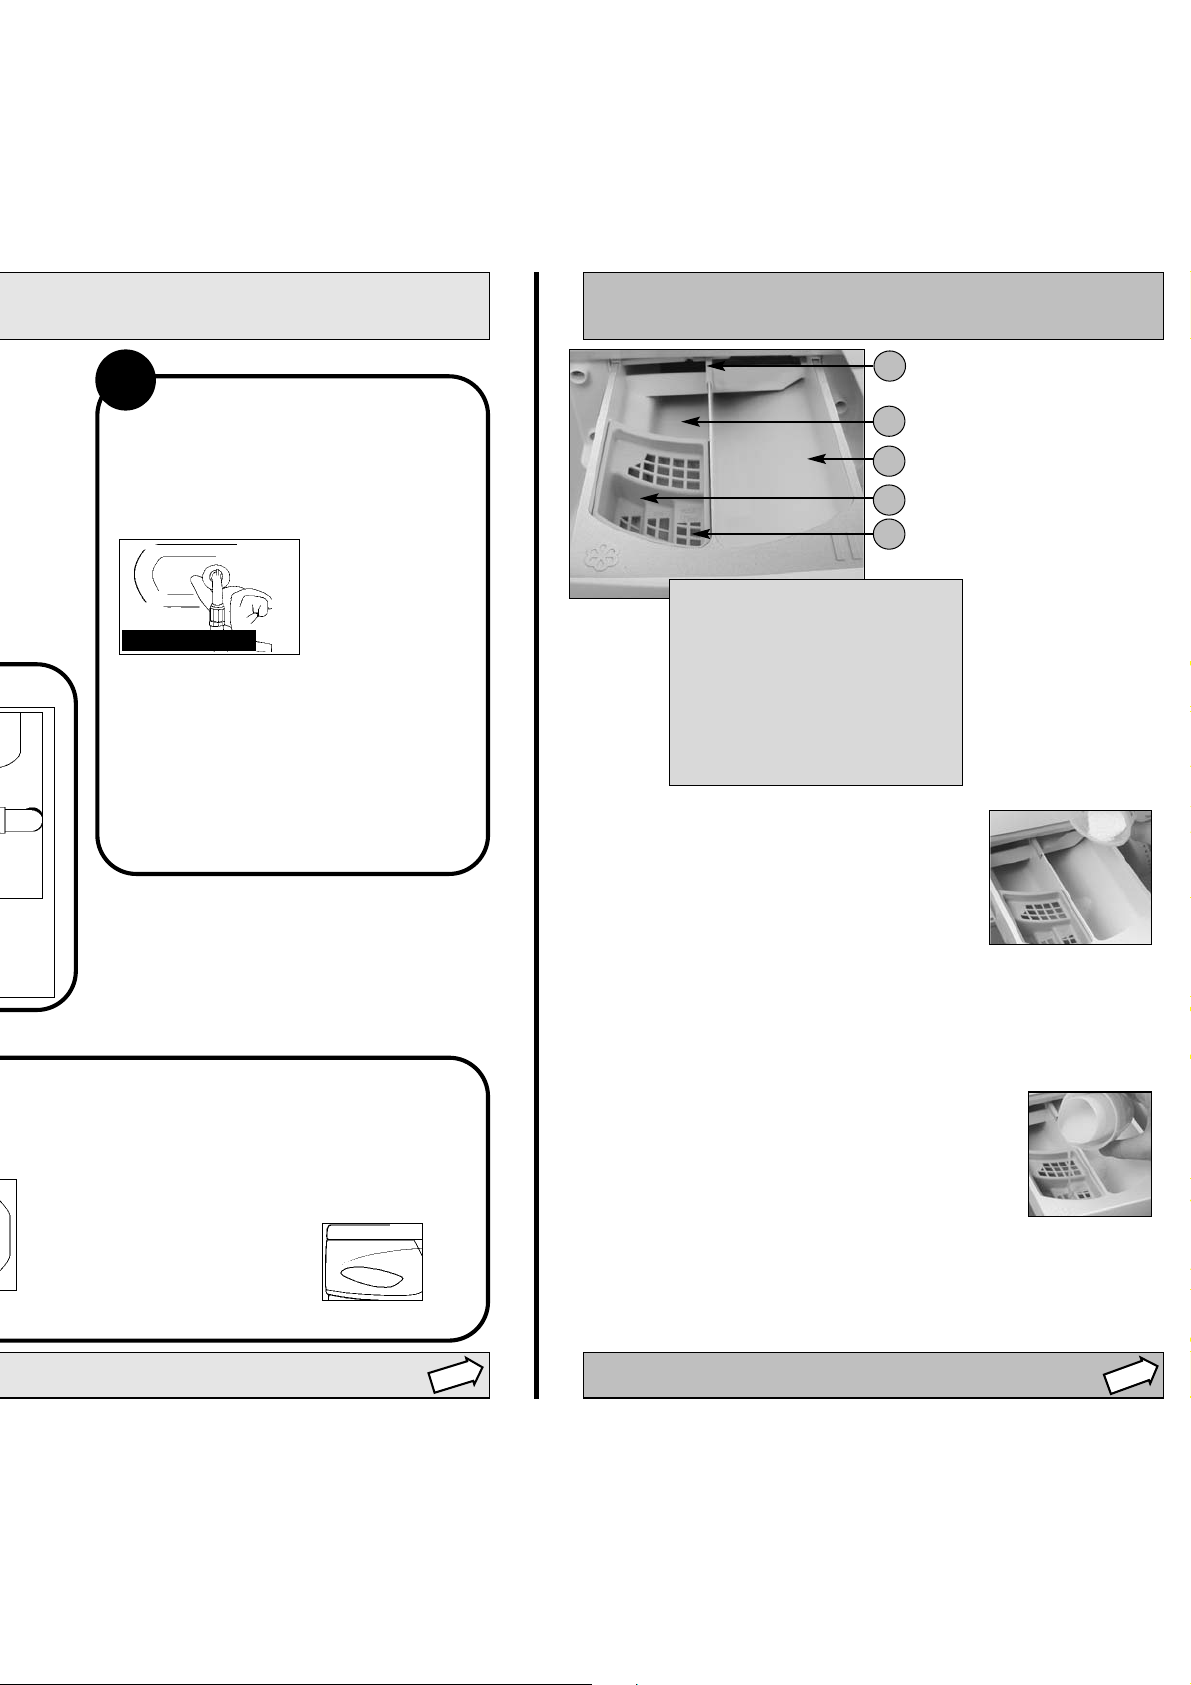
The Dispenser Drawer
STEP 3
ii
i
Index:
1. Drawer release latch
2. Pre-wash detergent compartment
Maximum 200ml powder or
100ml liquid
3. Main detergent compartment
Maximum 400ml powder or
200ml liquid
4. Grate
5. Fabric conditioner compartment
120ml maximum
1
2
3
4
5
PLEASE USE THE NEW HOSE SUPPLIED,FITTED
TO THE MACHINE.
Old hoses may
cause leaks due to
worn out washers.
Check the cold
water supply is
running freely...
Connect fill hose (Blue
connector) to the cold
water supply tap.
TURN COLD WATER
SUPPLY TAP ON...
DO NOT REMOVE!
PARTS OF THE INSTALLATION AND TO THOROUGHLY
MME ‘C’ (refer to ‘Programme Selector Dial’, STEP 4).
WITHOUT ANY LAUNDRY
WITHOUT ANY DETERGENT
and
✗
WARNING:
● Do not put any items into
the drawer, other than
detergents designed to be
released from the drawer, as
they may cause damage or
blockage.
Adding Fabric Conditioner
Dispensing Powder Detergent
Dispensing Liquid Detergent
To achieve the best wash results the manufacturer’s
recommended amount of detergent should be measured
and added to the main detergent compartment (II symbol)
(max. 400ml).
Pour the recommended amount of fabric conditioner into the
compartment (flower symbol).
Do not exceed the maximum fill line.
Pre-wash Programmes A and B
When selecting programmes A or B add detergent to both the pre-wash
compartment (I symbol) and the main wash compartment (II symbol).
DO NOT use in drum dosing devices with Pre-wash programmes A and B.
We recommend the use of a detergent dosing ball,as provided by your
detergent manufacturer.
Page 6
Programme Selector Dial
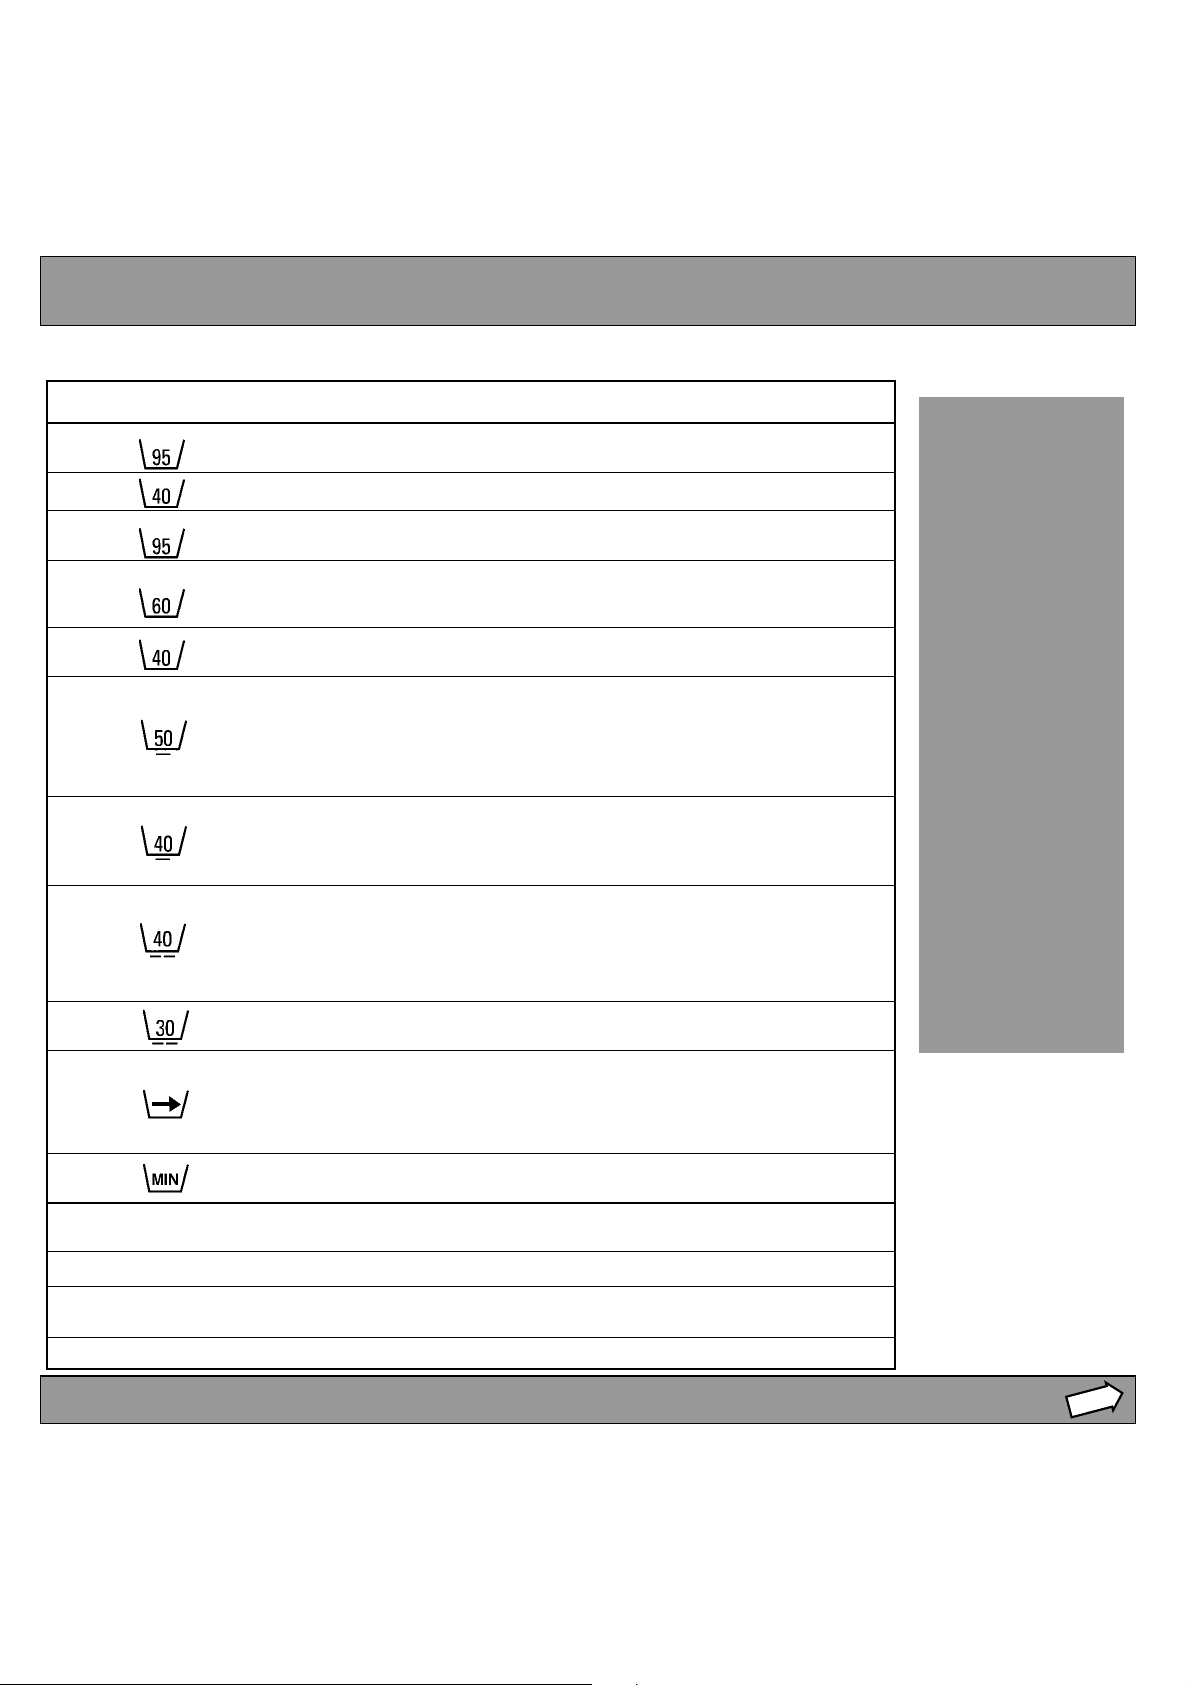
IMPORTANT INFORMATION: The temperature of the incoming water supply and selection of any Optional Wash Feature, ie.Energy
Save, will affect the programme times*. Turn the programme selector dial from ‘OFF’to the programme you need...
NOTE:
When the programme
has finished, return
the programme
selector dial to the
‘OFF’ position.
WEIGHT OF
WASH LOAD
Two examples of
maximum wash loads
for different types of
fabric:
2 Bath Towels
5 Shirts
6 Blouses
1 Pair of Pyjamas
4 Items of
Underwear
COTTON
= 5.5kg
2 Children’s Dresses
4 Shirts
4 Blouses
1 Pair of Pyjamas
4 Items of
Underwear
SYNTHETIC
= 3kg
Wash Fabric Temp. Max. Approximate Spin
label ˚C dry load programme time* speed
White Cotton, Heavy soil 95 5.5kg Fast
Cotton, Heavy soil 40 5.5kg Fast
White Cotton & Linen 2 hours 20minutes without special finishes. 95 5.5kg 2 hours 30minutes Fast
Colourfast cotton, linen or
viscose without special 60 5.5kg 2 hours 5minutes - Fast
finishes 2 hours 15minutes
Non-colourfast cotton, 1 hour 40minutes linen or viscose 40 5.5kg 1 hour 55minutes Fast
Synthetics
coloured nylon, polyester,
acrylic and cotton mixtures,
cotton or viscose with special
finishes, coloured polyester 1 hour 5minutes and cotton mixtures 50 3kg 1 hour 15 minutes Slow
Acrylics
acrylics and tri-acetate blends
of these fabrics with wool,
polyester and wool blends 40 3kg 40 - 50minutes Slow
Wool
Shrink resistant machine 1 hour 15minutes washable wool, woollen 40 1.5kg 1 hour 25minutes Fast
blankets.
Wool mixtures with cotton 1 hour 15minutes or rayon. 40 2.5kg 1 hour 25minutes Fast
Silk 55minutes Printed acetate 30 3kg 1 hour 5minutes Slow
Quick Wash
for freshening up lightly 35 1kg 35 - 45minutes Slow
soiled items.
Warning: not for woollen,
silk or delicate items.
Cold wash 55minutes cold fill only,no heating action. 25 3kg 1 hour 5minutes Slow
Rinse and Fast Spin - Cotton 5.5kg 30minutes Fast
Rinse and Slow Spin - Delicates 3kg 30minutes Slow
Fast Spin - Cotton 5.5kg 15minutes Fast
Slow Spin - Delicates 3kg 15minutes Slow
A
B
C
D
E
F
G
H
J
K
L
M
N
P
Q
STEP 4
Automatic Pre-wash and Wash Programmes
Wash Programmes
2 hours 30minutes 2 hours 40minutes
1 hour 40minutes 1 hour 50minutes
Rinse and Spin Programmes
Spin only Programmes
Page 7
Using your Machine
STEP 5
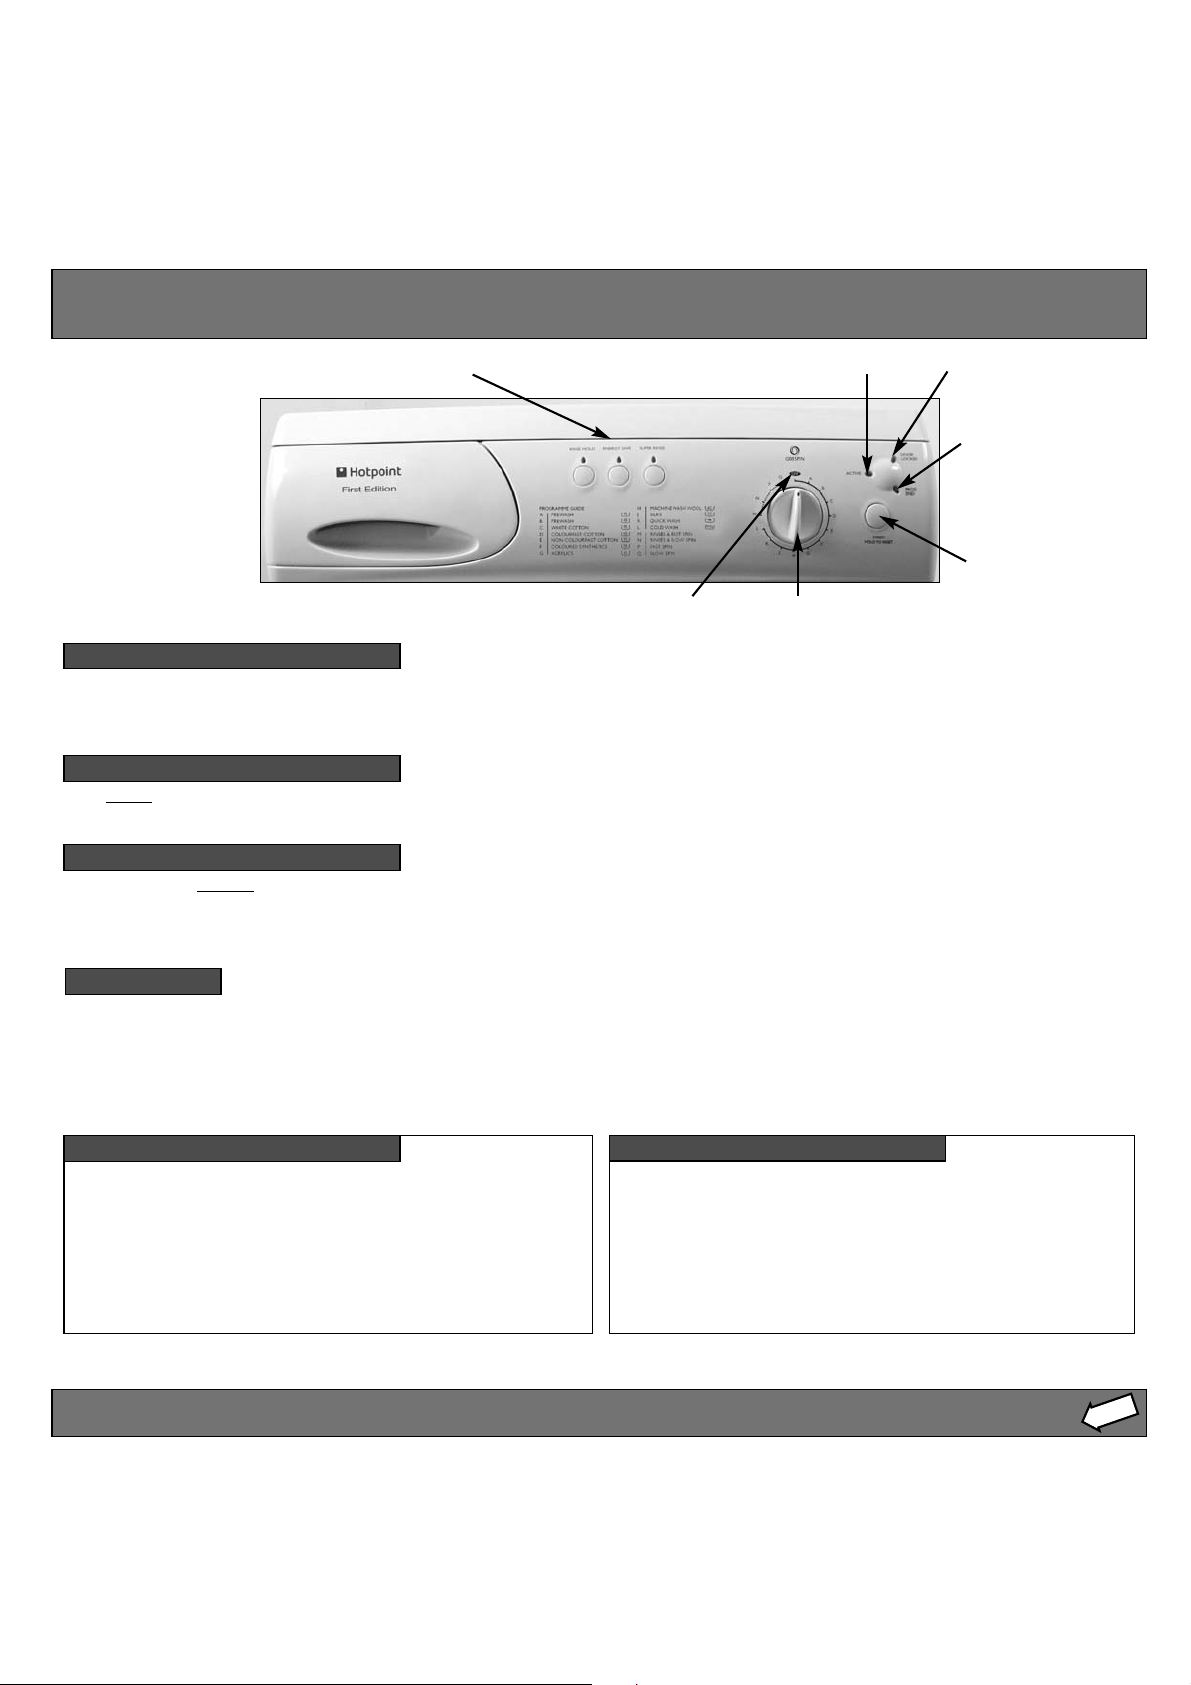
Door Locked indicator light
Programme End light
WARNINGS:
● In the unlikely
event of something
not working, see
‘Troubleshooting’
STEP 8.
Option buttons
Programme Active indicator light
‘START/Hold To Reset
button
OFF position
On-Off / Selecting a programme...
The machine is switched on, by turning the programme selector dial away from the ‘OFF’ position to your selected programme.
To start the programme press and release the ‘START/HOLD TO RESET’ button.
NOTE: When the programme has finished, return the programme selector dial to the ‘OFF’ position.
To pause a programme...
To pause
To continue, press the ‘START/HOLD TO RESET’ button once more.
a programme hold the ‘START/HOLD TO RESET’ button for two seconds until the ‘PROG.END’ indicator light flashes.
To change a programme...
If you want to change a programme hold the ‘START/HOLD TO RESET’ button for two seconds until the ‘PROG.END’ indicator light
flashes.
You can then change the programme. Then press the ‘START/HOLD TO RESET’ button once more.
Programme selector dial
NOTE:
If you turn the programme selector dial during a programme, the ‘ACTIVE’indicator light will flash to show that the programme
running is not that shown on the dial. Turn the dial to the original programme to stop the flashing.
The flashing will automatically stop when the programme enters the rinse phase.
Progress indicator lights...
●
The ‘ACTIVE’indicator light will come on as soon as the
selected programme has started. This light will remain lit
throughout the programme and will go out when the
programme has finished.
●
The ‘PROG.END’ indicator light will come on after the
selected programme has finished. This light will remain lit
until you return the programme selector dial to its ‘OFF’
position, or start another programme.
Door Locked indicator light...
●
The ‘DOOR LOCKED’ indicator light will come on two
seconds after you press the ‘START/HOLD TO RESET’ button
and will stay lit throughout the programme. A short time
after the programme has finished the indicator light will go
out and you can then open the door.
●
Selected programmes will not start if the door is not closed
properly, the ‘DOOR LOCKED’ indicator light will flash to
show this. Push the door shut until you hear the catch click.
Page 8

Options
STEP 6
Button Selection:
Super Rinse...
Large wash loads and items for young children or people with
sensitive skin.
This option increases the water level of the first two rinses.
● This is not available with Cold Wash, Rinse and Spin or Spin
only programmes.
To select an option,press the button and you will see a light come on above the button.
Press again to cancel, and the light will go out.
You cannot alter the options once the machine is running.
use this option for...
Rinse Hold...
Help reduce the creasing of delicate or synthetic fabrics by
holding clothes in the final rinse water.
The ‘Rinse Hold’ option light will flash to indicate that the
programme is holding the clothes in the final rinse water.
Complete the final spin by pressing the ‘RINSE HOLD’button
when the light is flashing..
● This is not available with Wool or Spin only programmes.
use this option to...
NOTE: Remember to cancel buttons after use!
Energy Save...
Save money and time on lightly soiled loads.
● This is not available with Quick Wash, Rinse and Spin or Spin
only programmes.
use this option to...
Automatic Features...
Auto half load
Auto half load saves you time and money when washing smaller loads.
Water levels are automatically adjusted to cater for the different loads.
Unbalanced load warning
Your machine has an inbuilt feature to prevent it spinning with an unbalanced load. This will minimise excessive vibration and
prolong the life of the machine. Before each spin the machine ‘senses’ the load within the drum and if the machine considers the
load to be unbalanced, it will not
tumbling backwards and forwards. If it is unable to balance the load after the fifth attempt the machine will abort the spin process
and the load will still be wet at the end of the programme.
If this safety feature is encountered you can spin the load after first opening the door, redistributing the load and selecting a fast or
slow,spin only programme. In the case of small loads or single items you may try adding some extra items of a comparable size to
help balance the load.
automatically spin. Instead the machine will try to redistribute the load to achieve balance by
Page 9
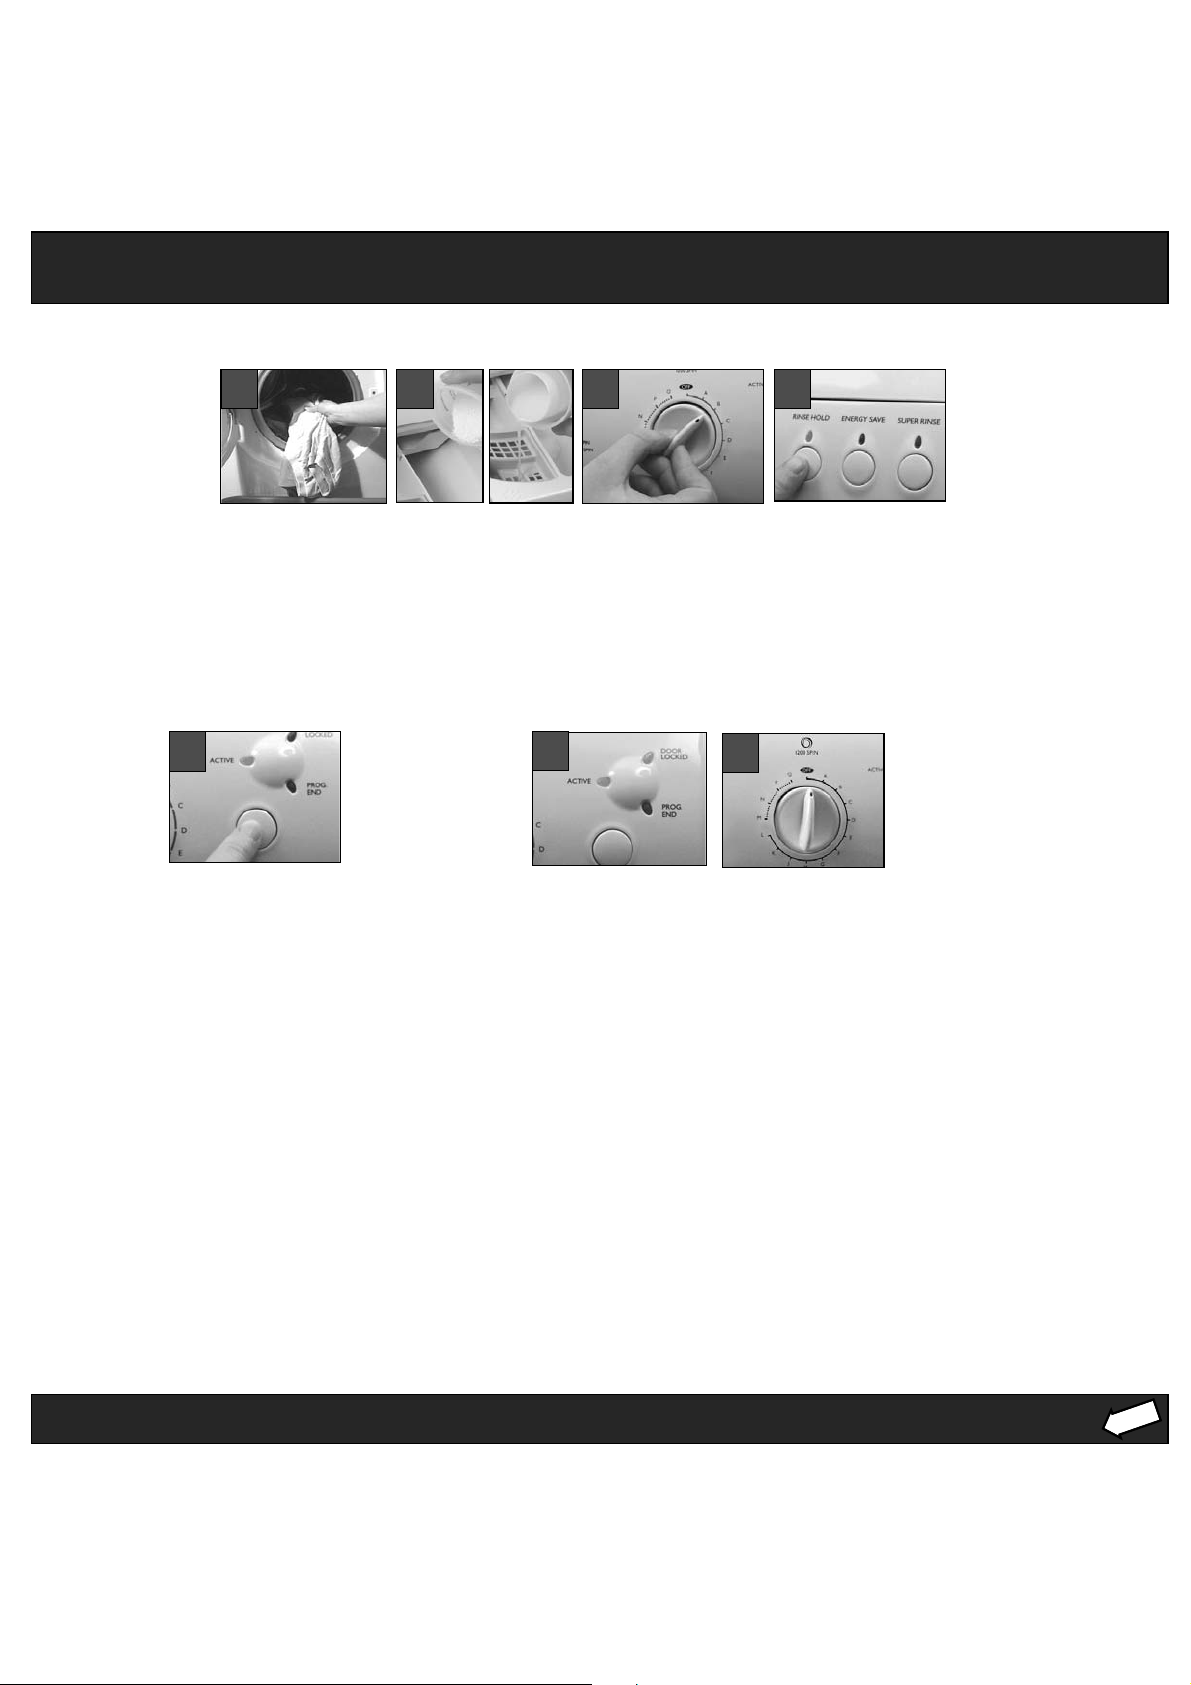
When all selections
have been made press
the ‘START/HOLD TO
RESET’ button.
The ‘PROG.END’ light
will go out and the
‘ACTIVE’ light will
illuminate to indicate
the start of a programme. After a short time
the ‘DOOR LOCKED’ indicator light will
illuminate.
To cancel a programme once the machine
has started, press and hold the ‘START/HOLD
TO RESET’ button for two seconds, until the
‘PROG.END’ light flashes.
You can then make a new selection. Press
the ‘START/HOLD TO RESET’ button again to
carry on.
STEP 7
A Typical Wash Programme
WARNINGS:
● DO NOT allow
children to play
with the appliance
or tamper with the
controls.
1
Sort laundry into
groups by washcare
labels.
Load the machine,
making sure that the
laundry is not
trapped in the door.
Close the door by
pushing it until it
clicks.
2
Add detergent (and
fabric conditioner if
required) to the
dispenser drawer (see
STEP 3).
Refer to the detergent
manufacturer’s
dosage instructions.
5
● DO NOT overload
the appliance!
It may damage the
laundry and reduce
the quality of the
wash.
● During the wash
cycle, remember
that the door glass
may become hot to
the touch.
3
Turn the programme
selector dial from the
‘OFF’ position to the
programme required
(see STEP 4).
The ‘PROG.END’ light
will illuminate to
indicate that the
machine has power.
6
During the wash, the
‘ACTIVE’ and ‘DOOR
LOCKED’indicator
light will remain lit.
● DO NOT open the
dispenser drawer
during any
programme.
4
Select any optional
wash feature(s) that
you may require by
pressing the
appropriate button(s)
(see STEP 6) indicator
lights will show what
you have chosen.
7
After a short time the ‘DOOR LOCKED’
indicator light will go out. You can
then open the door.
To switch the machine off, return the
programme selector dial to the ‘OFF’
position.
The ‘PROG.END’ light will go out.
We also recommend that you switch
off the electricity and water supply.
● DO NOT try to
open the door
when the ‘DOOR
LOCKED’indicator
light is on.
When the programme has
finished the
‘PROG.END’ and
‘DOOR LOCKED’
indicator lights
will remain lit.
● If you stop a
programme part
way through a
wash or there is a
power cut, take
care when opening
the door,the
machine may
contain hot water.
Page 10
o
t
e
D
W
d
g
o
n
a
o
n
n
a
b
i
n
D
r
P
M
STEP 8
e
T
Washcare Tips:
● Do not overload the machine
(maximum load 5.5kg).
In addition to reducing the
quality of the wash, this may also
damage your laundry and the
machine.
● We strongly recommend that you
do not
wash underwired bras in
this machine. Should the wires
become detached it could cause
damage to your clothes and the
machine. If the washcare label
states that the bra is machine
washable, then we advise placing
it in a sealed pillow case or a
similar washbag.
Remember,you will be charged
for a service call resulting from a
detached bra wire.
● Do not use the machine if the
item to be washed does not have
a wash label.
Before washing laundry we
recommend that you do the
following:
● Pre-treat awkward stains with
washable treatments.
Do not wash any items that have
previously been treated with
solvents.
● Close zips, fasten belts, tie strings
and close press studs to prevent
tangling.
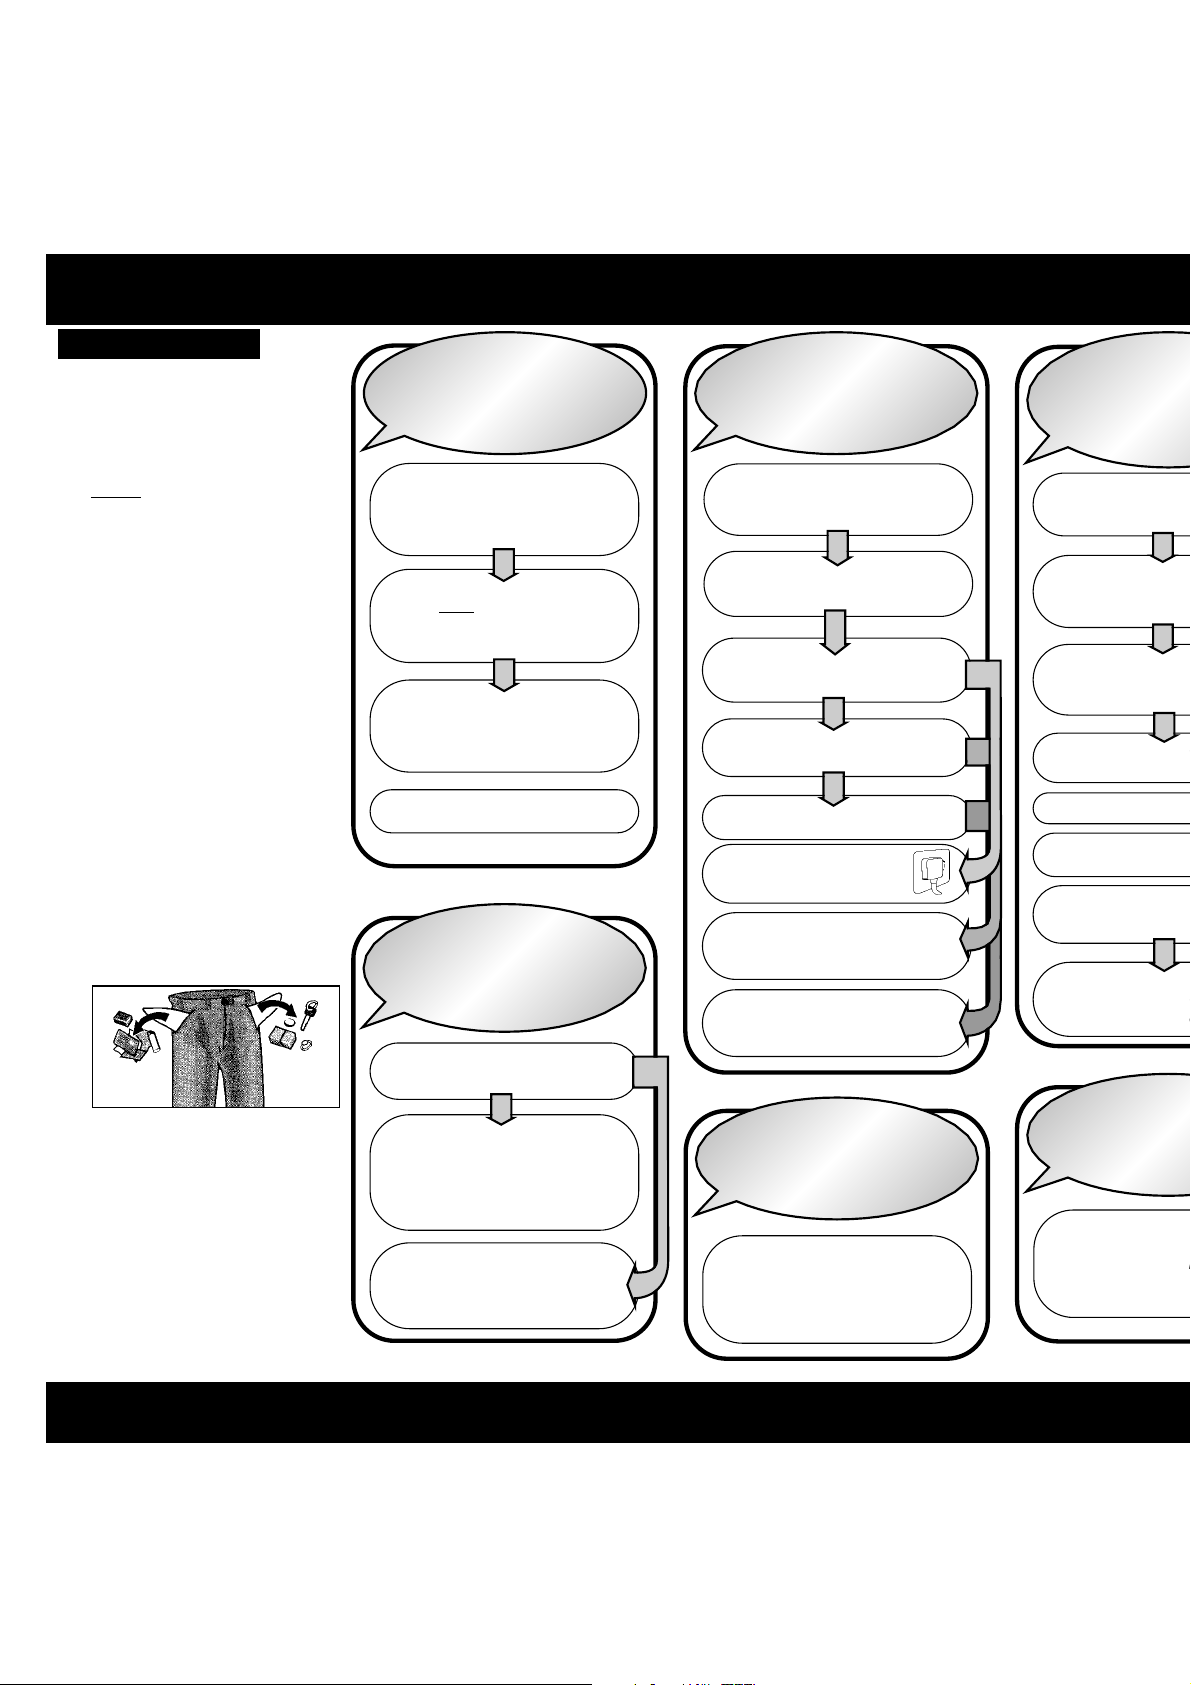
● Empty ALL objects from pockets
as they may damage the clothes
and the machine.
Troubleshooting - More ‘Troubleshooting information and general pr
MY MACHINE MAKES A
NOISE OR VIBRATES IN A
SPIN PROGRAMME.
Check all loose items, such as
coins, have been removed
from the laundry.
Have both transit bolts been
removed from the machine?
✓
Have you adjusted the feet to
stabilise the machine?
See STEP 2: Installation
MY LAUNDRY HAS NOT
SPUN DRY.
Was a short spin programme
used on a non-synthetic load.
✗
MY MACHINE WILL NOT
START
Close the door. Choose a
programme and then press
‘START/HOLD TO RESET’
Does the ‘door indicator’ light
come on after 2 seconds?
✓
Is the machine plugged in
and switched on?
✓
Is the socket OK? Test with
another appliance to check.
✓
Is the fuse in the plug OK?
Plug the machine in and
turn the socket switch on.
If possible use another socket
for the machine.
If not replace it, see STEP 1:
Electricity Supply
Has the drain hose
correctly? Ensure it
Are the drainage u
or under sink con
✗
✗
✗
Has ‘Rinse Hold’ be
The light will flash u
Clear any blockag
Check the blocke
MY MACHINE
PUMP OUT
or kinke
✓
from block
✓
is pressed
✓
Press the ‘Rinse H
again.
See STEP 2: Ins
been fou
Is the machine co
a sink waste s
✓
under sink draina
been cut
Remember,you will be charged
for a service call to rectify a
malfunction resulting from
objects, such as coins,pens, hair
grips etc. falling from pockets.
● Limit the size of absorbent loads
ie. towels, to 3kg (7lb) to give
good washing and rinsing results.
● Place small items in a wash bag.
● Always follow the care label on
items when choosing the wash
programme.
● Wash non-colourfast items or
really dirty laundry separately as
they may affect other items.
There has been an
unbalanced load and the machine
could not spin.
See ‘Automatic Features’ STEP 6.
Did the water pump out?
If not see ‘MY MACHINE DOES
NOT PUMP OUT WATER’.
MY MACHINE STOPS
BEFORE A SPIN
PROGRAMME.
The ‘RINSE HOLD’ button has
been pressed, this will hold
laundry in the final rinse water,
until the button is pressed
again.
WATER COLLEC
Clean fabric dispe
See STEP 3:‘The
Remember, you will be charged for a service call for problems caused by incorrect installation, non-r
Washing items that DO NOT have a wash label or washing items that are not intended as machine washable and NO
FABRIC DIS
COMPART
Drawe
Page 11
t
ion and general product advice can be found on our website,visit: www.theservicecentre.co.uk/help
MY MACHINE DOES NOT
PUMP OUT WATER
Has the drain hose been installed
correctly? Ensure it is not blocked
or kinked.
✓
Are the drainage unit, standpipe
or under sink connections free
from blockages?
✓
Has ‘Rinse Hold’been selected?
The light will flash until the button
is pressed again.
✓
Press the ‘Rinse Hold’ button
again.
See STEP 2: Installation
Clear any blockages that have
been found
Is the machine connected to
a sink waste system?
✓
Check the blocked end of the
under sink drainage unit has
been cut off.
WATER COLLECTS IN THE
FABRIC DISPENSER
COMPARTMENT
Clean fabric dispenser drawer.
See STEP 3:‘The Dispenser
Drawer’.
MY MACHINE IS LEAKING
✗
Is the fill hose on correctly?
If not tighten it.
Does the washer need
replacing?
✗
Is your water pressure too
high?
✗
✓
✗
Turn the main supply tap
down.
Is the standpipe or household
drain blocked.
✗
✓
You may need to call in a
plumber.
Is steam coming
from the dispenser
drawer?
✗
✓
The machine is designed to
release steam from the dispenser
drawer during hot washes.
Check the feet have been
levelled.
THE PROGRAMME TAKES A
LONG TIME
Check for low temperature and
low pressure of the cold water
supply.
THE DISPENSER WILL NOT
CLOSE PROPERLY
Is the drawer clogged with
detergent?
✓
Clean the dispenser drawer,see
STEP 3:‘The Dispenser Drawer’
Check the drawer is properly
aligned.
SUDS ARE COMING FROM
THE DISPENSER DRAWER
Check the correct amount of
suitable detergent has been used,
refer to manufacturer’s
recommendations.
If you have used the wrong type of
detergent, select a Rinse programme
to flush out your machine.
NOT ALL OF THE DETERGENT
HAS BEEN FLUSHED AWAY
Check that your cold water
supply tap is turned on fully.
✓
Check the inlet hose is not
kinked.
Indicator Lights:
The ‘DOOR LOCKED’indicator light:
●
If the ‘DOOR LOCKED’indicator light is flashing:
Shut the door firmly,until it clicks.
The ‘DOOR LOCKED’indicator light should now stay
✗
on.
●
If the door will not open... Check the programme has
finished, is the ‘PROG.END’ indicator light lit? It takes
about two minutes for the ‘DOOR LOCKED’ indicator
light to go out after a programme has finished.
The door will not open until the ‘DOOR LOCKED’
indicator light has gone out.
The ‘ACTIVE’ and ‘PROG.END’indicator
lights are both flashing...
●
This means that the machine cannot fill.
Check that the water supply is turned on and that the
inlet hose is not kinked.
The ‘ACTIVE’indicator light is flashing...
●
If the ‘ACTIVE’indicator light is flashing:
This means that the programme selector dial has been
moved since the programme started.
Return the dial to the original selection.
If your machine is still not working
contact:
Repair Service and Information Desk
UK 08709 066 066
Republic of Ireland 1850302 200
You will be asked for the following
details: Name and Address, Post
Code,Telephone Number, Date of
Purchase, Colour and Model/Serial
Numbers - which can be found on
the inside of the door.
Clear and precise details of the query
or fault.
Remember,you will be charged for a
service call if a problem with your
machine is caused by incorrect
installation or misuse.
t installation, non-removal of transit bolts or packaging, leaks from household pipework, loose or blocked fill and drain hoses.
e washable and NOT emptying contents from pockets may cause pump or drain blockages, or may damage components within the machine.
Page 12
195043803.04
05/2005 - SIMLEX . Four Ashes, Wolverhampton
Hotpoint guarantee
“Satisfaction guaranteed or your money back”
We give you a unique ‘satisfaction guaranteed’ promise - valid for 90
days - after you have purchased your Hotpoint appliance.
If there is a technical problem simply call Hotpoint Repair service or
visit our web-site at www
we will arrange for an engineer to call. If the technical problem is not
resolved under this guarantee, we will replace your machine or,if
you prefer, give you your money back.
All Hotpoint appliances carry a fully inclusive 12 month parts and
labour guarantee as well as free replacement parts for the first 5 years
(except microwaves, selected integrated appliances and cooker hoods,
which have a one year guarantee) provided that they are fitted by a
Hotpoint engineer.
Guarantee terms and conditions
Your guarantee is only applicable in the United Kingdom or
Republic of Ireland and is subject to the following provisions
that your appliance:
● Has been installed and used correctly in accordance with this
instruction booklet.
● Has been used solely for domestic purposes and is located on
domestic premises (ie. not for commercial or trade use).
● Has been properly connected to a suitable electrical supply
voltage as stated on the appliance rating plate.
● Has not been subject to misuse, accident, modified or repaired by
anyone other than one of our own service engineers.
Recycling & Disposal Information
As part of Hotpoint’s continued commitment to helping the environment,
Hotpoint reserves the right to use quality recycled components to keep down
customer costs and minimise material wastage.
Please dispose of packaging and old appliances carefully.
To minimise risk of injury to children, remove the door, plug and cut mains cable
off flush with the appliance. Dispose of these parts separately to ensure that the
appliance can no longer be plugged into a mains socket, and the door cannot be
locked shut.
Disposal of old electrical appliances
The European Directive 2002/96/EC on Waste Electrical and Electronic
Equipment (WEEE), requires that old household electrical appliances must
not be disposed of in the normal unsorted municipal waste stream. Old
appliances must be collected separately in order to optimise the recovery
and recycling of the materials they contain and reduce the impact on
human health and the environment.
The crossed out “wheeled bin”symbol on the product reminds you of
your obligation, that when you dispose of the appliance it must be
separately collected.
Consumers should contact their local authority or retailer for
information concerning the correct disposal of their old appliance.
.hotpointservice.co.uk and where necessary,
After Sales Service
“No company is better positioned to offer an after sales service on
added benefit of a fully inclusive parts and labour guarantee for the first
Note: Our operators will require the Model number and the Serial number
service. We have the largest white goods repair service in the UK with over
1100 of our own fully trained engineers. All repairs include a parts and
All this ensures that you will receive the best available after sales service
Whether you have just one or a number of Hotpoint appliances in your
kitchen, we offer two service cover plans to give you total peace of mind.
● Repair Protection Plan - FREE service repairs for a single Hotpoint
● Kitchen Cover - FREE service repairs for all your Hotpoint
a Hotpoint appliance than us - the manufacturer”.
As part of our commitment to you, all Hotpoint appliances have the
12 months. In addition to this you also have the advantage of free
replacement parts for the first 5 years when fitted by a Hotpoint
engineer. When the 12 months parts and labour guarantee expires we
Available 364 days a year with a fast, effective and value for money
If you require any information or have any questions about your
A wide range of genuine parts and accessories are available from our
Genuine parts and accessories, extended warranties and service
offer the following after sales service options:
Repair Service and Information Help Desk
labour guarantee for 12 months from the date of the repair.
appliance, our operators are on hand with help and advice.
repairs are all available on our web-site at:
For pre purchase information on any other Hotpoint
product,
call: 08701 50 60 70 or visit:www
UK: 08709 066066
www
Republic of Ireland: 1850 302 200
Republic of Ireland: 1850 502 200
Republic of Ireland: (01) 842 6836
.hotpointservice.co.uk
of your appliance.
possible.
Extended Warranties
UK: 08709 088 088
www
.hotpointservice.co.uk
appliance during the period of cover.
appliances less than 8 years old.
Genuine Parts and Accessories
UK: 08709 077 077
www
.hotpointservice.co.uk
hotline or through our web site.
www
.hotpointservice.co.uk
.hotpoint.co.uk
Indesit Company UK Limited, Morley Way, Peterborough, PE2 9JB.
 Loading...