

Page 1
Quick Guide
1
2
A
B
*
THANK YOU FOR PURCHASING A HOTPOINT PRODUCT.
To receive more comprehensive assistance, register the
appliance on
www.hotpoint.co.uk/register
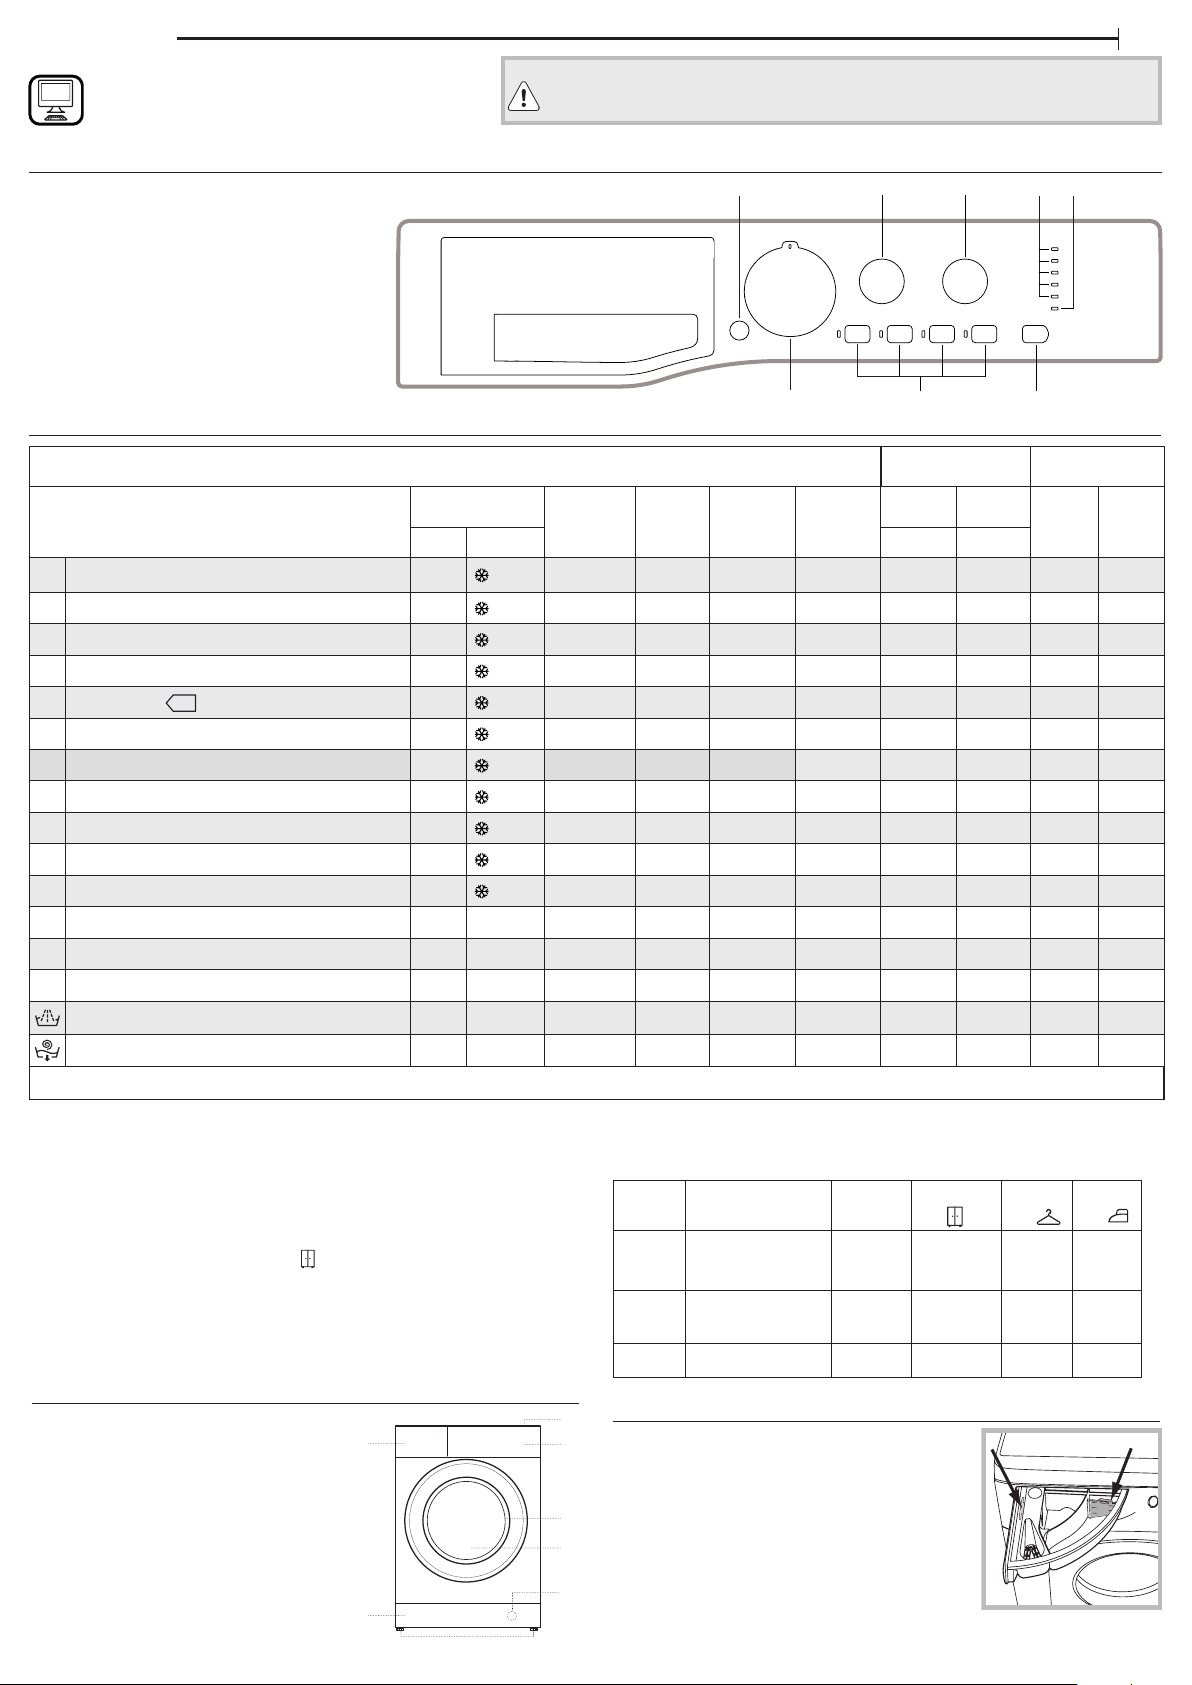
CONTROL PANEL
1. ON/OFF button
2. TEMPERATURE knob
3. DRYING knob
4. WASH CYCLE PROGRESS indicator lights
5. DOOR LOCKED indicator light
6. START/PAUSE button and indicator light
7. FUNCTION buttons and indicator lights
8. WASH CYCLE SELECTOR KNOB
Before using the appliance carefully read the Health and Safety guide.
Before using the machine, it is imperative that the transport bolts are removed. For more
detailed instructions on how to remove them, see the Installation Guide.
1
2
3
4
GB
5
WASH CYCLE TABLE
Maximum load 9 kg
Power input in o mode 0.5 W / in left-on mode 8 W
Wash cycle
Temperature
Default Range
1 Anti-Stain 40°C
2 Anti-Stain Quick 40°C
3 Whites 60°C
4 Cotton (2) 40°C
5
Eco Cotton (1)
60°C
6 Synthetics (3) 40°C
7 Anti Allergy 60°C
8 Wool 40°C
9 Delicates 30°C
10 Fast Wash 30’ 30°C
11 Wash & Dry 45’ 30°C
- 40°C 1400 5 185
- 40°C 1200 4,5 60
- 90°C 1400 5 170
- 60°C 1400 9 235
- 60°C 1400 9 225
- 60°C 1000 4,5 125
- 60°C 1400 5 210
- 40°C 800 2 90
- 30°C 0 1 80
- 30°C 800 3,5 30 –
- 30°C 1400 1 45
Max.
spin speed
(rpm)
12 Drying Cotton – – – 6 –
13 Drying Synthetics – – – 4 –
14 Drying Wool – – – 2 –
Rinse – – 1400 9 50
Spin+Pump out – – 1400 9 10
Required dosage Optional dosage
The cycle duration indicated on the display or instruction manual is an estimate based on
standard conditions. The actual duration may vary in relation to several factors, such as
the temperature and pressure of the incoming water, ambient temperature, amount of
detergent, load quantity and type, load balancing and any additional options selected.
1) Test programme in compliance with standard EN 50229 (Wash):
This cycle is designed for normally soiled cotton loads and is the most ecient in terms of
both electricity and water consumption; it should be used for garments washable at 60°C or
at 40°C. The actual washing temperature may dier from the indicated value.
Test programme in compliance with standard EN 50229 (Drying): select the “Cotton”
drying programme and set the drying level to “ ”, for both loads. The rst drying cycle must
be carried out with the nominal load.
Max.
load
(kg)
For all testing institutes:
2) Long cotton cycle: set wash cycle 4 with a temperature of 40°C.
3) Long synthetics cycle: set wash cycle 6 with a temperature of 40°C.
Fabric
type
Cotton
Synthetics
Duration
(minutes)
Load type
Clothing of di erent sizes, Terry
towels
Sheets, Shirts, Pyjamas, socks, etc.
8
7
6
Detergents and
Additives
Fabric
softener
Drying
Wash
1 2
Max.
load (kg)
– – – –
– – – –
– – – –
–
– – – –
Cupboard
dry
6 255 230 200
4 220 200 190
Henger
dry
Recommended
detergent
Powder Liquid
–
–
–
–
–
–
–
– –
Iron
dry
PRODUCT DESCRIPTION
1. Top
2. Detergent dispenser drawer
3. Control panel
4. Handle
5. Porthole door
6. Drain pump (behind the plinth)
7. Plinth (removable)
8. Adjustable feet (2)
Wool Knitwea r, Pullovers. etc. 2 210 190 180
DETERGENT DISPENSER DRAWER
1.
2.
Compartment *:
3.
Do not insert detergent in this compartment.
Compartment 1: Washing detergent (powder
or liquid)
If liquid detergent is used, the removable plastic par tition
4.
A (supplied) should be used for proper dosage.
If powder detergent is used, place the partition
5.
into slot B.
Compartment 2: Additives (fabric softeners, etc.)
6.
The fabric softener must not exceed the “MAX” level.
7.
8.
! Use powder detergent for white cotton
garments, for pre-washing, and for washing at temperatures over 60°C.
! Follow the instructions given on the detergent packaging.
Page 2
WASH CYCLES
END
Follow the instructions on the symbols of the garment’s wash
care label. The value indicated in the symbol is the maximum
recommended temperature for washing the garment.
Anti-Stain
this programme is suitable to heavily-soiled garments with resistant
colours. It ensures a washing class that is higher than the standard class
(A class). When running the programme, do not mix garments of dierent
colours. We recommend the use of powder detergent. Pre-treatment with
special additives is recommended if there are obstinate stains.
If the drying function is selected, a drying cycle automatically activates at
the end of the wash cycle that resembles open-air drying, with the added
advantages of preserving garments from yellowing due to sunlight
exposure and preventing loss of whiteness caused by the possible
presence of dust in the air. Drying cycles can only be selected on a level
basis. Dryness level “ ” recommended.
Anti-Stain Quick
this programme is ideal for washing the most dicult daily stains in 1
hour. It is ideal for mixed fabrics and coloured garments, caring for your
clothes as it washes.
If the drying function is selected, a drying cycle automatically activates at
the end of the wash cycle that resembles open-air drying, with the added
advantages of preserving garments from yellowing due to sunlight
exposure and preventing loss of whiteness caused by the possible
presence of dust in the air. Drying cycles can only be selected on a level
basis. Dryness level “ ” recommended.
Whites
for heavily soiled whites and resistant colours.
Eco Cotton
Suitable for washing moderately soiled cotton garments. At 40°C and
60°C it is the standard cycle for washing cotton garments, and is the most
ecient in terms of combined water and electricity consumption.
Synthetics
Suitable for washing moderately soiled garments made of synthetic bres
(e.g. polyester, polyacrylic, viscose, etc.) or mixed synthetic-cotton bres.
Anti Allergy
Suitable for removing major allergens such as pollen, mites and cat or
dog hair.
Wool - Woolmark Apparel Care - Green:
the wool wash cycle of this machine has been approved by The
Woolmark Company for the washing of wool garments labelled as “hand
wash” provided that the products are washed according to the
instructions on the garment label and those issued by the manufacturer
of this washer-dryer (M1318)
Delicates
use programme to wash very delicate garments with decorative features, such
as diamantes and sequins.
We recommend turning the garments inside out before washing and
placing small items into the special bag for washing delicates.
When selecting an exclusively time-based drying function, a drying cycle
is performed at the end of the wash cycle that is particularly delicate,
thanks to light handling and appropriate temperature control of the
water jet.
The recommended durations are:
1 kg of synthetic garments --> 150 min
1 kg of synthetic and cotton garments --> 180 min
1 kg of cotton garments --> 180 min
The degree of dryness depends on the load and fabric composition.
Fast Wash 30’
For washing lightly soiled garments in a short time. Not suitable for wool,
silk and garments to be washed by hand.
Wash & Dry 45’
select programme for washing and drying lightly soiled garments (Cotton
and Synthetics) in a short time. This cycle may be used to wash and dry a
laundry load of up to 1 kg in just 45 minutes. To achieve optimum results,
use liquid detergent and pre-treat cus, collars and stains.
Drying Cottons
To dry cotton garments.
Drying Synthetics
To dry synthetics garments.
Drying Wool
To dry wool garments.
Rinse
Designed for rinsing and spinning.
Spin + Pump out
Designed for spinning and draining the water.
INDICATOR LIGHTS
The indicator lights provide important information. This is what they can tell you:
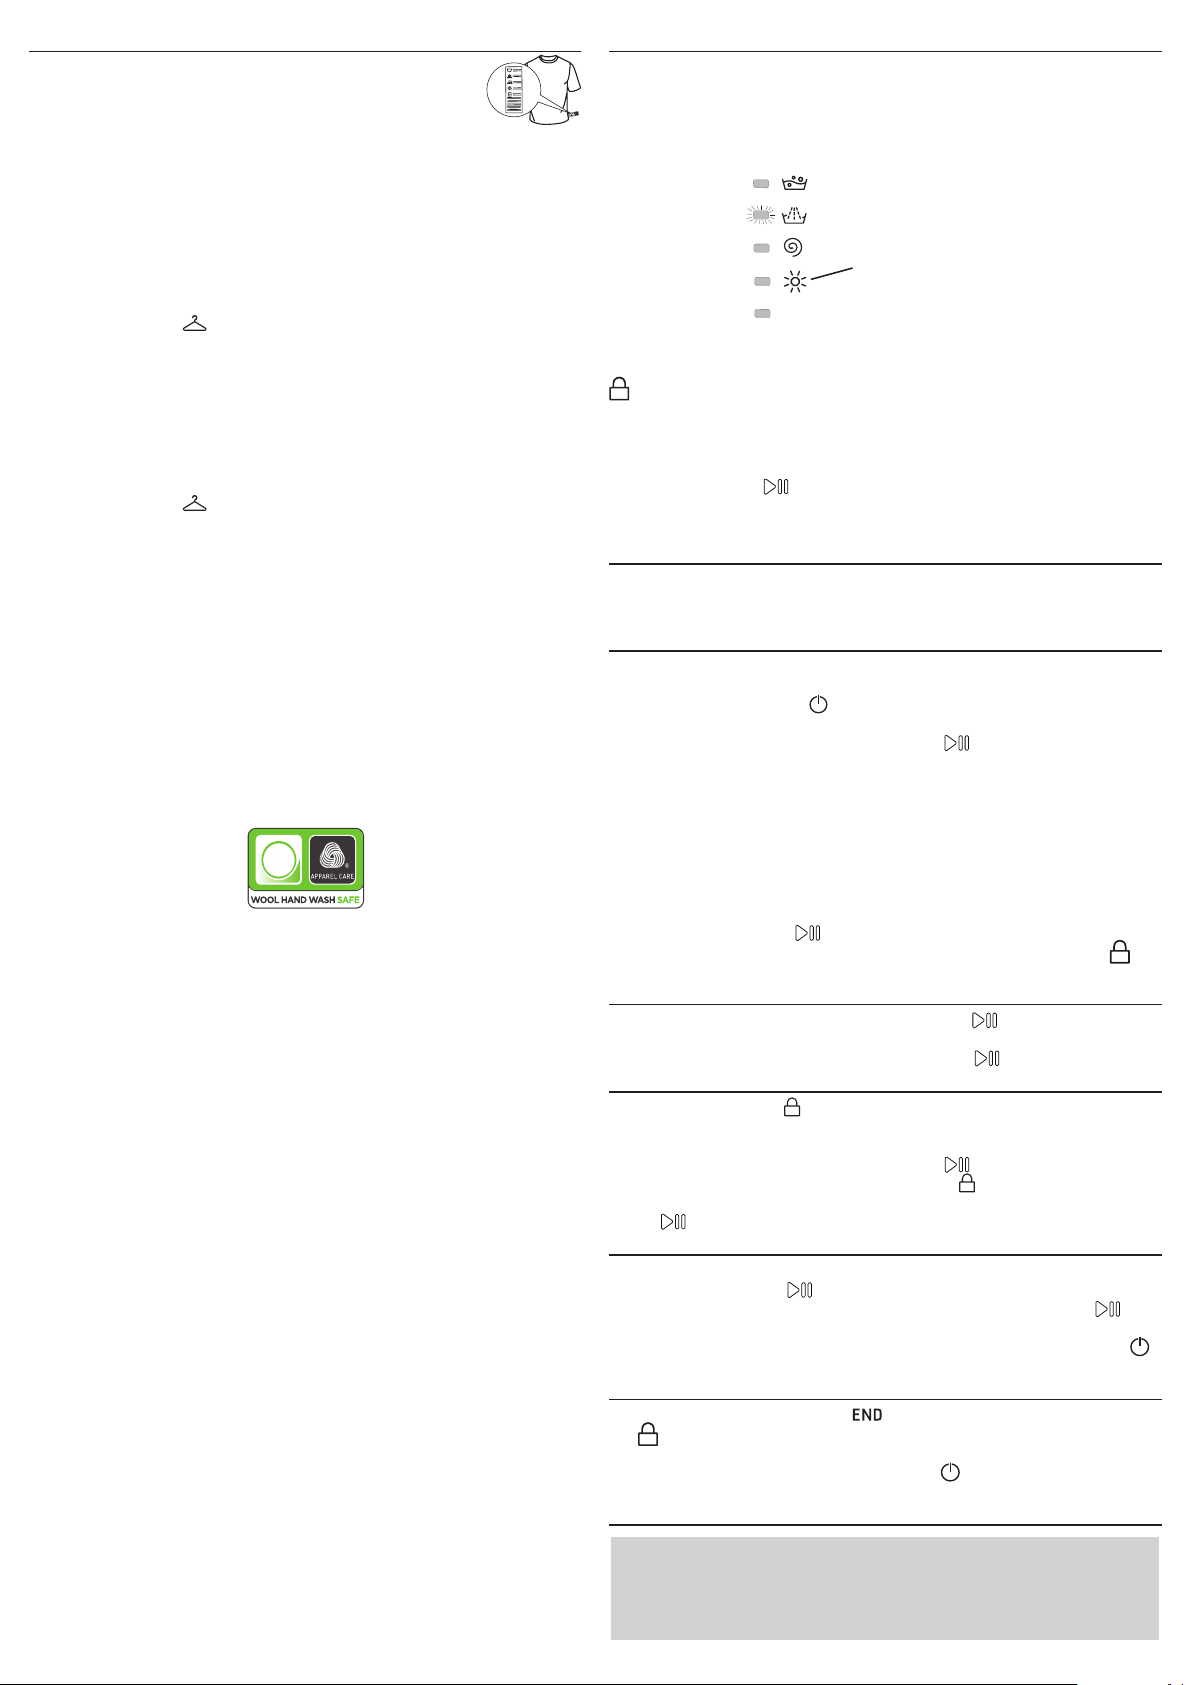
Wash cycle phase indicator lights
Once the desired wash cycle has been selected and has begun, the
indicator lights switch on one by one to indicate which phase of the cycle
is currently in progress.
Wash
Rinse
Spin
Drying
End of wash cycle
Note: during the “Drain” phase, the indicator light corresponding to the
“Spin” cycle phase will illuminate.
Door locked indicator light
If this indicator light is on, the appliance door is locked to prevent it from
being opened accidentally; to avoid any damage, wait for the indicator
light to switch o before you open the appliance door (wait
approximately 3 minutes).
! If the START/PAUSE indicator light (orange) ashes rapidly at the
same time as the function indicator light, this indicates a problem has
occurred (see “ Troubleshooting”).
Note: as soon as a drying
level or time period has
been set, this indicator light
illuminates to indicate that
the selected wash cycle will
be followed by a drying
phase.
FIRSTTIME USE
Once the appliance has been installed, and before it is used for the rst
time, run a wash cycle with detergent and no laundry, by setting the
“Auto-Clean” cycle.
DAILY USE
Prepare the laundry by following the suggestions appearing under the
“TIPS AND SUGGESTIONS” section.
- Press the ON/OFF button ; all the indicator lights will turn on for a few
seconds, then only the indicator lights relative to the selected programme
settings will remain lit and the START/PAUSE indicator light will ash.
- Open the door. Load the laundry while making sure not to exceed the
maximum load quantity indicated in the wash cycle table.
- Pull out the detergent dispenser drawer and pour the detergent into the
relevant compartments, as described in the “DETERGENT DISPENSER
DRAWER” section.
- Close the door.
- Select the desired wash cycle.
- Set the washing temperature.
- Select the desired options.
- Press the START/PAUSE button to start the wash cycle; the relative
indicator light will light up steady green and the door will lock (the
indicator light will switch on).
PAUSING A CYCLE
To pause the wash cycle, press the START/PAUSE button again; the
indicator light will ash amber. To start the wash cycle from the point at
which it was interrupted, press the START/PAUSE button again.
OPENING THE DOOR, IF NECESSARY
Once a cycle starts, the indicator light turns on to signal that the door
cannot be opened. While a wash cycle is running, the door remains
locked. To open the door while a cycle is under way, for example, to add
or remove garments, press the START/PAUSE button to pause the
cycle; the indicator light will ash amber. If the indicator light is not lit,
the door may be opened (wait approximately 3 minutes). Press the START/
PAUSE button again to continue the cycle.
CHANGING A RUNNING WASH CYCLE
To change a wash cycle while it is in progress, pause the washer-dryer
using the START/PAUSE button (the relative indicator light will ash
amber), then select the desired cycle and press the START/PAUSE
button again.
! To cancel a cycle that has already begun, press and hold the ON/OFF
button. The cycle will be stopped and the machine will switch o.
AT THE END OF THE WASH CYCLE
At the end of the wash cycle the indicator light will switch on; when
the indicator light switches o, the door may be opened (wait
approximately 3 minutes). Open the door, unload the laundry and switch
o the machine. If you do not press ON/OFF button, the washer-dryer
will switch o automatically after about a half of an hour.
OPTIONS
- If the selected function is not compatible with the programmed wash
cycle, the corresponding indicator light will ash and a sound alert (3
beeps); the function will not be activated.
- If a function which is incompatible with another function selected
previously, only the most recent selection will remain active.
Page 3
Super Wash
This option oers a high-performance wash due to the greater quantity of
water used in the initial phase of the cycle, and due to the increased wash
cycle duration, is particularly useful for the removal of stubborn stains.
Slow Spin
By selecting this function, reduces the spin speed.
Timer Saver
If you select this option, the wash cycle duration will be reduced by up to
50%, depending on the selected cycle, thereby guaranteeing simultaneous
water and energy saving. Use this cycle for lightly soiled garments.
Eco Wash
The Eco Wash option saves energy by not heating the water used to wash
your laundry – an advantage both to the environment and to your energy
bill. Instead, intensied wash action and water optimisation ensure great
wash results in the same average time of a standard cycle. For the best
washing results we recommend the usage of a liquid detergent.
By also turning the DRYING knob to the position, a drying cycle
automatically activates at the end of the wash cycle that also helps to
reduce energy consumption, thanks to an optimal combination of air
temperature and cycle duration.
Temperature
Turn the TEMPERATURE knob to set the wash temperature (see Table of
wash cycles).
The temperature may be lowered, or even set to a cold wash ( ). The
washer-dryer will automatically prevent you from selecting a temperature
which is higher than the maximum value set for each wash cycle.
Drying
Turn the DRYING knob to set the desired drying type.
Two options are available:
A - Based on time: from 40 to 180 minutes.
B - Based on the how damp the clothes are once they have been dried:
Iron : slightly damp clothes, easy to iron.
Hanger : dry clothes to put away.
Cupboard : very dry clothes, recommended for towelling and
bathrobes.
If your laundry load to be washed and dried is much greater than the
maximum stated load (see adjacent table), perform the wash cycle, and
when the cycle is complete, divide the garments into groups and put
some of them back in the drum. At this point, follow the instructions
provided for a “Drying only” cycle. Repeat this procedure for the
remainder of the load.
N.B: when the drying is complete there is a cooling period, even though
the DRYING knob is in the position.
Drying only
Turn the WASH CYCLE knob to one of the drying settings (12-13-14)
according to the type of fabric, then select the desired drying duration
using the DRYING knob.
Selecting the cotton drying cycle ( position) through the programme
selector knob and pressing the “Eco” button activates an automatic drying
cycle that allows for saving energy, thanks to an optimal combination of air
temperature and cycle duration.
TIPS AND SUGGESTIONS
Divide the laundry according to:
Type of fabric (cotton, mixed bres, synthetics, wool, garments to be
hand-washed). Colour (separate coloured garments from whites, wash
new coloured garments separately). Delicates (small garments – such as
nylon stockings – and items with hooks – such as bras: insert them in a
fabric bag).
Empty the pockets:
Objects such as coins or lighters can damage the washer-dryer and the
drum. Check all buttons.
CARE AND MAINTENANCE
Before performing cleaning and maintenance, switch the washer-dryer o
and disconnect it from the mains power. Do not use ammable liquids to
clean the washer-dryer.
Cutting o the water and electricity supplies
Close the water tap after every wash. This will limit wear on the hydraulic
system inside the washer-dryer and help to prevent leaks.
Unplug the washer-dryer when cleaning it and during all maintenance
work.
Cleaning the washer-dryer
The outer parts and rubber components of the appliance can be cleaned
using a soft cloth soaked in lukewarm soapy water. Do not use solvents or
abrasives.
The washer-dryer has a “Auto-Clean” cycle for its internal parts; it must be
run without any load in the drum.
To optimise this cycle, it is possible to use either detergent (10% of the
quantity specied for lightly soiled garments) or special additives to clean
the washer-dryer. We recommend running a cleaning cycle every 40 wash
cycles.
To start the cycle press buttons “Super Wash” and “Slow Spin”
simultaneously for 5 seconds.
The cycle will start automatically and will run for about 70 minutes. To
stop the cycle, press the START/PAUSE button.
Cleaning the detergent dispenser drawer
Remove the dispenser drawer by lifting and pulling it outwards. Wash it
under running water; this procedure should be eected regularly.
Caring for the door and drum
Always leave the porthole door ajar in order to prevent unpleasant odours
from forming.
Cleaning the pump
The washer-dryer is tted with a self-cleaning pump that does not require
any maintenance. Small items (such as coins or buttons) may sometimes
fall into the protective pre-chamber situated at the base of the pump.
! Make sure that the wash cycle has ended and unplug the appliance.
To access the pre-chamber:
1. remove the covering panel on the front side of the machine by
inserting a screwdriver in the centre and sides of the panel and using it as
a lever;
2. loosen the drainage pump cover by turning it anti-clockwise: it is
normal for some water to leak out;
3. clean the inside thoroughly;
4. screw the cover back on;
5. put the panel back in place, making sure the hooks slot in place before
pushing the panel onto the appliance.
Checking the water inlet hose
Check the water inlet hose at least once a year. If it is cracked or broken, it
must be replaced: during wash cycles, the high pressure of the water
could suddenly split the hose open.
! Never use hoses that have already been used.
LOAD BALANCING SYSTEM
Before every spin cycle, to avoid excessive vibrations before every
spin and to distribute the load in a uniform manner, the drum rotates
continuously at a speed which is slightly greater than the washing
rotation speed. If, after several attempts, the load is not balanced
correctly, the machine spins at a reduced spin speed. If the load is
excessively unbalanced, the washer-dryer performs the distribution
process instead of spinning. To encourage improved load distribution and
balance, we recommend small and large garments are mixed in the load.
ACCESSORIES
Contact our Technical Assistance Service to check whether the following
accessories are available for this washer-dryer model.
Stacking kit
With this accessory you can secure the tumble dryer to the upper part of
your washer-dryer to save space and facilitate loading and unloading of
the tumble dryer.
TRANSPORT AND HANDLING
Do not lift the washer-dryer by gripping it from the upper section.
Unplug the appliance and close the water tap. Check that the door and
detergent dispenser drawer are tightly closed. Detach the lling hose
from the water tap then detach the drain hose. Empty all the water
remaining in the hoses and secure the latter so that they do not get
damaged during transport. Apply the transport bolts back on. Repeat, in
reverse order, the transport bolt removal procedure described in the
“Installation instructions”.
Important: Not emptying contents from pockets may cause pump or drain
blockages, or may damage the machine.
Do not wash items which do not have a wash label, or wash items that are
not intended as machine washable.
Page 4
TROUBLESHOOTING
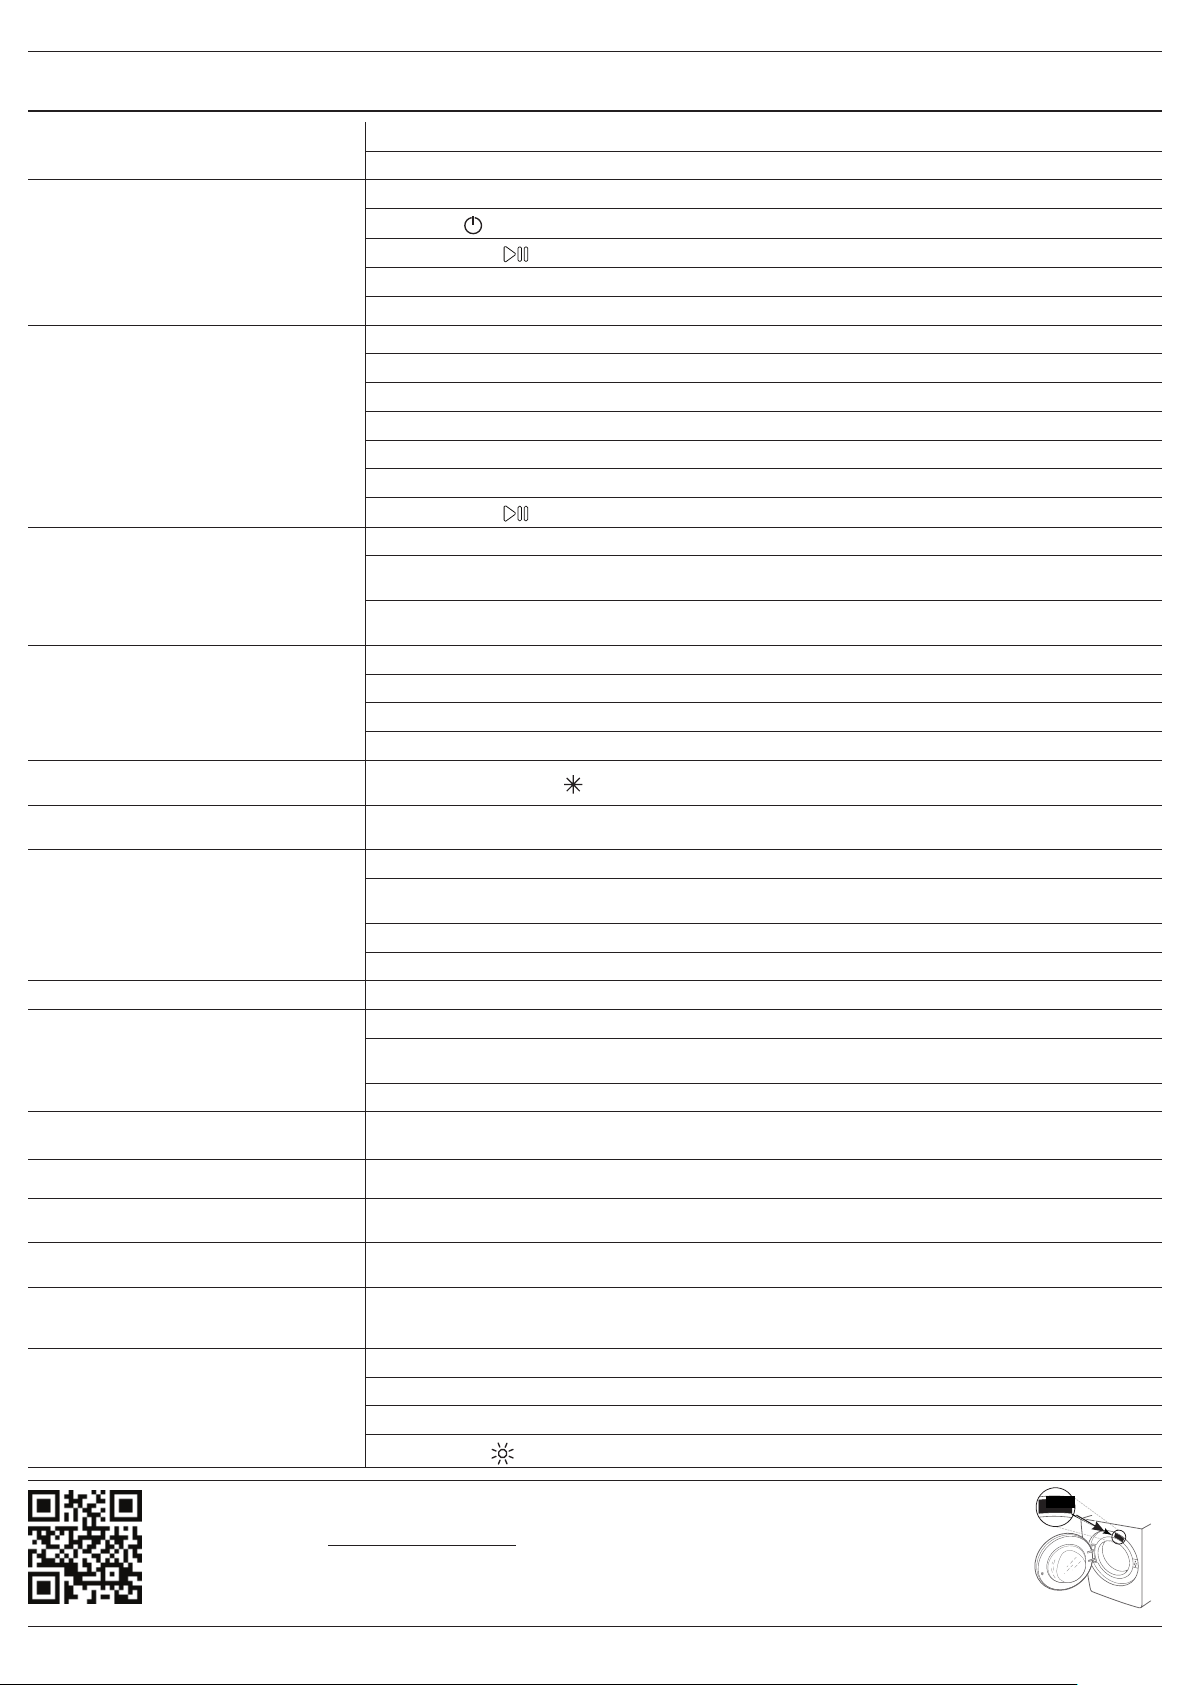
Your machine could occasionally fail to work. Before contacting the Technical Assistance Service, make sure that the problem cannot be easily solved
using the following list.
Anomalies Possible causes / Solution
The machine does not switch on.
The wash cycle does not start.
The machine does not ll with water or
the indicator light for the rst wash cycle
stage ashes rapidly.
The machine continuously lls with water
and continually drains away or Water left
in the drum or Stuck on wash.
The machine does not drain or spin - (error
lights ashing).
The machine does not heat or poor wash
results.
The programme takes too long.
The washer-dryer vibrates a lot during the
spin cycle.
The machine is noisy. There will always be some motor, pump and drum noise during spin.
The machine leaks from the
dispenser.
The indicator lights on the console are
ashing rapidly.
The appliance is not plugged into the socket fully, or not enough to make contact.
There is no power to the socket, or the fuse has blown in the mains plug.
The door is not closed properly.
The ON/OFF button has not been pressed.
The START/PAUSE button has not been pressed.
The water tap has not been turned on to allow water to ow into the machine.
A delayed start has been set.
The water inlet hose is kinked.
The water inlet hose is not connected to the water supply.
The water pressure is too low.
The water tap has not been turned on to allow water to ow into the machine.
There is no water supply to the house.
The inlet valve lter is blocked.
The START/PAUSE button has not been pressed.
The top of the drain hose is too low - It must be tted at a height between 65 and 100 cm from the oor.
The drain hose is connected incorrectly to the sink trap allowing water to run into the machine, the drain hose
must be positioned higher than the bottom of the sink to prevent water owing down the drain hose.
The end of the drain hose has been pushed too far down the standpipe, the ‘U’ bracket should be tted 100
mm from the end of the drain hose.
The Pump lter is blocked.
The drain hose is kinked.
New Installation - The blanking cap or spigot has not been removed if connected under a sink.
The drain hose or sink trap is blocked.
The ‘Temperature’ is set to “ ” position.
Programme times will vary due to water pressure, the incoming water temperature and if the wash load goes
out of balance. This will increase the programme times accordingly.
The feet have not been adjusted, enabling the machine to rock.
New Installation - Either the Transit Bolts including the plastic spacers, or the Polystyrene Packaging have not
been removed when installing the machine.
The machine is trapped between cabinets and/or walls.
The load is in a slight out of balance condition and machine is spinning, but at a lower speed.
The dispenser drawer is blocked with detergent and requires cleaning.
The water pressure is too high and requires turning down - turn down the tap on the water supply pipe
slightly and try again.
The machine is tilting forwards - It must be level when in its nal position.
Switch o the machine and unplug it, wait for approximately 1 minute and then switch back on again. If the
problem persists contact Technical Assistance Centre.
The machine smells. The machine requires a service wash. Run a auto clean wash cycle with detergent and no laundry.
The water level is too low when the
machine is washing.
There is too much foam.
General.
The washer-dryer does not dry.
You can download the SAFETY AND INSTALLATION INSTRUCTIONS, OPERATING MANUAL, TECHNICAL
SHEET and ENERGY DATA by:
The water level is correct if it can be seen at the bottom of the door.
The detergent is not suitable for machine washing (it should display the text
‘for washer-dryers’ or ‘hand and machine wash’ or the like).
Your washer-dryer contains sensors that monitor progress during the wash cycle (eg: Water Levels,
Temperatures, Out of Balance loads, Wash time/progress). Normally, if your machine successfully completes
the cycle, there is unlikely to be anything wrong!
The appliance is not plugged into the socket, or not enough to make contact.
There has been a power failure.
The appliance door is not shut properly.
DRYING is in the position.
xxxxxxxxxxxx
• Visiting the website http://docs.hotpoint.eu.
• Using the QR code.
• Alternatively, contact our Technical Assistance Service (the telephone number is indicated in the warranty
booklet). When contacting the Technical Assistance Service, provide the codes shown on the adhesive label applied
to the inside of the door.
11331265
xxxx
 Loading...