


La ringraziamo per aver scelto un prodotto Ariston, sicuro e davvero facile da usare. Per conoscerlo, utilizzarlo al
G
A
F
H
meglio e a lungo, le consigliamo , prima di utilizzare l’apparecchio, di leggere attentamente le a vvertenze contenute nel
presente libretto, in quanto f orniscono importanti indicazioni riguardanti la sicurezza di installazione, d’uso e di manutenzione. Conservare con cura questo libretto per ogni ulteriore consultazione. Grazie.
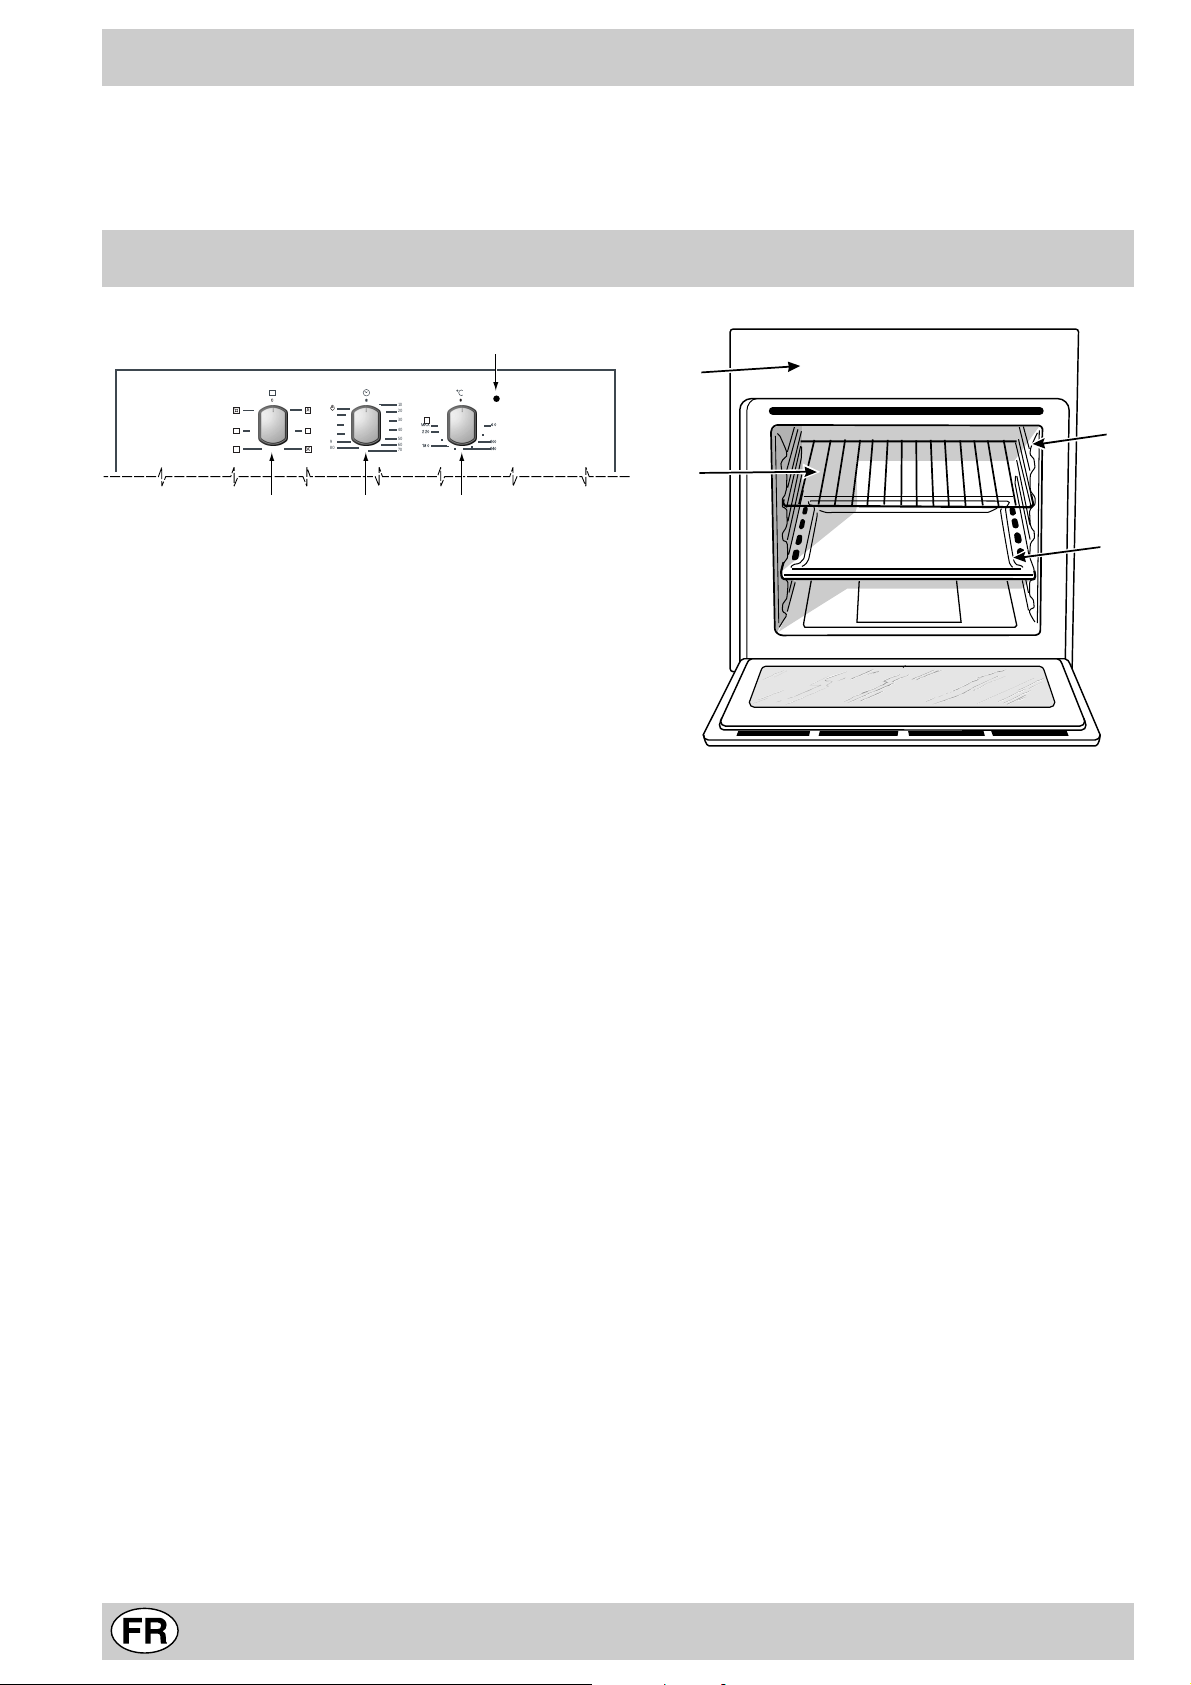
Visto da vicino
E
10
120
110
100
90
80
20
30
MAX
40
220
50
60
180
70
60
100
140
B
I
C
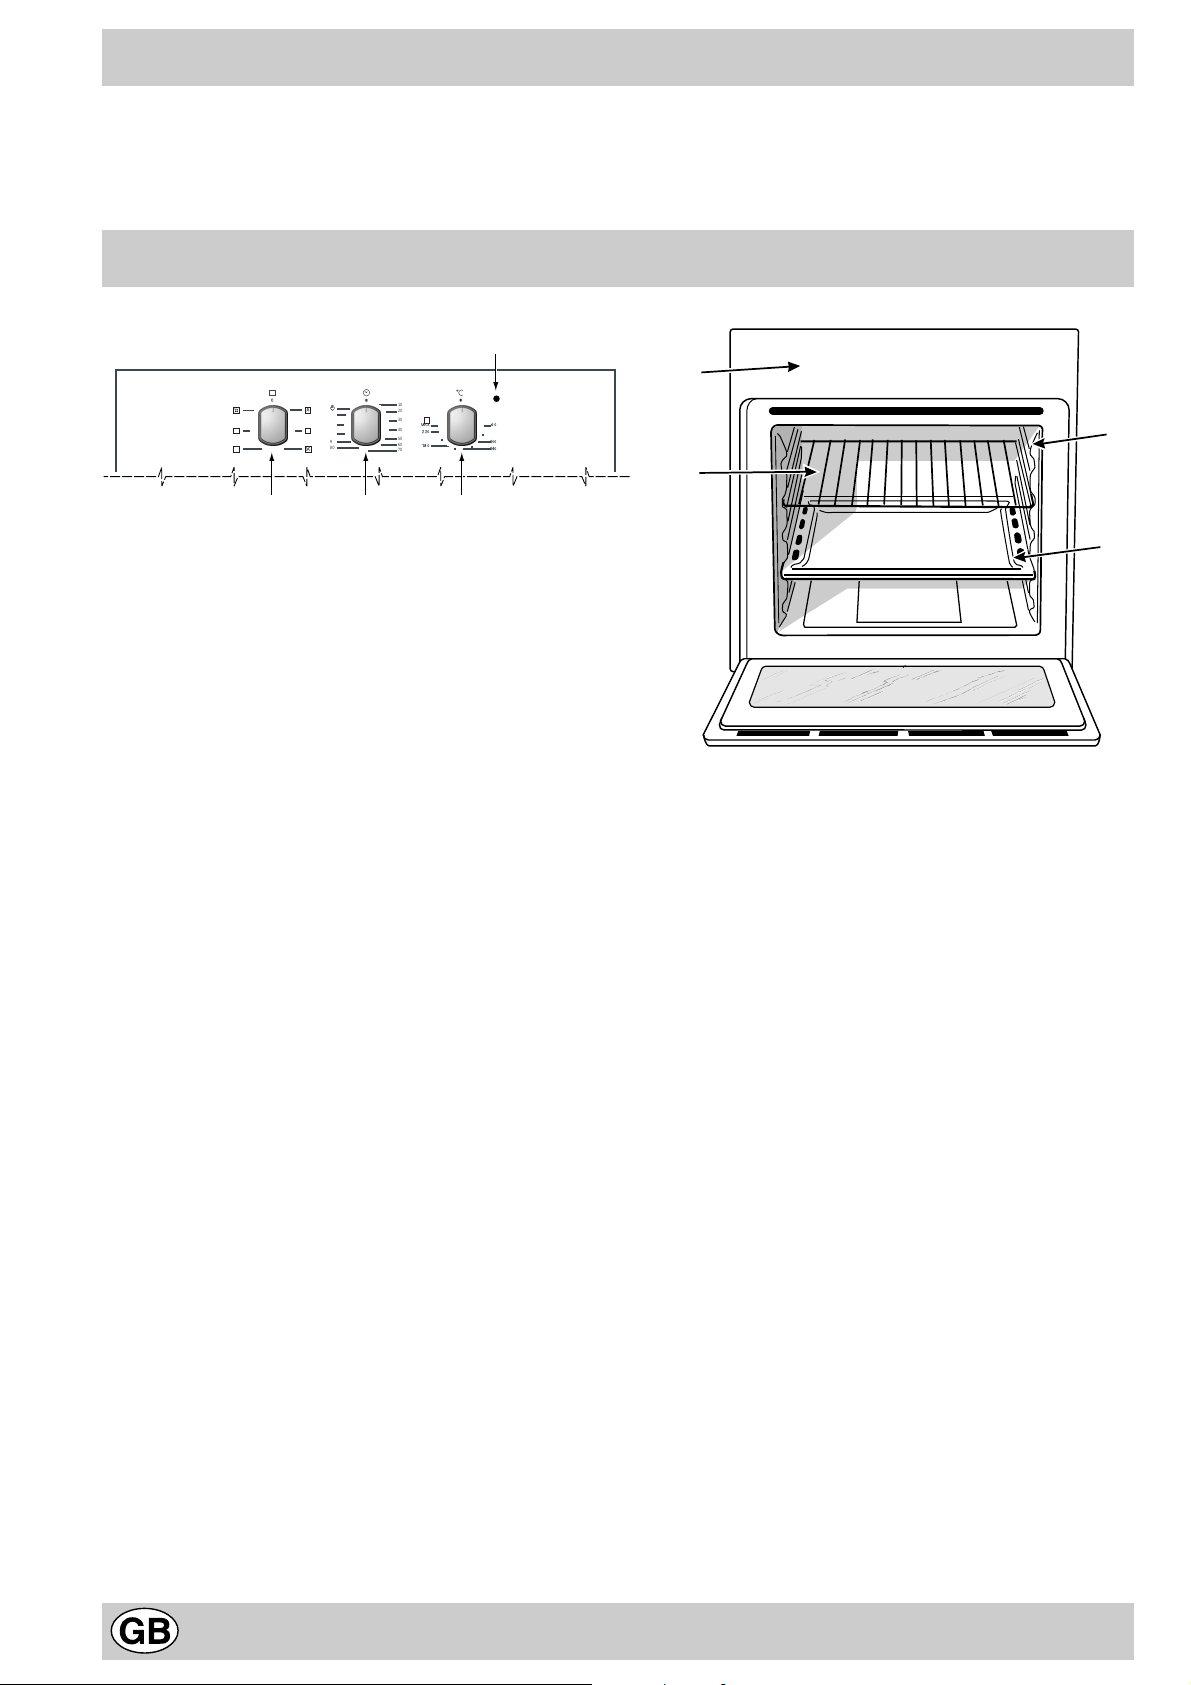
A. Cruscotto comandi
B. Manopola di selezione funzioni di cottura
C. Manopola per la temperatura di cottura
E. Spia di funzionamento del forno (presente solo su
alcuni modelli) - Se accesa indica la fase di riscaldamento fino alla temperatura impostata
F. Leccarda o piano di cottura
G. Griglia ripiano del forno
H. Guide di scorrimento di leccarde e griglie
I. Manopola del contaminuti di fine cottura (presente
solo su alcuni modelli)
2

Come utilizzarlo
Il forno multifunzione riunisce in un unico apparecchio i
pregi dei tradizionali forni a convezione natur ale: “statici”
a quelli dei moderni forni a convezione forzata: “v entilati”.
E’ un apparecchio estremamente versatile che permette
di scegliere in modo facile e sicuro fra 5 diversi metodi di
cottura. La selezione delle diverse funzioni offerte si ottiene agendo sulle manopole di selezione “B” e del termostato “C” presenti sul cruscotto.
Attenzione: Alla prima accensione consigliamo di f ar funzionare il forno a vuoto per circa mezz’ora con il termostato al massimo e a porta chiusa. Quindi trascorso tale
tempo spegnerlo, aprite la porta ed areare il locale. L’odore che talvolta si avverte durante questa operazione è
dovuto all’ev aporazione delle sostanze usate per proteggere il forno durante l’intervallo di tempo che intercorre
tra la produzione e l’installazione del prodotto.
Attenzione: Utilizzare il primo ripiano dal basso, posizionandoci la leccarda in dotazione per raccogliere sughi e/
o grassi, solamente nel caso di cotture al grill o con girarrosto (presente solo su alcuni modelli). P er le altre cotture
non utilizzate mai il primo ripiano dal basso e non appoggiate mai oggetti sul fondo del forno mentre state cuocendo perchè potreste causare danni allo smalto. P onete sempre i V ostri recipienti di cottura (pirofile, pellicole di alluminio, ecc. ecc.) sulla griglia in dotazione con l’apparecchio,
appositamente inserita nelle guide del forno.
Attenzione: per utilizzare il f orno in funzionamento manuale, escludendo cioè il programmatore di fine cottura, occorre far coincidere con il riferimento fisso del frontalino il sim-
bolo 9.
Forno Statico a
Posizione manopola termostato “C”: Tra 60°C e Max.
In questa posizione si accendono i due elementi riscaldanti
inferiore e superiore. E’ il classico f orno della nonna che è
stato però portato ad un eccezionale livello di distribuzione
della temperatura e di contenimento dei consumi. Il forno
statico resta insuperato nei casi in cui si debbano cucinare
piatti i cui ingredienti risultano composti da due o più
elementi che concorrono a formare un piatto unico come
ad esempio: cavoli con costine di maiale, baccalà alla
spagnola, stoccafisso all’anconetana, teneroni di vitello
con riso etc... Ottimi risultati si ottengono nella
preparazione di piatti a base di carni di manzo o vitello
quali: brasati, spezzatini, gulasch, carni di selvaggina,
cosciotto e lombo di maiale etc... che necessitano di
cottura lenta con costante aggiunta di liquidi. Resta
comunque il miglior sistema di cottura per i dolci, per la
frutta e per le cotture con recipienti coperti specifici per le
cotture al forno. Nella cottur a al forno statico utilizzate un
solo ripiano, in quanto su più ripiani si avrebbe una cattiva
distribuzione della temperatura. Usando i diversi ripiani a
disposizione potrete bilanciare la quantità di calore tra la
parte superiore ed inferiore. Se la cottura necessita di
maggior calore dal basso o dall’alto, utilizzate
rispettivamente i ripiani inferiori o superiori.
Forno Ventilato b
Posizione manopola termostato “C”: T r a 60°C e Max.
Si attivano gli elementi riscaldanti ed entra in funzione la
ventola. Poichè il calore è costante ed uniforme in tutto il
forno, l’aria cuoce e rosola il cibo in modo uniforme in tutti
i punti. Potete cuocere contemporaneamente anche pietanze diverse tra loro, purchè le temperature di cottura
siano simili. E’ possibile utilizzare fino ad un massimo di 2
ripiani contemporaneamente seguendo le avvertenze riportate nel paragrafo “Cottura contemporanea su più ripiani”.
Questa funzione è particolarmente indicata per piatti che
necessitano di gratinatura o per piatti che necessitano di
cottura abbastanza lunga ad esempio: lasagne,
maccheroni pasticciati, pollo e patate arrosto etc... Note voli
vantaggi si ottengono nella cottura degli arrosti di carne
in quanto la migliore distribuzione della temperatura
consente di utilizzare temperature più basse che riducono
la dispersione degli umori mantenendo la carne più
morbida con minor calo di peso. Il ventilato è
particolarmente apprezzato per la cottura dei pesci che
possono essere cucinati con pochissima aggiunta di
condimenti mantenendo così inalterato l’aspetto e il
sapore.
Dessert: risultati sicuri si ottengono cuocendo torte
lievitate.
La funzione “ventilato” può anche essere usata per uno
scongelamento rapido carne bianca o rossa, pane, impostando una temperatura di 80 °C. P er scongelare cibi più
delicati potete impostare 60°C o usare la sola circolazione di aria fredda impostando la manopola termostato a
0°C.
Forno “sopra” c
Posizione manopola termostato “C”: Tra 60°C e Max.
Si accende l’elemento riscaldante superiore.
Questa funzione può essere utilizzata per ritocchi di cottura.
Grill d
Posizione manopola termostato “ C”: Max.
Si accende l’elemento riscaldante superiore centrale.
La temperatura assai elevata e diretta del grill consente
la immediata rosolatura superficiale dei cibi che,
ostacolando la fuoriuscita dei liquidi, li mantiene più teneri
internamente. La cottura al grill è particolarmente
consigliata per quei piatti che necessitano di elevata
temperatura superficiale: bistecche di vitello e manzo,
entrecôte, filetto, hamb urger etc...
Effettuare le cotture con porta forno semiaperta.
Alcuni esempi di utilizzo sono riportati al paragrafo “Consigli
pratici per la cottura”.
Grill Ventilato e
Posizione manopola termostato “C”: T r a 60°C e 200°C.
Si accende l’elemento riscaldante superiore centrale e si
mette in funzione la ventola. Unisce all’irradiazione termica unidirezionale la circolazione forzata dell’aria all’interno del forno. Ciò impedisce la bruciatura superficiale degli alimenti aumentando il potere di penetrazione del calore. Risultati eccellenti si ottengono utilizzando il g rill ventilato per spiedini misti di carne e verdura, salsicce, costine di maiale, costolette di agnello, pollo alla dia vola, quaglie alla salvia, filetto di maiale etc...
3

Effettuare le cotture al “grill ventilato” con porta del forno chiusa.
Fra i pesci il g rill ventilato è insuperabile nella cottura di tranci di cernia, di tonno, di pesce spada, seppioline ripiene etc...
La manopola del contaminuti di fine cottura (I)
(presente solo su alcuni modelli)
Alcuni modelli sono dotati di programmatore di fine cottura. Per utilizzarlo occorre caricare la suoneria ruotando la
manopola “I” di un giro quasi completo in senso orario 4;
quindi, tornando indietro 5, impostare il tempo desidera-
to facendo coincidere con il riferimento fisso del frontalino
il numero corrispondente ai minuti prefissati, al termine
del tempo impostato oltre all’intervento della suoneria si
ha lo spegnimento automatico del forno.
Attenzione: per utilizzare il forno in funzionamento manuale, escludendo cioè il programmatore di fine cottura,
occorre far coincidere con il riferimento fisso del frontalino
il simbolo 9.
Quando il forno è spento il programmatore di fine cottura
può essere usato come un normale contaminuti.
La luce forno
Si accende ruotando la manopola “B” sul simbolo 8. Illumina il forno e resta accesa quando sia messo in funzione un qualsivoglia elemento elettrico riscaldante del forno.
Ventilazione di raffreddamento
Al fine di ottenere una riduzione delle temperature esterne, alcuni modelli sono dotati di una ventola di raffreddamento che si attiva automaticamente a forno caldo .
Quando la ventola è in funzione è possibile sentire un
getto d’aria che esce tra frontalino e porta forno.
Nota: A fine cottura la ventola rimane attiva finchè il
forno non sarà sufficentemente freddo.
4
Come tenerlo in forma
Prima di ogni operazione disconnettere l’apparecchio dall’ alimentazione elettrica.
Per una lunga durata del forno è indispensabile eseguire
frequentemente una accurata pulizia generale, tenendo
presente che:
• per la pulizia non utilizzare apparecchi a vapore
• le parti esterne smaltate o inox vanno lavate con acqua tiepida senza usare polveri abrasive e sostanze corrosive che
potrebbero rovinarle. L ’acciaio inox può rimanere macchiato .
Se le macchie sono difficili da asportare usare prodotti specifici normalmente in commercio. Si consiglia di sciacquare
abbondantemente ed asciugare dopo la pulizia.
• l’interno del forno va pulito, pref eribilmente ogni v olta dopo
l’uso, quando è ancora tiepido usando acqua calda e detersivo, risciaquando e asciugando poi accuratamente con un
panno morbido. Evitare l’uso di detersivi abrasivi (ad esempio le polveri, ecc...) e di spugne abrasive per piatti oppure
acidi (ad esempio anticalcare, ecc...), perchè potrebberto
rovinare lo smalto. Se lo sporco è particolarmente duro da
togliere, usare un prodotto specifico per la pulizia del forno ,
secondo le istruzioni riportate sulla confezione.
• se usate il forno per un tempo prolungato ci potrebbe essere
formazione di condensa. Asciugatela usando un panno
morbido.
• attorno all’aper tura del forno, una guarnizione in gomma
garantisce il suo corretto funzionamento. Controllate quindi
periodicamente lo stato di questa guarnizione. Se necessario pulitela evitando di usare prodotti o oggetti abrasivi. In
caso risulti danneggiata rivolgetevi al Centro Assistenza più
vicino. E’ consigliabile non usare il f orno fino all’avvenuta riparazione.
• non rivesta mai il fondo forno con fogli di alluminio, poichè
l’accumulo di calore conseguente comprometterebbe la cottura danneggiando anche lo smalto.
• pulire il vetro della porta forno utilizzando prodotti e
spugne non abrasive ed asciugare con un panno morbido.
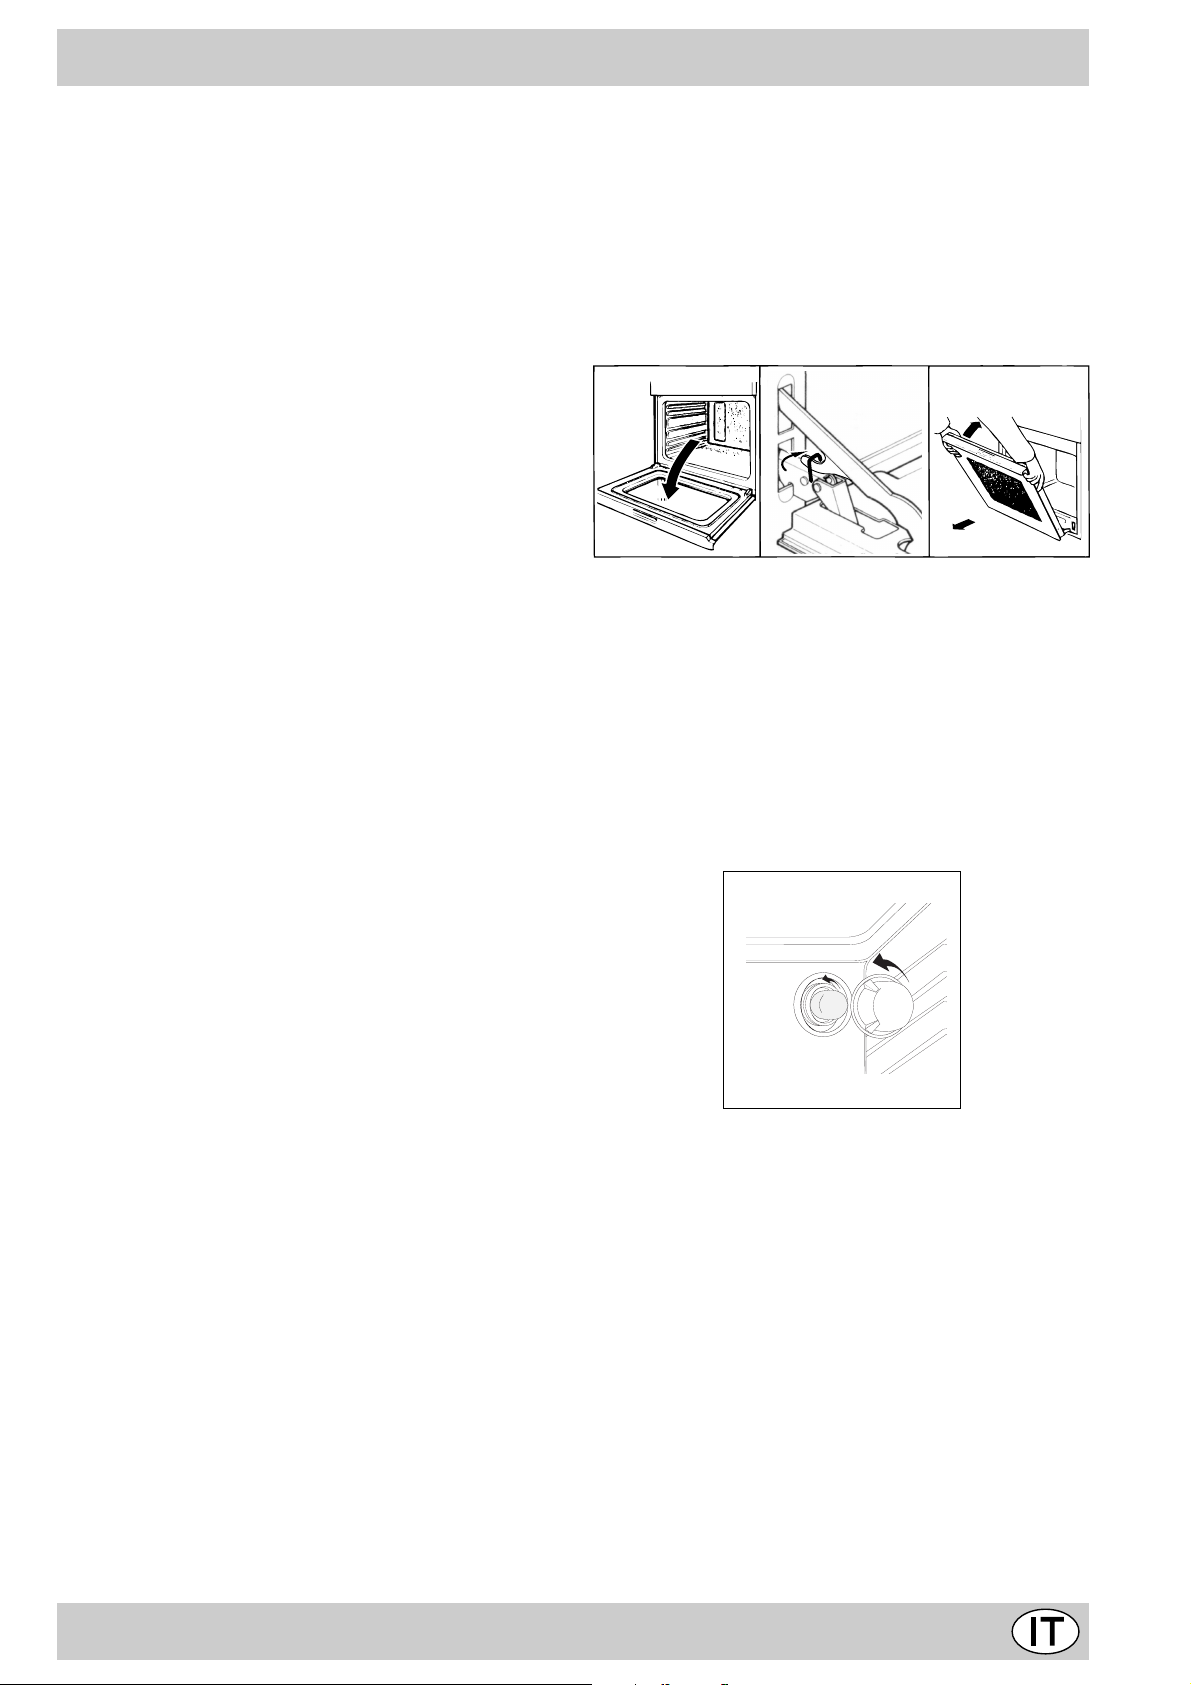
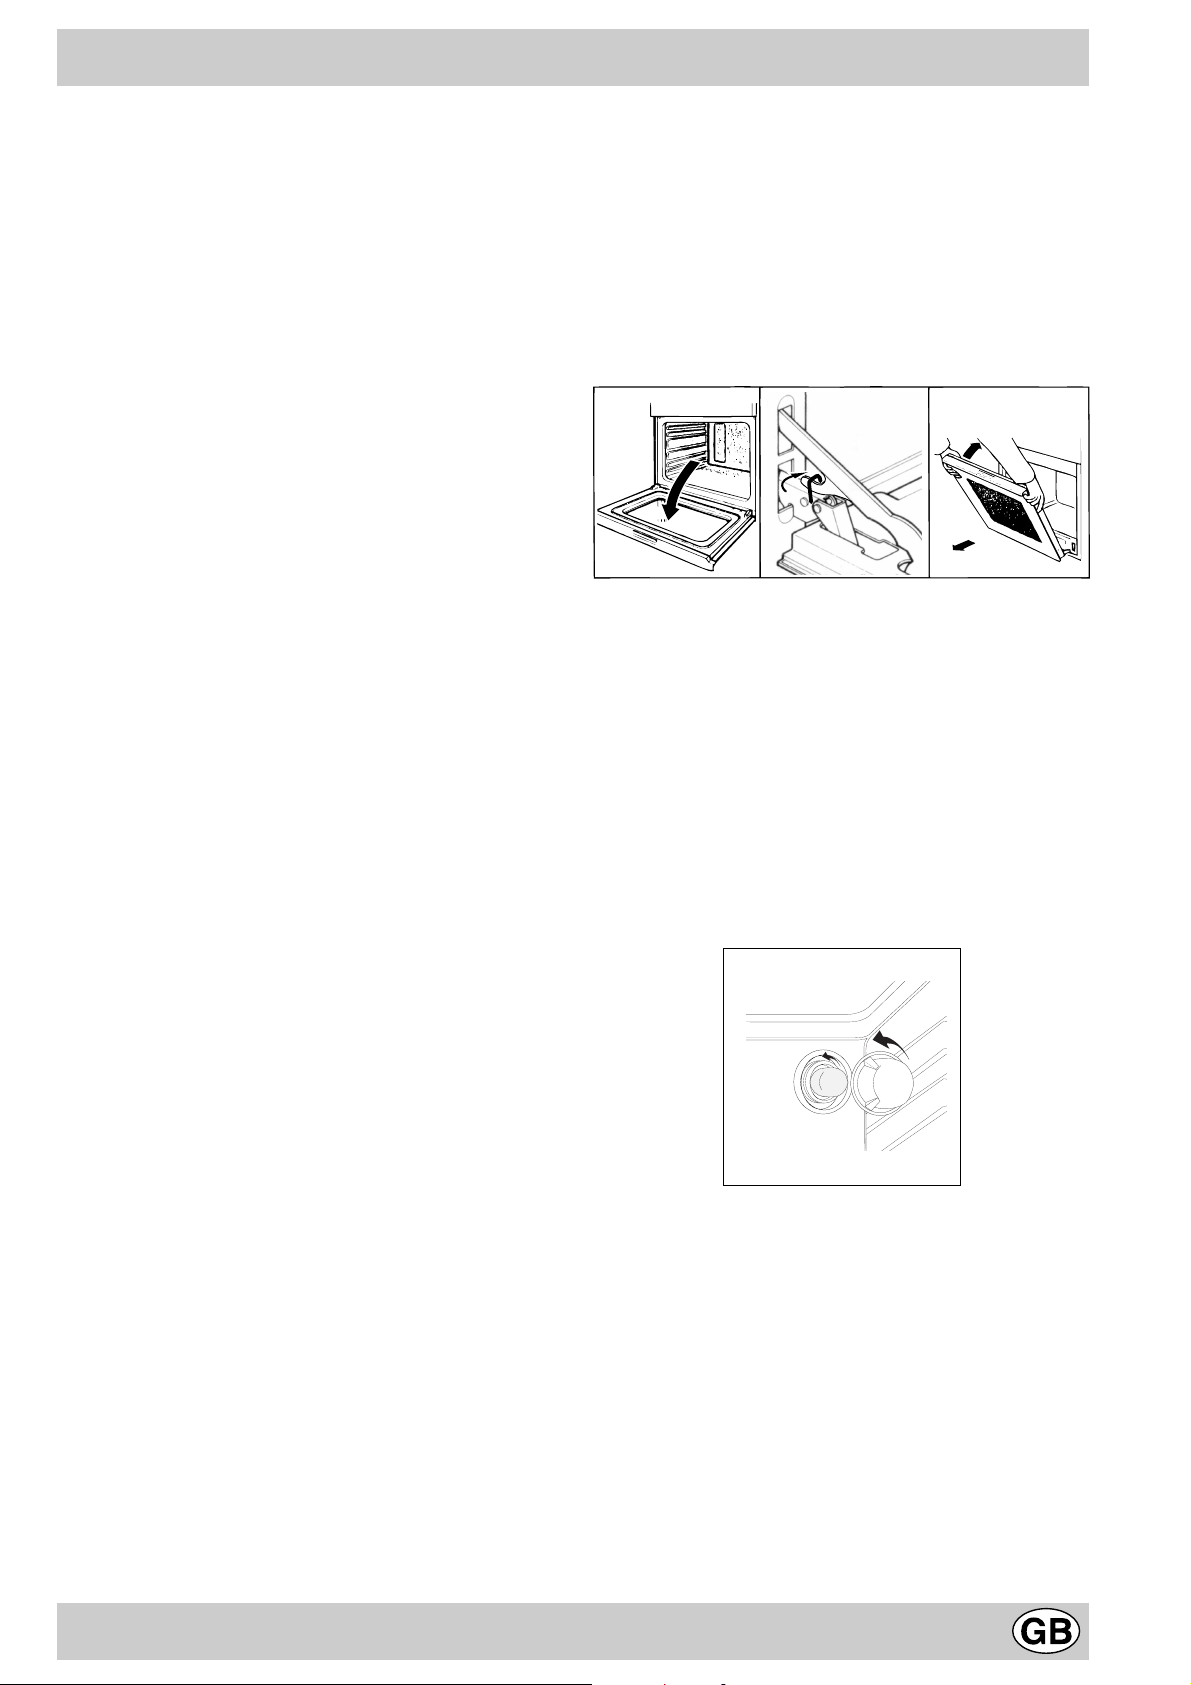
Come togliere la porta forno
Per una pulizia più accur ata è possibile togliere la porta del forno. Procedere nel seguente modo:
• aprite completamente la porta;
• alzate e ruotate le levette poste sulle due cerniere;
• afferrate la porta ai due lati esterni, richiudetela lentamente
ma non completamente;
• tirate la porta verso di voi estraendola dalla sua sede;
Rimontare la porta seguendo il procedimento sopra descritto in
senso contrario.
132
Sostituzione della lampada nel vano forno
• Togliere l’alimentazione al forno tramite l’interruttore
omnipolare utilizzato per il collegamento del forno all’impianto elettrico, o scollegare la spina, se accessibile;
• Svitare il coperchio in vetro del portalampada;
• Svitare la lampada e sostituirla con una resistente ad alta
temperatura (300°C) con queste caratteristiche:
- T ensione 230/240 V
- Potenza 25W
- Attacco E14
• Rimontare il coperchio in vetro e ridate alimentazione al forno.
5

Consigli pratici per la cottura
Il forno mette a vostra disposizione una vasta gamma di
possibilità che consentono di cuocere ogni cibo nella maniera migliore. Con il tempo potrete sfruttare al meglio
questo versatile apparecchio di cottura, pertanto le note
riportate di seguito sono solamente delle indicazioni di
massima che potrete ampliare con la vostra esperienza
personale.
Preriscaldamento
Nel caso in cui sia necessario preriscaldare il forno, in
linea di massima tutte le volte in cui si cuocciano cibi lie-
vitati, è possibile utilizzare la funzione b “ventilato” che
consente di raggiungere la temperatura desiderata in bre ve
tempo e con consumi ridotti.
Una volta infornato si può passare alla funzione di cottura
più indicata.
Cottura contemporanea su più ripiani
Se dovete cuocere su due ripiani utilizzate solamente la
funzione b “ventilato” che è l’unica che consente tale
possibilità.
• Il f orno è dotato di 5 ripiani. Nella cottur a v entilata utilizzate due dei tre ripiani centrali, il primo in basso e
l’ultimo in alto sono investiti direttamente dall’aria calda che potrebbe provocare delle bruciature sui cibi delicati;
• Normalmente utilizzate il 2° ed il 4° ripiano dal basso,
inserendo nel 2° ripiano i cibi che richiedono maggior
calore. Ad esempio nel caso della cottura di arrosti di
carne contemporaneamente ad altri cibi, inserite l’arrosto al 2° ripiano, lasciando il 4° a cibi più delicati;
• Nella cottura contemporanea di cibi che hanno tempi
e temperature di cottura diversi impostate una temperatura intermedia tra le due, infornate il cibo più delicato al 4° ripiano ed estraete dal forno prima l’alimento
con tempo di cottura più brev e;
• Utilizzate la leccarda al ripiano inferiore e la griglia a
quello superiore;
Utilizzo del grill
Il forno multifunzione mette a vostra disposizione 2 diver se possibilità di grigliare.
Utilizzate la funzione d “grill”, a porta semiaperta, posizionando il cibo al centro della griglia (posta al 3° o 4°
ripiano partendo dal basso), dato che risulta accesa solamente la parte centrale della resistenza superiore.
Utilizzare il primo ripiano dal basso, posizionandoci la
leccarda in dotazione per raccogliere sughi e/o grassi.
Quando si utilizza tale funzione, si raccomanda di
impostare il termostato al massimo. Questo, però, non
significa che non si possano utilizzare temperature
inferiori, semplicemente regolando la manopola del
termostato sulla temperatura desiderata.
La posizione e “grill ventilato”, esclusivamente con
porta forno chiusa, è utilissima per grigliature veloci, si
distribuisce il calore emesso dal grill consentendo contemporaneamente alla doratura superficiale anche una
cottura nella parte inferiore.
Potete anche usarla nella parte finale della cottura dei
cibi che abbiano bisogno di doratura superficiale, ad esempio è l’ideale per dorare la pasta al forno a fine cottura.
Nell’utilizzo di tale funzione disponete la griglia sul 2° o 3°
ripiano partendo dal basso (vedi tabella cottura)
dopodiché, per raccogliere i grassi ed evitare la f ormazione
di fumo, disponente una leccarda nel 1° ripiano dal basso.
Importante: effettuare la cottura al “grill ventilato” con
porta del forno chiusa, ciò per ottenere migliori risultati
ed un sensibile risparmio di energia (10% circa).
Quando si utilizza tale funzione, si raccomanda di
impostare il termostato a 200 °C, perchè questa è la
condizione di rendimento ottimale, che si basa
sull’irraggiamento ai raggi infrarossi. Questo, però, non
significa che non si possano utilizzare temperature
inferiori, semplicemente regolando la manopola del
termostato sulla temperatura desiderata.
Pertanto i migliori risultati nell’utilizzo delle funzioni
grill si ottengono disponendo la griglia sugli ultimi
ripiani partendo dal basso (vedi tabella cottura)
dopodiché, per raccogliere i grassi ed evitare la formazione di fumo, disponete la leccarda in dotazione
nel primo ripiano dal basso.
Cottura dei dolci
Nella cottura dei dolci infornate sempre a forno caldo, attendete la fine di preriscaldamento, indicata dallo spegnimento della spia rossa “E”. Non aprite la porta durante la
cottura, per evitare un abbassamento del dolce. In generale:
Dolce troppo secco
La prossima volta impo state u na temp eratu ra di1 0°C
superiore e riducete il t empo di c ottur a.
Dolce si abbassa
Usate meno liquido o ab bassa te la tem pera tura d i
10°C.
Dolce scuro superiormente
Inseritelo ad altezz a infer iore, i mpost ate u na
temperatura più bas sa e prolu ngate la cott ura.
Buona cottura esterna, ma interno colloso
Usate meno liquido, riducete la temperatura,
aumentate il tem po di co ttura.
Dolce non si stacca dallo stampo
Ungete bene lo stampo e cos pargetel o anche con un
pò di farina oppure util izza te carta forno .
Ho cotto su più ripiani (nella funzione "ventilato")
e non tutti sono allo stesso avanzamento di
cottura
Impostate una tem per atura in feri ore.
Non necessariamente ripiani inse riti
contemporanea mente debbono ess ere to lti in siem e.
6
Cottura della pizza
Per una b uona cottura della pizza utilizzate la funzione b
“ventilato”:
• Preriscaldare il forno per almeno 10 minuti
• Utilizzare una teglia in alluminio leggero appoggiandola sulla griglia in dotazione. Utilizzando la leccarda
si allungano i tempi di cottura e difficilmente si ottiene
una pizza croccante
• Non aprite frequentemente il forno durante la cottura
• Nel caso di pizze molto farcite (capricciosa, quattro
stagioni) è consigliabile inserire la mozzarella a metà
cottura.
• Nella cottura della pizza su due ripiani utilizzate il 2°
ed il 4° con temperatura di 220°C ed infornate dopo
aver preriscaldato per almeno 10 minuti.
Caratteristiche tecniche
Cottura del pesce e della carne
Per le carni bianche, i volatili ed il pesce utilizzate temperature da 180 °C a 200 °C.
Per le carni rosse che si vuole siano ben cotte all’esterno
conservando all’interno il sugo, è bene utilizzare una temperatura iniziale alta (200°C-220°C) per brev e tempo, per
poi diminuirla successivamente.
In generale, più grosso è l’arrosto , più bassa do vrà essere la temperatura e più lungo il tempo di cottura. P onete la
carne da cuocere al centro della griglia ed inserite sotto
la griglia la leccarda per raccogliere i grassi.
Inserite la griglia in modo che il cibo si trovi al centro del
forno. Se volete più calore da sotto, utilizzate i ripiani più
bassi. P er ottenere arrosti saporiti (in particolare anatra e
selvaggina) bardate la carne con lardo o pancetta e posizionatela in modo che sia nella parte superiore.
Dimensioni utili del forno:
larghezza cm. 43,5
profondità cm. 40
altezza cm. 32
Volume utile del forno:
litri 56
ENERGY LABEL
Direttiva 2002/40/CE sull’etichetta dei forni elettrici
Norma EN 50304
Consumo energia convezione F orzata
funzione di riscaldamento: b V entilato
Consumo energia dichiarazione Classe convezione Naturale
funzione di riscaldamento: a Statico
Tensione e frequenza di alimentazione:
230V ~ 50/60Hz 2250W
Questa apparecchiatura è conforme alle seguenti
Direttive Comunitarie:
- 73/23/CEE del 19/02/73 (Bassa Tensione) e successive modificazioni;
- 89/336/CEE del 03/05/89 (Compatibilità Elettromagnetica) e successive modificazioni;
- 93/68/CEE del 22/07/93 e successive modificazioni.
- 2002/96/CE
La direttiva Europea 2002/96/CE sui rifiuti di
apparecchiature elettriche ed elettroniche (RAEE), prevede che gli elettrodomestici non debbano essere smaltiti
nel normale flusso dei rifiuti solidi urbani. Gli apparecchi
dismessi devono essere raccolti separatamente per
ottimizzare il tasso di recupero e riciclaggio dei materiali
che li compongono ed impedire potenziali danni per la
salute e l’ambiente. Il simbolo del cestino barrato è riportato su tutti i prodotti per ricordare gli obblighi di raccolta
separata.
Per ulteriori informazioni, sulla corretta dismissione degli
elettrodomestici, i detentori potranno rivolgersi al servizio
pubblico preposto o ai rivenditori.
7
Posizione
manopola
selezione
Cibo da cucinare Peso
(Kg)
Posizione di
cottura ripiani
dal basso
Tempo di preriscaldamento
(minuti)
Posizione
manopola
termostato
Tempo di
cottura
(minuti)
1 Statico
a
2 Ventilato
b
3 Forno Sopra
c
4 Grill
d
Anatra
Arrosto di vitello o
manzo
Arrosto di maiale
Biscotti (di frolla)
Crostate
(su 2 ripiani)
Pizza
Lasagne
Agnello
Pollo arrosto + pat ate
Sgombro
Plum-cake
(su 2 ripiani)
Bignè
Biscotti
Pan di spagna
ripiano
Pan di spagna
ripiani)
Torte salate
Ritocchi di cottura - 3/4 15 220 -
Sogliole e seppie
Spiedini di calamari e
gamberi
Filetto di merluzzo
Verdure alla grigli a
Bistecca di vite llo
Cotolette
Hamburger
Sgombri
Toast
Con girarrosto (ove
presente)
Vitello allo spiedo
Pollo allo spiedo
Agnello allo spiedo
(su 2 ripiani
)
)
(su 1
(su 2
1
1
1
-
1
1
1
1
1
1
1
0.5
0.5
0.5
1.0
1.5
1
1
1
1
1
1
1
1
n.° 4
1.0
1.5
1.0
3
3
3
3
3
2-4
3
2
2-4
2
2
2-4
2-4
2
2-4
3
4
4
4
3/4
4
4
4
4
4
-
-
-
15
15
15
15
15
15
10
10
10
10
10
10
10
10
10
15
5
5
5
5
5
5
5
5
5
5
5
5
200
200
200
180
180
220
200
180
180
180
170
190
180
170
170
200
Max
Max
Max
Max
Max
Max
Max
Max
Max
Max
Max
Max
65-75
70-75
70-80
15-20
30-35
15-20
30-35
50-60
60-75
30-35
40-50
20-25
10-15
15-20
20-25
25-30
8-10
6-8
10-15
15-20
15-20
7-10
15-20
2-3
80-90
70-80
70-80
10
5 Grill
ventilato
Pollo alla griglia
Seppie
1.5
1.5
3
3
5
5
200
200
55-60
30-35
e
Con girarrosto (ove
presente)
Vitello allo spiedo
Pollo allo spiedo
Pollo (allo sp iedo ) +
patate (sulla leccard a)
Agnello allo spiedo
NB: i tempi di cottura sono in dicati vi e pos sono essere m od ificati in base ai propri gusti p erso nali. Nelle c ottur e al
grill o grill ventil ato, la l ecca rda va posta se mpre a l 1° r ipiano a p arti re dal b asso.
1.5
2.0
1.5
-
1.5
-
-
-
2
-
8
5
5
5
5
5
200
200
200
200
200
70-80
70-80
70-75
70-75
70-80

La sicurezza una buona abitudine
Per garantire l’efficienza e la sicurezza di questo elettr odomestico:
• riv olgetevi esc lusiv amente a centri di assistenza tecnica autorizzati
• richiedete sempre l’utilizzo di parti di ricambio originali
• P er movimentare l’apparecchio, onde evitare dan-
ni a persone e al prodotto stesso, servirsi sempre
delle apposite maniglie ricavate sulle fiancate del
forno.
• L’apparecchio è concepito per uso non professionale nelle
abitazioni e le sue caratteristiche non vanno modificate.
• Le istruzioni sono valide solo per i paesi di destinazione
i cui simboli figurano sul libretto e sulla targa matricola.
• La sicurezza elettrica di questo apparecchio è assicurata soltanto quando lo stesso è correttamente collegato
ad un efficiente impianto di messa a terra come previsto
dalle vigenti norme di sicurezza.
• Durante l’uso dell’apparecchio gli elementi riscal-
danti e alcune parti della porta forno diventano
molto calde. Fare attenzione a non toccarle e tenere i bambimi a distanza.
T rattandosi di fonti di pericolo, e vitare che bambini e
incapaci abbiano contatti con:
- i comandi e l’apparecchio in genere;
- gli imballaggi (sacchetti, polistirolo, chiodi ecc.);
- l’apparecchio, durante e subito dopo il funzionamento del
forno e del grill, visto il surriscaldamento;
- l’apparecchio inutilizzato (in questo caso vanno rese innocue le parti che potrebbero essere pericolose).
Vanno e vitate le seguenti operazioni:
- toccare l’apparecchio con parti del corpo umide;
- l’uso quando si è a piedi nudi;
- tirare l’apparecchio o il cavo di alimentazione per staccarli dalla presa di corrente;
- operazioni improprie e pericolose;
- ostruire le aperture di ventilazione o smaltimento calore;
- che il cavo di alimentazione di piccoli elettrodomestici finisca su parti calde dell’apparecchio;
- l’esposizione ad agenti atmosferici (pioggia, sole);
- l’utilizzo del forno come ripostiglio;
- l’utilizzo di liquidi infiammabili nei pressi;
- l’impiego di adattatori, prese multiple e/o prolunghe;
- tentativi di installazione o riparazione senza l’intervento
di personale qualificato.
Occorre assolutamente rivolgersi a personale
qualificato nei seguenti casi:
- installazione (secondo le istruzioni del costruttore);
- quando si hanno dubbi sul funzionamento;
- sostituzione della presa in caso di incompatibilità con la
spina dell’apparecchio.
Occorre rivolgersi a centri di assistenza autorizzati dal
costruttore nei seguenti casi:
- in caso di dubbio sull’integrità dell’apparecchio dopo aver
tolto l’imballaggio;
- danneggiamento o sostituzione del cavo di alimentazione;
- in caso di guasto o cattivo funzionamento , richiedendo i
ricambi originali.
È opportuno effettuare le seguenti operazioni:
- solo la cottura dei cibi evitando altre operazioni;
- verificare l’integrità dopo aver tolto l’imballaggio;
- disconnettere l’apparecchio dalla rete di alimentazione
elettrica in caso di cattivo funzionamento e prima di qualsiasi operazione di pulizia o manutenzione;
- quando inutilizzato, disinserire l’apparecchio dalla rete
elettrica e chiudere il rubinetto del gas (se previsto);
- utilizzare guanti da forno per inserire o estrarre recipienti;
- impugnare sempre la maniglia della porta al centro dato
che all’estremità potrebbe essere più calda a causa di
eventuali uscite d’aria;
- controllare sempre che le manopole siano nella posizione “•”/”o” quando l’apparecchio non è utilizzato;
- tagliare il cavo di alimentazione dopo a verlo disconnesso
dalla rete elettrica quando si decide di non utilizzare più
l’apparecchio.
• Il costruttore non può essere considerato responsabile
per eventuali danni derivanti da: errata installazione, usi
impropri, erronei ed irragionevoli.
9
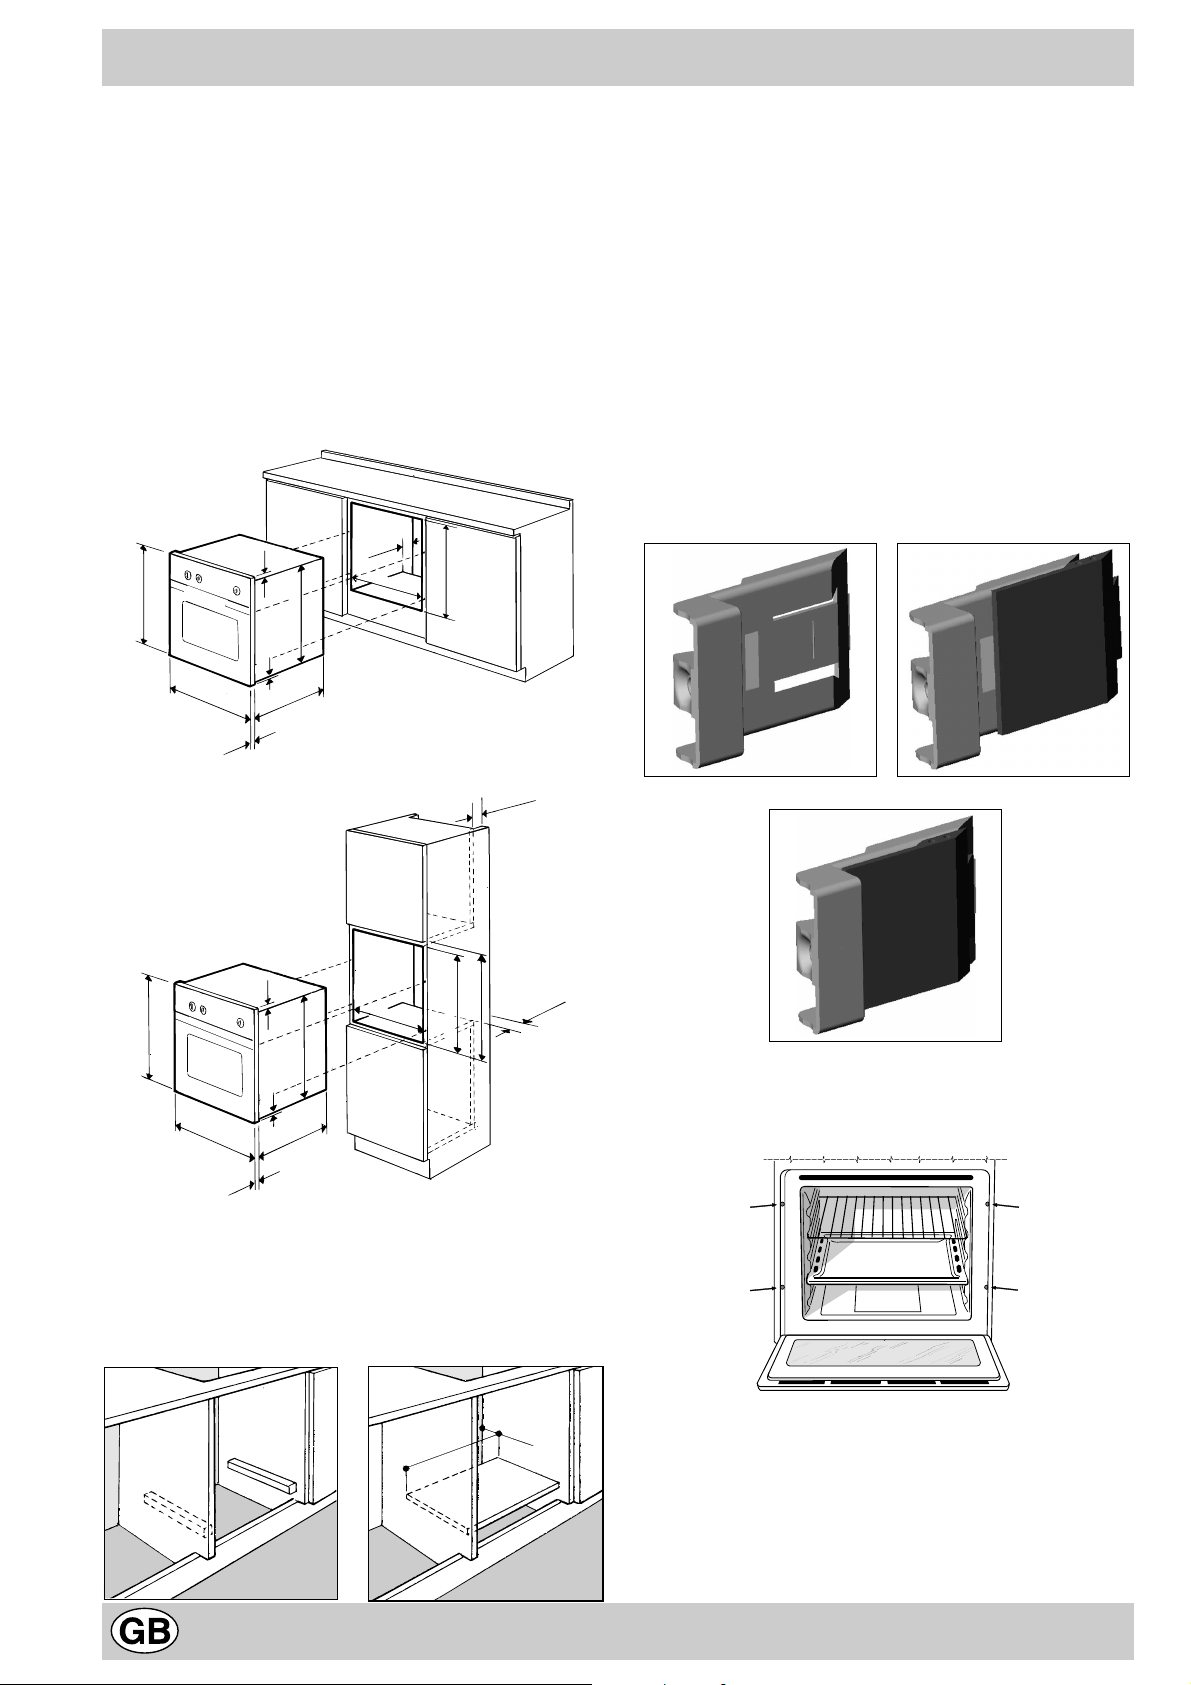
Installazione
L’installazione deve essere effettuata secondo le istruzioni del costruttore da personale professionalmente
qualificato. Una errata installazione può causare danni a
persone, animali o cose, nei confronti dei quali il costruttore
non può essere considerato responsabile.
Importante: qualsiasi intervento di regolazione, manutenzione etc. deve essere eseguito con il forno elettricamente disinserito.
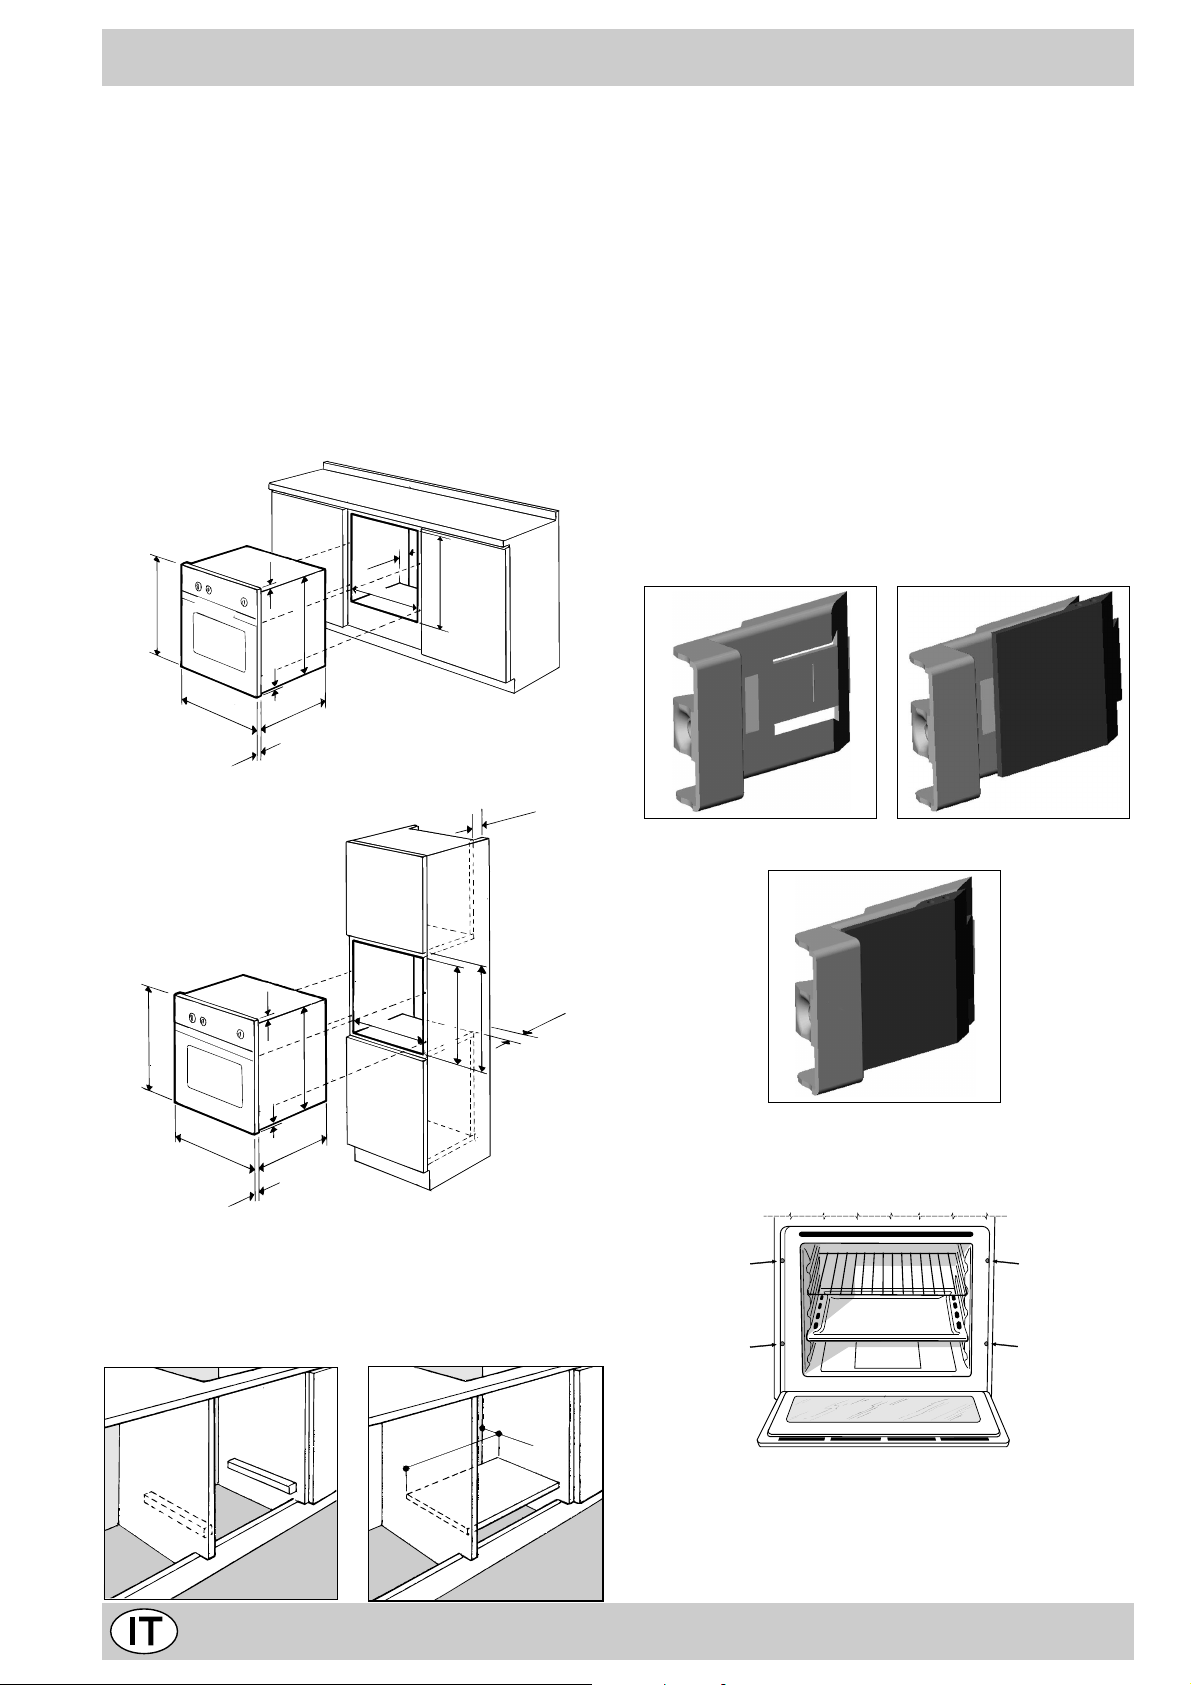
Installazione dei forni da incasso
Per garantire un b uon funzionamento dell’apparecchio da
incasso è necessario che il mobile sia di caratteristiche
adatte. Nella figura sottostante vengono ripor tate le dimensioni del vano del mobile nell’inserimento sottotavolo
ed a colonna.
567 mm.
45 mm.
558 mm.
593 mm.
23 mm.
595 mm.
5 mm.
595 mm.
545 mm.
I pannelli dei mobili adiacenti il forno dovranno essere in
materiale resistente al calore. In particolare nel caso di
mobili in legno impiallicciato le colle dovranno essere resistenti alla temperatura di 100 °C.
In conformità alle norme di sicurezza, una volta incassato
l’apparecchio, non debbono essere possibili e ventuali contatti con le pareti elettriche.
T utte le parti che assicurano la protezione debbono essere fissate in modo tale da non poter essere tolta senza
l’aiuto di qualche utensile.
Per un corretto centraggio regolare i 4 tacchetti posti lateralmente al forno in corrispondenza dei 4 fori sulla cornice perimetrale. In particolare se lo spessore della fiancata
del mobile:
• è di 20 mm: la parte mobile del taccheto deve essere
rimossa (Fig. A);
• è di 18 mm: utilizzare la prima scanalatura; già predi-
sposto in fabbrica (Fig. B);
• è di 16 mm: utilizzare la seconda scanalatura (Fig. C).
24 mm.
N.B.: Installazione per dichiarazione consumi
45 mm.
min.
595 mm.
23 mm.
567 mm.
5 mm.
595 mm.
545 mm.
24 mm.
558 mm.
595 mm.
575-585 mm.
45 mm.
min.
Per garantire una b uona areazione è necessario eliminare la parete posteriore del vano, è preferibile installare il
forno in modo che appoggi su due listelli in legno; nel caso
in cui sia presente un piano continuo di appoggio questo
deve a vere un’apertura di almeno 45 x 560 mm.
Fig. A Fig. B
Fig. C
Per fissare il forno al mobile aprite la por ta del forno e
fissate il forno tramite 4 viti a legno nei 4 fori posti sulla
cornice perimetrale.
560 mm.
45 mm.
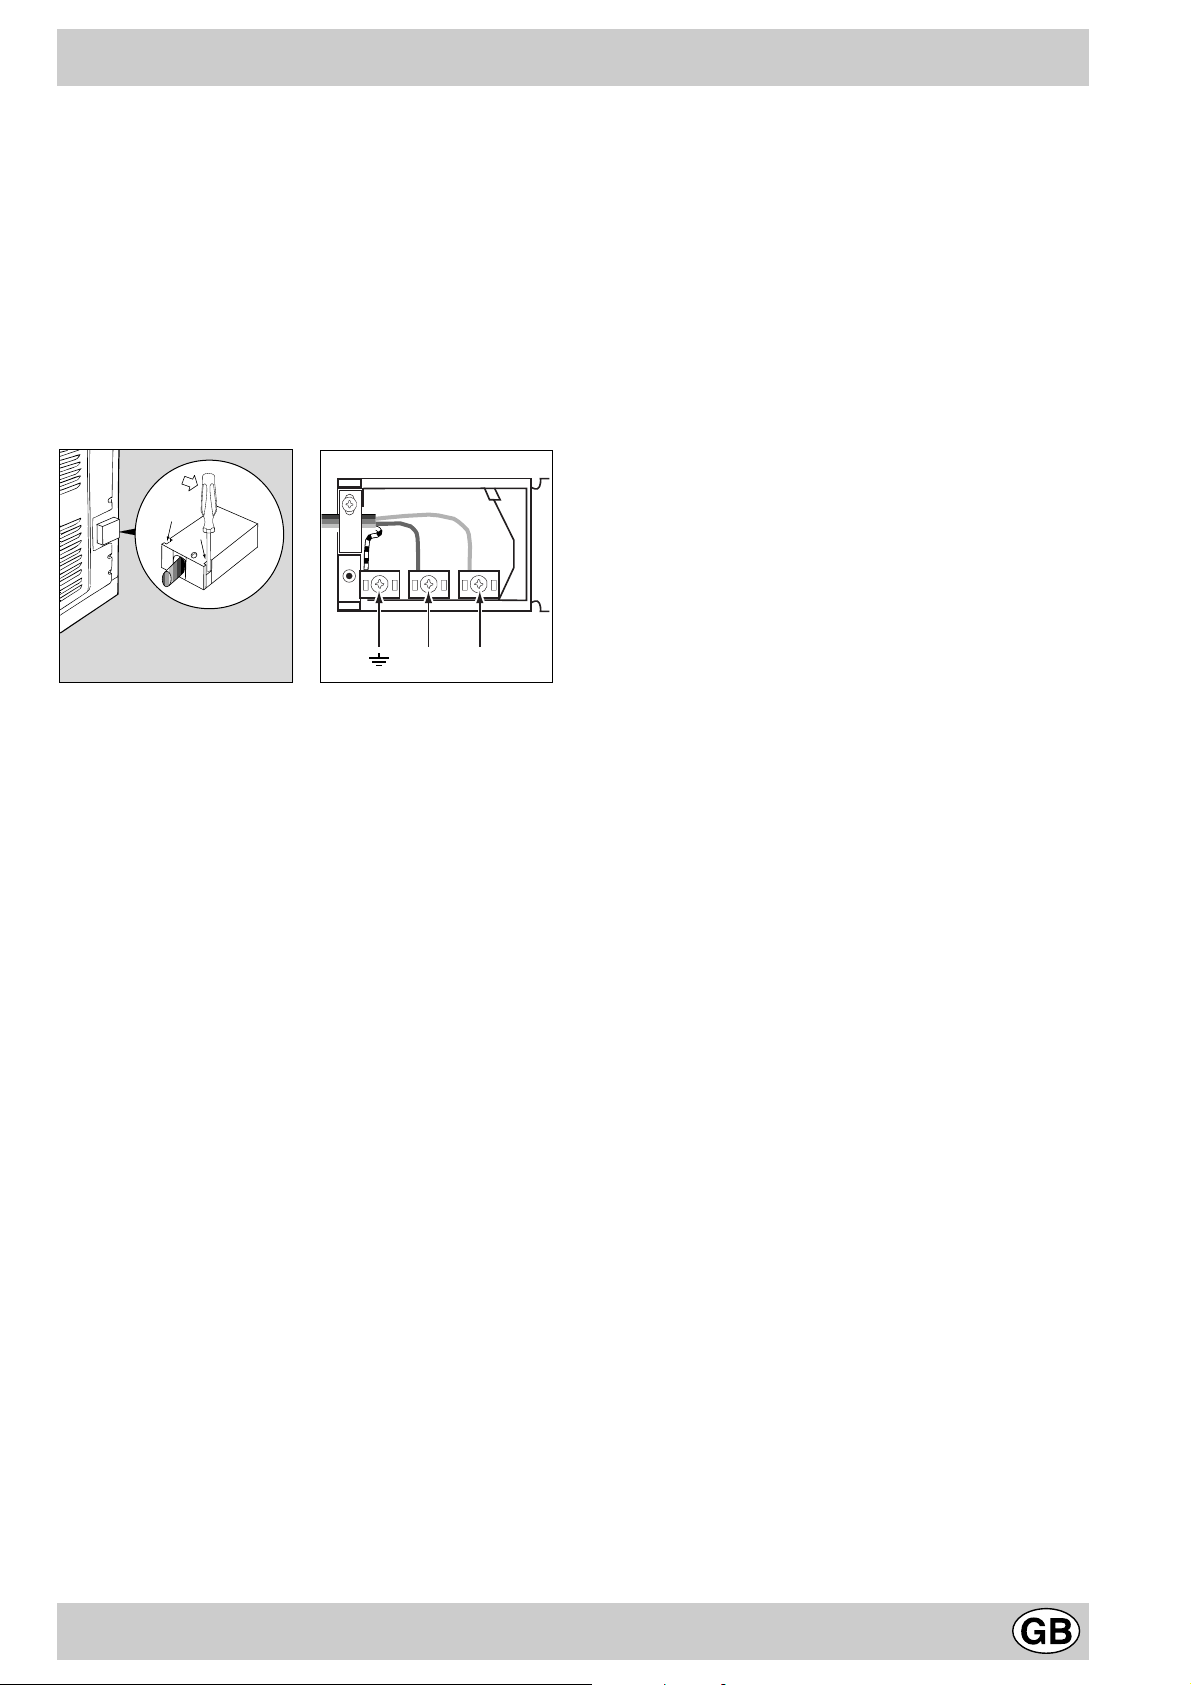
Collegamento elettrico
I forni dotati di cavo di alimentazione tripolare, sono predisposti per il funzionamento con corrente alternata alla
tensione e frequenza di alimentazione indicate sulla
targhetta caratteristiche (posta sull’apparecchio) e sul libretto istruzioni. Il conduttore di terra del cavo è
10
contraddistinto dai colori giallo-verde.
Montaggio cavo di alimentazione
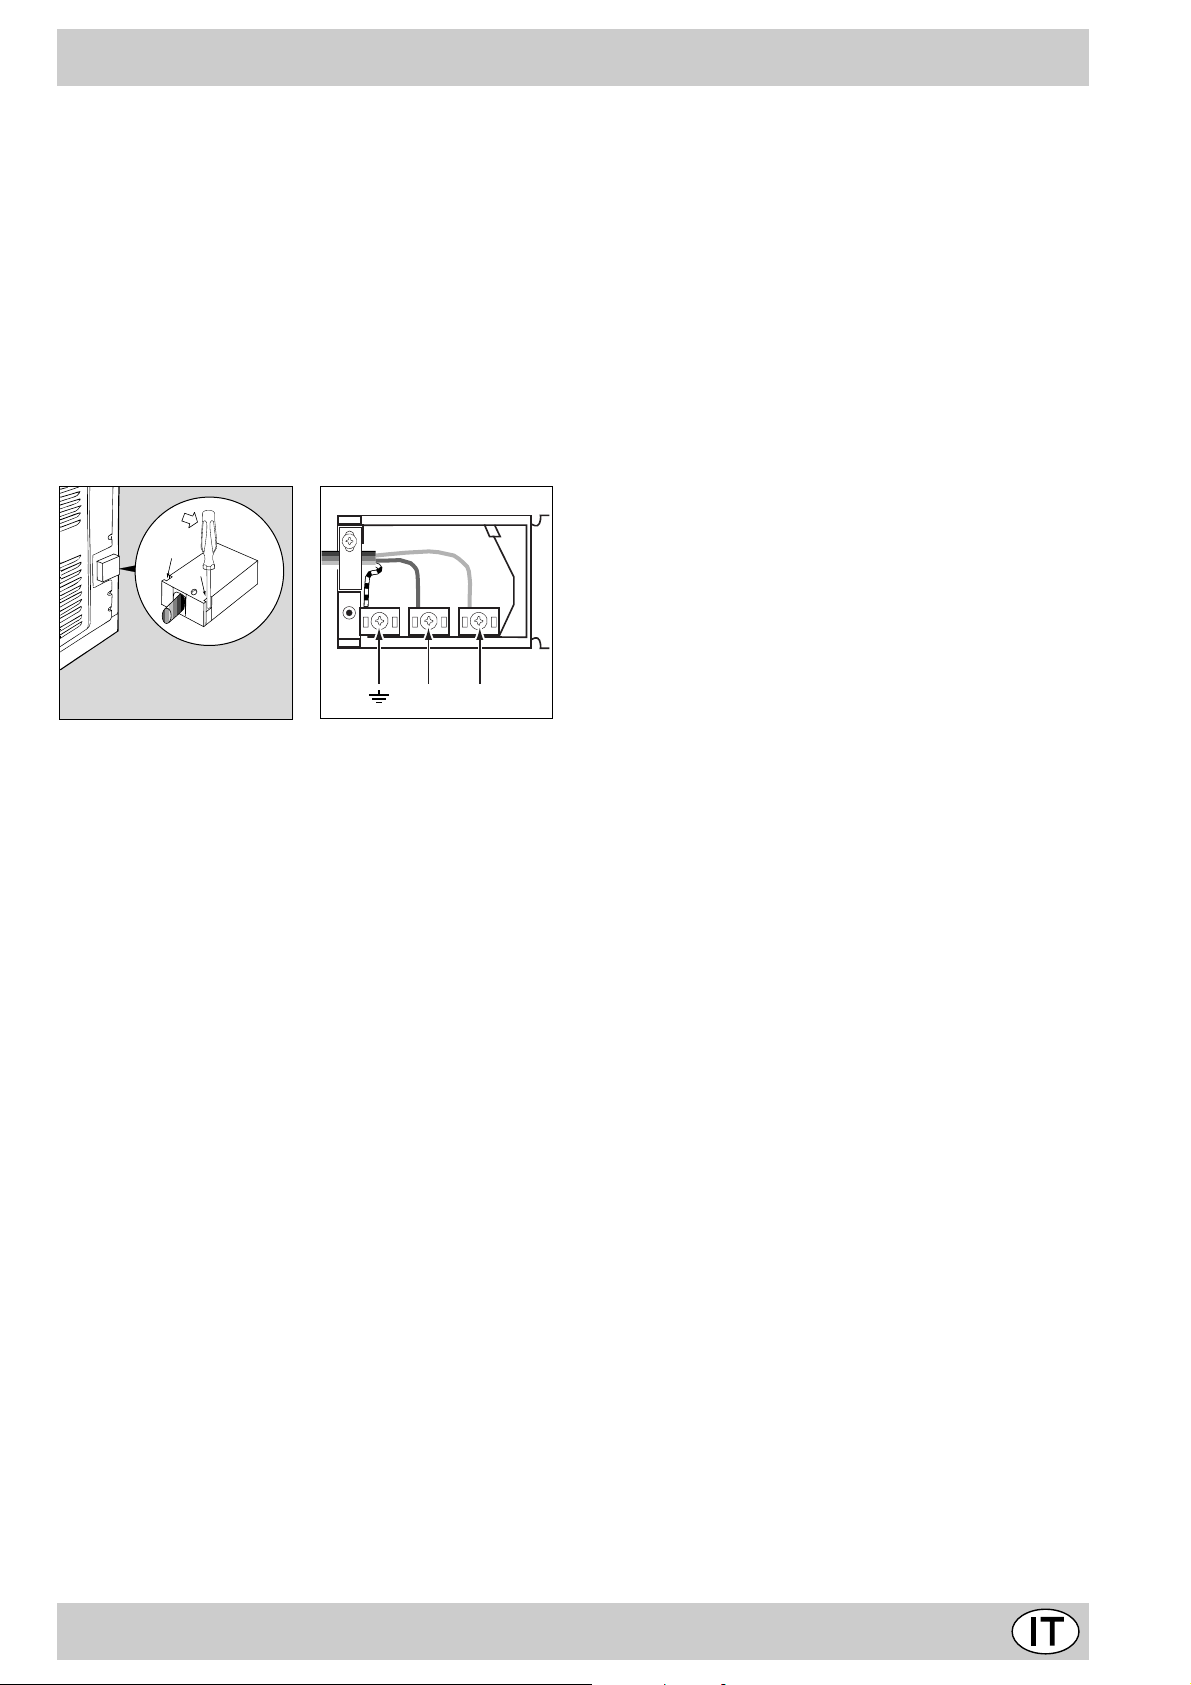
Apertura morsettiera:
• Servendosi di un cacciavite, fare leva sulle linguette
laterali del coperchio della morsettiera;
• Tirare ed aprire il coperchio della morsettiera.
Per la messa in opera del ca v o eseguire le seguenti operazioni:
• svitare la vite del serracavo e le tre viti dei contatti LN-6
• fissare i cavetti sotto le teste delle viti rispettando i
colori: Blu (N) Marrone (L) Giallo-Verde 6
• fissare il cav o di alimentazione nell’apposito fermacavo
e chiudere il coperchio
NL
Allacciamento del cavo di alimentazione alla rete
Montare sul cavo una spina normalizzata per il carico indicato sulla targhetta caratteristiche, nel caso di collegamento diretto alla rete è necessario interporre tra l’apparecchio e la rete un interruttore omnipolare con apertura
minima fra i contatti di 3 mm. dimensionato al carico e
rispondente alle norme in vigore (il filo di terra non deve
essere interrotto dall’interruttore).
Il cavo di alimentazione de ve essere posizionato in modo
che non raggiunga in nessun punto una temperatura superiore di 50°C a quella ambiente.
Prima di effettuare l’allacciamento accertarsi che:
• La sicurezza elettrica di questo apparecchio è assicurata soltanto quando lo stesso è correttamente collegato ad un efficiente impianto di messa a terra come
previsto dalle vigenti norme di sicurezza elettrica. E’
necessario verificare questo fondamentale requisito di
sicurezza e, in caso di dubbio , richiedere un controllo
accurato dell’impianto da parte di personale professionalmente qualificato. Il costruttore non può essere
considerato responsabile per eventuali danni causati
dalla mancanza di messa a terra dell’impianto.
• Prima di collegare l’apparecchio accertarsi che i dati
di targa (posti sull’apparecchio e/o sull’imballo) siano
rispondenti a quelli della rete di distribuzione elettrica
e gas.
• Verificare che la portata elettrica dell’impianto e delle
prese di corrente siano adeguate alla potenza massima dell’apparecchio indicata in targa. In caso di dubbio rivolgersi ad una persona professionalmente qualificata.
• In caso di incompatibilità tra la presa e la spina dell’apparecchio fare sostituire la presa con altra di tipo
adatto da personale professionalmente qualificato.
Quest’ultimo, in particolare, dovrà anche accertare che
la sezione dei cavi della presa sia idonea alla potenza
assorbita dall’apparecchio. In generale è sconsigliabile
l’uso di adattatori, prese multiple e/o prolunghe. Qualora il loro uso si rendesse indispensabile è necessario utilizzare solamente adattatori semplici o multipli e
prolunghe conformi alle vigenti norme di sicurezza,
facendo però attenzione a non superare il limite di portata in valore di corrente, marcato sull’adattatore semplice e sulle prolunghe, e quello di massima potenza
marcato sull’adattatore multiplo. La spina e la presa
devono essere facilmente accessibili.
11
Congratulations on choosing an Ariston appliance, which you will find is dependable and easy to use. We recommend
G
A
F
H
that you read the instructions in this owner’ s manual carefully before use f or the best performance and to extend the lif e
of your appliance, as it will provide you with all the instructions you require to ensure its safe installation, use and
maintenance. Always k eep this owner’ s manual close to hand since you ma y need to refer to it in the future. Thank you.
Close-up view
E
10
120
110
100
90
80
20
30
MAX
40
220
50
60
180
70
60
100
140
B
I
C
A. Control Panel
B. Cooking mode selection knob
C. Cooking temperature selection knob
E. Oven indicator light (only available on certain models)
- When lit, it indicates the ovens is heating up to the
temperature set.
F. Dripping Pan or Baking Sheet
G. Oven Rack
H. Guides for sliding the racks or dripping pan in and
out
I. End Cooking Time Knob (only available on cer tain
models)
12

How to use your oven
This multi-function oven combines the adv antages of traditional convection ov ens with those of the more modern
fan assisted models in a single appliance.
It is an extremely versatile appliance that allows you to
choose easily and safely between 5 different cooking
modes. The various features offered by the oven are selected by means of selector knob “B” and thermostat “C”
situated on the control panel.
Notice: The first time y ou use your appliance, we recommend that you set the thermostat to the highest setting
and leave the ov en on f or about half an hour with nothing
in it, with the oven door shut. Then, open the oven door
and let the room air. The odour that is often detected during this initial use is due to the evaporation of substances
used to protect the oven during storage and until it is installed.
Notice: Place the dripping pan provided on the bottom
shelf of the oven to prev ent any sauce and/or grease from
dripping onto the bottom of the oven only when grilling
food or when using the rotisserie (only available on certain models). F or all other types of cooking, ne ver use the
bottom shelf and never place anything on the bottom of
the oven when it is in operation because this could damage the enamel. Alw ays place your cookware (dishes , aluminium foil, etc. etc.) on the grid provided with the appliance inserted especially along the oven guides
Notice: to use the oven in manual mode (not using the
end cooking time programmer), the 9 symbol must be
aligned with the reference mark on the control panel.
Convection Mode a
Position of thermostat knob “C”: betw een 60°C and Max.
On this setting, the top and bottom heating elements come
on. This is the classic, traditional type of oven which has
been perfected, with exceptional heat distrib ution and reduced energy consumption. The convection oven is still
unequalled when it comes to cooking dishes made up of
several ingredients , e.g. cabbage with ribs, Spanish style
cod, Ancona style stockfish, tender veal strips with rice,
etc. Excellent results are achieved when preparing veal
or beef-based dishes as well (braised meats, stew, goulash, wild game, ham etc.) which need to cook slowly and
require basting or the addition of liquid. It nonetheless remains the best system for baking cakes as well as fruit
and cooking using covered casserole dishes for o ven baking. When cooking in conv ection mode, only use one dripping pan or cooking rack at a time, otherwise the heat
distribution will be unev en. Using the diff erent rack heights
available, you can balance the amount of heat between
the top and the bottom of the oven. Select from among
the various rack heights based on whether the dish needs
more or less heat from the top.
Fan Assisted Mode b
Position of thermostat knob “ C”: Between 60°C and Max.
The heating elements, as well as the fan, will come on.
Since the heat remains constant and uniform throughout
the oven, the air cooks and browns f ood uniformly over its
entire surface. With this mode , you can also cook v arious
dishes at the same time, as long as their respective cooking temperatures are the same. A maximum of 2 racks
can be used at the same time, following the instructions in
the section entitled: “Cooking On More Than One Rack”.
This fan assisted mode is particularly recommended for
dishes requiring a gratin finish or for those requiring considerably prolonged cooking times, such as f or example:
lasagne, pasta bakes, roast chic ken and potatoes, etc…
Moreover, the excellent heat distribution makes it possible to use lower temperatures when cooking roasts . This
results in less loss of juices, meat which is more tender
and a decrease in the loss of weight for the roast. The f an
assisted mode is especially suited for cooking fish, which
can be prepared with the addition of a limited amount of
condiments, thus maintaining their flavour and appearance.
Desserts: the fan assisted mode is also perf ect for baking
leavened cak es.
Moreover, this mode can also be used to thaw quickly
white or red meat and bread by setting the temperature to
80 °C. T o tha w more delicate f oods, set the thermostat to
60°C or use only the cold air circulation feature by setting
the thermostat to 0°C.
“Top” oven c
Position of thermostat knob “C”: Betw een 60°C and Max.
The top heating element comes on.
This mode can be used to brown food at the end of cooking.
Grill d
Position of thermostat knob “C”: Max
The top central heating element comes on.
The extremely high and direct temperature of the grill
makes it possible to brown the surf ace of meats and roasts
while locking in the juices to keep them tender . The grill is
also highly recommended for dishes that require a high
temperature on the surface: beef steaks, veal, rib steak,
filets, hamburgers etc...
Cook food with the oven door ajar.
Some grilling examples are included in the “Practical Cooking Advice” paragraph.
Fan Assisted Grill e
Position of thermostat knob “C”: between 60°C and 200°C .
The top central heating element and the fan come on. This
combination of features increases the effectiv eness of the
unidirectional thermal radiation of the heating elements
through forced circulation of the air throughout the ov en.
This helps prevent food from bur ning on the surface, allowing the heat to penetrate right into the food. Excellent
results are achieved with kebabs made with meats and
vegetables, sausages , ribs, lamb chops, chicken in a spicy
sauce, quail, pork chops, etc.
Cook food in “fan assisted grill mode” with the oven
door shut.
This mode is also ideal for cooking fish steaks, lik e swordfish, tuna, grouper , stuff ed cuttlefish etc.
13

End Cooking Time Knob (I) (only available on certain
models)
Some models are equipped with a timer program to control
when the oven shuts off during cooking. To use this feature,
you must wind the “I” knob one full tur n in the clockwise
direction 4 ; Then, turn the knob in the counter-clockwise
direction 5, to set the time by matching up the indicator
on the control panel with the number of minutes on the
knob.
At the end of the programmed length of time, the timer will
sound and automatically turn off the oven.
Attention: to use the oven in manual mode without the
cooking control timer, match the indicator on the control
panel with the 9 symbol on the timer knob .
When the oven is not in use, the cooking control timer can
be used like a normal timer.
The oven light
Set knob “B” to the 8 symbol to turn it on. It lights the
oven and stays on when any of the electrical heating elements in the oven come on.
Cooling ventilation
In order to cool down the exterior of the appliance, some
models are equipped with a cooling fan which comes on
automatically when the oven is hot.
When the fan is on, a normal flow of air can be heard
exiting between the oven door and the control panel.
Note: When cooking is done, the fan stays on until
the oven cools down sufficiently.
14
How to Keep Your Oven in Shape
Before cleaning your oven, or performing maintenance,
disconnect it from the power supply.
To extend the life of your oven, it must be cleaned
frequently, keeping in mind that:
• Do not use steam equipment to c lean the appliance.
• the enamelled or stainless steel parts should be
washed with lukewarm water without using any abrasive powders or corrosiv e substances which could ruin
them; Stainless steel could get stained. If these stains
are difficult to remove, use special products available
on the market. After cleaning, it is advisable to rinse
thoroughly and dry .
• the inside of the oven should preferably be cleaned
immediately after use, when it is still warm, with hot
water and soap; the soap should be rinsed away and
the interior dried thoroughly. Avoid using abrasiv e detergents (for example cleaning powders, etc…) and
abrasive sponges for dishes or acids (such as
limescale-remover , etc…) as these could damage the
enamel. If the grease spots and dir t are particularly
tough to remove, use a special product f or ov en cleaning, following the instructions provided on the packet.
• if you use your oven for an extended period of time,
condensation may form. Dry it using a soft cloth.
• there is a rubber seal surrounding the oven opening
which guarantees its perfect functioning. Check the
condition of this seal on a regular basis. If necessary,
clean it and avoid using abrasive products or objects
to do so. Should it become damaged, please contact
your nearest After-sales Service Centre. We recommend you avoid using the oven until it has been repaired.
• never line the oven bottom with aluminium foil, as the
consequent accumulation of heat could compromise
the cooking and even damage the enamel.
• clean the glass door using non-abrasive products or
sponges and dry it with a soft cloth.
How to remove the oven door
For a more thorough clean, you can remove the oven
door. Proceed as follows:
• open the door fully;
• lift up and turn the small levers situated on the two
hinges;
• grip the door on the two external sides, shut it slowly
but not completely;
• pull the door tow ards y ou, pulling it out of its seat;
Reassemble the door by follo wing the abov e procedures
backwards.
132
Replacing the Oven Lamp
• Disconnect the ov en from the power supply b y means
of the omnipolar switch used to connect the appliance
to the electrical mains; or unplug the appliance if the
plug is accessible;
• Remov e the glass co v er of the lamp-holder;
• Remov e the lamp and replace with a lamp resistant to
high temperatures (300°C) with the following characteristics:
- V oltage: 230/240 V
- W attage 25W
- Type E14
• Replace the glass cover and reconnect the oven to
the mains power supply.
15
Practical Cooking Advice
The oven off ers a wide range of alternatives which allow
you to cook any type of food in the best possib le wa y . With
time you will learn to make the best use of this versatile
cooking appliance and the following directions are only a
guideline which may be varied according to your o wn personal experience.
Preheating
If the oven must be preheated (this is generally the case
when cooking leavened f oods), the “fan assisted” mode
b can be used to reach the desired temperature as quickly
as possible in order to sav e on energy.
Once the food has been placed in the oven, the most
appropriate cooking mode can then be selected.
Cooking on More Than One Rack
If you have to cook on more than one rack at the same
time, use only the “fan assisted mode” b which is the
only one that is appropriate for this type of cooking.
• The oven is fitted with 5 racks. During fan assisted
cooking, use two of the three central racks; the lowest
and highest racks receive the hot air directly and
therefore delicate foodstuffs could be burnt on these
racks.
• As a general rule, use the 2nd and 4th rack from the
bottom, placing the foodstuffs that require greater heat
on the 2nd rack from the bottom. For example, when
cooking meat roasts together with other food, place
the roast on the 2nd rack from the bottom and the more
delicate food on the 4th rack from the bottom.
• When cooking foodstuffs that require differing times
and temperatures, set a temperature that is somewhere
between the two temperatures required, place the more
delicate food on the 4th rac k from the bottom and take
the food requiring less time out of the oven first.
• Use the dripping pan on the low er rack and the grid on
the upper;
Using the Grill
This multi-function oven offers you 2 different grilling
modes.
Use the “grill” mode d, with the oven door ajar , placing
the food under the centre of the grill (situated on the 3rd
or 4th rack f orm the bottom) because only the central part
of the top heating element is turned on.
Use the bottom rack (1st from the bottom), placing the
dripping pan provided to collect any sauce and/or grease
and prevent the same from dripping onto the ov en bottom.
When using this mode, we recommend you set the
thermostat to the highest setting. However, this does not
mean you cannot use lower temperatures, simply by
adjusting the thermostat knob to the desired temperature.
Setting e “fan assisted grill”, only with the oven door
shut, is extremely useful for grilling foods rapidly, as the
distribution of heat makes it possible not only to brown
the surface, b ut also to cook the bottom part.
Moreover, it can also be used for browning foods at the
end of the cooking process, such as adding that gratin
finish to pasta bakes, for example.
When using this mode, place the grid on the 2nd or 3rd
oven rack from the bottom (see cooking table) then, to
prevent fat and grease from dripping onto the bottom of
the oven and thus smoke from f orming, place a drippingpan on the 1st rack from the bottom.
Important: always use the “fan assisted grill ” with the
oven door shut. This will allow y ou both to obtain excellent
results and to save on energy (appro ximately 10%).
When using this mode, we advise you to set the thermostat
to 200°C, as it is the most efficient way to use the gr ill,
which is based on the use of infrared rays . However, this
does not mean you cannot use lower temperatures , simply
by adjusting the thermostat knob to the desired temperature.
Therefore the best results when using the grill modes
are obtained by placing the grid on the lower racks
(see cooking table) then, to prevent fat and grease
from dripping onto the bottom of the oven and smoke
from forming, place a dripping-pan on the 1st oven
rack from the bottom.
Baking Cakes
When baking cakes, always place them in a preheated
oven. Make sure you wait until the oven has been
preheated thoroughly (the red light “E” will turn off). Do
not open the oven door during baking to prev ent the cake
from dropping. In general:
Pastry is too dry
Increase the tem peratur e by 10°C and r educ e the
cooking time.
Pastry dropped
Use less liquid or lower t he temp eratu re by 10° C.
Pastry is too dark on top
Place it on a lower rack , lower the t emper atur e, and
increase the coo king time .
Cooked well on the inside but sticky on the
outside
Use less liquid, lowe r the te mperat ure, a nd incr ease
the cooking time.
The pastry sticks to the pan
Grease the pan well and sprink le it with a dusting o f
flour or use greaseproo f paper .
I used more than one level (in the function
"ventilated oven") and they are not all at th e same
cooking point
Use a lower temperature s ettin g. It is not nec essa ry to
remove the food from all the ra cks at t he sam e time.
16
Cooking Pizza
For best results when cooking pizza, use the “fan
assisted “ b mode:
• Preheat the oven for at least 10 minutes;
• Use a light aluminium pizza pan, placing it on the grid
supplied with the oven. If the dripping pan is used, this
will extend the cooking time, making it difficult to get a
crispy crust;
• Do not open the oven door frequently while the pizza
is cooking;
• If the pizza has a lot of toppings (three of four), we
recommend you add the mozzarella cheese on top
halfway through the cooking process .
• When cooking pizza on two racks, use the 2nd and
4th with a temperature of 220°C and place the pizzas
in the oven after having preheated it for at least 10
minutes.
Technical Specifications
Cooking Fish and Meat
When cooking white meat, fowl and fish, use temperature
settings from 180 °C to 200 °C.
For red meat that should be well done on the outside while
tender and juicy in the inside, it is a good idea to start with
a high temperature setting (200°C-220°C) for a short time,
then turn the oven down afterwards.
In general, the larger the roast, the lower the temperature
setting. Place the meat on the centre of the grid and place
the dripping pan beneath it to catch the fat.
Make sure that the grid is inserted so that it is in the centre
of the oven. If you would like to increase the amount of
heat from below, use the low rack heights. For savour y
roasts (especially duck and wild game), dress the meat
with lard or bacon on the top.
Inner dimensions of the oven:
Width 43.5 cm
Depth 40 cm
Height 32 cm
Inner Volume of the Oven:
56 litres
ENERGY LABEL
Directive 2002/40/EC on the label of electric ovens
Norm EN 50304
Energy consumption for Forced con v ection
heating mode: b Fan assisted
Declared energy consumption for Natural conv ection Class
heating mode: a Conv ection
Voltage and Frequency of Power Supply:
230V ~ 50/60Hz 2250W
7
This appliance conforms with the following
European Economic Community directives:
- 73/23/EEC of 19/02/73 (Low V oltage) and subsequent
modifications;
- 89/336/EEC of 03/05/89 (Electromagnetic
Compatibility) and subsequent modifications;
- 93/68/EEC of 22/07/93 and subsequent
modifications.
- 2002/96/EC
The European Directive 2002/96/EC on Waste Electrical
and Electronic Equipment (WEEE), requires that old
household electrical appliances must not be disposed of
in the normal unsorted municipal waste stream. Old
appliances must be collected separately in order to
optimise the recovery and recycling of the materials they
contain and reduce the impact on human health and the
environment. The crossed out “wheeled bin” symbol on
the product reminds you of your obligation, that when y ou
dispose of the appliance it must be separately collected.
Consumers should contact their local authority or retailer
for information concerning the correct disposal of their old
appliance.
17
Selector knob
a
b
c
setting
Food to be cooked
Weight
(in kg)
Cooking rack
position from
bottom
Preheating time
(minutes)
Thermostat
knob
setting
Cooking
time
(minutes)
1 Convection
2 Fan
assisted
3 Top Oven
4 Grill
d
5 Fan
assisted grill
e
Duck
Roast veal or beef
Pork roast
Biscuits (short pastry)
Tarts
Pizza (on 2 racks)
Lasagne
Lamb
Roast chicken + potatoes
Mackerel
Plum-cake
Cream puffs (on 2 racks)
Biscuits (on 2 racks)
Sponge cake (on 1 rack)
Sponge cake (on 2 racks)
Savoury pies
Browning food to perfect
cooking
Soles and cuttlefish
Squid and prawn kebabs
Cod filet
Grilled vegetables
Veal steak
Cutlets
Hamburgers
Mackerels
Toasted sandwiches
With rotisserie (where
present)
Veal on the spit
Chicken on the spit
Lamb on the spit
Grilled chicken
Cuttlefish
1
1
1
-
1
1
1
1
1
1
1
0.5
0.5
0.5
1.0
1.5
- 3/4 15 220 -
1
1
1
1
1
1
1
1
n.° 4
1.0
1.5
1.0
1.5
1.5
3
3
3
3
3
2-4
3
2
2-4
2
2
2-4
2-4
2
2-4
3
4
4
4
3/4
4
4
4
4
4
-
-
-
3
3
15
15
15
15
15
15
10
10
10
10
10
10
10
10
10
15
5
5
5
5
5
5
5
5
5
5
5
5
5
5
200
200
200
180
180
220
200
180
180
180
170
190
180
170
170
200
Max
Max
Max
Max
Max
Max
Max
Max
Max
Max
Max
Max
200
200
65-75
70-75
70-80
15-20
30-35
15-20
30-35
50-60
60-75
30-35
40-50
20-25
10-15
15-20
20-25
25-30
8-10
6-8
10
10-15
15-20
15-20
7-10
15-20
2-3
80-90
70-80
70-80
55-60
30-35
With rotisserie (where
present)
Veal on the spit
Chicken on the spit
Chicken (on the spit) +
potatoes (roasted)
Lamb on the spit
NB: cooking times are approximate and may vary according to personal taste. When cooking using the grill or fan
assisted grill, the dripping pan must always be placed on the 1st oven rack from the bottom.
1.5
2.0
1.5
-
1.5
-
-
-
2
-
5
5
5
5
5
200
200
200
200
200
70-80
70-80
70-75
70-75
70-80
18

Safety Is A Good Habit To Get Into
To maintain the efficiency and safety of this appliance, we recommend that you do the following:
• only call the Service Centres authorised b y the man ufacturer
• alwa ys use original spare parts
• When handling the appliance, we recommend y ou
always use the purpose provided handles recessed
into the sides of the oven to prevent harming
people or damaging the appliance itself.
• This appliance is designed for non-prof essional, household use and its functions must not be changed.
• These instructions are only valid for the countries
whose symbols appear on the manual and the serial
number plate.
• The electrical system of this appliance can only be used
safely when it is correctly connected to an efficient
earthing system in compliance with current safety
standards.
• When the appliance is in use, the heating elements
and some parts of the oven door become extremely
hot. Make sure you don’t touc h them and keep children well away.
The following items are potentially danger ous, and
therefore appropriate measures must be taken to
prevent children and the disabled from coming into
contact with them:
- Controls and the appliance in general;
- P ac kaging (bags, polystyrene , nails, etc.);
- The appliance itself, immediately after use of the o ven
or grill due to the heat generated;
- The appliance itself, when no longer in use (potentially
dangerous parts must be made safe).
Av oid the following:
- Touching the appliance with wet parts of the body;
- Using the appliance when barefoot;
- Pulling on the appliance or the supply cable to unplug
it from the electrical outlet;
- Improper or dangerous operations;
- Obstructing the ventilation or heat dissipation slots;
- Allowing power supply cables of small appliances to
come into contact with the hot parts of the appliance;
- Exposing the appliance to atmospheric agents such
as rain, or sunlight;
- Using the ov en for storage purposes;
- Using flammable liquids near the appliance;
- Using adapters, multiple sockets and/or extension
leads;
- Attempting to install or repair the appliance without the
assistance of qualified personnel.
Qualified personnel must be contacted in the
following cases:
- Installation (follo wing the manufacturer’ s instructions);
- When in doubt about operating the appliance;
- Replacing the electrical socket when it is not compatible with the appliance plug.
Service Centres authorised by the manufacturer
must be contacted in the follo wing cases:
- If in doubt about the soundness of the appliance after
removing it from its packaging;
- If the power supply cable has been damaged or needs
to be replaced;
- If the appliance breaks down or functions poorly; ask
for original spare parts.
It is a good idea to do the following:
- Only use the appliance to cook food and nothing else;
- Check the soundness of the appliance after it has been
unpacked;
- Disconnect the appliance from the electrical mains if it is
not functioning properly and before cleaning or performing maintenance;
- When left unused, unplug the appliance form the electricity mains and turn off the gas tap (if foreseen);
- Use oven glo ves to place cookware in the o ven or when
removing it;
- Always grip the oven door handle in the centre as the
extremities of the same may be hot due to any hot air
leaks;
- Make sure the knobs are in the “•”/”o” position when the
appliance is not in use.
- Cut the power supply cable after disconnecting it from
the mains when you decide not to use the appliance any
longer.
• The manufacturer may not be held responsible for any
damage due to: incorrect installation, improper , incorrect
and irrational use.
19
Instalation
The appliance must be installed only by a qualified
person in compliance with the instructions provided.
The manufacturer declines all responsibility f or improper
installation which may harm persons and animals and
damage property.
Important: The power supply to the appliance must be
cut off before any adjustments or maintenance work is
done on it.
Installation of Built-in Ovens
In order to ensure that the built-in appliance functions properly, the cabinet containing it must be appropr iate. The
figure below gives the dimensions of the cut-out f or installation under the counter or in a wall cabinet unit.
567 mm.
45 mm.
558 mm.
593 mm.
23 mm.
595 mm.
5 mm.
595 mm.
545 mm.
The panels of the adjacent cabinets must be made of heatresistant material. In particular, cabinets with a veneer e xterior must be assembled with glues which can withstand
temperatures of up to 100 °C.
In compliance with current safety standards, contact with
the electrical parts of the oven must not be possible once
it has been installed.
All parts which ensure the safe operation of the appliance
must be removable only with the aid of a tool.
For the correct centring of your appliance, position the 4
tabs on the sides of the oven in correspondence with the
4 holes on the perimeter of the frame. In particular, if the
cabinet side panel:
• is 20 mm thick: the removable part of the tab must be
removed (Fig. A);
• is 18 mm thick: use the first groove, which is factoryset (Fig. B);
• is 16 mm thick: use the second groove (Fig.C)
24 mm.
N.B.: Installation in compliance with the consumption declaration
45 mm.
min.
595 mm.
23 mm.
567 mm.
5 mm.
595 mm.
545 mm.
24 mm.
558 mm.
595 mm.
575-585 mm.
45 mm.
min.
In order to ensure adequate ventilation, the back panel of
the cabinet unit must be removed. Installing the oven so
that it rests on two strips of wood is preferab le. If the ov en
rests on a continuous, flat surface, there must be an aperture of at least 45 x 560 mm.
Fig. A Fig. B
Fig. C
To fasten the oven to the cabinet, open the door of the
oven and attach it by inserting the 4 wooden screws into
the 4 holes located on the perimeter of the frame.
560 mm.
45 mm.
Electrical Connection
Those ovens equipped with a three-pole power supply
cable are designed to operate with an alternating current
with the voltage and frequency indicated on the data plate
(located on the appliance) and in the instruction manual.
The wire for earthing the appliance is yellow-green in colour.
20
Fitting on a Power Suppl y Cable
Opening the terminal board:
• Using a screwdriver, prise on the side tabs of the terminal board cover;
• Pull open the cover of the terminal board.
To install the cable, proceed as follows:
• Remove the wire clamp screw and the three contact
screws L-N-6
• Fasten the wires beneath the screwheads using the
following colour scheme: Blue (N) Br o wn (L) Yellow-
Green 6
• Fasten the supply cable in place with the clamp and
close the cover of the terminal board.
NL
Connecting the supply cable to the mains
Install a standardised plug corresponding to the load indicated on the data plate. When connecting the cable directly to the mains, install an omnipolar circuit-breaker with
a minimum contact opening of 3 mm between the appliance and the mains. The omnipolar circuit break er should
be sized according to the load and should comply with
current regulations (the earth wire should not be interrupted by the circuit breaker).
The supply cable should be positioned so that it does not
reach a temperature of more than 50°C with respect to
the room temperature, anywhere along its length.
Before making the connection, check that:
• The electrical saf ety of this appliance can only be guaranteed if the cooker is correctly and efficiently earthed,
in compliance with regulations on electrical safety. Always ensure that the earthing is efficient; if you have
any doubts call in a qualified technician to check the
system. The manufacturer declines all responsibility
for damage resulting from a system which has not been
earthed.
• Before plugging the appliance into the mains, check
that the specifications indicated on the date plate (on
the appliance and/or packaging) correspond to those
of the electrical mains system of your home.
• Check that the electrical capacity of the system and
sockets will support the maximum power of the appliance, as indicated on the data plate. If you have any
doubts, call in a qualified technician.
• If the socket and appliance plug are not compatible,
have the socket replaced with a suitable model by a
qualified technician. The latter, in particular, will also
have to ensure that the cross section of the socket
cables are suitable for the po w er absorbed b y the appliance. The use of adapters, multiple sockets and/or
extensions, is not recommended. If their use cannot
be avoided, remember to use only single or multiple
adapters and extensions which comply with current
safety regulations. In these cases, never exceed the
maximum current capacity indicated on the single
adapter or extension and the maximum power indicated
on the multiple adapter. The plug and socket must
be easily accessible.
21
Merci d’avoir choisi un produit Ariston, fiable et facile à utiliser. Pour apprendre à bien connaître votre appareil, à
G
A
F
H
l’utiliser et à le conserver longtemps, lisez attentivement cette notice av ant toute utilisation car elle contient des instructions
très importantes concernant sa sécurité d’installation, d’usage et d’entretien. Conservez av ec soin cette brochure pour
toute consultation ultérieure. Merci.
Vu de près
E
10
120
110
100
90
80
20
30
MAX
40
220
50
60
180
70
60
100
140
B
I
C
A. T a bleau de bor d
B. Sélecteur de fonctions
C. Sélecteur de températures
E. V oy ant de fonctionnement du f our (n’existe que sur
certains modèles) - Allumé, il indique la montée en
température jusqu’à la température sélectionnée.
F. Lèchefrite ou plateau de cuisson
G. Grille du four
H. Crémaillère pour lèchefrites et grilles
I. La manette du minuteur fin de cuisson (n’existe que
sur certains modèles)
22

Mode d’emploi
Le four multifonction réunit en un seul appareil les qualités des fours traditionnels à convection naturelle : “statiques” à celles des fours modernes à convection forcée :
“ventilés”.
Il s’agit d’un appareil extrêmement performant qui vous
permet de choisir facilement et sans vous tromper parmi
5 modes de cuisson. Pour sélectionner les fonctions disponibles, utilisez le sélecteur «B» et le sélecteur de températures «C» du tableau de bord.
Attention : Lors de son premier allumage, faites fonctionner le four à vide, porte fermée, pendant au moins
une demi-heure en réglant la température à son maximum. Ouvrez ensuite la porte et ventilez la pièce. L’odeur
qui se dégage parfois pendant cette opération est due à
l’évaporation des produits utilisés pour protéger le four
pendant le laps de temps qui s’écoule entre la fabrication
et l’installation du produit.
Attention : Installez la lèchefrite sur le premier gradin du
bas pour recueillir les graisses et les jus uniquement en
cas de cuissons au gril ou au tournebroche (ce dernier
n’est présent que sur certains modèles). P our les autres
modes de cuisson n’utilisez jamais le gradin du bas et ne
posez jamais d’objets à même la sole du four, vous risqueriez d’abîmer l’émail. Enf ournez toujours vos plats de
cuisson (plats pyrex, papier alu, etc. etc.) sur la grille f ournie avec l’appareil et montée dans les gradins de la crémaillère à l’intérieur de l’enceinte du four.
Attention : pour toute utilisation du four en fonctionnement manuel, c’est à dire sans programmateur de fin de
cuisson, amenez le symbole 9 en face du repère fixe du
bandeau.
Four Statique a
Position sélecteur des températures «C» : entre 60°C et
Max.
En effectuant ce choix, vous obtiendrez le branchement
des deux résistances (sole et voûte) C’est le four traditionnel de grand-mère revu pour atteindre un niveau exceptionnel de diffusion de la chaleur et d’économie d’électricité. Rien n’égale le f our statique quand il s’agit de cuisiner des plats garnis traditionnels tels que : côtes de porc
au chou, morue à l’espagnole, stockfisch à la mode d’Ancône, veau au riz etc... V ous obtiendrez des résultats tout
aussi excellents pour vos plats de viande de bœuf ou de
veau tels que : bœuf braisé, ragoût, goulasch, gibier , jambon et longe de porc etc... qui exigent une cuisson lente
et de fréquents ajouts de liquides. C’est aussi le mode de
cuisson recommandé pour les gâteaux, les fruits et les
plats mijotés dans des cocottes avec couv ercle. Lorsque
vous utilisez le four statique, ne cuisez que sur un seul
niveau pour avoir une meilleure diffusion de la chaleur.
Choisissez le niveau qui vous permettra de mieux équilibrer la quantité de chaleur provenant de la voûte et de la
sole. Enfournez, au choix, sur les gradins du haut ou du
bas selon que vous désirez plus de chaleur provenant de
la voûte ou de la sole.
Four Ventilé b
Position sélecteur de températures «C» : entre 60°C et
Max.
Mise en marche des éléments chauffants ainsi que de la
turbine. La chaleur est constante et bien répartie à l’intérieur du four , l’air cuit et dore de façon uniforme et en tous
points. Vous pouvez ainsi procéder à une cuisson groupée en enfournant plusieurs plats ensemble à condition
qu’ils cuisent à la même température. P our cuire simultanément sur 2 niveaux, suivez les conseils f ournis dans le
paragraphe «Cuisson groupée sur plusieurs niveaux».
C’est la fonction qui convient le mieux à des plats gratinés ou à la cuisson prolongée tels que : lasagnes, gratins de pâtes, poulet rôti et pommes de terre au four etc...
Le choix de températures plus basses, possible grâce à
une meilleure répartition de la chaleur, vous permettra
d’obtenir des rôtis de viande plus juteux et tendres à souhait avec une moindre perte de poids. Cette fonction convient aussi à merveille à la cuisson du poisson qui ne
subit aucune altération de son aspect et de son goût car il
exige un moindre apport de condiment.
Desserts: vous réussirez à coup sûr vos gâteaux levés.
La fonction «v entilé», réglée à une température de 80 °C
sert aussi à décongeler rapidement la viande, rouge ou
blanche, le pain. P our décongeler des mets plus délicats,
sélectionnez une température de 60°C ou n’utilisez que
la circulation d’air froid en amenant le sélecteur de températures sur 0°C.
Résistance de voûte c
Position sélecteur de températures «C» : entre 60°C et
Max.
L’élément chauffant supérieur est branché.
Cette fonction est conseillée pour parf aire la cuisson des
aliments.
Grill d
Position sélecteur de températures «C»: Max.
L’élément chauffant supérieur central est branché.
La température élevée et directe du gril permet de saisir
l’aliment en surface pour qu’il ne perde pas son jus et
reste tendre à souhait. La cuisson au g ril est particulièrement recommandée pour les plats qui exigent une température élevée à leur surface : côtes de v eau et de boeuf,
entrecôtes, filet, hamburgers, etc....
Cuissons à effectuer avec porte du four entrouverte.
Vous trouverez des exemples d’utilisation dans le paragraphe “Conseils utiles pour la cuisson”.
Gril Ventilé e
Position sélecteur de températures «C» : entre 60°C et
200°C.
Mise en marche de l’élément chauffant supérieur central
ainsi que de la turbine. L’irradiation ther mique unidirectionnelle s’ajoute au brassage de l’air pour une répartition
uniforme de la chaleur dans l’enceinte du four. Plus de
risques de brûler vos aliments en surface et plus grande
pénétration de la chaleur . C’est l’idéal pour cuire: brochettes de viande et de légumes, saucisses, côtelettes de porc,
côtelettes d’agneau, poulet à la crapaudine, cailles à la
sauge, filet de porc etc...
23
 Loading...