

Page 1

HOTPOINT EG21
COOKER
INSTRUCTION
AND RECIPE BOOK
The cooker must be installed in accordance with the regulations in force
and only used in a well ventilated space.
Read these instructions prior to installing or using the cooker and retain
them for future reference.
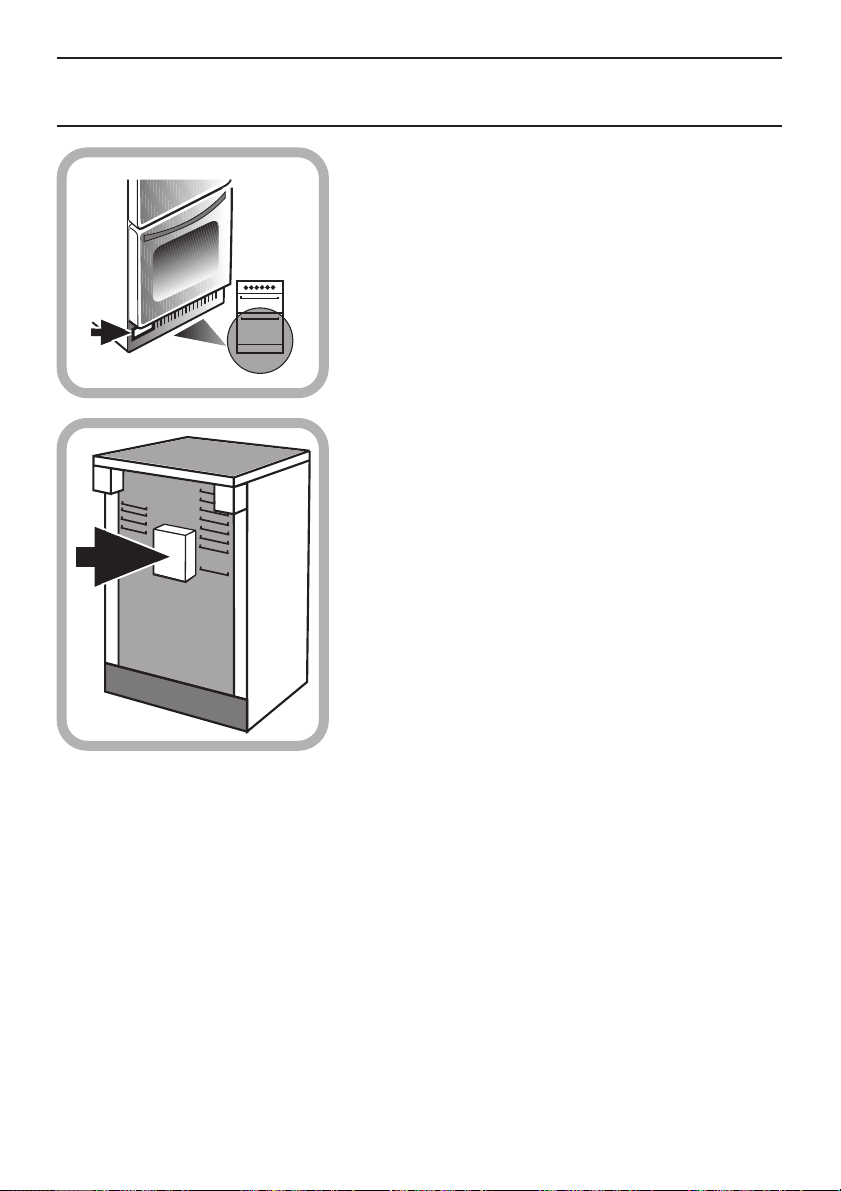
The data badge is located below the oven door on the plinth panel.
Page 2

Contents
Introduction 3
For your Safety – Always 4
For your Safety – Never 5
Features 6
Control Panel 7
Using the Hob 8
Temperature Conversion Scale 9
Using the Grill 10
Using the Fan Oven 11
Oven Cookery Notes 12
Oven Temperature Chart – Meat 13
Oven Temperature Chart – Baking 14
Recipes 15 - 17
Care and Cleaning 18 - 19
Something Wrong with your Cooker 20
If it still won’t work 21
Installation 22- 28
Hotpoint Service Cover 29
Service Back Cover
2
Page 3
Introduction
To help make the best use of your Hotpoint cooking
equipment please read this booklet carefully.
Your new cooker is guaranteed and will give lasting
service. This guarantee is only applicable if the
appliance has been installed in accordance with
the installation instructions detailed in this
booklet.
The cooker is designed specifically for domestic use
and responsibility will not be accepted for use in any
other installation.
When the cooker is first used an odour may be emitted
by the oven lagging insulation – this should cease after
a short period of use. Ensure that the room is well ventilated (e.g. open a window or use an extractor fan) and
that any pets are removed from the room until the smell
has ceased.
3
Page 4

For Your Safety
PLEASE READ THE PRECAUTIONS BELOW BEFORE USING YOUR APPLIANCE.
● Always make sure you remove all packing from inside the oven
Always
and grill compartments before switching on for the first time.
● Always make sure you understand the controls prior to using
the appliance.
● Always keep children away from the appliance when grilling
as the surfaces will get extremely hot during and after use.
● Always check all controls on the cooker are turned off after use.
● Always stand back when opening an oven door to allow any
heat to disperse.
●
Always use dry good quality oven gloves when removing items
from the oven/grill.
● Always place pans centrally over the hob burners and position
them so that the handles cannot accidentally be caught or
knocked or become heated by other burners.
●
Always take care to avoid heat/steam burns when operating the
controls.
● Always turn off the electricity supply at the wall switch before
cleaning and allow the appliance to cool.
●
Always make sure the shelves are in the correct position before
switching on the oven.
● Always keep the oven and grill doors closed when the
appliance is not
● Always take care when removing items from the grill when the
lower oven is on as the contents will be hot.
● Always keep the appliance clean, as a build up of grease or fat
from cooking can cause a fire.
●
Always follow the basic principles of food handling and hygiene
to prevent the possibility of bacterial growth.
● Always keep ventilation slots clear of obstructions.
● Always refer servicing to CORGI registered appliance service
engineers.
in use.
4
Page 5

For Your Safety
● Never leave children unsupervised where a cooking appliance
Never
is installed as all surfaces will be hot during and after its use.
● Never allow anyone to sit or stand on any part of the appliance.
●
Never store items above the appliance that children may attempt
to reach.
● Never leave anything on the hob surface when unattended and
not in use.
● Never remove the oven shelves whilst the oven is hot.
● Never heat up unopened food containers as pressure can build
up causing the container to burst.
● Never store chemicals/food stuffs, pressurised container in or
on the appliance, or in cabinets immediately above or next to
the appliance.
● Never place flammable or plastic items on or near the hob.
● Never fill a deep fat frying pan more than 1/3 full of oil, or use
a lid. DO NOT LEAVE UNATTENDED WHILE COOKING.
● Never operate the grill with the grill door closed as this will
cause the appliance to overheat.
● Never use the appliance as a room heater.
● Never use the grill to warm plates.
● Never dry any items on either the hob or oven doors.
● Never install the appliance next to curtains or other soft
furnishings.
● Never use proprietary spillage collectors on the hob.
● Never wear garments with long flowing sleeves whilst cooking.
NOTE: The use of a gas cooking appliance results in the production
of heat and moisture in the room in which it is installed. Ensure that
the kitchen is well ventilated; keep natural ventilation holes open or
install a mechanical ventilation device (mechanical extractor hood)
Prolonged intensive use of the appliance may call for additional
ventilation, for example opening of a window, or more effective
ventilation, for example increasing the level of mechanical ventilation
where present.
5
Page 6
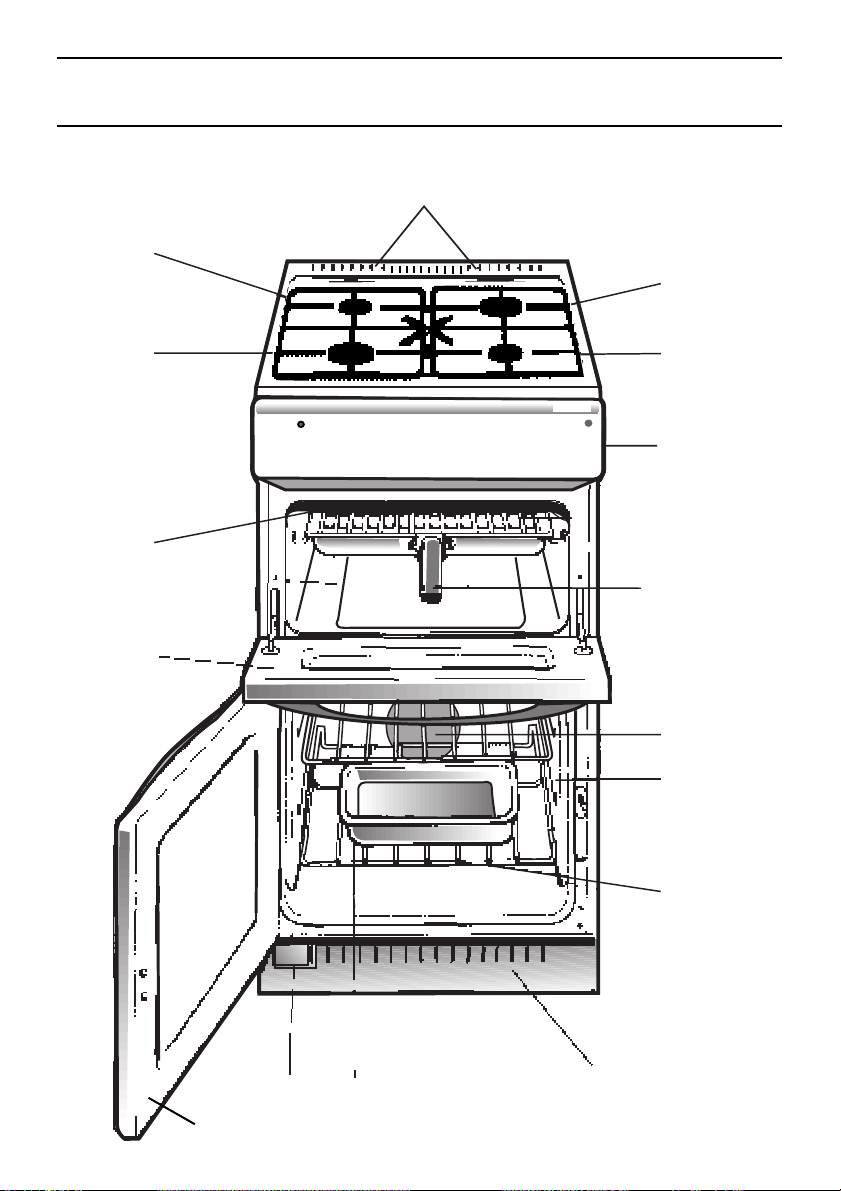
Features
NORMAL
SIMMERING
BURNER
HIGH
SPEED
BURNER
GRILL
GRILL
DOOR
HOB VENTILATION SLOTS
EW 21
❍ ❍ ❍ ❍ ❍ ❍
Oven
Grill
Made in Great Britain
SMALL
SIMMERING
BURNER
NORMAL
SIMMERING
BURNER
CONTROL
PANEL
GRILL/MEAT PAN
WITH FIXED/
DETACHABLE
HANDLE AND GRID
OVEN FAN
STAYCLEAN
OVEN LINERS
OVEN
SHELVES
RATING
PLATE
6
OVEN DOOR
MEAT
PAN
PLINTH VENTILATION
SLOTS
Page 7
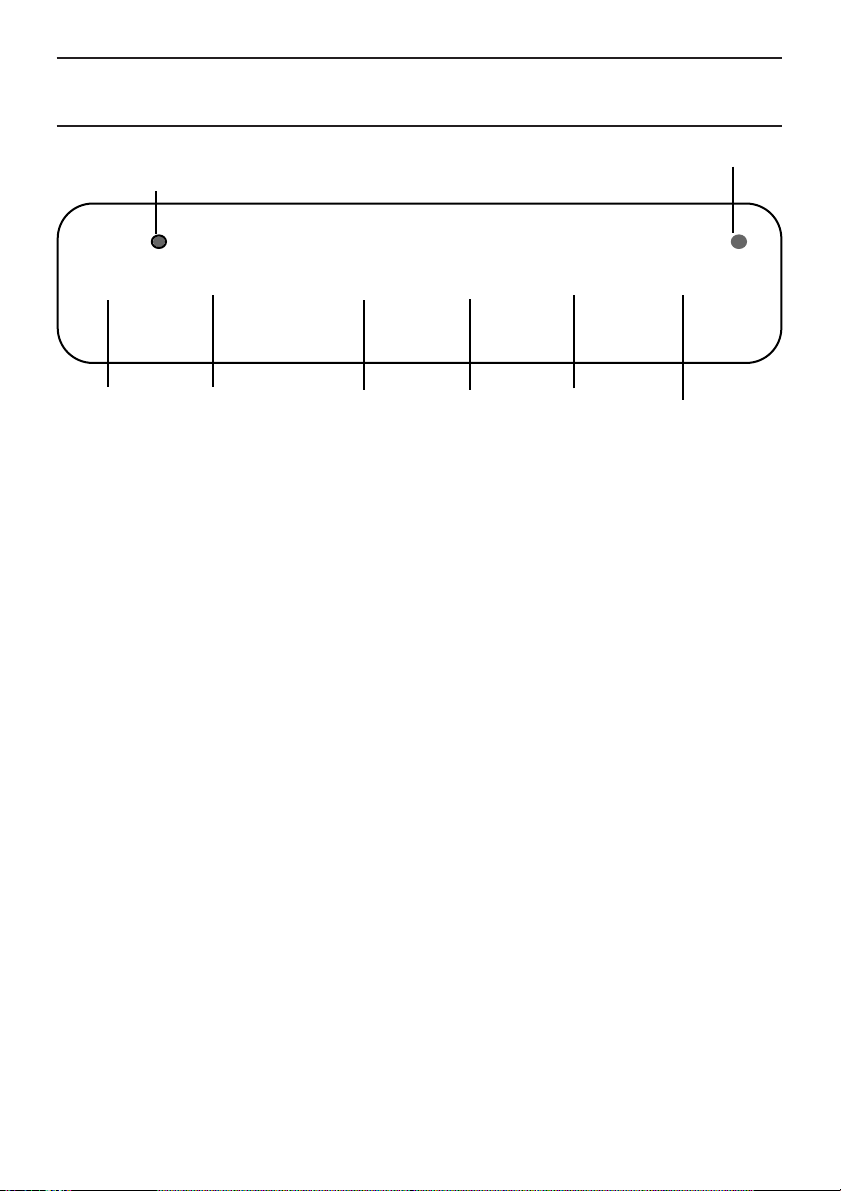
Control Panel
OVEN
INDICATOR
LIGHT
IGNITION
BUTTON
❍ ❍ ❍ ❍ ❍ ❍
OVEN LEFT
Operating the In common with all cookers having controls sited above the grill
control when the compartment, care must be taken when setting the controls, due
grill is in use to hot air being emitted from the grill compartment.
GRILL
FRONT
Note: Always ensure that all controls are in the OFF position,
when the appliance is not in use.
LEFT
REAR
RIGHT
REAR
RIGHT
FRONT
7
Page 8

Hotplate
The hob has one large high speed burner, two normal simmering
burners and one small simmering burner which will accommodate
pans between 100mm (4”) and 200mm (8”) diameter. All pans
should be positioned centrally over the burners.
The pan supports should be fitted on the hob such that the indents
along one side of each pan support are inner-most.
To Use the
Hob
Safety
Requirements
for Deep Fat
Frying
1. Press the ignition button and then push in and turn the control
knob of the chosen burner anti-clockwise to the large flame
symbol. Continue to press the ignition button until the sparks
light the gas.
2. Turn the control knob anti-clockwise to the desired setting.
Only turn the control knob between the large flame symbol and
the small flame symbol for adjusting the setting.
3. To turn off, turn the control knob fully clockwise to the symbol O.
DO NOT use mis-shapen pans which may be unstable.
DO NOT use round base woks directly on the pan supports.
Each burner is fitted with a spark ignition electrode for lighting the
gas. To ensure rapid lighting of the burners every time they are
used, the electrodes must be kept clean and dry. Remove any food
spillage or cleaning materials from the electrode using a small nylon
brush such as a tooth brush. Access to the electrode can be
achieved by lifting off the loose burner parts carefully when the burners are cool.
If aluminium based pans are used, a silvery deposit may appear on
the top edge of the pan support fingers. See ‘Care and Cleaning’
section for cleaning information.
1. Never fill chip pans more than one third full with oil or fat.
2. Never leave oil or fat unattended during the heating or cooling
period.
3. Never heat fat or fry with a lid on the pan.
4. Always dry food thoroughly before frying, and lower it slowly
into the hot oil or fat. Frozen foods in particular will cause
frothing and spitting if added too quickly.
5. Always keep the outside of the pan clean and free from streaks
of oil or fat.
How to Deal with a
Fat Fire
8
1. Do not move the pan.
2. Turn off the hob burners.
3. Smother the flames with a fire blanket or damp cloth to
extinguish the fire. Do not use water or a fire extinguisher as
the force of it may spread the burning fat or oil over the edge of
the pan.
4. Leave the pan for at least 60 minutes before moving it.
Page 9
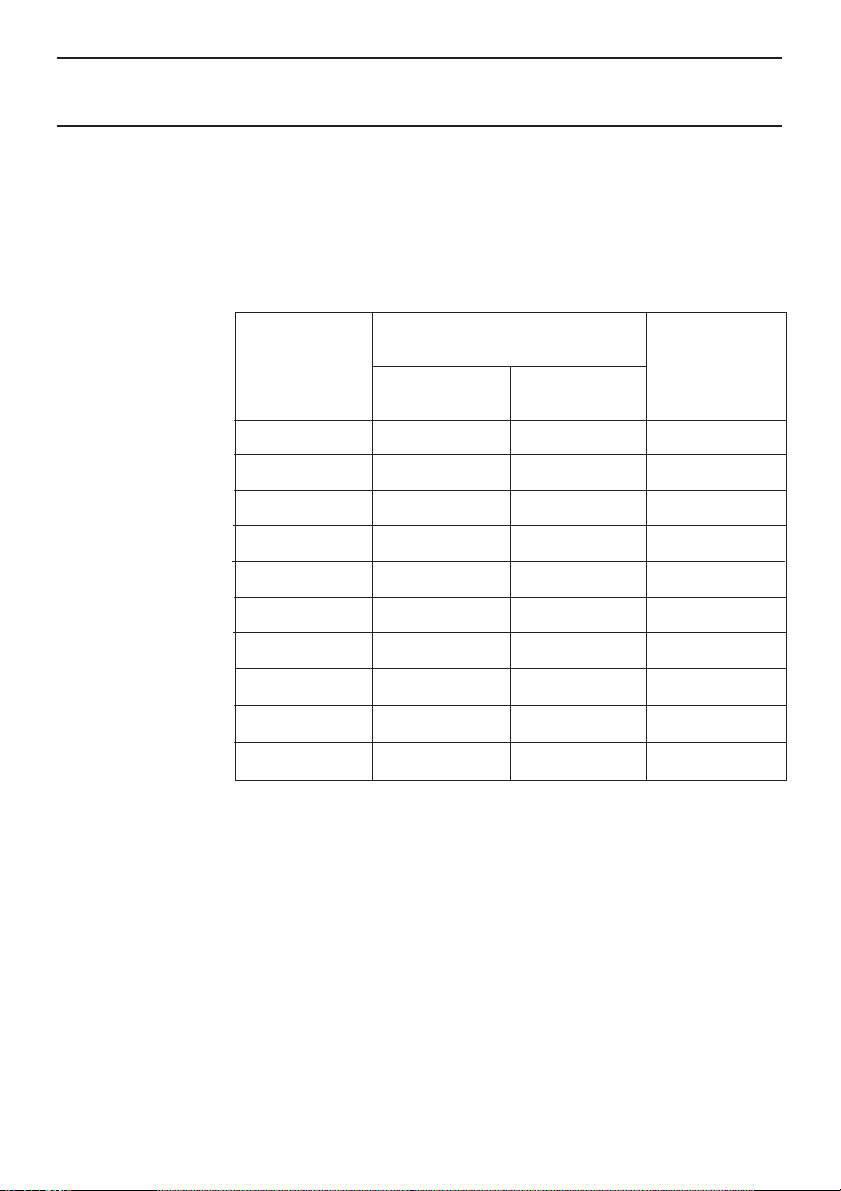
Temperature Conversion Scale
Comparative scale of oven settings (degrees Celsius to degrees
Fahrenheit) as recommended by the Association of Manufacturers of
Domestic Electrical Appliances.
The temperature control knobs on this electric cooker are marked
in degrees Celsius. This chart will help when the recipes show
alternative scales.
Gas Mark
1
2
/
1
2
3
4
5
6
7
8
9
Conventional
Oven
o
F
250
275
300
325
350
375
400
425
450
475
o
C
120
140
150
160
180
190
200
220
230
240
Fan Oven
(It is not always
necessary to
preheat oven)
o
C
100
120
130
140
160
170
180
200
210
220
9
Page 10
Using the Grill
CAUTION: ACCESSIBLE PARTS MAY BECOME HOT WHEN THE
GRILL IS IN USE. CHILDREN SHOULD BE KEPT AWAY.
GRILLING SHOULD NOT BE UNDERTAKEN WITH THE GRILL
DOOR CLOSED.
To Use the
Grill
Grill Pan
Handle
Open the grill chamber door fully.
Preheat the grill at setting 6 for approximately 5 minutes.
When toasting/grilling push the pan back to correctly position it under
the grill element.
Leave the control at 6 for toast, for sealing and fast cooking of foods.
For thicker foods requiring longer cooking, turn the switch to a lower
setting after the initial sealing on both sides at 6. The thicker the food,
the lower the control should be set.
When grilling thicker food, the wire grid should be turned over to its
lowest setting.
Food which requires browning only should be placed under the hot
grill, either in the grill pan or on the floor of the grill compartment,
according to the depth of the dish. (The grill pan wire grid can be
removed).
Do not line the grill pan with aluminium foil.
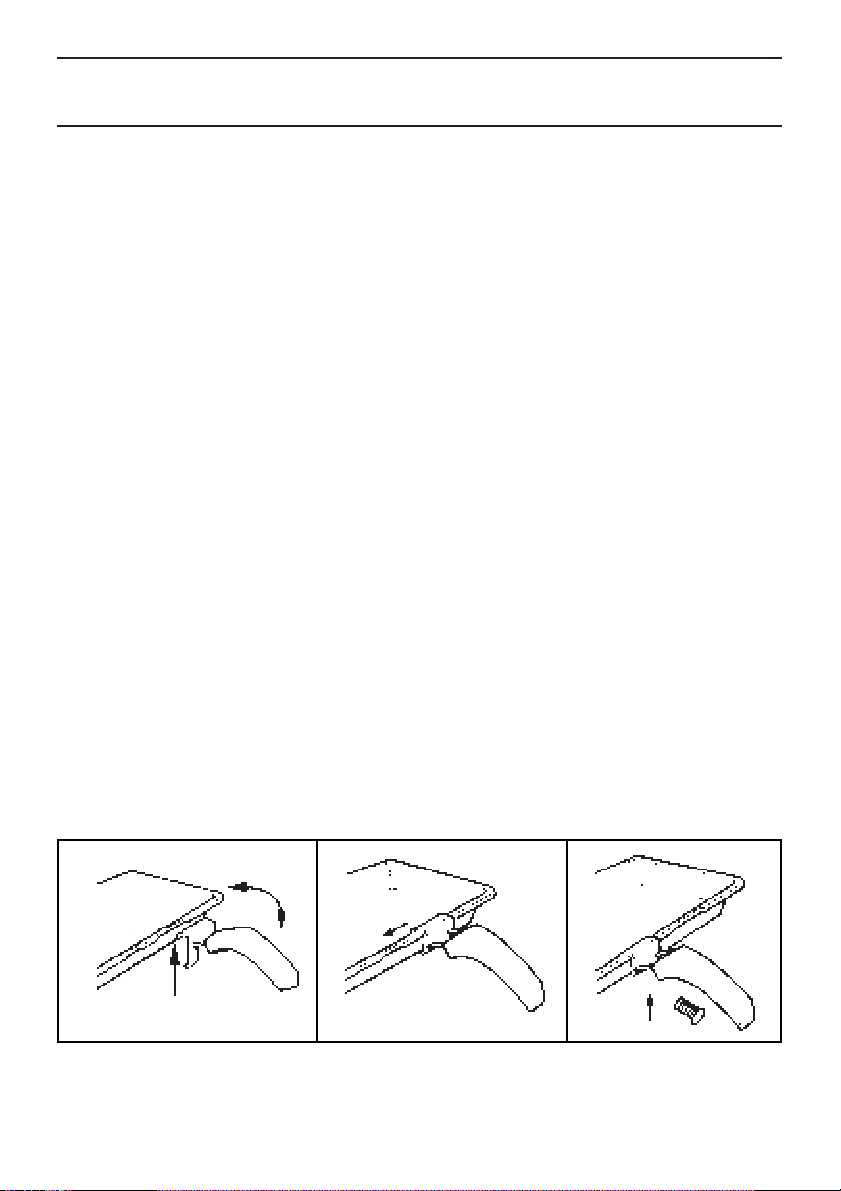
The grill pan handle is detachable so that the pan may also be used in
the oven as a meat pan. It is possible to fix the handle to the pan. To
do this remove the screw and washers from the grill pan bracket, tilt
the handle over the recess adjacent to the bracket (A), slide it towards
the centre of the pan (B) and let the handle locate over the bracket (C).
Replace screw and washers and ensure that they are fully tightened
up. For a detachable handle remove screw and washers from the grill
pan and discard.
Please note, if a fixed handle is required, grill pan cannot be used in
oven.
Fig. A Fig. B Fig. C
Grill Compartment
as a ‘Hotcupboard’
10
Plates and dishes placed on the floor of the grill compartment will be
heated when the oven is in use.
Do not operate the grill control when using the compartment as a
hotcupboard.
Page 11

Using the Fan Oven
The oven is fitted with ‘Stayclean’ liners, two rod shelves and a
meat pan. Remove the meat pan if it is not being used.
To Use the To heat
Oven required temperature between 80oC (180oF) and 230oC (450oF) as
recommended in the temperature chart. The indicator light will
immediately come on and remain on until the oven reaches the
required temperature. This light will then automatically go off and on
during
perature.
It should be noted that at the end of a cooking period there may be
a momentary puff of steam when the oven door is opened. This will
disperse in a few seconds and is a perfectly normal characteristic
of an oven with a good door seal.
Since a fan oven heats up more quickly, and generally cooks food at
a lower temperature than a conventional oven, preheating the oven is
often unnecessary. However food such as bread, scones, Yorkshire
pudding, do benefit from being placed in a pre-heated oven.
The charts on pages 13 and 14 are a guide only, giving approximate cooking temperatures and times. To suit personal taste and
requirements, it may be necessary to increase or decrease temperatures by 10oC.
Unless otherwise indicated in the charts, food is placed in a cold
oven, i.e. without pre-heating. If food is placed in an already hot
oven, the suggested cooking time should be reduced, depending
on the type and quantity of food being cooked.
Oven Positions Since the distribution of heat in the circulaire ovens is very even,
most foods will cook satisfactorily on any shelf position, but the
shelves should be evenly spaced. Do not fit shelves upside down.
Additional shelves can be purchased through your oven supplier or
Spares Centre. Never use more than 3 shelves in the oven as air
circulation will be seriously restricted. To ensure even circulation do
not use meat pans larger than 390 x 300mm (15" x 12") and baking
trays no larger than 330 x 255mm (13" x 10"), these should be
positioned centrally on the oven shelf. Food should not be placed
directly on the floor of the oven. To avoid unnecessary cleaning, rod
shelves which are not in use should be removed from the oven.
the oven, turn the control knob clockwise,
cooking as the oven thermostat maintains the correct tem-
selecting the
Temperature When three shelves are used to cook large quantities of food for
and Time home freezing or parties, it may be necessary to increase the
cooking times given in the charts on pages 13 and 14 by a few
minutes, to allow for the loss of heat due to the extra time taken to
load the oven, and the larger mass of food. Baking trays should
allow an equal gap at either side of the oven.
N.B. Recipes in cookery books give times and temperatures for
cooking in ordinary ovens. The introduction of improved thermal
insulation on fan ovens makes it possible, in most cases, to reduce
(a) the recommended temperature by 25oC (45oF) and
(b) the recommended time by approximately 10 minutes per hour.
11
Page 12

Oven Cookery Notes
To prepare meat and poultry for roasting in your fan oven.
(a) Wipe the meat or poultry, dry well and weigh it. Meat which has
been stored in a refrigerator should be allowed to come to room
temperature before cooking, and frozen meat or poultry must be
completely defrosted before placing in the oven.
(b) The weight of any stuffing used should be added before cal-
culating the cooking time.
(c) Place meat/poultry in the meat pan supplied with your cooker.
Small joints weighing less than 1.75kg (3
roasted in a smaller meat pan/tin - or they may be 'pot roasted' a small joint in a large meat pan causes unnecessary oven
splashing and evaporation of meat juices.
(d) Additional fat should not be added, except for veal, very lean
meat or poultry which can either be 'larded' with fat bacon or
brushed very sparingly with cooking oil or melted fat.
(e) Beef, lamb, mutton and poultry may be dusted lightly with sea-
soned flour to give a crisp outer surface. The skin of duck and
goose should be pricked to release excess fat during cooking,
and the rind of pork should be scored, brushed lightly with oil,
and rubbed with salt, to give crisp crackling.
(f) Meat and poultry wrapped in, or covered with a tent of
aluminium foil will be juicy and tender. Roasting bags offer the
same advantages. Always follow the manufacturers pack instructions, and remember to reduce the temperatures given for conventional ovens by approximately 25
mately 10 minutes per hour.
(g) Potatoes for roasting only require to be brushed with cooking oil
or melted fat.
(h) It is not necessary to baste when roasting in an electric oven and
stock or liquid should not be added to the meat pan since this
only causes unnecessary soiling, steam and condensation.
1
/2lbs) should be
o
C and the time by approxi-
12
Page 13
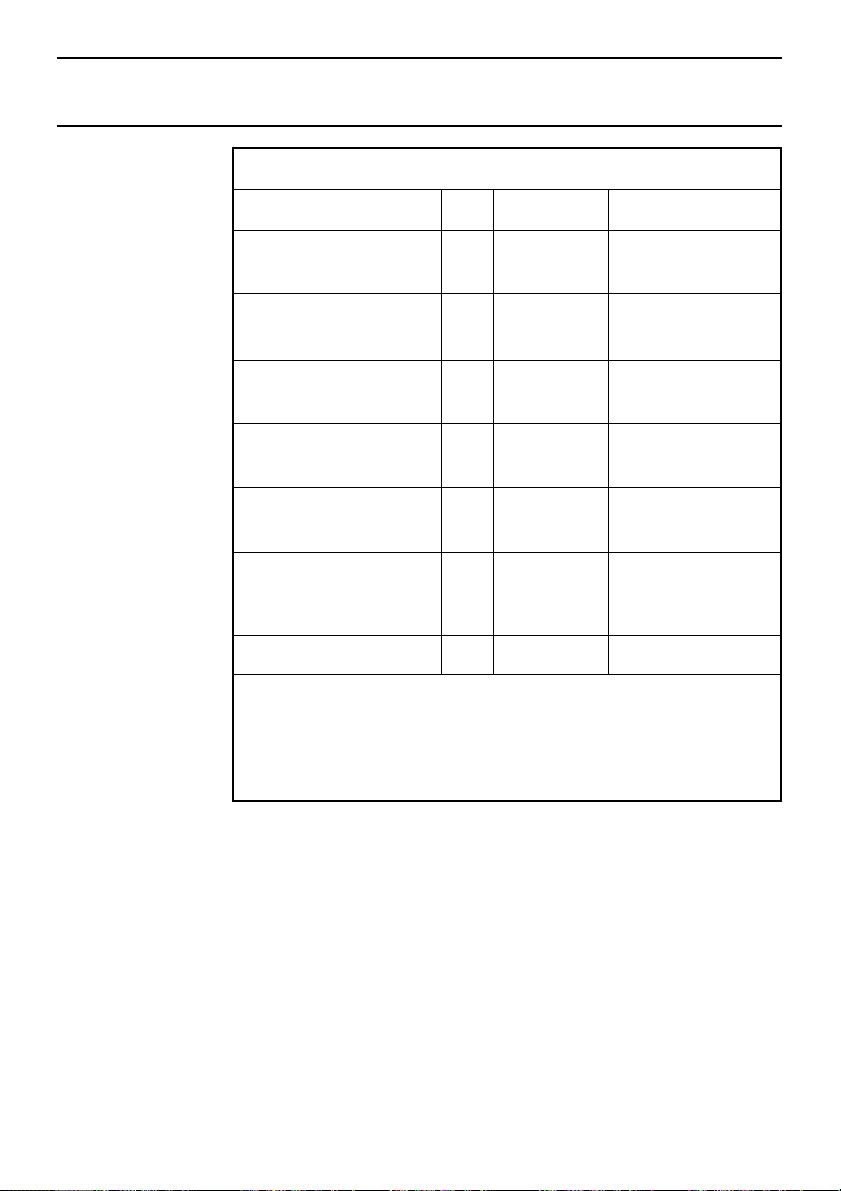
Oven Temperature Charts – Meat
Fan Oven Cooking
Pre-
Meat
Beef
heat
No
Temperature
o
C
160/180
Time (approx.)
20-25 mins per 450g
(1 lb) + 20 mins extra
Lamb
Pork
Veal
Chicken/Turkey
up to 4kg (8 lb)
Turkey
up to 5.5kg (12 lb)
over 5.5kg (12 lb)
Casserole Stews
No
No
No
No
No
No
160/180
160/180
160/170
160/180
150/160
150
140-150
25 mins per 450g
(1 lb) + 25 mins extra
25 mins per 450g
(1 lb) + 25 mins extra
25-30 mins per 450g
(1 lb) + 25 mins extra
18-20 mins per 450g
(1 lb) + 20 mins extra
13-15 mins per 450g (1 lb)
e.g. 5kg (1 lb) = 143-165
mins
12 mins per 450g (1 lb)
e.g. 10kg (22 lb) = 264 mins
11/2- 2 Hrs
If using aluminium foil, never:
1. Allow foil to touch sides of oven.
2. Cover oven interior with foil.
3. Cover shelves with foil.
The most accurate method of testing the readiness of joints of meat
or whole poultry is to insert a meat thermometer into the thickest
part of a joint, or the thickest part of poultry thighs, during the cooking
period. The meat thermometer will indicate when the required internal
temp has been reached.
Beef – Rare: 60
Medium: 70
Well Done: 75
o
C Lamb: 80oC Poultry: 90˚C
o
C Pork: 90oC
o
C Veal: 75oC
13
Page 14
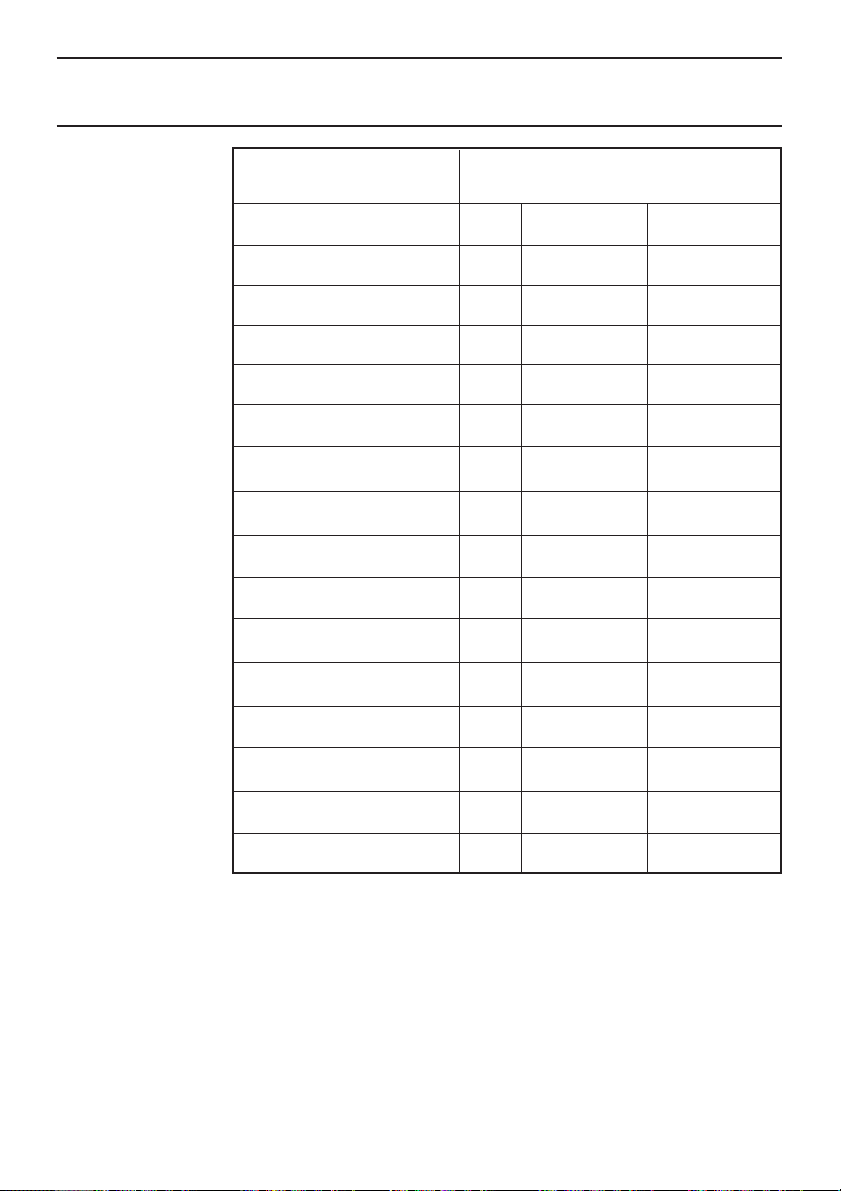
Oven Temperature Charts – Baking
Baking
Food
Scones
Small Cakes
Victoria Sandwich
Sponge Sandwich
Swiss Roll
Semi-rich Fruit
cakes
Rich Fruit Cakes
Shortcrust Pastry
Puff Pastry
Yorkshire Pudding
Individual Yorkshire
Puddings
Milk Pudding
Fan Oven Cooking
Temperature
Pre-
heat
Yes
Yes
Yes
Yes
Yes
o
C
210/220
170/180
160/170
170/190
180/200
140/150
130/140
190/200
190/200
180/190
190/200
130/140
Time in mins.
8-10
15-20
20-25
15-20
12-15
75-90
Depending
on size.
45-50
Depending
on use.
40-45
20-25
105-135
14
Baked Custard
Bread
Meringues
Note: If soft margarine is used for cake making, temperatures
recommended by the manufacturers should be followed.
Temperatures recommended in this chart refer to cakes made with
block margarines or butter only.
Yes
140/150
200/210
70-90
40-50
45-50
180-240
Page 15

Recipes For Fan Oven
BEEF STEW AND DUMPLINGS
675g (1
1
/2 lb) stewing steak, cut into
2.5cm (1 in. cubes)
2 medium sized onions, peeled and
quartered
225g (8oz) carrots, peeled and sliced
225g (8oz) swede, peeled and cubed
4 sticks of celery, cut into 2.5cm (1 in.)
lengths
500ml (1 pint) beef stock, boiling
30ml (2 tbsp) tomato puree
5ml (1 tsp) mixed dried herbs
Salt and pepper
Dumplings:
100g (4oz) self raising flour
Pinch of salt
50g (2oz) shredded suet
15ml (1 tbsp) chopped parsley
Cold water to mix
1. Place meat, vegetables, stock, puree,
herbs and seasoning in large
casserole dish.
2. Cover dish.
3. Bake: 140˚C; 1
4. Cook until meat is tender.
5. Make dumplings: mix flour, salt, suet
and parsley together in bowl.
6.
Add enough water to make soft dough.
7. Divide into 4 pieces, from each into
ball and place on top of stew.
8. Cover and continue to cook for further
20-30 minutes or until cooked through.
1
/2-2 hours.
FRUIT PLATE TARTS
Pastry:
800g (1
3
/4 lb) plain flour
200g (7oz) block margarine
200g (7oz) cooking fat
250ml (10floz) cold water
Filling:
675g (1
1
/2 lb) prepared fruit
50g (2oz) sugar
1. Make pastry. Sift flour into bowl, rub in
fats until mixture resembles fine
breadcrumbs.
2. Gradually add cold water to bind
pastry together to form stiff dough.
RICE PUDDING
1
/2 oz) pudding rice
40g (1
25g (1oz) sugar
500ml (1 pint) milk
Grated nutmeg
50g (2oz) sultanas or raisins (optional)
3. Turn onto lightly floured surface.
Knead lightly then divide pastry into
four equal pieces.
4. Roll out two pieces to line base of
two 25cm (10in) plates. Roll out
remaining two pieces and leave to
one side.
5. Prepare fruit for filling. Divide equally
between the two pastry lined plates,
adding the sugar.
6. Dampen edges of pastry with water.
Cover fruit with rolled out pastry.
7. Trim and seal edges. Make a slit in the
top of the pastry.
8. Bake: 190˚C; 35-45 mins.
1. Grease pie dish and put in rice and
dried fruit (if used).
2. Add sugar and milk, stir well, sprinkle
grated nutmeg on top.
3. Bake: 140˚C; 1
1
/2– 2 hours.
15
Page 16

Recipes For Fan Oven
BATTERS
Basic Recipe:
100g (4oz) plain flour
Pinch of salt
1 large egg
1
250ml (
equal quantities
YORKSHIRE PUDDING
1. Place 25g (1oz) dripping into shallow
2. Pour batter into hot fat.
3. Bake: preheat; 180˚C; 35-45 mins.
ALL-IN-ONE VICTORIA SANDWICH
100g (4oz) soft tub margarine
100g (4oz) caster sugar
2 eggs
100g (4oz) self raising flour
5ml (1 tsp) baking powder
/2pint) milk and water mixed in
ovenproof dish or 22.5cm (9in) square
Yorkshire pudding tin and place in
top of oven to heat for 10 minutes.
1. Sieve flour and salt into basin.
2. Make a well in centre and add egg
plus one-third of liquid.
3. Beat well until mixture is smooth.
4. Add another third of liquid and again
beat well until smooth.
5. Lightly stir in remaining liquid.
6. If possible, allow batter to stand in
cool place for at least half an hour.
1. Place all ingredients into a bowl.
2. Beat with a wooden spoon for 2-3
minutes or beat in electric mixer for
1 minute.
3. Grease and line two 18cm (7in)
sandwich tins.
4. Place mixture into prepared tins.
5. Bake: 150-160˚C; 20-30 mins.
VICTORIA SANDWICH
100g (4oz) block margarine
100g (4oz) caster sugar
2 eggs
100g (4oz) self raising flour
16
1. Cream margarine and sugar until
light, fluffy and pale in colour.
2. Beat in eggs.
3. Sift flour and fold into mixture.
4. Grease and line two 18cm (7in).
sandwich tins.
5. Divide mixture equally into tins. Level
tops.
6. Bake: 160-170˚C; 20-30 mins.
7. Bake until well risen, golden brown
and firm to touch.
Page 17

Recipes For Fan Oven
CHRISTMAS CAKE
225g (8oz) butter or block margarine
225g (8oz) brown sugar
4 eggs
225g (8oz) plain flour
5ml (1 tsp) mixed spice
2.5ml (1/2tsp) baking powder
200g (7oz) raisins
200g (7oz) sultanas
200g (7oz) currants
50g (2oz) chopped almonds
75g (3oz) glace cherries (cut in pieces)
60ml (4 tbsp) brandy (optional)
SMALL CAKES
225g (8oz) block margarine
225g (8oz) caster sugar
4 eggs
300g (11oz) self raising flour
Variations:
100g (4oz) sultanas
100g (4oz) chocolate chips
100g (4oz) chopped glace cherries
30ml (2 tbsp) cocoa powder mixed to
paste with water
Add any of the above with flour
1. Cream fat and sugar until light and
fluffy.
2. Add eggs one at a time, beating well.
3. Sieve dry ingredients. Add gradually
with mixed fruit, cherries and nuts.
4. Bake in lined 20cm (8in) cake tin:
130˚C; 2
It may be necessary to cover top of
cake with brown paper for final hour
to prevent overbrowning.
5. Leave in tin to cool a little, before
turning out.
6. When cold, prick bottom of cake and
sprinkle brandy over. Leave for about
a week before icing.
1. Cream margarine and sugar until
light, fluffy and pale in colour.
2. Add each egg, beating well after
each addition.
3. Fold in sifted flour, mixing well.
4. Place paper cases on baking trays
and two-thirds fill them with mixture.
5. Bake until golden brown and springy
to touch: 170˚C; 15-20 mins.
1
/2-3 hours.
SCONES
450g (1lb) plain flour
10ml (2 tsp) cream of tartar
5ml (tbsp) bicarbonate of soda
100g (4 oz) block margarine
225ml (8 fl oz) milk
Variations:
Sultana scones – add 100g (4 oz)
sultanas and 50g (2oz) caster sugar
Wholemeal scones – use half quantity
of wholemeal flour
Cheese scones – add 100g (4oz) grated
cheddar cheese and 5ml (1 tsp) dry
mustard
1. Sift together flour, cream of tartar and
bicarbonate of soda.
2. Rub in margarine until mixture
resembles fine breadcrumbs.
3. Make a well in centre. Stir in enough
milk to give fairly soft dough.
4. Turn onto lightly floured surface.
Knead lightly to remove any cracks.
Roll out to about 15mm (
5cm (2in) rounds. Place on baking
sheet.
5. Knead remaining dough and re-roll.
6. Bake until well risen and golden
brown; preheat; 210˚C; 9-12 mins.
3
/4in). Cut out
17
Page 18
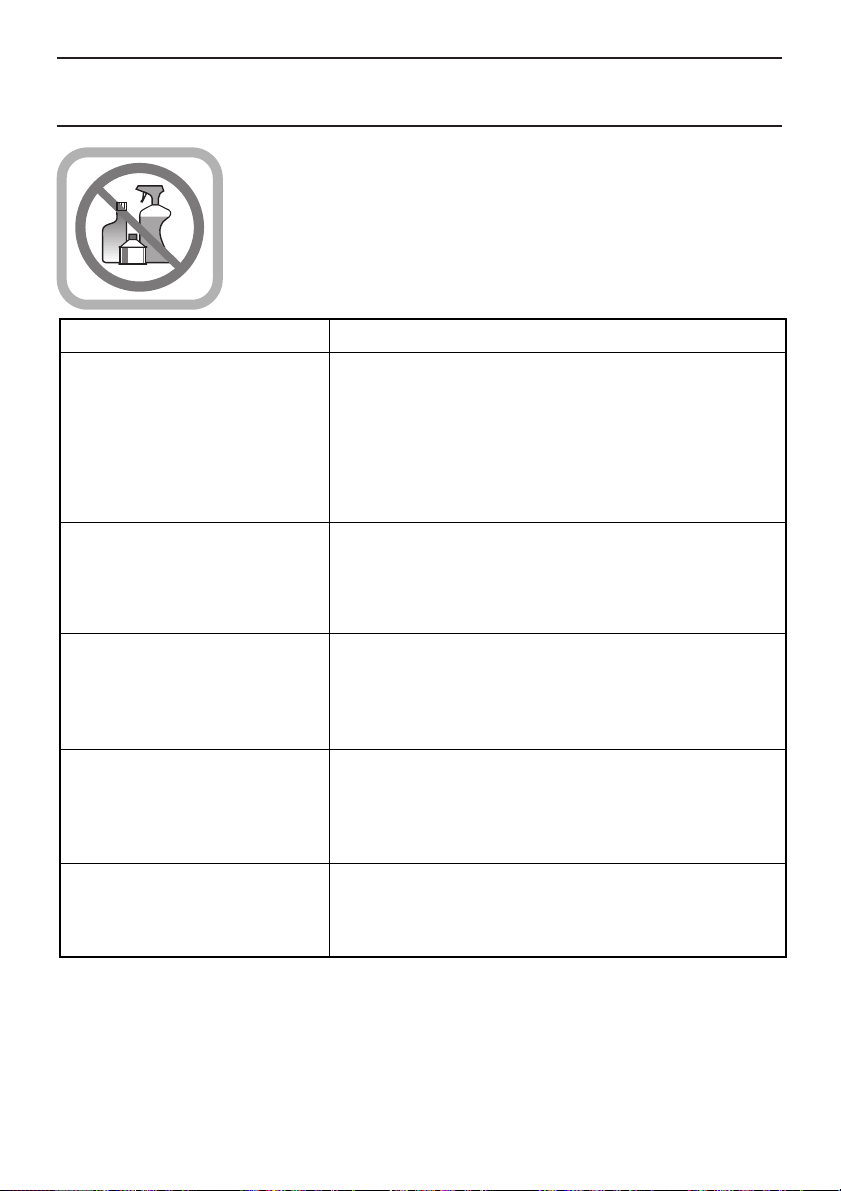
Care and Cleaning
TURN OFF THE MAIN SWITCH BEFORE CLEANING.
BEFORE SWITCHING ON AGAIN, ENSURE THAT ALL
CONTROLS ARE IN THE OFF POSITION.
NEVER USE BIOLOGICAL WASHING POWDER, HARSH
ABRASIVES, SCOURING PADS, AEROSOL CLEANERS OR OVEN
CHEMICAL CLEANERS OF ANY KIND.
COOKER FINISH CLEANING METHOD
Vitreous Enamel
Hob, burner caps,
roasting dish, grill pan,
oven base and roof, inside
of grill compartment, inside
of doors, control panel.
Paint
Plinth, fascia bottom trim,
side panels, side trims,
door fronts
Aluminium
Hob burner bodies
Chromium Plating
Oven shelves, grill pan grid,
grill pan handle support.
Plastic
Grill pan handle, door
handles, control knobs.
Cloth wrung out in hot soapy water. Stubborn
stains can be removed with a cream paste,
liquid cleaner or by rubbing with fine steel wool
soap pads.
Check that the cleaning agent is approved by the
Vitreous Enamel Development Council.
Wash with a cloth wrung out in hot soapy water
only.
DO NOT USE ABRASIVES.
Similar to paint cleaning above. Use a nylon brush
to remove any cleaning materials, water or dirt
from the hob burners.
Wipe with a cloth wrung out in hot soapy water.
A fine steel wool soap pad e.g. Brillo, Ajax, or a
chrome or stainless steel cleaner may be used.
Wipe with a cloth wrung out in hot soapy water.
Stubborn stains can be removed with a cream
cleaner.
NOTE: Strong detergents used in dishwashers may damage the grill pan grid
finish; clean in soapy water as described in CARE AND CLEANING SECTION.
18
Page 19

Care and Cleaning
How ‘Stayclean’
Works
The surface of the ‘Stayclean’ oven liners are treated on the mottled
face with a special vitreous enamel which absorbs cooking soils. At
temperatures of 220
these soils to be slowly destroyed. The higher the temperature the
more effective it is. In most cases normal cooking operation at this
temperature will permit this cleaning operation to proceed during
cooking. However if higher cooking temperatures are not used
regularly it may be necessary, to prevent heavy soiling, to run the
oven without a meat pan at maximum setting for a couple of hours.
This may be necessary once a month or once every two or three
months depending on the type and amount of oven cooking.
Oven Liners – sides
It should not normally be necessary to clean the ‘Stayclean’ panels in
water. If desirable remove the rod shelves and the side panels and
wash them in warm soapy water, followed by rinsing in clean water.
o
C (425oF) or above, the special surface enables
19
Page 20
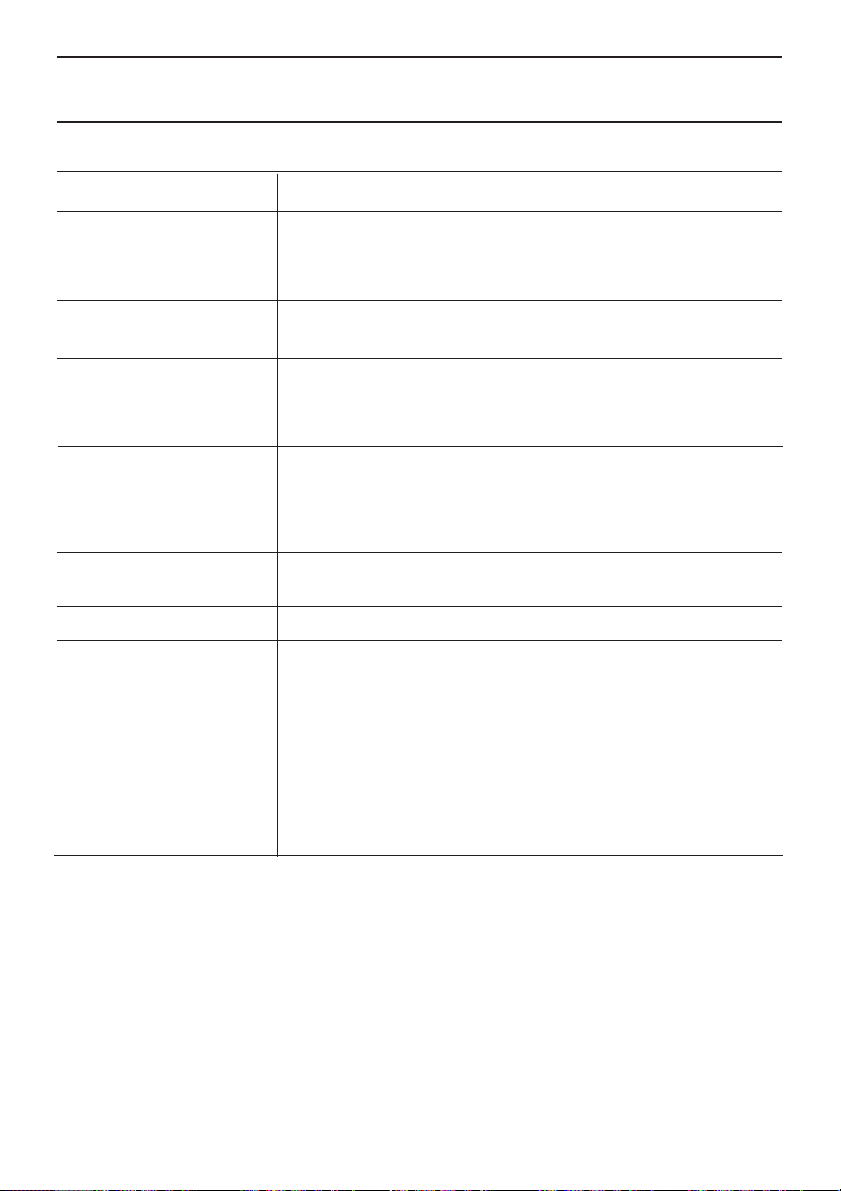
Something Wrong with your Cooker?
Before contacting your Service Office/Installer, check the problem guide below.
Problem Check
Slight odour or small This is normal and should cease after a short period.
amount of smoke when
using the cooker for the
first time.
Cooker does not work Check that the switch on the control unit is in the on
at all. position. If so check that the main fuse has not blown.
Oven temperature seems Check that the temperature has been set in accordance
too high or too low. with the temperature charts. It may be necessary to
Oven does not cook Check that the temperature and shelf position are as
evenly. recommended in the temperature charts.
Hotplates are slow to boil Check that your pans conform to the recommendations
or will not simmer. in these instructions.
Grilling is uneven. Check that the grill pan has been correctly positioned.
increase or decrease the recommended temperature by
up to 10oC to suit your taste.
Check that the containers being used in the oven allow
sufficient air flow around them.
Check that the cooker is level.
Ignition does not work If all burners fail to ignite, check that the sparks appear at the
20
burners; a clicking noise should be heard. If not check that
the switch on the control unit is in the on position. If so check
that the main fuse has not blown. If only one hob burner is
failing to ignite, check that the parts are sitting correctly and
that the burner ports are not blocked (see care & cleaning).
Note: Satisfactory ignition will only be achieved if all hob
burners are fitted.
All burners can be lit with a match.
Page 21

Installation
Prior to installation, ensure that the local distributions (nature of the
gas and gas pressure) and the adjustment conditions are compatible.
The adjustment conditions for this appliance are stated on the rating
plate which is fitted below the oven door on the plinth panel. This
appliance is not designed to be connected to a combustion products
evacuation device. It must be installed and connected in accordance
with current installation regulations. Particular attention should be
given to the relevant requirements regarding ventilation.
MODEL NUMBER EG21
Category I2H(G.B. IE)
These models are set to burn NATURAL GAS (G20) at 20 mbar
ONLY and cannot be used on any other gas.
Gas Safety
(Installation & Use)
Regulations
Location
Provision for
Ventilation
It is the law that all gas appliances are installed by competent
persons in accordance with the current edition of the above
regulations. It is in your interest and that of safety to ensure
compliance with the law.
In the UK, CORGI registered installers work to safe standards of
practice.
The cooker must also be installed in accordance with BS 6172.
Failure to install the cooker correctly could invalidate the warranty
liability claims and could lead to prosecution.
The cooker may be located in a kitchen, kitchen/diner or a
bedsitting room, but not in a room containing a bath or shower. The
cooker must not be installed in a bed-sitting room of less than 20m
The room containing the cooker should have an air supply in
accordance with BS 5440: Part 2.
The room must have an opening window or equivalent; some rooms
may also require a permanent vent. If the room has a volume
between 5 and 10m3, it will require an air vent of 50cm2effective
area unless it has a door which opens directly to outside. If the room
has a volume of less than 5m3, it will require an air vent of 100cm
effective area. If there are other fuel burning appliances in the same
room, BS 5440: Part 2 should be consulted to determine air vent
requirements.
3
.
2
21
Page 22
Installation
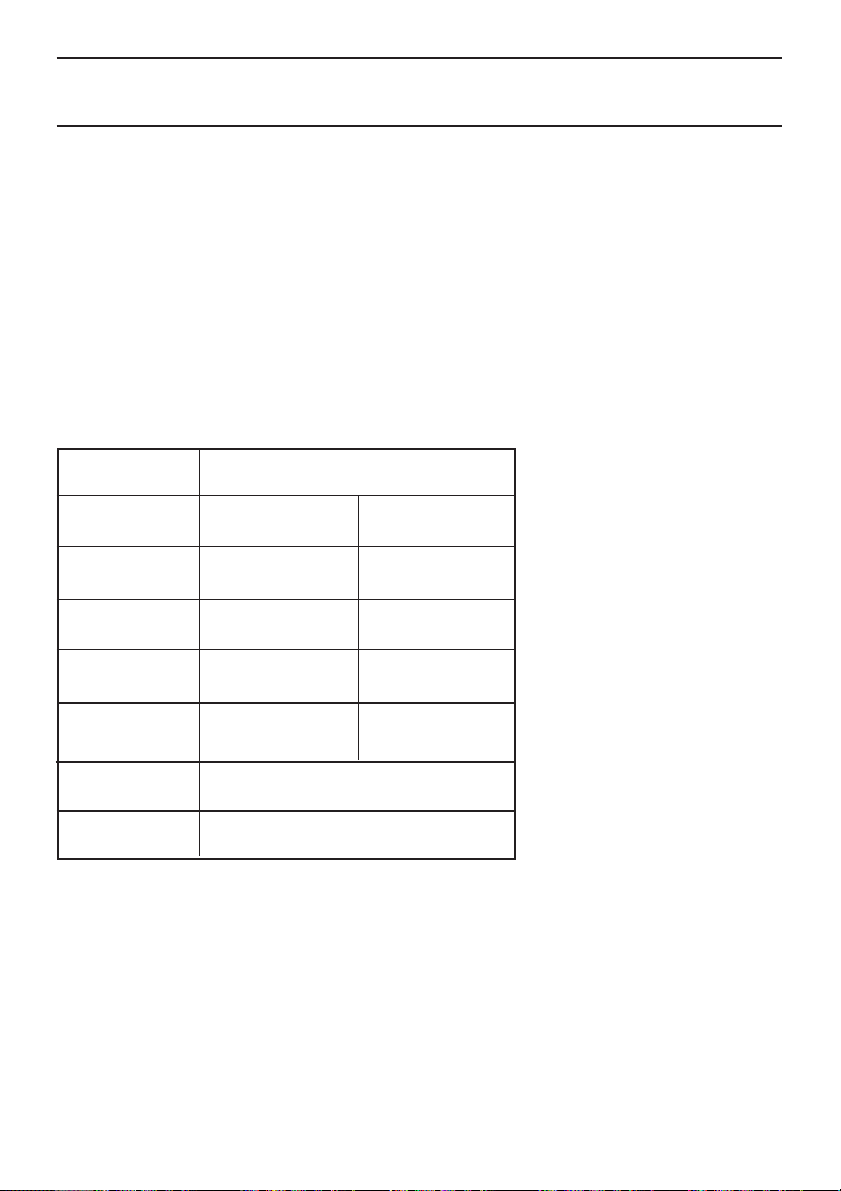
Technical Data
Dimension
General
BURNER
Hob
Front left
Hob
rear left
Hob
rear right
Hob
front right
Height 900mm
Width 500mm
Depth 600mm (excluding door handles)
Gas connection Rp 1/2(1/2” BSP female)
Pressure test point Burner injector
Gas rate adjustment None
Aeration adjustment None
Electrical connection 230 - 240V ~ 50Hz
Total Electrical heat input 4.35kW
HEAT INPUT
3.0 kW
2.0 kW
1.0 kW
2.0 kW
INJECTOR
128
102
72
102
22
GRILL
OVEN
1.75kW
2.5kW
Page 23
Installation
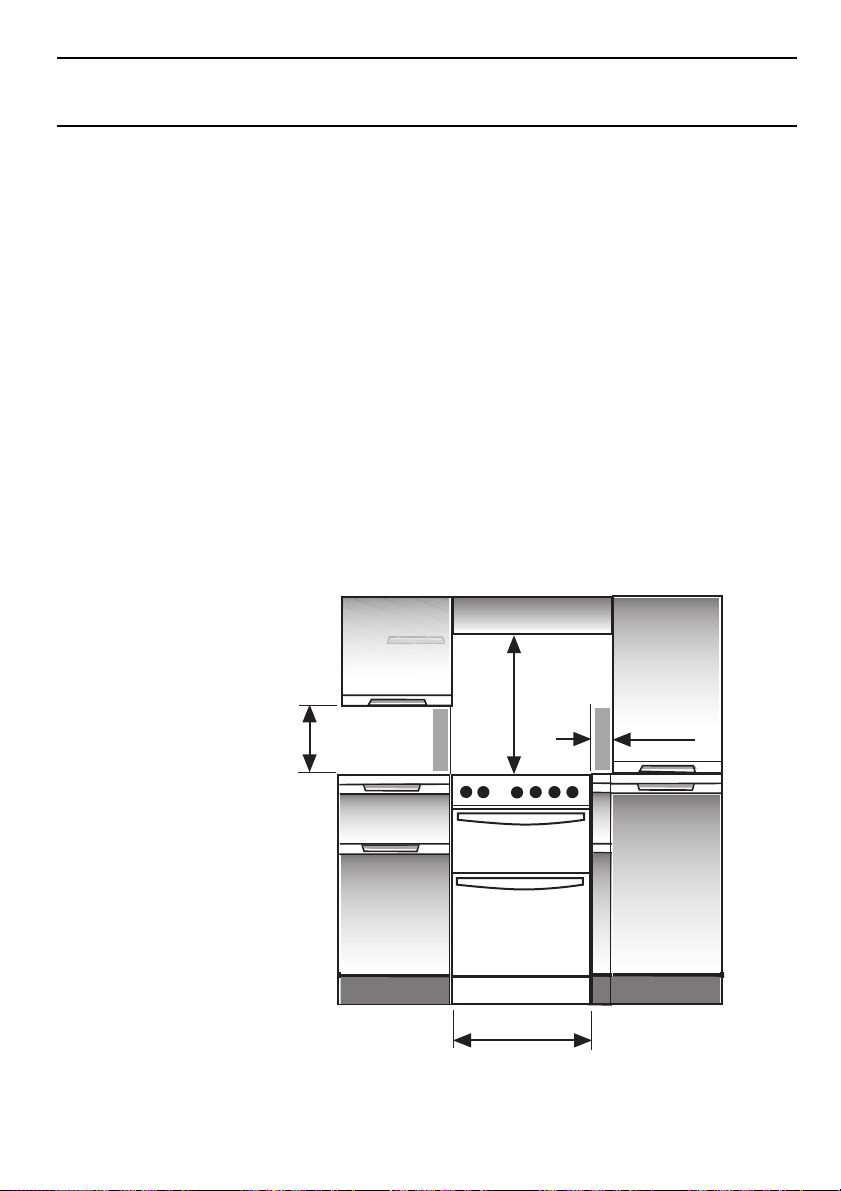
The cooker is of type X with regard to protection against overheating
of surrounding surfaces as defined in BS EN60335-2-6: 1991 it can
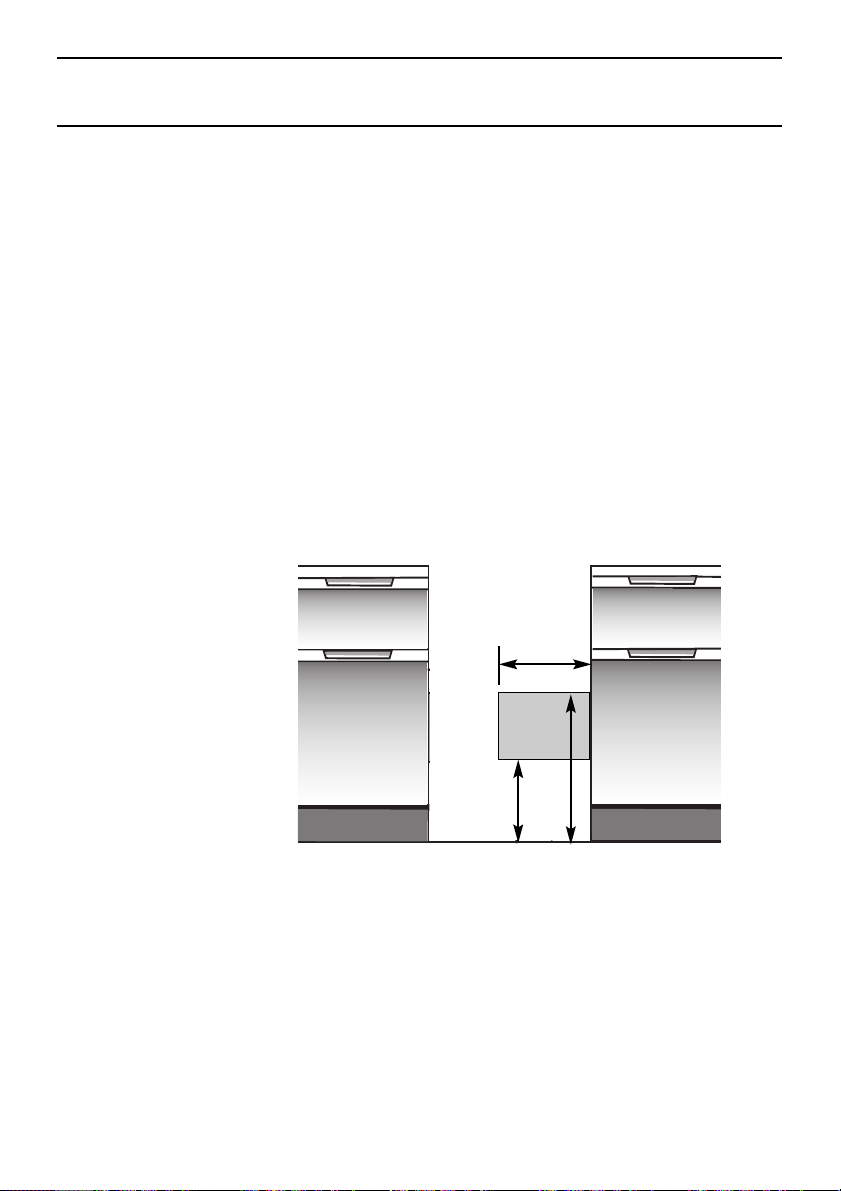
be close fitted below hotplate level. This requires a minimum
distance of 503mm between cupboard units of hotplate height.
When installing next to a tall cupboard, partition or wall, for a
minimum distance of 400mm above hotplate level, allow a side
clearance of at least 65mm.
The diagram below illustrates the minimum clearance between the
cooker and adjacent walls, cupboards etc.
The wall behind the cooker 150mm below the hotplate and 450mm
above, and the width of the cooker, must be a non-combustible
material such as ceramic wall tiles.
If the cooker is to be fitted close to a corner on the left hand side,
ensure that there is a clearance of at least 50mm to allow the main
oven door to open fully for when removing oven shelves.
The height of the cooker can be adjusted by means of adjustable
feet in the plinth (900mm - 915mm). Adjust the feet by tilting the
cooker from the side. Then install the product into position.
Cooker Hoods
750 mm Min
840 mm Min
400 mm Min
503 mm Min
If a cooker hood is to be installed, refer to the cooker hood
manufacturers’ instructions regarding fixing height.
65 mm Min
23
Page 24
Installation
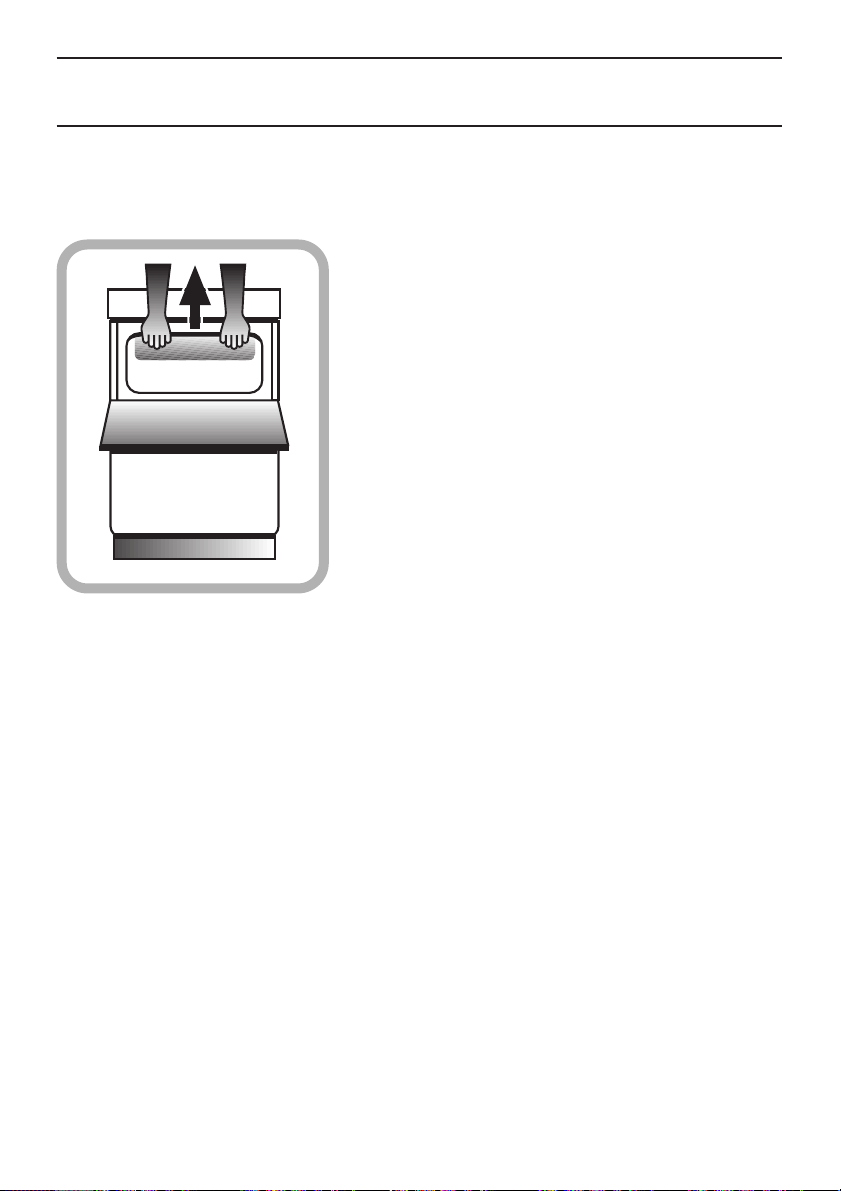
Moving the Cooker
Splash Panel
Kit (Wall Mounted)
Before moving your cooker check that it is cool, and
switch off at the cooker control unit.
Movement of your cooker is most easily achieved by
lifting the front as follows:
Open the grill door sufficiently to allow a comfortable
grip on the underside front edge of the oven roof,
avoiding any grill elements.
Note: Take care in moving the cooker as it is heavy.
Take care to ensure that any floor covering is not
damaged.
Splashplate optional, apply to Hotpoint Spares
Department.
24
Page 25
Installation
Unpacking the
Cooker
Stability Chain
Connecting To
The Gas Supply
Unpack the components from inside the grill and oven: Check that
the following parts are present.
Grill pan and grid Grill pan handle
Baking dish Pan supports (2)
Oven shelves (2) Enamelled discs (4)
Literature Aluminium burner bodies (4)
The cooker must be fitted with a stability device firmly secured to the
fabric of the building. The M6 bolt at the top of the rear of the cooker
can be used to engage a stability chain. Keep the chain clear of
controls and pipes on the rear of the cooker.
The chain must be fitted to the wall behind the cooker.
The cooker is designed to match the depth of standard 600mm worktops. An adaptor backplate should, therefore, be fitted within the
shaded area shown to allow the cooker to be pushed fully to the wall.
If a forward facing backplate is used, it must be chased into the wall.
200
300
530
530
300
250
Connection to the cooker should be made with an approved
appliance flexible connection to BS 669. A length of 0.9 to 1.25m is
recommended. The length of hose chosen should be such that when
the cooker is in situ, the hose does not touch the floor.
The temperature rise of areas at the rear of the cooker that are likely
to come in contact with the flexible hose do not exceed 70oC.
25
Page 26
Installation
WARNING – THIS APPLIANCE MUST BE EARTHED.
Your cooker should have been checked to ensure
the voltage corresponds with your supply volt
stated on the rating plate, which is situated
of the plinth. The cooker must be connected by a competent person eg. (NICEIC registered contractor) to
suitable double-pole control unit with a minimum rating
of 32A and a minimum contact clearance of 3mm,
which should be fitted adjacent to the cooker, in accordance with latest IEE regulations.
The power supply cable should conform to B.S.6004
with a conductor size of 2.5mm2minimum.
The control unit should be easily accessible in the
event of an emergency, but must be within 2 metres
of and not directly above an appliance.
This appliance conforms to EN 55014 regarding
suppression of radio and television interference.
Access to the mains terminals is gained by removing
the rear access cover.
The mains cable must pass through the cable clamp
adjacent to the terminal block. Sufficient cable should
be used to allow the cooker to be pulled out for
servicing.
Ensure that the mains cable is routed away from any
brackets affixed to the rear panel and is not trapped to
the rear wall when pushing the cooker into
position between cabinets.
on the front
age,
that
this is
26
Page 27

Installation
Operational
Checks
DISPOSAL OF COOKER
To minimise the risk of injury to children please dispose of your product carefully and
safely. Remove all doors and lids (where fitted). Remove the mains cable (where fitted)
by cutting off flush with the appliance and always ensure that no plug is left in a condition
where it could be connected to the electricity supply.
To help the environment Local Authority instructions should be followed for the disposal
of you product.
After installation, check for gas soundness.
Fit the hob burner bodies, enamelled discs and pan supports.
Referring to the instructions for use where necessary;
1. Check that the hotplate burners ignite correctly and burn with a
steady flame. Check for a steady flame on the low setting.
2. Check that with the oven set to 230˚C, the oven fan operates
and the oven heats up.
3. Check that the grill heats up.
Instruct the user on the operation of the cooker.
This appliance conforms to the following EEC Directives:
Low Voltage Equipment Gas Appliances
73/23/EEC 90/396/EEC
93/68/EEC 93/68/EEC
Electromagnetic Compatibility
89/336/EEC
92/31/EEC
93/68/EEC
27
Page 28

Hotpoint Service Cover
Satisfaction Guaranteed or Your
Money Back
Hotpoint gives you a unique ‘Satisfaction
Guaranteed’ promise – valid for ninety days after
you have purchased your Hotpoint product. If there is a
technical problem with your Hotpoint appliance, just
call Hotpoint Service (see back page). If necessary we
will arrange for an engineer to call. If the technical
problem is not resolved under this Guarantee, Hotpoint
will replace your appliance or, if you prefer, give you
your money back. Your statutory rights are not affected, and the Guarantee is additional and subject to the
terms of Hotpoint’s Five Year Parts Guarantee.
Hotpoint’s Free Five Year Guarantee
From the moment your appliance is delivered
Hotpoint guarantees it for FIVE YEARS.
• In the Five Years all replacement parts are FREE
provided that they are fitted by our own
Service Engineer. During the first year our
Engineer’s time and labour is also free.
• Our guarantee covers loss of food in our
refrigeration and freezer products up to £250
during the first year, subject to verification by
one of our engineers.
• After the first year we will charge for our
Engineer’s time and labour. We do, however,
operate a range of Service Plans (see opposite)
which, for an annual payment, enables you to
cover any repair costs which may be necessary.
• All our service repairs are guaranteed for
twelve months in respect of our labour and any
parts fitted.
• The appliance must be used in the United
Kingdom, and must not be tampered with or
taken apart by anyone other than our own
Service Engineers.
• You may, however, buy parts which can be
safely fitted without specialist knowledge or
equipment. The correct fitting of such parts,
provided they are genuine Hotpoint spares, will
not affect your Guarantee. Parts are available
from our Hotpoint Spares Centres (see back
page).
• Our guarantee does not cover the cost of any
repair, or loss of food in refrigeration products,
due to power failure, accidents or misuse. Nor
does it cover the cost of any visits to advise
you on the use of your appliance. Please read
thoroughly the instruction book supplied with
this appliance.
• If at any time during the Guarantee period we
are unable to repair your appliance, we will
refund any repair costs paid to us in the
previous twelve months. We will also offer you
a new appliance at a reduced charge instead of
a repair.
• Our Guarantee is in addition to and does not
affect your legal rights.
• Should you need independent advice on your
consumer rights, help is available from your
Consumer Advice Centre, Law Centre, Trading
Standards Department and Citizens Advice
Bureau.
• All Hotpoint servicing is carried out by our own
Service Organisation located throughout the
United Kingdom and Eire. We will be happy to
deal with any problems which you may have.
28
Hotpoint’s Extended Warranties
Whether you have just one or a number of Hotpoint
appliances in your kitchen, Hotpoint has a range of
Service Plans to give you complete peace of mind. They
enable you to extend your one year labour guarantee so
that you can have repairs completed FREE during the
membership period.
Service Cover
We offer a number of payment methods;
cheque, credit card or you can spread the cost and pay
by direct debit (full details can be obtained on Free
phone 0800 716356). This covers you for all repairs
during the period of cover, which can be from 1 to 4
years. Service Cover also includes loss of food, up to the
value of £250, in refrigeration appliances.There is also
an option of Service Cover with Maintenance at an
additional cost. This includes an annual Electrical and
Safety check and replacement
of any parts as necessary.
Kitchen Cover
An annual payment covers you for all repairs for all your
Hotpoint appliances which are less than ten years old. It
also covers the cost of loss of food up to £250 in our
refrigeration and freezer products. There is also the
option of Kitchen Cover with Maintenance at an
additional cost. Any additional Hotpoint appliances
purchased after you have joined Hotpoint Kitchen Cover
will automatically be included during the annual period of
cover without further charge.
Appliance Registration
To ensure that you have the opportunity to benefit from
any of the above Service Schemes and other offers you
should complete and return immediately the Appliance
Registration Form/Questionnaire supplied with this
appliance. Full details and costs of our Service
Schemes, together with an application form, will be sent
to you at the end of the first year of the guarantee.
Annual Safety/Maintenance Checks
Hotpoint strongly recommends that all its
appliances are regularly checked for electrical and
mechanical safety, whether or not they are covered by a
Service Plan. Worn door gaskets or hoses may cause a
leak on an appliance, which could become dangerous if
neglected.
Proof of Purchase
For future reference please attach your purchase receipt
to this booklet and keep it in a safe place.
Spares and Accessories
Spares and accessories can be ordered from your local
Hotpoint Spares Centre (see back page), using the order
form enclosed.
NOTE: Our Engineers will use every effort to avoid
damage to floor coverings and adjacent units when
carrying out repairs/service work, but in locations where
the Engineer advises you that it will be impossible to
move appliances without risk of damage, he will only
proceed with your approval that no liability is accepted.
Page 29

Page 30

Page 31

Page 32

Key Contacts
Service
Hotpoint has the largest appliance manufacturer’s service team in Europe,
trained specialists directly employed by us to ensure your complete
confidence.
Repair Service
UK: 08709 066 066
Republic of Ireland: 1850 302 200
You will be asked for the following information:-
Name, address and postcode.
Telephone number
Model / Serial number of the appliance
Clear and concise details of the query or fault
Place and Date of purchase
(Please keep the receipt as evidence will be required when the engineer calls).
Extended Warranty
To join: UK 08709 088 088
Republic of Ireland: 1850 302 200
Genuine Parts & Accessories
Mail Order Hotline
UK: 08709 077 077
Republic of Ireland: (01) 842 6836
For further product information
All Hotpoint Services are offered as an extra benefit and do not affect your statutory rights.
General Domestic Appliances Limited, Morley Way, Peterborough, PE2 9JB
PRINTED BY SIMLEX .FOUR ASHES, WOLVERHAMPTON. November 2001 Part no. 4966200005-01
08701 50 60 70
 Loading...