

Page 1

Instructions for use
WASHING MACHINE
GB
English, 1
HU
Magyar, 13
ECOTF 1051
UK
Українська, 25
Contents
Installation, 2-3
Unpacking and levelling
Connecting the electricity and water supplies
The first wash cycle
Technical data
Description of the washing machine
and starting a wash cycle, 4-5
Control panel
Indicator lights
How to open and shut the drum
Starting a wash cycle
Wash cycles, 6
Table of wash cycles
Personalisation, 7
Setting the temperature
Setting the spin speed
Functions
Detergents and laundry, 8
Detergent dispenser drawer
Bleach cycle
Preparing the laundry
Garments requiring special care
Load balancing system
GB
Precautions and tips, 9
General safety
Disposal
Saving energy and respecting the environment
Care and maintenance, 10
Cutting off the water or electricity supply
Cleaning the washing machine
Caring for your appliance door and drum
Cleaning the pump
Checking the water inlet hose
How to clean the detergent dispenser
Troubleshooting, 11
Service, 12
1
Page 2
Installation
GB
! Keep this instruction manual in a safe place for future
reference. Should the appliance be sold, transferred or
moved, make sure the instruction manual accompanies
the washing machine to inform the new owner as to its
operation and features.
! Read these instructions carefully: they contain vital infor-
mation on installation, use and safety.
Unpacking and levelling
Unpacking
1. Unpack the washing
machine.
2. Check whether the
washing machine has
been damaged during
transport. If this is the
case, do not install it and
contact your retailer.
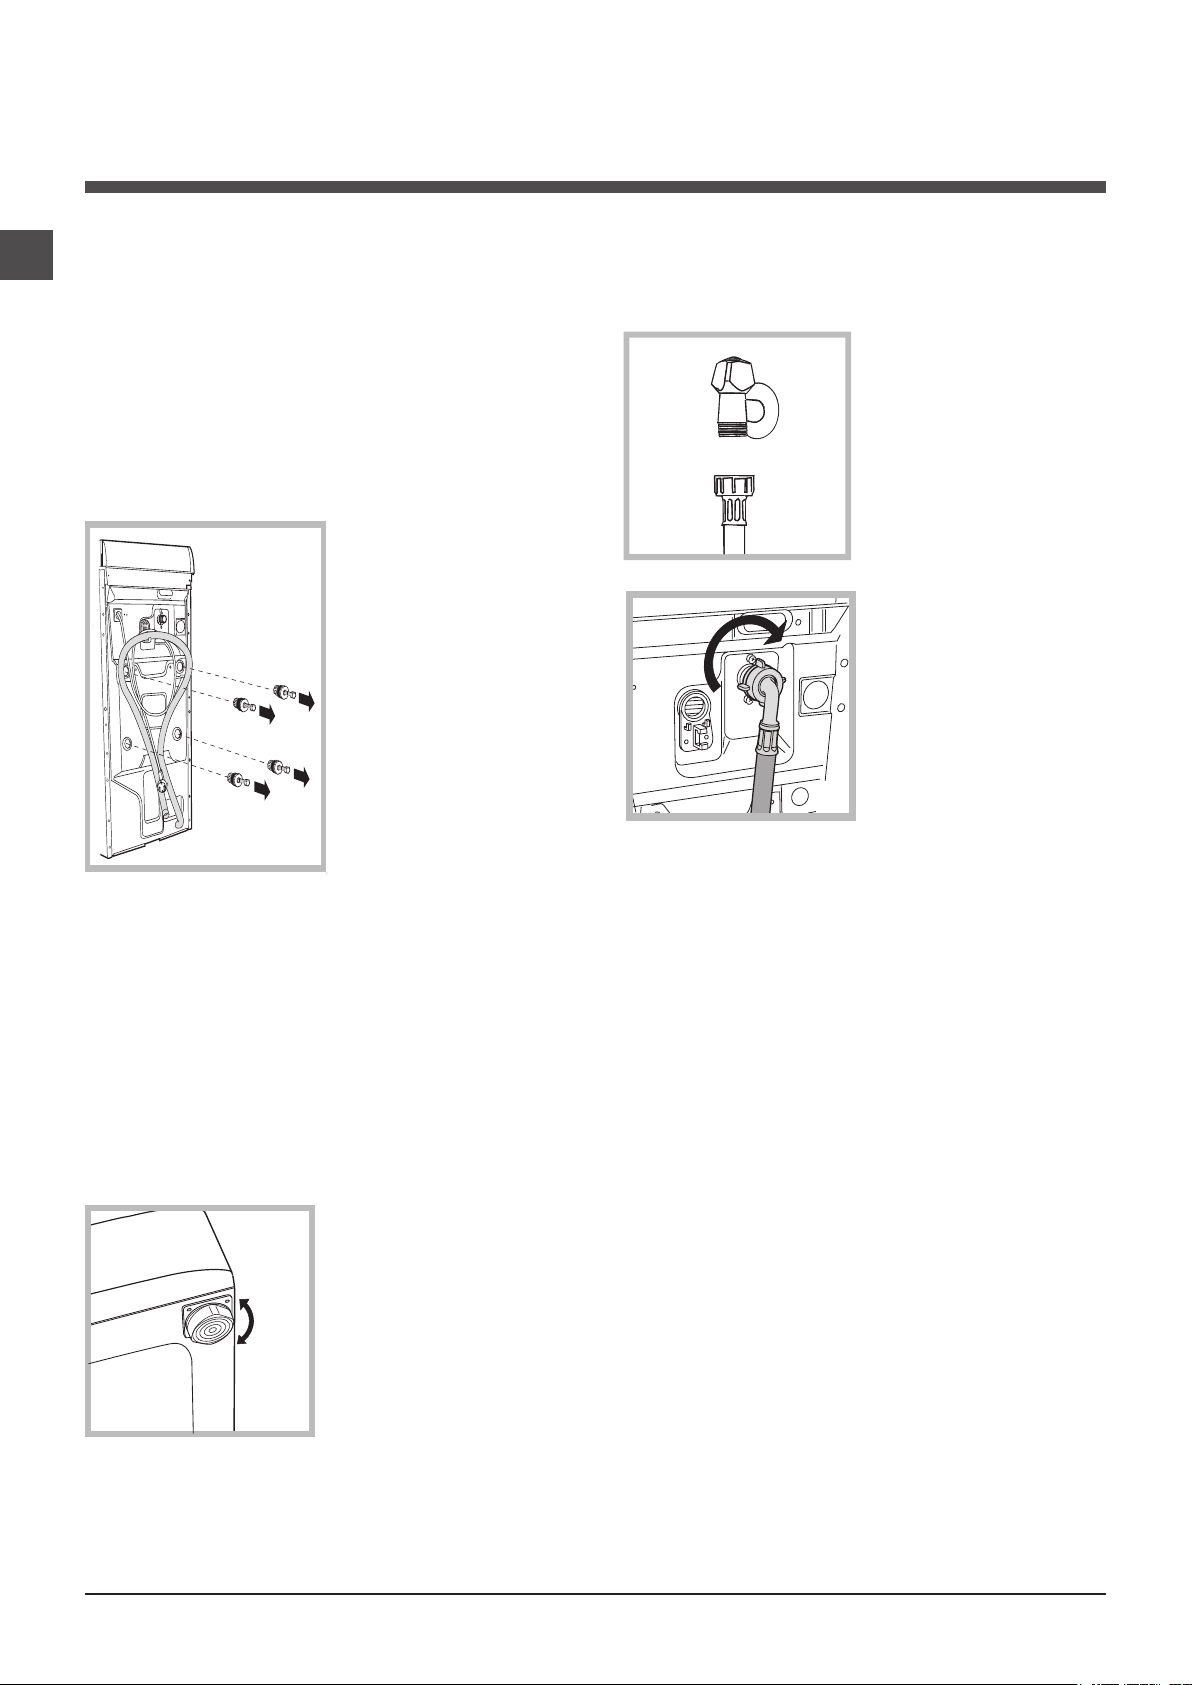
3. Remove the four
protective screws and
the rubber washer with
the respective spacer,
situated on the rear of the
appliance (see figure).
4. Seal the gaps using the
plastic plugs provided.
5. Keep all the parts: you will need them again if the washing machine needs to be moved to another location.
Electric and water connections
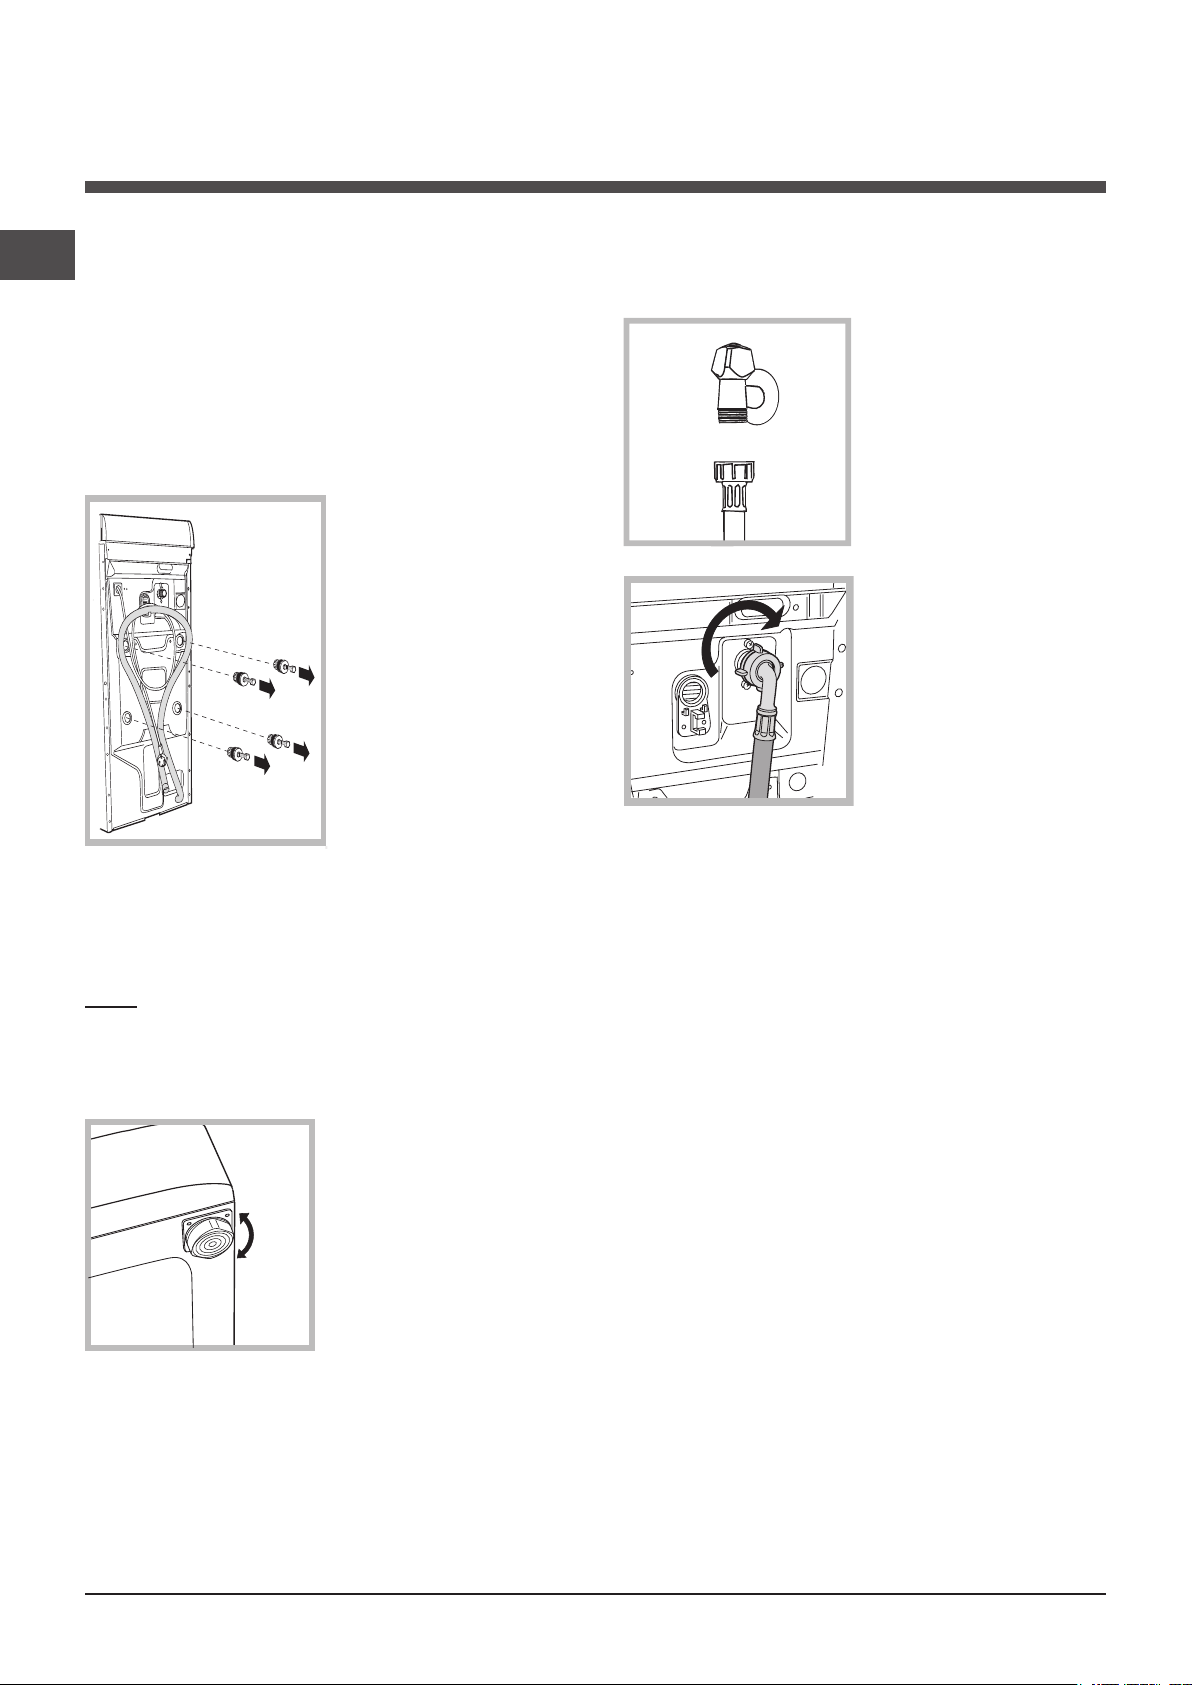
Connecting the water inlet hose
1. Connect the supply pipe
by screwing it to a cold
water tab using a 3/4 gas
threaded connection (see
figure).
Before performing the connection, allow the water to
run freely until it is perfectly
clear.
2. Connect the other end of
the water inlet hose to the
washing machine, screwing
it onto the appliance’s cold
water inlet, situated on the
top right-hand side on the
rear of the appliance (see
figure).
3. Make sure there are no kinks or bends in the hose.
! The water pressure at the tap must be within the values
indicated in the Technical details table
(on the next page).
Warning: should the screws be re-used, make sure you fasten
the shorter ones at the top.
! Packaging materials are not children’s toys.
Levelling
Your machine may make a considerable amount of noise if
the two front feet have not been adjusted correctly.
1. Install the washing machine on a flat sturdy floor, without
resting it up against walls, furniture cabinets or other.
2. If the floor is not perfectly
level, compensate for any
unevenness by tightening or
loosening the adjustable front
feet (see figure); the angle of
inclination, measured according to the worktop, must not
exceed 2°.
Levelling your appliance
correctly will provide it with
stability and avoid any vi-
brations, noise and shifting
during operation. If it is placed on a fitted or loose carpet,
adjust the feet in such a way as to allow enough room for
ventilation beneath the washing machine.
! If the water inlet hose is not long enough, contact a
specialist store or an authorised serviceman.
2
Page 3
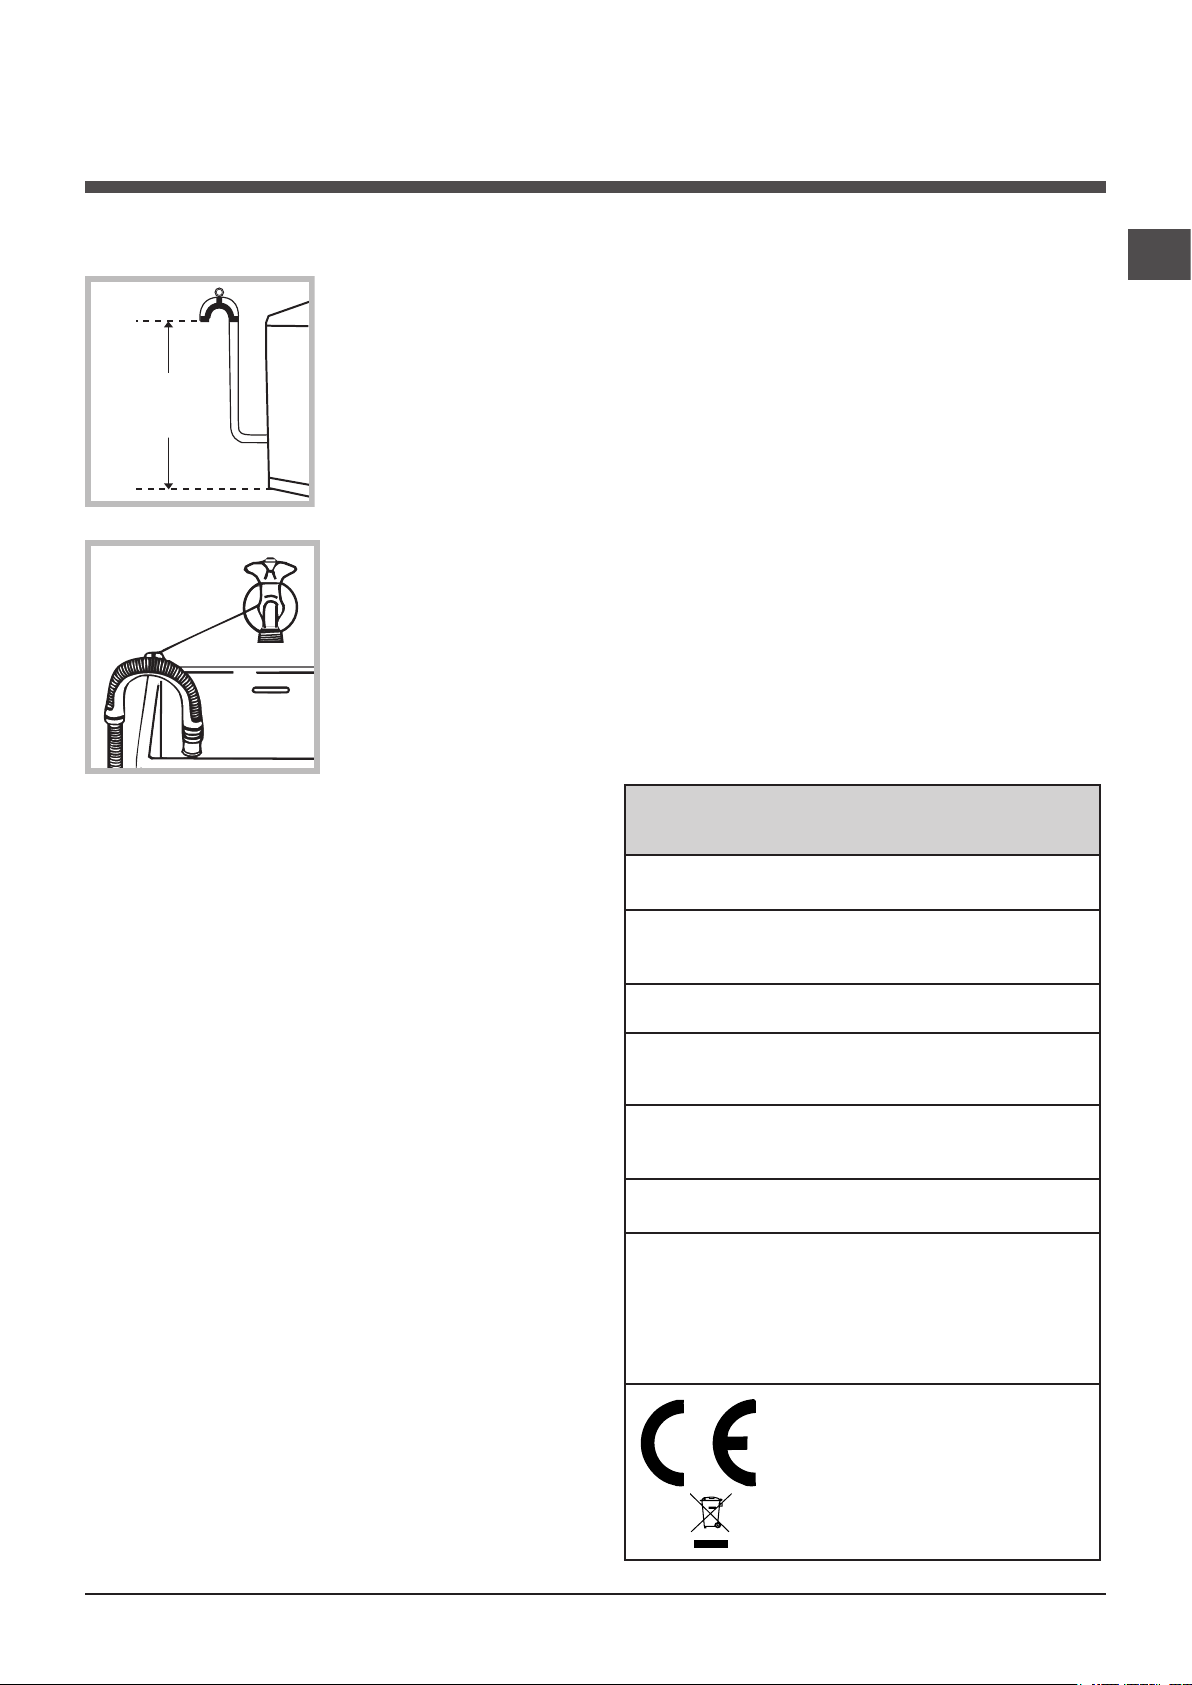
65 - 100 cm
Connecting the drain hose
Connect the drain hose,
without bending it, to a drai-
nage duct or a wall drain
located at a height between
65 and 100 cm from the
floor;
! Do not use extension cords or multiple sockets.
! The cable should not be bent or compressed.
! The power supply cable must only be replaced by autho-
rised technicians.
Warning! The company shall not be held responsible in the
event that these regulations are not respected.
The first wash cycle
GB
alternatively, rest it on
the side of a washbasin
or bathtub, fastening the
duct supplied to the tap
(see figure). The free end
of the hose should not be
underwater.
! We advise against the use of hose extensions; if it is
absolutely necessary, the extension must have the same
diameter as the original hose and must not exceed 150 cm
in length.
Electrical connections
Before plugging the appliance into the electricity socket,
make sure that:
• the socket is earthed and complies with all applicable
laws;
• the socket is able to withstand the maximum power load
of the appliance as indicated in the Technical data table
(see opposite);
Once the appliance has been installed, and before you use
it for the first time, run a wash cycle with detergent and no
laundry, using the wash cycle 2.
Technical details
Model
Dimensions
Capacity
Electric
connections
Water
connections
Spin speed
ECOTF 1051
40 cm wide
85 cm high
60 cm deep
from 1 to 5 kg
Please refer to the technical data plate
fixed to the machine.
maximum pressure 1 MPa (10 bar)
minimum pressure 0.05 MPa (0.5 bar)
drum capacity 42 litres
up to 1000 rpm
• the power supply voltage falls within the values indicated
in the Technical data table (see opposite);
• the socket is compatible with the plug of the washing
machine. If this is not the case, replace the socket or the
plug.
! The washing machine must not be installed outdoors,
even in covered areas. It is extremely dangerous to leave
the appliance exposed to rain, storms and other weather
conditions.
! When the washing machine has been installed, the elec-
tricity socket must be within easy reach.
Test wash
cycles in
accordance
with directives
1061/2010 and
1015/2010
programme 6; temperature 60°C and
40°C.
This appliance is compliant with
the following European Community
Directives:
- 2004/108/CE (Electromagnetic
Compatibility)
- 2006/95/CE (Low Voltage)
- 2002/96/CE
3
Page 4
Description of the washing
machine and starting a wash cycle
GB
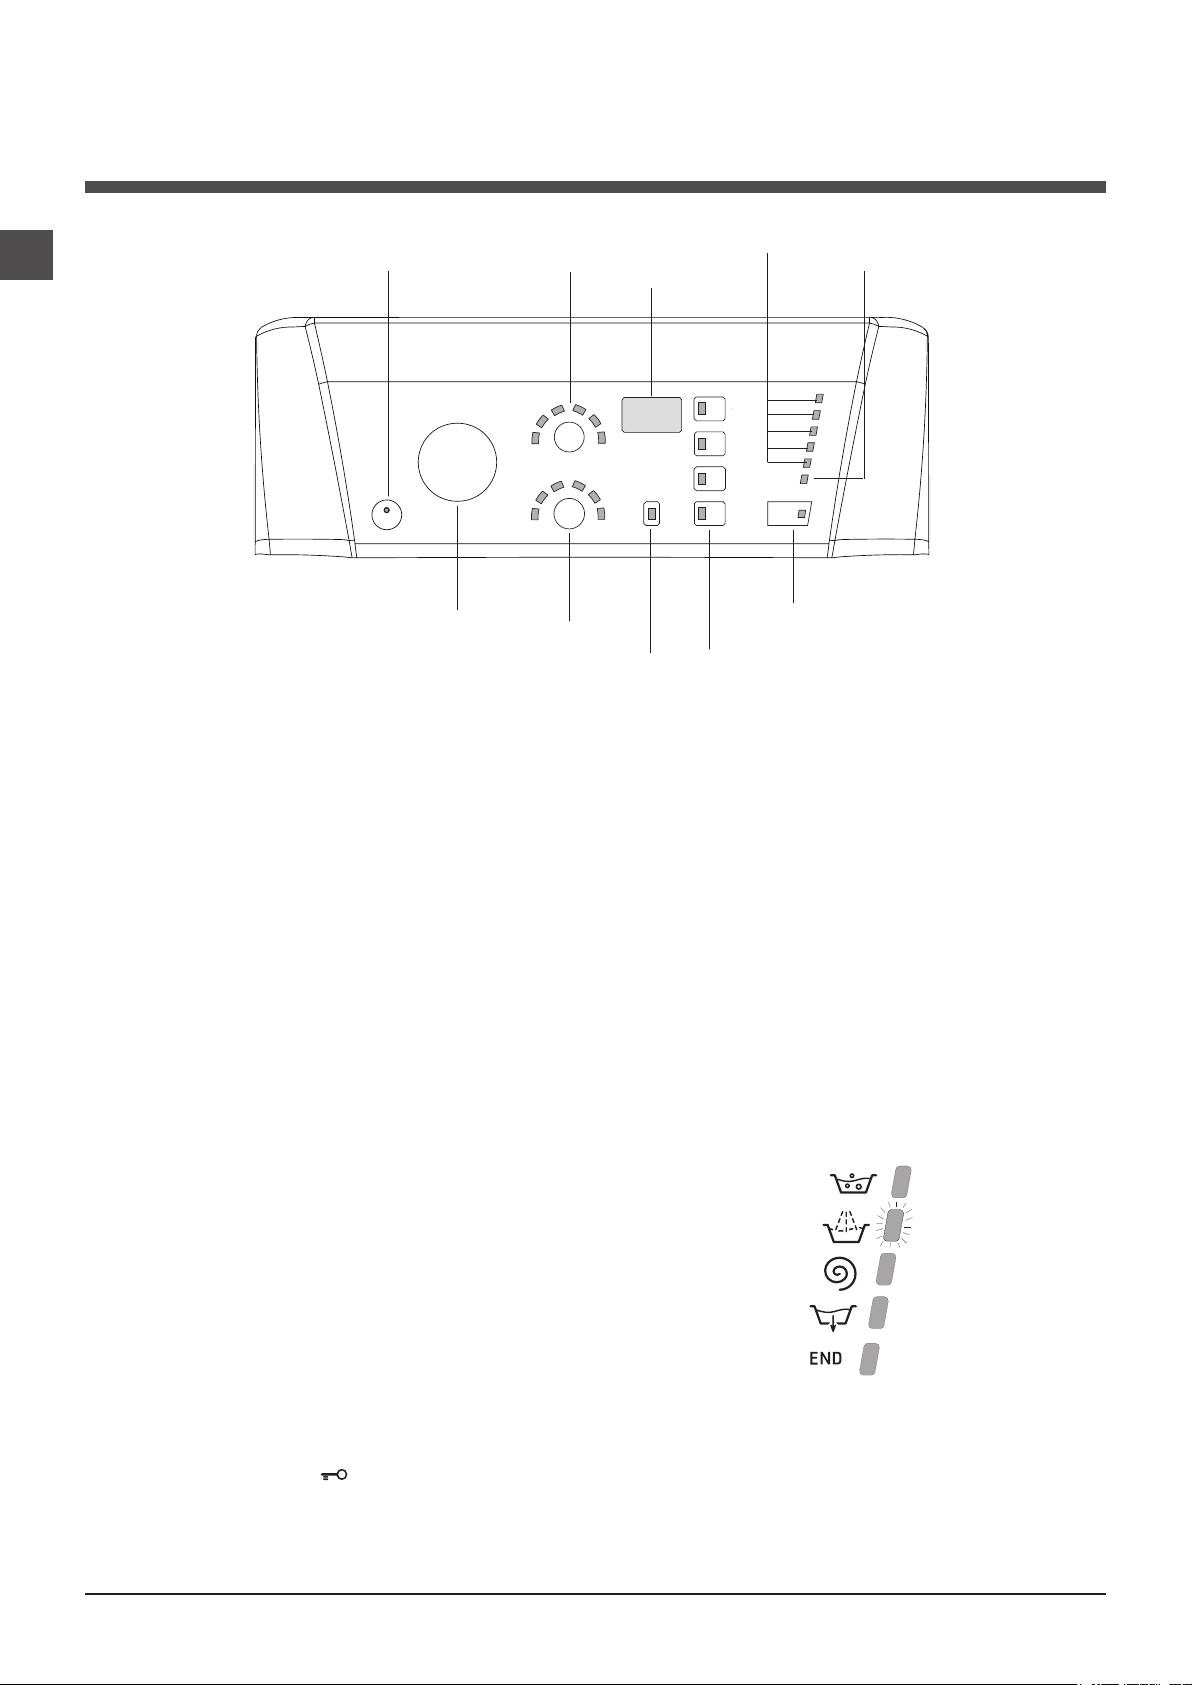
Control panel
butto n with indicator light
ON/OFF button with indicator light: switches the machine
on and off. If the indicator light is illuminated, this indicates
that the machine is switched on.
WASH CYCLE knob: programmes the wash cycles. During
the wash cycle, the knob does not move.
SPIN SPEED button: sets the spin speed or exclude the
spin cycle completely (see “Personalisation”).
TEMPERATURE button: sets the temperature or the cold
wash cycle (see “Personalisation”).
DISPLAY: indicates the time remaining for the selected wash
cycle and, if a delayed start has been programmed, the time
remaining until the start of the wash cycle.
CONTROL PANEL LOCK button with indicator light:
activates or deactivates the control panel lock.
FUNCTION buttons with indicator light: used to select the
available functions. The indicator light corresponding to the
selected function will remain lit.
WASH CYCLE PROGRESS
tor the progress of the wash cycle. The illuminated indicator
light shows which phase is in progress.
DOOR LOCKED indicator light: indicates whether the door
may be opened or not (see next page).
ON/OFF
WASH CYCLE
indicator light
TEMPERATURE
knob
s: used to moni-
button
SPIN
SPEED
button
CONTROL PANEL LOCK
butto n with indicator light
WASH CYCLE
PROGRESS
DISPLAY
START/PAUSE
button with indicator light
FUNCTION
indicator lights
Standby mode
This washing machine, in compliance with new energy saving
regulations, is fitted with an automatic standby system which is
enabled after about 30 minutes if no activity is detected. Press the
ON-OFF button briefly and wait for the machine to start up again.
Consumption in off-mode: 1 W
Consumption in Left-on: 1 W
LID LOCKED
indicator light
butto ns with
Indicator lights
The indicator lights provide important information.
This is what they can tell you:
Wash cycle phase indicator lights
As the WASH CYCLE knob is rotated, the indicator lights
illuminate, indicating the stages which will be performed by
the machine in accordance with the selected wash cycle.
Once the desired wash cycle has been selected and has begun,
the indicator lights switch on one by one to indicate which phase
of the cycle is currently in progress.
Wash
Rinse
Spin
Drain
START/PAUSE button with indicator light: starts or temporarily interrupts the wash cycles.
N.B. To pause the wash cycle in progress, press this button; the
corresponding indicator light will flash orange, while the indicator
light for the current wash cycle phase will remain lit in a fixed
manner. If the DOOR LOCKED indicator light is switched off,
the door may be opened.To start the wash cycle from the point
at which it was interrupted, press this button again.
4
End of wash cycle
Function buttons and corresponding indicator lights
When a function is selected, the corresponding indicator
light will illuminate. If the selected function is not compatible with the programmed wash cycle, the corresponding
indicator light will flash, a sound signal will be emitted and
the function will not be activated. If a function which is incompatible with another function selected previously, only
the most recent selection will remain active.
Page 5
Temperature indicator light
When a temperature value is selected, the
corresponding indicator light will illuminate.
Spin indicator light
When a spin value is selected, the corresponding indicator light will illuminate.
Control panel lock indicator light
To activate the control panel lock, press and hold the
button for approximately 2 seconds. When the indicator
light is illuminated, the control panel is locked. This means
it is possible to prevent wash cycles from being modified
accidentally, especially where there are children in the home.
To deactivate the control panel lock, press and hold the
button for approximately 2 seconds.
Lid locked indicator light
If this indicator light is on, the appliance door is locked to prevent
it from being opened accidentally; to avoid any damage, wait for
the indicator light to switch off (it will take about three minutes)
before you open the appliance door.
N.B. If the DELAY TIMER function is activated, the door
cannot be opened; pause the machine by pressing the
START/PAUSE button if you wish to open it.
! If the START/PAUSE indicator light (orange) flashes
rapidly at the same time as the function indicator light, this
indicates a problem has occurred (see “Troubleshooting”).
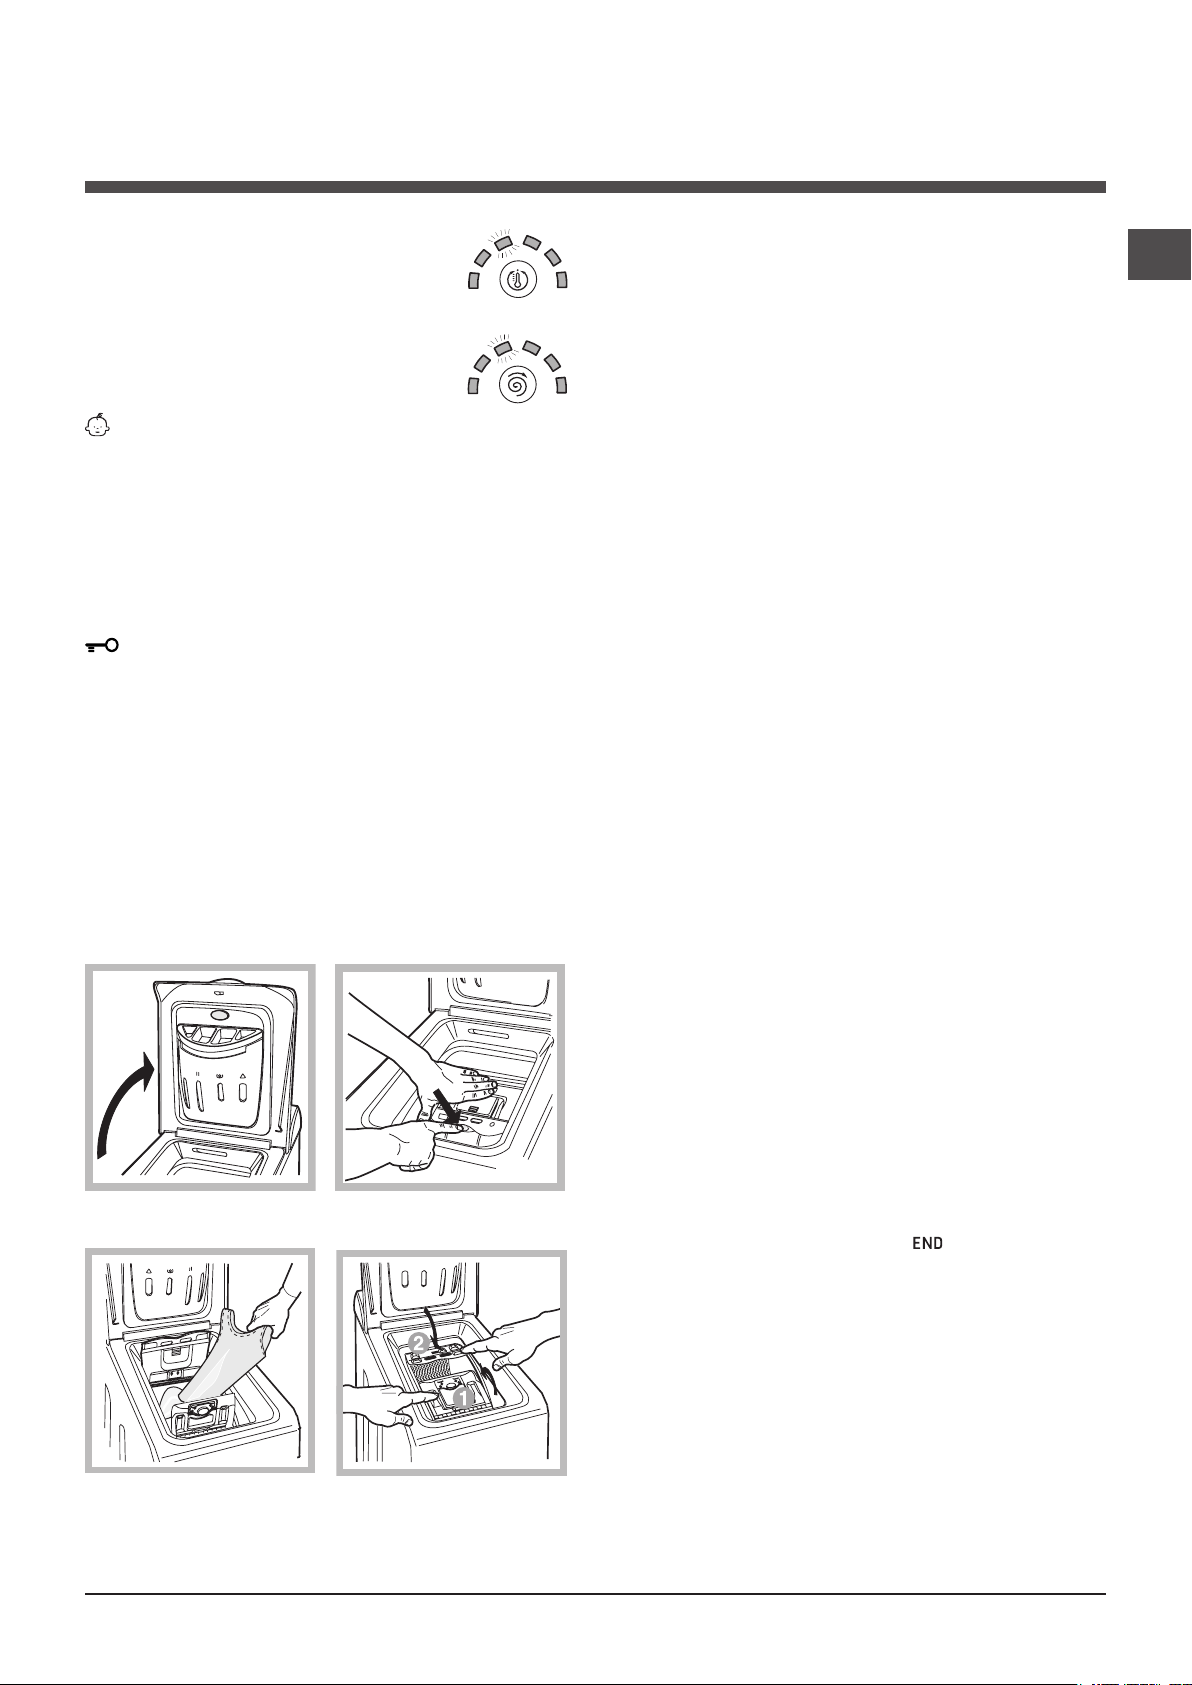
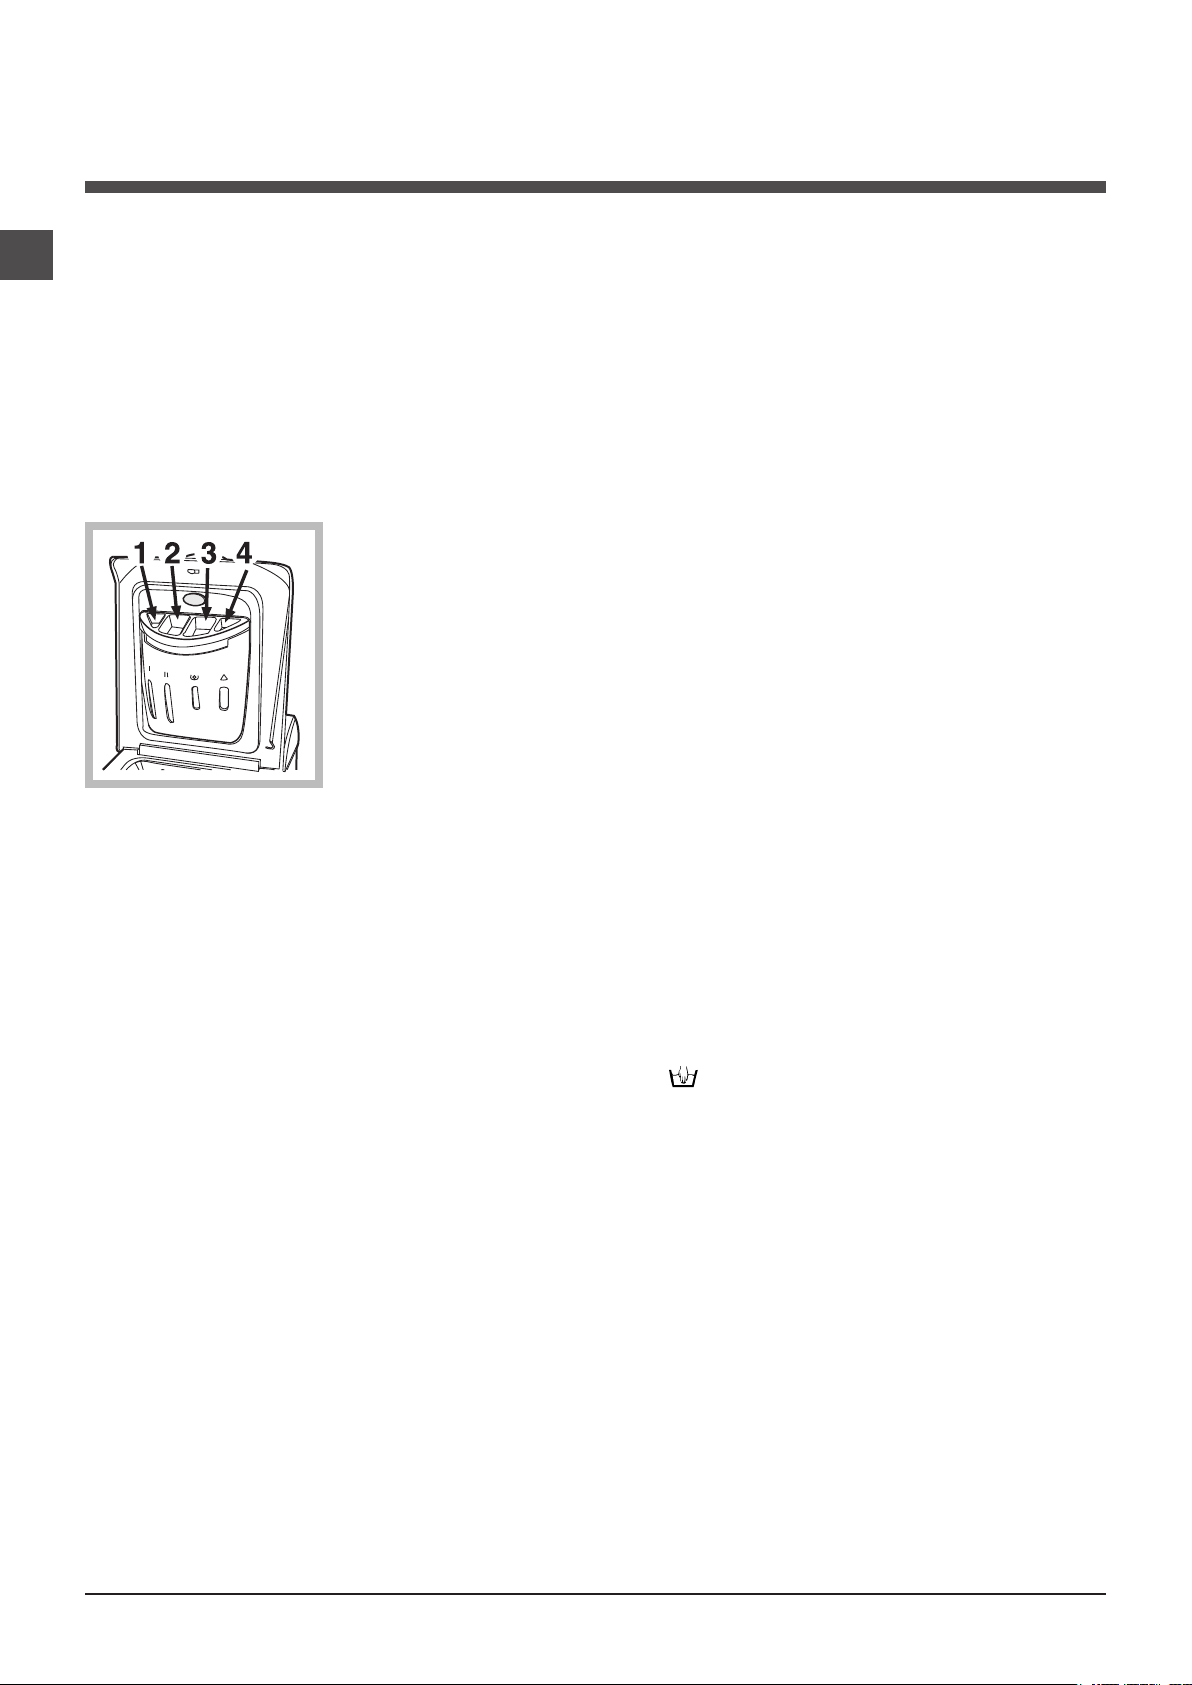
How to open and to close the drum
Fig. 1
Fig. 2
A) Opening (Fig. 1):
Lift the external lid and open it completely.
B) Then open the drum using both hands as
shown in Fig. 2:
- press the button indicated by the arrow in Fig. 2 lightly
downwards, with one hand firmly resting on the doors
to prevent them from suddenly opening and hurting your
fingers;
- therefore follow the appliance doors along as these
unhook and open easily.
C) Loading the washing machine (Fig. 3).
D) Shutting (Fig. 4):
- close the drum fully by first shutting the front
door followed by the rear one;
- then ensure the hooks on the front door are
perfectly housed within the seat of the rear door;
- after the hooks have clicked into position, press
both doors lightly downwards to make sure they do not
come loose;
- finally shut the external lid.
Starting a wash cycle
1. Turn the washing machine on by pressing the ON/OFF
button. All the indicator lights will turn on for a few seconds, then only the indicator lights relative to the selected
programme settings will remain lit and the START/PAUSE
indicator light will flash.
2. Load the laundry, close the door and the lid.
3. Set the WASH CYCLE knob to the desired programme.
4. Set the washing temperature (see “Personalisation”).
5. Set the spin speed (see “Personalisation”).
6. Measure out the detergent and washing additives (see
“Detergents and laundry”).
7. Select the desired functions.
8. Start the wash cycle by pressing the START/PAUSE
button and the corresponding indicator light will remain lit
in a fixed manner, in green.
To cancel the set wash cycle, pause the machine by pressing the START/PAUSE button and select a new cycle.
9. At the end of the wash cycle the indicator light will
switch on. The LID LOCKED indicator light will switch off,
indicating that the door may be opened. Take out your
laundry and leave the appliance door ajar to make sure the
drum dries completely.
Switch the washing machine off by pressing the ON/OFF
button.
GB
Fig. 3
Fig. 4
5
Page 6
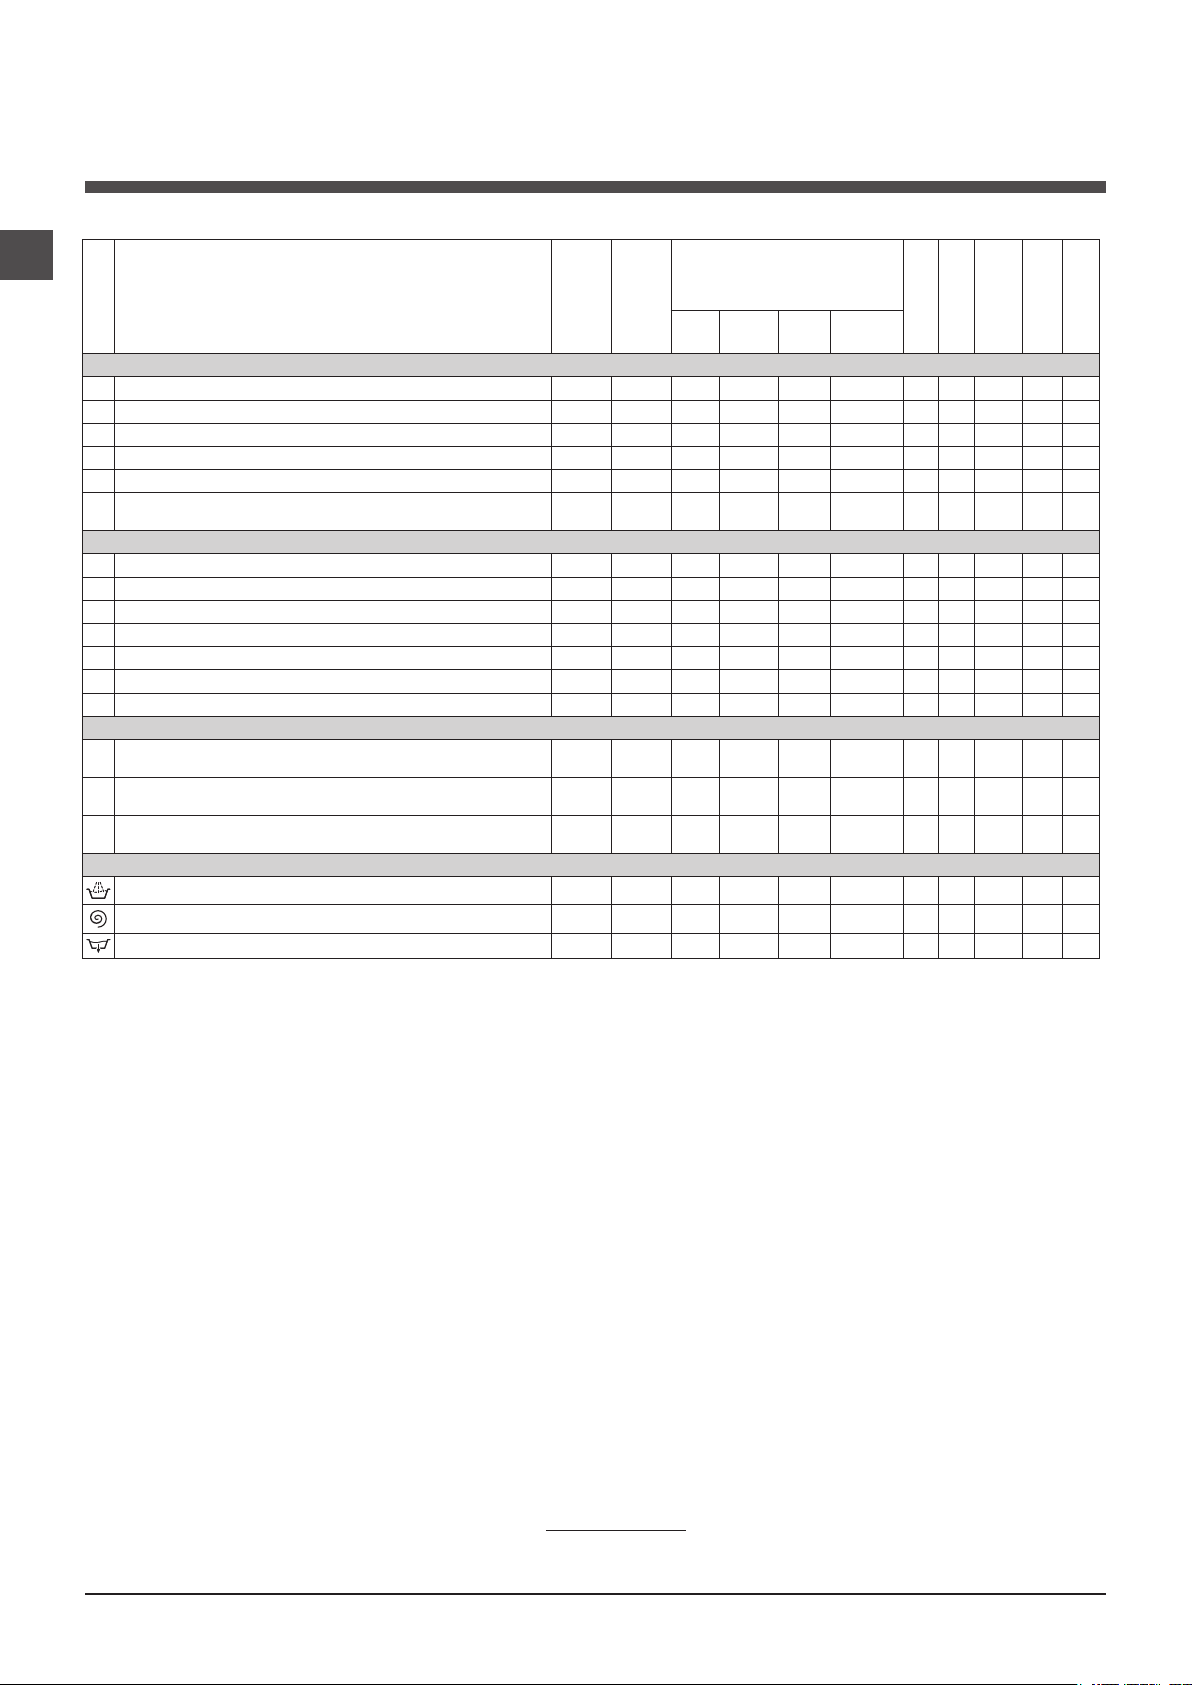
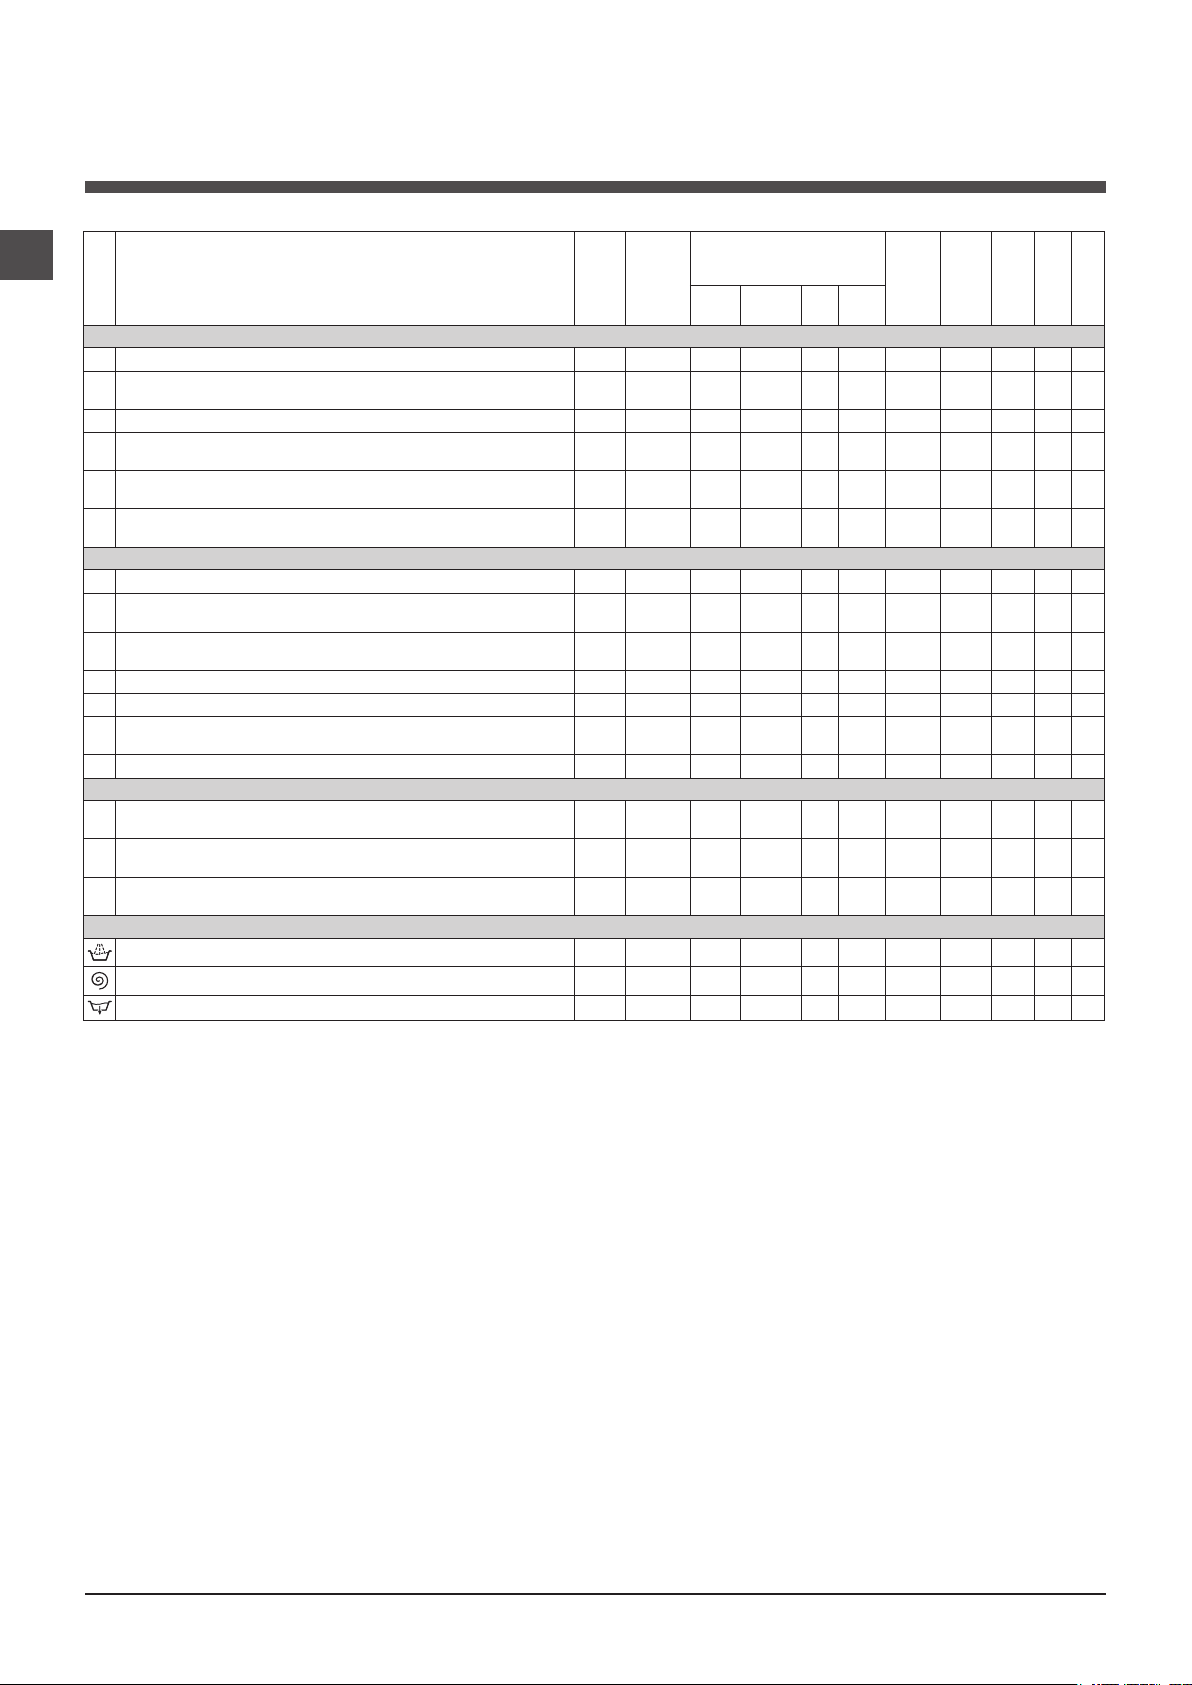
Wash cycles
Table of wash cycles
GB
Max.
Description of the wash cycle
Wash cycles
Essentials cycles
1
Cotton + Prewash: extremely soiled whites. 90° 1000
2
Cotton: heavily soiled whites and resistant colours. 60° 1000 -
3
Coloured cottons (3): lightly soiled whites and delicate colours. 40° 1000 -
4
Synthetics: heavily soiled resistant colours. 60° 800 - -
4
Synthetics (4): heavily soiled resistant colours. 40° 800 - -
Mix 15’: to refresh lightly soiled garments quickly (not suitable for
5
wool, silk and clothes which require washing by hand).
Special cycles
Sanitizing cycle: extremely soiled whites.
6
6
Sanitizing cycle (1-2): heavily soiled whites and resistant colours. 60° 1000 - -
6
Sanitizing cycle (2): lightly soiled whites and resistant colours. 40° 1000 - -
7
Goodnight cycle: lightly soiled delicate colours. 40° 800 - -
8
Shirts
9
Silk/Curtains: for garments in silk and viscose, lingerie. 30° 0 - -
10
Wool: for wool, cashmere, etc. 40° 800 - -
Eco cycles
11
Cottons
12
Synthetics
13
Fast Wash
Partials wash cycles
Rinse - 1000 - - -
Spin - 1000 - - - - 5 - - - 16
Pump out - 0 - - - - 5 - - - 2
The length of cycle shown on the display or in this booklet is an estimation only and is calculated assuming standard working conditions. The actual duration can vary according to factors such as water
temperature and pressure, the amount of detergent used, the amount and type of load inserted, load balancing and any wash options selected.
temp.
Water
Water
Water
Max.
speed
(°C)
(rpm)
Pre-
wash
30 800 - -
90° 1000 -
40° 600 - -
Cold
1000 - -
Cold
Cold
800 - -
800 - -
Detergents
Bleach Wash
-
Fabric
softener
Residual
dampness %
Max. load (kg)
5 62 1,82 64 150
5 - - - 125
5 62 0,53 50 90
2,5 44 0,85 39 105
2,5 44 0,53 39 95
1,5 71 0,08 29 15
5 - - - 165
5 62 0,882 52 160
5 62 0,916 63 150
4 - - - 282
2 - - - 80
1 - - - 56
1 - - - 65
5 62 0,08 48 82
2,5 48 0,07 27 68
2,5 71 0,04 34 30
5 - - - 36
kWh
Energy
Total water lt
consumption
Cycle duration
For all Test Institutes:
1)
Control programmes according to 1061/2010 directive
: set wash cycle 6 with a temperature of 60°C and 40°C. This cycle is designed
for cotton loads with a normal soil level and is the most efficient in terms of both electricity and water consumption; it should be used
for garments which can be washed at of 60°C and 40°C. The actual washing temperature may differ from the indicated value.
2) Long wash cycle for cottons: set wash cycle 6 with a temperature of 40°C.
3) Short wash cycle for cottons: set wash cycle 3 with a temperature of 40°C.
4) Long wash cycle for synthetics: set wash cycle 4 with a temperature of 40°C.
Specials wash cycles
Mix 15’(wash cycle 5) this wash cycle was designed to wash lightly soiled garments quickly: it lasts just 15 minutes and therefore
saves both energy and time. By selecting this wash cycle (5 at 30°C), it is possible to wash different fabrics together (except
for wool and silk items), with a maximum load of 1.5 kg.
Sanitizing cycle (wash cycle 6). A high-temperature hygienic wash cycle (over 60°C) which requires the use of bleach. Pour the
bleach, the detergent and the additives into the relevant compartments (see paragraph entitled “Detergent dispenser drawer”).
Goodnigt cycle (wash cycle 7). This is a silent cycle which can be run at night, when the electricity prices are lower. The wash
cycle is designed for cottons and synthetics. At the end of the cycle the machine stops while there is still water in the drum; to
spin and drain the laundry press the START/PAUSE button; alternatively the machine will perform the spin cycle and drain the
water automatically after 8 hours.
Eco cycles
The Eco Cycles assure energy saving by eliminating the need of heating water and it’s an advantage both to your energy
bill and the environment! These innovative Eco programmes (Cotton 11, Synthetics 12 and Fast Wash 13) are available for
various fabrics and different quantity of garment; they have been designed to guarantee a high cleaning action even at low
temperature and can be used for lightly to medium soiled loads. Eco Cycles give the best results thanks to an intensified
wash action, water optimization and are carried out in the same average time of a standard cycle. For the best washing
results with Eco Cycles we recommend the usage of a liquid detergent.
6
Page 7
Personalisation
Setting the temperature
By pressing the TEMPERATURE button to set the wash temperature (see Table of wash cycles).
The temperature may be lowered, or even set to a cold wash ( ).
The washing machine will automatically prevent you from selecting a temperature which is higher than the maximum value
set for each wash cycle.
Setting the spin speed
By pressing the SPIN SPEED button to set the spin speed for the selected wash cycle.
The maximum spin speeds available for each wash cycle are as follows:
Wash cycles Maximum spin speed
Cottons 1000 rpm
Synthetics 800 rpm
Wool 800 rpm
Silk drain only
The spin speed may be lowered, or the spin cycle can be excluded altogether by selecting the symbol .
The washing machine will automatically prevent you from selecting a spin speed which is higher than the maximum speed
set for each wash cycle.
Functions
The various wash functions available with this washing machine will help to achieve the desired results, every time.
To activate the functions:
1. Press the button corresponding to the desired function;
2. the function is enabled when the corresponding indicator light is illuminated.
Note: If the indicator light flashes rapidly, this signals that this particular function may not be selected in conjunction with the
selected wash cycle.
GB
Delay timer
To set a delayed start for the selected wash cycle, press the button repeatedly until the desired delay time is displayed (this
may be between 1 hour and 24 hours).
To disable the function press the button until the text is displayed.
N.B. Once you have pressed the START/PAUSE button, the delay time may only be decreased if you wish to modify it.
! This option is enabled with all programmes.
Super Wash
Because a greater quantity of water is used in the initial phase of the cycle, and because of the increased cycle duration, this
function offers a high-performance wash.
! This function may not be used in conjunction with wash cycles 5, 6, 9, 10, 11, 12, 13, , , .
Extra rinse
By selecting this function, the efficiency of the rinse is increased and optimal detergent removal is guaranteed. It is particularly
useful for sensitive skin.
! This function may not be used in conjunction with wash cycles 5, 13, , .
Easy iron
By selecting this function, the wash and spin cycles will be modified in order to reduce the formation of creases. At the end of
the cycle the washing machine will perform slow rotations of the drum.
For the 9 wash cycle, the machine will end the cycle while the laundry is soaking, the EASY IRON and START/PAUSE indicator lights will flash (orange) and the RINSE phase will remain lit in a fixed manner. To drain the water so that the laundry may
be removed, press the START/PAUSE button or the EASY IRON button.
! This function may not be used in conjunction with wash cycles 5, 6, 7, 10, 11, 12, 13, , .
7
Page 8
Detergents and laundry
GB
Detergent dispenser drawer
Good washing results also depend on the correct dose of
detergent: adding too much detergent won’t necessarily
make for a more efficient wash, and may in fact cause
build up on the interior of your appliance and even pollute
the environment.
! Use powder detergent for white cotton garments, for pre-
washing, and for washing at temperatures over 60°C.
! Follow the instructions given on the detergent packaging.
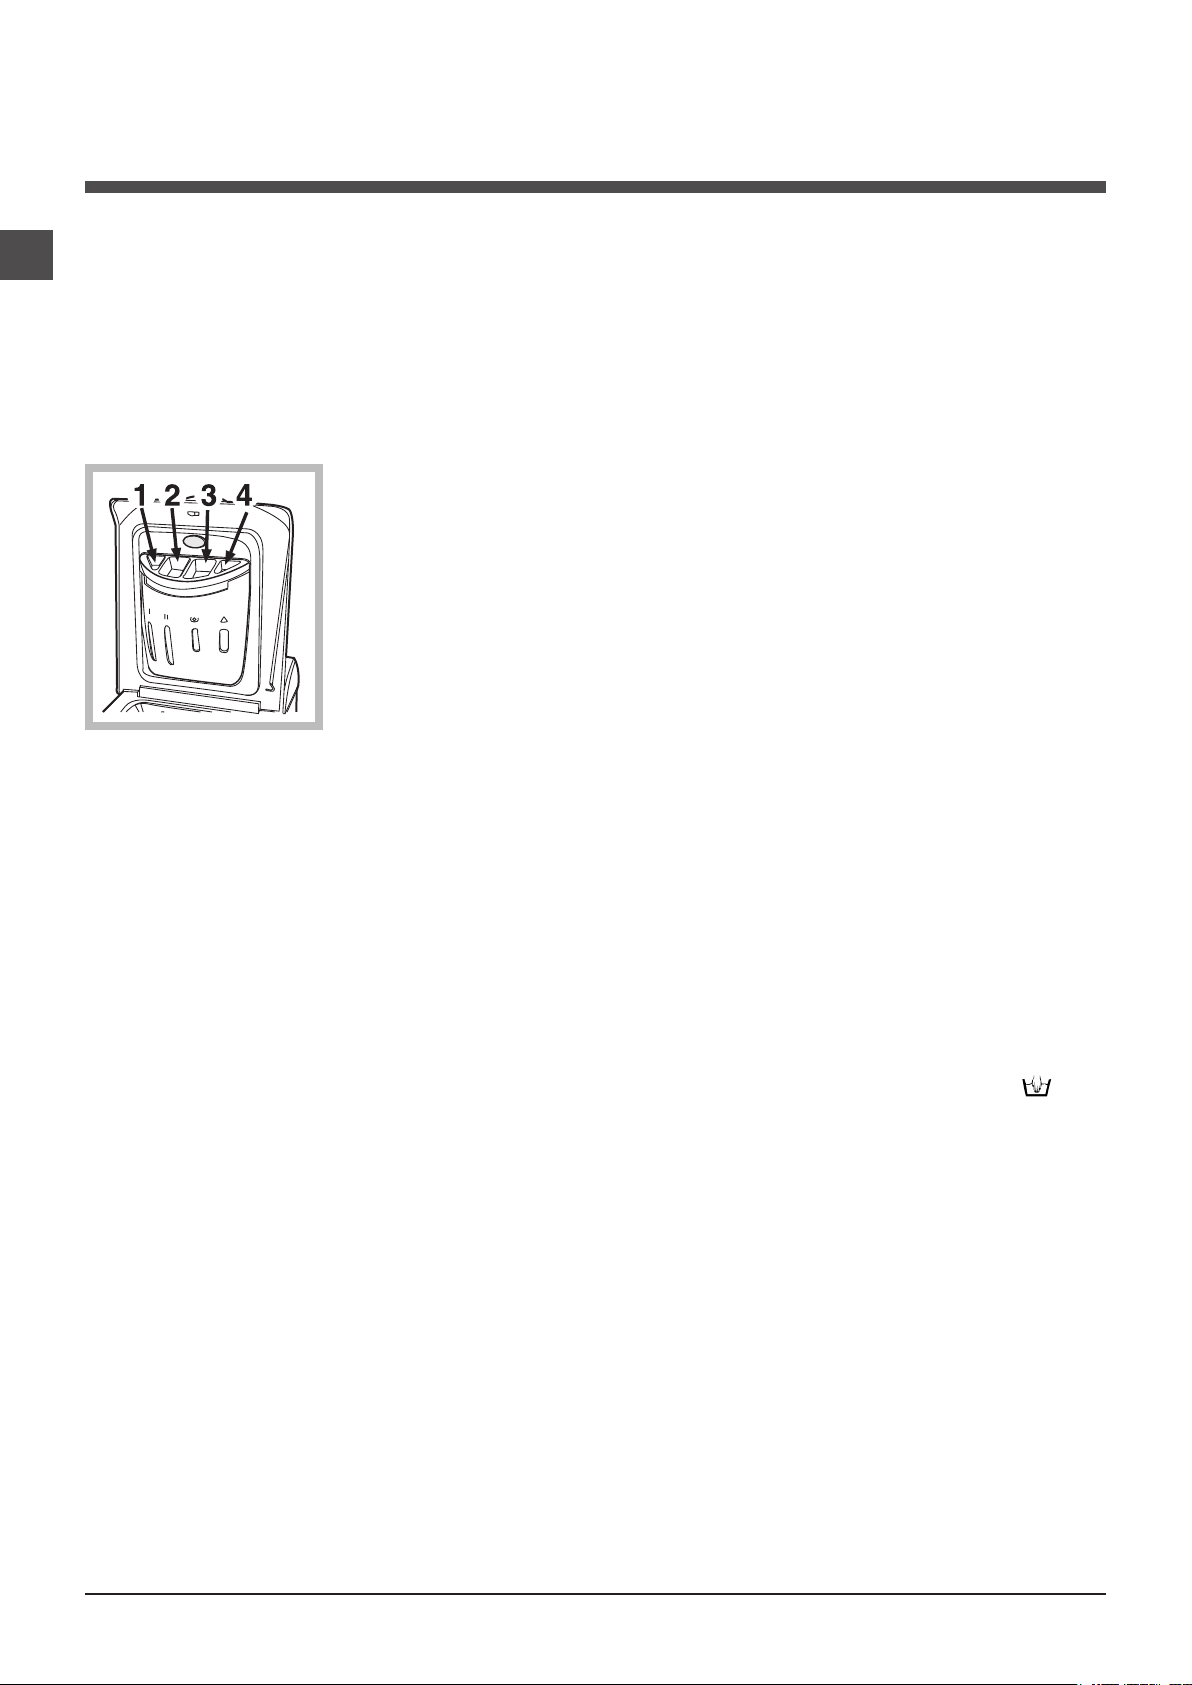
Open up the detergent
dispenser and pour in the
detergent and fabric softener, as follows.
compartment 1: Detergent for pre-wash
compartment 2: Detergent for the wash cycle
(powder or liquid)
It is recommended that you place liquid detergent directly
into the compartment using the appropriate dosing cup.
compartment 3: Additives (softener, etc.)
When pouring the softener in compartment 3, avoid exceeding the “max” level indicated.
The softener is added automatically into the machine
during the last wash. At the end of the wash programme,
some water will be left in compartment 3. This is used for
the inlet of denser fabric softeners into the machine, i.e.
to dilute the more concentrated softeners. Should more
than a normal amount of water remain in compartment 3,
this means the emptying device is blocked. For cleaning
instructions, see “Care and maintenance”.
compartment 4: Bleach
Bleach cycle
Bleaching may only be performed in conjunction with wash
cycles 2, 3, 6.
Pour the bleach into compartment 4; pour the detergent
and softener into the corresponding compartments, then
select one of the abovementioned wash cycles.
This option is recommended only for very soiled cotton
garments.
Preparing the laundry
• Divide the laundry according to:
- the type of fabric/the symbol on the label
- the colours: separate coloured garments from whites.
• Empty all garment pockets and check the buttons.
• Do not exceed the listed values, which refer to the weight
of the laundry when dry:
Durable fabrics: max. 5 kg
Synthetic fabrics: max. 2,5 kg
Delicate fabrics: max. 2 kg
Wool: max. 1 kg
How much does your laundry weigh?
1 sheet 400-500 g
1 pillow case 150-200 g
1 tablecloth 400-500 g
1 bathrobe 900-1200 g
1 towel 150-250 g
Garments requiring special care
Shirts: use special wash cycle 8 to wash shirts in various
fabrics and colours.
It guarantees maximum care is taken of the garments and
minimises the formation of creases.
Silk: use special wash cycle 9 to wash all silk garments.
We recommend the use of special detergent which has
been designed to wash delicate clothes.
Curtains: fold curtains and place them in a pillow case or
mesh bag. Use wash cycle 9.
Wool: is the only washing machine manufacturer to have
been awarded the prestigious Woolmark Platinum Care
endorsement (M.0508) by the Woolmark Company, which
means that all woollen garments may be washed in the
washing machine, even those which state “hand wash
only” on the label. Wash cycle 10 therefore offers
complete peace of mind when washing woollen garments
in the washing machine (max. load 1 kg) and guarantees
optimal performance.
Load balancing system
Before every spin cycle, to avoid excessive vibrations and
to distribute the load in a uniform manner, the drum rotates
continuously at a speed which is slightly greater than the
washing rotation speed. If, after several attempts, the load
is not balanced correctly, the machine spins at a reduced
spin speed. If the load is excessively unbalanced, the
washing machine performs the distribution process instead
of spinning. To encourage improved load distribution and
balance, we recommend small and large garments are
mixed in the load.
8
Page 9

Precautions and tips
! This washing machine was designed and constructed in
accordance with international safety regulations. The following information is provided for safety reasons and must
therefore be read carefully.
General safety
• This appliance was designed for domestic use only.
• This appliance is not intended for use by persons (including children) with reduced physical, sensory or mental
capabilities, or lack of experience and knowledge, unless
they have been given supervision or instruction concerning use of the appliance by a person responsible for
their safety. Children should be supervised to ensure that
they do not play with the appliance.
• Do not touch the machine when barefoot or with wet or
damp hands or feet.
• Do not pull on the power supply cable when unplugging
the appliance from the electricity socket. Hold the plug
and pull.
• Do not touch the drained water as it may reach extremely high temperatures.
• Never force the porthole door. This could damage the
safety lock mechanism designed to prevent accidental
opening.
• If the appliance breaks down, do not under any circumstances access the internal mechanisms in an attempt
to repair it yourself.
• Always keep children well away from the appliance while
it is operating.
• If the appliance has to be moved, work in a group of two
or three people and handle it with the utmost care. Never
try to do this alone, because the appliance is very heavy.
• Before loading laundry into the washing machine, make
sure the drum is empty.
Consumers should contact their local authority or
retailer for information concerning the correct
disposal of their old appliance.
Saving energy and respecting the environment
Saving on detergent, water, energy and time
• To avoid wasting resources, the washing machine
should be used with a full load. A full load instead
of two half loads allows you to save up to 50% on
energy.
• The pre-wash cycle is only necessary on
extremely soiled garments. Avoiding it will save on
detergent, time, water and between 5 and 15%
energy.
• Treating stains with a stain remover or leaving
them to soak before washing will cut down the
need to wash them at high temperatures. A
programme at 60°C instead of 90°C or one at
40°C instead of 60°C will save up to 50% on
energy.
• Use the correct quantity of detergent depending
on the water hardness, how soiled the garments
are and the amount of laundry you have, to avoid
wastage and to protect the environment: despite
being biodegradable, detergents do contain
ingredients that alter the natural balance of the
environment. In addition, avoid using fabric
softener as much as possible.
• If you use your washing machine from late in the
afternoon until the early hours of the morning, you
will help reduce the electricity board’s peak load.
The “Delay Timer” option helps to organise your
wash cycles accordingly.
GB
Disposal
• Disposing of the packaging materials: observe local
regulations so that the packaging may be re-used.
• The European Directive 2002/96/EC on Waste
Electrical and Electronic Equipment, requires that
old household electrical appliances must not be
disposed of in the normal unsorted municipal waste
stream. Old appliances must be collected
separately in order to optimise the recovery and
recycling of the materials they contain and reduce
the impact on human health and the environment.
The crossed out “wheeled bin” symbol on the
product reminds you of your obligation, that when
you dispose of the appliance it must be separately
collected.
• If your laundry has to be dried in a tumble dryer,
select a high spin speed. Having the least water
possible in your laundry will save you time and
energy in the drying process.
9
Page 10
Care and maintenance
GB
Cutting off the water or electricity supply
• Turn off the water tap after every wash. This will limit
the wear of your appliance’s water system and also
prevent leaks.
• Unplug your appliance when cleaning it and during all
maintenance operations.
Cleaning your appliance
The exterior and rubber parts of your appliance can be
cleaned with a soft cloth soaked in lukewarm soapy water.
Do not use solvents or abrasives.
Caring for your appliance door and
drum
• Always leave the appliance door ajar to prevent unplea-
sant odours from forming.
Cleaning the pump
The washing machine is fitted with a self-cleaning pump
that does not require any maintenance. Sometimes, small
items (such as coins or buttons) may fall into the prechamber that protects the pump, situated in the lower part
of the same.
! Make sure the wash cycle has ended and unplug the
appliance.
To recover any objects that have fallen into the pre-chamber:
1. remove the plinth at the
bottom on the front side
of the washing machine
by pulling from the side
with your hands (see
figure);
2. unscrew the lid rotating it anticlock-wise (see
figure): a little water may
trickle out. This is perfectly normal;
3. clean the interior thoroughly;
4. screw the lid back on;
5. reposition the panel,
making sure the hooks are
securely in place before you push it onto the
appliance.
Checking the water inlet hose
Check the water inlet hose at least once a year. If you see
any cracks, replace it immediately: during the wash cycles,
water pressure is very strong and a cracked hose could
easily split open.
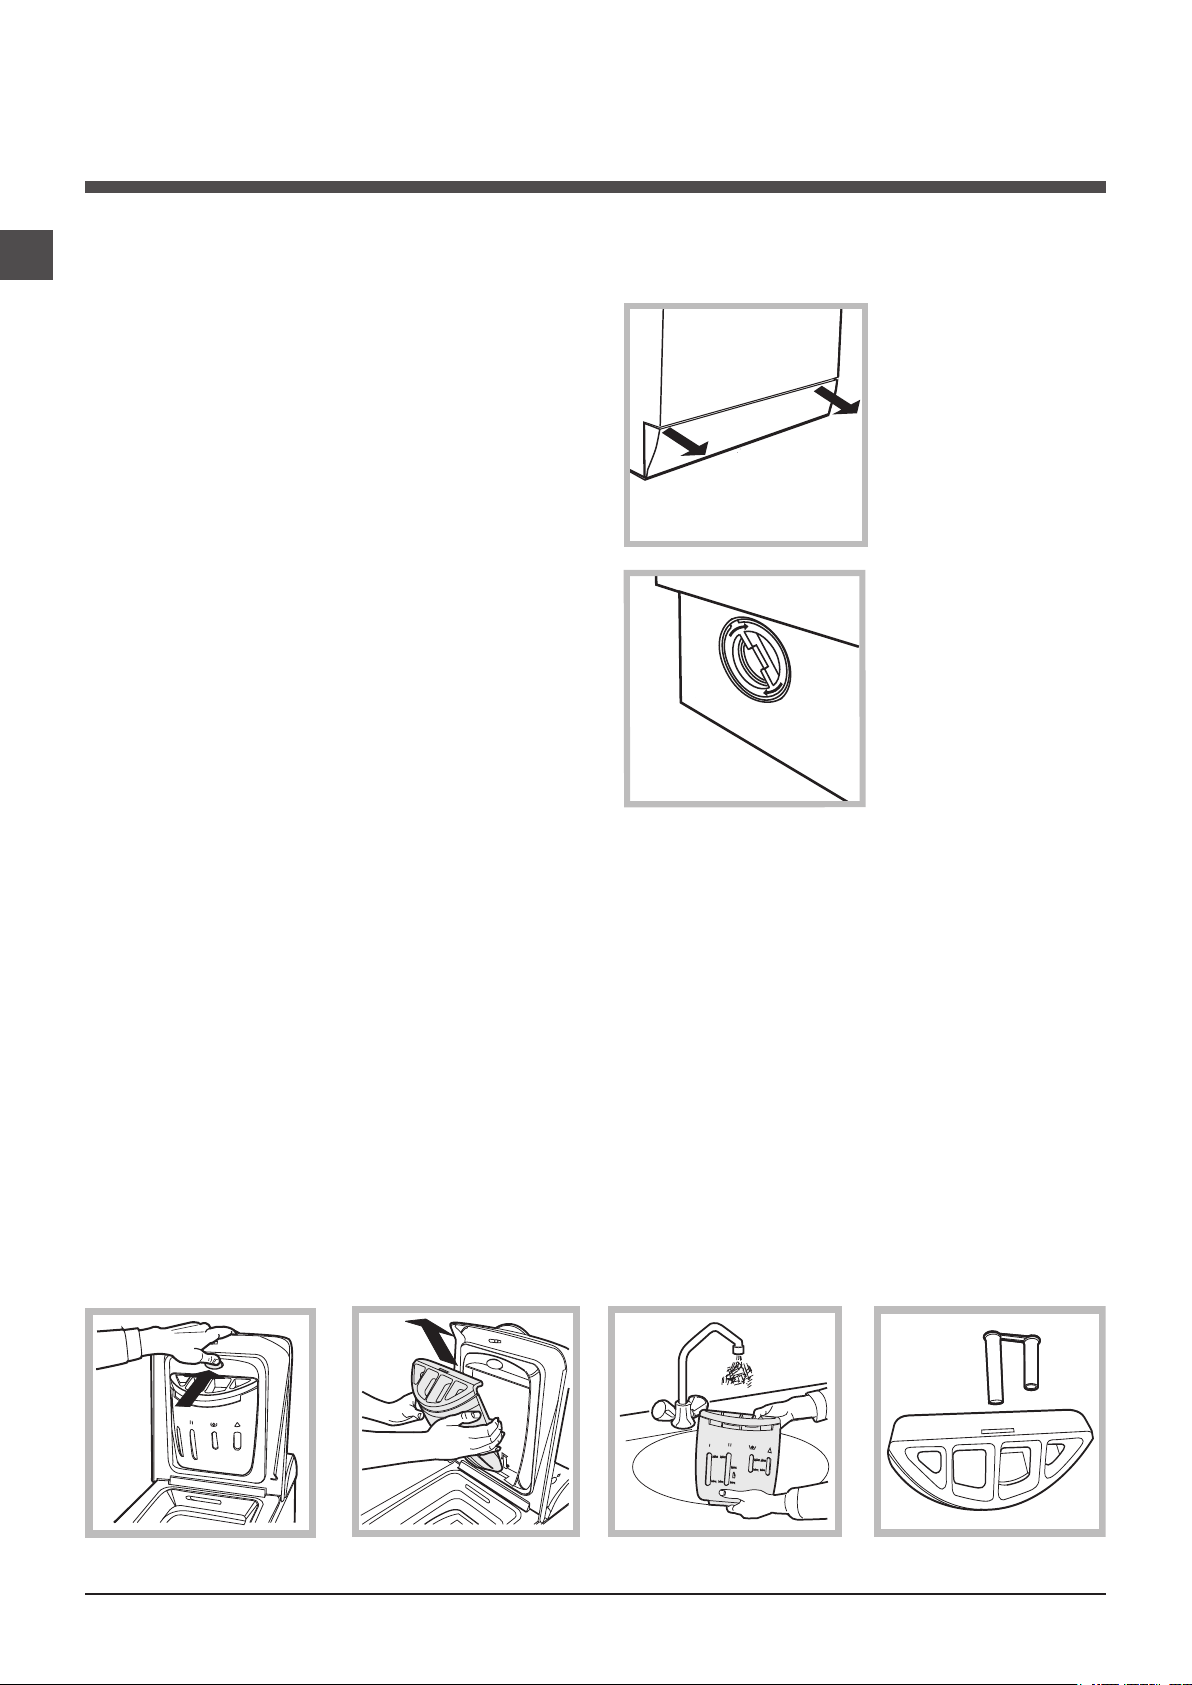
How to clean the detergent dispenser
Disassembly:
Press lightly on the large
button on the front of the
detergent dispenser and pull
it upwards (fig. 1, 2).
Fig. 1 Fig. 2
Cleaning:
Then clean the dispenser under a tap (fig. 3) using an old
toothbrush and, once the pair of siphons inserted in the top
of compartments 1 and 2 (fig. 4) have been pulled out, check
whether the same are not clogged and then rinse them.
! Never use hoses that have already been used.
Reassembly:
Do not forget to reinsert the
pair of siphons into the special
housings and then to replace
the dispenser into its seat,
clicking it into place (fig. 4, 2
and 1).
Fig. 3
Fig. 4
10
Page 11

Troubleshooting
Your washing machine could fail to work. Before contacting the Technical Assistance Centre (see “Assistance”), make sure
that the problem cannot be not solved easily using the following list.
Problem:
The washing machine does not
switch on.
The wash cycle does not start.
The washing machine does not
take in water (the indicator light for
the first wash cycle stage flashes
rapidly).
The washing machine continuously
takes in and drains water.
Possible causes / Solutions:
• The appliance is not plugged into the socket fully, or is not making contact.
• There is no power in the house.
• The appliance Lid is not shut properly.
• The ON/OFF button has not been pressed.
• The START/PAUSE button has not been pressed.
• The water tap has not been opened.
• A delayed start has been set (see “Personalisation”).
• The water inlet hose is not connected to the tap.
• The hose is bent.
• The water tap has not been opened.
• There is no water supply in the house.
• The pressure is too low.
• The START/PAUSE button has not been pressed.
• The drain hose is not fitted at a height between 65 and 100 cm from the floor
(see “Installation”).
• The free end of the hose is under water (see “Installation”).
• The wall drainage system is not fitted with a breather pipe.
If the problem persists even after these checks, turn off the water tap, switch
the appliance off and contact the Assistance Service. If the dwelling is on one of
the upper floors of a building, there may be problems relating to water drainage,
causing the washing machine to fill with water and drain continuously. Special
anti-draining valves are available in shops and help to avoid this inconvenience.
GB
The washing machine does not
drain or spin.
The washing machine vibrates a lot
during the spin cycle.
The washing machine leaks.
The START/PAUSE indicator light
(orange) and the function indicator
lights flash rapidly.
There is too much foam.
• The wash cycle does not include draining: some wash cycles require the drain
phase to be started manually.
• The EASY IRON function has been activated: To complete the wash cycle,
press the START/PAUSE button (“Personalisation”).
• The drain hose is bent (see “Installation”).
• The drainage duct is clogged.
• The drum was not unlocked correctly during installation (see “Installation”).
• The washing machine is not level (see “Installation”).
• The washing machine is trapped between cabinets and walls (see “Installation”).
• The water inlet hose is not screwed on properly (see “Installation”).
• The detergent dispenser drawer is blocked (for cleaning instructions, see
“Care and maintenance”).
• The drain hose is not fixed properly (see “Installation”).
• Switch off the machine and unplug it, wait for approximately 1 minute and
then switch it back on again.
If the problem persists, contact the Technical Assistance Service.
• The detergent is not suitable for machine washing (it should display the text
“for washing machines” or “hand and machine wash”, or the like).
• Too much detergent was used.
11
Page 12

Service
GB
Before calling for Assistance:
• Check whether you can solve the problem alone (see “Troubleshooting”);
• Restart the programme to check whether the problem has been solved;
• If this is not the case, contact an authorised Technical Assistance Centre using the telephone number provided on the
guarantee certificate.
! Always request the assistance of authorised technicians.
Have the following information to hand:
• the type of problem;
• the appliance model (Mod.);
• the serial number (S/N).
This information can be found on the data plate situated on the rear of the washing machine.
12
Page 13

Használati utasítás
MOSÓGÉP
HU
Magyar
ECOTF 1051
Összefoglalás
Üzembe helyezés, 14-15
Kicsomagolás és vízszintbe állítás
Víz- és elektromos csatlakozás
Első mosási ciklus
Mőszaki adatok
A mosógép leírása és program
elindítása, 16-17
Kezelőpanel
Jelzőlámpák
A forgódob kinyitása és bezárása
Program elindítása
Programok, 18
Programtáblázat
Egyéni beállítások, 19
A hőmérséklet beállítása
A centrifugálás beállítása
Funkciók
Mosószerek és mosandók, 20
Mosószer-adagoló fiók
Fehérítő ciklus
A mosandó ruhák előkészítése
Különleges bánásmódot igénylő ruhadarabok
A bepakolt ruhák kiegyensúlyozására szolgáló rendszer
HU
Óvintézkedések és tanácsok, 21
Általános biztonság
Hulladékelhelyezés
Környezetvédelem
Karbantartás és ápolás, 22
A víz elzárása és az elektromos áram kikapcsolása
A mosógép tisztítása
Az ajtó és a forgódob ápolása
A szivattyú tisztítása
A vízbevezető cső ellenőrzése
A mosószertartó tisztítása
Rendellenességek és elhárításuk, 23
Szerviz, 24
13
Page 14

Üzembe helyezés
HU
! E kézikönyv megőrzése azért fontos, hogy bármikor elővehesse,
és megnézhesse. Ha a mosógépet eladná, átadná vagy
másnál helyezné el, gondoskodjon arról, hogy e használati
utasítás a géppel együtt maradjon, hogy az új tulajdonos is
megismerhesse a mosógép funkcióit és az ezekre vonatkozó
figyelmeztetéseket.
! Figyelmesen olvassa el az utasításokat: fontos infor-
mációkat tartalmaznak az üzembehelyezésről, a használatról
és a biztonságról.
Kicsomagolás és vízszintbe állítás
Kicsomagolás
1. Csomagolja ki a mosógépet.
2. Ellenőrizze, hogy a mosógép nem sérült-e meg a
szállítás során. Ha a gépen
sérülést talál, ne
csatlakoztassa, és forduljon
a készülék eladójához.
3. Távolítsa el a hátoldalon
található, a szállításhoz felszerelt 4 védőcsavart, valamint
a gumit a hozzá tartozó
távtartóval (lásd ábra).
4. A furatokat zárja le a tartozékként kapott mőanyag
dugókkal.
5. Minden darabot őrizzen meg: ha a mosógépet szállítani kell,
előtte ezeket vissza kell szerelni.
Figyelem: újbóli használat esetén a rövidebb csavarokat
felülre kell szerelni.
Víz és elektromos csatlakozás
Vízbevezető cső csatlakoztatása
1. A vízbevezető cső csatlakoztatásához csavarozza fel a csövet
egy 3/4”-os külső menettel
rendelkező hidegvíz csapra (lásd
ábra). A csatlakoztatás előtt
eressze meg a csapot addig,
amíg a víz teljesen átlátszóvá
nem válik.
2. Csatlakoztassa a
vízbevezető csövet a mosógéphez úgy, hogy azt a
hátul jobboldalon fent lévő
vízbemeneti csonkra csavarozza (lásd ábra).
3. Ügyeljen arra, hogy a
csövön ne legyen törés
vagy szőkület.
! A csapnál a víznyomásnak a Mőszaki adatok táblázatban
szereplő határértékek között kell lennie (lásd a szemben lévő
oldalt).
! Amennyiben a vízbevezető cső nem elég hosszú, forduljon
szaküzlethez vagy megbízott szakemberhez.
! Soha ne alkalmazzon már használt csöveket.
! A csomagolóanyag nem gyermekjáték
Vízszintezés
1. A mosó gépet sík és
kem ény pa dlóra állít sa,
úgy, hogy ne érjen falhoz,
bútorhoz vagy máshoz.
2. Ha a padló nem tökéletese
vízszintes, az első lábak be-, illetve kicsavarásával kompenzálhatja azt (lásd ábra). A dőlés
a gép felső burkolatán mérve
nem lehet több, mint 2°.
A pontos vízszintezés biztosítja a gép stabilitását, így az a
mőködés során nem fog vibrálni, zajt okozni vagy elmozdulni.
Szőnyegpadló vagy szőnyeg esetén a lábakat úgy állítsa be,
hogy a mosógép alatt elegendő hely maradjon a szellőzésre.
14
Page 15

65 - 100 cm
A leeresztőcső csatlakoztatása
Ez a berendezés megfelel a következõ Uniós
Csatlakoztassa a
leeresztőcsövet a lefolyóhoz
vagy a padlótól 65 és
100 cm közötti magas-
ságban lévő fali szifonhoz
anélkül, hogy megtörné;
! Ne használjon hosszabbítót vagy elosztót.
! A kábel ne legyen se megtörve, se összenyomva.
! A tápkábelt csak engedéllyel rendelkező szakember cse-
rélheti.
Figyelem! A fenti előírások figyelmen kívül hagyása esetén a
gyártó elhárít minden felelősséget.
Első mosási ciklus
HU
illetve akassza a mosdó
vagy a kád szélére úgy,
hogy a mellékelt csővezető
ívet a csaphoz erősíti (lásd
ábra). A leeresztőcső szabad
végének nem szabad vízbe
merülnie.
! Toldások használata nem javasolt. Amennyiben feltétlenül
szükséges, a toldás átmérője egyezzen meg az eredeti
csőével és semmiképpen se legyen 150 cm-nél hosszabb.
Elektromos csatlakoztatás
Mielőtt a csatlakozódugót az aljzatba dugná, bizonyosodjon
meg arról, hogy:
• az aljzat földelése megfelel a törvény által előírtnak;
• az aljzat képes elviselni a készülék mőszaki adatait tartalmazó táblázatban megadott maximális teljesítményfelvételt
(lásd szemben);
• a hálózat feszültsége a mőszaki adatokat tartalmazó táblázatban szereplő értékek közé esik (lásd szemben);
• az aljzat kompatibilis a mosógép csatlakozódugójával.
Ellenkező esetben cserélje ki az aljzatot vagy a csatlakozódugót!
Üzembe helyezés után – mielőtt a mosógépet használni
kezdené – mosószerrel, mosandó ruha nélkül futtassa le az
2-es mosási programot.
Mûszaki adatok
Modell
Méretek
Ruhatöltet:
Elektromos
csatlakozás
Vízcsatlakozások
Centrifuga
fordulatszám
Az 1061/2010 és
1015/2010 rendeletek
szerinti vizsgálati
programok
ECOTF 1051
szélesség 40 cm
magasság 85 cm
mélység 60 cm
1-tõl 5 kg-ig
lásd a készüléken található, muszaki
jellemzoket tartalmazó adattáblát!
maximális nyomás 1 MPa (10 bar)
minimális nyomás 0,05 MPa (0,5 bar)
dob ûrtartalma 42 lite
1000 fordulat/perc-ig
6 program: 60 °C-os és 40 °C-os
hőmérséklet
! A mosógép nem állítható fel nyílt téren, még akkor sem,
ha tető van fölötte, mivel nagyon veszélyes, ha a gép esőnek
vagy zivataroknak van kitéve.
! A csatlakozódugónak a mosógép üzembe helyezett álla-
potában is könnyen elérhető helyen kell lennie.
Elõírásoknak:
- 2004/108/CE (Elektromágneses összeférhetõség)
- 2002/96/CE
- 2006/95/CE (Alacsony feszültség
15
Page 16

A mosógép leírása és program
elindítása
HU
Kezelőpanel
BEKAPCSOLÁS/
KIKAPCSOLÁS
jelzőlámpás gomb
PROGRAMOK
BEKAPCSOLÁS/KIKAPCSOLÁS jelzőlámpás gomb: a készülék be- és kikapcsolására szolgál.
Ha a jelzőlámpa világít, a készülék be van kapcsolva.
PROGRAMOK tekerőgomb: a programok beállítására szolgál.
A program lefutása alatt a tárcsa nem mozdul.
CEN T R I FUG Á L Á S gom b : a cen t r if u gá l ás be k a pc s o l á s ár a , il l e t ve k ika p cs o l á s á ra szo l gál
(lásd „Egyéni beállítások”).
HŐMÉRSÉKLET gomb: a hőmérséklet, illetve a hideg vizes mosás beállítására szolgál (lásd „Egyéni beállítások”).
KIJELZŐ: a kiválasztott mosási ciklus maradékidejének, vala-
mint késleltetett indítás beállítása esetén a mosás indításáig
hátralévő idő megjelenítésére szolgál.
GYEREKZÁR jelzőlámpás gomb: a kezelopanel gombjainak
letiltására, illetve letiltásuk kikapcsolására szolgál.
FUNKCIÓ jelzőlámpás gombok: a lehetséges funkciók kiválasztására szolgál. A kiválasztott funkció jelzőlámpája égve
marad.
CIKLUS ELŐREHALADÁSÁT jelző lámpák: a mosási program
előrehaladásának követésére szolgál.
AJTÓZÁR lámpa: az ajtó kinyithatóságának jelzésére szolgál
(lásd a szemben lévő oldalt).
ELINDÍTÁS/SZÜNETELTETÉS jelzőlámpás gomb: a programok elindítására, illetve pillanatnyi megszakítására szolgál.
Megjegyzés: A folyamatban lévő mosás szüneteltetéséhez
nyomja meg ezt a gombot – a vonatkozó jelzőlámpa narancssárga fénnyel fog villogni, míg a folyamatban lévő
fázist jelző lámpa folyamatos fénnyel világítani fog. Ha
az AJTÓZÁR lámpa nem világít, kinyithatja az ajtót.
A mosásnak a megszakítás időpontjától való folytatásához
nyomja meg ismét ezt a gombot.
HőMÉRSÉKLET
tekerőgomb
gomb
CENTRIFUGÁLÁS
GYEREKZÁR
jelzőlámpás gomb
CIKLUS
ELőREHALADÁSÁT
KIJELZŐ
ELINDÍTÁS/
SZÜNETELTETÉS
gomb
FUNKCIÓ jelzőlámpás
gombok
Készenléti üzemmód
Ez a mosógép - az energiatakarékosságra vonatkozó
legújabb eloírásoknak megfeleloen - automatikus kikapcsolási
(készenléti) rendszerrel van ellátva, mely a használat 30 percnyi szüneteltetése esetén bekapcsol. Nyomja meg röviden a
BEKAPCSOLÁS/KIKAPCSOLÁS gombot, és várjon, amíg a
készülék újrabekapcsol.
Fogyasztás off üzemmódban: 1 W
Fogyasztás bekapcsolva hagyott üzemmódban: 1 W
jelzőlámpás gomb
AJTÓZÁR
lámpa
Jelzőlámpák
A jelzőlámpák fontos információkat közvetítenek.
Ezek a következők:
Folyamatban lévő fázis jelzőlámpái
A PROGRAMOK programválasztó elforgatásakor világító
jelzőlámpák a kiválasztott program esetén végrehajtandó
mosási fázisokat jelzik.
A kívánt mosási ciklus kiválasztása és elindítása után a
jelzőlámpák a program előrehaladásának megfelelően, egymás
után kigyulladnak.
Mosás
Öblítés
Centrifugálás
Ürítés
Mosás vége
Funkciógombok és az azokhoz tartozó lámpák
A Kívánt funkció kiválasztásakor a megfelelő jelzőlámpa kigyullad.
Amennyiben a kiválasztott funkció nem kompatibilis a beállított
programmal, a vonatkozó jelzőlámpa villogni kezd, a készülék
hangjelzést ad ki, és a funkció nem lesz bekapcsolva. Abban az
esetben, ha egy másik, korábban kiválasztottal össze nem férő funkciót kapcsol be, csak az utolsóként választott marad bekapcsolva.
16
Page 17

HŐmérséklet jelzŐlámpa
A kívánt hőmérséklet-érték kiválasztásakor a vonatkozó jelzőlámpa világít.
CentrifugálásjelzŐ jelzŐlámpa
A kívánt centrifugasebesség kiválasztásakor a vonatkozó jelzőlámpa világít.
Gyerekzár jelzŐlámpa
A kezelőpanel letiltásához nagyjából 2 másodpercig tartsa
lenyomva ezt a gombot. Ha a jelzőlámpa világít, a gyerekzár
be van kapcsolva. Ez a funkció megakadályozza a programok
véletlen átállítását, főképp, ha gyerekek is vannak a lakásban.
A kezelőpanel letiltásának kikapcsolásához nagyjából 2
másodpercig tartsa lenyomva ezt a gombot.
Ajtózár lámpa
A világító jelzőlámpa azt jelzi, hogy az ajtó a véletlen kinyitás
megakadályozása érdekében be van zárva. A károsodások
elkerülése érdekében az ajtó kinyitása előtt meg kell várni, hogy
a jelzőlámpa kialudjon (várjon kb. 3 percet).
Megjegyzés: Amennyiben a késleltetésidőzítés funkció be van
kapcsolva, az ajtót nem lehet kinyitni. Az ajtó kinyitásához
az ELINDÍTÁS/SZÜNETELTETÉS gomb megnyomásával
szüneteltesse le a készüléket.
! Az ELINDÍTÁS/SZÜNETELTETÉS lámpa (narancssárga)
funkciólámpákkal egyidejő gyors villogása hibát jelez (lásd
„Rendellenességek és elhárításuk”).
A forgódob kinyitása és bezárása
ábra. 1
ábra. 2
A) KINYITÁS (1. ábra):
Felemelni a külső fedőlapot és teljesen kinyitni.
B) Ezután mindkét kézzel kinyitni a forgódobot,
mint azt a 2) ábra jelzi:
- a 2. ábrán nyíllal jelölt nyomógombot megnyomni
és enyhe nyomást gyakorolva lefelé az egyik kezet
rátámasztani, amivel elkerülhető, hogy az ajtók hirtelen
kinyílásával az ujjak megsérüljenek.
- végül kézzel vezetve az ajtók kikattannak és könnyen
kinyílnak.
C) RUHANEMő BEHELYEZÉSE (3. ábra).
D) BEZÁRÁS (4. ábra):
- elször az elüls ajtót leeresztve majd a hátsót ráhajtva jól
bezárni a forgódobot.
- ellenrizni, hogy az elüls ajtó kampói tökélete- sen illeszked-
nek-e a hátsó ajtóban levő helyükre.
- a kattanás „klak” észlelése után mindkét ajtóra enyhe
nyomást gyakorolni lefelé, melyeknek nem szabad kikattanni.
- végül a külső fedőlapot bezárni.
Program elindítása
1. A BEKAPCSOLÁS/KIKAPCSOLÁS gomb megnyomásával
kapcsolja be a mosógépet. Néhány másodpercre az összes
jelzőlámpa bekapcsol, majd ezt követően a kiválasztott programra vonatkozó jelzőlámpák bekapcsolva maradnak, és az
ELINDÍTÁS/SZÜNETELTETÉS lámpa villogni kezd.
2. Pakolja be a mosandó ruhákat, és csukja be az ajtókat
és a fedelet.
3. A PROGRAMOK tekerőgombbal állítsa be a kívánt programot.
4. Állítsa be a mosási hőmérsékletet (lásd „Egyéni beállítások”).
5. Állítsa be a centrifugálás sebességét (lásd „Egyéni beállítások”).
6. Töltse be a mosószert és adalékanyagokat (lásd „Mosó-
szerek és mosandók”).
7. Válassza ki a kívánt funkciókat.
8. Az ELINDÍTÁS/SZÜNETELTETÉS gomb megnyomásával
indítsa el a programot, mire a megfelelő jelzőlámpa zöld fénnyel
világítani kezd.
A beállított mosási ciklus törléséhez az ELINDÍTÁS/SZÜNETELTETÉS gomb megnyomásával szüneteltesse le a
készüléket, és válasszon egy úgy mosási ciklust.
9. A program végeztével kigyullad a jelzőlámpa. Az
AJTÓZÁR lámpa kialszik, jelezve, hogy az ajtót ki lehet nyitni.
Vegye ki a mosandó ruhákat, és hagyja az ajtót félig nyitva,
hogy a forgódob kiszáradjon. A BEKAPCSOLÁS/KIKAPCSOLÁS gomb megnyomásával kapcsolja ki a mosógépet.
HU
ábra. 3
ábra. 4
17
Page 18
Programok
Programtáblázat
HU
Max.
Max. se-
hőm.
Programleírás
Programok
Hétköznapi programok
PAMUT ELÕMOSÁS 90°C: Erősen szennyezett fehér ruhák.
1
PAMUT: Erősen szennyezett fehér és magasabb hőmérsékleten
2
mosható színes ruhák.
SZÍNES PAMUT (3): Enyhén szennyezett fehér és kényes színes ruhák.
3
SZINTETIKUS: Erősen szennyezett, magasabb hőmérsékleten mo-
4
sható színes ruhák.
SZINTETIKUS (4): Erősen szennyezett, magasabb hőmérsékleten
4
mosható színes ruhák.
15' FRISSÍTŐ MOSÁS: Az enyhén szennyezett ruhadarabok gyors átö-
5
blítésére (nem javasolt gyapjú, selyem és kézzel mosandó ruhaneműkhöz).
Speciális programok
HIGIENIZÁLÓ CIKLUS: Erősen szennyezett fehér ruhák.
6
HIGIENIZÁLÓ CIKLUS (1-2): Erősen szennyezett fehér és maga-
6
sabb hőmérsékleten mosható színes ruhák.
HIGIENIZÁLÓ CIKLUS (2): Erősen szennyezett fehér és magasabb
6
hőmérsékleten mosható színes ruhák.
JÓ ÉJT: Enyhén szennyezett kényes, színes ruhák.
7
ING
8
SELYEM/FÜGGÖNY: Selyem ruhaneműkhöz, viszkózus anyago-
9
khoz, fehérneműkhöz.
GYAPJÚ: Gyapjú, kasmír stb. ruhaneműk mosásához.
10
Eco programok
11 PAMUT
12 MÛSZÁL
13 GYORSMOSÁS
Részleges programok
ÖBLÍTÉS
CENTRIFUGÁLÁS
SZIVATTYÚZÁS
A kijelzőn megjelenő vagy a kézikönyben feltüntetett ciklusidők szokásos körülmények alapján becsült értékek. A tényleges időt számos tényező befolyásolhatja – pl. a bemeneti
víznyomás, a környezeti hőmérséklet, a mosószer mennyisége, a ruhatöltet mennyisége és típusa, a ruhatöltet kiegyensúlyozása, a kiválasztott további opciók.
A viszgálószervek számára:
1) Az 1061/2010/EU rendelet szerinti vizsgálati programok: állítsa be a 6-os programot 60 °C és 40°C -ra. Ez a ciklus egy adag, nem különösebben koszos pamut ruhadarabok mosására alkalmas, és ez a leghatékonyabb a víz- és energiafogyasztás szempontjából is. 60 °C és 40°C -ra. mosható termékekhez. A mosás tényleges hőmérséklete
eltérhet a megjelölt értéktől.
2) Hosszú pamut program: állítsa be a 6-os programot 40 °C-ra.
3) Rövid pamut program: állítsa be a 3-es programot 40 °C-ra.
4) Szintetikus program mentén: állítsa be a 4-es programot 40 °C-ra.
besség
(°C)
(ford./
perc)
90° 1000
60° 1000 -
40° 1000 -
60° 800 - -
40° 800 - -
30 800 - -
90° 1000 -
60° 1000 - -
40° 1000 - -
40° 800 - 40° 600 - -
30° 0 - -
40° 800 - -
hideg
1000 - -
víz
hideg
hideg
800 - -
víz
800 - -
víz
- 1000 - - -
- 1000 - - - - 5 - - - 16
- 0 - - - - 5 - - - 2
Előm-
osás
Mosószerek
Fehérí-
Mo-
tőszer
sás
-
Öblítő
Max.
ség (kg)
Maradék
tartalom %
nedvesség-
Energiafog-
ruhamennyi-
5 62 1,82 64 150
5 - - - 125
5 62 0,53 50 90
2,5 44 0,85 39 105
2,5 44 0,53 39 95
1,5 71 0,08 29 15
5 - - - 165
5 62 0,882 52 160
5 62 0,916 63 150
4 - - - 282
2 - - - 80
1 - - - 56
1 - - - 65
5 62 0,08 48 82
2,5 48 0,07 27 68
2,5 71 0,04 34 30
5 - - - 36
yasztás kHw
Összes víz lt
midő
Progra-
Különleges programok
15’ FRISSÍTO MOSÁS (
kifejlesztve – mindössze 15 percig tart, így energiát és időt takarít meg. Az
5-es
program). Ez a program enyhén koszos ruhadarabok rövid idő alatt történő kimosására lett
5-es
programot 30 °C-ra beállítva különböző jellegő
anyagokat együttesen is lehet mosni (kivéve gyapjút és selymet) maximum 1,5 kg ruhatöltet-mennyiségig.
HIGIENIZÁLÓ CIKLUS (6-os program). Ez egy olyan magas hőmérsékleten futó fertőtlenítő program, melynél fehérítőszert
kell használni, és a hőmérsékletet 60 °C-nál magasabbra kell állítani.
A fehérítéshez öntse be a fehérítőszert, a mosószert és
az adalékanyagokat a megfelelő rekeszekbe (lásd „Mosószer-adagoló fiók”).
JÓ ÉJT (7-ös program). Ez egy olyan halk program, mellyel éjszaka lehet mosni, amikor az energiaárak alacsonyabbak. A
program mőszálas és pamut ruhadarabokhoz lett kifejlesztve. A ciklus végeztével a készülék, vízzel a forgódobban megáll,
majd – a centrifugálás és ürítés elvégzéséhez nyomja meg az ELINDÍTÁS/SZÜNETELTETÉS gombot, ellenkező esetben –
8 óra elteltével a készülék automatikusan elvégzi a centrifugálást és a víz ürítését.
Eco programok
Az Eco programok jó mosási teljesítményt kínálnak alacsony hőmérsékleten, így energiát takaríthat meg, ami kíméli a környezetet és megtakarítást jelent az Ön számára.
Az Eco programok (Pamut 11, Mőszál 12 és Gyorsmosás 30’ 13) különféle típusú szövetekre és enyhén szennyezett
ruhadarabokra lettek tervezve. A kiváló minőség érdekében folyékony mosószer használatát javasuljuk – a mandzsettákat,
gallérokat és foltokat tanácsos előkezelni.
18
Page 19

Egyéni beállítások
A hőmérséklet beállítása
A mosási hőmérséklet beállításához forgassa el a HőMÉRSÉKLET gomb megnyomása (lásd Programtáblázat). A hőmérsékletet a
hideg vízzel történő mosás hőmérséklet-értékéig lehet csökkenteni ( ).
A készülék automatikusan megakadályozza, hogy az egyes programokhoz maximálisan beállíthatónál magasabb fordulatszámon centrifugáljon.
A centrifugálás beállítása
A kiválasztott programhoz tartozó centrifugálás fordulatszámának beállításához forgassa el a CENTRIFUGÁLÁS gomb megnyomása.
A különféle programokhoz beállítható maximális fordulatszámok a következők:
Programok Maximális fordulatszám
Pamut 1000 fordulat/perc
Mőszál 800 fordulat/perc
Gyapjú 800 fordulat/perc
Selyem Csak ürítés
A centrifugálás fordulatszáma csökkenthető, vagy a jelre állítással teljesen kikapcsolható.
A készülék automatikusan megakadályozza, hogy az egyes programokhoz maximálisan megengedett fordulatszámnál magasabbon centrifugáljon.
Funkciók
A mosógép különféle mosási funkciói lehetővé teszik a kívánt tisztítás és fehérség elérését.
A funkciók bekapcsolásához tegye a következőket:
1. Nyomja meg a kívánt funkció gombját.
2. A megfelelő jelzőlámpa világítása azt jelzi, hogy a hozzá tartozó funkció be van kapcsolva.
Megjegyzés: A jelzőlámpa gyors villogása azt jelenti, hogy a beállított programhoz a jelzőlámpához tartozó funkció nem vála-
sztható.
HU
Késleltetett indítás
A kiválasztott program késleltetett indításának beállításához nyomogassa a gombot mindaddig, míg a kívánt késleltetés
értéke (1–24 óráig) meg nem jelenik a kijelzőn.
A funkció kikapcsolásához nyomogassa a gombot addig, míg kijelzőn az felirat meg nem jelenik.
Megjegyzés: Az ELINDÍTÁS/SZÜNETELTETÉS gomb megnyomását követően a késleltetés értékét csak csökkenteni lehet.
! Ez valamennyi program esetén bekapcsolható.
Szupermosás
A ciklus kezdetén felhasznált nagy mennyiségő víznek, valamint a hosszabb mosásidőnek köszönhetően a szupermosás funkció
nagy mosóhatást biztosít.
! Nem kapcsolható be a 5-es, 6-ös, 9-as 10-es, 11-es,12-es, 13-es, , , , programoknál.
Extra öblítés
E funkció alkalmazásával nő az öblítés, valamint a végső mosószer-eltávolítás hatékonysága. Használata a különösen érzékeny
bőrő embereknél ajánlott.
! Nem kapcsolható be a 5-es, 13-es, , , programoknál.
Vasaláskönnyítés
Ez a funkció a győrődések keletkezésének csökkentése érdekében a megfelelő időben módosítja a mosási beállításokat és a
centrifugasebességet.
A 9 program esetén a ciklus a mosandó ruhák öblítésével végződik, a VASALÁSKÖNNYÍTÉS funkció lámpája, valamint az
ELINDÍTÁS/SZÜNETELTETÉS lámpa narancssárga fénnyel villog, az ÖBLÍTÉS fázis jelzőlámpája pedig állandó fénnyel világít.
Az öblítővíz leeresztéséhez és a mosott ruhanemők kiszedéséhez meg kell nyomni az ELINDÍTÁS/SZÜNETELTETÉS gombot,
vagy a VASALÁSKÖNNYÍTÉS gombot.
! Nem kapcsolható be a 5-es, 6-ös, 7-ös, 10-es, 11-es, 12-es, 13-es, , , programoknál.
19
Page 20
Mosószerek és mosandók
HU
Mosószeradagoló fiók
A mosás eredményessége függ a mosószer helyes adagolásától is: ha túl sokat adagol belőle, a mosás nem lesz
hatékonyabb, de hozzájárul ahhoz, hogy lerakódás képződjön
a mosógépben, valamint a környezetet is jobban szennyezi.
! Fehér színő pamut ruhadarabokhoz, előmosáshoz és 60 °C-
nál magasabb hőmérsékleten történő mosásokhoz mosóport
használjon.
! Kövesse a mosópor csomagolásán feltüntetett utasításokat.
Húzza ki a mosószeradagoló fiókot, és a
következőképpen tegye
bele a mosószret vagy az
adalékot.
1. es tartály: Mosószer előmosáshoz (por)
2. rekesz: Mosószer (por vagy folyékony)
A folyékony mosószert helyezze közvetlen a rekeszbe az
erre a célra kialakított mérőedénybe.
3. rekesz: Adalékanyagok (lágyítószer, stb.)
Amikor a 3. rekeszbe betölti a lágyítószert, ügyeljen rá,
hogy ne lépje túl a “max” jelzést.
A lágyítószer automatikusan belekerül
a mosógépbe az utolsó öblítéskor. A program végén a 3.
rekeszben bizonyos mennyiségu víz marad. Ez a túlságosan suru lágyítószer feloldására, vagy a koncentrátumok
higítására szolgál. Ha a 3. rekeszben több víz marad, mint
általában, az az ürítonyílás eltömodését jelenti. A kitisztításához lásd “Karbantartás és ápolás”.
4. rekesz: Fehérítőszer
A mosandó ruhák előkészítése
• Osztályozza a mosandókat a következők szerint:
- Szövet típusa / címkén lévő szimbólum.
- Színek Válogassa külön a színes és fehér ruhákat.
• Ürítse ki a zsebeket, és vizsgálja meg a gombokat.
• Ne lépje túl a mosandók száraz súlyára vonatkozóan
megadott értékeket:
Magasabb hmérsékleten mosható anyagok: max. 5 kg
Mőszálas anyagok: max. 2,5 kg
Kényes anyagok: max. 2 kg
Gyapjú: max. 1 kg
Milyen nehezek a mosandó ruhák?
1 lepedő: 400–500 g
1 párnahuzat: 150–200 g
1 asztalterítő: 400–500 g
1 fürdőköpeny: 900–1200 g
1 törölköző: 150–250 g
Különleges bánásmódot igénylő ruhadarabok
Ing: a különböző szövető és színő ingek mosásához használja
az ehhez való, 8-as programot!
A győrődések kialakulásának minimalizálásával a program
maximális védelmet biztosít a ruháknak.
Selyem: az összes selyem ruhadarab mosásához használja az ehhez való, 9-as programot! A kényesebb
ruhanemőkhöz tanácsos speciálisan rájuk kifejlesztett
mosószert használni.
Függönyök: hajtogatva tegye párnahuzatba (vászonzsákba) vagy hálós zacskóba. Használja a 9-as programot.
Gyapjú: az egyedüli mosógép, mely a Woolmark
Companytől megkapta a rangos Woolmark Platinum Care
ismertetőjelet (M.0508), ami tanúsítja, hogy az összes
gyapjú ruhadarab mosható a mosógépben, még azok is,
melyek címkéjén a „kézzel mosandó” megjelölés szerepel. A 10-es programmal teljes nyugalommal moshatja
mosógépben az összes gyapjú ruhadarabot (max. 1 kg),
garantáltan a legjobb hatásfokon.
Fehérítő ciklus
Fehérítőt csak az 2-es, 3-es, 6-ös, programoknál lehet használni.
Öntsön fehérítőt a 4. pótrekeszbe, a mosószert és az öblítőt
pedig a megfelelő tartályokba, majd állítsa be az egyik fent
említett programot. Csak nagyon szennyezett pamut ruhadarabokhoz javasolt.
20
A bepakolt ruhák kiegyensúlyozására
szolgáló rendszer
A túlzott zajhatás megelőzésére, valamint a mosandók egyenletes eloszlása érdekében a forgódob a centrifugafázis
előtt a mosási centrifugasebességnél kicsit nagyobb sebességre kapcsol. Amennyiben a töltet kiegyensúlyozására
irányuló próbálkozások nem vezetnek eredményre, a
készülék az elméleti centrifugasebességnél lassabb
centrifugálásra kapcsol. Jelentős kiegyensúlyozatlanság
esetén a mosógép, centrifugálás előtt megpróbálja a töltetet
megfelelően eloszlatni. A töltet megfelelő eloszlásának biztosítása érdekében ajánlatos a nagy ruhanemőket a kicsikkel
összekeverni.
Page 21

Óvintézkedések és
tanácsok
! A mosógép a nemzetközi biztonsági szabványoknak
megfelelően lett tervezve és gyártva. Ezeket a figyelmeztetéseket biztonsági okokból írjuk le, kérjük, olvassa el őket
figyelmesen!
Általános biztonság
• Ez a készüléket háztartási használatra lett tervezve.
• A készüléket mőködtetésre alkalmatlan személyek (a gye-
rekeket is beleértve) nem használhatják, kivéve, amennyiben ezeket a személyeket egy, a biztonságukért felelős
személy felügyeli, illetve a készülék használatát nekik
elmagyarázza. Ne hagyja a gyerekeket felügyelet nélkül,
és győződjön meg arról, hogy nem játszanak a készülékkel.
• Ne érjen a géphez mezítláb, illetve vizes vagy nedves
kézzel vagy lábbal!
• A csatlakozódugót az aljzatból ne a kábelnél, hanem a
csatlakozónál fogva húzza ki!
• Ne nyúljon a leeresztett vízbe, mert forró lehet!
• Semmiképpen ne feszegesse az ajtót: megsérülhet a
véletlen nyitást megakadályozó biztonsági retesz.
• Hiba esetén semmiképpen se nyúljon a gép belső rés-
zeihez, és ne próbálja megjavítani!
• Mindig ügyeljen arra, hogy gyermekek ne mehessenek a
mőködő gép közelébe.
• Amennyiben a gépet át kell helyezni, az áthelyezést két
vagy három személy végezze, maximális odafigyeléssel.
Soha ne próbálja egyedül elmozdítani, mert a készülék
nagyon nehéz.
• A mosandó berakása előtt ellenőrizze, hogy a forgódob
üres-e.
Hulladékelhelyezés
Környezetvédelem
Takarítson meg mosószert, vizet, energiát és időt
• Annak érdekében, hogy ne pazaroljunk az erőforrásokkal,
a mosógépet teljes ruhatöltettel kell használni. Egy teljes
ruhatöltettel való mosás két féltöltet helyett, akár 50%
energia megtakarítást is lehetővé tehet.
• Az előmosás csak nagyon szennyezett ruhák esetén
szükséges. Ha nem használja, azzal mosószert, időt és
5-15% energiát takarít meg.
• Ha a foltokat a mosás előtt folttisztítóval kezeli, és
beáztatja, kevesebb szükség lesz a magas hőmérséklető
mosásra. A 60°C-on történő mosás a 90°C helyett, vagy
40°C-on 60°C helyett akár 50% energiamegtakarításhoz
is vezethet.
• Ha a mosószert a víz keménysége, a szennyezettség
mértéke és a ruha mennyisége alapján helyesen adagolja, elkerüli a pazarlást és nem terheli feleslegesen a
környezetet: még, ha biológiailag lebomló fajtájúak is, a
mosószerek olyan összetevőket tartalmaznak, amelyek
megváltoztatják a természet egyensúlyát. Ezen kívül,
kerülje az öblítőszerek használatát, amennyire csak lehet.
• Ha a késő délután és a kora hajnal közötti időszakban
mos, akkor hozzájárul ahhoz, hogy csökkentse az
áramszolgáltató vállalatok terhelését.
A “Késleltetett indítás” nagyon hasznos a mosás
időzítése szempontjából.
• Ha a mosott ruhákat utána szárítógépben szárítja,
magas fordulatszámú centrifugálást válasszon. Ha a
mosott ruhában kevés a víz, időt és energiát takarít meg
a szárítóprogramnál.
HU
• A csomagolóanyag megsemmisítése: tartsa be a helyi
előírásokat, így a csomagolás újrahasznosítható.
• Az elektromos készülékek megsemmisítéséről szóló
európai direktíva 2002/96/EC előírja, hogy a régi háztartási gépeket nem szabad a normál nem szelektív
hulladékgyőjtési folyamat során összegyőjteni. A régi
gépeket szelektíven kell összegyőjteni, hogy optimalizálni
lehessen a bennük lévő anyagok újrahasznosítását és
csökkenteni lehessen az emberi egészségre és környezetre gyakorolt hatásukat. Az áthúzott “szemeteskuka”
jele emlékezteti Önt arra, hogy kötelessége ezeket a
termékeket szelektíven összegyőjteni. A fogyasztóknak
a helyi hatóságot vagy kereskedőt kell felkeresniük a régi
háztartási gépek helyes elhelyezését illetően.
21
Page 22

Karbantartás és ápolás
HU
A víz elzárása és az elektromos áram
kikapcsolása
• Minden mosás után zárja el a vízcsapot. Így kíméli a
mosógép vízrendszerét, és megszünteti a vízszivárgás
kockázatát.
• Húzza ki a hálózati csatlakozódugót az aljzatból, amikor
a mosógépet tisztítja vagy karbantartást végez.
A mosógép tisztítása
A külső részeket és a gumi részeket langyos szappanos
vizes ronggyal tisztíthatja. Ne használjon oldószert vagy
súrolószert.
Az ajtó és a forgódob gondozása
• Az ajtót hagyja mindig résre nyitva, nehogy
rossz szagok keletkezzenek.
A szivattyú tisztítása
A mosógép öntisztító szivattyúval van felszerelve, melynek nincs szüksége tisztítási és karbantartási mőveletekre.
Az azonban megtörténhet, hogy kis tárgyak kerülnek
(aprópénz, gomb) a szivattyút védő előkamrába, ami a szivattyú alsó részén található.
! Győződjön meg róla, hogy a mosóprogram véget ért, és
húzza ki a hálózati csatlakozót.
Az esetlegesen a dob mellé esett tárgyak kiemeléséhez:
1. vegye le a mosógép elülső oldalán alul
elhelyezkedő részt kézzel
meghúzva a szélén (lásd
ábra); ábra);
2. az óra járásával ellentétes irányban forgatva
csavarja le a fedelet (lásd
ábra): természetes, hogy
egy kevés víz kifolyik;
3. gondosan tisztítsa ki a
belsejét;
4. csavarja vissza a
fedelet;
5. szerelje vissza a panelt
úgy, hogy mielőtt azt a gép
felé nyomná, meggyőződik
arról, hogy a horgok a
hozzájuk tartozó furatokba
illeszkednek.
A vízbevezető cső ellenőrzése
Évente legalább egyszer ellenőrizze a gumicsövet. Ki kell
cserélni, ha repedezett vagy hasadozott: a mosás során a
nagy nyomás hirtelen szakadást okozhat.
! Soha ne alkalmazzon már használt csöveket.
Kivétel:
Enyhe nyomást gyakorolni a
K i v é t e l :
mosószertartó elülső részén
En yhe nyo mást gy ak oroln i a
levő nagy nyomó-gombra és
mosószertartó elülsõ részén levõ
felfelé kihúzni (1, 2. ábra).
nagy nyomó-gombra és felfelé
kihúzni (1. ábra).
4. ábra
ábra. 1 ábra. 2
22
Tisztítás:
Ezután kitisztítani vízcsap alatt a tartót (3. ábra) egy régi fog-
T i s z t í t á s :
kefe segítségével és az 1-es és 2-es rekeszek felső részébe
Ezután kitisztítani vízcsap alatt a tartót (3. ábra) egy régi fogkefe
illesztett két szivornyát kihúzva (4. ábra) megvizsgálni, hogy
segítségével és az 1-es és 2-es rekeszek felsõ részébe illesztett két
azok ne legyenek eltömődve majd leöblíteni.
szivornyát kihúzva (4. ábra) megvizsgálni, hogy azok ne legyenek
eltömõdve majd leöblíteni.
4. ábra
A mosószertartó tisztítása
A mosószertartó tisztítása
A mosószertartó tisztítása
4. ábra
ábra. 3
Visszahelyezés:
Ne felejtsd el visszailles-zteni
Visszahelyezés:
a két szivornyát a megfelelő
Ne felejtsd el visszailles-zteni a
helyére és végül a tokjába
két szivornyát a megfelelõ helyére
beakasztva visszatenni a tartót
és végül a tokjába beakasztva
(4, 2, 1 ábra).
visszatenni a tartót.
4. ábra
ábra. 4
Page 23

Rendellenességek és
elhárításuk
Előfordulhat, hogy a mosógép nem mőködik. Mielőtt felhívná a szervizt (lásd „Szerviz”), ellenőrizze, hogy nem olyan problémáról
van-e szó, amely a következő lista segítségével egyszerően megoldható!
Rendellenességek:
A mosógép nem kapcsol be.
A mosási ciklus nem indul el.
A mosógép nem kap vizet (az első
mosási fázis jelzőlámpája gyorsan
villog).
A mosógép folytonosan szívja, és
üríti a vizet.
Lehetséges okok / megoldás:
• A hálózati csatlakozódugó nincs bedugva az aljzatba, vagy nem eléggé ahhoz,
hogy jól érintkezzen.
• Nincs áram a lakásban.
• Az ajtó nincs jól becsukva.
• Nem nyomta meg a BEKAPCSOLÁS/KIKAPCSOLÁS gombot.
• Nem nyomta meg az ELINDÍTÁS/SZÜNETELTETÉS gombot.
• A vízcsap nincs nyitva.
• Az indítás időjelzőjén késletetés lett beállítva – késleltetésidőzítő (lásd „Egyéni beál-
lítások”).
• A vízbevezető cső nincs csatlakoztatva a csaphoz.
• A cső meg van törve.
• A vízcsap nincs nyitva.
• A lakásban nincs víz.
• Nincs elegendő nyomás.
• Nem nyomta meg az ELINDÍTÁS/SZÜNETELTETÉS gombot.
• A leeresztőcső nem a padlószinttől 65 és 100 cm közötti magasságban van felszerelve (lásd „Üzembe helyezés”).
• A leeresztőcső vége vízbe merül (lásd „Üzembe helyezés”).
• A fali szifonnak nincs szellőzése.
Ha ezen vizsgálatok után a probléma nem oldódik meg, zárja el a vízcsapot,
kapcsolja ki a mosógépet, és hívja ki a szervizszolgálatot. Ha a lakás egy épület
legfelsőbb emeleteinek egyikén található, lehetséges, hogy a csatornaszellőző
eltömődésének jelensége (szivornyahatás) lépett fel, ezért a mosógép folytonosan
szívja, és leereszti a vizet. E kellemetlenség elkerülésére a kereskedelmi forgalomban rendelkezésre állnak csatornaszellőző-szelepek.
HU
A mosógép nem üríti le a vizet,
vagy nem centrifugál.
A mosógép nagyon rázkódik a centrifugálás alatt.
A mosógépből elfolyik a víz.
Az ELINDÍTÁS/SZÜNETELTETÉS
lámpa (narancssárga), valamint a
funkciólámpák gyorsan villognak.
Sok hab képződik.
• A program nem ereszti le a vizet: néhány programnál a vizet kézileg kell leereszteni.
• A VASALÁSKÖNNYÍTÉS funkció be lett kapcsolva – a program befejezéséhez
nyomja meg az ELINDÍTÁS/SZÜNETELTETÉS gombot (lásd „Egyéni beállítá-
sok”).
• A leeresztőcső meg van törve (lásd „Üzembe helyezés”).
• A lefolyó el van dugulva.
• Az üzembe helyezéskor a forgódob rögzítése nem lett eltávolítva (lásd „Üzem-
be helyezés”).
• A készülék nincs vízszintben (lásd „Üzembe helyezés”).
• A mosógép bútorok és falak közé van szorítva (lásd „Üzembe helyezés”).
• A vízbevezető cső nincs jól felcsavarva (lásd „Üzembe helyezés”).
• A mosószer-adagoló fiók eltömődött (tisztításához lásd „Karbantartás és ápo-
lás”).
• A leeresztőcső nincs szorosan rögzítve (lásd „Üzembe helyezés”).
• Kapcsolja ki a készüléket, és húzza ki a dugót a konnektorból, várjon körülbelül 1 percet, majd indítsa újra!
Ha a hiba továbbra is fennáll, forduljon a szervizhez!
• A mosószer nem mosógépekhez való (kell, hogy szerepeljen rajta, hogy „gépi”,
„kézi vagy gépi mosáshoz”, vagy hasonló).
• Túl sok mosószert használt.
23
Page 24

Szerviz
HU
Mielőtt a szervizhez fordulna:
• Győződjön meg arról, hogy a hibát nem tudja saját maga is elhárítani (lásd „Rendellenességek és elhárításuk”);
• Indítsa újra a programot, hogy lássa, elhárította-e a hibát;
• Ellenkező esetben forduljon az engedéllyel rendelkező szakszervizhez a garanciajegyen található telefonszámon.
! Soha ne forduljon engedéllyel nem rendelkező szerelőhöz!
Közölje:
• a meghibásodás jellegét;
• a mosógép típusát (Mod.);
• a gyártási számot (S/N).
Ezen információk a mosógép hátsó részére felerősített táblán találhatók.
24
Page 25

Iнструкцiї з експлуатацiї
ПРАЛЬНА МАШИНА
UK
Українська
ECOTF 1051
Зміст
UK
Установка, 26-27
Розпакування та встановлення по рівню
Підключення електричного живлення та
подачі води
Перший цикл прання
Технічні дані
Опис пральної машини та запуск циклу
прання, 28-29
Панель керування
Світлові індикатори
Як відкривати та закривати барабан
Запуск циклу прання
Цикли прання, 30
Таблиця циклів прання
Персоналізація, 31
Встановлення температури
Встановлення швидкості обертання
Функції
Пральні засоби та білизна,32
Дозатор прального засобу
Цикл відбілювання
Підготування білизни
Речі, що потребують спеціального догляду
Система балансування завантаження
Попередження та рекомендації, 33
Загальні правила безпеки
Утилізація приладу
Збереження електроенергії та захист
навколишнього середовища
Догляд та обслуговування, 34
Відключення води та електричного
живлення
Очищення пральної машини
Догляд за дверцятами та барабаном Вашого
приладу
Чищення насосу
Перевірка водозабірного шланга
Як очищати дозатор миючого засобу
Пошук та усунення несправностей, 35
Сервісне обслуговування, 36
25
Page 26
Встановлення
UK
! Зберігайте це довідник, щоб мати нагоду звернутися до нього
у будь-який момент. У разi продажу, передачі іншій особі або
переїзду переконайтеся в тому, що інструкція перебуває разом
із пральною машиною й новий власник може ознайомитися з
її принципами роботи й відповідними запобіжними заходами.
! Уважно вивчіть інструкцію: в ній міститься важлива
інформація щодо монтажу, використання і безпеки.
Розпакування й вирівнювання
Розпакування
1. Розпакування пральної машини
2. Вдоскональтеся, що машина не зазнала ушкоджень пiд час транспортування. Якщо такі є, не виконуйте нiяких пiдключень
та негайно зверніться до
постачальника.
3. Видаліть 4 запобіжнi
гвинти для транспортування та гумову прокладку з відповідною
розпірною деталлю, якi
зн аходяться позаду (
див. малюнок).
4. Закрийте отвори пластмасовими пробками з комплекту постачання.
5. Зберiгайте всi компоненти: у разi транспортування
пральної машини їх потрiбно повернути на мiсце.
Увага. При повторному використанні коротші гвинти
слід встановити зверху.
Підключення води й електроенергії
Контроль труби для подачі води
1. Підключити трубу подачі, прикрутивши її до крану
холодної води за допомогою штуцеру з газовою
різьбою 3/4 (див. схему).
Пе р ед пi д к л ю ч е нн я м
спустiть воду, доки вона
не стане прозорою.
2. Підключіть шланг подачі води до пральної
машини, під’єднавши його
до водорозбiрного крану,
який знаходиться угорі
праворуч на задньому боцi
машини ( див. малюнок).
3. Зверніть у вагу, щоб
труба не мала згинів та
утисків.
! Тиск води в крані має відповідати значенням у таблиці
Технічних даних (див.сторінку поруч).
! Якщо довжини шланга для води не вистачає, зверніть-
ся у спеціалізовану крамницю або до уповноваженого
фахівця.
! Не користуйтеся трубами, якi були вже у вживаннi.
! Забороняйте дiтям гратися з упаковками.
Вирiвнювання
1. Встановіть пральну машину на плоскій та твердій
підлозі, не притуляючи її
до стін, меблів, тощо.
2. Якщо пiдлога не iдеально
горизонтальна, компенсуйте нерiвностi за допомогою переднiх нiжок (див.
малюнок) – розкручуючи чи
закручуючи їх; кут нахилу
вiдносно робочої поверхнi
не повинен перевищувати 2°.
Належне вирiвнювання забезпечить стабiльнiсть машинi
та запобiжить вiбрацiям, шуму та пересуванням пiд час
роботи. У випадку встановлення машини на килимовому
покритті або килимах, ніжки необхідно відрегулювати
таким чином, щоб гарантувати під пральною машиною
необхідний простір для вентиляції.
26
Page 27

Пiд’єднання шлангу злива води
65 - 100 cm
Пi д ’ єд н а йт е зл и в ни й
шланг, не згинаючи його,
до каналізації або до зливного отвору у стіні на висоті від 65 до 100 см від
підлоги.
Або покладіть його на
край вмивальника або
ванни; прив’язавши направляючу з комплекту
постачання до крана (див.
малюнок). Не залишайте
вільний кінець зливного
шланга зануреним у воду.
! Використання подовжувача шланга не рекомендоване.
В разi необхiдностi використання подовжувача шланга,
переконайтеся у тому, що він має той самий діаметр та
його довжина не перевищує 150 см.
! Проводити замiну кабелю живлення можуть тiльки
вповноваженi фахiвцi.
Увага! Компанія знімає з себе відповідальність у разi
недотримання наведених вказівок.
Перший цикл прання
Після того, як пристрій установлений, але перед тим,
як зробити перше прання, слід запустити цикл прання
2 з мийним засобом, але без білизни.
Технiчнi характеристики
UK
Підключення до електричної мережі
Перш нiж вставити вилку в електричну розетку, переконайтеся, що:
• розетка має заземлення у відповідності до встановлених норм;
• розетка розрахована на максимальне навантаження
у межах потужності машини, зазначене у таблиці
Технічних даних (див.малюнок поруч);
• напруга живлення перебуває у межах, зазначених у
таблиці Технічних даних (див.малюнок поруч);
• розетка підходить до вилки пральної машини. В іншому випадку замініть розетку або вилку.
! Машину не можна встановлювати поза приміщенням,
навіть в захищених мiсцях, тому що дуже небезпечно
піддавати її впливу дощу і грози.
! Коли машину вже встановлено, забезпечте вільний
доступ до електричної розетки.
! Не використовуйте подовжувачі й трійники.
! Шнур не повинен мати згинів або утисків.
Модель ECOTF 1051
Розмiри
Мiсткiсть вiд 1 до 5 кг
Електричнi
пiдключення
Водопровiднi
пiдключення
Швидкiсть
вiджиму
Програма керування
згiдно до норми
EN 60456
ширина 40 см
висота 85 см
глибина 60 см
див. табличку з технiчними даними
на машинi
максимальний тиск 1 мПа (10 бар)
мiнiмальний тиск 0,05 мПа (0,5 бар)
ємнiсть барабана – 42 лiтри
до 1000 обертiв за хвилину
програма 6; температура 60°C;
виконується з завантаженням у 5 кг.
Цей прилад вiдповiдає таким європейським директивам:
- 2004/108/CE (Про
електромагнiтну сумiснiсть)
- 2006/95/CE (про Низьку напругу)
- 2002/96/CE
27
Page 28

Опис пральної машини та
процедури iз запуску програм
Панель керування
UK
індикаторною лампою
УВIМКНЕННЯ/
Кнопка з індикаторною лампою УВIМКНЕННЯ/ВИМКНЕННЯ:
для увiмкнення й вимкнення пральної машини. Запалена
індикаторна лампа означає, що машину ввімкнено.
Ручка ПРОГРАМИ: для задання бажаних програм. Під час
програми ручка залишається нерухомою.
Кнопка ВIДЖИМУ: для установки в або для вимкнення його
(див. “Налаштування п”).
Кнопка ТЕМПЕРАТУРА: для установки температури або
холодного прання (див. “Налаштування п”).
ДИСПЛЕЙ: для вiдображення часу, який залишився до
завершення обраного циклу прання, та в разi вiдстроченого
запуску – для вiдображення часу, який залишився до
початку прання.
Кнопка з індикаторною лампою БЛОКУВАННЯ КНОПОК:
для активацiї або вiдключення блокування панелi команд.
Кнопки з iндикаторними лампами ФУНКЦIЯ: для вибору
наявних функцій. Iндикаторна лампа обраної функцї
залишається увiмкненою.
Індика т о р н i лампи У В I М К Н ЕННЯ ЦИКЛУ: д л я
спостереження за станом програми прання. Увiмкнена
iндикаторна лампа вказує на активовану фазу.
Iндикаторна лампа ЛЮК ЗАБЛОКОВАНО: для перевiрки
того, чи люк може вiдкриватись (див. сторiнку поруч).
Кнопка з індикаторною лампою ПУСК/ПАУЗА: для запуску
програм або для їх тимчасового переривання.
Увага: щоб установити в режим паузи поточне прання,
натиснiть на цю кнопку, вiдповiдна кнопка почне блимати
померанцевим кольором, в той час як iндикаторна лампа
поточної фази свiтитиметься постiйним свiтлом. Якщо
індикаторна лампа “ЛЮК ЗАБЛОКОВАНО ” погасне,
можна відкривати люк для завантаження білизни. Щоб
продовжити прання з місця, де воно було перервано, знову
натисніть на цю кнопку.
Кнопка з
ВИМКНЕННЯ
ТЕМПЕРАТУРА
Ручка
ВIДЖИМУ
Кнопка
ВIДЖИМУ
ДИСПЛЕЙ
Кнопка
Кнопка з
індикаторною лампою
БЛОКУВАННЯ
КНОПОК
Кнопки з
iндикаторними
лампами
ФУНКЦIЯ
Режим очiкування
Вiдповiдно до норм, пов’язаних з заощадження енергiї, цю
пральну машину оснащено системою автовимкнення (stand
by), яка активується через 30 секунд вiдсутностi роботи
з боку машини. Швидко натиснiть кнопку УВIМКНЕННЯ/
ВИМКНЕННЯ та зачекайте вiдновлення роботи машини.
Індикаторнi лампи
Індикаторнi лампи надають важливу iнформацiю
От на що вони вказують:
Iндикаторнi лампи поточних операцiй
Пiд час обертання ручки ПРОГРАМ iндикаторнi лампи
запалюються, вказуючи на поточнi фази, якi виконує
машина згiдно до обраної програми.
Пiсля обрання та запуску бажаного циклу прання
iндикаторнi лампи вмикаються по черзi, щоб вказати
на стан програми:
Прання
Полоскання
Вiджим
Злив
Кiнець прання
Кнопки функцiй та вiдповiднi iндикаторнi лампи
Пiсля вибору функцiї вiдповiдна iндикаторна лампа
починає свiтитися. Якщо вибрана функція несумісна з
заданою програмою, індикаторна лампа почне блимати,
подається звуковий сигнал й цю функцiю не буде
активовано. У разi задання функцiї, несумiсної з iншою
попередньо обраною, активується останнiй вибiр.
Індикаторнi лампи
ЦИКЛУ
Кнопка з
індикаторною
лампою
ПУСК/ПАУЗА
УВIМКНЕННЯ
Iндикаторна лампа
ЛЮК
ЗАБЛОКОВАНО
28
Page 29

Iндикаторна лампа температури
Пiсля вибору значення температури iндикаторна лампа
запалюється.
Iндикаторна лампа вiджиму
Пiсля вибору значення вiджиму iндикаторна лампа
запалюється.
Iндикаторна лампа блокування кнопок
Що б “ак тивувати” блокування керуючої панелi
натиснiть та утримуйте кнопку впродовж 2 секунд.
Ввімкнена індикаторна лампа показує, що панель
керування заблоковано. У цей спосіб перешкоджають
випадковій зміні програм, передусім, якщо у домі є
діти. Для “вiдключення” блокування панелi керування
натиснiть та утримуйте кнопку впродовж 2 секунд.
Iндикаторна лампа заблокованого люку
Запалена iндикаторна лампа вказує на те, що люк заблоковано
з метою запобiгання випадкового вiдкриття; щоб уникнути
ушкоджень, перш нiж вiдкрити люк, зачекайте вимикання
iндикаторної лампи.
Увага: якщо функцiю “Вiдстрочений запуск” активовано,
заборонено вiдкривати люк, для вiдкриття люку
встановiть машину в режим паузи натиснувшни на
кнопку ПУСК/ПАУЗА.
! Швидке блимання iндикаторної лампи ПУСК/ПАУЗА
(померанцевий) разом iз iндикаторною лампою функцiй вказує
на неполадку (див. “Несправностi та засоби їх лiквiдацiї”).
Як відкривати та закривати барабан
Мал. 1 Мал. 2
A) Відкриття верхньої кришки (Мал. 1):
Підійміть зовнішню кришку і повністю її відкрийте.
B) Відкриття барабану за допомогою двох рук, як
показано (Мал. 2) :
- натисніть на кнопку, вказану стрілкою на мал. 2,
з легким натисненням униз, притримуючи рукою,
щоб попередити відкриття дверцят і придавлення
пальців;
- притримайте дверцята, які розчіпляться і легко відкриються.
C) Завантаження білизни (Рис. 3).
D) Зачинення (Мал. 4).
- добре зачиніть барабан, спочатку опустивши
передні дверцята в поклавши на них задні;
- переконайтеся, що крючки передніх дверцят ідеально увійшли у гніздо задніх дверцят;
- після клацання, яке сповіщає про зчеплення,
злегка натисніть униз на обидві дверцята: вони не
повинні відчепитися;
- закрийте зовнішню кришку.
Як запустити програму
1. Увiмкнiть пральну машину, натиснувши на кнопку
УВIМКНЕННЯ/ВИМКНЕННЯ. Усi iндикаторнi лампи
увiмкнуться на декiлька секунд, потiм згаснуть та
почне блимати iндикаторна лампа ПУСК/ПАУЗА.
2. Завантажте бiлизну й закрийте люк.
3. Встановiть за допомогою ручки ПРОГРАМ бажану
програму.
4. Встановiть температуру прання (див. “Налаштування
пiд власнi потреби”).
5. Встановiть швидкiсть вiджиму (див. “Налаштування
пiд власнi потреби”).
6. Додайте миюч засоби та присадки (див. “Миючi засоби
та бiлизна”).
7. Виберiть бажанi функцiї.
8. Запустiть програму, натиснувши кнопку ПУСК/ПАУЗА
й вiдповiдна iндикаторна лампа загориться зеленим
свiтлом. Для скасування заданого циклу встановiть
машину в режим паузи, натиснувши кнопку ЗАПУСК/
ПАУЗА, та оберiть новий цикл.
9. Наприкiнцi програми почне свiтитися iндикаторна
лампа . iдкрити. Виймiть бiлизну та залиште люк
напiввiдкритим, щоб висушити барабан.
Вимкнiть пральну машину, натиснувши на кнопку
УВIМКНЕННЯ/ВИМКНЕННЯ.
UK
Мал. 3 Мал. 4
29
Page 30

UK
Програми
Таблиця програм
Опис циклу прання
Цикл прання
Автоматичні цикли
Бавовна + замочування: дуже забруднена білизна.
1
Бавовна: дуже забруднена білизна та стійка кольорова білизна.
2
Кольорова бавовна (3): злегка забруднена білизна та
3
делікатна кольорова білизна.
Синтетика: дуже забруднена стійка кольорова білизна.
4
Синтетика: злегка забруднена стійка кольорова білизна.
4
Mix 15’: швидко освіжити не дуже забруднений одяг (не
5
рекомендовано для вовни, шовку та одягу, який потребує
ручного прання).
Спеціальні цикли
Цикл дезінфікування: дуже забруднена білизна.
6
Цикл дезінфікування (1): дуже забруднена білизна та
6
стійка кольорова білизна.
Цикл дезінфікування (2): дуже забруднена білизна та
6
стійка кольорова білизна.
Цикл «На добраніч»: злегка забруднена делікатна кольорова білизна.
7
Сорочки
8
Шовк/ фіранки: для одягу з шовку та віскози, жіночої білизни.
9
Вовна: для вовни, кашеміру і таке інше.
10
Цикли Eco
11 Бавовна
12 Синтетика
13 Швидке прання
НЕПОВНІ ПРОГРАМИ
Полоскання
Віджимання
Злив
Тривалість циклу, вказана на дисплеї або в керівництві, разрахована на основі стандартних умов роботи. Фактичний час може залежати від чисельних факторів, таких як температура
і тиск подаваної води, температура у приміщенні, кількість миючого засобу, кількість і тип завантаженої білизни, зрівноваження завантаженої білизни, додаткові обрані опції.
Макс.
темп.
холодній
холодній
холодній
Макс.
швид-
кість
(ºС)
(об/хв)
90° 1000
60° 1000 -
40° 1000 -
60° 800 - -
40° 800 - -
30 800 - -
90° 1000 -
60° 1000 - -
40° 1000 - -
40° 800 - -
40° 600 - -
30° 0 - -
40° 800 - -
В
1000 - -
воді
В
воді
воді
800 - -
В
800 - -
- 1000 - - -
- 1000 - - - - 5
- 0 - - - - 5
Замо-
чування
Миючі засоби
Відбілювач
Пран-няПом’як-
-
шувач
Для всiх Установ з проведення випробувань:
1) Програма керування згiдно до норми EN 60456: встановiть програму 6 з температурою 60°C.
2) Довга програма бавовна: встановiть програму 6 з температурою 40°C.
3) Коротка програма бавовна: встановiть програму 3 з температурою 40°C.
Спеціальні цикли прання
Mix15’ (цикл прання 5). Цей цикл прання було розроблено для швидкого прання злегка забрудненого одягу: він
триває 15 хвилин, зберігаючи таким чином електроенергію та час. Обираючи цей цикл (5 при 30°C), Виможете прати
разом різні види тканини (окрім вовни та шовку), з максимальним завантаженням 1,5 кг.
Цикл дезінфікування (цикл прання 6). Гігієнічний цикл прання при високій температурі (більше 60°C), щопотребує
використання відбілювача. Налийте відбілювач, миючий засіб та добавки у відповідні відділення (див. розділ під
назвою «Дозатор миючого засобу»).
Цикл «На добраніч» (цикл прання 7). Це тихий цикл, яким можна користуватися вночі, коли ціни на електроенергію
менші. Цей цикл прання розрахований на бавовну та синтетику. Наприкінці циклу машина зупиняється, в той час
як у барабані залишається вода; для того, щоб віджати та висушити білизну, натисніть кнопку пуску/паузи (ПУСК/
ПАУЗА); у протилежному випадку машина знову автоматично виконає цикл віджимання та сушки через 8 годин.
Програми Eco
Програми Eco пропонують добру якість прання при низьких температурах із заощадженням електричної енергії, що
позитивно впливає на довкілля і забезпечує економічну вигоду користувачеві.
Програми Eco (Бавовна 11, Синтетика 12 і Швидке прання 30’ 13) призначені для різних типів тканин і для речей
з легкими забрудненнями. Для гарантованого оптимального результату рекомендується використовувати рідкий
пральний засіб; краще зробити попередню обробку манжетів, коміру і плям.
Макс.
заван-
таже
ння
(кг)
5
5
5
2,5
2,5
1,5
5
5
5
4
2
1
1
5
2,5
2,5
5
Трива-
лість
циклу
Тривалість циклів прання можна перевірити на дисплеї
30
Page 31

Налаштування пiд
власнi потреби
Встановлення темепратури
Натиснiть кнопку ТЕМПЕРАТУРА ви можете задати температуру прання (див. Таблицю програм).
Ви можете знижувати температуру аж до прання в холоднiй водi ( ).
Машина перешкоджатиме встановленню температури, яка перевищує максимально дозволену для кожної
конкретної програми.
Встановлення вiджиму
Натиснiть кнопку ВIДЖИМУ ви можете задати швидкiсть вiджиму обраної програми.
Максимальнi значення швидкостi, передбаченi для програм:
Програми Максимальна швидкiсть
Бавовна 1000 обертiв за хвилину
Синтетичнi тканини 800 обертiв за хвилину
Вовна 800 обертiв за хвилину
Шовк лише злив
Швидкiсть вiджиму можна зменшити чи виключити; оберiть для цього позначку .
Машина автоматично перешкоджатиме вiджиму, який перевищує максимально дозволенi значення для кожної
конкретної програми.
Функцiї
Рiзноманiтнi функцiї прання, передбаченi у пральнiй машинi, дозволяють отримати бажану чистоту та бiлизну
ваших речей.
Для активацiї функцiй:
1. натиснiть на кнопку бажаної функцiї;
2. запалення вiдповiдної iндикаторної лампи вказує не те, що функцiю активовано.
Примiтка: Швидке блимання iндикаторної лампи вказує на те, що вiдповiдну функцiю не можна обрати для заданої
програми.
UK
Вiдстрочений запуск
Для встановлення вiдстроченого запуску обраної програми натиснiть на кнопку декiлька разiв, доки не з’явиться
значення бажаного вiдстрочення (вiд 1 до 24 годин).
Для вiдключення функцiї натискайте на кнопку, доки не з’явиться надпис .
Увага: Пiсля натискання кнопки ЗАПУСК/ПАУЗА ви можете змiняти значення вiдстрочення тiльки зменшуючи його.
! Є активним iз усiма програмами.
Супер-прання
Завдяки використанню більшої кількості води на початковій фазі циклу і застосуванню більшої кількості часу, така
функція гарантує прання високої якості.
! Не активується у програмах 5, 6, 9, 10, 11, 12, 13, , , .
Додаткове полоскання
При виборі даної функції збільшується ефективність полоскання та гарантується максимальне видалення
миючого засобу. Вона є зручною для осіб зі шкірою, особливо чутливою до миючих засобів.
! Не активується у програмах 5, 13, , .
Полегшене прасування
З обранням такої функцiї прання та вiджим будуть вiдповiдно змiненi, щоб запобiгти утворенню складок.
Наприкiнцi циклу пральна машина виконає повiльнi оберти барабану;
iндикаторнi лампи функцiй ПОЛЕГШЕНОГО ПРАСУВАННЯ та ЗАПУСКУ/ПАУЗИ блиматимуть (помаранчевим
кольором), а на дисплеї запалиться надпис “ ”. Для завершення циклу натиснiть на кнопку ЗАПУСК/ПАУЗА або
на кнопку ПОЛЕГШЕНОГО ПРАСУВАННЯ.
У програмi “Шовк” машина закiнчить цикл iз замоченою бiлизною, iндикаторнi кнопки функцiї ПОЛЕГШЕНОГО
ПРАСУВАННЯ та ЗАПУСКУ/ПАУЗИ блиматимуть (помаранчевим кольором), а надпис ПОЛОСКАННЯ залишиться
запаленим. Щоб злити воду й отримати можливість витягнути білизну, натисніть на кнопку ПУСКУ/ПАУЗИ або
кнопку ПОЛЕГШЕНОГО ПРАСУВАННЯ.
! Не активується у програмах 5, 6, 7, 10, 11, 12, 13, , .
31
Page 32

Миючі засоби і білизна
UK
Дозатор миючого засобу
Хороші результати прання залежать також від
правильного дозування миючого засобу. Додавання
занадто великої кількості миючого засобу не обов’язково
приводить до більш ефективного прання, але може
викликати появу відкладень на внутрішніх поверхнях
машини й до забруднення навколишнього середовища.
Відкрийте дозатор
миючого засобу та
налийте миючий засіб і
пом’якшувач, наступним
способом.
відділення 1: Миючий засіб для замочування
відділення 2: Миючий засіб для циклу прання
(порошок та рідкий засіб) Рекомендується лити
рідкий миючий засіб безпосередньо до відділення,
застосовуючи відповідну чашку для дозування.
відділення 3: Додаткові засоби (пом’яшувач, і т.д.)
При наливанні пом’якшувача до відділення 3, уникайте
перевищення вказаного максимального
рівня. Пом’якшувач додається до машини автоматично
під час останнього прання. В кінці програми прання
деяка кількість води залишиться у відділенні 3. Вона
використовується для додавання до машини більш
густих пом’якшувачів, наприклад для розведення більш
концентрованих пом’якшувачів. Якщо у відділенні
3 залишиться більше нормальної кількості води, це
означає, що спорожнювання приладу заблоковано.
Інструкції з очищення Ви знайдете у розділі «Догляд та
обслуговування».
відділення 4: Відбілювач
Цикл відбілювання
Відбілювання можна здійснювати лише у циклах
прання 2, 3, 6.
Налийте відбілювач до відділення 4; налийте миючий
засіб та пом’якшувач до відповідних відділень, потім
оберіть один з вищезгаданих циклів прання.
Ця опція рекомендована тільки для дуже забруднених
бавовняних речей.
Підготовка білизни
• Роздiлiть бiлизну, враховуючи:
- тип тканини / позначку на етикетцi.
- кольори: вiдокремте кольоровi речi вiд бiлих.
• Перевірте кишені й ґудзики.
• Не перевищуйте вказанi значення щодо ваги сухої
бiлизни:
Стiйкi тканини: макс. 5 кг
Синтетичнi тканини: макс. 2,5 кг
Делiкатнi тканини: макс. 2 кг
Вовна: макс. 1 кг
Скільки важить білизна?
1 простирадло 400-500 г
1 наволочка 150-200 г
1 скатертина 400-500 г
1 махровий халат 900-1 200 г
1 рушник 150-250 г
Речі, що потребують спеціального догляду
Сорочки: застосовуйте спеціальні цикл прання 8 для
того, щоб прасувати сорочки з різної тканини та різних
кольорів. Це гарантує максимальний догляд за одягом
та зменшує формування загинів.
Шовк: для прання будь-якого шовкового одягу слід
використовувати спеціальний цикл прання 9. Ми
рекомендуємо використовувати спеціальні миючі засоби,
призначені для прання делікатних видів одягу.
Фіранки: ми рекомендуємо згорнути фіранки й скласти
їх у наволочку або сітчастий мішок. Слід використовувати
цикл прання 9.
Вовна: це єдиний виробник пральних машин, який був
нагороджений престижним передавальним написом
Woolmark Platinum Care (M.0508) компанії Woolmark, яка
означає, що всі предмети одягу з вовни можна прати в
пральній машині, навіть такі, які мають ярлик “тільки
для ручного прання” (тільки ручне прання). Цикл прання
10 можна використовувати для прання всіх вовняних
виробів в пральній машині (максимум 1 кг), гарантуючи
оптимальний режим прання.
Система балансування завантаженнÿ
Перед кожним віджимом, для запобігання надмірній
вібрації та для рівномірного розподілу навантаження,
барабан здійснює оберти на дещо більшій швидкості, ніж
швидкість прання. Якщо по закінченні декількох спроб
завантажені речі ще не були правильно відбалансовані,
машина здійснює віджим на швидкості, нижчій від
передбаченої. У випадку надмірної незбалансованості
пральна машина здійснює розподіл замість віджиму. З
метою оптимального розподілу завантаження та його
правильного балансування рекомендується одночасне
прання великих і малих речей.
32
Page 33

Запобіжні заходи та
поради
! Машину була спроектовано і вироблено у відповід-
ності з міжнародними нормами безпеки. Дані попередження складені для забезпечення безпеки і тому
їх треба уважно прочитати.
Загальна безпека
• Дане обладнання було розроблене виключно для
побутового використання.
• Цей електропобутовий прилад не має використовуватися дітьми або особами з обмеженими фізичними, сенсорними чи розумовими можливостями,
або якщо їм бракує досвіду та необхідних знань.
Винятки складають ситуації, коли користування
відбувається під наглядом або за вказівками осіб,
відповідальних за їхню безпеку.
Дорослі мають стежити, щоб діти не гралися з
електропобутовим приладом.
• Машина має використовуватися тільки повнолітніми особами і згідно з інструкціями, наведеними у
даній брошурі.
• Не торкайтеся машини голими ногами або мокрими
чи вологими руками й ногами.
• Вивід з експлуатації електропобутової техніки
Європейська директива 2002/96/CE з відходів від
електричної й електронної апаратури (RAEE), передбачає, що побутові електроприлади не можуть
перероблятися у звичайному порядку для твердих
міських відходів. Зняті з експлуатації побутові прилади мають бути зібрані окремо для оптимізації ступеню
відновлення й повторного застосування матеріалів,
що входять до їхнього складу, та з метою усунення
потенційної шкоди для здоров’я та довкілля. Символ
закресленого сміттєвого баку, зображений на всіх виробах, нагадує про необхідність окремої утилізації.
Щодо подальшої iнформацiї стосовно правильної
утилiзацiї електропобутових приладiв, власники можуть звернутися до вiдповiдних мiських служб або
до продавцiв.
Охорона і дбайливе відношення до довкілля
Технологія на службі у довкілля: заощадження
пральних засобів, води, енергії і часу
• Щоб не витрачати ресурси, необхідно завантажувати
пральну машину повністю. Повне завантаження у
порівнянні з двома половинними завантаженнями
заощаджує до 50% енергії.
UK
• Не виймайте вилку з електричної розетки, витягуючи її за шнур, тримайтеся тільки за саму вилку.
• Будьте обережні: вода, що зливається, може бути
дуже гарячою.
• У жодному випадку не застосовуйте силу до люку:
це може ушкодити запобiжний механiзм проти випадкових вiдкривань.
• В разі поломки забороняється проводити будь-які
дії з внутрішніми механізмами.
• Слiдкуйте, щоб дiти не наближалися до працюючої
машини.
• Пересування машини має здiйснюватися двома
або трьома особами за умови максимальної уваги.
Нi в якому разi - однiєю особою, тому що машина
дуже важка.
• Перш ніж завантажити білизну, перевірте, щоб
барабан був порожній.
Утилiзацiя
• Утилізація пакувального матеріалу: дотримуйтесь
місцевих норм, так як упаковка може використовуватися повторно.
• Попереднє прання необхідно тільки у випадках дуже
забрудненої білизни. Його уникнення заощаджує
пральний засіб, час, воду і від 5 до 15% енергії.
• При обробці плям за допомогою спеціальних засобів
або шляхом замочування зменшується необхідність
прання при високих температурах. Програма 60°C
замість 90°C, або 40°C замість 60°C призводить до
заощадження 50% енергії.
• Добре відмірюйте пральний засіб залежно від жорсткості води, ступеню забруднення і кількості білизни,
щоб уникнути зайвих витрачань і захистити довкілля:
незважаючи на те, що пральні засоби здатні біологічно руйнуватися, вони містять елементи, що змінюють
рівновагу довкiлля. Уникайте також використання
пом'якшувачів.
• Якщо Ви використовуєте Вашу пральну машину з
другої половини дня до ранніх годин ранку, Ви допоможете зменшити пік навантаження на електричні
мережі. Опція «Відкладеного пуску» допомагає організувати
• Якщо передбачається сушіння білизни у сушильній
машині, оберіть іншу швидкість віджиму. Невелика
кількість воду у білизні призведе до заощадження
часу і енергії у програмі сушіння.
33
Page 34
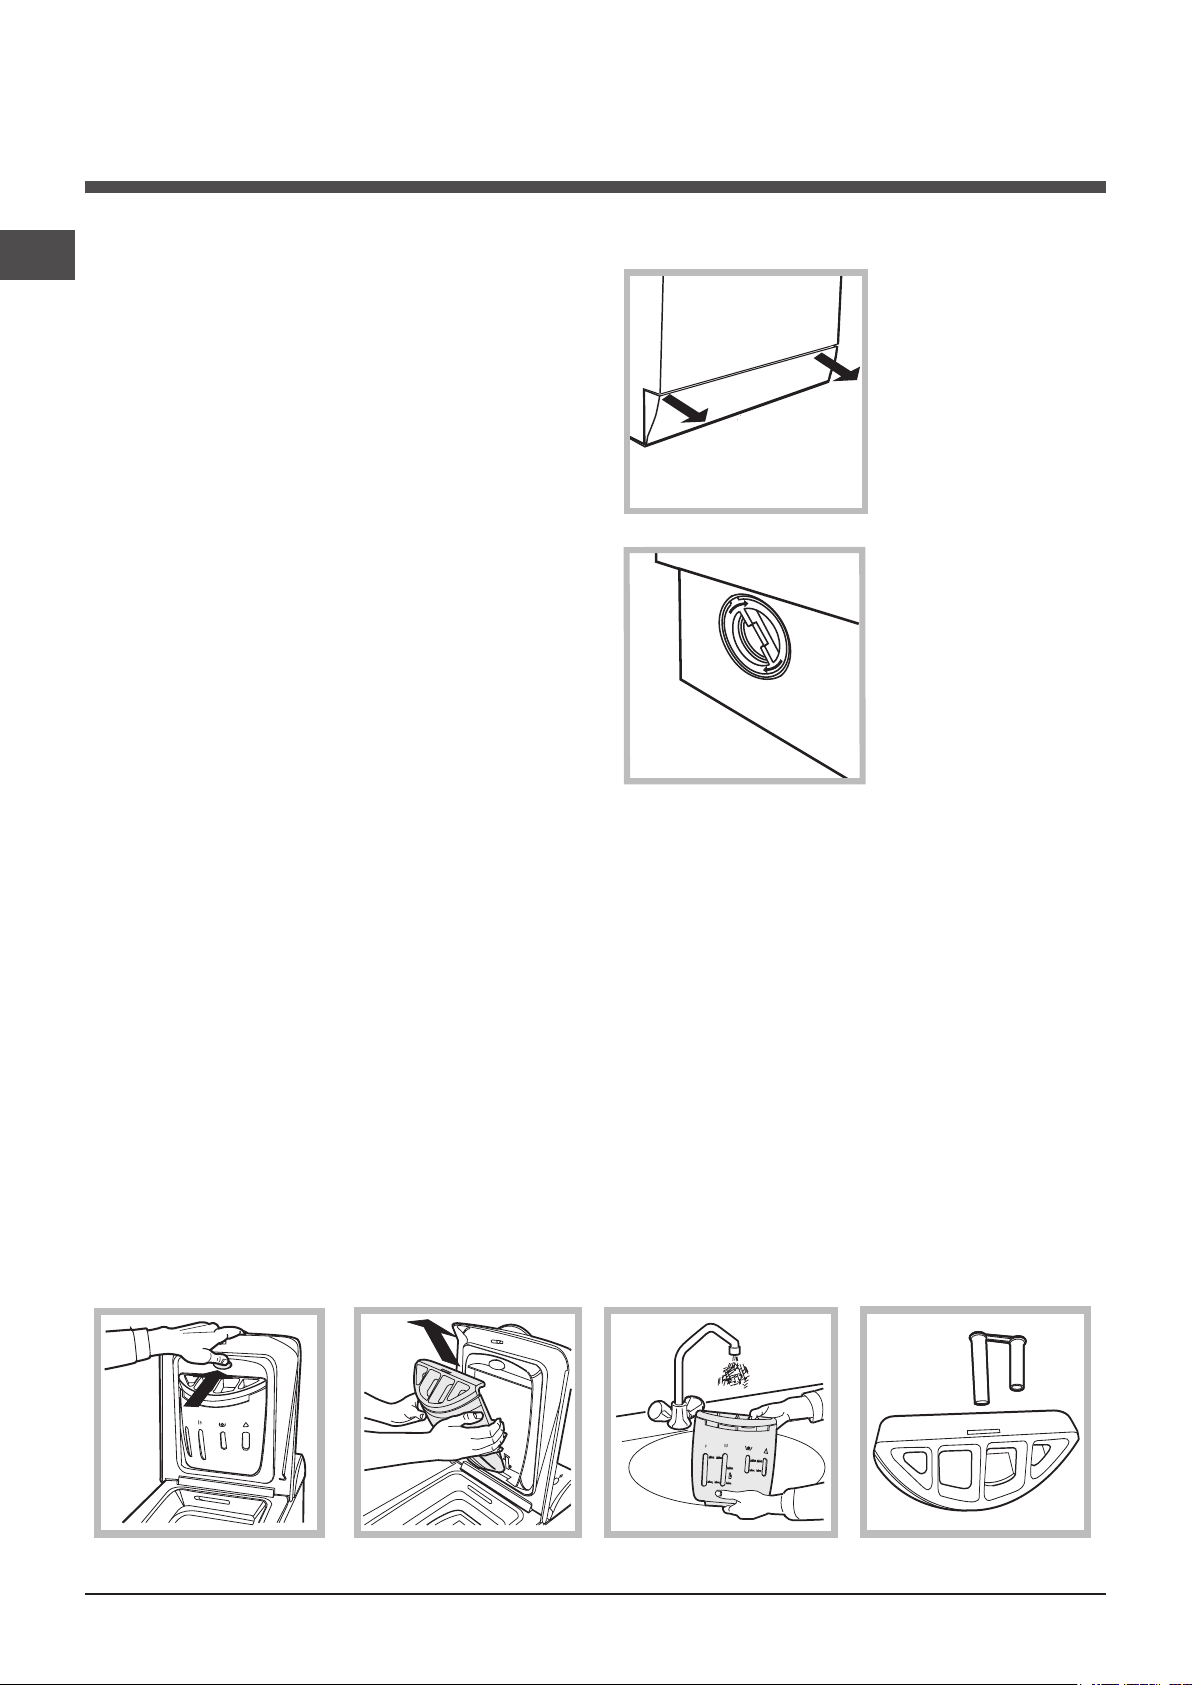
Технічне обслуговування та
догляд
UK
Виключення води й електричного живлення
• Закривайте водопровідний кран після кожного
прання. У такий спосіб зменшується знос гідравлічної частини машини й усувається небезпека
витоку.
• Виймайте вилку з розетки під час миття машини та
під час робіт з технічного обслуговування.
Очищення пральної машини
• Зовнішня частина і гумові деталі можуть бути вимиті ганчіркою, змоченою у теплому мильному роз-
чині. Не використовуйте розчинники або абразиви.
Догляд за кришкою та барабаном
• Завжди залишайте відкритою кришку, щоб запобігти утворенню неприємних запахів.
Миття насосу
Пральну машину обладнано насосом з автоматичною
чисткою, який не вимагає технічного обслуговування.
Може трапитися так, що малі предмети (монети, ґудзики) потраплять до форкамери, що захищає насос,
розташований у її нижній частині.
! Переконайтеся у тому, що цикл прання закінчено, і
витягніть вилку з розетки.
Щоб дістати речі, які потрапили до форкамери:
1. зніміть передню панель з пральної машини, потягнувши руками
з боків цоколю (див.
малюнок);
2. відкрутіть кришку,
обертаючи її проти
годинникової стрілки
(див. малюнок): виток
незначної кiлькостi води
є нормальним;
3. ретельно очистіть
всерединi;
4. накрутіть кришку;
5. встановіть панель
на місце, пересвідчіться у тому, що крюки
були вставлені у спеціальні петлі, пiсля чого
притиснiть її до машини.
Контроль труби для подачі води
! Не користуйтеся трубами, якi були вже у вживаннi.
Перевіряйте трубу для подачі води не менше одного
разу на рік. Якщо на ній є тріщини, вона підлягає заміні: під час прання високий тиск може призвести до
розірвання.
Демонтаж:
Злегка натисніть на кнопку, яка знаходиться попереду ємності для пральних засобів і потягніть
вгору (мал. 1).
Мал. 1
34
Чищення:
Промийте ємність під краном (мал. 3) за допомогою
звичайної зубної щітки, потім зніміть сифони з верхної
частини ванночок 1 і 2 (мал. 4), перевірте їх і ополосніть.
Мал. 2
Мал. 3 Мал. 4
Повторне
збирання:
Не забудьте повернути на
місце пару сифонів - у пази,
ємність - у власне гніздо,
зачіплюючи її (мал. 4, 2, 1).
Page 35

Несправності та засоби
їх усунення
Може трапитися так, що пральна машина не буде працювати. До того як зателефонувати у Сервiсний центр (див.
“Допомога”), перевірте, чи не є дана несправність проблемою, що легко вирішується, звернувшись до списку
нижче.
UK
Несправності:
Пральна машина не вмикається.
Цикл прання не розпочинається.
Пральна машина не завантажує
воду (швидко блимає iндикаторна
лампа першої фази прання).
Машина безперервно завантажує і
зливає воду.
Можливі причини/Рішення:
• Штепсель не вставлений в електричну розетку або вставлений не до кiнця.
• У будинку немає електроенергії.
• Погано закритий люк.
• Кнопку УВIМКНЕННЯ/ВИМКНЕННЯ не було натиснуто.
• Кнопку ПУСК/ПАУЗА не було натиснуто.
• Водопровідний кран закритий.
• Якщо вiдстрочення задане на час запуску (див. “Налаштування пiд
власнi потреби”).
• Шланг подачі води не підключено до водопровiдного крану.
• Перегин у шлангу.
• Водопровідний кран закритий.
• У водопроводі немає води.
• Недостатній тиск.
• Кнопку ПУСК/ПАУЗА не було натиснуто.
• Зливний шланг не знаходиться на відстані від 65 до 100 см від підлоги
(див. “Встановлення”).
• Кінець зливного шланга занурений у воду (див. “Встановлення”).
• Стiнний каналiзацiйний злив не має віддушини для виходу повiтря.
Якщо після таких перевірок проблема залишається, закрийте водопровідний
кран, вимкніть машину і зателефонуйте у Сервiсний центр. Якщо квартира
знаходиться на верхніх поверхах будинку, можливо, відбувається сифонний
ефект, при якому машина безперервно завантажує й зливає воду. Щоб його
ліквідувати, існують спеціальні антисифонні клапани, які можна придбати у
торговельній мережі.
Пральна машина не зливає воду чи
не вiджимає.
Пральна машина дуже вiбрує пiд
час вiджиму.
Пральна машина пропускає воду.
Iндикаторна лампа ПУСКУ/ПАУЗИ
(померанцева) та iндикаторнi лампи
рiзних функцiй швидко блимають.
Утворюється занадто багато піни.
• Програма не передбачає зливання: у деяких програмах його потрібно
вмикати вручну.
• Активовано функцiю “Полегшене прасування” для завершення програми
натиснiть на кнопку ПУСК/ПАУЗА (“Налаштування пiд власнi потреби”).
• Перегин зливного шланга (див. “Встановлення”).
• Засмітився зливний шланг.
• Барабан, у момент встановлення, не був правильно розблокований
(див. “Встановлення”).
• Машина стоїть не на плоскій поверхні (див. “Встановлення”).
• Машину затиснуто між меблями і стіною (див. “Встановлення”).
• Погано пригвинчений шланг подачі води (див. “Встановлення”).
• Забруднена касета для миючих засобів (як вимитидив. “Технічне
обслуговування і догляд”).
• Погано закріплений зливний шланг (див. “Встановлення”).
• Вимкніть машину й витягніть штепсель з розетки, зачекайте близько 1
хвилини й увімкніть її повторно.
Якщо несправність не усунено, зателефонуйте у Сервiсний центр.
• Миючий засіб не підходить для пральної машини (має бути напис “для
машинного прання”, “для ручного й машинного прання”, або подібний).
• Перевищена доза миючого засобу.
35
Page 36

UK
Допомога
195097277.00
11/2011 - Xerox Fabriano
Перш ніж телефонувати у Сервiсний центр:
• Перевірте, чи можна самостійно вирішити проблему
(див. “Несправності і засоби їх усунення”);
• Запустіть програму повторно, щоб перевірити чи усунено несправність;
• Якщо нi, зв’яжiться з авторизованим Сервiсним Центром, зателефонувавши за номером, вказаним у
гарантiйному свiдоцтвi.
! Звертайтеся виключно до уповноважених фахівців.
Повідомити:
• тип несправності;
• модель машини (Мод.);
• серійний номер (С/Н).
Цю iнформацiю ви знайдете на заводськiй табличцi позаду пральної машини та в її переднiй частинi, якщо ви
вiдкриєте люк.
36
 Loading...