

Page 1

Instructions for use
WASHING MACHINE
GB
English,1
Ελληνικά, 13
SB
Cрпски, 37
ECOT6L 85
GR
UK
Українська, 25
Contents
Installation, 2-3
Unpacking and levelling
Connecting the electricity and water supplies
The first wash cycle
Technical data
Description of the washing machine
and starting a wash cycle, 4-5
Control panel
Indicator lights
How to open and shut the drum
Starting a wash cycle
Wash cycles, 6
Table of wash cycles
Personalisation, 7
Setting the temperature
Setting the spin speed
Functions
Detergents and laundry, 8
Detergent dispenser drawer
Bleach cycle
Preparing the laundry
Garments requiring special care
Load balancing system
GB
Precautions and tips, 9
General safety
Disposal
Saving energy and respecting the environment
Care and maintenance, 10
Cutting off the water or electricity supply
Cleaning the washing machine
Caring for your appliance door and drum
Cleaning the pump
Checking the water inlet hose
How to clean the detergent dispenser
Troubleshooting, 11
Service, 12
1
Page 2
Installation
GB
! Keep this instruction manual in a safe place for future
reference. Should the appliance be sold, transferred or
moved, make sure the instruction manual accompanies
the washing machine to inform the new owner as to its
operation and features.
! Read these instructions carefully: they contain vital infor-
mation on installation, use and safety.
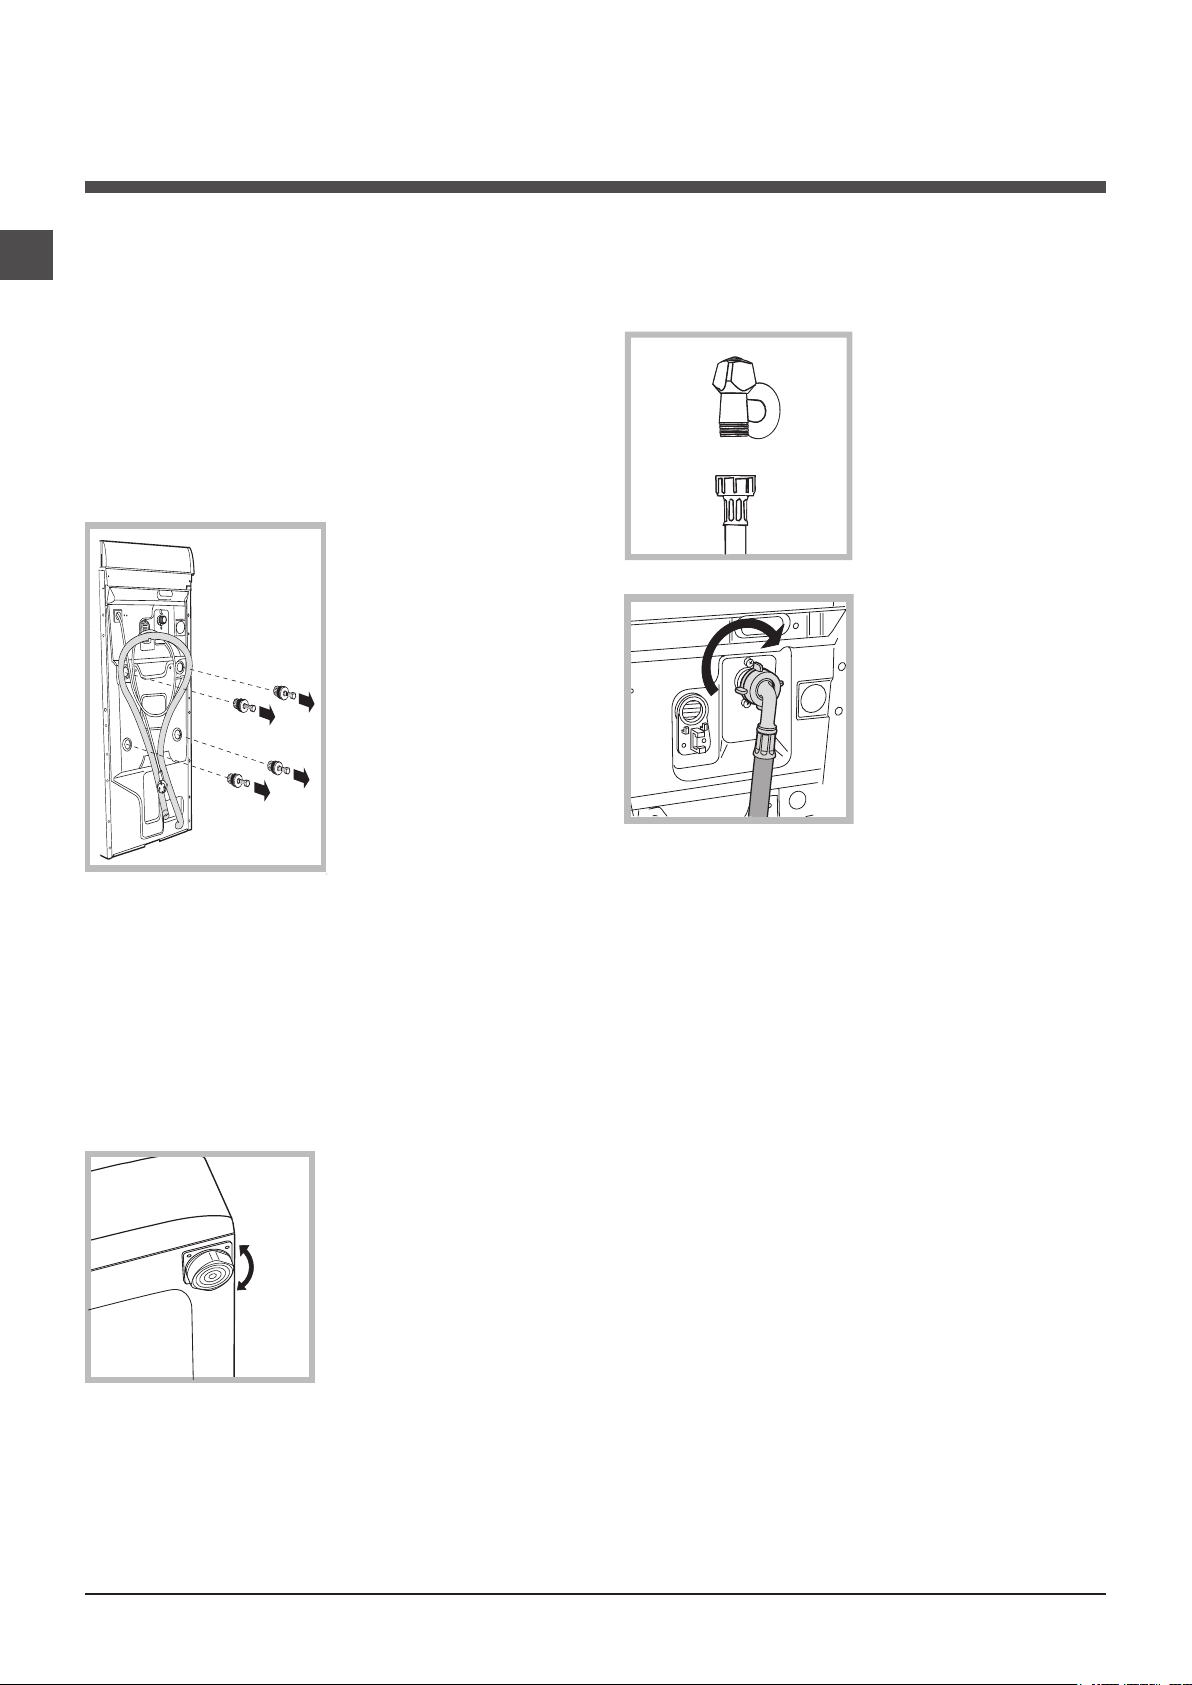
Unpacking and levelling
Unpacking
1. Unpack the washing
machine.
2. Check whether the
washing machine has
been damaged during
transport. If this is the
case, do not install it and
contact your retailer.
3. Remove the four
protective screws and
the rubber washer with
the respective spacer,
situated on the rear of the
appliance (see figure).
4. Seal the gaps using the
plastic plugs provided.
5. Keep all the parts: you will need them again if the washing machine needs to be moved to another location.
Electric and water connections
Connecting the water inlet hose
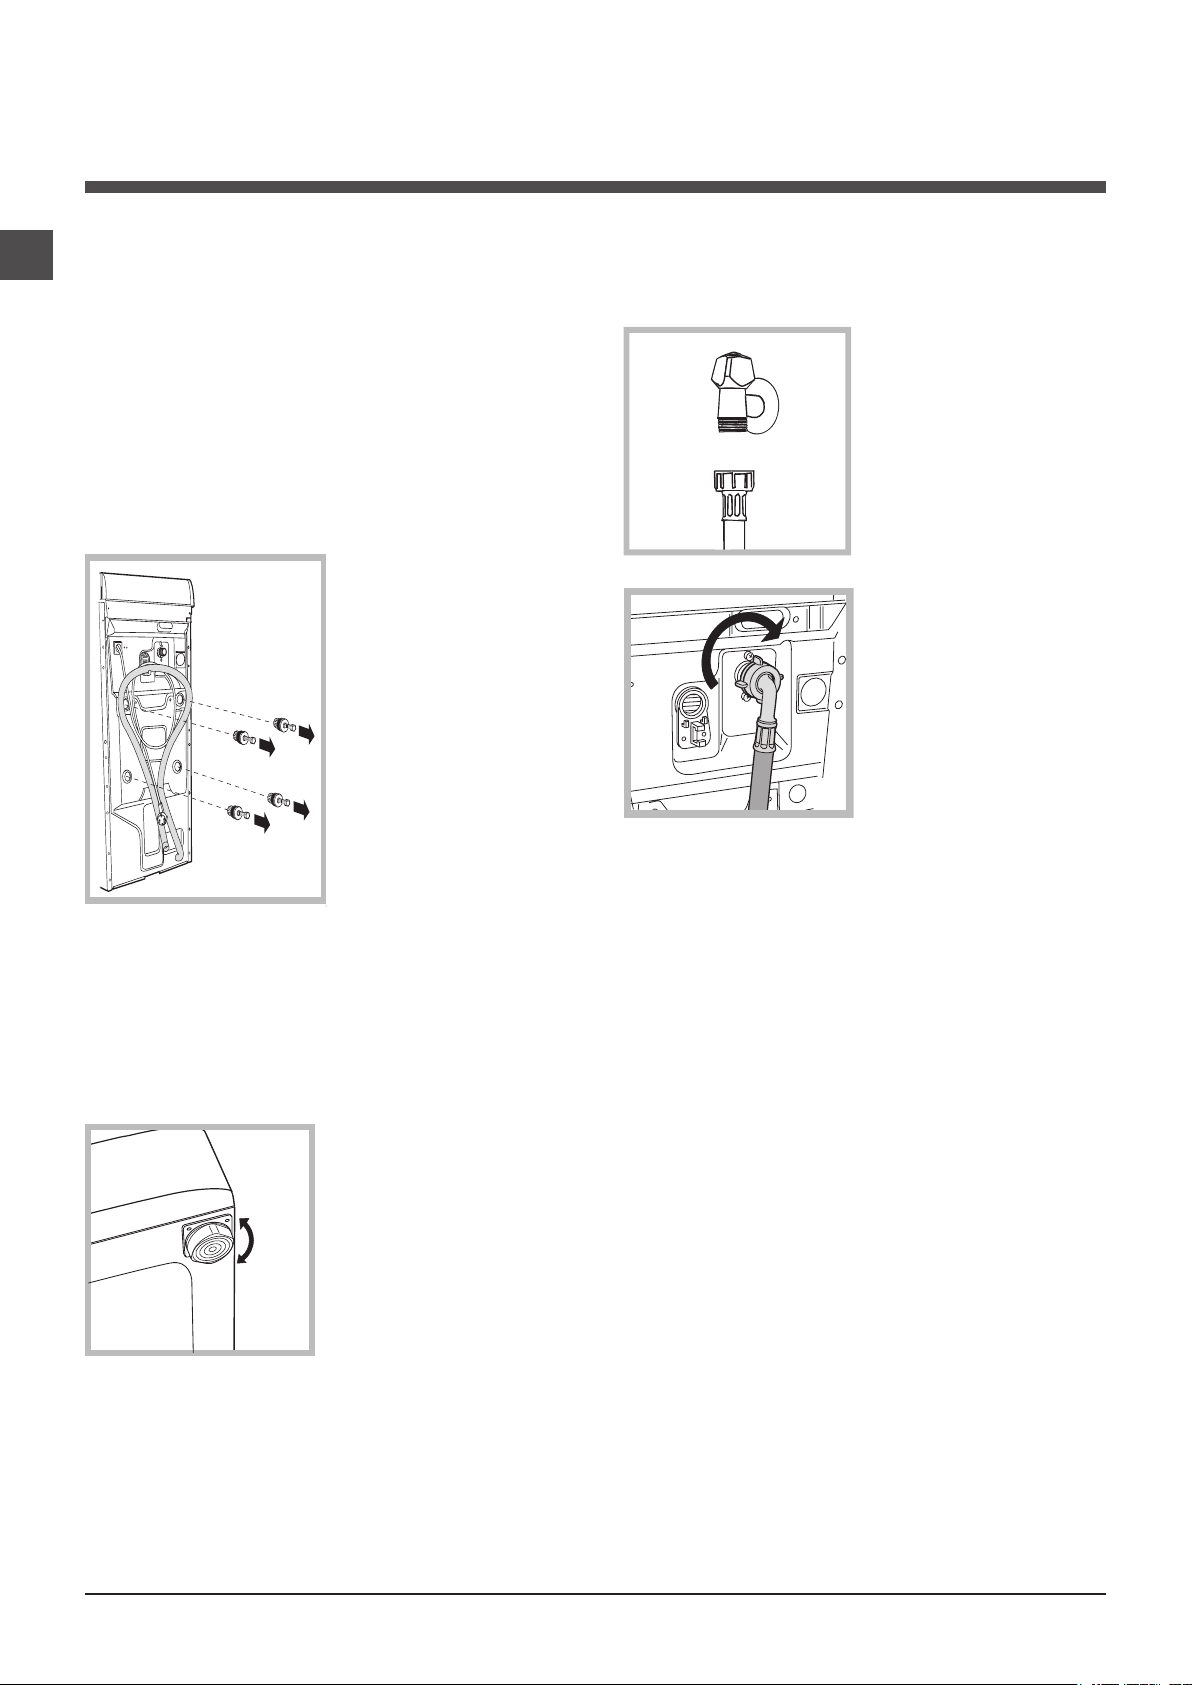
1. Connect the supply pipe
by screwing it to a cold water
tab using a ¾ gas threaded
connection (see figure).
Before performing the connection, allow the water to run
freely until it is perfectly clear.
2. Connect the other end of
the water inlet hose to the
washing machine, screwing
it onto the appliance’s cold
water inlet, situated on the
top right-hand side on the
rear of the appliance (see
figure).
3. Make sure there are no kinks or bends in the hose.
! The water pressure at the tap must be within the values
indicated in the Technical details table
(on the next page).
Warning: should the screws be re-used, make sure you fasten
the shorter ones at the top.
! Packaging materials are not children’s toys.
Levelling
Your machine may make a considerable amount of noise if
the two front feet have not been adjusted correctly.
1. Install the washing machine on a flat sturdy floor,
without resting it up against
walls, furniture cabinets or
other.
2. If the floor is not perfectly
level, compensate for any
unevenness by tightening
or loosening the adjustable
front feet (see figure); the
angle of inclination, measured according to the worktop, must not exceed 2°.
Levelling your appliance correctly will provide it with stability and avoid any vibrations, noise and shifting during
operation. If it is placed on a fitted or loose carpet, adjust
the feet in such a way as to allow enough room for ventilation beneath the washing machine.
! If the water inlet hose is not long enough, contact a spe-
cialist store or an authorised serviceman.
2
Page 3
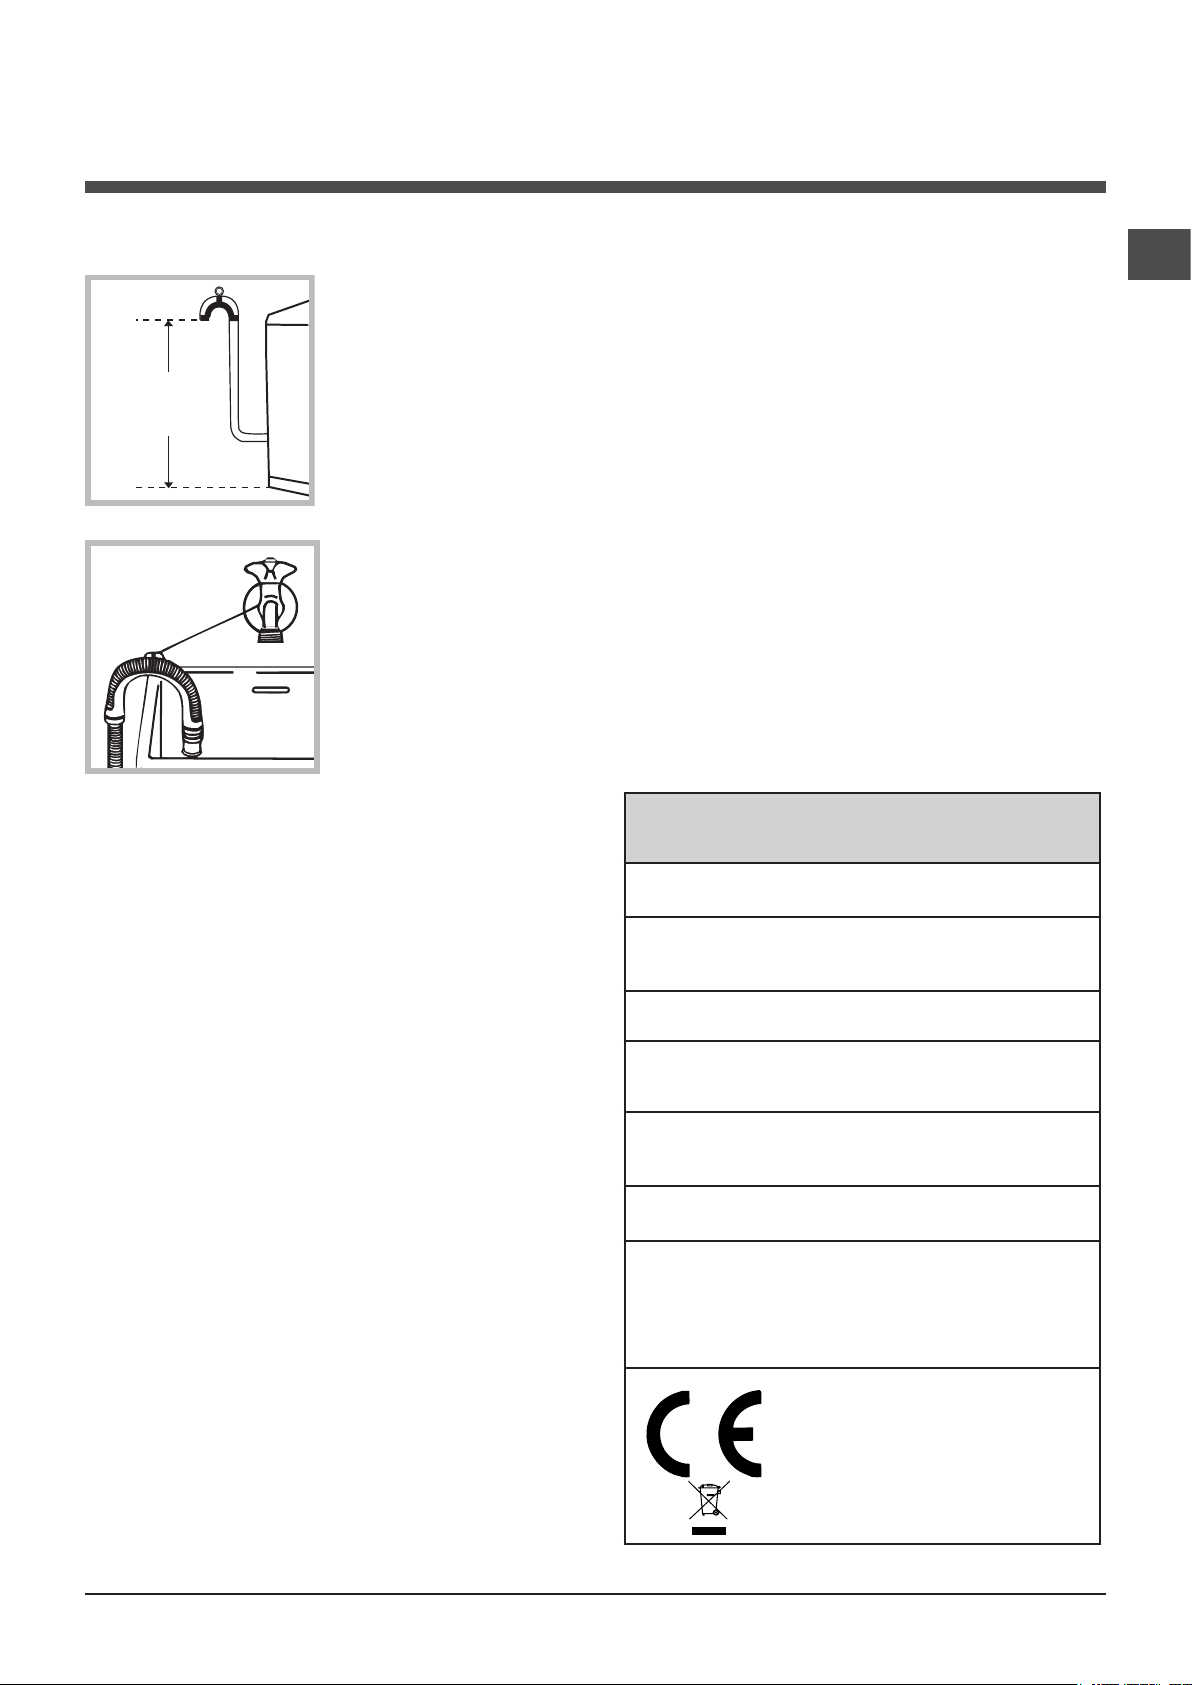
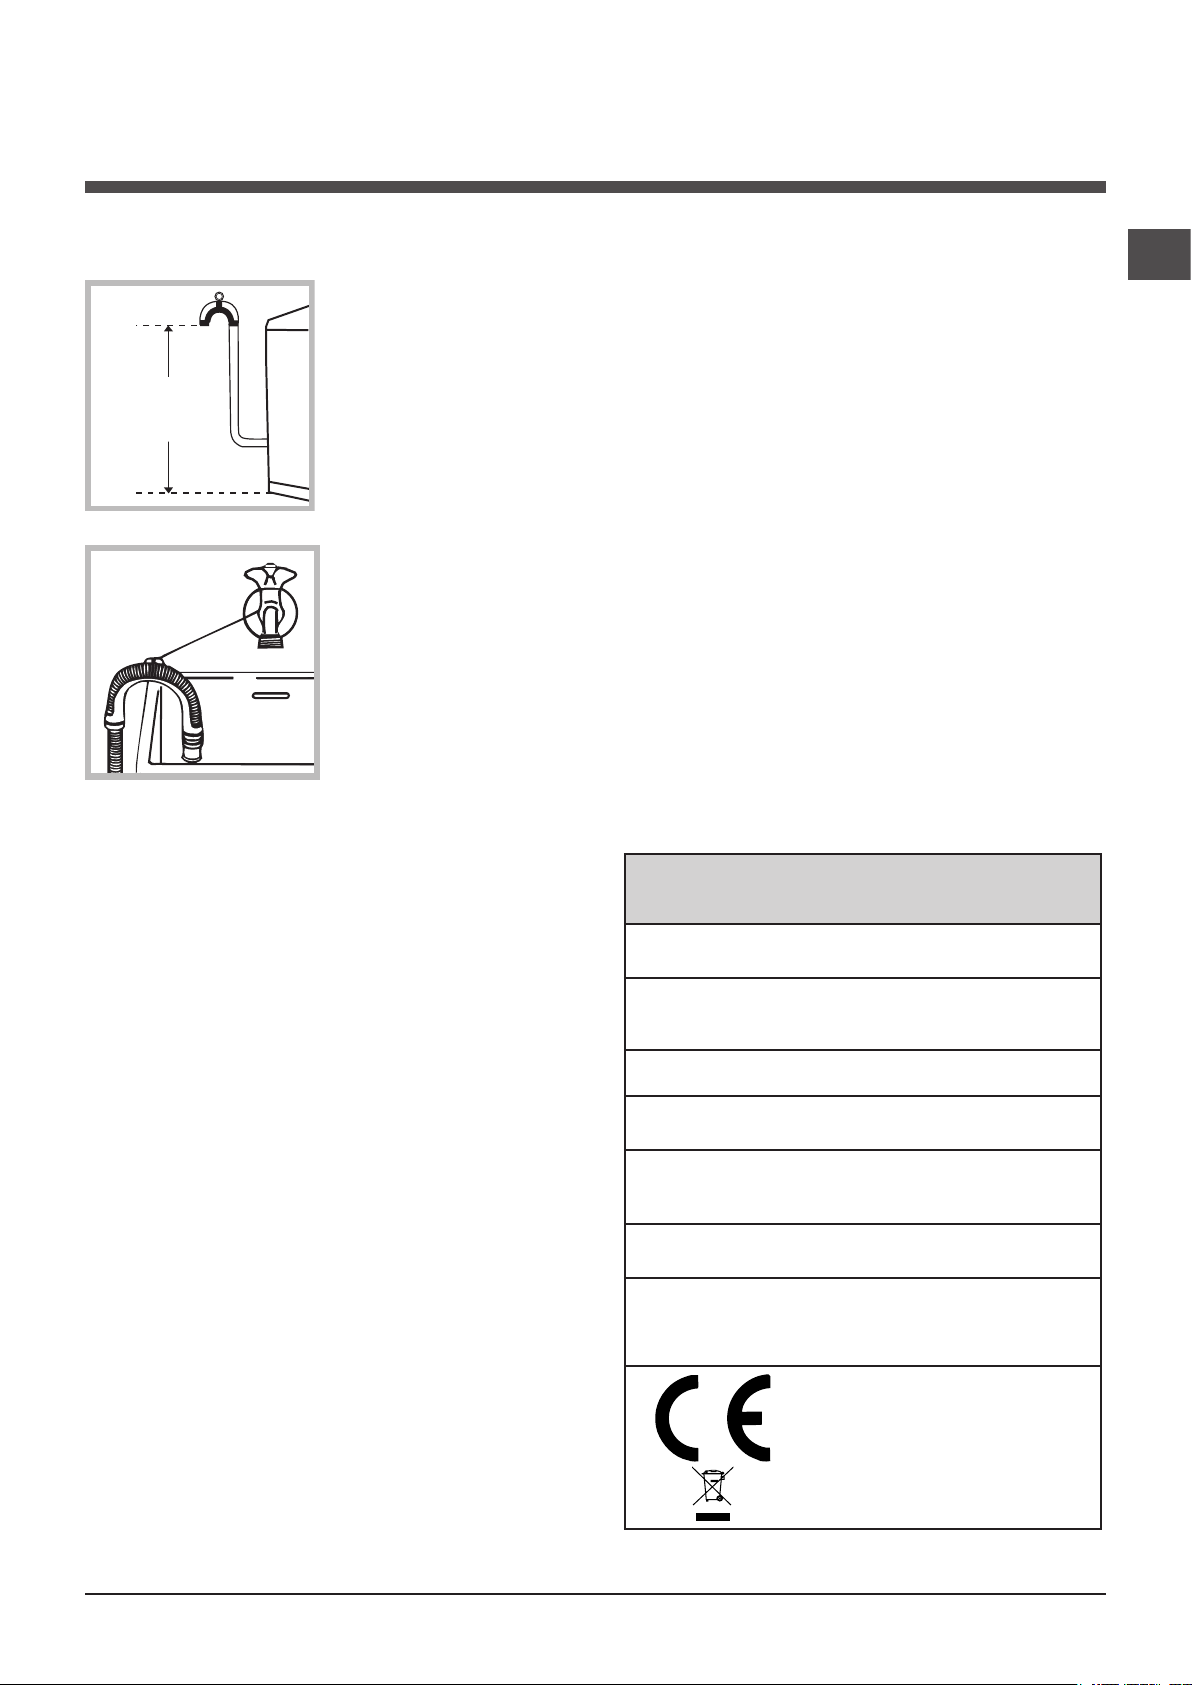
Connecting the drain hose
65 - 100 cm
Connect the drain hose,
without bending it, to a
drainage duct or a wall
drain located at a height
between 65 and 100 cm
from the floor;
! Do not use extension cords or multiple sockets.
! The cable should not be bent or compressed.
! The power supply cable must only be replaced by autho-
rised technicians.
Warning! The company shall not be held responsible in the
event that these regulations are not respected.
The first wash cycle
GB
alternatively, rest it on
the side of a washbasin
or bathtub, fastening the
duct supplied to the tap
(see figure). The free end
of the hose should not be
underwater.
! We advise against the use of hose extensions; if it is
absolutely necessary, the extension must have the same
diameter as the original hose and must not exceed 150 cm
in length.
Electrical connections
Before plugging the appliance into the electricity socket,
make sure that:
• the socket is earthed and complies with all applicable
laws;
• the socket is able to withstand the maximum power load
of the appliance as indicated in the Technical data table
(see opposite);
• the power supply voltage falls within the values indicated
in the Technical data table (see opposite);
• the socket is compatible with the plug of the washing
machine. If this is not the case, replace the socket or the
plug.
! The washing machine must not be installed outdoors,
even in covered areas. It is extremely dangerous to leave
the appliance exposed to rain, storms and other weather
conditions.
! When the washing machine has been installed, the elec-
tricity socket must be within easy reach.
Once the appliance has been installed, and before you use
it for the first time, run a wash cycle with detergent and no
laundry, using the wash cycle 2.
Technical details
Model
Dimensions
Capacity
Electric
connections
Water
connections
Spin speed
Control
programmes
according to
1061/2010
directive
ECOT6L 85
40 cm wide
85 cm high
60 cm deep
from 1 to 6 kg
Please refer to the technical data plate
fixed to the machine.
maximum pressure 1 MPa (10 bar)
minimum pressure 0.05 MPa (0.5 bar)
drum capacity 42 litres
up to 800 rpm
programme 6; temperature 60°C and
40°C.
This appliance is compliant with
the following European Community
Directives:
- 2004/108/CE (Electromagnetic
Compatibility)
- 2006/95/CE (Low Voltage)
- 2002/96/CE
3
Page 4
Description of the washing
machine and starting a wash cycle
GB
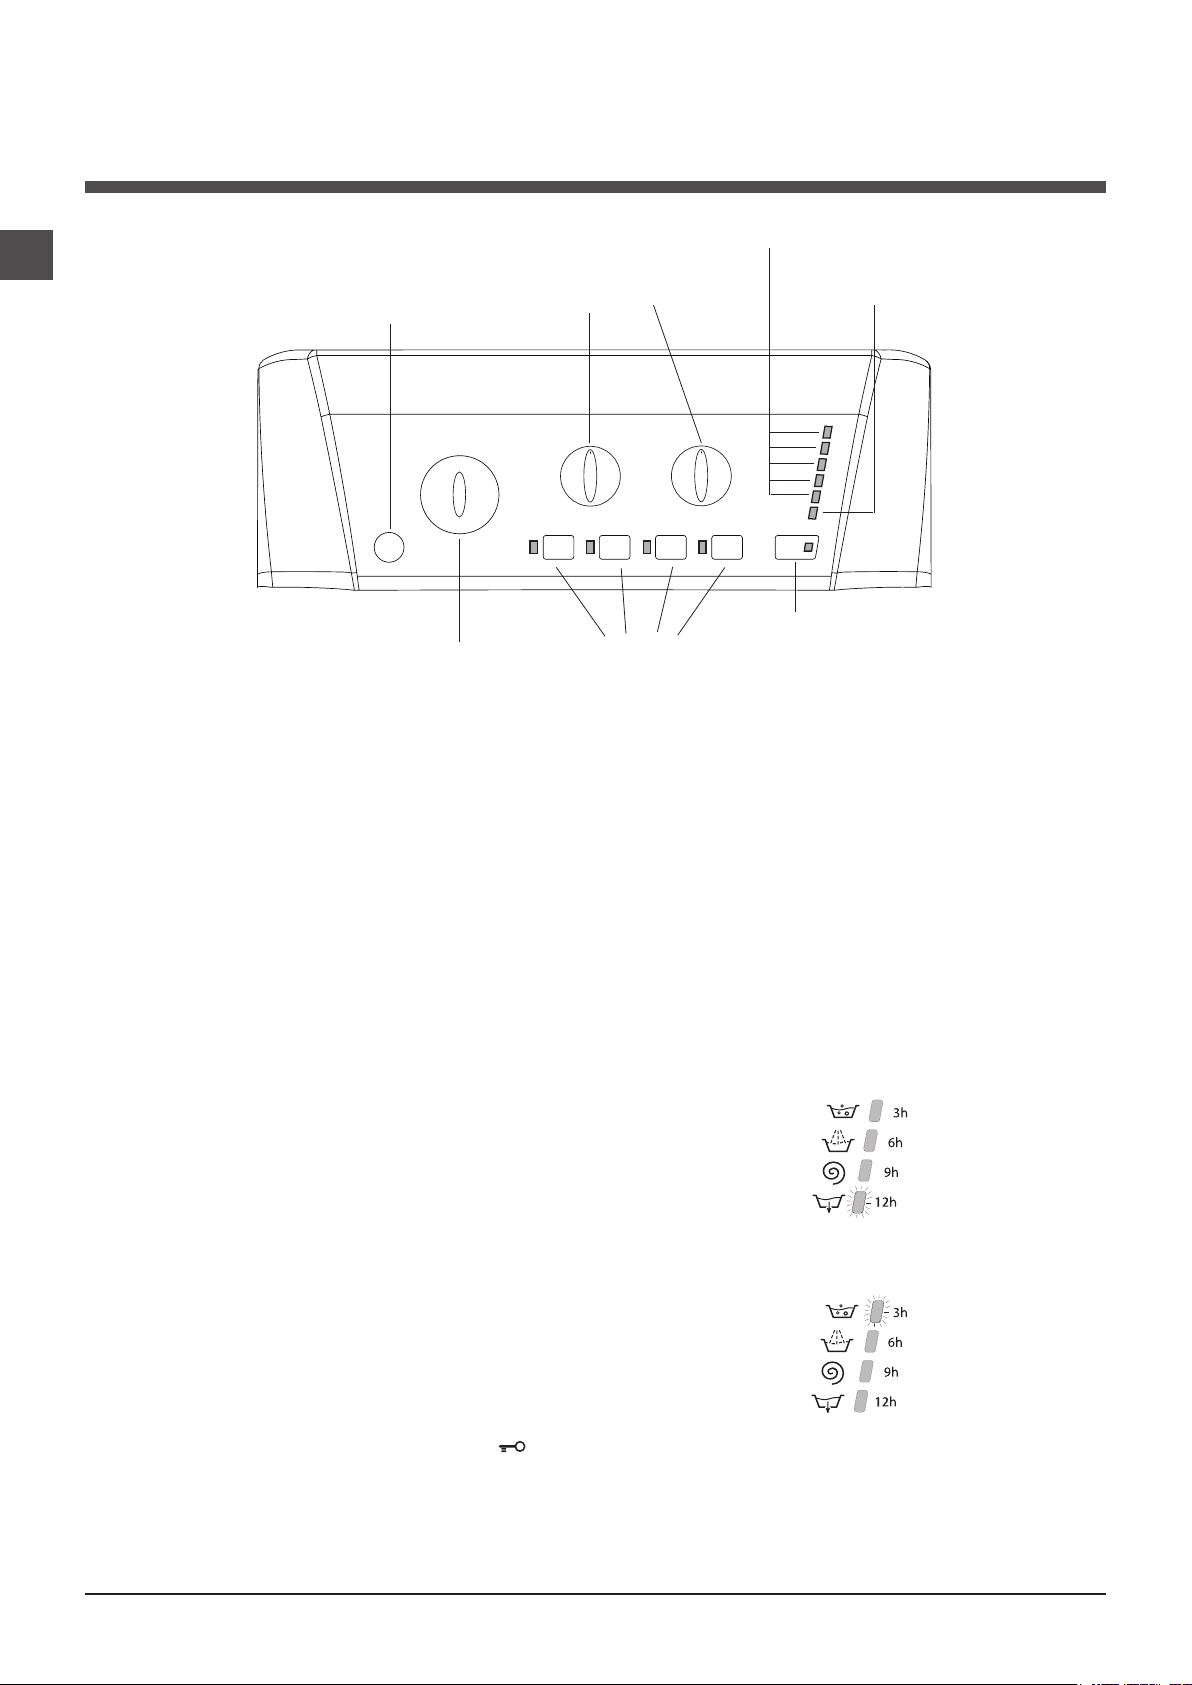
Control panel
ON/OFF
ON/OFF button: switches the washing machine on and off.
WASH CYCLE knob: programmes the wash cycles. Du-
ring the wash cycle, the knob does not move.
FUNCTION buttons with indicator light: used to select the
available functions. The indicator light corresponding to the
selected function will remain lit.
TEMPERATURE knob: sets the temperature or the cold
wash cycle (see “Personalisation”).
SPIN SPEED knob: sets the spin speed or exclude the
spin cycle completely (see “Personalisation”).
WASH CYCLE PROGRESS/DELAY TIMER
light
s: used to monitor the progress of the wash cycle.
The illuminated indicator light shows which phase is in
progress. If the Delay Timer function has been set, the time
remaining until the wash cycle starts will be indicated (see
next page).
button
WASH CYCLE
TEMPERATURE
knob
knob
indicator
SPIN SPEED
knob
FUNCTION
buttons with
indicator lights
Standby mode
This washing machine, in compliance with new energy saving regulations, is fitted with an automatic standby system
which is enabled after about 30 minutes if no activity is
detected. Press the ON-OFF button briefly and wait for the
machine to start up again.
Indicator lights
The indicator lights provide important information.
This is what they can tell you:
Delayed start
If the DELAY TIMER function has been activated (see “Personalisation”), after the wash cycle has been started the
indicator light corresponding to the selected delay period
will begin to flash:
WASH CYCLE PROGRESS/
DELAY TIMER indicator lights
LID LOCKED
indicator light
START/PAUSE
button with indicator
light
LID LOCKED indicator light: indicates whether the door
may be opened or not (see next page).
START/PAUSE button with indicator light: starts or temporarily interrupts the wash cycles.
N.B. To pause the wash cycle in progress, press this
button; the corresponding indicator light will flash orange,
while the indicator light for the current wash cycle phase
will remain lit in a fixed manner. If the LID LOCKED
indicator light is switched off, the door may be opened. To
start the wash cycle from the point at which it was interrupted, press this button again.
4
As time passes, the remaining delay will be displayed and
the corresponding indicator light will flash:
Once the set delay has elapsed, the flashing indicator light will
switch off and the selected wash cycle will begin.
Wash cycle phase indicator lights
Once the desired wash cycle has been selected and has begun, the indicator lights switch on one by one to indicate which
phase of the cycle is currently in progress.
Page 5
Wash
Rinse
Spin
Drain
End of wash cycle
Function buttons and corresponding indicator lights
When a function is selected, the corresponding indicator
light will illuminate.
If the selected function is not compatible with the programmed wash cycle, the corresponding indicator light will flash
and the function will not be activated.
If a function which is incompatible with another function
selected previously, only the most recent selection will
remain active.
Lid locked indicator light
If this indicator light is on, the appliance door is locked to prevent
it from being opened accidentally; to avoid any damage, wait for
the indicator light to switch off (it will take about three minutes)
before you open the appliance door.
N.B. If the DELAY TIMER function is activated, the door
cannot be opened; pause the machine by pressing the
START/PAUSE button if you wish to open it.
! If the START/PAUSE indicator light (orange) flashes
rapidly at the same time as the function indicator light, this
indicates a problem has occurred (see “Troubleshooting”).
How to open and to close the drum
Fig. 1
Fig. 2
A) Opening (Fig. 1):
Lift the external lid and open it completely.
B) Then open the drum using both hands as
shown in Fig.2:
- press the button indicated by the arrow in fig. 2
lightly downwards, with one hand firmly resting on
the doors to prevent them from suddenly opening
and hurting your fingers;
- therefore follow the appliance doors along as these
unhook and open easily.
C) Loading the washing machine (Fig. 3).
D) Shutting (Fig. 4):
- close the drum fully by first shutting the front
door followed by the rear one;
- then ensure the hooks on the front door are
perfectly housed within the seat of the rear door;
- after the hooks have clicked into position, press
both doors lightly downwards to make sure they do
not come loose;
- finally shut the external lid.
Starting a wash cycle
1. Turn the washing machine on by pressing the
ON/OFF button. All the indicator lights will turn on for a few
seconds, then only the indicator lights relative to the selected
programme settings will remain lit and the START/PAUSE
indicator light will flash.
2. Load the laundry, close the door and the lid.
3. Set the WASH CYCLE knob to the desired programme.
4. Set the washing temperature (see “Personalisation”).
5. Set the spin speed (see “Personalisation”).
6. Measure out the detergent and washing additives (see
“Detergents and laundry”).
7. Select the desired functions.
8. Start the wash cycle by pressing the START/PAUSE button
and the corresponding indicator light will remain lit in a fixed
manner, in green.
To cancel the set wash cycle, pause the machine by pressing
the START/PAUSE button and select a new cycle.
9. At the end of the wash cycle the indicator light will
switch on. The LID LOCKED indicator light will switch off,
indicating that the door may be opened. Take out your
laundry and leave the appliance door ajar to make sure the
drum dries completely.
Switch the washing machine off by pressing the ON/OFF
button.
GB
Fig. 3
Fig. 4
5
Page 6
GB
Wash cycles
Table of wash cycles
Description of the wash cycle
Wash cycles
Essentials cycles
Cotton + Prewash: extremely soiled whites.
1
Cotton: heavily soiled whites and resistant colours.
2
Coloured cottons (3): lightly soiled whites and delicate colours.
3
Synthetics: heavily soiled resistant colours.
4
Synthetics (4): lightly soiled resistant colours.
4
Mix 15’: to refresh lightly soiled garments quickly (not suitable for wool,
5
silk and clothes which require washing by hand).
Special cycles
Sanitizing cycle: extremely soiled whites.
6
Sanitizing cycle (1-2): heavily soiled whites and resistant colours.
6
Sanitizing cycle (2): lightly soiled whites and resistant colours.
6
Goodnight cycle: lightly soiled delicate colours.
7
Shirts
8
Silk/Curtains: for garments in silk and viscose, lingerie.
9
Wool: for wool, cashmere, etc.
10
Eco cycles
11
Cottons
12
Synthetics
13
Fast Wash
Partials cycles
Rinse - 800 - - -
Spin - 800 - - - -
Pump out - 0 - - - -
The length of cycle shown on the display or in this booklet is an estimation only and is calculated assuming standard working conditions. The actual duration can vary according to factors such as water temperature and pressure, the amount of detergent used, the amount and type of load inserted, load balancing and any wash options selected.
For all Test Institutes:
1) Test wash cycle in compliance with regulation 1061/2010: set wash cycle 6 with a temperature of 60°C and 40°C.
2) Long wash cycle for cottons: set wash cycle 6 with a temperature of 40°C.
3) Short wash cycle for cottons: set wash cycle 3 with a temperature of 40°C.
4) Long wash cycle for synthetics: set wash cycle 4 with a temperature of 40°C.
Max.
temp.
Cold
Water
Cold
Water
Cold
Water
Max.
speed
(°C)
(rpm)
Prewash Bleach Wash
90° 800
60° 800 -
40° 800 -
60° 800 - -
40° 800 - -
30° 800 - -
90° 800 -
60° 800 - -
40° 800 - -
40° 800 - -
40° 600 - -
30° 0 - -
40° 800 - -
800 - -
800 - -
800 - -
Specials wash cycles
Mix 15’ (wash cycle 5) this wash cycle was designed to wash lightly soiled garments quickly: it lasts just 15 minutes and therefore
saves both energy and time. By selecting this wash cycle (5 at 30°C), it is possible to wash different fabrics together (except
for wool and silk items), with a maximum load of 1.5 kg.
Sanitizing cycle (wash cycle 6). A high-temperature hygienic wash cycle (over 60°C) which requires the use of bleach. Pour the
bleach, the detergent and the additives into the relevant compartments (see paragraph entitled “Detergent dispenser drawer”).
Goodnigt cycle (wash cycle 7). This is a silent cycle which can be run at night, when the electricity prices are lower. The wash
cycle is designed for cottons and synthetics. At the end of the cycle the machine stops while there is still water in the drum; to
spin and drain the laundry press the START/PAUSE button; alternatively the machine will perform the spin cycle and drain the
water automatically after 8 hours.
Detergents
softener
-
Fabric
Max.
Cycle
load
duration
(kg)
6 160
6 135
6 90
2,5 105
2,5 95
1,5 15
6 180
6 185
6 175
4 280
2 80
1 55
1 65
6 80
3 70
3 30
6 40
6 15
6 2
Eco cycles
The Eco Cycles assure energy saving by eliminating the need of heating water and it’s an advantage both to your
energy bill and the environment! These innovative Eco programmes (Cotton 11, Synthetics 12 and Fast Wash 13) are
available for various fabrics and different quantity of garment; they have been designed to guarantee a high cleaning
action even at low temperature and can be used for lightly to medium soiled loads.
Eco Cycles give the best results thanks to an intensified wash action, water optimization and are carried out in the same average time of a standard cycle. For the best washing results with Eco Cycles we recommend the usage of a liquid detergent.
6
Page 7

Personalisation
Setting the temperature
Turn the TEMPERATURE knob to set the wash temperature (see Table of wash cycles).
The temperature may be lowered, or even set to a cold wash ( ).
The washing machine will automatically prevent you from selecting a temperature which is higher than the maximum value
set for each wash cycle.
Setting the spin speed
Turn the SPIN SPEED knob to set the spin speed for the selected wash cycle.
The maximum spin speeds available for each wash cycle are as follows:
Wash cycles Maximum spin speed
Cottons 800 rpm
Synthetics 800 rpm
Wool 800 rpm
Silk drain only
The spin speed may be lowered, or the spin cycle can be excluded altogether by selecting the symbol .
The washing machine will automatically prevent you from selecting a spin speed which is higher than the maximum speed
set for each wash cycle.
Functions
The various wash functions available with this washing machine will help to achieve the desired results, every time.
To activate the functions:
1. Press the button corresponding to the desired function;
2. the function is enabled when the corresponding indicator light is illuminated.
Note: If the indicator light flashes rapidly, this signals that this particular function may not be selected in conjunction with the
selected wash cycle.
GB
Super Wash
Because a greater quantity of water is used in the initial phase of the cycle, and because of the increased cycle duration, this
function offers a high-performance wash.
! This function may not be used in conjunction with wash cycles 5, 6, 9, 10, 11, 12, 13, , , .
Extra rinse
By selecting this function, the efficiency of the rinse is increased and optimal detergent removal is guaranteed. It is particularly
useful for sensitive skin.
! This function may not be used in conjunction with wash cycles 5, 13, , .
Easy iron
By selecting this function, the wash and spin cycles will be modified in order to reduce the formation of creases. At the end of
the cycle the washing machine will perform slow rotations of the drum.
For the 9 wash cycle, the machine will end the cycle while the laundry is soaking, the EASY IRON and START/PAUSE indicator lights will flash (orange) and the RINSE phase will remain lit in a fixed manner. To drain the water so that the laundry may
be removed, press the START/PAUSE button or the EASY IRON button.
! This function may not be used in conjunction with wash cycles 5, 6, 7, 10, 11, 12, 13, , .
Delay timer
This timer delays the start time of the wash cycle by up to 12 hours.
Press the button repeatedly until the indicator light corresponding to the desired delay time switches on. The fifth time the button
is pressed, the function will be disabled.
N.B. Once you have pressed the START/PAUSE button, the delay time may only be decreased if you wish to modify it.
! This option is enabled with all programmes.
7
Page 8
Detergents and laundry
GB
Detergent dispenser drawer
Good washing results also depend on the correct dose of
detergent: adding too much detergent won’t necessarily
make for a more efficient wash, and may in fact cause build
up on the interior of your appliance and even pollute the
environment.
Open up t he detergent
dispenser and pour in the
detergent and fabric softener, as follows.
compartment 1: Detergent for pre-wash
compartment 2: Detergent for the wash cycle
(powder or liquid)
It is recommended that you place liquid detergent directly into
the compartment using the appropriate dosing cup.
compartment 3: Additives (softener, etc.)
When pouring the softener in compartment 3, avoid exceeding the “max” level indicated.
The softener is added automatically into the machine during
the last wash. At the end of the wash programme, some
water will be left in compartment 3. This is used for the inlet
of denser fabric softeners into the machine, i.e. to dilute the
more concentrated softeners. Should more than a normal
amount of water remain in compartment 3, this means the
emptying device is blocked. For cleaning instructions, see
“Care and maintenance”.
compartment 4: Bleach
Bleach cycle
Bleaching may only be performed in conjunction with wash
cycles 2, 3, 6.
Pour the bleach into compartment 4; pour the detergent and
softener into the corresponding compartments, then select
one of the abovementioned wash cycles.
This option is recommended only for very soiled cotton
garments.
Preparing the laundry
• Divide the laundry according to:
- the type of fabric/the symbol on the label
- the colours: separate coloured garments from whites.
• Empty all garment pockets and check the buttons.
• Do not exceed the listed values, which refer to the weight
of the laundry when dry:
Durable fabrics: max. 6 kg
Synthetic fabrics: max. 2,5 kg
Delicate fabrics: max. 2 kg
Wool: max. 1 kg
How much does your laundry weigh?
1 sheet 400-500 g
1 pillow case 150-200 g
1 tablecloth 400-500 g
1 bathrobe 900-1200 g
1 towel 150-250 g
Garments requiring special care
Shirts: use special wash cycle 8 to wash shirts in various
fabrics and colours.
It guarantees maximum care is taken of the garments and
minimises the formation of creases.
Silk: use special wash cycle 9 to wash all silk garments. We
recommend the use of special detergent which has been
designed to wash delicate clothes.
Curtains: fold curtains and place them in a pillow case or
mesh bag. Use wash cycle 9.
Wool: is the only washing machine manufacturer to have
been awarded the prestigious Woolmark Platinum Care
endorsement (M.0508) by the Woolmark Company, which
means that all woollen garments may be washed in the washing machine, even those which state “hand wash only”
on the label. Wash cycle 10 therefore offers complete peace
of mind when washing woollen garments in the washing machine (max. load 1 kg) and guarantees optimal performance.
Load balancing system
Before every spin cycle, to avoid excessive vibrations and
to distribute the load in a uniform manner, the drum rotates
continuously at a speed which is slightly greater than the
washing rotation speed. If, after several attempts, the load is
not balanced correctly, the machine spins at a reduced spin
speed. If the load is excessively unbalanced, the washing machine performs the distribution process instead of spinning.
To encourage improved load distribution and balance, we
recommend small and large garments are mixed in the load.
8
Page 9

Precautions and tips
! This washing machine was designed and constructed in
accordance with international safety regulations. The following information is provided for safety reasons and must
therefore be read carefully.
General safety
• This appliance is not intended for use by persons (including children) with reduced physical, sensory or mental
capabilities, or lack of experience and knowledge, unless
they have been given supervision or instruction concerning use of the appliance by a person responsible for
their safety. Children should be supervised to ensure that
they do not play with the appliance.
• The washing machine must only be used by adults, in
accordance with the instructions provided in this manual.
• This appliance was designed for domestic use only.
• Do not touch the machine when barefoot or with wet or
damp hands or feet.
• Do not pull on the power supply cable when unplugging
the appliance from the electricity socket. Hold the plug
and pull.
• Do not touch the drained water as it may reach extremely high temperatures.
• Never force the porthole door. This could damage the
safety lock mechanism designed to prevent accidental
opening.
• If the appliance breaks down, do not under any circumstances access the internal mechanisms in an attempt
to repair it yourself.
• Always keep children well away from the appliance while
it is operating.
• If the appliance has to be moved, work in a group of two
or three people and handle it with the utmost care. Never
try to do this alone, because the appliance is very heavy.
• Before loading laundry into the washing machine, make
sure the drum is empty.
Disposal
• Disposing of the packaging materials: observe local
regulations so that the packaging may be re-used.
Consumers should contact their local authority or
retailer for information concerning the correct
disposal of their old appliance.
Saving energy and respecting the environment
Saving on detergent, water, energy and time
• To avoid wasting resources, the washing machine
should be used with a full load. A full load instead
of two half loads allows you to save up to 50% on
energy.
• The pre-wash cycle is only necessary on
extremely soiled garments. Avoiding it will save on
detergent, time, water and between 5 and 15%
energy.
• Treating stains with a stain remover or leaving
them to soak before washing will cut down the
need to wash them at high temperatures. A
programme at 60°C instead of 90°C or one at
40°C instead of 60°C will save up to 50% on
energy.
• Use the correct quantity of detergent depending
on the water hardness, how soiled the garments
are and the amount of laundry you have, to avoid
wastage and to protect the environment: despite
being biodegradable, detergents do contain
ingredients that alter the natural balance of the
environment. In addition, avoid using fabric
softener as much as possible.
• If you use your washing machine from late in the
afternoon until the early hours of the morning, you
will help reduce the electricity board’s peak load.
The “Delay Timer” option helps to organise your
wash cycles accordingly.
• If your laundry has to be dried in a tumble dryer,
select a high spin speed. Having the least water
possible in your laundry will save you time and
energy in the drying process.
GB
• The European Directive 2002/96/EC on Waste
Electrical and Electronic Equipment, requires that
old household electrical appliances must not be
disposed of in the normal unsorted municipal waste
stream. Old appliances must be collected
separately in order to optimise the recovery and
recycling of the materials they contain and reduce
the impact on human health and the environment.
The crossed out “wheeled bin” symbol on the
product reminds you of your obligation, that when
you dispose of the appliance it must be separately
collected.
9
Page 10
Care and maintenance
GB
Cutting off the water or electricity supply
• Turn off the water tap after every wash. This will limit
the wear of your appliance’s water system and also
prevent leaks.
• Unplug your appliance when cleaning it and during all
maintenance operations.
Cleaning your appliance
The exterior and rubber parts of your appliance can be
cleaned with a soft cloth soaked in lukewarm soapy water.
Do not use solvents or abrasives.
Caring for your appliance door and drum
• Always leave the appliance door ajar to prevent unplea-
sant odours from forming.
Cleaning the pump
The washing machine is fitted with a self-cleaning pump
that does not require any maintenance. Sometimes, small
items (such as coins or buttons) may fall into the prechamber that protects the pump, situated in the lower part
of the same.
! Make sure the wash cycle has ended and unplug the
appliance.
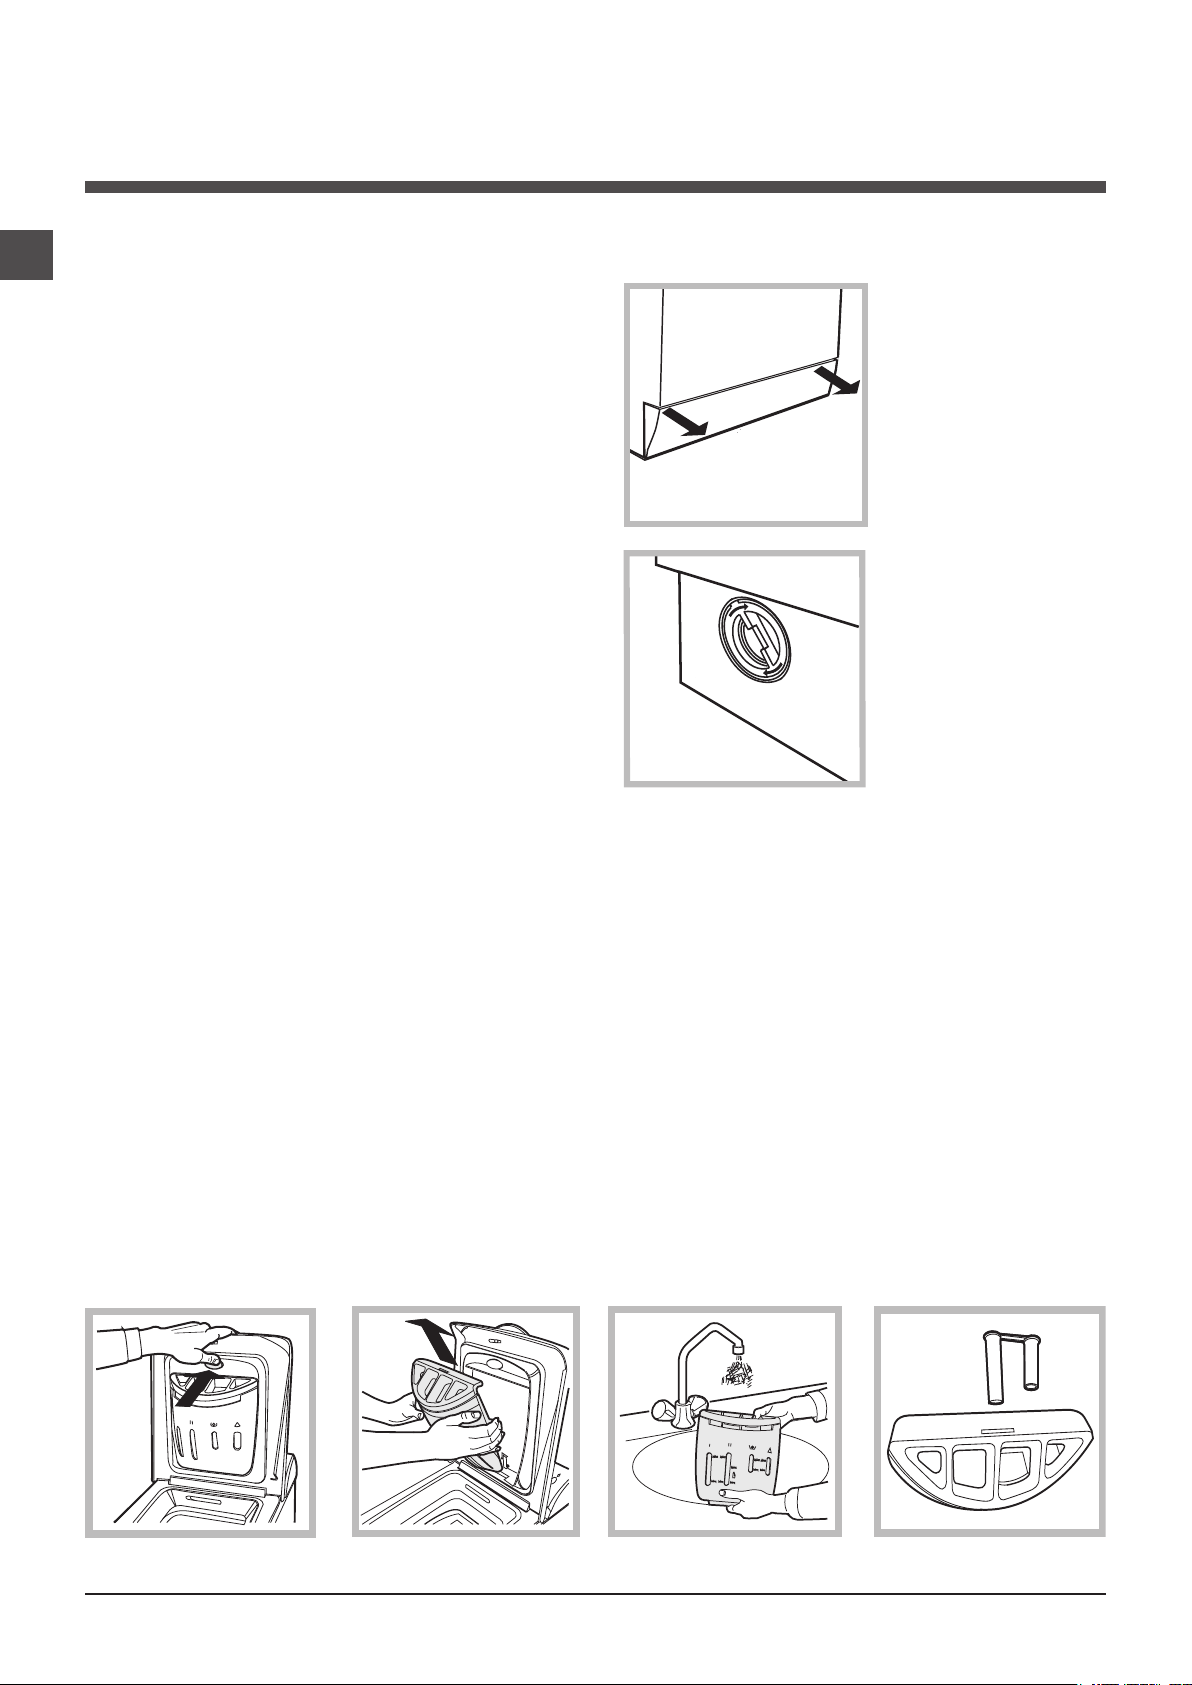
To recover any objects that have fallen into the pre-chamber:
1. remove the plinth at the
bottom on the front side
of the washing machine
by pulling from the side
with your hands (see
figure);
2. unscrew the lid rotating it anticlock-wise (see
figure): a little water may
trickle out. This is perfectly normal;
3. clean the interior thoroughly;
4. screw the lid back on;
5. reposition the panel,
making sure the hooks are
securely in place before you push it onto the
appliance.
Checking the water inlet hose
Check the water inlet hose at least once a year. If you see
any cracks, replace it immediately: during the wash cycles,
water pressure is very strong and a cracked hose could
easily split open.
How to clean the detergent dispenser
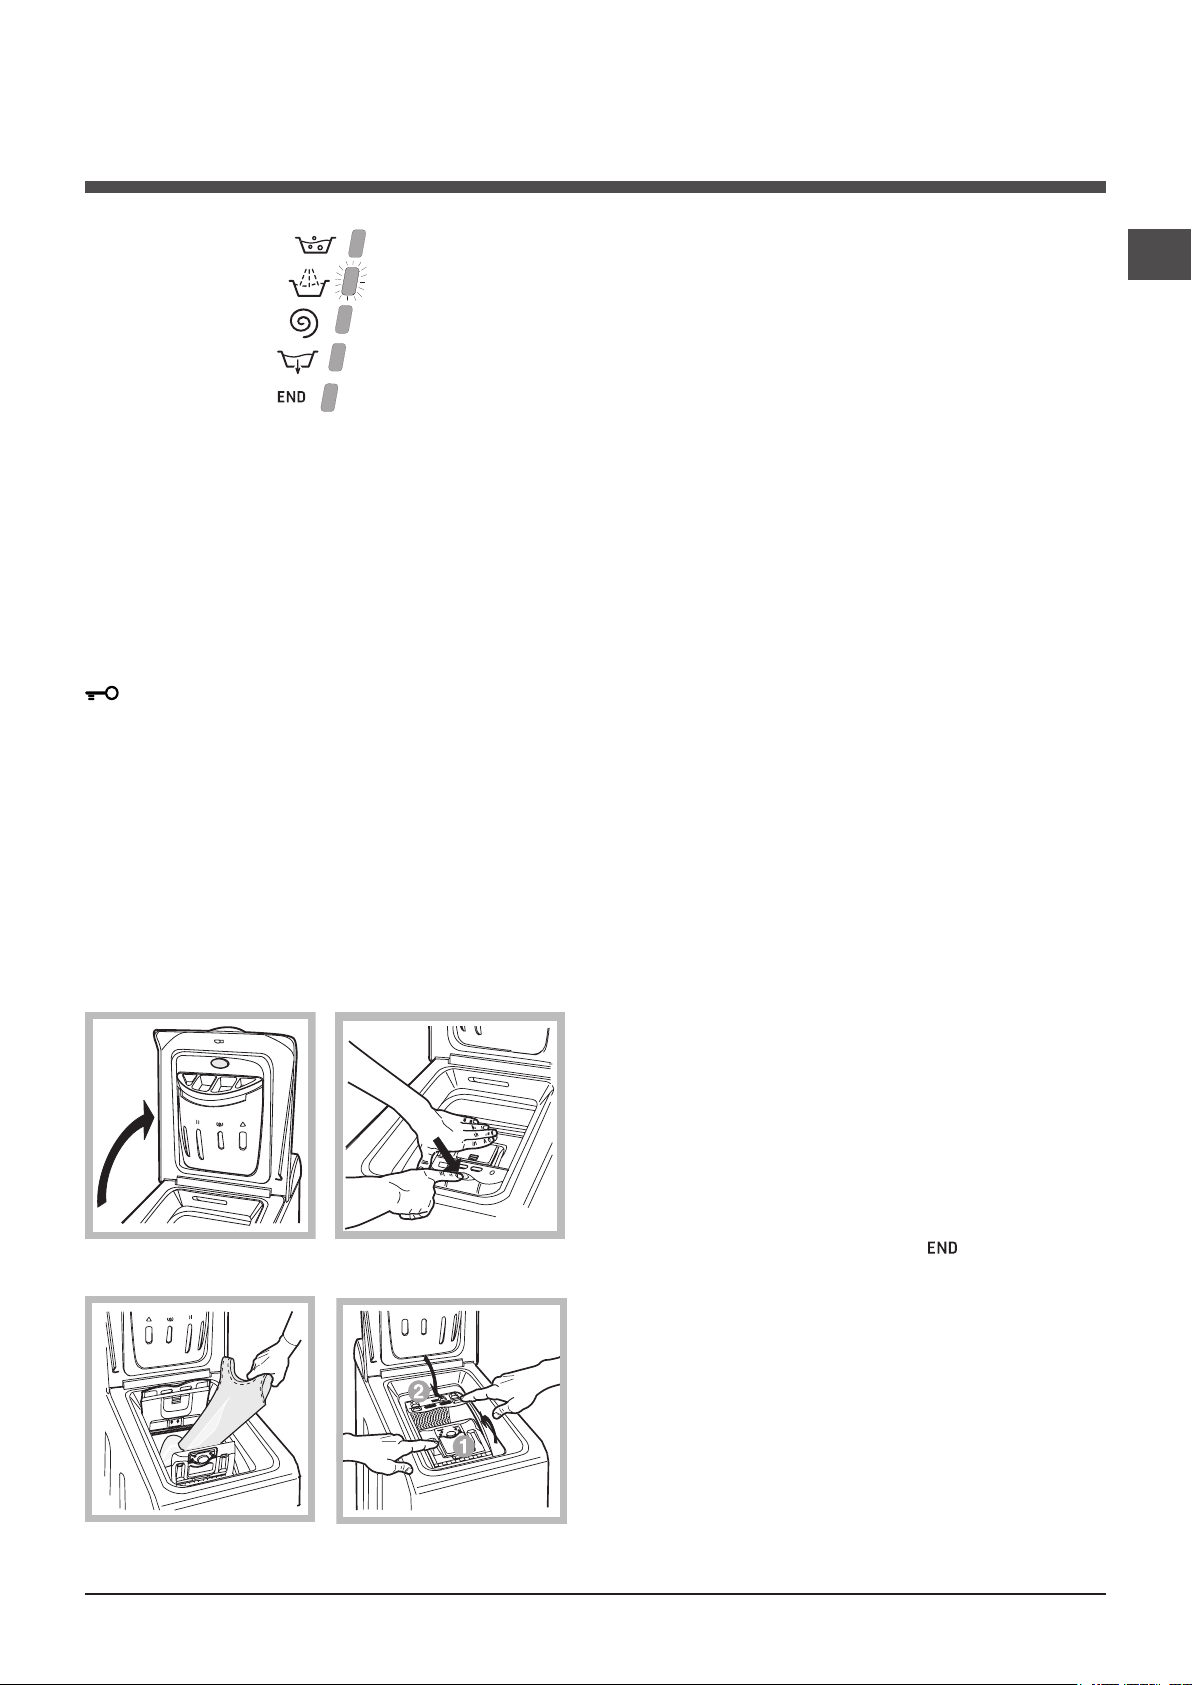
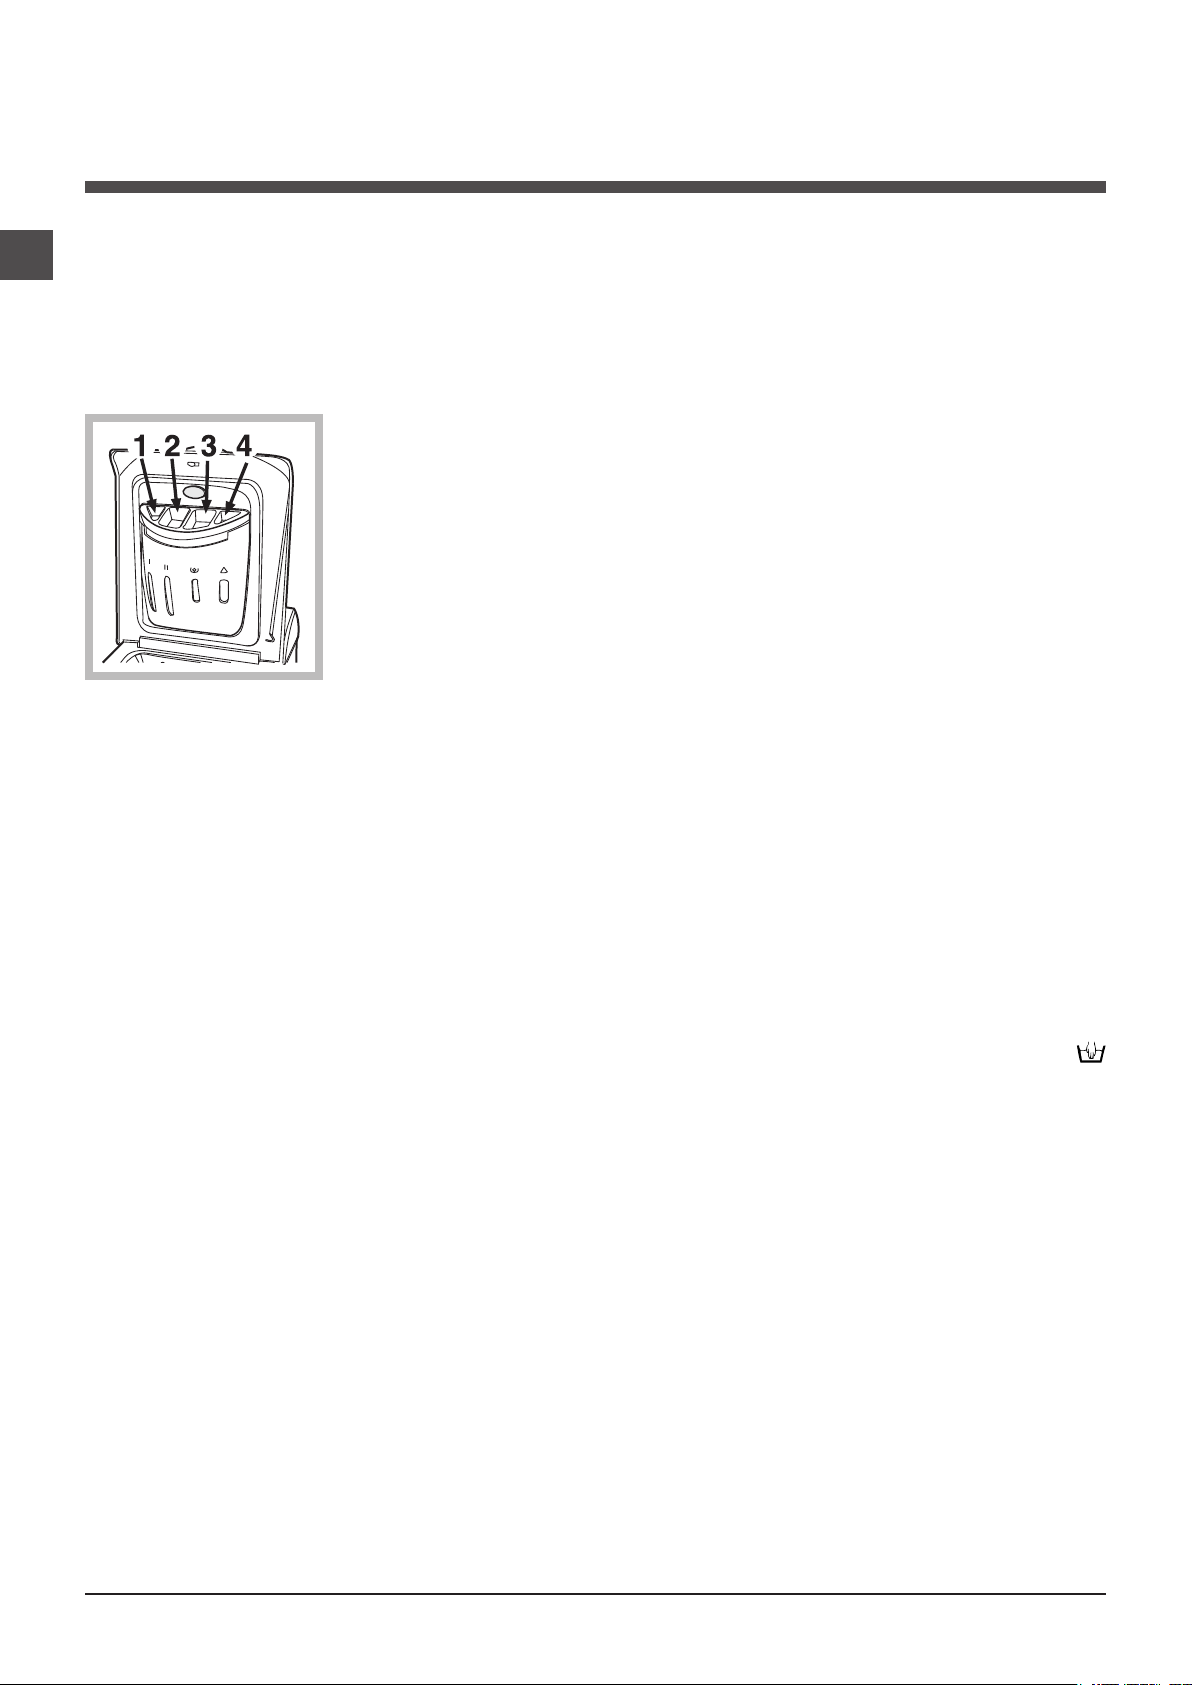
Disassembly:
Press lightly on the large
button on the front of the
detergent dispenser and pull
it upwards (fig. 1, 2).
Fig. 1 Fig. 2
Cleaning:
Then clean the dispenser under a tap (fig. 3) using an old
toothbrush and, once the pair of siphons inserted in the top
of compartments 1 and 2 (fig. 4) have been pulled out, check
whether the same are not clogged and then rinse them.
! Never use hoses that have already been used.
Reassembly:
Do not forget to reinsert the
pair of siphons into the special
housings and then to replace
the dispenser into its seat, clicking it into place (fig. 4, 2 and 1).
Fig. 3
Fig. 4
10
Page 11

Troubleshooting
Your washing machine could fail to work. Before contacting the Technical Assistance Centre (see “Assistance”), make sure
that the problem cannot be not solved easily using the following list.
Problem:
The washing machine does not
switch on.
The wash cycle does not start.
The washing machine does not
take in water (the indicator light for
the first wash cycle stage flashes
rapidly).
The washing machine continuously
takes in and drains water.
Possible causes / Solutions:
• The appliance is not plugged into the socket fully, or is not making contact.
• There is no power in the house.
• The appliance Lid is not shut properly.
• The ON/OFF button has not been pressed.
• The START/PAUSE button has not been pressed.
• The water tap has not been opened.
• A delayed start has been set (see “Personalisation”).
• The water inlet hose is not connected to the tap.
• The hose is bent.
• The water tap has not been opened.
• There is no water supply in the house.
• The pressure is too low.
• The START/PAUSE button has not been pressed.
• The drain hose is not fitted at a height between 65 and 100 cm from the floor
(see “Installation”).
• The free end of the hose is under water (see “Installation”).
• The wall drainage system is not fitted with a breather pipe.
If the problem persists even after these checks, turn off the water tap, switch
the appliance off and contact the Assistance Service. If the dwelling is on one of
the upper floors of a building, there may be problems relating to water drainage,
causing the washing machine to fill with water and drain continuously. Special
anti-draining valves are available in shops and help to avoid this inconvenience.
GB
The washing machine does not
drain or spin.
The washing machine vibrates a lot
during the spin cycle.
The washing machine leaks.
The START/PAUSE indicator light
(orange) and the function indicator
lights flash rapidly.
There is too much foam.
• The wash cycle does not include draining: some wash cycles require the drain
phase to be started manually.
• The EASY IRON function has been activated: To complete the wash cycle,
press the START/PAUSE button (“Personalisation”).
• The drain hose is bent (see “Installation”).
• The drainage duct is clogged.
• The drum was not unlocked correctly during installation (see “Installation”).
• The washing machine is not level (see “Installation”).
• The washing machine is trapped between cabinets and walls (see “Installation”).
• The water inlet hose is not screwed on properly (see “Installation”).
• The detergent dispenser drawer is blocked (for cleaning instructions, see “Care
and maintenance”).
• The drain hose is not fixed properly (see “Installation”).
• Switch off the machine and unplug it, wait for approximately 1 minute and then
switch it back on again.
If the problem persists, contact the Technical Assistance Service.
• The detergent is not suitable for machine washing (it should display the text
“for washing machines” or “hand and machine wash”, or the like).
• Too much detergent was used.
11
Page 12

Service
GB
Before calling for Assistance:
• Check whether you can solve the problem alone (see “Troubleshooting”);
• Restart the programme to check whether the problem has been solved;
• If this is not the case, contact an authorised Technical Assistance Centre using the telephone number provided on the
guarantee certificate.
! Always request the assistance of authorised technicians.
Have the following information to hand:
• the type of problem;
• the appliance model (Mod.);
• the serial number (S/N).
This information can be found on the data plate situated on the rear of the washing machine.
12
Page 13

ПдзгЯет чсЮузт
РЛХНФЗСЙП СПХЧЩН
GR
ЕллзнйкЬ
ECOT6L 85
Ресйечьменб
ЕгкбфЬуфбуз, 14-15
БрпухукехбуЯб кбй псйжпнфЯщуз
ХдсбхлйкЭт кбй злекфсйкЭт ухндЭуейт
Рсюфпт кэклпт рлхуЯмбфпт
ФечнйкЬ уфпйчеЯб
РесйгсбцЮ фпх рлхнфзсЯпх кбй еккЯнзуз
еньт рспгсЬммбфпт, 16-17
РЯнбкбт елЭгчпх
ЕндейкфйкЬ цщфЬкйб
Рщт бнпЯгей кбй клеЯней п кЬдпт
ЕккЯнзуз еньт рспгсЬммбфпт
РспгсЬммбфб, 18
РЯнбкбт фщн РспгсбммЬфщн
Еобфпмйкеэуейт, 19
ИЭуфе фз иесмпксбуЯб
ИЭуфе фп уфэшймп
ЛейфпхсгЯет
БрпссхрбнфйкЬ кбй мрпхгЬдб, 20
ИЮкз брпссхрбнфйкюн
Кэклпт леэкбнузт
РспефпймбуЯб фзт мрпхгЬдбт
ЕйдйкЬ спэчб
Уэуфзмб йупуфЬимйузт фпх цпсфЯпх
GR
РспцхлЬоейт кбй ухмвпхлЭт, 21
ГенйкЮ буцЬлейб
ДйЬиеуз
Еопйкпньмзуз енЭсгейбт кбй уевбумьт фпх
ресйвЬллпнфпт
УхнфЮсзуз кбй цспнфЯдб, 22
КлеЯуймп рбспчюн неспэ кбй злекфсйкпэ сеэмбфпт
Кбибсйумьт фпх рлхнфзсЯпх
ЦспнфЯдб фзт рьсфбт кбй фпх кЬдпх
Кбибсйумьт фзт бнфлЯбт
¸легчпт фпх ущлЮнб фспцпдпуЯбт фпх неспэ
Рщт кбибсЯжефбй з иЮкз брпссхрбнфйкпэ
БнщмблЯет кбй лэуейт, 23
ХрпуфЮсйоз, 24
13
Page 14
ЕгкбфЬуфбуз
GR
! ЕЯнбй узмбнфйкь нб цхлЬоефе фп егчейсЯдйп бхфь гйб
нб мрпсеЯфе нб фп ухмвпхлеэеуфе прпйбдЮрпфе уфйгмЮ.
Уе ресЯрфщуз рюлзузт, рбсбчюсзузт Ю мефбкьмйузт,
вевбйщиеЯфе ьфй рбсбмЭней мбжЯ ме фп рлхнфЮсйп гйб нб
рлзспцпсеЯ фпн нЭп йдйпкфЮфз гйб фз лейфпхсгЯб кбй фйт
учефйкЭт рспейдпрпйЮуейт.
! ДйбвЬуфе рспуекфйкЬ фйт пдзгЯет: хрЬсчпхн
узмбнфйкЭт рлзспцпсЯет гйб фзн егкбфЬуфбуз, фз чсЮуз
кбй фзн буцЬлейб.
БрпухукехбуЯб кбй псйжпнфЯщуз
БрпухукехбуЯб
1. БрпухукехЬуфе фп
рлхнфЮсйп.
2. ЕлЭгофе бн фп
рлхнфЮсйп Эчей
хрпуфеЯ жзмйЭт кбфЬ
фз мефбцпсЬ. Бн
Эчей хрпуфеЯ жзмйЭт
мзн фп ухндЭефе кбй
ерйкпйнщнЮуфе ме фпн
мефбрщлзфЮ.
3. БцбйсЭуфе фйт фЭууесйт
вЯдет мефбцпсЬт кбй фп
лбуфйчЬкй ме фп учефйкь
дйбчщсйуфйкь, рпх
всЯукпнфбй уфп рЯущ мЭспт
(влЭре ейкьнб).
4. КлеЯуфе фйт прЭт ме фб
рлбуфйкЬ рюмбфб рпх убт рбсЭчпнфбй.
5. ДйбфзсеЯуфе кбй фб фсЯб фемЬчйб: бн фп рлхнфЮсйп чсейбуфеЯ нб
мефбцесиеЯ, иб рсЭрей нб обнбмпнфбсйуфпэн.
РспупчЮ: уе ресЯрфщуз ербнбчсзуймпрпЯзузт пй рйп
кпнфЭт вЯдет рсЭрей нб мпнфбсйуфпэн ерЬнщ.
! Пй ухукехбуЯет ден еЯнбй рбйчнЯдйб гйб мйксЬ рбйдйЬ.
ХдсбхлйкЭт кбй злекфсйкЭт ухндЭуейт
Уэндеуз фпх ущлЮнб фспцпдпуЯбт неспэ
1. УхндЭуфе фп ущлЮнб
фспцпдпуЯбт вйдюнпнфЬт
фпн уе Энб кспхнь
ксэпх неспэ ме уфьмйп
урейсюмбфпт 3/4 gas
(влЭре ейкьнб).
Рсйн фз уэндеуз, бцЮуфе
нб фсЭоей фп несь мЭчсй нб
гЯней дйбхгЭт.
2. УхндЭуфе фп ущлЮнб
фспцпдпуЯбт уфп
рлхнфЮсйп вйдюнпнфЬт фп
уфзн бнфЯуфпйчз еЯупдп
неспэ, уфп рЯущ мЭспт
ерЬнщ деойЬ (влЭре
ейкьнб).
3. ВевбйщиеЯфе ьфй
п ущлЮнбт ден еЯнбй
фубкйумЭнпт уе кбнЭнб
узмеЯп фпх.
! З рЯеуз фпх неспэ рсЭрей нб кхмбЯнефбй мефбоэ фщн
фймюн фпх рЯнбкб ме фб фечнйкЬ уфпйчеЯб (влЭре ерьменз
уелЯдб).
! Бн фп мЮкпт фпх ущлЮнб фспцпдпуЯбт неспэ ден
ербскеЯ, иб рсЭрей нб брехихниеЯфе уе ейдйкехмЭнп
кбфЬуфзмб Ю уе еопхуйпдпфзмЭнп фечнйкь.
ПсйжпнфЯщуз
1. ЕгкбфбуфЮуфе фп
рлхнфЮсйп уе Энб дЬредп
ерЯредп кбй бниекфйкь,
чщсЯт нб фп бкпхмрЮуефе
уе фпЯчпхт, Эрйрлб Ю Ьллп.
2. Бн фп дЬредп ден еЯнбй
брьлхфб ерЯредп, псйжпнфйюуфе
фзн ухукехЮ вйдюнпнфбт Ю
оевйдюнпнф бт фйт ейдйкЭт
вЬуейт уфп мрспуфйнь фмЮмб
фзт ухукехЮт (влЭре ейкьнб). З гщнЯб клЯузт, мефсзмЭнз уфзн
ерйцЬнейб есгбуЯбт, ден рсЭрей нб оереснЬей фйт 2°.
З ущуфЮ псйжпнфЯщуз рспудЯдей уфбиесьфзфб уфп
мзчЬнзмб кбй брпупвеЯ дпнЮуейт, ипсэвпхт кбй
мефбфпрЯуейт кбфЬ фз лейфпхсгЯб. Бн фп рлхнфЮсйп
фпрпиефзиеЯ рЬнщ уе мпкЭфб Ю фЬрзфб, схимЯуфе фб
рпдбсЬкйб Эфуй юуфе нб хрЬсчей кЬфщ брь фп рлхнфЮсйп
бскефьт чюспт гйб фпн бесйумь.
14
Page 15
65 - 100 cm
Уэндеуз фпх ущлЮнб бдейЬумбфпт
УхндЭуфе бдейЬумбфпт,
чщсЯт нб фпн дйрлюуефе,
уе Энбн бгщгь еккЭнщузт
Ю уе мйб ерйфпЯчйб
брпчЭфехуз уе брьуфбуз
áðü 65 Ýùò 100 cm áðü
фп Эдбцпт.
! Мз чсзуймпрпйеЯфе рспекфЬуейт кбй рплэрсйжб.
! Фп кблюдйп ден рсЭрей нб цЭсей рфхчЭт Ю нб еЯнбй
ухмрйеумЭнп.
! Фп кблюдйп фспцпдпуЯбт рсЭрей нб бнфйкбиЯуфбфбй мьнп
брь еопхуйпдпфзмЭнпхт фечнйкпэт.
РспупчЮ! З ерйчеЯсзуз брпрпйеЯфбй кЬие ехиэнзт уе
ресЯрфщуз рпх ден фзспэнфбй бхфпЯ пй кбньнет.
GR
ДйбцпсефйкЬ брпиЭуфе фпн
уфп чеЯлпт еньт нйрфЮсб
Ю мйбт лекЬнзт, дЭнпнфбт
фпн пдзгь рпх убт
рбсЭчефбй уфпнкспхнь
(влЭре ейкьнб). Фп
елеэиесп Ьксп фпх
ущлЮнб бдейЬумбфпт ден
рсЭрей нб рбсбмЭней
вхийумЭнп уфп несь.
! Ден ухнйуфЬфбй з чсЮуз рспекфЬуещн ущлЮнщн. Бн
брбйфеЯфбй, з рспЭкфбуз рсЭрей нб Эчей фзн Ядйб дйЬмефсп
фпх бсчйкпэ ущлЮнб кбй нб мзн оереснЬей фб 150 cm.
ЗлекфсйкЮ уэндеуз
Рсйн ейуЬгефе фп вэумб уфзн злекфсйкЮ рсЯжб,
вевбйщиеЯфе ьфй:
• з рсЯжб дйбиЭфей геЯщуз кбй фзсеЯ фйт ек фпх ньмпх
рспдйбгсбцЭт.
• З рсЯжб нб еЯнбй уе иЭуз нб хрпцЭсей фп мЭгйуфп
цпсфЯп йучэпт фзт мзчбнЮт, рпх бнбцЭсефбй уфпн
рЯнбкб Фечнйкюн уфпйчеЯщн (влЭре дЯрлб).
• З фЬуз фспцпдпуЯбт нб кхмбЯнефбй мефбоэ фщн фймюн
рпх бнбцЭспнфбй уфпн рЯнбкб Фечнйкюн уфпйчеЯщн
(влЭре дЯрлб).
• З рсЯжб нб еЯнбй ухмвбфЮ ме фп вэумб фпх
рлхнфзсЯпх. Уе бнфЯиефз ресЯрфщуз, бнфйкбфбуфЮуфе
фзн рсЯжб Ю фп вэумб.
! Фп рлхнфЮсйп ден егкбиЯуфбфбй уе бнпйчфь чюсп, бкьмз
кбй бн п чюспт еЯнбй кблхммЭнпт, дйьфй еЯнбй рплэ
ерйкЯндхнп нб фп бцЮнефе екфеиеймЭнп уе вспчЮ кбй
кбкпкбйсЯб.
! Ме фзн егкбфЬуфбуз фпх рлхнфзсЯпх, з рсЯжб сеэмбфпт
рсЭрей нб еЯнбй еэкплб рспувЬуймз.
Рсюфпт кэклпт рлхуЯмбфпт
МефЬ фзн егкбфЬуфбуз, рсйн фз чсЮуз, дйенесгЮуфе Энб
кэклп рлхуЯмбфпт ме брпссхрбнфйкь кбй чщсЯт спэчб
иЭфпнфбт фп рсьгсбммб 2.
ФечнйкЬ уфпйчеЯб
МпнфЭлп ECOT6L 85
ДйбуфЬуейт
Чщсзфйкьфзфб áðü 1 Ýùò 6 kg
ЗлекфсйкЭт
ухндЭуейт
УхндЭуейт неспэ
Фбчэфзфб
уфхшЯмбфпт
Προγράμματα
δοκιμής σύμφωνα
με την οδηγία
1061/2010
рлЬфпт cm 40
эшпт cm 85
вЬипт cm 60
ВлЭре фзн рйнбкЯдб
чбсбкфзсйуфйкюн ерЯ фзт мзчбнЮт
мЭгйуфз рЯеуз 1 MPa (10 bar)
ЕлЬчйуфз рЯеуз 0,05 MPa (0,5 bar)
чщсзфйкьфзфб фпх кЬдпх 42 лЯфсб
мЭчсй 800 уфспцЭт фп лерфь
рсьгсбммб 6; иесмпксбуЯб 60°C
кбй 40°C.
З ухукехЮ бхфЮ еЯнбй уэмцщнз ме
фйт бкьлпхиет КпйнпфйкЭт ПдзгЯет:
- 2004/108/CE
(ЗлекфспмбгнзфйкЮ Ухмвбфьфзфб)
- 2002/96/CE
- 2006/95/CE (ЧбмзлЮ ФЬуз)
15
Page 16

РесйгсбцЮ фпх рлхнфзсЯпх кбй
еккЯнзуз еньт рспгсЬммбфпт
GR
РЯнбкбт елЭгчпх
УФХШЙМБФПУ
БНБММБФПУ/
УВЗУЙМБФПУ
КпхмрЯ БНБММБФПУ/УВЗУЙМБФПУ: Гйб нб бнЬшефе Ю
нб увЮуефе фп рлхнфЮсйп.
ЕрйлпгЭ бт РС ПГСБММБФ ЩН: гй б нб иЭуефе фб
рспгсЬммбфб. КбфЬ фз дйЬскейб фпх рспгсЬммбфпт п
ерйлпгЭбт рбсбмЭней бкЯнзфпт.
Кпхмрй Ь ме ендейкфйкЬ цщфЬкйб ЛЕЙФПХСГЙБУ: гйб нб
ерйлЭоефе фйт дйбиЭуймет лейфпхсгЯет. Фп учефйкь ме фзн
ерйлегеЯуб лейфпхсгЯб ендейкфйкь цщфЬкй иб рбсбмеЯней
бнбммЭнп.
ЕрйлпгЭбт УФХШЙМБФПУ: гйб нб иЭуефе фп уфэшймп Ю нб
фп брпклеЯуефе (влЭре “Еобфпмйкеэуейт”).
ЕрйлпгЭбт ИЕСМПКСБУЙБ: гйб нб иЭуефе фз иесмпксбуЯб
Ю фп рлэуймп уе ксэп несь (влЭре «Еобфпмйкеэуейт»).
ЕНДЕЙКФЙК Б Ц ЩФБКЙБ РСП ЩИЗУЗУ КХК ЛП Х/
КБИХУФЕСЗМЕНЗУ ЕККЙНЗУЗУ: гйб нб бкплпхиеЯфе фзн
кбфЬуфбуз рспьдпх фпх рспгсЬммбфпт рлхуЯмбфпт. Фп
бнбммЭнп ендейкфйкь цщфЬкй деЯчней фзн уе еоЭлйоз цЬуз.
Бн фЭизке з лейфпхсгЯб “КбихуфесзмЭнз еккЯнзуз”, иб
деЯчнпхн фпн чсьнп рпх хрплеЯрефбй гйб фзн Энбсоз фпх
рспгсЬммбфпт (влЭре уелЯдб дЯрлб).
КпхмрЯ
ЕрйлпгЭбт
РСПГСБММБФЩН
ИЕСМПКСБУЙБ
ЕрйлпгЭбт
Кпхмрй Ь ме ендейкфйкЬ
цщфЬкйб ЛЕЙФПХСГЙБУ
ЕрйлпгЭбт
Фсьрпт stand by
Фп рлхнфЮсйп бхфь, уэмцщнб ме фйт нЭет дйбфЬоейт гйб фзн
еопйкпньмзуз енЭсгейбт, дйбиЭфей Энб уэуфзмб бхфьмбфпх
увзуЯмбфпт (stand by) рпх фЯиефбй уе лейфпхсгЯб енфьт
30 лерфюн уфзн ресЯрфщуз мз чсЮузт. РйЭуфе уфйгмйбЯб фп
кпхмрЯ БНБММБФПУ/УВЗУЙМБФПУ кбй ресймЭнефе нб
енесгпрпйзиеЯ ек нЭпх з мзчбнЮ.
ЕНДЕЙКФЙКБ ЦЩФБКЙБ РСПЩИЗУЗУ
КХКЛПХ/КБИХУФЕСЗМЕНЗУ
ЕККЙНЗУЗУ
Ендейкфйкь
цщфЬкй РПСФБ
БУЦБЛЙУМЕНЗ
КпхмрЯ ме ендейкфйкь цщфЬкй
ЕККЙНЗУЗ/РБХУЗ
ЕндейкфйкЬ цщфЬкйб
Фб ендейкфйкЬ цщфЬкйб рбсЭчпхн узмбнфйкЭт рлзспцпсЯет.
Нб фй мбт лЭне:
КбихуфесзмЭнз еккЯнзуз
Бн енесгпрпйЮизке з лейфпхсгЯб “КбихуфесзмЭнз еккЯнзуз”
(влЭре “Еобфпмйкеэуейт”), бцпэ еккйнЮуефе фп рсьгсбммб,
иб бсчЯуей нб бнбвпувЮней фп ендейкфйкь цщфЬкй фп учефйкь
ме фзн ерйлегмЭнз кбихуфЭсзуз:
Ме фп рЭсбумб фпх чсьнпх иб брейкпнЯжефбй з хрплейрьменз
кбихуфЭсзуз, ме фп учефйкь ендейкфйкь цщфЬкй нб бнбвпувЮней.
Ендейкфйкь цщфЬкй РПСФБ БУЦБЛЙУМЕНЗ: гйб нб
кбфблЬвефе бн з рьсфб бнпЯгей (влЭре уелЯдб дЯрлб).
КпхмрЯ ме ендейкфйкь цщфЬкй ЕККЙНЗУЗ/РБХУЗ: гйб фзн
еккЯнзуз фщн рспгсбммЬфщн Ю фзн рспущсйнЮ дйбкпрЮ фпхт.
УЗМЕЙЩУЗ: гйб нб иЭуефе уе рбэуз фп уе еоЭлйоз рлэуймп,
рйЭуфе фп кпхмрЯ бхфь, фп учефйкь ендейкфйкь цщфЬкй иб
бнЬшей ме рпсфпкблЯ чсюмб еню екеЯнп фзт уе еоЭлйозт
цЬузт иб еЯнбй ухнечют бнбммЭнп. Бн фп ендейкфйкь цщфЬкй
РПСФБ БУЦБЛЙУМЕНЗ увЮуей, мрпсеЯфе нб бнпЯоефе
фзн рьсфб. Гйб нб оекйнЮуей рЬлй фп рлэуймп брь фп узмеЯп
дйбкпрЮт, рбфЮуфе ек нЭпх фп кпхмрЯ бхфь.
16
Бцпэ дйбнхиеЯ з ерйлегеЯуб кбихуфЭсзуз фп ендейкфйкь
цщфЬкй рпх бнбвпувЮней иб увЮуей кбй иб бсчЯуей фп феиЭн
рсьгсбммб.
ЕндейкфйкЬ цщфЬкй цЬузт уе еоЭлйоз
КбфЬ фпн ерйихмзфь кэклп рлхуЯмбфпт, фб ендейкфйкЬ
цщфЬкйб иб бнЬшпхн рсппдехфйкЬ гйб нб деЯопхн фзн
кбфЬуфбуз рспюизузт:
Page 17

Рлэуймп
ОЭвгблмб
Уфэшймп
¢дейбумб
ФЭлпт РлхуЯмбфпт
КпхмрйЬ лейфпхсгЯбт кбй учефйкЬ ендейкфйкЬ цщфЬкйб
ЕрйлЭгпнфбт мйб лейфпхсгЯб фп учефйкь ендейкфйкь цщфЬкй
иб цщфйуфеЯ. Бн з ерйлегмЭнз лейфпхсгЯб ден еЯнбй
ухмвбфЮ ме фп феиЭн рсьгсбммб фп учефйкь ендейкфйкь
цщфЬкй иб бнбвпувЮней кбй з лейфпхсгЯб ден иб
енесгпрпйзиеЯ. Уфзн ресЯрфщуз рпх феиеЯ мйб лейфпхсгЯб
мз ухмвбфЮ ме мйб Ьллз рпх ерйлЭчизке рспзгпхмЭнщт
иб рбсбмеЯней енесгЮ мьнп з фелехфбЯб ерйлпгЮ.
Ендейкфйкь цщфЬкй буцблйумЭнзт рьсфбт
Фп бнбммЭнп ендейкфйкь цщфЬкй деЯчней ьфй з рьсфб еЯнбй
буцблйумЭнз гйб фзн рбсемрьдйуз фхчбЯщн бнпйгмЬфщн.
Гйб фзн брпцхгЮ жзмйюн рсЭрей нб ресймЭнефе нб увЮуей
фп ендейкфйкь цщфЬкй рсйн фп Ьнпйгмб фзт рьсфбт (З
бнбмпнЮ дйбскеЯ ресЯрпх фсЯб лерфЬ).
УЗМЕЙЩУЗ: бн еЯнбй енесгЮ з лейфпхсгЯб
“КбихуфесзмЭнз еккЯнзуз” з рьсфб ден мрпсеЯ нб
бнпЯоей, гйб нб фзн бнпЯоефе иЭуфе фз мзчбнЮ уе рбэуз
рйЭжпнфбт фп кпхмрЯ ЕККЙНЗУЗ/РБХУЗ.
! Фп фбчэ бнбвпувЮуймп фпх цщфьт ЕККЙНЗУЗ/РБХУЗ
(рпсфпкблЯ) фбхфьчспнб ме екеЯнп фщн лейфпхсгйюн
ерйузмбЯней мйб бнщмблЯб (влЭре “БнщмблЯет кбй
лэуейт”).
Рщт бнпЯгей кбй клеЯней п кЬдпт
Åéê. 1
Åéê. 3
Åéê. 2
Åéê. 4
A) БНПЙГМБ (Ейк. 1):
Бнбузкюуфе фп еощфесйкь кбрЬкй кбй бнпЯофе фелеЯщт.
B) БнпЯофе ухнерют фпн кЬдп чсзуймпрпйюнфбт кбй фб
дэп чЭсйб ьрщт цбЯнефбй брь фзн Ейк. 2:
- рйЭуфе фп кпхмрЯ рпх деЯчней фп вЭлпт фзт Ейк. 2 кбй
еобукюнфбт мйб елбцсЬ рЯеуз рспт фб кЬфщ, ксбфЮуфе
бкпхмрйумЭнп фп Энб чЭсй, юуфе ме фп брьфпмп Ьнпйгмб
фзт рьсфбт нб мзн чфхрЮупхн фб дЬчфхлб
- ухнпдЭшфе кбфьрйн фйт рьсфет рпх брбуцблЯжпнфбй кбй
бнпЯгпхн еэкплб.
C) ЕЙУБГЩГЗ СПХЧЩН (Ейк. 3).
D) КЛЕЙУЙМП (Ейк. 4):
- клеЯуфе кблЬ фпн кЬдп чбмзлюнпнфбт рсюфб фзн
рсьуийб рьсфб кбй брпиЭфпнфбт кбфьрйн фзн рЯущ;
- вевбйщиеЯфе кбфьрйн ьфй пй гЬнфжпй фзт рсьуийбт
рьсфбт еЯнбй Ьшпгб фпрпиефзмЭнпй уфзн Эдсб фзт
рЯущ рьсфбт;
- бцпэ бкпэуефе фп “клбк” фпх кпхмрюмбфпт,
еобукЮуфе мйб елбцсЬ рЯеуз рспт фб кЬфщ
уе бмцьфесет фйт рьсфет рпх ден рсЭрей нб
брбуцблйуфпэн;
- фЭлпт, клеЯуфе фп еощфесйкь кбрЬкй.
ЕккЯнзуз еньт рспгсЬммбфпт
1. БнЬвей фп рлхнфЮсйп рйЭжпнфбт фп кпхмрЯ
БНБММБФПУ/УВЗУЙМБФПУ. ¼лб фб ендейкфйкЬ
цщфЬкйб иб бнЬшпхн гйб месйкЬ дехфесьлерфб, мефЬ иб
рбсбмеЯнпхн бнбммЭнб фб ендейкфйкЬ цщфЬкйб фб учефйкЬ
ме фйт схимЯуейт фпх ерйлегмЭнпх рспгсЬммбфпт кбй иб
рЬллефбй фп ендейкфйкь цщфЬкй ЕККЙНЗУЗ/РБХУЗ.
2. Цпсфюуфе фб бурсьспхчб, клеЯуфе фйт ихсЯдет кбй фп
кбрЬкй.
3. ИЭуфе ме фпн ерйлпгЭб РСПГСБММБФЩН фп
ерйихмзфь рсьгсбммб.
4. ИЭуфе фз иесмпксбуЯб рлхуЯмбфпт (влЭре
«Еобфпмйкеэуейт»).
5. ИЭуфе фзн фбчэфзфб уфхшЯмбфпт (влЭре
«Еобфпмйкеэуейт»).
6. Чэуфе брпссхрбнфйкь кбй рсьуиефб (влЭре
«БрпссхрбнфйкЬ кбй мрпхгЬдб»).
7. ЕрйлЭоефе фйт дйбиЭуймет лейфпхсгЯет.
8. ЕккйнЮуфе фп рсьгсбммб рйЭжпнфбт фп кпхмрЯ
ЕККЙНЗУЗ/РБХУЗ кбй фп учефйкь ендейкфйкь цщфЬкй иб
рбсбмеЯней бнбммЭнп ухнечют ме рсЬуйнп чсюмб.
Гйб нб бкхсюуефе фпн феиЭнфб кэклп иЭуфе фз мзчбнЮ уе
рбэуз рйЭжпнфбт фп кпхмрЯ ЕККЙНЗУЗУ/РБХУЗУ кбй
ерйлЭофе Энб нЭп кэклп.
9. Уфп фЭлпт фпх рспгсЬммбфпт иб цщфйуфеЯ фп
ендейкфйкь цщфЬкй . Фп ендейкфйкь цщфЬкй РПСФБ
БУЦБЛЙУМЕНЗ иб увЮуей деЯчнпнфбт ьфй з рьсфб
мрпсеЯ нб бнпЯоей. ВгЬлфе фз мрпхгЬдб кбй бцЮуфе фзн
рьсфб мйуьклейуфз гйб нб уфегнюуей п кЬдпт. УвЮуфе фп
рлхнфЮсйп рйЭжпнфбт фп кпхмрЯ БНБММБ/УВЗУЙМП.
GR
17
Page 18

GR
РспгсЬммбфб
РЯнбкбт фщн РспгсбммЬфщн
ðñüð-
ëõóç
БрпссхрбнфйкЬ
Лехкб-
Ðëý-
нфйкь
óéµï
-
Ìáëá-
кфйкь
МЭгйуфп
ЦпсфЯп.
(Kg)
6 160
6 135
6 90
2,5 105
2,5 95
1,5 15
6 180
6 185
6 175
4 280
2 80
1 55
1 65
6 80
3 70
3 30
6 40
6 15
6 2
ÄéÜñ-
êåéá
кэклпх
РесйгсбцЮ фпх РспгсЬµµбфпт
Προγράμματα
KбизµесйнЬ
1 ВбмвбkесЬ+Рспрлхуз: ЛехкЬ еобйсефйкЬ лесщмЭнб.
2 ВбмвбkесЬ: ЛехкЬ кбй чсщµбфйуфЬ бниекфйкЬ, рплэ лесщµЭнб.
ВбмвбkесЬ ЧСЩМБФЙУФ¢ (3): ЛехкЬ лЯгп лесщµЭнб кбй
3
ехбЯуизфб чсюµбфб.
4 УхниефйkЬ: ЧсщµбфйуфЬ бниекфйкЬ, рплэ лесщµЭнб.
4 УхниефйkЬ (4): ЧсщµбфйуфЬ бниекфйкЬ, лЯгп лесщµЭнб.
Öpåóêápéóìá 15': Гйб фп гсЮгпсп цсеукЬсйуµб спэчщн елбцсЬ
5
лесщµЭнщн (ден ендеЯкнхфбй гйб µЬллйнб, µефбощфЬ кбй спэчб рпх
рлЭнпнфбй уфп чЭсй).
ЕйдйкЬ РспгсЬµµбфб
6 Брпуфейсщуз: ЛехкЬ еобйсефйкЬ лесщµЭнб.
6 Брпуфейсщуз (1-2): ЛехкЬ кбй чсщµбфйуфЬ бниекфйкЬ, рплэ лесщµЭнб.
6 Брпуфейсщуз (2): ЛехкЬ кбй чсщµбфйуфЬ бниекфйкЬ, рплэ лесщµЭнб.
7 Кэклпт kблзнэчфб: ЧсщµбфйуфЬ ехбЯуизфб лЯгп лесщµЭнб.
8 РпхkЬмйуб
9 МефбощфЬ/ КпхсфЯнет: Гйб µефбощфЬ спэчб, вйукьжз, лйнЬ.
10 МЬллйнб: Гйб µЬллйнб, cachemire, клр.
РспгсЬµµбфб Eco
11 ВбмвбкесЬ ¢дейбмб
12 УхниефйкЬ ¢дейбмб
13 Öpåóêápéóìá 30’ ¢дейбмб
ЕрЯ µЭспхт рспгсЬµµбфб
ОЭвгблмб
Уфэшймп
¢нфлзпз
Η διάρκεια του κύκλου που φαίνεται στην οθόνη ή στο εγχειρίδιο αποτελεί μια εκτίμηση υπολογισμένη με βάση τις στάνταρ συνθήκες. Ο πραγματικός χρόνος μπορεί να ποικίλει με
βάση πολυάριθμους παράγοντες όπως θερμοκρασία και πίεση του εισερχόμενου νερού, θερμοκρασία περιβάλλοντος, ποσότητα απορρυπαντικού, ποσότητα και τύπος φορτίου,
ισοστάθμιση του φορτίου, πρόσθετες επιλεγμένες δυνατότητες.
Για όλα τα Test Institutes:
1) Πρόγραμμα ελέγχου σύμφωνα με την προδιαγραφή 1061/2010: θέστε το πρόγραμμα 6 σε μια θερμοκρασία 60°C και 40°C.
2) Πρόγραμμα βαμβακερών μακρύ: θέστε το πρόγραμμα 6 σε μια θερμοκρασία 40°C.
3) Πρόγραμμα βαμβακερών σύντομο: θέστε το πρόγραμμα 3 σε μια θερμοκρασία 40°C.
4) Πρόγραμμα
ухниефйkб
μακρύ: θέστε το πρόγραμμα 4 σε μια θερμοκρασία 40°C.
МЭгйуфз
èåñµïêñ.
(°C)
90° 800
60° 800 -
40° 800 -
60° 800 - -
40° 800 - -
30° 800 - -
90° 800 -
60° 800 - -
40° 800 - -
40° 800 - -
40° 600 - -
30° 0 - -
40° 800 - -
МЭгйуфз
фбчэфзфб
(уфспцЭт
бнЬ лерфь)
800 - -
800 - -
800 - -
- 800 - - -
- 800 - - - -
- 0 - - - -
ЕйдйкЬ рспгсЬммбфб
ЦСЕУKБСЙУМБ 15’ (рсьгсбммб 5) мелефЮизке гйб фп рлэуймп спэчщн елбцсЬ лесщмЭнщн уе уэнфпмп чсьнп: дйбскеЯ
мьнп 15 лерфЬ кбй убт еопйкпнпмеЯ чсьнп кбй енЭсгейб. ИЭфпнфбт фп рсьгсбммб (5 уе 30°C) мрпсеЯфе нб рлэнефе
мбжЯ хцЬумбфб дйбцпсефйкЮт цэузт (екфьт мЬллйнщн кбй мефбощфюн) ме Энб мЭгйуфп цпсфЯп 1,5 kg.
KХKЛПУ БРПУФЕЙСЩУЗУ (рсьгсбммб 6). ¸нб еохгйбнфйкь рсьгсбммб уе хшзлЭт иесмпксбуЯет рпх рспвлЭрей фз
чсЮуз лехкбнфйкпэ уе иесмпксбуЯет бнюфесет фщн 60°C.
Гйб фз леэкбнуз чэуфе фп лехкбнфйкь, фб брпссхрбнфйкЬ кбй
фб рсьуиефб уфб учефйкЬ дйбмесЯумбфб (влЭре рбсЬгсбцп “УхсфЬсй фщн брпссхрбнфйкюн”).
БЛЗНХЧФБ (рсьгсбммб 7). ЕЯнбй Энбт биьсхвпт кэклпт рпх мрпсеЯ нб дпхлеэей фз нэчфб ьфбн фп фймпльгйп фпх
злекфсйкпэ еЯнбй мейщмЭнп. Фп рсьгсбммб мелефЮизке гйб ухниефйкЬ кбй вбмвбкесЬ фпэчб. Уфп фЭлпт фпх кэклпх
з мзчбнЮ уфбмбфЬей ме фп несь уфз лекЬнз. Гйб фп уфэшймп кбй фп Ьдейбумб рйЭуфе фп кпхмрЯ ЕККЙНЗУЗ/РБХУЗ,
дйбцпсефйкЬ мефЬ брь 8 юсет з мзчбнЮ иб кЬней бхфьмбфб фп уфэшймп кбй фп Ьдейбумб фпх неспэ.
РспгзсЬммбфб Eco
Фб рспгсЬммбфб Eco рспуцЭспхн кблЭт ерйдьуейт рлхуЯмбфпт уе чбмзлЭт иесмпксбуЯет ерйфсЭрпнфбт лйгьфесз чсЮуз
злекфсйкЮт енЭсгейбт ме щцЭлейб гйб фп ресйвЬллпн кбй еопйкпньмзуз чсзмЬфщн.
Фб рспгсЬммб Eco (ВбмвбкесЬ 11, УхниефйкЬ 12 êáé Ôá÷ý 30’ 13) дзмйпхсгЮизкбн гйб дйбцьспхт фэрпхт
хцбумЬфщн кбй гйб спэчб лЯгп лесщмЭнб. Гйб фз дйбуцЬлйуз еньт вЭлфйуфпх брпфелЭумбфпт ухуфЮнефбй з чсЮуз хгспэ
брпссхрбнфйкпэ. РспфеЯнефбй з рсьрлхуз фщн гйбкЬдщн, фщн мбнйкефйюн кбй фщн лекЭдщн.
18
Page 19

Еобфпмйкеэуейт
ИЭуфе фз иесмпксбуЯб
УфсЭцпнфбт фпн ерйлпгЭб ИЕСМПКСБУЙБ фЯиефбй з иесмпксбуЯб рлхуЯмбфпт (влЭре РЯнбкб рспгсбммЬфщн).
З иесмпксбуЯб мрпсеЯ нб мейщиеЯ мЭчсй фп рлэуймп уе ксэп несь ( ).
Фп мзчЬнзмб иб рбсемрпдЯуей бхфьмбфб фз иЭуз иесмпксбуЯбт мегблэфесзт фзт мЭгйуфзт рспвлерьмензт гйб кЬие
рсьгсбммб.
ИЭуфе фп уфэшймп
УфсЭцпнфбт фпн ерйлпгЭб УФХШЙМП фЯиефбй з фбчэфзфб уфхшЯмбфпт фпх ерйлегмЭнпх рспгсЬммбфпт.
Пй мЭгйуфет рспвлерьменет фбчэфзфет гйб фб рспгсЬммбфб еЯнбй:
РспгсЬммбфб МЭгйуфз фбчэфзфб
ВбмвбкесЬ 800 уфспцЭт бнЬ лерфь
УхниефйкЬ 800 уфспцЭт бнЬ лерфь
МЬллйнб 800 уфспцЭт бнЬ лерфь
МефбощфЬ мьнп Ьдейбумб
З фбчэфзфб уфхшЯмбфпт мрпсеЯ нб елбффщиеЯ Ю нб брпклейуфеЯ ерйлЭгпнфбт фп уэмвплп .
Фп мзчЬнзмб иб рбсемрпдЯуей бхфьмбфб фз дйенЭсгейб уфхшЯмбфпт мегблэфеспх фпх мЭгйуфпх рспвлерьменпх гйб кЬие
рсьгсбммб.
ЛейфпхсгЯет
Пй дйЬцпсет лейфпхсгЯет рлхуЯмбфпт рпх рспвлЭрпнфбй брь фп рлхнфЮсйп ерйфсЭрпхн фзн ерЯфехоз фпх кбибсйумпэ кбй
фпх лехкпэ рпх ерйихмеЯфе.
Гйб фзн енесгпрпЯзуз фщн лейфпхсгйюн:
1. рйЭуфе фп рлЮкфсп фп учефйкь ме фзн ерйлегмЭнз лейфпхсгЯб.
2. Фп Ьнбммб фпх ендейкфйкпэ цщфьт ерйузмбЯней ьфй з лейфпхсгЯб еЯнбй енесгЮ.
РбсбфЮсзуз: Фп гсЮгпсп бнбвпувЮуймп фпх ендейкфйкпэ цщфьт деЯчней ьфй з учефйкЮ лейфпхсгЯб ден мрпсеЯ нб ерйлегеЯ
гйб фп феиЭн рсьгсбммб.
GR
Super Wash
ЧЬсз уфз чсЮуз мегблэфесзт рпуьфзфбт неспэ уфзн бсчйкЮ цЬуз фпх кэклпх кбй уфз чсЮуз ресйууьфеспх чсьнп, з
дхнбфьфзфб бхфЮ еобуцблЯжей Энб рлэуймп хшзлюн ерйдьуещн.
! Ден еЯнбй енесгь уфб рспгсЬммбфб 5, 6, 9, 10, 11, 12, 13, , , .
¸офсб ОЭвгблмб
ЕрйлЭгпнфбт фз дхнбфьфзфб бхфЮ бхоЬнефбй з брпфелеумбфйкьфзфб фпх оевгЬлмбфпт кбй еобуцблЯжефбй з мЭгйуфз
брпмЬксхнуз фпх брпссхрбнфйкпэ. ЕЯнбй чсЮуймп гйб ерйдесмЯдет йдйбЯфесб ехбЯуизфет.
! Ден еЯнбй енесгь уфб рспгсЬммбфб 5, 13, , .
Еэкплп уйдЭсщмб
ЕрйлЭгпнфбт фз лейфпхсгЯб бхфЮ, фп рлэуймп кбй фп уфэшймп иб фспрпрпйзипэн кбфЬллзлб гйб фз меЯщуз учзмбфйумпэ
фублбкщмЬфщн.
Уфп рсьгсбммб 9 з мзчбнЮ иб фелейюуей фпн кэклп ме фзн мрпхгЬдб уе мпэлйбумб кбй фп ендейкфйкь цщфЬкй
фзт лейфпхсгЯбт ЕХКПЛП УЙДЕСЩМБ кбй фзт ЕККЙНЗУЗУ/РБХУЗУ иб бнбвпувЮнпхн (рпсфпкблЯ) кбй з цЬуз
ОЕВГБЛМБФПУ иб рбсбмеЯней ухнечют бнбммЭнз. Гйб нб бдейЬуефе фп несь кбй нб мрпсеЯфе нб вгЬлефе фзн мрпхгЬдб
рсЭрей нб рбфЮуефе фп кпхмрЯ ЕККЙНЗУЗ/РБХУЗ Ю фп кпхмрЯ ЕХКПЛП УЙДЕСЩМБ.
! Ден еЯнбй енесгь уфб рспгсЬммбфб 5, 6, 7, 10, 11, 12, 13, , .
КбихуфесзмЭнз еккЯнзуз
КбихуфесеЯ фзн еккЯнзуз фпх мзчбнЮмбфпт мЭчсй 12 юсет.
РйЭуфе рпллЭт цпсЭт фп рлЮкфсп мЭчсй нб бнЬшей фп ендейкфйкь цщфЬкй фп учефйкь ме фзн ерйихмзфЮ кбихуфЭсзуз. Уфзн рЭмрфз цпсЬ
рпх иб рйЭуефе фп кпхмрЯ з лейфпхсгЯб иб бренесгпрпйзиеЯ.
УЗМЕЙЩУЗ: Бцпэ рбфзиеЯ фп рлЮкфсп ЕККЙНЗУЗ/РБХУЗ, мрпсеЯфе нб бллЬоефе фзн фймЮ кбихуфЭсзузт мьнп мейюнпнфЬт фзн.
! ЕЯнбй енесгь ме ьлб фб рспгсЬммбфб.
19
Page 20

БрпссхрбнфйкЬ кбй мрпхгЬдб
GR
ИЮкз брпссхрбнфйкюн
Фп кбль брпфЭлеумб фпх рлхуЯмбфпт еобсфЬфбй ерЯузт кбй брь
фз ущуфЮ дпуплпгЯб фпх брпссхрбнфйкпэ: хресвЬллпнфбт ден
рлЭнпхме брпфелеумбфйкьфесб кбй ерйрлЭпн ухнфелпэме уфз
дзмйпхсгЯб кспэуфбт уфб еущфесйкЬ мЭсз фпх рлхнфзсЯпх кбй уфз
мьлхнуз фпх ресйвЬллпнфпт.
ВгЬлфе фз иЮкз
брпссхрбнфйкюн кбй
ейуЬгефе фп брпссхрбнфйкь
Ю фп рсьуиефп щт еоЮт.
лекбнЯфуб 1: Брпссхрбнфйкь гйб рсьрлхуз (уе укьнз)
лекбнЯфуб 2: Брпссхрбнфйкь гйб рлэуймп
(уе укьнз Ю уе хгсь)
фп хгсь брпссхрбнфйкь еЯнбй кбль нб фп егчэефе бр’
ехиеЯбт уфз лекЬнз мЭущ фзт бнфЯуфпйчзт мрблЯфубт
дпупмЭфсзузт.
лекбнЯфуб 3: Рсьуиефб (мблбкфйкь, клр.)
¼фбн чэнефе фп мблбкфйкь уфп дйбмЭсйумб 3, рспуЭофе
нб мзн оересЬуей фзн хрпдейкнхьменз уфЬимз “max”.
Фп мблбкфйкь ейуЬгефбй бхфьмбфб уфз мзчбнЮ кбфЬ
фп фелехфбЯп оЭвгблмб. Уфп фЭлпт фпх рспгсЬммбфпт
рлэузт уфп дйбмЭсйумб 3 рбсбмЭней хрьлейммб неспэ.
Бхфь чсзуймеэей гйб фзн ейучюсзуз рплэ рхкнюн
мблбкфйкюн, дзлбдЮ гйб нб бсбйюуей фб ухмрхкнщмЭнб.
Бн уфп дйбмЭсйумб 3 рбсбмеЯней несь ресйууьфесп брь
фп кбнпнйкь, бхфь узмбЯней ьфй з дйЬфбоз еккЭнщузт
еЯнбй впхлщмЭнз. Гйб фпн кбибсйумь влЭре “УхнфЮсзуз
кбй цспнфЯдб”.
лекбнЯфуб 4: ЧлщсЯнз
Кэклпт леэкбнузт
З леэкбнуз мрпсеЯ нб дйенесгзиеЯ мьнп ме фб
рспгсЬммбфб 2, 3, 6.
Чэуфе фп лехкбнфйкь уфз иЮкз 4, фп брпссхрбнфйкь кбй
фп мблбкфйкь уфйт учефйкЭт лекбнЯфует, кбфьрйн иЭуфе Энб
брь фб рспбнбцесиЭнфб рспгсЬммбфб.
ЕндеЯкнхфбй мьнп гйб спэчб вбмвбкесЬ рплэ лесщмЭнб.
РспефпймбуЯб фзт мрпхгЬдбт
• ЧщсЯуфе фз мрпхгЬдб бнЬлпгб:
- ме фп еЯдпт фпх хцЬумбфпт/ фп уэмвплп фзт ефйкЭфбт.
- фб чсюмбфб: чщсЯуфе фб чсщмбфйуфЬ спэчб брь фб
лехкЬ.
• Еккенюуфе фйт фуЭрет кбй елЭгофе фб кпхмрйЬ.
• Мзн оереснЬфе фйт хрпдейкнхьменет фймЭт, уе учЭуз
ме фп вЬспт фзт уфегнЮт мрпхгЬдбт:
БниекфйкЬ хцЬумбфб: max 6 kg
УхниефйкЬ хцЬумбфб: max 2,5 kg
ЕхбЯуизфб хцЬумбфб: max 2 kg
МЬллйнб: max 1 kg
Рьуп жхгЯжей з мрпхгЬдб;
1 уенфьнй 400-500 gr.
1 мбойлбспиЮкз 150-200 gr.
1 фсбрежпмЬнфйлп 400-500 gr.
1 мрпхснпэжй 900-1.200 gr.
1 рефуЭфб 150-250 gr.
ЕйдйкЬ спэчб
Рпйкбмйуб: чсзуймпрпйЮуфе фп бнфЯуфпйчп рсьгсбммб 8
гйб нб рлэнефе рпхкЬмйуб дйбцьсщн ейдюн хцЬумбфпт кбй
чсюмбфпт.
ЕобуцблЯжей фз мЭгйуфз цспнфЯдб елбчйуфпрпйюнфбт фп
учзмбфйумь фублбкщмЬфщн.
МефбощфЬ: чсзуймпрпйЮуфе фп бнфЯуфпйчп рсьгсбммб 9 ãéá
нб рлэнефе ьлб фб мефбощфЬ спэчб. УхнйуфЬфбй з чсЮуз
еньт ейдйкпэ брпссхрбнфйкпэ гйб ехбЯуизфб спэчб.
КпхсфЯнет: дйрлюуфе фйт мЭуб уе Энб мбойлЬсй Ю уе Энб
дйкфхщфь убкпэлй. ЧсзуймпрпйЮуфе фп рсьгсбммб 9.
МЬллйнб: Фп еЯнбй фп мпнбдйкь рлхнфЮсйп рпх кбфЭкфзуе
фз узмбнфйкЮ бнбгнюсйуз Woolmark Platinum Care
(M.0508) ек мЭспхт фзт The Woolmark Company, рпх
рйуфпрпйеЯ фп рлэуймп уфп рлхнфЮсйп ьлщн фщн мЬллйнщн
спэчщн кбиют кбй екеЯнщн рпх цЭспхн фзн ефйкЭфб
“мьнп рлэуймп уфп чЭсй” . Ме фп рсьгсбммб 10
Эчефе ухнерют брьлхфз вевбйьфзфб нб рлЭнефе уфп
рлхнфЮсйп ьлб фб мЬллйнб спэчб (max. 1 kg) ме фзн
еггэзуз фщн кблэфесщн ерйдьуещн.
Уэуфзмб йупуфЬимйузт фпх цпсфЯпх
Рсйн брь кЬие уфэшймп, гйб нб брпцэгефе дпнЮуейт
хресвплйкЭт кбй гйб нб кбфбнеЯмефе пмпйьмпсцб фп
цпсфЯп, п кЬдпт дйенесгеЯ ресйуфспцЭт уе мйб фбчэфзфб
елбцсЬ бнюфесз екеЯнзт фпх рлхуЯмбфпт. Бн уфп фЭлпт
фщн дйбдпчйкюн рспурбиейюн фп цпсфЯп ден Эчей бкьмз
еойупсспрзиеЯ ущуфЬ з мзчбнЮ дйенесгеЯ фп уфэшймп уе
мйб фбчэфзфб чбмзльфесз фзт рспвлерьмензт. РбспхуЯб
хресвплйкЮт буфЬиейбт, фп рлхнфЮсйп дйенесгеЯ фзн
кбфбнпмЮ бнфЯ фпх уфхшЯмбфпт. Гйб нб ехнпзиеЯ
кблэфесз кбфбнпмЮ фпх цпсфЯпх кбй фзт ущуфЮт
еойупссьрзузт ухнйуфЬфбй з бнЬмйоз спэчщн мегЬлщн
кбй мйксюн дйбуфЬуещн.
20
Page 21

РспцхлЬоейт кбй
ухмвпхлЭт
! Фп рлхнфЮсйп учедйЬуфзке кбй кбфбукехЬуфзке
уэмцщнб ме фпхт дйеинеЯт кбньнет буцблеЯбт. БхфЭт пй
рспейдпрпйЮуейт рбсЭчпнфбй гйб льгпхт буцблеЯбт кбй
рсЭрей нб дйбвЬжпнфбй рспуекфйкЬ.
ГенйкЮ буцЬлейб
• З ухукехЮ ден рсЭрей нб чсзуймпрпйеЯфбй брь Ьфпмб
(ухмресйлбмвбнпмЭнщн фщн рбйдйюн) ме цхуйкЭт,
бйуизфзсйбкЭт Ю нпзфйкЭт йкбньфзфет кбй ме емрейсЯет
кбй гнюуейт бнербскеЯт, екфьт кй бн з чсЮуз бхфЮ
гЯнефбй хрь фзн ерЯвлешз Ю фйт пдзгЯет еньт бфьмпх
хреэихнпх гйб фзн буцЬлейЬ фпхт. Фб рбйдйЬ рсЭрей нб
ерйфзспэнфбй гйб нб еобуцблйуфеЯ ьфй ден иб рбЯопхн
ме фз ухукехЮ.
• Фп рлхнфЮсйп рсЭрей нб чсзуймпрпйеЯфбй мьнп брь
енЮлйкб Ьфпмб кбй уэмцщнб ме фйт пдзгЯет рпх
бнбцЭспнфбй уфп рбсьн егчейсЯдйп.
• З ухукехЮ бхфЮ учедйЬуфзке брпклейуфйкЬ гйб пйкйбкЮ
чсЮуз.
• Мзн бггЯжефе фп мзчЬнзмб ме гхмнЬ рьдйб Ю ме фб
чЭсйб Ю фб рьдйб всегмЭнб.
• Мзн вгЬжефе фп вэумб брь фзн злекфсйкЮ рсЯжб
фсбвюнфбт фп кблюдйп, бллЬ нб рйЬнефе фзн рсЯжб.
• Мзн бггЯжефе фп несь бдейЬумбфпт, бцпэ мрпсеЯ нб
цфЬуей уе хшзлЭт иесмпксбуЯет.
• Мзн жпсЯжефе уе кбмЯб ресЯрфщуз фзн рьсфб: иб
мрпспэуе нб чблЬуей п мзчбнйумьт буцблеЯбт рпх
рспуфбфеэей брь фхчбЯб бнпЯгмбфб.
• Уе ресЯрфщуз влЬвзт, уе кбмЯб ресЯрфщуз нб мзн
еремвбЯнефе уфпхт еущфесйкпэт мзчбнйумпэт
рспурбиюнфбт нб фзн ерйукехЬуефе.
• Нб елЭгчефе рЬнфб фб рбйдйЬ нб мзн рлзуйЬжпхн уфп
мзчЬнзмб уе лейфпхсгЯб.
• Бн рсЭрей нб мефбфпрйуфеЯ, ухнесгбуфеЯфе дэп Ю фсЯб
Ьфпмб ме фз мЭгйуфз рспупчЮ. РпфЭ мьнпй убт гйбфЯ фп
мзчЬнзмб еЯнбй рплэ вбсэ.
• Рсйн ейуЬгефе фз мрпхгЬдб елЭгофе бн п кЬдпт еЯнбй
Ьдейпт.
ДйЬиеуз
• ДйЬиеуз фпх хлйкпэ ухукехбуЯбт: фзсеЯфе фпхт
фпрйкпэт кбнпнйумпэт, юуфе пй ухукехбуЯет нб
мрпспэн нб ербнбчсзуймпрпйзипэн.
• З ехсщрбъкЮ пдзгЯб 2002/96/EK гйб фб Брьвлзфб
Злекфсйкпэ кбй Злекфспнйкпэ Еопрлйумпэ, брбйфеЯ ьфй
пй рблбйЭт пйкйбкЭт злекфсйкЭт ухукехЭт ден рсЭрей
нб брпвЬлпнфбй мбжЯ ме фб хрьлпйрб брьвлзфб фпх
дзмпфйкпэ дйкфэпх. Пй рблбйЭт ухукехЭт рсЭрей нб
ухллечипэн чщсйуфЬ рспкеймЭнпх нб велфйуфпрпйзипэн
з брпкбфЬуфбуз кбй з бнбкэклщуз фщн хлйкюн рпх
ресйЭчпхн кбй ме укпрь фз меЯщуз фщн влбвесюн
ерйрфюуещн уфзн бнисюрйнз хгеЯб кбй фп ресйвЬллпн.
Фп уэмвплп ме фп дйегсбммЭнп “дпчеЯп брпвлЮфщн”
уфп рспъьн хренихмЯжей уе убт фзн хрпчсЭщуЮ убт,
рщт ьфбн ерйихмеЯфе нб рефЬоефе фз ухукехЮ ,рсЭрей
нб ухллечиеЯ чщсйуфЬ.
Пй кбфбнблщфЭт иб рсЭрей нб брехиэнпнфбй уфйт
фпрйкЭт бсчЭт Ю уфб кбфбуфЮмбфб лйбнйкЮт гйб
рлзспцпсЯет рпх бцпспэн фз ущуфЮ дйЬиеуз фщн
рблбйюн злекфсйкюн ухукехюн.
Еопйкпньмзуз енЭсгейбт кбй уевбумьт фпх
ресйвЬллпнфпт
Еопйкпньмзуз брпссхрбнфйкпэ, неспэ, енЭсгейбт кбй
чсьнпх
• Гйб нб мзн опдеэефе рьспхт иб рсЭрей нб
чсзуймпрпйеЯфе фп рлхнфЮсйп ме фп мЭгйуфп цпсфЯп.
¸нб рлЮсет цпсфЯп уфз иЭуз дэп мйуюн убт
еопйкпнпмеЯ мЭчсй фп 50% енЭсгейбт.
• З рсьрлхуз еЯнбй бнбгкбЯб мьнп фб бурсьспхчб рпх
еЯнбй рплэ лесщмЭнб. БрпцеэгпнфЬт фз еопйкпнпмеЯфе
брпссхрбнфйкь, чсьнп, несь кбй брь 5 Эщт 15%
енЭсгейбт.
• Реснюнфбт фпхт лекЭдет ме Энб кбибсйуфйкь Ю
бцЮнпнфЬт фпхт уе мпэлйбумб рсйн фп рлэуймп,
мейюнефбй з бнбгкбйьфзфб рлхуЯмбфпт уе хшзлЭт
иесмпксбуЯет. ¸нб рсьгсбммб уе 60°C бнфЯ фщн
90°C Ю Энб уе 40°C бнфЯ фщн 60°C, убт еопйкпнпмеЯ
мЭчсй 50% енЭсгейбт.
• Нб дпуплпгеЯфе кблЬ фп брпссхрбнфйкь ме вЬуз
фзн уклзсьфзфб фпх неспэ, фп вбимь всщмйЬт кбй
фзн рпуьфзфб фзт мрпхгЬдбт юуфе нб брпупвеЯфе
урбфЬлет кбй нб рспуфбфеэефе фп ресйвЬллпн: бкьмб
кбй фб вйпдйбурюменб брпссхрбнфйкЬ ресйЭчпхн
уфпйчеЯб рпх бллпйюнпхн фзн йупсспрЯб уфзн цэуз.
ЕрйрлЭпн нб брпцеэгефе фп мЭгйуфп дхнбфьн фп
мблбкфйкь.
• РлЭнпнфбт бсгЬ фп брьгехмб мЭчсй фйт рсюфет
рсщйнЭт юсет ухмвЬллефе уфзн меЯщуз фпх
брбйфпэменпх злекфсйкпэ цпсфЯпх брь рлехсЬт
ерйчейсЮуещн злекфсйкЮт енЭсгейбт.
З дхнбфьфзфб “КбихуфесзмЭнз еккЯнзуз” впзиЬей рплэ
уфзн псгЬнщуз фщн рлхуймЬфщн ме фзн Эннпйб бхфЮ.
• Бн з мрпхгЬдб рсЭрей нб уфегнюуей уе Энб уфегнщфЮсйп,
ерйлЭофе хшзлЮ фбчэфзфб уфхшЯмбфпт. ЛЯгп несь уфзн
мрпхгЬдб убт еопйкпнпмеЯ чсьнп кбй енЭсгейб уфп
рсьгсбммб уфегнюмбфпт.
GR
21
Page 22

УхнфЮсзуз кбй цспнфЯдб
GR
КлеЯуймп рбспчюн неспэ кбй злекфсйкпэ
сеэмбфпт
• КлеЯнефе фзн всэуз мефЬ брь кЬие рлэуймп. ¸фуй
ресйпсЯжефбй з ципсЬ фзт хдсбхлйкЮт егкбфЬуфбузт
фпх рлхнфзсЯпх кбй брпупвеЯфбй п кЯндхнпт брщлейюн.
• ВгЬлфе фп вэумб брь фп сеэмб ьфбн кбибсЯжефе фп
рлхнфЮсйп кбй кбфЬ фйт есгбуЯет ухнфЮсзузт.
Кбибсйумьт фпх рлхнфзсЯпх
Фп еощфесйкь мЭспт кбй фб лбуфйчЭнйб мЭсз мрпспэн нб
кбибсЯжпнфбй ме Энб рбнЯ всегмЭнп ме члйбсь несь кбй
убрпэнй. Мз чсзуймпрпйеЯфе дйблэфет Ю брпохуфйкЬ.
ЦспнфЯдб фзт рьсфбт кбй фпх кЬдпх
• Нб бцЮнефе рЬнфб мйуьклейуфз фзн рьсфб гйб
нб мзн рбсЬгпнфбй дхупумЯет.
Кбибсйумьт фзт бнфлЯбт
Фп рлхнфЮсйп дйбиЭфей мйб бнфлЯб бхфпкбибсйжьменз
рпх ден чсейЬжефбй ухнфЮсзуз. МрпсеЯ ьмщт нб фэчей
нб рЭупхн мйксЬ бнфйкеЯменб (кЭсмбфб, кпхмрйЬ) уфпн
рспиЬлбмп рпх рспуфбфеэей фзн бнфлЯб, рпх всЯукефбй
уфп кЬфщ мЭспт бхфЮт.
! ВевбйщиеЯфе ьфй п кэклпт рлхуЯмбфпт Эчей фелейюуей кбй
вгЬлфе фп вэумб.
Гйб нб бнбкфЮуефе ендечьменб реумЭнб бнфйкеЯменб
уфпн рспиЬлбмп:
1. брпмбксэнефе фп
рпдбсЬкй кЬфщ уфп
рсьуийп рлехсь фпх
рлхнфзсЯпх фсбвюнфбт
ме фб чЭсйб брь фб
рлбънЬ (влЭре ейкьнб).
2. оевйдюуфе фп
кбрЬкй уфсЭцпнфЬт фп
бсйуфесьуфспцб (влЭре
ейкьнб): еЯнбй цхуйкь нб
вгбЯней лЯгп несь.
3.кбибсЯуфе ерймелют фп
еущфесйкь.
4.обнбвйдюуфе фп кбрЬкй.
5.обнбмпнфЬсефе фп
фбмрль ьнфбт уЯгпхспй,
рсйн фп урсюоефе рспт
фп мзчЬнзмб, ьфй Эчефе
ейуЬгей фб гбнфжЬкйб уфйт
бнфЯуфпйчет еупч Эт.
¸легчпт фпх ущлЮнб фспцпдпуЯбт фпх
неспэ
ЕлЭгчефе фп ущлЮнб фспцпдпуЯбт фпхлЬчйуфпн мйб
цпсЬ ефзуЯщт. Бн рбспхуйЬжей укбуЯмбфб кбй учйумЭт
бнфйкбиЯуфбфбй: кбфЬ фб рлхуЯмбфб пй йучхсЭт рйЭуейт иб
мрпспэубн нб рспкблЭупхн обцнйкЬ урбуЯмбфб.
! Мз чсзуймпрпйеЯфе рпфЭ ущлЮнет чсзуймпрпйзмЭнпхт.
Брпухнбсмпльгзуз:
Еоб укЮ уфе мй б ел бцс Ь
рЯеуз уфп мегЬлп кпхмрЯ
уфп рсьуийп мЭспт фзт
иЮкзт брпссхрбнфйкпэ кбй
фсбвЮофе фзн рспт фб рЬнщ
(ейк. 1, 2).
Åéê. 1
22
Рщт кбибсЯжефбй з иЮкз брпссхрбнфйкпэ
Кбибсйумьт:
Кбфьрйн, кбибсЯуфе фз иЮкз кЬфщ брь фз всэуз (ейк. 3)
чсзуймпрпйюнфбт мйб пдпнфьвпхсфуб кбй, бцпэ фсбвЮоефе
фп жехгЬсй фщн уйцпнЯщн рпх еЯнбй вблмЭнб уфп ерЬнщ мЭспт
фщн дйбмесйумЬфщн 1 кбй 2 (ейк. 4), елЭгофе бн фб Ядйб еЯнбй
впхлщмЭнб кбй оерлэнефЭ фб.
Åéê. 2 Åéê. 3
Ербнбухнбсмпльгзуз:
Мзн оечнЬфе нб ербнейуЬгефе
фп жехгЬсй фщн уйцпнЯщн уфйт
бнфЯуфпйчет Эдсет кбй, фЭлпт,
нб обнбвЬлефе фз иЮкз уфзн
Эдсб фзт ецбсмьжпнфЬт фз
(ейк. 4, 2, 1).
Åéê. 4
Page 23

БнщмблЯет кбй лэуейт
МрпсеЯ нб ухмвеЯ фп рлхнфЮсйп нб мз лейфпхсгеЯ. Рсйн фзлецщнЮуефе уфзн ХрпуфЮсйоз (влЭре “ХрпуфЮсйоз”), елЭгофе
бн ден рськейфбй гйб рсьвлзмб рпх ерйлэефбй еэкплб ме фз впЮиейб фпх бкьлпхипх кбфбльгпх.
БнщмблЯет:
Фп рлхнфЮсйп ден бнЬвей.
П кэклпт рлхуЯмбфпт ден оекйнЬей.
Фп рлхнфЮсйп ден цпсфюней несь
(бнбвпувЮней гсЮгпсб фп ендейкфйкь
цщфЬкй фзт рсюфзт цЬузт рлэузт).
Фп рлхнфЮсйп цпсфюней кбй бдейЬжей
несь ухнечют.
ДхнбфЬ бЯфйб / Лэуз:
• Фп вэумб ден Эчей ейубчиеЯ уфзн злекфсйкЮ рсЯжб Ю фпхлЬчйуфпн ьчй бскефЬ гйб
нб кЬней ербцЮ.
• Уфп урЯфй ден хрЬсчей сеэмб.
• З рьсфб ден еЯнбй кблЬ клейуфЮ.
• Фп кпхмрЯ БНБММБ/УВЗУЙМП ден рбфЮизке.
• Фп кпхмрЯ ЕККЙНЗУЗ/РБХУЗ ден рбфЮизке.
• З всэуз фпх неспэ ден еЯнбй бнпйчфЮ.
• ФЭизке мйб кбихуфЭсзуз уфпн чсьнп еккЯнзузт (влЭре «Еобфпмйкеэуейт»).
• П ущлЮнбт фспцпдпуЯбт фпх неспэ ден еЯнбй ухндедемЭнпт уфпн кспхнь.
• П ущлЮнбт еЯнбй дйрлщмЭнпт.
• З всэуз фпх неспэ ден еЯнбй бнпйчфЮ.
• Уфп урЯфй леЯрей фп несь.
• Ден хрЬсчей бскефЮ рЯеуз.
• Фп кпхмрЯ ЕККЙНЗУЗ/РБХУЗ ден рбфЮизке.
• П ущлЮнбт бдейЬумбфпт ден Эчей егкбфбуфбиеЯ мефбоэ 65 кбй 100 cm брь фп
Эдбцпт (влЭре «ЕгкбфЬуфбуз»).
• Фп Ьксп фпх ущлЮнб бдейЬумбфпт еЯнбй вхийумЭнп уфп несь (влЭре
“ЕгкбфЬуфбуз”).
• Фп ерйфпЯчйп Ьдейбумб ден Эчей брбЭсщуз.
Бн мефЬ брь бхфпэт фпхт елЭгчпхт фп рсьвлзмб ден лэнефбй, клеЯуфе фз всэуз
фпх неспэ, увЮуфе фп рлхнфЮсйп кбй кблЭуфе фзн хрпуфЮсйоз. Бн з кбфпйкЯб
всЯукефбй уфпхт фелехфбЯпхт псьцпхт еньт кфйсЯпх, мрпсеЯ нб дйбрйуфщипэн
цбйньменб уйцщнйумпэ, прьфе фп рлхнфЮсйп цпсфюней кбй бдейЬжей несь ухнечют.
Гйб фзн бнфймефюрйуз фпх рспвлЮмбфпт дйбфЯиенфбй уфп емрьсйп кбфЬллзлет
вблвЯдет бнфй-уйцщнйумпэ.
GR
Фп рлхнфЮсйп ден цпсфюней Ю ден
уфэвей.
Фп рлхнфЮсйп дпнеЯфбй рплэ кбфЬ фп
уфэшймп.
Фп рлхнфЮсйп чЬней несь.
Фп ендейкфйкь цщфЬкй ЕККЙНЗУЗ/
РБХУЗ (рпсфпкблЯ) кбй фб ендейкфйкЬ
цщфЬкйб бнбвпувЮнпхн гсЮгпсб.
УчзмбфЯжефбй рплэт бцсьт.
• Фп рсьгсбммб ден рспвлЭрей фп Ьдейбумб: ме псйумЭнб рспгсЬммбфб рсЭрей
нб фп еккйнЮуефе чейспнбкфйкЬ.
• ЕЯнбй енесгЮ з лейфпхсгЯб ЕХКПЛП УЙДЕСЩМБ: гйб фзн плпклЮсщуз фпх
рспгсЬммбфпт рйЭуфе фп кпхмрЯ ЕККЙНЗУЗ/РБХУЗ («Еобфпмйкеэуейт»).
• П ущлЮнбт бдейЬумбфпт еЯнбй дйрлщмЭнпт (влЭре «ЕгкбфЬуфбуз»).
• П бгщгьт еккЭнщузт еЯнбй впхлщмЭнпт.
• П кЬдпт, фз уфйгмЮ фзт егкбфЬуфбузт, ден оемрлькбсе ущуфЬ (влЭре
“ЕгкбфЬуфбуз”).
• Фп рлхнфЮсйп ден еЯнбй псйжпнфйщмЭнп (влЭре “ЕгкбфЬуфбуз”).
• Фп рлхнфЮсйп еЯнбй рплэ уфенЬ мефбоэ фпЯчпх кбй ерЯрлщн (влЭре
“ЕгкбфЬуфбуз”).
• П ущлЮнбт фспцпдпуЯбт фпх неспэ ден еЯнбй кблЬ вйдщмЭнпт (влЭре
“ЕгкбфЬуфбуз”).
• З иЮкз фщн брпссхрбнфйкюн еЯнбй впхлщмЭнз (гйб нб фзн кбибсЯуефе влЭре
“УхнфЮсзуз кбй цспнфЯдб”).
• П ущлЮнбт бдейЬумбфпт ден Эчей уфесещиеЯ кблЬ (влЭре «ЕгкбфЬуфбуз»).
• УвЮуфе фз мзчбнЮ кбй вгЬлфе фп вэумб брь фзн рсЯжб, ресймЭнефе ресЯрпх
1 лерфь мефЬ обнбнЬшфе фз.
Бн з бнщмблЯб ерймЭней, кблЭуфе фзн ХрпуфЮсйоз.
• Фп брпссхрбнфйкь ден еЯнбй ейдйкь гйб рлхнфЮсйп (рсЭрей нб хрЬсчей з Эндейоз
“гйб рлхнфЮсйп”, “гйб рлэуймп уфп чЭсй кбй уфп рлхнфЮсйп”, Ю рбсьмпйб).
• З дпуплпгЯб хрЮсое хресвплйкЮ.
23
Page 24

ХрпуфЮсйоз
GR
Рсйн ерйкпйнщнЮуефе ме фзн ХрпуфЮсйоз:
• ЕлЭгофе бн з бнщмблЯб мрпсеЯфе нб фзн бнфймефщрЯуефе мьнпй убт (влЭре “БнщмблЯет кбй лэуейт”);
• ЕрбнеккйнЮуфе фп рсьгсбммб гйб нб елЭгоефе бн фп рсьвлзмб бнфймефщрЯуфзке;
• Уе бснзфйкЮ ресЯрфщуз, ерйкпйнщнЮуфе ме фзн еопхуйпдпфзмЭнз ФечнйкЮ ХрпуфЮсйоз уфпн фзлецщнйкь бсйимь рпх
хрЬсчей уфп рйуфпрпйзфйкь еггэзузт.
! Мзн кбфбцеэгефе рпфЭ уе мз еопхуйпдпфзмЭнпхт фечнйкпэт.
ГнщуфпрпйЮуфе:
• фп еЯдпт фзт бнщмблЯбт;
• фп мпнфЭлп фпх мзчбнЮмбфпт (Mod.);
• фпн бсйимь уейсЬт (S/N).
Пй рлзспцпсЯет бхфЭт всЯукпнфбй уфзн фбмрелЯфуб рпх хрЬсчей уфп рЯущ мЭспт фпх рлхнфзсЯпх.
24
Page 25

Iнструкцiї з експлуатацiї
ПРАЛЬНА МАШИНА
UK
Українська
ECOT6L 85
Зміст
UK
Установка, 26-27
Розпакування та встановлення по рівню
Підключення електричного живлення та
подачі води
Перший цикл прання
Технічні дані
Опис пральної машини та запуск циклу
прання, 28-29
Панель керування
Світлові індикатори
Як відкривати та закривати барабан
Запуск циклу прання
Цикли прання, 30
Таблиця циклів прання
Персоналізація, 31
Встановлення температури
Встановлення швидкості обертання
Функції
Пральні засоби та білизна,32
Дозатор прального засобу
Цикл відбілювання
Підготування білизни
Речі, що потребують спеціального догляду
Система балансування завантаження
Попередження та рекомендації, 33
Загальні правила безпеки
Утилізація приладу
Збереження електроенергії та захист
навколишнього середовища
Догляд та обслуговування, 34
Відключення води та електричного
живлення
Очищення пральної машини
Догляд за дверцятами та барабаном Вашого
приладу
Чищення насосу
Перевірка водозабірного шланга
Як очищати дозатор миючого засобу
Пошук та усунення несправностей, 35
Сервісне обслуговування, 36
25
Page 26

Встановлення
UK
! Зберігайте це довідник, щоб мати нагоду звернутися до нього
у будь-який момент. У разi продажу, передачі іншій особі або
переїзду переконайтеся в тому, що інструкція перебуває разом
із пральною машиною й новий власник може ознайомитися з
її принципами роботи й відповідними запобіжними заходами.
! Уважно вивчіть інструкцію: в ній міститься важлива
інформація щодо монтажу, використання і безпеки.
Розпакування й вирівнювання
Розпакування
1. Розпакування пральної машини
2. Вдоскональтеся, що машина не зазнала ушкоджень пiд час транспортування. Якщо такі є, не виконуйте нiяких пiдключень
та негайно зверніться до
постачальника.
3. Видаліть 4 запобіжнi
гвинти для транспортування та гумову прокладку з відповідною
розпірною деталлю, якi
зн аходяться позаду (
див. малюнок).
4. Закрийте отвори пластмасовими пробками з комп-
лекту постачання.
5. Зберiгайте всi компоненти: у разi транспортування
пральної машини їх потрiбно повернути на мiсце.
Увага. При повторному використанні коротші гвинти
слід встановити зверху.
Підключення води й електроенергії
Контроль труби для подачі води
1. Підключити трубу подачі, прикрутивши її до крану
холодної води за допомогою штуцеру з газовою
різьбою 3/4 (див. схему).
Перед пi д к л ю ч е н н я м
спустiть воду, доки вона
не стане прозорою.
2. Підключіть шланг подачі води до прал ьної
машини, під’єднавши його
до водорозбiрного крану,
який знаходиться угорі
праворуч на задньому боцi
машини ( див. малюнок).
3. Зверніть увагу, щоб
труба не мала згинів та
утисків.
! Тиск води в крані має відповідати значенням у таблиці
Технічних даних (див.сторінку поруч).
! Якщо довжини шланга для води не вистачає, зверніть-
ся у спеціалізовану крамницю або до уповноваженого
фахівця.
! Не користуйтеся трубами, якi були вже у вживаннi.
! Забороняйте дiтям гратися з упаковками.
Вирiвнювання
1. Встановіть пральну машину на плоскій та твердій
підлозі, не притуляючи її
до стін, меблів, тощо.
2. Якщо пiдлога не iдеально
горизонтальна, компенсуйте нерiвностi за допомогою переднiх нiжок (див.
малюнок) – розкручуючи чи
закручуючи їх; кут нахилу
вiдносно робочої поверхнi
не повинен перевищувати 2°.
Належне вирiвнювання забезпечить стабiльнiсть машинi
та запобiжить вiбрацiям, шуму та пересуванням пiд час
роботи. У випадку встановлення машини на килимовому
покритті або килимах, ніжки необхідно відрегулювати
таким чином, щоб гарантувати під пральною машиною
необхідний простір для вентиляції.
26
Page 27

Пiд’єднання шлангу злива води
65 - 100 cm
Пiд’єднайте зливний
шланг, не згинаючи його,
до каналізації або до зливного отвору у стіні на висоті від 65 до 100 см від
підлоги.
Або покладіть його на
край вмивальника або
ванни; прив’язавши направляючу з комплекту
постачання до крана (див.
малюнок). Не залишайте
вільний кінець зливного
шланга зануреним у воду.
! Використання подовжувача шланга не рекомендоване.
В разi необхiдностi використання подовжувача шланга,
переконайтеся у тому, що він має той самий діаметр та
його довжина не перевищує 150 см.
! Проводити замiну кабелю живлення можуть тiльки
вповноваженi фахiвцi.
Увага! Компанія знімає з себе відповідальність у разi
недотримання наведених вказівок.
Перший цикл прання
Після того, як пристрій установлений, але перед тим,
як зробити перше прання, слід запустити цикл прання
2 з мийним засобом, але без білизни.
Технiчнi характеристики
UK
Підключення до електричної мережі
Перш нiж вставити вилку в електричну розетку, переконайтеся, що:
• розетка має заземлення у відповідності до встанов-
лених норм;
• розетка розрахована на максимальне навантаження
у межах потужності машини, зазначене у таблиці
Технічних даних (див.малюнок поруч);
• напруга живлення перебуває у межах, зазначених у
таблиці Технічних даних (див.малюнок поруч);
• розетка підходить до вилки пральної машини. В ін-
шому випадку замініть розетку або вилку.
! Машину не можна встановлювати поза приміщенням,
навіть в захищених мiсцях, тому що дуже небезпечно
піддавати її впливу дощу і грози.
! Коли машину вже встановлено, забезпечте вільний
доступ до електричної розетки.
! Не використовуйте подовжувачі й трійники.
! Шнур не повинен мати згинів або утисків.
Модель ECOT6L 85
Розмiри
Мiсткiсть вiд 1 до 6 кг
Електричнi
пiдключення
Водопровiднi
пiдключення
Швидкiсть
вiджиму
Програма керування
згiдно до норми
EN 60456
ширина 40 см
висота 85 см
глибина 60 см
див. табличку з технiчними даними
на машинi
максимальний тиск 1 мПа (10 бар)
мiнiмальний тиск 0,05 мПа (0,5 бар)
ємнiсть барабана – 42 лiтри
до 800 обертiв за хвилину
програма 6; температура 60°C;
виконується з завантаженням у 6 кг.
Цей прилад вiдповiдає таким європейським директивам:
- 2004/108/CE (Про
електромагнiтну сумiснiсть)
- 2006/95/CE (про Низьку напругу)
- 2002/96/CE
27
Page 28

UK
Опис пральної машини та
процедури iз запуску програм
Панель керування
УВIМКНЕННЯ/
Кнопка
ВИМКНЕННЯ
ТЕМПЕРАТУРА
Ручка
ВIДЖИМУ
Ручка
Ручка
ВIДЖИМУ
Кнопки з
iндикаторними
лампами
ФУНКЦIЯ
Індикаторнi лампи
ЦИКЛУ/ ВIДСТРОЧЕНОГО
ЗАПУСКУ
Кнопка з
індикаторною
лампою
ПУСК/ПАУЗА
УВIМКНЕННЯ
Iндикаторна лампа
ЛЮК
ЗАБЛОКОВАНО
Кнопка УВIМКНЕННЯ/ВИМКНЕННЯ: для увiмкнення й
вимкнення пральної машини
Ручка ПРОГРАМИ: для задання бажаних програм. Під
час програми ручка залишається нерухомою.
Кнопки з iндикаторними лампами ФУНКЦIЯ: для вибору
наявних функцій. Iндикаторна лампа обраної функцї
залишається увiмкненою.
Ручка ВIДЖИМУ: для установки в або для вимкнення
його (див. “Налаштування п”).
Ручка ТЕМПЕРАТУРА: для установки температури або
холодного прання (див. “Налаштування п”).
І н д и катор н i ла м п и У В I М К НЕН Н Я ЦИ К Л У /
ВIДСТРОЧЕНОГО ПУСКУ: для спостереження за
станом програми прання. Увiмкнена iндикаторна
лампа вказує на активовану фазу. При заданнi функцiї
“Вiдстрочений запуск” вiдображається час вiдстрочення
запуску програми (див. сторiнку поруч).
Iндик аторна лампа ЛЮ К З АБ ЛО КОВА НО: для
перевiрк и того , чи лю к може в i дкриват и с ь
(див. сторiнку поруч).
Кнопка з індикаторною лампою ПУСК/ПАУЗА: для
запуску програм або для їх тимчасового переривання.
Увага: щоб установити в режим паузи поточне прання,
натиснiть на цю кнопку, вiдповiдна кнопка почне блимати
померанцевим кольором, в той час як iндикаторна
лампа поточної фази свiтитиметься постiйним свiтлом.
Якщо індикаторна лампа “ЛЮК ЗАБЛОКОВАНО
” погасне, можна відкривати люк для завантаження
білизни. Щоб продовжити прання з місця, де воно було
перервано, знову натисніть на цю кнопку.
Режим очiкування
Вiдповiдно до норм, пов’язаних з заощадження
енергiї, цю пральну машину оснащено системою
автовимкнення (stand by), яка активується через 30
секунд вiдсутностi роботи з боку машини. Швидко
натиснiть кнопку УВIМКНЕННЯ/ВИМКНЕННЯ та
зачекайте вiдновлення роботи машини.
Індикаторнi лампи
Індикаторнi лампи надають важливу iнформацiю
От на що вони вказують:
Вiдстрочений запуск
Якщо активовано функцiю “Вiдстрочений запуск” (див.
“Налаштування пiд вл аснi потреби”), тодi пiсля
запуску програми розпочне блимати iндикаторна лампа,
пов’язана з вiдстрочкою, яку було задано:
Протягом усього часу шляхом блимання вiдповiдної
iндикаторної лампи вiдображається час вiдстрочення,
який залишився:
По закiнченнi обраного часу вiдстрочення згасне iндикаторна
лампа, яка блимала, й запуститься задана програма.
28
Iндикаторнi лампи поточних операцiй
Пiсля обрання та запуску бажаного циклу прання iндикаторнi
лампи вмикаються по черзi, щоб вказати на стан програми:
Page 29

Прання
Полоскання
Вiджим
Злив
Кiнець прання
Кнопки функцiй та вiдповiднi iндикаторнi лампи
Пiсля вибору функцiї вiдповiдна iндикаторна лампа
починає свiтитися.
Якщо вибрана функція несумісна з заданою
програмою, індикаторна лампа почне блимати й цю
функцiю не буде активовано.
У разi задання функцiї, несумiсної з iншою
попередньо обраною, активується останнiй вибiр.
Iндикаторна лампа заблокованого люку
Запалена iндикаторна лампа вказує на те, що люк
заблоковано з метою запобiгання випадкового
вiдкриття; щоб уникнути ушкоджень, перш нiж
вiдкрити люк, зачекайте вимикання iндикаторної
лампи.
Увага: якщо функцiю “Вiдстрочений запуск”
активовано, заборонено вiдкривати люк, для
вiдкриття люку встановiть машину в режим паузи
натиснувшни на кнопку ПУСК/ПАУЗА.
! Швидке блимання iндикаторної лампи ПУСК/ПАУЗА
(померанцевий) разом iз iндикаторною лампою
функцiй вказує на неполадку (див. “Несправностi та
засоби їх лiквiдацiї”).
Як відкривати та закривати барабан
Мал. 1 Мал. 2
A) Відкриття верхньої кришки (Мал. 1):
Підійміть зовнішню кришку і повністю її відкрийте.
B) Відкриття барабану за допомогою двох рук, як
показано (Мал. 2) :
- натисніть на кнопку, вказану стрілкою на мал. 2,
з легким натисненням униз, притримуючи рукою,
щоб попередити відкриття дверцят і придавлення
пальців;
- притримайте дверцята, які розчіпляться і легко відкриються.
C) Завантаження білизни (Рис. 3).
D) Зачинення (Мал. 4).
- добре зачиніть барабан, спочатку опустивши
передні дверцята в поклавши на них задні;
- переконайтеся, що крючки передніх дверцят іде-
ально увійшли у гніздо задніх дверцят;
- після клацання, яке сповіщає про зчеплення,
злегка натисніть униз на обидві дверцята: вони не
повинні відчепитися;
- закрийте зовнішню кришку.
Як запустити програму
1. Увiмкнiть пральну машину, натиснувши на кнопку
УВIМКНЕННЯ/ВИМКНЕННЯ. Усi iндикаторнi лампи
увiмкнуться на декiлька секунд, потiм згаснуть та
почне блимати iндикаторна лампа ПУСК/ПАУЗА.
2. Завантажте бiлизну й закрийте люк.
3. Встановiть за допомогою ручки ПРОГРАМ бажану
програму.
4. Встановiть температуру прання (див.
“Налаштування пiд власнi потреби”).
5. Встановiть швидкiсть вiджиму (див.
“Налаштування пiд власнi потреби”).
6. Додайте миюч засоби та присадки (див. “Миючi
засоби та бiлизна”).
7. Виберiть бажанi функцiї.
8. Запустiть програму, натиснувши кнопку ПУСК/
ПАУЗА й вiдповiдна iндикаторна лампа загориться
зеленим свiтлом.
Для скасування заданого циклу встановiть машину в
режим паузи, натиснувши кнопку ЗАПУСК/ПАУЗА, та
оберiть новий цикл.
9. Наприкiнцi програми почне свiтитися iндикаторна
лампа . iдкрити. Виймiть бiлизну та залиште люк
напiввiдкритим, щоб висушити барабан.
Вимкнiть пральну машину, натиснувши на кнопку
УВIМКНЕННЯ/ВИМКНЕННЯ.
UK
Мал. 3 Мал. 4
29
Page 30

UK
Програми
Таблиця програм
Опис циклу прання
Цикл прання
Автоматичні цикли
Бавовна + замочування: дуже забруднена білизна.
1
Бавовна: дуже забруднена білизна та стійка кольорова білизна.
2
Кольорова бавовна (3): злегка забруднена білизна та
3
делікатна кольорова білизна.
Синтетика: дуже забруднена стійка кольорова білизна.
4
Синтетика: злегка забруднена стійка кольорова білизна.
4
Mix 15’: швидко освіжити не дуже забруднений одяг (не
5
рекомендовано для вовни, шовку та одягу, який потребує
ручного прання).
Спеціальні цикли
Цикл дезінфікування: дуже забруднена білизна.
6
Цикл дезінфікування (1): дуже забруднена білизна та
6
стійка кольорова білизна.
Цикл дезінфікування (2): дуже забруднена білизна та
6
стійка кольорова білизна.
Цикл «На добраніч»: злегка забруднена делікатна кольорова білизна.
7
Сорочки
8
Шовк/ фіранки: для одягу з шовку та віскози, жіночої білизни.
9
Вовна: для вовни, кашеміру і таке інше.
10
Цикли Eco
11 Бавовна
12 Синтетика
13 Швидке прання
НЕПОВНІ ПРОГРАМИ
Полоскання - 800
Віджимання - 800
Злив - 0
Тривалість циклу, вказана на дисплеї або в керівництві, разрахована на основі стандартних умов роботи. Фактичний час може залежати від чисельних факторів, таких як температура
і тиск подаваної води, температура у приміщенні, кількість миючого засобу, кількість і тип завантаженої білизни, зрівноваження завантаженої білизни, додаткові обрані опції.
Макс.
темп.
холодній
холодній
холодній
Макс.
швид-
кість
(ºС)
(об/хв)
90° 800
60° 800
40° 800
60° 800
40° 800
30° 800
90° 800
60° 800
40° 800
40° 800
40° 600
30° 0
40° 800
В
воді
воді
воді
800
В
800
В
800
Замо-
чування
Миючі засоби
Відбілювач
-
-
- -
- -
- -
-
- -
- -
- -
- -
- -
- -
- -
- -
- -
- - -
- - - -
- - - -
Пран-няПом’як-
-
шувач
Для всiх Установ з проведення випробувань:
1) Програма керування згiдно до норми EN 60456: встановiть програму 6 з температурою 60°C.
2) Довга програма бавовна: встановiть програму 6 з температурою 40°C.
3) Коротка програма бавовна: встановiть програму 3 з температурою 40°C.
Спеціальні цикли прання
Mix15’ (цикл прання 5). Цей цикл прання було розроблено для швидкого прання злегка забрудненого одягу: він
триває 15 хвилин, зберігаючи таким чином електроенергію та час. Обираючи цей цикл (5 при 30°C), Виможете прати
разом різні види тканини (окрім вовни та шовку), з максимальним завантаженням 1,5 кг.
Цикл дезінфікування (цикл прання 6). Гігієнічний цикл прання при високій температурі (більше 60°C), щопотребує
використання відбілювача. Налийте відбілювач, миючий засіб та добавки у відповідні відділення (див. розділ під
назвою «Дозатор миючого засобу»).
Цикл «На добраніч» (цикл прання 7). Це тихий цикл, яким можна користуватися вночі, коли ціни на електроенергію
менші. Цей цикл прання розрахований на бавовну та синтетику. Наприкінці циклу машина зупиняється, в той час
як у барабані залишається вода; для того, щоб віджати та висушити білизну, натисніть кнопку пуску/паузи (ПУСК/
ПАУЗА); у протилежному випадку машина знову автоматично виконає цикл віджимання та сушки через 8 годин.
Макс.
заван-
таже
ння
(кг)
Трива-
лість
циклу
6 160
6 135
6 90
2,5 105
2,5 95
1,5 15
6 180
6 185
6 175
4 280
2 80
1 55
1 65
6 80
3 70
3 30
6 40
6 15
6 2
Програми Eco
Програми Eco пропонують добру якість прання при низьких температурах із заощадженням електричної енергії, що
позитивно впливає на довкілля і забезпечує економічну вигоду користувачеві.
Програми Eco (Бавовна 11, Синтетика 12 і Швидке прання 30’ 13) призначені для різних типів тканин і для речей
з легкими забрудненнями. Для гарантованого оптимального результату рекомендується використовувати рідкий
пральний засіб; краще зробити попередню обробку манжетів, коміру і плям.
30
Page 31

Налаштування пiд
власнi потреби
Встановлення темепратури
Обертаючи ручку ТЕМПЕРАТУРИ ви можете задати температуру прання (див. Таблицю програм).
Ви можете знижувати температуру аж до прання в холоднiй водi ( ).
Машина перешкоджатиме встановленню температури, яка перевищує максимально дозволену для кожної
конкретної програми.
Встановлення вiджиму
Обертаючи ручку ВIДЖИМУ ви можете задати швидкiсть вiджиму обраної програми.
Максимальнi значення швидкостi, передбаченi для програм:
Програми Максимальна швидкiсть
Бавовна 800 обертiв за хвилину
Синтетичнi тканини 800 обертiв за хвилину
Вовна 800 обертiв за хвилину
Шовк лише злив
Швидкiсть вiджиму можна зменшити чи виключити; оберiть для цього позначку .
Машина автоматично перешкоджатиме вiджиму, який перевищує максимально дозволенi значення для кожної
конкретної програми.
Функцiї
Рiзноманiтнi функцiї прання, передбаченi у пральнiй машинi, дозволяють отримати бажану чистоту та бiлизну
ваших речей.
Для активацiї функцiй:
1. натиснiть на кнопку бажаної функцiї;
2. запалення вiдповiдної iндикаторної лампи вказує не те, що функцiю активовано.
Примiтка: Швидке блимання iндикаторної лампи вказує на те, що вiдповiдну функцiю не можна обрати для заданої
програми.
UK
Супер-прання (Суперстирка)
Завдяки використанню більшої кількості води на початковій фазі циклу і застосуванню більшої кількості часу, така
функція гарантує прання високої якості.
! Не активується у програмах 5, 6, 9, 10, 11, 12, 13, , , .
Додаткове полоскання (Дополнительное Полоскание)
При виборі даної функції збільшується ефективність полоскання та гарантується максимальне видалення
миючого засобу. Вона є зручною для осіб зі шкірою, особливо чутливою до миючих засобів.
! Не активується у програмах 5, 13, , .
Полегшене прасування (Легкая глажка)
З обранням такої функцiї прання та вiджим будуть вiдповiдно змiненi, щоб запобiгти утворенню складок.
Наприкiнцi циклу пральна машина виконає повiльнi оберти барабану;
iндикаторнi лампи функцiй ПОЛЕГШЕНОГО ПРАСУВАННЯ та ЗАПУСКУ/ПАУЗИ блиматимуть (помаранчевим
кольором), а на дисплеї запалиться надпис “ ”. Для завершення циклу натиснiть на кнопку ЗАПУСК/ПАУЗА або
на кнопку ПОЛЕГШЕНОГО ПРАСУВАННЯ. У програмi “Шовк” (9) машина закiнчить цикл iз замоченою бiлизною,
iндикаторнi кнопки функцiї ПОЛЕГШЕНОГО ПРАСУВАННЯ та ЗАПУСКУ/ПАУЗИ блиматимуть (помаранчевим
кольором), а надпис ПОЛОСКАННЯ залишиться запаленим. Щоб злити воду й отримати можливість витягнути
білизну, натисніть на кнопку ПУСКУ/ПАУЗИ або кнопку ПОЛЕГШЕНОГО ПРАСУВАННЯ.
! Не активується у програмах 5, 6, 7, 10, 11, 12, 13, , .
Вiдстрочений запуск (Таймер отсрочки)
Вiдстрочує запуск машини до 12 годин включно.
Натиснiть декiлька разiв на кнопку, доки на запалиться iндикаторна лампа бажаного вiдстрочення. При п’ятому
натисканнi на кнопку функцiя скасовується.
Увага: Пiсля натискання кнопки ЗАПУСК/ПАУЗА ви можете змiняти значення вiдстрочення тiльки зменшуючи його.
! Є активним iз усiма програмами.
31
Page 32

Миючі засоби і білизна
UK
Дозатор миючого засобу
Хороші результати прання залежать також від
правильного дозування миючого засобу. Додавання
занадто великої кількості миючого засобу не обов’язково
приводить до більш ефективного прання, але може
викликати появу відкладень на внутрішніх поверхнях
машини й до забруднення навколишнього середовища.
Відкрийте дозатор
миючого засобу та
налийте миючий засіб і
пом’якшувач, наступним
способом.
відділення 1: Миючий засіб для замочування
відділення 2: Миючий засіб для циклу прання
(порошок та рідкий засіб) Рекомендується лити
рідкий миючий засіб безпосередньо до відділення,
застосовуючи відповідну чашку для дозування.
відділення 3: Додаткові засоби (пом’яшувач, і т.д.)
При наливанні пом’якшувача до відділення 3, уникайте
перевищення вказаного максимального
рівня. Пом’якшувач додається до машини автоматично
під час останнього прання. В кінці програми прання
деяка кількість води залишиться у відділенні 3. Вона
використовується для додавання до машини більш
густих пом’якшувачів, наприклад для розведення більш
концентрованих пом’якшувачів. Якщо у відділенні
3 залишиться більше нормальної кількості води, це
означає, що спорожнювання приладу заблоковано.
Інструкції з очищення Ви знайдете у розділі «Догляд та
обслуговування».
відділення 4: Відбілювач
Цикл відбілювання
Відбілювання можна здійснювати лише у циклах
прання 2, 3, 6.
Налийте відбілювач до відділення 4; налийте миючий
засіб та пом’якшувач до відповідних відділень, потім
оберіть один з вищезгаданих циклів прання.
Ця опція рекомендована тільки для дуже забруднених
бавовняних речей.
Підготовка білизни
• Роздiлiть бiлизну, враховуючи:
- тип тканини / позначку на етикетцi.
- кольори: вiдокремте кольоровi речi вiд бiлих.
• Перевірте кишені й ґудзики.
• Не перевищуйте вказанi значення щодо ваги сухої
бiлизни:
Стiйкi тканини: макс. 6 кг
Синтетичнi тканини: макс. 2,5 кг
Делiкатнi тканини: макс. 2 кг
Вовна: макс. 1 кг
Скільки важить білизна?
1 простирадло 400-500 г
1 наволочка 150-200 г
1 скатертина 400-500 г
1 махровий халат 900-1 200 г
1 рушник 150-250 г
Речі, що потребують спеціального догляду
Сорочки: застосовуйте спеціальні цикл прання 8 для
того, щоб прасувати сорочки з різної тканини та різних
кольорів. Це гарантує максимальний догляд за одягом
та зменшує формування загинів.
Шовк: для прання будь-якого шовкового одягу слід
використовувати спеціальний цикл прання 9. Ми
рекомендуємо використовувати спеціальні миючі засоби,
призначені для прання делікатних видів одягу.
Фіранки: ми рекомендуємо згорнути фіранки й скласти
їх у наволочку або сітчастий мішок. Слід використовувати
цикл прання 9.
Вовна: це єдиний виробник пральних машин, який був
нагороджений престижним передавальним написом
Woolmark Platinum Care (M.0508) компанії Woolmark, яка
означає, що всі предмети одягу з вовни можна прати в
пральній машині, навіть такі, які мають ярлик “тільки
для ручного прання” (тільки ручне прання). Цикл прання
10 можна використовувати для прання всіх вовняних
виробів в пральній машині (максимум 1 кг), гарантуючи
оптимальний режим прання.
Система балансування завантаженнÿ
Перед кожним віджимом, для запобігання надмірній
вібрації та для рівномірного розподілу навантаження,
барабан здійснює оберти на дещо більшій швидкості, ніж
швидкість прання. Якщо по закінченні декількох спроб
завантажені речі ще не були правильно відбалансовані,
машина здійснює віджим на швидкості, нижчій від
передбаченої. У випадку надмірної незбалансованості
пральна машина здійснює розподіл замість віджиму. З
метою оптимального розподілу завантаження та його
правильного балансування рекомендується одночасне
прання великих і малих речей.
32
Page 33

Запобіжні заходи та поради
! Машину була спроектовано і вироблено у відповід-
ності з міжнародними нормами безпеки. Дані попередження складені для забезпечення безпеки і тому
їх треба уважно прочитати.
Загальна безпека
• Дане обладнання було розроблене виключно для
побутового використання.
• Цей електропобутовий прилад не має використовуватися дітьми або особами з обмеженими фізичними, сенсорними чи розумовими можливостями,
або якщо їм бракує досвіду та необхідних знань.
Винятки складають ситуації, коли користування
відбувається під наглядом або за вказівками осіб,
відповідальних за їхню безпеку.
Дорослі мають стежити, щоб діти не гралися з
електропобутовим приладом.
• Машина має використовуватися тільки повнолітніми особами і згідно з інструкціями, наведеними у
даній брошурі.
• Не торкайтеся машини голими ногами або мокрими
чи вологими руками й ногами.
• Вивід з експлуатації електропобутової техніки
Європейська директива 2002/96/CE з відходів від
електричної й електронної апаратури (RAEE), передбачає, що побутові електроприлади не можуть
перероблятися у звичайному порядку для твердих
міських відходів. Зняті з експлуатації побутові прилади мають бути зібрані окремо для оптимізації ступеню
відновлення й повторного застосування матеріалів,
що входять до їхнього складу, та з метою усунення
потенційної шкоди для здоров’я та довкілля. Символ
закресленого сміттєвого баку, зображений на всіх виробах, нагадує про необхідність окремої утилізації.
Щодо подальшої iнформацiї стосовно правильної
утилiзацiї електропобутових приладiв, власники можуть звернутися до вiдповiдних мiських служб або
до продавцiв.
Охорона і дбайливе відношення до довкілля
Технологія на службі у довкілля: заощадження
пральних засобів, води, енергії і часу
• Щоб не витрачати ресурси, необхідно завантажувати
пральну машину повністю. Повне завантаження у
порівнянні з двома половинними завантаженнями
заощаджує до 50% енергії.
UK
• Не виймайте вилку з електричної розетки, витягуючи її за шнур, тримайтеся тільки за саму вилку.
• Будьте обережні: вода, що зливається, може бути
дуже гарячою.
• У жодному випадку не застосовуйте силу до люку:
це може ушкодити запобiжний механiзм проти випадкових вiдкривань.
• В разі поломки забороняється проводити будь-які
дії з внутрішніми механізмами.
• Слiдкуйте, щоб дiти не наближалися до працюючої
машини.
• Пересування машини має здiйснюватися двома
або трьома особами за умови максимальної уваги.
Нi в якому разi - однiєю особою, тому що машина
дуже важка.
• Перш ніж завантажити білизну, перевірте, щоб
барабан був порожній.
Утилiзацiя
• Утилізація пакувального матеріалу: дотримуйтесь
місцевих норм, так як упаковка може використовуватися повторно.
• Попереднє прання необхідно тільки у випадках дуже
забрудненої білизни. Його уникнення заощаджує
пральний засіб, час, воду і від 5 до 15% енергії.
• При обробці плям за допомогою спеціальних засобів
або шляхом замочування зменшується необхідність
прання при високих температурах. Програма 60°C
замість 90°C, або 40°C замість 60°C призводить до
заощадження 50% енергії.
• Добре відмірюйте пральний засіб залежно від жорсткості води, ступеню забруднення і кількості білизни,
щоб уникнути зайвих витрачань і захистити довкілля:
незважаючи на те, що пральні засоби здатні біологічно руйнуватися, вони містять елементи, що змінюють
рівновагу довкiлля. Уникайте також використання
пом'якшувачів.
• Якщо Ви використовуєте Вашу пральну машину з
другої половини дня до ранніх годин ранку, Ви допоможете зменшити пік навантаження на електричні
мережі. Опція «Відкладеного пуску» допомагає організувати
• Якщо передбачається сушіння білизни у сушильній
машині, оберіть іншу швидкість віджиму. Невелика
кількість воду у білизні призведе до заощадження
часу і енергії у програмі сушіння.
33
Page 34

Технічне обслуговування та
догляд
UK
Виключення води й електричного живлення
• Закривайте водопровідний кран після кожного
прання. У такий спосіб зменшується знос гідравлічної частини машини й усувається небезпека
витоку.
• Виймайте вилку з розетки під час миття машини та
під час робіт з технічного обслуговування.
Очищення пральної машини
• Зовнішня частина і гумові деталі можуть бути вимиті ганчіркою, змоченою у теплому мильному роз-
чині. Не використовуйте розчинники або абразиви.
Догляд за кришкою та барабаном
• Завжди залишайте відкритою кришку, щоб запобігти утворенню неприємних запахів.
Миття насосу
Пральну машину обладнано насосом з автоматичною
чисткою, який не вимагає технічного обслуговування.
Може трапитися так, що малі предмети (монети, ґудзики) потраплять до форкамери, що захищає насос,
розташований у її нижній частині.
! Переконайтеся у тому, що цикл прання закінчено, і
витягніть вилку з розетки.
Щоб дістати речі, які потрапили до форкамери:
1. зніміть передню панель з пральної машини, потягнувши руками
з боків цоколю (див.
малюнок);
2. відкрутіть кришку,
обертаючи її проти
годинникової стрілки
(див. малюнок): виток
незначної кiлькостi води
є нормальним;
3. ретельно очистіть
всерединi;
4. накрутіть кришку;
5. встановіть панель
на місце, пересвідчіться у тому, що крюки
були вставлені у спеціальні петлі, пiсля чого
притиснiть її до машини.
Контроль труби для подачі води
! Не користуйтеся трубами, якi були вже у вживаннi.
Перевіряйте трубу для подачі води не менше одного
разу на рік. Якщо на ній є тріщини, вона підлягає заміні: під час прання високий тиск може призвести до
розірвання.
Демонтаж:
Злегка натисніть на кнопку, яка знаходиться попереду ємності для пральних зас обів і потягніть
вгору (мал. 1).
Мал. 1
34
Чищення:
Промийте ємність під краном (мал. 3) за допомогою
звичайної зубної щітки, потім зніміть сифони з верхної
частини ванночок 1 і 2 (мал. 4), перевірте їх і ополосніть.
Мал. 2
Мал. 3 Мал. 4
Повторне
збирання:
Не забудьте повернути на
місце пару сифонів - у пази,
ємність - у власне гніздо,
зачіплюючи її (мал. 4, 2, 1).
Page 35

Несправності та засоби
їх усунення
Може трапитися так, що пральна машина не буде працювати. До того як зателефонувати у Сервiсний центр (див.
“Допомога”), перевірте, чи не є дана несправність проблемою, що легко вирішується, звернувшись до списку
нижче.
UK
Несправності:
Пральна машина не вмикається.
Цикл прання не розпочинається.
Пральна машина не завантажує
воду (швидко блимає iндикаторна
лампа першої фази прання).
Машина безперервно завантажує і
зливає воду.
Можливі причини/Рішення:
• Штепсель не вставлений в електричну розетку або вставлений не до кiнця.
• У будинку немає електроенергії.
• Погано закритий люк.
• Кнопку УВIМКНЕННЯ/ВИМКНЕННЯ не було натиснуто.
• Кнопку ПУСК/ПАУЗА не було натиснуто.
• Водопровідний кран закритий.
• Якщо вiдстрочення задане на час запуску (див. “Налаштування пiд
власнi потреби”).
• Шланг подачі води не підключено до водопровiдного крану.
• Перегин у шлангу.
• Водопровідний кран закритий.
• У водопроводі немає води.
• Недостатній тиск.
• Кнопку ПУСК/ПАУЗА не було натиснуто.
• Зливний шланг не знаходиться на відстані від 65 до 100 см від підлоги
(див. “Встановлення”).
• Кінець зливного шланга занурений у воду (див. “Встановлення”).
• Стiнний каналiзацiйний злив не має віддушини для виходу повiтря.
Якщо після таких перевірок проблема залишається, закрийте водопровідний
кран, вимкніть машину і зателефонуйте у Сервiсний центр. Якщо квартира
знаходиться на верхніх поверхах будинку, можливо, відбувається сифонний
ефект, при якому машина безперервно завантажує й зливає воду. Щоб його
ліквідувати, існують спеціальні антисифонні клапани, які можна придбати у
торговельній мережі.
Пральна машина не зливає воду чи
не вiджимає.
Пральна машина дуже вiбрує пiд
час вiджиму.
Пральна машина пропускає воду.
Iндикаторна лампа ПУСКУ/ПАУЗИ
(померанцева) та iндикаторнi лампи
рiзних функцiй швидко блимають.
Утворюється занадто багато піни.
• Програма не передбачає зливання: у деяких програмах його потрібно
вмикати вручну (див. “Як запустити програму”).
• Активовано функцiю “Полегшене прасування” для завершення програми
натиснiть на кнопку ПУСК/ПАУЗА (“Налаштування пiд власнi потреби”).
• Перегин зливного шланга (див. “Встановлення”).
• Засмітився зливний шланг.
• Барабан, у момент встановлення, не був правильно розблокований
(див. “Встановлення”).
• Машина стоїть не на плоскій поверхні (див. “Встановлення”).
• Машину затиснуто між меблями і стіною (див. “Встановлення”).
• Погано пригвинчений шланг подачі води (див. “Встановлення”).
• Забруднена касета для миючих засобів (як вимитидив. “Технічне
обслуговування і догляд”).
• Погано закріплений зливний шланг (див. “Встановлення”).
• Вимкніть машину й витягніть штепсель з розетки, зачекайте близько 1
хвилини й увімкніть її повторно.
Якщо несправність не усунено, зателефонуйте у Сервiсний центр.
• Миючий засіб не підходить для пральної машини (має бути напис “для
машинного прання”, “для ручного й машинного прання”, або подібний).
• Перевищена доза миючого засобу.
35
Page 36

Допомога
UK
Перш ніж телефонувати у Сервiсний центр:
• Перевірте, чи можна самостійно вирішити проблему
(див. “Несправності і засоби їх усунення”);
• Запустіть програму повторно, щоб перевірити чи усунено несправність.
• Якщо нi, зв’яжiться з авторизованим Сервiсним Центром, зателефонувавши за номером, вказаним у
гарантiйному свiдоцтвi.
! Звертайтеся виключно до уповноважених фахівців.
Повідомити:
• тип несправності;
• модель машини (Мод.);
• серійний номер (С/Н).
Цю iнформацiю ви знайдете на заводськiй табличцi позаду пральної машини та в її переднiй частинi, якщо ви
вiдкриєте люк.
36
Page 37

Упутство за употребу
МАШИНА ЗА ПРАЊЕ РУБЉА
SB
Cрпски
ECOT6L 85
Садржај
Постављање, 38-39
Pаспакивање и нивелисање
Прикључивање на водоводну и електричну мрежу
Први циклус прања
Технички подаци
Опис машине за прање рубља, 40-41
Контролни панел
Како отворати и затварати бубањ
Сијалице
Програми, 42
Табела програма
Посебна подешавања, 43
Задавање температуре
Задавање центрифуге
Функције
Детерџенти и веш, 44
Посуда за детерџент
Циклус избељивања
Припрема веша
Посебне тканине
Систем за балансирање терета
SB
Упозорења и савети, 45
Општа безбедност
Одлагање на отпад
Ручно отварање врата
Одржавање и хигијена, 46
Искључивање довода воде и струје
Чишћење машине за рубље
Чишћење фиоке за детерџент
Одржавање врата и бубња
Контрола цеви за довод воде
Чишћење фиоке за детерџент
Неправилности и решења, 47
Помоћ, 48
Активна помоћ 7 дана у недељи
37
Page 38

Постављање
SB
! Чувајте ову књижицу ради консултација у случају
потребе. У случају продаје, преноса или селидбе,
чувајте је уз машину ради информисања будућег
власника.
! Пажљиво прочитајте упутство: унутра су важне
информације о инсталацији, употреби и безбедности.
Отварање и постављање
Отварање
1. Отварање машине за
рубље.
2. П реко нтр оли ш ите
машину да нема оштећења
везаних за транспорт. Ако
има оштећења, немојте
је прикљ учивати, ве ћ
контактирајте продавца.
3. У к лони т е ч е т ири
штитника и заштитну гумицу
за транспорт постављене на
задњој страни (види слику).
4. За т вори т е о т вор е
приложеним пластичним
затварачима.
5. Сачувајте све
делове: у случају
транспорта машине морају поново бити намонтирани.
Пажња. У случају поновне употребе краћи навоји
морају да буду навијени високо.
! Амбалажа није играчка за децу!
Прикључак за воду и струју
Подешавање црева за довод воде
1. Повежите црево за
довод воде са славином
за хладну воду и нави¼те
¼е 3/4 дужине наво¼а
(види слику).
Пре повезивања пустите
воду да тече све док не
постане чиста.
2. Наместите црево за
довод воде на машину
и затегните га у смеру
стрелице (види слику).
3. Пазите да нема
оштећења на цреву и
навоју.
! Притисак воде у славини мора да буде у оквиру
вредности у табели Технички подаци (види доле).
! Ако дужина црева за довод воде није довољна,
обратите се специјализованој продавници или
овлашћеном сервису.
Постављање
1. Инсталирајте машину на
равну и чврсту површину,
не наслањајте је на зид,
намештај и друге површине.
2. Ако површина није
савршено хоризонтална,
исправите неправилност
одвртањем предњих
ногара (види слику); угао
нагиба, измерен на радној
површини, не сме да пређе
2°.
Прецизно постављање даје стабилност и спречава
вибрације, буку и померање током рада машине. У
случају да машину постављате на итисон или тепих,
подесите ногаре тако да испод машине оставите
довољно простора за вентилацију.
38
Page 39

Подешавање црева за пражњење
65 - 100 cm
Наместите црево за
пражњење, без савијања,
на одводну цев или на
одвод у зиду уграђен 65
до 100 цм од земље;
можете га пребацити
преко ивице умиваоника
или каде, али га морате
причврстити за славину
(види сликку). Слободни
крај црева за пражњење
не сме да буде уроњен
у воду.
! Не препоручује се употреба продужетака за црева;
ако је неопходно да га користите, продужетак мора да
има исти пречник као и оригинално црево и не сме да
буде дужи од 150 цм.
! Кабал не сме да буде савијен и притиснут.
! Кабал за довод мора да задовољава строга
техничка правила.
Пажња! Произвођач се ограђује од било какве
одговорности у случају непоштовања ових норми.
Први циклус прања
Након постављања, пре употребе, извршите циклус
прања са детерџентом и без веша задајући програм 2.
Технички подаци
Модел ECOT6L 85
SB
Електрични прикључак
Пре него што гурнете утикач у утичницу, проверите да ли:
• утичница има уземљење по законској норми;
• утичница може да издржи снагу потребну за рад
машине, приказан у табели Технички подаци (види
доле);
• се напон довода уклапа у приказане вредности у
табели Технички подаци (види доле);
• је утичница компатибилна са утикачем машине. У
случају да није, промените утичницу или утикач.
! Машину немојте инсталирати на отвореном
простору, чак иако је простор наткривен, пошто је
изузетно опасно да буде изложена киши и променама
времена.
! Код инсталирања машине утичница мора да буде
лако доступна.
! Не користите продужне каблове и вишеструке
утичнице.
ширина 40 цм
Димензије
Капацитет од 1 до 6 кг
Електрични
прикључак
Прикључак за
воду
Брзина
центрифуге
Пробни
програми
према директиви
1061/2010
висина 85 цм
дубина 60 цм
Види налепницу са техничким
карактеристикама која се налази на
машини
максимални притисак 1 MPa (10 bar)
минимални притисак 0,05 MPa (0,5 bar)
капацитет бубња 42 литара
до 800 обртаја у минуту
програм 6; температура 60°C и
40°C.
Ова машина је у складу са
следећим стандардима:
- 2004/108/CE (електромагнетска
компатибилност)
- 2006/95/CE (ниски напон)
- 2002/96/CE)
39
Page 40

Опис машине за прање веша и
покретање програма
SB
Командна табла
УКЉУЧИ/ИСКЉУЧИ
Тастер
ПРОГРАМИ
Дугм е УК ЉУЧ И/И СКЉ УЧИ : при тис нит е га за
укључивање или искључивање машине.
Дугме ПРОГРАМИ: за задавање програма. Током
трајања програма дугме се не помера.
Тастер са лампицама ФУНКЦИЈА: за избор функција
које су на располагању. Контролна лампица која
одговара одабраној функцији остаће упаљена.
Дугме ЦЕНТРИФУГА: за задавање или искључивање
центрифуге (види «Посебна подешавања»).
Дугме ТЕМПЕРАТУРА: за задавање температуре или
прање на хладно (види «Посебна подешавања»).
Контролне лампице НАПРЕДОВАЊА ЦИКЛУСА/
ЗАДРШКЕ ПОЧЕТКА: за праћење статуса напредовања
програма прања. Упаљена контролна лампица показује
фазу у току. Ако је активирана функција “пауза почетка”,
показиваће време преостало до покретања програма
(види страну поред).
Кон т рол н а лам п ица В РАТА БЛ О КИРАН А : за
обавештавање да ли се врата могу отворити (види
страну поред).
ТЕМПЕРАТУРА
Дугме
Дугме
Контролне лампице
ЦЕНТРИФУГА
Дугме
Тастер са лампицама
ФУНКЦИЈА
Stand By
Ова машина за прање испуњава све нове стандарде
везане за уштеду електричне енергије и опремљена
је системом за аутоматско гашење (stand by) који
се активира за 30 минута у случају да се машина
не користи. Накратко притисните тастер
ИСКЉУЧИ
НАПРЕДОВАЊА ЦИКЛУСА/
ЗАДРШКЕ ПОЧЕТКА
и машина ће се поново активирати.
Контролне лампице
Контролне лампице пружају важне информације.
Ево шта оне значе:
Пауза почетка
Ако је активирана функција “пауза почетка” (види «Посебна
подешавања»), после покретања програма, почеће да
трепери контролна лампица одабране задршке:
Како време протиче треперењем одговарајуће контролне
лампице очитаваће се преостало време задршке:
Контролна
лампица ВРАТА
БЛОКИРАНА
Тастер са
лампицом
УКЉУЧИ/
ПАУЗА
УКЉУЧИ/
Тастер са лампицом УКЉУЧИ/ПАУЗА: за покретање
или моментално прекидање програма.
НАПОМЕНА: за покретање паузе прања које је у току,
притиснути овај тастер, одговарајућа контролна лампица
ће треперити наранџастом бојом а лампица фазе у току
ће светлети константно. Када се контролна лампица
БЛОКАДА ВРАТА угаси, врата је могуће отворити.
За повратак прања на део у којем је пр екинуто
притиснути поново овај тастер.
40
Када истекне одабрано време задршке лампица која
трепери ће се угасити и задати програм ће започети.
Контролне лампице фазе у току
По избору и покретању жељеног циклуса прања, лампице
ће се прогресивно палити указујући на статус напредовања:
Page 41

Прање
Испирање
А) Отварање горњег поклопца (Сл. 1):
- Подигните спољни поклопац и широм га
отворите.
SB
Центрифуга
Пражњење
Крај прања
Тастери функција и одговарајуће контролне лампице
Избором функције одговарајућа лампица ће се упалити.
Ако одабрана функција није компатибилна са задатим
програмом одговарајућа лампица ће треперити а
функција неће бити активирана.
У случају да се зада функцију која не одговара некој
претходно одабраној функцији, остаће активна само
она која је последња одабрана.
Лампица блокаде врата:
Упаљена лампица указује да су врата блокирана како би
се спречило случајно отварање; да би се избегле штете
пре отварања врата треба сачекати да се сијалица
угаси.
НАПОМ ЕНА: ак о је активирана функција “пауза
почетка” врата се не могу отворити, за отварање треба
укључити паузу притиском на тастер УКЉУЧИ/ПАУЗА.
! Брзо трептање лампице УКЉУЧИ/ПАУЗА (наранџасто)
ис то вр емено са лампицом функциј е ук аз уј е на
неправилност (види “Неправилности и решења”).
Како отворати и затварати бубањ
Сл. 1
Сл. 2
Б) Отварање бубња са обе руке, као на
слици (Сл. 2):
- притисните дугме на које показује стрелица
на сл. 2 и благим притиском наниже,
ослањајући се на једну руку, пазећи да врата
приликом отварања не прикљеште прсте;
- на овај начин приступајте вратима која се
лако затварају и отварају.
В) Слагање рубља (Сл. 3).
Г) Затварање (Сл. 4).
- добро затворите бубањ тако што ћете прво
спустити предња врата а затим и задња;
- пазите да реза предњих врата буде
савршено постављена у седиште на задњим
вратима;
- када чујете «клик» након уклапања, благо
притисните наниже обоја врата која не смеју
да се расклопе.
- затворите спољни поклопац.
Покретање програма
1. Укључити машину притиском на тастер УКЉУЧИ/
ИСКЉУЧИ. Све контролне лампице ће се укључити на
неколико секунди, затим ће се угасити а наставиће да
пулсира лампица УКЉУЧИ/ПАУЗА.
2. Убаците рубље и затворите врата.
3. На дугмету ПРОГРАМИ одаберите жељени програм.
4. За да ти темпер ат уру п ра ња (в иди « Посебна
подешавања»).
5. Задати брз ину цент ри фуге (ви ди «П осе бна
подешавања»).
6. Сипати детерџент и адитиве (види «Детерџенти и веш»).
7. Одабрати жељене функције.
8. Покренути програм притиском на тастер УКЉУЧИ/
ПАУЗА и одговарајућа лампица ће остати да светли
константно зеленом бојом. За поништавање задатог
циклуса укључити паузу машине притиском на тастер
УКЉУЧИ/ПАУЗА и одабрати нови циклус.
9. По завршетку програма упалиће се лампица .
Лампица ВРАТА БЛОКИРАНА ће се угасити указујући
да је могуће отворити врата. Извући веш и оставити
врата одшкринута да би се осушио бубањ.
Искључити машину притиском на тастер УКЉУЧИ/
ИСКЉУЧИ
Сл. 3
Сл. 4
41
Page 42

Програми
SB
Табела програма
Макс.
Опис програма
Програми
Ессентиалс програми
Памук + Претпрање: Јако прљав бели веш.
1
ПАМУК: Веома запрљан бели и шарени веш постојаних боја.
2
ПАМУК (3): Веома запрљан осетљив бели и шарени веш.
3
СИНТЕТИКА: Веома прљав отпоран шарени веш.
4
СИНТЕТИКА (4): Веома прљав отпоран шарени веш.
4
МЕШАНО 15’: За брзо освежавање мало прљавог веша (није
5
за вуну, свилу и веш који се пере ручно).
Посебни програми
САНИТАРНО: Јако прљав бели веш.
6
САНИТАРНО (1-2): Веома запрљан бели и шарени веш
6
постојаних боја.
САНИТАРНО (2): Веома запрљан бели и шарени веш
6
постојаних боја.
ЛАКУ НОЋ: Мало запрљан осетљив шарени веш.
7
КОШУљЕ
8
СВИЛА/ЗАВЕСЕ: За веш од свиле, вискозе, доњи веш.
9
ВУНА: За вуну, кашмир, итд.
10
Еко програми
11 Памук
12 Синтетика
13 Брзо 30 минута
Одвојени програми
Испирање - 800 - - -
Центрифуга - 800 - - - - 6 15
Испуштање - 0 - - - - 6 2
Трајање циклуса приказано на екрану или наведено у упутству је процена заснована на стандардним условима. Стварно време може да зависи од више бројних фактора, као што
су температура и притисак воде на улазу, температура околине, количина детерџента, количина и тип рубља, уравнотеженост рубља, додатне изабране опције.
темп.
(°C)
Хладна
вода
Хладна
вода
Хладна
вода
За све Тест институте:
1) Контролни програми према норми 1061/2010: задати програм 6 (Санитарна) са температуром од 60°C и 40°C .
2) Продужени програм памук: задати програм 6 (Санитарна) са температуром од 40°C.
3) Скраћени програм памук: задати програм 3 (Памук) са температуром од 40°C.
4) Продужени програм cинтетика: задати програм 4 (Синтетика) са температуром од 40°C.
Макс.
брзина
(обртаја
у
минути)
90° 800
60° 800 -
40° 800 -
60° 800 - -
40° 800 - -
30° 800 - -
90° 800 -
60° 800 - -
40° 800 - -
40° 800 - -
40° 600 - -
30° 0 - -
40° 800 - -
800 - -
800 - -
800 - -
Претп-
рање
Детерџенти
Избељ-
ивач
Прање
-
Омекш-
ивач
Макс.
Трајање
теж.
циклуса
(кг)
6 160
6 135
6 90
2,5 105
2,5 95
1,5 15
6 180
6 185
6 175
4 280
2 80
1 55
1 65
6 80
3 70
3 30
6 40
Посебни програми
Мешано 15’ (програм 5) осмишљен за прање мало прљавог веша у кратком периоду: траје само 15 минута
и тако штеди енергију и време. Задавањем програма (5 на 30°C) могуће је истовремено прање тканина
различитог порекла (осим вуне и свиле) у максималној тежини од 1,5 кг.
Санитарна (програм 6). Хигијенски програм са високим температурама који предвиђа употребу избељивача
са температурама вишим од 60°C.
За избељивање сипати избељивач, детерџенте и адитиве у одговарајуће
кадице (види параграф «Посуда за детерџенте»).
Лаку ноћ (програм 7). Тих циклус који може да ради ноћу када је енергетска тарифа нижа. Програм је
осмишљен за синтетички и памучни веш. На крају циклуса, машина се зауставља са водом у кадици; за
реализовање центрифуге и пражњења притиснути тастер УКЉУЧИ/ПАУЗА, у супротном после 8 сати
машина ће аутоматски обавити центрифугу и пражњење воде.
Еко програми
Еко програми нуде добре перформансе прања на основу ниске температуре са малим утрошком енергије ради
заштите животне средине и уштеде. Еко програми (
11
Памук,
12
Синтетика и
13
Брзо 30 минута) направљени
су за разне врсте тканина и за мало прљав веш. За оптималан резултат препоручујемо коришћење течног
детерџента; саветујемо претходно третирање манжетни, оковратника и мрља.
42
Page 43

Посебна подешавања
Задавање температуре
Окретањем дугмета ТЕМПЕРАТУРА задаје се температура прања (види Табелу програма).
Температура се може смањити све до хладног прања ( ).
Машина аутоматски спречава задавање температуре веће од предвиђеног максимума за сваки програм.
Задавање центрифуге
Окретањем дугмета ЦЕНТРИФУГА задаје се брзина центрифуге одабраног програма.
Максималне предвиђене брзине за програме су:
Програми Максимална брзина
Памук 800 обртаја у минути
Синтетика 800 обртаја у минути
Вуна 800 обртаја у минути
Свила само пуњење
Брзина центрифуге се може смањити или искључити избором симбола .
Машина аутоматски спречава центрифугу јачу од максимума предвиђеног за сваки програм.
Функције
Различите предвиђене функције прања омогућују постизање жељене чистоће и белине.
За активирање функција:
1. притиснути тастер који одговара жељеној функцији;
2. паљење одговарајуће лампице показује да је функција активна.
Напомена: Брзо треперење контролне лампице показује да није могуће одабрати одређену функцију за задати програм.
Супер прање
Захваљујући употреби веће количине воде у почетној фази и дужем временском периоду, ова опција гарантује прање
високог учинка.
! Не може се активирати у програмима 5, 6, 9, 10, 11, 12, 13, , , .
SB
Додатно испирање
Избором ове функције повећава се ефикасност испирања и осигурава са максимално уклањање детерџента.
Корисно је за посебно осетљиву кожу.
! Не може се активирати у програмима 5, 13, , .
Лако пеглање
Избором ове функције, прање и центрифуга ће бити на одговарајући начин модификовани како би се смањило
гужвање. На крају прања машина ће извести лагано окретање бубња; лампице ЛАКО ПЕГЛАЊЕ и УКЉУЧИ/
ПАУЗА ће трептати (наранџасто) а фаза ИСПИРАЊЕ (9) ће остати константно укључена. За завршетак циклуса
биће потребно притиснути тастер УКЉУЧИ/ПАУЗА или тастер ЛАКО ПЕГЛАЊЕ.
Током програма Свила машина ће завршити циклус са натопљеним вешом а лампица функције ЛАКО ПЕГЛАЊЕ
ће трептати. За избацивање воде и извлачење мокрог веша биће потребно притиснути тастер УКЉУЧИ/ПАУЗА
или тастер ЛАКО ПЕГЛАЊЕ.
! Не може се активирати у програмима 5, 6, 7, 10, 11, 12, 13, , .
Пауза покретања
Одлаже време почетка рада машине до 12 часова.
Притискати тастер све док се не упали лампица која одговара жељеном времену задршке. На пети притисак на
тастер функција ће се деактивирати.
НАПОМЕНА: После притиска на тастер УКЉУЧИ/ПАУЗА време задршке је могуће само смањити.
! Активна је са свим програмима.
43
Page 44

Детерџенти и веш
SB
Посуда за детерџент
Добар резултат прања зависи чак и од исправног
дозирања детерџента: повећаном дозом прање није
ефикасније а доприноси се стварању наслага на
унутрашњим деловима машине и загађењу животне
средине.
Извуците посуду за
детерџенте и сипајте
детерџент или адитив
прању на следећи
начин.
кадица 1: Детерџент за претпрање (у праху)
кадица 2: Детерџент за прање (у праху или течни)
Течни детерџент убацити тек пред почетак.
кадица 3: Адитиви (омекшивач, итд.)
Када у преградак 3 сипате омекшивач, пазите да не
пређете обележени максимални ниво.Омекшивач ће се
аутоматски разлити по машини током задњег испирања.
На крају програма прања у одељку 3 ће остати остаци
воде. Они служе за разблаживање густих омекшивача,
или за растварање концентрованих. Ако у одељку 3
остане више воде него што је потребно, то значи да
је контрола пражњења блокирана. За чишћење види
“Одржавање и чување”
додатна кадица 4: Избељивач
Циклус избељивања
Избељивање се може извести само у програмима 2,
3, 6.
Сипати избељивач у додатну кадицу 4, детерџент и
омекшивач у одговарајуће кадице, затим задати један
од напред наведених програма. Намењен је само за
јако прљав памучни веш.
Припрема веша
• Веш поделите према:
- врсти тканине / симболу на етикети.
- бојама: одвојите шарени од белог веша.
• Испразните џепове и проверите дугмад.
• Не прелазите наведене вредности, које се односе
на суво рубље:
Отпорне тканине: макс 6 кг
Cинтетичке тканине: макс 2,5 кг
Осетљиве тканине: макс 2 кг
Вуна: макс 1,5 кг
Колико је тежак веш?
1 чаршав 400-500 гр.
1 јастучница 150-200 гр.
1 столњак 400-500 гр.
1 баде-мантил 900-1.200 гр.
1 пешкир 150-250 гр.
Посебне тканине
Кошуље: користите одговарајући програм „Кошуље“
8 за прање кошуља од различитих врста тканине и
боје чиме се осигурава максимална нега.
Свила: овај програм користити 9 за прање свиленог
веша. За прање осетљивог веша препоручује се
употреба посебних детерџената.
Завесе: препоручује се да се савију и увуку у врећицу
испоручену са машином. Користити програм 9.
Вуна: Hotpoint/Ariston је једина машина за прање која
је добила престижно признање «Woolmark Platinum
Care» (M.0508) од стране «The Woolmark Company»,
који дозвољава прање у машини свих врста вуне, чак
и оних које на етикети носе ознаку «само ручно прање»
. Са програмом 10, дакле, у потпуности сте мирни
при машинском прању вуненог веша (макс. 1 кг) уз
загарантоване одличне резултате.
Систем за балансирање терета
Пре сваке центрифуге, да би се избегле претеране
вибрације и терет равномерно распоредио, бубањ
се окреће брзином мало већом од оне током прања.
Ако се после неколико поновљених покушаја
терет још увек није равномерно распоредио,
машина ће извршити центрифугу брзином мањом
од предвиђене. У случају великог дисбаланса,
распоређивање врши машина уместо центрифуге. Да
би се побољшало распоређивање терета и правилно
балансирање препоручује се мешање великих и
малих комада веша.
44
Page 45

Упозорења и савети
! Машина је пројектована и направљена да задовољи
све међународне безбедносне норме. Ова упозорења
се односе на безбедност и морају строго бити
поштована.
Општа безбедност
• Овај апарат је предвиђен за употребу у
домаћинству, не професионалну, и његове
функције се не смеју мењати.
• Уређај не смеју да користе особе (укључујући децу)
са смањеним физичким, сензорним или менталним
способностима и недовољним искуством и знањем,
ос им ако ко ри шћ ење не надгледа или њ име
не управља особа која је одговорна за њихову
безбедност. Децу треба надгледати к ако би се
обезбедило да се не играју са уређајем.
• Машину могу да користе само одрасле особе
према упутствима из ове књижице.
• Не дирајте машину босоноги или када су вам руке
или ноге мокре или влажне.
• Не вадите утикач из струје вучењем кабла, већ
чврсто ухватите утикач.
• Не отварајте фиоку за детерџент док машина ради.
• Не дирајте воду коју машина испушта, пошто може
бити врућа.
Отпад
• Бацање амбалаже:
руководите се локалним нормама, пошто
амбалажа може да се поново искористи.
• Уклањање старе машине:
пре него што је баците, онеспособите је за рад
извлачењем електричног кабла и врата.
Чување и поштовање околине
Технологија у служби околине
Ако вам се чини да је у бубњу мало воде, то је стога
што нова Аристон технологија омогућава максималну
чистоћу са упола мање воде: у сврху очувања
околине.
Штедите детерџент, воду, енергију и време
• Ради очувања околине машину треба увек
користити са максималним теретом. За два месеца
пун терет штеди до 50% енергије.
• Претпрање је неопходно само за изузетно
прљаво рубље. Избегавањем претпрања штедите
детерџент, време, воду и 5 до 15 % енергије.
• Третирањем флека посебним средствима или
потапањем пре прања, смањује се потреба за
прањем на високим температурама. Коришћење
програма од 60°C уместо 90°C, 40°C уместо 60°C,
штеди до 50% енергије.
SB
• Никада немојте на силу отварати врата машине:
можете да оштетите сигурносни механизам који
спречава случајно отварање.
• У случају квара, никако немојте сами да
покушавате да извршите поправку.
• Увек пазите да деца нису у близини машине док
ради.
• Током прања врата машине могу да се загреју.
• Ако се помери са места, пажљиво је вратите на
место уз нечију помоћ. Никада је не померајте
сами јер је изузетно тешка.
• Пре убацивања рубља проверите да ли је бубањ
празан.
• Обављање прања касно после подне или рано
предвече смањује оптерећење електричној
компанији. Опција “пауза почетка” изузетно помаже
код организовања прања у том смислу.
• Правилно дозирање детерџента, зависно од
тврдоће воде, степена прљавштине и количине
рубља, спречава отпад и штити околину: иако су
биолошки распадни, детерџенти садрже елементе
који могу да поремете природну равнотежу. Што је
више могуће избегавајте омекшиваче.
• Ако рубље сушите у машини за сушење, одаберите
високу брзину центрифуге. Мање воде у рубљу
штеди време и енергију у програму за сушење.
45
Page 46

Одржавање и чување
SB
Искључивање довода воде и струје
• Затегните славину за воду након сваког прања. Овим
се спречава хабање водених инсталација машине и
елиминише опасност од кварова.
• Електрични кабал уклоните када чистите машину и
током поправки.
Чишћење машине за рубље
• Спољашњи и гумени делови се могу чистити меком
крпом наквашеном млаком водом и сапуницом. Не
користите абразивне растворе.
Одржавање поклопца и бубња
• Врата бубња увек остављајте полуотвореним како
бисте избегли стварање непријатних мириса.
За сакупљање предмета који евентуално упадну у
преткомору:
1. у клоните па нел за
затварање са предње
стране машине тако што
ћете извадити странице
потковице (види слику);
2. окрените поклопац
у пра в цу с упр отн о м
казаљкама на сату (види
слику): нормално је да
мало воде исцури;
3. пажљиво очистите
унутрашњост;
4. вратите панел;
5. наместите панел, али
пазите да пре него што
га н ав иј ете назад на
машину, убаците шарке
на право место.
Чишћење пумпе
Машина је опремљена самочистећом пумпом коју не
треба посебно одржавати. Може да се догоди да мали
предмети (новчићи, дугмад) испадну у преткомору која
штити пумпу, а налази се са њене доње стране.
! Проверите да ли је циклус прања завршен и извуците
утикач.
Чишћење фиоке за детерџент
Расклапање:
Благо притисните дугме
на предњем делу фиоке
за детерџент и повуците
је навише (сл. 1).
Чишћење:
Очистите фиоку под млазом воде (сл. 3) уз употребу
једноставне назубљене четкице и, одвивши пар сифона
који се налазе на горњем делу одељака 1 и 2 (сл. 4),
проверите да исти не буду блокирани и исперите их.
Контрола цеви за довод воде
! Никада не користите половне цеви.
Контролишите цев за довод воде најмање једном
годишње. Ако се појаве пукотине треба га заменити:
током прања јак притисак може да доведе до пуцања.
Поновно склапање:
Не заборавите да поново
поставите пар сифона на
одређено место и затим
вратите на место фиоку
(сл. 4, 2, 1).
Сл. 1 Сл. 2
46
Сл. 3 Сл. 4
Page 47

Неправилности и решења
Може се догодити да машина не ради. Пре позивања Техничке службе (види “Помоћ”), проверите да се не ради о
проблему лако решивом уз помоћ следећег списка.
Неправилности:
Машина се не укључује.
Циклус прања не почиње.
Машина не убацује воду
(лампица прве фазе прања
трепће брзо).
Машина константно убацује
и испушта воду.
Могући узроци / Решење:
• Утикач није увучен у утичницу или није увучен довољно да би имао контакт.
• Нема струје у кући.
• Врата нису добро затворена.
• Тастер УКЉУЧИ/ИСКЉУЧИ није притиснут.
• Тастер УКЉУЧИ/ПАУЗА није притиснут.
• Славина за воду није отворена.
• Задата пауза на време покретања (Тајмер задршке), види «Посебна
подешавања»).
• Црево за довод воде није повезано са славином.
• Црево је савијено.
• Славина за воду није отворена.
• У кући нема воде.
• Нема довољног притиска.
• Тастер УКЉУЧИ/ПАУЗА није притиснут.
• Одводно црево није постављено између 65 и 100 цм од земље (види
“Постављање”).
• Крај одводног црева је потопљен у воду (види “Постављање”).
• Цев у зиду пропушта ваздух.
Ако се и после ових провера проблем не реши, затворите славину за воду,
искључите машину и позовите Техничку службу. Ако се стан налази на
последњим спратовима зграде, могуће је да се јавља феномен сифона, због чега
машина стално убацује и избацује воду. За решавање овог проблема у продаји су
доступни одговарајући неповратни вентили.
SB
Машина не испушта воду или
не центрифугира.
Машина јако вибрира током
центрифуге.
Машина губи воду.
Брзо трепери лампица
УКЉУЧИ/ПАУЗА и лампице
функција.
Ствара се много пене.
• Програмом није предвиђено избацивање: код неких програма потребно је
ручно га покренути (види “Покретање програма”).
• Активирана функција ЛАКО ПЕГЛАЊЕ: за завршетак програма притиснути
тастер УКЉУЧИ/ПАУЗА (“Посебна подешавања”).
• Одводно црево је савијено (види “Постављање”).
• Вод за пражњење је запушен.
• Бубањ у тренутку инсталације није био правилно деблокиран (види
“Постављање”).
• Машина не стоји равно (види “Постављање”).
• Машина је притиснута између намештаја и зида (види “Постављање”).
• Црево за довод воде није добро затегнуто (види “Постављање”).
• Посуда за детерџенте је загушена (за чишћење види “Одржавање и чување”).
• Одводно црево није добро причвршћено (види “Постављање”).
• Искључите машину и извуците утикач из утичнице, сачекајте око 1 минут, а
затим је поново укључите.
Уколико неправилност остане, позвати Техничку службу.
• Детерџент не одговара машини (треба да носи натпис “за машинско прање”,
“за ручно и машинско прање” или слично).
• Доза је превелика.
47
Page 48

Помоћ
195096269.00
09/2011 - Xerox Fabriano
SB
Пре него што позовете Техничку службу:
• Проверите да ли неправилност можете решити сами (види “Неправилности и решења”);
• Поново започните програм да видите да ли је проблем отклоњен;
• У супротном контактирајте овлаштени Центар техничке службе на број телефона назначен на гарантном листу.
! Никада не користите неовлашћене сервисе.
Јавите:
• врсту неисправности;
• модел машине (Мо.);
• серијски број (S/N).
Ове информације се налазе на плочици постављеној на задњем делу машине и у предњем делу отвора.
48
 Loading...