

Page 1

Instructions for use
WASHING MACHINE
GB
English,1
F
Français,13
HU PL
Magyar, 37
Polski, 49
ECOT6F 1291
ES
Español,25
Contents
Installation, 2-3
Unpacking and levelling
Connecting the electricity and water supplies
The first wash cycle
Technical data
Description of the washing machine
and starting a wash cycle, 4-5
Control panel
Indicator lights
How to open and shut the drum
Starting a wash cycle
Wash cycles, 6
Table of wash cycles
Personalisation, 7
Setting the temperature
Setting the spin speed
Functions
Detergents and laundry, 8
Detergent dispenser drawer
Bleach cycle
Preparing the laundry
Garments requiring special care
Load balancing system
GB
Precautions and tips, 9
General safety
Disposal
Saving energy and respecting the environment
Care and maintenance, 10
Cutting off the water or electricity supply
Cleaning the washing machine
Caring for your appliance door and drum
Cleaning the pump
Checking the water inlet hose
How to clean the detergent dispenser
Troubleshooting, 11
Service, 12
1
Page 2
Installation
GB
! Keep this instruction manual in a safe place for future
reference. Should the appliance be sold, transferred or
moved, make sure the instruction manual accompanies
the washing machine to inform the new owner as to its
operation and features.
! Read these instructions carefully: they contain vital infor-
mation on installation, use and safety.
Unpacking and levelling
Unpacking
1. Unpack the washing
machine.
2. Check whether the
washing machine has
been damaged during
transport. If this is the
case, do not install it and
contact your retailer.
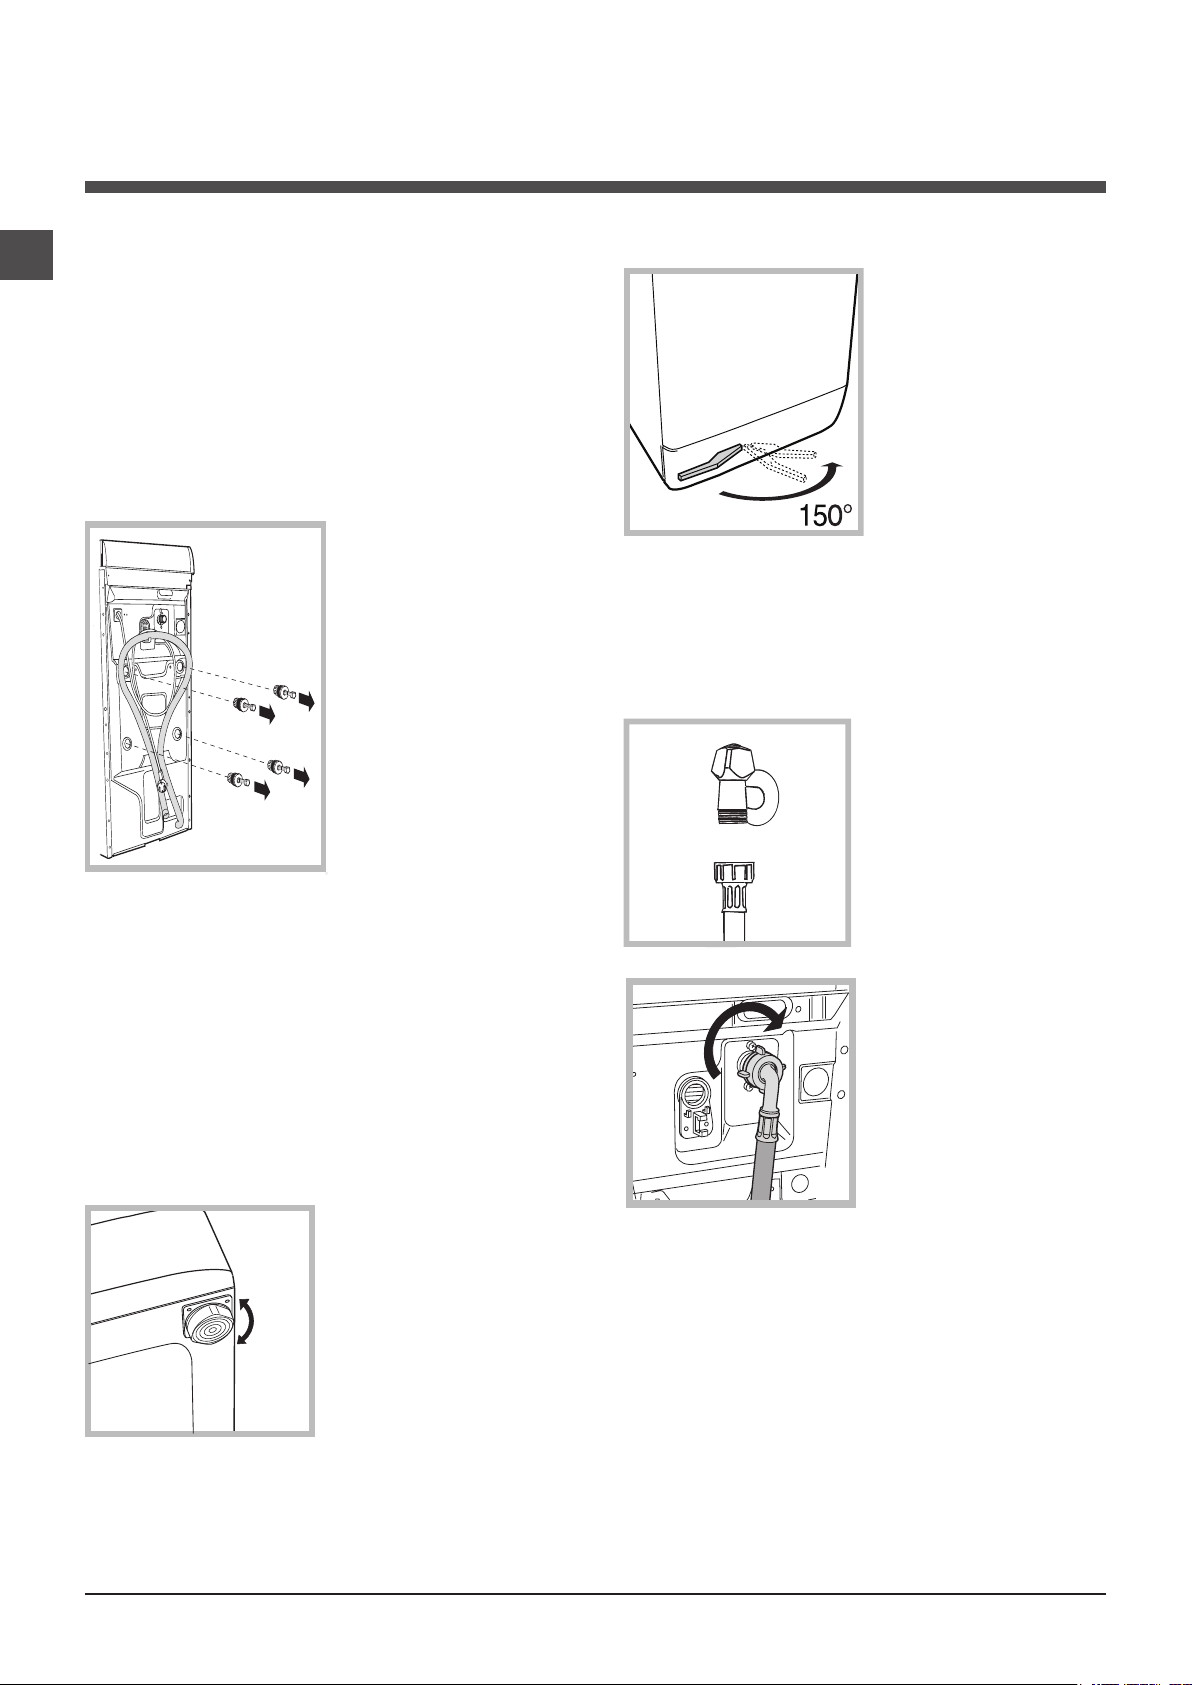
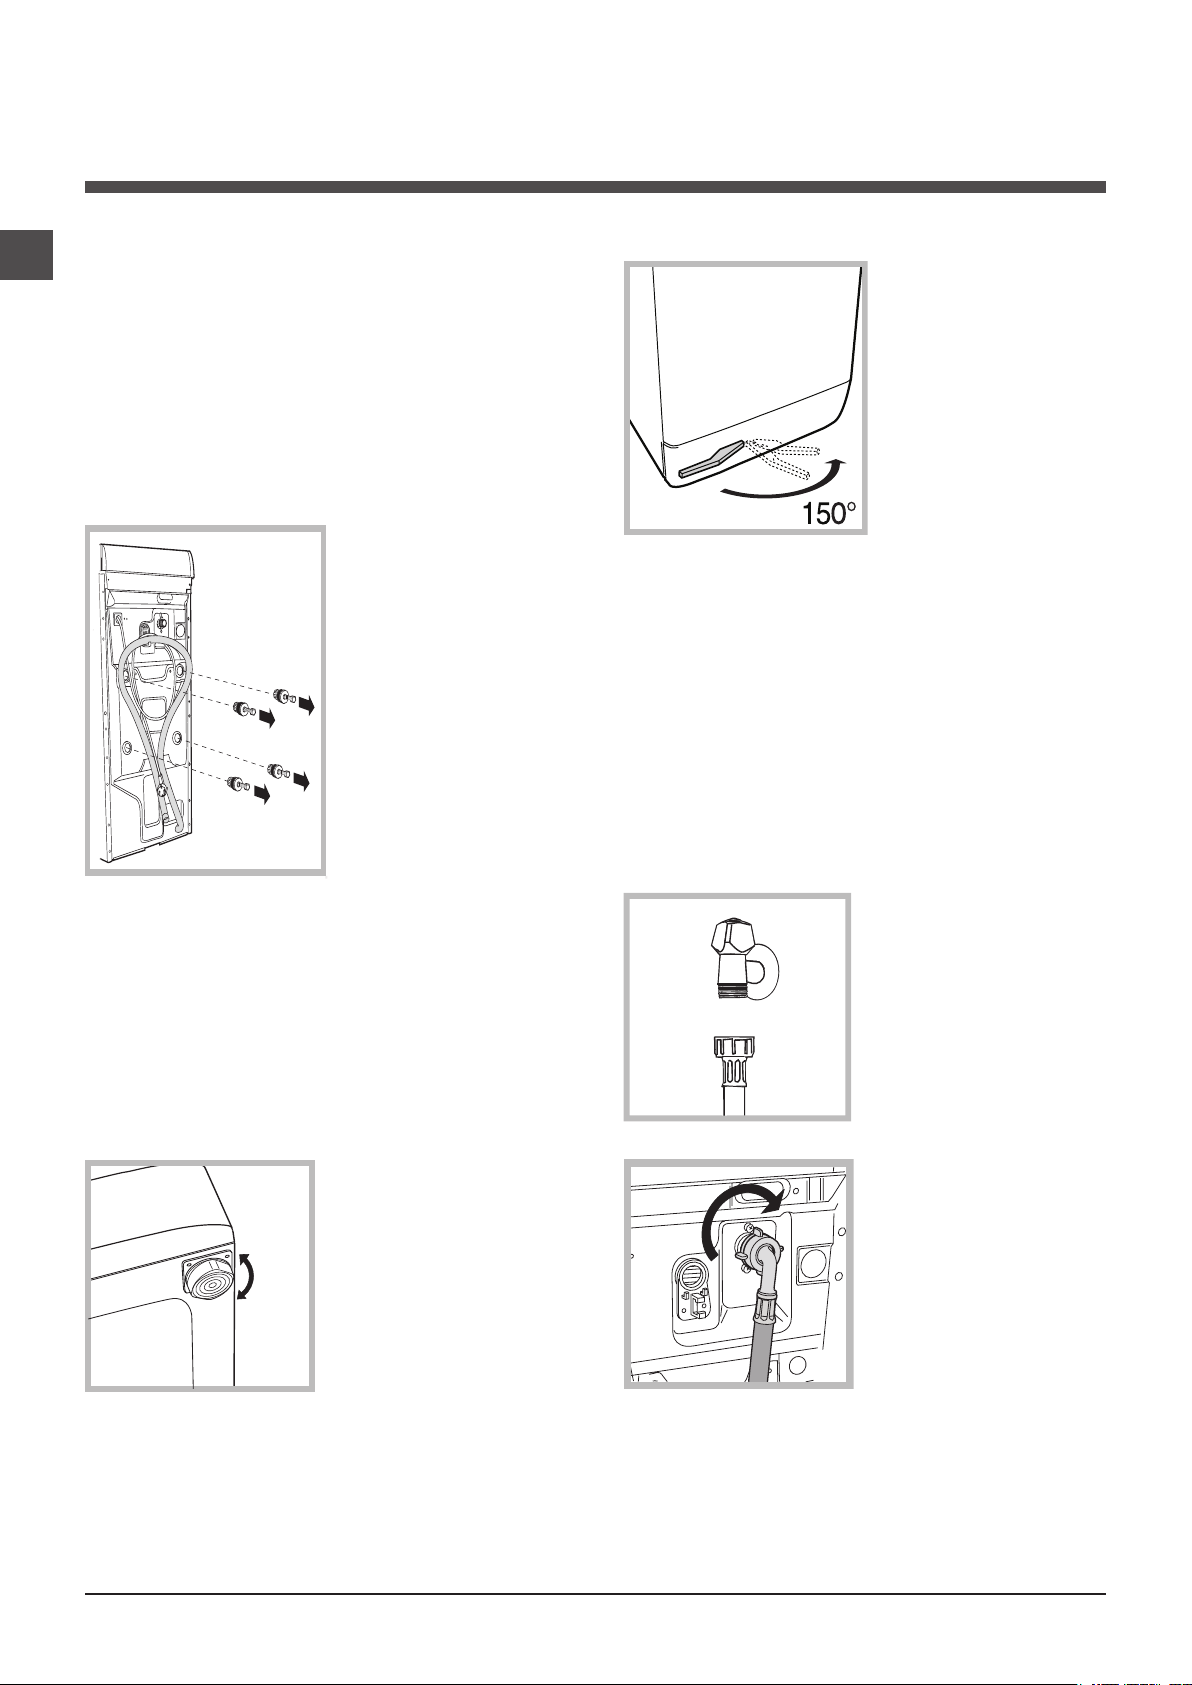
3. Remove the four
protective screws and
the rubber washer with
the respective spacer,
situated on the rear of the
appliance (see figure).
4. Seal the gaps using the
plastic plugs provided.
5. Keep all the parts: you will need them again if the washing machine needs to be moved to another location.
Putting your appliance in place and moving it.
If your washing machine
is equipped with a special
set of retractable wheels
you can easy move it.
To lower the wheels and
thus move the appliance
effortlessly, just pull the
lever, situated on the lefthand side beneath the
base. Once the appliance
is in the required position,
put the lever back in
place. The washing
machine is now firmly in place (see figure).
Electric and water connections
Connecting the water inlet hose
1. Connect the supply pipe
by screwing it to a cold
water tab using a 3/4 gas
threaded connection (see
figure).
Before performing the connection, allow the water to
run freely until it is perfectly
clear.
Warning: should the screws be re-used, make sure you fasten
the shorter ones at the top.
! Packaging materials are not children’s toys.
Levelling
Your machine may make a considerable amount of noise if
the two front feet have not been adjusted correctly.
1. Install the washing machine on a flat sturdy floor, without
resting it up against walls, furniture cabinets or other.
2. If the floor is not perfectly
level, compensate for any
unevenness by tightening or
loosening the adjustable front
feet (see figure); the angle of
inclination, measured according to the worktop, must not
exceed 2°.
Levelling your appliance
correctly will provide it with
stability and avoid any vi-
brations, noise and shifting
during operation. If it is placed on a fitted or loose carpet,
adjust the feet in such a way as to allow enough room for
ventilation beneath the washing machine.
2. Connect the other end
of the water inlet hose
to the washing machine,
screwing it onto the appliance’s cold water inlet,
situated on the top righthand side on the rear of
the appliance (see figure).
3. Make sure there are no
kinks or bends in the hose.
! The water pressure at the tap must be within the values
indicated in the Technical details table
(on the next page).
! If the water inlet hose is not long enough, contact a
specialist store or an authorised serviceman.
2
Page 3
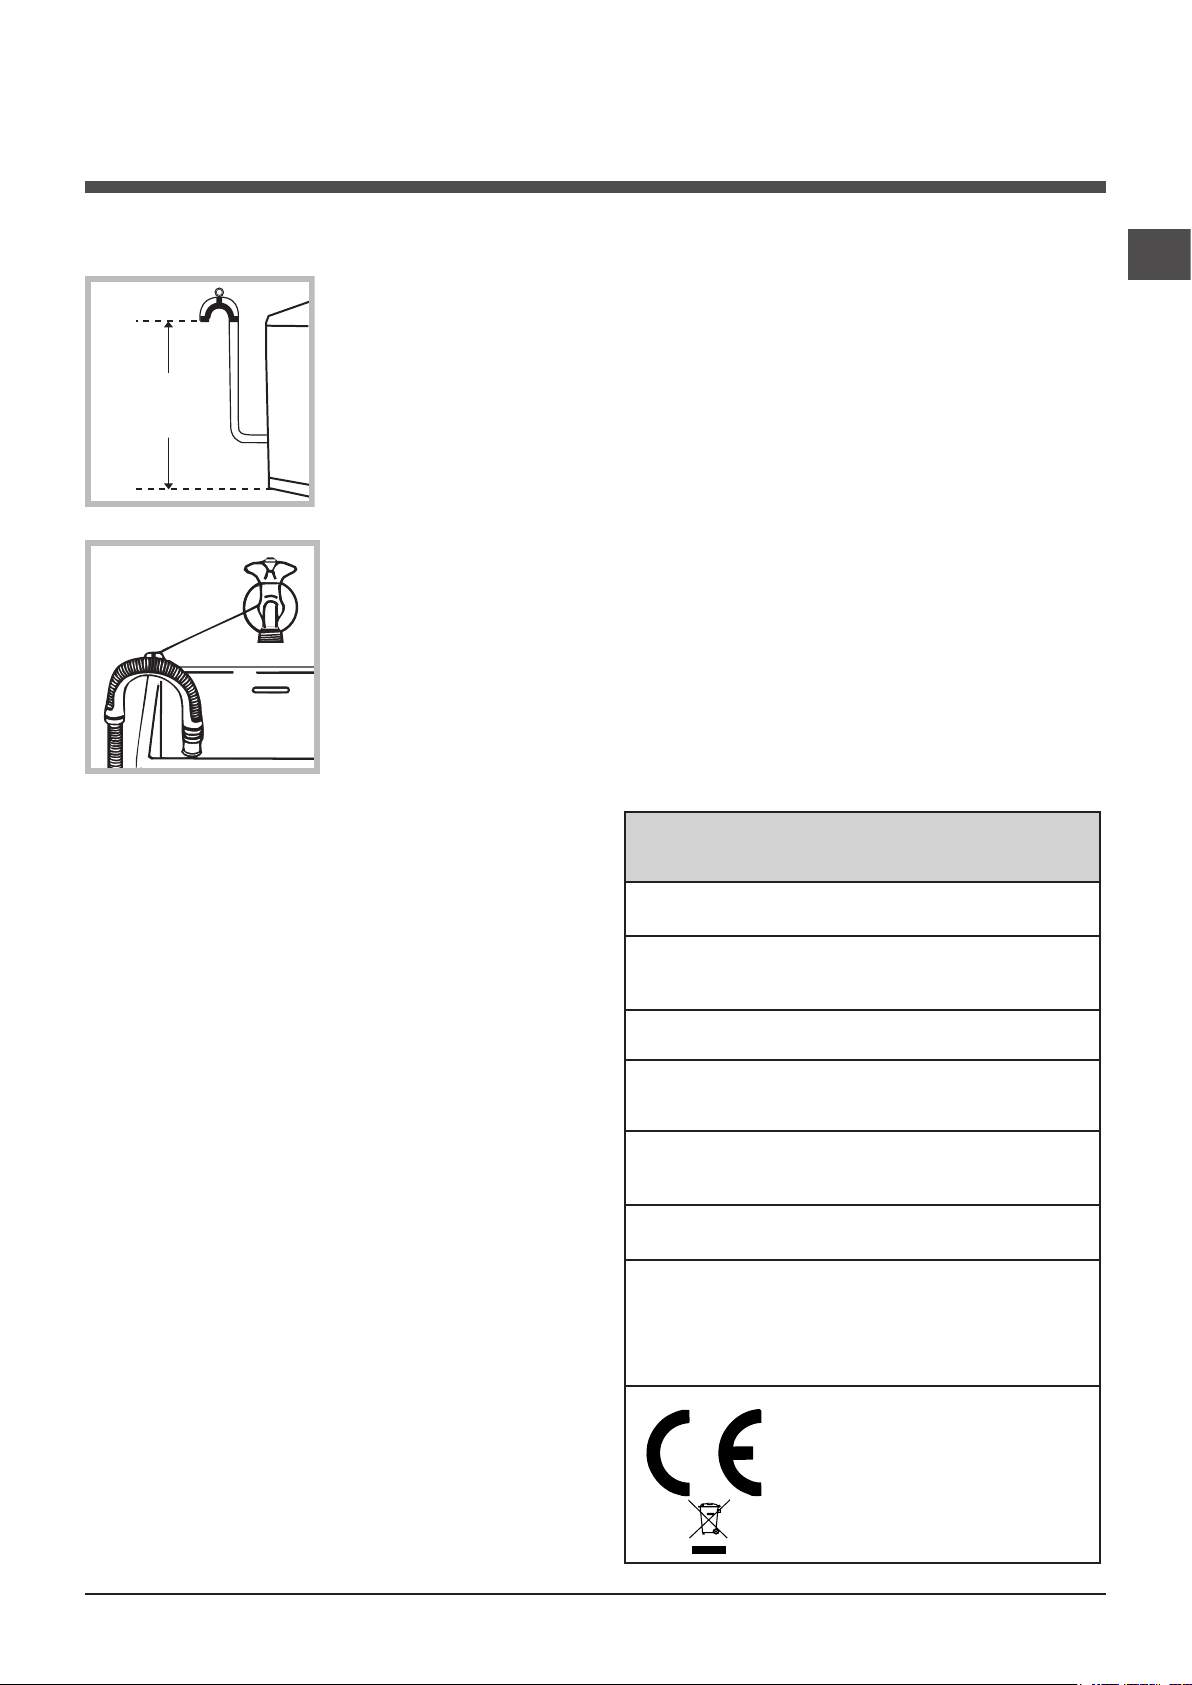
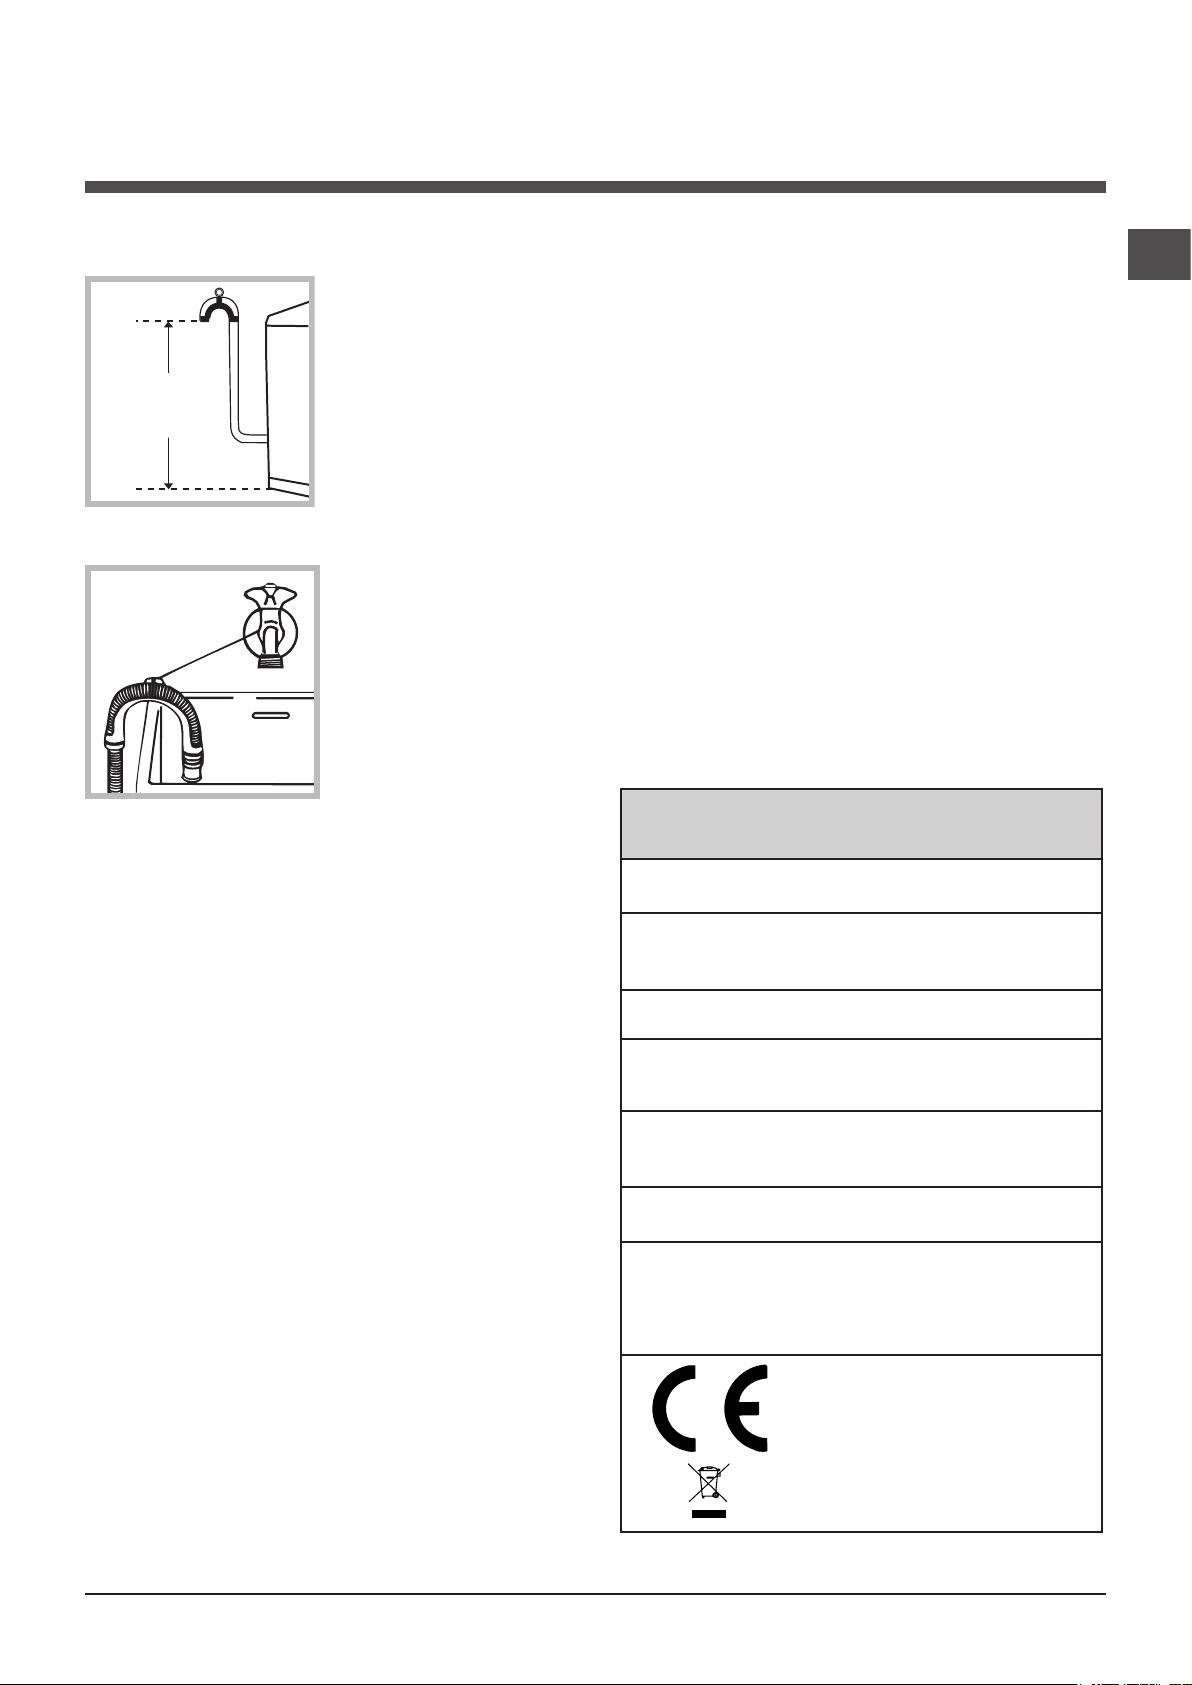
65 - 100 cm
Connecting the drain hose
Connect the drain hose,
without bending it, to a drai-
nage duct or a wall drain
located at a height between
65 and 100 cm from the
floor;
! Do not use extension cords or multiple sockets.
! The cable should not be bent or compressed.
! The power supply cable must only be replaced by autho-
rised technicians.
Warning! The company shall not be held responsible in the
event that these regulations are not respected.
The first wash cycle
GB
alternatively, rest it on
the side of a washbasin
or bathtub, fastening the
duct supplied to the tap
(see figure). The free end
of the hose should not be
underwater.
! We advise against the use of hose extensions; if it is
absolutely necessary, the extension must have the same
diameter as the original hose and must not exceed 150 cm
in length.
Electrical connections
Before plugging the appliance into the electricity socket,
make sure that:
• the socket is earthed and complies with all applicable
laws;
Once the appliance has been installed, and before you use
it for the first time, run a wash cycle with detergent and no
laundry, using the wash cycle 2.
Technical details
Model
Dimensions
Capacity
Electric
connections
ECOT6F 1291
40 cm wide
85 cm high
60 cm deep
from 1 to 6 kg
Please refer to the technical data plate
fixed to the machine.
• the socket is able to withstand the maximum power load
of the appliance as indicated in the Technical data table
(see opposite);
• the power supply voltage falls within the values indicated
in the Technical data table (see opposite);
• the socket is compatible with the plug of the washing
machine. If this is not the case, replace the socket or the
plug.
! The washing machine must not be installed outdoors,
even in covered areas. It is extremely dangerous to leave
the appliance exposed to rain, storms and other weather
conditions.
! When the washing machine has been installed, the elec-
tricity socket must be within easy reach.
Water
connections
Spin speed
Control
programmes
according to
2010/1061
directive
maximum pressure 1 MPa (10 bar)
minimum pressure 0.05 MPa (0.5 bar)
drum capacity 42 litres
up to 1200 rpm
programme 6; temperature 60°C and
40°C.
This appliance is compliant with
the following European Community
Directives:
- 2004/108/CE (Electromagnetic
Compatibility)
- 2006/95/CE (Low Voltage)
- 2002/96/CE
3
Page 4
Description of the washing
machine and starting a wash cycle
GB
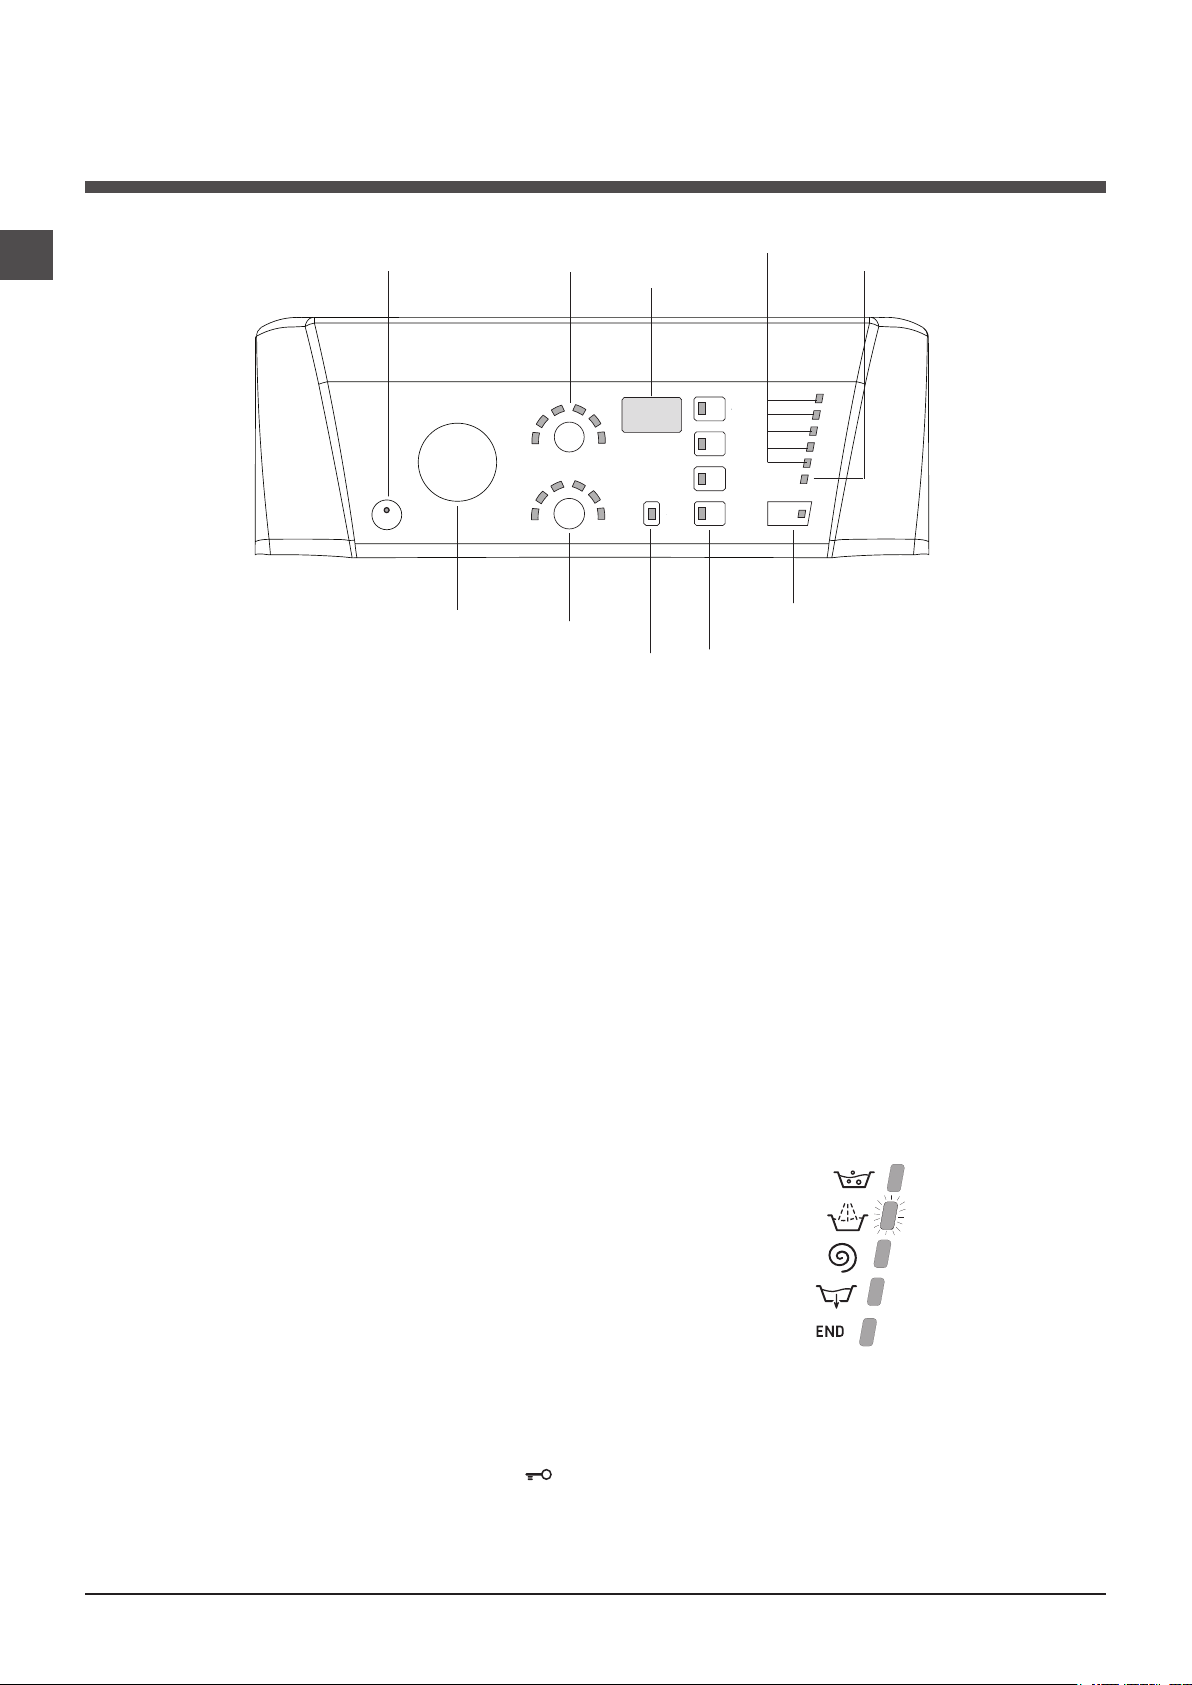
Control panel
butto n with indicator light
ON/OFF
WASH CYCLE
ON/OFF button with indicator light: switches the machine
on and off. If the indicator light is illuminated, this indicates
that the machine is switched on.
WASH CYCLE knob: programmes the wash cycles. During
the wash cycle, the knob does not move.
SPIN SPEED button: sets the spin speed or exclude the
spin cycle completely (see “Personalisation”).
TEMPERATURE button: sets the temperature or the cold
wash cycle (see “Personalisation”).
TEMPERATURE
knob
button
SPIN
SPEED
button
CONTROL PANEL LOCK
butto n with indicator light
WASH CYCLE
PROGRESS
DISPLAY
START/PAUSE
button with indicator light
FUNCTION
indicator lights
Standby mode
This washing machine, in compliance with new energy saving regulations, is fitted with an automatic standby system
which is enabled after about 30 minutes if no activity is
detected. Press the ON-OFF button briefly and wait for the
machine to start up again.
LID LOCKED
indicator light
butto ns with
Indicator lights
The indicator lights provide important information.
This is what they can tell you:
DISPLAY: indicates the time remaining for the selected
wash cycle and, if a delayed start has been programmed,
the time remaining until the start of the wash cycle.
CONTROL PANEL LOCK button with indicator light:
activates or deactivates the control panel lock.
FUNCTION buttons with indicator light: used to select the
available functions. The indicator light corresponding to the
selected function will remain lit.
WASH CYCLE PROGRESS
monitor the progress of the wash cycle. The illuminated
indicator light shows which phase is in progress.
DOOR LOCKED indicator light: indicates whether the
door may be opened or not (see next page).
START/PAUSE button with indicator light: starts or temporarily interrupts the wash cycles.
N.B. To pause the wash cycle in progress, press this
button; the corresponding indicator light will flash orange,
while the indicator light for the current wash cycle phase
will remain lit in a fixed manner. If the DOOR LOCKED
indicator light is switched off, the door may be opened.To
start the wash cycle from the point at which it was interrupted, press this button again.
indicator light
s: used to
Wash cycle phase indicator lights
As the WASH CYCLE knob is rotated, the indicator lights
illuminate, indicating the stages which will be performed by
the machine in accordance with the selected wash cycle.
Once the desired wash cycle has been selected and has begun, the indicator lights switch on one by one to indicate which
phase of the cycle is currently in progress.
Wash
Rinse
Spin
Drain
End of wash cycle
Function buttons and corresponding indicator lights
When a function is selected, the corresponding indicator light will
illuminate. If the selected function is not compatible with the programmed wash cycle, the corresponding indicator light will flash, a
sound signal will be emitted and the function will not be activated.
If a function which is incompatible with another function selected
previously, only the most recent selection will remain active.
4
Page 5
Temperature indicator light
When a temperature value is selected, the
corresponding indicator light will illuminate.
Spin indicator light
When a spin value is selected, the corresponding indicator light will illuminate.
Control panel lock indicator light
To activate the control panel lock, press and hold the
button for approximately 2 seconds. When the indicator
light is illuminated, the control panel is locked. This means
it is possible to prevent wash cycles from being modified
accidentally, especially where there are children in the home.
To deactivate the control panel lock, press and hold the
button for approximately 2 seconds.
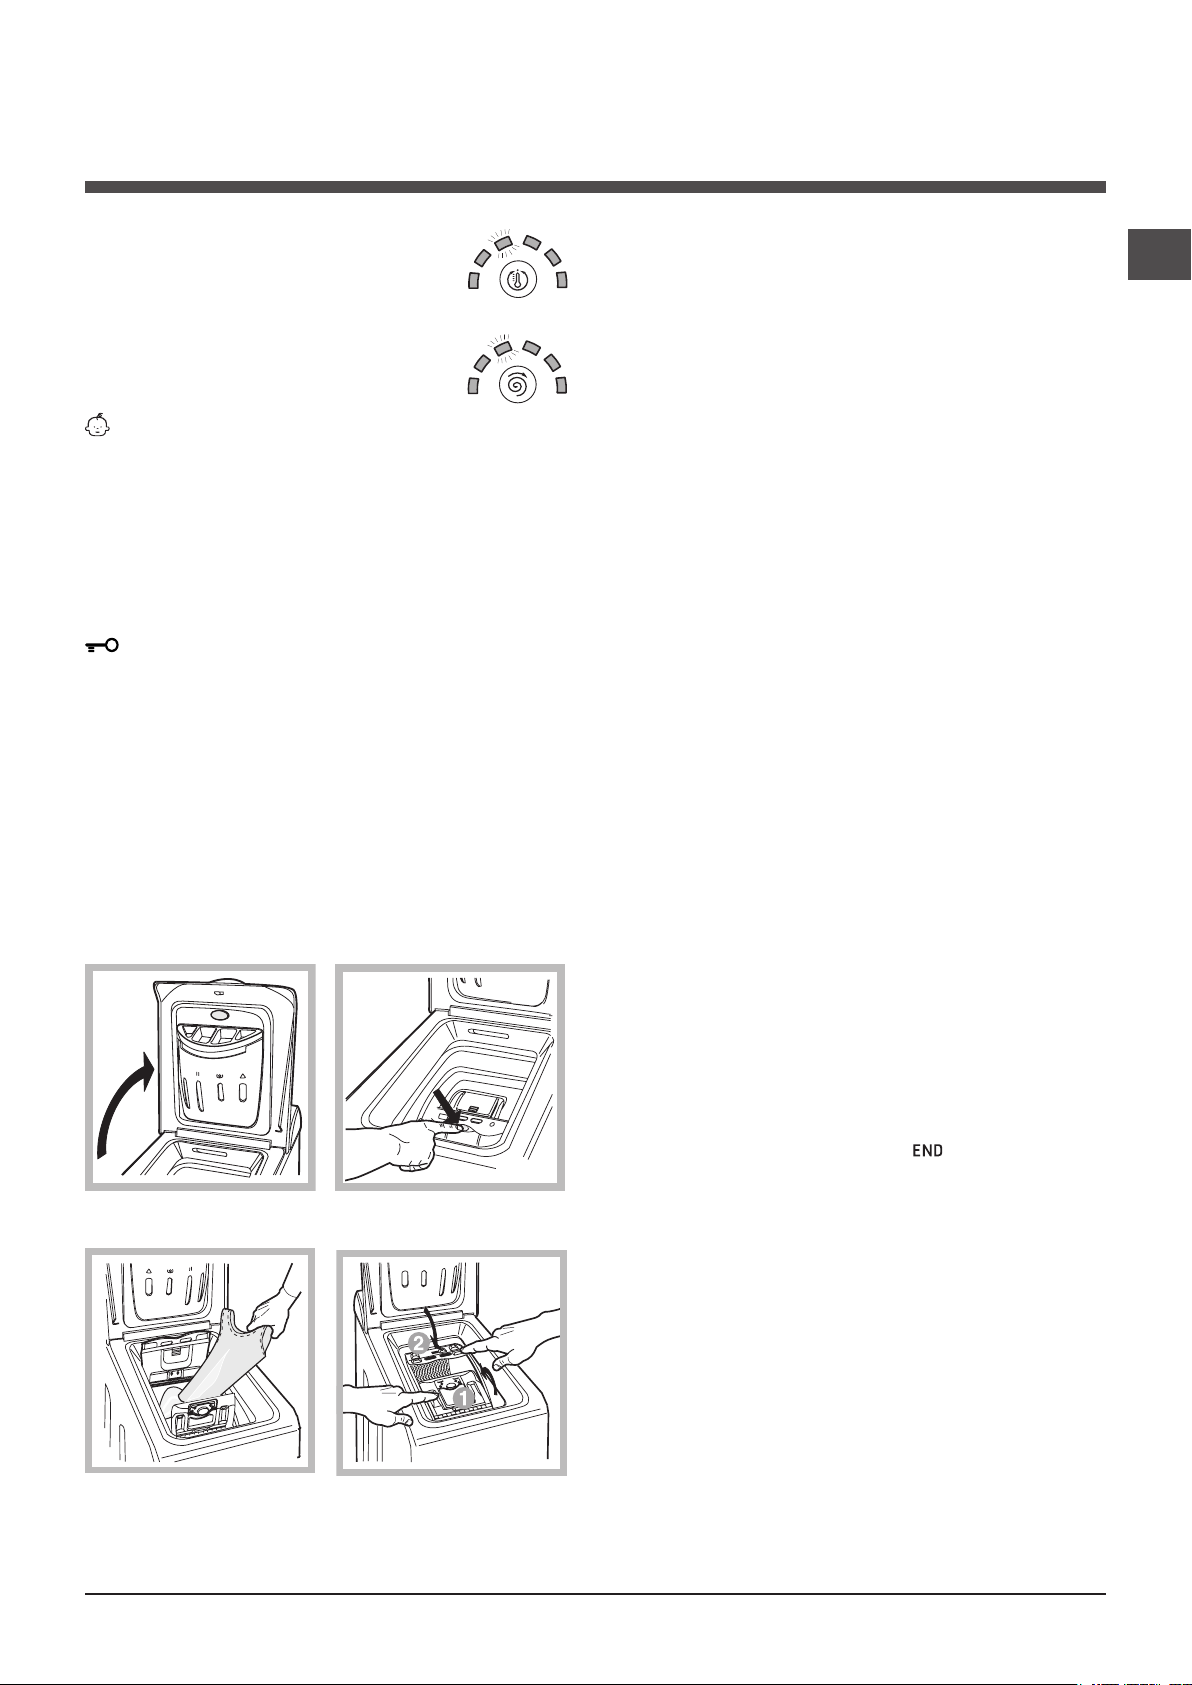
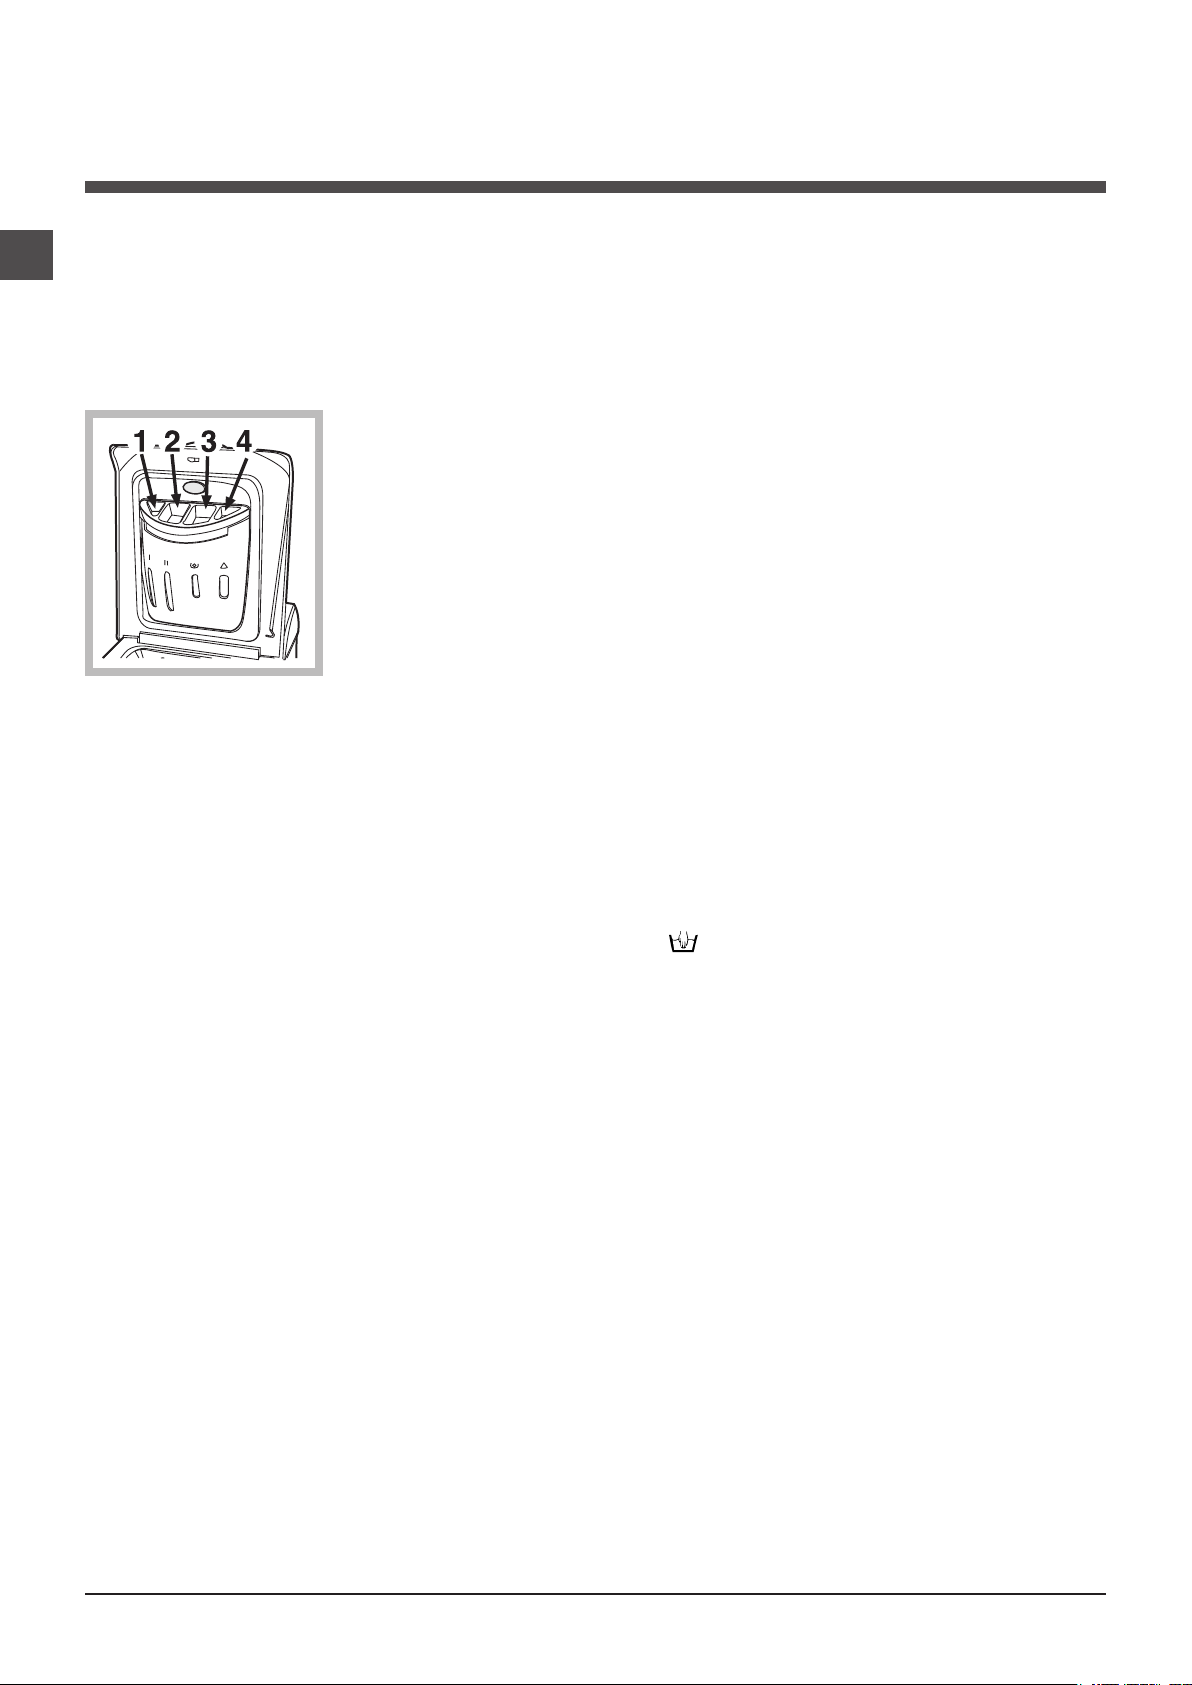
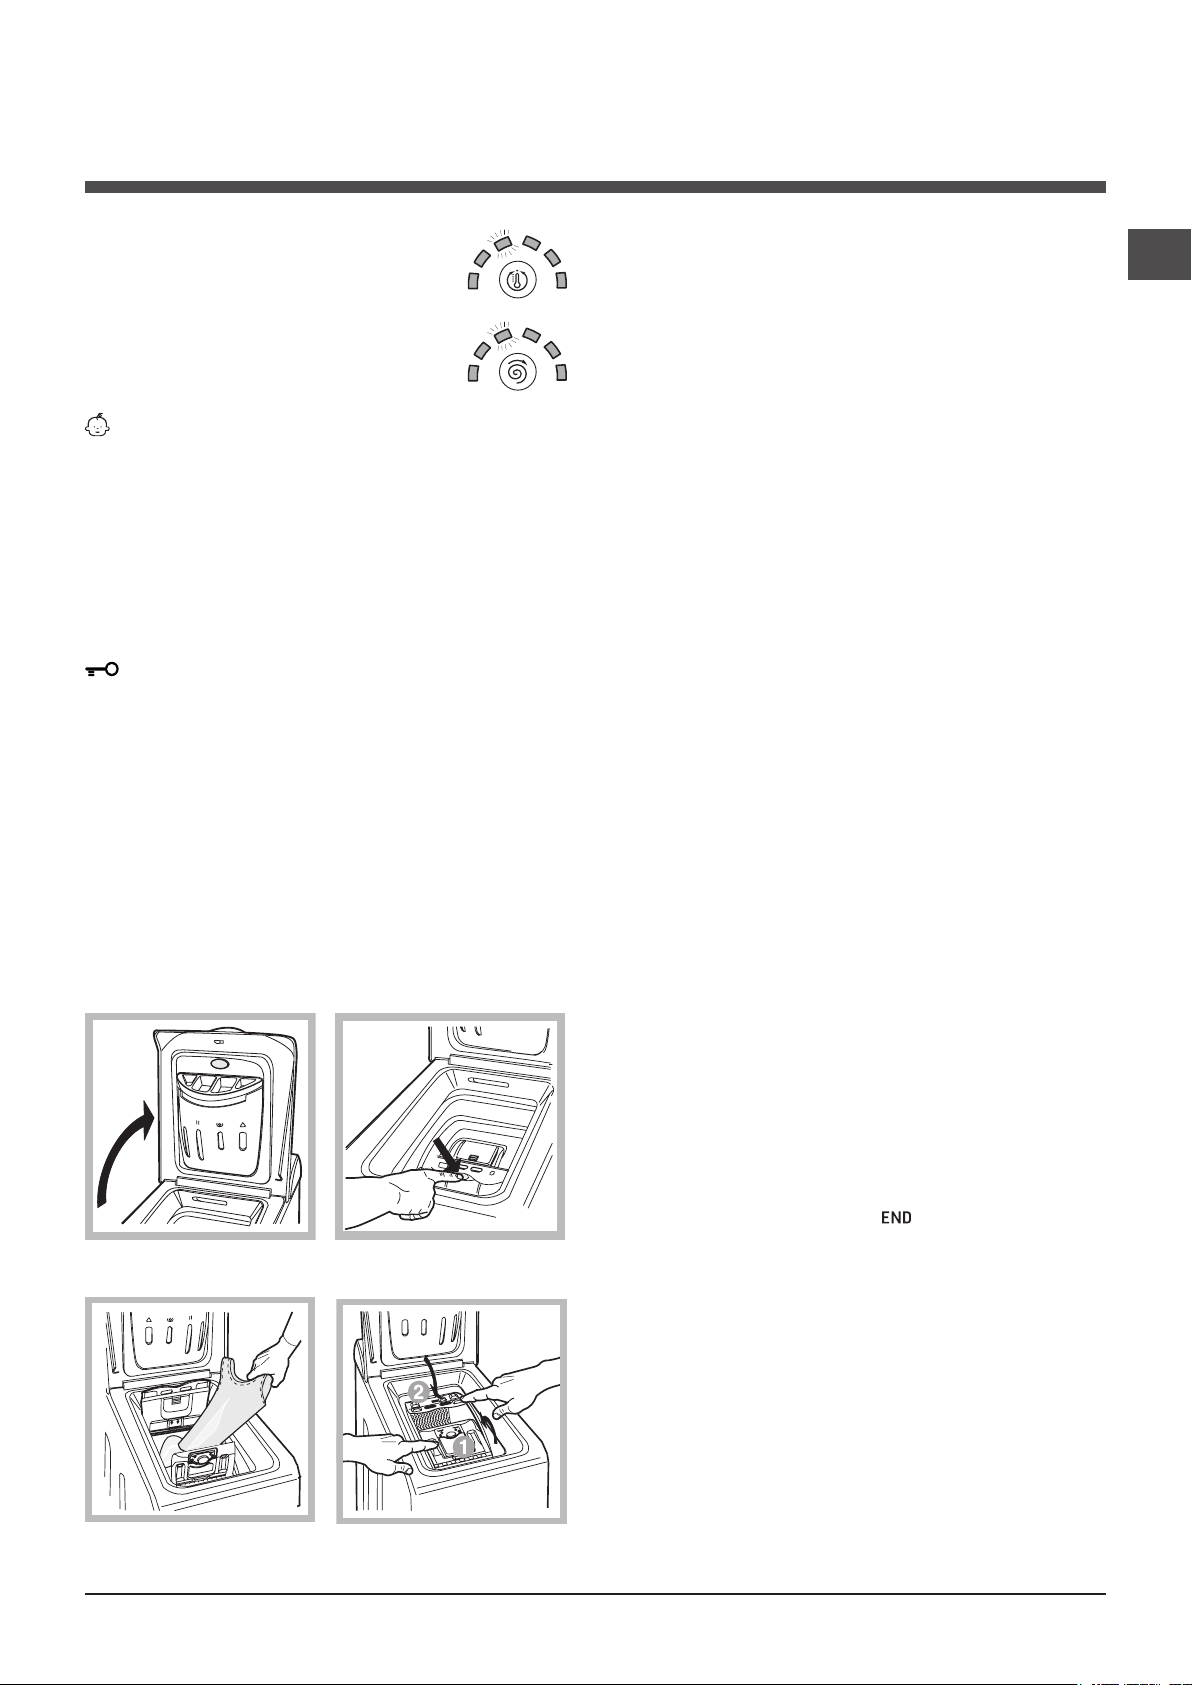
A) Opening (Fig. 1):
Lift the external lid and open it completely.
B) Opening the drum (Soft opening):
With one finger, push the button indicated in fig. 2
and the drum will open delicately.
C) Loading the washing machine (Fig. 3).
D) Shutting (Fig. 4):
- close the drum fully by first shutting the front
door followed by the rear one;
- then ensure the hooks on the front door are
perfectly housed within the seat of the rear door;
- after the hooks have clicked into position, press
both doors lightly downwards to make sure they do not
come loose;
- finally shut the external lid.
GB
Lid locked indicator light
If this indicator light is on, the appliance door is locked to prevent
it from being opened accidentally; to avoid any damage, wait for
the indicator light to switch off (it will take about three minutes)
before you open the appliance door.
N.B. If the DELAY TIMER function is activated, the door
cannot be opened; pause the machine by pressing the
START/PAUSE button if you wish to open it.
! If the START/PAUSE indicator light (orange) flashes
rapidly at the same time as the function indicator light, this
indicates a problem has occurred (see “Troubleshooting”).
How to open and to close the drum
Fig. 1
Fig. 2
Starting a wash cycle
1. Turn the washing machine on by pressing the ON/OFF
button. All the indicator lights will turn on for a few seconds, then only the indicator lights relative to the selected
programme settings will remain lit and the START/PAUSE
indicator light will flash.
2. Load the laundry, close the door and the lid.
3. Set the WASH CYCLE knob to the desired programme.
4. Set the washing temperature (see “Personalisation”).
5. Set the spin speed (see “Personalisation”).
6. Measure out the detergent and washing additives (see
“Detergents and laundry”).
7. Select the desired functions.
8. Start the wash cycle by pressing the START/PAUSE
button and the corresponding indicator light will remain lit
in a fixed manner, in green.
To cancel the set wash cycle, pause the machine by pressing the START/PAUSE button and select a new cycle.
9. At the end of the wash cycle the indicator light will
switch on. The LID LOCKED indicator light will switch off,
indicating that the door may be opened. Take out your
laundry and leave the appliance door ajar to make sure the
drum dries completely.
Switch the washing machine off by pressing the ON/OFF
button.
Fig. 3
Fig. 4
5
Page 6
GB
Wash cycles
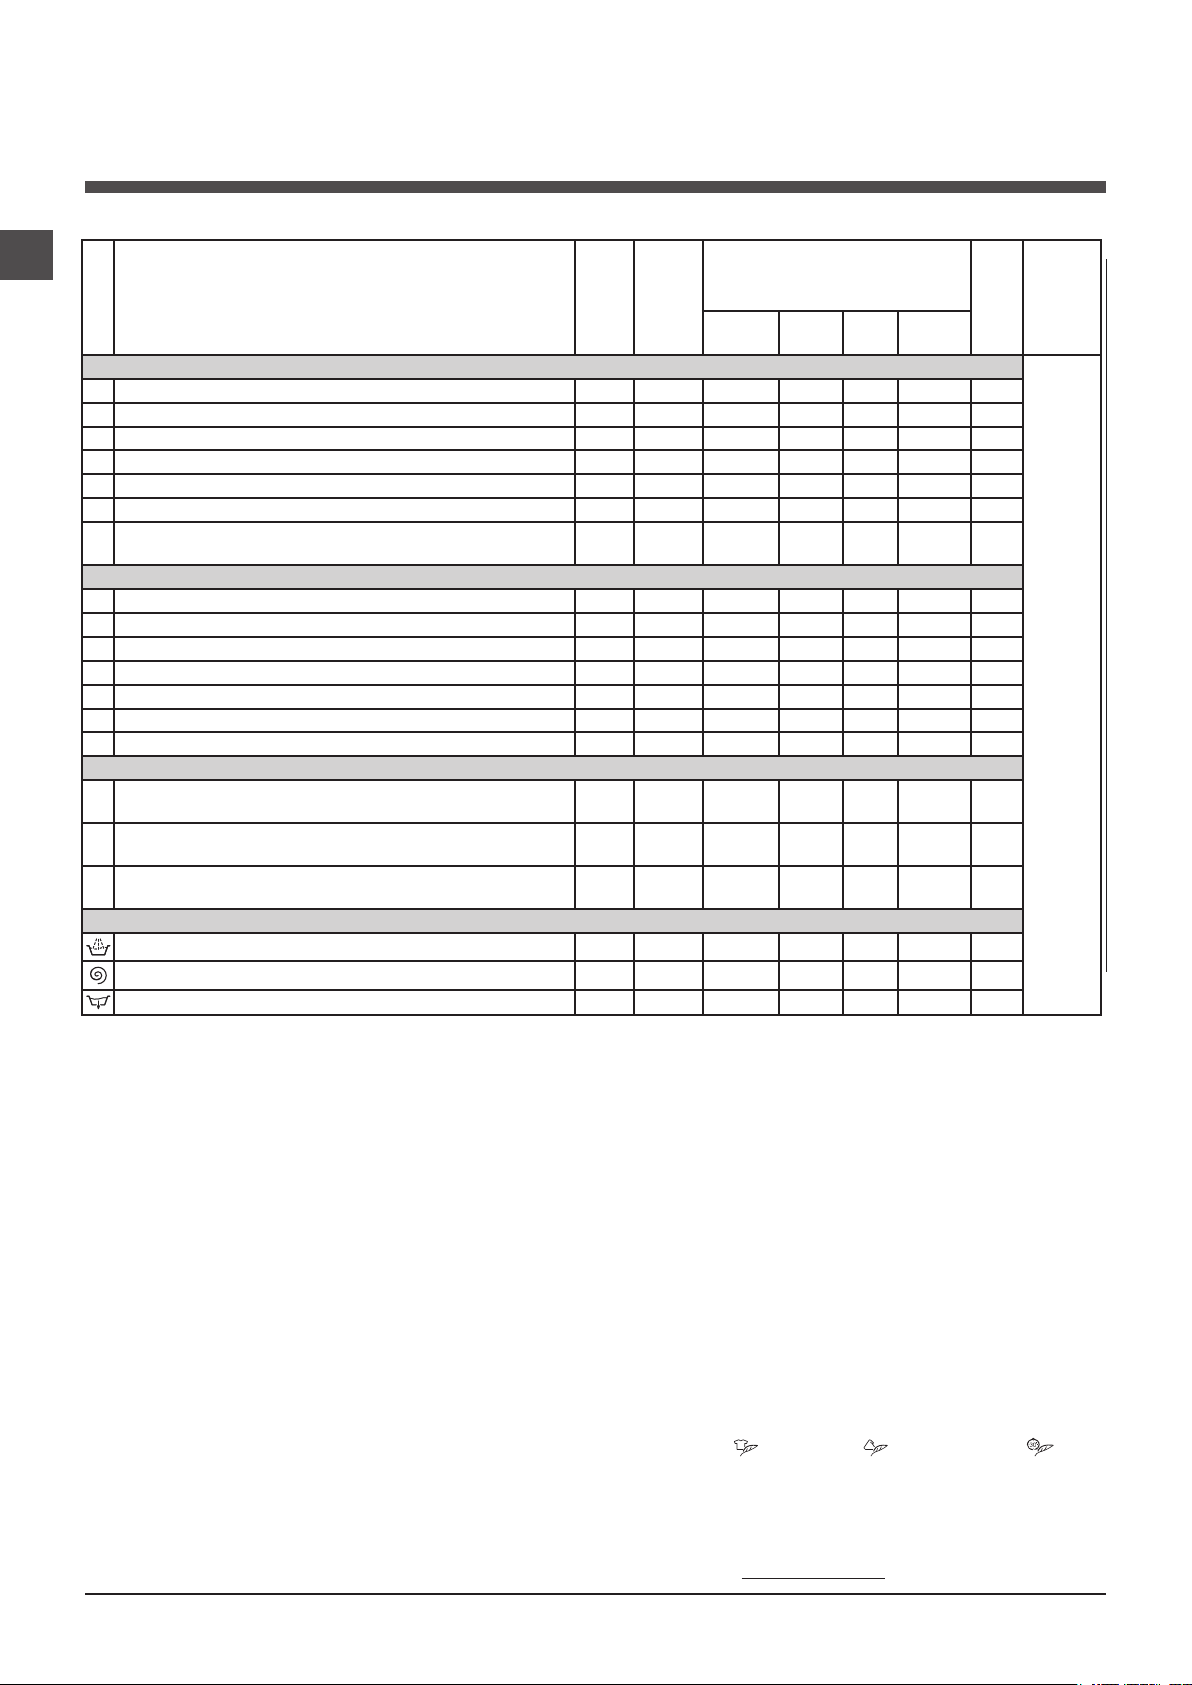
Table of wash cycles
Description of the wash cycle
Wash cycles
Essentials cycles
1
Cotton + Prewash: extremely soiled whites. 90° 1200
2
Cotton: heavily soiled whites and resistant colours. 60° 1200 -
3
Coloured cottons (3): lightly soiled whites and delicate colours. 40° 1200 -
4
Synthetics: heavily soiled resistant colours. 60° 800 - -
4
Synthetics (4): heavily soiled resistant colours. 40° 800 - -
4
Synthetics: lightly soiled resistant colours. 40° 800 - -
Mix 15’: to refresh lightly soiled garments quickly (not suitable for
5
wool, silk and clothes which require washing by hand).
Special cycles
6
Sanitizing cycle: extremely soiled whites. 90° 1200 -
6
Sanitizing cycle (1-2): heavily soiled whites and resistant colours. 60° 1200 - -
6
Sanitizing cycle (2): lightly soiled whites and resistant colours. 40° 1200 - -
7
Goodnight cycle: lightly soiled delicate colours. 40° 800 - -
8
Shirts
9
Silk/Curtains: for garments in silk and viscose, lingerie. 30° 0 - -
10
Wool: for wool, cashmere, etc. 40° 800 - -
Eco cycles
11
Cottons
12
Synthetics
13
Fast Wash
Partials wash cycles
Rinse - 1200 - - -
Spin - 1200 - - - - 6
Pump out - 0 - - - - 6
The length of cycle shown on the display or in this booklet is an estimation only and is calculated assuming standard working conditions. The actual duration can vary according to factors such as water
temperature and pressure, the amount of detergent used, the amount and type of load inserted, load balancing and any wash options selected.
For all Test Institutes:
1) Test wash cycle in compliance with regulation 2010/1061: set wash cycle 6 with a temperature of 60°C and 40°C.
2) Long wash cycle for cottons: set wash cycle 6 with a temperature of 40°C.
3) Short wash cycle for cottons: set wash cycle 3 with a temperature of 40°C.
4) Long wash cycle for synthetics: set wash cycle 4 with a temperature of 40°C.
Max.
temp.
Cold
Water
Cold
Water
Cold
Water
Max.
speed
(°C)
(rpm)
Prewash Bleach Wash
30 800 - -
40° 600 - -
1200 - -
800 - -
800 - -
Specials wash cycles
Mix 15’(wash cycle 5) this wash cycle was designed to wash lightly soiled garments quickly: it lasts just 15 minutes and
therefore saves both energy and time. By selecting this wash cycle (5 at 30°C), it is possible to wash different fabrics together
(except for wool and silk items), with a maximum load of 1.5 kg.
Sanitizing cycle (wash cycle 6). A high-temperature hygienic wash cycle (over 60°C) which requires the use of bleach. Pour the
bleach, the detergent and the additives into the relevant compartments (see paragraph entitled “Detergent dispenser drawer”).
Goodnigt cycle (wash cycle 7). This is a silent cycle which can be run at night, when the electricity prices are lower. The
wash cycle is designed for cottons and synthetics. At the end of the cycle the machine stops while there is still water in the
drum; to spin and drain the laundry press the START/PAUSE button; alternatively the machine will perform the spin cycle and
drain the water automatically after 8 hours.
Detergents
softener
-
Fabric
Max.
load
(kg)
6
6
6
2,5
2,5
2,5
1,5
6
6
6
4
2
1
1
6
3
3
6
Cycle
duration
The duration of the wash cycles can be checked on the display.
Eco cycles
The Eco Cycles assure energy saving by eliminating the need of heating water and it’s an advantage both to your
energy bill and the environment! These innovative Eco programmes (Cotton , Synthetics and Fast Wash ) are
available for various fabrics and different quantity of garment; they have been designed to guarantee a high cleaning
action even at low temperature and can be used for lightly to medium soiled loads.
Eco Cycles give the best results thanks to an intensified wash action, water optimization and are carried out in the
same average time of a standard cycle.
For the best washing results with Eco Cycles we recommend the usage of a liquid detergent.
6
Page 7
Personalisation
Setting the temperature
By pressing the TEMPERATURE button to set the wash temperature (see Table of wash cycles).
The temperature may be lowered, or even set to a cold wash ( ).
The washing machine will automatically prevent you from selecting a temperature which is higher than the maximum value
set for each wash cycle.
Setting the spin speed
By pressing the SPIN SPEED button to set the spin speed for the selected wash cycle.
The maximum spin speeds available for each wash cycle are as follows:
Wash cycles Maximum spin speed
Cottons 1200 rpm
Synthetics 800 rpm
Wool 800 rpm
Silk drain only
The spin speed may be lowered, or the spin cycle can be excluded altogether by selecting the symbol .
The washing machine will automatically prevent you from selecting a spin speed which is higher than the maximum speed
set for each wash cycle.
Functions
The various wash functions available with this washing machine will help to achieve the desired results, every time.
To activate the functions:
1. Press the button corresponding to the desired function;
2. the function is enabled when the corresponding indicator light is illuminated.
Note: If the indicator light flashes rapidly, this signals that this particular function may not be selected in conjunction with the
selected wash cycle.
GB
Delay timer
To set a delayed start for the selected wash cycle, press the button repeatedly until the desired delay time is displayed (this
may be between 1 hour and 24 hours).
To disable the function press the button until the text is displayed.
N.B. Once you have pressed the START/PAUSE button, the delay time may only be decreased if you wish to modify it.
! This option is enabled with all programmes.
Super Wash
Because a greater quantity of water is used in the initial phase of the cycle, and because of the increased cycle duration, this
function offers a high-performance wash.
! This function may not be used in conjunction with wash cycles 5, 6, 9, 10, 11, 12, 13, , , .
Extra rinse
By selecting this function, the efficiency of the rinse is increased and optimal detergent removal is guaranteed. It is particularly
useful for sensitive skin.
! This function may not be used in conjunction with wash cycles 5, 13, , .
Easy iron
By selecting this function, the wash and spin cycles will be modified in order to reduce the formation of creases. At the end of
the cycle the washing machine will perform slow rotations of the drum.
For the 9 wash cycle, the machine will end the cycle while the laundry is soaking, the EASY IRON and START/PAUSE indicator lights will flash (orange) and the RINSE phase will remain lit in a fixed manner. To drain the water so that the laundry may
be removed, press the START/PAUSE button or the EASY IRON button.
! This function may not be used in conjunction with wash cycles 5, 6, 7, 10, 11, 12, 13, , .
7
Page 8
Detergents and laundry
GB
Detergent dispenser drawer
Good washing results also depend on the correct dose of
detergent: adding too much detergent won’t necessarily
make for a more efficient wash, and may in fact cause
build up on the interior of your appliance and even pollute
the environment.
Open up the detergent
dispenser and pour in the
detergent and fabric softener, as follows.
compartment 1: Detergent for pre-wash
compartment 2: Detergent for the wash cycle
(powder or liquid)
It is recommended that you place liquid detergent directly
into the compartment using the appropriate dosing cup.
compartment 3: Additives (softener, etc.)
When pouring the softener in compartment 3, avoid exceeding the “max” level indicated.
The softener is added automatically into the machine
during the last wash. At the end of the wash programme,
some water will be left in compartment 3. This is used for
the inlet of denser fabric softeners into the machine, i.e.
to dilute the more concentrated softeners. Should more
than a normal amount of water remain in compartment 3,
this means the emptying device is blocked. For cleaning
instructions, see “Care and maintenance”.
compartment 4: Bleach
Bleach cycle
Bleaching may only be performed in conjunction with wash
cycles 2, 3, 6.
Pour the bleach into compartment 4; pour the detergent
and softener into the corresponding compartments, then
select one of the abovementioned wash cycles.
This option is recommended only for very soiled cotton
garments.
• Do not exceed the listed values, which refer to the weight
of the laundry when dry:
Durable fabrics: max. 6 kg
Synthetic fabrics: max. 2,5 kg
Delicate fabrics: max. 2 kg
Wool: max. 1 kg
How much does your laundry weigh?
1 sheet 400-500 g
1 pillow case 150-200 g
1 tablecloth 400-500 g
1 bathrobe 900-1200 g
1 towel 150-250 g
Garments requiring special care
Shirts: use special wash cycle 8 to wash shirts in various
fabrics and colours.
It guarantees maximum care is taken of the garments and
minimises the formation of creases.
Silk: use special wash cycle 9 to wash all silk garments.
We recommend the use of special detergent which has
been designed to wash delicate clothes.
Curtains: fold curtains and place them in a pillow case or
mesh bag. Use wash cycle 9.
Wool: is the only washing machine manufacturer to have
been awarded the prestigious Woolmark Platinum Care
endorsement (M.0508) by the Woolmark Company, which
means that all woollen garments may be washed in the
washing machine, even those which state “hand wash
only” on the label. Wash cycle 10 therefore offers
complete peace of mind when washing woollen garments
in the washing machine (max. load 1 kg) and guarantees
optimal performance.
Load balancing system
Before every spin cycle, to avoid excessive vibrations and
to distribute the load in a uniform manner, the drum rotates
continuously at a speed which is slightly greater than the
washing rotation speed. If, after several attempts, the load is
not balanced correctly, the machine spins at a reduced spin
speed. If the load is excessively unbalanced, the washing machine performs the distribution process instead of spinning.
To encourage improved load distribution and balance, we
recommend small and large garments are mixed in the load.
Preparing the laundry
• Divide the laundry according to:
- the type of fabric/the symbol on the label
- the colours: separate coloured garments from whites.
• Empty all garment pockets and check the buttons.
8
Page 9

Precautions and tips
! This washing machine was designed and constructed in
accordance with international safety regulations. The following information is provided for safety reasons and must
therefore be read carefully.
General safety
• This appliance was designed for domestic use only.
• This appliance is not intended for use by persons (including children) with reduced physical, sensory or mental
capabilities, or lack of experience and knowledge, unless
they have been given supervision or instruction concerning use of the appliance by a person responsible for
their safety. Children should be supervised to ensure that
they do not play with the appliance.
• Do not touch the machine when barefoot or with wet or
damp hands or feet.
• Do not pull on the power supply cable when unplugging
the appliance from the electricity socket. Hold the plug
and pull.
• Do not touch the drained water as it may reach extremely high temperatures.
• Never force the porthole door. This could damage the
safety lock mechanism designed to prevent accidental
opening.
• If the appliance breaks down, do not under any circumstances access the internal mechanisms in an attempt
to repair it yourself.
• Always keep children well away from the appliance while
it is operating.
• If the appliance has to be moved, work in a group of two
or three people and handle it with the utmost care. Never
try to do this alone, because the appliance is very heavy.
• Before loading laundry into the washing machine, make
sure the drum is empty.
Consumers should contact their local authority or
retailer for information concerning the correct
disposal of their old appliance.
Saving energy and respecting the environment
Saving on detergent, water, energy and time
• To avoid wasting resources, the washing machine
should be used with a full load. A full load instead
of two half loads allows you to save up to 50% on
energy.
• The pre-wash cycle is only necessary on
extremely soiled garments. Avoiding it will save on
detergent, time, water and between 5 and 15%
energy.
• Treating stains with a stain remover or leaving
them to soak before washing will cut down the
need to wash them at high temperatures. A
programme at 60°C instead of 90°C or one at
40°C instead of 60°C will save up to 50% on
energy.
• Use the correct quantity of detergent depending
on the water hardness, how soiled the garments
are and the amount of laundry you have, to avoid
wastage and to protect the environment: despite
being biodegradable, detergents do contain
ingredients that alter the natural balance of the
environment. In addition, avoid using fabric
softener as much as possible.
• If you use your washing machine from late in the
afternoon until the early hours of the morning, you
will help reduce the electricity board’s peak load.
The “Delay Timer” option helps to organise your
wash cycles accordingly.
GB
Disposal
• Disposing of the packaging materials: observe local
regulations so that the packaging may be re-used.
• The European Directive 2002/96/EC on Waste
Electrical and Electronic Equipment, requires that
old household electrical appliances must not be
disposed of in the normal unsorted municipal waste
stream. Old appliances must be collected
separately in order to optimise the recovery and
recycling of the materials they contain and reduce
the impact on human health and the environment.
The crossed out “wheeled bin” symbol on the
product reminds you of your obligation, that when
you dispose of the appliance it must be separately
collected.
• If your laundry has to be dried in a tumble dryer,
select a high spin speed. Having the least water
possible in your laundry will save you time and
energy in the drying process.
9
Page 10
Care and maintenance
GB
Cutting off the water or electricity supply
• Turn off the water tap after every wash. This will limit
the wear of your appliance’s water system and also
prevent leaks.
• Unplug your appliance when cleaning it and during all
maintenance operations.
Cleaning your appliance
The exterior and rubber parts of your appliance can be
cleaned with a soft cloth soaked in lukewarm soapy water.
Do not use solvents or abrasives.
Caring for your appliance door and
drum
• Always leave the appliance door ajar to prevent unplea-
sant odours from forming.
Cleaning the pump
The washing machine is fitted with a self-cleaning pump
that does not require any maintenance. Sometimes, small
items (such as coins or buttons) may fall into the prechamber that protects the pump, situated in the lower part
of the same.
! Make sure the wash cycle has ended and unplug the
appliance.
To recover any objects that have fallen into the pre-chamber:
1. remove the plinth at the
bottom on the front side
of the washing machine
by pulling from the side
with your hands (see
figure);
2. unscrew the lid rotating it anticlock-wise (see
figure): a little water may
trickle out. This is perfectly normal;
3. clean the interior thoroughly;
4. screw the lid back on;
5. reposition the panel,
making sure the hooks are
securely in place before you push it onto the
appliance.
Checking the water inlet hose
Check the water inlet hose at least once a year. If you see
any cracks, replace it immediately: during the wash cycles,
water pressure is very strong and a cracked hose could
easily split open.
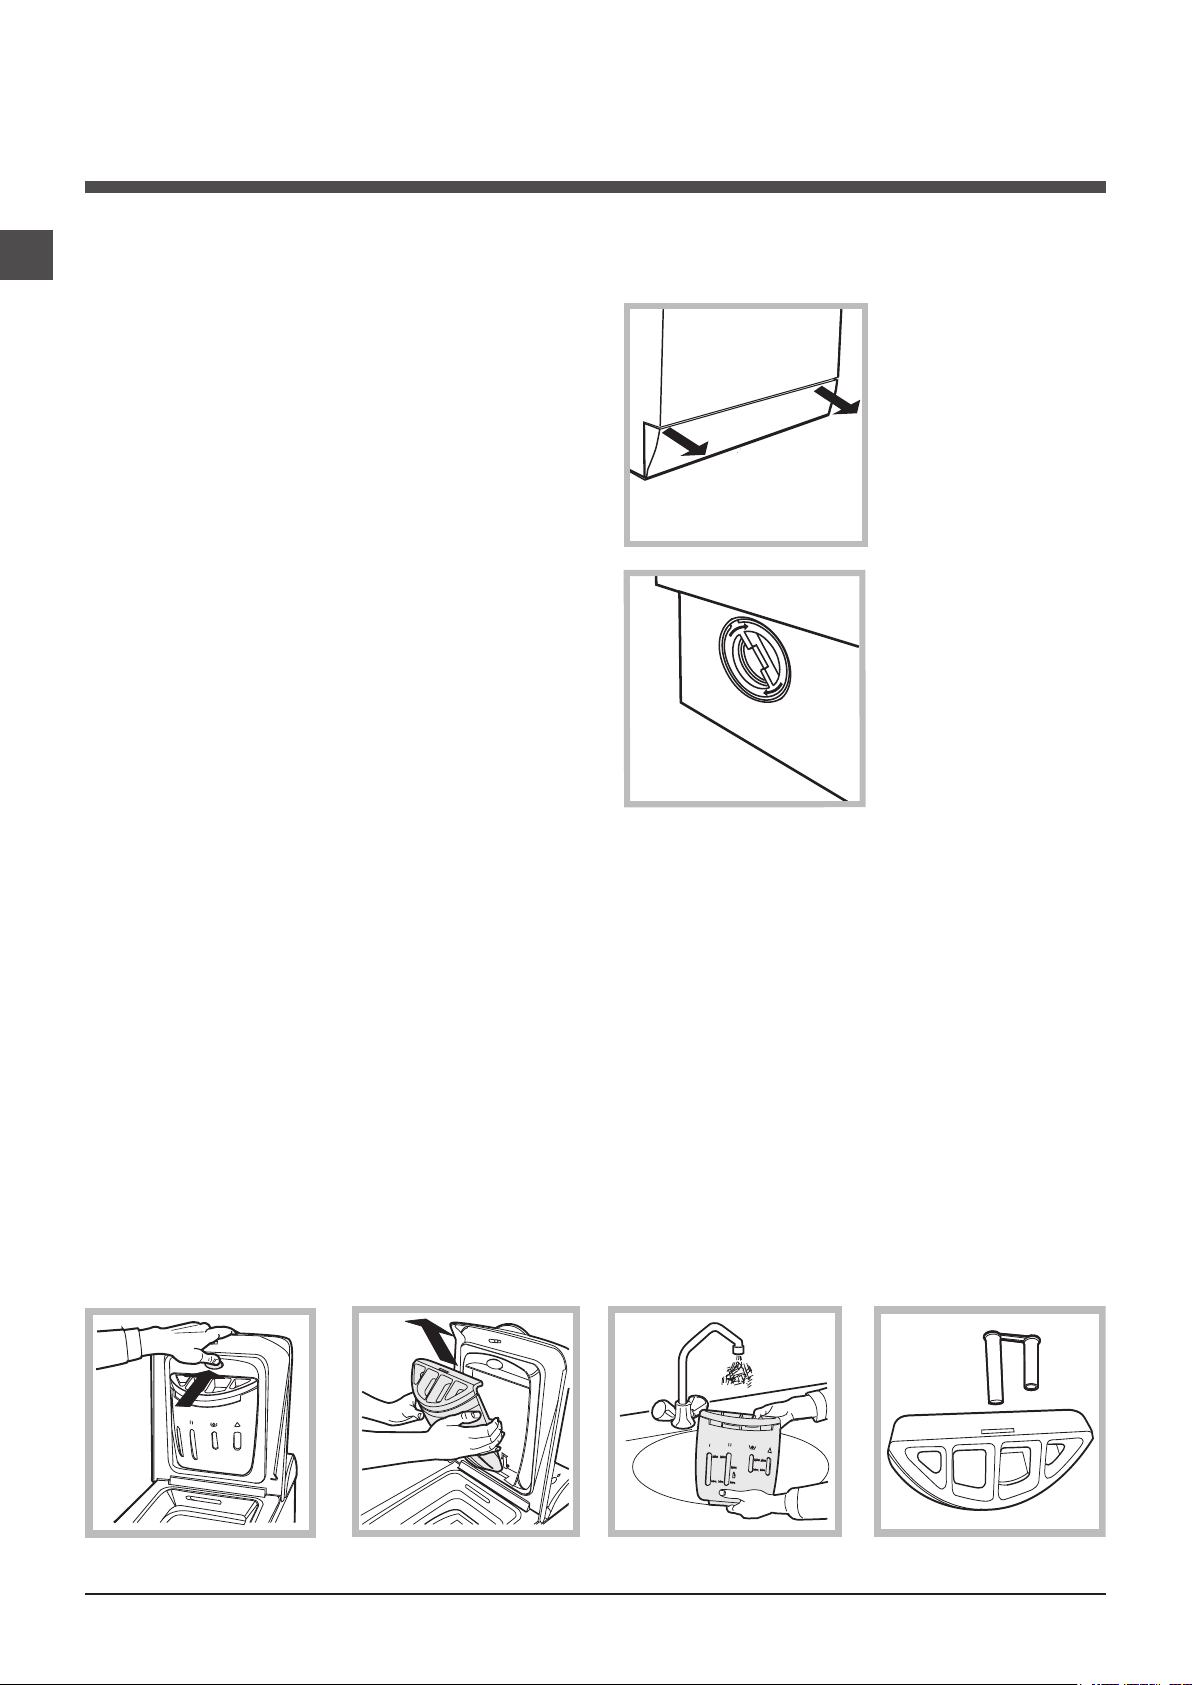
How to clean the detergent dispenser
Disassembly:
Press lightly on the large
button on the front of the
detergent dispenser and pull
it upwards (fig. 1, 2).
Fig. 1 Fig. 2
Cleaning:
Then clean the dispenser under a tap (fig. 3) using an old
toothbrush and, once the pair of siphons inserted in the top
of compartments 1 and 2 (fig. 4) have been pulled out, check
whether the same are not clogged and then rinse them.
! Never use hoses that have already been used.
Reassembly:
Do not forget to reinsert the
pair of siphons into the special
housings and then to replace
the dispenser into its seat,
clicking it into place (fig. 4, 2
and 1).
Fig. 3
Fig. 4
10
Page 11

Troubleshooting
Your washing machine could fail to work. Before contacting the Technical Assistance Centre (see “Assistance”), make sure
that the problem cannot be not solved easily using the following list.
Problem:
The washing machine does not
switch on.
The wash cycle does not start.
The washing machine does not
take in water (the indicator light for
the first wash cycle stage flashes
rapidly).
The washing machine continuously
takes in and drains water.
Possible causes / Solutions:
• The appliance is not plugged into the socket fully, or is not making contact.
• There is no power in the house.
• The appliance Lid is not shut properly.
• The ON/OFF button has not been pressed.
• The START/PAUSE button has not been pressed.
• The water tap has not been opened.
• A delayed start has been set (see “Personalisation”).
• The water inlet hose is not connected to the tap.
• The hose is bent.
• The water tap has not been opened.
• There is no water supply in the house.
• The pressure is too low.
• The START/PAUSE button has not been pressed.
• The drain hose is not fitted at a height between 65 and 100 cm from the floor
(see “Installation”).
• The free end of the hose is under water (see “Installation”).
• The wall drainage system is not fitted with a breather pipe.
If the problem persists even after these checks, turn off the water tap, switch
the appliance off and contact the Assistance Service. If the dwelling is on one of
the upper floors of a building, there may be problems relating to water drainage,
causing the washing machine to fill with water and drain continuously. Special
anti-draining valves are available in shops and help to avoid this inconvenience.
GB
The washing machine does not
drain or spin.
The washing machine vibrates a lot
during the spin cycle.
The washing machine leaks.
The START/PAUSE indicator light
(orange) and the function indicator
lights flash rapidly.
There is too much foam.
• The wash cycle does not include draining: some wash cycles require the drain
phase to be started manually.
• The EASY IRON function has been activated: To complete the wash cycle,
press the START/PAUSE button (“Personalisation”).
• The drain hose is bent (see “Installation”).
• The drainage duct is clogged.
• The drum was not unlocked correctly during installation (see “Installation”).
• The washing machine is not level (see “Installation”).
• The washing machine is trapped between cabinets and walls (see “Installation”).
• The water inlet hose is not screwed on properly (see “Installation”).
• The detergent dispenser drawer is blocked (for cleaning instructions, see
“Care and maintenance”).
• The drain hose is not fixed properly (see “Installation”).
• Switch off the machine and unplug it, wait for approximately 1 minute and
then switch it back on again.
If the problem persists, contact the Technical Assistance Service.
• The detergent is not suitable for machine washing (it should display the text
“for washing machines” or “hand and machine wash”, or the like).
• Too much detergent was used.
11
Page 12

Service
GB
Before calling for Assistance:
• Check whether you can solve the problem alone (see “Troubleshooting”);
• Restart the programme to check whether the problem has been solved;
• If this is not the case, contact an authorised Technical Assistance Centre using the telephone number provided on
the guarantee certificate.
! Always request the assistance of authorised technicians.
Have the following information to hand:
• the type of problem;
• the appliance model (Mod.);
• the serial number (S/N).
This information can be found on the data plate situated on the rear of the washing machine.
12
Page 13

Mode d’emploi
LAVE-LINGE
FR
Français
ECOT6F 1291
Sommaire
Installation, 14-15
Déballage et mise à niveau
Raccordements eau et électricité
Premier cycle de lavage
Caractéristiques techniques
Description du lave-linge et démarrage
d’un programme, 16-17
Bandeau de commandes
Voyants
Comment ouvrir et fermer le tambour
Démarrage d’un programme
Programmes, 18
Tableau des programmes
Personnalisations, 19
Sélection de la température
Sélection de l’essorage
Fonctions
Produits lessiviels et linge, 20
Tiroir à produits lessiviels
Cycle blanchissage
Triage du linge
Linge ou vêtements particuliers
Système d’équilibrage de la charge
FR
Précautions et conseils, 21
Sécurité générale
Mise au rebut
Economies et respect de l’environnement
Entretien et soin, 22
Coupure de l’arrivée d’eau et du courant
Nettoyage du lave-linge
Entretien du couvercle et du tambour
Nettoyage de la pompe
Contrôle du tuyau d’arrivée de l’eau
Comment nettoyer le tiroir à produits lessiviels
Anomalies et remèdes, 23
Assistance, 24
13
Page 14
Installation
FR
! Conservez ce mode d’emploi pour pouvoir le consulter à
tout moment. En cas de vente, de cession ou de déménagement, veillez à ce qu’il suive toujours le lave-linge pour que
son nouveau propriétaire soit informé sur son mode de fonctionnement et puisse profiter des conseils correspondants.
! Lisez attentivement les instructions: elles fournissent
d’importantes informations sur l’installation, l’utilisation et la
sécurité.
Déballage et mise à niveau
Déballage: enlever les 4 vis
1. Déballez le lave-linge.
2. Contrôlez que le lavelinge n’a pas été endommagé pendant le transport. S’il est abîmé, ne le
raccordez pas et contactez votre revendeur.
3. Enlevez les quatre vis
de protection pour le transport, le caoutchouc et la
cale, placés dans la partie
arrière (voir figure).
4. Bouchez les trous
à l’aide des bouchons plastique fournis.
5. Conservez bien toutes ces pièces: il faudra les remonter
en cas de transport du lave-linge.
! Attention: en cas de réutilisation, les vis plus courtes
doivent être montées dessus.
! Les emballages ne sont pas des jouets pour enfants.
Mise à niveau
Votre appareil peut s’avérer bruyant si vous n’avez pas
bien réglé ses deux pieds avant.
1.Installez le lave-linge sur
un sol plat et rigide, sans
l’appuyer contre des murs,
des meubles ou autre.
2. Si le sol n’est pas parfaitement horizontal, vissez
ou dévissez les petits pieds
avant (voir figure) pour niveler
l’appareil; son angle d’incli-
naison, mesuré sur le plan
de travail, ne doit pas dépasser 2°.
Une bonne mise à niveau garantit la stabilité de la machine et
évite qu’il y ait des vibrations, du bruit et des déplacements
en cours de fonctionnement. Si la machine est posée sur de
la moquette ou un tapis, réglez les petits pieds de manière à
ce qu’il y ait suffisamment d’espace pour assurer une bonne
ventilation.
Mise en place, deplacements
Si votre lave-linge est muni
d’un chariot spécial avec
roues rétractiles, vous pouvez le déplacer facile-ment.
Pour faire descendre ce
chariot et pouvoir ainsi
déplacer sans effort votre
lave-linge, vous devez tirer
le levier situé en bas à
gauche, sous la base. Une
fois le lave-linge déplacé,
remettez-le dans la position
initiale. Le lave-linge est
ainsi solidement mis en place. Voir figure (seulement pour
les modéles prevues).
Raccordements hydrauliques et
électriques
Raccordement du tuyau d’arrivée de l’eau
1. Reliez le tuyau d’alimentation en le vissant à un robinet
d’eau froide à embout fileté 3/4 gaz (voir figure).
Faire couler l’eau jusqu’à ce qu’elle soit limpide et sans
impuretés avant de raccorder.
2. Raccordez le tuyau
d’alimentation au lave-linge
en le vissant à la prise d’eau
prévue, dans la partie arrière
en haut à droite (voir figure).
3. Faites attention à ce que
le tuyau ne soit ni plié ni
écrasé.
! La pression de l’eau doit
être comprise entre les
valeurs indiquées dans le
tableau des Caractéristiques techniques (voir page
ci-contre).
! Si la longueur du tuyau
d’alimentation ne suffit
pas, adressez-vous à un
magasin spécialisé ou à un
technicien agréé.
14
Page 15
65 - 100 cm
Raccordement du tuyau de vidange
Raccorder le tuyau d’éva-
cuation, sans le plier, à un
conduit d’évacuation ou
à une évacuation murale
placés à une distance du
sol comprise entre 65 et
100 cm;
! N’utiliser ni rallonges ni prises multiples.
! Le câble ne doit être ni plié ni trop écrasé.
! Le câble d’alimentation ne doit être remplacé que par
des techniciens agréés.
Attention! Nous déclinons toute responsabilité en cas de
non-respect des normes énumérées ci-dessus.
Premier cycle de lavage
FR
ou bien l’accrocher à un évier ou à une baignoire, dans ce
cas, fixer le support en plastique fourni avec l’appareil
au robinet (voir figure).
L’extrémité libre du tuyau
d’évacuation ne doit pas
être plongée dans l’eau.
! L’utilisation d’un tuyau de
rallonge est absolument
déconseillée mais si on ne
peut faire autrement, il faut absolument qu’il ait le même
diamètre que le tuyau original et sa longueur ne doit pas
dépasser 150 cm.
Branchement électrique
Avant de brancher la fiche dans la prise de courant, s’assurer que:
• la prise est bien reliée à la terre et est conforme aux
réglementations en vigueur;
• la prise est bien apte à supporter la puissance maximale
de l’appareil indiquée dans le tableau des Caractéristiques techniques (voir ci-contre);
• la tension d’alimentation est bien comprise entre les
valeurs figurant dans le tableau des Caractéristiques
techniques (voir ci-contre);
• la prise est bien compatible avec la fiche du lave-linge.
Autrement, remplacer la prise ou la fiche.
! Le lave-linge ne doit pas être installé dehors, même à
l’abri, car il est très dangereux de le laisser exposé à la
pluie et aux orages.
! Après installation du lave-linge, la prise de courant doit
être facilement accessible.
Avant la première mise en service de l’appareil, effectuer
un cycle de lavage avec un produit lessiviel mais sans linge
et sélectionner le programme 2.
Caractéristiques techniques
Modèle
Dimensions
Capacité
Raccordements
électriques
Raccordements
hydrauliques
Vitesse d’essorage
Programmes de
contrôle selon
la norme
2010/1061
ECOT6F 1291
largeur 40 cm
hauteur 85 cm
profondeur 60 cm
de 1 à 6 kg
Voir la plaque signalétique appliquée
sur la machine
pression maximale 1 MPa (10 bar)
pression minimale 0,05 MPa (0,5
bar) capacité du tambour 42 litres
jusqu’à 1200 tours minute
programme 6; température 60°C et
40°C.
Cet appareil est conforme aux Directives Communautaires suivantes:
- 2004/108/CE (Compatibilité électromagnétique)
- 2006/95/CE (Basse Tension)
- 2002/96/CE
15
Page 16

Description du lave-linge et
démarrage d’un programme
FR
Bandeau de commandes
Touche avec voyant
ON/OFF
PROGRAMMES
Touche avec voyant ON/OFF: pour allumer ou éteindre le
lave-linge. Le témoin allumé indique quel’ appareil est sous
tension.
Bouton PROGRAMMES: pour sélectionner les programmes. Pendant le programme, le bouton ne tournera pas.
Touche ESSORAGE: pour sélectionner l’essorage ou le
supprimer (voir “Personnalisations”).
Touche TEMPÉRATURE: pour sélectionner la températu-
re ou un lavage à froid (voir “Personnalisations”).
AFFICHEUR: pour afficher le temps restant du cycle de
lavage sélectionné et, en cas de sélection d’un départ
différé, le temps restant avant le démarrage du lavage.
Touche et voyant VERROUILLAGE DES TOUCHES:
pour activer ou désactiver le verrouillage du bandeau de
commandes.
Touches avec voyants FONCTION: pour sélectionner
les fonctions disponibles. Le voyant correspondant à la
fonction sélectionnée restera allumé.
Voyants DÉROULEMENT CYCLE: pour suivre le stade
d’avancement du programme de lavage.
Le voyant allumé indique la phase de lavage en cours.
Voyant HUBLOT VERROUILLÉ: indique si la porte est
verrouillée (voir page ci-contre).
Touche avec voyant MARCHE/PAUSE: pour démarrer les
programmes ou les interrompre momentanément.
N.B.: pour effectuer une pause du lavage en cours, appuyer sur cette touche, le voyant correspondant se mettra à
clignoter en orange tandis que celui de la phase en cours
restera allumé fixe. Si le voyant HUBLOT VERROUILLÉ
est éteint, on peut ouvrir la porte. Pour faire redémarrer
le lavage exactement de l’endroit où il a été interrompu,
appuyer une nouvelle fois sur la touche.
TEMPÉRATURE
Bouton
Touche
ESSORAGE
Touche avec voyant
VERROUILLAGE
DES TOUCHES
AFFICHEUR
Touche
Voyants DÉROULEMENT
CYCLE
Touche avec voyant
MARCHE/
PAUSE
Touches avec voyants
FONCTION
Stand-by
Ce lave-linge, conformément aux nouvelles normes en
vigueur dans le domaine de l’économie d’énergie, est
équipée d’un système d’extinction automatique (veille)
activé après environ 30 minutes d’inutilisation. Appuyez
brièvement sur la touche ON/OFF et attendre que la machine soit réactivée.
Voyant
COUVERCLE
VERROUILLÉ
Voyants
Les voyants fournissent des informations importantes.
Voilà ce qu’ils signalent:
Voyants phase en cours
Au fur et à mesure qu’on tourne le bouton des PROGRAMMES, les voyants s’allument pour indiquer les phases que
l’appareil effectue selon le programme choisi.
Une fois que le cycle de lavage sélectionné a démarré,
les voyants s’allument progressivement pour indiquer son
stade d’avancement:
Lavage
Rinçage
Essorage
Vidange
Fin de Lavage
Touches fonction et voyants correspondants
La sélection d’une fonction entraîne l’allumage du voyant
correspondant. Si la fonction sélectionnée est incompatible
avec le programme sélectionné, le voyant correspondant
se met à clignoter, un signal sonore retentit et la fonction
n’est pas activée. En cas de sélection d’une fonction incompatible avec une autre précédemment sélectionnée, la
seule à être activée sera celle choisie en dernier.
16
Page 17
Voyants température
La sélection d’une température entraîne
l’éclairage du voyant correspondant.
Voyants essorage
La sélection d’un essorage entraîne l’éclairage
du voyant correspondant.
A) Ouvrez le couvercle (Fig. 1):
Soulevez le Couvercle externe et ouvrez le complètement;
B) Ouverture douce du tambour (Fig. 2):
Appuyez d’un doigt sur le bouton comme illustré et
le tambour s’ouvrira délicatement.
C) Introduisez le linge (Fig. 3).
FR
Voyant verrouillage des touches
Pour “activer” le verrouillage du bandeau de commandes,
garder la touche enfoncée pendant 2 secondes environ. Le
voyant allumé indique que le tableau de bord est verrouillé.
Ceci permet d’éviter toute modification involontaire des
programmes, surtout s’il y a des enfants à la maison.
Pour “désactiver” le verrouillage du bandeau de
commandes, garder la touche enfoncée pendant 2
secondes environ.
Voyant hublot verrouillé
Le voyant allumé indique que le hublot est verrouillé pour
empêcher toute ouverture accidentelle. Pour éviter d’endommager l’appareil, attendre que le voyant cesse de
clignoter avant d’ouvrir la porte.
N.B: si la fonction DÉPART DIFFÉRÉ est activée, le hublot
ne s’ouvre pas. Pour l’ouvrir il faut appuyer sur la touche
MARCHE/PAUSE qui met l’appareil en pause.
! Un clignotement rapide du voyant MARCHE/PAUSE
(orange) simultané à celui des fonctions signale une anomalie (voir “Anomalies et remèdes”).
Comment ouvrir et fermer le tambour
Fig. 1
Fig. 2
D) Fermer (Fig. 4):
• refermez bien le tambour en baissant d’abord la porte
antérieure et posez ensuite la porte postérieure;
• faites attention à parfaitement positionner les crochets de la porte antérieure dans leur siège dans la
porte postérieure;
• vous entendrez un “ clac ” qui confirmera la bonne
fixation; appuyez alors légèrement vers le bas sur les
deux portes qui ne doivent pas se décrocher;
• fermez enfin le couvercle externe.
Démarrage d’un programme
1. Allumer le lave-linge en appuyant sur la touche ON/OFF.
Tous les voyants s’allumeront pendant quelques secondes,
ne resteront ensuite allumés que les voyants correspondant
aux sélections du programme en cours et le voyant MARCHE/
PAUSE se mettra à clignoter.
2. Charger le linge et fermer les portes et le couvercle.
3. Sélectionner à l’aide du bouton PROGRAMMES le pro-
gramme désiré.
4. Sélectionner la température de lavage (voir “Personnalisations”).
5. Sélectionner la vitesse d’essorage (voir “Personnalisations”).
6. Verser les produits lessiviels et les additifs (voir “Produits
lessiviels et linge”).
7. Sélectionner les fonctions désirées.
8. Appuyer sur la touche MARCHE/PAUSE pour démarrer le
programme, le voyant correspondant vert restera allumé en fixe.
Pour annuler le cycle sélectionné, appuyer sur la touche
MARCHE/PAUSE pour placer l’appareil en pause et choisir
un nouveau cycle.
9. A la fin du programme, le voyant s’allume. Le voyant COU-
VERCLE VERROUILLÉ s’éteint pour signaler que le couvercle
peut être ouvert. Sortir le linge et laisser le couvercle entrouvert
pour faire sécher le tambour.
Eteindre le lave-linge en appuyant sur la touche MARCHE/ARRÊT.
Fig. 3
Fig. 4
17
Page 18

FR
Programmes
Tableau des programmes
Produits lessiviels
Préla-
vage
Javel Lavage
-
Assou-
plissant
Charge
maxi
(Kg)
6
6
6
2,5
2,5
2,5
1,5
6
6
6
4
2
1
1
6
3
3
6
Durée
cycle
maxi.
(°C)
Vitesse
maxi
(tours
minute)
Description du Programme
Temp.
Programmes
Programmes Quotidien
1
Coton Prélavage 90°C: blancs extrêmement sales. 90° 1200
2
Coton: blancs et couleurs résistantes très sales. 60° 1200 -
3
Coton (3): blancs peu sales et couleurs délicates. 40° 1200 -
4
Synthétique: couleurs résistantes très sales. 60° 800 - -
4
Synthétique (4): couleurs résistantes très sales. 40° 800 - -
4
Synthétique: couleurs résistantes peu sales. 40° 800 - -
MIX 15': pour rafraîchir rapidement du linge peu sale (ne convient
5
pas pour la laine, la soie et le linge à laver à la main).
30 800 - -
Programmes Spécial
Anti-bactérien 90°C: blancs extrêmement sales.
6
Anti-bactérien 90°C (1-2): blancs et couleurs résistantes très sales.
6
Anti-bactérien 90°C (2): blancs et couleurs résistantes peu sales.
6
Bonne Nuit: couleurs délicates peu sales.
7
Chemises
8
Soie/Voilages: pour linge en soie, viscose, lingerie.
9
Laine: pour laine, cachemire, etc.
10
90° 1200 60° 1200 - 40° 1200 - 40° 800 - 40° 600 - 30° 0 - 40° 800 - -
Eco Programmes
11 Coton
12 Synthétique
13 Lavage Rapide
Eau
froid
Eau
froid
Eau
froid
1200 - -
800 - -
800 - -
Cycle
Rinçage - 1200 - - Essorage - 1200 - - - - 6
Vidange - 0 - - - - 6
La durée du cycle indiquée sur l’écran ou dans la notice représente une estimation calculée dans des conditions standard. Le temps effectif peut varier en fonction de nombreux facteurs tels que :
température et pression de l’eau en entrée, température ambiante, quantité de lessive, quantité et type de charge, équilibrage de la charge, options supplémentaires sélectionnées.
Pour tous les instituts qui effectuent ces tests :
1) Programme de contrôle selon la norme 2010/1061: sélectionner le programme 6 et une température de 60°C et 40°C.
2) Programme coton long: sélectionner le programme 6 et une température de 40°C.
3) Programme coton court: sélectionner le programme 3 et une température de 40°C.
4) Programme synthétique long: sélectionner le programme 4 et une température de 40°C.
La durée des programmes de lavage est contrôlable sur l’afficheur.
Programmes spéciaux
Mix 15’ (programme 5) spécialement conçu pour laver du linge peu sale en un rien de temps: il ne dure que 15 minutes et
permet ainsi de faire des économies d’énergie et de temps. La sélection de ce programme (5 à 30°C) permet de laver ensemble des textiles différents (sauf laine et soie) en ne dépassant pas 1,5 kg de charge.
Anti-bactérien (programme 6). Un programme hautes températures qui prévoit l’utilisation de produits javelisés à des
températures supérieures à 60°C. Pour blanchir, verser le produit javelisé, les lessives et les additifs dans les compartiments
correspondants (voir paragraphe “Tiroir à produits lessiviels”).
Bonne nuit (programme 7). C’est un cycle silencieux qui permet de faire fonctionner le lave-linge la nuit quand le tarif d’électricité est plus bas. Ce programme est spécialement conçu pour les synthétiques et le coton. A la fin du cycle l’appareil
s’arrête, cuve pleine. Pour procéder à l’essorage et à la vidange, appuyer sur la touche MARCHE/PAUSE, à défaut, l’appareil
procédera automatiquement au bout de 8 heures à l’essorage et à la vidange de l’eau.
Les cycles de lavage Eco
Les cycles Eco garantissent une économie d’énergie car ils permettent d’obtenir les meilleurs résultats de lavage sans besoin
de chauffer l’eau. L’action mécanique (utilisation de l’eau + phases de lavage) est optimisée afin de compenser l’action
thermique. L’avantage pour vous : alléger vos factures d’eau et d’électricité. Et un geste de plus pour l’environnement! Vous
pouvez utiliser ces nouveaux programmes Eco (Coton , synthétique et Lavage Rapide ) pour tous types de textile
et toute charge de linge, peu ou moyennement sale. Pour optimiser les résultats de lavage avec les programmes Eco, nous
vous recommandons d’utiliser de la lessive liquide.
18
Page 19

Personnalisations
Sélection de la température
Appuyer sur la touche TEMPÉRATURE pour sélectionner la température de lavage (voir Tableau des programmes).
La température peut être abaissée jusqu’au lavage à froid ( ).
La machine interdira automatiquement toute sélection d’une température supérieure à la température maximale prévue pour
chaque programme.
Sélection de l’essorage
Appuyer sur la touche ESSORAGE pour sélectionner la vitesse d’essorage du programme sélectionné.
Les vitesses maximales prévues pour les programmes sont:
Programmes Vitesse maximale
Coton 1200 tours/minute
Synthétiques 800 tours/minute
Laine 800 tours/minute
Soie vidange seule
La vitesse d’essorage peut être réduite ou l’essorage supprimé en sélectionnant le symbole .
La machine interdira automatiquement tout essorage à une vitesse supérieure à la vitesse maximale prévue pour chaque
programme.
Fonctions
Les différentes fonctions de lavage prévues par le lave-linge permettent d’obtenir la propreté et le blanc souhaités.
Pour activer les fonctions:
1. appuyer sur la touche correspondant à la fonction désirée;
2. l’allumage du voyant correspondant signale que la fonction est activée.
Remarque: Le clignotement rapide du voyant signale que la fonction correspondante n’est pas disponible pour le programme
sélectionné.
FR
Départ différé
Pour programmer un départ différé du programme sélectionné, appuyer plusieurs fois de suite sur la touche jusqu’à ce que
le retard désiré (de 1 à 24 h) soit affiché.
Pour désactiver cette fonction, appuyer sur la touche jusqu’à affichage du message .
N.B.: Après avoir appuyé sur la touche MARCHE/PAUSE, le retard programmé ne peut être modifié que pour le diminuer.
! Il est activé avec tous les programmes.
Intensif
Grâce à l’utilisation d’une plus grande quantité d’eau au cours de la phase initiale du cycle et à l’emploi de davantage de
temps, cette fonction permet d’obtenir un lavage très performant.
! Cette option n’est pas activable avec les programmes 5, 6, 9, 10, 11, 12, 13, , , .
Rinçage plus
La sélection de cette fonction permet d’augmenter l’efficacité du rinçage et d’éliminer toute trace de lessive. Elle est très utile
en cas de peaux particulièrement sensibles.
! Cette option n’est pas activable avec les programmes 5, 13, , .
Repassage facile
En cas de sélection de cette fonction, le lavage et l’essorage seront dûment modifiés pour réduire le froissage.
Pour le programme 9 l’appareil arrive au bout du cycle en laissant le linge tremper, le voyant de la fonction REPASSAGE
FACILE et celui de MARCHE/PAUSE se mettent à clignoter (orange), la phase RINCAGE reste allumée en fixe. Pour vidanger
l’eau et pouvoir sortir le linge, il faut appuyer sur la touche MARCHE/PAUSE ou sur la touche REPASSAGE FACILE.
! Cette option n’est pas activable avec les programmes 5, 6, 7, 10, 11, 12, 13, , .
19
Page 20

Produits lessiviels et linge
FR
Tiroir à produits lessiviels
Un bon résultat de lavage dépend aussi d’un bon dosage
de produit lessiviel: un excès de lessive ne lave pas mieux,
il incruste l’intérieur de votre lave-linge et pollue l’environnement.
Sortez le tiroir à produits
lessiviels et versez la lessive ou l’additif comme suit.
bac 1: Lessive prélavage (en poudre)
bac 2: Lessive lavage (en poudre ou liquide)
En cas d’utilisation de lessive liquide, il est conseillé d’introduire la boule doseuse directement dans la cuve.
bac 3: Additifs (adoucissant, etc.)
Combien pèse le linge ?
1 drap 400-500 g
1 taie d’oreiller 150-200 g
1 nappe 400-500 g
1 peignoir 900-1200 g
1 serviette éponge 150-250 g
Linge ou vêtements particuliers
Chemises: sélectionner le programme 8 approprié au lavage
de chemises de couleurs et textiles différents. Il en prend le
plus grand soin en réduisant le froissage.
Soie: sélectionner le programme de lavage spécial 9 pour
vêtements en soie. Il est conseillé d’utiliser une lessive spéciale pour linge délicat.
Rideaux: pliez-les bien et glissez-les dans une taie d’oreiller
ou dans un sac genre filet. Sélectionner le programme 9.
Laine: est le seul lave-linge à avoir obtenu le prestigieux label
Woolmark Platinum Care (M.0508) délivré par The Woolmark
Company qui garantit le lavage à la machine de tous les
vêtements en laine, y compris ceux qui portent l’étiquette
“lavage à la main uniquement” . Grâce au programme 10
on peut donc laver à la machine, en toute tranquillité, tous
les vêtements en laine (max. 1 kg) avec des performances
de lavage optimales.
L’assouplissant ne doit pas déborder de la grille (max). Le
lave-linge prélève automatiquement l’assouplissant lors du
dernier rinçage. A la fin du programme de lavage il reste dans
le bac 3 un résidu d’eau. Cette eau sert au prélèvement des
assouplissants très denses ou à dissoudre les assouplissants
concentrés. Si dans le bac 3 il reste un peu plus d’eau que
d’habitude, cela signifie que le dispositif de vidange est bouché et empêche l’effet aspirant du dispositif.
bac 4: Eau de javel
Cycle blanchissage
Le blanchissage n’est possible qu’avec les programmes 2,
3, 6.
Verser le produit javelisé dans le bac 4, la lessive et l’assouplissant dans les bacs correspondants, puis sélectionner
un des programmes sus-indiqués.
Conseillé en cas de linge en coton très sale.
Triage du linge
• Trier correctement le linge d’après:
- le type de textile / le symbole sur l’étiquette.
- les couleurs: séparer le linge coloré du blanc.
• Vider les poches et contrôler les boutons.
• Ne pas dépasser les valeurs indiquées correspondant au
poids de linge sec :
Textiles résistants: 6 kg max.
Textiles synthétiques: 2,5 kg max.
Textiles délicats: 2 kg max.
Laine: 1 kg max.
Système d’équilibrage de la charge
Avant tout essorage, pour éviter toute vibration excessive et
répartir le linge de façon uniforme, le lave-linge fait tourner
le tambour à une vitesse légèrement supérieure à la vitesse
de lavage. Si au bout de plusieurs tentatives, la charge n’est
toujours pas correctement équilibrée, l’appareil procède à un
essorage à une vitesse inférieure à la vitesse normalement
prévue. En cas de déséquilibre excessif, le lave-linge préfère
procéder à la répartition du linge plutôt qu’à son essorage.
Pour une meilleure répartition de la charge et un bon équilibrage, nous conseillons de mélanger de grandes et petites
pièces de linge.
20
Page 21

Précautions et conseils
! Ce lave-linge a été conçu et fabriqué conformément aux
normes internationales de sécurité. Ces consignes sont
fournies pour des raisons de sécurité, il faut les lire attentivement.
Sécurité générale
• Cet appareil est conçu pour un usage domestique.
• Cet appareil n’est pas destiné à être utilisé par des personnes (enfants compris) dont les capacités physiques,
sensorielles ou mentales sont réduites ou qui ne disposent pas des connaissances ou de l’expérience nécessaires, à moins qu’elles n’aient été formées et encadrées pour l’utilisation de cet appareil par une personne
responsable de leur sécurité. Surveiller les enfants pour
s’assurer qu’ils ne jouent pas avec l’appareil.
• Ne jamais toucher l’appareil si l’on est pieds nus et si les
mains sont mouillées ou humides.
• Ne jamais tirer sur le câble pour débrancher la fiche de la
prise de courant.
• Ne pas toucher à l’eau de vidange, elle peut atteindre
des températures très élevées.
• Ne pas forcer pour ouvrir le couvercle: le verrouillage de
sécurité qui protège contre les ouvertures accidentelles
pourrait s’endommager.
• En cas de panne, éviter à tout prix d’accéder aux mécanismes internes pour tenter une réparation.
• Veiller à ce que les enfants ne s’approchent pas de l’appareil pendant son fonctionnement.
• Deux ou trois personnes sont nécessaires pour déplacer
l’appareil avec toutes les précautions nécessaires. Ne
jamais le déplacer tout seul car il est très lourd.
• Avant d’introduire le linge, s’assurer que le tambour est
bien vide.
Economies et respect de l’environnement
Economie de produit lessiviel, d’eau, d’électricité
et de temps
• Pour ne pas gaspiller de ressources, utilisez le lave-linge
à sa charge maximale. Mieux vaut une pleine charge
que deux demies, vous économiserez jusqu’à 50%
d’électricité.
• Un prélavage n’est nécessaire qu’en cas de linge très
sale. S’en passer permet de faire des économies de
produit lessiviel, de temps, d’eau et entre 5 et 15%
d’électricité.
• Si vous traitez les taches avec un produit détachant
ou si vous les laissez tremper avant de les laver, vous
éviterez d’avoir à laver à de hautes températures. Un
programme à 60°C au lieu de 90°C ou un à 40°C au
lieu de 60°C, fait économiser jusqu’à 50% d’électricité.
• Bien doser la quantité de produit lessiviel en fonction
de la dureté de l’eau, du degré de salissure et de la
quantité de linge à laver évite les gaspillages et protège
l’environnement: bien que biodégradables, les produits
lessiviels contiennent des éléments qui altèrent l’équilibre de la nature. Evitez le plus possible l’utilisation
d’assouplissant.
• Effectuer ses lavages tard dans l’après-midi et jusqu’aux premières heures du matin permet de réduire la
charge d’absorption des opérateurs énergétiques.
FR
Mise au rebut
• Mise au rebut du matériel d’emballage: se conformer aux
réglementations locales de manière à ce que les emballages puissent être recyclés.
• La Directive Européenne 2002/96/EC sur les Déchets
des Equipements Electriques et Electroniques, exige que
les appareils ménagers usagés ne soient pas jetés dans
le flux normal des déchets municipaux. Les appareils
usagés doivent être collectés séparément afin d’optimiser le taux de récupération et le recyclage des matériaux qui les composent et réduire l’impact sur la santé
humaine et l’environnement. Le symbole de la ‘’poubelle
barrée’’ est apposée sur tous les produits pour rappeler
les obligations de collecte séparée. Les consommateurs
devront contacter les autorités locales ou leur revendeur
concernant la démarche à suivre pour l’enlèvement de
leur vieil appareil.
21
Page 22

Entretien et soin
FR
Coupure de l’arrivée d’eau et de courant
• Fermez le robinet de l’eau après chaque
lavage: vous limiterez ainsi l’usure de l’installation
hydraulique de votre lave-linge et éliminerez le danger
de fuites.
• Débranchez la fiche de la prise de courant quand vous
nettoyez votre lave-linge et pendant tous vos travaux
d’entretien.
Nettoyage du lave-linge
Pour nettoyer l’extérieur et les parties en caoutchouc,
utilisez un chiffon imbibé d’eau tiède et de savon. N’utilisez
ni solvants ni abrasifs.
Entretien du couvercle
et du tambour
• Quand vous n’utilisez pas votre lave-linge, laissez tou-
jours le couvercle entrouvert pour éviter la formation de
mauvaises odeurs.
Nettoyage de la pompe
Pour récupérer les objets qui pourraient être tombés dans
la préchambre :
1. déposez la ba se à
l’avant de votre lave-linge
en la saisissant sur les
côtés et en la tirant des
deux mains (voir figure);
2. dévissez le cou vercle
en le faisant tourner dans
le sens inverse des aiguilles
d’une montre (voir figure):
il est normal qu’un peu
d’eau s’écoule;
3. nettoyez soigneusement à l’intérieur;
4. revissez le couvercle;
5. remontez le panneau
en veillant à bien enfiler les
crochets dans les fentes
prévues avant de le pousser contre la machine.
Le lave-linge est équipé d’une pompe autonettoyante
qui n’exige aucune opération d’entretien. Il peut toutefois
arriver que de menus objets (pièces de monnaie, boutons)
tombent dans la préchambre qui protège la pompe, placée
en bas de cette dernière.
! Contrôlez que le cycle de lavage est bien terminé et
débranchez la fiche.
Comment nettoyer le tiroir à produits lessiviels
Démontage:
Appuyez légèrement sur la
grosse touche située sur la
partie antérieure du tiroir à
produits lessiviels et tirez vers
le haut (fig. 1, 2).
Nettoyage:
Nettoyez le tiroir sous le robinet (fig. 3) à l’aide par exemple d’une
vieille brosse à dents; tirez sur les deux petits siphons placés
dans la partie supérieure des bacs 1 et 2 (fig. 4), contrôlez qu’ils
ne soient pas bouchés et rincez-les.
Contrôle du tuyau d’arrivée de l’eau
Contrôlez le tuyau d’alimentation au moins une fois par an.
Remplacez-le dès que vous remarquez des craquèlements
et des fissures: les fortes pressions subies pendant le lavage
pourraient provoquer des cassures.
! N’utilisez jamais de tuyaux usés.
Remontage:
N’oubliez pas de replacez
les deux petits siphons dans
leurs emplacements spéciaux et remettez enfin le tiroir
dans son siège en le fixant
(fig. 4, 2, 1).
Fig. 1
22
Fig. 2 Fig. 3 Fig. 4
Page 23

Anomalies et remèdes
Il peut arriver que le lave-linge ne fonctionne pas bien. Avant d’appeler le Service de dépannage (voir “Assistance”), contrôler
s’il ne s’agit pas par hasard d’un problème facile à résoudre à l’aide de la liste suivante.
Anomalies:
Le lave-linge ne s’allume pas.
Le cycle de lavage ne démarre pas.
Il n’y a pas d’arrivée d’eau (le
voyant de la première phase de
lavage clignote rapidement).
Le lave-linge prend l’eau et vidange
continuellement.
Causes / Solutions possibles:
• La fiche n’est pas branchée dans la prise de courant ou mal branchée.
• Il y a une panne de courant.
• Le couvercle n’est pas bien fermé (le voyant Couvercle Verrouillé clignote).
• La touche MARCHE/ARRÊT n’a pas été enfoncée.
• La touche MARCHE/PAUSE n’a pas été enfoncée.
• Le robinet de l’eau n’est pas ouvert.
• Un départ différé a été sélectionné (voir “Personnalisations”).
• Le tuyau d’arrivée de l’eau n’est pas raccordé au robinet.
• Le tuyau est plié.
• Le robinet de l’eau n’est pas ouvert.
• Il y a une coupure d’eau.
• La pression n’est pas suffisante.
• La touche MARCHE/PAUSE n’a pas été enfoncée.
• Le tuyau de vidange n’est pas installé à une distance du sol comprise entre 65
et 100 cm (voir “Installation”).
• L’extrémité du tuyau de vidange est plongée dans l’eau (voir “Installation”).
• L’évacuation murale n’a pas d’évent.
Si après ces vérifications, le problème persiste, fermer le robinet de l’eau,
éteindre la machine et appeler le service Assistance. Si l’appartement est situé
en étage dans un immeuble, il peut y avoir des phénomènes de siphonnage qui
font que le lave-linge prend et évacue l’eau continuellement. Pour supprimer
cet inconvénient, on trouve dans le commerce des soupapes spéciales antisiphonnage.
FR
Le lave-linge ne vidange pas et
n’essore pas.
Le lave-linge vibre beaucoup pendant l’essorage.
Le lave-linge a des fuites.
Le voyant MARCHE/PAUSE (orange)
ainsi que les voyants des fonctions
clignotent rapidement.
Il y a un excès de mousse.
• Le programme ne prévoit pas de vidange: pour certains programmes, il faut la
faire partir manuellement.
• La fonction REPASSAGE FACILE est activée: pour compléter le programme, appuyer sur la touche MARCHE/PAUSE (“Personnalisations”).
• Le tuyau de vidange est plié (voir “Installation ”).
• La conduite d’évacuation est bouchée.
• Le tambour n’a pas été débloqué comme il faut lors de l’installation du lavelinge (voir “Installation”).
• Le lave-linge n’est pas posé à plat (voir “Installation”).
• Le lave-linge est coincé entre des meubles et le mur (voir “Installation”).
• Le tuyau d’arrivée de l’eau n’est pas bien vissé (voir “Installation”).
• Le tiroir à produits lessiviels est bouché (pour le nettoyer voir “Entretien et soin”).
• Le tuyau de vidange n’est pas bien fixé (voir “Installation”).
• Eteindre l’appareil et débrancher la fiche de la prise de courant, attendre 1
minute environ avant de rallumer.
Si l’anomalie persiste, appeler le service d’assistance.
• Le produit de lavage utilisé n’est pas une lessive spéciale machine (il faut qu’il y ait
l’inscription “pour lave-linge”, “main et machine”, ou autre semblable).
• La quantité utilisée est excessive.
23
Page 24

Assistance
FR
Avant d’appeler le service après-vente:
• Vérifier si on ne peut pas résoudre l’anomalie par ses propres moyens (voir “Anomalies et Remèdes”);
• Remettre le programme en marche pour contrôler si l’inconvénient a disparu;
• Autrement, contacter le Centre d’Assistance technique agréé au numéro de téléphone indiqué sur le certificat de garantie.
! Ne jamais s’adresser à des techniciens non agréés.
Communiquer:
• le type de panne;
• le modèle de l’appareil (Mod.);
• son numéro de série (S/N).
Vous trouverez tous ces renseignements sur la plaquette signalétique située sur le panneau arrière de votre lave-linge.
Consultation à tout moment
Pour toute demande concernant nos produits, n’hésitez pas à contacter notre Service Consommateurs 0.825.05.44.44.
24
Page 25

Manual de instrucciones
LAVADORA
ES
Español
ECOT6F 1291
Sumario
Instalación, 26-27
Desembalaje y nivelación
Conexiones hidráulicas y eléctricas
Primer ciclo de lavado
Datos técnicos
Descripción de la lavadora y comienzo
de un programa, 28-29
Panel de control
Pilotos
Cómo abrir y cerrar el cesto
Poner en marcha un programa
Programas, 30
Tabla de programas
Personalizaciones, 31
Seleccionar la temperatura
Seleccionar el centrifugado
Funciones
Detergentes y ropa, 32
Contenedor de detergentes
Ciclo de blanqueo
Preparar la ropa
Prendas especiales
Sistema de equilibrado de la carga
ES
Precauciones y consejos, 33
Seguridad general
Eliminaciones
Ahorrar y respetar el ambiente
Mantenimiento y cuidados, 34
Interrumpir el agua y la corriente eléctrica
Limpiar la lavadora
Cuidar la puerta y el cesto
Limpiar la bomba
Controlar el tubo de alimentación de agua
Cómo limpiar la cubeta de detergente
Anomalías y soluciones, 35
Asistencia, 36
25
Page 26

Instalación
ES
! Es importante conservar este manual para poder consul-
tarlo en cualquier momento. En caso de venta, de cesión o
de traslado, verifique que permanezca junto con la lavadora para informar al nuevo propietario sobre el funcionamiento y brindar las correspondientes advertencias.
! Lea atentamente las instrucciones: ellas contienen
importante información sobre la instalación, el uso y la
seguridad.
Desembalaje y nivelación
Desembalaje
1. Desembale la lavadora.
2. Controle que la lavadora
no haya sufrido daños durante el transporte. Si estuviera dañada no la conecte
y llame al revendedor.
3. Quite los cuatro tornillos
de protección para el transporte y la arandela de goma
con el correspondiente distanciador, ubicados en la
parte posterior (ver la figura).
4. Cierre los orificios con los
tapones de plástico suministrados con el aparato.
5. Conserve todas las piezas:
cuando la lavadora deba ser transportada nuevamente, deberán
volver a colocarse.
Atención: si vuelve a utilizar los tornillos más cortos, se deben
colocar arriba.
! Los embalajes no son juguetes para los niños.
Nivelación
1. Instale la lavadora sobre un
piso plano y rígido, sin apoyarla
en las paredes, muebles ni en
ningún otro aparato.
Instalación, desplazamientos
Si su lavadora està dotada
de un carro especial con
ruedas retráctiles, se
facilitarà su desplazamiento. Para hacer descender
este carro y poder moverla
sin esfuerzo, es necesario
tirar la palanca, situada abajo a la izquierda,
debajo del zócalo. Finalizado el desplazamiento es
necesario devolverla a su
posición inicial. A partir de
ese momento, la máquina está sólidamente colocada.
Conexiones hidráulicas y eléctricas
Conexión del tubo de alimentación de agua
1. Conectar el tubo de tubo
enroscándolo a un grifo de
agua fría con la boca roscada
de 3/4 gas (ver la figura).
Antes de conectarlo, haga
correr el agua hasta que esté
límpida.
2. Conecte el tubo de alimentación a la lavadora enroscándolo en la toma de agua
correspondiente ubicada en
la parte posterior arriba y a
la derecha (véase la figura).
3. Verifique que el tubo no
tenga pliegues ni estrangulaciones.
2. Si el piso no está perfectamente horizontal, compense
las irregularidades desenroscando o enroscando los pies
delanteros (véase la figura); el
ángulo de inclinación medido
sobre la superficie de trabajo, no debe superar los 2º.
Una cuidadosa nivelación brinda estabilidad a la máquina y evita vibraciones, ruidos y desplazamientos durante el funcionamiento.
Cuando se instala sobre moquetas o alfombras, regule los
pies para conservar debajo de la lavadora un espacio suficiente para la ventilación.
26
! La presión de agua del grifo debe estar comprendida
dentro de los valores contenidos en la tabla de Datos
técnicos (ver la página del costado).
! Si la longitud del tubo de alimentación no fuera suficiente,
diríjase a una tienda especializada o a un técnico autorizado.
! No utilice nunca tubos ya usados.
Page 27

65 - 100 cm
Conexión del tubo de descarga
Conecte el tubo de de-
scarga, sin plegarlo, a una
tubería de descarga o a una
descarga de pared colo-
cadas a una altura del piso
entre 65 y 100 cm;
! No utilice prolongaciones ni conexiones múltiples.
! El cable no debe estar plegado ni sufrir compresiones.
! El cable de alimentación debe ser sustituido sólo por
técnicos autorizados.
¡Atención! La empresa fabricante declina toda responsabilidad en caso de que estas normas no sean respetadas.
Primer ciclo de lavado
ES
o apóyelo en el borde
de un lavamanos o de
una bañera, uniendo la
guía suministrada con el
aparato, al grifo (ver la
figura). El extremo libre del
tubo de descarga no debe
permanecer sumergido en
el agua.
! No se aconseja utilizar tubos de prolongación, si fuera in-
dispensable hacerlo, la prolongación debe tener el mismo
diámetro del tubo original y no superar los 150 cm.
Conexión eléctrica
Antes de enchufar el aparato, verifique que:
• la toma tenga la conexión a tierra y haya sido hecha
según las normas legales;
• la toma sea capaz de soportar la carga máxima de
potencia de la máquina indicada en la tabla de Datos
técnicos (ver al costado);
• la tensión de alimentación esté comprendida dentro de
los valores indicados en la tabla de Datos técnicos (ver
al costado);
• la toma sea compatible con el enchufe de la lavadora. Si
no es así, sustituya la toma o el enchufe.
! La lavadora no debe ser instalada al aire libre, ni siquiera
si el lugar está reparado, ya que es muy peligroso dejarla
expuesta a la lluvia o a las tormentas.
! Una vez instalada la lavadora, la toma de corriente debe
ser fácilmente accesible.
Después de la instalación y antes del uso, realice un ciclo
de lavado con detergente y sin ropa, seleccionando el
programa 2.
Datos técnicos
Modelo
Dimensiones
Capacidad
Conexiones
eléctricas
Conexiones
hídricas
Velocidad de
centrifugado
Programas de
control según la
norma 2010/1061
ECOT6F 1291
ancho 40 cm.
altura 85 cm.
profundidad 60 cm.
de 1 a 6 kg.
ver la placa de características técnicas
aplicada en la máquina
presión máxima 1 MPa (10 bar)
presión mínima 0,05 MPa (0,5 bar)
capacidad del cesto 42 litros
máxima 1200 r.p.m.
programa 6; temperatura 60ºC y 40°.
Esta máquina cumple con lo establecido
por las siguientes Directivas de la Comunidad:
- 2004/108/CE (Compatibilidad Electromagnética)
- 2002/96/CE
- 2006/95/CE (Baja Tensión)
27
Page 28

Descripción de la lavadora y
comienzo de un programa
ES
Panel de control
Botón y piloto de
ENCENDIDO/
APAGADO
PROGRAMAS
Botón y piloto de ENCENDIDO/APAGADO: para encen-
der y apagar la máquina. El piloto iluminado indica que la
máquina está encendida.
Mando de PROGRAMAS: para elegir los programas.
Durante el funcionamiento del programa el mando no se
mueve.
TEMPERATURA
Mando de
BLOQUEO DE BOTONES
Botón
CENTRIFUGADO
Botón y piloto de
Pilotos DE AVANCE DEL
CICLO
PANTALLA
Botón
Botones con pilotos
FUNCIÓN
Modalidad de stand by
Esta lavasecadora está en conformidad con las nuevas
normativas vinculadas al ahorro energético. Está dotada
de un sistema de auto-apagado (stand by) que, en caso
de no funcionamiento, se activa pasados aproximadamente 30 minutos. Presionar brevemente el botón ENCENDIDO/APAGADO y esperar que la máquina se active.
Botón con piloto
PUESTA EN
MARCHA/PAUSA
Piloto PUERTA
BLOQUEADA
Botón CENTRIFUGADO: para seleccionar el centrifugado o excluirlo (ver “Personalizaciones”).
Botón TEMPERATURA: para seleccionar la temperatura
o el lavado en frío (ver “Personalizaciones”).
PANTALLA: para visualizar el tiempo residual del ciclo de
lavado seleccionado y, si se ha fijado un comienzo retrasado, el tiempo que falta para que comience el lavado.
Botón y piloto de BLOQUEO DE BOTONES: para activar
o desactivar el bloqueo del panel de mandos.
Botones con pilotos de FUNCIÓN: para seleccionar las
funciones disponibles. El piloto correspondiente a la función seleccionada permanecerá encendido.
Pilotos DE AVANCE DEL CICLO: para seguir el estado
de avance del programa de lavado.
El piloto encendido indica la fase en curso.
Piloto PUERTA BLOQUEADA: para saber si la puerta se
puede abrir (ver la página correspondiente).
Botón con piloto PUESTA EN MARCHA/PAUSA: se uti-
liza para poner en marcha los programas o interrumpirlos
momentáneamente.
Nota: Presione este botón para poner en pausa el lavado
en curso, el piloto correspondiente centelleará con color
anaranjado mientras que el de la fase en curso permanecerá encendido en forma fija. Si el piloto PUERTA BLOQUEADA está apagado, se podrá abrir la puerta. Para
que el lavado se reanude a partir del momento en el cual
fue interrumpido, presione nuevamente este botón.
Pilotos
Los pilotos suministran información importante.
He aquí lo que nos dicen:
Pilotos fase en curso
Girando el mando PROGRAMAS, los pilotos se iluminarán
indicando las fases que la máquina realizará según el
programa elegido.
Una vez seleccionado y puesto en marcha el ciclo de
lavado deseado, las luces testigo se encenderán progresivamente para indicar su estado de avance:
Lavado
Aclarado
Centrifugado
Descarga
Fin del Lavado
Botones de función y pilotos correspondientes
Seleccionando una función, el piloto correspondiente se
iluminará.
Si la función seleccionada no es compatible con el programa elegido, el piloto correspondiente centelleará, se
emitirá una señal sonora y la función no se activará.
Cuando se seleccione una función incompatible con otra
seleccionada precedentemente, permanecerá activa sólo
la última elección realizada.
28
Page 29

Pilotos de temperatura
Seleccionando un valor de temperatura, el
piloto correspondiente se iluminará.
Pilotos de centrifugado
Seleccionando un valor de centrifugado, el
piloto correspondiente se iluminará.
Piloto de bloqueo de botones
Para “activar” el bloqueo del panel de control,
mantenga presionado el botón durante 2 segundos
aproximadamente. El piloto encendido indica que el panel
de control está bloqueado. De este modo, se evitan
modificaciones accidentales de los programas, sobre todo
si en la casa hay niños.
Para “desactivar” el bloqueo del panel de control,
mantenga presionado el botón durante 2 segundos
aproximadamente.
Piloto puerta bloqueada
El piloto encendido indica que la puerta está bloqueada
para impedir aperturas accidentales; antes de abrir la
puerta es necesario esperar que dicho piloto se apague,
de este modo se evitarán daños
(la espera es de aproximadamente 3 minutos).
Nota: si la función “Comienzo retrasado” está activada,
la puerta no se puede abrir, para abrirla se debe poner
en pausa la máquina presionando el botón PUESTA EN
MARCHA/PAUSA.
! El centelleo rápido del piloto PUESTA EN MARCHA/PAU-
SA (anaranjado) simultáneamente con el de las funciones
indica una anomalía (ver “Anomalías y soluciones”).
Cómo abrir y cerrar el cesto
Fig. 1
Fig. 2
A) Abertura (Fig. 1):
Levante la tapa externa y ábrala completamente.
B) Abertura del cesto (Soft opening):
Pulse el botón indicado en la fig. 2 con un dedo y el
cesto se abrirá delicadamente.
C) IntroduccIón de la ropa (Fig. 3).
D) Cierre (Fig. 4):
- cierre bien el cesto bajando primero la puerta
delantera y apoyando luego la posterior;
- luego verifique que los ganchos de la puerta
delantera estén perfectamente alojados en la sede de
la puerta posterior;
- después de haber escuchado el “clac” correspon
diente al enganche, ejerza una leve presión hacia abajo
sobre ambas puertas que no se deben desenganchar;
- por último cierre la tapa externa.
Poner en marcha un programa
1. Encienda la lavadora pulsando el botón ENCENDIDO/
APAGADO. Todos los pilotos se encenderán durante algunos
segundos, luego permanecerán encendidos sólo los pilotos
correspondientes a las configuraciones para el programa seleccionado y centelleará el piloto PUESTA EN MARCHA/PAUSA.
2. Cargue la ropa y cierre las puertas y la tapa.
3. Seleccione el programa deseado con el mando de
PROGRAMAS.
4. Fije la temperatura de lavado (ver “Personalizaciones”).
5. Fije la velocidad de centrifugado (ver “Personalizaciones”).
6. Vierta detergente y aditivos (ver “Detergentes y ropa”).
7. Seleccione las funciones deseadas.
8. Ponga en marcha el programa presionando el botón
PUESTA EN MARCHA/PAUSA y el piloto correspondiente
permanecerá encendido, fijo y de color verde.
Para anular el ciclo seleccionado ponga en pausa la
máquina presionando el botón PUESTA EN MARCHA/
PAUSA y elija un nuevo ciclo.
9. Al final del programa se iluminará el piloto . El piloto
PUERTA BLOQUEADA se apagará indicando que la puerta
se puede abrir. Extraiga la ropa y deje la puerta semicerrada para permitir que el cesto se seque.Apague la lavadora
presionando el botón ENCENDIDO/APAGADO.
ES
Fig. 3
Fig. 4
29
Page 30

ES
Programas
Tabla de programas
Descripción del Programa
Programas
Diario (programas para todos los días)
1
Prelavado Algodón 90°C: blancos sumamente sucios. 90° 1200
2
Algodón: blancos y colores resistentes muy sucios. 60° 1200 -
3
Algodón de color (3): blancos poco sucios y colores delicados. 40° 1200 -
4
Sintético: colores resistentes muy sucios. 60° 800 - -
4
Sintético (4): colores resistentes muy sucios. 40° 800 - -
4
Sintético: colores resistentes poco sucios. 40° 800 - -
Mix 15': para refrescar rápidamente prendas poco sucias (no se acon-
5
seja utilizarlo para lana, seda y prendas para lavar a mano).
Programas Especiales
6
Ciclo Desinfectante: ropa blanca muy sucia. 90° 1200 -
6
Ciclo Desinfectante (1-2): blancos y colores resistentes muy sucios. 60° 1200 - -
6
Ciclo Desinfectante (2): blancos y colores resistentes muy sucios. 40° 1200 - -
7
Ciclo Buenas Noches: colores delicados poco sucios. 40° 800 - -
Camisas
8
9
Seda/Cortinas: para prendas de seda, viscosa, lencería. 30° 0 - -
10
Lana: para lana, cachemira, etc. 40° 800 - -
Programas Eco
11
Algodón
12
Sintéticos
13
Rápido 30'
Programas Parciales
Aclarado Algodón - 1200 - - Centrifugado Rápido - 1200 - - - - 6
Descarga - 0 - - - - 6
La duración del ciclo que se indica en el visor o en el manual es una estimación calculada en base a condiciones estándar. El tiempo efectivo puede variar en función de
numerosos factores como la temperatura y la presión del agua de entrada, la temperatura ambiente, la cantidad de detergente, la cantidad y el tipo de carga, el equilibrado
de la carga y las opciones adicionales seleccionadas.
Para todos los Test Institutes:
1) Programa de control según la norma 2010/1061: seleccione el programa 6 con una temperatura de 60ºC y 40°C.
2) Programa algodón largo: seleccione el programa 6 con una temperatura de 40ºC.
3) Programa algodón corto: seleccione el programa 3 con una temperatura de 40ºC.
4) Programa sintético largo: seleccione el programa 4 con una temperatura de 40ºC.
Temp.
max.
agua
agua
agua
Velo-
cidad
máx.
(°C)
(r.p.m.)
30 800 - -
40° 600 - -
fría
fría
fría
Prela-
vado
1200 - -
800 - -
800 - -
Programas particulares
Mix 15’ (programa 5) fue estudiado para lavar prendas ligeramente sucias y en poco tiempo: dura sólo 15 minutos y
de esa manera permite ahorrar energía y tiempo. Seleccionando el programa (5 a 30ºC) es posible lavar conjuntamente
tejidos de distinto tipo (excluidas lana y seda), con una carga máxima de 1,5 kg.
Ciclo Desinfectante (programa 6). Un programa higienizante con elevadas temperaturas, prevé el uso del blanqueador
con temperaturas mayores que 60ºC.
mentos correspondientes (ver el párrafo “Contenedor de detergentes”).
Para blanquear vierta el blanqueador, los detergentes y los aditivos en los comparti-
Ciclo Buenas noches (programa 7). Es un ciclo silencioso que puede trabajar de noche cuando la tarifa energética es
menor. El programa ha sido estudiado para prendas sintéticas y de algodón. Al final del ciclo, la máquina se detiene con
el agua en la cuba; para realizar el centrifugado y la descarga presione el botón PUESTA EN MARCHA/PAUSA, de lo
contrario, después de 8 horas, la máquina los realizará automáticamente.
Detergentes
Blan-
queador
Lavado
-
Suavi-
zante
Carga
máx.
(Kg.)
6
6
6
2,5
2,5
2,5
1,5
6
6
6
4
2
1
1
6
3
3
6
Duración
del ciclo
Se puede controlar la duración de los programas de lavado en la pantalla.
Programas Eco
Los programas Eco ofrecen buenos rendimientos en los lavados a bajas temperaturas permitiendo un menor uso de
energía eléctrica con un beneficio para el medio ambiente y un ahorro económico.
Los programas Eco (Algodón , Sintéticos y Rápido 30’ ) han sido creados para distintos tipos de tejido y para
prendas poco sucias. Para garantizar un resultado óptimo, recomendamos el uso de un detergente líquido. Se aconseja
además tratar previamente los puños, cuellos y manchas.
30
Page 31

Personalizaciones
Seleccionar la temperatura
Presionando el botón TEMPERATURA se selecciona la temperatura de lavado (ver la Tabla de programas).
La temperatura se puede disminuir hasta el lavado en frío ( ).
La máquina impedirá automáticamente seleccionar una temperatura mayor que la máxima prevista para cada programa.
Seleccionar el centrifugado
Presionando el botón CENTRIFUGADO se selecciona la velocidad de centrifugado del programa seleccionado.
Las velocidades máximas previstas para los programas son:
Programas Velocidad máxima
Algodón 1200 r.p.m.
Sintéticos 800 r.p.m.
Lana 800 r.p.m.
Seda sólo descarga
Se puede disminuir la velocidad de centrifugado o excluirlo seleccionando el símbolo .
La máquina impedirá automáticamente efectuar un centrifugado a una velocidad mayor que la máxima prevista para cada
programa.
Funciones
Las distintas funciones de lavado previstas por la lavadora permiten obtener la limpieza y el blanco deseados.
Para activar las funciones:
1. presione el botón correspondiente a la función deseada;
2. el encendido del piloto correspondiente indica que la función está activa.
Nota: El centelleo rápido del piloto indica que la función correspondiente no se puede seleccionar para el programa elegido.
ES
Comienzo retrasado
Para seleccionar el comienzo retrasado del programa elegido, presione varias veces el botón hasta visualizar el retraso
deseado (de 1 a 24 hs.)
Para desactivar la función, presione el botón hasta visualizar el mensaje .
Nota: Una vez presionado el botón PUESTA EN MARCHA/PAUSA, se puede modificar el valor del retraso sólo
disminuyéndolo.
! Se puede utilizar en todos los programas.
Super wash
Gracias al uso de una mayor cantidad de agua en la fase inicial del ciclo y al empleo de mayor tiempo, dicha función garantiza un lavado con óptimos resultados.
! No se puede activar con los programas 5, 6, 9, 10, 11, 12, 13, , , .
Aclarado extra
Al elegir esta función aumentará la eficacia del aclarado y se asegurará la máxima eliminación del detergente. Es útil para
pieles particularmente sensibles.
! No se puede activar con los programas 5, 13, , .
Plancha fácil
Cuando se selecciona esta función, el lavado y el centrifugado se modificarán oportunamente para disminuir la formación de
arrugas.
En el programa 9 la máquina terminará el ciclo dejando la ropa en remojo y el piloto de la función PLANCHA FÁCIL y el de
PUESTA EN MARCHA/PAUSA centellearán (anaranjado) y el de la fase ACLARADO permanecerá encendido en forma fija.
Para descargar el agua y poder sacar la ropa, es necesario presionar el botón PUESTA EN MARCHA/PAUSA o el botón
PLANCHA FÁCIL.
! No se puede activar con los programas 5, 6, 7, 10, 11, 12, 13, , .
31
Page 32

Detergentes y ropa
ES
Cajón de detergentes
El buen resultado del lavado depende también de la correcta dosificación del detergente: si se excede la cantidad,
no se lava de manera más eficaz, sino que se contribuye a
encostrar las partes internas de la lavadora y a contaminar
el ambiente.
Extraiga el cajón de detergentes e introduzca el
detergente o el aditivo de
la siguiente manera:
cubeta 1: Detergente para prelavado (en polvo)
cubeta 2: Detergente para lavado
(en polvo o líquido)
El detergente líquido es conveniente colocarlo directamente en la cuba utilizando la correspondiente bola de dosificación.
cubeta 3: Aditivos (suavizante, etc.)
Cuando vierta el suavizante en el compartimiento 3, tenga
cuidado de no superar el nivel “max” indicado.
El suavizante se introduce automáticamente
en la máquina durante el último aclarado. Al finalizar el programa de lavado, en el compartimiento 3 permanece una
cantidad residual de agua. La función de la misma es la
introducción de suavizantes muy densos o diluir a aquellos
concentrados. Si en el compartimiento 3 permaneciera
más agua de la normal, esto significa que el dispositivo de
vaciado está obstruido. Para la limpieza, véase “Manteni-
miento y cuidados”.
cubeta 4: Blanqueador
Ciclo de blanqueo
El blanqueo se puede realizar sólo con los programas 2,
3, 6.
Vierta el blanqueador en la cubeta 4, el detergente y el
suavizante en las correspondientes cubetas y luego seleccione uno de los programas indicados.
Es adecuado sólo para prendas de algodón muy sucias.
Preparar la ropa
• Subdivida la ropa según:
- el tipo de tejido / el símbolo en la etiqueta.
- los colores: separe las prendas de color y las blancas.
• Vacíe los bolsillos y controle los botones.
• No supere los valores indicados, referidos al peso de la
ropa seca:
Tejidos resistentes: max 6 kg.
Tejidos sintéticos: max 2,5 kg.
Tejidos delicados: max 2 kg.
Lana: max 1 kg.
¿Cuánto pesa la ropa?
1 sábana 400/500 g
1 funda 150/200 g
1 mantel 400/500 g
1 albornoz 900/1200 g
1 toalla 150/250 g
Prendas especiales
Camisas: para lavar camisas de distintos tipos de telas y
color, utilice el programa 8. Garantiza su máximo cuidado
minimizando la formación de arrugas.
Seda: utilice el programa correspondiente 9 para lavar
todas las prendas de seda. Se aconseja el uso de un
detergente específico para prendas delicadas.
Cortinas: pliéguelas y colóquelas dentro de una funda o
de una bolsa de red. Utilice el programa 9.
Lana: es la única lavadora que ha obtenido el prestigioso reconocimiento Woolmark Platinum Care (M.0508)
otorgado por The Woolmark Company que certifica el
lavado en lavadora de todas las prendas de lana, incluidas
aquellas que contienen la etiqueta “sólo lavado a mano”
. En consecuencia, con el programa 10 se puede utilizar la lavadora con total tranquilidad para lavar todas sus
prendas de lana (máx. 1 kg) garantizando la obtención de
los mejores resultados.
Sistema de equilibrado de la carga
Antes de cada centrifugado, para evitar vibraciones excesivas y para distribuir la carga de modo uniforme, el cesto
realiza rotaciones a una velocidad ligeramente superior a la
del lavado. Si después de varios intentos, la carga todavía
no está correctamente equilibrada, la máquina realiza el
centrifugado a una velocidad inferior a la prevista. Cuando
existe un excesivo desequilibrio, la lavadora realiza la
distribución antes que el centrifugado. Para obtener una
mejor distribución de la carga y su correcto equilibrado, se
aconseja mezclar prendas grandes y pequeñas.
32
Page 33

Precauciones y consejos
! La lavadora fue proyectada y fabricada en conformidad
con las normas internacionales de seguridad. Estas advertencias se suministran por razones de seguridad y deben
ser leídas atentamente.
Seguridad general
• Este aparato ha sido fabricado para un uso de tipo doméstico exclusivamente.
• El aparato no debe ser empleado por personas (niños
incluidos) con capacidades físicas, sensoriales o mentales reducidas y con experiencias y conocimientos insuficientes, a menos que dicho uso no se realice bajo la
supervisión o las instrucciones de una persona responsable de su seguridad. Los niños deben ser vigilados
para asegurarse que no jueguen con el aparato.
• No toque la máquina con los pies desnudos ni con las
manos o los pies mojados o húmedos.
• No desenchufe la máquina tirando el cable, sino tomando el enchufe.
• No toque el agua de descarga porque puede alcanzar
temperaturas elevadas.
• En ningún caso fuerce la puerta: podría dañarse el
mecanismo de seguridad que la protege de aperturas
accidentales.
• En caso de avería, no acceda nunca a los mecanismos
internos para intentar una reparación.
• Controle siempre que los niños no se acerquen a la
máquina cuando está en funcionamiento.
• Si debe ser trasladada, deberán intervenir dos o más
personas, procediendo con el máximo cuidado. La
máquina no debe ser desplazada nunca por una sola
persona ya que es muy pesada.
• Antes de introducir la ropa controle que el cesto esté
vacío.
Ahorrar y respetar el medio ambiente
Tecnología a servicio del medio ambiente:
ahorrar detergente, agua, energía y tiempo
• Para no derrochar recursos es necesario utilizar la
lavadora con la máxima carga. Una carga completa en
lugar de dos medias cargas permite ahorrar hasta el
50% de energía.
• El prelavado es necesario sólo para ropa muy sucia.
Evitarlo permite ahorrar detergente, tiempo, agua y
entre el 5 y el 15% de energía.
• Tratar las manchas con un quitamanchas o dejarlas en
remojo antes del lavado, disminuye la necesidad de
lavar a altas temperaturas. Un programa a 60ºC en vez
de 90ºC o uno a 40ºC en vez de 60ºC, permite ahorrar
hasta un 50% de energía.
• Dosificar bien el detergente en base a la dureza del
agua, al grado de suciedad y a la cantidad de ropa evita
derroches y protege el ambiente: aún siendo biodegradables, los detergentes contienen elementos que alteran el equilibrio de la naturaleza. Además, si es posible,
evite utilizar el suavizante.
• Realizando los lavados desde el atardecer hasta las
primeras horas de la mañana se colabora para reducir
la carga de absorción de las empresas eléctricas.
La opción “Comienzo retrasado” ayuda mucho a orga-
nizar los lavados en ese sentido.
• Si el lavado debe ser secado en una secadora, seleccione una velocidad de centrifugado alta. Poca agua
en el lavado, permite ahorrar tiempo y energía en el
programa de secado.
ES
Eliminaciones
• Eliminación del material de embalaje: respete las normas
locales, de ese modo, los embalajes podrán volver a ser
utilizados.
• En base a la Norma europea 2002/96/CE de Residuos
de aparatos Eléctricos y Electrónicos, los electrodomésticos viejos no pueden ser arrojados en los contenedores municipales habituales; tienen que ser recogidos
selectivamente para optimizar la recuperación y reciclado de los componentes y materiales que los constituyen,
y reducir el impacto en la salud humana y el medioambiente. El símbolo del cubo de basura tachado se marca
sobre todos los productos para recordar al consumidor
la obligación de separarlos para la recogida selectiva.
El consumidor debe contactar con la autoridad local o
con el vendedor para informarse en relación a la correcta eleminación de su electrodoméstico viejo.
33
Page 34

Mantenimiento y cuidados
ES
Excluir agua y corriente eléctrica
• Cierre el grifo de agua después de cada lavado. De este
modo se limita el desgaste de la instalación hidráulica
de la lavadora y se elimina el peligro de pérdidas.
• Desenchufe la máquina cuando la deba limpiar y duran-
te los trabajos de mantenimiento.
Limpiar la lavadora
La parte externa y las partes de goma se pueden limpiar
con un paño embebido en agua tibia y jabón. No use
solventes ni productos abrasivos.
Cuidar la puerta y el cesto
• Deje siempre semicerrada la puerta para evitar
que se formen malos olores.
Limpiar la bomba
La lavadora posee una bomba autolimpiante que no
necesita mantenimiento. Pero puede suceder que objetos
pequeños (monedas, botones) caigan en la precámara que
protege la bomba, situada en la parte inferior de la misma.
! Verifique que el ciclo de lavado haya terminado y desen-
chufe la máquina.
Para recuperar los objetos caídos en la precámara:
1. quite el zócalo ubicado
en la parte inferior delantera de la lavadora tirando
de los costados con las
manos (ver la figura);
2. desenrosque la tapa
girándola en sentido antihorario (ver la figura); es
normal que se vuelque un
poco de agua;
3. limpie con cuidado el
interior;
4. vuelva a enroscar la tapa;
5. vuelva a montar el panel
verificando, antes de empujarlo hacia la máquina,
que los ganchos se hayan
introducido en las corre-
spondientes ranuras.
Controle el tubo de alimentación
de agua
Controle el tubo de alimentación al menos una vez al año.
Si presenta grietas o rozaduras se debe sustituir: durante
los lavados, las fuertes presiones podrían provocar roturas
imprevistas.
! No utilice nunca tubos ya usados.
Cómo limpiar la cubeta de detergente
Desmontaje:
Ejerza una ligera presión
sobre el botón grande en la
parte delantera de la cubeta
de detergente y tírelo hacia
arriba (fig. 1, 2).
Fig. 1 Fig. 2
34
Limpieza:
Limpie luego la cubeta bajo el grifo (fig. 3) utilizando un viejo
cepillo de dientes y, una vez extraído el par de sifones ubicados en la parte superior de los compartimientos 1 y 2 (fig. 4),
controle que los mismos no estén obstruidos y enjuáguelos.
Fig. 3
Reinstalación:
No olvide volver a introducir
el par de sifones en sus
correspondientes alojamientos y por último volver a colocar la cubeta en su lugar,
enganchándola (fig. 4, 2, 1).
Fig. 4
Page 35

Anomalías y soluciones
Puede suceder que la lavadora no funcione. Antes de llamar al Servicio de Asistencia Técnica
(ver “Asistencia”),controle que no se trate de un problema de fácil solución utilizando la siguiente lista.
Anomalías:
La lavadora no se enciende.
El ciclo de lavado no comienza.
La lavadora no carga agua (centellea rápidamente el piloto de la
primera fase de lavado).
La lavadora carga y descarga agua
continuamente.
Posibles causas / Solución:
• El enchufe no está introducido en la toma de corriente, o no hace contacto.
• En la casa no hay corriente.
• a puerta no está bien cerrada.
• El botón ENCENDIDO/APAGADO no ha sido presionado.
• El botón PUESTA EN MARCHA/PAUSA no ha sido presionado.
• El grifo de agua no está abierto.
• Se fijó un retraso de la hora de puesta en marcha (ver “Personalizaciones”).
• El tubo de alimentación de agua no está conectado al grifo.
• El tubo está plegado.
• El grifo de agua no está abierto.
• En la casa no hay agua.
• No hay suficiente presión.
• El botón PUESTA EN MARCHA/PAUSA no ha sido presionado.
• El tubo de descarga no está instalado entre los 65 y 100 cm. del suelo (ver “Instalación”).
• El extremo del tubo de descarga está sumergido en el agua (ver “Instalación”).
• La descarga de pared no posee un respiradero.
Si después de estas verificaciones, el problema no se resuelve, cierre el grifo de
agua, apague la lavadora y llame a la Asistencia. Si la vivienda se encuentra en
uno de los últimos pisos de un edificio, es posible que se verifiquen fenómenos de
sifonaje, por ello la lavadora carga y descarga agua de modo continuo. Para eliminar
este inconveniente se encuentran disponibles en el comercio válvulas especiales
que permiten evitar el sifonaje.
ES
La lavadora no descarga o no centrifuga.
La lavadora vibra mucho durante la
centrifugación.
La lavadora pierde agua.
El piloto PUESTA EN MARCHA/PAUSA (anaranjado) y los pilotos de las
funciones centellean rápidamente.
Se forma demasiada espuma.
• El programa no prevé la descarga: con algunos programas es necesario ponerla en marcha manualmente.
• Se puede utilizar la función PLANCHA FÁCIL: para completar el programa, pulse
el botón PUESTA EN MARCHA/PAUSA (“Personalizaciones”).
• El tubo de descarga está plegado (ver “Instalación”).
• El conducto de descarga está obstruido.
• El cesto, en el momento de la instalación, no fue desbloqueado correctamente (ver “Instalación”).
• La máquina no está instalada en un lugar plano (ver “Instalación”).
• Existe muy poco espacio entre la máquina, los muebles y la pared (ver “Insta-
lación”).
• El tubo de alimentación de agua no está bien enroscado (ver “Instalación”).
• El contenedor de detergentes está obstruido (para limpiarlo ver “Mantenimien-
to y cuidados”).
• El tubo de descarga no está bien fijado (ver “Instalación”).
• Apague la máquina y desenchúfela, espere aproximadamente 1 minuto y
luego vuelva a encenderla.
Si la anomalía persiste, llame al Servicio de Asistencia Técnica.
• El detergente no es específico para la lavadora (debe contener algunas de las
frases “para lavadora”, “a mano o en lavadora” o similares).
• La dosificación fue excesiva.
35
Page 36

Asistencia
ES
Antes de llamar al Servicio de Asistencia Técnica:
• Verifique si la anomalía la puede resolver Ud. solo (ver “Anomalías y soluciones”);
• Vuelva a poner en marcha el programa para controlar si el inconveniente fue resuelto;
• Si no es así, llame al Servicio de Asistencia técnica autorizado, al número de teléfono indicado en el certificado de garantía.
! No recurra nunca a técnicos no autorizados.
Comunique:
• el tipo de anomalía;
• el modelo de la máquina (Mod.);
• el número de serie (S/N ).
Estas informaciones se encuentran en la placa que está fijada en la parte posterior de la lavadora.
La siguiente información es válida solo para España.
Para otros países de habla hispana consulte a su vendedor.
Ampliación de garantía
Llame al 902.363.539 y le informaremos sobre el fantástico plan de ampliación de garantía hasta 5 años.
Consiga una cobertura total adicional de
• Piezas y componentes
• Mano de obra de los técnicos
• Desplazamiento a su domicilio de los técnicos
Y NO PAGUE AVERIAS NUNCA MAS
Servicio de asistencia técnica (SAT)
Llame al 902.133.133 y nuestros técnicos intervendrán con rapidez y eficacia, devolviendo el electrodoméstico a sus condiciones óptimas de funcionamiento.
En el SAT encontrará recambios, accesorios y productos específicos para la limpieza y mantenimiento de su electrodoméstico a precios competitivos.
ESTAMOS A SU SERVICIO
36
Page 37

Használati utasítás
MOSÓGÉP
HU
Magyar
ECOT6F 1291
Összefoglalás
Üzembe helyezés, 38–39
Kicsomagolás és vízszintbe állítás
Víz- és elektromos csatlakozás
Első mosási ciklus
Mőszaki adatok
A mosógép leírása és program
elindítása, 40–41
Kezelőpanel
Jelzőlámpák
A forgódob kinyitása és bezárása
Program elindítása
Programok, 42
Programtáblázat
Egyéni beállítások, 43
A hőmérséklet beállítása
A centrifugálás beállítása
Funkciók
Mosószerek és mosandók, 44
Mosószer-adagoló fiók
Fehérítő ciklus
A mosandó ruhák előkészítése
Különleges bánásmódot igénylő ruhadarabok
A bepakolt ruhák kiegyensúlyozására szolgáló rendszer
HU
Óvintézkedések és tanácsok, 45
Általános biztonság
Hulladékelhelyezés
Környezetvédelem
Karbantartás és ápolás, 46
A víz elzárása és az elektromos áram kikapcsolása
A mosógép tisztítása
Az ajtó és a forgódob ápolása
A szivattyú tisztítása
A vízbevezető cső ellenőrzése
A mosószertartó tisztítása
Rendellenességek és elhárításuk, 47
Szerviz, 48
37
Page 38

Üzembe helyezés
HU
! E kézikönyv megőrzése azért fontos, hogy bármikor elővehesse,
és megnézhesse. Ha a mosógépet eladná, átadná vagy
másnál helyezné el, gondoskodjon arról, hogy e használati
utasítás a géppel együtt maradjon, hogy az új tulajdonos is
megismerhesse a mosógép funkcióit és az ezekre vonatkozó
figyelmeztetéseket.
! Figyelmesen olvassa el az utasításokat: fontos infor-
mációkat tartalmaznak az üzembehelyezésről, a használatról
és a biztonságról.
Kicsomagolás és vízszintbe állítás
Kicsomagolás
1. Csomagolja ki a mosógépet.
2. Ellenőrizze, hogy a mosógép nem sérült-e meg a
szállítás során. Ha a gépen
sérülést talál, ne
csatlakoztassa, és forduljon
a készülék eladójához.
3. Távolítsa el a hátoldalon
található, a szállításhoz felszerelt 4 védőcsavart, valamint
a gumit a hozzá tartozó
távtartóval (lásd ábra).
4. A furatokat zárja le a tartozékként kapott mőanyag
dugókkal.
5. Minden darabot őrizzen meg: ha a mosógépet szállítani kell,
előtte ezeket vissza kell szerelni.
Figyelem: újbóli használat esetén a rövidebb csavarokat
felülre kell szerelni.
! A csomagolóanyag nem gyermekjáték
Vízszintezés
1. A mosó gépet sík és
kem ény pa dlóra állít sa,
úgy, hogy ne érjen falhoz,
bútorhoz vagy máshoz.
2. Ha a padló nem tökéletese
vízszintes, az első lábak be-,
illetve kicsavarásával kompenzálhatja azt (lásd ábra).
A dőlés a gép felső burkolatán
mérve nem lehet több, mint
2°.
A pontos vízszintezés biztosítja a gép stabilitását, így az a
mőködés során nem fog vibrálni, zajt okozni vagy elmozdulni.
Szőnyegpadló vagy szőnyeg esetén a lábakat úgy állítsa be,
hogy a mosógép alatt elegendő hely maradjon a szellőzésre.
Felállítás, áthelyezések
A mosógéped egy
speciális, behúzható
kerekekkel ellátott kocsival van felszerelve az
áthelyezés megkönnyítése
érdekében. Ezen kocsi
leengedéséhez és így
a gép erőfeszítés nélküli
elmozdításához alul a
zárócsík alatt, bal oldalon elhelyezett kart kell
meghúzni. Az áthelyezés
befejeztével a kiindulási
állapotba tegyük a gépet.
Ezen a ponton a gép biztonságosan fel van állítva.
Víz és elektromos csatlakozás
Vízbevezető cső csatlakoztatása
1. A vízbevezető cső csatlakoztatásához csavarozza fel
a csövet egy 3/4”-os külső
menettel rendelkező hidegvíz
csapra (lásd ábra). A csat-
lakoztatás előtt eressze meg
a csapot addig, amíg a víz
teljesen átlátszóvá nem
válik.
2. Csatlakoztassa a
vízbevezető csövet a mosógéphez úgy, hogy azt a
hátul jobboldalon fent lévő
vízbemeneti csonkra csavarozza (lásd ábra).
3. Ügyeljen arra, hogy a
csövön ne legyen törés
vagy szőkület.
! A csapnál a víznyomásnak a Mőszaki adatok táblázatban
szereplő határértékek között kell lennie (lásd a szemben lévő
oldalt).
! Amennyiben a vízbevezető cső nem elég hosszú, forduljon
szaküzlethez vagy megbízott szakemberhez.
! Soha ne alkalmazzon már használt csöveket.
38
Page 39

65 - 100 cm
A leeresztőcső csatlakoztatása
Ez a berendezés megfelel a következõ Uniós
Csatlakoztassa a
leeresztőcsövet a lefolyóhoz
vagy a padlótól 65 és
100 cm közötti magasságban lévő fali szifonhoz
anélkül, hogy megtörné;
! Ne használjon hosszabbítót vagy elosztót.
! A kábel ne legyen se megtörve, se összenyomva.
! A tápkábelt csak engedéllyel rendelkező szakember cse-
rélheti.
Figyelem! A fenti előírások figyelmen kívül hagyása esetén a
gyártó elhárít minden felelősséget.
Első mosási ciklus
HU
illetve akassza a mosdó
vagy a kád szélére úgy,
hogy a mellékelt csővezető
ívet a csaphoz erősíti (lásd
ábra). A leeresztőcső szabad
végének nem szabad vízbe
merülnie.
! Toldások használata nem javasolt. Amennyiben feltétlenül
szükséges, a toldás átmérője egyezzen meg az eredeti
csőével és semmiképpen se legyen 150 cm-nél hosszabb.
Elektromos csatlakoztatás
Mielőtt a csatlakozódugót az aljzatba dugná, bizonyosodjon
meg arról, hogy:
• az aljzat földelése megfelel a törvény által előírtnak;
• az aljzat képes elviselni a készülék mőszaki adatait tartalmazó táblázatban megadott maximális teljesítményfelvételt
(lásd szemben);
• a hálózat feszültsége a mőszaki adatokat tartalmazó táblázatban szereplő értékek közé esik (lásd szemben);
• az aljzat kompatibilis a mosógép csatlakozódugójával.
Ellenkező esetben cserélje ki az aljzatot vagy a csatlakozódugót!
Üzembe helyezés után – mielőtt a mosógépet használni
kezdené – mosószerrel, mosandó ruha nélkül futtassa le az
2-es mosási programot.
Mûszaki adatok
Modell
Méretek
Ruhatöltet:
Elektromos
csatlakozás
Vízcsatlakozások
Centrifuga
fordulatszám
Az 2010/1061 rendelet
szerinti
vizsgálati programok
ECOT6F 1291
szélesség 40 cm
magasság 85 cm
mélység 60 cm
1-tõl 6 kg-ig
lásd a készüléken található, muszaki
jellemzoket tartalmazó adattáblát!
maximális nyomás 1 MPa (10 bar)
minimális nyomás 0,05 MPa (0,5 bar)
dob ûrtartalma 42 lite
1200 fordulat/perc-ig
6 program: 60 °C-os és 40 °C-os
hőmérséklet
! A mosógép nem állítható fel nyílt téren, még akkor sem,
ha tető van fölötte, mivel nagyon veszélyes, ha a gép esőnek
vagy zivataroknak van kitéve.
! A csatlakozódugónak a mosógép üzembe helyezett álla-
potában is könnyen elérhető helyen kell lennie.
Elõírásoknak:
- 2004/108/CE (Elektromágneses összeférhetõség)
- 2002/96/CE
- 2006/95/CE (Alacsony feszültség
39
Page 40

A mosógép leírása és program
elindítása
HU
Kezelőpanel
BEKAPCSOLÁS/
KIKAPCSOLÁS
jelzőlámpás gomb
PROGRAMOK
BEKAPCSOLÁS/KIKAPCSOLÁS jelzőlámpás gomb: a készülék be- és kikapcsolására szolgál.
Ha a jelzőlámpa világít, a készülék be van kapcsolva.
PROGRAMOK tekerőgomb: a programok beállítására szolgál.
A program lefutása alatt a tárcsa nem mozdul.
CEN T R I FUG Á L Á S gom b : a cen t r if u gá l ás be k a pc s o l á s ár a , il l e t ve k ika p cs o l á s á ra szo l gál
(lásd „Egyéni beállítások”).
HŐMÉRSÉKLET gomb: a hőmérséklet, illetve a hideg vizes mosás beállítására szolgál (lásd „Egyéni beállítások”).
KIJELZŐ: a kiválasztott mosási ciklus maradékidejének, vala-
mint késleltetett indítás beállítása esetén a mosás indításáig
hátralévő idő megjelenítésére szolgál.
GYEREKZÁR jelzőlámpás gomb: a kezelopanel gombjainak
letiltására, illetve letiltásuk kikapcsolására szolgál.
FUNKCIÓ jelzőlámpás gombok: a lehetséges funkciók kiválasztására szolgál. A kiválasztott funkció jelzőlámpája égve
marad.
CIKLUS ELŐREHALADÁSÁT jelző lámpák: a mosási program
előrehaladásának követésére szolgál.
AJTÓZÁR lámpa: az ajtó kinyithatóságának jelzésére szolgál
(lásd a szemben lévő oldalt).
ELINDÍTÁS/SZÜNETELTETÉS jelzőlámpás gomb: a programok elindítására, illetve pillanatnyi megszakítására szolgál.
Megjegyzés: A folyamatban lévő mosás szüneteltetéséhez
nyomja meg ezt a gombot – a vonatkozó jelzőlámpa narancssárga fénnyel fog villogni, míg a folyamatban lévő
fázist jelző lámpa folyamatos fénnyel világítani fog. Ha
az AJTÓZÁR lámpa nem világít, kinyithatja az ajtót.
A mosásnak a megszakítás időpontjától való folytatásához
nyomja meg ismét ezt a gombot.
HőMÉRSÉKLET
tekerőgomb
gomb
CENTRIFUGÁLÁS
GYEREKZÁR
jelzőlámpás gomb
CIKLUS
ELőREHALADÁSÁT
KIJELZŐ
ELINDÍTÁS/
SZÜNETELTETÉS
gomb
FUNKCIÓ jelzőlámpás
gombok
Készenléti üzemmód
Ez a mosógép - az energiatakarékosságra vonatkozó
legújabb eloírásoknak megfeleloen - automatikus kikapcsolási
(készenléti) rendszerrel van ellátva, mely a használat 30 percnyi szüneteltetése esetén bekapcsol. Nyomja meg röviden a
BEKAPCSOLÁS/KIKAPCSOLÁS gombot, és várjon, amíg a
készülék újrabekapcsol.
jelzőlámpás gomb
AJTÓZÁR
lámpa
Jelzőlámpák
A jelzőlámpák fontos információkat közvetítenek.
Ezek a következők:
Folyamatban lévő fázis jelzőlámpái
A PROGRAMOK programválasztó elforgatásakor világító
jelzőlámpák a kiválasztott program esetén végrehajtandó
mosási fázisokat jelzik.
A kívánt mosási ciklus kiválasztása és elindítása után a
jelzőlámpák a program előrehaladásának megfelelően, egymás
után kigyulladnak.
Mosás
Öblítés
Centrifugálás
Ürítés
Mosás vége
Funkciógombok és az azokhoz tartozó lámpák
A Kívánt funkció kiválasztásakor a megfelelő jelzőlámpa kigyullad.
Amennyiben a kiválasztott funkció nem kompatibilis a beállított
programmal, a vonatkozó jelzőlámpa villogni kezd, a készülék
hangjelzést ad ki, és a funkció nem lesz bekapcsolva. Abban
az esetben, ha egy másik, korábban kiválasztottal össze nem
férő funkciót kapcsol be, csak az utolsóként választott marad
bekapcsolva.
40
Page 41

HŐmérséklet jelzŐlámpa
A kívánt hőmérséklet-érték kiválasztásakor a vonatkozó jelzőlámpa világít.
CentrifugálásjelzŐ jelzŐlámpa
A kívánt centrifugasebesség kiválasztásakor a vonatkozó jelzőlámpa világít.
Gyerekzár jelzŐlámpa
A kezelőpanel letiltásához nagyjából 2 másodpercig tartsa
lenyomva ezt a gombot. Ha a jelzőlámpa világít, a gyerekzár
be van kapcsolva. Ez a funkció megakadályozza a programok
véletlen átállítását, főképp, ha gyerekek is vannak a lakásban.
A kezelőpanel letiltásának kikapcsolásához nagyjából 2
másodpercig tartsa lenyomva ezt a gombot.
Ajtózár lámpa
A világító jelzőlámpa azt jelzi, hogy az ajtó a véletlen kinyitás
megakadályozása érdekében be van zárva. A károsodások
elkerülése érdekében az ajtó kinyitása előtt meg kell várni, hogy
a jelzőlámpa kialudjon (várjon kb. 3 percet).
Megjegyzés: Amennyiben a késleltetésidőzítés funkció be van
kapcsolva, az ajtót nem lehet kinyitni. Az ajtó kinyitásához
az ELINDÍTÁS/SZÜNETELTETÉS gomb megnyomásával
szüneteltesse le a készüléket.
! Az ELINDÍTÁS/SZÜNETELTETÉS lámpa (narancssárga)
funkciólámpákkal egyidejő gyors villogása hibát jelez (lásd
„Rendellenességek és elhárításuk”).
A forgódob kinyitása és bezárása
ábra. 1
ábra. 2
A) KINYITÁS (1. ábra):
Felemelni a külső fedőlapot és teljesen kinyitni.
B) A DOB KINYITÁSA (Soft opening):
Egy ujjal nyomja meg a 2-es ábrán jelzett
gombot és a dob finoman kinyílik.
C) RUHANEMő BEHELYEZÉSE (3. ábra).
D) BEZÁRÁS (4. ábra):
- elször az elüls ajtót leeresztve majd a hátsót ráhajtva jól
bezárni a forgódobot.
- ellenrizni, hogy az elüls ajtó kampói tökélete- sen illeszked-
nek-e a hátsó ajtóban levő helyükre.
- a kattanás „klak” észlelése után mindkét ajtóra enyhe
nyomást gyakorolni lefelé, melyeknek nem szabad kikattanni.
- végül a külső fedőlapot bezárni.
Program elindítása
1. A BEKAPCSOLÁS/KIKAPCSOLÁS gomb megnyomásával
kapcsolja be a mosógépet. Néhány másodpercre az összes
jelzőlámpa bekapcsol, majd ezt követően a kiválasztott programra vonatkozó jelzőlámpák bekapcsolva maradnak, és az
ELINDÍTÁS/SZÜNETELTETÉS lámpa villogni kezd.
2. Pakolja be a mosandó ruhákat, és csukja be az ajtókat
és a fedelet.
3. A PROGRAMOK tekerőgombbal állítsa be a kívánt programot.
4. Állítsa be a mosási hőmérsékletet (lásd „Egyéni beállítások”).
5. Állítsa be a centrifugálás sebességét (lásd „Egyéni beállítások”).
6. Töltse be a mosószert és adalékanyagokat (lásd „Mosó-
szerek és mosandók”).
7. Válassza ki a kívánt funkciókat.
8. Az ELINDÍTÁS/SZÜNETELTETÉS gomb megnyomásával
indítsa el a programot, mire a megfelelő jelzőlámpa zöld fénnyel
világítani kezd.
A beállított mosási ciklus törléséhez az ELINDÍTÁS/SZÜNETELTETÉS gomb megnyomásával szüneteltesse le a
készüléket, és válasszon egy úgy mosási ciklust.
9. A program végeztével kigyullad a jelzőlámpa. Az
AJTÓZÁR lámpa kialszik, jelezve, hogy az ajtót ki lehet nyitni.
Vegye ki a mosandó ruhákat, és hagyja az ajtót félig nyitva,
hogy a forgódob kiszáradjon. A BEKAPCSOLÁS/KIKAPCSOLÁS gomb megnyomásával kapcsolja ki a mosógépet.
HU
ábra. 3
ábra. 4
41
Page 42

HU
Programok
Programtáblázat
Max.
Programleírás
Programok
Hétköznapi programok
PAMUT ELÕMOSÁS 90°C: Erősen szennyezett fehér ruhák.
1
PAMUT: Erősen szennyezett fehér és magasabb hőmérsékleten
2
mosható színes ruhák.
SZÍNES PAMUT (3): Enyhén szennyezett fehér és kényes színes ruhák.
3
SZINTETIKUS: Erősen szennyezett, magasabb hőmérsékleten mo-
4
sható színes ruhák.
SZINTETIKUS (4): Erősen szennyezett, magasabb hőmérsékleten
4
mosható színes ruhák.
SZINTETIKUS/KÉNYES: Enyhén szennyezett, magasabb
4
hőmérsékleten mosható színes ruhák.
15' FRISSÍTŐ MOSÁS: Az enyhén szennyezett ruhadarabok gyors átö-
5
blítésére (nem javasolt gyapjú, selyem és kézzel mosandó ruhaneműkhöz).
Speciális programok
HIGIENIZÁLÓ CIKLUS: Erősen szennyezett fehér ruhák.
6
HIGIENIZÁLÓ CIKLUS (1-2): Erősen szennyezett fehér és magasabb
6
hőmérsékleten mosható színes ruhák.
HIGIENIZÁLÓ CIKLUS (2): Erősen szennyezett fehér és magasabb
6
hőmérsékleten mosható színes ruhák.
JÓ ÉJT: Enyhén szennyezett kényes, színes ruhák.
7
ING
8
SELYEM/FÜGGÖNY: Selyem ruhaneműkhöz, viszkózus anyagokhoz,
9
fehérneműkhöz.
GYAPJÚ: Gyapjú, kasmír stb. ruhaneműk mosásához.
10
Eco programok
11 PAMUT
12 MÛSZÁL
13 GYORSMOSÁS
Részleges programok
ÖBLÍTÉS
CENTRIFUGÁLÁS
SZIVATTYÚZÁS
A kijelzőn megjelenő vagy a kézikönyben feltüntetett ciklusidők szokásos körülmények alapján becsült értékek. A tényleges időt számos tényező befolyásolhatja – pl. a bemeneti
víznyomás, a környezeti hőmérséklet, a mosószer mennyisége, a ruhatöltet mennyisége és típusa, a ruhatöltet kiegyensúlyozása, a kiválasztott további opciók.
A viszgálószervek számára:
1) 2010/1061 szabvány szerinti vezérlőprogramok: állítsa be a 6-os programot 60 °C és 40°C -ra.
2) Hosszú pamut program: állítsa be a 6-os programot 40 °C-ra.
3) Rövid pamut program: állítsa be a 3-es programot 40 °C-ra.
4) Szintetikus program mentén: állítsa be a 4-es programot 40 °C-ra.
hőm.
(°C)
hideg
hideg
hideg
Különleges programok
15’ FRISSÍTO MOSÁS (
5-es
program). Ez a program enyhén koszos ruhadarabok rövid idő alatt történő kimosására lett
kifejlesztve – mindössze 15 percig tart, így energiát és időt takarít meg. Az
anyagokat együttesen is lehet mosni (kivéve gyapjút és selymet) maximum 1,5 kg ruhatöltet-mennyiségig.
HIGIENIZÁLÓ CIKLUS (6-os program). Ez egy olyan magas hőmérsékleten futó fertőtlenítő program, melynél fehérítőszert
kell használni, és a hőmérsékletet 60 °C-nál magasabbra kell állítani.
az adalékanyagokat a megfelelő rekeszekbe (lásd „Mosószer-adagoló fiók”).
JÓ ÉJT (7-ös program). Ez egy olyan halk program, mellyel éjszaka lehet mosni, amikor az energiaárak alacsonyabbak. A
program mőszálas és pamut ruhadarabokhoz lett kifejlesztve. A ciklus végeztével a készülék, vízzel a forgódobban megáll,
majd – a centrifugálás és ürítés elvégzéséhez nyomja meg az ELINDÍTÁS/SZÜNETELTETÉS gombot, ellenkező esetben –
8 óra elteltével a készülék automatikusan elvégzi a centrifugálást és a víz ürítését.
Max.
sebes-
ség
(ford./
perc)
90° 1200
60° 1200 -
40° 1200 -
60° 800 - -
40° 800 - -
40° 800 - -
30 800 - -
90° 1200 -
60° 1200 - -
40° 1200 - -
40° 800 - 40° 600 - -
30° 0 - -
40° 800 - -
1200 - -
víz
800 - -
víz
800 - -
víz
- 1200 - - -
- 1200 - - - - 6
- 0 - - - - 6
Előm-
osás
5-es
programot 30 °C-ra beállítva különböző jellegő
Mosószerek
Fehérí-
tőszer
Mosás
-
Öblítő
Max.
ruhamen-
nyiség
(kg)
2,5
2,5
2,5
1,5
A fehérítéshez öntse be a fehérítőszert, a mosószert és
Progra-
midő
6
6
6
A mosási programok mosási ideje leolvasható a kijelzõrõl.
6
6
6
4
2
1
1
6
3
3
6
Eco programok
Az Eco programok jó mosási teljesítményt kínálnak alacsony hőmérsékleten, így energiát takaríthat meg, ami kíméli a környezetet és megtakarítást jelent az Ön számára.
Az Eco programok (Pamut , Mőszál és Gyorsmosás 30’ ) különféle típusú szövetekre és enyhén szennyezett
ruhadarabokra lettek tervezve. A kiváló minőség érdekében folyékony mosószer használatát javasuljuk – a mandzsettákat,
gallérokat és foltokat tanácsos előkezelni.
42
Page 43

Egyéni beállítások
A hőmérséklet beállítása
A mosási hőmérséklet beállításához forgassa el a HőMÉRSÉKLET gomb megnyomása (lásd Programtáblázat). A hőmérsékletet a
hideg vízzel történő mosás hőmérséklet-értékéig lehet csökkenteni ( ).
A készülék automatikusan megakadályozza, hogy az egyes programokhoz maximálisan beállíthatónál magasabb fordulatszámon centrifugáljon.
A centrifugálás beállítása
A kiválasztott programhoz tartozó centrifugálás fordulatszámának beállításához forgassa el a CENTRIFUGÁLÁS gomb megnyomása.
A különféle programokhoz beállítható maximális fordulatszámok a következők:
Programok Maximális fordulatszám
Pamut 1200 fordulat/perc
Mőszál 800 fordulat/perc
Gyapjú 800 fordulat/perc
Selyem Csak ürítés
A centrifugálás fordulatszáma csökkenthető, vagy a jelre állítással teljesen kikapcsolható.
A készülék automatikusan megakadályozza, hogy az egyes programokhoz maximálisan megengedett fordulatszámnál magasabbon centrifugáljon.
Funkciók
A mosógép különféle mosási funkciói lehetővé teszik a kívánt tisztítás és fehérség elérését.
A funkciók bekapcsolásához tegye a következőket:
1. Nyomja meg a kívánt funkció gombját.
2. A megfelelő jelzőlámpa világítása azt jelzi, hogy a hozzá tartozó funkció be van kapcsolva.
Megjegyzés: A jelzőlámpa gyors villogása azt jelenti, hogy a beállított programhoz a jelzőlámpához tartozó funkció nem vála-
sztható.
HU
Késleltetett indítás
A kiválasztott program késleltetett indításának beállításához nyomogassa a gombot mindaddig, míg a kívánt késleltetés
értéke (1–24 óráig) meg nem jelenik a kijelzőn.
A funkció kikapcsolásához nyomogassa a gombot addig, míg kijelzőn az felirat meg nem jelenik.
Megjegyzés: Az ELINDÍTÁS/SZÜNETELTETÉS gomb megnyomását követően a késleltetés értékét csak csökkenteni lehet.
! Ez valamennyi program esetén bekapcsolható.
Szupermosás
A ciklus kezdetén felhasznált nagy mennyiségő víznek, valamint a hosszabb mosásidőnek köszönhetően a szupermosás funkció
nagy mosóhatást biztosít.
! Nem kapcsolható be a 5-es, 6-ös, 9-as 10-es, 11-es,12-es, 13-es, , , , programoknál.
Extra öblítés
E funkció alkalmazásával nő az öblítés, valamint a végső mosószer-eltávolítás hatékonysága. Használata a különösen érzékeny
bőrő embereknél ajánlott.
! Nem kapcsolható be a 5-es, 13-es, , , programoknál.
Vasaláskönnyítés
Ez a funkció a győrődések keletkezésének csökkentése érdekében a megfelelő időben módosítja a mosási beállításokat és a
centrifugasebességet.
A 9 program esetén a ciklus a mosandó ruhák öblítésével végződik, a VASALÁSKÖNNYÍTÉS funkció lámpája, valamint az
ELINDÍTÁS/SZÜNETELTETÉS lámpa narancssárga fénnyel villog, az ÖBLÍTÉS fázis jelzőlámpája pedig állandó fénnyel világít.
Az öblítővíz leeresztéséhez és a mosott ruhanemők kiszedéséhez meg kell nyomni az ELINDÍTÁS/SZÜNETELTETÉS gombot,
vagy a VASALÁSKÖNNYÍTÉS gombot.
! Nem kapcsolható be a 5-es, 6-ös, 7-ös, 10-es, 11-es, 12-es, 13-es, , , programoknál.
43
Page 44

Mosószerek és mosandók
HU
Mosószeradagoló fiók
A mosás eredményessége függ a mosószer helyes
adagolásától is: ha túl sokat adagol belőle, a mosás nem
lesz hatékonyabb, de hozzájárul ahhoz, hogy lerakódás
képződjön a mosógépben, valamint a környezetet is jobban
szennyezi.
Húzza ki a mosósze-
radagoló fiókot, és a
következőképpen tegye
bele a mosószret vagy az
adalékot.
1. es tartály: Mosószer előmosáshoz (por)
2. rekesz: Mosószer (por vagy folyékony)
A folyékony mosószert helyezze közvetlen a rekeszbe az
erre a célra kialakított mérőedénybe.
3. rekesz: Adalékanyagok (lágyítószer, stb.)
Amikor a 3. rekeszbe betölti a lágyítószert, ügyeljen rá,
hogy ne lépje túl a “max” jelzést.
A lágyítószer automatikusan belekerül
a mosógépbe az utolsó öblítéskor. A program végén a 3.
rekeszben bizonyos mennyiségu víz marad. Ez a túlságosan suru lágyítószer feloldására, vagy a koncentrátumok
higítására szolgál. Ha a 3. rekeszben több víz marad, mint
általában, az az ürítonyílás eltömodését jelenti. A kitisztításához lásd “Karbantartás és ápolás”.
4. rekesz: Fehérítőszer
Fehérítő ciklus
Fehérítőt csak az 2-es, 3-es, 6-ös, programoknál lehet használni.
Öntsön fehérítőt a 4. pótrekeszbe, a mosószert és az öblítőt
pedig a megfelelő tartályokba, majd állítsa be az egyik fent
említett programot. Csak nagyon szennyezett pamut ruhadarabokhoz javasolt.
Magasabb hmérsékleten mosható anyagok: max. 6 kg
Mőszálas anyagok: max. 2,5 kg
Kényes anyagok: max. 2 kg
Gyapjú: max. 1 kg
Milyen nehezek a mosandó ruhák?
1 lepedő: 400–500 g
1 párnahuzat: 150–200 g
1 asztalterítő: 400–500 g
1 fürdőköpeny: 900–1200 g
1 törölköző: 150–250 g
Különleges bánásmódot igénylő ruhadarabok
Ing: a különböző szövető és színő ingek mosásához használja
az ehhez való, 8-as programot!
A győrődések kialakulásának minimalizálásával a program
maximális védelmet biztosít a ruháknak.
Selyem: az összes selyem ruhadarab mosásához használja az ehhez való, 9-as programot! A kényesebb
ruhanemőkhöz tanácsos speciálisan rájuk kifejlesztett
mosószert használni.
Függönyök: hajtogatva tegye párnahuzatba (vászonzsákba) vagy hálós zacskóba. Használja a 9-as programot.
Gyapjú: az egyedüli mosógép, mely a Woolmark
Companytől megkapta a rangos Woolmark Platinum Care
ismertetőjelet (M.0508), ami tanúsítja, hogy az összes
gyapjú ruhadarab mosható a mosógépben, még azok is,
melyek címkéjén a „kézzel mosandó” megjelölés szerepel. A 10-es programmal teljes nyugalommal moshatja
mosógépben az összes gyapjú ruhadarabot (max. 1 kg),
garantáltan a legjobb hatásfokon.
A bepakolt ruhák kiegyensúlyozására
szolgáló rendszer
A túlzott zajhatás megelőzésére, valamint a mosandók egyenletes eloszlása érdekében a forgódob a centrifugafázis
előtt a mosási centrifugasebességnél kicsit nagyobb sebességre kapcsol. Amennyiben a töltet kiegyensúlyozására
irányuló próbálkozások nem vezetnek eredményre, a
készülék az elméleti centrifugasebességnél lassabb
centrifugálásra kapcsol. Jelentős kiegyensúlyozatlanság
esetén a mosógép, centrifugálás előtt megpróbálja a töltetet
megfelelően eloszlatni. A töltet megfelelő eloszlásának biztosítása érdekében ajánlatos a nagy ruhanemőket a kicsikkel
összekeverni.
A mosandó ruhák előkészítése
• Osztályozza a mosandókat a következők szerint:
- Szövet típusa / címkén lévő szimbólum.
- Színek Válogassa külön a színes és fehér ruhákat.
• Ürítse ki a zsebeket, és vizsgálja meg a gombokat.
• Ne lépje túl a mosandók száraz súlyára vonatkozóan
megadott értékeket:
44
Page 45

Óvintézkedések és
tanácsok
! A mosógép a nemzetközi biztonsági szabványoknak
megfelelően lett tervezve és gyártva. Ezeket a figyelmeztetéseket biztonsági okokból írjuk le, kérjük, olvassa el őket
figyelmesen!
Általános biztonság
• Ez a készüléket háztartási használatra lett tervezve.
• A készüléket mőködtetésre alkalmatlan személyek (a gye-
rekeket is beleértve) nem használhatják, kivéve, amennyiben ezeket a személyeket egy, a biztonságukért felelős
személy felügyeli, illetve a készülék használatát nekik
elmagyarázza. Ne hagyja a gyerekeket felügyelet nélkül,
és győződjön meg arról, hogy nem játszanak a készülékkel.
• Ne érjen a géphez mezítláb, illetve vizes vagy nedves
kézzel vagy lábbal!
• A csatlakozódugót az aljzatból ne a kábelnél, hanem a
csatlakozónál fogva húzza ki!
• Ne nyúljon a leeresztett vízbe, mert forró lehet!
• Semmiképpen ne feszegesse az ajtót: megsérülhet a
véletlen nyitást megakadályozó biztonsági retesz.
• Hiba esetén semmiképpen se nyúljon a gép belső rés-
zeihez, és ne próbálja megjavítani!
• Mindig ügyeljen arra, hogy gyermekek ne mehessenek a
mőködő gép közelébe.
• Amennyiben a gépet át kell helyezni, az áthelyezést két
vagy három személy végezze, maximális odafigyeléssel.
Soha ne próbálja egyedül elmozdítani, mert a készülék
nagyon nehéz.
• A mosandó berakása előtt ellenőrizze, hogy a forgódob
üres-e.
Hulladékelhelyezés
Környezetvédelem
Takarítson meg mosószert, vizet, energiát és időt
• Annak érdekében, hogy ne pazaroljunk az erőforrásokkal,
a mosógépet teljes ruhatöltettel kell használni. Egy teljes
ruhatöltettel való mosás két féltöltet helyett, akár 50%
energia megtakarítást is lehetővé tehet.
• Az előmosás csak nagyon szennyezett ruhák esetén
szükséges. Ha nem használja, azzal mosószert, időt és
5-15% energiát takarít meg.
• Ha a foltokat a mosás előtt folttisztítóval kezeli, és
beáztatja, kevesebb szükség lesz a magas hőmérséklető
mosásra. A 60°C-on történő mosás a 90°C helyett, vagy
40°C-on 60°C helyett akár 50% energiamegtakarításhoz
is vezethet.
• Ha a mosószert a víz keménysége, a szennyezettség
mértéke és a ruha mennyisége alapján helyesen adagolja, elkerüli a pazarlást és nem terheli feleslegesen a
környezetet: még, ha biológiailag lebomló fajtájúak is, a
mosószerek olyan összetevőket tartalmaznak, amelyek
megváltoztatják a természet egyensúlyát. Ezen kívül,
kerülje az öblítőszerek használatát, amennyire csak lehet.
• Ha a késő délután és a kora hajnal közötti időszakban
mos, akkor hozzájárul ahhoz, hogy csökkentse az
áramszolgáltató vállalatok terhelését.
A “Késleltetett indítás” nagyon hasznos a mosás
időzítése szempontjából.
• Ha a mosott ruhákat utána szárítógépben szárítja,
magas fordulatszámú centrifugálást válasszon. Ha a
mosott ruhában kevés a víz, időt és energiát takarít meg
a szárítóprogramnál.
HU
• A csomagolóanyag megsemmisítése: tartsa be a helyi
előírásokat, így a csomagolás újrahasznosítható.
• Az elektromos készülékek megsemmisítéséről szóló
európai direktíva 2002/96/EC előírja, hogy a régi háztartási gépeket nem szabad a normál nem szelektív
hulladékgyőjtési folyamat során összegyőjteni. A régi
gépeket szelektíven kell összegyőjteni, hogy optimalizálni
lehessen a bennük lévő anyagok újrahasznosítását és
csökkenteni lehessen az emberi egészségre és környezetre gyakorolt hatásukat. Az áthúzott “szemeteskuka”
jele emlékezteti Önt arra, hogy kötelessége ezeket a
termékeket szelektíven összegyőjteni. A fogyasztóknak
a helyi hatóságot vagy kereskedőt kell felkeresniük a régi
háztartási gépek helyes elhelyezését illetően.
45
Page 46

Karbantartás és ápolás
HU
A víz elzárása és az elektromos áram
kikapcsolása
• Minden mosás után zárja el a vízcsapot. Így kíméli a
mosógép vízrendszerét, és megszünteti a vízszivárgás
kockázatát.
• Húzza ki a hálózati csatlakozódugót az aljzatból, amikor
a mosógépet tisztítja vagy karbantartást végez.
A mosógép tisztítása
A külső részeket és a gumi részeket langyos szappanos
vizes ronggyal tisztíthatja. Ne használjon oldószert vagy
súrolószert.
Az ajtó és a forgódob gondozása
• Az ajtót hagyja mindig résre nyitva, nehogy
rossz szagok keletkezzenek.
A szivattyú tisztítása
A mosógép öntisztító szivattyúval van felszerelve, melynek nincs szüksége tisztítási és karbantartási mőveletekre.
Az azonban megtörténhet, hogy kis tárgyak kerülnek
(aprópénz, gomb) a szivattyút védő előkamrába, ami a szivattyú alsó részén található.
! Győződjön meg róla, hogy a mosóprogram véget ért, és
húzza ki a hálózati csatlakozót.
Az esetlegesen a dob mellé esett tárgyak kiemeléséhez:
1. vegye le a mosógép elülső oldalán alul
elhelyezkedő részt kézzel
meghúzva a szélén (lásd
ábra); ábra);
2. az óra járásával ellentétes irányban forgatva
csavarja le a fedelet (lásd
ábra): természetes, hogy
egy kevés víz kifolyik;
3. gondosan tisztítsa ki a
belsejét;
4. csavarja vissza a
fedelet;
5. szerelje vissza a panelt
úgy, hogy mielőtt azt a gép
felé nyomná, meggyőződik
arról, hogy a horgok a
hozzájuk tartozó furatokba
illeszkednek.
A vízbevezető cső ellenőrzése
Évente legalább egyszer ellenőrizze a gumicsövet. Ki kell
cserélni, ha repedezett vagy hasadozott: a mosás során a
nagy nyomás hirtelen szakadást okozhat.
! Soha ne alkalmazzon már használt csöveket.
Kivétel:
Enyhe nyomást gyakorolni a
K i v é t e l :
mosószertartó elülső részén
En yhe nyo mást gy ak oroln i a
levő nagy nyomó-gombra és
mosószertartó elülsõ részén levõ
felfelé kihúzni (1, 2. ábra).
nagy nyomó-gombra és felfelé
kihúzni (1. ábra).
4. ábra
ábra. 1 ábra. 2
46
Tisztítás:
Ezután kitisztítani vízcsap alatt a tartót (3. ábra) egy régi fog-
T i s z t í t á s :
kefe segítségével és az 1-es és 2-es rekeszek felső részébe
Ezután kitisztítani vízcsap alatt a tartót (3. ábra) egy régi fogkefe
illesztett két szivornyát kihúzva (4. ábra) megvizsgálni, hogy
segítségével és az 1-es és 2-es rekeszek felsõ részébe illesztett két
azok ne legyenek eltömődve majd leöblíteni.
szivornyát kihúzva (4. ábra) megvizsgálni, hogy azok ne legyenek
eltömõdve majd leöblíteni.
4. ábra
A mosószertartó tisztítása
A mosószertartó tisztítása
A mosószertartó tisztítása
4. ábra
ábra. 3
Visszahelyezés:
Ne felejtsd el visszailles-zteni
Visszahelyezés:
a két szivornyát a megfelelő
Ne felejtsd el visszailles-zteni a
helyére és végül a tokjába
két szivornyát a megfelelõ helyére
beakasztva visszatenni a tartót
és végül a tokjába beakasztva
(4, 2, 1 ábra).
visszatenni a tartót.
4. ábra
ábra. 4
Page 47

Rendellenességek és
elhárításuk
Előfordulhat, hogy a mosógép nem mőködik. Mielőtt felhívná a szervizt (lásd „Szerviz”), ellenőrizze, hogy nem olyan problémáról
van-e szó, amely a következő lista segítségével egyszerően megoldható!
Rendellenességek:
A mosógép nem kapcsol be.
A mosási ciklus nem indul el.
A mosógép nem kap vizet (az első
mosási fázis jelzőlámpája gyorsan
villog).
A mosógép folytonosan szívja, és
üríti a vizet.
Lehetséges okok / megoldás:
• A hálózati csatlakozódugó nincs bedugva az aljzatba, vagy nem eléggé ahhoz,
hogy jól érintkezzen.
• Nincs áram a lakásban.
• Az ajtó nincs jól becsukva.
• Nem nyomta meg a BEKAPCSOLÁS/KIKAPCSOLÁS gombot.
• Nem nyomta meg az ELINDÍTÁS/SZÜNETELTETÉS gombot.
• A vízcsap nincs nyitva.
• Az indítás időjelzőjén késletetés lett beállítva – késleltetésidőzítő (lásd „Egyéni beál-
lítások”).
• A vízbevezető cső nincs csatlakoztatva a csaphoz.
• A cső meg van törve.
• A vízcsap nincs nyitva.
• A lakásban nincs víz.
• Nincs elegendő nyomás.
• Nem nyomta meg az ELINDÍTÁS/SZÜNETELTETÉS gombot.
• A leeresztőcső nem a padlószinttől 65 és 100 cm közötti magasságban van felszerelve (lásd „Üzembe helyezés”).
• A leeresztőcső vége vízbe merül (lásd „Üzembe helyezés”).
• A fali szifonnak nincs szellőzése.
Ha ezen vizsgálatok után a probléma nem oldódik meg, zárja el a vízcsapot,
kapcsolja ki a mosógépet, és hívja ki a szervizszolgálatot. Ha a lakás egy épület
legfelsőbb emeleteinek egyikén található, lehetséges, hogy a csatornaszellőző
eltömődésének jelensége (szivornyahatás) lépett fel, ezért a mosógép folytonosan
szívja, és leereszti a vizet. E kellemetlenség elkerülésére a kereskedelmi forgalomban rendelkezésre állnak csatornaszellőző-szelepek.
HU
A mosógép nem üríti le a vizet,
vagy nem centrifugál.
A mosógép nagyon rázkódik a centrifugálás alatt.
A mosógépből elfolyik a víz.
Az ELINDÍTÁS/SZÜNETELTETÉS
lámpa (narancssárga), valamint a
funkciólámpák gyorsan villognak.
Sok hab képződik.
• A program nem ereszti le a vizet: néhány programnál a vizet kézileg kell leereszteni.
• A VASALÁSKÖNNYÍTÉS funkció be lett kapcsolva – a program befejezéséhez
nyomja meg az ELINDÍTÁS/SZÜNETELTETÉS gombot (lásd „Egyéni beállítá-
sok”).
• A leeresztőcső meg van törve (lásd „Üzembe helyezés”).
• A lefolyó el van dugulva.
• Az üzembe helyezéskor a forgódob rögzítése nem lett eltávolítva (lásd „Üzem-
be helyezés”).
• A készülék nincs vízszintben (lásd „Üzembe helyezés”).
• A mosógép bútorok és falak közé van szorítva (lásd „Üzembe helyezés”).
• A vízbevezető cső nincs jól felcsavarva (lásd „Üzembe helyezés”).
• A mosószer-adagoló fiók eltömődött (tisztításához lásd „Karbantartás és ápo-
lás”).
• A leeresztőcső nincs szorosan rögzítve (lásd „Üzembe helyezés”).
• Kapcsolja ki a készüléket, és húzza ki a dugót a konnektorból, várjon körülbelül 1 percet, majd indítsa újra!
Ha a hiba továbbra is fennáll, forduljon a szervizhez!
• A mosószer nem mosógépekhez való (kell, hogy szerepeljen rajta, hogy „gépi”,
„kézi vagy gépi mosáshoz”, vagy hasonló).
• Túl sok mosószert használt.
47
Page 48

Szerviz
HU
Mielőtt a szervizhez fordulna:
• Győződjön meg arról, hogy a hibát nem tudja saját maga is elhárítani (lásd „Rendellenességek és elhárításuk”);
• Indítsa újra a programot, hogy lássa, elhárította-e a hibát;
• Ellenkező esetben forduljon az engedéllyel rendelkező szakszervizhez a garanciajegyen található telefonszámon.
! Soha ne forduljon engedéllyel nem rendelkező szerelőhöz!
Közölje:
• a meghibásodás jellegét;
• a mosógép típusát (Mod.);
• a gyártási számot (S/N).
Ezen információk a mosógép hátsó részére felerősített táblán találhatók.
48
Page 49

Instrukcja obsługi
PRALKA
PL
Polski
ECOT6F 1291
Spis treści
Instalacja, 50-51
Rozpakowanie i wypoziomowanie
Podłączenia hydrauliczne i elektryczne
Pierwszy cykl prania
Dane techniczne
Opis pralki i uruchamianie programu, 52-53
Panel sterowania
Kontrolki
Jak otwierać i zamykac kosz
Uruchamianie programu
Programy, 54
Tabela programów
Personalizacja, 55
Ustawianie temperatury
Ustawianie wirowania
Funkcje
Środki piorące i bielizna, 56
Szuadka na środki piorące
Cykl wybielania
Przygotowanie bielizny
Tkaniny wymagające szczególnego traktowania
System równoważenia ładunku
PL
Zalecenia i środki ostrożności, 57
Ogólne zasady bezpieczeństwa
Utylizacja
Oszczędność i ochrona środowiska
Utrzymanie i konserwacja, 58
Wyłączenie wody i prądu elektrycznego
Czyszczenie pralki
Czyszczenie drzwiczek i bębna
Czyszczenie pompy
Kontrola rury doprowadzania wody
Jak czyścić szuadkę środków piorących
Nieprawidłowości w działaniu i sposoby ich
usuwania, 59
Serwis Techniczny, 60
49
Page 50

Instalacja
PL
! Należy zachować niniejszą książeczkę instrukcji dla
przyszłych konsultacji. W razie sprzedaży, oddania, czy
przeniesienia pralki w inne miejsce należy upewnić się,
by przekazana została ona razem z instrukcją, aby nowy
właściciel zapoznać się mógł z działaniem urządzenia i
odpowiednimi informacjami.
! Należy uważnie przeczytać instrukcję obsługi, gdyż
zawiera ona ważne informacje dotyczące instalacji oraz
właściwego i bezpiecznego użytkowania pralki.
Rozpakowanie i wypoziomowanie
Rozpakowanie
1. Rozpakować pralkę.
2. Sprawdzić, cz y nie
doznała ona uszkodzeń
w czasie transportu. Jeśli
byłaby ona uszkodzona, nie podłączać jej i
powiadomić sprzedawcę.
3. Odkręcić cztery śruby
ochronne, zamocowane
na czas transportu, oraz
zdjąć gumową podkładkę
z odpowiednią rozpórką,
znajdujące się w tylnej
ścianie i (zobacz rysunek).
4. Zatkać otwory przy
pomocy załączonych do pralki plastykowych zaślepkek.
Ustawienie, przeniesienie
Jeśli twój model pralki
wyposażony jest w
specjalne wysuwalne
kółka, łatwo jest ją
przesuwać. Aby wysunąć
kółka i móc dzięki temu
łatwo przesunąć pralkę,
należy pociągnąć
dźwignię, znajdującą się
na dole z lewej strony pod
cokołem. Po przesunięciu
pralki należy z powrotem
ustawić dźwignię w
pierwotnej pozycji.
Urządzenie stoi teraz pewnie na podłodze.
Podłączenie do sieci wodnej i elektrycznej
Podłączenie rury pobierania wody
1. Podłączyć przewód
zasilajŕcy poprzez
przykrćcenie do zaworu
wody zimnej z końcówkŕ
gwintowanŕ ľ gas (patrz
rysunek).
Przed podłączeniem
spuszczać wodę do momentu, aż stanie się ona
całkowicie przezroczysta.
5. Zachować wszystkie te części: gdyby okazało się
konieczne przewiezienie pralki w inne miejsce, powinny
one zostać ponownie zamontowane.
Uwaga: w razie ponownego uzycia kròtsze srubki powinny byc przymocowane u gòry.
! Części opakowania nie nadają się do zabawy dla dzieci
Wypoziomowanie
1. Ustawić pralkę na
płaskiej i twardej podłodze;
nie opierać jej o ściany,
meble itp.
2. Jeśli podłoga nie jest
dokładnie pozioma, należy
wypoziomować pralkę,
dokręcając lub odkręcając
przednie nóżki (zobacz
rysunek). Kąt nachylenia,
zmierzony na górnym
blacie pralki, nie powinien przekraczać 2°.
Staranne wypoziomowanie pralki zapewnia jej stabilność
i zapobiega wibrowaniu, hałasom i przesuwaniu się
urządzenia w czasie pracy. W razie ustawienia na dywanie lub wykładzinie dywanowej należy tak wyregulować
nóżki, aby pod pralką pozostawała wolna przestrzeń
niezbędna dla wentylacji.
2. Podłączyć rurę pobierania wody do
pralki, przykręcając ją
do odpowiedniego otworu pobierania wody,
znajdującego się w tylnej
ścianie pralki, z prawej
strony u góry (zobacz
rysunek).
3. Zwrócić uwagę, by na
rurze nie było zgięć ani
ściśnięć.
! Ciśnienie hydrauliczne kurka powinno mieścić się w pr-
zedziale podanym w tabeli Danych technicznych (zobacz
na sąsiedniej stronie).
! Jeśli rura doprowadzania wody okazałaby się za krótka,
należy zwrócić się do wyspecjalizowanego sklepu lub do
upoważnionego fachowca.
! Nigdy nie instalować rur używanych.
50
Page 51

65 - 100 cm
Podłączenie przewodu odpływowego
Podłączyć przewód
odpływowy, nie zginając
go, do rury ściekowej lub
do otworu odpływowego
w ścianie, które powinny znajdować się na
wysokości od 65 do 100
cm od podłogi;
! Nie używać przedłużaczy ani rozgałęźników.
! Przewód nie powinien być pozginany ani przygnieciony.
! Przewód zasilania elektrycznego może być wymieniany
wyłącznie przez autoryzowanych techników.
Uwaga! Producent nie ponosi żadnej odpowiedzialności
w przypadku nieprzestrzegania powyższych zasad.
Pierwszy cykl prania
PL
ewentualnie oprzeć go na
brzegu zlewu lub wanny,
przymocowując do kranu
prowadnik, znajdujący
się w wyposażeniu (patrz
rysunek). Wolny koniec
przewodu odpływowego
nie powinien być zanurzony w wodzie.
! Odradza się stosowanie przewodów przedłużających;
jeśli to konieczne, przewód przedłużający powinien mieć
taką samą średnicę jak oryginalny, a jego długość nie
może przekraczać 150 cm.
Podłączenie elektryczne
Przed włożeniem wtyczki do gniazdka elektrycznego
należy się upewnić, czy:
• gniazdko posiada uziemienie i jest zgodne z
obowiązującymi przepisami;
• gniazdko jest w stanie wytrzymać maksymalne
obciążenie mocy maszyny, wskazane w tabeli Danych
technicznych (patrz obok);
• napięcie zasilania mieści się w wartościach wskazanych w tabeli Danych technicznych
(patrz obok);
• gniazdko pasuje do wtyczki pralki. W przeciwnym razie
należy wymienić gniazdko lub wtyczkę.
! Nie należy instalować pralki na otwartym powietrzu, na-
wet w osłoniętym miejscu, gdyż wystawienie urządzenia
na działanie deszczu i burz jest bardzo niebezpieczne.
! Po zainstalowaniu pralki gniazdko elektryczne powinno
być łatwo dostępne.
Po zainstalowaniu pralki, przed przystąpieniem do jej
użytkowania, należy wykonać jeden cykl prania ze
środkiem piorącym, ale bez wsadu, nastawiając program
2.
Dane techniczne
Model ECOT6F 1291
szerokoϾ cm 40
Wymiary
PojemnoϾ od 1 do 6 kg
Dane pr¹du
elektrycznego
Dane sieci
wodoci¹gowej
SzybkoϾ
wirowania
Programy kontrolne
zgodnie z przepisami
2010/1061
wysokoϾ cm 85
g³êbokoœæ cm 60
dane techniczne umieszczone s¹ na
tabliczce na maszynie
Maksymalne ciœnienie 1 MPa (10 barów)
ciœnienie minimalne 0,05 MPa (0,5 barów)
pojemnoœæ bêbna 42 litrów
do 1200 obrotów na minutê
program 6; temperatura 60°C i 40°C.
Urz¹dzenie to zosta³o wyprodukowane
zgodnie z nastêpuj¹cymi przepisami EWG:
- 2004/108/CE (o Kompatybilnoœci
Elektromagnetycznej)
- 2006/95/CE (o Niskim Napiêciu)
- 2002/96/CE
51
Page 52

Opis pralki i uruchamianie
programu
PL
Panel sterowania
Przycisk z kontrolką
WŁĄCZANIA/WYŁĄCZANIA
Przycisk z kontrolką WŁĄCZANIA/WYŁĄCZANIA: aby
włączyć lub wyłączyć urządzenie. Zapalona kontrolka
wskazuje, że urządzenie jest włączone.
Pokrętło PROGRAMÓW: do ustawiania programów. W
czasie trwania programu pokrętło pozostaje nieruchome.
Przycisk WIROWANIA: do nastawienia lub wyłączenia
wirowania (patrz “Personalizacja”).
Przycisk TEMPERATURY: do regulacji temperatury
prania lub do nastawienia prania w zimnej wodzie (patrz
„Personalizacja”).
WYŚWIETLACZ: aby wyświetlić czas pozostający do
zakończenia wybranego cyklu prania oraz, jeśli zostało
ustawione opóźnienie startu, czas pozostający do
rozpoczęcia prania.
Przycisk z kontrolką BLOKADY PRZYCISKÓW: aby
włączyć lub wyłączyć blokadę panelu sterowania.
Przyciski z kontrolkami FUNKCJI: do wyboru dostępnych
funkcji. Kontrolka wybranej funkcji pozostaje zaświecona.
Kontrolki STANU ZAAWANSOWANIA CYKLU:
umożliwiają kontrolę stanu zaawansowania programu
prania.
Kontrolka BLOKADY OKRĄGŁYCH DRZWICZEK:
pozwala sprawdzić czy możliwe jest otwarcie okrągłych
drzwiczek (patrz strona obok).
Przycisk z kontrolką START/PAUZA: do uruchamiania
programów lub ich chwilowego przerywania.
N.B.: aby przerwać wykonywane pranie, należy nacisnąć
ten przycisk, jego kontrolka zacznie pulsować na
pomarańczowo, natomiast kontrolka bieżącej fazy będzie
świecić ciągłym światłem. Jeśli kontrolka BLOKADY
OKRĄGŁYCH DRZWICZEK jest wyłączona, można
otworzyć drzwiczki pralki.
W celu ponownego uruchomienia prania od momentu, w którym zostało ono przerwane, należy ponownie
nacisnąć ten przycisk.
TEMPERATURY
Pokrętło
PROGRAMÓW
BLOKADY PRZYCISKÓW
Przycisk
WIROWANIA
Przycisk z kontrolką
WYŚWIETLACZ
Przycisk
Funkcja stand by
Pralka ta, w myśl nowych norm europejskich
związanych z oszczędnością elektryczną, posiada
system auto wyłączenia (stand by), który włącza się
po 30 minutach nie użytkowania. Ponownie lekko
wcisnąć przycisk WŁĄCZANIA/WYŁĄCZANIA i
poczekać, aż pralka ponownie włączy się.
Kontrolki
Kontrolki dostarczają ważnych informacji.
Oto co sygnalizują:
Kontrolki bieżącej fazy prania
Przy obracaniu pokrętłem PROGRAMÓW kontrolki będą
się zapalać, wskazując kolejne fazy pracy, które wykona
urządzenie na podstawie ustawionego programu. Po
wybraniu i uruchomieniu żądanego cyklu prania kontrolki
będą się kolejno zapalać, wskazując stan zaawansowania programu:
Pranie zasadnicze
Płukanie
Wirowanie
Wydalanie wody
Koniec cyklu
Przyciski funkcyjne i ich kontrolki
Po dokonaniu wyboru funkcji jej kontrolka zaświeci się.
W przypadku wyboru funkcji niezgodnej z ustawionym
programem jej kontrolka zacznie pulsować, zostanie
wyemitowany sygnał dźwiękowy, a funkcja nie włączy
się. Jeśli ustawiona funkcja będzie sprzeczna z inną,
wybraną wcześniej, uwzględniony zostanie tylko ostatni
dokonany wybór.
Kontrolki
CYKLU
STANU ZAAWANSOWANIA
Kontrolka
BLOKADY OKRĄGŁYCH
DRZWICZEK
Przycisk z kontrolką
START/PAUZA
Przyciski z kontrolkami
FUNKCJI
52
Page 53

Kontrolka temperatury
Przy wyborze wartości temperatury zaświeci
się właściwa kontrolka.
Kontrolka wirowania
Przy wyborze prędkości wirowania zaświeci
się właściwa kontrolka.
Kontrolka blokady przycisków
Aby „włączyć” blokadę panelu sterowania, należy
przytrzymać przycisk wciśnięty przez około 2 sekundy.
Zapalona kontrolka wskazuje, że panel sterowania
jest zablokowany. W ten sposób uniemożliwia się
dokonywanie przypadkowych zmian w programach,
zwłaszcza jeśli w domu są dzieci. Aby „wyłączyć”
blokadę panelu sterowania, należy przytrzymać przycisk
wciśnięty przez około 2 sekundy.
Kontrolka blokady okrągłych drzwiczek
Zapalona kontrolka wskazuje, że okrągłe drzwiczki pralki
są zablokowane, aby zapobiec ich przypadkowemu otwarciu. Przed przystąpieniem do otwierania drzwiczek należy
poczekać, aż kontrolka zgaśnie, w przeciwnym razie można
spowodować ich uszkodzenie (około 3 minut).
N.B.: jeśli funkcja „Timer opóźnienia” jest włączona, nie
można otworzyć okrągłych drzwiczek, w celu ich otwarcia konieczne jest chwilowe zatrzymanie urządzenia
poprzez naciśnięcie przycisku START/PAUZA.
! Szybkie pulsowanie (pomarańczowej) kontrolki START/
PAUZA równocześnie z kontrolką funkcji sygnalizuje
wystąpienie nieprawidłowości w działaniu pralki (patrz
„Nieprawidłowości w działaniu i sposoby ich usuwania”).
Jak otwierać i zamykac kosz
Rys. 1
Rys. 2
A) OTWIERANIE. (Rys. 1):
Podnieść zewnętrzną pokrywę i całkowicie ją
otworzyć.
B) OTWIERANIE KOSZA (Soft opening):
Nacisnąć palcem przycisk wskazany na rys. 2 i
koszyk delikatnie się otworzy.
C) WKŁADANIE BIELIZNY (Rys. 3).
D) ZAMKNIĘCIE (Rys. 4):
- dobrze zamknąć drzwiczki, opuszczając najpierw
drzwiczki przednie i opierając na nich drzwiczki
tylne;
- upewnić się, czy zaczepy przednich drzwiczek
dobrze weszły na swoje miejsce w tylnych
drzwiczkach;
- po usłyszeniu charakterystycznego “clac”, co
świadczy o zaskoczeniu zaczepów, lekko docisnąć
oboje drzwiczek, które nie powinny się rozczepić.;
- na zakończenie zamknąć klapę zewnętrzną.
Uruchamianie programu
1. Włączyć pralkę, naciskając przycisk
WŁĄCZANIE / WYŁĄCZANIE. Wszystkie kontrolki zapalą
się na kilka sekund, następnie wyłączą się i zacznie
pulsować kontrolka START/PAUZA.
2. Załadować bieliznę do pralki, zamknąć drzwiczki i
pokrywę.
3. Ustawić żądany program przy pomocy pokrętła PROGRAMÓW.
4. Ustawić temperaturę prania (patrz „Personalizacja”).
5. Ustawić szybkość wirowania (patrz „Personalizacja”).
6. Wsypać środek piorący i dodatki (patrz „Środki piorące
i bielizna”).
7. Wybrać żądane funkcje.
8. Uruchomić program naciskając przycisk START/PAUZA,
kontrolka programu będzie świecić ciągłym światłem w
kolorze zielonym. Aby anulować ustawiony cykl, należy
chwilowo zatrzymać urządzenie, naciskając przycisk
START/PAUZA, i wybrać nowy cykl.
9. Po zakończeniu programu zapali się kontrolka .
Kontrolka BLOKADY DRZWICZEK zgaśnie, wskazując,
że otwarcie drzwiczek jest możliwe. Wyjąć bieliznę i
pozostawić drzwiczki pralki uchylone, aby bęben mógł
wyschnąć.
Wyłączyć pralkę, naciskając przycisk WŁĄCZANIE/
WYŁĄCZANIE.
PL
Rys. 3
Rys. 4
53
Page 54

PL
Programy
Tabela programów
Prêdkoœæ
Opis programu
Programy
Codzienne
Bawe³na z praniem wstêpnym
1
Bawe³na
2
Bawe³na tkaniny kolorowe (3)
3
Syntetyczne:
4
Syntetyczne (4):
4
Syntetyczne:
4
Odświeżanie 15’: w celu szybkiego odœwie¿enia lekko
zabrudzonych tkanin (niewskazany dla we³ny, jedwabiu
5
i tkanin przeznaczonych do prania rêcznego).
Specjalne
Higieniczny
6
Higieniczny (1-2)
6
Higieniczny (2)
6
Spokojny sen
7
Koszule
8
Jedwab/Firanki
9
Wełna
10
Programy Eco
Bawe³na
11
Syntetyczne
12
Mix 30'
13
Programy częściowe
Płukanie
Wirowanie
Odprowadzenie wody
Czas trwania cyklu wskazany na wyświetlaczu lub w instrukcji jest czasem oszacowanym dla standardowych warunków. Rzeczywisty czas trwania cyklu może się
zmieniać w zależności od wielu czynników, takich jak temperatura i ciśnienie wody na wlocie, temperatura otoczenia, ilość detergentu, ilość i rodzaj pranej odzieży,
wyważenie ładunku, wybrane opcje dodatkowe.
Dla wszystkich Instytucji homologacyjnych:
1) Program kontrolny zgodny z normą 2010/1061: ustawić program 6, wybierając temperaturę 60°C i 40°C.
2) Program bawełna, długi: ustawić program 6, wybierając temperaturę 40°C.
3) Program bawełna, krótki: ustawić program 3, wybierając temperaturę 40°C.
4) Program Syntetyczne, krótki: ustawić program 4, wybierając temperaturę 40°C.
tkaniny kolorowe, wytrzymale, mocno zabrudzone.
tkaniny kolorowe, wytrzymale, mocno zabrudzone.
tkaniny kolorowe, wytrzymale, lekko zabrudzone.
Temp.
maks.
(°C)
90° 1200
60° 1200 -
40° 1200 -
60° 800 - -
40° 800 - -
40° 800 - -
90° 1200 -
60° 1200 - -
40° 1200 - -
40° 800 - -
40° 600 - -
30° 0 - -
40° 800 - -
Zimna
woda
Zimna
woda
Zimna
woda
maks.
(obroty na
minutê)
30 800 - -
1200 - -
800 - -
800 - -
- 1200 - - -
- 1200 - - - - 6
- 0 - - - - 6
Programy specjalne
MIX 15’ (program 5) to program przeznaczony do prania lekko zabrudzonej bielizny w krótkim czasie: trwa on tylko 15 minut i pozwala dzięki temu na zaoszczędzenie energii i czasu. Ustawiając program (5 w temperaturze 30°C) można razem
wyprać różnego rodzaju tkaniny (z wyjątkiem wełny i jedwabiu), przy maksymalnym ładunku 1,5 kg.
CYKL HIGIENICZNY (program 6). Wysokotemperaturowy program higienizujący, który przewiduje użycie wybielacza w
temperaturze powyżej 60°C. Aby wybielić pranie, należy umieścić w odpowiednich przegródkach wybielacz, środek piorący
i dodatki (patrz paragraf „Szuadka na środki piorące”).
PROGRAM SPOKOJNY SEN (program 7). Jest to cichy cykl, który może być uruchamiany w nocy, w godzinach niższej taryfy energetycznej. Program ten został opracowany dla tkanin syntetycznych i bawełnianych. Po zakończeniu cyklu pralka
zatrzymuje się z wodą w bębnie; aby wykonać wirowanie i odprowadzenie wody, należy nacisnąć przycisk START/PAUZA,
w przeciwnym razie po 8 godzinach urządzenie automatycznie odwiruje pranie i odprowadzi wodę.
Œrodki pior¹ce i dodatki
Pranie
wstêpne
Wybie-
lacz
-
Pranie
Œrodek
zmiêkc-
zaj¹cy
£adunek
max (kg)
6
6
6
2,5
2,5
2,5
1,5
6
6
6
4
2
1
1
6
3
3
6
Czas
trwania
cyklu
Możliwa jest kontrola czasu trwania programów na wyświetlaczu.
Programy Eco
Programy Eco dają dobre wyniki prania w niskich temperaturach, umożliwiając mniejsze zużycie energii
elektry cznej, co pr zekł ada się na korzyści dla śro dowiska naturalne go oraz oszc zędn ości pieniężne.
Programy Eco (Bawełna , Tkaniny syntetyczne i Szybki 30’ ) zostały utworzone dla różnych rodzajów tkanin i dla
odzieży mało zabrudzonej. Dla osiągnięcia najlepszych rezultatów zalecamy stosowanie środka piorącego w płynie; przed
praniem użyć odpowiedniego środka do czyszczenia kołnierzyków, mankietów i usuwania plam.
54
Page 55

Personalizacja
Ustawianie temperatury
Naciskając przycisk TEMPERATURA ustawia się temperaturę prania (patrz Tabela programów).
Temperaturę można zmniejszać, aż do prania w zimnej wodzie ( ).
Pralka automatycznie uniemożliwi ustawienie temperatury wyższej od maksymalnej temperatury przewidzianej dla danego programu.
Ustawianie wirowania
Naciskając przycisk WIROWANIE ustawia się prędkość wirowania dla wybranego programu.
Maksymalne prędkości przewidziane dla poszczególnych programów są następujące:
Programy Prędkość maksymalna
Bawełna 1200 obrotów na minutę
Tkaniny syntetyczne 800 obrotów na minutę
Wełna 800 obrotów na minutę
Jedwab tylko odprowadzenie wody
Prędkość wirowania może zostać zmniejszona, można też całkowicie wyłączyć wirowanie, wybierając symbol .
Pralka automatycznie uniemożliwi wykonanie wirowania z prędkością większą niż maksymalna prędkość wirowania
przewidziana dla danego programu.
Funkcje
Różne funkcje, w jakie wyposażona jest pralka, pozwalają na uzyskanie oczekiwanej czystości i bieli prania.
Aby włączyć poszczególne funkcje, należy:
1. nacisnąć przycisk odpowiadający żądanej funkcji;
2. zapalenie się jego kontrolki sygnalizuje, że funkcja jest włączona.
Uwaga: Szybkie pulsowanie kontrolki wskazuje, że danej funkcji nie można ustawić dla wybranego programu.
PL
Timer opóźnienia
Aby ustawić opóźnione uruchomienie wybranego programu, należy naciskać przycisk aż do wyświetlenia się żądanego
opóźnienia (od 1 do 24 h).
W celu wyłączenia funkcji naciskać przycisk dopóki nie wyświetli się napis .
N.B.: Po naciśnięciu przycisku START/PAUZA wartość opóźnienia można zmienić tylko na mniejszą.
! Jest aktywny ze wszystkimi programami.
Super Wash
Dzieki zastosowaniu wiekszej ilosci wody w poczatkowej fazie cyklu i wydluzeniu czasu trwania programu, funkcja ta
gwarantuje pranie o wysokiej skutecznosci.
! Funkcji tej nie można włączyć w programach 5, 6, 9, 10, 11, 12, 13, , , .
Płukanie dodatkowe
Wybierając tę opcję zwiększa się skuteczność płukania i zapewnia się optymalne usunięcie środka piorącego. Jest to
przydatne w przypadku, gdy skóra jest szczególnie wrażliwa na środki piorące.
! Funkcji tej nie można włączyć w programach 5, 13, , .
Łatwe prasowanie
Po wybraniu tej opcji pranie oraz wirowanie zostaną odpowiednio zmodykowane w celu ograniczenia powstawania
zagnieceń.
W programie 9 po zakończeniu cyklu bielizna pozostanie namoczona, a kontrolka funkcji „ŁATWE PRASOWANIE” oraz
kontrolka START/PAUZA będą pulsować (pomarańczowym światłem), natomiast kontrolka PŁUKANIA będzie świecić
światłem ciągłym. W celu odprowadzenia wody i umożliwienia wyjęcia prania konieczne jest naciśnięcie przycisku
START/PAUZA lub przycisku „ŁATWE PRASOWANIE”.
! Funkcji tej nie można włączyć w programach 5, 6, 7, 10, 11, 12, 13, , .
55
Page 56

Środki piorące i bielizna
PL
Szuadka na środki piorące
Dobre rezultaty prania zależą również od właściwego dozowania środka piorącego: wsypując go za dużo, wcale
nie poprawia się wydajności prania, lecz przyczynia się
do odkładania się nalotów na wewnętrznych cześciach
pralki i do zanieczyszczania środowiska.
Wysunąć szuadkę i
wsypać do niej środki
piorące i dodatkowe w
następujący sposób
przegródka 1: Środek piorący do prania wstępnego (w
proszku)
przegródka 2: Środek piorący
(w proszku lub w płynie)
Środek piorący w płynie należy włożyć bezpośrednio do
bębna z zastosowaniem odpowiedniej kulki dozującej.
przegródka 3: Środki dodatkowe (zmiękczające, itp.)
Kiedy wlewa się środek zmiękczający do przegródki 3, to
należy zwrócić uwagę, aby nie przekroczyć oznaczonego
poziomu “max”.
Środek zmiękczający jest automatycznie dodawany do
wody podczas ostatniego płukania. Na zakończenie
tego programu prania w przegródce 3 pozostaje reszta wody. Służy ona dla skoncentrowanych środków
zmiękczających, to znaczy do ich rozprowadzenia z
wodą. Jeśliby w przegródce 3 pozostało więcej wody niż
zwykle, oznacza to, że urządzenie dozujące jest zatkane. Jak je wyczyścić patrz strona “Utrzymanie i konser-
wacja”.
przegródka 4: Wybielacz
Cykl wybielania
Wybielanie jest możliwe tylko w programach 2, 3, 6.
Wlać wybielacz do pojemnika 4, umieścić we właściwych
przegródkach środek piorący i środek zmiękczający, po
czym ustawić jeden z wyżej wymienionych programów.
Zalecany tylko do prania bardzo zabrudzonej bielizny
bawełnianej.
• Nie przekraczać wskazanego ciężaru suchej bielizny:
Tkaniny wytrzymałe: max 6 kg
Tkaniny syntetyczne: max 2,5 kg
Tkaniny delikatne: max 2 kg
Wełna: max 1 kg
Ile waży bielizna?
1 prześcieradło 400-500 gr.
1 poszewka 150-200 gr.
1 obrus 400-500 gr.
1 szlafrok 900-1.200 gr.
1 ręcznik 150-250 gr.
Tkaniny wymagające szczególnego
traktowania
Koszule: stosowac specjalny program 8 przeznaczony
do prania koszul z róznego rodzaju tkanin i w róznych
kolorach.
Program ten pozwala zachowac je w doskonalym stanie,
zmniejszajac do minimum powstawanie zagniecen.
Jedwab: stosować odpowiedni program 9 do prania
wszelkiego rodzaju wyrobów z jedwabiu. Zaleca się
stosowanie specjalnego środka piorącego do tkanin
delikatnych.
Firany: włożyć je złożone do poszewki lub do siatkowatego worka. Stosować program 9.
Wełna: to jedyna pralka, która uzyskała prestiżowe
oznaczenie Woolmark Platinum Care (M.0508) od The
Woolmark Company, które certykuje pranie w pralce
wszystkich wyrobów wełnianych, także tych z etykietą
„tylko pranie ręczne” . Korzystając z programu 10
można więc w pełni bezpiecznie prać w pralce wszystkie
tkaniny wełniane (maks. 1 kg) z gwarancją uzyskania
najlepszych rezultatów.
System równoważenia ładunku
Przed każdym wirowaniem, aby uniknąć nadmiernych
drgań oraz jednorodnie rozłożyć wsad, bęben wykonuje obroty z prędkością nieco większą niż podczas
prania. Jeśli pomimo kolejnych prób wsad nie zostanie
równomiernie rozłożony, maszyna wykona wirowanie
z prędkością mniejszą od przewidzianej. W przypadku nadmiernego niezrównoważenia pralka wykona
rozłożenie wsadu zamiast wirowania. Aby zapewnić lepsze rozłożenie wsadu oraz jego właściwe zrównoważenie,
zaleca się wymieszanie dużych i małych sztuk bielizny.
Przygotowanie bielizny
• Podzielić bieliznę do prania według:
- rodzaju tkaniny / symbolu na etykietce.
- kolorów: oddzielić tkaniny kolorowe od białych.
• Opróżnić kieszenie i sprawdzić guziki.
56
Page 57

Zalecenia i środki
ostrożności
! Pralka została zaprojektowana i wyprodukowana
zgodnie z międzynarodowymi normami bezpieczeństwa.
Niniejsze ostrzeżenia zostały tu zamieszczone
ze względów bezpieczeństwa i należy je uważnie
przeczytać.
Ogólne zasady bezpieczeństwa
• Urządzenie to zostało zaprojektowane wyłącznie do
użytkowania w warunkach domowych.
• Urządzenie to nie jest przeznaczone do użytkowania
przez osoby (w tym dzieci) o ograniczonej
sprawności zycznej, zmysłowej lub umysłowej oraz
nieposiadające odpowiedniego doświadczenia i
wiedzy, chyba że używają go pod nadzorem lub po
otrzymaniu wskazówek od osoby odpowiedzialnej za
ich bezpieczeństwo. Należy pilnować, aby dzieci nie
bawiły się urządzeniem.
• Nie dotykać pralki, stojąc przy niej boso lub mając
mokre lub wilgotne ręce albo stopy.
• Nie wyjmować wtyczki z gniazdka, ciągnąc za kabel,
lecz trzymając za wtyczkę.
• Nie dotykać odprowadzanej wody, gdyż może ona
osiągać wysokie temperatury.
• W żadnym wypadku nie otwierać okrągłych drzwiczek
pralki na siłę: grozi to uszkodzeniem mechanizmu
zabezpieczającego drzwiczki przed przypadkowym
otwarciem.
• W razie wystąpienia usterki nie należy w żadnym
wypadku próbować dostać się do wewnętrznych części
pralki z zamiarem samodzielnego dokonania naprawy.
• Zawsze uważać, aby dzieci nie zbliżały się do
pracującej pralki.
• Jeśli trzeba przenieść pralkę w inne miejsce, należy to
robić bardzo ostrożnie, w dwie lub trzy osoby. Nigdy
nie przenosić pralki samodzielnie, gdyż jest ona bardzo
ciężka.
• Przed włożeniem bielizny sprawdzić, czy bęben jest
pusty.
Utylizacja
• Utylizacja opakowania: stosować się do lokalnych przepisów, dzięki temu opakowanie będzie mogło zostać
ponownie wykorzystane.
• Europejska Dyrektywa 2002/96/EC dotycząca
Zużytych Elektrycznych i Elektronicznych Urządzeń
zakłada zakaz pozbywania się starych urządzeń domowego użytku jako nieposortowanych śmieci komunalnych. Zużyte urządzenia muszą być osobno zbierane
i sortowane w celu zoptymalizowania odzyskania oraz
ponownego przetworzenia pewnych komponentów i
materiałów. Pozwala to ograniczyć zanieczyszczenie
środowiska i pozytywnie wpływa na ludzkie zdrowie.
Przekreślony symbol „kosza” umieszczony na produkcie przypomina klientowi o obowiązku specjalnego
sortowania.
Konsumenci powinni kontaktować się z władzami
lokalnymi lub sprzedawcą w celu uzyskania informacji dotyczących postępowania z ich zużytymi
urządzeniami gospodarstwa domowego.
Oszczędność i ochrona środowiska
Oszczędność środka piorącego, wody, energii i
czasu
• Aby nie trwonić zasobów, należy używać pralki
załadowanej do pełna. Jedno załadowane do pełna
pranie, zamiast dwóch załadowanych do połowy, pozwala na zaoszczędzenie aż do 50% energii.
• Pranie wstępne konieczne jest tylko w przypadku
bielizny bardo brudnej. Unikanie prania wstępnego
pozwala na zaoszczędzenie środka piorącego; czasu,
wody oraz od 5 do 15% energii.
• Wywabiając plamy odplamiaczem i pozostawiając
bieliznę namoczoną w wodzie przed praniem, można
zredukować temperaturę prania. Stosując program
60°C zamiast 90°C lub program 40°C zamiast 60°C,
można zaoszczędzić aż do 50% energii.
• Dokładne dozowanie środka piorącego w zależności
od twardości wody, stopnia zabrudzenia i ilości bielizny pozwala uniknąć jego trwonienia i wychodzi na
korzyść środowisku: środki piorące, mimo że ulegają
biodegradacji, zawsze zawierają jednak składniki,
które zakłócają środowisko naturalne. Należy również
unikać, gdy jest to możliwe, środka zmiękczającego.
• Dokonując prania późnym popołudniem i wieczorem,
aż do wczesnych godzin rannych, przyczynia się do
zmniejszenia obciążenia energetycznego elektrowni.
Opcja “Timer opóźnienia” pomaga przy takim zaprogramowaniu prania w czasie.
• Jeśli bielizna ma być wyszuszona w suszarce, należy
wybrać wysoką szybkość odwirowania. Dobrze odwirowana z wody bielizna pozwala na zaoszczędzenie
czasu i energii przy suszeniu.
PL
57
Page 58

Utrzymanie i konserwacja
PL
Wyłączenie wody i prądu elektrycznego
• Zamknąć kurek dopływu wody po każdym praniu.
Zmniejsza się w ten sposób zużycie instalacji hydraulicznej pralki oraz niebezpieczeństwo przecieków.
• Wyjąć wtyczkę z kontaktu przed przystąpieniem do
czyszczenia pralki oraz czynności konserwacyjnych.
Czyszczenie pralki
Obudowę zewnętrzną i gumowe części pralki należy
myć wilgotną ściereczką zmoczoną w wodzie z mydłem.
Nie stosować rozpuszczalników ani ostrych i ściernych
środków czyszczących.
Czyszczenie drzwiczek i bębna
• Należy zawsze pozostawiać uchylone drzwiczki pralki,
aby zapobiec tworzeniu się przykrych zapachów.
Czyszczenie pompy
Pralka wyposażona jest w pompę samooczyszczającą,
która nie wymaga zabiegów konserwacyjnych. Może
się jednak zdarzyć, że małe przedmioty (monety, guziki)
wpadną do przedsionka ochronnego pompy, znajdującego
się w jej dolnej części.
! Upewnić się, by cykl prania był zakończony i by wty-
czka była wyjęta z gniazdka.
Aby odzyskać ewentualne przedmioty, które upadły do
wstępnej komory:
1. Odczepić dolny cokół
w przedniej części pralki
po cią gaj ąc rękoma jej
boczne końce (patrz ry-
sunek);
2. odkręcić przykrywkę,
obracając ją w kierunku przeciwnym do ruchu
wskazówek zegara (zo-
bacz rysunek): fakt, że
wypłynie trochę wody, jest
zjawiskiem normalnym;
3. dokładnie wyczyścić
wnętrze;
4. ponownie przykręcić
przykrywkę;
5. ponownie przymocować
pa n e l, pa m i ęt a j ąc o
wsunięciu zaczepów w
odpowiednie otwory przed dopchnięciem go do
urządzenia.
Kontrola rury doprowadzania wody
Przynajmniej raz do roku należy skontrolować rurę
doprowadzania wody. Jeśli widoczne są na niej rysy
i pęknięcia, należy ją wymienić: w trakcie prania duże
ciśnienie może bowiem spowodować jej nagłe rozerwanie się.
! Nigdy nie instalować rur używanych.
Jak czyścić szuadkę środków piorących
Wymontowanie:
Lekko przycisnąć duży
przycisk w przedniej części
szuadki środków piorących
i pociągnąć ją do góry
(Rys.1, 2).
Czyszczenie:
Wymyć. szuadkę pod bieżącą wodą (Rys.3), pomagając
sobie starą szczoteczką do zębów i po wyjęciu pary
syfonków znajdujących się w górnej części przegródek 1
i 2 (Rys.4), sprawdzić, czy nie są one zatkane i wypłukać
je.
Ponowne zamontowanie:
Po włożeniu pary syfon-ków,
wstaw szuadkę na swoje
miejsce, zaczepia jąc ją
(Rys. 4, 2, 1).
Rys. 1 Rys. 2 Rys. 3 Rys. 4
58
Page 59

Nieprawidłowości w działaniu
i sposoby ich usuwania
Może się zdarzyć, że pralka nie działa. Przed wezwaniem Serwisu Technicznego (patrz „Serwis Techniczny”) należy
sprawdzić, czy problemu nie da się łatwo rozwiązać przy pomocy poniższego wykazu.
Nieprawidłowości w działaniu:
Pralka nie włącza się.
Cykl prania nie rozpoczyna się.
Pralka nie pobiera wody (szybko pulsuje kontrolka pierwszej fazy prania).
Pralka cały czas pobiera i odprowadza wodę.
Możliwe przyczyny / Rozwiązania:
• Wtyczka nie jest włączona do gniazdka lub jest wsunięta za słabo, tak że nie
ma styku.
• W domu nastąpiła przerwa w dostawie prądu.
• Drzwiczki nie są dobrze zamknięte.
• Nie został wciśnięty przycisk WŁĄCZANIA/WYŁĄCZANIA.
• Nie został wciśnięty przycisk START/PAUZA.
• Kurek dopływu wody jest zamknięty.
• Zostało nastawione opóźnienie startu (patrz „Personalizacja”).
• Przewód doprowadzający wodę nie jest podłączony do kurka.
• Przewód jest zgięty.
• Kurek dopływu wody jest zamknięty.
• W domu nastąpiła przerwa w dostawie wody.
• Ciśnienie wody nie jest wystarczające.
• Nie został wciśnięty przycisk START/PAUZA.
• Przewód odpływowy nie został zainstalowany na wysokości między 65 a
100 cm od podłogi (patrz „Instalacja”).
• Końcówka przewodu odpływowego jest zanurzona w wodzie (patrz „Insta-
lacja”).
• Otwór odpływowy w ścianie nie posiada odpowietrznika.
Jeśli po sprawdzeniu tych możliwości problem nie zostanie rozwiązany, należy
zamknąć kurek dopływu wody, wyłączyć pralkę i wezwać Serwis Techniczny. Jeśli mieszkanie znajduje się na najwyższych piętrach budynku, może
wystąpić efekt syfonu, w wyniku którego pralka cały czas pobiera i odprowadza wodę. W celu wyeliminowania tej niedogodności należy zakupić specjalny
zawór, zapobiegający powstawaniu efektu syfonu.
PL
Pralka nie odprowadza wody i nie
odwirowuje prania.
Pralka mocno wibruje w fazie wirowania.
Z pralki wycieka woda.
Kontrolka START/PAUZA
(pomarańczowa) oraz kontrolki funkcji szybko pulsują.
Tworzy się zbyt duża ilość piany.
• Program nie przewiduje odprowadzania wody: w przypadku niektórych programów należy uruchomić je ręcznie.
• Włączona jest funkcja ŁATWE PRASOWANIE: aby zakończyć program,
należy nacisnąć przycisk START/PAUZA („Personalizacja”).
• Przewód odpływowy jest zgięty (patrz „Instalacja”).
• Instalacja odpływowa jest zatkana.
• Podczas instalacji pralki bęben nie został prawidłowo odblokowany (patrz
„Instalacja”).
• Pralka nie jest właściwie wypoziomowana (patrz „Instalacja”).
• Pralka, zainstalowana pomiędzy meblami a ścianą, ma za mało miejsca
(patrz „Instalacja”).
• Przewód doprowadzający wodę nie jest dobrze przykręcony (patrz „Instalacja”).
• Szuadka na środki piorące jest zatkana (w celu jej oczyszczenia patrz „Utr-
zymanie i konserwacja”).
• Przewód odpływowy nie jest dobrze zamocowany(patrz „Instalacja”).
• Wyłączyć maszynę i wyjąć wtyczkę z gniazdka, odczekać około 1 minuty,
następnie włączyć ją ponownie. Jeśli problem nie ustępuje, należy wezwać
Serwis Techniczny.
• Środek piorący nie jest odpowiedni do pralek automatycznych (na opakowaniu musi być umieszczony napis: „do pralek”, „do prania ręcznego i w
pralce” lub podobny).
• Użyto za dużo środka piorącego.
59
Page 60

Serwis Techniczny
195095043.00
08/2011 - Xerox Fabriano
PL
Przed skontaktowaniem się z Serwisem Technicznym:
• Sprawdzić, czy problemu nie można rozwiązać samodzielnie (patrz „Nieprawidłowości w działaniu i sposoby ich usuwa-
nia”);
• Ponownie uruchomić program i sprawdzić, czy problem nie zniknął;
• Jeśli nie, zwrócić się do autoryzowanego Serwisu Technicznego, dzwoniąc pod numer podany w karcie gwarancyjnej.
! Nigdy nie wzywać nieautoryzowanych techników.
Należy podać:
• rodzaj nieprawidłowości;
• model maszyny (Mod.);
• numer seryjny (S/N).
Informacje te znajdują się na przymocowanej z tyłu pralki tabliczce znamionowej.
60
 Loading...