

Page 1

Instructions for use
WASHING MACHINE
GB
English,1
SB
Cрпски,37
ECO8L 1252
FR
Français, 13
TR
Türkçe, 49
BG
Български,25
I
Italiano, 61
Contents
Installation, 2-3
Unpacking and levelling
Connecting the electricity and water supplies
The first wash cycle
Technical data
Care and maintenance, 4
Cutting off the water or electricity supply
Cleaning the washing machine
Cleaning the detergent dispenser drawer
Caring for the door and drum of your appliance
Cleaning the pump
Checking the water inlet hose
Precautions and tips, 5
General safety
Disposal
Description of the washing machine
and starting a wash cycle, 6-7
Control panel
Indicator lights
Starting a wash cycle
GB
Wash cycles, 8
Table of wash cycles
Personalisation, 9
Setting the temperature
Setting the spin speed
Functions
Detergents and laundry, 10
Detergent dispenser drawer
Bleach cycle
Preparing the laundry
Garments requiring special care
Load balancing system
Troubleshooting, 11
Service, 12
1
Page 2
Installation
GB
! This instruction manual should be kept in a safe
place for future reference. If the washing machine
is sold, transferred or moved, make sure that the
instruction manual remains with the machine so
that the new owner is able to familiarise himself/
herself with its operation and features.
! Read these instructions carefully: they contain
vital information relating to the safe installation
and operation of the appliance.
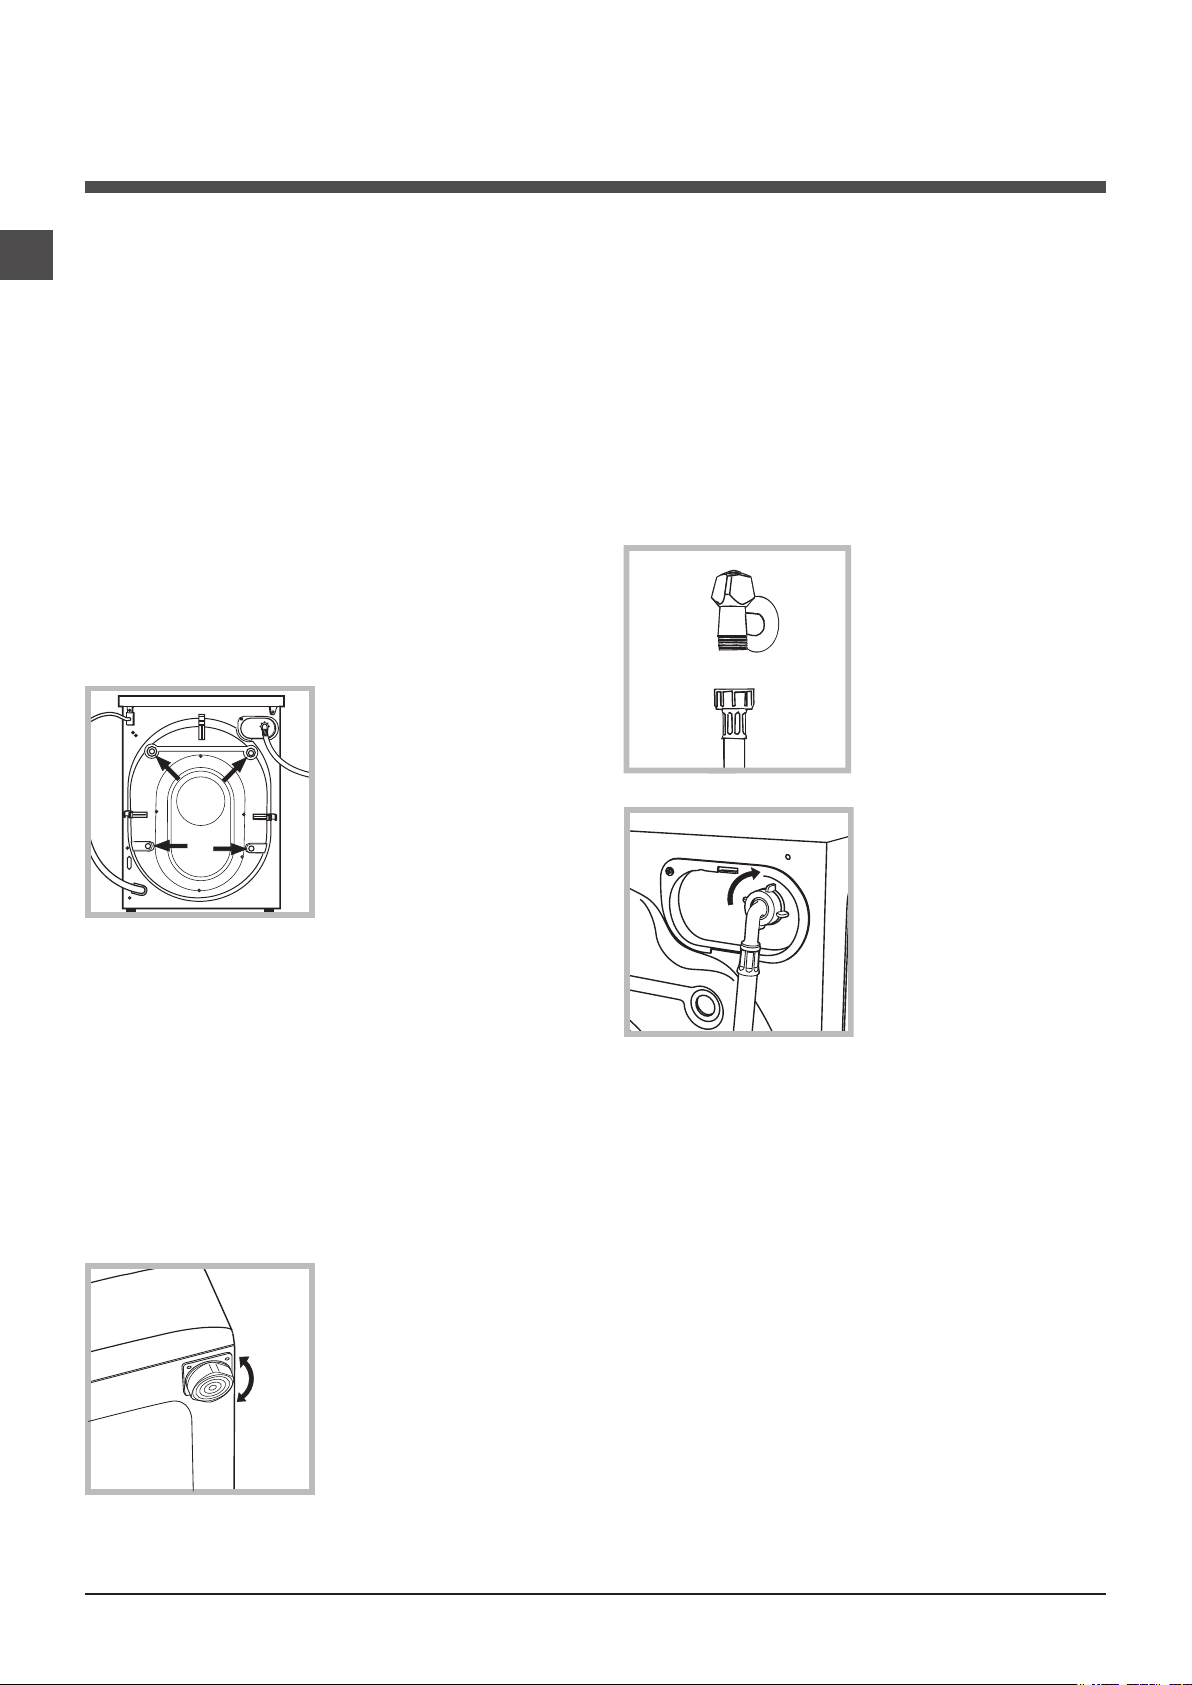
Unpacking and levelling
Unpacking
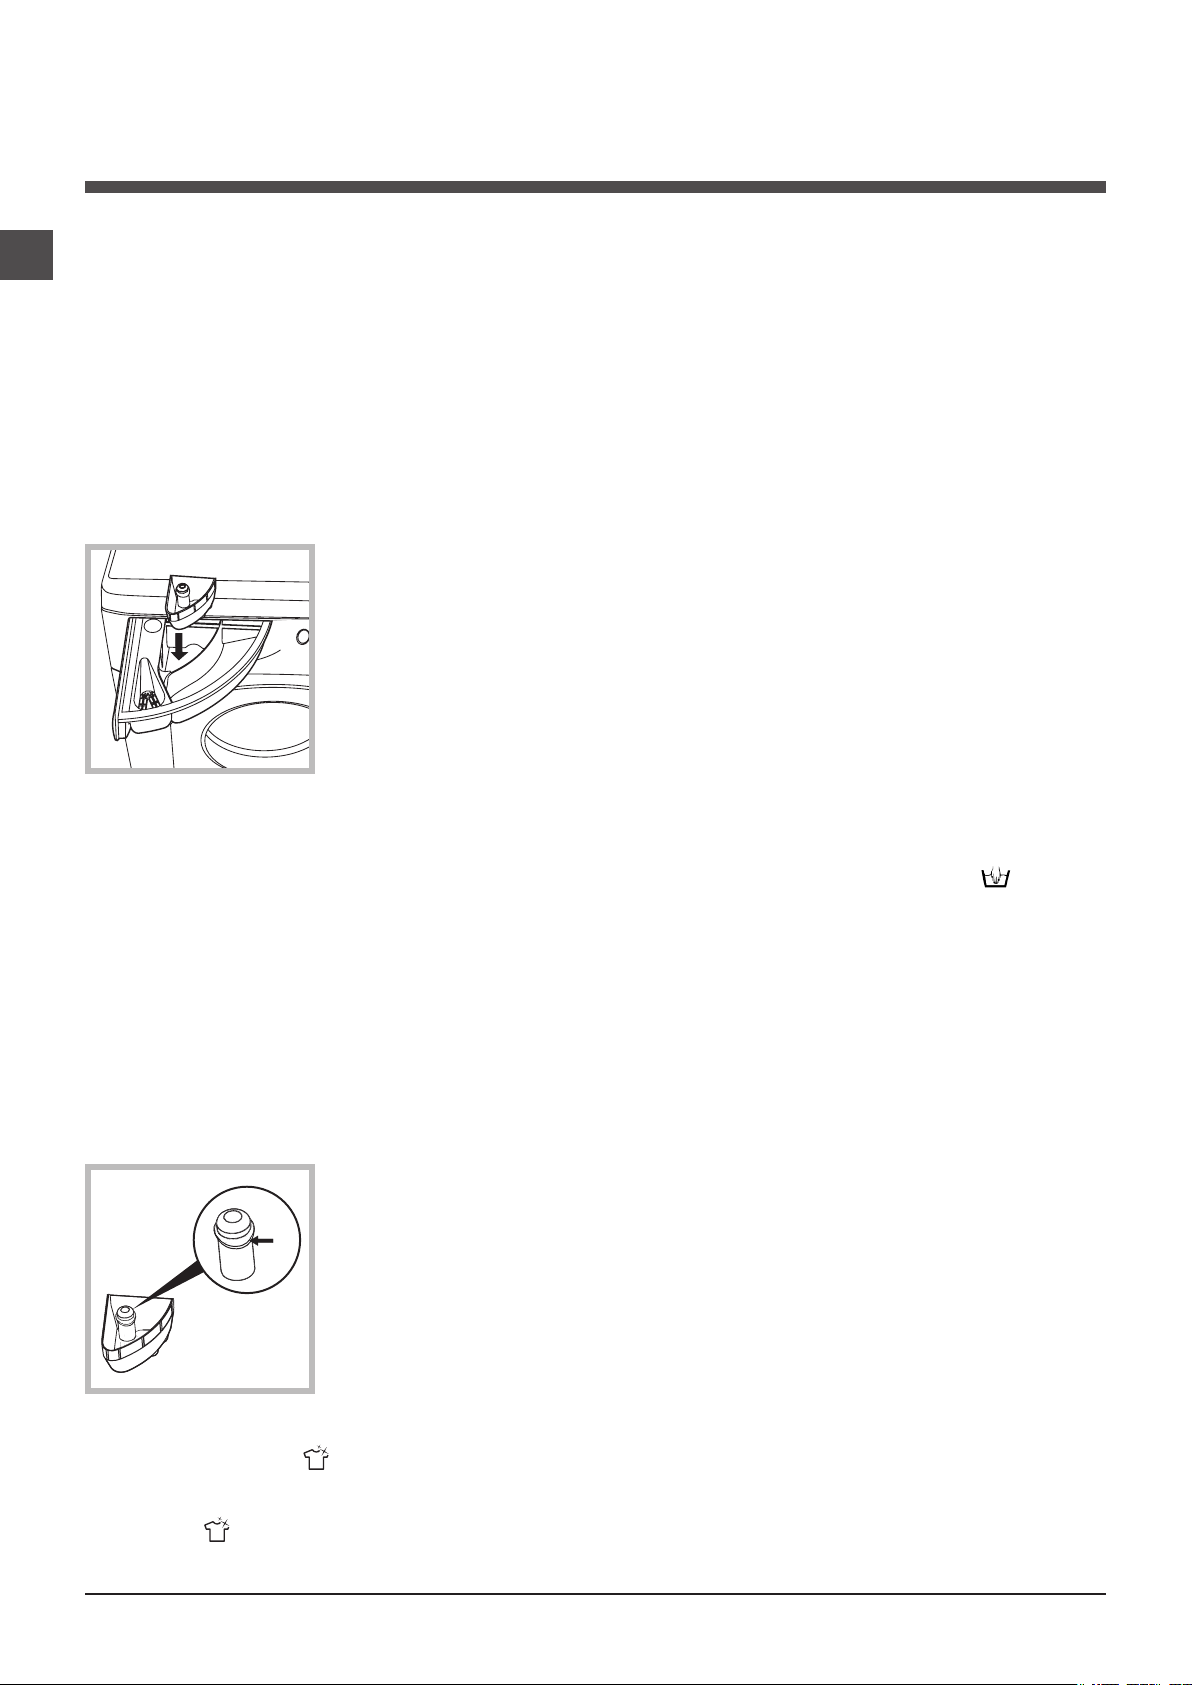
1. Remove the washing machine from its packaging.
2. Make sure that the washing machine has not
been damaged during the transportation process.
If it has been damaged, contact the retailer and do
not proceed any further with the installation process.
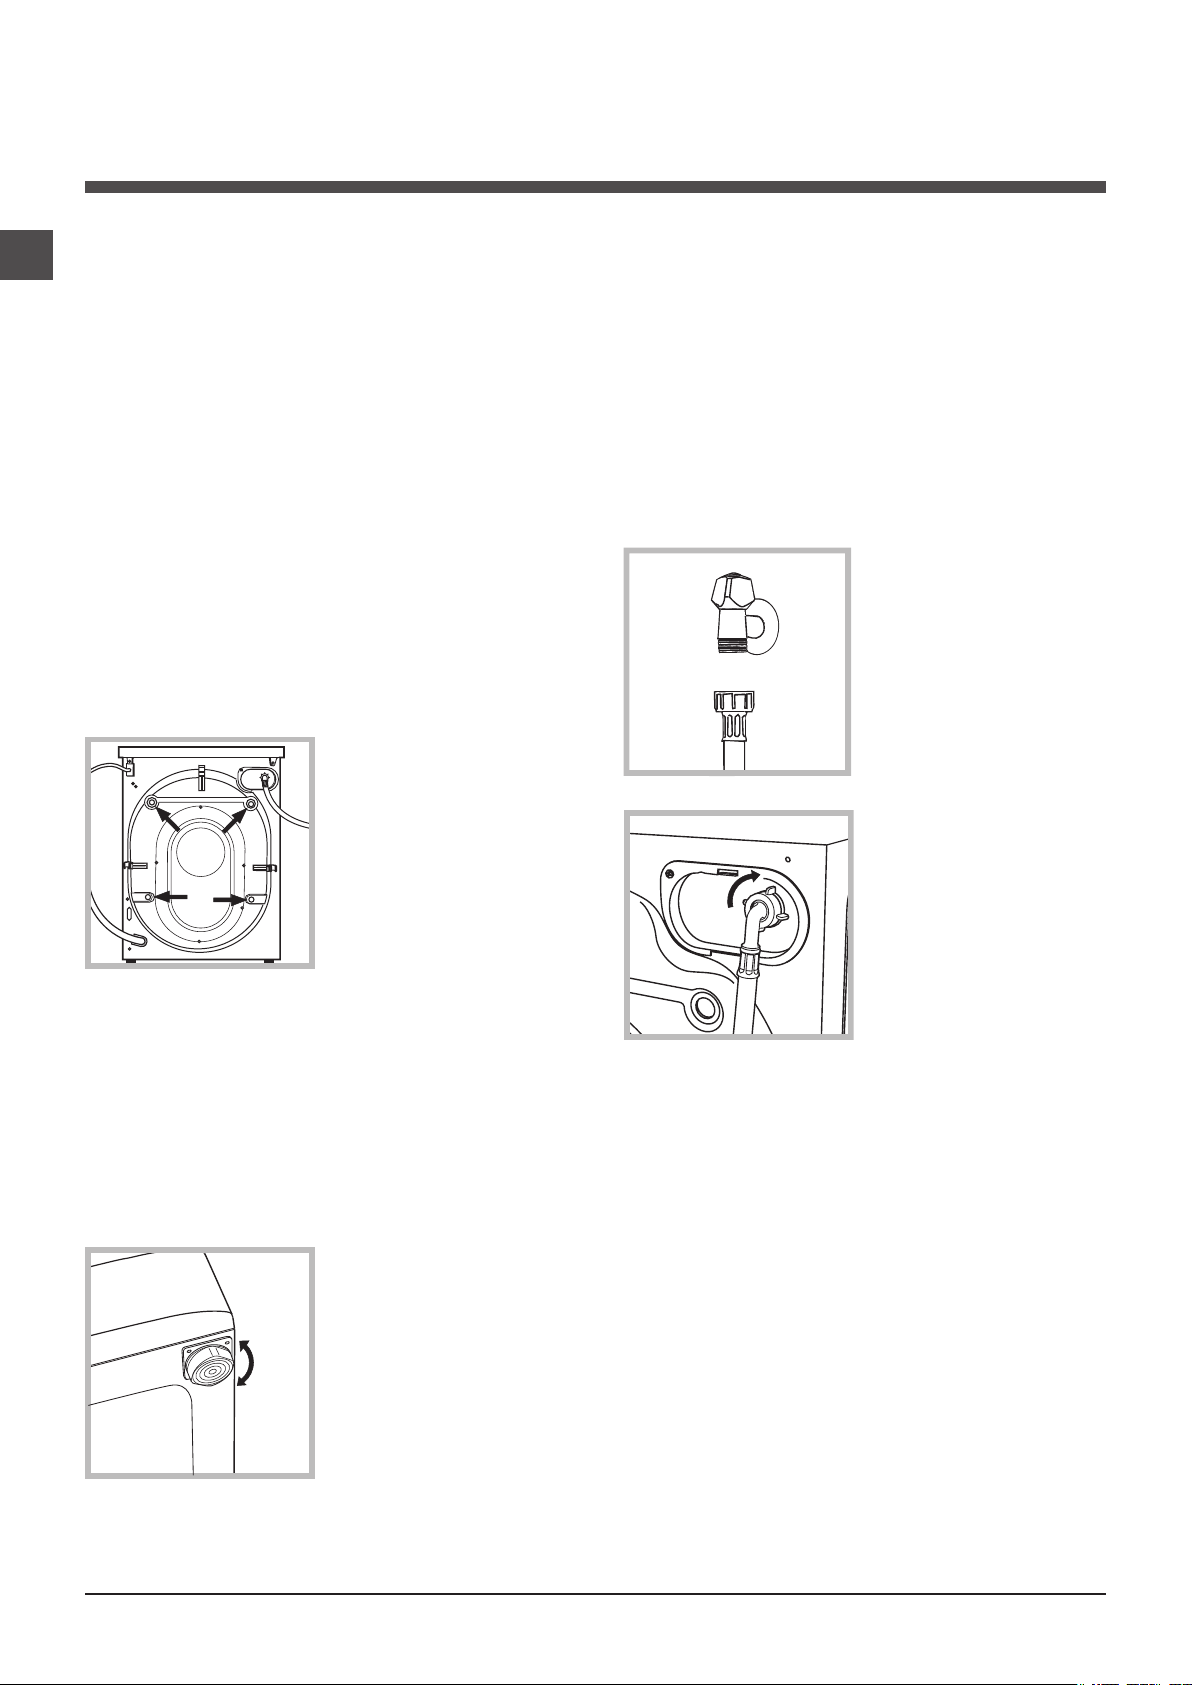
3. Remove the 4 protective screws (used
during transportation)
and the rubber washer
with the corresponding
spacer, located on the
rear part of the appliance (see figure).
4. Close off the holes using the plastic plugs
provided.
5. Keep all the parts in a safe place: you will need
them again if the washing machine needs to be
moved to another location.
! Packaging materials should not be used as
toys for children.
Levelling
Levelling the machine correctly will provide it with
stability, help to avoid vibrations and excessive
noise and prevent it from shifting while it is operating. If it is placed on carpet or a rug, adjust the
feet in such a way as to allow a sufficient ventilation space underneath the washing machine.
Connecting the electricity and water supplies
Connecting the water inlet hose
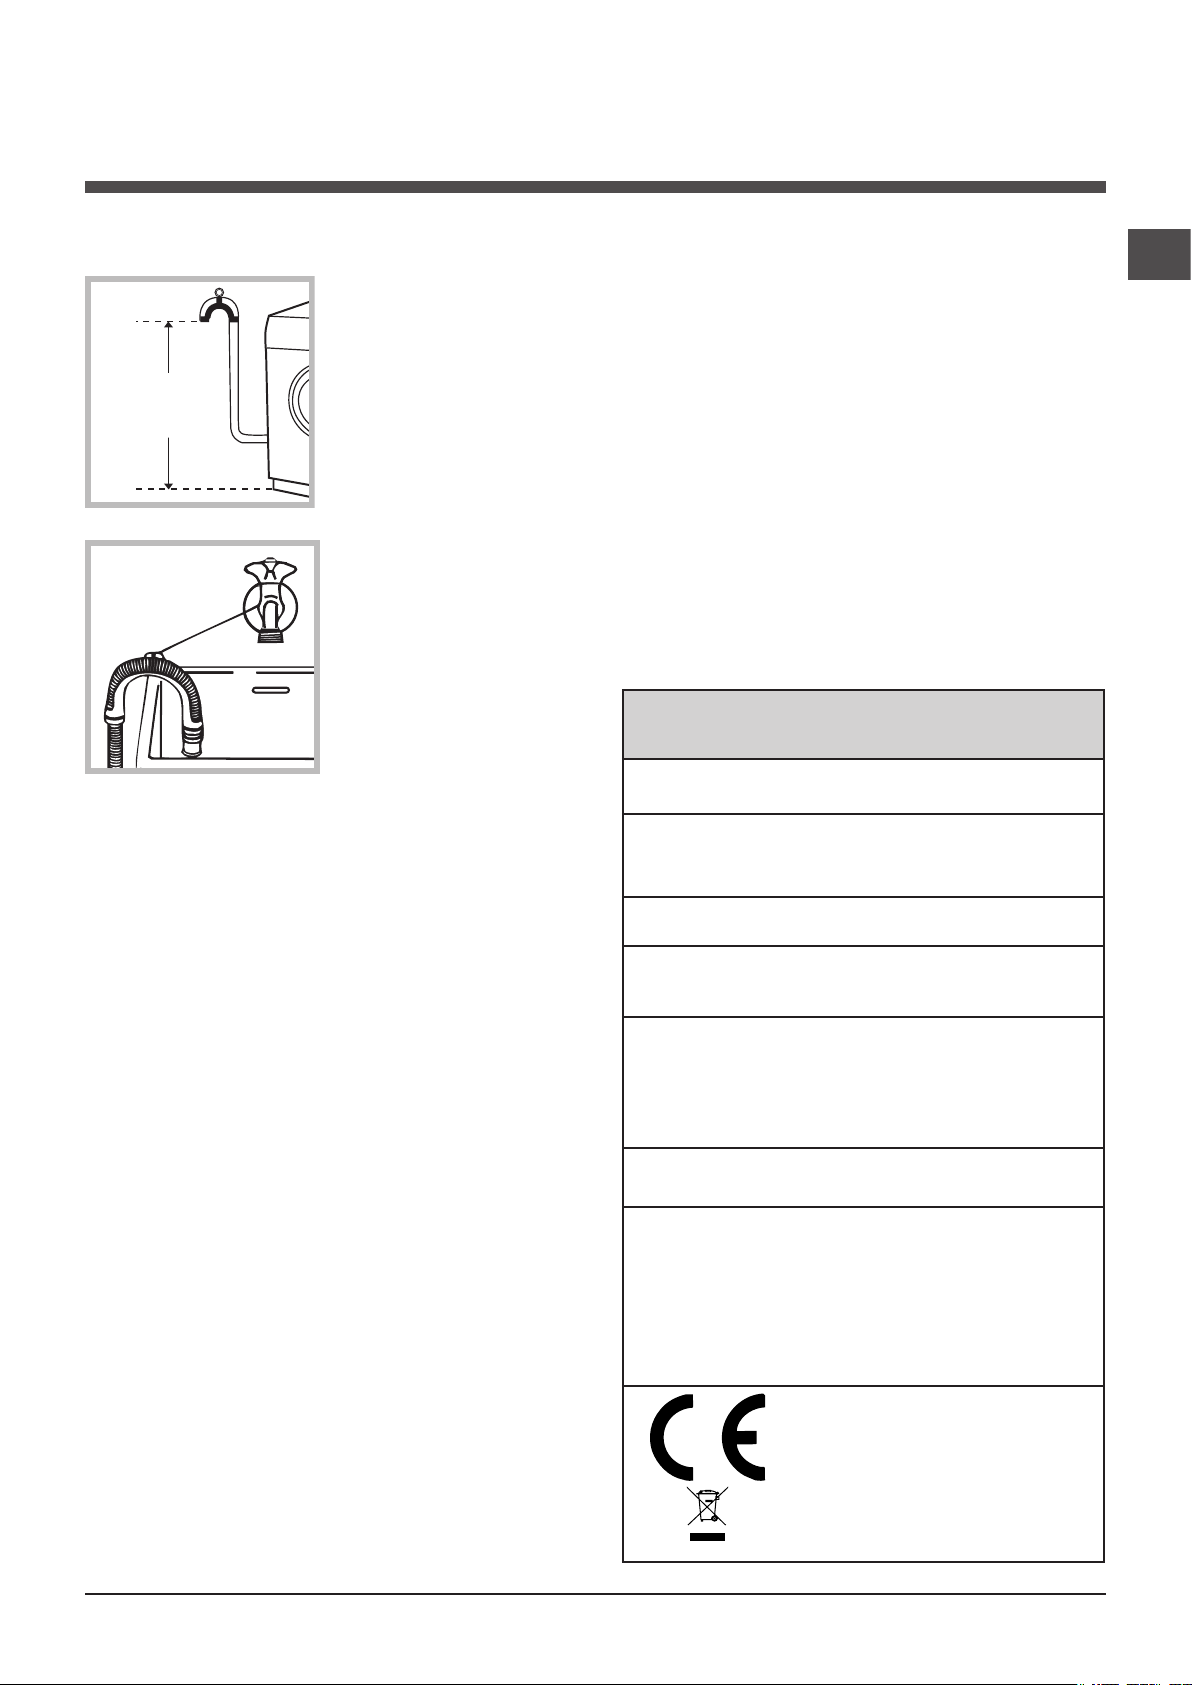
1. Connect the supply
pipe by screwing it to
a cold water tab using
a ¾ gas threaded connection (see figure).
Before performing the
connection, allow the
water to run freely until
it is perfectly clear.
2. Connect the inlet
hose to the washing
machine by screwing
it onto the corresponding water inlet of the
appliance, which is situated on the top righthand side of the rear
part of the appliance
(see figure).
3. Make sure that the hose is not folded over
or bent.
! The water pressure at the tap must fall within
the values indicated in the Technical details table
(see next page).
1. Install the washing
machine on a flat sturdy floor, without resting
it up against walls,
furniture cabinets or
anything else.
2. If the floor is not
perfectly level, compensate for any une-
venness by tightening
or loosening the adjustable front feet (see figure);
the angle of inclination, measured in relation to
the worktop, must not exceed 2°.
2
! If the inlet hose is not long enough, contact a
specialised shop or an authorised technician.
! Never use second-hand hoses.
! Use the ones supplied with the machine.
Page 3
data plate fixed to the machine
65 - 100 cm
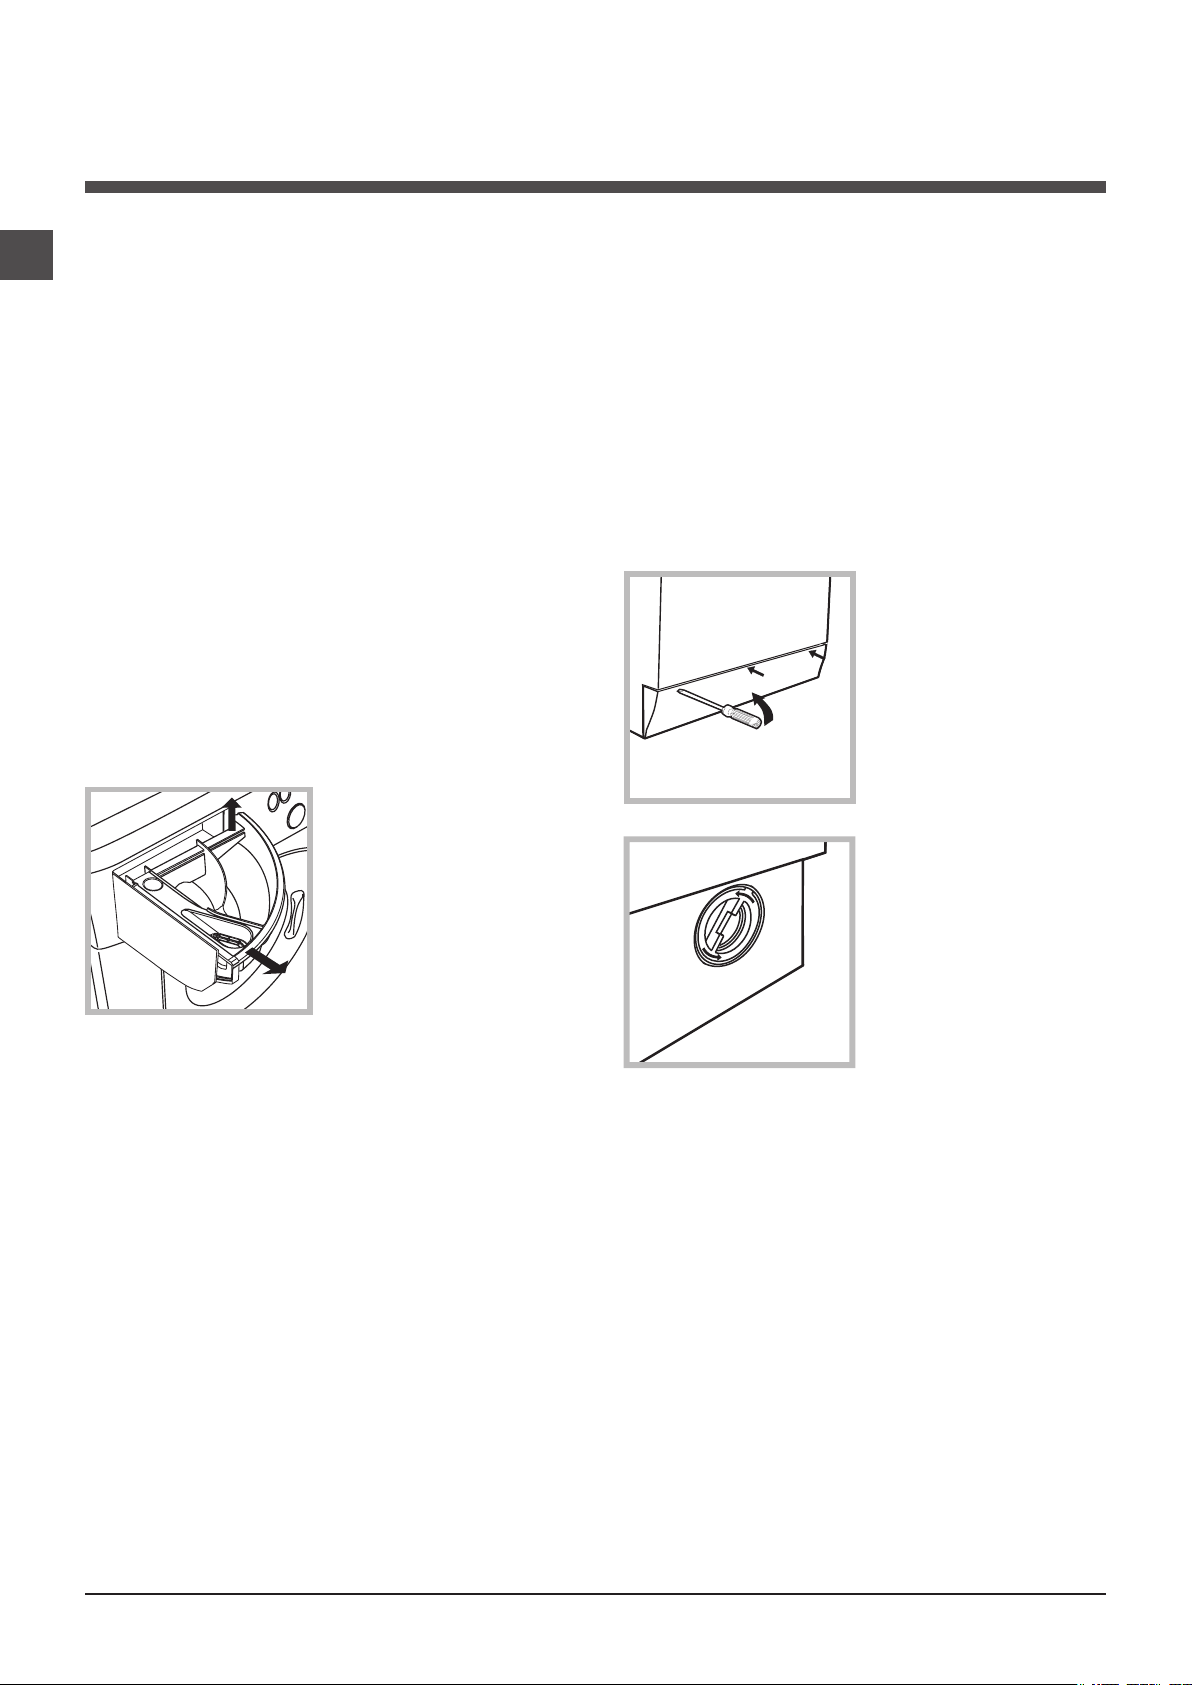
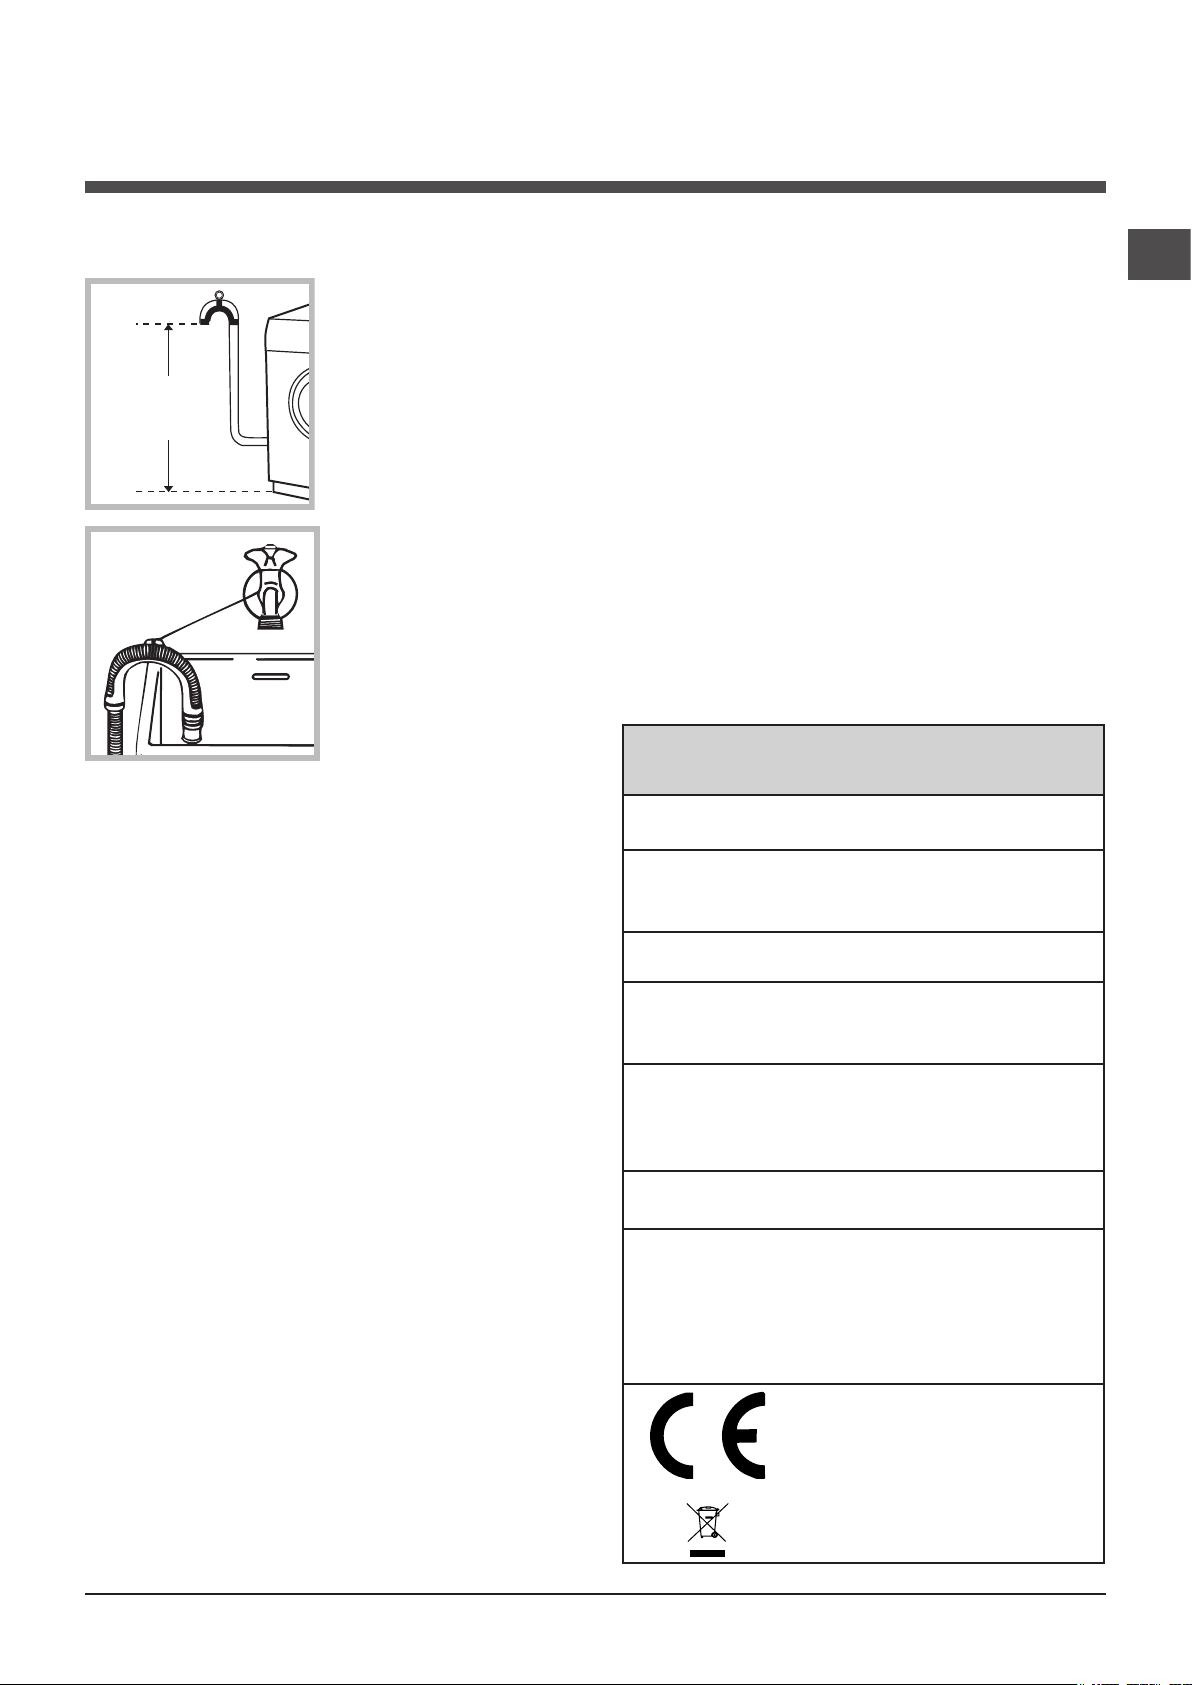
Connecting the drain hose
Co n ne ct t he dra in
hose, without bending
it, to a drainage duct or
a wall drain located at a
height between 65 and
100 cm from the floor;
! Do not use extension cords or multiple sockets.
! The cable should not be bent or compressed.
! The power supply cable must only be replaced
by authorised technicians.
Warning! The company shall not be held responsible
in the event that these regulations are not respected.
The first wash cycle
GB
alternatively, rest it on
the side of a washbasin or bathtub, fastening the duct supplied
to the tap (see figure).
The free end of the
hose should not be
underwater.
! We advise against the use of hose extensions;
if it is absolutely necessary, the extension must
have the same diameter as the original hose and
must not exceed 150 cm in length.
Electrical connections
Before plugging the appliance into the electricity
socket, make sure that:
• the socket is earthed and complies with all
applicable laws;
• the socket is able to withstand the maximum
power load of the appliance as indicated in the
Technical data table (see opposite);
• the power supply voltage falls within the values
indicated in the Technical data table (see opposite);
• the socket is compatible with the plug of the
washing machine. If this is not the case, replace the socket or the plug.
Once the appliance has been installed, and
before you use it for the first time, run a wash
cycle with detergent and no laundry, using the
wash cycle 2.
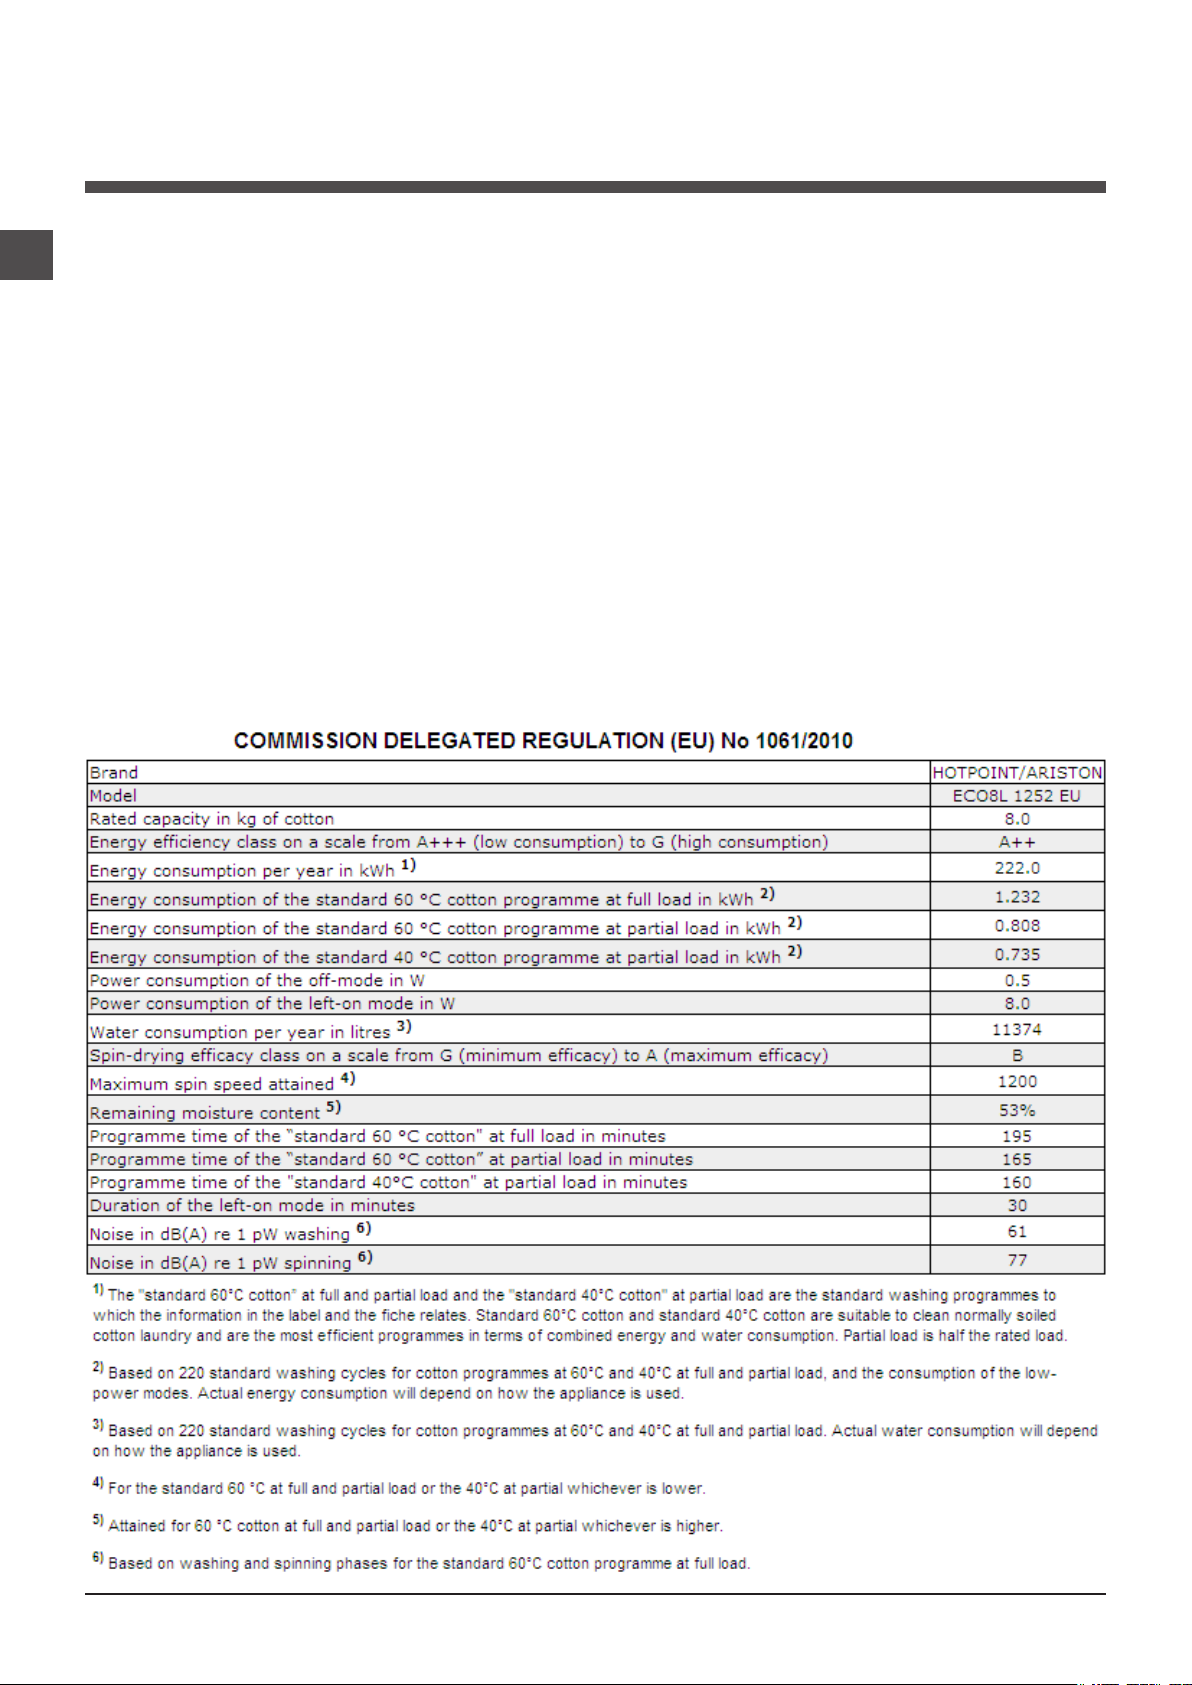
Technical data
Model
Dimensions
Capacity
Electrical
connections
Water
connection
Spin speed
Test wash
cycles in accordance with
directives
1061/2010
and
1015/2010.
ECO8L 1252
width 59,5 cm
height 85 cm
depth 60 cm
from 1 to 8 kg
please refer to the technical
maximum pressure
1 MPa (10 bar)
minimum pressure
0.05 MPa (0.5 bar)
drum capacity 62 litres
up to 1200 rotations per
minute
Programme 2:
Cotton standard 60°C;
Programme 3:
Cotton standard 40°C.
! The washing machine must not be installed
outdoors, even in covered areas. It is extremely
dangerous to leave the appliance exposed to
rain, storms and other weather conditions.
! When the washing machine has been installed,
the electricity socket must be within easy reach.
This appliance conforms to
the following EC Directives:
- 2004/108/CE (Electromagnetic Compatibility)
- 2012/19/EU
- 2006/95/EC (Low Voltage)
3
Page 4
Care and maintenance
1
2
GB
Cutting off the water and electricity
supplies
• Turn off the water tap after every wash cycle.
This will limit wear on the hydraulic system inside the washing machine and help to prevent
leaks.
• Unplug the washing machine when cleaning it
and during all maintenance work.
Cleaning the washing machine
The outer parts and rubber components of the
appliance can be cleaned using a soft cloth
soaked in lukewarm soapy water. Do not use
solvents or abrasives.
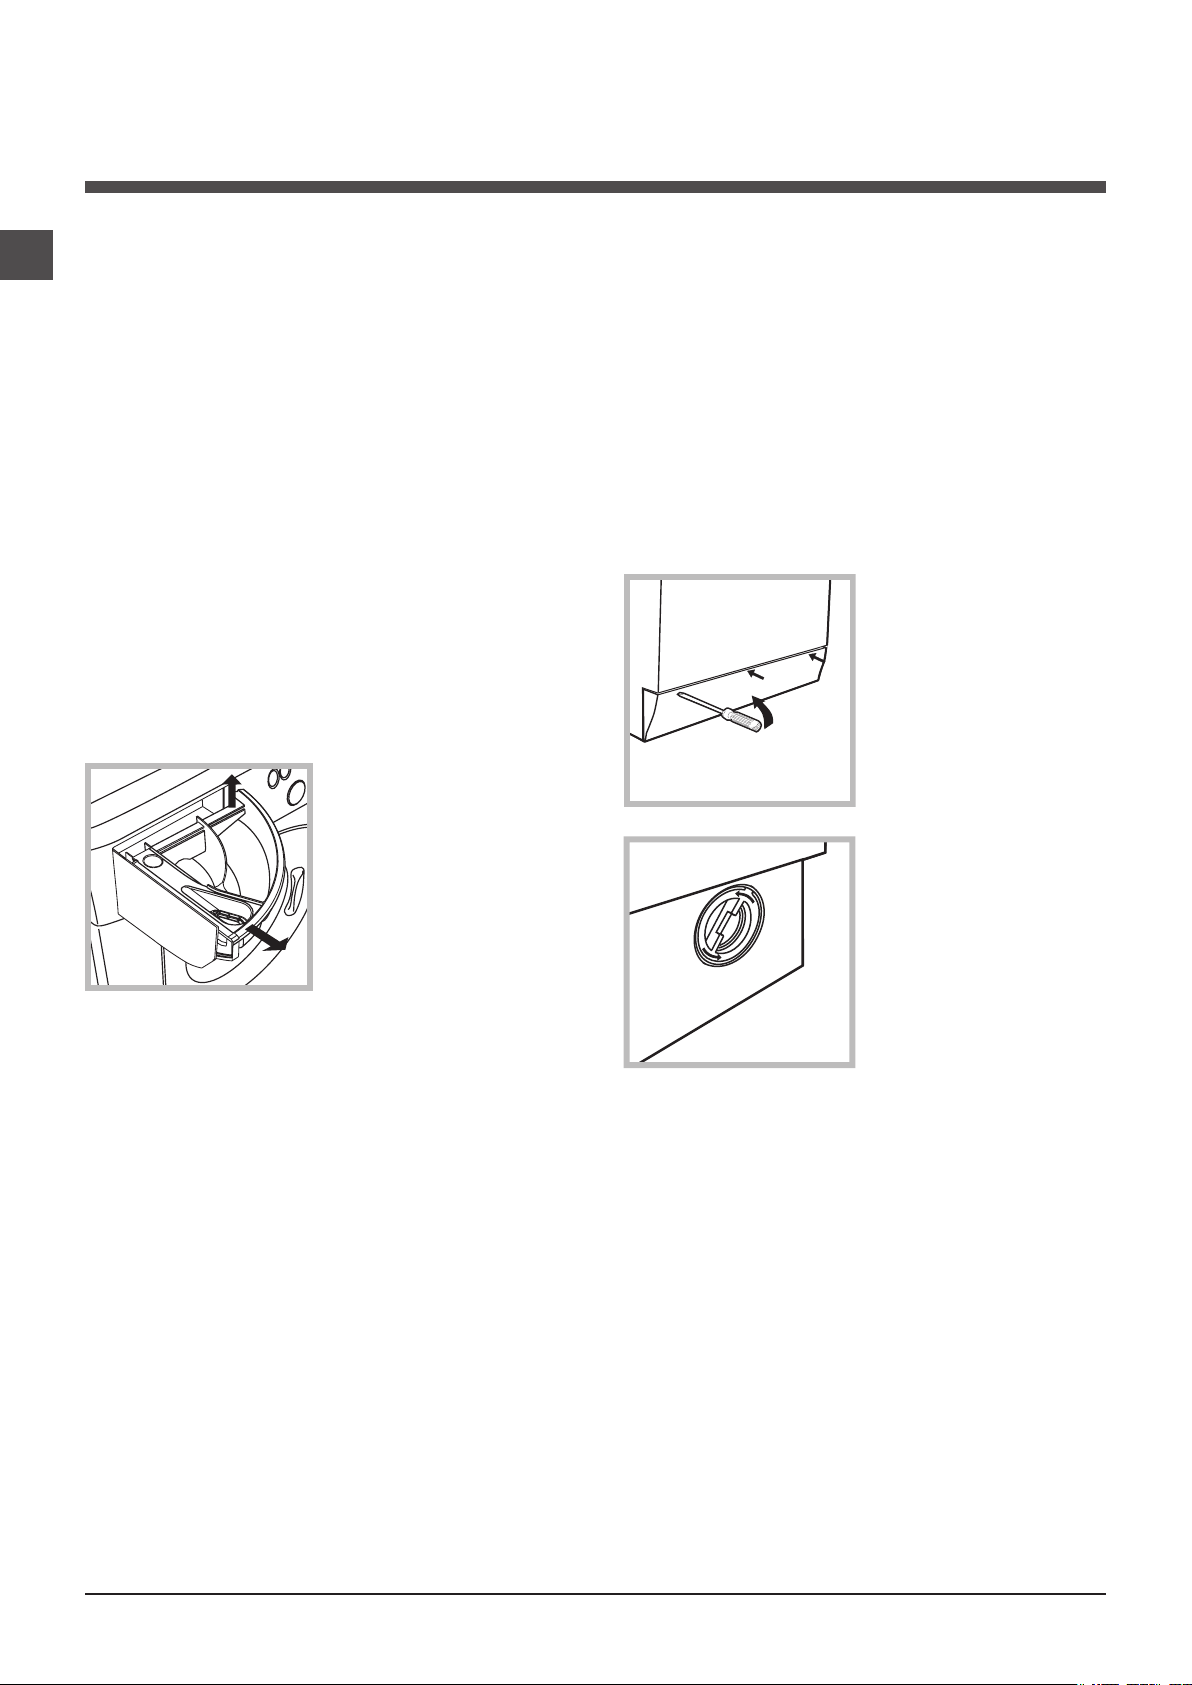
Cleaning the detergent dispenser
drawer
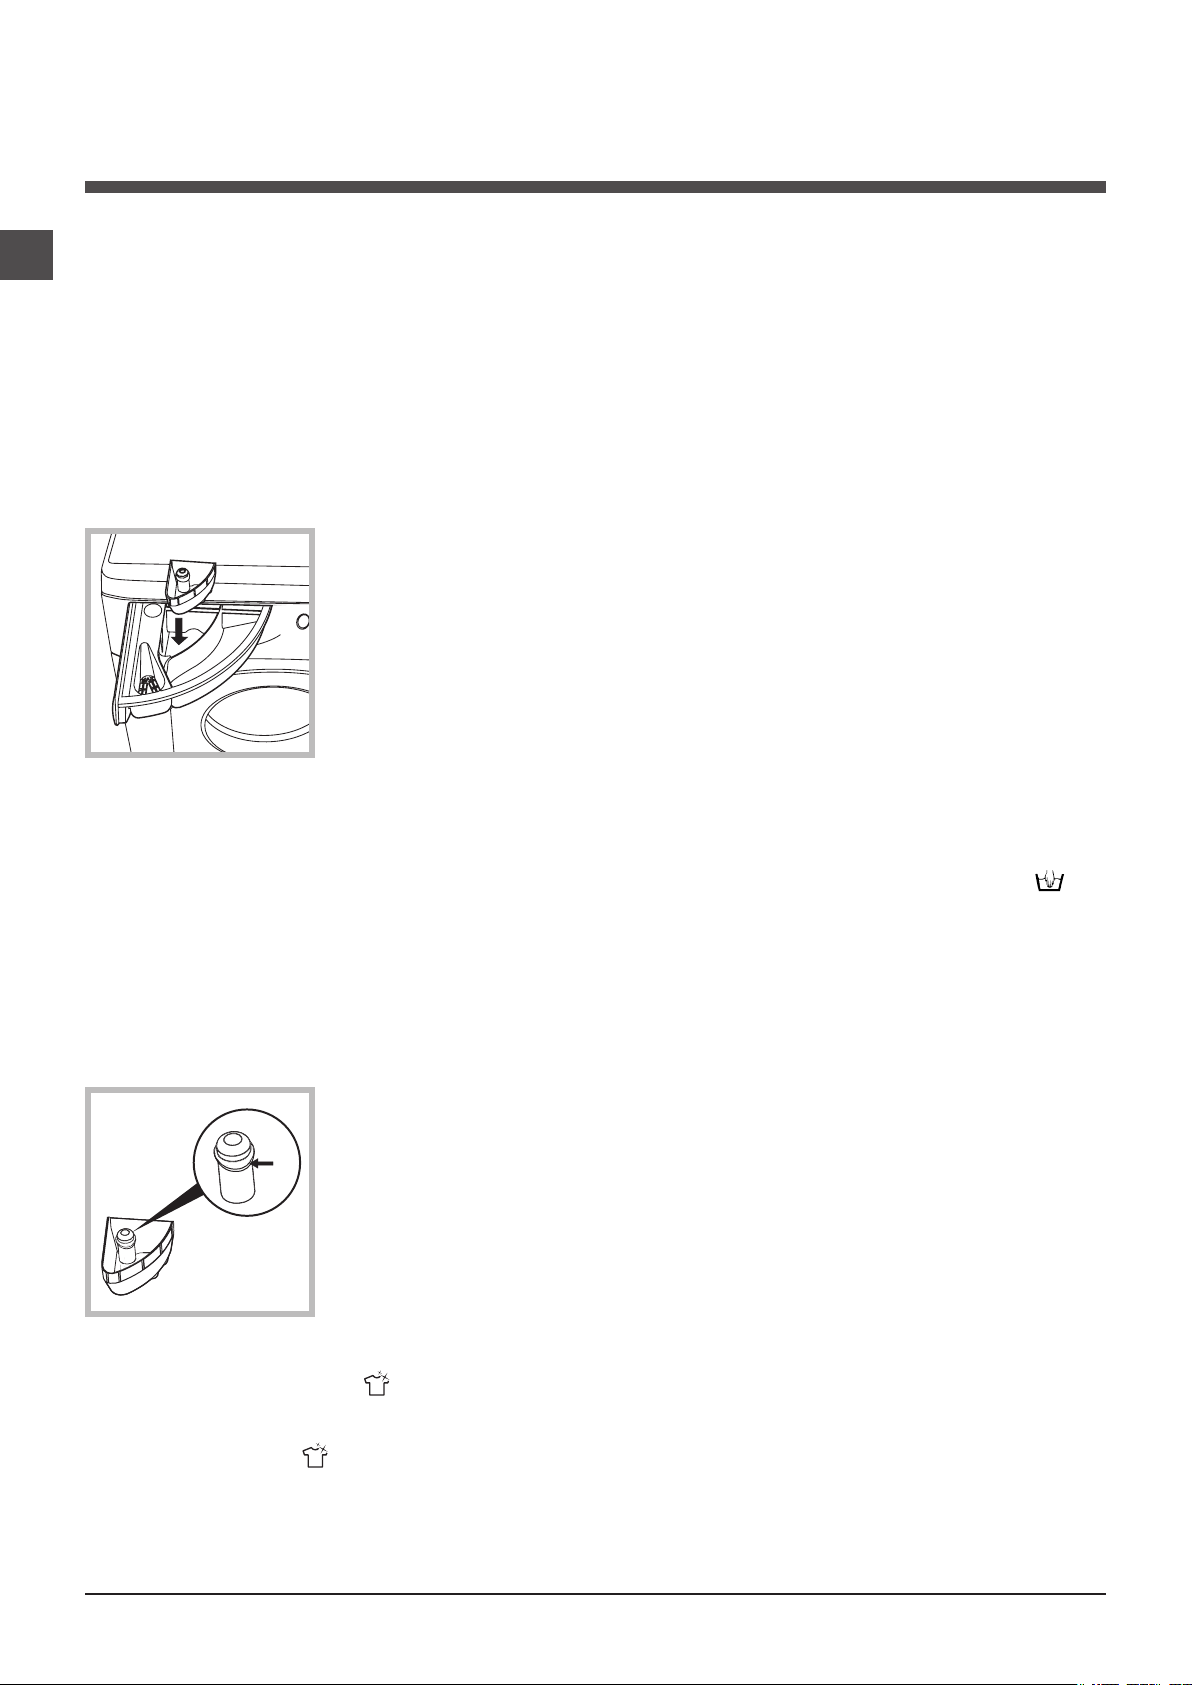
Remove the dispenser
by raising it and pulling
it out (see figure).
Wash it under running
water; this operation
should be repeated
frequently.
Cleaning the pump
The washing machine is fitted with a self-cleaning pump which does not require any maintenance. Sometimes, small items (such as coins
or buttons) may fall into the pre-chamber which
protects the pump, situated in its bottom part.
! Make sure the wash cycle has finished and
unplug the appliance.
To access the pre-chamber:
1. using a screwdriver,
remove the cover panel on the lower front
part of the washing
machine (see figure);
2. unscrew the lid by
rotating it anti-clockwise (see figure): a little
water may trickle out.
This is perfectly normal;
Caring for the door and drum of
your appliance
• Always leave the porthole door ajar in order to
prevent unpleasant odours from forming.
4
3. clean the inside thoroughly;
4. screw the lid back on;
5. reposition the panel, making sure the hooks
are securely in place before you push it onto the
appliance.
Checking the water inlet hose
Check the inlet hose at least once a year. If there
are any cracks, it should be replaced immediately: during the wash cycles, water pressure is
very strong and a cracked hose could easily
split open.
! Never use second-hand hoses.
Page 5

Precautions and tips
! This washing machine was designed and constructed in
accordance with international safety regulations. The following information is provided for safety reasons and must
therefore be read carefully.
General safety
• This appliance can be used by children aged
from 8 years and above and persons with reduced physical, sensory or mental capabilities
or lack of experience and knowledge if they
have been given supervision or instruction
concerning use of the appliance in a safe way
and understand the hazards involved. Children
shall not play with the appliance. Cleaning
and user maintenance shall not be made by
children without supervision.
• This appliance was designed for domestic use only.
• Do not touch the machine when barefoot or with wet or
damp hands or feet.
• Do not pull on the power supply cable when unplugging
the appliance from the electricity socket. Hold the plug
and pull.
• Do not open the detergent dispenser drawer while the
machine is in operation.
• Do not touch the drained water as it may reach extreme-
ly high temperatures.
• Never force the porthole door. This could damage the
safety lock mechanism designed to prevent accidental
opening.
• If the appliance breaks down, do not under any circum-
stances access the internal mechanisms in an attempt
to repair it yourself.
• Always keep children well away from the appliance while
it is operating.
• The door can become quite hot during the wash cycle.
• If the appliance has to be moved, work in a group of two
or three people and handle it with the utmost care. Never
try to do this alone, because the appliance is very heavy.
• Before loading laundry into the washing machine, make
sure the drum is empty.
The crossed out “wheeled bin” symbol on the product
reminds you of your obligation, that when you dispose of
the appliance it must be separately collected.
Consumers should contact their local authority or retailer
for information concerning the correct disposal of their
old appliance.
GB
Disposal
• Disposing of the packaging materials: observe local
regulations so that the packaging may be re-used.
• The European Directive 2012/19/EU on Waste Electrical
and Electronic Equipment, requires that old household
electrical appliances must not be disposed of in the
normal unsorted municipal waste stream. Old appliances
must be collected separately in order to optimise the
recovery and recycling of the materials they contain and
reduce the impact on human health and the environment.
5
Page 6
Description of the washing
machine and starting a wash cycle
GB
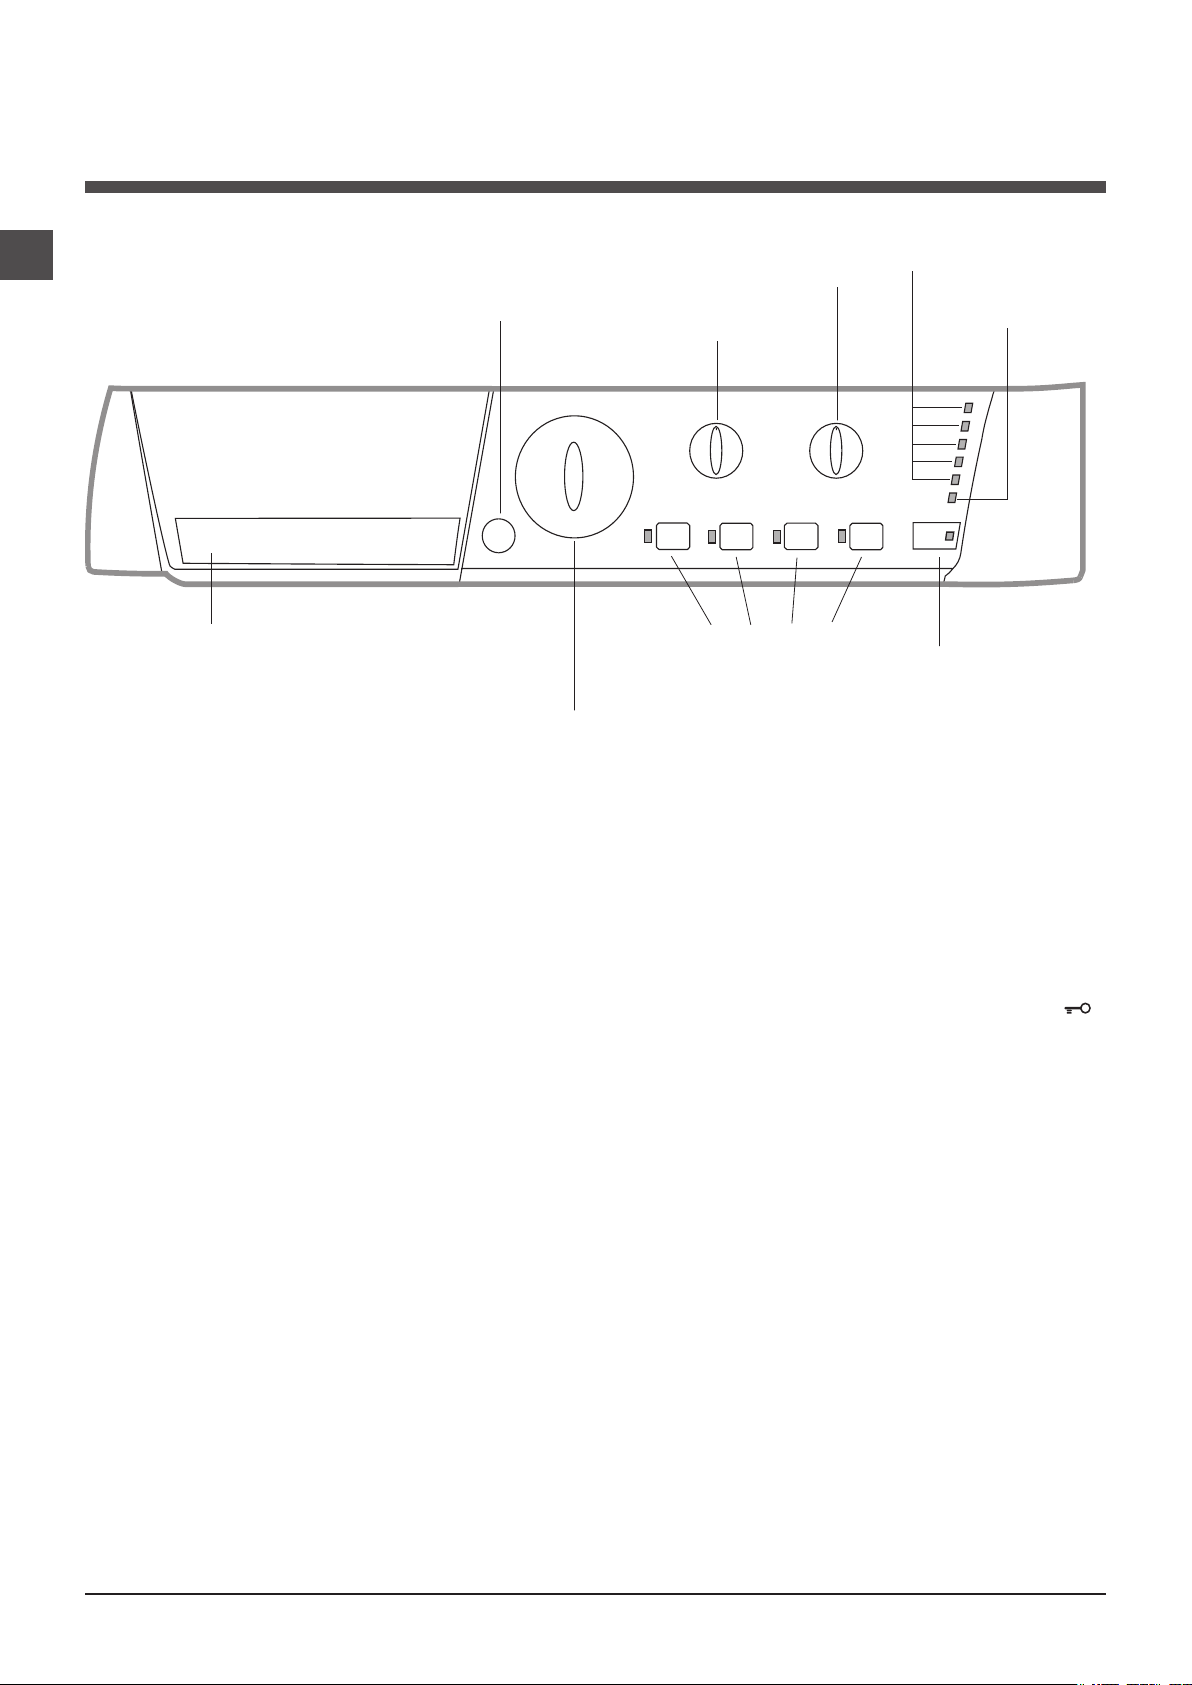
Control panel
Detergent dispenser drawer
ON/OFF
button
WASH CYCLE
knob
TEMPERATURE
knob
WASH CYCLE PROGRESS/
DELAY TIMER indicator lights
SPIN SPEED
knob
FUNCTION
buttons with
indicator lights
DOOR
LOCKED
indicator light
START/PAUSE
button with indicator
light
Detergent dispenser drawer: used to dispense
detergents and washing additives (see “Detergents and
laundry”).
ON/OFF button: switches the washing machine on and off.
WASH CYCLE knob: programmes the wash cycles. Du-
ring the wash cycle, the knob does not move.
FUNCTION buttons with indicator light: used to select the
available functions. The indicator light corresponding to the
selected function will remain lit.
TEMPERATURE knob: sets the temperature or the cold
wash cycle (see “Personalisation”).
SPIN SPEED knob: sets the spin speed or exclude the
spin cycle completely (see “Personalisation”).
WASH CYCLE PROGRESS/DELAY TIMER
light
s: used to monitor the progress of the wash cycle.
The illuminated indicator light shows which phase is in
progress.
If the Delay Timer function has been set, the time remaining
until the wash cycle starts will be indicated (see next page).
indicator
START/PAUSE button with indicator light: starts or temporarily interrupts the wash cycles.
N.B. To pause the wash cycle in progress, press this
button; the corresponding indicator light will flash orange,
while the indicator light for the current wash cycle phase
will remain lit in a fixed manner. If the DOOR LOCKED
indicator light is switched off, the door may be opened
(wait approximately 3 minutes).
To start the wash cycle from the point at which it was interrupted, press this button again.
Standby mode
This washing machine, in compliance with new energy saving regulations, is fitted with an automatic standby system
which is enabled after about 30 minutes if no activity is
detected. Press the ON-OFF button briefly and wait for the
machine to start up again.
DOOR LOCKED indicator light: indicates whether the
door may be opened or not (see next page).
6
Page 7
Indicator lights
The indicator lights provide important information.
This is what they can tell you:
Wash cycle phase indicator lights
Once the desired wash cycle has been selected and has begun, the indicator lights switch on one by one to indicate which
phase of the cycle is currently in progress.
GB
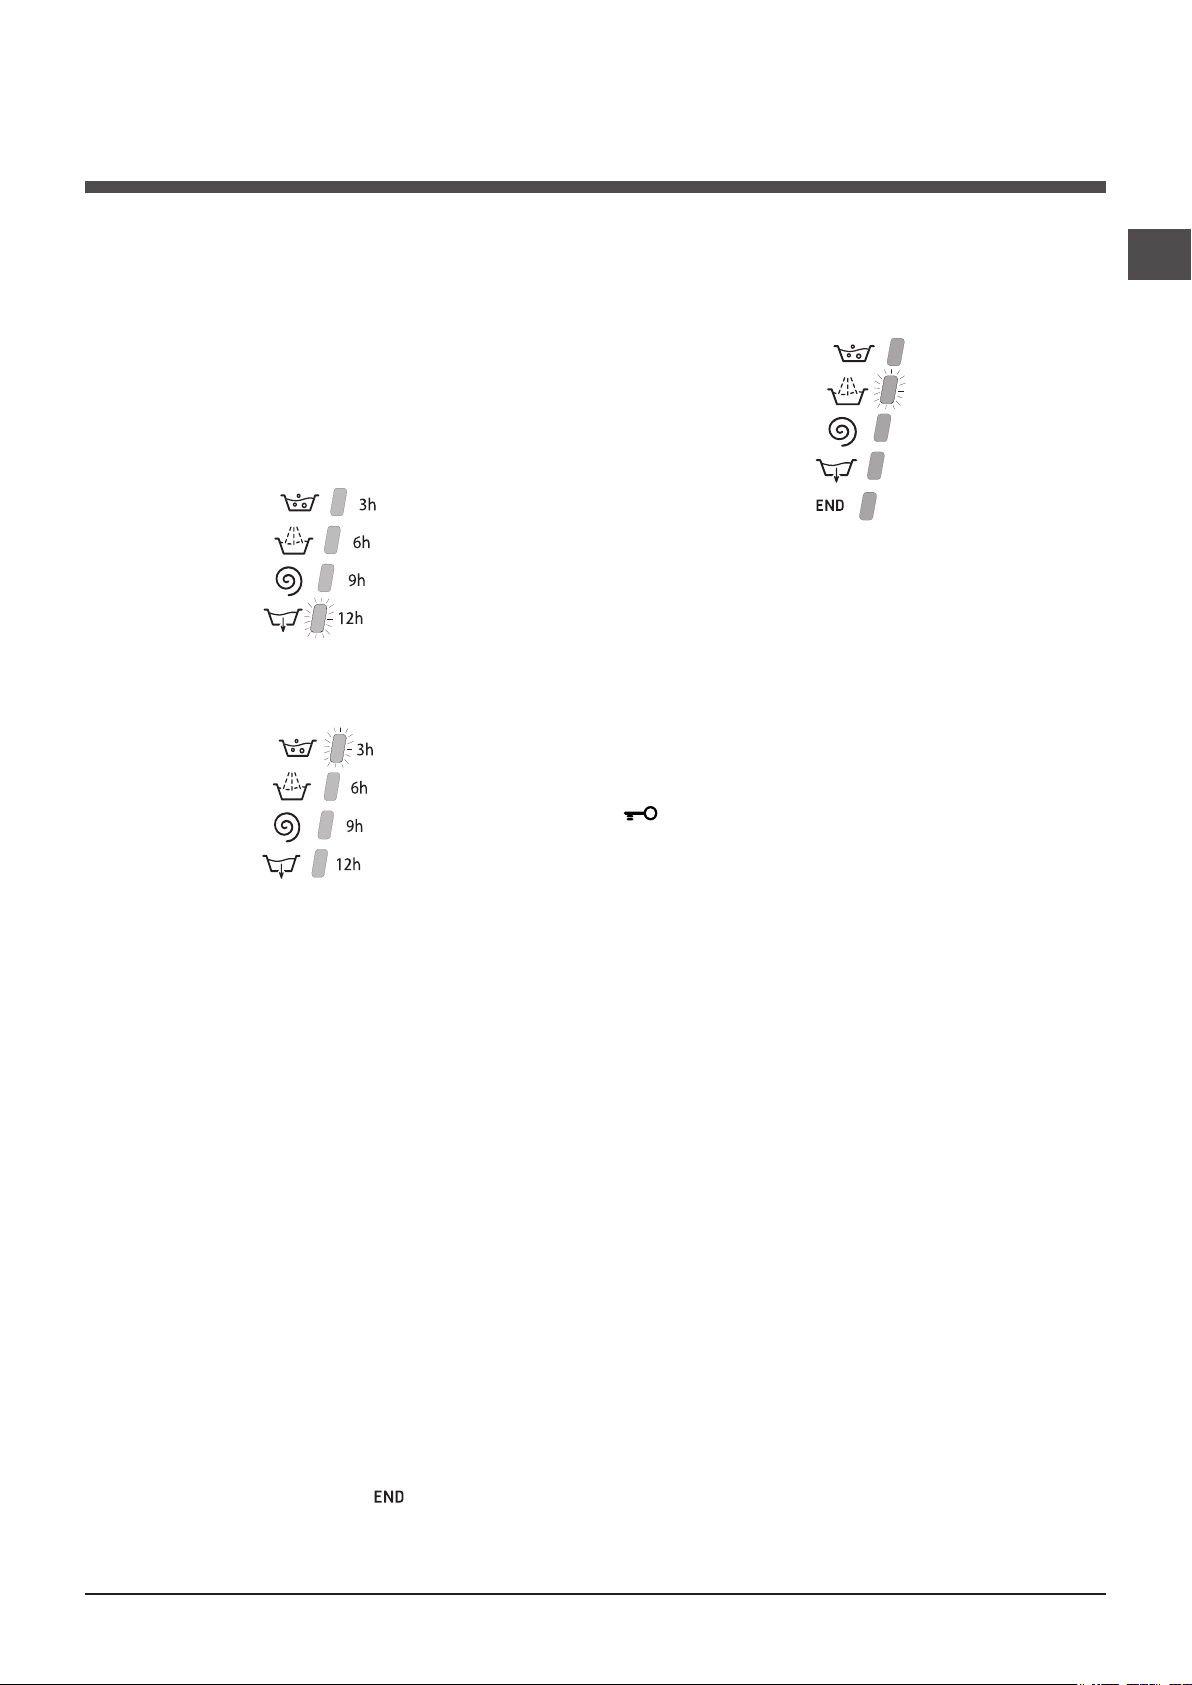
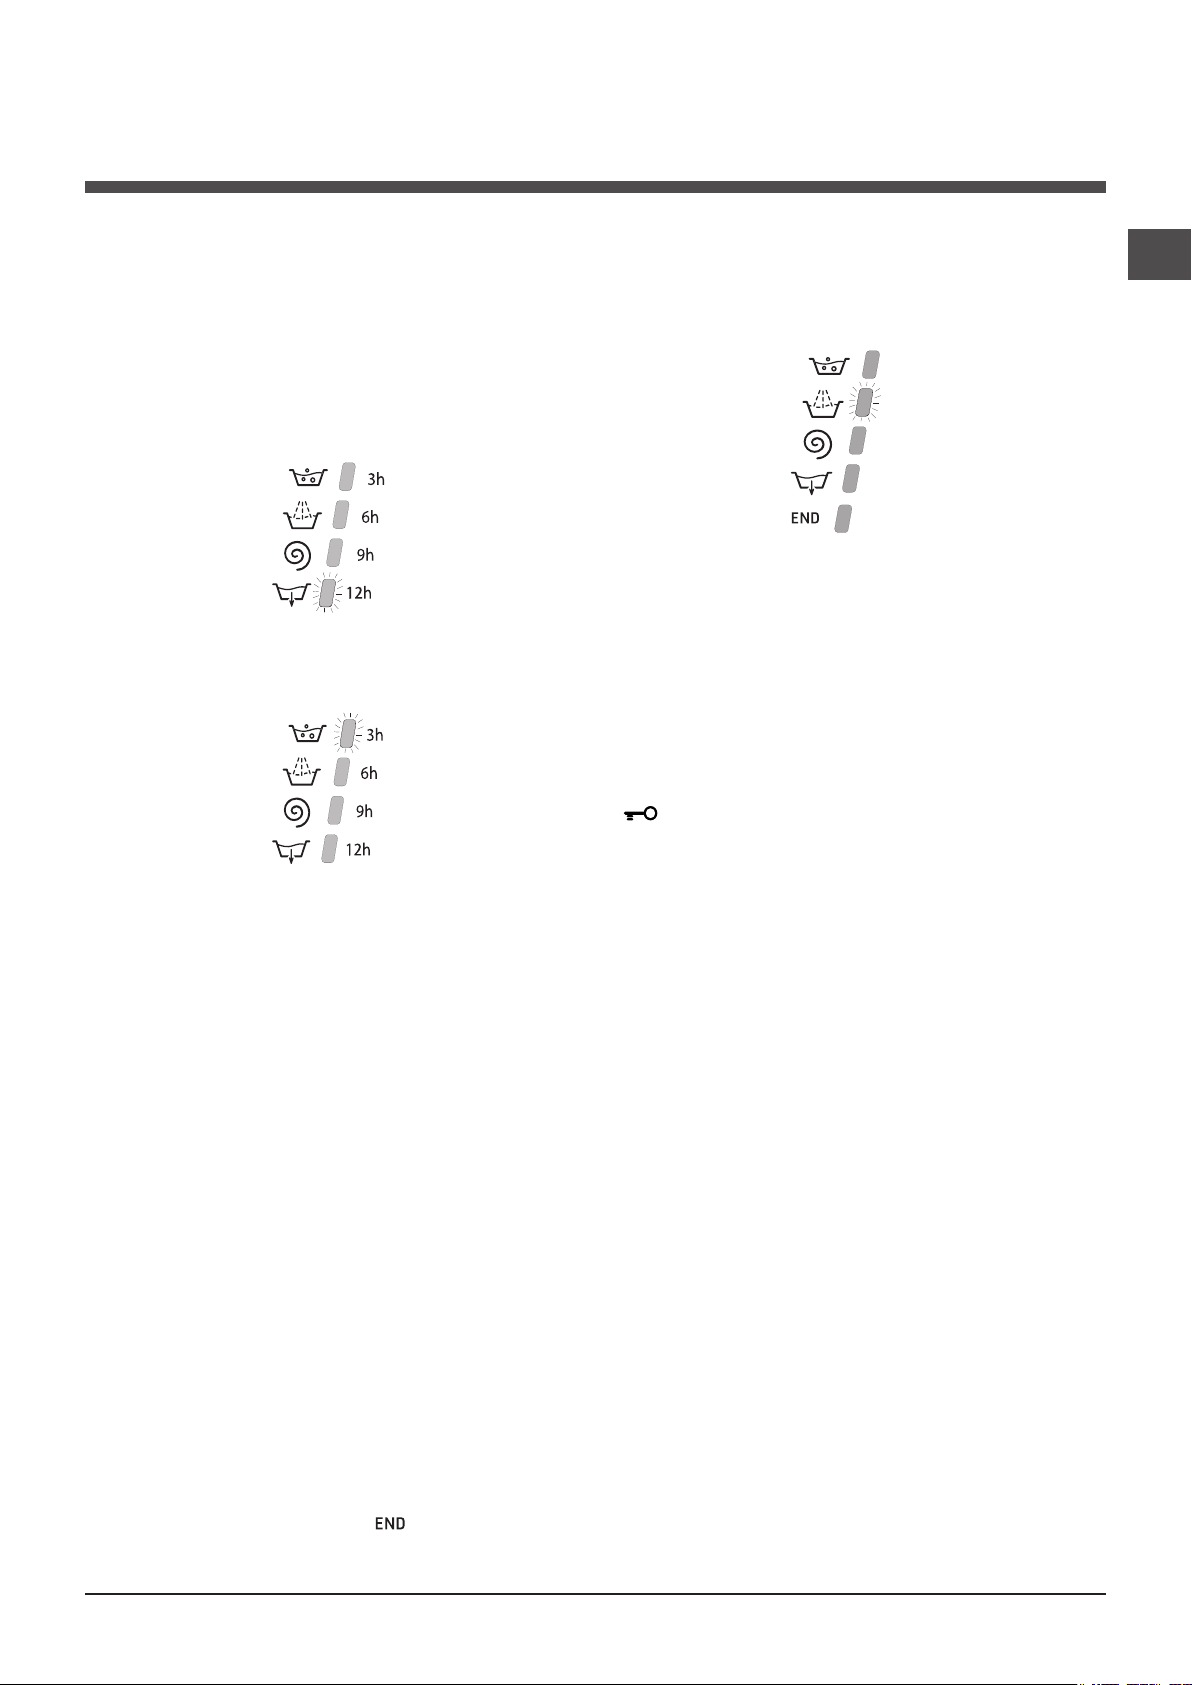
Delayed start
If the DELAY TIMER function has been activated (see “Personalisation”), after the wash cycle has been started the
indicator light corresponding to the selected delay period
will begin to flash:
As time passes, the remaining delay will be displayed and
the corresponding indicator light will flash:
Once the set delay has elapsed, the flashing indicator light
will switch off and the selected wash cycle will begin.
Wash
Rinse
Spin
Drain
End of wash cycle
Function buttons and corresponding indicator
lights
When a function is selected, the corresponding indicator
light will illuminate.
If the selected function is not compatible with the programmed wash cycle, the corresponding indicator light will flash
and the function will not be activated.
If a function which is incompatible with another function
selected previously, only the most recent selection will
remain active.
Door locked indicator light
If this indicator light is on, the appliance door is locked to
prevent it from being opened accidentally; to avoid any
damage, wait for the indicator light to switch off before you
open the appliance door (wait approximately 3 minutes).
N.B. If the DELAY TIMER function is activated, the door
cannot be opened; pause the machine by pressing the
START/PAUSE button if you wish to open it.
! If the START/PAUSE indicator light (orange) flashes
rapidly at the same time as the function indicator light, this
indicates a problem has occurred (see “Troubleshooting”).
Starting a wash cycle
1. Turn the washing machine on by pressing the ON/OFF button. All the indicator lights will turn on for a few seconds, then only
the indicator lights relative to the selected programme settings will remain lit and the START/PAUSE indicator light will flash.
2. Load the laundry and close the door.
3. Set the WASH CYCLE knob to the desired programme.
4. Set the washing temperature (see “Personalisation”).
5. Set the spin speed (see “Personalisation”).
6. Measure out the detergent and washing additives (see “Detergents and laundry”).
7. Select the desired functions.
8. Start the wash cycle by pressing the START/PAUSE button and the corresponding indicator light will remain lit in a fixed
manner, in green.
To cancel the set wash cycle, pause the machine by pressing the START/PAUSE button and select a new cycle.
9. At the end of the wash cycle the indicator light will switch on. The DOOR LOCKED indicator light will switch off, indi-
cating that the door may be opened (wait approximately 3 minutes). Take out your laundry and leave the appliance door ajar
to make sure the drum dries completely. Switch the washing machine off by pressing the ON/OFF button.
7
Page 8
Wash cycles
GB
Table of wash cycles
Detergents
Description of the wash cycle
Wash cycles
Essentials cycles
Cotton + Prewash: extremely soiled whites.
1
Cotton Standard 60° (1): heavily soiled whites and resistant
2
colours.
3
Cotton Standard 40° (2): lightly soiled whites and delicate colours.
Synthetics: heavily soiled resistant colours.
4
Synthetics (3): lightly soiled resistant colours.
4
Mix 15’: to refresh lightly soiled garments quickly (not suitable
5
for wool, silk and clothes which require washing by hand).
Special cycles
Goodnight cycle: lightly soiled delicate colours.
6
Shirts
7
Silk/Curtains: for garments in silk and viscose, lingerie.
8
9
Wool: for wool, cashmere, etc. 40° 800 -
Eco cycles
10
Cotton Standard 20°: lightly soiled whites and delicate colours.
11 Cottons
12 Synthetics
13 Fast Wash
Partials wash cycles
A
Rinse - 1200 - -
B
Spin - 1200 - - - - 8 - - - 16’
C
Pump out - 0 - - - - 8 - - - 2’
The length of cycle shown on the display or in this booklet is an estimation only and is calculated assuming standard working conditions. The actual duration can vary according to factors such as water
temperature and pressure, the amount of detergent used, the amount and type of load inserted, load balancing and any wash options selected.
1) Test wash cycle in compliance with directive 1061/2010: set wash cycle 2 with a temperature of 60°C.
This cycle is designed for cotton loads with a normal soil level and is the most efficient in terms of both electricity and water consumption; it should be used for
garments which can be washed at 60°C. The actual washing temperature may differ from the indicated value.
2) Test wash cycle in compliance with directive 1061/2010: set wash cycle 3 with a temperature of 40°C.
This cycle is designed for cotton loads with a normal soil level and is the most efficient in terms of both electricity and water consumption; it should be used for
garments which can be washed at 40°C. The actual washing temperature may differ from the indicated value.
For all Test Institutes:
2) Long wash cycle for cottons: set wash cycle 3 with a temperature of 40°C.
3) Long wash cycle for synthetics: set wash cycle 4; with a temperature of 40°C.
Max.
temp.
(°C
90° 1200
60°
(Max. 90°)
40° 1200 -
60° 800 -
40° 800 -
30° 800 -
40° 800 -
40° 600 -
30° 0 -
20° 1200 -
Cold
Water
Cold
Water
Cold
Water
Mix 15’(wash cycle 5) this wash cycle was designed to wash lightly soiled garments quickly: it lasts just 15 minutes and therefore
saves both energy and time. By selecting this wash cycle (5 at 30°C), it is possible to wash different fabrics together (except
for wool and silk items), with a maximum load of 1.5 kg.
Goodnigt cycle (wash cycle 6). This is a silent cycle which can be run at night, when the electricity prices are lower. The wash
cycle is designed for cottons and synthetics. At the end of the cycle the machine stops while there is still water in the drum; to
spin and drain the laundry press the START/PAUSE button; alternatively the machine will perform the spin cycle and drain the
water automatically after 8 hours.
Cotton Standard 20° (wash cycle 10) ideal for lightly soiled cotton loads. The effective performance levels achieved at cold
temperatures, which are comparable to washing at 40°, are guaranteed by a mechanical action which operates at varying
speed, with repeated and frequent peaks.
Eco cycles
The Eco Cycles assure energy saving by eliminating the need of heating water and it’s an advantage both to your energy
bill and the environment! These innovative Eco programmes (Cotton , Synthetics and Fast Wash ) are available for various fabrics and different quantity of garment; they have been designed to guarantee a high cleaning action
even at low temperature and can be used for lightly to medium soiled loads. Eco Cycles give the best results thanks
to an intensified wash action, water optimization and are carried out in the same average time of a standard cycle.
For the best washing results with Eco Cycles we recommend the usage of a liquid detergent.
Max.
speed
(rpm)
1200 -
1200 -
800 -
800 -
Pre-
Wash
wash
Fabric
softe-
ner
Ble-
ach
- 8 53 2,86 98 195’
8 53 1,23 55,0 195’
8 53 1,01 84 180’
4,5 46 1,03 60 115’
4,5 46 0,56 60 100’
- 1,5 71 0,11 33 15’
4 - - - 290’
- 2 - - - 80’
- 2 - - - 65’
- 2 - - - 85’
8 - - - 175’
- 8 53 0,23 68 80’
- 3 48 0,12 37 70’
- 3 71 0,10 36 30’
8 - - - 36’
pness %
Max. load (Kg)
Residual dam-
Energy consum-
ption kWh
Total water lt
Cycle duration
8
Page 9
Personalisation
Setting the temperature
Turn the TEMPERATURE knob to set the wash temperature (see Table of wash cycles).
The temperature may be lowered, or even set to a cold wash ( ).
The washing machine will automatically prevent you from selecting a temperature which is higher than the maximum value
set for each wash cycle.
! Exception: if the
2
programme is selected, the temperature can be increased up to a value of 90°C.
Setting the spin speed
Turn the SPIN SPEED knob to set the spin speed for the selected wash cycle.
The maximum spin speeds available for each wash cycle are as follows:
Wash cycles Maximum spin speed
Cottons 1200 rpm
Synthetics 800 rpm
Wool 800 rpm
Silk drain only
The spin speed may be lowered, or the spin cycle can be excluded altogether by selecting the symbol .
The washing machine will automatically prevent you from selecting a spin speed which is higher than the maximum speed
set for each wash cycle.
Functions
The various wash functions available with this washing machine will help to achieve the desired results, every time.
To activate the functions:
1. Press the button corresponding to the desired function;
2. the function is enabled when the corresponding indicator light is illuminated.
Note: If the indicator light flashes rapidly, this signals that this particular function may not be selected in conjunction with the
selected wash cycle.
GB
Delay timer
This timer delays the start time of the wash cycle by up to 12 hours.
Press the button repeatedly until the indicator light corresponding to the desired delay time switches on. The fifth time the button
is pressed, the function will be disabled.
N.B. Once you have pressed the START/PAUSE button, the delay time may only be decreased if you wish to modify it.
! This option is enabled with all programmes.
Easy iron
By selecting this function, the wash and spin cycles will be modified in order to reduce the formation of creases. At the end
of the cycle the washing machine will perform slow rotations of the drum; the EASY IRON and START/PAUSE indicator lights
will flash (orange) and the phase will remain lit in a fixed manner. To end the cycle, press the START/PAUSE button or the
EASY IRON button.
For the Silk wash cycle, the machine will end the cycle while the laundry is soaking, the EASY IRON and START/PAUSE
indicator lights will flash (orange) and the RINSE phase will remain lit in a fixed manner. To drain the water so that the laundry
may be removed, press the START/PAUSE button or the EASY IRON button.
! This function may not be used in conjunction with wash cycles 5, 6, 9, 11, 12, 13, A, B, C.
Extra rinse
By selecting this function, the efficiency of the rinse is increased and optimal detergent removal is guaranteed. It is particularly
useful for sensitive skin.
! This function may not be used in conjunction with wash cycles 5, 13, B, C.
Super Wash
Because a greater quantity of water is used in the initial phase of the cycle, and because of the increased cycle duration, this
function offers a high-performance wash.
! This function may not be used in conjunction with wash cycles 1, 5, 8, 9, 11, 12, 13, B, C.
9
Page 10
Detergents and laundry
M
AX
1
2
4
3
GB
Detergent dispenser drawer
Good washing results also depend on the correct dose of
detergent: adding too much detergent will not necessarily result in a more efficient wash, and may in fact cause
build up on the inside of your appliance and contribute to
environmental pollution.
!Use powder detergent for white cotton garments, for pre-
washing, and for washing at temperatures over 60°C.
!Follow the instructions given on the detergent packaging.
! Do not use hand washing detergents because these
create too much foam.
Open the detergent dispenser drawer and pour
in the detergent or washing
additive, as follows.
compartment 1: Pre-wash detergent (powder)
Before pouring in the detergent, make sure that extra compartment 4 has been removed.
compartment 2: Detergent for the wash cycle
(powder or liquid)
Liquid detergent should only be poured in immediately
prior to the start of the wash cycle.
compartment 3: Additives (fabric softeners, etc.)
The fabric softener should not overflow the grid.
extra compartment 4: Bleach
Bleach cycle
! Traditional bleach should be used on sturdy white fa-
brics, and delicate bleach for coloured fabrics, synthetics
and for wool.
This option is particularly
useful for the removal of
MAX
MAX
into extra compartment 4, set the “Rinse” programme and
activate the “Super Wash” option. To bleach during a
wash cycle, pour in the detergent and any fabric softener
you wish to use, set the desired wash cycle and enable the
“Super Wash” option. The use of extra compartment 4
excludes the “Pre-wash” option.
stubborn stains. Place extra
compartment 4 (supplied)
into compartment 1.
When pouring in the bleach,
be careful not to exceed the
“max” level marked on the
central pivot (see figure).
To run the bleach cycle on
its own, pour the bleach
Preparing the laundry
• Divide the laundry according to:
- the type of fabric/the symbol on the label.
- the colours: separate coloured garments from whites
• Empty all garment pockets and check the buttons.
• Do not exceed the values listed in the “Table of wash
cycles”, which refer to the weight of the laundry when dry.
How much does your laundry weigh?
1 sheet 400-500 g
1 pillow case 150-200 g
1 tablecloth 400-500 g
1 bathrobe 900-1200 g
1 towel 150-250 g
Garments requiring special care
Shirts: use special wash cycle 7 to wash shirts in various
fabrics and colours.
It guarantees maximum care is taken of the garments and
minimises the formation of creases.
Silk: use special wash cycle 8 to wash all silk garments.
We recommend the use of special detergent which has
been designed to wash delicate clothes.
Curtains: fold curtains and place them in a pillow case or
mesh bag. Use wash cycle 8.
Wool: all wool garments can be washed using programme
9, even those carrying the “hand-wash only” label. For
best results, use special detergents and do not exceed
2 kg of laundry.
Load balancing system
Before every spin cycle, to avoid excessive vibrations and
to distribute the load in a uniform manner, the drum rotates
continuously at a speed which is slightly greater than the
washing rotation speed. If, after several attempts, the load
is not balanced correctly, the machine spins at a reduced
spin speed. If the load is excessively unbalanced, the
washing machine performs the distribution process instead
of spinning. To encourage improved load distribution and
balance, we recommend small and large garments are
mixed in the load.
10
Page 11

Troubleshooting
Your washing machine could fail to work. Before contacting the Technical Assistance Centre (see “Assistance”), make sure
that the problem cannot be solved easily using the following list.
Problem:
The washing machine does not
switch on.
The wash cycle does not start.
The washing machine does not
take in water (the indicator light for
the first wash cycle stage flashes
rapidly).
The washing machine continuously
takes in and drains water.
Possible causes / Solutions:
• The appliance is not plugged into the socket fully, or is not making contact.
• There is no power in the house.
• The washing machine door is not closed properly.
• The ON/OFF button has not been pressed.
• The START/PAUSE button has not been pressed.
• The water tap has not been opened.
• A delayed start has been set (see “Personalisation”).
• The water inlet hose is not connected to the tap.
• The hose is bent.
• The water tap has not been opened.
• There is no water supply in the house.
• The pressure is too low.
• The START/PAUSE button has not been pressed.
• The drain hose is not fitted at a height between 65 and 100 cm from the floor
(see “Installation”).
• The free end of the hose is under water (see “Installation”).
• The wall drainage system is not fitted with a breather pipe.
If the problem persists even after these checks, turn off the water tap, switch
the appliance off and contact the Assistance Service. If the dwelling is on one of
the upper floors of a building, there may be problems relating to water drainage,
causing the washing machine to fill with water and drain continuously. Special
anti-draining valves are available in shops and help to avoid this inconvenience.
GB
The washing machine does not
drain or spin.
The washing machine vibrates a lot
during the spin cycle.
The washing machine leaks.
The START/PAUSE indicator light
(orange) and the function indicator
lights flash rapidly.
There is too much foam.
• The wash cycle does not include draining: some wash cycles require the drain
phase to be started manually.
• The EASY IRON function has been activated: To complete the wash cycle,
press the START/PAUSE button (“Personalisation”).
• The drain hose is bent (see “Installation”).
• The drainage duct is clogged.
• The drum was not unlocked correctly during installation (see “Installation”).
• The washing machine is not level (see “Installation”).
• The washing machine is trapped between cabinets and walls (see “Installation”).
• The water inlet hose is not screwed on properly (see “Installation”).
• The detergent dispenser drawer is blocked (for cleaning instructions, see
“Care and maintenance”).
• The drain hose is not fixed properly (see “Installation”).
• Switch off the machine and unplug it, wait for approximately 1 minute and
then switch it back on again.
If the problem persists, contact the Technical Assistance Service.
• The detergent is not suitable for machine washing (it should display the text
“for washing machines” or “hand and machine wash”, or the like).
• Too much detergent was used.
11
Page 12
Service
GB
Before calling for Assistance:
• Check whether you can solve the problem alone (see “Troubleshooting”);
• Restart the programme to check whether the problem has been solved;
• If this is not the case, contact an authorised Technical Assistance Centre using the telephone number provided on the
guarantee certificate.
! Always request the assistance of authorised technicians.
Have the following information to hand:
• the type of problem;
• the appliance model (Mod.);
• the serial number (S/N).
This information can be found on the data plate applied to the rear of the washing machine, and can also be found on the
front of the appliance by opening the door.
12
Page 13

Mode d’emploi
LAVE-LINGE
FR
Français
ECO8L 1252
Sommaire
Installation, 14-15
Déballage et mise à niveau
Raccordements eau et électricité
Premier cycle de lavage
Caractéristiques techniques
Entretien et soin, 16
Coupure de l’arrivée d’eau et du courant
Nettoyage du lave-linge
Nettoyage du tiroir à produits lessiviels.
Entretien du hublot et du tambour
Nettoyage de la pompe
Contrôle du tuyau d’arrivée de l’eau
Précautions et conseils, 17
Sécurité générale
Mise au rebut
Description du lave-linge et démarrage
d’un programme, 18-19
Bandeau de commandes
Voyants
Démarrage d’un programme
FR
Programmes, 20
Tableau des programmes
Personnalisations, 21
Sélection de la température
Sélection de l’essorage
Fonctions
Produits lessiviels et linge, 22
Tiroir à produits lessiviels
Cycle blanchissage
Triage du linge
Linge ou vêtements particuliers
Système d’équilibrage de la charge
Anomalies et remèdes, 23
Assistance, 24
13
Page 14
Installation
FR
! Conserver ce mode d’emploi pour pouvoir le consulter à tout moment. En cas de vente, de cession
ou de déménagement, veiller à ce qu’il suive toujours le lave-linge pour que son nouveau propriétaire
soit informé sur son mode de fonctionnement et
puisse profiter des conseils correspondants.
! Lire attentivement les instructions: elles fournissent des conseils importants sur l’installation,
l’utilisation et la sécurité de l’appareil.
Déballage et mise à niveau
Déballage
1. Déballer le lave-linge.
2. Contrôler que le lave-linge n’a pas été endom-
magé pendant le transport. S’il est abîmé, ne pas
le raccorder et contacter le vendeur.
3. Enlever les 4 vis
de protection servant
au transport, le caoutchouc et la cale,
placés dans la partie
arrière (voir figure).
4. Boucher les trous à l’aide des bouchons
plastique fournis.
5. Conserver toutes ces pièces: il faudra les
remonter en cas de transport du lave-linge.
Une bonne mise à niveau garantit la stabilité
de l’appareil et évite qu’il y ait des vibrations,
du bruit et des déplacements en cours de
fonctionnement. Si la machine est posée sur
de la moquette ou un tapis, régler les pieds de
manière à ce qu’il y ait suffisamment d’espace
pour assurer une bonne ventilation.
Raccordements eau et électricité
Raccordement du tuyau d’arrivée de l’eau
1. Relier le tuyau d’alimentation en le vissant
à un robinet d’eau froide à embout fileté 3/4
gaz (voir figure).
Faire couler l’eau jusqu’à ce qu’elle soit
limpide et sans impuretés avant de raccorder.
2. Raccorder le tuyau
d’arrivée de l’eau au
lave-linge en le vissant
à la prise d’eau prévue,
dans la partie arrière
en haut à droite (voir
figure).
! Les pièces d’emballage ne sont pas des jouets
pour enfants.
Mise à niveau
1. Installer le lave-linge sur un sol plat et rigide,
sans l’appuyer contre des murs, des meubles
ou autre.
2. Si le sol n’est pas
parfaitement horizontal, visser ou dévisser
les pieds de réglage
avant (voir figure) pour
niveler l’appareil; son
angle d’inclinaison,
mesuré sur le plan
de travail, ne doit pas
dépasser 2°.
14
3. Attention à ce que le tuyau ne soit pas plié
ou écrasé.
! La pression de l’eau doit être comprise entre
les valeurs indiquées dans le tableau des Caractéristiques techniques (voir page ci-contre).
! Si la longueur du tuyau d’alimentation ne suffit
pas, s’adresser à un magasin spécialisé ou à un
technicien agréé.
! N’utiliser que des tuyaux neufs.
! Utiliser ceux qui sont fournis avec l’appareil.
Page 15
65 - 100 cm
Raccordement du tuyau de vidange
Raccorder le tuyau
d’évacuation, sans
le plier, à un conduit
d’évacuation ou à une
évacuation murale placés à une distance du
sol comprise entre 65
et 100 cm;
ou bien l’accrocher à
un évier ou à une baignoire, dans ce cas,
fixer le support en plastique fourni avec l’appareil au robinet (voir
figure). L’extrémité libre
du tuyau d’évacuation
ne doit pas être plongée dans l’eau.
! L’utilisation d’un tuyau de rallonge est absolument déconseillée mais si on ne peut faire
autrement, il faut absolument qu’il ait le même
diamètre que le tuyau original et sa longueur ne
doit pas dépasser 150 cm.
! N’utiliser ni rallonges ni prises multiples.
! Le câble ne doit être ni plié ni trop écrasé.
! Le câble d’alimentation ne doit être remplacé
que par des techniciens agréés.
Attention! Nous déclinons toute responsabilité en cas
de non-respect des normes énumérées ci-dessus.
Premier cycle de lavage
Avant la première mise en service de l’appareil, effectuer un cycle de lavage avec un produit lessiviel
mais sans linge et sélectionner le programme 2.
Caractéristiques techniques
Modèle
Dimensions
ECO8L 1252
largeur 59,5 cm
hauteur 85 cm
profondeur 60 cm
FR
Branchement électrique
Avant de brancher la fiche dans la prise de courant, s’assurer que:
• la prise est bien reliée à la terre et est conforme
aux réglementations en vigueur;
• la prise est bien apte à supporter la puissance maximale de l’appareil indiquée dans le
tableau des Caractéristiques techniques (voir
ci-contre);
• la tension d’alimentation est bien comprise
entre les valeurs figurant dans le tableau des
Caractéristiques techniques (voir ci-contre);
• la prise est bien compatible avec la fiche du lavelinge. Autrement, remplacer la prise ou la fiche.
! Le lave-linge ne doit pas être installé dehors,
même à l’abri, car il est très dangereux de le
laisser exposé à la pluie et aux orages.
! Après installation du lave-linge, la prise de
courant doit être facilement accessible.
Capacité
Raccorde-
ments électriques
Raccordements
hydrauliques
Vitesse
d'essorage
Programmes
de contrôle
selon les
directives
1061/2010
1015/2010
de 1 à 8 kg
Voir la plaque signalétique
appliquée sur la machine
pression maximale 1 MPa
(10 bar) pression minimale
0,05 MPa (0,5 bar) capacité
du tambour 62 litres
jusqu'à 1000 tours minute
Programme 2;
Coton standard 60°C.
Programme 3;
Coton standard 40°C.
Cet appareil est conforme
aux Directives Communautaires suivantes:
- 2004/108/CE (Compatibilité électromagnétique)
- 2012/19/EU
- 2006/95/CE (Basse Tension)
15
Page 16
Entretien et soin
1
2
FR
Coupure de l’arrivée d’eau et du
courant
• Fermer le robinet de l’eau après chaque lavage.
Cela réduit l’usure de l’installation hydraulique
du lave-linge et évite tout danger de fuites.
• Débrancher la fiche de la prise de courant lors
de tout nettoyage du lave-linge et pendant tous
les travaux d’entretien.
Nettoyage du lave-linge
Pour nettoyer l’extérieur et les parties en caoutchouc, utiliser un chiffon imbibé d’eau tiède et
de savon. N’utiliser ni solvants ni abrasifs.
Nettoyage du tiroir à produits lessiviels.
Soulever le tiroir et le
tirer vers soi pour le
sortir de son logement
(voir figure).
Le laver à l’eau courante; effectuer cette
opération assez souvent.
Nettoyage de la pompe
Le lave-linge est équipé d’une pompe autonettoyante qui n’exige aucune opération d’entretien.
Il peut toutefois arriver que de menus objets
(pièces de monnaie, boutons) tombent dans la
préchambre qui protège la pompe, placée en
bas de cette dernière.
! S’assurer que le cycle de lavage est bien terminé et débrancher la fiche.
Pour accéder à cette préchambre:
1. démonter le panneau situé à l’avant du
lave-linge à l’aide d’un
tournevis (voir figure);
2. dévisser le couvercle en le tournant dans
le sens inverse des
aiguilles d’une montre
(voir figure): il est normal qu’un peu d’eau
s’écoule;
Entretien du hublot et du tambour
• Il faut toujours laisser le hublot entrouvert pour
éviter la formation de mauvaise odeurs.
16
3. nettoyer soigneusement l’intérieur;
4. revisser le couvercle;
5. remonter le panneau en veillant à bien enfiler
les crochets dans les fentes prévues avant de
le pousser contre l’appareil.
Contrôle du tuyau d’arrivée de l’eau
Contrôler le tuyau d’alimentation au moins une
fois par an. Procéder à son remplacement en cas
de craquèlements et de fissures: car les fortes
pressions subies pendant le lavage pourraient
provoquer des cassures.
! N’utiliser que des tuyaux neufs.
Page 17

Précautions et conseils
! Ce lave-linge a été conçu et fabriqué conformément aux
normes internationales de sécurité. Ces consignes sont
fournies pour des raisons de sécurité, il faut les lire attentivement.
Sécurité générale
• Cet appareil peut être utilisé par les enfants à
partir de 8 ans et par les personnes dont les
capacités physiques, sensorielles ou mentales
sont réduites ou qui ne disposent pas des connaissances suffisantes, à condition qu’ils soient
encadrés ou aient été formés de façon appropriée pour l’utilisation de l’appareil de façon sûre
et en comprenant les dangers qui y sont liés.
Les enfants ne doivent pas jouer avec l’appareil.
L’entretien et le nettoyage ne doivent pas être
effectués par les enfants sans surveillance.
• Cet appareil est conçu pour un usage domestique.
• Ne jamais toucher l’appareil si l’on est pieds nus et si les
mains sont mouillées ou humides.
• Ne jamais tirer sur le câble pour débrancher la fiche de la
prise de courant.
• Ne pas ouvrir le tiroir à produits lessiviels si la machine
est branchée.
• Ne pas toucher à l’eau de vidange, elle peut atteindre
des températures très élevées.
• Ne pas forcer pour ouvrir le hublot: le verrouillage de
sécurité qui protège contre les ouvertures accidentelles
pourrait s’endommager.
• En cas de panne, éviter à tout prix d’accéder aux mécanismes internes pour tenter une réparation.
• Veiller à ce que les enfants ne s’approchent pas de l’appareil pendant son fonctionnement.
• Pendant le lavage, le hublot a tendance à se réchauffer.
• Deux ou trois personnes sont nécessaires pour déplacer
l’appareil avec toutes les précautions nécessaires. Ne jamais
le déplacer tout seul car il est très lourd.
• Avant d’introduire le linge, s’assurer que le tambour est
bien vide.
Le symbole de la ‘’poubelle barrée’’ est apposée sur
tous les produits pour rappeler les obligations de collecte
séparée. Les consommateurs devront contacter les autorités locales ou leur revendeur concernant la démarche
à suivre pour l’enlèvement de leur vieil appareil.
FR
Mise au rebut
• Mise au rebut du matériel d’emballage: se conformer aux
réglementations locales de manière à ce que les emballages puissent être recyclés.
• La Directive Européenne 2012/19/EU sur les Déchets
des Equipements Electriques et Electroniques, exige que
les appareils ménagers usagés ne soient pas jetés dans
le flux normal des déchets municipaux. Les appareils
usagés doivent être collectés séparément afin d’optimiser le taux de récupération et le recyclage des matériaux
qui les composent et réduire l’impact sur la santé humaine et l’environnement.
17
Page 18

Description du lave-linge et
démarrage d’un programme
FR
Bandeau de commandes
Touche ON/OFF
Tiroir à produits lessiviels
PROGRAMMES
Bouton
TEMPÉRATURE
Bouton
Touches avec voyants
FONCTION
Voyants DÉROULEMENT
CYCLE/DÉPART DIFFÉRÉ
Bouton
ESSORAGE
Voyant
HUBLOT
VERROUILLÉ
Touche avec voyant
START/PAUSE
Tiroir à produits lessiviels: pour charger les produits
lessiviels et les additifs (voir “Produits lessiviels et linge”).
Touche ON/OFF: pour allumer ou éteindre le lave-linge.
Bouton PROGRAMMES: pour sélectionner les programmes. Pendant le programme, le bouton ne tournera pas.
Touches avec voyants FONCTION: pour sélectionner
les fonctions disponibles. Le voyant correspondant à la
fonction sélectionnée restera allumé.
Bouton TEMPÉRATURE: pour sélectionner la températu-
re ou un lavage à froid (voir “Personnalisations”).
Bouton ESSORAGE: pour sélectionner l’essorage ou le
supprimer (voir “Personnalisations”).
Voyants DÉROULEMENT CYCLE/DÉPART DIFFÉRÉ:
pour suivre le stade d’avancement du programme de
lavage.
Le voyant allumé indique la phase de lavage en cours.
Si la fonction “Départ différé” (départ différé) a été sélectionnée, ils indiquent le temps restant jusqu’au démarrage
du programme (voir page ci-contre).
Touche avec voyant START/PAUSE: pour démarrer les
programmes ou les interrompre momentanément.
N.B.: pour effectuer une pause du lavage en cours, appuyer sur cette touche, le voyant correspondant se mettra à
clignoter en orange tandis que celui de la phase en cours
restera allumé fixe. Si le voyant HUBLOT VERROUILLÉ
est éteint, on peut ouvrir la porte (3 minutes environ).
Pour faire redémarrer le lavage exactement de l’endroit où
il a été interrompu, appuyer une nouvelle fois sur la touche.
Stand-by
Ce lave-linge, conformément aux nouvelles normes en
vigueur dans le domaine de l’économie d’énergie, est
équipée d’un système d’extinction automatique (veille)
activé après environ 30 minutes d’inutilisation. Appuyez
brièvement sur la touche
chine soit réactivée.
ON/OFF
et attendre que la ma-
Voyant HUBLOT VERROUILLÉ: indique si la porte est
verrouillée (voir page ci-contre).
18
Page 19
Voyants
Les voyants fournissent des informations importantes.
Voilà ce qu’ils signalent:
Voyants phase en cours
Une fois que le cycle de lavage sélectionné a démarré,
les voyants s’allument progressivement pour indiquer son
stade d’avancement:
FR
Départ différé
Si la fonction “Départ différé” a été activée (voir “Personnalisations”), le voyant correspondant au temps sélectionné se
mettra à clignoter, après avoir lancé le programme :
Au fur et à mesure que le temps passe, le temps restant
est affiché avec clignotement du voyant correspondant.
Quand le temps sélectionné touche à sa fin, le voyant
clignotant s’éteint et le programme sélectionné démarre.
Lavage
Rinçage
Essorage
Vidange
Fin de Lavage
Touches fonction et voyants correspondants
La sélection d’une fonction entraîne l’allumage du voyant
correspondant.
Si la fonction sélectionnée est incompatible avec le programme sélectionné, le voyant correspondant se met à
clignoter et la fonction n’est pas activée.
En cas de sélection d’une fonction incompatible avec une
autre précédemment sélectionnée, la seule à être activée
sera celle choisie en dernier.
Voyant hublot verrouillé:
Le voyant allumé indique que le hublot est verrouillé pour
empêcher toute ouverture accidentelle. Pour éviter d’endommager l’appareil, attendre que le voyant cesse de
clignoter avant d’ouvrir la porte (3 minutes environ).
N.B: si la fonction DÉPART DIFFÉRÉ est activée, le hublot
ne s’ouvre pas. Pour l’ouvrir il faut appuyer sur la touche
START/PAUSE qui met l’appareil en pause.
! Un clignotement rapide du voyant START/PAUSE (oran-
ge) simultané à celui des fonctions signale une anomalie
(voir “Anomalies et remèdes”).
Démarrage d’un programme
1. Allumer le lave-linge en appuyant sur la touche MARCHE/ARRET. Tous les voyants s’allumeront pendant quelques secon-
des, ne resteront ensuite allumés que les voyants correspondant aux sélections du programme en cours et le voyant START/
PAUSE se mettra à clignoter.
2. Charger le linge et fermer le hublot.
3. Sélectionner à l’aide du bouton PROGRAMMES le programme désiré.
4. Sélectionner la température de lavage (voir “Personnalisations”).
5. Sélectionner la vitesse d’essorage (voir “Personnalisations”).
6. Verser les produits lessiviels et les additifs (voir “Produits lessiviels et linge”).
7. Sélectionner les fonctions désirées.
8. Appuyer sur la touche START/PAUSE pour démarrer le programme, le voyant correspondant vert restera allumé en fixe.
Pour annuler le cycle sélectionné, appuyer sur la touche START/PAUSE pour placer l’appareil en pause et choisir un nouveau cycle.
9. A la fin du programme, le voyant s’allume. Le voyant HUBLOT VERROUILLÉ s’éteint pour signaler que le hublot peut
être ouvert (3 minutes environ). Sortir le linge et laisser le hublot entrouvert pour faire sécher le tambour.
Eteindre le lave-linge en appuyant sur la touche ON/OFF.
19
Page 20
Programmes
Tableau des programmes
FR
Description du Programme
Programmes
Quotidien
Coton Prélavage: blancs extrêmement sales.
1
2
Coton standard 60°C (1): blancs et couleurs résistantes très sales.
3
Coton standard 40°C (2): blancs et couleurs délicates peu sales.
Synthétique 60°: couleurs résistantes très sales.
4
Synthétique 40° (3): couleurs résistantes peu sales.
4
Mix 15': pour rafraîchir rapidement du linge peu sale (ne convient
5
pas pour la laine, la soie et le linge à laver à la main).
Spécial
Bonne Nuit: couleurs délicates peu sales.
6
Chemises
7
Soie/Voilages 30°: pour linge en soie, viscose, lingerie.
8
Laine 40°: pour laine, cachemire, etc.
9
Froid
10
Coton standard 20°: blancs et couleurs délicates peu sales.
11 Coton
Temp.
maxi.
(Max. 90°)
Eau froid
Vitesse
maxi
(°C)
90° 1200
60°
40° 1200 60° 800 40° 800 -
30° 800 -
40° 800 40° 600 30° 0 40° 800 -
20° 1200 -
(tours
minute)
1200 -
1200 -
Detersivi
Lavage
Prélavage
Javel
Assou-
plissant
- 8 53 2,86 98 195’
8 53 1,23 55,0 195’
8 53 1,01 84 180’
4,5 46 1,03 60 115’
4,5 46 0,56 60 100’
- 1,5 71 0,11 33 15’
4 - - - 290’
- 2 - - - 80’
- 2 - - - 65’
- 2 - - - 85’
8 - - - 175’
- 8 53 0,23 68 80’
Humidité rési-
Charge maxi) (Kg)
duelle %
Consommation
d’énergie kWh
Durée cycle
Eau totale lt
12 Synthétique
13 Lavage Rapide
Programmes partiaux
A
Rinçage
B
Essorage
C
Vidange
La durée du cycle indiquée sur l’écran ou dans la notice représente une estimation calculée dans des conditions standard. Le temps effectif peut varier en fonction de nombreux facteurs tels que :
température et pression de l’eau en entrée, température ambiante, quantité de lessive, quantité et type de charge, équilibrage de la charge, options supplémentaires sélectionnées.
1) Programme de contrôle selon la norme 1061/2010: sélectionner le programme 2 et une température de 60°C.
Ce cycle convient au lavage d’une charge de coton normalement sale et c’est le plus performant en termes de consommation d’eau et d’énergie, l’utiliser pour du linge
lavable à 60°C. La température effective de lavage peut différer de la température indiquée.
2) Programme de contrôle selon la norme 1061/2010: sélectionner le programme 3 et une température de 40°C.
Ce cycle convient au lavage d’une charge de coton normalement sale et c’est le plus performant en termes de consommation d’eau et d’énergie, l’utiliser pour du linge
lavable à 40°C. La température effective de lavage peut différer de la température indiquée.
Pour tous les instituts qui effectuent ces tests :
2) Programme coton long: sélectionner le programme 3 et une température de 40°C.
3) Programme Synthétique ainsi que: sélectionner le programme 4 et une température de 40°C.
Eau froid
Eau froid
- 1200 - -
- 1200 - - - - 8 - - - 16’
- 0 - - - - 8 - - - 2’
800 -
800 -
- 3 48 0,12 37 70’
- 3 71 0,10 36 30’
8 - - - 36’
Mix 15’ (programme 5) spécialement conçu pour laver du linge peu sale en un rien de temps: il ne dure que 15 minutes et permet ainsi de faire des économies d’énergie et de temps. La sélection de ce programme (5 à 30°C) permet de laver ensemble
des textiles différents (sauf laine et soie) en ne dépassant pas 1,5 kg de charge.
Bonne nuit (programme 6). C’est un cycle silencieux qui permet de faire fonctionner le lave-linge la nuit quand le tarif d’électricité est plus bas. Ce programme est spécialement conçu pour les synthétiques et le coton. A la fin du cycle l’appareil s’arrête,
cuve pleine. Pour procéder à l’essorage et à la vidange, appuyer sur la touche MARCHE/PAUSE, à défaut, l’appareil procédera
automatiquement au bout de 8 heures à l’essorage et à la vidange de l’eau.
Coton Standard 20° (programme 10). Idéal pour des charges de linge sale en coton. Les bonnes performances, même à
froid, comparables à celles d’un lavage à 40°, sont assurées grâce à une action mécanique qui brasse en variant la vitesse et
avec des pics répétés et rapprochés.
Les cycles de lavage Eco
Les cycles Eco garantissent une économie d’énergie car ils permettent d’obtenir les meilleurs résultats de lavage sans besoin de
chauffer l’eau. L’action mécanique (utilisation de l’eau + phases de lavage) est optimisée afin de compenser l’action thermique.
L’avantage pour vous : alléger vos factures d’eau et d’électricité. Et un geste de plus pour l’environnement! Vous pouvez utiliser
ces nouveaux programmes Eco (Coton , synthétique et Lavage Rapide ) pour tous types de textile et toute charge de
linge, peu ou moyennement sale. Pour optimiser les résultats de lavage avec les programmes Eco, nous vous recommandons
d’utiliser de la lessive liquide.
20
Page 21

Personnalisations
Sélection de la température
Tourner le bouton TEMPÉRATURE pour sélectionner la température de lavage (voir Tableau des programmes).
La température peut être abaissée jusqu’au lavage à froid ( ).
La machine interdira automatiquement toute sélection d’une température supérieure à la température maximale prévue pour
chaque programme.
! Exception: lors de la sélection du programme 2 la température peut être augmentée jusqu’à 90°.
Sélection de l’essorage
Tourner le bouton ESSORAGE pour sélectionner la vitesse d’essorage du programme sélectionné.
Les vitesses maximales prévues pour les programmes sont:
Programmes Vitesse maximale
Coton 1200 tours/minute
Synthétiques 800 tours/minute
Laine 800 tours/minute
Soie vidange seule
La vitesse d’essorage peut être réduite ou l’essorage supprimé en sélectionnant le symbole .
La machine interdira automatiquement tout essorage à une vitesse supérieure à la vitesse maximale prévue pour chaque
programme.
Fonctions
Les différentes fonctions de lavage prévues par le lave-linge permettent d’obtenir la propreté et le blanc souhaités.
Pour activer les fonctions:
1. appuyer sur la touche correspondant à la fonction désirée;
2. l’allumage du voyant correspondant signale que la fonction est activée.
Remarque: Le clignotement rapide du voyant signale que la fonction correspondante n’est pas disponible pour le programme
sélectionné.
FR
Départ différé
Pour différer la mise en marche de la machine jusqu’à 12 heures.
Appuyer plusieurs fois de suite sur la touche jusqu’à ce que le voyant correspondant au retard souhaité s’allume. A la cinquième
pression sur la touche, la fonction se désactive.
N.B: Après avoir appuyé sur la touche START/PAUSE, le retard programmé ne peut être modifié que pour le diminuer.
! Il est activé avec tous les programmes.
Repassage facile
En cas de sélection de cette fonction, le lavage et l’essorage seront dûment modifiés pour réduire le froissage. En fin de
cycle, le lave-linge fait tourner le tambour lentement, le voyant de la fonction REPASSAGE FACILE et celui de START/PAUSE se mettent à clignoter (orange), la phase reste allumée en fixe. Pour compléter le cycle, il faut appuyer sur la touche
START/PAUSE ou sur la touche REPASSAGE FACILE.
Pour le programme Soie l’appareil arrive au bout du cycle en laissant le linge tremper, le voyant de la fonction REPASSAGE
FACILE et celui de START/PAUSE se mettent à clignoter (orange), la phase RINCAGE reste allumée en fixe. Pour vidanger
l’eau et pouvoir sortir le linge, il faut appuyer sur la touche START/PAUSE ou sur la touche REPASSAGE FACILE.
! Cette option n’est pas activable avec les programmes 5, 6, 9, 11, 12, 13, A, B, C.
Super rinçage
La sélection de cette fonction permet d’augmenter l’efficacité du rinçage et d’éliminer toute trace de lessive. Elle est très utile
en cas de peaux particulièrement sensibles.
! Cette option n’est pas activable avec les programmes 5, 13, B, C.
Super lavage
Grâce à l’utilisation d’une plus grande quantité d’eau au cours de la phase initiale du cycle et à l’emploi de davantage de
temps, cette fonction permet d’obtenir un lavage très performant.
! Cette option n’est pas activable avec les programmes 1, 5, 8, 9, 11, 12, 13, B, C.
21
Page 22
Produits lessiviels et linge
M
AX
1
2
4
3
FR
Tiroir à produits lessiviels
Un bon résultat de lavage dépend aussi d’un bon dosage
de produit lessiviel: un excès de lessive ne lave pas mieux,
il incruste l’intérieur du lave-linge et pollue l’environnement.
! Utiliser des lessives en poudre pour du linge en coton
blanc et en cas de prélavage et de lavages à une température
supérieure à 60°C.
! Respecter les indications figurant sur le paquet de lessive.
! Ne pas utiliser de lessives pour lavage à la main, elles
moussent trop.
Sortir le tiroir à produits lessiviels et verser la lessive ou
l’additif comme suit.
bac 1: Lessive prélavage (en poudre)
Avant d’introduire la lessive, s’assurer que le bac supplémentaire 4 n’est pas présent.
bac 2: Lessive lavage (en poudre ou liquide)
Verser la lessive liquide juste avant la mise en marche.
bac 3: Additifs (assouplissant, etc.)
L’assouplissant ne doit pas déborder de la grille.
bac supplémentaire 4: Produit javelisé
Cycle blanchissage
! N’utilisez de l’eau de Javel traditionelle que pour les
tissus blancs résistants et des détachants délicats pour
les couleurs, les synthétiques et la laine.
Montez le bac supplémentaire 4 fourni avec l’appareil
MAX
MAX
à l’intérieur du bac 1.
Lorsque vous versez l’eau
de Javel, attention à ne pas
dépasser le niveau “max”
indiqué sur le pivot central
(voir figure).
Triage du linge
• Trier correctement le linge d’après:
- le type de textile / le symbole sur l’étiquette.
- les couleurs: séparer le linge coloré du blanc.
• Vider les poches et contrôler les boutons.
• Ne pas dépasser les valeurs indiquées correspondant au
poids de linge sec : voir “Tableau des programmes”.
Combien pèse le linge ?
1 drap 400-500 g
1 taie d’oreiller 150-200 g
1 nappe 400-500 g
1 peignoir 900-1200 g
1 serviette éponge 150-250 g
Linge ou vêtements particuliers
Chemises: sélectionner le programme 7 approprié au lavage
de chemises de couleurs et textiles différents.
Il en prend le plus grand soin en réduisant le froissage.
Soie: sélectionner le programme de lavage spécial 8 pour
vêtements en soie. Il est conseillé d’utiliser une lessive spéciale pour linge délicat.
Voilages: pliez-les bien et glissez-les dans une taie d’oreiller
ou dans un sac genre filet. Sélectionner le programme 8.
Laine: grâce au programme 9 vous pouvez laver à la
machine tous vos vêtements en laine, y compris ceux qui
portent l’étiquette “ lavage à la main uniquement “ .
Pour obtenir d’excellents résultats utilisez un produit lessiviel spécial et ne dépassez pas une charge de 2 kg
Système d’équilibrage de la charge
Avant tout essorage, pour éviter toute vibration excessive et répartir le linge de façon uniforme, le lave-linge fait
tourner le tambour à une vitesse légèrement supérieure
à la vitesse de lavage. Si au bout de plusieurs tentatives,
la charge n’est toujours pas correctement équilibrée,
l’appareil procède à un essorage à une vitesse inférieure
à la vitesse normalement prévue. En cas de déséquilibre
excessif, le lave-linge préfère procéder à la répartition du
linge plutôt qu’à son essorage. Pour une meilleure répartition de la charge et un bon équilibrage, nous conseillons
de mélanger de grandes et petites pièces de linge.
Pour blanchir uniquement, versez l’eau de Javel dans le bac
supplémentaire 4, sélectionnez le programme «Rinçage» et
activez le fonction «Super lavage» .
Pour blanchir en cours de lavage, versez le produit lessiviel
et les additifs, sélectionnez le programme souhaité et activez
le fonction «Super lavage» .
L’utilisation du bac supplémentaire 4 exclut le prélavage.
22
Page 23

Anomalies et remèdes
Il peut arriver que le lave-linge ne fonctionne pas bien. Avant d’appeler le Service de dépannage (voir “Assistance”), contrôler
s’il ne s’agit pas par hasard d’un problème facile à résoudre à l’aide de la liste suivante.
Anomalies:
Le lave-linge ne s’allume pas.
Le cycle de lavage ne démarre pas.
Il n’y a pas d’arrivée d’eau (le
voyant de la première phase de
lavage clignote rapidement).
Le lave-linge prend l’eau et vidange
continuellement.
Causes / Solutions possibles:
• La fiche n’est pas branchée dans la prise de courant ou mal branchée.
• Il y a une panne de courant.
• Le hublot n’est pas bien fermé.
• La touche ON/OFF n’a pas été enfoncée.
• La touche START/PAUSE n’a pas été enfoncée.
• Le robinet de l’eau n’est pas ouvert.
• Un départ différé a été sélectionné (voir “Personnalisations”).
• Le tuyau d’arrivée de l’eau n’est pas raccordé au robinet.
• Le tuyau est plié.
• Le robinet de l’eau n’est pas ouvert.
• Il y a une coupure d’eau.
• La pression n’est pas suffisante.
• La touche START/PAUSE n’a pas été enfoncée.
• Le tuyau de vidange n’est pas installé à une distance du sol comprise entre 65
et 100 cm (voir “Installation”).
• L’extrémité du tuyau de vidange est plongée dans l’eau (voir “Installation”).
• L’évacuation murale n’a pas d’évent.
Si après ces vérifications, le problème persiste, fermer le robinet de l’eau,
éteindre la machine et appeler le service Assistance. Si l’appartement est situé
en étage dans un immeuble, il peut y avoir des phénomènes de siphonnage qui
font que le lave-linge prend et évacue l’eau continuellement. Pour supprimer cet
inconvénient, on trouve dans le commerce des soupapes spéciales anti-siphonnage.
FR
Le lave-linge ne vidange pas et
n’essore pas.
Le lave-linge vibre beaucoup pendant l’essorage.
Le lave-linge a des fuites.
Le voyant START/PAUSE (orange)
ainsi que les voyants des fonctions
clignotent rapidement.
Il y a un excès de mousse.
• Le programme ne prévoit pas de vidange: pour certains programmes, il faut la
faire partir manuellement.
• La fonction REPASSAGE FACILE est activée: pour compléter le programme,
appuyer sur la touche START/PAUSE (“Personnalisations”).
• Le tuyau de vidange est plié (voir “Installation ”).
• La conduite d’évacuation est bouchée.
• Le tambour n’a pas été débloqué comme il faut lors de l’installation du lavelinge (voir “Installation”).
• Le lave-linge n’est pas posé à plat (voir “Installation”).
• Le lave-linge est coincé entre des meubles et le mur (voir “Installation”).
• Le tuyau d’arrivée de l’eau n’est pas bien vissé (voir “Installation”).
• Le tiroir à produits lessiviels est bouché (pour le nettoyer voir “Entretien et soin”).
• Le tuyau de vidange n’est pas bien fixé (voir “Installation”).
• Eteindre l’appareil et débrancher la fiche de la prise de courant, attendre 1
minute environ avant de rallumer.
Si l’anomalie persiste, appeler le service d’assistance.
• Le produit de lavage utilisé n’est pas une lessive spéciale machine (il faut qu’il y ait
l’inscription “pour lave-linge”, “main et machine”, ou autre semblable).
• La quantité utilisée est excessive.
23
Page 24

Assistance
FR
Avant d’appeler le service après-vente:
• Vérifier si on ne peut pas résoudre l’anomalie par ses propres moyens (voir “Anomalies et Remèdes”);
• Remettre le programme en marche pour contrôler si l’inconvénient a disparu;
• Autrement, contacter le Centre d’Assistance technique agréé au numéro de téléphone indiqué sur le certificat de garantie.
! Ne jamais s’adresser à des techniciens non agréés.
Communiquer:
• le type de panne;
• le modèle de l’appareil (Mod.);
• son numéro de série (S/N).
Ces informations se trouvent sur la plaque signalétique apposée à l’arrière du lave-linge et à l’avant quand on ouvre la porte
hublot.
24
Page 25

Инструкции за ползване
ПЕРАЛНА МАШИНА
BG
Български
ECO8L 1252
Съдържание
Монтиране, 26-27
Разопаковане и нивелиране
Хидравлични и електрически връзки
Първо пране
Технически данни
Поддръжка и почистване, 28
Спиране на водата и изключване на електрозахранването
Почистване на пералната машина
Почистване на чекмеджето за перилните препарати
Поддръжка на люка и на барабана
Почистване на помпата
Проверка на маркуча за студената вода
Мерки за безопасност и препоръки, 29
Общи предохранителни мерки
Рециклиране
Опи с ан и е на пе рал н ата машин а и
пускането на дадена програма, 30-31
Табло за управление
Светлинни индикатори
Включване на програма
BG
Програми, 32
Таблица с програмите
Персонализирания, 33
Задаване на температурата
Задаване на центрофугата
Функции
Перилни препарати и дрехи за пране, 34
Чекмедже за перилните препарати
Цикъл на избелване
Подготвяне на прането
Специфично пране
Система за измерване на товара
Проблеми и мерки за отстраняването
им, 35
Сервизно обслужване, 36
25
Page 26

Монтиране
BG
! Важно е да съхранявате инструкциите,
за да можете да правите допълнителни
справки по всяко време. В случай
че пералната машина се продаде,
преотстъпи или премести, трябва да
се погрижите инструкциите винаги да
я придружават, за да се предостави
информация на новия собственик за
работата и съответните предупреждения.
! Прочетете внимателно инструкциите:
защото съдържат важна информация за
монтажа, използването и безопасността.
Разопаковане и нивелиране
Разопаковане
1. Разопаковайте пералната машина.
2. Проверете дали пералната машина не
е повредена при транспортирането. Ако е
повредена, не я свързвайте, а се обърнете
към продавача.
3. Свалете
4-те винта за
предпазване
при транспорт
и гумичката със
съответната
втулка, поставени
от задната страна
(виж показаното на
фигурата).
4. Затворете отворите с предоставените
пластмасови капачки.
5. Съхранете всички части: за да се
монтират отново при необходимост
пералната машина да бъде
транспортирана.
! Опаковъчният материал не е детска
играчка.
работната повърхност, не трябва да
надвишава 2°.
Точното нивелиране позволява машината
да бъде стабилна и да се избягват
вибрациите, шумът и преместването й
по време на работа. Когато настилката
е мокет или килим, регулирайте така
крачетата, че под пералната машина да
остане достатъчно място за вентилация.
Хидравлични и електрически
връзки
Свързване на маркуча към
водопроводната мрежа
1. Свържете
захранващия маркуч,
като го завиете към
крана за студената
вода с накрайник с
газова резба 3/4 (виж
фигурата).
Преди да го
свържете, източете
водата, докато се
избистри.
2. Свържете
маркуча за
студената вода към
пералната машина,
като го завиете
към специалния
щуцер, разположен
от задната страна,
горе вдясно (виж
фигурата).
3. Внимавайте маркуча да не се прегъва и
притиска.
Нивелиране
1. Монтирайте пералната машина на
равен и твърд под, без да я опирате в
стени, мебели и др.
2. Ако подът
не е идеално
хоризонтален,
компенсирайте
неравностите, като
отвиете или завиете
предните крачета
(виж фигурата);
ъгълът на наклона,
измерен върху
26
! Налягането по водопроводната мрежа
трябва да бъде в границите, указани
в таблицата „Технически данни” (вж.
следващата страница).
! Ако дължината на захранващия
маркуч не е достатъчна, се обърнете
към специализиран магазин или към
оторизиран техник.
! Никога не използвайте вече употребяван
маркуч.
! Използвайте тези, което са доставени с
пералната машина.
Page 27

Свързване на маркуча за мръсната вода
65 - 100 cm
Свържете маркуча
за мръсната
вода, без да го
прегъвате, към
канализационната
тръба или
към тръбата
за отвеждане
в стената,
разположени на
височина между 65
и 100 см от пода, или го подпрете на ръба
на мивката или ваната,
свързвайки
доставения
водач към крана
(вж. фигурата).
Свободният край
на маркуча за
мръсната вода
не трябва да
бъде потопен във
водата.
! Не се препоръчва използването на
удължителни маркучи. Ако е необходимо,
удължителят трябва да има същия
диаметър като оригиналния и да не
надвишава 150 см.
Свързване към електрическата мрежа
Преди да свържете щепсела в контакта,
проверете дали:
• контактът е заземен съгласно
действащите стандарти;
• контактът може да поеме максималната
мощност на натоварване на машината,
указана в таблицата с техническите
данни (виж следващата страница);
• захранващото напрежение е в границите
на указаното в таблицата с техническите
данни (виж следващата страница);
• контактът отговаря на щепсела на
пералната машина. В противен случай
заменете щепсела или контакта.
! Пералната машина не се монтира на
открито, дори под навес, защото е много
опасно да се остави на влиянието на
атмосферните условия.
! За монтираната перална машина
електрическият контакт трябва да бъде
лесно достъпен.
! Не използвайте удължители или
разклонители.
! Кабелът не трябва да бъде огънат или
сплескан.
! Захранващият кабел трябва да се
подменя само от оторизирани техници.
Внимание! Фирмата отхвърля всякаква
отговорност в случаите, в които тези
норми не се спазват.
Първо пране
След инсталиране и преди употреба
включете един цикъл на изпиране
с перилен препарат, но без дрехи,
задавайки програма 2.
Технически данни
Модел ECO8L 1252
ширина 59,5 см
Размери
Вместимост îò 1 äî 8 êã.
Електрическо
захранване
Захранване с
вода
Скорост на
центрофугата
Програми
за проверка
съгласно
Регламенти
№ 1061/2010
и №
1015/2010 на
Комисията
височина 85 см
дълбочина 60 см
Виж табелката с
характеристиките,
поставена на машината
максимално налягане
1 МРа (10 bar)
минимално налягане
0,05 МРа (0,5 bar)
обем на казана 62 литра
до 1200 оборота/минута
програма 2;
стандартна програма за
памук при 60°C.
програма 3;
стандартна програма за
памук при 40°C.
Пералната машина
съответства на следните
Европейски директиви:
- 2004/108/CE (за
електромагнитна
съвместимост)
- 2006/95/СЕ (за ниско
напрежение)
- 2012/19/EU
BG
27
Page 28

Поддръжка и почистване
1
2
BG
Спиране на водата и изключване
на електрозахранването
• Затваряйте крана за вода след всяко
изпиране. По този начин се ограничава
износването на хидравличната
инсталация на пералната машина и се
ограничава опасността от течове.
• Изключвайте щепсела от електрическото
захранване, когато почиствате пералната
машина и по време на работи по
поддръжката.
Почистване на пералната машина
Външната част и гумените части могат
да се почистват с кърпа с хладка вода и
сапун. Не използвайте разтворители или
абразивни препарати.
Почистване на чекмеджето за
перилните препарати
Почистване на помпата
Пералната машина е окомплектована със
самопочистваща се помпа, която няма
нужда от поддръжка. Възможно е обаче
малки предмети (монети, копчета) да
попаднат във филтъра, който предпазва
помпата и се намира в долната й част.
! Уверете се, че цикълът на пране е
завършил, и изключете щепсела от
контакта.
За достъп до филтъра:
1. свалете панела
в предната част
на пералната
машина с помощта
на отвертка (âæ.
фигура).
Извадете
чекмеджето с
повдигане и
изтегляне навън
(виж фигурата).
Измийте го под
течаща вода. Това
почистване трябва
да се извършва
често.
Поддръжка на люка и на барабана
• Оставяйте люка винаги открехнат за
избягване образуването на неприятни
миризми.
2. отвийте
капачката, като
я завъртите в
посока, обратна
на часовниковата
стрелка (âèæ
фигура): нормално
е да изтече малко
вода;
3. почистете внимателно отвътре;
4. завийте отново капачката;
5. затворете отново панела, като, преди
да го избутате към пералнята, се уверите,
че сте поставили правилно закрепващите
куки в специалните водачи.
Проверка на маркуча за студената
вода
Проверявайте маркуча за студената вода
поне веднъж годишно. Да се замени, ако
е напукан и нацепен, защото по време
на изпиране голямото налягане може да
предизвика внезапно спукване.
28
! Никога не използвайте вече употребяван
маркуч.
Page 29

Мерки за безопасност и
препоръки
! Пералната машина е проектирана и произведена в
съответствие с международните норми за безопасност.
Предупрежденията тук са продиктувани по причини за
безопасност и трябва да се четат внимателно.
Общи предохранителни мерки
• Този уред е предназначен изключително за домашна
употреба.
• Този уред може да бъде използван от деца
над 8 години и лица с ограничени физически,
сетивни или умствени способности, или с
недостатъчен опит и познания, ако те са
наблюдавани или инструктирани относно
използването на уреда от лице, отговорно
за тя хната безопасност и разб и р ат
опасностите, свързани с употребата на
уреда. Децата не трябва да си играят с
уреда. Поддръжката и почистването не
трябва да се извършват от деца без надзор.
• Не докосвайте машината, когато сте боси или с мокри
или влажни ръце или крака.
• Изключвайте от контакта, като хващате за щепсела,
а не като дърпате кабела.
• Не отваряйте чекмеджето с перилните препарати,
докато пералната машина работи.
• Не докосвайте маркуча за мръсната вода, защото
може да достигне високи температури.
• Никога не отваряйте люка със сила, защото може
да се повреди механизма за безопасност, който
предпазва от случайно отваряне.
• В случай на повреда по никакъв повод не достигайте
до вътрешните механизми в опити за ремонт.
• Винаги контролирайте децата да не се доближават
до работещата машина.
• По време на изпирането люкът се нагрява.
• Преместването да се извършва внимателно от
двама или трима души. Никога от сам човек, защото
пералната машина тежи много.
• Преди да заредите машината, проверете дали
барабанът е празен.
За допълнителна информация относно правилното
изваждане от употреба на домакинските електроуреди,
интересуващите се могат да се обърнат към службата
за събиране на отпадъци или към дистрибуторите.
BG
Рециклиране
• Унищожаване на опаковъчния материал: спазвайте
местните норми – по този начин опаковъчният
материал може да се рециклира.
• Европеиската директива 2012/19/EU за отпадъците
от електрическо и електронно оборудване предвижда
домакинските електроуреди да не се изхвърлят заедно
с обичайните твърди градски отпадъци. Извадените
от употреба уреди трябва да бъдат събирани отделно
с цел да бъде увеличен делът на подлежащите на
повторна употреба и рециклиране материали, от които са
направени, както и да бъдат избегнати евентуални вреди
за здравето и околната среда. Символът “зачеркнато
кошче” е поставен върху всички продукти, за да напомня
за задължителното разделно събиране.
29
Page 30

Описание на пералната машина и
пускането на дадена програма
BG
Табло за управление
Чекмедже за
перилните
препарати
Бутон ON/OFF
Програматор
ПРОГРАМИ
Програматор
ТЕМПЕРАТУРА
Бутони със светлинни
индикатори ФУНКЦИЯ
Светлинни ИНДИКАТОРИ ЗА ХОД НА
ЦИКЪЛ/ЗАБАВЕНО ВКЛЮЧВАНЕ
Програматор
ЦЕНТРОФУГА
Светлинен
индикатор
БЛОКИРАН
ЛЮК
Бутон със светлинен
индикатор
START/PAUSE
Чекмедже за перилните препарати: за дозиране
на перилните препарати и добавките (âæ. “Перилни
препарати и дрехи за пране”).
Вътре в чекмеджето за перилните препарати има
джоб за пластмасовата схема на програмите, с която
да може да се направи справка по всяко време.
Бутон ON/OFF: за включване и изключване на
пералнята.
Програматор ПРОГРАМИ: за задаване на програмите.
По време на изпълнение на програмата ключът
остава неподвижен.
Бутони със светлинни индикатори ФУНКЦИЯ: за
селектиране на възможните функции. Светлинният
индикатор за избраната функция ще продължи да
свети.
ПрограматорЦЕНТРОФУГА: за задаване
на центрофуга или за изключването й (âæ.
“Персонализирания”).
Програматор ТЕМПЕРАТУРА: за задаване на
температура или пране със студена вода (âæ.
“Персонализирания”).
Светлинни ИНДИКАТОРИ ЗА ХОД НА ЦИКЪЛ/
ЗАБАВЕНО ВКЛЮЧВАНЕ: за да следвате хода на
изпълнение на програмата за пране.
Включеният светлинен индикатор показва, че се
извършва определена фаза от цикъла.
Ако е зададена функцията “Забавено включване”, ще
се посочва времето, оставащо до стартирането на
програмата (вж. съседната страница).
Светлинен индикатор БЛОКИРАН ЛЮК: за да
се разбере дали люкът може да се отвори (âæ.
съседната страница).
Бутон със светлинен индикатор START/PAUSE:
за стартиране на програмите или временното им
прекъсване.
Забележка: за задаване на пауза в прането
натиснете отново бутона - индикаторът ще
мига с оранжева светлина, докато светлинният
индикатор, указващ изпълнение на фаза, ще
свети непрекъснато. Ако светлинният индикатор
БЛОКИРАН ЛЮК е угаснал, ще може да се отвори
вратата на люка (изчакайте около 3 минути).
За продължаване на цикъла пране от мястото, в
което е бил прекъснат, натиснете отново този бутон.
Режим на stand by
В съответствие с новите нормативи за пестене
на енергия тази перална машина е снабдена със
система за автоматично изключване (stand by), която
се задейства след 30 минути в случай, че машината
не се използва. Натиснете за кратко бутон ON/OFF и
изчакайте машината да се задейства отново.
30
Page 31

Светлинни индикатори
Следящите светлинни индикатори дават важна
информация.
Ето какво казват:
Светлинни индикатори за текущите фази
След като е избран и стартиран желаният цикъл на
пране, светлинните индикатори ще светват един след
друг, за да указват хода на цикъла:
Пране
BG
Отложен старт
Ако е активирана функцията “Забавено включване” (âæ.
“Персонализирания”), след пускане на програмата ще
светне индикаторът за избраното забавяне:
В течение на времето ще се визуализира оставащото
забавяне чрез мигане на съответния светлинен
индикатор:
След като изтече времето за отлагане на
изпълнението, примигващият светлинен индикатор
ще угасне и избраната програма ще се стартира.
Изплакване
Центрофуга
Източване на водата
Край на прането
Бутони за функция и съответни светлинни
индикатори
При избор на функция съответният светлинен индикатор
ще светне.
Ако избраната функция не е съвместима със зададената
програма, съответният светлинен индикатор ще мига и
функцията няма да се активира.
В случай на задаване на функция, несъвместима с
друга, зададена преди нея функция, остава активен само
последният избор.
Светлинен индикатор блокиран люк
Светещият индикатор показва, че люкът е блокиран, за да
се предотвратят случайни отваряния; за избягване на щети
е необходимо да се изчака изгасването на светлинния
индикатор, преди да се отвори люкът (изчакайте около 3
минути).
Забележка: ако е активирана функцията “Забавено
включване”, люкът не може да се отвори, за
отварянето му е необходимо пералната машина да
се постави в пауза чрез натискане на бутон START/
PAUSE.
! Бързото мигане на светлинния индикатор START/
PAUSE (оранжев) заедно с индикатора за функциите
е сигнал за неизправност (âæ. “Неизправности и
отстраняването им”).
Включване на програма
1. Включете пералнята, като натиснете бутона ON/OFF. Всички индикатори ще се включат и ще светят в
продължение на няколко секунди, след което ще угаснат и ще свети с пулсираща светлина индикаторът START/
PAUSE.
2. Заредете дрехите за пране и затворете люка.
3. Задайте желаната програма с ключа ПРОГРАМИ.
4. Задайте температурата на пране (âæ. “Персонализирания”).
5. Задайте скоростта на центрофугиране (âæ. “Персонализирания”).
6. Поставете перилен препарат и добавки âæ. “Перилни препарати и дрехи за пране”.
7. Избиране на желаните функции.
8. Включете програмата, като натиснете бутона START/PAUSE, съответният светлинен индикатор ще свети
постоянно в зелен цвят.
За да отмените зададения цикъл, поставете машината в пауза, като натиснете бутона START/PAUSE, и изберете
новия цикъл.
9. Когато програмата свърши, ще светне индикаторът . Светлинният индикатор за БЛОКИРАН ЛЮК ще угасне,
указвайки, че люкът може да бъде отварян (изчакайте около 3 минути). Извадете прането и оставете люка
притворен, за да изсъхне барабанът.
Изключете пералнята, като натиснете бутона ON/OFF.
31
Page 32

Програми
BG
Таблица с програмите
Ìàêñ.
Описание на програмата
Програми
Програми за всеки ден
ПАМУ бели с предпране: Бели, изключително замърсени.
1
Cтандартна програма за памук при 60°(1): Бели и цветни,
2
устойчиви, силно замърсени.
Cтандартна програма за памук при 40°(2): Бели и цветни,
3
деликатни, много замърсени.
СИНТЕТИЧНИ: Цветни, устойчиви, много замърсени.
4
СИНТЕТИЧНИ (3): Цветни, устойчиви, много замърсени.
4
ОСВЕАВАНЕ 15: За бързо освежаване на не много
замърсени дрехи (не се препоръчва за вълна, коприна и дрехи,
5
които трябва да се перат на ръка).
Специални програми
ËÅÀ ÍÎ: Неустойчиви цветни, леко замърсени.
6
ÐÈÇÈ
7
ОПРИНА/ПЕРДЕТА: За дрехи от коприна, вискоза, фино бело.
8
ВЪЛНЕНИ ТЪАНИ: За вълна, кашмир и т.н.
9
E програми
Cтандартна програма за памук при 20°:
10
деликатни,
ÏÀÌÓ
11
СИНТЕТИЧН
12
БЪРЗА 30’
13
Частични програми
Изплакване
A
Центрофуга
B
Източване на водата
C
Продължителността на цикъла, показана на дисплея или посочена в ръководството, е приблизително изчислена въз основа на стандартните условия.
Реалното времетраене може да варира в зависимост от множество фактори като температура и налягане на водата при пълнене, температура на въздуха
в помещението, количество перилен препарат, количество, вид и тегло на прането, допълнително избрани опции.
1) Програма за проверка съгласно стандарт 1061/2010: задайте програма 2 с температура 60°C.
Този цикъл е подходящ за пране на памучни, нормално замърсени тъкани и е най-ефективен от гледна точка на комбиниран разход на енергия и вода, подходящ е за дрехи, които
могат да се перат на 60°C. Действителната температура на пране може да се различава от указаната.
2) Програма за проверка съгласно стандарт 1061/2010: задайте програма 3 с температура 40°C.
Този цикъл е подходящ за пране на памучни, нормално замърсени тъкани и е най-ефективен от гледна точка на комбиниран разход на енергия и вода, подходящ е за дрехи, които
могат да се перат на 40°C. Действителната температура на пране може да се различава от указаната.
За всички институции, извършващи изпитания:
2) Продължителна програма за памук: задайте програма 3 с температура 40° C.
3) Дълга програма за синтетични тъкани: задайте програма 4 с температура 40° C.
много
замърсени.
Бели и цветни,
темпера-
òóðà
(C)
90° 1200
60°
(Max. 90°)
40° 1200 -
60° 800 -
40° 800 -
30° 800 -
40° 800 -
40° 600 -
30° 0 -
40° 800 -
20° 1200 -
студена
âîäà
студена
âîäà
студена
âîäà
Ìàêñ.
скорост
(обороти
минута
1200 -
1200 -
- 1200 - -
- 1200 - - - - 8 - - - 16’
- 0 - - - - 8 - - - 2’
(програма 5) е създадена за пране на леко замърсени дрехи за кратко време: трае само 15 минути
и по този начин пести енергия и време. Със задаването на програмата (5 на 3 ) може да перете едновременно
тъкани от различен вид (с изключение на вълна и коприна) с максимално тегло до 1,5 кг.
(програма 6). Това е безшумен цикъл, който може да се извършва през нощта при по-ниска тарифа
на електроенергията. Програмата е създадена за синтетични и памучни дрехи. В края на цикъла машината спира,
когато в барабана все още има вода; за да изпълни центрофугиране и източване , натиснете бутон START/PAUSE,
в противен случай след часа пералната машина автоматично ще центрофугира и ще източи водата.
стандартна програма за памук при 20 C° (програма 1) е идеална за замърсено пране от памучна тъкан. Добрите
резултати включително при изпиране със студена вода, в сравнение с тези след пране при 40°, са гарантирани от механичното
действие с промяна на скоростта, многократно и често достигащо до пикови стойности.
Перилни препарати
â
Предпране
800 -
800 -
тител
пране
Омеко-
Основно
Зареж-дане
Белина
ìêñ (êã)
Остатъчна
влажност %
Разход на
вода lt
енергия kWh
Продълж-
Общ разход на
- 8 53 2,86 98 195’
8 53 1,23 55,0 195’
8 53 1,01 84 180’
4,5 46 1,03 60 115’
4,5 46 0,56 60 100’
- 1,5 71 0,11 33 15’
4 - - - 290’
- 2 - - - 80’
- 2 - - - 65’
- 2 - - - 85’
8 - - - 175’
- 8 53 0,23 68 80’
- 3 48 0,12 37 70’
- 3 71 0,10 36 30’
8 - - - 36’
ителност на
цикъла
Програми Еко
Програмите Еко предлагат добър резултат от изпирането при ниска температура, позволявайки по-ниско потребление
на електроенергия, като с това допринасят за опазването на околната среда и икономическата ефективност.
Програмите Еко (Памук 11, Синтетика 12 и Бърза 3 13) са създадени за различни видове тъкани и слабо замърсени
дрехи. За да бъдат гарантирани оптимални резултати, препоръчваме да използвате течен перилен препарат; добре
е да обработите предварително маншетите, яките и петната.
32
Page 33

Персонализирания
Задаване на температурата
Завъртайки ключа ТЕМПЕРАТУРА, се задава температурата на пране (вж. Таблица на програмите).
Температурата може да се понижи до пране със студена вода ( ).
Пералнята автоматично ще попречи да се зададе температура, която е по-висока от максималната температура,
предвидена за всяка програма.
! Изключение: с избиране на програма 2 температурата може да се повиши до 90°.
Задаване на центрофугата
Завъртайки ключа ЦЕНТРОФУГА, се задава скоростта на центрофугиране за избраната програма.
Максималните предвидени скорости за програмите са:
Програми Максимална скорост
Памучни 12 оборота в минута
Синтетични тъкани оборота в минута
Вълна оборота в минута
Коприна, само източване
Скоростта на центрофугиране може да се намали или да се изключи, като се избере символът .
Пералнята автоматично ще попречи да се центрофугира със скорост, по-висока от максимално предвидената за
всяка програма.
Функции
Допълните функции за пране, предвидени в пералната машина, дават възможност за постигане на желаното бяло
и чисто пране:
За активиране на възможните функции;
1. натиснете бутона, съответстващ на желаната функция;
2. светването на съответния индикатор показва, че функцията е избрана.
Бележка: Бързото мигане на индикатора показва, че съответната функцията не може да бъде избрана за
зададената програма.
BG
Отложен Старт
Забавя пускането на машината до 12 часа.
Натиснете многократно бутона, докато светне индикаторът, съответстващ на желаната стойност за време на забавяне.
При петото натискане на бутона функцията няма да е активна.
Забележка: След натискане на бутона START/PAUSE стойността на забавянето може да се променя само като се
намалява.
Валидна с всички програми.
Лесно гладене
При избор на тази функция прането и центрофугирането ще се изменят целесъобразно, така че да се намали
образуването на гънки. При завършване на цикъла пералнята прави бавни завъртания на барабана, следящият
светлинен индикатор на функцията ЛЕСНО ГЛАДЕНЕ и на START/PAUSE ще светят с мигаща светлина (в
оранжев цвят) и следящият индикатор ще светне. За завършване на цикъла трябва да се натисне бутон
START/PAUSE или бутон ЛЕСНО ГЛАДЕНЕ.
В програмата „Коприна” машината ще приключи цикъла с накиснато пране, следящият индикатор на функцията
ЛЕСНО ГЛАДЕНЕ и на START/PAUSE ще светят с мигаща светлина (в оранжев цвят) и фазата „ИЗПЛАКВАНЕ” ще
остане да свети с постоянна светлина. За да се източи водата и да може да се извади прането, е необходимо да
се натисне бутон START/PAUSE или бутон ЛЕСНО ГЛАДЕНЕ.
Не може да се активира с програмите 5, 6, 9, 11, 12, 13, A, B, .
Допълнително изплакване
С избора на тази функция се увеличава ефикасността на изплакването и се гарантира максимално отстраняване
на перилния препарат. Подходяща е за особено чувствителна кожа.
Не може да се активира с програмите 5, 13, B, .
Супер изпиране
Благодарение на използваното по-голямо количество вода в началната фаза на цикъла и на по-дългото време на
пране тази функция гарантира висококачествено изпиране.
Не може да се активира с програмите 1, 5, , 9, 11, 12, 13, B, .
33
Page 34

Перилни препарати и
M
AX
1
2
4
3
дрехи за пране
BG
Чекмедже за перилните препарати
Добрият резултат от прането зависи и от правилното
дозиране на перилните препарати. с предозиране
не се пере по-ефикасно, а това води до отлагане на
налепи по вътрешната страна на пералната машина
и до замърсяване на околната среда.
! Не използвайте препарати за ръчно пране, защото
образуват много пяна.
! Използвайте прахообразни перилни препарати за
бели памучни тъкани за предпране и за пране при
температура над 60°C.
! Уверете се, че следвате указанията, посочени върху
опаковката на перилния препарат.
Изтеглете чекмеджето за
перилните препарати и
изсипете праха за пране
и допълните препарати
по следния начин.
отделение 1: Препарат за предпране (на прах)
Преди да изсипете препарата, проверете дали не е
поставено допълнителното отделение 4.
отделение 2: Препарат за пране (на прах или
течен)
Течният препарат се изсипва преди включването на
машината.
отделение 3: Допълнителни препарати
(омекотител и др.)
Омекотителят не трябва да излиза извън решетката.
допълнително отделение 4: Белина
Цикъл на избелване
! Обикновената белина се използва за устойчиви бели
тъкани, а деликатната белина за цветни, синтетични и
вълнени тъкани.
Поставете приложеното
допълнително отделение
MAX
MAX
допълнителното отделение 4, изберете програма
“Изплакване” и включете допълнителната функция
за "Супер изпиране” . За избелване по време на
пране изсипете перилния препарат и допълнителните
препарати, изберете желаната програма и включете
допълнителната функция за "Супер изпиране” .
4 в отделение 1.
П р и до з и р а н е т о на
белината не надвишавайте
м а к с и м а л н о т о н и в о ,
показано на централния
щифт (виж фигурата).
Ñ à ìî ç à è çá å ëâ à íå
èç ñ è ïå ò å á åë è í àò à â
Подготвяне на прането
• Разпределете прането съобразно:
- типа на тъканите/символа върху етикета.
- цветовете: отделете цветните от белите дрехи.
• Изпразнете джобовете и проверете копчетата.
• Не надвишавайте указните стойности за теглото на
сухото пране: вижте “Таблица с програмите”.
Колко тежат дрехите за пране?
1 чаршаф 4-5 г
1 калъфка 15-2 г
1 покривка 4-5 г
1 хавлия 9-12 г
1 кърпа 15-25 г
Специфично пране
Ðèçè: използвайте специалната програма 7 за пране
на ризи от различен вид тъкан и цвят.
Това гарантира максимално доброто им поддържане,
намалявайки възможността за образуване на гънки.
Коприна: използвайте специалната програма 8 çà
пране на всички дрехи от коприна. За деликатните
тъкани се препоръчва използването на специален
вид перилен препарат.
Пердета: сгънете ги и ги поставете в калъфка или
мрежеста торба. Използвайте програма 8.
Вълнени тъкани: С програма 9 е възможно да се
перат в пералня всякакви вълнени дрехи, също и тези
с етикет “само за ръчно пране” . За постигане на
по-добри резултати използвайте специален перилен
препарат и не надвишавайте 2 kg пране.
Система за измерване на товара
Преди всяко центрофугиране, с цел избягване
на прекалени вибрации и за равномерно
разпределяне на товара, барабанът се завърта
с малко по-висока от тази при прането скорост.
Ако след направените последователни опити
товарът все още не е перфектно разпределен,
машината извършва центрофугиране при скорост,
по-ниска от предвидената. При наличие на
прекален дебалансиране пералнята извършва
разпределението вместо центрофугата. За
улесняване на по-доброто разпределение на товара
и правилното му балансиране се препоръчва да се
смесват дрехи за пране с големи и малки размери.
34
Page 35

Проблеми и мерки за
отстраняването им
Възможно е пералната машина да откаже да работи. Преди да се обадите в сервиза за техническа поддръжка и
ремонт (âæ. “Сервизно обслужване”), проверете дали не става въпрос за лесно решим проблем, като си помогнете
със следващия списък.
Проблеми:
Пералната машина не се включва.
Цикълът на изпиране не започва.
Пералната машина не се пълни
с вода (бързо мига светлинният
индикатор за първата фаза на
пране).
Пералнята непрекъснато се пълни
и източва.
Възможни причини / Мерки за отстраняването им:
• Щепселът не е включен към електрически контакт или не е добре
включен, за да прави контакт.
• Нямате ток вкъщи.
• Люкът не е затворен добре.
• Бутонът ON/OFF не е бил натиснат.
• Бутонът START/PAUSE не е бил натиснат.
• Кранът за вода не е отворен.
• Зададено е забавяне, което се е насложило върху времето за пускане
(âæ. “Персонализирания”).
• Маркучът за студената вода не е свързан към крана.
• Маркучът е прегънат.
• Кранът за вода не е отворен.
• Няма вода по водопроводната мрежа.
• Налягането е недостатъчно.
• Бутонът START/PAUSE не е бил натиснат.
• Маркучът за мръсната вода не е монтиран между 65 и 1 см от земята (âæ.
“Инсталиране”).
• Краят на маркуча за мръсната вода е потопен във вода (âæ. “Монтаж”).
• Канализационната тръба в стената няма отдушник.
Ако след тези проверки проблемът не се реши, затворете крана за
водата, изключете пералната машина и позвънете в сервиза. Ако
жилището ви се намира на последните етажи на сградата, налягането
на студената вода може да е ниско, поради което пералната машина
непрекъснато се пълни и източва. За избягване на това неудобство в
търговската мрежа се предлагат подходящи възвратни клапани.
BG
Пералната не се източва или не
центрофугира.
Пералната вибрира много по време
на центрофугиране.
Пералната има теч.
Светлинният индикатор START/
PAUSE (оранжев) и светлинните
индикатори за функции мигат бързо.
Образува се твърде много пяна.
• Програмата не предвижда източване: с някои програми трябва да се
извършва ръчно (âæ. “Старт и програми”).
• Включена е функцията ЛЕСНО ГЛАДЕНЕ: за завършване на
програмата се натиска бутон START/PAUSE (âæ. “Програми и опции”).
• Маркучът за мръсната вода е притиснат (âæ. “Монтаж”).
• Канализационната тръба е запушена.
• При монтажа барабанът не е бил отблокиран правилно (âæ. “Монтаж”).
• Пералната машина не е нивелирана (âæ. “Монтаж”).
• Пералната машина е притисната между мебели и стена (âæ.
“Монтаж”).
• Маркучът за студената вода не е добре свързан (âæ. “Монтаж”).
• Чекмеджето за перилните препарати е запушено (за почистването му
âæ. “Поддръжка и почистване”).
• Маркучът за мръсната вода не е фиксиран добре (âæ. “Монтаж”).
• Изключете машината и извадете щепсела от контакта, изчакайте около
1 минута и я включете отново.
Ако неизправността не може да се отстрани, потърсете услугите на
Сервиза.
• Перилният препарат не е за автоматична перална (трябва да има
надпис “за автоматична перална”, “за пране на ръка и за автоматична
перална” или подобен надпис).
• Дозирането е било твърде голямо.
35
Page 36

Сервизно обслужване
BG
Преди да се свържете с техническия сервиз:
• Проверете дали можете да решите сами проблема (âæ. “Íåизправности и начин за отстраняването им”);
• Включете отново програмата, за да проверите дали неизправността е отстранена;
• В противен случай се обърнете към оторизирания технически сервиз на телефонния номер, указан на
гаранционната карта.
! Никога не ползвайте услугите на неоторизирани техници.
Съобщете:
• типа на проблема;
• модела на машината (Mod.);
• серийния номер (S/N).
Тази информация се намира на фабричната табелка, разположена на задната страна на пералната машина и в
предната част, след като се отвори люкът.
36
Page 37

Упутство за употребу
МАШИНА ЗА ПРАЊЕ РУБЉА
SB
Cрпски
ECO8L 1252
Садржај
Постављање, 38-39
Pаспакивање и нивелисање
Прикључивање на водоводну и електричну мрежу
Први циклус прања
Технички подаци
Одржавање и чување, 40
Искључите воду и електричну енергију
Чишћење машине за прање веша
Чишћење посуде за детерџенте
Нега врата и бубња
Чишћење пумпе
Проверите црево за довод воде
Упозорења и савети, 41
Општа безбедност
Одлагање на отпад
Опис машине за прање веша и
покретање програма, 42-43
Командна табла
Контролне лампице
Покретање програма
SB
Програми, 44
Табела програма
Посебна подешавања, 45
Задавање температуре
Задавање центрифуге
Функције
Детерџенти и веш, 46
Посуда за детерџент
Циклус избељивања
Припрема веша
Посебне тканине
Систем за балансирање терета
Неправилности и решења, 47
Помоћ, 48
Активна помоћ 7 дана у недељи
37
Page 38

Постављање
SB
! Важно је сачувати ову књижицу како
бисте је могли консултовати у сваком
тренутку. У случају продаје, уступања или
селидбе, обезбедите да остане уз машину
за прање веша како би нови власник могао
да се обавести о раду и одговарајућим
упозорењима.
! Пажљиво прочитати упутства: садрже
важне информације о постављању, употреби
и безбедности.
Распакивање и нивелисање
Распакивање
1. Распакивање машине за веш.
2. Проверити да машина није претрпела
оштећења при транспорту. Уколико је
оштећена, не повезивати је и обратити се
продавцу.
3. С к и н у т и 4
завртња постављена
к ао за ш т и та пр и
транспорту и гумицу
са одгова рај у ћим
о д б о ј н и к о м ,
п о с т а в љ е н е н а
задњем делу машине
(види слику).
4. Затворити отворе приложеним пластичним
затварачима.
5. Сачувати све делове: уколико машину
треба транспортовати, биће потребно
поново их поставити.
! Амбалажа није играчка за децу.
Нивелисање
1. Поставити машину на равну и чврсту
површину, не наслањати је на зид, намештај
или друге површине.
2. У к о л и к о п о д
н и ј е с а в р ш е н о
раван, надокнадите
н е п р а в и л н о с т
от пу ш та њ ем и л и
затезањем предњих
стопица (види слику);
угао нагиба, измерен
на радној површини
не сме прелазити 2°.
Прецизно нивелисање даје стабилност
и спречава вибрације, буку и померање
током рада машине. У случају да машину
постављате на итисон или тепих, подесите
стопице тако да испод машине оставите
довољно простора за вентилацију.
Прикључивање на водоводну и
електричну мрежу
Повезивање црева за довод воде
1. Повежите црево
за довод воде са
славином за хладну
воду и нави¼те ¼е 3/4
дужине наво¼а
(види слику).
П р е по в ез и в а њ а
пустите воду да тече
све док не постане
чиста.
2 . П о в е ж и т е
доводно црево са
машином заврћући
га на одговарајући
прикључак за воду,
н а за д њ е м де л у
машине, горе десно
(види слику).
3. Обратите пажњу да црево није савијено
или зачепљено.
! Притисак воде у славини мора да буде у
оквиру вредности у табели Технички подаци
(види доле).
! Ако дужина црева за довод воде није
довољна, обратите се специјализованој
продавници или овлашћеном сервису.
! Никада не користите половне цеви.
! Користити црева испоручена уз машину.
38
Page 39

65 - 100 cm
Повезивање одводног црева
Повезати
одводно црево,
без савијања, са
сливником или
испустом у зиду
постављеним
између 65 и 100 цм
изнад земље;
или га ослонити
на умиваоник или
каду, везујући
га вођицом из
паковања за
славину (види
слику). Слободни
крај одводног црева
не сме остати
потопљен у воду.
! Не препоручује се употреба продужних
црева; ако је неопходно, продужетак мора
имати исти пречник као и оригинално
црево и не сме премашити 150 цм.
Повезивање на електричну мрежу
Пре уметања утикача у утичницу, уверите се:
• да утичница има уземљење и да је у
складу са законским прописима;
• да утичница може да издржи максимално
оптерећење снаге машине, дато у табели
са Техничким подацима (види поред);
• напон напајања треба да се креће у
границама вредности датих у табели са
Техничким подацима (види поред);
• да је утичница компатибилна са утикачем
машине. У случају да не одговара,
променити утичницу или утикач.
! Машину немојте инсталирати на отвореном
простору, чак иако је простор наткривен,
пошто је изузетно опасно да буде изложена
киши и променама времена.
! Код инсталирања машине утичница мора
да буде лако доступна.
! Не користите продужне каблове и
вишеструке утичнице.
! Кабл не сме да буде савијен и притиснут.
! Замену енергетског кабла треба да
обавља само овлаштени сервисер.
Пажња! Произвођач се ограђује од сваке
одговорности у случају непоштовања ових
норми.
Први циклус прања
Након постављања, пре употребе,
извршите циклус прања са детерџентом и
без веша задајући програм 2.
Технички подаци
Модел ECO8L 1252
ширина 59,5 цм
Димензије
Капацитет од 1 до 8 кг
Електрични
прикључак
Прикључак
за воду
Брзина
центрифуге
Контролни
програми
према
директиви
1061/2010 и
1015/2010
висина 85 цм
дубина 60 цм
Види налепницу
са техничким
карактеристикама која се
налази на машини
максимални притисак 1
MPa (10 bar)
минимални притисак 0,05
MPa (0,5 bar)
капацитет бубња 62
литара
до 1200 обртаја у минуту
програм 2; Памук
стандард 60°C.
програм 3; Памук
стандард 40°C.
Ова машина је у складу са
следећим стандардима:
- 2004/108/CE
(електромагнетска
компатибилност)
- 2006/95/CE (ниски напон)
- 2012/19/EU
SB
39
Page 40

Одржавање и чување
1
2
SB
Искључите воду и електричну
енергију
• Затворити славину за воду после сваког
прања. Овим се спречава хабање
водоводних инсталација машине и
уклања опасност од цурења.
• Извући утикач из утичнице пре чишћења
машине и током радњи одржавања.
Чишћење машине за прање веша
Спољни и гумени делови се могу чистити
крпом натопљеном млаком водом и
сапуном. Не користите растворе или
абразивна средства.
Чишћење посуде за детерџенте
Извући посуду
подизањем и
повлачењем према
споља (види слику).
Испрати је под
млазом воде;
овакво чишћење
треба често радити.
Чишћење пумпе
Машина је опремљена самочистећом
пумпом која не захтева посебно
одржавање. Ипак, може се десити да
мали предмети (новчићи, дугмад) упадну у
преткомору која штити пумпу, смештену у
њеном доњем делу.
! Проверите да ли је циклус прања
завршен и извуците утикач.
За приступ преткомори:
1. скинути плочу
на предњем делу
машине помоћу
одвијача (види
слику);
2. одврнути
поклопац окрећући
га супротно од
смера казаљке на
сату (види слику):
излазак воде је
нормалан;
Нега врата и бубња
• Врата увек остављајте одшкринута да би
се избегло стварање непријатних мириса.
40
3. пажљиво очистите унутрашњост;
4. вратите поклопац;
5. вратити плочу, водећи рачуна да су
шарке убачене у одговарајуће осовине,
пре него што га притиснете према
машини.
Проверите црево за довод воде
Црево за довод воде проверите барем
једном годишње. Уколико има напрслина и
пукотина треба га заменити: јаки притисци
током прања могли би изазвати изненадна
пуцања.
! Никада не користите половне цеви.
Page 41

Упозорења и савети
! Машина је пројектована и направљена да задовољи
све међународне безбедносне норме. Ова упозорења
су дата из безбедносних разлога и треба их пажљиво
прочитати.
Општа безбедност
• Овај уређај је пројектован искључиво за кућну
употребу.
• Овај уређај могу да користе деца од 8
година старости и особе са смањеним
физичким, сензорним и менталним
могућностима и са недовољним искуством
и знањем ако их неко надгледа или ако су
добили адектватне информације у вези са
коришћењем уређаја на сигуран начин и
разумели опасне спојеве. Деца не смеју
да се играју са уређајем. Одржавање и
чишћење не смеју да обављају деца без
надгледања.
• Не дирајте машину уколико сте босих ногу или
мокрих или влажних руку или ногу.
• Не вадите утикач из утичнице повлачењем кабла,
већ чврсто ухватите утикач.
• Не отварајте посуду за детерџенте док машина
ради.
• Не дирати воду испуштену из машине, јер може
достићи високе температуре.
• Ни у ком случају не отварати врата силом: могао
би се оштетити сигурносни механизам који
спречава случајно отварање.
• У случају квара, нипошто не прилазити унутрашњим
механизмима у покушају поправке.
• Проверавајте увек да нема деце у близини машине
док ради.
• Током прања врата машине могу се могу загрејати.
• Уколико треба померити машину, то треба да
раде две или три особе уз максималну пажњу. Не
радите то никада сами јер је машина веома тешка.
• Пре убацивања веша проверите да ли је бубањ
празан.
Симбол прецртане канте за отпатке налази се на свим
производима да би подсетио на обавезу одвојеног
сакупљања.
За детаљније информације о правилном одлагању
кућних уређаја власници се могу обратити
предвиђеној јавној служби или продавцима.
SB
Одлагање на отпад
• Одлагање амбалаже на отпад: придржавајте се
локалних прописа, тако да се амбалажа може
поново искористити.
• Европска директива 2012/19/EU о отпаду
електричних и електронских уређаја, прописује да
кућни уређаји не смеју бити одлагани у редовном
промету чврстог градског отпада. Одбачене уређаје
треба посебно сакупити чиме се побољшава стопа
прикупљања корисног отпада и рециклаже материјала
од којих су сачињени и спречава потенцијално
нарушавање здравља и животне средине.
41
Page 42

Опис машине за прање веша и
покретање програма
SB
Командна табла
Посуда за детерџент
Тастер
ON/OFF
ПРОГРАМИ
ТЕМПЕРАТУРА
Дугме
ЦЕНТРИФУГА
Дугме
Тастер са лампицама
ФУНКЦИЈА
Дугме
Контролне лампице
НАПРЕДОВАЊА ЦИКЛУСА/
ЗАДРШКЕ ПОЧЕТКА
Контролна
лампица ВРАТА
БЛОКИРАНА
Тастер са
лампицом
START/PAUSE
Посуда за детерџент: за сипање детерџената и
адитива (види «Детерџенти и веш»).
У посуди са детерџентима се налази сталак, преко којег
се у сваком тренутку може консултовати синтетичка
шема програма.
Дугме ON/OFF: притисните га за укључивање или
искључивање машине.
Дугме ПРОГРАМИ: за задавање програма. Током
трајања програма дугме се не помера.
Тастер са лампицама ФУНКЦИЈА: за избор функција
које су на располагању. Контролна лампица која
одговара одабраној функцији остаће упаљена.
Дугме ЦЕНТРИФУГА: за задавање или искључивање
центрифуге (види «Посебна подешавања»).
Дугме ТЕМПЕРАТУРА: за задавање температуре или
прање на хладно (види «Посебна подешавања»).
Контролне лампице НАПРЕДОВАЊА ЦИ КЛУСА/
ЗАДРШКЕ ПОЧЕТКА: за праћење статуса напредовања
програма прања.
Упаљена контролна лампица показује фазу у току.
Ако је активирана функција “пауза почетка”, показиваће
време преостало до покретања програма (види страну
поред).
Кон т р о л н а л а м п ица В РАТА БЛОК И РА НА: з а
обавештавање да ли се врата могу отворити (види
страну поред).
Тастер са лампицом START/PAUSE: за покретање или
моментално прекидање програма.
НАПОМЕНА: за покретање паузе прања које је у
току, притиснути овај тастер, одговарајућа контролна
лампица ће треперити наранџастом бојом а лампица
фазе у току ће светлети константно. Када се контролна
лампица БЛОКАДА ВРАТА угаси, врата је могуће
отворити (3 кратка звучна сигнала).
За повратак прања на део у којем је преки нуто
притиснути поново овај тастер.
Stand By
Ова машина за прање испуњава све нове стандарде
везане за уштеду електричне енергије и опремљена
је системом за аутоматско гашење (stand by) који се
активира за 30 минута у случају да се машина не
користи. Накратко притисните тастер
ће се поново активирати.
ON/OFF
и машина
42
Page 43

Контролне лампице
Контролне лампице пружају важне информације.
Ево шта оне значе:
Контролне лампице фазе у току
По избору и покретању жељеног циклуса прања,
лампице ће се прогресивно палити указујући на
статус напредовања:
SB
Пауза почетка
Ако је активирана функција “пауза почетка” (види
«Посебна подешавања»), после покретања програма,
почеће да трепери контролна лампица одабране
задршке:
Како време протиче треперењем одговарајуће
контролне лампице очитаваће се преостало време
задршке:
Када истекне одабрано време задршке лампица која
трепери ће се угасити и задати програм ће започети.
Прање
Испирање
Центрифуга
Пражњење
Крај прања
Тастери функција и одговарајуће контролне лампице
Избором функције одговарајућа лампица ће се
упалити.
Ако одабрана функција није компатибилна са задатим
програмом одговарајућа лампица ће треперити а
функција неће бити активирана.
У случају да се зада функцију која не одговара некој
претходно одабраној функцији, остаће активна само
она која је последња одабрана.
Лампица блокаде врата:
Упаљена лампица указује да су врата блокирана како
би се спречило случајно отварање; да би се избегле
штете пре отварања врата треба сачекати да се
сијалица угаси (3 кратка звучна сигнала).
НАПОМЕНА: ако је активирана функција “пауза
почетка” врата се не могу отворити, за отварање
треба укључити паузу притиском на тастер START/
PAUSE.
! Брзо трептање лампице START/PAUSE (наранџасто)
истовремено са лампицом функције указује на
неправилност (види “Неправилности и решења”).
Покретање програма
1. Укључити машину притиском на тастер ON/OFF. Све контролне лампице ће се укључити на неколико секунди,
затим ће се угасити а наставиће да пулсира лампица START/PAUSE.
2. Убаците рубље и затворите врата.
3. На дугмету ПРОГРАМИ одаберите жељени програм.
4. Задати температуру прања (види «Посебна подешавања»).
5. Задати брзину центрифуге (види «Посебна подешавања»).
6. Сипати детерџент и адитиве (види «Детерџенти и веш»).
7. Одабрати жељене функције.
8. Покренути програм притиском на тастер START/PAUSE и одговарајућа лампица ће остати да светли константно
зеленом бојом. За поништавање задатог циклуса укључити паузу машине притиском на тастер START/PAUSE и
одабрати нови циклус.
9. По завршетку програма упалиће се лампица . Лампица ВРАТА БЛОКИРАНА ће се угасити указујући да је
могуће отворити врата (3 кратка звучна сигнала). Извући веш и оставити врата одшкринута да би се осушио
бубањ.
Искључити машину притиском на тастер ON/OFF
43
Page 44

SB
Програми
Табела програма
Макс.
Опис програма
Програми
Ессентиалс програми
Памук + Претпрање: Јако прљав бели веш.
1
Памук стандард 60° (1): веома запрљан бели и
2
шарени веш постојаних боја.
Памук стандард 40° (2): мало запрљан бели и
3
шарени веш постојаних боја.
Синтетика: веома прљав отпоран шарени веш.
4
Синтетика (3): мало запрљан отпоран шарени веш.
4
Мешано 15’: За брзо освежавање мало прљавог веша
5
(није за вуну, свилу и веш који се пере ручно).
Посебни програми
Лаку Ноћ: Мало запрљан осетљив шарени веш.
6
Кошуље
7
Свила/Завесе: За веш од свиле, вискозе, доњи веш
8
Вуна: За вуну, кашмир, итд.
9
Еко програми
Памук стандард 20°C:
10
веш постојаних боја.
Памук
11
Синтетика
12
Брзо 30 минута
13
Одвојени програми
Испирање
A
Центрифуга
B
Испуштање
C
Трајање циклуса приказано на екрану или наведено у упутству је процена заснована на стандардним условима. Стварно време може да зависи од више бројних фактора, као што
су температура и притисак воде на улазу, температура околине, количина детерџента, количина и тип рубља, уравнотеженост рубља, додатне изабране опције.
1) Контролни програми према норми 1061/2010: задати програм 2 са температуром од 60°C.
Овај циклус је погодан за прање памучног рубља које је уобичајено запрљано и најефикаснији је у погледу комбиноване потрошње струје
и воде за рубље које може да се пере на 60°C. Ефективна температура прања може да се разликује од оне која је назначена.
2) Контролни програми према норми 1061/2010: задати програм 3 са температуром од 40°C.
Овај циклус је погодан за прање памучног рубља које је уобичајено запрљано и најефикаснији је у погледу комбиноване потрошње струје
и воде за рубље које може да се пере на 40°C. Ефективна температура прања може да се разликује од оне која је назначена.
За све Тест институте:
2) Продужени програм памук: задати програм 3 са температуром од 40°C.
3) Продужени програм cинтетика: задати програм 4 са температуром од 40°C.
мало запрљан бели и шарени
темп.
(°C)
90° 1200
60°
(Max. 90°)
40° 1200 -
60° 800 -
40° 800 -
30° 800 -
40° 800 -
40° 600 -
.
30° 0 -
40° 800 -
20° 1200 -
Хладна
вода
Хладна
вода
Хладна
вода
- 1200 - -
- 1200 - - - - 8 - - - 16’
- 0 - - - - 8 - - - 2’
Макс.
брзина
(обртаја
у
минути)
1200 -
1200 -
800 -
800 -
Претп-
рање
Посебни програми
Мешано 15’ (програм 5) осмишљен за прање мало прљавог веша у кратком периоду: траје само 15 минута и
тако штеди енергију и време. Задавањем програма (5 на 30°C) могуће је истовремено прање тканина различитог
порекла (осим вуне и свиле) у максималној тежини од 1,5 кг.
Лаку ноћ (програм 6). Тих циклус који може да ради ноћу када је енергетска тарифа нижа. Програм је осмишљен
за синтетички и памучни веш. На крају циклуса, машина се зауставља са водом у кадици; за реализовање
центрифуге и пражњења притиснути тастер START/PAUSE, у супротном после 8 сати машина ће аутоматски
обавити центрифугу и пражњење воде.
Памук стандард 20°C (програм 10) је идеалан за прљав памучни веш. Добре перформансе, такође са хладном
водом, упоредне са прањем на 40°, гарантоване су механичком радњом која функционише варирањем брзине
поновљеним и приближеним ударцима.
Детерџенти
Омекш-
Прање
ивач
Избељ-
ивач
воде lt
влага %
Преостала
Макс. теж. (кг)
- 8 53 2,86 98 195’
8 53 1,23 55,0 195’
8 53 1,01 84 180’
4,5 46 1,03 60 115’
4,5 46 0,56 60 100’
- 1,5 71 0,11 33 15’
4 - - - 290’
- 2 - - - 80’
- 2 - - - 65’
- 2 - - - 85’
8 - - - 175’
- 8 53 0,23 68 80’
- 3 48 0,12 37 70’
- 3 71 0,10 36 30’
8 - - - 36’
Укупна
Потрошња
струје kWh
потрошња
циклуса
Трајање
Еко програми
Еко програми нуде добре перформансе прања на основу ниске температуре са малим утрошком енергије ради
заштите животне средине и уштеде. Еко програми (
11
Памук,
12
Синтетика и
13
Брзо 30 минута) направљени су за
разне врсте тканина и за мало прљав веш. За оптималан резултат препоручујемо коришћење течног детерџента;
саветујемо претходно третирање манжетни, оковратника и мрља.
44
Page 45

Посебна подешавања
Задавање температуре
Окретањем дугмета ТЕМПЕРАТУРА задаје се температура прања (види Табелу програма).
Температура се може смањити све до хладног прања ( ).
Машина аутоматски спречава задавање температуре веће од предвиђеног максимума за сваки програм.
! Избором програма
2
температуру можете повећати све до 90°.
Задавање центрифуге
Окретањем дугмета ЦЕНТРИФУГА задаје се брзина центрифуге одабраног програма.
Максималне предвиђене брзине за програме су:
Програми Максимална брзина
Памук 1200 обртаја у минути
Синтетика 800 обртаја у минути
Вуна 800 обртаја у минути
Свила само пуњење
Брзина центрифуге се може смањити или искључити избором симбола .
Машина аутоматски спречава центрифугу јачу од максимума предвиђеног за сваки програм.
Функције
Различите предвиђене функције прања омогућују постизање жељене чистоће и белине.
За активирање функција:
1. притиснути тастер који одговара жељеној функцији;
2. паљење одговарајуће лампице показује да је функција активна.
Напомена: Брзо треперење контролне лампице показује да није могуће одабрати одређену функцију за задати
програм.
SB
Пауза покретања
Одлаже време почетка рада машине до 12 часова.
Притискати тастер све док се не упали лампица која одговара жељеном времену задршке. На пети притисак на
тастер функција ће се деактивирати.
НАПОМЕНА: После притиска на тастер START/PAUSE време задршке је могуће само смањити.
! Активна је са свим програмима.
Лако пеглање
Избором ове функције, прање и центрифуга ће бити на одговарајући начин модификовани како би се смањило
гужвање. На крају прања машина ће извести лагано окретање бубња; лампице ЛАКО ПЕГЛАЊЕ и START/PAUSE ће трептати (наранџасто) а фаза ће остати константно укључена. За завршетак циклуса биће потребно
притиснути тастер START/PAUSE или тастер ЛАКО ПЕГЛАЊЕ.
Током програма Свила машина ће завршити циклус са натопљеним вешом, лампице ЛАКО ПЕГЛАЊЕ и START/
PAUSE ће трептати (наранџасто) а фаза ИСПИРАЊЕ ће остати константно укључена. За избацивање воде и
извлачење мокрог веша биће потребно притиснути тастер START/PAUSE или тастер ЛАКО ПЕГЛАЊЕ.
! Не може се активирати у програмима 5, 6, 9, 11, 12, 13, A, B, C.
Додатно испирање
Избором ове функције повећава се ефикасност испирања и осигурава са максимално уклањање детерџента.
Корисно је за посебно осетљиву кожу.
! Не може се активирати у програмима 5, 13, B, C.
Супер прање
Захваљујући употреби веће количине воде у почетној фази и дужем временском периоду, ова опција гарантује прање
високог учинка.
! Не може се активирати у програмима 1, 5, 8, 9, 11, 12, 13, B, C.
45
Page 46

Детерџенти и веш
M
AX
1
2
4
3
SB
Посуда за детерџент
Добар резултат прања зависи чак и од исправног дозирања
детерџента: повећаном дозом прање није ефикасније а
доприноси се стварању наслага на унутрашњим деловима
машине и загађењу животне средине.
! Не користите детерџенте за ручно прање, пошто
стварају много пене.
! Користите детерџент у праху за бело памучно
рубље и за претпрање или за прање рубља на
температури већој од 60°C.
! Пратите упутства на паковању детерџента.
Извуците посуду за
детерџенте и сипајте
детерџент или адитив
прању на следећи начин.
кадица 1: Детерџент за претпрање (у праху)
Пре него што сипате детерџент проверите да није
убачена додатна кадица 4.
кадица 2: Детерџент за прање
(у праху или течни)
Течни детерџент убацити тек пред почетак.
кадица 3: Адитиви (омекшивач, итд.)
Омекшивач не сме да цури кроз решетку.
додатна кадица 4: Избељивач
Циклус избељивања
! Класично белило се користи за беле и отпорне
тканине, а белило за осетљиве тканине за обојено
рубље, синтетику и вуну.
Ова функција је корисна за
уклањање упорних мрља.
Убаците испоручену додатну
MAX
MAX
кадицу 4, задајте програм «Испирање» и покрените
функцију «Супер прање» .
За бељење током прања сипајте детерџент и адитиве, задајте
жељени програм и активирајте функцију «Супер прање» .
Употреба додатног суда 4 искључује претпрање.
кадицу 4, у кадицу 1.
Код дозирања белила не
пр елазит е нив о «max »
обележен на средишњем
клину (види слику).
З а р е л и з а ц и ј у с а м о
б е љ е њ а с и п а ј т е
избељивач у додатну
Припрема веша
• Веш поделите према:
- врсти тканине / симболу на етикети.
- бојама: одвојите шарени од белог веша.
• Испразните џепове и проверите дугмад.
• Немојте прелазити вредности наведене у „Табели са
програмима“ које се односе на тежину сувог веша.
Колико је тежак веш?
1 чаршав 400-500 гр.
1 јастучница 150-200 гр.
1 столњак 400-500 гр.
1 баде-мантил 900-1.200 гр.
1 пешкир 150-250 гр.
Посебне тканине
Кошуље: користите одговарајући програм „Кошуље“
7 за прање кошуља од различитих врста тканине и
боје чиме се осигурава максимална нега.
Свила: овај програм користити 8 за прање свиленог
веша. За прање осетљивог веша препоручује се
употреба посебних детерџената.
Завесе: препоручује се да се савију и увуку у врећицу
испоручену са машином. Користити програм 8.
Вуна: Програмом 8 је могуће прати у машини сву вунену
одећу, такође и ону са етикетом „само ручно прање“
. За најбоље резултате користите посебан детерџент и
не прелазите терет од 2 кг.
Систем за балансирање терета
Пре сваке центрифуге, да би се избегле претеране
вибрације и терет равномерно распоредио, бубањ
се окреће брзином мало већом од оне током прања.
Ако се после неколико поновљених покушаја
терет још увек није равномерно распоредио,
машина ће извршити центрифугу брзином мањом
од предвиђене. У случају великог дисбаланса,
распоређивање врши машина уместо центрифуге. Да
би се побољшало распоређивање терета и правилно
балансирање препоручује се мешање великих и
малих комада веша.
46
Page 47

Неправилности и решења
Може се догодити да машина не ради. Пре позивања Техничке службе (види “Помоћ”), проверите да се не ради о
проблему лако решивом уз помоћ следећег списка.
Неправилности:
Машина се не укључује.
Циклус прања не почиње.
Машина не убацује воду
(лампица прве фазе прања
трепће брзо).
Машина константно убацује
и испушта воду.
Могући узроци / Решење:
• Утикач није увучен у утичницу или није увучен довољно да би имао контакт.
• Нема струје у кући.
• Врата нису добро затворена.
• Тастер ON/OFF није притиснут.
• Тастер START/PAUSE није притиснут.
• Славина за воду није отворена.
• Задата пауза на време покретања (Тајмер задршке), види «Посебна
подешавања»).
• Црево за довод воде није повезано са славином.
• Црево је савијено.
• Славина за воду није отворена.
• У кући нема воде.
• Нема довољног притиска.
• Тастер START/PAUSE није притиснут.
• Одводно црево није постављено између 65 и 100 цм од земље (види
“Постављање”).
• Крај одводног црева је потопљен у воду (види “Постављање”).
• Цев у зиду пропушта ваздух.
Ако се и после ових провера проблем не реши, затворите славину за воду,
искључите машину и позовите Техничку службу. Ако се стан налази на
последњим спратовима зграде, могуће је да се јавља феномен сифона, због чега
машина стално убацује и избацује воду. За решавање овог проблема у продаји су
доступни одговарајући неповратни вентили.
SB
Машина не испушта воду или
не центрифугира.
Машина јако вибрира током
центрифуге.
Машина губи воду.
Брзо трепери лампица START/
PAUSE и лампице функција.
Ствара се много пене.
• Програмом није предвиђено избацивање: код неких програма потребно је
ручно га покренути (види “Покретање програма”).
• Активирана функција ЛАКО ПЕГЛАЊЕ: за завршетак програма притиснути
тастер START/PAUSE (“Посебна подешавања”).
• Одводно црево је савијено (види “Постављање”).
• Вод за пражњење је запушен.
• Бубањ у тренутку инсталације није био правилно деблокиран (види
“Постављање”).
• Машина не стоји равно (види “Постављање”).
• Машина је притиснута између намештаја и зида (види “Постављање”).
• Црево за довод воде није добро затегнуто (види “Постављање”).
• Посуда за детерџенте је загушена (за чишћење види “Одржавање и чување”).
• Одводно црево није добро причвршћено (види “Постављање”).
• Искључите машину и извуците утикач из утичнице, сачекајте око 1 минут, а
затим је поново укључите.
Уколико неправилност остане, позвати Техничку службу.
• Детерџент не одговара машини (треба да носи натпис “за машинско прање”,
“за ручно и машинско прање” или слично).
• Доза је превелика.
47
Page 48

Помоћ
SB
Пре него што позовете Техничку службу:
• Проверите да ли неправилност можете решити сами (види “Неправилности и решења”);
• Поново започните програм да видите да ли је проблем отклоњен;
• У супротном контактирајте овлаштени Центар техничке службе на број телефона назначен на гарантном листу.
! Никада не користите неовлашћене сервисе.
Јавите:
• врсту неисправности;
• модел машине (Мо.);
• серијски број (S/N).
Ове информације се налазе на плочици постављеној на задњем делу машине и у предњем делу отвора.
48
Page 49

Kullanma Kılavuzu
ÇAMAŞIR MAKİNESİ
TR
Türkçe
ECO8L 1252
İçindekiler
Montaj, 50-51
Ambalajın çıkartılması ve seviye ayarı getirilmesi
Su ve elektrik bağlantıları
İlk yıkama
Teknik veriler
Bakım ve özen, 52
Su ve elektrik kesilmesi
Çamaşır makinesin temizlenmesi
Deterjan haznesinin temizlenmesi
Kapak ve hazne bakımı
Pompanın temizlenmesi
Su besleme hortumunun kontrol edilmesi
Önlemler ve öneriler, 53
Genel güvenlik uyarıları
Atıkların tasye edilmesi
Çamaşır makinesinin tanımı ve
programların çalıştırılması, 54-55
Kontrol paneli
Işıklı göstergeler
Bir programın başlatılması
TR
Programlar, 56
Program tablosu
Kişisel ayarlar, 57
Sıcaklık ayarı
Sıkma hızı ayarı
Fonksiyonlar
Deterjan ve çamaşır, 58
Deterjan haznesi
Beyazlatma işlevi
Çamaşırın hazırlanması
Özel çamaşırlar
Yük dengeleme sistemi
Arızalar ve onarımlar, 59
Teknik Servis, 60
49
Page 50

Montaj
TR
! Bu kitapçığı gerektiği her an danışabilmeniz
için özenle saklayınız. Çamaşır makinesinin
satılması, devri veya nakli durumlarında da,
yeni sahibinin faydalanabilmesi için bu kılavuz
makineyle beraber saklanmalıdır.
! Talimatları dikkatlice okuyunuz; montaj,
kullanım ve güvenliğe ilişkin önemli bilgiler
içermektedir.
Ambalajın çıkartılması ve aynı seviyeye getirilmesi
Ambalajdan çıkartılması
1. Çam aşı r m a ki n esi nin amb ala jda n
çıkartılması.
2. Çamaşır makinesinin taşıma esnasında
hasar görmemiş olduğunu kontrol ediniz.
Hasar görmüş ise monte etmeyiniz. Satıcıya
başvurunuz.
3. Taşıma sırasında
arka tarafta bulunan 4
adet koruyucu vidayı
ve ara parçasıyla birlikte buradaki lastiği
de çıkartınız (bakınız
şekil).
Sağlıklı bir dengeleme, çamaşır makinesine
sağlam bir duruş kazandıracağı gibi, çalışması
esnasındaki sarsıntı, gürültü ve hareketlilikleri de önleyecektir. Zeminde moket veya
halı olması halinde, ayarı makinenin altında
havalandırma olabilecek şekilde yapınız .
Su ve elektrik bağlantıları
Su besleme hortumunun takılması
1. Tedarik borusunu
3/4 gaz vidalı bağlantı
kullanarak bir soğuk su
musluğuna bağlayın
(bkz. şekil).
Bağl antıyı yapmad a n ö n c e , s u y u
berraklaşana kadar
akıtınız.
2. Su besleme hortumunu arka kısımının
üst sağ köşesinde
bulunan su girişine
vidalayarak makineye
bağlayınız (bkz. şekil).
4. Delikleri ambalajda bulacağınız plastik kapaklarla kapayınız.
5. Tüm parçaları muhafaza ediniz: çamaşır
makinesinin nakli gerektiği takdirde takılmaları
gerekmektedir.
! Ambalajlar çocuk oyuncağı değildir.
Cihazın aynı seviyeye getirilmesi
1. çamaşır makinesini düz ve sert bir zemine yerleştiriniz, duvar veya mobilyalara
dayamayınız.
2. Yerleştirilecek zemin tam düz değilse
çamaşır makinesinin
vidalı ön ayaklarını
s ı k a r a k v e y a
gevşeterek dengeyi
sağlayınız (bkz. şekil);
eğim açısı, makinenin
üst tezgahına göre 2°
den fazla olmamalıdır.
3. Hortumda katlanma ve ezilme olmamasına
dikkat ediniz.
! Musluğun su basıncının Teknik Veriler
tabelasında belirtildiği gibi olması gerekir (bkz.
yan sayfa).
! Besleme hortumunun boyu yetersizse yetkili
bir satıcı mağaza veya teknisyene başvurunuz.
! Kesinlikle daha önceden kullanılmış hortum
kullanmayınız.
! Makine ile birlikte verilen hortumları kullanınız.
50
Page 51

65 - 100 cm
Tahliye hortumunun takılması
Tahliye hortumunu,
katlanmasını önleyerek, zemindeki veya
yerden 65 ile 100 cm
yükseklik arasındaki
bir duvar tahliyesine
takınız
veya mevcut olan
kılavuzu çeşmeye
bağlayarak lavabo
ya da küvet kenarına
yaslayınız (bkz.
şekil). Tahliye hortumunun serbest ucunun suya girmemesi
gerekir.
! Kablonun ezilmemesi ve katlanmaması gerekir.
! Beslenme kablosunun yalnızca yetkili tekni-
syenler tarafından değiştirilmelidir.
Dikkat! Bu kurallara uyulmaması halinde rma
hiç bir sorumluluk kabul etmemektedir.
İlk yıkama
Montajdan sonra, çamaşır koymaksızın deterjanla 2. programı ayarlayarak yıkama yapınız.
TR
! Tahliye hortumu için ilave uzatma
kullanılmaması tavsiye olunur; aksi mümkün
değilse, uzatma hortumunun çapının da aynı
olması ve 150 cm. den uzun olmaması gerekir.
Elektrik bağlantısı
Fişi prize takmadan evvel aşağıdaki hususlara dikkat ediniz:
• prizin topraklamasının yürürlükteki normlara uygun olmasına;
• prizin, makinenin Teknik Veriler tabelasında
belirtilen, azami gücünü taşıyabilecek
olmasına (bkz. yan taraf);
• şebeke geriliminin, Teknik Veriler
tabelasında belirtilen değerlere uygun
olmasına (bkz. yan taraf);
• prizin çamaşır makinesinin şiyle uyumlu olmasına. Aksi takdirde şi veya prizi
değiştiriniz.
! Çamaşır makinesi, muhafazalı olsa bile
açık alanda monte edilemez, çünkü rüzgara
ve yağmura maruz kalması çok tehlikelidir.
! Monte edilen çamaşır makinesinin şinin
kolaylıkla erişilebilir olması gerekir.
! Uzatma kablosu ile çoklu prizler kullanmayınız.
Teknik bilgiler
Model ECO8L 1252
genişlik 59,5 cm
Ölçüler
Kapasite 1 - 8 kg
Elektrik
bağlantıları
Su
bağlantıları
Sıkma hızı
1061/2010 ve
1015/2010 sayýlý
direktiflere göre
kontrol
programlarý
yükseklik 85 cm
derinlik 60 cm
makine üstünde takılı olan
teknik veriler plakasına
bakınız.
max. su basıncı 1 MPa (10
bar) min. su basıncı 0,05
MPa (0,5 bar)
tambur kapasitesi 62 litre
maksimum dakikada 1200
devire kadar
Program 2:
Pamuklu Standart 60°C.
Program 3:
Pamuklu Standart 40°C.
Bu makina aşağıda belirtilen AB normlarına uygundur:
- 2004/108/CE (Elektromanyetik Uyum)
- 2012/19/EU
- 2006/95/CE (Alçak gerilim)
51
Page 52

Bakım ve özen
1
2
TR
Su ve elektrik kesilmesi
• Su musluğunu her yıkamadan sonra
kapatınız. Böylece çamaşır makinesinin su
tesisatının eskimesi engellenir, su kaçağı
tehlikesi ortadan kalkar.
• Bakım ve temizlik işlemleri esnasında
çamaşır makinesinin şini çekiniz.
Çamaşır makinesinin temizlenmesi
Dış gövde ve plastik aksam ılık su ve sabunla
ıslatılmış bir bez vasıtasıyla temizlenebilir.
Çözücü ve aşındırıcı maddeler kullanmayınız.
Deterjan haznesinin temizlenmesi
Hazneyi kaldırarak,
dışarıya doğru çekmek
suretiyle çıkartınız
(bkz. şekil).
A k a r su a l t ı n d a
yıkayınız, bu çekmecenin temizliği sık sık
yapılmalıdır.
2. makine kapağını
saatin ters yönünde çevirerek sökünüz (bkz.
şekil). bir miktar su
gelmesi normaldir;
3. içini dikkatlice temizleyiniz;
4. kapağı vidalayınız;
5. paneli takarken, tam yerleştirmeden evvel,
kancaların yuvalara gelip gelmediğini kontrol
ediniz.
Su besleme hortumunun kontrol
edilmesi
Su besleme hortumunu, en azından senede
bir defa kontrol ediniz. Yarık veya çatlaklar
varsa değiştiriniz: yıkama esnasındaki yüksek
basınçlar ani patlamalara yol açabilirler.
! Kesinlikle daha önceden kullanılmış hortum
kullanmayınız.
Kapak ve hazne bakımı
• Kötü kokuların oluşmasını engellemek için
kapağı daima aralık bırakınız.
Pompanın temizlenmesi
Çamaşır makinesinin pompası kendini temizleyen bir özelliğe sahip olup, ayrıca temizlik
gerektirmez. Ancak, bazı küçük cisimler (madeni para, düğme) pompanın alt kısmındaki
koruyucu bölmeye düşebilirler.
! Yıkama devresinin bitmiş olup olmadığını
kontrol ediniz ve şini çekiniz.
Pompa koruyucu bölgesine erişebilmek için:
1. çamaşır makinesinin ön kapama panelini, bir tornavida
vasıtasıyla çıkartınız
(bkz. şekil);
52
Page 53

Önlemler ve öneriler
! Çamaşır makinesi uluslararası güvenlik standartlarına
uygun olarak projelendirilmiş ve üretilmiştir. Bu uyarılar
güvenlik amaçlı olup dikkatlice okunmalıdır.
Genel güvenlik uyarıları
• Bu cihaz, eğer gözetim altında bulunuyorlar
ise veya güvenli şekilde ve ilişkin tehlikeler göz önünde bulundurularak, cihazın
kullanımı hakkında uygun eğitim almışlar
ise, 8 yaşından büyük çocuklar ve ziksel,
duyusal veya mental kapasitelerden yoksun veya yetersiz tecrübe ve bilgiye sahip
kişiler tarafından kullanılabilir. Çocuklar,
cihaz ile oynamamalıdır. Bakım ve temizlik
işlemleri, denetimsiz çocuklar tarafından
gerçekleştirilmemelidir.
• Makine meskenlerde kullanılmak üzere tasarlanmış olup
profesyonel kullanım amaçlı değildir.
• Cihaza ayaklarınız çıplakken yada elleriniz veya
ayaklarınız ıslak yada nemliyken dokunmayınız.
• Fişi prizden çekerken kablosundan değil şin kendisin-
den tutarak çekiniz.
• Makine çalışırken deterjan haznesini açmayınız.
• Tahliye suyuna el sürmeyiniz, yüksek ısıda olabilir.
• Kapağı, hiçbir şekilde zorlamayınız: istenmedik
açılmalara karşı olan güvenlik mekanizması arıza yapabilir.
• Arıza halinde onarmak amacıyla iç mekanizmaları
kurcalamayınız.
• Çocukların çalışır vaziyetteki makineye yaklaşmalarına
mani olunuz.
• Çalışma esnasında kapak ısınabilir.
• Taşınması gerektiğinde, bu işlemin, iki veya üç kişi
tarafından, azami dikkatle yapılması gerekir. Kesinlikle
tek başınıza yapmayınız, çünkü makine çok ağırdır.
• Çamaşırları yerleştirmeden evvel, sepetin boş
olduğundan emin olunuz.
Cihazların tasye edilmesi konusunda daha geniş bilgi almak için cihaz sahiplerinin mevcut müşteri hizmetine veya
satış noktalarına başvurulması gerekir.
- AEEE Yönetmeliğine uygundur.
- Atık Elektrikli ve Elektronik Eşyaların (AEEE) Kontrolü
Yönetmeliği.
TR
Atıkların tasye edilmesi
• Ambalaj malzemelerinin tasye edilmesi: yerel yasalara uyunuz, bu şekilde ambalajların geri dönüşümü
mümkün olur.
• Elektrik ve elektronik cihazların atıklarını değerlendirme
2012/19/EU sayılı Avrupa Konseyi direktinde; beyaz
eşyaların kentsel katı atık genel yöntemi ile tasye edilmemesi öngörülmüştür. Kullanılmayan cihazların, madde
geri kazanım ve geri dönüşüm oranını en yüksek seviyeye yükseltmek, çevre ve insan sağlığına olası zararları
engellemek için ayrı ayrı toplanması gerekir. Tüm ürünlerin
üzerinde; ayrı toplama hükümlerini hatırlatmak amacıyla
üstünde çarpı işareti olan sepet sembolü verilmiştir.
53
Page 54

Çamaşır makinesinin tanımı ve
programların çalıştırılması
TR
Kontrol paneli
ON/OFFdüğmesi
Deterjan Bölmesi
PROGRAMLAR
düğmesi
Deterjan Bölmesi: ve diğer katkıları koyunuz (“Deterjanlar
bölümüne” bakınız).
ON/OFFdüğmesi: çamaşır makinesini çalıştırmak ve kapatmak için.
PROGRAMLAR uyarı lambalı tuşları: programları ayarlamak. Program esnasında düğme sabit kalır.
PROGRAM TAKİP
Uyarı lambası
SİKMA HİZİ AYARİ
SİCAKLİK AYARİ
düğmesi
Bekleme modu
Yeni enerji tasarrufu düzenlemeleri ile uyumlu bu çamaşır
makinesine herhangi bir faaliyet algılanmadığında 30
dakika içinde devreye sokulan otomatik bekleme sistemi yerleştirilmiştir ON/OFFdüğmesine bir süre basın ve
makinenin tekrar çalışmasını bekleyin.
düğmesi
FONKSİYON
uyarı lambalı tuşları
START/PAUSE
uyarı lambalı tuş
KAPAK
KİLİTLİ
göstergesi
FONKSİYON düğmeleri: işlev seçimi için. Seçilen işlev
düğmesinde ışıklı gösterge yanık kalır.
SİCAKLİK AYARİ düğmesi: istenen sıcaklığı veya soğuk
suyla yıkamayı ayarlamak için (bkz. Kişisel ayarlar bölümü).
SİKMA HİZİ AYARİ düğmesi: sıkma çalıştırmak veya durdurmak için (bkz. Kişisel ayarlar bölümü).
PROGRAM TAKİP uyarı lambası: yıkama programının
aşamalarını görmek için.
Uyarı lambası makinenin açık olduğunu gösterir.
KAPAK KİLİTLİ göstergesi: çamaşır makinesinin kapağının
açılabilirliğini görmek için (bkz. yan sayfa).
START/PAUSE uyarı lambalı tuş: programları başlatmak
yada geçici olarak durdurmak için.
Not: devrede olan bir programın beklemeye alınması için
bu düğmeye basınız; turuncu renkli uyarı lambası yanıp
sönecektir. MAKİNE KAPAĞI KİLİTLİ uyarı lambası
kapalı ise, kapak açılabilir (yaklaşık 3 dakika bekleyiniz).
Yıkama programının kaldığı yerden devam etmesi için bu
düğmeye tekrar basınız.
54
Page 55

Işıklı göstergeler
Işıklı göstergeler önemli bilgiler verir.
İşte verdikleri bilgiler:
Program Takip uyarı lambasi
İstenilen yıkama devresini seçtikten sonra çalışma
esnasında ışıklı göstergeler sürekli yanarak yürütülmekte olan işlemi gösterecektir.
TR
Zaman Ayarı
Gecikmeli başlatmayı programlayarak sonradan
çalıştırma ayarı yapıldıysa (bkz. kişisel ayarlar bölümü),
gösterge yanacak ve çalışma başlangıcı için kalan süreyi
gösterecektir:
s
s
s
s
Süre geçtikçe, bu ışıklı gösterge kalan süreyi göstermeye
devam edecektir.
s
s
s
s
Seçilen gecikme sonunda, gösterge sönecek ve makine
ayarlandığı programda çalışmaya başlayacaktır.
Yıkama
Durulama
Sıkma
Su boşaltma
Yıkama sonu
FONKSİYON tuşları ve ilgili uyarı lambaları
Herhangi bir işlem seçildiğinde ilgili gösterge yanacaktır.
Seçilen işlem yürütülen programla uyumlu olmadığı
takdirde, ilgili gösterge yanıp sönecek ve işlev
başlatılmayacaktır.
Daha önceden ayarlanmış olanla uyumsuz bir işlem
seçildiği takdirde son seçilen işlem geçerli olacaktır.
KAPAK KİLİTLİ göstergesi
Işıklı gösterge devamlı yanıyorsa, kapak istenmeyen
açılmalara karşı kapalı demektir, açmak için göstergenin
sönmesini bekleyiniz (yaklaşık 3 dakika bekleyiniz).
Not: “Zaman Ayarı” işlevi seçili ise makinenin kapağını
açmak mümkün değildir. Kapağı açabilmek için START/
PAUSE tuşuna basarak makineyi beklemeye alınız.
! KAPAK KİLİTLİ göstergesinin (turuncu olarak) işlev
göstergesi ile aynı anda hızlı şekilde yanıp sönmesi, bir
arıza göstergesidir (“Arızalar ve onarımlar”).
Bir programın başlatılması
1. ON/OFFdüğmesine basarak çamaşır makinesini açın. Gösterge lambalarının hepsi birkaç saniyeliğine yanacaktır
ve daha sonra sadece seçilen program ayarları ile ilgili gösterge lambaları yanık kalacaktır, START/PAUSE gösterge
lambaları yanıp sönecektir.
2. Çamaşırı yerleştirip kapağı kapatınız.
3. PROGRAMLAR düğmesiyle istenen programı seçiniz.
4. Yıkama suyu sıcaklığını seçiniz (bkz. “Kişisel ayarlar”).
5. Sıkma hız ayarını seçiniz (bkz. “Kişisel ayarlar”).
6. Deterjan ve diğer katkıları koyunuz (Bkz. Deterjanlar ve çamaşırlar bölümü).
7. İstenilen işlevleri seçin.
8. START/PAUSE düğmesine basmak suretiyle programı çalıştırınız ve ilgili gösterge yeşil renkte yanık kalacaktır.
Seçilen programı iptal etmek için makineyi beklemeye aldıktan sonra START/PAUSE tuşunu basılı tutarak yeni bir program seçiniz.
9. Program bitiminde “END” göstergesi yanmaya başlayacaktır. KAPAK KİLİTLİ göstergesinin yanıp sönmesi sona ere-
cek, kapağın açılabilir olduğunu gösterecektir (yaklaşık 3 dakika bekleyiniz). Çamaşırı çıkarınız ve içerisinin kuruması için
kapağı haf aralık bırakınız. ON/OFFtuşuna basarak çamaşır makinasını kapatınız.
55
Page 56

TR
Programlar
Program tablosu
Maks
Program açıklaması
Programlar
Günlük programlar
Pamuklular + Ön yýkama: aþýrý kirli beyazlar.
1
Pamuklu Standart 60° (1): çok kirli hassas renkli ve beyazlar.
2
Pamuklu Standart 40° (2): az kirli beyazlar ve nazik renkliler.
3
Sentetikler:az kirli dayanýklý renkli çamaþýrlar.
4
Sentetikler (3): az kirli dayanıklı renkli çamaşırlar.
4
Çeşitli 15 dak: az kirli çamaşırları kısa sürede yıkamak üzere kullanılır
5
(yünlü, ipekli, ve elde yıkanacak çamaşırlara uygun değildir).
Özel programlar
IYý Geceler: az kirli hassas renkli çamaþýrlar.
6
Gömlek programý
7
İpekliler/Perdeler: ıpekli, viskoz ve iç çamaşırlar için kullanılır.
8
Yünlüler: yün ve kaşmir için kullanılır.
9
Eco Programlar
Pamuklu Standart 20°: az kirli hassas renkli ve beyazlar.
10
Pamuklular
11
Sentetikler
12
Hızlı yıkama 30’
13
Kısmi Programlar
Durulama
A
Sıkma
B
Su Boşaltma
C
Ekran veya kitapçýk üzerinde gösterilen devre süresi, standart þartlara göre hesaplanmýþ tahmini bir süredir. Geçerli olan süre, giriþteki sýcaklýk derecesi ve suyun basýncý, ortam sýcaklýðý, deterjan miktarý, yük
miktarý ve tipi, yükün dengesi, seçilen ilave seçenekler gibi sayýsýz faktörlere göre deðiþiklik gösterebilmektedir.
1) 1061/2010 standartlarý uyarýnca kontrol programlarý 60°C ve 2. programa ayarlayýnýz.
Bu devre, orta kirlilikteki pamuklu çamaşırları temizlemek için uygundur ve 60°C de yıkanabilir çamaşırlar üzerinde kullanılacak, kombine enerji ve su tüketimi açısından
en etkili devredir. Geçerli olan yıkama sıcaklık derecesi, belirtilen sıcaklık derecesinden farklı olabilir.
2) 1061/2010 standartlarý uyarýnca kontrol programlarý 40°C ve 3. programa ayarlayýnýz.
Bu devre, orta kirlilikteki pamuklu çamaşırları temizlemek için uygundur ve 40°de yıkanabilir çamaşırlar üzerinde kullanılacak, kombine enerji ve su tüketimi açısından
en etkili devredir. Geçerli olan yıkama sıcaklık derecesi, belirtilen sıcaklık derecesinden farklı olabilir.
Tüm Test Enstitüleri için:
2) Pamuklu uzun programý; 3 programda 40°C’ye ayarlayýnýz.
3) Sentetik programı boyunca: 40°C lik bir sıcaklık ile 4 yıkama döngüsü ayarlamak.
Maks. Isı
derecesi
(°C)
90° 1200
60°
(Max. 90°)
40° 1200 -
60° 800 -
40° 800 -
30° 800 -
40° 800 -
40° 600 -
30° 0 -
40° 800 -
20° 1200 -
Soğuk
su
Soğuk
su
Soğuk
su
Hız
(Da-
Önyý-
ki-
kama
kada
devir)
1200 -
1200 -
800 -
800 -
- 1200 - -
- 1200 - - - - 8 - - - 16’
- 0 - - - - 8 - - - 2’
Deterjanlar
Yık-
Yumu-
ama
şatıcı
Çamaşır
suyu
Enerji
Kalan nem %
Maks yük (Kg)
Toplam su lt
tüketimi kWh
- 8 53 2,86 98 195’
8 53 1,23 55,0 195’
8 53 1,01 84 180’
4,5 46 1,03 60 115’
4,5 46 0,56 60 100’
- 1,5 71 0,11 33 15’
4 - - - 290’
- 2 - - - 80’
- 2 - - - 65’
- 2 - - - 85’
8 - - - 175’
- 8 53 0,23 68 80’
- 3 48 0,12 37 70’
- 3 71 0,10 36 30’
8 - - - 36’
Devir süresi
Çeşitli 15 dak (program 5) az kirli çamaşırları kısa sürede yıkamak üzere hazırlanmıştır: sadece 15 dakika sürer ve
böylece zaman ve enerji tasarrufu sağlar. 6. programın 30°C ye ayarlanmasıyla, azami 1,5 kg. olmak üzere muhtelif
kumaşlardaki (yün ve ipek hariç) çamaşırları yıkamak
mümkündür
.
İyi geceler (6. program). Bu sessiz program elektrik enerjisi tarifesinin daha ucuz olduğu gece saatlerinde de çalışabilir.
Program sentetik ve pamuklu ürünler için özel olarak tasarlanmıştır. Yıkama programı sonunda makina haznesinde su
mevcutken durur; santrifüj ve su tahliyesi yapmak için START/PAUSE tuşuna basınız, aksi halde 8 saat sonra makina
santrifüj ve su taliye işlemini otomatik olarak gerçekleştirecektir.
Pamuklu Standart 20 °C (program 10) kirli pamuklu çamaşırlar için idealdir. 40°’de bir yıkama ile mukayese edilebilen, soğuk
suda da etkili olan performanslar, yinelenen ve karşılaştırılan en yüksek hız varyasyonu ile çalışan mekanik bir hareket ile sağlanır.
Eco Programlar
Eco programlar, çevre için bir avantaja ve ekonomik bir tasarrufa sahip daha az elektrik enerjisi kullanmayı sağlayarak,
düşük sıcaklıklarda etkili yıkama performansları sunmaktadır.
Eco programlar (Pamuklular , Sentetikler ve Hızlı yıkama 30’ ), farklı kumaş türleri ve az kirli çamaşırlar için
oluşturulmuştur.
En iyi sonucu garanti etmek için, sıvı bir deterjan kullanmanızı öneririz; manşet, yaka ve lekeleri önceden işleme tabi
tutmanız tavsiye edilir.
56
Page 57

Kişisel ayarlar
Sıcaklık ayarı
Yıkama suyu ısısını SİCAKLİK AYARI düğmesini çevirerek seçiniz (bkz. Program tablosu).
sıcaklık ayarı soğuk suyla yıkanacak seviyeye kadar düşürülebilir ( ).
Makine, seçilen program için öngörülenin üzerinde bir yıkama ısısını otomatik olarak uygulamayacaktır.
! İstisna:
2
programı seçildiğinde sıcaklık derecesi 90°C ye kadar yükseltilebilir.
Sıkma hızı ayarı
Seçilen programın SIKMA HIZI ayarı bu düğmenin çevrilmesiyle yapılır.
Programlar için öngörülen azami süratler şöyledir:
Programlar Azami Sıkma hızı
Pamuklular Dakikada 1200 devir
Sentetik kumaşlar Dakikada 800 devir
Yünlüler Dakikada 800 devir
İpekli sadece boşaltma
Sıkma sürati azaltılabilir veya işareti seçilerek devre dışı bırakılabilir.
Makine, her bir program için öngörülenin üzerinde bir sıkma hızını kabul etmez.
Fonksiyonlar
Çamaşır makinesince öngörülen muhtelif işlemler arzu edilen temizlik ve beyazlıktaki yıkamalara olanak sağlar.
İşlevleri çalıştırmak için:
1. istediğiniz işlev düğmesine basınız;
2. ilgili göstergenin yanması işlevin başladığını belirtir.
Not: göstergenin hızlı bir şekilde yanıp sönmesi seçilen işlevin yürütülmekte olan programa uygun olmadığının işaretidir.
TR
Zaman Ayarı
Makinanın çalışmasını 12 saate kadar geciktirebilir.
Gecikmeli çalıştırmayı programlamak için arzu ettiğiniz süreyi görünceye kadar göstergeli düğmeye basınız. Düğmeye
beşinci basışınızda işlem iptal olacaktır.
Not: START/PAUSE tuşuna bastıktan sonra süre ayarı ancak aşağıya doğru ayarlanabilir.
! Tüm programlarla uygulanabilir.
Kolay Ütü
Bu işlev seçildiğinde kırışıkları önleyecek şekilde yıkama ve sıkma devrinin özellikleri değiştirilecektir. Program bitiminde çamaşır makinesi iç sepetini yavaşça döndürecektir, KOLAY ÜTÜ ve START/PAUSE uyarı lambaları turuncu renkte
yanıp sönecek ve “END” safhasının lambası yanık kalacaktır. Programı bitirmek için START/PAUSE veya KOLAY ÜTÜ
düğmesine basınız.
İpekli programda makine çamaşırları durulama suyu içinde durduracaktır ve KOLAY ÜTÜ ve START/PAUSE uyarı
lambaları turuncu renkte yanıp sönecek ve DURULAMA safhasının lambası yanık kalacaktır. Su boşaltmak için START/
PAUSE ya da KOLAY ÜTÜ düğmesine basmanız gerekir. Şimdi çamaşırlarınızı alabilirsiniz.
! Bu programlarda uygulanamaz: 5, 6, 9, 11, 12, 13, A, B, C.
İlave Durulama
Bu işlev seçildiğinde durulamanın verimliliği daha yüksek olur ve deterjandan tamamen temizlenmesi sağlanır. Hassasbir
cilt tipine sahip kişiler için önerilir.
! Bu programlarda uygulanamaz: 5, 13, B, C.
Süper Beyaz
Devir başlangıç fazında daha yüksek bir su miktarı ve daha uzun bir süre kullanıldığı için bu işlev yıkamada yüksek
performansları sağlar.
! Bu programlarda uygulanamaz: 1, 5, 8, 9, 11, 12, 13, B, C.
57
Page 58

Deterjanlar ve çamaşır
M
AX
1
2
4
3
TR
Deterjan haznesi
Yıkamanın iyi sonuç vermesi doğru dozda deterjan
kullanılmasına da bağlıdır: aşırı deterjan kullanmak suretiyle daha temiz çamaşırlar elde edilemeyeceği gibi makinenin
aksamına zarar verilerek, çevre kirliliğine sebebiyet verilir.
! Elde yıkama deterjanları kullanmayınız, çünkü aşırı köpük
yaparlar.
Deterjan haznesini açınız
ve deterjan ile katkı maddelerini aşağıdaki şekilde
koyunuz.
hazne 1: Ön yıkama için deterjan (toz)
Deterjanı koymadan önce 4 numaralı ilave haznenin takılı
olmadığını kontrol edin.
hazne 2: Yıkama için deterjan (toz veya likit)
Sıvı deterjan, yalnızca, makine çalıştırılmadan konulabilir.
hazne 3: Katkı maddeleri (yumuşatıcı, vs.)
Yumuşatıcı ızgara seviyesini aşmamalıdır.
ilave hazne 4: Çamaşır suyu
Beyazlatma işlevi
Bu fonksiyon en inatçı lekeleri çıkarmak için kullanılır.
MAX
MAX
beyazlatıcıyı (çamaşır suyunu) koyunuz, “Durulama”
programını ayarlayınız ve “Süper Beyaz ” fonksiyonunu
etkin hale getiriniz. Yıkama esnasında beyazlatma yapmak
için deterjan ve diğer katkıları koyunuz, istenilen programı
ayarlayıp “Süper Beyaz ” işlevini devreye alınız. İlave
bölme 4 ün kullanımı ön yıkama işlevini önler.
4 n uma r alı il ave ha zneyi 1 numaralı hazneye
yerleştiriniz. Çamaşır suyu
dozajını ayarlarken orta
mildeki “max” işaretini geçmeyiniz (bkz. şekil). Sadece beyazlatma işlemini
gerçekleştirmek için 4. kaba
Çamaşırların ağırlığı nedir?
1 çarşaf 400-500 gr.
1 yastık kılıfı 150-200 gr.
1 masa örtüsü 400-500 gr.
1 bornoz 900-1.200 gr.
1 havlu 150-250 gr.
Özel çamaşırlar
Gömlek: farklı dokumalı ve renkli gömlekler için
tasarlanmış olan 7. programın kullanılması tavsiye
edilir. Kırışıkların oluşmasını önleyerek en yüksek
performansları sağlar.
İpekliler: ipekli tüm dokumalar için tasarlanmış olan 8.
programın kullanılması tavsiye edilir. Hassas dokumalar
için özel bir deterjan kullanılması önerilir.
Perdeler: katlayarak bir yastık kılıfı veya le içerisine
yerleştiriniz. 8. programın kullanılması önerilir.
Yünlüler: tüm yünlü kıyafetler üzerinde “yalnızca elde
yıkayın” etiketi olsa bile program 9 kullanılarak
yıkanabilir. En iyi sonuçlar için, özel deterjanlar kullanın
ve 2 kg çamaşırı geçmeyin.
Yük dengeleme sistemi
Aşırı titremenin engellenmesi ve yükün düzenli dağılması
için her sıkma devrinden önce iç sepet normal yıkama
hızından biraz daha hızlı döner. Farklı şekillerde
çamaşırları makineye doldurduktan sonra yük dengeli
hale gelmediyse makine daha yavaş bir sıkma devrini
uygular. Yük çok dengesiz ise çamaşır makinesi sıkma
devrini gerçekleştirmeden çamaşırları dağıtır. Yükün
daha iyi yerleştirilmesi ve dengeli olması için küçük giysilerle büyük giysileri karıştırınız.
Çamaşır hazırlanması
• Çamaşırları aşağıdaki gibi ayırınız:
- kumaş tipi / etiketteki işaret.
- renkler: renkli çamaşırları beyazlardan ayırınız.
• Ceplerini boşaltınız ve düğmeleri kontrol ediniz.
• Kurulama sırasında çamaşırın ağırlığını gösteren “Pro-
gramlar Tablosu’’ daki değerleri aşmayın.
58
Page 59

Arızalar ve onarımlar
Çamaşır makinesi çalışmıyor olabilir. Teknik Servise başvurmadan önce (Teknik Servis bölümüne bakınız) aşağıdaki liste
yardımıyla kolay çözülebilecek bir problem olup olmadığını kontrol ediniz.
Arızalar:
Çamaşır makinesi çalışmıyor.
Yıkama işlemi başlamıyor.
Çamaşır makinesi su almıyor (ilk
yıkama safhasının gösterge lambası
hızlıca yanıp sönüyor).
Çamaşır makinesi devamlı su alıp
veriyor.
Olası nedenler / Çözümler:
• Fiş prize takılı değil veya tam temas etmiyor.
• Evde elektrik yok.
• Makinanın kapağı tam kapanmamış.
• ON/OFFdüğmesine basılmamış.
• START/PAUSE düğmesine basılmamış.
• Su musluğu açık değil.
• Su besleme hortumu musluğa takılı değil.
• Hortum bükülmüş.
• Su musluğu açık değil.
• Evde su kesik.
• Basınç yetersiz.
• START/PAUSE düğmesine basılmamış.
• Tahliye hortumu yerden 65 ile 100 cm arasında yerleştirilmemiş (bkz. “Mon-
taj”).
• Tahliye hortumunun başı suya girmiş (bkz. “Montaj”).
• Duvardaki tahliyenin hava boşluğu yok.
Bu kontrollerden sonra olumlu sonuç alınamazsa, musluğu ve kapatıp,
çamaşır makinesini durdurarak Servise haber veriniz. Daire, binanın üst
katlarındaysa, sifon olayı meydana gelerek çamaşır makinesi devamlı su
alıp, veriyor olabilir. Bu sorunun çözümü için piyasada sifon önleyici valar
satılmaktadır.
TR
Çamaşır makinesi su boşaltmıyor
veya santrifüj yapmıyor.
Çamaşır makinesi santrifüj esnasında
aşırı sarsılıyor.
Çamaşır makinesi su kaçırıyor.
START/PAUSE uyarı lambası yanıp
sönerse deviri bitirmek için düğmeye
basınız.
Aşırı köpük oluşuyor.
• Program su boşaltmayı öngörmüyor: bazı programlarda su boşaltma
işlemini elle müdahale ederek başlatmak gerekir.
• “Kolay Ütü” işlevi devrede: programı tamamlamak için START/PAUSE
düğmesine basınız (“Kişisel ayarlar”).
• Tahliye hortumu bükülmüş (bkz. “Montaj”).
• Tahliye kanalı tıkalı.
• Hazne, çamaşır makinesinin montajı esnasında düzgün çözülmemiş (bkz.
“Montaj”).
• Çamaşır makinesinin bulunduğu zemin düz değil (bkz. “Montaj”).
• Çamaşır makinesi mobilyalarla duvar arasında sıkışmış (bkz. “Montaj”).
• Su giriş hortumu tam sıkılmamış (bkz. “Montaj”).
• Deterjan haznesi tıkanmış (temizlemek için bkz. “Bakım ve özen”).
• Tahliye hortumu düzgün takılmamış (bkz. “Montaj”).
• Makineyi kapatınız, prizden şi çekiniz ve 1 dakika sonra tekrar açınız.
Arıza çözülmüyorsa Teknik Servisine başvurunuz.
• Deterjan çamaşır makinesi için uygun değil (“çamaşır makinesi için”, elde
yıkama ve çamaşır makinesi için” veya benzer ibareler olmalıdır).
• Aşırı doz kullanıldı.
59
Page 60

Teknik Servis
TR
Servise başvurmadan önce:
• Servise başvurmadan çözülebilecek bir ariza olup olmadığını kontrol ediniz (“Arızalar ve onarımlar” bölümüne bakınız);
• Programı tekrar başlatarak, sorunun çözülüp çözülmediğini görünüz;
• Aksi takdirde, garanti belgesinde belirtilen telefon numaralarından teknik servisi arayınız.
! Kesinlikle, yetkili olmayan tamircilere müracaat etmeyiniz.
Şunları bildiriniz:
• arıza tipini;
• cihazın modeli (Mod.);
• seri numarası (S/N).
Bu bilgiler, çamaşır makinesinin arkasındaki plakada bulunurlar.
Cihazın ömrü 10 yıldır.
Tüm Türkiye’de; Yetkili Teknik Servis, Orijinal Yedek Parça, Bakım Ürünlerimiz ve Garanti ile ilgili bilgi için:
0 212 444 50 10
Ürün Verileri
60
Page 61

Istruzioni per l’uso
LAVABIANCHERIA
I
Italiano
ECO8L 1252
Sommario
Installazione, 62-63
Disimballo e livellamento
Collegamenti idraulici ed elettrici
Primo ciclo di lavaggio
Dati tecnici
Manutenzione e cura, 64
Escludere acqua e corrente elettrica
Pulire la lavabiancheria
Pulire il cassetto dei detersivi
Curare oblò e cestello
Pulire la pompa
Controllare il tubo di alimentazione dell’acqua
Precauzioni e consigli, 65
Sicurezza generale
Smaltimento
Descrizione della lavabiancheria e
avviare un programma, 65-67
Pannello di controllo
Spie
Avviare un programma
I
Programmi, 68
Tabella dei programmi
Personalizzazioni, 69
Impostare la temperatura
Impostare la centrifuga
Funzioni
Detersivi e biancheria, 70
Cassetto dei detersivi
Ciclo candeggio
Preparare la biancheria
Capi particolari
Sistema bilanciamento del carico
Anomalie e rimedi, 71
Assistenza, 72
Assistenza Attiva 7 giorni su 7
61
Page 62

Installazione
! È importante conservare questo libretto per poterlo
I
consultare in ogni momento. In caso di vendita, di
cessione o di trasloco, assicurarsi che resti insieme
alla lavabiancheria per informare il nuovo proprietario
sul funzionamento e sui relativi avvertimenti.
! Leggere attentamente le istruzioni: ci sono
importanti informazioni sull’installazione, sull’uso
e sulla sicurezza.
Disimballo e livellamento
Disimballo
1. Disimballare la lavabiancheria.
2. Controllare che la lavabiancheria non abbia
subìto danni nel trasporto. Se fosse danneggiata
non collegarla e contattare il rivenditore.
3. Rimuovere le 4 viti di
protezione per il trasporto e il gommino con il
relativo distanziale, posti
nella parte posteriore
(vedi figura).
4. Chiudere i fori con i tappi di plastica in dotazione.
5. Conservare tutti i pezzi: qualora la lavabiancheria debba essere trasportata, dovranno essere
rimontati.
! Gli imballaggi non sono giocattoli per bambini.
Un accurato livellamento dà stabilità alla macchina ed evita vibrazioni, rumori e spostamenti
durante il funzionamento. In caso di moquette
o di un tappeto, regolare i piedini in modo da
conservare sotto la lavabiancheria uno spazio
sufficiente per la ventilazione.
Collegamenti idraulici ed elettrici
Collegamento del tubo di alimentazione
dell’acqua
1. Collegare il tubo
di alimentazione avvitandolo a un rubinetto
d’acqua fredda con
bocca filettata da 3/4
gas (vedi figura).
Prima di allacciare,
far scorrere l’acqua
finché non sia limpida.
2. Collegare il tubo
di alimentazione alla
lavabiancheria
avvitandolo all’apposita presa d’acqua,
nella parte posteriore
in alto a destra (vedi
figura).
3. Fare attenzione che nel tubo non ci siano né
pieghe né strozzature.
Livellamento
1. Installare la lavabiancheria su un pavimento piano e rigido, senza appoggiarla a muri, mobili o altro.
2. Se il pavimento non
fosse perfettamente
orizzontale, compensare le irregolarità svitando
o avvitando i piedini
anteriori (vedi figura);
l’angolo di inclinazione,
misurato sul piano di
lavoro, non deve superare i 2°.
62
! La pressione idrica del rubinetto deve essere
compresa nei valori della tabella Dati tecnici
(vedi pagina a fianco).
! Se la lunghezza del tubo di alimentazione
non fosse sufficiente, rivolgersi a un negozio
specializzato o a un tecnico autorizzato.
! Non utilizzare mai tubi già usati.
! Utilizzare quelli in dotazione alla macchina.
Page 63

Collegamento del tubo di scarico
65 - 100 cm
Collegare il tubo di
scarico, senza piegarlo, a una conduttura di scarico o a uno
scarico a muro posti
tra 65 e 100 cm da
terra;
! Non usare prolunghe e multiple.
! Il cavo non deve subire piegature o compressioni.
! Il cavo di alimentazione deve essere sostituito
solo da tecnici autorizzati.
Attenzione! L’azienda declina ogni responsabilità
qualora queste norme non vengano rispettate.
Primo ciclo di lavaggio
I
oppure appoggiarlo
al bordo di un lavandino o di una vasca,
legando la guida in
dotazione al
rubinetto (vedi figu-
ra). L’estremità libera
del tubo di scarico
non deve rimanere
immersa nell’acqua.
! È sconsigliato usare
tubi di prolunga; se indispensabile, la prolunga
deve avere lo stesso diametro del tubo originale
e non superare i 150 cm.
Collegamento elettrico
Prima di inserire la spina nella presa della corrente, accertarsi che:
• la presa abbia la messa a terra e sia a norma
di legge;
• la presa sia in grado di sopportare il carico
massimo di potenza della macchina, indicato
nella tabella Dati tecnici (vedi a fianco);
• la tensione di alimentazione sia compresa nei
valori indicati nella tabella Dati tecnici (vedi a
fianco);
• la presa sia compatibile con la spina della
lavabiancheria. In caso contrario sostituire
la presa o la spina.
! La lavabiancheria non va installata all’aperto,
nemmeno se lo spazio è riparato, perché è
molto pericoloso lasciarla esposta a pioggia e
temporali.
! A lavabiancheria installata, la presa della
corrente deve essere facilmente raggiungibile.
Dopo l’installazione, prima dell’uso, effettuare un
ciclo di lavaggio con detersivo e senza biancheria
impostando il programma 2.
Dati tecnici
Modello
Dimensioni
Capacità
Collega-
menti elettrici
Collegamenti idrici
Velocità di
centrifuga
Programmi
di controllo
secondo
la direttive
1061/2010
e
1015/2010
ECO8L 1252
larghezza cm 59,5
altezza cm 85
profondità cm 60
da 1 a 8 kg
vedi la targhetta caratteristiche tecniche applicata sulla
macchina
pressione massima 1 MPa
(10 bar)
pressione minima 0,05 MPa
(0,5 bar)
capacità del cesto 62 litri
sino a 1200 giri al minuto
programma 2;
Cotone standard 60°C.
programma 3;
Cotone standard 40°C.
Questa apparecchiatura è conforme alle seguenti Direttive
Comunitarie:
- 2004/108/CE (Compatibilità
Elettromagnetica)
- 2012/19/EU
- 2006/95/CE (Bassa Tensione)
63
Page 64

Manutenzione e cura
1
2
Escludere acqua e corrente elettrica
I
• Chiudere il rubinetto dell’acqua dopo ogni lavag-
gio. Si limita così l’usura dell’impianto idraulico della
lavabiancheria e si elimina il pericolo di perdite.
• Staccare la spina della corrente quando si pulisce
la lavabiancheria e durante i lavori di manutenzione.
Pulire la lavabiancheria
La parte esterna e le parti in gomma possono
essere puliti con un panno imbevuto di acqua
tiepida e sapone. Non usare solventi o abrasivi.
Pulire il cassetto dei detersivi
Sfilare il cassetto sollevandolo e tirandolo verso l’esterno (vedi figura).
Lavarlo sotto l’acqua
corrente; questa pulizia
va effettuata
frequentemente.
2. svitare il coperchio ruotandolo in
senso antiorario
(vedi figura): è normale che fuoriesca
un po’ d’acqua;
3. pulire accuratamente l’interno;
4. riavvitare il coperchio;
5. rimontare il pannello assicurandosi, prima di
spingerlo verso la macchina, di aver inserito i
ganci nelle apposite asole.
Controllare il tubo di alimentazione dell’acqua
Controllare il tubo di alimentazione almeno
una volta all’anno. Se presenta screpolature e
fessure va sostituito: durante i lavaggi le forti
pressioni potrebbero provocare improvvise
spaccature.
Curare oblò e cestello
• Lasciare sempre socchiuso l’oblò per evitare
che si formino cattivi odori.
Pulire la pompa
La lavabiancheria è dotata di una pompa autopulente che non ha bisogno di manutenzione.
Può però succedere che piccoli oggetti (monete,
bottoni) cadano nella precamera che protegge la
pompa, situata nella parte inferiore di essa.
! Assicurarsi che il ciclo di lavaggio sia terminato
e staccare la spina.
Per accedere alla precamera:
1. rimuovere il pannello
di copertura sul lato
anteriore della lavabiancheria con l’ausilio di un
giravite (vedi figura);
! Non utilizzare mai tubi già usati.
64
Page 65

Precauzioni e consigli
! La lavabiancheria è stata progettata e costruita in
conformità alle norme internazionali di sicurezza. Queste
avvertenze sono fornite per ragioni di
sicurezza e devono essere lette attentamente.
Sicurezza generale
• Questo apparecchio può essere usato da
bambini da 8 anni in su e da persone con capacità fisiche, sensoriali o mentali ridotte o con
esperienza e conoscenze insufficienti se sono
supervisionati o se hanno ricevuto adeguata
formazione in merito all’uso dell’apparecchio
in modo sicuro e capendo i pericoli connessi.
I bambini non devono giocare con l’apparecchio. Manutenzione e pulizia non devono essere effettuati dai bambini senza supervisione
• Questo apparecchio è stato concepito esclusivamente
per un uso di tipo domestico.
• Non toccare la macchina a piedi nudi o con le mani o i
piedi bagnati o umidi.
• Non staccare la spina dalla presa della corrente tirando il
cavo, bensì afferrando la spina.
• Non aprire il cassetto dei detersivi mentre la macchina è
in funzione.
• Non toccare l’acqua di scarico, che può raggiungere
temperature elevate.
• Non forzare in nessun caso l’oblò: potrebbe danneggiarsi
il meccanismo di sicurezza che protegge da aperture
accidentali.
• In caso di guasto, in nessun caso accedere ai meccanismi
interni per tentare una riparazione.
• Controllare sempre che i bambini non si avvicinino alla
macchina in funzione.
• Durante il lavaggio l’oblò tende a scaldarsi.
• Se dev’essere spostata, lavorare in due o tre persone con
la massima attenzione. Mai da soli perché la macchina è
molto pesante.
• Prima di introdurre la biancheria controlla che il cestello
sia vuoto.
Il simbolo del cestino barrato è riportato su tutti i prodotti per
ricordare gli obblighi di raccolta separata.
Per ulteriori informazioni, sulla corretta dismissione degli
elettrodomestici, i detentori potranno rivolgersi al servizio
pubblico preposto o ai rivenditori.
I
Smaltimento
• Smaltimento del materiale di imballaggio:
attenersi alle norme locali, così gli imballaggi potranno
essere riutilizzati.
• La direttiva Europea 2012/19/EU sui rifiuti di apparecchia-
ture elettriche ed elettroniche, prevede che gli elettrodomestici non debbano essere smaltiti nel normale flusso dei
rifiuti solidi urbani. Gli apparecchi dismessi devono essere
raccolti separatamente per ottimizzare il tasso di recupero
e riciclaggio dei materiali che li compongono ed impedire
potenziali danni per la salute e l’ambiente.
65
Page 66

Descrizione della lavabiancheria e
avviare un programma
Pannello di controllo
I
SPIE AVANZAMENTO
CICLO/PARTENZA
RITARDATA
Manopola
Tasto ON/OFF
CENTRIFUGA
Manopola
TEMPERATURA
Spia
OBLÒ
BLOCCATO
Cassetto dei detersivi
Manopola
PROGRAMMI
Cassetto dei detersivi: per caricare detersivi e additivi
(vedi “Detersivi e biancheria”).
Tasto ON/OFF: per accendere e spegnere la lavabiancheria.
Manopola PROGRAMMI: per impostare i programmi. Durante il programma la manopola resterà ferma.
Tasti FUNZIONE: per selezionare le funzioni disponibili. La
spia relativa alla funzione selezionata rimarrà accesa.
Manopola CENTRIFUGA: per impostare la centrifuga o
escluderla (vedi “Personalizzazioni”).
Manopola TEMPERATURA: per impostare la temperatura
o il lavaggio a freddo (vedi “Personalizzazioni”).
SPIE AVANZAMENTO CICLO/PARTENZA RITARDATA:
per seguire lo stato di avanzamento del programma di lavaggio.
La spia accesa indica la fase in corso.
Se è stata impostata la funzione “Partenza Ritardata”, indicheranno il tempo mancante all’avvio del programma (vedi
pagina a fianco).
Tasto con spia
START/
Tasti con spie
FUNZIONE
Tasto START/PAUSE: per avviare i programmi o inter-
romperli momentaneamente.
N.B.: per mettere in pausa il lavaggio in corso, premere
questo tasto, la spia relativa lampeggerà con colore
arancione mentre quella della fase in corso sarà accesa
fissa. Se la spia OBLÒ BLOCCATO sarà spenta, si
potrà aprire l’oblò (attendere circa 3 minuti).
Per far ripartire il lavaggio dal punto in cui è stato
interrotto, premere nuovamente questo tasto.
Modalità di stand by
Questa lavatrice, in conformità alle nuove normative
legate al risparmio energetico, è dotata di un sistema
di autospegnimento (stand by) che entra in funzione
dopo circa 30 minuti nel caso di non utilizzo. Premere
brevemente il tasto ON/OFF e attendere che la macchina
si riattivi.
PAUSE
Spia OBLÒ BLOCCATO: per capire se l’oblò è apribile
(vedi pagina a fianco).
66
Page 67

Spie
Le spie forniscono informazioni importanti.
Ecco che cosa dicono:
Spie fase in corso
Una volta selezionato e avviato il ciclo di lavaggio desiderato, le spie si accenderanno progressivamente per indicarne
lo stato di avanzamento:
I
Partenza ritardata
Se è stata attivata la funzione “Partenza ritardata” (vedi
“Personalizzazioni”), dopo avere avviato il programma, ini-
zierà a lampeggiare la spia relativa al ritardo selezionato:
Col trascorrere del tempo verrà visualizzato il ritardo residuo con il lampeggio della spia relativa:
Trascorso il ritardo selezionato la spia lampeggiante si
spengnerà e avrà inizio il programma impostato.
Lavaggio
Risciacquo
Centrifuga
Scarico
Fine lavaggio
Tasti funzione e relative spie
Selezionando una funzione la spia relativa si illuminerà.
Se la funzione selezionata non è compatibile con il programma impostato la spia relativa lampeggerà e la funzione non
verrà attivata.
Nel caso venga impostata una funzione incompatibile con
un’altra precedentemente selezionata rimarrà attiva solo
l’ultima scelta.
Spia oblò bloccato
La spia accesa indica che l’oblò è bloccato per impedire
aperture accidentali; per evitare danni è necessario attendere che la spia si spenga prima di aprire l’oblò (attendere
circa 3 minuti).
! Il lampeggio veloce della spia START/PAUSE (arancione)
contemporaneo a quello delle funzioni segnala un’anomalia
(vedi “Anomalie e rimedi”).
Avviare un programma
1. Accendere la lavabiancheria premendo il tasto ON/OFF. Tutte le spie si accenderanno per qualche secondo, poi rimarranno
accese le spie ralative alle impostazioni del programma selezionato e pulserà la spia START/PAUSE.
2. Caricare la biancheria e chiudere l’oblò.
3. Impostare con la manopola PROGRAMMI il programma desiderato.
4. Impostare la temperatura di lavaggio (vedi “Personalizzazioni”).
5. Impostare la velocità di centrifuga (vedi “Personalizzazioni”).
6. Versare detersivo e additivi (vedi “Detersivi e biancheria”).
7. Selezionare le funzioni desiderate.
8. Avviare il programma premendo il tasto START/PAUSE e la spia relativa rimarrà accesa fissa di colore verde.
Per annullare il ciclo impostato mettere la macchina in pausa premendo il tasto START/PAUSE e scegliere un nuovo ciclo.
9. Al termine del programma si illuminerà la spia END. La spia OBLÒ BLOCCATO si spegnerà indicando che l’oblò è apribile
(attendere circa 3 minuti). Estrarre la biancheria e lasciare l’oblò socchiuso per far asciugare il cestello.
Spegnere la lavabiancheria premendo il tasto ON/OFF.
67
Page 68

Programmi
Tabella dei programmi
I
Descrizione del Programma
Programmi
Giornalieri
Cotone + Prelavaggio: Bianchi estremamente sporchi.
1
2
Cotone standard 60° (1): bianchi e colorati resistenti molto sporchi.
3
Cotone standard 40° (2): bianchi poco sporchi e colori delicati. 40° 1200 -
4
Sintetici 60°: colori resistenti molto sporchi. 60° 800 -
4
Sintetici (3): colori resistenti poco sporchi. 40° 800 -
Mix 15': Per rinfrescare rapidamente capi poco sporchi
5
(non indicato per lana, seta e capi da lavare a mano).
Speciali
Buonanotte: Colori delicati poco sporchi.
6
Camicie
7
Seta/Tende: Per capi in seta, viscosa, lingerie.
8
Lana: Per lana, cachemire, ecc.
9
A Freddo
Temp.
max.
(Max. 90°)
Velocità
max.
(°C)
90° 1200
60°
30° 800 -
40° 800 40° 600 30° 0 40° 800 -
(giri al
minuto)
1200 -
Detersivi
Prela
vaggio
Lavaggio
%
(Kg)
gina
dente
Ammorbi-
Carico max.
Candeg-
- 8 53 2,86 98 195’
8 53 1,23 55,0 195’
8 53 1,01 84 180’
4,5 46 1,03 60 115’
4,5 46 0,56 60 100’
- 1,5 71 0,11 33 15’
4 - - - 290’
- 2 - - - 80’
- 2 - - - 65’
- 2 - - - 85’
Umidità residua
Consummo
energia kWh
Acqua totale lt
Durata ciclo
10
Cotone standard 20°: bianchi poco sporchi e colori delicati. 20° 1200 -
11 Cotone
12 Sintetici
13 Rapido 30'
Parziali
A
Risciacquo - 1200 - -
B
Centrifuga - 1200 - - - - 8 - - - 16’
C
Scarico - 0 - - - - 8 - - - 2’
La durata del ciclo indicata sul display o su questo libretto è una stima calcolata in base a condizioni standard. Il tempo effettivo può variare in base a numerosi fattori quali la temperatura e la
pressione dell’acqua in ingresso, la temperatura ambiente, la quantità di detersivo, la quantità ed il tipo di carico, il bilanciamento del carico, le opzioni aggiuntive selezionate.
1) Programma di controllo secondo la direttiva 1061/2010: impostare il programma 2 con una temperaura di 60°C.
Questo ciclo è adatto per pulire un carico di cotone normalmente sporco ed è il più efficiente in termini di consumo combinato di energia e di acqua, da usare su
capi lavabili a 60°. La temperatura effettiva di lavaggio può differire da quella indicata.
2) Programma di controllo secondo la direttiva 1061/2010: impostare il programma 3 con una temperaura di 40°C.
Questo ciclo è adatto per pulire un carico di cotone normalmente sporco ed è il più efficiente in termini di consumo combinato di energia e di acqua, da usare su
capi lavabili a 40°. La temperatura effettiva di lavaggio può differire da quella indicata.
Per tutti Test Institutes:
2) Programma cotone lungo: impostare il programma 3 con una temperatura di 40°C.
3) Programma sintetico lungo: impostare il programma 4 con una temperatura di 40°C.
Acqua
fredda
Acqua
fredda
Acqua
fredda
1200 -
800 -
800 -
8 - - - 175’
- 8 53 0,23 68 80’
- 3 48 0,12 37 70’
- 3 71 0,10 36 30’
8 - - - 36’
Mix 15’ (programma 5) è studiato per lavare capi leggermente sporchi in poco tempo: dura solo 15 minuti e fa così risparmiare energia e tempo. Impostando il programma (5 a 30°C) è possibile lavare insieme tessuti di diversa natura (esclusi
lana e seta) con un carico massimo di 1,5 kg.
Buonanotte (programma 6). E’ un ciclo silenzioso che può lavorare di notte quando la tariffa energetica è ridotta. Il programma è studiato per capi sintetici e di cotone. Alla fine del ciclo la macchina si ferma con l’acqua in vasca; per effettuare
la centrifiga e lo scarico premere il tasto AVVIO/PAUSA, altrimenti dopo 8 ore la macchina effettuerà automaticamente
la centrifuga e lo scarico dell’acqua.
Cotone standard 20°: (programma ) ideale per carichi in cotone sporchi. Le buone performance anche a freddo, comparabili
con un lavaggio a 40°, sono garantite da un’azione meccanica che lavora con variazione di velocità a picchi ripetuti e ravvicinati.
Programmi Eco
I programmi Eco offrono buone performance di lavaggio a basse temperature consentendo un minore utilizzo di energia elettrica con un beneficio per l’ambiente e un risparmio economico.
I programmi Eco (Cotone , Sintetici e Rapido 30’ ) sono stati creati per diversi tipi di tessuto e per capi poco sporchi.
Per garantire un risultato ottimale raccomandiamo l’uso di un detergente liquido; si consiglia di pretrattare polsini, colli e macchie.
68
Page 69

Personalizzazioni
Impostare la temperatura
Ruotando la manopola TEMPERATURA si imposta la temperatura di lavaggio (vedi Tabella programmi).
La temperatura si può ridurre sino al lavaggio a freddo ( ).
La macchina impedirà automaticamente di impostare una temperatura maggiore a quella massima prevista per ogni programma.
! Eccezione: selezionando il programma 2 la temperatura può essere portata sino a 90°.
Impostare la centrifuga
Ruotando la manopola CENTRIFUGA si imposta la velocità di centrifuga del programma selezionato.
Le velocità massime previste per i programmi sono:
Programmi Velocità massima
Cotone 1200 giri al minuto
Sintetici 800 giri al minuto
Lana 800 giri al minuto
Seta solo scarico
La velocità di centrifuga può essere ridotta, oppure esclusa selezionando il simbolo .
La macchina impedirà automaticamente di effettuare una centrifuga maggiore a quella massima prevista per ogni programma.
Funzioni
Le varie funzioni di lavaggio previste dalla lavabiancheria permettono di ottenere la pulizia e il bianco desiderati.
Per attivare le funzioni:
1. premere il tasto relativo alla funzione desiderata;
2. l’accensione della spia relativa segnala che la funzione è attiva.
Nota: Il lampeggio veloce della spia indica che la funzione relativa non è selezionabile per il programma impostato.
I
Partenza ritardata
Ritarda l’avvio della macchina sino a 12 ore.
Premere più volte il tasto fino a far accendere la spia relativa al ritardo desiderato. Alla quinta pressione del tasto la funzione si
disattiverà.
N.B.: Una volta premuto il tasto START/PAUSE, si può modificare il valore del ritardo solo diminuendolo.
! E’ attivo con tutti i programmi.
Stira Facile
Selezionando questa funzione, il lavaggio e la centrifuga saranno opportunamente modificati per ridurre la formazione di
pieghe. Al temine del ciclo la lavabiancheria effettuerà delle lente rotazioni del cestello;
la spia della funzione STIRA FACILE e quella di START/PAUSE lampeggeranno (arancione) e la fase END rimarrà accesa
fissa. Per terminare il ciclo si dovrà premere il tasto START/PAUSE o il tasto STIRA FACILE.
Nel programma Seta la macchina terminerà il ciclo con la biancheria in ammollo e la spia della funzione STIRA FACILE e
quella di START/PAUSE lampeggeranno (arancione) e la fase RISCIACQUO rimarrà accesa fissa. Per scaricare l’acqua e
poter rimuovere il bucato sarà necessario premere il tasto START/PAUSE o il tasto STIRA FACILE.
! Non è attivabile sui programmi 5, 6, 9, 11, 12, 13, A, B, C.
Extra Risciacquo
Selezionando questa funzione si aumenta l’efficacia del risciacquo, e si assicura la massima rimozione del detersivo. E’ utile
per pelli particolarmente sensibili.
! Non è attivabile sui programmi 5, 13, B, C.
Super Lavaggio
Grazie all’utilizzo di una maggior quantità d’ acqua nella fase iniziale del ciclo e all’impiego di maggior tempo, tale
funzione garantisce un lavaggio di alte performance.
! Non è attivabile sui programmi 1, 5, 8, 9, 11, 12, 13, B, C.
69
Page 70

Detersivi e biancheria
M
AX
1
2
4
3
Cassetto dei detersivi
I
Il buon risultato del lavaggio dipende anche dal corretto
dosaggio del detersivo: eccedendo non si lava in modo più
efficace e si contribuisce a incrostare le parti interne della
lavabiancheria e a inquinare l’ambiente.
! Usare detersivi in polvere per capi in cotone bianchi e per
il prelavaggio e per lavaggi con temperatura superiore a
60°C.
! Seguire le indicazioni riportate sulla confezione di detersi-
vo.
! Non usare detersivi per il lavaggio a mano, perché formano
troppa schiuma.
Estrarre il cassetto dei detersivi e inserire il detersivo o
l’additivo come segue.
vaschetta 1: Detersivo per prelavaggio (in polvere)
Prima di versare il detersivo verificare che non sia inserita la
veschetta aggiuntiva 4.
vaschetta 2: Detersivo per lavaggio
(in polvere o liquido)
Il detersivo liquido va versato solo prima dell’avvio.
vaschetta 3: Additivi (ammorbidente, ecc.)
L’ammorbidente non deve fuoriuscire dalla griglia.
vaschetta aggiuntiva 4: Candeggina
Ciclo candeggio
! La candeggina tradizionale si usa per i tessuti resistenti bian-
chi, quella delicata per i tessuti colorati, i sintetici e per la lana.
Inserire la vaschetta aggiuntiva 4,
in dotazione, nella vaschetta 1.
MAX
MAX
e attivare la funzione “Super Lavaggio” .
Per candeggiare durante il lavaggio versare il detersivo e gli
additivi, impostare il programma desiderato
e attivare la funzione “Super Lavaggio” . L’utilizzo della vaschetta aggiuntiva 4 esclude il prelavaggio.
Nel dosare la candeggina
non superare il livello “max”
indicato sul perno centrale
(vedi figura).
Per effettuare solo il candeggio
versare la candeggina nella vaschetta aggiuntiva 4, impostare il programma “Risciacquo”
Preparare la biancheria
• Suddividere la biancheria secondo:
- il tipo di tessuto / il simbolo sull’etichetta.
- i colori: separare i capi colorati da quelli bianchi.
• Vuotare le tasche e controllare i bottoni.
• Non superare i valori indicati, riferiti al peso della biancheria asciutta: vedi “Tabella dei programmi”.
Quanto pesa la biancheria?
1 lenzuolo 400-500 gr.
1 federa 150-200 gr.
1 tovaglia 400-500 gr.
1 accappatoio 900-1.200 gr.
1 asciugamano 150-250 gr.
Capi particolari
Camicie: utilizzare l’apposito programma 7 per lavare
camicie di diversi tipo di tessuto e colore.
Ne garantisce la massima cura minimizzando la
formazione delle pieghe.
Seta: utilizzare l’apposito programma 8 per lavare tutti i
capi in seta. Si consiglia l’utilizzo di un detersivo specifico
per capi delicati.
Tende: si raccomanda di piegarle e sistemarle dentro una
federa o un sacchetto a rete. Utilizzare il programma 8.
Lana: con il programma 9 è possibile lavare in lavatrice
tutti i capi in lana, anche quelli con l’etichetta “solo
lavaggio a mano” . Per ottenere i migliori risultati
utilizzare un detersivo specifico e non superare 2 kg di
bucato.
Sistema bilanciamento del carico
Prima di ogni centrifuga, per evitare vibrazioni eccessive
e per distribuire il carico in modo uniforme, il cestello
effettua delle rotazioni ad una velocità leggermente
superiore a quella del lavaggio. Se al termine di ripetuti
tentativi il carico non fosse ancora correttamente
bilanciato la macchina effettua la centrifuga ad una
velocità inferiore a quella prevista. In presenza di
eccessivo sbilanciamento la lavabiancheria effettua
la distribuzione anzichè la centrifuga. Per favorire
una migliore distribuzione del carico e il suo corretto
bilanciamento si consiglia di mescolare capi grandi e
piccoli.
70
Page 71

Anomalie e rimedi
Può accadere che la lavabiancheria non funzioni. Prima di telefonare all’Assistenza (vedi “Assistenza”), controllare che non si
tratti di un problema facilmente risolvibile aiutandosi con il seguente elenco.
Anomalie:
La lavabiancheria
non si accende.
Il ciclo di lavaggio
non inizia.
La lavabiancheria non carica
acqua (lampeggia velocemente la
spia della prima fase di lavaggio).
La lavabiancheria carica e scarica
acqua di continuo.
Possibili cause / Soluzione:
• La spina non è inserita nella presa della corrente, o non abbastanza
da fare contatto.
• In casa non c’è corrente.
• L’oblò non è ben chiuso
• Il tasto ON/OFF non è stato premuto.
• Il tasto START/PAUSE non è stato premuto.
• Il rubinetto dell’acqua non è aperto.
• Si è impostato un ritardo sull’ora di avvio (PARTENZA RITARDATA,
vedi “Personalizzazioni”).
• Il tubo di alimentazione dell’acqua non è collegato al rubinetto.
• Il tubo è piegato.
• Il rubinetto dell’acqua non è aperto.
• In casa manca l’acqua.
• Non c’è sufficiente pressione.
• Il tasto START/PAUSE non è stato premuto.
• Il tubo di scarico non è installato fra 65 e 100 cm da terra (vedi “Installazione”).
• L’estremità del tubo di scarico è immersa nell’acqua (vedi “Installazione”).
• Lo scarico a muro non ha lo sfiato d’aria.
Se dopo queste verifiche il problema non si risolve, chiudere il rubinetto dell’acqua, spegnere la lavabiancheria e chiamare l’Assistenza. Se l’abitazione si trova
agli ultimi piani di un edificio, è possibile che si verifichino fenomeni di sifonaggio, per cui la lavabiancheria carica e scarica acqua di continuo. Per eliminare
l’inconveniente sono disponibili in commercio apposite valvole anti-sifonaggio.
I
La lavabiancheria non scarica
o non centrifuga.
La lavabiancheria vibra
molto durante la centrifuga.
La lavabiancheria perde acqua.
La spia START/PAUSE (arancione)
e le spie delle funzioni lampeggiano velocemente.
Si forma troppa schiuma.
• Il programma non prevede lo scarico: con alcuni programmi occorre
avviarlo manualmente.
• È attiva la funzione STIRA FACILE: per completare il programma
premere il tasto START/PAUSE (“Personalizzazioni”).
• Il tubo di scarico è piegato (vedi “Installazione”).
• La conduttura di scarico è ostruita.
• Il cestello, al momento dell’installazione, non è stato sbloccato
correttamente (vedi “Installazione”).
• La lavabiancheria non è in piano (vedi “Installazione”).
• La lavabiancheria è stretta tra mobili e muro (vedi “Installazione”).
• Il tubo di alimentazione dell’acqua non è ben avvitato (vedi “Installazione”).
• Il cassetto dei detersivi è intasato (per pulirlo vedi “Manutenzione e cura”).
• Il tubo di scarico non è fissato bene (vedi “Installazione”).
• Spegnere la macchina e togliere la spina dalla presa, attendere circa 1 minuto quindi riaccenderla.
Se l’anomalia persiste, chiamare l’Assistenza.
• Il detersivo non è specifico per lavabiancheria (deve esserci la
dicitura “per lavatrice”, “a mano e in lavatrice”, o simili).
• Il dosaggio è stato eccessivo.
71
Page 72

Assistenza
195117951.00
10/2013 - Xerox Fabriano
Prima di contattare l’Assistenza:
I
• Verificare se l’anomalia può essere risolta da soli (vedi “Anomalie e rimedi”).
• Riavviare il programma per controllare se l’inconveniente è stato ovviato;
• In caso negativo, contattare il Numero Unico 199.199.199*;
! Non ricorrere mai a tecnici non autorizzati.
Comunicare:
• il tipo di anomalia;
• il modello della macchina (Mod.);
• il numero di serie (S/N);
Queste informazioni si trovano sulla targhetta applicata nella parte posteriore della lavabiancheria e nella parte anteriore
aprendo l’oblò.
Assistenza Attiva 7 giorni su 7
In caso di necessità d’intervento chiamare il Numero Unico Nazionale 199.199.199*.
Un operatore sarà a completa disposizione per fissare un appuntamento con il Centro Assistenza Tecnico Autorizzato più
vicino al luogo da cui si chiama.
È attivo 7 giorni su 7, sabato e domenica compresi, e non lascia mai inascoltata una richiesta.
* Al costo di 14,25 centesimi di Euro al minuto (iva inclusa) dal Lun. al Ven. dalle 08:00 alle 18:30, il Sab. dalle 08:00 alle 13:00 e di 5,58 centesimi di
Euro al minuto (iva inclusa) dal Lun. al Ven. dalle 18:30 alle 08:00, il Sab. dalle 13:00 alle 08:00 e i giorni festivi, per chi chiama da telefono fisso.
Per chi chiama da radiomobile le tariffe sono legate al piano tariffario dell’operatore telefonico utilizzato. Le suddette tariffe potrebbero essere soggette a variazione da parte dell’operatore telefonico; per maggiori informazioni consultare il sito www.hotpoint-ariston.it.
*
72
 Loading...