

Page 1

kitchen think
Instructions for Installation and Use
Electric Hobs
Models EC6005
The Recipe Book
Hotpoint has come up with a small recipe book - which is practical, full of helpful tips and easy to use - to help you
rediscover the delights of cooking.
It contains a wide variety of handy tips to keep in mind to try out new dishes effortlessly .
It also has 15 recipes preprogrammed into the oven, so thanks to the interactive display, once you have done the
preparation all you have to do is make one simple selection.
T o the Installer
Before installation fill in the product details on the back cov er this book.
The information can be found on the rating plate.
To the User
You must read the instructions prior to installing and using the appliance and
then retain them for future reference.
Page 2

CONTENTS
Introduction
Advice and recommendations
Installation and fastening
Electrical connection
Description of the cooktop and cooking zone
The controls
The different function of the hob
Safetz devices
Maintenance and care
After Sales Service
Hotpoint Guarantee
Key Contacts
3
4
5
6
7
8
9
10
11
14
15
Back Cover
Retention of this Instruction Book
This Instruction Book must be kept handy f or reference as it contains important details on the safe and proper use of
the appliance.
If you sell or pass the appliance to someone else, or move house and leave it behind, make sure this Book is also
provided so the new owner can become familiar with the appliance and safety warnings.
If the Book is lost or damaged a copy ma y be obtained from:
Merloni Elettrodomestici LTD, Morley W a y, P eterborough, PE2 9JB
2
Page 3

Introduction
Your new hob is guaranteed* and will giv e lasting service. This guarantee is only applicable if the appliance has been
installed in accordance with the installation instructions detailed in this booklet.
To help make best use of your cooking equipment, please read this booklet carefully.
The hob is designed specifically for domestic use and responsibility will not be accepted f or use in any other installation.
* The guarantee is subject to the provisions that the appliance:
(a) Has been used solely in accordance with this booklet.
(b) Has been properly connected to a suitable supply voltage as stated on the rating plate, attached to the
appliance.
(c) Has not been subjected to misuse or accident or been modified or repaired by any per son other than the
manufacturers authorised employee or agent.
(d) Has been correctly installed.
This appliance conforms with the following European Economic Community directives:
- 73/23/EEC of 19/02/73 (Low Voltage) and subsequent modifications;
- 89/336/EEC of 03/05/89 (Electromagnetic Compatibility) and subsequent modifications;
- 90/396/EEC of 29/06/90 (Gas) and subsequent modifications;
- 93/68/EEC of 22/07/93 and subsequent modifications.
3
Page 4

Advice and recommendations
• This appliance was designed for non-professional,
household use.
• Before using the appliance, read the instructions in the
owner’ s manual carefully since it contains all the instructions you require to ensure safe installation, use and maintenance. Keep this owner’s manual in a safe place for future reference.
• When you have removed the packing, check whether
the appliance is intact. If you have any doubts, contact a
qualified professional bef ore using the appliance.
• Never leave the packing components (plastic bags,
polystyrene foam, nails, etc.) within the reach of children
since these are a source of potential danger .
• The appliance must be installed by a qualified technician in compliance with the instructions provided by the
manufacturer.
• The latter denies all responsibility for improper installation which may harm persons and animals and damage
property .
• The electrical safety of this appliance can only be guaranteed if the latter is correctly and efficiently earthed, in
compliance with regulations on electrical safety. Always
ensure that this vital safety measure has been taken. If
you hav e any doubts, call in a qualified technician to check
the electrical system thoroughly .
• The manufacturer denies all responsibility for damage
resulting from a system which has not been earthed correctly.
• Before powering the appliance, chec k whether the technical characteristics featured on the appliance data plate
correspond with those of the mains electrical system.
• Check that the current load of the mains supply and of
the power sockets is suitable for the maximum power of
the appliance, indicated on the appliance data plate. If in
doubt, contact a qualified professional.
• This appliance must only be used for the purpose for
which it was e xpressly designed. Any other use (such as
heating a room for e xample) is considered to be improper
and consequently dangerous.
• The manufacturer denies all responsibility for damage
resulting from improper or incorrect use of the appliance.
• Certain fundamental rules must be follow ed when using electrical appliances. The following are of particular
importance:
• do not touch the appliance with wet or damp hands,
• never use the appliance when baref oot,
• never use extensions,
• never pull on the power supply cable or the appliance itself to unplug it from the mains socket,
• never lea ve the appliance e xposed to atmospheric
agents (rain, sun, etc.),
• do not allow children or persons who are not familiar with the appliance to use it without supervision.
• Alwa ys unplug the appliance from the mains or switch
off the main switch before cleaning or performing any
cleaning or maintenance operations.
• If the surface of the glass cracks, unplug the appliance immediately. For any repairs, contact only an au-
thorised after-sales service centre and demand original
spare parts. Failure to comply with the above may compromise the safety of the appliance.
• Cut the power supply cable after disconnecting it from
the power mains when you decide not to use the appliance any longer. Also mak e all potentially dangerous parts
of the appliance safe, above all for children who could
play with the appliance.
• The glass ceramic hob is resistant to thermal and mechanical shocks. H owever , it may break due to a shoc k
caused by a sharp object, such as a tool for e xample.
In this case, unplug the appliance immediately and
contact an authorised after-sales service centre to
have it repaired.
• Remember that the heating area stays hot f or at least
half an hour after being turned off; please refrain from
placing any cookware or other items on the cooking zone
while still hot.
• Do not turn on the heating zones if aluminium foil or
plastic items have been placed on the hob surface .
• Do not go near the heating zones when these are still
hot.
• If you use small electric appliances near the hob, mak e
sure their power supply cable does not come into contact
with the hot parts of the hob.
• Make sure all pan handles are alwa ys pointing inwards
towards the centre of the hob to prevent any accidental
spills.
First use: the glue used on the hob seals may leave greasy traces on the glass surface. We recommend you wipe
these off before using the appliance, with the aid of a non abr asiv e cleaner . During the first few hours of use, you ma y
detect a smell of rubber, which will disappear quic kly.
4
Page 5
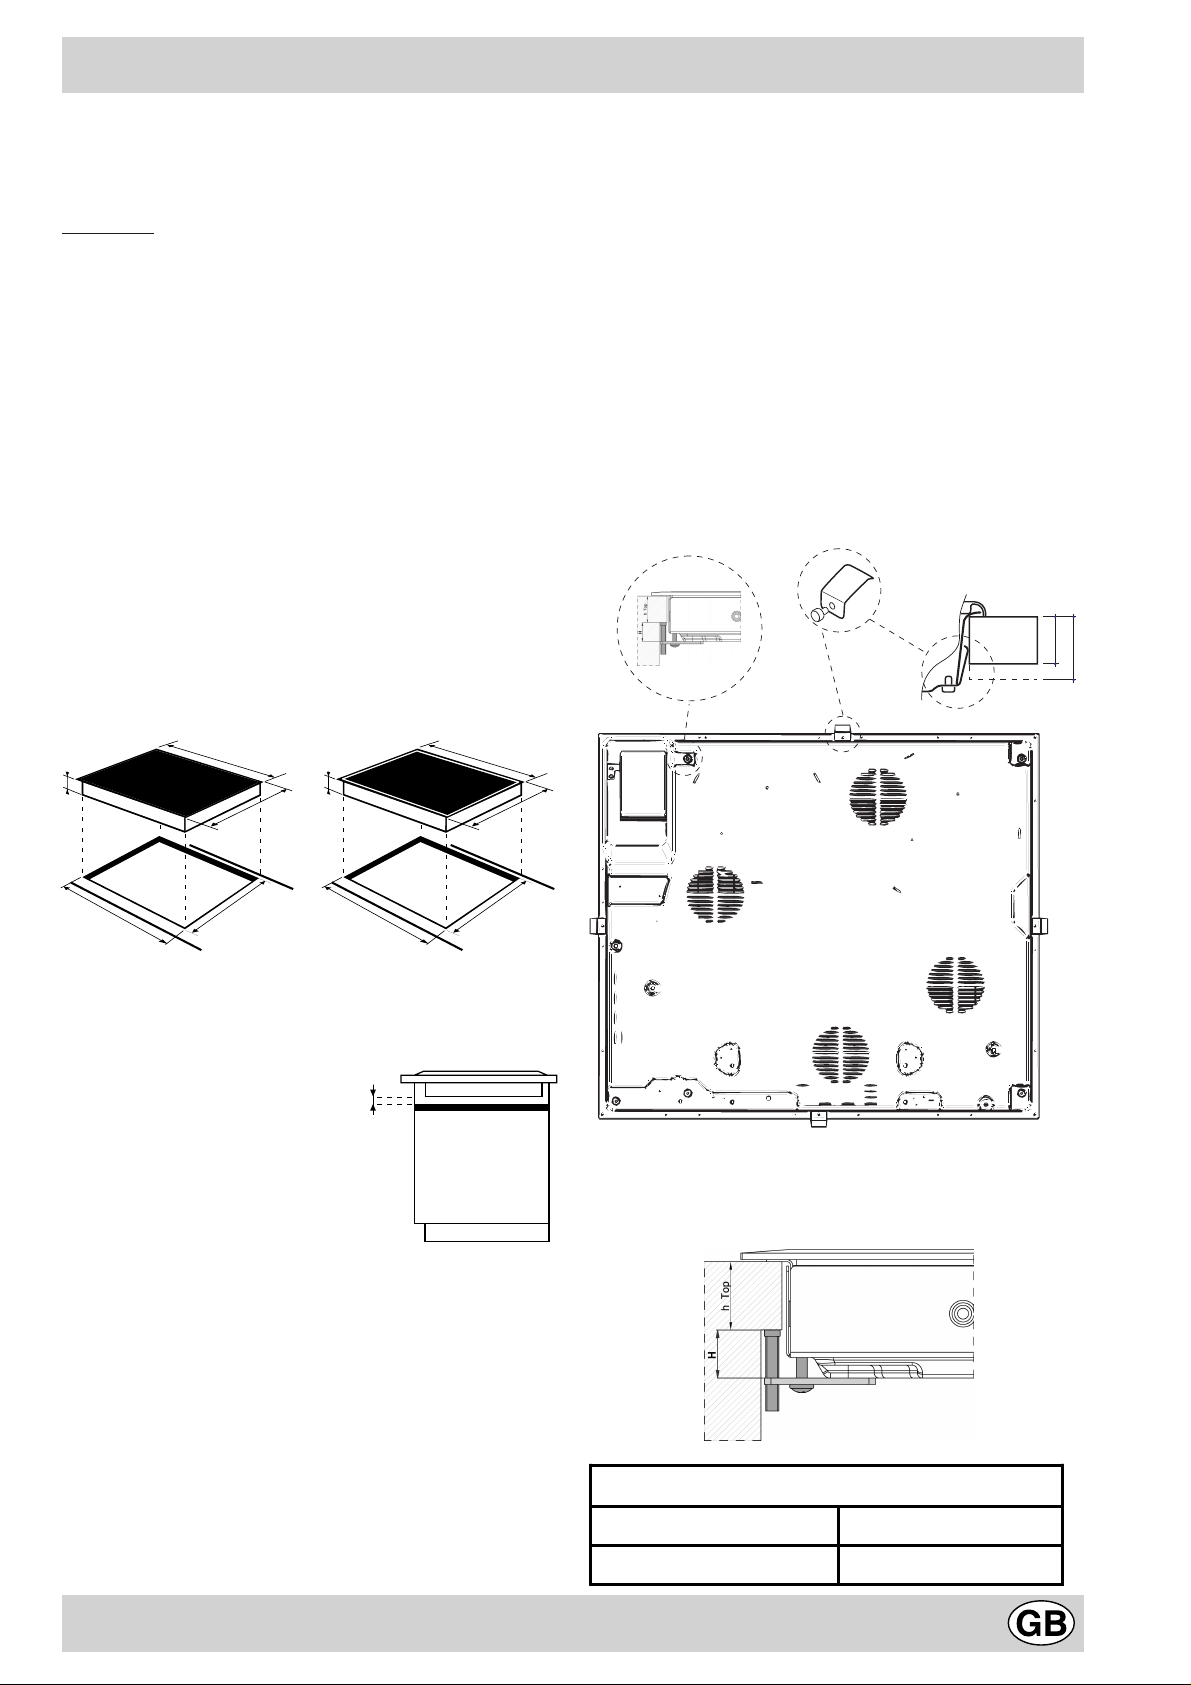
Installation and fastening
The following instructions are provided f or qualified installers so that they may accomplish installation, adjustment
and technical maintenance operations correctly and in
compliance with current regulations and standards.
Important: bef ore any operation, disconnect the hob from
the electrical supply .
Installation
• The hob should be installed on a piece of kitchen
furniture simply by removing the corresponding space.
• The material used for the working surf ace must be
able to resist a temperature of approximately 100°C
• The hob must be positioned at a minimum distance
of 40mm from the back wall or from any other ve rtical
surface, to allow for adequate aeration and to prevent
the surfaces surrounding the appliance from ov erheating.
• If you want to install the hob on top of an oven, the
latter must come with a forced ventilation cooling system.
• Try to avoid installing the hob on a dishwasher; if
you hav e to do this, place a waterproof separating element between the two appliances.
Fastening
Very important: The installation of a glass ceramic hob
must be carried out on a perfectly-level supporting surface.
Any deformations caused by incorrect fastening could
alter the characteristics and performance of the hob .
The fastening springs are screwed on with screws (see
diagram).
It is essential that these screws are always accessible.
Insert the hob in the space provided in furniture unit, exercising suitable pressure on the entire perimeter so that
the hob sticks perfectly to the top.
REAR SPRING ASSEMBLY
FRONT OF HOB
KITCHEN
WORKTOP
30
40
48
560 +/- 1
590
490 +/- 1
520
48
560 +/- 1
10
574
504
490 +/- 1
Distance to
keep between the
cut-out slot and
the cabinet
HOB FROM BELOW
The length of the adjusting screw of the fastening hooks
must be set before they are assembled, in according to
the thickness of the top and to the following table:
H
h Top = 30mm h Top = 40mm
17,5 mm 7,5 mm
5
Page 6
Electrical connection
• The electr ical safety of this appliance can only be
guaranteed if the latter is correctly and efficiently
earthed, in compliance with regulations on electrical
safety . Alw ays ensure that this vital safety measure has
been taken. If you have any doubts, call in a qualified
technician to check the electrical system thoroughly.
• The manufacturer denies all responsibility for damage resulting from a system which has not been
earthed correctly .
• Before powering the appliance, check whether the
technical characteristics featured on the appliance data
plate correspond with those of the mains electrical system.
• Check that the current load of the mains supply and
of the power sockets is suitab le for the maximum pow er
of the appliance, indicated on the appliance data plate.
If in doubt, contact a qualified professional.
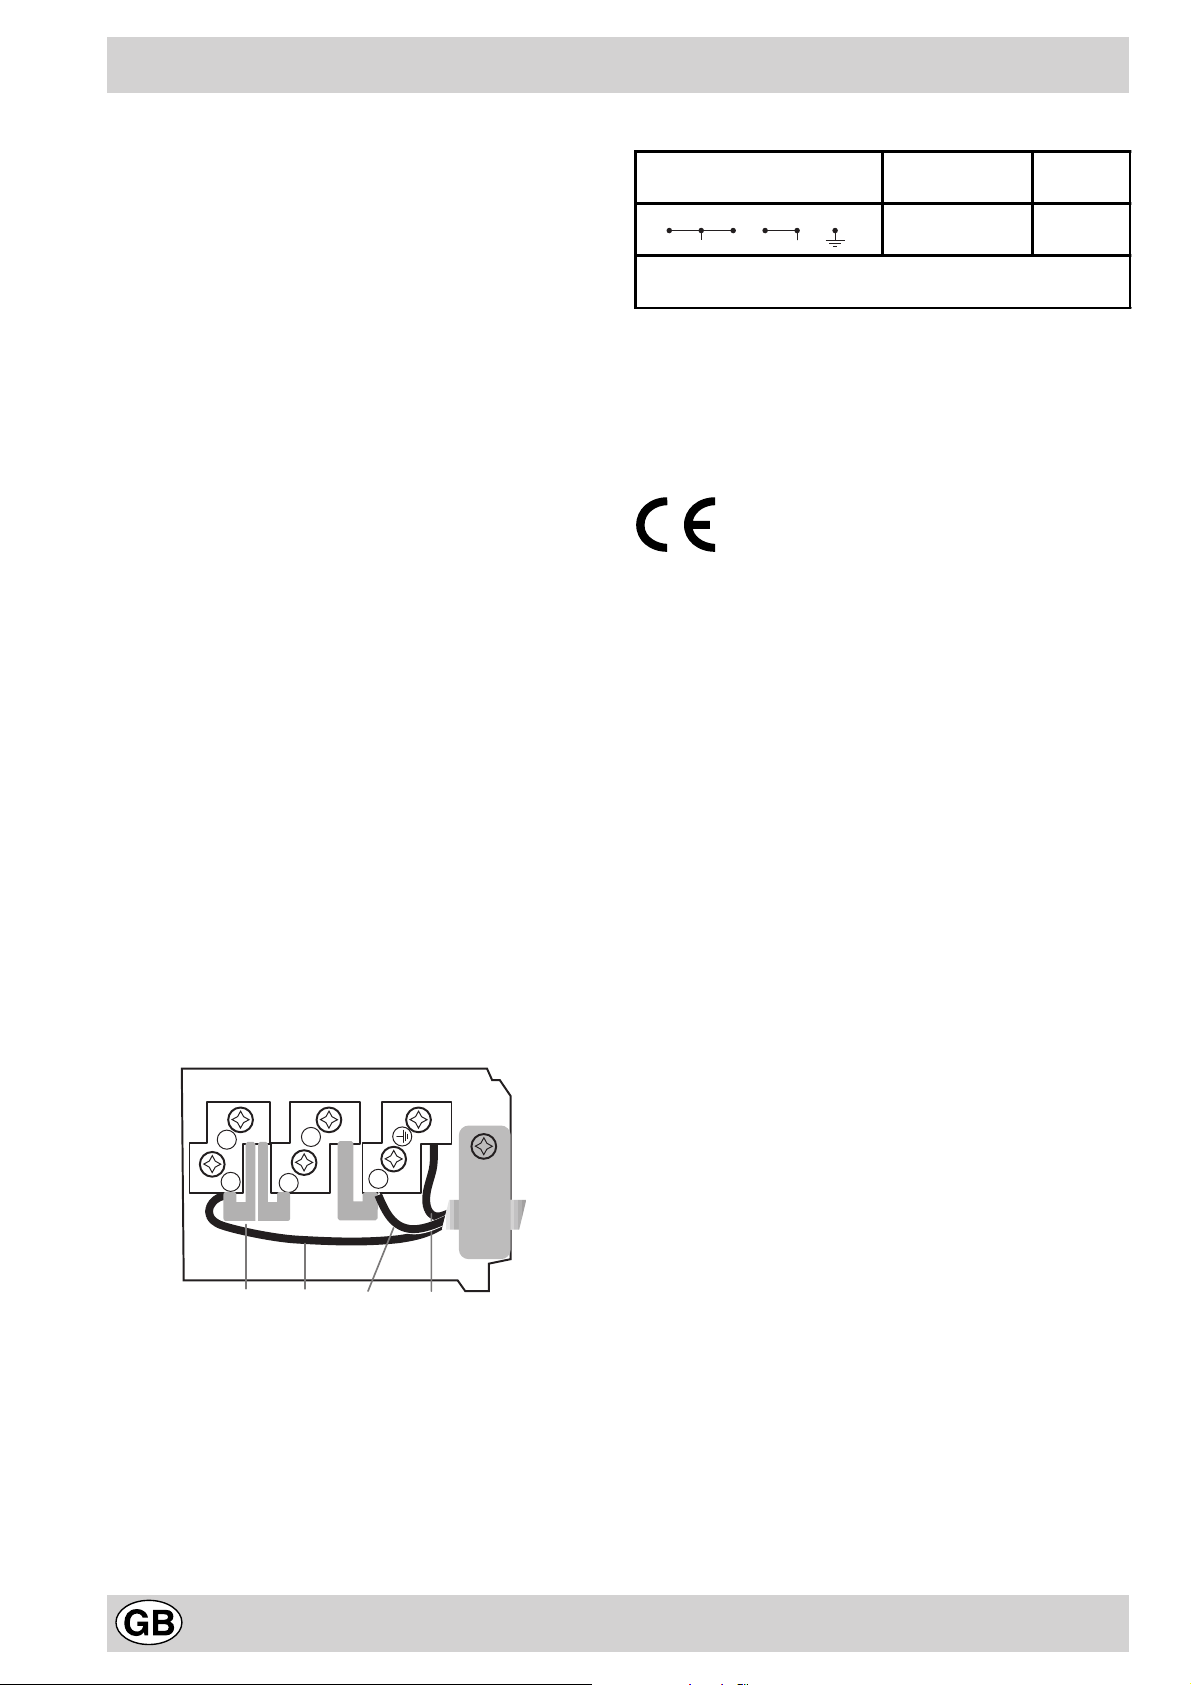
Electrical connections
1 2 3 4 5
L N
* Application of the simultaneity coefficient in accordance with
IEC 60335-2-6 norm
Voltage
Frequency
230V-1+N~50 Hz
Sections
2.5 mm²
In the event of an incorrect connection:
• if your appliance does not work,
• check the position of the wires in the terminal board,
• check that all screws are tight,
• check the positioning of the jumpers.
Fuses
25 A*
Disconnect the appliance from the electricity supply
before all operations.
You may connect your hob to the electrical system in two
different w a ys:
• by means of a junction box: if the appliance is
connected permanently to the mains, an omnipolar
circuit breaker, accessible if necessary, with a minimum contact opening of 3 mm should be installed.
• by means of a socket conforming to the regulations
in force in the country where the appliance is fitted. It
should be accessible whenev er necessary; do not use
adaptors, multiple plugs or extensions.
Important
After connecting the appliance to the flexible cab le, tighten
all the screws on the terminal board. Make sure jumpers
are installed according to the type of mains system as
indicated in the table.
For example: line 1 in the table
2
4
This appliance conforms with the following Eur opean
Community Directives:
- 73/23/EEC of 19/02/73 (Low V oltage) and subsequent
amendments;
- 89/336/EEC of 03/05/89 (Electromagnetic
compatibility) and subsequent amendments;
- 93/68/EEC of 22/07/93 and subsequent amendments;
Warning: If the hob is fitted above a built-in oven, the hob
and the oven must be connected to the mains separately f or
safety reasons and to simplify operations when it is necessary
to pull the oven out for some reason.
1
U-bolt
connection support
3
Phase Neutral Earth
5
6
Page 7
Description of cooking zones
Halogen elements
This type of element transmits heat through the radiation of the halogen lamp which it contains. It is held in high regard
because of its properties which are similar to the typical characteristics of gas: rapid response to commands, instant
display of power .
The radiant elements
This type of element is made up of many coils which guarantee the uniform distribution of heat on the bottom of the pot,
to ensure perfect cooking on low heat: stews, sauces or dishes that require reheating.
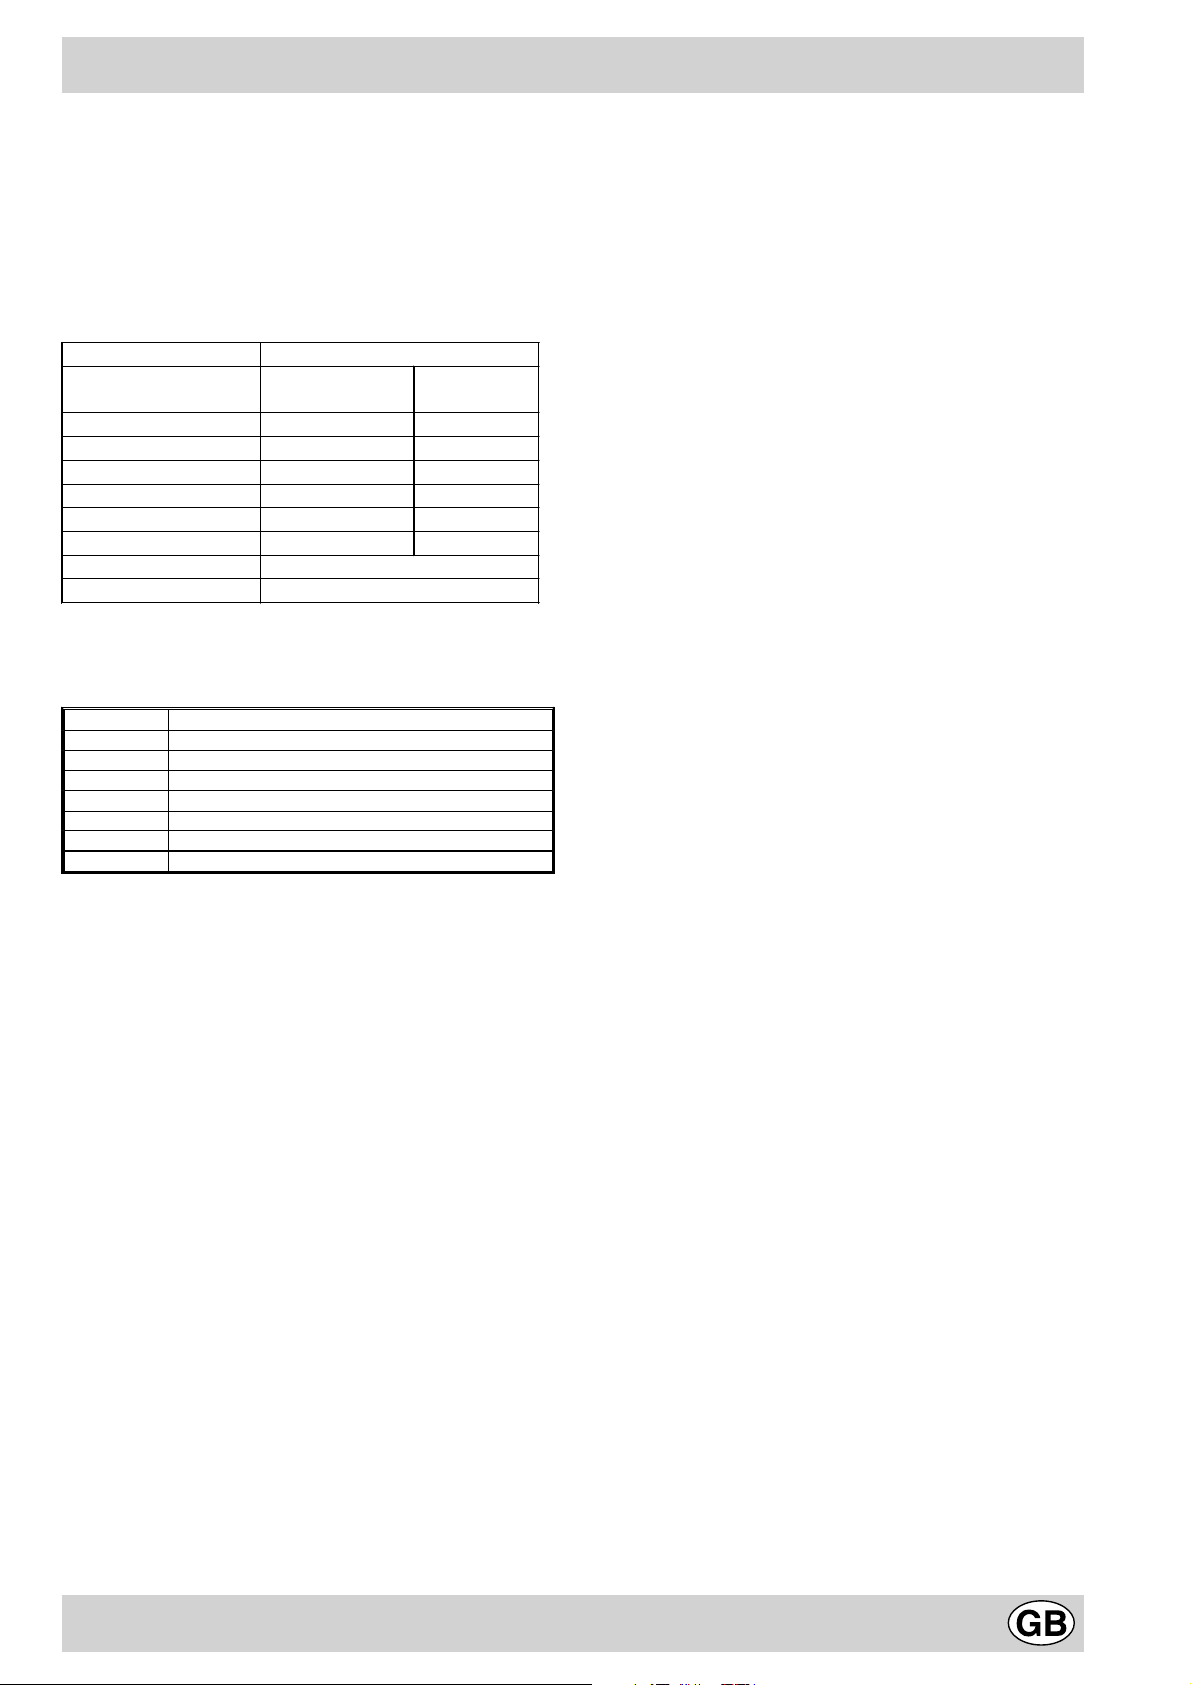
HOBS EC 6005
Cooking zones Power
(W)
Back Righ t
Front Right
Back Left
Front Left
R 1400 180
R 1800 200
R 1100/2500 250
R 600 120
Centre
Right
Total power 6300
R = radian t
Diameter
(mm)
The following table provides useful indications on how to
use the various cooking zones in the best way possibl e.
Power Type of cooking
1 Melted butter or chocolate
2-3 Heating liquids
4 Preparation of creams and sauces
5 Boiling meats, cooking blanquettes, desserts
6 Cooking pasta and rice
7-8-9 Cooking meats, fish, omelettes
10-11 Frying
Each cooking zone is activated by a power adjustment
device which is made up of a double key (+,-).
The extension of the cooking zones (concentric or oval) is
activated by means of key provided.
As long as the temperature of the cooking zones remains
above 60°C, even after they have been switched off, the
residual heat indicators, which are located near the
relative cooking zone, remain on to prevent you from
getting burnt.
7
Page 8
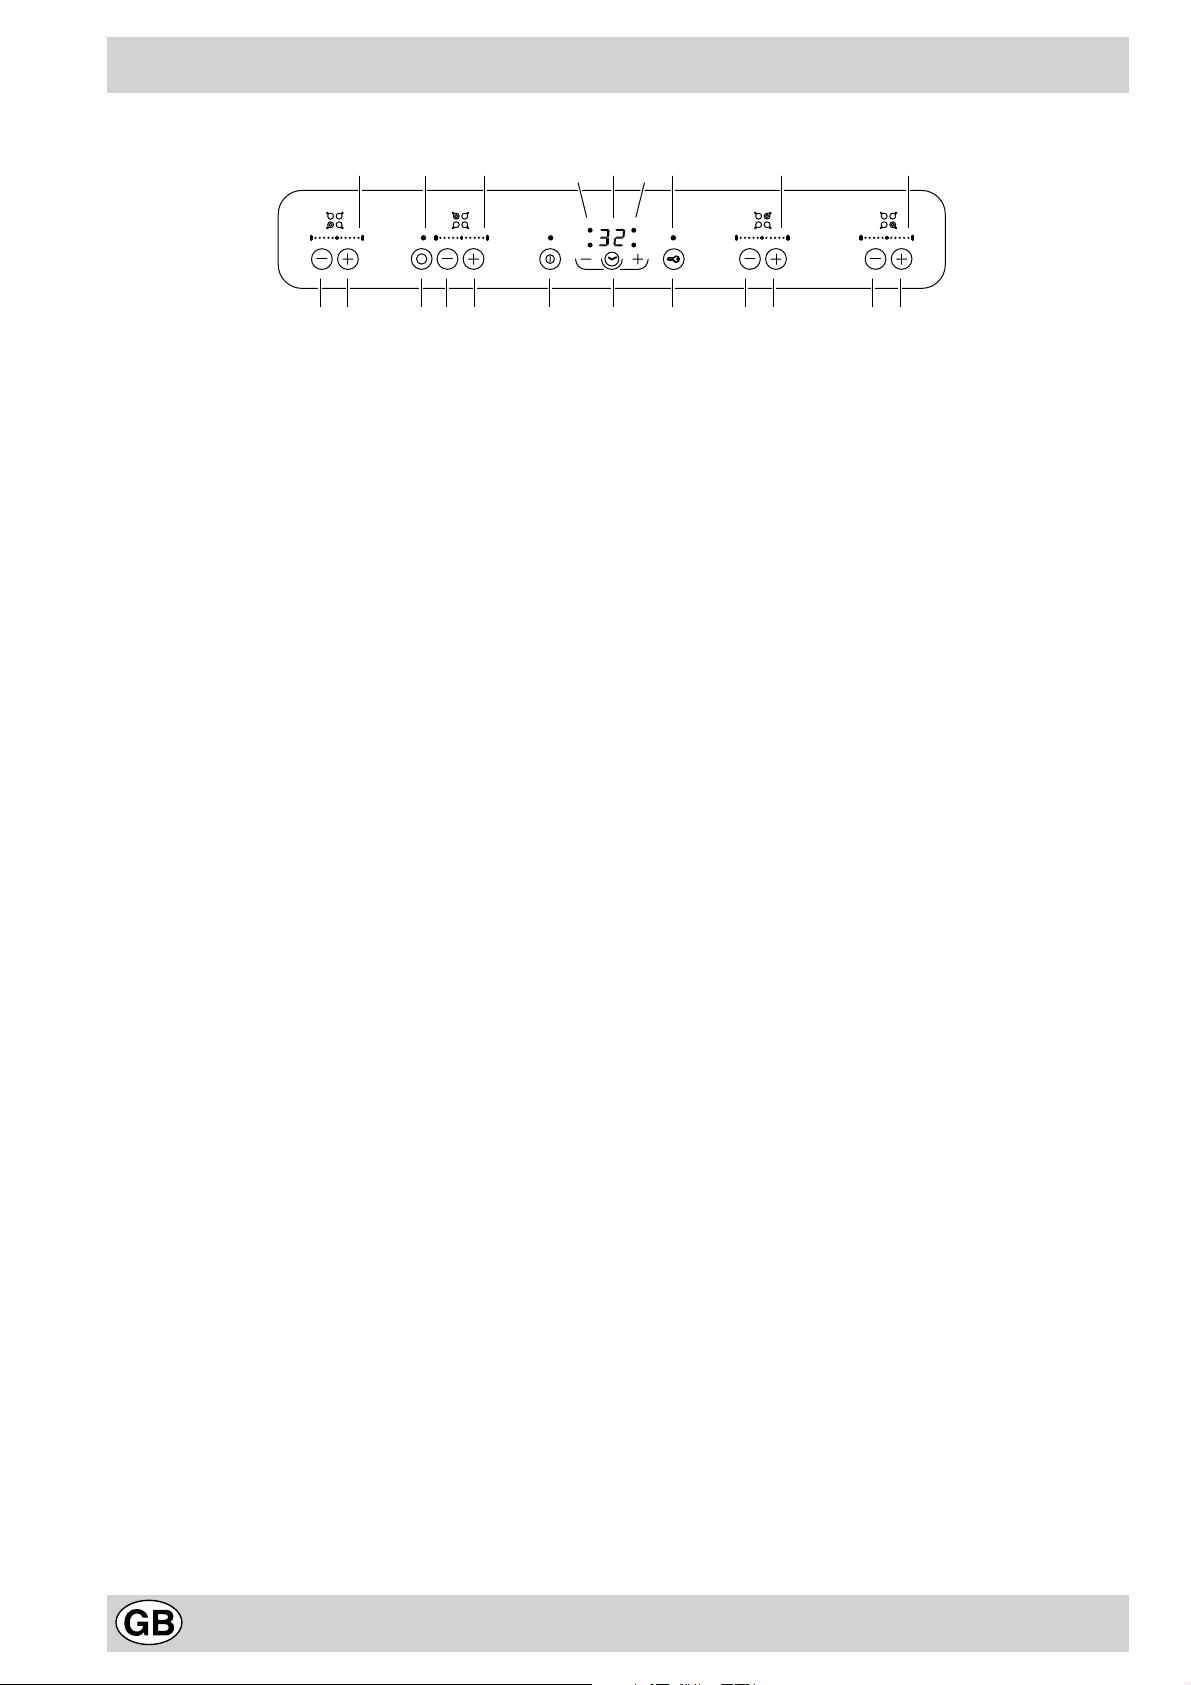
The controls
11
6 5 67 1 9 2
1. On/ off key
2. Control lock key
3. Pow er indicators
4. Lock indicator light
5. Power increase key
6. Power decrease key
7. Extension key for the extendab le cooking zone/s (concentric or oval): found on hobs where there are 1 or 2
extendable cooking zones
5 6 5 6 5
483 3 3 310
11
8. Surface operation indicator light for the extendable
cooking zone/s (concentric or oval): f ound beside each
extendable cooking zone
9. Timer- adjustment key to programme the cooking time
10.Programmed duration indicator
11.Programmed cooking zone indicator light
Note
• The extension key for the extendable cooking zone/s (7) and the relative indicator lights (8) are only found on
models that have e xtendab le cooking zones (concentric or oval).
8
Page 9
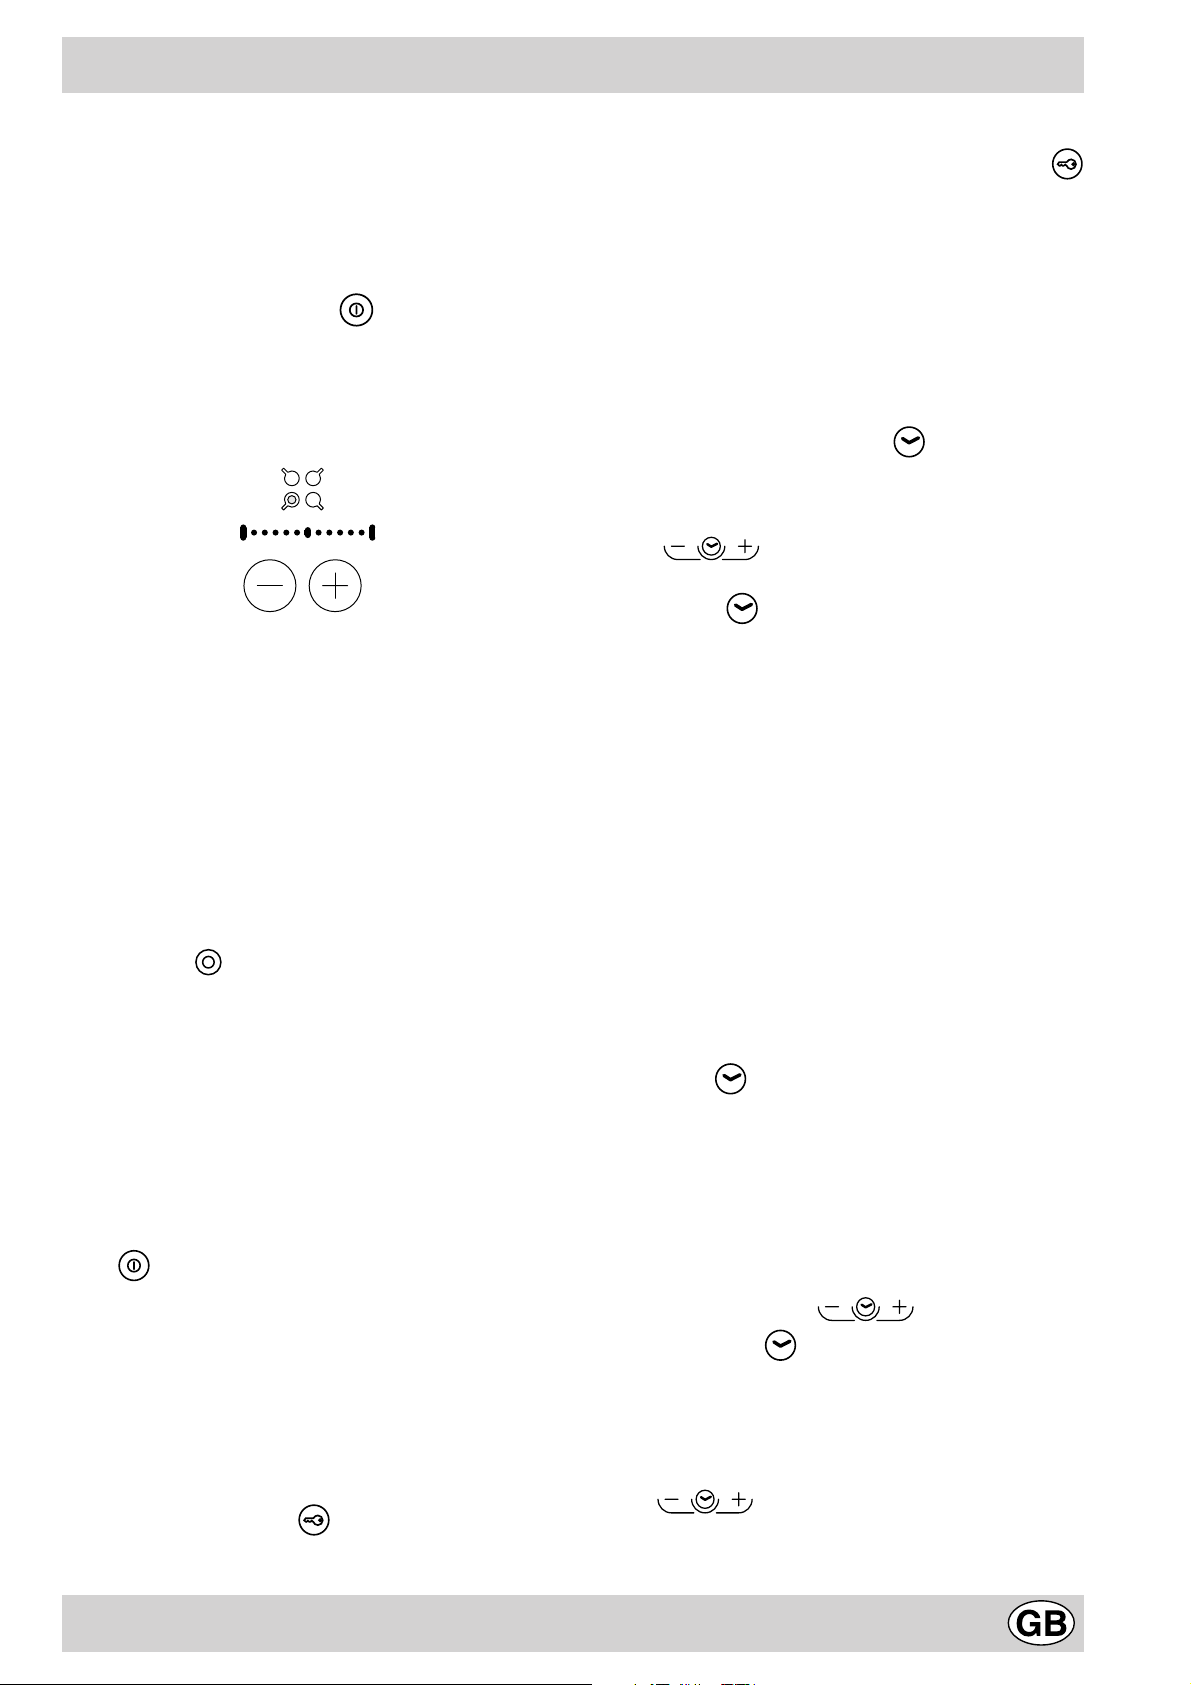
The different function of the hob
When the hob is plugged in, all the indicator lights on the
control panel light up for a fe w moments and there will be
a short acoustic signal. Subsequently, the control panel
switches off and, at this point, it will be possible to switch
the hob on.
Switching the hob on
To switch on the hob, hold the button down for approximately 1 second.
Cooking zone operation
Each cooking zone is activated by means of a pow er adjustment device which is made up of a double key (+,-).
Switching on a cooking zone
• T o s witch on a cooking zone, set the desired power
using the “+” and “-” keys.
• To set the maximum temperature directly, briefly
press the “-” key.
Extendable cooking zone operation
(if the hob comes with extendable cooking zones , see previous page)
Double plate;
a. set the desired power using the “+” and “-” keys
(the innermost cooking zone is activated).
b. press
ing area
to enable/disable the outermost cook-
Switching off a cooking zone
To switch off a cooking zone:
• press thekey s “+” and “-” simultaneously: the power
immediately returns to 0 and the cooking zone switches
off;
• or press the “-” ke y: the cooking zone’s power decreases progressively until it switches off.
To modify the heating power or to interrupt the cooking
process, it is necessary to unlock the controls: press
for a few moments; the indicator light goes off and the
controls unlock..
Programming the cooking time
It is possible to programme all the cooking zones for a
duration of between 1 and 99 minutes. Proceed as follows:
•
set the desired power on the plate/s using the “+” and
“-” keys;
• press the programming key
light in the position corresponding to the plate that you
intend to programme lights up;
• set the desired cooking time using the “+” and “-”
keys
• to confirm the programme
a. press
b. wait approximately 10 seconds without pressing
any other key s .
The cooking time countdown begins immediately .
The end of the programmed cooking time is indicated by
means of an acoustic signal (this lasts for 10 seconds)
and the cooking zone switches off.
Repeat the above-mentioned procedure for each plate that
you intend to programme.
;
again
until the indicator
Programmed time display
If one or more plates have been programmed, the display
shows the time remaining for the plate which is closest to
the end of the programmed time, indicating its position by
means of the corresponding indicator light, which will be
on. The indicator lights that correspond to the other programmed plates will flash.
To show the time remaining for the other programmed
plates, press
grammed plates will be shown in sequence, in an anti-
clockwise direction, beginning from the front left one (only
the corresponding indicator light will be on and the display flashes)
repeatedly; the times of all the pro-
Switching off the hob
Press ; the appliance switches off.
If the hob’s controls ha ve been locked (see pre vious para-
graph), they will continue to be lock ed even after the hob
has been switched back on. To switch the hob back on, it
is necessary to unlock the controls.
Locking the controls
When the hob is operating, it is possible to bloc k the controls to prevent the settings from being accidentally modified (children, cleaning operations, etc.).
All you have to do is press
the key lights up and the controls are locked.
; the indicator light above
Modification of programmed times
Proceed as per the paragraph “Progr ammed time display”
until the time of the plate you intend to modify is shown.
Press the keys “+” and “-”
Confirm by pressing
ing any ke ys.
or wait 10 seconds without press-
to set the new time.
Cancelling a programme
Display the time of the plate concerned (as in the paragraph “Programmed time displa y”) and press the keys “+”
and “-”
set and you exit the programming mode.
9
simultaneously; the progr amme is re-
Page 10
Safety devices
Acoustic signal
Some anomalies, such as:
• an object (pot, utensil, etc.) placed on the control
area for more than 10 seconds,
• a spillage on the control panel,
• sustained pressure on one of the keys, etc.
may cause the acoustic signal to go off .
Remove the cause of the malfunction to stop the acoustic
signal. The hob remains locked; all you have to do is unlock it to continues using it (the settings are sav ed). If the
cause of the malfunction is not eliminated, the acoustic
signal will carry on, while the hob will switch off for saf ety
reasons.
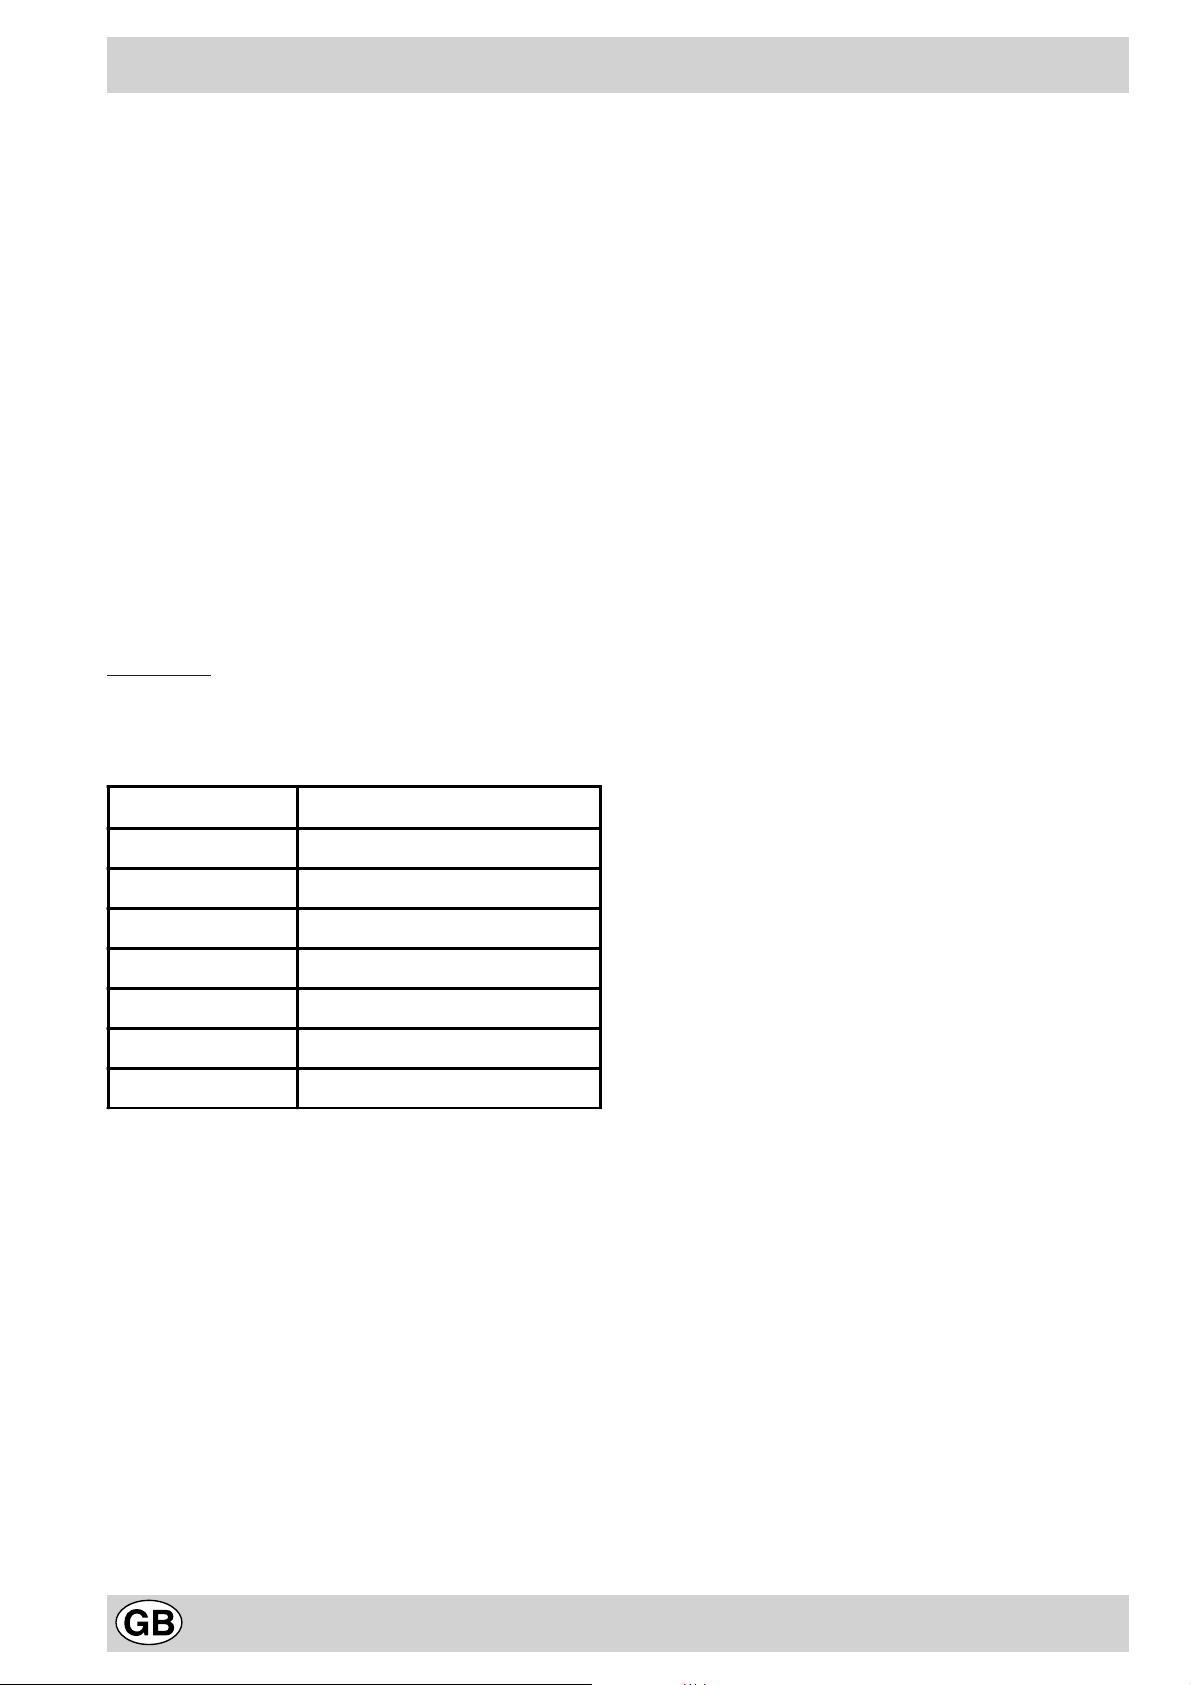
Safety switch
The appliance comes with an automatic safety switch
which goes off after a certain time interval (see table) in
accordance with the selected power . During the safety in-
terruption, the letters “
play.
for example: the right rear cooking zone is set on 5 and
the front left cooking zone is set on 2. The right rear zone
will switch off after 5 hours of operation, while the left front
zone will switch off after 6 hours of operation.
TI” and “ME” alternate on the dis-
Inactivity
If the plate is switched on b ut is not used for approximately
2 minutes, the control lock function will be enab led.
If the
same status remains for approximately another 4
minutes, the plate will switch off automatically.
Overheating
Prolonged use of the hob may cause the electrical components to overheat.
A thermal protection device temporarily induces reduced
power (3) on the front cooking zones until the temperature has come down to an acceptable level.
Power level Operating time limi t in hours
110
26
3-4-5 5
64
7-8 3
9-10 2
11 1
10
Page 11
Maintenance and care
Advice on using your appliance
To get the best from your hob, it is vital that you follow a
few fundamental rules during cooking and when preparing food.
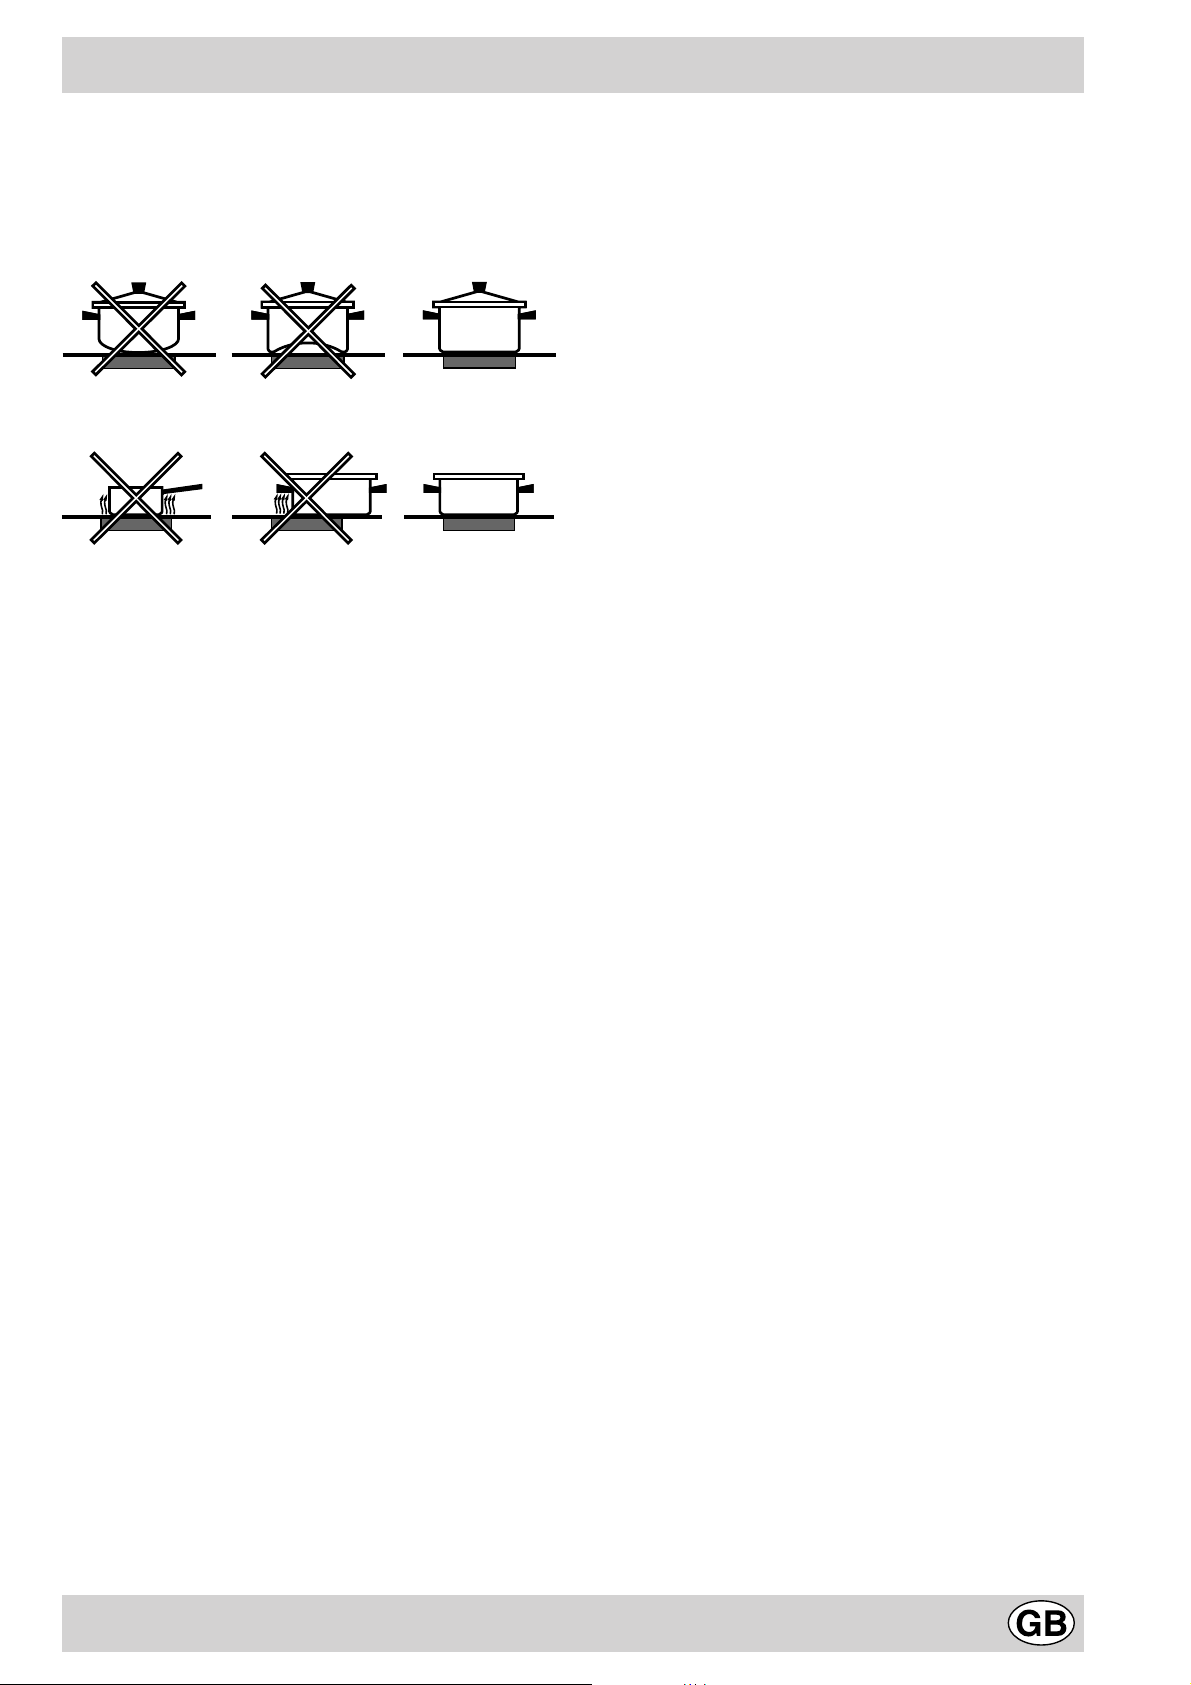
• Use pans with a flat bottom so they adhere fully to the
heating zone.
• Always use pans whose diameter covers the cooking
zone fully so that all the availab le heat can be used.
• Make sure the pan base is always clean and dry, to
guarantee good contact and long life for the cooking
zones and pans alike.
• Avoid using pans used normally on gas burners. The
concentration of heat on gas burners can warp the
bottom of the pan, consequently you would nev er obtain
the desired result when using the pan on the glass
ceramic hob.
• Never leave a cooking zone on without a pan on it as
the maximum heat level w ould be reached very quickly ,
which could damage the heating elements.
• The glass ceramic hob is resistant to thermal and
mechanical shocks. However, it may break due to a
shock caused by a sharp object. In this case, unplug
the appliance immediately and contact an authorised
after-sales service centre to have it repaired.
Always k eep your hob clean. Bef ore proceeding with maintenance operations, check that all the cooking zones are
turned off and have cooled down completely.
Stainless steel frame (only on some models)
Stainless steel can stain as an effect of enduring contact
with limescale in water or as an effect of highly aggressive detergents (containing phosphorus). We recommend
you rinse and dry it thoroughly after maintenance. It is
preferable to remove any water spills immediately.
Hob care
The vitroceramic glass used for the heating surface is
smooth and poreless and it is also resistant to thermal
shocks and to mechanical shocks under normal conditions of use. In order to preserve these properties, we
recommend you care for your hob as follows:
• for ordinary maintenance, just wipe it with a damp
sponge and dry it thoroughly using paper towels.
• If the hob is dirty, rub clean using a special cleaner
suitable for vitroceramic glass, rinse off and dry thoroughly.
• food residue and dirt can be removed using a special scraper. Do this as soon as possible, do not wait
for the hob to cool down in order to av oid incrustations.
For excellent results , use a special stainless steel wool
pad for vitroceramic glass cleaning soaked in soapy
water.
• When the hob is clean, you can apply a special
product for the care and protection of the same: this
type of product leaves an invisible film on the surface
of the hob to protect the same against any spills and
boiled-over f ood. It is best if you do this when the hob
is lukewarm or cold.
• Make sure you always rinse the hob with clean water and dry it thoroughly: otherwise the cleaning products could become encrusted onto the hob during subsequent cooking.
Recommendations
• Never use abrasive or corrosive substances,
such as aerosol cleaners for grills and ovens, stain
removers or rust remove rs, scouring powders and abrasive sponges: even the delicate ones could scr atch the
hob surface irrev ersib ly.
• We recommend you keep all items which could melt
away fr om the hob, such as plastic utensils, sugar
or products with a high sugar content. Should liq-
uid boil over onto the hob surface, remove it immediately (while the hob is still hot) using a razor blade
scraper, in order to av oid damaging the surf ace.
• Use this hob exclusively for cooking. Do not
place items on the hob when the same is not in use.
Do not use the hob as a work surface (by placing lids,
saucepans or dishcloths on it, for example), nor as a
chopping board.
• Never leave aluminium wrappers, aluminium foil and
plastic cookware on the hob when hot or still warm.
• Do not use steam cleaners or high pressure cleaners to clean your appliance.
• Do not place metal items on the hob (such as knives,
spoons, lids, etc.).
• Never heat up unopened tins: they could b urst.
The guarantee does not cover damage to the hob caused
by incorrect use.
11
Page 12

12
Page 13

13
Page 14

After Sales Service
"No company is better positioned to offer an after sales service on a
Hotpoint appliance than us - the manufacturer"
As part of our commitment to you, all Hotpoint appliances have the added benefit of a fully inclusive parts
and labour guarantee for the first 12 months. In addition to this you also have the advantage of free
replacement parts for the first 5 years when fitted by a Hotpoint
engineer. When the 12 months parts and labour guarantee expires we offer the following after sales
service options:
Repair Service and Information Help Desk
UK: 08709 066066
www .theservicecentre.co.uk
Republic of Ireland: 1850 302 200
Note: Our operators will require the Model number and the Serial number of your appliance
Available 364 days a year with a fast, effective and value for money service. We have the largest white
goods repair service in the UK with over 1200 of our own fully trained engineers. All repairs include a
parts and labour guarantee for 12 months from the date of the repair.
If you require any information or have any questions about your appliance, our operators are on hand with
help and advice.
All this ensures that you will receive the best available after sales service possible.
Extended Warranties
UK: 08709 088 088
www .theservicecentre.co.uk
Republic of Ireland: 1850 502 200
Whether you have just one or a number of Hotpoint appliances in your kitchen, we offer two service cover
plans to give you total peace of mind.
l Repair Protection Plan - FREE service repairs for a single Hotpoint appliance during the period
of cover.
l Kitchen Cover - FREE service repairs for all your Hotpoint appliances less than 8
years old.
Genuine Parts and AccessoriesUK: 08709 077 077
www.theservicecentre.co.uk
Republic of Ireland: (01) 842 6836
A wide range of genuine parts and accessories are available from our hotline or through our web site.
Genuine parts and accessories, extended warranties and service repairs are all
available on our web-site at:
GB
www.theservicecentre.co.uk
10
Page 15

Guarantee
"Satisfaction guaranteed or your money back"
We give you a unique 'satisfaction guaranteed' promise - valid for 90 days - after you have
purchased your Hotpoint appliance. If there is a technical problem simply call Hotpoint Repair service
or visit our web-site at
engineer to call. If the technical problem is not resolved under this guarantee, we will replace your
All Hotpoint appliances carry a fully inclusive 12 month parts and labour guarantee as well as free
replacement parts for the first 5 years (except microwaves, selected integrated appliances and cooker
hoods, which have a one year guarantee) provided that they are fitted by a Hotpoint engineer.
Guarantee terms and conditions
Your guarantee is only applicable in the United Kingdom or Republic of Ireland and is subject to the
following provisions that your appliance:
l Has been installed and used correctly in accordance with this instruction booklet.
l Has been used solely for domestic purposes and is located on domestic premises (ie. not for
commercial or trade use).
l Has been properly connected to a suitable electrical supply voltage as stated on the appliance
rating plate.
l Has not been subject to misuse, accident, modified or repaired by anyone other than one of our
own service engineers.
www.theservicecentre.co.uk and where necessary, we will arrange for an
machine or, if you prefer, give you your money back.
For pre purchase information on any other Hotpoint product call: 08701 50 60 70
or visit: www.hotpoint.co.uk
Recycling & Disposal Information
As part of Hotpoint's continued commitment to helping the environment, Hotpoint reser ves the right to
use quality recycled components to keep down customer costs and minimise material wastage.
Please dispose of packaging and old appliances carefully.
To minimise risk of injury to children, remove the door, plug and cut mains cable off flush with the
appliance. Dispose of these parts separately to ensure that the appliance can no longer be plugged
into a mains socket, and the door cannot be locked shut.
11
GB
Page 16
Key Contacts
After Sales Service
Over 1200 trained specialists, directly employed by us, ensure that you can have complete confidence in
both the appliances and services we offer.
Repair Service and Information Desk
UK: 08709 066 066
(Open 8 to 8 Mon - Fri, 8 to 6 Sat, 10 to 4 Sun & Bank Holidays)
www.theservicecentre.co.uk
Republic of Ireland: 1850 302 200
Note: Our operators will require the following information:
Model number:
Serial number:
Extended Warranties
UK: 08709 088 088
(Open 8 to 8 Mon - Sun)
www.theservicecentre.co.uk
Republic of Ireland: 1850 502 200
Genuine Parts and Accessories
UK: 08709 077 077
(Open 8-30 to 5-30 Mon - Fri & 9 to 12 Sat)
www.theservicecentre.co.uk
Republic of Ireland: (01) 842 6836
195.046.611.00
Merloni Elettrodomestici UK Ltd, Morley Way, Peterborough, PE2 9JB.
10-2004Part no. FP157 - 01
 Loading...