Hotpoint EBGH 20323 F O3, EBGH 18323 F O3 User Manual

EBGH 18xxx F O3

EBGH 20xxx F O3

Italiano

Istruzioni per l’uso

COMBINATO FRIGORIFERO/CONGELATORE

Sommario

Istruzioni per l’uso, 1

Assistenza, 3

Descrizione dell’apparecchio, 6

Descrizione dell’apparecchio, 11

Reversibilità apertura porte, 16

Installazione, 17

Avvio e utilizzo, 17

Manutenzione e cura, 19

Precauzioni e consigli, 19

Anomalie e rimedi, 20

English

Operating Instructions

REFRIGERATOR/FREEZER COMBINATION

Contents

Operating Instructions, 1

Assistance, 3

Description of the appliance, 6

Description of the appliance, 11

Reversible doors, 16

Installation, 21

Start-up and use, 21

Maintenance and care, 23

Precautions and tips, 23

Troubleshooting, 24

Français

Mode d’emploi

COMBINE REFRIGERATEUR/CONGELATEUR

Sommaire

Mode d’emploi, 1

Assistance, 3

Description de l’appareil, 7

Description de l’appareil, 12

Réversibilité des portes, 16

Installation, 25

Mise en marche et utilisation, 25

Entretien et soin, 27

Précautions et conseils, 27

Anomalies et remèdes, 28

Deutsch

Gebrauchsanleitungen

KÜHL-/GEFRIERKOMBI

Inhaltsverzeichnis

Gebrauchsanleitungen, 1

Kundendienst, 4

Beschrijving van het apparaat, 7

Beschreibung Ihres Gerätes, 12

Wechsel des Türanschlags, 16

Installation, 29

Inbetriebsetzung und Gebrauch, 29

Wartung und Pflege, 31

Vorsichtsmaßregeln und Hinweise, 31

Störungen und Abhilfe, 32

Nederlands

Gebruiksaanwijzingen

KOEL/DIEPVRIESCOMBINATIE

Inhoud

Gebruiksaanwijzingen, 1

Service, 4

Beschreibung Ihres Gerätes, 8

Beschrijving van het apparaat, 13

Draairichting deuren verwisselbaar, 16

Installatie, 33

Starten en gebruik, 33

Onderhoud en verzorging, 35

Voorzorgsmaatregelen en advies, 35

Storingen en oplossingen, 36

Español

Manual de instrucciones

COMBINADO FRIGORÍFICO/CONGELADOR

Sumario

Manual de instrucciones, 2 Asistencia, 4

Descripción del aparato, 8

Descripción del aparato, 13

Reversibilidad de la apertura de las puertas, 16

Instalación, 37

Puesta en funcionamiento y uso, 37 Mantenimiento y cuidados, 39 Precauciones y consejos, 39

Anomalías y soluciones, 40

Portuges

Instruções para a utilização

COMBINADO FRIGORÍFICO/CONGELADOR

Índice

Instruções para a utilização, 2 Assistência, 5

Descrição do aparelho, 9 Descrição do aparelho, 14

Reversibilidade da abertura das portas, 16 Instalação, 41

Início e utilização, 41

Manutenção e cuidados, 43 Precauções e conselhos, 43

Anomalias e soluções, 44

Polski

Instrukcja obsługi

LODÓWKO - ZAMRAŻARKA

Spis treści

Instrukcja obsługi, 2

Serwis Techniczny, 5

Opis urządzenia, 9

Opis urządzenia, 14

Zmiana kierunku otwierania drzwi, 16

Instalacja, 45

Uruchomienie i użytkowanie, 45

Konserwacja i utrzymanie, 47

Zalecenia i środki ostrożności, 47

Anomalie i środki zaradcze, 48

Română

Instrucţiuni de folosire

COMBINĂ FRIGIDER/CONGELATOR

Sumar

Instrucţiuni de folosire, 2 Asistenţă, 5

Descriere aparat, 10 Descriere aparat, 15

Reversibilitate deschidere uşi, 16

Instalare, 49

Pornire şi utilizare, 49 Întreţinere şi curăţire, 51 Precauţii şi sfaturi, 51 Anomalii şi remedii, 52

Assistenza

Prima di contattare l’Assistenza:

Verificare se l’anomalia può essere risolta autonomamente

(vedi Anomalie e Rimedi).

In caso negativo, contattare il Numero Unico Nazionale

199.199.199.

Comunicare:

il tipo di anomalia

il modello della macchina (Mod.)

il numero di serie (S/N)

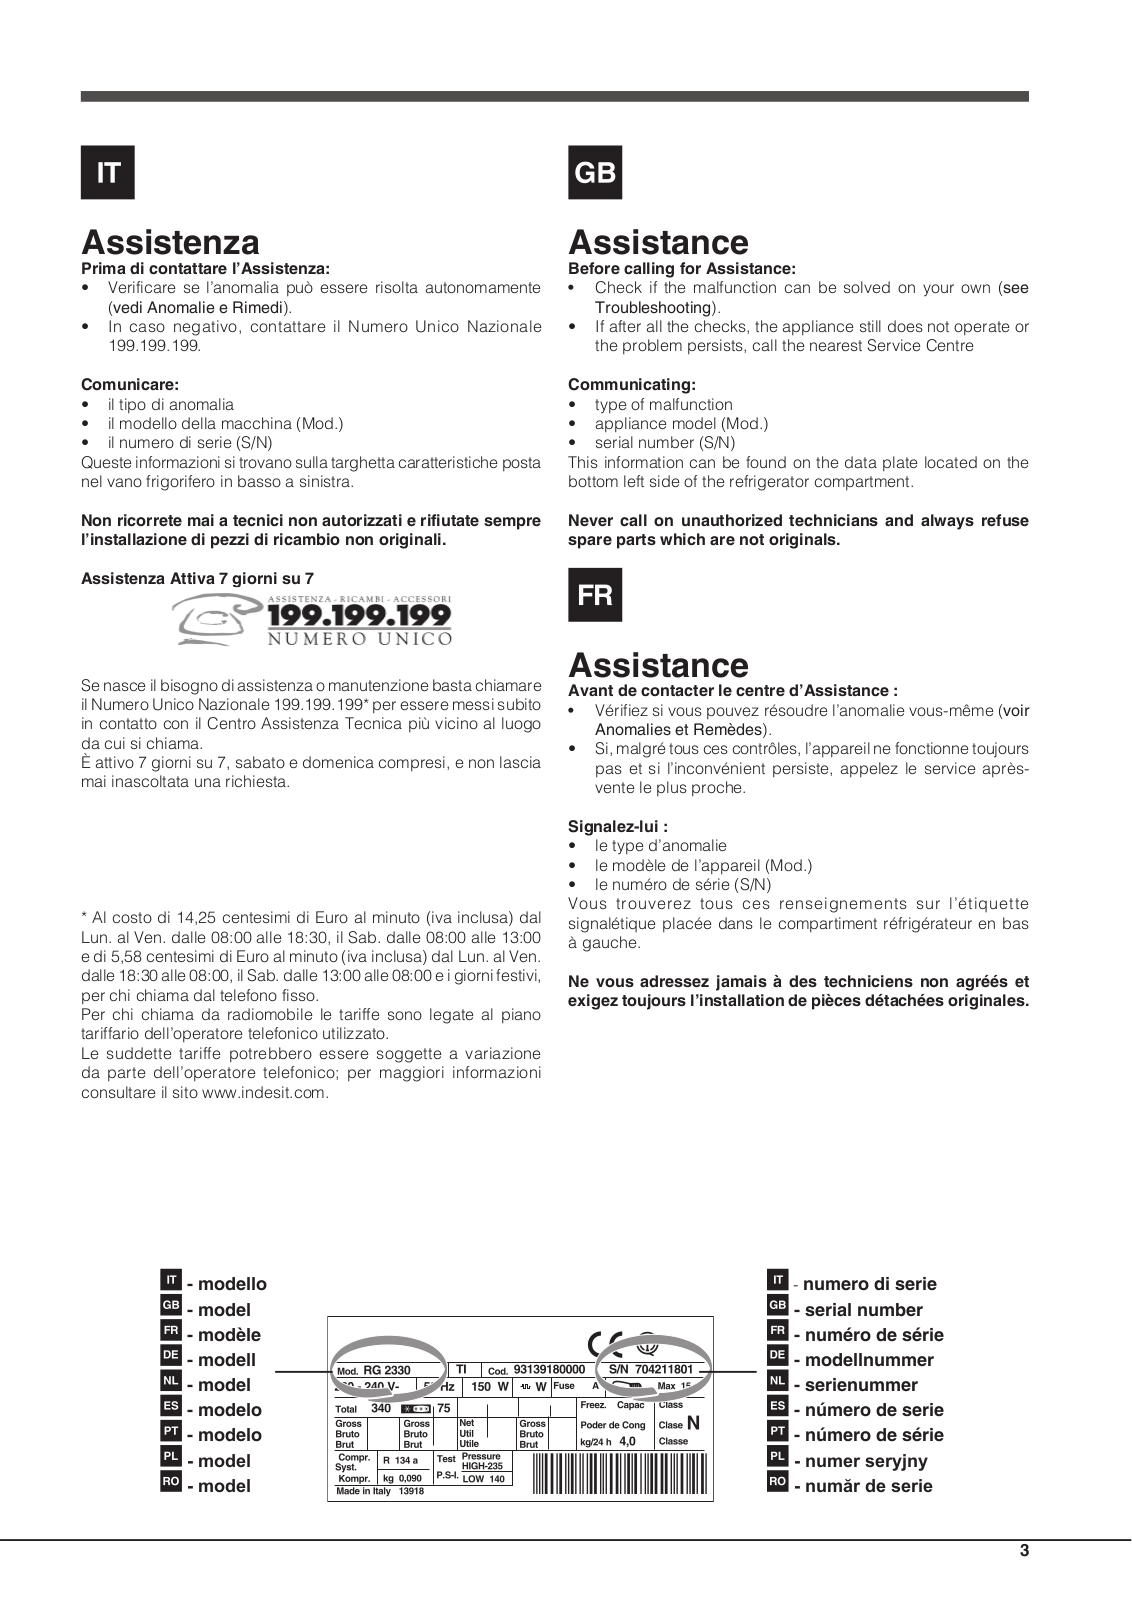
Queste informazioni si trovano sulla targhetta caratteristiche posta nel vano frigorifero in basso a sinistra.

Non ricorrete mai a tecnici non autorizzati e rifiutate sempre l’installazione di pezzi di ricambio non originali.

Assistenza Attiva 7 giorni su 7

Se nasce il bisogno di assistenza o manutenzione basta chiamare il Numero Unico Nazionale 199.199.199* per essere messi subito in contatto con il Centro Assistenza Tecnica più vicino al luogo da cui si chiama.

È attivo 7 giorni su 7, sabato e domenica compresi, e non lascia mai inascoltata una richiesta.

* Al costo di 14,25 centesimi di Euro al minuto (iva inclusa) dal Lun. al Ven. dalle 08:00 alle 18:30, il Sab. dalle 08:00 alle 13:00 e di 5,58 centesimi di Euro al minuto (iva inclusa) dal Lun. al Ven. dalle 18:30 alle 08:00, il Sab. dalle 13:00 alle 08:00 e i giorni festivi, per chi chiama dal telefono fisso.

Per chi chiama da radiomobile le tariffe sono legate al piano tariffario dell’operatore telefonico utilizzato.

Le suddette tariffe potrebbero essere soggette a variazione da parte dell’operatore telefonico; per maggiori informazioni consultare il sito www.indesit.com.

- modello

- model

- modèle

- modell

- model

- modelo

- modelo

- model - model

Assistance

Before calling for Assistance:

Check if the malfunction can be solved on your own (see Troubleshooting).

If after all the checks, the appliance still does not operate or the problem persists, call the nearest Service Centre

Communicating:

type of malfunction

appliance model (Mod.)

serial number (S/N)

This information can be found on the data plate located on the bottom left side of the refrigerator compartment.

Never call on unauthorized technicians and always refuse spare parts which are not originals.

Assistance

Avant de contacter le centre d’Assistance :

Vérifiez si vous pouvez résoudre l’anomalie vous-même (voir Anomalies et Remèdes).

Si, malgré tous ces contrôles, l’appareil ne fonctionne toujours pas et si l’inconvénient persiste, appelez le service aprèsvente le plus proche.

Signalez-lui :

le type d’anomalie

le modèle de l’appareil (Mod.)

le numéro de série (S/N)

Vous trouverez tous ces renseignements sur l’étiquette signalétique placée dans le compartiment réfrigérateur en bas à gauche.

Ne vous adressez jamais à des techniciens non agréés et exigez toujours l’installation de pièces détachées originales.

- numero di serie

- serial number

- numéro de série

- modellnummer

- serienummer

- número de serie

- número de série

- numer seryjny

- număr de serie

3

Kundendienst

Bevor Sie sich an den Kundendienst wenden:

Prüfen Sie, ob die Störung selbst behoben werden kann (siehe Störungen und Abhilfe).

Sollte trotz aller Kontrollen das Gerät nicht funktionieren und der von Ihnen festgestellte Fehler weiter bestehen bleiben, dann fordern Sie bitte den nächstgelegenen technischen Kundendienst an und teilen Sie dort zusammen mit Ihrer Fehlerbeschreibung folgende Daten mit:

Geben Sie bitte Folgendes an:

die Art der Störung

das Gerätemodell (Mod.)

die Modellnummer (S/N).

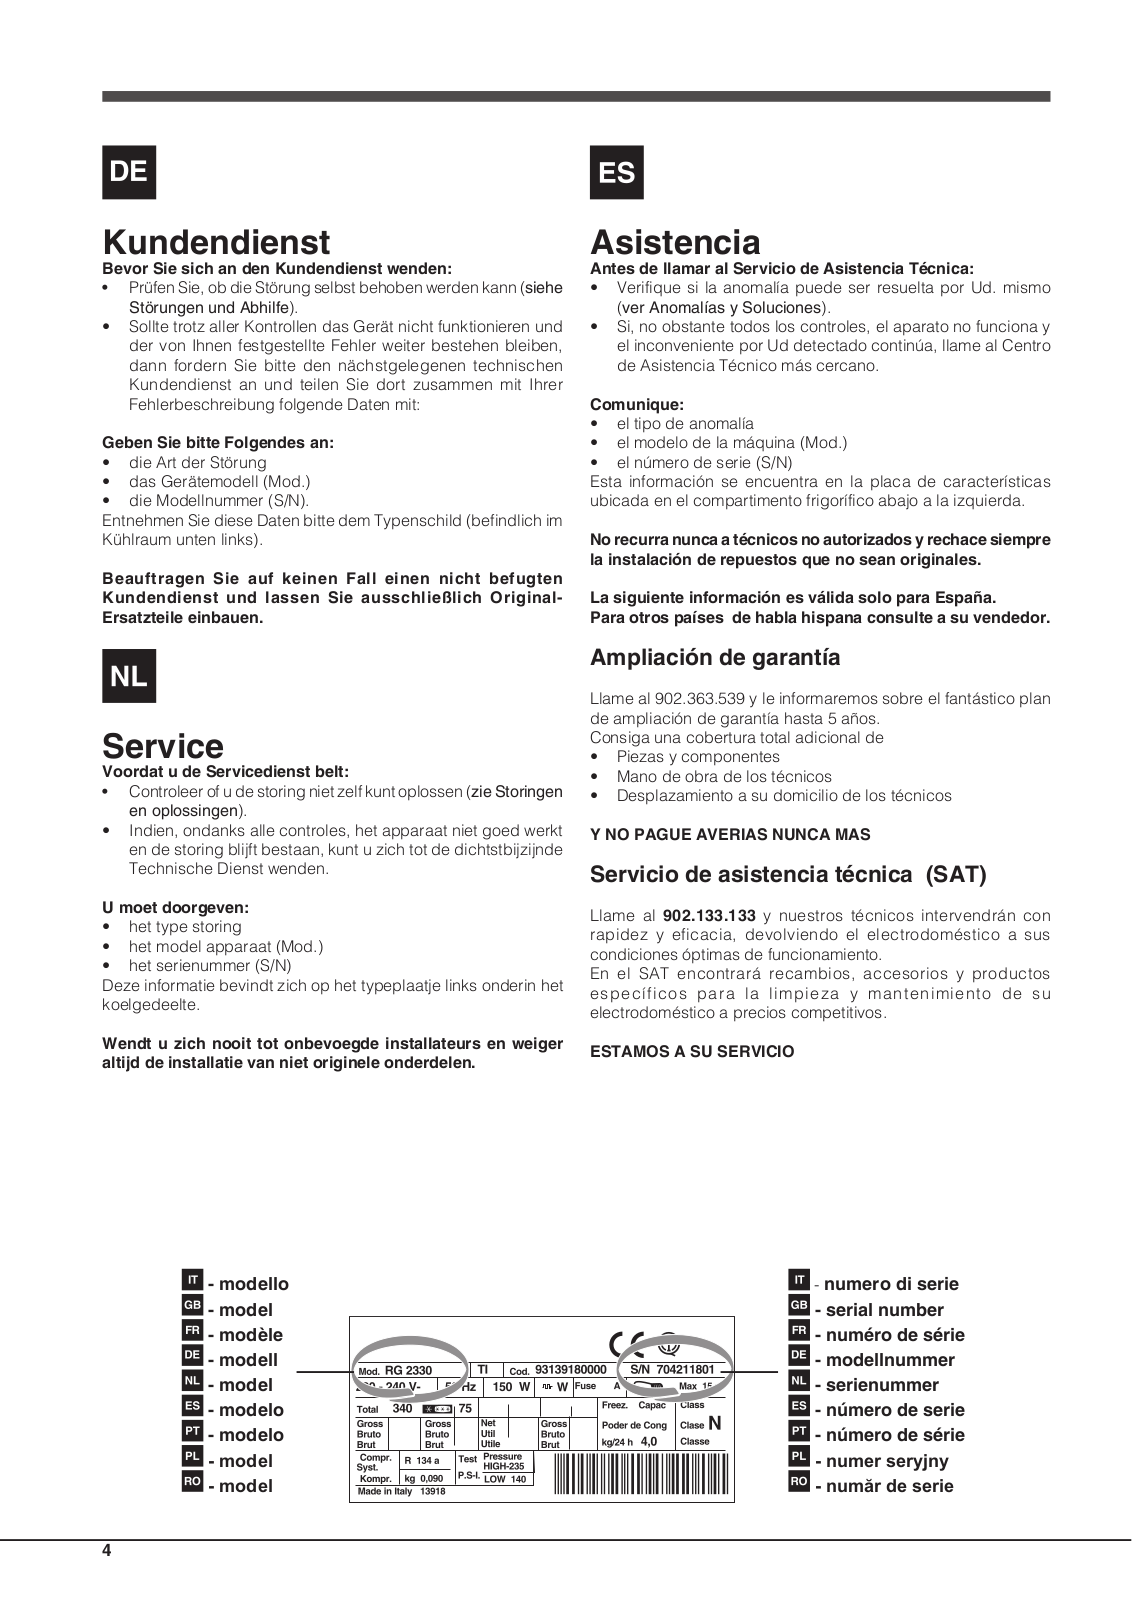
Entnehmen Sie diese Daten bitte dem Typenschild (befindlich im Kühlraum unten links).

Beauftragen Sie auf keinen Fall einen nicht befugten Kundendienst und lassen Sie ausschließlich OriginalErsatzteile einbauen.

Asistencia

Antes de llamar al Servicio de Asistencia Técnica:

Verifique si la anomalía puede ser resuelta por Ud. mismo

(ver Anomalías y Soluciones).

Si, no obstante todos los controles, el aparato no funciona y el inconveniente por Ud detectado continúa, llame al Centro de Asistencia Técnico más cercano.

Comunique:

el tipo de anomalía

el modelo de la máquina (Mod.)

el número de serie (S/N)

Esta información se encuentra en la placa de características ubicada en el compartimento frigorífico abajo a la izquierda.

No recurra nunca a técnicos no autorizados y rechace siempre la instalación de repuestos que no sean originales.

La siguiente información es válida solo para España.

Para otros países de habla hispana consulte a su vendedor.

Service

Voordat u de Servicedienst belt:

Controleer of u de storing niet zelf kunt oplossen (zie Storingen en oplossingen).

Indien, ondanks alle controles, het apparaat niet goed werkt en de storing blijft bestaan, kunt u zich tot de dichtstbijzijnde Technische Dienst wenden.

U moet doorgeven:

het type storing

het model apparaat (Mod.)

het serienummer (S/N)

Deze informatie bevindt zich op het typeplaatje links onderin het koelgedeelte.

Wendt u zich nooit tot onbevoegde installateurs en weiger altijd de installatie van niet originele onderdelen.

- modello

- model

- modèle

- modell

- model

- modelo

- modelo

- model - model

Ampliación de garantía

Llame al 902.363.539 y le informaremos sobre el fantástico plan de ampliación de garantía hasta 5 años.

Consiga una cobertura total adicional de

Piezas y componentes

Mano de obra de los técnicos

Desplazamiento a su domicilio de los técnicos

Y NO PAGUE AVERIAS NUNCA MAS

Servicio de asistencia técnica (SAT)

Llame al 902.133.133 y nuestros técnicos intervendrán con rapidez y eficacia, devolviendo el electrodoméstico a sus condiciones óptimas de funcionamiento.

En el SAT encontrará recambios, accesorios y productos específicos para la limpieza y mantenimiento de su electrodoméstico a precios competitivos.

ESTAMOS A SU SERVICIO

- numero di serie

- serial number

- numéro de série

- modellnummer

- serienummer

- número de serie

- número de série

- numer seryjny

- număr de serie

4

Assistência

Antes de contactar a Assistência técnica:

Verifique se pode resolver sozinho a anomalia (veja as Anomalias e Soluções).

Se, apesar de todos os controlos, o aparelho não funcionar e o inconveniente detectado continuar, contactar o Centro de Assistência mais próximo.

Comunique:

o tipo de anomalia

o modelo da máquina (Mod.)

o número de série (S/N)

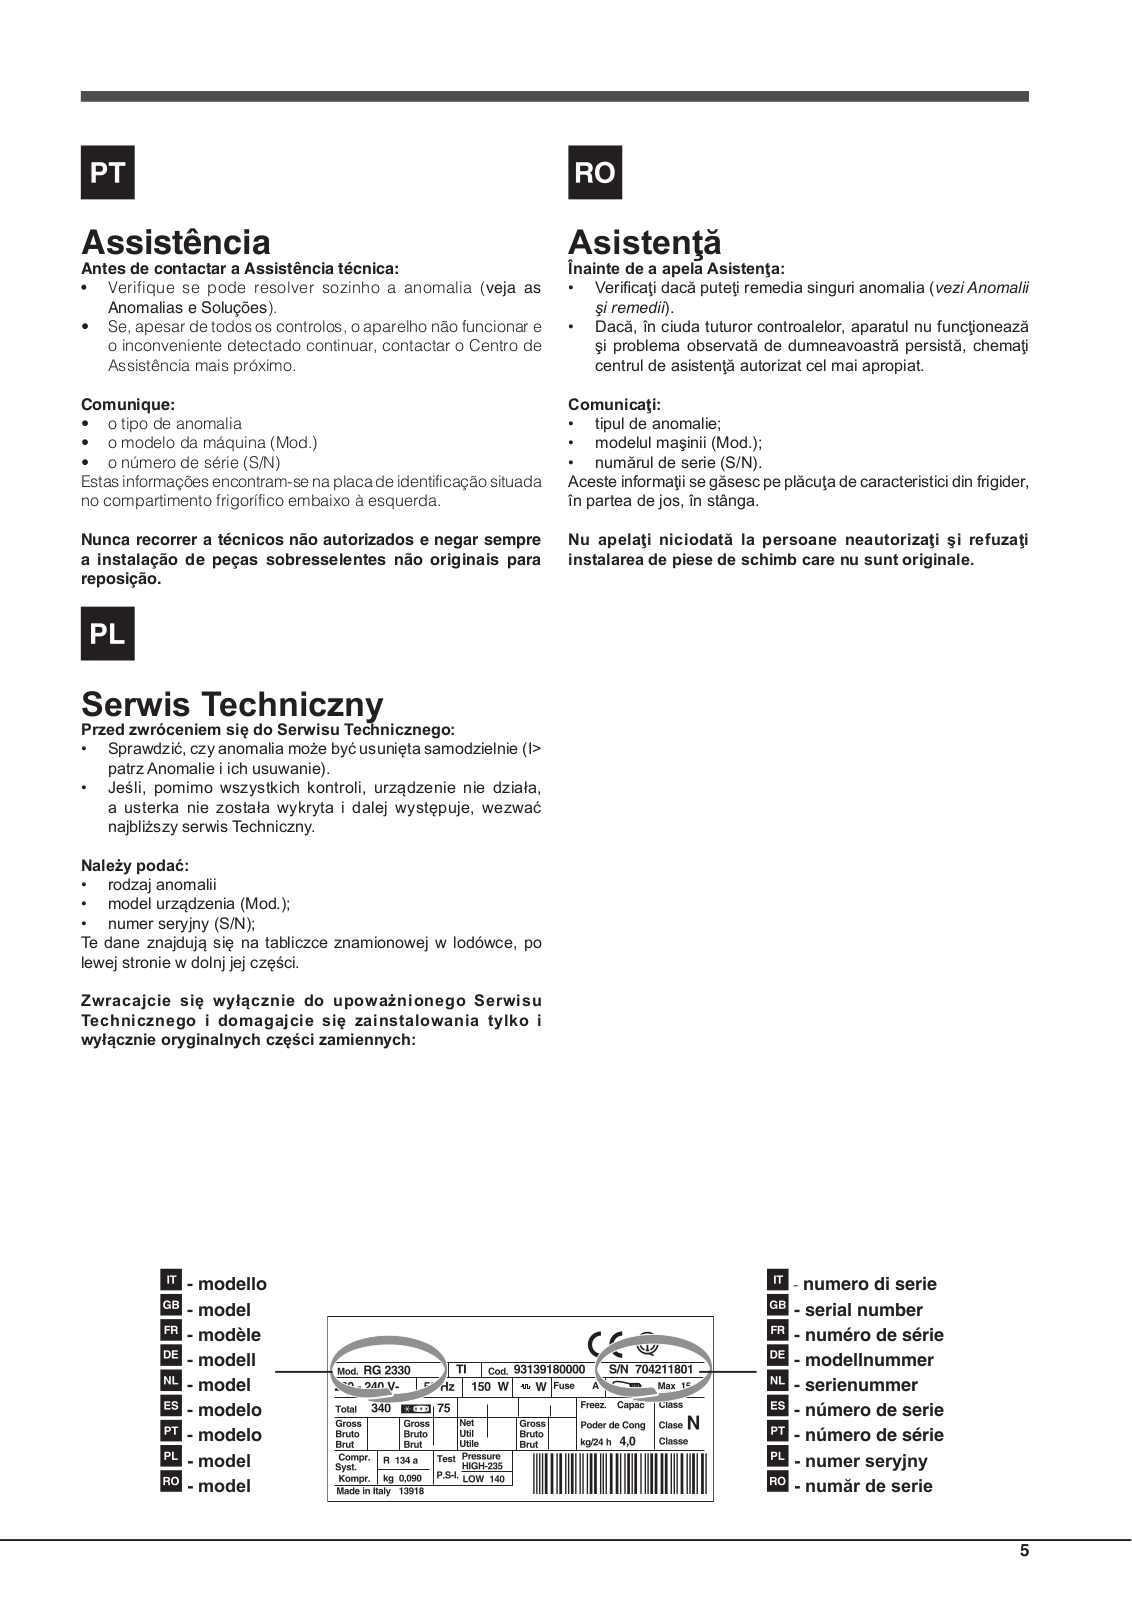
Estas informações encontram-se na placa de identificação situada no compartimento frigorífico embaixo à esquerda.

Nunca recorrer a técnicos não autorizados e negar sempre a instalação de peças sobresselentes não originais para reposição.

Asistenţă

Înainte de a apela Asistenţa:

Verificaţi dacă puteţi remedia singuri anomalia (vezi Anomalii

şi remedii).

Dacă, în ciuda tuturor controalelor, aparatul nu funcţionează şi problema observată de dumneavoastră persistă, chemaţi centrul de asistenţă autorizat cel mai apropiat.

Comunicaţi:

tipul de anomalie;

modelul maşinii (Mod.);

numărul de serie (S/N).

Aceste informaţii se găsesc pe plăcuţa de caracteristici din frigider, în partea de jos, în stânga.

Nu apelaţi niciodată la persoane neautorizaţi şi refuzaţi instalarea de piese de schimb care nu sunt originale.

Serwis Techniczny

Przed zwróceniem się do Serwisu Technicznego:

Sprawdzić, czy anomalia może być usunięta samodzielnie (I> patrz Anomalie i ich usuwanie).

Jeśli, pomimo wszystkich kontroli, urządzenie nie działa, a usterka nie została wykryta i dalej występuje, wezwać najbliższy serwis Techniczny.

Należy podać:

rodzaj anomalii

model urządzenia (Mod.);

numer seryjny (S/N);

Te dane znajdują się na tabliczce znamionowej w lodówce, po lewej stronie w dolnj jej części.

Zwracajcie się wyłącznie do upoważnionego Serwisu Technicznego i domagajcie się zainstalowania tylko i wyłącznie oryginalnych części zamiennych:


- modello


- numero di serie


- model


- serial number


- modèle


- numéro de série


- modell


- modellnummer


- model


- serienummer


- modelo


- número de serie


- modelo


- número de série


- model


- numer seryjny


- model


- număr de serie


5


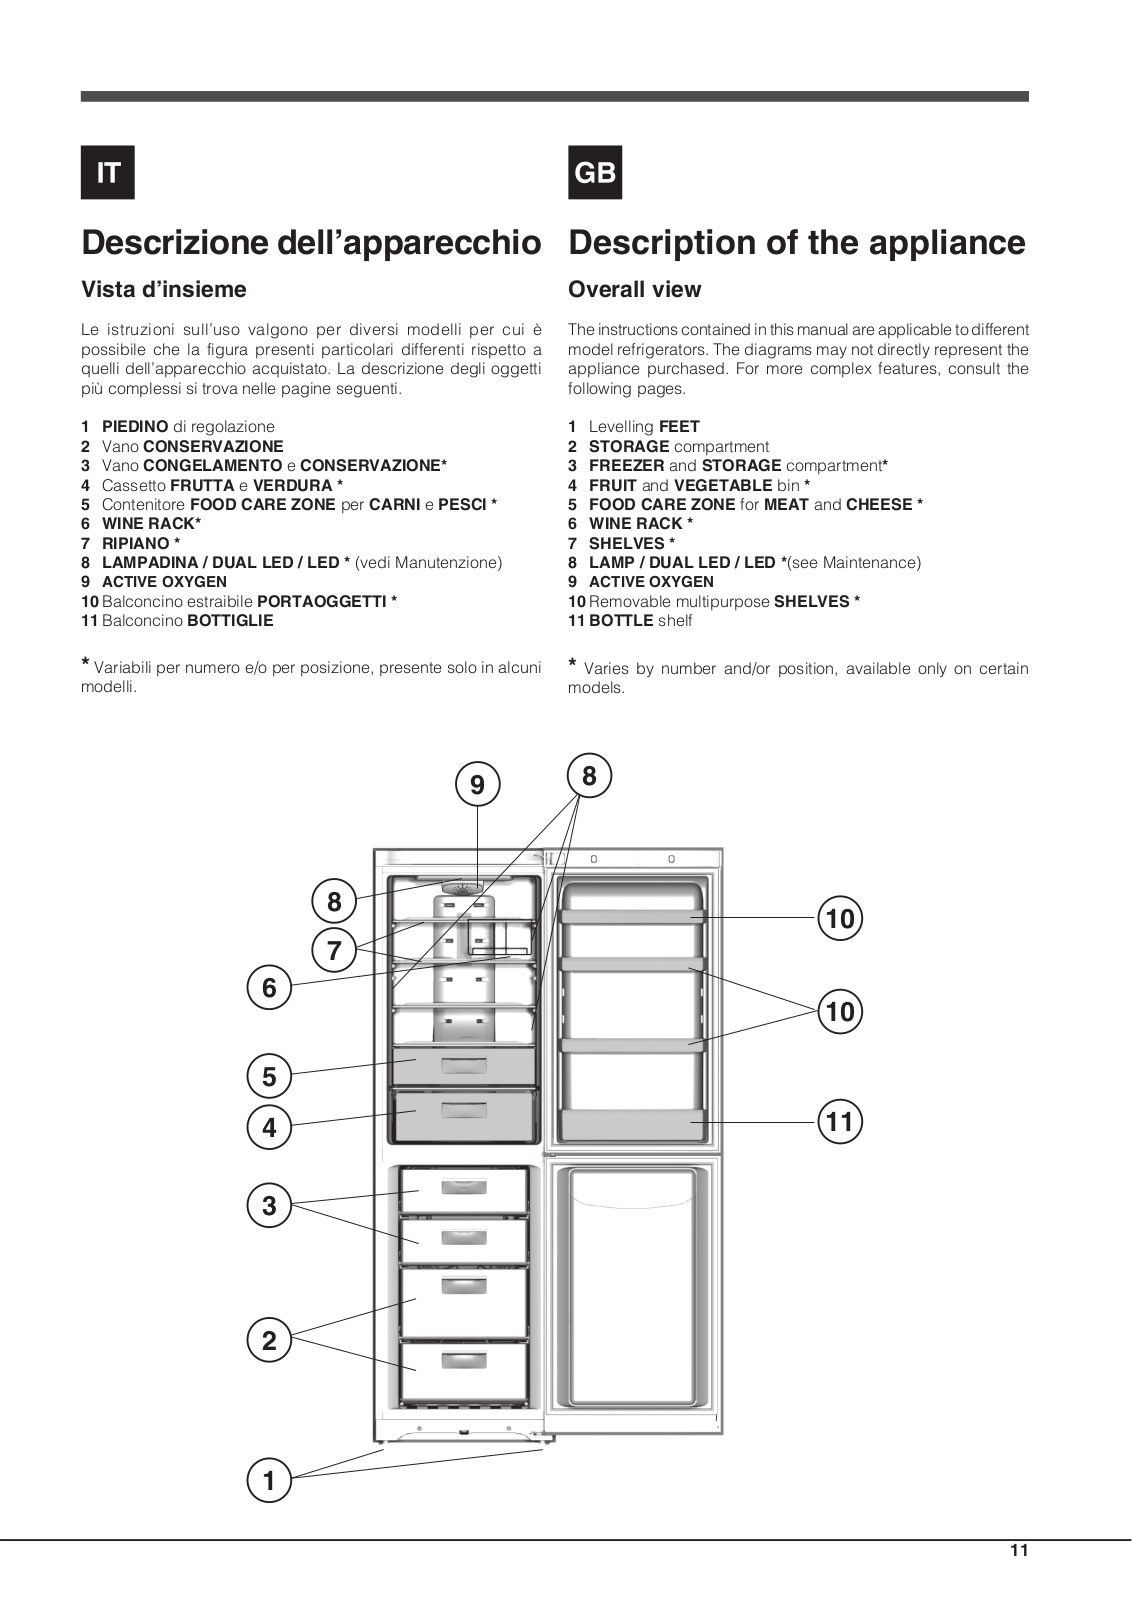
Descrizione dell’apparecchio

Description of the appliance

Pannello di controllo

Control panel

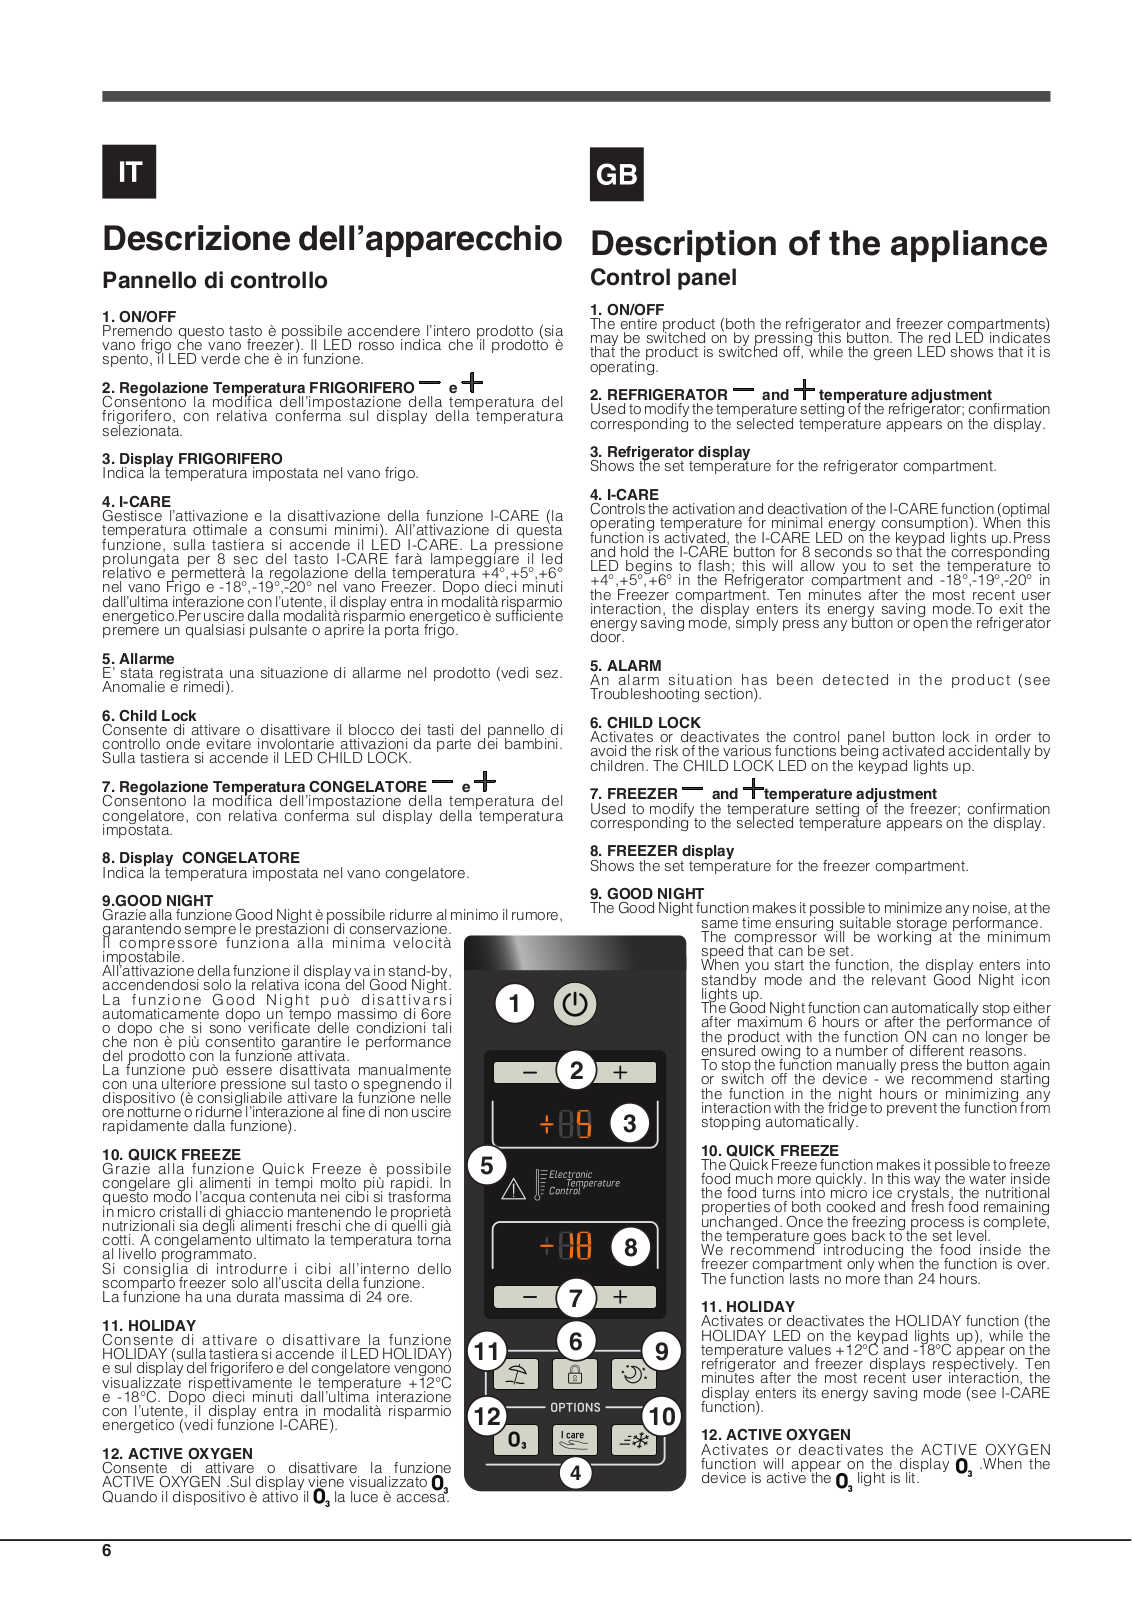
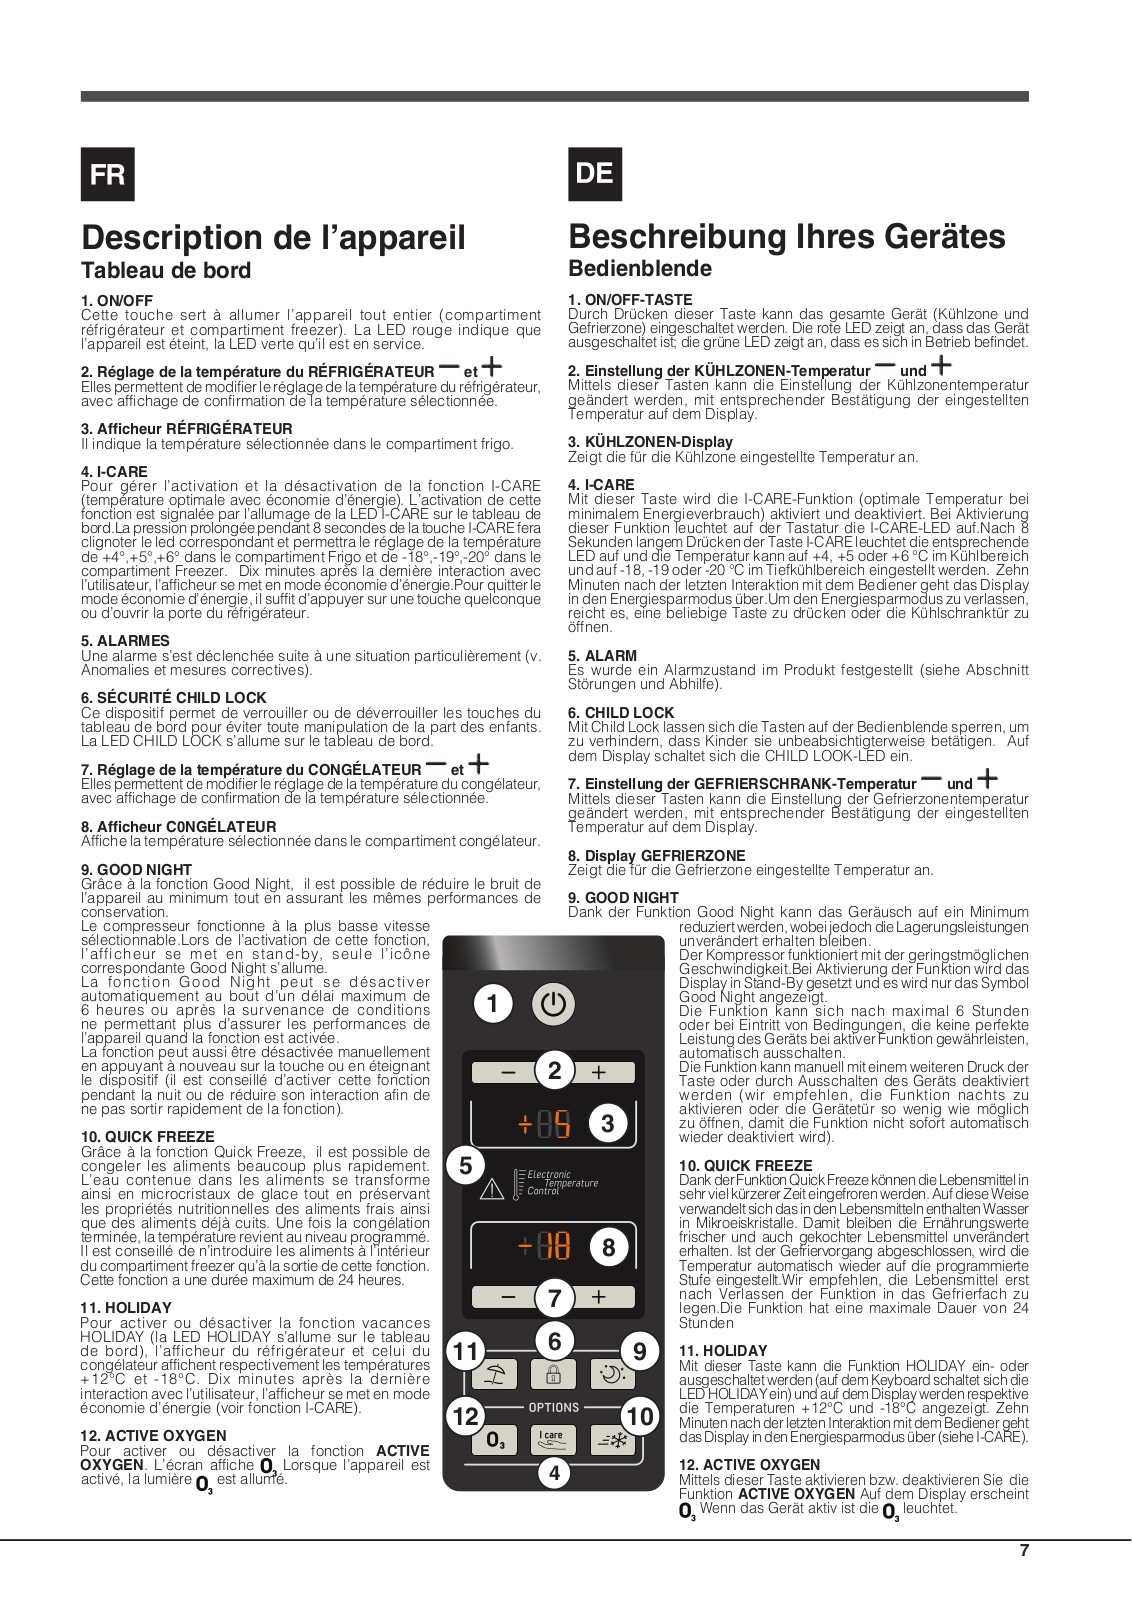
1. ON/OFF

Premendo questo tasto è possibile accendere l’intero prodotto (sia vano frigo che vano freezer). Il LED rosso indica che il prodotto è spento, il LED verde che è in funzione.

2. Regolazione Temperatura FRIGORIFERO e

Consentono la modifica dell’impostazione della temperatura del frigorifero, con relativa conferma sul display della temperatura selezionata.

3. Display FRIGORIFERO

Indica la temperatura impostata nel vano frigo.

4. I-CARE

Gestisce l’attivazione e la disattivazione della funzione I-CARE (la temperatura ottimale a consumi minimi). All’attivazione di questa funzione, sulla tastiera si accende il LED I-CARE. La pressione prolungata per 8 sec del tasto I-CARE farà lampeggiare il led relativo e permetterà la regolazione della temperatura +4°,+5°,+6° nel vano Frigo e -18°,-19°,-20° nel vano Freezer. Dopo dieci minuti dall’ultima interazione con l’utente, il display entra in modalità risparmio energetico.Per uscire dalla modalità risparmio energetico è sufficiente premere un qualsiasi pulsante o aprire la porta frigo.

5. Allarme

E’ stata registrata una situazione di allarme nel prodotto (vedi sez. Anomalie e rimedi).

6. Child Lock

Consente di attivare o disattivare il blocco dei tasti del pannello di controllo onde evitare involontarie attivazioni da parte dei bambini. Sulla tastiera si accende il LED CHILD LOCK.

7. Regolazione Temperatura CONGELATORE e

Consentono la modifica dell’impostazione della temperatura del congelatore, con relativa conferma sul display della temperatura impostata.

9.GOOD NIGHT


Grazie alla funzione Good Night è possibile ridurre al minimo il rumore,

garantendo sempre le prestazioni di conservazione.


Il compressore funziona alla minima velocità


impostabile.


All’attivazione della funzione il display va in stand-by,


accendendosi solo la relativa icona del Good Night.

1

La funzione Good Night può disattivarsi

automaticamente dopo un tempo massimo di 6ore

o dopo che si sono verificate delle condizioni tali


che non è più consentito garantire le performance


del prodotto con la funzione attivata.

2

La funzione può essere disattivata manualmente

con una ulteriore pressione sul tasto o spegnendo il


8. Display CONGELATORE

Indica la temperatura impostata nel vano congelatore.

dispositivo (è consigliabile attivare la funzione nelle ore notturne o ridurne l’interazione al fine di non uscire rapidamente dalla funzione).

10. QUICK FREEZE

Grazie alla funzione Quick Freeze è possibile congelare gli alimenti in tempi molto più rapidi. In questo modo l’acqua contenuta nei cibi si trasforma in micro cristalli di ghiaccio mantenendo le proprietà nutrizionali sia degli alimenti freschi che di quelli già cotti. A congelamento ultimato la temperatura torna al livello programmato.

Si consiglia di introdurre i cibi all’interno dello scomparto freezer solo all’uscita della funzione. La funzione ha una durata massima di 24 ore.

11. HOLIDAY

Consente di attivare o disattivare la funzione HOLIDAY (sulla tastiera si accende il LED HOLIDAY) e sul display del frigorifero e del congelatore vengono visualizzate rispettivamente le temperature +12°C e -18°C. Dopo dieci minuti dall’ultima interazione con l’utente, il display entra in modalità risparmio energetico (vedi funzione I-CARE).

12. ACTIVE OXYGEN

Consente di attivare o disattivare la funzione ACTIVE OXYGEN .Sul display viene visualizzato Quando il dispositivo è attivo il la luce è accesa.

5

7 11 6

12

4

1. ON/OFF

The entire product (both the refrigerator and freezer compartments) may be switched on by pressing this button. The red LED indicates that the product is switched off, while the green LED shows that it is operating.

2. REFRIGERATOR and temperature adjustment

Used to modify the temperature setting of the refrigerator; confirmation corresponding to the selected temperature appears on the display.

3. Refrigerator display

Shows the set temperature for the refrigerator compartment.

4. I-CARE

Controls the activation and deactivation of the I-CARE function (optimal operating temperature for minimal energy consumption). When this function is activated, the I-CARE LED on the keypad lights up.Press and hold the I-CARE button for 8 seconds so that the corresponding LED begins to flash; this will allow you to set the temperature to +4°,+5°,+6° in the Refrigerator compartment and -18°,-19°,-20° in the Freezer compartment. Ten minutes after the most recent user interaction, the display enters its energy saving mode.To exit the energy saving mode, simply press any button or open the refrigerator door.

5. ALARM

An alarm situation has been detected in the product (see Troubleshooting section).

6. CHILD LOCK

Activates or deactivates the control panel button lock in order to avoid the risk of the various functions being activated accidentally by children. The CHILD LOCK LED on the keypad lights up.

7. FREEZER and temperature adjustment

Used to modify the temperature setting of the freezer; confirmation corresponding to the selected temperature appears on the display.

8. FREEZER display

Shows the set temperature for the freezer compartment.

9. GOOD NIGHT


The Good Night function makes it possible to minimize any noise, at the


same time ensuring suitable storage performance.


The compressor will be working at the minimum


speed that can be set.


When you start the function, the display enters into


standby mode and the relevant Good Night icon


lights up.


The Good Night function can automatically stop either


after maximum 6 hours or after the performance of


the product with the function ON can no longer be


ensured owing to a number of different reasons.


To stop the function manually press the button again


or switch off the device - we recommend starting


the function in the night hours or minimizing any

3

interaction with the fridge to prevent the function from

stopping automatically.


10. QUICK FREEZE


The Quick Freeze function makes it possible to freeze


food much more quickly. In this way the water inside


the food turns into micro ice crystals, the nutritional


properties of both cooked and fresh food remaining


unchanged. Once the freezing process is complete,

8

the temperature goes back to the set level.

We recommend introducing the food inside the


freezer compartment only when the function is over.


The function lasts no more than 24 hours.


11. HOLIDAY


Activates or deactivates the HOLIDAY function (the

9

HOLIDAY LED on the keypad lights up), while the

temperature values +12°C and -18°C appear on the


refrigerator and freezer displays respectively. Ten


minutes after the most recent user interaction, the


display enters its energy saving mode (see I-CARE

10

function).


12. ACTIVE OXYGEN


Activates or deactivates the ACTIVE OXYGEN


function will appear on the display

.When the


device is active the

light is lit.


6


Description de l’appareil


Beschreibung Ihres Gerätes

Tableau de bord


Bedienblende


1. ON/OFF


1. ON/OFF-TASTE


Cette touche sert à allumer l’appareil tout entier (compartiment


Durch Drücken dieser Taste kann das gesamte Gerät (Kühlzone und

réfrigérateur et compartiment freezer). La LED rouge indique que


Gefrierzone) eingeschaltet werden. Die rote LED zeigt an, dass das Gerät

l’appareil est éteint, la LED verte qu’il est en service.


ausgeschaltet ist; die grüne LED zeigt an, dass es sich in Betrieb befindet.

2. Réglage de la température du RÉFRIGÉRATEUR

et


2. Einstellung der KÜHLZONEN-Temperatur

und


Elles permettent de modifier le réglage de la température du réfrigérateur,


Mittels dieser Tasten kann die Einstellung der Kühlzonentemperatur

avec affichage de confirmation de la température sélectionnée.


geändert werden, mit entsprechender Bestätigung der eingestellten

3. Afficheur RÉFRIGÉRATEUR


Temperatur auf dem Display.


3. KÜHLZONEN-Display


Il indique la température sélectionnée dans le compartiment frigo.


4. I-CARE


Zeigt die für die Kühlzone eingestellte Temperatur an.


4. I-CARE


Pour gérer l’activation et la désactivation de la fonction I-CARE


(température optimale avec économie d’énergie). L’activation de cette


Mit dieser Taste wird die I-CARE-Funktion (optimale Temperatur bei

fonction est signalée par l’allumage de la LED I-CARE sur le tableau de


minimalem Energieverbrauch) aktiviert und deaktiviert. Bei Aktivierung

bord.La pression prolongée pendant 8 secondes de la touche I-CARE fera


dieser Funktion leuchtet auf der Tastatur die I-CARE-LED auf.Nach 8

clignoter le led correspondant et permettra le réglage de la température


Sekunden langem Drücken der Taste I-CARE leuchtet die entsprechende

de +4°,+5°,+6° dans le compartiment Frigo et de -18°,-19°,-20° dans le


LED auf und die Temperatur kann auf +4, +5 oder +6 °C im Kühlbereich

compartiment Freezer. Dix minutes après la dernière interaction avec


und auf -18, -19 oder -20 °C im Tiefkühlbereich eingestellt werden. Zehn

l’utilisateur, l’afficheur se met en mode économie d’énergie.Pour quitter le


Minuten nach der letzten Interaktion mit dem Bediener geht das Display

mode économie d’énergie, il suffit d’appuyer sur une touche quelconque


in den Energiesparmodus über.Um den Energiesparmodus zu verlassen,

ou d’ouvrir la porte du réfrigérateur.


reicht es, eine beliebige Taste zu drücken oder die Kühlschranktür zu

5. ALARMES


öffnen.


5. ALARM


Une alarme s’est déclenchée suite à une situation particulièrement (v.


Anomalies et mesures correctives).


Es wurde ein Alarmzustand im Produkt festgestellt (siehe Abschnitt

6. SÉCURITÉ CHILD LOCK


Störungen und Abhilfe).


6. CHILD LOCK


Ce dispositif permet de verrouiller ou de déverrouiller les touches du


tableau de bord pour éviter toute manipulation de la part des enfants.


Mit Child Lock lassen sich die Tasten auf der Bedienblende sperren, um

La LED CHILD LOCK s’allume sur le tableau de bord.


zu verhindern, dass Kinder sie unbeabsichtigterweise betätigen. Auf

7. Réglage de la température du CONGÉLATEUR

et


dem Display schaltet sich die CHILD LOOK-LED ein.


Elles permettent de modifier le réglage de la température du congélateur,


7. Einstellung der GEFRIERSCHRANK-Temperatur

und

avec affichage de confirmation de la température sélectionnée.


Mittels dieser Tasten kann die Einstellung der Gefrierzonentemperatur

8. Afficheur C0NGÉLATEUR


geändert werden, mit entsprechender Bestätigung der eingestellten


Temperatur auf dem Display.


Affiche la température sélectionnée dans le compartiment congélateur.


8. Display GEFRIERZONE


9. GOOD NIGHT


Zeigt die für die Gefrierzone eingestellte Temperatur an.


Grâce à la fonction Good Night, il est possible de réduire le bruit de


l’appareil au minimum tout en assurant les mêmes performances de


9. GOOD NIGHT


conservation.


Dank der Funktion Good Night kann das Geräusch auf ein Minimum

Le compresseur fonctionne à la plus basse vitesse


reduziertwerden,wobeijedochdieLagerungsleistungen

sélectionnable.Lors de l’activation de cette fonction,


unverändert erhalten bleiben.


l’afficheur se met en stand-by, seule l’icône


Der Kompressor funktioniert mit der geringstmöglichen

correspondante Good Night s’allume.


Geschwindigkeit.Bei Aktivierung der Funktion wird das

La fonction Good Night peut se désactiver


Display in Stand-By gesetzt und es wird nur das Symbol

automatiquement au bout d’un délai maximum de

1


Good Night angezeigt.


6 heures ou après la survenance de conditions


Die Funktion kann sich nach maximal 6 Stunden

ne permettant plus d’assurer les performances de


oder bei Eintritt von Bedingungen, die keine perfekte

l’appareil quand la fonction est activée.


Leistung des Geräts bei aktiver Funktion gewährleisten,

La fonction peut aussi être désactivée manuellement


2


automatisch ausschalten.


en appuyant à nouveau sur la touche ou en éteignant


Die Funktion kann manuell mit einem weiteren Druck der

le dispositif (il est conseillé d’activer cette fonction


Taste oder durch Ausschalten des Geräts deaktiviert

pendant la nuit ou de réduire son interaction afin de


werden (wir empfehlen, die Funktion nachts zu

ne pas sortir rapidement de la fonction).


3


aktivieren oder die Gerätetür so wenig wie möglich

10. QUICK FREEZE


zu öffnen, damit die Funktion nicht sofort automatisch


wieder deaktiviert wird).


Grâce à la fonction Quick Freeze, il est possible de

5


10. QUICK FREEZE


congeler les aliments beaucoup plus rapidement.


L’eau contenue dans les aliments se transforme


DankderFunktionQuickFreezekönnendieLebensmittelin

ainsi en microcristaux de glace tout en préservant


sehrvielkürzererZeiteingefrorenwerden.AufdieseWeise

les propriétés nutritionnelles des aliments frais ainsi


verwandeltsichdasindenLebensmittelnenthaltenWasser

que des aliments déjà cuits. Une fois la congélation


in Mikroeiskristalle. Damit bleiben die Ernährungswerte

terminée, la température revient au niveau programmé.


8


frischer und auch gekochter Lebensmittel unverändert

Il est conseillé de n’introduire les aliments à l’intérieur


erhalten. Ist der Gefriervorgang abgeschlossen, wird die

du compartiment freezer qu’à la sortie de cette fonction.


Temperatur automatisch wieder auf die programmierte

Cette fonction a une durée maximum de 24 heures.


7


Stufe eingestellt.Wir empfehlen, die Lebensmittel erst

11. HOLIDAY


nach Verlassen der Funktion in das Gefrierfach zu


legen.Die Funktion hat eine maximale Dauer von 24

Pour activer ou désactiver la fonction vacances


6


Stunden


HOLIDAY (la LED HOLIDAY s’allume sur le tableau

11


9


de bord), l’afficheur du réfrigérateur et celui du


11. HOLIDAY


congélateur affichent respectivement les températures


Mit dieser Taste kann die Funktion HOLIDAY einoder

+12°C et -18°C. Dix minutes après la dernière


ausgeschaltetwerden(aufdemKeyboardschaltetsichdie

interaction avec l’utilisateur, l’afficheur se met en mode


LEDHOLIDAYein)undaufdemDisplaywerdenrespektive

économie d’énergie (voir fonction I-CARE).

12


10

die Temperaturen +12°C und -18°C angezeigt. Zehn


12. ACTIVE OXYGEN


MinutennachderletztenInteraktionmitdemBedienergeht


dasDisplayindenEnergiesparmodusüber(sieheI-CARE).


Pour activer ou désactiver la fonction ACTIVE


OXYGEN. L’écran affiche

Lorsque l’appareil est


4


12. ACTIVE OXYGEN


activé, la lumière

est allumé.


Mittels dieser Taste aktivieren bzw. deaktivieren Sie die


Funktion ACTIVE OXYGEN Auf dem Display erscheint


Wenn das Gerät aktiv ist die

leuchtet.

7


Beschrijving van het apparaat


Descripción del aparato


Bedieningspaneel


Panel de control


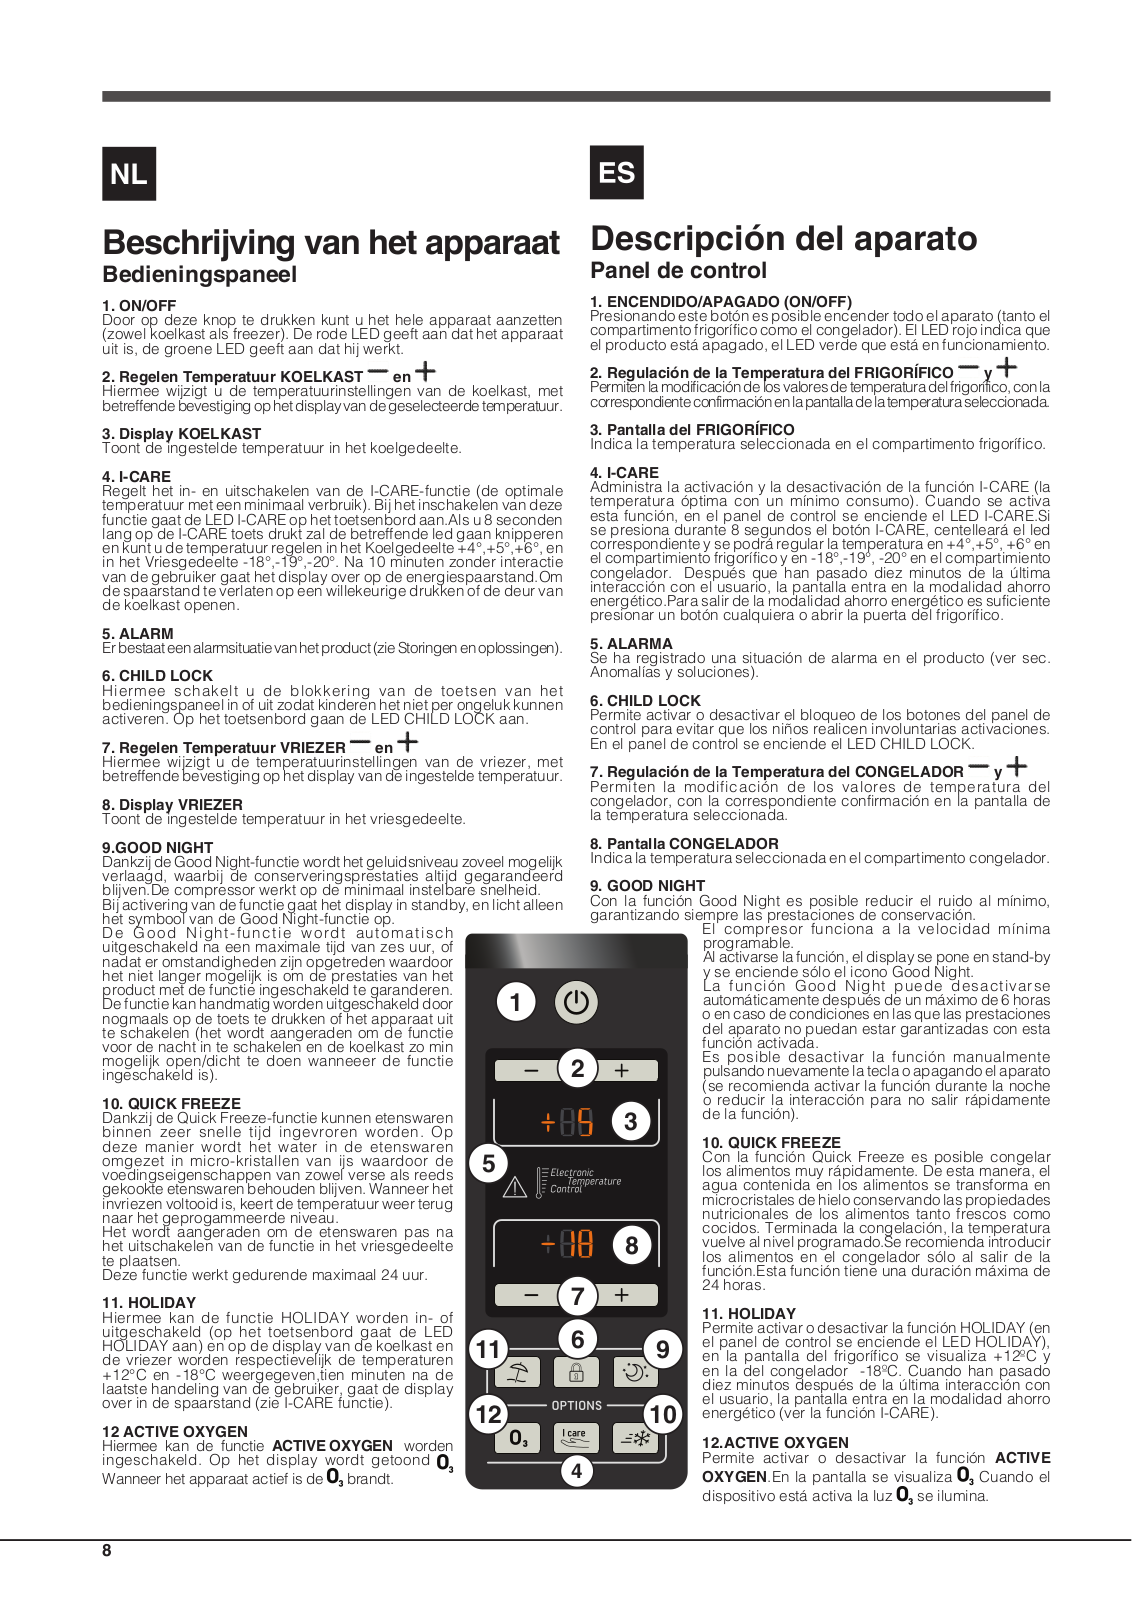
1. ON/OFF


1. ENCENDIDO/APAGADO (ON/OFF)


Door op deze knop te drukken kunt u het hele apparaat aanzetten


Presionando este botón es posible encender todo el aparato (tanto el

(zowel koelkast als freezer). De rode LED geeft aan dat het apparaat


compartimento frigorífico como el congelador). El LED rojo indica que

uit is, de groene LED geeft aan dat hij werkt.


el producto está apagado, el LED verde que está en funcionamiento.

2. Regelen Temperatuur KOELKAST

en


2. Regulación de la Temperatura del FRIGORÍFICO

y

Hiermee wijzigt u de temperatuurinstellingen van de koelkast, met


Permitenlamodificacióndelosvaloresdetemperaturadelfrigorífico,conla

betreffendebevestigingophetdisplayvandegeselecteerdetemperatuur.


correspondienteconfirmaciónenlapantalladelatemperaturaseleccionada.

3. Display KOELKAST


3. Pantalla del FRIGORÍFICO


Toont de ingestelde temperatuur in het koelgedeelte.


Indica la temperatura seleccionada en el compartimento frigorífico.

4. I-CARE


4. I-CARE


Regelt het inen uitschakelen van de I-CARE-functie (de optimale


Administra la activación y la desactivación de la función I-CARE (la

temperatuur met een minimaal verbruik). Bij het inschakelen van deze


temperatura óptima con un mínimo consumo). Cuando se activa

functie gaat de LED I-CARE op het toetsenbord aan.Als u 8 seconden


esta función, en el panel de control se enciende el LED I-CARE.Si

lang op de I-CARE toets drukt zal de betreffende led gaan knipperen


se presiona durante 8 segundos el botón I-CARE, centelleará el led

en kunt u de temperatuur regelen in het Koelgedeelte +4°,+5°,+6°, en


correspondiente y se podrá regular la temperatura en +4°,+5°, +6° en

in het Vriesgedeelte -18°,-19°,-20°. Na 10 minuten zonder interactie


el compartimiento frigorífico y en -18°,-19°, -20° en el compartimiento

van de gebruiker gaat het display over op de energiespaarstand.Om


congelador.

Después que han pasado diez minutos de la última

de spaarstand te verlaten op een willekeurige drukken of de deur van


interacción con el usuario, la pantalla entra en la modalidad ahorro

de koelkast openen.


energético.Para salir de la modalidad ahorro energético es suficiente


presionar un botón cualquiera o abrir la puerta del frigorífico.

5. ALARM


5. ALARMA


Erbestaateenalarmsituatievanhetproduct(zieStoringenenoplossingen).


Se ha registrado una situación de alarma en el producto (ver sec.

6. CHILD LOCK


Anomalías y soluciones).


Hiermee schakelt u de blokkering van de toetsen van het


6. CHILD LOCK


bedieningspaneel in of uit zodat kinderen het niet per ongeluk kunnen


activeren. Op het toetsenbord gaan de LED CHILD LOCK aan.


Permite activar o desactivar el bloqueo de los botones del panel de


control para evitar que los niños realicen involuntarias activaciones.

7. Regelen Temperatuur VRIEZER

en


En el panel de control se enciende el LED CHILD LOCK.


Hiermee wijzigt u de temperatuurinstellingen van de vriezer, met


7. Regulación de la Temperatura del CONGELADOR

y

betreffende bevestiging op het display van de ingestelde temperatuur.


8. Display VRIEZER


Permiten la modificación de los valores de temperatura del


congelador, con la correspondiente confirmación en la pantalla de

Toont de ingestelde temperatuur in het vriesgedeelte.


la temperatura seleccionada.


9.GOOD NIGHT


8. Pantalla CONGELADOR


Dankzij de Good Night-functie wordt het geluidsniveau zoveel mogelijk


Indica la temperatura seleccionada en el compartimento congelador.

verlaagd, waarbij de conserveringsprestaties altijd gegarandeerd


9. GOOD NIGHT


blijven.De compressor werkt op de minimaal instelbare snelheid.


Bij activering van de functie gaat het display in standby, en licht alleen


Con la función Good Night es posible reducir el ruido al mínimo,

het symbool van de Good Night-functie op.


garantizando siempre las prestaciones de conservación.


De Good Night-functie wordt automatisch


El compresor funciona a la velocidad mínima

uitgeschakeld na een maximale tijd van zes uur, of


programable.


nadat er omstandigheden zijn opgetreden waardoor


Al activarse la función, el display se pone en stand-by

het niet langer mogelijk is om de prestaties van het


y se enciende sólo el icono Good Night.


product met de functie ingeschakeld te garanderen.

1


La función Good Night puede desactivarse

De functie kan handmatig worden uitgeschakeld door


automáticamente después de un máximo de 6 horas

nogmaals op de toets te drukken of het apparaat uit


o en caso de condiciones en las que las prestaciones

te schakelen (het wordt aangeraden om de functie


del aparato no puedan estar garantizadas con esta

voor de nacht in te schakelen en de koelkast zo min


función activada.


mogelijk open/dicht te doen wanneeer de functie


2


Es posible desactivar la función manualmente

ingeschakeld is).


pulsando nuevamente la tecla o apagando el aparato


(se recomienda activar la función durante la noche

10. QUICK FREEZE


o reducir la interacción para no salir rápidamente

Dankzij de Quick Freeze-functie kunnen etenswaren


3


de la función).


binnen zeer snelle tijd ingevroren worden. Op


10. QUICK FREEZE


deze manier wordt het water in de etenswaren


omgezet in micro-kristallen van ijs waardoor de

5


Con la función Quick Freeze es posible congelar

voedingseigenschappen van zowel verse als reeds


los alimentos muy rápidamente. De esta manera, el

gekookte etenswaren behouden blijven. Wanneer het


agua contenida en los alimentos se transforma en

invriezen voltooid is, keert de temperatuur weer terug


microcristales de hielo conservando las propiedades

naar het geprogammeerde niveau.


nutricionales de los alimentos tanto frescos como

Het wordt aangeraden om de etenswaren pas na


8


cocidos. Terminada la congelación, la temperatura

het uitschakelen van de functie in het vriesgedeelte


vuelve al nivel programado.Se recomienda introducir


los alimentos en el congelador sólo al salir de la

te plaatsen.


Deze functie werkt gedurende maximaal 24 uur.


función.Esta función tiene una duración máxima de


7


24 horas.


11. HOLIDAY


11. HOLIDAY


Hiermee kan de functie HOLIDAY worden inof


uitgeschakeld (op het toetsenbord gaat de LED


6


Permite activar o desactivar la función HOLIDAY (en

HOLIDAY aan) en op de display van de koelkast en

11

9

el panel de control se enciende el LED HOLIDAY),

de vriezer worden respectievelijk de temperaturen


en la pantalla del frigorífico se visualiza +12ºC y

+12°C en -18°C weergegeven,tien minuten na de


en la del congelador -18ºC. Cuando han pasado

laatste handeling van de gebruiker, gaat de display


diez minutos después de la última interacción con

over in de spaarstand (zie I-CARE functie).


12


10

el usuario, la pantalla entra en la modalidad ahorro


12 ACTIVE OXYGEN


energético (ver la función I-CARE).


worden


12.ACTIVE OXYGEN


Hiermee kan de functie ACTIVE OXYGEN


ingeschakeld. Op het display wordt getoond


4


Permite activar o desactivar la función ACTIVE

Wanneer het apparaat actief is de

brandt.


OXYGEN.En la pantalla se visualiza

Cuando el

dispositivo está activa la luz se ilumina.

8

Descrição do aparelho

Painel de comandos

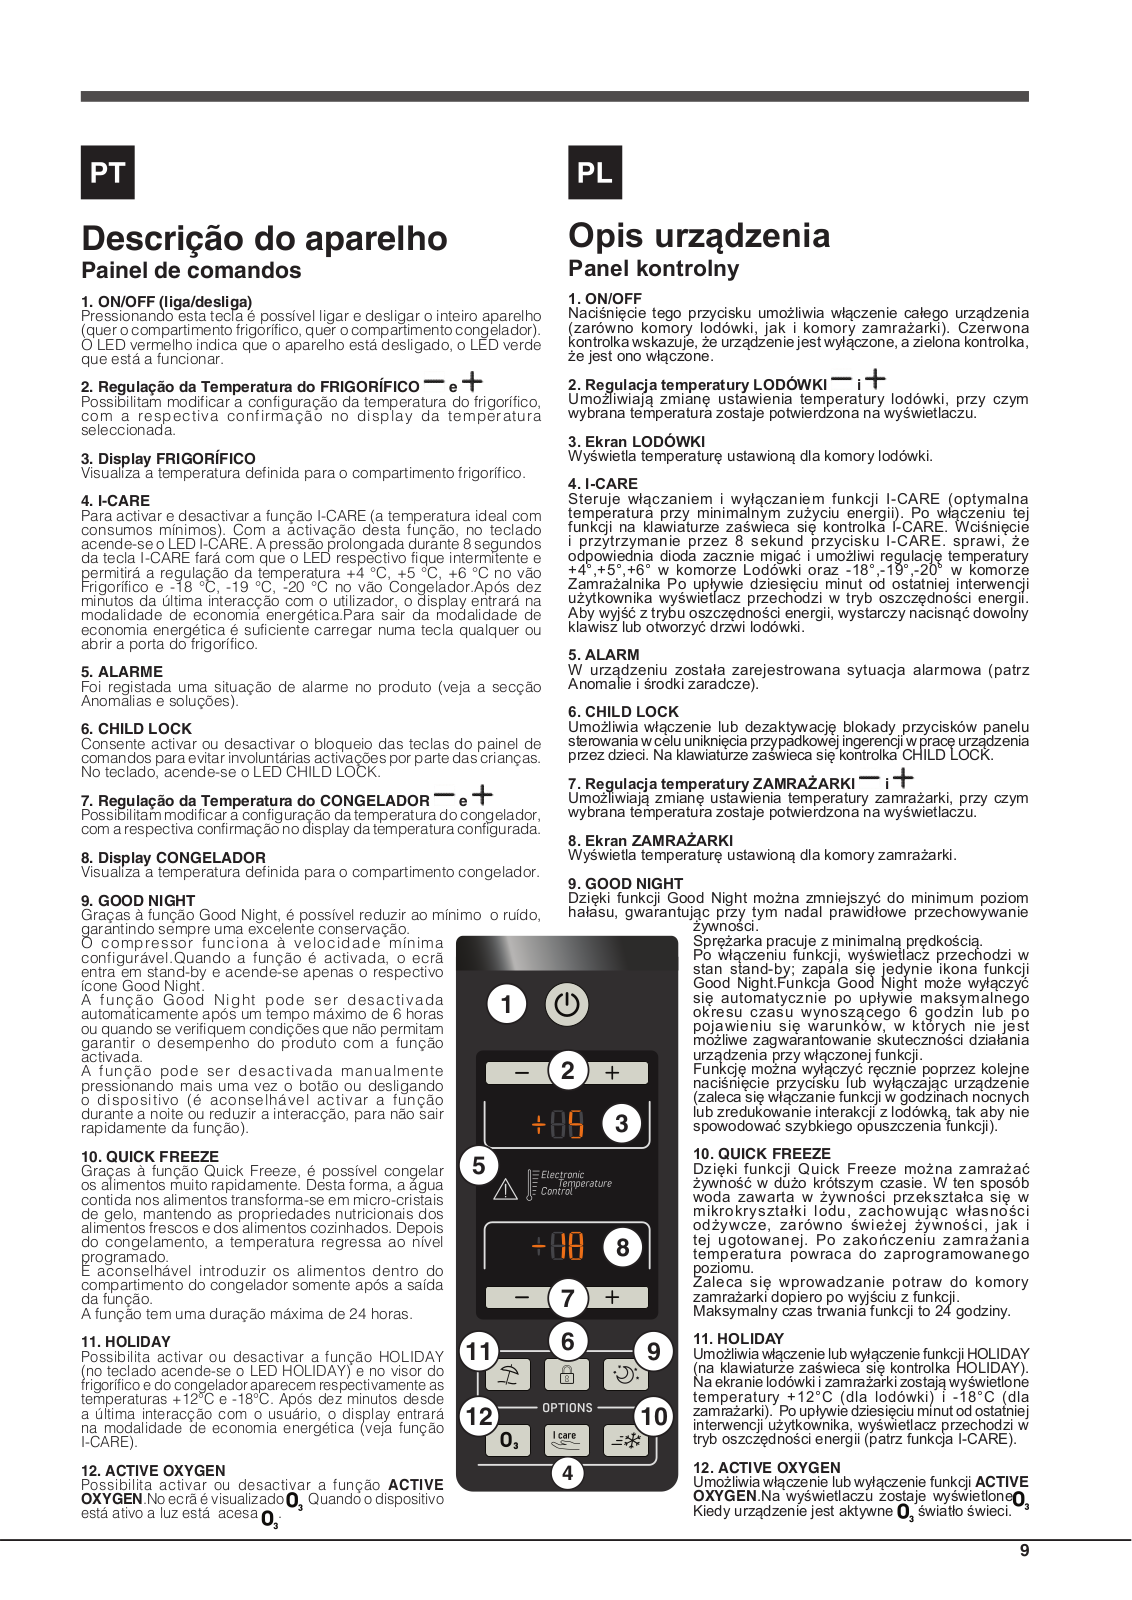
1. ON/OFF (liga/desliga)

Pressionando esta tecla é possível ligar e desligar o inteiro aparelho (quer o compartimento frigorífico, quer o compartimento congelador). O LED vermelho indica que o aparelho está desligado, o LED verde que está a funcionar.

2. Regulação da Temperatura do FRIGORÍFICO e

Possibilitam modificar a configuração da temperatura do frigorífico, com a respectiva confirmação no display da temperatura seleccionada.

3. Display FRIGORÍFICO

Visualiza a temperatura definida para o compartimento frigorífico.

4. I-CARE

Para activar e desactivar a função I-CARE (a temperatura ideal com consumos mínimos). Com a activação desta função, no teclado acende-se o LED I-CARE. A pressão prolongada durante 8 segundos da tecla I-CARE fará com que o LED respectivo fique intermitente e permitirá a regulação da temperatura +4 °C, +5 °C, +6 °C no vão Frigorífico e -18 °C, -19 °C, -20 °C no vão Congelador.Após dez minutos da última interacção com o utilizador, o display entrará na modalidade de economia energética.Para sair da modalidade de economia energética é suficiente carregar numa tecla qualquer ou abrir a porta do frigorífico.

5. ALARME

Foi registada uma situação de alarme no produto (veja a secção Anomalias e soluções).

6. CHILD LOCK

Consente activar ou desactivar o bloqueio das teclas do painel de comandos para evitar involuntárias activações por parte das crianças. No teclado, acende-se o LED CHILD LOCK.

7. Regulação da Temperatura do CONGELADOR e

Possibilitam modificar a configuração da temperatura do congelador, com a respectiva confirmação no display da temperatura configurada.

8. Display CONGELADOR

Visualiza a temperatura definida para o compartimento congelador.

9. GOOD NIGHT

Graças à função Good Night, é possível reduzir ao mínimo o ruído, garantindo sempre uma excelente conservação.

O compressor funciona à velocidade mínima configurável.Quando a função é activada, o ecrã entra em stand-by e acende-se apenas o respectivo ícone Good Night.

A função Good Night pode ser desactivada 1 automaticamente após um tempo máximo de 6 horas

ou quando se verifiquem condições que não permitam garantir o desempenho do produto com a função activada.

A função pode ser desactivada manualmente pressionando mais uma vez o botão ou desligando o dispositivo (é aconselhável activar a função durante a noite ou reduzir a interacção, para não sair rapidamente da função).

Opis urządzenia

Panel kontrolny

1. ON/OFF

Naciśnięcie tego przycisku umożliwia włączenie całego urządzenia (zarówno komory lodówki, jak i komory zamrażarki). Czerwona kontrolka wskazuje, że urządzenie jest wyłączone, a zielona kontrolka, że jest ono włączone.

2. Regulacja temperatury LODÓWKI i

Umożliwiają zmianę ustawienia temperatury lodówki, przy czym wybrana temperatura zostaje potwierdzona na wyświetlaczu.

3. Ekran LODÓWKI

Wyświetla temperaturę ustawioną dla komory lodówki.

4. I-CARE

Steruje włączaniem i wyłączaniem funkcji I-CARE (optymalna temperatura przy minimalnym zużyciu energii). Po włączeniu tej funkcji na klawiaturze zaświeca się kontrolka I-CARE. Wciśnięcie i przytrzymanie przez 8 sekund przycisku I-CARE. sprawi, że odpowiednia dioda zacznie migać i umożliwi regulację temperatury

+4°,+5°,+6° w komorze Lodówki oraz -18°,-19°,-20° w komorze

Zamrażalnika Po upływie dziesięciu minut od ostatniej interwencji użytkownika wyświetlacz przechodzi w tryb oszczędności energii.

Aby wyjść z trybu oszczędności energii, wystarczy nacisnąć dowolny klawisz lub otworzyć drzwi lodówki.

5. ALARM

W urządzeniu została zarejestrowana sytuacja alarmowa (patrz Anomalie i środki zaradcze).

6. CHILD LOCK

Umożliwia włączenie lub dezaktywację blokady przycisków panelu sterowaniawceluuniknięciaprzypadkowejingerencjiwpracęurządzenia przez dzieci. Na klawiaturze zaświeca się kontrolka CHILD LOCK.

7. Regulacja temperatury ZAMRAŻARKI i

Umożliwiają zmianę ustawienia temperatury zamrażarki, przy czym wybrana temperatura zostaje potwierdzona na wyświetlaczu.

8. Ekran ZAMRAŻARKI

Wyświetla temperaturę ustawioną dla komory zamrażarki.

9. GOOD NIGHT


Dzięki funkcji Good Night można zmniejszyć do minimum poziom

hałasu, gwarantując przy tym nadal prawidłowe przechowywanie


żywności.


Sprężarka pracuje z minimalną prędkością.


Po włączeniu funkcji, wyświetlacz przechodzi w


stan stand-by; zapala się jedynie ikona funkcji


Good Night.Funkcja Good Night może wyłączyć


się automatycznie po upływie maksymalnego


okresu czasu wynoszącego 6 godzin lub po


pojawieniu się warunków, w których nie jest


możliwe zagwarantowanie skuteczności działania

2

urządzenia przy włączonej funkcji.

Funkcję można wyłączyć ręcznie poprzez kolejne


naciśnięcie przycisku lub wyłączając urządzenie


(zaleca się włączanie funkcji w godzinach nocnych

3

lub zredukowanie interakcji z lodówką, tak aby nie

spowodować szybkiego opuszczenia funkcji).

10. QUICK FREEZE

Graças à função Quick Freeze, é possível congelar os alimentos muito rapidamente. Desta forma, a água contida nos alimentos transforma-se em micro-cristais de gelo, mantendo as propriedades nutricionais dos alimentos frescos e dos alimentos cozinhados. Depois do congelamento, a temperatura regressa ao nível programado.

É aconselhável introduzir os alimentos dentro do compartimento do congelador somente após a saída da função.

A função tem uma duração máxima de 24 horas.

11. HOLIDAY

Possibilita activar ou desactivar a função HOLIDAY (no teclado acende-se o LED HOLIDAY) e no visor do frigorífico e do congelador aparecem respectivamente as temperaturas +12°C e -18°C. Após dez minutos desde a última interacção com o usuário, o display entrará na modalidade de economia energética (veja função I-CARE).

12. ACTIVE OXYGEN

Possibilita activar ou desactivar a função ACTIVE OXYGEN.No ecrã é visualizado Quando o dispositivo está ativo a luz está acesa .

5

7

116

12

4

10. QUICK FREEZE

Dzięki funkcji Quick Freeze można zamrażać żywność w dużo krótszym czasie. W ten sposób woda zawarta w żywności przekształca się w mikrokryształki lodu, zachowując własności odżywcze, zarówno świeżej żywności, jak i

8 tej ugotowanej. Po zakończeniu zamrażania temperatura powraca do zaprogramowanego poziomu.

Zaleca się wprowadzanie potraw do komory zamrażarki dopiero po wyjściu z funkcji.

Maksymalny czas trwania funkcji to 24 godziny.

11. HOLIDAY

9 UmożliwiawłączenielubwyłączeniefunkcjiHOLIDAY

(na klawiaturze zaświeca się kontrolka HOLIDAY).

Na ekranie lodówki i zamrażarki zostają wyświetlone temperatury +12°C (dla lodówki) i -18°C (dla 10 zamrażarki). Po upływie dziesięciu minut od ostatniej interwencji użytkownika, wyświetlacz przechodzi w

tryb oszczędności energii (patrz funkcja I-CARE).

12. ACTIVE OXYGEN

Umożliwia włączenie lub wyłączenie funkcjiACTIVE OXYGEN.Na wyświetlaczu zostaje wyświetlone Kiedy urządzenie jest aktywne światło świeci.

9

Descriere aparat

Panoul de control

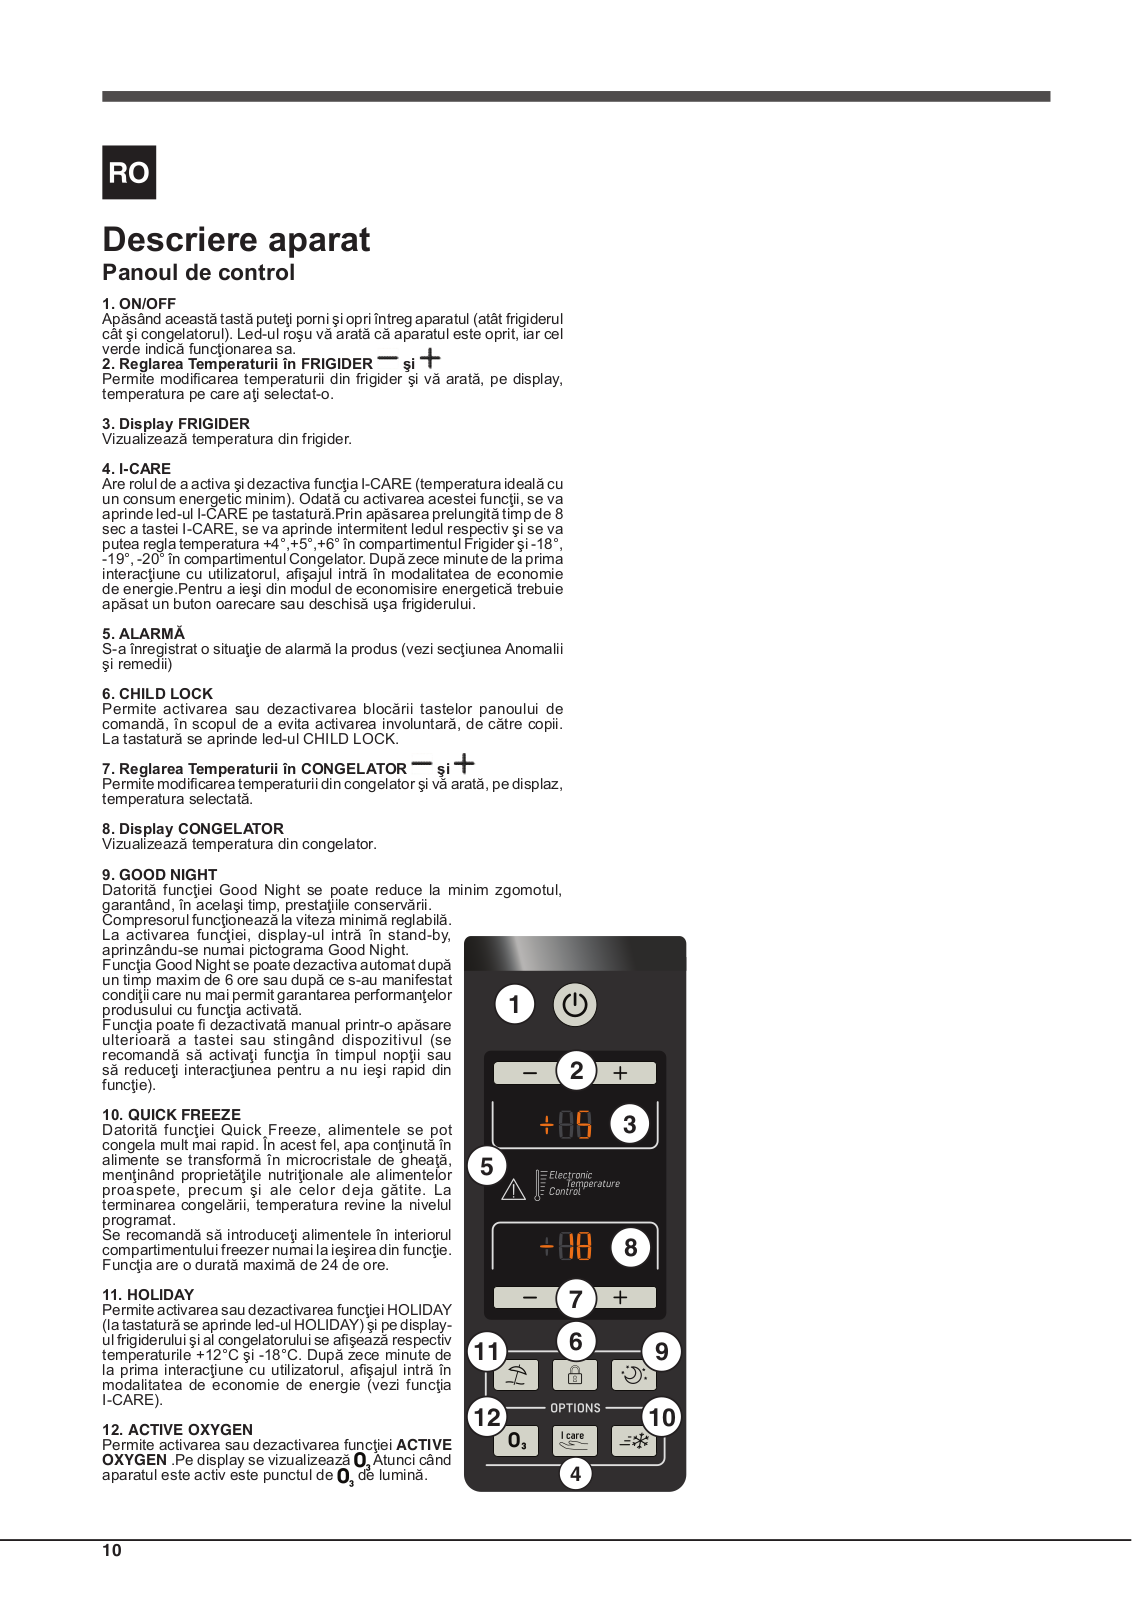
1. ON/OFF

Apăsând această tastă puteţi porni şi opri întreg aparatul (atât frigiderul cât şi congelatorul). Led-ul roşu vă arată că aparatul este oprit, iar cel verde indică funcţionarea sa.

2. Reglarea Temperaturii în FRIGIDER şi

Permite modificarea temperaturii din frigider şi vă arată, pe display, temperatura pe care aţi selectat-o.

3. Display FRIGIDER

Vizualizează temperatura din frigider.

4. I-CARE

Are rolul de a activa şi dezactiva funcţia I-CARE (temperatura ideală cu un consum energetic minim). Odată cu activarea acestei funcţii, se va aprinde led-ul I-CARE pe tastatură.Prin apăsarea prelungită timp de 8 sec a tastei I-CARE, se va aprinde intermitent ledul respectiv şi se va putea regla temperatura +4°,+5°,+6° în compartimentul Frigider şi -18°, -19°, -20° în compartimentul Congelator. După zece minute de la prima interacţiune cu utilizatorul, afişajul intră în modalitatea de economie de energie.Pentru a ieşi din modul de economisire energetică trebuie apăsat un buton oarecare sau deschisă uşa frigiderului.

5. ALARMĂ

S-a înregistrat o situaţie de alarmă la produs (vezi secţiunea Anomalii şi remedii)

6. CHILD LOCK

Permite activarea sau dezactivarea blocării tastelor panoului de comandă, în scopul de a evita activarea involuntară, de către copii. La tastatură se aprinde led-ul CHILD LOCK.

7. Reglarea Temperaturii în CONGELATOR şi

Permite modificarea temperaturii din congelator şi vă arată, pe displaz, temperatura selectată.

8. Display CONGELATOR

Vizualizează temperatura din congelator.

9. GOOD NIGHT


Datorită funcţiei Good Night se poate reduce la minim zgomotul,

garantând, în acelaşi timp, prestaţiile conservării.


Compresorul funcţionează la viteza minimă reglabilă.


La activarea funcţiei, display-ul intră în stand-by,


aprinzându-se numai pictograma Good Night.


Funcţia Good Night se poate dezactiva automat după


un timp maxim de 6 ore sau după ce s-au manifestat


condiţii care nu mai permit garantarea performanţelor

1

produsului cu funcţia activată.

Funcţia poate fi dezactivată manual printr-o apăsare


ulterioară a tastei sau stingând dispozitivul (se


recomandă să activaţi funcţia în timpul nopţii sau

2

să reduceţi interacţiunea pentru a nu ieşi rapid din

funcţie).


10. QUICK FREEZE

Datorită funcţiei Quick Freeze, alimentele se pot congela mult mai rapid. În acest fel, apa conţinută în alimente se transformă în microcristale de gheaţă, menţinând proprietăţile nutriţionale ale alimentelor proaspete, precum şi ale celor deja gătite. La terminarea congelării, temperatura revine la nivelul programat.

Se recomandă să introduceţi alimentele în interiorul compartimentului freezer numai la ieşirea din funcţie. Funcţia are o durată maximă de 24 de ore.

11. HOLIDAY

Permite activarea sau dezactivarea funcţiei HOLIDAY

(la tastatură se aprinde led-ul HOLIDAY) şi pe displayul frigiderului şi al congelatorului se afişează respectiv temperaturile +12°C şi -18°C. După zece minute de la prima interacţiune cu utilizatorul, afişajul intră în modalitatea de economie de energie (vezi funcţia

I-CARE).

12. ACTIVE OXYGEN

Permite activarea sau dezactivarea funcţiei ACTIVE OXYGEN .Pe display se vizualizează Atunci când aparatul este activ este punctul de de lumină.

3

5

8

7 11 6 9

12 10

4

10

Descrizione dell’apparecchio

Vista d’insieme

Le istruzioni sull’uso valgono per diversi modelli per cui è possibile che la figura presenti particolari differenti rispetto a quelli dell’apparecchio acquistato. La descrizione degli oggetti più complessi si trova nelle pagine seguenti.

1PIEDINO di regolazione

2Vano CONSERVAZIONE

3Vano CONGELAMENTO e CONSERVAZIONE*

4Cassetto FRUTTA e VERDURA *

5Contenitore FOOD CARE ZONE per CARNI e PESCI *

6WINE RACK*

7RIPIANO *

8LAMPADINA / DUAL LED / LED * (vedi Manutenzione)

9ACTIVE OXYGEN

10Balconcino estraibile PORTAOGGETTI *

11Balconcino BOTTIGLIE

*Variabili per numero e/o per posizione, presente solo in alcuni modelli.

Description of the appliance

Overall view

The instructions contained in this manual are applicable to different model refrigerators. The diagrams may not directly represent the appliance purchased. For more complex features, consult the following pages.

1Levelling FEET

2STORAGE compartment

3FREEZER and STORAGE compartment*

4FRUIT and VEGETABLE bin *

5FOOD CARE ZONE for MEAT and CHEESE *

6WINE RACK *

7SHELVES *

8LAMP / DUAL LED / LED *(see Maintenance)

9ACTIVE OXYGEN

10Removable multipurpose SHELVES *

11BOTTLE shelf

*Varies by number and/or position, available only on certain models.

9 8

8

7

6

5

4

3

2

1

10

10

11

11

Hotpoint EBGH 20323 F O3, EBGH 18323 F O3 User Manual

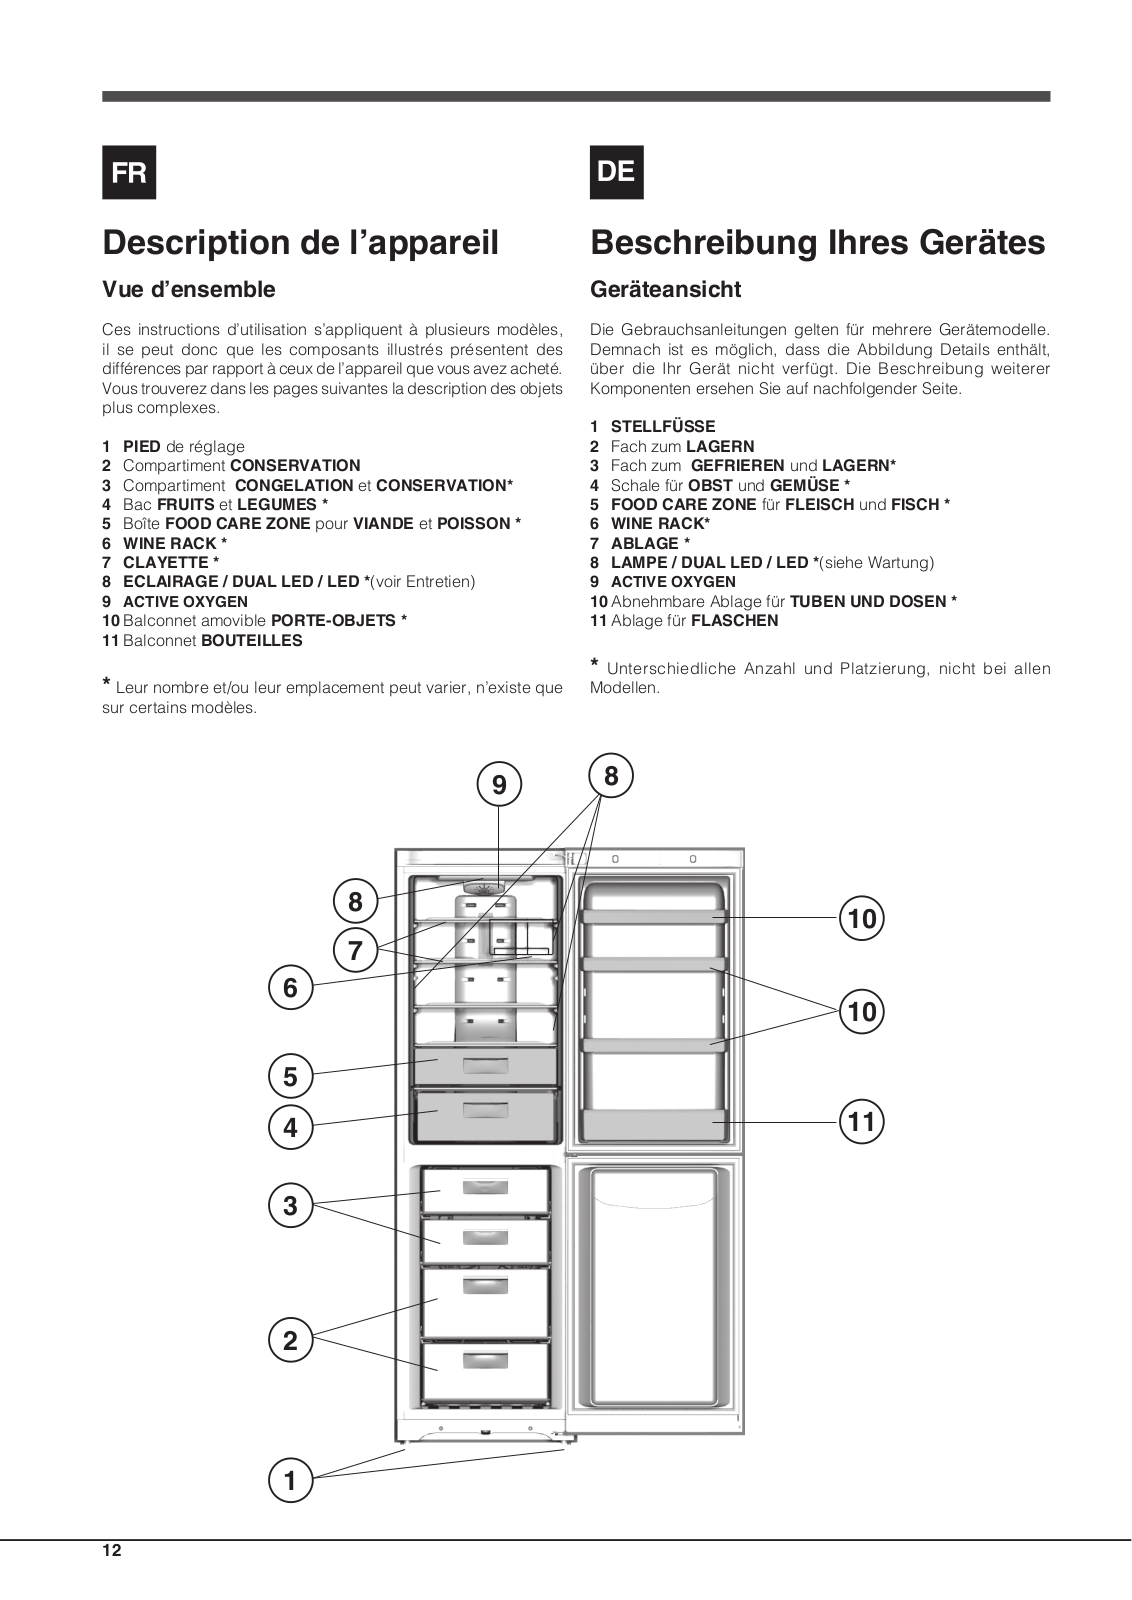
Description de l’appareil

Vue d’ensemble

Ces instructions d’utilisation s’appliquent à plusieurs modèles, il se peut donc que les composants illustrés présentent des différences par rapport à ceux de l’appareil que vous avez acheté. Vous trouverez dans les pages suivantes la description des objets plus complexes.

1PIED de réglage

2Compartiment CONSERVATION

3Compartiment CONGELATION et CONSERVATION*

4Bac FRUITS et LEGUMES *

5Boîte FOOD CARE ZONE pour VIANDE et POISSON *

6WINE RACK *

7CLAYETTE *

8ECLAIRAGE / DUAL LED / LED *(voir Entretien)

9ACTIVE OXYGEN

10Balconnet amovible PORTE-OBJETS *

11Balconnet BOUTEILLES

* Leur nombre et/ou leur emplacement peut varier, n’existe que sur certains modèles.

Beschreibung Ihres Gerätes

Geräteansicht

Die Gebrauchsanleitungen gelten für mehrere Gerätemodelle. Demnach ist es möglich, dass die Abbildung Details enthält, über die Ihr Gerät nicht verfügt. Die Beschreibung weiterer Komponenten ersehen Sie auf nachfolgender Seite.

1STELLFÜSSE

2Fach zum LAGERN

3Fach zum GEFRIEREN und LAGERN*

4Schale für OBST und GEMÜSE *

5FOOD CARE ZONE für FLEISCH und FISCH *

6WINE RACK*

7ABLAGE *

8LAMPE / DUAL LED / LED *(siehe Wartung)

9ACTIVE OXYGEN

10Abnehmbare Ablage für TUBEN UND DOSEN *

11Ablage für FLASCHEN

*Unterschiedliche Anzahl und Platzierung, nicht bei allen Modellen.

9 8

8

7

6

5

4

3

2

1

10

10

11

12

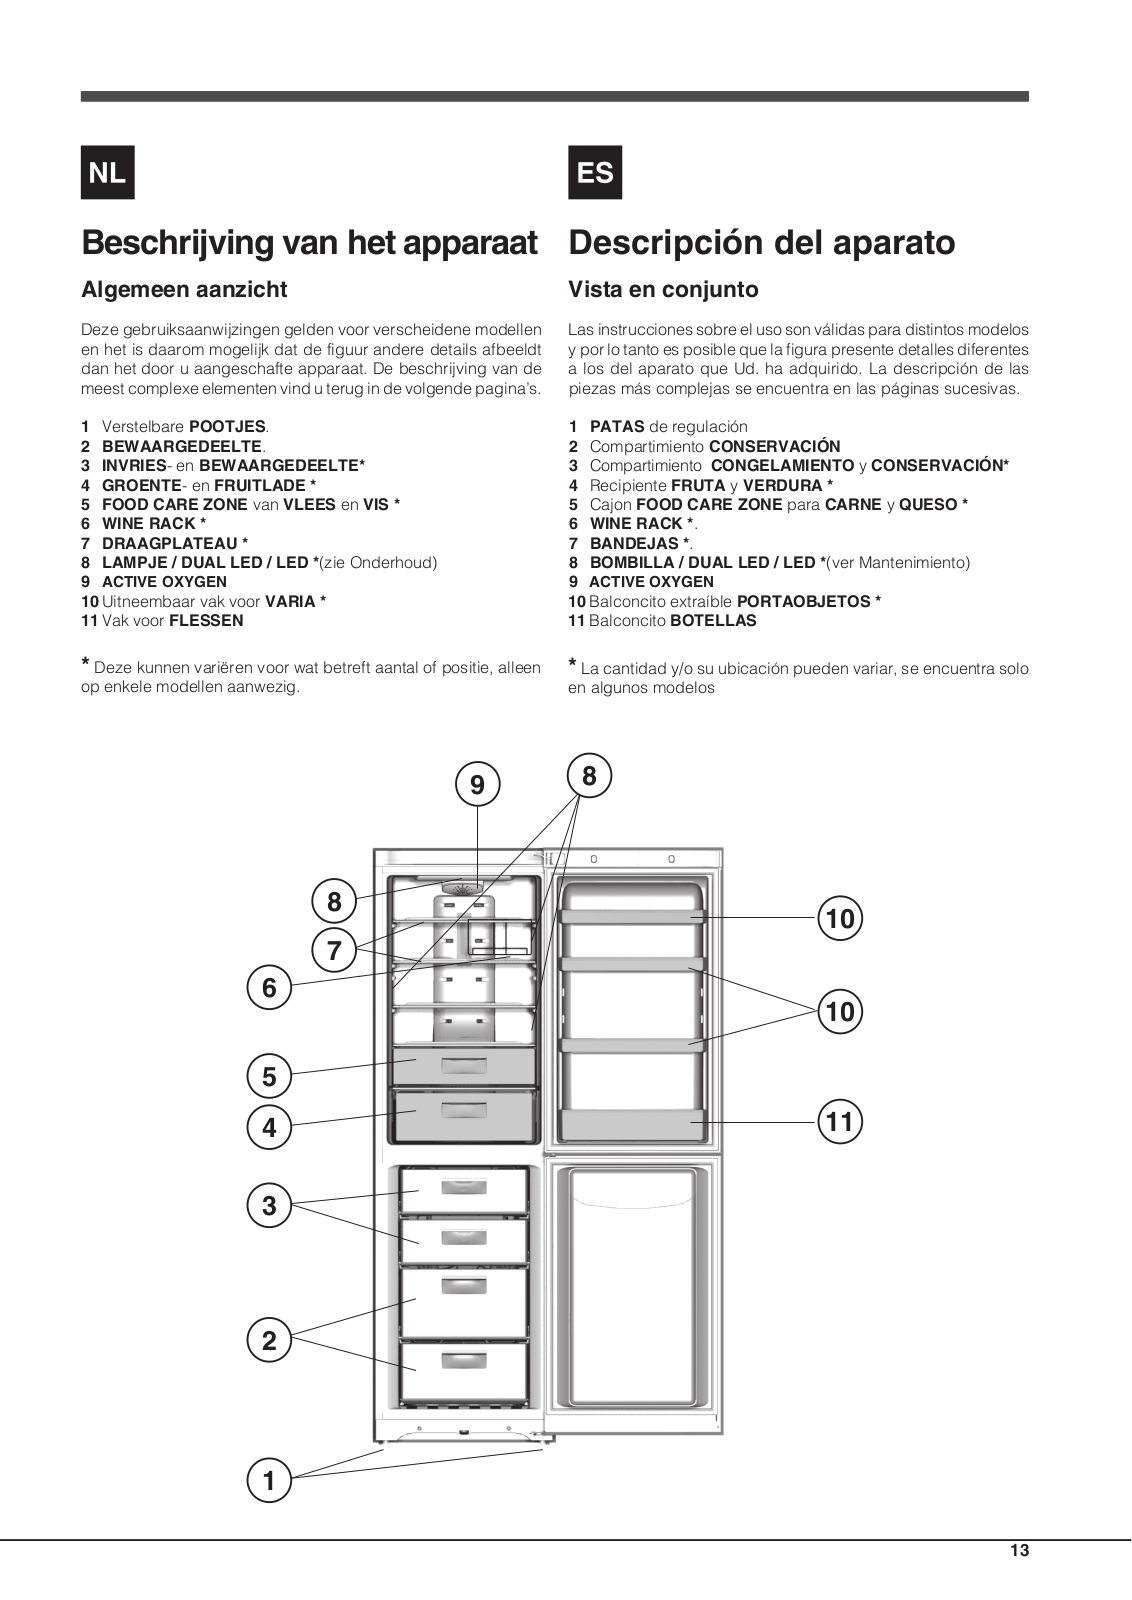
Beschrijving van het apparaat

Algemeen aanzicht

Deze gebruiksaanwijzingen gelden voor verscheidene modellen en het is daarom mogelijk dat de figuur andere details afbeeldt dan het door u aangeschafte apparaat. De beschrijving van de meest complexe elementen vind u terug in de volgende pagina’s.

1Verstelbare POOTJES.

2BEWAARGEDEELTE.

3INVRIES- en BEWAARGEDEELTE*

4GROENTE- en FRUITLADE *

5FOOD CARE ZONE van VLEES en VIS *

6WINE RACK *

7DRAAGPLATEAU *

8LAMPJE / DUAL LED / LED *(zie Onderhoud)

9ACTIVE OXYGEN

10Uitneembaar vak voor VARIA *

11Vak voor FLESSEN

*Deze kunnen variëren voor wat betreft aantal of positie, alleen op enkele modellen aanwezig.

Descripción del aparato

Vista en conjunto

Las instrucciones sobre el uso son válidas para distintos modelos y por lo tanto es posible que la figura presente detalles diferentes a los del aparato que Ud. ha adquirido. La descripción de las piezas más complejas se encuentra en las páginas sucesivas.

1PATAS de regulación

2Compartimiento CONSERVACIÓN

3Compartimiento CONGELAMIENTO y CONSERVACIÓN*

4Recipiente FRUTA y VERDURA *

5Cajon FOOD CARE ZONE para CARNE y QUESO *

6WINE RACK *.

7BANDEJAS *.

8BOMBILLA / DUAL LED / LED *(ver Mantenimiento)

9ACTIVE OXYGEN

10Balconcito extraíble PORTAOBJETOS *

11Balconcito BOTELLAS

*La cantidad y/o su ubicación pueden variar, se encuentra solo en algunos modelos

9 8

8

7

6

5

4

3

2

1

10

10

11

13

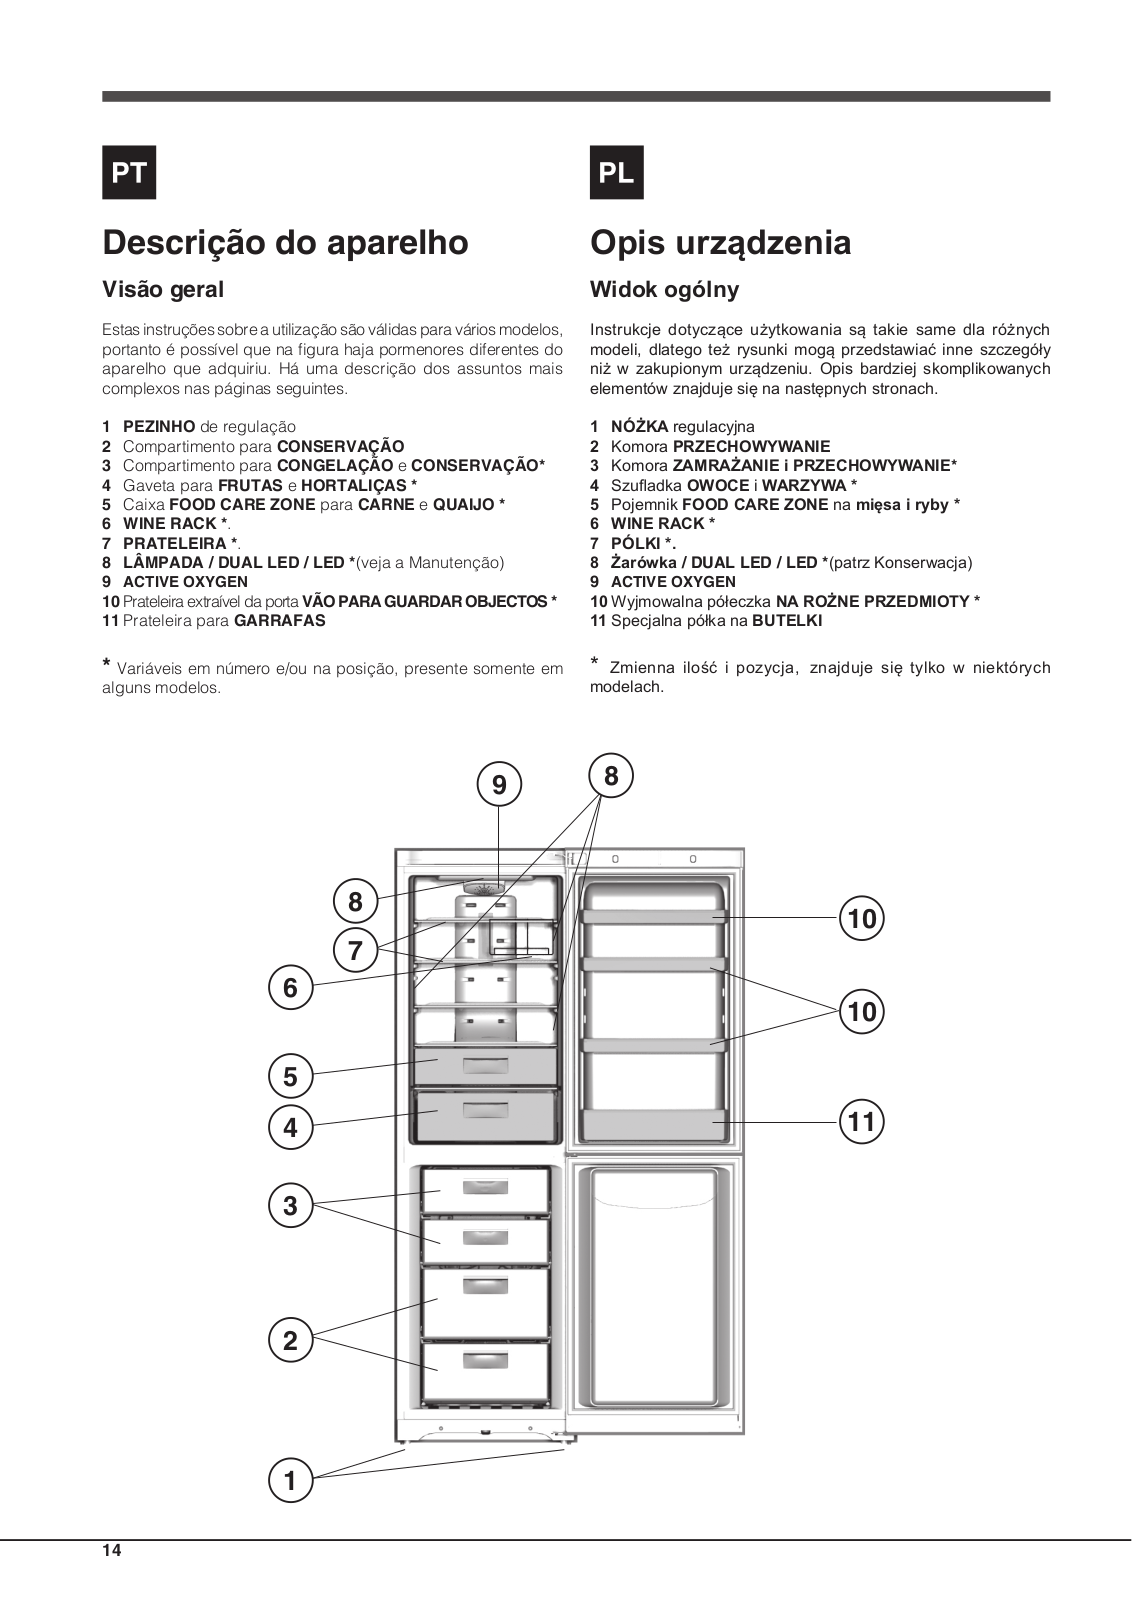
Descrição do aparelho

Visão geral

Estas instruções sobre a utilização são válidas para vários modelos, portanto é possível que na figura haja pormenores diferentes do aparelho que adquiriu. Há uma descrição dos assuntos mais complexos nas páginas seguintes.

1PEZINHO de regulação

2Compartimento para CONSERVAÇÃO

3Compartimento para CONGELAÇÃO e CONSERVAÇÃO*

4Gaveta para FRUTAS e HORTALIÇAS *

5Caixa FOOD CARE ZONE para CARNE e QUAIJO *

6WINE RACK *.

7PRATELEIRA *.

8LÂMPADA / DUAL LED / LED *(veja a Manutenção)

9ACTIVE OXYGEN

10Prateleira extraível da porta VÃO PARA GUARDAR OBJECTOS *

11Prateleira para GARRAFAS

*Variáveis em número e/ou na posição, presente somente em alguns modelos.

Opis urządzenia

Widok ogólny

Instrukcje dotyczące użytkowania są takie same dla różnych modeli, dlatego też rysunki mogą przedstawiać inne szczegóły niż w zakupionym urządzeniu. Opis bardziej skomplikowanych elementów znajduje się na następnych stronach.

1NÓŻKA regulacyjna

2Komora PRZECHOWYWANIE

3Komora ZAMRAŻANIE i PRZECHOWYWANIE*

4Szufladka OWOCE i WARZYWA *

5Pojemnik FOOD CARE ZONE na mięsa i ryby *

6WINE RACK *

7PÓLKI *.

8Żarówka / DUAL LED / LED *(patrz Konserwacja)

9ACTIVE OXYGEN

10Wyjmowalna półeczka NA ROŻNE PRZEDMIOTY *

11Specjalna półka na BUTELKI

* Zmienna ilość i pozycja, znajduje się tylko w niektórych modelach.

9 8

8

7

6

5

4

3

2

1

10

10

11

14

Descriere aparat

Vedere de ansamblu

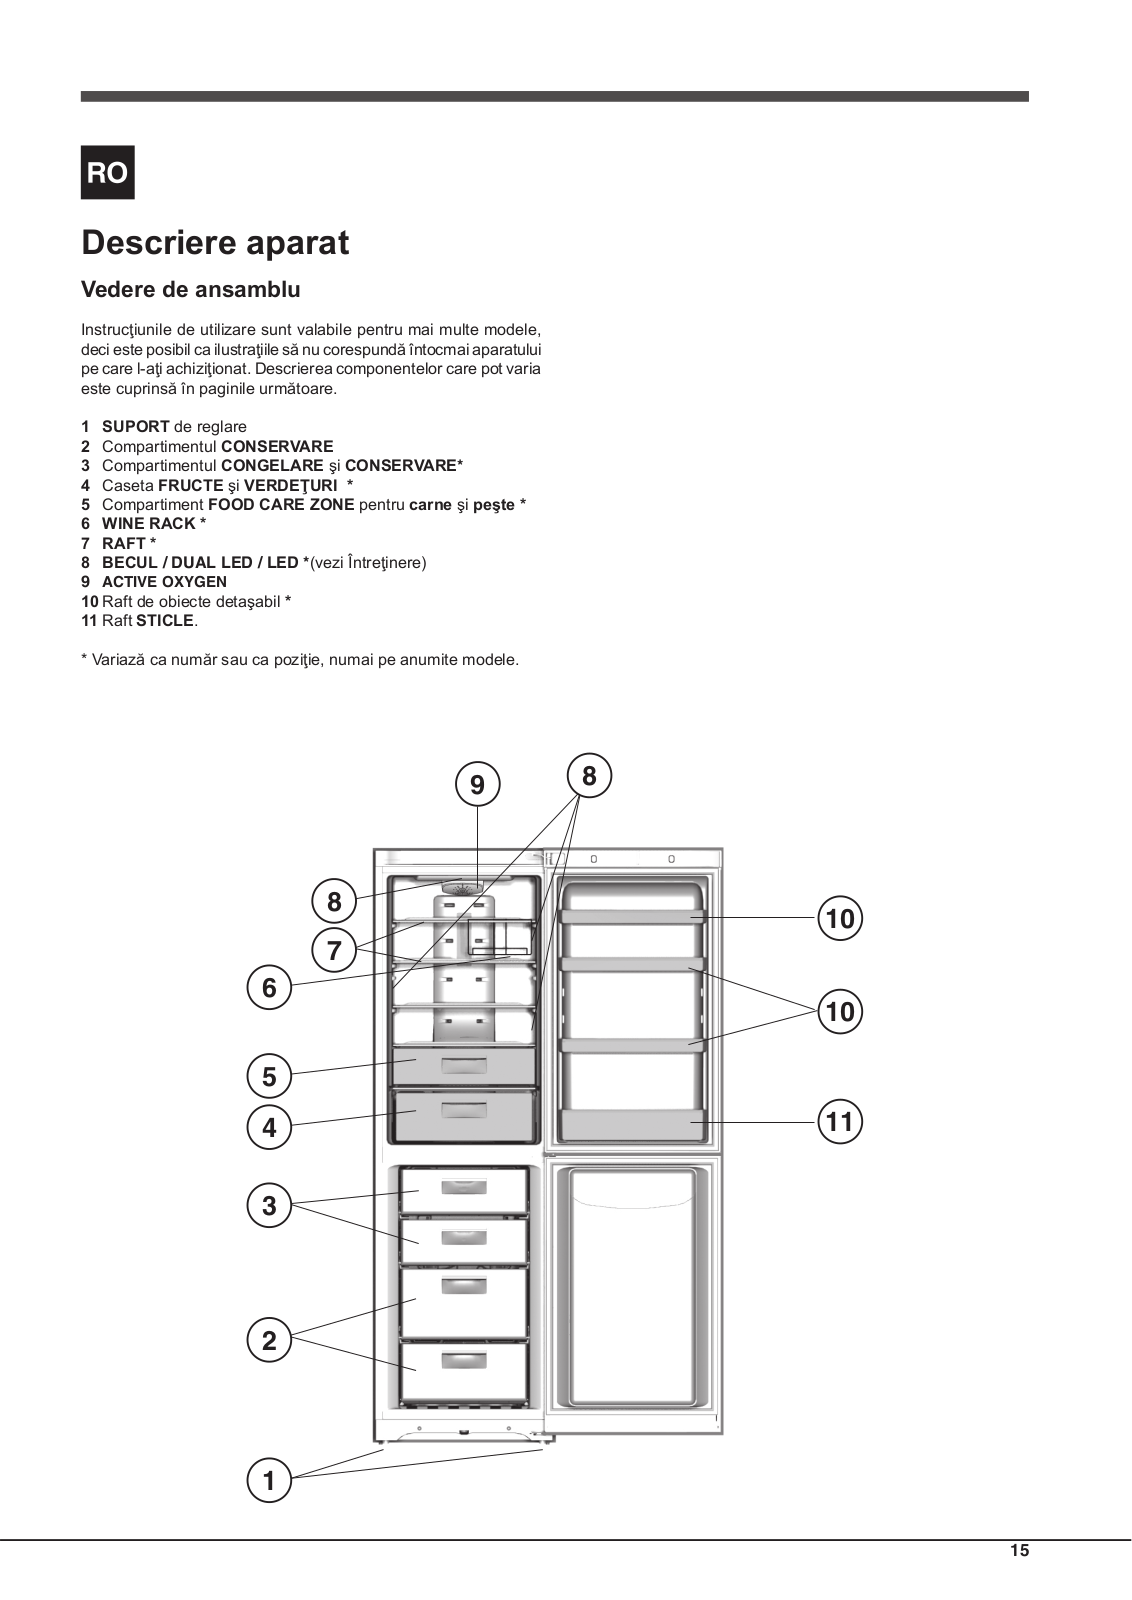
Instrucţiunile de utilizare sunt valabile pentru mai multe modele, deci este posibil ca ilustraţiile să nu corespundă întocmai aparatului pe care l-aţi achiziţionat. Descrierea componentelor care pot varia este cuprinsă în paginile următoare.

1SUPORT de reglare

2Compartimentul CONSERVARE

3Compartimentul CONGELARE şi CONSERVARE*

4Caseta FRUCTE şi VERDEŢURI *

5Compartiment FOOD CARE ZONE pentru carne şi peşte *

6WINE RACK *

7RAFT *

8BECUL / DUAL LED / LED *(vezi Întreţinere)

9ACTIVE OXYGEN

10Raft de obiecte detaşabil *

11Raft STICLE.

* Variază ca număr sau ca poziţie, numai pe anumite modele.

9 8

8

7

6

5

4

3

2

1

10

10

11

15

Reversibilità apertura porte

Nel caso sia necessario cambiare il verso di apertura delle porte, rivolgersi al servizio di Assistenza Tecnica.

Reversible doors

If it is necessary to change the direction in which the doors open, please contact the Technical Assistance Centre.

Réversibilité des portes

Si une inversion du sense d’ouverture des portes s’avère nécessaire, faire appel à notre service d’assistance technique.

Wechsel des Türanschlags

llte ein Wechsel des Türanschlags erforderlich sein, dann wenden Sie sich bitte an die Kundendienststelle.

Draairichting deuren verwisselbaar

In het geval u de draairichting van de deuren wilt verwisselen dient u contact op te nemen met de Technische Dienst.

Reversibilidad de la apertura de las puertas

Cuando sea necesario cambiar el sentido de apertura de las puertas, llame al servicio de Asistencia Técnica.

Reversibilidade da abertura das portas

No caso em que se torne necessário inverter o sentido de abertura das portas, contacte o serviço de Assistência Técnica.

Zmiana kierunku otwierania drzwi

W przypadku konieczności zmiany kierunku otwarcia drzwi należy zgłosić się od Serwisu Technicznego.

Reversibilitate deschidere uşi

Dacă doriţi să schimbaţi sensul de deschidere a uşilor, adresaţi-vă centrului de Asistenţă tehnică.

16

Loading...
+ 36 hidden pages