

Hotpoint E7134, E6005 User Manual

Instructions for Installation and Use
Electric Hob
Models: E7134-E6005
T o the Installer
Before installation fill in the product details on the back cover of this book.
The information can be found on the rating plate.
T o the User
You must read the instructions prior to installing and using the appliance and
then retain them for future reference.

CONTENTS
Introduction
Advice and recommendations
Installation and fastening
Electrical Connection
Cooking zone description
The controls
Operation
The safety devices
Maintenance and care
After Sales Service
Hotpoint Guarantee
Key Contacts
3
4
5
6
7
8
9
10
11
12
13
Back Cover
Retention of this Instruction Book
This Instruction Book must be kept handy for ref erence as it contains important details on the safe and proper use of
the appliance.
If you sell or pass the appliance to someone else, or move house and leave it behind, make sure this Book is also
provided so the new owner can become familiar with the appliance and safety warnings.
If the Book is lost or damaged a copy may be obtained from:
Merloni Elettrodomestici L TD , Morley Wa y , P eterborough, PE2 9JB
2

Introduction
Your new hob is guaranteed* and will give lasting service. This guarantee is only applicable if the appliance has been
installed in accordance with the installation instructions detailed in this booklet.
To help make best use of your cooking equipment, please read this booklet carefully.
The hob is designed specifically for domestic use and responsibility will not be accepted for use in any other installation.
* The guarantee is subject to the provisions that the appliance:
(a) Has been used solely in accordance with this booklet.
(b) Has been properly connected to a suitable supply voltage as stated on the rating plate, attached to the
appliance.
(c) Has not been subjected to misuse or accident or been modified or repaired by any person other than the
manufacturers authorised employee or agent.
(d) Has been correctly installed.
This appliance conforms with the following European Economic Community directives:
- 73/23/EEC of 19/02/73 (Low V oltage) and subsequent modifications;
- 89/336/EEC of 03/05/89 (Electromagnetic Compatibility) and subsequent modifications;
- 90/396/EEC of 29/06/90 (Gas) and subsequent modifications;
- 93/68/EEC of 22/07/93 and subsequent modifications.
3

Advice and recommendations
• This appliance was designed for non-professional,
household use.
• Before using the appliance, read the instructions in the
owner’s manual carefully since it contains all the
instructions you require to ensure safe installation, use
and maintenance. Keep this owner’ s manual in a safe place
for future reference .
• When you have removed the packing, check whether
the appliance is intact. If you have any doubts, contact a
qualified professional before using the appliance .
• Never leave the packing components (plastic bags,
polystyrene foam, nails, etc.) within the reach of children
since these are a source of potential danger.
• The appliance must be installed by a qualified
technician in compliance with the instructions provided
by the manuf acturer .
• The latter denies all responsibility for improper
installation which may harm persons and animals and
damage property.
• The electrical safety of this appliance can only be
guaranteed if the latter is correctly and efficiently earthed,
in compliance with regulations on electrical safety . Alwa ys
ensure that this vital safety measure has been taken. If
you hav e any doubts, call in a qualified technician to check
the electrical system thoroughly .
• The manufacturer denies all responsibility for damage
resulting from a system which has not been earthed
correctly.
• Before power ing the appliance, check whether the
technical characteristics featured on the appliance data
plate correspond with those of the mains electrical system.
• Check that the current load of the mains supply and of
the power sockets is suitable for the maximum power of
the appliance, indicated on the appliance data plate. If in
doubt, contact a qualified professional.
• This appliance must only be used for the purpose for
which it was expressly designed. Any other use (such as
heating a room for example) is considered to be improper
and consequently dangerous.
• The manufacturer denies all responsibility for damage
resulting from improper or incorrect use of the appliance.
• Certain fundamental rules must be followed when using
electrical appliances. The following are of particular
importance:
• do not touch the appliance with wet or damp hands,
• never use the appliance when barefoot,
• never use extensions,
• never pull on the power supply cable or the
appliance itself to unplug it from the mains socket,
• never lea ve the appliance e xposed to atmospheric
agents (rain, sun, etc.),
• do not allow children or persons who are not familiar
with the appliance to use it without supervision.
• Always unplug the appliance from the mains or s witch
off the main switch before cleaning or performing any
cleaning or maintenance operations.
• If the surface of the glass cracks, unplug the
appliance immediately. For any repairs, contact only an
authorised after-sales service centre and demand original
spare parts. Failure to comply with the above may compromise the safety of the appliance.
• Cut the power supply cable after disconnecting it from
the power mains when you decide not to use the appliance
any longer. Also make all potentially dangerous parts of
the appliance safe, above all for children who could play
with the appliance.
• The glass ceramic hob is resistant to thermal and
mechanical shocks. However, it may break due to a
shock caused by a sharp object, such as a tool for
example. In this case, unplug the appliance
immediately and contact an authorised after-sales
service centre to have it repaired.
• Remember that the heating area stays hot for at least
half an hour after being turned off; please refrain from
placing any cookware or other items on the cooking zone
while still hot.
• Do not turn on the heating zones if aluminium foil or
plastic items have been placed on the hob surf ace .
• Do not go near the heating zones when these are still
hot.
• If you use small electric appliances near the hob, make
sure their power supply cable does not come into contact
with the hot parts of the hob.
• Make sure all pan handles are always pointing inw ards
towards the centre of the hob to prevent any accidental
spills.
First use: the glue used on the hob seals ma y leave g reasy traces on the glass surface. We recommend you wipe these
off before using the appliance, with the aid of a non abrasiv e cleaner . During the first f e w hours of use, you ma y detect
a smell of rubber, which will disappear quickly.
4
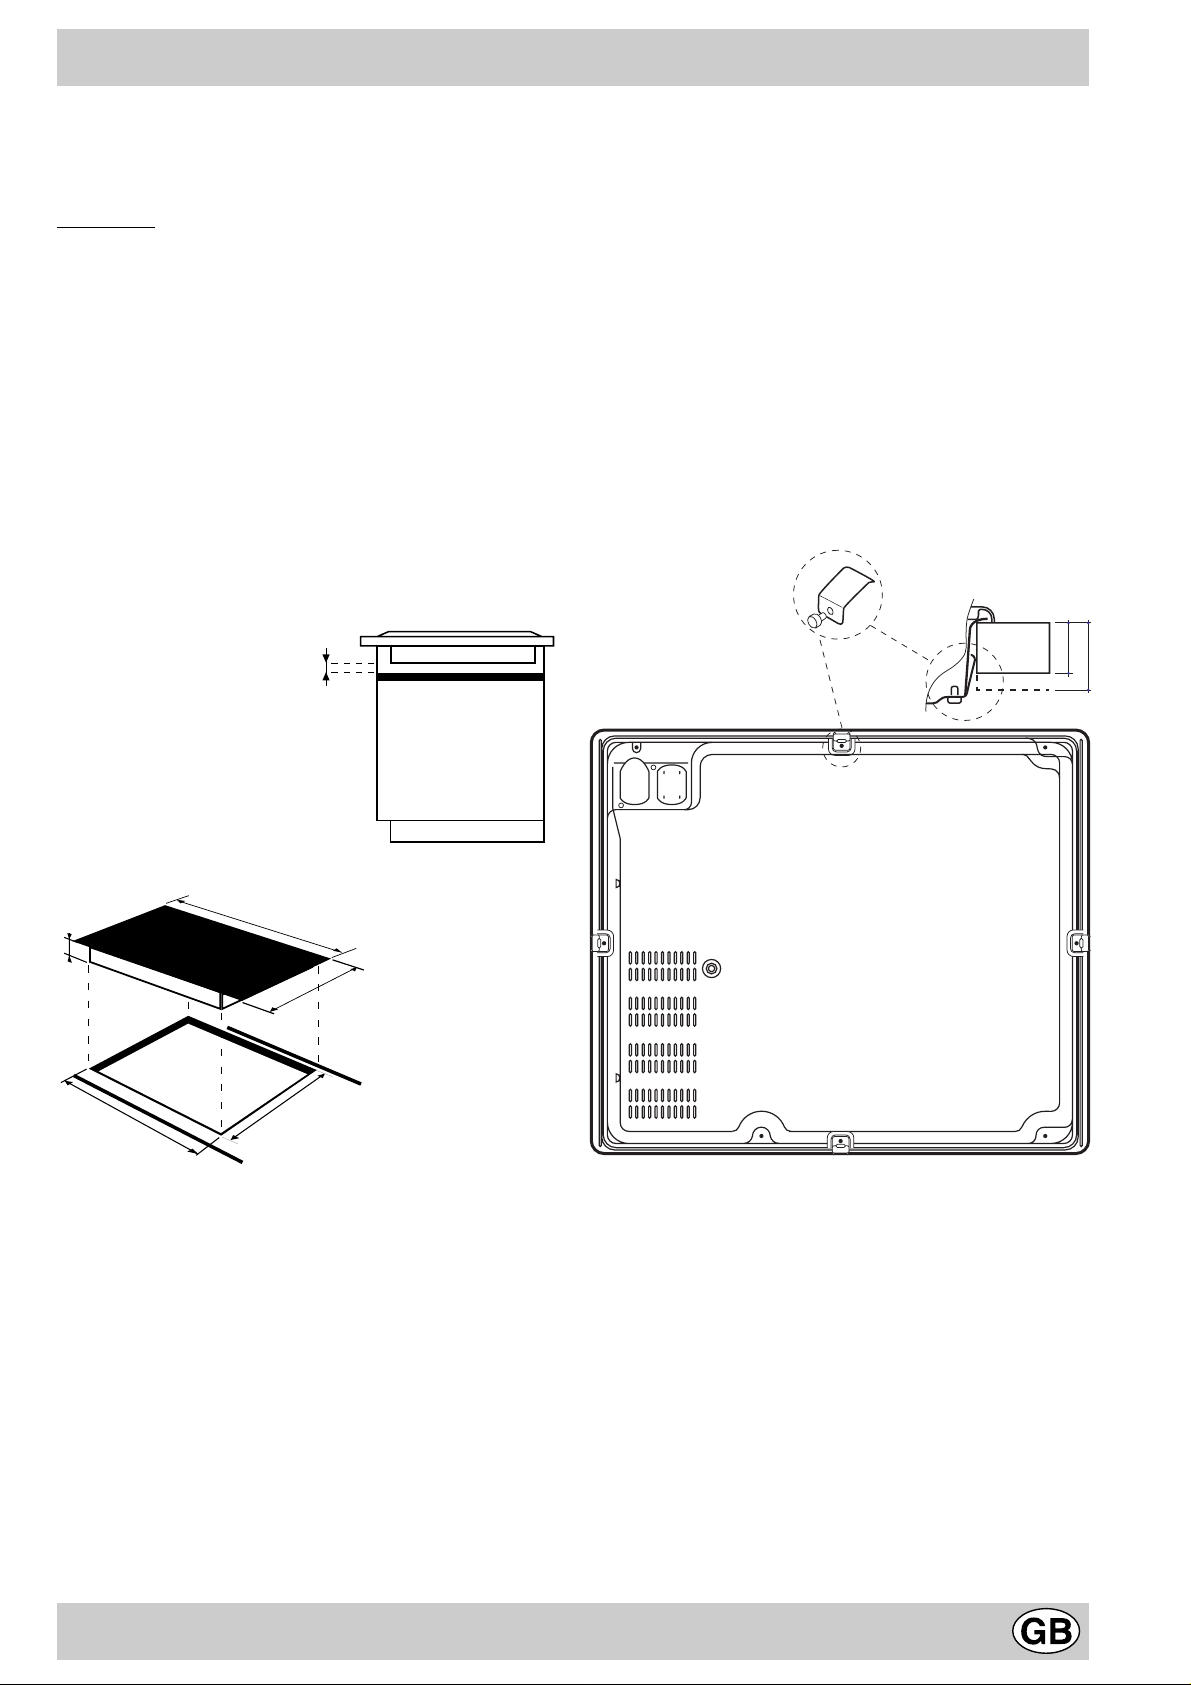
Installation and fastening
The following instructions are intended for a qualified fitter
to guide him/her along the installation, adjustment and
technical maintenance procedures as correctly as possible
and in full compliance with the applicable norms in force.
Important : unplug the hob before all operations .
Installation
• This hob can be built into a worktop simply by cutting
out the corresponding slot.
• The worktop must be made with a material designed
to withstand a temperature of approximately 100°C .
• The hob should be positioned at least 40 mm awa y
from the back wall or any other v ertical surface in order
to allow for correct ventilation and to prevent the
surfaces around the appliance from ov erheating.
• If you wish to install the hob on top of an oven, the
latter must be fitted with a cooling fan.
• T ry to avoid installing the hob on top of a dishwasher;
if this is unavoidable, place a watertight separating
element between the two appliances.
10
Distance to
keep between the
cut-out slot and
the cabinet
Fastening
Very important: It is vital that you ensure the glass
ceramic hob is built into a perfectly flat supporting surface .
Deformations due to improper fastening could alter the
characteristics of the hob and compromise its performance.
The fastening springs are fastened by screws (see
diagram).
It is vital that these screws be kept accessible at all
times.
Insert the hob into the cut-out slot, applying pressure all
along the perimeter of the hob frame so that the latter
adheres fully to the worktop.
REAR SPRING ASSEMBLY
FRONT OF HOB
KITCHEN
WORKTOP
30
40
48
560 +/- 1
HOB FROM BELOW
690
520
490 +/- 1
5
 Loading...