

Page 1

Instructions for
Installation and Use
Build-in Electric
double oven
GBGB
GB
GBGB
English, 2
DX 892 CX
Contents
GB
Introduction, 2
Safety Information, 3
Installation, 5
Tall Cabinet Ventilation, 6
The main parts of your Double Oven, 8
Start-up and use, 9
The Cooking Modes in your Double Oven, 11
Solarplus Grill, 14
Top Oven - Conventional Cooking, 16
Top Oven Temperature Charts - Meat, 17
Top Oven Temperature Charts - Baking, 18
Main Oven - The Intelligent Cooking System, 19
Temperature Conversion Chart, 21
Care and Cleaning, 22
If something goes wrong...,25
Disposal of the appliance, 26
Guarantee Information, 27
Service Information, 28
08448 24 24 24
Please phone us on
guarantee
to activate your
Page 2
Introduction
GB
To the Installer:
Before installation, fill in the product details on the
back cover of this book.
The information can be found on the rating plate.
To the User:
You must read the instructions prior to installing and
using the appliance and then retain them for future
reference.
! Before operating your new appliance please read
this instruction booklet carefully. It contains
important information concerning the safe operation,
installation and maintenance of the appliance.
! Please keep these operating instructions for future
reference. Pass them on to possible new owners of
the appliance.
Retention of this Instruction Book
This Instruction Book must be kept handy for
reference as it contains important details on the safe
and proper use of the appliance.
If you sell or pass the appliance to someone else, or
move house and leave it behind, make sure this
Book is also provided so the new owner can become
familiar with the appliance and safety warnings.
Your new appliance is guaranteed* and will give
lasting service. This guarantee is only applicable if
the appliance has been installed in accordance with
the installation instructions detailed in this booklet.
To help make best use of your cooking equipment,
please read this booklet carefully.
The appliance is designed specifically for domestic
use and responsibility will not be accepted for use in
any other installation.
When the cooker is first used an odour may be
emitted, this will cease after a period of use
To help remove the 'new' smell, heat up the empty
ovens to maximum temperature for a minimum of
two or three hours, keeping the oven doors closed.
Ensure that the room is well ventilated (e.g. open a
window or use an extractor fan) and that persons
who may be sensitive to the odour avoid any fumes.
It is suggested that any pets be removed from the
room until the smell has ceased.
* The guarantee is subject to the provisions that
the appliance:
(a) Has been used solely in accordance with the
Users Instruction Book.
(b) Has been properly connected to a suitable
supply voltage as stated on the rating plate
attached to this equipment.
(c) Has not been subjected to misuse or accident
or been modified or repaired by any person
other than the authorised employee or agent.
(d) Has been correctly installed.
This appliance conforms with the followingThis appliance conforms with the following
This appliance conforms with the following
This appliance conforms with the followingThis appliance conforms with the following
European Economic Community directives:European Economic Community directives:
European Economic Community directives:
European Economic Community directives:European Economic Community directives:
- 2006/95/
subsequent modifications;
- 2004/108/
Compatibility) and subsequent modifications;
- 90/396/
modifications (only for models which use gas);
- 93/68/
modifications.
- 2002/96/
--
-
1275/2008 (Stand-by/Off mode)
--
EC EC
EC of 12/12/06 (Low Voltage) and
EC EC
ECEC
EC of 15/12/04 (Electromagnetic
ECEC
EECEEC
EEC of 29/06/90 (Gas) and subsequent
EECEEC
EECEEC
EEC of 22/07/93 and subsequent
EECEEC
ECEC
EC
ECEC
Technical Characteristics
Top Oven
Usable Volume: 35 Litres
ENERGY LABEL - Top Oven
Directive 2002/40/EC on the label of electric ovens
Norm EN 50304
Declared energy consumption for
Natural convection Class
heating mode: Conventional
Main Oven
Usable Volume: 65 Litres
ENERGY LABEL - Main Oven
Directive 2002/40/EC on the label of electric ovens
Norm EN 50304
Declared energy consumption for
Natural convection Class
This odour is due to temporary finish on oven liners
and elements and also any moisture absorbed by
the insulation.
PLEASE PHONE US TO REGISTER YOUR APPLIANCE AND ACTIVATE YOUR PARTS GUARANTEE ON 08448 24 24 24
2
Voltage and Frequency
heating mode: Fan Oven
230-240V~ 50Hz
Page 3

Safety Information
• WARNING: The appliance and its
accessible parts become hot
during use.
• Care should be taken to avoid
touching heating elements.
• Children less than 8 years of age
shall be kept away unless
continuously supervised.
• This appliance can be used by
children aged from 8 years and
above and persons with reduced
physical, sensory or mental
capabilities or lack of experience
and knowledge if they have been
given supervision or instruction
concerning use of the appliance in
a safe way and understand the
hazards involved. Children shall
not play with the appliance.
Cleaning and user maintenance
shall not be made by children
without supervision
GB
• During use the appliance
becomes hot. Care should be
taken to avoid touching heating
elements inside the oven.
• WARNING: Accessible parts may
become hot during use. Young
children should be kept away.
• Do not use harsh abrasive
cleaners or sharp metal scrapers
to clean the oven door glass since
they can scratch the surface,
which may result in shattering of
the glass
• When cleaning the appliance do
not use steam cleaner.
• WARNING: Ensure that the
appliance is switched off before
replacing the lamp to avoid the
possibility of electric shock
• The appliance is not intended to
be operated by means of an
external timer or separate remotecontrol system.
PLEASE PHONE US TO REGISTER YOUR APPLIANCE AND ACTIVATE YOUR PARTS GUARANTEE ON 08448 24 24 24
3
Page 4

Safety Information
When used properly your appliance is completely
safe but as with any electrical product there are
certain precautions that must be observed.
PLEASE READ THE PRECAUTIONS BELOW
BEFORE USING YOUR APPLIANCE.
Always
Always make sure you remove all packaging and literature from
•
inside the oven and grill compartments before switching on for
the first time.
Always make sure you understand the controls prior to using the
•
appliance.
Always keep children away from the appliance when in use as
•
the surfaces will get extremely hot during and after cooking.
Always make sure all controls are turned off when you have
•
finished cooking and when not in use.
Always stand back when opening an oven door to allow any
•
build up of steam or heat to disperse.
Always use dry, good quality oven gloves when removing items
•
from the oven/grill.
Always take care to avoid heat/steam burns when operating the
•
controls.
• Always turn off the electricity supply at the wall switch before
cleaning and allow the appliance to cool.
Always make sure the shelves are in the correct position before
•
switching on the oven.
Always keep the oven and grill doors closed when the appliance
•
is not in use.
Always take care when removing utensils from the top oven
•
when the main oven is in use as the contents may be hot.
Always keep the appliance clean as a build up of grease or fat
•
from cooking can cause a fire.
Always follow the basic principles of food handling and hygiene
•
to prevent the possibility of bacterial growth.
•
Always keep ventilation slots clear of obstructions.
•
Always refer servicing to a qualified appliance service engineer.
During use the oven becomes hot. Care should be taken to
•
avoid touching heating elements inside the oven.
3. LEAVE THE PAN TO COOL FOR AT LEAST 60 MINUTES
BEFORE MOVING IT. Injuries are often caused by picking up
a hot pan and rushing outside with it.
Never
• Never leave children unsupervised where a cooking appliance is
installed as all cooking surfaces will be hot during and after use.
Never allow anyone to sit or stand on any part of the appliance.
•
Never store items above the appliance that children may attempt
•
to reach.
Never remove the oven shelves whilst the oven is hot.
•
Never heat up unopened food containers as pressure can build
•
up causing the container to burst.
Never store chemicals, food stuffs or pressurised containers in or
•
on the appliance, or in cabinets immediately above or next to
the appliance.
•
Never operate the grill with the door closed as this will cause the
appliance to overheat.
•
Never use the appliance as a room heater.
Never use the grill to warm plates.
•
Never dry any items on the oven doors.
•
Never install the appliance next to curtains or other soft
•
furnishings.
Never allow children to play with the appliance controls.
•
Never use 'steam cleaners'.
•
Children should be supervised to ensure that they do not play
with the appliance.
! The appliance should not be operated by people (including
children) with reduced physical, sensory or mental capacities, by
inexperienced individuals or by anyone who is not familiar with the
product. These individuals should, at the very least, be
supervised by someone who assumes responsibility for their
safety or receive preliminary instructions relating to the operation
of the appliance.
GB
! The appliance must be used by adults only for
the preparation of food, in accordance with the
instructions outlined in this booklet. Any other
use of the appliance (e.g. for heating the room)
constitutes improper use and is dangerous. The
manufacturer may not be held liable for any
damage resulting from improper, incorrect and
unreasonable use of the appliance.
SAFETY ADVICE
IN THE EVENT OF A CHIP PAN OR ANY OTHER
PAN FIRE:
1. TURN OFF THE COOKER APPLIANCE AT THE WALL
SWITCH.
2. COVER THE PAN WITH A FIRE BLANKET OR DAMP CLOTH,
this will smother the flames and extinguish the fire.
PLEASE PHONE US TO REGISTER YOUR APPLIANCE AND ACTIVATE YOUR PARTS GUARANTEE ON 08448 24 24 24
4
Page 5

Installation
GB
Electrical Requirements
For your own safety, we recommend that your cooker
is installed by a competent person such as one who
is registered with NICEIC (National Inspection
Council for Electrical Installation Contracting). The
cooker should be installed in accordance with the
latest edition of the IEE Regulations.
Warning: This appliance must be earthed.
Electrical Connections
The installer must check that the voltage shown on
the rating plate corresponds with the house
electricity supply. The cooker must be supplied via
a suitable double pole isolating switch, having a
contact separation of at least 3mm in all poles
placed in a readily accessible position adjacent to
the cooker. If the cooker is to be wired into a
connector unit, this may be positioned behind the
cooker providing the following requirements are met:
i) The connector unit must not project from the wall
more than 25mm.
ii) The top of the connector must not be more than
130mm above floor level.
Remove the terminal cover at the rear base of the
cooker. Pass the cable through the cable clamp and
connect to the appropriate terminals provided.
Allow sufficient cable for any future servicing.
Tighten the screws on the cable clamp and replace
the cover. Make main connections in the connector
unit or cooker control unit. This appliance conforms
to B.S. EN 55014 regarding suppression of Radio
and Television reception interference.
A double Pole control switch having a minimum
rating of 32 amps should be used to feed the cooker
using a suitably rated cable. Where a hob is fitted
adjacent to or over the cooker, a 45 amp Double
Pole control switch should be used to feed both
units via separate suitably rated cables.
We recommend a minimum of 4mm2 PVC insulated
twin and earth cable conforming to B.S. 6004 for
connection of each appliance.
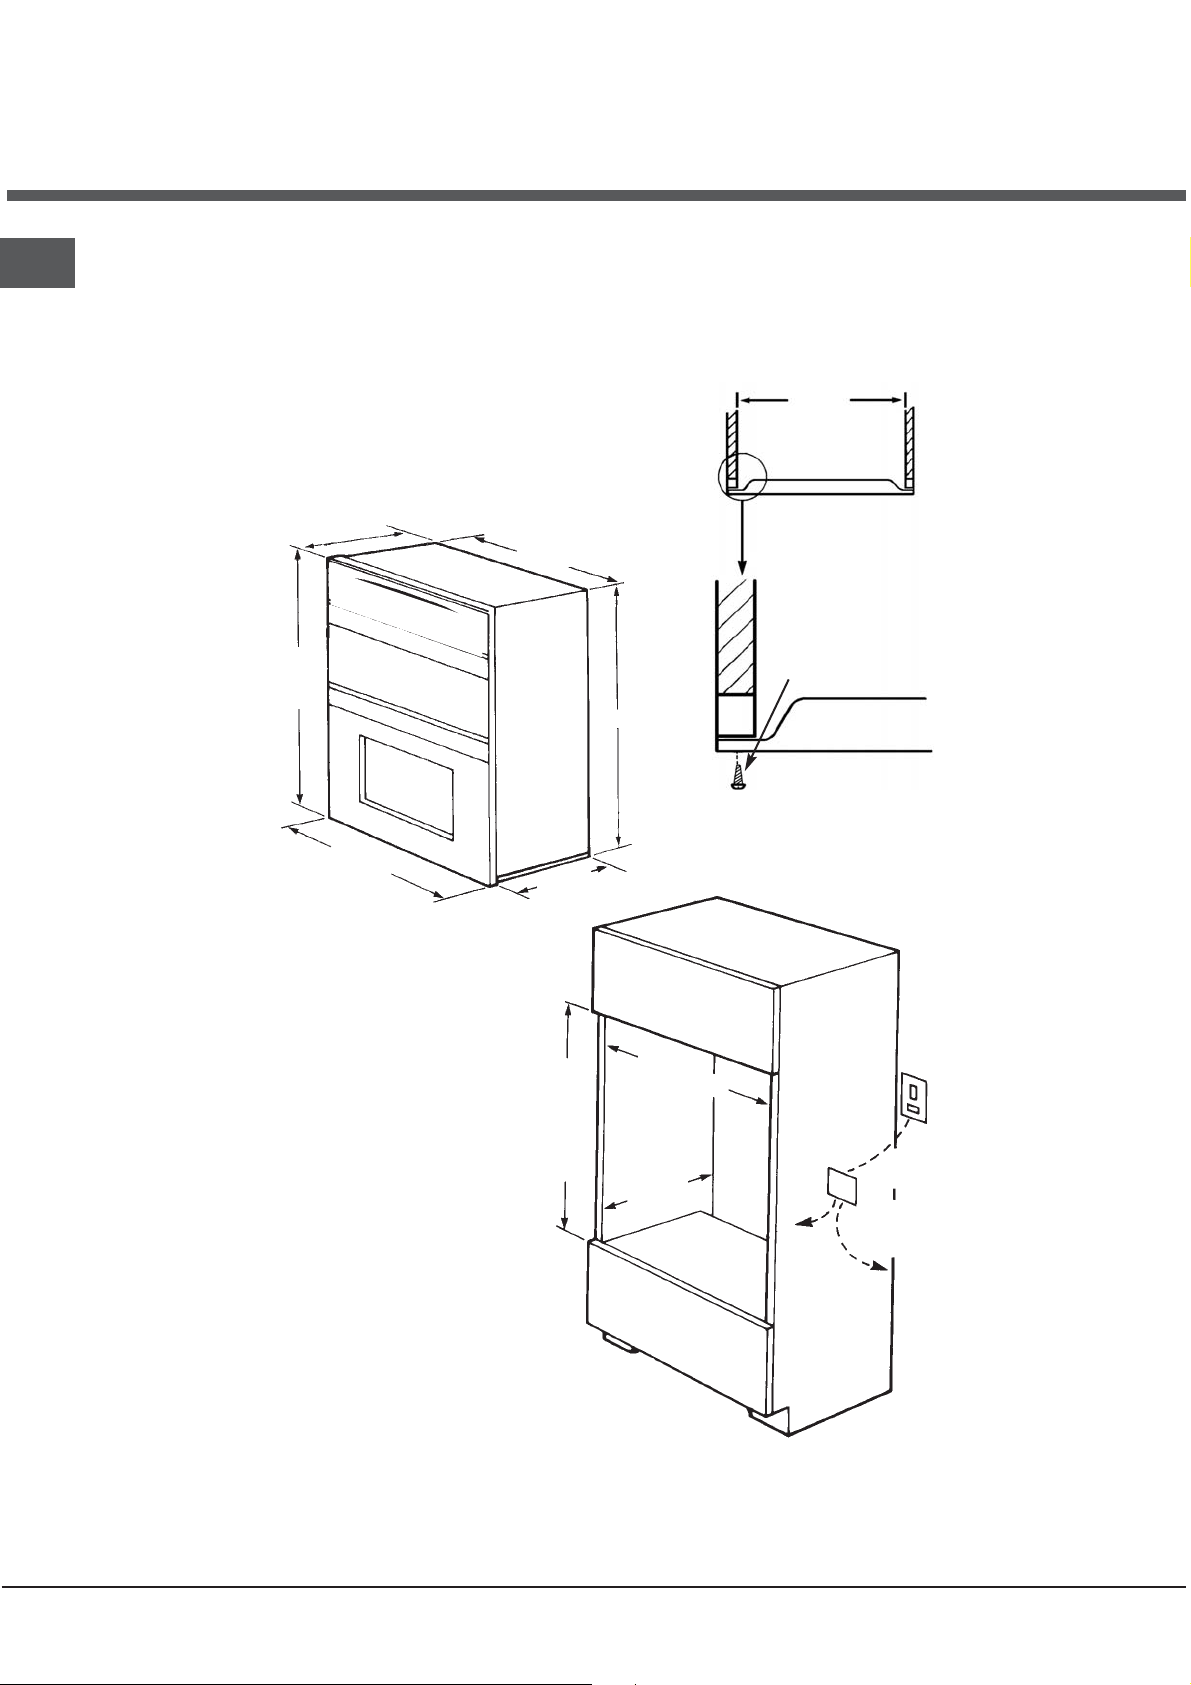
In all cases adhere to routing details (see fig. 4).
This appliance must not be installed over any other
appliance that generates heat such as a plinth
heater.
Note: Due to many different types of installation,
a mains cable is not supplied with this product.
The installer will fit the correct type and length of
cable.
Important
It is essential that the lower cupboard is constructed in
the manner illustrated i.e. having side, back, and roof
panels so joined as to provide no apertures which
could permit access to the oven unit when installed.
1. General
The appliance is designed for mounting at a safe
level into an oven housing which must be secured to
the backing wall.
2. Ventilation
a. The oven housing unit cabinet dimensions must
comply with fig. 4.
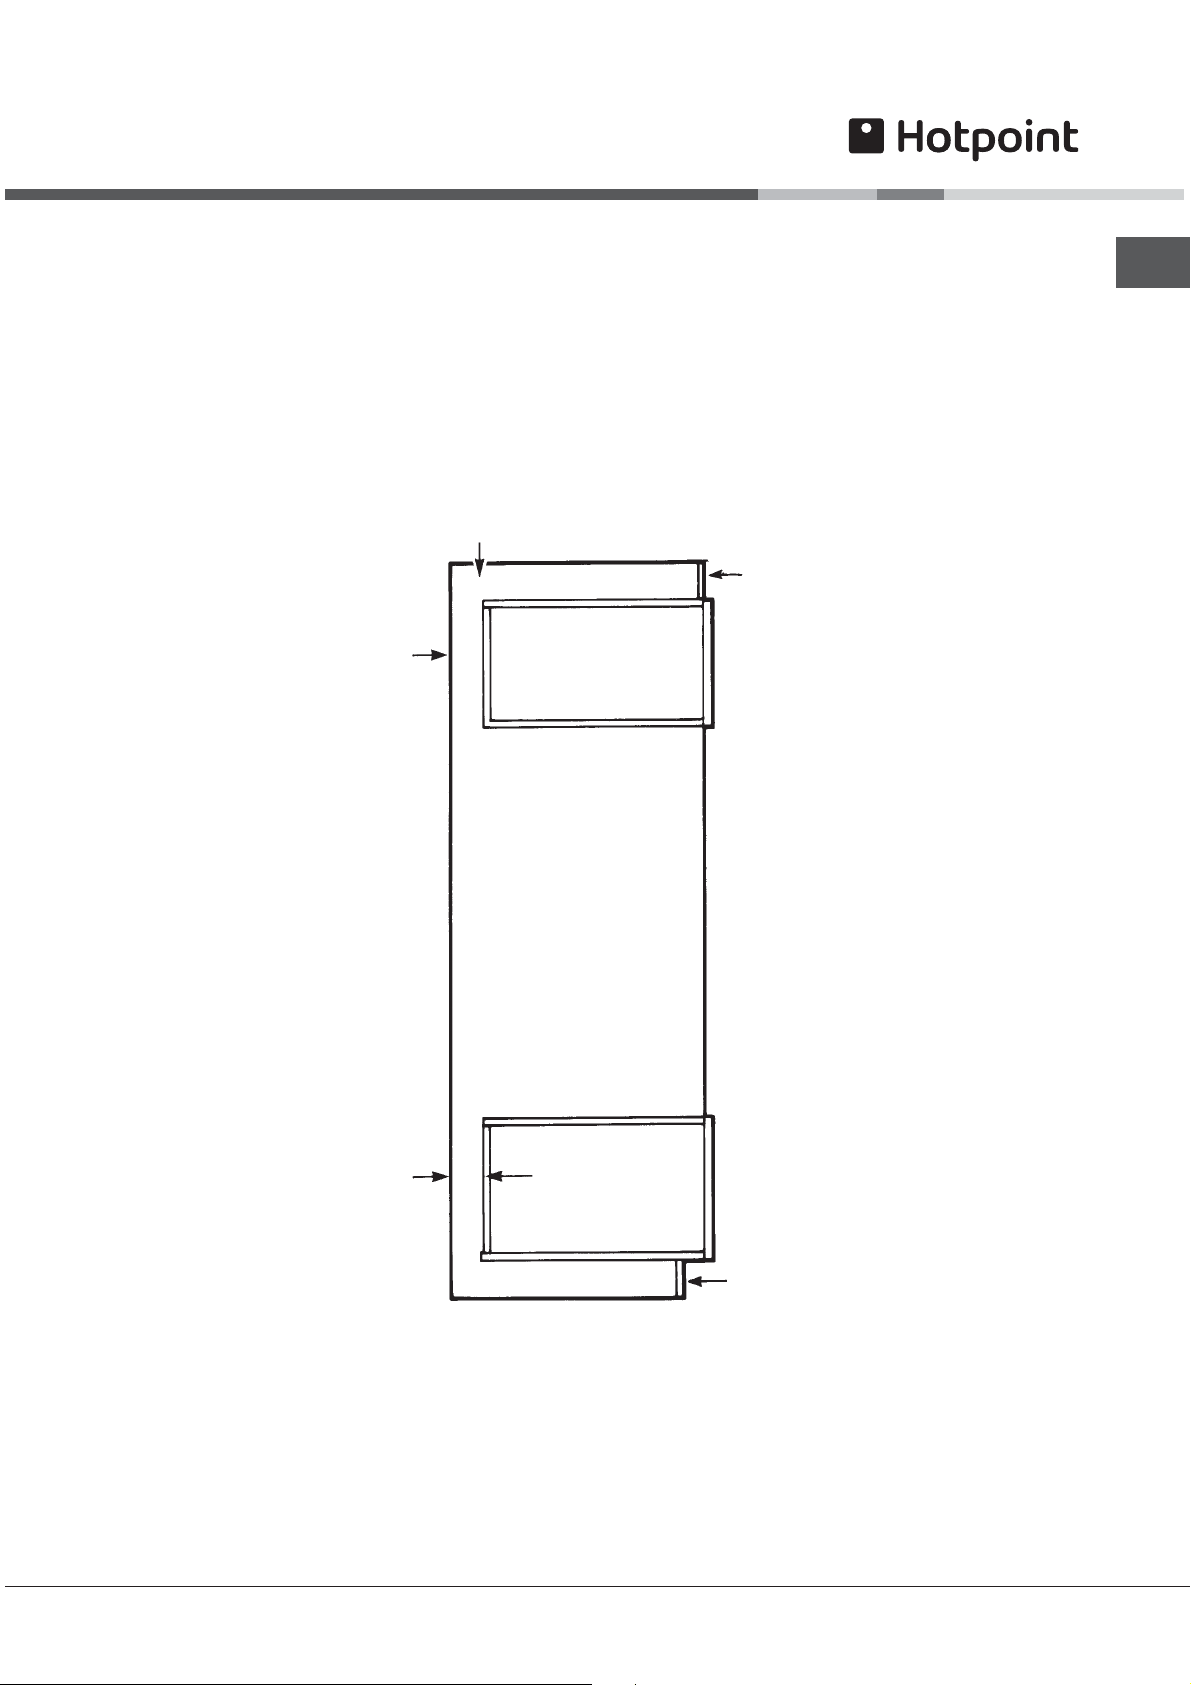
b. An air gap of 50mm minimum must be provided at
the rear of any top or bottom cupboards or shelves
(see fig. 1).
c. It is necessary that the cabinets are provided with
unobstructed ventilation, i.e. from adjacent
cabinetry. This can be done by either raising the
base of the cabinets using the adjusting feet (or
spacers) or alternatively by providing a slot in the
cabinet plinth to the dimensions in fig. 1.
d. The air gap at rear allows the warmed air to pass out
of the inner cabinet space. Where it is intended to fit
cupboards above the oven unit to ceiling height, it is
essential that the warmed air is exhausted through
the front of the cabinet (see fig. 1).
e. If an oven unit is installed adjacent to a tall cabinet,
steam escaping from the oven when the door is
opened could condense on and maybe stain the
adjacent surface. To prevent permanent staining, the
adjacent surface should be made of a material that is
heat resisting and easy to clean. Adjacent tall cabinets
should not be deeper than the oven housing cabinet.
3. Final Installation
a. Using a spirit level, check that the housing cabinet
is level from side to side and from front to back in
its installed position.
b. Correct any unevenness by placing spacers under
the bottom of the cabinet. Make sure that the cabinet
rests firmly on the floor without rocking.
c. Before the oven is fitted, the cabinet must be firmly
secured to the backing wall for stability.
d. The oven unit should now be lifted (this is a two
person lift) into the cabinet and pushed fully home.
e. Finally, the oven is secured to the cabinet by means
of the four Phillips C/SK Head screws - two through
each side trim.
f. Remove all packaging material from the grill and
oven interior.
List of loose items:
4 x Phillips C/SK Head No. 6 x 25mm screws.
PLEASE PHONE US TO REGISTER YOUR APPLIANCE AND ACTIVATE YOUR PARTS GUARANTEE ON 08448 24 24 24
5
Page 6
Tall Cabinet Ventilation
t
GB
Fig. 1
Ventilation Slot required
here if cabinet does not
fit to ceiling - 51mm x 457mm min. area
50 mm
Air Gap
Ventilation Slot
required
here if the cabinet does no
fit to the ceiling
- 51mm x 457mm min.
area
50 mm
Air Gap
Ventilation Slot
required here
- 51mm x 457mm
min. area
PLEASE PHONE US TO REGISTER YOUR APPLIANCE AND ACTIVATE YOUR PARTS GUARANTEE ON 08448 24 24 24
6
Page 7
GB
562mm
570mm
exc. handle
knobs
882mm
Fig. 2
595mm
561mm
550mm
882mm,
870mm if
cooker trim
is to overlap
top edge
of shelf
Fig. 4
870mm
550mm
min *
Cabinet
562mm
Viewed down through cabinet
No. 6x25mm screw
(4 supplied)
Fig. 3
Oven Door
Connector
Box
2
4mm
Cable
To Oven
if hob fitted
4mm
to Hob if
if fitted
6mm
Cable
2
Cable
2
* excluding pipe work
and other projections
PLEASE PHONE US TO REGISTER YOUR APPLIANCE AND ACTIVATE YOUR PARTS GUARANTEE ON 08448 24 24 24
7
Page 8
The main parts of your
Double Oven
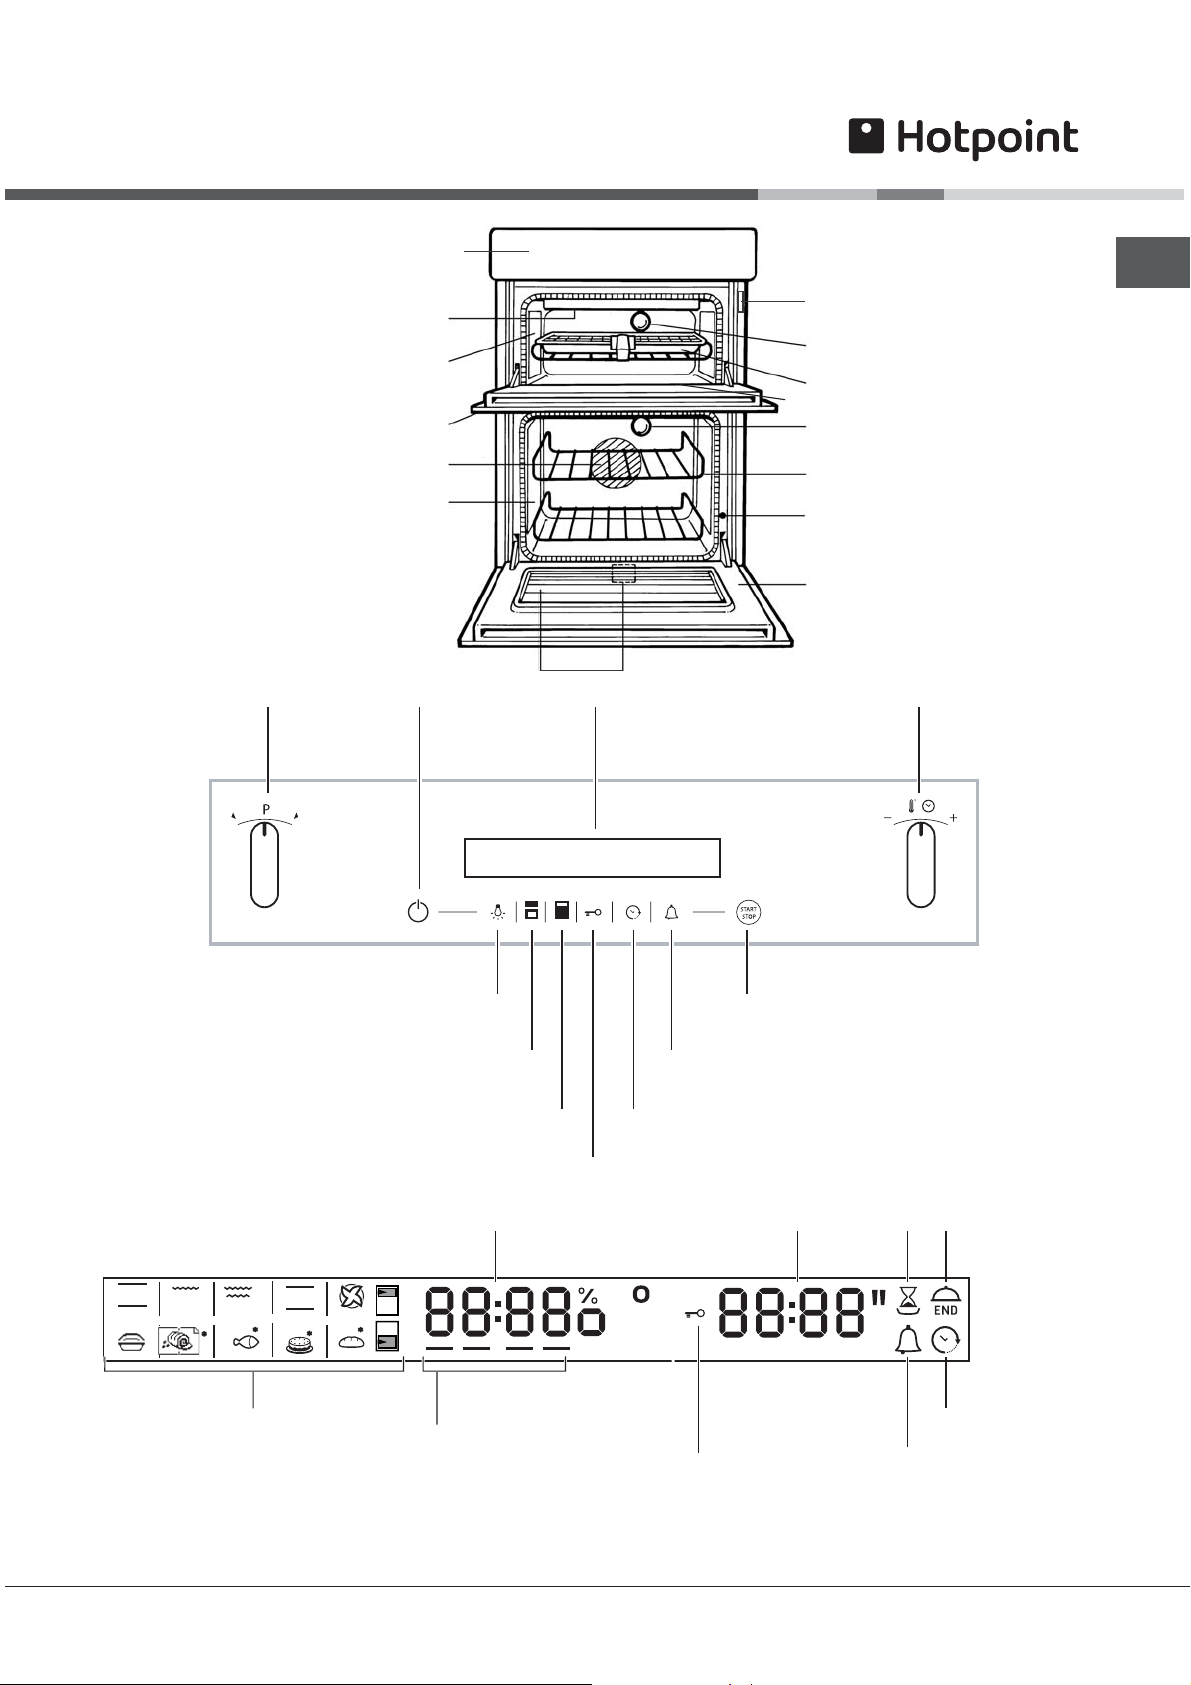
Overall view
Control Panel
Grill Element
Stay Clean Liners*
& Wirework Shelf
Supports
Top Oven Door
MODEL & SERIAL
NUMBER LABEL Record the Model No.
and the Serial No.
on back page.
Oven Light
Grill Pan &
Food Support*
Inner Door Glass
Oven Light
GB
Control panel
SELECTOR
knob
Oven Fan
Stay Clean
Liners* &
Wirework Shelf
Support
CONTROL
PANEL
POWER BUTTON
LIGHT
button
TOP OVEN
button
Inner Door Glass
TOP MAIN
DISPLAY
MINUTE MINDER
button
Oven Shelves
Door Switch
Main Oven Door
THERMOSTAT /
TIMER
knob
START /
STOP
MAIN OVEN
button
TIMER
button
CONTROL PANEL LOCK
button
Display
TEMPERATURE
numerical digits
numerical digits
TIME
DURATION
icon
END OF COOKING
icon
w
g
MODE
icons
Preheating /
Residual heat
indicator
CONTROL PANEL LOCK
indicator
*Available only on certain models
PLEASE PHONE US TO REGISTER YOUR APPLIANCE AND ACTIVATE YOUR PARTS GUARANTEE ON 08448 24 24 24
CLOCK
icon
MINUTE MINDER
icon
8
Page 9
Start-up and use
GB
! The first time you use your appliance, heat the
empty oven with its door closed at its maximum
temperature for at least 2-3 hours. Ensure that the
room is well ventilated before switching the oven off
and opening the oven door. The appliance may emit
a slightly unpleasant odour caused by protective
substances used during the manufacturing process
burning away.
! To make the setting process easier, keep the knob
in position: this will increase the scrolling speed of
the numbers on the display.
! Each setting will automatically be stored in the
appliance memory after 10 seconds.
! The touch controls cannot be activated if the user
is wearing gloves.
Control panel lock
! The control panel can be locked during the cooking
as well as once the cooking has finished.
To lock the oven controls, press and hold the
button for at least 2 seconds. A buzzer will sound
and the TEMPERATURE display shows the key
symbol “O—n”. The
lock activation.
To deactivate the lock, press and hold the
button again for at least 2 seconds.
icon will light up to indicate
4. Repeat the above process to set the minutes.
If a blackout occurs, it will be necessary to reset the
clock. If the
indicates that the clock has not been set correctly.
icon flashes on the display, this
Setting the minute minder
! The minute minder may still be set whether the
oven is switched on or off. It does not switch the
oven on or off.
When the set time has elapsed, the timer emits a
buzzer that will automatically stop after 30 seconds
or when any active button on the control panel is
pressed.
To set the minute minder proceed as follows:
1. Press button
2. Adjust the time as desired by turning the TIMER
knob towards “
3. Once you have reached the desired value, press
the
The lit symbol will remind you that the minute
minder is on. The DISPLAY will show the countdown.
To cancel the minute minder, press the button
and use the knob to set the time to 00:00. Press
button again.
button again.
.
++
+” and “
++
--
-”.
--
Setting the clock
! The clock can only be set when the oven is
switched off. If the oven is in standby mode,
pressing the button once will display the current
time setting. Press it again to set the time.
After connection to the power supply network or after
a blackout, the button on the display will flash
for 10 seconds.
To set the clock:
1. Press button .
++
2. Turn the TIMER knob towards “
adjust the hour value.
3. Once you have reached the correct hour value,
press the
button.
+” and “
++
--
-” to
--
The icon will switch off to indicate that the
minute minder has been disabled.
Starting the oven
1. Switch the control panel on by pressing the
button. The appliance buzzer sounds three times
(ascending) and all buttons light up in sequence.
2. Select the TOP/GRILL or MAIN oven by pressing the
TOP OVEN/ GRILL or MAIN OVEN icon.
3. Select the desired cooking mode by turning the
SELECTOR knob. The display shows:
- the temperature associated with the mode, if
programming manually;
PLEASE PHONE US TO REGISTER YOUR APPLIANCE AND ACTIVATE YOUR PARTS GUARANTEE ON 08448 24 24 24
9
Page 10
- “Auto” and the duration alternately, if programming
is automatic.
4. Press the button to begin cooking.
5. The oven will begin its preheating phase, the
preheating indicators will light up as the temperature
rises.
6. When the preheating process has finished, a
buzzer sounds and all the preheating indicator lights
show that this stage has been completed: the food
can then be placed in the oven.
7. During cooking it is always possible to:
- modify the temperature by turning the
THERMOSTAT
- set the duration of a cooking mode (
Modes
- press the button to stop cooking. In this case
the appliance stores the temperature modified
previously in its memory (
- switch off the oven by pressing the button
for 3 seconds.
8. If a blackout occurs while the oven is already in
operation, an automatic system within the appliance
will reactivate the cooking mode from the point at
which it was interrupted, provided that the
temperature has not dropped below a certain level.
Programmed cooking modes which have not yet
started will not be restored and must be
reprogrammed (for example: a cooking mode has
been programmed to start at 20:30. At 19:30 a
blackout occurs. When the power supply is restored,
the mode will have to be reprogrammed).
! There is no preheating stage for the GRILL mode.
! Never put objects directly on the bottom of the
oven; this will prevent the enamel coating from being
damaged.
! Always place cookware on the rack(s) provided.
);
knob (
manual modes only
see Cooking
manual modes only
);
);
Oven light
The light comes on when the oven door is opened or
when a cooking mode starts.
The
the light at any time.
Residual heat indicators
The appliance is fitted with a residual heat indicator.
When the oven is off, the “residual heat” bar on the
display lights up to indicate high temperatures
inside the oven cavity. The individual segments of
the bar switch off one by one as the temperature
inside the oven falls.
button can be used to switch on/ switch off
Restoring the factory settings
The oven factory settings can be restored to reset all
selections made by the user (clock and customised
durations). To carry out a reset, switch off the oven,
then keep the SELECTOR knob turned while
pressing the
restore procedure is complete, a buzzer will sound.
The first time the button is pressed, the oven will
behave as if it is being switched on for the first time.
button for 6 seconds. Once the
Standby
This product complies with the requirements of the
latest European Directive on the limitation of power
consumption of the standby mode. If no buttons are
pressed for 30 minutes and the control panel
lock has not been activated, the appliance
automatically reverts to standby mode. The standby
mode is visualised by the high luminosity “Watch
Icon”. As soon as interaction with the machine
resumes, the system’s operating mode is restored.
GB
Cooling ventilation
In order to cool down the external temperature of the
oven, a cooling fan blows a stream of air between
the control panel and the oven door, as well as
towards the bottom of the oven door.
! Once cooking has been completed, the cooling fan
continues to operate until the oven has cooled down
sufficiently.
PLEASE PHONE US TO REGISTER YOUR APPLIANCE AND ACTIVATE YOUR PARTS GUARANTEE ON 08448 24 24 24
10
Page 11
The Cooking Modes
in your Oven
GB
Your new appliance is equipped with a number of
different cooking modes:
Manual cooking modes
! All cooking modes have a default cooking
temperature which may be adjusted manually to a
value between 30°C and 250°C for TOP OVEN,
between 80°C and 230°C for MAIN OVEN,
(for GRILL mode- from 5% to 100%).
When the temperature in the oven has
reached a certain level and
the newly selected temperature is lower than the
temperature inside the oven, the text “Hot” appears
on the display. However, it will still be possible to
start cooking.
Conventional Heating (Top Oven)
- with upper and lower heat. This system is particularly
suitable for roasting and baking on one shelf only.
Variable Grilling (Top Oven)
- the oven can also be used for conventional grilling
with a full or half width fully controllable grill.
Note: The Top Oven door should be fully open when
Note: The Top Oven door should be fully open whenNote: The Top Oven door should be fully open when
grilling. Temperature level can be modified in this
grilling. Temperature level can be modified in thisgrilling. Temperature level can be modified in this
mode.
mode.mode.
Traditional (Main Oven)
- the upper and rear heating elements are switched on
in this position. The traditional oven brings an
outstanding level of temperature distribution and
reduced consumption. In traditional cooking use only
one rack to ensure good heat distribution. By using the
various shelf positions available you can balance the
quantity of heat between the upper and lower part. If
cooking requires more heat from below or above, use
the lower or higher shelves respectively.
MULTILEVEL mode (Main Oven)
Since the heat remains constant throughout the
oven, the air cooks and browns food in a uniform
manner. A maximum of two racks may be used at
the same time.
Rising (Main Oven)
- this mode heats and holds the oven at 35-40°C. It is
ideal for proving bread and yeast based dough
mixtures.
Automatic cooking modes
C.O.P.® (Programmed Optimal Cooking) system.
The cooking cycle stops automatically and the oven
indicates when the dish is cooked. You may start
cooking whether the oven has been preheated or
not. The cooking duration can be customised
according to personal taste by modifying the relevant
value - before cooking begins - by ±5/20 minutes
depending on the selected programme. The duration
can however be modified even once cooking has
begun. If the temperature inside the oven is higher
than the suggested value for the selected mode, the
text “Hot” appears on the display and it will not be
possible to begin cooking; wait for the oven to cool.
! When the cooking stage has been reached, the
oven buzzer sounds.
! Do not open the oven door as this will disrupt the
cooking time and temperature.
BAKED CAKES mode
This function is ideal for cooking desserts which are
made using natural yeast, baking powder and
desserts which contain no yeast. Place the dish in
the oven while it is still cold. The dish may also be
placed in a preheated oven.
The maximum weight of the cake is about 700 g.
BREAD mode
Use this function to bake bread. To obtain the best
results, we recommend that you carefully observe
the instructions below:
• follow the recipe;
• do not exceed the maximum weight of the
dripping pan;
• remember to pour 50 g (0,5 dl) of cold water into
the baking tray in position 5.
• The dough must be left to rise at room temperature
for 1 – 1 ½ hours (depending on the room
temperature) or until the dough has doubled in
size.
Recipe for BREAD:
1 Dripping pan holding 1000 g Max, lower level
2 Dripping pans each holding 1000 g Max, medium
and lower levels
Recipe for 1000 g of dough: 600 g flour, 360 g
water, 11g salt, 25 g fresh yeast (or 2 sachets of
powder yeast)
Method:
• Mix the flour and salt in a large bowl.
• Dilute the yeast in lukewarm water (approximately
35 degrees).
PLEASE PHONE US TO REGISTER YOUR APPLIANCE AND ACTIVATE YOUR PARTS GUARANTEE ON 08448 24 24 24
11
Page 12

• Make a small well in the mound of flour.
• Pour in the water and yeast mixture.
• Knead the dough by stretching and folding it over
itself with the palm of your hand for 10 minutes
until it has a uniform consistency and is not too
sticky.
• Form the dough into a ball shape, place it in a
large bowl and cover it with transparent plastic
wrap to prevent the surface of the dough from
drying out. Select the manual LOW
TEMPERATURE function on the oven and set the
temperature to 40°C. Place the bowl inside and
leave the dough to rise for approximately 1 hour
(the dough should double in volume).
• Cut the dough into equal sized loaves.
• Place them in the dripping pan, on a sheet of
baking paper.
• Dust the loaves with flour.
• Make incisions on the loaves.
• Place the food inside the oven while it is still cold.
GB
• Start the
BREAD cooking mode.
• Once baked, leave the loaves on one of the grill
racks until they have cooled completely.
FISH FISH
FISH mode
FISH FISH
Use this function to cook fish with a maximum
weight of 1 kg. The paper/foil package can be
placed directly on the dripping pan. Place the food
inside the oven while it is still cold.
ROAST MEATROAST MEAT
ROAST MEAT mode
ROAST MEATROAST MEAT
Use this function to cook beef, veal and lamb. Place the
food inside the oven while it is still cold. The dish may also
be placed in a preheated oven.
The maximum weight of the meat is about 1 kg.
PLEASE PHONE US TO REGISTER YOUR APPLIANCE AND ACTIVATE YOUR PARTS GUARANTEE ON 08448 24 24 24
12
Page 13
GB
Programming cooking
! A cooking mode must be selected before
programming can take place.
To cancel programming press the
Practical cooking advice
button.
Programming the cooking duration
1. Press the
numerical digits on the display begin to flash.
2. Turn the TIMER knob towards “
adjust the time as desired; keep the knob in position
to scroll through the numbers more quickly and
make the setting process easier.
3. Once you have reached the desired duration,
press the
the duration and set temperature alternately.
4. Press the button to begin cooking.
5. When cooking has finished, “END” appears on the
display and a buzzer sounds.
• For example: it is 9:00 a.m. and a duration of 1
hour and 15 minutes is programmed. The
programme will stop automatically at 10:15 a.m.
Setting the end time for a cooking mode
! A cooking duration must be set before the cooking
end time can be scheduled.
! For the delayed programming to work properly, the
clock should be set to the correct time.
button until the icon and the
++
+” and “
++
button again. The display will show
--
-” to
--
! Do not place racks in position 1 and 5 during fanassisted cooking. This is because excessive direct
heat can burn temperature sensitive foods.
! In the GRILL cooking mode,
dripping pan in position 1 to collect cooking
residues (fat and/or grease).
MULTILEVEL
• Use positions 2 and 4, placing the food which
requires more heat on 2.
• Place the dripping pan on the bottom and the rack
on top.
place the
1. Follow steps 1 to 3 to set the duration as detailed
above.
2. Press the
numerical digits on the display will begin to flash.
3. Turn the TIMER knob towards “
adjust the cooking end time value.
4. Once you have reached the desired end time,
press the
the duration, the cooking end time and the set
temperature alternately.
5. Press the button to activate the programmed
mode.
Programming has been set when the and
buttons are illuminated. The DISPLAY shows the
cooking end time and the cooking duration
alternately.
6. Once cooking has finished, “END” appears on the
display and a buzzer sounds.
• For example: it is 9:00 a.m. and a time of 1 hour
and 15 minutes is programmed, while the end time
is set to 12:30. The programme will start
automatically at 11:15 a.m.
button twice: the icon and the
++
+” and “
++
button again. The display will show
--
-” to
--
PLEASE PHONE US TO REGISTER YOUR APPLIANCE AND ACTIVATE YOUR PARTS GUARANTEE ON 08448 24 24 24
13
Page 14
Solarplus Grill
CAUTION: Accessible parts may become hot when
the grill is in use - children should be kept away.
Your cooker is not fitted with a conventional type of
grill. The solarplus grill is designed to reduce your
grilling times. It is quicker because it takes less
time to warm up from cold. Conventional grills
require 5 minutes pre-heat before food is placed
beneath them, but for normal grilling the solarplus
grill can be used from cold without any pre-heat.
However, when toasting, optimum performance is
achieved by pre-heating the grill for about 1 minute.
Notes
You will notice that the grill elements are protected
by a wire mesh.
This stops you from touching live parts.
DO NOT under any circumstances insert objects
into the grill mesh as this could damage or break
the element tubes OR if the grill is on cause an
electric shock.
During use the mesh may become soiled. Do not
attempt to clean it while the grill is still on. Turn the
cooker off at the control unit and wait until it has
cooled down before cleaning.
Care must be taken to ensure the grill mesh is not
distorted - DO NOT store the grill pan handle on the
grill pan grid when the grill pan runners are on the
top runner position.
There are two halves to the grill, one on the left and
one on the right. You can choose to have both sides
on or just the left side on.
GRILLING SHOULD NOT BE UNDERTAKEN WITH
THE TOP OVEN/GRILL DOOR CLOSED
- This will cause overheating.
To operate the grill proceed as follows:
1. Open the grill/top oven door fully.
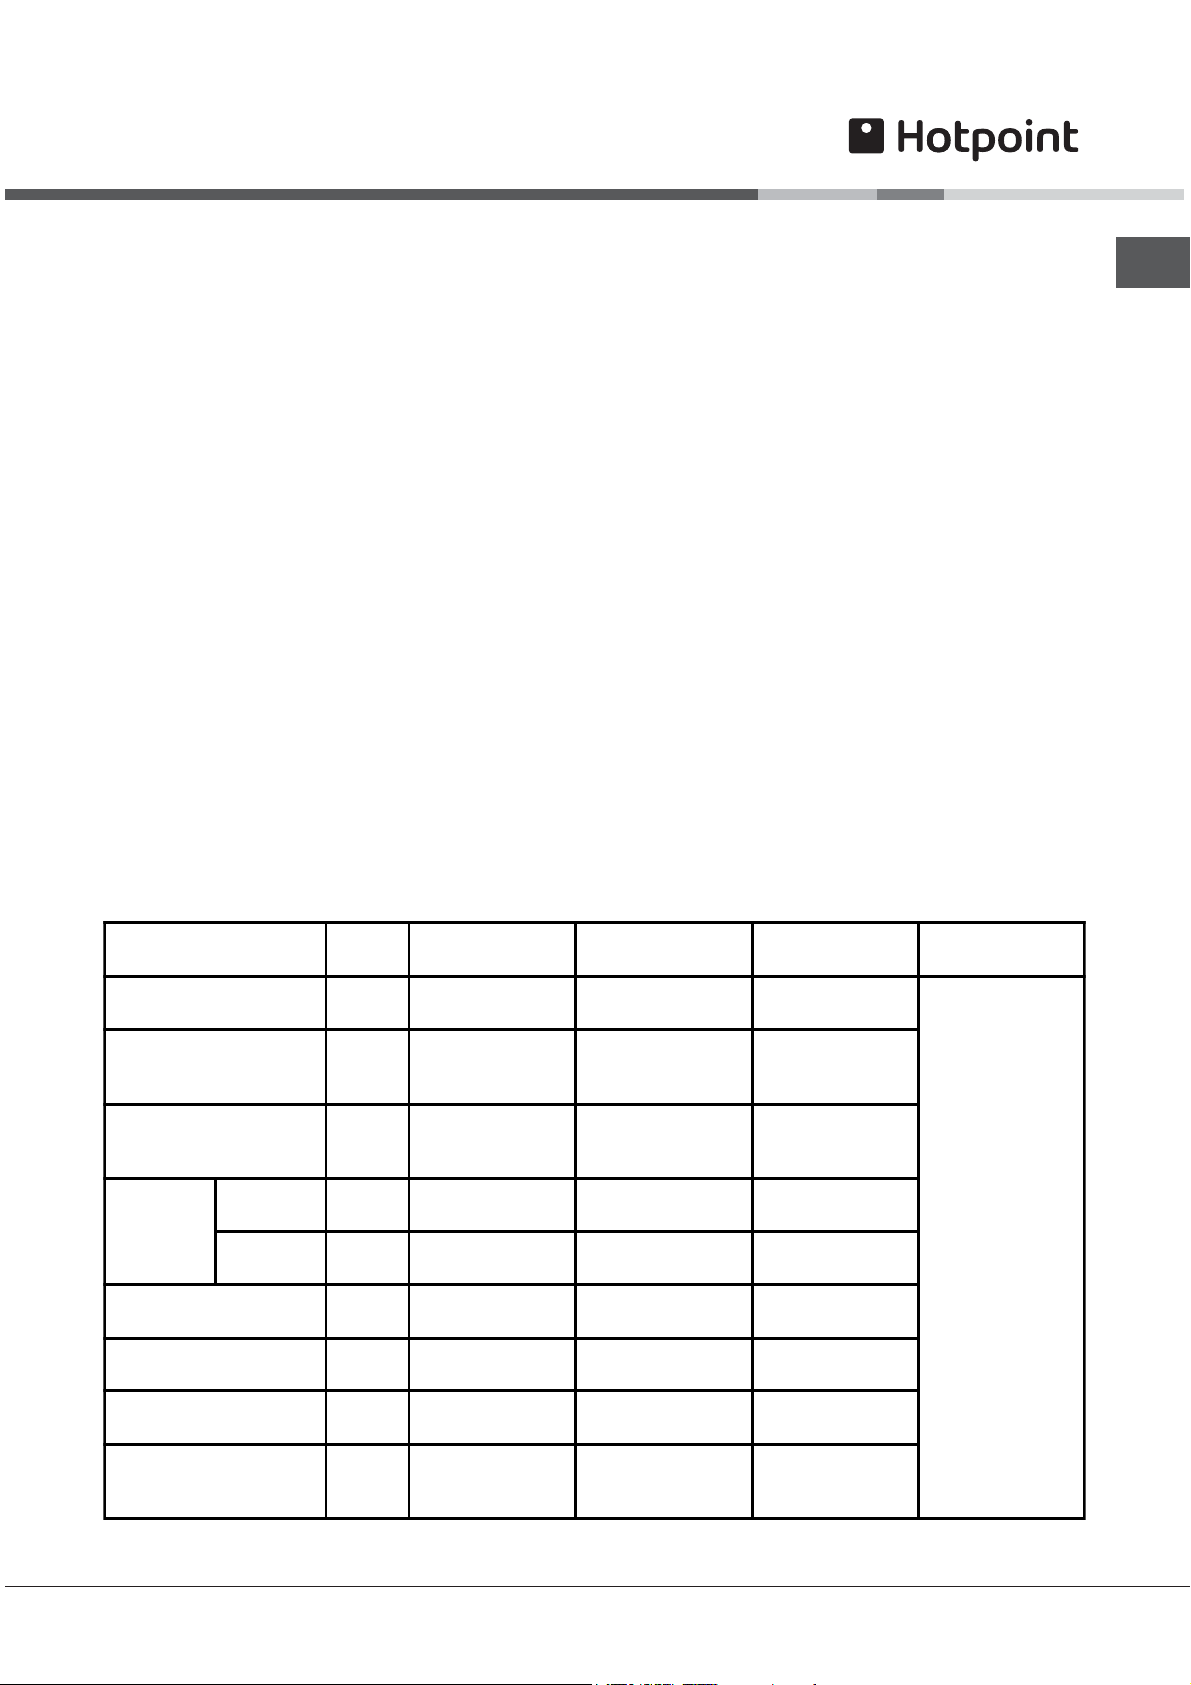
2. Position the rod shelf as recommended, in the chart
below, for the food being cooked.
3. Place the grill pan on the rod shelf, ensuring it is
positioned centrally under the element.
4. Never line the grill pan with aluminium foil as this
may cause overheating of fat in the grill pan.
GB
Toasting of Bread
Products
Small cuts of meat Sausages, Bacon
Chops, etc. Gammon
Steaks, Chicken pieces
Whole: None 2 Maximum100% 6-8 minutes.
Fish
Fillets: None 3 or 2 Maximum100% In base of grill pan.
Fish in breadcrumbs None 3 or 2 85-90% 10-15 minutes.
Pre-cooked Potato
Products
Pizzas None 3 or 2 85-90% 10-15 minutes.
Browning of Food 1 min. 1 or 2 Maximum100% 5-7 minutes.
1 min. 3 or 2 Maximum 100% 3-5 minutes.
None 3 or 2 Maximum 100% for
None 2 Maximum100% or 6-
None 3 or 2 85-90% 10-12 minutes.
Grill pan and grid.
10-15 minutes.
4 minutes, then
reduce to 85-90%
8 minutes. reduce to
85%
Grill pan and grid.
25-30 minutes.
Grill pan and grid.
Grill pan and grid.
Grill pan and grid.
Dish placed
directly on shelf.
NOTE: Posi tion 1 is
bottom runner from
the base of the
oven.
PLEASE PHONE US TO REGISTER YOUR APPLIANCE AND ACTIVATE YOUR PARTS GUARANTEE ON 08448 24 24 24
14
Page 15
GB
Using the grill pan kitUsing the grill pan kit
Using the grill pan kit
Using the grill pan kitUsing the grill pan kit
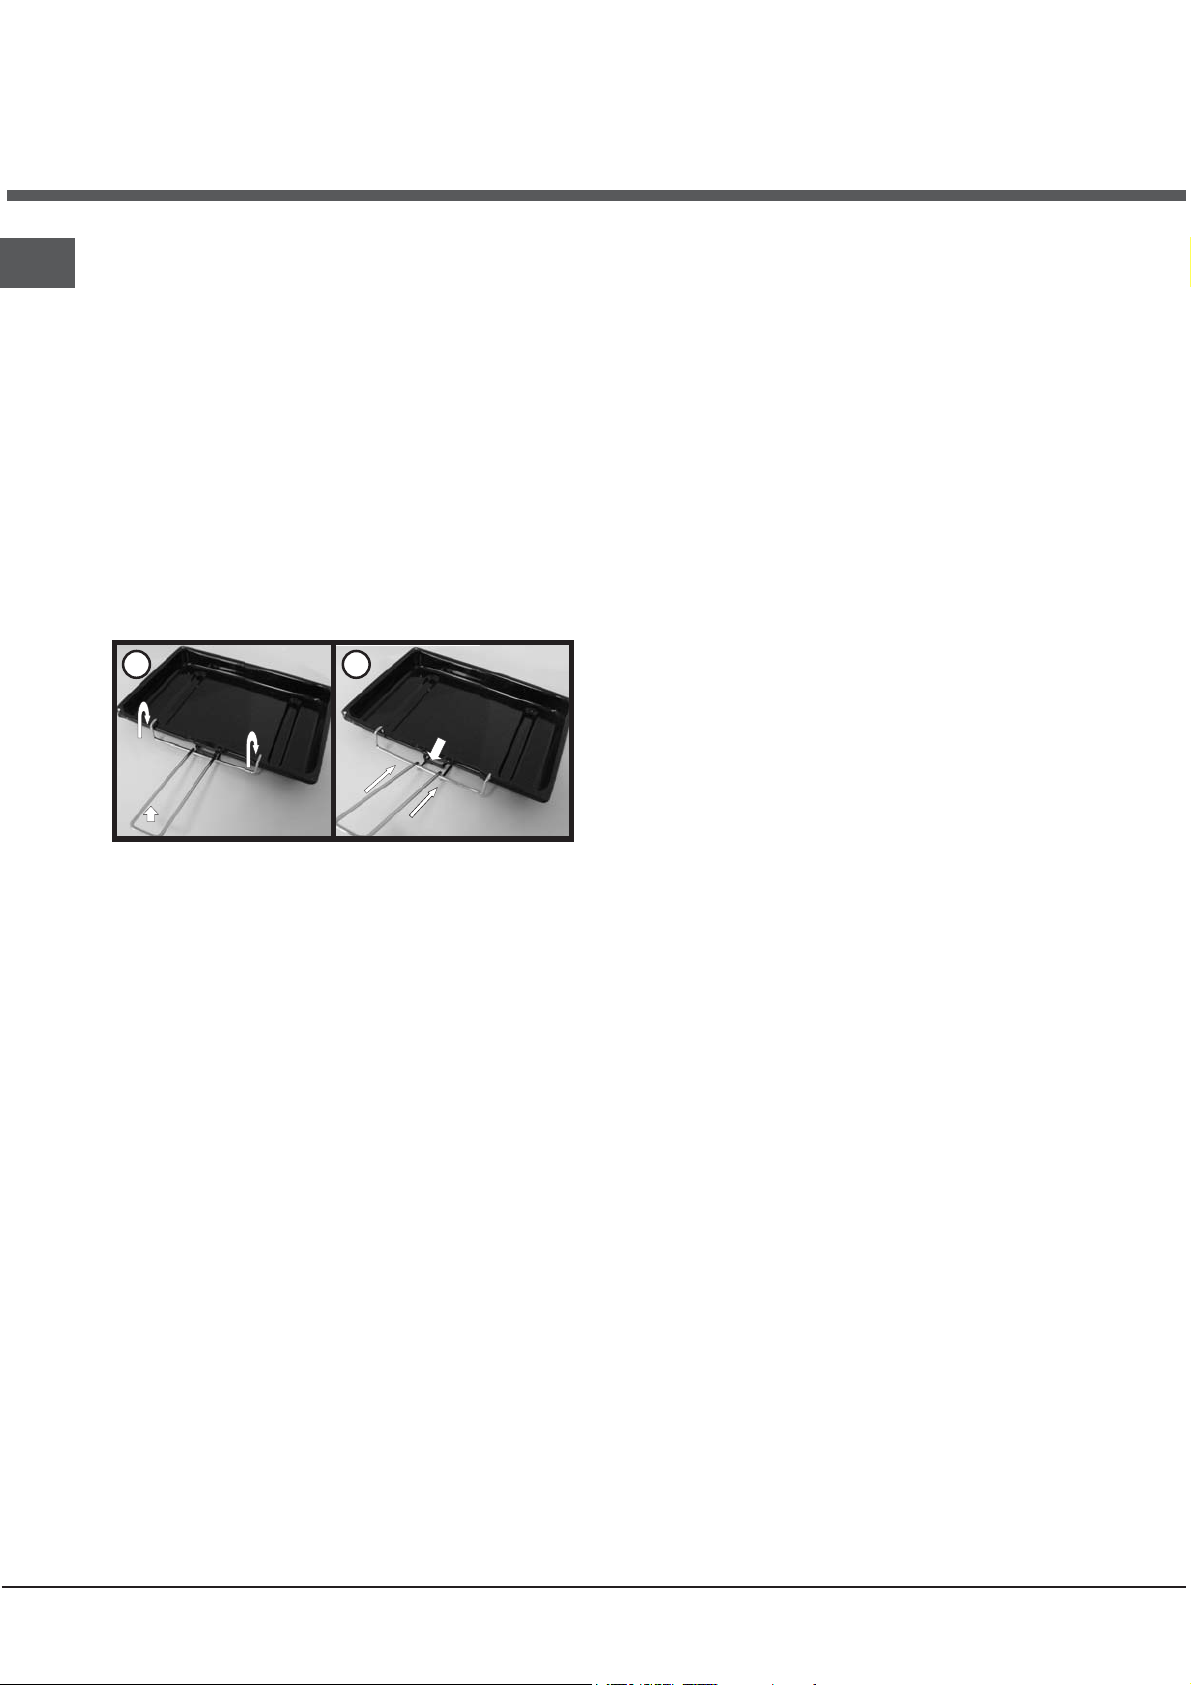
The grill pan handle is detachable from the pan to
facilitate cleaning and storage. Fix the pan handle
securely before use:
1. Fit the handle to the grill pan so that the external
‘hooks’ embrace the edge of the pan (fig. 1)
2. Make sure that the middle part of the handle fits
exactly the protruding support of the pan (fig .2)
and holds the pan from the bottom.
The food must be placed on the rack in the grill pan.
Position the grill pan on top of the oven rack. The
best results are achieved by placing the oven rack
on the uppermost shelves. Pouring a little water into
the grill pan will make the collection of grease
particles more efficient and prevent the formation of
smoke.
1
2
PLEASE PHONE US TO REGISTER YOUR APPLIANCE AND ACTIVATE YOUR PARTS GUARANTEE ON 08448 24 24 24
15
Page 16
Top Oven Conventional Cooking
The heat for conventional cooking in the top oven is
provided by the grill element and the element under
the floor of the oven. It is ideal for the slow cooking of
cheaper cuts of meat in casseroles etc. but can also
be used for small joints of meat up to 1.5kg (3lb).
See cooking charts for temperatures and shelf
positioning.
The top oven can be used either independently to
cook small quantities of food or in conjunction with
the main oven to provide additional cooking space.
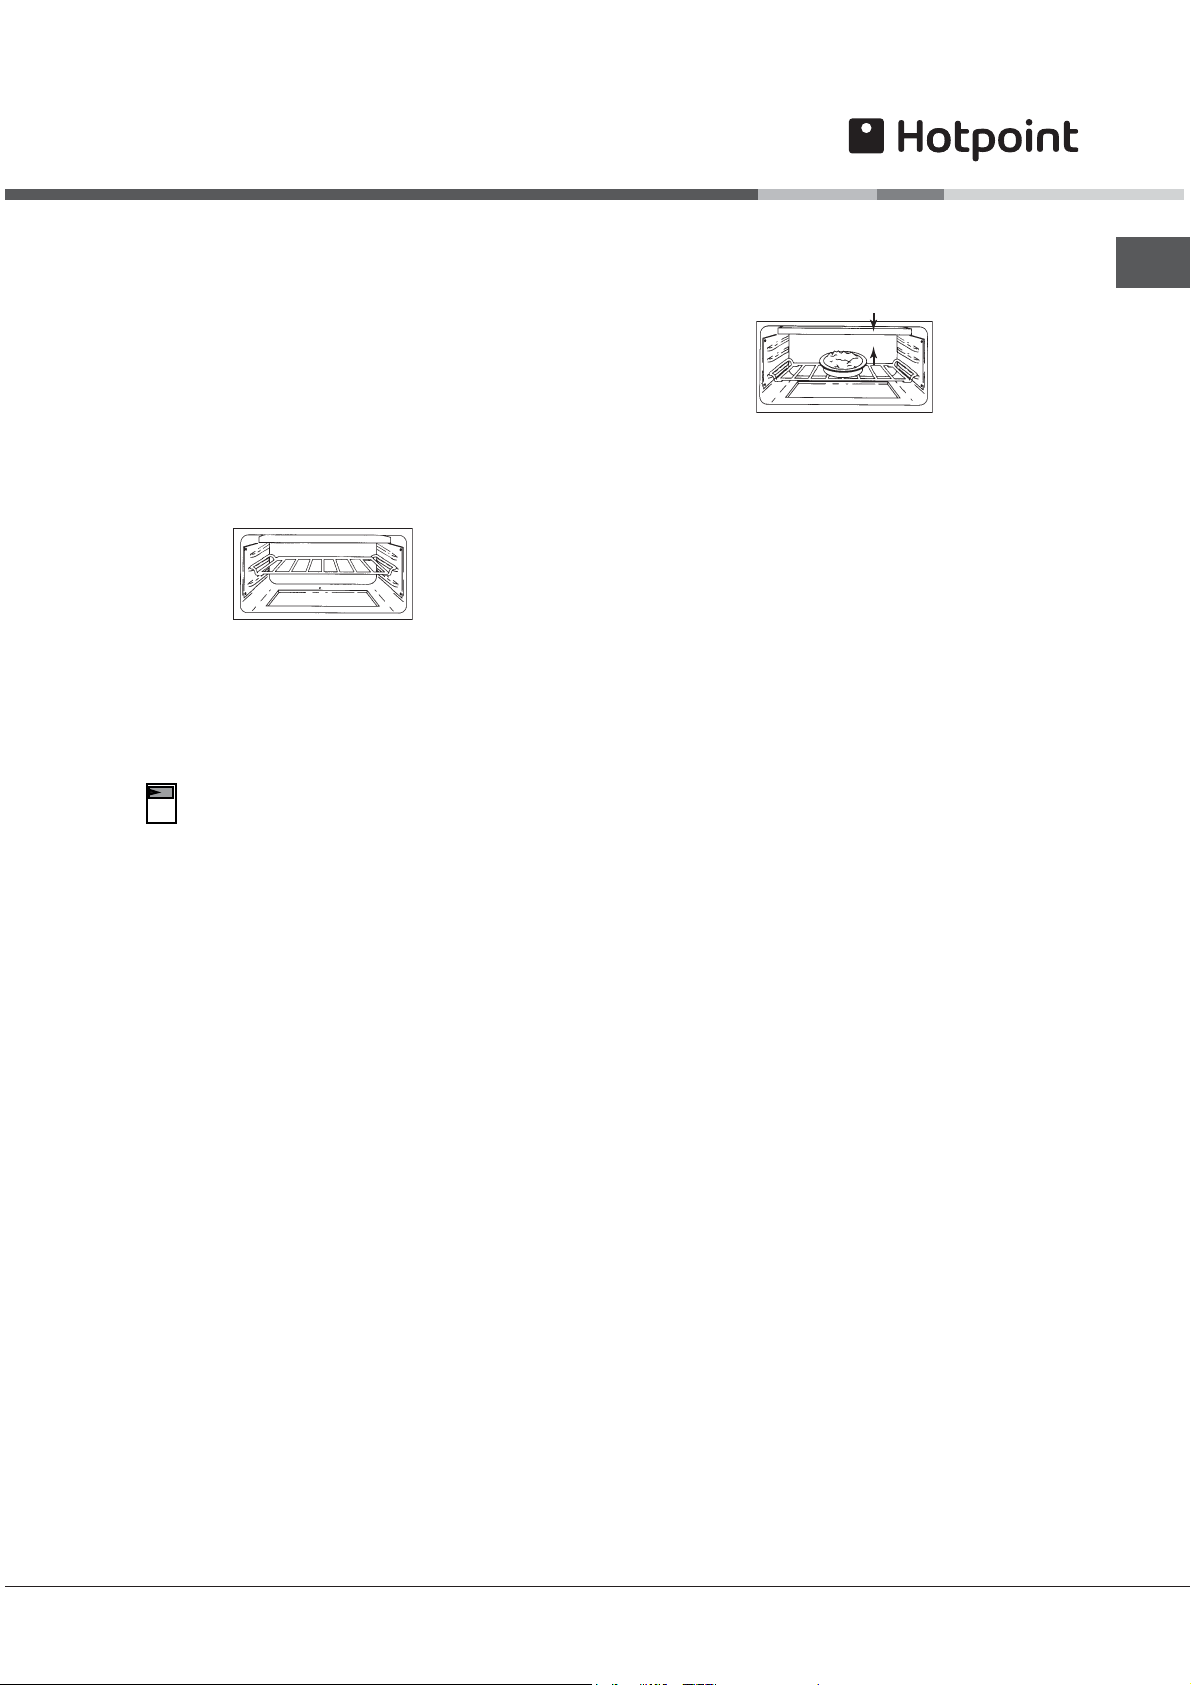
The shelf should be positioned on the first or
•
second runner from the bottom.
To use the oven proceed as follows:
Select the top oven, by pressing appropriate
button
Do not place food or dishes on the floor of the
•
oven.
25 mm (1 in)
Platewarming in the top oven
Plates and dishes placed on shelf 1 of the top oven
will be heated when the main oven is in use.
When the main oven is not in use, for instance when a
meal is being cooked on the hob, place the plates and
serving dishes on the shelf using the bottom runner
and turn the top oven control to approximately 100°C.
A maximum time of 10-12 minutes is all that is required
to heat the plates and dishes.
NEVERNEVER
NEVER operate the grill control when using the top
NEVERNEVER
oven for cooking or warming plates and dishes.
WARNING: DO NOT put delicate items china or
items which could be affected by heat into the
oven.
GB
Select desired program by turning the SELECTOR
knob, located to the left.
It’s possible to change default temperature and
default cooking duration. To change temperature
turn the THERMOSTAT/TIMER knob, clockwise to
increase temperature and anticlockwise to decrease
the temperature.
To change the cooking duration, press the TIMER
button, then turn the knob clockwise to increase
and anticlockwise to decrease the cooking duration.
Confirm the desired cooking duration by pressing
the TIMER button again.
The food to be cooked should be placed in the
•
centre of the shelf with a gap of at least 25mm
(1in) between it and the grill element. This should
avoid burning and ensure even cooking.
PLEASE PHONE US TO REGISTER YOUR APPLIANCE AND ACTIVATE YOUR PARTS GUARANTEE ON 08448 24 24 24
16
Page 17
Top Oven Temperature
Charts - Meat
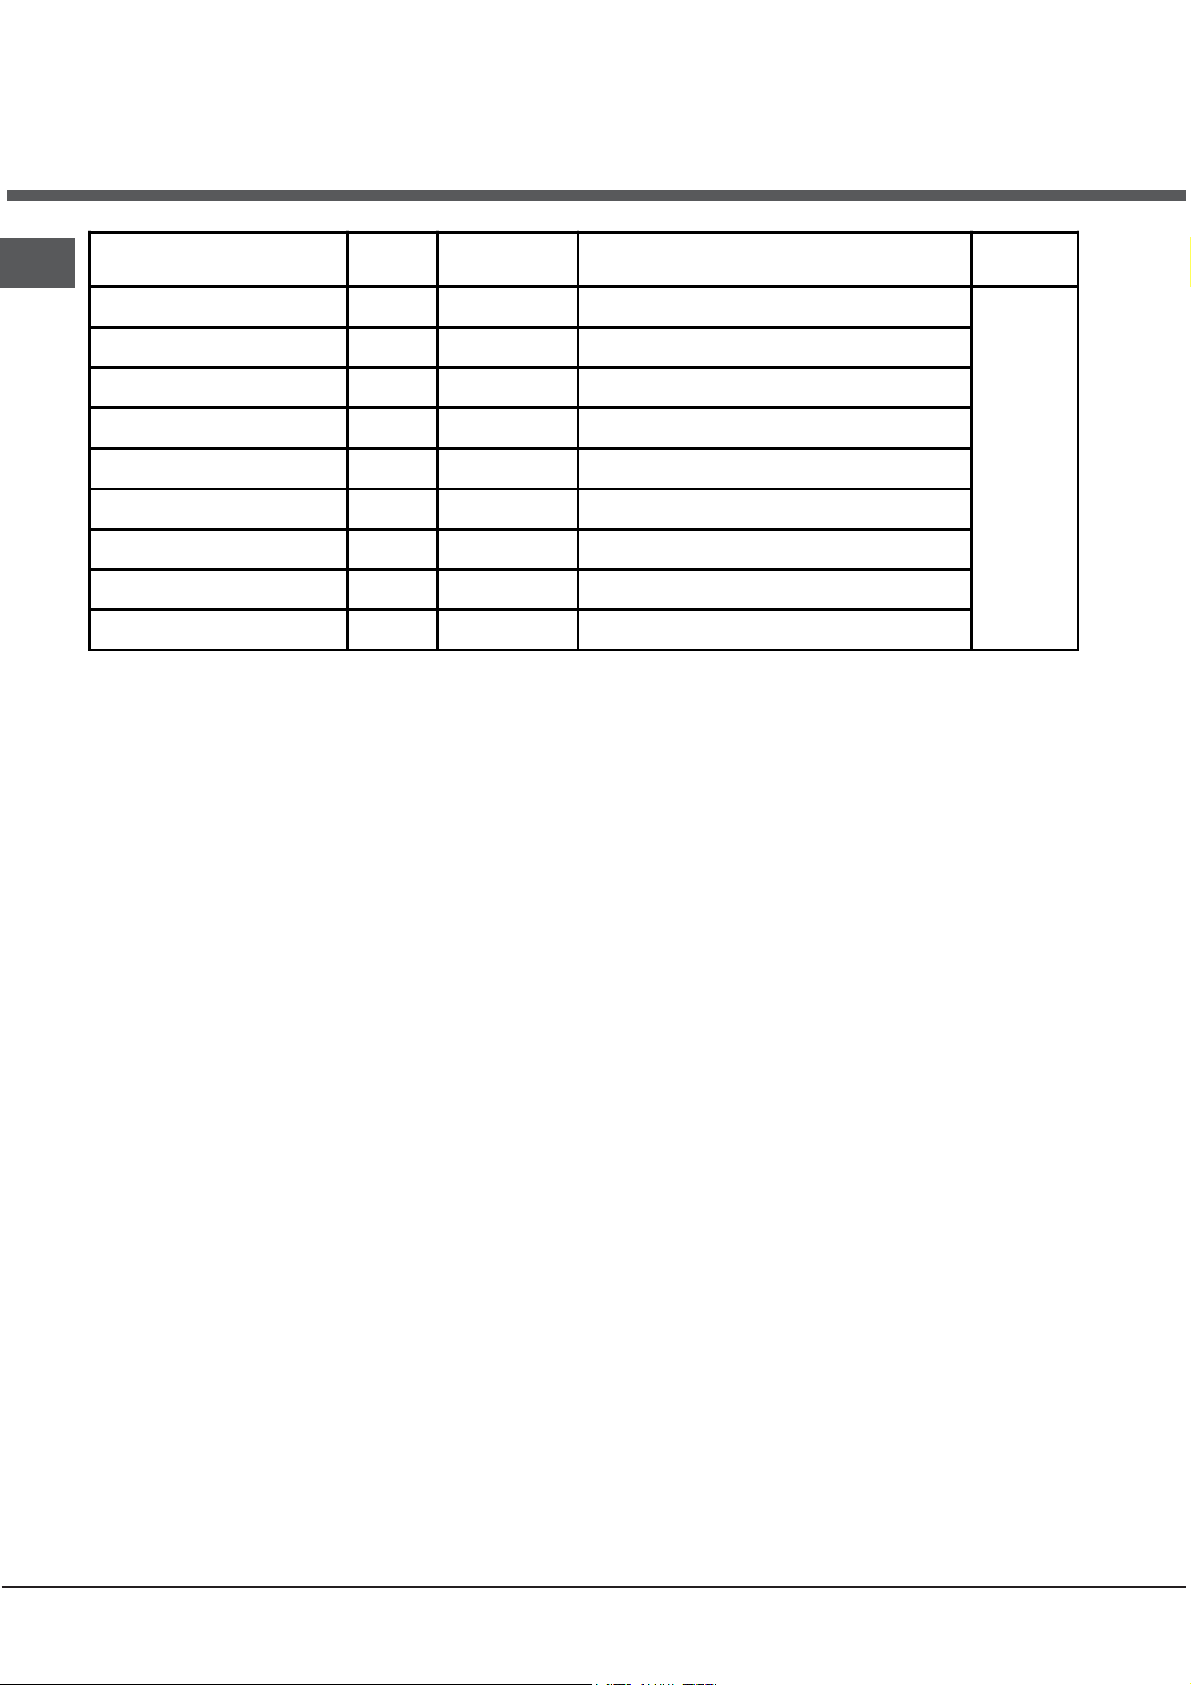
Meat Pre-heat
GB
Beef/ Lamb (slow roasting) Yes 170/180 35 mins per 450g (1lb) + 35 mins over.
Beef/ Lamb (foil covered) Yes 190/200 35-40 mins per 450g (1lb)+20mins
Pork (slow roasting) Yes 170/180 40 mins per 450g (1lb) + 40 mins over
Pork (foil covered) Yes 190/200 40 mins per 450g (1lb)+25mins
Veal (slow roasting) Yes 170/180 40-45 mins per 450g (1lb) + 40 mins over
Veal (foil covered) Yes 190/200 40-45 mins per 450g (1lb)+25mins
Poultry/Game (slow roasting) Yes 170/180 25-30 mins per 450g (1lb) + 25 mins over
Poultry/Game (foil covered) Yes 190/200 25-30 mins per 450g (1lb)+10mins
Casserole Yes 150 2-21/2 hrs
If using aluminium foil, never:
1. Allow foil to touch sides of oven.
2. Cover oven interior with foil.
3. Cover shelves with foil.
The most accurate method of testing the readiness of joints of meat or whole poultry is to insert a meat
thermometer into the thickest part of a joint, or the thickest part of poultry thighs, during the cooking period. The
meat thermometer will indicate when the required internal temp has been reached.
BeefBeef
Beef - Rare: 60°C
BeefBeef
Medium: 70°C
Well Done: 75°C
Temperature
°C
Lamb:Lamb:
Lamb: 80°C
Lamb:Lamb:
Pork:Pork:
Pork: 80°C
Pork:Pork:
Veal:Veal:
Veal: 75°C
Veal:Veal:
Time (approx.)
Position in
Poultry:Poultry:
Poultry: 90°C
Poultry:Poultry:
Oven
Runner 1
from
bottom of
oven.
PLEASE PHONE US TO REGISTER YOUR APPLIANCE AND ACTIVATE YOUR PARTS GUARANTEE ON 08448 24 24 24
17
Page 18
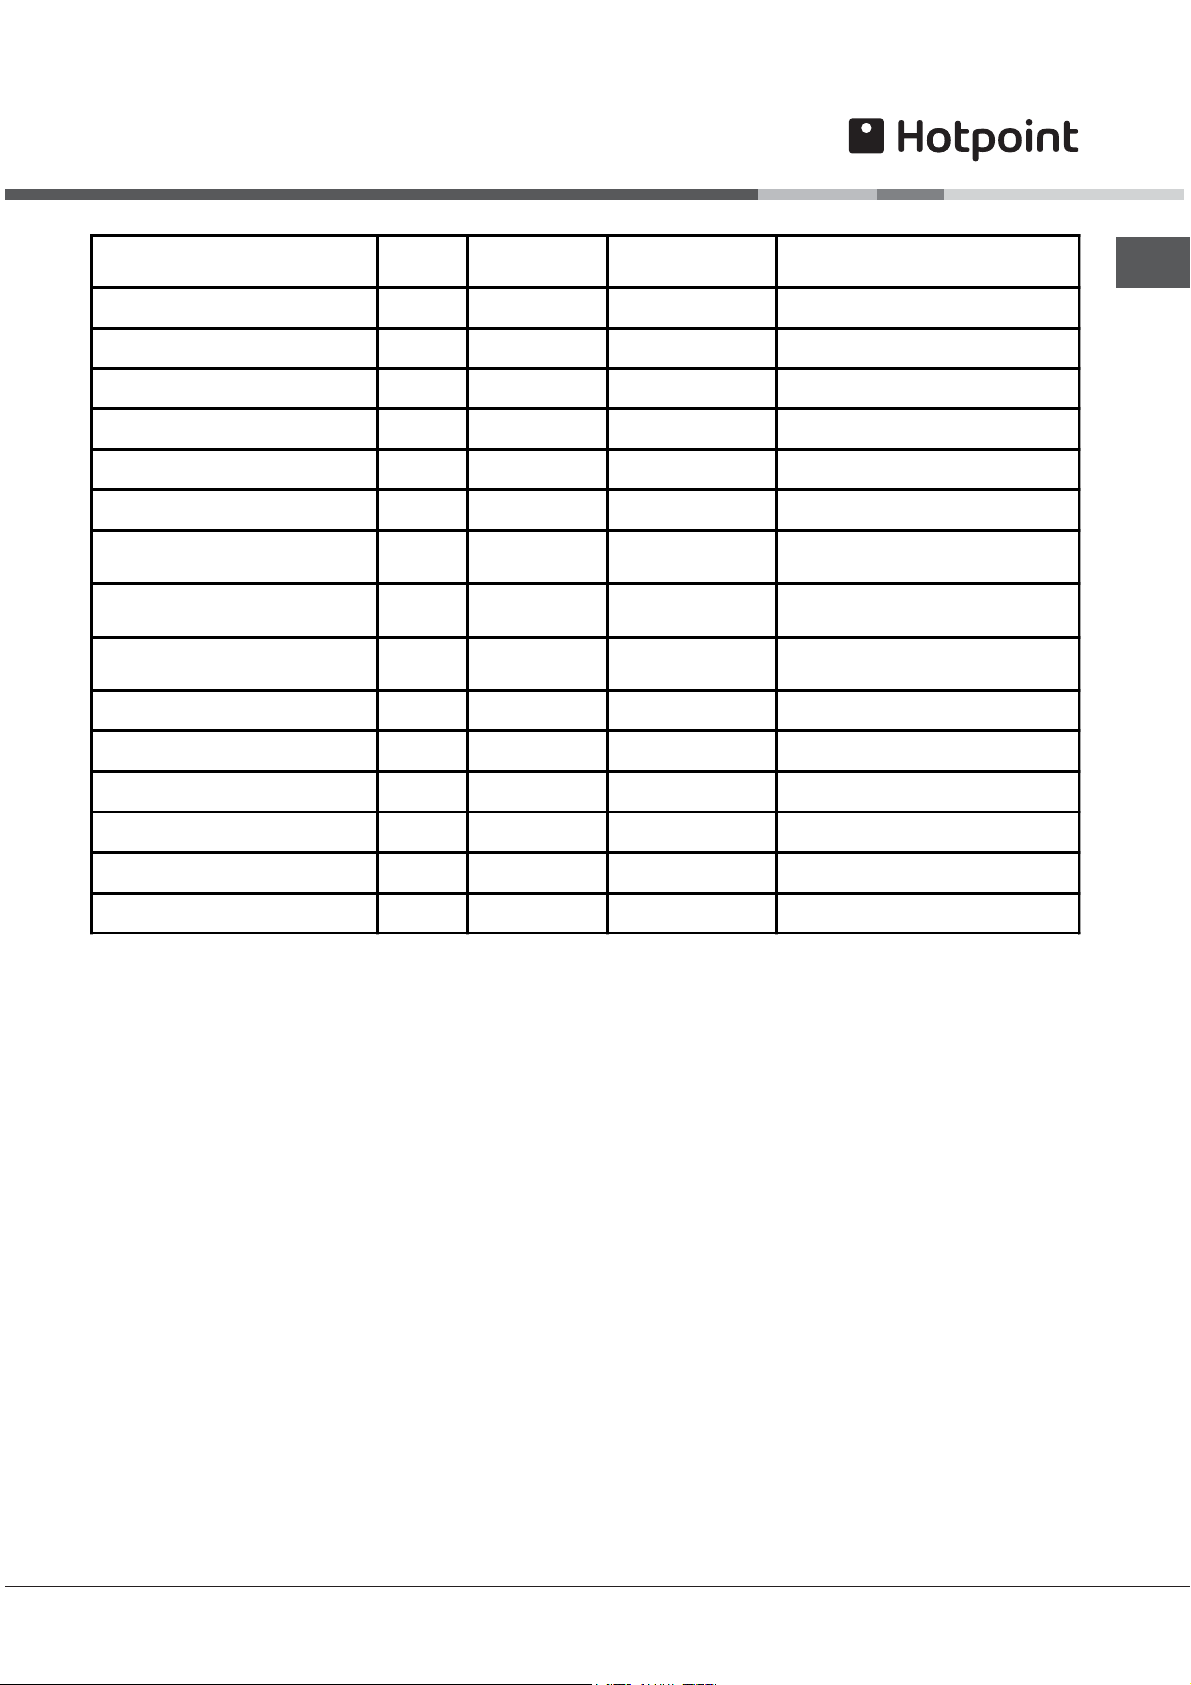
Top Oven Temperature
Charts - Baking
Scones Yes 210/220 10-15 Runner 2 from bottom of oven.
Small Cakes Yes 180/190 20-25 Runner 2 from bottom of oven.
Victoria Sandwich Yes 170/180 20-30 Runner 2 from bottom of oven.
Sponge Sandwich (fatless) Yes 180/190 20-25 Runner 2 from bottom of oven.
Swiss Roll Yes 200/210 10-15 Runner 2 from bottom of oven.
Semi-rich Fruit cakes Yes 150/160 60-75 7 inch Runner 1 from bottom of oven.
Rich Fruit cakes) Yes 140/150
Shortcrust Pastry Yes 190/200
Puff Pastry Yes 200/210
Yorkshire Pudding Yes 190/200 30-40 Runner 1 or 2 from bottom of oven.
Individual Yorkshire Puddings Yes 200/210 20-30 Runner 2 from bottom of oven.
Milk Pudding Yes 140/150 90-120 Runner 1 from bottom of oven.
#
Time Dependent
on size
Time Dependent
on recipe
Time Dependent
on recipe
Runner 1 from bottom of oven.
Runner 1 or 2 from bottom of oven.
Runner 1 from bottom of oven.
GB
Baked Custard Yes 150/160 40-50 Runner 1 from bottom of oven.
Bread Yes 200/210 30-45 Runner 1 from bottom of oven.
Meringues Yes 100 150-180 Runner 2 from bottom of oven.
Note: If soft margarine is used for cake making, temperatures recommended by the manufacturers should be
followed. Temperatures recommended in this chart refer to cakes made with block margarine only.
PLEASE PHONE US TO REGISTER YOUR APPLIANCE AND ACTIVATE YOUR PARTS GUARANTEE ON 08448 24 24 24
18
Page 19

GB
Main Oven - The Intelligent Cooking
System
The main oven of your new cooker is equipped with
an intelligent electronic cooking system that gives
you additional cooking performance, flexibility and
features over traditional cooking products.
See cooking charts for temperatures and
shelf positioning.
Cooking temperature ranges
The intelligent cooking system will automatically
suggest a suitable cooking temperature for several
cooking modes. It is possibile however to modify
the suggested temperature within a range specific to
each cooking mode.
Telescopic runners and Meat pan*
The main oven on this cooker comes equipped with
telescopic runners, meat pan and a food support.
The meat pan is suitable for cooking joints of meat
and poultry using the intelligent cooking system
(Fan, Traditional, Roast Meat and Roast Chicken).
Use the information given in the 'Cook Charts' for the
shelf positioning of the pan and runners.
To reposition the telescopic runners unclip the
runners from position, move them to the position you
require and re-clip them to secure.
*Available only on certain models
PLEASE PHONE US TO REGISTER YOUR APPLIANCE AND ACTIVATE YOUR PARTS GUARANTEE ON 08448 24 24 24
19
Page 20
Main Oven - The Intelligent Cooking
System
Cooking Advice Table
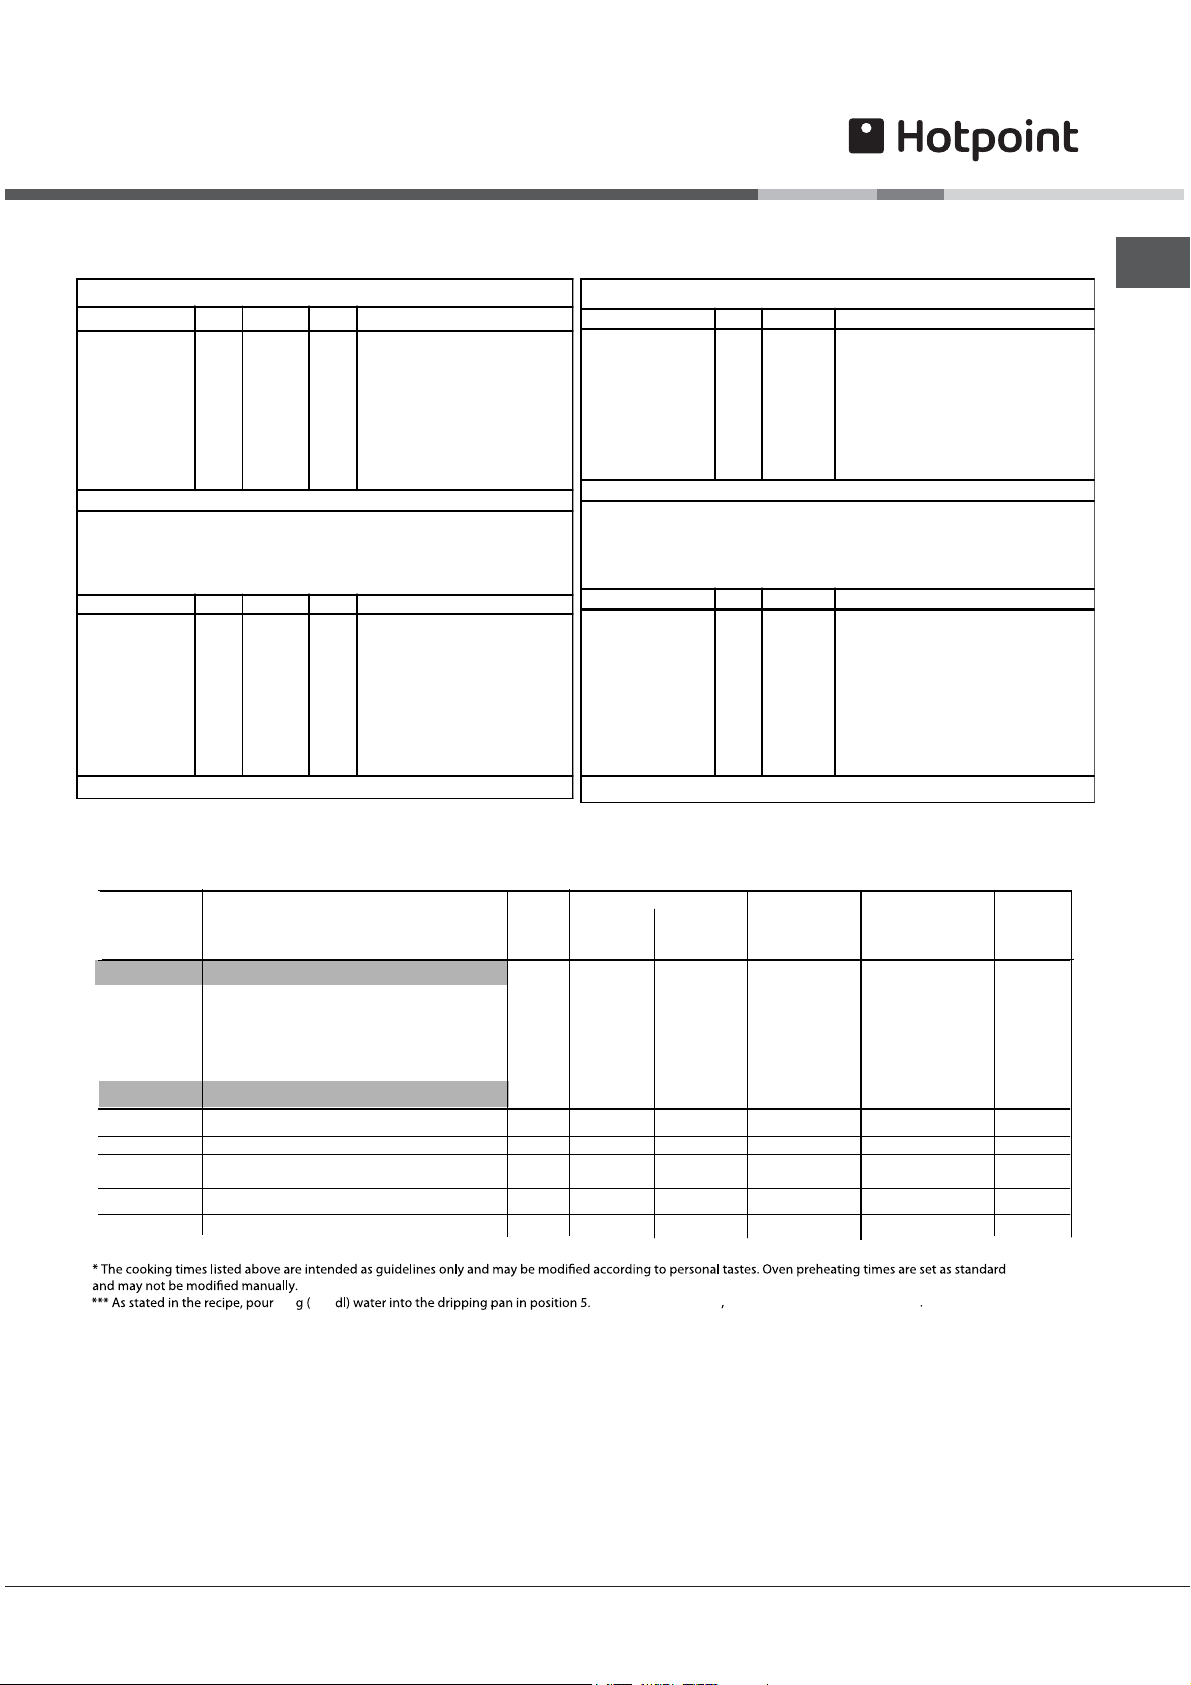
COOK CHA RT - Tradi ti onal m ode:
Shelf
Meat Pre-heat Temperature
Beef yes 190/200°C 2 or 3 20-25 minutes per 450g (1lb) + 20 minutes extra
Beef (foil covered) yes 190/200°C 2 or 3 35-45 minutes per 450g (1lb)
Lamb yes 190/200°C 2 or 3 25-30 minutes per 450g (1lb) + 25 minutes extra
Lamb (foil covered) yes 190/200°C 2 or 3 35-45 minutes per 450g (1lb)
Pork yes 190/200°C 2 or 3 30-35 minutes per 450g (1lb) + 30 minutes extra
Pork (foil covered) yes 190/200°C 2 or 3 40 minutes per 450g (1lb)
Poultry yes 190/200°C 2 or 3 20-25 minutes per 450g (1lb) + 20 minutes extra
Poultry (foil covered) yes 190/200°C 2 or 3 25-30 minutes per 450g (1lb)
Notes:
BAKING Preheat Temperature Cooking Time
Scones
Small cakes
Victoria sandwich
Fatless sponge sandwich
Swiss roll
Semi rich fruit cake
Ric h fruit cake
Shortcrust pastry
Puff pastry
Yorkshire pudding
Yorkshire pudding:
Individual
Bread
Meringu es
Notes:
Internal Temperatures:
Beef rare 60°C
medium 70° C
well done 75°C
Lamb 80°C
Pork 80°C
Poultry 90° C
200°C
yes
180/190°C
yes
170/180°C
yes
190/200°C
yes
190/200°C
yes
150/160°C
yes
130/140°C
yes
190/200°C
yes
yes
190/200°C
yes
190/200°C
yes
200/210°C
yes
200/210°C
yes
For best results use one shelf. Preheat the o ven b efore use.
80/90°C
Posit io n
2
2
2
3
2
2
2
2 or 3
2 or 3
3
3
3
3
Cooking Time
10-15 minutes
15-25 minutes
20-30 minutes
15-20 minutes
10-15 minutes
60-75 minutes
depending on size
depending on recip e
depending on recip e
35-45 minutes
20-30 minutes
30-45 minutes
180-240 minutes
COOK C HART - Fan oven mod e:
Meat Pre-heat Temperature Cooking Time
Beef
Beef (foil covered)
Lamb
Lamb (foi l covered)
Pork
Por k (foil c overed )
Chicken/Turkey (up to
4kg/8lb )
Chicken/Turkey(foil covered)
Turkey (4-5.5 kg/8-12lb) No 15 0/160°C 12-14 min utes per 450g (1l b) + 15 minute s extra
Notes:
BAKING Preheat Temperature Cooking Ti me
Scones
Small cakes
Victori a sandwich
Fatless spo ng e sandwich
Swiss roll
Semi rich fruit cake
Rich frui t cake
Shortcrust pastry
Puff pastry
Yorkshire pudding
Yorkshire pudding:
Indi vidua l
Bread
Meringues
Notes:
No
160/180°C
Yes
180/190°C
No
160/180°C
Yes
180/190°C
No
160/180°C
Yes
180/190°C
No
160/180°C
Yes
170/180°C
Internal Temperatures:
Be ef rare 60° C
medium 70°C
well done 75°C
Lamb 80°C
Pork 80°C
Poultry 90°C
200/210°C
yes
170/180°C
yes
160/170°C
yes
180/190°C
yes
yes
190/200°C
yes
140/150°C
no
130/140°C
no
190/200°C
no
190/200°C
yes
180/190°C
yes
190/200°C
yes
200/210°C
no
Use u p to 2 shelves w hen cooki ng (ensure they are evenly spac ed) It is not
necessary to preheat the oven for some items.
80/90°C
20-25 min ute s per 450g (1lb) + 20 minutes e xtra
30-35 min ute s per 450g (1lb)
25 minu tes per 450g (1 lb) + 25 minu tes extra
30-35 min ute s per 450g (1lb)
25 minu tes per 450g (1 lb) + 25 minu tes extra
40
-45 minute s per 450g (1lb )
18-20 min ute s per 450g (1lb) + 20 minutes e xtra
30-35 min ute s per 450g (1lb)
8-10 minu tes
15-25 min ute s
20-30 min ute s
10-20 min ute s
10-15 min ute s
60-75 min ute s
depending on size
depending on recipe
depending on recipe
30-45 min ute s
20-25 min ute s
30-45 min ute s
180-240 m inutes
GB
Cooking advice table*
Modes
Foods
Weight
(in kg)
Rack position
Standard
guide
rails
Sliding
guide
rails
Preheating
Recommended
Temperature
(˚C)
Manual*
Low
temperature
(Raising)*
Rising process for dough made with yeast
(brioches, bread, sugar pie, croissants, etc.).
2
2
no
35-40
Automatic**
Roast Meat
Fish fillets
Bread***
Baked cakes
Roast dishes 1 2 or 3 2 no
Cod
Perch
Trout
Bread (see recipe)
Baked cakes
0,4-0,5
0,4-0,5
0,4-0,5
2 or 3
2 or 3
2 or 3
2
2
2
11 or 2 1 no
12 or 3 2 no
no
no
no
50 0,5
** The duration of automatic coking functions are set by default. The values can be modified by the user, starting with the default duration.
! AUTOMATIC COOKING FUNCTIONS:
When cooking/baking the foods of the weight that varies slightly from the suggested, the cooking duration can
be customised according to personal taste by modifying the relevant value by ±5/20 minutes.
Cooking
duration
(minutes)
If using aluminium foil, never:
1.Allow foil to touch sides of oven. 2.Cover oven interior with foil. 3.Cover shelves with foil.
PLEASE PHONE US TO REGISTER YOUR APPLIANCE AND ACTIVATE YOUR PARTS GUARANTEE ON 08448 24 24 24
20
Page 21
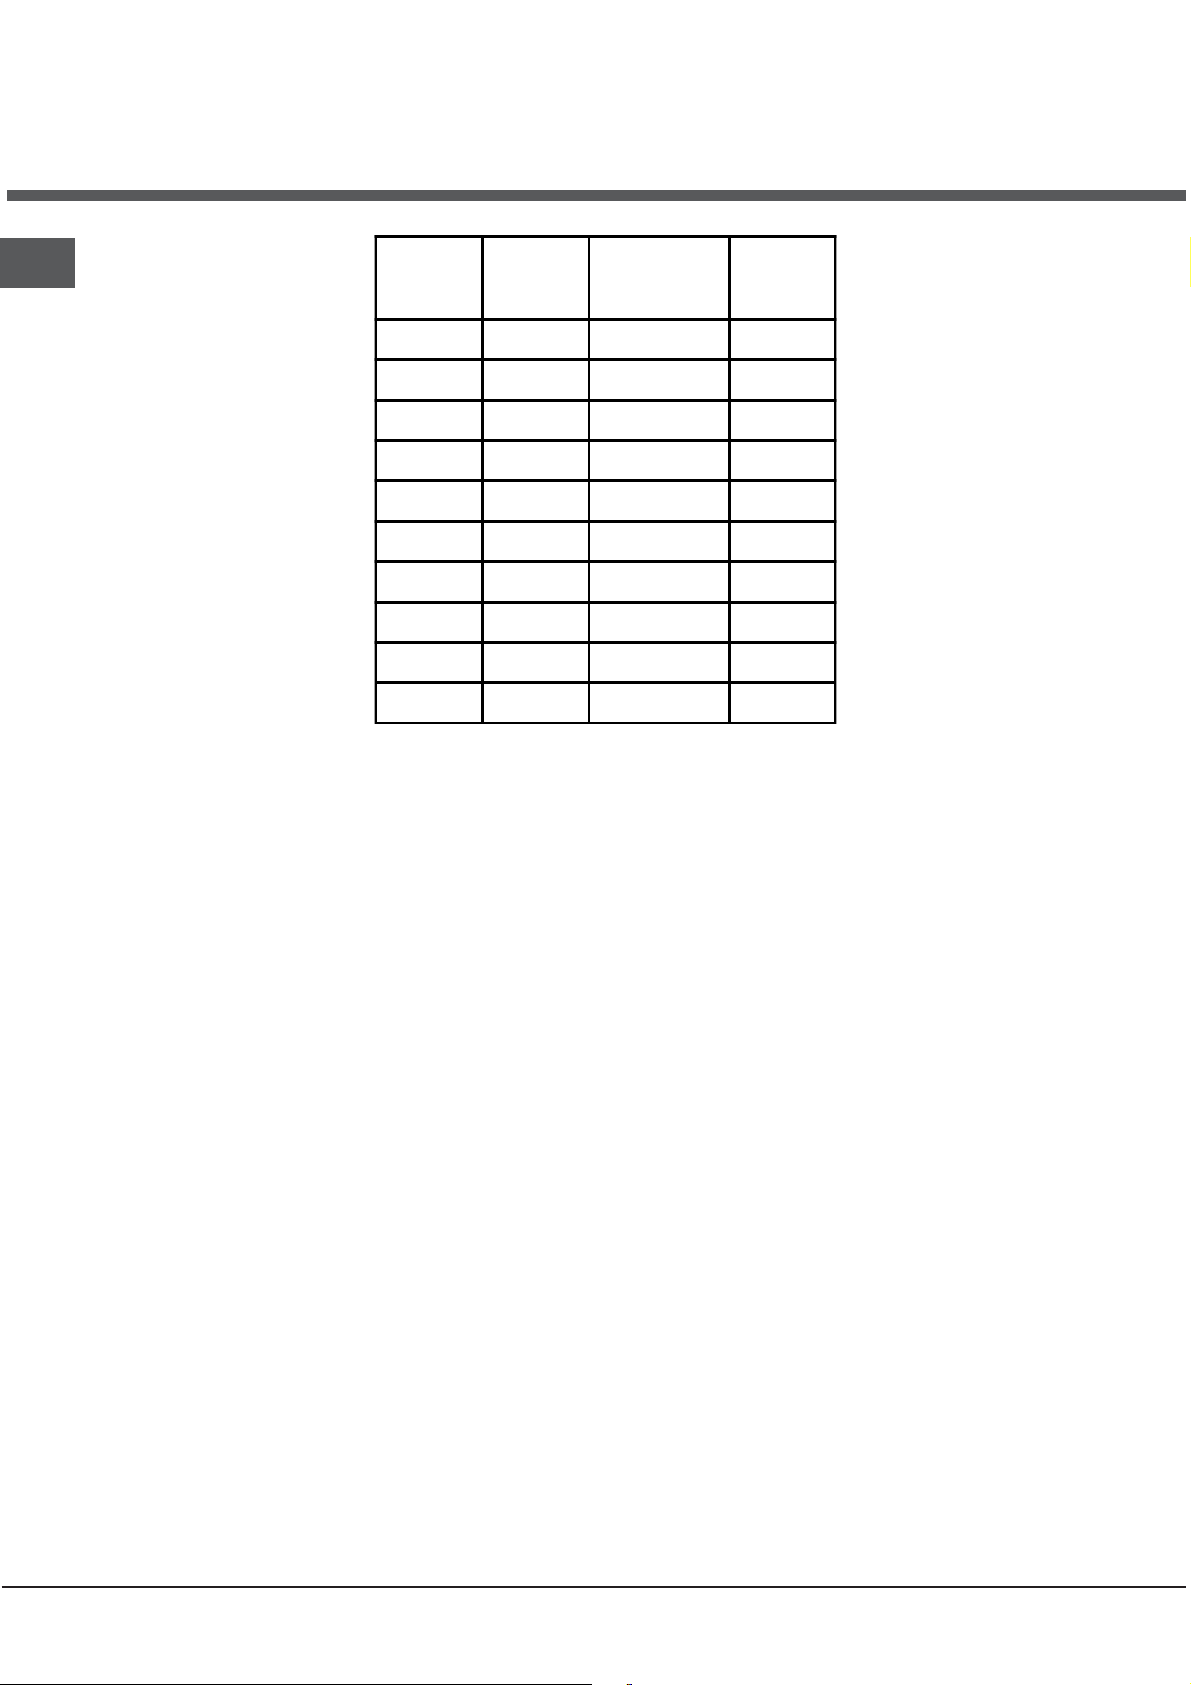
Temperature Conversion Chart
GB
G
½ 250 120 100
1 275 140 120
2 300 150 130
3 325 160 140
4 350 180 160
5 375 190 170
6 400 200 180
7 425 220 200
8 450 - 210
9 475 - 220
F
v
#v
F
#v
PLEASE PHONE US TO REGISTER YOUR APPLIANCE AND ACTIVATE YOUR PARTS GUARANTEE ON 08448 24 24 24
21
Page 22
Care and Cleaning
L
&
Warning: Before cleaning, please ensure that the
electricity supply to the appliance is switched off
and the appliance is fully cold.
! Never use steam cleaners or pressure cleaners on
the appliance.
!
Clean the glass part of the oven door using a sponge
and a non-abrasive cleaning product, then dry
thoroughly with a soft cloth. Do not use rough abrasive
material or sharp metal scrapers as these could
scratch the surface and cause the glass to crack.
! The accessories can be washed like averyday
crockery (even in your dishwasher).
1. "STAYCLEAN" OVEN LINERS*
(Top Oven Sides, Main Oven Sides and
Rear Panel)
TOP OVEN SIDES
It should not normally be necessary to clean the
"Stayclean" panels with water. If the user feels it is
desirable to do so, wipe them over with a clean,
soapy cloth, followed by a wipe with a clean damp
cloth.
DO NOT use biological washing powder, harsh
abrasives or chemical oven cleaners of any kind
as this could damage the "Stayclean" oven liners.
2. CLEANING GRILL, TOP OVEN AND
MAIN OVEN
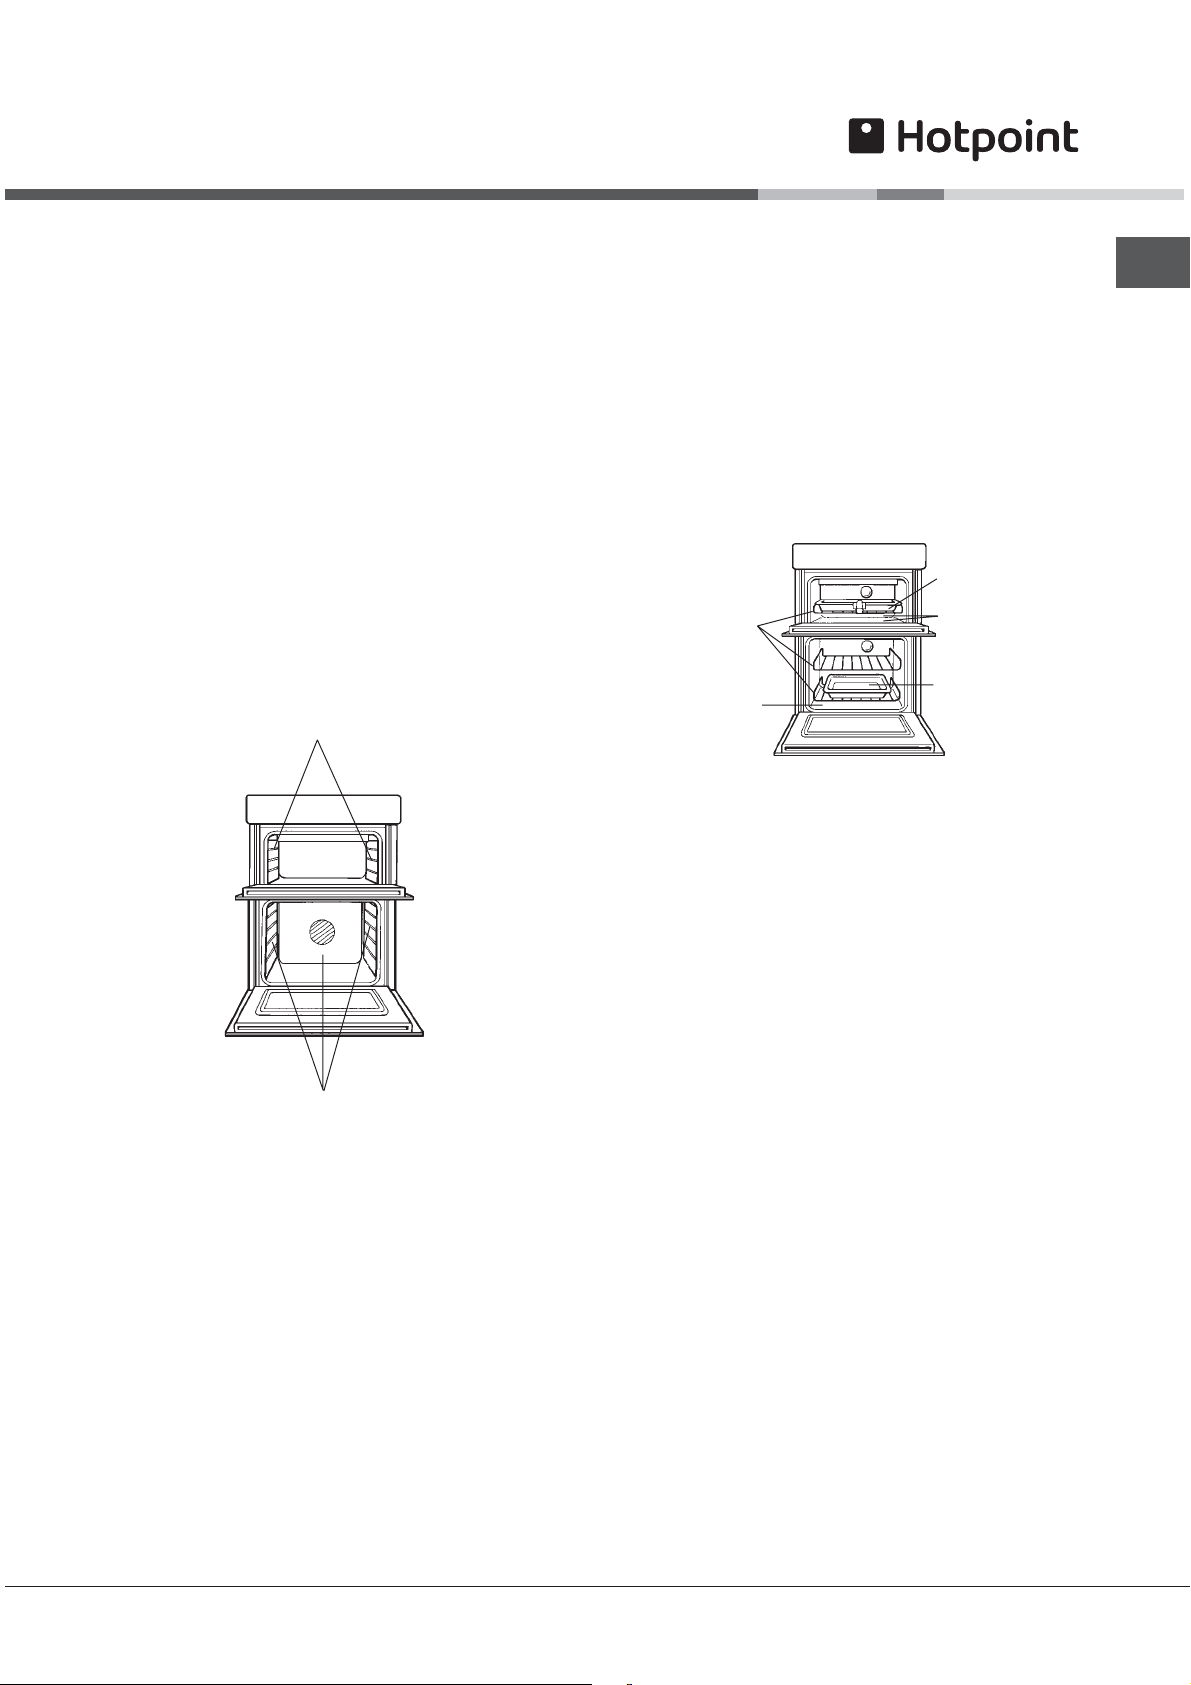
GRILL
PAN
OVEN
SHELVES
MAIN
OVEN
BASE
(a) Base & Rear of Top Oven and Base of Main
Oven.
Wipe out the oven with a damp soapy cloth. For
more stubborn stains on the base of the oven use a
well soaped fine steel wool soap pad.
BASE
REAR
MEAT
PAN
GB
MAIN OVEN SIDES AND REAR PANE
(a) How "Stayclean" works.
The surfaces of the "Stayclean" oven liners (Main
Oven rear panel) are treated with a special vitreous
enamel which absorbs cooking soils. At
temperatures of 220°C (425°F) or above, the special
surface enables these soils to be slowly destroyed.
The higher the temperature the more effective it is.
(b) Cleaning.
In most cases normal cooking operations at 220°C
(425°F) will permit this cleaning operation to proceed
during cooking. However if higher cooking
temperatures are not used regularly, it may be
necessary, in order to prevent heavy soiling, to run
the ovens without shelves or meat pan, at a
maximum setting for a couple of hours (Fan Oven
mode only).
(b) Grill Pan, Meat Pan* & Oven Shelves.
To prevent stains from being burnt on to the grill
pan, food support and rod shelf, always wash
immediately after use in warm soapy water.
Use a well soaped fine steel wool soap pad to
remove stubborn stains from the rod shelves, grill
pan, meat pan and the base of the oven.
DO NOT use aerosol cleaners on this oven as
they could adversely affect the fan motor unit,
and cannot be wiped off the fan blade.
(c) Solarplus Grill.
To clean the Solarplus Grill, use a clean, damp,
soapy cloth and wipe over. If stubborn stains
remain, gently clean with a well soaped nylon
scouring pad and wipe over with a damp cloth.
DO NOT use metal cleaning utensils, wire wool or
proprietary oven cleaners on the grill element
mesh.
*Available only on certain models
PLEASE PHONE US TO REGISTER YOUR APPLIANCE AND ACTIVATE YOUR PARTS GUARANTEE ON 08448 24 24 24
22
Page 23
Care and Cleaning
S
GB
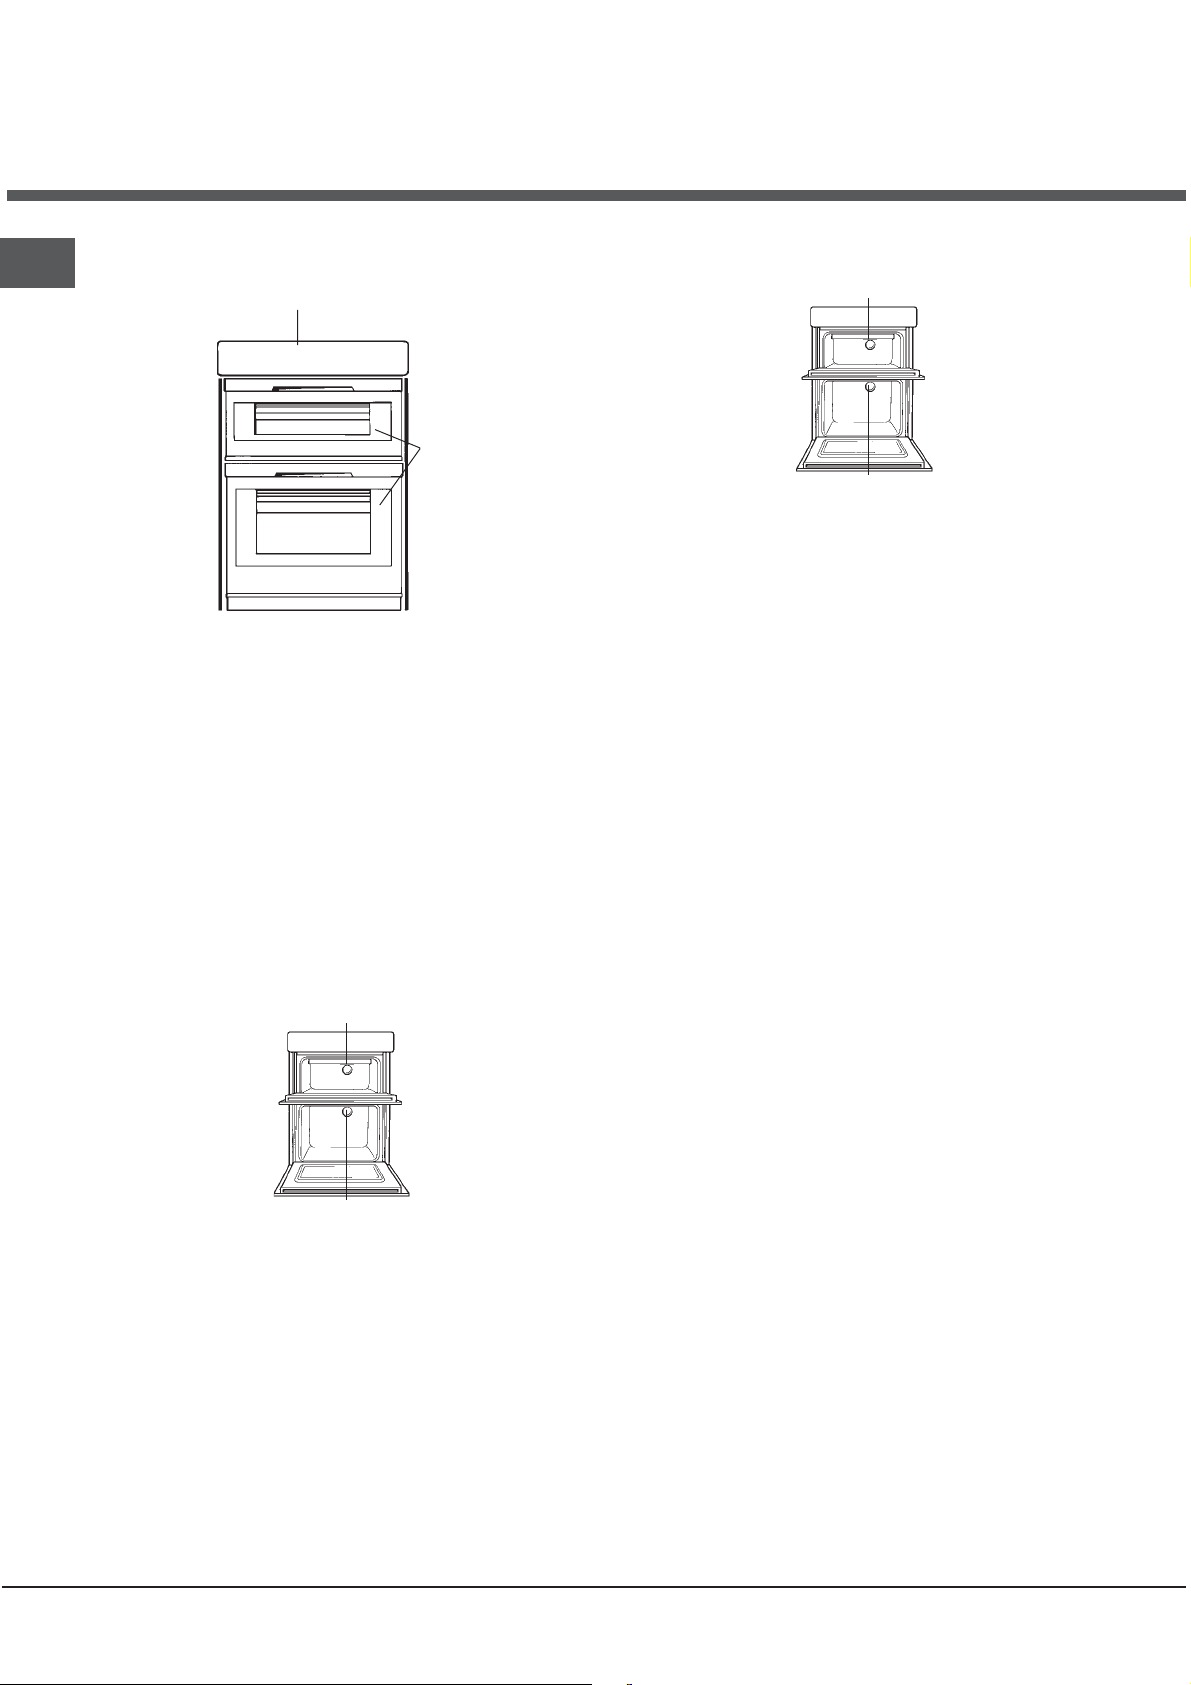
3. OVEN DOORS
CONTROL PANEL
OVEN
DOOR
(a) Control Panel
Regularly wipe with a clean, damp cloth and polish
with a clean, dry cloth.
(b) Inner Door Panels & Glass
Open the door fully. The glass panel may now be
washed. Stubborn stains can be removed by using
a well soaped, fine steel wool soap pad.
5. HOW TO CLEAN THE LAMP LENS
TOP OVEN LAMP
MAIN OVEN LAMP
Warning: To avoid electric shocks - please ensure
that the electricity supply to the appliance is
switched off and the appliance is fully cold,
before cleaning lamp lens.
Open the oven door and remove the oven shelves.
Using a thick cloth, grip the lamp lens, unscrew
anticlockwise and remove.
Clean with a non-abrasive cleansing cream and refit
lamp lens.
DO NOT use scouring pads, or abrasive powder,
which will scratch the glass lens
DO NOT use scouring pads, or abrasive powder,
which will scratch the glass.
4. REPLACEMENT OF THE OVEN LAMP
TOP OVEN LAMP
MAIN OVEN LAMP
Warning: To avoid electric shocks - please ensure
that the electricity supply to the appliance is
switched off and the appliance is fully cold,
before removing the lamp lens.
Open the oven door and remove the oven shelves.
Using a thick cloth, grip the lamp lens, unscrew
anticlockwise and remove the lens.
Carefully unscrew the bulb anti-clockwise.
Fit replacement bulb (25W 300°C SES) and refit lens.
PLEASE PHONE US TO REGISTER YOUR APPLIANCE AND ACTIVATE YOUR PARTS GUARANTEE ON 08448 24 24 24
23
Page 24
Care and Cleaning
CLEANING THE DOORS
Take particular care not to damage the inner
surface of the door inner glass that is coated with
a heat reflective layer. Do not use scouring pads,
or abrasive powder, which will scratch the glass.
Ensure that the glass panel is not subjected to
any sharp mechanical blows.
Stubborn stains can be removed by using a fine
steel wool soap pad. For slight soiling the inner
glass panel may be cleaned, while still warm,
without removing it from the door. After cleaning,
rinse and dry with a soft cloth.
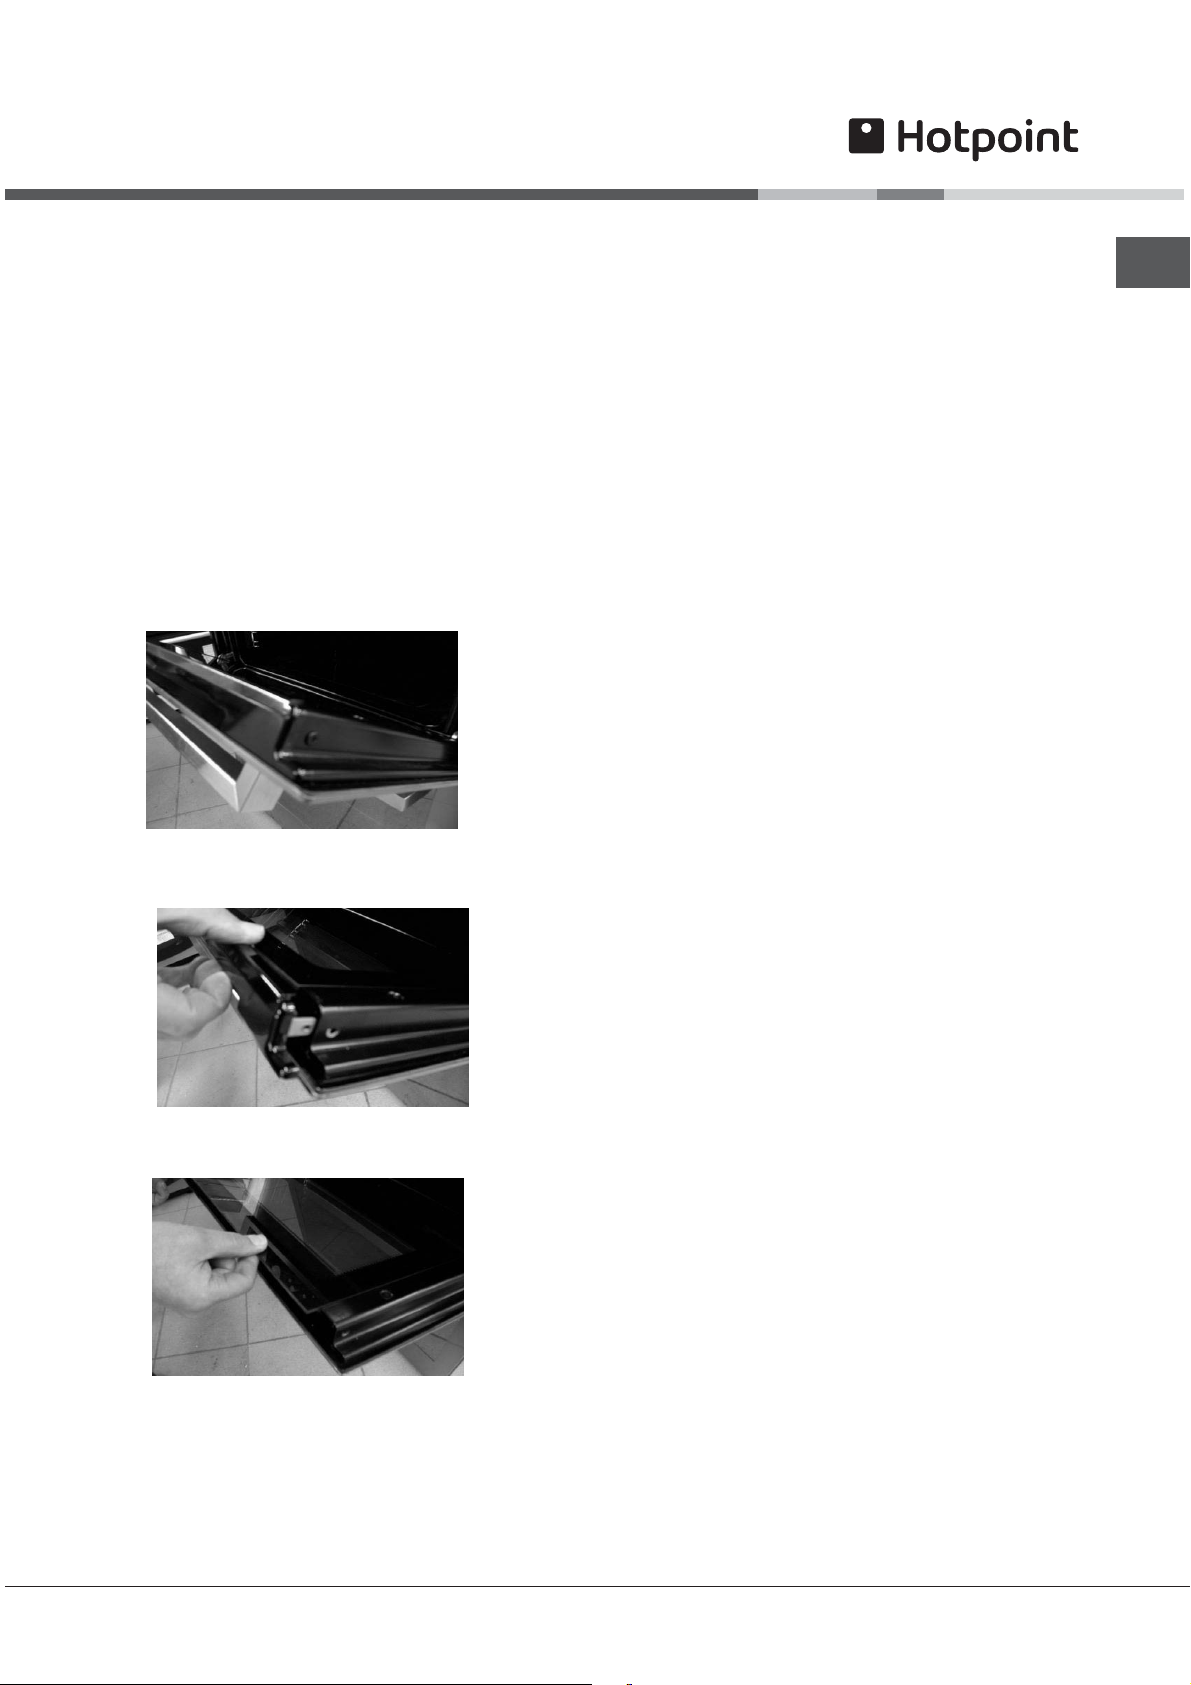
DROP DOWN DOORS
Remove the door inner glass as follows.
NEVER OPERATE THE COOKER WITHOUT THE
INNER DOOR GLASS IN POSITION.
Refit the door inner glass as follows.
1. Open the door fully.
2. Locate the inner door glass into its slots.
3. Carefully slide the glass into its slots as far as it
will go and replace the top filler cap as well as the
tapping plates
4. Ensure the tapping plates are correctly fitted, as
theycan easily fall out and get mislaid.
GB
Remove screws from both side of door
Gently ease the top trim away from door
Gently ease glass upwards and remove from door
PLEASE PHONE US TO REGISTER YOUR APPLIANCE AND ACTIVATE YOUR PARTS GUARANTEE ON 08448 24 24 24
24
Page 25
GB
If something
goes wrong...
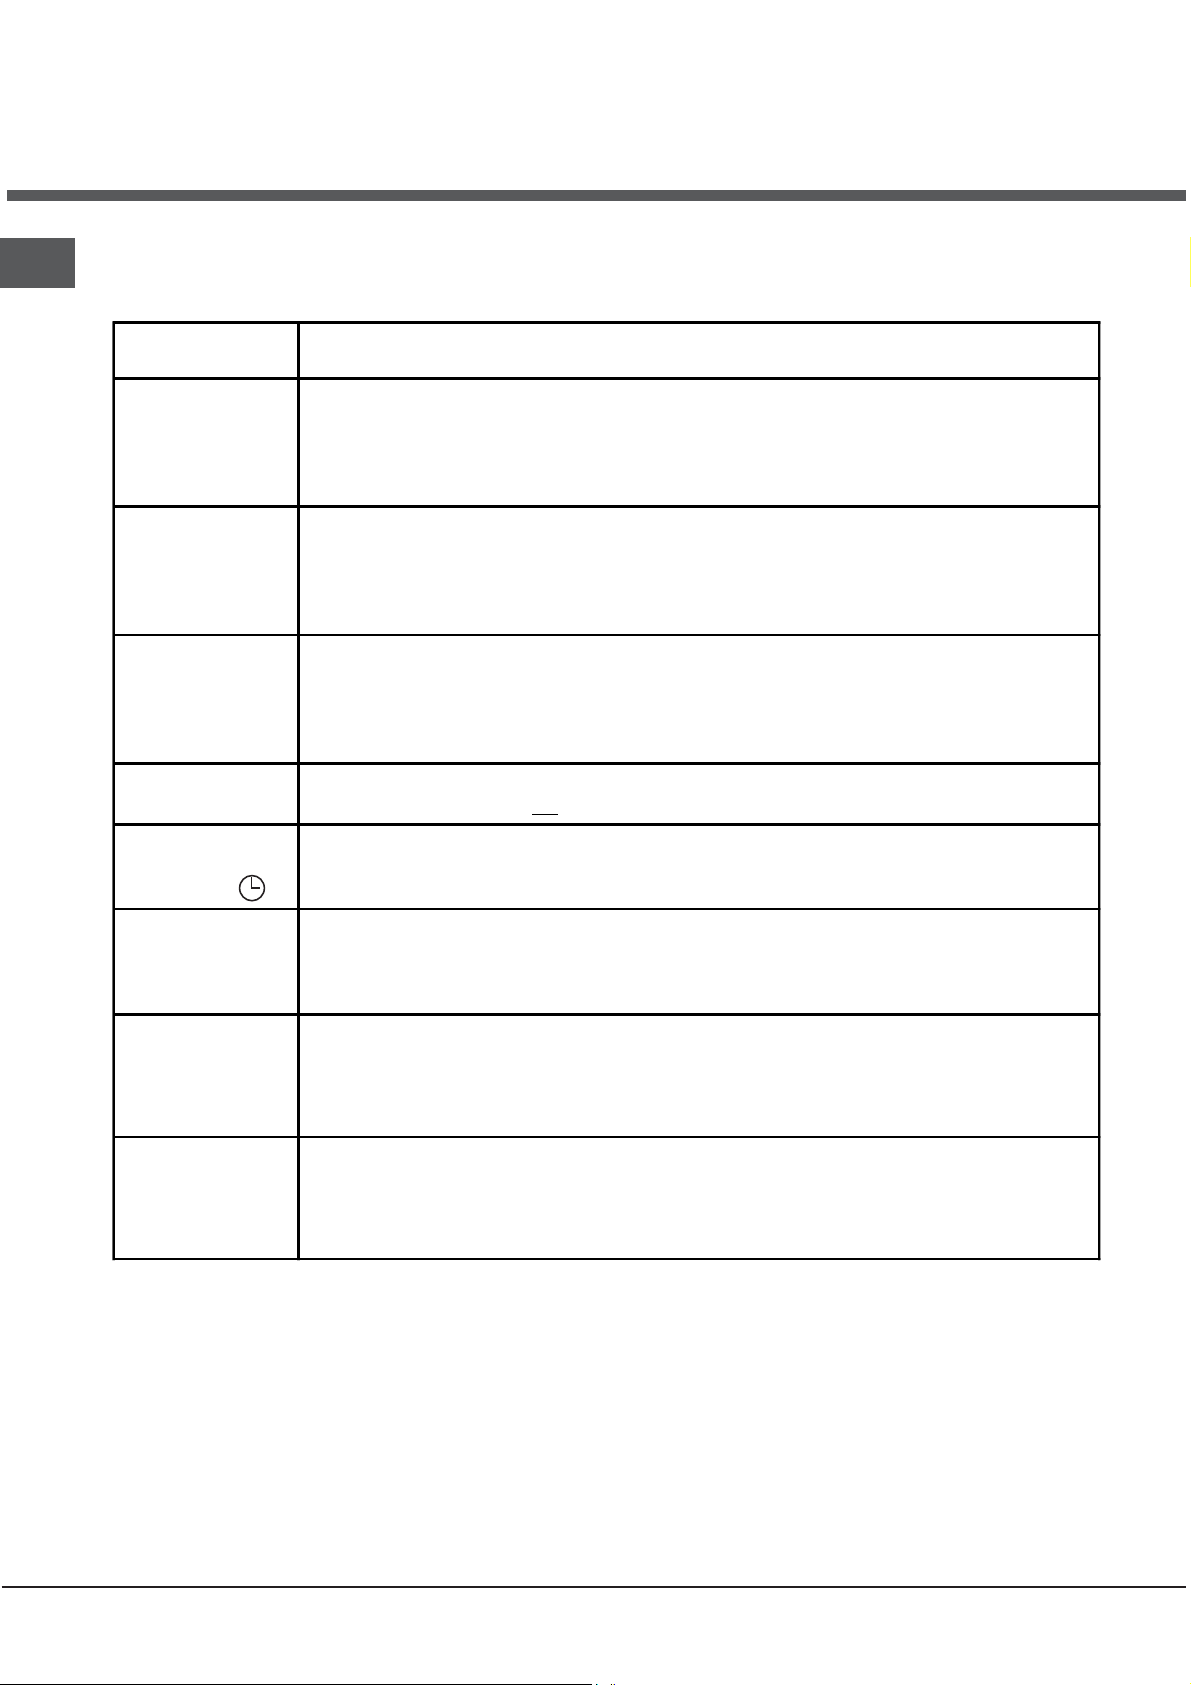
Before calling a Service Engineer, please check through the following lists.
THERE MAY BE NOTHING WRONG.
b ,
Slight odour or
small amount of
smoke when grill /
oven used for first
time
Nothing works
Top oven, grill and
main oven do not
work.
This is normal and should cease after a short period.
If you find that the timer display is blank, then it is likely that there is no electricity supply to
your oven. Check:
(i) That the main cooker wall is switched on
(ii) Other appliances, to see if you have had a power cut
(iii) The main circuit breaker for the property
Operating the cooker under the following conditions may cause a safety device to operate:
(a) Grilling with the door closed - Always grill with the door fully open
(b) Grilling for an excessively long period at maximum setting - see Grilling guide.
Switch off appliance and allow to cool for approx 30 mins.
Switch the cooker back on and check that the Grill / Top oven is now operating.
Grill keeps turning
on and off
Timer Display is
flashing '0.00 '
Oven temperatures
too high or low
Oven does not
cook evenly
The oven is not
working and
showing F01 to F68
code in the display
When the Grill control is operating at less than its maximum setting, the Grill will cycle on
and off, this is normal and not
The power supply to your oven has possibly been interrupted, but has now come back on
again. Reset the timer to the correct time and "Manual" operation using the instructions given
in the timer section of the book.
Check temperature and shelf positions are as recommended in the Oven Temperature
Charts.
It may be necessary to increase or decrease the recommended temperature slightly to suit
your taste.
Check:
(a) Temperature and shelf positions are as recommended in the Oven Temperature
(b) Oven utensils being used allow sufficient air flow around them.
Your appliance has developed a fault which will require assistance from our service
department.
a fault.
Charts.
PLEASE PHONE US TO REGISTER YOUR APPLIANCE AND ACTIVATE YOUR PARTS GUARANTEE ON 08448 24 24 24
25
Page 26
If something
u
t
e
goes wrong...
b ,
Oven light does not
work
Draught from
beneath control
panel
Steam /
Condensation in
the oven after use.
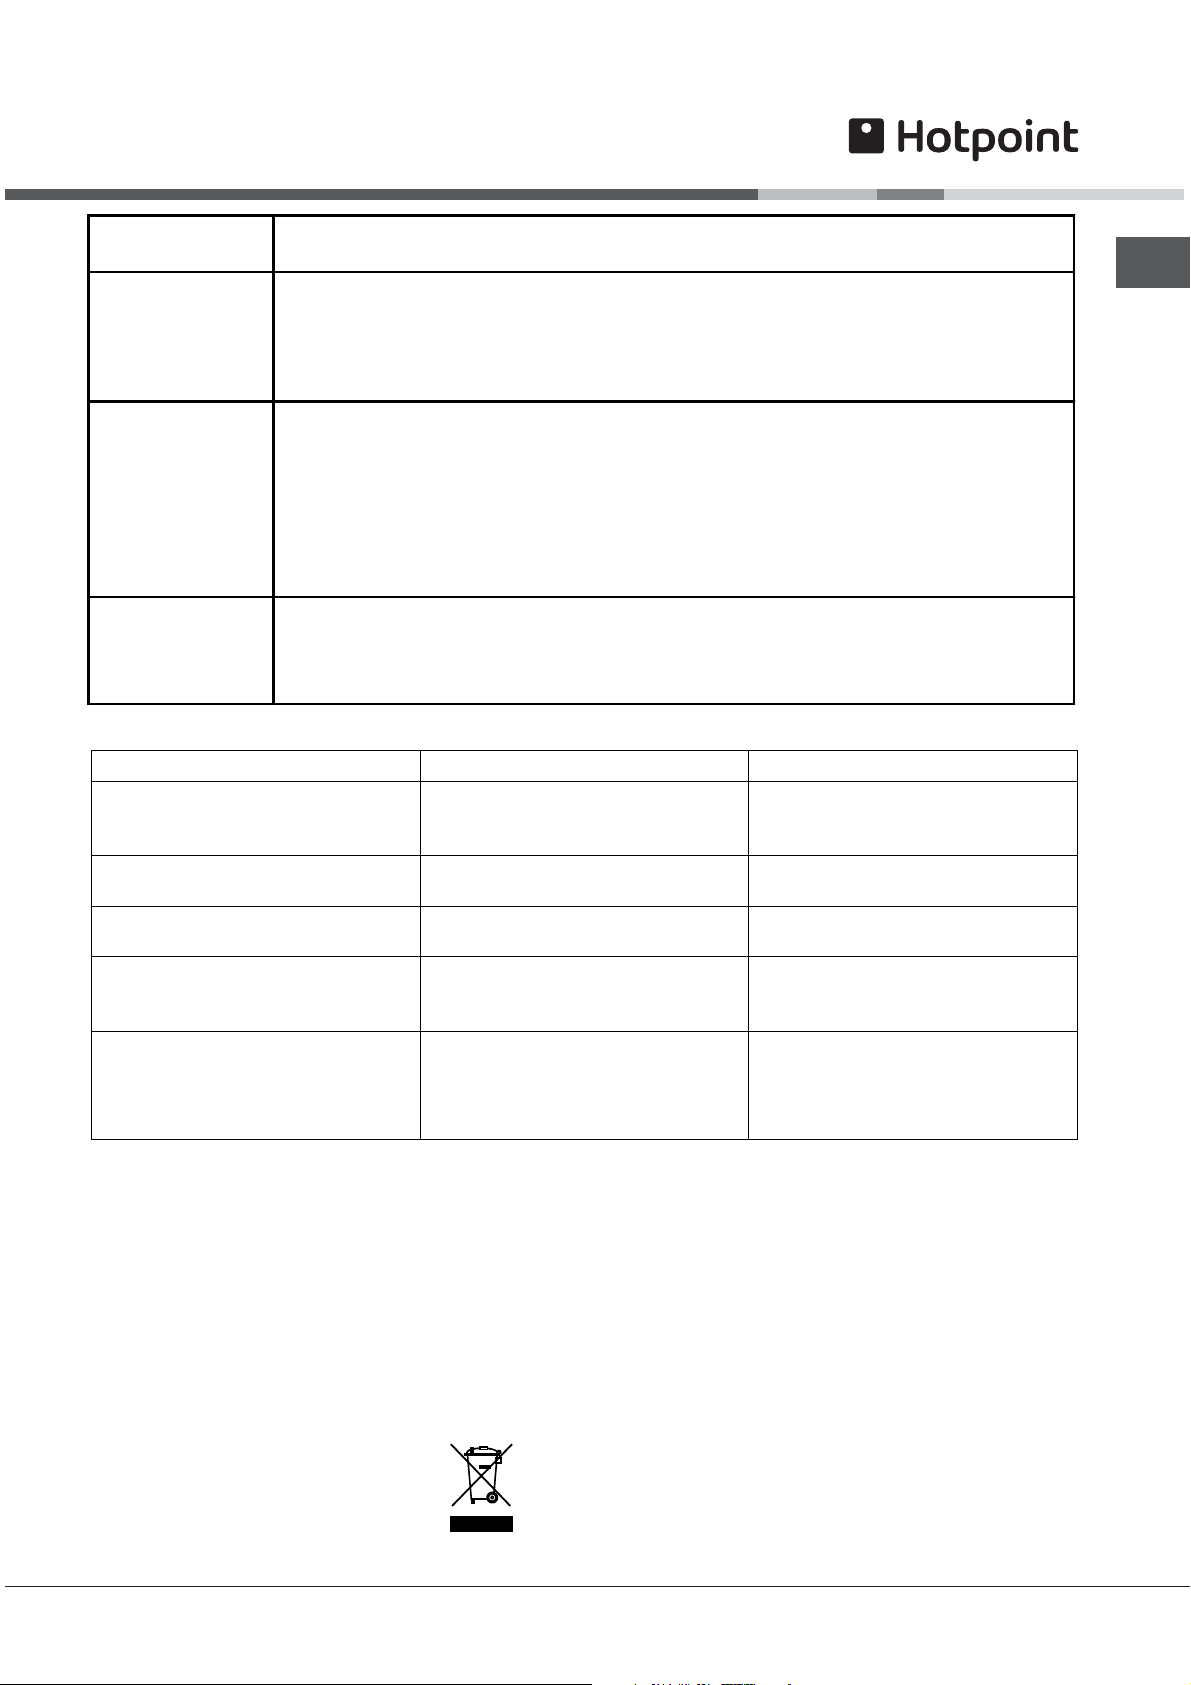
If you have been through the above list and there is still a problem, contact Service (see back page).
The oven lamp is not covered by the guarantee. The part is easily changed (see the section
on oven lamp replacement). A new lamp may be obtained from our Parts department see
back page.
A gentle flow of air will be blown from beneath the control panel when the appliance is
used. If the appliance is still warm, this cooling fan may run on, or restart itself when all
controls have been turned off. The fan will stop once the appliance has been cooled. This
is normal and not a fault.
Steam is a by - product of cooking any food with a high water content. To help minimise
always:
a) Try to avoid leaving food in the oven to cool after being cooked.
b) Use a covered container, wherever possible.
Problem Possible cause Solution
The “Clock button” and the
digits on the display flash.
A programmed cooking mode
does not start.
Only the high luminosity
“Clock button” is lit.
An automatic mode has been
selected. “Hot” appears on the
display and cooking does not star
Fan-assisted cooking has been
selected and the food looks burnt.
The appliance has just been
connected to the electricity
mains or there has been a blacko
There has been a blackout. Reprogram the cooking mode.
The appliance is in standby mode Press any button to exit
The temperature inside the oven
is higher than the suggested valu
for the selected mode.
Positions 1 and 5: the direct
heat could cause
temperature-sensitive
foods to burn.
Set the clock.
standby mode.
Wait for the oven to cool down.
We recommend switching
dripping pan positions halfway
through cooking.
GB
Disposal of your product
To minimise the risk of injury to children please
dispose of your product carefully and safely.
Remove all doors and lids. Remove the mains cable
(where fitted) by cutting off flush with the appliance
and always ensure that no plug is left in a condition
where it could be connected to the electricity
supply.
To help the environment, Local Authority instructions
should be followed for the disposal of your product.
Disposal of old electrical appliances
PLEASE PHONE US TO REGISTER YOUR APPLIANCE AND ACTIVATE YOUR PARTS GUARANTEE ON 08448 24 24 24
The European Directive 2002/96/EC on Waste
Electrical and Electronic Equipment (WEEE),
requires that old household electrical appliances
must not be disposed of in the normal unsorted
municipal waste stream. Old appliances must be
collected separately in order to optimise the
recovery and recycling of the materials they contain
and reduce the impact on human health and the
environment.
The crossed out "wheeled bin" symbol on the
product reminds you of your obligation, that when
you dispose of the appliance it must be separately
collected.
Consumers should contact their local authority or
retailer for information concerning the correct
disposal of their old appliance.
26
Page 27

GB
Guarantee
12 months Parts and Labour Guarantee
Your appliance has the benefit of our manufacturer's guarantee, which covers the cost of
breakdown repairs for twelve months from the date of purchase.
This gives you the reassurance that if, within that time, your appliance is proven to be
defective because of either workmanship or materials, we will, at our discretion, either repair
or replace the appliance at no cost to you.
The guarantee is subject to the following conditions:
- The appliance has been installed and operated correctly and in accordance with our
operating and maintenance instructions.
- The appliance is only used on the electricity or gas supply printed on the rating plate.
- The appliance has been used for normal domestic purposes only.
- The appliance has not been altered, serviced, maintained, dismantled or otherwise interfered
with by any person not authorised by us.
- Any repair work must be undertaken by us or our appointed agent.
- Any parts removed during repair work or any appliance that is replaced become our property.
- The appliance is used in the United Kingdom or Republic of Ireland.
The guarantee does not cover:
- Damage resulting from transportation, improper use, neglect or interference or as a result of
improper installation.
- Replacement of any consumable item or accessory. These include but are not limited to:
plugs, cables, batteries, light bulbs, fluorescent tubes and starters, covers and filters.
- Replacement of any removable parts made of glass or plastic.
THE GUARANTEE WILL NOT APPLY IF THE APPLIANCE HAS BEEN USED IN
COMMERCIAL OR NON-DOMESTIC PREMISES.
5 Year Parts Guarantee
Hotpoint also offers you a FREE 5 year parts guarantee. This additional guarantee is conditional
on you registering your appliance with us and the parts being fitted by one of our authorised
engineers. There will be a charge for our engineer's time. To activate the extra parts warranty on
your appliance, simply call our registration line on 08448 24 24 24 (ROI 01 230 0800)
Extended Guarantees
We offer a selection of protection plans that enable you to fully cover yourself against the expense
of repair bills for the life of your policy. To find the ideal plan for you please call our advice line on
08448 226 226 (ROI 01 230 0233)
Free Helpdesk Service
We have a dedicated team who can provide free advice and assistance with your appliance if
you experience any technical difficulties within the first 90 days of ownership.
Simply call our Hotpoint Service Hotline on 08448 224 224 (ROI 0818 313 413) for telephone
assistance, or, where necessary, to arrange for an engineer to call.
PLEASE PHONE US TO REGISTER YOUR APPLIANCE AND ACTIVATE YOUR PARTS GUARANTEE ON 08448 24 24 24
27
Page 28

06/2011 - 195086601.00
XEROX FABRIANO
After Sales Service
No one is better placed to care for your Hotpoint appliance during the course of its working
life than us - the manufacturer.
Essential Contact Information
Hotpoint Service
We are the largest service team in the country offering you access to 400 skilled telephone
advisors and 1100 fully qualified engineers on call to ensure you receive fast, reliable, local
service.
UK: 08448 224 224
Republic of Ireland: 0818 313 413
www.hotpoint.co.uk
Please note: Our advisors will require the following information:
Model number
Serial number
GB
Parts & Accessories
We supply a full range of genuine replacement parts as well as accessory products that
protect and hygienically clean your appliance to keep it looking good and functioning
efficiently throughout its life.
UK: 08448 225 225
Republic of Ireland: 0818 313 413
www.hotpointservice.co.uk
Appliance Registration
We want to give you additional benefits of Hotpoint ownership. To activate your FREE 5 year
parts guarantee you must register your appliance with us.
UK 08448 24 24 24
Republic of Ireland: 01 230 0800
www.hotpointservice.co.uk
As part of Hotpoint's continued commitment to helping the environment, Hotpoint reserves
the right to use quality, recycled components to keep down customer costs and minimise
material wastage.
Indesit Company UK Limited, Morley Way, Peterborough, PE2 9JB
Indesit Company, Unit 49 Airways Industrial Estate, Dublin 17
PLEASE PHONE US TO REGISTER YOUR APPLIANCE AND ACTIVATE YOUR PARTS GUARANTEE ON 08448 24 24 24
28
 Loading...