


HOTPOINT
60cm FREESTANDING
DISHWASHER
USER & INSTALLATION
INSTRUCTIONS
MODELS DWF61 & DWF60

Contents...
Electricity Supply / Safety Information |
...............3 |
Installation: |
|
Choose a Location...................................................... |
4 |
Adjust the Feet............................................................ |
4 |
Connect to a Drainage System.............................. |
5 |
Connect to the Water Supply................................. |
6 |
Check List...................................................................... |
6 |
Getting to Know your Appliance.................. |
7 & 8 |
Before Using your Appliance: |
|
Adjust the Water Softener....................................... |
9 |
Filling the Special Salt Container........................ |
10 |
Filling the Rinse Aid Container............................ |
11 |
Detergents........................................................ |
12 & 13 |
What Can I Wash....................................................... |
14 |
Programme Overview.................................. |
15 & 16 |
Loading your Dishwasher........................... |
17 & 18 |
Washing Dishes.............................................. |
19 & 20 |
Care & Maintenance..................................... |
21 & 22 |
Troubleshooting............................................. |
23 & 24 |
Important Information........................................... |
25 |
Hotpoint After Sales Service................................ |
26 |
Hotpoint Guarantee................................................ |
27 |
Key Contacts............................................... |
Back Page |
Retention of this Instruction Book...
This Instruction Book must be kept handy for reference as it contains important details on the safe and proper use of the appliance.
If you sell or pass the appliance to someone else, or move house and leave it behind, make sure this Book is also provided so the new owner can become familiar with the appliance and safety warnings.
Recycling & Disposal Information...
As part of Hotpoint’s continued commitment to helping the environment, Hotpoint reserves the right to use quality recycled components to keep down customer costs and minimise material wastage.
Please dispose of packaging and old appliances carefully.
To minimise risk of injury to children, remove the door, plug and cut mains cable off flush with the appliance, dispose of separately to ensure that the appliance can no longer be plugged into a mains socket.
CE marking certifies that this appliance conforms to the following EEC directives:
Low Voltage Equipment 72/23/EEC Electromagnetic Compatibility 89/336/EEC and subsequent modifications.
2

Electrical Supply...
WARNING: This appliance must be earthed.
Fuses
Your appliance comes fitted with a plug and a 13A fuse.
If you need to replace the fuse, only those rated at 13A and ASTA approved to BS1362 should be used.
WARNING: Do not use the plug unless the fuse cover is fitted.
Changing the plug
Cut off and dispose of the supplied plug if it does not fit your socket.
WARNING: To avoid a shock hazard do not insert the discarded plug into a socket anywhere else.
IMPORTANT: WIRES IN THE MAINS LEAD ARE COLOURED IN ACCORDANCE WITH THE FOLLOWING CODE:
Green / Yellow |
- |
Earth |
Blue |
- |
Neutral |
Brown |
- |
Live |
If you change the plug, the colour of the wires in the mains lead may not correspond with the colour of the markings identifying terminals in the plug. You should therefore wire it as shown.
Green and yellow (Earth) wire to terminal marked ‘E’, symbol  , or coloured green and yellow.
Blue (Neutral) wire to terminal marked ‘N’ or coloured black.
Cord clamp
13A ASTA approved fuse to BS1362.
Brown (Live) wire to terminal marked ‘L’ or coloured red.
Changing the Mains Lead
A special lead can be ordered from your Service Department:
UK: 08709 066 066 or
Republic of Ireland: 1850 302 200
If you have damaged the existing lead or require a longer one a charge will be made. It is strongly advised that this work is carried out by a qualified electrician.
3

Installation...
Follow the Installation Instructions, making sure the Dishwasher is correctly installed.
When installing the Dishwasher, carry out tasks in the following order:
-choose a location.
-level the appliance (adjusting the feet).
-connect to a drainage system.
-connect inlet hose to water supply.
CHOOSE A LOCATION...
The choice of location for your appliance will influence its performance.
●Position where possible on a solid floor. Vibration may occur with a wooden floor.
●Take care with vinyl floor coverings. The weight of the appliance may cause indentations in some vinyl floor coverings.
●For your safety and to comply with IEE regulations, you should not install your appliance in a bath or shower room.
Seek professional advice if you wish to do so.
●Ensure sufficient space is allowed for the appliance.
●Ensure the electrical socket and water taps are easily accessible and that the water supply can be isolated if necessary. Do not use an extension lead or multiple plug for connection to the electrical socket.
●If your dishwasher is underneath a work surface with a hob. You must
add thermal insulation to the top of the machine.
ADJUST THE FEET...
It is essential that the door is closed and latched before stabilising the dishwasher. Ensure that the rear feet are adjusted so that the product is not sitting on the base of the machine. Adjust either clockwise or anti-clockwise as necessary to level.
Then adjust either of the two front feet clockwise or anti-clockwise as necessary until all feet are in contact with the floor to avoid the machine from rocking and is level to within 2˚
The door must be aligned centrally with the sides of the cabinet to ensure the door seal is correctly located.
Note: If the appliance is not stabilised the door may be off centre and make the machine unstable.
4
Installation...
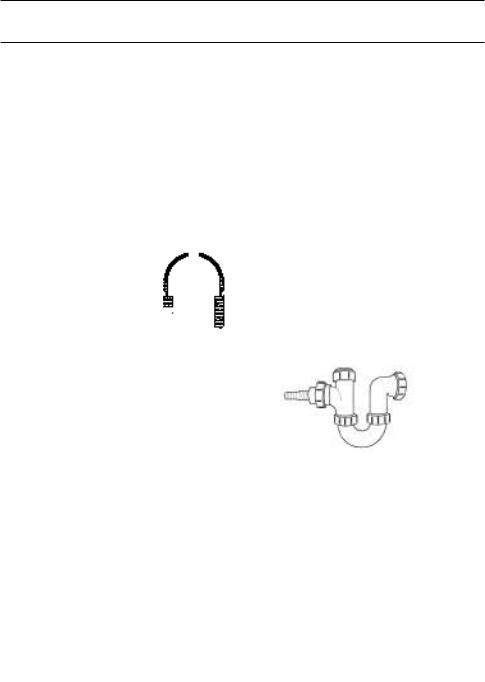
CONNECT TO A DRAINAGE SYSTEM...
WARNING
● Connect your dishwasher drain hose to pipes which connect to the foul drain system, and not to surface water drains. IMPORTANT NOTES For the correct operation of your dishwasher, it is essential to comply with the following information.
Standpipe
Fit the hose to the standpipe hook which can be found in the machine.
Ensure that the hose is not pushed too far down the standpipe.
DO NOT position the stand- |
|
|
120 |
|
|
|
min |
||
pipe near an electrical outlet. |
|
|
|
|
|
|
|
|
|
ENSURE that the drain hose is routed as shown in the diagram.
The standpipe should be connected to:
a)A discharge stack-pipe
b)An external gulley OR
c)A sink waste.
The standpipe should have a bore of at least 38mm (11/2"). It should be installed as shown, have a trap fitted and must discharge into the same drain system as your household sink.
It must NOT be connected to a surface water drain.
Sink Waste System
For under sink drainage:
Before connecting the drain hose, remove any internal restrictions - This will prevent a build up of debris which could cause a blockage.
Remove any restrictions from the waste spigot and ensure that the sealing bung is removed. The hose should be routed, such that it is raised to a minimum height of 800mm (31/2")
Note: Ensure the sink outlet pipe has a minimum diameter of 32mm.
1.Untie the end of the GREY drainage hose from the rear of the appliance.
2.Reposition ‘Hooked End Support’ as required along GREY drainage hose.
3.If fitting an under sink waste disposal unit, cut out the membrane, bung or blanking plug.
4.Attach the GREY drainage hose to the under sink waste disposal unit securely, using the clip and rubber tube supplied.
Ensure the drain hose is securely attached, to prevent it coming away while the machine is in use and causing a flood.
5

Installation...
CONNECT TO THE WATER SUPPLY...
●For your machine to operate correctly it requires water pressures in the range of 6-150 psi (100-1000 KPa). Most
cold water supplies will be in this range.
●Ensure the fill hose is only connected to the cold water supply.
WARNING
● Ensure the fill hose is NOT kinked.
Note: Do not over tighten the hose connector. Hand tight is sufficient.
●Tap connections (if applicable) - A range of adaptors are available to suit your tap.
WARNING
●Do not connect appliance to a single outlet instantaneous water heater or an electric heater.
Remember you may be charged for a service call if a problem with your appliance is caused by incorrect installation or misuse.
CHECKLIST...
When you have installed your appliance, ensure it is ready to use by following this Check List:
1.Dispose of packaging safely, see ‘Recycling Information’ on page 2.
2.Position appliance close to electrical/water supply see ‘Choose a Location’ on page 4.
3.Connect supplied hose to appliance water supply, confirm water is flowing before connecting to the appliance inlet valve see ‘Connect to a Water Supply’, page 6.
4.Untie drainage hose at rear of appliance and connect to either a standpipe or sink waste drainage system see ‘Connect to a Drainage System’ page 5.
5.Untie mains lead at rear of appliance and plug into electrical supply via a switched socket, see ‘Electrical Supply’ on page 3.
6.Position appliance, taking care not to kink or damage hose at rear of appliance.
7.Stabilise the appliance, see ‘Adjusting the Feet’ page 4.
8.Turn on the water supply to the appliance.
9.Switch on at plug socket.
Your appliance is now ready for use, refer to ‘Getting to know your Appliance’ on page 7 to familiarise yourself with the appliance.
6

Getting to Know your Appliance...
7
6
8
2
3
1
9
4
11
10
5
Interior...
1.Salt Container, with level indicator.
2.Filters.
3.Lower Basket.
4.Rinse Aid Container, with level indicator.
5.Rating Plate.
6.Upper Basket,
with 2-tier cup rack.
7.Upper Spray Arm.
8.Lower Spray Arm.
9.Cutlery Basket.
10.Detergent Compartment Locking Mechanism.
11.Detergent Compartment.
Rating plate sample
Model
No.
Serial
No.
7
Getting to Know your Appliance...
DWF61
|
|
|
|
|
|
|
|
|
|
|
|
|
|
|
|
|
|
|
|
|
|
|
|
|
|
|
|
|
|
|
|
|
|
|
|
|
|
|
|
|
|
|
|
|
|
|
|
|
|
|
|
|
|
|
|
|
|
|
|
|
|
|
|
|
|
|
|
|
|
|
|
|
|
|
|
|
|
|
|
|
|
|
|
|
|
|
|
|
|
|
|
|
|
|
|
|
|
|
|
|
|
|
|
|
|
|
|
|
|
|
|
|
|
|
|
|
|
|
|
|
|
|
|
|
|
|
|
|
|
|
|
|
|
|
|
|
|
|
|
|
|
|
|
|
|
|
|
|
|
|
|
|
|
|
1 |
|
2 |
|
3 |
4 |
5 |
6 |
|
7 |
|
|
|
|
9 |
|
10 |
|
|
|
|
11 |
|||||||||
DWF60
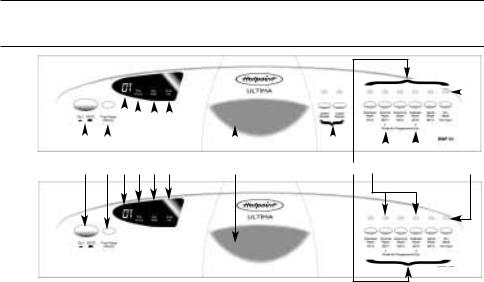
Fascia. |
|
|
|
1. |
Mains Switch (ON/OFF) |
7. |
Door Handle |
2. |
Time Delay Selector Switch |
8. |
Wash Basket Programme Selector* |
3. |
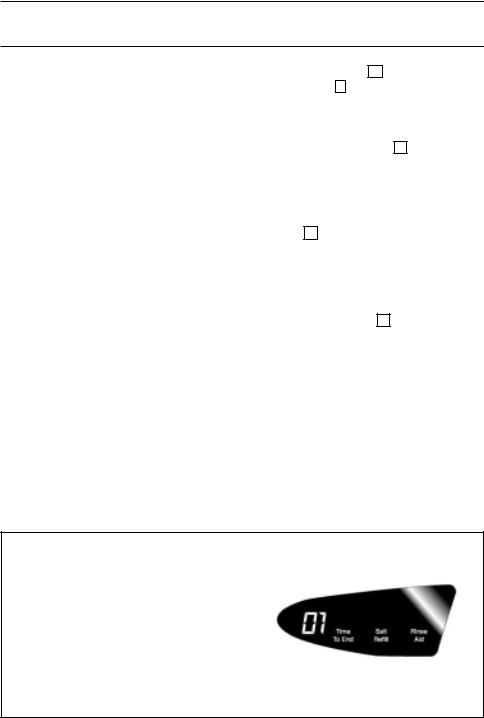
Numerical Indicator |
|
(DWF 61 only) |
4. |
Time to End Indicator |
9. |
Programme Selection Buttons |
5. |
Salt Refill Indicator |
10. Programme End Buttons (Reset) |
|
6. |
Rinse Aid Indicator |
11. Selection Indicators |
|
8
Before Using your Appliance...
Before using your Dishwasher you must carry out the following steps to ensure you obtain the best possible wash performance from your appliance.
Follow these 4 steps:
-Adjust the Water Softener.
-Fill the Salt Container.
-Fill the Rinse Aid Container.
-Add detergent.
ADJUSTING THE WATER SOFTENER...
●In order to rinse dishes and glasses satisfactorily, the dishwasher requires soft water i.e containing little or no lime, otherwise water stains are left behind on crockery and glasses etc. If the tap water exceeds a certain level of hardness, it must be softened, ie. decalcified, so that it can be used in the dishwasher.
●The water Softener should be properly adjusted to optimise salt consumption and for best washing results.
●In order to ensure that the correct amount of salt is being used to regenerate the water softener, the water hardness adjuster needs to be set accordingly. To set this correctly the hardness of your water needs to be ascertained. Find on the table the level corresponding to the hardness of your water and the required adjustments or contact your local Water company to find the exact water hardness level for your area.
●Press and hold the ECONOMY 50˚ programme button 9 , and set the mains switch 1 to on, before releasing the programme button again.
The indicator lamp for the ECONOMY 50˚ button flashes, as does the figure 4 in the numerical display 3 . The latter represents the value that was pre-set in the factory.
To change the setting:
Press the ECONOMY 50˚ programme button 9 .
Every time the button is pressed, the figure increases by one. After reaching 7, the display starts at 0 again.
●Set the mains switch 1 to OFF. The new setting is stored in the appliance’s memory.
Approximately 4 litres of water are required for regenerating the water softening system. The overall water consumption per load can therefore be increased by between 0 and a maximum of 4 litres according to the water hardness setting.
Water hardness table |
|
|
|
|
Display readout example |
||
˚dH |
˚fH |
˚Clarke |
mmol/l |
|
|
|
|
|
|
|
|
|
|
|
|
0 - 3 |
0 - 6 |
0 |
- 4 |
0 - 0.6 |
0 |
|
|
|
|
||||||
|
|
|
|||||
|
|
|
|
|
|
|
|
4 - 6 |
7 - 11 |
5 |
- 8 |
0.7 - 1.1 |
1 |
|
|
|
|
|
|
|
|
|
|
7 - 9 |
12-16 |
9 |
- 11 |
1.2 - 1.6 |
2 |
|
|
|
|
|
|
|
|
|
|
10-12 |
17-21 |
12-15 |
1.7 - 2.1 |
3 |
|
|
|
|
|
|
|
|
|
|
|
13-16 |
22-29 |
16-20 |
2.2 - 2.9 |
4 |
|
|
|
|
|
|
|
|
|
|
|
17-21 |
30-37 |
21-26 |
3.0 - 3.7 |
5 |
|
|
|
|
|
||||||
|
|
|
|
|
|
|
|
22-30 |
38-54 |
27-38 |
3.8 - 5.4 |
6 |
|
|
|
31-50 |
55-89 |
39-62 |
5.5 - 8.9 |
|
|
|
|
7 |
|
|
|||||
9
 Loading...