

Page 1
Dishwasher
and Care of
and Convertible
Dishwashers
Loaded
dishes get cleaner
Energy-sating tips
dishwasher
How to
convertible
Save time and
Before you
use the Problem Solver
for service,
inside
cover
,\ns\!er [’ent~?
800.626.2000
Page 2
Contents
Good
with HOT water . . . . . . ........2
Using a rinse agent . . . ........2
How to choose and use
the right detergent. . . . . . . . . . ..2
How to prepare dishes
How to load your
dishwasher. . . . . . . . . . . .. ...4.5
What can you wash safely. .. ...6
How to connect electricity
on convertible models. .. ......7
How to connect the
on
convertible models . . . ........8
User maintenance
instructions . . . . . . . . . .. ......9
Problem solving . .........10,11
Consumer services ... , .. ....13
Warranty. . . . . . . . . . . Back Cover
starts
Help us
help you...
Read this book and the
separate Operating
Instructions
They are designed to help you
operate and maintain your new
dishwasher properly.
Keep them handy for answers to
your questions.
If you don’t understand something
or need more help... Call, toll free:
The GE Answer Center
800.626.2000
consumer information service
or write (include your phone
number):
Consumer Affairs
Appliance Park
Louisville, KY 40225
carefully
TM
Write down the model and
serial numbers.
You’ll find them on a label just
inside the dishwasher door.
These numbers are also on the
Consumer Product Ownership
Registration Card that comes with
your dishwasher. Before sending in
this card, please write these
numbers here:
Model No.
Serial No.
Use these numbers in any
correspondence or service calls
concerning your dishwasher.
If you
dishwasher, immediately contact
the dealer (or builder) that sold-you
the dishwasher.
received a damaged
tips
The
power consumption of your
dishwasher can be minimized if
you follow these suggestions:
●
Operate the dishwasher only
when
mulate in the dishwasher, When
you put in only a partial load, use
the Rinse Hold cycle to rinse off
heavy soils. Be sure to latch the
door when waiting for a full load.
This helps to keep soils moist,
easier to remove.
●
Always select the cycle that
uses the least amount of water
that will remove the soil from the
load. See
Instructions Leaflet.
●
If you don’t need your dishes
right away,
drying heater off automatically.
Dishes dry naturally over a longer
period such as overnight.
full.
Let the dishes accu-
your Operating
use your
feature
that turns the
Save
time and money...
before you call for service
Check the Problem Solver (pages
10-11). It lists minor causes of
operating problems that you can
correct yourself. It could save you
an unnecessary service call.
Page 3
(for
7. This
grounded.
be
a
shock by
reduq
for
appliance. fs~ui~’ti66.@
having
conductor and a
The plug must be plugged Into an
appropriate outlet that is
and grounded in accordance with
codes and
,-
1
Page 4
Good
starts with HOT water.
To get dishes clean and dry you
need hot water. To help you get
water of the proper temperature,
your
matically senses the temperature
of the water in the wash cycle and
heats it, if necessary, to the proper
temperature. For good washing
and drying, the entering water
must be at least
should not exceed
Check your water temperature
with a candy or meat
Turn on the hot water faucet
nearest the dishwasher. Put the
thermometer in a glass and let the
water fill the glass until the temperature stops rising. If the water
temperature is below
your water heater.
Helpful hints:
tures are unusually low or if your
water travels a long distance from
heater to dishwasher you may
need to set your heater’s thermostat up. If you have not used hot
water for some time, the water in
the pipes will be cold. Turn on the
hot water faucet at the sink and
allow it to run until the water is
hot. Then start the dishwasher. If
you’ve recently done laundry or run
hot water for showers, give your
water heater time to recover before
operating the dishwasher.
dishwasher auto-
To prevent
adjust
If outside tempera-
You can help prevent
spotting with a rinse
agent.
A rinse agent makes water flow off
dishes quicker than usual. This
lessens water spotting. Makes
drying faster, too.
Rinse agents come in either liquid
or solid form. Your dishwasher’s
dispenser (on models so equipped)
uses the liquid form.
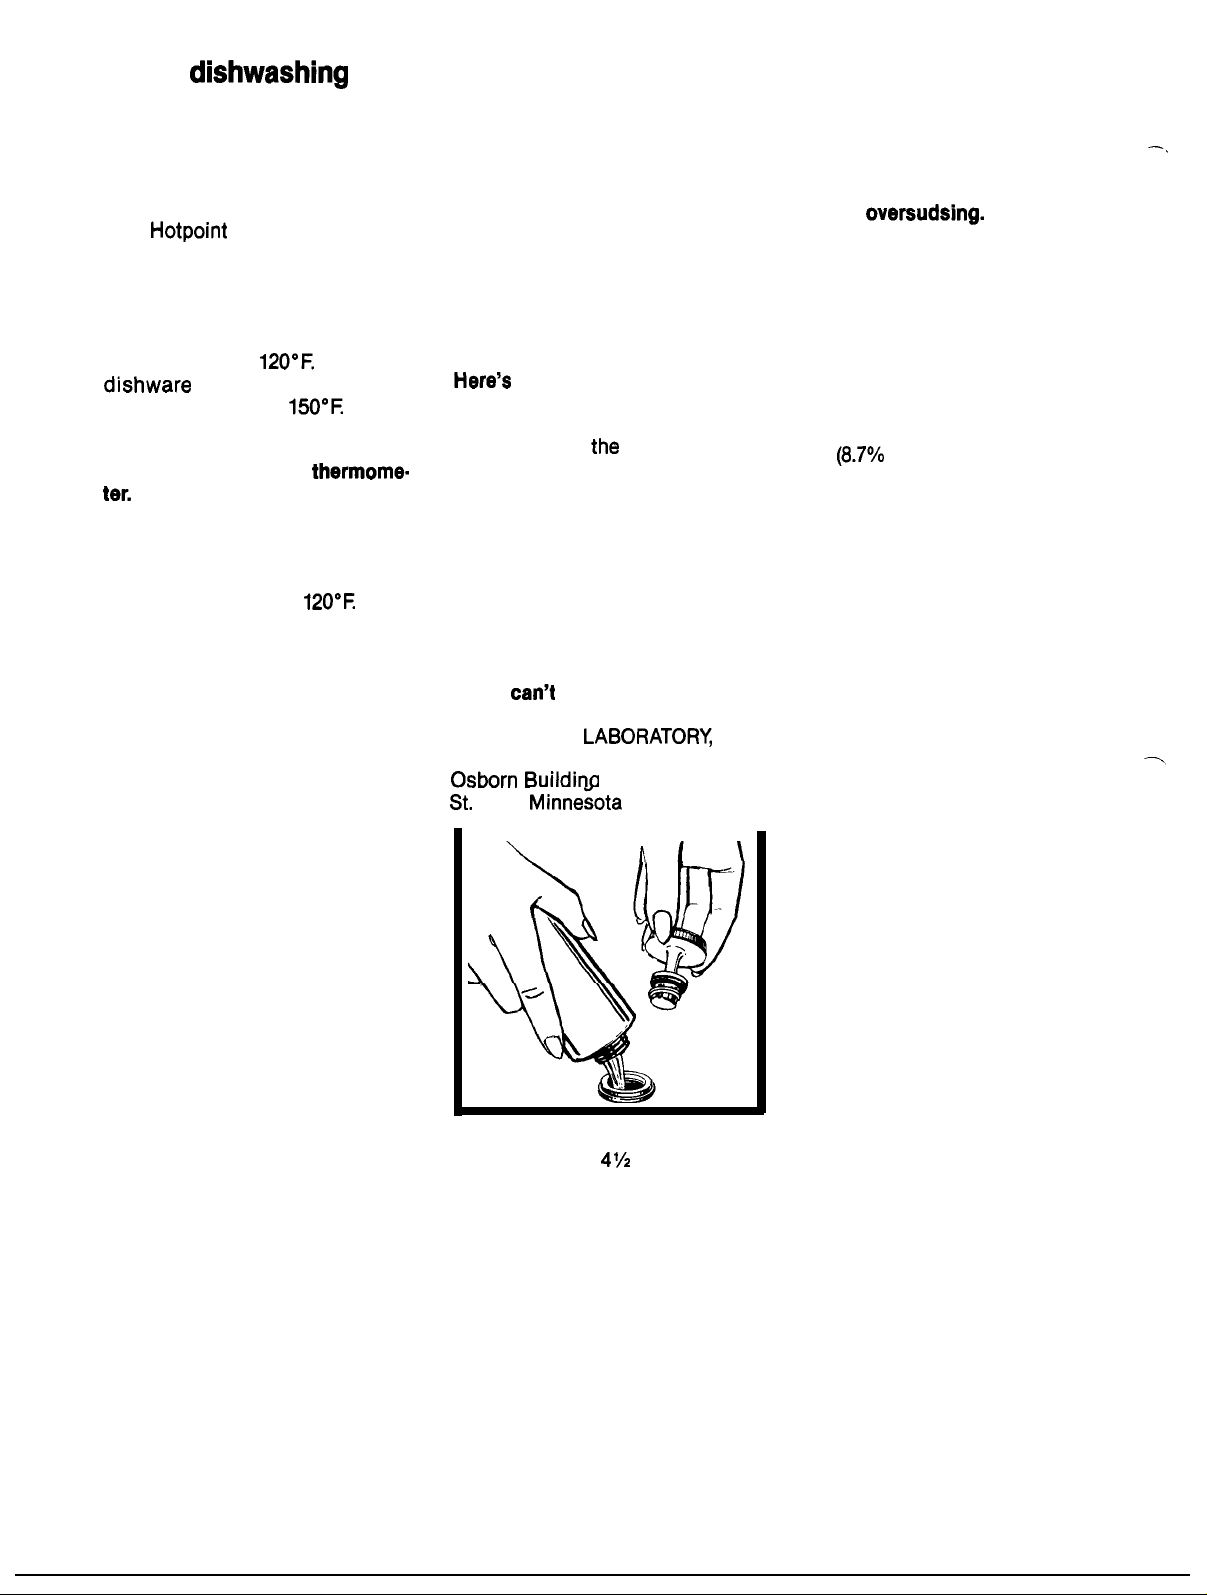
how to fill the rinse agent
dispenser.
Add the liquid rinse agent until
it just reaches
lip inside the dispenser opening.
Replace the cap. The dispenser
automatically releases the rinse
agent into the final rinse water.
If you accidentally spill:
the rinse agent with a damp cloth.
Don’t leave the spill in the dishwasher. It can keep your detergent
from working.
If you
write:
ECONOMICS
(“JET DRY”)
Paul, Minne;ota 55102
Unscrew the cap.
bottom of the
Wipe up
find any rinse agent,
INC.
How to choose and use
detergent.
First, use only detergent
specifically made for use in
dishwashers. Other types will
cause
Second, check the phosphate
content.
hard-water materials from forming
spots or film on your dishes. If
your water is hard (10 grains or
more), your detergent has to work
harder. Detergents with a higher
phosphate level will probably work
better. If the phosphate content is
low
use extra detergent with hard
water.
Your water department can tell
you how hard your water is. So
can your rural county agent. Or
your area’s water softener company. Just call and ask them how
many “grains” of hardness is in
your water.
How much detergent should you
use?
“hard” or “soft?” With hard water,
you need extra detergent to get
dishes clean. With soft water, you
need less detergent.
Too much detergent with soft
water not only wastes money, it
can be harmful. It can cause a
permanent cloudiness of glassware, called “etching.” An outside
layer of glass is etched away! Of
course, this takes some time. But
why take a chance when it’s easy
to find out the hardness of your
water.
Phosphate helps prevent
or less), you’ll have to
That depends. Is your water
Your dishwasher’s rinse agent
container holds
should last about 3 months. Fill as
needed.
ounces. This
2
Keep your detergent fresh and
dry.
Under the sink isn’t a good
place to store detergent. Too much
moisture. Don’t put detergent into
the dispenser until you’re ready to
wash dishes, either. (It won’t be
fresh OR dry.)
Page 5
What you can
leave on dishes.
And what you
‘f
your detergent gets old or
throw it away. It won’t
wash well. Old detergent loses its
power. Lumpy detergent often model, you may wonder how much
won’t dissolve.
You’ll
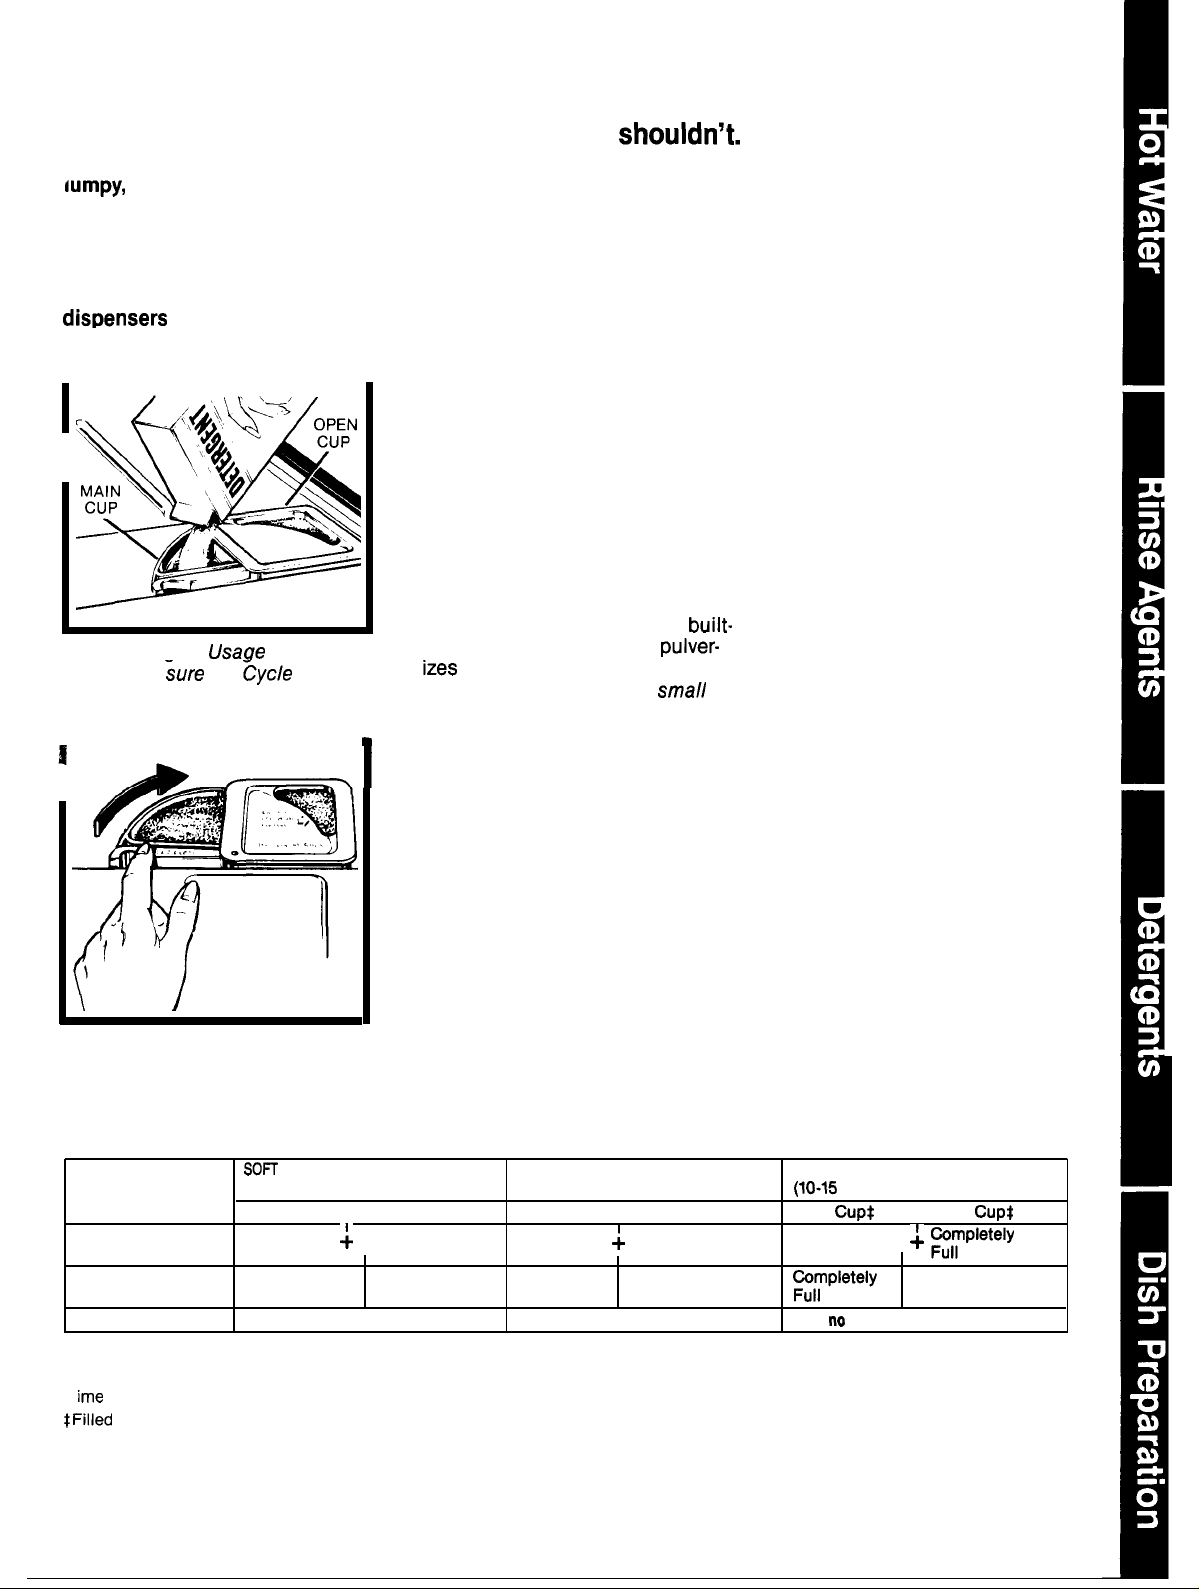
find two detergent
on the inside door of
your dishwasher. Two, because
some cycles use two washes.
See “Detergent
below, (Be
the
Guide”
Indicator
Dial is at OFF position before
adding detergent.)
If this is your first dishwasher, or if
you’re replacing a much older
pre-preparation your dishes need.
Actually very little. Pre-rinsing of
normal food soils is not necessary.
With common sense and a little
practice you’ll soon know what
foods to remove. Here are some
guidelines:
1. Scrape off bones, seeds, skins,
toothpicks and other hard solids. It
is also best to remove hard shelled
vegetables, meat trimmings, leafy
vegetables and crusts. Remove
excessive quantities of oil or
grease.
2. Remove large quantities of any
food. Your dishwasher has a
in soft food disposer that
soft food bits and flushes
them away. It can handle
amounts of soft foods, but large
amounts of food as soft as
mashed potatoes or applesauce
will be difficult to handle.
3. Try to remove food scraps and
place dishes in dishwasher before
soil has a chance to dry and
become hard. Dishes with dried-on
soil are more difficult to wash and
may not come clean in the Normal
Cycle. Remember to use your
Rinse Hold Cycle for small
“holding” loads.
Note:
The foods mentioned above
are for examples only. Other foods
not mentioned may also need to
be removed from your dishes. You
may also want to consider
removing foods such as mustard,
mayonnaise, vinegar, lemon juice
and other foods that can cause
discoloration of stainless steel if
allowed to remain on dishes for a
long period of time.
When using the POWER SCRUB
cycle (on models so equipped)
less preparation is required before
loading. The Power Scrub cycle
can wash heavily-soiled dishes and
remove dried-on and baked-on
soils from pots, pans and casseroles. Items with burned-on soils
will not come clean. And the
dishwasher cannot remove burn
marks or restore fading caused by
overheating during cooking.
Close the main cup.
NOTE: Detergent cup may be
opened manually with no harm.
Detergent Usage Guide
WATER
(O-3
grains hardness)
CYCLES
Power Scrub and
Normal cycles minimum minimum
Delicate and
Light Wash cycles
Rinse Hold cycle
● 15 grains and up is extremely hard water. A water softener is recommended. Without it,
can build up in the water valve. The water valve may stick while open and cause flooding.
Main Cup
1 Tablespoon
1 Tablespoon
minimum
Use no detergent
Open Cup
1
Tablespoon
None Half Full None
MEDIUM WATER HARD WATER
(4-9 grains)
Main Cup
Half Full
Use no detergent
Open Cup Main
Half Full Completely
3
Full
Use
grains*)
Open
None
detergent
Page 6
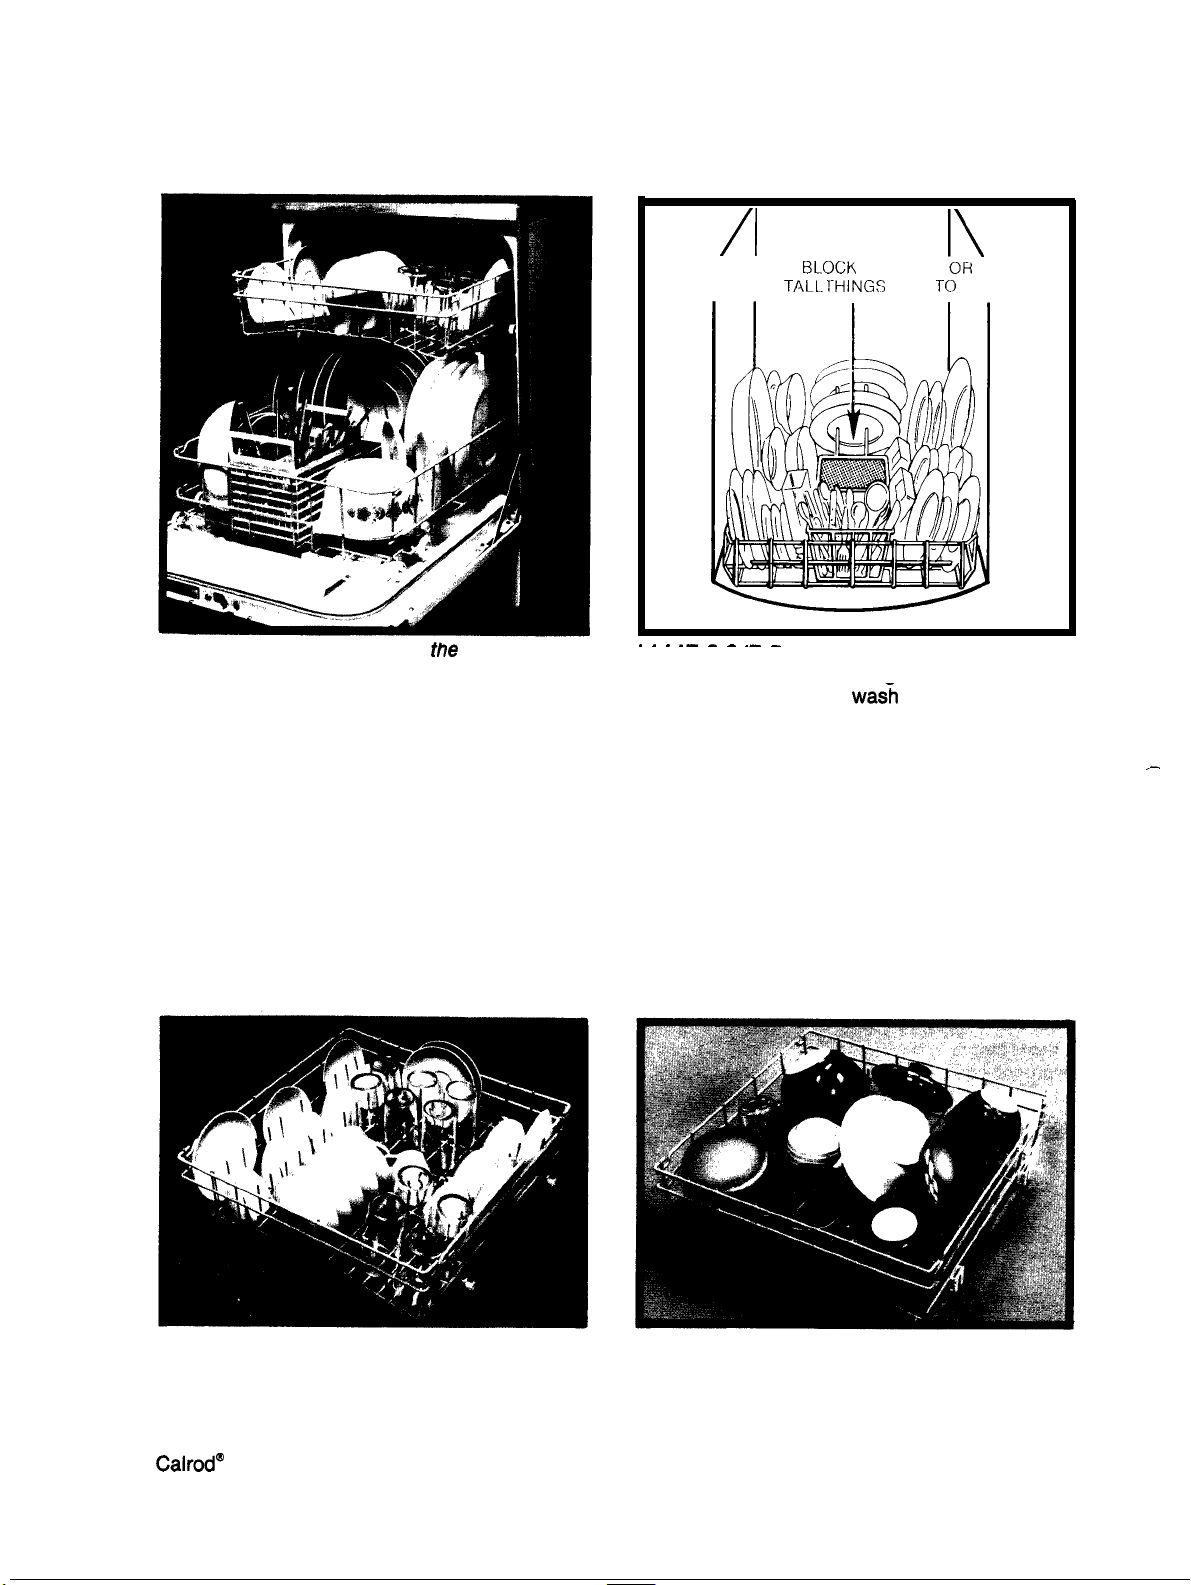
Loaded right, dishes get cleaner.
This is a random mixed load,
most common
type you will have.
Make sure dishes are properly loaded to insure
that water can reach the soiled surfaces. The
wash arm in the bottom sprays water up. The
tower that rises in the center sends water out
over the dishes to wash the items in the upper
rack. On some models so equipped a spray arm
in the top washes down also.
DO NOT
LOAD
WATCH OUT FOR THIS.
THIS AREA
NEXT
IT.
The wash tower rises through the center of the
bottom rack during the
and rinse portions
of the cycle. Don’t block it or load tall things
next to it. Also, be careful not to let portion of
an item extend through the bottom rack or the
silverware basket, such as knives, skewers or
pot handles.
How to load the TOP RACK.
The top rack is best for glasses, cups and
saucers. Cups and glasses fit best along the
sides. This is the place for dishwasher-safe
plastics, too. Make sure small plastic items are
lodged in tightly so they can’t fall onto the
heating unit.
Sauce pans, mixing bowls and other small
items may be placed—face down—in the top
rack. The top rack is handy for all kinds of
odd shapes. Be sure the force of water and
detergent can reach soiled surfaces.
4
Page 7
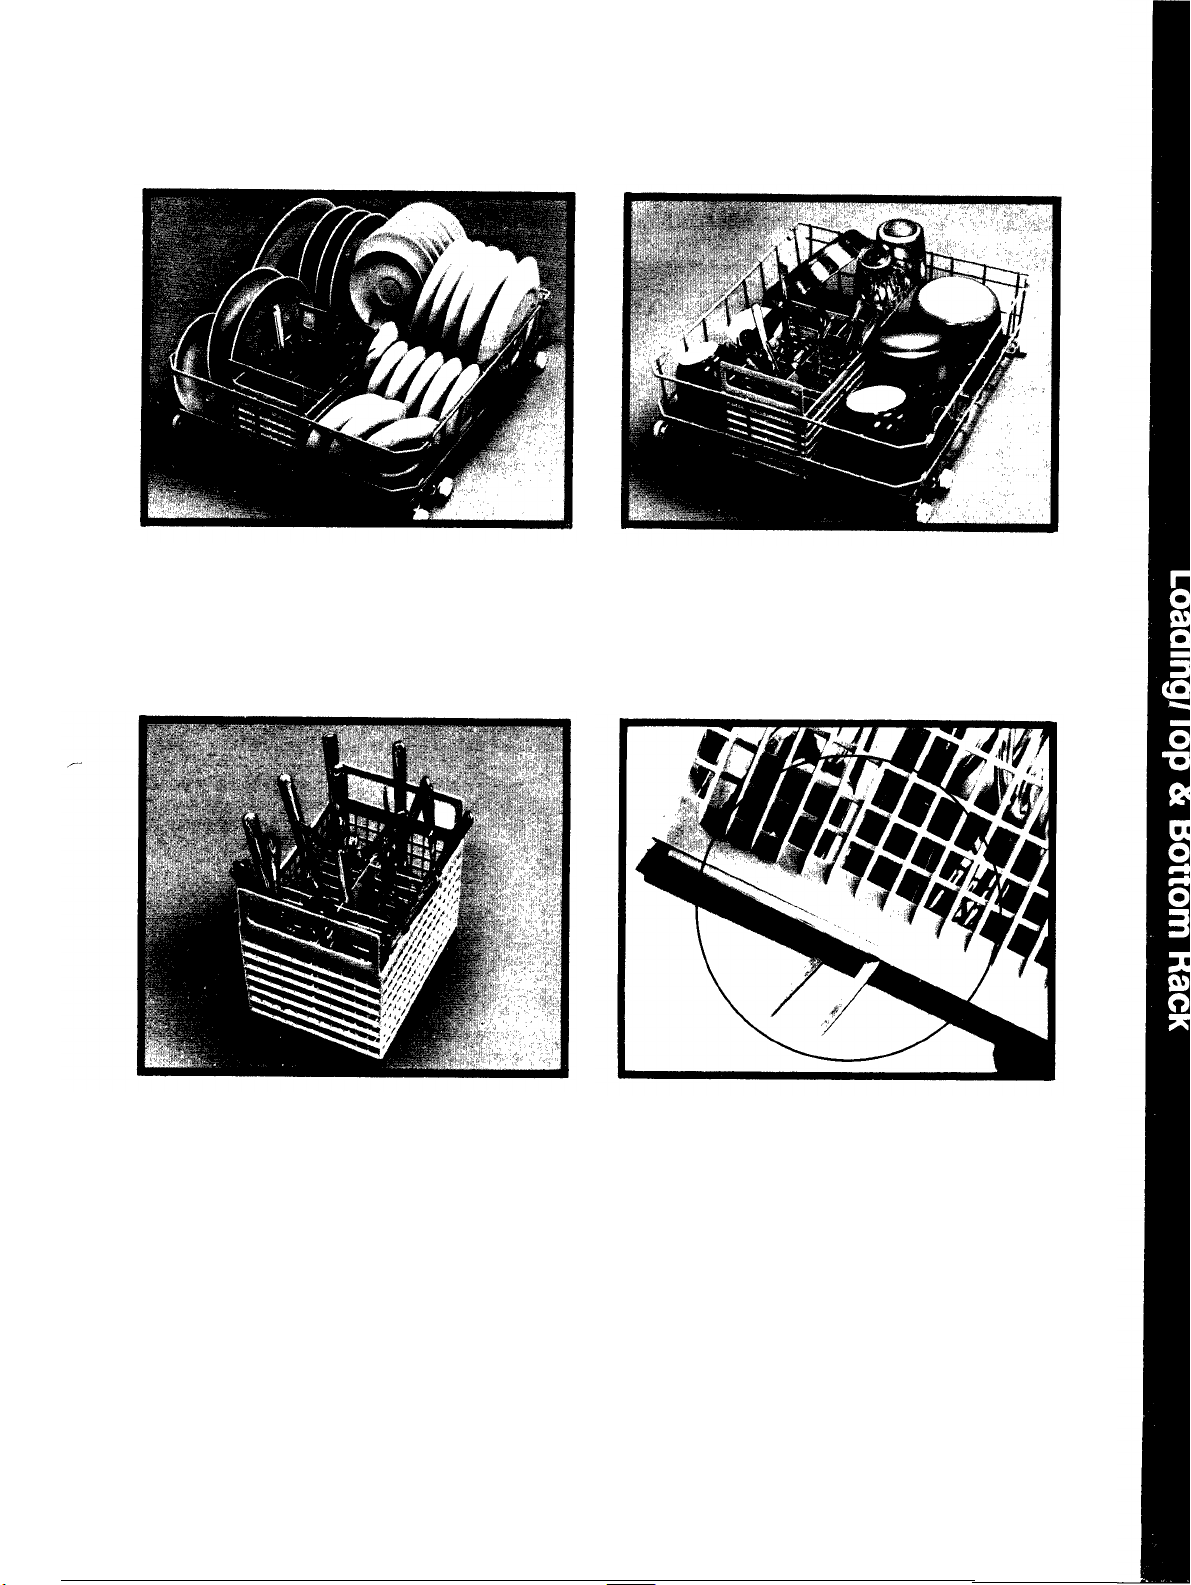
How to load the BOTTOM RACK.
Fit plates and saucers between the pins. Load
platters, pots, pans and bowls along the sides,
in corners or in the back.
Put flatware in the removable silverware basket.
Load with handles up, to protect your hands.
Mix knives, forks and spoons so they don’t nest
together. Distribute evenly. Take out anything
that may fall or extend through the bottom of
the basket.
Heavily soiled pots, pans and casseroles MUST
be loaded in the bottom rack, facing down. Prop
the broiler pan and rack along the edge, tilted
toward the center. Shallow items may be angled
provided the lower side does not shield the
soiled surface inside from the water,
Don’t let any item extend through bottom.
5
Page 8
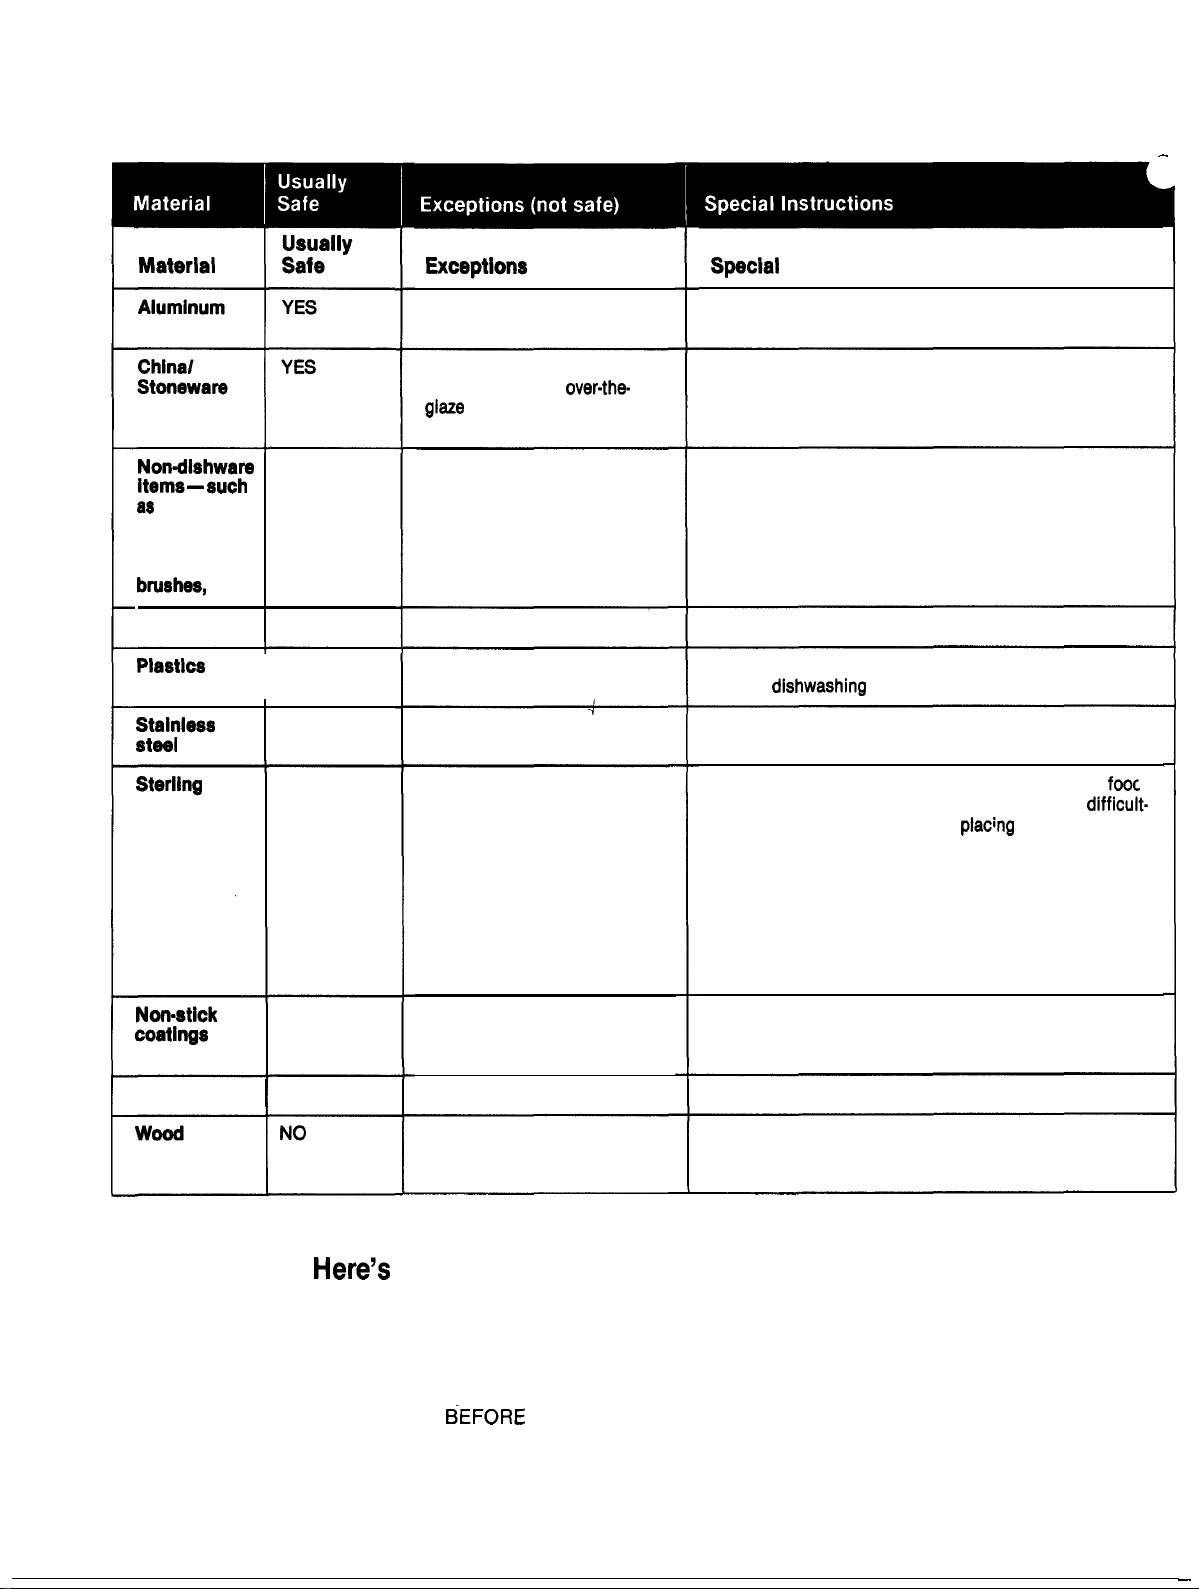
What you can usually wash safely in your
dishwasher. And what you can’t.
Instructions
electronic
air cleaner
filters, furnace
filters, paint
etc.
Pewter
Silver and
Silver.plate
NO
NO
YES
YES
YES
Some colored anodized
aluminum can fade.
Antique, metal trimmed,
hand-painted or
patterns fade.
Gold-leaf will discolor.
Pewter tarnishes.
Don’t put in same silverware
basket with stainless steel.
Contact between metals can
damage silver.
Don’t use copper utensils in
the same load. Silver may
get a brown film.
Adhesive used to attach
some hallow-handle knives
can loosen,
Some darkening or spotting possible. Remove by
scouring with soap-filled steel wool pads.
If in doubt, check with the manufacturer. Or test wash
one piece daily for at least a month. Compare with the
rest of the set.
Do not wash in dishwasher. Damage to dishwasher
and discoloration or staining of dishwasher may
result.
If it doesn’t say DISHWASHER SAFE, test one piece
before
Rinse if not washing immediately. Salty or acid foods
can stain if left on.
Rinse if not washing immediately. Salty or acid
can stain if left on. Dry detergent can cause
to-remove black spots. Avoid
detergent cup.
an entire set.
under the
After washing, wipe the non-stick coating area with
vegetable oil to keep it from losing its non-stick
quality.
Tin
YES
NO
Tin can rust.
Wood can warp, crack or
lose its finish with any type
washing.
Forget a dish?
when you can add it.
Add dishes any time during a
RINSE HOLD cycle.
With other wash cycles, you can beginning.
add dishes at any time
the main detergent wash portion Here’s how to add a forgotten
of the cycle.
However, opening the door during
any cycle lessens cleaning power.
So try to load everything at the
- -
dish:
1. Push the door latch to the left.
Washing will stop.
6
2. Wait a few seconds until the
water calms. Then open the door.
3. Add dishes you’ve forgotten.
4. Close the door and push the
latch to the far right. When the
door is locked, washing will
continue.
–
Page 9
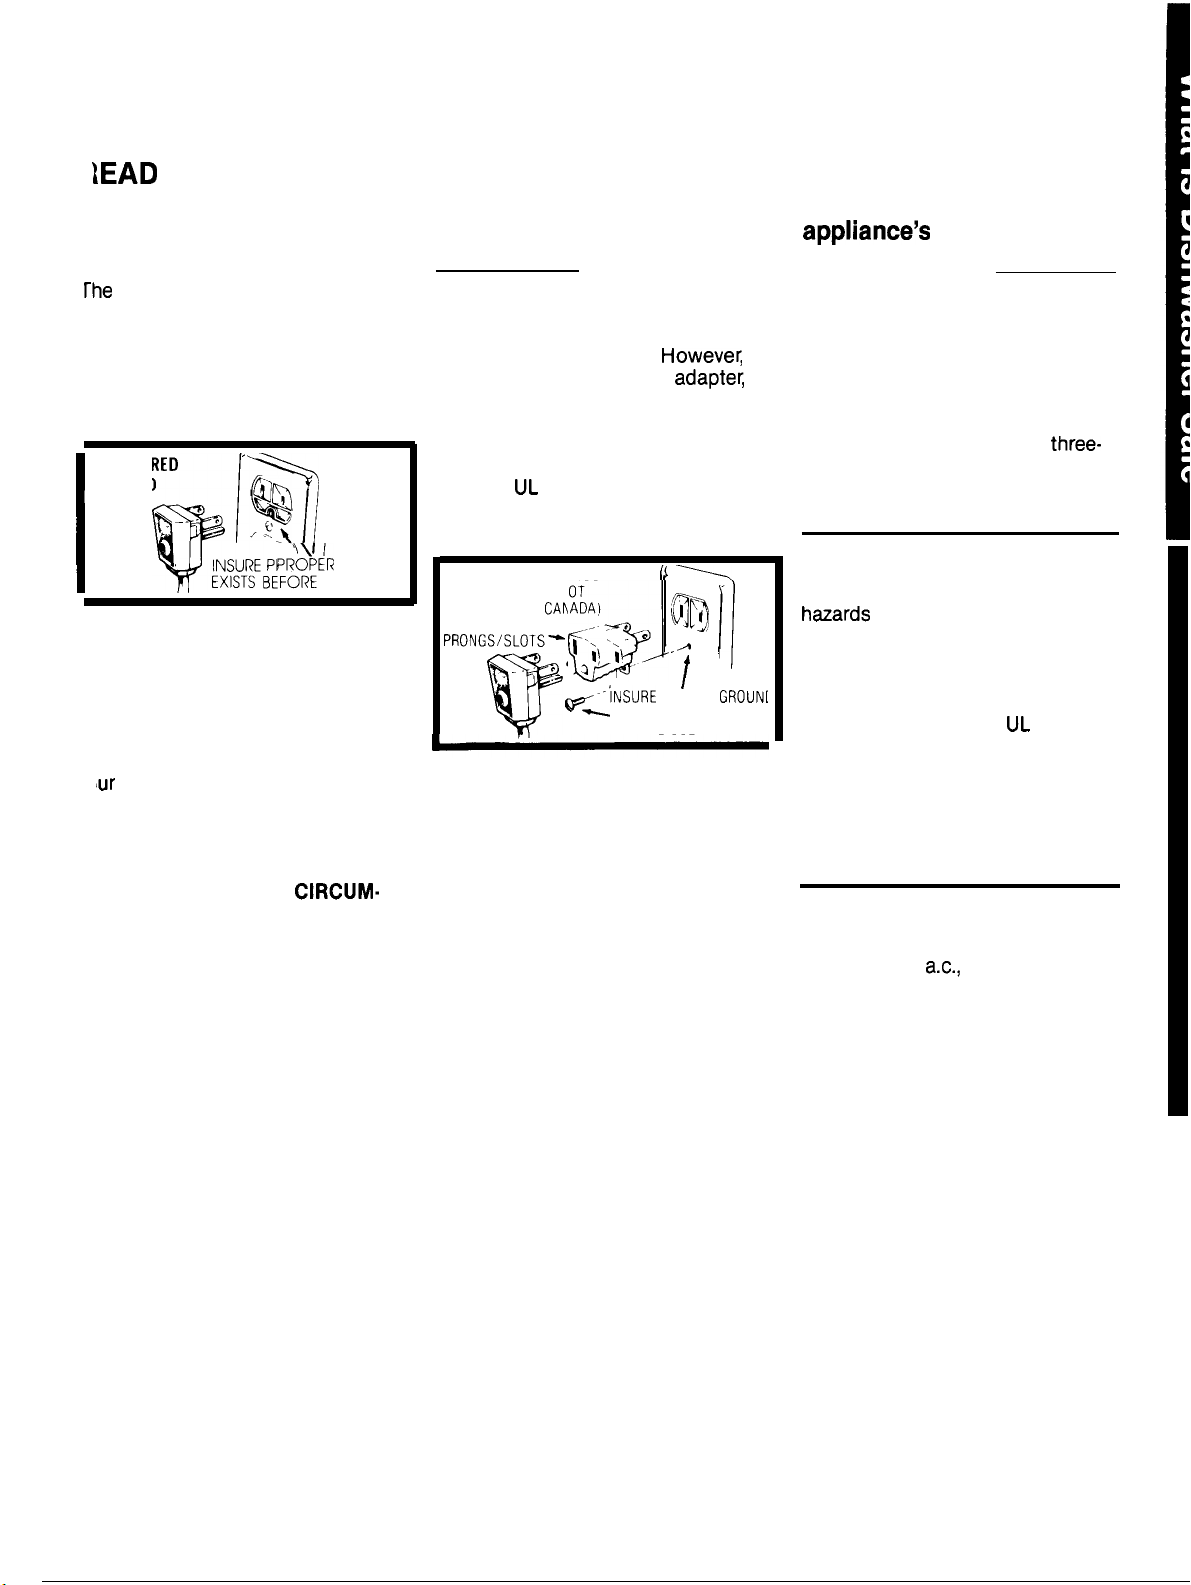
How to connect electricity on Cord= Connected models
IMPORTANT– PLEASE
CAREFULLY
For personal safety, this
appliance must be properly
grounded.
power cord of this appliance is
equipped with a three-prong
(grounding) plug which mates with
a standard three-prong (grounding)
wall receptacle (Fig. 1) to minimize
the possibility of electric shock
hazard from this appliance.
PREFERRED ‘
METHOD
\–. ,
Fig. 1
Have the wall receptacle and
circuit checked by a qualified
electrician to make sure the
receptacle is properly grounded.
Where a standard two-prong wall
receptacle is encountered, it is
obligation to have it replaced with
a properly grounded three-prong
wall receptacle.
DO NOT, UNDER ANY
STANCES, CUT OR REMOVE
THE THIRD (GROUND) PRONG
FROM THE POWER CORD.
INSURE
EXISTS BEFORE USE
\
GROUND
Use of adapter plugs
Usage situations where
appliance’s power cord will
be disconnected
infrequently.
Because of potential safety hazards under certain conditions, we
strongly recommend against the
use of an adapter
if you still elect to use an
where local codes permit, a
TEMPORARY CONNECTION may
be made to a properly grounded
two-prong wall receptacle by the
use of a
which is available at most local
hardware stores.
TEMPORARY METHOD
(ADAPTER PLUGS NOT
PERMITTED IN
ALIGN LARGE
Fig. 2
The larger slot in the adapter must
be aligned with the larger slot in
the wall receptacle to provide
proper polarity in the connection
of the power cord.
CAUTION:
ground terminal to wall receptacle
cover screw does not ground the
appliance unless cover screw is
metal, and not insulated, and wall
receptacle is grounded through
house wiring. You should have the
circuit checked by a qualified
electrician to make sure the
receptacle is properly grounded.
When disconnecting the power
cord from the adapter,
hold the adapter with one hand.
If this is not done, the adapter
ground terminal is very likely
to break with repeated use.
listed adapter (Fig. 2)
---
Attaching adapter
plug.
,
-
I
PROPER
AND FIRM CONNECTION
BEFORE USE
always
.,
Usage situations where
be disconnected frequently.
Do not use an
these situations because frequent
disconnecting of the power cord
places undue strain on the adapter
and leads to eventual failure of the
adapter ground terminal. You
should have the two-prong wall
receptacle replaced with a
prong (grounding) receptacle by a
qualified electrician before using
the appliance.
adapter plug
in
Use of extension cords
Because of potential safety
under certain conditions,
we strongly recommend against
the use of an extension cord.
However, if you still elect to use
an extension cord, it is absolutely
necessary that it be a
3-wire grounding type appliance
extension cord and that the current carrying rating of the cord be
15 amperes minimum. Such extension cords are obtainable through
your local service organization.
. Your dishwasher requires a
single branch circuit supplying 120
volt, 60 hertz
15 amp or 20 amp fuse or circuit
breaker.
. Your dishwasher circuit should
not be used for any other
appliance while the dishwasher is
in operation as the dishwasher
requires the full capacity of the
circuit.
. If the wall receptacle you plug
the dishwasher’s power cord into
is controlled by a switch, turn on
the switch.
protected with a
listed
Should the adapter ground
terminal break, DO NOT USE the
appliance until a proper ground
has again been established.
7
Page 10
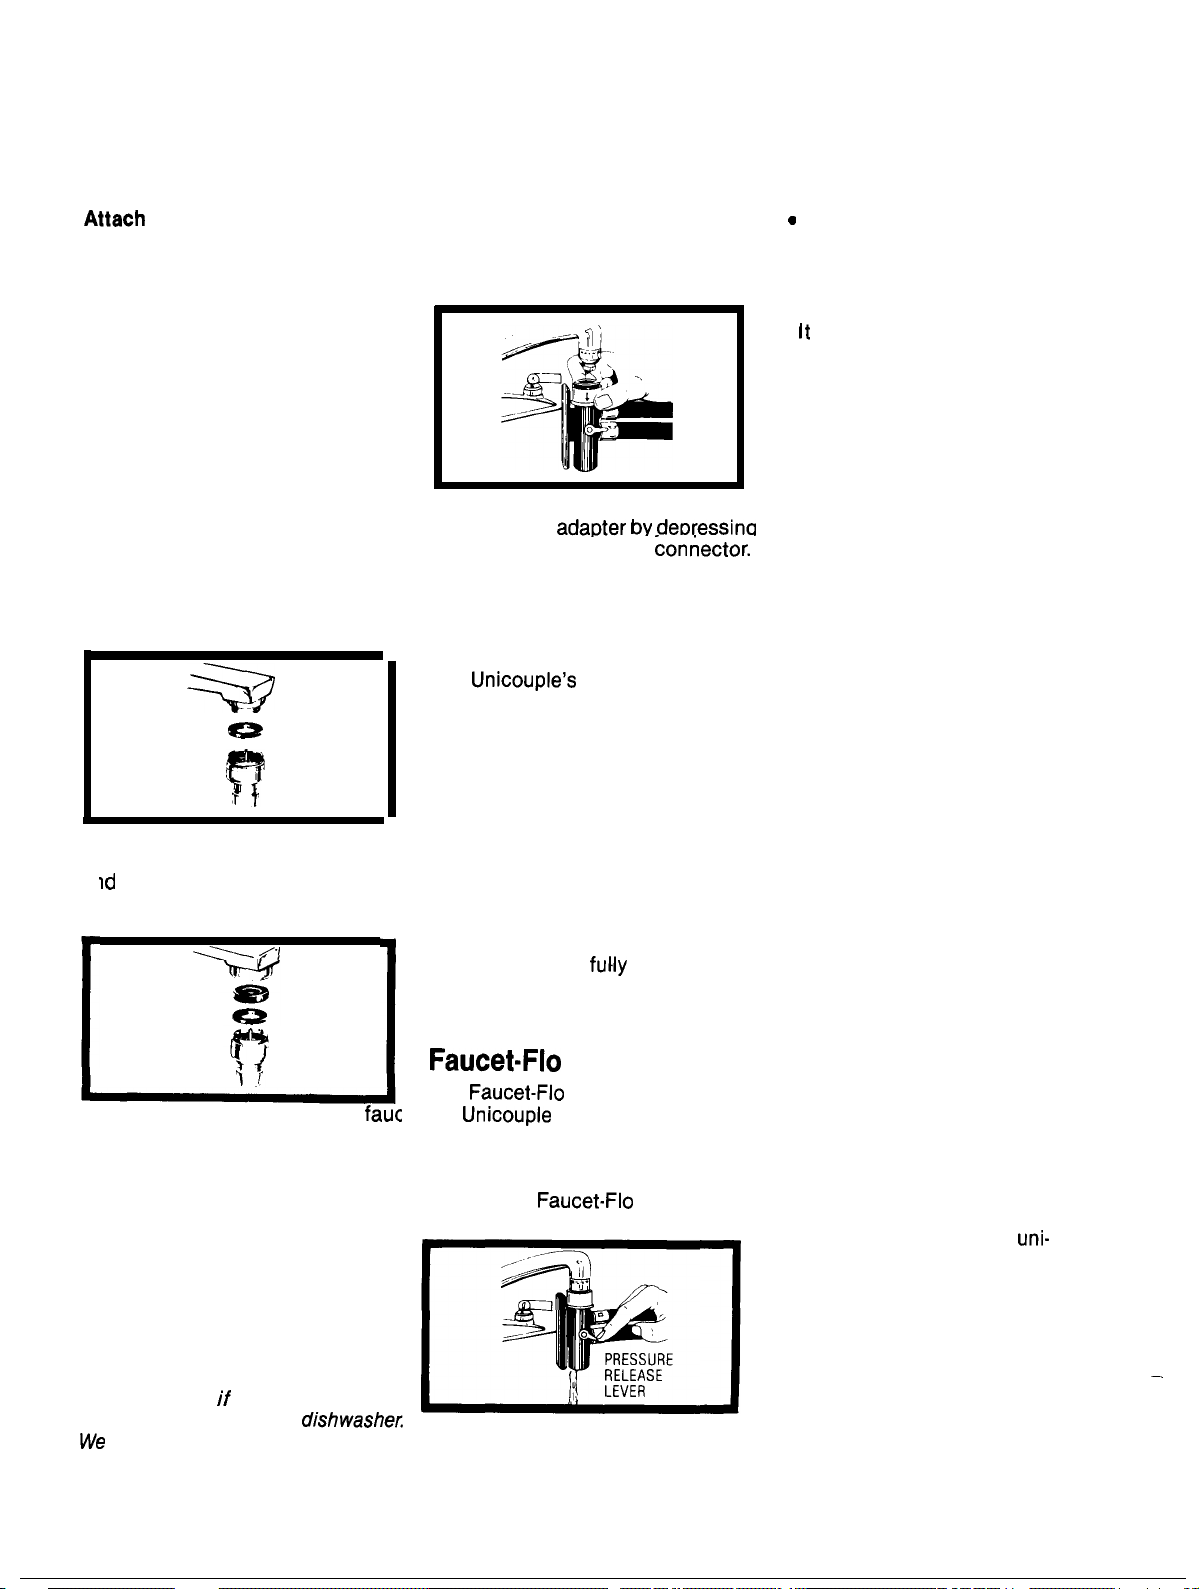
How to use the Unicouple on convertible
models
Before operating your
convertible dishwasher
the first time...
the Aerator Faucet
Adapter
The special aerator faucet adapter
supplied with your dishwasher
must be assembled to the sink
faucet spout before you can use
your dishwasher.
The faucet adapter is designed to
fit standard spouts having internal
or external threads. You will find
the adapter and two washers in
the “Hardware for Installation”
packet in your dishwasher.
To install faucet adapter,
remove the old aerator or trim ring
on your faucet spout.
If faucet has external threads:
Insert the thinner of the two
washers into the faucet adapter
attach it to the faucet spout.
faucet has internal threads:
Insert both washers into the
adapter and attach it to the faucet
spout.
If the faucet adapter threads do
not match your faucet spout,
your local hardware or plumbing
supply store normally has
additional fittings to adapt your
faucet spout to the special aerator
faucet adapter.
first
How to connect the
Unicouple on
convertible models
1.
Pull Unicouple and its hoses
from storage compartment located
at rear of dishwasher and attach it
to the faucet adapter.
2. Attach the Unicouple connector
to the faucet
collar at the top of the
When Unicouple is all the way up
onto the adapter, release the collar.
It will then snap into position to
lock the Unicouple in place.
The
water from the faucet to the
dishwasher. Its large hose carries
drain water to the sink. Be sure
drain hose is pointing toward the
sink bowl drain opening and the
sink drain is open for water that
will drain from your dishwasher. If
your dishwasher drains into a disposer, operate the disposer until it
is completely empty before starting the dishwasher.
3. Turn hot water
starting the dishwasher.
small hose carries
on before
-
How to use the
nozzle.
The
the
the nozzle by depressing the
pressure release lever on the side
of the Unicouple connector. You
will find the
useful for several reasons:
nozzle is part of
connector. Operate
nozzle
It allows you to flush cold water
out of the hot water line so that
you can better regulate your water
temperature.
●
allows you to test the
temperature of the water before
starting your dishwasher.
If you need fresh water for
personal use:
Disconnect the unicouple.
Draw your fresh water directly from
your faucet.
Do not disconnect the unicouple
while the dishwasher is operating.
How to disconnect the
Unicouple from faucet
adapter.
1.
Turn off the hot water,
2. Release the water pressure by
depressing the pressure release .
lever. This relieves water pressure
and protects you, and the room,
from severe splashing.
3. Release unicouple from faucet
by depressing the collar at the top
of the unicouple connector.
How to disconnect your
convertible dishwasher
1. Remove the power cord plug
from the wall receptacle.
2. Disconnect unicouple from
faucet adapter.
3. Shake excess water out of
unicouple and return it and its
hoses to the dishwasher storage
compartment.
NOTE:
end of the final rinse, the
couple can be disconnected and
returned to storage.
When motor stops at the
NOTE: A sink spray attachment
hose can burst
the same sink with your
suggest that you disconnect
the sink spray attachment if your
sink has one and plug the hole.
it is installed on
8
Page 11
User Maintenance
Instructions
Care of the wood top
Before using, wipe well with a dry
cloth to remove surface dust.
Saturate a clean cloth with mineral
oil and polish all exposed wood
surfaces until they gleam. Allow
wood top to stand overnight to
absorb the oil and repeat the
treatment the next day. Allow to
stand for 4 to 6 hours and wipe off
excess oil with a soft, dry cloth.
Wood tops should not be used as
a place for thawing frozen foods,
even when protected by a sheet of
aluminum foil. Never let water
stand on the wood top.
To remove water stains, rub with a
cloth saturated with non-toxic
mineral oil (available at most drug
stores).
Should your top become too
stained, dirty or cut, sand with
#000(150) or #0000(220) sandpaper
then wipe with a cloth
with non-toxic mineral oil.
dishwashers
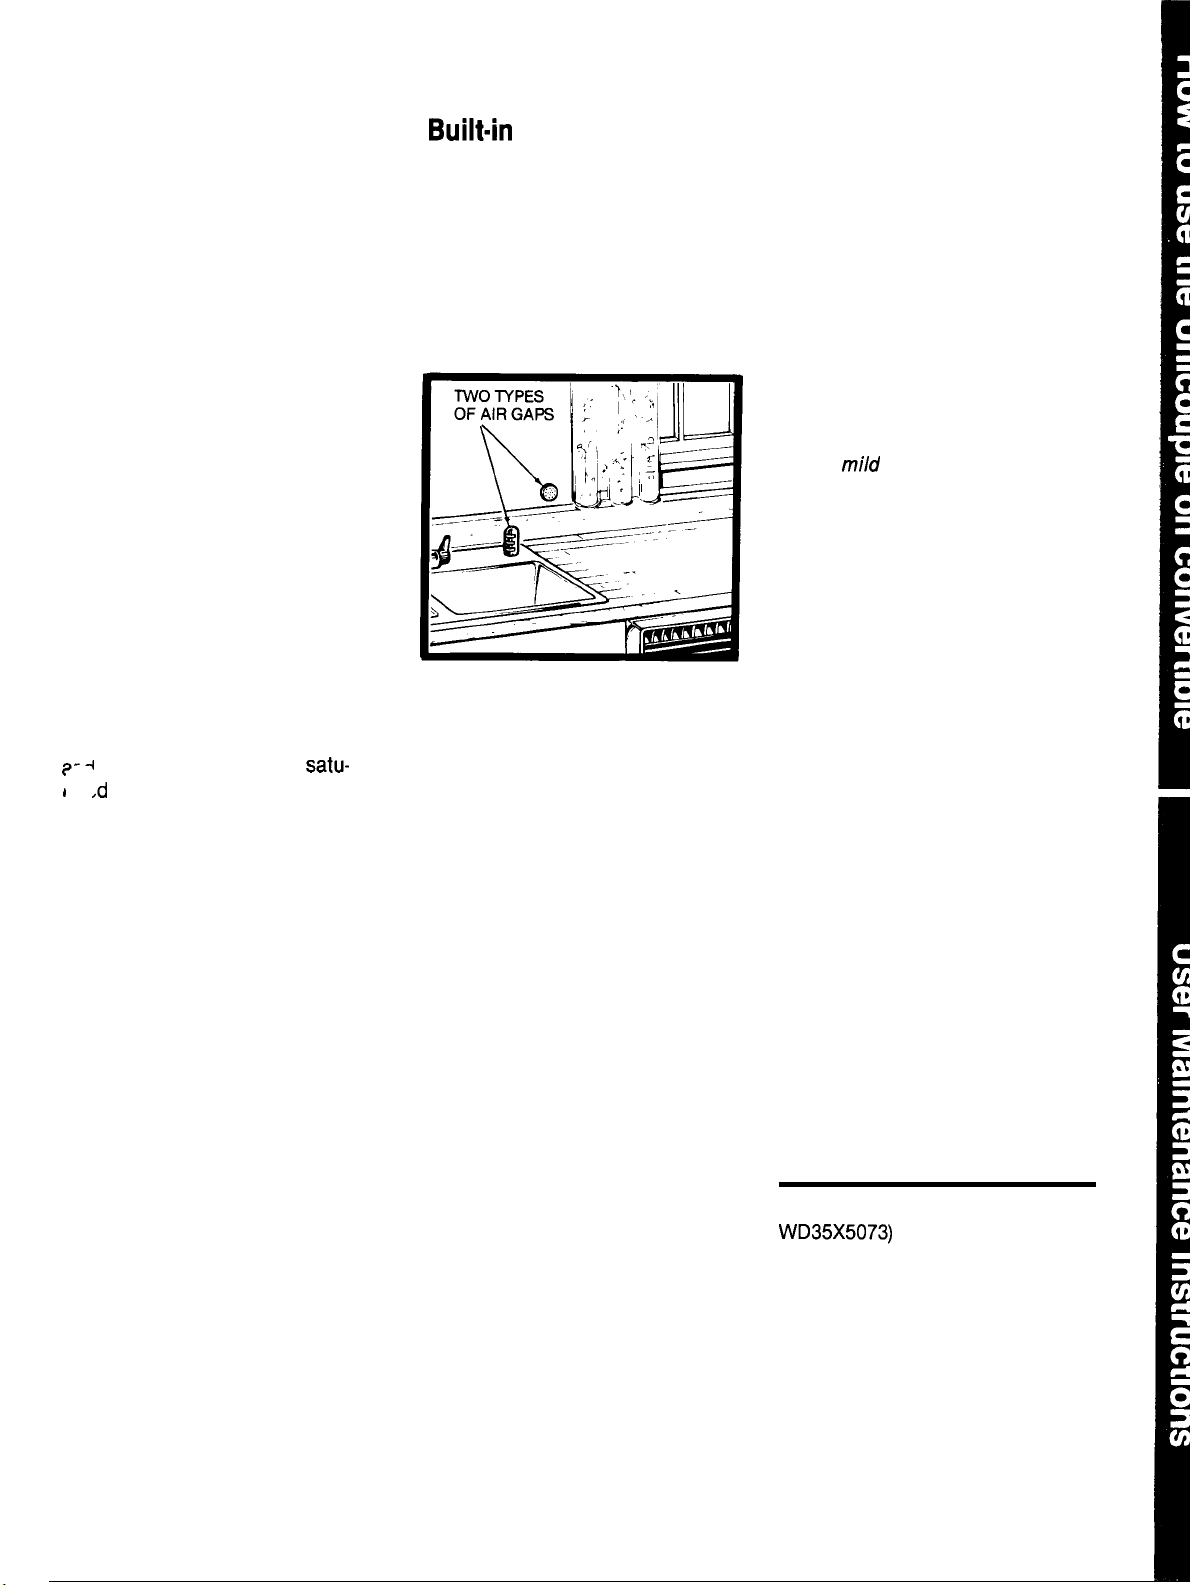
often use an air gap.
Keep it clean.
An air gap is a plumbing device. It
protects your dishwasher against
water backing up into it if a drain
clogs. The air gap is not a part of
the dishwasher. And you may not
even have one. Not all plumbing
codes require air gaps.
If you have an air gap, check it at
least once a month. THE AIR GAP
IS NOT PART OF YOUR DISH-
WASHER. IT IS NOT COVERED IN
YOUR WARRANTY
The air gap is easy to clean.
most types, first turn off the dishwasher, then lift off the chrome
cover. Then unscrew the plastic
cap and check for any build-up of
grit. A toothpick makes cleaning
easy.
Check the air gap any time your
dishwasher isn’t draining well.
With
To keep your dishwasher
looking good...
DO NOT USE ABRASIVES, SHARP
OBJECTS, SCOURING PADS,
HARSH OR GRITTY CLEANSERS
ON ANY PART OF YOUR
DISHWASHER.
Clean control panel with a damp
cloth. Dry thoroughly.
The interior usually takes care of
itself. If it should need cleaning,
use a
Clean the exterior with a good
appliance polish wax to protect
finish.
cleaning powder.
How to prepare your
dishwasher for winter
storage
If the dishwasher is to be left
unused in an unheated location
during the winter months, have a
service technician take the
following steps to prevent the
machine from freezing:
. Remove fuses or trip circuit
breakers to remove electric
power from the dishwasher.
. Turn off water to dishwasher.
Disconnect the water inlet line
from the water valve and drain.
. Remove water valve from the
dishwasher and blow on small
plastic outlet to remove water.
Replace water valve and water
line.
. Remove plug in bottom of rubber
boot and drain completely.
Replace the plug.
Conversion Kit
tible dishwasher to permanent
built-in installation is available
from your dealer or service
organization.
9
(Cat. No.
to convert conver-
Page 12
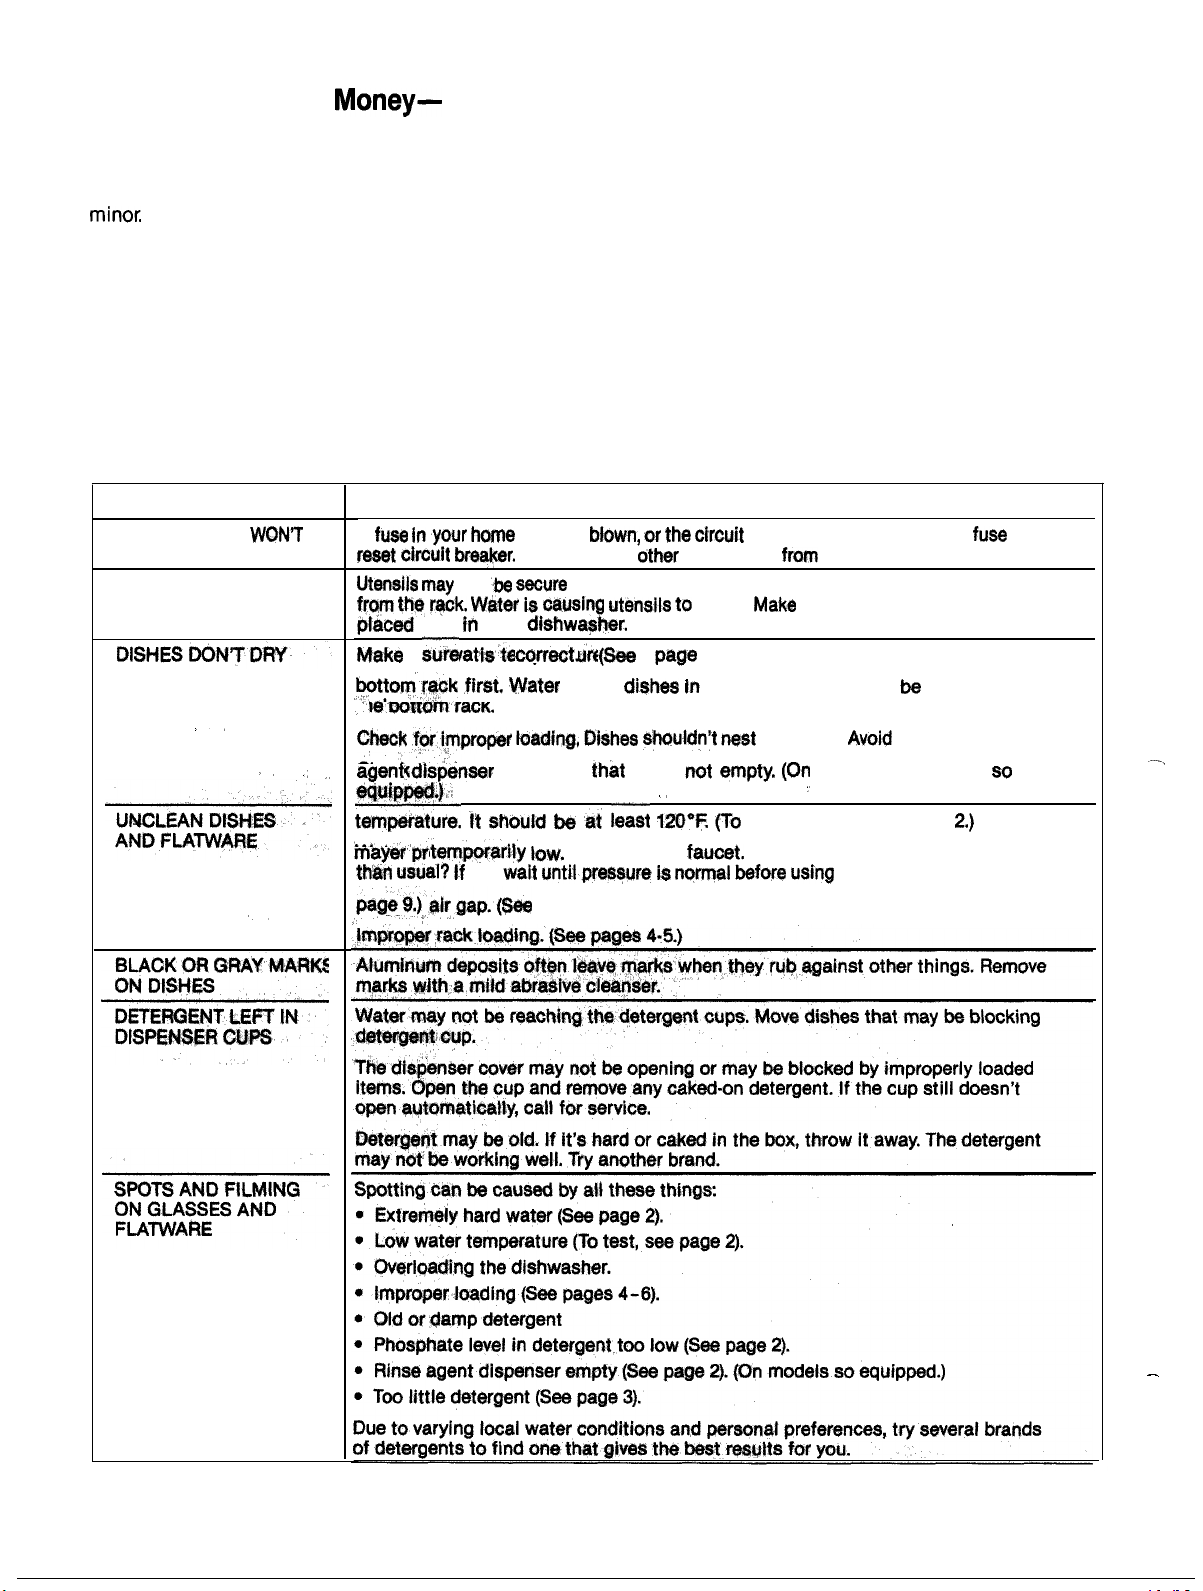
To Save Time and
before you call for service,
check the Problem Solver
If you have a problem, it may be
You may be able to correct
it yourself. Just use this Problem
Solver to locate your problem and
then follow the suggested
recommendations.
The Problem Solver
PROBLEM
DISHWASHER
RUN
UNUSUAL NOISE
POSSIBLE CAUSE AND REMEDY
A
may be
not
“
be
Remove any
s~ure on rack pins. Or something small may have dropped
so,
Mti{ng,
to see
from
Turn on a
‘it’s
breaker tripped. Replace
appliances
rattle,
2.)
the top rack may
together.
~o test, see page
Is water coming out slower
the circuit.
sure everything is securely
dishwashers
your dishwasher.
or
spilling into
overloading.
10
The Problem Solver (continued)
Page 13
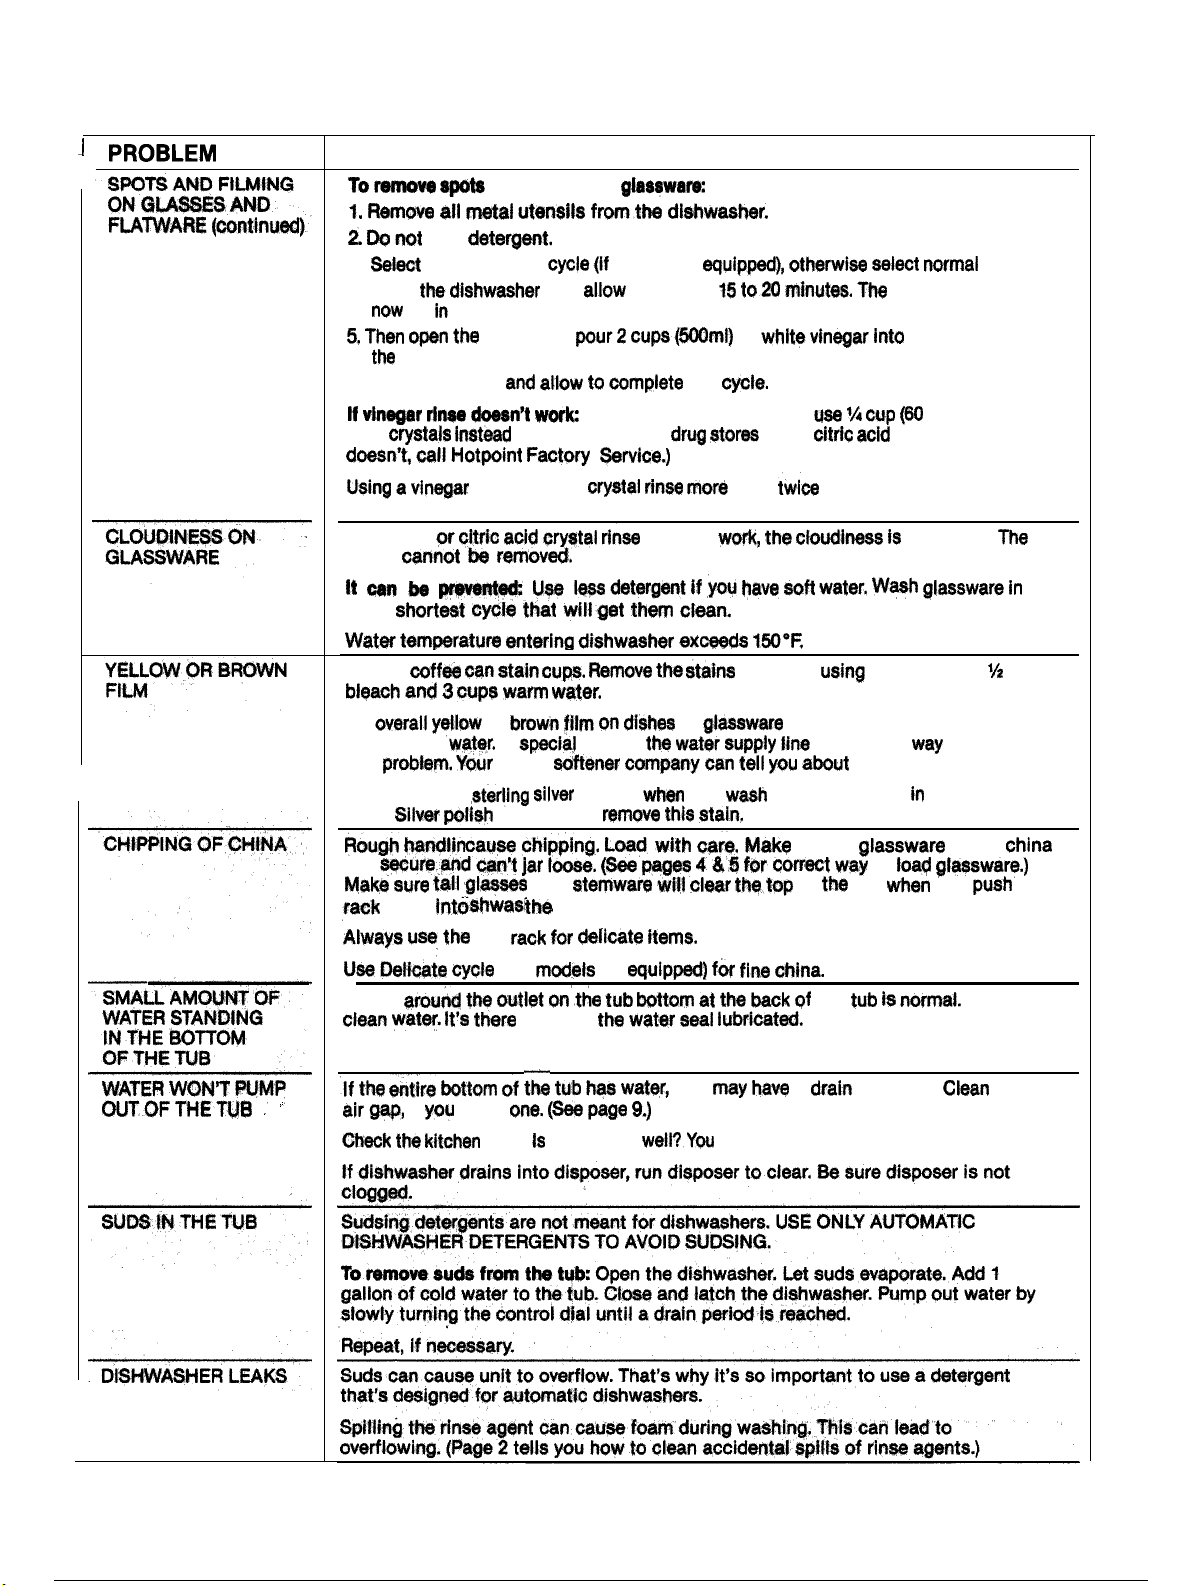
The Problem Solver (continued)
POSSIBLE CAUSE AND REMEDY
and film from
3.
4. Start
6. Close the
sold
home water-softener.
tf’vinegar
film
the
Tea or
An
deposits in
this
Yellow film on
load.
are
Water
add
Power Scrub
be
the main wash.
dishwasher.
lnst~d of vinegar, (Most
tem~fatura
a&o
and
door and’
door
or citric acid
top
or
A
water
wilt usually
(on
and
to
keep
Repeat as above, except
dishwas~r xceeds
Rem~e
filter in
results
so
model so
to run for
doesn’t
the
or
you
than
of
carry
cfoudi~ss
by hand,
can be caused by iron
copper utensils
sure
of
dishwasher wilt
crystals. If yours
a month? Consider a
a solution of
is the only
the filter.
to
tub
the
cycle.
the bottom of
ml) of citric
“etching.”
to correct
the same
you
cup
and
It is
the
tit~r~
if
have
sink,
it draining
you
haw a
may
need a plumber,
problem.
the
I
11
Page 14

NOTES
12
Page 15
—
1
●
●
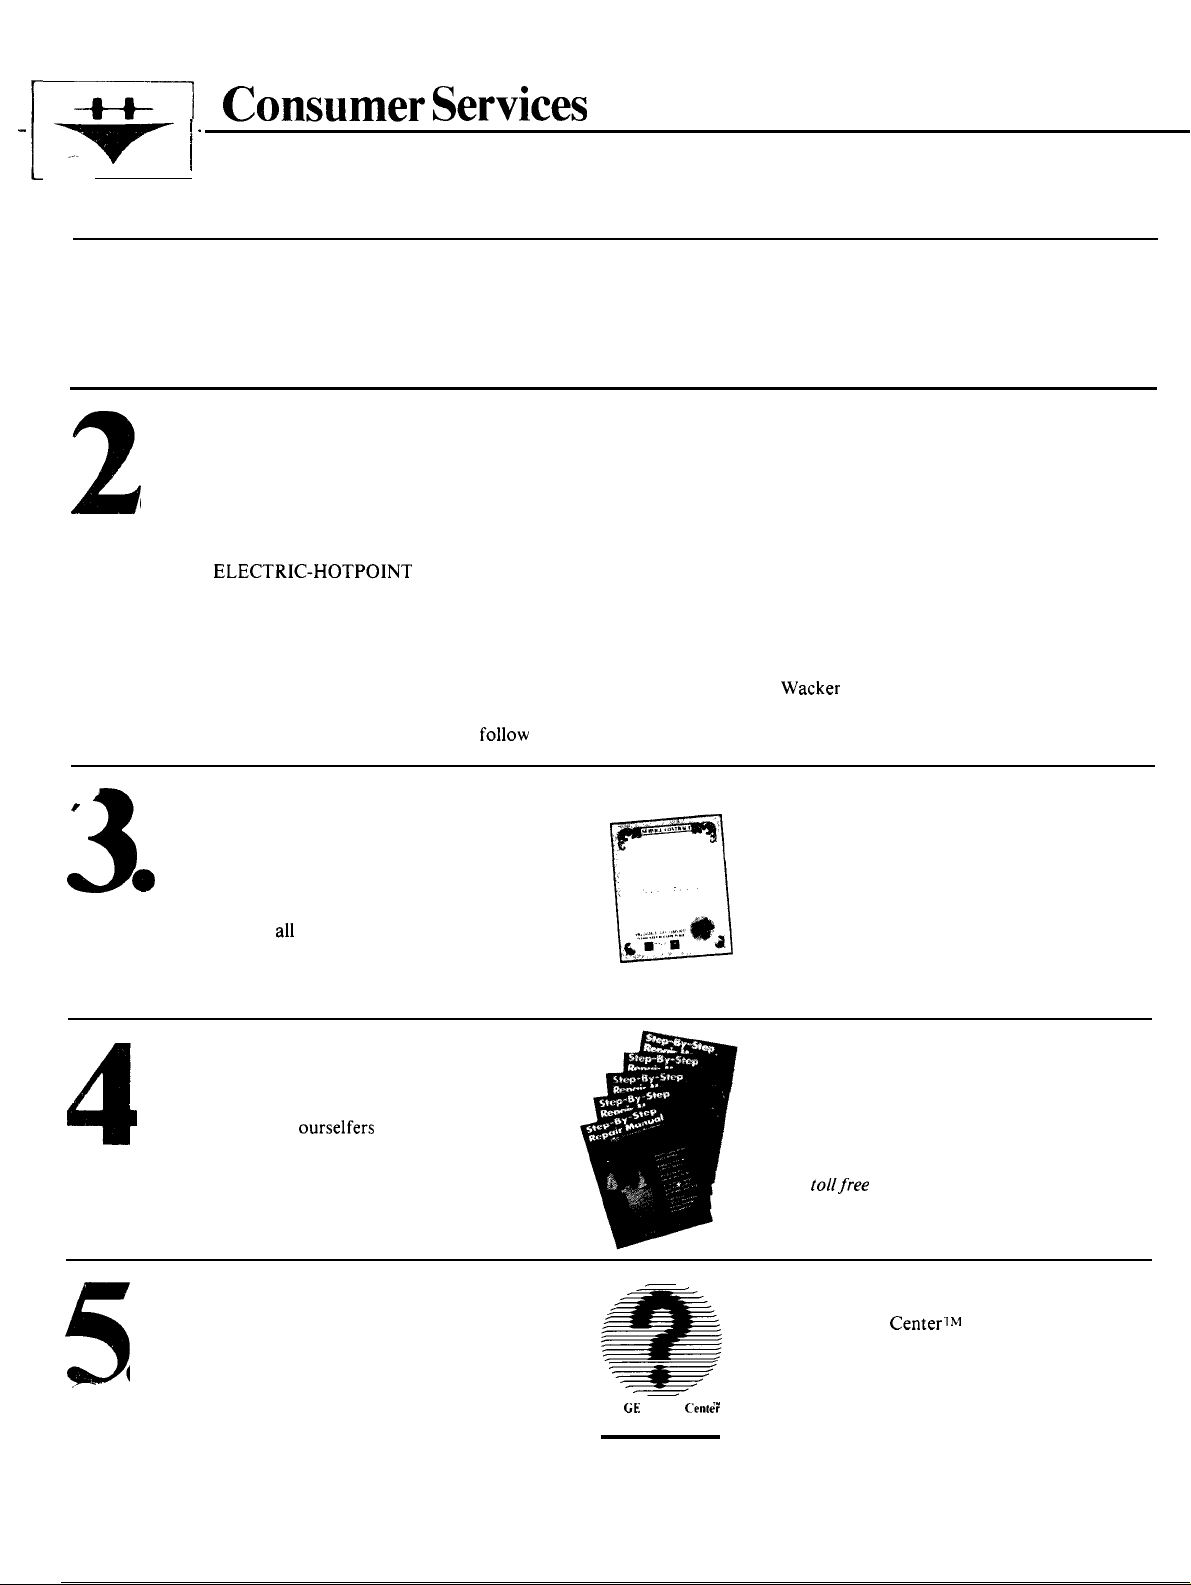
At Hotpoint we’re committed to providing you with the best appliances we know how to build and we know that you
want your appliances to give you many years of dependable service.
Our Consumer Services are designed with your needs and wants in mind.
Warranty Protection
Before your new appliance left the factory, it went
through rigorous tests to detect manufacturing defects.
And you have a written warranty to protect you. See the
warranty on the back page of this book for details.
Convenient Service
Whether your appliance is in or out of warranty, you’re
just a phone call away from our nationwide network of
Factory Trained Service professionals.
Simply call our Hotpoint service organization. Look in
the White or Yellow Pages of your telephone directory for
HOTPOINT FACTORY SERVICE, GENERAL
HOTPOINT CUSTOMER CARE
Service can normally be scheduled at your convenience
and the technician drives a fully-stocked parts service
truck so that, in most cases, the repair can be completed
in one visit.
We’re proud of our service and want you to be pleased,
but if for some reason you are not happy with the service
you receive, here are three steps to
@
SERVICE.
FIRST, contact the people who serviced your appliance.
Explain why you are not pleased. In most cases, this will
solve the problem.
NEXT, if you are still not pleased write all the details
—including your phone number to:
Manager, Consumer Relations
Hotpoint
Appliance Park
Louisville, Kentucky 40225
FINALLY, if your problem is still not resolved, write:
Major Appliance Consumer Action Panel
20 North
Chicago, Illinois 60606
●
●
Service Contracts
For trouble-free service beyond
the written warranty period.
If you prefer to budget your repair expenditure:
instead of being surprised by them, Hotpoint
offers service contracts for varying lengths of
time on
contract, we’ll keep your appliance in good
operating condition during the contract period
at no additional charge.
The Quick Fix” System
You can save money and time
by doing it yourself.
For do-it-y ourselfers who would prefer to fix
Hotpoint major appliances themselves . . .
Hotpoint offers an industry first, the Quick
Fix” System.
Help For You By Phone
Should you need help in the selection and
purchase of new appliances, or have questions
about the operation of the Hotpoint appliances
you now own—or have
about Hotpoint consumer products or services,
you are only a
TOLL FREE call away.
any other questions
The GE Answer
800.626.2000
Service contracts let you pay today’s prices for
service a month, a year, or several years from
now. And, you’ll receive service from Hotpoint
trained service technicians using only genuine
Hotpoint parts. If you have any questions about
Service Contracts, call
800.626.2224.
A program for do-it-yourself appliance repair,
the system includes
for refrigerators, most non-microwave electric
ranges, dishwashers, and standard and large
capacity washers and dryers, plus
packaged replacement parts,
with a
The GE Answer Centerl
information service is open 24 hours a day,
seven days a week.
Our staff of experts stands ready to assist you
anytime.
800
TOLL-FREE
(In Kentucky, call 800.292 .2057.)
step-by-step repair manuals
specially
and technical help
number.
consumer
13
Page 16
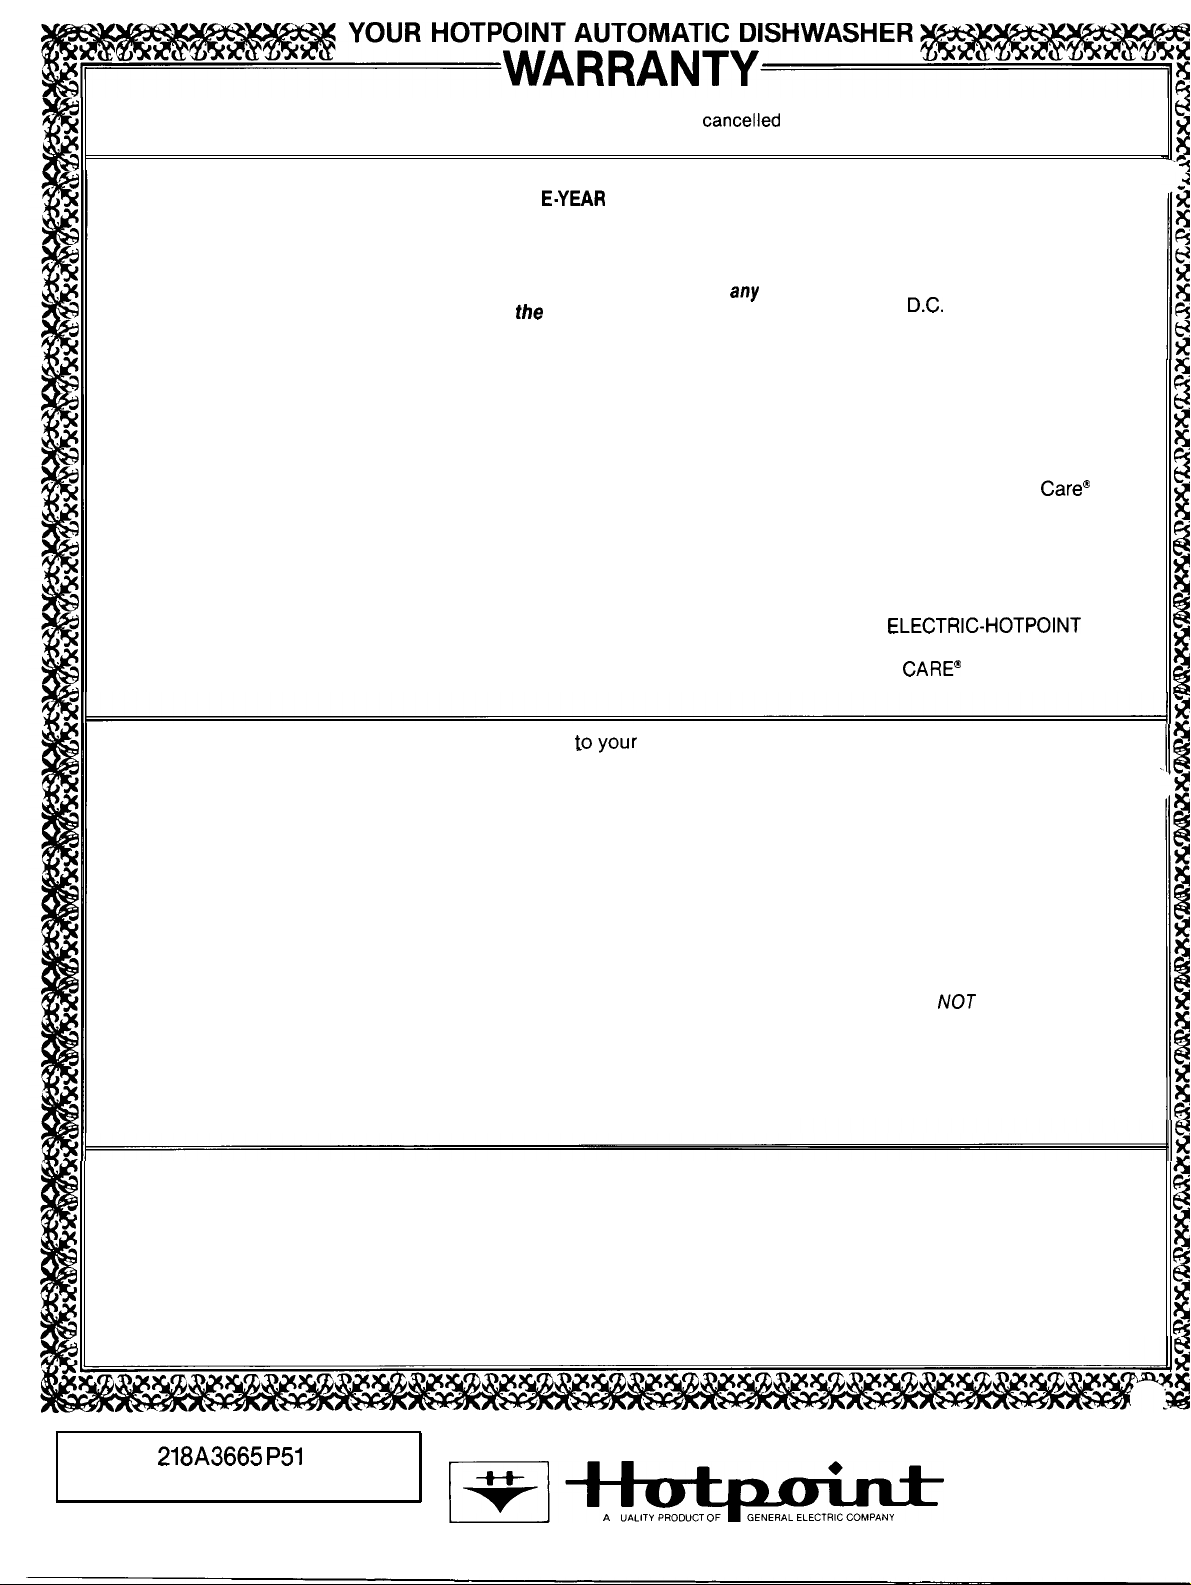
AUTOMATIC DISHWASHER
Save proof of original purchase date such as your sales slip or
WHAT IS COVERED
check to establish warranty period.
FULL ON
WARRANTY
For one year from date of original
purchase, we will provide, free of
charge, parts and service labor in
your home to repair or replace
part of
dishwasher that fails
because of a manufacturing defect.
This warranty is extended to the
original purchaser and any succeeding owner for products purchased
for ordinary home use in the 48
mainland states, Hawaii and
Washington,
In Alaska the
warranty is the same except that it
is LIMITED because you must pay
to ship the product to the service
shop or for the service technician’s
travel costs to your home.
All warranty service will be provided
by our Factory Service Centers or
by our authorized Customer
servicers during normal working
hours.
Look in the White or Yellow Pages
of your telephone directory for
HOTPOINT FACTORY SERVICE,
GENERAL
FACTORY SERVICE or HOTPOINT
CUSTOMER
SERVICE.
WHAT IS NOT COVERED . Service trips
teach you how to use the product.
Read your Use and Care material.
If you then have any questions
about operating the product,
please contact your dealer or our
Consumer Affairs office at the
address below, or call, toll free:
The GE Answer Center
800.626.2000
consumer information service
. Improper installation.
If you have an installation problem,
contact your dealer or installer.
home to
TM
● Replacement of house fuses
or resetting of circuit breakers.
● Cleaning or servicing of air gap
device in drain line.
● Failure of the product if it is
used for other than its intended
purpose or used commercially.
● Damage to product caused
by accident, fire, floods or acts
of God.
WARRANTOR IS
RESPONSIBLE FOR CONSEQUENTIAL
DAMAGES.
You are responsible for providing
adequate electrical, plumbing and
other connecting facilities.
Some states do not allow the exclusion or limitation of incidental or consequential damages, so the above limitation or exclusion
may not apply to you. This warranty gives you specific legal rights, and you may also have other rights which vary from state to state.
To know what your legal rights are in your state, consult your local or state consumer affairs office or your state’s Attorney General.
Warrantor: General Electric Company
If further help is needed concerning this warranty, contact:
Manager—Consumer Affairs, General Electric Company, Appliance Park, Louisville, KY 40225
—
Part No. 218A3665
Pub. No. 39-5148—1
9/84
— Rev. 1
QuALITY PRODUCT
●
GENERAL ELECTRIC COMPANY
 Loading...