

Page 1
CX65SP6 PT/HA
GB
English
Operating Instructions
COOKER AND OVEN
Contents
Operating Instructions,1
Control Panel,1
Overall view,2
Warning,3
Installation,5
Installation,
Start-up and use,10
Cooking modes,11
Precautions and tips,14
Care and maintenance,15
Assistance,15
1
2
PT
Português
Instruções para a utilização
FOGÃO E FORNO
Índice
Instruções para a utilização,1
Painel de comandos,1
Vista de conjunto,2
Attentacao,3
Instalaçao,16
Início e utilizaçao, 21
Utilizaçao do forno,22
Precauçoes e conselhos,25
Manutençao e cuidados,26
Assistencia técnica,26
7
6
4
3
GB
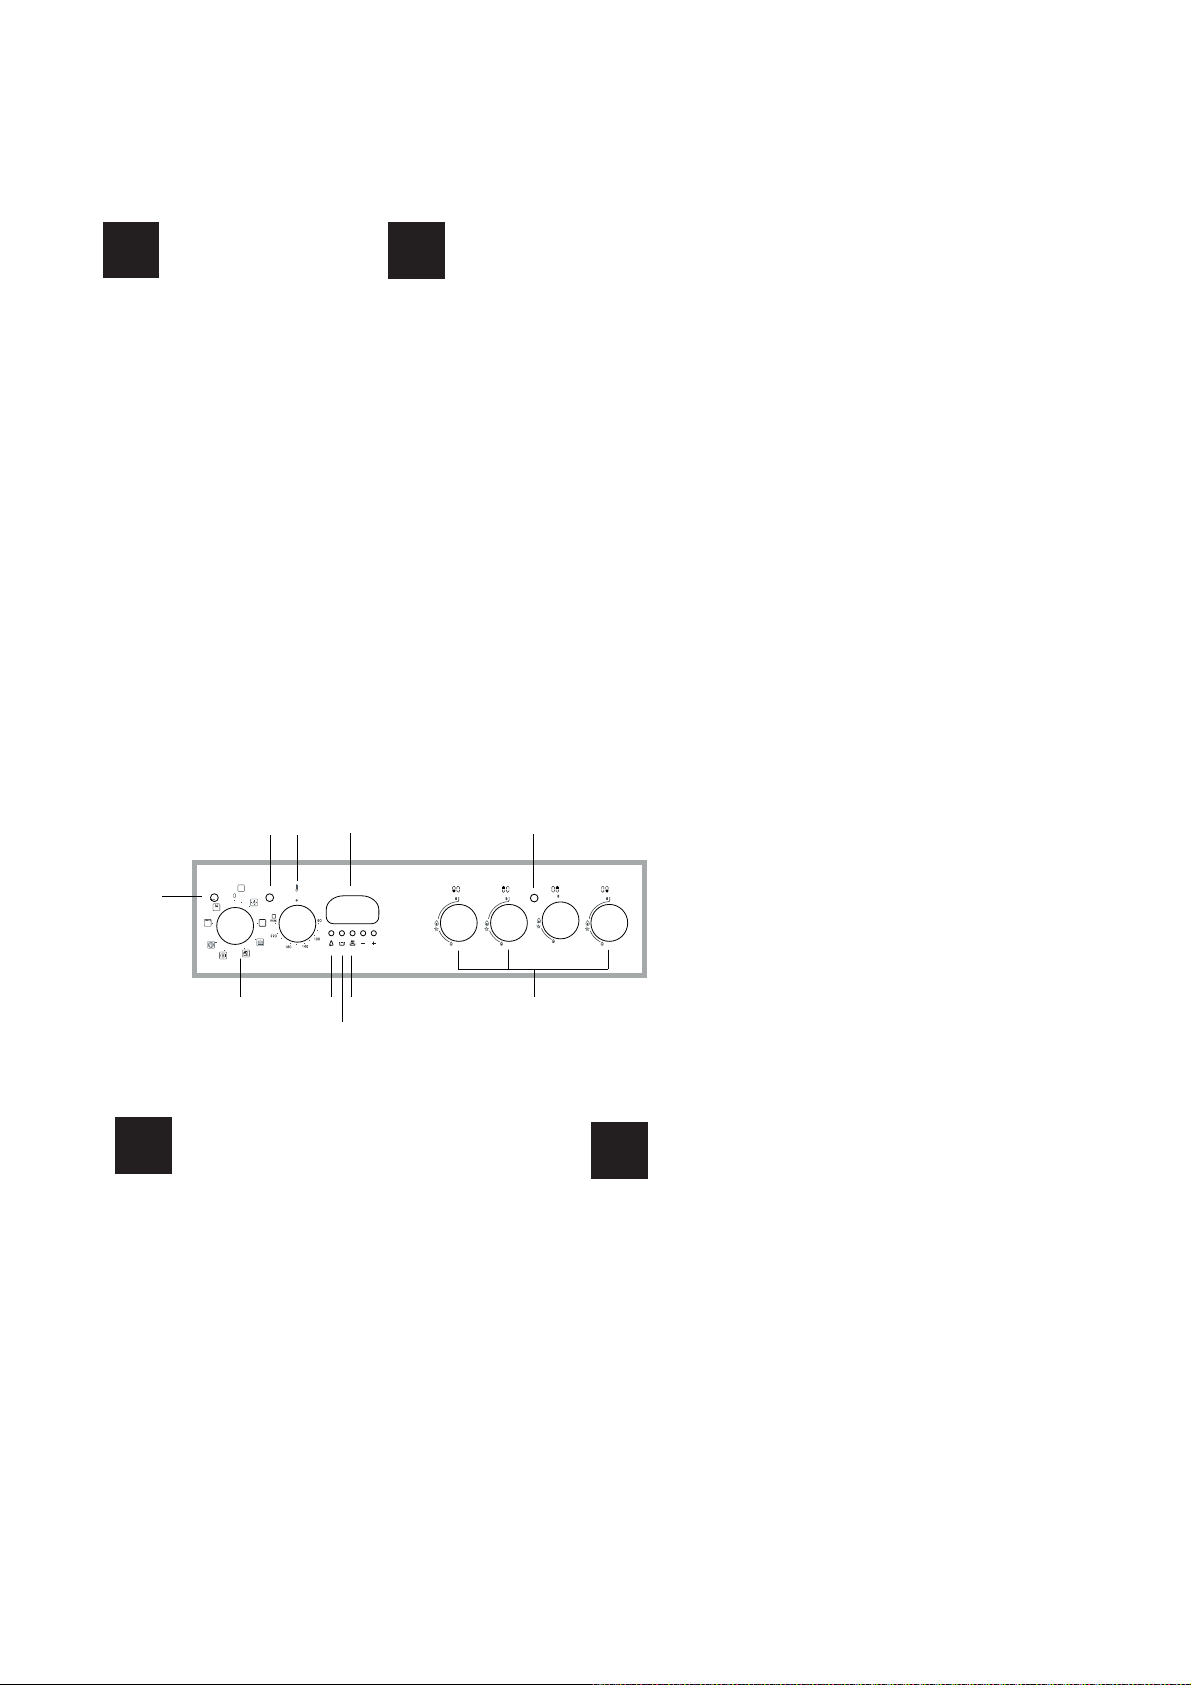
1.THERMOSTAT knob
2.THERMOSTAT indicator light
3.SELECTOR knob
4.OVENIndicator light
5.Hob BURNER control knob
6. ELECTRIC HOTPLATE indicator light
7. Electronic cooking programmer
8.TIMER button
9.COOKING TIME button
10.COOKING END TIME button
Description of the appliance
Control panel
8910
5
Descrição do aparelho
PT
Painel de comandos
1.Selector para a temperatura de cozedura (termostato)
2.Indicador de funcionamento termostato
3.Botão selector das funções de cozedura
4.Indicador de funcionamento forno
5.Botão luz do forno e rotisserie
6.Indicador de funcionamento chapas
7.O programador de cozedura electrónico
8.Botão contador de minutos.
9.Botão duração da cozedura
10.Botão final da cozedura
1
Page 2
GB
2
3
4
5
8
1
6
6
9
10
11
12
13
7
14
Description of the appliance
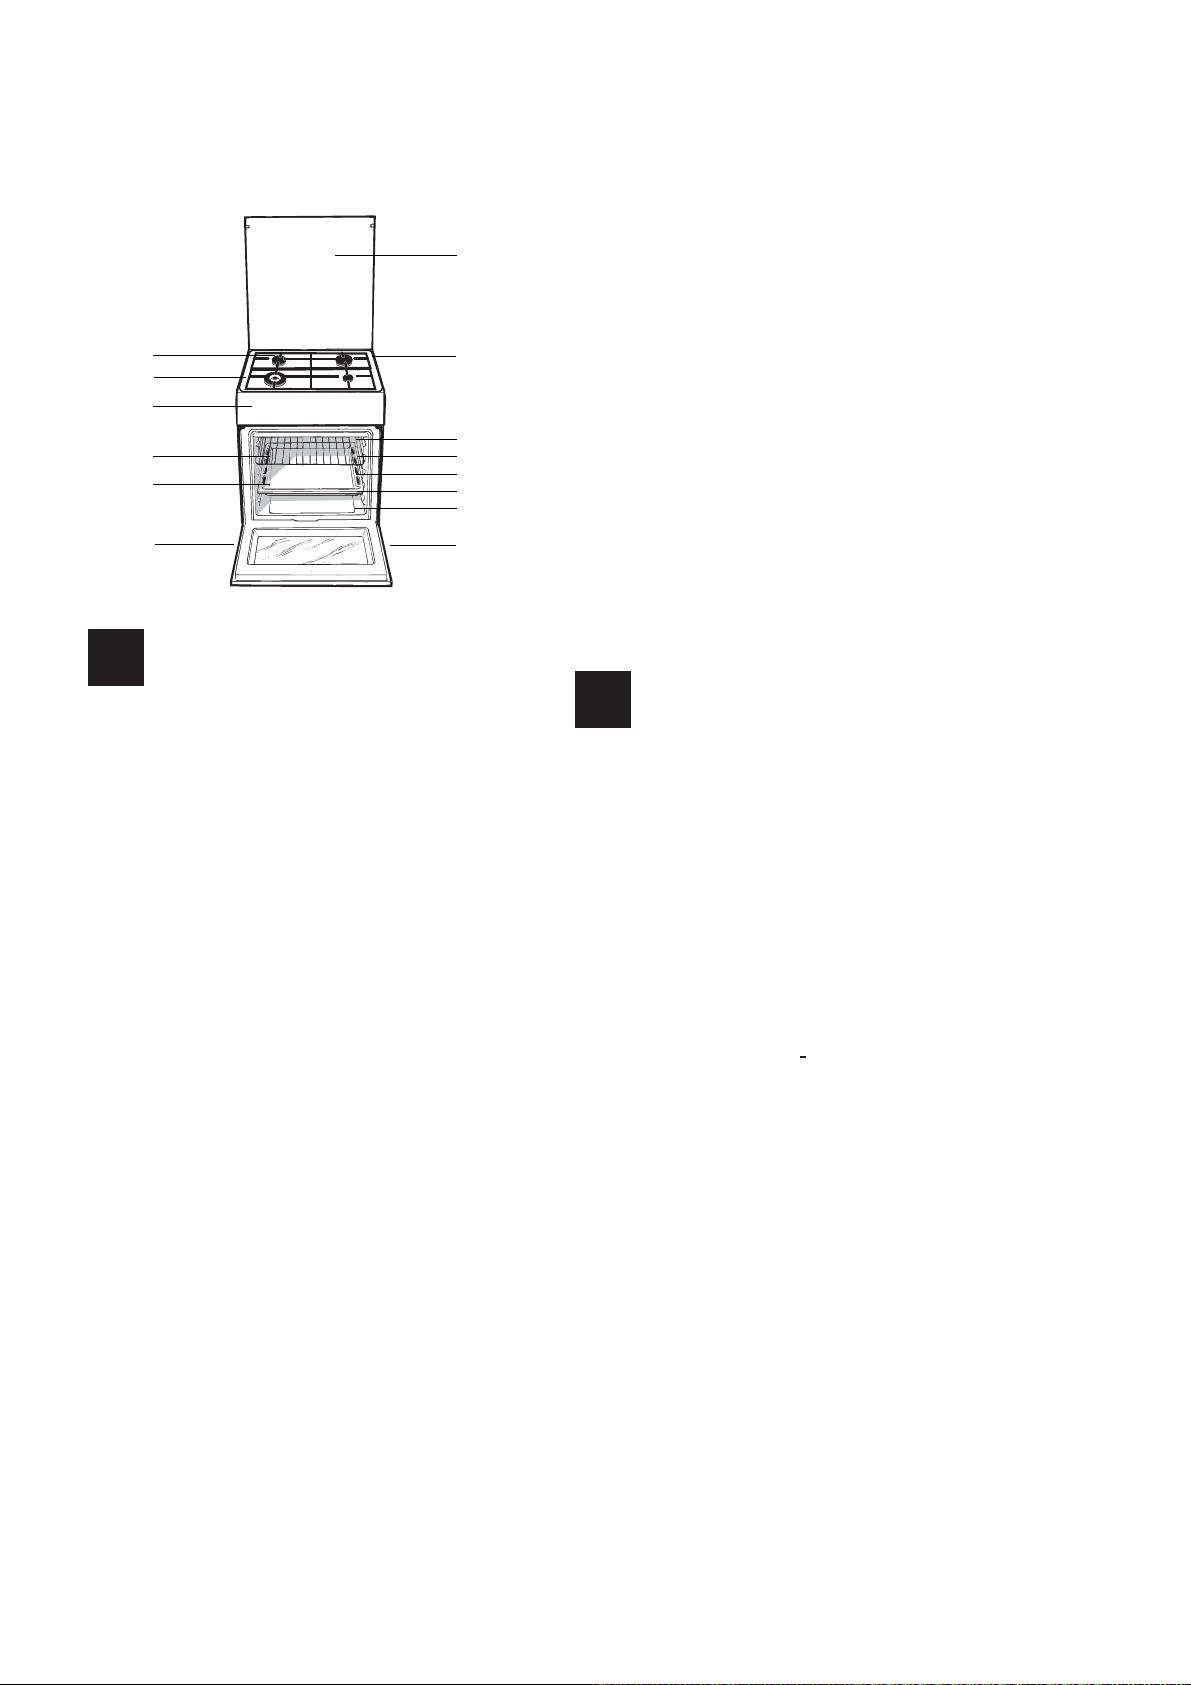
Overall view
1 Hob burner
2 Hob Grid
3.Control panel
4.Sliding grill rack
5.DRIPPING pan
6.Adjustable foot
7.Containment surface for spills
8.GUIDE RAILS for the sliding racks
9.position 5
10.position 4
11.position 3
12.position 2
13.position 1
14.Glass Cover*(Available only on certain models)
Descrição do aparelho
PT
Vista de conjunto
1 Queimador a gás
2 Grade do piano de trabalho
3 Painel de comandos
4 Prateleira GRADE
5 Prateleira BANDEJA PINGADEIRA
6 Pé de regulação
7 Plano de retenção dos eventuais vazamentos
8 GUIAS de deslizamento das prateleiras
9 Posição 5
10 Posição 4
11 Posição 3
12Posição 2
13 Posição 1
14 O sobretampo de vidro (Presente apenas em alguns modelos)
2
Page 3

GB
WARNINGWARNINGWARNING
WARNING: The appliance and its
accessible parts become hot during
use.
Care should be taken to avoid
touching heating elements.
Children less than 8 years of age shall
be kept away unless continuously
supervised.
This appliance can be used by
children aged from 8 years and
above and persons with reduced
physical, sensory or mental
capabilities or lack of experience
and knowledge if they have been
given supervision or instruction
concerning use of the appliance in a
safe way and understand the hazards
involved. Children shall not play with
the appliance. Cleaning and user
maintenance shall not be made by
children without supervision.
WARNING: Unattended cooking on a
hob with fat or oil can be dangerous
and may result in fire.
Do not use harsh abrasive cleaners
or sharp metal scrapers to clean
the oven door glass since they can
scratch the surface, which may result
in shattering of the glass.
The internal surfaces of the
compartment (where present) may
become hot.
Never use steam cleaners or pressure
cleaners on the appliance.
Remove any liquid from
the lid before opening it.
Do not close the glass cover (if present)
when the gas burners or electric
hotplates are still hot.
WARNING: Ensure that the appliance is
switched off before replacing the lamp
to avoid the possibility of electric shock.
CAUTION: the use of inappropriate hob
guards can cause accidents.
! When you place the rack inside,
make sure that the stop is directed
upwards and in the back of the cavity.
NEVER try to extinguish a fire with
water, but switch off the appliance
and then cover flame e.g. with a lid or
a fire blanket.
3
Page 4

PT
ATENÇAOATENÇAOATENÇAO
ATENÇÃO: Este aparelho e as suas
partes acessíveis aquecem muito
durante a utilização.
É preciso ter atenção e evitar tocar
os elementos que aquecem.
Manter afastadas as crianças com
menos de 8 anos, caso não estejam
a ser vigiadas.
O presente aparelho pode ser utilizado por crianças com mais de 8 anos
e por pessoas com capacidades
físicas, sensoriais ou mentais reduzidas ou com pouca experiência e
conhecimentos, caso sejam adequadamente vigiadas ou caso tenham
recebido instruções em relação ao
uso do aparelho de forma segura
e tenham conhecimento dos perigos associados. As crianças não
devem brincar com o aparelho. As
operações de limpeza e manutenção
não devem ser efectuadas por crianças sem vigilância.
ATENÇÃO: Deixar um fogão com
gordura e óleo sem vigilância
pode ser perigoso e provocar um
incêndio.
NUNCA tente apagar as chamas
com água. É necessário desligar o
aparelho e cobrir as chamas com
uma tampa ou com uma manta
ignífuga.
Não utilizar produtos abrasivos nem
espátulas de metal cortantes para
limpar a porta em vidro do forno,
uma vez que pode riscar a superfície, provocando a ruptura do vidro.
As superfícies internas da gaveta (se
presentes) podem ficar muito quentes.
Nunca utilize equipamento de limpeza a vapor ou de alta pressão para
limpar o aparelho.
Elimine os líquidos presentes na tampa antes de abri-la. Não feche a tampa de vidro (se presente) se os queimadores ou a chapa eléctrica ainda
estiverem quentes.
ATENÇÃO: Assegure-se de que o
aparelho esteja desligado antes de
substituir a lâmpada, para evitar a
possibilidade de choques eléctricos.
ATENÇÃO: O uso de protecções do
plano inadequadas pode causar incidentes.
! Quando inserir a grelha, assegure-
-se de que o bloqueio esteja voltado
para cima e na parte posterior da
cavidade.
4
Page 5

Installation
! Before operating your new appliance please read
this instruction booklet carefully. It contains important
information concerning the safe installation and
operation of the appliance.
! Please keep these operating instructions for future
reference. Make sure that the instructions are kept with
the appliance if it is sold, given away or moved.
! The appliance must be installed by a qualified
professional according to the instructions provided.
! Any necessary adjustment or maintenance must be
performed after the cooker has been disconnected
from the electricity supply.
Room ventilation
The appliance may only be installed in permanentlyventilated rooms, in accordance with current national
legislation. The room in which the appliance is installed
must be ventilated adequately so as to provide as
much air as is needed by the normal gas combustion
process (the flow of air must not be lower than 2 m
per kW of installed power).
The air inlets, protected by grilles, should have a duct
with an inner cross section of at least 100 cm
should be positioned so that they are not liable to even
partial obstruction (see gure A).
These inlets should be enlarged by 100% - with a
minimum of 200 cm
hob is not equipped with a flame failure safety device.
When the flow of air is provided in an indirect manner
from adjacent rooms (see gure B), provided that these
are not communal parts of a building, areas with
increased fire hazards or bedrooms, the inlets should
be fitted with a ventilation duct leading outside as
described above.
Adjacent room Room requiring ventilation
A B
2
- whenever the surface of the
2
and
3
/h
Disposing of combustion fumes
The disposal of combustion fumes should be
guaranteed using a hood connected to a safe and
efficient natural suction chimney, or using an electric
fan that begins to operate automatically every time the
appliance is switched on (see gure).
Fumes channelled Fumes channelled through
straight outside a chimney or a branched
flue system (reserved for
cooking appliances)
! The liquefied petroleum gases are heavier than air
and collect by the floor, therefore all rooms containing
LPG cylinders must have openings leading outside so
that any leaked gas can escape easily.
LPG cylinders, therefore, whether partially or
completely full, must not be installed or stored in rooms
or storage areas that are below ground level (cellars,
etc.). Only the cylinder being used should be stored
in the room; this should also be kept well away from
sources of heat (ovens, chimneys, stoves) that may
cause the temperature of the cylinder to rise above
50°C.
Positioning and levelling
! It is possible to install the appliance alongside
cupboards whose height does not exceed that of the
hob surface.
! Make sure that the wall in contact with the back of
the appliance is made from a non-flammable, heatresistant material (T 90°C).
GB
A
Ventilation opening Increase in the gap
between
for comburent air the door and the
flooring
! After prolonged use of the appliance, it is advisable to
open a window or increase the speed of any fans used.
To install the appliance correctly:
• Place it in the kitchen, the dining room or the bed-sit
(not in the bathroom).
• If the top of the hob is higher than the cupboards,
the appliance must be installed at least 600 mm away
from them.
5
Page 6
GB
HOOD
420
Min.
min.
650
mm. with hood
min.
700
mm. without hood
mm.
600
Min. mm.
420
Min. mm.
• If the cooker is
installed underneath a
wall cabinet, there must
be a minimum distance
of 420 mm between this
cabinet and the top of
the hob.
This distance should be
increased to 700 mm
if the wall cabinets are
flammable (see gure).
indicated on the data plate.
• The socket is compatible with the plug of the
appliance. If the socket is incompatible with the
plug, ask an authorised technician to replace it. Do
not use extension cords or multiple sockets.
! Once the appliance has been installed, the power
supply cable and the electrical socket must be easily
accessible.
! The cable must not be bent or compressed.
• Do not position blinds behind the cooker or less than
200 mm away from its sides.
• Any hoods must be installed according to the
instructions listed in the relevant operating manual.
Levelling
If it is necessary to level the appliance, screw the
adjustable feet into the places
provided on each corner of the
base of the cooker (see gure).
The legs* fit into the slots on the
underside of the base of the
cooker.
Electrical connection
Install a standardised plug corresponding to the load
indicated on the appliance data plate (see Technical
data table).
The appliance must be directly connected to the mains
using an omnipolar circuit-breaker with a minimum contact
opening of 3 mm installed between the appliance and
the mains. The circuit-breaker must be suitable for the
charge indicated and must comply with current electrical
regulations (the earthing wire must not be interrupted by
the circuit-breaker). The supply cable must be positioned
so that it does not come into contact with temperatures
higher than 50°C at any point.
Before connecting the appliance to the power supply,
make sure that:
• The appliance is earthed and the plug is compliant with
the law.
• The socket can withstand the maximum power of the
appliance, which is indicated by the data plate.
• The voltage is in the range between the values
6
! The cable must be checked regularly and replaced
by authorised technicians only.
! The manufacturer declines any liability should
these safety measures not be observed.
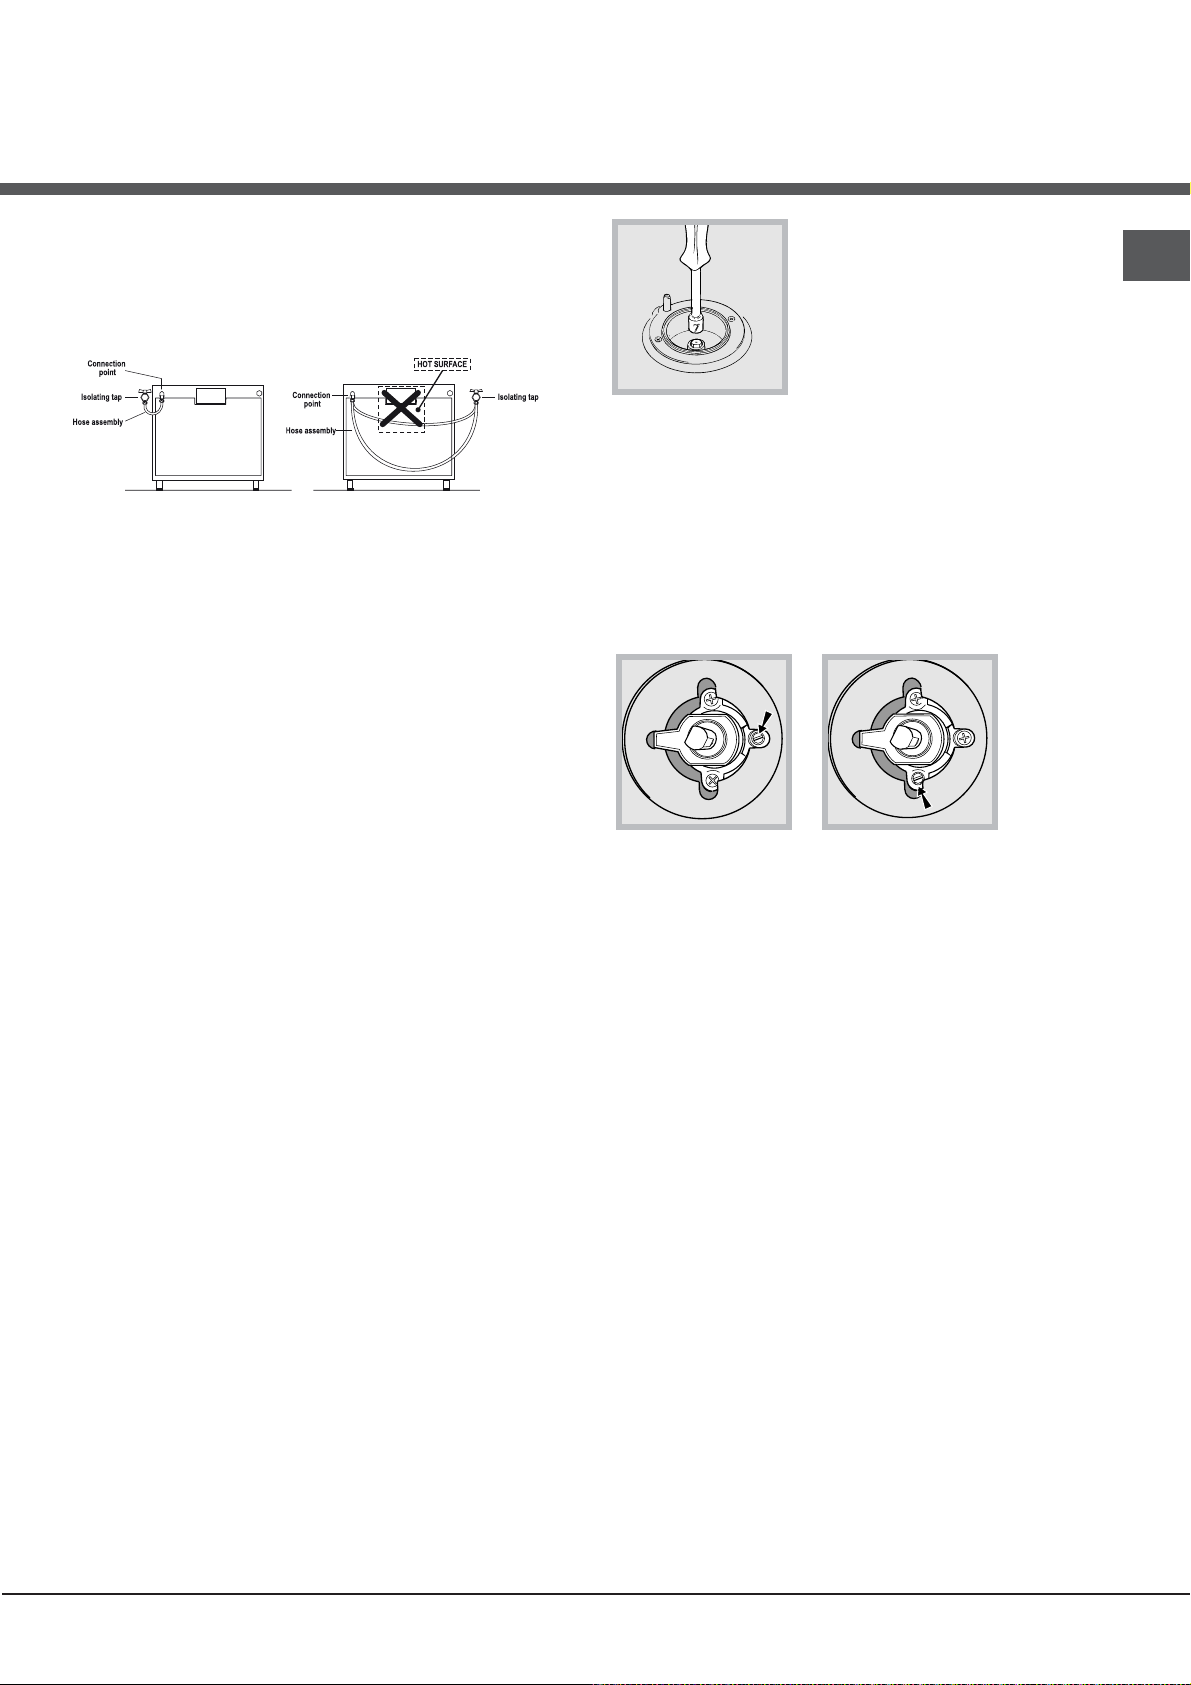
Gas connection
Connection to the gas network or to the gas cylinder
may be carried out using a flexible rubber or steel hose,
in accordance with current national legislation and after
making sure that the appliance is suited to the type of gas
with which it will be supplied (see the rating sticker on
the cover: if this is not the case see below). When using
liquid gas from a cylinder, install a pressure regulator
which complies with current national regulations. To
make connection easier, the gas supply may be turned
sideways*: reverse the position of the hose holder with
that of the cap and replace the gasket that is supplied
with the appliance.
! Check that the pressure of the gas supply is
consistent with the values indicated in the Table
of burner and nozzle specifications (see below).
This will ensure the safe operation and durability of
your appliance while maintaining efficient energy
consumption.
Gas connection using a flexible rubber hose
Make sure that the hose complies with current national
legislation. The internal diameter of the hose must
measure: 8 mm for liquid gas supply; 13 mm for
methane gas supply.
Once the connection has been performed, make sure
that the hose:
• Does not come into contact with any parts that reach
temperatures of over 50°C.
• Is not subject to any pulling or twisting forces and
that it is not kinked or bent.
• Does not come into contact with blades, sharp
corners or moving parts and that it is not
compressed.
• Is easy to inspect along its whole length so that its
Page 7
condition may be checked.
• Is shorter than 1500 mm.
• Fits firmly into place at both ends, where it will
be fixed using clamps that comply with current
regulations.
3. Replace all the components
by following the above
instructions in reverse.
Adjusting the hob burners’
minimum setting:
GB
! If one or more of these conditions is not fulfilled
or if the cooker must be installed according to the
conditions listed for class 2 - subclass 1 appliances
(installed between two cupboards), the flexible steel
hose must be used instead (see below).
Connecting a flexible jointless stainless steel pipe
to a threaded attachment
Make sure that the hose and gaskets comply with
current national legislation.
To begin using the hose, remove the hose holder on
the appliance (the gas supply inlet on the appliance is
a cylindrical threaded 1/2 gas male attachment).
! Perform the connection in such a way that the hose
length does not exceed a maximum of 2 metres,
making sure that the hose is not compressed and does
not come into contact with moving parts.
Checking the tightness of the connection
When the installation process is complete, check the
hose fittings for leaks using a soapy solution. Never
use a flame.
1. Turn the tap to the minimum
2. Remove the knob and adjust
the regulatory screw, which is positioned inside or next
to the tap pin, until the flame is small but steady.
! If the appliance is connected to a liquid gas supply,
the regulatory screw must be fastened as tightly as
possible:
the
burner
While
3.
alight, quickly change the position of the knob from
minimum to maximum and vice versa several times,
checking that the flame is not extinguished.
! The hob burners do not require primary air
adjustment.
! After adjusting the appliance so it may be used with
a different type of gas, replace the old rating label with
a new one that corresponds to the new type of gas
(these labels are available from Authorised Technical
Assistance Centres).
is
position.
Adapting to different types of gas
It is possible to adapt the appliance to a type of gas
other than the default type (this is indicated on the
rating label on the cover).
Adapting the hob
Replacing the nozzles for the hob burners:
1. Remove the hob grids and slide the burners off their
seats.
2. Unscrew the nozzles using a 7 mm socket spanner
(see gure), and replace them with nozzles suited to
the new type of gas (see Burner and nozzle speci cations
table).
! Should the gas pressure used be different (or vary
slightly) from the recommended pressure, a suitable
pressure regulator must be fitted to the inlet hose in
accordance with current national regulations relating to
“regulators for channelled gas”.
7
Page 8
GB
Replacing the Triple ring burner nozzles
1. Remove the pan supports and lift the burners out of their
housing. The burner consists of two separate parts (see
pictures).
2. Unscrew the nozzles using a 7 mm socket spanner.
Replace the nozzles with models that are configured
for use with the new type of gas (see Table 1). The two
nozzles have the same hole diameter.
3. Replace all the components by completing the above
operations in reverse order.
• Adjusting the burners’ primary air :
Does not require adjusting.
• Setting the burners to minimum:
1. Turn the tap to the low flame position.
2. Remove the knob and adjust the adjustment screw, which
is positioned in or next to the tap pin, until the flame is
small but steady.
3. Having adjusted the flame to the required low setting,
while the burner is alight, quickly change the position
of the knob from minimum to maximum and vice versa
several times, checking that the flame does not go out.
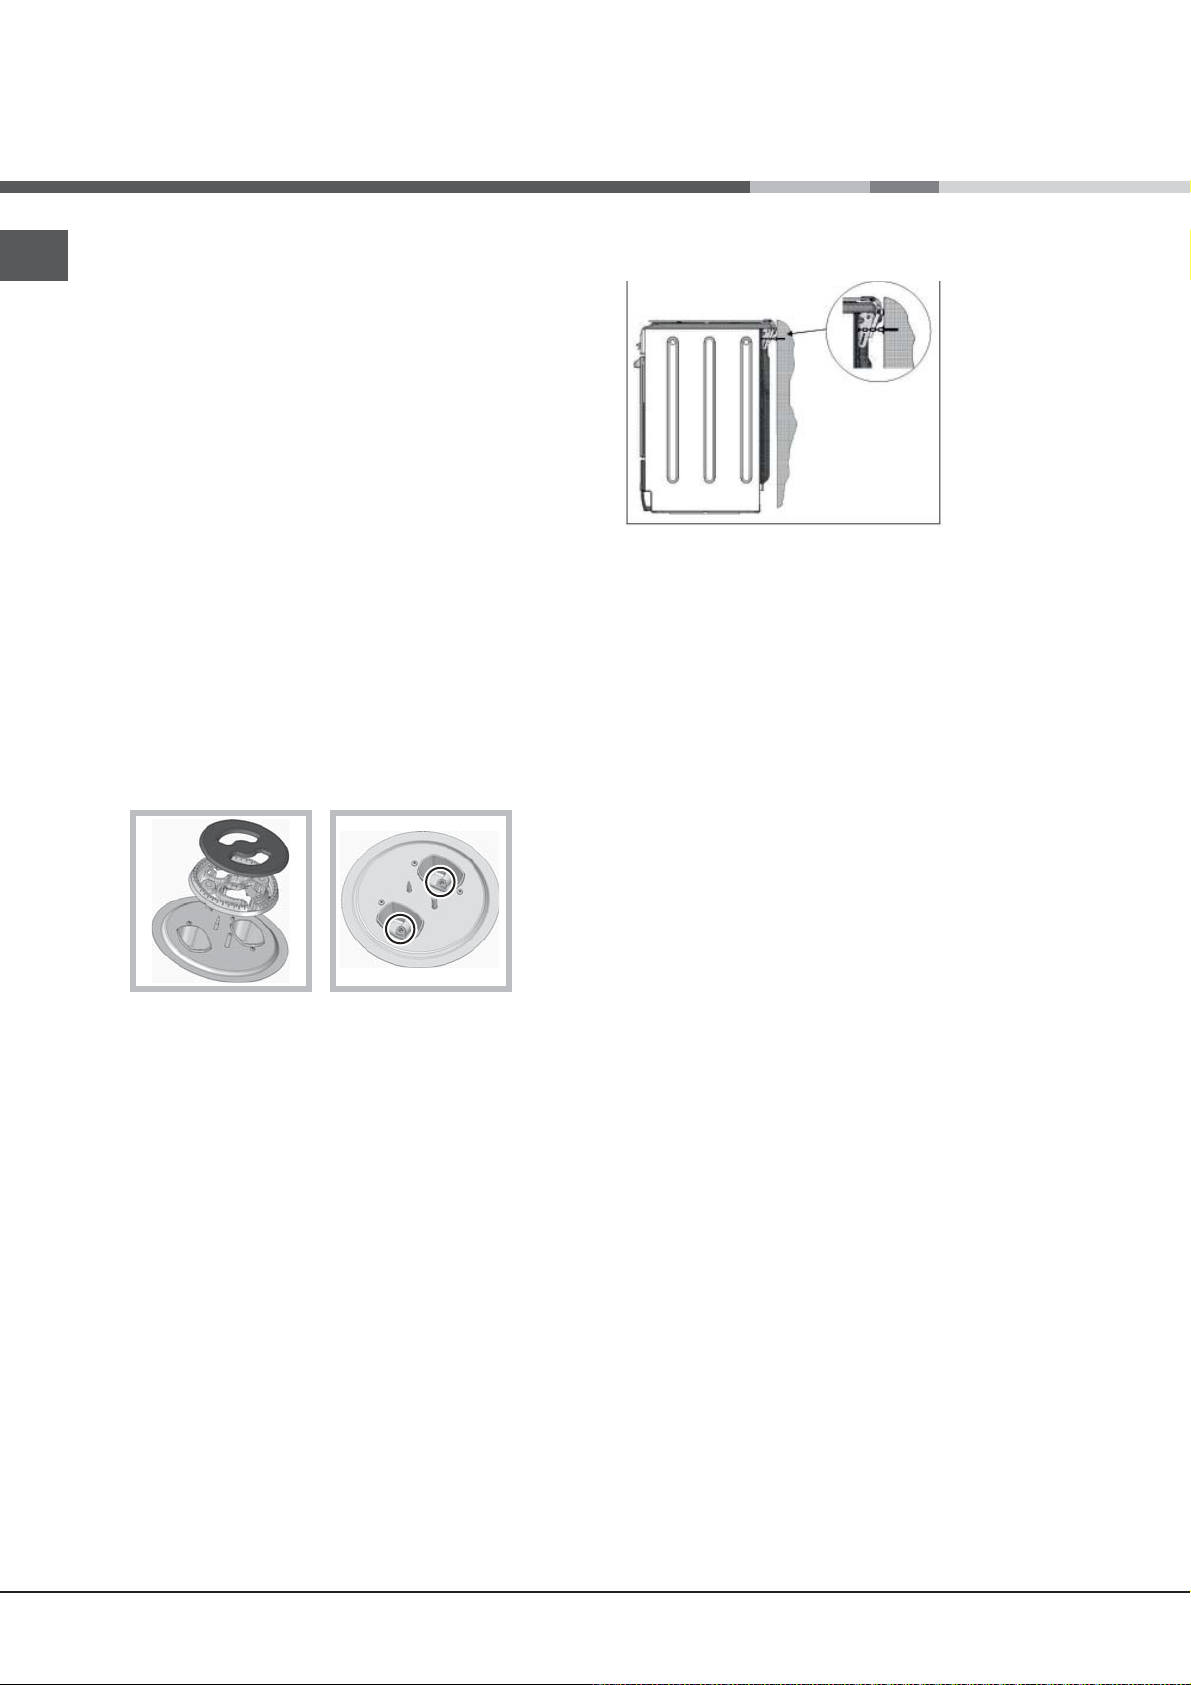
Safety Chain
! In order
to prevent
accidental
tipping of the
appliance, for
example by
a child climbing onto the
oven door, the
supplied safety
chain MUST be
installed!
The cooker is fitted with a safety chain to be fixed by
means of a screw (not supplied with the cooker) to
the wall behind the appliance, at the same height as
the chain is attached to the appliance.
Choose the screw and the screw anchor according
to the type of material of the wall behind the appliance. If the head of the screw has a diameter smaller
than 9mm, a washer should be used. Concrete wall
requires the screw of at least 8mm of diameter, and
60mm of length.
Ensure that the chain is fixed to the rear wall of the
cooker and to the wall, as shown in figure, so that
after installation it is tensioned and parallel to the
ground level.
4. Some appliances have a safety device
(thermocouple) fitted. If the device fails to work
when the burners are set to the low flame setting,
increase this low flame setting using the adjusting
screw.
5. Once the adjustment has been made, replace the
seals on the by-passes using sealing wax
! If the appliance is connected to liquid gas, the
regulation screw must be fastened as tightly as
possible.
! Once this procedure is finished, replace the old
rating sticker with one indicating the new type of gas
used. Stickers are available from any of our Service
Centres.
! Should the gas pressure used be different (or vary
slightly) from the recommended pressure, a suitable
pressure regulator must be fitted to the inlet pipe (in
order to comply with current national regulations).
8
Page 9
Table of burner and nozzle specifications
S
R
TC A
Table 1 Liquid gas Natural gas
Burner Diameter
(mm)
Triple.ring (TC) 130 3.25 1.50 63 2,x65 236 232 2x99 309
Rapid (Large)
(R)
Semi-rapid
(Medium) (S)
Auxiliary
(Small) (A)
Supply
pressure
* At 15°C and 1013 mbar - dry gas
** Propane P.C.S. = 50.37 MJ/kg
*** Butane P.C.S. = 49.47 MJ/kg
Natural P.C.S. = 37.78 MJ/m³
100 3.00 0.70 41 86 218 214 116 286
75 1.90 0.40 30 70 138 136 106 181
55 1.00 0.40 30 50 73 71 79 95
Maximised (mbar)
CX65SP6 PT/HA
WARNING! The oven is
provided with a stop system to extract the racks
and prevent them from
coming out of the oven.(1)
As shown in the drawing,
to extract them completely, simply lift the racks,
holding them on the front
part, and pull (2).
Thermal power
kW (p.c.s.*)
Nominal Reduced *** **
Nomina l (mbar)
Minimal (mbar)
Bypass
1/100
(mm)
Nozzle
1/100
(mm)
TECHNICAL DATA
Oven dimensions
(HxWxD)
Volume
Useful
measurements
relating to the oven
compartment
Burners
Voltage and
frequency
ENERGY LABEL
Data plate, is located inside the flap or, after the oven
compartment has been opened, on the left-hand wall
inside the oven.
Capacity*
g/h
28-30
20
35
Nozzle
1/100
(mm)
37
25
45
32x43.5x40 cm
56 l
width 42 cm
depth 44 cm
height 8.5 cm
may be adapted for use with any
type of gas shown on the data plate
see data plate
Directive 2002/40/EC on the label
of electric ovens.
Regulation EN 50304
Energy consumption for Natural
convection – heating mode:
X
Traditional mode;
Declared energy consumption for
Forced convection Class –
heating mode:
EC Directives: 2006/95/EC dated
12/12/06 (Low Voltage) and
subsequent amendments 2004/108/EC dated 15/12/04
(Electromagnetic Compatibility)
and subsequent amendments 2004/142/EC dated 30/11/09
(Gas) 1275/2008 (Stand-by/ Off
mode)
Capacity*
20
17
25
u
Baking.
GB
l/h
9
Page 10

Start-up and use
GB
Using the hob
Lighting the burners
For each BURNER knob there is a complete ring showing
the strength of the flame for the relevant burner.
To light one of the burners on the hob:
1. Bring a flame or gas lighter close to the burner.
2. Press the BURNER knob and turn it in an
anticlockwise direction so that it is pointing to the
maximum flame setting E.
3. Adjust the intensity of the flame to the desired level by
turning the BURNER knob in an anticlockwise direction.
This may be the minimum setting C, the maximum setting
E or any position in between the two.
If the appliance is fitted with an
electronic lighting device* (see
gure), press the BURNER knob
and turn it in an anticlockwise
direction, towards the minimum
flame setting, until the burner
is lit. The burner may be
extinguished when the knob is
released. If this occurs, repeat
the operation, holding the knob down for a longer period
of time.
! If the flame is accidentally extinguished, switch off the
burner and wait for at least 1 minute before attempting
to relight it.
If the appliance is equipped with a flame failure
safety device*, press and hold the BURNER knob for
approximately 2-3 seconds to keep the flame alight
and to activate the device.
To switch the burner off, turn the knob until it reaches
the stop position •.
Practical advice on using the burners
For the burners to work in the most efficient way
possible and to save on the amount of gas consumed,
it is recommended that only pans that have a lid and
a flat base are used. They should also be suited to the
size of the burner:
! For models equipped with a reducer grid, the latter
must be used only for the auxiliary burner, when pans
with a diameter of less than 12 cm are used.
Using the oven
! The first time you use your appliance, heat the empty
oven with its door closed at its maximum temperature
for at least half an hour. Ensure that the room is well
ventilated before switching the oven off and opening
the oven door. The appliance may emit a slightly
unpleasant odour caused by protective substances
used during the manufacturing process burning away.
! Never put objects directly on the bottom of the oven;
this will avoid the enamel coating being damaged.
! Before operating the product, remove all plastic film
from the sides of the appliance.
1. Select the desired cooking mode by turning the
SELECTOR knob.
2. Select the recommended temperature for the
cooking mode or the desired temperature by turning
the THERMOSTAT knob.
A list detailing cooking modes and suggested cooking
temperatures can be found in the relevant table (see
Oven cooking advice table).
During cooking it is always possible to:
• Change the cooking mode by turning the
SELECTOR knob.
• Change the temperature by turning the
THERMOSTAT knob.
• Stop cooking by turning the SELECTOR knob to the
“0” position.
! Always place cookware on the rack(s) provided.
THERMOSTAT indicator light
When this is illuminated, the oven is generating heat.
It switches off when the inside of the oven reaches
the selected temperature. At this point the light
illuminates and switches off alternately, indicating
that the thermostat is working and is maintaining the
temperature at a constant level.
To identify the type of burner, please refer to the
diagrams contained in the “Burner and nozzle
specifications”.
10
OPERATION indicator light
When this is illuminated, the oven is generating heat.
Oven light
This is switched on by turning the SELECTOR knob to
any position other than “0”. It remains lit as long as the
8
oven is operating. By selecting
light is switched on without any of the heating elements
being activated.
with the knob, the
Page 11

Cooking modes
! A temperature value can be set for all cooking modes
between 60°C and Max, except for the following modes
• GRILL (recommended: set only to MAX power level)
• GRATIN (recommended: do not exceed 200°C).
X
TRADITIONAL OVEN mode
d
The central part of the top heating element is switched
on. The high and direct temperature of the grill is
recommended for food that requires a high surface
temperature (veal and beef steaks, fillet steak and
entrecôte). This cooking mode uses a limited amount of
energy and is ideal for grilling small dishes. Place the
food in the centre of the rack, as it will not be cooked
properly if it is placed in the corners.
GRILL mode
GB
Both the top and bottom heating elements will come
on. When using this traditional cooking mode, it is best
to use one cooking rack only. If more than one rack is
used, the heat will be distributed in an uneven manner.
u
BAKING mode
The rear heating element and the fan are switched
on, thus guaranteeing the distribution of heat in a
delicate and uniform manner throughout the entire
oven. This mode is ideal for baking and cooking
temperature sensitive foods (such as cakes that need
to rise) and for the preparation of pastries on 3 shelves
simultaneously.
W
The heating elements and the fan come on,
guaranteeing the distribution of heat consistently and
uniformly throughout the oven.
Preheating is not necessary for this cooking mode. This
mode is particularly suitable for cooking pre-packed
food quickly (frozen or pre-cooked). The best results
are achieved using one cooking rack only.
Y
FAST COOKING mode
MULTI-COOKING mode
GRATIN
e
The top heating element and the rotisserie (where
present) are activated and the fan begins to
operate. This combination of features increases the
effectiveness of the unidirectional thermal radiation
provided by the heating elements through forced
circulation of the air throughout the oven. This helps
prevent food from burning on the surface and allows
the heat to penetrate right into the food.
! The GRILL and GRATIN cooking modes must be
performed with the oven door shut.
Timer*
To activate the Timer proceed as follows:
1. Turn the TIMER knob in a clockwise direction 4 for
almost one complete revolution to set the buzzer.
2. Turn the TIMER knob in an anticlockwise direction 5
to set the desired length of time.
mode
Practical cooking advice
! Do not place racks in position 1 or 5 during fanassisted cooking. Excessive direct heat can burn
temperature sensitive foods.
All the heating elements (top, bottom and circular)
switch on and the fan begins to operate. Since the heat
remains constant throughout the oven, the air cooks
and browns food in a uniform manner. A maximum of
two racks may be used at the same time.
Z
The circular heating elements and the elements at
the bottom of the oven are switched on and the fan is
activated. This combination heats the oven rapidly by
producing a considerable amount of heat, particularly
from the element at the bottom. If you use more than
one rack at a time, switch the position of the dishes
halfway through the cooking process.
PIZZA mode
MULTILEVEL
• Use positions 2 and 4, placing the food that requires
more heat on the rack in position 2.
• Place the dripping pan on the bottom and the rack
on top.
GRILL
• When using the GRILL cooking mode, place the rack
in position 5 and the dripping pan in position 1 to
collect cooking residues (fat and/or grease). When
using the GRATIN cooking mode, place the rack in
position 2 or 3 and the dripping pan in position 1 to
collect cooking residues.
• We recommend that the power level is set to
maximum. The top heating element is regulated by a
thermostat and may not always operate constantly.
11
Page 12

GB
PIZZA MODE
• Use a light aluminium pizza pan. Place it on the rack
provided.
For a crispy crust, do not use the dripping pan as
Oven cooking advice table
it prevents the crust from forming by extending the
total cooking time.
• If the pizza has a lot of toppings, we recommend
adding the mozzarella cheese on top of the pizza
halfway through the cooking process.
Cooking
modes
Traditional
Oven
Baking
Mode
Fast
cooking
Multi-
cooking
Pizza Mode
Barbecue
Gratin
Foods Weight
(in kg)
Rack Position Pre-heating
time
(minutes)
Duck
Roast veal or beef
Pork roast
Biscuits (short pastry)
Tarts
Tarts
Fruit cakes
Plum cake
Sponge cake
Stuffed pancakes (on 2 racks)
Small cakes (on 2 racks)
Cheese puffs (on 2 racks)
Cream puffs (on 3 racks)
Biscuits (on 3 racks)
Meringues (on 3 racks)
Frozen food
Pizza
Courgette and prawn pie
Country style spinach pie
Turnovers
Lasagne
Golden Rolls
Chicken morsels
Pre-cooked food
Golden chicken wings
Fresh Food
Biscuits (short pastry)
Plum cake
Cheese puffs
Pizza (on 2 racks)
Lasagne
Lamb
Roast chicken + potatoes
Mackerel
Plum cake
Cream puffs (on 2 racks)
Biscuits (on 2 racks)
Sponge cake (on 1 rack)
Sponge cake (on 2 racks)
Savoury pies
Pizza
Roast veal or beef
Chicken
Soles and cuttlefish
Squid and prawn kebabs
Cuttlefish
Cod filet
Grilled vegetables
Veal steak
Sausages
Hamburgers
Mackerels
Toasted sandwiches (or toast)
Grilled chicken
Cuttlefish
1
1
1
-
1
0.5
1
0.7
0.5
1.2
0.6
0.4
0.7
0.7
0.5
0.3
0.4
0.5
0.3
0.5
0.4
0.4
0.4
0.3
0.6
0.2
1
1
1
1+1
1
1
0.5
0.5
0.5
1
1.5
0.5
1
1
0.7
0.6
0.6
0.8
0.4
0.8
0.6
0.6
1
4 and 6
1.5
1.5
3
3
3
3
3
3
2 or 3
3
3
2 and 4
2 and 4
2 and 4
1 and 3 and 5
1 and 3 and 5
1 and 3 and 5
2
2
2
2
2
2
2
2
2
2
2
2 and 4
3
2
2 and 4
2
2
2 and 4
2 and 4
2
2 and 4
3
3
2
2 or 3
4
4
4
4
3 or 4
4
4
4
4
4
2
2
15
15
15
15
15
15
15
15
15
15
15
15
15
15
15
-
-
-
-
-
-
-
-
-
-
15
10
10
15
10
10
10
10
10
10
15
15
10
10
-
-
-
-
-
-
-
-
-
10
10
Recommended
temperature
200
200
200
180
180
180
180
180
160
200
190
210
180
180
90
250
200
220
200
200
180
220
200
200
180
210
230
180
180
200
180
170
190
180
170
170
200
220
220
180
Max
Max
Max
Max
Max
Max
Max
Max
Max
Max
200
200
Cooking
time
(minutes)
65-75
70-75
70-80
15-20
30-35
20-30
40-45
40-50
25-30
30-35
20-25
15-20
20-25
20-25
180
12
20
30-35
25
35
25-30
15-20
20-25
15-18
45
10-12
15-20
30-35
40-45
60-70
30-35
40-50
20-25
10-15
15-20
20-25
25-30
15-20
25-30
60-70
10-12
8-10
10-15
10-15
15-20
15-20
15-20
10-12
15-20
3-5
55-60
30-35
12
Page 13

Planning cooking with the electronic
programmer
Setting the clock
After the appliance has been connected to the
power supply, or after a blackout, the display will
automatically reset to 0:00 and begin to blink. To set
the time:
and the
1. Press the COOKING TIME button
COOKING END TIME simultaneously.
2. Within 4 seconds of having pressed these buttons,
set the exact time by pressing the
button advances the hours and the button
The
decreases the hours.
Once the time has been set, the programmer
automatically switches to manual mode.
Setting the timer
The timer enables a countdown to be set, when the
time has elapsed a buzzer sounds.
To set the timer proceed as follows:
1. press the TIMER button
. The display shows:
and buttons.
.
2. Press the and buttons to set the desired time.
3. When the buttons are released the timer begins
counting down and the current time appears on the
display.
4. After the time has elapsed a buzzer will sound, and
this can be switched off by pressing any button (except
and buttons). The symbol will switch off.
the
! The timer does not switch the oven on or off.
Adjusting the volume of the buzzer
After selecting and confirming the clock settings, use
button to adjust the volume of the alarm buzzer.
the
Setting the cooking time with a delayed start
First decide which cooking mode you wish to use and
set a suitable temperature using the SELECTOR and
THERMOSTAT knobs on the oven.
At this point it is possible to set the cooking time:
1. Press the COOKING TIME button
2. Within 4 seconds of having pressed this button, set
the desired amount of time by pressing the
buttons. If, for example, you wish to set a cooking time
of 30 minutes, the display will show:
.
and
3. 4 seconds after the buttons are released, the current
time (for example 10.00) reappears on the display with
the symbol
Next the desired cooking end time must be set:
4. Press the END COOKING TIME button
5. Within 4 seconds of having pressed this button,
adjust the cooking end time by pressing the
buttons. If, for example, you want cooking to end at
13.00, the display shows:
and the letter A (AUTO).
.
and
6. 4 seconds after the buttons are released, the current
time (for example 10.00) reappears on the display with
the letter A (AUTO).
At this point, the oven is programmed to switch on
automatically at 12:30 and switch off after 30 minutes,
at 13.00.
Setting the cooking time with an immediate start
Follow the above procedure for setting the cooking
time (points 1-3).
! When the letter A appears, this indicates that both
the cooking time and the end cooking time have been
programmed in AUTO mode. To restore the oven to
manual operation, after each AUTO cooking mode
and END COOKING
press the COOKING TIME
buttons simultaneously.
TIME
! The symbol will remain lit, along with the oven, for
the entire duration of the cooking programme.
The set cooking duration can be displayed at any time
by pressing the COOKING TIME button
the cooking end time may be displayed by pressing
the END COOKING TIME button
time has elapsed a buzzer sounds. To stop it, press
any button apart from the
. When the cooking
and buttons.
, and
GB
13
Page 14

Precautions and tips
! This appliance has been designed and manufactured
in compliance with international safety standards.
The following warnings are provided for safety reasons
and must be read carefully.
General safety
• The appliance was designed for domestic use inside
the home and is not intended for commercial or
industrial use.
• The appliance must not be installed outdoors, even in
covered areas. It is extremely dangerous to leave the
appliance exposed to rain and storms.
• Do not touch the appliance with bare feet or with wet
or damp hands and feet.
• The appliance must be used by adults only for
the preparation of food, in accordance with the
instructions outlined in this booklet. Any other
use of the appliance (e.g. for heating the room)
constitutes improper use and is dangerous.
The manufacturer may not be held liable for any
damage resulting from improper, incorrect and
unreasonable use of the appliance.
• The instruction booklet accompanies a class 1
(insulated) or class 2 - subclass 1 (recessed
between 2 cupboards) appliance.
• Do not touch the heating elements or certain
parts of the oven door when the appliance is in
use; these parts become extremely hot. Keep
children well away from the appliance.
• Make sure that the power supply cables of other
electrical appliances do not come into contact with
the hot parts of the oven.
• The openings used for the ventilation and dispersion
of heat must never be covered.
• Always use oven gloves when placing cookware in
the oven or when removing it.
• Do not use flammable liquids (alcohol, petrol, etc...)
near the appliance while it is in use.
• Do not place flammable material in the lower storage
compartment or in the oven itself. if the appliance is
switched on accidentally, they could catch fire.
• The internal surfaces of the compartment (where
present) may become hot.
•
• Always make sure the knobs are in the
when the appliance is not in use.
• When unplugging the appliance, always pull the
plug from the mains socket; do not pull on the cable.
• Never perform any cleaning or maintenance work
without having disconnected the appliance from the
electricity mains.
• If the appliance breaks down, under no
circumstances should you attempt to perform
the repairs yourself. Repairs carried out by
inexperienced persons may cause injury or further
malfunctioning of the appliance. Contact Assistance.
position
• Do not rest heavy objects on the open oven door.
• The appliance should not be operated by people
(including children) with reduced physical, sensory
or mental capacities, by inexperienced individuals
or by anyone who is not familiar with the product.
These individuals should, at the very least, be
supervised by someone who assumes responsibility
for their safety or receive preliminary instructions
relating to the operation of the appliance.
• Do not let children play with the appliance.
•
If the cooker is placed on a pedestal, take the necessary precautions to prevent the cooker from sliding
off the pedestal itself.
Disposal
• When disposing of packaging material: observe
local legislation so that the packaging may be
reused.
• The European Directive 2002/96/EC relating
to Waste Electrical and Electronic Equipment
(WEEE) states that household appliances should
not be disposed of using the normal solid urban
waste cycle. Exhausted appliances should be
collected separately in order to optimise the cost
of re-using and recycling the materials inside the
machine, while preventing potential damage to the
atmosphere and to public health. The crossed-out
dustbin is marked on all products to remind the
owner of their obligations regarding separated
waste collection.
For further information relating to the correct
disposal of exhausted household appliances,
owners may contact the public service provided or
their local dealer.
Respecting and conserving the
environment
• You can help to reduce the peak load of the
electricity supply network companies by using the
oven in the hours between late afternoon and the
early hours of the morning.
• Always keep the oven door closed when using
the GRILL and GRATIN modes: This will achieve
improved results while saving energy (approximately
10%).
• Check the door seals regularly and wipe them clean
to ensure they are free of debris so that they adhere
properly to the door, thus avoiding heat dispersion.
GB
14
Page 15

Care and maintenance
GB
Switching the appliance off
Disconnect your appliance from the electricity supply
before carrying out any work on it.
Cleaning the appliance
! Never use steam cleaners or pressure cleaners on
the appliance.
• The stainless steel or enamel-coated external parts
and the rubber seals may be cleaned using a
sponge that has been soaked in lukewarm water
and neutral soap. Use specialised products for the
removal of stubborn stains. After cleaning, rinse well
and dry thoroughly. Do not use abrasive powders or
corrosive substances.
• The hob grids, burner caps, flame spreader rings
and burners may be removed to make cleaning
easier; wash them in hot water and non-abrasive
detergent, making sure all burnt-on residue is
removed before drying them thoroughly.
Inspecting the oven seals
Check the door seals around the oven regularly. If
the seals are damaged, please contact your nearest
Authorised After-sales Service Centre. We recommend
that the oven is not used until the seals have been
replaced.
Replacing the oven light bulb
1. After disconnecting the
oven from the electricity mains,
remove the glass lid covering the
lamp socket (see gure).
2. Remove the light bulb and
replace it with a similar one:
voltage 230 V, wattage 25 W,
cap E 14.
3. Replace the lid and reconnect the oven to the
electricity supply.
! Do not use the oven lamp as/for ambient lighting.
• Clean the terminal part of the flame failure safety
devices* frequently.
• The inside of the oven should ideally be cleaned
after each use, while it is still lukewarm. Use hot
water and detergent, then rinse well and dry with a
soft cloth. Do not use abrasive products.
• Clean the glass part of the oven door using a
sponge and a non-abrasive cleaning product, then
dry thoroughly with a soft cloth. Do not use rough
abrasive material or sharp metal scrapers as these
could scratch the surface and cause the glass to
crack.
• The accessories can be washed like everyday
crockery, and are even dishwasher safe.
• Do not close the cover when the burners are alight
or when they are still hot.
WARNING! The glass lid can break
in if it is heated up. Turn off all the
burners and the electric plates before closing the lid.
Gas tap maintenance
Over time, the taps may become jammed or difficult to
turn. If this occurs, the tap must be replaced.
! This procedure must be performed by a qualified
technician authorised by the manufacturer.
Assistance
! Never use the services of an unauthorised technician.
Please have the following information to hand:
• The type of problem encountered.
• The appliance model (Mod.).
• The serial number (S/N).
The latter two pieces of information can be found on the
data plate located on the appliance.
15
Page 16

Instalação
! É importante guardar este folheto para poder
consultá-lo a qualquer momento. No caso de venda,
cessão ou mudança, assegure-se que o mesmo
permaneça com o aparelho.
! Leia com atenção as instruções: nas quais há
informações importantes sobre a instalação, a
utilização e a segurança.
! A instalação do aparelho deve ser realizada segundo
estas instruções e por pessoal profissional qualificado.
! Qualquer intervenção de regulação ou manutenção,
deve ser efectuada com o fogão desligado da rede
eléctrica.
Ventilação dos locais
O aparelho poderá ser instalado somente em locais
permanentemente ventilados, nos termos previstos
pelos regulamentos nacionais em vigor. No local no
qual o aparelho é instalado deve poder chegar tanto ar
quanto pedido pela regular combustão do gás (o fluxo
de ar não deve ser inferior a 2 m
instalada).
As tomadas de admissão do ar, protegidas por
grades, devem ter uma conduta de ao menos 100
2
de secção útil e devem ser colocadas em modo
cm
que não possam ser obstruídas, mesmo parcialmente
(ver gura A).
Estas tomadas de ar devem ser aumentadas de 100%
- com um mínimo de 200 cm
plano de trabalho do fogão não tenha o dispositivo
de segurança para a falta de chama e quando o fluxo
de ar ocorre em modo indirecto a partir de locais
adjacentes (ver gura B) - desde que não constituam
partes comuns do imóvel, ambientes com perigo de
incêndio ou quartos de dormir - que possuam um
conduto de ventilação comunicador com a parte
externa, como descrito acima.
Sala ao lado Sala a ser ventilada
A B
3
/h por kW de potência
2
– no caso em que o
Descarga dos fumos de combustão
A descarga dos fumos de combustão deve ser
garantida por meio de um exaustor ligado a uma
chaminé com tiragem natural de segura eficiência,
ou por meio de uma ventoinha eléctrica que entre
automaticamente em função cada vez que se ligar o
aparelho (ver guras).
Descarga directamente Descarga através de uma
para o exterior chaminé ou uma conduta
para fumo ramificada
(reservada para os
aparelhos de
cozedura).
! Os gases liquefeitos de petróleo, mais pesados
que o ar, ficam em baixo, portanto os locais onde
estão contidos os recipientes de GLP devem prever
aberturas para o exterior para o escoamento das
eventuais fugas de gás.
Os cilindros de GLP, mesmo vazios ou parcialmente
cheios, não devem ser instalados nem guardados
em lugares ou vãos a nível mais baixo do que o solo
(caves etc.). Manter no local somente o cilindro que
estiver sendo utilizado, longe de fontes de calor
(fornos, chaminés, esquentadores) que possam levá-lo
a uma temperatura superior a 50ºC.
PT
Posicionamento e nivelamento
! É possível instalar o aparelho ao lado de móveis que
não superem a altura do plano de trabalho.
! Assegurar-se de que a parede em contacto com a
parte traseira do aparelho seja de um material não
inflamável e resistente ao calor (T 90°C).
A
Abertura para ventilação Aumento do vão entre
do ar comburente a porta e o chão
! Após um uso prolongado do aparelho é aconselhável
abrir uma janela ou aumentar a velocidade dos
eventuais ventiladores.
Para uma instalação correcta:
• colocar o aparelho na cozinha, na sala de jantar ou
numa sala única (não na casa de banho);
• se o plano da cozinha for mais alto que o dos
móveis, estes deverão ser colocados a pelo menos
600 mm do aparelho;
16
Page 17

PT
HOOD
420
Min.
min.
650
mm. with hood
min.
700
mm. without hood
mm.
600
Min. mm.
420
Min. mm.
• se o fogão for
instalado embaixo de
uma prateleira, esta
deverá estar pelo menos
a 420 mm. (milímetros) do
plano de trabalho.
Tal distância deve ser de
700 mm se as prateleiras
forem de material
inflamável (ver gura);
• não colocar cortinas atrás do fogão ou a menos de
200 mm dos seus lados;
• se houver exaustor, o mesmo deverá ser instalado
seguindo as indicações contidas no relativo livrete
de instruções.
• a tensão de alimentação seja entre os valores da
placa de identificação;
• a tomada seja compatível com a ficha do aparelho.
Em caso contrário, substitua a tomada ou a ficha;
não empregue extensões nem tomadas múltiplas.
! Depois de ter instalado o aparelho, o acesso ao cabo
eléctrico e à tomada da corrente deve ser fácil.
! O cabo não deve ser dobrado nem comprimido.
! O cabo deve ser verificado periodicamente e
substituído somente por técnicos autorizados.
! A empresa exime-se de qualquer responsabilidade
se estas regras não forem obedecidas.
Ligação ao gás
Nivelamento
Se for necessário nivelar o
aparelho, parafusar os pés
de regulação fornecidos em
dotação nos específicos
lugares colocados nos cantos
na base do fogão (ver gura).
As pernas* devem ser
encaixadas na base do fogão.
Ligação eléctrica
Monte no cabo uma ficha em conformidade com
as normas para a carga indicada na placa de
identificação (veja a tabela dos Dados técnicos).
No caso de uma ligação directa à rede, será
necessário interpor, entre o aparelho e a rede, um
interruptor omnipolar com abertura mínima entre os
contactos de 3 mm. na dimensão certa para a carga
e em conformidade com as normas nacionais em
vigor (a ligação à terra não deve ser interrompida pelo
interruptor). O cabo de alimentação deve ser colocado
de maneira que em nenhum ponto ultrapasse de 50°C
a temperatura do ambiente.
Antes de efectuar a ligação, certifique-se que:
• a tomada tenha uma ligação à terra e seja em
conformidade com a legislação;
• a tomada tenha a capacidade de suportar a carga
máxima de potência da máquina, indicada na placa
de identificação;
17
A ligação do aparelho à rede do gás ou à botija do
gás pode ser efectuada com um tubo flexível de
borracha ou de aço, conforme prescrito pelas normas
nacionais em vigor e somente após ter controlado que
o mesmo esteja regulado para o tipo de gás com o
qual será alimentado (veja a etiqueta de calibragem
sobre a tampa: em caso contrárioveja abaixo). Em
caso de alimentação com gás líquido de botija, utilizar
reguladores de pressão em conformidade com as
normas nacionais em vigor. Para facilitar a ligação, a
alimentação do gás é orientável lateralmente *: inverter
o porta-borracha para a ligação com a tampa de fecho
e substituir a guarnição de vedação fornecida em
dotação.
! Para garantir um funcionamento seguro, uma
utilização de energia apropriada e maior duração
da aparelhagem, assegurar-se que a pressão de
alimentação respeite os valores indicados na tabela
“Características dos queimadores e dos bicos” (ver
abaixo).
Ligação do gás com tubo flexível de borracha
Verificar que o tubo seja em conformidade com as
normas nacionais em vigor. O diâmetro interno do tubo
deve ser de: 8 mm para a alimentação com gás líquido;
13 mm para a alimentação com gás metano.
Quando a ligação estiver terminada, assegure-se de
que o tubo:
• não esteja em contacto em ponto algum com partes
que alcancem temperaturas superiores a 50ºC;
• não esteja sujeito a qualquer esforço de tracção e
de torção não apresente dobras nem apertos;
• não encoste em corpos cortantes, arestas agudas
nem em peças móveis e não esteja esmagado;
• seja fácil de inspeccionar ao longo de todo o próprio
Page 18

percurso, a fim de poder-se controlar o estado de
conservação do mesmo;
• tenha um comprimento menor do que 1500 mm;
• esteja bem apoiado nas duas pontas, onde deve
ser fixado mediante braçadeiras de bloqueio nos
termos dos regulamentos nacionais em vigor.
Ponto de
ligação
Fita isoladora
Conjunto
do tubo
Ponto de
ligação
Conjunto
do tubo
SUPERFÍCIE QUENTE
Fita
isoladora
! Se uma ou mais destas condições não puder ser
respeitada ou se o fogão for instalado conforme
as condições da classe 2 – subclasse 1 (aparelho
encaixando entre dois móveis), deverá ser utilizado o
tubo flexível de aço (ver abaixo).
Ligação com tubo flexível de aço inoxidável com
parede contínua com rosca
Verificar que o tubo e as guarnições sejam em
conformidade com as normas nacionais em vigor.
Para poder instalar o tubo, elimine o porta-borracha
presente no aparelho (a junta de entrada de gás no
aparelho tem rosca de 1/2 gás macho cilíndrica).
! Efectuar a ligação em modo que o comprimento da
tubagem não supere os 2 metros de extensão máxima
e assegurar-se de que o tubo não entre em contacto
com partes móveis e não seja esmagado.
Controle da vedação
Ao terminar a instalação controlar a vedação de todas
as juntas utilizando uma solução de sabão e nunca
uma chama.
3. coloque outra vez todas as
peças no lugar, realizando as operações na ordem
contrária à acima apresentada.
Regulação do mínimo dos queimadores do plano:
1. coloque a torneira na posição de mínimo;
2. retire o selector e ajuste o parafuso de regulação
situado no interior ou ao lado da haste da torneira até
obter uma pequena chama regular.
! No caso dos gases líquidos, o parafuso de regulação
deve ser atarraxado até o fundo;
verifique em seguida se ao girar rapidamente a
3.
torneira da posição de máximo até a de mínimo, o
queimador não se apague;
! Os queimadores do plano não precisam de nenhuma
regulação do ar primário.
! Após a regulação com um gás diferente daquele com
o qual foi aferido o aparelho, troque a velha etiqueta
de calibragem por outra que corresponda ao novo tipo
de gás, que pode ser encontrada junto aos nossos
Centros de Assistência Técnica Autorizados.
! Se a pressão do gás utilizado for diferente (ou
variável) daquela prevista, é necessário instalar
na tubagem de entrada um regulador de pressão
conforme as Normas Nacionais em vigor sobre os
“reguladores para gás canalizados”.
PT
Adaptação aos diferentes tipos de gás
É possível adaptar o aparelho a um tipo de gás
diferente daquele para o qual foi preparado (indicado
na etiqueta de calibragem na tampa).
Adaptação ao plano de cozedura
Substituição dos bicos dos queimadores do plano:
1. retire as grades e desenfie os queimadores das
suas sedes;
2. desparafusar os bicos
utilizando uma chave a tubo de
7 mm (ver gura), e substituí-los
com aqueles apropriados para
o novo tipo de gás (ver tabela
“Características dos queimadores
e dos bicos”);
Substituição dos bicos do queimador de tripla coroa
1. retire as grelhas e extraia os queimadores das suas sedes.
O queimador é composto por duas partes separadas (ver
figuras);
2. desenrosque os bicos, utilizando uma chave de tubo de 7
mm. Troque os bicos por outros adequados ao novo tipo
de gás (ver a tabela 1). Os dois bicos têm furos idênticos.
3. volte a colocar todas as peças no lugar, realizando as
operações na ordem contrária à acima apresentada.
18
Page 19

PT
• Regulação do ar primário dos queimadores
Os queimadores não necessitam de qualquer regulação de
ar primário.
• Regulação dos mínimos
1. Coloque a torneira na posição de mínimo;
2. Retire o selector e ajuste o parafuso de regulação situado
no interior ou ao lado da haste da torneira até obter uma
pequena chama regular.
3. Verifique se ao girar rapidamente o botão
da posição de máximo até a de mínimo, os
queimadores não se apagam.
4. Nos aparelhos equipados com dispositivo
de segurança (termopar), em caso de não
funcionamento do dispositivo com os queimadores
no mínimo, aumente a capacidade dos próprios
mínimos mediante o parafuso de regulação.
5. Depois de realizar a regulação, restabeleça os
lacres situados nos ‘by-pass’ com cera lacre ou
materiais equivalentes.
! No caso dos gases líquidos, o parafuso de regulação
deve ser atarraxado até o fundo.
! Ao terminar a operação substitua a velha etiqueta
de calibragem com a que corresponde ao novo
gás utilizado que se acha nos nossos Centros de
Assistência Técnica.
! Se a pressão do gás utilizado for diferente (ou
variável) daquela prevista, é necessário instalar
na tubagem de entrada um regulador de pressão
(conforme as Normas Nacionais em vigor).
anilha. As paredes de betão requerem um parafuso
com pelo menos 8 mm de diâmetro e 60 mm de
comprimento.
Assegure-se de que a correia seja fixada à parede
traseira do fogão e à parede, tal como mostrado
na figura, para que esteja bem esticada após a
instalação e paralela ao nível do chão.
A correia de segurança
! Para evitar a
queda acidental do aparelho,
por exemplo, por uma
criança subir
para a porta
do forno, DEVE
ser instalada
a correia de
segurança
fornecida! O
fogão é instalado com uma correia de segurança fixada com um parafuso (não fornecido com o fogão)
à parede atrás do aparelho, à mesma altura que a
correia é fixada ao aparelho. Seleccione o parafuso
e bucha de acordo com o tipo de material da parede atrás do aparelho. Se a cabeça do aparelho tiver
um diâmetro inferior a 9 mm, deve ser usada uma
19
Page 20

Tabela das características dos queimadores e bicos
S
R
TC A
Tabela 1 Gás Líquido Gás Natural
Queimador Diâmetro
(mm.)
Tripla Coroa
(TC)
Rápido
(Grande)(R)
Semi Rápido
(Médio)(S)
Auxiliar
(Pequeno)(A)
Pressões de
fornecimento
* A 15°C 1013 mbars-gás seco
** Propano P.C.S. = 50,37 MJ/Kg
*** Butano P.C.S. = 49,47 MJ/Kg
Natural P.C.S. = 37,78 MJ/m3
130 3.25 1.50 63 2x65 236 232 2x99 309
100 3.00 0.70 41 86 218 214 116 286
75 1.90 0.40 30 70 138 136 106 181
55 1.00 0.40 30 50 73 71 79 95
Potência térmica
kW (p.c.s.*)
Nominal Reduzida *** **
Nominal (mbar)
Mínima (mbar)
Máxima (mbar)
CX65SP6 PT/HA
ATENÇÃO! O forno está
equipado com um sistema
de bloqueio das grelhas
que permite retirá-las sem
que estas ressaiam do
forno(1).
Para retirar completamente as grelhas, tal como
indicado no desenho, basta levantá-las, segurando-as pela parte da frente, e
puxá-las (2).
By-pass
1/100
(mm)
bico
1/100
(mm)
DADOS TÉCNICOS
Medidas Forno
HxLxP
Volume
Medidas úteis da
gaveta estufa
Queimadores
Tensão e
frequência de
fornecimento
ETIQUETA DE
ENERGIA
O placa de identifi caçăo e’ situada no interior da parte
escamoteável ou, uma vez aberto o compartimento
aquecedor de alimentos, na parede interna esquerda.
vazão*
28-30
20
35
g/h
37
25
45
bico
1/100
(mm)
20
17
25
32x43,5x40 cm
Litros 56
largura 42 cm, profundidade 44
cm, altura 8,5 cm
adaptáveis a todos os tipos de
gás indicados na placa das
características
veja a placa das características
Directiva 2002/40/CE acerca dos
fornos eléctricos. Norma EN 50304
Consumo de energia com
convecção Natural – função de
aquecimento:
Consumo de energia da
declaração de Classe com
convecção Forçada - função de
aquecimento:
Directivas Comunitárias:
2006/95/EC de 12/12/06 (Baixa
Tensão) e posteriores
modificações – -2004/108/EC de
15/12/04 (Compatibilidade
Electromagnética) e posteriores
modificações - 2009/142/EC de
30/11/09 (Gás) e posteriores
modificações - 2002/96/EC.
1275/2008 (Stand-by/ Off mode)
vazão*
l/h
X
Tradicional;
u
Pastelaria.
PT
20
Page 21

Início e utilização
PT
Utilização do plano de cozedura
Acendimento dos queimadores
Em correspondência com cada selector de
QUEIMADOR está indicado um círculo cheio para o
queimador associado.
Para acender um queimador do plano de cozedura:
1. aproximar uma chama ou um acendedor ao
queimador;
2. pressionar e contemporaneamente girar no sentido
contrário ao dos ponteiros do relógio o selector
QUEIMADOR no símbolo da chama máxima E;
3. regular a potência da chama desejada, girando no
sentido contrário ao dos ponteiros do relógio o selector
QUEIMADOR: no mínimo C, no máximo E ou numa
posição intermediária.
Se o aparelho for equipado com
dispositivo de acendimento
electrónico* (ver gura) será
suficiente pressionar e
contemporaneamente girar
no sentido contrário ao dos
ponteiros do relógio o selector
QUEIMADOR no símbolo de
chama mínima, até o acendimento. Pode ocorrer que
o queimador se apague no momento em que se solta
o selector. Neste caso, repetira operação mantendo
pressionado o selector por mais tempo.
! Se a chama do queimador se apagar acidentalmente,
desligue o queimador e aguarde ao menos 1 minuto
antes de tentar novamente o acendimento.
Se o aparelho for equipado com um dispositivo
de segurança* para a falta de chama, mantenha
pressionado o selector do QUEIMADOR por
aproximadamente 2-3 segundos para manter acesa a
chama e activar o dispositivo.
Para apagar o queimador, girar o selector até que se
apague •.
Conselhos práticos para utilização dos queimadores
Para um melhor rendimento dos queimadores e um
consumo mínimo de gás é necessário usar recipientes
de fundo chato, dotados de tampa e proporcionados
ao queimador:
Queimador ř Diâmetro Recipientes (cm)
Rápido (R) 24 - 26
Semi Rápido (S) 16 - 20
Auxiliar (A) 10 - 14
Coroa Tripla (TC) 24 - 26
Para identificar o tipo de queimador, veja os desenhos
presentes no parágrafo “Características dos
queimadores e bicos”.
! Nos modelos equipados de grade de redução, a
mesma deverá ser utilizada somente para o queimador
auxiliar, quando forem utilizados recipientes de
diâmetro menor de 12 cm.
Utilização do forno
! Quando o acender pela primeira vez, aconselhamos
de fazer funcionar o forno vazio pelo menos durante
uma hora, com o termóstato posto à temperatura
máxima e a porta fechada. Em seguida, pode apagar,
abrir a porta do forno e ventilar a sala. O odor que
se sente deve-se à evaporação das substâncias
empregadas para proteger o forno.
! Nunca encoste objectos no fundo do forno, para
evitar riscos de danos ao esmalte.
! Antes do uso, remova taxativamente as películas de
plástico posicionadas aos lados do aparelho.
1. Para seleccionar o programa de cozedura que
desejar, rode o selector dos PROGRAMAS.
2. Escolha a temperatura recomendada para o
programa ou aquela desejada girando o selector do
TERMÓSTATO.
Uma lista com as cozeduras e as respectivas
temperaturas aconselhadas pode ser consultada na
específica tabela (veja a Tabela de cozedura no forno).
Durante a cozedura é sempre possível:
• modificar o programa de cozedura mediante o
selector dos PROGRAMAS;
• modificar a temperatura mediante o selector do
TERMÓSTATO;
• interromper a cozedura se recolocar o selector dos
PROGRAMAS na posição “0”.
! Coloque sempre os recipientes de cozedura sobre a
grade fornecida.
Indicador do TERMÓSTATO
Se estiver ligado significa que o forno está a produzir
calor. Desliga-se quando no interior do forno for
alcançada a temperatura seleccionada. A esta
altura, o indicador começa a piscar indicando que
o termóstato está a funcionar e mantém constante a
temperatura.
Indicador luminoso FUNCIONAMENTO FORNO
Se estiver ligado significa que o forno está a funcionar.
Luz do forno
Acende-se girando o selector dos PROGRAMAS em
qualquer posição diferente do “0” e fica acesa até
quando o forno estiver a funcionar. Seleccionando
com o selector, a luz acende-se sem activar algum
elemento aquecedor.
8
21
Page 22

Programas de cozedura
! Para todos os programas pode ser definida uma
temperatura
entre 60°C e MÁX., excepto:
• GRILL (é aconselhável configurar somente em
MÁX.);
• GRATIN (é aconselhável não ultrapassar a
temperatura de 200°C).
X
Activam-se os dois elementos aquecedores inferior
e superior. Com esta cozedura tradicional é melhor
utilizar um único tabuleiro: com mais de um tabuleiro
haverá má distribuição da temperatura.
u
Liga-se o elemento aquecedor traseiro e entra em
funcionamento a ventoinha para garantir um calor
suave e uniforme no interior do forno. Esta função
é indicada para a cozedura de comidas delicadas,
(especialmente doces que necessitarem de levitação)
e algumas preparações “mignon” em 3 prateleiras
simultaneamente.
W
Activam-se os elementos aquecedores e entra em
funcionamento a ventoinha para proporcionar um calor
constante e uniforme.
Este programa não necessita de aquecimento
prévio. Este programa é especificamente indicado
para cozeduras rápidas de alimentos previamente
preparados (congelados ou previamente cozidos).
Os melhores resultados são obtidos se utilizar apenas
uma prateleira.
Y
Activam-se todos os elementos aquecedores
(superior, inferior e circular) e entra em funcionamento
a ventoinha. Como o calor é constante e uniforme em
todo o forno, o ar coze e cora os alimentos de maneira
uniforme. É possível utilizar até duas prateleiras no
máximo contemporaneamente.
Programa de FORNO TRADIÇÃO
Programa FORNO PARA PASTÉIS
Programa de FAST COOKING
Programa de COZEDURA MÚLTIPLA
vez, será necessário trocar a posição das mesmas na
metade da cozedura.
d Programa de GRILL
Activa-se a parte central do elemento aquecedor
superior. Uma temperatura alta e directa do grill é
aconselhada para os alimentos que necessitarem de
uma alta temperatura superficial (bifes de vitela ou vaca,
filés, entrecôte). É um programa de baixos consumos,
ideal para grelhar pratos de pequenas dimensões.
Colocar os alimentos no meio da grelha, pois os
alimentos colocados nos cantos ficam crus.
e Programa
Activa-se o elemento aquecedor superior e começam
a funcionar a ventoinha e o espeto rotatório (se
houver). Une a irradiação térmica unidireccional com
a circulação forçada do ar no interior do forno. Deste
modo impede-se a queimadura da superfície dos
alimentos ao aumentar-se o poder de penetração do
calor.
! As cozeduras GRILL e GRATIN devem ser efectuadas
com a porta fechada.
Timer*
Para accionar o Timer (contador de minutos) proceder
da seguinte maneira:
1. para dar corda na campainha é necessário rodar
o selector do TIMER 4 uma volta quase inteira na
direcção dos ponteiros do relógio;
2. rodar no sentido contrário ao dos ponteiros do
relógio 5 o selector TIMER configurando o tempo
desejado;
Conselhos práticos para cozedura
! Nas cozeduras ventiladas não utilize as posições
das prateleiras 1 e 5: estes recebem directamente
ar quente que poderia provocar queimaduras em
alimentos delicados.
COZEDURA MÚLTIPLA
• Utilize as posições 2 e 4 dos tabuleiros, coloque na 2
os alimentos que necessitarem de mais calor.
• Coloque a bandeja pingadeira embaixo e a grade
em cima.
GRATIN
PT
Z
Activam-se os elementos aquecedores inferior e
circular e entra em funcionamento a ventoinha. Esta
combinação possibilita um aquecimento rápido do
forno, com um grande fluxo de calor principalmente
por baixo. Se utilizar mais de uma prateleira de cada
Programa do
FORNO PARA PIZZA
GRILL
• Nas cozeduras de GRILL coloque a grelha na
posição 5 e a bandeja pingadeira na posição 1
para recolher os resíduos de cozedura (molhos e/ou
gordura). Nas cozeduras GRATIN coloque a grelha
na posição 2 ou 3 e a bandeja pingadeira na posição
1 para recolher os resíduos de cozedura.
22
Page 23

PT
• É aconselhável configurar o nível de energia no
máximo. Não se alarme se a resistência superior
não permanecer constantemente acesa: o seu
funcionamento é controlado por um termóstato.
FORNO para PIZZA
• Utilize uma forma de alumínio leve, apoie-a na
Tabela de cozedura no forno
grelha do forno.
Se utilizar a bandeja pingadeira aumentará os
tempos de cozedura
e dificilmente será obtida uma pizza crocante.
• No caso de pizzas com muita cobertura é
aconselhável colocar o queijo mozzarella na metade
da cozedura.
Programas Alimentos Peso
Pato
Forno
Tradicional
Forno para
Pastéis
Cozinha Rápida
Cozedura
Múltipla
Forno para
Pizza
Grill
Gratin
Carne de vitela ou vaca assada
Carne de porco assada
Biscoitos (de massa tenra)
Tortas doces
Tortas doces
Torta de fruta
Plum cake
Pão-de-ló
Crêpes recheadas (em 2 prateleiras)
Queques pequenos (em 2 prateleiras)
Salgadinhos folhados como queijo
(em 2 prateleiras)
Bignés (em 3 prateleiras)
Biscoitos (em 3 prateleiras)
Merengues (em 3 prateleiras)
CongeladosCongelados
Pizza
Misto abóbora e camarão panado
Torta rústica de espinafre
Panzerotte
Lasanha
Pãezinhos doirados
Bolinhos de frango
PréPré-cozidoscozidos
Asas de frango doiradas
Comidas Frescas
Comidas Frescas
Biscoitos (de massa tenra)
Plum cake
Salgadinhos folhados de queijo
Pizza (em 2 prateleiras)
Lasanha
Cordeiro
Frango assado com batatas
Cavala
Plum cake
Bignés (em 2 prateleiras)
Biscoitos (em 2 prateleiras)
Pão-de-ló (em 1 prateleira)
Pão-de-ló (em 2 prateleiras)
Tortas salgadas
Pizza
Carne de vitela ou vaca assada
Frango
Linguado e chocas
Espetinhos de calamares e camarão
Chocas
Filé de bacalhau
Verduras na grelha
Bife de vitela
Chouriças
Hambúrgueres
Cavala
Tostas (ou pão torrado)
Frango na grelha
Chocas
(Kg)
4 ou 6
1
1
1
-
1
0.5
1
0.7
0.5
1.2
0.6
0.4
0.7
0.7
0.5
0.3
0.4
0.5
0.3
0.5
0.4
0.4
0.4
0.3
0.6
0.2
1
1
1
1+1
1
1
0.5
0.5
0.5
1
1.5
0.5
1
1
0.7
0.6
0.6
0.8
0.4
0.8
0.6
0.6
1
1.5
1.5
Posição das
prateleiras
3
3
3
3
3
3
2 ou 3
3
3
2 ou 4
2 ou 4
2 ou 4
1 e 3 e 5
1 e 3 e 5
1 e 3 e 5
2
2
2
2
2
2
2
2
2
2
2
2 ou 4
3
2
2 ou 4
2
2
2 ou 4
2 ou 4
2
2 ou 4
3
3
2
2 ou 3
4
4
4
4
3 ou 4
4
4
4
4
4
2
2
Pré
aquecimento
(minutos)
15
15
15
15
15
15
15
15
15
15
15
15
15
15
15
-
-
-
-
-
-
-
-
-
-
15
10
10
15
10
10
10
10
10
10
15
15
10
10
-
-
-
-
-
-
-
-
-
10
10
Temperatura
aconselhada
200
200
200
180
180
180
180
180
160
200
190
210
180
180
90
250
200
220
200
200
180
220
200
200
180
210
230
180
180
200
180
170
190
180
170
170
200
220
220
180
Max
Max
Max
Max
Max
Max
Max
Max
Max
Max
200
200
Duração da
cozedura
(minutos)
65-75
70-75
70-80
15-20
30-35
20-30
40-45
40-50
25-30
30-35
20-25
15-20
20-25
20-25
180
12
20
30-35
25
35
25-30
15-20
20-25
15-18
45
10-12
15-20
30-35
40-45
60-70
30-35
40-50
20-25
10-15
15-20
20-25
25-30
15-20
25-30
60-70
10-12
8-10
10-15
10-15
15-20
15-20
15-20
10-12
15-20
3-5
55-60
30-35
23
Page 24

PT
Programar a cozedura com o
programador electrónico
Regule o relógio
Depois de ligar à rede eléctrica ou depois de um corte
de corrente o ecrã piscará com: 0:00
Para acertar a hora:
1. carregue contemporaneamente nas teclas
e FIM DA COZEDURA
DURAÇÃO DA COZEDURA
;
2. dentro de 4 segundos ajuste a hora exacta
carregando nas teclas
tempo aumenta; com a tecla o tempo diminui.
Depois de ter regulado a hora, o programador passa
automaticamente para a posição manual.
Programe o contador de minutos
Com o contador de minutos pode-se programar uma
contagem regressiva no fim da qual o aparelho emitirá
um sinal acústico.
Como regular o contador de minutos:
1. carregue na tecla CONTADOR DE MINUTOS
visor aparece:
e . Com a tecla o
. No
2. carregue nas teclas e para regular o tempo
desejado;
3. quando soltam-se as teclas começa a contagem
regressiva e no visor aparece a hora actual:
4. no final do tempo tocará um sinal acústico que pode
ser parado se for premida uma tecla qualquer (excepto
e ): o símbolo apaga-se.
as teclas
! O contador de minutos não comanda o forno para
acender-se ou apagar-se.
Regular o volume do sinal acústico
Depois de ter escolhido e confirmado as regulações
do relógio, mediante a tecla
volume do sinal acústico.
Programar a duração de uma cozedura com início
posterior.
Em primeiro lugar, deve-se decidir o programa de
cozedura e a temperatura desejados, actuando nos
selectores PROGRAMAS e TERMOSTATO do forno.
A esta altura é possível programar a duração de uma
cozedura:
1. carregue na tecla DURAÇÃO DA COZEDURA
2. dentro de 4 segundos ajuste a duração da cozedura
desejada carregando nas teclas
exemplo, for programada uma duração de 30 minutos,
no visor aparece:
é possível regular o
e . Se, por
;
3. ao soltar-se as teclas, depois de 4 segundos, no
visor aparece novamente a hora actual (por exemplo,
as 10:00) com o símbolo
Em seguida deve-se programar a hora para terminar a
cozedura:
4. carregue na tecla FIM DA COZEDURA
5. dentro de 4 segundos ajuste a hora do fim da
cozedura desejada carregando nas teclas e . Se,
por exemplo, desejar terminar a cozedura as 13:00,
no visor aparecerá:
e a letra A (AUTO):
;
6. ao soltar-se as teclas, depois de 4 segundos, no
visor aparece novamente a hora actual (por exemplo,
as 10:00) com a letra A (AUTO):
Conforme o exemplo proposto, o forno acende-se
automaticamente às 12:30 de modo que termine
depois de 30 minutos, antes das 13:00.
Programar a duração de uma cozedura com início
posterior.
Seguir o procedimento para programar a duração da
cozedura descrita acima (pontos 1-3).
! A letra A acesa recorda que foi realizada a
programação de duração e de final de cozedura com
funcionamento AUTO. Para voltar ao funcionamento
manual do forno, depois de cada cozedura AUTO
carregue novamente nas teclas DURAÇÃO DA
COZEDURA
! O símbolo
durante toda a cozedura.
A qualquer momento é possível visualizar a duração
programada, carregando na tecla DURAÇÃO DA
COZEDURA
da cozedura carregando na tecla FIM DA COZEDURA
. No final da cozedura, tocará um sinal acústico.
Para interrompê-lo, carregue uma tecla qualquer,
excepto as teclas
Anular uma cozedura programada.
Carregue contemporaneamente nas teclas DURAÇÃO
DA COZEDURA
Corrigir ou cancelar os dados programados.
Os dados programados podem ser modificados
a qualquer momento carregando na tecla
correspondente (CONTADOR DE MINUTOS,
DURAÇÃO DA COZEDURA ou FIM DA COZEDURA) e
carregando na tecla
Ao cancelar a duração de cozedura, cancela-se
automaticamente também o final da cozedura e viceversa.
No caso de funcionamento programado, o aparelho
não aceita tempos de final de cozedura anteriores ao
de início de cozedura propostos pelo próprio aparelho.
e FIM DA COZEDURA .
permanece aceso junto ao forno
, e é possível visualizar a hora do final
e .
e FIM DA COZEDURA .
ou .
24
Page 25

Precauções e conselhos
! Este aparelho foi projectado e fabricado em
conformidade com as normas internacionais de
segurança.
Estas advertências são fornecidas por razões de
segurança e devem ser lidas com atenção.
Segurança geral
• Este aparelho foi concebido para utilização de tipo
não profissional no âmbito de moradas.
• Este aparelho não deve ser instalado ao ar livre,
mesmo num sítio protegido, porque é muito
perigoso deixá-lo exposto a chuva e temporais.
• Não toque na máquina se estiver descalço, ou se as
suas mãos ou pés estiverem molhados ou húmidos.
• O aparelho deve ser utilizado para cozinhar
alimentos, somente por pessoas adultas e
conforme as instruções contidas neste livrete.
Qualquer outro uso (como por exemplo,
aquecedor de ambientes) deve ser considerado
impróprio e portanto perigoso. O fabricante não
pode ser considerado responsável por eventuais
danos derivados de usos impróprios, errados e
irrazoáveis.
• Este folheto diz respeito a um aparelho de classe 1
(isolado) ou classe 2 - subclasse 1 (situado entre
dois móveis).
• Durante o uso deste aparelho, os elementos
aquecedores e algumas das partes da porta do
forno esquentam-se muito. Tome cuidado para
não tocar nos mesmos e mantenha as crianças
afastadas.
• Evite que o cabo de alimentação de outros
electrodomésticos encoste-se em partes quentes do
aparelho.
• Não tape as aberturas de ventilação e de eliminação
de calor.
• Utilize luvas de forno para colocar e tirar recipientes;
• Não utilize líquidos inflamáveis (álcool, gasolina,
etc.) perto do aparelho enquanto este estiver
funcionando.
• Não guarde material inflamável no vão inferior
de depósito ou no forno: se o aparelho for
inadvertidamente colocado a funcionar, poderia
incendiar-se.
• As superfícies internas da gaveta (se presente)
podem ficar muito quentes.
• Controlar sempre que os botões estejam na posição
quando o aparelho não é utilizado.
•
• Não puxe pelo cabo para desligar a ficha da
tomada eléctrica, pegue pela ficha.
• Não realize limpeza nem manutenção sem antes ter
desligado a ficha da rede eléctrica.
• Se houver avarias, em nenhum caso mexa nos
mecanismos internos para tentar repará-las.
Contactar a Assistência.
• Não coloque objectos pesados sobre a porta do
forno aberta.
• Não é previsto que este aparelho seja utilizado
por pessoas (incluso crianças) com reduzidas
capacidades físicas, sensoriais ou mentais,
por pessoas inexperientes ou que não tenham
familiaridade com o produto, a não ser que seja
vigiadas por uma pessoa responsável pela sua
segurança ou que tenham recebido instruções
preliminares sobre o uso do aparelho.
• Não permita que as crianças brinquem com o
aparelho.
Eliminação
• Eliminação do material de embalagem: obedeça
as regras locais, de maneira que as embalagens
possam ser reutilizadas.
• A directiva Europeia 2002/96/CE relativa aos
resíduos de equipamentos eléctricos e electrónicos
(REEE) prevê que os electrodomésticos não devem
ser eliminados no normal fluxo dos resíduos sólidos
urbanos. Os aparelhos não mais utilizados devem
ser recolhidos separadamente para optimizar a taxa
de recuperação e reciclagem dos materiais que os
compõem e impedir potenciais danos à saúde e
ao meio ambiente. O símbolo da lixeira cancelada
está indicado em todos os produtos para lembrar o
dever de colecta selectiva.
Para maiores informações sobre a correcta
eliminação dos electrodomésticos, os proprietários
poderão contactar o serviço de colecta público ou
os revendedores.
Economia e respeito do meio ambiente
• Utilizando o forno nos horários a partir do fim da
tarde, até as primeiras horas da manhã, estará
contribuindo para reduzir a carga de absorção das
empresas de fornecimento de electricidade.
• É recomendável realizar as cozeduras GRILL e
GRATIN sempre com a porta fechada: quer para
obter melhores resultados, quer para uma sensível
economia de energia (aproximadamente 10%).
• Mantenha as guarnições eficientes e limpas,
para poderem aderir bem na porta e não causar
dispersão de calor.
PT
25
Page 26

Manutenção e cuidados
PT
Desligar a corrente eléctrica
Antes de realizar qualquer operação, desligue o
aparelho da alimentação eléctrica.
Limpeza do aparelho
! Nunca utilize equipamento de limpeza a vapor ou de
alta pressão para limpar a aparelhagem.
• As partes externas esmaltadas ou inoxidáveis e
as guarnições de borracha podem ser limpas
com uma esponja molhada com água morna e
sabão neutro. Se for difícil remover as manchas,
empregue produtos específicos. Enxaguar com
água abundante e enxugar depois da limpeza.
Não empregue pós abrasivos nem substâncias
corrosivas.
• As grades, as sobretampas, as coroas
distribuidoras de chamas e os queimadores do
plano de cozedura são extraíveis para facilitar a
limpeza; lave-os com água quente e detergente
não abrasivo, tendo o cuidado de remover toas
as incrustações e aguardar até que estejam
perfeitamente enxutos.
Verificação das guarnições do forno
Verifique periodicamente o estado da guarnição ao
redor da porta do forno. Se houver danos, contacte
o Centro de Assistência Técnica Autorizado mais
próximo. É aconselhável não usar o forno antes do
mesmo ter sido reparado.
Substituir a lâmpada de iluminação do
forno
1. Após ter desligado o forno
da electricidade, remova
a tampa de vidro do portalâmpadas (ver gura).
2. Desenrosque a lâmpada e
troque-a por outra análoga:
tensão 230V, potência 25 W,
engate E 14.
3. Monte novamente a tampa e restabeleça a ligação
eléctrica do forno.
! Não utilizar a lâmpada do forno como iluminação
de ambientes.
• Limpar frequentemente a parte terminal dos
dispositivos de segurança* para a falta de chama.
• O interior do forno deve ser sempre limpo de
preferência depois de cada utilização, enquanto
ainda estiver morno. Utilize água quente e
detergente, enxagúe e enxugue com um pano
macio. Evite abrasivos.
• Limpe o vidro da porta com esponjas e produtos
não abrasivos e enxugue com um pano macio;
não use materiais ásperos, abrasivos ou espátulas
metálicas afiadas que podem arranhar a superfície
e quebrar o vidro.
• Os acessórios podem ser facilmente lavados como
quaisquer utensílios, inclusive numa máquina de
lavar louça.
• Evite fechar a tampa de vidro enquanto os
queimadores estiverem acesos ou ainda quentes.
ATENÇÃO! O sobretampo
de vidro pode fragmentar
se estiver quente. Desligar
todos os queimadores e
eventuais placar eléctricas
antes de o fechar.
Manutenção das torneiras do gás
Com o tempo pode ocorrer que uma torneira se
bloqueie ou apresente dificuldades na rotação,
portanto será necessário substitui-la.
! Esta operação deve ser efectuada por um técnico
autorizado pelo fabricante.
Assistência técnica
! Nunca recorra a técnicos não autorizados.
Comunique:
• o tipo de avaria;
• o modelo da máquina (Mod.);
• o número de série (S/N);
Estas últimas informações encontram-se na placa de
identificação situada no aparelho.
26
Page 27

27GR28
Page 28

GR
12/2012 - 195108417.00
XEROX FABRIANO
 Loading...