

Page 1

Operating Instructions
HOB
GB
GB
English,1
RS
Русский, 7
CISKBH 6004 IX/1/HA
CISKBH 6024 DO IX/HA
CISKBH 6024 DO IX/1/HA
Contents
Installation, 2-3
Positioning
Electrical connection
Disposal
Description of the appliance, 4
Radiant zones
The control knobs
Extendable cooking zone control
Precautions and tips, 5
Practical advice on using the appliance
General safety
Care and maintenance, 6
Switching the appliance off
Cleaning the appliance
Disassembling the hob
Page 2
Installation
GB
Before operating your new appliance please read this
instruction booklet carefully. It contains important
information concerning the safe operation, installation
and maintenance of the appliance.
Please keep these operating instructions for future
reference. Pass them on to possible new owners of the
appliance.
Positioning
Keep all packaging materials out of the reach of children.
It may present a choking or suffocation hazard (see
Precautions and tips).
The appliance must be installed by a qualified
professional in accordance with the instructions provided.
Incorrect installation may damage property or cause harm
to people or animals.
Built-in appliance
Use the appropriate cabinet to ensure that the appliance
functions properly.
The supporting surface must be heat-resistant up to
a temperature of approximately 100°C.
If the appliance is to be installed above an oven, the
oven must have a forced ventilation cooling system.
Avoid installing the hob above a dishwasher: if this
cannot be avoided, place a waterproof separation
device between the two appliances.
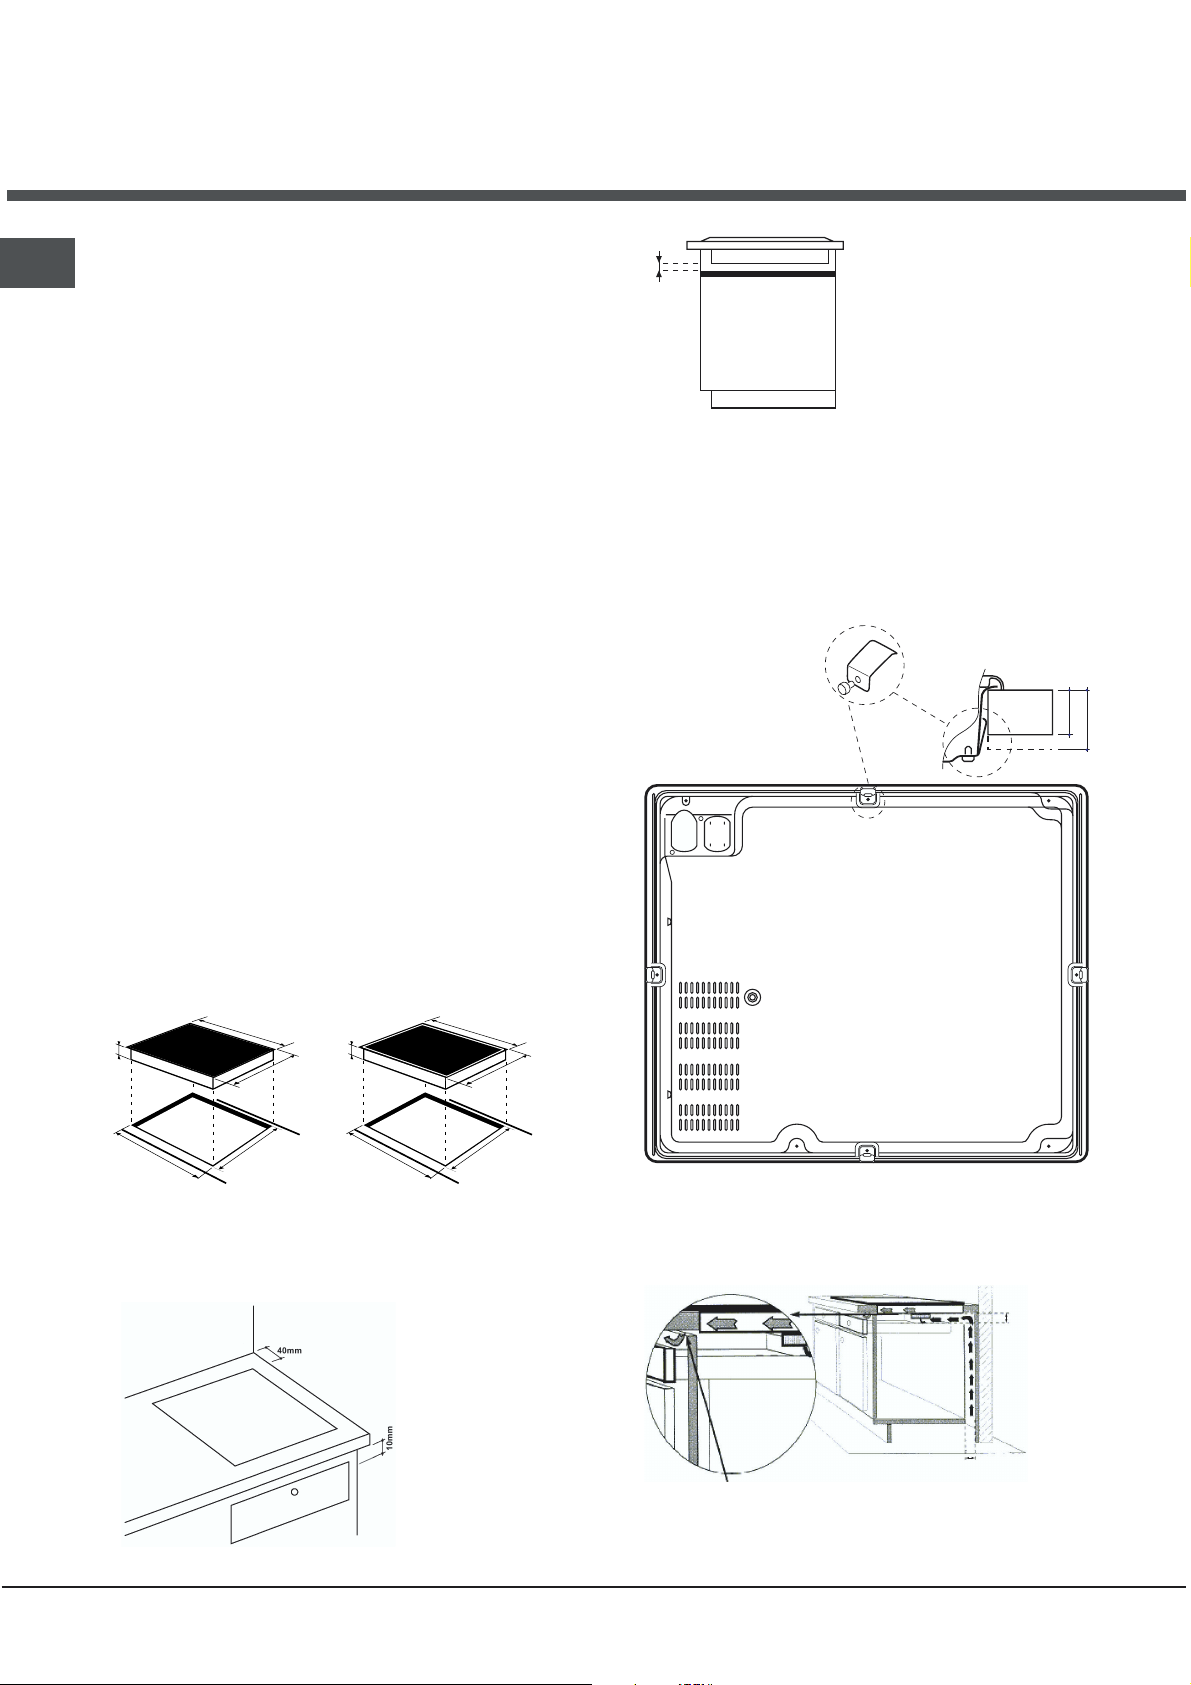
Depending on the hob you want to install, the
cabinet must have the following dimensions (see
figure):
590
574
So that a minimum
distance of 10 mm is
10 mm
Distance to
keep between the
cut-out slot and
the cabinet
maintained between the
installation cavity and the
cabinet underneath.
Fixing
The appliance must be installed on a perfectly level
supporting surface.
Any deformities caused by improper fixing could change
the features and the operation of the hob.
REAR SPRING ASSEMBLY
FRONT OF HOB
KITCHEN
WORKTOP
30
HOB FROM BELOW
40
48
560 +/- 1
520
490 +/- 1
48
560 +/- 1
504
490 +/- 1
Ventilation
To allow adequate ventilation and to avoid overheating
of the surrounding surfaces the hob should be positioned
as follows:
At a minimum of
40 mm from the
back panel and
600 mm from any
other vertical
surfaces.
2
Above an empty cabinet or a drawer
A space of at least 40 mm, or an opening of 5 mm on
the width measurement of the cabinet, should be created.
40 mm min.
40mm
Opening of at least 5 mm
on the overall width
measurement of the surface.
Page 3
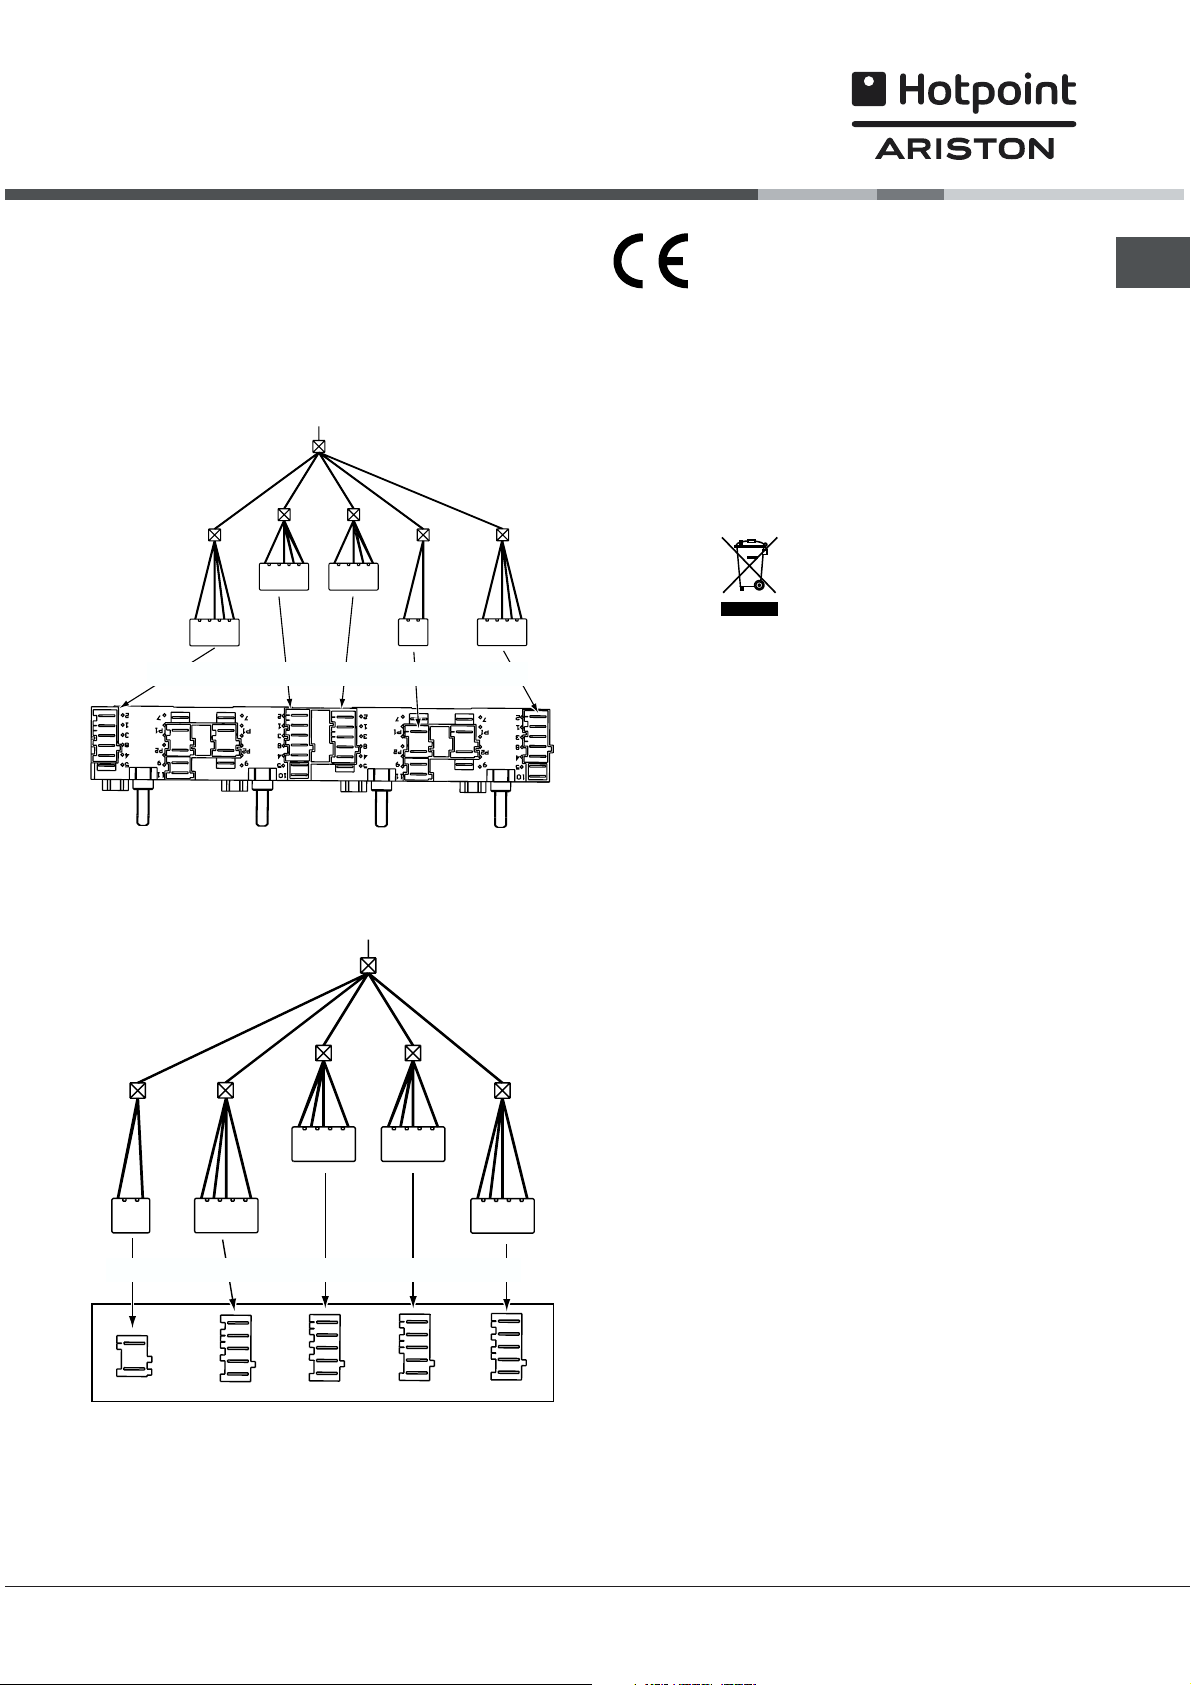
Connecting the hob to the oven
This appliance can only work if it has been connected to
a specific oven, listed on the sheet included in the
documents pouch.
CISKBH 6004/1/HA
BUILT-IN CERAMIC HOBS
This appliance conforms to the following
European Economic Community
directives:
- 73/23/EEC dated 19/02/73 (Low Voltage) and
subsequent amendments;
- 89/336/EEC dated 03/05/89 (Electromagnetic
Compatibility) and subsequent amendments;
- 93/68/EEC dated 22/07/93 and subsequent
amendments.
Disposal
GB
WHITE RED YELLOW BLUE GREEN
OVEN
CISKBH 6024 DO/HA-CISKBH 6024 DO/1/HA
BUILT-IN CERAMIC HOBS
When disposing of packaging material: observe
local legislation so that the packaging may be
reused.
The European Directive 2002/96/EC relating to Waste
Electrical and Electronic Equipment (WEEE) states
that household appliances should not be disposed of
using the normal solid urban waste cycle. Exhausted
appliances should be collected separately in order to
optimise the cost of re-using and recycling the
materials inside the machine, while preventing
potential damage to the atmosphere and to public
health. The crossed-out dustbin is marked on all
products to remind the owner of their obligations
regarding separated waste collection.
For further information relating to the correct disposal
of exhausted household appliances, owners may
contact the public service provided or their local
dealer.
WHITE RED YELLOWBLUE GREEN
OVEN
3
Page 4
GB
Description
of the appliance
Radiant zones
This type of burner consists of several coils that guarantee the even distribution of heat over the bottom of the
pan and ensure the success of all cooking on low heat: simmering, sauces or reheating.
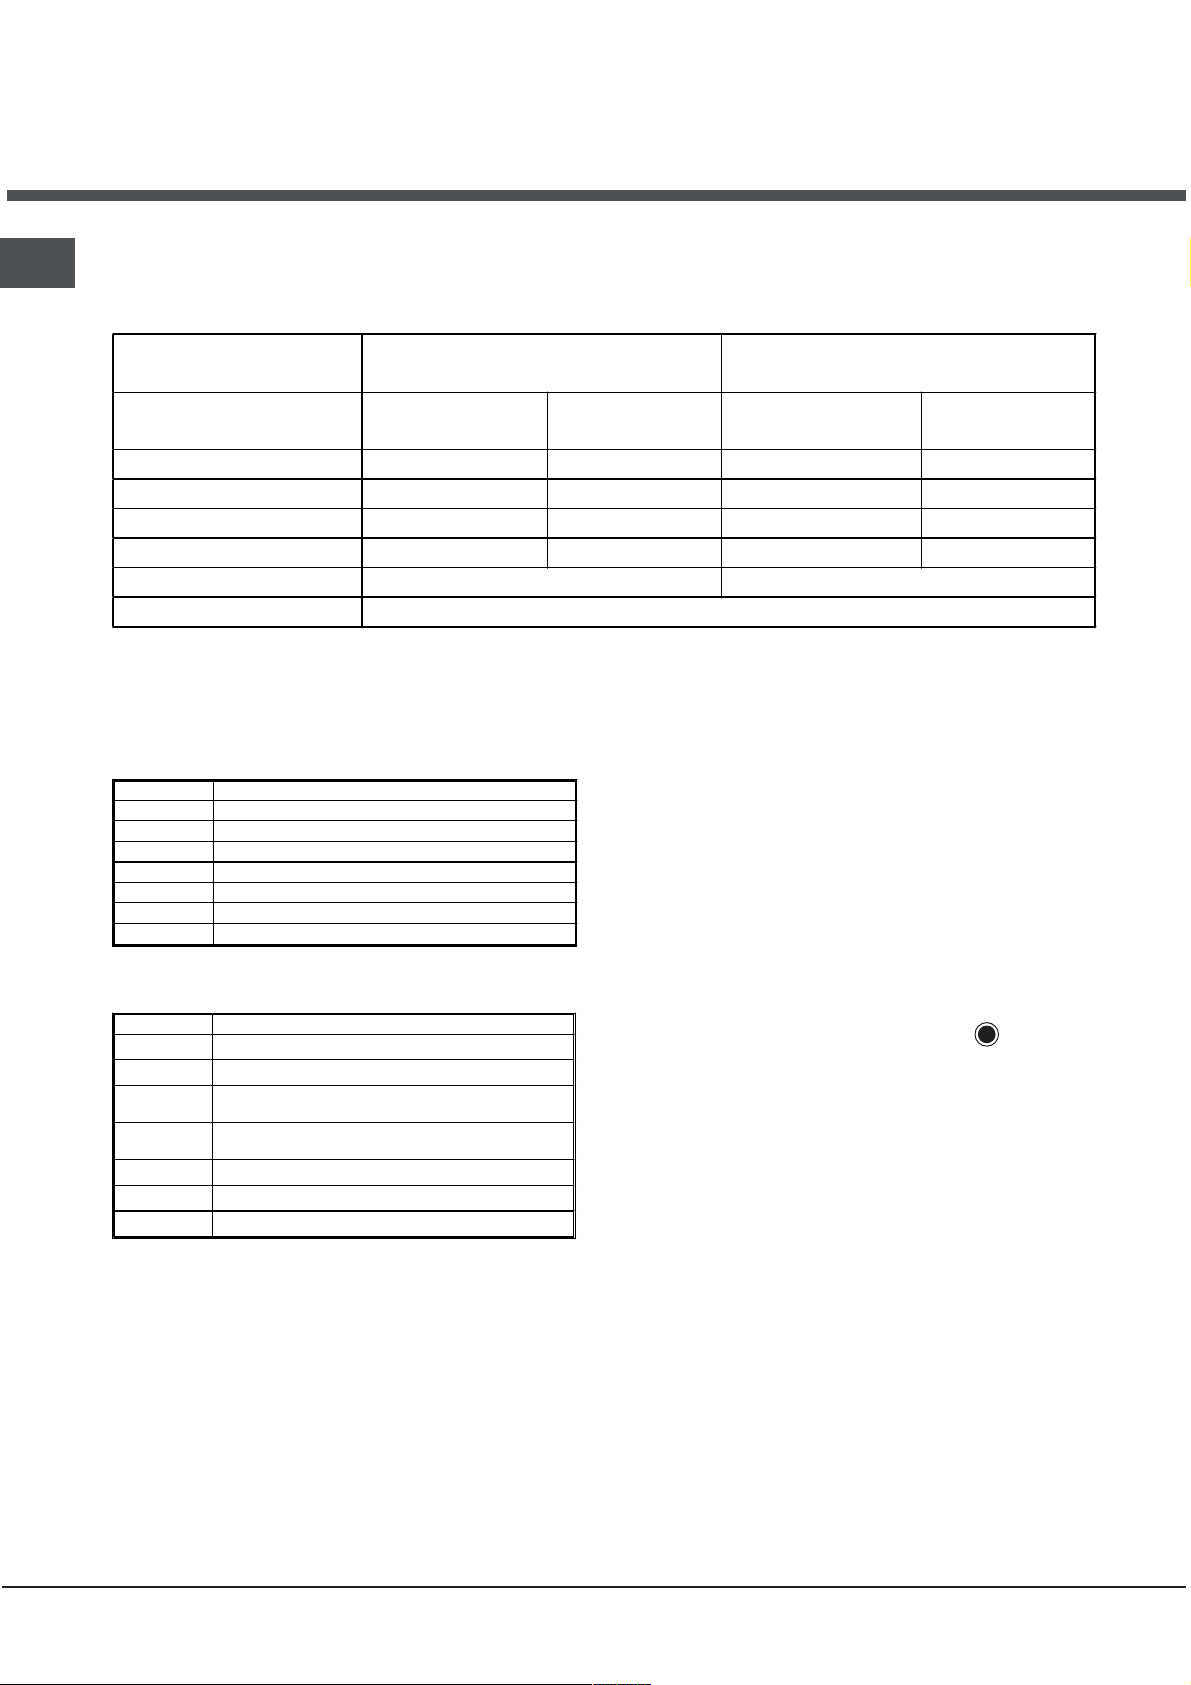
HOBS
Cooking zones
Back left
Front left
Back right
Front right
CISKBH 6024 DO/HA
CISKBH 6024 DO/1/HA
Power
(in W)
Diameter
(in mm)
CISKBH 6004/1/HA
Power
(in W)
R 1200 140 R 2100 210
RD 1000/2200 210 R 1200 140
RO 1000/1800 180 R 1200 140
R 1400 160 R 1700 180
Overall power 6600 6400
The tables below feature information on how to use the zones to their full potential.
CISKBH 6024 DO/HA - CISKBH 6024 DO/1/HA
Power Type of dish
1 Melted butter or chocolate
2/3 Reheating liquids
4/5 Preparation of creams and sauces
6/7 Cooking stews, blanquette, desserts
8/9 Cooking pasta and rice
10/11 Sealing meat, fish, omelettes
12 Fried food
CISKBH 6004/1/HA
Power Type of dish
0 off
1 cooking greens, fish
steaming potatoes, cooking soups, chickpeas,
2
beans
steaming potatoes, cooking soups, chickpeas,
3
beans
4 for roasting (moderate)
5 for roasting (high)
6 for browning, to bring large volumes to the boil
R = simple radiant, RO = oval radiant, RD = dual radiant
The control knobs
These are situated on the oven control panel and
allow for the continuous control of the power setting
of each cooking zone (from 1 to 12 or from 1 to 6).
Extendable cooking zone control
Extendable cooking zones (concentric or oval) are
indicated on the glass hob surface by a dual heating
zone.
To use the smaller zone only, set the control knob to
between 1 and 12 according to the desired heating
power.
To use the large zone, set the knob to
adjust it to the desired heating power.
Diameter
(in mm)
and then
As long as the temperature of the cooking zones
remains above 60°C, even after use, the residual
heat indicators stay on to prevent the risk of burns.
4
Page 5

Precautions and tips
This appliance has been designed and
manufactured in compliance with international safety
standards. The following warnings are provided for
safety reasons and must be read carefully.
Practical advice on using the appliance
To obtain the best results from your hob:
Use flat-bottomed pans to ensure that they adhere
to the cooking zone perfectly.
Always use pans with a diameter that is large
enough to cover the hotplate fully, in order to use
all the available heat.
Make sure that the bottom of the cookware is
always dry and clean to guarantee correct
adherence and durability, not only for the cooking
zones but also for the cookware itself.
Avoid using the same cookware that is used on
gas burners: the heat concentration on gas
burners may have warped the base of the pan,
causing it not to adhere to the surface correctly.
Never leave a cooking zone on without cookware
placed on it because it heats up and rapidly
reaches the maximum level, which could damage
the heating elements.
General safety
The appliance was designed for domestic use
inside the home and is not intended for
commercial or industrial use.
The appliance must not be installed outdoors,
even in covered areas. It is extremely dangerous
to leave the appliance exposed to rain and
storms.
Do not touch the appliance with bare feet or with
wet or damp hands and feet.
The appliance must be used by adults only for the
preparation of food, in accordance with the
instructions provided in this booklet. Do not use
the hob as a worktop or chopping board.
The glass ceramic hob is resistant to mechanical
shocks, but it may crack (or even break) if hit with
a sharp object such as a tool. If this happens,
disconnect the appliance from the electricity
mains immediately and contact a Service Centre.
If the surface of the hob is cracked, switch off the
appliance to prevent electric shocks from
occurring.
Ensure that power supply cables of other
electrical appliances do not come into contact
with the hot parts of the hob.
Remember that the cooking zones remain
relatively hot for at least thirty minutes after they
have been switched off. An indicator light
provides a warning when residual heat is present (see
Start-up and use).
Keep any object which could melt away from the
hob, for example plastic and aluminium objects,
or products with a high sugar content. Be
especially careful when using plastic film and
aluminium foil or packaging:
if placed on surfaces that are still hot, they may
cause serious damage to the hob.
Always make sure that pan handles are turned
towards the centre of the hob in order to avoid
accidental burns.
When unplugging the appliance, always pull the
plug from the mains socket; do not pull on the
cable.
Never perform any cleaning or maintenance work
without having disconnected the appliance from
the electricity mains.
Do not place metal objects (knives, spoons, pan lids,
etc.) on the hob as they may become hot.
For the attention of wearers of pacemakers or
other active implants:
The hob complies with all current standards on
electromagnetic interference.
Your induction hob is therefore perfectly in
keeping with legal requirements (89/336/CEE
directives). It is designed not to create
interference on any other electrical apparatus
being used on condition that the apparatus in
question also complies with this legislation.
Your induction hob generates short-range
magnetic fields.
To avoid any interference between your induction
hob and a pacemaker, the latter must be
designed to comply with relevant regulations.
In this respect, we can only guarantee our own
product conformity. Please consult the pacemaker
manufacturer or your doctor concerning its
conformity or any possible incompatibility.
GB
5
Page 6

Care and maintenance
GB
Switching the appliance off
Disconnect your appliance from the electricity
supply before carrying out any work on it.
Cleaning the appliance
Do not use abrasive or corrosive detergents (for
example, products in spray cans for cleaning
barbecues and ovens), stain removers, anti-rust
products, powder detergents or sponges with
abrasive surfaces: these may scratch the surface
beyond repair.
Never use steam cleaners or pressure cleaners on
the appliance.
It is usually sufficient simply to wash the hob
using a damp sponge and dry it with absorbent
kitchen roll.
If the hob is particularly dirty, rub it with a special
glass ceramic cleaning product, then rinse well
and dry thoroughly.
Food residue and dirt can be removed using a
special scraper. Do this as soon as possible, do
not wait for the hob to cool down in order to avoid
incrustations. For excellent results, use a special
stainless steel wool pad for vitroceramic glass
cleaning soaked in soapy water.
Stainless steel frame *
Stainless steel can be marked by hard water which
has been left on the surface for a long time, or by
cleaning products containing phosphorus.
After cleaning, it is advisable to rinse the surface
well and dry it thoroughly. If water is spilt on the
surface, dry it quickly and thoroughly.
Some hobs have an aluminium frame which is
similar to stainless steel. Do not use any cleaning or
degreasing products which are not suitable for use
with aluminium.
Disassembling the hob
If it is necessary to disassemble the hob:
1. Loosen the screws fixing the alignment springs on
each side.
2. Loosen the screws holding the fixing hooks in
each corner.
3. Take the hob out of its installation cavity.
Do not attempt to repair the appliance yourself. If
the appliance breaks down, contact a Service
Centre.
If any plastic or sugary substances are
accidentally melted on the hob, remove them
immediately with the scraper, while the surface is
still hot.
Once it is clean, the hob may be treated with a
special protective maintenance product: the
invisible film left by this product protects the
surface from drips during cooking. This
maintenance should be carried out while the
appliance is warm (not hot) or cold.
Always remember to rinse the appliance well with
clean water and dry it thoroughly: residues can
become encrusted during subsequent cooking
processes.
Only available on certain models.
*
6
Page 7

Руководство по
эксплуатации
GB
English,1
CISKBH 6004 IX/1/HA
CISKBH 6024 DO IX/HA
CISKBH 6024 DO IX/1/HA
RS
Русский7
ВАРОЧНАЯ ПАНЕЛЬ
Содержание
Установка, 8-9
Расположение
Соединение варочной панели с духовым шкафом
Утилизация
Описание изделия, 10
Нагревательное сопротивление
Рукоятки-регуляторы
Регуляция двойных нагревательных зон
Предосторожности и
рекомендации,11
Практические советы по эксплуатации изделия
Общие требования к безопасности
Техническое обслуживание и
уход,12
Отключение электропитания
Чистка изделия
Порядок демонтажа варочной панели
RS
Page 8

Монтаж
RS
Важно сохранить данное руководство для его
последующих консультаций. В случае продажи,
передачи изделия или при переезде на новое место
жительства необходимо проверить, чтобы руководство
оставалось вместе с изделием, для того чтобы его
новый владелец мог ознакомиться с правилами
эксплуатации и с соответствующими
предупреждениями.
Внимательно прочитайте инструкции: в них
содержатся важные сведения об установке,
эксплуатации и безопасности изделия.
Расположение
Не разрешайте детям играть с упаковочными
материалами. Упаковка должна быть уничтожена в
соответствии с правилами сбора мусора (ñì.
Предосторожности и рекомендации).
Установка изделия производится в соответствии с
данными инструкциями квалифицированными
специалистами. Неправильная установка изделия
может стать причиной повреждения имущества и
причинить ущерб людям и домашним животным.
Встроенный монтаж
Для обеспечения исправного функционирования
встраиваемого изделия кухонный элемент должен
иметь соответствующие характеристики:
поверхность кухонного топа должна быть из
материала, устойчивого к температуре примерно
100°C;
если варочная панель устанавливается над духовым
шкафом, он должен быть оснащен системой
охлаждения с принудительной вентиляцией.
не рекомендуется устанавливать варочную панель
над посудомоечными машинами: при
необходимости установите между варочной панелью
и посудомоечной машиной герметичную
разделительную вставку;
в зависимости от модели варочной панели, которую
вы устанавливаете (см. рисунки), размеры ниши в
кухонном элементе должны быть следующими:
590
574
между проемом под варочную
10 mm
расстояние между
нишей для установки
Обязательно
кухонной техники
и кухонным
элементом.
панель и расположенным
снизу кухонным элементом
должно быть расстояние не
менее 10 мм.
Крепление
Изделие должно быть установлено на идеально
ровной поверхности.
Возможные деформации, вызванные неправильным
креплением, могут привести к изменениям
характеристик и эксплуатационных качеств варочной
панели.
МОНТАЖ ПРУЖИН С НИЖНЕЙ СТОРОНЫ
ПЕРЕДНЯЯ ЧАСТЬ
ВАРОЧНОЙ ПАНЕЛИ
РАБОЧАЯ
ПОВЕРХНОСТЬ
ПЕРЕВЕРНУТАЯ ВАРОЧНАЯ ПАНЕЛЬ
30
40
48
560 +/- 1
520
490 +/- 1
48
560 +/- 1
504
490 +/- 1
Вентиляция
Для надлежащей вентиляции и во избежание
перегрева поверхностей, прилегающих к варочной
панели она должна быть установлена:
на минимальном
расстоянии 40 мм от
задней стенки и 600 мм от
любой вертикальной
поверхности;
8
Page 9

Соединение варочной панели с
духовым шкафом
Для эксплуатации данного изделия необходимо
соединить его со специальными духовыми шкафами,
перечень которых приводится в конверте с
технической документацией.
CISKBH 6004 IX/1/HA
ВСТРОЕННАЯ ВАРОЧНАЯ ПАНЕЛЬ
БЕЛЫЙ КРАСНЫЙ ЖЕЛТЫЙ СИНИЙ ЗЕЛЕНЫЙ
ВСТРОЕННАЯ КУХОННАЯ ПЛИТА
CISKBH 6024 DO/HA - CISKBH 6024 DO/1/HA
Данное оборудование отвечает
требованиям нижеуказанных Директив
Европейского Сообщества:
- 73/23/СЕЕ от 19.02.73 (Низкое напряжение) и
последующим изменениям;
- 89/336/СЕЕ от 03.05.89 (Электромагнитная
совместимость) и последующим изменениям;
- 93/68/СЕЕ от 22.07.93 и последующим изменениям;
Утилизация
Уничтожение упаковочных материалов:
соблюдайте местные нормативы по утилизации
упаковочных материалов.
Согласно Европейской Директиве 2002/96/СЕ
касательно утилизации электронных и
электрических электроприборов электроприборы
не должны выбрасываться вместе с обычным
городским мусором. Выведенные из строя
приборы должны собираться отдельно для
оптимизации их утилизации и рекуперации
составляющих их материалов, а также для
безопасности окружающей среды и здоровья.
Символ зачеркнутая мусорная корзинка,
имеющийся на всех приборах, служит
напоминанием об их отдельной утилизации.
За более подробной информацией о правильной
утилизации бытовых электроприборов
пользователи могут обратиться в специальную
государственную организацию или в магазин.
RS
ВСТРОЕННАЯ ВАРОЧНАЯ ПАНЕЛЬ
БЕЛЫЙ КРАСНЫЙ ЖЕЛТЫЙСИНИЙ ЗЕЛЕНЫЙ
ВСТРОЕННАЯ КУХОННАЯ ПЛИТА
9
Page 10

Описание изделия
î
RS
Нагревательное сопротивление
Такой нагревательный элемент состоит из нескольких спиральных сопротивлений, обеспечивающих однородное
распределение
CISKBH 6024 DO/HA
ВАРОЧНЫЕ ПАНЕЛИ
CISKBH 6024 DO/1/HA
Зоны
приготовления
Мощность
(Âò)
Диаметр
(мм)
Задняя левая R 1200 140
Передняя левая RD 1000/2200 210
Задняя правая RO 1000/1800 180
Передняя правая R 1400 160
Общая мощность 6600
R = одинарная с сопротив
сопротивлением, RD = äâ
В таблицах ниже приводятся полезные рекомендации по оптимальному использованию разных зон варочной
панели.
CISKBH 6024 DO/HA - CISKBH 6024 DO/1/HA
Мощность Тип приготовления
1
2/3
4/5
6/7
8/9
10/11
12
KBH 6004/1/HA-KBH 6000/1/HA
Мощность Тип приготовления
0
1
2
3
4
5
6
До тех пор, пока температура нагревательных зон будет
выше 60°C, даже после их выключения, индикаторы
остаточного тепла будут гореть во избежание случайных
ожегов.
Растопленное масло или шоколад
Разогревание жидкостей
Приготовление кремов и соусов
Вареное мясо, закуски
Отвареный рис и макароны
Приготовления на сильном огне мяса, рыбы,
омлетов
Приготовление во фритюре
Выключено
свежие овощи, рыба
картофель (на пару), супы, горох, фасоль
картофель (на пару), супы, горох, фасоль
жаркое (среднее)
жаркое (интенсивное)
обжаривание, кипячение большого
количества âîäû
Рукоятки-регуляторы
Рукоятки располагаются на панели управления
духового шкафа и позволяют регулировать мощность
каждой нагревательной зоны (от 1 до 12 и от 1 до 6).
Регуляция двойных нагревательных
зон
Двойные нагревательные зоны (концентричная или
овальная) отличаются наличием двойной
нагревательной зоны на стекле.
Для использования только малой зоны поверните
регулятор на значение от 1 до 12 в зависимости от
нужной вам мощности нагервания.
Для использования большой зоны поверните
рукоятку в положение
мощность.
, затем задайте нужную
10
Page 11

Предосторожности и
рекомендации
Изделие спроектировано и изготовлено в
соответствии с международными нормативами по
безопасности. Необходимо внимательно прочитать
настоящие предупреждения, составленные в целях
вашей безопасности.
Практические советы по
эксплуатации изделия
Для оптимальной эксплуатации варочной панели
следует:
использовать посуду с плоским дном, идеально
прилегающим к зоне нагревания;
использовать кастрюли с дном такого диаметра,
чтобы полностью закрыть зону нагревания для
оптимального использования всего выделяемого
тепла;
проверить, чтобы дно используемой посуды было
всегда совершенно сухим и чистым для идеального
прилегания к конфорке и для долгого срока
службы как варочной панели, так и самой посуды;
не следует использовать ту же посуду,
использованную на газовых конфорках:
концентрация тепла на газовых конфорках может
деформировать дно посуды и нарушить
прилегание к варочной зоне;
никогда не оставлять какую-либо зону нагревания
включенной, не поместив на нее посуду, так как
она быстро достигает максимального нагрева, что
может повредить нагревательные элементы.
Общие правила безопасности
Данное изделие предназначается для
непрофессионального использования в домашних
условиях.
Запрещается устанавливать изделие на улице, даже
под навесом, так как воздействие на него дождя и
грозы является чрезвычайно опасным.
Не прикасайтесь к изделию влажными руками,
босиком или с мокрыми ногами.
Изделие предназначено для приготовления
пищевых продуктов, может быть использовано
только взрослыми лицами в соответствии с
инструкциями, приведенными в данном техническом
руководстве. Не используйте варочную панель в
качестве стола или для нарезки продуктов.
Стеклокерамическая варочная панель устойчива к
механическим ударам, тем не менее она может
треснуть (или даже разбиться) при ударе острым
предметом или инструментом. В этом случае
незамедлительно отсоедините изделие от сети
электропитания и обратитесь в Центр технического
обслуживания.
Если поверхность варочной панели треснула,
выключите ее во избежание ударов током.
Избегайте касания сетевых шнуров других бытовых
электроприборов к горячим частям варочной
панели.
Помните, что температура конфорок остается очень
высокой в течение тридцати минут после их
выключения. Остаточное тепло показывается также
индикатором (см. Включение и эксплуатация).
Держите на безопасном расстоянии от варочной
панели любые предметы, которые могут
расплавиться, например, пластмасса, алюминий
или изделия из сахара. Обращайте особое внимание
на упаковочные материалы, полиэтиленовую или
алюминиевую пленку: если оставить эти материалы
на еще горячей или теплой поверхности, они могут
серьезно повредить варочую панель.
Следите, чтобы ручки кастрюль на варочной панели
были всегда повернуты таким образом, чтобы вы не
могли случайно задеть их.
Не тяните за сетевой кабель для отсоединения
вилки изделия из сетевой розетки, возьмитесь за
вилку рукой.
Перед началом чистки или технического
обслуживания изделия всегда вынимайте
штепсельную вилку из сетевой розетки.
Не кладите металлические предметы (ножи,
ложки, крышки и т.д.) на варочную панель, так как
они могут сильно нагреться.
Предупреждение для носителей
электрокардиостимуляторов или других
медицинских имплантированных аппаратов:
Варочная панель полностью соответствует всем
действующим нормативам по электромагнитным
помехам.
Поэтому данное изделие полностью отвечает всем
требованиям закона (директивы 89/336/CEE).
Изделие было изготовлено таким образом, чтобы не
создавать помех электрическим приборам, при
условии, что эти приборы также соответствуют
вышеуказанным нормативам.
Индуктивная варочная панель образует
электромагнитные поля малого диапазона.
Во избежание помех между варочной панелью и
электрокардиостимулятором последний должен
соответствовать действующим нормативам.
С этой целью мы можем гарантировать соответствие
нормативам только нашего изделия. За
информацией о соответствии и о возможных
проблемах из-за несовместимости обращайтесь к
вашему лечащему врачу или к производителю
электрокардиостимулятора.
RS
11
Page 12

Техническое
RS
обслуживание и уход
Отключение электропитания
Перед началом какой-либо операции по
обслуживанию или чистке отсоедините изделие от
сети электропитания.
Чистка изделия
Не следует пользоваться абразивными или
коррозивными чистящими средствами такими как
спрай для чистки духовок и мангалов,
пятновыводители или средства для удаления
ржавчины, порошковыми чистящими средствами или
абразивными губками: они могут необратимо
поцарапать поверхность изделия.
Не используйте паровые чистящие агрегаты или
агрегаты под высоким давлением для чистки
изделия.
В качестве регулярного ухода достаточно вымыть
варочную панель влажной губкой и затем
протереть насухо кухонным бумажным
полотенцем.
Если варочная панель сильно загрязнена,
используйте специальное чистящее средство для
стеклокерамических поверхностей, ополосните
водой и протрите насухо.
Для удаления особо сильных загрязнений
используйте специальный скребок. Удаляйте
загрязнения незамедлительно, не дожидаясь
охлаждения изделия, во избежание
затвердевания остатков пищи. Очень удобна для
чистки варочной панели мочалка из проволоки из
нержавеющей стали, специально для
стеклокерамических поверхностей , смоченная в
мыльном растворе.
Если на варочной панели случайно расплавились
какие-либо предметы или пластиковые
материалы или сахар, незамедлительно удалите
их скребком с еще горячей поверхности.
По завершении чистки варочная панель может
быть обработана специальным защитным
средством для ухода за стеклокерамическими
поверхностями: это средство образует на
поверхности варочной панели невидимую
защитную пленку, предохраняющую поверхность в
случае утечек пище в процессе приготовления.
Рекомендуется производить чистку, когда варочная
панель едва теплая или холодная.
Следует всегда ополаскивать варочную панель
чистой водой и насухо вытирать: возможные
остатки чистящих средств могут затвердеть при
последующей готовке.
Структура из нержавеющей стали *
На поверхности из нержавеющей стали могут
образоваться пятна от воды с большим
содержанием извести, если она будет
воздействовать на поверхность в течение
длительного времени, или при использовании
чистящих средств, содержащих фосфор.
Рекомендуется тщательно ополоснуть и вытереть
варочную панель после чистки. В случае случайного
проливания воды незамедлительно удалите ее.
Некоторые варочные панели оснащены
алюминиевой рамкой, похожей на нержавеющую
сталь. Для чистки рамки не используйте средства,
непригодные для алюминия.
Порядок демонтажа варочной
панели
При необходимости демонтировать варочную
панель:
1. снимите шурупы, крепящие сбоков центровочные
пружины;
2. ослабьте шурупы крепежных крюков по углам;
3. выньте варочную панель из ниши.
Не рекомендуется открывать внутренние
комплектующие для попытки самостоятельно
выполнить ремонт. В случае неисправности
обращайтесь в Центр технического обслуживания.
03/2007 - 195061797.00
XEROX BUSINESS SERVICES
* Имеется только в некоторых моделях.
12
 Loading...