

Hotpoint CB310, CB380 Quick Manual
EN
Quick guide
THANK YOU FOR BUYING A HOTPOINT PRODUCT
In order to receive a more complete assistance, please
register your product on www . hotpoint . eu/ register
Before using the appliance carefully read the Safety
Instruction.
PRODUCT DESCRIPTION
FIRST TIME USE
Wait at least two hours, after the installation, before connecting
the appliance to the power supply. Connect the appliance to the
power supply it starts the operation automatically. The ideal storage
temperatures for the food are preset in the factory.
After turning the appliance on, you must wait for 4-6 hours for the
correct storage temperature to be reached for a normally lled
appliance. Position the antibacterial anti-odour lter in the fan as
demonstrated in the lter packaging (if available). If the audible signal
sounds, it means that the temperature alarm has intervened: press the
button to switch o the acoustic alarms.
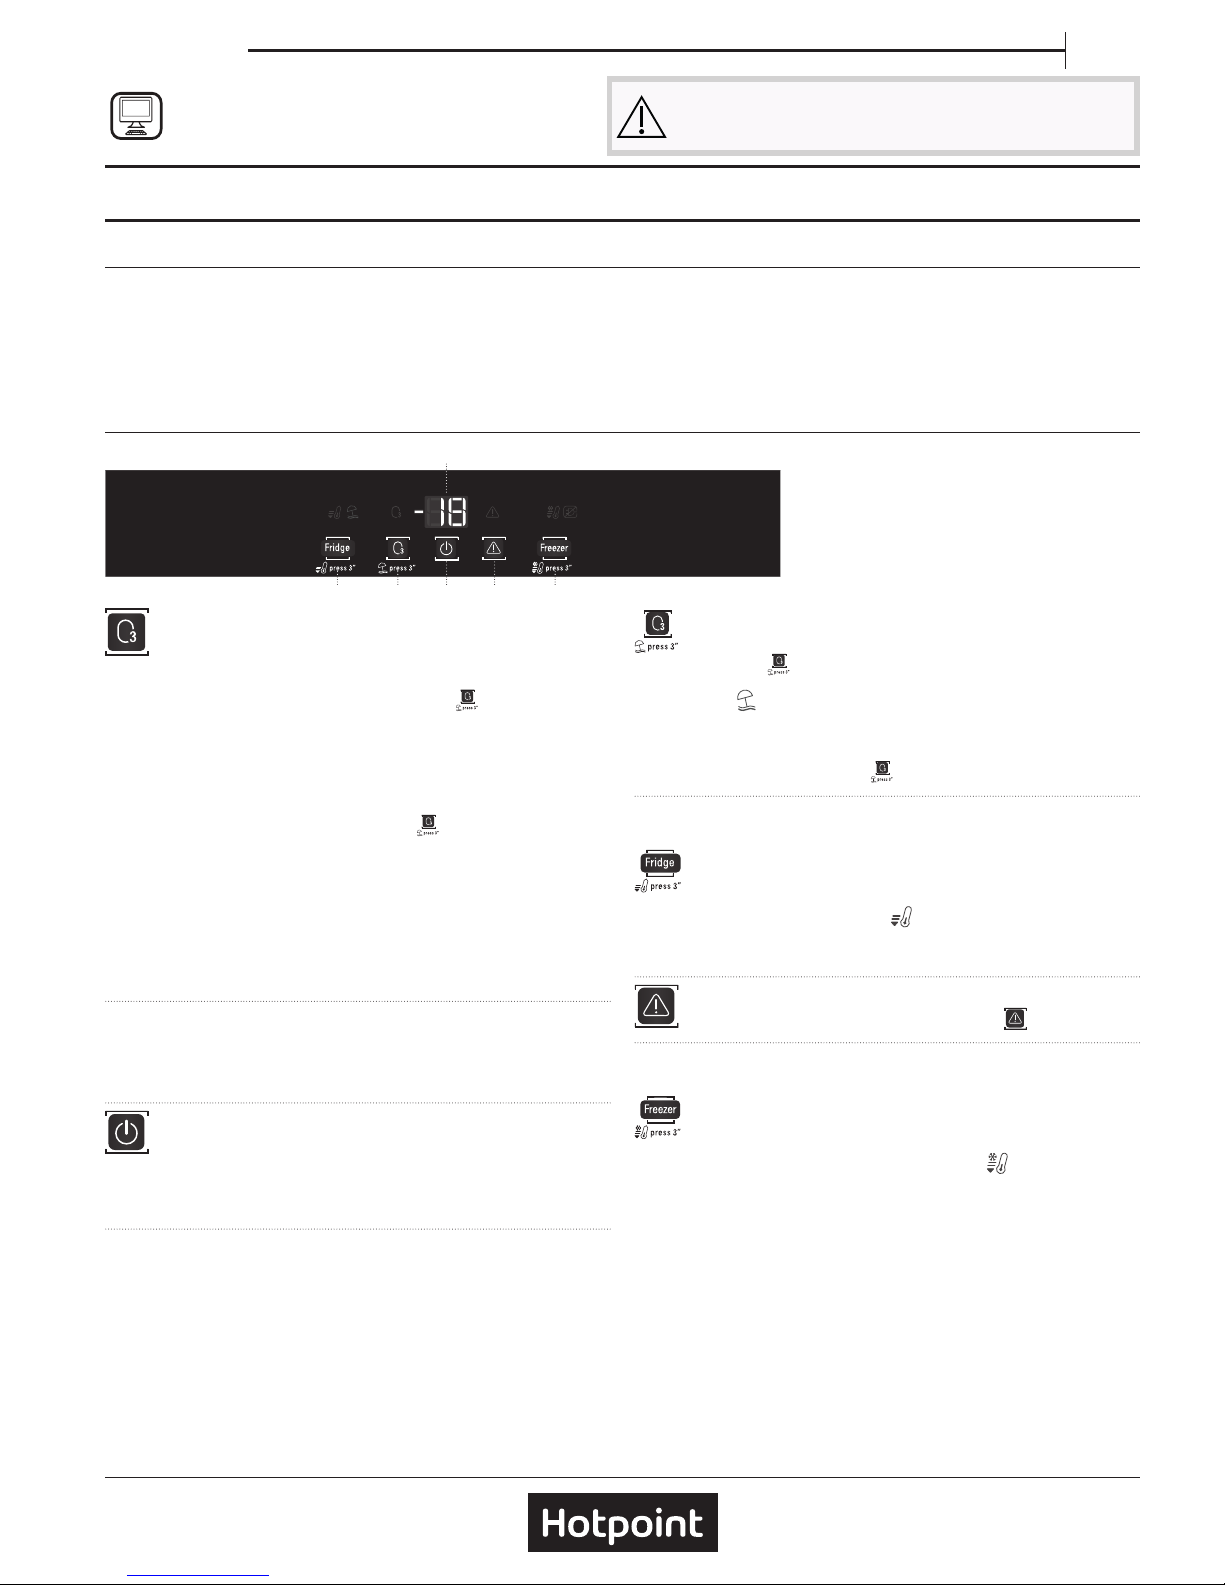
CONTROL PANEL
6. 4. 2.
1.
3.5.
1. Temperature Display
2. Freezer temperature - Fast freeze
3. Turning o the sound alarm
4. On/stand-by
5. Vacation (holiday mode) - "Active Oxygen"
6. Refrigerator temperature - Fast cool
"ACTIVE OXYGEN" FUNCTION
Through the emission of a small quantity of ozone, this function
enables a reduction in the proliferation of bacteria and microorganisms
inside the refrigerator and limits bad odours.
To activate the Active Oxygen function, press the
button on the
control panel.
When the function is activated, a coloured light will appear on the
device, according to the following cyclical features:
• Green light: ozone emission phase
• Blue light: antibacterial and anti-odour action phase (without
ozone emission)
To deactivate the function, simply press the
button on the control
panel.
Note: when the Active Oxygen function is activated, a faint odour might
be perceived inside the refrigerator (the same odour that sometimes
accompanies a thunder storm due to the zone produced by the lightning):
it is absolutely normal.
Note: Disabling the function optimizes energy consumption. Keep the
bottle rack grid in the upper parts of the comparison to optimize the
function.
FAN*
The fan activates and deactivates automatically for a better
temperature distribution and for humidity reduction in the fridge
compartment.
ON/STANDBY
Press the button for 3 seconds to turn the appliance o. In
Stand-by mode the light in the refrigerator compartment does not turn
on. Press the button again briey to reactivate the appliance.
Note: this does not disconnect the appliance from the power supply.
TEMPERATURE DISPLAY
The display may alternately show the refrigerator compartment
temperature (between 2°C and 8° C) or the temperature of the freezer
compartment (between -16°C and -24°C).
VACATION HOLIDAY MODE
You can use this function in the event of your prolonged
absence. Press the
button for 3 seconds to turn the function on.
The display will show the temperature of the refrigerator compartment
(12°C) and the
icon will light up. After activating the function,
remove the food from the refrigerator compartment and keep both
doors closed - the refrigerator will maintain a suitable temperature to
prevent odours from forming. The freezer, however, will stay turned on.
To turn o the function press the
button for 3 seconds.
REFRIGERATOR COMPARTMENT TEMPERATURE
It is possible to set a dierent temperature with the “Fridge” button.
FAST COOL
Press the “Fridge” button for 3 seconds before placing a large
quantity of fresh food in the refrigerator compartment.
When the function is turned on, the
icon will be displayed. The
function turns o automatically after 6 hours, or manually by pressing
the ”Fridge” button for 3 seconds.
TURNING OFF THE SOUND ALARM
To turn o the sound alarm, briey press the
button.
FREEZER COMPARTMENT TEMPERATURE
It is possible to set a dierent temperature with the “Freezer” button.
FAST FREEZE
Press the “Freezer” button for 3 seconds 24 hours before
putting large quantities of food to freeze in the freezer compartment.
When the function is turned on the icon lights up
.
The function turns o automatically after 48 hours, or manually by
pressing the “Freezer” button again for 3 seconds.
Note: avoid a direct contact between the fresh food and the food that is
already frozen. To optimise the freezing speed, drawers can be removed
and the food can be placed directly on the bottom of the compartment.
* Available only on certain models
* Available only on certain models
FOOD CARE ZONE*
The drawer is specically designed to maintain a low temperature
to preserve fresh food for longer time (for example , fresh pasta,
sour cream, pesto/salsa,homemade preparation,pastry cream,
pudding,cream cheese , cold cuts, desserts, meat and sh).
The internal temperature of the drawer is between +3 °C and -2 °C.
For the correct functioning of the drawer, it is necessary that Vacation
mode option is not selected.
“0° ZONE” COMPARTMENT*
The “0°ZONE” compartment is specically designed to maintain a low
temperature and the correct humidity to preserve fresh food for longer
(for example, meat, sh, fruits and winter vegetables).
Humidity control technology coupled with Active0 provides the best
food preservation when the food is not completely packed.
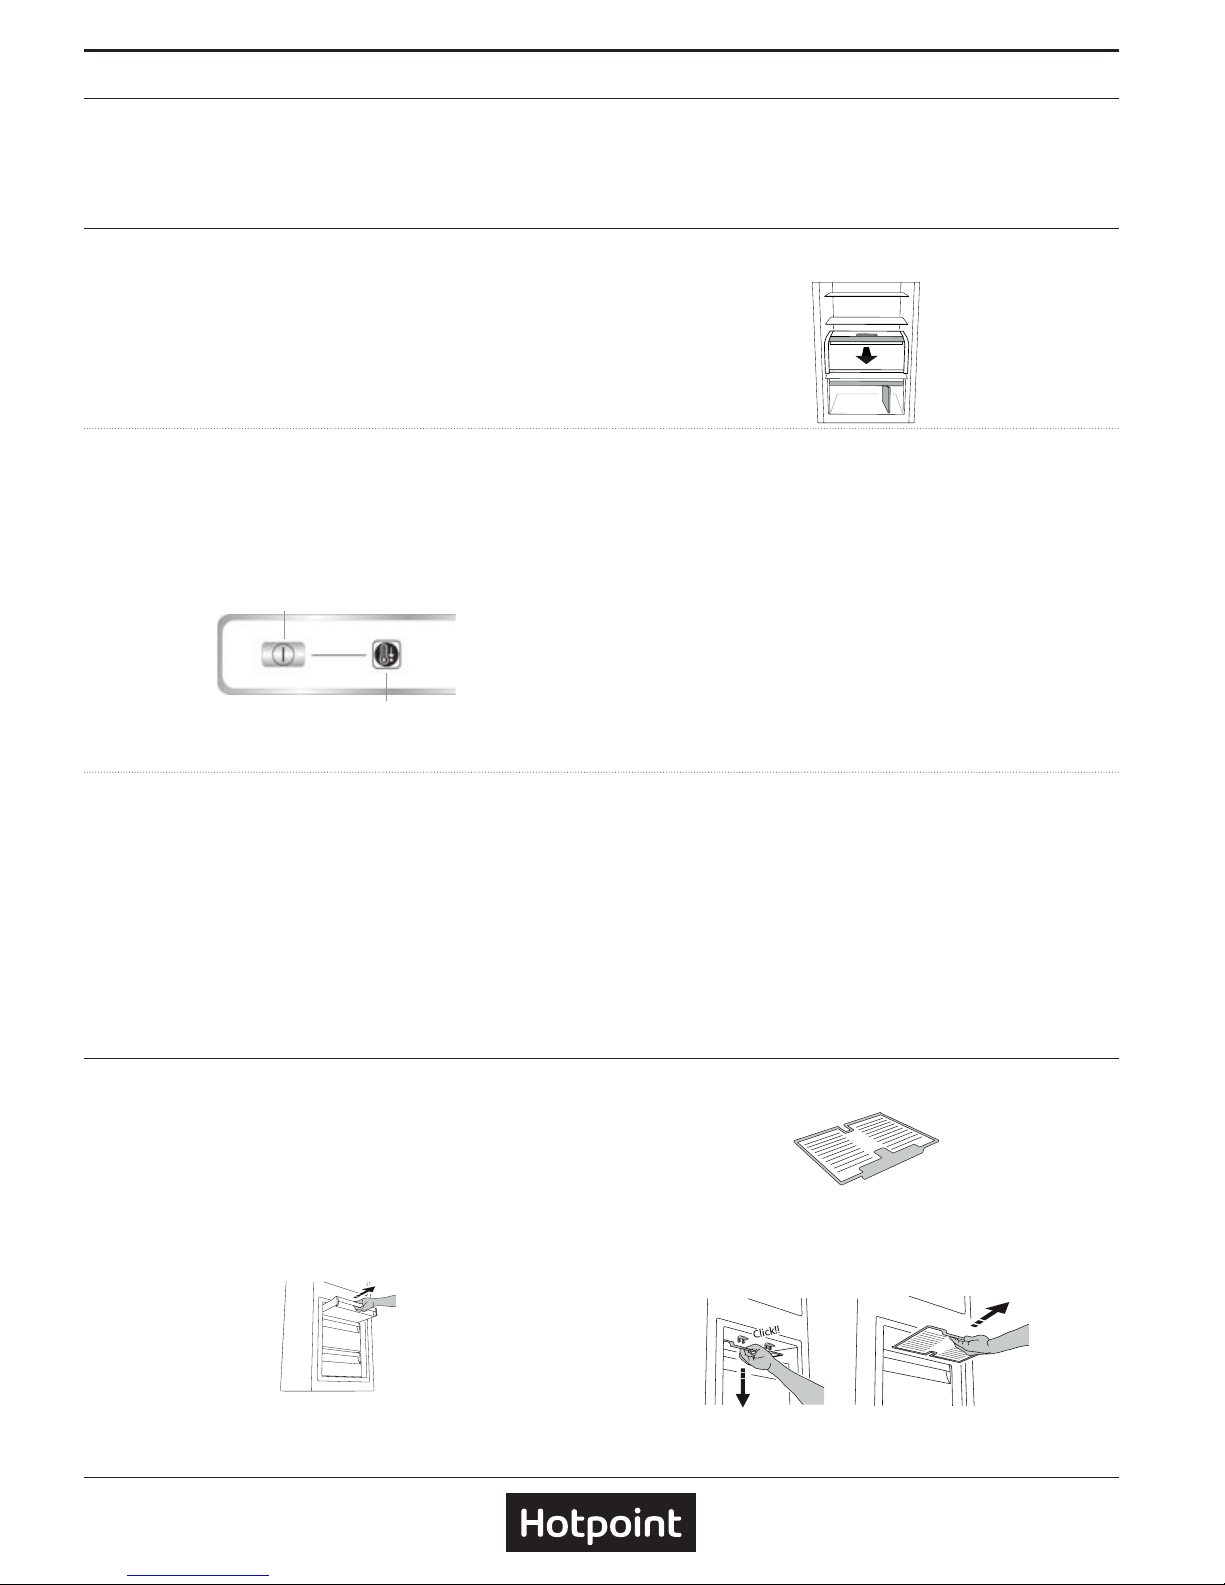
TURNING ON AND TURNING OFF THE COMPARTMENT
The internal temperature of the compartment is approximately 0°
when the compartment is turned on.
To turn on the compartment, press the button (1) for more than one
second until the symbol (2) lights up. The lit symbol (2) means that the
compartment is working. Press the button (1) again for more than one
second to turn o the compartment. The temperature inside depends
on the general temperature of the refrigerator.
1
2
.
.
For the correct functioning of the “0°ZONE” compartment, it is
necessary that:
• the appliance is turned on;
• the fridge temperature is between +2°C and +6°C;
• the “0°ZONE” compartment is turned on
• Vacation Mode and Stand by are not selected
Note:
- if the symbol does not light up when you turn on the compartment,
check that the drawer is properly inserted; if the problem persists
contact the authorised Technical Assistance Service;
- when the “0°ZONE” compartment is inserted in the appliance you
may hear a faint noise, which you should consider as normal;
Important: be careful when positioning food and containers that are
small in size on the upper shelf of the “0°ZONE“ compartment in order
to prevent them accidentally falling between the shelf and the back
wall of the refrigerator compartment.
REMOVING THE “0° ZONE“ COMPARTMENT
Carry out the following steps:
1. To make it easier to remove the compartment, we recommend
that you empty (and possibly remove) the lower door shelves.
2. Remove the compartment by rotating it upwards.
3. Remove the white plastic shelf under the compartment.
Note: it is not possible to remove the upper shelf and side supports.
To use the “0° ZONE“ compartment again, carefully reposition the
white plastic shelf under the compartment before inserting the drawer
and turning the function back on.
To have a larger refrigerator volume and to reduce energy
consumption, it is recommended to remove the “0°ZONE“
compartment.
Clean the compartment and its components occasionally using a cloth
and a solution of warm water (taking care not to submerge the white
plastic shelf under the drawer) and neutral cleaning agents specically
for cleaning the inside of the refrigerator. Do not use abrasive cleaning
agents.
Before cleaning the compartment (also externally) it is necessary
to remove the drawer to disconnect the electrical supply.
STOP FROST SYSTEM*
The STOP FROST SYSTEM facilitates the defrost procedure for the
freezer compartment.
The STOP FROST accessory is designed to collect some of the frost
that forms in the freezer compartment and it is easy to remove and
clean, therefore reducing the time needed to defrost the freezer
compartment.
To remove the frost on the STOP FROST accessory follow the cleaning
procedure demonstrated below.
PROCEDURE TO CLEAN THE STOP FROST ACCESSORY
1. Open the freezer compartment door and remove the upper
drawer.
2.
Unfasten the STOP FROST accessory and remove it, taking care not
to drop it on the glass shelf below.
Note: if the accessory is jammed or dicult to remove, do not keep
trying to remove it, but proceed with the complete defrost of the freezer
compartment.
3.
Close the door of the freezer compartment.
 Loading...