

Page 1
3
Cooking Hobs
VITROCERAMIC
GB
English
C320IX
Index
Instructions for use
Installation, 4
Use, 4
Maintenance, 4
Instructions for the installater
Installation, 6
Positioning, 6
Electrical connection, 6
Heating elements, 6
Assistance, 7
THIS APPLIANCE IS CONCEIVED FOR
DOMESTIC USE ONLY. THE MANUFACTURER
SHALL NOT IN ANY WAY BE HELD
RESPONSIBLE FOR WHATEVER INJURIES
OR DAMAGES ARE CAUSED BY INCORRECT
INSTALLATION OR BY UNSUITABLE, WRONG
OR ABSURD USE.
GB
Dear customer,
We thank you and con-gratulate you on your
choice. This new carefully de-signed product,
manu-factured with the highest quality materials,
has been carefully tested to satisfy all your
cooking demands. We would therefore request
you to read and follow these easy instructions
which will allow you to obtain ex-cellent results
right from the start. May we wish you all the
very best with your modern appliance!
THE MANUFACTURER
Page 2
4
GB
Instructions for use
Installation
All operations relative to installation (electric connection)
should be carried out by skilled personnel in conformity
with the rules in force. As for the specific instructions
see part pertaining to installer.
Use
Heating elements - Manual control
(Fig. 1-2)
Rotate the knob concerned to the position correspondant
to the needs of cooking taking into consideration that
to a higher number a higher heat supply corresponds,
see table “use of heating elements”.
When pilot lights are lit, they indicate the top temperature
at the indicated spot is higher than 50’ C.
Some types of pilot lights will maintain some slight
luminescence even after disconnection. That is
quite normal.
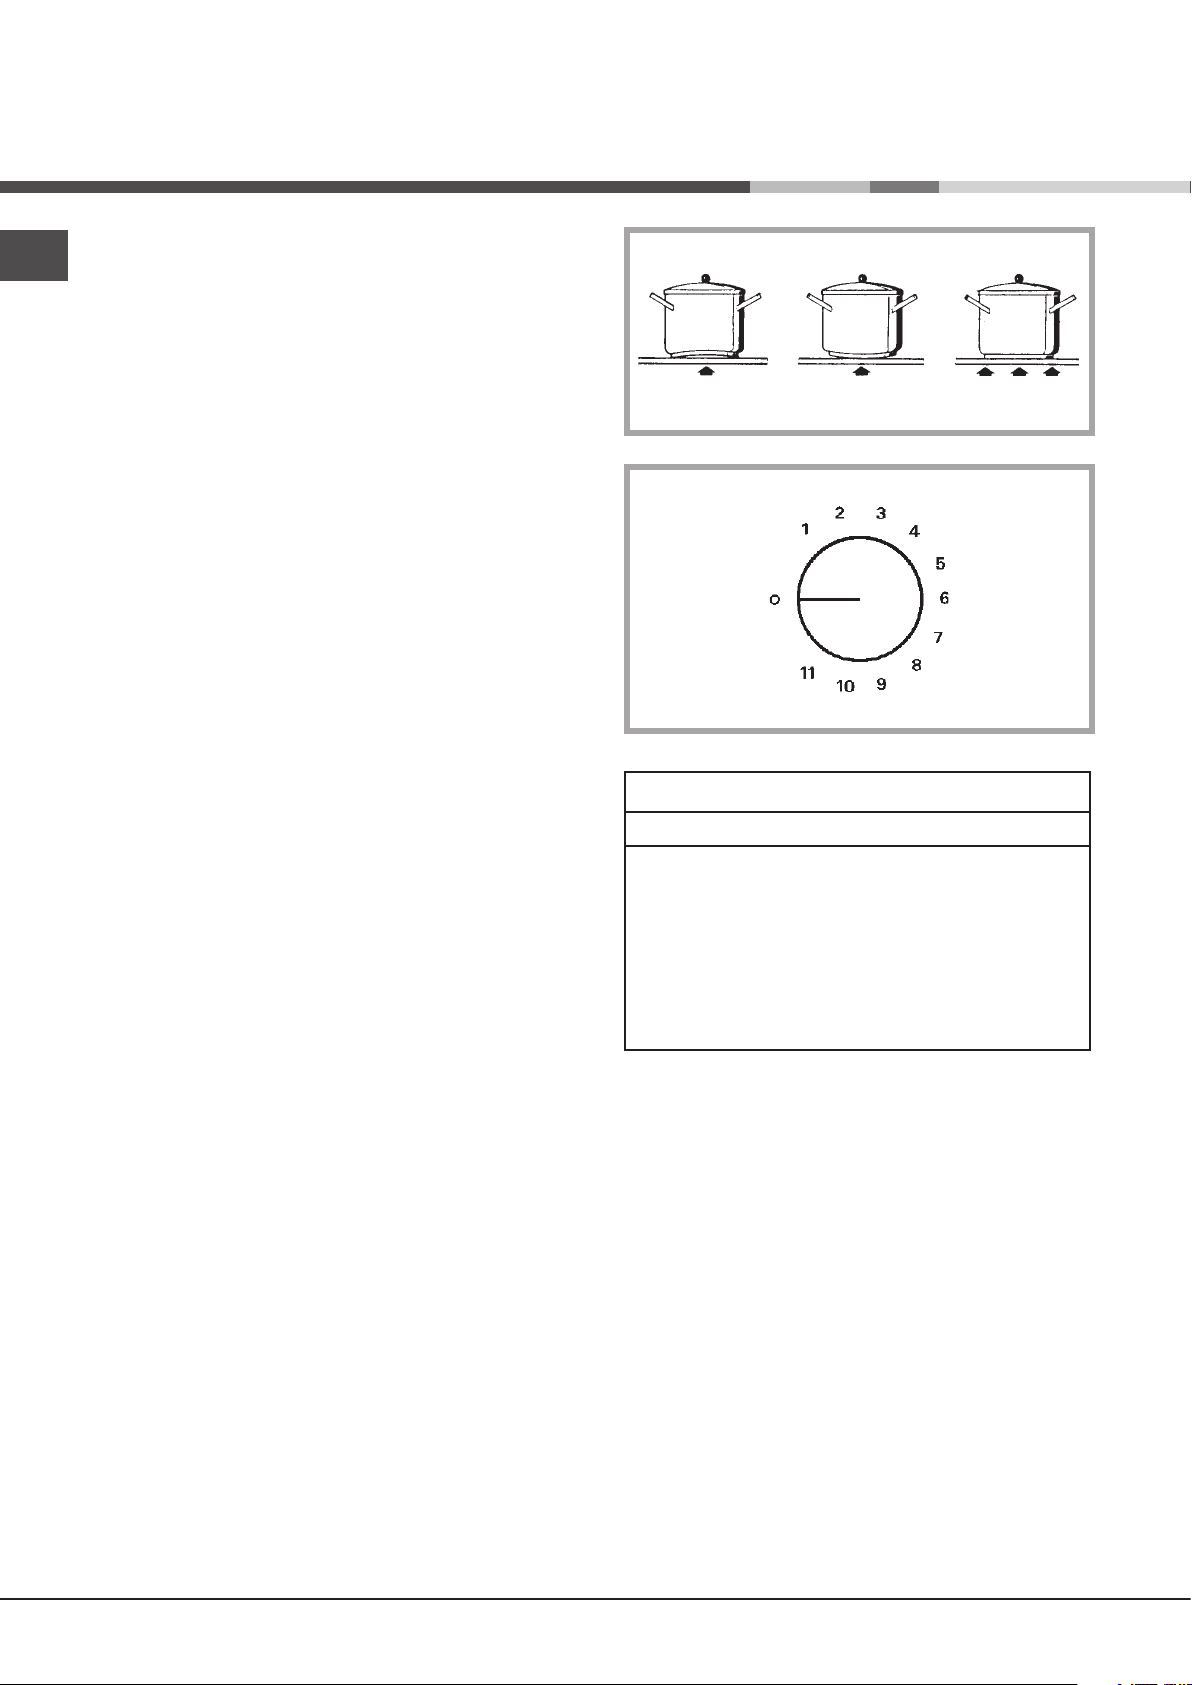
N.B. - When one makes use of heating elements, we
advise receptacles with flat bottom (Fig. 3) having same
diameter or lightly higher than that of the hot area.
- Avoid overflows of liquid, therefore when boiling has
happened, or in any case when liquid is heated,
reduce the heat supply.
- Don’t leave the heating elements on without
receptades on the top or withvoid pots and pans.
In the event of even a slight fracture on the cooking surface,
disconnect the electric power supply immediately.
Fig.1
NO NO YES
Fig.2
USE OF THE HEATING ELEMENTS
energy regulator intensità calore
1 - 2 Weak
3 - 4 Gentle
5 - 6 Slow
7 - 8 Medium
9 - 10 Strong
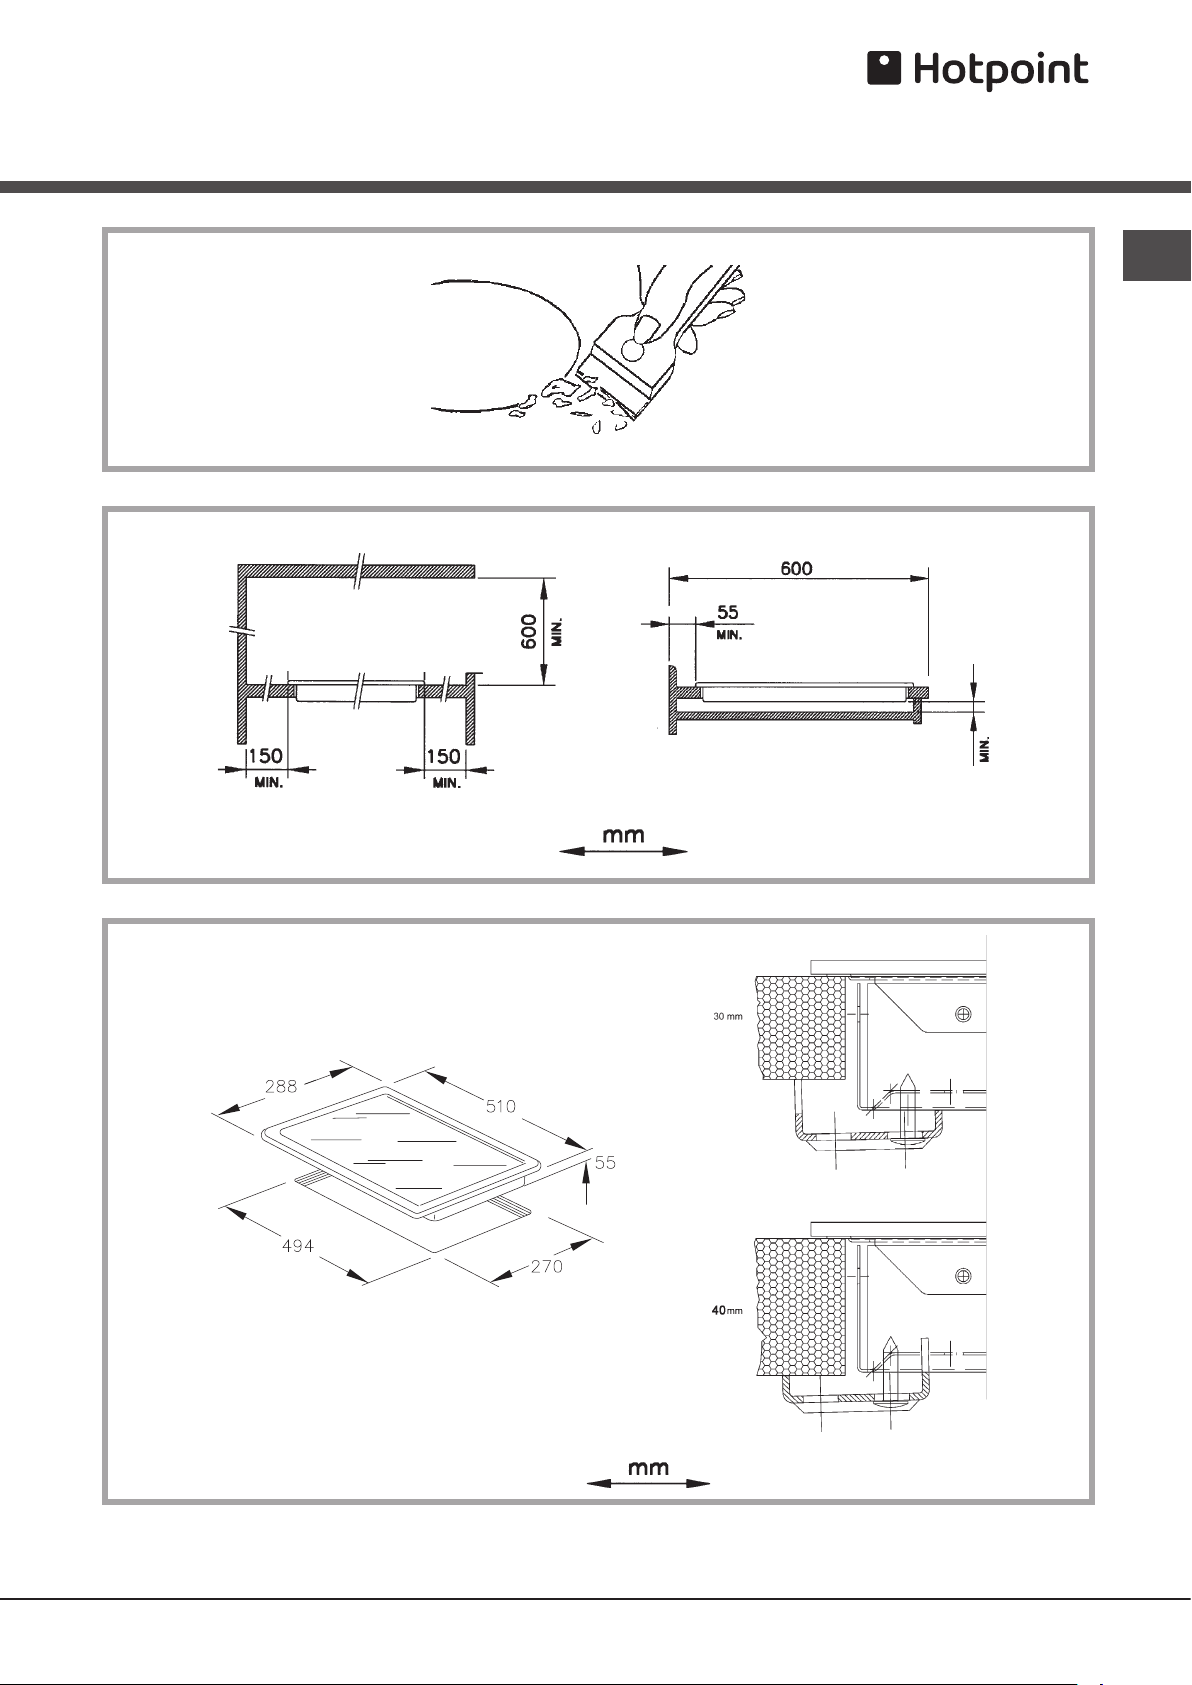
Maintenance (Fig. 3)
First of all remove stray food bits and grease drops from
the cooking surface with the special scraper (fig. 4).
Then clean the hot area as best as possible with SIDOL,
STAHLFE or other similar products with a papertowel,
then rinse again with water and dry with a dean cloth.
Pieces of aluminum foil and plastic material whic
have inadvertently melted or sugar remains or highly
sacchariferous food have to be removed immediately
from the hot cooking area with the special scraper (fig.
4) -This is to avoid any possible damage to the surface
of the top. Under no circumstances should abrasive
sponges or irritating chemical detergents be used such
as oven sprays or spot removers.
DO NOT USE STEAM CLEANERS
10 - 11 Bright
Page 3
5
GB
Fig.3
Fig.4
Fig.4a
Page 4

6
GB
Instructions for the installer
H05RR-F3x1.5
Installation
These Instrnctions are for the qualified technician, as a
guide to the installation, adjustment and maintenance,
according to the laws and standards in force. Any of these
operations must always be canied out when the appliance
has been disconnected from the electric system.
Positioning (Fig. 4-4a)
The appliance can be fitted into a working area as
illustrated on the figure. Apply the seal supplied over the
whole perimeter of the working area.
Electrical connection (Fig. 5)
Prior io carrying out the electrical connection, please ensure that:
- the plant characteristics are such as to follow what is indicated
on the matrix plate placed at the bottom of the working area;
- that the plant is fitted with an efficient earth connection,
following the standards and law provisions in force.
The earth connection is compulsory in terms of the law.
Should there be no cable andlor plug on the equipment, use
suitable absorption material for the working temperature as
well, as indicated on the matrix plate. Under no circumstance
must the cable reach a temperature above 50°C of the
ambient temperature. lf connecting directly to the mains
power supply, fit a multi-pole switch of a suitable size for the
rated capacity with a clearance distance which completely
disconnects the power line under overvoltage category
III conditions, consistently with the rules of installation (the
yellow/green earth wire must not be interrupted).
The plug or omnipolar switch must be easily reached on
the installed equipment.
N.B.: - The manufacturers dedine any responsibility in
the event of non-compliance with what is described
above and the accident prevention norms not being
respected and followed.
To avoid all risk, if the power cable becomes damaged,
it must only be replaced by the manufacturer, by
an authorised service centre, or by a qualified
electrician.
HEATING ELEMENTS
V TYPE W REGULATION
~ 230 V
single-circuit radiant Ø 145 1200 energy regulator 0+11
single-circuit radiant Ø 180 - Ø 195 1700-1900 energy regulator 0+11
Fig.5
Page 5

7
GB
Assistance
Before contacting After-Sales Service:
1. See if you can solve the problem yourself.
2. Switch the appliance on again to see if the problem
has been solved. if it has not, disconnect the
appliance from the power supply and wait for about
an hour before switching on again.
3. If the problem persists after this course of action,
contact After-Sales Service.
Specify:
• thenatureofthefault,
• themodel
• the service number (the number after the word
SERVICE on the rating plate on the rear of the
appliance)
• yourfulladdress,
• yourtelephonenumberandareacode.
Never call on unauthorized technicians and always
refuse to purchase non-original spare parts.
The manufacturer declines all responsibility for possible inaccuracies contained in this pamphlet, due to printing or
copying errors. We reserve the right to make on our own products those changes to be considered necessary or useful,
without jeopardizing the essential characteristics.
Page 6

8
GB
Page 7

Notes
9
 Loading...