

Page 1
Instructions for Installation and Use
Dishwasher
Model BFI 680
Page 2

ISHWASHER
D
Contents
Electrical Connection
For Your Safety
Installation
Getting to know your Dishwasher
The Controls
How to use your Dishwasher
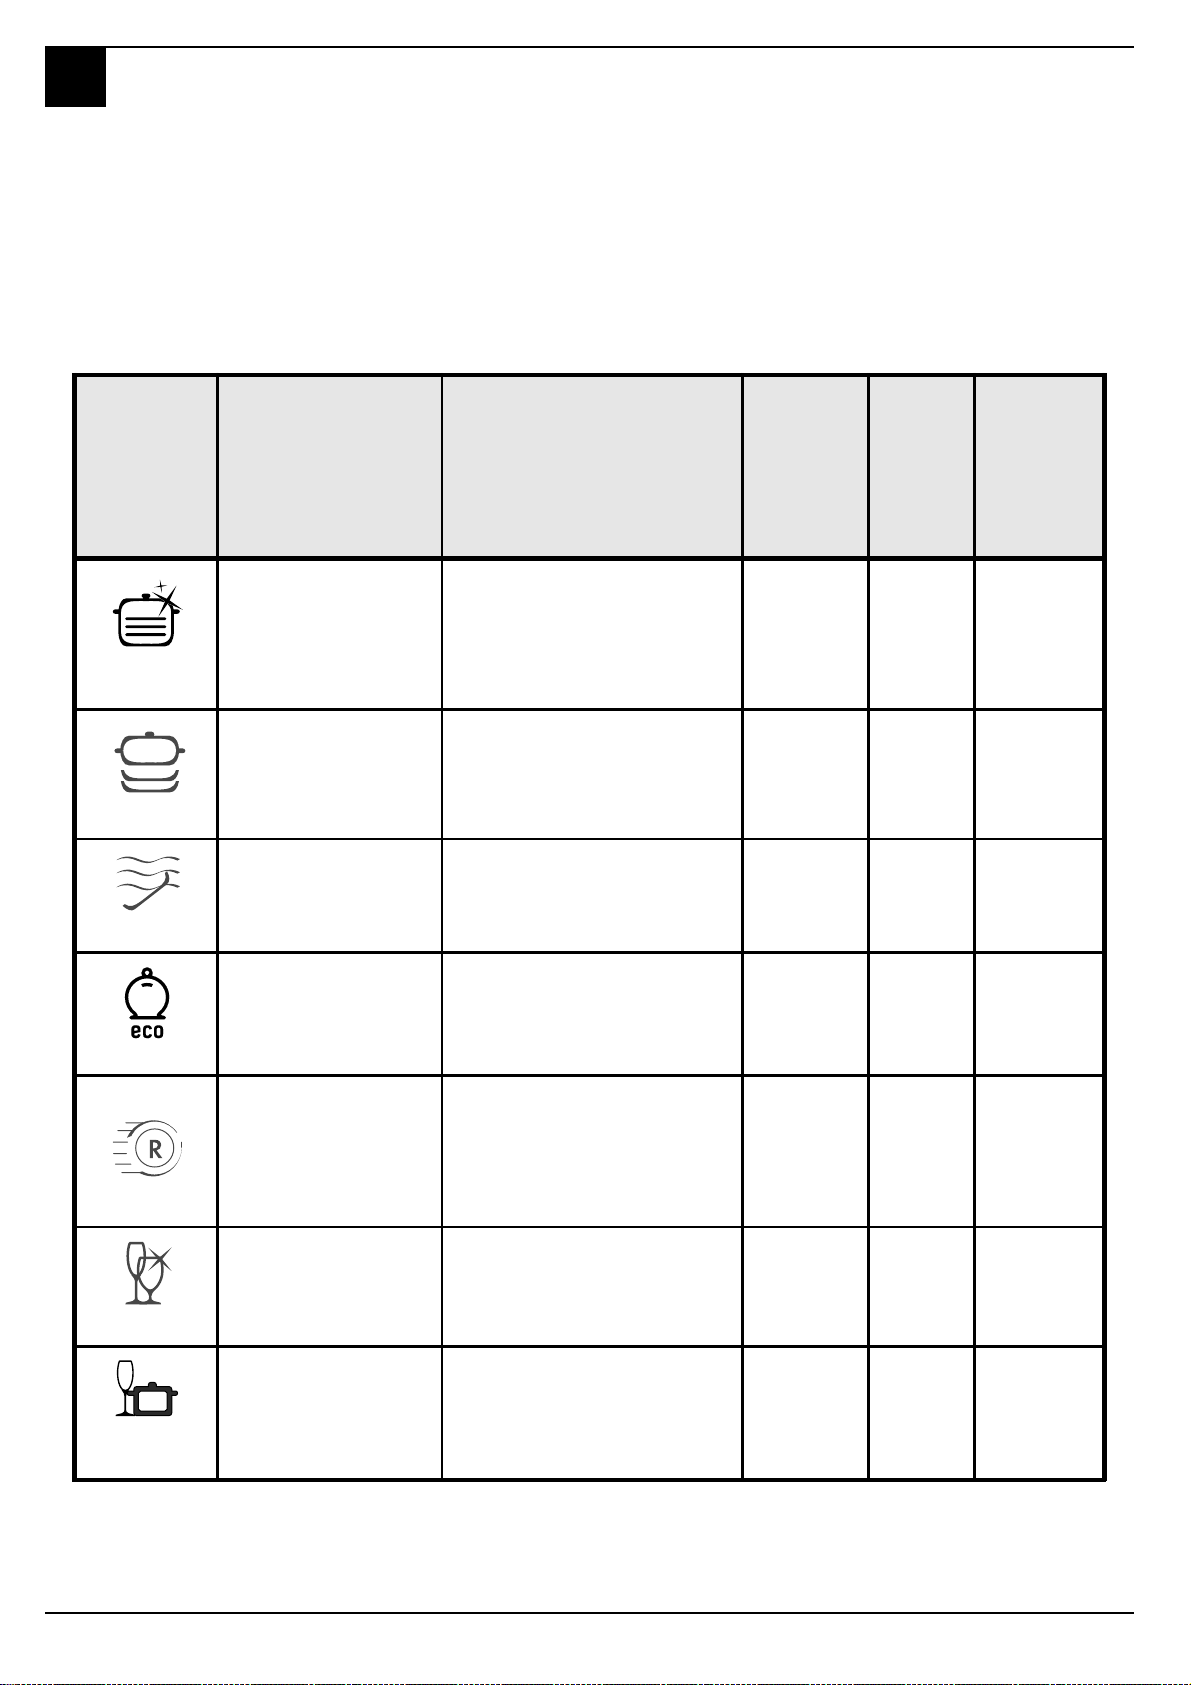
Programme Chart
Before Using your Dishwasher
Loading your Dishwasher
Care and Cleaning
Troubleshooting
Information for Test Labs
After Sales Service
Hotpoint Guarantee
Notes
Key Contacts
3
4
5
6
6
7
8
9-10
11
12
13
14
15
16
17-18-19
Back Cover
Retention of this Instruction Book
This Instruction Book must be kept handy for reference as it contains important details on the safe and proper use of the
appliance.
If you sell or pass the appliance to someone else, or move house and leave it behind, make sure this Book is also
provided so the new owner can become familiar with the appliance and safety warnings.
If the Book is lost or damaged a copy may be obtained from:
Merloni Elettrodomestici UK Ltd. Morley Way, Peterborough, PE2 9JB.
2
Page 3

Electrical Connection
WARNING: This appliance must be earthed.
ISHWASHER
D
Fuses
Your appliance comes fitted with a plug and a 13A fuse. If you need to
replace the fuse, only those rated at 13A and ASTA approved to
BS1362 should be used. If you lose the fuse cover, a replacement
may be obtained from your local authorised Service Centre or
Electrical company. Correct replacement is identified by colour coding
or the marking on base of plug.
WARNING: DO NOT use the plug unless the fuse cover is fitted.
Safety Information
At the time of delivery...
All functions of your dishwasher have been thoroughly tested at the
factory. A small number of water marks may have been left as a
result, they will disappear when the appliance is used for the first time.
WARNING: The dishwasher must not be connected to the electricity
supply while installation is being carried out.
- This appliance should only be connected to a 230/240V AC
Changing the Plug
Cut off and dispose of the supplied plug if it does not fit your socket.
WARNING: T o avoid a shock hazard DO NOT insert the discarded plug
into a socket anywhere else.
IMPORTANT: WIRES IN THE MAINS LEAD ARE COLOURED IN
ACCORDANCE WITH THE FOLLOWING CODE:
Green/Yellow - Earth
Blue - Neutral
Brown - Live
If you change the plug, the colour of the wires in the mains lead may
not correspond with the terminal markings in the plug, which if not
coloured, could be:
EARTH ‘E’ or
NEUTRAL ‘N’
LIVE ‘L’
- Use the dishwasher solely in a domestic environment.
- DO NOT stand or place heavy objects on the door when it is
If your family includes children...
- DO NOT allow children to play with the appliance or tamper
- Keep detergents and rinse aids away from children. Keep
source, via a properly installed earthed socket.
open, this could damage the door or cause the appliance to tip
forward.
with its controls.
children away from the open door of a dishwasher, there could
still be some detergent left inside.
Changing the Mains Lead
A lead can be ordered from Hotpoint Service
UK: 08709 066 066 or
Republic of Ireland: 1850 302 220
If you have damaged the existing lead or require a longer one a
charge will be made. It is strongly advised that this work is carried out
by a qualified electrician.
If the domestic wiring includes a residual current-operated circuit
breaker, ensure that it conforms to the latest regulations.
CAUTION:
The dishwasher meets the requirements set out by the regulations in
force concerning safety and electrical equipment.
Any technical checks should be conducted exclusively by a trained
and authorised technician: Repairs carried out by unaithorised
persons will invalidate the guarantee, as well as posing a potential
hazard to the user.
The manufacturer declines all responsibility for damage to persons or
property resulting from failure to observe the above precautions, from
tampering with even a single component or from the use of nonoriginal spare parts.
3
Page 4

ISHWASHER
D
For your Safety
This manual forms an integral part of the appliance. It must always be kept handy for reference. Read through all the instructions contained in this manual
before using the dishwasher.
Installation must be performed by a qualified technician, in compliance
with the regulations in force, including the prevention and elimination of
radio frequency interference.
The dishwasher is designed for washing and drying dishes, any
other use shall be considered improper. The manufacturer declines
all responsibility for uses other than those described above.
1. Seperate the various
packaging materials and
dispose of safely - DO NOT
leave discarded packaging
material around the home.
2. After removing the packaging,
check to make sure your
appliance is intact. If in doubt,
contact a qualified
professional.
3. DO NOT use extension leads
and multiple plugs. If the
electricity supply wire is not
long enough, then have it
replaced with one of the correct
length and remember that it
should be free of bends or
dangerous kinks.
4. In the event of any damage to
the power cord have it
replaced by a qualified
technician.
5. The mains plug must be
easily accessible after
installation.
6. If the appliance is not
operating properly or if
maintenance operations are
necessary, disconnect the
dishwasher from the mains
power supply (unplug it!).
7. DO NOT install outdoors, not
even if the area is covered by
a roof: it is extremely
dangerous to leave it exposed
to rain and thunderstorms.
8 . If installed on a carpeted or
covered floor, ensure that the
openings on the underside are
not obstructed.
9. Do not touch the heating
element during or straight after
a wash cycle.
10. If the appliance malfunctions,
turn off the water inlet tap and
disconnect the plug from the
wall socket. Then read the
section entitled
"Troubleshooting". If you
cannot resolve the problem,
then call Hotpoint Service
(see KEY CONTACTS, back
page).
The rating plate, featuring the
technical data, serial number
and markings, is visibly
positioned on the inner edge of
the door.
DO NOT remove the rating plate.
The dishwasher is intended for use by adults. DO NOT allow children
to come near or play with the controls.
Keep children away from detergents and clear of the dishwasher door
when open.
Keep all packaging material away from children.
1 . DO NOT use solvents, such as alcohol or turpentine which may
cause an explosion.
2. DO NOT load dishes to wash that are soiled with ash, wax or paints.
3. DO NOT lean, sit or stand on any part of the dishwasher - this could
cause injury and/or damage the appliance.
4. DO NOT drink any water residues from inside the dishwasher.
4
Page 5
Installation
ISHWASHER
D
Choose where you want to install
your dishwasher, you can place it
so that its sides or back panel are
side by side with furniture or up
against the wall. The dishwasher is
provided with water supply and drain
hoses, which can be directed
towards the left or right to facilitate
appropriate installation.
Levelling.
Once the appliance is positioned,
adjust the feet by screwing them in
or out depending on how high you
want it and to level it so that it is
horizontal. Make sure that it is not
inclined more than 2 degrees. If the
appliance is level, it will help ensure
its correct operation.
Height Adjustment
Insert the appliance into the cutout
and then adjust the height using the
screws located on the front bottom
part of the machine. Use a
screwdriver to turn the screws in
the clockwise or anti-clockwise
direction to increase or decrease
the height respectively.
Adjusting the back Feet
Insert the appliance into the cutout
and then adjust the height using the
screws located on the front bottom
part of the machine. Use a
screwdriver to turn the screws in
the clockwise or anti-clockwise
direction to increase or decrease
the height respectively.
Cold water connection.
Connect the cold water supply hose
to a 3/4 gas threaded connection,
taking care to screw it tightly onto
the tap. If the water hoses are new
or have been out of use for an
extended period of time, let the water
run to make sure it is clear and free
of impurities before making the
connection. If this precaution is not
taken, the water inlet could get
blocked, causing damage to your
dishwasher.
Anti-flooding protection
Your dishwasher has a special
system which stops the water
supply in the event of leaks inside
the appliance.
It is equipped with a water inlet that
has a clear outer hose and an inner
high pressure hose which turns
bright red if it breaks.
Leaks are prevented as the clear
outer hose now contains the water.
It is vital that you check it on a
regular basis, if you see it has turned
bright red, you know you need to
replace it as soon as possible.
Call for an authorised technical
engineer to come and replace it.
Drain hose connection.
WARNING: Connect your
dishwasher drain hose to pipes
which connect to the foul drain
system and not to surface water
drains.
IMPORTANT: For the correct
operation of your dishwasher, it is
essential to comply with the following
information:-
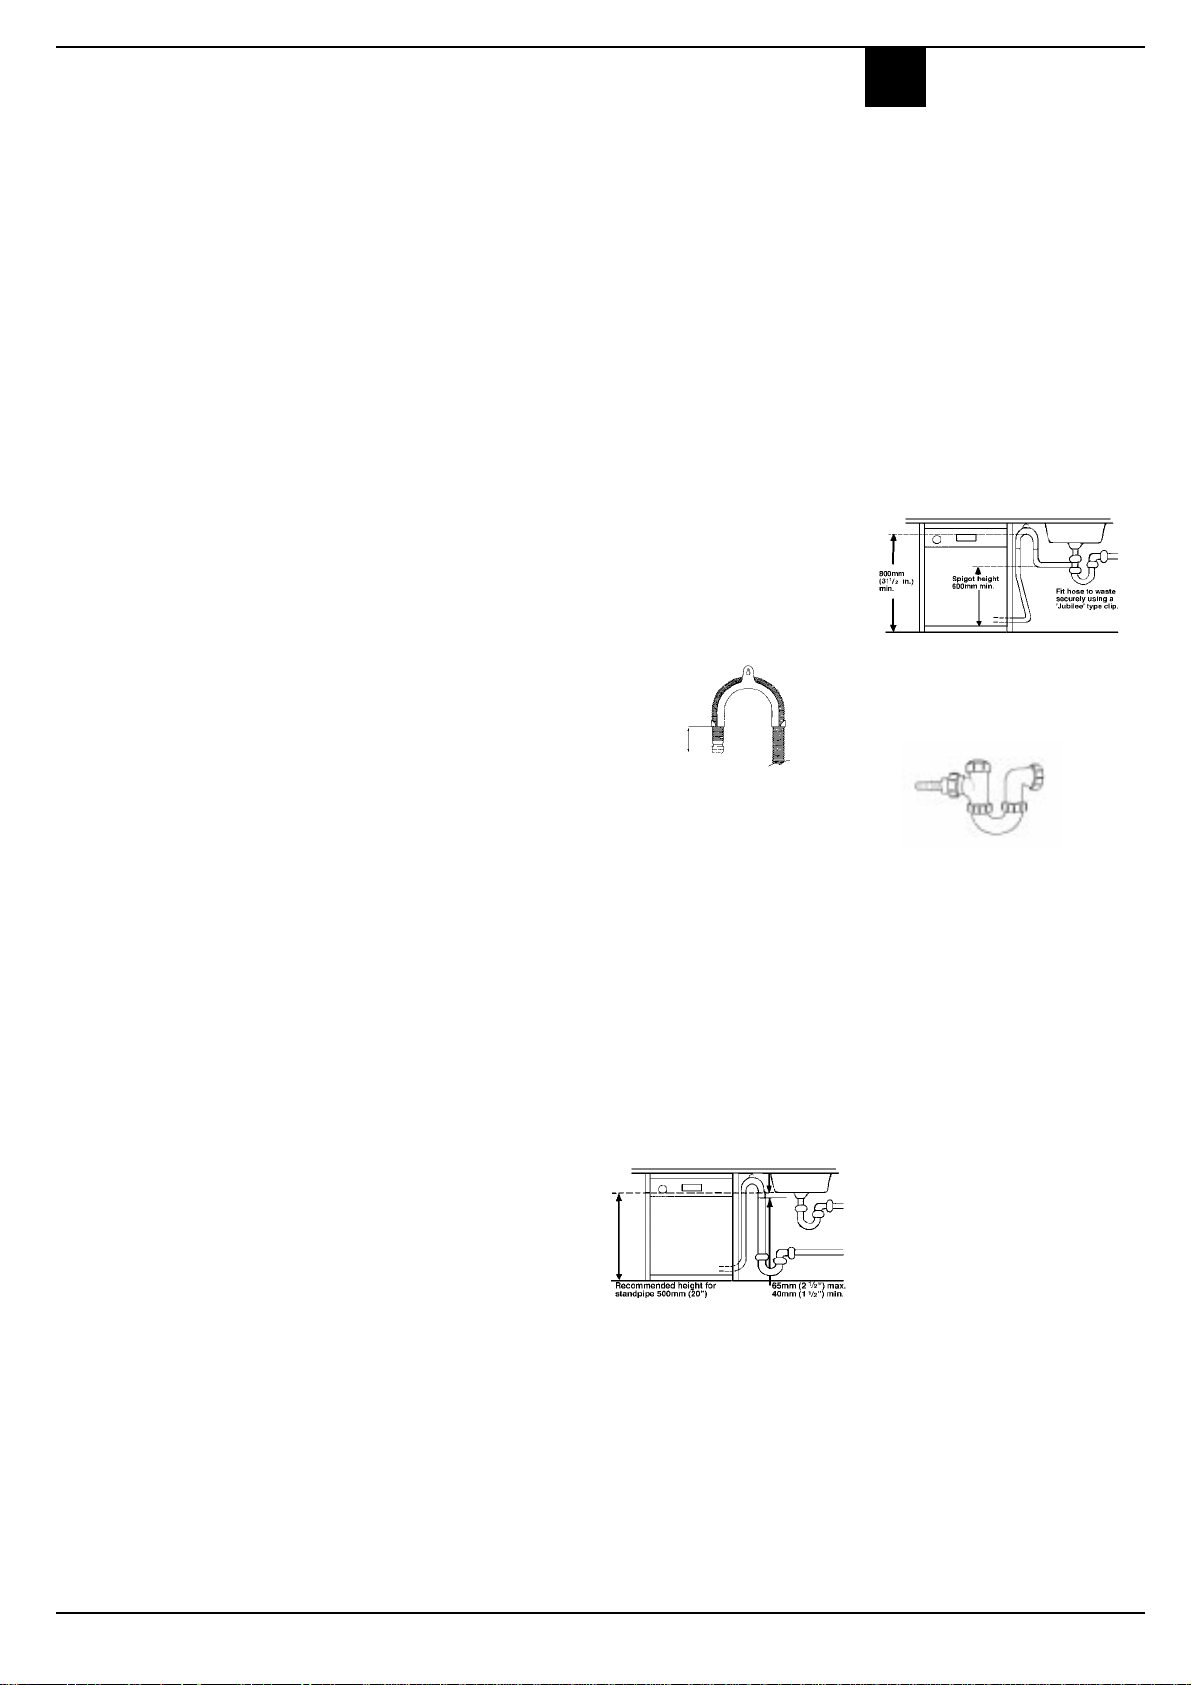
Standpipe:
Ensure that the hose is not pushed
too far down the standpipe.
If the end of your drain hose is fitted
with ‘retaining flaps’, ensure they are
inserted fully into the standpipe. This
will prevent the pipe from jumping
out during installation and use.
DO NOT position the standpipe near
an electrical outlet.
ENSURE that the drain hose is not
kinked and it is routed as shown in
the diagram.
The standpipe should have a bore
of at least 38mm (11/2”). It should
be installed as shown, have a trap
fitted and must discharge into the
same drain system as your
household sink.
It MUST NOT be connected to a
surface water drain.
Sink Waste System:
For under sink drainage:
Before connecting the drain hose,
remove any internal restrictions This will prevent a build up of debris
which could cause a blockage.
Remove any restrictions from the
waste spigot and ensure that the
sealing bung is removed. The hose
should be routed, such that it is
raised to a minimum height of
800mm (31/2”).
NOTE: Ensure the sink outlet
pipe has a minimum diamtere of
32mm.
1. Untie the end of the GREY
drainage hose from the rear of
the appliance.
2. Reposition the ‘Hooked End
Support’ as required along the
GREY drainage hose.
3. If fitting an under sink waste
disposal unit, cut out the
membrane, bung or blanking
plug.
Condensation-proof tape.
On some models, a transparent
condensation-proof adhesive tape
has been provided.
It should be stuck onto the lower
side of your wooden worktop to
protect it from the formation of
condensation.
When not provided, this tape can
be requested as a spare part from
authorised retailers.
Ensure the drain hose is
securely attached, to prevent
it coming away while the
machine is in use and causing
a flood.
5
Page 6
ISHWASHER
C
A
B
S
T
Q
M
1
2
D
R
P
E
D
Getting to know your Dishwasher
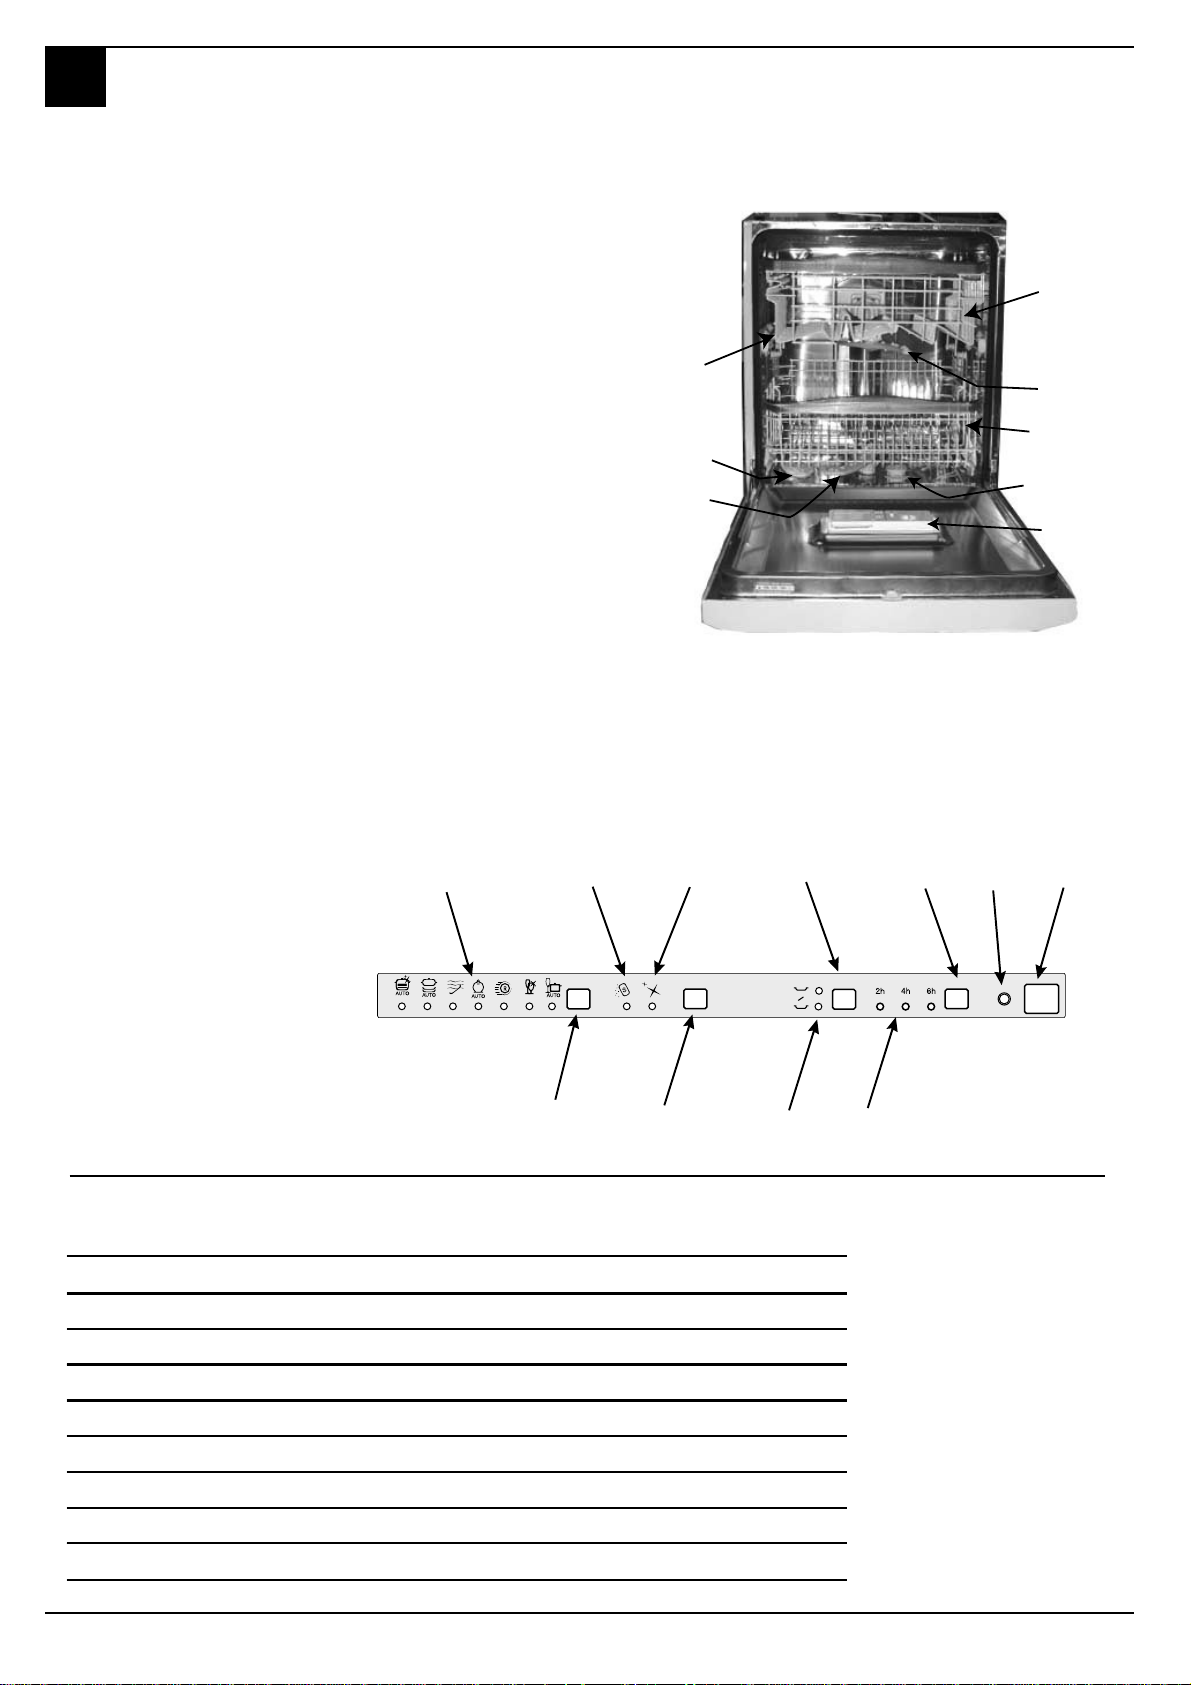
E. Upper basket
F. Top spray arm
G. Basket height adjuster
H. Lower basket
I. Bottom spray arm
J. Salt container cap
K. Washing filter
L. Detergent and rinse aid
The Controls
A. ON-OFF Button
Press this button to switch the
appliance on.
B. ON-OFF Indicator light
This light informs you that the
dishwasher is on.
C. Delayed start select button
This button delays the start of the
wash cycle you selected by 2, 4
or 6 hours.
D. Delayed start Indicator light
This indicates that the delayed
start has been set.
E. Extra drying button
Press this button for greater
drying.
M. Cycle indicator light
This light shows you which cycle
you have selected or the one in
progress.
P . Wash Programme Selector
Each time this button is pressed,
one of the cycle indicator lights
“M” will come on in sequence.
Q. Basket selection button
Press this to choose whether you
want dishes on the lower or upper
basket to be washed.
R. Basket indicator light
S. Low Salt indicator light
T. Low Rinse Aid indicator light
dispenser
This light shows the basket
selected.
This light warns you that it is time
to add more salt.
This light warns you that it is time
to add more rinse aid.
E
G
J
I
F
H
K
L
Technical Characteristics
Technical characteris tics
Width cm. 59,5
Depth cm. 57
Height cm. 82
Capacity 12 standard place settings
Mains water pressure 4,3 psi - 145 psi (30 KPa÷ 1MPa) (0,3 ÷10 bar)
Power volta ge See data pl ate
Tot al ab s orb e r power See data p l at e
Fuse See data plate
6
This dishwasher conforms to the
following European Community
Directives:
73/23/EEC of 19/02/73 (Low
Voltage) and subsequent
modifications;
89/336/EEC of 03/05/89
(Electromagnetic Compatibility)
and subsequent modifications;
97/17/CE
(Labelling)
Page 7
How to use your Dishwasher
ISHWASHER
D
First of all.
- Turn on the water supply
tap completely.
- Add the correct amount of
detergent.
- Load the baskets correctly.
- Check that the spray arms
rotate freely.
- Close the door securely.
-
Press the ON-OFF button "A":
indicator light "B" comes on. Your
appliance is now on and awaiting
instructions.
Select the wash cycle.
Select the wash cycle by pressing
button "P". Each time this button is
pressed, one of the indicator lights
“M” will come on in sequence.
Select the wash cycle most suitable for the type of dishes to wash
(see ‘Programme Chart’).
Close the door and after a few
seconds, you will hear a short beep:
the wash cycle has started.
Modifying a wash cycle in
progress.
If you have chosen the wrong cycle
- You can modify the wash cycle in
progress, if it has only just started.
Open the door carefully, to avoid
any hot water splashes. Then keep
button "P" pressed in for approximately 5 seconds, you will hear a
prolonged beep will sound,
followed by three short beeps.
Indicator light "M" will go out to
show all the settings will have been
cancelled. You are now free to reset the correct wash cycle.
You've left out a dish?
Interrupt the wash cycle by opening
the door, carefully, then insert the
dish you had forgotten.
When you shut the door the cycle
will start up from where you interrupted it.
Cycle end
The end of the wash cycle is indicated by 2 short beeps and the
flashing of the wash cycle indicator
light “M”.
Warning!
Open the dishwasher
door.Turn the appliance off by
pressing button “A”, unplug the
appliance from the electricity
socket to cut off the power
supply; the power supply cable
should consequently be easily
accessible.
Delaying the start of a
programme.
When you have loaded the dishes,
you can choose when to start your
dishwasher before setting the wash
cycle desired.
Press button "C" to delay the start
of the wash cycle by 2, 4 or 6 hours.
Each time you press it, you will hear
a short beep and indicator light "D"
corresponding to the selected delay
will come on.
Select the desired wash cycle.
Close the door and, after you hear
the beep, the countdown to the
delayed start will begin.
If, for example, you have set the
delayed start to 6 hours, the 6 hour
indicator light will flash, then the 4
hour indicator light will flash, and
finally the 2 hour indicator light. The
indicator lights will keep you informed
of the countdown progress at all
times.
Once this time is up, indicator light
"D" will stop flashing and the wash
cycle will begin.
If you change your mind and you
wish to set a different delay, just open
the door, press button "C" and
repeat the selection.
If you want to cancel the delay set
and you wish to start the wash cycle
immediately, press the button in
sequence until indicator light "D"
comes off.
Once you close the door, the wash
cycle set previously will begin.
Half load.
Your dishwasher also allows you to
wash half a load, to save water ,
electricity and detergent (use only
half the amount).
Before setting a wash cycle , press
button "Q" repeatedly to select
whether you want to run a half cycle
on the upper or lower basket. Each
time you press it, you will hear a
short beep and indicator light "R" corresponding to the selected basket
will come on.
Extra drying
Press button "E" before you start
the selected wash cycle.
A prolonged beep will inform you that
you have selected extra drying, a
short beep indicates it has been
cancelled.
With extra drying, the wash cycle
will last longer, to provide you with
drier dishes.
There's been a power
failure or you opened the
dishwasher door
The wash cycle stops and then
restarts when the electricity comes
back on or when you close the door.
Turn off the water tap.
Wait a few minutes before unloading the dishes: they are very hot! If
you wait a little while, they dry better
due to the steam.
Empty the lower basket first.
7
Page 8
ISHWASHER
D
Programme Chart
Select the most suitable programme for the type of dishes and how dirty they are. To select the wash programme see the chart below:
Auto Wash Cycle: the dishwasher is equipped with a Sensor System that measures how dirty the dishes are and decides the most
suitable programme for the load, setting the optimal cycle length, number of rinses and water level. This provides a more efficient and
economic wash cycle.
: DVKF\FO H
GXUDWLRQ
WROHUDQFH
ZLWKRXW
H[WUD
GU\LQJ
&\FOH
$XWR6XSH U
:DV K
&\FOHVH OHFWLRQ
LQVWUXFWLRQV
9 HU\GLUW\GLVKHVDQGSDQV
Q RW WREHXVHGI RU
GHOLFDWHLWHP V
&\FOH GHVFULSWLRQ
3UHZDV KZLWKKRWZDWHUDW&
:DVKDW&
5LQVHVZLWK FROGZDWHU
5LQVH ZLWKKRWZDWHUD W &
'U\LQ J
'HWHUJHQW
IRUSUH
ZDV K
ZDV K
J
5LQVH
$LG
$XWR1RU P DO
6RDN LQJ
$XWR
5DSLG
&U \VWDO
&\FOHIRUQRUPDOO\GLUW\
SDQVDQGGLVKHV 6WDQGDUG
GDLO\ F\ FOH
3UHOLPL Q D U\ZDVK F\FOHI RU
GLVKH V Z KLOH DZ DLWLQ J
FRPSOHWL RQ RIWKHORDG
ZLWKWKHGLVKHVIURPWKH
QH[WPHDO
(QYLURQPHQWDO O\IULHQGO \
F\FOHZL W KORZHQHU J\
FR QVXPSWLRQOHYHOV
VXLW D E OH IR U QR UPDOO\ G LU W \
SDQVDQGGLVKHV
(FRQRPLFDQGIDVWF\FOHWR
EHXVHGIRUVOLJKWO\GLUW \
GLVKHV5XQF\FOH
LPPHGLDWHO\DIWHUXVH
:LWKRXWGU\LQJ H[FHS W
ZKHQWKH H[WUDG U\LQJ
RSWLRQKDVEHHQ VHOHFWHG
6SHFL DOF\FOHWREHXVHG
IR U PRUH GHOLF D WH LWHPV
ZKLFKDUHVHQ V LWLYHWRKLJK
WHPSHUDWX UHV5XQ F\FO H
LPPHGLDWHO\DIWHUXVH
:DVKDW&
& R OG 5LQVH
5LQVH ZLWKKRWZDWHUD W &
'U\LQ J
6KRUWFRO G ZDVKWR SUHYHQWIRRG
IURP GU\LQJR QWR WKH GL VKHV
&ROGSUHZDVK
:DVKDW&
+RWULQVHDW&
'U\LQ J
6KRU WZDVKDW&
+RWULQVHDW&
:DVKDW&
5L QVHDW&
+RWULQVHDW&
'U\LQ J
J
J
J
J
ZLWKH[WUD
GU\LQ J
:DVKGLII HUHQ WLDWHGRQWK H
WZRUDFNVGHOLFDW HIRU
JODVVZDUHDQ GJODVV HV RQ
$XWR'XR
:DV K
T o optimise wash performance and save on energy , try to use the dishwasher with a full wash load. If it takes some time to fill your
dishwasher, use the soak cycle to avoid caked on food and build up of bad odours.
WK H XSSHU UDFNDQGKHD Y \
GXW\IRUWKHSDQVRQWKH
ORZHUUDFN
&ROGSUHZDVK
:DVKDW&
/XNHZDUP U LQVHDW &
+RWULQVHDW&
'U\LQ J
J
8
Page 9
ISHWASHER
D
Before Using your Dishwasher
Adjusting the water softener.
Y our dishwasher can adjust its salt
consumption according to the hardness of the water in your home.
This way, you can optimise and
customise your dishwasher's salt
consumption.
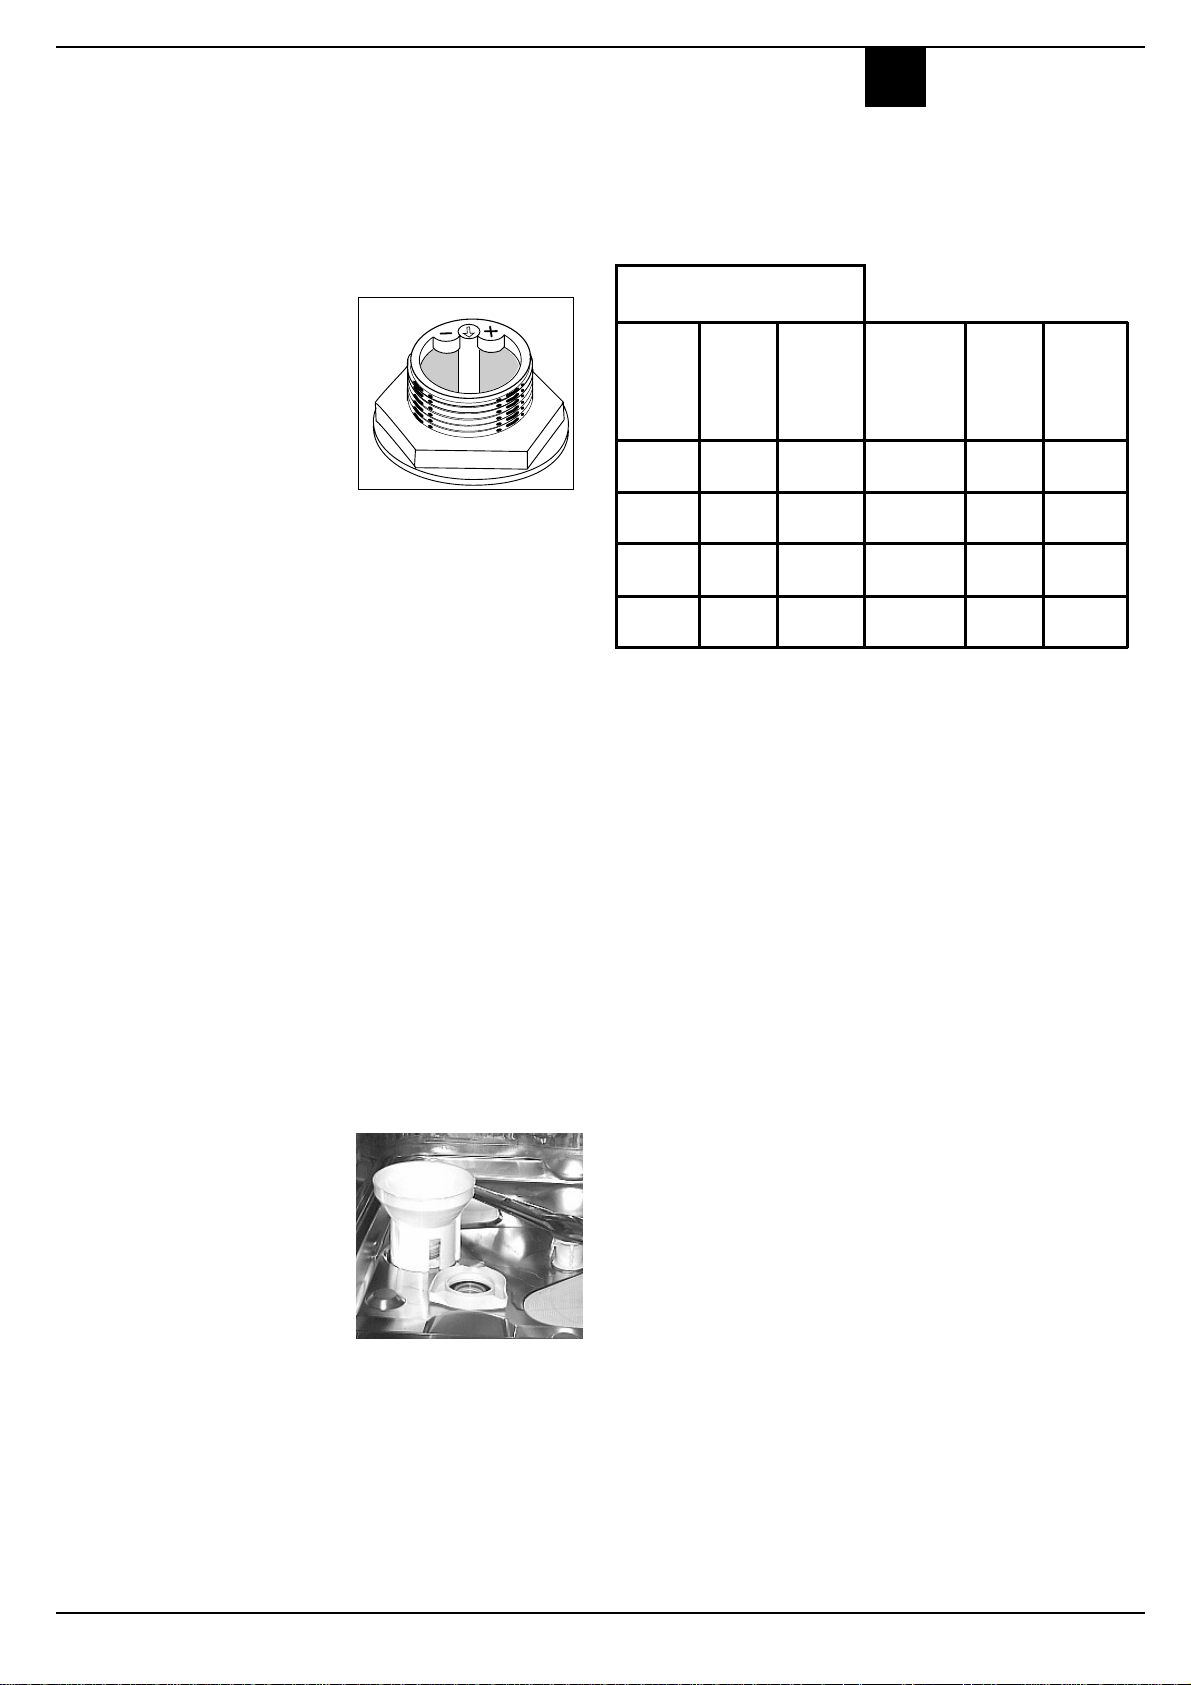
To adjust salt consumption, do as
follows:
1. Unscrew the salt container cap
2. There is an arrow on the neck
of the container (see figure): if
necessary , turn the arrow anticlockwise from the "-" setting
to the "+" setting.
Select the arrow position
depending on the water
hardness, referring to the table.
Water Hardness
Clarke
degrees
0 - 14 0 - 17 0 -1,7 / 0 /
14 - 36 18 - 44 1,8 - 4,4 "-" 20 60
36 - 71 45 - 89 4,5 - 8,9 MED 40 40
>71 >89 > 8,9 "+" 60 25
°fH mmol/l
To prevent rust from forming,
load the salt just before
beginning a wash cycle.
Salt
Selector
position
You don't know how hard
the water in your home
is? Ask the company that
supplies water in your
consumption
(grams/cycle)
area.
Autono-
my
(cycles\2kg)
Salt
Filling the salt container.
Always use salt which is intended
for dishwasher use.
The salt container is situated
underneath the lower basket, fill it
up as follows:
1.Pull out the lower basket
completely, unscrew and
remove the container cap
2. If it is the first time you add the
salt, first fill the container up with
water (you won't have to do this
again next time)
3. Put the dishwasher funnel on the
hole and pour in approximately
two kilos of salt. It is normal that
some water comes out of the
container.
4. Screw the cap back in place
carefully.
When to add salt:
The salt container should be filled
up when the low salt indicator light
“S” flashes.
The dishwasher will remind you to
do so for three consecutive wash
cycles.
9
Page 10
ISHWASHER
D
Before Using your Dishwasher
The detergent
Adding detergent
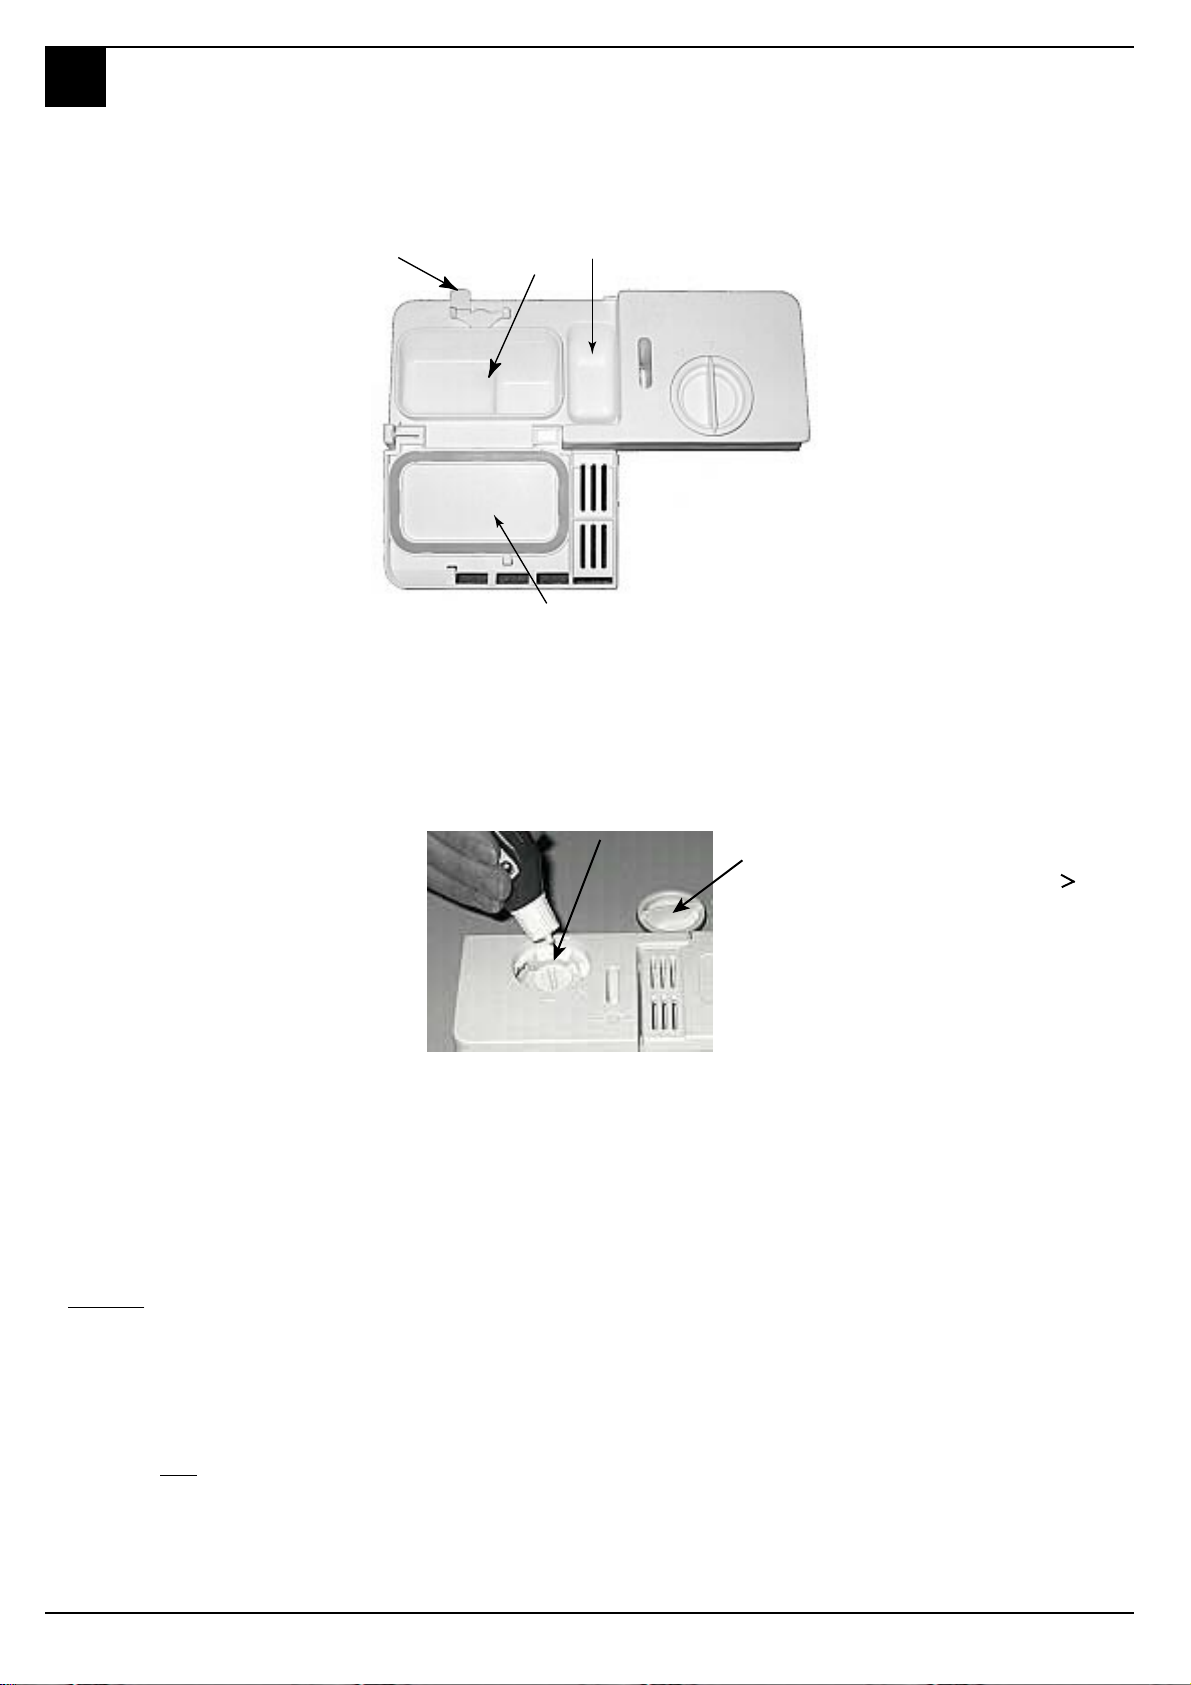
To open lid A, press button B.
The detergent should be put into the
two containers C and D.
If using a tablet, put it in container
"D".
Now you can close the lid: press it
down until you hear it click.
If it won't close
Check whether there is any
detergent residue on the edges of
the dispenser. Remove the excess.
Rinse aid.
Rinse aid makes dishes sparkle
more as it improves their drying. The
rinse aid container is situated on the
inside of the door. You should fill it
up when the rinse aid indicator light
“T” flashes.
Adding rinse aid.
To open the dispenser, turn cap C
anticlockwise. Take care when you
pour in the rinse aid to avoid it
overflowing. You can regulate the
amount of rinse aid used by the
dishwasher, move the adjuster F
which you will find under lid C.
• Use the right amount of
B
You can choose from six different positions.
It is normally set to 4.
C
D
A
F
C
detergent (see programme
chart).
• Store your detergent and rinse
aid in a cool, dry place, safely
away from children.
- The amount of rinse aid
needs to be increased if the
dishes appear dull or you can
see circular stains.
- The amount of rinse aid
needs to be reduced if the
dishes are sticky or you can
see white streaks.
Warning
Three-in-one dishwasher tablets are now available on the market, and combine detergent, salt and rinse aid all in one.
If the water in your area is hard or very hard, we still recommend you pour extra salt into the relevant dispenser to prevent
the formation of white streaks on your dishes or on the interior of the appliance.
Using a three-in-one product means it is no longer necessary to put rinse aid into the relevant container.
If you want to achieve perfectly dry dishes, you may add rinse aid as long as the dosage adjuster is set to no.2.
In any case, please read the manufacturer's instructions on the packet.
If you use only these products, it is normal for the salt and rinse aid indicator lights to flash permanently after a certain
number of cycles.
10
Page 11
Loading your Dishwasher
ISHWASHER
D
First of all.
Before placing dishes in the baskets,
remove all course food remains. This
avoids blocking the filter, which
would reduce the efficiency of the
wash.
If saucepans and frying pans are
very dirty, allow them to soak before
being washed.
To make it easier to load your dishes,
pull the baskets out.
Multisystem baskets
The dishwasher is fitted with upper,
lower and cutlery baskets. They
provide greater flexibility for loading
dishes, making them more suitable
for your specific needs.
The basket handles can be
removed for cleaning. Pull out the
two fastening plugs, remove the
handles and rinse under running
water. Replace the handles fixing
them in place with the two fastening
plugs.
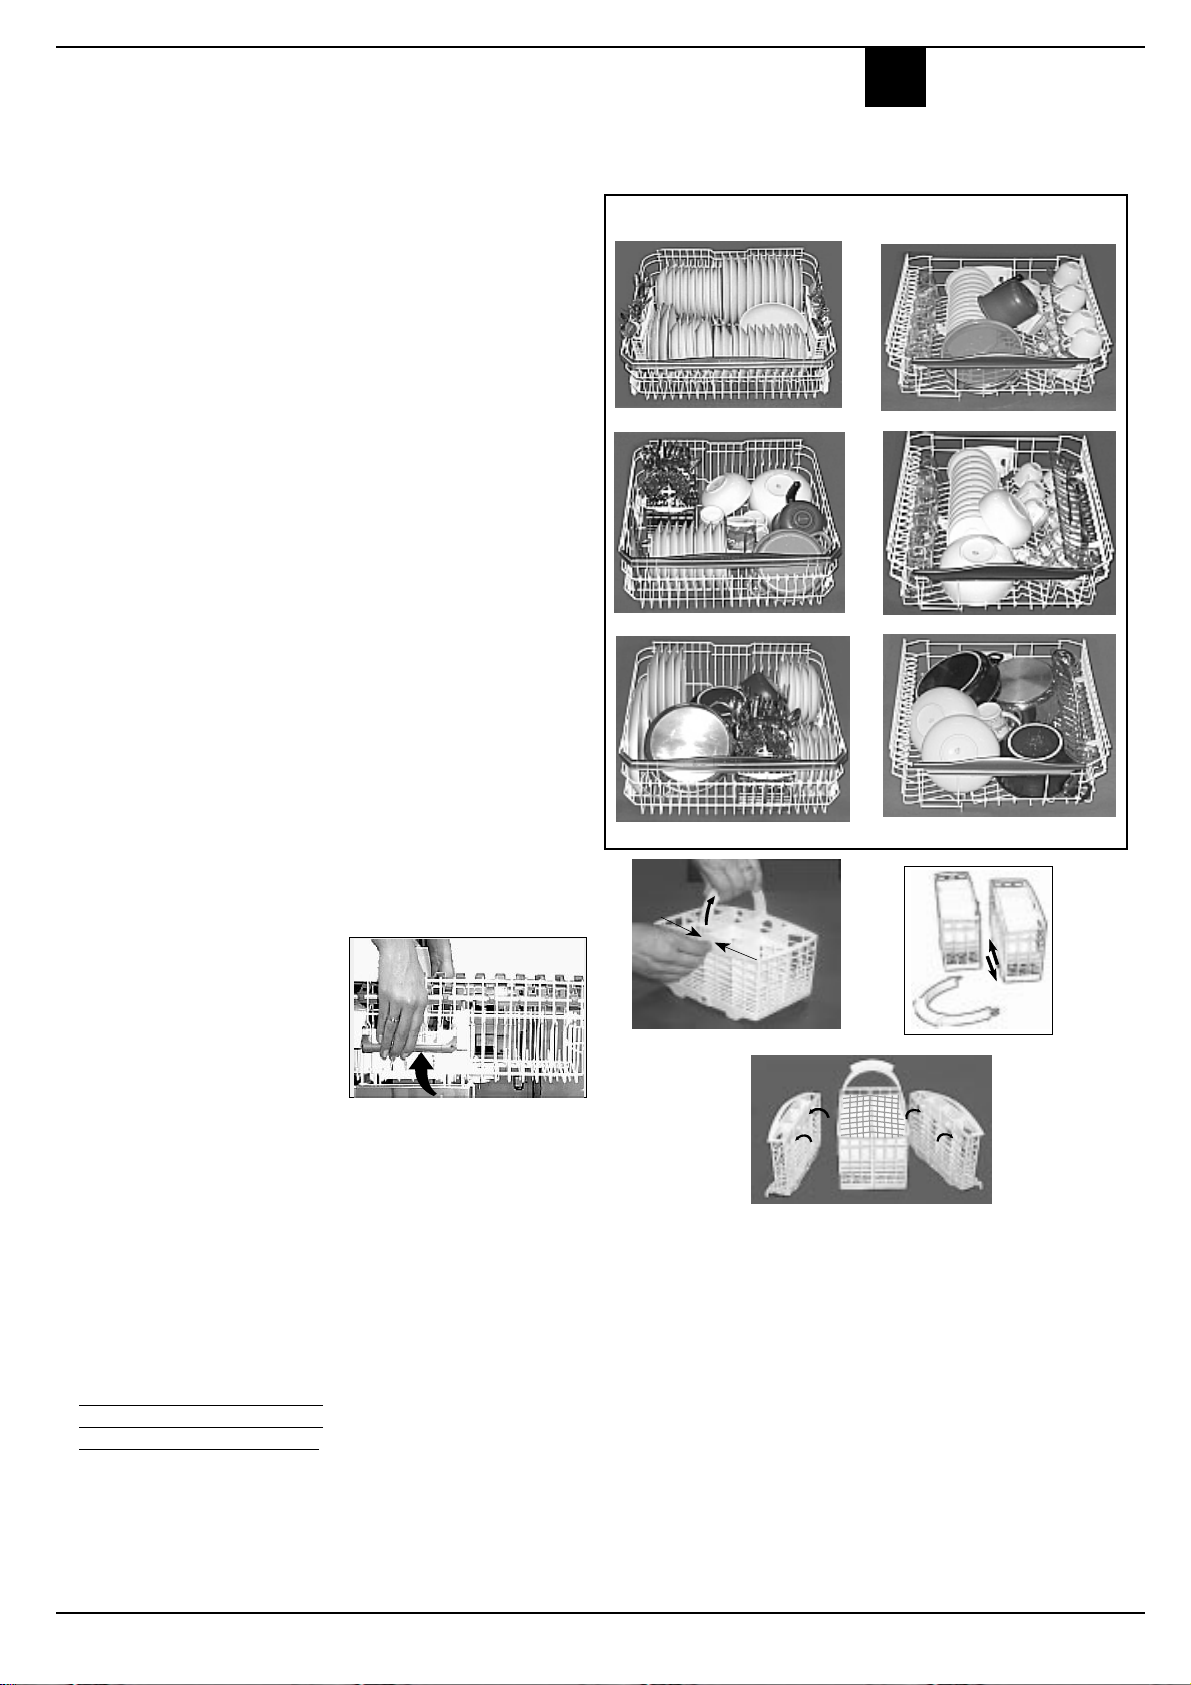
What goes into the lower
basket?
We recommend you place the most
difficult dishes to wash into the lower
basket: saucepans, lids, soup
dishes and plates (a load example
is shown in the photo).
• Serving dishes and large lids:
place them on the sides of the
basket.
• Saucepans, salad bowls: must
always be placed upside down
• Very deep dishes: place them
obliquely, thus allowing water to
run down them and cleaning
them better
• Glasses and cups: position
them as shown in load example
photo.
The cutlery basket may be split into
two parts by pulling out the handle.
When you only have a little cutlery
to wash you can use just half the
basket, save space for other
crockery or place the other half in
the upper basket instead (see
figures A and B).
Knives and utensils with sharp
blades or tips should be positioned
with the sharp parts at the bottom.
This basket is equipped with two
removable grids. Insert the cutlery
one by one into the slots, with the
handles at the bottom. Position them
so that they don’t touch.
In this specific model, the cutlery
basket is fitted with two detachable
side compartments, as shown in
figure A1, which can be hooked on
either the upper or lower basket as
required.
What goes into the upper
basket?
Place delicate and lightweight
dishes in the upper basket:
glasses, tea cups and coffee cups,
saucers and plates - shallow salad
bowls, slightly dirty frying pans and
shallow pans.
Position lightweight dishes in such
as way as to avoid their being
moved by the spray of water.
The dishwasher can also be
equipped with one or two tip up
compartments onto which you can
place mugs and cups, as well as
long sharp knives and serving
cutlery.
After loading the dishes, remember
to check that the spray arms can
turn freely without hitting against
any dishes.
How to adjust the upper
basket.
The upper basket can be set in high
or low position to enable you to
organise your dishes effortlessly.
Fig.C
There are two handles on the
sides of the upper basket, use
these to adjust its height (see
fig.C).
What can I Wash
• Cutlery and tableware made from wood or part wood - They may become faded and unsightly in appearance.
• Avoid washing horn handled and bronze cutlery in the machine.
• Delicate/decorative glassware and vases, special antique or irreplaceable china - the decorative patterns
printed on these items will not be dishwasher proof.
• Plastic objects that are not resistant to hot water.
• Copper and Pewter utensils. Aluminium and Sliver objects.
• Some types of glass can become opaque in appearance after they have been washed too many times in a
dishwasher.
• Highly absorbent materials such as sponges and towels should never be placed in a dishwasher.
• If in any doubt, check with the manufacturer on items suitability for dishwasher’s.
WARNING: Dishes or cutlery soiled with tobacco ash, wax, lubricating grease or paint should not be put
in the dishwasher.
Our recommendation: In future, only purchase table or kitchenware that has been confirmed - dishwasher proof.
lower basket
Items not suitable for the dishwasher:
Load examples
upper basket
A
B
A1
A1
11
Page 12
ISHWASHER
D
Care and Cleaning
Unplug the appliance.
Before carrying out any cleaning or
maintenance on the dishwasher,
always remove the plug from the
electricity socket.
After every wash.
When the wash cycle has ended,
always remember to turn off the
water supply tap and to leave the
appliance door ajar. This way,
moisture and bad odours will not be
trapped inside.
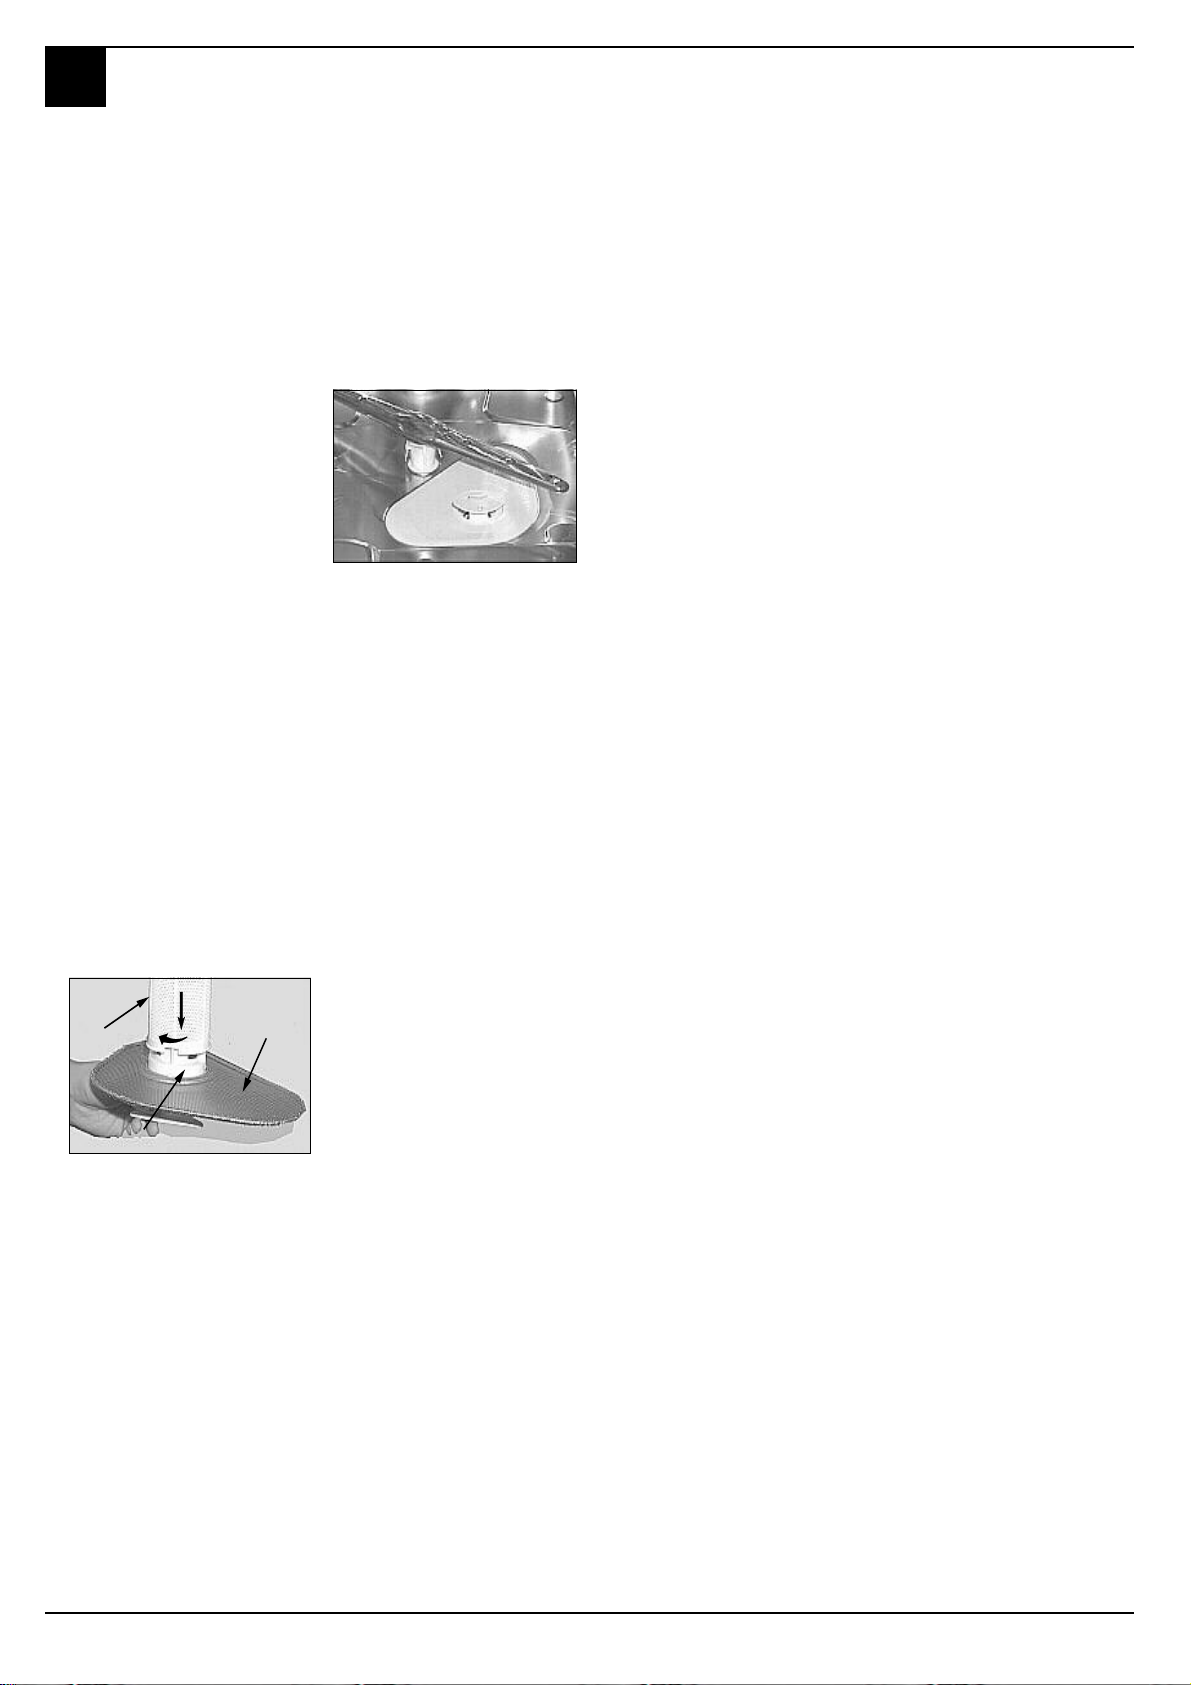
The filter assembly
• If you want consistent good
results from your dishwasher, you
need to clean the filter assembly.
•
Remove the larger food particles
trapped inside the cup “C” and the
semi-circular filter A after each
wash; pull the cup handle upwards
to remove them. Just rinse them
under running water.
• The entire filter assembly should
be cleaned thoroughly once a
month: cup C + semi-circular filter
A + cylindrical filter B. Rotate filter
“B” anticlockwise to remove it.
For cleaning, use a non metallic
brush.
1
B
2
A
Cleaning the spray arms.
Food residue may become
encrusted onto the spray arms and
block the holes where water comes
out. Check the spray arms regularly
and clean them once in a while.
DO NOT use solvents or abrasives
to clean the exterior and rubber parts
of your appliance, do not use
solvents or abrasive cleaning
products. Use a cloth dampened
with lukewarm soapy water only.
If there are any stains on the surface
of the appliance interior, use a cloth
dampened with water and a little
white vinegar, or a cleaning product
specifically made for dishwashers.
The seals.
One of the factors that cause
unpleasant odours to form inside the
dishwasher is food that remains
trapped in the seals. Periodic
cleaning using a damp sponge will
prevent this from occurring.
Going away
If the dishwasher is not going to be
used for some time, carry out the
following:
• run a cycle with the dishwasher
empty.
• switch off at the electrical socket
and unplug.
• turn off the water supply tap,
disconnect the inlet hose and
allow to drain.
• fill the rinse aid dispenser.
• leave the door ajar, to prevent the
build up of unpleasant odours
inside the dishwasher.
Before using the dishwasher after a
long break, plug in and switch on at
the electrical socket. Reconnect the
inlet hose and turn on the water
supply tap. Check there are no
deposits of rust inside the water
pipe, if there are allow water to run
from the supply tap for a few
minutes.
Disconnecting the dishwasher.
When disconnecting the dishwasher
it is important that tasks are carried
out in the correct sequence.
• switch off at the mains and remove
the plug from the socket.
• turn off the water supply.
• disconnect drain and water inlet
hose.
• pull out the dishwasher, carefully,
withdrawing hoses at the same
time.
C
Reassemble the filter parts (as
shown in the figure) and reinsert
the whole assembly into the
dishwasher. Position it into its
housing and press downwards.
The dishwasher is not to be used
without filters. Improper
replacement of the filters may reduce the efficiency of the wash and
even damage your dishwasher.
12
Moving the appliance.
Drain water from the dishwasher.
Secure all loose parts. Only
transport in an upright position.
• If not kept upright during transport,
any water remaining inside may
seep into the control module and
cause subsequent errors with
programme functions.
Page 13

ISHWASHER
D
Troubleshooting
Caution
- Do not forget that repairs should only be carried out by a qualified specialist. Improper repairs can lead to considerable
equipment damage, as well as danger to the user.
- The dishwasher must first be disconnected from the electricity supply before any repairs or other work can be carried out.
Switch off at the mains socket and water supply and remove the plug.
Resolving minor problems yourself.
Experience has shown that you can resolve most problems that arise during normal daily usage yourself, without having
to call out a service engineer. Not only does this save costs but it also means the appliance is available for use again
that much sooner. The following list of common occurences and their remedies should help you identify the causes of
most problems.
If the dishwasher won't
start, check...
■ Is the dishwasher plugged in at
the electricity socket and
switched on?
■ Is there a power failure, check
other appliances.
■ Check the fuse.
■ Is the water supply tap turned
on?
■ Is the water inlet hose connected
properly?
■ Is the pressure of the water
supply sufficient?
■ Is the inlet hose kinked?
■ Is the filter on the water supply
hose blocked?
■ Is the dishwasher door not closed
properly?
If water remains inside the
dishwasher, check...
■ the drain hose is not kinked.
■ the drain syphon is not
obstructed.
■ the dishwasher filters are not
clogged.
If the dishes are not being
cleaned properly, check...
■ the correct amount of detergent
has been added.
■ there is regenerating salt in the
salt container.
■ the dishes have been loaded
correctly.
■ the selected programme is
suitable for the type of dishes and
the degree of soiling.
■ all filters are clean and positioned
correctly.
■ the spray arm nozzles are not
obstructed.
■ there is nothing obstructing the
rotation of the spray arms.
If the dishes fail to dry or
remain dirty, check...
■ there is rinse aid inside the rinse
aid container.
■ the rinse aid dispenser setting is
correct.
■ the detergent being used is of
good quality and has not lost its
effectiveness (for example,
through incorrect storage, with
the box left open).
If the dishes show signs of
streaking, staining etc.
check...
■ the rinse aid dispenser setting is
not set too high.
If there are visible traces
of rust inside the tank,
check...
■ the cap off the salt container is
securely closed and that the
water softner setting is correct.
■ the correct amount of detergent
is being used. Certain
detergents can be more corrosive than others.
■ the tank is made of steel and
therefore any rust marks are due
to external elements (fragments
of rust from the tank pipes, pots,
cutlery etc.) Special products
are commercially available to
remove such marks.
Error messages
Your dishwasher is equipped with
a safety system which is able to
detect operating faults.
You will know if there are any faults
if codes start flashing on the display. Take a note of the codes, turn
the appliance off and call Hotpoint
Service for technical assistance.
Tap off alarm
If you have forgotten to turn the water tap on, your appliance will remind you of this by sounding a few
short beeps for a few minutes. Turn
the tap on and your appliance will
start up again after a few minutes.
Were you to be absent when these
beeps are sounded, the appliance
will be blocked automatically and
wash cycle 5 and 6 indicator lights
(rapid and crystal) will flash
rapidly.
Turn the appliance off at the ONOFF button, turn on the water tap
and wait approximately 20 seconds
before turning the appliance back
on.
Re-select the wash cycle and the
appliance will start up again.
Clogged filter alarm
If the appliance is blocked and wash
cycle4 and 6 indicator lights (auto
eco and crystal) flash rapidly, this
means the filter is clogged by large
particles of food residue. Turn the
appliance off, clean the filter
thoroughly and reposition it in its
seat as illustrated on page12. Then
turn the appliance back on.
Re-select a wash cycle as indicated in the "Selecting the wash
cycle" paragraph and the appliance
will start.
Water load solenoid valve
malfunction alarm.
If indicator light 5 (rapid wash)
flashes rapidly, TURN the
dishwasher OFF AND BACK
ON AGAIN after one minute. If
the alarm persists, first turn off the
water tap to avoid any flooding and
then cut off the electricity supply
and call for technical assistance.
If after all the checks, the appliance
still does not operate or the problem persists, call Hotpoint Service
(see KEY CONTACTS, back
page) and inform them of:
- the type of problem
- the abbreviation of the model
name (Mod.) and the relative numbers (S/N) written on the rating plate
located on the inner edge of
the door.
Switch off at the mains
socket and remove the plug.
Turn off the water supply.
13
Page 14
ISHWASHER
D
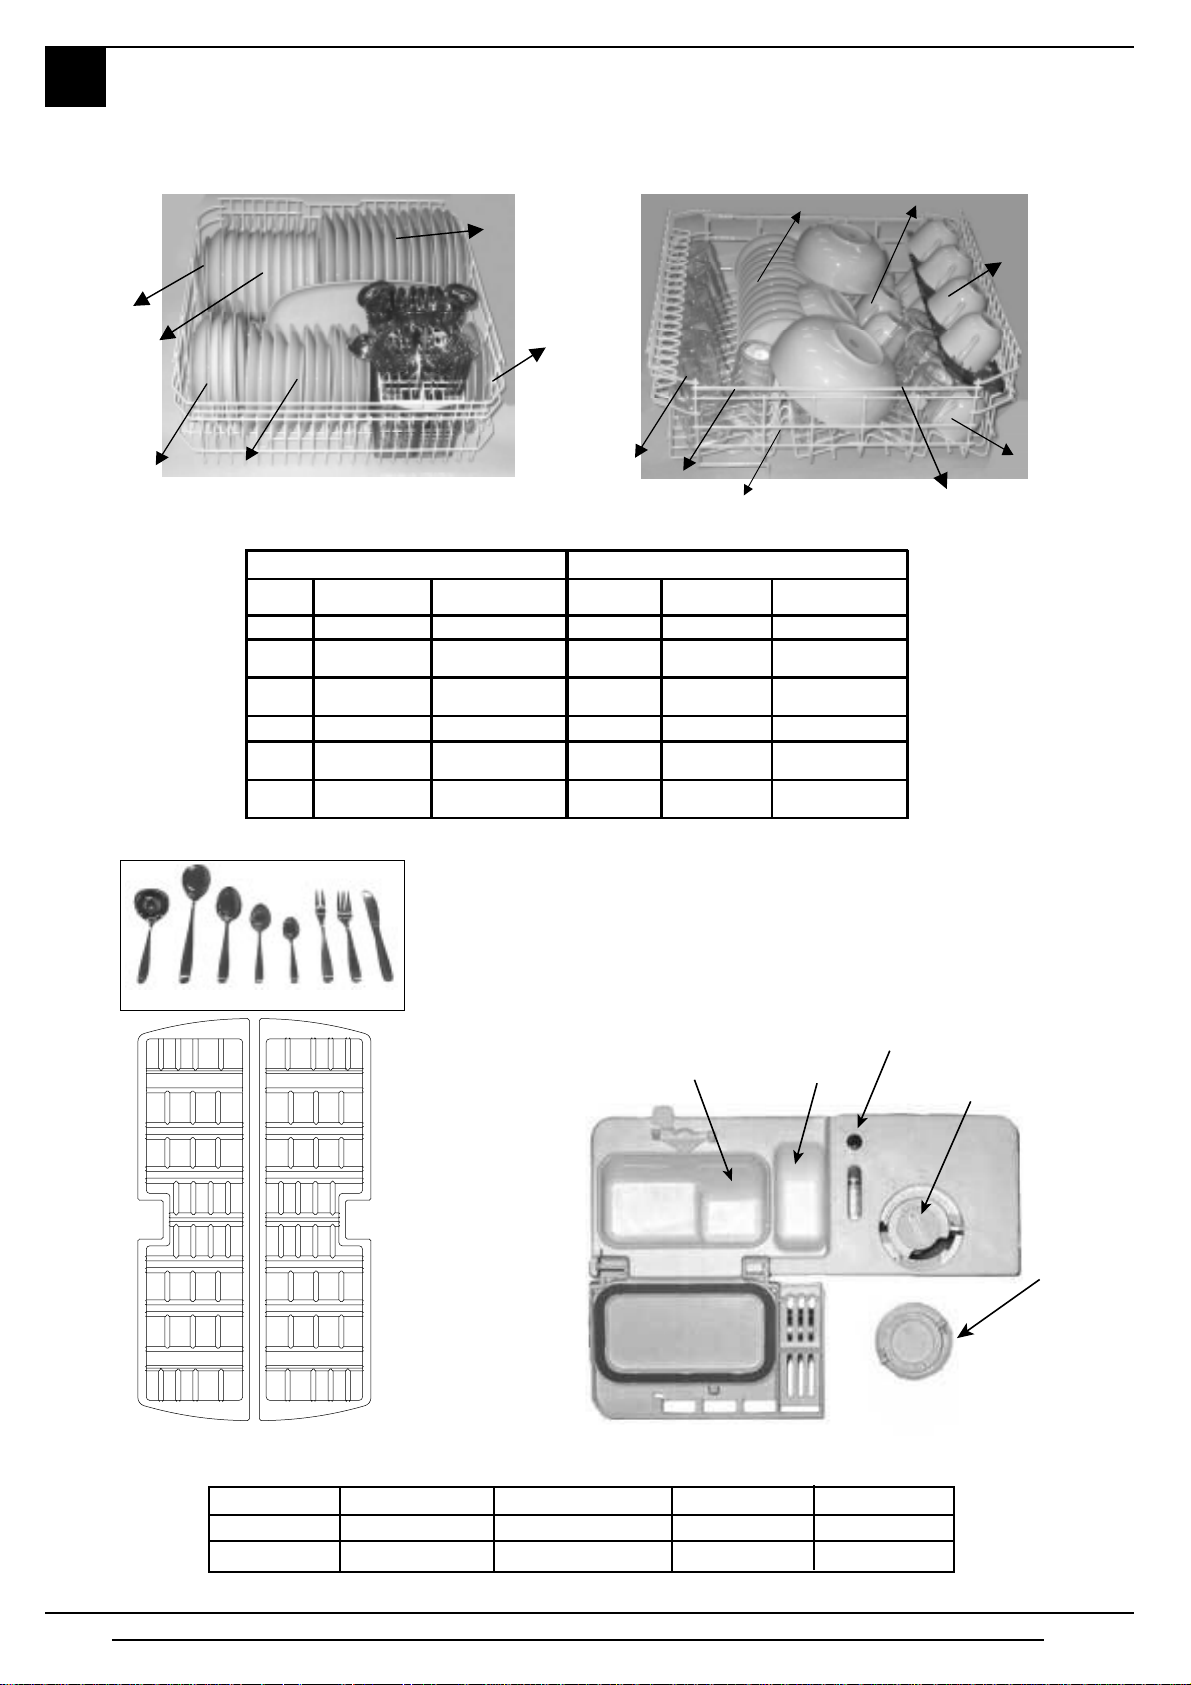
Load for 12 Standard Settings tests (upper basket at top position)
INFORMATION FOR TEST LABS
lower basket
upper basket
12
C
12
i
h
k
2
g
g
e
f
C
1
9
A
A
D
C
B
g
3
9
Low er basket Upp er basket
Type Item Diameter Volum
soupe plate 23 cm .
A
dinn er plate 26 cm .
B
C
D
dessert
plate
oval platter 35 cm .
(approxim ately)
19 cm .
6
1
2
Type Item Diameter/Volum
e
f
g
h
k
i
cup 0,20 l.
servin g
bowl
glass 250 m l.
saucer 14 cm.
servin g
bowl
servin g
bowl
(appro x im ately)
19 cm.
13 cm.
16 cm.
3
4
e
g
e
5
3
8
5
5
3
7
4
2
2
5
8
4
2
7
3
5
5
3
3
3
1
1
1
4
4
22
2
door side
2
55555
5
3
3
1
1
11
1
4
4
4
2
3
3
4
1
1
1
3
3
1
1
4
4
2
64
5
3
3
7
6
4
4
2
2
2
2
Loading the detergent
The cleaning detergent should be introduced into the two containers
“Comp.2” and “Comp.3” (see table at the end of the page).
Loading the Rinse Aid
The amount of rinse aid used for each cycle can be regulated by
5
turning the dose adjuster ‘F’ which you will find under lid ‘C’.There
are 6 different settings; the normal dosage is setting 5.
This basket is
equipped with two
removable grids:
insert the cutlery one
by one into the slots,
with the handles at
the bottom. Position
them so that they don't
touch.
Comp.2
D
Comp.3
F
C
14
Cycle
EN 50242
IEC/ DIN
Press the extra dry button, if existing.
*
Eco
*Eco + extra dry
Total detergent
30 gr.
30 gr.
Comp.2 Comp.3
25
30
5
Page 15

After Sales Service
"No company is better positioned to offer an after sales service on a
Hotpoint appliance than us - the manufacturer"
As part of our commitment to you, all Hotpoint appliances have the added benefit of a fully inclusive
parts and labour guarantee for the first 12 months. In addition to this you also have the advantage of
free
replacement parts for the first 5 years when fitted by a Hotpoint
engineer. When the 12 months parts and labour guarantee expires we offer the following after sales
service options:
Repair Service and Information Help Desk
UK: 08709 066066
www.theservicecentre.co.uk
Republic of Ireland: 1850 302 200
Note: Our operators will require the Model number and the Serial number of your appliance
Available 364 days a year with a fast, effective and value for money service. We have the largest
white goods repair service in the UK with over 1200 of our own fully trained engineers. All repairs
include a parts and labour guarantee for 12 months from the date of the repair.
If you require any information or have any questions about your appliance, our operators are on
hand with help and advice.
All this ensures that you will receive the best available after sales service possible.
Extended Warranties
UK: 08709 088 088
www.theservicecentre.co.uk
Republic of Ireland: 1850 502 200
Whether you have just one or a number of Hotpoint appliances in your kitchen, we offer two service
cover plans to give you total peace of mind.
l Repair Protection Plan - FREE service repairs for a single Hotpoint appliance during the
period of cover.
l Kitchen Cover - FREE service repairs for all your Hotpoint appliances less than 8
years old.
Genuine Parts and AccessoriesUK: 08709 077 077
www.theservicecentre.co.uk
Republic of Ireland: (01) 842 6836
A wide range of genuine parts and accessories are available from our hotline or through our web
site.
Genuine parts and accessories, extended warranties and service repairs are all
available on our web-site at:
15
www.theservicecentre.co.uk
Page 16

Guarantee
"Satisfaction guaranteed or your money back"
We give you a unique 'satisfaction guaranteed' promise - valid for 90 days - after you have
purchased your Hotpoint appliance. If there is a technical problem simply call Hotpoint Repair
service or visit our web-site at www.theservicecentre.co.uk and where necessary, we will arrange
for an engineer to call. If the technical problem is not resolved under this guarantee, we will
replace your machine or, if you prefer, give you your money back.
All Hotpoint appliances carry a fully inclusive 12 month parts and labour guarantee as well as free
replacement parts for the first 5 years (except microwaves, selected integrated appliances and
cooker hoods, which have a one year guarantee) provided that they are fitted by a Hotpoint
engineer.
Guarantee terms and conditions
Your guarantee is only applicable in the United Kingdom or Republic of Ireland and is subject to
the following provisions that your appliance:
l Has been installed and used correctly in accordance with this instruction booklet.
l Has been used solely for domestic purposes and is located on domestic premises (ie. not
for commercial or trade use).
l Has been properly connected to a suitable electrical supply voltage as stated on the
appliance rating plate.
l Has not been subject to misuse, accident, modified or repaired by anyone other than one of
our own service engineers.
For pre purchase information on any other Hotpoint product call: 08701 50 60 70
or visit: www.hotpoint.co.uk
Recycling & Disposal Information
As part of Hotpoint's continued commitment to helping the environment, Hotpoint reserves the right
to use quality recycled components to keep down customer costs and minimise material wastage.
Please dispose of packaging and old appliances carefully.
To minimise risk of injury to children, remove the door, plug and cut mains cable off flush with the
appliance. Dispose of these parts separately to ensure that the appliance can no longer be
plugged into a mains socket and the door cannot be locked shut.
16
Page 17

Notes
ISHWASHER
D
17
Page 18

ISHWASHER
D
Notes
18
Page 19

Notes
ISHWASHER
D
19
Page 20
Key Contacts
After Sales Service
Over 1200 trained specialists, directly employed by us, ensure that you can have complete confidence in
both the appliances and services we offer.
Repair Service and Information Desk
UK: 08709 066 066
(Open 8 to 8 Mon - Fri, 8 to 6 Sat, 10 to 4 Sun & Bank Holidays)
www.theservicecentre.co.uk
Republic of Ireland: 1850 302 200
Note: Our operators will require the following information:
Model number:
Serial number:
Extended Warranties
UK: 08709 088 088
(Open 8 to 8 Mon - Sun)
www.theservicecentre.co.uk
Republic of Ireland: 1850 502 200
Genuine Parts and Accessories
UK: 08709 077 077
(Open 8-30 to 5-30 Mon - Fri & 9 to 12 Sat)
www.theservicecentre.co.uk
Republic of Ireland: (01) 842 6836
Merloni Elettrodomestici UK Ltd. Morley Way, Peterborough, PE2 9JB.
195042147.03
December 2004
 Loading...