

Page 1

Instructions for
Installation and Use
Build-in Electric
double oven
/*
English, 2
BD62SS/2
BD52B/2
BD52K/2
BD52P/2
DQ47I/2
DE47X/2
Contents
GB
Introduction, 2
Safety Information, 3
The main parts of your Double Oven (BD62SS/2 & BD52B/2 BD52K/2 - BD52P/2), 4
The main parts of your Double Oven (DQ47I/2 & DE47X/2), 5
Temperature Conversion Chart, 6
Controls (BD62SS/2 & BD52B/2 - BD52K/2 - BD52P/2), 7
Controls (DQ47I/2 & DE47X/2), 8
Multifunction Selection Switch (BD62SS/2 & BD52B/2 - BD52K/2
- BD52P/2), 9
The electronic programmer, 10
Grill Pan and Handle, 11
Operation when using the Top Oven for Grilling, 12
Using the Top Oven for Solarplus Grilling, 13
Using the Top Oven as a Convection Oven, 14
Operation when using the Top Oven as a Convection Oven, 15
Oven Temperature Charts, 16-17
Main Oven - Fan Grilling (BD62SS/2 & BD52B/2 - BD52K/2 BD52P/2), 18
Main Oven - Fan Grilling Roasting Chart (BD62SS/2 & BD52B/2
- BD52K/2 - BD52P/2), 19
Using the Main Oven for Other Functions, 20
Main Oven - Conventional Oven (BD62SS/2 & BD52B/2 - BD52K/
2 - BD52P/2), 21
Main Oven - Fan Oven (all Models), 22
Main Oven - Fan Oven Cookery Notes, 23-24
Main Oven Temperature Chart, 25-26
Main Oven - Circulaire Roasting (BD62SS/2 & BD52B/2 - BD52K/
2 - BD52P/2), 27
Main Oven - Circulaire Roasting Chart (BD62SS/2 & BD52B/2 BD52K/2 - BD52P/2), 28
Using the Main Oven for Other Functions, 29
Main Oven Grilling (BD62SS/2 & BD52B/2 - BD52K/2 - BD52P/2),
30
Care and Cleaning, 31-32
Care and Cleaning (BD62SS/2 & BD52B/2 - BD52K/2 - BD52P/2),
33
Care and Cleaning (DQ47I/2 & DE47X/2), 34
Installation, 35
Tall Cabinet Ventilation, 36-37
If something goes wrong..., 38-40
Guarantee Information, 41
Service Information, 42
Page 2
Introduction
GB
To the Installer:
Before installation, fill in the product details on the
back cover of this book.
The information can be found on the rating plate.
To the User:
You must read the instructions prior to installing and
using the appliance and then retain them for future
reference.
! Before operating your new appliance please read
this instruction booklet carefully. It contains
important information concerning the safe operation,
installation and maintenance of the appliance.
! Please keep these operating instructions for future
reference. Pass them on to possible new owners of
the appliance.
Retention of this Instruction Book
This Instruction Book must be kept handy for
reference as it contains important details on the safe
and proper use of the appliance.
If you sell or pass the appliance to someone else, or
move house and leave it behind, make sure this
Book is also provided so the new owner can become
familiar with the appliance and safety warnings.
* The guarantee is subject to the provisions that
the appliance:
(a) Has been used solely in accordance with the
Users Instruction Book.
(b) Has been properly connected to a suitable
supply voltage as stated on the rating plate
attached to this equipment.
(c) Has not been subjected to misuse or accident
or been
other than the authorised employee or agent.
(d) Has been correctly installed.
This appliance conforms to the following EEC directives:
Electromagnetic Compatibility;
- 89/336/EEC
- 92/31/EEC
- 93/68/EEC
Low Voltage Equipment
- 2006/95/EEC
- 93/68/EEC
modified or repaired by any person
Your new appliance is guaranteed* and will give
lasting service. This guarantee is only applicable if
the appliance has been installed in accordance with
the installation instructions detailed in this booklet.
To help make best use of your cooking equipment,
please read this booklet carefully.
The appliance is designed specifically for domestic
use and responsibility will not be accepted for use in
any other installation.
When the cooker is first used an odour may be
emitted, this will cease after a period of use
To help remove the 'new' smell, heat up the empty
ovens to maximum temperature for a minimum of
two or three hours, keeping the oven doors closed.
Ensure that the room is well ventilated (e.g. open a
window or use an extractor fan) and that persons
who may be sensitive to the odour avoid any fumes.
It is suggested that any pets be removed from the
room until the smell has ceased.
This odour is due to temporary finish on oven liners
and elements and also any moisture absorbed by
the insulation.
Technical Characteristics
Top Oven
Usable Volume: 32 Litres
ENERGY LABEL - Top Oven
Directive 2002/40/EC on the label of electric ovens
Norm EN 50304
Declared energy consumption for
Natural convection Class
heating mode: Conventional
Main Oven
Usable Volume: 65 Litres
and 68 Litres for DQ47I/2 and DE47X/2
ENERGY LABEL - Main Oven
Directive 2002/40/EC on the label of electric ovens
Norm EN 50304
Declared energy consumption for
Natural convection Class
heating mode: Fan Oven
Voltage and Frequency
230-240V~ 50Hz
2
Page 3

Safety Information
When used properly your appliance is completely
safe but as with any electrical product there are
certain precautions that must be observed.
PLEASE READ THE PRECAUTIONS BELOW
BEFORE USING YOUR APPLIANCE.
Always
Always make sure you remove all packaging and
•
literature from inside the oven and grill
compartments before switching on for the first
time.
• Always make sure you understand the controls
prior to using the appliance.
• Always keep children away from the appliance
when in use as the surfaces will get extremely hot
during and after cooking.
• Always make sure all controls are turned off when
you have finished cooking and when not in use.
• Always stand back when opening an oven door to
allow any build up of steam or heat to disperse.
• Always use dry, good quality oven gloves when
removing items from the oven/grill.
• Always take care to avoid heat/steam burns when
operating the controls.
• Always turn off the electricity supply at the wall
switch before cleaning and allow the appliance to
cool.
• Always make sure the shelves are in the correct
position before switching on the oven.
• Always keep the oven and grill doors closed when
the appliance is not in use.
• Always take care when removing utensils from the
top oven when the main oven is in use as the
contents may be hot.
• Always keep the appliance clean as a build up of
grease or fat from cooking can cause a fire.
• Always follow the basic principles of food handling
and hygiene to prevent the possibility of bacterial
growth.
• Always keep ventilation slots clear of obstructions.
• Always refer servicing to a qualified appliance
service engineer.
• During use the oven becomes hot. Care should be
taken to avoid touching heating elements inside
the oven.
2. COVER THE PAN WITH A FIRE BLANKET OR
DAMP CLOTH, this will smother the flames and
extinguish the fire.
3. LEAVE THE PAN TO COOL FOR AT LEAST 60
MINUTES BEFORE MOVING IT. Injuries are often
caused by picking up a hot pan and rushing
outside with it. NEVER
EXTINGUISHER TO PUT OUT A PAN FIRE as the
force of the extinguisher is likely to tip the pan
over. Never use water to extinguish oil or fat fires.
USE A FIRE
Never
•
Never leave children unsupervised where a
cooking appliance is installed as all cooking
surfaces will be hot during and after use.
• Never allow anyone to sit or stand on any part of
the appliance.
• Never store items above the appliance that
children may attempt to reach.
• Never remove the oven shelves whilst the oven is
hot.
• Never heat up unopened food containers as
pressure can build up causing the container to
burst.
• Never store chemicals, food stuffs or pressurised
containers in or on the appliance, or in cabinets
immediately above or next to the appliance.
• Never operate the grill with the door closed as this
will cause the appliance to overheat.
• Never use the appliance as a room heater.
• Never use the grill to warm plates.
• Never dry any items on the oven doors.
• Never install the appliance next to curtains or other
soft furnishings.
• Never allow children to play with the appliance
controls.
• Never use 'steam cleaners'.
This appliance is not intended for use by persons
(including children) with reduced physical, sensory
or mental cpabilities, or lack of experience and
knowledge, unless they have been given
supervision or instruction concerning use of the
appliance by a person responsible for their safety.
Children should be supervised to ensure that they
do not play with the appliance.
GB
SAFETY ADVICE
IN THE EVENT OF A CHIP PAN OR ANY OTHER
PAN FIRE:
1.TURN OFF THE COOKER APPLIANCE AT THE
WALL SWITCH.
! The appliance should not be operated by people
(including children) with reduced physical, sensory
or mental capacities, by inexperienced individuals or
by anyone who is not familiar with the product.
These individuals should, at the very least, be
supervised by someone who assumes responsibility
for their safety or receive preliminary instructions
relating to the operation of the appliance.
3
Page 4
GB
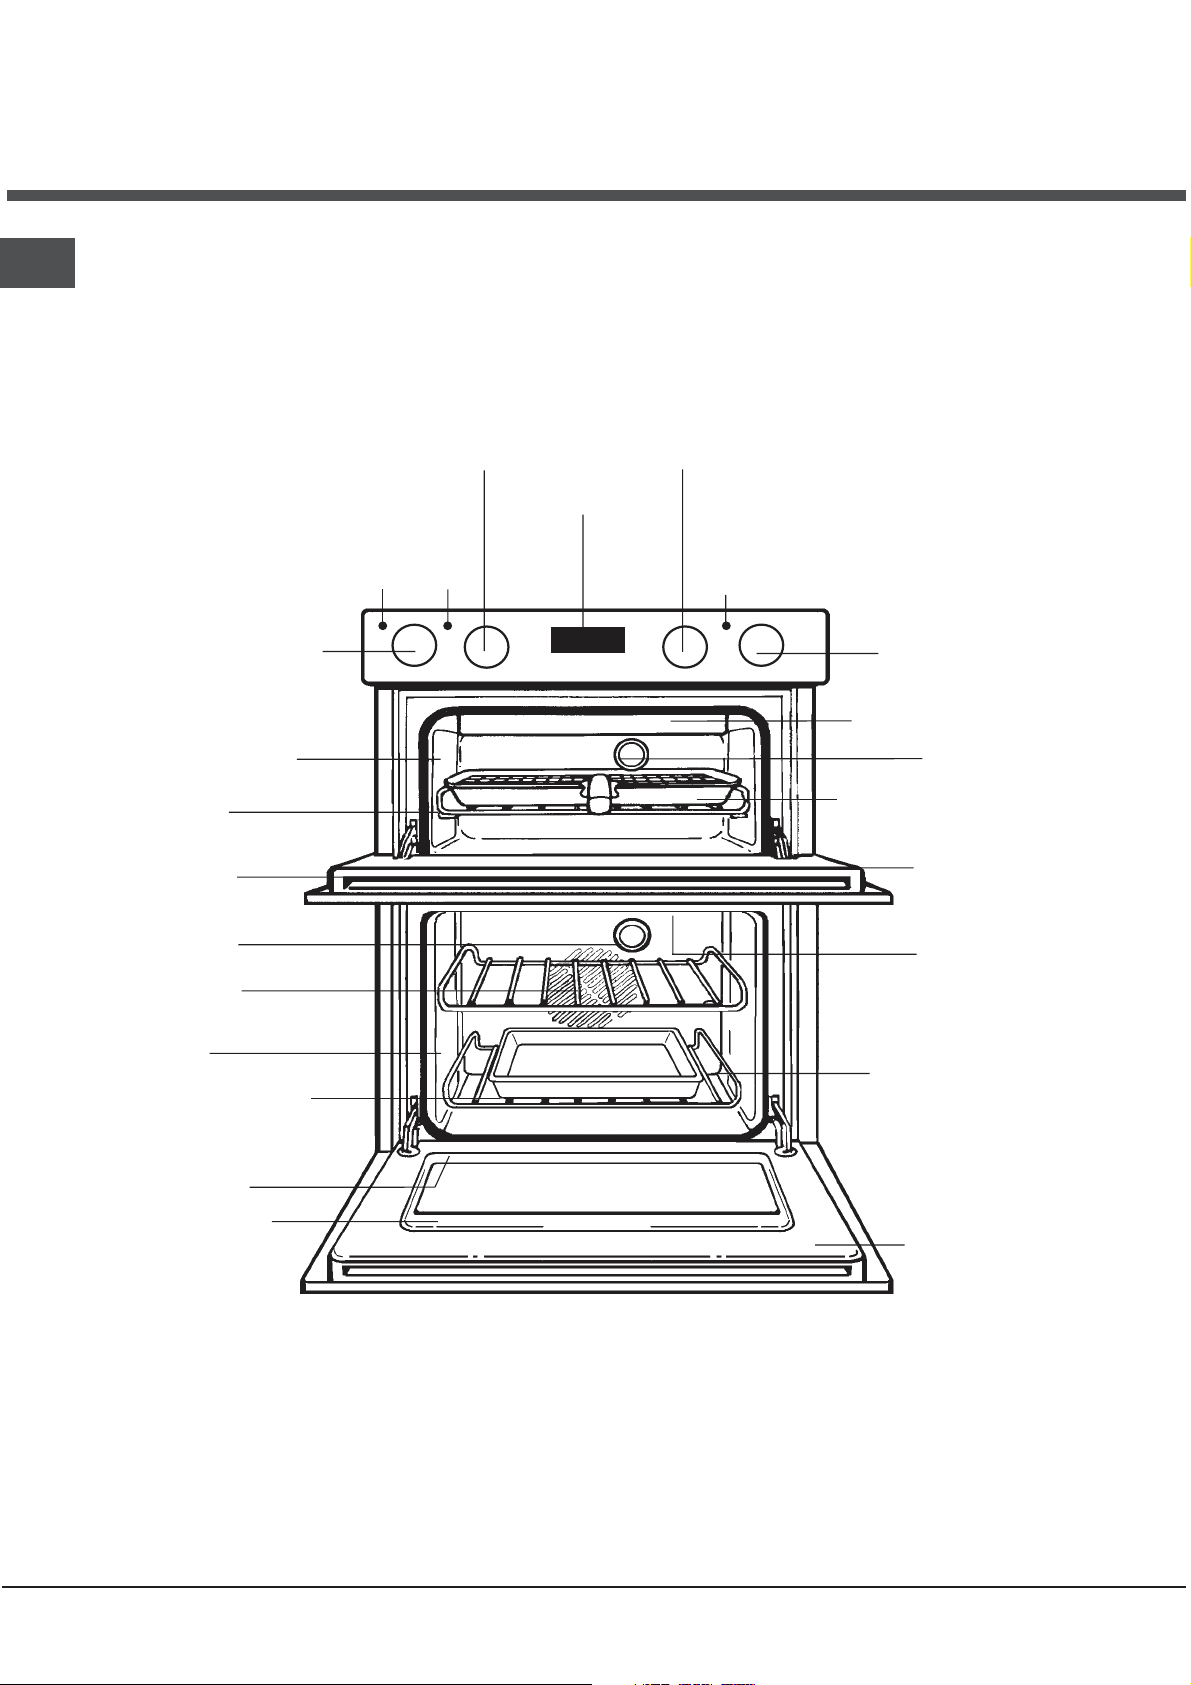
The main parts of your
Double Oven
(BD62SS/2 & BD52B/2 - BD52K/2 - BD52P/2)
WARNING: DO NOT
THESE AREAS CAN BECOME HOT.
TOUCH THE GLASS DOORS WHEN THE OVEN IS IN USE AS
Grill Control
Stay Clean
Liner
Rod
Shelf
Inner
Door
Glass
Oven
Light
Oven
Fan
Stay Clean
Liner
Meat pan and
Roasting rack
Top Oven
Temperature Control
Top
Oven
Grill
Pilot
Light
Pilot
Light
Main Oven
Temperature Control
Timer
Main
Oven
Pilot
Light
Multifunction
Selector
High Speed Grill Element
Top Oven Light
(not all models)
Grill Pan, Food support and
Anti-Splash Tray
Top Oven Door
Fan Grill Element
Oven Shelves
Model &
Serial number
Inner Door
Glass
Main Oven Door
NEVER line the shelves, floor or sides of the oven or grill with aluminium foil as
overheating and damage may result.
4
Page 5
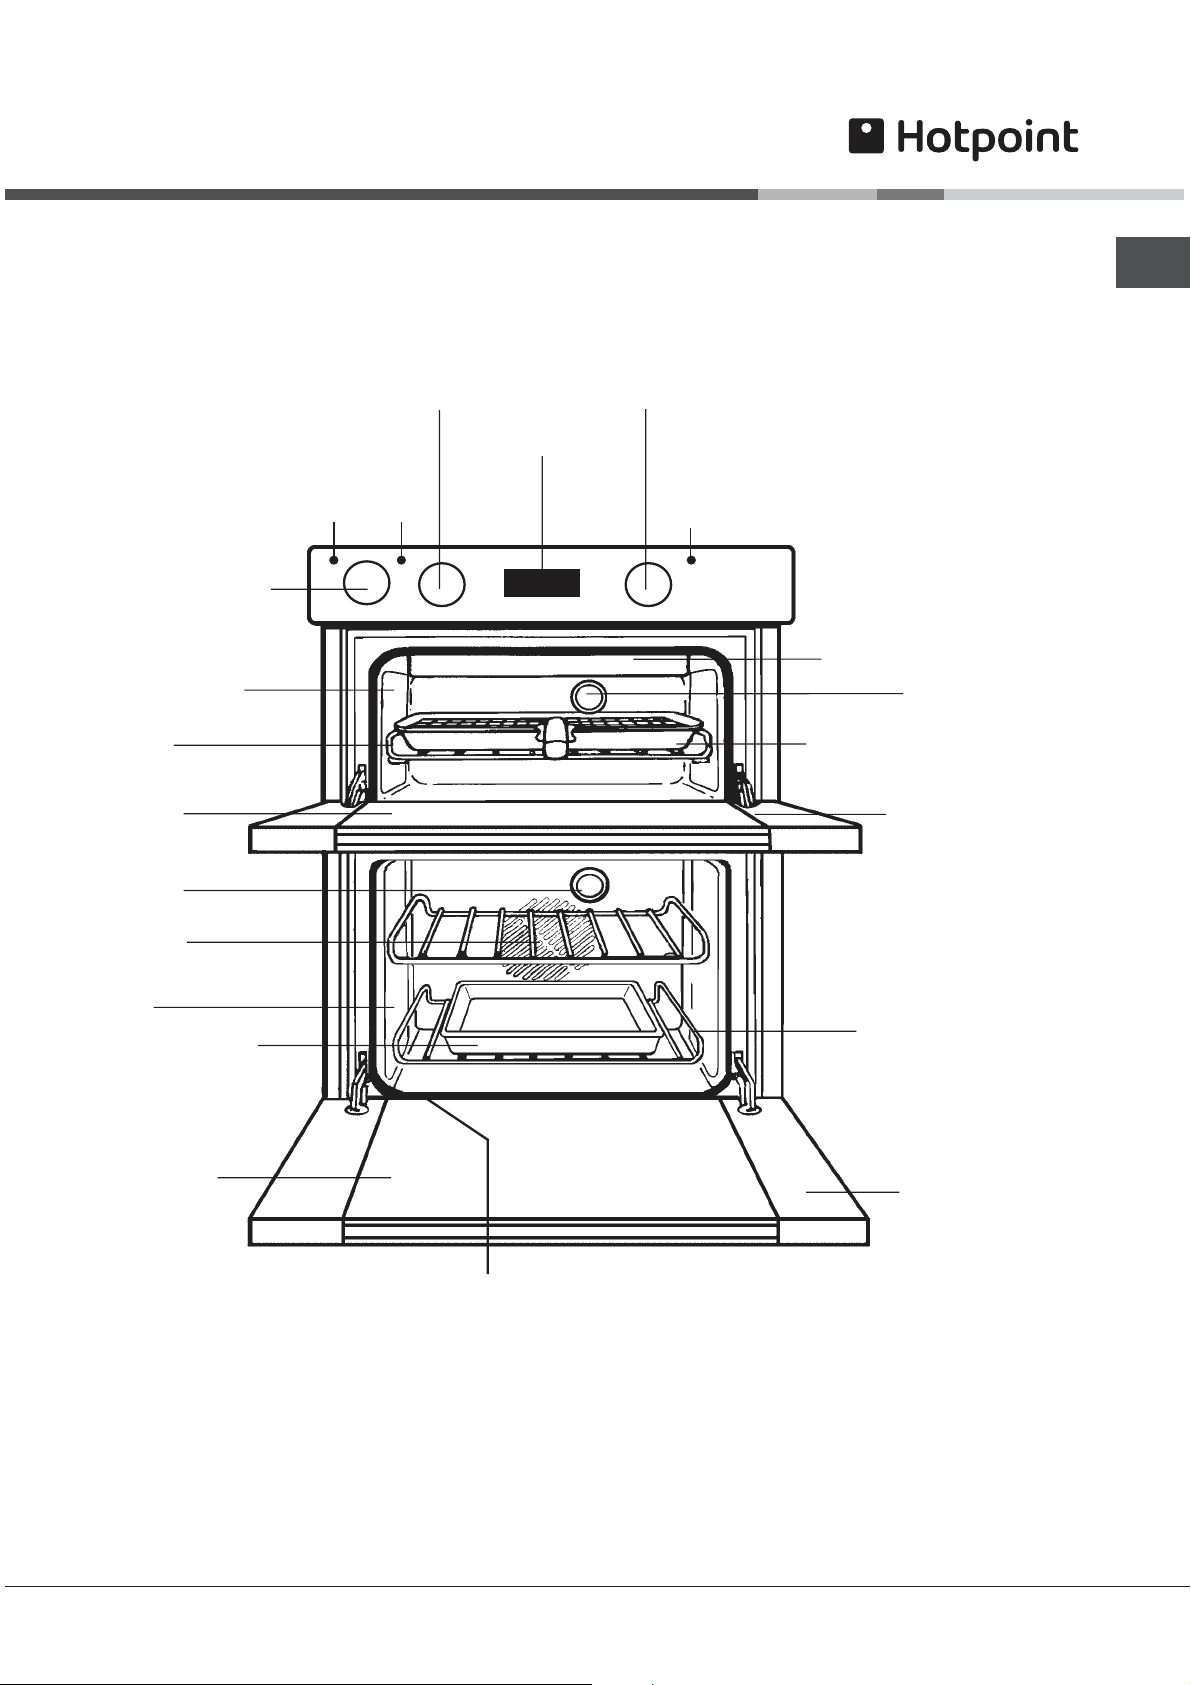
The main parts of your
Double Oven
(DQ47I/2 & DE47X/2)
WARNING: DO NOT TOUCH THE GLASS DOORS WHEN THE OVEN IS IN USE AS
THESE AREAS CAN BECOME HOT.
Grill Control
Stay Clean
Liner
Rod
Shelf
Inner
Door
Glass
Oven
Light
Oven
Fan
Stay Clean
Liner
Meat pan
Top Oven
Temperature Control
Top
Grill
Pilot
Light
Oven
Pilot
Light
Timer
Main Oven
Temperature Control
Main
Oven
Pilot
Light
High Speed Grill Element
Top Oven Light
(not all models)
Grill Pan, Food support and
Anti-Splash Tray
Top Oven Door
Oven Shelves
GB
Inner Door
Glass
MODEL & SERIAL NUMBER LABEL Record the Model No. and the Serial No.
on back page.
Main Oven Door
NEVER line the shelves, floor or sides of the oven or grill with aluminium foil as
overheating and damage may result.
5
Page 6
GB
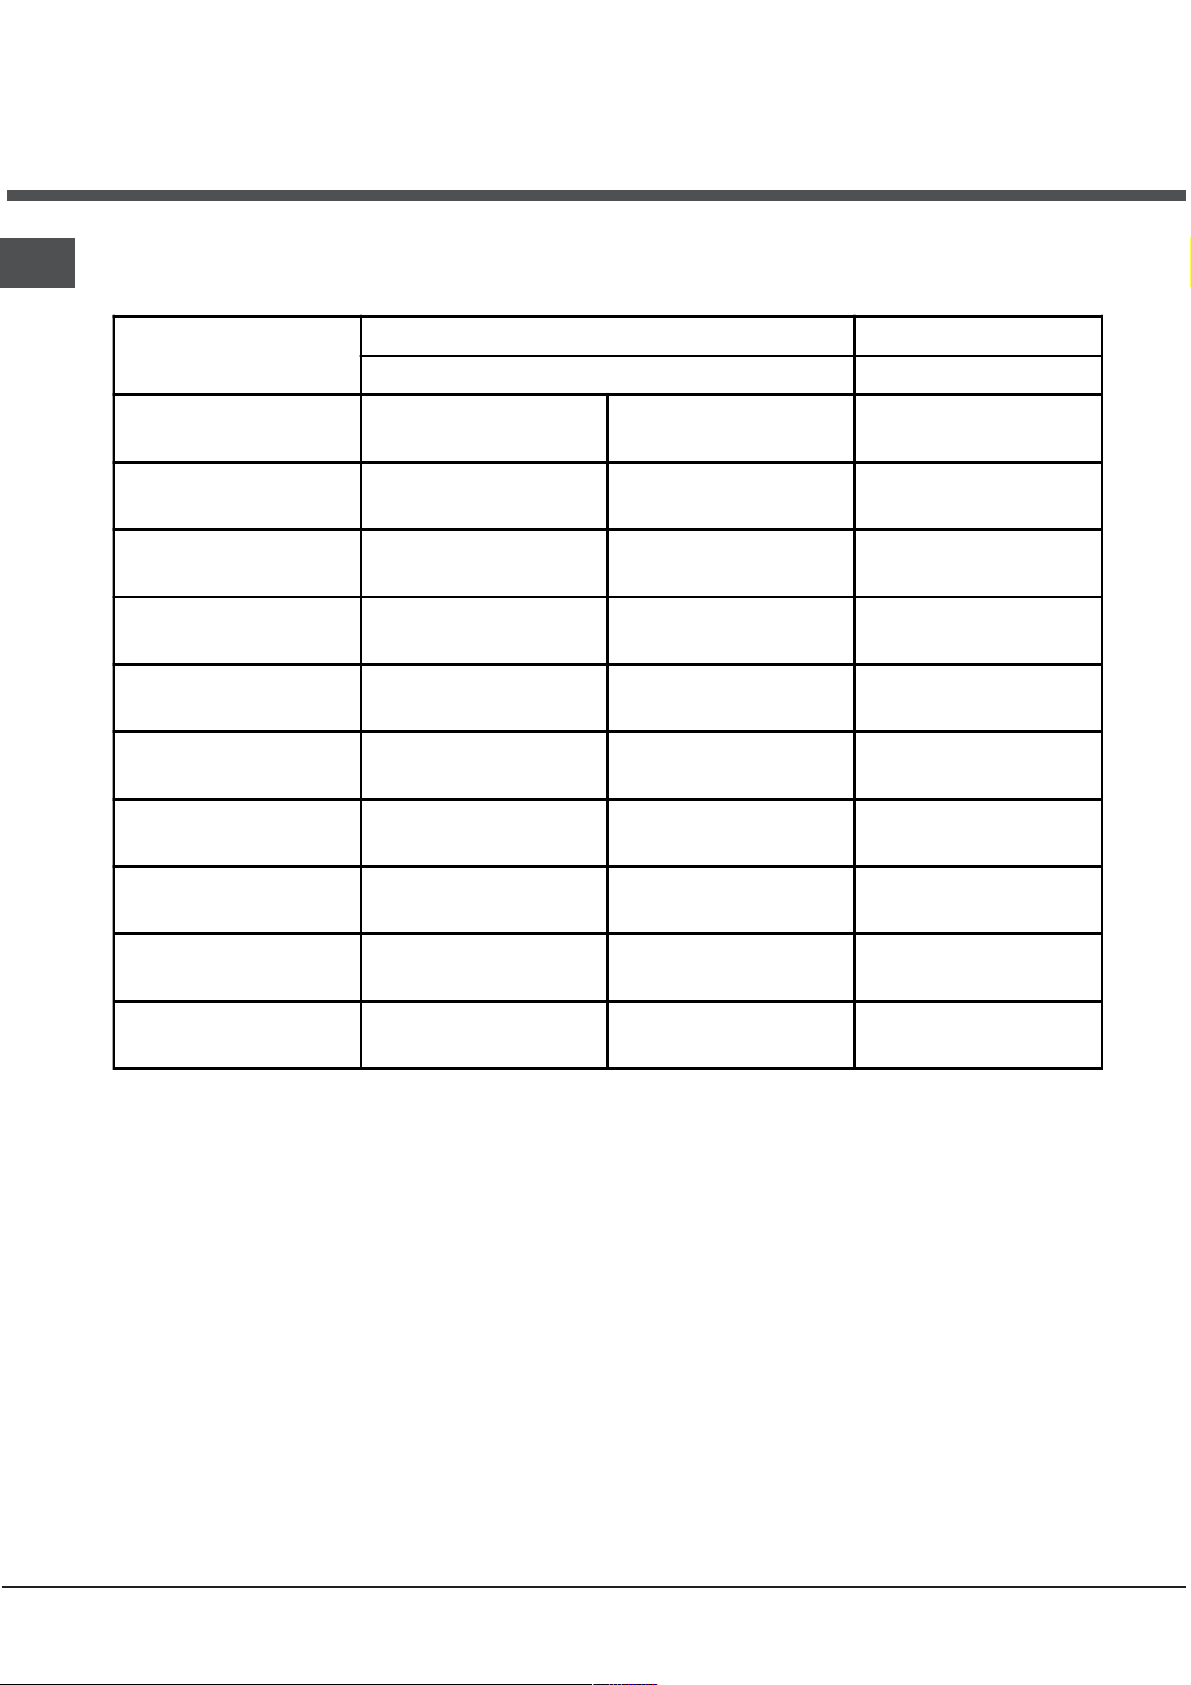
Temperature Conversion Chart
The chart below gives details of comparisons of
oven settings for gas conventional ovens and fan
oven in degrees °F and °C
Gas Mark
½ 250 120 100
1 275 140 120
2 300 150 130
3 325 160 140
4 350 180 160
5 375 190 170
6 400 200 180
7 425 220 200
Conventional Oven Fan Oven
°F °C °C
8 450 230 210
9 475 240 220
6
Page 7
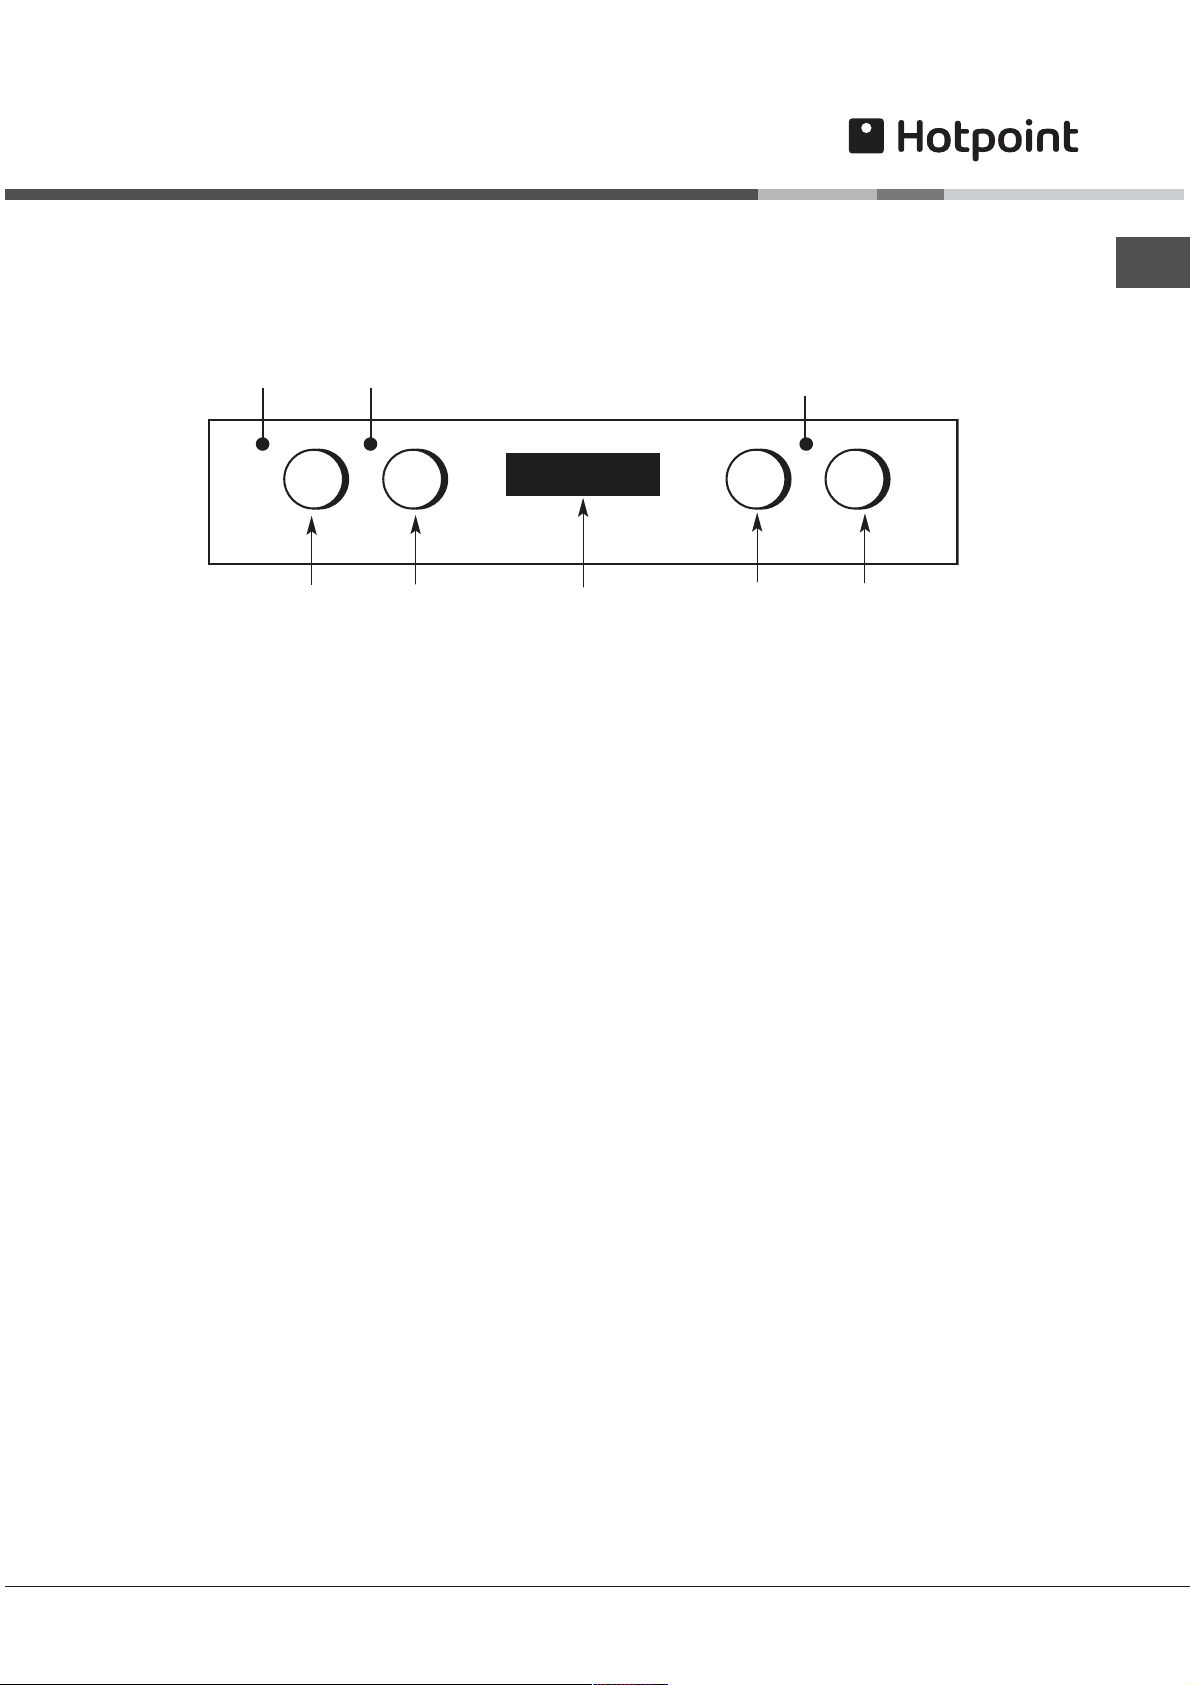
The Controls
(BD62SS/2 & BD52B/2 - BD52K/2 - BD52P/2)
Top
Grill
Pilot
Light
Oven
Pilot
Light
A B C D
Grill
Control
IMPORTANT
Before using your oven in the ordinary way,
ALWAYS make sure that the timer has been set to
MANUAL operation. Unless this is done, the main
oven cannot heat up. Before seeking assistance,
make sure this is done (refer to oven timer
operation).
Top Oven
Temperature
Control
Timer Main Oven
Main
Oven
Pilot
Light
Multifunction
Temperature
Control
TOP OVEN TEMPERATURE CONTROL
Turn the control clockwise to set the top oven
thermostat to the required temperature. An indicator
light will illuminate. This will remain on until the oven
reaches the required temperature. This light will then
cycle on and off as the thermostat maintains control
of the oven thermostat.
Selector
GB
MULTIFUNCTION SELECTOR
Rotate the control knob in either direction to the
required function. Many of the functions will also
require the main oven thermostat to be set before
the oven will heat up.
MAIN OVEN TEMPERATURE CONTROL
This is used in addition to the multifunction selector.
This is used for the functions: fan oven, fan grill, half
grill and full grill and conventional oven.
Turn the control clockwise to set the oven thermostat
to the required temperature.
If the timer is set correctly and the selector switch
set to a suitable function an indicator light will
illuminate. This will remain on until the oven reaches
the required temperature. This light will then cycle on
and off as the thermostat maintains control of the
oven temperature.
GRILL CONTROL
The grill control is designed to provide variable heat
control of either both grill elements on together or the
single left-hand grill element only.
To set the grill power turn the grill control to any
setting MIN (1) - MAX (4), clockwise for FULL grill
and anti-clockwise for HALF grill.
COOLING FAN
A gentle flow of air will be blown below the control
panel when the grill control is used and after a short
period of time when the ovens are used.
N
ote: Whenever the appliance has been used, the
cooling fan may run on or restart itself after all the
controls have been turned off. This indicates that the
appliance is still warm.
7
Page 8
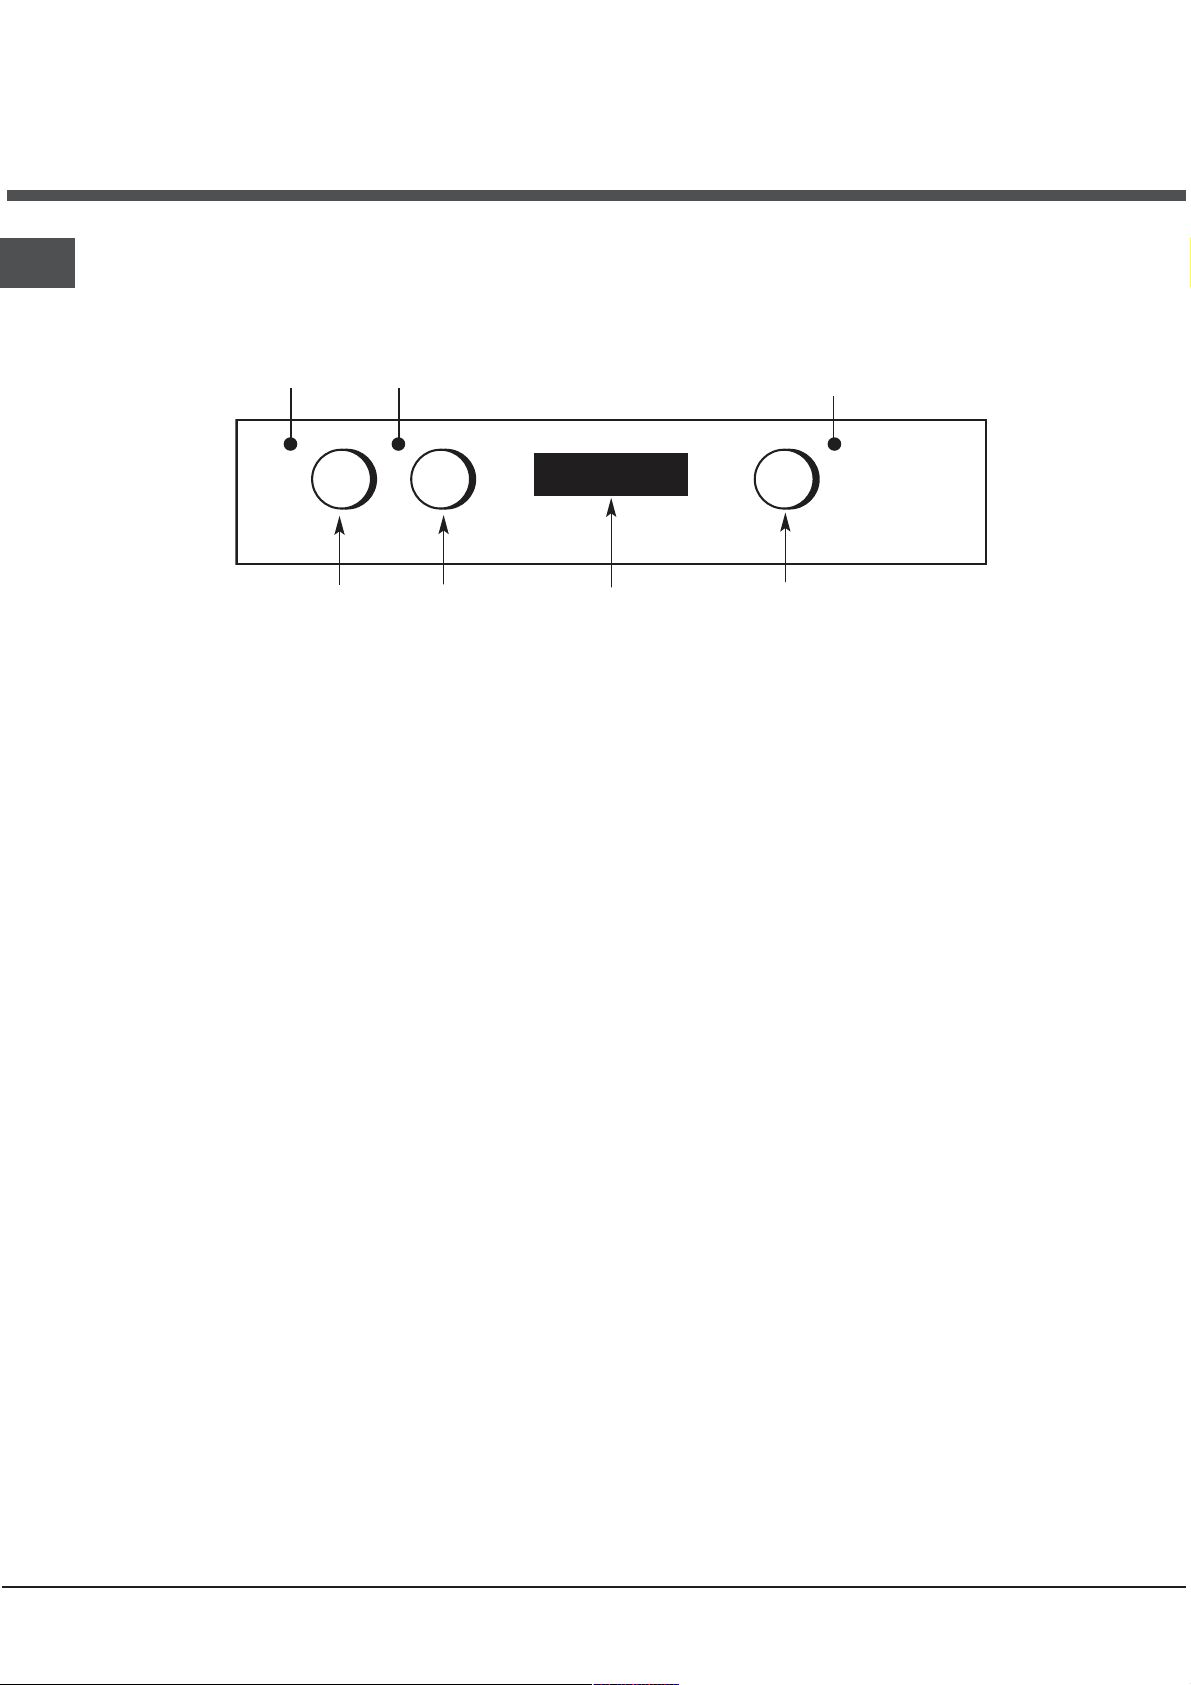
GB
The Controls
(DQ47I/2 & DE47X/2)
Top
Grill
Pilot
Light
Oven
Pilot
Light
A B C
Grill
Control
IMPORTANT
Before using your oven in the ordinary way,
ALWAYS make sure that the timer has been set to
MANUAL operation. Unless this is done, the main
oven cannot heat up. Before seeking assistance,
make sure this is done (refer to oven timer
operation).
Top Oven
Temperature
Control
Main
Oven
Pilot
Light
Timer Main Oven
Temperature
Control
GRILL CONTROL
The grill control is designed to provide variable heat
control of either both grill elements on together or the
single left-hand grill element only.
To set the grill power turn the grill control to any
setting MIN - MAX, clockwise for FULL grill and anticlockwise for HALF grill.
MAIN OVEN TEMPERATURE CONTROL
Turn the control clockwise to set the oven thermostat
to the required temperature.
If the timer is set correctly an indicator light will
illuminate. This will remain on until the oven reaches
the required temperature. This light will then cycle on
and off as the thermostat maintains control of the
oven temperature.
TOP OVEN TEM
Turn the control clockwise to set the top oven
thermostat to the required temperature. An indicator
light will illuminate. This will remain on until the oven
reaches the required temperature. This light will then
cycle on and off as the thermostat maintains control
of the oven thermostat.
PERATURE CONTROL
COOLING FAN
A gentle flow of air will be blown below the control
panel when the grill control is used and after a short
period of time when the ovens are used.
Note: Whenever the appliance has been used, the
cooling fan may run on or restart itself after all the
controls have been turned off. This indicates that the
appliance is still warm.
8
Page 9
Multifunction Selector Switch
(BD62SS/2 & BD52B/2 - BD52K/2 BD52P/2)
The Multifunction selector switch is used when
operating the main oven.
With the exception of the O position the main
oven light will remain on when this selector
switch is used.
Off
With the selector in this position the main oven will
not heat up. The timer will still operate.
Fan Oven
The oven fan and a rear element are controlled when
this function is selected.
Use the main oven thermostat control to set the
required temperature.
Conventional Oven
Top and base elements are controlled when this
function is selected.
Use the main oven thermostat to set the required
temperature.
Half Grill
With this function selected only the left hand side of
the grill will be on.
Use the oven thermostat control to set the required
temperature.
Oven door must be
Full Grill
Both left and right hand grill elements will be on in
this position.
Use the oven thermostat control to set the required
temperature.
Oven door must be
Fan Grill
The oven fan and fan grill element are controlled
when this function is selected.
Use the oven thermostat control to set the required
temperature.
Oven door must be
Fan Only
The oven fan will operate when this function is
selected.
The oven thermostat control
position.
open for grilling.
open for grilling.
closed for fan grilling.
must be set in the off
GB
Light Only
This function switches on the oven light only.
9
Page 10
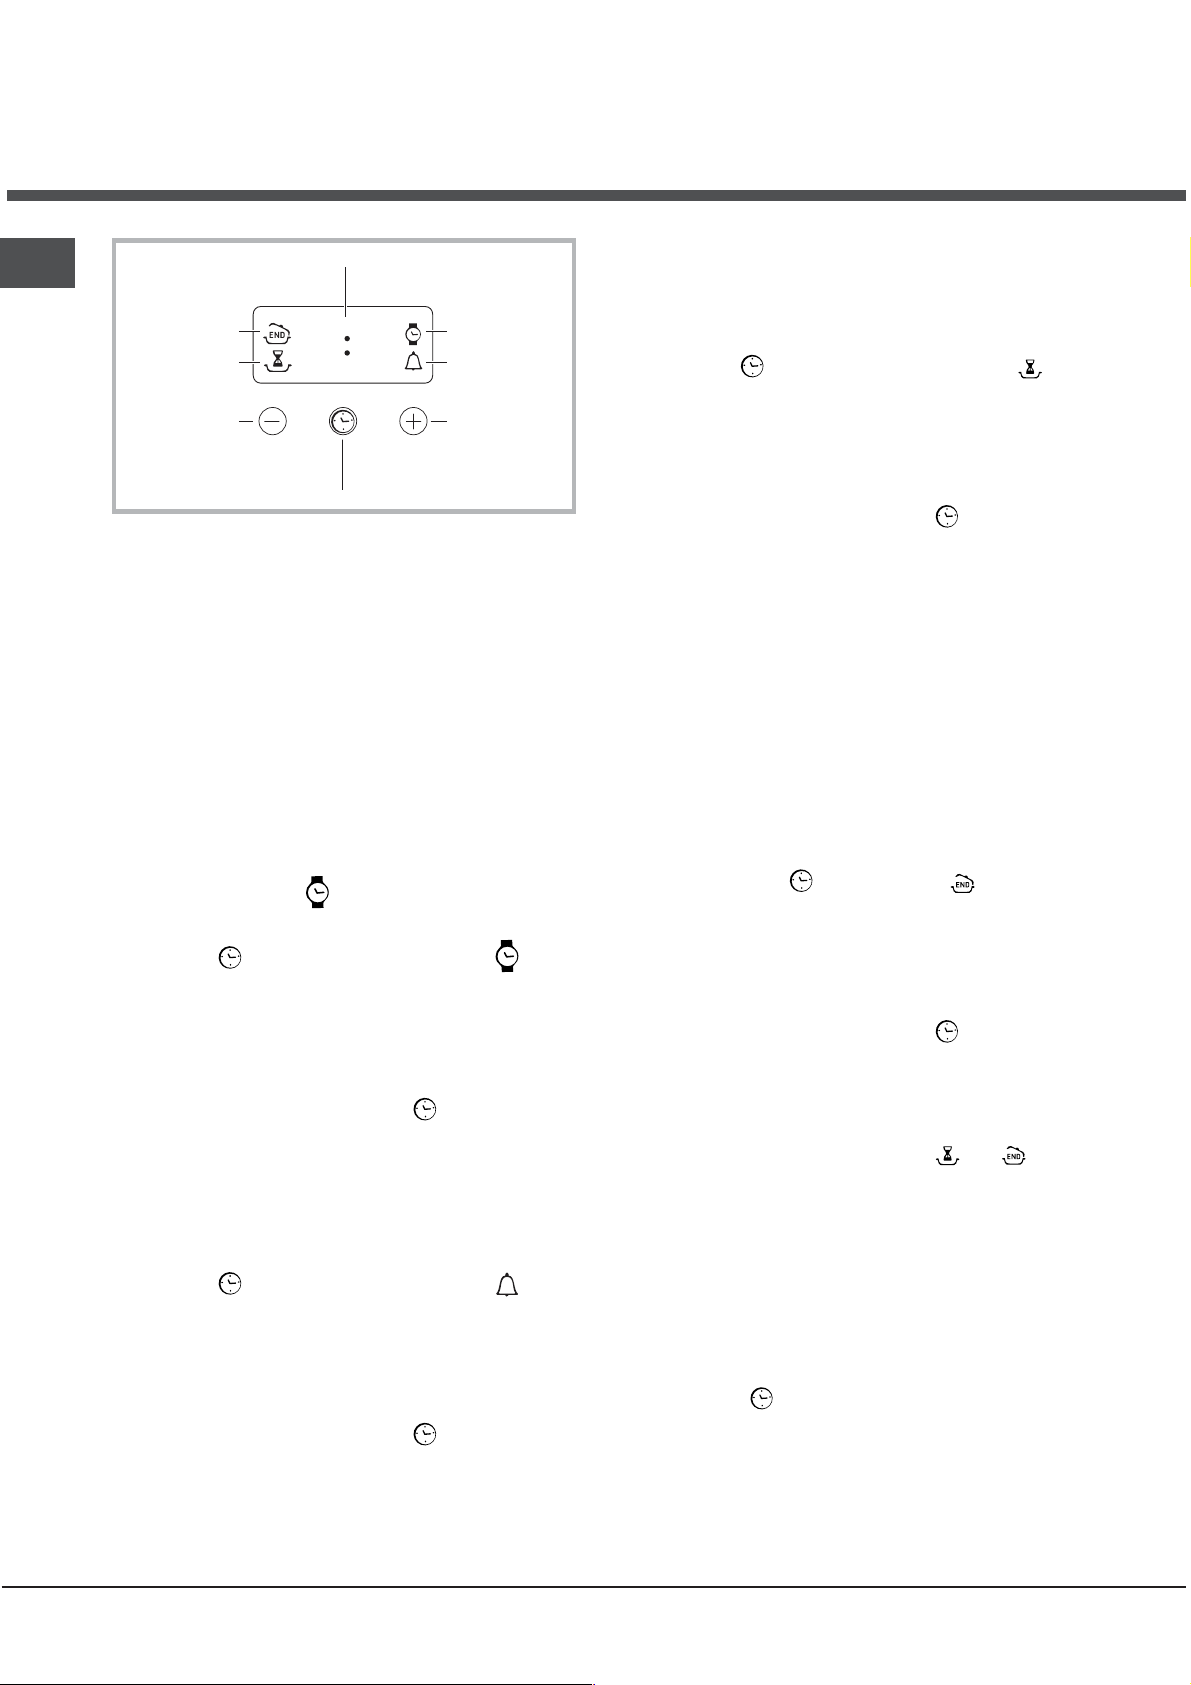
GB
The electronic programmer
Programming cooking
DISPLAY
A cooking mode must be selected before
programming can take place.
END OF
COOKING icon
DURATION
icon
DECREASE TIME
The Top Oven and Main Oven can be controlled by
the automatic timer. When the timer control has been
set for one oven, it is possible to use the other oven
only during the same automatic cooking programme.
NEVER operate the grill when the ovens are set to
cook automatically because the oven cavity can
become warm and this may cause bacterial growth
in food.
button
•• ••
SET TIME
button
CLOCK icon
TIMER icon
INCREASE TIME
button
Setting the clock
The clock may be set when the oven is switched off
or when it is switched on, provided that a the end time
of a cooking cycle has not been programmed
previously.
After the appliance has been connected to the mains,
or after a blackout, the
digits on the DISPLAY will begin to flash.
1. Press the
and the four digits on the display begin to flash.
2. Use the + and - buttons to adjust the time; if you
press and hold either button, the display will scroll
through the values more quickly, making it quicker and
easier to set the desired value.
3. Wait for 10 seconds or press the
finalise the setting.
button several times until the icon
icon and the four numerical
button again to
Setting the timer
This function does not interrupt cooking and does not
affect the oven; it is simply used to activate the buzzer
when the set amount of time has elapsed.
1. Press the
and the three digits on the display begin to flash.
2. Use the + and - buttons to set the desired time;
if you press and hold either button, the display will
scroll through the values more quickly, making it
quicker and easier to set the value.
3. Wait for 10 seconds or press the
finalise the setting.
The display will then show the time as it counts down.
When this period of time has elapsed the buzzer will
be activated.
button several times until the icon
button again to
Programming the cooking duration
1. Press the
and the three digits on the DISPLAY begin to flash.
2. Use the + and - buttons to set the desired
duration; if you press and hold either button, the
display will scroll through the values more quickly,
making it quicker and easier to set the value.
3. Wait for 10 seconds or press the
finalise the setting.
4. When the set time has elapsed, the text END
appears on the DISPLAY, the oven will stop cooking
and a buzzer sounds. Press any button to stop it.
For example: it is 9:00 a.m. and a time of 1 hour
and 15 minutes is programmed. The programme
will stop automatically at 10:15 a.m.
Setting the end time for a cooking mode
A cooking duration must be set before the cooking
end time can be scheduled.
1. Follow steps 1 to 3 to set the duration as detailed
above.
2. Next, press the
four digits on the DISPLAY begin to flash.
3. use the + and - buttons to adjust the cooking
end time; if you press and hold either button, the
display will scroll through the values more quickly,
making it quicker and easier to set the desired value.
4. Wait for 10 seconds or press the
finalise the setting.
5. When the set time has elapsed, the text END
appears on the DISPLAY, the oven will stop cooking
and a buzzer sounds.
Programming has been set when the and buttons
are illuminated. The DISPLAY shows the cooking end
time and the cooking duration alternately.
For example: It is 9:00 a.m. and a duration of 1
hour has been programmed. 12:30 is scheduled as
the end time. The programme will start
automatically at 11:30 a.m.
Cancelling a programme
To cancel a programme:
press the
the setting you wish to cancel and the digits on the
display are no longer flashing. Press the - button
until the digits 00:00 appear on the display.
Press and hold the + and - buttons; this will
cancel all the settings selected previously,
including timer settings.
button several times until the icon
button again to
button until the icon and the
button again to
Press any button to stop it.
button until the icon corresponding to
10
Page 11
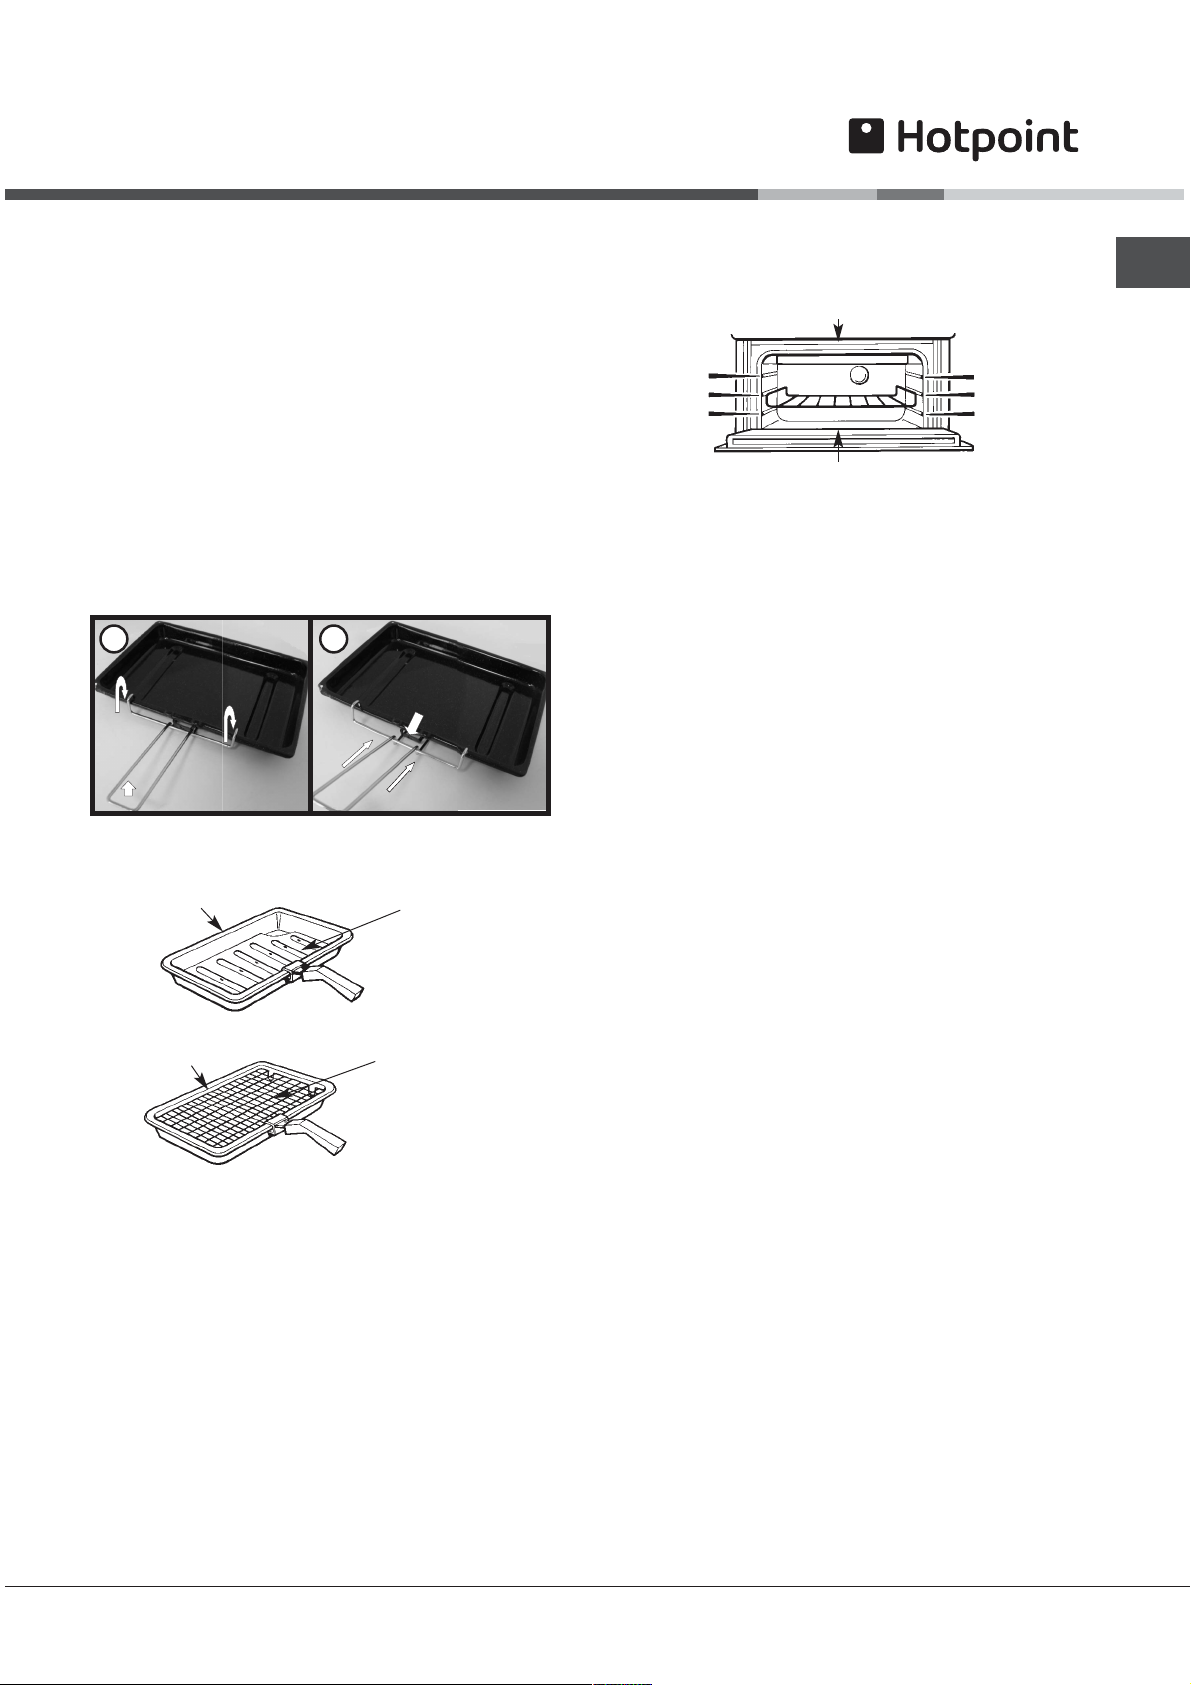
Grill Pan and Handle
T
Using the grill pan kit
The grill pan handle is detachable from the pan to
facilitate cleaning and storage. Fix the pan handle
securely before use:
1. Fit the handle to the grill pan so the external hooks
embrace the that edge of the pan (fig. 1)
2. Make sure that the middle part of the handle fits
exactly the protruding support of the pan (fig .2)
and holds the pan from the bottom.
The food must be placed on the rack in the grill pan.
Position the grill pan on top of the oven rack. The
best results are achieved by placing the oven rack
on the uppermost shelves. Pouring a little water into
the grill pan will make the collection of grease
particles more efficient and prevent the formation of
smoke.
1
Grill Pan, Food Support and Anti-Splash Tray
GRILL PAN
2
ANTI-SPASH
TRAY
Top Oven Shelf Positioning for Grilling
ENSURE SHELVES ARE
FITTED CORRECT WAY UP.
3
2
1
DO NOT PLACE FOOD/UTENSILS
DIRECTLY ON THE OVEN FLOOR
NOTE:
3
2
1
- Preheat the grill if indicated on grill chart.
- The grill pan must be placed on the correct
shelf and positioned centrally under the grill
element.
- Leave the control at MAX for toast, and for
fast cooking of foods.
- For thicker foods requiring longer cooking,
turn the switch to a lower setting after the
initial sealing on both sides at MAX. The
thicker the food, the lower the control should
be set.
- DO NOT line the grill pan with aluminium
foil, as this increases the amount of fat
spitting which can cause a fire.
- After use always return the grill control to
the OFF (0) position.
GB
GRILL PAN
Note: To stop fat splashing onto the grill mesh, it
is important to use the ant-splash tray as shown
in the grilling chart. Always clean the grill pan,
anti-splash tray and food support after each use.
FOOD SUPPOR
11
Page 12
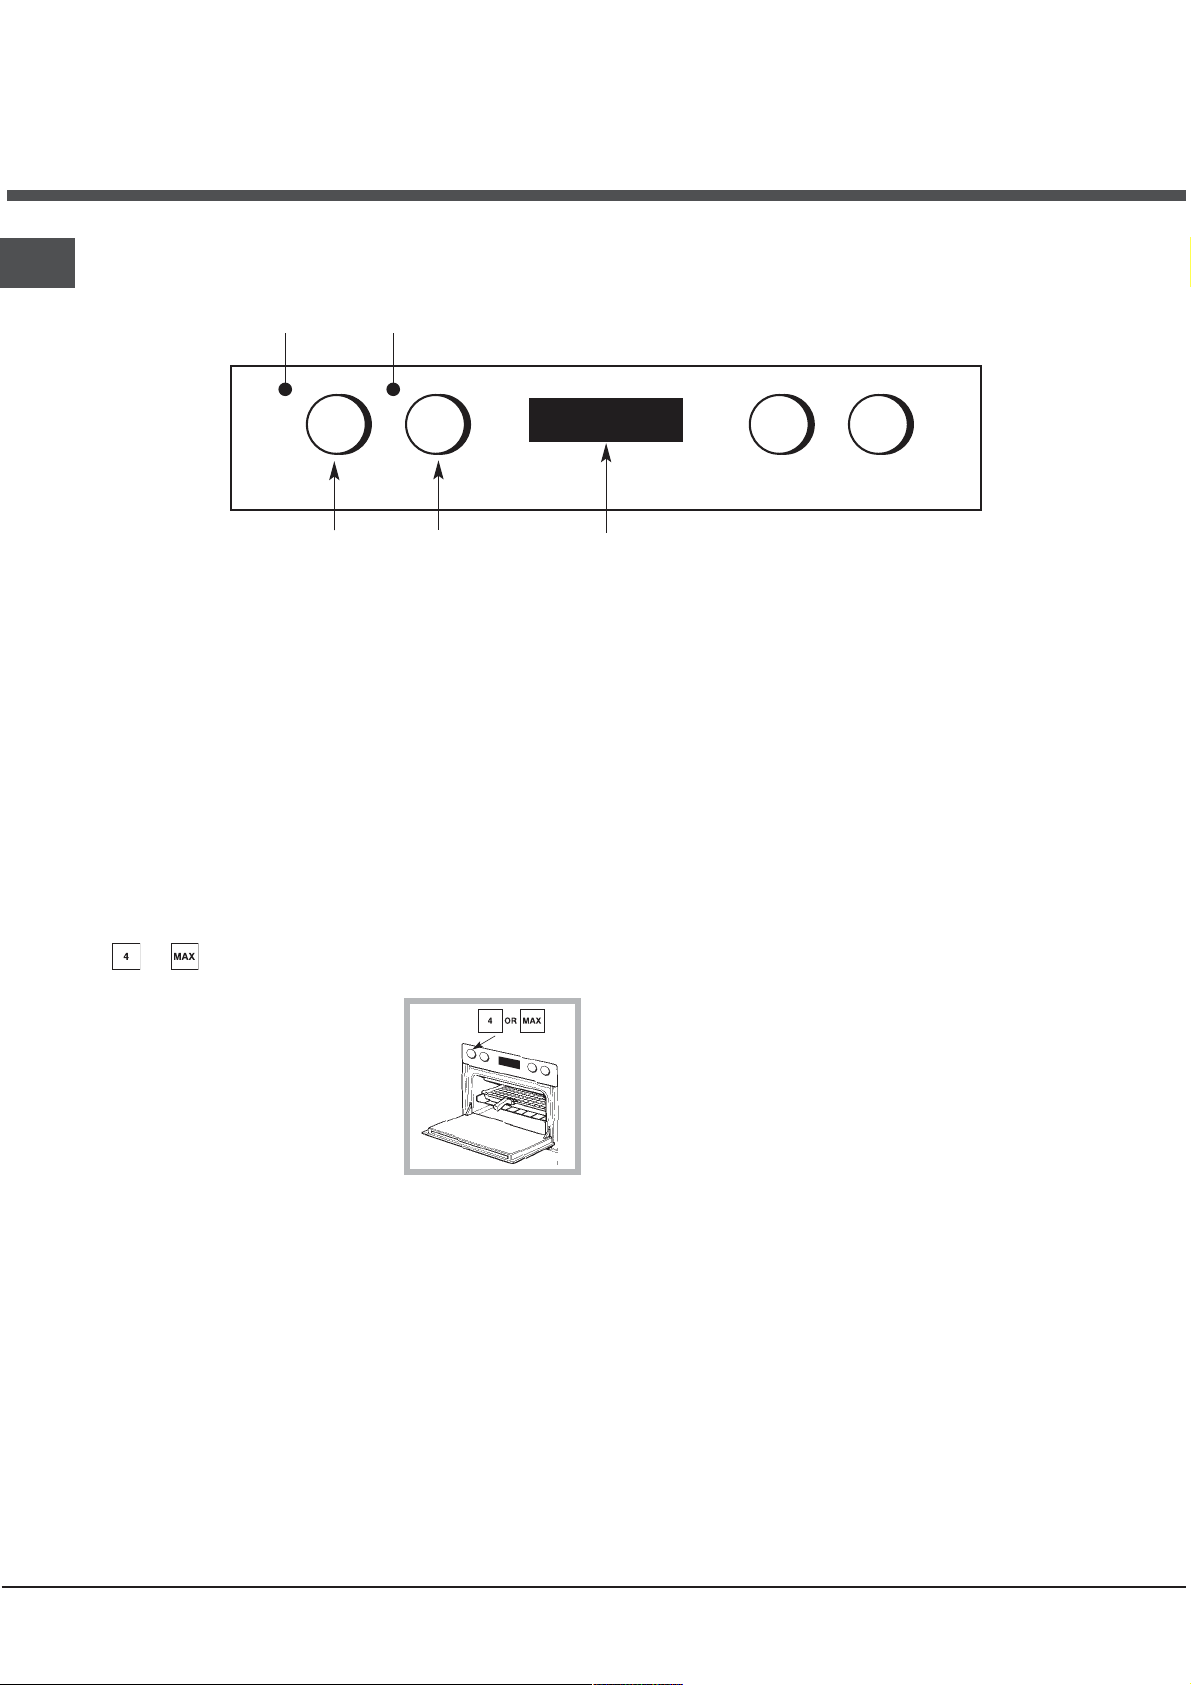
Operation when using
the Top Oven for Grilling
GB
Top
Grill
Pilot
Light
Oven
Pilot
Light
A B C D
Grill
Control
Step 1 Ensure oven timer is set to manual. Place
the shelf in the correct position (see Grilling
Guide). Place the food/grill pan on the
shelf, positioned centrally under the grill
element. Leave the top oven door fully
open.
Step 2 Turn knob (A), clockwise for FULL grill or
anti-clockwise for HALF grill,
grill setting MIN (1) MAX (4). NOTE: MIN
(1) = Low, MAX (4) = High.
Top Oven
Temperature
Control
to select the
Timer
Grill Controls Example:
or = High Grill Setting (depending on model)
NOTE: Do not grill with
the grill/top oven
door closed.
Step 3 After use, turn the
grill control (A) to
the off position (0).
! The Grill Pilot Light is lit when grill is used.
! Ensure knob (B) is in "0 position". The grill and
the top oven cannot work simultaneously
DO NOT
appliance when the grill is in use as the surfaces
get extremely hot.
allow young children near to the
DOOR POSITION
FOR GRILLING
12
Page 13
Using the Top Oven for
g
g
g
g
g
g
g
g
g
g
g
g
g
g
g
g
Solarplus Grilling
Your cooker is not fitted with a conventional grill.
Hotpoint have developed a Solarplus high speed
grill which is designed to reduce your grilling times.
It is quicker because it takes less time to warm up
from cold. Conventional grills require 5 minutes preheat before food can be placed beneath them, but
for normal grilling the Solarplus grill can be used
directly from cold without any pre-heat.
However, when toasting, optimum performance is
achieved by pre-heating the grill for about 1 minute.
NOTE: You will notice that the grill elements are
protected by a wire mesh. This stops you from
touching live p
arts.
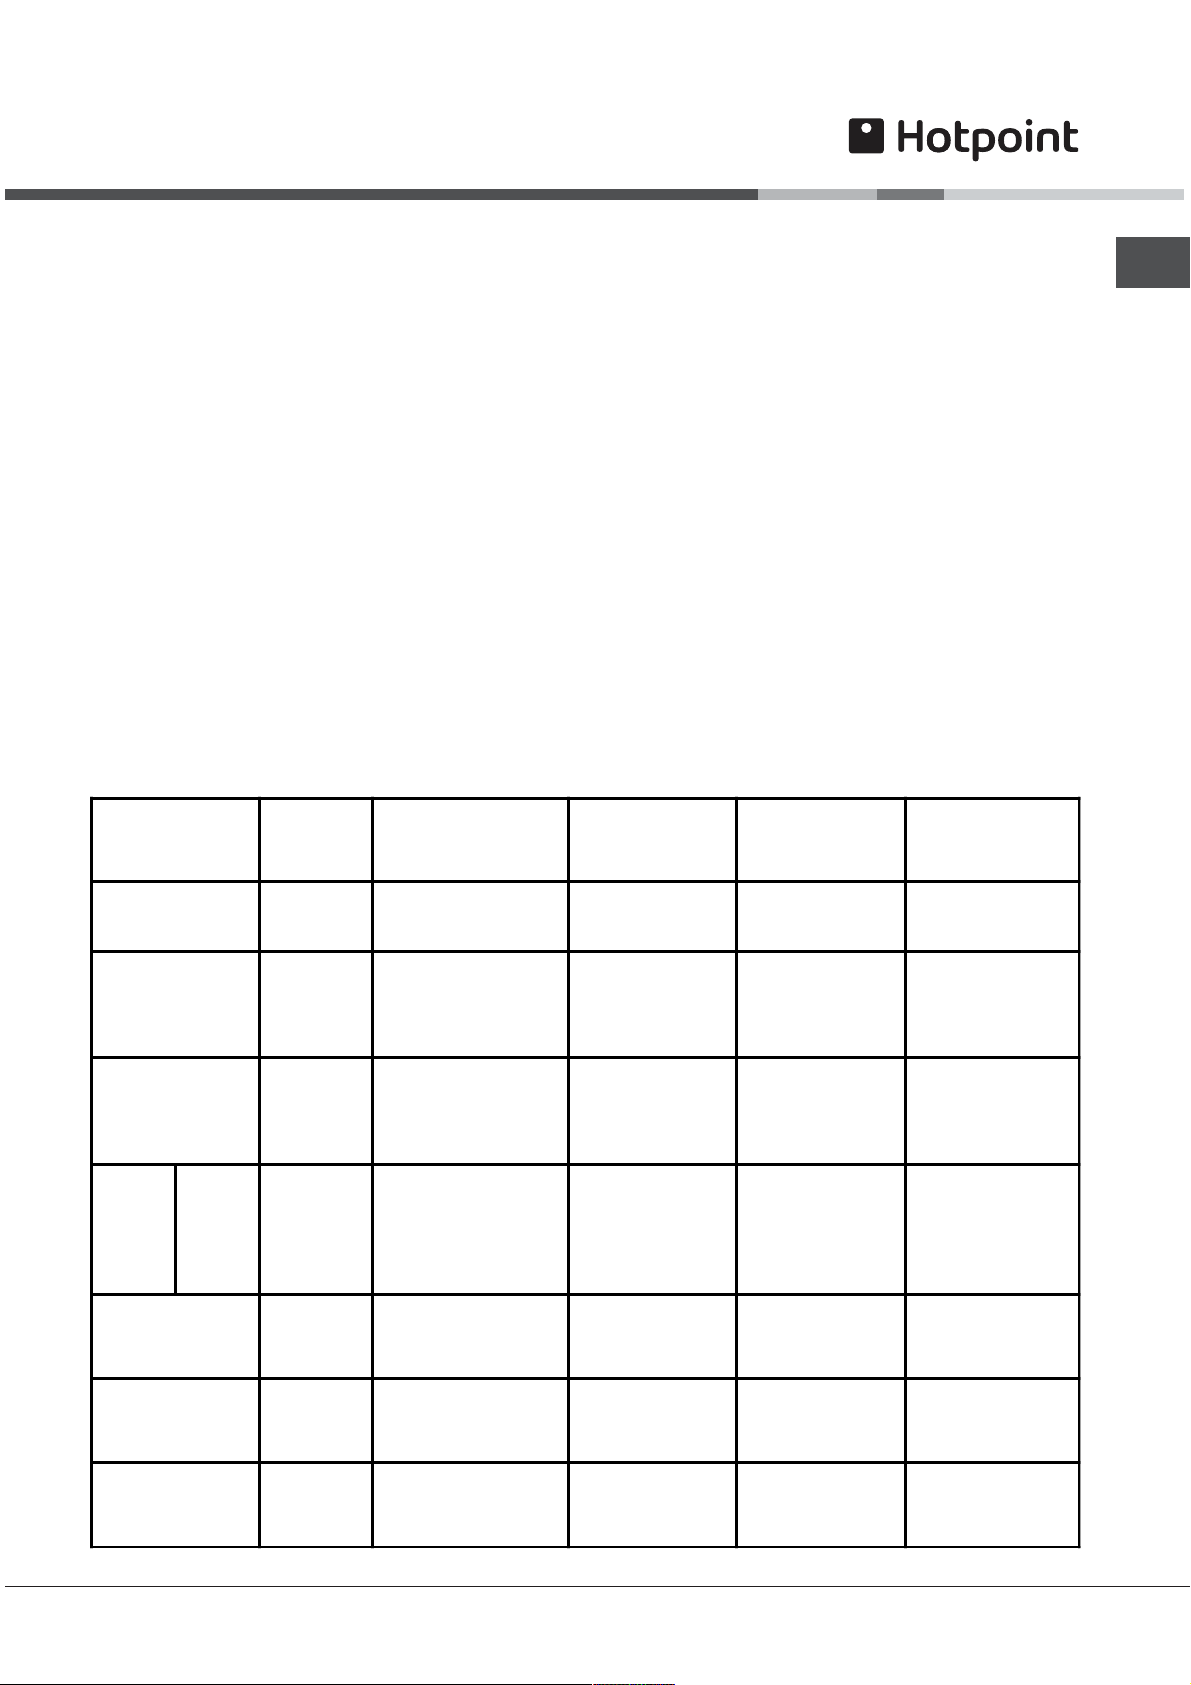
Guide to Solarplus Grilling
SHELF POSITION
FROM THE BASE
OF THE OVEN
FODD
PREHEAT
FOR ONE
MINUTE
DO NOT under any circumstances insert objects
into the grill mesh as this could damage the
element wire, break the glass tubes or if
is on, cause electric shock.
During use, the wire mesh may become soiled. DO
NOT attempt to clean it while the grill is still on. Turn
off at the control and allow to cool before cleaning.
Care must be taken to ensure the grill mesh is not
distorted - do not store the grill pan handle on the
food grid when the shelf is in the highest position.
IMPORTANT:
Grilling should never be undertaken with the
grill/top oven door closed.
SETTING
APPROXIMATE
COOKING TIME
the grill
PAN TO BE
USED
GB
Toastin
meat, Sausa
Gammon steaks
potato products
Brownin
e
of Bread
Products
Small cuts of
Bacon
Chops etc.
Whole
Fish:
Fillets
Fin
ers
Pre-cooked
Pizzas None 3 or 2
of food
. Cauliflower
Cheese
e,
Settin
MAX
None 3 or 2
None 2
None
None
None
None 3 or 2
Settin
MAX
3 or 2Settin
for 4 minutes then
2
3
3
Settin
MEDIUM (2) and
MAX (4) position
Settin
MEDIUM (2) and
MAX (4) position
3 or 2Settin
MAX (4) 3 - 5 minutes
MAX (4)
Settin
reduce to lower
settin
Settin
MAX (4)
for 6-8 minutes
then reduce to
lower settin
Settin
MAX (4)
between
between
MAX (4) 5 - 10 minutes
10 - 15 minutes
25 - 30 minutes
6 - 8 minutes
10 - 15 minutes
10 - 15 minutes
10 - 12 minutes
10 - 12 minutes
Grill pan and food
support
Grill pan,
antisplash tray
and foo d support
Grill pan,
antisplash tray
and foo d support
Grill pan and food
support
Grill pan and food
support
Grill pan and food
support
Dish placed
directly on the
shelf
13
Page 14
GB
Using the Top Oven as
a Convection Oven
The top oven should be used to cook small
quantities of food. The oven is designed so that the
grill element operates at a reduced heat output, this
is combined with a heating element situated
underneath the floor of the oven. To ensure even
cooking of the food it is important that cooking
utensils are positioned correctly on the oven shelf so
that the element is directly above. As a guide, the
front of the utensil should be approx.100mm (4")
from the front of the shelf.
Note: Charts are a guide only, to suit personal
taste and requirements, it may be necessary to
increase or d
may also be necessary to increase or decrease
cooking times.
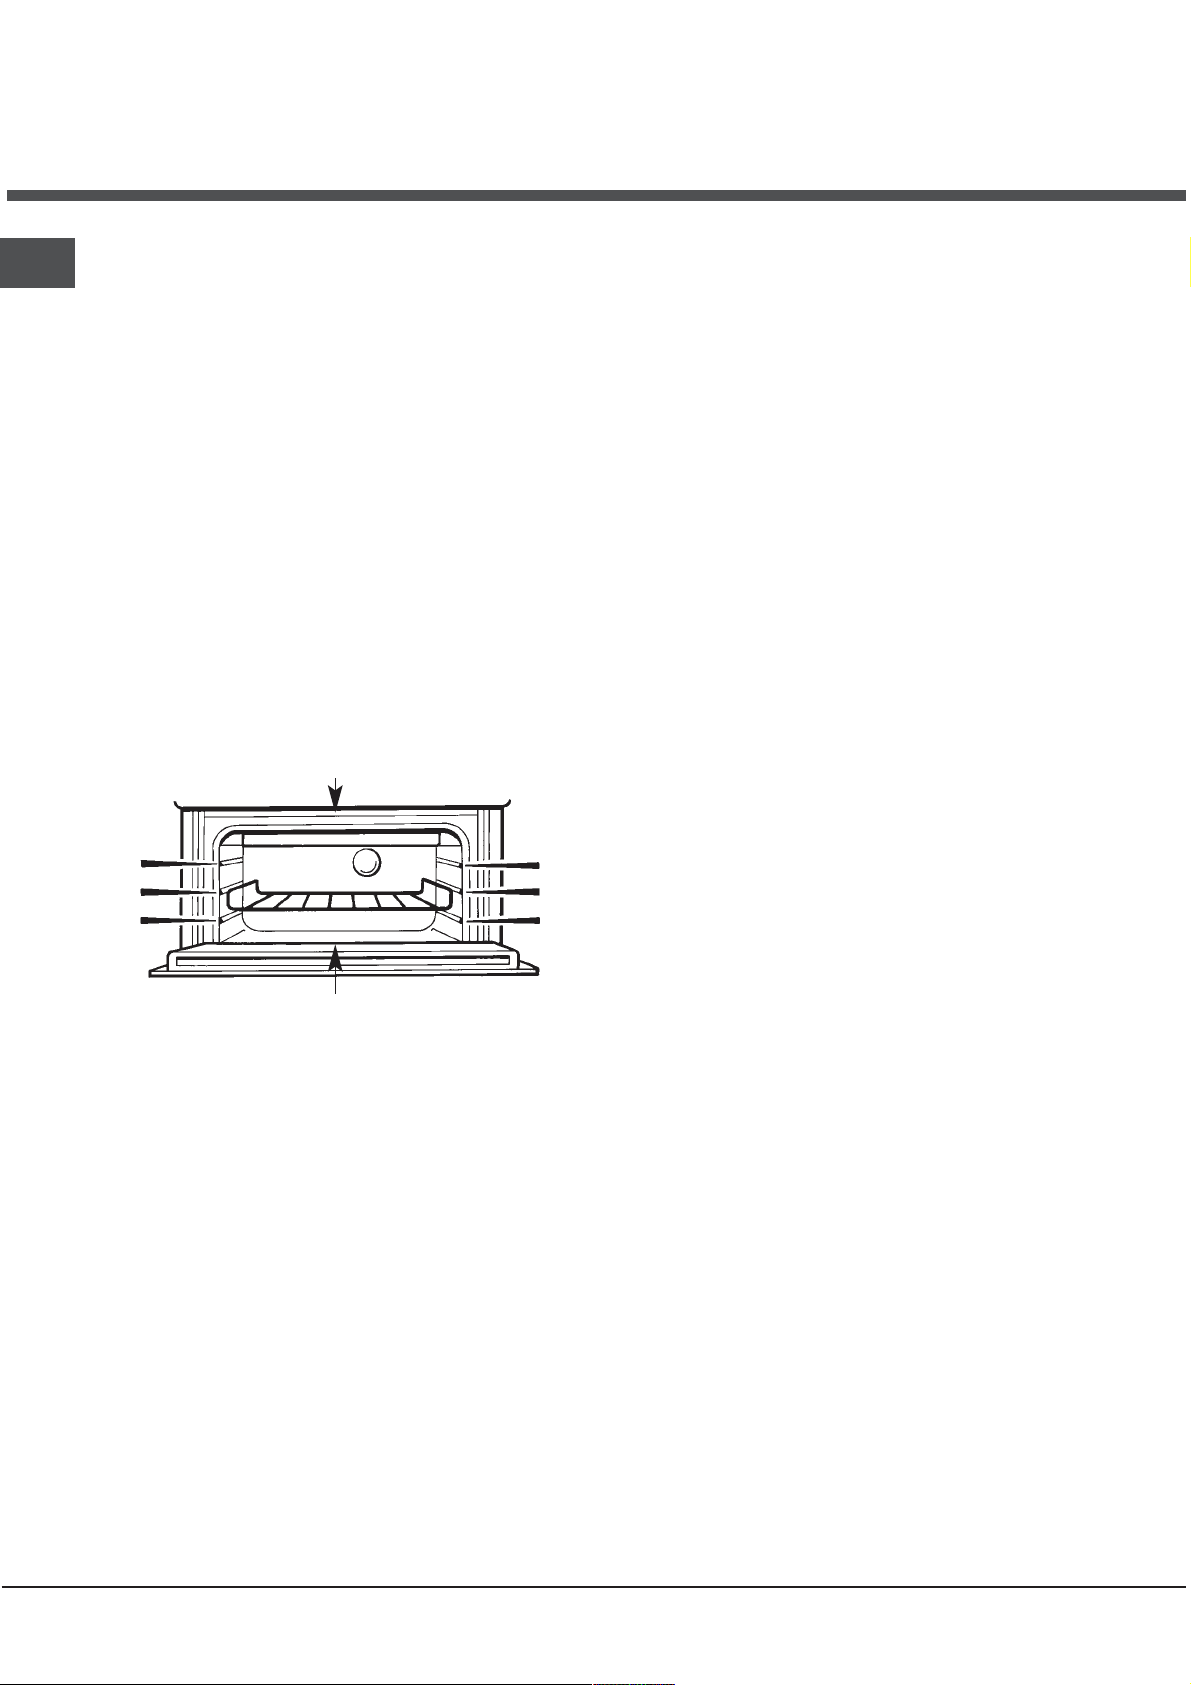
SHELF POSITIONING
ecrease temperatures by 10°C. It
ENSURE SHELVES ARE
FITTED CORRECT WAY UP.
3
2
1
DO NOT PLACE FOOD/UTENSILS
DIRECTLY ON THE OVEN FLOOR
There should always be at least 25mm (1 inch)
between the top of the food and the grill element.
WARNING: Items stored in the top oven will get
hot when the main oven is in use.
DO NOT allow young children near to the
appliance wh
surfaces get extremely hot.
en the top oven is in use as the
3
2
1
14
Page 15
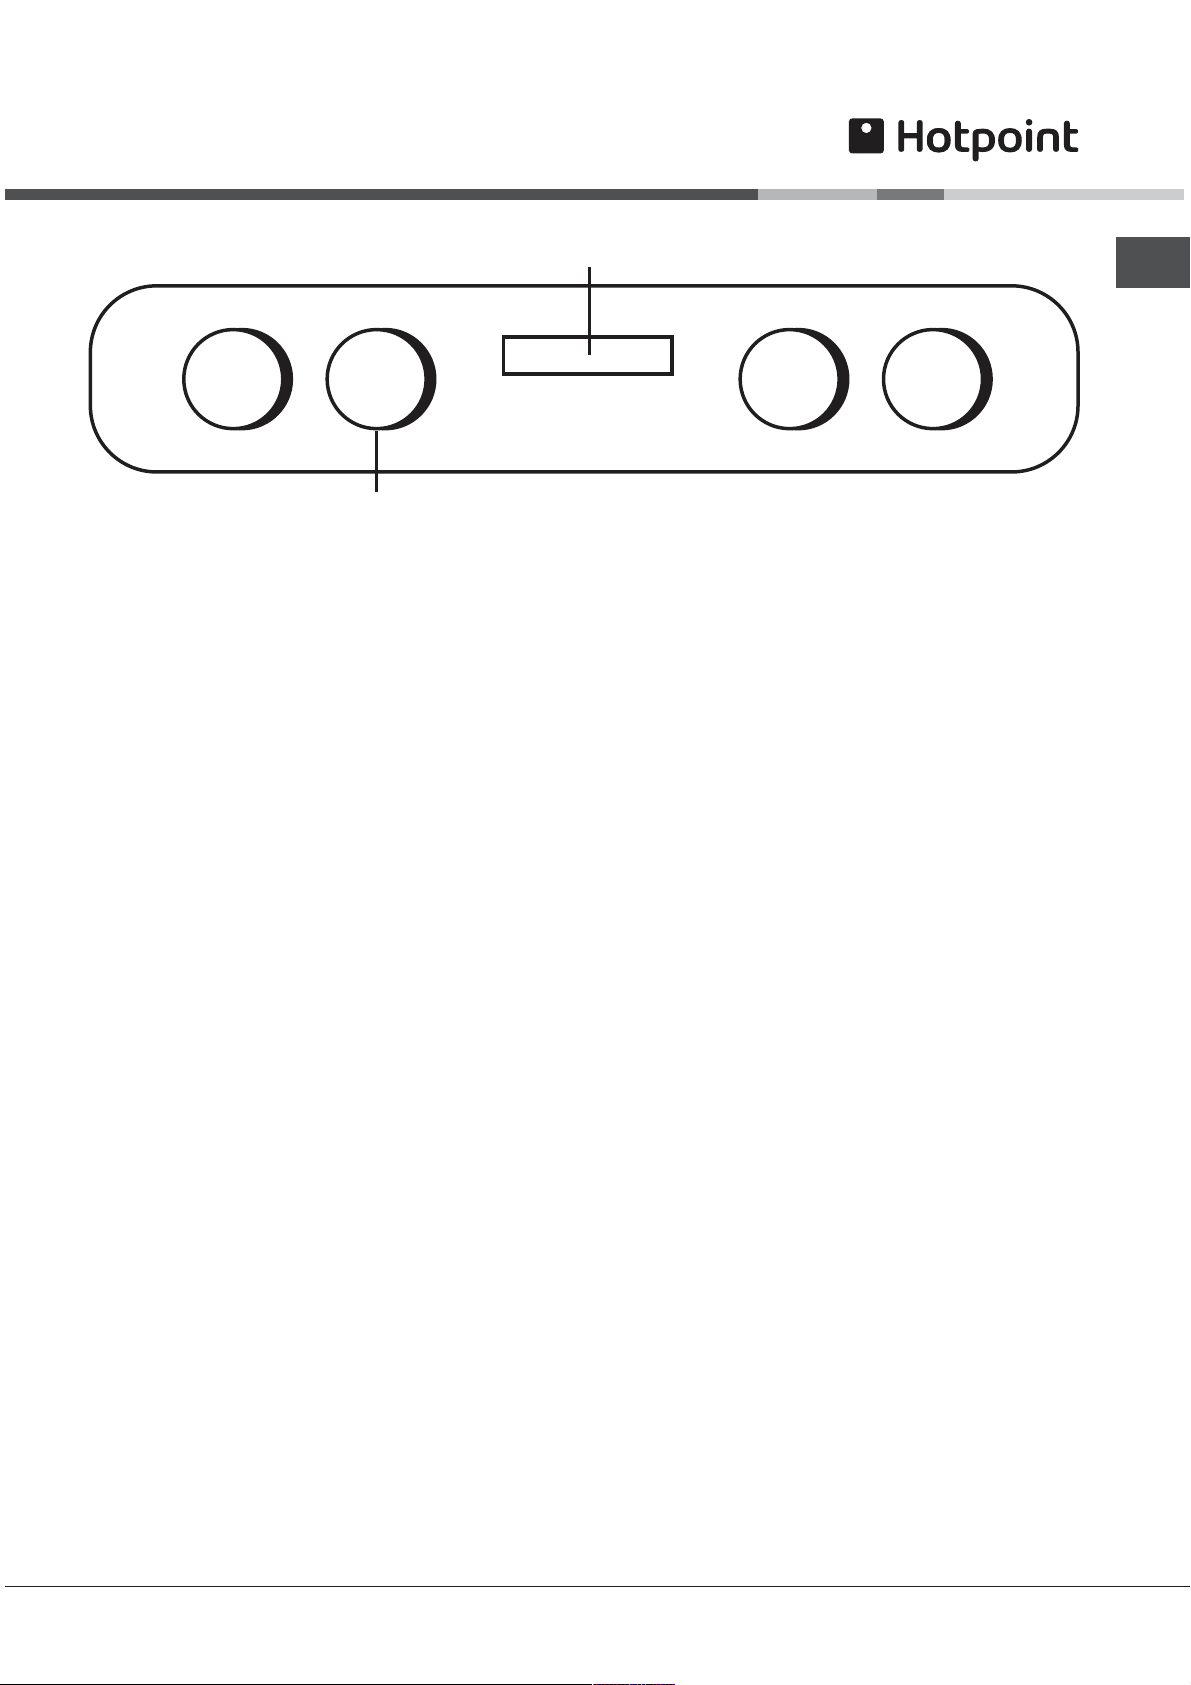
Operation when using the Top
Oven as a Convection Oven
A B C D
TOP OVEN TEMPERATURE
CONTROL
Step 1 Check that the timer is in manual.
Step 2 Place the shelf in the correct position (see
Oven Temperature Charts).
Step 3 Select the required cooking temperature
(100oC-MAX) using control (B) (see Top
Oven Temperature Charts). The pilot light
(·) will immediately come on, and remain
on until the oven reaches the required temperature. The light will then automatically
go off and on during cooking as the oven
thermostat maintains the correct temperature.
Step 4 Place the food on the shelf directly below
the element ensuring the oven door is
closed.
TIMER
PLATE WARMING
Place the plates/dishes on shelf position 1 from the
base of the top oven, and turn top oven temperature
control (B) to 100°C for 10-15 minutes.
Never use the grill setting control (A) when
warming plates.
TOP OVEN UTENSILS
Do Not use: Meat Pans and Baking Trays larger than
225mm x 300mm (9"x12")
DO NOT use
as a meat pan in the top oven, as the air
circulation will be seriously restricted.
the grill pan or main oven meat pan
GB
NOTE: At the end of your cooking, always return
control (B) to the OFF (O) position.
15
Page 16
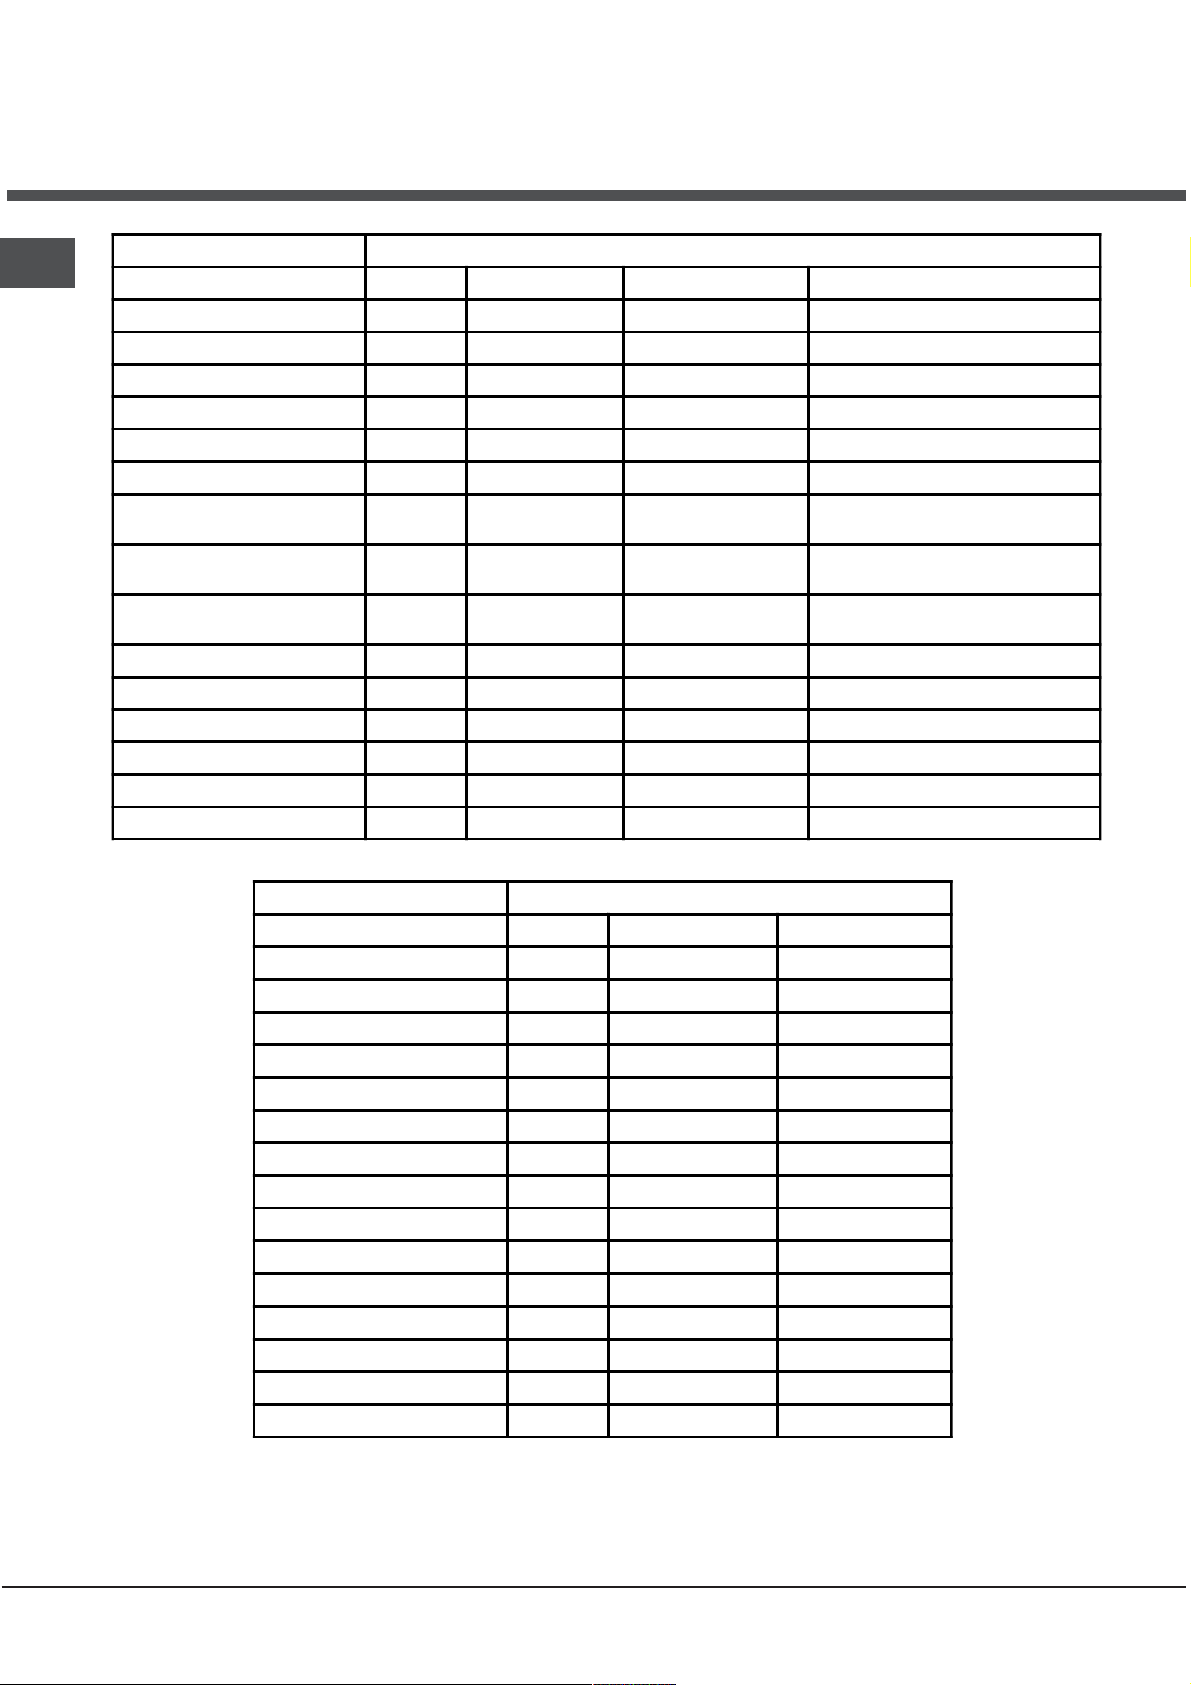
Oven Temperature
Charts - Baking
GB
Top Oven Cooking
Baking Pre-heat Temperature °C Time in mins. Position in Oven
Scones Yes 210/220 10-15 Runner 2 from bottom of oven
Small Cakes Yes 180/190 20-25 Runner 2 from bottom of oven
Victoria Sandwich Yes 170/180 20-30 Runner 2 from bottom of oven
Sponge Sandwich (fatless) Yes 180/190 20-25 Runner 2 from bottom of oven
Swiss Roll Yes 200/210 10-15 Runner 2 from bottom of oven
Semi-rich Fruit cakes Yes 150/160 60-75 7 inch Runner 2 from bottom of oven
Rich Fruit Cakes Yes 140/150
Shortcrust Pastry Yes 190/200
Puff Pastry Yes 200/210
Yorkshire Pudding Yes 190/200 30-40 Runner 1 or 2 from bottom of oven
Individual Yorkshire Pudding Yes 200/210 20-30 Runner 1 from bottom of oven
Milk Pudding Yes 140/150 90-120 Runner 1 from bottom of oven
Baked Custard Yes 150/160 40-50 Runner
Bread Yes 200/210 30-45 Runner 1 from bottom of oven
Meringues Yes 100 150-180 Runner 2 from bottom of oven
Time Dependent on
size
Time Dependent on
recipe
Time Dependent on
recipe
Runner 1
or 2 from bottom of oven
Runner 1 from bottom of oven
Runner 1 from bottom of oven
1 from bottom of oven
Fan Oven Cooking
Baking Pre-heat Temperature °C Time in mins.
Scones Yes 210/220 9-12
Small Cakes No 170/180 15-20
Victoria Sandwich No 160/170 20-25
Sponge Sandwich (fatless) Yes 190/200 15-20
Swiss Roll Yes 190/200 10-15
Semi-rich Fruit cakes No 140/150 1¼ - 1½ hrs
Rich Fruit Cakes No 130/140 Depending on size
Shortcrust Pastry No 190/200 Depending on size
Puff Pastry No 190/200 Depending on size
Yorkshire Pudding Yes 180/190 40-45
Individual Yorkshire Pudding Yes 190/200 20-25
Milk Pudding No 130/140 1½ - 2 hrs
Baked Custard No 140/150 35-45
Bread Yes 200/210 30-35
Meringues No 80-90 3 - 4 hrs
Note: If soft margarine is used for cake making, temperatures recommended by the manufacturers should
be followed. Temperatures recommende
16
d in this chart refer to cakes made with block margarine only.
Page 17
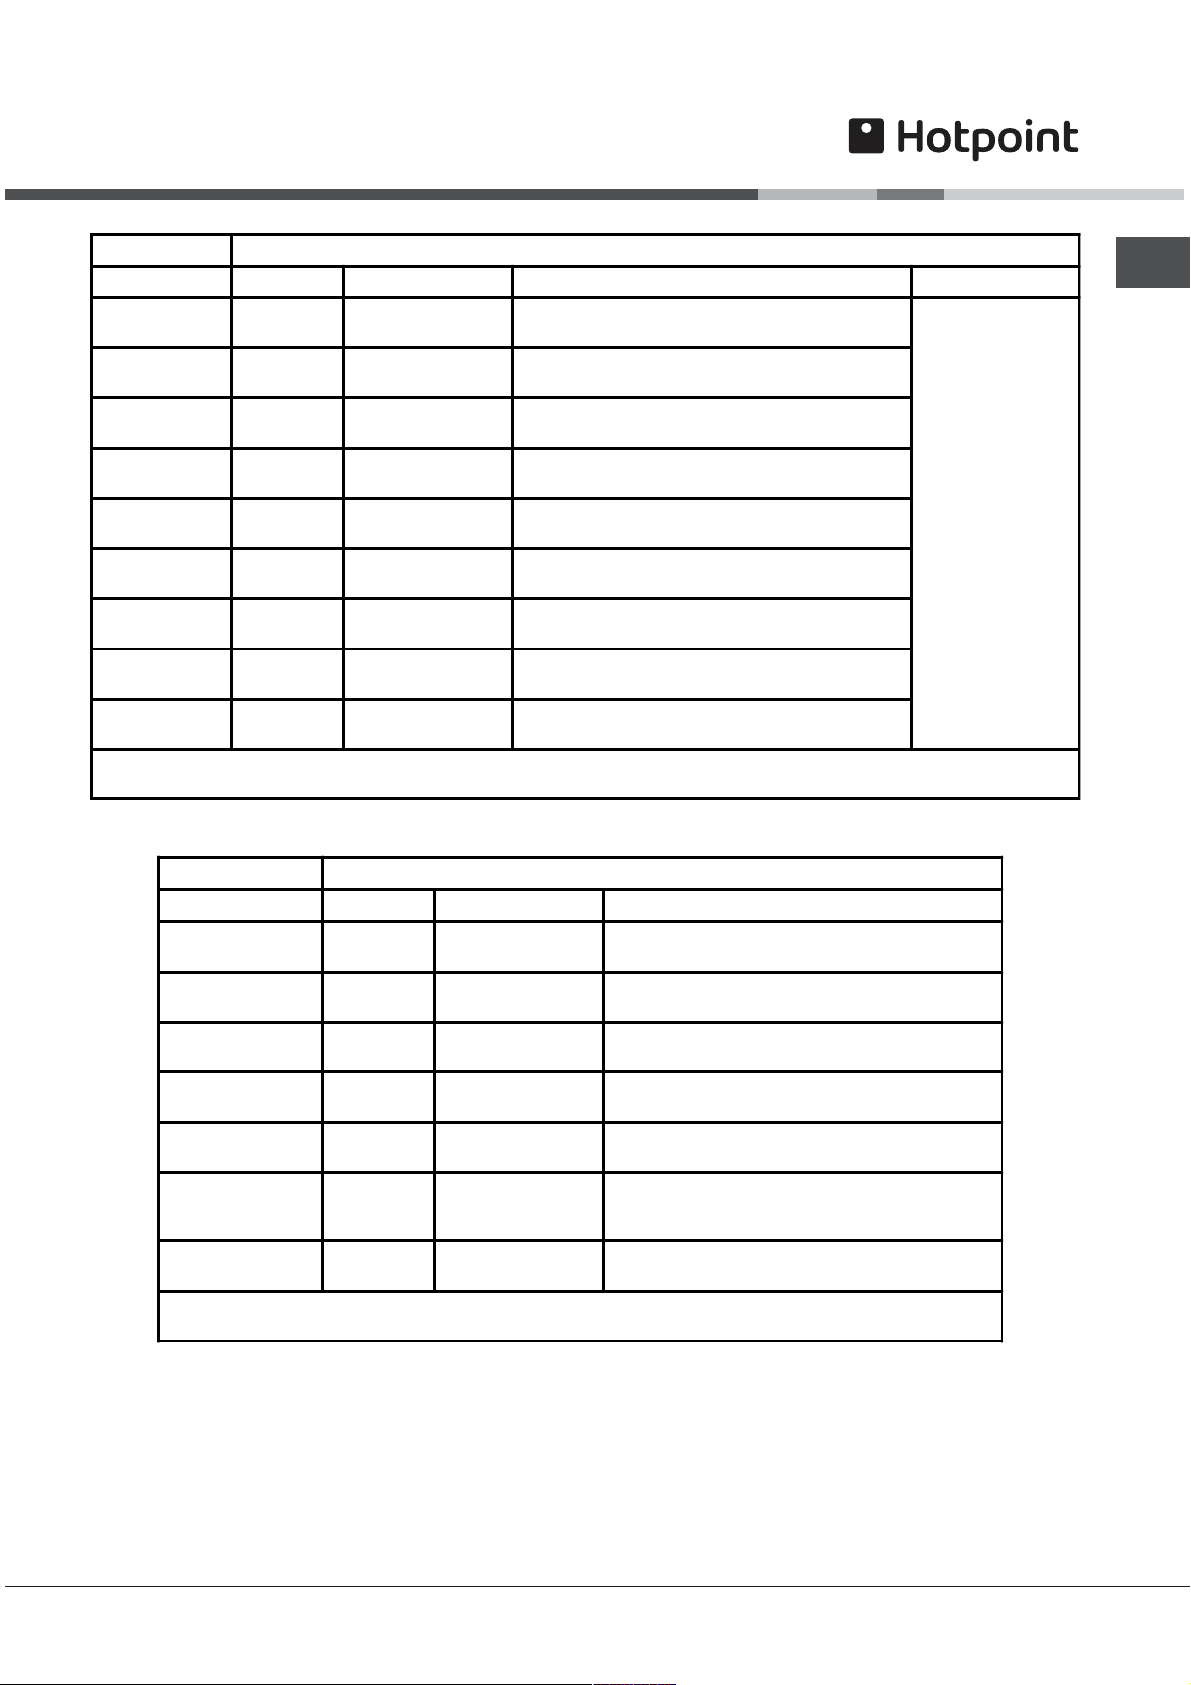
Oven Temperature
Charts - Meat
Top Oven Cooking
Meat Pre-heat Temperature °C Time (approx.) Position in Oven
Beef/ Lamb
(slow roasting)
Beef/ Lamb
(foil covered)
Pork
(slow roasting)
Pork
(foil covered)
Veal
(slow roasting)
Veal
(foil covered)
Poultry/Game
(slow roasting)
Poultry/Game
(foil covered)
Casserole
Cooking
Yes 170/180 35 mins per 450g (1lb) + 35 mins over.
Yes 190/200 35-40 mins per 450g (1lb)
Yes 170/180 40 mins per 450g (1lb) + 40 mins over
Yes 190/200 40 mins per 450g (1lb)
Yes 170/180 40-45 mins per 450g (1lb) + 40
Yes 190/200 40-45 mins per 450g (1lb)
Yes 170/180 25-30 mins per 450g (1lb) + 25 mins over
Yes 190/200 25-30 mins per 450g (1lb )
Yes 150 2-2½ hrs
If using aluminium foil, never:
1.Allow foil to touch sides of oven. 2.Cover oven interior with foil. 3.Cover shelves with foil.
mins over
Runner 1 from
bottom of oven.
GB
Top Oven Cooking
Meat Pre-heat Temperature °C Time (approx.)
Beef No 160/180 20-25 mins per 450g (1l b) + 20 mins extra.
Lamb No 160/180 20-30 mins per 450g (1lb) +25 mins extra.
Pork No 160/180 25-30 mins per 450g (1lb) +25 mins extra.
Veal No 160/170 25-30 mins per 450g (1l b) +25 mins extra.
Chicken/Turkey
up to 4kg (8lb)
Turkey 4 to 5.5kg
(8 to 12lb)
over 5.5kg (12lb)
Casserole
Cooking
1.Allow foil to touch sides of oven. 2.Cover oven interior with foil. 3.Cover shelves with foil.
The most accurate method of testing the readiness of joints of meat or whole poultry is to insert a meat
thermometer into the thickest part of a joint, or the thickest part of poultry thighs, during the cooking period.The
meat thermometer will indicate when the required internal temp has been reached.
Beef - Rare: 60°C Lamb: 80°C Poultry: 90°C
Medium: 70°C Pork: 90°C
Well Done: 75°C Veal: 75°C
No 160/180 18-20 mins per 450g (1l b) + 20 mins extra.
13-15 mins per 450g (1lb) at 150/160°C
No 150/160
allow 12 mins per 450g at 150°C
No 140-150 1½ - 2 hrs
If using aluminium foil, never:
17
Page 18
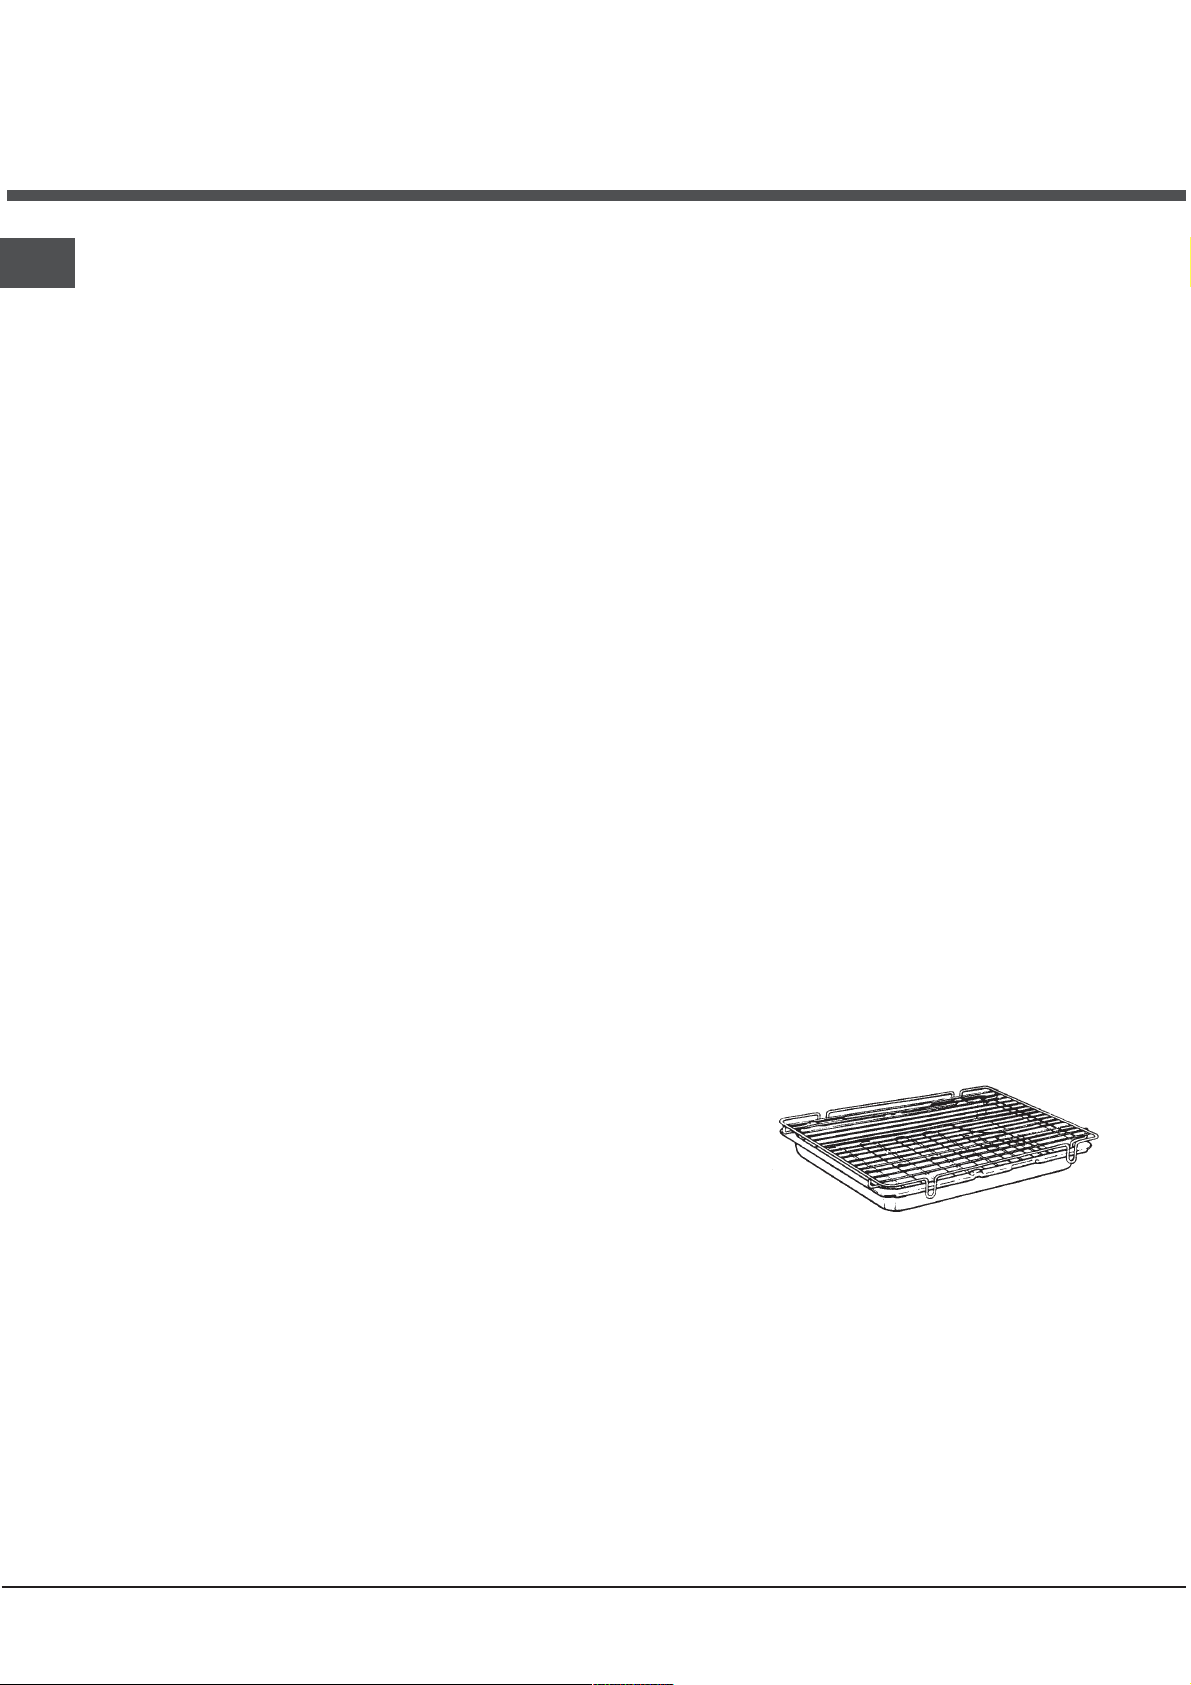
Main Oven - Fan Grilling
GB
(BD62SS/2 & BD52B/2 - BD52K/2 -
BD52P/2)
Fan grilling is a combination of heat from the grill
element and the oven fan circulating the hot air
around the food.
Joints of meat and poultry will be browned as if they
were cooked on a rotisserie or spit but more
economically as the door left closed.
If required, fan grilling can be timed using the Oven
Auto timer.
Follow the timer instructions before selecting fan grill
and the required temperature.
If Manual fan grilling is required always ensure
the timer is set to Manual.
Operating Instruction
1. Open the oven door.
2. Select the correct shelf position, as stated in chart.
3. Turn the selector switch to the Fan grill position.
4. Turn the oven thermostat control to the required
temperature (see Fan Grilling Roasting Chart, next
page).
5. Position the meat pan centrally under the grill
elements.
6. Close the oven door.
7. After use always return both controls to the off
position.
8. If the oven timer was used, reset to Manual.
As with the fan oven cooking there is no need to preheat the oven yet another economy feature. Also
you can cook more than one thing at a time even
up to 4 small chickens.
Temperatures
These will be similar to those used for the more
traditional form of roasting but the guide will give
you an indication of which temperature to set the
Thermostat. But remember that because of the way
the oven is heated this is a more economical way of
roasting.
General Recommenda
Most types of meat and poultry cooked by this
method will have an all over brownness and
crispness on the outside. The only exceptions are
very lean joints, such as veal, which, because of its
low fat content, is better cooked using conventional
heating.
1. Always place the pan on the shelf position
recommended. (See Chart).
2. There is no need to preheat the oven before cooking
and all fan grilling should be carried out with the
oven door closed, this saves energy. The cooking
temperatures and times are calculated from a cold
oven.
3. After rinsing and drying meat, place on the food
roasting support rack over the pan supplied.
4. Position meat in oven as recommended in the
roasting chart.
5. Fan grilling is ideally suited for cooking all types of
poultry and larger joints of meat (e.g.stuffed, rolled
joints and legs of pork and lamb). Results will be
as if you had cooked the food on a rotisserie. If you
use frozen meat or poultry it must be completely
defrosted before it is cooked.
6. When cooking a joint always grill it with the fat side
uppermost in order to crisp it. For bigger joints or
where there is little bone, grill at the lower temperature given in the table and cook for a longer time
per kg.
7. When cooking any type of poultry, start grilling the
underside uppermost and turn breast uppermost
about a third to halfway through the cooking period.
If cooking stuffed poultry allow slightly longer
cooking time.
Meat pan and
roasting rack
tions
18
Page 19
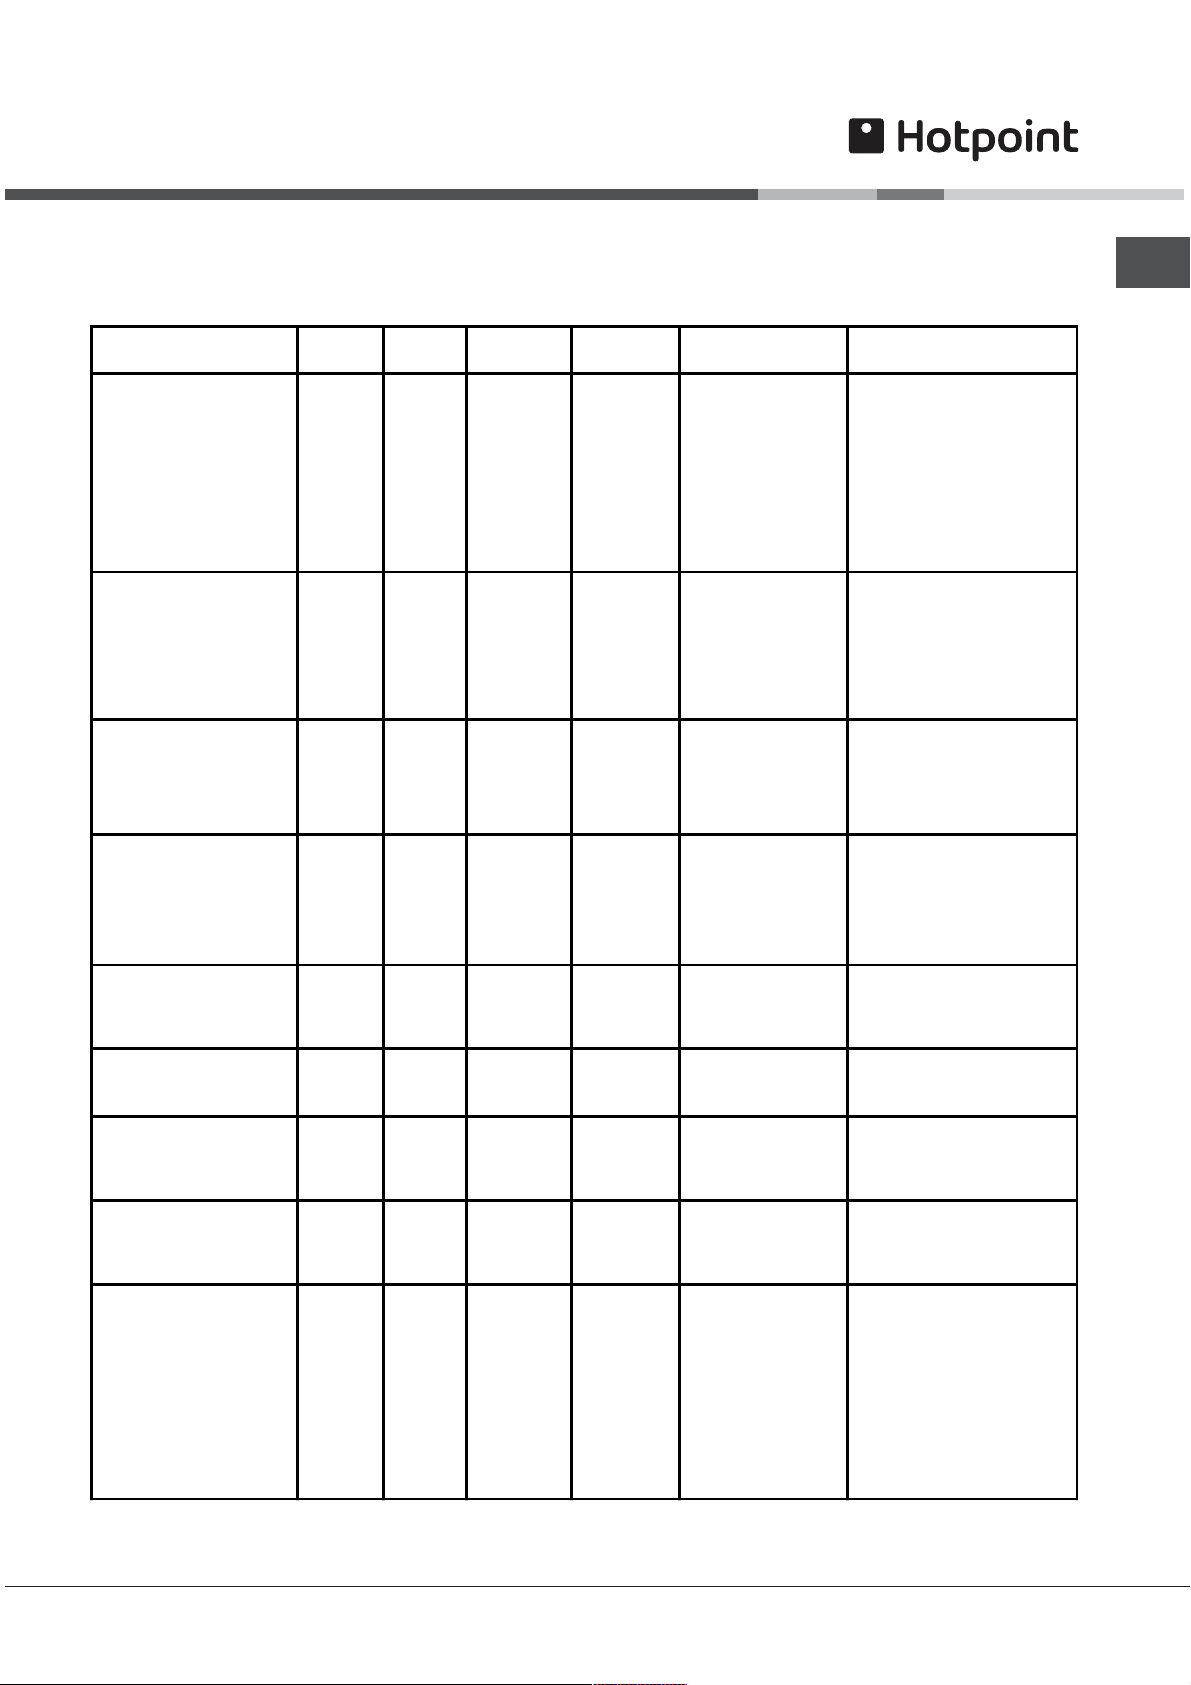
Main Oven - Fan Grilling
g
g
g
g
g
g
g
g
g
g
g
g
g
g
g
g
g
g
g
g
g
g
g
g
g
Roasting Chart
(BD62SS/2 & BD52B/2 - BD52K/2 - BD52P/2)
Shelf positions are counted from the base upwards ie: lowest shelf position is 1.
Type of Meat or Poultry
PORK
Pork Chop - thick
Gammon Steaks
Pork - any type of joint 1.0
LAMB
Lamb chop - thick
Lamb - any type of joint 1.0
BEEF
Beef - joints which have
an outside layer of fat
e
. Rib, Rolled, Sirloin
CHICKEN
Chicken joints
DUCK 1.5
Weight
kg
1.5
2.0
2.5
over 2.5
1.5
2.0
2.5
0ver 2.5
1.0
1.5
2.0
2.5
over 2.5
1.0
1.5
2.0
2.5
over 2.5
less than
1k
each
2.0
2.5
Temp ° C
170
160
160-170
150-170
140-150
140-150
140
170
160-170
160-170
150-160
150-160
150
170-180
170-180
160-170
160-170
160
180
180
170
170
160-170
180
180
180
180
Time
(min/kg)
25
30
60-70
60-70
65-75
65-75
70-75
25
30-40
35-40
35-45
40-45
45-50
40-50
40-50
40-50
45-50
45-50
30
30
35
35
40
30
30
30
35
Plus Extra
Time (mins)
45
45
50
50
50
45
45
50
50
50
20
20
20
30
40
30
30
30
30
30
30
30
30
30
Total Cooking Time
(mins)
Dependente on size
Dependente on size
105-120
130-150
180-230
220-240
-
Dependent on si ze
78-88
90-110
120-140
150-170
-
60-70
80-90
100-110
140-150
-
60
75
100
115
-
60
75
90
115-130
Tips
Season. Grill on shelf
position 3. Turn over after 15
mins. Grill on shelf position 3
Turn after
with sharp knife and rub on
salt. Pork should always be
thorou
overcook rather than
undercook. Grill on shelf
position 1.
Season. Grill on shelf
position 3. Turn over after 15
mins. Score fat. Season with
pepper and rosemary. If you
prefer the
the shorter ti me Grill on shel f
position 1.
Season. If joint preferred ra re
rill for the shorter time. If
preferred well done
the lon
position 1.
Season and brush over with
melted butter to
browned ski n. Grill on shelf
position 1. Shelf 1.
Dry thorou
salt. Grill on shelf position 1.
15 mins. Score fat
hly cooked . So
lamb pink choose
rill for
er time. Grill on shelf
ive nicely
hly and lightly
GB
GOOSE up to 4
TURKEY up to 5
GAME
Grouse
Partrid
e
Pheasant
Beefbur
Sausa
Bacon
Mixed Gril l
ers
es
450
450
450
4-5
6 -8
Any
Any
Any
(lb)
(lb)
(lb)
170-190
160-170
170
150
170-180
170-180
170-180
170
170
170
170
40
45
-
-
30-50
40-50
40-50
25mins per
(lb)
450
25mins per
450
(lb)
25mins per
450
(lb)
40
40
-
-
-
-
-
-
-
150-165
165-175
-
-
-
30
Can be stuffed. Gri ll on shel f
position 1
Season and brush over with
melted butter to
browned ski n. Grill on shelf
position 1.
Well hun
less cookin
position 1.
Shelf 3.
Shelf 3.
Prick sausa
cookin
.
Shelf 3.
Roll up bacon before
cookin
. 4 pieces of steak,
sausa
es, chops, bacon,
tomato es & mushrooms.
Cook sausa
bacon for 10 mins. add steak,
cook for further 20 mins.
ive nicely
meat will require
time. gril l on
es before
es, chops,
19
Page 20

Using the Main Oven for
Other Functions
GB
FAN ONLY SETTING
DEFROSTING FROZEN MEAT & POULTRY
Joints of meat and whole birds should be defrosted
slowly, preferably in a refrigerator (allowing 5-6 hours
per lb.) or at room temperature (allowing 2-3 hours
per lb.). Frozen meat or poultry must be completely
defrosted before cooking in the oven. However, to
decrease the amount of time required to defrost food
items, a nonheating fan only setting may be
selected for the main oven only.
OPERATION: TO ASSIST IN DEFROSTING:
Place food in the oven and close the oven door.
(BD62SS/2 & BD52B/2 - BD52K/2 - BD52P/2) - Turn
the Multifunction Control (D) clockwise to the
ONLY setting.
(DQ47I/2 & DE47X/2) - Turn the Main Oven Control
(C) clockwise to the
circulating the air around the food, time to defrost
will depend on type and size of the food.
NOTES: DO NOT defrost meat and poultry by
warming the food through.
Foods ideally suited to defrosting using the fan only
setting are cream/cream cakes, butter cream filled
cakes, gateaux, cheese cakes, iced cakes, quiches,
pastries, biscuits, bread, croissants, fruit and many
delicate frozen foods. If fish, meat and poultry are to
be defrosted using the fan only setting, where
possible it is recommended that the food should be
small and thin.
The items should be placed so that the maximum
amount of surface area is exposed to the circulating
air, and that they are turned regularly to ensure even
defrosting.
Larger cuts of meat and poultry may be defrosted
by using the fan only setting up to a maximum
weight of 2 kg (4lb 8oz).
It is important to wash both meat and poultry and
cooking utensils immediately after defrosting and
before cooking. Food should be cooked immediately
after defrosting.
setting. This defrosts by
FAN
LIGHT ONLY SETTING
(BD62SS/2 & BD52B/2 - BD52K/2 - BD52P/2) - When
the Multifunction Control (D) is turned clockwise to
the LIGHT ONLY setting, the main oven light only
will illuminate.
(DQ47I/2 & DE47X/2) - When the Main Oven Control
(C) is turned clockwise to the
oven light only will illuminate.
setting, the main
It is very important
basic principles of food handling and hygiene
to prevent the possibility of bacterial growth.
20
to strictly adhere to the
Page 21

Main Oven - Conventional
Oven
(BD62SS/2 & BD52B/2 - BD52K/2 BD52P/2)
Important
NEVER line the shelves, the floor or the sides of the
oven with aluminium foil as overheating and damage
may result.
The oven is heated by elements at the top of the
oven and underneath the floor of the oven.
Food should not be placed on the floor of the
oven
Operating Procedure
1. Ensure Oven Timer is set to Manual.
2. Position rod shelf as recommended in the chart for
food being cooked.
3. Position food centrally under grill element.
4. Turn the selector switch to the conventional oven
position.
5. Turn the oven thermostat control to the required
temperature setting (see oven temperature charts).
The oven light will remain on. The oven indicator
light will remain on until the oven reaches the set
temperature. This light will then automatically cycle
on and off during cooking as the oven temperature
is controlled.
6. After use always return both controls to the off
position and close the oven door.
GB
21
Page 22

GB
Main Oven - Fan Oven
(all Models)
Important
NEVER line the shelves, the floor or the sides of the
oven with aluminium foil as overheating and damage
may result.
The oven is heated by elements at the rear of the
oven.
A fan at the rear of the oven operates to circulate
heated air within the oven.
Operating Procedure
1. Ensure Oven Timer is set to Manual.
2. - (BD62SS/2 & BD52B/2 - BD52K/2 - BD52P/2)
- Turn the selector switch to the fan oven position.
- Turn the oven thermostat control to the required
temperature setting (see oven temperature
charts).
- (DQ47I/2 & DE47X/2)
- Turn the oven thermostat control to the
temperature setting (see oven temperature
charts).
3 The oven light will remain on. The oven indicator
light will remain on until the oven reaches the set
temperature. This light will then automatically cycle
on and off during cooking as the oven temperature
is controlled.
4. After use always return all controls to the off position
and close the oven door.
required
22
Page 23

Main Oven - Fan Oven
Cookery Notes
Since a fan oven heats up more quickly, and
generally cooks food at a lower temperature than a
conventional oven, pre-heating the oven is often
unnecessary. However, foods such as bread,
scones, Yorkshire pudding, do benefit from being
placed in a pre-heated oven.
The charts are a guide only, giving approximate
cooking temperatures and times. To suit personal
taste and requirements, it may be necessary to
increase or decrease temperatures by 10°C.
Because the fan oven cooks so efficiently, we
recommend that when cooking any recipes not
designed for a fan oven, you reduce the temperature
by about 25°C and the time by about 10 minutes in
the hour. If large quantities are being cooked it will
be necessary to increase the cooking time
somewhat to compensate for the extra oven load.
Unless otherwise indicated in the charts, food is
placed in a cold oven, i.e. without preheating.
If food is placed in an already hot oven, the
suggested cooking time should be reduced,
depending on the type and quantity of food being
cooked.
It should be noted that at the end of a cooking
period there may be a momentary puff of steam
when the oven door is opened, this will disperse in a
few seconds and is a perfectly normal characteristic
of an oven with a good door seal.
Oven Positions
Since the distribution of heat in the fan oven is very
even, most foods will cook satisfactorily on any shelf
position, but the shelves should be evenly spaced:
To ensure even circulation do not use meat pans
larger than 390x300mm (15ins x 12ins) and baking
trays no larger than 330 x 255mm (13ins x 10ins),
these should be positioned centrally on the oven
shelf.
Do not fit shelves upside down.
Never use more than 3 shelves in the oven as air
circulation will be restricted.
Food or cooking utensils should not be placed on
the floor of the oven. To avoid unnecessary cleaning,
rod shelves which are not in use should be removed
from the oven.
GB
23
Page 24

Main Oven - Fan Oven
Cookery Notes
GB
Temperature and Time
The oven is provided with two shelves. A third is
available as an optional extra, contact Genuine Parts
and Accessories Hotline (see back page) for further
information.
If three shelves are used to cook large quantities of
food for home freezing or parties, it may be
necessary to increase the cooking times given in the
charts by a few minutes, to allow for the loss of heat
due to the extra time taken to load the oven, and the
larger mass of food.
Baking trays should allow an equal gap on all sides
of the oven.
To prepare meat and poultry for Roasting in
your Fan Oven
(a) Wipe the meat or poultry, dry well and weigh it.
Meat which has for been stored in a refrigerator
should be allowed to come to room temperature
before cooking, and frozen meat or poultry must
be completely defrosted before placing in the oven.
(b) The weight of any stuffing used should be added
before calculating the cooking time.
(c) Place meat/poultry in the main oven meat pan
supplied with your cooker. Small joints weighing
less than 1.75kg (31/2 lbs) should be roasted in a
smaller meat pan/tin or they may be 'pot roasted'
a small joint or a large meat pan causes
unnecessary oven splashing and evaporation of
meat juices.
(d) Additional fat should not be added, except for veal,
very lean meat or poultry which can either be 'larded'
with fat bacon or brushed very sparingly with
cooking oil or melted fat.
(e) Beef, lamb, mutton and poultry may be dusted
lightly with seasoned flour to give a crisp
surface. The skin of duck and goose should be
pricked to release excess fat during cooking, and
the rind of pork should be scored, brushed lightly
with oil, and rubbed with salt to give crisp crackling.
(f) Meat and poultry wrapped in, or covered with a
tent of aluminium foil will be juicy and tender.
Roasting bags offer the same advantages. Always
follow the manufacturer's pack instructions, and
remember to reduce the temperatures given for
conventional ovens by approximately 25°C and the
time by approximately 10 minutes per hour.
(g) Potatoes for roasting only require to be brushed
with cooking oil or melted fat.
(h) It is not necessary to baste when roasting in an
electric oven and stock or liquid should not be added
to the meat pan since this only causes unnecessary
soiling, steam and condensation.
outer
Frozen Meat and Poultry
Joints of meat and whole birds should be defrosted
slowly, preferably in a domestic refrigerator (allowing
5-6 hours per 450g,1 lb), or at room temperature
(allowing 2-3 hours per 450g, 1 lb).
Frozen meat or poultry must be completely
defrosted before placing in the oven.
It is essential to wash thoroughly and cook meat and
poultry immediately after defrosting.
24
Page 25
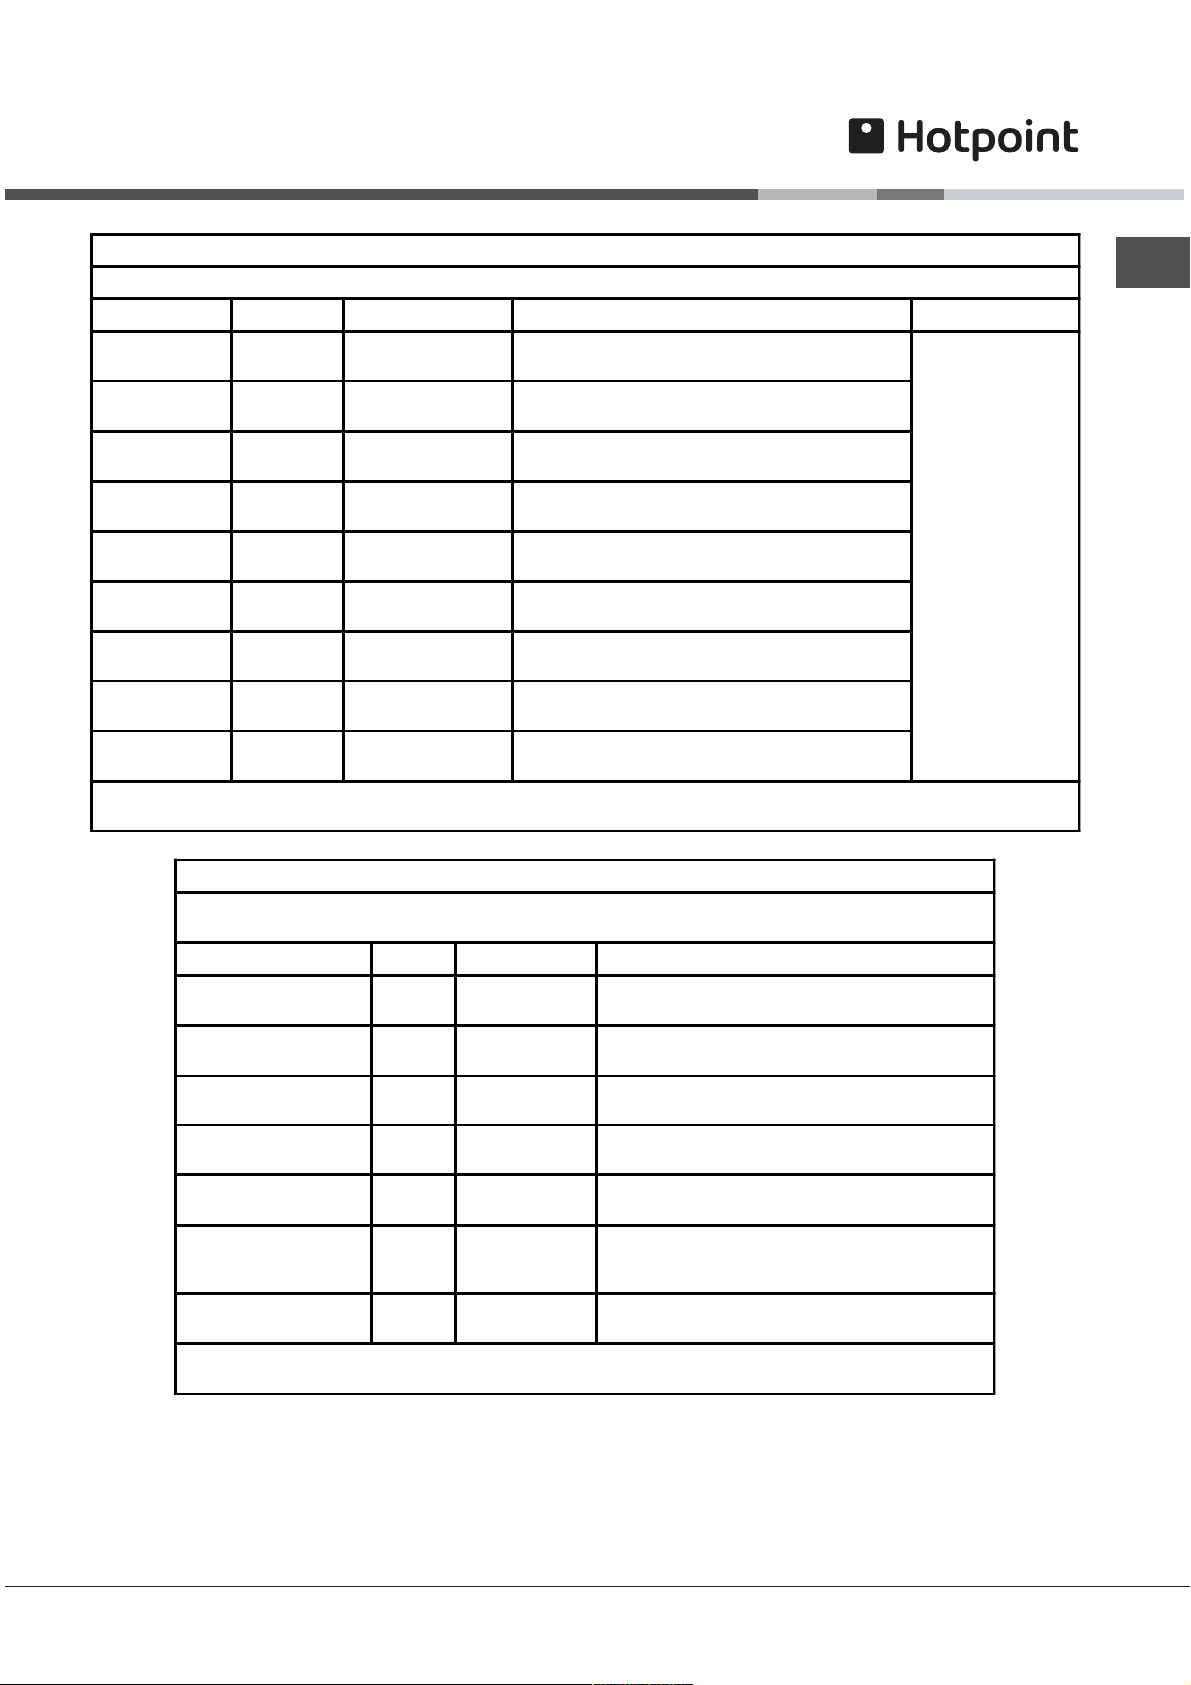
Main Oven
Temperature Chart
Conventional Oven (BD62SS/2 & BD52B/2 - BD52K/2 - BD52P/2)
It is not necessary to pre-heat the fan oven before roasting. Note: Where ti mes are stated, they are approximate only.
Meat Pre-heat Temperature °C Time (approx.) Position in Oven
Beef/ Lamb
(slow roasting)
Beef/ Lamb
(foil covered)
Pork
(slow roasting)
Pork
(foil covered)
Veal
(slow roasting)
Veal
(foil covered)
Poultry/Game
(slow roasting)
Poultry/Game
(foil covered)
Casserole
Cooking
Yes 170/18035 mi ns per 450g (1lb) + 35 mins over.
Yes 1
Yes 170/18040 mins per 450g (1lb) + 40 mins over
Yes 190/200 40 mins per 450g (1lb)
Yes 170/180 40-45 mins per 450g (1lb) + 40 mins over
Yes 190/200 40-45 mins per 450g
Yes 170/180 25-30 mins per 450g (1lb) + 25 mins over
Yes 190/200 25-30 mins per 450g (1lb )
Yes 150 2-2½ hrs
1.Allow foil to touch sides of oven. 2.Cover oven interior wi th foil. 3.Cover shelves with foi l.
90/200 35-45 mins per 450g (1lb)
Runner 2 or 3 from
(1lb)
If using aluminium foil, never:
bottom of oven.
GB
Fan Oven (BD62SS/2 & BD52B/2 - BD52K/2 - BD52P/2)
It is not necessary to pre-heat the fan oven before roasting. Note: Where times are stated, they are
Meat Pre-heat Temperature °C Time (approx.)
Beef No 160/180 20-25 mins per 450g (1lb) + 20 mins extra.
Lamb No 160/180 20-30 mins per 450g (1lb) +25 mins extra.
Pork No 160/180 25-30 mins per 450g (1lb)
Veal No 160/170 25-30 mi ns per 450g (1lb) +25 mins extra.
Chicken/Turkey
up to 4kg (8lb)
Turkey 4 to 5.5kg
(8 to 12lb)
Casserole Cooking No 140-150 1½ - 2 hrs
1.Allow foil to touch sides of oven. 2.Cover oven interior with foi l. 3.Cover shelves with foil .
The most accurate method of testing the readiness of joints of meat or whole poultry is to insert a meat
thermometer into the thickest part of a joint, or the thickest part of poultry thighs, during the cooking period.The
meat thermometer will indicate when the required internal temp has been reached.
Beef - Rare: 60°C Lamb: 80°C Poultry: 90°C
Medium: 70°C Pork: 90°C
Well Done: 75°C Veal: 75°C
No 160/18018-20 mins per 450g (1lb) + 20 mi ns extra.
No
approximate only.
150/160
or 150
If using aluminium foil, never:
12-14 mins per 450g (1lb) at plus 12
*For every 450g (1lb) over 5.5kg (12lb) allow 10
mins per 450g (1lb) and roast at 150°C
+25 mins extra.
mins extra
25
Page 26
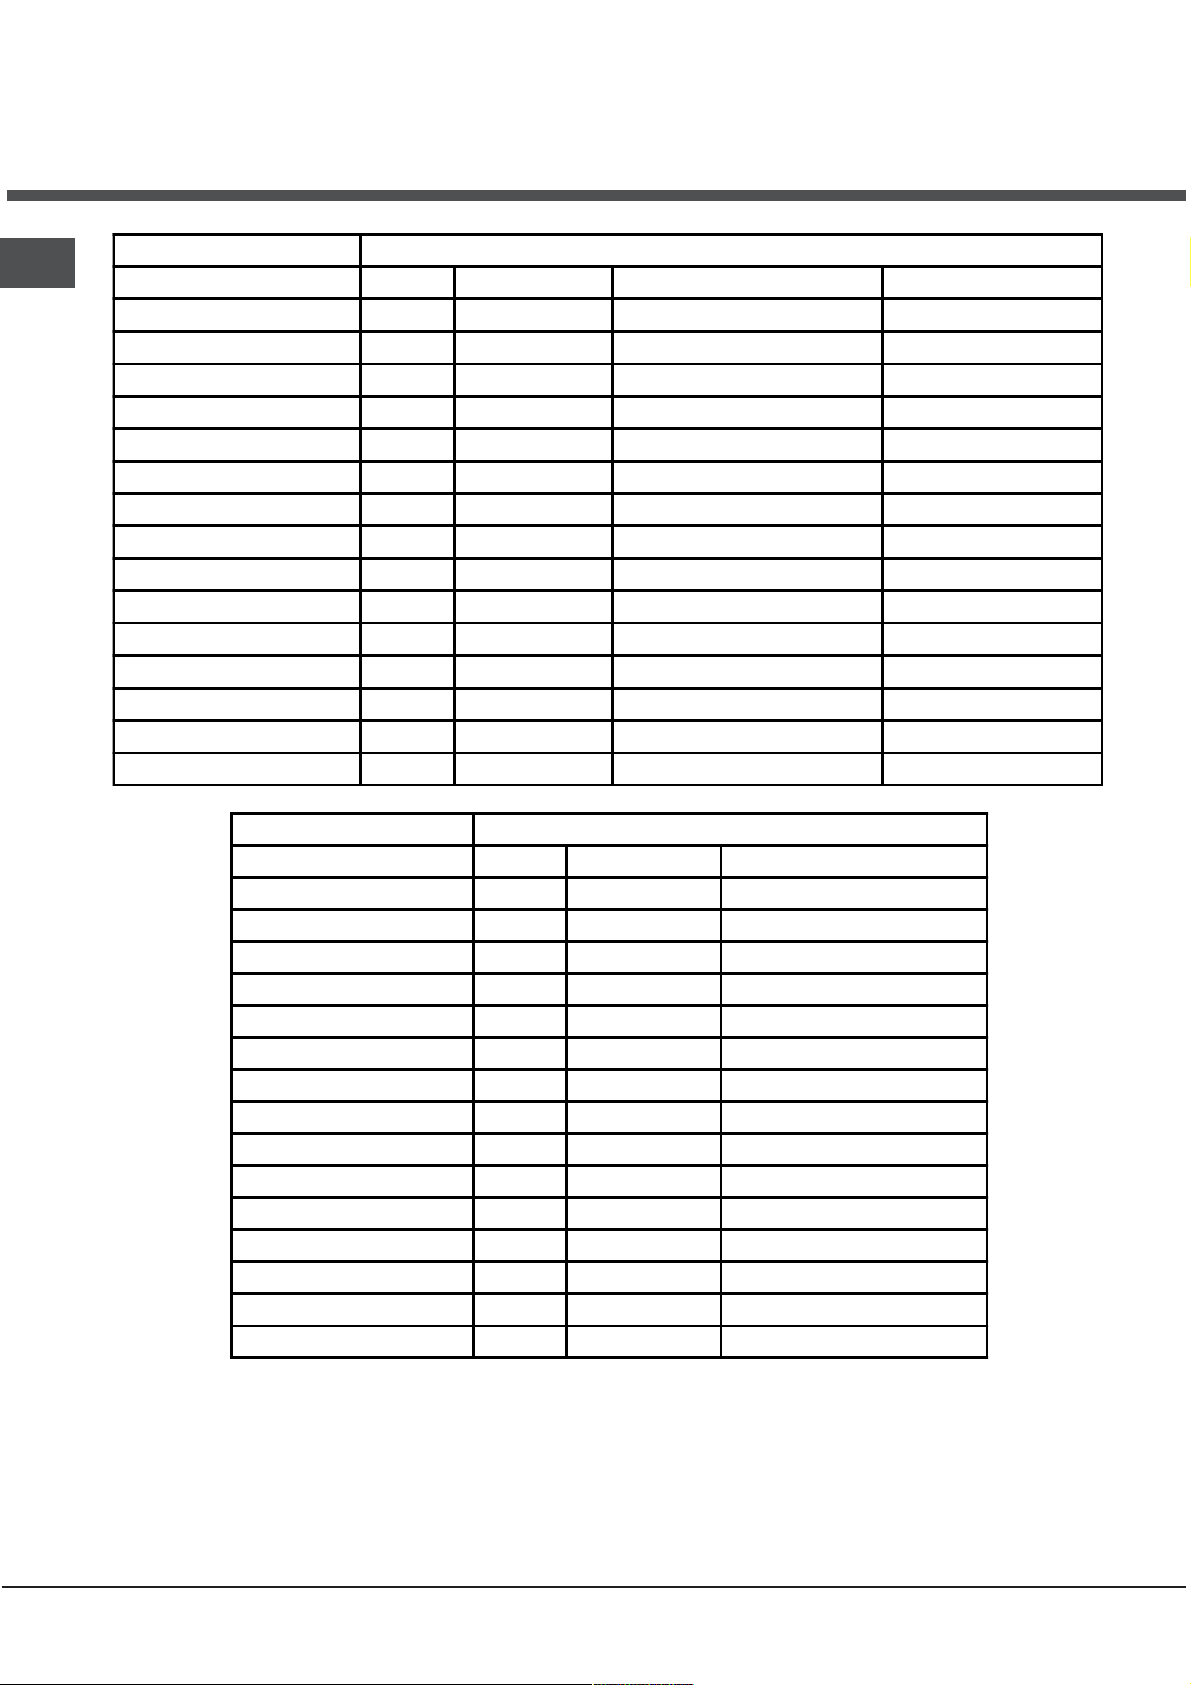
Main Oven
Temperature Chart
GB
Baking Conventional Oven (BD62SS/2 & BD52B/2 - BD52K/2 - BD52P/2)
Food Pre-heat Temperature °C Time in mins. Shelf Position
Scones Yes 220/230 10-15 2nd from bottom
Small Cakes Yes 180/190 15-25 3nd from bottom
Victoria Sandwich Yes 160/170 20-30 3nd from bottom
Sponge Sandwich (fatl ess) Yes 170/180 15-20 3nd from bottom
Swiss Roll Yes 190/200 8-12 3nd from bottom
Semi-rich Fruit cakes Yes 150/160 1¼ hrs. 7" 2nd from bottom
Rich Fruit Cakes Yes 130/140 Depending on recipe
Shortcrust Pastry Yes 180/190 Depending on use 2nd or 3rd from bottom
Puff Pastry Yes 190/200 Depending on use 2nd or 3rd from bottom
Yorkshire Pudding Yes 190/200 40-45 3nd from b ottom
Individual Yorkshire Pudding Yes 200/210 20-30 3nd from bottom
Milk Pudding Yes 140/150 1¼ - 2 hrs. 2nd from bottom
Baked Custard Yes 130/140 40-50 3nd from bottom
Bread Yes 190/200 25-35 3nd from bottom
Meringues Yes 80/903 - 3½ hrs. 3nd from bottom
Baking Fan Oven (BD62SS/2 & BD52B/2 - BD52K/2 - BD52P/2)
Food Pre-heat Temperature °C Time in mins.
Scones Yes 210/220 9-12 approx.
Small Cakes No 170/180 15-25 approx.
Victoria Sandwich No 160/170 20-30 approx.
Sponge Sandwich (fatless) Yes 180/190 15-20 approx.
Swiss Roll Yes 190/200 12-15 approx.
Semi -rich Fruit cakes No 140/150 1¼ - ½ hrs. approx.
Rich Frui t Cakes No 130/140 Depending on size
Shortcrust Pastry No 190/200 Depending on siz
Puff Pastry No 190/200 Depending on size
Yorkshire Pudding Yes 180/190 40-50 approx.
Individual Yorkshire Pudding Yes 190/200 20-25 approx.
Milk Pudding No 130/140 1½ - 2 hrs. approx.
Baked Custard No 140/150 35-45 approx.
Bread Yes 200/210 30-35 approx.
Meringues No 80/903 - 4 hrs. approx.
and size 2nd from bottom
e
Note: If soft tub margarine is used for cake making, we would recommend using the all in one method and to
reduce the temperature by 10°C.
Temperatures recommended in this chart refer to cakes made with block margarine or butter only.
Note: Where times are stated, they are approximate only.
26
Page 27

Main Oven - Circulaire
Roasting
(BD62SS/2 & BD52B/2 - BD52K/2 -
BD52P/2)
CIRCULAIRE ROASTING
Circulaire roasting - food is placed on the roasting
rack, this allows the oven fan to circulate the hot air
around the food, making it suitable for thin foods,
such as chops, steaks, sausages as well as meat
joints and poultry, as it will cook both sides at the
same time. it is possible to cook on any shelf
position, as the temperature in the oven is evenly
distributed. Also, the oven heats up more quickly
and generally will cook food at a lower temperature
than a conventional oven, so pre-heating is not
necessary for most foods. For a guide on "cooking
times" and "cooking temperatures" see "Circulaire
Roasting Chart", next page.
If required, circulaire roasting can be timed using
the Oven Timer. Follow the timer instructions before
selecting Fan Oven function and the required
temperature.
Note: It is also possible to cook food on the roasting
rack on one shelf, while cooking different types of
food at the same temperature, on other shelf
positions (three shelves maximum).
Operating Instructions:
STEP 1. Ensure the Oven Timer is set to manual.
Ensure that the oven shelf is in the position
you require. Place the food centrally on the
roasting rack. Position the roasting rack on
top of the grill/meat pan. Place the grill/
meat pan centrally on the oven shelf.
Ensure the oven door is fully closed.
STEP 2. Turn the control knob (D) clockwise to the
fan oven function. Turn the control knob
(C) clockwise and select the required
cooking temperature. The pilot light (•) will
immediately come on and will remain on
until the oven reaches the required temperature. The light will
off and on during cooking as the oven
thermostat maintains the correct temperature.
STEP 3. After use, turn controls (C) and (D) to the
Off (O) position.
Note: At the end of a cooking period there may be
a momentary puff of steam when the door is
opened. This will disperse in a few seconds and
is
a perfectly normal characteristic of an oven
with a good door seal.
then automatically go
GB
27
Page 28
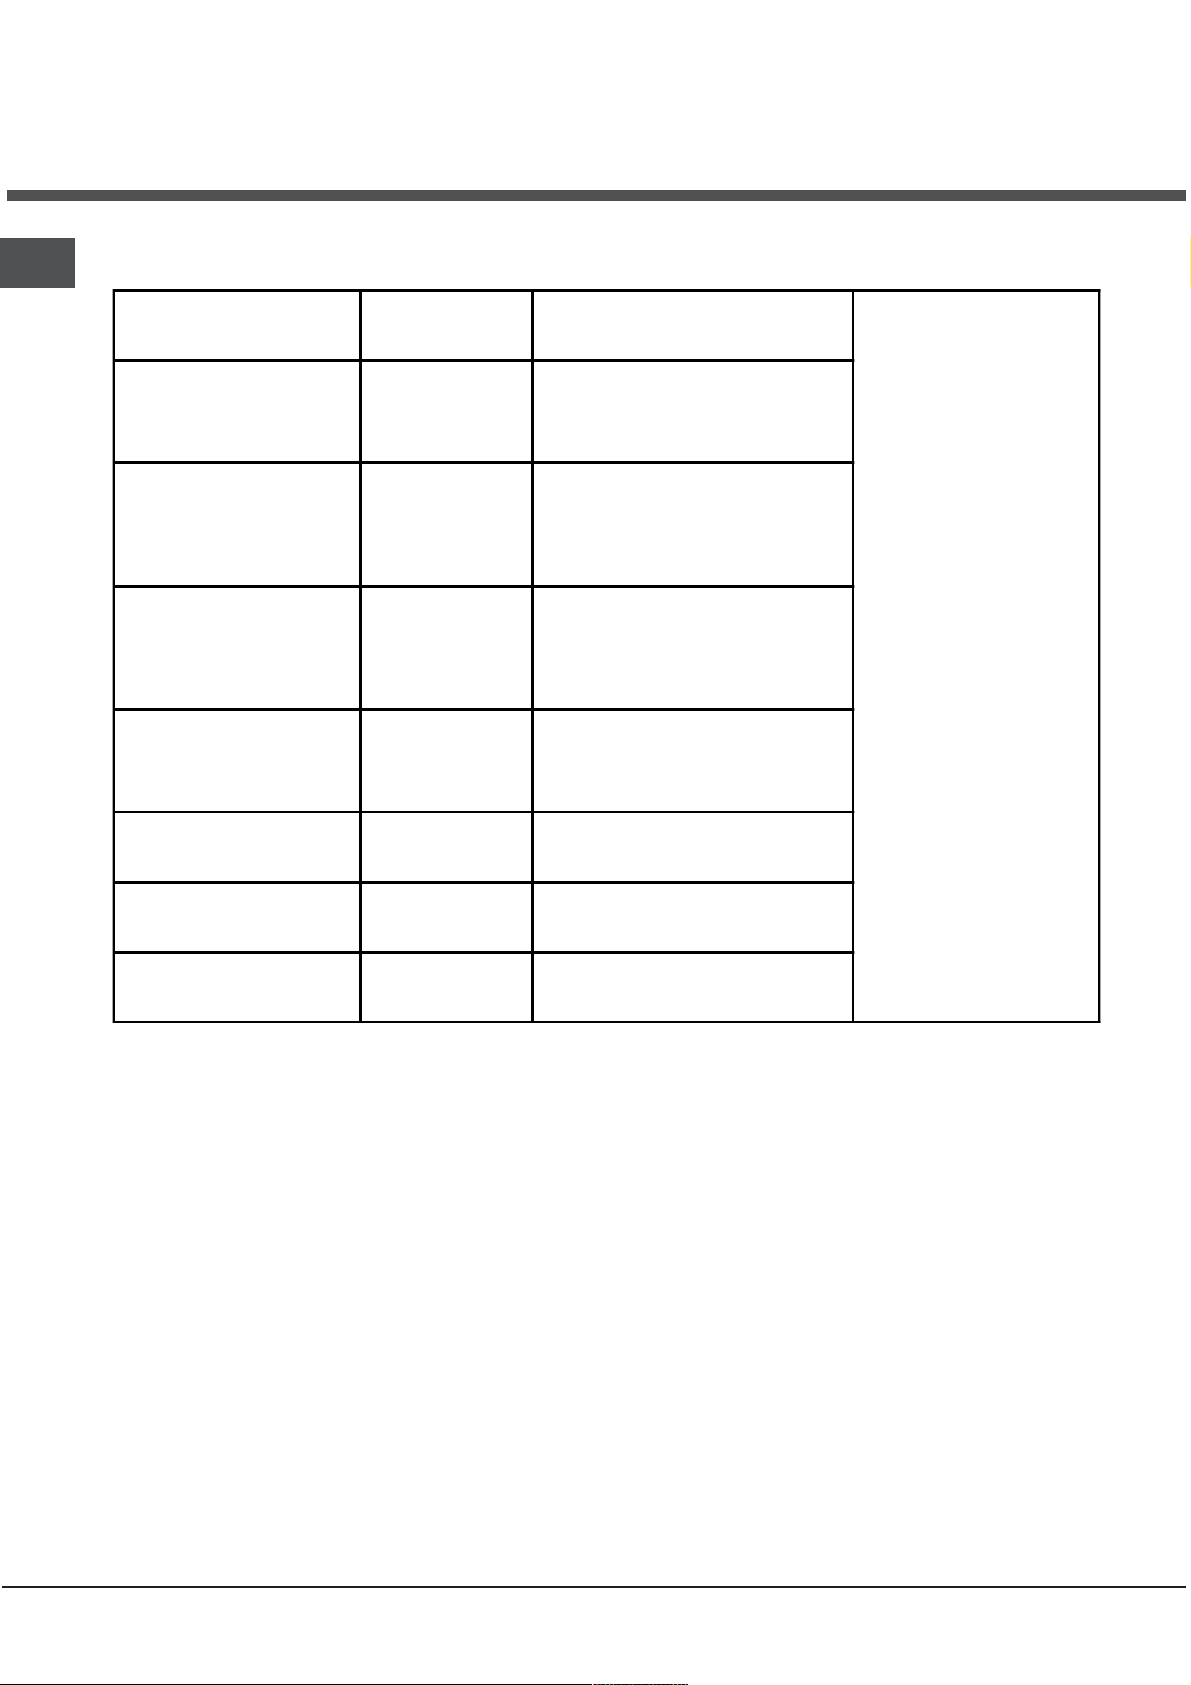
Main Oven - Circulaire
Roasting Chart
GB
(BD62SS/2 & BD52B/2 - BD52K/2 - BD52P/2)
Type of Meat & Poultry Temperature °C Time (approximate)
BEEF
Beef - any type of joint
PORK
Pork - any type of joint
Pork - Chops
LAMB
Lamb - any type of joint
Lamb
- Chops
CHICKEN/TURKEY
up to 4kg (8lb)
160/180 20-25 minutes per 450g (1lb)
+ 20 minutes extra
160/180
170
160/180
170
160/180 18-20 minutes per 450g (1lb)
25 minutes per 450g (1l b)
+ 25 minutes extra
30-45 minutes
25 minutes per 450g (1l b)
+ 25 minutes extra
20-30 minutes
+ 20 minutes extra
PLACE FOOD ON
ROASTING RACK, THEN
POSITION ABOVE THE
MEAT PAN.
STEAKS
GAMMON STEAKS
SAUSAGES
Note: The above chart is only a guideline. The times and temperatures may be increased or decreased
depending on personnal taste.
170 30-45 minutes
170 30-45 minutes
170 30-45 minutes
28
Page 29

Using the Main Oven
for Other Functions
'S' SLOW COOK SETTING
This is used for slow cooking, keeping food warm
and warming plates for short periods.
Extra care should be taken when warming bone
china, as it may be damaged in a hot oven.
DO NOT place food or plates directly on the oven
floor as this could damage both the oven lining
and the plates which are being
ADVANTAGES OF SLOW COOKING ARE:
The oven stays cleaner because there is less
splashing. Timing of food is not as critical, so there
is less fear of overcooking. Inexpensive joints of
meat are tenderised. Fully loading the oven can be
economical. Cooking times can be extended in
some cases by up to 2 hours.
OPERATION:
(for models BD62SS/2 & BD52B/2 - BD52K/2 -
BD52P/2):
1. Place the prepared food in the main oven and ensure
the door is fully closed.
2. Select Slow Cooking Temperature 'S' by turning the
Main Oven Temperature Control (C) and
Multifunction Control (D) clockwise to Fan Oven
mode.
(for models DQ47I/2 & DE47X/2):
1. Place the prepared food in the main oven and ensure
the door is fully closed.
2. Select Slow Cooking Temperature 'S' by turning Main
Oven Temperature Control (C).
STORAGE & RE-HEATING OF FOOD:
1. If food is to be frozen or not used immediately,
place it in a clean container and cool as soon as
possible.
2. Always thaw frozen food completely in the
refrigerator before re-heating.
3. Always reheat food thoroughly and ensure
hot before serving.
4. Only re-heat food once.
warmed.
it is piping
POINTS TO CONSIDER WHEN PREPARING
FOOD FOR SLOW COOKING
1. Make sure that the dishes to be used will fit into
the oven ensuring enough room for air to circulate.
2. All dishes cooked on the slow setting will require a
minimum of 6 hours, however, if they are cooked
for 1-2 hours longer then deterioration in their
appearance may be noticed.
3. Never cook joints of meat over 2.7kg (6 lb) or poultry
over 2.0kg (4lb 8oz). We do not recommend that
joints of meat or poultry are stuffed before cooking
on the slow setting.
4. To seal in the meat juices, always cook meat or
poultry at 170°C for 30 minutes before wrapping in
foil and placing on a rack over a tin (to allow good
air c
irculation) before turning the control to the slow
setting and cooking immediately.
5. Always ensure that joints of pork and poultry are
thoroughly cooked by checking with a meat
thermometer before serving.
6. Always thaw frozen foods completely before
cooking. We do not recommend placing frozen food
in the oven to cook.
7. Always bring soups, liquids and casseroles to the
boil before placing in the oven.
8. Ensure that casserole dishes have a good seal (not
airtight) and cover to the top with foil to prevent
loss of moisture.
9. Ensure that fruit and vegetables are cut into even
sized small pieces to cook properly.
10.Always adjust seasoning before serving.
11.If using dried red kidney beans it is important that
the beans are soaked and then boiled for a minimum
of 10 minutes before using in any dish to destroy
any toxins.
12.When cooking fish or egg dishes it may be
necessary to chec
overcooking.
k during cooking to avoid
GB
29
Page 30
Main Oven Grilling
GB
(BD62SS/2 & BD52B/2 - BD52K/2 -
BD52P/2)
DO NOT allow young children near the appliance
when the grill is in use as the surfaces can get
extremely hot.
GRILLING SHOULD NEVER BE UNDERTAKEN
WITH THE DOOR CLOSED.
-Do Not line the grill pan with aluminium foil.
- Ensure that the grill pan is cleaned after every use.
Excess fat build-up in the bottom of the pan could
cause a fire hazard.
- Preheat the grill on the required setting for 5 minutes
Food
Shelf Position
from base of oven
Grilling Procedure:
1. Open the main oven door fully and position the rod
shelf as recommended in the grilling chart (see
below) for the food being cooked.
2. Turn the multifunction selector switch to HALF grill
or FULL grill and then turn the Main Oven tempera-
ture control to the required setting to pre-heat for
approximately 5 minutes.
3. Position the grill pan centrally under the grill element
and push back as far as the location stops on the
rod shelf.
4. Leave the oven thermostat at setting MAX for toast
and for fast cooking of foods. For thicker foods
requiring longer cooking turn the thermostat to a
lower setting, after initial sealing on both sides at
MAX. The thicker the food, the lower the thermostat
should be set. If excessive smoke is emitted, reduce the setting.
5. After use always return both controls to their OFF
(O) position.
Setting Required Temp °C Cooking Time
Toasting of bread products 6 MAX 2-5 mins
Small cuts of meat,
sausages, bacon etc.
Chips, gammon steaks etc.5
Fish:
Whole / Fillets
Fingers
Pizza's 5 170 10-15 mins
Browning of food 5MAX 5-10 mi ns
5 or 6
5
6
MAX for 4- 6 mi ns then reduce to
setting 170
MAX for 4- 6 mi ns then reduce to
setting 170
170
MAX
10-20 mins
mins
20-30
15-20 mins
10-15 mins
30
Page 31
Care and Cleaning
L
&
Warning: Before cleaning, please ensure that the
electricity supply to the appliance is switched off
and the appliance is fully cold.
! Never use steam cleaners or pressure cleaners on
the appliance.
!
Clean the glass part of the oven door using a sponge
and a non-abrasive cleaning product, then dry
thoroughly with a soft cloth. Do not use rough abrasive
material or sharp metal scrapers as these could
scratch the surface and cause the glass to crack.
! The accessories can be washed like averyday
crockery (even in your dishwasher).
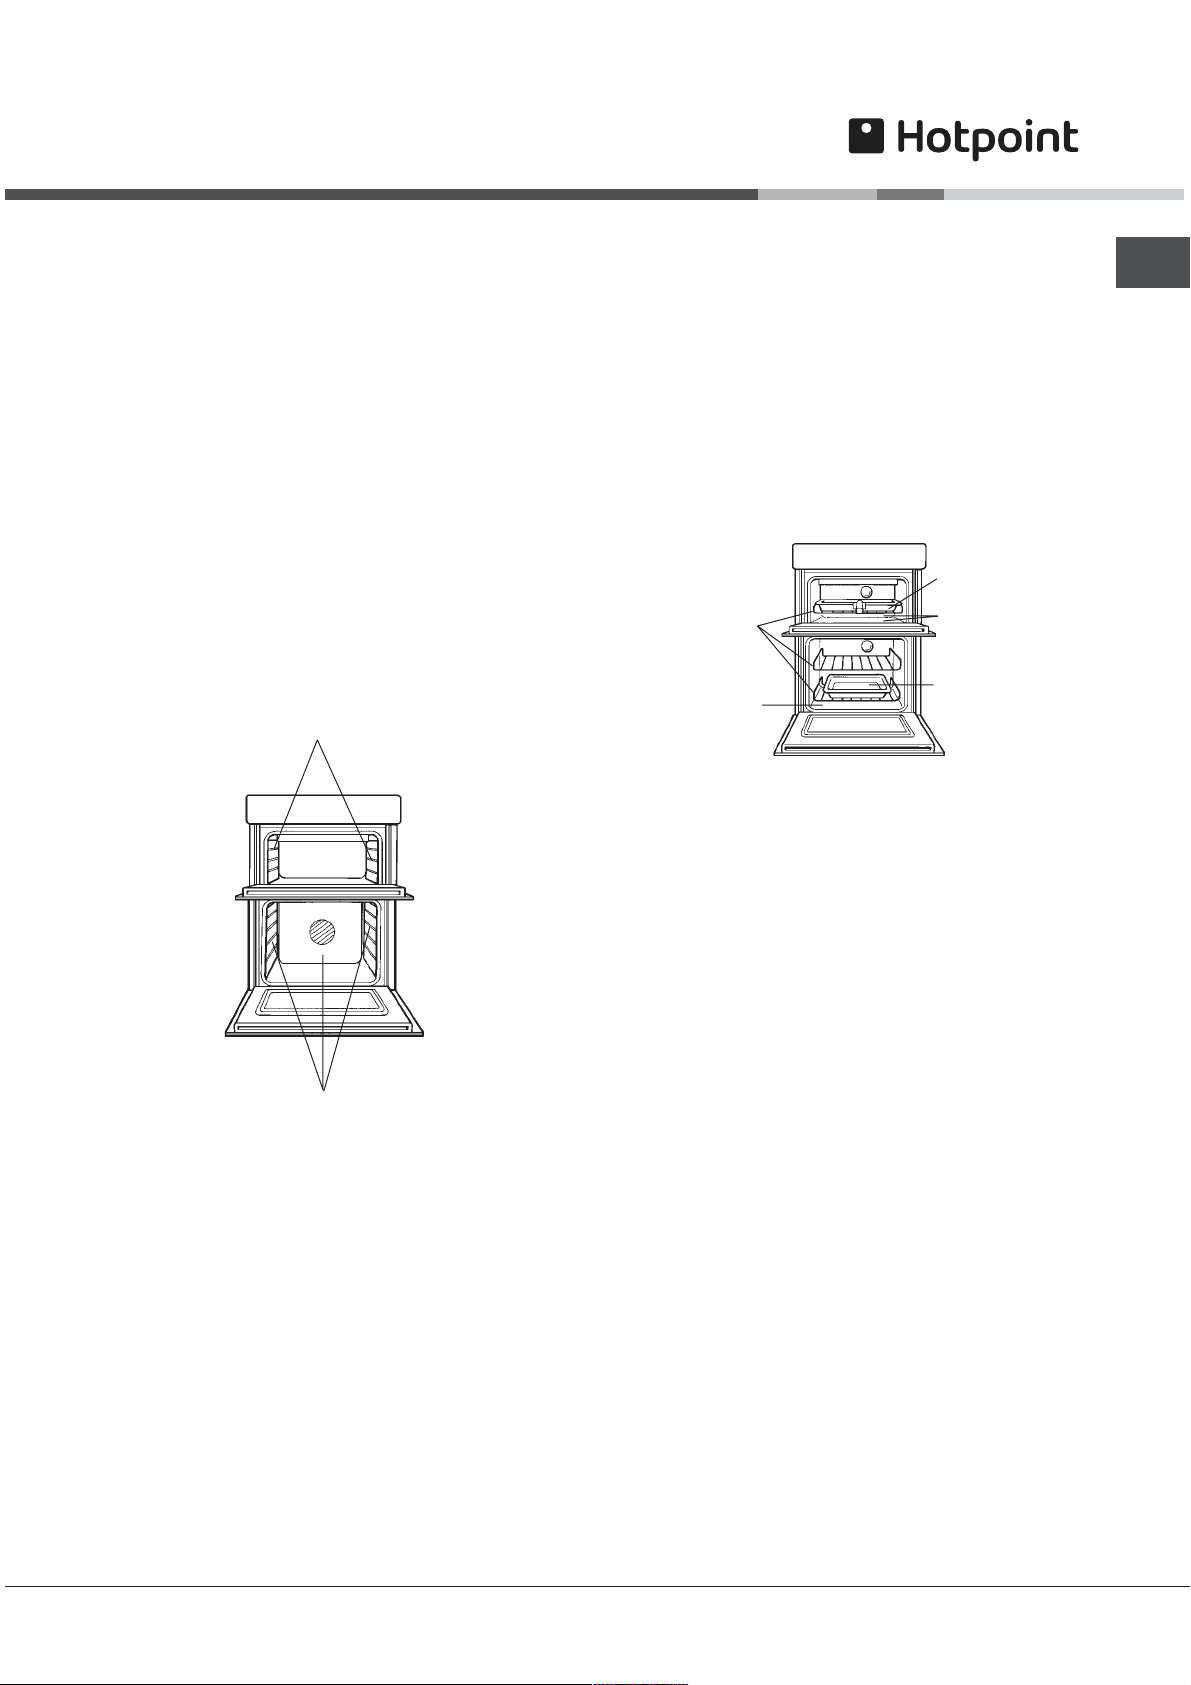
1. "STAYCLEAN" OVEN LINERS
(Top Oven Sides, Main Oven Sides and
Rear Panel)
TOP OVEN SIDES
It should not normally be necessary to clean the
"Stayclean" panels with water. If the user feels it is
desirable to do so, wipe them over with a clean,
soapy cloth, followed by a wipe with a clean damp
cloth.
DO NOT use biological washing powder, harsh
abrasives or
chemical oven cleaners of any kind
as this could damage the "Stayclean" oven liners.
2. CLEANING GRILL, TOP OVEN AND
MAIN OVEN
GRILL
PAN
OVEN
SHELVES
MAIN
OVEN
BASE
(a) Base & Rear of Top Oven and Base of Main
Oven.
Wipe out the oven with a damp soapy cloth. For
more stubborn stains on the base of the oven use a
well soaped fine steel wool soap pad.
BASE
REAR
MEAT
PAN
GB
MAIN OVEN SIDES AND REAR PANE
(a) How "Stayclean" works.
The surfaces of the "Stayclean" oven liners (Main
Oven rear panel) are treated with a special vitreous
enamel which absorbs cooking soils. At
temperatures of 220°C (425°F) or above, the special
surface enables these soils to be slowly destroyed.
The higher the temperature the more effective it is.
(b) Cleaning.
In most cases normal cooking operations at 220°C
(425°F) will permit this cleaning operation to proceed
during cooking. However if higher cooking
temperatures are not used regularly, it may be
necessary, in order to prevent heavy soiling, to run
the ovens without shelves or meat pan, at a
maximum setting for a couple of hours (Fan Oven
mode only).
(b) Grill Pan, Meat Pan & Oven Shelves.
To prevent stains from being burnt on to the grill
pan, food support and rod shelf, always wash
immediately after use in warm soapy water.
Use a well soaped fine steel wool soap pad to
remove stubborn stains from the rod shelves, grill
pan, meat pan and the base of the oven.
DO NOT use aerosol cleaners
on this oven as
they could adversely affect the fan motor unit,
and cannot be wiped off the fan blade.
(c) Solarplus Grill.
To clean the Solarplus Grill, use a clean, damp,
soapy cloth and wipe over. If stubborn stains
remain, gently clean with a well soaped nylon
scouring pad and wipe over with a damp cloth.
DO
NOT use metal cleaning utensils, wire wool or
proprietary oven cleaners on the grill element
mesh.
31
Page 32
Care and Cleaning
S
GB
3. OVEN DOORS
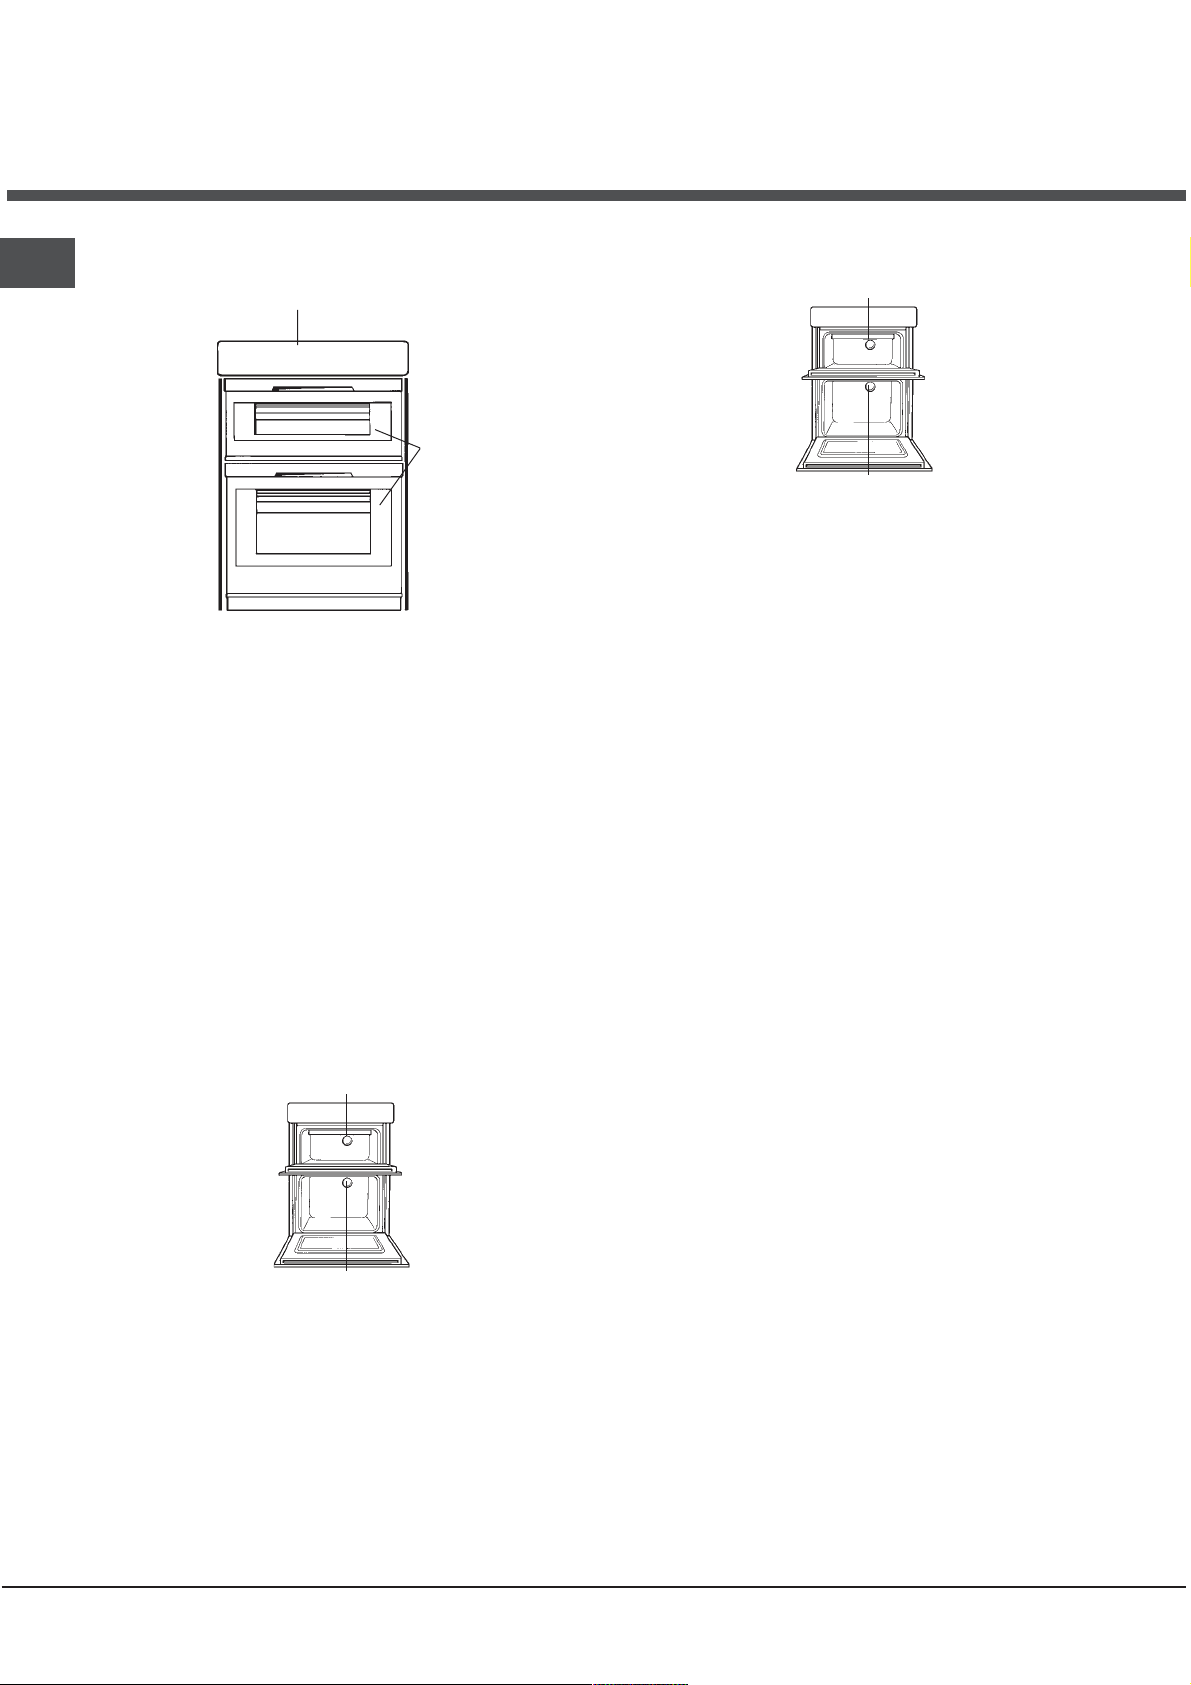
CONTROL PANEL
OVEN
DOOR
(a) Control Panel
Regularly wipe with a clean, damp cloth and polish
with a clean, dry cloth.
(b) Inner Door Panels & Glass
Open the door fully. The glass panel may now be
washed. Stubborn stains can be removed by using
a well soaped, fine steel wool soap pad.
5. HOW TO CLEAN THE LAMP LENS
TOP OVEN LAMP
MAIN OVEN LAMP
Warning: To avoid electric shocks - please ensure
that the electricity supply to the appliance is
switched off and the appliance is full
before cleaning lamp lens.
Open the oven door and remove the oven shelves.
Using a thick cloth, grip the lamp lens, unscrew
anticlockwise and remove.
Clean with a non-abrasive cleansing cream and refit
lamp lens.
DO NOT use scouring pads, or abrasive powder,
which will scratch the glass lens
y cold,
(c) Stainless trims (BD62SS/2 & DE47X/2 only)
Regularly wipe with a clean, damp cloth and polish
with a clean dry cloth.
DO NOT use scouring pads, or abrasive powder
which will scratch the glass.
,
4. REPLACEMENT OF THE OVEN LAMP
TOP OVEN LAMP
MAIN OVEN LAMP
Warning: To avoid electric shocks - please ensure
that the electricity supply to the appliance is
switched off and the appliance is full
before removing the lamp lens.
Open the oven door and remove the oven shelves.
Using a thick cloth, grip the lamp lens, unscrew
anticlockwise and remove the lens.
Carefully unscrew the bulb anti-clockwise.
Fit replacement bulb (25W 300°C SES) and refit lens.
y cold,
32
Page 33
Care and Cleaning
(BD62SS/2 & BD52B/2 - BD52K/2 BD52P/2)
Take particular care not to damage the inner
surface of the door inner glass that is coated with
a heat reflective layer. Do not use scouring pads,
or abrasive powder, which will scratch the glass.
Ensure that the glass panel is not subjected to
any sharp mechanical blows.
Stubborn stains can be removed by using a fine
steel wool pad. For slight soiling the inner glass
panel may be cleaned, while still warm, without
removing it from the door. After cleaning, rinse and
dry with a soft cloth.
CLEANING THE DOORS
SIDE OPENING DOORS
Cleaning the door glass is the same as the drop
down doors, except take care to support the
weight of the inner glass when removing and
refitting.
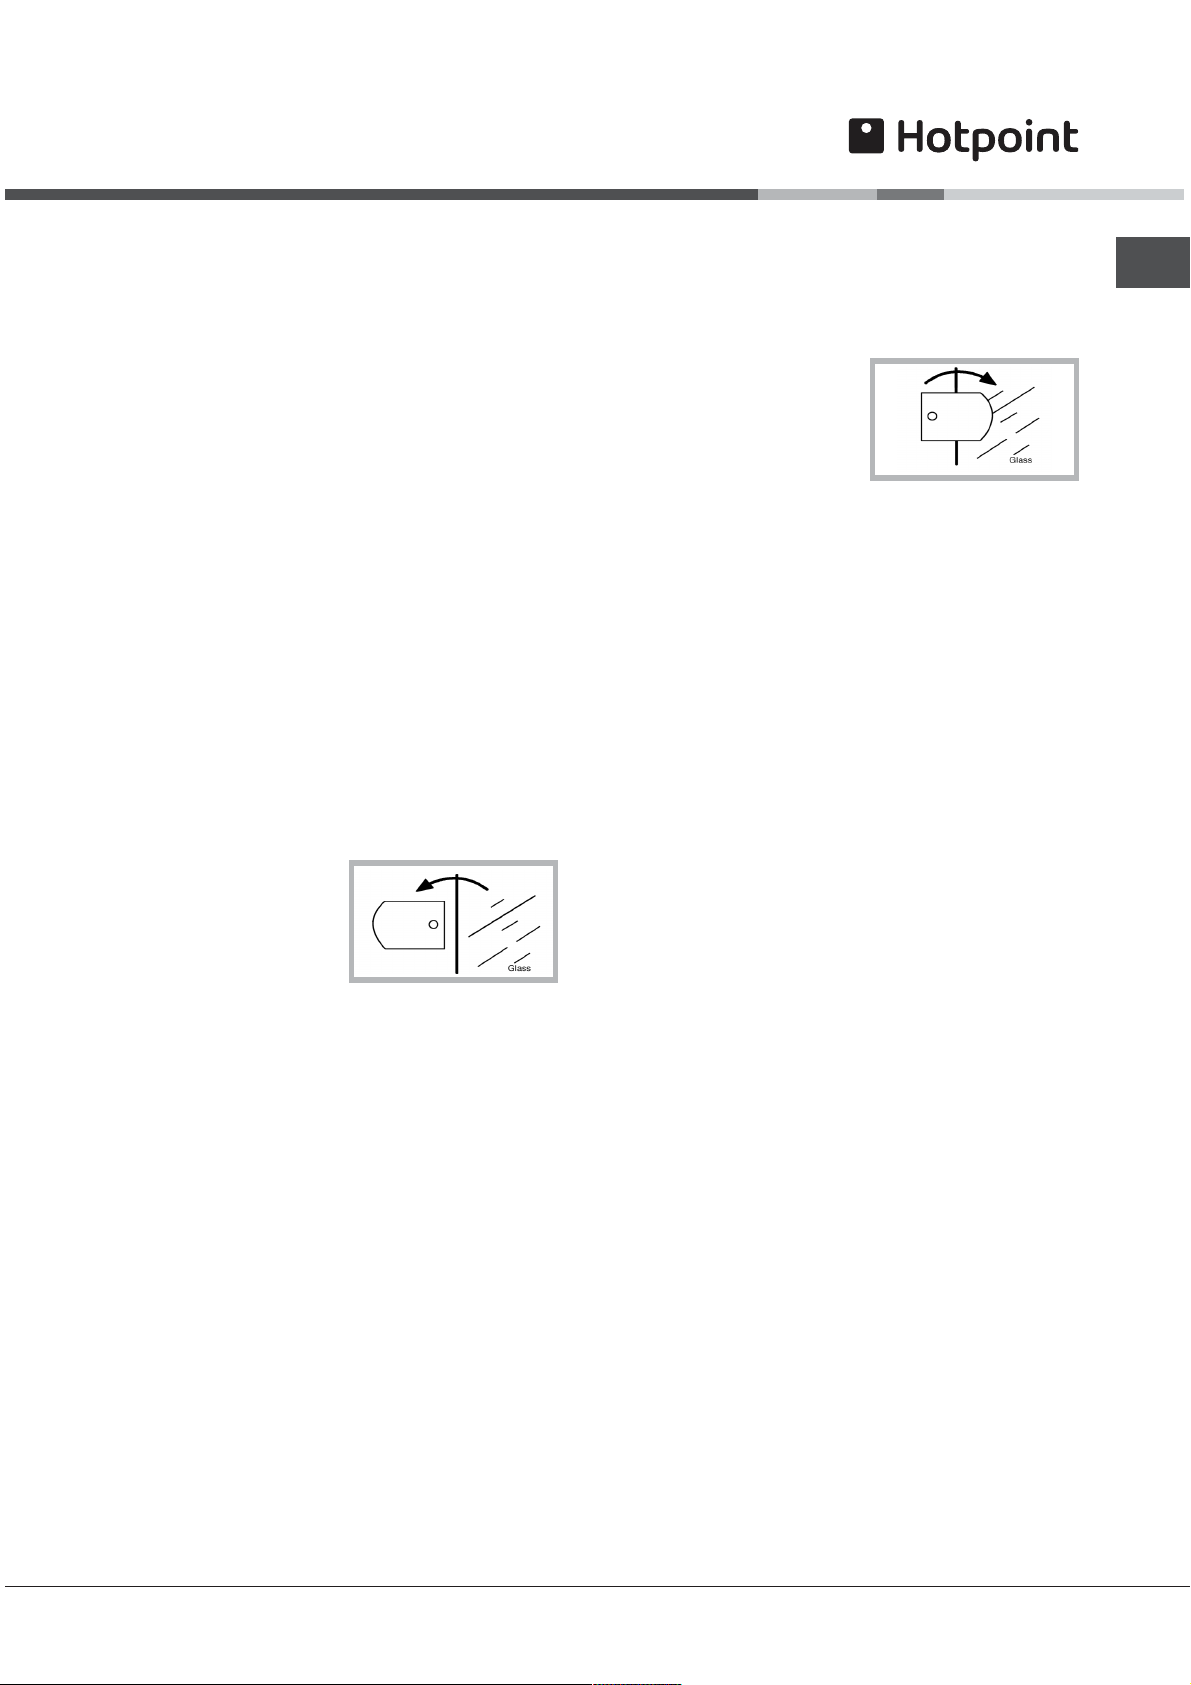
DROP DOWN DOORS
Remove the door inner glass as follows.
NEVER OPERATE THE COOKER
WITHOUT THE INNER DOOR GLASS IN
POSITION.
Refit the door inner glass as follows.
1. NOTE: The inner door
glass has a special
reflective coating on one
side. Replace the door
inner glass so that the
statement:
"IMPORTANT THIS FACE TOWARDS THE OVEN"
can be read from the inner side of the door.
2. Turn the two
position to retain the glass and tighten the screws
(Fig. 2.)
securing brackets back to their original
GB
1. Open the door fully and
unscrew the two screws
securing the glass panel
so that the securing
brackets can be turned.
There is no need to
remove the screws completely.
2. Turn the brackets so that the glass can be removed
and cleaned at the sink (Fig. 1.).
3. The inside of the outer door glass can now be
cleaned while still fitted to the cooker.
33
Page 34
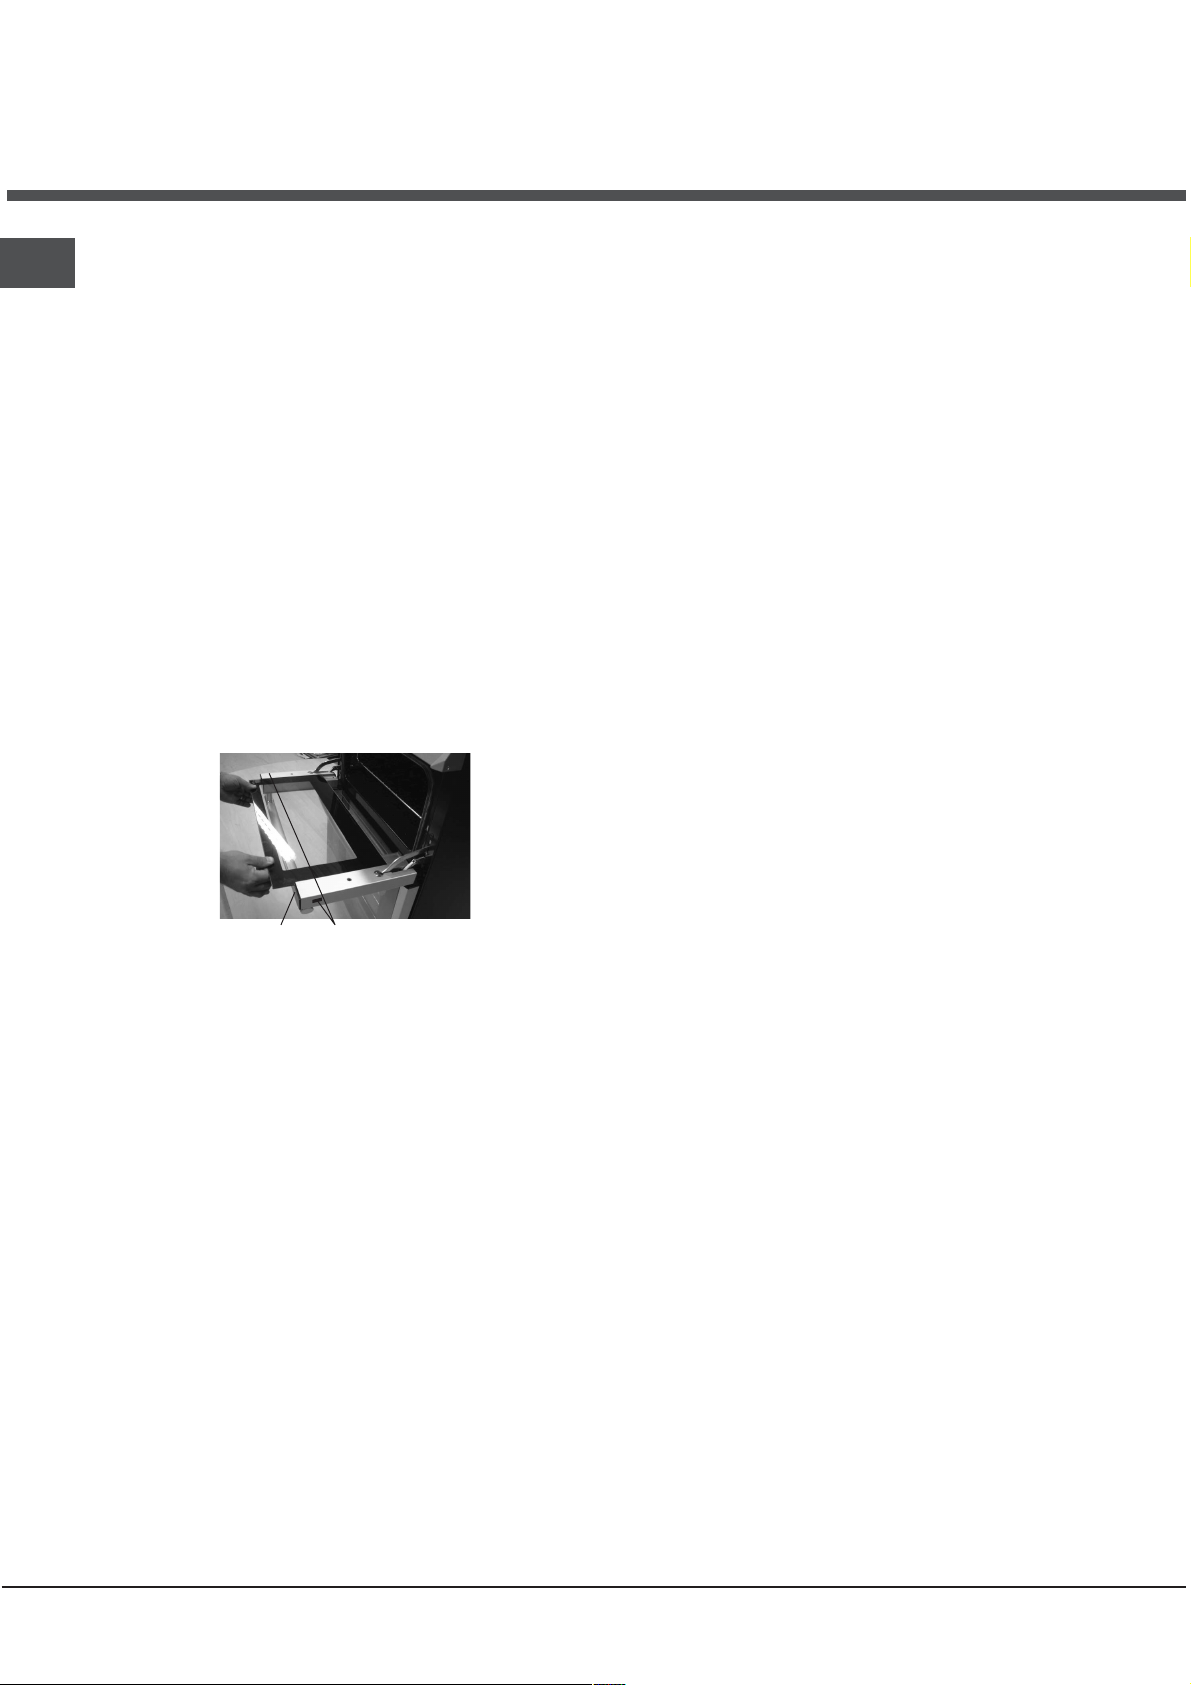
Care and Cleaning
(DQ47I/2 & DE47X/2)
GB
CLEANING THE DOORS
Take particular care not to damage the inner
surface of the door inner glass that is coated with
a heat reflective layer. Do not use scouring pads,
or abrasive powder, which will scratch the glass.
Ensure that the glass panel is not subjected to
any sharp
Stubborn stains can be removed by using a fine
steel wool soap pad. For slight soiling the inner
glass panel may be cleaned, while still warm,
without removing it from the door. After cleaning,
rinse and dry with a soft cloth.
DROP DOWN DOORS
Remove the door inner glass as follows.
1. Open the door fully and remove the extrusion end
caps (This should be done by hand but if it proves
too difficult, simply lift the inner glass to ease the
end caps out of position).
NOTE: If you need to use a tool - be careful
not to damage the extrusion or end cap.
mechanical blows.
Refit the door inner glass as follows.
1. Open the door fully.
2. Locate the inner door glass into its slots. The inner
door glass has a special reflective coating on one
side, in order to minimise surface temperatures
and energy consumption during use, it is important
it is fitted correctly.
3. Carefully slide the glass into its slots as far as it
will go and replace the top filler cap.
Top filler cap Remove both screws to
2. Carefully slide the inner glass towards you and
withdraw it from its locating slots. Ensure that the
door is not allowed to slam shut, due to the
reduction in door weight. Clean the glass as
described above.
3. The inside of the outer door glass can now be
cleaned while still fitted to the cooker.
NEVER OPERATE THE COOKER WITHOUT THE
INNER DOOR GLASS IN POSITION.
remove top filler cap
34
Page 35

Installation
Electrical Requirements
For your own safety, we recommend that your cooker
is installed by a competent person such as one who
is registered with NICEIC (National Inspection
Council for Electrical Installation Contracting). The
cooker should be installed in accordance with the
latest edition of the IEE Regulations.
Warning: This appliance must be earthed.
Electrical Connections
The installer must check that the voltage shown on
the rating plate corresponds with the house
electricity supply. The cooker must be supplied via
a suitable double pole isolating switch, having a
contact separation of at least 3mm in all poles
placed in a readily accessible position adjacent to
the cooker. If the cooker is to be wired into a
connector unit, this may be positioned behind the
cooker providing the following requirements are met:
i) The connector unit must not project from the wall
more than 25mm.
ii) The top of the connector must not be more than
130mm above floor level.
Remove the terminal cover at the rear base of the
cooker. Pass the cable through the cable clamp and
connect to the appropriate terminals provided.
Allow sufficient cable for any future servicing.
Tighten the screws on the cable clamp and replace
the cover. Make main connections in the connector
unit or cooker control unit. This appliance conforms
to B.S. EN 55014 regarding suppression of Radio
and Television reception interference.
A double Pole control switch having a minimum
rating of 32 amps should be used to feed the cooker
using a suitably rated cable. Where a hob is fitted
adjacent to or over the cooker, a 45 amp Double
Pole control switch should be used to feed both
units via separate suitably rated cables.
We recommend a minimum of 4mm2 PVC insulated
twin and earth cable conforming to B.S. 6004 for
connection of each appliance.
In all cases adhere to routing details (see fig. 4).
This appliance must not be installed over any other
appliance that generates heat such as a plinth
heater.
Note: Due to many
a mains cable is not supplied with this product.
The installer will fit the correct type and length of
c
able.
different types of installation,
Important
It is essential that the lower cupboard is constructed in
the manner illustrated i.e. having side, back, and roof
panels so joined as to provide no apertures which
could permit access to the oven unit when installed.
1. General
The appliance is designed for mounting at a safe
level into an oven housing which must be secured to
the backing wall.
2. Ventilation
a. The oven housing unit cabinet dimensions must
comply with fig. 4.
b. An air gap of 50mm minimum must be provided at
the rear of any top or bottom cupboards or shelves
(see fig. 1).
c. It is necessary that the
cabinets are provided with
unobstructed ventilation, i.e. from adjacent
cabinetry. This can be done by either raising the
base of the cabinets using the adjusting feet (or
spacers) or alternatively by providing a slot in the
cabinet
plinth to the dimensions in fig. 1.
d. The air gap at rear allows the warmed air to pass out
of the inner cabinet space. Where it is intended to fit
cupboards above the oven unit to ceiling height, it is
essential that the warmed air is exhausted through
the front of the cabinet (see fig. 1).
e. If an oven unit is installed adjacent to a tall cabinet,
steam escaping from the oven when the door is
opened could condense on and maybe stain the
adjacent surface. To prevent permanent staining, the
adjacent surface should be made of a material that is
heat resisting and easy to clean. Adjacent tall cabinets
should not be deeper than the oven housing cabinet.
3. Final Installation
a. Using a spirit level, check that the housing cabinet
is level from side to side and from front to back in
its installed position.
b. Correct any unevenness by placing spacers under
the bottom of the cabinet. Make sure that the cabinet
rests firmly on the floor without rocking.
c. Before the oven is fitted, the cabinet must be firmly
secured to the backing wall for stability.
d. The oven unit should now be lifted (this is a two
person lift) into the cabinet and pushed fully home.
e. Finally, the oven is secured to the cabinet by means
of the four Phillips C/SK Head screws - two through
each side trim.
f. Remove all packaging
material from the grill and
oven interior.
List of loose items:
4 x Phillips C/SK Head No. 6 x 25mm screws.
GB
35
Page 36
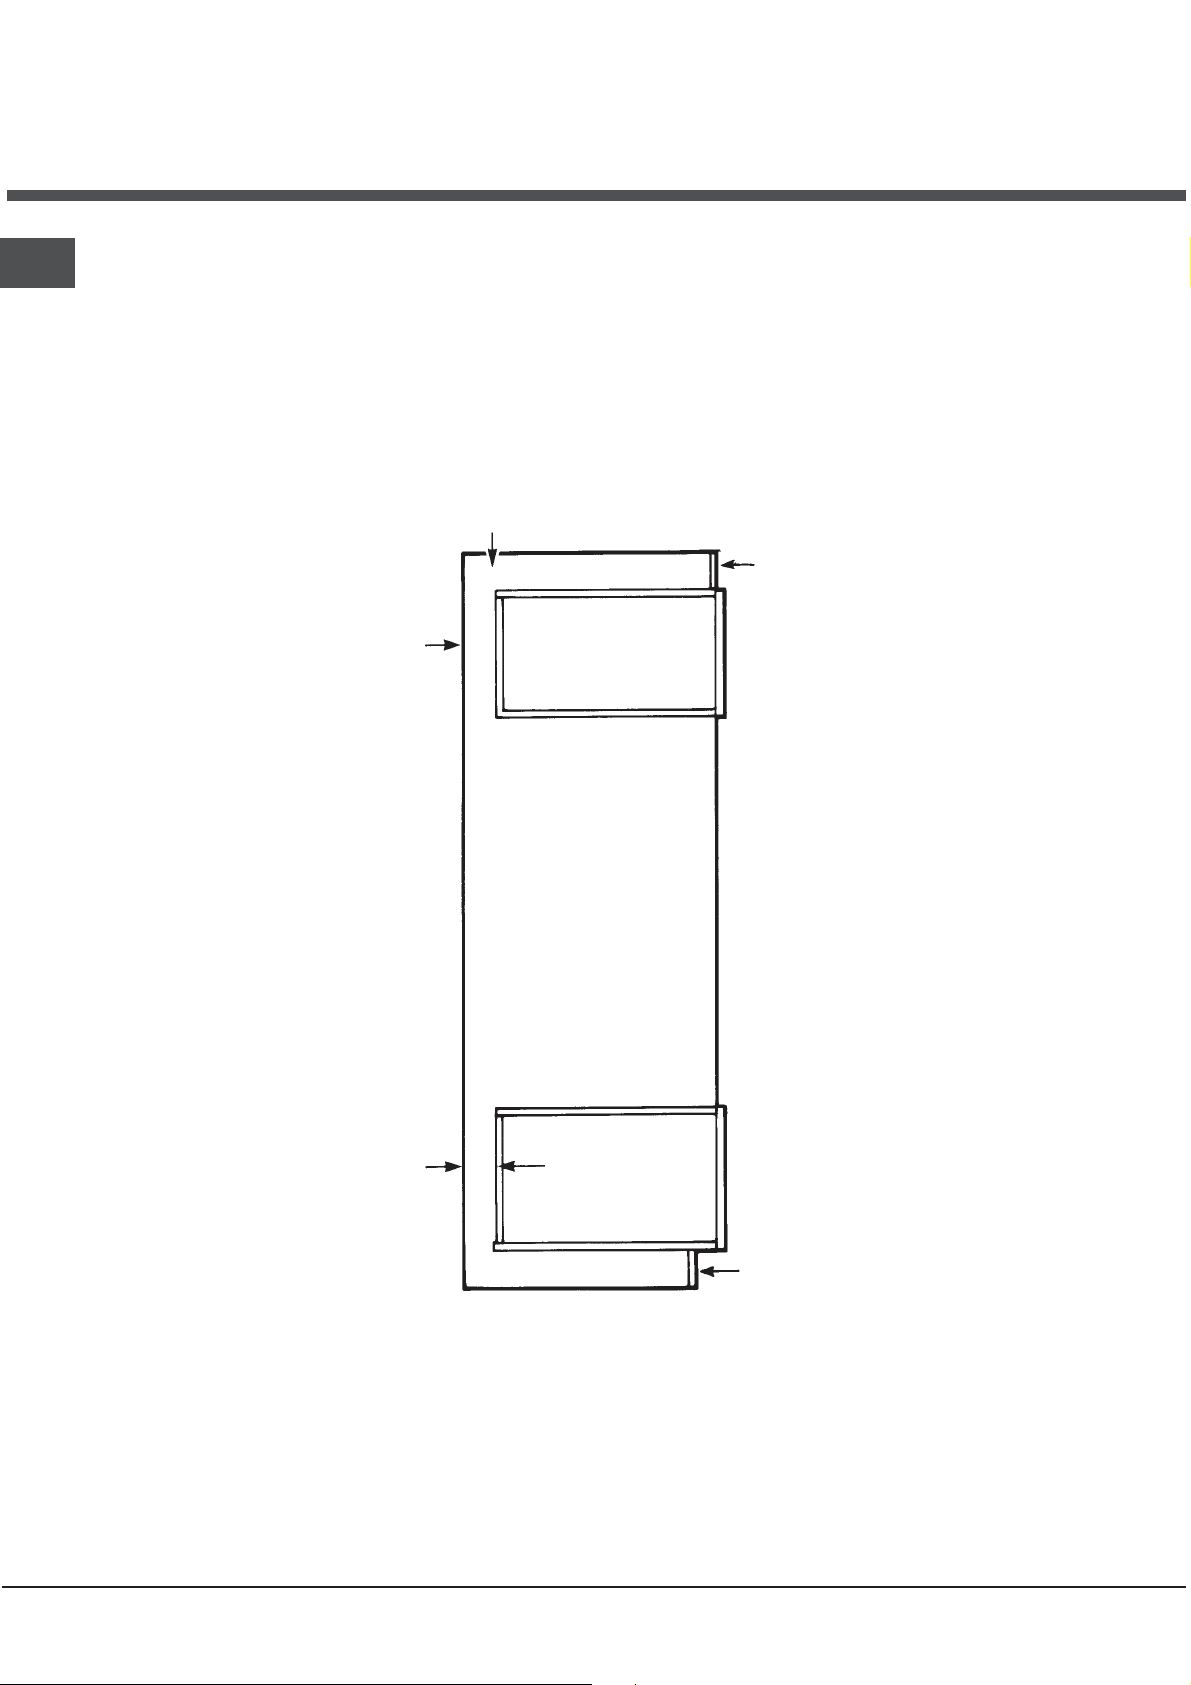
GB
t
Tall Cabinet Ventilation
Fig. 1
Ventilation Slot required
here if cabinet does not
fit to ceiling - 51mm x 457mm min. area
50 mm
Air Gap
Ventilation Slot
required
here if the cabinet does no
fit to the ceiling
- 51mm x 457mm min.
area
36
50 mm
Air Gap
Ventilation Slot
required here
- 51mm x 457mm
min. area
Page 37
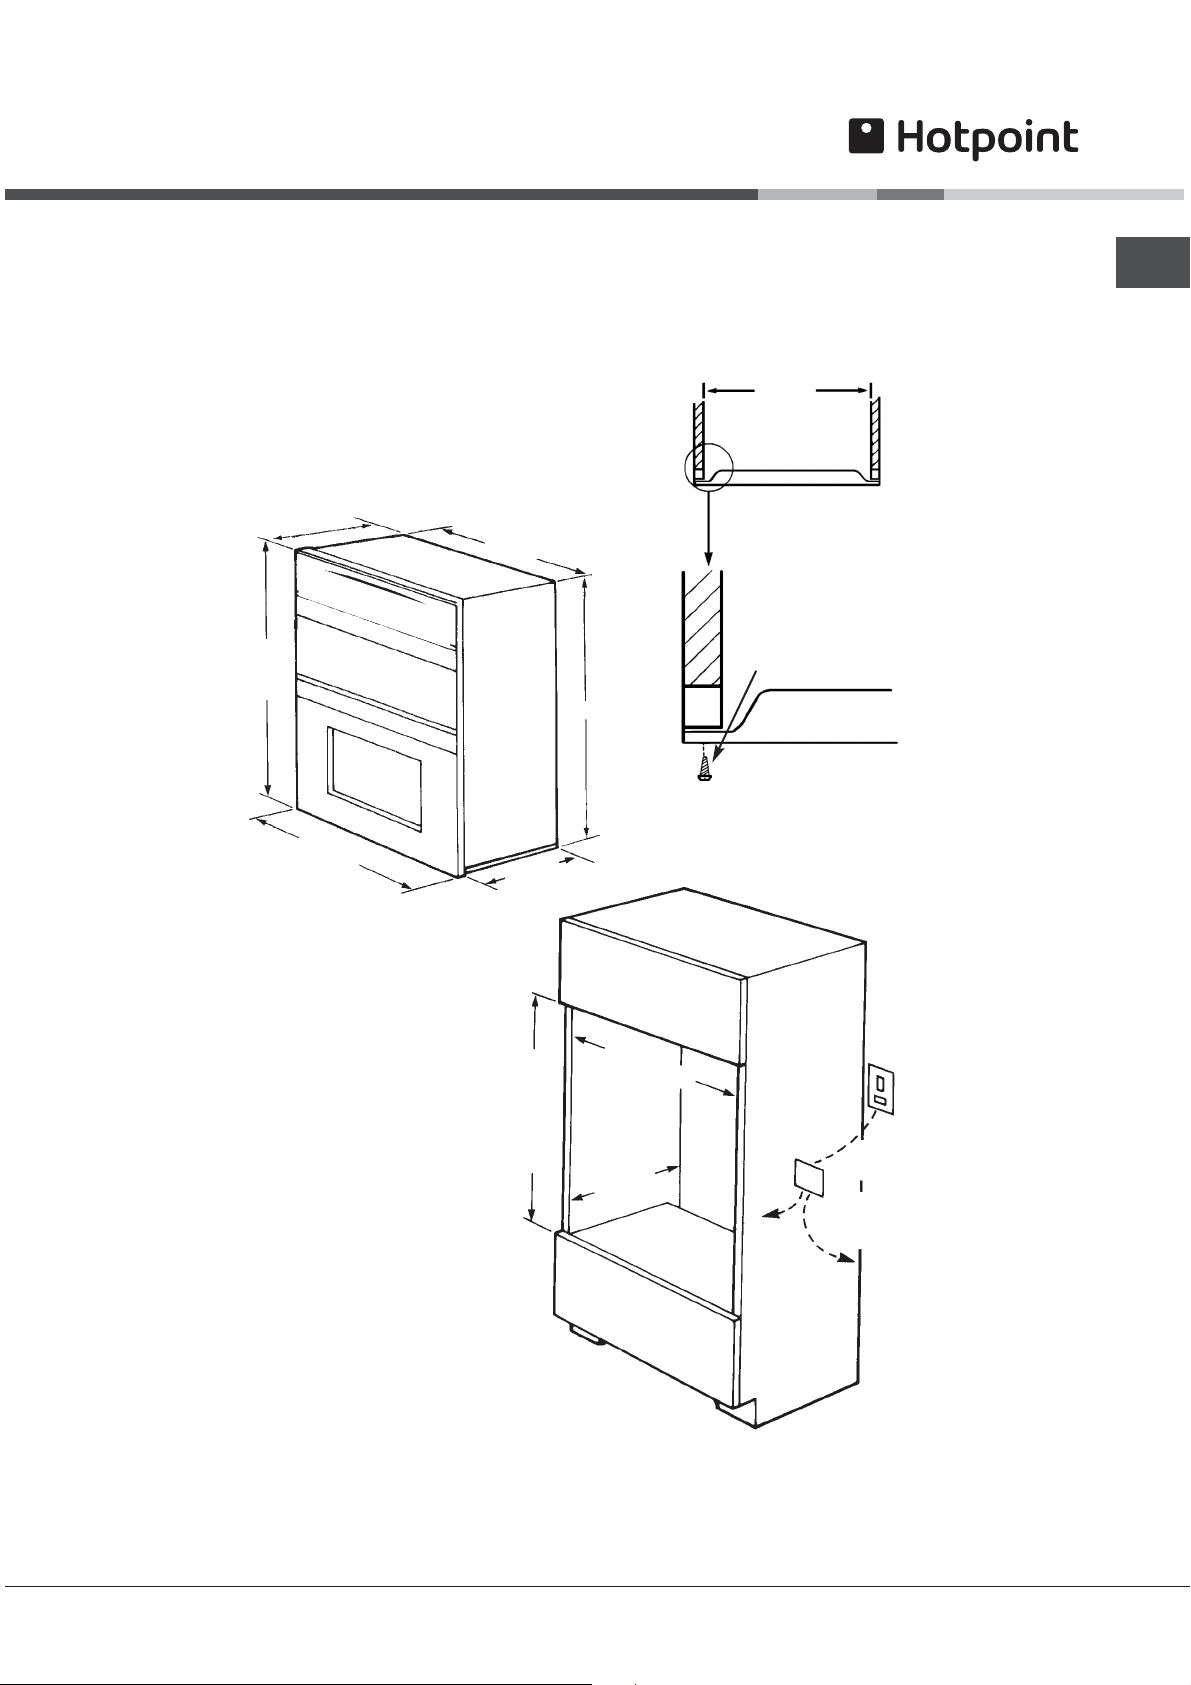
562mm
GB
570mm
exc. handle
knobs
882mm
Fig. 2
595mm
561mm
550mm
882mm,
870mm if
cooker trim
is to overlap
top edge
of shelf
Fig. 4
870mm
550mm
min *
Cabinet
562mm
Viewed down through cabinet
No. 6x25mm screw
(4 supplied)
Fig. 3
Oven Door
Connector
Box
2
4mm
Cable
To Oven
if hob fitted
4mm
to Hob if
if fitted
6mm
Cable
2
Cable
2
* excluding pipe work
and other projections
37
Page 38
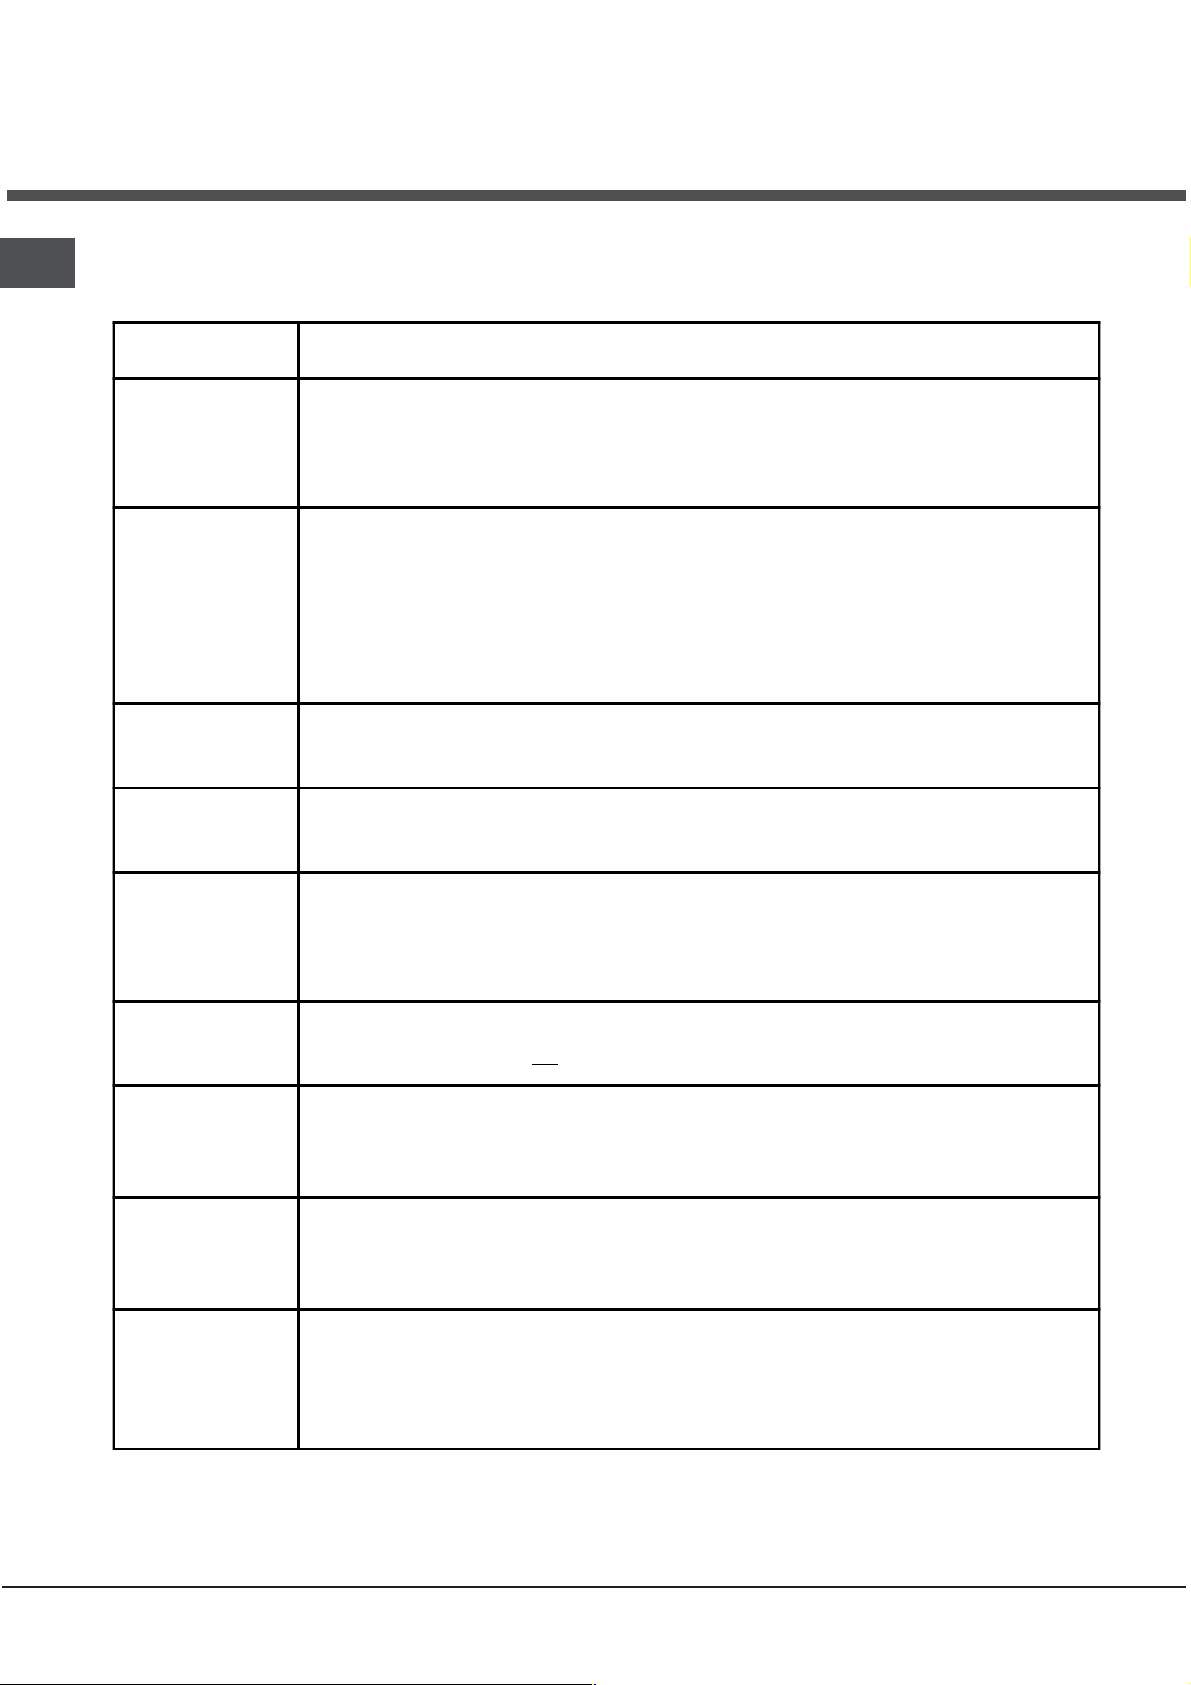
GB
g
g
g
g
g
g
g
g
g
g
g
g
g
g
g
g
g
g
If something
goes wrong...
Before calling a Service Engineer, please check through the following lists.
THERE MAY BE NOTHING WRONG.
Problem Check
Sli
ht odour or
small amount of
smoke when
oven used for first
time
Nothin
works
rill /
This is normal and should cease after a short period.
If you find that the timer display is blank, then it is likely that there is no electricity supply to
your oven. Check:
(i) That the main cooker wall is switched on
(ii) Other appliances, to see if you have had a power cut
(iii) The main circuit breaker for the property
Timer Display
shows '
"Auto" Flashin
Main oven and Top
ovens do not work,
but the
Top oven and
do not work, but
Main oven works.
Grill keeps turnin
on and off
Timer buzzer /
audible tone
operates
continually
Oven temperatures
too hi
' with
0.00
rill works
h or low
rill
The power supply to your oven has possibly been interrupted, but has now come back on
a
ain. Reset the timer to the correct day and "Manual" operation using the instructions given
in the timer section of the book.
Your timer may be set for an Auto Cookin
'Auto' is lit or flashin
this book to return the timer to Manual operation.
Operatin
(a) Grillin
(b) Grillin
Switch off appliance and allow to cool for approx 30 mins.
Switch the cooker back on and check that the Grill / Top oven is now operatin
When the Grill control is operatin
and off, this is normal and not
To cancel the audible tone, press the minute minder button.
Check temperature and shelf positions are as recommended in the Oven Temp erature
Charts.
It may be necessary to increase or decrease the recommended temperature sli
your taste.
the cooker under the following conditions may cause a safety device to operate:
with the door closed - Always grill with the door fully open
for an excessively long period at maximum setting - see Grilling guide.
. If it is then please follow the instructions given in the Timer section of
at less than its maximum setting, the Grill will cycle on
a fault.
programme: Check the timer to see whether
.
htly to suit
Oven does not
cook evenly
38
Check:
(a) Temp erature and shelf positions are as recommended in the Oven Temperature
(b) Oven utensils bein
used allow sufficient air flow around them.
Charts.
Page 39
If something
g
g
g
g
g
goes wrong...
Problem Check
Grilling is uneven. Ensure that Grill pan has been positioned as stated in the Grilling section of this book.
Oven lamp does
not work.
Condensation on
the wall at the rear
of the cooker.
Steam /
Condensation in
the oven after use.
If you have been through the above list and there is still a problem, contact Service (see back page).
The oven lamp is not covered by the
on oven lamp replacement) A new lamp may be obtained from our Genuine Parts &
Accessories Hotline (see back pa
Steam and / or condensation may appear from the vent at the rear of the appliance when
an oven particularly for foods with a high water content e.g. frozen chips, roast
usin
chicken etc. This is normal, and any excess should be wiped off.
Steam is a by - product of cookin
always:
a) Try to avoid leavin
b) Use a covered container, wherever possible.
food in the oven to cool after being cooked.
uarantee. The part is easily changed (see the section
e).
any food with a high water contact. To help minimise
GB
39
Page 40
GB
Disposal of your product
To minimise the risk of injury to children please
dispose of your product carefully and safely.
Remove all doors and lids. Remove the mains cable
(where fitted) by cutting off flush with the appliance
and always ensure that no plug is left in a condition
where it could be connected to the electricity
supply.
To help the environment, Local Authority instructions
should be followed for the disposal of your product.
Disposal of old electrical appliances
The European Directive 2002/96/EC on Waste
Electrical and Electronic Equipment (WEEE),
requires that old household electrical appliances
must not be disposed of in the normal unsorted
municipal waste stream. Old appliances must be
collected separately in order to optimise the
recovery and recycling of the materials they contain
and reduce the impact on human health and the
environment.
The crossed out "wheeled bin" symbol on the
product reminds you of your obligation, that when
you dispose of the appliance it must be separately
collected.
Consumers should contact their local authority or
retailer for information concerning the correct
disposal of their old appliance.
40
Page 41

Guarantee
12 months Parts and Labour Guarantee
Your appliance has the benefit of our manufacturer's guarantee, which covers the cost of
breakdown repairs for twelve months from the date of purchase.
This gives you the reassurance that if, within that time, your appliance is proven
defective because of either workmanship or materials, we will, at our discretion, either repair
or replace the appliance at no cost to you.
The guarantee is subject to the following conditions:
- The appliance has been installed and operated correctly and in accordance with our
operating and maintenance instructions.
- The appliance
- The appliance has been used for normal domestic purposes only.
- The appliance has not been altered, serviced, maintained, dismantled or otherwise interfered
with by any person not authorised by us.
- Any repair work must be undertaken by us or
- Any parts removed during repair work or any appliance that is replaced become our property.
- The appliance is used in the United Kingdom or Republic of Ireland.
is only used on the electricity or gas supply printed on the rating plate.
our appointed agent.
to be
GB
The guarantee does not cover:
- Damage resulting from transportation, improper use, neglect or interference or as a result of
improper installation.
- Replacement of
plugs, cables, batteries, light bulbs, fluorescent tubes and starters, covers and filters.
- Replacement of any removable parts made of glass or plastic.
THE GUARANTEE WILL NOT APPLY IF THE APPLIANCE HAS BEEN USED IN
Hotpoint also offers you a FREE 5 year parts guarantee. This additional guarantee is conditional
on you registering your appliance with us and the parts being fitted by one of our authorised
engineers. There will be a charge for our engineer's time. To activate the extra parts warranty on
your appliance, simply
We offer a selection of protection plans that enable you to fully cover yourself against the expense
of repair bills for the life of your policy. To find the ideal plan for you please call our advice line on
any consumable item or accessory. These include but are not limited to:
COMMERCIAL OR NON-DOMESTIC PREMISES.
5 Year Parts
call our registration line on 0870 6092094 (ROI 01 230 0800)
Extended Guarantees
08709 088 088 (ROI 01 230 0233)
Guarantee
Free Helpdesk Service
We have a dedicated team who can provide free advice and assistance with your appliance if
you experience any technical difficulties within the first 90 days of ownership.
Simply call our Hotpoint Service Hotline on 08709 066 066 (ROI 0818 313 413) for
assistance, or, where necessary, to arrange for an engineer to call.
telephone
41
Page 42
GB
After Sales Service
No one is better placed to care for your Hotpoint appliance during the course of its working
life than us - the manufacturer.
Essential Contact Information
Hotpoint Service
We are the largest service team in the country offering you access to 400 skilled telephone
advisors and 1100 fully qualified engineers on call to ensure you receive fast, reliable, local
service.
UK: 08709 066 066
Republic of Ireland: 0818 313 413
www.hotpoint.co.uk
Please note: Our advisors will
Parts & Accessories
We supply a full range of genuine replacement parts as well as accessory products that
protect and hygienically clean your appliance to keep it looking good and functioning
efficiently throughout its life.
UK: 08709 077 077
Republic of Ireland: 0818
www.hotpointservice.co.uk
Appliance Registration
We want to give you additional benefits of Hotpoint ownership. To activate your FREE 5 year
parts guarantee you must register your appliance with us.
require the following information:
Model number
Serial number
313 413
UK 0870 6092094
Republic of Ireland: 01 230 0800
www.hotpointservice.co.uk
As part of Hotpoint's continued commitment to helping the environment, Hotpoint reserves
the right to use quality, recycled components to keep down customer costs and minimise
material wastage.
42
Page 43

GB
43
Page 44

GB
01/2009 - 195072650.02
XEROX FABRIANO
44
 Loading...