

Hotpoint BCS 313 A VE I UK User Manual

Fridge/freezer combined
Installation and use

BCS 313 A VE I UK
Fridge/freezer combined
GB
Instructions for installation and use
To maintain the EFFICIENCY and SAFETY of this appliance, we recommend:
- use only the MANUFACTURER Service
- use only ORIGINAL Spare Parts

Safety - a good habit to get into.
ATTENTION
Read your manual carefully since it contains instructions
which will ensure safe installation, use and maintenance of
your appliance.
Your Refrigerator is built to International safety standards
(EN60) ans has been awarded the European approval mark
(IMQ) for compliance with UK electrical safety requirements.
It also meets the EC standards on the prevention and elimination of readio interference (EC directive 87/308 - 02.06.89).
1. This appliance must not be installed outdoors - not even in
an area protected by a roof. It is extr emely dangerous to leave
it exposed to rain or storms.
2. It must only be used by adults and exclusively to refrigerate
and freeze foodstuffs, following the instructions for use contained in this manual.
3. Do not ever touch or handle the appliance with bare feet or
with wet hands or feet.
4. It is highly recommended that you do not use extension
cords or multiple socket adapters. If the refrigerator is installed
between cabinets, make sure that the cord is not bent or dangerously pinched or compressed.
5. Never pull on the cord or the refrigerator to remove the plug
from the wall socket - this is very dangerous.
6. Never touch the cooling components within the appliance,
especially with wet hands because this could result in injury.
Never put ice cubes just removed from the freezer into your
mouth because they could stick to your mouth and cause
burns.
7. Never perform any cleaning or maintenance operations
without first unplugging the appliance; in fact, setting the
appliance ON/OFF knob to OFF is not enough to cut off all
electrical contacts.
8. Before having your old refrigerator picked up for disposal,
remove or make inoperable any locking devices to prevent children who might play in or around the appliance from being
locked inside.
9. Before calling for service/assistance in the case of malfunction, consult the chapter entitled “Is There a Problem? to determine whether it is possible to eliminate the problem. do not
try to repair the problem by trying to access the internal components of the appliance.
10. If damaged, the power supply cord on this appliance
must necessarily be replaced by our service centre because
special tools are required for replacement.
11. Do not use electric appliances inside the compartment for
food storage, if these are not those recommended by the
manufacturer.
12. At the end of the functional life of your appliance –
containing cyclopentane gas in the insulation foam and perhaps
gas R600a (isobutane) in the refrigeration circuit – the latter
should made safe before being sent to the dump.
For this operation, please contact your dealer or the Local
Organisation in charge of waste disposal.
Installation
To ensure that the appliance operates properly and to
reduce energy consumption, it is important that the
appliance is installed correctly .
Ventilation
The compressor and condenser generate heat and, therefore, need to be ventilated properly. Rooms with less than
perfect ventilation are not very suited for installation of the
appliance. Therefore, it should be installed in a room with
an opening (window or French window) that provide the
appropriate amount of air re-circulation. It is also important
that the room not be too humid.
Away from Heat
This appliance should not be positioned in a place where it
is directly exposed to sunlight or directly next to an iven/hob.
Electrical Connection and Earthing
Before proceeding with the electrical connection, make sur e
that the voltage indicated on the rating plate, located at the
bottom left near the vegetable crisper, corresponds to the
mains voltage in your home and that the socket is fitted
with a standard earthing wire in accordance with safety
standards for 46/90 systems. If the socket is not fitted with
an earthing wire, the manufacturer will not be held liability
for any damages and or injuries arising out of the use of the
appliance. Do not use multiple sockets or adapters.
Position the appliance in such a way that you can access
the socket where it is plugged in.
Insufficient power?
The electrical socket must be able to handle the maximum
power load of the appliance, which is indicated on the rating plate located at the bottom left next to the vegetable
crisper.
Before making the electrical connection ...
After the appliance has been delivered, place it in the vertical upright position and wait at least 3 hours before inserting the plug into the socket in order to ensure that it functions properly .
1
GB
Electrical connection
Your appliance is now supplied with a 13 amp fused plug
that can be plugged into a 13 amp socket for immediate
use. Before using the appliance please read the instructions
below.
WARNING - THIS APPLIANCE MUST BE EARTHED.
THE FOLLOWING OPERATIONS SHOULD BE CARRIED
OUT BY A QUALIFIED ELECTRICIAN.
Replacing the fuse:
When replacing a faulty fuse, a 13 amp AST A approved fuse
to BS 1362 should always be used, and the fuse cover refitted. If the fuse cover is lost, the plug must not be used
until a replacement is obtained.
Connect Blue wire to terminal marked “N” or coloured Black.
If a 13 amp plug (BS 1363) is used it must be fitted with a 13
amp fuse. A 15 amp plug must be protected by a 15 amp
fuse, either in the plug or adaptor or at the distribution board.
If you are in any doubt about the electrical supply to your
machine, consult a qualified electrician before use.
How to connect an alternative plug:
The wires in this mains lead are colour ed in accordance with
the following code:
BLUE “NEUTRAL” (“N”)
BROWN “LIVE” (“L”)
GREEN AND YELLOW “EARTH” (“E”)
Replacement fuse covers:
If a replacement fuse cover is fitted, it must be of the correct
colour as indicated by the coloured marking or the colour
that is embossed in words on the base of the plug.
Replacements can be obtained directly from your nearest
Service Depot.
Removing the plug:
If your appliance has a non-rewireable moulded plug and
you should wish to remove it to add a cable extension or to
re-route the mains cable through partitions, units etc., please
ensure that either:
- the plug is replaced by a fused 13 amp re-wireable plug
bearing the BSI mark of approval
or:
- the mains cable is wired directly into a 13 amp cable outlet,
controlled by a switch, (in compliance with BS 5733) which
is accessible without moving the appliance.
Disposing of the plug:
Ensure that before disposing of the plug itself, you make the
pins unusable so that it cannot be accidentally inserted into
a socket. Instructions for connecting cable to an alter-
native plug:
Important: the wires in the mains lead are coloured in
accordance with the following code:
Green & Yellow - Earth
Blue - Neutral
Brown - Live
As the colours of the wires in the mains lead may not
correspond with the coloured markings identifying the
terminals in your plug, proceed as follows:
Connect Green & Yellow wire to terminal marked “E” or
or coloured Green or Green & Yellow.
Connect Brown wire to terminal marked “L” or coloured
Red.
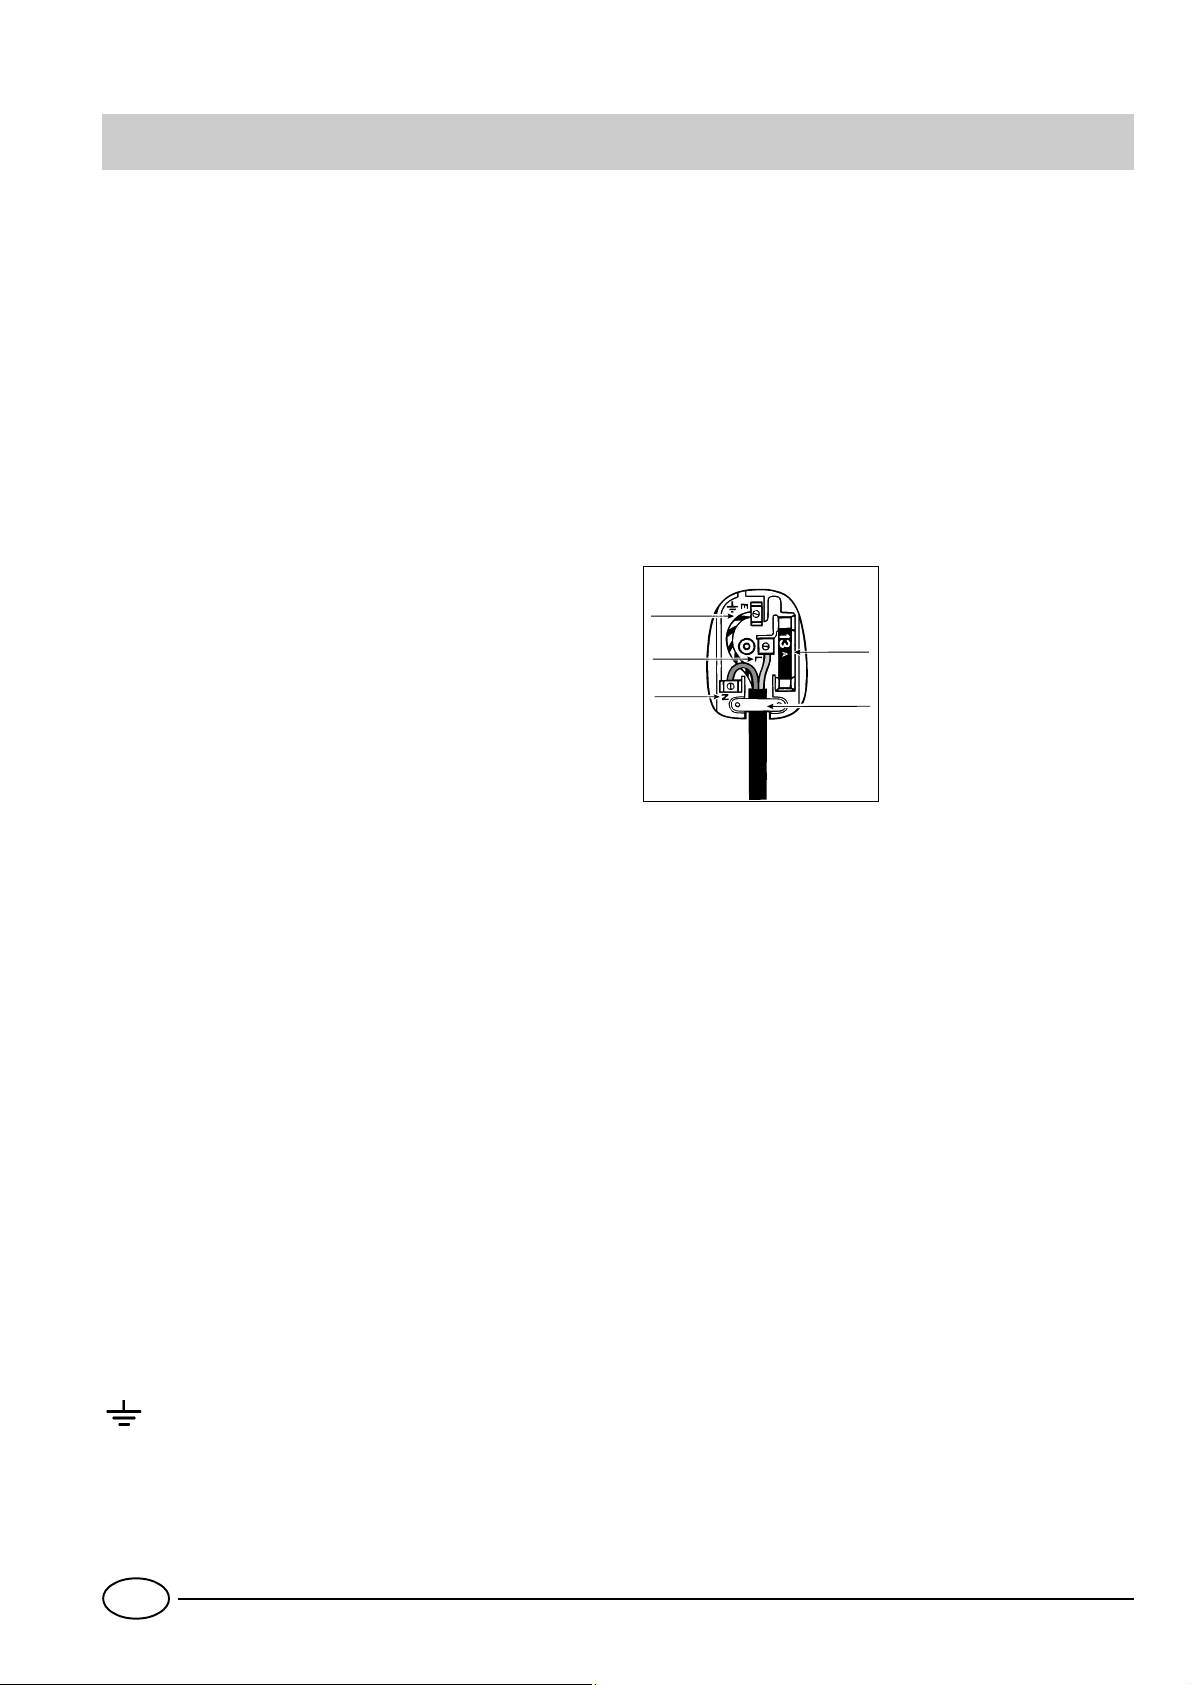
GREEN &
YELLOW
BROWN
BLUE
13 ampere fuse
CROSS-BAR
CORD GRIP
Disposing of the appliance:
When disposing of the appliance please remove the plug by
cutting the mains cable as close as possible to the plug body
and dispose of it as described above.
GB
2

Close-up view
I
ECO
M
D
E
O
N
L
M
F
K
A
B
C
B
J
G
H
G
I
H
Removable door shelves with lid, with egg tray
A
and lidded butter dish
Removable miscellaneous shelf
B
Hinged shelf
C
Compartment for a 2 litre bottle
D
Removable door shelf for bottles
E
Drain system for drawing off
F
defrost water from freezer
compartment
Compartment for storing
G
Removable/Adjustable Shelves
M
Hinged bottle rack
N
"A.I.R. System"
O
(Ariston Integrated Refrigeration)
frozen foods
Ice tray "ESY ICE"
H
Compartment for freezing
fresh foods and storing frozen
foods
Display
J
Fruit and Vegetable Crispers
K
Meat/cheese storage box
L
3
GB
 Loading...