

Page 1

Combinato frigo/freezer
Installazione e uso
Fridge/freezer combined
Installation and use
Réfrigérateur-congélateur combiné
Installation et emploi
Kühl/Gefrier-Kombination
Installation und Gebrauch
Koel-vriescombinatie
Installatie en gebruik
Frigorífico-freezer combinado
Instalación y uso
Page 2

BCS 313 A VE I
Combinato frigo/freezer 1
I
Istruzioni per l'installazione e l'uso
Fridge/freezer combined 13
GB
Instructions for installation and use
Réfrigérateur-congélateur combiné 25
F
Instructions pour l'installation et l'emploi
Kühl/Gefrier-Kombination 37
D
Installation- und Gebrauchshinweise
Koel-vriescombinatie 52
NL
Gebruiksaanwijzingen voor plaatsing en gebruik
Frigorífico-freezer combinado 64
E
Instrucciones para la instalación y uso
Per garantire l’efficienza e la sicurezza di questo elettrodomestico:
- rivolgetevi esclusivamente a centri di assistenza tecnica autorizzati
- richiedete sempre l’utilizzo di parti di ricambio originali
To maintain the EFFICIENCY and SAFETY of this appliance, we recommend:
- call only the Service Centers authorized by the manufacturer
- always use original Spare Parts
Pour garantir l’efficacité et la sécurité de ce produit:
- adressez-vous exclusivement aux Centres d’assistance technique agréés
- demander toujours l’utilisation de pièces détachées originales
Um die Leistungsfähigkeit und Sicherheit dieses Gerätes zu gewährleisten,
bitte folgendes beachten:
- wenden Sie sich ausschließlich an unsere autorisierten Service-Stellen
- verlangen Sie, daß nur Original-Ersatzteile verwendet werden
Om de doelmatigheid en veiligheid van dit toestel te garanderen raden wij u aan:
- voor reparaties alleen de Service Centers te bellen die door de fabrikant
gemachtigd zijn
- altijd gebruik te maken van originele onderdelen
Para garantizar la eficacia y seguridad de este electrodoméstico:
- Diríjase exclusivamente al Servicio Técnico Oficial del Fabricante.
- Solicite siempre la utilización de recambios originales.
Page 3

La sicurezza, una buona abitudine
ATTENZIONE
Leggete attentamente le avvertenze contenute nel presente
libretto in quanto forniscono importanti indicazioni riguardanti
la sicurezza di installazione, d’uso e di manutenzione.
Questa apparecchiatura è conforme alle seguenti Direttive Comunitarie:
- 73/23/CEE del 19/02/73 (Basse Tensioni) e successive
modificazioni;
- 89/336/CEE del 03/05/89 (Compatibilità Elettromagnetica) e successive modificazioni.
1. Questo apparecchio non va installato all’aperto, nemmeno se lo spazio è riparato da una tettoia; è molto pericoloso
lasciarlo esposto alla pioggia e ai temporali.
2. Deve essere usato soltanto da adulti ed esclusivamente
per conservare e congelare i cibi, seguendo le istruzioni d’uso
scritte in questo manuale.
3. Non toccate né manovrate mai l’apparecchio a piedi nudi
o con le mani o i piedi bagnati.
4. Sconsigliamo di ricorrere a prolunghe e prese multiple.
Se il frigorifero è installato tra i mobili, controllate che il
cavo non subisca piegature o compressioni pericolose.
5. Non tirate mai il cavo né il frigorifero per staccare la spina
dalla presa a muro: è molto pericoloso.
6. Non toccate le parti interne raffreddanti soprattutto con
le mani bagnate poiché potreste ustionarvi o ferirvi. Né mettete in bocca cubetti di ghiaccio appena estratti dal freezer
poiché rischiate di ustionarvi.
7. Non fate né pulizia né manutenzione senza aver prima
staccato la spina; per eliminare ogni contatto elettrico non
basta, infatti, posizionare la manopola ON/OFF prodotto in
OFF.
8. Prima di farvi ritirare il vecchio frigorifero, mettete fuori
uso l’eventuale serratura per evitare che i bambini, giocando, possano rimanere chiusi dentro l’apparecchio.
9. In caso di guasto, prima di chiamare il servizio-assistenza,
controllate al capitolo “C’è qualche problema?” per verificare se è possibile eliminare l’eventuale inconveniente. Non
tentate di riparare il guasto, cercando di accedere alle parti
interne.
10. In caso di sostituzione del cavo di alimentazione rivolgersi ai nostri Centri di Assistenza. In alcuni casi le connessioni sono eseguite con terminali speciali, in altri è richiesto
l’uso di un utensile speciale per accedere ai collegamenti.
11. Non usate apparecchi elettrici all'interno dello scomparto conservatore di cibi, se questi non sono del tipo raccomandato dal costruttore.
12. Al termine della vita funzionale dell'apparecchio, contenente gas ciclopentano nella schiuma isolante ed eventualmente gas R600a (isobutano) nel circuito refrigerante,
lo stesso dovrà essere messo in sicurezza prima dell'invio in
discarica. Per questa operazione rivolgetevi al vostro negoziante o all'Ente Locale preposto.
Installazione
Per garantire un buon funzionamento e un consumo
contenuto di elettricità è importante che l’installazione sia eseguita correttamente.
L’aerazione
Il compressore ed il condensatore emettono calore e richiedono perciò una buona aerazione. Sono poco adatti ambienti con una non perfetta ventilazione. L’apparecchio va
quindi installato in un ambiente servito da un’apertura (finestra o portafinestra) che assicuri il necessario ricambio
dell’aria e che non sia troppo umido.
Fare attenzione, durante l'installazione, a non coprire od
ostruire le griglie che permettono la buona ventilazione dell'apparecchio.
Lontano dal calore
Evitare di posizionare l'apparecchio in un luogo direttamente esposto alla luce solare, accanto alla cucina elettrica o
similari.
Collegamento elettrico e messa a terra
Prima di procedere al collegamento elettrico, controllare che
il voltaggio indicato sulla targhetta caratteristiche, posta in
basso a sinistra accanto alla verduriera, corrisponda a quello del vostro impianto di casa, e che la presa sia dotata di
una regolare messa a terra, come prescrive la legge sulla
sicurezza degli impianti 46/90. Se manca la messa a terra,
la Casa Costruttrice declina ogni responsabilità. Non usate
prese multiple o adattatori.
Posizionare l’apparecchio in modo che la presa, a cui
è collegato, sia accessibile.
La potenza è insufficiente?
La presa elettrica deve essere in grado di sopportare il carico
massimo di potenza dell’apparecchio, indicato sulla targhetta
caratteristiche posta in basso a sinistra accanto alla verduriera.
Prima di collegarlo elettricamente
Dopo il trasporto posizionare l’apparecchio verticalmente
ed attendere almeno 3 ore prima di collegarlo alla presa
per consentire un corretto funzionamento.
1
I
Page 4

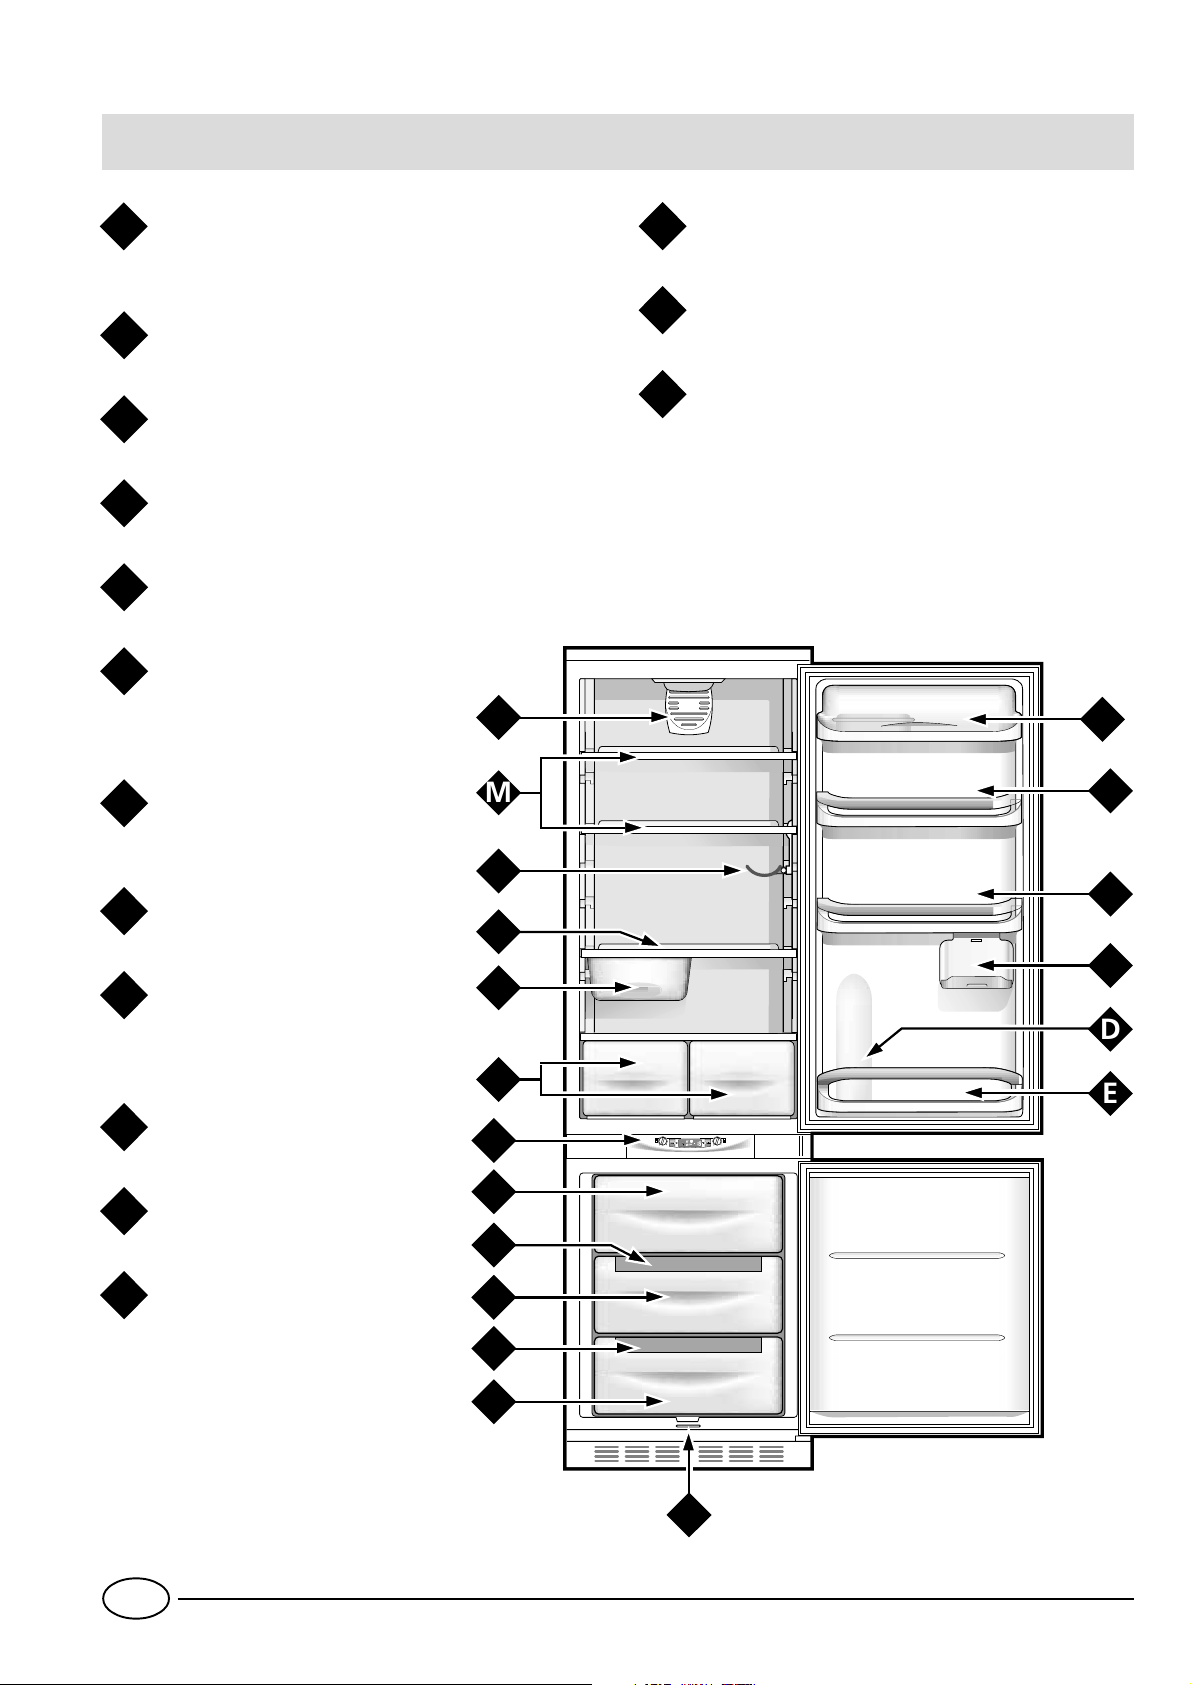
Visto da vicino
ECO
M
D
E
O
N
L
M
F
K
A
B
C
B
J
G
H
G
I
H
Balconcino estraibile con coperchio, con
A
portauova e scatola burro
Balconcino estraibile portaoggetti
B
Balconcino richiudibile
C
Vano per bottiglia da 2 litri
D
Balconcino bottiglie
E
Sistema "drain" per l'elimina-
F
zione dell'acqua di
sbrinamento
Ripiani estraibili e regolabili in altezza
M
Portabottiglia ribaltabile
N
"A.I.R. System"
O
(Ariston Integrated Refrigeration)
Vani per la conservazione
G
Bacinelle per la produzione di
H
ghiaccio
Vano utilizzabile per il conge-
I
lamento e la conservazione
Quadro comandi
J
Cassetti per frutta e verdura
K
Scatola scorrevole per carni e
L
formaggi
I
2
Page 5
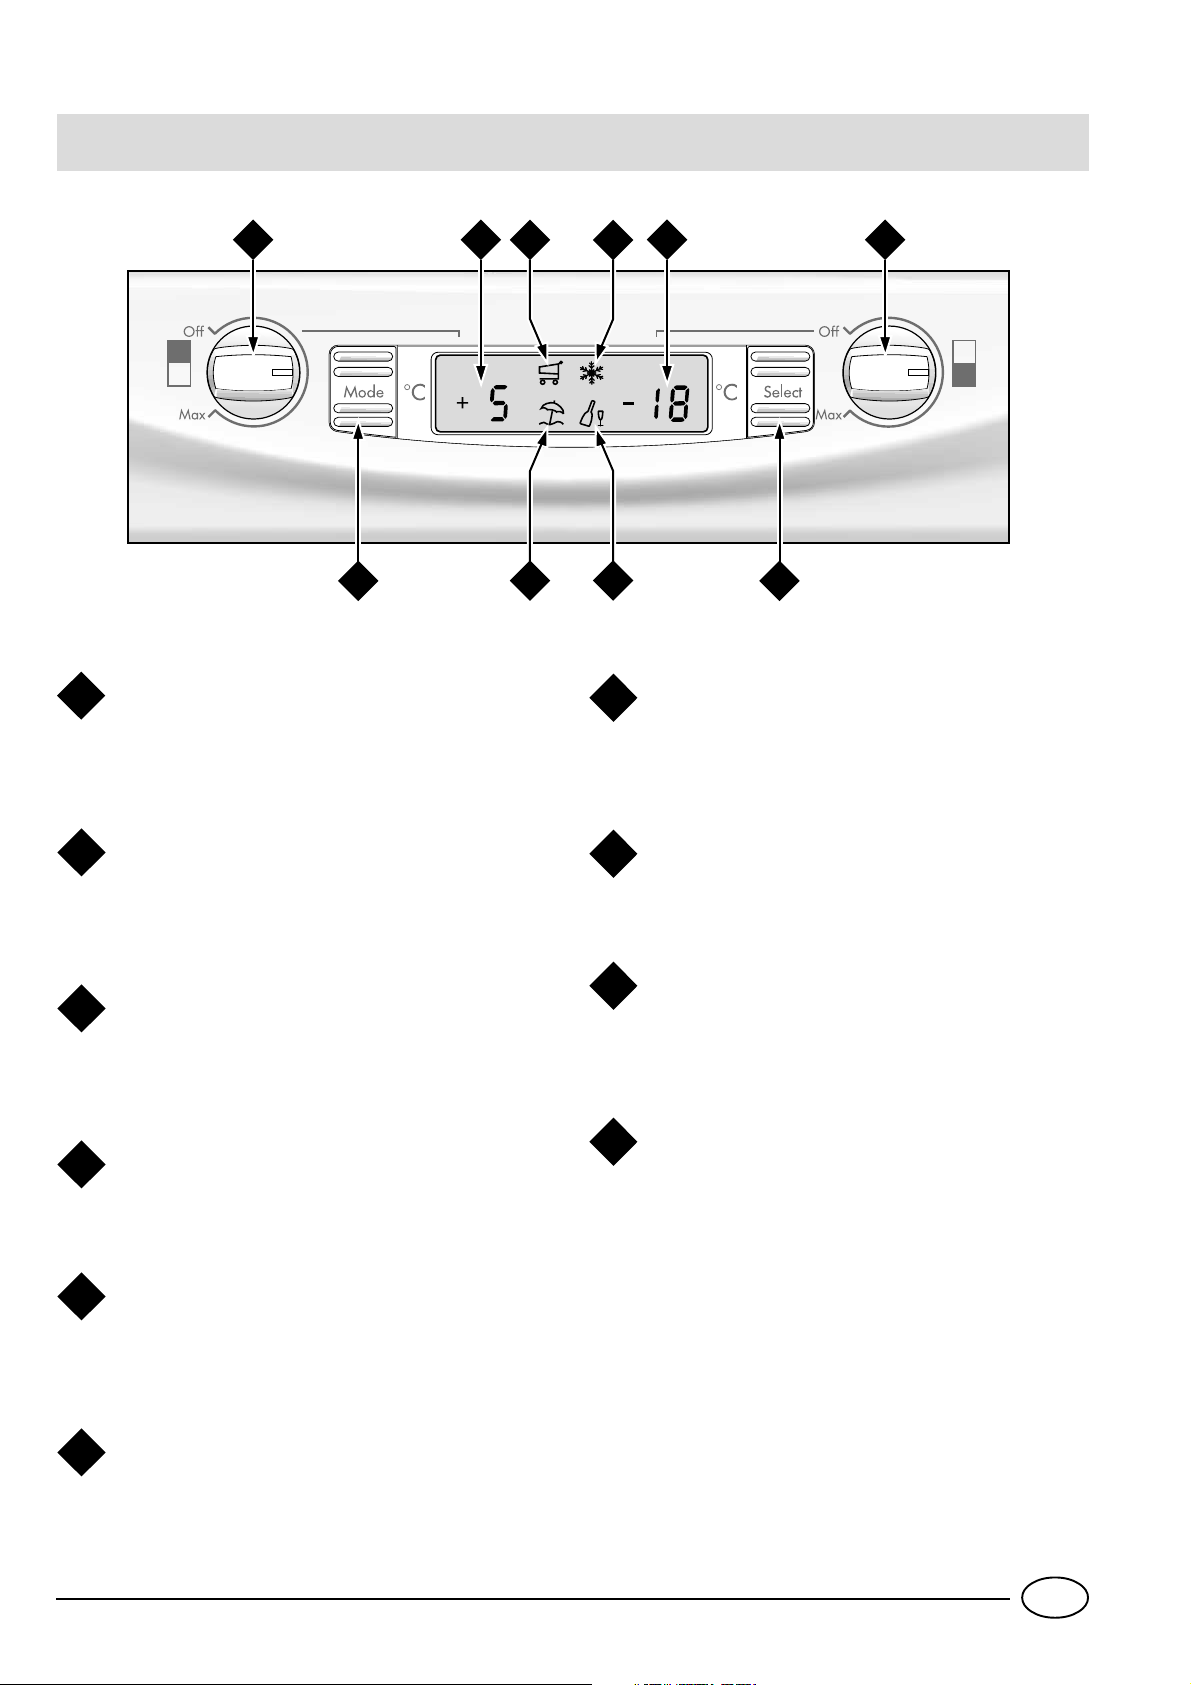
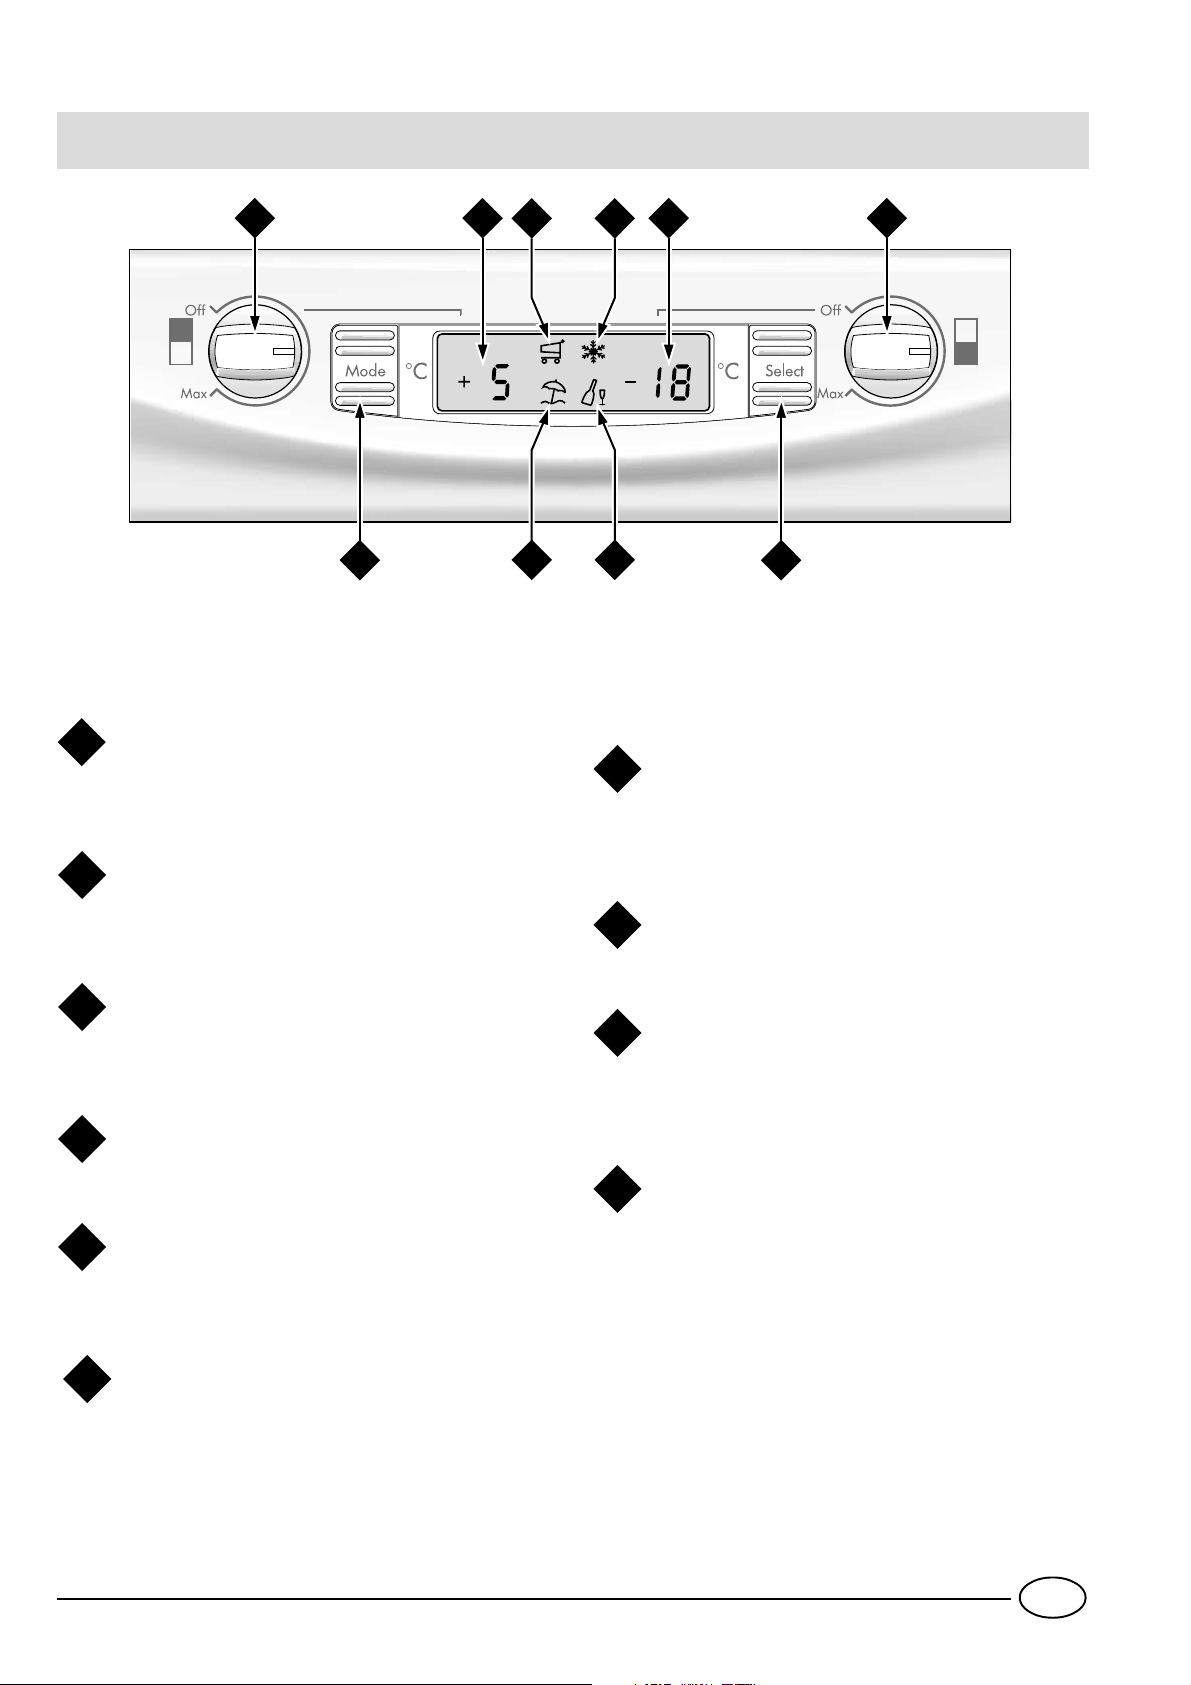
Il Display
A BFE
C D
Manopola frigo
A
Gestisce l’accensione e lo spegnimento dello scomparto frigorifero e permette di impostare le relative
temperature di funzionamento.
I J
G
HG
Funzione SUPER COOL
Visualizza lo stato (disattivato, selezionato o attivato)
della funzione SUPER COOL (raffreddamento rapido
del vano frigo).
Manopola freezer e ON/OFF prodotto
B
Gestisce l’accensione e lo spegnimento dell’intero prodotto e permette di impostare le temperature di funzionamento nello scomparto freezer.
Pulsante MODE
C
Consente lo spostamento all'interno del display per
arrivare alle varie impostazioni/funzioni e lo spegnimento degli allarmi sonori.
Pulsante SELECT
D
Consente la selezione/deselezione delle varie funzioni e lo spegnimento degli allarmi sonori.
Impostazione scomparto frigorifero
E
Visualizza la temperatura impostata nel vano frigo e
lo stato di OFF del comparto frigorifero (scritta OFF
attiva).
Funzione SUPER FREEZE
H
Visualizza lo stato (disattivato, selezionato o attivato)
della funzione SUPER FREEZE (congelamento rapido).
Funzione HOLIDAY
I
Visualizza lo stato (disattivato, selezionato o attivato)
della funzione HOLIDAY (temperature ottimali con minimi consumi in caso di lunghe assenze).
Funzione ICE PARTY
J
Visualizza lo stato (disattivato, selezionato o attivato
) della funzione ICE PARTY (la massima rapidità nel
freddare una bottiglia calda e servirla in tavola con
l’apposito secchiello adatto a mantenerne la temperatura raggiunta).
Impostazione scomparto congelatore
F
Visualizza la temperatura impostata nel vano freezer
e lo stato di OFF del prodotto (scritta OFF attiva).
3
I
Page 6
Come avviare il combinato
ATTENZIONE
Dopo il trasporto, posizionare l’apparecchio verticalmente ed attendere circa 3 ore prima di collegarlo alla
presa di corrente per favorire un buon funzionamento.
Prima di mettere gli alimenti nel frigorifero pulite bene l’interno con acqua tiepida e bicarbonato.
Tempo protezione motore.
Questo modello è provvisto di un controllo
salvamotore, pertanto dopo uno spegnimento impostato dall'utente non preoccupatevi se il compressore
non parte immediatamente, perché si attiverà automaticamente dopo circa 8 minuti.
Dopo aver collegato la spina alla presa di corrente accertatevi che il display sia acceso.
Come muoversi nel display
Impostazione delle temperature
Se il vano interessato è spento, sul relativo spazio di segnalazione sul display (E per il frigorifero e F per il congelatore)
apparirà la scritta OFF. Se il vano è acceso appariranno inve-
ce le temperature impostate in quel momento. Per modificarle agire direttamente sulla manopola relativa al vano interessato (A per il frigorifero e B per il congelatore).
Le temperature impostabili per il comparto frigorifero vanno da +2°C a +8°C, mentre quelle per il comparto congelatore vanno da –18°C a –26°C. Gli incrementi o decrementi
possibili sono comunque sempre di 1°C.
Quando è attiva la funzione HOLIDAY non sono possibili
regolazioni di temperatura, ma il prodotto si posiziona automaticamente alla regolazione ottimale per la situazione:
+12°C per il comparto frigorifero (se attivo) e –18°C per il
comparto congelatore.
Scomparto congelatore
All’accensione del prodotto (ruotare la manopola ON/OFF
prodotto "B" fino ad impostare la temperatura di funzionamento voluta nel vano freezer) si consiglia di inserire la funzione SUPER FREEZE per accelerare il raffreddamento del
vano; quando quest’ultimo avrà raggiunto la sua temperatura ottimale, la funzione si disattiverà e potrete introdurre
nel congelatore i surgelati.
Scomparto frigorifero
All’accensione dello scomparto frigo (ruotare la manopola "A"
fino ad impostare la temperatura di funzionamento voluta nel
vano frigorifero) si consiglia di inserire la funzione SUPER COOL
per accelerare il raffreddamento del vano: dopo qualche ora
potrete mettere i cibi nel frigorifero.
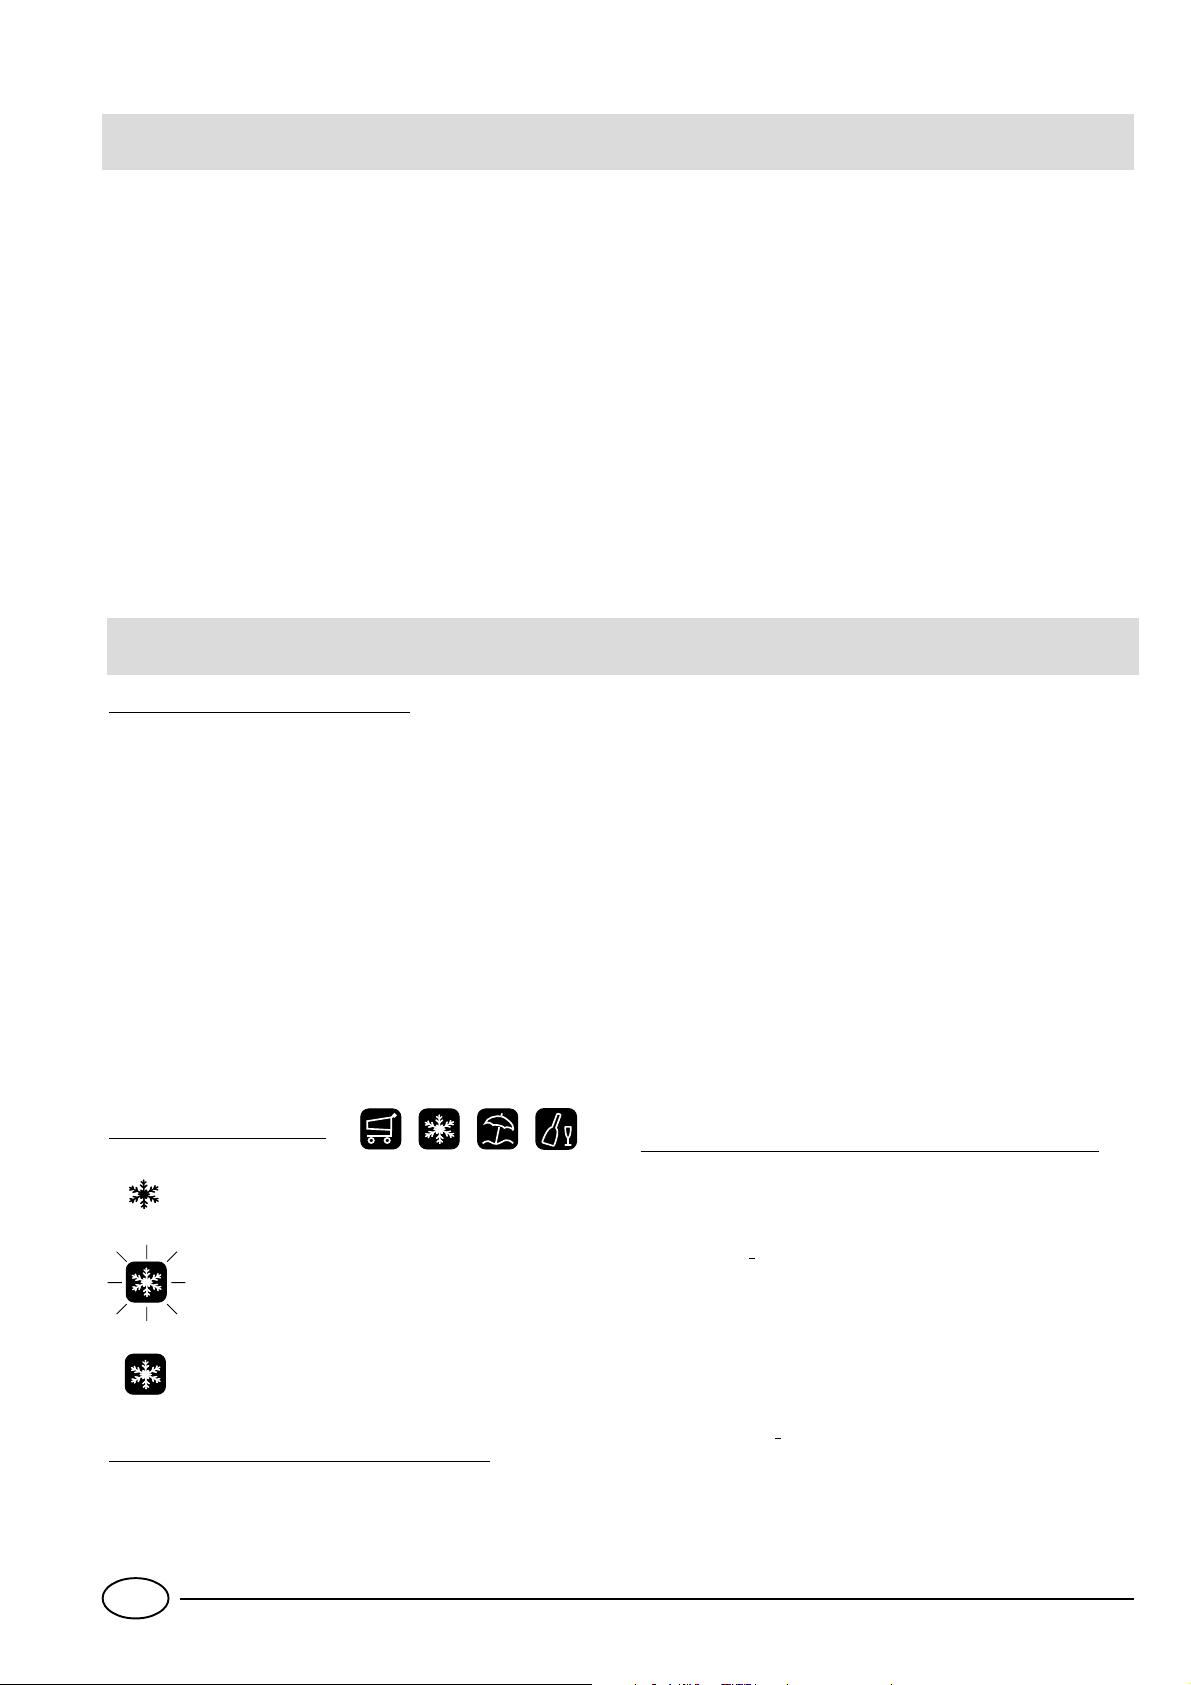
ad essere attivata o disattivata. A questo punto si può gestire la funzione tramite il pulsante SELECT "D" per attivarla
o disattivarla.
NOTA: se non si dà conferma premendo il pulsante SELECT
entro cinque secondi dall’ultima azione sul display, quest’ultimo tornerà a visualizzare la funzione come precedentemente
impostata ad indicare che nessuna modifica è stata impostata.
La funzione SUPER COOL è legata al comparto frigorifero
e quando questo è spento non sarà consentita alcuna azione su tale funzione; altre prevedono un funzionamento che
può creare dei conflitti (ad esempio quando vengono attivate contemporaneamente le funzioni HOLIDAY e SUPER
FREEZE), in questo caso si tiene conto di una priorità già
stabilita in modo da aiutarvi nella gestione del prodotto.
La funzione SUPER FREEZE prevede due modalità di attivazione (vedere il paragrafo relativo alla gestione del reparto
congelatore).
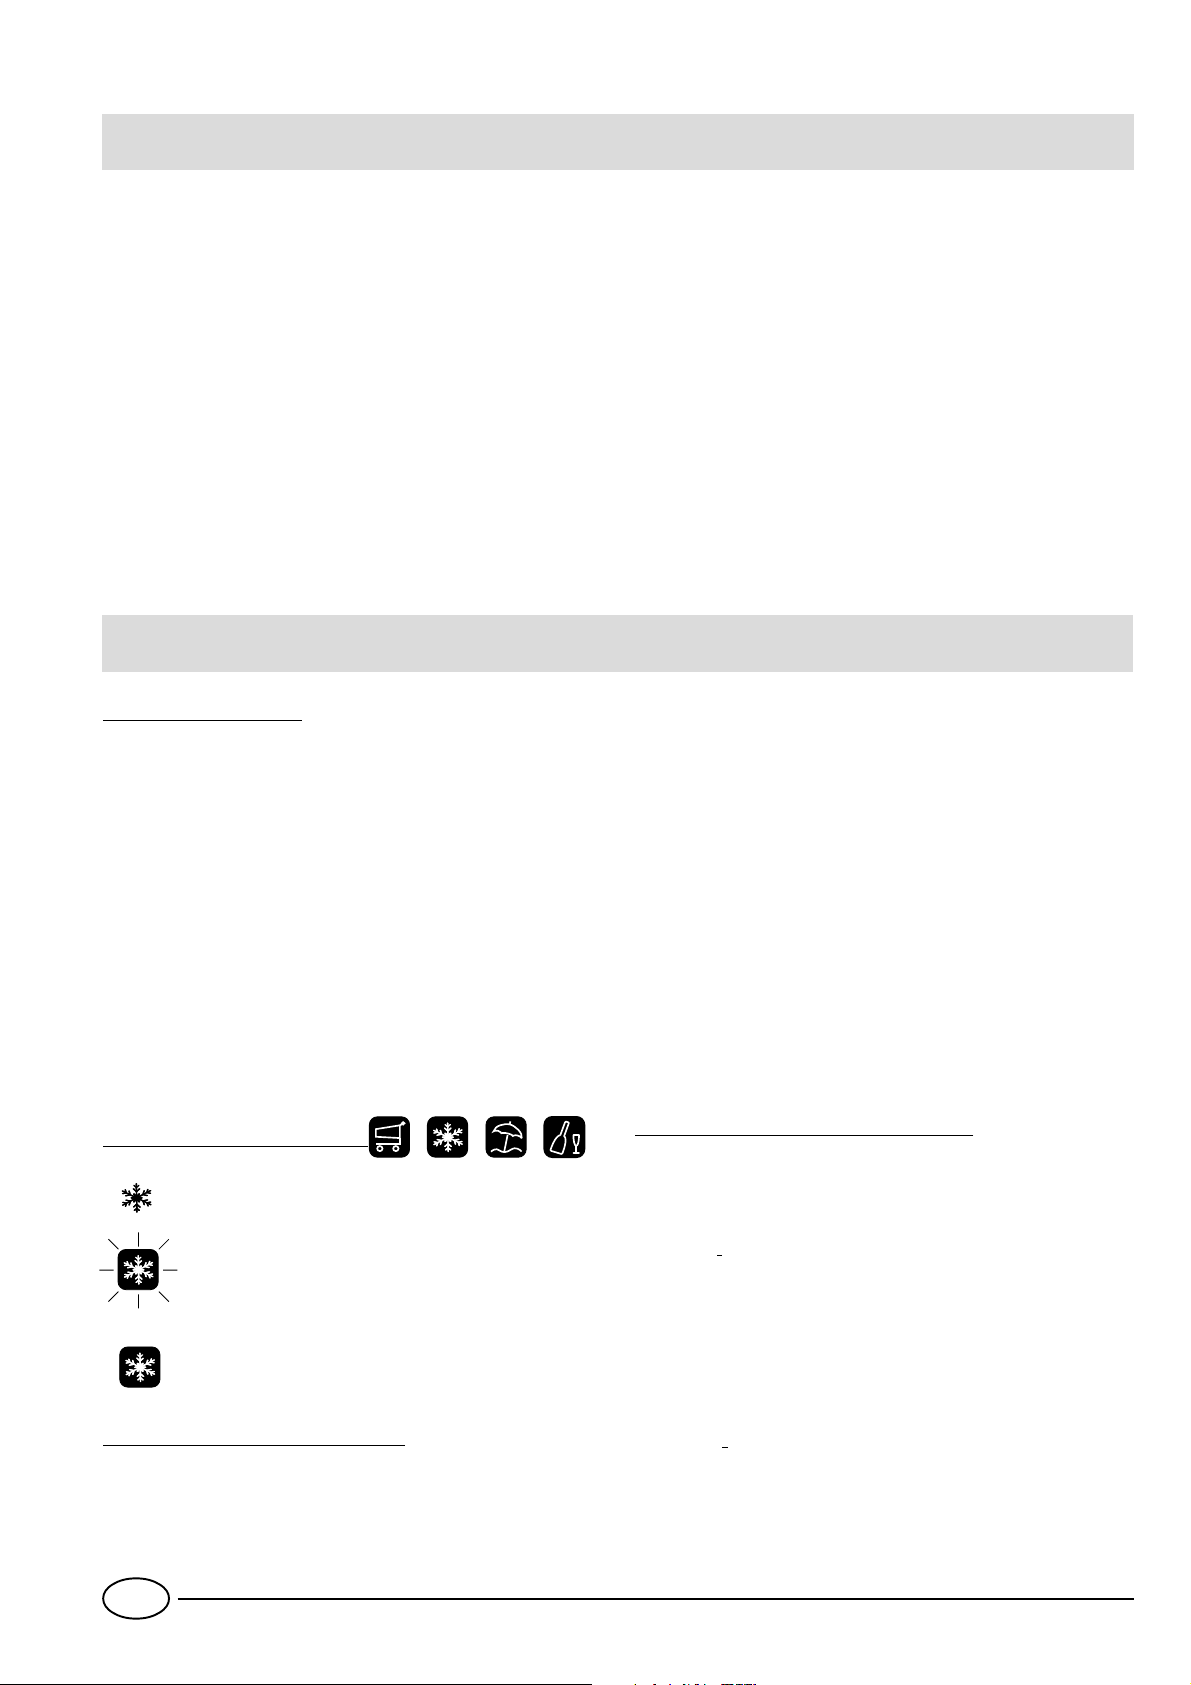
Gestione delle funzioni:
Simbolo della funzione nel normale funzionamento.
Funzione selezionata (contorno lampeggiante).
Funzione attivata (contorno acceso)
Attivazione/disattivazione delle funzioni
Premere il pulsante MODE "C" tante volte quante sono
necessarie a far lampeggiare il simbolo della funzione su cui
si vuole agire: ciò indica che la funzione è selezionata e pronta
I
Attivazione/disattivazione della modalità DEMO:
Per fare una dimostrazione del funzionamento del display
mantenendo il prodotto spento, si può attivare la modalità
DEMO.
Attivazione:
- posizionare la manopola della temperatura del freezer su 0;
- tenere premuti i due pulsanti “Select” e “Mode” per
circa 5 secondi, fino a che si sente un suono e lampeggiano
le due scritte “OFF” e “OFF” nel display; queste scritte
lampeggiano per tutto il tempo che la funzione DEMO è
attiva.
Disattivazione:
- posizionare la manopola della temperatura del freezer su 0;
- tenere premuti i due pulsanti “Select” e “Mode” per
circa 5 secondi, fino a che si sente un suono e le due scritte
“OFF” e “OFF” nel display smettono di lampeggiare.
4
Page 7

Come utilizzare al meglio il reparto frigorifero
La temperatura all’interno del frigorifero si regola automaticamente in base all’impostazione della manopola frigo "A".
Si consiglia una posizione intermedia (ad esempio +5°C).
Il reparto frigorifero del suo apparecchio è dotato di un dispositivo di "A.I.R. System" (Ariston Integrated Refrigeration)
che consente un'ottima conservazione degli alimenti ed un
utilizzo semplificato dell'apparecchio grazie a:
- un ripristino veloce della temperatura: dopo l'apertura della
porta le temperature raggiungono valori ottimali velocemente, per una migliore conservazione.
- una distribuzione omogenea della temperatura che consente di riporre alimenti in qualsiasi ripiano.
B
B
B
A
A - Aria soffiata che si raffredda a contatto della parete
fredda
B - Aria più calda aspirata
Quando il vano frigo viene riempito dopo una grossa spesa,
utilizzate la funzione SUPER COOL "G" (vedi paragrafo
"Come muoversi nel display") in modo da raggiungere rapidamente un'ottima condizione di funzionamento. Una volta trascorso il tempo necessario la funzione si disattiva automaticamente.
Seguite attentamente i nostri consigli sulla durata massima
della conservazione: qualsiasi cibo, anche il più fresco, non
rimane intatto molto a lungo.
Contrariamente a quanto si crede, i cibi cotti non si mantengono più a lungo di quelli crudi.
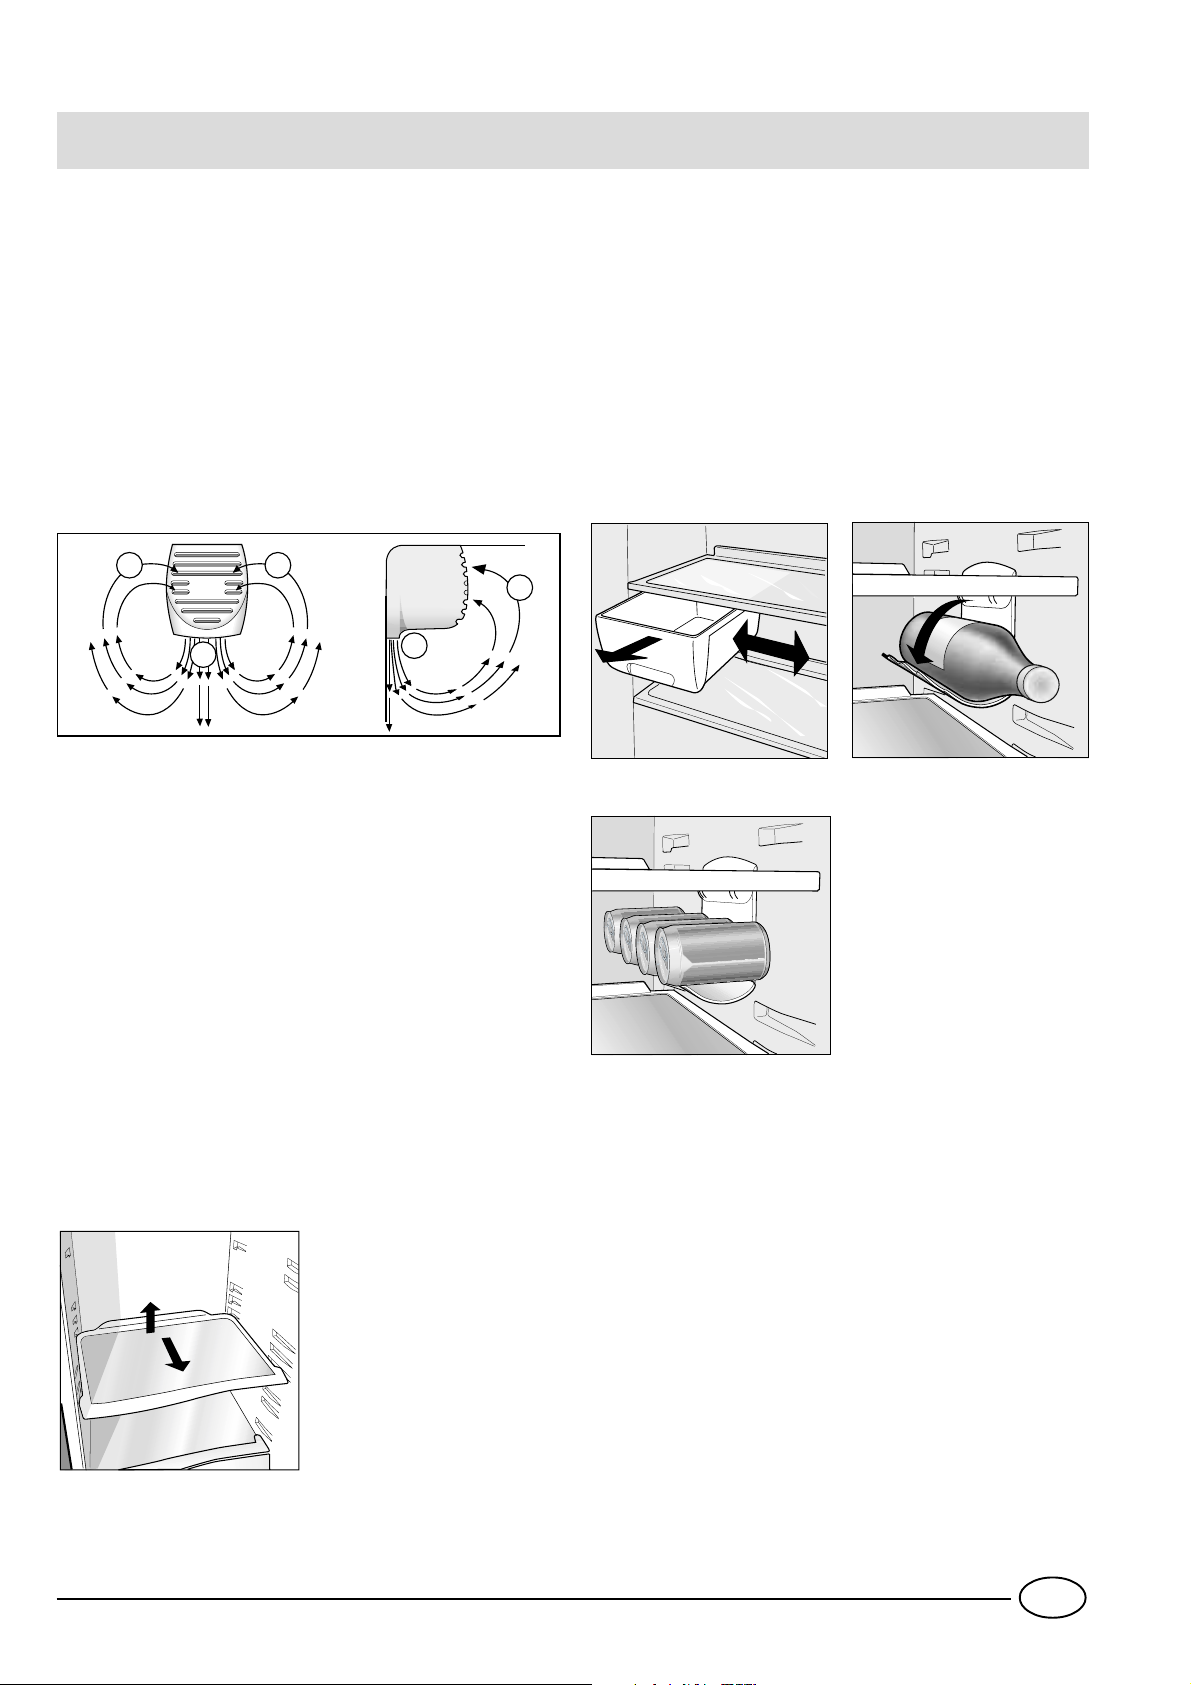
Lo scomparto frigorifero è dotato di pratici ripiani estraibili
e regolabili in altezza grazie alle apposite guide (Fig. 1). Per
questo è possibile inserire anche grandi contenitori e cibi di
notevoli dimensioni. La forma innovativa dei ripiani consente la regolazione in altezza senza estrarre completamente il
ripiano.
A
Inserite soltanto alimenti a temperatura ambiente, evitando di inserire quelli caldi: alzerebbero subito la temperatura
interna costringendo il compressore ad un super lavoro con
consumo eccessivo di energia elettrica.
Non inserite i liquidi in recipienti scoperti perché provocherebbero l’aumento di umidità all’interno del frigorifero e di
conseguenza la formazione di brina.
Il suo frigorifero è dotato anche della scatola carni e formaggi, che può essere spostata in senso laterale (Fig.2) per
ottimizzare lo spazio.
Il portabottiglie laterale è utilizzabile sia per riporre bottiglie
(Fig. 3) che per più lattine (2-4) posizionate orizzontalmente (Fig. 4). In caso di non utilizzo, è possibile comunque
richiudere il portabottiglie/lattine ed avere così più spazio
disponibile all'interno del frigo.
Fig. 2
Fig. 4
Fig. 3
Fig. 1
1
2
5
I
Page 8

Come utilizzare al meglio il reparto congelatore
Per la preparazione dei cibi da congelare consultare
un manuale specializzato.
Un alimento scongelato, anche solo parzialmente, non deve
mai essere ricongelato: lo dovete cuocere per consumarlo
(entro 24 ore) oppure per ricongelarlo.
Gli alimenti freschi da congelare non devono essere posti a
contatto con quelli già congelati o surgelati ma vanno messi nel vano superiore "I" dove la temperatura scende sotto
i -18°C ed è l'ideale per congelar bene i cibi. Non bisogna
infatti dimenticare che la buona conservazione degli alimenti
congelati dipende dalla velocità di congelazione.
La quantità massima giornaliera da congelare è indicata sulla
targhetta caratteristiche posta all'interno dello scomparto
frigorifero.
La prima volta, o dopo che il congelatore è stato inattivo,
potete congelare i cibi solo dopo aver fatto funzionare al
massimo l’apparecchio.
Quando l'apparecchio è già in funzione la congelazione può
essere fatta in due modi:
1. Per piccole quantità, inferiori alla capacità massima indicata sulla targhetta caratteristiche (posta in basso a sinistra,
accanto alla verduriera), attivate dal display la funzione
SUPER FREEZE nella sua modalità “24 ore” e introducete i
cibi da congelare. Per attivare la funzione premere il pulsante MODE "C" tante volte quante sono necessarie a far lam-
peggiare il simbolo del SUPER FREEZE e, quindi, premere il
pulsante SELECT "B" per rendere attiva la funzione .
Dopo 24 ore, o una volta raggiunte le temperature ottimali,
la funzione di congelamento rapido si disinserisce automaticamente.
2. Per grossi quantitativi di cibi da congelare (fino al carico
massimo indicato nella targhetta delle caratteristiche posta
in basso a sinistra, accanto alla verduriera) attivate dal display
la funzione SUPER FREEZE nella sua modalità “48 ore”.
Per attivare la funzione premere il pulsante MODE "C" tan-
te volte quante sono necessarie a far lampeggiare il simbolo del SUPER FREEZE e, quindi, mantenere premuto per
più di tre secondi il pulsante SELECT "B" per rendere attiva
Non aprite la porta del freezer in caso di mancanza di corrente o di un guasto, ritarderete così l’aumento della temperatura al suo interno. In questo modo i surgelati e i congelati si conserveranno senza alterazioni per circa 9-14 ore.
Non mettete nel congelatore bottiglie piene: potrebbero
rompersi poiché, gelandosi, tutti i liquidi aumentano di volume.
Per raffreddare rapidamente le bevande.
Grazie all’apposita funzione ICE PARTY non avrete più il
problema di trovare rotte le bottiglie messe a freddare nel
vano freezer (tutti i liquidi, gelandosi, aumentano infatti di
volume). Attivando questa funzione sarà il prodotto stesso
ad avvisarvi con un segnale acustico che è giunto il momento d estrarre la bottiglia dal vano freezer. Per tacitare l’allarme sonoro è sufficiente premere il pulsante SELECT "D".
Non dimenticatevi di usare l’ergonomico secchiello in dotazione per posizionare la bottiglia all’interno del vano freezer;
oltre ad accelerare il raffreddamento della stessa potrete,
giunto il momento di servire la bevanda, trasportarla facilmente grazie alle apposite maniglie e mantenerla fredda
per lungo tempo anche in tavola.
ATTENZIONE: tenete sempre il secchiello in dotazione per la
bottiglia all’interno del vano freezer (anche quando non avete bottiglie da freddare); solo così sarà garantita la bassa
temperatura del liquido in tempo breve.
la funzione (il simbolo inizia a lampeggiare lentamen-
te). Dopo 24 ore il simbolo della funzione smetterà di lampeggiare e tornerà fisso; a questo punto potete introdurre i
cibi da congelare. Dopo altre 24 ore la funzione si disinserirà
automaticamente.
Durante il congelamento evitate di aprire la porta del freezer.
Per ottenere una conservazione e un successivo
scongelamento ottimali è consigliabile dividere i cibi in piccole porzioni così da poterli congelare rapidamente e in
modo omogeneo. Sulle confezioni riportate le indicazioni
sul contenuto e sulla data di congelamento.
Al fine di ottenere un spazio maggiore nel reparto freezer
potete togliere il cassetto centrale, sistemando gli alimenti
direttamente sulla piastra evaporante. Verificare, dopo l'introduzione del carico, che la porta chiuda correttamente.
I
6
Page 9

Bacinelle ghiaccio
Questo nuovo concetto di bacinelle ghiaccio è un brevetto
esclusivo. Il fatto di essere poste sulla parte superiore dei
cassetti riposti nel vano freezer assicura una maggiore
ergonomia, pulizia e più spazio nei cassetti: il ghiaccio non
viene più a contatto con i cibi riposti nel vano freezer; inoltre si evita lo sgocciolamento dell’acqua nella fase di
caricamento (in dotazione anche il coperchio per chiudere
il foro dopo l’operazione di carico dell’acqua).
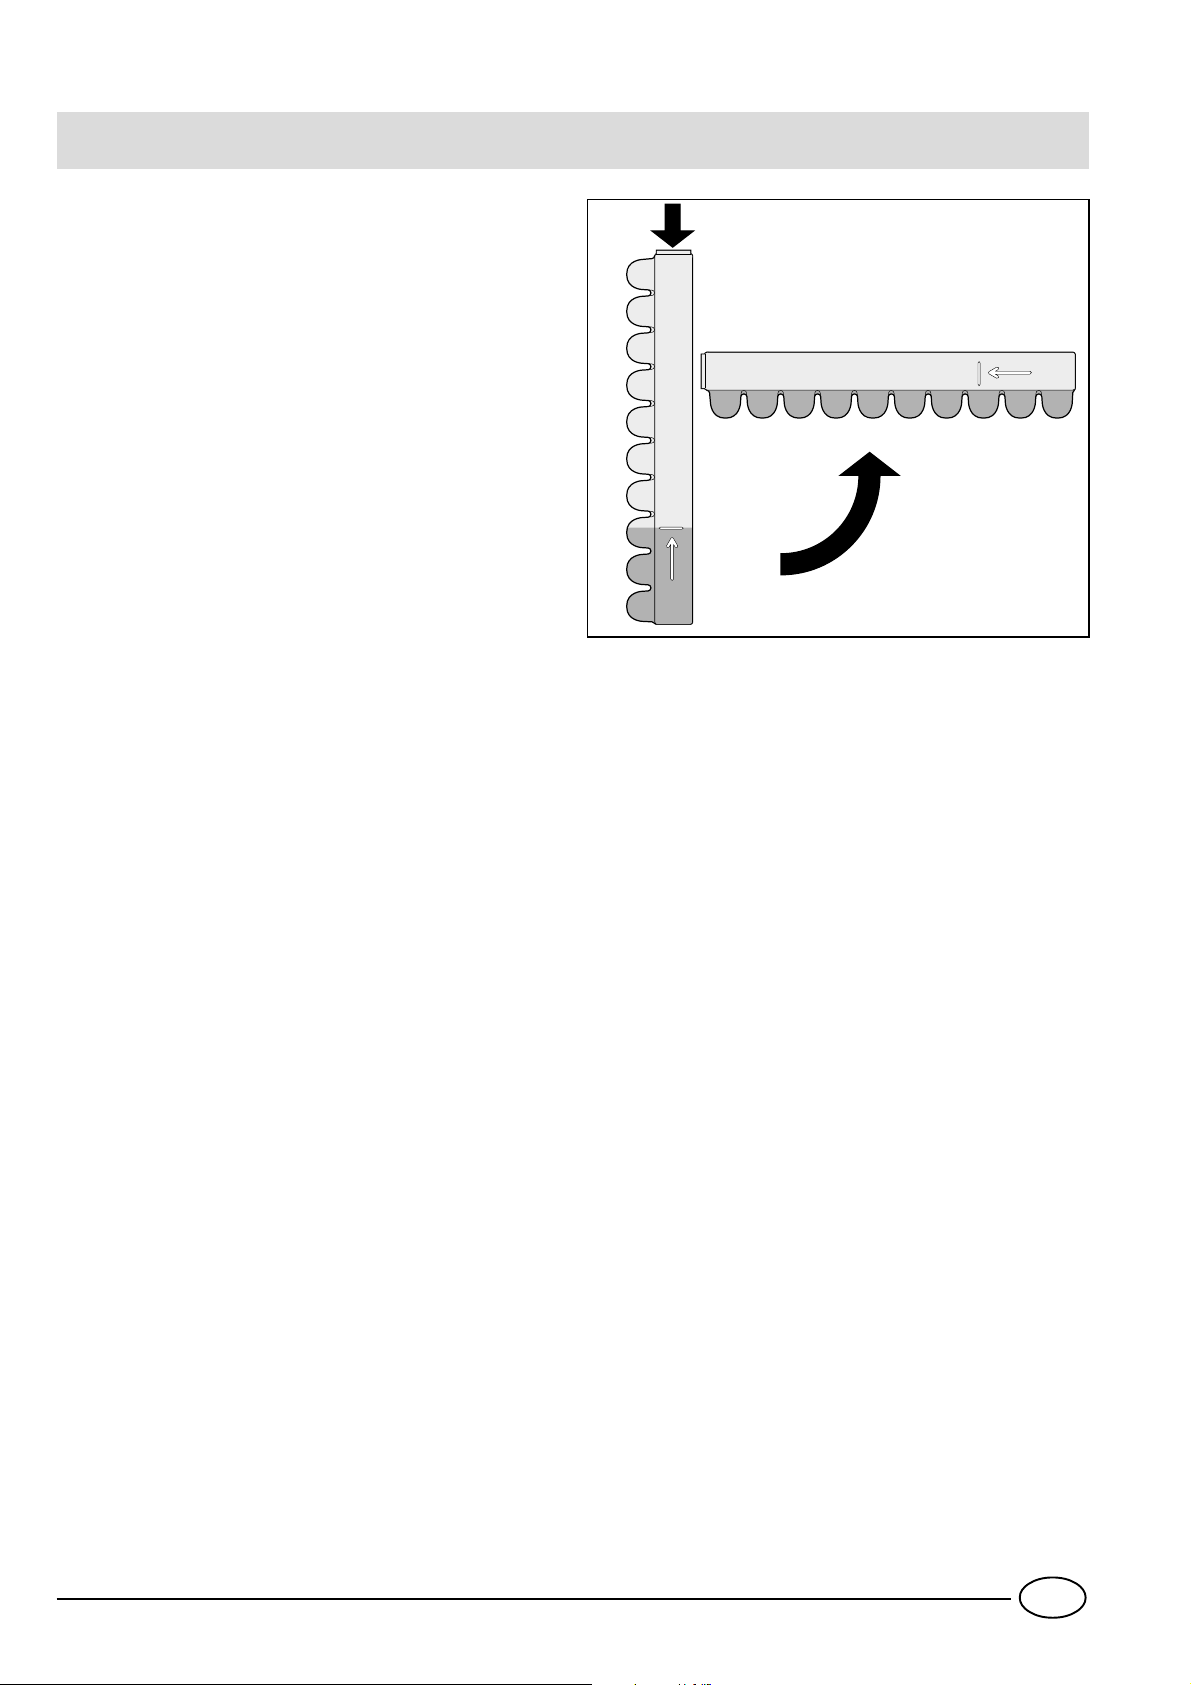
Modalità d’uso (Fig. 5)
Riempite la bacinella con acqua attraverso l’apposito foro
fino al livello indicato (MAX WATER LEVEL), prestando attenzione a non superarlo: l’inserimento dell’acqua in quantità superiore a quella necessaria, comporterà una tale formazione di ghiaccio che potrebbe ostacolare la fuoriuscita
dei ghiaccioli.
Nel caso in cui abbiate utilizzato una quantità eccessiva di
liquido, bisognerà attendere che il ghiaccio si sciolga, svuotare la bacinella, e ripetere l’operazione di carico.
Una volta effettuata l’operazione di carico attraverso il foro
indicato, ruotate la bacinella di 90 °. Per il principio dei vasi
comunicanti l’acqua va a riempire le apposite forme,
dopodichè si potrà chiudere il foro con il tappo ed allocare
la bacinella nell'apposita sede del cassetto.
Dopo che il ghiaccio si sarà formato, basterà battere la bacinella su una superficie dura affinché i ghiaccioli si stacchino dalle loro sedi e siano fatti uscire dallo stesso foro da cui
è stata introdotta l’acqua. Per migliorare l’uscita dei ghiaccioli bagnare con acqua l’esterno della bacinella.
ATTENZIONE: ogni volta che si effettua il caricamento con
acqua, verificare che la bacinella sia completamente vuota
e non siano presenti residui di ghiaccio.
Il tempo minimo necessario per una ottimale formazione di
ghiaccio è circa 8 ore.
Fig. 5
MAX
WATER LEVEL
MAX
WATER LEVEL
7
I
Page 10

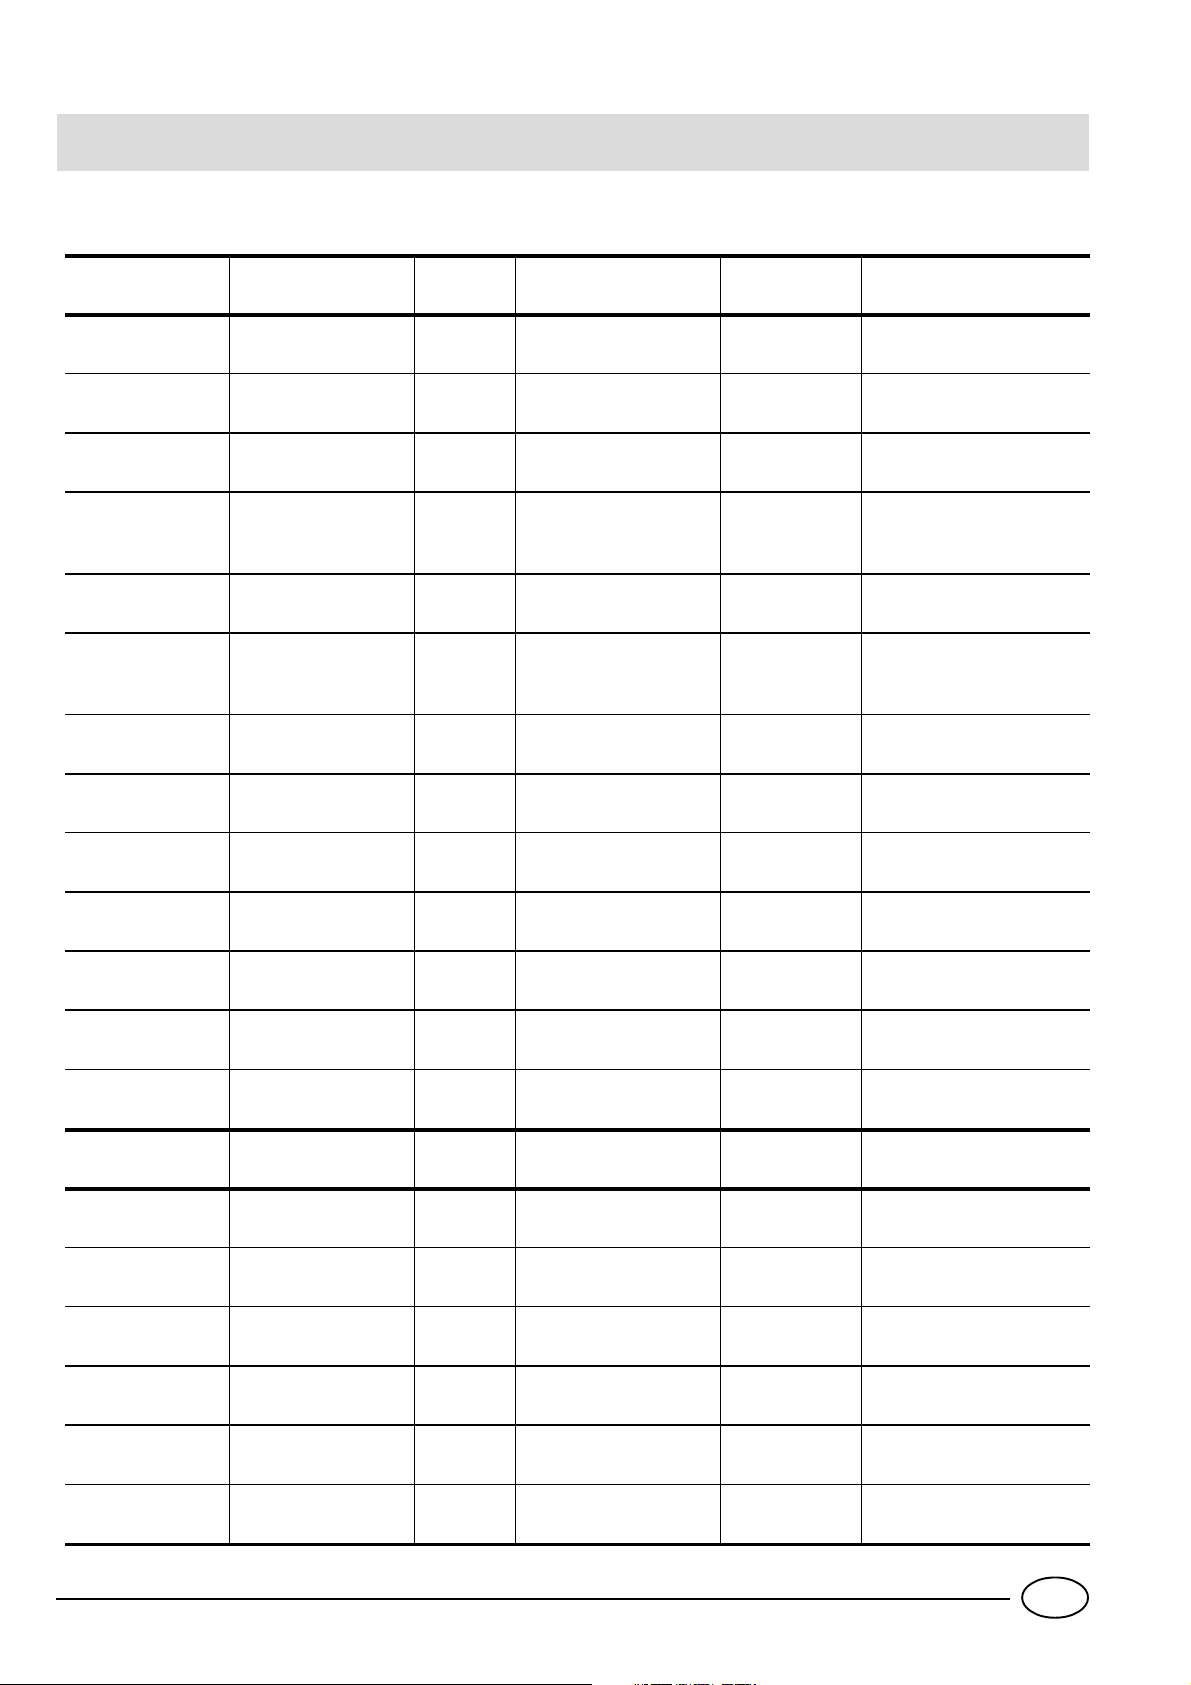
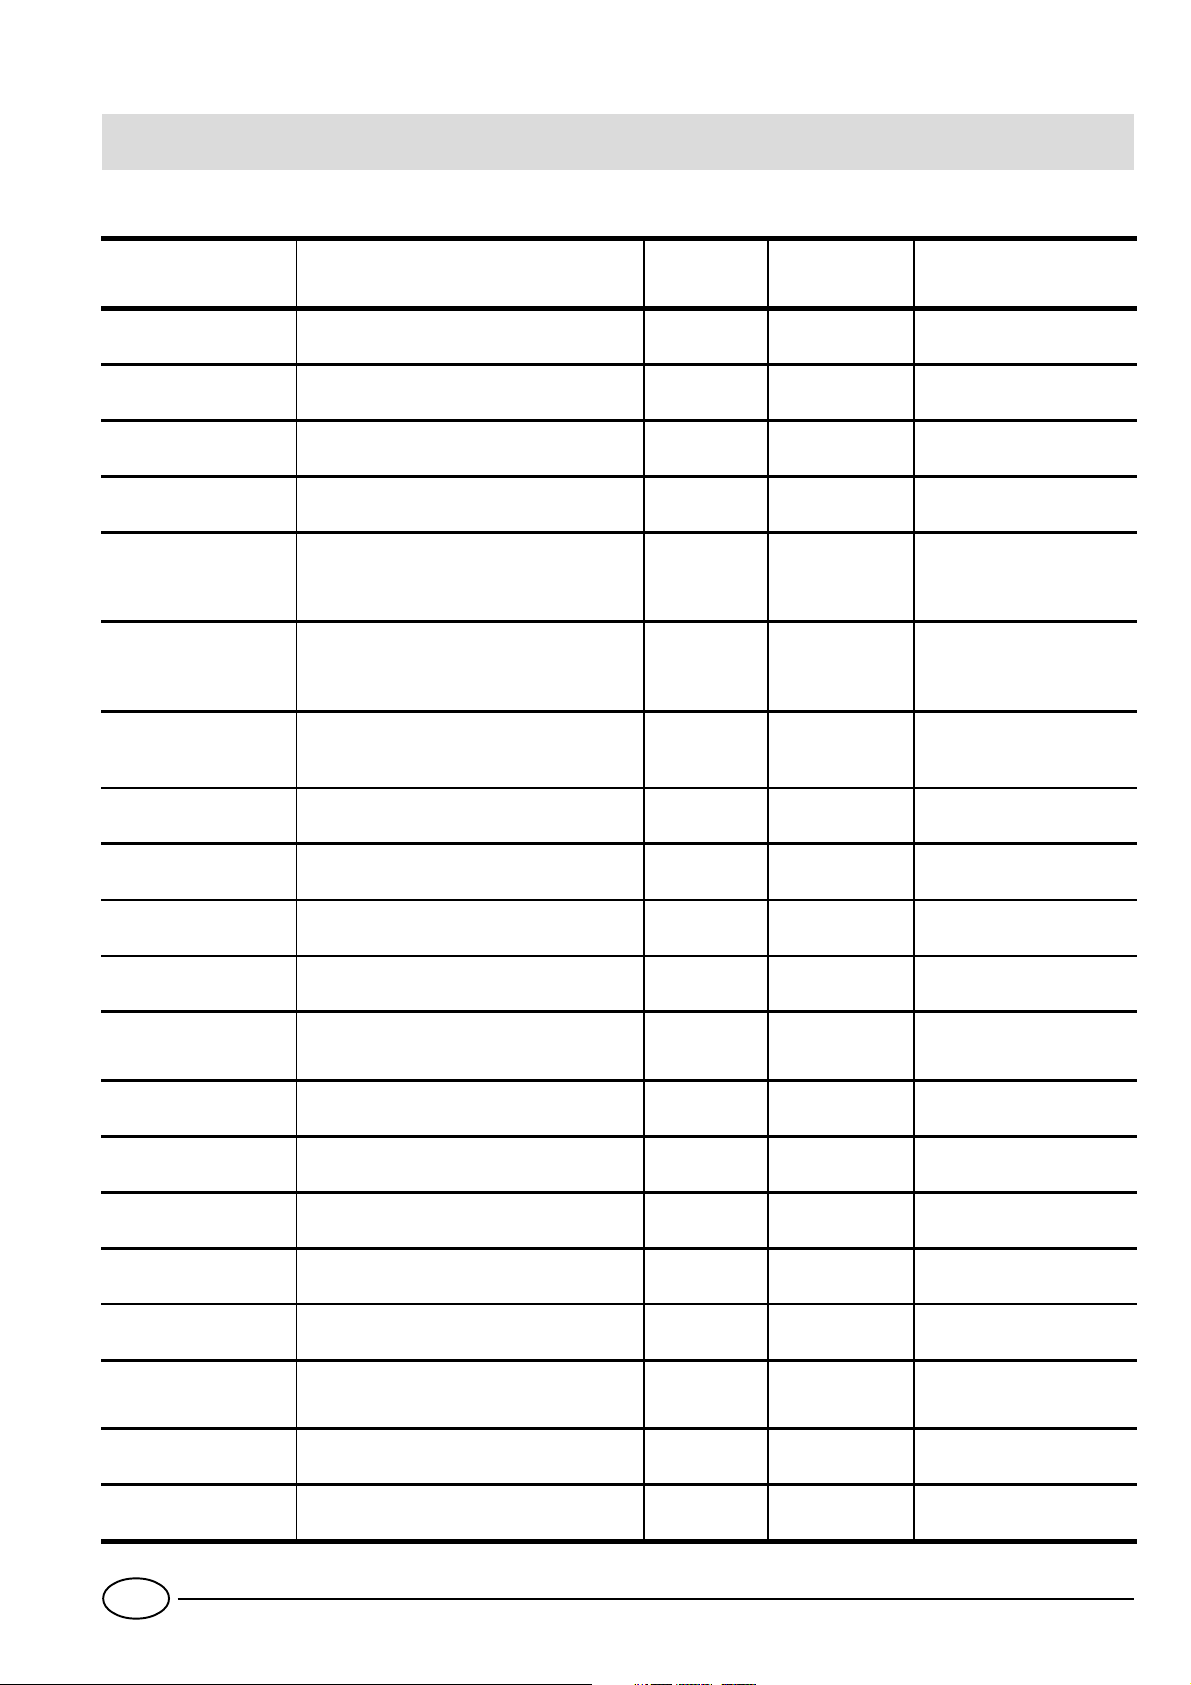
Guida all'utilizzo del reparto freezer
Carni e pesci
Tipo Confezionamento
Arrosto e bollito di
manzo
Agnello Avvolto in foglio di alluminio 1 / 2 6 Non necessario
Arrosto di maiale Avvolto in foglio di alluminio 1 6 Non necessario
Arrosto e bollito di
vitello
Bistecche e braciole di
maiale
Fettine e cotolette di
agnello o manzo
Carne macinata
Cuore e fegato In sacchetti di politene 3 Non necessario
Avvolto in foglio di alluminio 2 / 3 9 / 10 Non necessario
Avvolto in foglio di alluminio 1 8 Non necessario
Ogni fetta avvolta in politene e quindi in
foglio di alluminio in numero di 4-5
Ogni fetta avvolta in politene e quindi in
foglio di alluminio in numero di 4-5
In contenitori di alluminio ricoperti con
politene
Frollatura
(giorni)
Freschissi-
ma
Conservazione
(mesi)
6 Non necessario
6 Non necessario
2 Lentamente in frigorifero
Scongelamento
Salsicce In fogli di politene o alluminio 2 A seconda dell’uso
Polli e tacchini Avvolti in fogli di alluminio 1 / 3 9 Lentamente in frigorifero
Anatre e oche In fogli di alluminio 1 / 4 6 Lentamente in frigorifero
Anatre selvatiche,
fagiani e pernici
Conigli e lepri In fogli di alluminio 3 / 4 6 Lentamente in frigorifero
Cervo e capriolo In fogli di alluminio o politene 5 / 6 9 Lentamente in frigorifero
Pesci grossi In fogli di alluminio o politene 4 / 6 Lentamente in frigorifero
Pesci piccoli In buste di politene 2 / 3 Non necessario
Crostacei In buste di politene 3 / 6 Non necessario
Molluschi
Pesci cotti In fogli di alluminio o politene 12 In acqua calda
In fogli di alluminio 1 / 3 9 Lentamente in frigorifero
In contenitori di alluminio o plastica
ricoperti con acqua e sale
3 Lentamente in frigorifero
Pesci fritti In sacchetti di politene 4 / 6 Direttamente in padella
I
8
Page 11
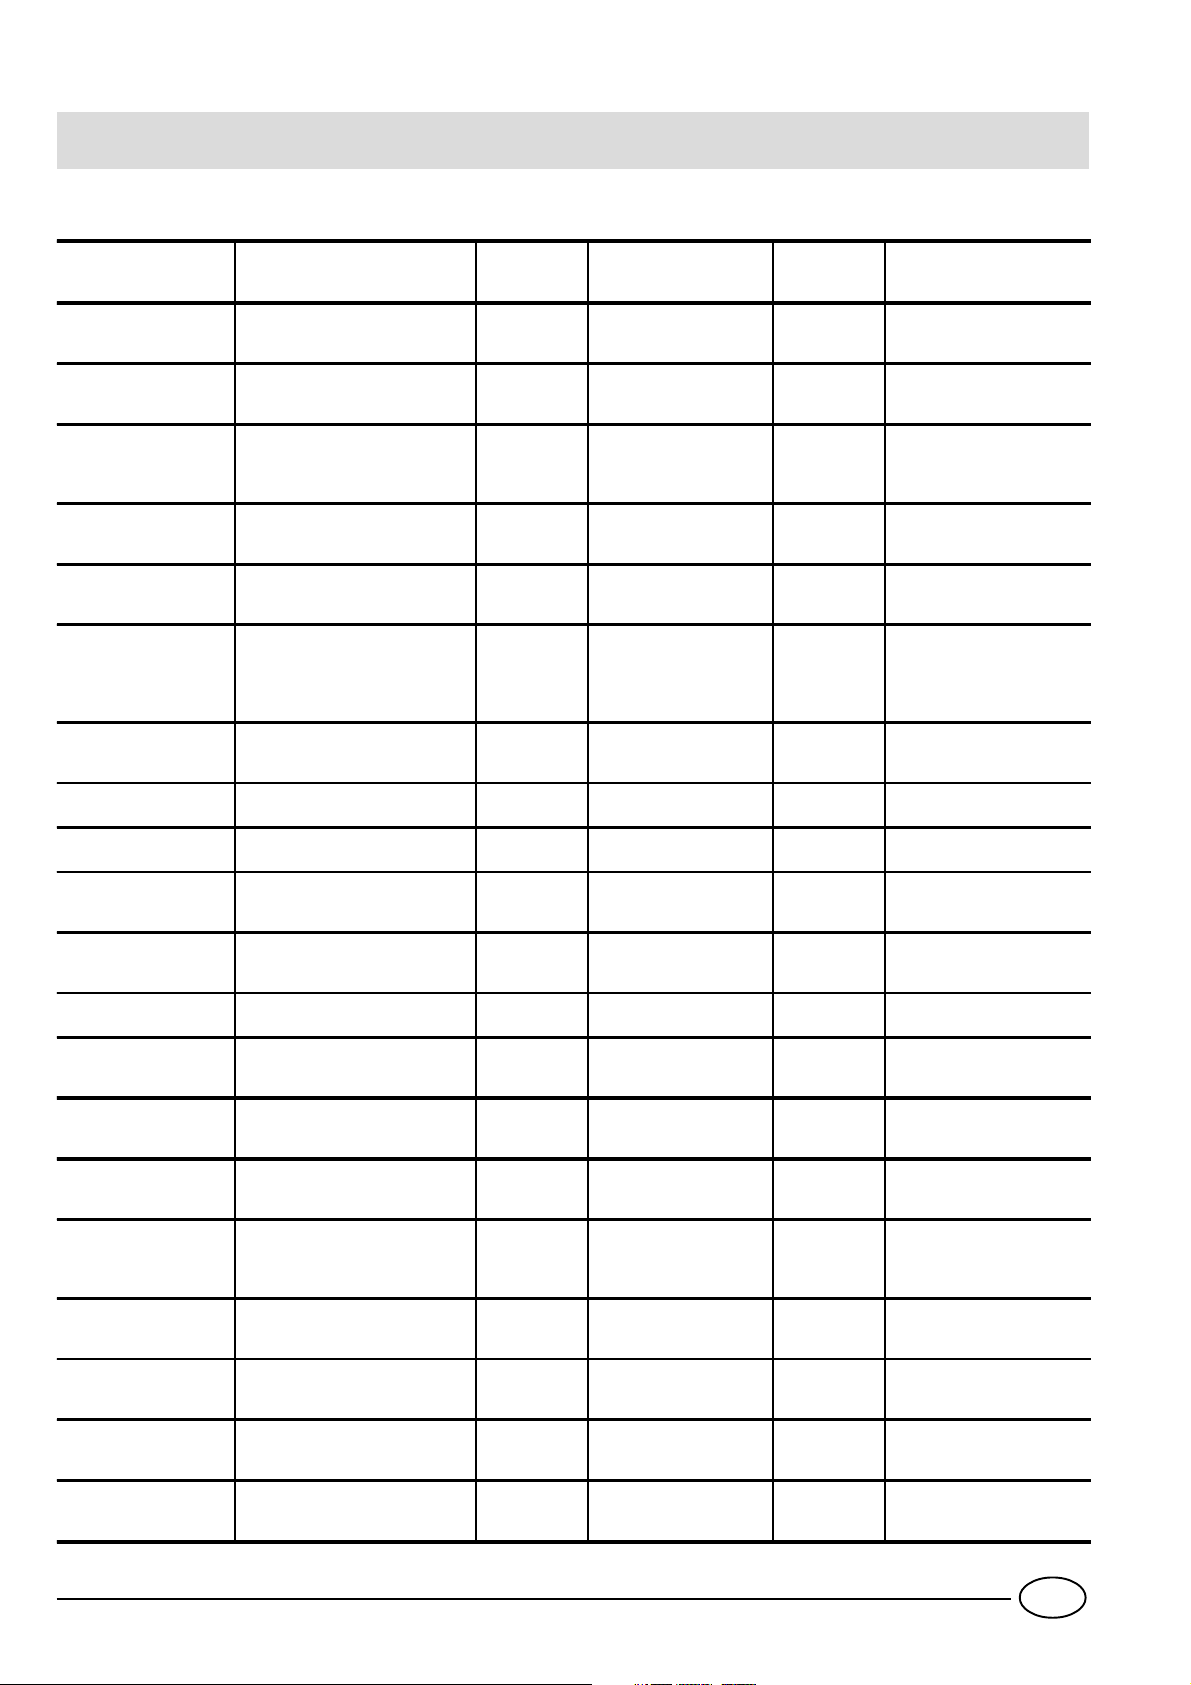
Frutta e verdura
Tipo Preparazione
Mele e pere
Albicocche, pesche,
ciliege e prugne
Fragole, more e
mirtilli
Frutta cotta
Succhi di frutta
Cavolfiori
Cavolo e cavolini
Piselli Sbucciare e lavare 2’ In sacchetti di politene 12 Non necessario
Fagiolini
Sbucciare e tagliare a
pezzetti
Snocciolare e pelare 1’ / 2’
Pulire, lavare e lasciare
asciugare
Tagliare, cuocere e
passare
Lavare, tagliare e
schiacciare
Spezzettare e scottare
in acqua e succo di
limone
Pulire e lavare
(spezzettare)
Lavare e tagliare a
pezzetti
Scottatura
(min)
2’
2’ In sacchetti di politene 12 Non necessario
1’ / 2’ In sacchetti di politene 10 / 12 A temperatura ambiente
2 In sacchetti di politene 10 / 12 Non necessario
Confezionamento
In contenitori ricoperti di
sciroppo
In contenitori ricoperti di
sciroppo
In contenitori ricoperti di
zucchero
In contenitori,
aggiungere 10% di
zucchero
In contenitori, zucchero
a piacere
Conservazione
(mesi)
12 Lentamente in frigorifero
12 Lentamente in frigorifero
10 / 12 Lentamente in frigorifero
12 Lentamente in frigorifero
10 / 12 Lentamente in frigorifero
Scongelamento
Carote, peperoni e
rape
Funghi e asparagi Lavare e tagliare 3’ / 4’ In sacchetti o contenitori 6 A temperatura ambiente
Spinaci Lavare e tagliuzzare 2’ In sacchetti di politene 12 A temperatura ambiente
Verdure varie per
minestra
Cibi vari Preparazione Scottatura Confezionamento
Pane In sacchetti di politene 4
Torte In fogli di politene 6
Panna In contenitori di plastica 6
Burro
Cibi cotti,
minestrone
Tagliare a fette,
pelare, lavare
Lavare e tagliare a
pezzetti
3’ / 4’ In sacchetti di politene 12 Non necessario
3’
In sacchetti in piccole
porzioni
Nel suo incarto originale
avvolto in alluminio
Suddiviso in contenitori
di plastica o vetro
6 / 7 A temperatura ambiente
Conservazione
(mesi)
6 In frigorifero
3 / 6
Scongelamento
A temperatura ambiente o
nel frigorifero
A temperatura ambiente e
cuocere a 100/200°C
A temperatura ambiente o
nel frigorifero
A temperatura ambiente e
in acqua calda
Uova
Congelare senza guscio
in piccoli contenitori
9
10
A temperatura ambiente o
nel frigorifero
I
Page 12

Consigli per risparmiare
- Installatelo bene
E cioè lontano da fonti di calore, dalla luce diretta del sole,
in locale ben aerato e con le distanze indicate nel paragrafo
"Installazione/L'aerazione".
IL CONSUMO DI ENERGIA EFFETTIVO DIPENDE DAL
MODO IN CUI L’APPARECCHIO VIENE UTILIZZATO E DAL
POSTO IN CUI VIENE SITUATO.
Le prove di consumo sono state eseguite in colonne di profondità 560mm, condizione più comune di installazione
- Il freddo giusto
L'impostazione per temperature interne troppo basse fa
aumentare i consumi.
- Non riempitelo troppo
Per conservare bene i cibi il freddo deve circolare liberamente
all’interno del frigorifero. Riempirlo troppo significa impedire questa circolazione facendo lavorare di continuo il compressore.
Allarmi sonori e visivi
Allarme per porta aperta
Nel caso in cui la porta del frigorifero rimane aperta per un
tempo superiore ai due minuti la lampada di illuminazione
interna inizia a lampeggiare; dopo alcuni secondi è emesso
un segnale acustico che è possibile tacitare chiudendo la
porta o premendo il pulsante SELECT "D". Se la porta ri-
mane aperta per più di 4 minuti la lampada inizia a lampeggiare più velocemente.
Allarme per riscaldamento anomalo del
freezer
1. Per segnalare un eccessivo riscaldamento del freezer (es.
momentaneo black out) viene emesso un segnale acustico e compare un messaggio sul display (A1) a segnalare
un pericoloso riscaldamento. Per non far ricongelare il
cibo, il freezer si manterrà ad una temperatura intorno a
0°C, permettendovi di consumare gli alimenti entro le
24 ore o di ricongelarli previa cottura. Si può spegnere il
segnale acustico premendo semplicemente il pulsante
SELECT "D".
Per tornare al normale funzionamento e cancellare il messaggio sul display si dovrà spegnere e riaccendere il prodotto, agendo sulla manopola ON/OFF prodotto "B".
- A porte chiuse
Aprite il vostro frigorifero il meno possibile perché ogni volta che lo fate va via gran parte dell’aria fredda. Per ristabilire
la temperatura il motore deve lavorare a lungo consumando molta energia.
- Occhio alle guarnizioni
Mantenetele efficienti e pulite in modo che aderiscano bene
alle porte; solo così non lasceranno uscire nemmeno un po’
di freddo.
- Niente cibi caldi
Una pentola calda messa nel frigorifero alza immediatamente la temperatura di diversi gradi, lasciatela raffreddare a
temperatura ambiente prima di introdurla nel frigorifero.
- Brina nel freezer
Controllate lo spessore della brina sulle pareti del freezer ed
effettuate subito lo sbrinamento se lo strato è diventato
troppo spesso (Vedi più avanti “Come tenerlo in forma”).
2. Se la temperatura continua a salire verso valori eccessivamente alti viene emesso nuovamente il segnale acustico
e compare un altro messaggio sul display (A2) a segnalare l’eccessivo riscaldamento. Si consiglia di verificare lo
stato del cibo, potrebbe essere necessario gettarlo. In ogni
caso il cibo non va ricongelato se non dopo cottura. Per
non far ricongelare il cibo, il freezer verrà mantenuto ad
una temperatura intorno a 0°C. Si può spegnere il segnale acustico premendo semplicemente il pulsante
SELECT "D".
Per tornare al normale funzionamento e cancellare il messaggio sul display si dovrà spegnere e riaccendere il prodotto, agendo sulla manopola ON/OFF prodotto "B".
I
10
Page 13

Come tenerlo in forma
Prima di procedere a qualsiasi operazione di pulizia o
sbrinamento staccare l'apparecchio dalla rete di alimentazione (ruotare la manopola ON/OFF prodotto "B" nella
posizione OFF e poi disinserire la spina). Nel caso in cui
tale procedura non sia eseguita, si potrebbe verificare
una condizione di allarme.
è sintomo di anomalia. Per ripristinare il corretto funzionamento spegnere e riaccendere il prodotto agendo direttamente sulla manopola ON/OFF prodotto "B".
Sbrinamento
ATTENZIONE: non danneggiare il circuito refrigerante.
Fare attenzione a non usare dispositivi meccanici o altri
utensili per accelerare il processo di sbrinamento, oltre
a quelli raccomandati dal costruttore.
Come sbrinare il reparto frigorifero.
Questo apparecchio ha lo sbrinamento automatico e l’acqua
viene convogliata verso la parte posteriore da un apposito scarico (fig. 6) dove il calore prodotto dal compressore la fa evaporare. L’unico intervento che dovete fare periodicamente consiste
nel controllare che l'acqua di scarico passi regolarmente. Pulire
il foro di scarico con l'apposito "scovolino".
Come sbrinare lo scomparto congelatore
- Eliminate ogni tanto la brina con l’apposito raschietto in
dotazione (niente coltelli od oggetti metallici).
- Se la brina ha superato i 5 mm bisogna fare un vero e proprio sbrinamento. Procedete così: un giorno prima attivare la
funzione SUPER FREEZE nella sua modalità 24 ore; serve a
dare agli alimenti un salutare “colpo di freddo” in più. Dopo
24 ore la funzione di congelamento si disinserisce automaticamente ma potete disinserirla voi. Spegnete il prodotto agendo sulla manopola ON/OFF prodotto "B". ATTENZIONE: que-
sta operazione spegne tutto l'apparecchio (reparto frigorifero
compreso).
Avvolgete tutti i surgelati e i congelati in carta da giornale mettendoli o in un altro frigorifero o in un luogo fresco. Lasciate
aperta la porta in modo che la brina si sciolga del tutto, aiutandola con dei contenitori pieni di acqua tiepida.
dotato di un apposito sistema che permette la raccolta dell'acqua di sbrinamento in un contenitore da porre sotto l'apparecchio (agire come illustrato nella figura 7 ).
Pulire ed asciugare con cura prima di riavviare l'apparecchio.
Ricordatevi che il motore può non partire immediatamente ma dopo circa 8 minuti.
ATTENZIONE: tale allarme non
L'apparecchio è
FUNZIONE VACANZE. Quello delle muffe e cattivi odori che si formano all'interno del frigorifero spento
quando si parte per le vacanze, non è più un problema: basta attivare la funzione Holiday. In questo modo,
con un basso consumo, si mantiene la
temperatura nel vano frigo a circa 12°C
(potete conservare ad esempio trucchi
e cosmetici) e si lascia funzionare il
congelatore al minimo, indispensabile per la conservazione dei cibi.
Pulizia e manutenzioni particolari
Prima di pulire il frigorifero ruotare la manopola ON/
OFF prodotto "B" nella posizioe OFF, fintanto che non
è visualizzato lo stato di OFF in entrambi i comparti
frigo e freezer, e successivamente disinserire la spina.
- I materiali con i quali è stato fabbricato il vostro apparecchio sono igienici e non trasmettono odori ma per mantenere queste qualità è necessario che i cibi vengano sempre
protetti e ben chiusi, per evitare macchie difficilmente rimovibili o la creazione di cattivi odori.
- Solo acqua e bicarbonato. Per pulire sia l’interno che l’ester-
no usate una spugnetta con acqua tiepida e bicarbonato di
sodio che, tra l’altro, è anche un buon disinfettante. Se non
l’avete in casa potete impiegare del sapone neutro (quello
di Marsiglia ad esempio).
- Cosa non usare. Mai abrasivi, mai candeggina, mai ammoniaca. Proibitissimi i solventi e altri prodotti simili.
- Tutto ciò che si può togliere, mettetelo a bagno in acqua
calda con sapone o detersivo per i piatti. E prima di rimetterlo a posto, risciacquatelo e asciugatelo bene.
- Quando sta fermo a lungo. Se decidete di fermare il frigorifero durante il periodo estivo, bisogna pulire l’interno e lasciare
le porte aperte.
- Come sostituire la lampadina interna.
Per sostituire la lampada di illuminazione dello scomparto
frigorifero staccate l'apparecchio dalla rete di alimentazione e cambiate la lampada avariata con un'altra di potenza
non superiore a 15 W.
Per accedere alla lampada "A", svitare la vite di fissaggio
centrale "B" posizionata nella parte posteriore del
coprilampada, come indicato in Fig. 8.
Fig. 6
Fig. 7
11
A
B
Fig. 8
I
Page 14
C'è qualche problema?
Il display è completamente spento
Avete controllato se:
· l’interruttore generale dell’appartamento è disinserito;
· la spina non è correttamente inserita nella presa di corren-
te;
· la presa non è efficiente; provate a collegare la spina ad
un'altra presa del locale.
Il motore non parte
Avete controllato se:
·
sono trascorsi 8 minuti dopo l’accensione?
Questo modello, infatti, è dotato di un controllo
salvamotore che lo fa avviare solo dopo circa 8 minuti dall’accensione;
·
è stata attivata la modalità DEMO? (Vedi a pag. 4).
Il frigorifero e il congelatore raffreddano poco
Avete controllato se:
· le porte non chiudono bene o le guarnizioni sono rovinate;
· le porte vengono aperte molto spesso;
· le manopole di regolazione della temperatura non sono in
posizione corretta;
· il frigorifero o il congelatore sono stati riempiti eccessivamente.
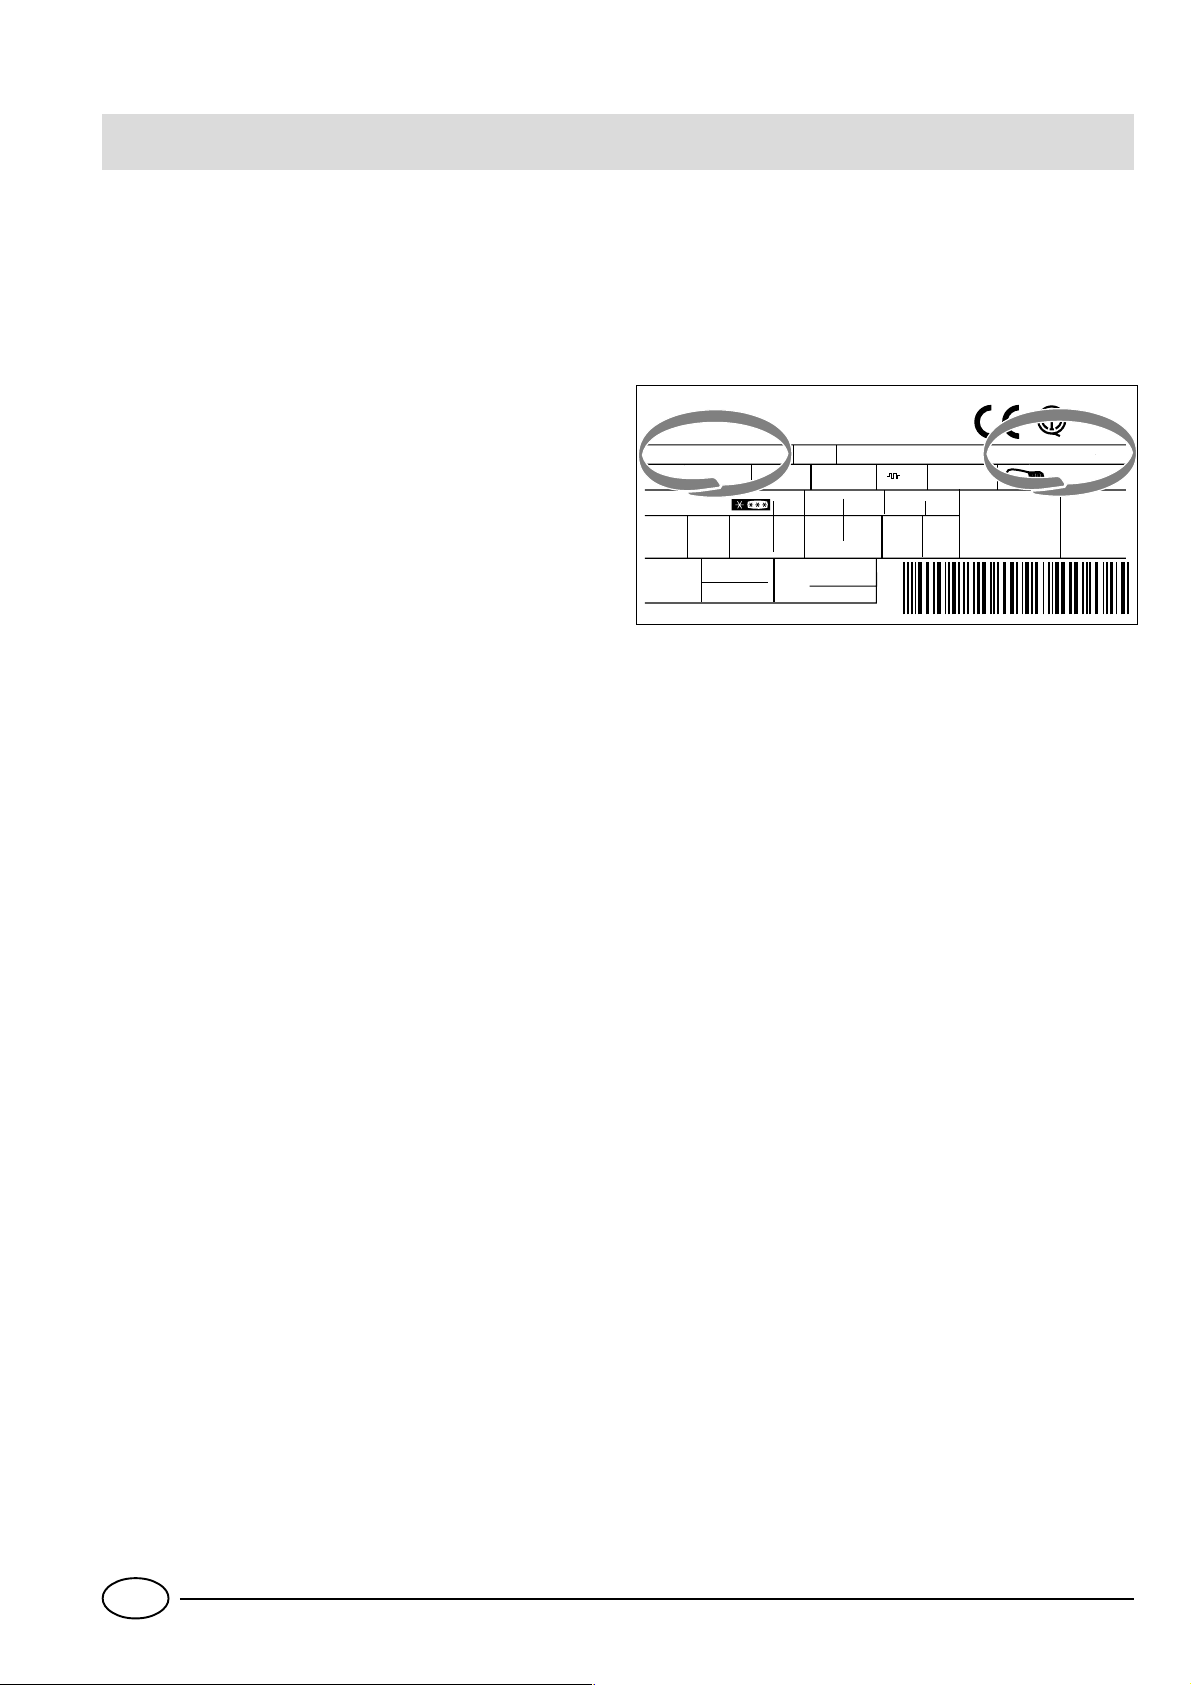
Se, nonostante tutti i controlli, l’apparecchio non funziona
e l’inconveniente da voi rilevato continua ad esserci, chiamate il Centro di Assistenza più vicino, comunicando queste informazioni: il tipo di guasto, la sigla del modello (Mod.)
e i relativi numeri (S/N) scritti sulla targhetta delle caratteristiche posta in basso a sinistra, accanto alla verduriera (vedi
esempio nellae figura seguente).
75
Test
P.S-I.
TI
Net
Util
Utile
Pressure
HIGH-235
LOW 140
RG 2330
Mod.
220 - 240 V- 50 Hz 150 W
340
Total
Gross
Bruto
Brut
Compr.
Syst.
Kompr.
Made in Italy 13918
Gross
Bruto
Brut
R 134 a
kg 0,090
93139180000 S/N 704211801
Cod.
Gross
Bruto
Brut
W
Fuse
A
Freez. Capac
Poder de Cong
kg/24 h
4,0
Max 15 w
Class
Clase
N
Classe
Non ricorrete mai a tecnici non autorizzati e rifiutate
sempre l’installazione di pezzi di ricambio non originali.
Nel frigorifero gli alimenti si gelano troppo
Avete controllato se:
· la regolazione della temperatura impostata è troppo bassa
(o non ottimale);
· gli alimenti sono a contatto con la parte posteriore, la più
fredda.
Il motore funziona di continuo
Avete controllato se:
· sono attive le funzioni SUPER COOL e/o SUPER FREEZE
e/o ICE PARTY;
· le porte sono state aperte di continuo;
· la temperatura esterna è molto alta .
L’apparecchio emette troppo rumore.
Avete controllato se:
· Il frigorifero non è posto ben in piano:
· è stato installato tra mobili o oggetti che vibrano ed emet-
tono rumori;
· il gas refrigerante interno produce un leggero rumore anche quando il compressore è fermo (non è un difetto).
Sul fondo del frigorifero c'è dell'acqua
Avete controllato se:
· Il foro dello scarico dell'acqua di sbrinamento è otturato
I
12
Page 15

Safety - a good habit to get into.
ATTENTION
Read your manual carefully since it contains instructions
which will ensure safe installation, use and maintenance of
your appliance.
Your Refrigerator is built to International safety standards
(EN60) and has been awarded the European approval mark
(IMQ) for compliance with UK electrical safety requirements.
It also meets the EC standards on the prevention and elimination of radio interference (EC directive 87/308 - 02.06.89).
1. This appliance must not be installed outdoors - not even in
an area protected by a roof. It is extremely dangerous to leave
it exposed to rain or storms.
2. It must only be used by adults and exclusively to refrigerate
and freeze foodstuffs, following the instructions for use contained in this manual.
3. Do not ever touch or handle the appliance with bare feet or
with wet hands or feet.
4. It is highly recommended that you do not use extension
cords or multiple socket adapters. If the refrigerator is installed
between cabinets, make sure that the cord is not bent or dangerously pinched or compressed.
5. Never pull on the cord or the refrigerator to remove the plug
from the wall socket - this is very dangerous.
6. Never touch the cooling components within the appliance,
especially with wet hands because this could result in injury.
Never put ice cubes just removed from the freezer into your
mouth because they could stick to your mouth and cause
burns.
7. Never perform any cleaning or maintenance operations
without first unplugging the appliance; in fact, setting the
appliance ON/OFF knob to OFF is not enough to cut off all
electrical contacts.
8. Before having your old refrigerator picked up for disposal,
remove or make inoperable any locking devices to prevent children who might play in or around the appliance from being
locked inside.
9. Before calling for service/assistance in the case of malfunction, consult the chapter entitled “Is There a Problem? to determine whether it is possible to eliminate the problem. do not
try to repair the problem by trying to access the internal components of the appliance.
10. If damaged, the power supply cord on this appliance
must necessarily be replaced by our service centre because
special tools are required for replacement.
11. Do not use electric appliances inside the compartment for
food storage, if these are not those recommended by the
manufacturer.
12. At the end of the functional life of your appliance –
containing cyclopentane gas in the insulation foam and perhaps
gas R600a (isobutane) in the refrigeration circuit – the latter
should made safe before being sent to the dump.
For this operation, please contact your dealer or the Local
Organisation in charge of waste disposal.
Installation
To ensure that the appliance operates properly and to
reduce energy consumption, it is important that the
appliance is installed correctly.
Ventilation
The compressor and condenser generate heat and, therefore, need to be ventilated properly. Rooms with less than
perfect ventilation are not very suited for installation of the
appliance. Therefore, it should be installed in a room with
an opening (window or French window) that provide the
appropriate amount of air re-circulation. It is also important
that the room not be too humid.
Away from Heat
This appliance should not be positioned in a place where it
is directly exposed to sunlight or directly next to an iven/hob.
Electrical Connection and Earthing
Before proceeding with the electrical connection, make sure
that the voltage indicated on the rating plate, located at the
bottom left near the vegetable crisper, corresponds to the
mains voltage in your home and that the socket is fitted
with a standard earthing wire in accordance with safety
standards for 46/90 systems. If the socket is not fitted with
an earthing wire, the manufacturer will not be held liability
for any damages and or injuries arising out of the use of the
appliance. Do not use multiple sockets or adapters.
Position the appliance in such a way that you can access
the socket where it is plugged in.
Insufficient power?
The electrical socket must be able to handle the maximum
power load of the appliance, which is indicated on the rating plate located at the bottom left next to the vegetable
crisper.
Before making the electrical connection ...
After the appliance has been delivered, place it in the vertical upright position and wait at least 3 hours before inserting the plug into the socket in order to ensure that it functions properly.
13
GB
Page 16
Close-up view
ECO
M
D
E
O
N
L
M
F
K
A
B
C
B
J
G
H
G
I
H
Removable door shelves with lid, with egg tray
A
and lidded butter dish
Removable miscellaneous shelf
B
Hinged shelf
C
Compartment for a 2 litre bottle
D
Removable door shelf for bottles
E
Drain system for drawing off
F
defrost water from freezer
compartment
Compartment for storing
G
Removable/Adjustable Shelves
M
Hinged bottle rack
N
"A.I.R. System"
O
(Ariston Integrated Refrigeration)
frozen foods
Ice tray
H
Compartment for freezing
I
fresh foods and storing frozen
foods
Display
J
Fruit and Vegetable Crispers
K
Meat/cheese storage box
L
GB
14
Page 17
The Display
A BFE
C D
Fridge knob
A
This knob turns the refrigerator compartment on or
off and enables you to set the relative operating
temperatures.
Freezer and appliance ON/OFF knob
B
I J
HG
SUPER COOL function
G
Displays the status (disabled, selected or enabled) of
the SUPER COOL function (rapid cooling of the
refrigerator compartment).
This knob turns the whole appliance on or off and
enables you to set the freezer compartment operating
temperatures.
MODE button
C
This button allows you to navigate the display to have
access to the various settings/functions and to turn
off the alarm buzzers.
SELECT button
D
This button selects/deselects the different functions
and turns off the alarm buzzers.
Fridge compartment setting
E
Displays the temperature set in the fridge
compartment and when the fridge compartment is
turned OFF (word OFF indicated).
Freezer compartment setting
F
Displays the temperature set in the freezer
compartment and when the appliance is turned OFF
(word OFF indicated).
SUPER FREEZE function
H
Displays the status (disabled, selected or enabled) of
the SUPER FREEZE function (rapid freezing).
HOLIDAY function
I
Displays the status (disabled, selected or enabled) of
the HOLIDAY FUNCTION (optimal temperatures with
the minimum consumption in the event of prolonged
absence).
ICE PARTY function
J
Displays the status (disabled, selected or enabled) of
the ICE PARTY function (maximum speed in cooling a
warm bottle and serving it at the table in the special
bucket designed to maintain the temperature reached
by the bottle).
15
GB
Page 18
How to Start the Appliance
NOTICE
After the appliance has been delivered, stand it in the
upright position and wait approximately 3 hours before connecting it to the electrical outlet to guarantee
that it operates properly.
Before placing foodstuffs in the refrigerator or freezer, clean
the interior well with warm water and baking soda.
Motor protection time.
This model is provided with a motor protection system.
Therefore, if the compressor does not start immediately
after the user has turned it off, do not worry as it will
start automatically after approximately 8 minutes.
Once you have plugged the appliance into the mains socket,
make sure the display is on.
How to use the display
Temperature settings
If the compartment concerned is switched off, the word OFF
will appear on the relative indication space on the display (E
for the refrigerator and F for the freezer). If the compartment
is switched on, then the temperatures set at that time will
appear. To change them, turn the relative knob directly (A
for the refrigerator and B for the freezer).
The refrigerator compartment can be set to between +2°C
and +8°C, while the freezer compartment can be set to a temperature of between -18°C and -26°C. The temperature in
both cases can be increased or decreased by 1°C at a time.
When the HOLIDAY function is enabled, temperature
regulations cannot be made, but the appliance automatically
sets itself to the best setting for the situation: +12°C for the
refrigerator compartment (if enabled) and -18°C for the
freezer compartment.
Freezer compartment
When you turn the appliance on (by turning the appliance ON/
OFF knob "B" to the required freezer compartment operating
temperature), we recommend you enable the SUPER FREEZE
function to speed up the cooling process inside the compartment;
when the latter has reached the optimal temperature, the
function will be disabled and you may place the frozen foods
inside the freezer.
Refrigerator compartment
When you turn the refrigerator compartment on (by turning
knob "A" to the required refrigerator compartment operating
temperature), we recommend you enable the SUPER COOL
function to speed up the cooling process inside the
compartment: after a few hours, you may place food inside
the refrigerator.
disable the selected function using the SELECT button "D".
NOTE: if you do not confirm your selection by pressing the
SELECT button within five seconds of the last action
performed on the display, the latter shall go back to displaying
the function previously set and indicate that no new
modification has been made.
The SUPER COOL function is linked to the refrigerator
compartment and when the latter is switched off, no action
whatsoever will be possible on the former, other functions
foresee an operation that can create conflicts (for example,
when the HOLIDAY and SUPER FREEZE functions are
enabled simultaneously), in this case a pre-set priority is taken
into consideration in order to help you operate the appliance.
The SUPER FREEZE function features a double mode of
operation (see paragraph on operating the freezer
compartment).
How to use the functions:
Function symbol during normal operation.
Function selected (outline flashing).
Function enabled (outline on)
Enabling/disabling the functions
Press the MODE button "C" as many times as necessary for
the red outline of the function you wish to act on to light
up: this indicates that the function has been selected and is
ready to be enabled or disabled. Now you can enable or
GB
Enabling/disabling the DEMO mode:
To run a demonstration of the display operation while
keeping the appliance turned off, just enable the DEMO
mode.
Enabling:
- set the freezer temperature knob to 0;
- keep the two buttons “Select” and “Mode” pressed for
approximately 5 seconds, until you hear the buzzer and the
two words “OFF” and “OFF” flash on the display; these
words will flash for the entire duration the DEMO mode is
enabled.
Disabling:
- set the freezer temperature knob to 0;
- keep the two buttons “Select” and “Mode” pressed for
approximately 5 seconds, until you hear the buzzer and the
two words “OFF” and “OFF” on the display stop flashing.
16
Page 19
How to use the refrigerator compartment...
The temperature inside the refrigerator is automatically adjusted according to the setting made on the display.We recommend, however, a medium position (+5°C).
The refrigerator compartment of your appliance is equipped with
"A.I.R. System" which makes it possible to achieve optimal
food storage while simplifying the use of the refrigerator thanks
to the following features:
- Fast temperature reset: after the doors heve been opened,
the internal temperatures return to optimal values faster,
improving food storage.
- More uniform temperature distribution: this makes it
possible to place any type of food on any shelf.
- Higher humidity level: this allows you to store food longer.
B
B
B
A
A - Blown air which is cooled when it comes into contact
with the refrigeration panel
B - Hotter air is drawn in
A
Remember to cool hot food before storing otherwise the
temperature inside the appliance will increase, causing the
compressor to work harder and use more energy.
Do not store liquids in unsealed containers since this will
increase the humidity and lead to the formation of frost in
the refrigerator.
To use the meat/cheese box, unhook it and remove it from
the shelf. To optimise space according to your needs, the
same can be moved laterally (Fig. 2).
The side bottle rack can be used either for storing bottles
(Fig. 3) as well as several cans (2-4) placed horizontally (Fig.
4). If not in use, the bottle/can rack can be tipped up and
away to make more room inside the refrigerator.
Fig. 2
Fig. 3
When the fridge compartment is filled up after a heavy
shopping spree, use the SUPER COOL "J" function (see the
paragraph on "How to use the display") in order to reach
optimum operating conditions quickly. Once the necessary
time has elapsed, the function is disabled automatically.
Remember to follow our instructions on the storage life of
foods: If not stored correctly, even the freshest food will
deteriorate quite quickly.
Contrary to popular belief, cooked foods do not keep longer
than fresh food.
The refrigerator compartment of your appliance is fitted with
practical removable shelves (Fig. 1) whose height can be
adjusted to allow storage of large containers. This allows
you to place even large containers and foodstuffs in the refrigerator.
1
2
Fig. 4
Fig. 1
17
GB
Page 20
How to use the freezer compartment...
For the preparation of food to be frozen, please consult a specialized manual.
Food that has be thawed, even partially, must not be refrozen: you must cook it in order to consume it (within 24
hours) or to freeze it once again.
When freezing fresh foods, remember that they should not
touch other previously frozen or deep frozen foods. Place
the food that you wish to freeze in the top compartment
"I" where the temperature will fall below -18°C, which is
ideal for freezing food properly. Remember that proper conservation depends on the speed of freezing.
The maximum amount of food you can freeze per day is
indicated on the data plate situated inside the refrigerator
compartment.
The first time, or after the freezer has been inactive, you can
only freeze food after having let the appliance function at
maximum. When the appliance is already on, freezing can
be done in two ways:
1. For small quantities, less than the maximum capacity
indicated on the data plate (situated on the lower left, next
to the salad crisper), enable the SUPER FREEZE function on
the display in the "24 hour" mode and insert the food to be
frozen. To enable the function, press the MODE button "C"
as many times as necessary for the SUPER FREEZE symbol
to start flashing and then press the SELECT "B" button to
To cool drinks down quickly.
Thanks to the special ICE PARTY function, you will no longer
have to deal with the problem of finding broken bottles
placed to cool inside the freezer compartment (all liquids,
upon freezing, expand and increase in volume). Once you
have enabled this function, the appliance itself will inform
you in the form of an alarm buzzer that the time has come
to remove the bottle from the freezer compartment. To
silence the alarm buzzer, just press the SELECT button "D".
Do not forget to use the ergonomic bucket provided to store
the bottle inside the freezer compartment; as well as
accelerating the cooling process of the same, once it is time
to serve it at the table, you can take it there easily thanks to
the special handles and keep it cool at length at the table.
WARNING: always keep the bucket provided for the bottle
inside the freezer compartment (even when you don't have
bottles to cool); only this way can the low temperature of
the liquid be guaranteed in a short amount of time.
enable the function. After 24 hours, or once the optimal
temperatures have been reached, the rapid freezing function
is automatically disabled.
2. For large quantities of food to be frozen (up until the
maximum load indicated on the data plate situated on the
lower left, next to the salad crisper), enable the SUPER
FREEZE function on the display in the "48 hours" mode: To
enable the function, press the MODE button "C" as many
times as necessary for the SUPER FREEZE symbol to start
flashing and then press the SELECT "B" button for more
than three seconds to ensure the function is enabled (symbol
starts to flash slowly).
During the freezing process, avoid opening the door of the
freezer.
In order to freeze and then thaw foods optimally, it is recommended that you divide food into small portions so that they
freeze quickly and uniformly. The packages should be clearly
marked with the content and the date they were frozen.
In order to obtain a larger amount of space in the freezer
compartment, you can remove the central drawer, and place
the food directly onto the evaporator plate. Make sure that,
after having inserted the load, the door closes correctly.
Do not open the freezer door in the event of a power failure
or malfunction. This precaution will slow the rise in temperature within the compartment. If the door is not opened,
frozen and fast-frozen foods will remain in their current state
for approximately 9-14 hours.
Do not place full bottles in the freezer: they could easily
burst because all liquids increase in volume when they freeze.
GB
18
Page 21
Ice trays
This new concept of ice trays is an exclusive patent. The fact
that they are situated on the top part of the freezer drawers
ensures greater ergonomics and cleanliness and leaves more
room free inside the drawers : the ice no longer comes into
contact with the food placed inside the freezer
compartment; furthermore, the dripping of the water during
filling is avoided (a lid to cover up the hole after filling with
water is also provided).
Instructions for use (Fig. 5)
Fill up the tray with water via the special hole up to the level
indicated (MAX WATER LEVEL), taking care not to exceed
it: inserting more water than is necessary will lead to the
formation of ice which could obstruct the exit of the ice
cubes.
If you have used an excessive amount of water, you will
have to wait until the ice has melted, empty out the tray
and re-fill it with water.
Once you have filled the ice tray up with water through the
hole indicated, turn it by 90 °. Thanks to the connected
compartments, the water fills up the special shapes, after
which you can cover the hole up with the special cap and
place the ice tray in the inner door of the freezer
compartment.
Once the ice has formed, all you need to do is to knock the
tray against a hard surface so that the ice cubes come away
from their housing and come out of the same hole used to
fill the tray with water. To make it easier for the ice cubes to
come out, wet the outside of the tray.
WARNING: every time you fill up the ice tray with water ,
make sure that the same is completely empty and that there
are no traces of ice left inside it.
The minimum time required for ice to form well is
approximately 8 hours.
Fig. 5
MAX
WATER LEVEL
MAX
WATER LEVEL
19
GB
Page 22
Guide to Using the Freezer
Meat and Fish
Food Wrapping
Beef Roast Tinfoil 2 / 3 9 / 10 Not required.
Lamb Tinfoil 1 / 2 6 Not required.
Pork Roast Tinfoil 1 6 Not required.
Veal Roast Tinfoil 1 8 Not required.
Veal/Pork Chops
Veal/Lamb Cutlets
Minced Meat
Heart and Liver Plastic Baggies 3 Not required.
Each piece wrapped in cling wrap and
then in tinfoil (4 to 6 slices)
Each piece wrapped in cling wrap and
then in tinfoil (4 to 6 slices)
In aluminium containers covered with cling
wrap.
Tenderising
(days)
Freshly
minced
Storage
(months)
6 Not required.
6 Not required.
2 Slowly in refrigerator.
Thawing Time
Sausages Cling Wrap or Tinfoil 2 As necessary.
Chicken and Turkey Tinfoil 1 / 3 9 Very slowly in refrigerator.
Duck and Goose Tinfoil 1 / 4 6 Very slowly in refrigerator.
Pheasant, Partrige and
Wild Duck
Hare and Rabbit Tinfoil 3 / 4 6 Very slowly in refrigerator.
Venison Tinfoil or Cling Wrap 5 / 6 9 Very slowly in refrigerator.
Large Fish Tinfoil or Cling Wrap 4 / 6 Very slowly in refrigerator.
Small Fish Plastic Baggies 2 / 3 Not required.
Crustaceans Plastic Baggies 3 / 6 Not required.
Shellfish
Tinfoil 1 / 3 9 Very slowly in refrigerator.
Store in salted water in aluminium
containers or plastic containers.
3 Very slowly in refrigerator.
Boiled Fish Tinfoil or Cling Wrap 12 In hot water.
Fried Fish Plastic Baggies 4 / 6 Directly in pan.
GB
20
Page 23
Fruits and Vegetables
Food Preparation
Apples and Pears Peel and cut into slices. 2’
Apricots, Peaches,
Cherries and Plums
Strawberries
Blackberries and
Raspberries
Cooked Fruit Cut, cook and strain.
Fruit Juice Wash, cut and crush.
Cauliflower
Cabbage and
Brussel Sprouts
Peas Shell and wash. 2’ Plastic Baggies 12 Not required.
Peel and pit. 1’ / 2’
Rinse and fry.
Remove leaves, cut head
into small pieces and blanch
in water and a little lemon
juice.
Wash and cut into small
pieces.
Blanching
Time
2’ Plastic Baggies 12 Not required.
1’ / 2’ Plastic Baggies 10 / 12 At room temperature.
Wrapping
In Containers (cover
with syrup)
In Containers (cover
with syrup)
In Containers (cover
with sugar)
In Containers (add
10% sugar)
In Containers (sugar
to taste)
Storage
(months)
12
12
10 / 12
12
10 / 12
Thawing Time
In refrigerator very
slowly.
In refrigerator very
slowly.
In refrigerator very
slowly.
In refrigerator very
slowly.
In refrigerator very
slowly.
French Beans Wash and slice if required. 2 Plastic Baggies 10 / 12 Not required.
Carrots, Peppers
and Turnips
Mushrooms and
Asparagus
Spinach Wash and mince. 2’ Plastic Baggies 12 At room temperature.
Vegetable for Soups
Various Foods Preparation
Bread Plastic Baggies 4
Cakes Plastic Baggies 6
Cream Plastic Containers 6
Butter
Peel, w ash and slice if
necessary.
Wash, peel and cut up. 3’ / 4’
Wash and cut up in small
pieces.
3’ / 4’ Plastic Baggies 12 Not required.
3’
Blanching
Time
Plastic Baggies or
Containers
Plastic Baggies or
Containers
Wrapping
In original wrapping
or tinfoil
6 At room temperature.
6 / 7 Not required.
Storage
(months)
6 In refrigerator.
Thawing time
At room temperature
and in the oven.
About 10 minutes at
room temperature,
cook at 100/200°C.
At room temperature or
in refrigerator.
Boiled Food or
Vegetable Soup
Eggs
Plastic or Glass
Containers
Freeze without shells
in sm all containers
21
3 / 6
10
At room temperature or
in hot water.
At room temperature or
in refrigerator.
GB
Page 24

Tips on Saving Energy
- Install the Appliance Correctly
This means that the appliance should be installed away from
heat sources or direct sunlight in a well ventilated room.
THE ACTUAL ENERGY CONSUMPTION OF THE
APPLIANCE DEPENDS ON THE WAY THE SAME IS USED
AND ON ITS LOCATION.
The consumption tests were performed in 560mm deep
column units, the most common installation setting for this
appliance.
- Just the right cold
Setting internal temperatures that are too low will increase
consumption levels.
- Do not Overfill
To conserve food properly, the cold air must circulate freely
within the refrigerator. If it is overfilled, this will prevent proper
air circulation, forcing the compressor to work continuously.
- Close the Doors
Open your refrigerator as little as possible because each time
you do so you loose much of the cold air. To raise the temperature to the proper level again, the motor must work for
a long time, consuming energy.
- Keep an Eye on the Seals
Keep the seals clean and make sure that they adhere well to
the door. This alone will ensure that no cold air escapes.
- No Hot Foods
A hot pot or pan placed in the refrigerator immediately raises
the temperature several degrees. Let hot cookware and food
cool to ambient temperature before placing them in the refrigerator.
- Defrost the Freezer
Check the thickness of the frost on the walls of the freezer
and immediately defrost it if the layer of frost is too thick.
(see the section entitled, “Keeping your Appliance in Shape”).
Alarm buzzers and visual warnings
Door open alarm
Should the refrigerator door be left open for more than two
minutes, the lamp inside the compartment will begin to flash;
after a few seconds, an alarm buzzer is sounded. To silence
this buzzer, just shut the door or press the SELECT button
"D". Should the door remain open for more than 4 minutes,
the lamp will flash more rapidly.
Abnormal freezer heating alarm
1. To signal an excessive heating on the part of the freezer
(e.g. momentary power failure), a buzzer will sound and
a message comes up on the display (A1) to signal the
dangerous heating of the compartment. To prevent food
from refreezing, the freezer will try to maintain a temperature of 0°C, thus allowing you to use up the food within
24 hours or to cook them and then refreeze them. You
can turn the buzzer off simply by pressing the SELECT
button "D".
To return to normal operation and cancel the message
from the display, you need to turn the appliance off and
on again, turning the appliance ON/OFF knob "B".
2. If the temperature inside the freezer continues to rise to
excessively high values, the buzzer will sound yet again
and another message (A2) will come up on the display to
signal the dangerous state of overheating. We recommend
you check the conditions of the food, as it may be
necessary to throw it away. In all cases, food should not
be refrozen unless you cook it first. To prevent food from
refreezing, the freezer will try to maintain a temperature
of 0°C. The buzzer can be turned off by simply pressing
the SELECT button "D". To return to normal operation
and cancel the message from the display, you need to
turn the appliance off and on again, turning the appliance
ON/OFF knob "B".
GB
22
Page 25

Keeping Your Appliance in Shape
Before proceeding with any cleaning or defrosting
operations, disconnect the appliance from the
electricity mains (by setting the appliance ON/OFF knob
“B” to the OFF position and then unplugging it). Should
you fail to do this, the appliance may go into alarm
mode. WARNING: this alarm is not a sign of any
anomaly. To return to normal operating mode, turn
the appliance off and back on again by turning the
appliance ON/OFF knob “B”.
Defrosting
WARNING: do not damage the refrigeration circuit.
Do not use mechanical devices or other tools to speed
up the defrosting process, unless they have been recommended by the manufacturer.
How to Defrost the Refrigerator
This appliance defrosts automatically, and the water is ducted
to the back of the appliance by a special outlet (fig. 6) where
the heat produced by the compressor makes it evaporate.
The only operation to be performed on a regular basis is to
control that the outlet water flows freely. Clean the outlet
hole with the special cleaning brush.
How to defrost the freezer compartment
- Remove the frost from time to time with the aid of the
special scraper provided (do not use knives or metal objects).
- If the frost is more than 5 mm thick, then you must defrost
the freezer completely. Proceed as follows: one day before
enabling the SUPER FREEZE function in the 24-hour mode;
it helps give the food a healthy extra "cold shock".
hours, the freezing function is automatically disabled but you
can disable it yourself. Turn the appliance off by turning the
appliance ON/OFF knob "B". WARNING: this operation
switches off the whole appliance (including the fridge
compartment).
Wrap all frozen foods in newspaper and place them either in
another refrigerator or in a cool place. Leave the door open,
so as to allow all the frost to melt completely, helping it along
with containers filled with lukewarm water.
The unit is provided with a system which allows the defrost
water to be collected in a container to be placed beneath the
unit (proceed as illustrated in fig. 7).
Clean and dry thoroughly before restarting the appliance.
Remember that the motor will not start immediately,
but rather after approximately 8 minutes.
After 24
HOLIDAY FUNCTION. Mould and bad odours forming
inside your unused fridge when you go on holiday need
no longer be a problem: just enable the Holiday
function (from the display). This way, with limited
energy consumption, the temperature of the
refrigerator compartment is kept at around 12°C (you
can store your make-up and beauty
products in it, for example) and the
freezer is operated at its minimum
setting, which is essential for food
preservation.
Cleaning and maintenance of the parts
Before you clean the refrigerator, turn the appliance
ON/OFF knob “B” to the OFF setting; only unplug the
appliance once the word OFF is displayed in both the
fridge and freezer compartments.
- Your appliance is manufactured with hygienic odourless
materials. To preserve these characteristics, always use sealed
containers for strong smelling foods to avoid the formation
of odours that are difficult to remove.
- Use only a water and bicarbonate solution: Clean the internal
and exterior of your appliance with a sponge soaked with a
warm water and sodium bicarbonate solution, which is also
a good disinfectant. If you do not have any sodium
bicarbonate at home, use neutral detergent.
- What not to use: Do not use abrasive detergents, bleach or
detergents containing ammonia. Never use solvent based
products.
- All the removable parts can be cleaned by soaking in hot
soapy water or detergent. Remember to dry thoroughly before
replacing them.
- When the appliance is left unused for an extended amount of
time. If you decide to switch your appliance off during the summer
months, clean it on the inside and leave the doors open.
- Replacing the light bulb.
When replacing the light of the refrigerator compartment
unplug the unit from the power supply and chang the used
lamp with another one of not more than 15 W.
For access ti lamp "A", remove the centre screw "B" at the
back of the lamp cover, as indicated in fig. 8.
A
Fig. 6
Fig. 7
23
B
Fig. 8
GB
Page 26

Is There a Problem?
The display is completely switched off
Have you checked whether:
• The main switch for the electricity to the apartment or
home has been turned off;
• The plug is properly inserted in the outlet;
• The outlet is adequate; try inserting the plug into another
outlet in the room.
The motor does not start
Have you checked whether:
· 8 minutes have passed since you switched the
appliance on?
This model is in fact provided with a motor protection
control system which means that it will only start
approximately 8 minutes after being switched on.
• the DEMO mode has been enabled? (see page 16)
The refrigerator and the freezer do not cool
properly.
Have you checked whether:
• The doors do not close well or the seals are faulty;
• The doors are left open too long;
• The thermostat knob is not on the proper setting;
• The refrigerator or freezer is overfilled.
If after all the checks, the appliance still does not operate or
the problem persists, call the nearest Service Centre and
inform them of: the type of problem, the abbreviation of
the model name (Mod.) and the relative numbers (S/N) written on the rating plate located at the bottom left next to
the vegetable crisper (see example in the figure below).
75
Test
P.S-I.
TI
Net
Util
Utile
Pressure
HIGH-235
LOW 140
RG 2330
Mod.
220 - 240 V- 50 Hz 150 W
340
Total
Gross
Bruto
Brut
Compr.
Syst.
Kompr.
Made in Italy 13918
Gross
Bruto
Brut
R 134 a
kg 0,090
93139180000 S/N 704211801
Cod.
Gross
Bruto
Brut
W
Fuse
A
Freez. Capac
Poder de Cong
kg/24 h
4,0
Max 15 w
Class
Clase
N
Classe
Never call on unauthorized technicians and always
refuse spare parts which are not originals.
The food inside the refrigerator is freezing
too much
Have you checked whether:
· the temperature setting is too low (or not the best);
• The food is in contact with the back wall - which is the
coldest part.
The motor runs constantly
Have you checked whether:
· the SUPER COOL and/or SUPER FREEZE and/or ICE PAR-
TY functions are enabled;
· the doors have been open continuously;
• The ambient temperature is too high;
The appliance makes too much noise.
The gas refrigerant produces a slight noise even when the
compressor is not running (this is not a defect).
Have you checked whether:
• The refrigerator is level.
• The appliance was installed between cabinets or objects
that vibrate and make noise.
There is water on the bottom of the refrigerator.
Have you checked whether:
• The hole for draining the water from the frost is clogged.
GB
24
Page 27

La sécurité, une bonne habitude
ATTENTION
Lire attentivement les avertissements contenus dans ce livret car ils fournissent des indications importantes pour la
sécurité de l’installation, de l’utilisation et de l’entretien.
Ce réfrigérateur a été construit conformément aux normes
internationales de sécurité qui ont pour but de protéger le
consommateur. Cet appareil a en effet obtenu le label IMQ
que les techniciens de l’Institut Italien de Qualité n’accordent qu’aux appareils conformes aux normes du CEI: Comité Electrotechnique Italien.
1. Cet appareil ne doit pas être installé à l’extérieur, même à
l’abri d’un appentis, il est extrêmement dangereux de le laisser exposé à la pluie et aux orages.
2. Il ne doit être utilisé que par des adultes et uniquement
pour conserver et congeler des aliments, conformément à
ce mode d’emploi.
3. Ne touchez jamais ni ne manoeuvrez l’appareil pieds nus
ou avec les mains ou les pieds mouillés.
4. Nous déconseillons d’utiliser des rallonges ou des prises
multiples. Si le réfrigérateur est installé entre des meubles,
veillez par soucis de sécurité à ce que le cordon d’alimentation ne soit ni plié ni comprimé.
5. Ne tirez jamais sur le cordon ou le réfrigérateur pour débrancher la fiche de la prise murale: c’est extrêmement dangereux.
6. Ne touchez pas aux parties intérieures réfrigérantes surtout avec les mains mouillées, vous pourriez vous brûler ou
vous blesser. Ne portez jamais à la bouche des glaçons à
peine sortis du freezer, vous risqueriez de vous brûler.
7. N'effectuez aucune opération de nettoyage ou d'entretien sans avoir auparavant débranché la fiche de la prise de
courant pour couper tout contact électrique, il ne suffit pas
en effet de tourner le bouton ON/OFF sur OFF.
8. Avant d’envoyer votre ancien réfrigérateur à la déchetterie,
rendez sa serrure inutilisable. Vous éviterez ainsi que des
enfants en jouant, ne restent enfermés à l’intérieur.
9. En cas de panne et avant de faire appel au service aprèsvente, consultez le chapitre «Quelque chose ne va pas?»
pour vérifier si vous pouvez vous-même résoudre le problème.
Ne tentez pas de réparer la panne en essayant d’accéder
aux parties internes.
10. Si le câble d’alimentation de cet appareil est abîmé, seul
notre Service Après Vente peut le changer à l’aide d’outils
spéciaux.
11. Ne pas utiliser d’appareils électriques à l’intérieur du
compartiment de conservation des aliments s’ils
n’appartiennent pas aux catégories recommandées par le
fabricant.
12. Avant d’envoyer votre appareil hors d’usage à la
déchetterie, veillez à le rendre sûr car sa mousse isolante
contient du gaz cyclopentane et son circuit réfrigérant peut
contenir du gaz R600a (isobutane).
Pour cette opération, adressez-vous à votre revendeur ou au
Service local prévu à cet effet.
Installation
Pour garantir le bon fonctionnement de votre appareil
tout en réduisant sa consommation d’électricité, il faut
qu’il soit installé correctement.
L’aération
Le compresseur et le condenseur produisent de la chaleur et
exigent par conséquent une bonne aération. Les pièces mal
ventilées sont par conséquent déconseillées. L’appareil doit
donc être installé dans une pièce munie d’une ouverture
(fenêtre ou porte-fenêtre) qui permette de renouveler l’air
et qui ne soit pas trop humide.
Attention, lors de son installation, à ne pas boucher les grilles
d’aération de l’appareil.
Loin de toute source de chaleur
Evitez d’installer votre appareil dans un endroit exposé à la lumière directe du soleil ou près d’une cuisinière électrique ou autre.
Raccordement électrique et mise à la terre
Avant de procéder à tout raccordement électrique, contrôlez si le voltage indiqué sur la plaquette des caractéristiques,
placée en bas à gauche à côté du bac à légumes, correspond bien à celui de votre installation et contrôlez si la prise
est dotée d’une mise à la terre conforme, comme prescrit
par la loi 46/90 sur la sécurité des installations. S’il n’y a pas
de mise à la terre, le Fabricant décline toute responsabilité.
N’utilisez ni prises multiples ni adaptateurs.
Installez l’appareil de manière à ce que la prise à
laquelle il est connecté soit parfaitement accessible.
La puissance est insuffisante?
La prise électrique doit être en mesure de supporter la charge
maximum de puissance de l’appareil, indiquée sur la plaquette des caractéristiques placée en bas à gauche à côté
du bac à légumes.
Avant de le raccorder électriquement
Après le transport, pour que votre appareil fonctionne bien,
placez-le à la verticale et attendez au moins 3 heures avant
de le brancher à la prise.
25
F
Page 28

Vu de près
ECO
M
D
E
O
N
L
M
F
K
A
B
C
B
J
G
H
G
I
H
Balconnet amovible avec couvercle, casier à œufs
A
et beurrier
Balconnet amovible porte-objets
B
Balconnet rabattable
C
Compartiment pour bouteille 2 litres
D
Balconnet pour bouteilles
E
Système de drainage pour
F
l’élimination de l’eau de
congélation
Compartiment pour la
G
conservation de produits
surgelés
Clayettes coulissantes et réglables en hauteur
M
Porte-bouteilles basculant
N
"A.I.R. System"
O
(Ariston Integrated Refrigeration)
Bac à glaçons
H
Compartiment pour congeler
I
les aliments frais et pour
conserver les aliments
surgelés
Afficheur
J
Tiroir pour fruits et légumes
K
Bac à viande/fromages
L
F
26
Page 29

L'afficheur
A BFE
C D
Bouton réfrigérateur
A
C'est lui qui sert à brancher et à débrancher le compartiment réfrigérateur et à sélectionner les températures de fonctionnement.
Bouton freezer et ON/OFF appareil
B
I J
HG
Fonction SUPER COOL
G
Affiche l'état (désactivé, sélectionné ou activé) de la
fonction SUPER COOL (refroidissement rapide du compartiment réfrigérateur).
C'est lui qui sert à brancher et à débrancher l'appareil tout entier et à sélectionner les températures de
fonctionnement dans le compartiment freezer.
Touche MODE
C
Pour se déplacer sur l'afficheur et accéder aux sélections/fonctions disponibles et éteindre les alarmes sonores.
Touche SELECT
D
Pour sélectionner/désélectionner les fonctions et éteindre les alarmes sonores.
Programmation compartiment réfrigérateur
E
Affiche la température sélectionnée dans le compartiment réfrigérateur et l'état de OFF du compartiment
réfrigérateur (message OFF activé).
Programmation compartiment congélateur
F
Affiche la température sélectionnée dans le compartiment freezer et l'état de OFF de l'appareil (message
OFF activé).
Fonction SUPER FREEZE
H
Affiche l'état (désactivé, sélectionné ou activé) de la
fonction SUPER FREEZE (congélation rapide).
Fonction HOLIDAY
I
Affiche l'état (désactivé, sélectionné ou activé) de la fonction HOLIDAY (températures optimales à très faible consommation d'énergie en cas d'absence prolongée).
Fonction ICE PARTY
J
Affiche l'état (désactivé, sélectionné ou activé) de la
fonction ICE PARTY (pour refroidir avec un maximum
de rapidité une bouteille et la servir à table dans son
rafraîchisseur spécial qui la maintiendra à la température atteinte).
27
F
Page 30

Comment mettre en marche l'appareil
ATTENTION
Après le transport, pour que votre appareil fonctionne
bien, placez-le à la verticale et attendez au moins 3
heures avant de le brancher à la prise de courant.
Avant d’introduire les aliments dans le réfrigérateur ou dans
le freezer, nettoyez bien l’intérieur de l’appareil avec de l’eau
tiède et du bicarbonate.
Ce modèle étant équipé d’un système de contrôle
protège-moteur, ne vous inquiétez par conséquent pas
si, à son installation, le compresseur ne démarre pas
tout de suite, il se mettra en marche au bout de 8
minutes environ.
Branchez la fiche à la prise de courant et vérifiez si l'afficheur est bien allumé.
Compartiment congélateur
Lors de l'allumage de l'appareil (tournez le bouton "B" ON/
OFF pour sélectionner la température de fonctionnement
souhaitée dans le compartiment freezer), sélectionnez la
fonction SUPER FREEZE pour accélérer le refroidissement
dans le compartiment, dès que ce dernier aura atteint sa
température optimale, la fonction se désactivera et vous
pourrez ranger vos surgelés à l'intérieur du congélateur.
Compartiment réfrigérateur
Lors de l'allumage de l'appareil (tournez le bouton "A" pour
sélectionner la température de fonctionnement souhaitée dans
le compartiment réfrigérateur), sélectionnez la fonction SU-
PER COOL pour accélérer le refroidissement dans le compartiment : au bout de quelques heures rangez les aliments dans
le réfrigérateur.
Comment se déplacer sur l'afficheur
Sélection des températures
Si le compartiment concerné est éteint, le message OFF apparaîtra dans la partie correspondante de l'afficheur (E pour
le réfrigérateur et F pour le congélateur). Si le compartiment est branché, il y aura par contre affichage des températures sélectionnées à ce moment-là. Pour les modifier, servez-vous du bouton correspondant au compartiment concerné (A pour le réfrigérateur et B pour le congélateur).
Les températures pouvant être sélectionnées vont de +2°C
à +8°C pour le compartiment réfrigérateur et de -18°C a
26°C pour le compartiment congélateur. Les augmentations
ou diminutions possibles sont toujours de 1°C.
Quand la fonction HOLIDAY est activée, aucun réglage de
température n'est plus possible, l'appareil se place automatiquement au réglage optimal correspondant : +12°C pour
le compartiment réfrigérateur (s'il est activé) et -18°C pour
le compartiment congélateur.
Gestion des fonctions :
Symbole correspondant à la fonction fonctionnement normal.
Fonction sélectionnée (pourtour clignotant).
Fonction activée (pourtour allumé)
Activation/désactivation des fonctions
Appuyez sur la touche MODE "C" autant de fois qu'il faut
jusqu'à ce que le symbole de la fonction sur laquelle vous
désirez agir se met à clignoter : ce qui indique que la fonc-
tion est sélectionnée et prête à être activée ou désactivée.
Vous pouvez alors gérer la fonction à l'aide de la touche
SELECT "D" pour l'activer ou la désactiver.
REMARQUE: si vous n'appuyez pas sur la touche SELECT
pour confirmer dans les cinq secondes qui suivent votre dernière action sur l'afficheur, ce dernier reviendra à l'affichage
de la fonction précédemment sélectionnée indiquant ainsi
qu'aucune modification n'a été programmée.
La fonction SUPER COOL est rattachée au compartiment
réfrigérateur, quand ce dernier est éteint aucune intervention n'est possible sur cette fonction; d'autres prévoient un
fonctionnement pouvant créer des conflits (les fonctions
HOLIDAY et SUPER FREEZE ne peuvent par exemple pas
être activées en même temps), dans ce cas il y a une priorité
déjà établie pour faciliter la gestion de l'appareil.
La fonction SUPER FREEZE prévoit deux modes d'activation
(voir paragraphe correspondant à la gestion du compartiment congélateur).
Activation/désactivation du mode DEMO :
Pour une démonstration de fonctionnement de l’afficheur,
appareil éteint, vous pouvez activer le mode DEMO.
Activation :
- positionnez le bouton températures du freezer sur 0;
- appuyez sur les deux touches “Select” et “Mode” pendant
5 secondes environ, jusqu’à ce qu’un signal sonore retentisse
et que “OFF” et “OFF” se mettent à clignoter sur l’afficheur;
ces derniers continueront à clignoter pendant toute la durée
d’activation de la fonction DEMO.
Désactivation :
- positionnez le bouton températures du freezer sur 0;
- appuyez sur les deux touches “Select” et “Mode” pendant
5 secondes environ, jusqu’à ce qu’un signal sonore retentisse
et que “OFF” et “OFF” cessent de clignoter sur l’afficheur.
F
28
Page 31

Comment utiliser au mieux le compartiment réfrigérateur
Le réglage de la température à l'intérieur du compartiment
réfrigérateur est automatique en fonction de la position du
bouton de réglage de la température "A".
Nous conseillons toutefois une position intermédiaire (+5°).
Le compartiment réfrigérateur de votre appareil est doté d'un
Dispositif de
Refrigeration)
aliments et un usage simplifié de l'appareil gràce à:
- un retour plus rapide à la juste température: après chaque
ouverture de porte les températures atteignent plus leurs
valeurs optimales, pour une meilleure conservation.
- Une distribution plus homogène de la température permettant de ranger les sliments sur n'importe clayette.
- Un plus haut degré d'humidité pour prolonger la durée de
conservation des aliments.
B
"A.I.R. System" (Ariston Integrated
permettant une excellente conservation des
B
B
A
A
N'introduisez que des aliments froids ou tièdes en évitant
d'y placer ceux qui sont encore chauds: ils augmenteraient
tout de suite la température interne en obligeant le compresseur a un surplus de travail qui représenterait un gaspillage d'énergie électrique.
N’introduisez pas de liquides dans des récipients ouverts, ils
entraîneraient une augmentation de l’humidité à l’intérieur
du réfrigérateur et donc la formation de givre.
Pour utiliser la boîte à viande/fromages suspendue, sortezla de sa clayette. Pour optimiser l'espace de rangement en
fonction de vos besoins, vous pouvez la déplacer
latéralement (Fig.2).
Le porte-bouteilles latéral peut aussi bien être utilisé pour
ranger des bouteilles (Fig. 3) que plusieurs boîtes de boisson
(2-4) placées à l'horizontale (Fig. 4). Si vous ne vous en servez
pas, vous pouvez rabattre le porte-bouteilles/boîtes pour
avoir davantage de place de rangement à l'intérieur de votre
réfrigérateur.
A - Air soufflé se refroidissant au contact de la paroi réfrigé-
rante
B - Air plus chaud aspiré
Si vous avez fait de grosses provisions et que votre compartiment
frigo est particulièrement plein, utilisez la fonction SUPER COOl
"G" (voir paragraphe "Comment se déplacer sur l'écran") pour
atteindre rapidement un fonctionnement optimal. Cette
fonction se désactive automatiquement dès que le délai
nécessaire à l'opération s'est écoulé.
conseils quant à la durée maximum de conservation: tout
aliment, pour frais qu’il soit, ne reste pas intact très
longtemps.
Contrairement à ce que l’on pense, les aliments cuits ne se
conservent pas plus longtemps que les aliments crus.
Des clayettes amovibles (Fig. 1) réglables en hauteur grâce
aux glissières prévues permettent de ranger de gros récipients et des aliments de grandes dimensions. La forme novatrice des clayettes permet de régler leur hauteur sans les
sortir complètement.
Suivez attentivement nos
1
Fig. 2
Fig. 4
Fig. 3
Fig. 1
2
29
F
Page 32

Pour profiter à plein de votre compartiment congélateur
Lors de la préparation des aliments à congeler, consultez un manuel spécialisé.
Un aliment décongelé, ne serait ce que partiellement, ne
doit jamais être remis à congeler : il faut le faire cuire pour le
consommer (dans les 24 heures) ou bien pour le congeler à
nouveau.
Les aliments frais que l’on doit congeler ne doivent pas être
mis à contact avec ceux qui sont déjà congelés ou surgelés
mais il faut les placer dans le compartiment supérieur "J"
où la température atteint -18°C, ce qui est l’idéal pour bien
congeler les aliments. En effet il ne faut pas oublier que la
bonne conservation des aliments congelés dépend de la vitesse de congélation.
La quantité maximum pouvant être congelée par jour est
indiquée sur l'étiquette placée à l'intérieur du compartiment
réfrigérateur.
Lors de sa première mise en service ou après une longue
période d'inactivité de votre congélateur, ne congelez vos
aliments qu'après avoir fait fonctionner votre appareil réglé
au maximum de sa puissance.
Quand l'appareil est déjà branché, vous pouvez procéder à
la congélation de deux façons :
1. Pour de petites quantités, inférieures à la charge maximum indiquée sur l'étiquette (placée en bas à gauche, à
côté du bac à légumes), activez sur l'afficheur la fonction
SUPER FREEZE en mode "24 heures" et introduisez les aliments à congeler. Pour activer la fonction, appuyez sur la
touche MODE "C" autant de fois qu'il faut jusqu'à ce que le
symbole correspondant à SUPER FREEZE commence à clignoter, appuyez ensuite sur la touche SELECT "B" pour ac-
tiver la fonction . Au bout de 24 heures ou dès que les
températures optimales ont été atteintes, la fonction con-
gélation rapide se désactive automatiquement.
2. Pour de grosses quantités (jusqu'à la charge maximum
indiquée sur l'étiquette placée en bas à gauche, à côté du
bac à légumes) activez sur l'afficheur la fonction SUPER
FREEZE en mode "48 heures". Pour activer la fonction, appuyez sur la touche MODE "C" autant de fois qu'il faut
jusqu'à ce que le symbole correspondant à SUPER FREEZE
commence à clignoter, appuyez ensuite pendant plus de trois
secondes de suite sur la touche SELECT "B" pour activer la
Pour avoir davantage de place dans le compartiment freezer, vous pouvez enlever le tiroir central et placer les aliments directement sur la plaque évaporante. Après avoir
introduit les aliments, vérifiez que la porte ferme bien.
N’ouvrez pas la porte du freezer en cas de coupure de courant ou de panne, vous éviterez ainsi d’accélérer la montée
de la température à l’intérieur du freezer. Les produits surgelés et congelés se conserveront ainsi inaltérés pendant environ 9-14 heures.
Ne mettez jamais de bouteilles pleines dans votre freezer:
elle pourraient se briser car tous les liquides augmentent de
volume en gelant.
Pour refroidir rapidement les boissons.
Grâce à la fonction spéciale ICE PARTY, finies les bouteilles
qui cassent après avoir été mises refroidir dans le compartiment freezer (tous les liquides, en gelant, augmentent en
effet de volume). Quand cette fonction est activée, c'est
l'appareil lui-même qui vous avertit par un signal acoustique
qu'il est temps de sortir la bouteille du freezer. Pour faire
taire l'alarme sonore, il suffit d'appuyer sur la touche SE-
LECT "D". Servez-vous du rafraîchisseur de bouteille fourni
avec l'appareil pour ranger la bouteille dans le compartiment freezer, le refroidissement de cette dernière en sera
accéléré et au moment de la servir vous pourrez la transporter plus facilement grâce à ses poignées et la garder froide
plus longtemps à table.
ATTENTION : gardez toujours le rafraîchisseur de bouteille
fourni avec l'appareil à l'intérieur du compartiment freezer
(même si vous n'avez pas de bouteilles à refroidir); ce n'est
qu'ainsi que le liquide pourra atteindre une basse température en peu de temps.
fonction (le symbole commence à clignoter lentement).
Au bout de 24 heures le symbole cesse de clignoter et passe
au fixe ; introduisez alors les aliments à congeler. Au bout de
24 autres heures, la fonction se désactive automatiquement.
En cours de congélation, évitez d’ouvrir la porte du freezer.
Pour obtenir une congélation et une décongélation parfaites, il vaut mieux congeler de petites portions d’aliments,
leur congélation n’en sera que plus rapide et homogène.
Indiquez sur vos sachets ou barquettes leur contenu et la
date de congélation.
F
30
Page 33

Bacs à glace
Le brevet exclusif de ce nouveau type de bacs à glace a été
déposé. Placés dans la partie supérieure des tiroirs du
compartiment freezer, ils sont plus ergonomiques et
garantissent davantage de propreté: en effet, les glaçons ne
touchent plus aux aliments stockés dans le freezer; de plus,
fini l'eau qui dégouline lorsque vous rangez votre bac (un
couvercle est fourni pour boucher le récipient après l'avoir
rempli).
Mode d'emploi (Fig. 5)
Remplissez le bac d'eau jusqu'au niveau indiqué (MAX
WATER LEVEL) en veillant à ne pas le dépasser. Si vous
introduisez davantage d'eau, la quantité de glace qui se
formera risque d'empêcher la sortie des glaçons.
Si vous avez introduit trop de liquide, attendez que la glace
fonde, videz le bac et recommencez depuis le début.
Après avoir introduit la quantité d'eau nécessaire par l'orifice
prévu à cet effet, tournez le bac de 90°. Suivant le principe
des vases communicants, l'eau va remplir les cavités. Fermez
l'orifice à l'aide du couvercle prévu et placez le bac à glaçons
dans la contre-porte.
Suivant le principe des vases communicants, l’eau va remplir
les cavités. Fermez l’orifice à l’aide du bouchon et placez le
bac à glaçons dans le tiroir à l’emplacement prévu. Pour
sortir plus facilement les glaçons, mouillez l'extérieur du bac.
ATTENTION: avant d'introduire à nouveau de l'eau dans le
bac, vérifiez qu'il est bien vide sans le moindre débris de
glace.
Il faut attendre au moins 8 heures pour obtenir de beaux
glaçons.
Fig. 5
MAX
WATER LEVEL
MAX
WATER LEVEL
31
F
Page 34

Guide à la congélacion
Viandes et poisson
Type Confection
Rôti et boeuf bouilli Enveloppé dans du papier aluminium 2 / 3 9 / 10 Pas nécessaire
Agneau Enveloppé dans du papier aluminium 1 / 2 6 Pas nécessaire
Rôti de porc Enveloppé dans du papier aluminium 1 6 Pas nécessaire
Veau rôti ou blanchi Enveloppé dans du papier aluminium 1 8 Pas nécessaire
Biftecks et côtelettes
de porc ou de veau
Tranches et côtelettes
d'agneau ou de boeuf
Viande hachée
Coeur et foie Sachets en polypropylène 3 Pas nécessaire
Par tranche enveloppée une par une dans
une feuille de polythéne puis dans du papier
aluminium, pas plus de 4 à 5 morceaux
ensemble
Chaque tranche enveloppée dans une feuille
de polythéne puis dans du papier aluminium,
pas plus de 4 à 5 morceaux ensemble
Dans des bacs aluminium recouverts d'une
feuille de polypropylène
Faisandage
(jours)
Très fraîche 2
Conservation
(mois)
6 Pas nécessaire
6 Pas nécessaire
Décongélation
Lentement dans le
réfrigérateur
Saucisses Papier aluminium ou polypropylène 2 Selon l'emploi
Poulets et dindons Papier aluminium 1 / 3 9
Canards et oies Papier aluminium 1 / 4 6
Canards sauvages
faisans, perdrix
Lapins, lièvres Papier aluminium 3 / 4 6
Chevreuil, cerf Papier aluminium ou polypropylène 5 / 6 9
Gros poissons Papier aluminium ou polypropylène 4 / 6
Petits poissons Sachets en polypropylène 2 / 3 Pas nécessaire
Crustacés Sachets en polypropylène 3 / 6 Pas nécessaire
Mollusques
Papier aluminium 1 / 3 9
Dans des bacs aluminium ou plastique
plongés dans du sel et de l'eau
3
Lentement dans le
réfrigérateur
Lentement dans le
réfrigérateur
Lentement dans le
réfrigérateur
Lentement dans le
réfrigérateur
Lentement dans le
réfrigérateur
Lentement dans le
réfrigérateur
Lentement dans le
réfrigérateur
Poissons cuits Papier aluminium ou polypropylène 12 Dans de l'eau chaude
Poissons frits Sachets en polypropylène 4 / 6
F
32
Directement dans la
poêle
Page 35

Fruits et légumes
Type Préparation Cuisson Confection
Pommes et poires
Abricots pêches
cerises, prunes
Fraises, mûres et
myrtilles
Fruits cuits Couper, cuire et passer
Jus de fruit Laver, couper et écraser
Choux-fleurs
Choux, choux de
Bruxelles
Petits pois Écosser et laver 2' Sachets en polythène 12 Pas nécessaire
Haricots verts
Peler et couper en
morceaux
Ôter les noyaux et peler 1' / 2'
Nettoyer, laver et laisser
sécher
Couper en morceaux et
blanchir à l'eau additionnée
de jus de citron
Nettoyer, laver et couper 1' / 2' Sachets en polythène 10 / 12 À température ambiante
Laver et couper en
morceaux
Dans des bacs, couvrir avec
2’
du sirop
Dans des bacs, couvrir avec
du sirop
Dans des bacs, couvrir avec
du sucre
Dans des bacs, ajouter 10%
de sucre
Dans des bacs, sucre à
discrétion
2' Sachets en polythène 12 Pas nécessaire
2' Sachets en polythène 10 / 12 Pas nécessaire
Conserv.
(mois)
12
12
10 / 12
12
10 / 12
Décongélation
Lentement dans le
réfrigérateur
Lentement dans le
réfrigérateur
Lentement dans le
réfrigérateur
Lentement dans le
réfrigérateur
Lentement dans le
réfrigérateur
Carottes, poivrons,
navets
Champignons et
asperges
Epinards Laver et hacher 2' Sachets en polythène 12 À température ambiante
Légumes assortis
pour potage
Denrées diverses Préparation Cuisson Confection
Pain Sachets en polythène 4
Gâteaux Feuilles de polythène 6
Crème fraîche Bacs en plastique 6
Beurre
Denrées cuites,
soupe de légumes
Couper en lamelles, peler et
laver
Laver et couper 3' / 4' Sachets ou bacs 6 A température ambiante
Laver et couper en
morceaux
3' / 4' Sachets en polythène 12 Pas nécessaire
En petites portions dans des
3'
sachets
Dans son papier original
enveloppé dans du papier
aluminium
Partagés dans des bacs verre
ou plastique
6 / 7 À température ambiante
Conserv.
(mois)
6 Dans le réfrigérateur
3 / 6
Décongélation
À température ambiante
et dans le four
À température ambiante
et cuire à 100/200°C
À température ambiante
ou dans le réfrigérateur
À température ambiante
ou dans de l'eau chaude
Oeufs
Congeler sans coquille dans
de petits bacs
33
10
À température ambiante
ou dans le réfrigérateur
F
Page 36

Quelques conseils pour faire des économies
- Installez-le bien
Autrement dit loin de sources de chaleur, de la lumière directe du soleil, dans une pièce bien ventilée et en respectant
les distances signalées dans le paragraphe «Installation/L’aération».
LA CONSOMMATION D’ENERGIE DE L’APPAREIL DEPEND
DE SES CONDITIONS D’UTILISATION ET DE SON
EMPLACEMENT. Les essais sur la consommation ont été
effectués sur des appareils montés dans des éléments colonnes
de 560 mm de profondeur, condition d’installation la plus
courante.
- Le froid nécessaire
Une sélection de températures intérieures trop basses fait
augmenter la consommation d’énergie.
- Ne le remplissez pas trop
Pour bien conserver les aliments, il faut que le froid puisse
circuler librement à l’intérieur du réfrigérateur. Si vous le remplissez trop, vous gênerez cette circulation et obligerez le
compresseur à fonctionner sans arrêt.
- Portes fermées
Ouvrez votre réfrigérateur le moins souvent possible car chaque fois que vous le faites, de l’air froid s’échappe. Pour
rétablir la température voulue, le moteur doit fonctionner
longtemps en consommant beaucoup d’électricité.
- Attention aux joints
Veillez à ce qu’ils soient toujours propres et en bon état pour
bien adhérer aux portes; ce n’est qu’ainsi qu’ils empêcheront toute fuite d’air froid.
- Jamais d’aliments chauds
Une casserole chaude mise au réfrigérateur entraîne automatiquement une hausse de la température de plusieurs
degrés, laissez-la refroidir à température ambiante avant de
l’introduire dans le réfrigérateur.
- Du givre dans le freezer
Contrôlez l’épaisseur du givre sur les parois du freezer et
procédez immédiatement au dégivrage si la couche est trop
épaisse (Voir plus bas “Comment le garder en forme”).
Alarmes sonores et visuelles
Alarme porte ouverte
Si la porte du réfrigérateur reste ouverte pendant plus de
deux minutes, l'éclairage intérieur commence à clignoter;
au bout de quelques secondes un signal acoustique retentit, ce dernier cesse dès que vous fermez la porte ou que
vous appuyez sur la touche SELECT "D". Si la porte reste
ouverte pendant plus de 4 minutes, l'éclairage commence à
clignoter plus rapidement.
Alarme réchauffement anormal du freezer
1. Pour signaler un réchauffement excessif du freezer (ex.:
panne de courant momentanée), un signal acoustique
retentit et un message apparaît sur l'afficheur (A1) pour
signaler un réchauffement dangereux. Pour ne pas faire
recongeler les aliments, le freezer maintient une tempé-
rature d'environ 0°C pour vous permettre de les consommer dans les 24 heures ou de les recongeler après cuisson. Pour faire cesser le signal acoustique, appuyez sur la
touche SELECT "D".
Pour revenir à un fonctionnement normal et effacer les
message sur l'afficheur, éteignez puis rallumez l'appareil
à l'aide du bouton ON/OFF "B".
2. Si la température continue à grimper et atteint des va-
leurs trop élevées, le signal acoustique retentit à nouveau
et un autre message apparaît sur l'afficheur (A2) pour
signaler un réchauffement excessif. Nous vous conseillons
de contrôler l'état des aliments, il se pourrait qu'il faille
les jeter. De toute manière, les aliments ne peuvent pas
être recongelés à moins que vous ne les fassiez cuire avant.
Pour ne pas faire recongeler les aliments, le freezer maintient une température d'environ 0°C. Pour faire cesser le
signal acoustique, appuyez sur la touche SELECT "D".
Pour revenir à un fonctionnement normal et effacer les
message sur l'afficheur, éteignez puis rallumez l'appareil
à l'aide du bouton ON/OFF "B".
F
34
Page 37

Comment le garder en forme
Avant de procéder à toute opération de nettoyage ou
de dégivrage, débranchez l’ appareil du réseau
d’alimentation électrique (tournez le bouton ON/OFF “B”
de l’appareil jusqu’à la position OFF puis débranchez la
fiche). Si vous ne suivez pas cette procédure, l’appareil
pourrait signaler une condition d’alarme.
cette alarme ne dénote pas une anomalie. Pour rétablir
le fonctionnement correct de l’appareil, il faut éteindre
et rallumer l’appareil en agissant directement sur le
bouton ON/OFF produit “B”.
ATTENTION :
Dégivrage
ATTENTION: ne pas endommager le circuit réfrigérant.
Attention: n’utilisez ni dispositifs mécaniques ni outils
pour accélérer l’opération de dégivrage, en dehors de
ceux conseillés par le fabricant.
Comment dégivrer le compartiment réfrigérateur.
Sur cet appareil le dégivrage est automatique, l’eau est
acheminée vers l’arrière dans un conduit d’évacuation prévu
à cet effet (fig.6) où la chaleur produite par le compresseur la
fait évaporer. Il vous suffit de contrôler périodiquement que
l’eau d’évacuation s’écoule normalement. Nettoyez le trou
d’évacuation à l’aide du “goupillon” prévu.
Comment dégivrer le compartiment congélateur
- Enlevez de temps en temps le givre à l'aide du racloir fourni
avec l'appareil (n'utilisez ni couteaux ni objets métalliques).
- Si le givre dépasse 5 mm d'épaisseur, effectuez un dégi-
vrage complet. Procédez comme suit : le jour précédent, activez la fonction SUPER FREEZE 24 heures ;
vous donnerez ainsi aux aliments un bon "coup de froid"
supplémentaire. Au bout de 24 heures, la fonction congélation
se désactive automatiquement mais vous pouvez aussi la
désactiver vous-même sur l'écran. Eteignez l'appareil en
appuyant plus de deux secondes sur le bouton ON/OFF (A).
ATTENTION: cette opération éteint l'appareil tout entier
(compartiment réfrigérateur y compris).
Enveloppez tous les produits surgelés et congelés dans du
papier journal et rangez-les dans un autre réfrigérateur ou
dans un endroit frais. Laissez la porte ouverte pour permettre
au givre de fondre complètement, simplifiez l'opération en
introduisant des bassines d'eau tiède.
L'appareil est équipé d'un systéme spécial permettant de recueillir
l'eau de dégivrage dans un récipient devant être placé sous l'appareil (procéder comme indiqué à la Fig. 7).
nettoyer et à bien essuyer avant de rebrancher l’appareil.
N’oubliez pas que le moteur ne redémarre pas aussitôt
mais seulement au bout de 8 minutes environ.
Attention à bien
FONCTION VACANCES.
Fini les moisissures et les mauvaises odeurs qui se
formaient à l'intérieur de votre réfrigérateur éteint
quand vous partiez en vacances, le problème est résolu
: activez la fonction Holiday (sur l'écran). Ainsi, en
consommant peu d'électricité, la température du
compartiment frigo est maintenue
autour de 12°C (vous pouvez par
exemple y conserver vos produits de
beauté et de maquillage) et le
congélateur fonctionne au minimum
indispensable à la conservation des
aliments.
Nettoyage et entretien particulier
Avant de nettoyer le réfrigérateur, tournez le bouton
ON/OFF produit “B” jusqu’à la position OFF, attendez
que l’état de OFF soit affiché pour les deux
compartiments frigo et freezer puis débranchez la fiche.
- Les matériaux de fabrication utilisés pour votre appareil sont
hygiéniques et inodores mais pour conserver ces propriétés il
faut que les aliments soient toujours bien protégés et enfermés, pour éviter toute formation de taches difficiles à enlever
ou la formation de mauvaises odeurs.
- De l’eau et du bicarbonate: c’est tout. Pour nettoyer l’inté-
rieur et l’extérieur, utilisez une éponge, de l’eau tiède et du
bicarbonate de soude qui est entre autre un excellent désin-
fectant. Si vous n’en avez pas chez vous, utilisez du savon
neutre (du savon de Marseille, par exemple).
- Ce qu’il ne faut jamais utiliser: des produits abrasifs, de l’eau
de Javel, de l’ammoniaque. Les solvants et autres produits
semblables sont absolument interdits.
- Tout ce qui est amovible peut être mis tremper dans de
l’eau chaude avec du savon ou du liquide vaisselle. Avant de
remettre ces pièces en place, rincez-les et essuyez-les bien.
- Quand il est inutilisé pendant de longues périodes. En été. si
vous décidez d’arrêter votre réfrigérateur, nettoyez-le à l’in-
térieur et laissez les portes ouvertes, vous éviterez ainsi toute
formation de mauvaises odeurs et de moisissures.
- Comment changer l’ampoule à l’intérieur. Pour remplacer la
lampe d’éclairage du compartiment réfrigérateur, débranchez
l’appareil du réseau d’alimentation et remplacez l’ampoule
grillée par une autre ampoule de même puissance, en aucun
cas supérieure à 15 W. Pour accéder à la lampe “A”, dévisser
la vis centrale de fixation “B” située à l’arrière du carter de la
lampe, comme indiqué à la Fig. 8.
Fig. 6
Fig. 7 Fig. 8
35
A
B
F
Page 38

Quelque chose ne va pas
L'écran est totalement éteint.
Avez-vous contrôlé si:
• l’interrupteur général de votre appartement est décon-
necté;
• la fiche n’est pas bien branchée dans la prise de courant;
• la prise n’est pas endommagée; essayez de la brancher
dans une autre prise de l’appartement.
Le moteur ne démarre pas
Avez-vous contrôlé si:
• 8 minutes se sont bien écoulées depuis son allumage?
Ce modèle est en effet équipé d’un système de contrôle
protège-moteur qui ne le fait démarrer que 8 minutes après
son branchement.
• le mode de fonctionnement DEMO a été activé? (voir page
28)
Le réfrigérateur et le freezer ne réfrigèrent
pas assez.
Avez-vous contrôlé si:
• les portes ne ferment pas bien ou si les joints sont abîmés;
• les portes restent trop longtemps ouvertes;
• la manette de réglage de la température n’est pas bien
positionnée;
• le réfrigérateur ou le freezer ont été excessivement rem-
plis.
Il y a de l’eau dans le fond du réfrigérateur.
Avez-vous contrôlé si:
• le trou d’évacuation de l’eau de dégivrage est bouché .
Si, malgré tous ces contrôles, l’appareil ne fonctionne tou-
jours pas et l’inconvénient persiste, faites appel au service
après-vente le plus proche de chez vous en indiquant: le
type de panne, le sigle du modèle (Mod.) ainsi que les chiffres (S/N) indiqués sur la plaquette des caractéristiques située en bas, à gauche, à côté du bac à légumes (voir exemples dans les figures suivantes).
75
Test
P.S-I.
TI
Net
Util
Utile
Pressure
HIGH-235
LOW 140
RG 2330
Mod.
220 - 240 V- 50 Hz 150 W
340
Total
Gross
Bruto
Brut
Compr.
Syst.
Kompr.
Made in Italy 13918
Gross
Bruto
Brut
R 134 a
kg 0,090
Ne faites jamais appel à des techniciens non agréés et
refusez toujours des pièces détachées non originales.
93139180000 S/N 704211801
Cod.
Gross
Bruto
Brut
W
Fuse
A
Freez. Capac
Poder de Cong
kg/24 h
4,0
Max 15 w
Class
Clase
N
Classe
Dans le réfrigérateur, les aliments gèlent trop
Avez-vous contrôlé si :
· le réglage de la température sélectionné n'est pas trop bas
(ou pas optimal) ;
• les aliments touchent à la paroi arrière qui est la plus froide.
Le moteur est branché en permanence.
Avez-vous contrôlé si :
· les fonctions SUPER COOL et/ou SUPER FREEZE et/ou
ICE PARTY ne sont pas par hasard activées ;
• les portes sont bien fermées ou si elles sont restées ouver-
tes trop longtemps;
• la température extérieure est trop élevée;
L’appareil est trop bruyant.
Il gaz réfrigérant interne produit un léger bruit même quand
le compresseur est à l’arrêt (ce n’est pas un défaut).
Avez-vous contrôlé si:
• le réfrigérateur est bien positionné à plat;
• s’il a été installé entre des meubles ou des objets qui vi-
brent en faisant du bruit;
F
36
Page 39

Die Sicherheit - Eine gute Gewohnheit und unsere Verpflichtung
ACHTUNG
Lesen Sie bitte vor Inbetriebnahme aufmerksam die
nachstehenden Sicherheitshinweise dieser Anleitung. Sie
enthalten wichtige Angaben über die Sicherheit bei der
Installation, Benutzung und Instandhaltung des Gerätes.
Dieses Gerät wurde gemäß der internationalen
Sicherheitsregelung zum Schutz des Verbrauchers
konstruiert. Das Gerät weist das IMQ Qualitätszeichen auf,
ausgegeben vom Istituto Italiano di Qualità (Ital. Institut zur
Qualitätsüberprüfung). Dieses Zeichen wird nur den Geräten
zuteil, die den Normen des CEI, Comitato Elettrotecnico
Italiano (Elektrotechn. Komitat Italiens ) entsprechen.
Dieses Gerät eignet sich zum Kühlen und Gefrieren von
Lebensmitteln und zur Eisbereitung.
Es ist für die Verwendung im privaten Haushalt bestimmt.
Bei Einsatz im gewerblichen Bereich sind die für das Gewerbe
gültigen Bestimmungen zu beachten.
1. Sollte das Gerät wider Erwarten auf dem Transport zu
Ihnen beschädigt worden sein, nehmen Sie es nicht in Betrieb
ohne zuvor Rücksprache mit Ihrem Lieferanten gehalten zu
haben.
2. Es darf nur von Erwachsenen benutzt werden und
ausschließlich zur Konservierung und zum Einfrieren von
Speisen unter Beachtung der hier aufgeführten Anleitung.
3. Berühren oder bedienen Sie niemals das Gerät mit nassen
Händen oder barfuß, wenn Sie auf feuchtem oder nassem
Bodenbelag stehen.
4. Wir raten vom Einsatz von Mehrfachsteckern,
Adaptersteckern oder Verlängerungen ab.
5. Trennen Sie das Gerät bei Störungen, Wartung und
Reinigung vom Stromnetz, oder schalten Sie die
entsprechende Sicherung aus. Ziehen Sie bitte bei Entfernen
des Netzkabels nie am Kabel, sondern bitte immer am
Netzstecker.
6. Vor der Reinigung und Wartung des Gerätes muss immer
der Stecker aus der Steckdose gezogen werden. Es genügt
nicht, den ON/OFF-Schalterknopf des Gerätes auf OFF
einzustellen, um jeglichen elektrischen Kontakt
auszuschließen.
7. Berühren Sie nicht die inneren Kühlteile, besonders nicht
mit nassen Händen; Sie könnten sich verbrennen oder
verletzen. Nehmen Sie niemals frisch entnommene Eiswürfel
oder gefrorenes Speiseeis in den Mund, Sie könnten sich
durch die sehr starken Temperaturunterschiede verbrennen.
8. Vor der Entsorgung Ihres alten Kühlschranks entfernen
Sie das Schloß, soweit vorhanden, um zu verhindern, daß
spielende Kinder eingesperrt werden könnten.
9. Reparaturen an Elektrogeräten dürfen nur von Fachkräften
ausgeführt werden. Durch unsachgemäße Reparaturen
können erhebliche Gefahren für den Benutzer entstehen.
10. Lagern Sie hochprozentigen Alkohol nur dicht
verschlossen und stehend, durch austretende Alkoholdämpfe
kann Explosionsgefahr bestehen.
11. Vermeiden Sie Beschädigungen an Teilen des
Kältemittelkreislaufes, zum Beispiel durch Aufstechen von
Kältemittelkanälen mit scharfen Gegenständen usw.
12. Lagern Sie keine Flüssigkeiten in Flaschen oder Dosen,
insbesondere mit kohlensäurehaltigen Flüssigkeiten, im
Gefrierteil des Gerätes. Ihr Gerät könnte durch platzende
Gebinde beschädigt werden.
13. Sollte Ihr Gerät nicht funktionieren oder einen Defekt
aufweisen, lesen Sie zuerst das Kapitel “Gibt's ein Problem?”,
bevor Sie den technischen Service anrufen; eventuell kann
der Fehler so behoben werden. Versuchen Sie nicht, in das
Innere der Kombination zu gelangen, um den Defekt zu
reparieren.
14. Im Falle einer Beschädigung des Gerätespeisekabels muß
dieses zwangsläufig durch unseren Kundendienst
ausgewechselt werden, da hierzu Spezialwerkzeuge benötigt
werden.
15. Bitte verwenden Sie im Innern des Lagerfachs für Speisen
keine Elektrogeräte, die nicht ausdrücklichst von der
Herstellerfirma empfohlen wurden.
16. Vor der Entsorgung eines Altgerätes - das ZyklopentaneGas im Isolierschaum, und eventuell R600a - Gas (Isobutan)
im Kühlkreis enthält - muss dieses sichergestellt werden,
bevor es der Entsorgung zugeführt wird.
Wenden Sie sich hierzu an Ihren Händler oder an die
zuständige kommunale Entsorgungsstelle.
Entsorgung Ihres Altgerätes sowie der Verpackung des
Neugerätes.
Ältere Kühl- und Gefriergeräte enthalten im Kältekreis und
in der Isolation Fluorchlorkohlenwasserstoffe (FCKW). Dieses
FCKW kann, wenn es freigesetzt wird, die Ozonschicht der
Atmosphäre schädigen.
Nehmen Sie deshalb zum Entsorgen des Altgerätes Ihre
zuständige kommunale Entsorgungsstelle in Anspruch.
Achten Sie bitte darauf, daß die Rohrleitungen Ihres
Kältegerätes bis zum Abtransport zu einer sachgerechten
und umweltfreundlichen Entsorgung nicht beschädigt
werden.
In der Bundesrepublik Deutschland können Sie die
Verpackung Ihres Neugerätes zur weiteren stofflichen
Verwendung Ihrem Händler zurückgeben.
37
D
Page 40

Installationshinweise
Um eine optimale und langfristige Funktion sowie
einen möglichst geringen Stromverbrauch zu erzielen,
ist es wichtig, das Gerät korrekt zu installieren.
Die Be- und Entlüftung
Der Kompressor sowie der Kondensator strahlen Wärme aus,
weshalb sich eine gute Lüftung als notwendig erweist. Das
Gerät muß deshalb in einem trockenen Raum aufgestellt
werden, in dem eine Öffnung (Fenster oder Balkontür) für
den nötigen Luftaustausch sorgt. Achten Sie bitte bei der
Installation darauf, die Luftgitter, die eine gute Belüftung
des Gerätes ermöglichen, zu verdecken oder zu verstopfen.
Von Hitzequellen fernhalten
Installieren Sie das Gerät in einem Abstand von mind. 60 cm
zu Öfen, Boilern, Wärmespendern, Backherden und
Kaminen, sowie auch anderen Kühlgeräten und mind. 3cm
zur nächsten Wand.
Eben aufstellen
Der Boden muß eben sein; wenn das nicht der Fall ist, können
Sie die Lage des Gerätes mit den verstellbaren Vorderfüßen
eben regulieren. Sollten Sie sich nicht sicher sein, daß das
Gerät gerade steht, oder sollte das Gerät mit einer starken
Lärmentwicklung arbeiten, kontrollieren Sie den Stand mit
einer Wasserwaage.
Die Erdung
Vor dem Stromanschluß kontrollieren Sie bitte, ob die
Voltangaben auf dem Schild links neben dem Gemüsefach
den Stromdaten Ihrer Wohnung entsprechen, und ob die
Steckdose eine reguläre Erdung aufweist. Fehlt diese Erdung,
lehnt der Hersteller jegliche Verantwortung und
Gewährleistung ab.
Benutzen Sie keine Mehrfachstecker, Adapterstecker oder
Verlängerungen.
Ist die Stromleistung ausreichend?
Die Steckdose muß die Höchststromleistung des Gerätes
aufnehmen können, die auf dem Schild unten links neben
dem Gemüsefach angegeben ist, bzw. auch entsprechend
abgesichert sein.
Vor dem Stromanschluß
Warten Sie mind. 3 Stunden, bevor Sie das Gerät an den
Stromkreis anschließen; so garantieren Sie ein einwandfreies
Funktionieren.
D
38
Page 41

Aus der Nähe betrachtet
ECO
M
D
E
O
N
L
M
F
K
A
B
C
B
J
G
H
G
I
H
Ausziehbares Abstellbord mit Decl, Eierablage
A
Butterfach
Abnehmbare Kippkonsolen
B
Abstellbord mit Klappdeckel
C
Fach für eine 2-Liter-Flasche
D
Abnehmbare Konsole für Flaschen
E
Tauwasserableitung des
F
Gefrierraumes
Schubfach für die Lagerung
G
Herausnehmbare, hõhenverstellbare
M
Ablageroste
Klappbarer Flaschenabsteller
N
"A.I.R. System"
O
(Ariston Integrated Refrigeration)
tiefgekühlter Speisen
Eiswürfelbehälter
H
Fach für das Einfrieren von
I
Frisch-Speisen und die
Lagerung von tiefgekühlten
Speisen
Display
J
Obst- und Gemüsefach
K
Behälter für Fleisch und Käse
L
39
D
Page 42

G
H
I
J
Das Display
A BFE
C D
Kühlzonen-Schalter
A
Mittels dieser Taste wird die Kühlzone ein- bzw.
ausgeschaltet, und ermöglicht außerdem die
Einstellung der entsprechenden
Betriebstemperaturen.
I J
HG
Gefrierzonen-Einstellung
F
Anzeige der eingestellten Gefrierzonen-Temperatur,
sowie OFF-Anzeige (Schrift OFF eingeblendet), bei
ausgeschalteter Gefrierzone.
Gefrierzonen- und Geräte-EIN/AUS-Schalter
B
Mittels dieser Taste wird das gesamte Gerät (die Kühlund die Gefrierzone) ein- bzw. ausgeschaltet, und
ermöglicht außerdem die Einstellung der
Gefrierzonentemperatur.
MODE-Taste
C
Über diese erhalten Sie Zugriff auf die einzelnen
Einstellungen/Funktionen innerhalb des Displays, und
ermöglicht außerdem das Ausschalten der
Alarmsignale.
SELECT-Taste
D
Über diese können Sie die einzelnen Funktionen
Wählen/Löschen sowie Alarmsignale ausschalten.
Kühlzonen-Einstellung
E
Anzeige der eingestellten Kühlzonen-Temperatur,
sowie OFF-Anzeige (Schrift OFF eingeblendet), bei
ausgeschalteter Kühlzone.
Funktion SUPER COOL
Auf diesem Display ist ersichtlich, ob die Funktion
SUPER COOL (rasches Kühlen der Kühlzone)
ausgeschaltet, gewählt oder aktiviert wurde.
Funktion SUPER FREEZE
Auf diesem Display ist ersichtlich, ob die Funktion SUPER
FREEZE (Schockfrieren) ausgeschaltet, gewählt oder
aktiviert wurde.
Funktion HOLIDAY
Auf diesem Display ist ersichtlich, ob die Funktion
HOLIDAY (optimale Temperatur bei Mindestverbrauch
im Falle einer längeren Abwesenheit) ausgeschaltet,
gewählt oder aktiviert wurde.
Funktion ICE PARTY
Auf diesem Display ist ersichtlich, ob die Funktion ICE
PARTY (äußerst rasches Kühlen einer warmen Flasche,
die zur Erhaltung der Kühltemperatur in dem
entsprechenden Kübel auch auf den Tisch gebracht
werden kann) ausgeschaltet, gewählt oder aktiviert
wurde.
D
40
Page 43

Die erste Inbetriebnahme des Gerätes
ACHTUNG
Bitte warten Sie nach dem Aufstellen, bzw. nach einem Transport ca. 3 Stunden, bevor Sie das Gerät anschließen, um eine optimale Funktionsweise zu gewährleisten.
Motorschutzzeit
Dieses Modell ist mit einem Motorschutzkontrollsystem
ausgestattet. Sollte nach einer Off-Einstellung Ihrerseits
anschließend der Kompressor nicht wieder sofort
anlaufen, so ist das kein Grund zur Besorgnis, denn er
startet nach ungefähr 8 Minuten automatisch.
Vergewissern Sie sich nach Einstecken des Steckers in die
Steckdose , dass das Display eingeschaltet ist.
So bediene ich das Display
Einstellung der Temperaturen
Ist das Fach, dessen Temperatur eingestellt werden soll, ausgeschaltet, wird auf dem entsprechenden Display (E für die Kühlzone und F für die Gefrierzone) die Anzeige OFF eingeblendet.
Ist das Fach jedoch eingeschaltet, erscheint die soeben eingestellte Temperatur. Um diese zu ändern, drehen Sie den Schalterknopf der entsprechenden Zone (A für die Kühlzone und B für
die Gefrierzone) auf die gewünschte Temperatur.
Die für die Kühlzone einstellbaren Temperaturen reichen von
+2°C bis +8°C, die für die Gefrierzone einstellbaren Tempera-
turen von -18°C a -26°C. Das Herauf- bzw. Herabsetzen einer Temperatur ist jeweils um nur 1°C möglich.
Wurde die Funktion HOLIDAY aktiviert, sind Temperaturein-
stellungen nicht möglich. Das Gerät schaltet automatisch auf
die der jeweiligen Situation entsprechende, optimale Einstellung. +12°C für die Kühlzone (wenn aktiviert) und -18°C für
die Gefrierzone.
Erläuterungen zu den Funktionen:
Gefrierzone
Bei Einschalten des Gerätes (durch Drehen des Geräte-ON/
OFF-Schalters "B" bis auf die für die Gefrierzone gewünschte
Betriebstemperatur), empfiehlt es sich, sofort auch die
Funktion SUPER FREEZE einzuschalten, um das Abkühlen
des Fachs zu beschleunigen. Nach Erreichen der optimalen
Temperatur schaltet sich die Funktion automatisch ab. Das
Gefriergut kann nun eingeräumt werden.
Kühlzone
Bei Einschalten der Kühlzone ( durch Drehen des Schalters "A"
bis auf die für die Kühlzone gewünschte Temperatur) empfiehlt
es sich, sofort auch die Funktion SUPER COOL einzuschalten,
um das Abkühlen des Fachs zu beschleunigen. Nach Ablauf
einiger Stunden können die Speisen in den Kühlschrank
eingeräumt werden.
ten Sie diese nun über die Taste SELECT "D" ein oder aus.
ANMERKUNG: Wird die Einstellung nicht innerhalb fünf
Sekunden nach der letzten Displayeingabe mittels der Taste
SELECT bestätigt, schaltet das Display auf die vorher eingestellte Funktion zurück, als Zeichen dafür, dass keine neue
Funktion eingestellt wurde.
Die Funktion SUPER COOL hängt von der Kühlzone ab. Ist
diese ausgeschaltet, sind Einstellungen bzw. Änderungen an
dieser Funktion nicht möglich. Andere Funktionen sehen eine
Betriebsweise vor, die Konflikte hervorrufen könnte (zum
Beispiel wenn zur gleichen Zeit die Funktionen HOLIDAY
und SUPER FREEZE aktiviert werden), in diesem Falle hilft
Ihnen die bereits vorbestimmte Priorität bei der Handhabung
des Geräts.
Die Funktion SUPER FREEZE sieht zwei Aktivierungs-
modalitäten vor (siehe Abschnitt Gefrierzone).
Aktivierung/Deaktivierung der DEMO-Modalität:
Soll bei ausgeschaltetem Gerät die Display-Funktionsweise
nachgewiesen werden, kann dies durch Aktivierung der
Modalität DEMO erfolgen.
Funktionssymbol für normale Betriebsweise.
Gewählte Funktion (Umrandung
eingeschaltet).
Gewählte Funktion (Umrandung
eingeschaltet).
Einschalten/Ausschalten der Funktionen
Drücken Sie die Taste Mode "C" so oft, bis in dem entsprechenden Feld das Symbol der entsprechenden Funktion blinkt.
Dies bedeutet, dass die Funktion gewählt wurde und demnach eingeschaltet bzw. ausgeschaltet werden kann. Schal-
Aktivierung:
- Stellen Sie den Gefrierfach-Temperaturschalter auf 0;
- halten Sie die beiden Tasten "Select“ und "Mode“ für ca.
5 Sekunden gedrückt, bis Sie ein Tonsignal vernehmen und
die beiden Display-Schriftanzeigen "OFF“ und "OFF“
blinken; diese Schriftanzeigen blinken für die gesamte Zeit
der DEMO-Aktivierung.
Deaktivierung:
- Stellen Sie den Gefrierfach-Temperaturschalter auf 0;
- halten Sie die beiden Tasten "Select“ und "Mode“ für ca.
5 Sekunden gedrückt, bis Sie ein Tonsignal vernehmen und
die beiden Display-Blinkanzeigen "OFF“ und "OFF“
erlöschen.
41
D
Page 44

So friere ich richtig ein
Die Temperatur des Kühlraums wird je nach der Einstellung des
Temperaturreglerknopfes "A" automatisch reguliert bzw. gehalten.
Es empfiehlt sich jedoch, einen mittleren Wert einzustellen (+5°C).
Das Kühlschrank-Fach Ihres Gerätes ist mit einer
System"(Ariston Integrated Refrigeration)
gerüstet, die ein optimales Aufbewahren der Lebensmittel
und eine Vereinfachung im Gebrauch des Gerätes gewährleistet, und dies dank:
- einer raschen Wiederherstellung der Kühltemperatur: nach Öff-
nen der Tür werden die optimalen Kühlwerte schneller erreicht,
was eine längere Erhaltung der Lebensmittel gewährleistet;
- einer gleichmäßigen Verteilung der Kälte, wodurch die Lebens-
mittel auf jeder beliebigen Ablage aufbewahrt werden können;
- Eines höheren Feuchtigkeitsgrades, und demnach können
die Lebensmittel länger aufbewahrt werden.
B
B
- Vorrichtung aus-
"A.I.R.
B
A
A
Warme Speisen sollten abgekühlt sein, bevor sie in den
Kühlschrank gestellt werden, um einen höheren
Stromverbrauch zu vermeiden.
Stellen Sie Flüssigkeiten niemals in offenen Behältern in den
Kühlschrank, um zu verhindern, daß sich zuviel Feuchtigkeit
und demzufolge übermäßig viel Reif bildet.
Die aufgehängte Frischhaltedose für Käse und Wurstwaren
muss zum Füllen herausgezogen werden. Diese kann aus
Platzgründen gegebenenfalls auch in Längsrichtung
verschoben werden (Abb. 2).
Der seitliche Flaschenabsteller kann sowohl zum Einstellen
von Flaschen (Abb. 3) als auch für mehrere, waagerecht
gelegte Getränkedosen (2-4; Abb, 4) verwendet werden.
Wird er nicht verwendet, kann er auch geschlossen werden;
Sie verschaffen sich so mehr Platz im Kühlschrank.
A - Abluft, die bei Kontakt mit der Kühlzelle abkühlt
B - Angesaugte wärmere Luft
Wird die Kühlzone aufgrund eines Großeinkaufs sehr gefüllt,
ist es ratsam, auf die Funktion SUPER COOL "G" (siehe
Abschnitt "So bediene ich das Display") umzuschalten, damit
die optimalen Betriebsbedingungen kurzfristig erreicht
werden. Nach Ablauf der erforderlichen Zeit schaltet sich
die Funktion automatisch ab.
Befolgen Sie unbedingt unsere Ratschläge für die maximalen Aufbewahrungszeiten, denn alle Nahrungsmittel, auch
die frischesten, sind nur begrenzt haltbar.
Beachten Sie auch bitte, daß es ein Irrtum ist, anzunehmen,
daß sich gekochte Speisen länger halten, als rohe.
Die praktischen ausziehbaren Abstellflächen (Abb. 1) können mittels der entsprechenden Gleitführungen höhenverstellt werden,
um auch hohe Behälter und große Gebinde leicht unterbringen
zu können, und dies, ohne sie ganz herausziehen zu müssen, dank
der innovativen Form dieser Abstellflächen.
1
Abb. 2
Abb. 4
Abb. 3
Abb. 1
D
2
42
Page 45

So friere ich richtig ein
- Für das Verpacken von einzufrierenden Nahrungsmitteln sollte ein spezielles Handbuch zu Rate gezogen
werden.
- Eine einmal, auch nur teilweise aufgetaute Speise darf auf
keinen Fall noch einmal eingefroren werden: Sie muß (innerhalb 24 Stunden) verbraucht, d.h. gekocht werden. Das
gekochte Gericht kann dann wieder eingefroren werden.
- Wenn Sie frische Nahrungsmittel einfrieren möchten, achten
Sie bitte darauf, daß diese nicht mit bereits eingefrorenen oder
tiefgefrorenen Speisen in Kontakt kommen. Lagern Sie frische
Nahrungsmittel daher zunächst in das obere Fach ein, in welchem eine Gefrier-Temperatur bis unter -18°C herrscht; die ideale Temperatur für richtiges Einfrieren. Vergessen Sie nicht, daß
die Haltbarkeit der Tiefkühlkost davon abhängt, wie schnell sie
eingefroren wurde.
Die täglich einfrierbare, maximale Lademenge ist auf dem Typenschild (befindlich im Kühlraum) aufgeführt.
Bei erstmaligem Gebrauch, oder nach längerem Stillstand der
Gefrierzone ist das Gerät auf seine maximale Einstellstufe in Betrieb zu setzen, und zwar solange erst dann können frische Lebensmittel eingefroren werden.
Befindet sich das Gerät bereits in Betrieb, kann auf zwei
Arten eingefroren werden:
1. Für kleine Mengen, die unter der auf dem Typenschild
(unten links neben der Gemüseschale) angegebenen, maximalen Kapazität liegen, aktivieren Sie über das Display die
Funktion SUPER FREEZE in der Betriebsart "24 Stunden",
und räumen die einzufrierenden Nahrungsmittel ein. Um
diese Funktion einzuschalten drücken Sie die Taste MODE
"C" so oft, bis das Symbol SUPER FREEZE blinkt, zur Akti-
Zur Erhöhung der Nutzfläche im Gefrierraum kann die mittlere
Schale herausgenommen werden, um die Lebensmittel direkt auf
die Verdampferplatte zu legen. Abschließend ist sicherzustellen,
dass die Gefrierraum-Tür korrekt geschlossen wurde.
Bitte öffnen Sie bei einem Stromausfall oder Defekt nicht
die Tür des Gefrierteils; so zögern Sie einen Temperaturanstieg im Innern hinaus. Die eingefrorenen bzw. tiefgekühlten Speisen halten sich so unverändert ca. 9 - 14 Stunden.
Stellen Sie keine vollen Glasflaschen ins Gefrierfach, da gefrierende Flüssigkeiten das Glas zum Explodieren bringen.
Zum raschen Kühlen von Getränken
Dank der Funktion ICE PARTY gibt es nun keine zerplatzten
Flaschen mehr, die zum Kühlen ins Tiefkühlfach gelegt wurden (sämtliche Flüssigkeiten erhöhen durch das Einfrieren
ihr Volumen). Aktivieren Sie diese Funktion, macht das Gerät Sie durch ein akustisches Signal darauf aufmerksam, wenn
der optimale Moment zur Entnahme der Flasche erreicht
wurde. Um das akustische Signal abzustellen, drücken Sie
ganz einfach die Taste SELECT "D". Vergessen Sie nicht,
den mitgelieferten, ergonomischen Flaschenkübel zu verwenden, um die Flasche in die Gefrierzone zu legen; die Flasche
wird nicht nur schneller gekühlt, sondern kann darin auch
auf den Tisch gebracht werden, wenn das Getränk serviert
werden soll. Die praktischen Griffe erleichtern das Handling
und die Flasche bleibt außerdem viel länger kalt.
ACHTUNG: Bewahren Sie den Flaschenkübel auch wenn
keine Flasche gekühlt werden soll in der Gefrierzone auf.
vierung der Funktion drücken Sie dann die Taste SELECT
"B". Nach Ablauf von 24 Stunden bzw. nach Erreichen der
optimalen Temperatur schaltet sich die Superfrost-Funktion
automatisch ab.
2. Sollen große Mengen eingefroren werden (Mengen bis
zu der auf dem Typenschild - links unten neben der Gemüseschale - angegebenen, maximalen Lademenge), aktivieren
Sie über das Display die Funktion SUPER FREEZE in der Betriebsart "48 Stunden". Um diese Funktion einzuschalten
drücken Sie die Taste MODE "C" so oft, bis das Symbol
SUPER FREEZE blinkt, halten Sie daraufhin die Taste SELECT
"B" für mehr als drei Sekunden gedrückt, um die Funktion
zu aktivieren (das Symbol blinkt dann langsam).
Nach Ablauf von 24 Stunden schaltet das Symbol dieser Funk-
tion von Blinkanzeige wieder auf Festanzeige zurück. Nun
können die einzufrierenden Nahrungsmittel eingeräumt
werden. Nach weiteren 24 Stunden schaltet sich die Funktion automatisch ab. Während des Einfrierens vermeiden Sie
ein Öffnen des Gefrierteils.
Um eine optimale Konservierung und nachträglich ein optimales Auftauen zu gewährleisten, empfehlen wir, die Speisen in kleine Portionen abzufüllen; auf diese Weise tauen
sie schnell und gleichmäßig auf. Beschriften Sie die Behälter
mit Angaben wie Inhalt und Einfrier-Datum.
43
D
Page 46

Eiswürfelbehälter
Bei diesem neuen Eiswürfelkonzept handelt es sich um ein
Exklusivpatent. Dank der Positionierung dieses Behälters
oberhalb der Gefrierzonenschalen ist größere Ergonomie und
Sauberkeit, und vor allem mehr Platz in den Schalen gewährleistet.: Die Berührung mit dem gelagerten Gefriergut
wird vermieden, wie auch ein Verschütten von Wasser beim
Füllen des Behälters (ein entsprechender Verschluss, mit dem
die Öffnung nach Füllen verschlossen werden kann, wird
mitgeliefert).
Gebrauchsanweisung (Abb. 5)
Füllen Sie den Behälter durch die entsprechende Öffnung
bis zu dem angegebenen Stand (MAX WATER LEVEL) mit
Wasser. Durch Einfüllen von zuviel Wasser, d.h. über diese
Anzeige hinaus, würde eine derartige Menge an Eis gebildet,
die das Herausnehmen der Eiswürfel erschweren könnte.
Sollten Sie doch zuviel Wasser eingefüllt haben, dann warten
Sie, bis das Eis geschmolzen ist, entleeren den Behälter und
füllen ihn dann erneut.
Nach dem Füllen ist der Behälter um 90° zu drehen.
Aufgrund der kommunizierenden Röhren werden die
entsprechenden Formen mit Wasser gefüllt. Schließen Sie
die Öffnung durch den Stöpsel und bringen Sie den Behälter
daraufhin vorschriftsmäßig an der Innentür unter.
Durch leichtes Aufschlagen des Behälters auf ein harte
Oberfläche fallen die geformten Eiswürfel aus ihren Sitzen
heraus und können so durch die Öffnung, durch die das
Wasser eingefüllt wurde, herausgenommen werden. Die
Eiswürfel fallen leichter heraus, wenn der Behälter vorher
kurz unter fließendes Wasser gehalten wird.
ACHTUNG: Stellen Sie vor jedem erneuten Füllen des
Behälters sicher, dass sich keine Eisreste mehr darin befinden.
Die zur optimalen Eisbildung erforderliche Mindestzeit
beträgt ungefähr 6 Stunden.
Abb. 5
MAX
WATER LEVEL
MAX
WATER LEVEL
D
44
Page 47

Anleitung zum Gebrauch des Gefriergerätes
Fleisch und Fisch
Lebensmittel Verpackung Abhängen
Rindfleisch Aluminiumfolie 2 / 3 9 / 10 Nicht nötig
Hammelfleisch Aluminiumfolie 1 / 2 6 Nicht nötig
Schweinefleisch Aluminiumfolie 1 6 Nicht nötig
Kalbfleisch Aluminiumfolie 1 8 Nicht nötig
Kalb-oder
Schweinekotelett
Hammelkotelett
Hackfleisch Alubehälter und Plastikfolie Frisch 2 Langsam im Kühlschrank
Leber Plastikbeutel 3 Nicht nötig
Wurst Plastik- oder Alufolie 2 Je nach Gebrauch
Plastikfolie zwischen den einzelnen
Scheiben anschließend 4-6 Stück in
Alufolie
Plastikfolie zwischen den einzelnen
Scheiben anschließend 4-6 Stück in
Alufolie
Lagerdauer
(Monate)
6 Nicht nötig
6 Nicht nötig
Auftauen
Geflügel Alufolie 1 / 3 9 Langsam im Kühlschrank
Gans - Ente Alufolie 1 / 4 6 Langsam im Kühlschrank
Wild Alufolie 1 / 3 9 Langsam im Kühlschrank
Hasen - Kanichen Alufolie 3 / 4 6 Langsam im Kühlschrank
Hirsch Alufolie oder Plastikfolie 5 / 6 9 Langsam im Kühlschrank
Große Fische Alufolie oder Plastikfolie 4 / 6 Langsam im Kühlschrank
Kleine Fische Plastikbeutel 2 / 3 Nicht nötig
Schalentiere Plastikbeutel 3 / 6 Nicht nötig
Muscheln Alu- oder Plastikbehälter mit Salzwasser 3 Langsam im Kühlschrank
Gekochter Fisch Alufolie oder Plastikfolie 12 In warmem Wasser
Bratfisch Plastikbeutel 4 / 6 Direkt in der Bratpfanne
45
D
Page 48

Obst und Gemüse
Lebensmittel Vorbereitung
Äpfel und Birnen
Aprikosen, Pfirsiche,
Kirschen, Zwetschgen
Erdbeeren, Heidelbeeren,
Johannisbeeren,
Himbeeren
Gekochtes Obst
Obst
Blumenkohl
Rosenkohl
Erbsen
Bohnen, grüne
Waschen,schälen und
in Stücke schneiden
Waschen und
entkernen
Waschen, verlesen,
gut abtropfen lassen
Waschen, In Stücke
schneiden
Waschen, In Stücke
schneiden
Putzen, verlesen,
blanchieren in
Zitronenwasser
Putzen, waschen, in
Stücke schneiden
Waschen und
auslesen
Waschen, inStücke
schneiden
Blanchierzeit
(Minuten)
2'
1' / 2'
2' Plastikbeutel 12 Nicht nötig
1' / 2' Plastikbeutel 10 / 12 Bei Raumtemperatur
2' Plastikbeutel 12 Nicht nötig
3' Plastikbeutel 10 / 12 Nicht nötig
Verpackung
Behälter mit Zuckersirup
bedecken
Behälter mit Zuckersirup
bedecken
Behälter mit Zuckersirup
bedecken
Behälter 10% Zucker
zugeben
Behälter nach Belieben
zuckern
Lagerdauer
(Monate)
12
12
10 / 12
12
10 / 12
Auftauen
Langsam im
Kühlschrank
Langsam im
Kühlschrank
Langsam im
Kühlschrank
Langsam im
Kühlschrank
Langsam im
Kühlschrank
Karotten, Paprika
Pilze, Spargel
Spinat
Suppengemüse
Verschiedene Speisen Vorbereitung Blanchierzeit Verpackung
Brot Plastikbeutel 4
Torten In Plastikfolien 6
Sahne Behälter 6
Butter
Gekochte Lebensmittel
Waschen schülen,
scheiben schneiden
Waschen und
schneiden
Waschen und
zerschneiden
Waschen und
zerschneiden
3' / 4' Plastikbeutel 12 Nicht nötig
3' / 4' Plastikbeutel - Behälter 6 Bei Raumtemperatur
2' Plastikbeutel 12 Bei Raumtemperatur
3'
Verpackt in kleinen
Portionen
Originalverpackung
Alufolie
Aufgeteilt in
entsprechenden
Behältern
6 / 7 Bei Raumtemperatur
Lagerdauer
(Monate)
3 / 6 Kühlschrank
Auftauen
Bei Raumtemperatur
oder im Backofen
Bei Raumtemperatur
und bei 100/200°C
backen
Bei Raumtemperatur
oder im Kühlschrank
6 Kühlschrank
Eier
D
In kleinen Behältern
ohne Schale
46
10
Raumtemperatur
oder Kühlschrank
Page 49

Tips zum Sparen
- Die richtige Installation
Das heißt fern von Hitzequellen, von direkter Sonneneinwirkung, in einem gut belüfteten Raum und unter Beachtung der im Abschnitt “Installationshinweise/Be- und Entlüftung” angegebenen Abstände.
DER TATSÄCHLICHE ENERGIEVERBRAUCH HÄNGT
DAVON AB, WIE DAS GERÄT EINGESETZT WIRD UND
WO ES AUFGESTELLT WIRD.
Die wurden in einem 560 mm tiefen Säulenschrank, die
üblichsten Installationsverhältnisse für ein derartiges Gerät,
vorgenommen.
- Die richtige Kälte
Die Einstellung zu niedriger Innentemperaturen hat nur
höheren Energieverbrauch zur Folge.
- Lagern Sie niemals zuviel ein
Um eine einwandfreie Aufbewahrung der Speisen zu gewährleisten, muß die Kälte frei im Innern des Kühlraums
zirkulieren können. Bei unsachgemäßer Befüllung ist dies
nicht möglich und der Kompressor kühlt ständig nach.
- Halten Sie die Türen Ihres Kombigerätes geschlossen
Öffnen Sie die Türen Ihres Kombigerätes nur wenn es unbe-
dingt nötig ist, denn bei jedem Öffnen geht Kälte verloren.
Um die richtige Temperatur erneut zu erreichen, kühlt der
Kompressor nach, was ebenfalls zu erhöhtem Stromverbrauch führt.
- Kontrollieren Sie die Dichtungen
Halten Sie diese elastisch und sauber, kontrollieren Sie, daß
sie gut an den Türen anliegen, nur so lassen sie keine Kälte
entweichen.
- Niemals warme Speisen
Ein Topf mit warmen Speisen erhöht sofort die Temperatur
um einige Grade; lassen Sie sie erst auf Raumtemperatur
abkühlen, bevor Sie sie in den Kühlschrank stellen.
- Eisschicht
Kontrollieren Sie die Eisschicht an den Wänden des Gefrierfachs. Tauen Sie Ihr Gerät sofort ab, wenn die Schicht zu
dick geworden ist (siehe auch den nächsten Abschnitt “So
halte ich das Gerät in Topform”).
Akustische und schriftliche Alarmanzeige
Alarm wegen offenstehender Tür
Bleibt die Tür des Kühlschranks länger als 2 Minuten
offenstehen, blinkt die Lampe der Innenbeleuchtung; nach
einigen Sekunden ertönt ein akustisches Signal, das durch
Schließen der Tür oder durch Drücken der Taste SELECT "D"
abgestellt werden kann. Bleibt die Tür länger als 4 Minuten
offenstehen, blinkt die Lampe sehr schnell.
Alarm wegen unnormalen Temperaturanstiegs in der Gefrierzone
1. Um auf einen unnormalen Temperaturanstieg im Innern
der Gefrierzone aufmerksam zu machen (ein vorübergehender Stromausfall), ertönt ein akustisches Alarmsignal
und auf dem Display erscheint eine Meldung (A1), die
auf diesen gefährlichen Temperaturanstieg hinweist. Um
zu vermeiden, dass das Gefriergut erneut eingefroren
wird, wird in der Gefrierzone eine Temperatur von ungefähr 0°C gehalten. Somit wird Ihnen die Möglichkeit gegeben, diese Lebensmittel innerhalb 24 Stunden zu verwenden bzw. nach dem Kochen als Fertiggericht erneut
einzufrieren. Der Signalton kann durch Druck auf die
Taste SELECT "D" abgestellt werden.
Um zur normalen Funktion zurückzukehren, und die auf
dem Display eingeblendete, schriftliche Nachricht zu lö-
schen, muss das Gerät über den ON/OFF-Geräteschalter
"B" zuerst ausgeschaltet und dann wieder eingeschaltet
werden.
2. Sollte die Temperatur auf zu hohe Werte ansteigen, er-
tönt erneut ein akustisches Signal, es erscheint ebenfalls
eine neue Alarmmeldung auf dem Display (A2), die Sie
auf diesen zu hohen Temperaturanstieg aufmerksam
macht. Es empfiehlt sich, das Gefriergut zu überprüfen,
gegebenenfalls ist es nicht mehr zu verwenden. Auf keinen Fall darf es neu eingefroren werden, es sei denn, es
wird gekocht. Um zu vermeiden, dass das Gefriergut erneut eingefroren wird, wird in der Gefrierzone eine Temperatur von ungefähr 0°C gehalten. Das akustische Signal kann durch Druck auf die Taste SELECT "D" abgestellt werden.
Um zur normalen Funktion zurückzukehren, und die auf
dem Display eingeblendete, schriftliche Nachricht zu lö-
schen, muss das Gerät über den ON/OFF-Geräteschalter
"B" zuerst ausgeschaltet und dann wieder eingeschaltet
werden.
47
D
Page 50

So halte ich das Gerät in Topform
Bevor Sie Ihr Gerät reinigen oder abtauen muss es vom
Stromnetz getrennt werden. (Drehen Sie hierzu den
ON/OFF-Geräteschalter "B" auf OFF und ziehen Sie
daraufhin den Stecker aus der Steckdose. Das
Unterlassen dieser Vorsichtsmaßnahme könnte ein
Alarmsignal seitens Ihres Gerätes auslösen. ACHTUNG:
Dieser Alarm ist kein Zeichen für eine eventuelle
Störung. Um den korrekten Betrieb wieder
herzustellen, muss das Gerät über den ON/OFFGeräteschalter "B" zuerst ausgeschaltet und dann
wieder eingeschaltet werden.
Abtauen
ACHTUNG: Der Kältekreis darf nicht beschädigt
werden. Vermeiden Sie den Gebrauch mechanischer
Vorrichtungen oder anderer Gegenstände, außer den
vom Hersteller empfohlenen, um den Abtauvorgang
zu beschleunigen.
So wird die Kühlzone abgetaut.
Bei diesem Gerät erfolgt das Abtauen automatisch; das Abtauwasser wird über einen entsprechenden Ablauf (Abb. 6)
zur Rückseite hin abgeleitet, wo es durch die vom Kompressoren erzeugte Hitze verdampft. Das Einzige, was Ihrerseits dazu beizutragen ist,
ist eine regelmäßige Kontrol-
le, dass der Ablauf nicht verstopft ist und das Wasser
ordnungsgemäß ablaufen
kann. Reinigen Sie hierzu
das Ablaufloch mit dem entsprechenden Reinigungsbürstchen.
Abb. 6
Wie taut man das Gefrierfach ab
- Entfernen Sie ab und zu die Reifschicht mit Hilfe des beilie-
genden Plastik-Kratzers (absolut nicht mit Messern oder
Metallgegenständen).
- Hat sich in der Gefrierzone eine Reifschicht von mehr als 5
mm gebildet, muss komplett abgetaut werden. Gehen Sie
hierzu wie folgt vor: Aktivieren Sie einen Tag vorher die
Funktion SUPER FREEZE in der Betriebsweise 24 Stunden.
Auf diese Weise geben Sie dem Gefriergut einen gesunden,
zusätzlichen "Kälteschub". Nach Ablauf dieser 24 Std.
schaltet sich die Funktion automatisch ab, jedoch können Sie
diese auch von Hand ausschalten. Schalten Sie das Gerät über
den ON/OFF-Geräteschalter "B" aus. ACHTUNG: Hierdurch
wird das gesamte Gerät (die Kühl- und die Gefrierzone)
ausgeschaltet.
Wickeln Sie das gesamte Tiefkühl- und Gefriergut in mehrere Lagen Zeitungspapier ein und bewahren Sie dieses wäh-
rend der zum Abtauen erforderlichen Zeit entweder im Kühl-
raum oder an einem frischen Ort auf. Lassen Sie die Tür der
Gefrierzone offen stehen, um den Abtauvorgang zu beschleunigen, der durch Einstellen von mit warmem Wasser
gefüllten Behältern noch unterstützt werden kann. Bevor
Sie das Gerät wieder in Betrieb setzen, sind sämtliche Teile
gründlich zu reinigen und abzutrocknen.
Das Abtauwasser kann, wie auf Abb. 7 veranschaulicht,
aufgefangen werden.
Beachten Sie, dass der Motor nicht umgehend anläuft,
sondern erst nach ungefähr 8 Minuten.
Abb. 7
FUNKTION HOLYDAY Bildung von Schimmel und
schlechten Gerüchen im abgeschalteten Kühlschrank
während der Ferienzeit? Dieses Problem existiert nicht
mehr: Schalten Sie ganz einfach (über das Display) die
Funktion Holyday ein. Auf diese Weise wird im Kühl-
schrank, bei niedrigstem Stromverbrauch, eine Temperatur von ungefähr 12°C gehalten
(praktisch auch zur Aufbewahrung Ihrer Kosmetik und Schminksachen), die
Gefrierzone läuft auf der zur Konservierung des Gefrierguts erforderlichen
Minimumeinstellung weiter.
D
48
Page 51

Reinigung und Pflege
Bevor Sie Ihren Kühlschrank reinigen drehen Sie bitte
den ON/OFF-Geräteschalter „B“ auf OFF, bis die Anzeige
OFF für beide Zonen, d.h. Kühl- und Gefrierzone,
eingeblendet wird. Ziehen Sie daraufhin den Stecker
aus der Steckdose.
- Das Material aus dem Ihr Gerät hergestellt wurde, ist hygienisch einwandfrei und überträgt keine Geruchsstoffe. Um
diese Vorzüge beizubehalten, ist es notwendig, daß die Nah-
rungsmittel immer gut geschützt und verschlossen gelagert
werden, um nur schwer entfernbare Flecken und unangenehme Geruchsbildung zu vermeiden.
- Nur Wasser und Bicarbonat: Zur Reinigung der Innen- und
Außenteile verwenden Sie bitte nur einen weichen
Schwamm, getränkt mit lauwarmem Wasser und
Natriumbicarbonat, welches außerdem auch ein ausgezeichnetes Desinfektionsmittel ist. Wenn Sie keines zur Hand haben, nehmen Sie eine neutrale Seife (z.B. Marseille- oder
Kernseife).
- Niemals zu benutzen sind: Scheuermittel, Weißmacher,
Ammoniak, Benzin oder sonstige Lösungsmittel.
- Alle herausnehmbaren Teile können in einer warmen Spül-
mittellauge eingeweicht werden, diese dann mit klarem
Wasser nachspülen und vor Wiedereinsetzen sorgfältig trocknen.
- Um auf der Rückseite eine Staubansammlung, die die
Funktionsweise nachträglich beeinflussen könnte, zu vermeiden, muß auch diese regelmäßig und mit besonderer Vorsicht gereinigt werden. Verwenden Sie hierzu einen Staubsauger.
- Sollte das Gerät für längere Zeit abgeschaltet werden, z.B.
während der Sommerferien, ist es ratsam, es innen sorgfältig zu reinigen und die Tür vorstehen zu lassen, um Schimmelbildung oder die Bildung schlechter Gerüche zu vermeiden.
- Wie tauscht man die Innenlampe aus? Am hinteren Teil
des Thermostatengehäuses befindet sich die Birne für die
Innenbeleuchtung. Bevor Sie diese austauschen, ziehen Sie
den Stecker aus der Steckdose; schrauben Sie hierauf die
defekte Birne heraus und ersetzen Sie diese durch eine neue,
die nicht stärker als 15 Watt sein darf. (Siehe Abb. 8).
Fig. 8
A
B
49
D
Page 52

Gibt’s ein Problem?
Das Display ist vollkommen dunkel
Bitte kontrollieren Sie, ob:
• die Hauptsicherung eingeschaltet ist;
• der Stecker richtig in der Steckdose steckt;
• die Steckdose in Ordnung ist defekt ist; kontrollieren Sie dies;
indem Sie den Stecker in eine andere Steckdose stecken;
· der Gefrierzonen-Reglerknopf auf "OFF" steht.
Der Motor startet nicht
Haben Sie sichergestellt, dass:
• 8 Minuten nach dem Einschalten vergangen sind?
Denn dieses Modell verfügt über ein Motorschutzkontrollsystem, aufgrund dessen er erst 8 Minuten nach
Einschalten des Gerätes startet.
• die Betriebsart DEMO eingestellt wurde (siehe S. 41).
Kühlraum und Gefrierfach kühlen
unzureichend
Bitte kontrollieren Sie, ob:
• die Türen richtig schließen oder die Dichtungen beschä-
digt sind;
•
die Türen vielleicht zu lange offenstehen;
• der Temperaturregler richtig eingestellt ist;
• der Kühlraum oder das Gefrierfach nicht überladen wurde.
Sollte trotz aller Kontrollen das Gerät nicht funktionieren
und der von Ihnen festgestellte Fehler weiter bestehen bleiben, dann fordern Sie bitte den nächstgelegenen technischen Kundendienst an und teilen Sie dort zusammen mit
Ihrer Fehlerbeschreibung folgende Daten mit: die Modellbezeichnung (Mod.), die entsprechenden Nummern (S/N),
die auf dem Schild unten links neben dem Gemüsefach angegeben sind (siehe untenstehende Beispiele).
75
Test
P.S-I.
TI
Net
Util
Utile
Pressure
HIGH-235
LOW 140
RG 2330
Mod.
220 - 240 V- 50 Hz 150 W
340
Total
Gross
Bruto
Brut
Compr.
Syst.
Kompr.
Made in Italy 13918
Gross
Bruto
Brut
R 134 a
kg 0,090
93139180000 S/N 704211801
Cod.
Gross
Bruto
Brut
W
Fuse
A
Freez. Capac
Poder de Cong
kg/24 h
4,0
Max 15 w
Class
Clase
N
Classe
Beauftragen Sie auf keinen Fall einen nicht befugten
Kundendienst und lassen Sie ausschließlich OriginalErsatzteile einbauen.
Der Kühlschrank kühlt zu stark
Bitte kontrollieren Sie, ob:
· eine zu niedrige (bzw. nicht optimale) Temperatur
eingestellt wurde;
•
die Nahrungsmittel an die Rückwand (Kühlzelle) anstoßen.
Der Motor läuft ununterbrochen
Bitte kontrollieren Sie, ob:
· vielleicht die Funktionen SUPER COOL und/oder SUPER
FREEZE und/oder ICE PARTY aktiviert wurden;
• die Außentemperatur sehr hoch ist;
• der Temperaturregler richtig eingestellt ist.
Das Gerät macht zu viel Lärm
Das im Innern des Geräts befindliche Kühlgas erzeugt ein
leichtes Geräusch, auch bei Stillstand des Kompressors (das
ist kein Defekt).
Bitte kontrollieren Sie, ob:
• Ihr Gerät gerade steht:
• es zwischen Möbelteilen oder Gegenständen steht, die
vibrieren und daher Lärm verursachen.
Auf dem Kühlraumboden sammelt sich
Wasser an
Kontrollieren Sie, ob:
• der Tauwasserablauf nicht verstopft ist.
D
50
Page 53

51
D
Page 54

De veiligheid, een goede gewoonte
BELANGRIJK
Lees de inhoud van deze gebruiksaanwijzing aandachtig door
aangezien hij belangrijke instructies bevat betreffende de
veiligheid van installeren, gebruik en onderhoud.
Deze combinatie is vervaardigd volgens de internationale
veiligheidsnormen die gericht zijn op het beschermen van de
gebruiker. Dit apparaat heeft het merkteken IMQ verworven,
dat door het Italiaanse Instituut van Kwaliteit alleen wordt
uitgereikt aan apparaten die voldoen aan de normen van de
CEI, de Italiaanse Elektrotechnische Commissie.
1. Dit apparaat mag niet buiten worden geïnstalleerd, zelfs
niet onder een dakje; het is uiterst gevaarlijk het bloot te
stellen aan regen en onweer.
2. Het mag alleen door volwassenen worden gebruikt en
alleen voor het bewaren van etenswaren, volgens de gebruiksaanwijzingen in dit handboekje.
3. Raak het apparaat nooit aan als u blootsvoets bent of
met natte handen of voeten.
4. Wij raden het gebruik van verlengsnoeren en dubbel-
stekkers af. Als de koelkast tussen meubelen in wordt geïnstalleerd, controleer dan dat de kabel niet krom of onder
gevaarlijke druk ligt.
5. Trek nooit aan de kabel of aan de koelkast zelf om de
stekker uit het stopcontact te halen: dit is uiterst gevaarlijk.
6. Raak de verkoelingselementen binnen in de koelvries-
combinatie nooit aan, vooral niet met natte handen; u kunt
zich branden of verwonden. Stop geen ijsblokje in uw mond
zodra het uit de freezer komt; u riskeert zich te branden.
7. Sluit altijd eerst de stroom af door de stekker uit het
stopcontact te trekken voordat u overgaat tot reinigen of
onderhoud; voor het afsluiten van ieder elektrisch contact is
het namelijk niet voldoende de ON/OFF knop van de koel/
vrieskast op OFF te zetten.
8. Voordat u uw oude koelkast weg laat halen, maak het
slot onklaar om te vermijden dat spelende kinderen erin opgesloten worden.
9. Voordat u er de technische dienst bij haalt als er een storing optreedt, controleer eerst in het hoofdstuk “Is er een
probleem?” of het mogelijk is dit probleem te verhelpen.
Probeer niet zelf de reparatie uit te voeren door te trachten
toegang te krijgen tot de interne onderdelen.
10. Als uw voedingskabel vervangen moet worden, moet u
zich tot onze Technische Dienst wenden. In sommige gevallen zijn de aansluitingen uitgevoerd met speciale contacten;
in andere gevallen is het noodzakelijk een speciaal gereedschap te gebruiken teneinde toegang te krijgen tot de verbindingen.
11. Gebruik geen elektrische apparaten in het bewaarvak
van de etenswaren tenzij van het soort dat door de fabrikant
wordt aangeraden.
12. Als het apparaat op is moet het veilig worden gemaakt
voordat het definitief wordt weggedaan, aangezien het
isolerende piepschuim cyclopentaangas bevat en zich
eventueel R600a gas (isobutaan) in het koelcircuit bevindt.
Wendt u zich voor deze ingreep tot uw handelaar of tot de
betreffende plaatselijke authoriteit.
Het installeren
Voor het goed functioneren en zuinig energieverbruik
is het belangrijk dat het installeren op de juiste wijze
wordt uitgevoerd.
Ventilatie
De compressor en de condensator geven warmte af en vragen dus om een goede ventilatie. Het apparaat moet dus geplaatst worden in een vertrek met een raam of buitendeur,
die de nodige luchtvervanging garanderen. Het vertrek mag
niet vochtig zijn.
Let erop gedurende het installeren dat de ventilatieroosters
van het apparaat niet bedekt of verstopt worden.
Ver van de hitte
Plaats het apparaat niet op een zonnige plek, naast het fornuis of dergelijke.
Electrische aansluiting en aarding
Controleer om te beginnen of de gegevens op het typeplaatje,
linksonder naast de groentenlade, overeenkomen met die van
het electrische net van uw woning en of het stopcontact voorzien is van een aardleiding zoals voorgeschreven door de wet
voor de veiligheid van installaties 46/90. Als de aardleiding
ontbreekt wijst de Fabrikant iedere aansprakelijkheid af. Gebruik geen dubbelstekkers of adapters.
op zodanige wijze dat het stopcontact waarmee het
is verbonden gemakkelijk bereikbaar is.
Plaats het apparaat
Is het vermogen voldoende?
Het stopcontact moet in staat zijn de maximum lading van
het vermogen van het apparaat te verdragen; deze is aangegeven op het typeplaatje linksonder naast de groentenlade.
Voor de electrische aansluiting
Houd het apparaat vertikaal gedurende het vervoer en,voor
het goed functioneren, wacht minstens 3 uren voordat u het
aansluit.
NLNL
NL
NLNL
52
Page 55

Van dichtbij gezien
ECO
M
D
E
O
N
L
F
M
K
A
B
C
B
J
G
H
G
I
H
Uitneembaar vak met eierrek en boterdoos
A
Uitneembaar vak
B
Deurvak met deksel
C
Ruimte voor een 2 liter fles
D
Flessenrek
E
"Drain" systeem voor afvoer
F
dooiwater
Uitneembare en regelbare rekken
M
Uitklapbaar flessenrek
N
"A.I.R. System"
O
(Ariston Integrated Refrigeration)
Vakken voor conserveren
G
Ijsbakjes
H
Vakken voor invriezen en
I
conserveren
Display
J
Fruit en groentebakken
K
Doos voor vleeswaren en
L
kaasscorrevole
53
NL
Page 56

De Display
A BFE
C D
Knop van de koelkast
A
Hiermee zet u de koelkast aan of uit en regelt u de
temperatuur.
Knop van de freezer en ON/OFF
B
Hiermee zet u de freezer aan of uit en regelt u de
temperatuur in de freezer.
MODE knop
C
Hiermee regelt u wat er op de display voorkomt om
zo de verschillenden instellingen/functies te bereiken
zowel als het afzetten van het alarmsignaal.
SELECT knop
D
I J
G
H
HG
Functie SUPER COOL
Hier ziet u de stand (non-actief, gekozen of actief)
van de functie SUPER COOL (snel afkoelen van de
koelkast).
Functie SUPER FREEZE
Hier ziet u de stand (non-actief, gekozen of actief) van
de functie SUPER COOL (snel invriezen).
Functie HOLIDAY
I
Hier ziet u de stand (non-actief, gekozen of actief) van
de functie HOLIDAY (optimale temperaturen met
minimum energieverbruik gedurende langdurige
afwezigheid).
Hiermee kiest/annuleert u de verschillende functies
en zet u het alarmsignaal af.
Instelling koelkast
E
Dit vertoont de temperatuur die is ingesteld in de
koelkast of de stand OFF (het woord OFF actief).
Instelling freezer
F
Dit vertoont de temperatuur die is ingesteld in de
freezer of de stand OFF (het woord OFF actief).
NLNL
NL
NLNL
54
Functie ICE PARTY
J
Hier ziet u de stand (non-actief, gekozen of actief)
van de functie ICE PARTY (de snelste manier om een
fles af te koelen en aan tafel te serveren met
bijhorende wijnkoeler die de temperatuur in stand
houdt).
Page 57

Het inschakelen van het apparaat
$
BELANGRIJK
Houd na het transport het apparaat vertikaal geplaatst
en wacht, voor het goed functioneren, ongeveer 3 uren
voordat u het aansluit.
Voordat u etenswaren in de koelkast of freezer plaatst, moet
de binnenkant met lauw water en soda gewassen worden.
Tijdsduur motorprotectie.
Dit model is voorzien van een motorbeschermende
controle, zodat u zich niet ongerust hoeft te maken als
de compressor niet onmiddelijk start nadat het apparaat door de gebruiker uitgeschakeld is geweest, aangezien de compressor na ongeveer 8 minuten automatisch aanslaat.
Gebruik van de display
Instelling van de temperatuur
Als een van de afdelingen uitgeschakeld is ziet u op de respectievelijke ruimte van de display (E voor de koelkast en F
voor de freezer) het woord OFF. Als de afdeling aan is ziet u
de temperatuur waarop hij is ingesteld. Om deze te veranderen draait u aan de knop die bij de afdeling hoort (A voor
de koelkast en B voor de freezer).
De temperaturen die u kunt instellen voor de koelkast gaan
van +2°C tot +8°C, terwijl de temperaturen voor de vriesafdeling gaan van -18°C a -26°C. De mogelijkheden voor
het verhogen of verlagen gaan altijd per 1°C.
Als de HOLIDAY functie aan is kunt u de temperatuur rege-
len, maar het apparaat gaat automatisch over op de optimale instelling voor de situatie: +12°C voor de koelkast (indien actief) en -18°C voor de freezer.
Gebruik van de functies:
Symbool van de functie in normale doen.
Gekozen functie (knipperend rondom).
Geactiveerde functie (rondom verlicht).
DQXLWYDQGHIXQFWLHV
Druk zo vaak op de knop MODE "C" als nodig is voor het
doen knipperen van het symbool van de functie die u wilt
gebruiken: dit geeft aan dat de functie is gekozen en klaar
Als u de stekker in het stopcontact heeft gestoken, kijk dan
even of ook de display aan is.
Afdeling freezer
Bij het inschakelen van de freezer (draai de ON/OFF knop
"B" op de gewenste temperatuur) raden wij aan de SUPER
FREEZE functie in te stellen voor het sneller afkoelen van de
freezer; als de temperatuur optimaal is gaat de functie uit
en kunt u de diepvries inladen.
Afdeling koelkast
Bij het inschakelen van de koelkast (draai de knop "A" op
de gewenste temperatuur) raden wij aan de SUPER COOL
functie in te stellen teneinde het afkoelen ervan te versnellen: na enkele uren kunt u de etenswaren in de koelkast
plaatsen.
om geactiveerd of gedeactiveerd te worden. Nu kunt u de
functie besturen met de knop SELECT "D" voor het activeren of deactiveren.
N.B.: als u niet binnen de 5 seconden na de laatste handeling op de display uw keuze heeft bevestigd met de SELECT
knop, komt op de display de laatst ingestelde functie te zien,
hetgeen betekent dat geen verandering is ingesteld.
De functie SUPER COOL hoort bij de koelkast en als deze
uit is werkt de functie dus niet; andere functies kunnen conflicten veroorzaken (b.v. als tegelijkertijd de functies
HOLIDAY en SUPER FREEZE geactiveerd worden), in welk
geval u rekening moet houden met welke u de voorrang
wilt geven.
De functie SUPER FREEZE kan op twee manieren geactiveerd worden (zie de paragraaf die het bedienen van de
freezer behandelt).
In- en uitschakelen van de DEMO:
Als u een demonstratie wilt zien van het functioneren van
de display met het apparaat ‘uit’ kunt u de DEMO inschakelen.
Inschakelen:
- zet de knop van de temperatuur van de freezer op 0;
- houd de twee knoppen “Select” en “Mode” ongeveer 5
seconden ingedrukt totdat u een geluidssignaal hoort en de
twee woorden “OFF” en “OFF” op de display gaan knipperen; deze blijven knipperen zolang als de DEMO actief is.
Uitschakelen:
- zet de knop van de temperatuur van de freezer op 0;
- houd de twee knoppen “Select” en “Mode” ongeveer 5
seconden ingedrukt totdat u een geluidssignaal hoort en de
twee woorden “OFF” en “OFF” op de display ophouden
met knipperen.
55
NL
Page 58

De beste gebruikmaking van de koelafdeling
De temperatuur in de koelkast regelt zichzelf automatisch
naar gelang de stand van de thermostaatknop.
Wij raden een gemiddelde stand aan.
De koelkast van uw apparaat is voorzien van een
System" (Ariston Integrated Refrigeration)
conservatie van de voedingswaren en vereenvoudigd gebruik
van het apparaat mogelijk maakt:
- Snelle temperatuursverlaging: nadat de deuren open zijn
geweest worden de optimale temperaturen sneller bereikt,
voor betere conservatie.
- Gelijkmatige e verdeling van de temperatuur, die het mogelijk maakt de voedingswaren op ieder rek te plaatsen.
- Hogere vochtigheidsgraad voor een langere conservatie
van de voedingswaren.
B
A
A - Uitgeblazen lucht die afkoelt in contact met de koeling-
wand
B - Opgezogen warmere lucht
B
, dat optimale
A
"A.I.R.
B
binnentemperatuur laten stijgen met overwerk voor de
compressor en energieverkwisting.
Laat geen onafbedekte vloeistoffen in de koelkast staan
aangezien deze de vochtigheid verhogen en dus ijsvorming
bevorderen.
De vleeswaren/kaas-doos moet uit het rek worden getrokken
voor gebruik. Hij kan ook, om meer ruimte te scheppen,
aan de zijkant worden geplaatst (afb.2).
Het flessenrek aan de zijkant kan zowel voor flessen (afb. 3)
als voor blikken (2-4) (horizontaal) worden gebruikt (afb.
4). Indien niet gebruikt kan het worden opgeklapt om meer
ruimte in de koelkast te scheppen.
Afb. 2
Afb. 3
Als er veel etenswaren zijn ingeladen gebruikt u de functie
SUPER COOl "G" (zie paragraaf "Het bedienen van de display")
teneinde zo snel mogelijk de optimale conditie van functioneren
te bereiken. Na het verlopen van de noodzakelijke tijd wordt
deze functie automatisch gedeactiveerd.
Volg onze aanwijzingen voor de maximum conservatietijd
zorgvuldig: geen enkel type voedsel, hoe vers ook, blijft heel
lang goed.
In tegenstelling tot wat over het algemeen geloofd wordt,
blijven gekookte etenswaren niet langer goed dan rauwe
etenswaren.
De praktische uittrekbare rekken (afb.1) kunnen ook in
hoogte worden geregeld dankzij de gleuven aan de zijkanten, zodat ook grotere bakken, dozen enz. geplaatst kunnen worden. De nieuwe vormgeving van de rekken maakt
het ook mogelijk de rekken in hoogte te verstellen zonder
ze geheel eruit te trekken.
Plaats alleen koude of heel
lauwe etenswaren en nooit
warme: dit zou meteen de
1
2
Afb. 4
NLNL
NL
NLNL
Afb. 1
56
Page 59

Het beste gebruik van de freezer
Raadpleeg een gespecialiseerd boekje voor de voorbereiding van in te vriezen etenswaren.
Reeds ontdooide etenswaren, ook al zijn ze slechts gedeeltelijk ontdooid, mogen niet meer ingevroren worden: u moet
het koken en opeten (binnen 24 uren) of weer invriezen.
In te vriezen verse etenswaren moeten niet in contact staan
met reeds ingevroren of diepvriesproducten, maar moeten
geplaatst worden in het bovenste vak waar de temperatuur
daalt tot -18°C hetgeen ideaal is voor goed invriezen. Vergeet niet dat een goede conservatie afhangt van de snelheid waarmee wordt ingevroren.
De maximum hoeveelheid die men dagelijks kan invriezen is
aangegeven op het typeplaatje binnenin de koelkast.
Bij het eerste gebruik, of nadat de freezer enige tijd niet is
gebruikt, kunt u de etenswaren pas invriezen nadat u de
freezer op maximum heeft laten functioneren.
Als het apparaat reeds in functie is, kan het invriezen op
twee wijzen plaatsvinden:
Als het apparaat reeds in functie is, kan het invriezen op
twee manieren worden uitgevoerd:
1. Voor kleine hoeveelheden, minder dan de maximum
capaciteit aangegeven op het typeplaatje (links-onder naast
de groentela), activeert u op de display de SUPER FREEZE
in zijn functie van "24 uur" en laadt u de in te vriezen
etenswaren in. Voor het activeren van de functie drukt u net
zo vaak op de knop MODE "C" totdat het symbool van
SUPER FREEZE gaat knipperen; vervolgens drukt u op de
Voor het snel afkoelen van dranken.
Dankzij de speciale functie ICE PARTY zult u geen problemen
meer hebben van flessen die, in de freezer geplaatst om af
te koelen, gebarsten zijn (alle vloeistoffen zetten uit als ze
bevriezen). Als u deze functie heeft gekozen wordt u door
de freezer zelf met een geluidssignaal gewaarschuwd als
het moment is gekomen om de fles uit te freezer te halen.
Voor het afzetten van het geluidssignaal drukt u op de knop
SELECT "D". Vergeet niet de bijgeleverde ergonomische
wijnkoeler te gebruiken voor het in de freezer plaatsen van
de fles; het afkoelen wordt zo versneld en u kunt het
gemakkelijk aan de handvaten transporteren en bovendien
de wijn lange tijd koel houden aan tafel.
BELANGRIJK: laat de bijgeleverde wijnkoeler altijd in de
freezer staan (ook zonder fles); alleen dan wordt het afkoelen
van de drank in korte tijd gegarandeerd.
knop SELECT "B" voor het activeren van de funct
24 uur, of zodra de optimale temperatuur is bereikt, wordt
de snelle invriesfunctie automatisch uitgeschakeld.
2. Voor het invriezen van grote hoeveelheden (tot aan de
maximum lading die is aangegeven op het typeplaatje, linksonder naast de groentela) activeert u op de display de SUPER
FREEZE in zijn functie van "48 uur". Voor het activeren van
de functie drukt u net zo vaak op de knop MODE "C" totdat
het symbool van de SUPER FREEZE gaat knipperen;
vervolgens houdt u de knop SELECT "B" drie seconden
ingedrukt voor het activeren van de functie (het symbool
gaat langzaam knipperen).
Open de deur van de freezer niet gedurende het invriezen.
Voor de beste resultaten van invriezen en ontdooien raden wij
aan de etenswaren in kleine porties te verdelen zodat ze snel
en gelijkmatig bevriezen. Zet de datum en de inhoud op de
verpakking.
Teneinde meer ruimte te creëren in de vries-afdeling kunt u de
middenla verwijderen en de etenswaren rechtstreeks op de verdampingsplaat zetten. Let erop dat de deur goed dicht is.
Mocht de stroom uitvallen, open dan de deur van de freezer
niet teneinde de temperatuur binnenin niet te verhogen.
Op deze manier blijven de diepvriesproducten voor ongeveer 12-14 uren zonder verandering geconserveerd.
Zet geen volle flessen in de freezer: alle vloeistoffen zetten
uit bij het invriezen en de flessen kunnen dus breken.
. Na
57
NL
Page 60

Ijsbakjes
Dit nieuwe type ijsbakjes is een exclusief patent. Het feit dat
ze bovenop de laden van de freezer zijn geplaatst zorgt
voor de beste ergonomie en reinheid: de ijsblokjes komen
niet meer in contact met de etenswaren in de freezer:
bovendien wordt water knoeien tijdens het opvullen
vermeden (ook de deksel voor het afsluiten van het gat na
het opvullen is bijgeleverd).
Gebruik (Afb. 5)
Vul het ijsbakje door het gat met water tot het aangegeven
niveau (MAX WATER LEVEL) en let op dat u dit niet
overschrijdt: teveel water kan een zodanige ijsvorming
veroorzaken dat het naar buiten komen van de ijsblokjes
erdoor belemmerd wordt.
In het geval dat u de maximum hoeveelheid water heeft
overschreden moet u wachten tot het ijs gesmolten is, het
bakje leeg gieten en weer opnieuw opvullen.
Als het bakje is bijgevuld draait u het 90°. Volgens het principe van communicerende vaten worden de vakjes gevuld,
waarna het gat kan worden afgesloten met de deksel en
het bakje kan in de deur van de freezer worden geplaatst.
Als het ijs zich heeft gevormd slaat u het bakje op een harde
oppervlakte zodat de ijsblokjes los komen en door het gat
naar buiten komen. U kunt het bakje even onder de kraan
houden voor het gemakkelijker loskomen van de ijsblokjes.
BELANGRIJK: als u het bakje opvult met water moet u erop
letten dat het helemaal leeg is en er geen ijsresten zijn
achtergebleven.
Het invriezen van ijsblokjes neemt ongeveer 8
Fig. 2uren.
Afb. 5
MAX
WATER LEVEL
MAX
WATER LEVEL
NLNL
NL
NLNL
58
Page 61

Gids voor het klaarmaken en invriezen
Vlees en vis
Soorten Verpakken
Runderbraadstuk Gewikkeld in aluminium folie 2 / 3 9 / 10 Niet nodig
Lamsvlees Gewikkeld in aluminium folie 1 / 2 6 Niet nodig
Varkensbraadstuk Gewikkeld in aluminium folie 1 6 Niet nodig
Kalfsbraadstuk Gewikkeld in aluminium folie 1 8 Niet nodig
Biefstukjes en
varkenslap
Lams- en
varkenscoteletten
Gehaktvlees In aluminium met plastic er omheen Zeer vers 2 Langzaam in koelkast
Hart en lever In plastic zakjes 3 Niet nodig
Worstjes In plastic of aluminium folie 2 Volgens gebruik
Ieder afzonderlijk in plastic folie en dan 4-6
samen in aluminium folie
Ieder afzonderlijk in plastic folie en dan 4-6
samen in aluminium folie
Besterven
(dagen)
Conservatie
(in maanden)
6 Niet nodig
6 Niet nodig
Ontdooien
Kip en kalkoen Gewikkeld in aluminium folie 1 / 3 9 Langzaam in koelkast
Eend en gans Gewikkeld in aluminium folie 1 / 4 6 Langzaam in koelkast
Wilde eend, fazant en
patrijs
Konijn en haas Gewikkeld in aluminium folie 3 / 4 6 Langzaam in koelkast
Hert en ree In aluminium of plastic folie 5 / 6 9 Langzaam in koelkast
Grote vissen In aluminium of plastic folie 4 / 6 Langzaam in koelkast
Kleine vissen In plastic zakjes 2 / 3 Niet nodig
Schaaldieren In plastic zakjes 3 / 6 Niet nodig
Weekdieren
Gekookte vis In aluminium of plastic folie 12 In warm water
Gewikkeld in aluminium folie 1 / 3 9 Langzaam in koelkast
In aluminium of plastic bakken met water
en zout
3 Langzaam in koelkast
Gebakken vis In plastic zakjes 4 / 6 Rechtstreeks in pan
59
NL
Page 62

Fruit en groenten
Soot Preparatie
Appel
Abrikozen, perziken,
kersen en pruimen
Aardbeien, moerbeien
en bosbessen
Gekookt fruit
Vruchtensap
Bloemkool
Kool en spruitjes
Erwtjes Doppen en wasser 2’ In plastic zakjes 12 Niet nodig
Sperziebonen Wassen en in stukjes 2 In plastic zakjes 10 / 12 Niet nodig
Schillen en in stukjes
snijden
Ontpitten en schillen 1’ / 2’ In bakjes, in siroop 12 Langzaam in koelkast
Wassen en laten
drogen
Snijden, koken en
zeven
Wassen, snijden en
persen
In stukjes in water
met citroen dompelen
Reinigen en wassen
(in stukjes)
In heet
water
2’ In bakjes, in siroop 12 Langzaam in koelkast
2’ In plastic zakjes 12 Niet nodig
1’ / 2’ In plastic zakjes 10 / 12 Kamertemperatuur
Voorbereiding
In bakjes, met suiker
bedekt
In bakjes, 10% suiker
toevoegen
In bakjes, suiker naar
smaak
Conservatie
(in maanden)
10 / 12 Langzaam in koelkast
12 Langzaam in koelkast
10 / 12 Langzaam in koelkast
Ondtooien
Wortels, paprika’s en
knolraap
Paddestoelen en
asperges
Spinazie Wassen en fijn snijden 2’ In zakjes of bakjes 12 Kamertemperatuur
Soepgroenten
Diversen Preparatie
Brood In plastic zakjes 4
Taarten In plastic folie 6
Room In plastic bakjes 6
Boter
Gekookt voedsel en
groentescep
In schijven, schillen en
wasser
Wassen en snijden 3’ / 4’ In zakjes of bakjes 6 Kamertemperatuur
Wassen en in stukjes
snijden
3’ / 4’ In plastic zakjes 12 Niet nodig
3’ In zakjes, in kleine porties 6 / 7 Kamertemperatuur
In heet
water
Voorbereiding
In de originele verpakking
met aluminium eromheen
Onderverdeeld in plastic
of glazen bakjes
Conservatie
(in maanden)
6 In de koelkast
3 / 6
Ondooien
Op kamertemperatuur
en in de oven
Op kamertemperatuur
en koken op 100/200°C
Op kamertemperatuur
of in de koelkast
Op kamertemperatuur
of in warm water
Eieren
NLNL
NL
NLNL
Invriezen zonder guscio in
kleine bakjes
60
10
Op kamertemperatuur
of in de koelkast
Page 63

Raadgevingen voor energiebesparing
- Installeer op de juiste wijze
Dat wil zeggen ver weg van warmtebronnen, van rechtstreeks zonlicht, in een goed geventileerd vertrek en op de
afstanden aangegeven in de paragraaf “Het installeren/De
ventilatie”.
HET EFFECTIEVE ENERGIEVERBRUIK HANGT AF VAN DE
WIJZE WAAROP HET APPARAAT WORDT GEBRUIKT EN
VAN DE PLAATS WAAR HET STAAT.
De energietests zijn uitgevoerd in kolommen met een diepte
van 560 mm hetgeen de meest normale conditie van
installatie is.
- De juiste temperatuur
Als de interne temperatuur te laag is ingesteld gaat het
energieverbruik omhoog.
- Laad hem niet te vol
Teneinde de etenswaren goed te conserveren moet de koude
lucht vrijelijk circuleren binnen in de koelkast. Hem te vol
laden betekent dat u de circulatie belemmert terwijl u de
compressor voortdurend laat werken.
Alarmsignalen
- Met dichte deuren
Open uw koelkast zo min mogelijk omdat iedere keer een
hoeveelheid koude lucht ontsnapt. De motor moet weer
werken om de temperatuur op peil te brengen en dit kost
energie.
- Let op de afdichtingen
Houd ze schoon en efficiënt zodat ze goed aan de deur aansluiten; zo laten ze geen koude ontsnappen.
- Geen warme gerechten
Een warme pan in de koelkast verhoogt de temperatuur
onmiddelijk met een paar graden; laat de pan afkoelen voordat u hem in de koelkast plaatst.
- Ijs in de freezer
Controleer de dikte van het ijslaagje op de wanden van de
freezer en ontdooi hem meteen als het ijslaagje te dik is (zie
verderop “Hoe onderhoud ik hem”).
Alarm signaal deur open
Als de deur van de koelkast meer dan twee minuten open
blijft staan gaat de binnenverlichting knipperen; na enkele
seconden hoort u een geluidssignaal dat afgezet kan worden
door de deur dicht te doen of door op de knop SELECT "D"
te drukken. Als de deur langer dan 4 minuten open blijft
staan gaat de verlichting sneller knipperen.
Alarm freezer abnormaal warm
1. Mocht de temperatuur in de freezer teveel stijgen (b.v.
vanwege een black out) dan hoort u een geluidssignaal en
verschijnt er een boodschap op de display (A1) om schadelijke
stijging van de temperatuur aan te geven. Teneinde de
etenswaren niet weer in te vriezen blijft de freezer op een
temperatuur rond de 0°C, zodat de etenswaren binnen de
24 uur kunnen worden opgegeten of na gekookt te zijn
nogmaals ingevroren. Zet het geluidssignaal af door op de
knop SELECT "D" te drukken.
Om terug te keren naar het normaal functioneren en de
boodschap op de display te annuleren moet het apparaat
worden uitgeschakeld met de ON/OFF knop "B".
2. Als de temperatuur blijft stijgen hoort u nogmaals het
geluidssignaal en komt er een andere boodschap op de
display (A2) die excessieve warmte aangeeft. Wij raden aan
de conditie van de etenswaren te controleren, het zou
kunnen zijn dat ze moeten worden weggegooid.. In ieder
geval mogen ze niet weer worden ingevroren tenzij ze
gekookt zijn. . Teneinde de etenswaren niet weer te laten
bevriezen blijft de freezer op een temperatuur van rond de
0°C. Met de knop SELECT "D" zet u het geluidssignaal af.
Voor het terugkeren tot normaal functioneren en het
annuleren van de boodschap op de display moet u de freezer
uitschakelen en dan weer inschakelen met de ON/OFF knop
"B".
61
NL
Page 64

Hoe onderhoud ik hem
Sluit altijd eerst de stroom af voordat u overgaat tot
reinigen of ontdooien (draai de ON/OFF knop “B” op
OFF en trek vervolgens de stekker uit het stopcontact).
Als u dit niet doet kan een alarmsituatie ontstaan.
BELANGRIJK: dit alarm is geen teken van een storing.
Voor het herstellen van het correct functioneren
schakelt u het apparaat uit en vervolgens weer aan
met de ON/OFF knop “B”.
Ontdooien
BELANGRIJK: let erop dat u het koelcircuit niet beschadigt.
Gebruik geen mechanische middelen of andere voorwerpen om het ontdooiingsproces te versnellen, maar alleen
die door de fabrikant worden aanbevolen.
Hoe ontdooi ik de koelkast.
Dit apparaat wordt automatisch ontdooid en het dooiwater
wordt door een speciale afvoer (afb.6) naar de achterkant
geleid waar het door de warmte van de compressor wordt
verdampt. U moet wel af en toe controleren of het water op
regelmatige wijze doorloopt. Reinig het afvoergat met het
hiervoor bestemde borsteltje.
Hoe ontdooi ik de freezer
- Verwijder af en toe de ijslaag met het bijgeleverde
schrapertje (geen messen of metalen voorwerpen).
- Als de ijslaag dikker is dan 5mm moet hij worden ontdooid.
Ga als volgt te werk: activeer de dag tevoren de functie SUPER
FREEZE 24 uren; dit dient ervoor de etenswaren een "koudestoot" te geven.
tisch uitgeschakeld, maar u kunt het ook zelf doen. Schakel
het apparaat uit met de ON/OFF knop "B". BELANGRIJK: dit
schakelt het hele apparaat uit (inclusief de koelkast).
Wikkel alle diepvriesproducten en ingevroren voedsel in krantenpapier en plaats ze of in een andere koelkast ofwel op een
koele plaats. Laat de deur openstaan zodat al het ijs kan ontdooien en plaats een bak met lauw water in de vrieskast om
het ontdooien te bevorderen.
Het apparaat is voorzien van een systeem dat het dooiwater
opvangt; plaats de bak zoals aangegeven in de afbeelding (Afb.
7), en droog en reinig dan de binnenkant van de vrieskast
Reinig en droog grondig voordat u het apparaat weer
aan zet.
Na 24 uren wordt de invriesfunctie automa-
Speciaal onderhoud en reinigen
VAKANTIE-FUNCTIE. Geen schimmel en muffe
luchtjes meer in de koelkast als u met vakantie
gaat. Activeer de functie Holiday (op de display).
Op deze manier blijft de temperatuur in de
koelkast ongeveer 12°C met laag energieverbruik
(u kunt b.v. cosmetische producten
en make up erin bewaren) en
functioneert de freezer op
minimum, onontbeerlijk voor het
conserrveren van de etenswaren.
Voordat u de koelkast gaat schoonmaken moet u de
ON/OFF knop “B” op OFF zetten, als niet beide
afdelingen, vries en koel, reeds op OFF staan;
vervolgens moet de stekker uit het stopcontact worden
gestrokken.
- De materialen van de vries-koelkast zijn van hygiënisch
materiaal gemaakt en geven geen geuren af, maar om dit
zo te houden moeten de etenswaren altijd goed afgedekt
zijn om eventuele vlekken of luchtjes te vermijden.
- Alleen water en soda. Zowel voor de buitenkant als voor
de binnenkant gebruikt u een spons met lauw water en soda,
hetgeen bovendien een goede ontsmetter is. Als u dit niet
in huis heeft kunt u een neutrale zeep gebruiken.
- Wat niet te gebruiken. Nooit schuurmiddelen, nooit bleekwater, nooit ammoniak. Ten strengste verboden zijn oplosmiddelen.
- Leg alle onderdelen die verwijderd kunnen worden in een
lauw sop. Goed spoelen en afdrogen vòòr het weer op hun
plaats zetten.
- Bij langdurig niet in gebruik zijn. Als u besluit de koelkast
uit te schakelen, maak dan de binnenkant schoon en laat de
deuren open staan, ander kunnen zich luchtjes en schimmel
ontwikkelen.
- Het vervangen van het lampje. Sluit de stroom af en gebruik een lampie van dezelfde sterkte of in ieder geval niet
sterker dan 15 Watt. Draai de schroef "B" los die zich aan
de achterkant van het lampschermpje bevindt en draai het
lampje "A" los (Afb. 8).
Afb. 6
NLNL
NL
NLNL
A
B
Afb. 7
Afb. 8
62
Page 65

Er is een probleem
De display is uit
Heeft u gecontroleerd of:
• de zekering is doorgeslagen;
• de stekker niet goed in het stopcontact zit;
• het stopcontact niet werkt; probeer de stekker in een an-
der stopcontact.
De motor start niet.
Heeft u gecontroleerd of:
• de 8 minuten na het aanzetten zijn verlopen?
Dit model is voorzien van een motorbeschermende
controle die het apparaat pas doet starten 8 minuten na
het aanzetten.
• de DEMO is geactiveerd? (zie blz 55)
De display is zwak verlicht
· Probeer de stekker andersom in het stopcontact te steken
De koelkast en de freezer zijn niet koud genoeg.
Heeft u gecontroleerd of:
• de deuren niet goed sluiten of de afdichtingen versleten
zijn;
• de deuren langdurig open zijn geweest;
• de temperatuurknop niet op de juiste positie staat;
• de koelkast of de freezer te vol zijn.
Er is water op de bodem van de koelkast.
Heeft u gecontroleerd of:
• het afvoergat verstopt is (zie afb. 6).
Als ondanks alle controles het apparaat niet functioneert en
het door u geconstateerde gebrek er nog steeds is, wend u
zich dan tot een erkende installateur met deze informatie:
het soort gebrek, het codenummer van het model (Mod.)
en de betreffende nummers (S/N) op het typeplaatje dat zich
linksonder naast de groentenlade bevindt (zie de hiervolgende voorbeelden).
75
Test
P.S-I.
TI
Net
Util
Utile
Pressure
HIGH-235
LOW 140
RG 2330
Mod.
220 - 240 V- 50 Hz 150 W
340
Total
Gross
Bruto
Brut
Compr.
Syst.
Kompr.
Made in Italy 13918
Gross
Bruto
Brut
R 134 a
kg 0,090
Wend u zich nooit tot een niet-erkende installateur en
weiger niet-originele onderdelen.
93139180000 S/N 704211801
Cod.
Gross
Bruto
Brut
W
Fuse
A
Freez. Capac
Poder de Cong
kg/24 h
4,0
Max 15 w
Class
Clase
N
Classe
De motor blijft werken
Avete controllato se:
· la regolazione della temperatura impostata è troppo bas-
sa (o non ottimale);
• de etenswaren tegen de achterwand aan staan, die het
koudst is.
Il motore funziona di continuo
Heeft u gecontroleerd of:
· de functies SUPER COOL en/of SUPER FREEZE en/of
ICE PARTY actief zijn.
• de deuren niet goed gesloten zijn of lang opengelaten;
• de buitentemperatuur hoog is;
• de temperatuurknop niet op de juiste positie staat.
Het apparaat maakt teveel lawaai.
Het verkoelende gas produceert een licht geluid ook als de
compressor stil staat (dit is geen gebrek).
Heeft u gecontroleerd of:
• de koelkast niet goed horizontaal staat;
• naast meubelen of voorwerpen staat die trillen of geluid
maken.
63
NL
Page 66

La seguridad, una buena costumbre
ATENCIÓN
Lea atentamente las advertencias contenidas en este folleto,
pues le proporcionará importantes indicaciones sobre la seguridad de la instalación, de uso y de mantenimiento.
Este aparato ha sido fabricado en conformidad con las normas internacionales de seguridad, cuyo objeto es proteger al
consumidor.
Ha obtenido además la marca IMQ, otorgada por los técnicos
del Instituto Italiano de Calidad, solo a los aparatos que cumplen las normas del CEI (Comité Electrotécnico Italiano)
- El fabricante se reserva el derecho de alterar las características de los modelos sín previo avise.
- Algunos modelos pueden no disposer de todos los accesorios indicados
1. Este aparato no se debe instalar al aire libre, ni siquiera si el
lugar está al resguardo de un cobertizo; es muy peligroso dejarlo expuesto a la lluvia o a las tormentas.
2. Lo deben usar solamente los adultos y exclusivamente para
conservar y congelar alimentos siguiendo las instrucciones de
uso escritas en este manual.
3. No tocar ni maniobrar nunca el aparato con los pies desnudos o con las manos o pies mojados.
4. No se aconseja usar prolongaciones o enchufes múltiples.
Si el refrigerador se instala entre muebles, controlar que el
cable no sufra pliegues o compresiones peligrosas.
5. No tirar nunca del cable o del refrigerador para desconectar la clavija de la toma de corriente de la pared: es muy peligroso.
6. No tocar las partes internas refrigerantes, sobre todo con
las manos mojadas, ya que se pueden quemar o herir. No introducir en la boca cubitos de hielo apenas secados del congelador ya que se corre el riesgo de quemaduras.
7. No realice ni la limpieza ni el mantenimiento sin haber
desconectado primero el aparato; en efecto, para eliminar
todo contacto eléctrico no basta colocar la perilla ON/OFF
del aparato, en OFF.
8. Antes de hacer retirar el refrigerador anterior, poner fuera
de uso su eventual cerradura para evitar que los niños, jugando, puedan quedar encerrados dentro del aparato.
9. En caso de avería, antes de llamar al servicio de asistencia
técnica, controlar el capítulo “Algunos problemas” para verificar si es posible eliminar el eventual inconveniente. No intentar reparar la avería tratando de acceder a las partes internas.
10. Cuando se deba sustituir el cable de alimentación, dirigirse a nuestros Centros de Asistencia. En algunos casos las conexiones se realizan con terminales especiales, en otros casos
es necesario el uso de una herramienta especial para acceder
a las conexiones.
11. No use aparatos eléctricos dentro del compartimiento
conservador de alimentos si los mismos no son del tipo
recomendado por el fabricante.
12. Al finalizar la vida funcional del aparato – que contiene
gas ciclopentano en la espuma aislante y eventualmente gas
R600a (isobutano) en el circuito refrigerante – el mismo se
deberá asegurar contra pérdidas antes de enviarlo al basurero.
Para esta operación dirigirse al comerciante o al Ente Local
encargado.
Instalación
Para garantizar un buen funcionamiento y un mínimo
consumo de electricidad es importante que la instalación se realice correctamente.
La aireación
El compresor y el condensador emiten calor y por ello requieren una buena aireación. No son adecuados los ambientes con poca ventilación. Por lo tanto, el aparato se debe
instalar en un ambiente que posea una apertura (ventana o
puertaventana) que asegure el necesario intercambio de aire.
Y que no sea demasiado húmedo.
Tener cuidado, durante la instalación, de no cubrir u obstruir
las rejillas que permiten la buena ventilación del aparato.
Lejos del calor
Evitar colocar el aparato en un lugar expuesto directamente
a la luz solar, junto a la cocina eléctrica o similares.
Conexión eléctrica y toma de tierra
Antes de proceder a la conexión eléctrica, controlar que el
voltaje indicado en la placa de características, colocada abajo y a la izquierda junto al recipiente para verduras, corres-
.
ponda con la de la instalación de su casa, y que la toma de
corriente posea una regular toma de tierra, de acuerdo a lo
prescripto por la ley sobre la seguridad de las instalaciones
46/90. Si no existe la toma de tierra, el Fabricante declina
toda responsabilidad. No usar tomas múltiples o adaptadores.
Coloque el aparato de modo tal que se pueda acceder
fácilmente al toma al cual está conectado.
¿La potencia es insuficiente?
La toma de corriente eléctrica debe ser capaz de soportar la
carga máxima de potencia del aparato, indicada en la placa
de características ubicada abajo y a la izquierda junto al recipiente de verduras.
Antes de conectarlo eléctricamente
Después del transporte, colocar el aparato verticalmente y
esperar 3 horas como mínimo antes de conectarlo a la toma
de corriente, para permitir un correcto funcionamiento.
E
64
Page 67

Visto de cerca
ECO
M
D
E
O
N
L
M
F
K
A
B
C
B
J
G
H
G
I
H
Balconcito extraible con tapa, con huevera y
A
recipiente para manteca
Balconcito extraible portaobjetos
B
Balconcito suspendido y volcable
C
Espacio para una botlla de 2 litros
D
Balconcito para botellas
E
Sistema "drain" para la
F
eliminación del agua de
descongelación
Espacios para la conservación
G
Pisos extraibles y de altura regulable
M
Portabotellas volcable
N
"A.I.R. System"
O
(Ariston Integrated Refrigeration)
Cubetas para la producción de
H
hielo
Espacios utilizables para la
I
congelación y la conservación
Display
J
Cajones para la fruta y la
K
verdura
Cajón para carne y queso
L
65
E
Page 68

El Display
A BFE
C D
Perilla del refrigerador
A
Administra el encendido y apagado del
compartimiento refrigerador y permite fijar las
correspondientes temperaturas de funcionamiento.
Perilla del congelador y ON/OFF del aparato
B
Administra el encendido y apagado de todo el aparato
y permite fijar las temperaturas de funcionamiento
del compartimiento congelador.
Botón MODE
C
Permite el desplazamiento en el display para llegar a
las distintas opciones/funciones y el pagado de las
alarmas sonoras
Botón SELECT
D
Permite seleccionar y anular la selección de las distintas
funciones y el apagado de las alarmas sonoras.
Configuración del compartimiento refrigerador
E
Visualiza la temperatura fijada en el refrigerador y el
estado de OFF del compartimiento refrigerador
(palabra OFF activa).
I J
G
H
HG
Función SUPER COOL
Visualiza el estado (desactivado, seleccionado o
activado) de la función SUPER COOL (enfriamiento
rápido del compartimiento refrigerador)
Función SUPER FREEZE
Visualiza el estado (desactivado, seleccionado o
activado) de la función SUPER FREEZE (congelamiento
rápido)
Función HOLIDAY
I
Visualiza el estado (desactivado, seleccionado o
activado) de la función HOLIDAY (temperaturas óptimas
con consumos mínimos en el caso de largas ausencias).
Función ICE PARTY
J
Visualiza el estado (desactivado, seleccionado o
activado) de la función ICE PARTY (ENFRIAMIENTO
RÁPIDO BOTELLA) (la máxima rapidez para enfriar una
botella caliente y servirla en la mesa con el cubo
adecuado para mantener la temperatura alcanzada)
Configuración del compartimiento congelador
F
Visualiza la temperatura fijada en el congelador y el
estado de OFF del aparato (palabra OFF activa).
E
66
Page 69

Cómo poner en marcha el combinado
ATENCIÓN
Después del transporte, para permitir un correcto funcionamiento, colocar el aparato en posición vertical y
esperar unas 3 horas antes de conectarlo a la toma de
corriente. Antes de introducir alimentos en el frigorífico,
limpie bien su interior con agua templada y bicarbonato.
Tiempo de protección del motor
Este modelo posee un control de protección contra
sobrecargas, por lo tanto, si después que el usuario lo
ha apagado, el compresor no arranca inmediatamente,
no se preocupe porque se activará automáticamente
después de 8 minutos aproximadamente.
Después de haber enchufado el aparato verifique que el
display esté encendido.
Cómo moverse en el display
Selección de las temperaturas:
Si el compartimiento en cuestión está apagado, en el espacio
correspondiente de comunicación en el display (E para el
refrigerador y F para el congelador) aparecerá la palabra
OFF. Si, en cambio, el compartimiento está encendido,
aparecerán las temperaturas seleccionadas en ese momento. Para modificarlas, utilice directamente la perilla
correspondiente al compartimiento en cuestión (A para el
refrigerador y B para el congelador).
Las temperaturas que se pueden fijar para el compartimiento
refrigerador van desde +2°C a +8°C, mientras que para el
compartimiento congelador van desde -18°C a -26°C. Los
aumentos o disminuciones posibles son siempre de 1°C.
Cuando se activa la función HOLIDAY no se pueden realizar
regulaciones de temperatura, pero el aparato se coloca
automáticamente en la regulación óptima para la situación:
+12°C para el compartimiento refrigerador (si está activo) y
-18°C para el compartimiento congelador.
Administración de las funciones:
Símbolo de la función en el normal
funcionamiento.
Función seleccionada (contorno centelleante).
Función activada (contorno encendido)
Activación/desactivación de las funciones
Pulse el botón MODE "C" las veces que sea necesario para
hacer centellear el símbolo de la función con la cual se desea
trabajar: esto indica que la función ha sido seleccionada y
está lista para ser activada o desactivada. A partir de ese
momento, se puede administrar la función utilizando el botón
Compartimiento congelador
Cuando se enciende el aparato (girar la perilla ON/OFF "B"
del aparato hasta fijar la temperatura de funcionamiento
deseada en el congelador), se aconseja activar la función
SUPER FREEZE para acelerar el enfriamiento del
compartimiento; cuando este último haya alcanzado su temperatura óptima, la función se desactivará y se podrán
introducir en el congelador los alimentos.
Compartimiento refrigerador
Cuando se enciende el compartimiento refrigerador (gire la
perilla "A" hasta fijar la temperatura de funcionamiento
deseada en el compartimiento refrigerador) se aconseja
activar la función SUPER COOL para acelerar el enfriamiento
del compartimiento: después de algunas horas podrá colocar
los alimentos en el refrigerador.
SELECT "D" para activarla o desactivarla.
NOTA: si no se confirma pulsando el botón SELECT dentro
de los cinco segundos de la última acción en el display, este
último volverá a visualizar la función como estaba
configurada precedentemente para indicar que no se ha
producido ninguna modificación.
La función SUPER COOL está ligada al compartimiento
refrigerador y cuando el mismo está apagado, no se permitirá
ninguna acción sobre ella; otras, en cambio, tienen un
funcionamiento que puede crear conflictos (por ejemplo:
cuando se activan simultáneamente las funciones HOLIDAY
y SUPER FREEZE …), en este caso se tiene en cuenta una
prioridad ya establecida para ayudarle en la administración
del aparato.
La función SUPER FREEZE prevé dos modalidades de
activación (véase el párrafo correspondiente a la
administración del compartimiento congelador).
Activación/desactivación de la modalidad DEMO:
Para hacer una demostración del funcionamiento del display
manteniendo el producto apagado, se puede activar la
modalidad DEMO.
Activación:
- coloque la perilla de la temperatura del freezer en 0;
- mantenga presionados los dos botones “Select” y “Mode”
durante 5 segundos aproximadamente, hasta que escuche
un sonido y centelleen las dos palabras “OFF” y “OFF” en
el display; estas palabras centellean durante todo el tiempo
en el que la función DEMO esté activa.
Desactivación:
- coloque la perilla de la temperatura del freezer en 0;
- mantenga presionados los dos botones “Select” y “Mode”
durante 5 segundos aproximadamente, hasta que escuche
un sonido y las dos palabras “OFF” y “OFF” en el display
dejen de centellear.
67
E
Page 70

Como utilizar lo mejor posible la sección nevera
La temperatura dentro del refrigerador se regula
automáticamente en base a la selección realizada a través
del display.
Se aconseja, siempre, una posición intermedia (es. +5°C).
La sección frigorífica se su aparato está dotada de un dispositivo de "A.I.R. System" (Ariston Integrated Refrigeration)
que permite una óptima conservación de los alimentos y un
simplificado del aparato gracias a:
- una restablecimiento veloz de la temperatura: después de
la apertura de las puertas, las temperaturas alcanzan valores
óptimos rápidamente, se logra así una mejor conservación.
- Una distribución homogénea de la temperatura que permite
colocar los alimentos en cualquier estante.
- Un grado de humidad más alto para una conservación más
larga de los alimentos.
B
B
B
A
A
Introduzca sólo alimentos fríos o, como máximo, apenas tibios, evitando colocar alimentos calientes: ellos alzarían inmediatamente la temperatura interna obligando al compresor a realizar un mayor trabajo que desperdiciaría tanta energía eléctrica.
No introduzca líquidos en recipientes destapados, pues aumentaría así la humedad en el interior del frigorífico y, por
consiguiente, la formación de escarcha.
Para utilizar el recipiente para fiambres/quesos suspendido,
se debe extraer del estante. El mismo, para optimizar el
espacio de acuerdo a las necesidades, se puede desplazar
en sentido lateral (Fig. 2).
El portabotellas lateral se utiliza ya sea para colocar botellas
(Fig. 3) como para varias latitas (2-4) colocadas
horizontalmente (Fig 4). Si no se utilizara, es posible cerrar
el portabotellas/latitas y tener así más espacio disponible
dentro del refrigerador.
A - Aire expulsado que se enfría en contacto con la pared
enfriadora
B - Aire más caliente aspirado
Cuando el compartimiento del refrigerador se llena después
de una gran compra, utilice la función SUPER COOl "J"
(ver el párrafo "Cómo moverse en el display") para alcanzar
rápidamente una condición óptima de funcionamiento. Una
vez transcurrido el tiempo necesario, la función se desactiva
automáticamente.
Siga atentamente nuestros consejos sobre la duración máxima de conservación: ningún alimento, ni aún el más fresco,
se mantiene inalterable durante mucho tiempo.
Contrariamente a lo que suele creerse, los alimentos cocinados no se conservan más tiempo que los crudos.
La sección nevera está dotada de prácticos estantes extraíbles
(Fig. 1) y regulables en altura gracias a las guías correspondientes. Por ello es posible introducir también grandes recipientes y alimentos de dimensiones notables
Fig. 2
Fig. 4
Fig. 3
Fig. 1
E
68
Page 71

Como utilizar lo mejor posible la sección congelador
Para la preparación de alimentos a congelar, consultar
un manual especializado.
No congele de nuevo un alimento descongelado, aunque
sólo sea parcialmente: cocínelo para consumirlo (en 24 horas) o para volverlo a congelar.
Los alimentos frescos a congelar no deben ser colocados en
contacto con aquellos ya congelados, sino que se deben
ubicar en el compartimiento superior "I", donde la temperatura desciende por debajo de los -18°C que es la temperatura ideal para congelar bien los alimentos. No olvide que
la buena conservación de los alimentos congelados depende de la velocidad de congelación.
Congele únicamente la cantidad en kg indicada en la placa
de características que encontrará a la izquierda del cajón
para frutas y verduras.
La primera vez que lo utilice, o cuando el congelador haya
estado inactivo, haga funcionar al máximo el aparato
Cuando el aparato está ya en marcha el congelamiento
puede ser realizado de dos modos:
1. Para pequeñas cantidades, inferiores a la capacidad
máxima indicada en la placa de características (ubicada abajo
a la izquierda, al lado del recipiente para verduras), active
desde el display la función SUPER FREEZE en su modalidad
"24 horas" e introduzca los alimentos que debe congelar.
Para activar la función, pulse el botón MODE "C" las veces
que sea necesario para hacer centellear el símbolo del SUPER
FREEZE y, luego, pulse el botón SELECT "B" para activar la
función . Pasadas las 24 horas, o una vez alcanzada la
temperatura óptima, la función de congelamiento rápido se
desactiva automáticamente.
2. Cuando se deben congelar grandes cantidades de
alimentos (hasta la carga máxima indicada en la placa de
características ubicada abajo a la izquierda, al lado del recipiente para verduras) active desde el display la función SUPER
FREEZE en su modalidad "48 horas". Para activar la función
pulse el botón MODE "C" las veces que sea necesario para
hacer centellear el símbolo del SUPER FREEZE y, luego,
mantenga presionado durante más de tres segundos el botón
No abra la puerta del congelador en caso de interrupción
del suministro eléctrico o de avería: así retrasará la elevación
de la temperatura en su interior y los congelados se conservarán sin alteraciones de 9 a 14 horas.
No introduzca en el congelador botellas llenas: podrían romperse, ya que todos los líquidos al congelarse aumentan de
volumen.
Para enfriar rápidamente las bebidas.
Gracias a la función especial ICE PARTY (ENFRIAMIENTO
RÁPIDO BOTELLA) no volverá a tener el problema de
encontrar rotas las botellas puestas a enfriar en el
compartimiento congelador (en efecto, todos los líquidos,
al congelarse, aumentan su volumen). Activando esta
función, será el aparato mismo que le avisará con una señal
sonora, que ha llegado el momento de quitar la botella del
compartimiento congelador. Para silenciar la alarma sonora
basta pulsar el botón SELECT "D". No olvide utilizar el
ergonómico cubo suministrado con el equipo para colocar
la botella en el congelador; ya que además de acelerar el
enfriamiento de la misma, Ud. podrá, llegado el momento
de servir la bebida, transportarla fácilmente gracias a sus
asas y mantenerla fría por mucho tiempo ya en la mesa.
ATENCIÓN: mantenga siempre el cubo para la botella,
suministrado con el equipo, dentro del compartimiento del
congelador (aún cuando no tenga botellas que enfriar); sólo
así se garantiza la baja temperatura del líquido en tiempo
breve.
SELECT "B" para activar la función (el símbolo comienza
a centellear lentamente).
Pasadas otras 24 horas, la función se desactivará
automáticamente.
Durante la congelación, evite abrir la puerta del congelador.
Para conseguir una conservación y una descongelación óptimas, se aconseja repartir los alimentos en pequeñas cantidades, así se congelarán rápidamente y de forma homogénea. Indique en los envases su contenido y la fecha de congelación.
Con la finalidad de obtener un mayor espacio en el
compartimiento del congelador, se puede extraer el cajón
central, colocando los alimentos directamente en el estante.
Después de realizar la carga, verifique, que la puerta cierre
correctamente.
69
E
Page 72

Cubetas de hielo
Este nuevo concepto de cubetas de hielo, es una patente
exclusiva. El hecho de estar ubicadas en la parte superior de
los cajones del freezer asegura una mayor ergonomía,
limpieza y más espacio en los cajones: el hielo no está más
en contacto con los alimentos ubicados en el congelador;
además se evita el goteo de agua en el momento de la carga
(se suministra también la tapa para cerrar el orificio después
de la operación de carga de agua).
Modo de uso (Fig. 5)
Llene la cubeta con agua a través del orificio correspondiente
hasta el nivel indicado (MAX WATER LEVEL), teniendo cuidado
de no superarlo: la introducción de agua en cantidad superior
a la necesaria, provocará una formación de hielo tal que
podría obstaculizar la salida de los cubitos.
Si se ha introducido una cantidad excesiva de líquido, se
deberá esperar que el hielo se derrita, vaciar la cubeta, y
repetir la operación de llenado
Una vez efectuada la operación de carga a través del orificio
indicado, gire la cubeta 90 °. Por el principio de vasos
comunicantes, el agua llena las distintas formas de la cubeta,
después de lo cual, se podrá cerrar el orificio con el tapón
correspondiente y colocar la cubeta en la contrapuerta.
Después que se formó el hielo, bastará golpear la cubeta
sobre una superficie dura para que los cubitos se despeguen
de sus alojamientos y puedan salir por el mismo orificio por
el cual se ha introducido el agua. Para facilitar la salida de los
cubitos, vierta agua en el exterior de la cubeta.
ATENCIÓN: cada vez que efectúa la carga con agua, verifique
que la cubeta esté completamente vacía y que no hayan
quedado residuos de hielo.
El tiempo mínimo necesario para una mejor formación de
hielo es de aproximadamente 8 horas.
Fig. 5
MAX
WATER LEVEL
MAX
WATER LEVEL
E
70
Page 73

Guía para el uso del compartimiento congelador
Carnes y pescados
Tipo Confección
Asado y cocido de
novillo
Cordero Envuelto en hojas de aluminio 1 / 2 6 No necesario
Asado de cerdo Envuelto en hojas de aluminio 1 6 No necesario
Asado y cocido de
ternera
Bistec de cerdo
Lonchas y costillas de
cordero o novillo
Carne picada
Corazón y hígado En bolsitas de politeno 3 No necesario
Envuelto en hojas de aluminio 2 / 3 9 / 10 No necesario
Envuelto en hojas de aluminio 1 8 No necesario
Cada loncha tiene que ser envuelta en
politeno y luego en hojas de aluminio en
número de 4-5
Cada lonchaa tiene que ser envuelta en
politeno y luego en hojas de aluminio en
número de 4-5
En recipientes de aluminio cubierto con
politeno
Macerado de
la carne (dias)
Fresquísima 2
Duración
(meses)
6 No necesario
6 No necesario
Descongelación
Lentamente en
frigorífico
Salchichas En hojas de politeno o aluminio 2 Según el empleo
Pollos y pavos Envuelto en hojas de aluminio 1 / 3 9
Patos y gansos En hojas de aluminio 1 / 4 6
Patos salvajes, faisanes
y perdices
Conejos y liebres En hojas de aluminio 3 / 4 6
Ciervo y corzo En hojas de aluminio o politeno 5 / 6 9
Pescados muy grandes En hojas de aluminio o politeno 4 / 6
Pescados pequeños En sobres de politeno 2 / 3 No necesario
Mariscosos En sobres de politeno 3 / 6 No necesario
Moluscos
En hojas de aluminio 1 / 3 9
En recipientes de aluminio o plástico cubiertos
con agua y sal
3
Lentamente en
frigorífico
Lentamente en
frigorífico
Lentamente en
frigorífico
Lentamente en
frigorífico
Lentamente en
frigorífico
Lentamente en
frigorífico
Pescados cocidos En hojas de aluminio o politeno 12 En agua caliente
Pescados fritos En sobres de politeno 4 / 6
Directamente en la
sartén
71
E
Page 74

Fruta y verdura
Tipo Confección
Manzanas y peras
Albaricoques, melocotones,
cerezas y ciruelas
Fresas, moras y arándanos
Fruta cocida
Jugos de fruta Lavar, cortar y aplastar
Coliflores
Coles y coles de Bruselas Limpiar y lavar (partir) 1' / 2' En bolsitas de politeno 10 / 12
Guisantes Pelar y lavar 2' En bolsitas de politeno 12 No necesario
Judías verdes
Zanahorias, pimientos y
nabos
Pelar y cortar en
pedacitos
Deshuesar y pelar 1' / 2'
Limpiar, lavar y dejar
secar
Cortar, cocinar y
tamizar
Partir y calentar en
agua y jugo de limón
Lavar y cortar en
pedacitos
Cortar en rebanadas,
pelar y lavar
Cocci-
ón
3' / 4' En bolsitas de politeno 12 No necesario
Confección
En recipientes, cubiertos
2’
de almíbar
En recipientes, cubiertos
de almíbar
En recipientes, cubiertos
de azúcar
En recipientes, agregar
el 10% de azúcar
En recipientes, azúcar
según los gustos
2' En bolsitas de politeno 12 No necesario
2 En bolsitas de politeno 10 / 12 No necesario
Duración
(meses)
12
12
10 / 12
12
10 / 12
Descongelación
Lentamente en
frigorífico
Lentamente en
frigorífico
Lentamente en
frigorífico
Lentamente en
frigorífico
Lentamente en
frigorífico
A temperatura
ambiente
Setas y espárragos Lavar y cortar 3' / 4' En bolsitas o recipientes 6
Espinacas Lavar y desmenuzar 2' En bolsitas de politeno 12
Verduras varias para sopa
Tipo Confección
Pan En bolsitas de politeno 4
Tortas En hojas de politeno 6
Nata
Mantequilla
Comidas cocidas, sopa de
legumbres
Lavar y cortar en
pedacitos
Scott-
atura
En bolsitas en pequeñas
3'
porciones
Confección
En recipientes de
plástico
En el envoltorio original
y en aluminio
Divididos en recipientes
de plástico o vidrio
6 / 7
Duración
(meses)
3 / 6
A temperatura
ambiente
A temperatura
ambiente
A temperatura
ambiente
Descongelación
A temperatura
ambiente y en el horno
A temperatura
ambiente y cocer a
100/200°C
6
6 En frigorífico
A temperatura
ambiente o en el
frigorífico
A temperatura
ambiente o en agua
caliente
Huevos
E
Congelar sin cáscara en
pequeños recipientes
72
10
A temperatura
ambiente o en el
frigorífico
Page 75

Consejos para ahorrar
- Instalarlo bien
O sea lejos de fuentes de calor, de la luz directa del sol, en
un ambiente bien aireado y con las distancias indicadas en
el párrafo “Instalación/La aireación”.
EL CONSUMO DE ENERGÍA EFECTIVO DEPENDE DEL
MODO EN QUE SE UTILIZA EL APARATO Y DEL LUGAR
EN EL QUE SE INSTALA.
Las pruebas de consumo se realizaron en columnas de
560mm. de profundidad que es la forma más común de
instalación
- El frío justo
La selección de temperaturas internas demasiado bajas, hace
aumentar el consumo.
- No llene demasiado el aparato.
Para conservar bien los alimentos, el frío debe circular libremente en el interior del frigorífico. Si lo llena demasiado,
impedirá la circulación, y el compresor tendrá que trabajar
de forma continuada.
Alarmas sonoras y visuales
- Mantenga la puerta cerrada.
Abra el combinado lo menos posible, porque cada vez que
lo haga se escapará parte del aire frío. Para restablecer la
temperatura, el motor tendrá que trabajar mucho tiempo y
consumirá mucha energía.
- Preste atención a las juntas.
Vigile que las juntas permanezcan elásticas y limpias, para
que se adhieran bien a las puertas y no dejen escapar ni
siquiera un poco de frío.
- No introduzca alimentos calientes.
La introducción de una olla caliente en el frigorífico eleva de
inmediato la temperatura varios grados, déjela enfriar a temperatura ambiente antes de introducirla en el frigorífico.
- Nada de escarcha.
Vigile el grosor de la capa de escarcha en las paredes del
congelador y, si se ha hecho demasiado gruesa, proceda
inmediatamente al descarche (véase más adelante: “Cómo
mantenerlo en buen estado”)
Alarma por la puerta abierta
Si la puerta del refrigerador permanece abierta por más de
dos minutos, la lámpara de iluminación interna comienza a
centellear; después de algunos segundos se emite una señal
sonora que se puede silenciar cerrando la puerta o pulsando el botón SELECT "D". Si la puerta permanece abierta
más de 4 minutos, la lámpara comienza a centellear más
velozmente.
Alarma por calentamiento anómalo del
congelador
1. Para indicar un excesivo calentamiento del congelador
(por ej. una momentánea interrupción de corriente) se
emite una señal acústica y aparece un mensaje en el
display (A1) para indicar un peligroso calentamiento. Para
no volver a congelar los alimentos, el congelador se
mantendrá a una temperatura de alrededor de 0°C,
permitiéndole consumirlos dentro de las 24 horas o volver
a congelarlos, previa cocción. Se puede silenciar la señal
sonora simplemente pulsando el botón SELECT "D".
Para volver al normal funcionamiento y borrar el mensaje
en el display se deberá apagar el aparato y volver a
encenderlo, utilizando la perilla ON/OFF "B" del aparato.
2. Si la temperatura continúa aumentando hacia valores
excesivamente altos, se emite nuevamente la señal sonora y aparece otro mensaje en el display (A2) para indicar
el excesivo calentamiento. Es aconsejable verificar el
estado de los alimentos porque podría ser necesario
tirarlos. Cualquiera sea el caso, los alimentos no se deben
volver a congelar, si no se cocinan primero. Para no volver
a congelar los alimentos, el congelador se mantendrá a
una temperatura de alrededor de 0°C. Se puede silenciar
la señal sonora simplemente pulsando el botón SELECT
"D".
Para volver al normal funcionamiento y borrar el mensaje
en el display se deberá apagar el aparato y volver a
encenderlo, utilizando la perilla ON/OFF "B" del aparato.
73
E
Page 76

Cómo mantenerlo en buen estado
Antes de proceder a cualquier operación de limpieza o
descongelación, desconecte el aparato de la red de
alimentación eléctrica (gire la perilla ON/OFF del
aparato “B” hasta la posición OFF y luego
desenchúfelo). Si dicho procedimiento no se realizara,
se podría producir una situación de alarma. ATENCIÓN:
dicha alarma no es síntoma de anomalía. Para
restablecer el correcto funcionamiento, apague el
aparato y vuelva a encenderlo, utilizando directamente
la perilla ON/OFF del aparato “B”.
Descongelación
ATENCIÓN: no dañe el circuito refrigerante.
Prestar atención de no utilizar dispositivos mecánicos
u otro medios para acelerar el proceso de
descongelamiento que no sean aquellos recomendados
por el constructor.
Como descongelar el compartimiento frigorífico
Este aparato posee descongelación automática, el agua
producida se hace circular hacia la parte posterior por una
descarga especial (fig. 6) y allí el calor producido por el
compresor la hace evaporar. La única intervención que debe
realizar periódicamente consiste en controlar que el agua
de descarga pase regularmente. Limpie el orificio de descarga
con el correspondiente “cepillo”.
Como descongelar el compartimiento congelador
- De vez en cuando, retire la escarcha con la paleta incluída
con el aparato (nada de cuchillos ni objetos metálicos).
- Si la escarcha ha superado los 5 mm es necesario efectuar
una verdadera y propia descongelación. Para ello proceda de
la siguiente manera: un día antes de activar la función SUPER
FREEZE en su modalidad 24 horas; sirve para dar a los
alimentos un saludable "golpe de frío" más.
horas, la función de congelamiento se desactiva
automáticamente, pero también puede desactivarla Ud. Apague
el aparato utilizando la perilla ON/OFF "B" del aparato.
ATENCIÓN: esta operación apaga todo el aparato
(compartimiento refrigerador incluido).
Envuelva los congelados en papel de periódico y colóquelos
en el frigorífico o en un lugar fresco. Deje abierta la puerta
para que la escarcha se funda por completo, e introduzca
recipientes con agua templada para ayudar.
El aparato está dotado de un siatema de recogida del agua
de descongelación; coloque el recipiente como se indica (Fig.
7). Limpie y seque con
cuidado antes de volver a
encender el aparato.
Recuerde que el motor no
arranca inmediatamente
sino después de 8 minutos
aproximadamente.
Pasadas las 24
Limpieza y operaciones de mantenimiento
particulares
FUNCIÓN VACACIONES. La producción de moho y
olores feos en el interior del refrigerador apagado
cuando partimos de vacaciones, no es más un
problema: basta activar la función Holiday (desde el
display). De este modo, con un bajo
consumo, se mantiene la temperatura
en el compartimiento del refrigerador
alrededor de 12°C (puede conservar,
por ejemplo, maquillaje y cosméticos)
y se deja funcionar el congelador al
mínimo, indispensable para la
conservación de los alimentos.
Antes de limpiar el refrigerador, gire la perilla ON/OFF
del aparato “B” hasta la posición OFF, espere hasta
visualizar el estado de OFF en ambos compartimientos:
refrigerador y congelador y posteriormente
desenchúfelo.
- Los materiales utilizados en la fabricación de este aparato
son higiénicos y no transmiten olores, pero, para mantener
estas cualidades, es necesario que los alimentos estén siempre protegidos y bien cerrados, con el fin de evitar manchas
difíciles de quitar o la aparición de malos olores.
- Sólo agua y bicarbonato: Para limpiar tanto el interior como
el exterior, utilice una esponja con agua templada y bicarbonato sódico, que es además un buen desinfectante. Si no
tiene en casa, puede emplear jabón neutro.
- Qué no debe usarse: No utilice nunca abrasivos, lejía, ni
amoníaco. Están totalmente prohibidos los disolventes y otros
productos similares.
- Todos los elementos extraíbles pueden lavarse en agua
caliente con jabón o detergente para vajillas. Antes de volverlos a colocar, séquelos bien.
- Cuando permanece sin funcionar un largo período. Si decide no hacer funcionar el refrigerador durante el período
estival, hay que limpiar su interior y dejar las puertas abiertas.
- Cómo cambiar la bombilla interior: Desenchufe el aparato
y emplee una bombilla de la misma potencia o de potencia
no superior a 15 Watt. Desatornille el tornillo de fijación B,
situado detrás en la parte posterior del cubrelámpara, y
desenrosque la bombilla A (véase al dibujo 8)
A
E
Fig. 6
74
Fig. 7
B
Fig. 8
Page 77

Solución de problemas
El display está completamente apagado
Compruebe que:
· El interruptor general de la casa esté conectado;
· El enchufe esté correctamente conectado a la toma de co-
rriente.
· La toma funcione: pruebe a conectar el enchufe en otra
toma.
El motor no arranca
Controle si:
·
han transcurrido 8 minutos después del encendido
En efecto, este modelo, está dotado de un control de
protección contra sobrecargas que lo hace arrancar sólo
después de 8 minutos del encendido, aproximadamente.
·
se activó la modalidad DEMO (véase la pág. 67).
El frigorífico y el congelador enfrían poco
Compruebe que:
· Las puertas cierren bien y las juntas no estén estropeadas;
· Las puertas no se abran muy a menudo.
· El mando de regulación esté en la posición correcta.
· El frigorífico y el congelador no se hayan llenado en exceso.
Si, no obstante se hayan realizado todos los controles, el
aparato no funciona y el inconveniente detectado existe
todavía, llamar al Centro de Asistencia Técnica más cercano, comunicando las siguientes informaciones: el tipo de
avería, la sigla del modelo (Mod.) y los relativos números (S/
N) escritos en la placa de características ubicada abajo y a la
izquierda, junto al recipiente para verduras (ver lo ejemplo
en la siguiente figura).
75
Test
P.S-I.
TI
Net
Util
Utile
Pressure
HIGH-235
LOW 140
RG 2330
Mod.
220 - 240 V- 50 Hz 150 W
340
Total
Gross
Bruto
Brut
Compr.
Syst.
Kompr.
Made in Italy 13918
Gross
Bruto
Brut
R 134 a
kg 0,090
93139180000 S/N 704211801
Cod.
Gross
Bruto
Brut
W
Fuse
Freez. Capac
Poder de Cong
kg/24 h
A
4,0
Max 15 w
Class
Clase
N
Classe
No se dirija nunca a técnicos no autorizados y rechace
siempre la instalación de piezas de repuesto no originales.
En el frigorífico los alimentos se hielan demasiado
Compruebe que:
·
La regulación de la temperatura fijada sea demasiado baja
(o no sea óptima);
· Los alimentos no estén en contacto con la parte posterior, la
más fría.
El motor no para de funcionar
Compruebe que:
·
Estén activas las funciones SUPER COOL y/o SUPER
FREEZE y/o ICE PARTY;
· las puertas fueron abiertas continuamente;
· La temperatura externa no sea muy alta.
El aparato hace demasiado ruido
Compruebe que:
· El frigorífico esté bien nivelado.
· El frigorífico no esté instalado entre muebles y objetos que
vibren y emitan ruido.
· El gas refrigerante interno produce un ligero ruido incluso
cuando el compresor está parado (no es un defecto).
Hay agua en el fondo del frigorífico
Controle que:
· El orificio de descarga del agua de descongelación no esté
tapado.
75
E
Page 78

E
76
Page 79

.
Page 80

Viale Aristide Merloni, 47
60044 Fabriano (AN) Italy
Tel. +39 0732 6611
www.aristonchannel.com
02/2004 - 195038335.02 - Xerox Business Services DocuTech
 Loading...