

Page 1
Istruzioni per luso
COMBINATO FRIGORIFERO/CONGELATORE
I
Italiano, 1
D
Deutsch, 31
P
Portuges, 61
BCB 311/HA
GB
English, 11
NL
Nederlands
, 41
F
Français, 21
E
Espanol, 51
Sommario
I
Installazione, 2
Posizionamento e collegamento
Descrizione dellapparecchio, 3
Vista dinsieme
Avvio e utilizzo, 4-5
Avviare lapparecchio
Regolazione della temperatura
Utilizzare al meglio il frigorifero
Utilizzare al meglio il congelatore
Manutenzione e cura, 6
Escludere la corrente elettrica
Pulire lapparecchio
Evitare muffe e cattivi odori
Sbrinare lapparecchio
Sostituire la lampadina
Precauzioni e consigli, 7
Sicurezza generale
Smaltimento
Risparmiare e rispettare lambiente
Anomalie e rimedi, 8
Assistenza, 9
Assistenza attiva 7 giorni su 7
Page 2
Installazione
! È importante conservare questo libretto per poterlo
I
consultare in ogni momento. In caso di vendita,
di cessione o di trasloco, assicurarsi che resti insieme
allapparecchio per informare il nuovo proprietario
sul funzionamento e sui relativi avvertimenti.
! Leggere attentamente le istruzioni: ci sono importanti
informazioni sullinstallazione, sulluso e sulla sicurezza.
Posizionamento e collegamento
Posizionamento
1. Posizionare lapparecchio in un ambiente ben aerato
e non umido.
2. Non ostruire le griglie posteriori di ventilazione:
compressore e condensatore emettono calore e
richiedono una buona aerazione per funzionare bene
e contenere i consumi elettrici.
3. Lasciare lapparecchio lontano da fonti di calore (la
luce solare diretta, una cucina elettrica).
Collegamento elettrico
Dopo il trasporto, posizionare lapparecchio verticalmente
e attendere almeno 3 ore prima di collegarlo allimpianto
elettrico. Prima di inserire la spina nella presa della
corrente, accertarsi che:
la presa abbia la messa a terra e sia a norma di legge;
la presa sia in grado di sopportare il carico massimo
di potenza della macchina, indicato nella targhetta
caratteristiche posta nel vano frigorifero in basso
a sinistra (es 150 W);
la tensione di alimentazione sia compresa nei valori
indicati nella targhetta caratteristiche, posta in basso
a sinistra (es 220-240 V);
la presa sia compatibile con la spina dellapparecchio.
In caso contrario richiedere la sostituzione della spina a
un tecnico autorizzato (vedi Assistenza); non usare
prolunghe e multiple.
! Ad apparecchio installato, il cavo elettrico e la presa della
corrente devono essere facilmente raggiungibili.
! Il cavo non deve subire piegature o compressioni.
! Il cavo deve essere controllato periodicamente
e sostituito solo da tecnici autorizzati (vedi Assistenza).
! Lazienda declina ogni responsabilità qualora
queste norme non vengano rispettate.
2
Page 3
Descrizione
dellapparecchio
Vista dinsieme
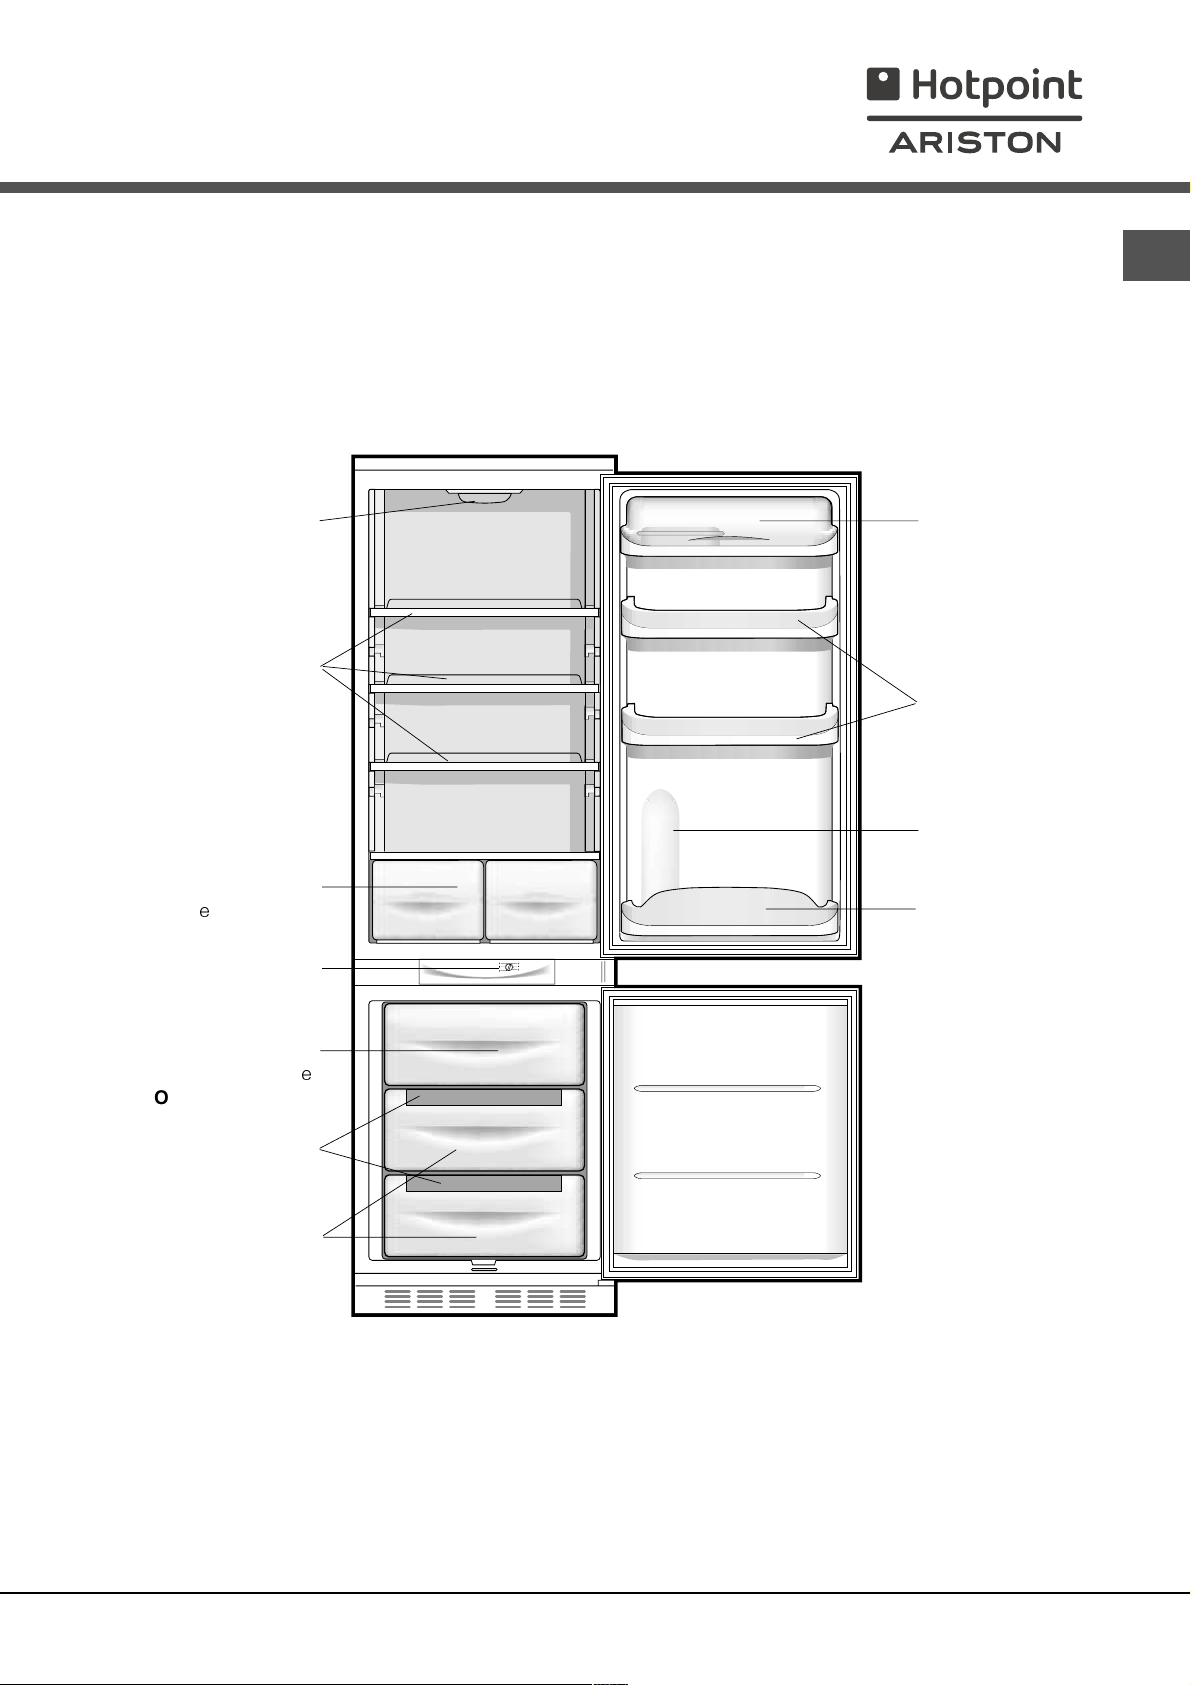
Le istruzioni sulluso valgono per diversi modelli per cui è possibile che la figura presenti particolari differenti rispetto a
quelli dellapparecchio acquistato. La descrizione degli oggetti più complessi si trova nelle pagine seguenti.
Lampadina
(vedi Manutenzione)
RIPIANO
Balconcino estraibile
con coperchio con
PORTAUOVA e
SCATOLA BURRO
Balconcino estraibile
PORTAOGGETTI
I
*
Cassetto
FRUTTA e VERDURA
Manopola
REGOLAZIONE DELLA
TEMPERATURA
Vano
CONGELAMENTO
CONSERVAZIONE
Bacinella
GHIACCIO
Ice Care
CONSERVAZIONE
Vano
Scomparto
BOTTIGLIA da 2
LITRI
Balconcino
BOTTIGLIE
e
*
Variabili per numero e/o per posizione.
Presente solo in alcuni modelli.
*
3
Page 4
Avvio e utilizzo
Avviare lapparecchio
I
! Prima di avviare lapparecchio, seguire
le istruzioni sullinstallazione (vedi Installazione).
! Prima di collegare lapparecchio pulire bene i vani
e gli accessori con acqua tiepida e bicarbonato.
1. Inserire la spina nella presa e accertarsi che si
accenda la lampada di illuminazione interna.
2. Ruotare la manopola per LA REGOLAZIONE DELLA
TEMPERATURA su un valore medio. Dopo qualche
ora sarà possibile inserire alimenti nel frigorifero.
Regolazione della temperatura
La temperatura all'interno del reparto frigorifero si regola
automaticamente in base alla posizione della manopola
del termostato.
1 = meno freddo
5 = più freddo
Si consiglia, comunque, una posizione media
Per aumentare lo spazio e disposizione e migliorare
l'aspetto estetico, questo apparecchio ha la "parte
raffreddante" posizionata all'interno della parete
posteriore del reparto frigo. Tale parete, durante il
funzionamento, si presenterà coperta di brina, oppure di
goccioline di acqua a secondo se il compressore è in
funzione o in pausa. Non preoccupatevi di questo! Il
frigorifero sta lavorando in modo normale.
Se si imposta la manopola FUNZIONAMENTO
FRIGORIFERO su valori alti, con grossi quantitativi di
alimenti e con una temperatura ambiente elevata,
lapparecchio può funzionare di continuo, favorendo
uneccessiva formazione di brina ed eccessivi consumi
elettrici: ovviare spostando la manopola verso i valori più
bassi (verrà effettuato uno sbrinamento automatico).
Negli apparecchi statici laria circola in modo naturale:
quella più fredda tende a scendere perché più pesante.
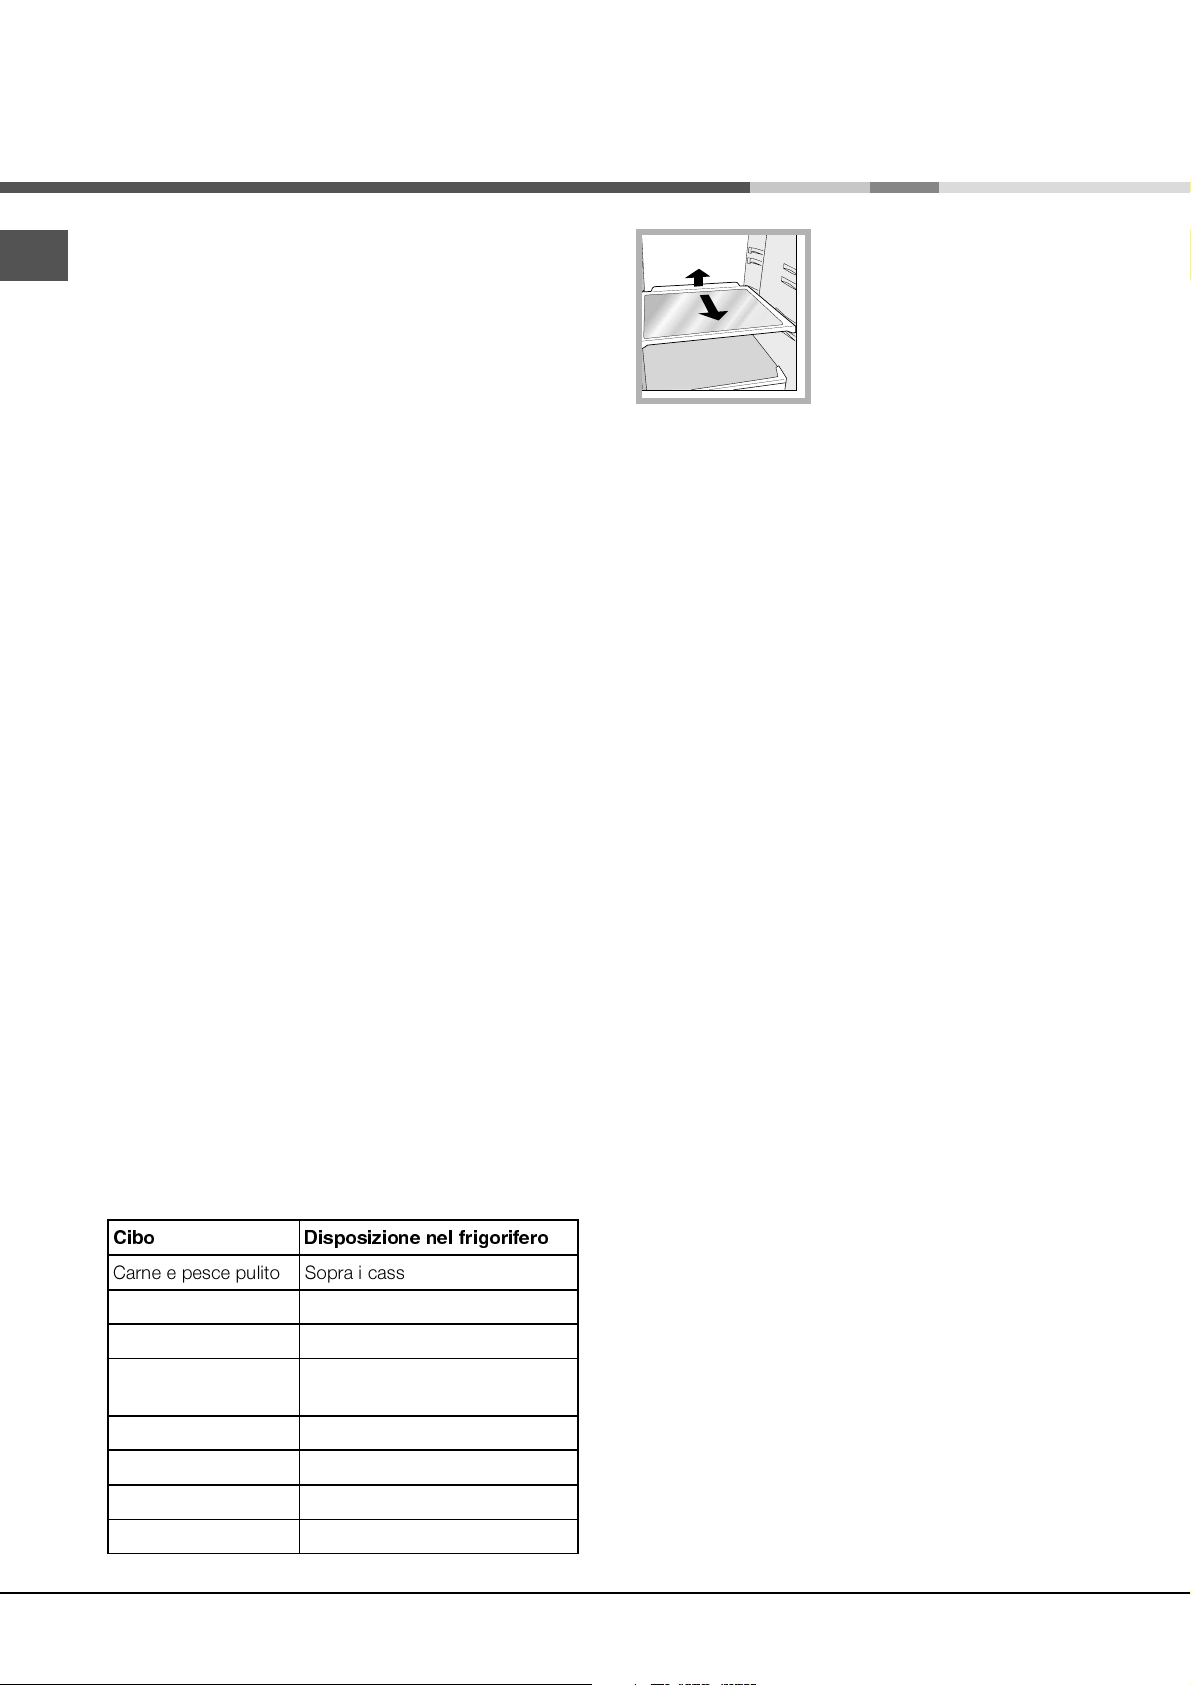
Ecco come sistemare gli alimenti:
$JCP %JTQPTJ[JPOFOFMGSJHPSJGFSP
'EVRIITIWGITYPMXS 7STVEMGEWWIXXMJVYXXEIZIVHYVE
RIPIANI: pieni o a griglia.
1
2
Sono estraibili e regolabili in
altezza grazie alle apposite
guide (vedi figura), per
linserimento di contenitori
o alimenti di notevole
dimensione. Per regolare
laltezza non è necessario
estrarre completamente il
ripiano.
Utilizzare al meglio il frigorifero
Per regolare la temperatura utilizzare la manopola
FUNZIONAMENTO FRIGORIFERO (vedi Descrizione).
Inserire soltanto alimenti freddi o appena tiepidi, non
caldi (vedi Precauzioni e consigli).
Ricordarsi che gli alimenti cotti non si mantengono più
a lungo di quelli crudi.
Non inserire liquidi in recipienti scoperti:
provocherebbero un aumento di umidità con
conseguente formazione di condensa.
Utilizzare al meglio il congelatore
Non ricongelare alimenti che stanno per scongelare o
scongelati; tali alimenti devono essere cotti per essere
consumati (entro 24 ore).
Gli alimenti freschi da congelare non devono essere posti
a contatto con quelli già congelati; vanno sistemati nel vano
superiore CONGELAMENTO e CONSERVAZIONE dove la
temperatura scende sotto i -18°C e garantisce una buona
velocità di congelamento.
Non mettere nel congelatore bottiglie di vetro
contenenti liquidi, tappate o chiuse ermeticamente,
perché potrebbero rompersi.
La quantità massima giornaliera di alimenti da
congelare è indicata sulla targhetta caratteristiche,
posta nel vano frigorifero in basso a sinistra (esempio:
Kg/24h 4).
*SVQEKKMJVIWGLM 7STVEMGEWWIXXMJVYXXEIZIVHYVE
'MFMGSXXM 7YUYEPWMEWMVMTMERS
7EPEQMTER IMR
GEWWIXXEGMSGGSPEXE
*VYXXEIZIVHYVE 2IMGEWWIXXMJVYXXEIZIVHYVE
9SZE 2IPPkETTSWMXSFEPGSRGMRS
&YVVSIQEVKEVMRE 2IPPkETTSWMXSFEPGSRGMRS
&SXXMKPMIFMFMXIPEXXI 2IKPMETTSWMXMFEPGSRGMRM
4
7YUYEPWMEWMVMTMERS
! Durante il congelamento evitare di aprire la porta.
! In caso di interruzione di corrente o di guasto,
non aprire la porta del congelatore: in questo modo
congelati e surgelati si conserveranno senza alterazioni
per circa 9-14 ore.
! Se per lungo tempo permane la temperatura ambiente
più fredda di 14°C, non si raggiungono completamente
le temperature necessarie per una lunga conservazione
nel reparto freezer e il periodo di conservazione risulterà
pertanto ridotto.
Page 5

Bacinella GHIACCIO Ice Care.
La collocazione sulla parte superiore dei cassetti ripisti
nel vano freezer garantisce una maggior pulizia (il
ghiaccio non viene più a contatto con gli alimenti) ed
ergonomia (non si sgocciola in fase di caricamento).
1. Verificare che la bacinella sia completamente vuota e
riempirla dacqua attraverso lapposito foro.
2. Fare attenzione a non superare il livello indicato (MAX
WATER LEVEL). Troppa acqua ostacola la fuoriuscita
dei ghiaccioli (se succede, attendere che il ghiaccio si
sciolga e svuotare la bacinella).
3. Ruotare la bacinella di 90°: lacqua riempie le forme
per il principio dei vasi comunicanti (vedi figura).
4. Chiudere il foro con il coperchio in dotazione e riporre
la bacinella.
5. Quando il ghiaccio sarà formato (tempo minimo circa
8 ore) battere la bacinella su una superficie dura e
bagnarne lesterno per far staccare i ghiaccioli; farli poi
uscire dal foro.
I
MAX
WATER LEVEL
MAX
WATER LEVEL
5
Page 6
Manutenzione e cura
Escludere la corrente elettrica
I
Durante i lavori di pulizia e manutenzione è necessario
isolare lapparecchio dalla rete di alimentazione
staccando la spina dalla presa.
Non è sufficiente portare la manopola per la regolazione
della temperatura sulla posizione 0 (apparecchio
spento) per eliminare ogni contatto elettrico.
Pulire lapparecchio
Le parti esterne, le parti interne e le guarnizioni in
gomma possono essere pulite con una spugnetta
imbevuta di acqua tiepida e bicarbonato di sodio o
sapone neutro. Non usare solventi, abrasivi,
candeggina o ammoniaca.
Gli accessori estraibili possono essere messi a bagno
in acqua calda e sapone o detersivo per piatti.
Sciacquarli e asciugarli con cura.
Il retro dellapparecchio tende a coprirsi di polvere, che
può essere eliminata utilizzando con delicatezza, dopo
aver spento l'apparecchio e staccato la presa di
corrente, la bocchetta lunga dellaspirapolvere,
impostato su una potenza media.
Evitare muffe e cattivi odori
Lapparecchio è fabbricato con materiali igienici
che non trasmettono odori. Per mantenere questa
caratteristica è necessario che i cibi vengano sempre
protetti e chiusi bene. Ciò eviterà anche
la formazione di macchie.
Nel caso si voglia spegnere lapparecchio per un lungo
periodo, pulire linterno e lasciare le porte aperte.
Sbrinare il vano congelatore
Se lo strato di brina è superiore ai 5 mm è necessario
effettuare lo sbrinamento manuale:
1. posizionare la manopola per LA REGOLAZIONE
DELLA TEMPERATURA nella posizione 0.
2. Avvolgere surgelati e congelati in carta da giornale e
metterli in un altro congelatore o in un luogo fresco.
3. Lasciare aperta la porta finché la brina non si sia
sciolta completamente; facilitare loperazione
sistemando nel vano congelatore contenitori con
acqua tiepida.
4. Pulire e asciugare con cura il vano congelatore prima
di riaccendere lapparecchio.
5. Alcuni apparecchi
sono dotati del SISTEMA
DRAIN per convogliare
lacqua allesterno:
inserire il raschietto in
dotazione nell'apposita
fessura posta in basso e
lasciare che l'acqua
defluisca in un
contenitore (vedi figura)
6. Prima di inserire i cibi nel vano congelatore attendere
circa 2 ore per il ripristino delle condizioni ideali di
conservazione.
Sbrinare lapparecchio
! Attenersi alle istruzioni sottostanti.
Per sbrinare lapparecchio non usare oggetti taglienti ed
appuntiti che potrebbero danneggiare irreparabilmente il
circuito refrigerante.
Sbrinare il vano frigorifero
Il frigorifero è dotato di sbrinamento automatico: lacqua
viene convogliata verso la parte posteriore da un
apposito foro di scarico (vedi figura) dove il calore
prodotto dal
compressore la fa
evaporare. Lunico
intervento da fare
periodicamente consiste
nel pulire il foro di scarico
affinché lacqua possa
defluire liberamente.
Sostituire la lampadina
Per sostituire la lampadina di illuminazione del vano
frigorifero, staccare la spina dalla presa di corrente.
Seguire le istruzioni riportate qui sotto.
Accedere alla lampada
A
B
(A) svitando la vite di
fissaggio (B) posizionata
nella parte posteriore del
comprilampada, come
indicato (vedi figura).
Sostituirla con una
analoga, di potenza non
superiore a 15 W.
6
Page 7
Precauzioni e consigli
! Lapparecchio è stato progettato e costruito
in conformità alle norme internazionali di sicurezza.
Queste avvertenze sono fornite per ragioni
di sicurezza e devono essere lette attentamente.
Questa apparecchiatura è conforme
alle seguenti Direttive Comunitarie:
- 73/23/CEE del 19/02/73 (Bassa Tensione)
e successive modificazioni;
- 89/336/CEE del 03/05/89 (Compatibilità
Elettromagnetica) e successive modificazioni.
- 2002/96/CE..
Sicurezza generale
Lapparecchio è stato concepito per un uso di tipo
non professionale allinterno dellabitazione.
Lapparecchio deve essere usato per conservare e
congelare cibi, solo da persone adulte e secondo le
istruzioni riportate in questo libretto.
Lapparecchio non va installato allaperto, nemmeno
se lo spazio è riparato, perché è molto pericoloso
lasciarlo esposto a pioggia e temporali.
Non toccare lapparecchio a piedi nudi o con le mani
o i piedi bagnati o umidi.
Non toccare le parti interne raffreddanti: cè pericolo
di ustionarsi o ferirsi.
Smaltimento
I
Smaltimento del materiale di imballaggio: attenersi alle
norme locali, così gli imballaggi potranno essere
riutilizzati.
La direttiva Europea 2002/96/CE sui rifiuti di
apparecchiature elettriche ed elettroniche (RAEE),
prevede che gli elettrodomestici non debbano essere
smaltiti nel normale flusso dei rifiuti solidi urbani. Gli
apparecchi dismessi devono essere raccolti
separatamente per ottimizzare il tasso di recupero e
riciclaggio dei materiali che li compongono ed
impedire potenziali danni per la salute e lambiente. Il
simbolo del cestino barrato è riportato su tutti i
prodotti per ricordare gli obblighi di raccolta separata.
Per ulteriori informazioni, sulla corretta dismissione
degli elettrodomestici, i detentori potranno rivolgersi al
servizio pubblico preposto o ai rivenditori.
Risparmiare e rispettare lambiente
Installare lapparecchio in un ambiente fresco e ben
aerato, proteggerlo dallesposizione diretta ai raggi
solari, non disporlo vicino a fonti di calore.
Per introdurre o estrarre gli alimenti, aprire le porte
dellapparecchio il più brevemente possibile.
Ogni apertura delle porte causa un notevole dispendio
di energia.
Non staccare la spina dalla presa della corrente
tirando il cavo, bensì afferrando la spina.
È necessario staccare la spina dalla presa prima di
effettuare operazioni di pulizia e manutenzione. Non è
sufficiente portare le manopole per la regolazione
della temperatura sulla posizione 0 (apparecchio
spento) per eliminare ogni contatto elettrico.
In caso di guasto, in nessun caso accedere ai
meccanismi interni per tentare una riparazione.
Non utilizzare, allinterno degli scomparti conservatori
di cibi congelati, utensili taglienti ed appuntiti o
apparecchi elettrici se non sono del tipo
raccomandato dal costruttore.
Non mettere in bocca cubetti appena estratti dal
congelatore.
Non permettere ai bambini di giocare con
lapparecchio. In nessun caso devono sedersi sui
cassetti o appendersi alla porta.
Gli imballaggi non sono giocattoli per bambini.
Non riempire con troppi alimenti lapparecchio:
per una buona conservazione, il freddo deve
poter circolare liberamente. Se si impedisce la
circolazione, il compressore lavorerà continuamente.
Non introdurre alimenti caldi: alzerebbero la
temperatura interna costringendo il compressore a un
grosso lavoro, con grande spreco di energia elettrica.
Sbrinare lapparecchio qualora si formasse del
ghiaccio (vedi Manutenzione); uno spesso strato
di ghiaccio rende più difficile la cessione di freddo
agli alimenti e fa aumentare il consumo di energia.
Mantenere efficienti e pulite le guarnizioni, in modo
che aderiscano bene alle porte e non lascino uscire il
freddo (vedi Manutenzione).
7
Page 8
Anomalie e rimedi
Può accadere che lapparecchio non funzioni. Prima di telefonare allAssistenza (vedi Assistenza), controllare
I
che non si tratti di un problema facilmente risolvibile aiutandosi con il seguente elenco.
Anomalie:
La lampada di illuminazione
interna non si accende.
Il frigorifero e il congelatore
raffreddano poco.
Nel frigorifero gli alimenti
si gelano.
Il motore funziona di continuo.
Lapparecchio emette
molto rumore.
Possibili cause / Soluzione:
La spina non è inserita nella presa della corrente o non abbastanza da
fare contatto, oppure in casa non cè corrente.
Le porte non chiudono bene o le guarnizioni sono rovinate.
Le porte vengono aperte molto spesso.
La manopola per LA REGOLAZIONE DELLA TEMPERATURA non è in
posizione corretta
Il frigorifero o il congelatore sono stati riempiti eccessivamente.
La temperatura ambiente di lavoro del prodotto è inferiore a 14°C.
La manopola per LA REGOLAZIONE DELLA TEMPERATURA non è in
posizione corretta.
Gli alimenti sono a contatto con la parete posteriore.
La porta non è ben chiusa o viene aperta di continuo.
La temperatura dellambiente esterno è molto alta.
Lo spessore della brina supera i 2-3 mm (vedi Manutenzione).
Lapparecchio non è stato installato ben in piano (vedi Installazione).
Lapparecchio è stato installato tra mobili o oggetti che vibrano
ed emettono rumori.
Il gas refrigerante interno produce un leggero rumore anche quando
il compressore è fermo: non è un difetto, è normale.
La temperatura di alcune parti
esterne del frigorifero è elevata.
La parete in fondo alla cella frigo
presenta brina o goccioline di
acqua.
Sul fondo del frigo cè dellacqua.
Le temperature elevate sono necessarie per evitare la formazioni di
condensa in particolari zone del prodotto
Si tratta del normale funzionamento del prodotto.
Il foro di scarico dellacqua è otturato (vedi Manutenzione).
8
Page 9
Assistenza
Prima di contattare lAssistenza:
Verificare se lanomalia può essere risolta autonomamente (vedi Anomalie e Rimedi).
In caso negativo, contattare il Numero Unico Nazionale 199.199.199.
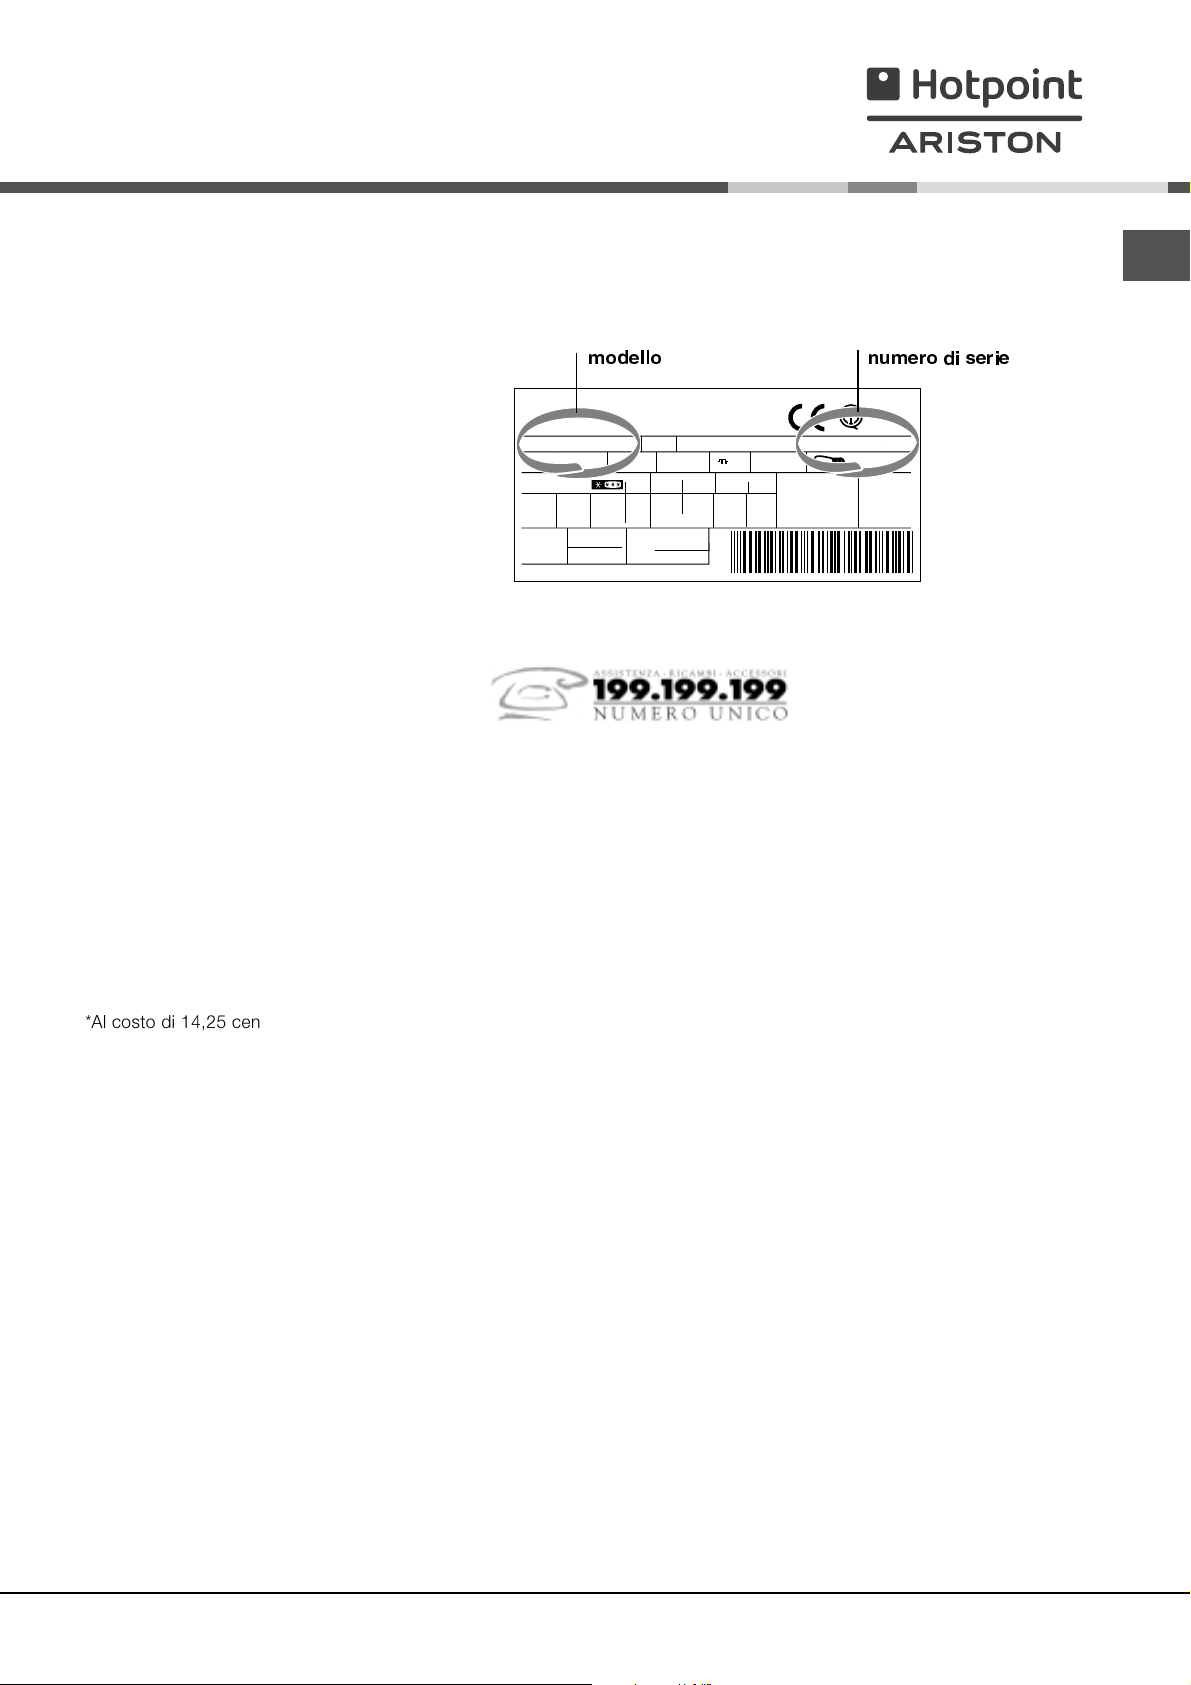
modello
numero di serie
Comunicare:
il tipo di anomalia
il modello della macchina (Mod.)
il numero di serie (S/N)
Queste informazioni si trovano
sulla targhetta caratteristiche posta
nel vano frigorifero in basso a sinistra.
RG 2330
Mod.
220 - 240 V- 50 Hz 150 W
340
Total
Gross
Bruto
Brut
Compr.
R 134 a
Syst.
kg 0,090
Kompr.
Made in Italy 13918
Gross
Bruto
Brut
75
Test
P.S-I.
TI
Net
Util
Utile
Pressure
HIGH-235
LOW 140
93139180000 S/N 704211801
Cod.
Gross
Bruto
Brut
W
Fuse
A
Freez. Capac
Poder de Cong
kg/24 h
4,0
Max 15 w
Class
Clase
Classe
N
Assistenza Attiva 7 giorni su 7
Se nasce il bisogno di assistenza o manutenzione basta chiamare il Numero Unico Nazionale 199.199.199* .
Un operatore sarà a tua completa disposizione per fissare un appuntamento con un tecnico del Centro Assistenza
Autrorizzato più vicino a casa tua.
È attivo 7 giorni su 7, sabato e domenica compresi, e non lascia mai inascoltata una richiesta.
I
*Al costo di 14,25 centesimi di Euro al minuto(iva inclusa) dal Lun. al Ven. dalle 08:00 alle 18:30, il Sab. dalle 08:00 alle
13:00 e di 5,58 centesimi di Euro al minuto (iva inclusa) dal Lun. al Ven. dalle 18:30 alle 08:00, il Sab. dalle 13:00 alle
08:00 e i giorni festivi, per chi chiama da telefono fisso.
Per chi chiama da radiomobile le tariffe sono legate al piano tariffario delloperatore telefonico utilizzato.
9
Page 10
195061964.00
01/2007 - Xerox Business Services
I
10
Page 11
Operating Instructions
REFRIGERATOR/FREEZER COMBINATION
I
Italiano, 1
D
Deutsch, 31
P
Portuges, 61
BCB 311/HA
GB
English, 11
NL
Nederlands
, 41
F
Français, 21
E
Espanol, 51
Contents
GB
Installation, 11
Positioning and connection
Description of the appliance, 12
Overall view
Start-up and use, 13-14
Starting the appliance
Setting the temperature
Using the refrigerator to its full potential
Using the freezer to its full potential
Maintenance and care, 15
Switching the appliance off
Cleaning the appliance
Avoiding mould and unpleasant odours
Defrosting the appliance
Replacing the light bulb
Precautions and tips, 16
General safety
Disposal
Respecting and conserving the environment
Troubleshooting, 17
Assistance, 18
Page 12

Installation
GB
! Before placing your new appliance into operation please
read these operating instructions carefully. They contain
important information for safe use, for installation and for
care of the appliance.
! Please keep these operating instructions for future
reference. Pass them on to possible new owners of the
appliance.
Positioning and connection
Positioning
1. Place the appliance in a well-ventilated humidity-free
room.
2. Do not obstruct the rear fan grills. The compressor and
condenser give off heat and require good 3. Ensure
the appliance is away from any sources of heat (direct
sunlight, electric stove, etc.).
Electrical connections
After the appliance has been transported, carefully place it
vertically and wait at least 3 hours before connecting it to
the electricity mains. Before inserting the plug into the
electrical socket ensure the following:
The appliance is earthed and the plug is compliant with
the law.
The socket can withstand the maximum power of the
appliance, which is indicated on the data plate located on
the bottom left side of the fridge (e.g. 150 W).
The voltage must be in the range between the values
indicated on the data plate located on the bottom left
side (e.g. 220-240V).
The socket is compatible with the plug of the appliance.
If the socket is incompatible with the plug, ask an
authorised technician to replace it (see Assistance). Do
not use extension cords or multiple sockets.
! Once the appliance has been installed, the power supply
cable and the electrical socket must be easily accessible.
! The cable must not be bent or compressed.
! The cable must be checked regularly and replaced by
authorised technicians only (see Assistance).
! The manufacturer declines any liability should
these safety measures not be observed.
12
Page 13
Description of the
appliance
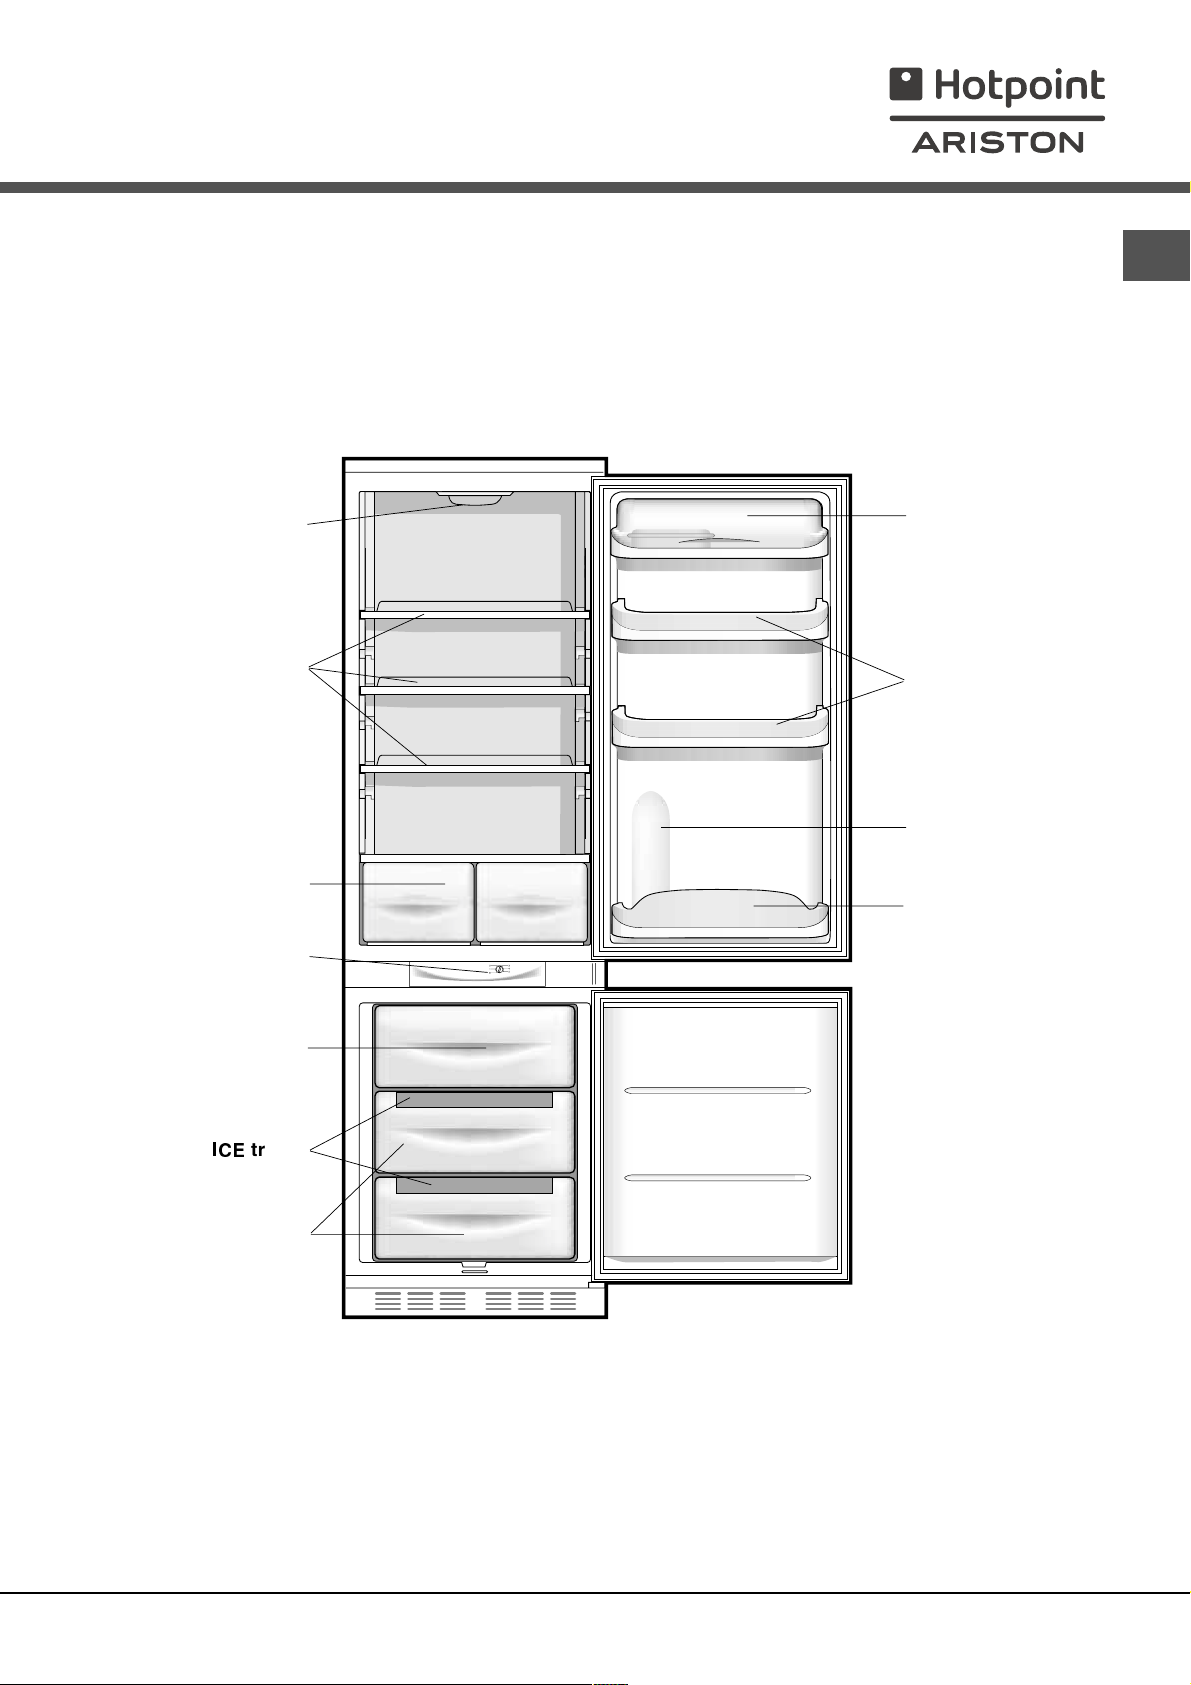
Overall view
The instructions contained in this manual are applicable to different model refrigerators. The diagrams may not directly
represent the appliance purchased. For more complex features, consult the following pages.
LAMP
(see Maintenance)
SHELVES
Removable lidded
shelf with EGG TRAY
and BUTTER DISH
Removable
multipurpose
SHELVES
GB
*
FRUIT and
VEGETABLE bin
TEMPERATURE
CONTROL
FREEZER and
STORAGE
compartment
ICE
trays
Ice Care
STORAGE
compartment
Compartment for a
2 LITRE BOTTLE
BOTTLE shelf
*
Varies by number and/or position.
Available only on certain models.
*
13
Page 14
Start-up and use
Starting the appliance
GB
! Before starting the appliance, follow the
installation instructions (see Installation).
! Before connecting the appliance, clean the
compartments and accessories well with lukewarm water
and bicarbonate.
1. Insert the plug into the socket and ensure that the
internal light illuminates.
2. Turn the TEMPERATURE ADJUSTMENT knob to an
average value. After a few hours you will be able to put
food in the refrigerator.
Setting the temperature
The temperature inside the refrigerator compartment
automatically adjusts itself according to the position of the
thermostat knob.
1 = warmest 5 = coldest
We recommend, however, a medium position.
The cooling section of the refrigerator is located inside the
back wall of the refrigerator compartment for increased
space and improved aesthetics. During operation, the
back wall will be covered in frost or water droplets
depending on whether the compressor is operating or
paused. Do not worry, the refrigerator is functioning
normally.
If the TEMPERATURE ADJUSTMENT knob has been set
on high values with large quantities of food and with a
high ambient temperature, the appliance can operate
continuously, resulting in excessive frost formation and
excessive energy consumption: compensate for this by
shifting the knob towards lower values (defrosting will
occur automatically).
In static appliances, the air circulates in a natural way: the
colder air tends to move downwards as it is heavier. The
food should be stored as follows:
)RRG
Fresh fish and meat
Fresh cheese
Cooked food On any shelf
Salami, bread loaf,
chocolate
Fruit and vegetables In the fruit and vegetable bins
Eggs On the shelf provided
Butter and margarine On the shelf provided
$UUDQJHPHQWLQVLGHWKH
UHIULJHUDWRU
Above the fruit and vegetable
bins
Above the fruit and vegetable
bins
On any shelf
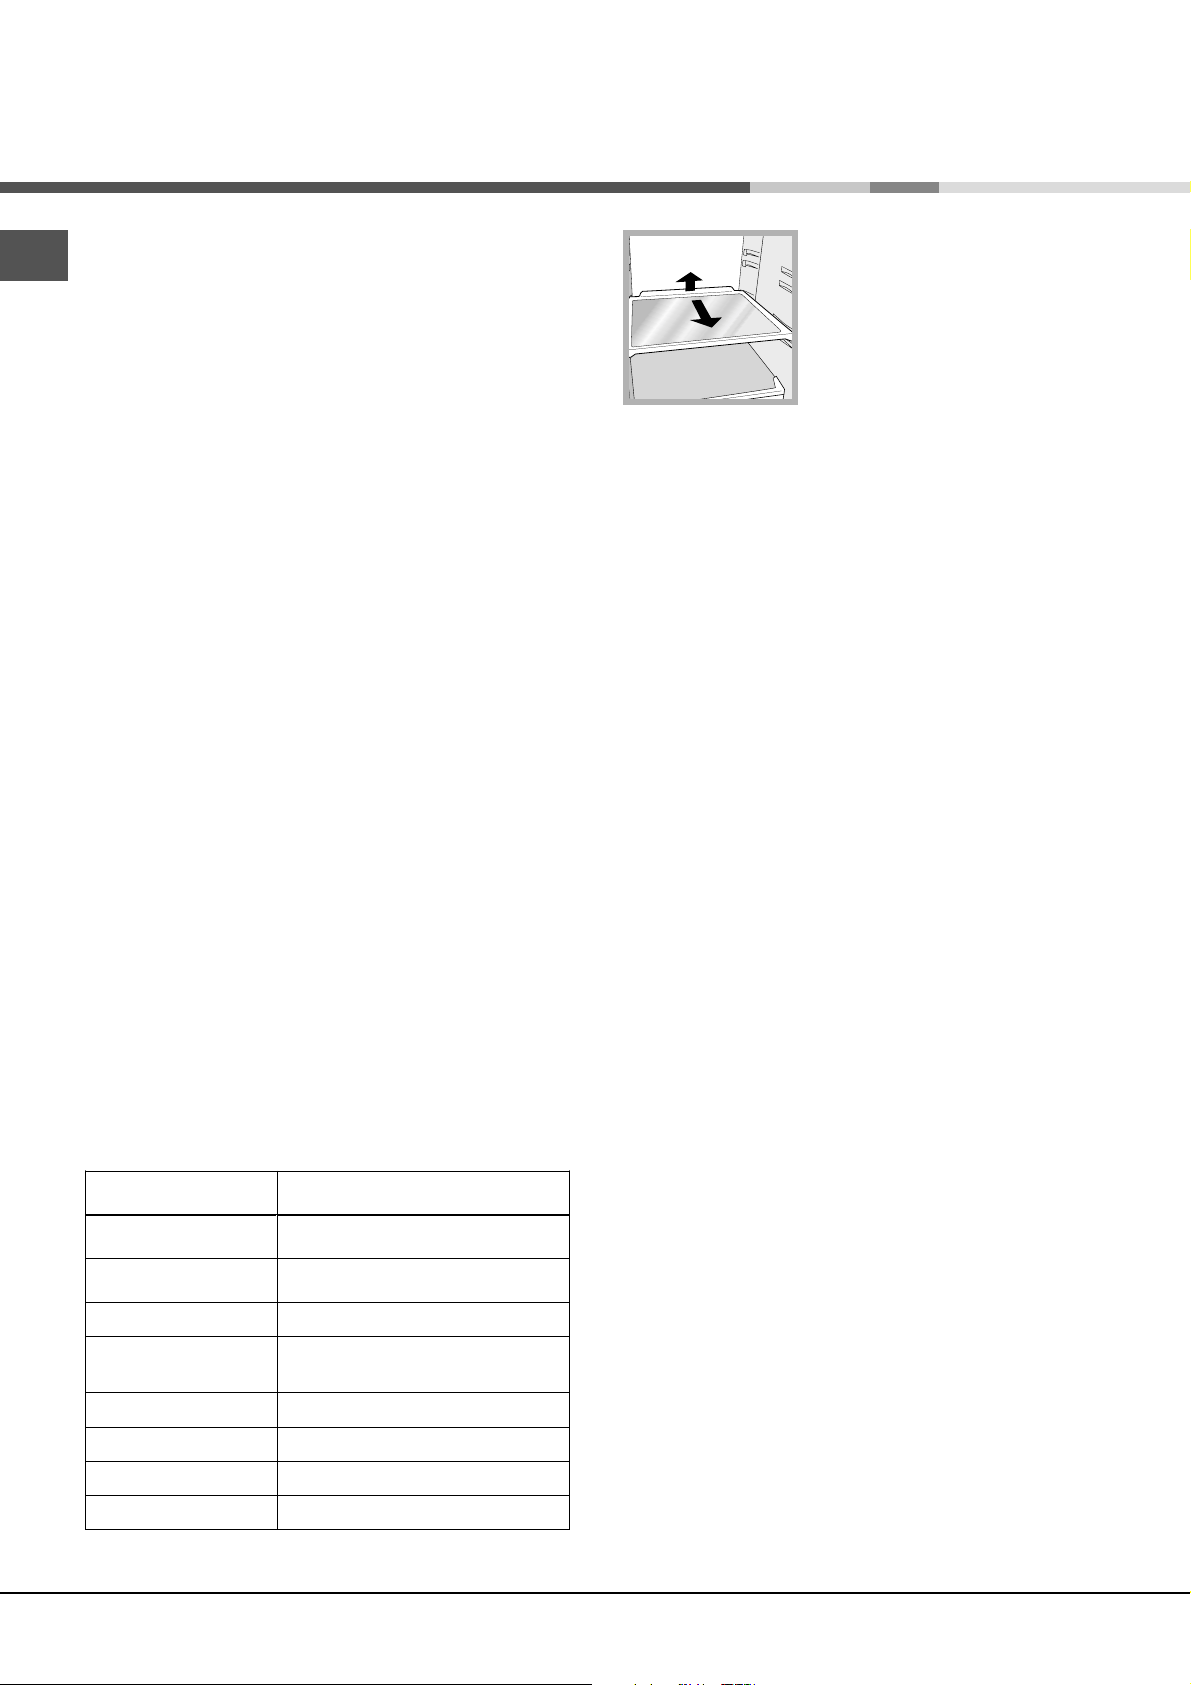
SHELVES: with or without grill.
1
2
Due to the special guides the
shelves are removable and the
height is adjustable (see
diagram), allowing easy storage
of large containers and food.
Height can be adjusted without
complete removal of the shelf.
Using the refrigerator to its full potential
Use the REFRIGERATOR OPERATION knob to adjust
the temperature (see Description).
Place only cold or lukewarm foods in the compartment,
not hot foods (see Precautions and tips).
Remember that cooked foods do not last longer than
raw foods.
Do not store liquids in open containers. They will
increase humidity in the refrigerator and cause
condensation to form.
Using the freezer to its full potential
Do not re-freeze food that is defrosting or that has already
been defrosted. These foods must be cooked and eaten
(within 24 hours).
Fresh food that needs to be frozen must not come into
contact with food that has already been defrosted. Fresh
food must be stored above the grill in the freezer
compartment and if possible be in direct contact with the
walls (side and rear), where the temperature drops below
-18°C and guarantees rapid freezing.
Do not place glass bottles which contain liquids, and
which are corked or hermetically sealed in the freezer
because they could break.
The maximum quantity of food that may be frozen daily is
indicated on the plate containing the technical properties
located on the bottom left side of the refrigerator
compartment (for example: Kg/24h: 4)
! Do not open the door during freezing.
! If there is a power cut or malfunction, do not open the
freezer door. This will help maintain the temperature inside
the freezer, ensuring that foods are conserved for at least 9 14 hours.
! If the room temperature drops below 14°C for an extended
period of time, the ideal temperature will not be reached in
the freezer compartment and food preservation will be
reduced.
Bottles, drinks, milk On the shelf provided
14
Page 15
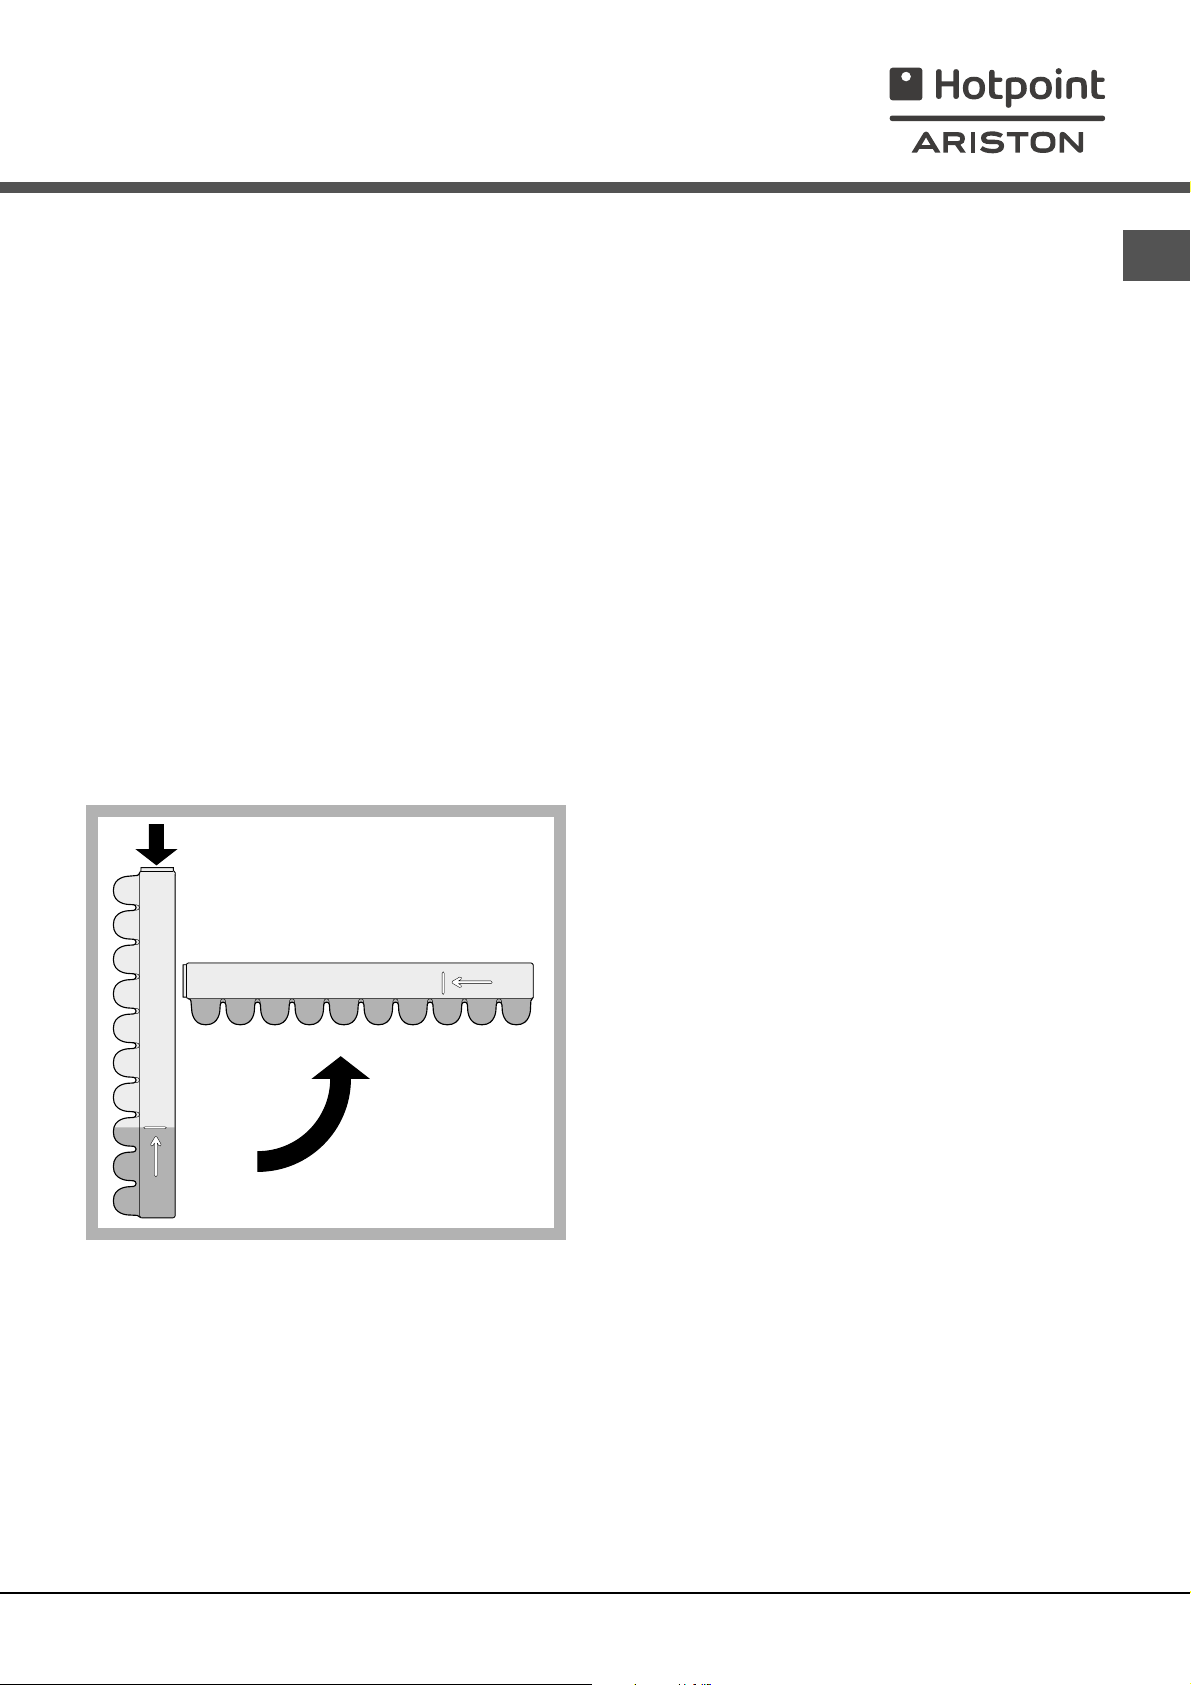
Ice Care.
The Easy Ice trays are set into the top part of the freezer
drawers to maximise the space within the freezer. The
trays are drip-free and sealed to prevent food from tainting
the ice cubes.
1. Check that the tray is completely empty and fill it with
water through the opening provided.
2. Take care not to exceed the level indicated (MAX
WATER LEVEL). Excess water prevents the ice cubes
from dispensing (if this happens, wait for the ice to melt
and empty the tray).
3. Turn the tray 90°: due to the connected compartments
each mould fills with water (see diagram).
4. Close the opening with the lid provided and put the tray
back.
5. When the ice has formed (minimum time approximately 8
hours) knock the tray against a hard surface and wet the
outside so that the ice cubes come loose and take them
out through the opening.
GB
MAX
WATER LEVEL
MAX
WATER LEVEL
15
Page 16
Maintenance and care
Switching the appliance off
GB
During cleaning and maintenance it is necessary to
disconnect the appliance from the electricity supply.
It is not sufficient to set the temperature adjustment knobs
0
(appliance off) to eliminate all electrical contact.
on
Cleaning the appliance
The external and internal parts, as well as the rubber
seals may be cleaned using a sponge that has been
soaked in lukewarm water and bicarbonate of soda or
neutral soap. Do not use solvents, abrasive products,
bleach or ammonia.
The removable accessories may be soaked in warm
water and soap or dishwashing liquid. Rinse and dry
them carefully.
The back of the appliance may collect dust which can be
removed by delicately using the hose of a vacuum
cleaner set on medium power. The appliance must be
switched off and the plug must be pulled out before
cleaning the appliance.
Avoiding mould and unpleasant odours
Defrosting the freezer compartment
If the frost layer is greater than 5 mm, it is necessary to
defrost manually:
1. Set the TEMPERATURE ADJUSTMENT knob to the
0
position
2. Wrap frozen foods in newspaper and place them in
another freezer or in a cool place.
3. Leave the door open until the frost has melted
completely. This can be made easier by placing
containers with lukewarm water in the freezer
compartment.
4. Clean and dry the freezer compartment carefully before
switching the appliance on again.
.
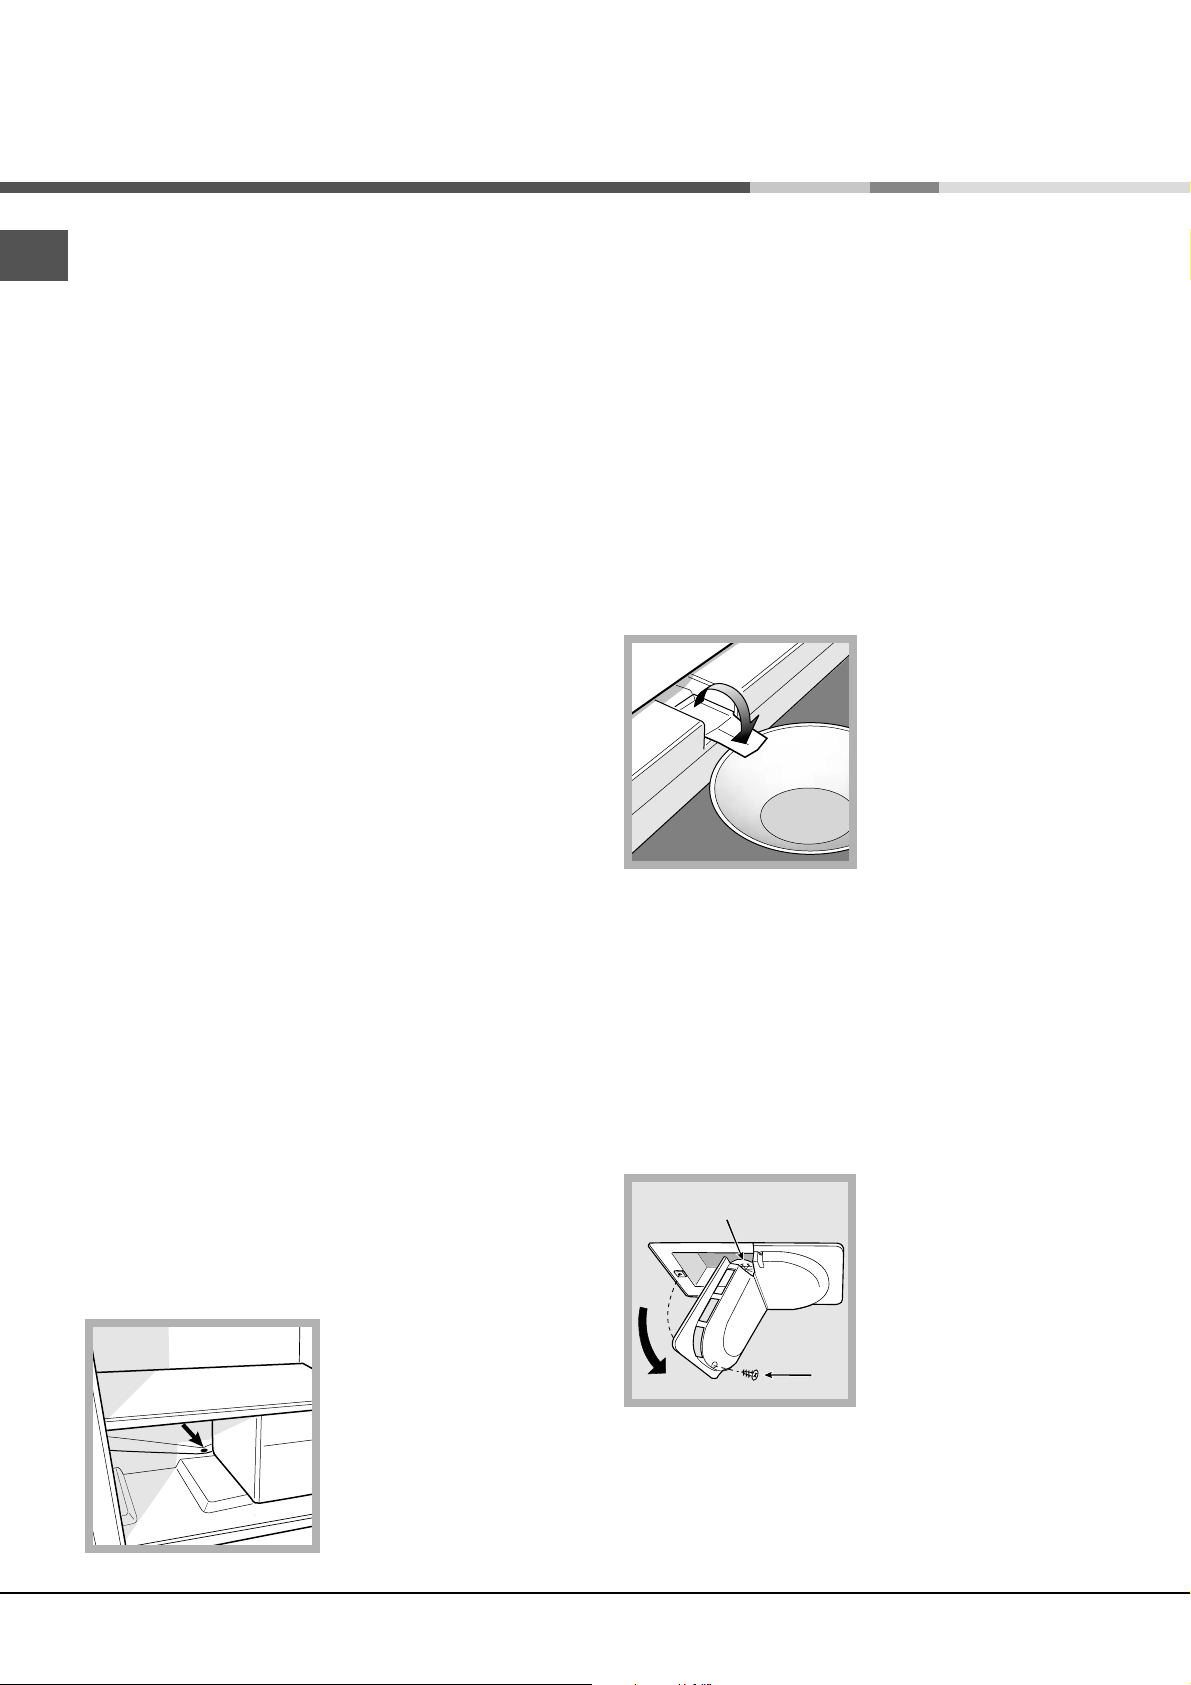
5. Certain appliances are
fitted with the DRAIN
SYSTEM to lead the water
outside: insert the scraper
into the slot provided at the
bottom and let the water
flow into a container (see
diagram).
The appliance is manufactured with hygienic materials
which are odour free. In order to maintain an odour free
refrigerator and to prevent the formation of stains, food
must always be covered or sealed properly.
If you want to switch the appliance off for an extended
period of time, clean the inside and leave the doors
open.
Defrosting the appliance
! Follow the instructions below.
Do not use objects with sharp or pointed edges to defrost
the appliance as these may damage the refrigeration circuit
beyond repair.
Defrosting the refrigerator compartment
The refrigerator has an automatic defrosting function: water
is ducted to the back of the appliance by a special
discharge outlet (see
diagram) where the heat
produced by the
compressor causes it to
evaporate. It is necessary
to clean the discharge hole
regularly so that the water
can flow out easily.
6. Wait for approximately 2 hours, i.e. until the ideal
storage conditions have been restored, before placing
food in the freezer compartment.
Replacing the light bulb
To replace the light bulb in the refrigerator compartment,
pull out the plug from the electrical socket. Follow the
instructions below.
Access the light bulb (A) by
A
B
unscrewing the fixing
screw (B) which is located
at the back of the
lampcover, as shown (see
diagram). Replace it with a
similar light bulb, the power
of which should not
exceed 15W.
16
Page 17
Precautions and tips
! The appliance was designed and manufactured in
compliance with international safety standards. The
following warnings are provided for safety reasons and
must be read carefully.
This appliance complies with the following
Community Directives:
- 73/23/EEC of 19/02/73 (Low Voltage) and
subsequent amendments;
-89/336/EEC of 03.05.89 (Electromagnetic
Compatibility) and subsequent amendments;
- 2002/96/CE..
General safety
The appliance was designed for domestic use inside the
home and is not intended for commercial or industrial
use.
The appliance must be used to store and freeze food
products by adults only and according to the instructions
in this manual.
The appliance must not be installed outdoors, even in
covered areas. It is extremely dangerous to leave the
appliance exposed to rain and storms.
Do not touch the appliance with bare feet or with wet or
moist hands and feet.
Do not touch the internal cooling elements: this could
cause skin abrasions or frost/freezer burns.
Disposal
GB
Observe local environmental standards when disposing
packaging material for recycling purposes.
The European Directive 2002/96/EC on Waste
Electrical and Electronic Equipment (WEEE), requires
that old household electrical appliances must not be
disposed of in the normal unsorted municipal waste
stream. Old appliances must be collected separately in
order to optimise the recovery and recycling of the
materials they contain and reduce the impact on
human health and the environment. The crossed out
wheeled bin symbol on the product reminds you of
your obligation, that when you dispose of the appliance
it must be separately collected.
Consumers should contact their local authority or
retailer for information concerning the correct disposal
of their old appliance.
Respecting and conserving the
environment
Install the appliance in a fresh and well-ventilated room.
Ensure that it is protected from direct sunlight and do
not place it near heat sources.
Try to avoid keeping the door open for long periods or
opening the door too frequently in order to conserve
energy.
When unplugging the appliance always pull the plug from
the mains socket, do not pull on the cable.
Before cleaning and maintenance, always switch off the
appliance and disconnect it from the electrical supply. It is
not sufficient to set the temperature adjustment knobs on
0 (appliance off) to eliminate all electrical contact.
In the case of a malfunction, under no circumstances
should you attempt to repair the appliance yourself.
Repairs carried out by inexperienced persons may cause
injury or further malfunctioning of the appliance.
Do not use any sharp or pointed utensils or electrical
equipment - other than the type recommended by the
manufacturer - inside the frozen food storage
compartments.
Do not put ice cubes taken directly from the freezer into
your mouth.
Do not allow children to tamper with the controls or play
with the appliance. Under no circumstance should they
be allowed to sit on the bins or to hang from the door.
Keep packaging material out of the reach of children! It
can become a choking or suffocation hazard.
Do not fill the appliance with too much food: cold air
must circulate freely for food to be preserved properly.
If circulation is impeded, the compressor will work
continuously.
Do not place hot food directly into the refrigerator. The
internal temperature will increase and force the
compressor to work harder and will consume more
energy.
Defrost the appliance if ice forms (see Maintenance). A
thick layer of ice makes cold transference to food
products more difficult and results in increased energy
consumption.
Regularly check the door seals and wipe clean to
ensure they are free of debris and to prevent cold air
from escaping (see Maintenance).
17
Page 18
Troubleshooting
If the appliance does not work, before calling for Assistance (see Assistance), check for a solution from the following list.
GB
Malfunctions:
Possible causes / Solutions:
The internal light does not
illuminate.
The refrigerator and the freezer do
not cool well.
The food inside the refrigerator is
beginning to freeze.
The motor runs continuously.
The appliance makes a lot of noise.
Some of the external parts of the
refrigerator become hot.
The plug has not been inserted into the electrical socket, or not far enough
to make contact, or there is no power in the house.
The doors do not close properly or the seals are damaged.
The doors are opened too frequently.
The TEMPERATURE ADJUSTMENT knob is not in the correct position
The refrigerator or the freezer have been over-filled.
The atmospheric temperature of the area surrounding the appliance is
lower than 14°C.
The TEMPERATURE ADJUSTMENT knob is not in the correct position.
The food is in contact with the back inside wall of the refrigerator.
The door is not closed properly or is continuously opened.
The outside ambient temperature is very high.
The thickness of the frost exceeds 2-3 mm (see Maintenance).
The appliance has not been installed on a level surface (see Installation).
The appliance has been installed between cabinets that vibrate and make
noise.
The internal refrigerant makes a slight noise even when the compressor is
off. This is not a defect, it is normal.
These raised temperatures are necessary in order to avoid the formation of
condensation on certain parts of the product.
The back wall of the refrigerator unit
is covered in frost or droplets of
water.
There is water at the bottom of the
refrigerator.
This shows the appliance is operating normally.
The water discharge hole is blocked (see Maintenance).
18
Page 19
Assistance
Before calling for Assistance:
Check if the malfunction can be solved on your own (see Troubleshooting).
If after all the checks, the appliance still does not operate or the problem persists, call the nearest Service
Centre
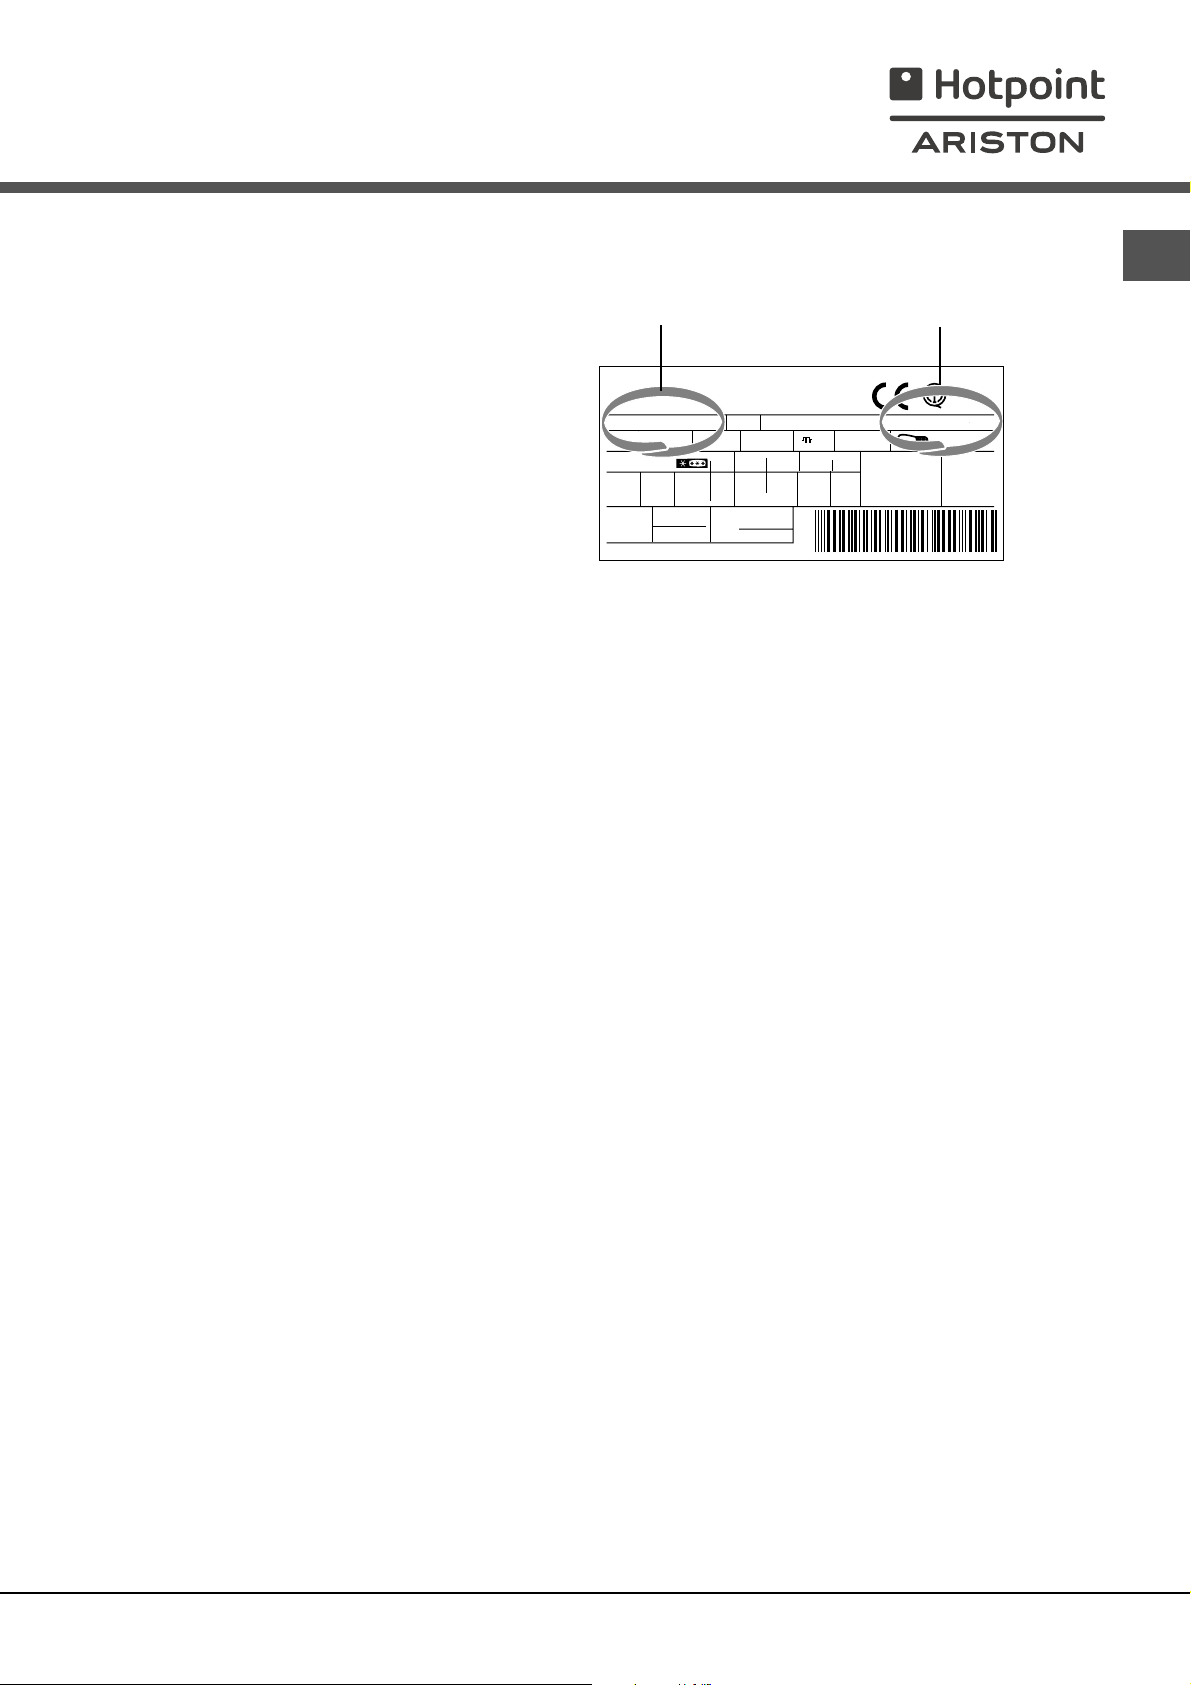
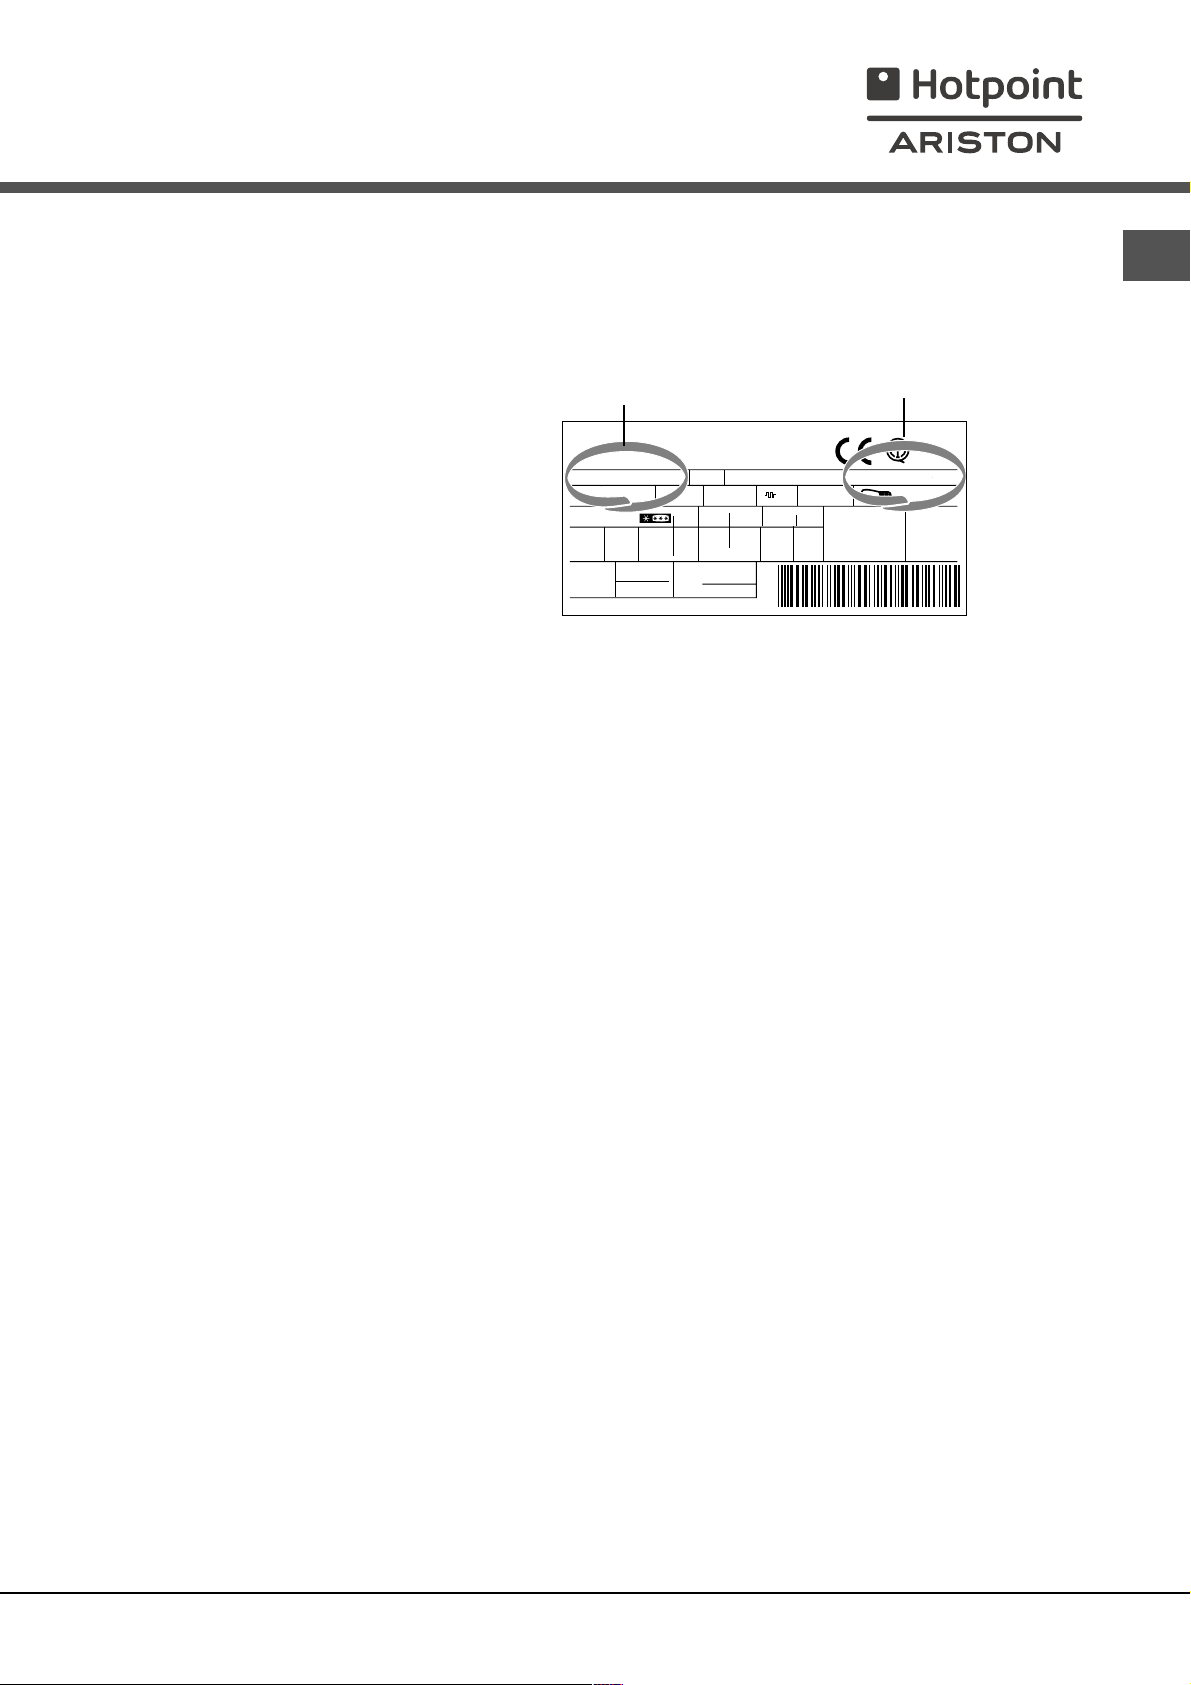
model serial number
Communicating:
type of malfunction
appliance model (Mod.)
serial number (S/N)
This information can be found on the data plate
located on the bottom left side of the
refrigerator compartment.
Gross
Bruto
Brut
TI
75
Test
P.S-I.
RG 2330
Mod.
220 - 240 V- 50 Hz 150 W
340
Total
Gross
Bruto
Brut
Compr.
R 134 a
Syst.
kg 0,090
Kompr.
Made in Italy 13918
93139180000 S/N 704211801
Net
Util
Utile
Pressure
HIGH-235
LOW 140
Cod.
Gross
Bruto
Brut
Fuse
W
A
Freez. Capac
Poder de Cong
4,0
kg/24 h
Max 15 w
Class
Clase
Classe
N
Never call on unauthorized technicians and always refuse spare parts which are not originals.
GB
19
Page 20
GB
195061964.00
01/2007 - Xerox Business Services
20
Page 21
Mode demploi
COMBINE REFRIGERATEUR/CONGELATEUR
I
Italiano, 1
D
Deutsch, 31
P
Portuges, 61
BCB 311/HA
GB
English, 11
NL
Nederlands
, 41
F
Français,21
E
Espanol, 51
Sommaire
F
Installation, 22
Mise en place et raccordement
Description de lappareil, 23
Vue densemble
Mise en marche et utilisation, 24-25
Mise en service de lappareil
Réglage de la température
Pour profiter à plein de votre réfrigérateur
Pour profiter à plein de votre congélateur
Entretien et soins, 26
Mise hors tension
Nettoyage de lappareil
Contre la formation de moisissures et de mauvaises odeurs
Dégivrage de lappareil
Remplacement de lampoule déclairage
Précautions et conseils, 27
Sécurité générale
Mise au rebut
Economies et respect de lenvironnement
Anomalies et remèdes, 28
Assistance, 29
Page 22
Installation
! Conservez ce mode demploi pour pouvoir le consulter à
F
tout moment. En cas de vente, de cession ou de
déménagement, veillez à ce quil suive lappareil pour
informer le nouveau propriétaire sur son fonctionnement et
lui fournir les conseils correspondants.
! Lisez attentivement les instructions : elles contiennent des
conseils importants sur linstallation, lutilisation et la
sécurité de votre appareil.
Mise en place et raccordement
Mise en place
1. Placez lappareil dans une pièce bien aérée et non
humide.
2. Ne bouchez pas les grilles daération arrière : le
compresseur et le condensateur produisent de la chaleur
et exigent une bonne aération pour bien fonctionner et
réduire la consommation délectricité.
3. Installez lappareil loin de sources de chaleur (rayons
directs du soleil, cuisinière électrique).
Raccordement électrique
Après le transport, placez lappareil à la verticale et
attendez au moins 3 heures avant de le raccorder à
linstallation électrique. Avant de brancher la fiche dans la
prise de courant, assurez-vous que :
la prise est bien munie dune terre conforme à la loi;
la prise est bien apte à supporter la puissance maximale
de lappareil, indiquée sur la plaquette signalétique
placée à lintérieur du compartiment réfrigérateur en bas
à gauche (ex. 150 W);
la tension dalimentation est bien comprise entre les
valeurs indiquées sur la plaquette signalétique, placée en
bas à gauche (ex.220-240 V);
la prise est bien compatible avec la fiche de lappareil.
En cas dincompatibilité, faites remplacer la fiche par un
technicien agréé (voir Assistance); nutilisez ni rallonges
ni prises multiples.
! Après installation de lappareil, le câble électrique et la
prise de courant doivent être facilement accessibles.
! Le câble ne doit être ni plié ni excessivement écrasé.
! Il doit être contrôlé prériodiquement et ne peut être
remplacé que par un technicien agréé (voir Assistance).
! Nous déclinons toute responsabilité en cas de non
respect des normes énumérées ci-dessus.
22
Page 23
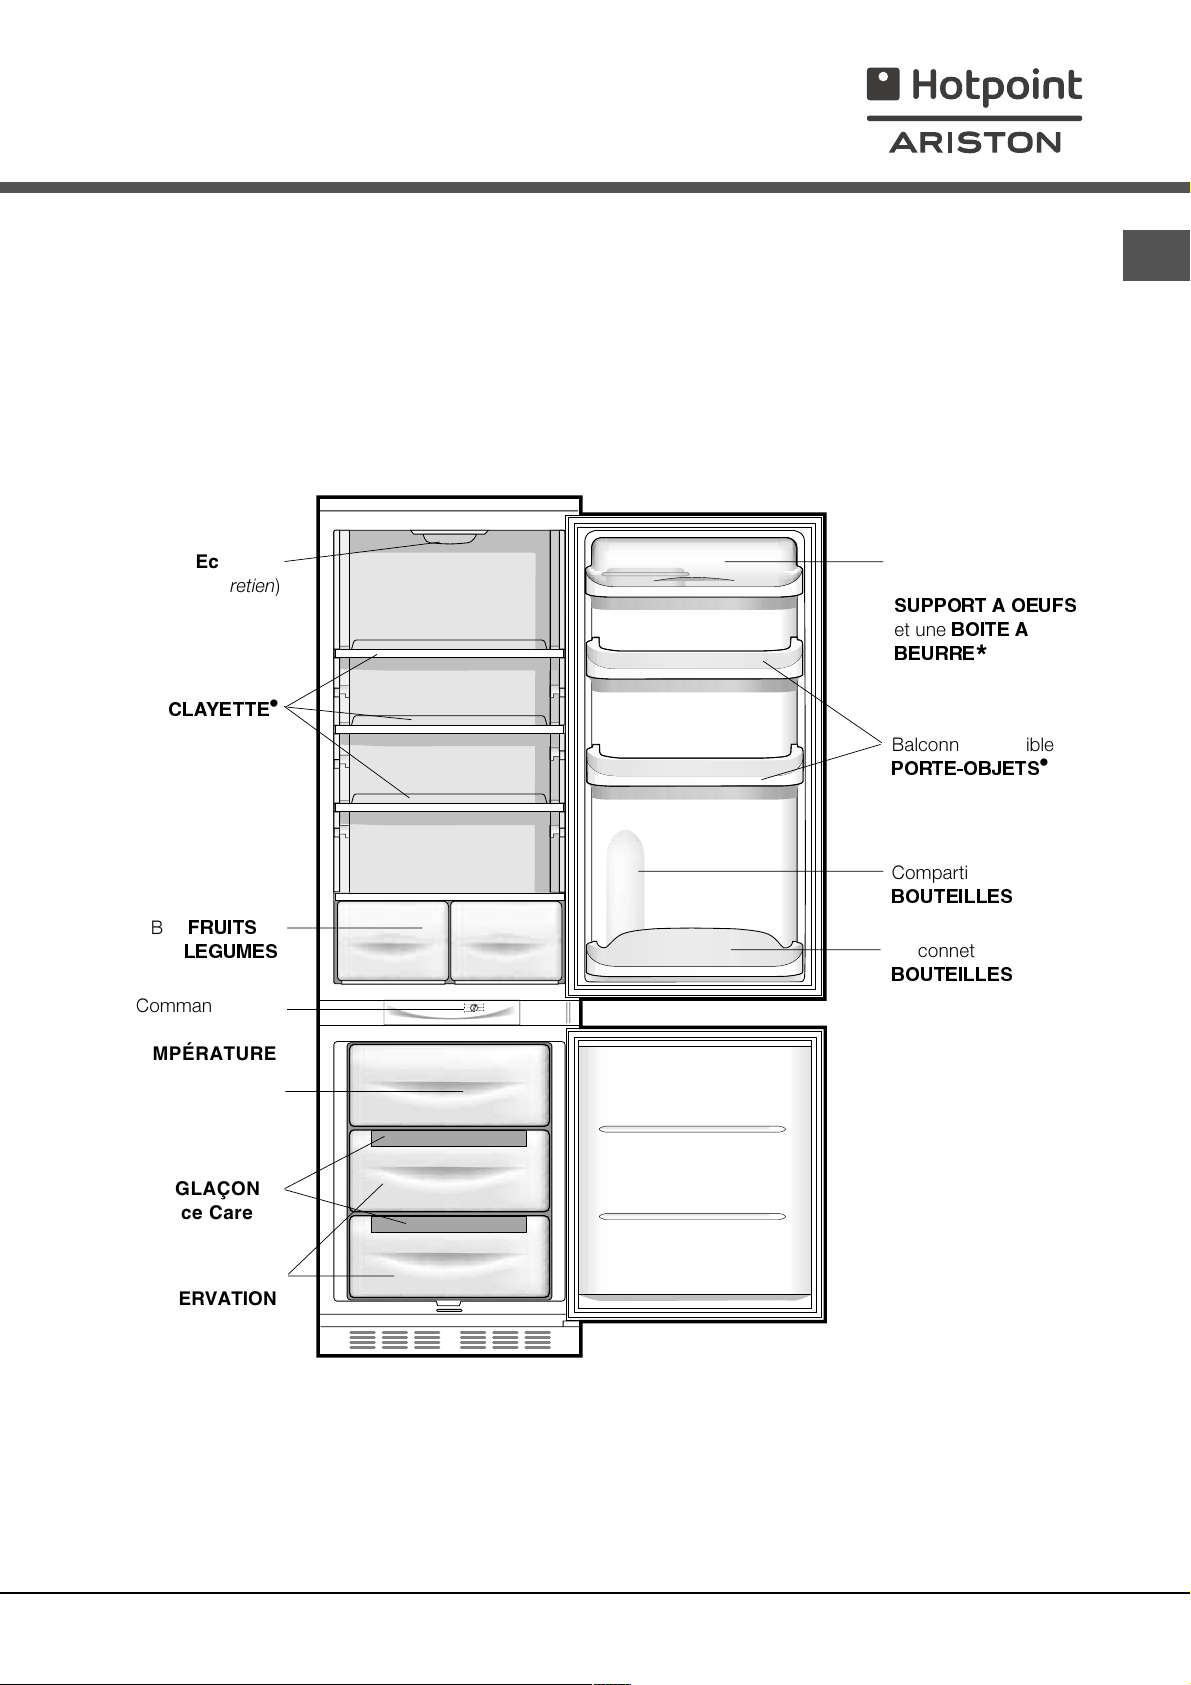
Description de
lappareil
Vue densemble
Ces instructions dutilisation sappliquent à plusieurs modèles, il se peut donc que les composants illustrés présentent
des différences par rapport à ceux de lappareil que vous avez acheté. Vous trouverez dans les pages suivantes la
description des objets plus complexes.
Eclairage
(voir Entretien)
CLAYETTE
Balconnet amovible à
abattant, contenant un
SUPPORT A OEUFS
et une
BOITE A
BEURRE
Balconnet amovible
PORTE-OBJETS
*
F
Bac
FRUITS
LEGUMES
Commande pour
RÉGLER LA
TEMPÉRATURE
Compartiment
CONGELATION et
CONSERVATION
Bac à GLAÇONS
Ice Care
Compartiment
CONSERVATION
Compartiment pour
BOUTEILLES
et
LITRES
Balconnet
BOUTEILLES
2
*
Leur nombre et/ou leur emplacement peut varier.
Nexiste que sur certains modèles.
*
23
Page 24
Mise en marche et
utilisation
Mise en service de lappareil
F
! Avant de mettre lappareil en service, suivez bien
les instructions sur linstallation (voir Installation).
! Avant de brancher votre appareil, nettoyez bien les
compartiments et les accessoires à leau tiède
additionnée de bicarbonate.
1. Branchez la fiche dans la prise de courant et assurezvous que léclairage intérieur sallume.
2. Amenez le bouton de REGLAGE DE LA
TEMPERATURE sur une valeur intermédiaire. Au bout
de quelques heures, vous pourrez commencer à
stocker des aliments dans le réfrigérateur.
Réglage de la température
Le réglage de la température à lintérieur du compartiment
réfrigérateur est automatique en fonction de la position du
bouton du thermostat.
11
1 = moins froid
11
Nous conseillons toutefois une position intermédiaire
Pour augmenter la place disponible, simplifier le rangement
et améliorer laspect esthétique, cet appareil loge sa partie
refroidissante à lintérieur de la paroi arrière du
compartiment réfrigérateur. Pendant le fonctionnement de
lappareil, cette paroi est tour à tour couverte de givre ou de
gouttelettes deau selon que le compresseur est en marche
ou à larrêt. Ne vous inquiétez pas ! Votre réfrigérateur
fonctionne normalement.
Si vous amenez le bouton de REGLAGE DE LA
TEMPERATURE sur des valeurs plus élevées, que vous
stockez de grandes quantités daliments et que la température
ambiante est élevée, votre appareil peut fonctionner de façon
continue, ce qui entraîne une formation abondante de givre et
une consommation délectricité excessive : amenez alors le
bouton sur des valeurs plus basses (un dégivrage automatique
sera lancé).
A lintérieur des appareils statiques lair circule de façon
naturelle : lair plus froid a tendance à descendre car il est plus
lourd. Quelques exemples de rangement des aliments:
"MJNFO U T
9LDQGHHWSRLVVRQ
¹YLG¹
)URPDJHVIUDLV
$OLPHQ WVF X LWV
6DXFLVVRQVSDLQGH
PLHFKRFRODW
)UX LWVHWO¹J X PHV
xXIV
%HXUUHHWPDUJDULQH'DQVOHEDOFRQQHWSU¹YX
%R X WHLOOHVE R L VV R Q V
ODLW
55
5 = plus froid
55
3BOHFNFOUËMJOUÏSJFVSEV
SÏGSJHÏSBUFVS
$XG HVVX VGH VE DF V³IUXLWVHW
O¹JXPHV
$XG HVVX VGH VE DF V³IUXLWVHW
O¹JXPHV
6XUQLPSRUWHTXHOOHFOD\HWWH
6XUQLPSRUWHTXHOOHFOD\HWWH
'DQVOHVEDFV³IUXLWVHW³
O¹JXPHV
'DQVOHEDOFRQQHWSU¹YX
'DQVOHEDOFRQQHWSU¹YX
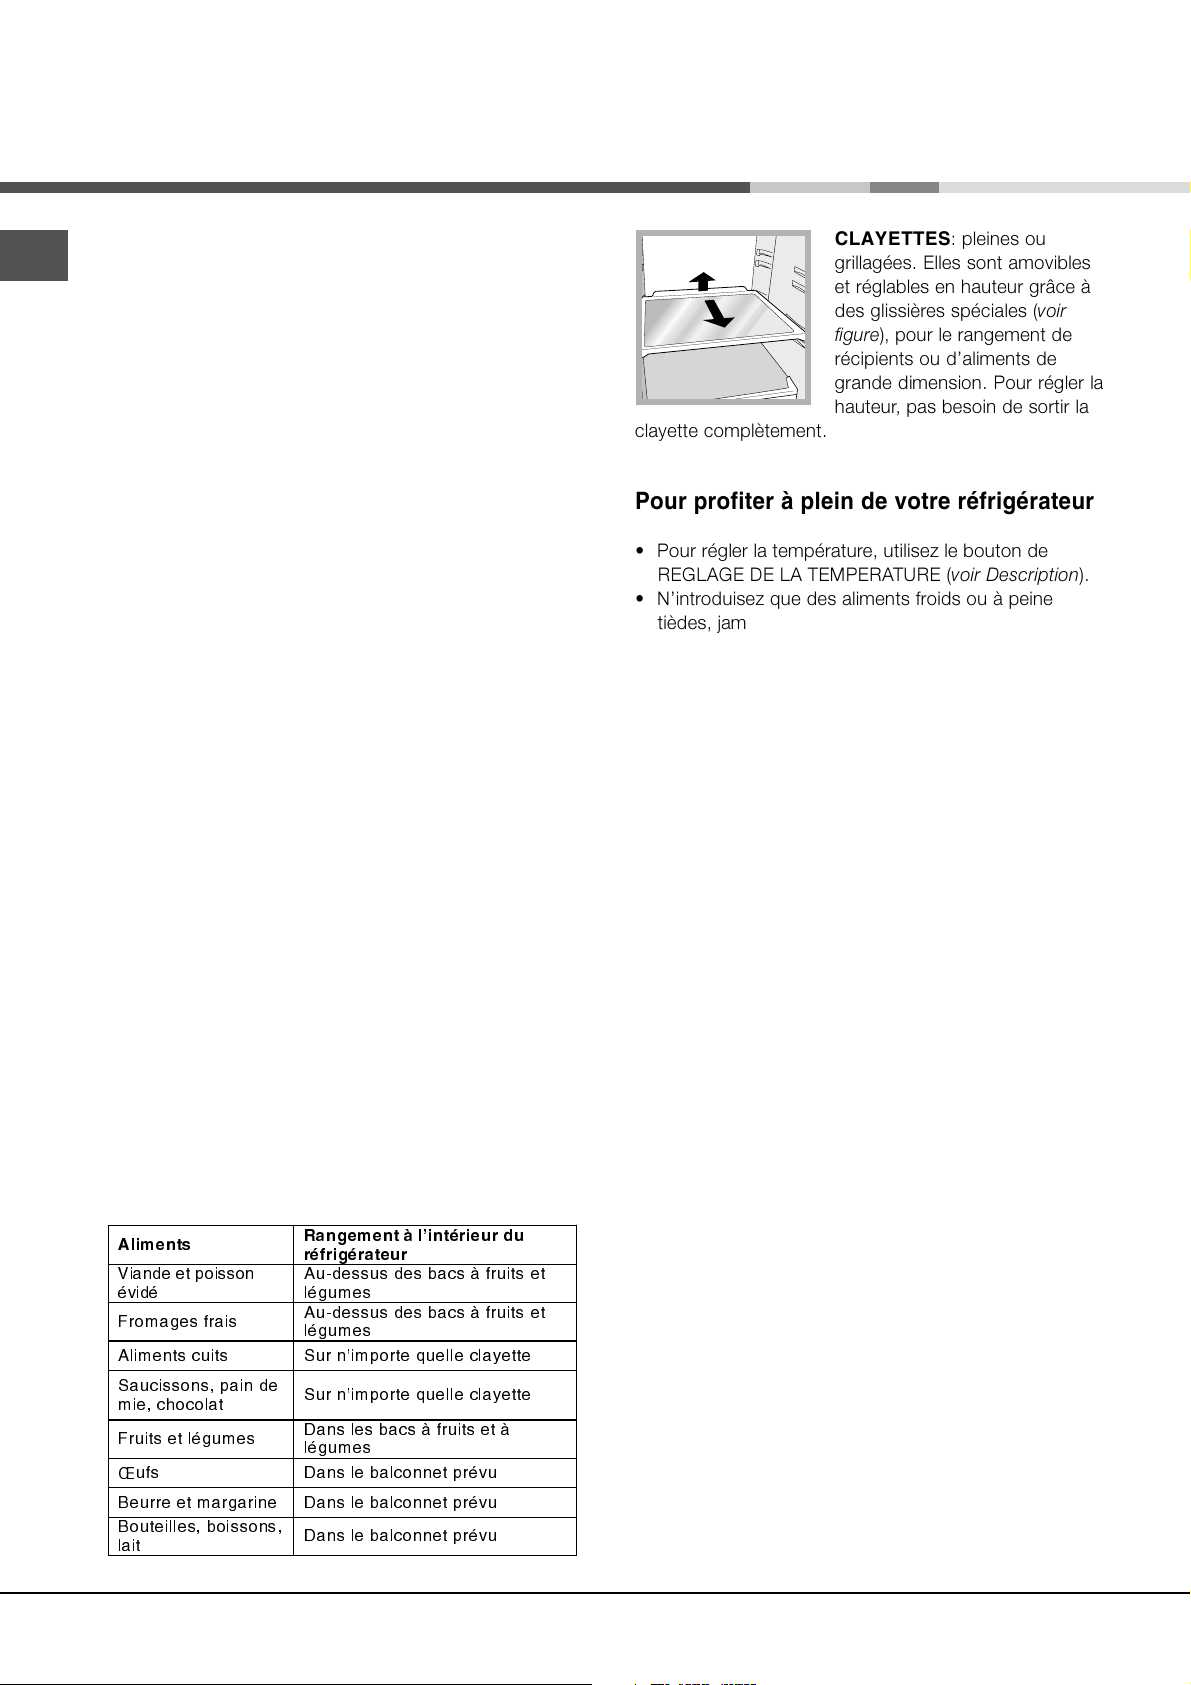
CLAYETTES: pleines ou
1
grillagées. Elles sont amovibles
et réglables en hauteur grâce à
des glissières spéciales (voir
2
figure), pour le rangement de
récipients ou daliments de
grande dimension. Pour régler la
hauteur, pas besoin de sortir la
clayette complètement.
Pour profiter à plein de votre réfrigérateur
Pour régler la température, utilisez le bouton de
REGLAGE DE LA TEMPERATURE (voir Description).
Nintroduisez que des aliments froids ou à peine
tièdes, jamais chauds (voir Précautions et conseils).
Les aliments cuits contrairement à ce que lon croit ne
se conservent pas plus longuement que les aliments
crus.
Nintroduisez pas de récipients non fermés contenant
des liquides : ces derniers entraîneraient une
augmentation de lhumidité et la formation deau
condensée.
Pour profiter à plein de votre congélateur
Ne recongelez pas des aliments décongelés ou en
cours de décongélation; il faut les faire cuire et les
consommer (dans les 24 heures).
Les aliments frais à congeler ne doivent pas être placés
au contact daliments déjà congelés; il faut les stocker
sur la clayette du compartiment freezer et, de
préférence, tout contre ses parois (latérales et arrière) où
la température qui descend au-dessous de -18°C
garantit une vitesse de congélation adéquate.
Ne stockez pas dans votre congélateur des bouteilles
en verre contenant des liquides, bouchées ou fermées
hermétiquement, elles pourraient se briser.
La quantité journalière maximale daliments pouvant
être congelée est indiquée sur létiquette des
caractéristiques, placée dans le compartiment
réfrigérateur en bas à gauche (exemple : 4 Kg/24h).
! Evitez douvrir la porte pendant la phase de congélation.
! En cas de coupure de courant ou de panne, nouvrez
pas la porte du congélateur : les produits surgelés et
congelés se conserveront ainsi sans problème pendant
9 - 14 heures environ.
! Si la température ambiante se maintient longuement
au-dessous de 14°C, le compartiment freezer narrive
pas à atteindre les températures indispensables à une
longue conservation et la période de conservation sera
par conséquent réduite.
24
Page 25
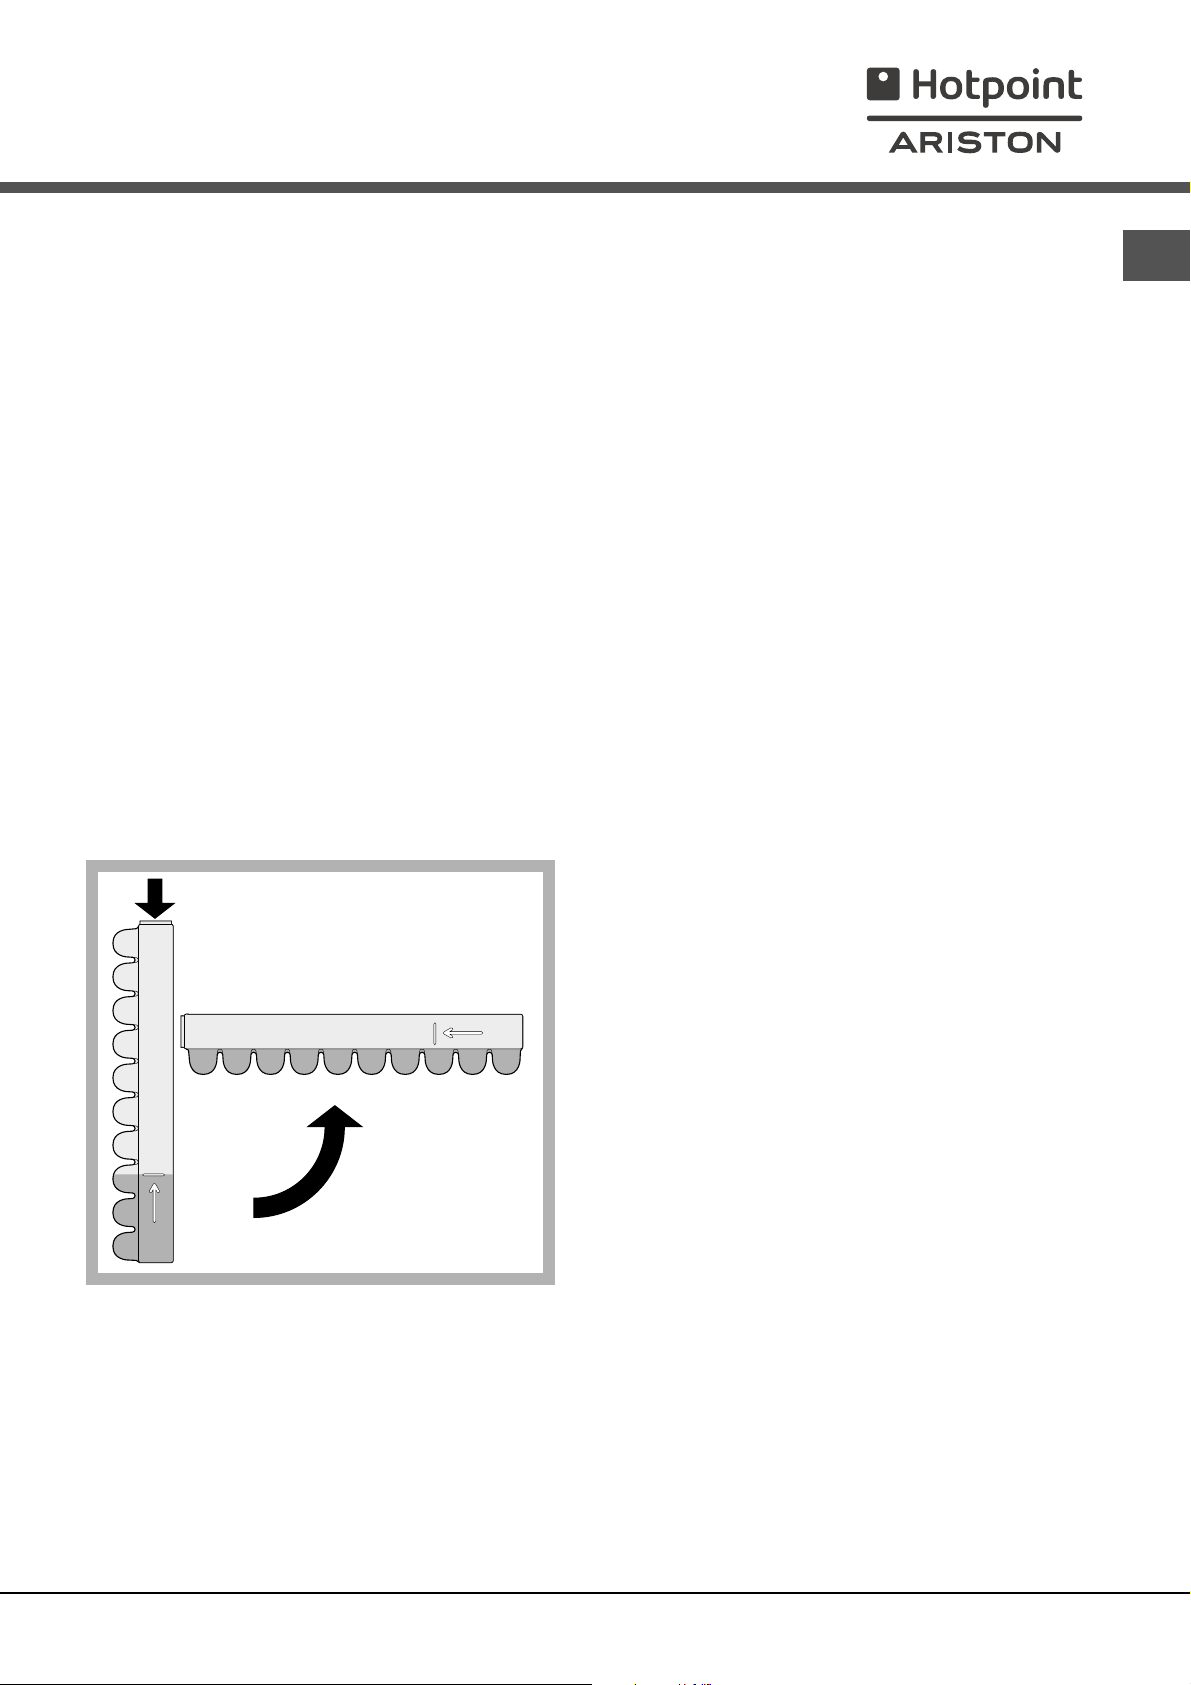
Bac à GLAÇONS Ice Care.
Placés dans la partie supérieure des tiroirs du
compartiment freezer, ils sont plus ergonomiques et
garantissent davantage de propreté: en effet, les glaçons
ne touchent plus aux aliments stockés dans le freezer;
de plus, fini l'eau qui dégouline lorsque vous rangez
votre bac (un couvercle est fourni pour boucher le
récipient après l'avoir rempli).
1. Pour sortir le bac, poussez-le vers le haut .
Vérifiez que le bac est bien vide avant de le remplir en
introduisant leau par louverture prévue.
2. Attention à ne pas dépasser le niveau indiqué (MAX
WATER LEVEL). Une trop grande quantité deau gêne
la sortie des glaçons (si celase produit, attendez que
la glace fonde et videz le bac).
3. Faites pivoter le bac de 90° : leau envahit les cavités
selon le principe des vases communicants (voir figure).
4. Bouchez louverture à laide du couvercle fourni,
remettez le bac à sa place.
5. Une fois que la glace sest formée (il faut compter au
moins 8 heures) tapez le bac contre une surface dure
et mouillez-le à lextérieur pour détacher les glaçons
que vous ferez sortir par louverture prévue.
F
MAX
WATER LEVEL
MAX
WATER LEVEL
25
Page 26
Entretien et soin
Mise hors tension
F
Pendant les opérations de nettoyage et dentretien,
mettez lappareil hors tension en débranchant la fiche de
lappareil de la prise de courant. Il ne suffit pas de placer
le bouton de réglage de la température sur 0 (appareil
éteint) pour éliminer tout contact électrique.
Nettoyage de lappareil
Nettoyez lextérieur, lintérieur et les joints en
caoutchouc à laide dune éponge imbibée deau tiède
additionnée de bicarbonate de soude ou de savon
neutre. Nutilisez pas de solvants, de produits abrasifs,
deau de Javel ou dammoniaque.
mettez tremper les accessoires amovibles dans de
leau chaude additionnée de savon ou de liquide
vaisselle. Rincez-les et essuyez-les soigneusement.
Le dos de lappareil a tendance à sempoussiérer, pour
éliminer la poussière avec délicatesse, après avoir
éteint lappareil et débranché la fiche, servez-vous dun
aspirateur montant un accessoire adéquat et réglé sur
une puissance intermédiaire.
Contre la formation de moisissures et
de mauvaises odeurs
Dégivrage du compartiment congélateur
Si la couche de givre dépasse 5 mm, procédez à un
dégivrage manuel :
1. Amenez le bouton de REGLAGE DE LA
TEMPERATURE sur 0 .
2. Enveloppez vos produits surgelés ou congelés dans du
papier et placez-les dans un endroit frais.
3. Laissez la porte ouverte jusquà ce que le givre fonde
complètement; pour accélérer cette opération placez
dans le compartiment congélateur des récipients deau
tiède.
4. Nettoyez et séchez soigneusement le compartiment
congélateur avant de rallumer lappareil.
5. Certains de nos
appareils sont équipés du
SYSTEME DRAIN pour
acheminer leau vers
lextérieur: laissez leau
sécouler dans un récipient
(voir figure).
Cet appareil est fabriqué dans des matériaux
hygiéniques qui ne transmettent pas dodeur. Pour
sauvegarder cette caractéristique, veillez à bien
emballer et couvrir vos aliments. Vous éviterez par la
même occasion la formation de taches.
Si vous devez laisser votre appareil éteint pendant une
période de temps prolongée, nettoyez-le bien lintérieur
et laissez les portes ouvertes.
Dégivrage de lappareil
! Conformez-vous aux instructions suivantes.
Ne pas utiliser dobjets pointus et coupants pour dégivrer
lappareil, ils risqueraient dendommager irréparablement
le circuit réfrigérant.
Dégivrage du compartiment réfrigérateur
Le réfrigérateur est muni dun système de dégivrage
automatique : leau est acheminée vers la paroi arrière par
un trou dévacuation (voir
figure) où la chaleur
produite par le
compresseur la fait
évaporer.
Il vous suffit de nettoyer
périodiquement le trou
dévacuation pour
permettre à leau de
sécouler normalement.
6. Avant da ranger vos aliments dans le compartiment
congélateur, attendez environ 2 heures pour le
rétablissement des conditions idéales de conservation
des aliments.
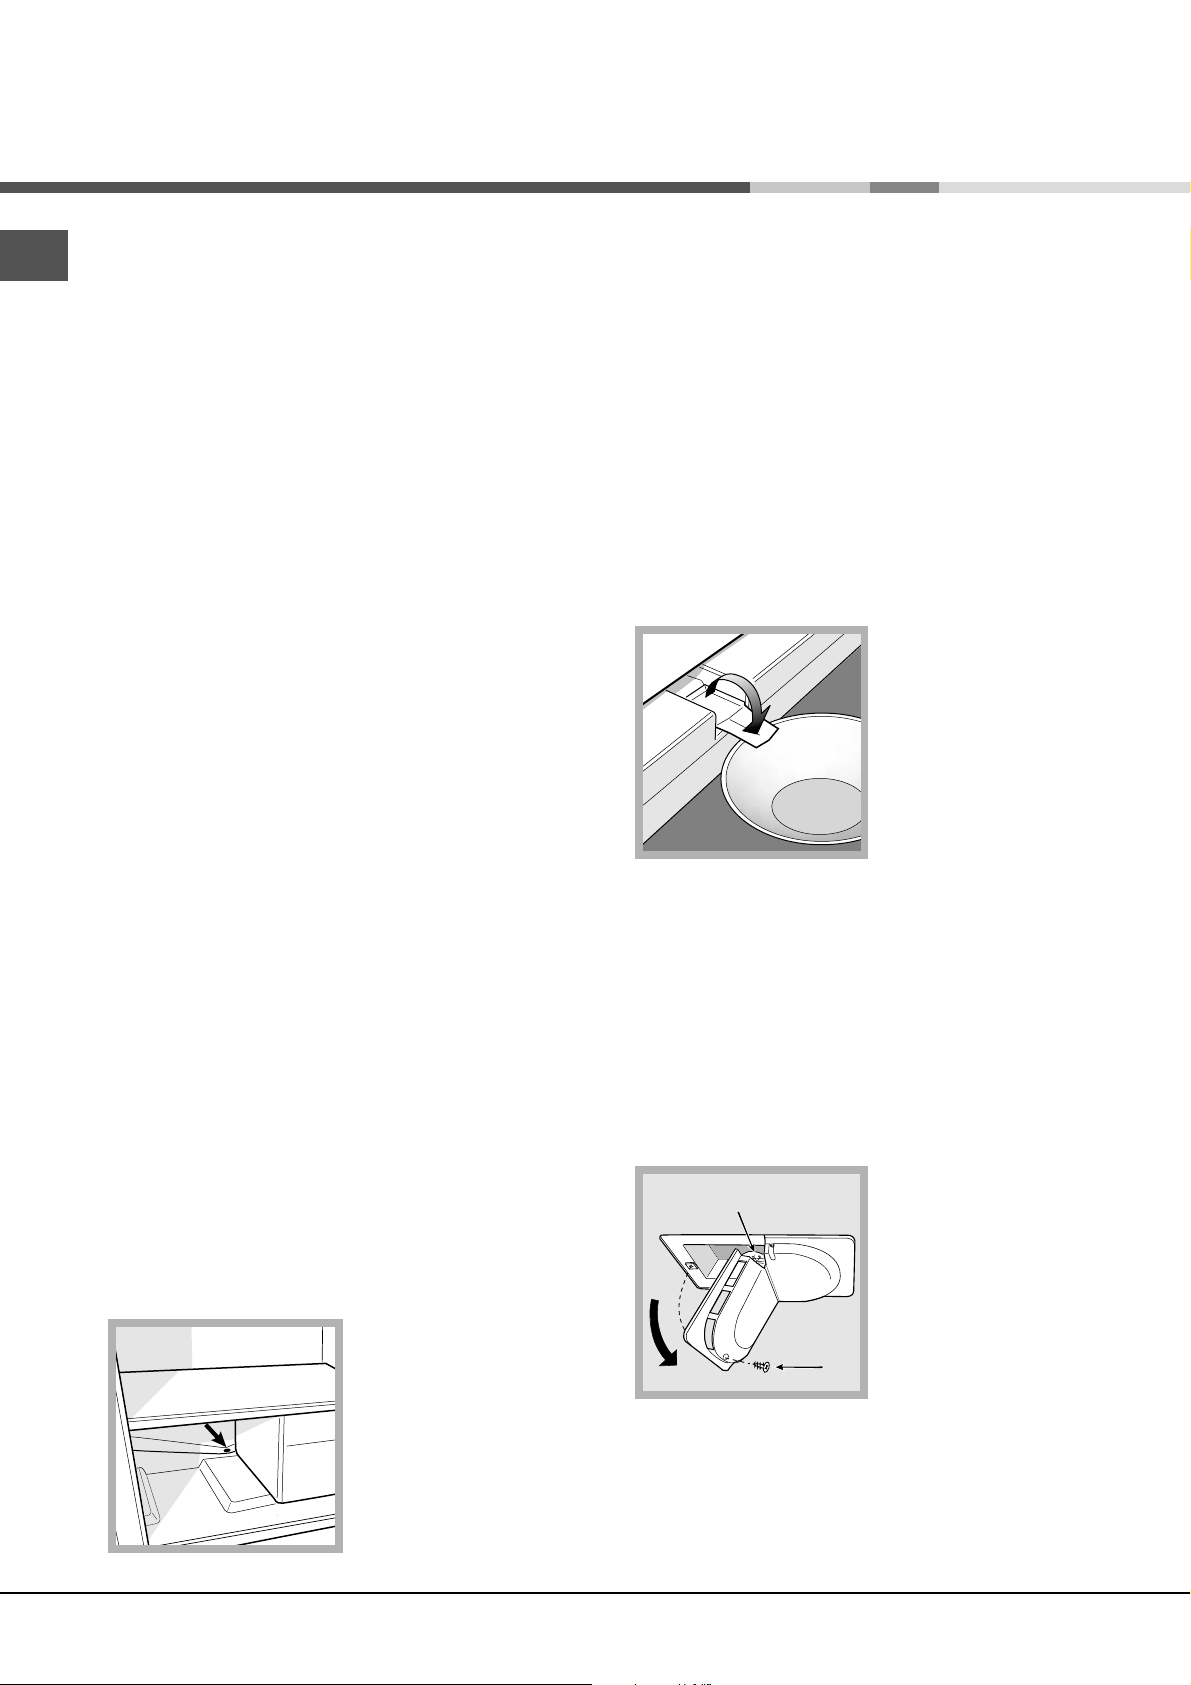
Remplacement de lampoule déclairage
Pour remplacer lampoule déclairage du compartiment
réfrigérateur, débranchez la fiche de la prise de courant.
Suivez les indications fournies ci-dessous.
Pour remplacer lampoule
A
B
(A) dévissez la vis de
fixation (B) située dans la
partie arrière du couvercle
de protection de la lampe,
comme indiqué (voir
figure). Remplacez-la par
une semblable dont la
puissance ne dépasse pas
15 W.
26
Page 27
Précautions et conseils
! Lappareil a été conçu et fabriqué conformément aux
normes internationales de sécurité. Ces conseils sont
fournis pour des raisons de sécurité et doivent être lus
attentivement.
Cet appareil est conforme aux Directives
Communautaires suivantes :
- 73/23/CEE du 19/02/73 (Basse Tensione) et
modifications suivantes;
-89/336/CEE du 03/05/89 (Compatibilité
Electromagnétique) et modifications suivantes;
- 2002/96/CE..
Sécurité générale
Cet appareil a été conçu pour un usage familial, de type
non professionnel.
Cet appareil qui sert à conserver et à congeler des aliments
ne doit être utilisé que par des adultes conformément aux
instructions du mode demploi.
Cet appareil ne doit pas être installé en extérieur, même
dans un endroit à labri, il est en effet très dangereux de le
laisser exposé à la pluie et aux orages.
Mise au rebut
F
Mise au rebut du matériel demballage : conformez-
vous aux réglementations locales, les emballages
pourront ainsi être recyclés.
La Directive Européenne 2002/96/EC sur les
Déchets des Equipements Electriques et
Electroniques (DEEE), exige que les appareils
ménagers usagés ne soient pas jetés dans le flux
normal des déchets municipaux. Les appareils
usagés doivent être collectés séparément afin
doptimiser le taux de récupération et le recyclage
des matériaux qui les composent et réduire limpact
sur la santé humaine et lenvironnement. Le
symbole de la poubelle barrée est apposée sur
tous les produits pour rappeler les obligations de
collecte séparée.
Les consommateurs devront contacter les autorités
locales ou leur revendeur concernant la démarche à
suivre pour lenlèvement de leur vieil appareil.
Economies et respect de
lenvironnement
Ne touchez pas à lappareil pieds nus ou si vos mains ou
pieds sont mouillés ou humides.
Ne touchez pas aux parties refroidissantes :
vous pourriez vous brûler ou vous blesser.
Pour débrancher la fiche de la prise de courant, sortez la
fiche, ne tirez surtout pas sur le câble.
Avant deffectuer toute opération de nettoyage ou
dentretien, débranchez la fiche de la prise de courant. Il ne
de garder la touche ON/OFF enfoncée pendant plus
suffit
de deux secondes
contact électrique.
En cas de panne, nessayez en aucun cas daccéder aux
mécanismes internes pour tenter de réparer lappareil.
Ne pas utiliser, à lintérieur des compartiments de
conservation pour aliments congelés, dustensiles
pointus et coupants ou dappareils électriques dun
type autre que celui recommandé par le fabricant.
Ne pas porter à la bouche des glaçons à peine sortis du
congélateur.
Ne permettez pas aux enfants de jouer avec lappareil. Il ne
faut en aucun cas quils sasseyent sur les tiroirs ou quils
saccrochent à la porte.
(appareil éteint) pour éliminer tout
Installez votre appareil dans un endroit frais et bien
aéré, protégez-le contre lexposition directe aux
rayons du soleil et ne le placez pas près de sources
de chaleur.
Pour introduire ou sortir les aliments, nouvrez les
portes de lappareil que le temps strictement
nécessaire. Chaque ouverture de porte cause
une considérable dépense dénergie.
Ne chargez pas trop votre appareil: pour une bonne
conservation des aliments, le froid doit pouvoir
circuler librement. Si la circulation est entravée, le
compresseur travaillera en permanence.
Nintroduisez pas daliments chauds : ces derniers
font monter la température intérieure ce qui oblige le
compresseur à travailler beaucoup plus en gaspillant
un tas délectricité.
Dégivrez lappareil dès que de la glace se dépose
(voir Entretien); une couche de glace trop épaisse
gêne considérablement la cession de froid aux
aliments et augmente la consommation délectricité.
Gardez toujours les joints propres et en bon état pour
quils adhèrent bien aux portes et ne laissent pas le
froid séchapper (voir Entretien).
Les emballages ne sont pas des jouets pour enfants.
27
Page 28
Anomalies et remèdes
Il peut arriver que lappareil ne fonctionne pas. Avant de téléphoner au service de dépannage (voir Assistance), contrôlez sil
F
ne sagit pas dun problème facile à résoudre à laide de la liste suivante.
Anomalies :
Léclairage intérieur ne sallume
pas.
Le réfrigérateur et le congélateur
refroidissent peu.
Les aliments gèlent à lintérieur du
réfrigérateur.
Le moteur est branché en
permanence.
Lappareil est très bruyant.
Causes / Solution possibles :
La fiche nest pas branchée dans la prise de courant ou pas assez
enfoncée pour quil y ait contact ou bien il y a une coupure de courant.
Les portes ne ferment pas bien ou les joints sont abîmés.
Ouverture trop fréquente des portes.
La position du bouton de REGLAGE DE LA TEMPERATURE nest pas
correcte
Le réfrigérateur et le congélateur sont excessivement remplis.
La température ambiante de travail du produit est inférieure à 14°C.
La position du bouton de REGLAGE DE LA TEMPERATURE nest pas
correcte
Les aliments touchent à la paroi arrière.
La porte nest pas bien fermée ou trop souvent ouverte.
La température à lextérieur est très élevée.
Lépaisseur du givre dépasse 2-3 mm (voir Entretien).
Lappareil na pas été installé bien à plat (voir Installation).
Lappareil est installé entre des meubles ou des objets qui vibrent et font
du bruit.
Le gaz réfrigérant interne produit un léger bruit même quand le
compresseur est à larrêt : il ne sagit pas dun défaut, cest tout à fait
normal.
La température est élevée à certains
endroits de lextérieur du
réfrigérateur.
Formation de givre ou de
gouttelettes deau sur la paroi
arrière du compartiment
réfrigérateur
Il y a de leau dans le fond du
réfrigérateur.
Les températures élevées sont nécessaires pour éviter la formation
deau condensée dans des zones particulières du produit.
Il sagit du fonctionnement normal du produit.
Le trou dévacuation de leau est bouché (voir Entretien).
28
Page 29
Assistance
Avant de contacter le centre dAssistance:
Vérifiez si vous pouvez résoudre lanomalie vous-même (voir Anomalies et Remèdes).
Si, malgré tous ces contrôles, lappareil ne fonctionne toujours pas et linconvénient persiste, faites appel au
service après-vente le plus proche de chez vous.
modèle
numéro de série
Signalez :
le type danomalie
le modèle de lappareil (Mod.)
le numéro de série (S/N)
Vous trouverez tous ces renseignements sur
létiquette signalétique placée dans le
compartiment réfrigérateur en bas à gauche.
Gross
Bruto
Brut
TI
75
Test
P.S-I.
RG 2330
Mod.
220 - 240 V- 50 Hz 150 W
340
Total
Gross
Bruto
Brut
Compr.
R 134 a
Syst.
kg 0,090
Kompr.
Made in Italy 13918
93139180000 S/N 704211801
Net
Util
Utile
Pressure
HIGH-235
LOW 140
Cod.
Gross
Bruto
Brut
Fuse
W
A
Freez. Capac
Poder de Cong
4,0
kg/24 h
Max 15 w
Class
Clase
Classe
N
Ne faites jamais appel à des techniciens non agréés et refusez toujours des pièces détachées non
originales.
F
29
Page 30
195061964.00
01/2007 - Xerox Business Services
F
30
Page 31
Gebrauchsanleitungen
KÜHL-/GEFRIERKOMBI
I
Italiano, 1
D
Deutsch, 31
P
Portuges, 61
BCB 311/HA
GB
English, 11
NL
Nederlands
, 41
F
Français,21
E
Espanol, 51
Inhaltsverzeichnis
DE
Installation, 32
Aufstellort und elektrischer Anschluss
Beschreibung Ihres Gerätes, 33
Geräteansicht
Inbetriebsetzung und Gebrauch, 34-35
Einschalten Ihres Gerätes
Temperatureinstellung
Optimaler Gebrauch des Kühlschranks
Optimaler Gebrauch des Gefrierfachs
Wartung und Pflege, 36
Abschalten Ihres Gerätes vom Stromnetz
Reinigung Ihres Gerätes
Vermeidung von Schimmelpilz- und Geruchsbildung
Abtauen Ihres Gerätes
Lampenaustausch
Vorsichtsmaßregeln und Hinweise, 37
Allgemeine Sicherheit
Entsorgung
Energie sparen und Umwelt schonen
Störungen und Abhilfe, 38
Kundendienst, 39
Page 32
Installation
DE
! Es ist äußerst wichtig, diese Bedienungsanleitung sorgfältig
aufzubewahren, um sie jederzeit zu Rate ziehen zu können.
Sorgen Sie dafür, dass sie im Falle eines Umzugs oder
Übergabe an einen anderen Benutzer das Gerät stets begleitet,
damit auch der Nachbesitzer die Möglichkeit hat, diese zu Rate
zu ziehen.
! Lesen Sie bitte folgende Hinweise aufmerksam durch, sie
liefern wichtige Informationen hinsichtlich der Installation, dem
Gebrauch und der Sicherheit.
Aufstellort und elektrischer Anschluss
Aufstellort
1. Stellen Sie das Gerät in einem gut belüfteten und trockenen
Raum auf.
2. Die hinteren Belüftungsöffnungen dürfen nicht zugestellt bzw.
abgedeckt werden: Kompressor und Kondensator geben
Wärme ab und benötigen eine gute Belüftung um optimal zu
arbeiten und den Stromverbrauch nicht unnötig zu erhöhen
3. Stellen Sie das Gerät fern von Wärmequellen auf
(Sonnenlicht, Elektroherd).
Elektrischer Anschluss
Warten Sie nach dem Transport etwa 3 Stunden, bevor Sie das
Gerät an das Elektronetz anschließen. Vor Einfügen des
Steckers in die Steckdose ist sicherzustellen, dass
die Steckdose über eine normgerechte Erdung verfügt;
die Steckdose die auf dem Typenschild (befindlich im
Kühlschrank unten links) angegebene max.
Leistungsaufnahme des Gerätes trägt (z.B. 150 W);
die Netzspannung den auf dem Typenschild (befindlich in
der Kühlzone unten links) angegebenen Werten entspricht
z.B. 220-240 V);
die Steckdose mit dem Netzstecker übereinstimmt.
Sollte dies nicht der Fall sein, dann lassen Sie den Stecker
durch autorisiertes Fachpersonal (siehe Kundendienst)
austauschen; verwenden Sie auf keinen Fall Verlängerungen
oder Vielfachsteckdosen.
! Netzkabel und Stecker müssen bei installiertem Gerät leicht
zugänglich sein.
! Das Netzkabel darf nicht gebogen bzw. eingeklemmt werden.
! Das Kabel muss regelmäßig kontrolliert werden und darf nur
durch autorisiertes Fachpersonal ausgetauscht werden (siehe
Kundendienst).
! Der Hersteller lehnt jede Verantwortung ab, falls diese
Vorschriften nicht eingehalten werden sollten.
32
Page 33
Beschreibung Ihres
Gerätes
Geräteansicht
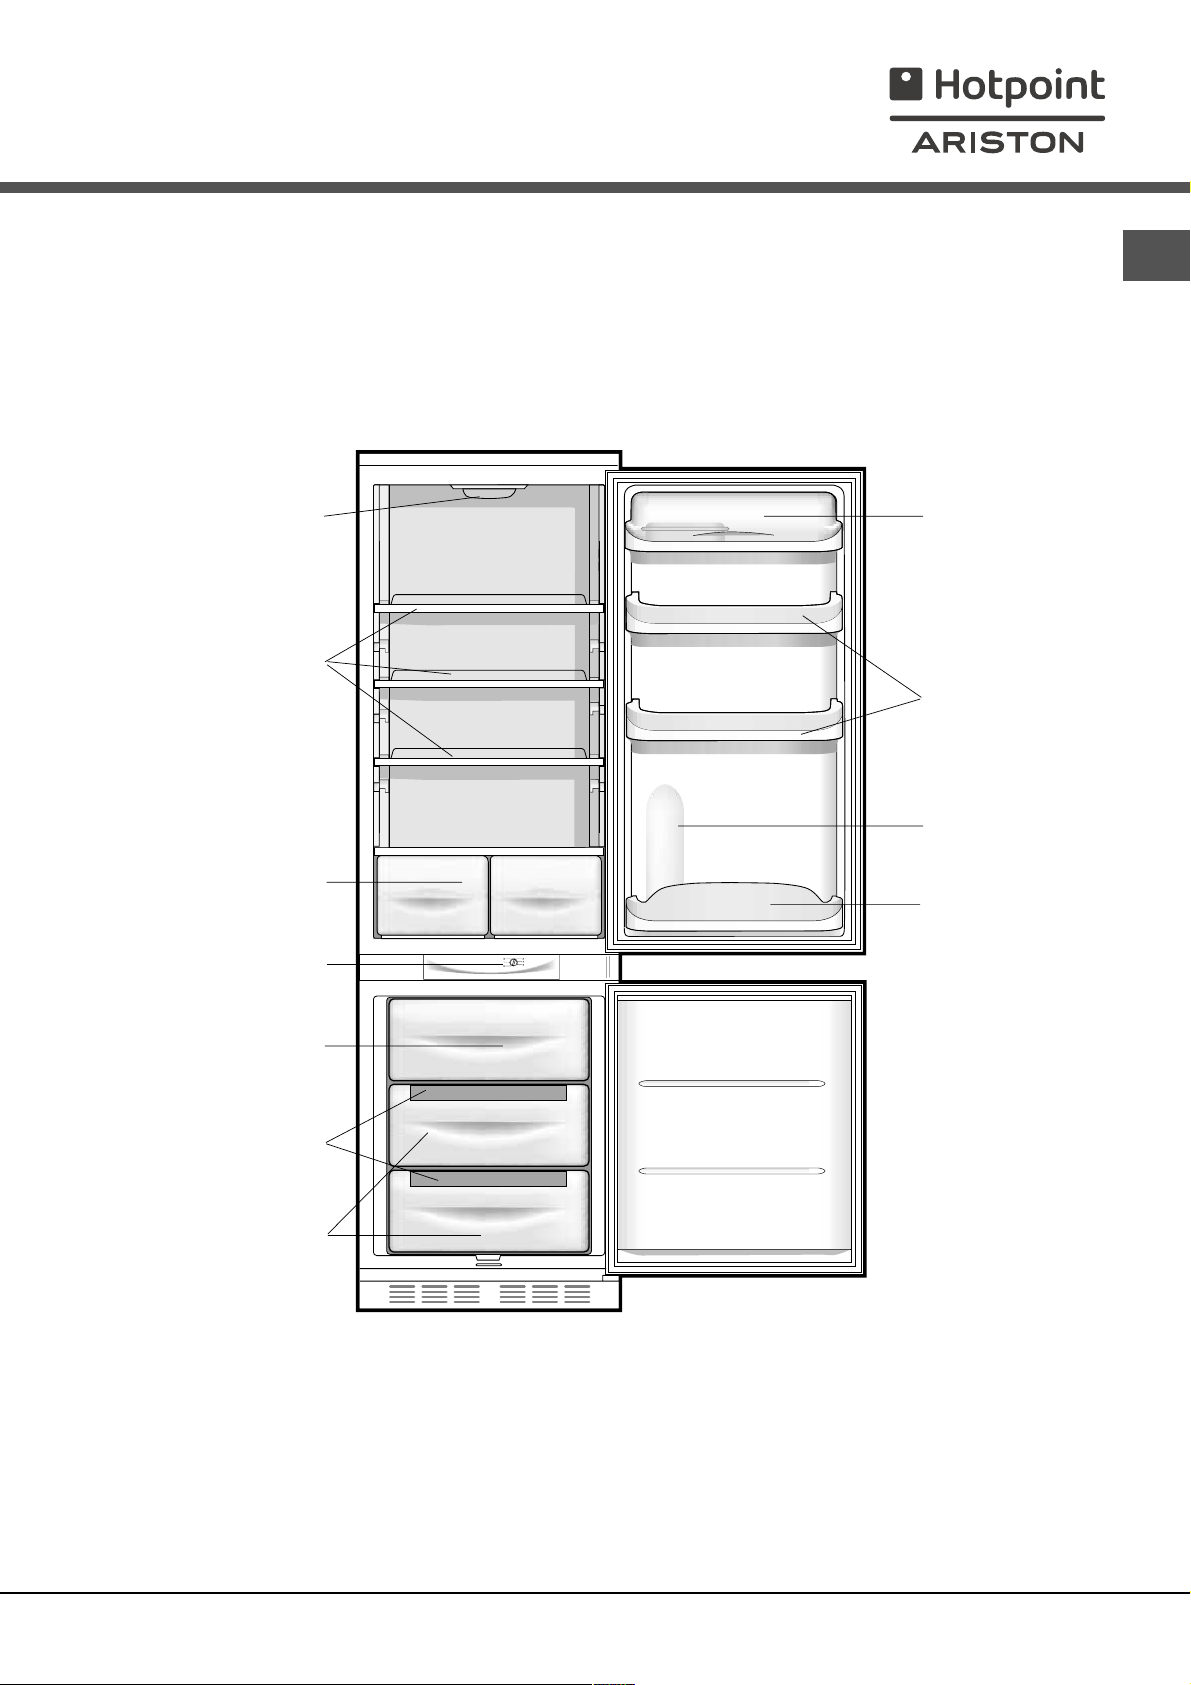
Die Gebrauchsanleitungen gelten für mehrere Gerätemodelle. Demnach ist es möglich, dass die Abbildung Details enthält,
über die Ihr Gerät nicht verfügt. Die Beschreibung weiterer Komponenten ersehen Sie auf nachfolgender Seite.
Lampe
(siehe Wartung)
ABLAGE
Abnehmbare Ablagen
mit Deckel, mit
EIERFACH und
BUTTERDOSE
Abnehmbare Ablage
für TUBEN UND
DOSEN
DE
*
Schale für OBST und
GEMÜSE
TEMPERATURREGLER
Fach zum
GEFRIEREN und
LAGERN
EISSCHALE
Ice Care
Fach zum
LAGERN
Fach für eine 2LITER-FLASCHE
Ablage für
FLASCHEN
*
Unterschiedliche Anzahl und Platzierung.
Nicht bei allen Modellen.
*
33
Page 34
Inbetriebsetzung
und Gebrauch
Einschalten Ihres Gerätes
DE
! Bevor Sie Ihr Gerät in Betrieb setzen, beachten Sie
bitte aufmerksam die Installationshinweise (siehe
Installation).
! Bevor Sie das Gerät anschließen, müssen die Fächer und
das Zubehör gründlich mit lauwarmem Wasser und
Bikarbonat gereinigt werden.
1. Stecken Sie den Netzstecker in die Steckdose und
stellen Sie sicher, dass sich die Innenbeleuchtung
einschaltet.
2. Drehen Sie den TEMPERATURSCHALTER auf einen
mittleren Wert. Nach einigen Stunden können die
Lebensmittel in den Kühlschrank eingeräumt werden.
Temperatureinstellung
Die Innentemperatur des Kühlschranks wird automatisch
geregelt, je nach Einstellung des Thermostatenschalters.
1 = höchste Temperatur 5 = kälteste Temperatur
Es empfiehlt sich, einen mittleren Wert einzustellen.
Zur Verbesserung der Ästhetik sowie zur Erhöhung des
Nutzvolumens, ist in der Rückwand des Kühlteils ein
Rückwandverdampfer integriert. Dieser ist daher
abwechselnd mit Reif oder Wassertropfen bedeckt, je
nach dem ob der Kompressor in Funktion ist oder nicht.
Keine Sorge! Der Kühlschrank arbeitet völlig normal.
Beides ist ganz normal. Wird der
TEMPERATURSCHALTER auf hohe Werte eingestellt, und
werden bei hohen Umgebungstemperaturen große
Lebensmittelmengen gelagert, ist es möglich, dass der
Kompressor laufend arbeitet und demnach die Reifbildung
und der Energieverbrauch ansteigt. Um dies zu
vermeiden, drehen Sie den Schalter auf niedrigere Werte
(es wird automatisch abgetaut).
Bei den statischen Geräten zirkuliert die Luft auf natürliche
Weise: Die Kaltluft sinkt nach unten, da sie schwerer ist. So
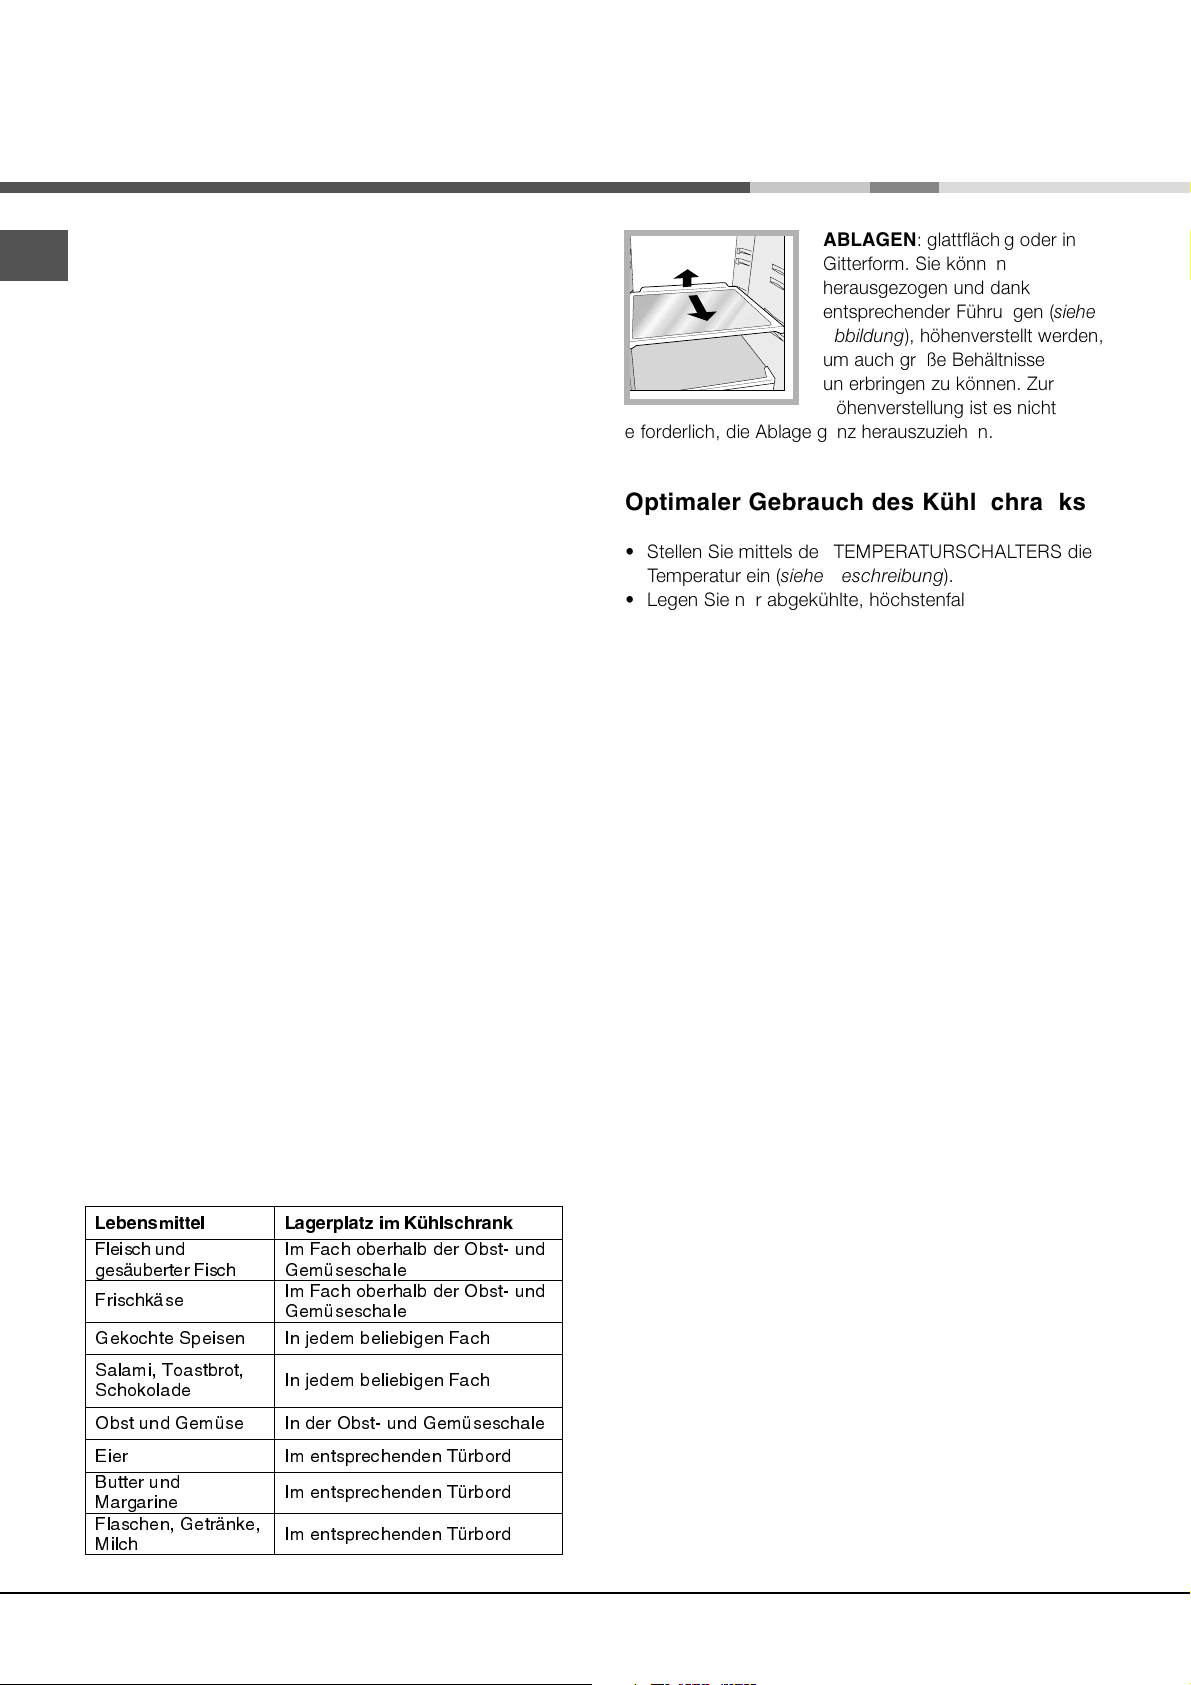
werden die Lebensmittel korrekt gelagert:
-FCFOTNJUUFM
)OHLVFKXQG
JHVµXEHUWHU)LVFK
)ULVFKNµVH
*HNRFKWH6SH LV H Q,QMHGHPEHOLHELJHQ)DFK
6DODPL 7RDVWEUR W
6FKRNRODGH
2EVWXQG*HPÊVH,QGHU2 EVWXQG*HPÊVHVFKDOH
(LHU
%XWWHUXQG
0DUJDULQH
)ODVFKHQ*HWUµQNH
0LOFK
-BHFSQMBU[JN,àIMTDISBOL
,P)DFKREHUKDOEGHU2EVWXQG
*HPÊVHVFKDOH
,P)DFKREHUKDOEGHU2EVWXQG
*HPÊVHVFKDOH
,QMHGHPEHOLHELJHQ)DFK
,PHQWVSUHFKHQGHQ7ÊUERUG
,PHQWVSUHFKHQGHQ7ÊUERUG
,PHQWVSUHFKHQGHQ7ÊUERUG
ABLAGEN: glattflächig oder in
1
2
erforderlich, die Ablage ganz herauszuziehen.
Gitterform. Sie können
herausgezogen und dank
entsprechender Führungen (siehe
Abbildung), höhenverstellt werden,
um auch große Behältnisse
unterbringen zu können. Zur
Höhenverstellung ist es nicht
Optimaler Gebrauch des Kühlschranks
Stellen Sie mittels des TEMPERATURSCHALTERS die
Temperatur ein (siehe Beschreibung).
Legen Sie nur abgekühlte, höchstenfalls lauwarme,
niemals heiße Speisen ein (siehe Vorsichtsmaßregeln
und Hinweise).
Bitte beachten Sie, dass gekochte Speisen nicht länger
halten als rohe Speisen.
Bewahren Sie keine Flüssigkeiten in offenen Behältern
auf: sie würden die Feuchtigkeit erhöhen und
demzufolge Kondensbildung verursachen.
Optimaler Gebrauch des Gefrierfachs
An- oder aufgetautes Gefriergut darf nicht wieder
eingefroren werden. Solche Lebensmittel müssen zu einem
Fertiggericht verarbeitet werden (innerhalb 24 Std.)
Frische Lebensmittel dürfen nicht mit den bereits
gefrorenen Lebensmitteln in Berührung geraten; frische
Lebensmittel müssen auf das Gefrierfachrost gelegt werden,
und möglichst nahe an den Wänden (seitlich oder hinten),
an denen die Temperatur unter -18°C sinkt, und die
Speisen demnach schnell und schonend eingefroren
werden.
Lagern Sie im Gefrierfach bitte keine hermetisch
verschlossenen Glasflaschen mit Flüssigkeiten, beim
Gefrieren könnten sie platzen.
Die Höchstmenge an Lebensmitteln, die täglich eingefroren
werden kann, ist auf dem Typenschild (befindlich im
Kühlschrank unten links) ersichtlich (Beispiel: Kg/24h 4).
! Während des Schnellgefrierens sollte das Öffnen der Tür
vermieden werden.
! Auch während eines Stromausfalls oder einer Störung
sollte die Gefrierfachtür nicht geöffnet werden: Das
Gefrier- bzw. Tiefkühlgut hält sich so unverändert für
ungefähr 9-14 Stunden.
! Liegt die Umgebungstemperatur für längere Zeit unter 14°C,
können die zur langzeitigen Konservierung im Gefrierfach
erforderlichen Temperaturen nicht komplett erreicht werden;
demnach ist die Haltbarkeitszeit verringert.
34
Page 35
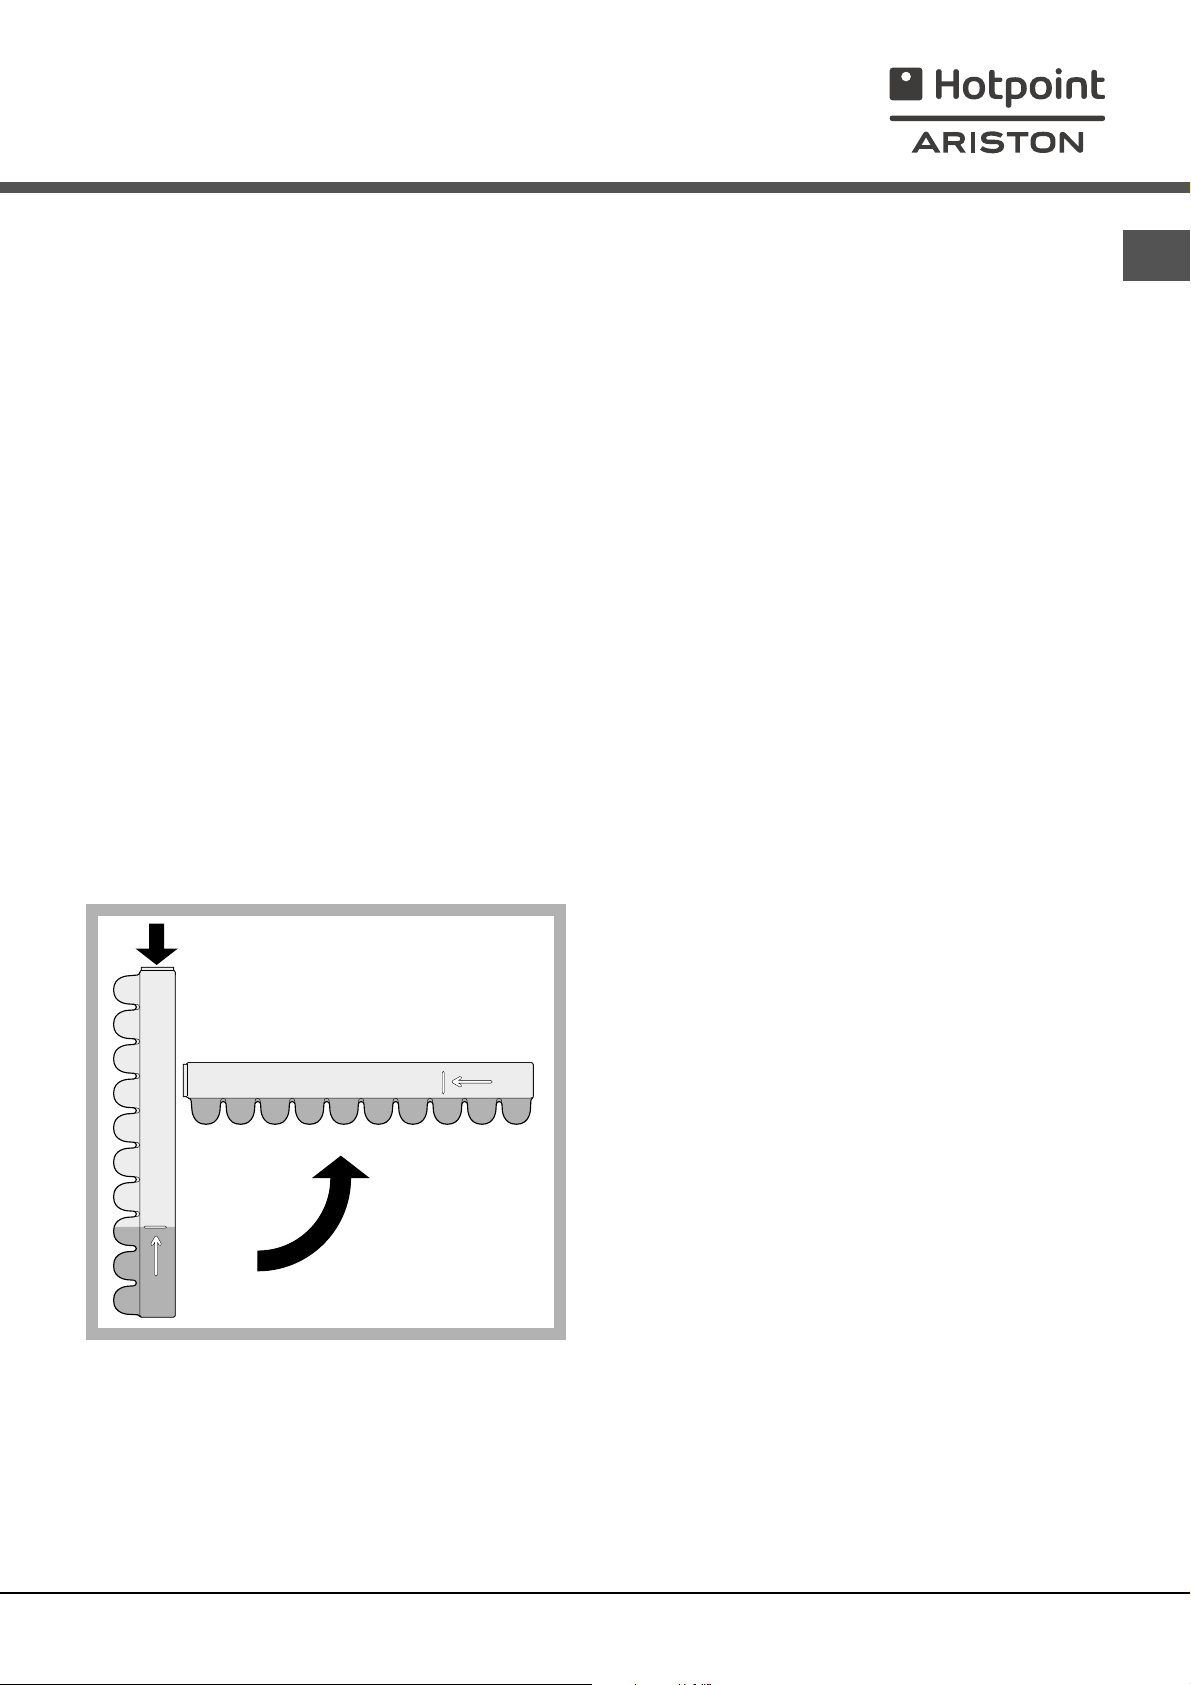
EISSCHALE Ice Care.
Dank der Positionierung dieses Behälters oben an den
Schalen der Gefrierzone ist größere Ergonomie und
Sauberkeit gewährleistet: Die Berührung mit dem
gelagerten Gefriergut wird vermieden, wie auch ein
Verschütten von Wasser beim Füllen des Behälters (ein
entsprechender Verschluss, mit dem die Öffnung nach
Füllen verschlossen werden kann, wird mitgeliefert).
1. Ziehen Sie die Eiswürfelschale nach oben hin heraus
Vergewissern Sie sich, dass die Schale ganz leer ist
und füllen Sie sie durch die entsprechende Öffnung.
2. Die angezeigte Füllmenge bitte nicht überschreiten
(MAX WATER LEVEL). Zu viel Wasser behindert das
Herausnehmen der Eiswürfel (in einem solchen Fall
warten Sie, bis das Eis schmilzt und entleeren Sie die
Schale).
3. Drehen Sie die Schale um 90°: das Wasser läuft in die
einzelnen, durch kleine Adern verbundenen Formen
(siehe Abbildung
4. Schließen Sie die Öffnung mit dem mitgelieferten
Deckel.
5. Die geformten Eiswürfel (Mindestzeit ca. 8 Std.) können
durch leichtes Aufschlagen des Behälters auf ein harte
Oberfläche gelöst werden, um sie dann durch die
Öffnung herausrutschen zu lassen.
DE
MAX
WATER LEVEL
MAX
WATER LEVEL
35
Page 36
Wartung und Pflege
Abschalten Ihres Gerätes vom Stromnetz
DE
Bei Reinigungs- und Wartungsmaßnahmen muss das
Gerät durch Herausziehen des Netzsteckers vom
Stromnetz getrennt werden.
Es genügt nicht, den Temperaturschalter auf Position 0
(Gerät ausgeschaltet) zu drehen, um jeglichen
Stromkontakt auszuschließen.
Reinigung Ihres Gerätes
Das Gehäuse des Gerätes, außen und innen, sowie die
Türdichtungen können mit einem mit Wasser und
Bikarbonat oder einer milden Spüllauge getränkten
Schwamm gereinigt werden. Vermeiden Sie Löse-,
Scheuer-, Bleichmittel oder Ammoniak.
Das Zubehör kann herausgenommen und in einer
warmen Spüllauge gereinigt werden. Anschließend
sorgfältig klarspülen und trockenreiben.
Auf der Geräterückseite könnte sich Staub ablagern.
Dieser kann vorsichtig mit dem langen Rohrstutzen des
auf eine geringe Leistung eingestellten Staubsaugers
entfernt werden, jedoch nicht ohne das Kühlgerät vom
Stromnetz getrennt zu haben.
Vermeidung von Schimmelpilz- und
Geruchsbildung
Das Gerät wurde mit hygienischen Materialien gefertigt,
die keine Gerüche übertragen. Um diese Eigenschaft
nicht zu verlieren, sind die Lebensmittel stets gut
verschlossen bzw. verpackt zu lagern. Hierdurch wird
auch die Bildung von Flecken vermieden.
Soll das Gerät für längere Zeit stillgelegt werden,
reinigen Sie den Innenraum und lassen Sie die
Gerätetür offenstehen.
Abtauen Ihres Gerätes
Diese kleine Öffnung sollte jedoch regelmäßig gereinigt
werden, damit das Tauwasser unbehindert ablaufen kann.
Abtauen des Gefrierfachs
Ist die Reifschicht jedoch zu dick, muss manuell abgetaut
werden:
1. Drehen Sie den TEMPERATURSCHALTER auf Position 0.
2. Wickeln Sie das Gefrier- bzw. Tiefkühlgut dicht ein und
legen Sie es in einen anderen Gefrierschrank oder
bewahren Sie es an einem ähnlich kalten Ort auf.
3. Lassen Sie die Gerätetür offen stehen, bis der Reif völlig
aufgetaut ist. Dies kann durch Einstellen eines Topfes
mit warmem Wasser beschleunigt werden.
4. Reinigen Sie das Gefrierfach gründlich und trocknen Sie
es sorgfältig aus, bevor Sie das Gerät wieder
einschalten-.
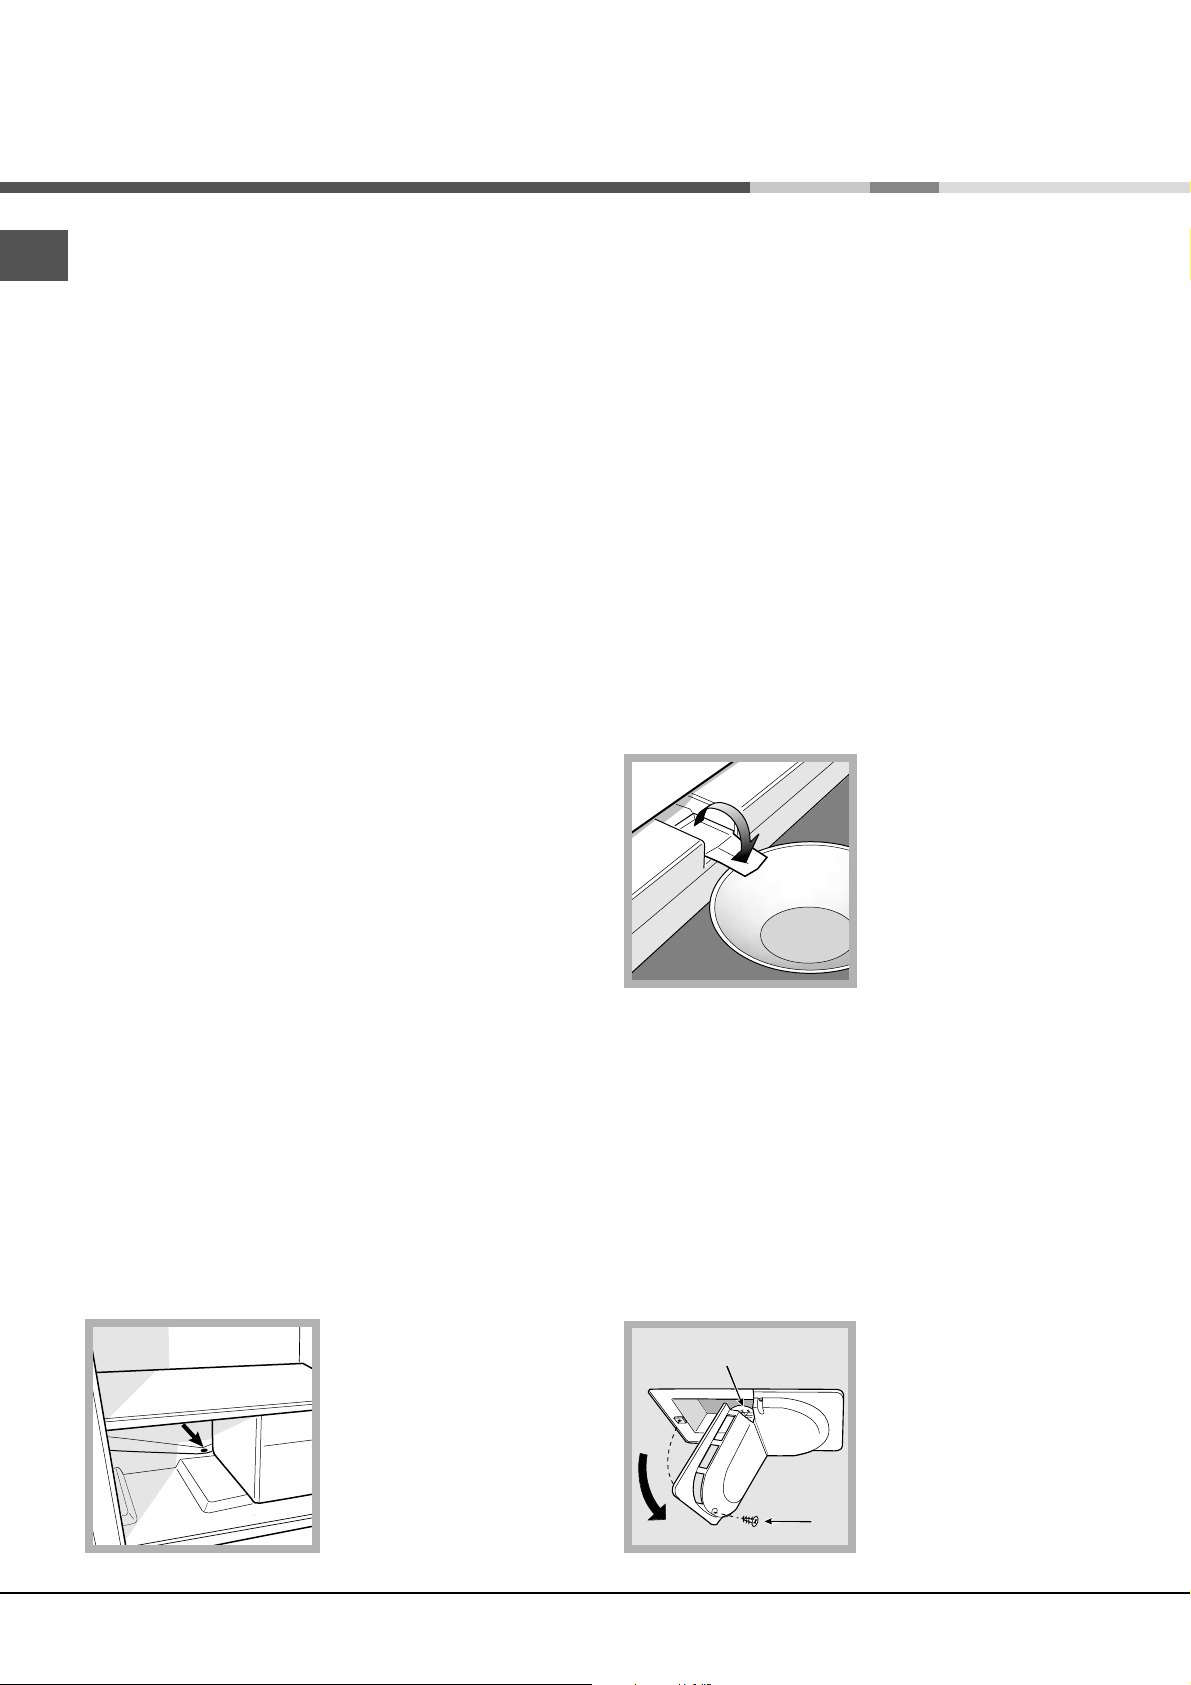
5. Einige Modelle sind mit
dem DRAIN SYSTEM, das
das Tauwasser nach außen
ableitet, ausgestattet:
Stecken Sie den
mitgelieferten Schaber in
den entsprechenden,
unten befindlichen Schlitz
und lassen Sie das
Tauwasser darüber in eine
Schale laufen (siehe
Abbildung).
6. Warten Sie bitte 2 Stunden, bis die idealen
Gefrierbedingungen wieder gegeben sind, bevor Sie
das Gefriergut in die Gefrierzone geben.
! Verfahren Sie hierzu wie nachstehend beschrieben.
Verwenden Sie zum Abtauen des Gerätes bitte keine
scharfen oder spitzen Gegenstände, die den Kühlkreis
hoffungslos beschädigen könnten.
Abtauen des Kühlschranks
Der Kühlschrank taut
automatisch ab: Das
Tauwasser wird nach
hinten durch eine kleine
Ablauföffnung (siehe
Abbildung) abgeleitet, wo
es dank der vom
Kompressor erzeugten
Wärme verdampft.
36
Lampenaustausch
Zum Austausch der Lampe der Kühlzonenbeleuchtung
muss der Netzstecker aus der Steckdose gezogen
werden. Verfahren Sie wie nachfolgend beschrieben.
Verschaffen Sie sich Zugang
A
B
zur Lampe (A) indem Sie die
LampenabdeckungsBefestigungsschaube (B)
ausschrauben (siehe
Abbildung). Ersetzen Sie die
Lampe durch eine neue
gleicher Leistung und
Bauform, nicht höher als
15W.
Page 37
Vorsichtsmaßregeln und
Hinweise
! Das Gerät wurde nach den strengsten internationalen
Sicherheitsvorschriften entworfen und gebaut.
Nachstehende Hinweise werden aus Sicherheitsgründen
geliefert und sollten aufmerksam gelesen werden.
Dieses Gerät entspricht den folgenden EGRichtlinien:
-73/23/EWG vom 19.02.73 (Niederspannung)
und nachfolgenden Änderungen.
- 89/336/EWG vom 03.05.89 (elektromagnetische
Verträglichkeit) und nachfolgenden Änderungen.
- 2002/96/CE..
Allgemeine Sicherheit
Dieses Gerät ist für den nicht professionellen Einsatz im
privaten Haushalt bestimmt.
Das Gerät ist zum Kühlen und Einfrieren von Lebensmitteln
zu verwenden, und nur von Erwachsenen gemäß den
Hinweisen der vorliegenden Gebrauchsanweisung zu
benutzen.
Der Kühl-/ und Gefrierkombi darf nicht im Freien aufgestellt
werden, auch nicht, wenn es sich um einen geschützten
Platz handelt. Es ist gefährlich, das Gerät Gewittern und
Unwettern auszusetzen.
Berühren Sie das Gerät nicht, wenn Sie barfuß sind, und
auch nicht mit nassen oder feuchten Händen oder Füßen.
Entsorgung
DE
Entsorgung des Verpackungsmaterials: Befolgen Sie
die lokalen Vorschriften, Verpackungsmaterial kann
wiederverwertet werden.
Gemäß der Europäischen Richtlinie 2002/96/EC über
Elektro- und Elektronik-Altgeräte (WEEE) dürfen
Elektrohaushalts-Altgeräte nicht über den
herkömmlichen Haushaltsmüllkreislauf entsorgt
werden. Altgeräte müssen separat gesammelt werden,
um die Wiederverwertung und das Recycling der
beinhalteten Materialien zu optimieren und die Einflüsse
auf die Umwelt und die Gesundheit zu reduzieren. Das
Symbol durchgestrichene Mülltonne auf jedem
Produkt erinnert Sie an Ihre Verpflichtung, dass
Elektrohaushaltsgeräte gesondert entsorgt werden
müssen.
Endverbraucher können sich an Abfallämter der
Gemeinden wenden, um mehr Informationen über die
korrekte Entsorgung ihrer Elektrohaushaltsgeräte zu
erhalten.
Energie sparen und Umwelt schonen
Stellen Sie das Gerät in einem trockenen, gut
belüftbaren Raum auf, nicht direkt in der Sonne oder in
der Nähe von Wärmequellen.
Berühren Sie nicht den Rückwandverdampfer: es besteht
Verletzungsgefahr.
Ziehen Sie den Gerätestecker nicht am Netzkabel aus der
Steckdose, sondern nur am Stecker selbst.
Vor allen Reinigungs- und Wartungsmaßnahmen muss
der Netzstecker gezogen werden. Es genügt nicht, den
TEMPERATURSCHALTER auf Position 0 (Gerät
ausgeschaltet) zu drehen, um jeglichen Stromkontakt
auszuschließen.
Bei etwaigen Störungen versuchen Sie bitte nicht, das
Gerät selbst zu reparieren.
Verwenden Sie im Innern der Gefriergutlagerfächer bitte
keine scharfen oder spitzen Gegenstände oder
Elektrogeräte, sondern nur die vom Hersteller erlaubten
Hilfsmittel.
Eiswürfel nicht sofort in den Mund nehmen.
Erlauben Sie Kindern nicht, mit dem Gerät zu spielen. Auf
keinen Fall dürfen sie sich auf die Gefrierzonenschalen
setzen, oder sich an die Tür hängen.
Verpackungsmaterial ist kein Spielzeug für Kinder.
Öffnen Sie die Gerätetür so kurz wie möglich, wenn Sie
Lebensmittel lagern oder herausnehmen.
Bei jeder Türöffnung geht wertvolle Energie verloren.
Das Gerät sollte nicht überladen werden: Zur Haltbarkeit
der Lebensmittel muss die Kälte frei zirkulieren können.
Die Behinderung der Zirkulation hat zur Folge, dass der
Kompressor ständig arbeitet.
Stellen Sie keine warmen Speisen in das Gerät, sie
würden die Temperatur erheblich erhöhen und den
Kompressor zu einer höheren Leistung zwingen, was
eine unnötige Verschwendung an Energie bedeutet.
Halten Sie die Dichtungen stets effizient und sauber,
damit sie ordnungsgemäß an den Türen anhaften und
die Kälte nicht entweichen lassen (siehe Wartung).
37
Page 38
Störungen und Abhilfe
Gerätestörung: Bevor Sie sich an den Technischen Kundendienst wenden (siehe Kundendienst), vergewissern Sie sich bitte
DE
zuerst, ob es sich um eine Kleinigkeit handelt, die Sie selbst beheben können. Ziehen Sie hierzu nachstehendes Verzeichnis
zu Rate.
Störungen:
Die Innenbeleuchtung schaltet nicht
ein.
Die Kühlleistung des Kühlschranks
und des Gefrierfachs ist zu gering.
Der Kühlschrank kühlt zu stark, das
Kühlgut gefriert.
Der Motor läuft ununterbrochen.
Das Betriebsgeräusch ist zu stark.
Die Temperatur einiger
Kühlschrank-Außenteile ist sehr
hoch.
Mögliche Ursachen / Abhilfe:
Der Netzstecker steckt nicht in der Steckdose, oder er sitzt nicht fest,
so dass kein Kontakt hergestellt wird; oder es besteht ein Stromausfall.
Die Türen schließen nicht gut bzw. die Dichtungen sind verschlissen.
Die Türen werden zu oft geöffnet.
Der TEMPERATURSCHALTER ist nicht richtig eingestellt.
Der Kühlschrank oder das Gefrierfach wurde zu sehr beladen.
Die Geräte-Betriebsraumtemperatur liegt unter 14°C.
Der TEMPERATURSCHALTER ist nicht richtig eingestellt.
Das Kühlgut kommt mit der Rückwand in Berührung.
Die Tür ist nicht richtig geschlossen oder wird zu häufig geöffnet.
Die Umgebungstemperatur ist sehr hoch.
Die Reifschicht ist stärker als 2-3 mm (siehe Wartung).
Das Gerät wurde nicht eben aufgestellt (siehe Installation).
Das Gerät wurde zwischen Möbelteilen oder Gegenständen aufgestellt,
die vibrieren und daher zur Geräuschbildung Ihres Gerätes beitragen.
Das Kühlmittel verursacht ein leises Geräusch auch wenn der
Kompressor nicht arbeitet: dies ist kein Fehler sondern ganz normal.
Die hohen Temperaturen sind erforderlich, um eine
Kondenswasserbildung in einigen Kühlschrank-Bereichen zu vermeiden.
An der Kühlzonen-Rückwand bildet
sich Reif oder Wassertropfen.
Auf dem Boden des Kühlschranks
steht Wasser.
Es handelt es sich um die normale Funktionsweise des Produkts.
Die Tauwasserablauföffnung ist verstopft (siehe Wartung).
38
Page 39
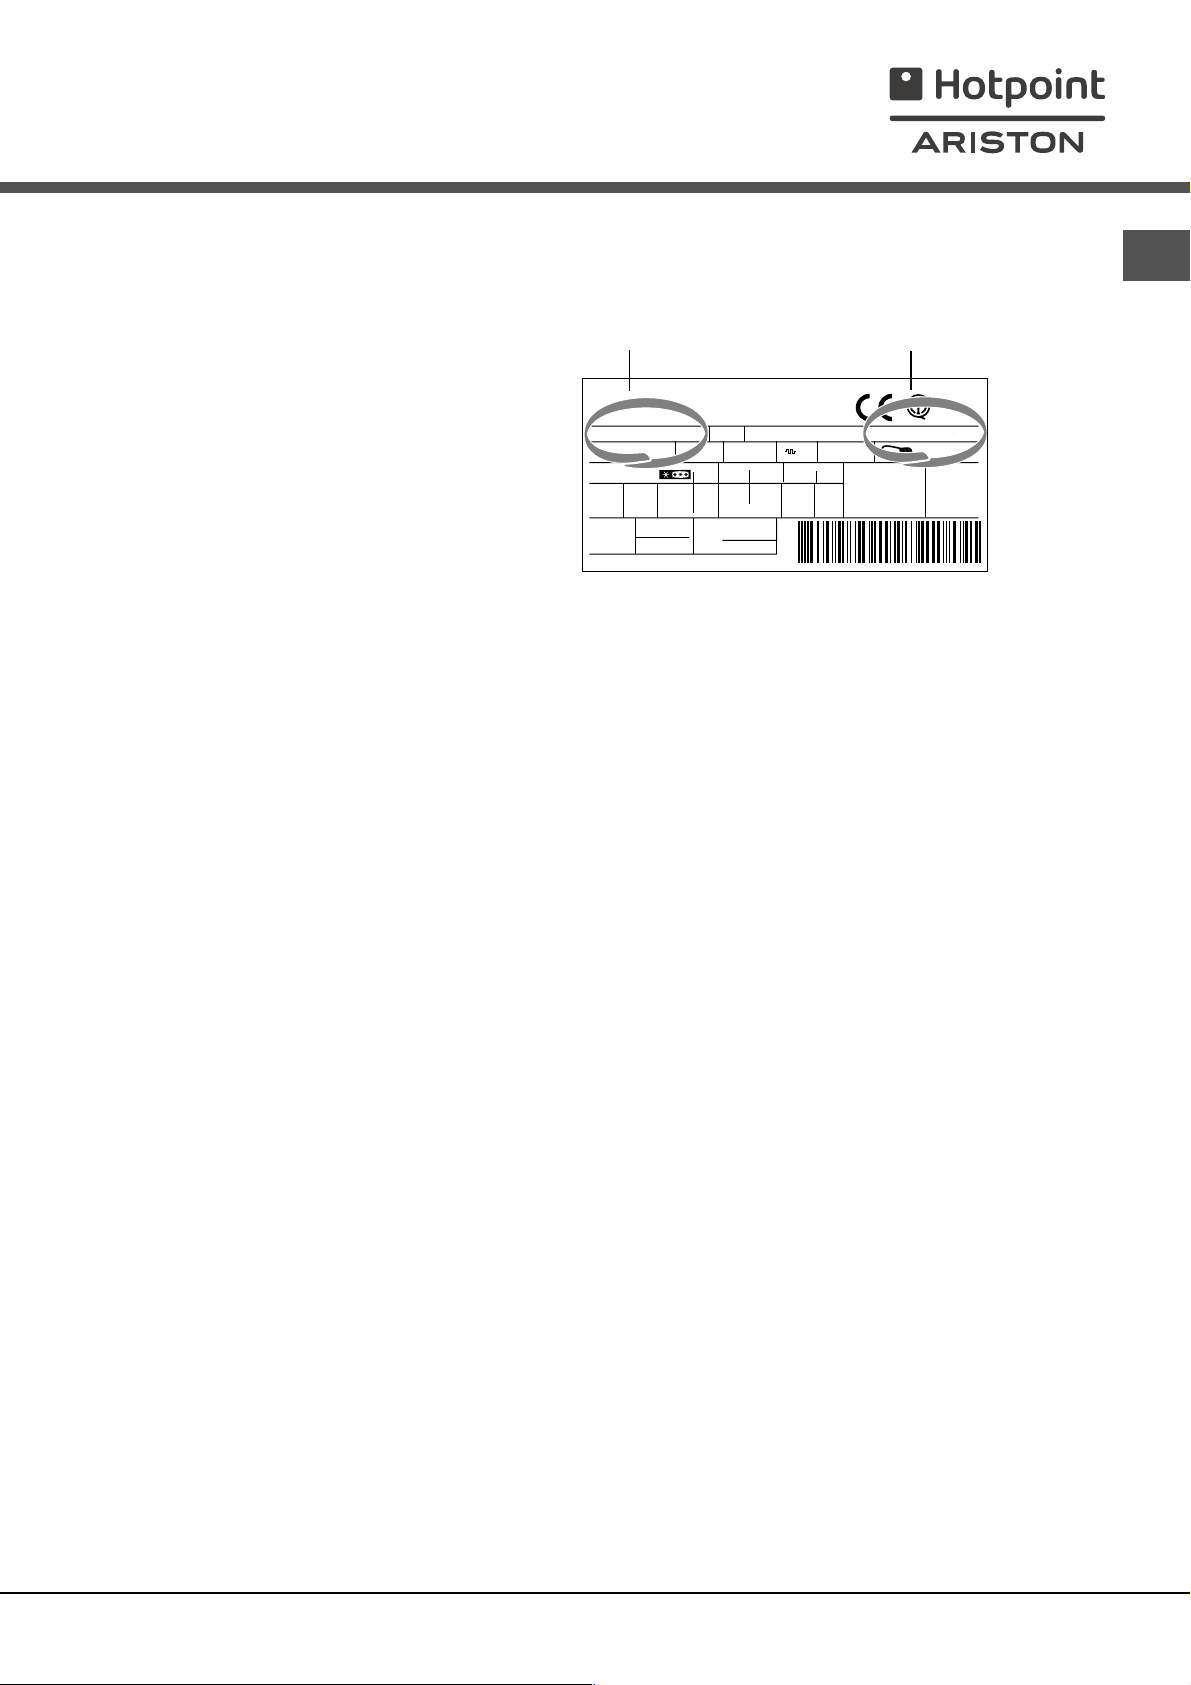
Kundendienst
Bevor Sie sich an den Kundendienst wenden:
Prüfen Sie bitte, ob die Störung nicht selbst behoben werden kann (siehe Störungen und Abhilfe).
Sollte trotz aller Kontrollen das Gerät nicht funktionieren, bzw. die Störung weiter bestehen bleiben,
kontaktieren Sie bitte die nächstgelegene technische Kundendienststelle.
Modell Modellnummer
Geben Sie bitte Folgendes an:
die Art der Störung
das Gerätemodell (Mod.)
die Modellnummer (S/N).
Entnehmen Sie diese Daten bitte dem Typenschild
(befindlich in der Kühlzone unten links).
Gross
Bruto
Brut
TI
75
Test
P.S-I.
RG 2330
Mod.
220 - 240 V- 50 Hz 150 W
340
Total
Gross
Bruto
Brut
Compr.
R 134 a
Syst.
kg 0,090
Kompr.
Made in Italy 13918
93139180000 S/N 704211801
Net
Util
Utile
Pressure
HIGH-235
LOW 140
Cod.
Gross
Bruto
Brut
Fuse
W
A
Freez. Capac
Poder de Cong
4,0
kg/24 h
Max 15 w
Class
Clase
Classe
N
Wenden Sie sich auf keinen Fall an nicht autorisierte Techniker und lassen Sie ausschließlich
Original-Ersatzteile einbauen.
DE
39
Page 40
DE
195061964.00
01/2007 - Xerox Business Services
40
Page 41
Gebruiksaanwijzingen
KOEL/DIEPVRIESCOMBINATIE
I
Italiano, 1
D
Deutsch, 31
P
Portuges, 61
BCB 311/HA
GB
English, 11
NL
Nederlands
, 41
F
Français,21
E
Espanol, 51
Inhoud
NL
Installatie, 42
Plaatsen en aansluiten
Beschrijving van het apparaat, 43
Algemeen aanzicht
Starten en gebruik, 44-45
Het apparaat starten
Regelen van de temperaturen
Optimaal gebruik van de koelkast
Optimaal gebruik van de diepvrieskast
Onderhoud en verzorging, 46
De elektrische stroom afsluiten
Het apparaat reinigen
Het vermijden van schimmel en vervelende luchtjes
Het apparaat ontdooien
Het lampje vervangen
Voorzorgsmaatregelen en advies, 47
Algemene veiligheid
Afvalverwijdering
Het milieu sparen en respecteren
Storingen en oplossingen, 48
Service, 49
Page 42
Installatie
NL
! Bewaar dit boekje zorgvuldig voor eventuele toekomstige
raadpleging. Wanneer u het product weggeeft, verkoopt of
wanneer u verhuist, dient u dit boekje bij het apparaat te
bewaren zodat alle nodige informatie voorhanden blijft.
! Lees de gebruiksaanwijzingen zorgvuldig door: er staat
belangrijke informatie in over installatie, gebruik en veiligheid.
Plaatsen en aansluiten
Plaatsen
1. Plaats het apparaat in een goed geventileerd en droog
vertrek.
2. Laat de ventilatieroosters aan de achterzijde vrij: de
compressor en de condensator geven warmte af en
vereisen een goede ventilatie om goed te functioneren en
het elektriciteitsverbruik te beperken.
3. Houdt het apparaat ver van hittebronnen vandaan (direct
zonlicht, elektrisch gasfornuis).
Elektrische aansluiting
Zet het apparaat na het transport verticaal en wacht minstens
3 uur voordat u het aansluit aan het elektriciteitsnet. Voordat u
de stekker in het stopcontact steekt, dient u zich ervan te
verzekeren dat:
het stopcontact geaard is en voldoet aan de geldende
normen;
het stopcontact in staat is het maximale vermogen van het
apparaat te dragen, zoals aangegeven op het typeplaatje
dat zich onderin links in het koelgedeelte bevindt (bv. 150
W);
de spanning zich bevindt tussen de waarden die staan
aangegeven op het typeplaatje, dat zich onderin links
bevindt (bv. 220-240 V);
het stopcontact en de stekker overeenkomen.
Als dat niet het geval is, dient een erkende monteur de
stekker te vervangen (zie Service); gebruik geen
verlengsnoeren of dubbelstekkers.
! Wanneer het apparaat geïnstalleerd is, moeten het snoer en
het stopcontact makkelijk te bereiken zijn.
! Het snoer mag niet worden gebogen of samengedrukt.
! Het snoer moet van tijd tot tijd worden gecontroleerd en
mag alleen door erkende monteurs worden vervangen (zie
Service).
! De fabrikant kan niet verantwoordelijkheid worden
gesteld als deze normen niet worden nageleefd.
42
Page 43
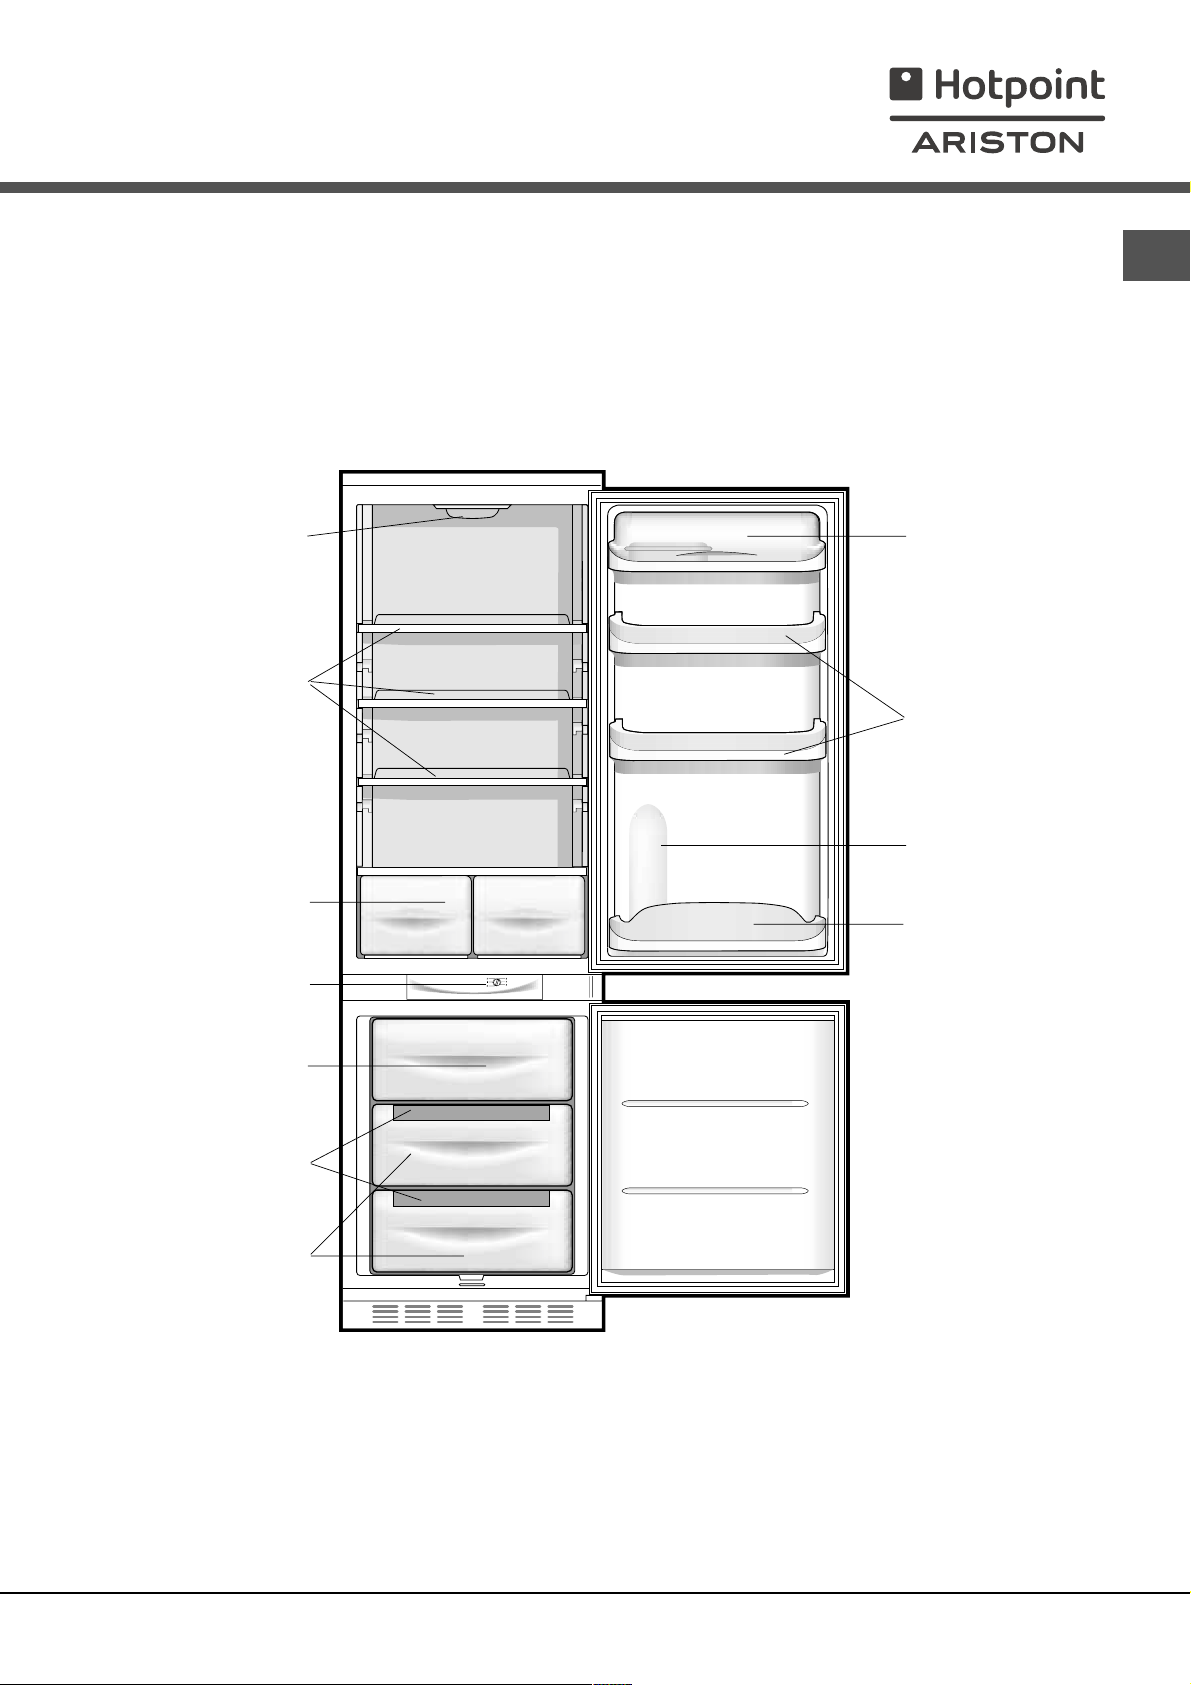
Beschrijving van
het apparaat
Algemeen aanzicht
Deze gebruiksaanwijzingen gelden voor verscheidene modellen en het is daarom mogelijk dat de figuur andere details
afbeeldt dan het door u aangeschafte apparaat. De beschrijving van de meest complexe elementen vind u terug in de
volgende paginas.
Lampje
(zie Onderhoud)
DRAAGPLATEAU
Uitneembaar vak met
deksel, voor
EIERREK en
BOTERVLOOT
Uitneembaar vak voor
VARIA
NL
*
GROENTE- en
FRUITLADE
TEMPERATUURKNOP
INVRIES- en
BEWAARGEDEELTE
IJSBLOKJESHOUDER
Ice Care
BEWAARGEDEELTE
Ruimte voor een 2
LITER FLES
Vak voor FLESSEN
*
Deze kunnen variëren voor wat betreft aantal of positie.
Alleen op enkele modellen aanwezig.
*
43
Page 44
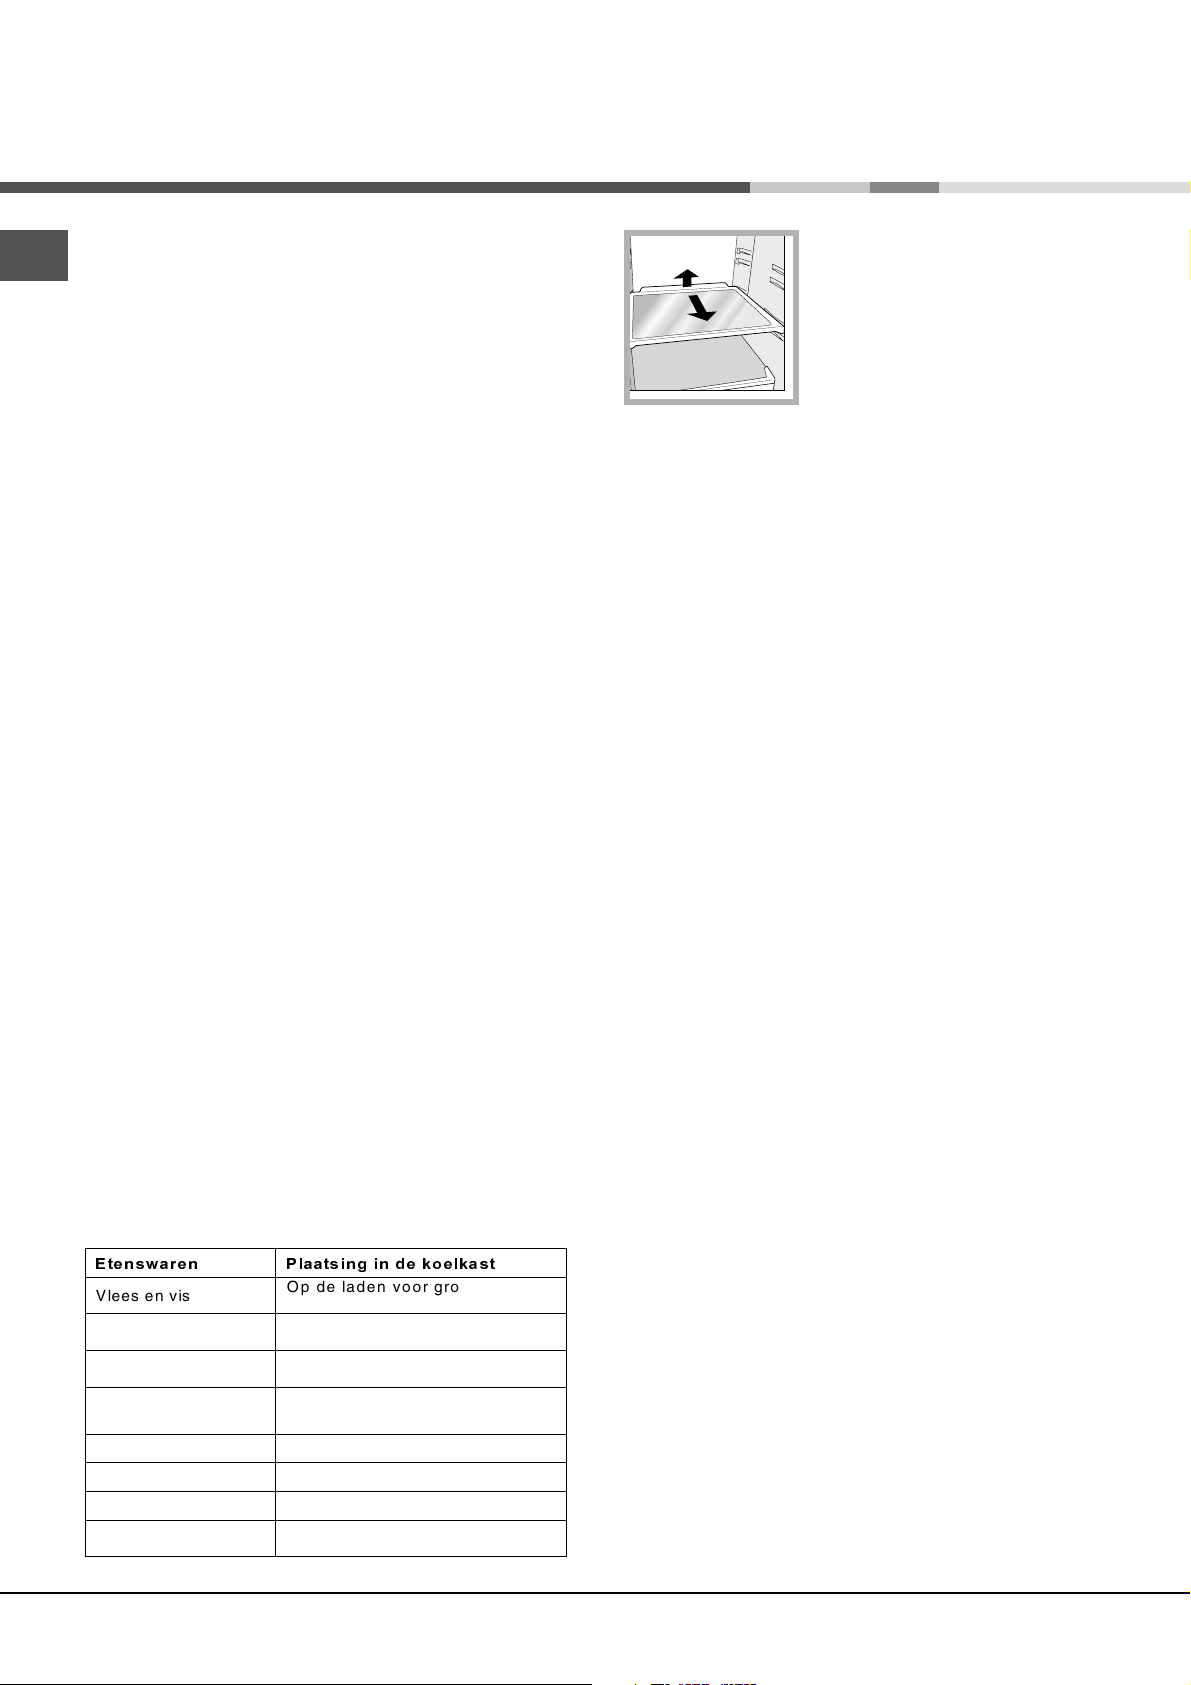
Starten en gebruik
Het apparaat starten
NL
! Voordat u het apparaat in gebruik stelt, dient u de
instructies voor wat betreft de installatie na te
volgen (zie Installatie).
! Voordat u het apparaat aansluit, dient u zowel het koel-
als het diepvriesgedeelte, alsook het toebehoren met lauw
water en soda te reinigen.
1. Steek de stekker in het stopcontact en verzeker u ervan
dat het lampje aan de binnenkant van het apparaat
aangaat.
2. Draai de knop van de TEMPERATUURREGELING op
een middelmatige stand. Na enkele uren kunt u de
levensmiddelen in de koelkast zetten.
Regelen van de temperaturen
De temperatuur in het koelgedeelte wordt automatisch
geregeld aan de hand van de stand van de
thermostaatknop.
1 = minder koud 5 = kouder
Wij raden een gemiddelde stand aan.
Het koelsysteem van dit apparaat bevindt zich aan de
binnenkant van de achterwand van het koelgedeelte.
Hiermee ontstaat een grotere en efficiëntere binnenruimte en
een verbeterd esthetisch effect. Deze achterwand zal tijdens
de werking van het apparaat ofwel bedekt zijn met ijs, ofwel
met waterdruppels, naar gelang de compressor wel of niet in
gebruik is. Maakt u zich hier dus geen zorgen om! De
koelkast werkt op normale wijze.
Als u de knop TEMPERATUURREGELING op een hoge
stand zet en als er tegelijkertijd veel etenswaar en een hoge
buitentemperatuur is, zou het kunnen gebeuren dat het
apparaat constant werkt. Dit heeft een overtollige
ijsproductie en een hoog elektriciteitsverbruik als gevolg: dit
kan voorkomen worden door de knop op een lagere stand
te zetten (er zal een automatische ontdooiing plaatsvinden).
In statische apparaten zal de lucht op natuurlijke wijze
circuleren: koude lucht daalt aangezien hij zwaarder is.
Daarom dient u de etenswaren op de volgende wijze te
rangschikken:
(WHQVZDUHQ
Vlees en vis
Verse kaas
Gekookte
etenswaren
Vleeswaren, brood,
chocolade
Groente en fruit In de groente- en fruitladen
Eieren In het speciale rek
Boter en margarine In het speciale rek
Flessen, frisdrank,
melk
3ODDWVLQJLQGHNRHONDVW
Op de laden voor groente en
fruit
Op de laden voor groente en
fruit
Waar u maar wilt
Waar u maar wilt
In het speciale rek
DRAAGPLATEAUS: plateaus of
1
roosters. Deze kunnen dankzij de
speciale gleuven worden
2
verwijderd of in hoogte geregeld
(zie afbeelding), voor het invoeren
van grote verpakkingen of
etenswaren. Het is niet
noodzakelijk het draagplateu
volledig te verwijderen om de hoogte te regelen.
Optimaal gebruik van de koelkast
Gebruik voor het regelen van de temperatuur de knop
TEMPERATUURREGELING(zie Beschrijving).
Zet alleen koude of lauwe levensmiddelen in de koelkast,
nooit warme (zie Voorzorgsmaatregelen en advies).
Denk eraan dat u gekookte etenswaren niet langer
kunt bewaren dan rauwe.
Zet geen vloeistoffen in open flessen of bakken in de
koelkast: dit brengt een toename van de
vochtigheidsgraad teweeg en een daaropvolgende
condensproductie.
Optimaal gebruik van de diepvrieskast
Vries nooit etenswaar in die op het punt staat te
ontdooien of al is ontdooid; dergelijke etenswaar moet
gelijk worden gekookt en gegeten (binnen 24 uur).
Verse etenswaren die moeten worden ingevroren
mogen nooit in contact raken met etenswaren die al
bevroren zijn; verse etenswaren moeten op het rooster
van het diepvriesgedeelte worden geplaatst,
mogelijkerwijs tegen de zijkant of de achterwand, waar
de temperatuur de -18°C of lager bereikt en waar ze
snel worden ingevroren.
Plaats nooit glazen flessen met vloeistof in de
diepvrieskast, vooral niet als er een dop op zit of als ze
hermetisch zijn afgesloten, ze zouden kunnen barsten.
De maximum hoeveelheid die men dagelijks kan
invriezen is aangegeven op het typeplaatje links
onderin de koelkast (voorbeeld: Kg/24h 4).
! Open de deur van de diepvrieskast niet tijdens het
invriezen.
! Wanneer de stroom wegvalt of wanneer er een storing
optreedt, dient u de deur van de diepvrieskast niet te
openen: de levensmiddelen blijven op deze manier nog
ongeveer 9 à 14 uur goed bewaard.
! Als de kamertemperatuur zich voor langere tijd onder de
14°C bevindt, bereikt het diepvriesgedeelte niet de
temperatuur die nodig is voor het langdurig bewaren van
de levensmiddelen en zal de bewaartijd van de
etenswaren als gevolg korter zijn.
44
Page 45
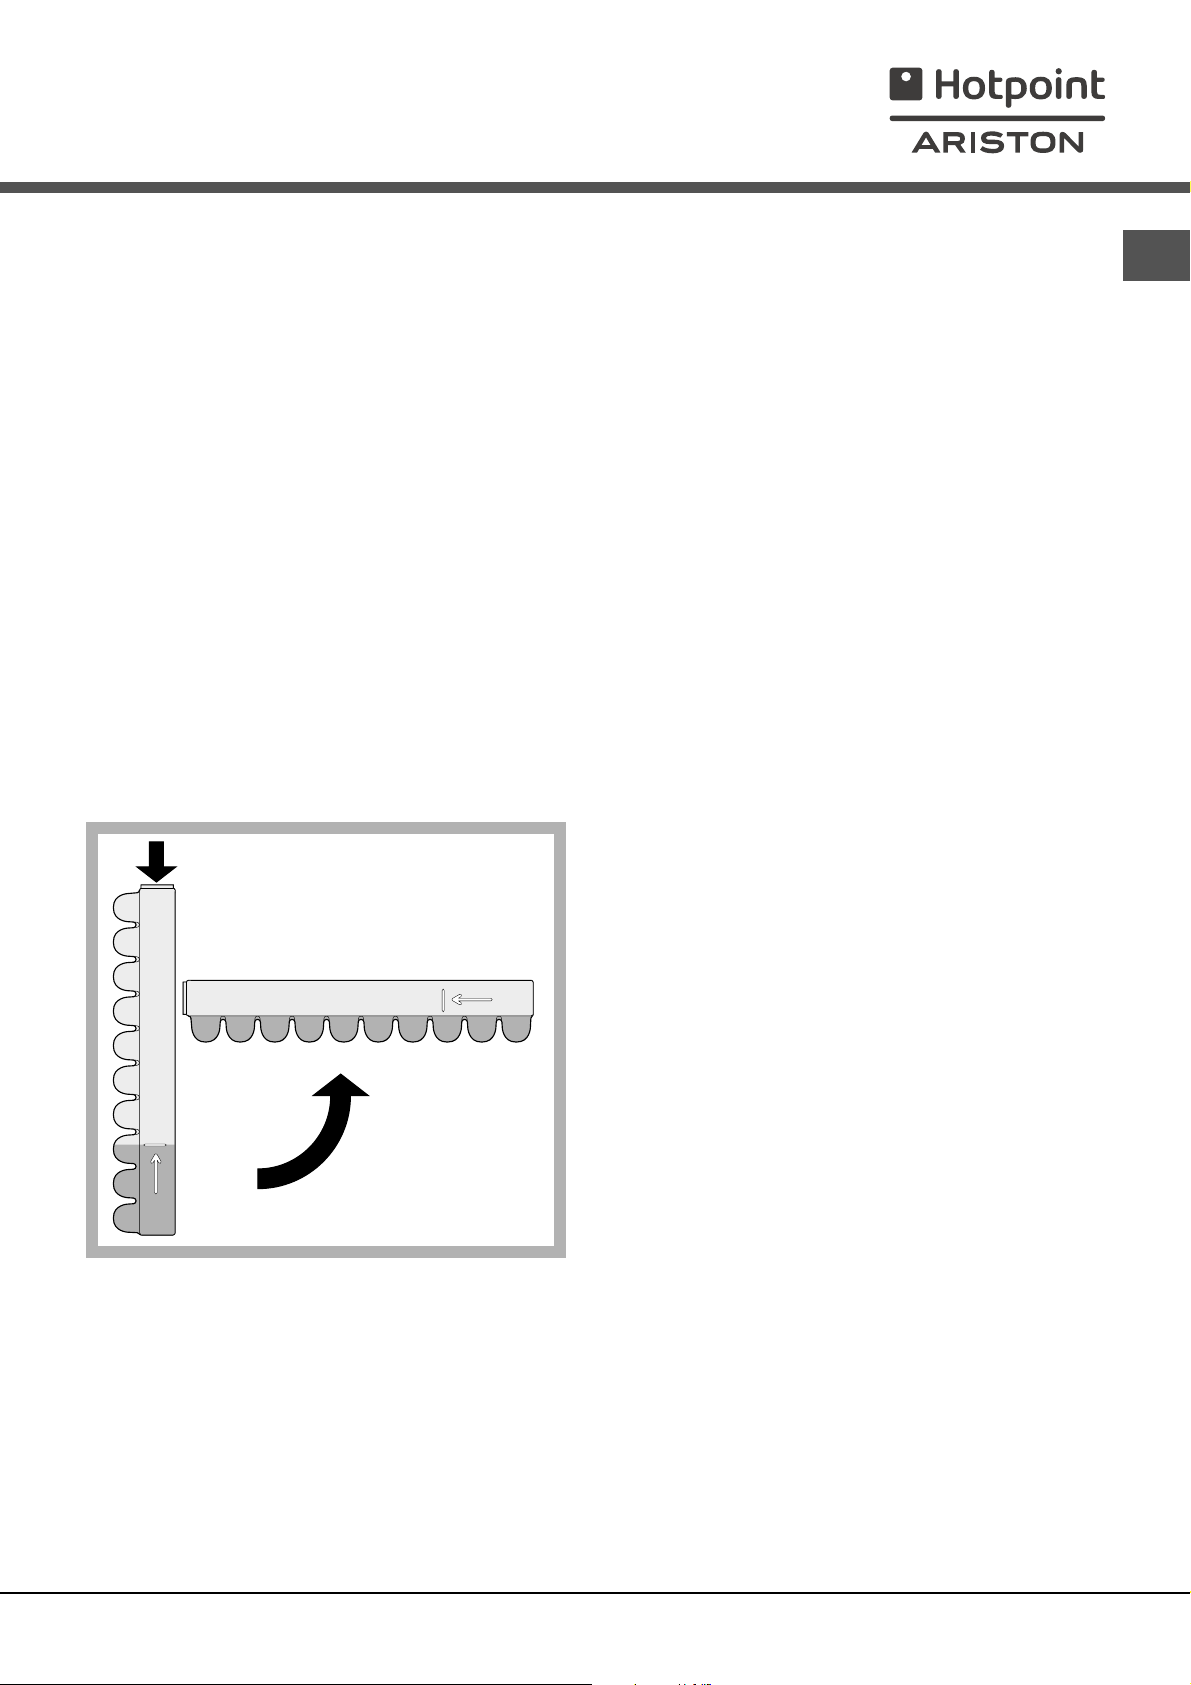
IJsblokjeshouder Ice Care.
Het feit dat ze bovenop de laden van de freezer zijn
geplaatst zorgt voor de beste ergonomie en reinheid: de
ijsblokjes komen niet meer in contact met de etenswaren
in de freezer: bovendien wordt water knoeien tijdens het
opvullen vermeden (ook de deksel voor het afsluiten van
het gat na het opvullen is bijgeleverd).
1. Haal de ijsblokjeshouder uit de deur door hem eerst naar
boven. Verzeker u ervan dat de houder helemaal leeg is
en vul hem met water door de speciale opening.
2. Zorg ervoor nooit het aangegeven niveau te overschrijden
(MAX WATER LEVEL). Teveel water belemmert het
loskomen van de ijsblokjes (mocht dit gebeuren, wacht dan
tot het ijs gesmolten is en leeg de houder).
3. Draai de houder 90°: het water vult de houders door
middel van de communicerende vaten (zie afbeelding).
4. Sluit de opening af met bijgeleverde dop en zet de
houder weer op zijn plaats.
5. Als het ijs is gevormd (minstens 8 uur) moet u de houder
tegen een hard oppervlak stoten en de buitenkant ervan
natmaken. Op deze manier raken de ijsblokjes los en
kunt u ze er door de opening uithalen.
NL
MAX
WATER LEVEL
MAX
WATER LEVEL
45
Page 46
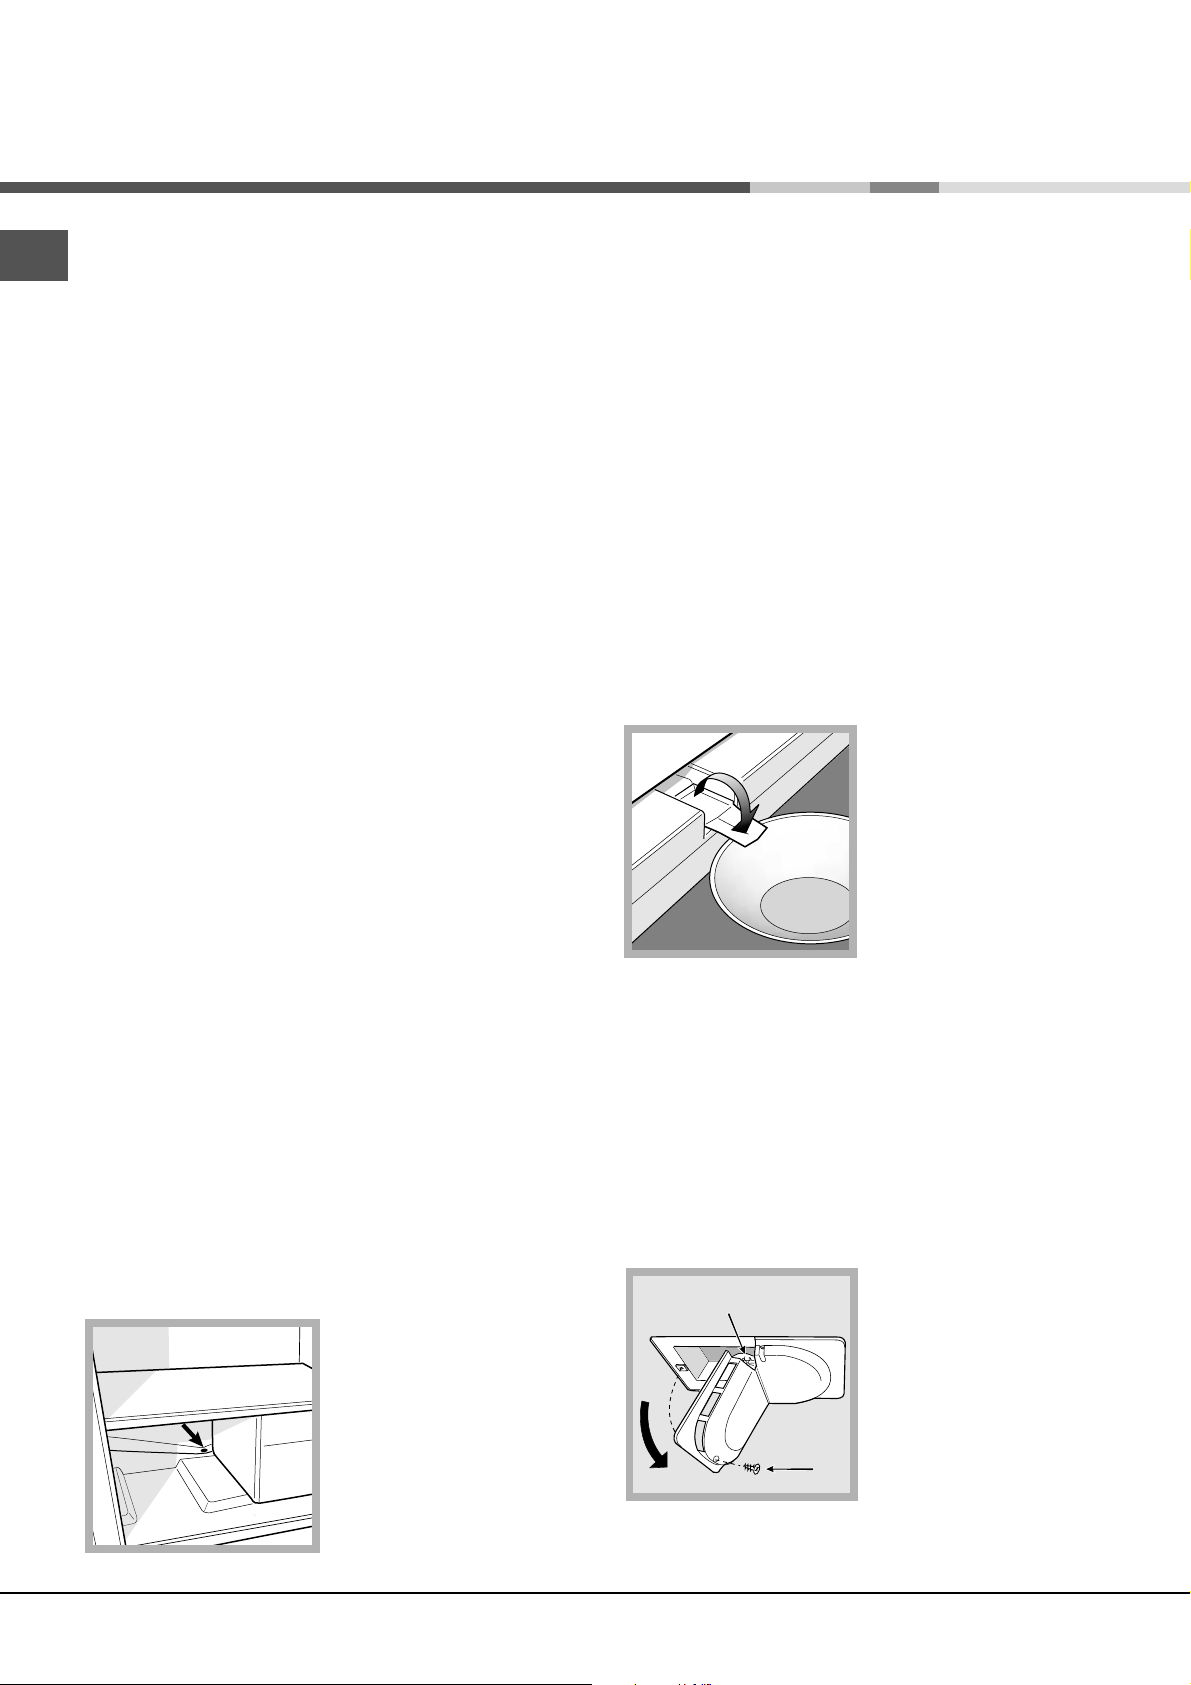
Onderhoud en verzorging
De elektrische stroom afsluiten
NL
Tijdens schoonmaak of onderhoud moet u het apparaat
afsluiten van de elektrische stroom door de stekker uit het
stopcontact te halen. Het is niet voldoende de knop van
demperatuurregeling op stand 0 te zetten (apparaat uit) om
alle elektrische contacten uit te schakelen.
Het apparaat reinigen
De buitenkant, de binnenkant en de rubberen
afdichtingen kunnen worden schoongemaakt met een
lauwe spons en soda of een neutraal
schoonmaakmiddel. Gebruik geen oplosmiddelen,
schuurmiddelen, chloor of ammonia.
Het uitneembare toebehoren kan worden afgewassen
met warm water en schoonmaak- of afwasmiddelen.
Spoel en droog alles goed af.
De achterkant van het apparaat vangt veel stof op. Na
het apparaat te hebben uitgezet en de stroom te
hebben afgesloten kunt u dit opzuigen met de lange
buis van de stofzuiger, op middelmatig vermogen.
Het vermijden van schimmel en
vervelende luchtjes
Het apparaat is vervaardigd uit hygiënisch materiaal dat
geen luchtjes absorbeert. Teneinde deze
eigenschappen te behouden moet u levensmiddelen
altijd goed bewaren en afsluiten. Hierdoor vermijdt u
ook het vormen van vlekken.
Als u het apparaat voor langere tijd uitzet moet u de
binnenkant reinigen en de deuren openlaten.
Het enige wat u af en toe moet doen is de opening
reinigen en controleren of het water vrijuit kan afvloeien.
Het ontdooien van het diepvriesgedeelte
Als de ijslaag dikker is dan 5 mm moet u een handmatige
ontdooiing uitvoeren:
1. Draai de knop van de TEMPERATUURREGELING op
stand 0.
2. Omwikkel de etenswaren uit de diepvries met papier en
leg ze op een koele plaats.
3. Laat de deur van de diepvrieskast open totdat het ijs
compleet gesmolten is; dit proces kunt u versnellen
door er bakken met lauw water in neer te zetten.
4. Maak de diepvrieskast goed schoon en droog hem
grondig af voordat u hem weer aanzet.
5. Enkele apparaten zijn
voorzien van een
DRAINAGE SYSTEEM om
het water naar buiten af te
voeren: laat het water in
een bak lopen (zie
afbeelding).
6. Nadat u de etenswaren in de diepvrieskast heeft
geplaatst moet u circa 2 uur wachten totdat het
apparaat weer op normale wijze functioneert.
Het apparaat ontdooien
! Houdt u aan onderstaande instructies.
Gebruik om het apparaat te ontdooien geen scherpe of
puntige voorwerpen. Deze zouden het koelcircuit
onherstelbaar kunnen beschadigen.
Het ontdooien van het koelgedeelte.
De koelkast is voorzien
van een automatische
ontdooifunctie: het water
wordt door een speciale
afvoeropening (zie
afbeelding) naar de
achterkant geleid waar de
warmte van de
compressor het doet
verdampen.
46
Het lampje vervangen
Om het lampje van het koelgedeelte te vervangen, dient u
eerst de stekker uit het stopcontact te halen. Volg de
instructies die hieronder zijn aangegeven.
Verwijder het lampje (A)
A
B
door de schroef (B), die
zich aan de achterkant van
het lampenkapje bevindt,
los te schroeven, zoals
aangegeven (zie
afbeelding). Vervang het
met eenzelfde soort
lampje, met een vermogen
van niet meer dan 15 W.
Page 47
Voorzorgsmaatregelen
en advies
! Het apparaat is ontworpen en vervaardigd volgens de
geldende internationale veiligheidsvoorschriften. Deze
aanwijzingen zijn geschreven voor uw veiligheid en u dient
ze derhalve goed door te nemen.
Dit apparaat voldoet aan de volgende EU
Richtlijnen:
- 73/23/EEG van 19/02/73 (Laagspanning) en
daaropvolgende wijzigingen;
- 89/336/EEG van 03/05/89 (Elektromagnetische
Compatibiliteit) en daaropvolgende wijzigingen;
- 2002/96/CE..
Algemene veiligheid
Dit apparaat is vervaardigd voor niet-professioneel
gebruik binnenshuis.
Het apparaat dient te worden gebruikt voor het
bewaren en het invriezen van levensmiddelen. Het
dient uitsluitend door volwassenen te worden bediend,
volgens de aanwijzingen die aangegeven zijn in dit
instructieboekje.
Het apparaat dient niet buitenshuis te worden
geplaatst, ook niet in overdekte toestand. Het is erg
gevaarlijk als het in aanraking komt met regen of als het
onweert.
Raak het apparaat niet blootsvoets of met natte
handen of voeten aan.
Raak nooit de koelelementen aan de binnenkant aan: u
zou zich kunnen verbranden of verwonden.
Haal de stekker nooit uit het stopcontact door aan het
snoer te trekken.
Maak de koelkast niet schoon of voer geen onderhoud uit
als de stekker nog in het stopcontact zit.
Het is niet voldoende langer dan twee seconden de
toets ON/OFF op de display ingedrukt te houden om
elke elektrische verbinding te verbreken.
Als het apparaat defect is, mag u nooit aan het interne
systeem sleutelen om een reparatie uit te voeren.
Gebruik in de vakken waar ingevroren levensmiddelen
worden bewaard geen scherpe of puntige voorwerpen
of elektrische apparaten die niet door de fabrikant
worden aanbevolen.
Plaats nooit ijsblokjes die net uit de diepvrieskast
komen in uw mond.
Laat kinderen niet met het apparaat spelen. Ze mogen
in ieder geval nooit op de lades zitten of aan de deur
hangen.
Het verpakkingsmateriaal is geen speelgoed voor
kinderen.
Afvalverwijdering
Verwijdering van het verpakkingsmateriaal: houdt u aan
de plaatselijke normen, zodat het verpakkingsmateriaal
hergebruikt kan worden.
De Europese Richtlijn 2002/96/EC over Vernietiging
van Electrische en Electronische Apparatuur (WEEE),
vereist dat oude huishoudelijke electrische apparaten
niet mogen vernietigd via de normale ongesorteerde
afvalstroom. Oude apparaten moeten apart worden
ingezameld om zo het hergebruik van de gebruikte
materialen te optimaliseren en de negatieve invloed op
de gezondheid en het milieu te reduceren. Het symbool
op het product van de afvalcontainer met een kruis
erdoor herinnert u aan uw verplichting, dat wanneer u
het apparaat vernietigt, het apparaat apart moet
worden ingezameld.
Consumenten moeten contact opnemen met de locale
autoriteiten voor informatie over de juiste wijze van
vernietiging van hun oude apparaat.
Het milieu sparen en respecteren
Plaats het apparaat in een koele, goed geventileerde
ruimte, behoedt het voor directe zonnestralen, plaats
het niet dichtbij warmtebronnen.
Laat de deur, wanneer u etenswaren in de koel- of
diepvrieskast zet of eruit haalt, zo kort mogelijk
openstaan. Elke keer dat de deur opengaat ontstaat
een aanzienlijk energieverlies.
Vul het apparaat niet met teveel etenswaren: voor een
optimale conservering moet de koude luchtstroom
vrijuit kunnen circuleren. Als u de circulatie belemmert,
zal de compressor constant blijven werken.
Zet geen warme levensmiddelen in het apparaat: deze
zouden de binnentemperatuur verhogen waardoor de
compressor harder werkt en er een groter elektrisch
verbruik ontstaat.
Houdt de afdichtingen efficiënt en schoon, zodat ze
goed aan de deuren sluiten en de kou niet laten
ontsnappen (zie Onderhoud).
NL
47
Page 48
Storingen en oplossingen
Het zou kunnen gebeuren dat het apparaat niet functioneert. Voordat u de Servicedienst belt (zie Service), moet u
NL
controleren dat het geen probleem is dat u kunt oplossen met behulp van volgende lijst.
Storingen:
Het lampje van de binnenverlichting
gaat niet aan.
De koelkast en de diepvrieskast zijn
niet koud genoeg.
In de koelkast bevriezen de
etenswaren.
De motor blijft doorlopend draaien
Het apparaat maakt veel lawaai.
Mogelijke oorzaken / Oplossingen:
De stekker zit niet in het stopcontact, of niet voldoende om contact te
maken. Wellicht zit het hele huis zonder stroom.
De deuren sluiten niet goed of de afdichtingen zijn versleten.
De deuren worden vaak geopend.
De knop van de TEMPERATUURREGELING staat niet op de goede
stand
De koelkast of de diepvrieskast zijn overmatig gevuld.
De temperatuur van het vertrek waar het apparaat zich bevindt is lager
dan 14°C.
De knop van de TEMPERATUURREGELING staat niet op de goede
stand
De levensmiddelen staan in contact met de achterwand.
De deur is niet goed dicht of wordt constant geopend.
De buitentemperatuur is erg hoog.
De ijslaag is meer dan 2-3 mm dik (zie Onderhoud).
Het apparaat staat niet waterpas (zie Installatie).
Het apparaat staat tussen meubels of objecten die trillen of geluid
maken.
Het verkoelingsgas maakt een licht geluid ook wanneer de compressor
stil staat: dit is normaal, het is geen storing.
Enkele delen aan de buitenkant van
de koelkast zijn zeer warm.
Op de achterwand van het
koelgedeelte bevindt zich ijs of
waterdruppels.
Op de bodem van de koelkast ligt
water.
De hoge temperaturen zijn noodzakelijk om het vormen van condens te
voorkomen in bepaalde gedeeltes van het product
.
Dit is de normale werking van het product.
De afvoeropening voor het water is verstopt (zie Onderhoud).
48
Page 49
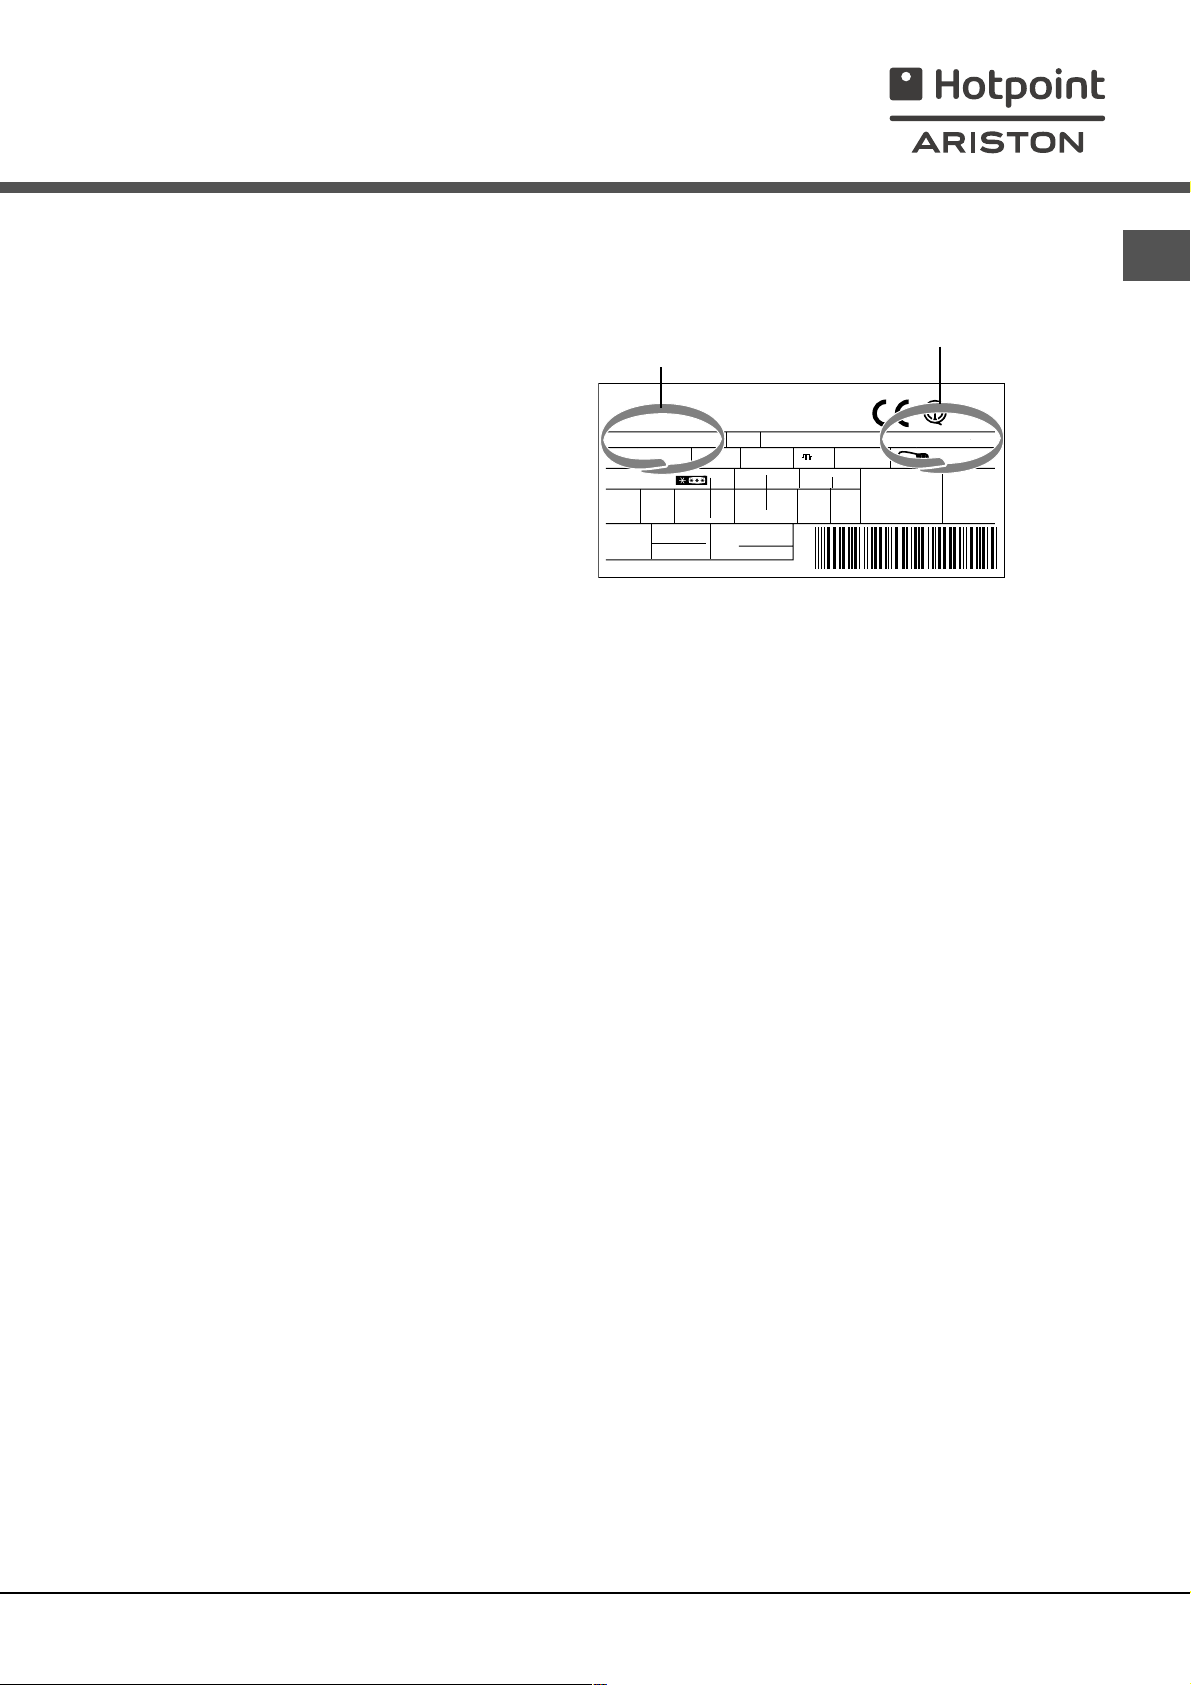
Service
Voordat u de Servicedienst belt:
Controleer of u de storing niet zelf kunt oplossen (zie Storingen en oplossingen).
Indien, ondanks alle controles, het apparaat niet goed werkt en de storing blijft bestaan, kunt u zich tot de
dichtstbijzijnde Technische Dienst wenden.
model
serienummer
U moet doorgeven:
het type storing
het model apparaat (Mod.)
het serienummer (S/N)
Deze informatie bevindt zich op het typeplaatje
links onderin het koelgedeelte.
RG 2330
Mod.
220 - 240 V- 50 Hz 150 W
340
Total
Gross
Bruto
Brut
Compr.
R 134 a
Syst.
kg 0,090
Kompr.
Made in Italy 13918
Gross
Bruto
Brut
75
Test
P.S-I.
TI
Net
Util
Utile
Pressure
HIGH-235
LOW 140
93139180000 S/N 704211801
Cod.
Gross
Bruto
Brut
W
Fuse
A
Freez. Capac
Poder de Cong
4,0
kg/24 h
Max 15 w
Class
Clase
Classe
N
Wendt u zich nooit tot onbevoegde installateurs en weiger altijd de installatie van niet originele
onderdelen
NL
49
Page 50
NL
195061964.00
01/2007 - Xerox Business Services
50
Page 51
Manual de instrucciones
COMBINADO FRIGORÍFICO/CONGELADOR
I
Italiano, 1
D
Deutsch, 31
P
Portuges, 61
BCB 311/HA
GB
English, 11
NL
Nederlands
, 41
F
Français, 21
E
Espanol, 51
Sumario
E
Instalación, 52
Colocación y conexión
Descripción del aparato, 53
Vista en conjunto
Puesta en funcionamiento y uso, 54-55
Poner en marcha el aparato
Regulación de la temperatura
Utilizar el refrigerador en forma óptima
Utilizar el congelador en forma óptima
Mantenimiento y cuidados, 56
Cortar la corriente eléctrica
Limpiar el aparato
Evitar la formación de moho y malos olores
Descongelar el aparato
Sustituir la bombilla
Precauciones y consejos, 57
Seguridad general
Eliminación
Ahorrar y respetar el ambiente
Anomalías y soluciones, 58
Asistencia, 59
Page 52
Instalación
! Es importante conservar este manual para poder
E
consultarlo cuando sea necesario. En caso de venta,
cesión o traslado, verifique que permanezca junto al
aparato para informar al nuevo propietario sobre su
funcionamiento y sobre las precauciones durante su uso
! Lea atentamente las instrucciones: contienen información
importante sobre la instalación, sobre el uso y sobre la
seguridad.
Colocación y conexión
Colocación
1. Coloque el aparato en un ambiente bien aireado y seco.
2. No obstruya las rejillas posteriores de ventilación: el
compresor y el condensador emiten calor y requieren
una buena aireación para funcionar bien y limitar el
consumo eléctrico.
3. Mantenga el aparato lejos de fuentes de calor (por ej. la
luz solar directa o una cocina eléctrica).
Conexión eléctrica
Después de su transporte, coloque el aparato verticalmente
y espere 3 horas como mínimo antes de conectarlo a la red
eléctrica. Antes de enchufarlo a la toma de corriente,
controle que:
la toma posea la conexión a tierra y que sea conforme a
la ley;
el enchufe sea capaz de soportar la carga máxima
de potencia de la máquina indicada en la placa de
características ubicada en la parte inferior izquierda del
frigorífico (ej. 150 W);
la tensión de alimentación esté comprendida entre los
valores indicados en la placa de características ubicada
abajo a la izquierda (ej. 220-240V);
la toma sea compatible con el enchufe del aparato.
Si no fuera así, solicite la sustitución del enchufe a un
técnico autorizado (ver Asistencia); no utilice
prolongaciones ni conexiones múltiples.
! Una vez instalado el aparato, el cable eléctrico y la toma
de corriente deben ser fácilmente accesibles.
! El cable no debe sufrir pliegues ni compresiones.
! El cable debe ser revisado periódicamente y sustituido
sólo por técnicos autorizados (ver Asistencia).
! La empresa declina toda responsabilidad en los
casos en que no hayan sido respetadas estas normas.
52
Page 53
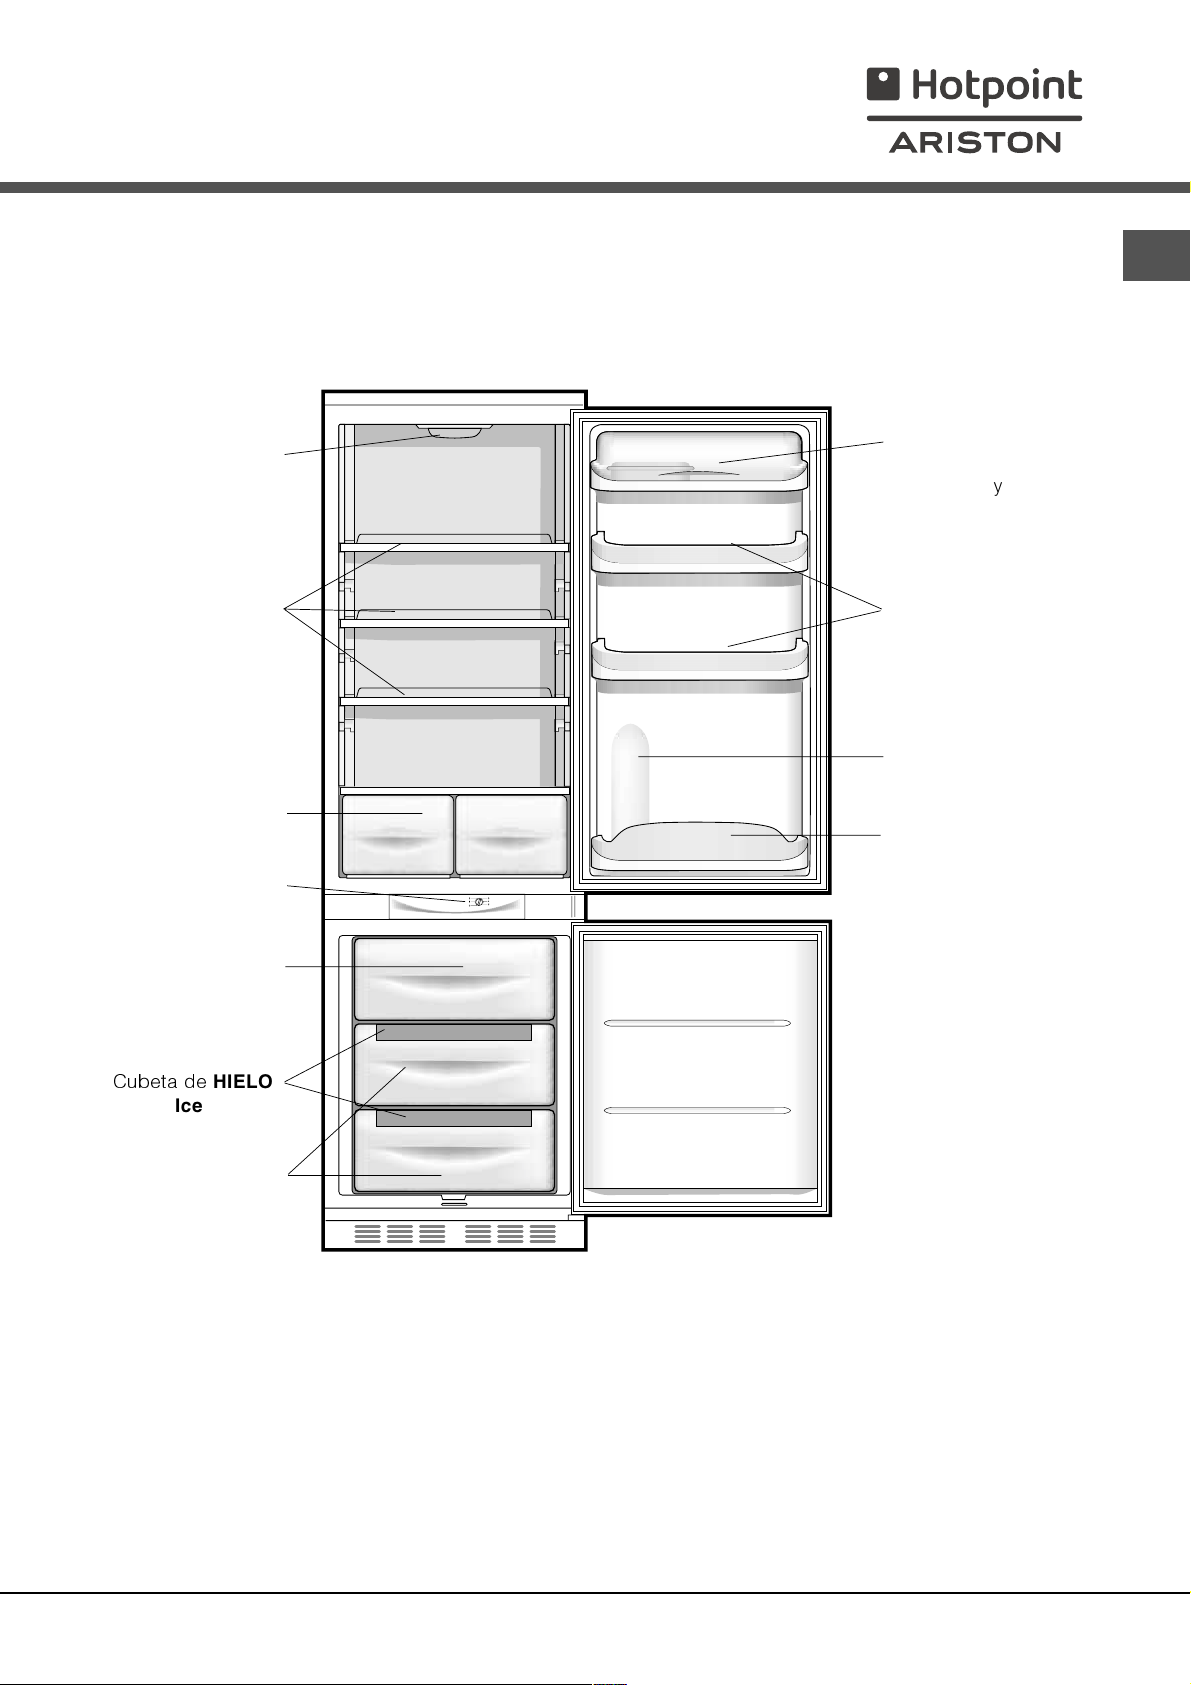
Descripción del
aparato
Vista en conjunto
Bombilla
(ver Mantenimiento
ESTANTE
Recipiente FRUTA y
VERDURA
Mando de REGULACIÓN
DE LA TEMPERATURA
E
Balconcito extraíble
con tapa, con
HUEVERA y
COMPARTIMENTO
PARA
MANTEQUILLA
Balconcito extraíble
PORTAOBJETOS
Espacio para una
BOTELLA de 2
LITROS
Balconcito
BOTELLAS
*
Compartimiento
CONGELAMIENTO y
CONSERVACIÓN
Cubeta de
Compartimiento
CONSERVACIÓN
La cantidad y/o su ubicación pueden variar.
HIELO
Ice Care
*
* Se encuentra solo en algunos modelos.
53
Page 54
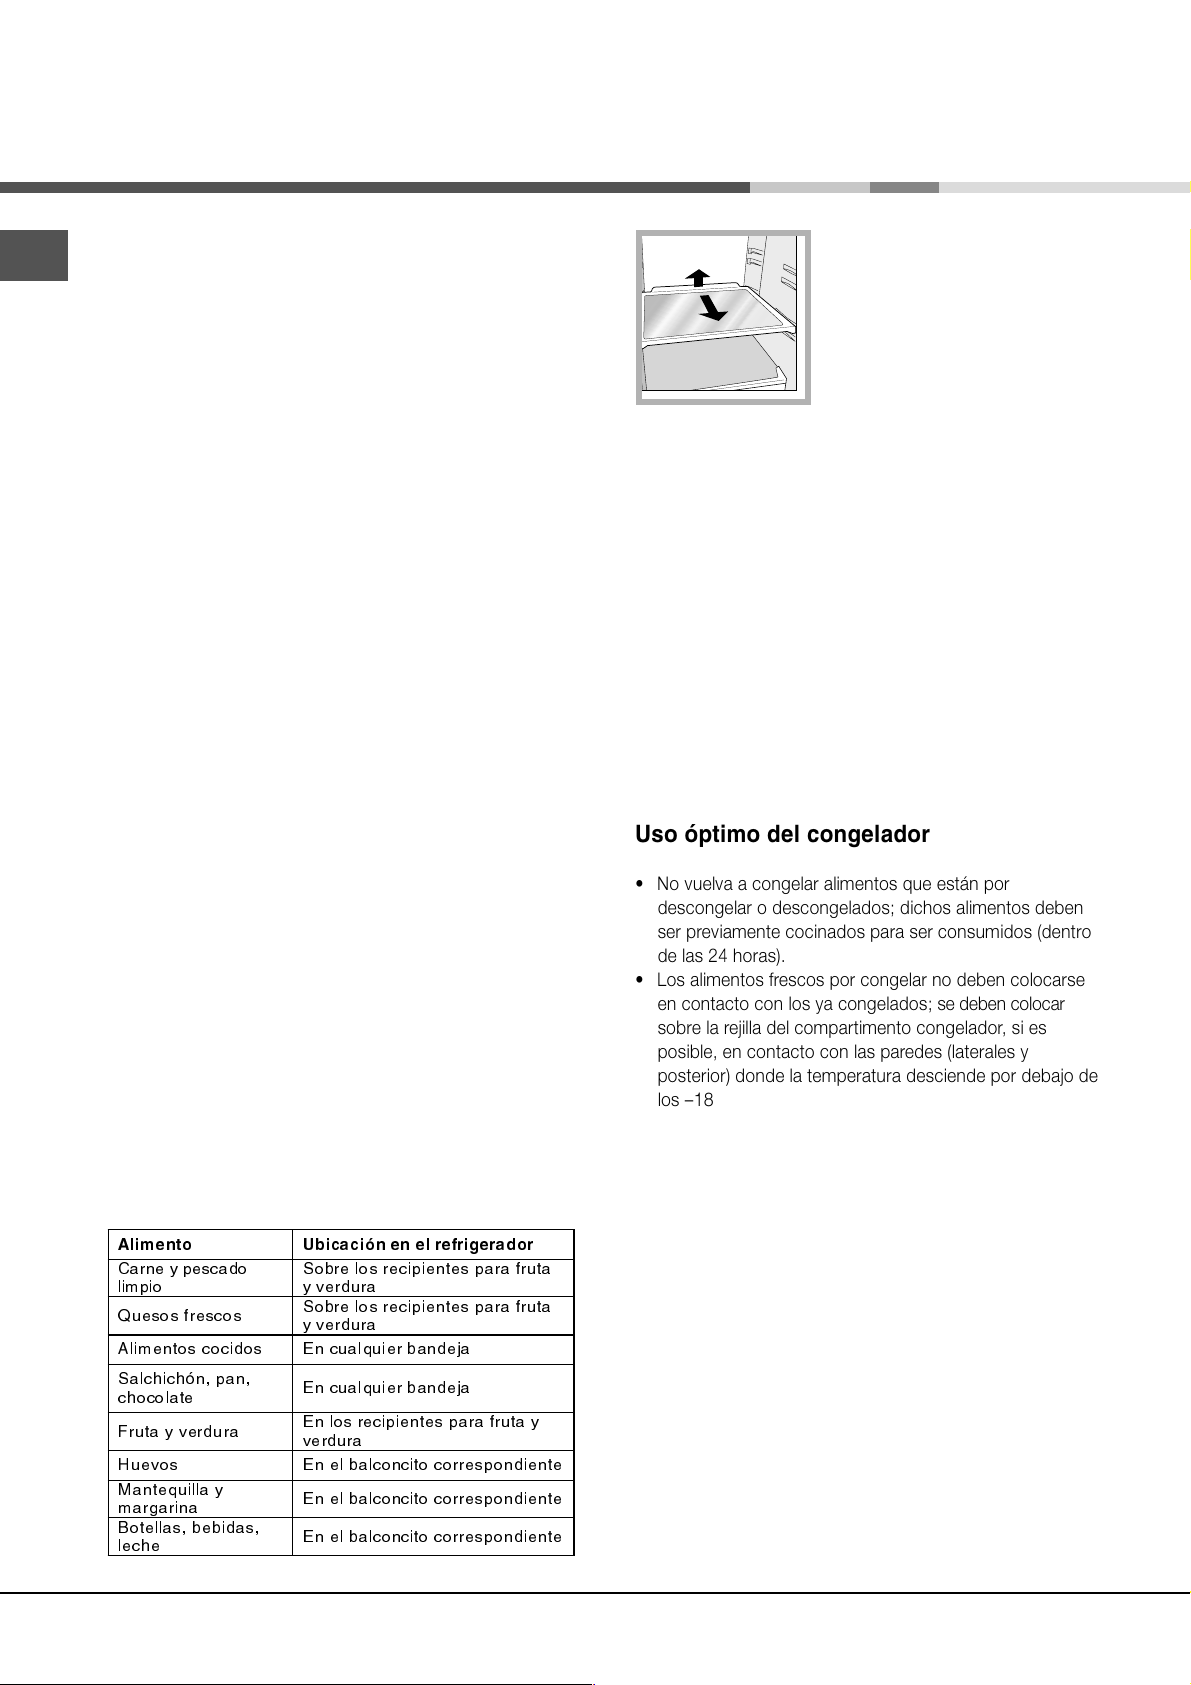
Puesta en
funcionamiento y uso
E
! Antes de poner en funcionamiento el aparato, siga
las instrucciones sobre la instalación (ver Instalación).
! Antes de conectar el aparato limpie bien los
compartimentos y los accesorios con agua tibia y
bicarbonato.
1. Enchufe el aparato en la toma de corriente y verifique
que se encienda la lámpara de iluminación interna.
2. Gire el mando de REGULACIÓN DE LA TEMPERATURA
hasta un valor medio. Después de algunas horas será
posible introducir alimentos en el frigorífico.
completamentes.
Utilizar el refrigerador en forma óptima
Para regular la temperatura utilice la perilla de
Regulación de la temperatura
La temperatura interna del compartimento frigorífico se
regula automáticamente en base a la posición del mando
del termostato.
1 = menos frío 5 = más frío
Se aconseja, en todo caso, poner una posición media.
Para aumentar el espacio disponible y mejorar el aspecto
estético, este aparato posee la parte refrigerante ubicada
en el interior de la pared posterior del compartimento
frigorífico. Durante el funcionamiento, dicha pared se
presentará cubierta de escarcha o de gotitas de agua
según si el compresor está en funcionamiento o en pausa.
¡No se preocupe por ello! El frigorífico está trabajando de
forma normal.
Si se coloca el mando de REGULACIÓN DE LA
TEMPERATURA en valores altos, con grandes cantidades
de alimentos y con una temperatura ambiente elevada, el
aparato puede funcionar continuamente, produciendo una
excesiva formación de escarcha y aumentando el
consumo de electricidad. evítelo desplazando el mando
hacia valores más bajos (se efectuará una descongelación
automática).
En los aparatos estáticos el aire circula de modo natural:
el más frío tiende a descender porque es más pesado. He
aquí como colocar los alimentos:
"MJN F O UP 6CJD B D JØ O F O F MSFGSJHFSBEP S
&DUQH\SHVFDGR
OLPSLR
4XHVRVIUHVFRV
$OLPHQWRVFRFLGRV (QFXDOTXLHUEDQGHMD
6DOFK LFKÂ QS DQ
FKRFRODWH
)UXWD\YHUGXUD
+XHYRV (QHOEDOFRQFLWRFRUUHVSRQGLHQWH
0DQWHTXLOOD\
PDUJDULQD
%RWH OODVEH ELGD V
OHFKH
6REUHORVUHFLSLHQWHVSDUDIUXWD
\YHUGXUD
6REUHORVUHFLSLHQWHVSDUDIUXWD
\YHUGXUD
(QFXDOTXLHUEDQGHMD
(QORVUHFLSLHQWHVSDUDIUXWD\
YHUGXUD
(QHOEDOFRQFLWRFRUUHVSRQGLHQWH
(QHOEDOFRQFLWRFRUUHVSRQGLHQWH
Introduzca sólo alimentos fríos o apenas tibios, nunca
Recuerde que los alimentos cocidos no se mantienen
No introduzca recipientes destapados con líquidos:
Uso óptimo del congelador
No vuelva a congelar alimentos que están por
Los alimentos frescos por congelar no deben colocarse
No coloque en el congelador botellas de vidrio que
La cantidad máxima diaria de alimentos a congelar está
! Evite abrir la puerta durante la congelación.
! Cuando se produzca una interrupción de corriente o
una avería, no abra la puerta del congelador: de este
modo, los alimentos congelados se conservarán sin
alteración durante aproximadamente 9-14 horas.
! Si durante un largo período de tiempo la temperatura
ambiente permanece por debajo de los 14ºC, no se
alcanzan las temperaturas necesarias para una larga
conservación en el compartimento congelador y, por lo
tanto, el período de conservación resultará menor.
1
2
FUNCIONAMIENTO DEL REFRIGERADOR (ver
Descripción).
calientes (ver Precauciones y consejos).
durante más tiempo que los crudos.
produciría un aumento de humedad con la consiguiente
formación de condensado.
descongelar o descongelados; dichos alimentos deben
ser previamente cocinados para ser consumidos (dentro
de las 24 horas).
en contacto con los ya congelados; se deben colocar
sobre la rejilla del compartimento congelador, si es
posible, en contacto con las paredes (laterales y
posterior) donde la temperatura desciende por debajo de
los 18ºC y garantiza una mayor velocidad de
congelación.
contengan líquidos, tapadas o cerradas herméticamente
porque podrían romperse.
indicada en la placa de características ubicada en el
compartimento frigorífico abajo a la izquierda (por
ejemplo: 4 Kg/24h).
Poner en marcha el aparato
BANDEJAS: enteras o tipo rejilla.
Son extraíbles y su altura es
regulable gracias a las guías
especiales (ver la figura), se
utilizan para introducir recipientes
o alimentos de gran tamaño. Para
regular la altura no es necesario
extraer las bandejas
54
Page 55
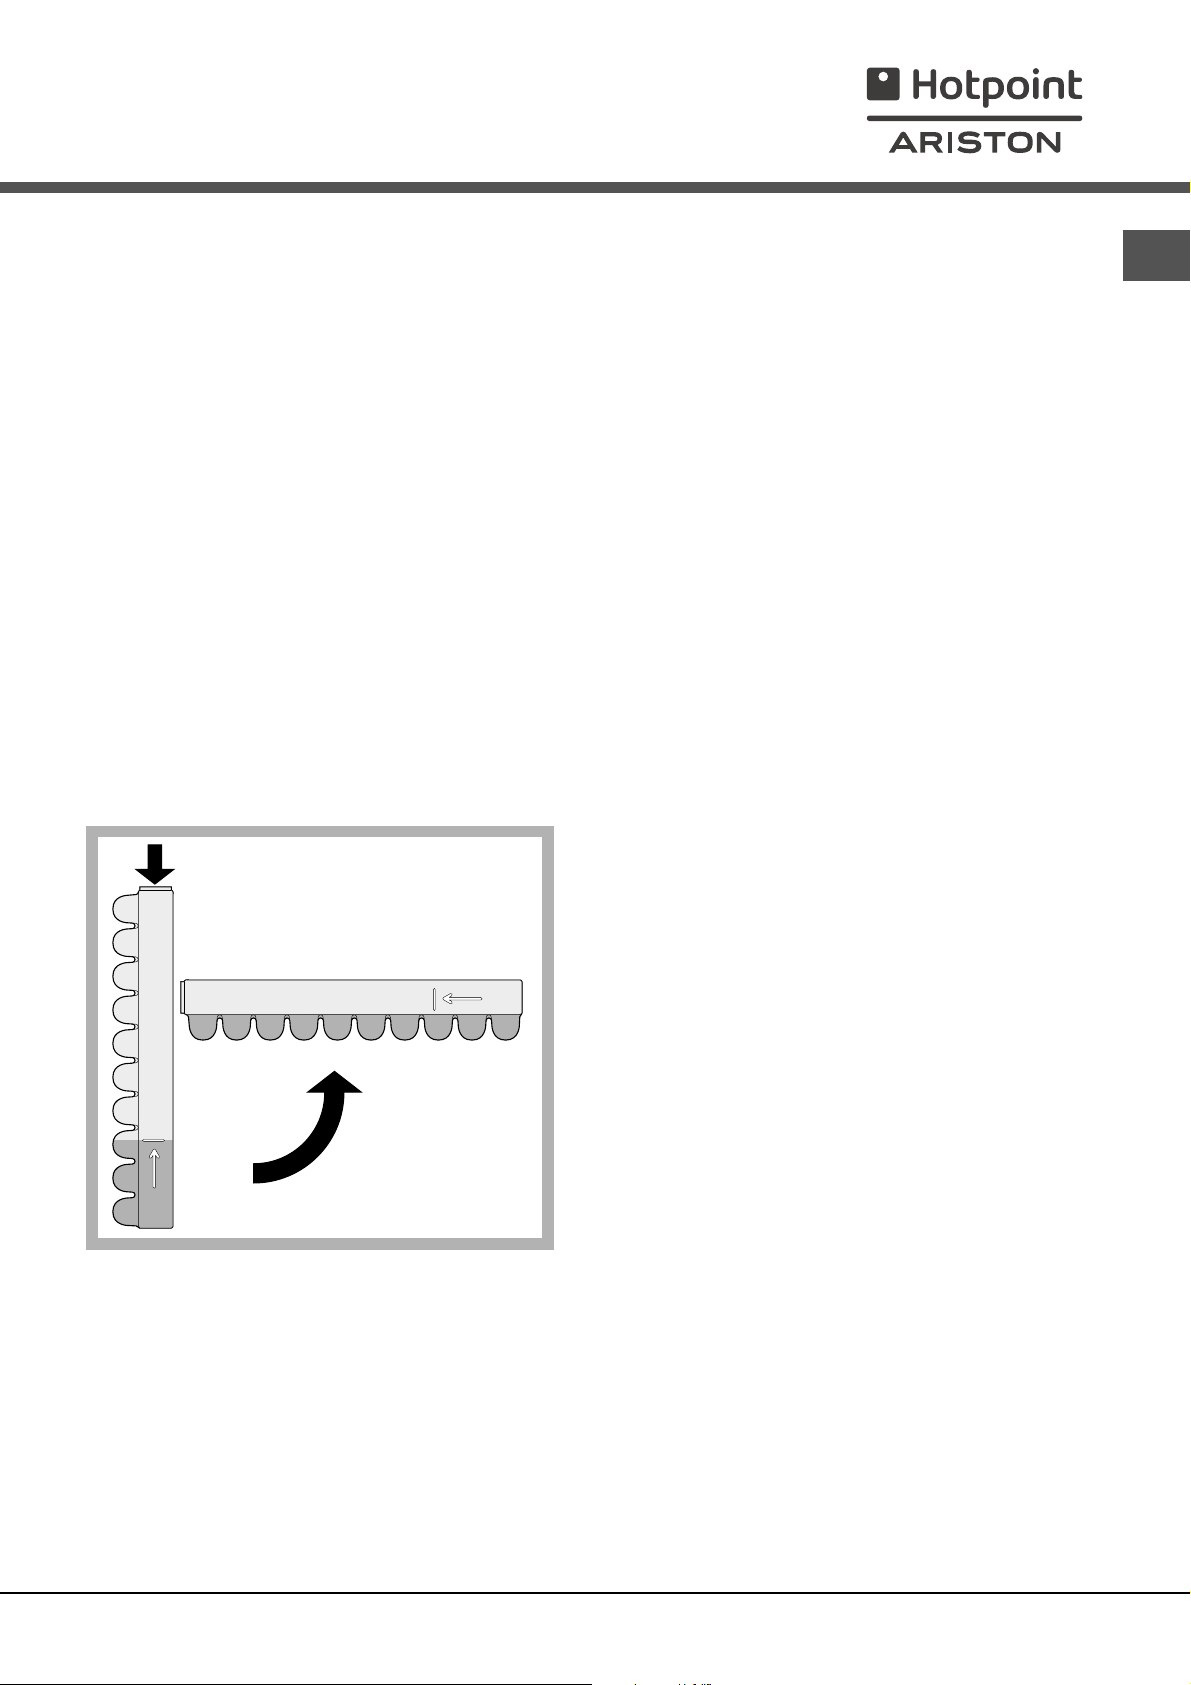
Cubeta de hielo Ice Care.
Su colocación en la parte superior de los cajones del
freezer garantiza una mayor limpieza (el hielo no está en
contacto con los alimentos) y ergonomía (no gotea
cuando se carga).
1. Extraiga la cubeta empujándola hacia arriba.
Controle que la cubeta esté completamente vacía y
llénela de agua utilizando el orificio correspondiente.
2. Tenga cuidado de no superar el nivel indicado (MAX
WATER LEVEL). Demasiada agua obstaculiza la salida
de los cubitos de hielo (si esto sucede, espere hasta
que el hielo se derrita y vacíe la cubeta).
3. Gire la cubeta 90º: el agua llena las formas por el
principio de vasos comunicantes (ver la figura).
4. Cierre el orificio con la tapa que se suministra con el
aparato y vuelva a colocar la cubeta.
5. Después de que se haya formado el hielo (tiempo
mínimo: 8 horas aproximadamente) golpee la cubeta
sobre una superficie dura y moje su parte externa para
despegar los cubitos; luego hágalos salir por el orificio.
E
MAX
WATER LEVEL
MAX
WATER LEVEL
55
Page 56
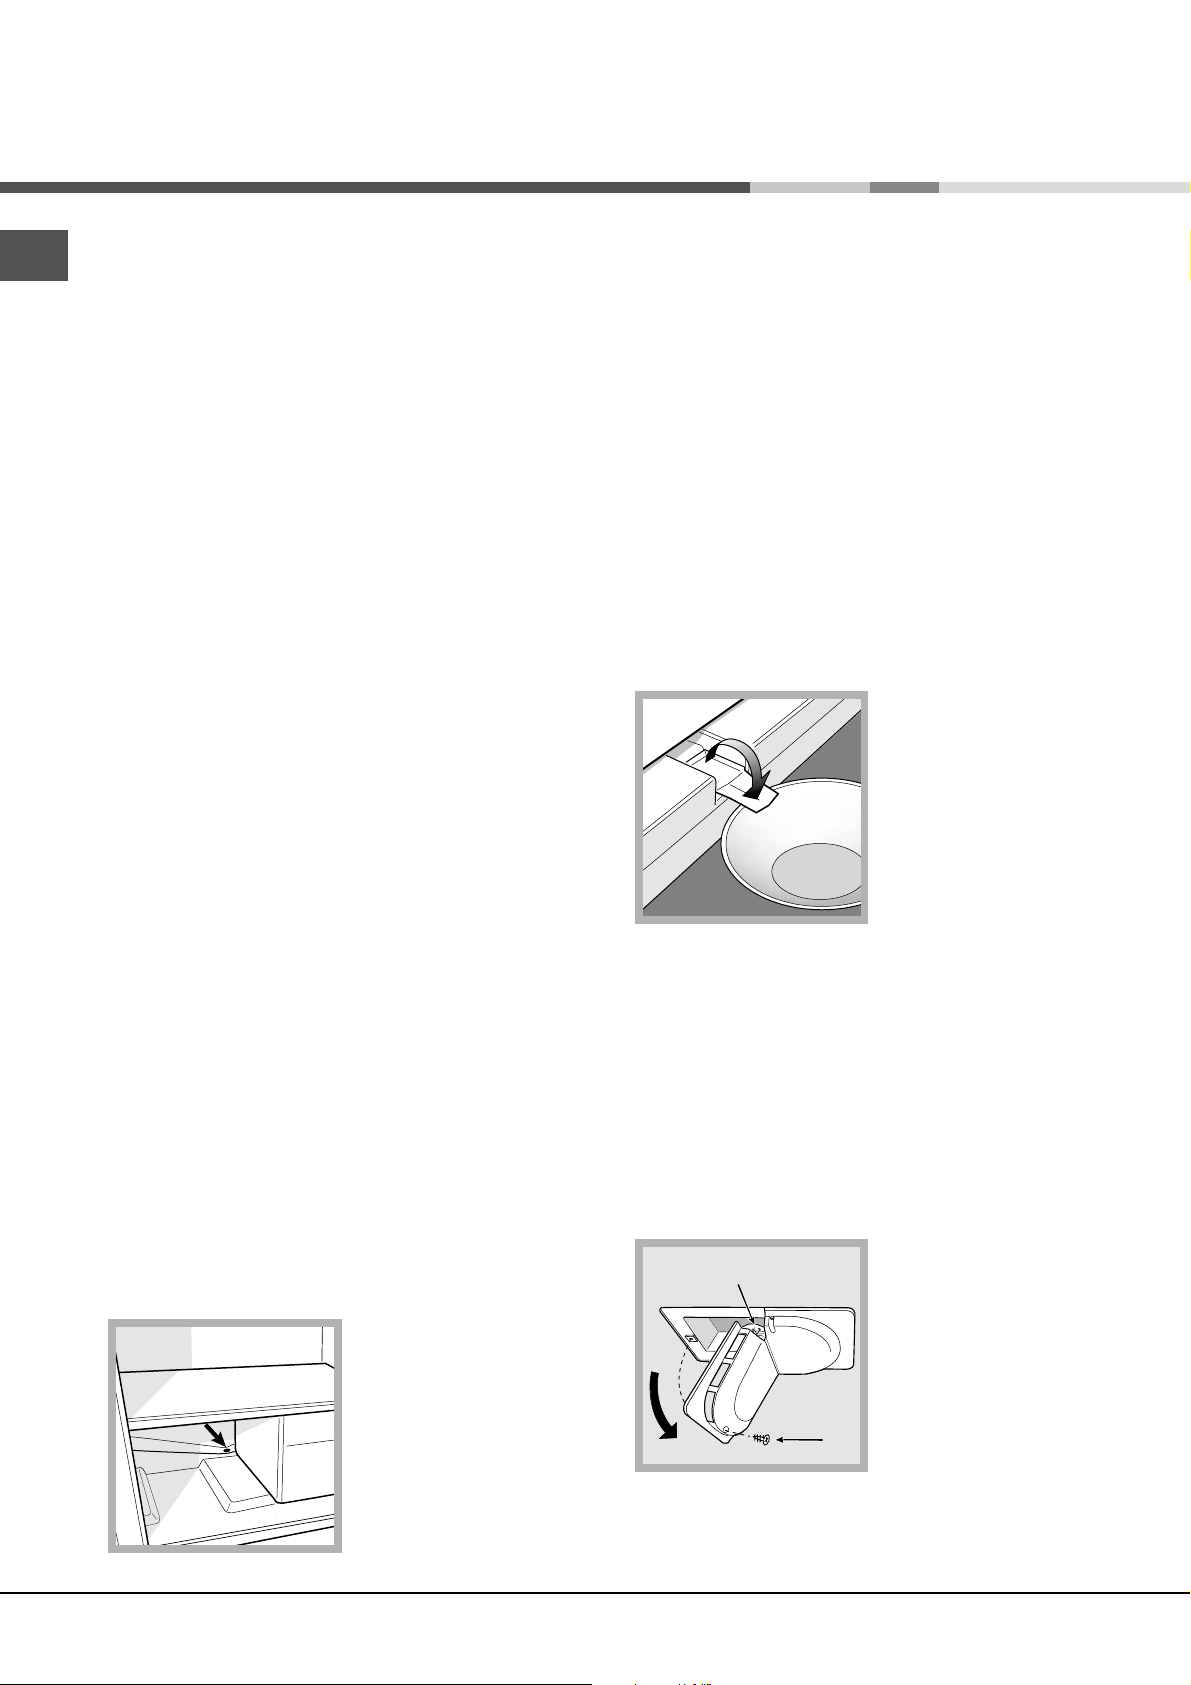
Mantenimiento y cuidados
Cortar la corriente eléctrica
E
Durante los trabajos de limpieza y mantenimiento, es
necesario aislar el aparato de la red de alimentación
eléctrica, desenchufándolo:
No es suficiente llevar el mando para la regulación de la
temperatura hasta la posición 0 (aparato apagado) para
eliminar todo contacto eléctrico.
Limpiar el aparato
Las partes externas, las partes internas y las juntas de
goma se pueden limpiar con una esponja empapada
en agua tibia y bicarbonato sódico o jabón neutro. No
utilice disolventes, productos abrasivos, lejía o
amoníaco.
Los accesorios extraíbles se pueden colocar en remojo
en agua caliente y jabón o detergente para platos.
Enjuáguelos y séquelos con cuidado.
La parte posterior del aparato tiende a cubrirse de
polvo que se puede eliminar, después de haber
apagado y desenchufado el aparato, utilizando con
delicadeza la boca de la aspiradora y trabajando con
una potencia media.
Evitar la formación de moho y malos olores
El aparato está fabricado con materiales higiénicos
que no transmiten olores. Para mantener esta
característica es necesario que los alimentos estén
siempre protegidos y bien cerrados. Esto evitará
también la formación de manchas.
Si se debe apagar el aparato por un largo período,
limpie su interior y deje las puertas abiertas.
Descongelar el compartimento congelador
Si la capa de escarcha es superior a los 5 mm es
necesario realizar una descongelación manual:
1. Coloque el mando de REGULACIÓN DE LA
TEMPERATURA en la posición 0.
2. Envuelva los alimentos congelados en papel de
periódico y colóquelos en otro congelador o en un
lugar fresco.
3. Deje la puerta abierta hasta que la escarcha se haya
derretido completamente; facilite la operación
colocando en el compartimento congelador
recipientes con agua tibia.
4. Limpie y seque con cuidado el compartimento
congelador antes de volver a encender el aparato.
5. Algunos aparatos poseen el SISTEMA DRAIN para
enviar el agua hacia el
exterior: introduzca la
raedera que se suministra
con el aparato en la
ranura correspondiente
ubicada en la parte
inferior y deje que el agua
fluya recogiéndola en un
recipiente (ver la figura).
6. Antes de introducir los alimentos en el compartimento
congelador, espere aproximadamente 2 horas para
restablecer las condiciones ideales de conservación.
Descongelar el aparato
! Respete las instrucciones que se dan a continuación.
Para descongelar el aparato no utilice objetos cortantes o
con punta porque podrían dañar irremediablemente el
circuito refrigerante.
Descongelar el compartimento frigorífico
El frigorífico posee descongelación automático: el agua se
envía hacia la parte posterior por un orificio de descarga
(ver la figura) donde el
calor producido por el
compresor la hace
evaporar. La única
intervención que se debe
realizar periódicamente
consiste en limpiar el
orificio de descarga para
que el agua pueda fluir
libremente.
56
Sustituir la bombilla
Para sustituir la bombilla de iluminación del
compartimiento refrigerador, desenchufe el aparato. Siga
las instrucciones que se dan a continuación.
Acceda a la bombilla (A)
A
B
desenroscando el tornillo
de fijación (B) ubicado en
la parte posterior del
cubrelámpara, como se
indica (ver la figura).
Sustitúyala con una
análoga de una potencia
que no sea superior a 15
W.
Page 57
Precauciones y consejos
! El aparato ha sido proyectado y fabricado en
conformidad con las normas internacionales sobre
seguridad. Estas advertencias se suministran por
razones de seguridad y deben ser leídas atentamente.
Este equipamiento es conforme con las
siguientes Directivas Comunitarias:
- 73/23/CEE del 19/02/73 (Baja Tensión) y
sucesivas modificaciones;
-89/336/CEE del 03/05/89 (Compatibilidad
Electromagnética) y sucesivas modificaciones;
- 2002/96/CE..
Seguridad general
El aparato ha sido pensado para un uso de tipo no
profesional en el interior de una vivienda.
El aparato debe ser utilizado para conservar y
congelar alimentos sólo por personas adultas y según
las indicaciones contenidas en este manual.
El aparato no se debe instalar al aire libre ni siquiera si
el lugar está protegido debido a que es muy peligroso
dejarlo expuesto a la lluvia y tormentas.
No toque el aparato estando descalzo o con las
manos o pies mojados o húmedos.
No toque las piezas refrigerantes internas: podría
quemarse o herirse.
No desenchufe el aparato tirando del cable sino
sujetando el enchufe.
Es necesario desenchufar el aparato antes de realizar
operaciones de limpieza y de mantenimiento. No es
suficiente llevar el mando para LA REGULACIÓN DE
LA TEMPERATURA hasta la posición 0 (aparato
apagado) para eliminar todo contacto eléctrico.
En caso de avería, nunca acceda a los mecanismos
internos para intentar una reparación.
En el interior de los compartimientos donde se
conservan alimentos congelados, no utilice utensilios
cortantes o con punta ni aparatos eléctricos, que no
sean los recomendados por el fabricante.
No introduzca en su boca cubitos apenas extraídos
del congelador.
No permita a los niños que jueguen con el aparato. No
se deben sentar en los cajones o colgarse de la
puerta.
Eliminación
Eliminación del material de embalaje: respete las normas
locales, de esta manera los embalajes podrán ser
reutilizados.
En base a la Norma europea 2002/96/CE de
Residuos de aparatos Eléctricos y Electrónicos
(RAEE), los electrodomésticos viejos no pueden ser
arrojados en los contenedores municipales habituales;
tienen que ser recogidos selectivamente para
optimizar la recuperación y reciclado de los
componentes y materiales que los constituyen, y
reducir el impacto en la salud humana y el
medioambiente. El símbolo del cubo de basura
tachado se marca sobre todos los productos para
recordar al consumidor la obligación de separarlos
para la recogida selectiva.
El consumidor debe contactar con la autoridad local o
con el vendedor para informarse en relación a la
correcta eleminación de su electrodoméstico viejo.
Ahorrar y respetar el medio ambiente
Instale el aparato en una ambiente fresco y bien
aireado, protéjalo de la exposición directa a los rayos
solares y no lo coloque cerca de fuentes de calor.
Para introducir o extraer los alimentos, abra las puertas
del aparato el menor tiempo posible. Cada apertura
de las puertas produce un notable gasto de energía.
No llene con demasiados alimentos el aparato:
para una buena conservación, el frío debe poder
circular libremente. Si se impide la circulación, el
compresor trabajará continuamente.
No introduzca alimentos calientes: elevarían la
temperatura interior obligando al compresor a un
mayor trabajo con un gran gasto de energía eléctrica.
Descongele el aparato si se formara hielo (ver
Mantenimiento); una espesa capa de hielo vuelve más
difícil la cesión de frío a los alimentos y hace que
aumente el consumo de energía.
Mantenga eficientes y limpias las juntas para que se
adhieran bien a las puertas y no dejen salir el frío (ver
Mantenimiento).
E
Los embalajes no son juguetes para los niños.
57
Page 58
Anomalías y soluciones
Puede suceder que el aparato no funcione. Antes de llamar al Servicio de Asistencia Técnica (ver Asistencia), controle que
E
no se trate de un problema fácilmente solucionable con la ayuda de la siguiente lista.
Anomalías:
La lámpara de iluminación interna
no se enciende.
El frigorífico y el congelador enfrían
poco.
En el frigorífico los alimentos se
congelan.
El motor funciona continuamente.
El aparato hace mucho ruido.
Posibles causas / Solución:
El enchufe no está introducido en la toma de corriente o no está lo suficiente
como para hacer contacto o bien en la casa no hay corriente.
Las puertas no cierran bien o las juntas están dañadas.
Las puertas se abren demasiado frecuentemente.
El mando de REGULACIÓN DE LA TEMPERATURA no está en la posición
correcta.
El frigorífico o el congelador se han llenado excesivamente.
La temperatura ambiente de trabajo del producto es menor que 14ºC.
El mando de REGULACIÓN DE LA TEMPERATURA no está en la posición
correcta.
Los alimentos están en contacto con la pared posterior.
La puerta no está bien cerrada o se abre continuamente.
La temperatura del ambiente externo es muy alta.
El espesor de la escarcha supera los 2-3 mm (ver Mantenimiento).
El aparato no fue instalado en un lugar plano (ver Instalación).
El aparato ha sido instalado entre muebles u objetos que vibran y producen
ruidos.
El gas refrigerante interior produce un ligero ruido aún cuando el compresor
está detenido: no es un defecto, es normal.
La temperatura de algunas partes
externas del frigorífico es elevada.
En la pared del fondo de la cámara
de refrigeración se ha formado
escarcha o gotitas de agua.
En el fondo del frigorífico hay agua.
Las temperaturas elevadas son necesarias para evitar la formación de
condensación en zonas particulares del producto.
Se trata del funcionamiento normal del producto.
El orificio de descarga del agua está obstruído (ver Mantenimiento).
58
Page 59
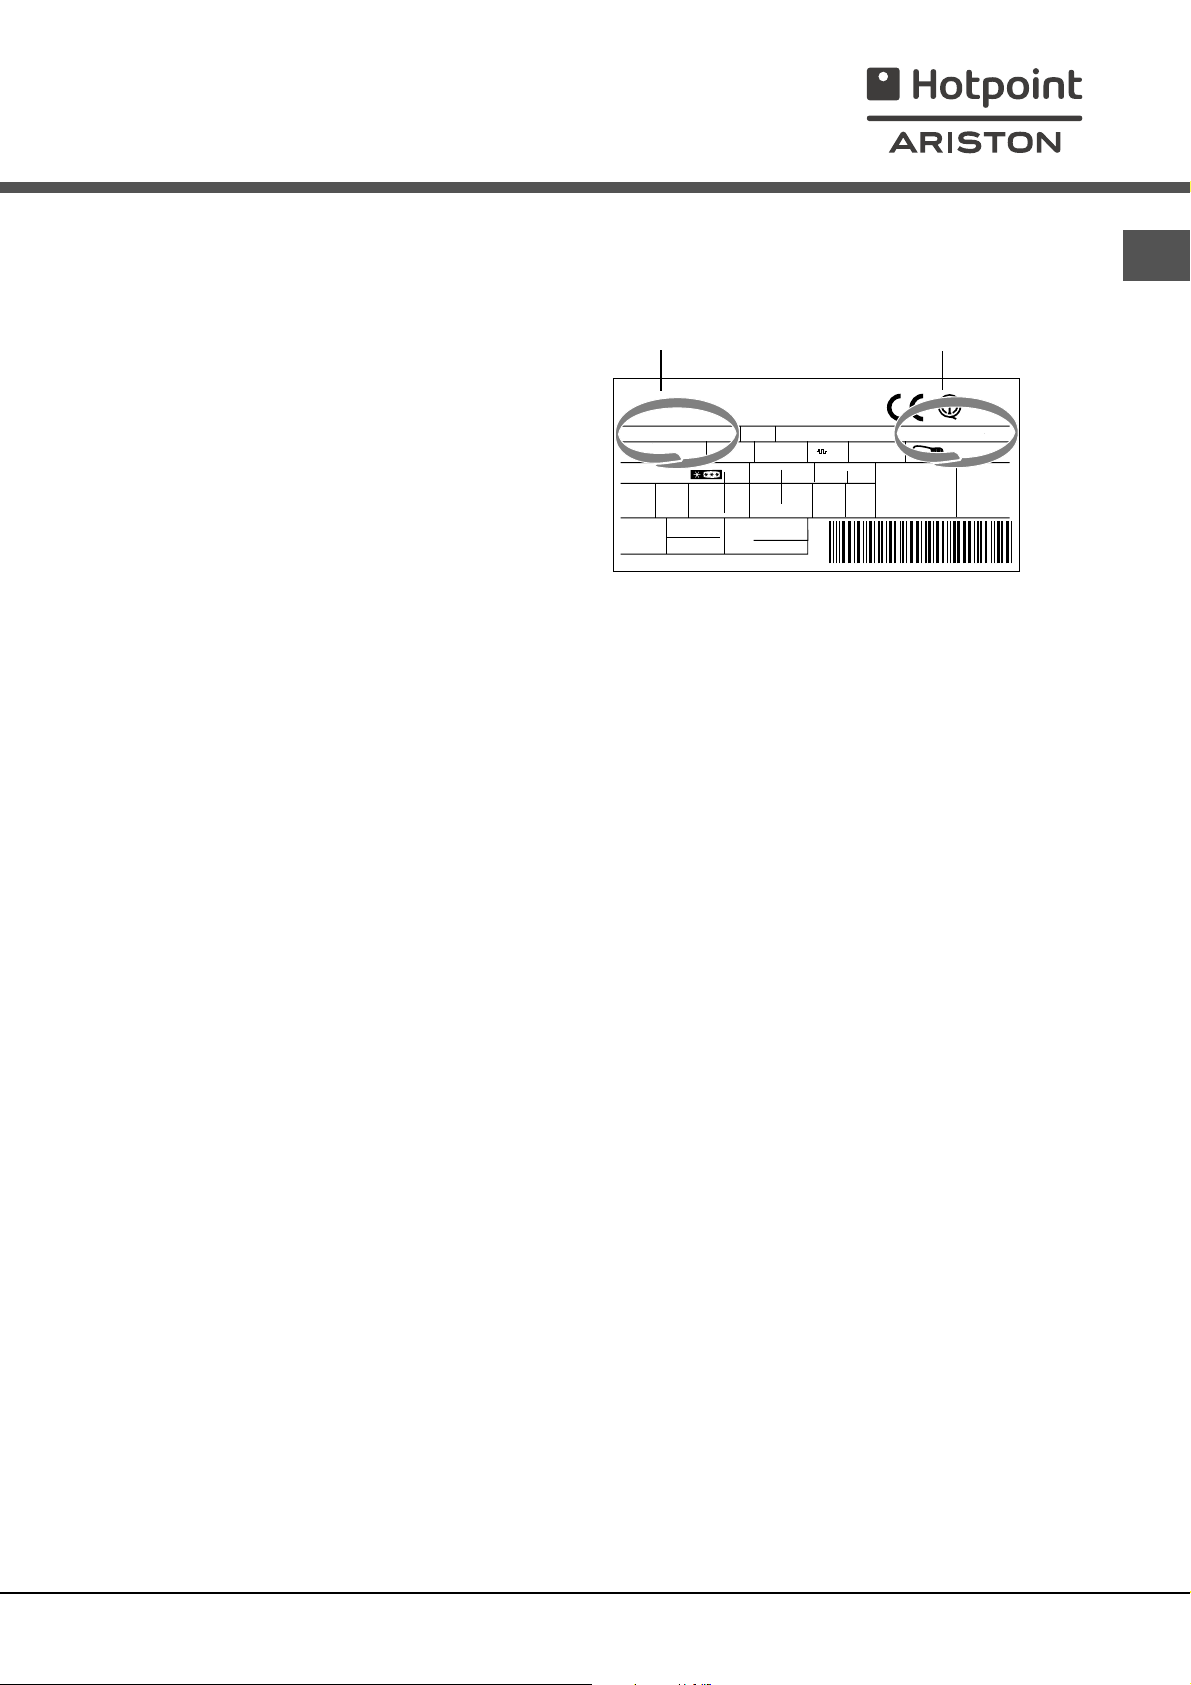
Asistencia
Antes de llamar al Servicio de Asistencia Técnica:
Verifique si la anomalía puede ser resuelta por Ud. mismo (ver Anomalías y Soluciones).
Si, no obstante todos los controles, el aparato no funciona y el inconveniente por Ud detectado continúa,
llame al Centro de Asistencia Técnico más cercano.
modelo
número de serie
Comunique:
el tipo de anomalía
el modelo de la máquina (Mod.)
el número de serie (S/N)
Esta información se encuentra en la placa de
características ubicada en el compartimento
frigorífico abajo a la izquierda.
Gross
Bruto
Brut
TI
75
Test
P.S-I.
RG 2330
Mod.
220 - 240 V- 50 Hz 150 W
340
Total
Gross
Bruto
Brut
Compr.
R 134 a
Syst.
kg 0,090
Kompr.
Made in Italy 13918
93139180000 S/N 704211801
Net
Util
Utile
Pressure
HIGH-235
LOW 140
Cod.
Gross
Bruto
Brut
Fuse
W
A
Freez. Capac
Poder de Cong
4,0
kg/24 h
Max 15 w
Class
Clase
Classe
N
No recurra nunca a técnicos no autorizados y rechace siempre la instalación de repuestos que no
sean originales.
E
59
Page 60
195061964.00
01/2007 - Xerox Business Services
E
60
Page 61
Instruções para a utilização
COMBINADO FRIGORÍFICO/CONGELADOR
I
Italiano, 1
D
Deutsch, 31
P
Portuges, 61
BCB 311/HA
GB
English, 11
NL
Nederlands
, 41
F
Français, 21
E
Espanol, 51
Índice
PT
Instalação, 62
Posicionamento e ligação
Descrição do aparelho, 63
Vista geral
Início e utilização, 64-65
Iniciar o aparelho
Regulação da temperatura
Utilize melhor o frigorífico
Utilize melhor o congelador
Manutenção e cuidados, 66
Interromper a corrente eléctrica
Limpar o aparelho
Evite bolor e maus cheiros
Degelar o aparelho
Substituição da lâmpada
Precauções e conselhos, 67
Segurança geral
Eliminação
Economizar e respeitar o meio ambiente
Anomalias e soluções, 68
Assistência, 69
Page 62
PT
Instalação
! É importante guardar este folheto para poder consultálo a qualquer momento. No caso de venda, cessão ou
mudança, assegure-se que o mesmo permaneça junto
com o aparelho para informar ao novo proprietário sobre
o funcionamento e as suas respectivas advertências.
! Leia com atenção as instruções: há informações
importantes sobre a instalação, a utilização e a
segurança.
Posicionamento e ligação
Posicionamento
1. Posicione o aparelho num ambiente bem ventilado e
não húmido.
2. Não tape as grades traseiras de ventilação: o
compressor e o condensador emitem calor e
necessitam de uma boa ventilação para funcionarem
bem e os consumos de electricidade diminuírem.
4. Deixe o aparelho longe de fontes de calor (a luz do
sol directa, um fogão eléctrico).
Ligação eléctrica
Depois do transporte, posicione o aparelho na vertical e
aguarde pelo menos 3 horas antes de ligar o sistema
eléctrico. Antes de colocar a ficha na tomada eléctrica,
certifique-se que:
a tomada tenha uma ligação à terra e seja em
conformidade com a legislação;
a tomada tenha a capacidade de suportar o carga
máxima de potência da máquina, indicada na placa
de identificação situada no compartimento frigorífico
em baixo à esquerda (p. ex.: 150 W);
a tensão de alimentação seja entre os valores
indicados na placa de identificação, situada embaixo
à esquerda (p. ex.: 220-240 V);
a tomada seja compatível com a ficha do aparelho.
Em caso contrário peça a substituição da ficha a um
técnico autorizado (veja a Assistência); não utilize
extensões nem tomadas múltiplas.
! Com o aparelho instalado, deve ser fácil o acesso ao
cabo eléctrico e à tomada eléctrica.
! O cabo não deve ser dobrado nem sofrer pressões.
! O cabo deve ser verificado periodicamente e
substituído somente por técnicos autorizados (veja a
Assistência).
! A empresa exime-se de qualquer
responsabilidade se estas regras não forem
obedecidas.
62
Page 63
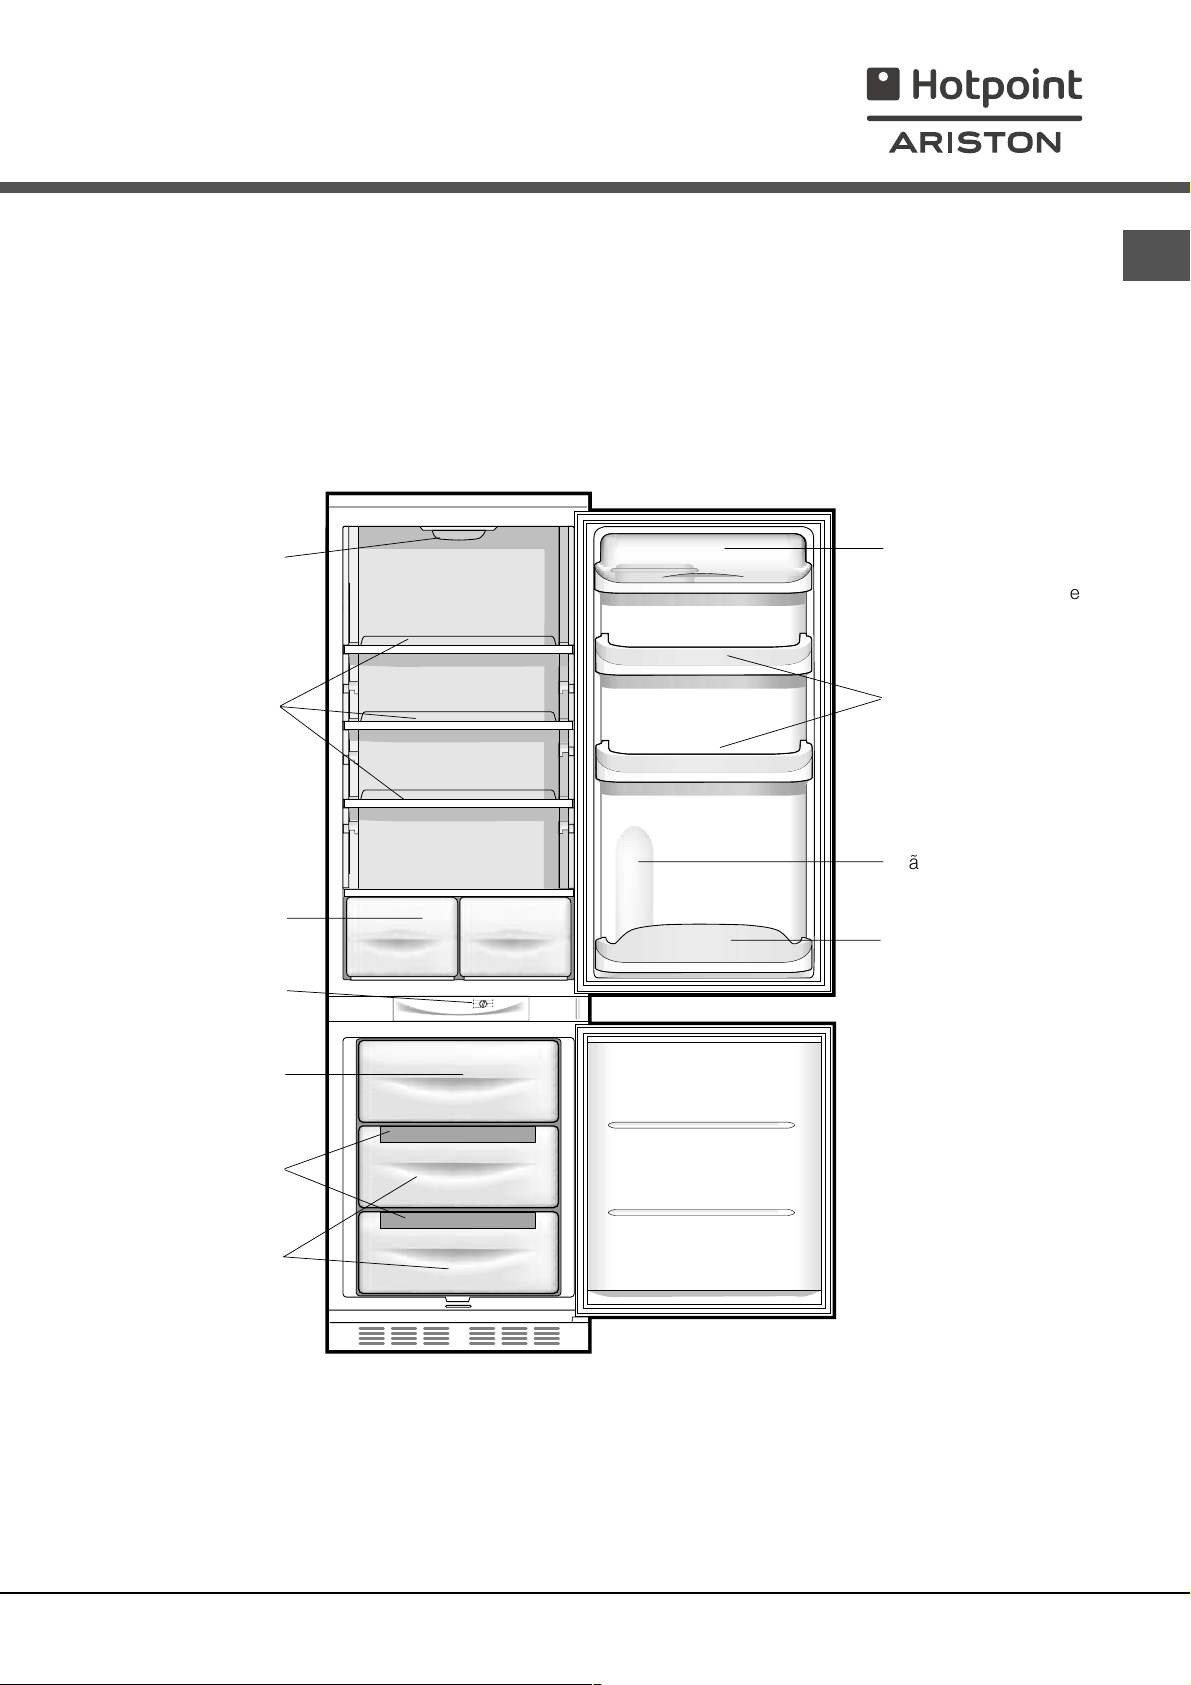
Descrição do
aparelho
Visão geral
Estas instruções sobre a utilização são válidas para vários modelos, portanto é possível que na figura haja pormenores
diferentes do aparelho que adquiriu. Há uma descrição dos assuntos mais complexos nas páginas seguintes.
LÂMPADA
(veja a Manutenção)
PRATELEIRA
Prateleira extraível da
porta com tampa,
com PORTA OVOS e
CAIXA PARA
MANTEIGA
Prateleira extraível da
porta VÃO PARA
GUARDAR
OBJECTOS
*
PT
Gaveta para FRUTAS e
HORTALIÇAS
Manípulo
REGULAÇÃO DA
TEMPERATURA
Compartimento para
CONGELAÇÃO e
CONSERVAÇÃO
Recipiente para
GELO
Ice Care
Compartimento para
CONSERVAÇÃO
*
Vão ara GARRAFA
de 2 LITROS
Prateleira para
GARRAFAS
Variáveis em número e/ou na posição.
* Presente somente em alguns modelos.
63
Page 64
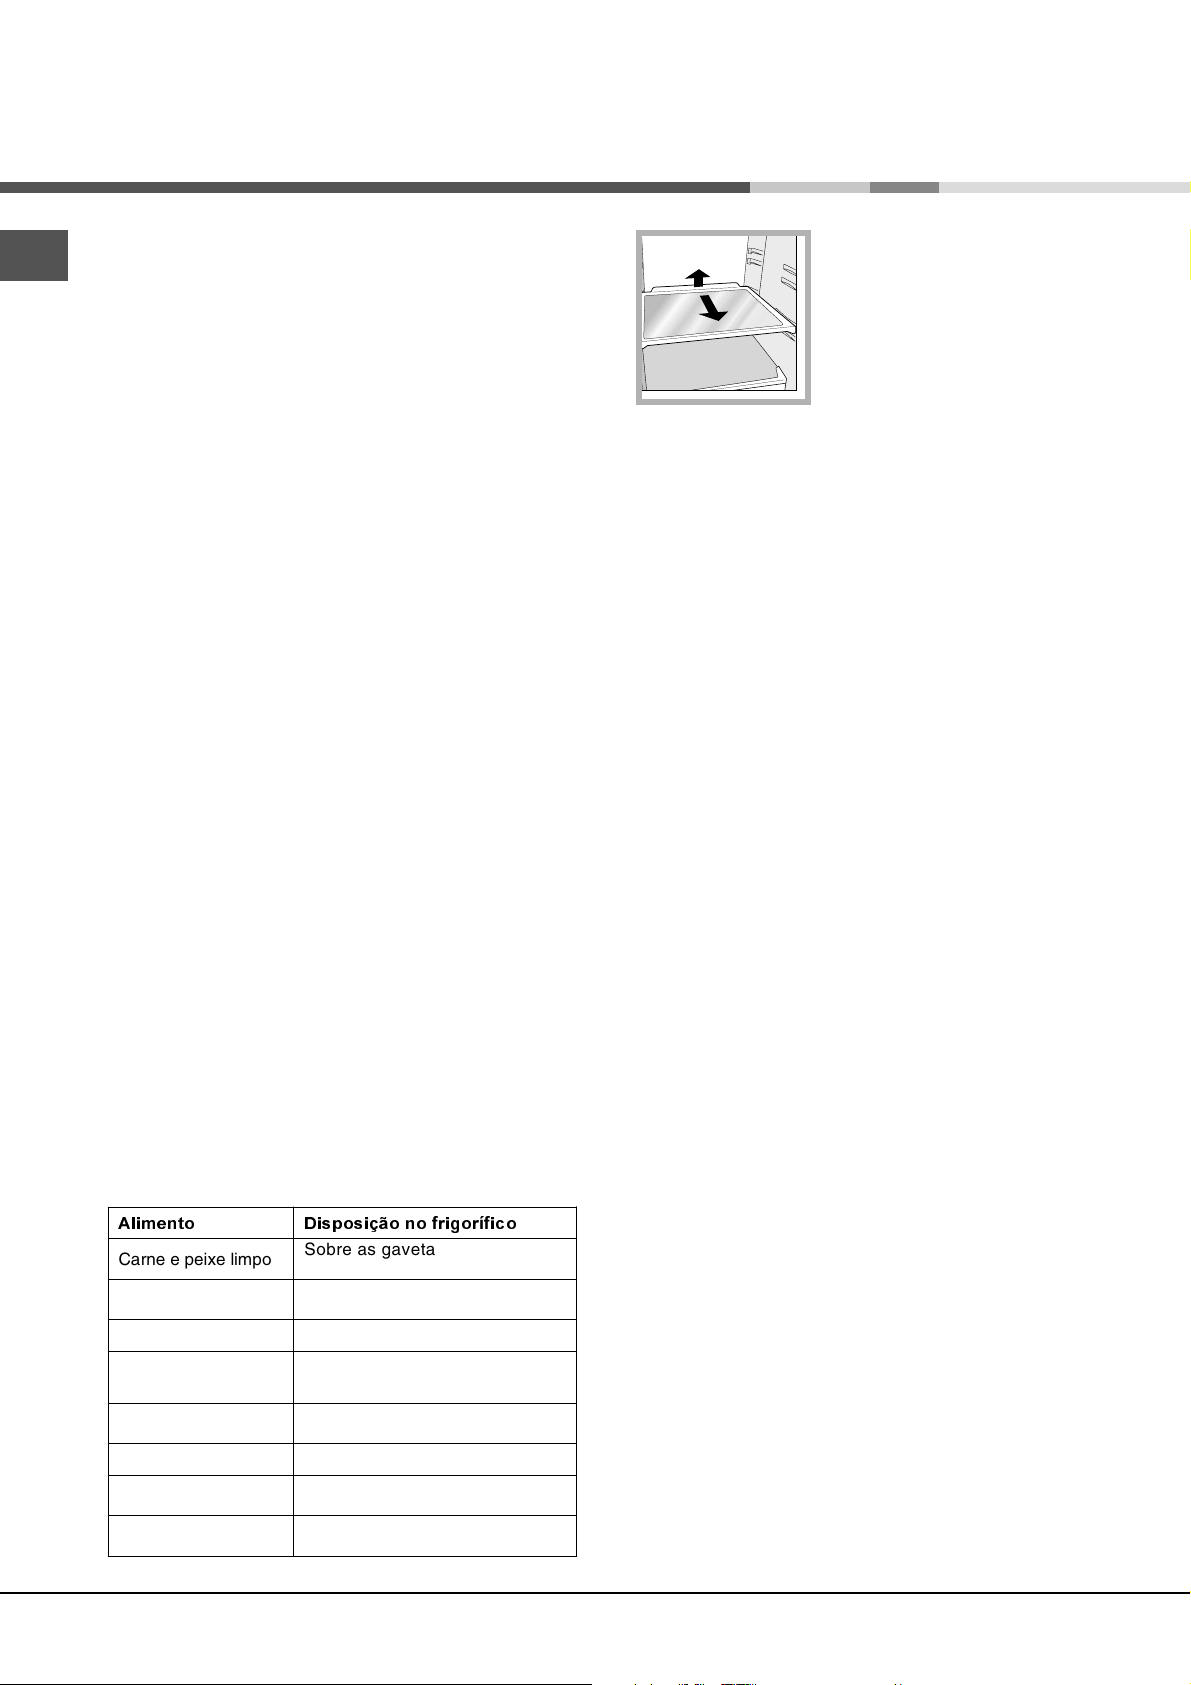
Início e utilização
PT
Iniciar o aparelho
! Antes de iniciar o aparelho, obedeça
as instruções para a instalação (veja a Instalação).
! Antes de ligar o aparelho limpe bem os
compartimentos
e os acessórios com água morna e bicarbonato.
1. Ligue a ficha numa tomada eléctrica e assegure-se
que a lâmpada de iluminação interna.
2. Rode o selector para A REGULAÇÃO DA
TEMPERATURA num valor médio. Depois de algumas
horas será possível guardar alimentos no frigorífico.
Regulação da temperatura
A temperatura no interior do compartimento frigorífico
regula-se automaticamente em função da posição do
botão para a regulação da temperatura.
1
= menos frio 5 = mais frio.
É aconselhado em todo o caso uma posição média
Para aumentar o espaço a disposição e melhorar a
aparência do aparelho, o mesmo tem a parte
refrigeradora situada no interior do painel traseiro do
compartimento frigorífico. Este painel, durante o
funcionamento, estará coberto de gelo, ou de gotinhas
de água, dependendo se o compressor estiver a
funcionar ou em pausa. Não se preocupe com isto! O
frigorífico está a funcionar de modo normal.
Se configurarse o selector de FUNCIONAMENTO DO
FRIGORÍFICO em valores altos, com grandes
quantidades de alimentos e com uma temperatura
ambiente alta, o aparelho poderá funcionar
continuamente, e favorecer uma formação excessiva de
gelo e consumos de electricidade excessivos: para
evitar isto, coloque o selector em valores mais baixos (o
gelo será derretido automaticamente).
Nos aparelhos estáticos o ar circula de maneira natural:
o mais frio tende a subir por ser mais pesado. Veja
como guardar os alimentos:
$OLP HQWR 'LVSRVLomRQR IU L J RUtILFR
Carne e peixe limpo
Queijo fresco
Alimentos cozidos Em quaisquer prateleiras
Chouriço, pão de
forma, chocolate
Frutas e verduras
Ovos Na respectiva prateleira da porta
Manteiga e
margarina
Garrafas, bebidas,
leite
Sobre as gavetas para frutas e
verduras
Sobre as gavetas para frutas e
verduras
Em quaisquer prateleiras
Nas gavetas para frutas e
hortaliças
Na respectiva prateleira da porta
Na respectiva prateleira da porta
PRATELEIRAS: vidro ou de
1
2
prateleira.
grade. Podem ser extraídas e têm
altura regulável mediante as guias
para este fim (veja a figura), para
introduzir recipientes ou
alimentos de tamanho grande.
Para regular a altura não é
necessário retirar inteiramente a
Utilize melhor o frigorífico
Para regular a temperatura utilize o selector de
FUNCIONAMENTO DO FRIGORÍFICO (veja a
Descrição).
Coloque somente alimentos frios ou levemente
mornos, mas não quentes (veja Precauções e
conselhos).
Lembre-se que os alimentos cozidos não se mantêm
mais tempo do que os crus.
Não guarde líquidos em recipientes destampados:
poderão provocar aumento de humidade com
consequente formação de condensação.
Utilize melhor o congelador
Não congele novamente alimentos que estiverem a
descongelar-se ou descongelados; estes alimentos
devem ser cozidos para ser consumados (dentro de
24 horas).
Os alimentos frescos a serem congelados não devem
ser colocados encostados nos já congelados; devem
ser guardados sobre a grade do compartimento
congelador, se possível encostados nas paredes
(laterais e traseiras) nas quais a temperatura desce
abaixo de - 18°C e garante uma boa velocidade de
congelação.
Não coloque no congelador garrafas de vidro
contendo líquidos, tampadas ou fechadas
hermeticamente, porque poderão partir-se.
A quantidade máxima diária de alimentos a ser
congelada é indicada na placa de identificação,
situada no compartimento frigorífico, embaixo à
esquerda (por exemplo: Kg/24h 4).
! Durante a congelação evite abrir a porta.
! Em caso de interrupção de corrente ou de avaria, não
abra a porta do congelador: desta maneira os alimentos
congelados em casa ou industriais não sofrerão alterações
durante aproximadamente 9 ~ 14 horas.
!Se durante muito tempo, a temperatura ambiente
permanecer inferior a 14° C, não se chegará plenamente
às temperaturas necessárias para uma longa
conservação no compartimento congelador e, portanto,
o período de conservação será reduzido.
64
Page 65
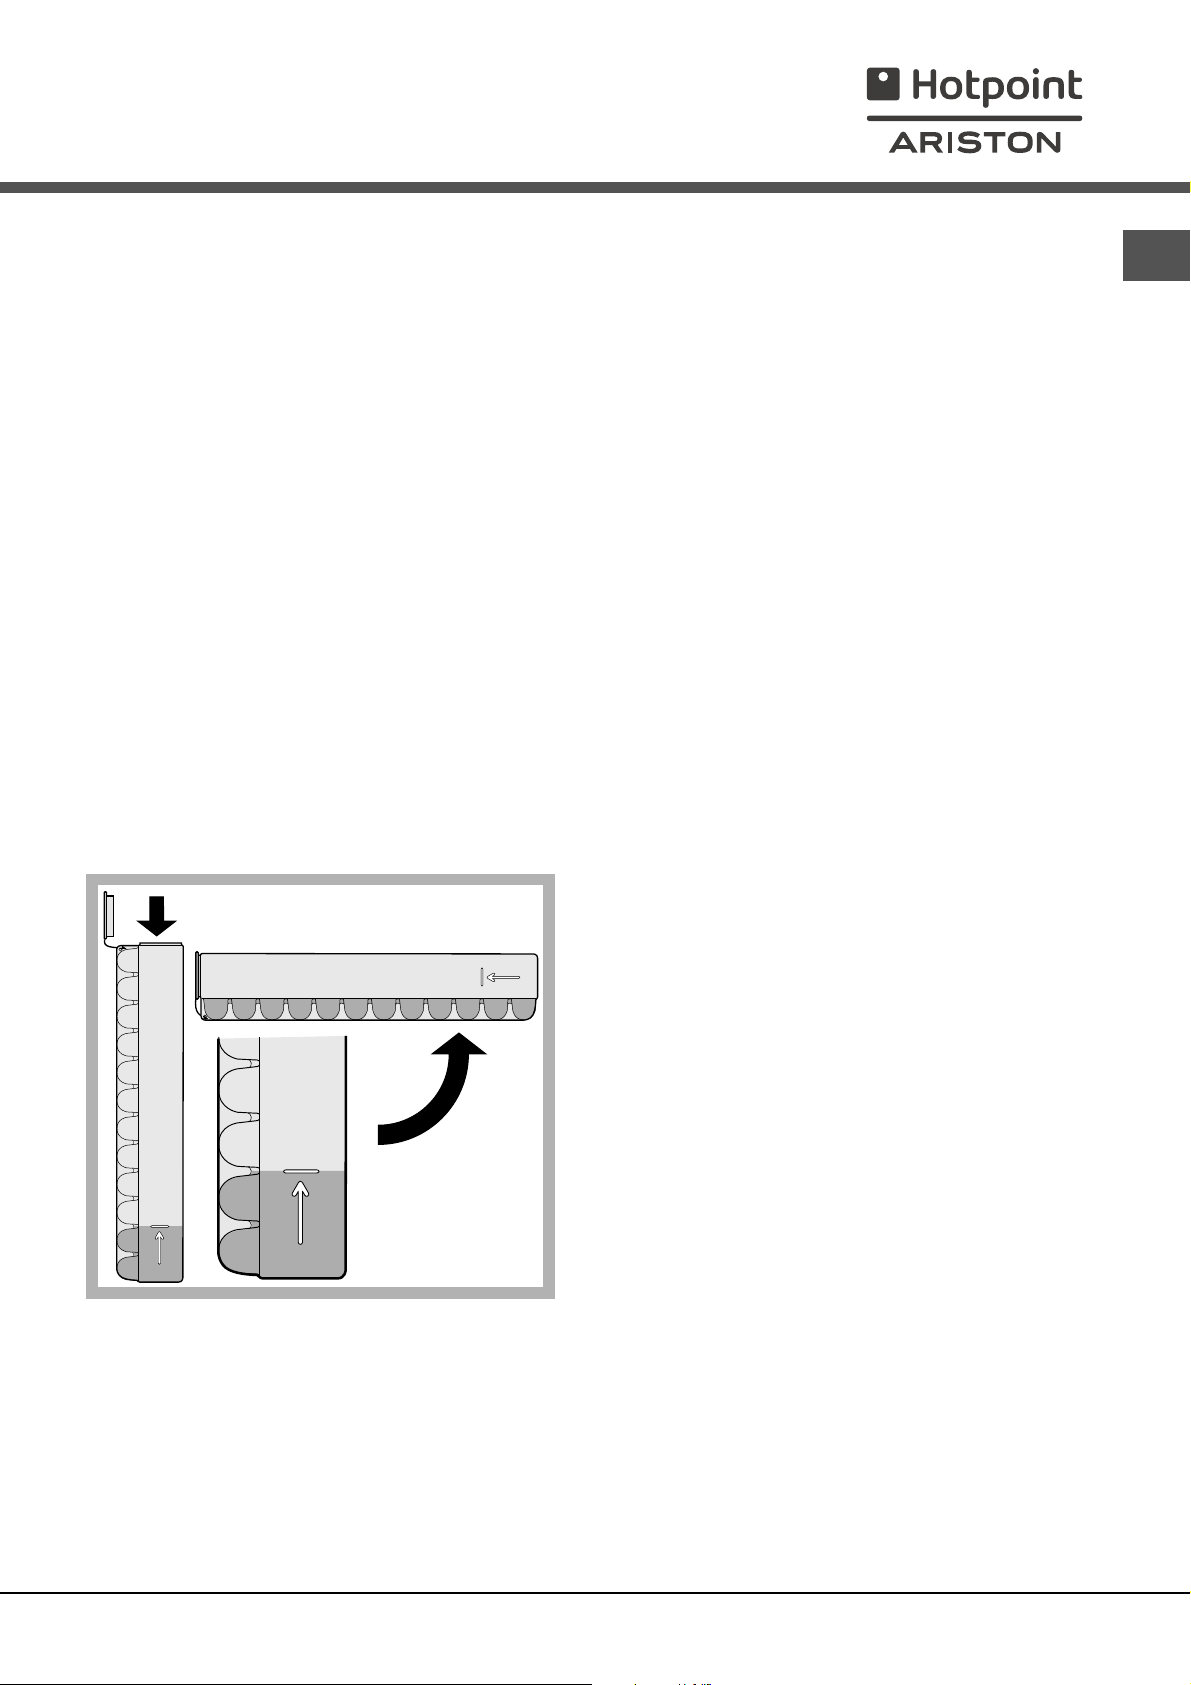
Recipiente para gelo Ice Care
A posição na parte superior das gavetas no vão do
freezer assegura uma limpeza maior (o gelo não entra
mais em contacto com os alimentos) e ergonomia (não
goteja quando for carregado).
1. Para retirar o recipiente empurre-o para
cima.Certifique-se que o recipiente esteja
inteiramente vazio e encha-o de água pelo furo para
este fim.
2. Preste atenção para não ultrapassar o nível indicado
(MAX WATER LEVEL). Água demais dificulta a
extracção do gelo (se acontecer, aguarde o gelo
derreter-se e esvazie o recipiente).
3. Rode o recipiente 90°: a água enche as formas pelo
princípio dos vasos comunicantes (veja a figura).
4. Tape o furo com a tampa fornecida e guarde o
recipiente.
5. Quando se tiver formato gelo (tempo mínimo
aproximadamente 8 horas) bata o recipiente sobre
uma superfície dura e molhe-o por fora para o gelo
soltar-se; em seguida deixe-o sair pelo furo.
PT
WATER LEVEL
MAX
WATER LEVEL
MAX
MAX
WATER LEVEL
65
Page 66
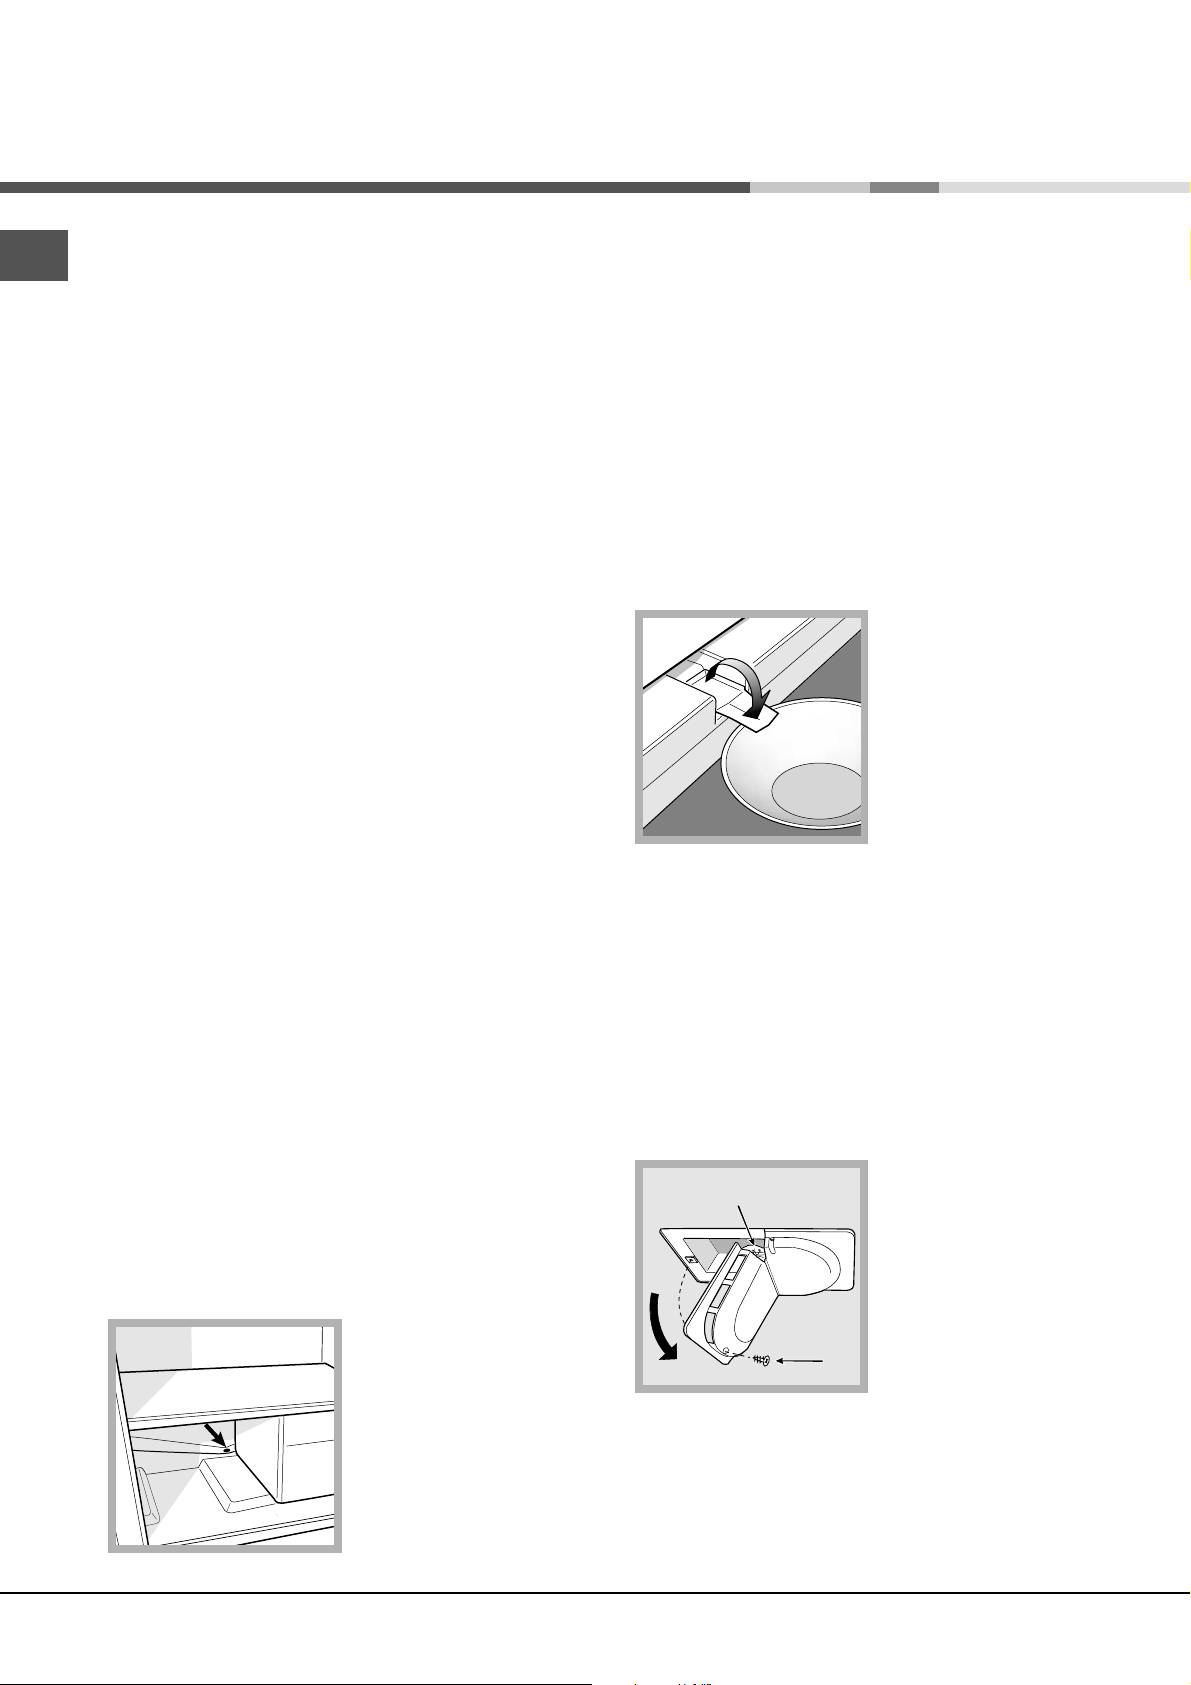
Manutenção e cuidados
PT
Interromper a corrente eléctrica
Durante as operações de limpeza e manutenção é
necessário isolar o aparelho da rede eléctrica:
Não é suficiente colocar os selectores de regulação da
temperatura na posição 0 (aparelho desligado) para
eliminar todos os contactos eléctricos.
Limpar o aparelho
As partes externas, as partes internas e as guarnições
de borracha podem ser limpadas com uma esponja
molhada de água morna e bicarbonato de sódio ou
sabão neutro. Não empregue solventes, abrasivos,
água de javel nem amoníaco.
Os acessórios removíveis podem ser colocados de
molho em água quente e sabão ou detergente para
pratos. Enxagúe-os e enxugue-os com cuidado.
Na parte de trás do aparelho tende a acumular-se poeira,
que pode ser eliminada, depois de ter desligado o
aparelho e retirado a ficha da tomada eléctrica, utilizando
delicadamente o bocal comprido de um aspirador de pó,
regulado numa potência média.
Evite bolor e maus cheiros
Descongelar o Compartimento congelador
Se a camada de gelo for superior a 5 mm. será
necessário descongelar manualmente:
1. Coloque o selector para A REGULAÇÃO DA
TEMPERATURA na posição 0 .
2. Envolva os alimentos congelados industrialmente ou
em casa com folhas de papel e guarde-os num sítio
fresco.
3. Deixe a porta aberta até o gelo ter-se derretido
inteiramente; para facilitar a operação coloque
recipientes com água morna dentro do
compartimento congelador.
4. Limpe e enxugue o compartimento congelador com
cuidado antes ligar novamente o aparelho.
5. Alguns aparelhos são
equipados com um
SISTEMA DE DRAIN para
conduzir a água para
fora: enfie a espátula
fornecida na respectiva
fenda situada embaixo e
deixe a água defluir para
um recipiente (veja a
figura).
Este aparelho foi fabricado com materiais higiénicos
que não transmitem odores. Para manter esta
característica é necessário os alimentos serem
sempre protegidos e bem fechados. Isto também
evitará a formação de manchas.
Se for deixar o aparelho muito tempo desligado,
limpe-o por dentro e deixe as portas abertas.
Descongelar o aparelho
! Obedeça as seguintes instruções.
Para degelar o aparelho não utilize objectos cortantes e
pontiagudos que poderiam danificar irremediavelmente o
circuito refrigerante.
Descongelar o compartimento frigorífico
Este frigorífico é equipado com degelo automático: a água
derretida é conduzida para a parte traseira através de um
furo de descarga (veja a
figura) desta maneira o
calor produzido pelo
compressor evapora-se. A
única intervenção a ser
realizada periodicamente
consiste na limpeza do
furo de descarga para a
água poder defluir
desimpedida.
6. Antes de introduzir os alimentos no compartimento do
congelador, aguardar aproximadamente duas horas
para o restabelecimento das condições ideais de
conservação.
Substituição da lâmpada
Para substituir a lâmpada de iluminação do
compartimento frigorífico, desligue a ficha da tomada de
corrente. Obedeça as seguintes instruções.
Para chegar até a
A
B
lâmpada (A) desatarraxe
o parafuso de fixação (B)
situado na parte traseira
da capa da lâmpada, da
maneira indicada (veja a
figura). Substitua-a por
uma análoga, de potência
não superior a 15 W.
66
Page 67
Precauções e conselhos
! Este aparelho foi projectado e fabricado em
conformidade com as regras internacionais de
segurança. Estas advertências são fornecidas para
razões de segurança e devem ser lidas com atenção.
Esta aparelhagem é em conformidade com a
seguintes Directivas da Comunidade Europeia:
- 73/23/CEE do 19/02/73 (Baixa Tensão) e
sucessivas modificações;
- 89/336/CEE do 03/05/89 (Compatibilidade
Electromagnética) e sucessivas modificações.
Segurança geral
Este aparelho foi concebido para uma utilização de tipo
não profissional, no âmbito de uma morada.
Este aparelho deve ser utilizado somente por pessoas
adultas, para conservar e congelar alimentos, segundo
as instruções apresentadas neste folheto.
Este aparelho não deve ser instalado ao ar livre mesmo
se num sítio abrigado, porque é muito perigoso deixá-lo
exposto à chuva e temporais.
Não toque neste aparelho com os pés descalços nem
com as mãos ou os pés molhados ou húmidos.
Não toque nas partes de refrigeração internas:
há perigo de queimaduras e feridas.
Não puxe o cabo eléctrico para desligar a ficha da
tomada, mas pegue pela ficha.
É necessário desligar a ficha da tomada antes de
realizar operações de limpeza e manutenção. Não é
suficiente colocar os selectores de regulação da
temperatura na posição 0 (aparelho desligado) para
eliminar todos os contactos eléctricos.
No caso de avaria, nunca mexa nos mecanismos
internos para tentar reparar.
Não utilize, no interior dos compartimentos para
guardar alimentos congelados, utensílios cortantes e
pontiagudos ou dispositivos eléctricos se não forem
do tipo recomendado pelo construtor.
Não coloque na boca cubos de gelo assim que os
retirar do congelador.
Não permita que crianças brinquem com este aparelho.
Em nenhum caso pode-se sentar-se nas gavetas ou
pendurar-se na porta.
Os embalagens não são brinquedos para as crianças.
Eliminação
PT
Eliminação do material de embalagem: obedeça as
regras locais, ou reutilize as embalagens.
A directiva Europeia 2002/96/CE referente à gestão
de resíduos de aparelhos eléctricos e electrónicos
(RAEE), prevê que os electrodomésticos não devem
ser escoados no fluxo normal dos resíduos sólidos
urbanos. Os aparelhos desactualizados devem ser
recolhidos separadamente para optimizar a taxa de
recuperação e reciclagem dos materiais que os
compõem e impedir potenciais danos para a saúde
humana e para o ambiente. O símbolo constituído por
um contentor de lixo barrado com uma cruz deve ser
colocado em todos os produtos por forma a recordar
a obrigatoriedade de recolha separada.
Os consumidores devem contactar as autoridades
locais ou os pontos de venda para solicitar
informação referente ao local apropriado onde devem
depositar os electrodomésticos velhos.
Economizar e respeitar o meio
ambiente
Instale este aparelho num ambiente fresco e bem
ventilado, proteja-o contra a exposição directa aos
raios do sol, não o coloque perto de fontes de calor.
Para colocar ou retirar alimentos, abra as portas
deste aparelho o mais rapidamente possível.
Cada vez que abrir as portas causa um notável gasto
de energia.
Não encha este aparelho com alimentos demais:
para uma boa conservação, o frio deve poder circular
livremente. Se impedir-se a circulação, o compressor
funcionará continuamente.
Não coloque dentro alimentos quentes: aumentarão a
temperatura interna forçando o compressor a
funcionar muito, com grande desperdício de energia
eléctrica.
Descongele este aparelho quando se formar gelo
(veja a Manutenção); uma camada grossa de gelo
torna mais difícil a transmissão do frio aos alimentos e
aumenta o consumo de energia.
Mantenha as guarnições eficientes e limpas, de
maneira que adiram bem nas portas e não deixem o
frio sair (veja a Manutenção).
67
Page 68
Anomalias e soluções
PT
Pode acontecer que este aparelho não funcione. Antes de telefonar à Assistência técnica (veja a Assistência), verifique se
não se trata de um problema fácil de resolver com a ajuda da seguinte lista.
Anomalias:
A lâmpada de iluminação interna
não se acende.
O frigorífico e o congelador
refrigeram pouco.
Os alimentos congelam-se no
frigorífico.
O motor está a funcionar
continuamente.
O aparelho está a fazer ruído.
Possíveis cause / Solução:
A ficha não está ligada na tomada eléctrica ou não está bem ligada e
portanto não há contacto, ou então não há corrente em casa.
As portas não se fecham bem ou as guarnições estão estragadas.
As portas são abertas com frequência excessiva.
O selector para A REGULAÇÃO DA TEMPERATURA não está na
posição certa
O frigorífico ou o congelador foram enchidos demais.
A temperatura ambiente de trabalho do produto é inferior a 14ºC.
O selector para A REGULAÇÃO DA TEMPERATURA não está na
posição certa.
Os alimentos estão encostados na parede traseira.
A porta não está bem fechada ou é aberta continuamente.
A temperatura do ambiente externo está muito alta.
A espessura do gelo ultrapassa 2 ~ 3 mm. (veja a Manutenção).
O aparelho não foi instalado bem plano (veja a Instalação).
O aparelho foi instalado entre móveis ou objectos que vibram e emitem
ruídos.
O gás refrigerante interno produz um ruído leve mesmo quando o
compressor estiver parado: não é um defeito, é normal.
A temperatura de algumas partes
externas do frigorífico é elevada
A parede no fundo da cela frigorífica
apresenta gelo ou gotas de água
No fundo do frigorífico há água.
As temperaturas elevadas são necessárias para evitar a formação de
condensa em particulares zonas do produto.
Trata-se do normal funcionamento do produto.
O furo de descarga da água está entupido (veja a Manutenção).
68
Page 69
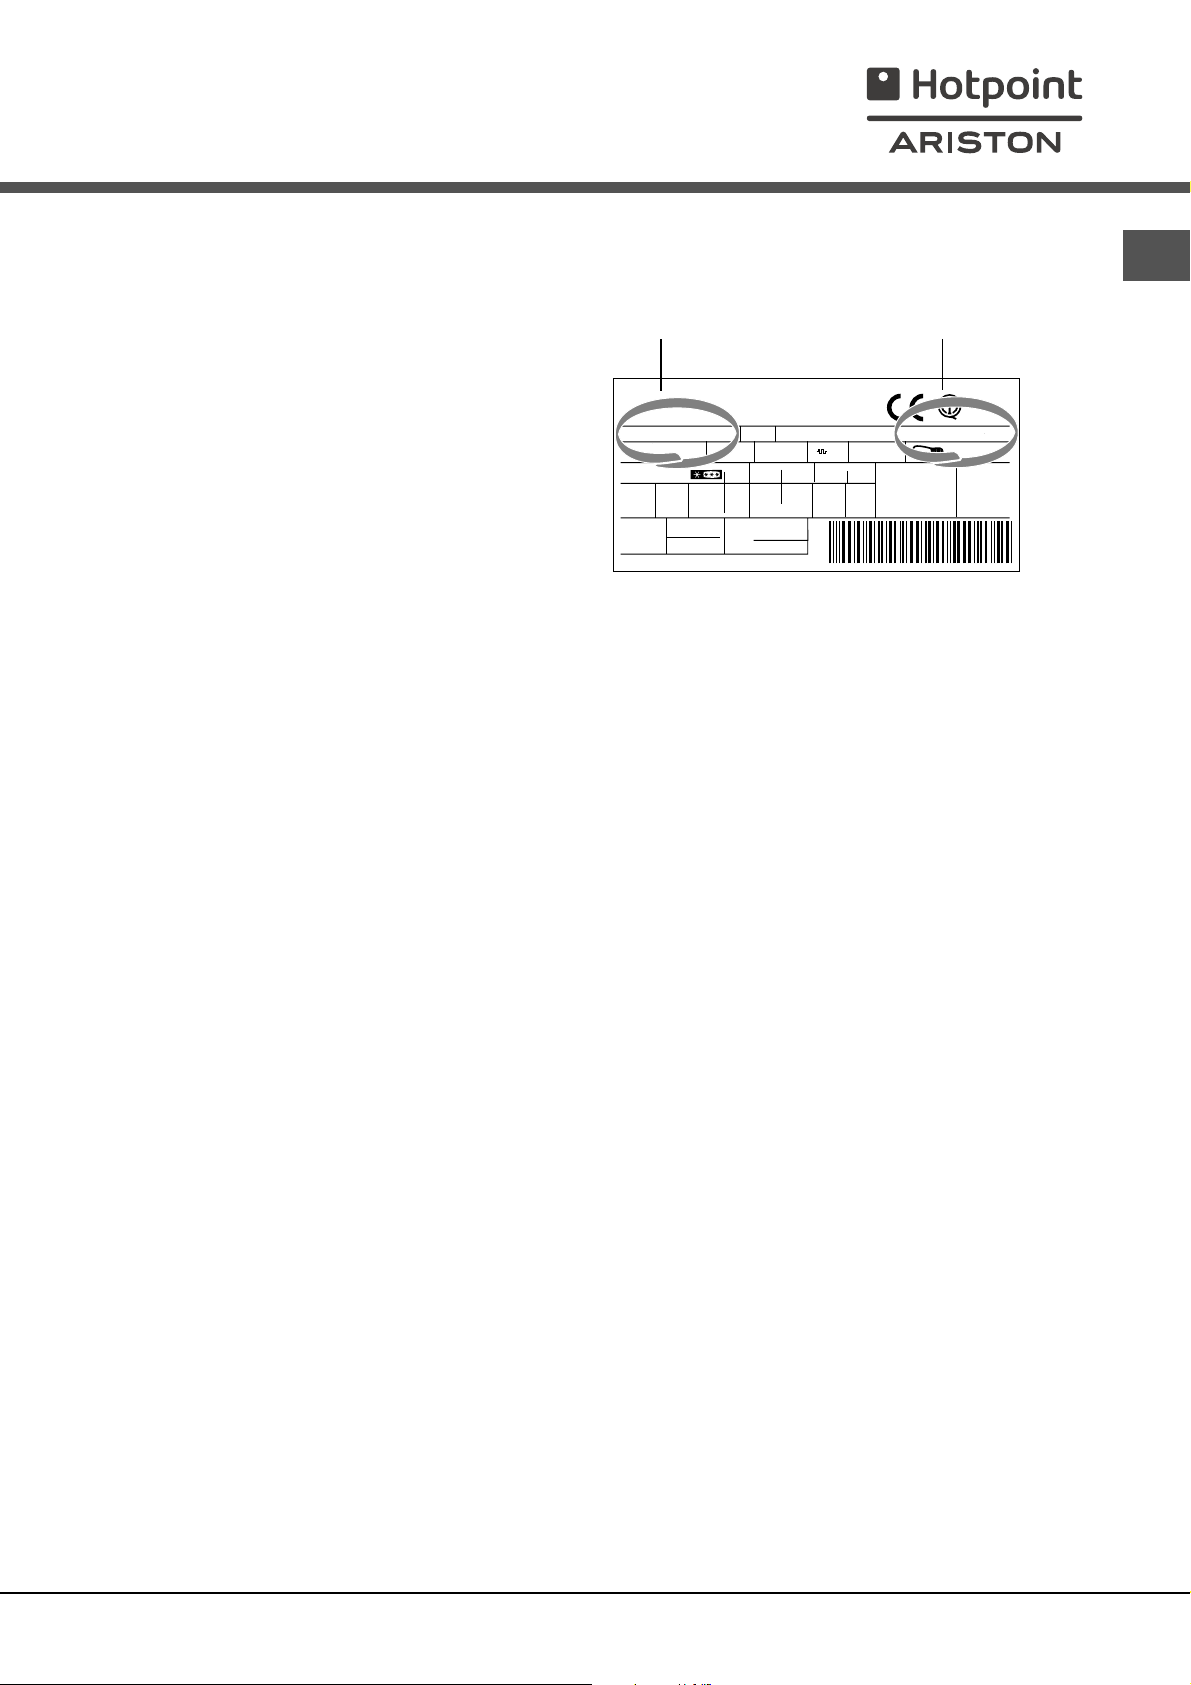
Assistência
Antes de contactar a Assistência técnica:
Antes de contactar a Assistência técnica:
Verifique se pode resolver sozinho a anomalia (veja as Anomalias e Soluções).
Verifique se pode resolver sozinho a anomalia (veja as Anomalias e Soluções).
Se, apesar de todos os controlos, o aparelho não funcionar e o inconveniente detectado continuar, contactar
Se, apesar de todos os controlos, o aparelho não funcionar e o inconveniente detectado continuar, contactar
o Centro de Assistência mais próximo.
o Centro de Assistência mais próximo.
Comunique:
Comunique:
o tipo de anomalia
o tipo de anomalia
o modelo da máquina (Mod.)
o modelo da máquina (Mod.)
o número de série (S/N)
o número de série (S/N)
Estas informações encontram-se na placa de
Estas informações encontram-se na placa de
identificação situada no compartimento
identificação situada no compartimento
frigorífico embaixo à esquerda.
frigorífico embaixo à esquerda.
modelo
Gross
Bruto
Brut
75
Test
P.S-I.
TI
Net
Util
Utile
Pressure
HIGH-235
LOW 140
Cod.
RG 2330
Mod.
220 - 240 V- 50 Hz 150 W
340
Total
Gross
Bruto
Brut
Compr.
R 134 a
Syst.
kg 0,090
Kompr.
Made in Italy 13918
número de série
93139180000 S/N 704211801
Fuse
Gross
Bruto
Brut
W
A
Freez. Capac
Poder de Cong
kg/24 h
4,0
Max 15 w
Class
Clase
Classe
PT
N
Nunca recorrer a técnicos não autorizados e negar sempre a instalação de peças sobresselentes não
Nunca recorrer a técnicos não autorizados e negar sempre a instalação de peças sobresselentes não
originais para reposição.
originais para reposição.
69
Page 70
PT
70
Page 71
PT
71
Page 72
PT
195061964.00
01/2007 - Xerox Business Services
72
 Loading...