

Page 1
Instructions for
installation and use
The secrets
Instrucciones para
of fabrics
How to get better results
How to get better results
la instalación y el uso
dinstallation et demploi
Washing machine
safe
AW 120
NA
SP
Mode
F
and easy to use
Lave-linge
sûr
et facile à utiliser
www.aristonappliances.us
Lavadora
IACKH=
y fácil de usar
Instructions for installation and use
Page 2
Quick guide
Here are the 10 topics explained in this manual. Read, learn and have fun. You will discover many secret ways to
get a better wash more easily, and making your washing machine last longer.
1.
Introduction (pages 3-4-5)
The top ten reasons for buying your washing machine.
Also covered:
1. Important Safety Instructions for you and your family.
Read this section carefully.
2. Helpful Hints on using your new Washing machine
3. Pre-Installation
2
Installation (pages 4-6-7-8)
Installation, after delivery or transport, is the most important
operation for the correct functioning of your washing machine.
Always check:
1. That the electric system conforms to regulations;
2. That the inlet and drain hoses are connected correctly.
Never use hoses that have already been used.
3. That the washing machine is levelled properly improving the
performance of your washing machine.
4. THAT THE DRUM'S SHIPPING BOLTS HAVE BEEN
REMOVED FROM THE BACK OF THE WASHING MACHINE.
3. What goes in your washing machine and how
to start it (pages 8-9)
A correct distribution of your laundry is vital to the successful
outcome of the wash and the life of the washing machine. Learn
all the tips and secrets to dividing your linen: color, type of fabric.
4.
Understanding the control panel (page 10)
This Washing machine’s control panel is very simple. It has
only a few essential buttons to help you choose any type of
wash and dry cycle, ranging from the most energetic, capable
of cleaning a mechanic’s overalls, to the most delicate for wool.
Familiarizing yourself with it will help you get the best out of
your wash while helping your machine last longer.
5. Guide to the wash programs (page 11)
Here is an easy table to help you choose the right program,
temperature, detergents and possible additives. Choose the
right program and you will get better results with your wash
while saving time, water and energy, day after day.
6.
Useful tips to wash and
to avoid mistakes (pages 12-13-14)
Years back, our grandmothers were the ones who gave us good
advice - and in those days synthetic fibers did not exist: washing
was easy.
7.
The detergent dispenser (page 15)
How to use the detergent dispenser and the bleach
compartment.
8.
Problems and solutions (pages 16-17)
Before calling a technician, read these pages. Immediate
solutions can be found for a many problems. If the problem
persists, call the Customer Care. They will be glad to help you.
9. Care and maintenance (page 18-19)
With just a bit of care, the washing machine will repay you with
outstanding performance for years and years to come.
10.
Technical characteristics (page 19)
Here are the technical features of your washing machine: model
number, electric and water specifications, size, capacity, speed
of the spin cycle and compliance with US & Canadian regulations.
2
In structions for installation and use
www.aristonappliances.us
Page 3

Introduction
Congratulations on your new Washing machine. In addition to its award winning design, this is a highly sophisticated
engineered product that will give you many years of satisfaction. Please spend a few moments to read the Owners
Manual. This will show you ways to best utilize your valuable purchase
Here are 7 of the best reasons for buying your Washing machine :
.
1. Maximum Energy and Water Savings
This appliance is engineered to provide valuable energy
and water savings when compared to other washing
machines.
2. Space Savings
The Washing machine is designed to utilize horizontal and
vertical space effectively.
4. Improved Operation
With a spin speed of 1200 RPM, more water is extracted,
allowing improved dry times.
5. Better Clothing Appearance
This Washer-Dryer has no agitator to damage your clothes
so they look better and last longer.
6. Placement Options
The Washing machine’s sleek Italian design makes it a
perfect appliance for any Kitchen or Laundry Room. Its
compact size makes the Washing machine perfect for
placement on any floor of your home.
7. Convenience
This appliance can be permanenty installed and be made
portable with casters and the faucet adapter kit (sold
separately as accessories) where needed.
Important Safety Instructions
Your safety and that of your children
Your washing machine has been built in
compliance with the strictest international
safety regulations, to protect you and all your
family.
8. Do not repair or replace any part of the appliance or attempt
any servicing unless specifically recommended in the usermaintenance instructions or in published user-repair instructions
that you understand and have the skills to carry out.
WARNING -To reduce the risk of fire, electrical shock, or
injury to persons when using your appliance, follow basic
precautions, including the following:
1. Read all instructions before using the appliance.
2. Do not wash articles that have been previously cleaned
in, washed in, or spotted with gasoline, dry cleaning solvents,
other flammable or explosive substances as they emit vapors
that could ignite or explode.
3. Do not allow children to play on or in the appliance. Close
supervision of children is necessary when the appliance is
used near children.
4. Before the appliance is removed from service or discarded,
remove the door.
5. Do not reach into the appliance if the tub or drum is moving.
6. Do not install or store this appliance where it will be exposed
to the weather.
7. Do not tamper with controls.
9. Do not add gasoline, dry-cleaning solvents, or other
flammable or explosive substances to the wash water. These
substances give off vapors, that could ignite or explode.
10. Under certain conditions, Hydrogen gas may be produced
in a hot water system that has not been used for 2 weeks or
more. HYDROGEN GAS IS EXPLOSIVE. If the hot water
system has not been used for such a period, before using a
washing machine, turn on all hot faucets and let the water
flow from each for several minutes. This will release any
accumulated Hydrogen.
11. Do not use fabric softeners or products to reduce static
unless recommended by the manufacturers of the fabric
softener product.
12. Check the Coin Trap every few months to remove any coins,
buttons or similar size objects.
Save these instructions
www.aristonappliances.us 3
Instructions for installation and use
Page 4
Safety
CAUTION
RISK OF ELECTRIC SHOCK
DO NOT OPEN
CAUTION:
To reduce the risk of electric shock, DO NOT
remove cover (or back).
The lightning flash with arrowhead symbol,
within a triangle, is intended to alert the user
to the presence of uninsulated “dangerous
voltage” within the product’s enclosure that may
be of sufficient magnitude to constitute a risk
of electric shock to
persons.
Refer for servicing to qualified services
personnel.
The model number of this product may be found on the
front and back of the unit and serial tag.
You should note the model and serial numbers of this
unit in the space provided. Retain this booklet as a
permanent record of your purchase to aid in identification in the event of Service Waranty.
MODEL N. .......................................
SERIAL N. .......................................
WARNING:
TO PREVENT FIRE OR SHOCK HAZARD DO NOT
EXPOSE THIS PRODUCT TO RAIN OR MOISTURE.
PRE-INSTALLATION
1. The washer must be installed on a strong level floor, and in
protected, dry, and well-ventilated area close to a power and
water supply of sufficient capacity, and a sufficient outlet.
2. Installation on Carpet or Wood increases vibrations.
• Carpets - place on thin carpet only.
• Wood - brace floor with screws and place additional sheets
of plywood before installation.
The exclamation
point within a triangle is
intended to alert the
user to the presence of
important operating and
maintenance (servicing)
instructions in the
literature accompanying
the appliance.
Merloni Elettrodomestici SpA
offers to our customers products
with the ENERGY STAR Label.
This appliance was tested by UL
and conforms with both Canadian
and U.S. UL safety requirements
and displays their Mark.
3. Washing machine installation and grounding should be
done in accordance with local codes by a qualified installer.
“Installation Instructions” are included in your Use and Care
manual for the Installer’ s reference.
4. The washer should be plugged into a properly grounded
three (3) prong electrical outlet of 120 Volt, 1300 W, 13 A,
60 Hz. It should not be controlled by a wall switch or pull
cord which might be turned off accidentally.
U
®
L
C
US LISTED
4
In structions for installation and use
www.aristonappliances.us
Page 5

Your new appliance is carefully engineered product. Many times
what appears to be a reason to call for service, requires nothing
more than a simple adjustment you can easily make in your
own home.
Your Washing machine is front loading, with an extra large
door opening for easier access. It has 9 wash cycles in addition
to
extra rinse
and
pre wash
cycles.
You will be charged for a service call while the appliance
is in warranty if the problem is not caused by defective
product workmanship or materials covered by this
warranty.
To avoid a charge for an unnecessary service call, and before
calling a serviceman, please refer to the troubleshooting section
for situations that you can remedy. This section is included on
pages 16-17 of this Use and Care Book.
This appliance is an automatic washer with a capacity of up to:
12 lbs. - 5,5 Kgs
You will obviously want to obtain the best possible wash. By
reading and following the instructions in this booklet you will
achieve excellent results.
Please, ensure that the instructions are followed. If you should
need any further advice or assistance, please, contact the
dealer where your machine was purchased.
Helpful Hints
Your Washing machine features three different speeds
during the wash cycle. During the Cotton cycle the drum
spins at 1,200 or 800 rpm depending on how you set it.
During Permanent Press the drum spins at 850 rpm. During
delicates, the drum spins at 500 rpm. The faster spinning
will extract more water from highly absorbent fabrics and
reduce the degree of dampness.
Using Liquid Fabric Softener. Fill the softener
compartment up to the level marked. Using fabric softener
fluffs out clothes immediately after the wash cycle. This
helps speed drying time and reduce wrinkles.
www.aristonappliances.us
Use Low sudsing Detergent. This is recommended for all
front loading washers. It ensures there is no over sudsing,
which may reduce the performance and damages to your
machine.
When sorting laundry always take into consideration the
quantity and type of fabric contained in the load. Highly
absorbent fabrics such as those used in towels or jeans
will absorb more water and become very heavy when
saturated. If you notice that your clothes are taking longer
than usual to dry you may be overloading the machine, or
washing too many highly absorbent articles for a single load.
Instructions for installation and use
5
Page 6
Installation
When the new washing machine arrives
Whether new or just transported to a new house, installation is extremely important
for the correct functioning of your washing machine.
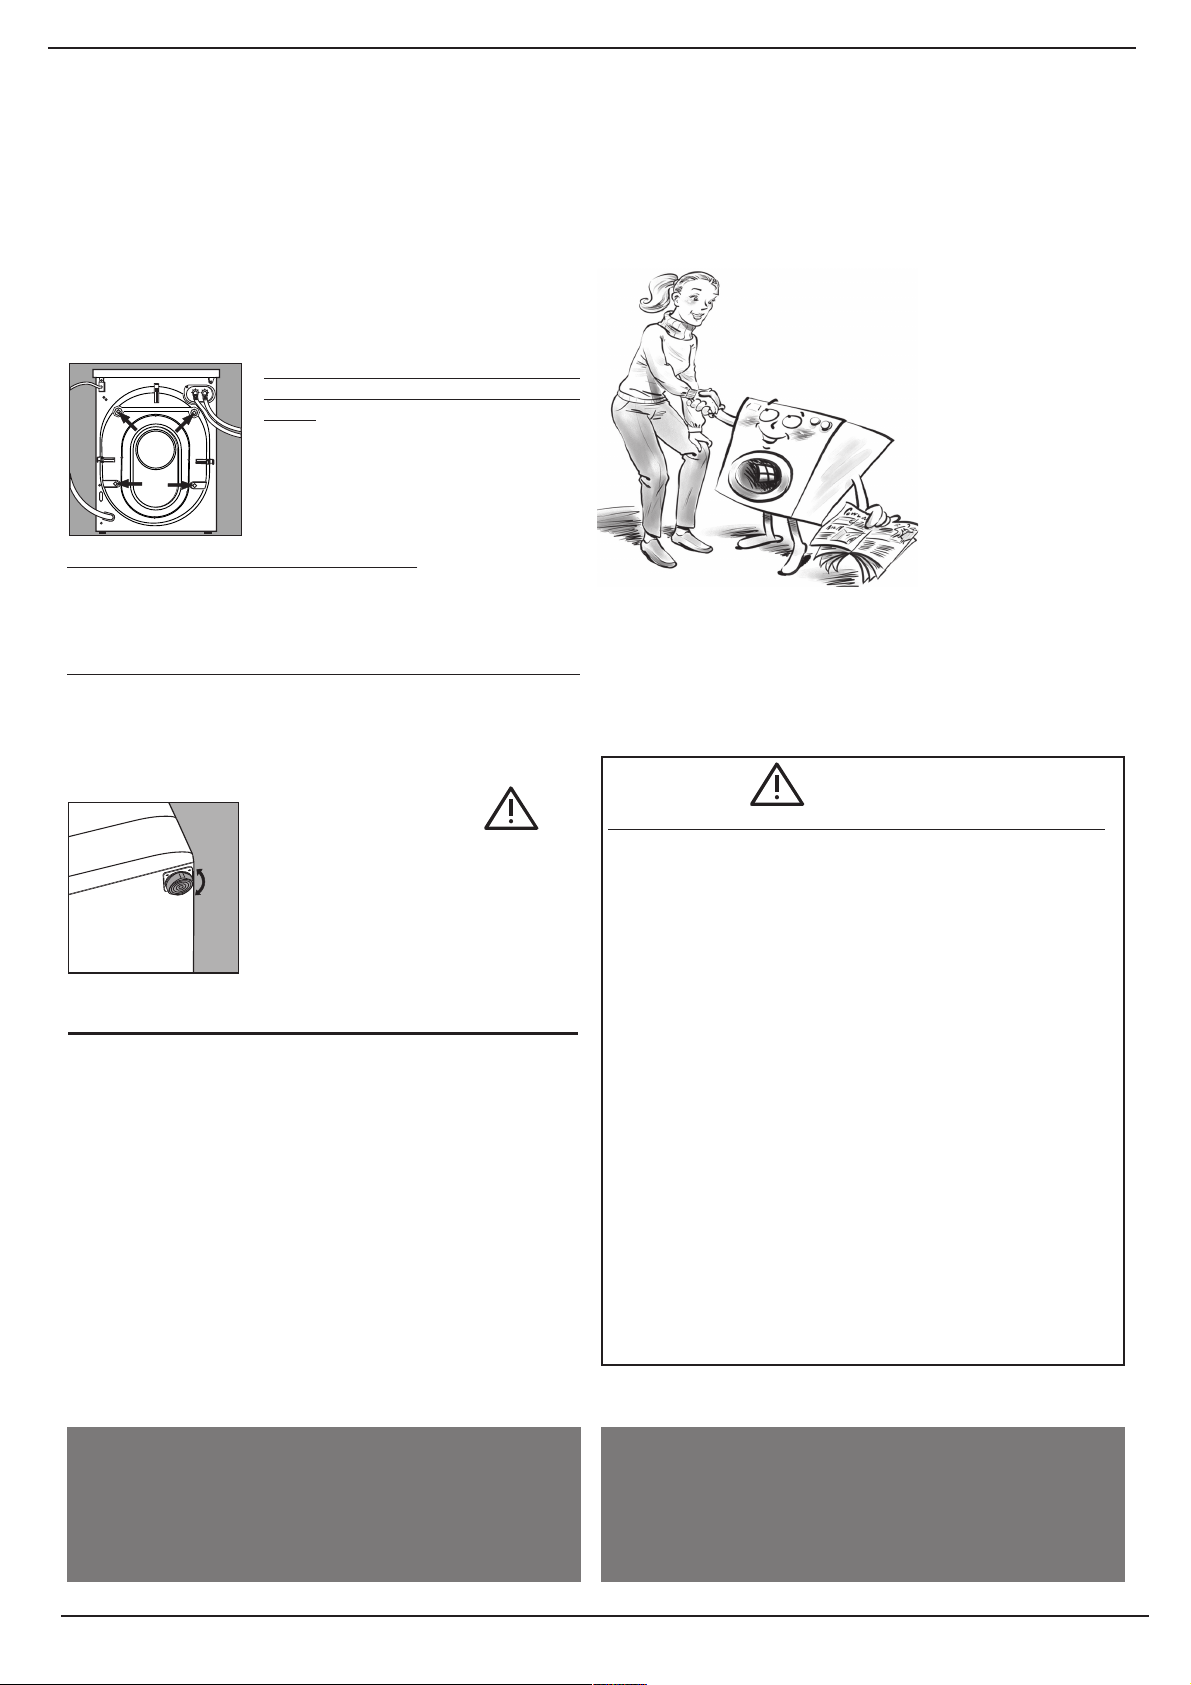
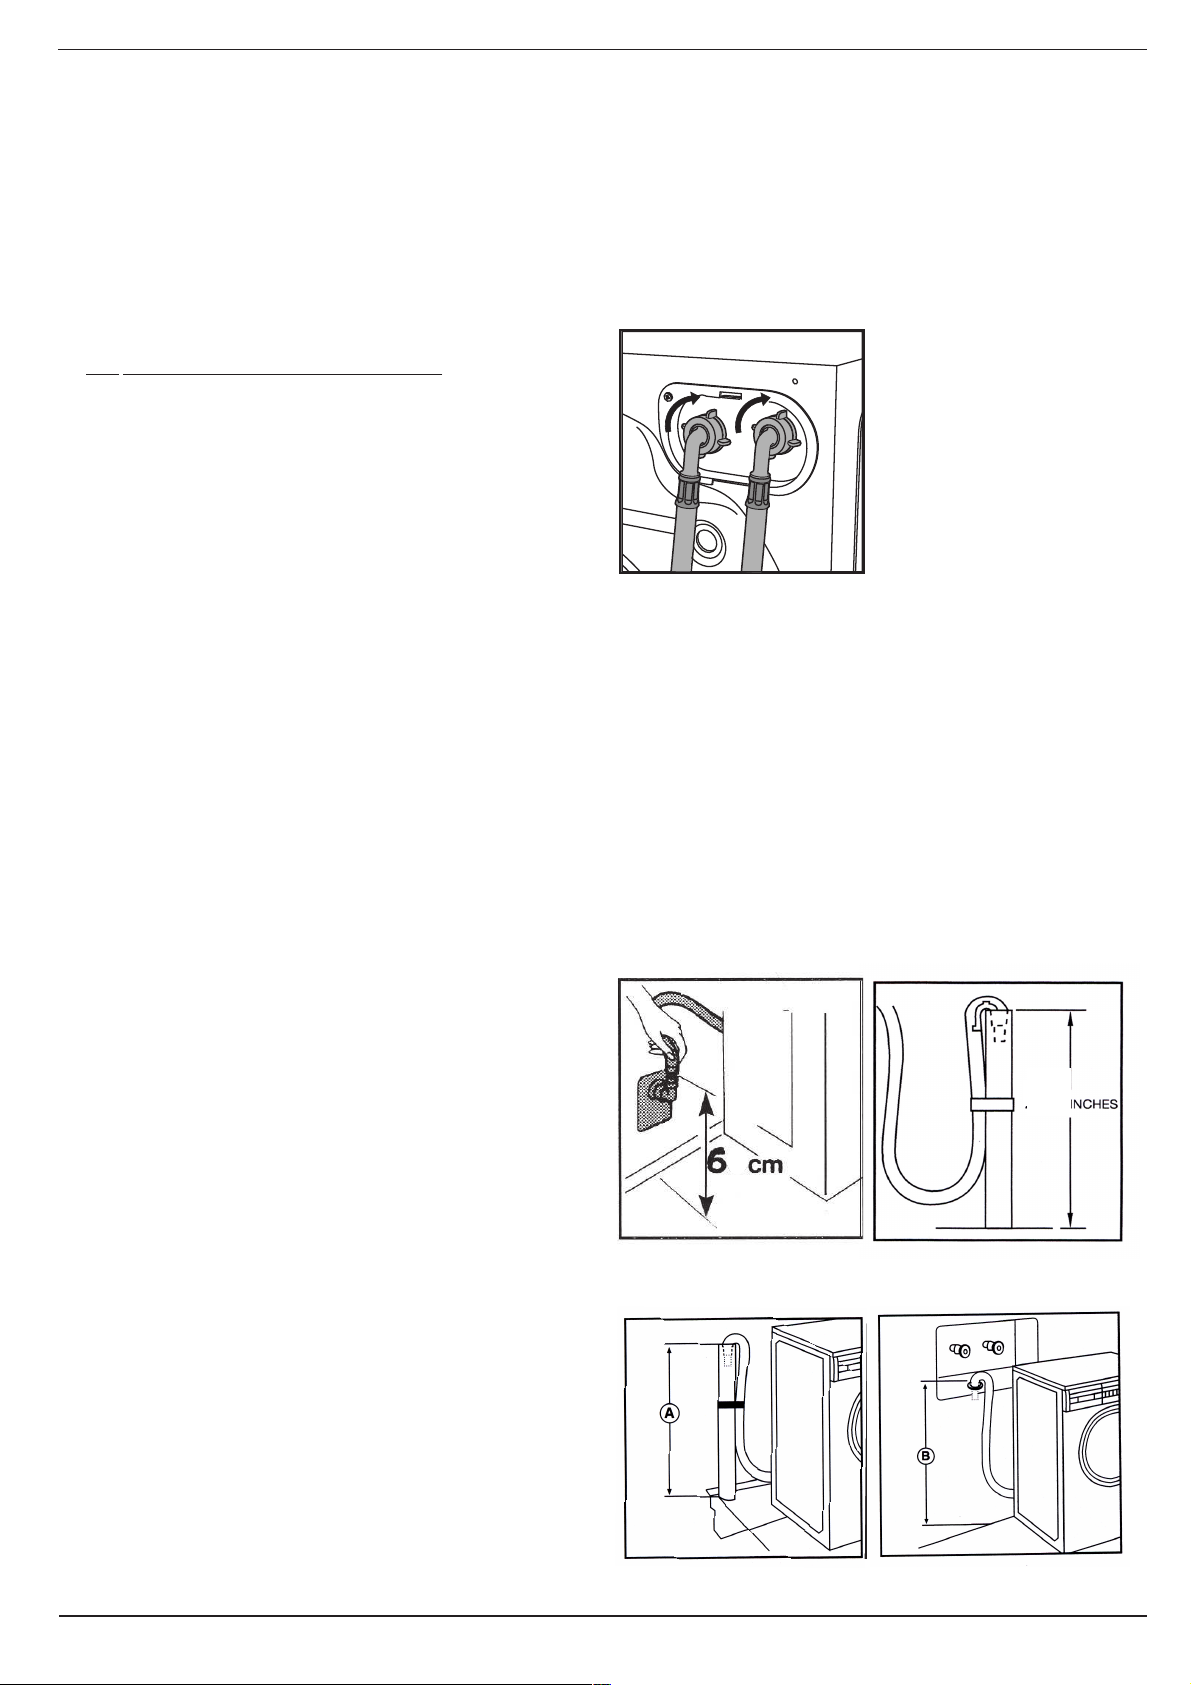
After removing the appliance from its packaging, check that it
is intact. The inside of the machine is supported, for
transportation, by four shipping bolts on the back panel.
Before using the washing machine,
remove the 4 external shipping
bolts, remove the spacers together
with the rubber tubes attached to them
(save all the parts) and use the plastic
blanking plugs provided to fill in the
holes. Use the wrench provided to
remove the external bolts.
Attach the two rubber hoses provided to the red (hot) and
white (cold) water inlets on the back (top right) of the appliance.
Using the “U”-Connector provided, place the drain hose into
the drain pipe (or the sink.) See Plumbing on Page 7 for more
details.
Leveling
The washing machine must be levelled appropriately in order to
guarantee its correct functioning. To level the appliance, the front
feet must be adjusted; the angle of inclination, measured according
to the worktop, must not exceed 2°.
WARNING
Excessive Weight Hazard
Use two or more people to move
and install your appliance.
Failure to do so can result in
back or other injury
The front feet are self-locking & adjustable
5. The washer must be
plugged into a properly
grounded 3-prong
electrical outlet. For
your safety, the third or
round grounding prong
must never be
removed.
DO NOT USE AN
EXTENSION CORD.
6. Repair or replace-
ment of a part should
be made only by a
qualified service
technician to prevent personal injury or damage to the machine.
7. Disconnect power to the washer at the circuit breaker or
fuse box, or unplug the machine in an emergency when
servicing is required. Have the installer show the proper switch
or fuse at the electrical disconnect box.
WARNING Electrical Requirements
Electrical Shock Hazard (death, fire or electrical shock):
1) Plug into a grounded 3 prong outlet.
2) Do not remove ground prong.
3) Do not use an adapter or an extension cord.
4) The Appliance should be connected to an Individual
Branch Circuit with N. 14 AWG Wire and Protected by 15
A Fuse.
GROUNDING INSTRUCTIONS
For your own protection, and to prevent accidents,
injury and fire, please read the following carefully:
1. Destroy the carton and plastic bags, after the washing
machine has been unpacked.
2. Children should never be left alone or unattended in the area
where appliances are located.
3. Washer installation and grounding must be done in
accordance with local codes by a qualified installer. Installation
instructions are packed in new washer for the installer’s
reference.
4. ONLY Low Sudsing detergent is recommended for this
appliance.
Retain the shipping bolts, spacers and washers.
Should you move residence then these should be
replaced to support the inside of the machine to
prevent damage when transporting the machine.
This appliance must be grounded. In the event of malfunction,
or breakdown, grounding will reduce the risk of electric shock
by providing a path of least resistance for electric current. This
appliance is equipped with a cord having an equipmentgrounding conductor and grounding plug. The plug must be
plugged into an appropriate outlet that is properly installed and
grounded in accordance with all local codes and ordinances.
WARNING - Improper connection of the equipment-grounding
conductor can result in a risk of electric shock. Check a qualified
electrician if you are in doubt as to whether the appliance is
properly grounded.
Do not modify the plug provided with the appliance. If it will not
fit the outlet, have a proper outlet installed by a qualified
electrician.
Warning !
The company denies all liability if and when these
instructions are not respected. Plastic bags,
expanded styrofoam, nails and other packaging
parts are not children’s toys, and are potentially
dangerous and they should be disposed off properly.
6
In structions for installation and use
www.aristonappliances.us
Page 7
PLUMBING (Water Inlet)
Included in the accessories supplied with this machine are 2
inlet hoses and 4 rubber washers. The straight end of these
hoses should be connected to the supply (fig. 1).
The 90° angled end of these hoses should be connected to
the inlet valves on the back of the machine, using one of the
washers to make a water tight seal on each connection.
The couplings should be tightened by hand, a tool should only
be used if a leak occurs.
Do not use excessive force (see fig. 1).
Repair or replacement of a part should be made only by a
qualified service technician to prevent personal injury or damage
to the machine. inlet valves are color coded:
Red = Hot
White = Cold
Note:
Replace inlet hoses after 5 years of use to reduce the risk of hose failure. Record hose installation or replacement dates on the
hoses for future reference.
Periodically inspect and replace hoses if bulges, kinks, cuts, wear or leaks are found.
Connection to the water mains
Water pressure must range within the values indicated on the
data plate on the rear of your washer-dryer. If the water pipes are
new or left unused, then before connecting the machine run the
water until clear to remove
debris. Connect the inlet hose
to a cold water tap having a ¾“
BSP thread. Ensure that there
are rubber washers are at each
end of the inlet hose. The LShaped end goes on the
machine and straight ends on
the water faucets
Fig. 1 - Water pipe inlet at the
rear top right
PLUMBING (Water Out)
You should carefully position the drain hose to avoid kinks and
ensure proper drainage of the water (fig. 2-3-4-5).
The outlet end of the drain hose must be at least 25” (62 cm)
above the base of the machine. At this point it is possible for
the water to be discharged into a sink or drain pipe, but an air
break must be available at this 25” height to prevent the machine
from syphoning (see fig. 2-3 aside).
No more than 6” of the drain hose should be inserted in the
drain pipe.
IMPORTANT
make sure that the drain hose is not kinked and the water flow
has not been restricted.
Standpipe drain system:
In RV installation needs a 1-1/2 inch (3.7 cm) diam.
standpipe with minimum carry away capacity of 7 gallons (31
liters) per minute or 2” (5 cm) in home installation (fig.3- 4).
Floor Standpipe drain:
Top of standpipe must be at least 25 inches (62 cm) high and
no higher than 34 inches (86 cm) from the bottom of
washer (A) (fig. 3-4).
25
2
Fig. 2 - Drainage
25”
34”
Fig. 3 - Drainage
Wall standpipe drain:
25 inches (62 cm) min.; 34 inches (86 cm.) max
from end of drain hose to bottom of washer (B) (fig. 5).
www.aristonappliances.us
Fig. 4 - Drainage
Fig. 5 - Drainage
Instructions for installation and use
7
Page 8
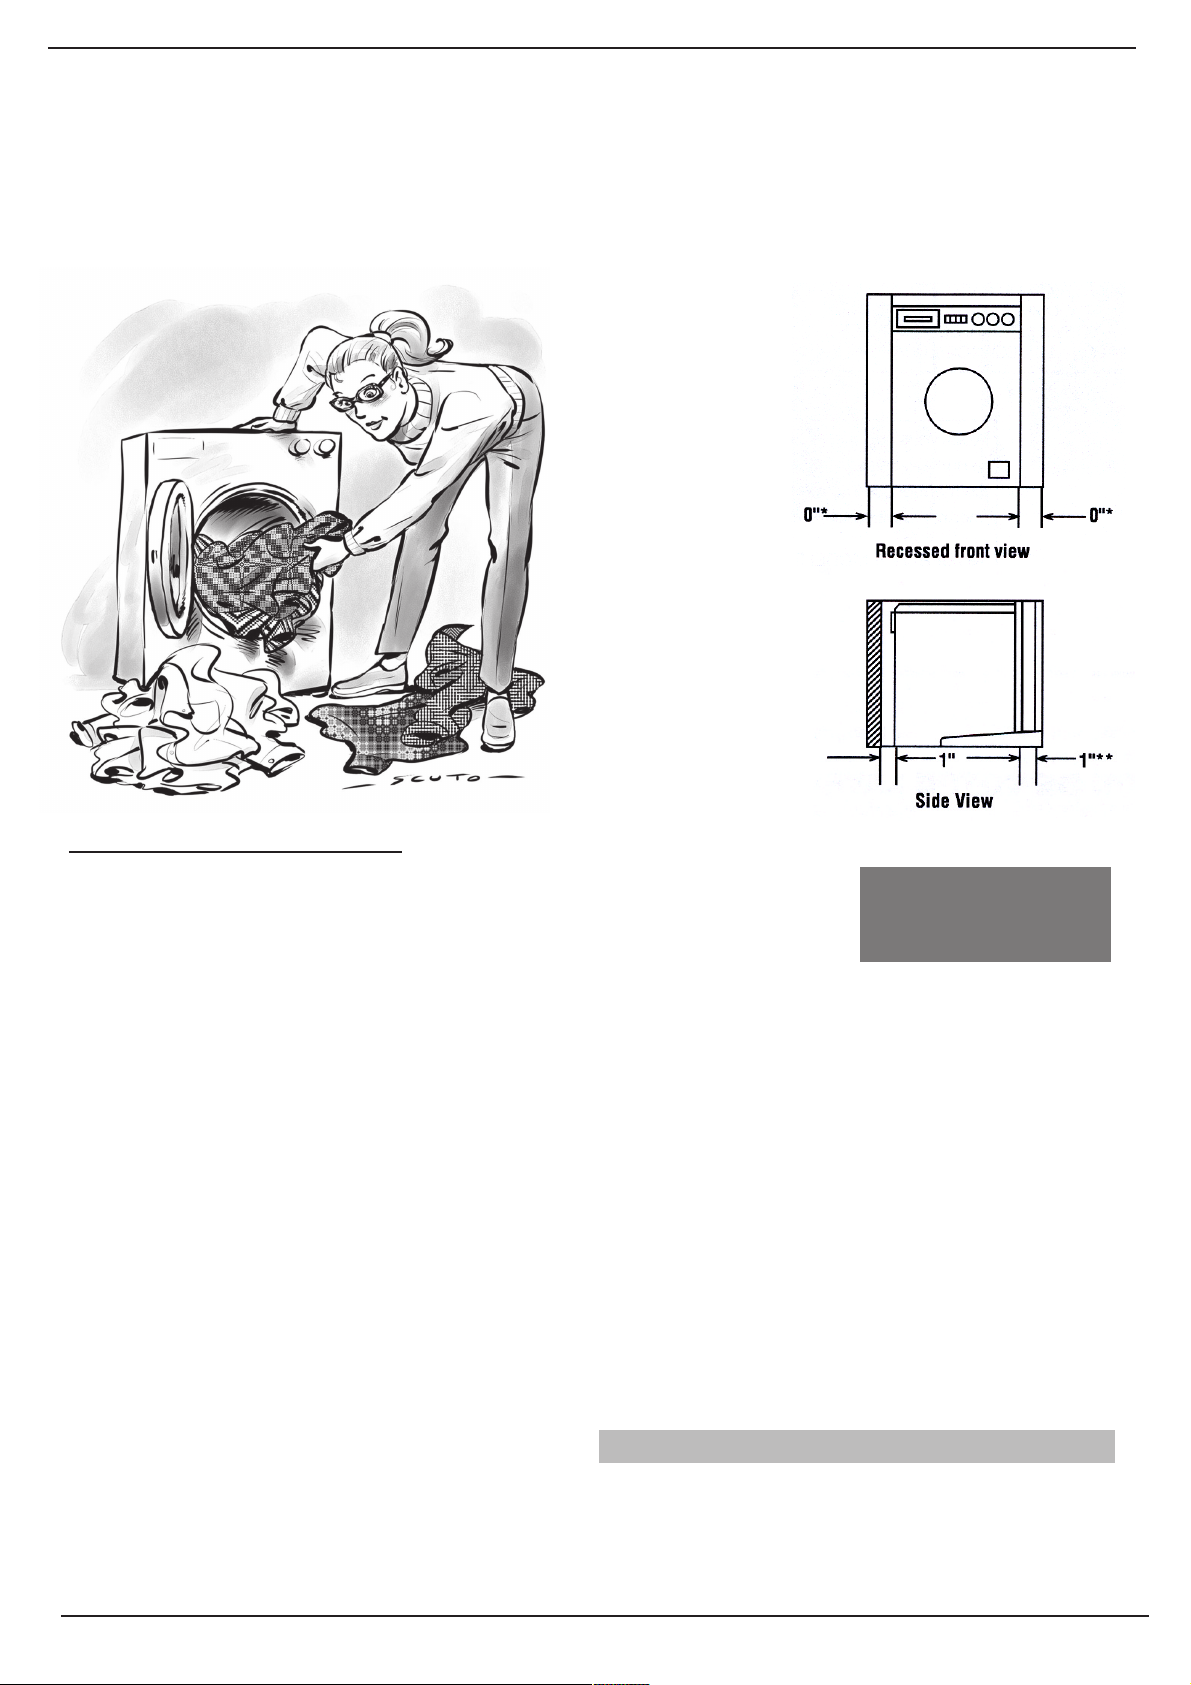
RECESSED, CLOSET AND ALCOVE INSTALLATION
(Instructions)
The machine may be installed in a recessed area,
closet or alcove.
The installation spacing is in inches and is the
minimum acceptable.
Additional spacing should be considered for easy
installation, servicing and in compliance with local
codes or ordinances.
Other installation must use the minimum dimensions
indicated .
* Additional clearances
for wall, door and floor
moldings maybe required.
Minimum
installation
spacing
** Additional space
is needed when an
external exhaust
elbow is used
(just for vented models)
Operating instructions
.
What goes in your washer ?
Before washing, you can do a great deal to ensure better results. Divide your
garments according to fabric and color. Read the labels, follow their guidelines.
LAUNDRY PREPARATION
Sorting
Clothes should be sorted from separate items which could
damage other garments. Sort items into loads according to
similar colors, fabrics, garment construction and degrees of
soil.
- Color. Separate clothes into three groups: whites and pastels,
medium and bright colors and dark colors. Items which bleed
color should be washed alone.
- Type of fabrics. Delicate items should be separated from
sturdier items. Fabrics that shed lint should be separated from
those which shed none or attract lint.
- Garment constructions. Garments that may fray easily or
that have unusual trim require gentle care. These garments
may be washed in the loader using the knit cycle. If garments
are fragile and delicate, hand washing may be desirable.
- Degree of soil. Heavily soiled items should be separated
from the rest of the wash to prevent transfer of soil in the wash
water.
Inspection
While sorting clothes into wash-loads, also inspect each
garment to see if it requires special care.
- Pretreat heavily soiled areas such as collars, cuffs and
centers of pillowcases. Refer to the “Pretreating” section for
specific instructions.
- Mend rips and tears, before washing, so further damage is
not done to garments.
- Empty pockets. Objects left in pockets such as crayon,
pens or markers, or tobacco crumbs may stain an entire wash
load. Paper tissues will shred leaving bits on each item in the
washer. Remove coins and other foreign objects to prevent
damage to the machine.
- Fasten all hooks, zippers and buttons.
- Turn knit garments inside out to reduce the tendency of
knits to “pill”. Fabric “pills” are balls of fibers on the surface the
garments caused by wear or friction.
- Remove loose dirt and sand. Brush dirt from trouser cuffs;
shake or vacuum rugs to remove loose surface soil.
- If buckle is washable, place a scrap of material securely
around the ornament before washing and drying to prevent
scratching and damage to the machine. Remove non-washable
trims, buckles, buttons and belts.
- Tie strings, belts and apron sashes into bows to avoid
tangling during washing.
- Before loading the washer, make sure the drum is empty.
Dividing your garments
according to fabric and
color, is very important for
good results
- Remove stains, while they are fresh and easy to get out. Try
cold water first to remove unknown stains. Hot water sets stains
containing protein such as blood, egg, meat and milk. To remove
difficult stains, refer to the removal Chart at the end of the
manual.
In structions for installation and use
8
Pretreating
Pretreat heavily soiled areas such as collars, cuffs and center
of pillowcases by using a prewash spray, or brushing liquid
detergent or a laundry detergent or a laundry detergent and
water paste over the areas before washing.
www.aristonappliances.us
Page 9

Refer to the Stain Removal Chart for treatment of specific stains.
If an entire item is heavily soiled or very stained, it may be both
easier and more effective to prewash the item before laundering
than to pretreat every spot.
Prewashing
Prewash excessively soiled clothes, such as work or children’s
clothes. Prewashing with detergent will help loosen the soil.
Laundry aids
Detergents are the most popular cleaning agents for home
laundry.
Using too little detergent results in poor wash quality, while
using too much causes excessive suds and poor rinsing.
Detergents not only remove soil, but also hold it in suspension
in the wash water to prevent redepositing it on the wash load.
The amount to use depends on wash load size, amount of soil,
water hardness and detergent type.
ALWAYS measure the amount of detergent. The amount
of suds formed is not necessarily an indication of how much to
use. Some detergents form a great amount of suds, others
only a few. Use only detergents suitable for front loading
washers.
LAUNDRY AIDS
1. Use only low sudsing detergent.
2. The degree of soil will change detergent amounts. For heavier
soiled loads, increase the amount of detergent used.
3. If water is extremely hard, detergent should be increased.
Less detergent should be used in soft water.
4. If garments have been pretreated, decrease the amount of
detergent. If garments have been heavily pretreated, it may not
be necessary to add detergent.
5. If the previous machine owned was a top loader, the initial
washloads in a front loader may require a reduced quantity of
detergent until the detergent remaining in the clothes is
removed. Old detergent trapped in the garments will be released
during the tumble action wash cycle.
For quantities of detergent to be used, refer to the detergent
manufacturer’s instructions on the box.
Detergent will be flushed automatically into the machine from
the detergent dispenser. The suds level should never rise more
than halfway up the porthole. Too much foam will not impede
the wash action of your machine but will rise through the
detergent dispenser and make a mess on the floor !
If this should happen clear excessive suds by setting the
timer to the beginning of the first rinse and allow the
machine to rinse out.
Bleaches
Bleach functions to whiten clothes, remove certain problem
stains, to deodorize and in some cases to sanitize; however
bleaching is not a substitute for good laundry techniques. Bleach
should never be added to the rinse water. Always dilute bleach
before using.
To add bleach, open detergent dispenser door and pour in
compartment 4 (see page 15 and 13-14).
WARNING:
Under no circumstances overfill the bleach dispenser. Excessive
bleach will run directly into the machine and may possibly
damage the clothes.
Fabric Softener
All fabrics, particularly towels, benefit from the use of fabric
conditioners in the final rinse. Items of laundry feel softer, and
are more easily ironed and making these clinging affect of
synthetics is considerably reduced.
Pour the softener into “Additives” compartment of the detergent
dispenser to the level indicated on the syphon. Under no
circumstances overfill, as the softener will immediately syphon
into the machine and in so doing, impair the wash results.
Starting the washing machine
After installing your new washing machine, start a wash cycle by setting a desired program .
Starting your washing machine in the right way is important
for the quality of your wash, to
help prevent future problems
and enhance life expectancy
of your appliance. Once you
have loaded your washing
machine and added the
detergent together with any
fabric conditioner,
For more delicate
garments:
protect underwear, tights
and stockings and
delicate items by placing
them in a canvas pouch
www.aristonappliances.us
always check that:
1. The door is closed
correctly.
2. The plug is secured in the
socket.
3. The water supply is turned
on.
Choose the desired program
The program is selected
according to the type of
garments that need to be
washed. To choose a program,
refer to the table on page 11,
then:
1) turn Washer knob until the
selected program is aligned
with the mark on the knob,
2) Set the Wash Temp knob to
the appropriate Wash/Rinse
temperature settings,
3) if necessary use buttons F,
G, H, I and lastly, press the
Power button.
4) Remember, if you want
to use the "Delay Timer"
it should be set before
the wash cycle.
At the end of the wash cycle...
Mode+Door Lock light will
flash fast for a few seconds,
and then flashes slowly.
Then turn the washer off by
pressing the Power button
(O position). You can now open
the washing machine door
safely. After having removed
the freshly cleaned laundry,
leave the door open to allow
air circulation inside the drum.
Remember that, in the event
of a power failure, or should
the washer switch itself off,
the program chosen will
remain in memory.
Instructions for installation and use
9
Page 10
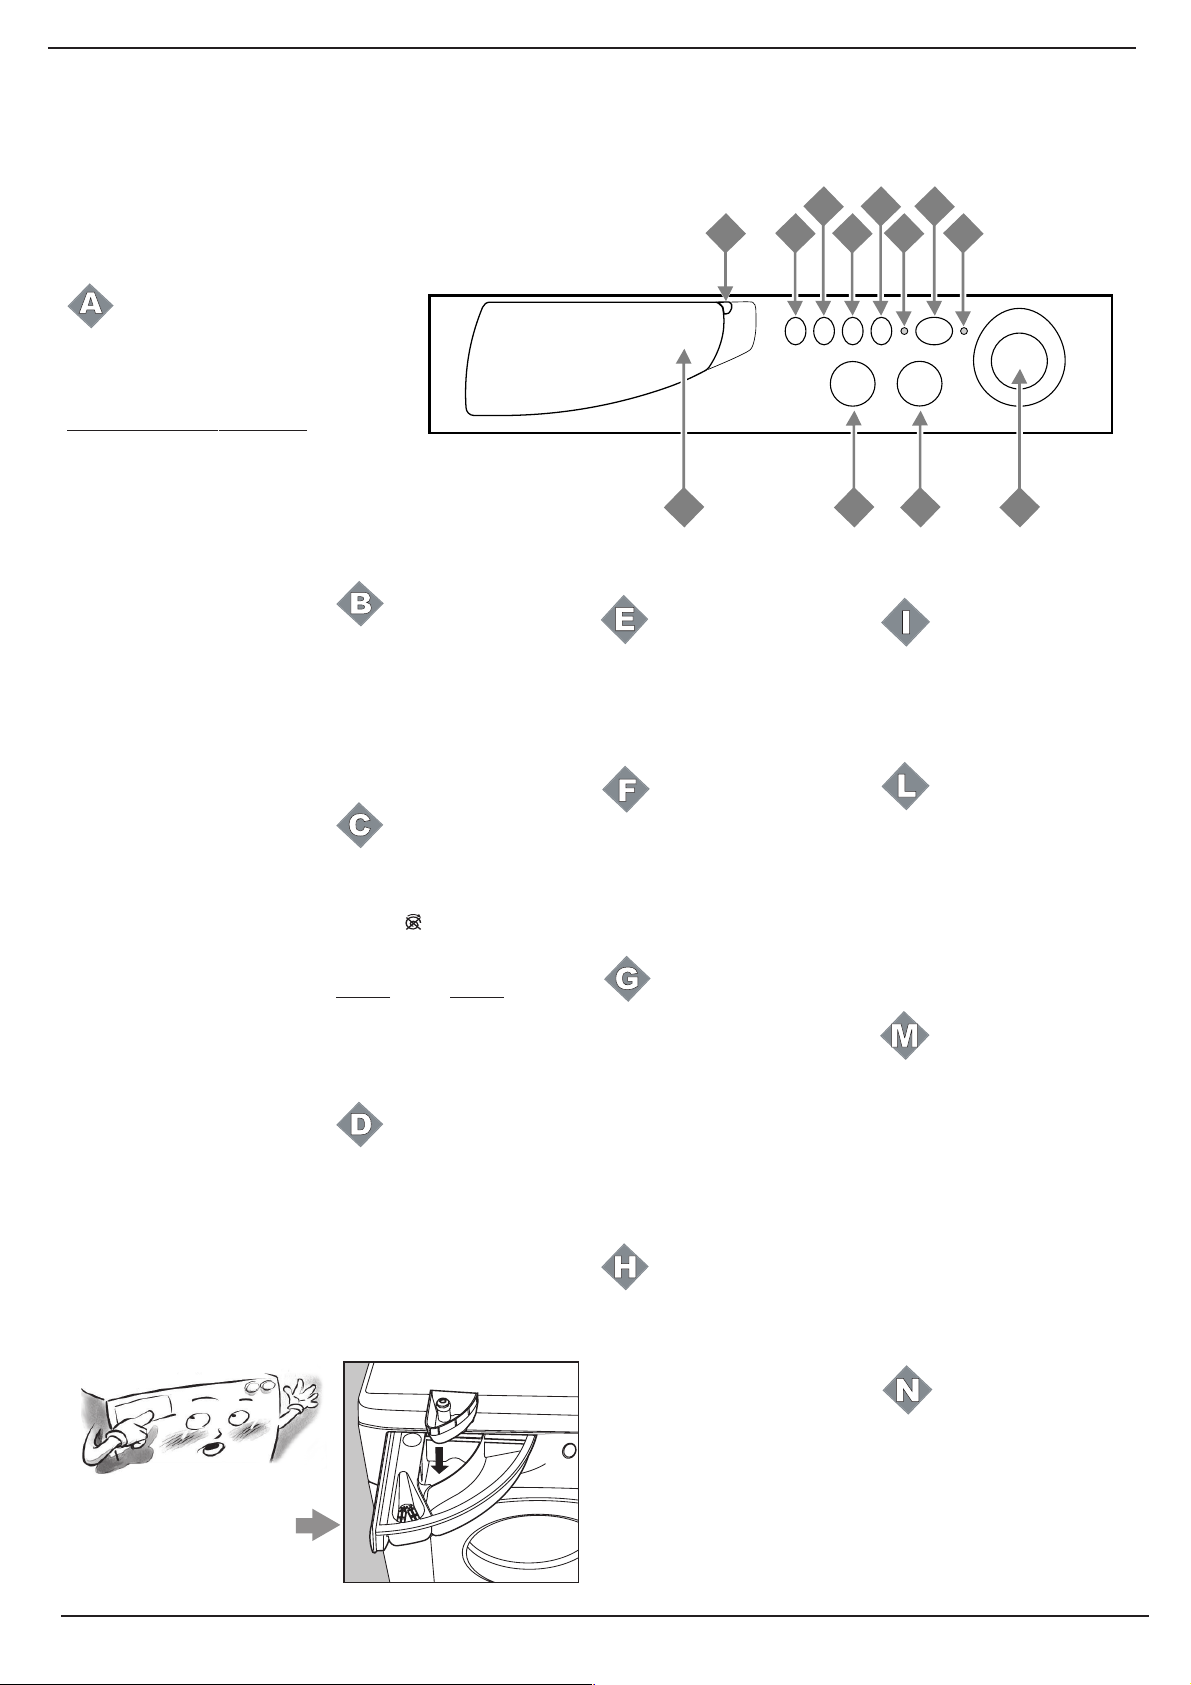
Making the right choice is important. And its easy.
Here I’m in control
Washer knob and Delay
start
Use this knob to select the
wash program.
Turn this knob clockwise only.
To select a program, you should
turn the knob so that the word/
number of the desired program
is in line with the pointer on the
knob.
Now press on/off button L , pilot
lamp M will start flashing.
After 5 seconds, the setting will
be accepted, pilot lamp M will
stop flashing (staying lit) and the
wash cycle will begin.
If you want to interrupt the
program in progress or set a new
one, select one of the Reset
positions and wait 5 seconds.
When the cancellation has
been accepted, pilot lamp will
flash 5 times, and you can then
turn the appliance off.
You can use this knob to delay
the appliance's operation.
Select one of the 4 delay time
positions, press the on/off
button L in and wait 5 sec. The
setting has now been accepted
(pilot lamp M stays lit) and you
can select the program you
desire.
Pilot lamp M has a particular
flashing motion (2 sec. on and
4 sec. off) to indicate that a
delayed start has been set.
During this phase, you can
open the appliance door and
change the washing load,
should you wish to do so.
After the wash cycle has been
set and accepted by the
washer-dryer, turning the knob
will have no effect (except for
when it is on position Reset
(Stop).
The detergent dispenser with
the additional bleach
compartment is here.
(For details see page 15).
Temperature control knob
It is used to set the wash temperature in the recommended
program table on page 11. It
also allows you to reduce the
temperature recommended for
the selected program, and
even to set a cold wash cycle.
Spin speed knob
It is used to change/exclude
the spin cycle (by choosing
symbol
program. The maximum speed
for the four types of fabric are:
Fabric Speed
Cotton max rpm
Synthetics 800 rpm
Wool 600 rpm
Silk no
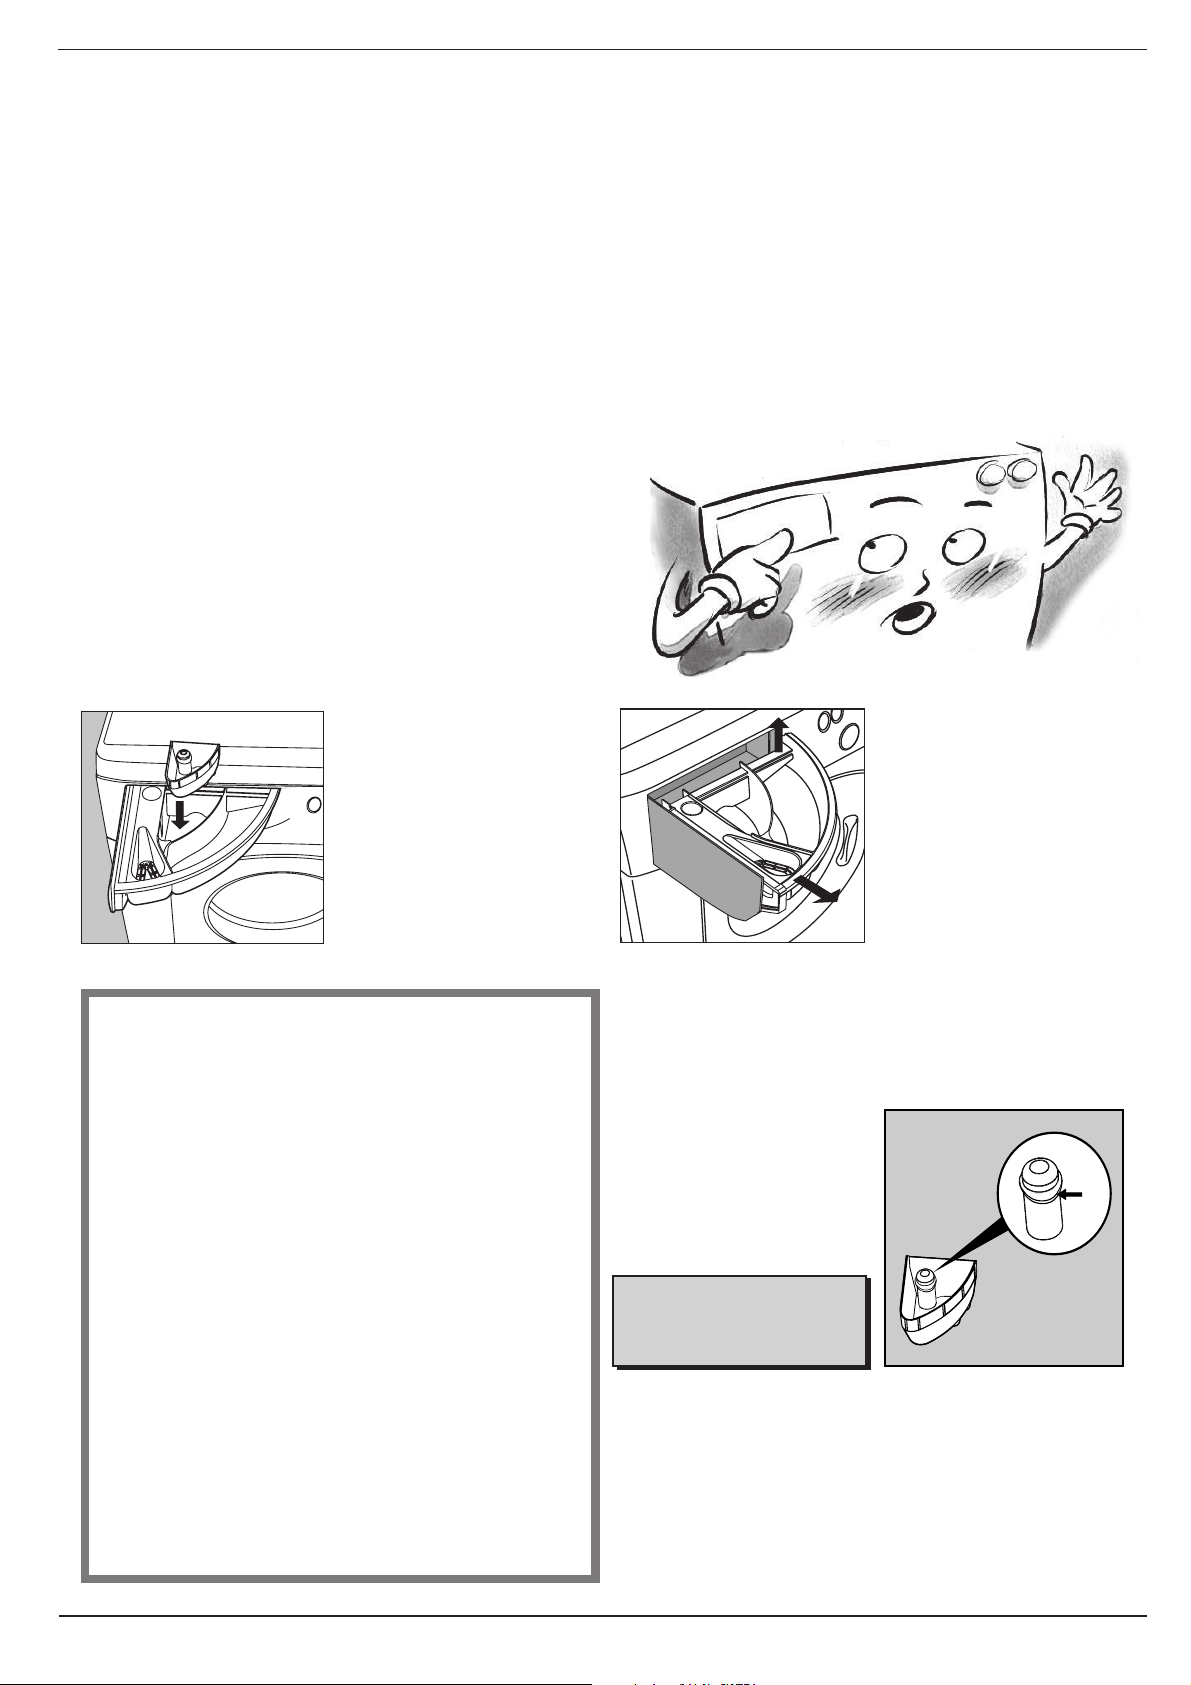
Detergent dispenser
It is divided into 3+1 sections:
1. Detergent for pre-wash;
2. Detergent for the main
cycle wash;
3. Fabric conditioner;
4. Bleach.
Knobs are hidden. Just
press them lightly in the
middle to extract them.
) of the selected
4
MAX
1
3
2
D
Program key to consult a
straightforward chart of the
different programmes available: pull the grey tab outwards
to open it.
SoakingSoaking
Soaking
SoakingSoaking
This function allows you to leave
your washing to soak for one
hour during the wash cycle.
During this time, your washing
is also tumbled.
Extra Rinse
This function adds one rinse
cycle for Cotton and
Permanent Press fabrics.
Use of this function is
recommended for improving
rinsing results when washing
full loads and large quantities
of detergent are used.
Recommended for detergent
contact allergies.
Easy iron
This function allows your
clothes to come out of the
machine without wrinkling,
making it much easier to iron.
You can use it with Permanent
Press and Hand Washables
programs.
Press this button in such
programs and the wash cycle
will come to a stop on one
position Easy iron.You can
complete the cycle by pressing
button H again.
E
G
H
F
C
L
I
M
N
B
Pre-wash
With this button, you can prewash on all programs except
the Wool program. (see page
11).
ON-OFF (Power)
To turn on the washer, press
button L in. To turn off, press
button L again so that it is out.
Turning the appliance off
does not cancel the selected
program.
On-Off lamp Door lock (Status)
Lamp M flashes slowly when
the appliance is switched on
and awaiting instructions and
at the end of a cycle, indicating
that the door can be opened. It
flashes quickly when the door
should not be opened. A
steady light means the
appliance has accepted the
selected program.
Door locked lamp
The safety lamp indicates the
washing machine door is
locked to prevent it from
beeing opened accidentally.
You must wait 2 minutes for the
lamp to extinguish, before
opening it.
A
10
In structions for installation and use
www.aristonappliances.us
Page 11
What are you washing today?
A program for all seasons
Type of fabric and degree
of soil
Program
knob
Wash
temperature
knob
Pre-wash Detergent
for wash
Fabric
softener
Bleach Length of
the cycle
(minutes)
Description of wash
cycle
DELAY TIMER
12h 9h 3h 1h
12 - 9 - 3 - 1 hour delay Start is delayed by 12 - 9 - 3 - 1 hours
Stop/Reset
Interrupts/Canc els the sel ected progr am
COTTON
Exceptionally soiled whites
(sheets, tablecloths, etc.)
Heavily soiled whites and fast colors
Slightly soiled whites and delicate
colors
(shirts, jumpers, etc.)
Rinse cycles
Spin cycle
Stop/Reset
1
2
3
Heavy
Regular
Light
KKKK
KKKK
KKKK
K
Wash cycle
90
final spin cycles
Wash cycle ,
50
final spin cycles
Wash cycle ,
40
final spin cycles
Rinse cycles, inte rmediate and final spin cycles
25
Draining and final spin cycle
13
Interrupts/Canc els the sel ected progr am
, rinse cycles, intermediate and
rinse cycles, intermediate and
rinse cycles, intermediate and
PERMANENT PRESS
Heavily soiled fast color synthetics
(baby linen, etc.)
Delicate color synthetics
(all types of slightly soiled garments)
Delicate color synthetics
(all types of slightly soiled garments
Rinse cycles
Fabric softener
Spin cycle
Stop/Reset Interrupts/Cancels the selected program
)
4
5
6
Heavy
Regular
Light
KKK
KKK
KKK
K
K
Wash cycle ,
80
delicate spin cycle
Wash cycle ,
65
delicate spin cycle
Wash cycle ,
40
cycle
Rinse cycles, Easy Iron or delicate spin cycel
25
Rinse cycles with automatic introduction of
softener, anti-crease or delicate spin cycle
Draini ng and delicate spin cycle
10
rinse cycles, Easy Iron or
rinse cycles, Easy Iron or
rinse cycles and delicate spin
HAND WASHABLES
Delicates
, particularly delicate garments
Silk
and fabrics
(curtains, silk, viscose, etc.)
Wool
Rinse cycles
Spin cycle Draini ng and delicate spin cycle
Drain Draini ng
Stop/Reset
7
8
9
Light
Silk
Wool
KKK
KKK
KK
K
Delicates ,
64
draining
Wash cycle ,
60
draining
Wash cycle ,
45
cycle
Rinse cycles, Easy Iron or draining
(Silk excluded)
Interrupts/Canc els the sel ected progr am
rinse cycles, Easy Iron or
rinse cycles, Easy Iron or
rinse cycles and de licate spin
IMPORTANT: TO CANCEL THE WASH PROGRAM YOU HAVE JUST SET, SET THE
WASHER KNOB TO THE “RESET” POSITION AND WAIT FOR AT LEAST 5 SECONDS.
The data found in the table are an average, and can vary according to the quantity and type of washing, the water system temperature
and the room temperature.
www.aristonappliances.us
Instructions for installation and use
11
Page 12

Useful tips
Never use your washing
machine to wash... torn, fraying
or non-hemmed linen. If it is
absolutely neccessary, place it
in a bag for protection. Do not
wash colored linen with whites.
Watch the weights !
For best results, do not exceed
the weight limits stated below
(figures show weight of dry
garments):
- Resistant fabrics:
12 lbs(5.5 kg) maximum
- Synthetic fabrics:
6 lbs 10 oz (3 kg) maximum
- Delicate fabrics:
5 lbs 8 oz (2.5 kg) maximum
- Pure new wool:
3 lbs(1,5 kg) maximum
- Bathrobe:5 lbs 8 oz (2.5 kg)
maximum
How much does it weigh?
1 sheet 1
1 pillow case 4 oz.(120 gr.)
1 tablecloth 1 lb (450 gr.)
1 bathrobe 2-3 lbs
(900-1,300 gr.)
1 towel 5
Colored T-shirts , printed ones
and shirts last longer if turned
inside out before washing.
Printed T-shirts and sweatshirts
should always be ironed inside
out.
1/4 lb (400-550 gr.)
oz/1 lb (150-500 gr.)
UNDERSTANDING FABRIC CARE LABELS
The symbols on labels of your garments will help you in choicing the suitable wash program, the right temperature,
wash cycles, and ironing methods. Don’t forget to give a glance to these useful indications !
Denim Alert.
Some overalls have straps with
hooks that can damage the
drum of your washing machine
or other garments during the
wash. To minimize the risk,
place hooks in the pocket and
fasten with safety pins.
Vacations: unplug the
appliance.
It is recommended that you
should unplug the machine from
the socket and turn off the water
supply. Leave the door ajar to
allow air circulation to the draw
and the door gasket area. This
will prevent unpleasant odours.
For more delicate
garments:
protect underwear,
tights and stockings
and delicate items by
placing them in a
linen bag
WOOL CYCLE
For best results, we
recommend you use very
little detergent, taking care
not to wash more than
3 lbs (1,5 kg) of laundry.
Machine Wash
Cycle
Water Temp.
Tumble
Dry
Special
Instructions
Bleach
Symbols
Normal/
Cotton Heavy Duty
Hot
(50oC/120oF)
Dry Do not
Cotton Heavy Duty
Line dry/
hang to dry
Any bleach
(when needed)
Permanent Press/
wrinkle resistant
Warm
(40oC/105oF)
Normal/
Drip dry Dry flat In the shade
Permt Press/
wrinkle resistant
Only non-chlorine bleach
(when needed)
Delicate/
Gentle
(30oC/85oF)
Delicate/
Gentle
Cold/Cool
Do not bleach
Look,
tumble dry
Do not washHand wash Do not wring
Do not dry
12
In structions for installation and use
...and select
the right
temperature !
www.aristonappliances.us
Page 13

Stain Removal Chart
Blood
Rinse or soak fresh stain in cold water. Work detergent into any
remaining stain. Rinse. If stain persists, put a few drops of ammonia
on stain and repeat detergent treatment. Rinse. If necessary bleach.
Candle Wax
Scrape off excess. Place stain between clean white blotters or several
layers of facial tissues. Press with warm iron. Sponge with
detergent. If dye spot remains, bleach.
Ketchup
Scrape of excess. Soak in cold water 30 minutes. Pretreat with a
detergent paste. Launder.
Chewing Gum
Rub with ice to harden. Scrape off excess with dull blade. Sponge
with detergent.
Chocolate or Cocoa
Soak 15 minutes in cold water. Rub detergent paste into stain, then
rinse thoroughly. Launder in hottest water safe for fabric. If colored
stain remains, sponge with hydrogen peroxide, rinse and launder.
Coffee or Tea (Black)
Soak fresh stains immediately in cold water. Then use bleach
treatment with hottest water safe for fabric. Or if safe for the fabric
pour boiling water through spot from a height of 1 to 3 feet. Launder.
Coffee or Tea (With Cream)
Rinse or soak in cold water. Work detergent into stain. Rinse. Dry. If
grease stain remains, sponge with cleaning fluid. Repeat, if
necessary. If stain remains, bleach.
Cosmetics: eye shadow, lipstick, liquid make-up,
mascara, powder, pancake make-up or rouge
Apply undiluted liquid detergent to stain, or dampen stain and rub
in soap or detergent paste until thick suds are formed. Work in until
stain is gone, rinse well. Repeat if necessary. If color remains,
bleach if safe for fabrics.
Cream, Ice Cream or Milk
Sponge stain with cool water or soak stain in cool water for 30
minutes or longer. If stain remains, work a detergent in- to spot then
rinse. Bleach if necessary.
Deodorants and Antiperspirants
Wash or sponge stain thoroughly with warm water and detergent;
rinse. If stain remains, bleach with hot sudsy water. Launder. You
may be able to restore fabric color by sponging with ammonia.
Rinse thoroughly.
Dye
Rinse or soak in cold water. Work detergent into stain. Rinse. If
necessary, bleach. Stain is not always possible to remove. A
commercial color remover may also be used.
Fabric Softener Stain
Rub with bar soap until stain has lightened. Rinse thoroughly.
Launder. Rubbing alcohol is sometimes effective if the color of
the garment can take it. Launder. If desired, dry cleaning can be
used.
Felt tip pen
Spray spot with cleaners suitable to this purpose. Sponge stain
thoroughly. Rinse with cold water. Reapply cleaner if necessary .
Fruit, Wine
Soak fresh stains immediately with cool water. Then use bleach
treatment with hottest water safe for fabrics, pour boiling water
through spot from a height of 1 to 3 feet. Launder.
Grass
Work detergent into stain. Sponge with denatured alcohol. Bleach,
if necessary.
Grease or Oil
Scrape away excess. Rub detergent paste or a general purpose
liquid household cleaner into stain, rinse with hot water. If stain
remains, sponge thoroughly with a grease solvent. Dry. Repeat if
necessary. To remove yellow stain, use a chlorine or oxygen
bleach.
Ink. Ball-point
Same ball-point inks are set by water. First test a scrap of cloth.
Sponge stain repeatedly with acetone, or rubbing alcohol. Hair
spray is effective. Launder. Bleach if necessary. Use amyl acetate
on triacetate, arnel, dynel and verel. Use acetone on other fabrics.
NOTE: Some inks cannot be removed.
Mildew
Brush off surface growth to keep mold spores from spreading.
Dip article into solution of 1/2 cup bleach per 1 gallon of cool
sudsy water for 5 to 10 minutes. Rinse well. Launder.
Mud
Let stain dry; then brush well. Rinse repeatedly in cool water until
mud comes out. Launder. (Hot soaps suds set a red or yellow
clay stain).
Mustard
Soak in hot detergent water for several hours. If stain remains,
bleach.
Nail Polish
Treat while fresh, scraping or wiping off as much as possible,
before it dries. Place stain face down on white paper towels.
Sponge back of stain acetone (nail polish remover) or sponge
with denatured alcohol and a few drops of household ammonia.
Sponge stain frequently. Launder with water at temperature
suitable for fabric.
Do not use acetone on acetate, arnel, dynel or rayon.
Egg or Meat Juice
Rinse in cold water. If stain remains, sprinkle with meat tenderizer,
let stand 15-20 minutes. If stain still remains, sponge with cleaning
fluid or diluted bleach. Launder in hot water. The use of hot water
first may set stain.
www.aristonappliances.us
Paint
Sponge or soak in turpentine or solvent recommended as a
thinner on label. Launder.
Perfume
Rinse in cold water. Rub undiluted liquid detergent or a detergent
paste into stain. Rinse. If stain remains, bleach.
Instructions for installation and use
13
Page 14

Perspiration
Wash or sponge stain thoroughly with warm water and detergent
paste. If perspiration has changed the color of the fabric, restore it
by treating with ammonia or vinegar. Apply ammonia to fresh stains;
rinse with water. Apply vinegar to old stains; rinse with water.
Rust and Iron
Apply commercial rust remover, according to manufacturer’s
directions. Rinse. Or, if safe for fabric, boil stained article in solution
of 4 teaspoons of cream of tartar to 1 pint water.
Scorch
Rinse or soak in cold water. Work detergent into stain. Rinse.
Bleach, if necessary. Stain may be impossible to re move.
Urine
Soak in cool water. If stain is dry, work a detergent paste into the
spot then rinse. If necessary, bleach.
Shoe
Polish Scrape off as much as possible. Pretreat with a detergent
paste; rinse. If stain persists, sponge with rubbing alcohol (1 part
to 2 parts water) or turpentine. Remove turpentine by sponging
again with warm detergent solution or with alcohol. Bleach if
necessary.
Soft Drinks
Sponge with cold water, some stains are invisible when they have
dried, but turn brown when heated and may be impossible to
remove.
Tar and Asphalt
Act quickly before stain is dry. Sponge with grease solvent or
turpentine. Launder.
14
In structions for installation and use
www.aristonappliances.us
Page 15
It’s important for a good wash
Useful tips about the detergent dispenser
The first secret is the easiest: the detergent dispenser is opened by pulling it out.
You must follow the quantity
recommendations provided by
the manufacturers when
adding detergent or fabric
softener. Quantities will vary
according to the wash load, the
water hardness and how soiled
the clothes are.
Experience will help you select
the right quantity almost
automatically.
Before adding detergent for
pre-washing in compartment
1, make sure that the extra
compartment for bleach 4 has
not been inserted.
Ensure no overfilling when
adding fabric conditioner in
compartment 3.
4
MAX
1
3
2
The washing machine automatically adds the softener to the
wash in each program.
Liquid detergent is poured into
compartment 2 just a few
seconds before starting the
wash cycle.
Remember that liquid
detergent is only designed for
wash cycles of up to 60
degrees on non pre-wash
items.
Special containers are sold
with liquid or powder detergents for placing inside the
washing machine drum, these
are positioned according to the
instructions found in the
detergent box
In compartment
Detergent for pre-washing
(powder)
In compartment
Detergent for washing
(powder or liquid)
In compartment
Additives (softeners,
perfumes, etc.)
In compartment
Bleach and delicate bleach.
1:
2:
3:
4:
Never use hand wash detergent, because it may form too
much foam, which could damage the washing machine.
Detergents that are specifically
formulated for both hand and
machine wash are an exception.
1
2
One last secret: when
washing with cold water,
always reduce the amount of
detergent you use: it dissolves
less easily in cold water than
in hot water, so part of it would
be wasted.
Detergent dispenser
cleansing
The detergent dispenser can
be removed and cleaned: pull
it outwards, as indicated in the
figure. Then leave it under
warm running water for a few
minutes.
Cutting costs efficiently
A guide to environmentally friendly and economic use
of your appliance.
MAXIMISE THE LOAD SIZE
Achieve the best use of energy, water, detergent
and time by using the recommended maximum
load size.
SAVE up to 50% energy by washing a full load
instead of 2 half loads.
DO YOU NEED TO PRE-WASH?
For heavily soiled laundry only!
SAVE detergent, time, water and between 5 to
15% energy consumption by NOT selecting
Prewash for slight to normally soiled laundry.
IS A HOT WASH REQUIRED?
Pretreat stains with stain remover or soak dried
in stains in water before washing to reduce the
necessity of a hot wash programme.
SAVE up to 50% energy by using a 140° F (60°C)
wash program.
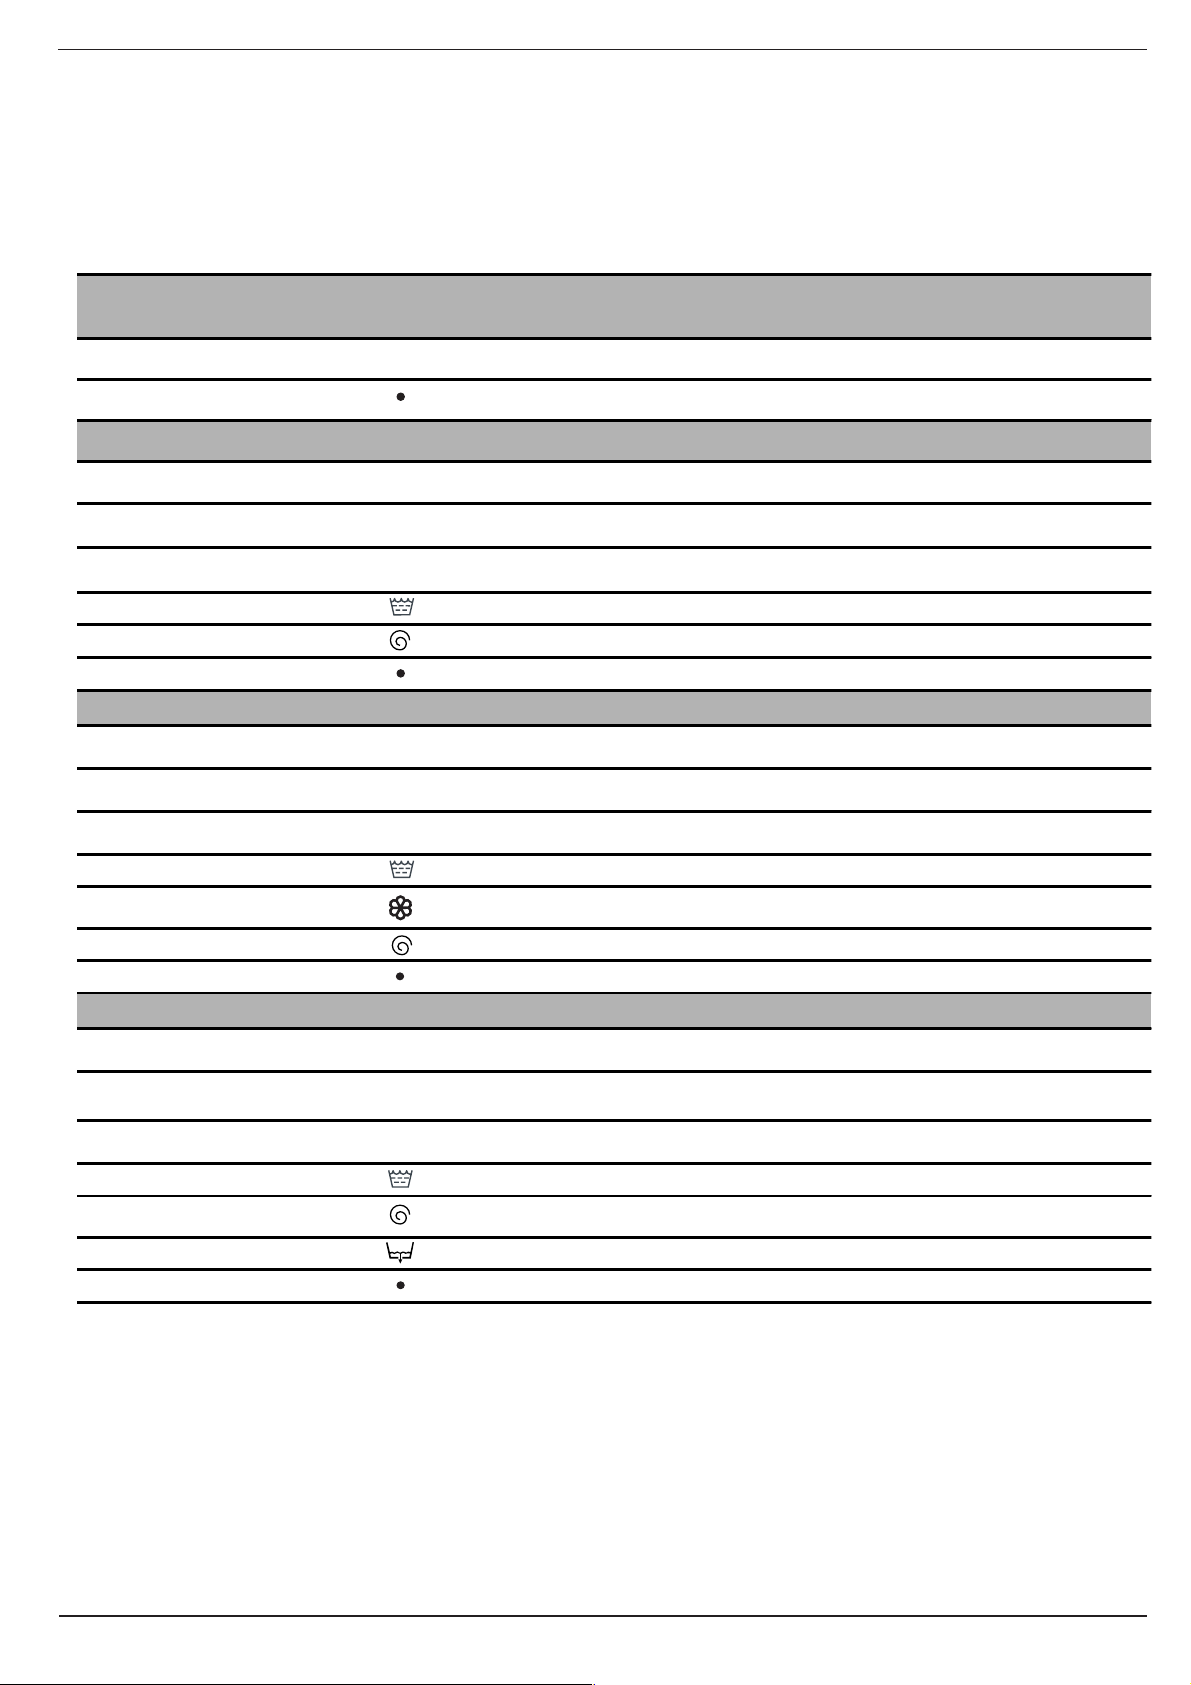
Bleach cycle and stain
removal button
If bleaching is necessary, the
extra case 4 (provided) must
be inserted into compartment
1 of the detergent dispenser.
When pouring in the bleach,
be careful not to exceed the
"max" level indicated on the
central pivot (see illustration).
The use of the additional
bleach container excludes
the possibility of using the
pre-wash cycle.
Traditional bleach can only be
used on sturdy white fabrics,
whereas delicate bleach can
be used for colored fabrics,
synthetics and for wool.
MAX
You cannot bleach with the
“Silk” program.(See page 11).
NOTE: BLEACH ONLY
WORKS WITH HOT WASH
TEMP.
MAX
www.aristonappliances.us
Instructions for installation and use
15
Page 16
Troubleshooting
Before calling, read the following
In most cases, when your washing machine fails to work, the problems arising can be easily solved
without having to call for a technician. Before calling for assistance, always check these points.
The washing machine
fails to start.
Is the plug correctly inserted
into the socket? It could have
been moved while cleaning.
Is there electricity in the
house?
A circuit breaker may have
switched off as a result of too
many electrical appliances
working at the same time. Or
maybe due to a general failure
in your entire area.
Is the washing machine
door closed properly?
For safety reasons, the
washer-dryer cannot work if
the door is open or not shut
properly.
Is the On/Off button
pressed?
If it is, has a program been
set?
Is the Washer knob in the
correct position for those
models concerned?
Is the water supply turned
on? For safety reasons, if the
washer-dryer does not load
water, it cannot start a wash
cycle.
“I only want an authorised
specialised technician
with original
Ariston spare parts!”
RIGHT WRONG
Turn off the water
supply after use.
This will eliminate
the possibility of
leakage.
Always leave the
appliance door ajar to
avoid bad odours.
Clean the appliance’s
exteriors gently.
To clean the
exteriors and the
rubber parts of the
appliance, always use
a soft cloth dipped in
warm and soapy
water.
You will be charged for a service call while the
appliance is in warranty if the problem is not
caused by defective workmanship or materials.
Leave the washing machine plugged
in while cleaning.
Even during maintenance, the
appliance should always be unplugged.
Use solvents and aggressive
abrasives.
Never use solvents or abrasives to
clean the external and rubber parts
of the washing machine.
Neglect the detergent dispenser.
It is removable and can easily be
cleaned by leaving it under running
water.
Go on holiday without thinking about
her.
Before leaving, always make sure
that the washing machine is unplugged and that the water supply is
turned off.
But where did all the water go?
Simple: with the new Ariston technology, you need less
than half of it, to get good results on twice as much!
This is why you cannot see the water through the door:
because there is little, very
little of it, to respect the
environment yet without
renouncing maximum
cleanliness.
And, on top of that, you are
also saving electricity.
positions stop/Reset , then
switch it back on. If the knob
continues to turn, call for
assistance because it is
showing an anomaly.
The washing machine
fails to fill with water.
Is the hose correctly
connected to the tap?
Is there a water shortage ?
There could be work in
progress in your building or
street.
Is there sufficient water
pressure? The autoclave
may be malfunctioning.
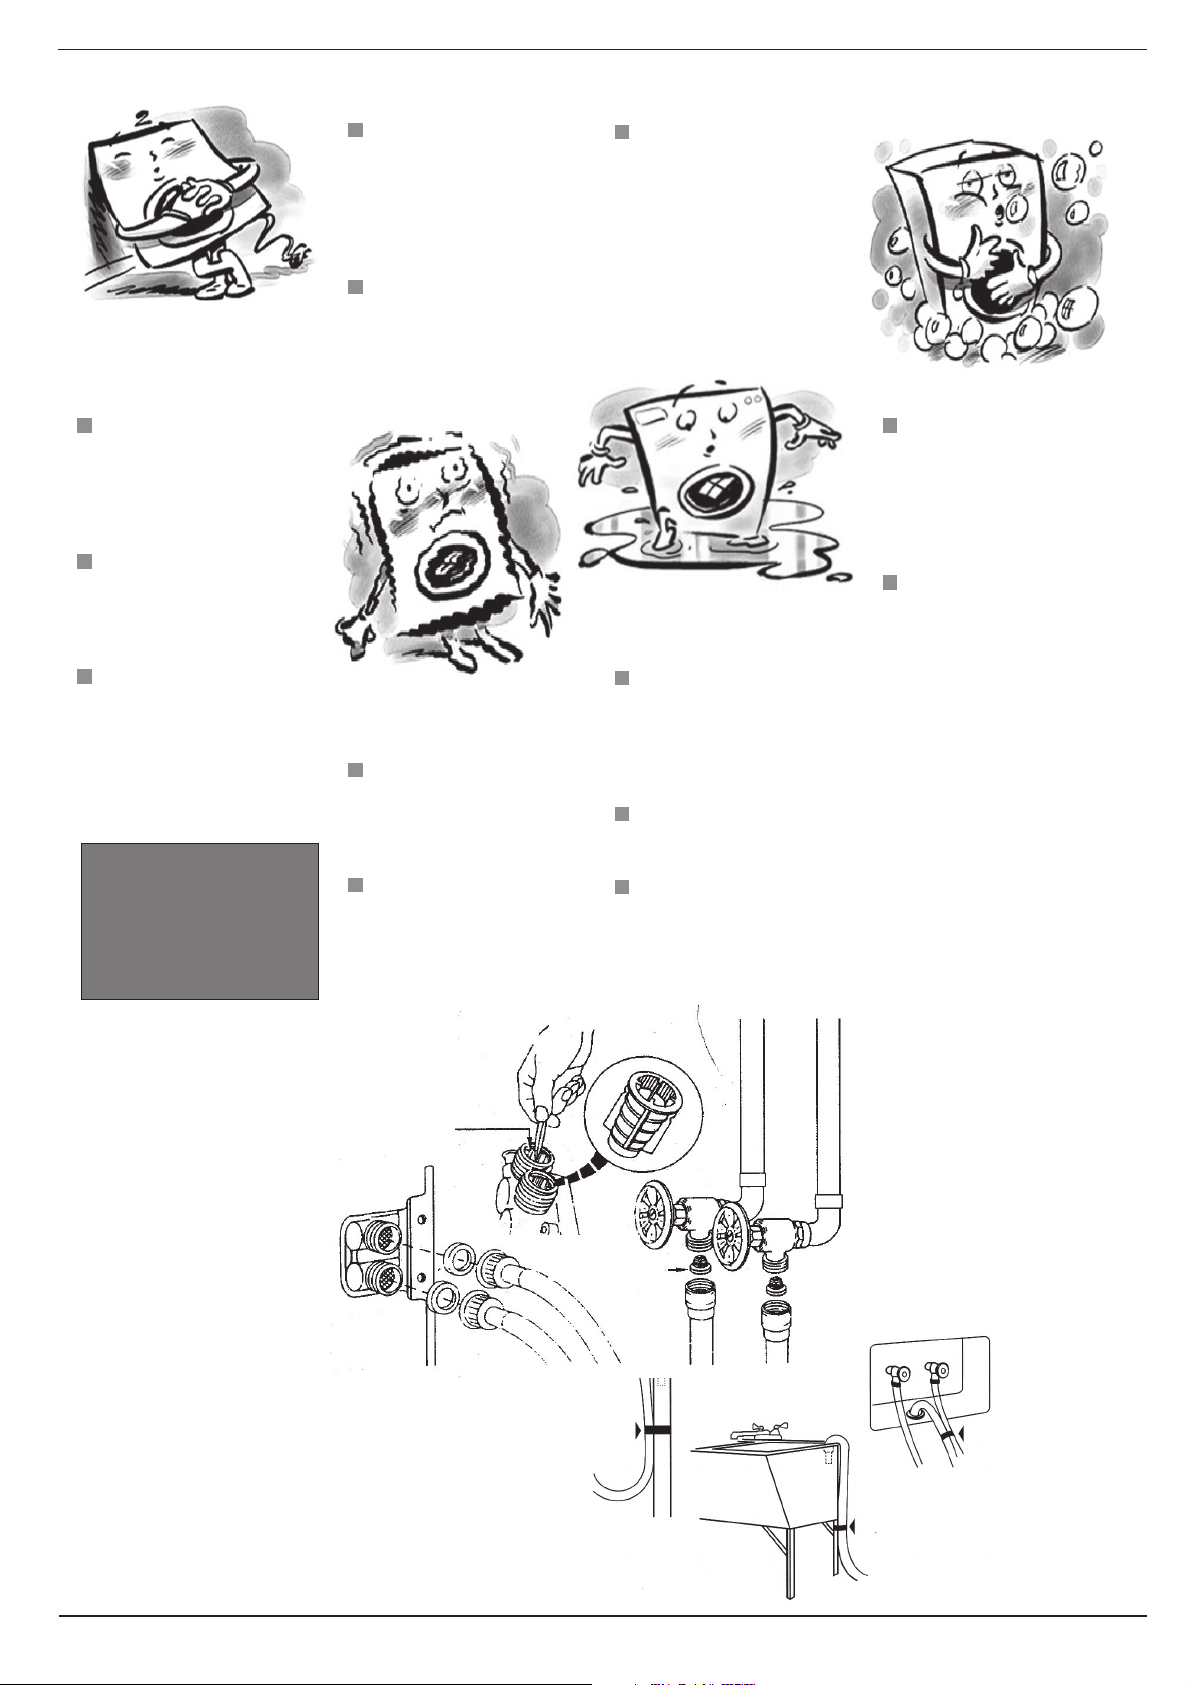
Is the tap filter clean? If the
water is very hard, or if work
has recently been carried
out on the water piping, the
tap filter could be clogged
with particles and debris.
Is the rubber hose kinked?
The rubber hose bringing
water to washer-dryer must
be as straight as possible.
Make sure it is not squashed
or kinked.
The Washer knob
keeps turning?
Wait a few minutes for the
drain pump to empty the
tub, switch the washer-dryer
off, select one of the
The washing machine
continuously fills and
drains water.
Is the drain hose positioned
too low? It must be installed
at a height ranging from 25”
to 34” (62 to 86 cms.).
Is the end of the hose
immersed in water?
Does the wall drainage
system have a breather
pipe? If the problem persists
even after these checks, turn
the water supply off the
machine and call for
assistance.
If you live on an upper floor
of your building, there may be
a problem with your drain
trap.
To solve this problem, a
special valve must be
installed.
16
In structions for installation and use
www.aristonappliances.us
Page 17
ZZZZ...
The washing
machine does not
drain or spin.
Does the selected program
incorporate water draining? Some programs stop
at the end of the wash cycle
and draining will have to be
selected manually.
Is the “Easy iron" function
-where provided - enabled?
This function requires
manual selection for
draining.
Is the drain pump clogged?
To check it, turn off the water
supply, unplug the washerdryer and follow the
instructions on page 18, or
call technical support.
Always get
assistance from
authorized service
agent and always
insist on original
spare parts.
Is the drain hose kinked?
The drain hose must be as
straight as possible. Make
sure the drain hose is not
crimped or kinked.
Is the washing machine’s
drain hose clogged? Is
there an extension of the
drain hose? If so, is it
positioned incorrectly,
blocking the water flow?
Excessive vibration
during the spin cycle.
Have all shipping bolts
been removed during
installation? See the
following page on
installation procedures.
Has the washing machine
been levelled correctly?
The levelling of the
appliance should be
checked periodically. Adjust
the feet and check them with
a level.
Is there space between the
machine and adjacent
units? If it is not a built-in
model, the washing machine
will oscillate a bit during the
spin cycle. An inch or two of
space should therefore be
left around it.
The washing
machine leaks.
Is the metal ring of the inlet
hose properly attached?
Turn off the water supply,
unplug the appliance and try
tightening its attachment
without forcing it.
Is the detergent dispenser
obstructed? Remove and
wash it under tap water.
Is the drain hose well
attached? Turn off the water
supply, unplug the
appliance and try tightening
its attachment.
Too much foam.
Is the detergent appropriate
for washing machine?
Check whether the definition
on its label reads “for machine
wash” or “hand and machine
wash”, or any other similar
wording.
Is the correct amount being
used? An excessive amount of
detergent, besides producing
too much foam, does not
guarantee a more effective
wash, and causes scaling in the
internal parts of the appliance.
.If, despite all checks, the
washer-dryer fails to function
and the problem persists, call
your nearest authorized
Customer Service Centre,
1-888-426-0825 providing
the following information:
- the nature of malfunction
- the model type no. (Mod. ....)
- the serial number (S/N ....)
This information can be found
on the data plate situated at the
back of the washer-dryer.
Cleaning Filters
Drain: to avoid flooding
be careful to the adjust the drain
hose to at least
25” above the base
of the appliance.
Fasten the hoses securely.
www.aristonappliances.us
Remove filters
using tweezers,
clean and replace
Remove
filters, clean
and replace
Tape
Tape
Tape
Instructions for installation and use
17
Page 18
Easy Care and Maintenance
Treat your machine well and it will provide
many years of trouble free service
Your washing machine is a reliable companion in life. It is just as important for you to keep it in shape.
Your washing machine is
designed to provide reliable
service over many years. A few
simple steps will help to extend
its life and avoid problems. It is
advisable to turn off water
faucets when the machine is
not in use. This protects the
hoses, etc.
If the water in your area is
hard, use a water softener
(hard water often leaves white
stains around taps or drains,
especially in bath tubs. For
more accurate information
about the type of water in the
system, call your local water
utility).
Pockets must always be
emptied, removing pins,
badges, coins, or any other
hard objects.
CLEANING THE EXTERIOR
The washing machine exterior
should be cleaned with a rag
dipped in lukewarm water and
soap. Do not use polish of any
kind on the plastic trim. Some
polishes contain agents which
can damage plastics.
Cleaning the interior
If you live an area where
phosphate detergents are
banned, it may be necessary
to recondition the washer
periodically. Because a nonphosphate detergent must be
used, body oils and detergent
may accumulate in the washer
tub. This is particularly evident
in hard water areas or in
homes where heavily soiled
garments are regularly
laundered. To remove this
build-up, run the washer
through a complete cycle
using hot water and 2 cups of
water softener. Do not add any
clothes, detergent, or other
laundry aids.
Once the accumulation has
been removed, your laundry
should be satisfactory if you
follow the preventive
suggestions in this owner’s
manual.
GENERAL MAINTENANCE
After washing is complete the
water faucets should be turned
off to relieve water pressure on
the hoses.
Wipe the inside of the door with
a soft cloth to remove any
remaining moisture.
Periodically, a thin coat of paste wax should be applied to
the inner door of the washer;
especially to the area which
is immediately next to the
door window. This will protect
the door finish from laundry
aid spills and any
discoloration which may
results of these spills.
Clear the Coin Trap
Clear the coin trap in case of
blockage. For instructions,
please read the section
below.
Never add too much
detergent.
Detergents already contain
deliming agents. Only if the
water is particularly hard, that
is, rich in lime content, do we
recommend the use of a
specific product at every
wash.
A periodical wash cycle with
a dose of a deliming product,
without detergents or
washing, may prove useful.
Never use too much
detergent or additives
because this could cause
excessive sudsing, scaling,
and possible damage to
components in your
washing machine.
It is important to wash
the detergent dispenser
regularly.
To prevent dried washing
powder from
accumulating, place the
dispenser under running
water for a few minutes.
Use only low-sudsing detergents.
Do not forget to empty all
pockets:
small objects can cause
serious damage to your
washing machine !
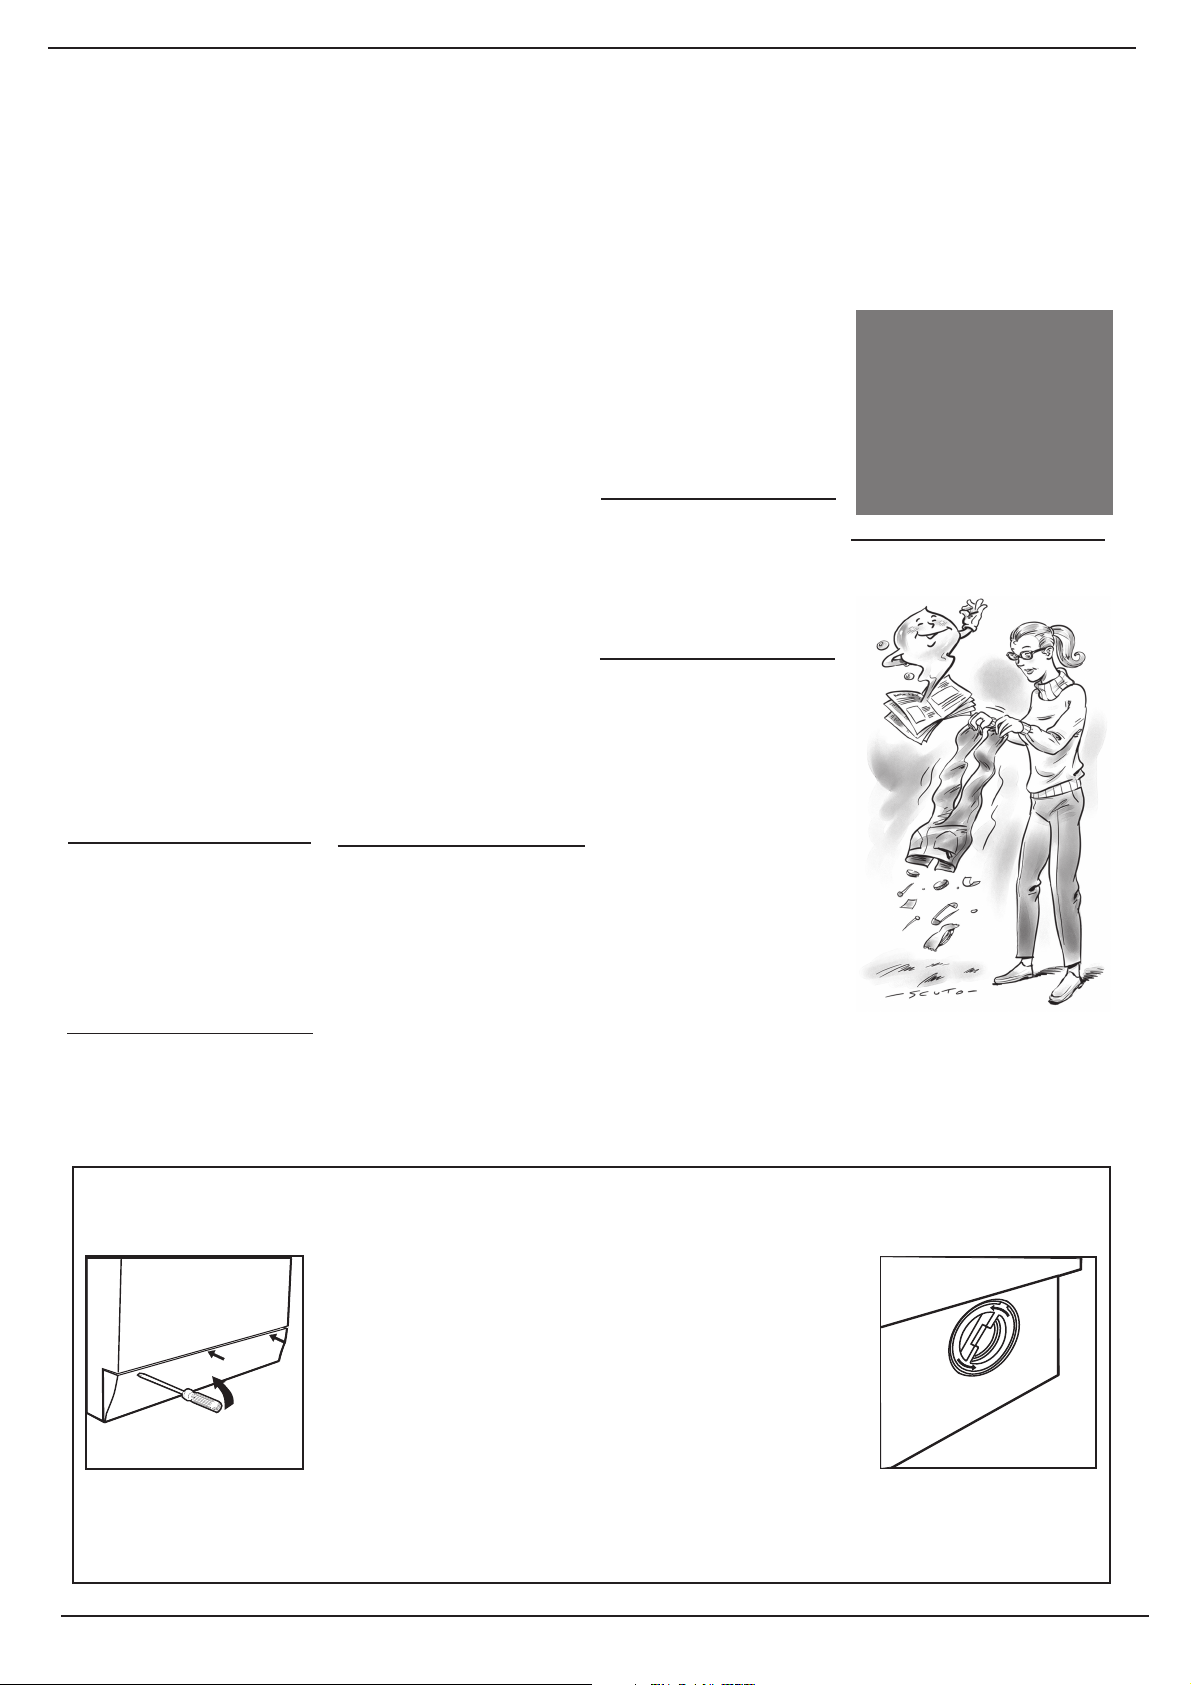
When in need, check the pump and the rubber hose.
The washing machine comes equipped with a self-cleaning pump that does not require any cleaning or maintenance.
Small objects may accidentally fall into the pump: coins, hair clips, loose buttons, etc. To avoid possible damage, they
are withheld in an accessible coin trap, located at the bottom right end of the machine.
Attention: Before attempting to examine this coin trap, first ensure
that the machine has finished its program and is empty. Unplug the
machine, as with any maintenance.
To gain access, gently ease down the top of the kick plate panel at the
base of the machine with a screwdriver etc, to release it. Then ease
the top edge forward to allow it to be lifted clear (Fig. 1). Place a
shallow dish or tray below the cover of the pre-chamber to catch any
water that might be present. Open the cover by turning it counterclockwise (Fig. 2). When finished cleaning, ensure that the cover is
Fig. 1
The water inlet hose
Check the rubber hoses at least once a year. If you see any cracks, replace the hose immediately. When you use your washing
machine, water pressure is very strong and a cracked tube could easily split open. Superior quality Stainless Steel hoses are
recommended.
18
In structions for installation and use
securely tightened.
Re-fit the kick plate cover by inserting the hooks on its lower edge
into the slots and ease the top edge back into position.
Fig. 2
www.aristonappliances.us
Page 19

Technical characteristics
Model
Dimensions
Capacity 1.92 cu.ft
Electrical
connections
Water
connections:
Spinning speed up to 1200 rpm
U
®
L
C
As a result of technological progress, the manufacturer reserves the right to make any improvements to its appliances without
giving prior notice to its clientele.
US LISTED
AW 12 0
width 23.4" (59.5 cm)
height 33.4" (85 cm)
depth 22" (56 cm)
Washing
voltage 120 Volt 60 Hz
maximum absorbed power 1350 W, 13 A.
maximum pressure 100 psi (689.6 kPa)
minimum pressure 20 psi (137.9 kPa)
This appliance conforms with the UL directives
for USA and Canada
: 2-12 lbs
(minimal working 108 volt)
CUSTOMER CARE , SERVICE & PARTS
Contact number: 1 888 426-0825
www.aristonappliances.us
Instructions for installation and use
19
Page 20

STATEMENT OF WARRANTIES
ARISTON Clothes Washers
The warranties provided by (Ariston) in this statement of warranties apply only to Ariston clothes washer sold to the
first using purchaser by Ariston or its authorized distributors, dealers, retailers or service centers in the United States
or Canada. The warranties provided herein are not transferable.
Length of Warranty
1st Year Full Limited Warranty from the date of installation
Ariston will repair or replace, free of charge, any component part that proves defective in conditions of normal home
use. Shipping and labor costs included. Waranty repair service must be performed by an authorized Ariston service
center.
2nd Year Limited Warranty from the date of installation*
Ariston will provide replacement parts, free of charge, for any component part that proves defective under conditions
of normal home use, labor charges excluded.
3rd - 5th Year Limited Warranty on Electronics from the date of installation*
Ariston will repair or replace free of charge, any microprocessor or circuit board that proves defective under conditions
of normal home use 3rd year through 5th year from the date of original installation, labor charges excluded.
3rd - 5th Year Limited Warranty on Motor from the date of installation*
Ariston will repair or replace free of charge, any motor or component part of the motor that proves defective under
conditions of normal home use, 3rd year through 5th year, from the date of original installation, labor charges excluded.
Lifetime Limited Warranty against Stainless Steel Rust Through from the date of installation*
Ariston wll replace your clothes washer, free of charge, with the same model or a current model that is equivalent or
better in functionality if the washer drum should rust though under conditions of normal home use, labor, shipping, and
installation charges excluded.
10 day warranty after purchase on cosmetic damages detected
Ariston will replace any cosmetic parts, free of charge - including labor call, which are detected damaged with in 10
days after purchase. Any damages deemed caused by improper handing, shipping, or installation will not be covered
under this clause.
*
* Date of installation shall refer to the earlier of the date the clothes washer is installed or ten business days after
delivery date.
Exlusions:
This warranty does not cover repair or service calls to correct the installation, to provide instructions on the use of
your product, to replace house fuses or correct plumbing or the electric wiring in your home. In addition any repair to
the products that’s use was in a manner other than what is normal for home use is void of any warranty claim.
The warranties exclude any defects or damage arising from accident, alteration, misuse, abuse, improper installation,
unathorized service work, or external forces beyond Ariston control, such as fire, flood, and other acts of God, or
installation not in accordance with local electric or plumbing codes. Labor, shipping, and installation charges incurred
in the repair or replacement of any product after a period of one year from the date of installation shall not be covered
by this warranty. Any and all replaced or repaired parts shall assume the identity of the original for the purposes of
the applicable warranty period. To the extent permitted by law, this warranty is in lieu of all other express and implied
warranties, including the implied warranties of merchantability and fitness for a particular purpose. Ariston does not
assume any responsibility for incidental or consequential damages.
To obtain warranty services call 1-888-426-0825, or write to:
Ultra 8 International, 2505 Anthem Village Drive, Suite E - PO BOX 562, Henderson Nevada 89052
Be sure to provide: model number, serial number, purchase date, and the sellers name and address.
Ultra 8 International, 3027 East Sunset Road, Suite 101, LAS VEGAS Nevada 89120
20
In structions for installation and use
www.aristonappliances.us
02/2004 - 195 041 205.00 - Xerox Business Services Docutech
Page 21

Los secretos
de los tejidos
Consejos para lavar mejor
AW 120
Instrucciones para
ESES
la instalación y el uso
L avadora
segurasegura
y fácil de usar
Page 22

Guía rápida
Descubra aquí los 10 temas que se explican en las páginas de este manual. Lea, aprenda y diviértase: descubrirá tantos
pequeños secretos para lavar mejor, con menor esfuerzo y haciendo durar más la lavadora.
1. Instalación y remoción (p. 4-5-6-7)
La instalación, después de la entrega o de una mudanza, es la
operación más importante para obtener un correcto
funcionamiento de la lavadora.
Verificar siempre:
1. que la instalación eléctrica cumpla con las normas;
2. que los tubos de carga y descarga del agua estén
correctamente conectados.
Nunca utilizar tubos ya usados.
3. Que la lavadora esté nivelada, vale la pena: para favorecer
las prestaciones de la lavadora;
4. Que del respaldo de la lavadora hayan sido quitados los
estribos para la fijación de la cesta durante el transporte.
5. ALGUNOS CONSEJOS ÚTILES
2. Seguridad para Ud. y para su familia (p. 3-4-5)
Aquí encontrará algunos consejos indispensables para la
seguridad de toda la familia, por lo tanto es muy importante
que lea atentamente esta sección.
3. Qué puedo colocar en la lavadora y cómo
ponerla en funcionamiento (p. 8-9)
Separar correctamente la ropa es una operación importante,
tanto para obtener un buen lavado como para garantizar la
duración de la lavadora. Aprender todos los trucos y los secretos
para dividir la ropa a lavar: color, tipo de tejido.
4. Comprender el funcionamiento del panel de
mandos (p. 10)
El panel de mandos de la lavadora es muy sencillo. Cuenta
con pocos mandos esenciales para obtener todo tipo de lavado,
desde el más enérgico, capaz de lavar la ropa de trabajo de un
mecánico, hasta el más delicado para la lana. Un buen
conocimiento de estos mandos es necesario para utilizar mejor
su electrodoméstico y hacerlo durar más. Es fácil.
5. Guía para los programas de lavado (p. 11)
Una tabla fácil para seleccionar rápidamente los programas,
las temperaturas, los detergentes y eventuales aditivos. Use el
más adecuado y obtendrá un lavado mejor, ahorrando tiempo,
agua y energía, día tras día.
6. Algunos consejos útiles para el lavado y para
no cometer errores (p. 12-13-14)
7. El contenedor de los detergentes (p.15)
Cómo utilizar el contenedor de los detergentes y la cubeta del
blanqueador.
8. Problemas, soluciones y asistencia técnica (p.
16-17)
Antes de llamar al técnico consulte estas páginas: muchísimos
problemas pueden tener una solución inmediata. Si el inconveniente persiste, llame al centro de asistencia más cercano
que gustosamente le brindará su ayuda. En poco tiempo
cualquier avería será reparada.
9. Cuidado y mantenimiento (p. 18-19)
Bastan pocas y pequeñas atenciones para devolver tanta
fidelidad y dedicación. Trátela con cuidado y lavará para Ud.
durante años y años.
Antes teníamos a las abuelas que nos daban buenos consejos
- y los tejidos sintéticos no existían. Obviamente era fácil lavar.
Hoy tu lavadora te ofrece muchos buenos consejos y te permite
además lavar lana, incluso mejor de como podría hacerlo una
experta lavandera a mano.
2
Instrucciones para la instalación y el uso
10. Características técnicas (p. 19)
Aquí encontrará las características técnicas de su lavadora :
sigla del modelo, especificaciones eléctricas e hídricas,
dimensiones, capacidad, velocidad de la centrífuga y
conformidad con las normas estadounidenses y canadienses.
www.aristonappliances.us
Page 23

Introducción
Felicitaciones por haber elegido una lavadora y secadora . Además de ser apreciada por su diseño, varias veces premiado, este sofisticado
producto, fruto de tecnología de innovación le garantizará años de servicio satisfactorio. Dedique algunos minutos a la lectura de este manual. En él
encontrará consejos útiles para el mejor uso de esta valiosa adquisición.
Detallamos al menos 6 razones por las cuales debe considerarse satisfecha con su nueva lavadora y secadora:
1. Ahorro energético y de agua
Este aparato ha sido proyectado para garantizar el ahorro energético y
de agua decididamente muy superior a cualquier producto de la
competencia.
2. Ahorro de espacio
La lavadora y secadora ha sido prensada para aprovechar al máximo el
espacio horizontal y vertical.
3. Funciones mejoradas
Con una velocidad máxima de centrifugación de 1200 vueltas por minuto,
sextrae una cantidad dea gua mayor, reduciendo los tiempos de secado.
4. Practicidad
Además de permitir realizar una instalación fija y simple, este aparato
puede ser utilizado como lavadora y secadora portátil, para utilizarla en
lugares en los cuales no es posible instalarla de manera permanente.
5. Mejor tratamiento de las prendas
Esta lavadora y secadora, sin transportador de ropa, no daña sus prendas,
que quedan más cuidadas y estiradas.
6. Versatilidad en la instalación
El preciado diseño italiano de la lavadora y secadora la convierte en un
complemento ideal para cualquier cocina o lavadero. Sus dimensiones
compactas le permiten encontrar la ubicación justa en cualquier ángulo de
la casa.
Importantes normas de seguridad
La seguridad para Ud. y sus niños.
Su lavadora se fabrica según las más severas normas internacionales de seguridad.
Para protegerle a Ud. y a su familia.
ATENCIÓN -Para reducir el riesgo de incendio, de descarga
eléctrica o de lesiones personales durante el uso del
electrodoméstico, se deben respetar escrupulosamente las
siguientes instrucciones:
1. Antes de utilizar el aparato, lea atentamente todas las
instrucciones.
2. No lave ni seque telas que hayan sido precedentemente
limpiadas, mojadas o manchadas con bencina, solventes para
limpieza en seco u otras sustancias inflamables y explosivas,
ya que emiten vapores que pueden arder o explotar.
3. No permita a los niños utilizar el aparato para sus juegos.
Cuando el aparato se utiliza cerca de niños, se deben vigilar
con atención.
4. Si Ud. decide no utilizar más este aparato o destinarlo al
desguace, saque la puerta de acceso al compartimiento de
lavado/secado.
5. No introduzca las manos dentro del aparato mientras la
cuba, el transportador de ropa o el cesto estén en movimiento.
6. No instalar o conservar el aparato en un ambiente expuesto
directamente a las condiciones atmosféricas.
7. No adultere los mandos.
8. Evitar cualquier intento de reparación o sustitución de las
partes del aparato o de intervenciones de mantenimiento, salvo
que sea expresamente especificado en las instrucciones de
mantenimiento o de reparación destinadas al usuario. Éste
último deberá asegurarse de haberlas comprendido
perfectamente y de sentirse capaz de ponerlas en práctica.
9. No introduzca bencina, solventes para limpieza en seco u
otras sustancias inflamables o explosivas en el agua de lavado.
Estas sustancias emiten vapores que pueden arder o explotar.
10. Es posible que en una instalación doméstica de agua
caliente que ha permanecido inutilizada durante dos o más
semanas, se produzca gas hidrógeno. EL GAS HIDRÓGENO ES
EXPLOSIVO. Por lo tanto, si la instalación doméstica de agua
caliente no se utiliza durante una o dos semanas, antes de
utilizar nuevamente una lavadora o secadora, abra todos los
grifos de agua caliente y deje correr el agua durante algunos
minutos. Esta operación permitirá eliminar toda acumulación
de hidrógeno.
11. No utilizar suavizantes o productos de otro tipo para reducir
la carga electrostática de las fibras sintéticas, salvo explícita
recomendación del productor del suavizante.
12. El interior de la máquina debe ser limpiado periódicamente
por personal especializado.
www.aristonappliances.us
Conserve con cuidado
este manual
Instrucciones para la instalacion y el uso
3
Page 24

Instalación y desembalaje
Cuando llega la nueva lavadora
Ya sea en el caso de recibirla nueva o que haya sido recién trasladada desde otra casa,
la instalación es un momento importantísimo para el correcto funcionamiento de la
lavadora.
Después de haber extraído el embalaje, verifique la integridad del
aparato. En caso de dudas, llame inmediatamente a un técnico
calificado. Para realizar el transporte, la parte interna de la má-
quina está bloqueada mediante cuatro estribos fijos colocados
en el respald
Antes de poner en funcionamiento la
lavadora, quite los estribos de
transporte, quitar los dispositivos
distanciadores y los tubos de goma a
ellos atornillados(conservar todas las
piezas) mientras que los agujeros
respectivos deben ser cerrados con los
tapones de plástico que se suministran
con la máquina.
Nivelación
Para un correcto funcionamiento de la lavadora es importante que
esté bien nivelada. Para efectuar la nivelación basta operar con los
pies delanteros de la máquina; el ángulo de inclinación, medido en el
plano de trabajo, no debe superar los 2°. En caso de moqueta,
asegurarse que la ventilación no esté reducida.
¡ATENCIÓN!
Riesgo de peso excesivo
El desplazamiento e instalación de la
lavadora requiere como mínimo de
dos personas.
Actuando solo, se arriesga a sufrir lesiones en la espada y de otro tipo.
Los pies delanteros
son regulables
ATENCIÓN Requisitos eléctricos
Riesgo de descarga eléctrica (muerte, incendio o
descarga eléctrica):
1) Conectar a una toma eléctrica tripolar conectada a
tierra.
2) No sacar el polo a tierra.
3) Evite el uso de adaptadores.
4) Evite el uso de prolongadores.
Por su propia seguridad y con la finalidad de evitar accidentes, lesiones o incendios, lea atentamente las siguientes instrucciones:
1. Una vez que se ha sacado la lavadora del embalaje, elimine
las bolsas de plástico y el cartón.
2. Nunca deje a los niños solos o sin vigilancia en el área en la
que se instalan los electrodomésticos.
3. Las operaciones de instalación y puesta a tierra deben ser
realizadas por un instalador especializado y respetando las
normas locales. Las instrucciones de instalación que acompañan al presente electrodoméstico están reservadas para el
instalador.
4. Utilizar solamente
detergentes de bajo
nivel de espuma, especiales para el uso en
lavadora de carga
frontal. El nivel de
espuma nunca debe
superar la línea media
de la abertura de
carga.
5. La lavadora debe
estar conectada a
una tomacorriente
tripolar con conexión
regular a la instala-
ción a tierra.
Por su propia seguridad, por ningún motivo quite el polo de
conexión a tierra del enchufe (el de sección circular).
EVITE EL USO DE PROLONGACIONES.
6. Cualquier reparación o sustitución de una pieza deberá ser
realizada únicamente por un técnico especializado para evitar
lesiones personales o daños al aparato. Solicitar a su revendedor el listado de centros de asistencia autorizada.
7. En caso de emergencia o de necesidad de asistencia técnica, apague la lavadora mediante el interruptor o la caja portafusibles o desenchufándola. Solicite al instalador que fije una
marca en el interruptor o en el fusible correcto en el tablero
eléctrico.
ATENCIÓN - El aparato debe estar conectado a un circuito simple derivado con un conductor AWG 14 y protegido mediante un fusible de 15 A.
CONEXIÓN A TIERRA DEL APARATO
El aparato debe estar conectado a tierra. En caso de mal funcionamiento o avería, la instalación de puesta a tierra reduce el
peligro de sacudidas eléctricas ofreciendo a la corriente eléctrica un circuito con menor resistencia. El aparato está dotado de
un cable que incluye un conductor y un enchufe para la conexión a tierra. El enchufe se debe conectar a un tomacorriente
adecuado, instalado correctamente y conectado a tierra en conformidad con los códigos y con las normas locales.
ATENCIÓN - Una incorrecta conexión a tierra del cable del aparato comporta un riesgo de sacudida eléctrica. En caso de dudas, llame a un técnico especializado o al servicio de asistencia
para que efectúe un control de la conexión a tierra del aparato.
No adultere el enchufe suministrado con el aparato. En el caso
de incompatibilidad entre el tomacorriente y el enchufe, haga instalar un tomacorriente adecuado por un técnico especializado.
Conserve los tornillos, los dispositivos distanciadores
y las gomitas para el transporte En caso de mudanza
deberán ser colocados nuevamente para bloquear la
parte interna de la máquina y de este modo evitar el
riesgo de daños durante el transport.
"
Instrucciones para la instalación y el uso
¡Advertencia!
La empresa fabricante declina toda responsabilidad en
caso de que estas normas no sean respetadas.
Bolsas de plástico, poliestirol expandido, clavos y otros
elementos del embalaje no son juguetes para los niños
ya que constituyen fuentes potenciales de peligro.
www.aristonappliances.us
Page 25

Importante para el uso seguro
de la lavadora
La empresa Merloni Elettrodomestici SpA está orgullosa de
ofrecer a sus clientes productos
distinguidos con la marca
ENERGY STAR.
USO Y MANTENIMIENTO DE LA
LAVADORA AUTOMÁTICA
PARA EVITAR LLAMADAS INÚTILES
Su nuevo electrodoméstico es un producto realizado con el
máximo cuidado. A menudo, aquello que en apariencia puede
parecer un motivo válido para contactar con la asistencia técnica se puede resolver con una simple regulación a realizar de
manera autónoma.
Ud. deberá hacerse cargo de una llamada de servicio
en garantía cuando se encuentre que los inconvenientes no son causados por defectos de materiales o de fabricación.
Para evitar el costo de la llamada no estrictamente necesaria,
antes de dirigirse a la asistencia técnica consulte el párrafo
"Antes de llamar al técnico" a fin de asegurarse que no se
Este aparato es una lavadora automática dotada con una capacidad de hasta:
12 lbs. - 5,5 Kgs.
Esta marca certifica que el
aparado fue probado en los
laboratorios UL y resultò
conforme con las normas de
seguridad UL canadienses y
estadounitenses.
trata de una situación que se puede resolver de manera autónoma. Éste párrafo se encuentra en la parte posterior de este
manual de instrucciones para el uso y el mantenimiento.
Es un electrodoméstico de carga frontal, con una amplia abertura del portilla para facilitar el acceso. Posee 9 ciclos de
lavado y además de un enjuague extra y un centrifugado extra.
Leyendo y siguiendo las instrucciones contenidas en este
manual obtendrá siempre excelentes resultados.
Asegúrese que las instrucciones sean seguidas correctamente. Para mayores indicaciones y asistencia técnica, dirigirse
al revendedor donde se ha adquirido la máquina.
U
®
L
C
US LISTED
ANTES DE UTILIZAR LA LAVADORA
1. La lavadora debe ser instalada sobre un piso perfectamente
plano e íntegro, en un ambiente seco y bien aireado, en
proximidad de un tomacorriente.
2. Las operaciones de instalación y conexión a tierra deben
ser realizadas por un instalador especializado y respetando
las normas locales. Las "Instrucciones de instalación"
reservadas para el instalador están contenidas en el manual
www.aristonappliances.us
Instrucciones para la instalación y el uso
para uso y mantenimiento del usuario.
3. La lavadora se debe conectar a un tomacorriente tripolar de
120 Volt, 60 Hz, 1300 W y 13 Amp con una regular conexión
a tierra. Para evitar que el aparato se apague accidentalmente,
no debe ser puesto en funcionamiento utilizando un interruptor
de pared o con tirador.
5
Page 26

CONEXIÓN (Descarga del agua)
Accessorios
Entre los accesorios suministrados con el aparato, se incluyen
4 gomitas y dos tubos de descarga. El extremo recto de
estos tubos debe estar conectado a la alimentación hídrica
fig. 1.
El extremo en forma de ángulo recto de estos tubos debe
estar conectado a las válvulas de carga colocadas en el
respaldo del aparato, aplicando una de las gomitas para permitir
el cierre perfecto en cada uno de los puntos de unión.
Las operaciones de ajuste se deben efectuar
manualmente;
utilice una herramienta únicamente cuando haya pérdidas de
agua. No hacer una fuerza excesiva (ver fig.1.)
Las válvulas para la carga están codificadas por colores:
Rojo = Agua caliente
Blanco = Agua fría
El aparato funciona también utilizando sólo agua fría; no
obstante, ambas válvulas de carga deben conectarse a la
alimentación hídrica.
Conexión a la toma de agua
La presión hídrica debe estar comprendida entre los valores indicados
en la placa situada en la parte posterior de la lavadora. Si la tubería de
agua es nueva o ha permanecido inactiva, antes de efectuar la
conexión a la máquina, haga correr el agua hasta verificar que salga
límpida y sin impurezas. Conectar el tubo de carga a una toma de
agua fría con rosca de ¾ gas. Asegurarse que las gomitas de cierre
estén colocadas en cada extremo del tubo de carga, con el porta
manguera colocado en la extremo del grifo.
Conectar el tubo de carga a la unión rosca en la parte posterior de la
máquina.
Nota: Para reducir el riesgo de
rotura de los tubos de carga
cambiarlos cada 5 años. Se
aconseja anotar la fecha de
instalación o de sustitución del tubo
de carga.
Controle periódicamente los tubos
flexibles y sustitúyalos cuando
Fig. 1 - Toma de agua
arriba a la derecha
compruebe la presencia de
hinchamientos, estrangulamientos,
signos de desgaste o pérdidas.
CONEXIÓN (Descarga del agua)
Colocar correctamente el tubo de descarga para evitar roturas
y asegurarse una descarga adecuada del agua.
El extremo de salida del tubo de descarga debe encontrarse,
como mínimo, a una altura de 60 cm de la base del aparato.
En este punto la descarga de agua se puede realizar
conectando el tubo de descarga a un desagüe fijo o directamente
en el lavamanos, pero es necesario que la lavadora y secadora
esté dotada de una válvula especial ubicada a una altura mínima
de 60 cm para evitar fenómenos de sifonaje (ver figura al lado).
El tubo de descarga no debe introducirse en el desagüe fijo
más de 15 cm.
IMPORTANTE
Verifique que el tubo de descarga no esté doblado y que el
paso de agua no esté obstruido por estrangulaciones.
Conexión al desagüe fijo:
La instalación en los vehículos de recreación requiere un
tubo de descarga fijo con un diámetro de 3,7 cm y una
capacidad mínima de 31 litros por minuto, mientras que
las instalaciones domésticas requieren de un diámetro
de 5 cm.
Conexión al desagüe fijo del piso:
La boca de descarga fija se debe encontrar a una altura
comprendida entre 62 y 86 cm de la base del aparato (A).
Conexión al desagüe fijo a la pared:
la distancia entre el extremo del tubo de descarga y la
base del aparato (B) debe estar comprendida entre los 62
y los 86 cm.
25”
34”
25
62cm
6
Instrucciones para la instalación y el uso
www.aristonappliances.us
Page 27

USO Y MANTENIMIENTO DE LA
LAVADORA AUTOMÁTICA
PARA EVITAR LLAMADAS INÚTILES
Su nuevo electrodoméstico es un producto realizado con el
máximo cuidado. A menudo, aquello que en apariencia puede
parecer un motivo válido para contactar con la asistencia técnica se puede resolver con una simple regulación a realizar de
manera autónoma.
Ud. deberá hacerse cargo de una llamada de servicio
en garantía cuando se encuentre que los inconvenientes no son causados por defectos de materiales o de fabricación.
Para evitar el costo de la llamada no estrictamente necesaria,
antes de dirigirse a la asistencia técnica consulte el párrafo
"Antes de llamar al técnico" a fin de asegurarse que no se
Este aparato es una lavadora automática dotada con una capacidad de hasta:
12 Lbs - 5,5 Kgs
trata de una situación que se puede resolver de manera autó-
noma. Éste párrafo se encuentra en la parte posterior de este
manual de instrucciones para el uso y el mantenimiento.
Es un electrodoméstico de carga frontal, con una amplia abertura del portilla para facilitar el acceso. Posee 9 ciclos de
lavado y además de un enjuague extra y un centrifugado ex-
tra.
Leyendo y siguiendo las instrucciones contenidas en este
manual obtendrá siempre excelentes resultados.
Asegúrese que las instrucciones sean seguidas correctamente. Para mayores indicaciones y asistencia técnica, dirigirse
al revendedor donde se ha adquirido la máquina.
ANTES DE UTILIZAR LA LAVADORA
1. La lavadora debe ser instalada sobre un piso perfectamente
plano e íntegro, en un ambiente seco y bien aireado, en
proximidad de un tomacorriente y de un desagüe fijo con una
capacidad adecuada.
2. Las operaciones de instalación y conexión a tierra deben
ser realizadas por un instalador especializado y respetando
las normas locales. Las "Instrucciones de instalación"
reservadas para el instalador están contenidas en el manual
para uso y mantenimiento del usuario.
3. La lavadora se debe conectar a un tomacorriente tripolar de
120 Volt, 60 Hz, 1300 W y 13 Amp con una regular conexión
a tierra. Para evitar que el aparato se apague accidentalmente,
no debe ser puesto en funcionamiento utilizando un interruptor
de pared o con tirador.
www.aristonappliances.us
Instrucciones para la instalación y el uso
7
Page 28
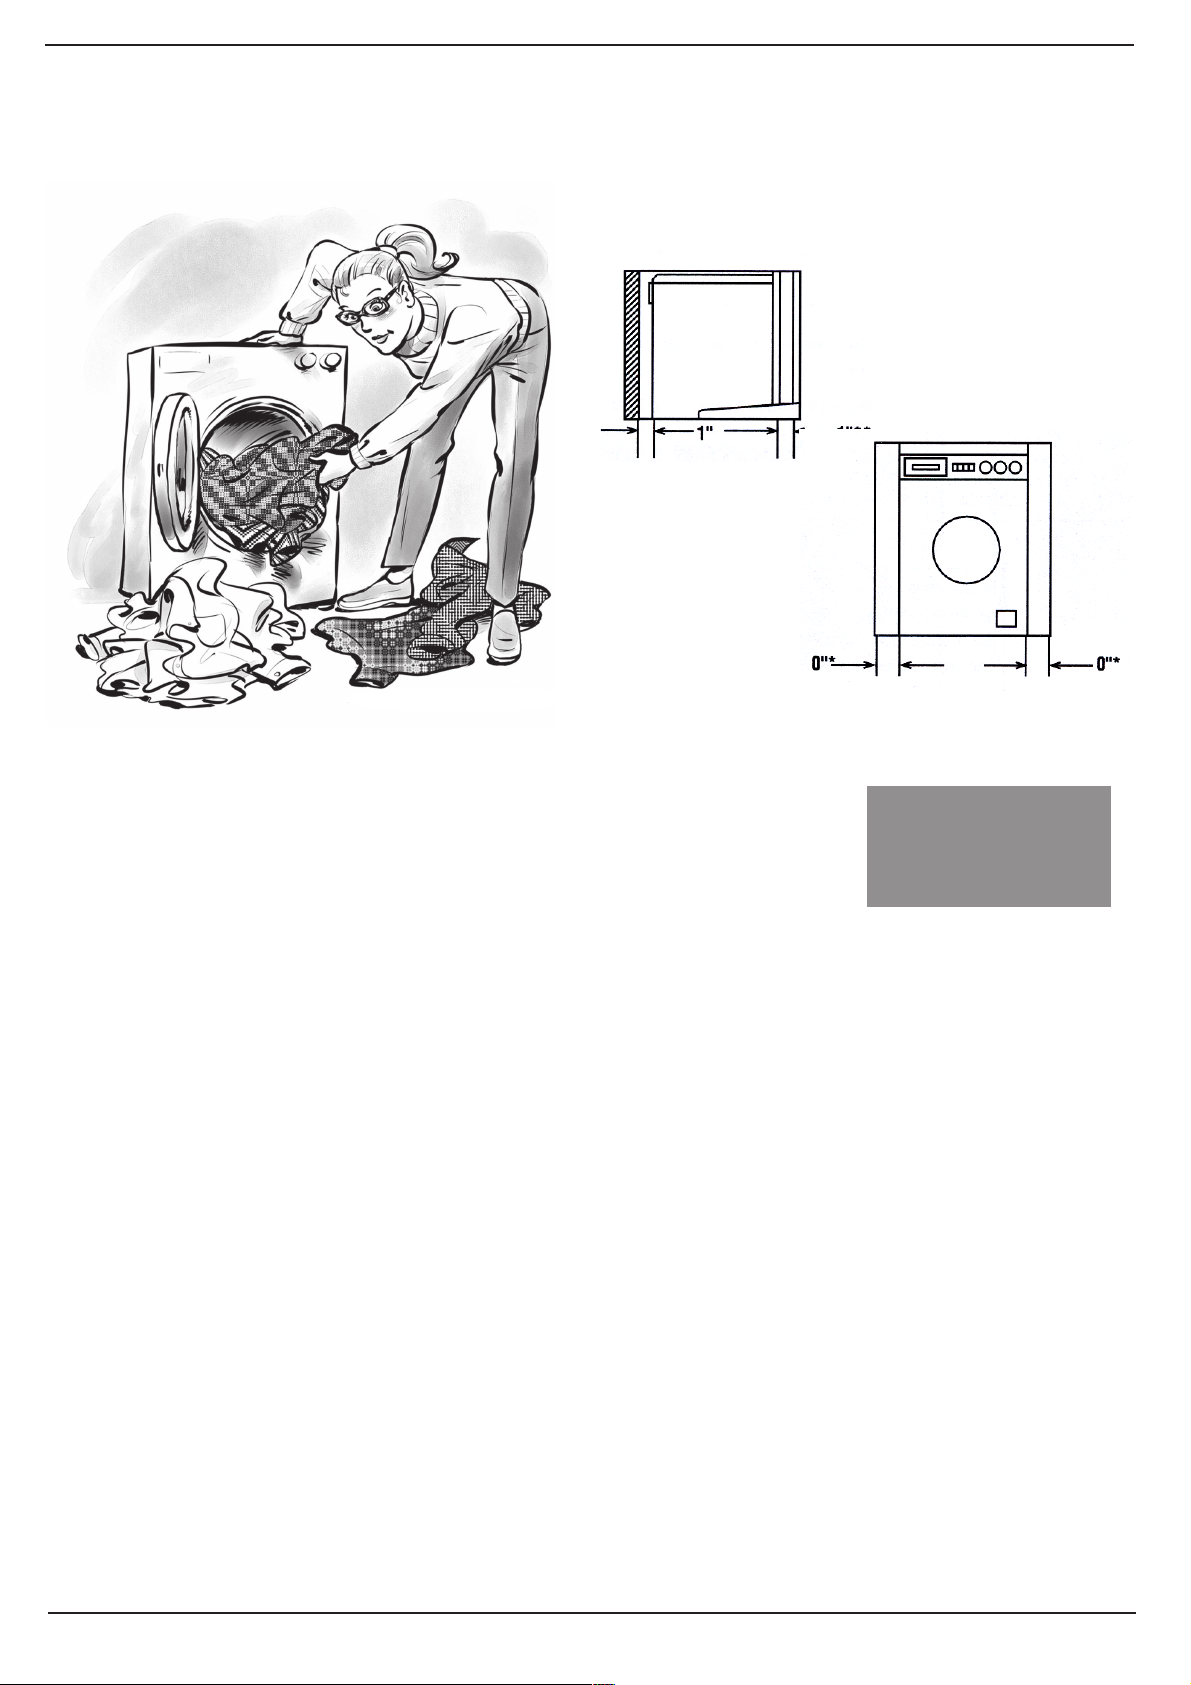
INSTALACIÓN EN ESPACIO EN LA PARED,
DESVÁN O NICHO (Instrucciones)
El aparato se puede instalar en un espacio en la
pared, en un desván o en un nicho.
Las distancias de instalación están expresadas en pulgadas y
se refieren a los valores mínimos permitidos.
No obstante, se aconseja dejar siempre un espacio mayor
para facilitar las operaciones de instalación, mantenimiento y
colocación según conformidad con los códigos y a las normas
locales.Otras instalaciones se deben realizar respetando las
dimensiones mínimas indicadas.
.
Distancias minimas de
instalacion
Vista lateral
* Podría ser necesario
dejar otro espacio libre
debido a la presencia de
elementos que
sobresalen de las
paredes, puertas o
pisos.
.
Vista frontal
Instrucciones de uso
¿Qué se puede introducir en la
lavadora ?
Antes de lavar, puede hacer mucho para obtener un mejor lavado. Separe las
prendas según tejido y colores. Mire las etiquetas y respete las indicaciones.
PREPARACIÓN DE LA ROPA
Selección de las prendas
Evite introducir en la misma carga prendas que podrían
perjudicar el resultado del lavado. Seleccione las prendas en
cargas, si es posible, con uniformidad de colores, tejido,
estructura de las prendas y grado de suciedad.
- Color. Separar las prendas en tres grupos: blanco y colores
claros, colores normales o fuertes, colores oscuros. Las
prendas que destiñen deben lavarse solas.
- Tipos de tejidos. Los tejidos delicados van separados de
aquellos más resistentes. Separe además las prendas que
tienden a producir pelusas de aquellas que no las producen o
las atraen.
- Estructura de las prendas. Las prendas que se deshilachan
con facilidad o que presentan decoraciones particulares
necesitan de un cuidado escrupuloso. Estas prendas pueden
ser lavadas en el aparato seleccionando un ciclo para tejidos
de punto. Para las prendas frágiles o delicadas se aconseja
lavar a mano.
- Grado de suciedad. Las prendas muy sucias deben separarse
del resto de la carga para evitar que la suciedad contamine el
agua del lavado.
Inspección
Al seleccionar las prendas para la carga comprobar que no
haya prendas que requieran un tratamiento particular.
- Eliminar las manchas, cuando están aún frescas y son
fáciles de quitar. Para las manchas de las cuales no se sabe
la naturaleza intentar primero quitarlas con agua fría. El agua
caliente seca las manchas producidas por productos que
contienen proteínas como la sangre, carne, huevo o leche.
Para quitar las manchas difíciles, consulte el párrafo
"Eliminación de las manchas" en la última parte del manual.
- Pre-tratamiento de las partes muy sucias como cuellos,
puños o partes centrales de las fundas. Consulte las
instrucciones del párrafo "Pre-Tratamiento".
- Remiende las prendas rasgadas, antes del lavado para
evitar que se dañen más aún.
- Vacíe los bolsillos. Los objetos que se dejan en los bolsillos
como lápiz pastel, lapiceras o restos de cigarrillos pueden
manchar toda la carga de la lavadora. Los pañuelos de papel
de deshacen dejando residuos en todas las prendas sometidas
al lavado. Sacar las monedas u otros objetos extraños a fin de
evitar daños al aparato.
- Cierre todos los ganchos, los cierres relámpagos y los
botones.
- Dar vuelta las prendas de punto para reducir la tendencia
al "pilling" de estos tejidos. El "pilling" es la formación de
pelotitas de fibra en la superficie de las prendas causadas
por el uso y el roce.
- Quitar la acumulación de suciedad y barro. Sacar con
un cepillos la suciedad de los ruedos de los pantalones, sacudir
o limpiar con aspiradoras las alfombras para quitar la suciedad
depositada en la superficie.
- En caso de hebillas lavables, envolver fuertemente con un
paño antes del lavado y del secado para evitar que se ralle o
que provoque daños al aparato. Sacar las hebillas, accesorios,
botones o cinturones no lavables.
- Atar los cordones, cinturones y anudar los lazos de los
delantales para evitar que se anuden durante el lavado,
Pre-tratamiento
Pre-tratar las partes sucias como los cuellos, puños o partes
centrales de las fundas con un spray de pre-lavado, un
quitamanchas líquido para el lavado o una mezcla de detergente
para el lavado y pasta detergente a aplicar en las partes sucias.
Separe las prendas según
el tipo de tejido y el
color, es importante para
obtener buenos
resultados.
8
Instrucciones para la instalación y el uso
www.aristonappliances.us
Page 29

Consultar el párrafo "Guía para la eliminación de las manchas"
para el tratamiento de manchas específicas.
En caso de prendas muy sucias o muy manchadas, antes
que tratar cada una de las manchas es más simple y eficaz
someter la prenda a un prelavado.
Prelavado
Utilice la función de prelavado cuando se trate de prendas
particularmente sucias, como la ropa de trabajo o las prendas
que usan los niños cuando juegan.
Estas prendas contienen a menudo manchas persistentes.
En estos casos el prelavado con un detergente idóneo ayuda
a disolver las manchas muy persistentes
Los productos para lavar
Los detergentes son los productos más comunes para el lavado doméstico.
Un uso insuficiente de detergente no permite obtener un lavado óptimo, mientras que un uso excesivo causa la
sobreabundancia de espuma e impide el correcto enjuague.
Además de remover la suciedad, los detergentes impiden que
se vuelva a depositar en el lavado, manteniéndola en suspensión en el agua de lavado. La dosis a utilizar depende de las
dimensiones de la carga de prendas, del grado de suciedad,
de la dureza del agua y del tipo de producto.
Dosificar SIEMPRE la cantidad de detergente. La cantidad de espuma formada no corresponde necesariamente con
la dosis a utilizar. Algunos detergentes forman más cantidad
de espuma que otros. Utilice únicamente detergentes adecuados para lavar en lavadora con carga frontal.
LOS PRODUCTOS PARA
LAVAR
1. Utilizar solamente detergentes que formen poca espuma.
2. La cantidad de detergente depende del grado de suciedad.
Para cargas muy sucias, aumentar la cantidad de detergente
a utilizar.
3. Utilizar más suavizante en presencia de agua especialmen-
te dura y menos suavizante si el agua de la instalación es
más dulce (menos de 0,063 gramos por litro).
4. Si las prendas fueron tratadas previamente, reduzca la cantidad de detergente o si han sido pre-tratadas con abundante
detergente no añadir más.
5. Si el aparato anterior era un modelo con carga superior, es
posible que las primeras cargas de lavado en un aparato de
carga horizontal requieran una cantidad reducida de detergente hasta la eliminación total del detergente residual de sus
prendas. El detergente que permanece atrapado en los tejidos
se disuelve durante el ciclo de lavado en cascada.
Para las dosis de detergente a utilizar, consulte las instrucciones del fabricante en el paquete.
El detergente será introducido de manera automática en el
aparato desde la cubeta dosificadora. El nivel de espuma no
debe superar nunca la línea media de la abertura de carga.
Una excesiva formación de espuma no obstaculiza la acción
de lavado de la máquina, pero sube por la cubeta del detergente y ¡se vuelca en el piso!
En este caso eliminar la espuma excesiva programando
el contador de minutos al comienzo del primer enjuague permitiendo que la máquina enjuague las prendas.
Blanqueador
El blanqueado tiene la función de blanquear, quitar las manchas persistentes, eliminar los malos olores y hasta desinfectar los tejidos, pero nunca se debe considerar como una alternativa a una correcta operación de lavado. No agregue nunca
blanqueador al agua de enjuague. Diluir siempre la lavandina
antes de usar.
Para agregar la lavandina, abrir la cubeta para el detergente e
colocar el producto en el compartimiento 4 (ver página 12 y
11-10).
ADVERTENCIA:
Evite llenar excesivamente el compartimiento del blanqueador. Una cantidad excesiva de lavandina circula directamente
dentro de la máquina y puede dañar las prendas.
Suavizante
Todos los tejidos y en especial las toallas, se benefician con
el uso de suavizantes en el último enjuague. Las prendas se
vuelven más suaves y fáciles de planchar, mientras que los
tejidos sintéticos pierden gran parte de su efecto adherente.
Colocar el suavizante en el compartimiento "Aditivos" de la
cubeta para detergente hasta el nivel indicado en el sifón. Evitar
el llenado excesivo del compartimiento ya que el suavizante
se puede volcar dentro de la máquina perjudicando la calidad
del lavado.
Poner en marcha la lavadora
Después de haber instalado la lavadora realizar un ciclo de lavado programando el programa deseado.
Poner en marcha correctamente la lavadora es importante
ya sea para la calidad del
lavado como para prevenir
problemas futuros y para
aumentar la duración de la lavadora. Después de haber cargado el aparato, agregado el
detergente y eventualmente el
suavizante,
siempre controle que:
1. La puerta haya quedado
correctamente cerrada.
2. El enchufe esté conectado
en el tomacorriente.
3. El grifo de agua esté abier-
to.
www.aristonappliances.us
4. El mando A esté dispuesto
en una de las posiciones
Reset.
Elegir el programa
El programa se elige de
acuerdo al tipo de prendas que
se deben lavar. Para elegir el
programa, consultar la tabla
de la página 10 y:
1) girar el mando A hasta que
el programa elegido coincida con el índice colocado
en el mando.
2) verificar que los mandos
B y C sean programados en
la temperatura y en el
centrifugado deseados.
3) es necesario utilizar los
botones F, G, H, I y presio-
nar el botón encendido/
apagado "I" (pos. apretado).
4) Por último, recuerde que si
desea utilizar la "partida
programada", ésta debe ser
predispuesta antes del ciclo
de lavado.
Al concluir el lavado ...
La luz testigo M comienza a
centellear rápidamente por
algunos segundos, luego más
lentamente.
Luego apague la lavadora presionando el botón de encendido-apagado L (posición O). A
Instrucciones para la instalación y el uso
partir de este momento puede
abrir con seguridad la portilla.
Después de haber retirado la
ropa recién lavada, deje siempre la portilla abierta o
semiabierta, para permitir que
circule el aire dentro de la cesta.
Desconectar siempre la corriente eléctrica del tomacorriente y cerrar el grifo.
Recuerda que en caso de falta de alimentación o de apagado de la lavadora, el programa seleccionado permanece almacenado en la memoria.
9
Page 30

Elegir los programas adecuados es importante. Y es fácil.
Quién dirige ¡es Ud.!
Mando de programas y
comienzo programado
Sirve para seleccionar el
programa de lavado.
Gire este mando exclusivamente en sentido horario.
Para seleccionar un programa,
debe hacer girar el mando de
modo que coincida el índice
ubicado en el mando, con la
palabra/número correspondiente al programa deseado.
A partir de ese momento,
presione el botón de encendido/
apagado L (posición I), la luz
testigo M comenzará a
centellear.
Después de 5", se acepta la operación, la luz testigo M deja de
centellear (permaneciendo
encendida) y comienza el ciclo
de lavado.
Si desea interrumpir el
programa en curso o elegir uno
nuevo, seleccione una de las
posiciones Reset (Stop) y
espere 5": cuando se aceptó la
anulación, la luz testigo M
centellea, a partir de ese
momento puede apagar la
máquina.
Se puede usar este mando
también para retrasar el
funcionamiento de la lavadora:
Seleccionar una de las 4 posiciones del delay timer,
presionar el botón de
encendido/ apagado L (posición I) y esperar 5". A partir de
ese momento, la operación es
aceptada (la luz testigo M permanece encendida) y puede
seleccionar el programa que
desee.
La luz testigo Mefectúa un centelleo particular (2" encendida
y 4" apagada) para indicar que
se seleccionó el comienzo
retrasado.
Durante esta fase y, si es necesario, es posible abrir la portilla
y modificar la carga de ropa.
Una vez que el ciclo de lavado
ha sido predispuesto y
aceptado por la lavadora, el
eventual desplazamiento del
mando no produce ya ningún
efecto (excepto al situarlo en la
posición Reset (Stop).
Mando de la temperatura
Permite seleccionar la temperatura
de lavado indicada en la tabla de
los programas (véase pág. 11).
Además, si lo desea, permite
reducir la temperatura aconsejada
para el programa seleccionado,
hasta el lavado en frío .
Perilla de centrifugado
Sirve para excluir la centrifugación
y para reducir la velocidad de
centrifugación del programa
seleccionado. Las velocidades
máximas previstas para los cuatro
tipos de tejido son:
Tejido Velocidad
Algodón máx r.p.m.
Sintéticos 800 r.p.m.
Lana 600 r.p.m.
Seda no
En todos los casos, la máquina
efectúa una distribución de la
carga a baja velocidad.
Cubeta de detergentes
Está dividido en 3+1 compartimientos:
1. Detergente para prelavado;
2. Detergente para lavado;
3. Suavizante;
4. Blanqueador.
Para información más
detallada ver la pág. 15.
4
MAX
1
3
2
G
E
F
D
Leyenda
Para consultar en cada momento
un esquema sintético de los
programas: se abre tirando la
lengüeta gris hacia afuera.
Remojo (Soaking)
Esta función permite la realización
del remojo durante el lavado con una
duración de 1 hora. En dicha fase se
producen movimientos.
Enjuague extra
Esta función realiza otro enjuague
final para algodón y tejidos No
planchado. El uso de esta función
se aconseja para mejorar el enjuague después de un lavado con
carga entera, con el consiguiente
uso de mayor cantidad de detergente.
Recomendado para las personas alérgicas a los detergentes.
Planchado fácil
Esta función permite obtener un
lavado "poco arrugado", y por lo
tanto, fácil de planchar.
Es posible utilizarla con 3+1 programas No-planchado y Delica-
dos.
Presionando este botón durante
estos programas, el ciclo de lavado se detiene en una posición
Antiarrugas. Para terminarlo, presionar nuevamente el botón H.
L
I
H
C
N
B
M
A
Prelavado
Este botón permite realizar el
prelavado con todos los programas (a excepción del programa
lana). (ver pag. 11)
Encendido-apagado (Alimentación) - On-Off
Con el botón L presionado la lavadora permanece encendida y
cuando este botón no está presionado la lavadora está apagada.
El apagado de la máquina no
anula el programa seleccionado.
Luz testigo encendida-apagada /bloqueo portilla (Estado)
La luz testigo M centellea lentamente cuando la máquina está encendida y espera la selección de un
programa y, al final del mismo, permite la abertura de la portilla. Centellea velozmente cuando no es
posible abrir la puerta. La luz fija
indica la aceptación del programa
seleccionado.
Luz indicadora de encendido/
puerta bloqueada
La luz testigo encendida indica que la puerta está
bloqueada para impedir
aperturas accidentales; para
evitar daños es necesario
esperar 2 minutos que la luz
testigo centellee antes de abrir
la puerta.
10 Instrucciones par ala instalacion y el uso use
www.aristonappliances.us
Page 31

¿Qué desea lavar hoy?
Los programas para todas las estaciones
Tipos de tejidos y de
suciedad
Mando de
programas
Mando de la
temperatura
Prel avado Deter gente
para el
lavado
Suavizante Blanquea-
dor
Duraci ón
del lavado
(minutos)
Descripción del ciclo de
lavado
Comienzo retrasado
Retraso de 12 - 9 - 3 - 1 horas El comienzo del programa se retrasa
Stop /Reset
12 - 9 - 3 - 1 horas
nterrumpe/Anula el programa seleccionado
ALGODÓN ENÉRGICO
Ropa blanca excepcionalmente sucia
(sábanas, manteles, etc.)
Ropa blanca y de color, resistente muy
sucia
Ropa blanca poco sucia y colores
delicados
Enjua gues
Centrifugado
Stop /Reset
(camisas, camisetas, etc.)
1 Super
2 Normal
3Rápido
KKKK
KKKK
KKKK
K
Lavado
90
50
40
25
13
enju agues, centrifugados
intermedios y final
Lavado
enjuagues, centrif ugados
intermedios y final
Lavado
enju agues, centrifugados
intermedios y final
Enjuagues, centrifugado intermedio y fi nal
Descarga y centri fugado final
Interrumpe/Anul a el programa seleccionado
SIN PLANCHAR
Sin téticos con colores resistentes muy
sucios
(ropa para recién nacidos, etc.)
Sin téticos con colores delicados
(ropa de todo tipo ligeramente suci a)
Sin téticos con colores delicados
(ropa de todo tipo ligeramente suci a)
Enjua gues
Centrifugado
Suavizante
Stop /Reset Interrumpe/Anul a el programa sel eccionado
4Normal
5Delicado
6 Breve
KKK
KKK
KKK
K
K
Lavado ,
80
65
40
25
10
enjuagues, antiarrugas o
centrif ugado deli cado
Lavado ,
enjuagues, antiarrugas o
centrif ugado deli cado
Lavado,
enjuagues y centr ifugado delicado
Enjuagues, antiarrugas o centrifugado delicado
Descarga y centri fugado delicado
Enjuagues con toma del suav izante
antiarrugas o centrifugado delicado
DELICADOS
(Sintéticos )
Delicados
Seda, prendas y tejidos
7Normal
8Seda
KKK
KK
especialmente delicados
(cortinas, seda, viscosa, etc
Lana
Enjua gues
Centrifugado Descarga y centri fugado delicado (exclui da la
Descarga Descarga
Stop /Reset Interrumpe/Anul a el programa sel eccionado
Notas
Para la descripción del antiarrugas: consulte Planchado fácil,
.)
9 Lana
KK
K
página precedente
.
Delicados,
64
descarga
Lavado,
60
Lavado,
45
Enjuagues, anti arrugas o descarga
seda)
Importante: para anular el programa apenas dispuesto, seleccione con el mando A una de las posiciones
"Reset" y espere al menos 5 segundos.
Los datos que aparecen en la tabla tienen un valor de carácter general, ya que pueden variar según la cantidad y tipo de
ropa, la temperatura del agua de red y la temperatura del ambiente.
enjuagues, antiarrugas o
enjuagues, antiarrugas o descarga
enjuagues y centr ifugado delicado
www.aristonappliances.us
Instrucciones para la instalación y el uso
11
Page 32

Consejos Útiles
No lave nunca en lavadora
.... ropa sin dobladillos,
deshilachada o rota. Si es necesario lavarla, colóquela dentro de un saco. No lave prendas de color junto con prendas
blancas.
¡Tenga cuidado con el peso!
Para obtener los mejores resultados, no supere los pesos indicados (correspondientes a la
carga máxima de ropa seca):
- Tejidos resistentes
12 lbs (5.5 kg) máximo
- Tejidos sintéticos:
6 lbs 10 oz (3 kg) máximo
- Tejidos delicados:
5 lbs 8 oz (2,5 kg) máximo
- Pura lana virgen:
3 lbs (1,5 kg) máximo
- Albornoces:5 lbs 8 oz
(2.5 kg) máximo
¿Cuánto pesan?
1 sábana 1
1/4 lb (400-550 gr.)
1 funda 4 oz.(120 gr.)
1 mantel 1 lb (450 gr.)
1 albornoz 2-3 lbs
(900-1,300 gr.)
1 toalla 5
oz/1 lb (150-500 gr.)
Las remeras de color, en es-
pecial las estampadas y las camisas, duran más si se lavan del
revés. Las remeras y los buzos
estampados deben plancharse
siempre del revés.
Alarma algodón denim.
Los difundidos mamelucos tipo
"salopette" tienen tirantes con
ganchos que pueden dañar al
cesto o a las otras prendas durante el lavado. Para reducir al
mínimo el peligro, coloque los
ganchos en los bolsillos de la
pechera y fíjelos con alfileres de
seguridad.
Período de no utilización:
desconectar el enchufe.
Se aconseja desconectar el enchufe de la máquina y cerrar el
grifo. Además deje la portilla
semiabierta para permitir que el
aire circule en la zona del cesto
y de la junta. Si así lo hace no se
formarán olores desagradables.
Para las prendas más
delicadas:
coloque la ropa
interior, medias de
mujer y prendas
delicadas en un saco
de tela para
protegerlas
CICLO LANA
Para obtener los mejores
resultados utilice un detergente específico, teniendo
cuidado de no superar 3 lbs
(1,5 kg) de carga.
Comprender las etiquetas de las prendas
Las etiquetas que encontramos en todas las prendas contienen instrucciones para el lavado y el secado expresadas en pequeños
símbolos. Consulte esta tabla para la correcta interpretación de estos símbolos; la ayudarán a lavar con más eficacia, a tratar mejor sus
prendas y a hacer rendir más su lavasecadora.
Ciclo de
lavado
Normal/
Algodón Heavy Duty
Sin planchar/
antiarrugas
Delicado/
Dolce
mano
No lave a umidoLavado a
No torcer
Temperatura
del agua
Secado en
secadora
Instrucciones
especiales
Símbolos
blanqueador
Caliente
(50oC/120oF)
Se puede
secar en
máquina
Colgar
para secar
Cualquier blanqueador
(si es necesario)
Algodón Heavy Duty
Tenga cuidado de no
equivocarse con la
temperatura !
Tibia
(40oC/105oF)
Normal/
Colgar sin
retorcer
Sólo blanqueador sin cloro
Sin planchar/
antiarrugas
para secar
(si es necesario)
Te nd e r
Fría
(30oC/85oF)
Delicado
Gentle
secar en secadora
Secar a la
sombra
No blanquear
No se puede
No se
puede secar
en máquina
12 Instrucciones par ala instalacion y el uso use
www.aristonappliances.us
Page 33

CONSEJOS PARA ELIMINAR LAS MANCHAS
Sangre.
Aclare o introducza en aqua frìa las manchas de sangre fresca.
Restriegue con detergente las manchas persistentes. Aclare, si la
mancha no desaparece vierta unas gotas de amonìaco sobre la
mancha y repita el tratamiento con el detergente. Aclare, si es
necesario utilice lejìa.
Cera de vela.
Rasgue la cera. Coloque la mancha entre hojas de papel secante
blancas limpias o entre varias capas de toallitas de papel y presione
con la palancha caliente. Limpie con una esponja con fluido de
limpieza. Se persiste una mancha de color, utilice la lejìa.
Ketchup.
Rasgue el ketchup. Introducza la prenda en agua frìa durante 30
minutos. Haga un pretratamiento con detergente en crema. Lave.
Chicle.
Frote con hielo para que el chicle se endurezca. Rasgue el chicle
con una cuchilla. Limpie con una esponja empapada con fluido
de limpieza.
Chocolate o cacao.
Introducza la prenda manchada 15 minutos en agua frìa. Frote
conn detergente la mancha y aclare abundantemente. Lave en
agua caliente, si el tejido de la prenda lo permite. Si persisten las
manchas de color limpie con una esponja empapada en peroxido
de hidrògeno, acalare y lave.
Colorante.
Aclare e introducza la prenda en agua frìa. Frote con detergente la
mancha. Aclare. Si es necesario utilice la lejìa. Si no es posible
eliminar la mancha, utilice un quitamanchas comercializado.
Huevo o grasa alimentaria.
Aclare la mancha en aqua frìa. Si persiste, rocìe con un ablandador
deje pasar un tiempo de 15-20 minutos. Si la mancha no desparece
tampoco, frote con una esponja con un fluido liquido o lejìa diluida.
Lave en agua caliente. El uso del agua caliente puede afirmar la
mancha.
Mancha de suavizante de tejidos.
Frote repetidamente con un trozo de jabòn. Frotar con alcohol
algunas veces es eficaz, si los colores de la prenda lo permiten.
Lave. Si lo desea puede usar la limpieza en seco.
Rotulador.
Pulverice las manchas con limpiadores a decuados paa esta
finalidad. Frote con una esponja la mancha profundamente. Aclare
con agua frìa. Aplique de nuevo el producto limpiador si es
necesario.
Fruta, vino.
Introducza la prenda manchada inmediatamente en agua frìa.
Utilice un tratamiento a base de lejìa con agua tan caliente como
lo permita el tejido. Si el tejido lo consiente, vierta agua hirviendo
sobre la mancha a una altura de 1 a 3 pies. Lave .
Café o te (negro).
Introducza la prenda manchada inmediatamente en agua
frìa.Utilice la lejìa para tratarla con agua caliente, si el tejido de la
prenda lo permite. O si el tejido lo permite vierta agua hirviendo
desde una altura de 1 a 3 pies sore la mancha. Lave.
Café o te (con crema).
Introducza y aclare la prenda manchada en agua fria. Frote con
detergente la mancha y aclare. Seque. Si la mancha persiste, frote
con una esponja con un producto quitamanchas. repita si es
necesario. Utilice lejìa, si la mancha no desparece.
Cosméticos.
Aplique detergente liquido sin diluir sobre la mancha o humedezca
las manchas y frote con jabon o detergente hasta obtener espuma.
Frote hasta que la espuma desaparezca, aclare
profundamentamene. Repita si es necesario. Si el color resiste,
utilice la lejìa si el tejido lo permite.
Crema, helado, o leche.
Frote con una esponja con agua frìa o introducza la prenda
manchada en agua frìa durante 30 minutos o màs tiempo. Si la
mancha persiste, frote con un detergente la mancha y aclare a
continuacion. Si el necesario, utilice la lejìa.
Desodorantes y productos para la traspiraciòn.
Lave o frote con una esponja la mancha profundamente con agua
y detergente , aclare. S la mancha persiste , utilice lejìa con agua
caliente enjabonada. Lave. Tal vez consiga obtener de nuevo el
color del tejido frotando con amonìaco. Aclare abundantemente.
Hierba.
Frote la mancha con el detergente. Limpie con una esponja con
alcohol desnaturalizado. Utilice lejìa, si es necesario.
Aceite y grasa.
Rasgue la mancha. rote con dtergente o un limpiador doméstico
para esta finalidad, aclare con agua templada. Si la mancha
persiste, limpie profundamente con una esponja con un disolvente
de grasa. Deje secar. Repita la operaciòn si es necesario. Para
quitar manchas amarillas, utilice cloro o lejìa con oxigeno.
Tinta de boligrafo.
Algunas manchas de tinta se afirmen con el agua . Haga la
prueba en primer lugar en una parte del tejido. Limpie con la
esponja repetidamente la mancha con un esmalte para unas.,
amil acetato o alcohol. La laca para el peso es eficiente. Lave.
Utilice lejìa si es necesario. Utilice amil acetato, arnel, dynel y
verel. Utilice acetona en otros tejidos.
NOTA:
algunas manchas de tinta no se pueden eliminar.
Moho.
Cepille la superficie de crecimiento sin extenderlo. Introduzca el
articulo en una soluciòn de vaso de lejìa para un galòn de agua
con jabonn durante 5-10 minutos. Aclare bien y lave.
www.aristonappliances.us
Instrucciones para la instalación y el uso
13
Page 34

Barro.
Deje que la mancha se seque; después cepille bien. Aclare
abundantemente en agua frìa hasta que el barro desaparezca.
Lave. (Espuma de jabòn caliente afirma la mancha de arcilla rojo
o amarilla).
Mostaza.
Introduzca la prenda en agua con detergente durante varias
horas. Si la mancha persiste, utilice lejìa.
Esmalte de uñas.
Trate la prenda mientras que la mancha està seca rasqando todo
lo posible antes de que se seque. Coloque la mancha hacia abajo
sobre toallitas de papel. Frote con una esponja el revés de la
mancha con un disolvente para quitar el esmalte de uñas o con
alcohol desnaturalizado y vierta unas gotas de amonìaco
domestico. Frote la mancha repetidamente con la esponja. Lave
con agua a una temperatura adecuada para el tejido. No use
acetona en acetato arnel, dynel o rayon.
Transpiraciòn.
lave o limpie con esponja la mancha profundamente con agua
templada y detergente en crema. Si la transpiraciòn ha cambiado
el color del tejido, devuélvaselo utilizando amoniaco o vnagre.
Aplique el amoniaco en als manchas frescas; aclare con agua.
Aplique vi en manchas no frescas, aclare con agua.
Oxidaciòn y hierro.
Aplique un limpiador para la oxidaciòn comericlizado respetando
las indicaciones del fabricante. Aclare, o si el tejido lo permite
ponga el articulo en una soluciòn con 4 cucharadas de crema de
tàartaro en una pinta de agua.
Crema de zapados.
Quite todo lo que sea posible. Pretrate con agua y detergente en
crema; aclare. Si la mancha persiste, lave con esponja con alcohol
diluido (1 parte de alcohol para 2 partes de agua) o trementina.
Quite la trementina lavando con esponja con una soluciòn de
detergente caliente o con alcohol. Si es necesario, utilice la lejia.
Pintura.
Limpie con esponja o introduzca en trementina o disolvente
indicado en la etiqueta como disolvente. Lave.
Parfume.
Aclare en agua frìa. Frote con un detergente lìquindo sin diluir o
con un detergente en crema la mancha. Aclare. Si la mancha
persiste utilice la lejìa.
Refrescos.
Lave con una esponja con agua fria. Algunas manchas son
invisibles cuando se secan, pero se oscuren cuando son calentadas
y a veces es imposible eliminarlas. Actùe antes de que la mancha
se seque. Limpie con una esponja con disolvente o trementina.
Lave
14
Instrucciones para la instalación y el uso
www.aristonappliances.us
Page 35

Importante para lavar mejor
MAX
1
2
4
3
Consejos útiles sobre la cubeta de detergente
El primer secreto y el más fácil: la cubeta de detergente se abre tirando hacia fuera.
Cuando se agrega detergente
o suavizante emplee las dosis
indicadas por el fabricante. Las
dosis varían en función de la
carga de ropa, de la dureza del
agua y del grado de suciedad.
Con la experiencia aprenderá
a dosificar las cantidades de
manera casi automática, se
convertirán en sus secreto.
Antes de verter el detergente
para el prelavado en el compartimiento 1, controle que no
esté instalada la cubeta adicional 4 reservada al blanqueo.
Cuando se vierte suavizante
en el compartimiento 3, evite
que se vuelque.
1
La lavadora retira automáticamente el suavizante en cada
programa de lavado.
El detergente líquido debe ser
vertido en el compartimiento 2
sólo pocos instantes antes de
comenzar el lavado.
Recuerde que el detergente lí-
quido es particularmente aconsejado para lavados con temperatura de hasta 60 grados y
para los programas de lavado
que no incluyan la fase de prelavado.
Están disponibles en el comercio detergentes líquidos o en
polvo con contenedores espe-
Limpieza de la cubeta para
detergente
La cubeta dosificadora se
puede extraer y limpiar
fácilmente: tirar hacia fuera
según indica la figura. Dejarla
2
un poco de tiempo bajo el
agua corriente.
Mayor ahorro
Una guía para un uso
económico y ecológico
de los electrodomésticos
CARGA MÁXIMA
La mejor manera para no derrochar energía, agua, detergente
y tiempo es utilizar la lavadora con la carga máxima
aconsejada.
Una carga completa en lugar de dos medias cargas permite
AHORRAR hasta el 50% de energía.
USE MENOS DETERGENTE SI: lava poca ropa, la ropa
está poco sucia, se forma espuma durante el lavado o el agua
no es muy dura, o dulce (véase la tabla anterior con los
grados de dureza del agua). Para conocer la dureza del agua,
infórmese en la Oficina correspondiente de su Municipio.
¿EL PRELAVADO ES EFECTIVAMENTE NECESARIO?
Sólo para ropa que esté verdaderamente sucia.
Programar un lavado SIN prelavado para ropa poco sucia o
medianamente sucia permite AHORRAR detergente, tiempo,
agua y entre el 5 y el 15% de energía.
¿EL LAVADO CON AGUA CALIENTE ES
VERDADERAMENTE NECESARIO?
Tratar las manchas con un quitamanchas o sumergir las
manchas secas en agua antes del lavado permite disminuir la
necesidad de programar un lavado con agua caliente.
Utilice un programa de lavado a 140° F (60° C)
para AHORRAR hasta el 50% de energía.
www.aristonappliances.us
ciales que deben ser introducidos directamente en el cesto, respetando las instrucciones escritas en el envase.
No utilice nunca detergentes
para lavado a mano ya que forman demasiada espuma potencialmente dañina para la
lavadora.
Constituyen una excepción los
detergentes específicamente
estudiados tanto para el lavado a mano como en lavadora.
El último secreto: cuando se
lava con agua fría debe reducir siempre la cantidad de detergente: en el agua fría el detergente se disuelve menos
que en el agua caliente y por
lo tanto se desperdiciaría.
En el compartimiento
Detergente para prelavado
(en polvo)
En el compartimiento
Detergente para el lavado
(en polvo o líquido)
En el compartimiento
Aditivos (suavizantes,
perfumes, etc.)
En el compartimiento
Blanqueador y blanqueador
delicado.
1:
2:
3:
4:
Ciclo blanqueo y botón
antimanchas
En caso de tener que efectuar
el blanqueo debe instalar la
cubeta adicional 4 (en dotación) en el compartimiento 1
de la cubeta de detergente.
Al verter el blanqueador no
debe superarse el nivel
"máx." indicado en el perno
central (véase figura).
El uso de la cubeta adicional
para el blanqueador excluye
la posibilidad de efectuar el
prelavado.
El blanqueador tradicional
debe utilizarse única y exclusivamente para los tejidos
resistentes blancos, mientras que aquél delicado debe
utilizarse para la lana y los
tejidos coloreados y sintéti-
cos.
Instrucciones para la instalación y el uso
MAX
Con el programa "Seda" no
es posible realizar el blanqueado (ver pág. 11).
MAX
15
Page 36

Problemas y soluciones
Antes de telefonear, lea aquí
En muchos casos, cuando la lavadora no funciona, se trata de problemas que pueden ser resueltos con
facilidad sin necesidad de llamar al técnico. Antes de telefonear al Servicio de asistencia controle siempre
los siguientes puntos.
La lavadora no se pone en funcionamiento
¿El enchufe está bien
conectado en el
tomacorriente? Haciendo la
limpieza se podría haber
movido.
¿Hay corriente en la casa?
Podría haber intervenido el
interruptor automático de
seguridad porque, por
ejemplo, hay demasiados
electrodomé sticos
encendidos. La causa
también puede ser una
interrupción general de la
energía eléctrica en la zona
aledaña.
¿La portilla está
correctamente cerrada?
Por motivos de seguridad la
¡Quiero sólo un técnico
especializado y
autorizado con
repuestos originales
garantizados Ariston !
Pero, ¿por qué no veo nada de agua?
Simple:
con la nueva tecnología, para obtener los
mismos resultados, es suficiente ¡menos de la mitad!
He aquí el motivo por el cual no se ve el agua a través
de la portilla:
hace falta muy poca,
siempre respetando el
ambiente pero
sin renunciar a la máxima
limpieza.
lavadora no puede funcionar
si la puerta está abierta o mal
cerrada.
¿El botón de Encendido/
Apagado está presionado?
En caso afirmativo, significa
que ha sido seleccionado un
comienzo programado.
El mando para el comienzo
programado, en los modelos
en que está previsto, ¿se
encuentra en la posición
correcta?
¿El grifo de agua está
abierto? Por motivos de
seguridad, si la lavadora no
carga agua, no puede
comenzar con el lavado.
La lavadora no carga
agua.
¿El tubo está
correctamente conectado
al grifo?
¿Falta agua? Podrían estar
efectuándose trabajos en el
edificio o en la calle.
¿Hay suficiente presión?
Podría existir una avería en
el autoclave.
¿El filtro del grifo está
limpio? Si el agua contiene
mucho material calcáreo o
por fragmentos o residuos.
¿El tubo de goma está
plegado? El recorrido del
tubo de goma que lleva el
agua a la lavadora debe ser
lo más rectilíneo posible.
Controle que no esté
aplastado ni doblado.
El mando de los
programas gira de
modo continuo?
Espere algunos minutos
para que la bomba de
descarga vacíe la cuba,
apague la lavadora, seleccione una de las posiciones
Stop/Reset y luego vuelva a
encenderla. Si el mando
continúa girando llame a la
Asistencia porque significa
que existe una anomalía.
La lavadora carga y
descarga agua de
modo continuo.
¿El tubo está ubicado
demasiado bajo? Debe ser
instalado a una altura
comprendida entre 60 y 100
cm.
¿El extremo del tubo está
sumergido en el agua?
¿La descarga de pared
posee un respiradero? Si
después de estas
verificaciones el problema
no se resuelve, cierre el grifo
de agua, apague la lavadora
y llame a la asistencia
técnica.
Si vive en un piso alto, podría
haberse verificado un
fenómeno de sifonaje.
Para resolverlo debe
instalarse una válvula
específica.
Y, sobre todo, se ahorra
en energía eléctrica.
16 Instrucciones para la instalación y el uso
Ud. se hará cargo de una llamada de servicio
en garantía cuando se compruebe que los
inconvenientes no son causados por defectos
de materiales o de fabricación.
www.aristonappliances.us
Page 37

La lavadora no
descarga o no
centrifuga
¿El programa elegido prevé la descarga de agua?
Algunos programas terminan al final del ciclo de lavado; en estos casos es necesario accionar la descarga manualmente.
La función "Plancha fácil"
- en las lavadoras donde
está prevista - ¿se puede
utilizar? Esta función re-
quiere accionar la descarga
manualmente.
¿La bomba de descarga
está obturada? Para inspec-
cionarla, cierre el grifo, desconecte el enchufe y siga las
instrucciones de la página
18, o bien, llame a la Asistencia técnica.
¿El tubo de descarga está
doblado? El recorrido del
tubo de descarga debe ser
lo más rectilíneo posible.
ZZZZ...
Controle que no esté aplastado ni doblado.
¿Los tubos de la instalación
de descarga están obstruidos? ¿La eventual prolon-
gación del tubo de descarga es irregular e impide el
paso del agua?
Excesiva vibración durante el centrifugado.
Durante la instalación ¿se
han quitado todos los tornillos y los estribos de
transporte? Véase la pági-
na siguiente dedicada a la
instalación.
¿La lavadora está bien
nivelada? La nivelación del
aparato se debe controlar
periódicamente. Utilice los
pies de la lavadora para
nivelar siempre controlando
con un nivel.
¿Existe espacio entre la
máquina y los elementos
adyacentes? Si no es un
modelo a empotrar, durante
el ciclo de centrifugación la
lavadora debe oscilar ligeramente. Es necesario que
disponga de algunos centí-
metros de espacio libre en
torno a ella.
La lavadora pierde
agua.
¿La abrazadera del tubo de
carga está bien atornillada?
Cierre el grifo, desconecte
el enchufe y pruebe a
apretarla sin forzar.
¿La cubeta de detergente
está tapada? Extraerla y la-
varla bajo el agua corrient
te.
¿El tubo de descarga no
está bien fijado? Cierre el
grifo, desconecte el enchufe y pruebe a fijarlo mejor.
Se forma demasiada espuma.
¿El detergente es adecuado para el uso en la
lavadora? Verifique que
contenga la definición "para
lavadora" o "a mano y en
lavadora", o algo similar.
¿La cantidad de detergente
es adecuada? Un exceso de
detergente, además de producir demasiada espuma, no
lava más eficazmente y contribuye a producir incrustaciones en las partes internas de
la lavadora.
.
Si, no obstante todos los controles, la lavadora no funciona
y el inconveniente detectado
continúa manifestándose, llame
al Centro de Asistencia autorizado más próximo,
(1-800-426-0825) comunicando la siguiente información:
- la naturaleza de la avería
- la sigla (Mod. ....)
- el número de serie (S/N......)
Esta información aparece en la
placa que está fijada en la parte posterior de la lavadora.
CORRECTO
Cerrar el grifo después de cada lavado
limita el desgaste del sistema
hidráulico de la lavadora y elimina el
peligro de pérdidas cuando no hay
nadie en casa.
No controle el funcionamiento de la
lavadora sólo si el lugar donde está
colocada está dotado de una descarga
en el piso (pozo).
Deje siempre las puertas
semicerradas.
De este modo no se producen malos
olores.
Limpie delicadamente la parte
externa.
Para limpiar la parte externa y las
piezas de goma de la lavadora, use
siempre un paño embebido en agua
tibia y jabón.
www.aristonappliances.us
INCORRECTO
Dejar conectado el enchufe mientras
limpia la lavadora.
También se debe desconectar el
enchufe antes de ejecutar tareas de
mantenimiento.
Usar solventes y abrasivos agresivos.
No use nunca productos solventes o
abrasivos para limpiar la parte
externa y las piezas de goma de la
lavadora.
Descuidar la cubeta de detergente.
Puede ser extraída y para lavarla basta
dejarla un poco de tiempo bajo el agua
corriente.
Irse de vacaciones sin pensar en la
lavadora.
Antes de partir de vacaciones, controle
siempre que el enchufe esté
desconectado y el grifo del agua
cerrado.
Instrucciones para la instalación y el uso 17
No recurra nunca a técnicos
no autorizados y rechace
siempre la instalación de
repuestos no originales.
Para qualquier pedido llamar
ASISTENCIA TÉCNICA
Y PIEZAS DE REPUESTO:
1-888-426-0825
Page 38

Cuidado y mantenimiento fácil
Cuide su lavadora y obtendrá
años de perfecto servicio.
La lavadora es una compañera de vida confiable. Mantenerla en forma
es importante.
Es importante lavar
periódicamente la cubeta
extraíble de detergente.
Para prevenir
incrustaciones basta
ponerla un corto tiempo
bajo el grifo de agua
corriente.
Esta lavadora fue proyectada
para garantizar un servicio
seguro durante muchos años.
He aquí algunos simples
consejos que ayudan a hacerla
durar todavía más y a evitar
problemas. Se aconseja cerrar
los grifos cuando la máquina
no está funcionando, de este
modo se protegen los tubos,
etc.
Si el agua de su zona es demasiado dura, use un producto anticalcáreo (el agua es
dura si deja fácilmente marcas
blanquecinas en torno a los
grifos o bien en torno a las descargas, especialmente en la
bañera.
Para obtener información más
precisa sobre el tipo de agua
de su instalación puede dirigirse al Acueducto local o bien a
un plomero de la zona).
Es necesario vaciar siempre
los bolsillos de las prendas,
retirando también alfileres,
distintivos y todo objeto duro.
Limpieza de las partes externas:
La parte externa de la lavadora debe ser lavada con un
paño embebido en agua tibia
y jabón. No utilice cera para la
limpieza de las piezas de
plástico. Algunas ceras
contienen agentes que
podrían dañar los materiales
plásticos.
Limpieza de las partes internas
Si en el país en el que se instala, los detergentes con fosfato están prohibidos, podría
ser necesario someter el electrodoméstico a una periódica
revisión. Si se usan detergentes sin fosfatos, es posible que
en la cuba de la lavadora se
acumulen grasas del cuerpo
y detergente. Este fenómeno
es mucho más evidente en las
zonas con agua dura o en el
caso de lavados frecuentes de
prendas muy sucias. Para eliminar estas acumulaciones,
someta la lavadora a un ciclo
completo con agua caliente y
2 vasos de suavizador de agua
no precipitante. No introduzca prendas, detergente u otros
productos para el lavado.
Una vez que se hayan eliminado todos los depósitos, el
lavado debería ser satisfactorio, siempre que se hayan respetado las advertencias contenidas en este manual.
Mantenimiento general
Una vez terminado el lavado,
cierre los grifos de agua para
disminuir la presión sobre
los tubos flexibles.
Limpie el interior de la puerta con un paño húmedo para
eliminar posibles restos de
humedad que quedaron
después del lavado. Periódi-
camente, aplique una fina
capa de cera protectora en
la puerta interna de la lavadora y secadora, especialmente en proximidad de la
puerta de carga. Este revestimiento sirve para proteger
el acabado superficial de la
puerta de posibles derrames
de productos para el lavado,
que podrían provocar su decoloración.
Limpieza de la precámara
de la bomba
En el caso de oclusión de la
precámara de la bomba, libérela del material acumulado. Siga las instrucciones
presentadas más adelante.
No utilizar una excesiva
cantidad de detergente.
Los detergentes contienen
ya productos anticalcáreos.
Sólo si el agua es particularmente dura, o sea, muy rica
en calcio, le aconsejamos
utilizar un producto específico al efectuar cada lavado.
Puede ser conveniente efec-
tuar, de vez en cuando, un ciclo
de lavado con una dosis de
producto anticalcáreo, sin
detergente y sin ropa.
No utilizar ningún detergente o
aditivo en dosis excesivas ya
que podrían causar producción excesiva de espuma, con
consiguientes incrustaciones
y posibles daños a los componentes de su lavadora y secadora.
Utilizar solamente detergentes
que formen poca espuma.
Vacíe los bolsillos:
los objetos pequeños pueden
dañar gravemente la lavasecadora !
Efectuar una inspección a la bomba y al tubo de goma cuando haga falta.
La lavadora está provista de una bomba autolimpiante que no requiere operaciones de limpieza ni mantenimiento. Sin embargo,
puede suceder que objetos pequeños caigan de manera accidental dentro de la bomba: monedas, botones, alfileres u otros objetos.
Para evitar daños, estos objetos son retenidos en una pre-cámara accesible, situada en la parte inferior de la bomba.
Atención: Antes de intentar examinar la precámara, verifique que la
máquina haya terminado el programa y que esté vacía. Como en cualquier
otro procedimiento de mantenimiento, primero desenchufe la máquina.
Para acceder a la precámara, afloje ligeramente la parte superior del panel
del zócalo ubicado en la base de la lavadora y secadora con la ayuda de un
destornillador o de una herramienta análoga, para poder sacarlo. Luego
haga deslizar hacia adelante el borde superior para poder levantarlo
fácilmente (Fig.1). Coloque un recipiente bajo o una cubeta debajo de la
tapa de la precámara para recoger la pequeña cantidad de agua presente.
Fig. 1
Tubo de carga del agua
Controle el tubo de goma al menos una vez al año. Si presenta grietas o rajaduras debe ser sustituido de inmediato ya que durante los lavados
debe soportar fuertes presiones que podrían provocar roturas repentinas.
18 Instrucciones para la instalación y el uso
Para quitar la tapa es suficiente girarla en sentido antihorario (Fig 2).
Recordarse de volver a colocar la tapa en su posición.Vuelva a colocar
también el panel del zócalo introduciendo los ganchos ubicados en la
parte inferior en las correspondientes ranuras y empuje la parte superior hasta lograr ubicarla en su posición.
Fig. 2
www.aristonappliances.us
Page 39

Cuidado y mantenimiento fácil
Extraiga los filtros
con las pinzas,
límpielos y
sustitúyalos
Cinta
Extraiga los filtros,
límpielos y sustitúyalos
Limpieza de los filtros
Descarga: para evitar pérdi-
das respetar con rigurosidad
las instrucciones respecto a
las alturas y fijar los tubos.
Cinta
Características técnicas
Modelo
Dimensiones
Capacidad 1,92
Conexión
elé ctrica
Conexiones
hídricas:
A W 120
ancho 23.4" (59,5 cm)
altura 33.4" (85 cm)
profundidad 22" (56 cm)
pies cú bicos:
tensión 120 Volt 60 Hz
potencia má xima absorbida 1350 W, 13 A.
presión má xima 100 psi (689.6 kPa)
presión mínima 20 psi (137.9 kPa)
Lavado:
(funcionamiento mínimo 108 volt)
2-12 lbs (1-5,5 Kgs)
Cinta
Cinta
Velocidad de
centrifugación
U
®
L
C
US LISTED
M á xima 1200 rpm
Esta má quina cumple con lo establecido por las Directivas
UL por USA y Canada.
Debido al continuo mejoramiento de los propios productos el fabricante se reserva el derecho de aportar cualquier
modificación a las máquinas sin obligación de aviso previo. Todos los derechos reservados. Impreso en Italia.
www.aristonappliances.us
Instrucciones para la instalación y el uso 19
Page 40

GARANTÍAS
Lavadora ARISTON
Las garantías entregadas por (Ariston) en la presente declaración son válidas únicamente para las máquinas
lavadoras Ariston vendidas al primer usuario que ha adquirido el producto a Ariston o a sus distribuidores,
revendedores o centros de asistencia autorizados en los Estados Unidos o en Canadá. Las garantías previstas por el
presente documento no son transferibles.
Duración de la garantía
Primer año: Garantía limitada completa a partir de la fecha de instalación*
Ariston reparará o sustituirá de forma gratuita cualquier pieza que se demuestre sea defectuosa bajo condiciones de
uso doméstico normales, incluyéndose además los gastos de envío y mano de obra. La reparación bajo garantía
deberá ser realizada por un centro de asistencia Ariston autorizado.
Segundo año: Garantía limitada a partir de la fecha de instalación*
Ariston suministrará gratuitamente las piezas de repuesto para cualquier componente que se demuestre defectuoso
bajo condiciones de uso doméstico normales, excluidos los gastos de mano de obra.
Tercer-Quinto año: Garantía limitada a componentes electrónicos a partir de la fecha de instalación*
Ariston reparará o sustituirá de forma gratuita los microprocesadores o tarjetas de circuitos que se demuestren
defectuosos bajo condiciones de uso doméstico normales a partir de los 3 a 5 años de la fecha de instalación original,
excluidos los gastos de mano de obra.
Tercer-Quinto año: Garantía limitada al motor a partir de la fecha de instalación*
Ariston reparará o sustituirá de forma gratuita el motor o cualquier componente del motor que se demuestren
defectuosos bajo condiciones de uso doméstico normales a partir de los 3 a 5 años de la fecha de instalación original,
excluidos los gastos de mano de obra.
Toda la vida útil del producto: Garantía limitada a la formación de herrumbre con perforación en acero
inoxidable a partir de la fecha de instalación*
Ariston sustituirá gratuitamente la máquina con el mismo modelo o con un modelo actual que sea equivalente o mejor
desde el punto de vista funcional, en el caso que el cesto de lavado, bajo condiciones de uso doméstico normales,
presente herrumbre con perforación, quedan excluidos los gastos de mano de obra, envío e instalación.
Dentro de los 10 días de la fecha de compra: Garantía por daños a las partes estéticas
Ariston cambiará de forma gratuita cada parte estética (incluida la llamada de asistencia) que aparezca dañada dentro
de los 10 días de la fecha de compra. La presente cláusula, sin embargo, no incluye los daños causados por
operaciones de transporte, desplazamiento o instalación realizadas de manera inadecuada.
* La fecha de instalación se refiere a la fecha en la cual se ha instalado la máquina lavadora o a diez días laborales
después de la fecha de entrega, según cuál de las dos situaciones se produzca primero.
Exclusiones:
La presente garantía no cubre las llamadas de asistencia o reparaciones realizadas para efectuar rectificaciones en la
instalación, para recibir instrucciones sobre el uso del producto, para sustituir fusibles domésticos o corregir el
cableado o la instalación hidráulica doméstica. Además, cualquier reparación que sea necesaria realizar al producto
como consecuencia de un uso doméstico normal diferente, no está cubierta por la garantía. Las garantías excluyen
los defectos o daños derivados de accidentes, alteraciones, usos impropios o incorrectos, instalaciones erróneas,
intervenciones de asistencia no autorizadas o fuerzas externas ajenas al control de Ariston tales como: incendios,
inundaciones u otras causas de fuerza mayor como instalaciones no conformes con los códigos eléctricos o
hidráulicos en vigor a nivel local. Los gastos de mano de obra, envío e instalación realizados para la reparación o
sustitución de un producto al finalizar el período de un año desde la fecha de instalación no serán cubiertos por la
presente garantía. Todos los componentes sustituidos o reparados reemplazarán a los originales en relación con el
período de garantía aplicable. Dentro de los límites permitidos por la ley, la presente garantía toma el lugar de
cualquier otra garantía explícita e implícita, comprendidas las garantías implícitas de comerciabilidad e idoneidad para
un objetivo específico. Ariston no asume ninguna responsabilidad por daños indirectos o consecuentes.
Para acceder a los servicios de garantía llamar al 1-888-426-0825 o escribir a:
Ultra 8 International, 2505 Anthem Village Drive, Suite E - PO BOX 562, Henderson Nevada 89052
indicando siempre número del modelo, número de serie, fecha de compra, nombre y dirección del revendedor.
Ultra 8 International, 3027 East Sunset Road, Suite 101, LAS VEGAS Nevada 89120
www.aristonappliances.us
02/2004 - 195 041 205 00 - Xerox
Page 41

Les secrets
des tissus
Des conseils pour mieux laver
AW 120
Mode dinstallation
.
et demploi
Lave-linge
sûr
et facile à utiliser
www.aristonappliances.us
Page 42

Guide rapide
Découvrez ci-dessous les 10 sujets qui seront développés dans les pages de ce manuel. Lisez, apprenez, amusezvous : vous découvrirez un tas de petits secrets pour mieux laver, avec moins d'efforts tout en augmentant la
longévité de votre lave-linge .
1.
Introduction (pages 3-4-5)
Dix bonnes raisons pour être satisfaite de votre nouveau lavelinge. De plus :
1. Des conseils de sécurité indispensables à votre sécurité et à
celle de votre famille. Lisez attentivement cette section.
2. Quelques conseils utiles pour bien utiliser votre nouveau
lave-linge
4. Pré-installation
2.
Installation (pages 4-6-7-8)
Pour un bon fonctionnement du lave-linge, l'opération la plus
importante après sa livraison ou après un déménagement, est
sans aucun doute son installation.
Vérifiez toujours :
1. si l'installation électrique est conforme ;
2. si les tuyaux d'arrivée et de vidange de l'eau sont bien rac-
cordés correctement
N'utilisez que des tuyaux neufs.
3. Si votre lave-linge est bien nivelé pour optimiser ses
performances de fonctionnement.
4. SI LES VIS DE FIXATION DU TAMBOUR PENDANT LE
TRANSPORT QUI SE TROUVENT SUR LE PANNEAU ARRIÈRE DU LAVE-LINGE ONT BIEN ÉTÉ ENLEVÉES.
3. Comment charger votre lave-linge et le mettre
en service (pages 8-9)
6.
Quelques conseils utiles pour le lavage et pour ne
pas vous tromper (pages 12-13-14)
Autrefois, on suivait les bons conseils de grand-mère et les
matières synthétiques n'existaient pas : il était donc facile de
laver. Désormais c'est votre lave-linge qui vous donne un tas
de bons conseils et vous permet de laver la laine encore mieux
que ne le ferait à la main une excellente blanchisseuse.
Triez correctement votre linge: c'est une opération importante
dont la réussite de votre lessive et la longévité de votre lavelinge séchant dépendent. Apprenez tous les trucs et tous les
secrets pour trier votre lessive : les couleur, les textiles.
4.
Bien maîtriser le bandeau de commandes (page 10)
Le bandeau de commandes de ce lave-linge est très simple.
Quelques commandes essentielles pour choisir les types de
lavage, du plus énergique, pour laver une combinaison de
mécanicien, jusqu'au plus délicat pour la laine. Apprenez à
bien maîtriser ces commandes pour profiter à plein de votre
électroménager et prolonger sa durée de vie.
5. Guide des programmes de lavage (page 11)
Un tableau facile à consulter pour cerner d'un seul coup d'œil
tous les programmes, les températures, les produits lessiviels
et additionnels. Choisissez le bon et vous obtiendrez de
meilleurs résultats en économisant du temps, de l'eau et de
l'électricité, jour après jour.
7.
Le tiroir à produits lessiviels (page 15)
Comment utiliser le tiroir à produits lessiviels et le bac à eau de
Javel.
8.
Problèmes, solutions et Assistance technique
(pages 16-17)
Avant d'appeler un technicien, lisez ces pages. De nombreux
problèmes peuvent trouver une solution immédiate. Si vous n'arrivez pas à les résoudre, appelez le numéro du service
assistance. Ils se feront un plaisir de vous aider.
9. Soin et entretien (pages 18-19)
Quelques petites attentions suffisent pour que votre lave-linge
vous récompense par des années et des anné es de
performances exceptionnelles.
10.
Vous y trouverez les caractéristiques techniques de votre lavelinge: sigle du modèle, spécifications électriques et
hydrauliques, dimensions, capacité, vitesse d'essorage et conformité aux normes américaines et canadiennes.
Caractéristiques techniques (page 19)
2
Mode d'installation et d'emploi
www.aristonappliances.us
Page 43

Introduction
Toutes nos félicitations pour avoir choisi un lave-linge. Ce
produit pointu dont le design très apprécié a été
récompensé à plusieurs reprises est le résultat d'un
technologie innovante, il vous servira fidèlement pendant
des années et des années. Veuillez consacrer quelques
minutes à la lecture de ce manuel. Vous y trouverez des
conseils utiles pour utiliser au mieux votre précieux achat.
Voilà au moins 7 bonnes raisons pour être satisfaite de
votre nouveau lave-linge.
1. Maximum d'économies d'énergie et d’eau
Cet appareil a été conçu pour garantir des économies d'énergie
nettement supérieures à tout autre produit de la concurrence.
2. Fonctions améliorées
Une vitesse d'essorage de 1200 tours minute permet d'extraire
une plus grosse quantité d'eau .
3. Praticité
L'appareil peut être installé de façon stable ou bien, au besoin,
être utilisé comme lave-linge portatif grâce à des roulettes.
4. Meilleur traitement du linge
Ce lave-linge, dépourvu d'aubes, n'endommage pas votre linge,
ce dernier est moins froissé et a un meilleur aspect.
5. Possibilités d'installation
Le beau design italien de ce lave-linge lui permet de s'intégrer
parfaitement dans n'importe quelle cuisine ou buanderie. Ses
dimensions compactes lui permettent de trouver place dans
n'importe quel coin de la maison.
6. Facilité d'emploi
Cet appareil est simple à utiliser aussi bien comme lave-linge
que comme lave-linge, il permet de passer automatiquement
du lavage au séchage.
7. Gain de place
Votre lave-linge a été conçu pour exploiter au mieux l'espace
horizontal et vertical.
Normes de sécurité importantes
Votre sécurité et celle de vos enfants
Votre lave-linge a été fabriqué selon les normes internationales de sécurité les plus
sévères, pour vous protéger ainsi que votre famille.
ATTENTION - Pour réduire tout risque d'incendie, de décharge
électrique ou de lésion personnelle pendant l'utilisation de cet
électroménager, suivez à la lettre les instructions suivantes :
1. Avant d'utiliser l'appareil, lisez attentivement toutes les
instructions fournies.
2. Ne lavez ou séchez jamais des textiles ayant été précédemment
détachés, mouillés ou tachés avec de l'essence, des solvants
pour nettoyage à sec ou d'autres substances inflammables et
explosives car ils dégagent des vapeurs qui peuvent s'enflammer
ou exploser.
3. Ne permettez pas aux enfants de se servir de l'appareil pour
jouer. Quand l'appareil fonctionne avec des enfants dans les
parages, surveillez-les attentivement.
4. Si vous décidez de ne plus utiliser cet appareil ou de le mettre
à la déchetterie, démontez d'abord le hublot.
5. N'introduisez jamais les mains à l'intérieur de l'appareil quand
la cuve ou le tambour sont en mouvement.
6. N'installez ni ne conservez l'appareil dans un endroit exposé
directement aux conditions atmosphériques.
7. N'intervenez pas sur les commandes.
8. Ne tentez pas de réparer ou de remplacer des pièces de
l'appareil ni d'effectuer des opérations de maintenance, à moins
qu'elles ne soient expressément autorisées par les instructions
d'entretien et de réparation destinées à l'utilisateur qui devra être
sûr de les avoir parfaitement comprises et se sentir en mesure de
les appliquer.
9. Ne versez pas d'essence, de solvants pour nettoyage à sec ou
toute autre substance inflammable ou explosive dans l'eau de
lavage. Ces substances dégagent des vapeurs qui peuvent
s'enflammer ou exploser.
10. Il peut arriver, dans certains cas, que du gaz hydrogène se
forme à l'intérieur d'une installation domestique inutilisée pendant
deux ou plusieurs semaines. LE GAZ HYDROGENE EST
EXPLOSIF. Si l'installation domestique d'eau chaude n'est pas
utilisée pendant une semaine ou deux, avant d'utiliser à nouveau
le lave-linge, ouvrez tous les robinets de l'eau chaude pendant
quelques minutes. Cette opération permettra d'éliminer toute
accumulation d'hydrogène.
11. N'utilisez ni assouplissants ni d'autres produits pour réduire la
charge é lectrostatique des fibres synthétiques, sauf
recommandation expresse du fabricant de l'assouplissant.
12. A quelques mois d'intervalle, contrôlez la trappe de vidange et
débarrassez-la des pièces de monnaie, boutons ou autres menus
objets qu'elle pourrait contenir.
Conservez cette brochure avec soin
www.aristonappliances.us
Mode d'installation et d'emploi
3
Page 44

Installation
Quand votre nouveau lave-linge arrive
Que votre lave-linge soit neuf ou que vous veniez juste de déménager, son bon
fonctionnement dépend en grande partie de son installation.
Après avoir déballé l'appareil, contrôlez s'il est en bon état.
Pour permettre son transport, l'intérieur de l'appareil a été
bloqué à l'aide de quatre vis sur le panneau arrière de la
machine.
Avant de brancher votre lave-linge
enlevez les 4 vis extérieures nécessaires au transport, les cales et les
tuyaux en caoutchouc qui y sont
vissés (conservez bien toutes ces
pièces) et bouchez les trous à l'aide
des cache-trous en plastique fournis
avec l'appareil. Pour déposer les
boulons extérieurs, utilisez la clé
fournie avec l'appareil.
Raccordez les deux tuyaux en caoutchouc à la prise d'eau
rouge (eau chaude) et à la blanche (eau froide) situées sur le
panneau arrière (en haut à droite) de l'appareil. Raccordez les
autres extrémités aux robinets correspondants de l'eau ou bien
à une seule prise (le robinet de la cuisine, par exemple) à l'aide
d'un adaptateur spécial en Y. A l'aide du connecteur en "U"
fourni avec l'appareil, introduisez le tuyau de vidange dans le
conduit d'évacuation fixe (ou dans l'évier). Pour des rensei-
gnements plus détaillés, voir le paragraphe Raccordement hydraulique page 5.
Mise à niveau
Pour un bon fonctionnent de votre lave-linge est important que
votre lave-linge soit bien posé à plat. Pour bien le niveler, il suffit
d'agir sur ses pieds avant; son angle d'inclinaison , mesuré sur le
plan de travail, ne doit pas dépasser 2°.
ATTENTION
!
Risque de poids excessif
Pour le déplacement et l'installation
du lave-linge il faut au moins deux
personnes.
Si vous agissez seul, vous risquez
de vous faire mal au dos ou d'avoir
d'autres accidents.
Les pieds avant sont réglables et autobloquants.
!
ATTENTION Conditions électriques requises
Risque de décharge électrique
(mort, incendie ou décharge électrique):
1) Raccordez l'appareil à une prise électrique tripolaire
raccordé à la terre.
2) Ne démontez pas la broche de mise à la terre.
3) Evitez l'emploi d'adaptateurs ou de rallonges.
Pour votre sécurité et pour éviter tout risque
d'accidents, de lésions et d'incendies, lisez
attentivement les instructions suivantes :
1. Après avoir déballé le lave-linge, jetez les sachets plastique
et les cartons.
2. Ne laissez jamais les enfants seuls ou sans surveillance
dans le voisinage des électroménagers.
3. Les opérations
d'installation et de
mise à la terre
doivent être effectuées par un professionnel, conformé-
ment aux normes
locales applicables
en la matière. Les
instructions d'installation qui accompagnent cet électromé-
nager sont réservées
à l'installateur.
4. Pour cet appareil,
nous conseillons
DE N' UTILISER QUE de la lessive peu moussante .
5. Le lave-linge doit être branché à une prise électrique tripolaire
avec raccordement à l'installation de mise à la terre. Pour votre
sécurité, ne déposez pour aucune raison la broche de mise à
la terre de la fiche (la ronde).
EVITEZ L'UTILISATION DE RALLONGES.
6. Toute réparation ou remplacement d'une pièce doit être
effectué par un professionnel pour éviter tout risque de lésion
personnelle ou d'endommagement de l'appareil.
7. Quand vous faites appel à l'assistance technique pour une
panne, éteignez votre lave-linge à l'aide de l'interrupteur ou du
boîtier porte-fusibles ou bien en débranchant la fiche de la
prise de courant. Demandez à votre installateur de vous montrer
quel est l'interrupteur ou le fusible du tableau électrique concerné
et d'y apposer une étiquette.
ATTENTION - L'appareil doit être raccordé à un seul circuit dérivé
avec un conducteur AWG 14 et protégé par un fusible de 15 A.
RACCORDEMENT A L'INSTALLATION
DE MISE A LA TERRE
L'appareil doit être raccordé à une installation de mise à la terre.
En cas de mauvais fonctionnement ou de panne, l'installation de
mise à la terre réduit tout risque de décharge électrique en offrant
au courant électrique un circuit ayant moins de résistance. L'appareil est muni d'un câble avec conducteur et fiche de mise à la terre.
La fiche doit être branchée à une prise de courant adéquate, correctement installée et raccordée à la terre conformément aux ré-
glementations et normes locales applicables.
ATTENTION- Un mauvais raccordement du conducteur de mise
à la terre de l'appareil peut entraîner un risque de décharge
électrique. En cas de doute, adressez-vous à un technicien
qualifié pour un contrôle de la mise à la terre de l'appareil.
N'essayez pas de modifier la fiche fournie avec l'appareil. En
cas d'incompatibilité entre la prise et la fiche, faites installer
une prise adéquate par un professionnel.
Conservez les vis de fixation, les cales et les
caoutchoucs utilisés pour le transport. En cas de
déménagement vous pourrez vous en resservir
pour bloquer les pièces internes de l'appareil et
éviter que ce dernier ne s'abîme pendant le
transport.
4 Mode d'installation et d'emploi
www.aristonappliances.us
Page 45

ATTENTION
RISQUE DE DECHARGES
ELECTRIQUES
NE PAS OUVRIR
Sécurité
!
Le symbole de l'éclair enfermé dans un
triangle équilatéral, signale à l'usager la
présence de "voltage dangereux" non isolé
à l'intérieur de l'appareil, représentant un risque d'électrocution pour les personnes.
ATTENTION:
Pour éviter tout risque de décharge électrique, NE PAS
déposer le panneau de fermeture supérieur (ni postérieur). A l'intérieur de l'appareil, aucun composant ne peut
être réparé par l'utilisateur. Pour toute réparation, adres-
sez-vous toujours à un professionnel du secteur.
Vous trouverez au dos de l'appareil, le numéro du modèle
de cet article de même que le numéro de série indiqué sur
une étiquette.
Notez ci-dessous le numéro du modèle et le numéro de
série de l'appareil. Conservez ce livret comme document
prouvant votre acte d'achat, il permettra d'identification votre appareil en cas de vol.
N° MODELE ______________________
N° DE SERIE______________________
AVERTISSEMENT:
POUR EVITER TOUT RISQUE D'INCENDIE OU DE
DECHARGE ELECTRIQUE, NE PAS EXPOSER
L'APPAREIL A LA PLUIE OU A L'HUMIDITE
Le point d'exclamation Le point
!
La société Merloni Elettrodomestici
SpA est fière d'offrir à ses clients
des produits portant la marque
ENERGY STAR.
Cette marque certifie que l’ appareil
a été testé par les laboratoires UL
et s’est avéré conforme aux normes
de sécurité UL du Canada e des
Etats-Unis.
d'exclamation enfermé dans un triangle
équilatéral signale à l'usager la présence
d'instructions d'utilisation et de maintenance
(assistance) importantes dans la documentation fournie avec l'appareil.
U
®
L
C
US LISTED
Quelques conseils utiles
Le lave-linge offre trois vitesses de lavage différentes. Pour
le cycle Coton la vitesse du tambour est de 1200 ou 800 tours
minute en fonction de la sélection. Pendant le programme Sans
repassage, la vitesse du tambour est de 850 tours minute.
Pendant le programme Délicats, la vitesse du tambour est de
500 tours minute. Un essorage à la vitesse maximum permet
d'extraire une plus grande quantité d'eau de ces tissus
hautement absorbants et de réduire le degré d'humidité. Les
temps de séchage seront par conséquent considérablement
réduits.
Utilisez un assouplissant liquide. Remplissez le
compartiment de l'assouplissant jusqu'au niveau indiqué.
L'utilisation d'assouplissant rend le linge vaporeux tout de suite
après le cycle de lavage, accélère les temps de séchage et
réduit la formation de plis.
ATTENTION!
Nous déclinons toute responsabilité en cas de non respect des instructions énumérées ci-dessus.
Ne laissez pas les enfants jouer avec les sachets plastique, le polystyrène expansé, les clous et les autres
éléments d'emballage, ils pourraient être dangereux. Ces derniers doivent être éliminés comme il se doit.
Ce lave-linge est alimenté à 110 volt, la résistance met donc
plus de temps qu'un appareil fonctionnant à 220 volt pour
atteindre une chaleur maximum. La résistance met environ 10
minutes à atteindre son niveau de chaleur maximum.
Utilisez des lessives peu moussantes. Recommandée pour
lave-linge frontal, l’utilisation de cette lessive évite une formation
excessive de mousse qui pourrait réduire les performances de
l’appareil et élimine tout risque d’endommagement de ce dernier
dû à une infiltration excessive de mousse dans la chambre de
condensation et à une obstruction du rotor par des dépôts de
peluches.
Lors du triage du linge tenez compte de la quantité de linge
et du type de textile. Les textiles à haute absorption (tels que
serviettes éponge et jeans) absorbent davantage d'eau et
deviennent donc très lourds une fois mouillés.
www.aristonappliances.us
Mode d'installation et d'emploi 5
Page 46

RACCORDEMENT EAU (Arrivée de l'eau)
Les accessoires fournis avec l'appareil comprennent aussi 2
tuyaux d'arrivée et 4 caoutchoucs. Raccordez l'extrémité droite
de ces tuyaux au réseau d'alimentation en eau fig. 1.
Raccordez l'extrémité en angle droit de ces tuyaux aux vannes
de chargement placées sur le panneau arrière de l'appareil,
appliquez un des caoutchoucs fournis pour garantir une
étanchéité parfaite aux différents points de raccordement.
Les opérations de serrage doivent être effectuées à la main;
n'utilisez un outil qu'en cas de fuite d'eau. Ne forcez pas (voir
fig. 1).
Les vannes de chargement sont codifiées avec des couleurs
différentes :
Rouge = Eau chaude
Blanc = Eau froide
L'appareil fonctionne même en n'utilisant qu'un seul robinet
d'eau froide; les vannes d'arrivée doivent toutefois être toutes
deux raccordées au réseau d'alimentation de l'eau.
Remarque: Pour réduire le risque de rupture des tuyaux d'arrivée, remplacez-les tous les 5 ans. Il est conseillé de prendre note
de la date d'installation ou de remplacement du tuyau d'arrivée.
Raccordement à la prise d'eau
La pression de l'eau doit être comprise entre les valeurs
indiquées sur la plaquette fixée à l'arrière de l'appareil. Si les
tuyauteries de l'eau sont neuves ou inutilisées depuis
longtemps, faites couler l'eau jusqu'à ce qu'elle soit limpide et
sans impuretés avant de raccorder
l'appareil. Raccordez le tuyau
d'arrivée à une prise d'eau froide à
embout fileté 3/4 gaz. Veillez à ce
que les caoutchoucs soient bien
installés à chacune des extrémités
du tuyau d'arrivée. L'extrémité en L
doit être raccordée à la machine,
tandis que les extrémités rectilignes
doivent être raccordées aux
robinets de l'eau
Fig. 1 - Prise d'eau
en haut à droite
Contrôlez périodiquement les flexibles et remplacez-les si vous constatez des renflements, des étranglements, des signes
d'usure ou des fuites.
RACCORDEMENT EAU (Evacuation de l'eau)
Positionnez correctement le tuyau de vidange pour éviter tout
étranglement et garantir une bonne vidange de l'eau.
L'extrémité de sortie du tuyau de vidange doit être placée à au
moins 25" (62 cm) de haut par rapport à la base de l'appareil.
L'eau peut alors être évacuée dans un conduit d'évacuation ou
directement dans un évier, mais il faut que le lave-linge séchant
soit équipé d'une vanne spéciale située à 25" (62 cm) de haut
pour éviter tout phénomène de siphonnement (voir fig. ci-contre).
Le tuyau de vidange ne doit pas être introduit dans la
canalisation fixe pour plus de 6" (15 cm).
IMPORTANT
Contrôlez que le tuyau de vidange n'est pas plié et que le
passage de l'eau n'est pas gêné par des étranglements.
Raccordement à la canalisation
d'évacuation fixe :
L'installation dans des véhicules de loisirs exige un tuyau de
vidange fixe ayant 1-1/2" (3,7 cm) de diamètre et un débit
minimum de 31 litres minute, tandis que les installations
domestiques exigent 2" (5 cm) de diamètre.
Raccordement à la canalisation
d'évacuation fixe au sol :
L'embouchure de la canalisation fixe doit se trouver à une
hauteur comprise entre 25" (62 cm) et 34" (86 cm) mesurée à
partir du socle de l'appareil (A).
25
2
25”
34”
Raccordement à la canalisation
d'évacuation fixe murale :
la distance entre l'extrémité du tuyau de vidange et la base de
l'appareil doit être comprise entre 25" (62cm) et 34" (86 cm) (B).
6 Mode d'installation et d'emploi
www.aristonappliances.us
Page 47

Votre nouvel électroménager a été fabriqué avec le plus grand
soin. Très souvent ce qui, en apparence, semble une bonne
raison pour faire appel au service après-vente peut en fait être
résolu par une simple régulation à effectuer vous-même.
Le forfait d'appel en garantie sera à votre charge si les
inconvénients ne dépendent pas de défauts de matériaux
ou de fabrication couverts par la présente garantie.
Pour éviter le coût d'un appel n'étant pas strictement nécessaire,
avant d'appeler le service après-vente consultez le paragraphe
"Problèmes et solutions" pour vous assurez qu'il ne s'agit pas
de situations que vous pourriez résoudre vous-même. Ce
Cet appareil est un lave-linge automatique ayant une capacité de:
12 lbs. - 5,5 Kgs.
PRE-INSTALLATION
1. Le lave-linge doit être installé sur un sol résistant parfaitement
plat, dans un lieu sec et bien ventilé, à proximité d'une prise
de courant, d'un robinet d'eau.
2. L'installation sur une moquette ou du parquet augmente les
vibrations.
• Moquette - à n'installer que sur des moquettes légères.
• Parquet - avant l'installation, renforcez le plancher à l'aide
de vis et placez d'autres panneaux de contreplaqué.
3. Les opérations d'installation et de mise à la terre doivent
paragraphe se trouve pages 16-17 de ce mode d'emploi et
d'entretien.
Ce lave-linge séchant est un électroménager à charge frontale
avec un hublot à large ouverture qui simplifie considérablement
le chargement. 9 cycles de lavage sont disponibles qui
viennent s'ajouter au super rinçage et aux cycles de prélavage.
Lisez et suivez les instructions de cette brochure pour obtenir
d'excellents résultats.
Veillez à ce que ces instructions soient bien respectées. Si
vous avez besoin d'autres renseignements ou d'assistance
technique, adressez-vous au commerçant qui vous a vendu
l'appareil ou bien appelez le service après-vente.
être effectuées par un professionnel, conformément aux
normes locales applicables en la matière. Les "Instructions
d'installation" réservées à l'installateur sont contenues dans
le mode d'emploi et d'entretien de l'utilisateur.
4. Le lave-linge doit êre raccordé à une prise électrique tripolaire
de 120 Volt, 60 Hz, 1300 W et 13 Amp avec raccordement à
l'installation de mise à la terre. Pour éviter que l'appareil ne
s'éteigne accidentellement, il ne faut pas le mettre en marche
au moyen d'un interrupteur mural ou à tirette.
www.aristonappliances.us
Mode d'installation et d'emploi 7
Page 48

INSTALLATION DANS UN RENFONCEMENT MURAL,
DANS UN PLACARD OU DANS UNE NICHE (Instructions)
L'appareil peut êre installé dans un renfoncement
mural, dans un placard ou dans une niche.
Les distances d'installation sont exprimées en pouces
et se réfèrent aux valeurs minimales permises.
Nous conseillons néanmoins de toujours laisser
davantage de place pour simplifier les opérations
d'installation, d'entretien et de mise en conformité par
rapport aux réglementations ou normes locales.
Pour les autres types d'installation, respectez les
dimensions minimales indiquées (1 pouce=2,54 cm.).
Distances minimales
d’installation
Vue latérale
* Il se pourrait qu’il faille
davantage de place de
libre en cas d’éléments
saillants de mur, portes
ou sols.
Vue frontale
Mode d'emploi
Que placer dans votre lave-linge ?
.
Quelques astuces pour mieux laver. Triez votre linge en tenant compte des
textiles et des couleurs. Attention aux étiquettes, suivez leurs indications.
PREPARATION DU LINGE
Tri du linge
Triez les vêtements pour éviter que certains puissent en abîmer
d'autres en cours de lavage. Triez le linge et formez des charges
qui soient le plus possibile uniformes au point de vue couleurs,
textiles, composition des vêtements et degré de salissure.
- Couleur. Triez le linge en trois groupes : blanc et couleurs
claires, couleurs normales et vives, couleurs foncées. Les
vêtements qui déteignent doivent être lavés à part.
- Type de textiles. Les textiles délicats doivent être séparés
des textiles résistants. Séparez les vêtements qui ont tendance
à pelucher de ceux qui ne le font pas ou qui au contraire attirent
les peluches.
- Composition des vêtements. Les vêtements qui s'effilochent
facilement ou qui ont des décorations particulières exigent
une attention minutieuse. Vous pouvez les laver dans cet
appareil en choisissant un cycle pour tissus en maille. Il est
conseillé de laver à la main les vêtements fragiles et délicats.
- Degré de salissure. Séparez les vêtements très sales du reste
du linge pour éviter que la salissure encrasse l'eau de lavage.
Contrôle
Lors du tri du linge au moment du chargement du lave-linge
séchant, vérifiez s'il n'y a pas des vêtements qui exigent un
traitement particulier.
- Détachez le linge, quand les taches sont encore fraîches et
faciles à enlever. Tentez d'abord d'éliminer à l'eau froide les
taches dont vous ignorez l'origine. L'eau chaude tend à sécher
les taches de produits contenant des protéines tels que sang,
œuf, viande et lait. Pour enlever les taches difficiles, consultez
le paragraphe "Comment enlever certaines taches spéciales"
dans la dernière partie de ce manuel.
- Prétraitez d'abord les parties particulièrement sales telles
que cols, poignets et taies d'oreiller. Consultez le paragraphe
"Prétraitement", vous y trouverez les conseils correspondants.
- Reprisez les vêtements déchirés, avant de les laver, pour
éviter qu'ils ne s'abîment encore plus.
- Videz les poches. Les objets oubliés dans les poches tels
que crayons, stylos, feutres ou mégots de cigarettes peuvent
tacher tout le chargement de linge. Les mouchoirs en papier
s'effritent pendant le lavage en éparpillant des morceaux sur
toutes les pièces de linge. Enlevez les pièces de monnaie et
autres objets étrangers qui pourraient endommager l'appareil.
- Fermez toutes les agrafes, les fermetures éclair et les boutons.
- Retournez tous les vêtements en maille pour réduire la
tendance de ces tissus à "pelucher". Des petites boules de
fibres se forment à la surface des vêtements suite à usure et
frottement.
- Enlevez l'excès de saleté et de boue. Brossez le revers
des pantalons, secouez ou passez à l'aspirateur les tapis pour
enlever la saleté déposée en surface.
- En cas de boucles lavables, enveloppez-les bien dans un
linge de protection avant de les laver et de les faire sécher
pour éviter qu'elles ne rayent et abîment l'appareil. Enlevez les
boucles, accessoires, boutons et ceintures non lavables.
- Nouez lacets, ceintures et pans de tablier pour éviter qu'ils
s'entremêlent pendant le lavage.
- Avant d'introduire votre linge, contrôlez si le tambour est
bien vide.
Pré-traitement
Pré-traitez les parties très sales telles que cols, poignets et
taies d'oreillers à l'aide d'un spray de prélavage, un détachant
liquide, une lessive ou un mélange de lessive et de détergent
en pâte à appliquer sur les parties les plus sales.
Triez votre linge par type
de tissu, couleur: vous
obtiendrez de meilleurs
résultats
8 Mode d'installation et d'emploi
www.aristonappliances.us
Page 49

Consultez le paragraphe "Comment enlever certaines taches
spéciales" (voir page 13) pour traiter des taches particulières.
En cas de linge particulièrement sale ou taché, plutôt que de
traiter les taches une par une, il vaut mieux effectuer un
prélavage.
Prélavage
Utilisez la fonction de prélavage pour des vêtements
particulièrement sales comme ceux des enfants par exemple
qui se salissent beaucoup en jouant.
Ces vêtements sont souvent très sales. Dans ce cas, un
prélavage avec une lessive appropriée aide à dissoudre même
la saleté la plus obstinée.
Produits de lavage
Les lessives sont les produits les plus courants pour le lavage
du linge de maison.
Des doses de lessive insuffisantes ne permettent pas d'obtenir
un lavage optimal tandis que des doses excessives produisent
un excès de mousse et empêchent un rinçage efficace. Les
lessives servent non seulement à dissoudre la saleté mais
gardent aussi cette dernière en suspension dans l'eau d elavage
pour empêcher qu'elle ne se redépose sur le linge. La dose à
utiliser dépend de la quantité de linge, de son degré de salissure,
de la dureté de l'eau et du type de lessive utilisée.
Dosez TOUJOURS la quantità de lessive. La quantié de
mousse produite n'est pas obligatoirement un indice de la
quantité devant êre utilisée. Il y a en effet des lessives qui
produisent beaucoup plus de mousse que d'autres. N'utilisez
que des lessives spéciales pour lave-linge frontal.
PRODUITS DE LAVAGE
1. N'utilisez que des lessives peu moussantes.
2. La quantité de lessive dépend du degré de salissure. Pour
un chargement de linge très sale, augmentez la quantité de
lessive à utiliser.
3. Utilisez davantage d'assouplissant en cas d'eau
particulièrement dure et moins si votre eau est plus douce.
4. Si le linge a été pré-traité, réduisez la quantité de lessive et
s'il a été pré-traité avec une lessive abondante, n'en ajoutez
pas du tout.
5. Si votre appareil précédent était du type à chargement par
dessus, il se peut que les premiers chargements de lavage
dans un appareil à chargement en façade exigent moins de
lessive jusqu'à ce qu'il n'y ait plus du tout de résidus de lessive
sur le linge. La lessive qui est restée nichée dans les tissus
est dissoute pendant le cycle de lavage en cascade.
Pour utiliser des doses de lessive adéquates, consultez les
instructions indiquées par le fabricant sur le paquet.
La lessive sera introduite automatiquement dans l'appareil par
le tiroir doseur. Le niveau de mousse ne doit jamais dépasser
la ligne de milieu du hublot de chargement. Une formation
excessive de mousse ne gêne pas l'action de lavage de
l'appareil mais remonte à travers le tiroir à produits lessiviels
et déborde en se répandant sur le sol!
Dans ce cas, amenez le programmateur sur le premier
rinçage pour effectuer un rinçage qui permettra
d'éliminer la mousse excédente.
Eau de Javel
Le blanchissage sert à blanchir, à enlever les taches les plus
obstinées, à supprimer les mauvaises odeurs et même à
désinfecter les tissus, mais il ne doit jamais être considéré
comme une alternative à un lavage normal. N'ajoutez pas d'eau
de javel à votre eau de rinçage. Diluez toujours l'eau de Javel
avant utilisation.
Pour ajouter de l'eau de Javel, ouvrez le tiroir à produits lessiviels
et versez le produit dans le bac 4 (voir pages 15 et 13-14).
AVERTISSEMENTS :
Evitez de trop remplir le bac à eau de Javel. La quantité d'eau
de javel en excès irait directement à l'intérieur de l'appareil et
pourrait abîmer le linge.
Assouplissant
Tous les textiles et notamment les serviettes éponge gagnent
à être traités avec un assouplissant lors de leur dernier rinçage.
Le linge est en effet plus souple et plus facile à repasser,
tandis que les textiles synthétiques perdent beucoup de leur
effet adhérent.
Versez l'assouplissant dans le bac "Additifs" du tiroir à produits
lessiviels jusqu'au niveau indiqué sur le petit siphon. Evitez de
trop remplir le bac car l'assouplissant se déverserait
immédiatement à l'intérieur de l'appareil et compromettrait le
résultat du lavage.
Mise en marche du lave-linge séchant
Après avoir installé votre lave-linge, effectuez un cycle de lavage en sélectionnant le programme souhaité.
Une bonne mise en service de
votre lave-linge est primordiale tant pour la qualité du
lavage que pour éviter des
problèmes et augmenter sa
longévité.
Après avoir chargé l'appareil,
ajouté le produit lessiviel et, au
besoin, les assouplissants,
contrôlez toujours si :
Chouchoutez votre linge
: placez vos pièces de
lingerie, vos bas et vos
vêtements délicats dans
un sachet en toile pour
les protéger
www.aristonappliances.us
1. Le hublot est bien fermé ;
2. La fiche est bien branchée
dans la prise ;
3. Le robinet de l'eau est
ouvert.
Choisissez un programme
Choisissez le programme en
fonction du type de linge à laver. Pour choisir le programme,
consultez le tableau page 11,
puis :
1) Tournez le sé lecteur
Lavage jusqu'à ce que le
programme choisi arrive
en face du repère situé sur
le bouton ;
2) Tournez les boutons Tem-
pérature de lavage et
Vitesse d’essorage jus-
qu'à la sélection de la température adéquate pour les
fonctions de lavage et vitesse d’essorage desirée;
4) au besoin, utilisez les touches F, G, H, I et, enfin,,
appuyez sur la touche d'allumage.
5) N'oubliez pas, si vous souhaitez l'utiliser, que le "dé-
part programmé" doit être
sélectionné avant le cycle
de lavage.
Une fois le lavage terminé...
Le voyant M Mode +Verrouilla-
ge de porte clignote rapide-
ment pendant quelques secon
des, puis il passe à un clignotement lent.
Eteignez alors le lave-linge en
appuyant sur la touche L
Power (position O). Vous
pouvez alors ouvrir le hubloten
toute sécurité. Après avoir sorti
le linge, laissez toujours le
hublot ouvert pour permettre
à l'air de circuler à l'intérieur
du tambour.
N'oubliez pas qu'en cas de
coupure de courant ou si
vous éteignez votre lavelinge séchant, le programme
sélectionné reste mémorisé.
Mode d'installation et d'emploi 9
Page 50

Choisissez les bons programmes : c'est important. Et c'est facile.
C'est vous qui
G
commandez !
E
F
H
L
I
M
N
Bouton Lavage et Départ
différé
Il sert à sélectionner le pro-
gramme de lavage.
Ne tournez ce bouton que
dans le sens des aiguilles
d'une montre.
Pour sélectionner un programme, tournez le bouton
jusqu'à ce que le repère situé
sur le bouton coïncide avec
lemot/chiffre correspondant
au programme souhaité.
Appuyez alors sur la touche L
allumé/éteint (position I) ; le
voyant M commence à cligno-
ter.
Au bout de 5 secondes, la sé-
lection est acceptée, le voyant
M cesse de clignoter (mais
reste allumé) et le cycle de
lavage commence.
Si vous souhaitez interrompre
le programme en cours ou en
programmer un autre, sélectionnez l'une des positions
Reset et attendez 5 secondes.
Dès que l'annulation est acceptée, le voyant M se met à
clignoter, vous pouvez alors
éteindre la machine.
Ce bouton sert aussi à diffé-
rer le fonctionnement de votre lave-linge.
Sélectionnez une des 4 positions de départ différé, appuyez sur la touche allumé/
éteint I et attendez 5 sec. La
sélection est alors acceptée
(le voyant M reste allumé) et
vous pouvez sélectionner le
programme désiré.
Le voyant M clignote d'une façon particulière (2 sec. allumé
et 4 sec. éteint) pour indiquer
qu'un départ différé a été sé-
lectionné.
Pendant cette phase vous
pouvez aussi ouvrir le hublot
et modifier votre chargement
de linge.
Une fois que le cycle de lavage a été sélectionné et accepté par votre lave-linge sé-
chant, un changement de position du bouton n'aura
aucune conséquence (sauf
dans la position Reset (Stop).
Sélecteur température
Il sert à sélectionner la tempé-
rature de lavage indiquée dans
le tableau des programmes
(voir page. 11). Il vous permet
aussi de réduire la température
conseillée pour le programme
sélectionné, jusque au lavage
à froid.
Sélecteur vitesse essorage
Il sert à supprimer l’essorage
et /ou à réduire la vitesse d’essrage du programme sélectionné. Les vitesses maximum
prévues pour les 4 types de
tissu sont:
Tissu Vitesse
Coton max tours min.
Synthétiques 800 tours min.
Laine 600 tours min.
Soie non
De toute manière, la machine
procède à une répartition de la
charge à faible vitesse.
Tiroir à produits lessiviels
l comprend 3+1 bacs :
1. Lessive prélavage;
2. Lessive lavage;
3. Assouplissant;
4. Eau de Javel.
Le tiroir à produits lessiviels (pour
plus de détails voir page 14).
10 Mode d'installation et d'emploi
D
Légende programme
Consultation rapide des
programmes: pour l'ouvrir,
tirez la languette grise vers
vous.
Trempage (Soaking)
Cette fonction permet de
laisser tremper le linge
pendant une heure en cours
de lavage. Pendant cette
phase, le linge est soumis à
des mouvements de berce-
ment.
Rinçage Plus
Cette fonction permet d'effectuer un rinçage supplémentaire pour le coton et les tis-
sus Sans-repassage. Cette
fonction est conseillée pour
améliorer le rinçage en cas
de pleine charge et d'une
plus grande quantité de lessive.
Recommandé pour les personnes allergiques aux produits lessiviels.
Repassage facile
4
3
2
1
Grâce à cette fonction, votre
linge ne sera pas froissé et
donc beaucoup plus facile à
repasser.
Vous pouvez l'utiliser avec les
programmes Sans-repas-
sage et Délicats.
Si vous appuyez sur cette touche au cours de ces programmes, le cycle de lavage s'arrête sur une position Repas-
sage facile. Pour le complé-
ter, appuyez à nouveau sur la
touche H.
.
C
B
Prélavage
Cette touche permet d'effectuer un prélavage avec tous les
programmes (sauf le programme Laine). (voir page 11).
Allumé/éteint (Alimentation)
Pour allumer votre lave-linge
séchant, appuyez sur la touche L . Pour l'éteindre, appuyez une nouvelle fois sur
la touche L.
Si vous éteignez votre machine le programme sélectionné reste mémorisé.
Voyant allumé/éteint/ver-
rouillage de porte (Etat)
Le voyant M clignote lentement pour signaler que la
machine est allumée et attend
d'être programmée, à la fin du
cycle il signale le déverrouillage de la porte. Il clignote rapidement quand le
hublot est verrouillé. Sa lumière fixe indique que le programme sélectionné est accepté.
Voyant
couvercle verrouillé
L’allumage du voyant indique
que la porte couvercle est
bloquée pour empêcher toute
ouverture accidentelle.
Attendez que le voyant
s’éteigne avant de l’ouvrir.
L’attente est d’environ deux
minutes.
A
www.aristonappliances.us
Page 51

Que laver, aujourd'hui ?
Des programmes pour toutes les saisons
Nature des textiles et
degré de salissure
Bouton
programmes
Bouton
température
Prélavage Lessive
lavage
Assouplissant
Javel Durée du
lavage
(minutes)
Description du cycle de
lavage
DEPART DIFFERE
Retard de 12 - 9 - 3 - 1 heures Diffère le départ de 12 - 9 - 3 - 1 heures
Stop/Reset
Interrompt/Annule le programme sélectionné
COTON INTENSIF
Blancs extrêmement sales
(draps, nappes, etc.)
Blancs et couleurs résistantes très
sales
Blancs peu sales et couleurs
délicates
Rinçages
Essorage
Stop/Reset
(chemises, pulls, etc..)
1
2
3
Super
Prolongé
NORMAL
KKKK
KKKK
KKKK
K
Lavage
90
50
40
25
13
, rinçages, essorages intermédiaires
et final
Lavage,
rinçages, essorages intermédiaires
et final
Lavage,
rinçages, essorages intermédiaires
et final
Rinçages, essorages intermédiaires et final
Vidange et essorage final
Interrompt/Annule le programme sélectionné
SANS REPASSAGE
Synthétiques aux couleurs
résistantes très sales
etc.)
Synthétiques aux couleurs délicates
(linge en tout genre légèrement sale)
Synthétiques aux couleurs délicates
(linge en tout genre légèrement sale)
Rinçages
Essorage
Assouplissant
Stop/Reset
(linge de bébé,
4
5
6
Standard
Délicat
Rapide
KKK
KKK
KKK
K
K
Lavage,
rinçages, anti-froissement ou
essorage délicat
80
Lavage,
65
40
25
10
rinçages, anti-froissement ou
essorage délicat
Lavage,
délicat
Rinçages, anti-froissement ou essorage
délicat
Vidange et essorage délicat
Anti-froissement pour linge particulièremen délicat
Interrompt/Annule le programme sélectionné
Lavage, rinçages et essorage
DELICATS
(SYNTHETIQUES)
Délicats
7
Lavage à
KK
64
Délicats,
vidange
rinçages, anti-froissement ou
la main
Soie, vêtements et tissus
particulièrement délicats
(rideaux, soie, viscose, etc.
Laine
Rinçages
Essorage Vidange et essorage délicat (sauf soie)
Vidange Vidange
Stop/Reset
8
9
Soie
Laine
KKK
KK
K
Lavage,
vidange
60
Lavage,
45
Rinçages, anti-froissement ou vidange
Interrompt/Annule le programme sélectionné
rinçages, anti-froissement ou
rinçages et essorage délicat
Remarque
Pour la fonction anti-froissement: voir Repassage facile,
page ci-contre
.
IMPORTANT: POUR ANNULER LE PROGRAMME QUE VOUS VENEZ DE SÉLECTIONNER, AMENEZ
LE BOUTON LAVAGE EN POSITION "RESET" ET ATTENDEZ AU MOINS 5 SECONDES.
Les données de ce tableau sont fournies à titre indicatif ; elles peuvent varier selon la quantité et le type de linge, la température de l'eau de
réseau et la température ambiante.
www.aristonappliances.us
Mode d'installation et d'emploi 11
Page 52

Conseils Utiles
Ne lavez jamais à la ma-
chine... du linge non ourlé, ef-
filoché ou déchiré. Si vous devez absolument le laver, enfermez-le dans un sac. Ne mé-
langez jamais les couleurs
avec le blanc.
Attention au poids !
Pour obtenir d'excellents résul-
tats, ne dépassez jamais les
poids indiqués (se référant à
la capacité maximum de linge
sec):
- Textiles résistants:
5.5 kg, 12 lbs maximum
- Textiles synthétiques:
3 kg, 6 lbs maximum
- Textiles délicats:
2.5 kg, 5 lbs maximum
- Pure laine vierge:
1,5 kg, 3 lbs maximum
- Peignoirs :
2.5 kg, 5 lbs maximum
Mais combien pèsent-ils?
1 drap 400-550 g
1 taie d'oreiller 120 g
1 nappe 450 g
1 peignoir 900-1300 g
1 serviette de toilette 150-500 g
Les Tee-shirts couleur,
les imprimés et les chemises
durent plus longtemps si
vous les lavez à l'envers.
Repassez toujours vos Teeshirts et vos sweats imprimés
sur l'envers.
Alarme Coton denim.
Les combinaisons genre "salopette" ont des bretelles
avec des crochets qui peuvent endommager le tambour
ou les autres vêtements.
Pourquoi ne pas les enfiler
dans la poche de la bavette
et les fixer avec des épingles à nourrice pour supprimer tout danger !
Périodes d'inutilisation:
débranchez la fiche.
Mieux vaut mieux débrancher la fiche et fermer le robinet. Laissez le hublot entrouvert pour permettre à l'air
de circuler dans la zone du
tiroir et du joint. Vous éviterez ainsi la formation de
mauvaises odeurs.
Chouchoutez votre
linge : placez vos
pièces de lingerie, vos
bas et vos vêtements
délicats dans un sachet
en toile pour les
protéger
CYCLE LAINE
Pour obtenir d'excellents
résultats utilisez de petites
quantités de lessive et ne
dépassez pas une charge de
1,5 kg.
SACHEZ LIRE LES ETIQUETTES
Les étiquettes que vous trouvez sur tous les vêtements contiennent des messages concernants le lavage et le
séchage sous forme de petits mais très importants symboles.Consultez ce tableau pour interpréter correctement ces
symboles; vous apprendrez à mieux laver et traiter votre linge et à augmenter les performances de votre lave-linge.
Cycle de
lavage
Température
eau
Séchage en
sèche-linge
Consignes
spéciales
Symboles
eau de
Javel
Normal/
Coton Intensif
Chaude
(50oC/120oF)
Séchage
autorisé en
sèche-linge
Suspendre
pour sécher
Eau de Javel
autorisée (au
besoin)
Pli Permanent/
anti-froissement
Normal/Coton
Intensif
Suspendre pour
sécher sans essorer
Seulement eau de Javel
sans chlore (au besoin)
Attention !
Tiède
(40oC/105oF)
Pli Permanent/
anti-froissement
Sécher à
plat
Délicat/
Doux
(30oC/85oF)
Délicat/
Doux
Froide
Sécher à
l'ombre
Traitement
interdit
la main
Séchage par
culbutage
interdit
Séchage
interdit en
sèche-linge
Ne pas laverLavage à
Ne tordez pas
12
M
ode d'installation et d'emploi
Attention à ne pas
vous tromper de
température...
www.aristonappliances.us
Page 53

Comment enlever certaines taches spéciales
Sang
Traitez les taches encore fraîches avec de l'eau froide. Versez de la
lessive sur les taches restantes. Rincez. Si les taches persistent, versez quelques gouttes d'ammoniaque et traitez à nouveau avec un
produit lessiviel. Rincez. Au besoin, utilisez de l'eau de javel.
Cire
Raclez l'épaisseur de cire. Placez le tissu taché entre deux feuilles de
papier buvard ou entre plusieurs couches de mouchoirs en papier.
Repassez au fer tiède. Frottez avec une éponge et un détergent liquide. Si la tache ne part pas, passez à l'eau de javel.
Ketchup
Raclez les couches plus épaisses. Mettez tremper à l'eau froide pendant 30 minutes. Pré-traitez avec du détergent en pâte. Lavez à la
machine.
Chewing gum.
Frottez avec un glaçon pour faire durcir le chewing gum. Raclez les
couches plus épaisses avec une lame non tranchante. Frottez avec
une éponge et un détergent liquide.
Chocolat ou cacao
Mettez tremper à l'eau froide pendant 15 minutes. Frottez la tache avec
un détergent en pâte puis rincez abondamment. Lavez à la température la plus élevée appropriée au type de tissu. Si la tache ne part pas,
frottez avec une éponge et de l'eau oxygénée, rincez et lavez à la
machine.
Café ou thé (noir)
En cas de taches fraîches, mettez tremper tout de suite en eau froide;
puis traitez avec de l'eau de Javel à la température la plus élevée
supportée par le type de textile. Si le tissu ne risque rien, versez de
l'eau bouillante sur la tache en la versant de 1" à 3" (30 - 90 cm) de haut.
Lavez à la machine.
Café ou thé (au lait)
Rincez ou mettez tremper à l'eau froide. Versez un produit lessiviel sur
la tache, rincez et laissez sécher. S'il reste des traces de graisse,
frottez avec une éponge et un détergent liquide. Au besoin, renouvelez
l'opération. Si la tache ne part pas, passez à l'eau de Javel.
Produits de beauté : fard à paupières, rouge à
lèvres, fond de teint liquide, mascara, poudre, fond
de teint compact ou fard à joues
Versez du détergent liquide concentré sur la tache ou bien mouillez la
tache et frottez avec du savon ou du détergent en pâte jusqu'à obtenir
une mousse dense. Frottez jusqu'à ce que la tache disparaisse complètement, puis rincez abondamment. Au besoin, renouvelez l'opération. Si la tache ne part pas, lavez avec un produit blanchissant qui
n'endommage pas le tissu.
Crème, glace ou lait
Frottez la tache avec une éponge et de l'eau froide, ou bien mettez
tremper en eau froide pendant 30 minutes au moins. Si la tache ne part
pas, versez un détergent sur la tache puis rincez. Au besoin, traitez à
l'eau de Javel.
Déodorants et anti-transpirants
Lavez ou frottez soigneusement la tache avec une éponge et de l'eau
tiède savonneuse, rincez. Si la tache ne part pas, blanchissez avec de
l'eau chaude savonneuse. Lavez à la machine. Pour raviver les couleurs, utilisez de l'ammoniaque. Rincez abondamment.
Taches de couleur
Rincez ou mettez tremper à l'eau froide. Versez du détergent sur la
tache. Rincez. Au besoin, blanchissez. Certaines taches sont impossibles à enlever. Vous pouvez aussi utiliser un détachant courant dispo-
nible dans le commerce.
Œuf ou jus de viande
Rincez à l'eau froide. Si la tache ne part pas, appliquez un produit pour
assouplir le tissu et laissez agir pendant 15-20 minutes. Si la tache ne
part pas, frottez avec une éponge et du détergent liquide ou de l'eau de
Javel diluée. Lavez à la machine en eau chaude. Si vous traitez tout de
suite la tache à l'eau chaude, elle risque de se fixer encore plus.
Assouplissant
Frottez au savon de Marseille jusqu'à ce que la tache s'assouplisse.
Rincez abondamment et lavez à la machine. Dans certains cas, si la
couleur le permet, un frottement à l'alcool peut s'avérer efficace. Lavez
à la machine. Si vous le désirez, vous pouvez faire nettoyer à sec.
Feutre
Aspergez la tache avec un détergent spécial. Frottez soigneusement
la tache avec une éponge. Rincez à l'eau froide. Au besoin, appliquez
encore du détergent.
Fruits, vin
Mettez immédiatement tremper en eau froide quand la tache est encore fraîche. Traitez à l'eau de Javel à la température la plus élevée
supportée par le type de tissu ; versez de l'eau bouillante sur la tache
en la faisant tomber de 1" à 3" (30 - 90 cm) de haut. Lavez à la machine.
Herbe
Appliquez un détergent sur la tache. Frottez avec une éponge et de
l'alcool dénaturé. Au besoin, traitez à l'eau de Javel.
Graisse ou huile
Raclez les couches plus épaisses. Frottez la tache avec un détergent
en pâte ou un produit lessiviel courant; rincez à l'eau chaude. Si la tache
ne part pas, frottez soigneusement avec une éponge et un détachant.
Séchez. Au besoin, renouvelez l'opération. Pour enlever les taches
jaunâtres, utilisez un produit blanchissant au chlore ou à l'oxygène.
Encre et stylo à bille
Le lavage risque de fixer encore plus certains types d'encre. Nous
conseillons de traiter préalablement une petite portion de tissu. Frottez
plusieurs fois la tache avec une éponge et de l'acétone, du solvant
(acétate d'amyle) ou de l'alcool. Essayez avec de la laque, ça peut
marcher. Lavez à la machine. Au besoin, traitez à l'eau de Javel. Utilisez de l'acétate d'amyle sur des synthétiques en triacétate, Arnel,
Dynel et Verel. Sur d'autres textiles, utilisez de l'acétone.
REMARQUE : Certaines taches d'encre sont impossibles à enlever.
Moisissures
Brossez la surface pour la débarrasser de la moisissure et empêcher
que les spores se répandent. Plongez dans une solution composée
d'un 1/2 verre d'eau de Javel diluée dans 4 litres d'eau froide savonneuse pendant 5-10 minutes. Rincez avec soin. Lavez à la machine.
Boue
Laissez sécher la tache; puis brossez. Rincez plusieurs fois à l'eau
froide jusqu'à ce que la boue disparaisse. Lavez à la machine. (L'eau
savonneuse pourrait créer des taches rougeâtres ou jaunâtres).
www.aristonappliances.us
Mode d'installation et d'emploie 13
Page 54

Encre et stylo à bille
Le lavage risque de fixer encore plus certains types d'encre. Nous
conseillons de traiter préalablement une petite portion de tissu. Frottez
plusieurs fois la tache avec une éponge et de l'acétone, du solvant
(acétate d'amyle) ou de l'alcool. Essayez avec de la laque, ça peut
marcher. Lavez à la machine. Au besoin, traitez à l'eau de Javel. Utilisez de l'acétate d'amyle sur des synthétiques en triacétate, Arnel,
Dynel et Verel. Sur d'autres textiles, utilisez de l'acétone.
REMARQUE : Certaines taches d'encre sont impossibles à enlever.
Moutarde
Mettez tremper en eau chaude avec un produit lessiviel pendant quelques heures. Si la tache ne part pas, passez à l'eau de Javel.
Vernis à ongles
Traitez la tache quand elle est encore fraîche, raclez-la et frottez-la le
plus possible avant qu'elle ne sèche. Posez le tissu du côté de la tache
contre une feuille de papier buvard. Frottez sur l'envers de la tache
avec une éponge et de l'acétone (solvant à vernis à ongles), ou bien
frottez avec de l'alcool dénaturé additionné de quelques gouttes d'ammoniaque. Passez plusieurs fois sur la tache. Lavez à la machine à la
température supportée par le type de tissu.
N'utilisez pas d'acétone sur les synthétiques en acétate, Arnel, Dynel
ou Rayonne.
Brûlures
Rincez ou mettez tremper à l'eau froide. Appliquez un détergent sur la
tache et rincez. Au besoin, traitez à l'eau de Javel. Les taches sont
parfois impossibles à enlever.
Parfum
Rincez à l'eau froide. Frottez la tache avec un détergent liquide concentré ou un détergent en pâte. Rincez. Si la tache ne part pas, traitez
à l'eau de Javel.
Urine
Mettez tremper dans de l'eau froide. Si la tache est sèche, appliquez du
détergent en pâte sur la tache puis rincez. Au besoin, traitez à l'eau de
Javel.
Cirage
Raclez le plus possible. Prétraitez avec un détergent en pâte puis
rincez. Si la tache ne part pas, frottez avec une éponge et de l'alcool (1
part contre 2 parts d'eau) ou de l'essence de térébenthine. Eliminez
l'essence de térébenthine en frottant à nouveau avec une solution
d'eau tiède et de détergent ou avec de l'alcool. Au besoin, traitez à l'eau
de Javel.
Peinture
Frottez ou mettez tremper dans de l'essence de térébenthine ou dans
un solvant indiqué comme dilutif pour peinture. Lavez à la machine.
Transpiration
Lavez ou frottez énergiquement la tache avec une éponge et de l'eau
tiède additionnée de détergent en pâte. Si la transpiration a modifié la
couleur du tissu, traitez-le avec de l'ammoniaque ou du vinaigre pour le
raviver. Versez de l'ammoniaque sur les taches encore fraîches ; rincez. Sur les taches de vieille date, versez par contre du vinaigre et
rincez.
Rouille et fer
Appliquez un solvant spécial rouille disponible dans le commerce en
vous conformant aux instructions du fabricant. Rincez. S'il y a pas de
risques pour le tissu, faites bouillir le vêtement taché dans une solution
contenant 4 cuillères à café de crème de tartre dissoute dans un demi-
litre d'eau.
Boissons
Frottez avec une éponge et de l'eau froide; certaines taches sont invisibles quand elles sèchent, mais, une fois réchauffées, elles foncent et
sont parfois impossibles à enlever.
Goudron
Agissez immédiatement avant que la tache ne sèche. Frottez avec une
éponge et un détachant ou de l'essence de térébenthine. Lavez à la
machine.
14 Mode d'installation et d'emploi
www.aristonappliances.us
Page 55

Important pour mieux laver
M
AX
1
2
4
3
Quelques conseils utiles sur le tiroir à produits
lessiviels
Lorsque vous versez le produit
lessiviel ou l'assouplissant ne
dépassez pas les doses conseillées par le fabricant. Les
doses varient en fonction de
la charge, de la dureté de l'eau
et du degré de salissure.
L'expérience aidant, vous apprendrez à doser les quantités presque automatiquement.
Avant de verser la lessive pour
le prélavage dans le compartiment 1, contrôlez qu'il n'y ait
pas à l'intérieur le bac supplé-
mentaire 4 à eau de Javel.
Quand vous versez l'assouplissant dans le bac 3, attention à
ce qu'il ne déborde pas.
Le lave-linge prélève automatiquement l'assouplissant lors
de chaque programme de lavage.
1
Son premier secret et aussi le plus simple: c'est facile, il se trouve sous le couvercle...
Versez la lessive liquide dans
le bac 2 quelquesinstants seulement avant de brancher votre machine.
N'oubliez pas que la lessive
liquide n'est indiquée que pour
des lavages à des températures allant jusqu'à 60 degrés et
pour les programmes qui ne
prévoient pas de prélavage.
Vous trouverez dans le commerce des lessives liquides ou
en poudre avec boule
doseuse à placer directement
dans le tambour, leur mode
d'emploi est indiqué sur le paquet
N'utilisez jamais de lessive
pour lavage à la main, leur
excès de mousse risquerait
d'endommager votre lavelinge.
Les lessives spéciales main et
machine font bien sûr exception.
Encore un petit secret: quand
vous lavez à l’eau froide, ré-
duisez la quantité de lessive:
cette dernière s’y dissout moins
bien que dans l’eau chaude et
serait en partie gaspillée.
Bac
1:
Lessive prélavage (poudre)
Nettoyage du tiroir à
produits lessiviels
Pour sortir et nettoyer le tiroir :
tirez-le vers vous comme
2
illustré. Laissez -le un peu sous
l'eau courante tiède.
Des économies sur toute la ligne
Guide pour un emploi
économique et écologique des
CHARGE MAXIMUM
La meilleure façon déviter des gaspillages délectricité,
deau, de lessive et de temps, cest dutiliser votre lavelinge au maximum de la charge conseillée.
Mieux vaut une pleine charge que deux demies, vous
pourrez ECONOMISER jusquà 50% délectricité.
UN PRELAVAGE EST-IL VRAIMENT NECESSAIRE?
Uniquement en cas de linge vraiment sale.
Programmer un lavage SANS prélavage pour du linge
peu sale ou moyennement sale permet dECONOMISER
sur la lessive, le temps, leau et de 5 à 15%
délectricité.
UN LAVAGE A LEAU CHAUDE EST-IL VRAIMENT
NECESSAIRE?
Avant le lavage, traitez les taches avec un détacheur
ou mettez a tremper le linge taché dans leau, vous
pourrez sélectionner un programme de lavage à leau
chaude à une température moins élevée.
Choisissez un programme de lavage à 60° C (150° F)
pour ECONOMISER jusquà 50% délectricité.
électroménagers
Bac
2:
lessive lavage (poudre ou
liquide)
Bac
3:
Additifs (assouplissants,
parfums, etc.)
Bac
4:
Javel et détachant délicat.
Cycle blanchissage et
touche spéciale taches
Si vous voulez blanchir votre
linge, placez le bac
supplémentaire 4 (fourni)
dans le compartiment 1 du
tiroir à produits lessiviels.
Quand vous versez le produit
de blanchissage, attention à
ne pas dépasser le niveau
"max" indiqué sur le pivot
central (voir figure).
L'utilisation du bac
supplémentaire à eau de
Javel exclut la possibilité
d'effectuer un prélavage.
N'utilisez de l'eau de Javel
que pour les tissus blancs
résistants, et des détachants
délicats pour les couleurs,
les synthétiques et la laine.
Impossibile d'effectuer un
blanchissage pour le
programme "Soie".(Voir
page11).
REMARQUE:
LE BLANCHISSAGE N'A
D'EFFET QU'EN CAS DE
LAVAGE A L'EAU CHAUDE
www.aristonappliances.us
M
ode d'installation et d'emploi
15
Page 56

Problèmes et solutions
Avant de téléphoner, lisez ce qui suit
Sachez que quand votre lave-linge ne fonctionne pas
c'est, la plupart du temps, à cause de problèmes faciles
à résoudre sans l'aide d'un technicien. Avant d'appeler
le SAV, effectuez les contrôles suivants.
Le lave-linge ne démarre pas.
La fiche est-elle bien
branchée dans la prise? Elle
pourrait avoir été déplacée en
faisant le ménage.
Y a-t-il du courant?
Le disjoncteur pourrait s'être
déclenché parce qu'il y a trop
d'électroménagers branchés
en même temps. Ou bien il
peut y avoir une panne de
courant dans votre quartier.
Le hublot est-il bien fermé?
Par sécurité, le lave-linge ne
fonctionne pas si le hublot est
ouvert ou mal fermé.
“J’exige un professionnel
qualifié et agréé et des
pièces de rechange
originales garanties
Ariston!”
Mais où est passée l'eau?
C'est très simple : grâce à la nouvelle tecnologie
adoptée, pour obtenir les mêmes résultats, la moitié
suffit!
Voilà pourquoi vous ne
voyez pas d'eau à
travers le hublot : il en
faut peu, très peu
même, pour respecter
l'environnement sans
pour autant renoncer à
une propreté optimale.
Et qui plus est, vous
économisez aussi sur
l'électricité.
La touche Allumé/Eteint estelle enfoncée?
Dans ce cas, un programme
a été sélectionné.
Le sélecteur Lavage , sur les
modèles qui en prévoit un,
est-il dans une position
correcte?
Le robinet de l'eau est-il
ouvert? Par sécurité, s'il n'y a
pas d'arrivée d'eau au lavelinge séchant, le lavage ne
démarre pas.
Il n'y a pas d'arrivée
d'eau.
Le tuyau est-il bien
raccordé au robinet?
Panne d'eau? N'y a-t-il pas
des travaux en cours dans
votre immeuble ou dans la
rue?
La pression est-elle
suffisante? L'autoclave
pourrait être en panne.
Le filtre du robinet est-il
propre? Si l'eau est très
calcaire, ou suite à des
travaux récents sur la
canalisation d'eau, le filtre
pourrait être bouché par des
détritus.
Le tuyau en caoutchouc
n'est-il pas plié? Le
parcours du tuyau en
caoutchouc qui amène l'eau
au lave-linge séchant doit
être le plus rectiligne
possible. Contrôlez s'il n'est
pas écrasé ou plié.
Le bouton Lavage
tourne sans cesse?
Attendez quelques minutes
pour que la pompe de
vidange vide la cuve,
éteignez le lave-linge,
sélectionnez l'une des
positions stop/OFF, puis
rallumez. Si le bouton tourne
toujours, c'est un signal de
panne, appelez le SAV.
Le lave-linge prend
l'eau et vidange
continuellement.
Le tuyau n'est-il pas placé
trop bas? Il faut l'installer
entre 62 et 86 cm (25 - 34”)
de haut.
L'embouchure du tuyau estelle plongée dans l'eau?
L'évacuation murale a-t-elle
un évent? Si après ces
vérifications, le problème
persiste, fermez le robinet de
l'eau, éteignez la machine et
appelez le SAV.
Si vous habitez en étage, il
pourrait y avoir des phénomènes de siphonnement.
Pour les résoudre, il faut
monter une soupape spécia-
le.
Un appel de service sous garantie vous sera
débité au cas où les inconvénients ne
dépendraient pas de défauts de matériel ou de
fabrication.
16 Mode d'installation et d'emploi
www.aristonappliances.us
Page 57

ZZZZ...
Votre lave-linge ne
vidange pas et
n'essore pas.
Est-ce que le programme
choisi prévoit la vidange de
l'eau? Il y a des programmes
qui s'interrompent à la fin du
cycle de lavage, dans ce
cas, il faut intervenir pour
lancer la vidange.
La fonction "Repassage
facile", quand il y en a une
de prévue, est-elle
activée? Cette fonction
exige que vous interveniez
pour lancer la vidange.
Est-ce que la pompe
d'évacuation est
bouchée?Pour l'inspecter,
fermez le robinet, débranchez la fiche et suivez les
instructions fournies page
18 ou bien appelez le SAV.
Le tuyau en caoutchouc
n'est-il pas plié? Le tuyau
de vidange doit être le plus
rectiligne possible.
Contrôlez s'il n'est pas
écrasé ou plié
Est-ce que la conduite de
l'installation de vidange est
bouchée? S'il y a une
rallonge, est-ce qu'elle est
bien montée ou empêche-telle l'eau de passer?
Vibration excessive de
l'appareil pendant
l'essorage.
Est-ce que vous avez bien
déposé toutes les vis de
blocage pour le transport
au moment de l'installation? Voir la page consacrée
à l'installation.
Est-ce que la machine est
bien nivelée?Contrôlez
ré gulièrement sa mise à
niveau. Agissez sur les
pieds et contrôlez à l'aide
d'un niveau.
Y a-t-il suffisamment de
place entre la machine et
les meubles avoisinants? A
moins qu'il ne s'agisse d'un
modèle à encastrer, votre
lave-linge a besoin d'osciller
un peu pendant l'essorage.
Prévoyez quel-ques cm de
libres tout autour.
Le lave-linge a des
fuites.
Est-ce que la bague du
tuyau d'arrivée de l'eau est
bien vissée? Fermez le
robinet, débranchez la fiche
et essayez de la serrer sans
trop forcer.
Est-ce que le tiroir à
produits lessiviels est
engorgé? Dégagez-le et
lavez-le à l'eau courante.
Est-ce que le tuyau de
vidange n'est pas bien
fixé? Fermez le robinet,
débranchez la fiche et
essayez de mieux le fixer.
Il y a un excès de
mousse.
Est-ce que vous utilisez bien
une lessive machine?
Vérifiez qu'il y ait bien
l'inscription: "pour lave-linge"
ou bien "main et machine".
Est-ce que la quantité est
correcte? Un excès de
lessive produit plus de
mousse mais ne lave pas
mieux tout en produisant des
incrustations à l'intérieur du
lave-linge.
Si malgré tous ces contrôles,
votre lave-linge séchant ne
fonctionne pas et l'inconvénient
persiste, appelez le SAV le plus
proche de votre domicile en
précisant :
- la nature de la panne
- le sigle (Mod. …) ....)
- le numéro de série (S/N....)
Vous trouverez tous ces
renseignements sur la
plaquette signalétique située
sur le panneau arrière de votre
lave-linge séchant.
A FAIRE A NE PAS FAIRE
Fermez le robinet
après chaque
utilisation. Vous
éviterez tout danger
de fuites.
Laissez toujours le
hublot entrebâillé.
Pour éviter la
formation de
mauvaises odeurs.
Nettoyez l'extérieur
avec soin.
Pour nettoyer
l'extérieur et les
parties en
caoutchouc, utilisez
toujours un chiffon
imbibé d'eau tiède et
de savon.
www.aristonappliances.us
Laisser la fiche branchée pendant le
nettoyage de l'appareil.
Même pendant les travaux
d'entretien, il faut toujours
débrancher la fiche.
Utiliser des solvants ou des produits
abrasifs agressifs.
N'utilisez ni solvants ni produits
abrasifs pour nettoyer l'extérieur et
les parties en caoutchouc.
Négliger le tiroir à produits
lessiviels.
Il est amovible, pour le laver il suffit
de le laisser un peu sous un jet d'eau
courante.
Partir en vacances sans vous
soucier de lui.
Avant de partir, il faut toujours
contrôler si la fiche est bien débranchée
et le robinet de l'eau fermé.
Ne vous adressez jamais à des centres d'assistance
technique non agréés et exigez toujours l'emploi de
pièces détachées originales.
Service après vente
Numero de téléphone
ASSISTANCE ET
PIECES DETACHEES
1-888-245-0825
Mode d'installation et d'emploi 17
Page 58

Soins et entretien facile
Chouchoutez votre lave-linge, il vous servira
fidèlement pendant des années et des années
Votre lave-linge est un véritable compagnon de vie.
Votre lave-linge est conçu
pour bien vous servir pendant
de nombreuses années.
Quelques astuces vous
permettront de prolonger encore plus sa durée de vie et
d'éviter des problèmes. Nous
vous conseillons de fermer les
robinets quand la machine
n'est pas en marche. Vous protégerez ainsi les tuyaux, etc.
Si votre eauest dure, utilisez
un adoucisseur (une eau dure
laisse des traces blanchâtres
autour des robinets ou bien au
niveau des bondes, notamment dans la baignoire. Si
vous désirez avoir des renseignements plus précis à propos
de l'eau de votre installation,
adressez-vous au Service des
Eaux local).
Il faut toujours vider les poches, et enlever les broches,
les pin's, les pièces de monnaie ou tout autre objet dur.
NETTOYAGE EXTERIEUR
Lavez l'extérieur du lave-linge
avec un chiffon, de l'eau tiède
et du savon. N'utilisez pas de
polish sur les parties en
plastique. Certains polish
contiennent des agents qui
pourraient endommager les
matériaux plastique.
Nettoyage interne
Si vous habitez dans un pays
où les produits lessiviels con-
tenant du phosphate sont interdits, votre électroménager
pourrait avoir besoin d'une ré-
vision périodique. Si vous utilisez des produits lessiviels ne
contenant pas de phosphates,
des dépôts gras d'origine corporelle et de lessive peuvent
s'accumuler dans la cuve du
lave-linge. Ce phénomène est
d'autant plus manifeste dans
les zones à eau dure ou en
cas de lavages fréquents de
vêtements très sales. Pour éli-
miner ces dépôts, programmez un cycle de lavage complet à l'eau chaude en ajoutant 2 verres d'addoucisseur
d'eau non précipitant. N'introduisez pas de linge, de lessive
ou autres produits lessiviels.
Après avoir éliminé ces
dépôts, les résultats de lavage
du linge devraient être
satisfaisants, à condition
toutefois de se conformer aux
instructions de cette brochure.
ENTRETIEN GENERAL
Une fois que le lavage est terminé, fermez les robinets de
l'eau pour réduire la pression
sur les flexibles.
Nettoyez l'intérieur du hublot
à l'aide d'un chiffon humide
pour éliminer toute trace d'humidité. Appliquez, périodiquement une légère couche de
cire de protection sur la porte
intérieure du lave-linge, surtout sur les parties avoisinantes du hublot. Ce revêtement
sert à protéger la finition
superficielle de la porte
contre les débordements de
produits lessiviels qui
pourraient la décolorer.
Débarrassez la trappe de
vidange de tout corps
étranger
En cas de blocage, nettoyez
cette trappe. Pour plus de
renseignements, lisez le paragraphe suivant.
N'ayez pas la main lourde
avec les produits lessiviels.
Les lessives contiennent
déjà des produits anticalcaires. Donc, n'ajoutez à votre
lavage un produit spécifique
que si votre eau est
particulièrement dure, c'est à
dire très riche en calcaire.
Il peut être utile, de temps en
temps, d'effectuer un cycle de
lavage avec une dose de
produit anticalcaire, sans
lessive et sans linge.
N'ayez pas la main lourde
avec les produits lessiviels,
l'excès de mousse pourrait
causer de incrustations et
abîmer les composants de
votre lave-linge.
Le tiroir à produits
lessiviels est amovible; il
est important de le laver
régulièrement. Pour éviter
les incrustations il suffit
de le laisser un peu sous
un jet d'eau courante.
N'utilisez que des lessives peu
moussantes.
Videz toujours les poches:
les menus objets peuvent endommager sérieusement votre
lave-linge.
En cas de besoin, inspectionnez la pompe et le tuyau en caoutchouc.
Le lave-linge est équipé d'une pompe autonettoyante qui n'exige aucune opération de nettoyage et d'entretien. Il peut
toutefois arriver que de menus objets tombent par mégarde dans la pompe: pièces de monnaie, agrafes, boutons
ballants, etc. Pour éviter qu'ils endommagent la machine, ils sont bloqués dans une trappe accessible, située en bas,
à droite de la machine.
Attention: Avant de contrôler cette trappe, assurez-vous que le programme
en cours est bien terminé et que la machine est vide. Débranchez la fiche de
l'appareil, comme pour toute autre opération d'entretien.
Pour accéder à la trappe, dégagez avec soin le haut du panneau du socle du
lave-linge à l'aide d'un tournevis pour pouvoir le déposer. Faites ensuite
glisser vers l'avant le bord supérieur pour pouvoir le soulever plus facilement
(Fig. 1). Placez un récipient bas ou une cuvette sous le couvercle de la trappe
pour recevoir l'eau qu'elle peut contenir. Déposez enfin le couvercle en le
tournant dans le sens inverse des aiguilles d'une montre (Fig. 2). Une fois le
nettoyage terminé, n'oubliez pas de remonter le couvercle.
Fig. 1
Tuyau d'arrivée de l'eau
Contrôlez les tuyaux en caoutchouc au moins une fois par an. Remplacez-le dès que vous remarquez des craquèlements et
des fissures car ils sont soumis à de fortes pressions en cours de lavage qui pourraient entraîner des cassures. Des tuyaux en
acier inox de qualité supérieure peuvent aussi être commandés. Contactez pour cela le service.
18 Mode d'installation et d'emploi
Remontez ensuite le panneau du socle en fixant les crochets situés dans le
bas aux fentes prévues et poussez sur la partie supérieure pour la remettre
en place.
www.aristonappliances.us
Fig. 2
Page 59

Nettoyage des filtres
Enlevez les filtres
avec des pincettes, nettoyez-les et
remontez-les
Enlevez les filtres,
nettoyez- les et
remontez-les
Ruban
Vidange:
pour éviter tout débordement veillez à ce
que le tuyau de vidange se trouve bien à
au moins 62 cm. (25’’)de haut par rapport
au socle de l'appareil.
Fixez solidement les tuyaux.
Ruban
Caractéristiques techniques
Modèle
Dimensions
Capacité 1.92
Branchement
électrique
Raccordements
hydrauliques :
Vitesse
d'essorage
U
®
L
C
US LISTED
AW 120
largeur 23.4" (59.5 cm)
hauteur 33.4" (85 cm)
profondeur 22 (56 cm)
1200
- Lavage
tours par minute
: 2-12 lbs (1-5,5 Kgs)
1350 W, 13 A.
cu. ft.
tension 120 Volt 60 Hz (fonctionnement minimum 108 volt
puissance maximum absorbée
pression maximum 100 psi (689.6 kPa)
pression minimum 20 psi (137.9 kPa)
jusqu'à
Cet appareil est conforme aux directives UL pour les Etats-Unis
et pour le Canada.
Ruban
)
Dans un soucis constant d'amélioration, le fabricant se réserve le droit d'apporter, à tout moment et sans aucun préavis, toutes
les modifications qu'il estimera nécessaires. Tous droits réservès. Imprimé en Italie.
www.aristonappliances.us
Mode d'installation et d'emploie 19
Page 60

GARANTIES
Lave-linge ARISTON
Les garanties fournies par (Ariston) dans cette déclaration ne sont applicables qu'aux lave-linges Ariston vendus au
premier utilisateur qui aura acheté l'appareil chez Ariston ou chez l'un de ses distributeurs, revendeurs ou centres
d'assistance agréés aux Etats-Unis ou au Canada. Les garanties prévues par ce document ne sont pas transférables.
Durée de la garantie
Première année Garantie totale limitée à compter de la date d'installation*
Ariston s'engage à réparer ou à remplacer gratuitement tout composant qui s'avèrera défectueux, sous réserve de
conditions normales d'utilisation domestique, frais d'expédition et de main d'œuvre inclus. La réparation sous garantie
devra être effectuée par un centre d'assistance Ariston agréé.
Deuxième année Garantie limitée à compter de la date d'installation*
Ariston s'engage à fournir gratuitement les pièces détachées pour tout composant qui s'avèrera défectueux sous réserve
de conditions normales d'utilisation domestique, frais de main d'œuvre exclus.
Troisième-Cinquième année Garantie limitée aux composants Electroniques à compter de la date d'installation*
Ariston s'engage à réparer ou à remplacer gratuitement tout microprocesseur ou carte des circuits qui s'avèrera
défectueux sous réserve de conditions normales d'utilisation domestique dans les 3-5 ans suivant la date d'installation
originale, frais de main d'oeuvre exclus.
Troisième-Cinquième année Garantie limitée au moteur à compter de la date d'installation*
Ariston s'engage à réparer ou à remplacer gratuitement le moteur ou tout composant du moteur qui s'avèrera défectueux
sous réserve de conditions normales d'utilisation domestique dans les 3-5 ans suivant la date d'installation originale, frais
de main d'oeuvre exclus.
Garantie à vie limitée du produit contre la corrosion de l'acier inoxydable due à la rouille à compter de la date
d'installation*
Ariston s'engage à fournir gratuitement un lave-linge de remplacement du même modèle ou d'un modèle actuel qui soit
équivalent ou meilleur d'un point de vue fonctionnel, au cas où le tambour de lavage serait attaqué par de la rouil- le sous
réserve de conditions normales d'utilisation ; frais de main d'oeuvre, d'expédition et d'installation exclus.
10 jours à compter de la date d'achat Garantie détériorations esthétiques
Ariston s'engage à remplacer gratuitement toute partie esthétique (appel au service assistance inclus) qui s'avèrera
abîmée, dans les 10 jours suivant la date d'achat. Cette clause n'inclut toutefois pas les dommages dus aux opérations
de transport, manutention ou installation effectuées de façon inappropriée.
* La date d'installation se réfère à la date d'installation du lave-linge séchant ou à dix jours ouvrables suivant la date
de livraison, la date à retenir est celle qui correspond à la circonstance qui s'est produite en premier.
Exclusions :
La présente garantie ne couvre pas les appels d'assistance ou de réparation effectués pour rectifier l'installation, demander des instructions sur l'utilisation de l'appareil, remplacer les fusibles de l'appartement ou corriger le câblage électrique
ou l'installation hydraulique domestique. De plus, toute réparation de l'appareil qui s'avèrera nécessaire suite à une
utilisation autre qu'une utilisation domestique normale n'est pas couverte par la garantie. Les garanties ne couvrent aucun
défaut ou dommage causé par un accident, une mauvaise utilisation, un usage abusif ou acte de négligence, une
intervention d'assistance non autorisée ou des forces extérieures hors contrôle d'Ariston, tels qu'incendies, inondations
et autres causes de force majeure, ou les installations non conformes aux réglementations électriques ou hydrauliques
applicables au niveau local. Les frais de main d'oeuvre, d'expédition et d'installation supportés pour la réparation ou le
remplacement d'un appareil un an après la date d'installation ne seront pas couverts par la présente garantie. Tous les
composants remplacés ou réparés seront assimilés aux pièces d'origine pour ce qui est de la période de garantie
applicable. Dans les limites permises par la loi, la présente garantie remplace toute autre garantie expresse ou implicite,
y compris les garanties implicites de commerciabilité et d'aptitude à un emploi spécifique. Ariston ne pourra en aucun
cas être tenu pour responsable des dommages accessoires ou indirects.
Pour accéder aux services de garantie, appeler les 1-888-426-0825 ou écrivez à :
Ultra 8 International, 2505 Anthem Village Drive, Suite E - PO BOX 562, Henderson Nevada 89052
En précisant toujours le numéro du modèle, le numéro de série, la date d'achat, le nom et l'adresse du revendeur.
Ultra 8 International, 3027 East Sunset Road Suite, Suite 101, LAS VEGAS, Nevada 89120
2020
20
2020
www.aristonappliances.us
02/2004 - 195 041 205.00 - Xerox
 Loading...