

Page 1
Kullanma Kýlavuzu
ÇAMAÞIR MAKÝNESÝ
TR
Türkçe, 1
AVF 8
GB
English,13
Ýçindekiler
TR
Montaj, 2-3
Ambalajdan çýkartma ve yerleþtirilmesi, 2
Su ve elektrik baðlantýsý, 2-3
Ýlk yýkama, 3
Teknik bilgiler, 3
Çamaþýr makinesini tanýyalým, 4-5
Kontrol paneli, 4
Likit kristal ekran, 5
Çalýþtýrma ve programlar, 6
Programýn baþlatýlmasý, 6
Program tablosu, 6
Kiþisel ayarlar, 7
Sýkma devri ayarý, 7
Sýcaklýk ayarý, 7
Zaman ayarý, 7
Fonksiyonlar, 7
Deterjanlar ve çamaþýr, 8
Deterjan bölmesi, 8
Çamaþýrýn hazýrlanmasý, 8
Özel çamaþýrlar, 8
Woolmark Platinum Care (Kaþmir platinum), 8
Önlem ve tavsiyeler, 9
Genel güvenlik, 9
Elden çýkartma, 9
Tasarruf ve çevrenin korunmasý, 9
Bakým ve temizlik, 10
Su ve elektrik baðlantýsýný kesiniz, 10
Çamaþýr makinesin temizliði, 10
Deterjan bölmesinin temizliði, 10
Kapak ve tambur bakýmý, 10
Pompa temizliði, 10
Su giriþ hortumunun kontrolü, 10
Sorunlar ve çözümleri, 11
Servis, 12
Yetkili Servisini aramadan önce, 12
1
Page 2
Montaj
TR
Bu kullanma kýlavuzunun saklanmasý daha sonradan
da okunup faydalý olabilmesi açýsýndan önemlidir. Çamaþýr
makinesinin nakli durumunda da, yeni sahibinin
faydalanabilmesi için bu kýlavuz makine ile beraber
saklanmalýdýr.
Talimatlarý dikkatlice okuyunuz:
montaj, kullaným ve güvenlik hakkýnda önemli
bilgiler yeralmaktadýr.
Ambalajdan çýkartma ve yerleþtirilmesi
Ambalajdan çýkartýlmasý
1. Çamaþýr makinesinin ambalajdan çýkartýlmasý
2. Çamaþýr makinesinin taþýma esnasýnda hasar
görmemiþ olduðunu kontrol ediniz. Hasar görmüþ ise
monte etmeyiniz ve yetkili satýcýyla temas kurunuz.
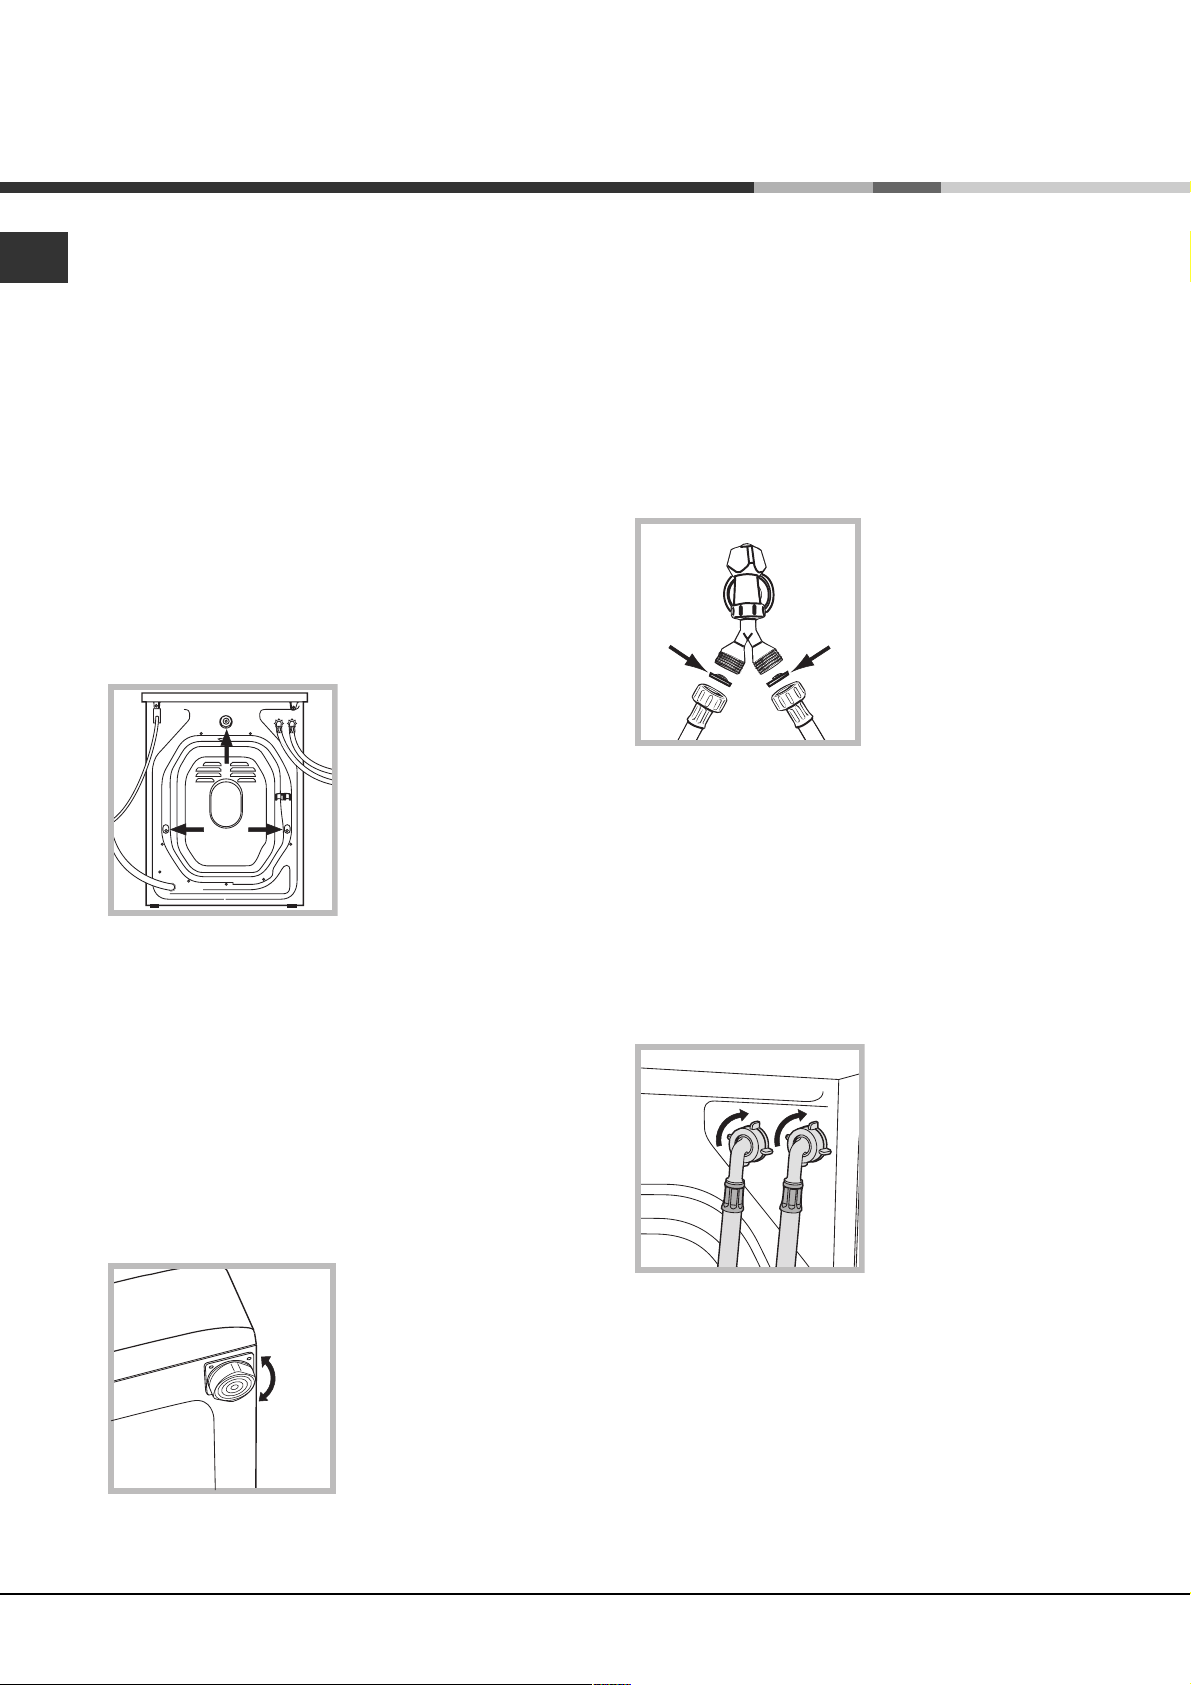
3. TTaþýma sýrasýnda
arka tarafta bulunan 3
adet koruyucu vidayý ve
ara parçasýyla birlikte
buradaki lastiði de
çýkartýnýz (resime bkz.).
4. Delikleri ambalajda bulacaðýnýz plastik kapaklarla
kapayýnýz.
5. Tüm parçalarý muhafaza ediniz: çamaþýr
makinesinin nakli gerektiði takdirde takýlmalarý
gerekmektedir.
Ambalajlar çocuklar için oyuncak deðildir.
Yerleþtirilmesi
Saðlýklý yerleþtirme, çamaþýr makinesine saðlam bir
duruþ kazandýracaðý gibi, çalýþmasý esnasýndaki
sarsýntý, gürültü ve hareketlilikleri de önleyecektir.
Zeminde halý olmasý halinde, ayak ayarýný makinenin
altýnda havalandýrma olabilecek þekilde yapýnýz .
Su ve elektrik baðlantýsý
Su giriþ hortumunun takýlmasý
1. Hortumu, 3/4
ölçülerinde vidalý bir gaz
baþlýðý kullanmak
suretiyle, makinenin
ambalajýnda bulunan filtre
ve contayý da ilave
ederek, hortumun
musluða sabit bir þekilde
tesbit edildiðinden emin
olarak takýnýz. C harfiyle
iþaretlenmiþ olan su hortumunun soðuk su
musluðuna, H harfiyle iþaretlenmiþ olanýn da sýcak
su musluðuna takýlmasý gerekmektedir. Her iki
hortum da, makineyle beraber teslim edilen Y
þeklindeki öok baþlý ara ünite kullanýlmak suretiyle
soðuk su musluðuna takýlabilir (resime bkz.).
Baðlantýyý yapmadan önce, suyu berraklaþana kadar
akýtýnýz.
Uyarý: Filtreleri düzenli olarak, suyun altýna tutarak
temizleyiniz.
2.Su giriþ hortumunu
çamaþýr makinesinin
arka kýsmýnda üst sað
köþedeki su giriþine
takýnýz (resime bkz.).
1. Çamaþýr makinesini düz ve sert bir zemine
yerleþtiriniz, duvar veya mobilyalara dayamayýnýz.
2. Yerleþtirilecek zemin
tam düz deðilse çamaþýr
makinesinin vidalý ön
ayaklarýný sýkarak veya
gevþeterek dengeyi
saðlayýnýz (resime bkz.);
eðim açýsý 2° den fazla
olmamalýdýr.
2
3. Hortumda katlanma ve ezilme olmamasýna
dikkat ediniz.
Musluðun su basýncýnýn teknik veriler tablosunda
belirtildiði gibi olmasý gerekir (yan sayfaya bkz.).
Su giriþ hortumunun boyu yetersiz ise Ariston
Yetkili Servisine baþvurunuz.
Page 3
Boþaltma hortumunun takýlmasý
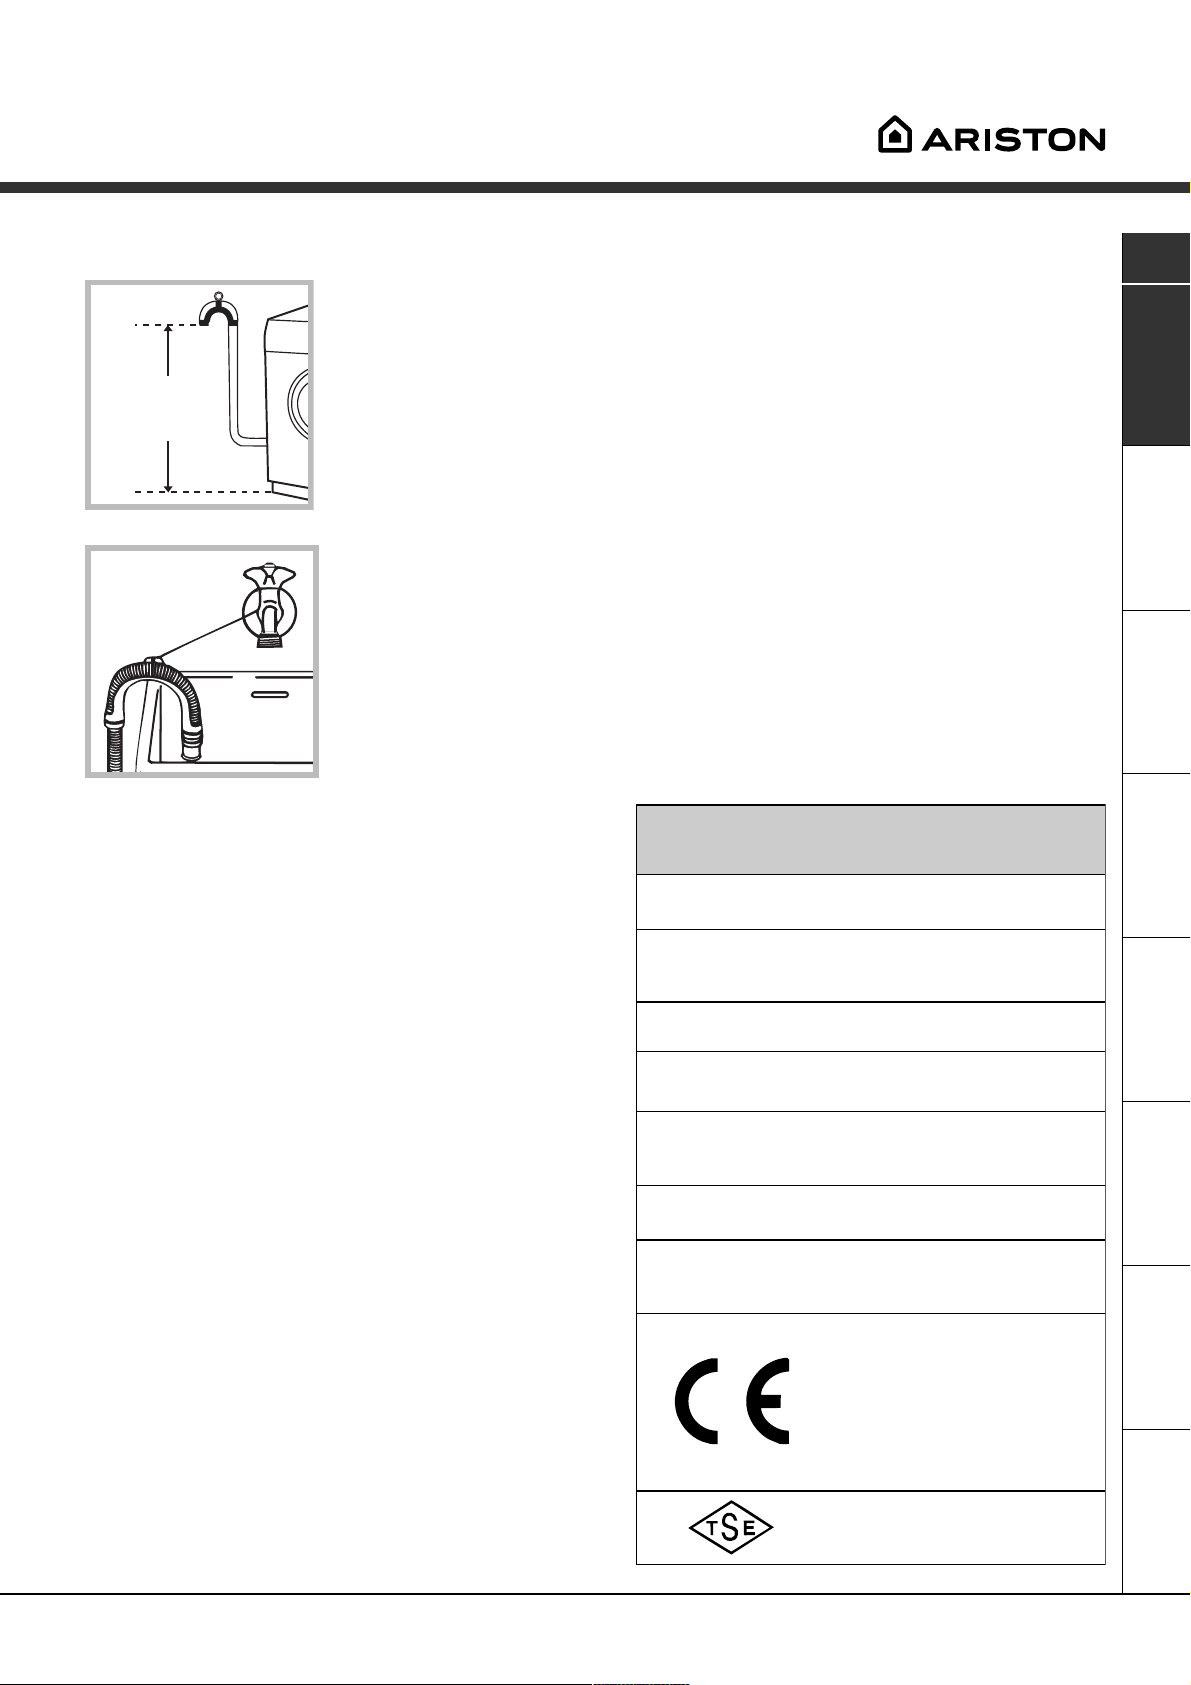
Boþaltma hortumunu,
katlanmasýný önleyerek,
yerden 65 ile 100 cm
yükseklik arasýndaki bir
duvar tahliyesine takýnýz;
65 - 100 cm
Uzatma kablosu ve çoklu prizler kullanmayýnýz.
TR
Kablonun ezilmemesi ve katlanmamasý gerekir.
Su giriþ kablosu yalnýzca Ariston Yetkili Servis
teknisyenler tarafýndan deðiþtirilmelidir.
Dikkat! Bu þartlara uyulmamasý halinde firma hiçbir
sorumluluk kabul etmez.
Ýlk yýkama
veya, ambalajda
bulacaðýnýz plastik
yönlendiriciyi
kullanarak, bir küvet
veya lavabo kenarýna
asýnýz (resime bkz.).
Boþaltma hortumunun
serbest ucunun suya
girmemesi gerekir.
Boþaltma hortumu için uzatma kullanýlmamasý
tavsiye olunur; bu mümkün deðilse, uzatma
hortumunun çapýnýn ayný olmasý ve 150 cm. den uzun
olmamasý gerekir.
Elektrik baðlantýsý
Fiþi prize takmadan önce aþaðýdaki hususlara
dikkat ediniz:
_ prizin topraklý ve standartlara uygun olmasýna;
_ prizin, makinenin teknik veriler tablosunda
belirtilen, azami gücünü taþýyabilecek olmasýna
(yandaki tabloya bkz.);
_ priz hattýnýn akým ve voltajýnýn, teknik veriler
tablosunda belirtilen deðerlere uygun olmasýna
(yandaki tabloya bkz.);
_ prizin çamaþýr makinesinin fiþiyle uyumlu
olmasýna. Aksi takdirde prizi uyumlu olaný ile
deðiþtiriniz.
Çamaþýr makinesi, muhafazalý olsa bile açýk
alanda monte edilemez, rüzgara ve yaðmura maruz
kalmasý çok tehlikelidir.
Monte edilen çamaþýr makinesinin fiþinin
kolaylýkla eriþilebilir olmasý gerekir.
Montajdan sonra, çamaþýr koymaksýzýn ve ön
yýkama programýný uygulamaksýzýn, deterjanla 90ºC
programýnda yýkama yapýnýz.
Teknik bilgiler
Model
Ölçüler
Kapasite
Elektrik baðlantýlarý
Su baðlantýlarý
Sýkma hýzý
IEC456 standartlarý
uyarýnca kontrol
programlarý
AVF 8
geniþlik 59,5 cm
yükseklik 85 cm
derinlik 52,5 cm
1 - 5 kg
gerilim 220/230 Volt 50 Hz
azami güç 1850 W
max. su basýncý 1 MPa (10 bar)
min. su basýncý 0,05 MPa (0,5 bar)
tambur kapasitesi 46 litre
maksimum
dakikada 800 devire kadar
program 3; 60°C sýcaklýkta;
5 kg çamaþýrla.
Bu makina aþaðýda belirtilen AB
normlarýna uygundur:
- 19/02/73 tarihli 73/23/CEE
(Düþük voltaj) ve daha sonra
yapýlan düzenlemeler
- 03/05/89 tarihli 89/336/CEE
(Elektromanyetik Uyum) ve daha
sonra yapýlan düzenlemeler
TS 2004 EN 60335-2-7
ServisArýzalarÖnlemler BakýmProgramlar DeterjanlarMontaj Taným
3
Page 4
Çamaþýr makinesini
tanýyalým
TR
Kontrol paneli
Kolay
kullaným
kartý
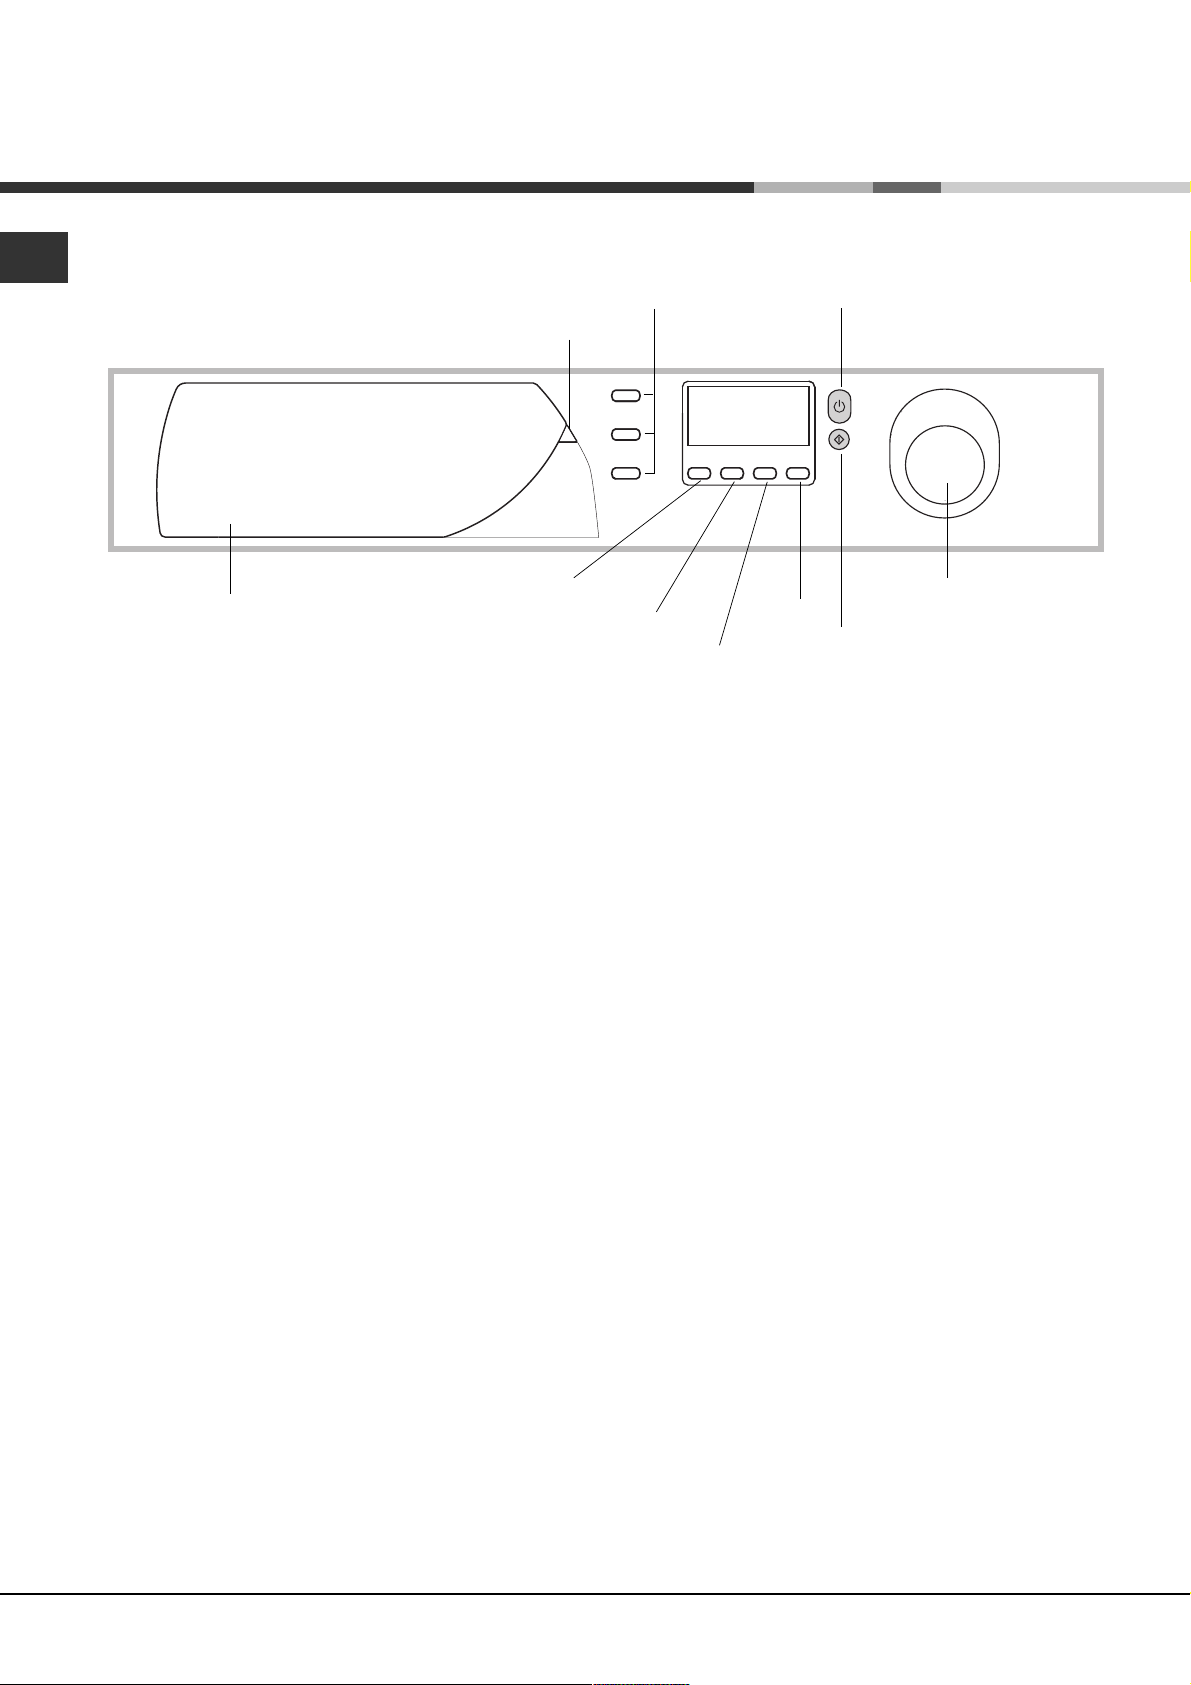
Deterjan Bölmesi
Deterjan ve diðer katký maddeleri için Deterjan
Bölmesi (bkz. sayfa 8).
Programlar konusundaki önemli hususlarýn daima
el altýnda olmasý ve okunabilmesi için Kolay
Kullaným Kartý: gri ucun çekilmesi ile açýlýr.
FONKSÝYON tuюlarэ: mevcut fonksiyonlardan birini
seзmek iзin kullanэlэr. Seзilen fonksiyona ait tuюun
эюэрэ yanar.
SIKMA
FONKSÝYON
tuþlarý
Likit kristal
ekran
SICAKLIK
Zaman ayarý
Çocuk Kilidi tuþunun çamaþýr makinenizin
çalýþma sýrasýnda veya Stand-by durumunda iken
tüm tuþlarýný bloke eder.
Çamaþýr makinesini programlamak ve yürütülen
iþlemi izleyebilmek için Likit kristal ekran
(bkz. yandaki sayfa).
Çamaþýr makinesini çalýþtýrýp, durdurmak için
AÇMA/KAPAMA tuþu (bkz. sayfa 6).
Çocuk
Kilidi
AÇMA/KAPAMA
tuþu
Program düðmesi
BAÞLAT/TEKRAR
BAÞLAT tuþu
Sýkma hýzýný ayarlayabilmek veya sýkmayý devre
dýþý býrakmak için SIKMA tuþu (bkz. sayfa 7).
Yýkama suyu sýcaklýðýný ayarlamak için SICAKLIK
ayar tuþu (bkz. sayfa 7).
Zaman ayarý tuþu, ayarlanan programý 24 saate
kadar gecikmeli baþlatmak için (bkz. sayfa 7).
4
Programlamak veya yanlýþ programlarý iptal için
BAÞLAT/TEKRAR BAÞLAT tuþu (bkz. sayfa 6).
Program seçmek için Program Düðmesi. Düðme
gömme tiptir: çýkartmak için, ortasýna hafifçe
basýnýz. Program esnasýnda düðme sabit kalýr.
Page 5
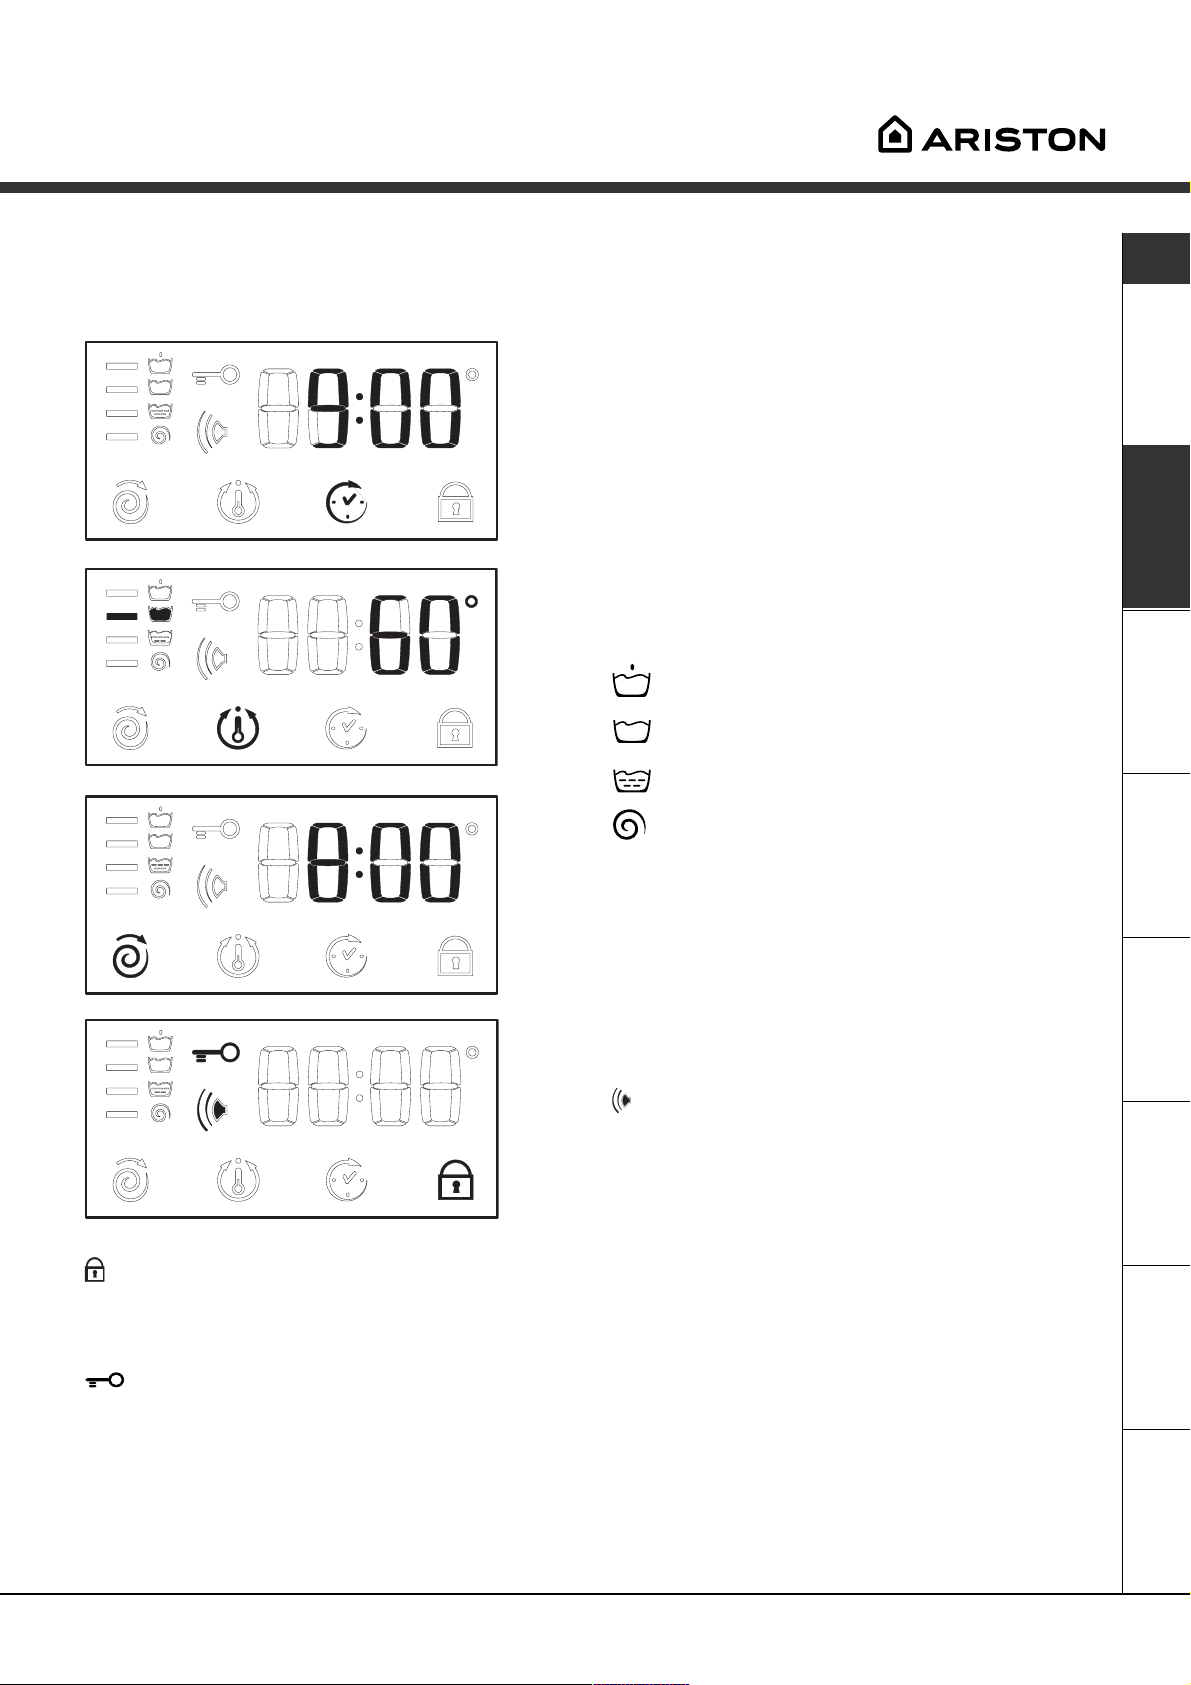
Likit Kristal Ekran
Makineyi kolayca programlamayý saðlayan likit kristal ekran (bkz. sayfa 7), yýkama iþlemi hakkýnda bilgi verir
ve yürütülmekte olan iþlemi gösterir.
Programý devreye sokmak için BAÞLAT/TEKRAR
BAÞLAT tuþuna bastýktan sonra, programýn sonuna
kalan süre ekranda belirir. Yýkama programýnýn
baþlangýç saatini erteleme programlanmýþ olmasý
halinde (Zaman ayarý, bkz. sayfa 7), bu ekranda
görülecektir.
Yýkama iþlemi esnasýnda þunlar görüntülenir:
Yýkama aþamalarý:
Ön yýkama
Yýkama
Durulama
TR
Sýkma
Kiþiselleþtirme fonksiyonlarý ve seçenekleri:
Fonksiyonlari ve seçenekleri seçmek için asagidaki
kisma ve 7. sayfaya bakiniz. 7.
Zil:
Makinenizde çesitli fonksiyonlarin veya arizalari
bildiren bir ses sinyali bulunmaktadir: uyumsuzluk,
seçenek/program tuslari, devre sonu, yeniden
çalistirma.
Çocuk Kilidi:
Sizin ve çocuklarýnýzýn güvenliði için makine çalýþýrken veya bekleme durumunda iken (geciktirilmiþ baþlatmaStand-by durumu) tüm tuþlarý bloke edebilirsiniz bunun için bu tuþa 2 saniye boyunca basmanýz gerekecektir.
Devre dýþý býrakmak için 4 saniye tutunuz.
Elektronik kapý kilidi:
Iþýklý göstergenin yanýyor olmasý kapaðýn, istenmeyen açýlmalara karþý kilitli olduðunu gösterir.
Herhangi bir arýzaya yol açmamak için ýþýklý göstergenin sönmesini beklemek gerekir.
Bu modelde, yýkamanýn bazý aþamalarýnda kapaðýn açýlmasýna olanak saðlayan bir sistem mevcuttur.
Bu, ýþýklý gösterge yanýl olmadýðý zamanlarda kapaðý açmak mümkündür.
Program bitiminde ‘’END’’ ibaresi belirir.
ServisArýzalarÖnlemler BakýmProgramlar DeterjanlarMontaj Taným
Arýza halinde, arýza kodlarýna bakýnýz, örneðin: Ariston Yetkili Servisine bildirilecek olan F-01 kodu (bkz. sayfa 12).
5
Page 6
g
ð
j
þ
þ
þ
y
y
Çalýþtýrma ve Programlar
TR
Programýn baþlatýlmasý
1. Düðmeye basarak çamaþýr makinesini açýnýz .
Tüm iþaretler bir an için yanacak sonra
söneceklerdir.
2. Çamaþýrý yerleþtirip, kapaðý kapatýnýz.
3. Düðme vasýtasýyla arzu edilen programý
seçiniz. Tahmini süre ýþýklý göstergede
belirecektir. Sýcaklýk ve sýkma devri, seçilen
programa göre, otomatik olarak ayarlanýr
(deðiþtirmek için bkz. sayfa. 7).
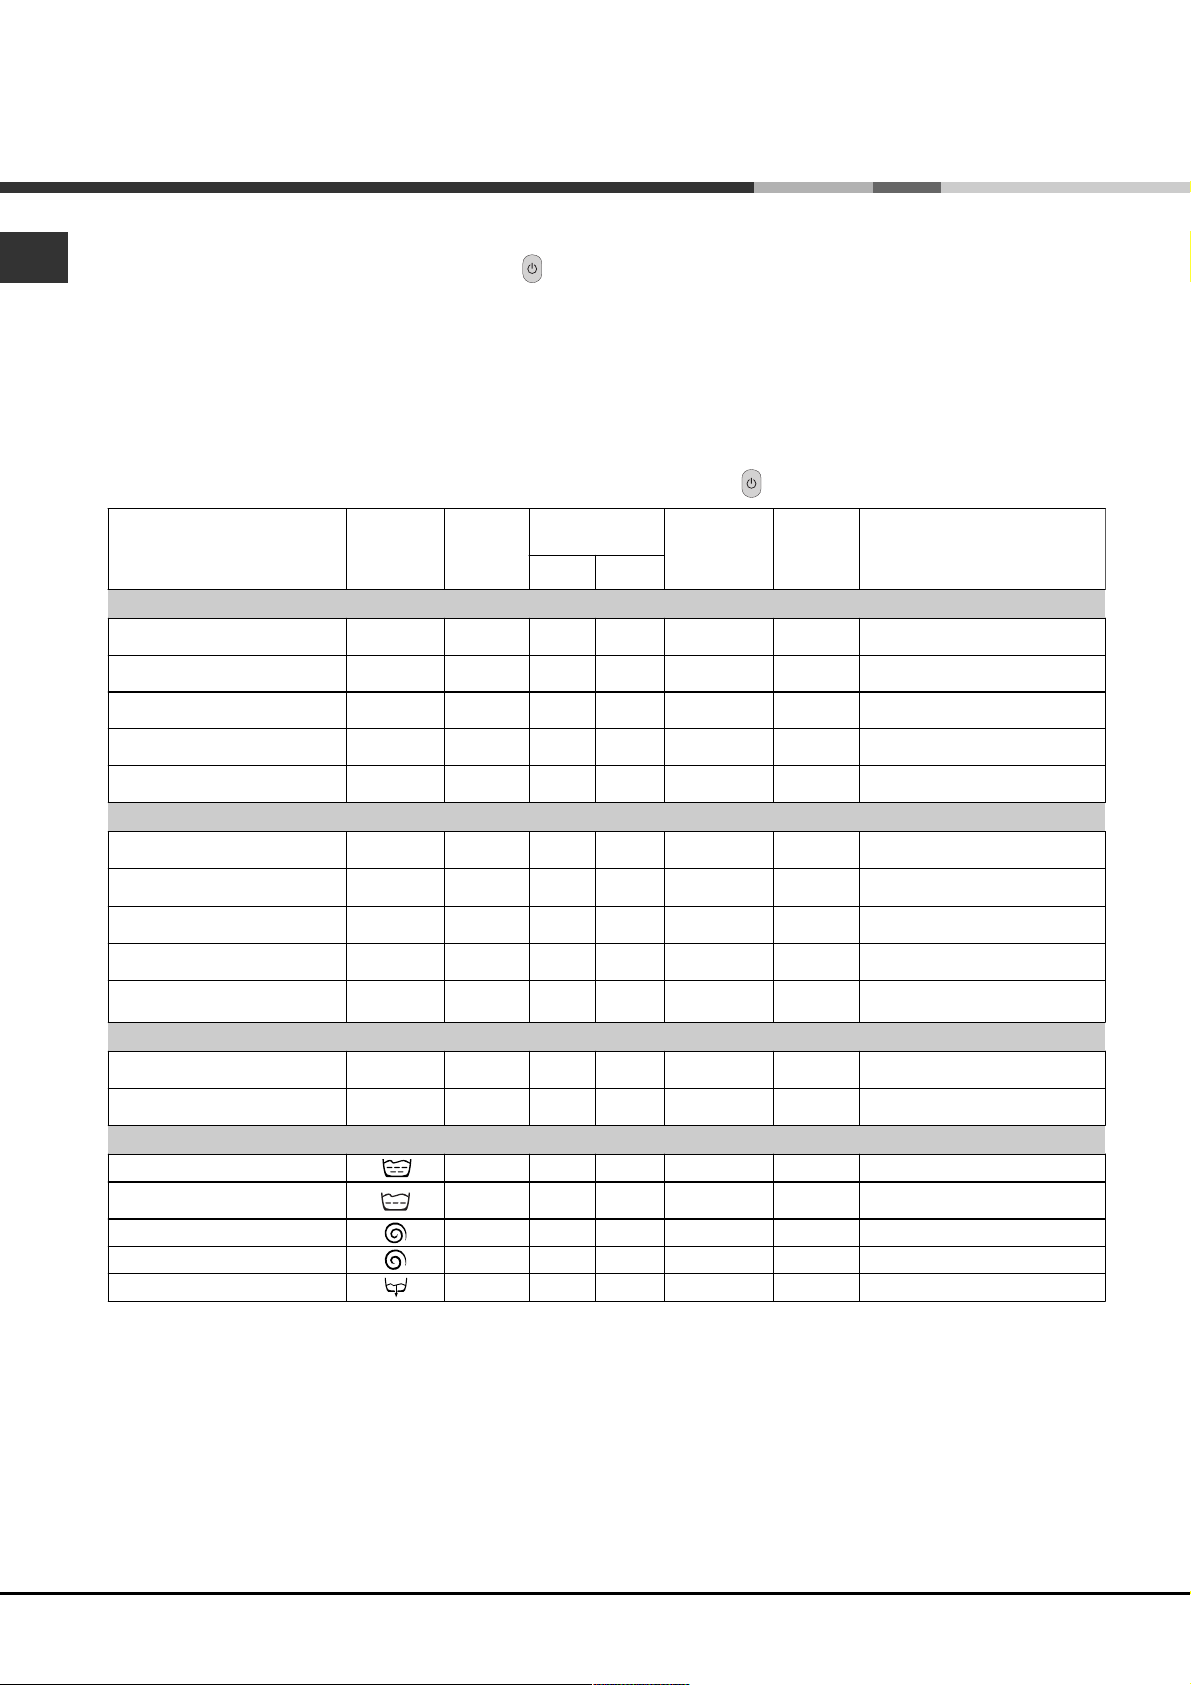
Program tablosu
Kumaþ ve lekenin tipiPro
ramlar
Yýkama
sýcaklý
ý
Deter
ön
ýkama
4. Deterjan ve katký maddelerini koyunuz (bkz. sayfa 8).
5. Ýstediðiniz herhangi bir fonksiyonu seçin (bkz. sayfa 7).
6. BAÞLAT/TEKRAR BAÞLAT düðmesine basmak
suretiyle programý çalýþtýrýnýz.
Ýptal etmek için BAÞLAT/TEKRAR BAÞLAT
düðmesine en az 2 saniye basýlý tutunuz.
7. Program bitiminde END ibaresi belirecektir.
Çamaþýrlarý çýkartýnýz ve kapaðý, tamburun
kurumasý için aralýk býrakýnýz.
8. Çamaþýr makinesini düðmeye basmak suretiyle
atýcý
.
i
süresi
(dakika)
lem
Yýkama i
kapatýnýz
an
Yumu
ýkama
Pamuklular
kirli beyazlar
Aþýrý
af, masa örtüsü, vs.)
(çar
þ
kirli beyazlar
Aþýrý
af, masa örtüsü, vs.)
(çar
þ
Çok kirli
ve renkliler
Çok kirli
ve renkliler
Az kirli beyazlar ve hassas
renkliler (gömlekler, atletler, vs.)
dayanýklý
dayanýklý
beyaz
beyaz
1
2
3
4
5
90°C
90°C
60°C
40°C
40°C
__ _
__
__
__
__
1
7
4
1
0Yýkama, durulamalar, sýkmalar
3
5Yýkama, durulamalar, sýkmalar
1
1
120 Y
2
8
ý
kama, yýkama, durulamalar,
Ön y
sýkmalar
ý
kama, durulamalar, sýkmalar
ý
kama, durulamalar, sýkmalar
Y
Sentetikler
dayanýklý
Çok kirli
(bebek çama
Dayanýklý
her tür iç çama
Çok kirli
(bebe
Hassas renkliler (hafif kirli her
tür iç çama
Hassas renkliler (hafif kirli her
tür iç çama
renkliler (hafif kirli
dayanýklý
k
çamaþýrlarý, vs.)
þý
þý
þý
rlarý)
þýrý
rlarý)
rlar
renkliler
)
renkliler
ý)
6
6
7
8
9
60°C
40°C
50°C
40°C
30°C
__
__
__
__
__
8
7
8
6
30
ý
kama, durulamalar,
Y
7
önleme veya hassas
ý
kama, durulamalar,
Y
2
önleme veya hassas
ý
kama, durulamalar,
Y
3
önleme veya hassas
ý
kama, durulamalar,
Y
8
önleme veya hassas
ý
kama, durulamalar, veya
Y
hassas
sýkma
Narinler
lüler
Yün
Çok hassas kumaþlar
(perdeler, ipek, viskon, vs.)
KISMÝ PROGRAMLAR
Durulama
Hassas durulama
10
11
40°C
30°C
__
__
_
_
50
45
Y
sýkma
hassas
ý
kama, durulamalar,
Y
önleme veya
Durulamalar ve
Durulamalar,
boþaltma
veya
ý
kama, durulamalar, veya
Sýkma Boþaltma
s sýkma
Hassa
Boþaltma
Su boþaltma Su boþaltma
leminin tanýmý
sýkma
sýkma
sýkma
sýkma
boþaltma
sýkma
kýrýþýk
önleme
ve kuvvetli
ve kuvvetli
kýrýþýk
kýrýþýk
kýrýþýk
kýrýþýk
kýrýþýk
sýkma
sýkma
Notlar
Kýrýþýk önleme iþlemi için: Kolay ütü fonksiyonuna bakýnýz, yan sayfada. Tabloda belirtilen veriler yaklaþýk deðerlerdir.
Özel programlar
40º C'de A Sýnýfý yýkama: Çamaþýr makinesinin düþük sýcaklýklarda bile en iyi sonuçlarý elde ettiði özel bir
yýkama programýdýr. (Diðer çamaþýr makinelerinde 60º C'de alacaðýnýz yýkama performansýný, program 4'ü 40º
C'ye ayarladýðýnýzda elde edebilirsiniz; Bu program örneðin 60º C'de yýkamaya cesaret edemediðiniz renkli
giysilerinizi 40º C'de ayný kalitede yýkamanýzý saðlar.
Günlük yýkama 30' (sentetikler için program 9) az kirli çamaþýrlarý kýsa sürede yýkamak üzere hazýrlanmýþtýr:
sadece 30 dakika sürer, böylece zaman ve enerji tasarrufu saðlar. Programýn (9), 30°C ye ayarlanmasýyla,
azami 3 kg. olmak üzere çeþitli türdeki (yün ve ipek hariç) çamaþýrlarý yýkamak mümkündür.
Sývý deterjan kullanýlmasý tavsiye olunur.
6
Page 7
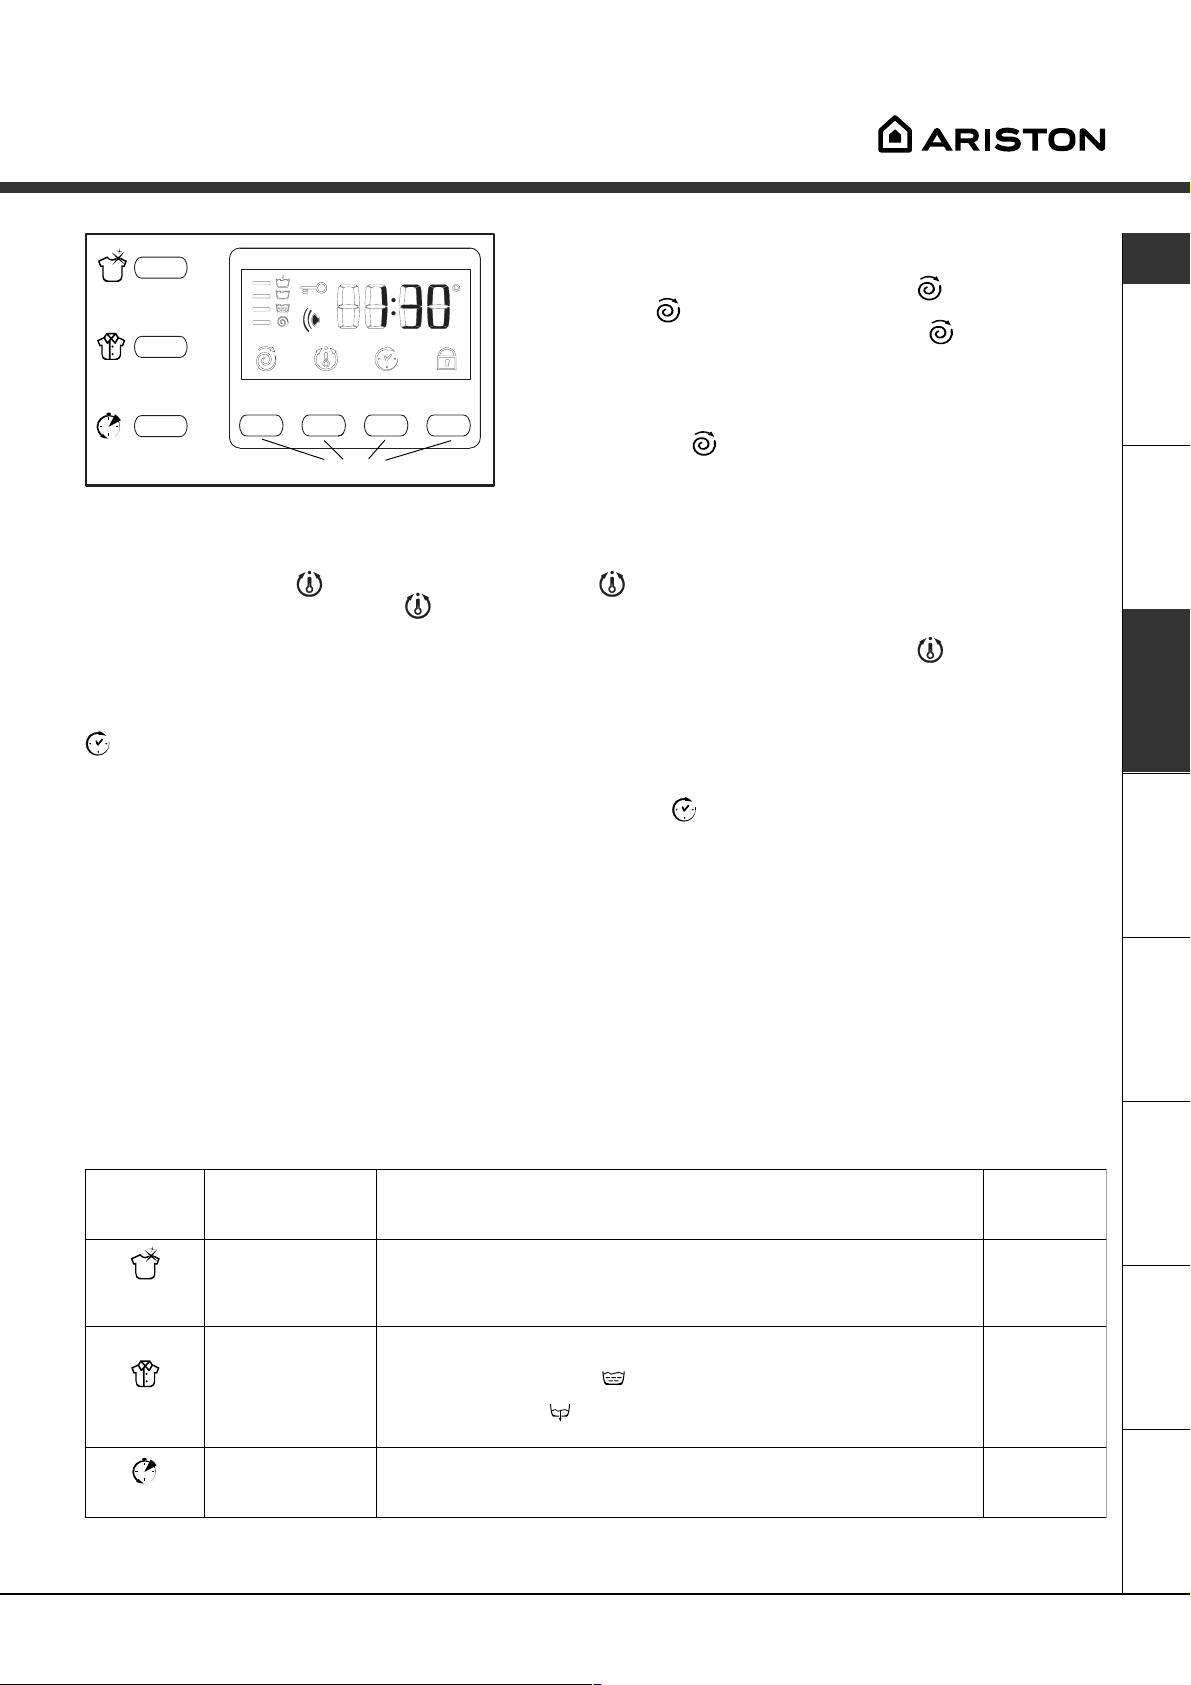
Kiþisel ayarlar
Sýkma devri ayarý
Eðer makine çalýþtýrýldýðýnda PROGRAM DÜÐMESÝ sýkma olan
bir program üzerine getirilmiþ durumda ise,
olarak görülür.
tuþuna basýlarak ayarlanan program için izin
verilen maksimum sýkma hýzý görüntülenir ve
sembolü sabit
sembolü yanýp
sönmeye baþlar. Bir daha basýldýðýnda deðerler sýkmanýn devre
dýþý olduðunu belirten OFFa gelinceye kadar düþer (en yüksek
deðere dönmek için bir kez daha basýnýz); istenilen sýkma hýzý
deðeri üzerinde durduðunuzda, yaklaþýk 2 saniye sonra yapýlan
sembolü sabit olarak kalýr. Sýkma ayarý,
Seçenek tuþu
seçim kabul edilir:
11 numaralý program ve boþaltma programlarý haricinde, tüm
programlarda kullanýlabilir.
Sýcaklýk ayarý
Eðer makine çalýþtýrýldýðýnda PROGRAM DÜÐMESÝ sýcaklýk ayarýnýn ayarlanmasý gerektiði bir program üzerine
getirilmiþ durumda ise,
maksimum sýcaklýk görüntülenir ve
sembolü sabit olarak görülür. tuþuna basýlarak ayarlanan program için izin verilen
sembolü yanýp sönmeye baþlar. Bir daha basýldýðýnda sýcaklýk soðuk
yýkamayý belirten OFFa gelinceye kadar düþer (en yüksek deðere dönmek için bir kez daha basýnýz); istenilen
sýcaklýk deðeri üzerinde durduðunuzda, yaklaþýk 2 saniye sonra yapýlan seçim kabul edilir:
sembolü sabit
olarak kalýr. Sýcaklýk ayarý tüm yýkama programlarýyla kullanýlabilir.
Zaman ayarý
tuþuna basýldýðýnda ekran üzerinde OFF yazýsý görülür ve ilgili sembol yanýp sönmeye baþlar.
Tuþa bir kez daha basýldýðýnda 1h yani bir saatlik gecikme görüntülenir ve bu þekilde 24 h (24 saat)e kadar
ayarlanabilir, istenilen gecikme süresi üzerinde durduðunuzda yaklaþýk 2 saniye sonra seçim kabul edilir;
bundan sonra ekranda program için ayarlanan süre belirecek ve
Þimdi BAÞLAT/TEKRAR BAÞLAT tuþuna basýldýðýnda seçilmiþ olan gecikme deðeri belirir ve program çalýþana
kadar her saat düþmeye devam eder, bu aþamada gecikme süresine ancak bu süreyi düþürmek için müdahale
edilebilir. Geciktirme zaman ayarý tüm programlarda aktiftir.
yanýk kalacaktýr.
TR
Çocuk Kilidi (bkz. sayfa 5).
Fonksiyonlar
Çamaþýr makinesinde mevcut olan çeþitli fonksiyonlar arzu edilen temizlik ve beyazlýktaki yýkamalara olanak
saðlar. Fonksiyonlarý devreye sokmak için:
1. aþaðýdaki tabloda gösterildiði üzere, istediðiniz fonksiyon tuþuna basýnýz;
2. seçilen tuþ üzerindeki göstergenin yanmasý fonksiyonun devreye alýndýðýný gösterir.
Not: Tuþ göstergesinin hýzlý bir þekilde yanýp sönmesi seçilen fonksiyonun seçilmiþ olan programa uygun
olmadýðýnýn iþaretidir.
Daha önceden seçilmiþ olan fonksiyonla uyumsuz bir fonksiyon seçildiði takdirde son seçilen fonksiyon geçerli olacaktýr.
Fonksiyonlar Uygulama Kullaným için notlar
A s ýnýfý üstünde,
Süper
beyaz
Kolay ütü
Hýzlý yýkama
mükemmel bir
beyazlýk saðlar.
Kumaþýn daha az
kýrýþmasýný sa ðlar
ve ütüyü
kolaylaþtýrýr.
Yýkama süresini
takriben %30
kýsaltýr.
Hýzlý yýkama iþlemi ile birlikte uygulanamaz.
Bu fonksiyonu seçtiðiniz takdirde 6, 7, 8, 11 ve hassas durulama
iþlemleri, çamaþýrlarýn suda kalmasýyla (Kýrýþýk önleme) duracak ve ýþýklý
gösterge yanýp, sönmeye baþlayacaktýr:
- iþlemi tamamlamak için BAÞLAT/TEKRAR BAÞLAT düðmesine basýnýz
- yalnýzca boþaltma yapmak iistiyorsanýz düðmeyi bu pozisyona
ayarlayýnýz ve BAÞLAT/TEKRAR BAÞLAT düðmesine basýnýz.
Süper beyaz iþlemi ile birlikte uygulanamaz.
Uyumlu
olduðu
programlar:
1, 2, 3, 5,
6, 7, 8
1, 2, 4,
9, 10, ve
boþaltma
haricinde
tümü.
1, 2, 3, 5,
6, 7, 8
ServisArýzalarÖnlemler BakýmProgramlar DeterjanlarMontaj Taným
7
Page 8
Deterjanlar ve çamaþýr
TR
Deterjan bölmesi
Yýkamanýn iyi sonuç vermesi doðru miktarda
deterjan kullanýlmasýna da baðlýdýr: aþýrý deterjan
kullanarak daha temiz çamaþýrlar elde
edilemeyeceði gibi makinenin aksamýna zarar
verilir, çevre kirliliðine neden olunur.
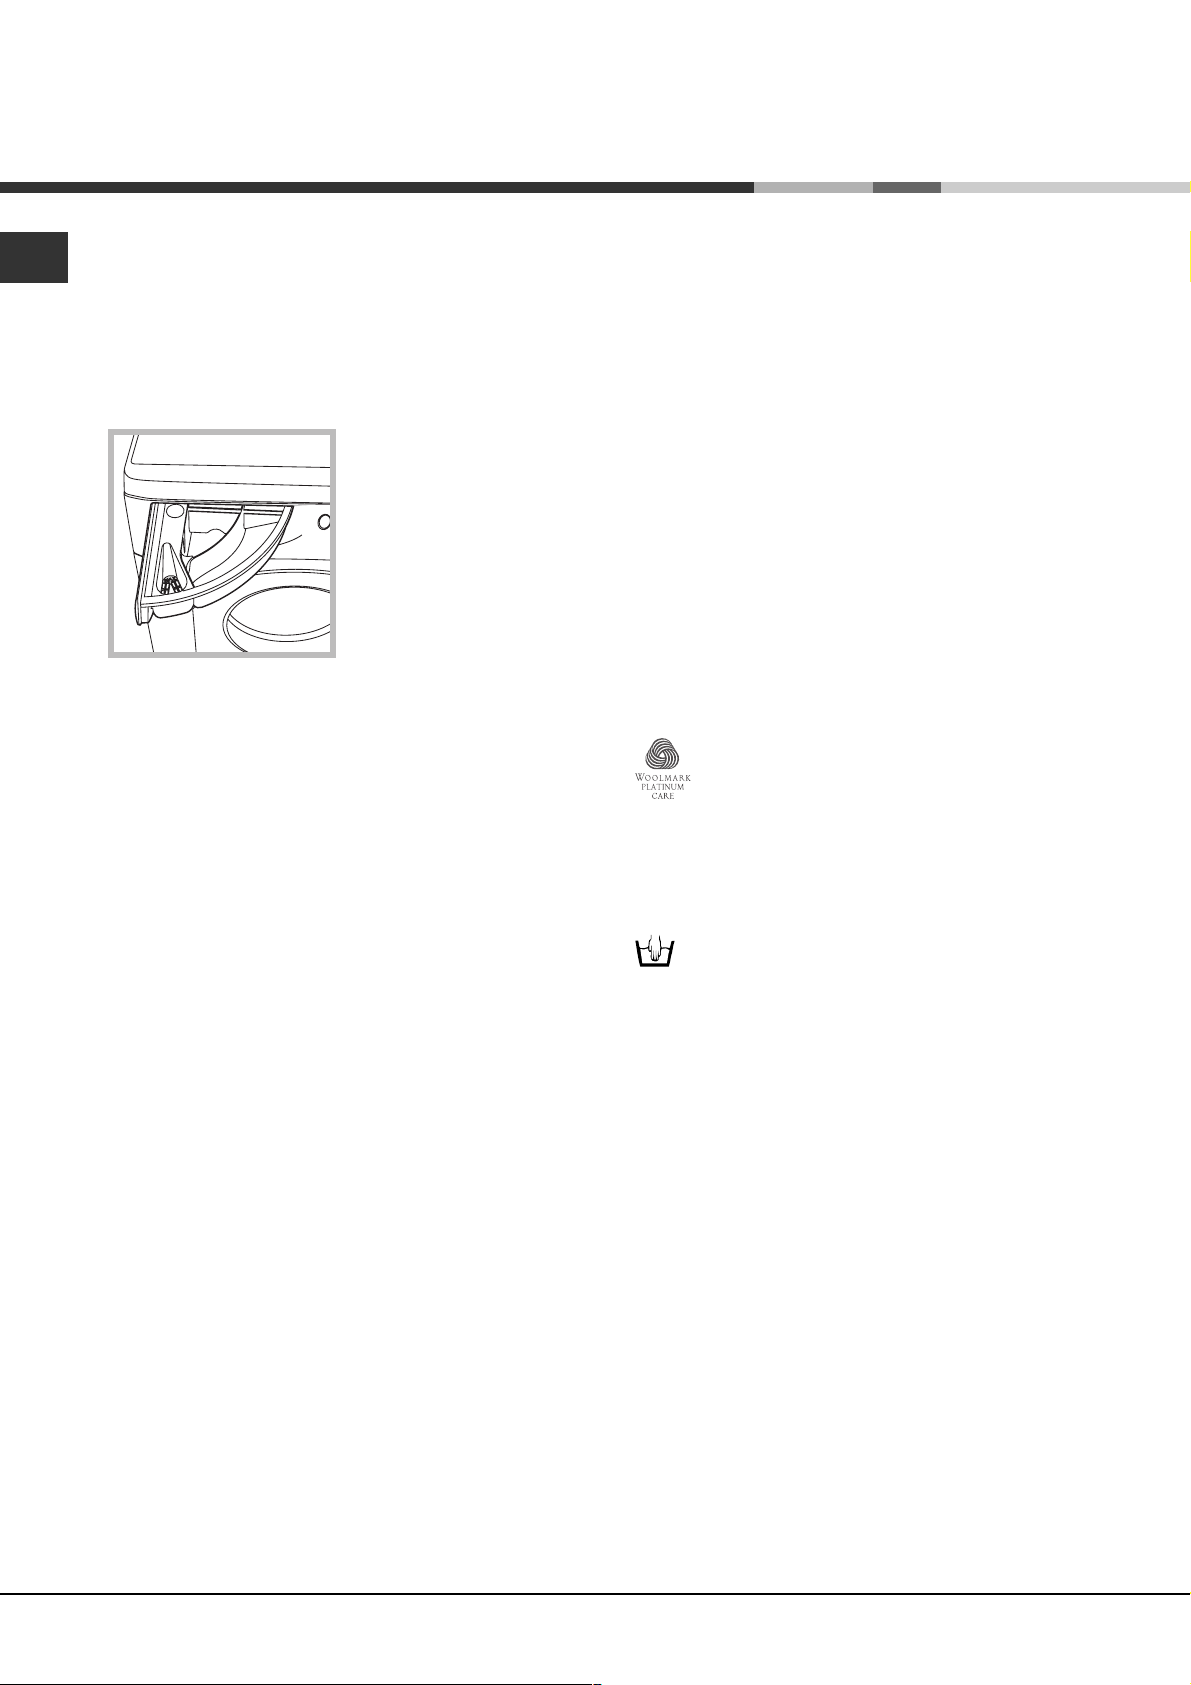
Deterjan bölmesini
açýnýz ve deterjan ile
katký maddelerini
aþaðýdaki þekilde
1
3
hazne 1: ön yýkama için deterjan (toz)
hazne 2: Yýkama için deterjan (toz veya sývý)
Sývý deterjan, yalnýzca, makine çalýþtýrýlmadan
konulabilir.
hazne 3: Katký maddeleri (yumuþatýcý, vs.)
Yumuþatýcý ýzgara seviyesini aþmamalýdýr.
2
koyunuz.
Elde yýkama deterjanlarýný kullanmayýnýz, çünkü
aþýrý köpüðe neden olur.
Çamaþýrýn hazýrlanmasý
Çamaþýrlarý aþaðýdaki gibi ayýrýnýz:
- kumaþ tipi / etiketteki iþaret
- renkler: renkli çamaþýrlarý beyazlardan ayýrýnýz
Ceplerini boþaltýn ve düðmeleri kontrol ediniz.
Çamaþýrýn kuru aðýrlýðýný esas alan deðerlerin
dýþýna çýkmayýnýz:
Dayanýklý kumaþlar: max 5 kg
Sentetik kumaþlar: max 2,5 kg
Hassas kumaþlar: max 2 kg
Yün: max 1 kg
Özel çamaþýrlar
Perdeler: Katlayarak bir yastýk kýlýfý veya file
içerisine yerleþtiriniz. Yarým dolumu geçmeksizin
tek baþlarýna yýkayýnýz. Sýkmayý otomatik olarak
devre dýþý býrakan 11 numaralý programý kullanýnýz.
Mont ve anoraklar: Dolgu maddeleri kaz veya
ördek tüyü ise çamaþýr makinesinde yýkanabilirler.
Mont veya anoraklarý ters yüz ederek, azami 2-3
kg. olarak ve bir iki defa durulamak suretiyle,
hassas sýkma kullanarak yýkayýnýz.
Tenis ayakkabýlarý: Çamurunu temizleyiniz. Kot
pantolon ve dayanýklý çamaþýrlarla birlikte
yýkayabilirsiniz, ancak kesinlikle, beyazlarla
beraber yýkamayýnýz.
Yün: En iyi neticeyi elde edebilmek için, azami 1
kg. yýkanmalý ve özel deterjan kullanýlmalýdýr.
Woolmark Platinum Care
(Kaþmir Platinum)
Elde yýkama gibi hassas.
Ariston, Woolmark Company tarafýndan
da onaylanan Woolmark Platinum Care
standardýný uygulamaya koymuþtur. Çamaþýr
makinesinin üzerinde Woolmark Platinum Care
sembolü varsa, etiketinde elde yýkayýnýz iþareti
olan yün giysilerinizi mükemmel bir þekilde
yýkayabilirsiniz (M.00221):
Elde yýkayýnýz etiketli tüm çamaþýrlar için
10 numaralý programý kullanýnýz.
Çamaþýrlarýn aðýrlýðý nedir?
1 çarþaf 400-500 gr.
1 yastýk kýlýfý 150-200 gr.
1 masa örtüsü 400-500 gr.
1 bornoz 900-1.200 gr.
1 havlu 150-250 gr.
8
Page 9
Önlem ve tavsiyeler
Çamaþýr makinesi uluslar arasý güvenlik
standartlarýna uygun olarak üretilmiþtir. Bu uyarýlar
güvenlik açýsýndan önemli olup, dikkatlice
okunmalýdýrlar.
Genel güvenlik
Bu cihaz profesyonel olmayan, ev tipi kullaným
için dizayn edilmiþtir ve kullaným amacý
deðiþtirilmemelidir.
Çamaþýr makinesi yalnýzca yetiþkin kiþiler
tarafýndan ve kullanma talimatýna uygun olarak
kullanýlmalýdýr.
Makineye yalýnayak, ýslak ya da nemli el ve
ayakla dokunmayýnýz.
Fiþi çýkarýrken, kablodan çekerek deðil, fiþi
tutarak çýkartýnýz.
Makine çalýþýrken deterjan bölmesini açmayýnýz.
Boþaltma suyuna el sürmeyiniz, yüksek
sýcaklýkda olabilir.
Kapaðý, hiçbir þekilde zorlamayýnýz: istenmeyen
açýlmalara karþý olan güvenlik mekanizmasý arýza
yapabilir.
Eski çamaþýr makinesinin elden çýkarýlmasý:
hurdaya çýkartýlmadan önce, elektrik kablosunun
kesilip, çýkartýlmasý suretiyle faydalanýlamaz
hale getiriniz.
Tasarruf ve çevrenin korunmasý
Teknoloji çevre hizmetinde
Kapak camýndan az su görülüyorsa, bunun nedeni,
yeni Ariston teknolojisi sayesinde az suyla azami
temizliðe ulaþýlabilmesidir: çevre korunmasý için
ulaþýlan mükemmel bir noktadýr.
Deterjan, su, enerji ve zaman tasarrufu
Kaynaklardan tasarruf saðlayabilmek için
çamaþýr makinesini azami yükte çalýþtýrmak
gerekir. Ýki yarým yerine bir tam yük uygulanmasý
sayesinde %50 enerji tasarrufu saðlanýr.
Ön yýkama sadece çok kirli çamaþýrlar için
gereklidir. Ön yýkamanýn uygulanmamasý
deterjan, zaman, su ve % 5 ile 15 arasýnda enerji
tasarrufu saðlar.
Çamaþýrlarý, makinede yýkamadan önce, suda
býrakmak veya lekeler üzerinde leke çýkartýcý
kullanmak, yüksek ýsýlarda yýkama gereðini
ortadan kaldýrýr. 90°C yerine 60°C veya 60°C
yerine 40°Clik bir program, %50ye varan oranda
enerji tasarrufu saðlar.
TR
Arýza halinde, kesinlikle mekanik aksama
müdahale ederek tamire çalýþmayýnýz.
Çocuklarýn çalýþýr vaziyetteki makineye
yaklaþmalarýna engel olunuz.
Çalýþma esnasýnda kapak ýsýnabilir.
Taþýnmasý gerektiðinde, bu iþlemin, iki veya üç
kiþi tarafýndan, azami dikkatle yapýlmasý gerekir
. Kesinlikle tek baþýnýza yapmayýnýz, çünkü
makine çok aðýrdýr.
Çamaþýrlarý yerleþtirmeden önce, tamburun boþ
olduðundan emin olunuz.
Elden çýkartma
Ambalaj malzemelerinin yok edilmesi:
yerel talimatlara uyunuz, böylece ambalajlar
tekrar kullanýlabilir.
Suyun sertlik derecesi, yýkanacak çamaþýrýn
kirliliði ve miktarý gözönüne alýnarak ayarlanan
deterjan dozajý, israfý önleyeceði gibi çevreyi de
korur: deterjanlar, her ne kadar doðada
çözülebilir olsalar da, doða yapýsýna zarar veren
maddeler içerirler. Ayrýca, mümkün olduðunca,
yumuþatýcýlardan kaçýnýnýz.
Yýkamalar akþamüzeri geç saatler ile sabahýn ilk
saatleri arasýnda yapýldýðý takdirde, enerji
hatlarýnýn yükü azaltýlmýþ olur. Zaman ayarý
özelliði (bkz. sayfa 7) yýkamalarý bu saatlere
göre programlayabilmek açýsýndan çok yararlýdýr.
Çamaþýrlar bir kurutucuda kurutulacaksa, yüksek
devirli bir sýkma programý seçiniz. Yýkamada
kullanýlan az miktardaki su, zaman
kazandýrmanýn yaný sýra kurutma programýnda
enerji israfýný önler.
ServisArýzalarÖnlemler BakýmProgramlar DeterjanlarMontaj Taným
9
Page 10
Bakým ve temizlik
TR
Su ve elektrik baðlantýsýný kesiniz
Su musluðunu her yýkamadan sonra kapatýnýz
Böylece sistemin aþýnmasý önlenir
ayrýca da su kaçaðý tehlikesi ortadan kalkar.
Bakým ve temizlik iþlemleri esnasýnda çamaþýr
makinesinin fiþini çekiniz.
Çamaþýr makinesin temizliði
Dýþ gövde ve plastik aksam ýlýk su ve sabunla
ýslatýlmýþ bir bez vasýtasýyla temizlenebilir. Çözücü
ve aþýndýrýcý maddeler kullanmayýnýz.
Deterjan bölmesinin temizliði
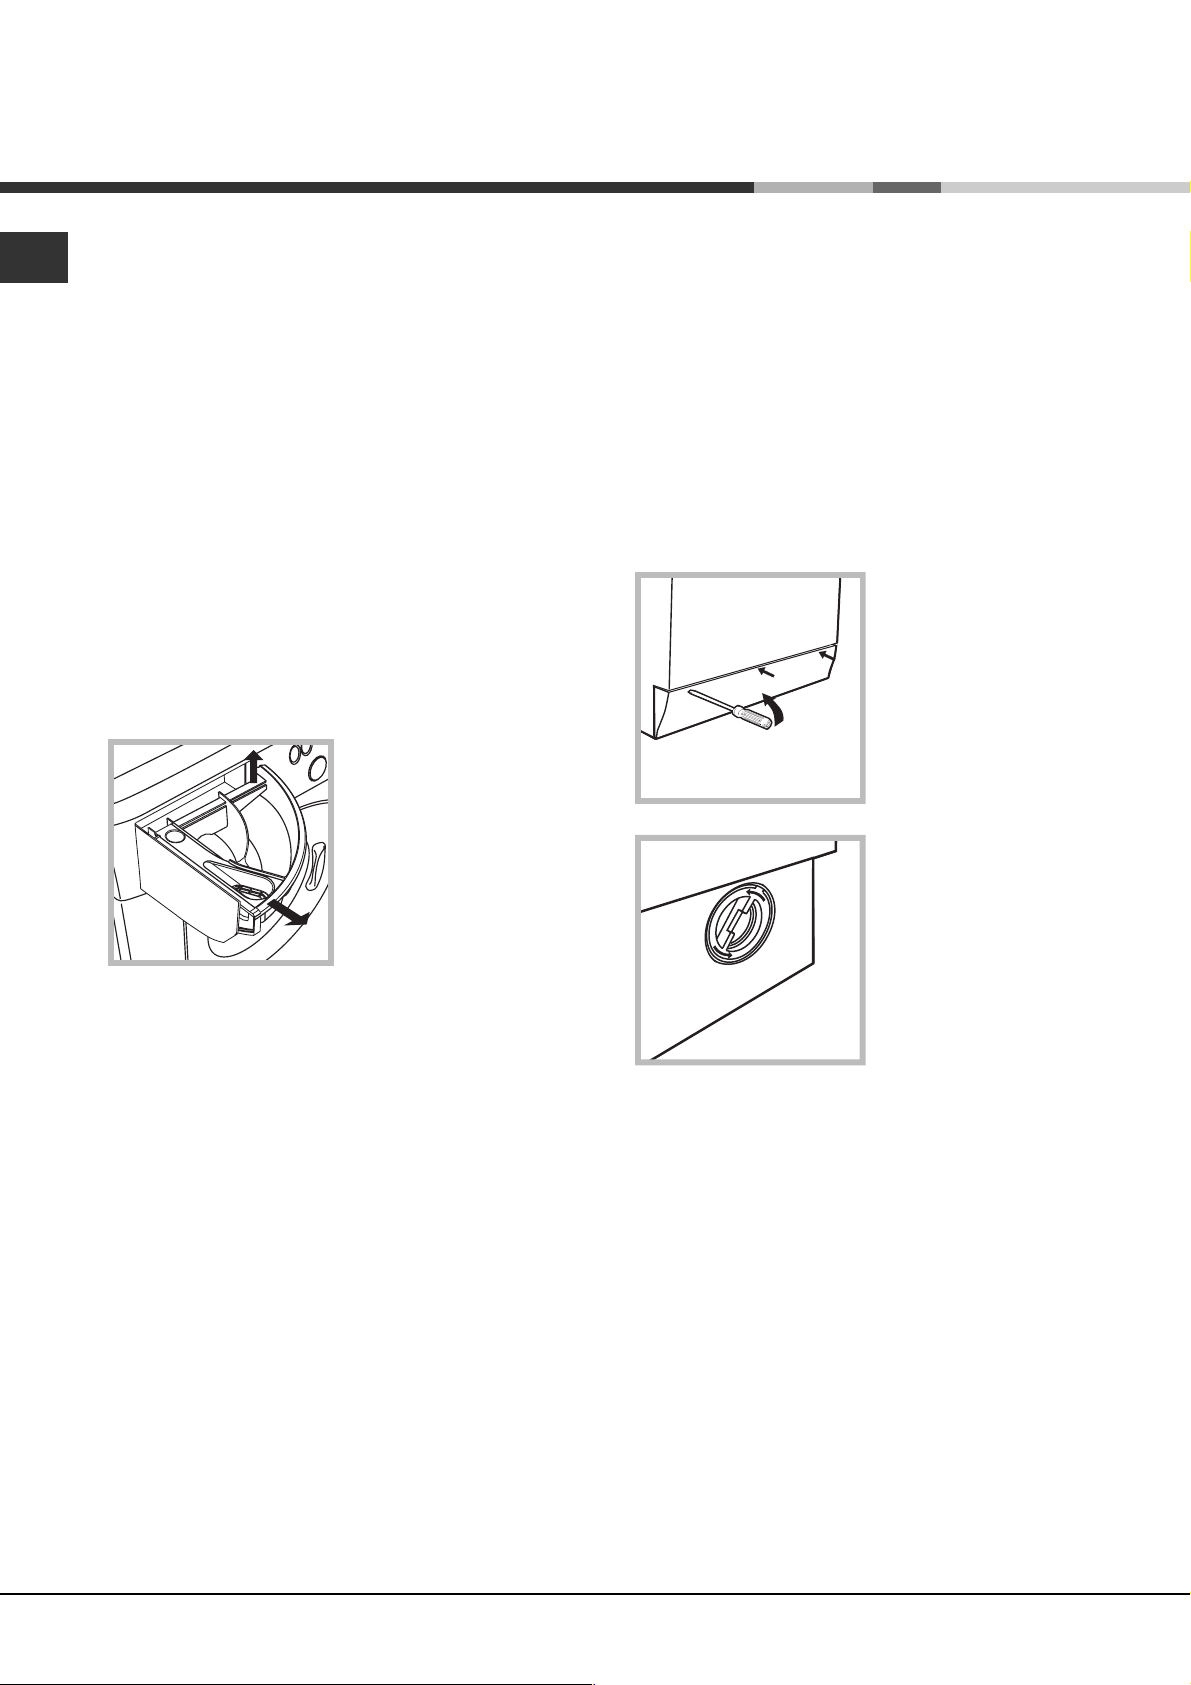
1
Bölmeyi kaldýrarak,
dýþarýya doðru çekmek
suretiyle çýkartýnýz
(resime bkz.).
Musluk altýnda
yýkayýnýz, bu hazne
temizliði için yeterli
olup sýklýkla
2
uygulanmalýdýr.
Pompa temizliði
Çamaþýr makinesinin pompasý kendini temizleyen
bir özelliðe sahip olup, ayrýca temizlik gerektirmez.
Ancak, bazý küçük cisimler (madeni para, düðme)
pompanýn alt kýsmýndaki koruyucu bölmeye
düþebilirler.
Yýkama iþleminin bittiðinden emin olup, fiþi çekiniz.
Pompa koruyucu bölgesine ulaþabilmek için:
1. Çamaþýr makinesinin
alttaki ön panelini, bir
tornavida vasýtasýyla,
çýkartýnýz (resme bkz).
2. Kapaðý saatin aksi
istikametine çevirerek
çýkartýnýz (resme bkz.):
bir miktar su gelmesi
normaldir.
Kapak ve tambur bakýmý
Kötü kokularýn oluþmasýný engellemek için
kapaðý daima aralýk býrakýnýz.
10
3. Ýçini dikkatlice temizleyiniz
4. Kapaðý takýnýz
5. Paneli takarken, tam yerleþtirmeden evvel,
kancalarýn yuvalara gelip gelmediðini kontrol ediniz.
Su giriþ hortumunun kontrolü
Su giriþ hortumunu, en azýndan senede bir defa
kontrol ediniz. Yarýk veya çatlaklar varsa
deðiþtiriniz: yýkama esnasýndaki yüksek basýnçlar
ani delinmelere yol açabilirler.
Kesinlikle daha önceden kullanýlmýþ hortum
kullanmayýnýz.
Page 11
Sorunlar ve çözümleri
Çamaþýr makinesi çalýþmýyor olabilir. Servisi aramadan önce (bkz. sayfa 12), aþaðýdaki liste yardýmýyla
kolayca çözümlenecek bir sorun olup olmadýðýna bakýnýz.
Sorunlar:
Çamaþýr makinesi çalýþmýyor.
Yýkama iþlemi baþlamýyor.
Çamaþýr makinesi su almýyor.
(Iþýklý göstergede H
görüntüleniyor).
Çamaþýr makinesi devamlý su
alýp veriyor.
O ibaresi
2
Muhtemel nedenler / Çözümler:
Fiþ prize takýlý deðil veya tam temas etmiyor.
Evde elektrik yok.
Kapak iyi kapalý deðil (ýþýklý göstergede DOOR ibaresi
görüntüleniyor).
Düðmeye
BAÞLAT/TEKRAR BAÞLATdüðmesine basýlmadý.
Su musluðu açýk deðil.
Baþlangýç zamanýný erteleme programlanmýþ
(zaman ayarý, bkz. sayfa 7).
Su giriþ hortumu musluða takýlý deðil.
Hortum bükülmüþ.
Su musluðu açýk deðil.
Evde su kesik.
Basýnç yetersiz.
BAÞLAT/TEKRAR BAÞLAT düðmesine basýlmadý.
Boþaltma hortumu zeminden 65 ile 100 cm arasýnda
yerleþtirilmemiþ (bkz. sayfa 3).
Boþaltma hortumu suya girmiþ (bkz. sayfa 3).
Duvardaki tahliyenin hava boþluðu yok.
basýlmadý.
TR
Çamaþýr makinesi su boþaltmýyor
veya sýkma yapmýyor.
Çamaþýr makinesi sýkma
esnasýnda aþýrý sarsýlýyor.
Çamaþýr makinesi su kaçýrýyor.
Aþýrý köpük oluþuyor.
Bu kontrollerdan sonra olumlu sonuç alýnamazsa, musluðu kapatýp,
çamaþýr makinesini durdurarak Ariston Yetkili Servisine haber veriniz.
Oturduðunuz kat binanýn üst katlarýndaysa, sifon etkisi sebebiyle
çamaþýr makinesi devamlý su alýp, veriyor olabilir. Bu sorunun çözümü
için piyasada sifon önleyici valfler satýlmaktadýr.
Program su boþaltmayý öngörmüyor: bazý programlarda su
boþaltma iþlemini elle müdahale ederek baþlatmak gerekir
(bkz. sayfa 6).
Kolay ütü fonksiyonu devrede: program sürecini tamamlamak için
BAÞLAT/TEKRAR BAÞLAT düðmesine basýnýz (bkz. sayfa 7).
Boþaltma hortumu bükülmüþ (bkz. sayfa 3).
Boþaltma kanalý týkalý.
Çamaþýr makinesinin montajý esnasýnda nakliye braketleri
çýkarýlmamýþ (bkz. sayfa 2).
Çamaþýr makinesinin bulunduðu zemin düz deðil (bkz. sayfa 2).
Çamaþýr makinesi mobilyalarla duvar arasýnda sýkýþmýþ (bkz. sayfa 2).
Su giriþ hortumu tam sýkýlmamýþ ( bkz. sayfa 2).
Deterjan bölmesi týkanmýþ (temizlemek için bkz. sayfa 10).
Boþaltma hortumu iyi sabitlenmemiþ (bkz. sayfa 3).
Deterjan çamaþýr makinesi için uygun deðil (deterjan kutusunda
çamaþýr makinesi için veya benzer ibareler olmalýdýr).
Aþýrý dozda deterjan kullanýlmýþ.
ServisArýzalarÖnlemler BakýmProgramlar DeterjanlarMontaj Taným
11
Page 12
Servis
TR
Ariston Yetkili Servisini aramadan önce:
Arýzayý kendiniz çözüp çözemeyeceðinize bakýnýz (bkz. sayfa 11);
Programý tekrar baþlatarak, sorunun çözülüp çözülmediðini görünüz;
Aksi takdirde, garanti belgesi ile verilen servis listesinde belirtilen telefon numaralarýndan size en
yakýn yetkili servisi arayýnýz.
Kesinlikle, yetkili olmayan tamircilere müracaat etmeyiniz.
Bildiriniz:
arýza tipini;
makinenin modelini (Mod.);
seri numarasýný (S/N).
Bu bilgiler, çamaþýr makinesinin arkasýndaki ürün plaketinde yeralmaktadýr.
Cihazýn kullaným ömrü on yýldýr.
Servis
12
Page 13
Instructions for use
WASHING MACHINE
GB
English
AVF 8
Contents
GB
Installation, 14-15
Unpacking and levelling, 14
Electric and water connections, 14-15
The first wash cycle, 15
Technical details, 15
Washing machine description, 16-17
Control panel, 16
Display, 17
Starting and Programmes, 18
Briefly: how to start a programme, 18
Programme table, 18
Personalisations, 19
Setting the spin cycle, 19
Setting the temperature, 19
Setting the delay Timer, 19
Functions, 19
Detergents and laundry, 20
Detergent dispenser, 20
Preparing your laundry, 20
Special items, 20
Woolmark Platinum Care, 20
Precautions and advice, 21
General safety, 21
Disposal, 21
Saving energy and respecting the environment, 21
Care and maintenance, 22
Cutting off the water or electricity supply, 22
Cleaning your appliance, 22
Cleaning the detergent dispenser, 22
Caring for your appliance door and drum, 22
Cleaning the pump, 22
Checking the water inlet hose, 22
Troubleshooting, 23
Service, 24
Before calling for Assistance, 24
13
Page 14
Installation
GB
Keep this instruction manual in a safe place for
future reference. Should the appliance be sold,
transferred or moved, make sure the instruction
manual accompanies the washing machine to inform
the new owner as to its operation and features.
Read these instructions carefully: they contain vital
information on installation, use and safety.
Unpacking and levelling
Unpacking
1. Unpack the washing machine.
2. Check whether the washing machine has been
damaged during transport. If this is the case, do not
install it and contact your retailer.
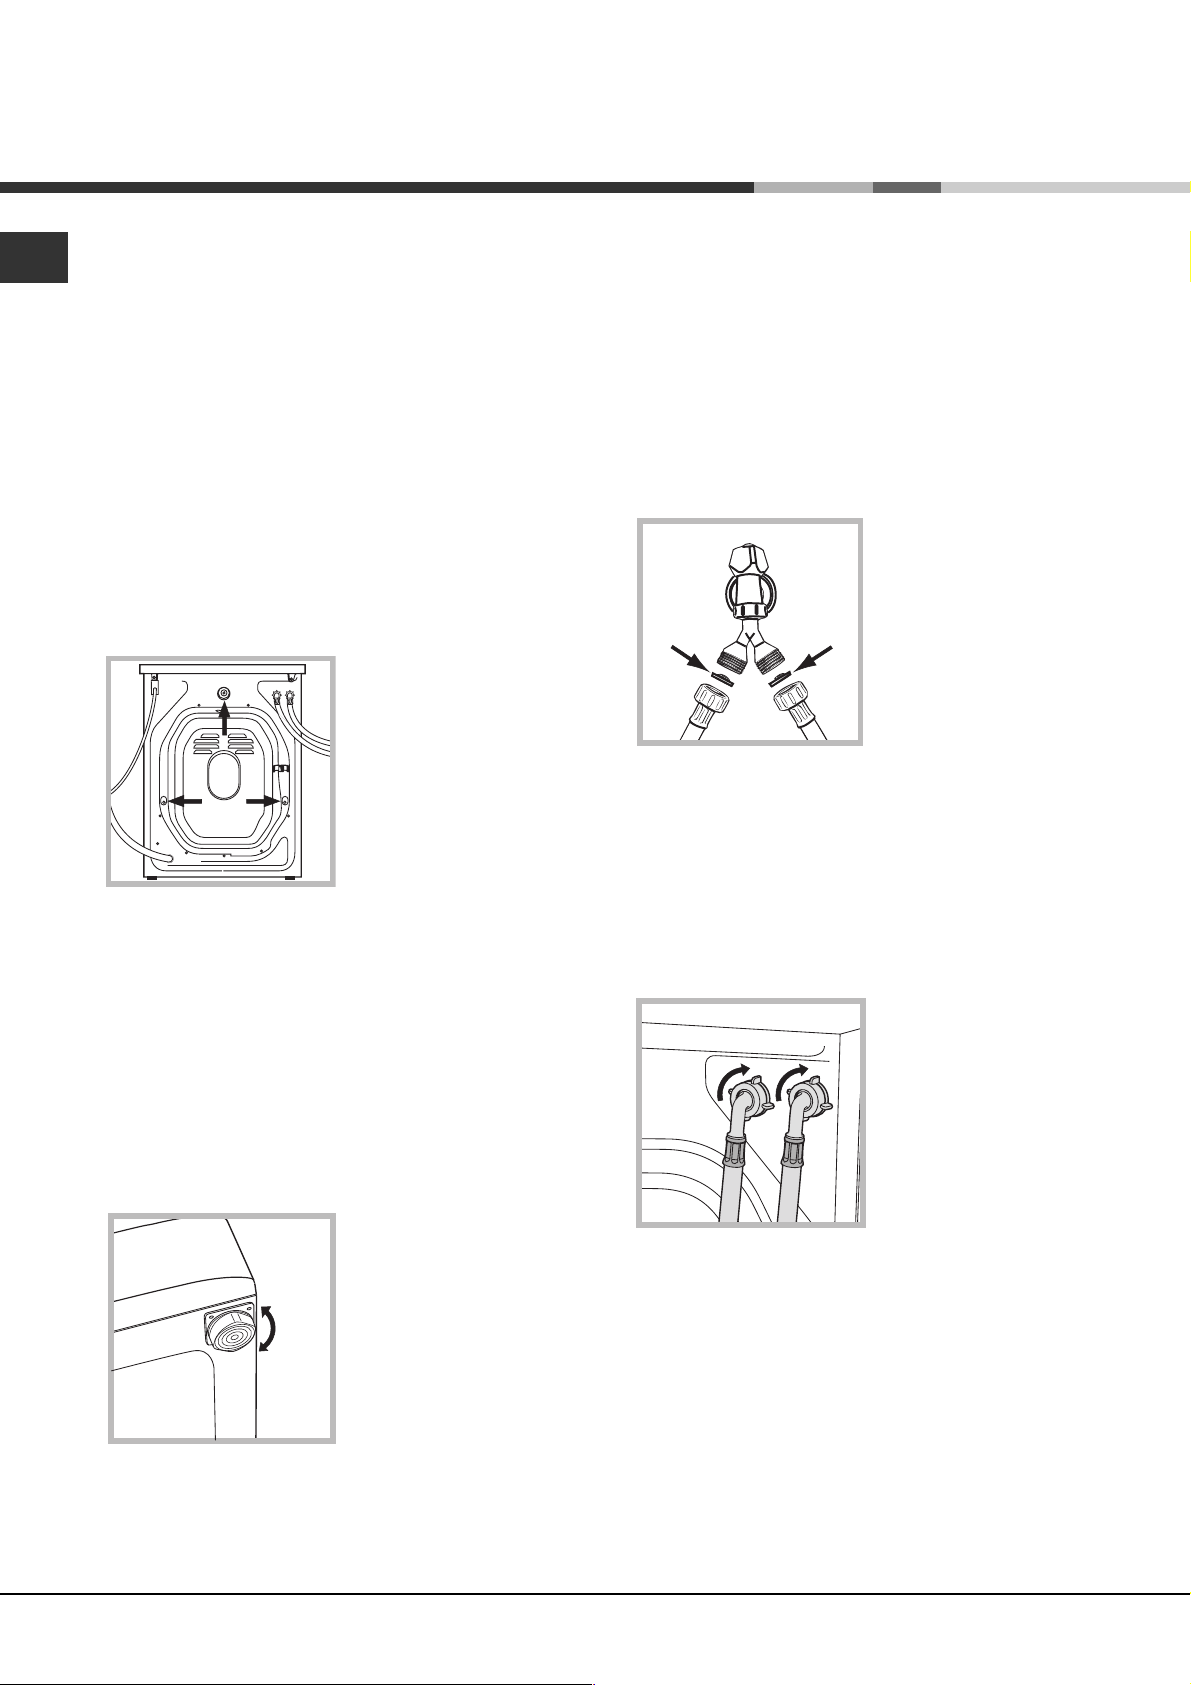
3. Remove the 3
protective screws and
the rubber washer with
the respective spacer,
situated on the rear of
the appliance (see
figure).
4. Seal the gaps using the plastic plugs provided.
5. Keep all the parts: you will need them again if the
washing machine needs to be moved to another
location.
Packaging materials are not children's toys.
Levelling
1. Install the washing machine on a flat sturdy floor,
without resting it up against walls, furniture cabinets
or other.
2. If the floor is not
perfectly level, compensate for any unevenness
by tightening or
loosening the adjustable
front feet (see figure);
the angle of inclination,
measured according to
the worktop, must not
exceed 2°.
Levelling your appliance correctly will provide it with
stability and avoid any vibrations, noise and shifting
during operation. If it is placed on a fitted or loose
carpet, adjust the feet in such a way as to allow
enough room for ventilation beneath the washing
machine.
Electric and water connections
Connecting the water inlet hose
1. Connect the supply
pipe to the water mains
using a gas 3/4
attachment, fitting the
rubber gasket and the
filter supplied with the
appliance and ensuring
that they are fimly
tightened to the taps.
The water supply marked
C must be connected to the cold water tap; the pipe
marked H must be connected to the hot water tap.
Both pipes may be connected to the cold water tap
using the special Y connection with multiple
attachments, supplied with the appliance (see figure).
Before making the connection, allow the water to run
freely until it is perfectly clear.
Warning: clean the filters regularly by rinsing it
under running water.
2. Connect the other end
of the water inlet hose to
the washing machine,
screwing it onto the
appliance's cold water
inlet, situated on the top
right-hand side on the
rear of the appliance
(see figure).
3. Make sure there are no kinks or bends in the
hose.
The water pressure at the tap must be within the
values indicated in the Technical details table
(on the next page).
If the water inlet hose is not long enough, contact
a specialist store or an authorised serviceman.
14
Page 15
Connecting the drain hose
65 - 100 cm
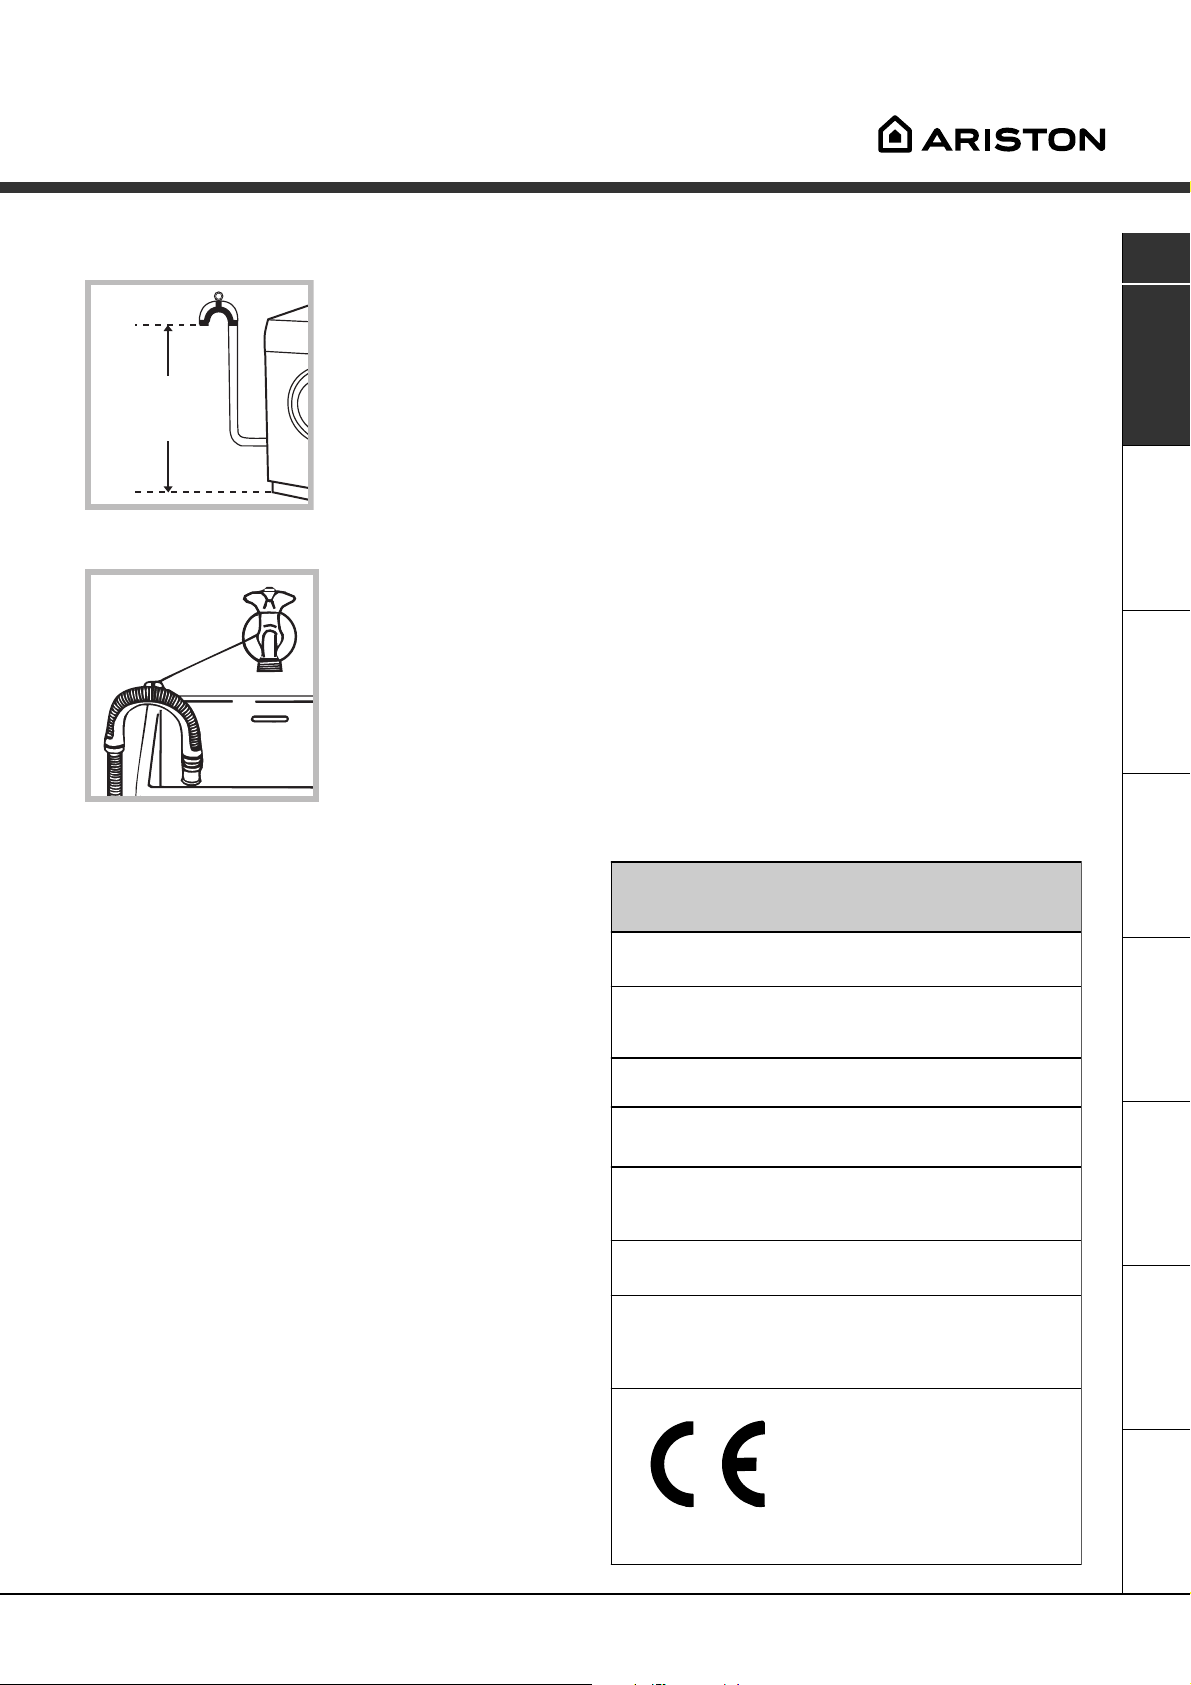
Connect the drain hose,
without bending it, to a
draining duct or a wall
drain situated between
65 and 100 cm from the
floor;
Do not use extensions or multiple sockets.
GB
The power supply cable must never be bent or
dangerously compressed.
The power supply cable must only be replaced by
an authorised serviceman.
Warning! The company denies all liability if and when
these norms are not respected.
The first wash cycle
alternatively, place it
over the edge of a
basin, sink or tub,
fastening the duct
supplied to the tap (see
figure). The free end of
the hose should not be
underwater.
We advise against the use of hose extensions; in
case of absolute need, the extension must have the
same diameter as the original hose and must not
exceed 150 cm in length.
Electric connection
Before plugging the appliance into the mains socket,
make sure that:
the socket is earthed and in compliance with the
applicable law;
the socket is able to sustain the appliance's
maximum power load indicated in the Technical
details table (on the right);
the supply voltage is included within the values i
ndicated on the Technical details table
(on the right);
Once the appliance has been installed, and before
you use it for the first time, run a wash cycle with
detergent and no laundry, setting the 90°C
programme without a pre-wash cycle.
Technical details
Model
Dimensions
Capacity
Electric
connections
Wat er
connections
Spin speed
AVF 8
59.5 cm wide
85 cm high
52,5 cm deep
from 1 to 5 kg
voltage 220/230 Volts 50 Hz
maximum absorbed power 1850 W
maximum pressure 1 MPa (10 bar)
minimum pressure 0.05 MPa (0.5 bar)
drum capacity 46 litres
up to 800 rpm
the socket is compatible with the washing
machine's plug. If this is not the case, replace the
socket or the plug.
The washing machine should not be installed in an
outdoor environment, not even when the area is
sheltered, because it may be very dangerous to
leave it exposed to rain and thunderstorms.
When the washing machine is installed, the mains
socket must be within easy reach.
Control
programmes
according to
IEC456 directive
programme 3; temperature 60°C;
run with a load of 5 kg.
This appliance is compliant with the
following European Community
Directives:
- 73/23/CEE of 19/02/73 (Low
Voltage) and subsequent amendments
- 89/336/CEE of 03/05/89
(Electromagnetic Compatibility) and
subsequent amendments
ServiceTroubleshootingPrecautions CareProgrammes DetergentsInstallation Description
15
Page 16
GB
Washing machine description
Control panel
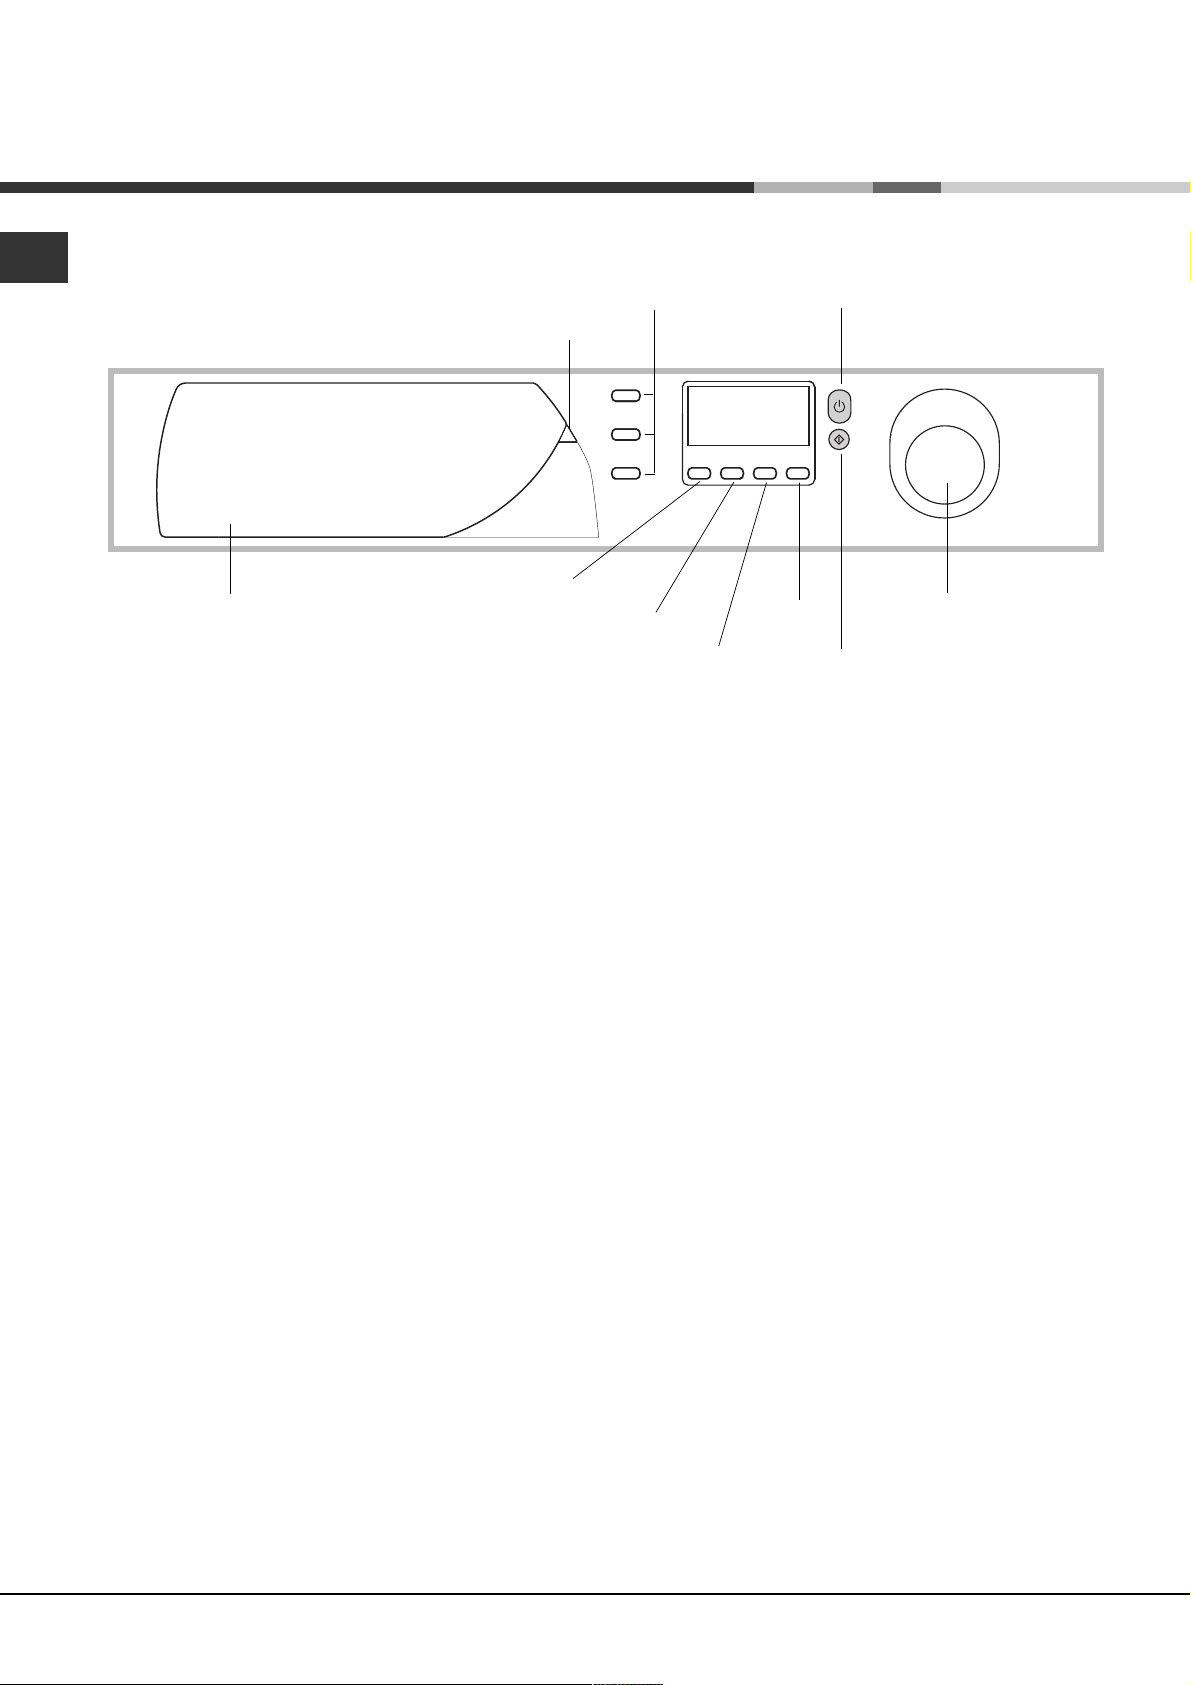
Programme key
Detergent dispenser
Detergent dispenser to add detergent and fabric
softener (see page 20).
Programme key to consult a straightforward chart
of the different programmes available: pull the grey
tab outwards to open it.
SPIN
FUNCTION
buttons
Display
TEMPERATURE
DELAY TIMER
KEYBOARD LOCK key. To lock all the keys on the
washing machine during operation or during Stand-by
mode.
Display to programme the washing machine and
follow the wash cycle progress (see opposite page).
KEYBOARD
LOCK
START/STOP
button
Control knob
START/RESET
button
FUNCTION buttons to select the functions
available. The button corresponding to the function
selected will remain on.
SPIN button to adjust the spin speed or exclude it
altogether (see page 19).
TEMPERATURE button to adjust the wash tempe-
rature (see page 19).
DELAY TIMER button to delay the start of the set
programme for a maximum period of 24 hours
(see page 19).
START/STOP button to turn the washing machine
on and off (see page 18).
START/RESET button to start the programmes or
cancel any incorrect settings (see page 18).
Control knob to select the wash programmes. The
retractable control knob: press the centre of the
knob for it to pop out. The knob stays still during the
cycle.
16
Page 17
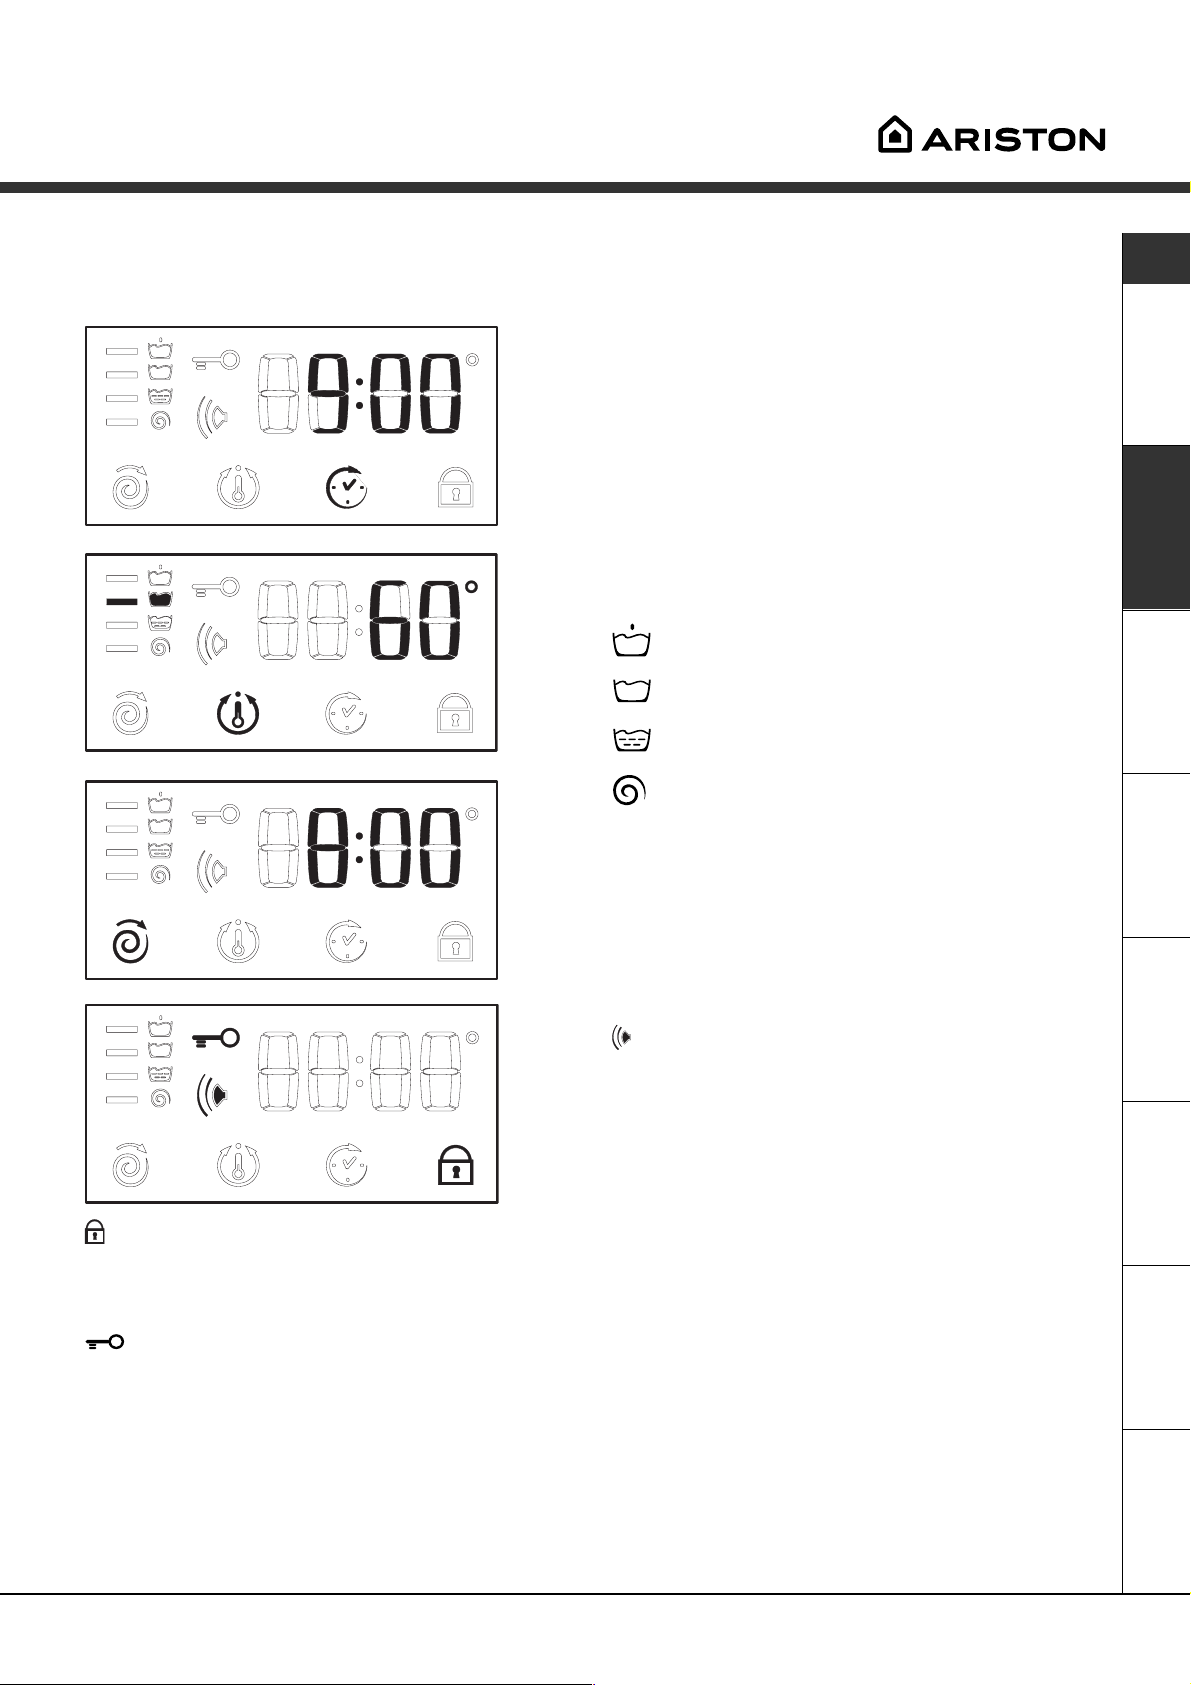
Display
In addition to being a practical tool to programme your appliance (see page 19), the display provides useful
information concerning the wash cycle and status.
Once you have pressed the START/RESET button to
start the programme, the display will indicate the
amount of time left until the end of the wash cycle. If
a delayed start has been set (using the Delay Timer,
see page 19), the delay time will be indicated on the
display.
The following information is displayed during the
wash cycle:
Cycle phase under way:
Pre-wash
Wash cycle
Rinse
Spin cycle
GB
Customised functions and options:
To select functions and options, see below and on
page 19.
Buzzer:
Your washing machine comes with a buzzer, which
will inform you of the various functions being carried
out, or of any malfunctions: incompatibility, option/
programme keys, start, end of cycle, reset.
Keyboard lock:
For your safety and that of your children, you can block all the keys during the machine's operation or during
waiting position (delayed start - Stand-by) by pressing the function key for 2 seconds.
To disable this function, hold the same button down for 4 seconds.
Door lock:
If the symbol is on, the washing machine door is locked to prevent it from being opened accidentally. To avoid
any damages, wait for the symbol to switch itself off before you open the appliance door.
This model is fitted with a device that allows you to open the appliance door during some of the programme
phases. This is possible when the symbol is not on.
At the end of the programme, the word END is displayed.
In the event of an anomaly, an error code will appear, such as: F-01, which should be communicated to the
Service Centre (see page 24).
ServiceTroubleshootingPrecautions CareProgrammes DetergentsInstallation Description
17
Page 18
Starting and Programmes
GB
Briefly: starting a programme
1. Turn the washing machine on by pressing button .
All the icons will light up for a few seconds and
then go off.
2. Load your laundry into the washing machine and
shut the appliance door.
3. Set the knob to the desired programme. The
estimated duration of the selected programme is
displayed. The temperature and spin speed are
automatically set according to the programme
(to change them, see page 19).
4. Add the detergent and any fabric softener
(see page 20).
5. Select any function (see page 19).
6. Start he programme by pressing the START/RESET
button.
To cancel it, keep the START/RESET button
pressed for at least 2 seconds.
7. When the programme has ended, the word END is
displayed. Take out your laundry and leave the
appliance door ajar to allow the drum to dry
thoroughly.
8. Turn the washing machine off by pressing button
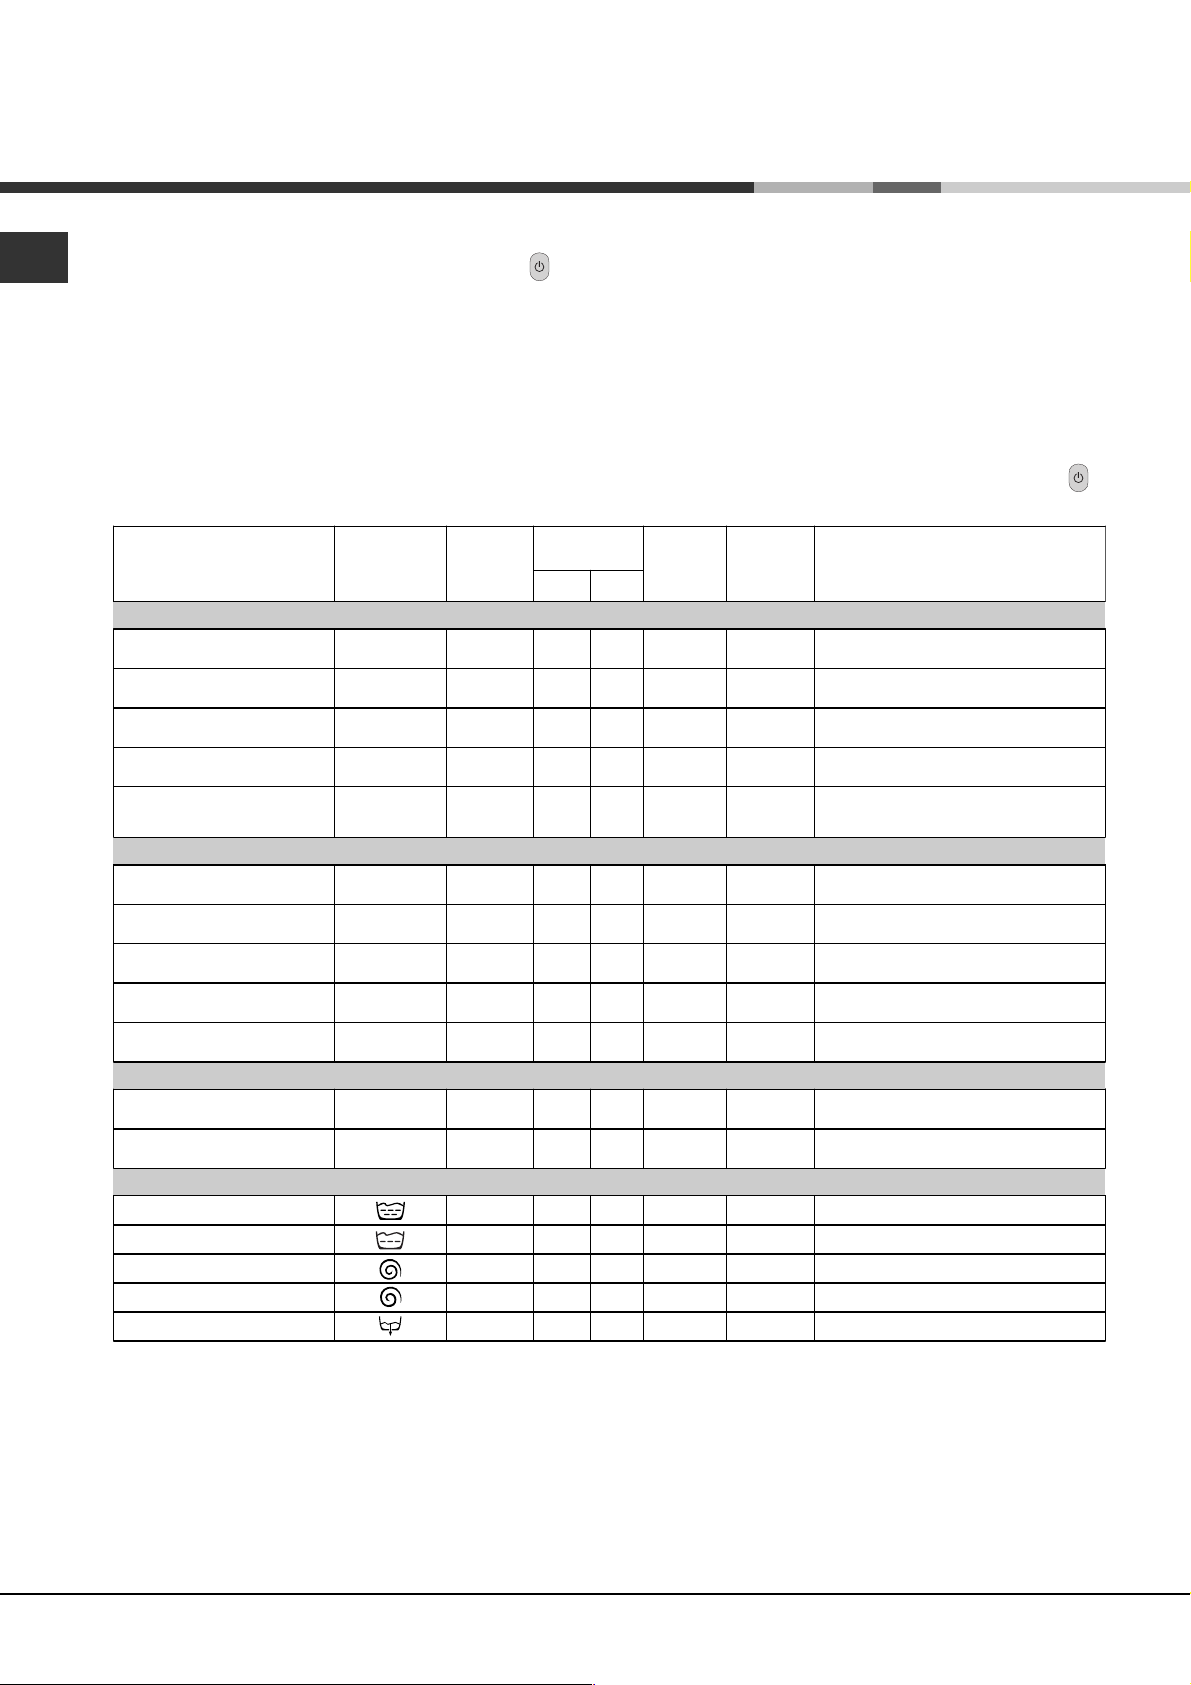
Programme table
Type of fabric and degree of
soil
Cotton
Extremely soiled whites
(sheets, tablecloths, etc.)
Extremely soiled whites
(sheets, tablecloths, etc.)
Heavily soiled whites and
fast colours
Heavily soiled whites and
fast colours
Slightly soiled whites and
delicate colours (shirts,
jumpers, etc.)
Synthetics
Heavily soiled fast colours
(baby linen, etc.)
Fast colours (all types of
slightly soiled garments)
Heavily soiled fast colours
(baby linen, etc.)
Delicate colours (all types of
slightly soiled garments)
Delicate colours (all types of
slightly soiled garments)
Delicate
Wool
Very delicate fabrics
(curtains, silk, viscose, etc.)
PARTIAL PROGRAMMES
Rinse Rinse cycles and spin cycle
Delicate rinse cycle Rinse cycles, anti-crease or draining
Spin cycle Draining and heavy duty spin cycle
Delicate spin cycle Draining and delicate spin cycle
Draining Draining
Programmes
1
2
3
4
5
6
6
7
8
9
10
11
Wash
temperat.
90°C 1
90°C 1
60°C 1
40°C 120
40°C 82
60°C 87
40°C 72
50°C 83
40°C 68
30°C 30
40°C
30°C 45
Detergent
Pre-
wash
Wash
Fabric
softener
Cycle
length
(minutes)
7
4
3
0
5
1
50
Description of wash cycle
Pre-wash, wash cycle, rinse cycles,
intermediate and final spin cycles
Wash cycle, rinse cycles, intermediate
and final spin cycles
Wash cycle, rinse cycles, intermediate
and final spin cycles
Wash cycle, rinse cycles, intermediate
and final spin cycles
Wash cycle, rinse cycles, intermediate
and final spin cycles
Wash cycle, rinse cycles, anti-crease
or delicate spin cycle
Wash cycle, rinse cycles, anti-crease
or delicate spin cycle
Wash cycle, rinse cycles, anti-crease
or delicate spin cycle
Wash cycle, rinse cycles, anti-crease
or delicate spin cycle
Wash cycle, rinse cycles and delicate
spin cycl
Wash cycle, rinse cycles and delicate
spin cycle
Wash cycle, rinse cycles, anti-crease
or draining cycle
.
Notes
For the anti-crease function: see Easy iron, opposite page. The information contained in the table is purely indicative.
Special programmes
A wash performance The washing nachine has a special programme to allow you to obtain optimum results even at
low temperatures. By setting programme 4 at a temperature of 40° C, the results you will obtain will be the same as
you would normally obtain at 60°C thanks to the washing machines action and the length of the wash cycle.
Daily 30' (programme 9 for Synthetics) is designed to wash lightly soiled garments in a short amount of time: it only
lasts 30 minutes and allows you to save on both time and energy. By setting this programme (9 at 30°C), you can
wash different fabrics together (except for woollen and silk items), with a maximum load of 3 kg.
We recommend the use of liquid detergent.
18
Page 19
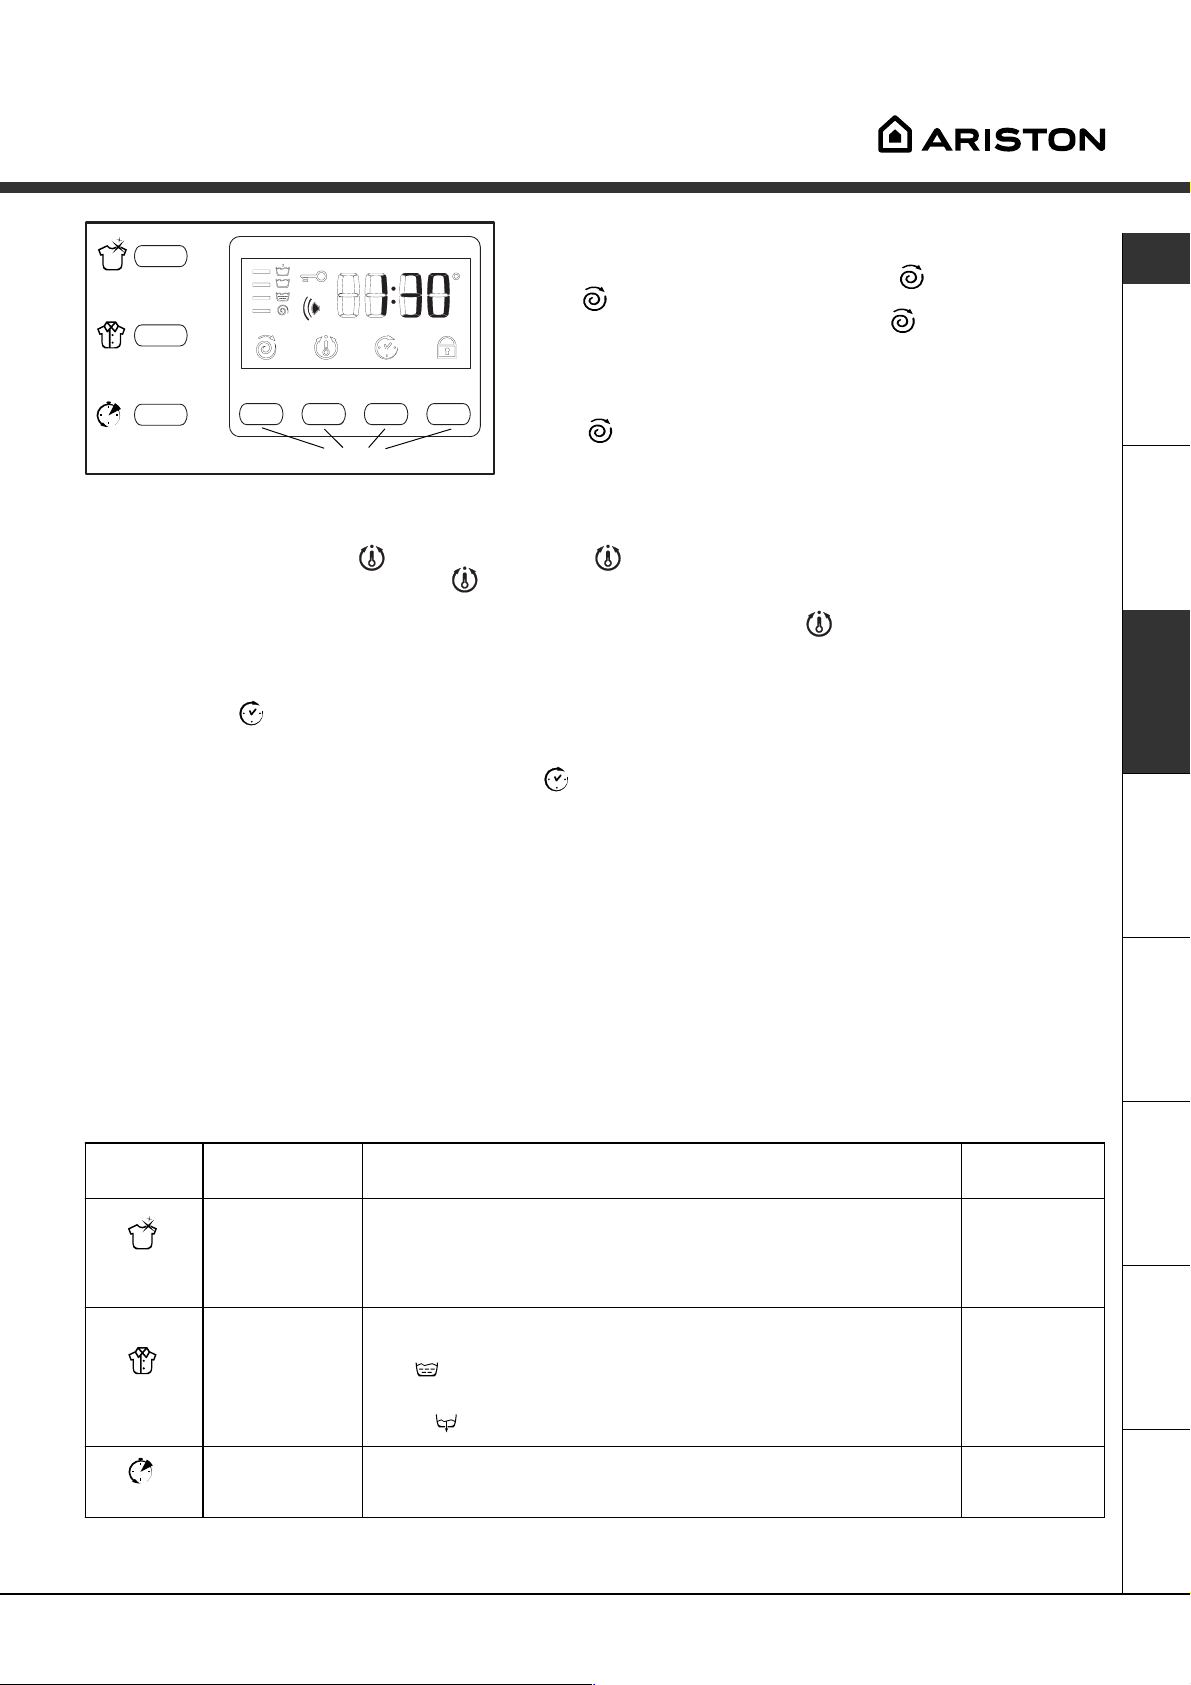
Personalisations
Setting the spin cycle
If, when the appliance is switched on, the KNOB is positioned
on a programme with a spin cycle, a fixed
Option buttons
button
programme set will be displayed, and the
Press it again and the values lower until they reach OFF, which
indicates that the spin cycle has been excluded (press it again
to go back to the maximum value); stop on the desired speed,
after approximately 2 seconds the setting is accepted: the
symbol
all the programmes except for 11 and the Draining cycle.
and the maximum spin speed allowed for the
remains fixed. The spin cycle setting is enabled with
Setting the temperature
If, when the appliance is switched on, the KNOB is positioned on a programme for which the temperature
needs to be regulated, a fixed
programme set will be displayed and the
reaches OFF, which indicates a cold wash cycle (press it again to go back to the maximum value); stop on the
desired value, after approximately 2 seconds the setting is accepted: the symbol
The temperature adjustment is enabled with all wash programmes.
appears. Press button and the maximum temperature allowed for the
icon flashes. Press it again and the temperature lowers until it
remains fixed.
appears. Press
icon flashes.
GB
Setting the delay Timer
Press the button and you will see the word OFF on the display, while the relative symbol flashes.
Press the button again and "1h" appears, that is, a delay of one hour (this can reach up to 24h); stop on the
"desired" delay; after approximately 2 seconds the setting is accepted, following which, the time for the set
programme appears on the display and the symbol
If you now press the START/RESET button, the set "delay" appears; this decreases every hour until the start of
the cycle. In this phase, the "delay" can only be modified by decreasing it.
The Delay Timer regulation is enabled with all programmes.
remains on.
Keyboard Lock (see page 17).
Functions
To enable a function:
1. press the button corresponding to the desired function, according to the table below;
2. the function is enabled when the corresponding button is illuminated.
Note: The rapid flashing of the button indicates that the corresponding function cannot be selected for the
programme set.
If you set a function that is incompatible with another function you selected previously, only the last one
selected will be enabled.
Function Effect Comments
Allows for an
impeccable wash,
Super
wash
visibly whiter than
a standard
wash.
A
Class
This option is incompatible with the RAPID option.
Enabled with
programmes:
1, 2, 3, 5,
6, 7, 8
Easy iron
Rapid
This option
reduces the
amount of
creasing on
fabrics, making
them easier to
iron.
Cuts the duration
of the wash cycle
by 30%.
If you set this option, programmes 6, 7, 8, 11 and Delicate Rinse
will be suspended, leaving the laundry to soak (Anti-crease) and
icon will flash:
- to conclude the cycle, press the START/RESET button;
- to run the draining cycle alone, set the knob to the relative
symbol and press the START/RESET button.
This option is incompatible with the SUPER WASH option.
All
programmes
except for
1, 2, 4, 9, 10
and Draining.
1, 2, 3, 5,
6, 7, 8
19
ServiceTroubleshootingPrecautions CareProgrammes DetergentsInstallation Description
Page 20
Detergents and laundry
GB
Detergent dispenser
Good washing results also depend on the correct
dose of detergent: adding too much detergent won't
necessarily make for a more efficient wash, and may
in fact cause build up on the interior of your
appliance and even pollute the environment.
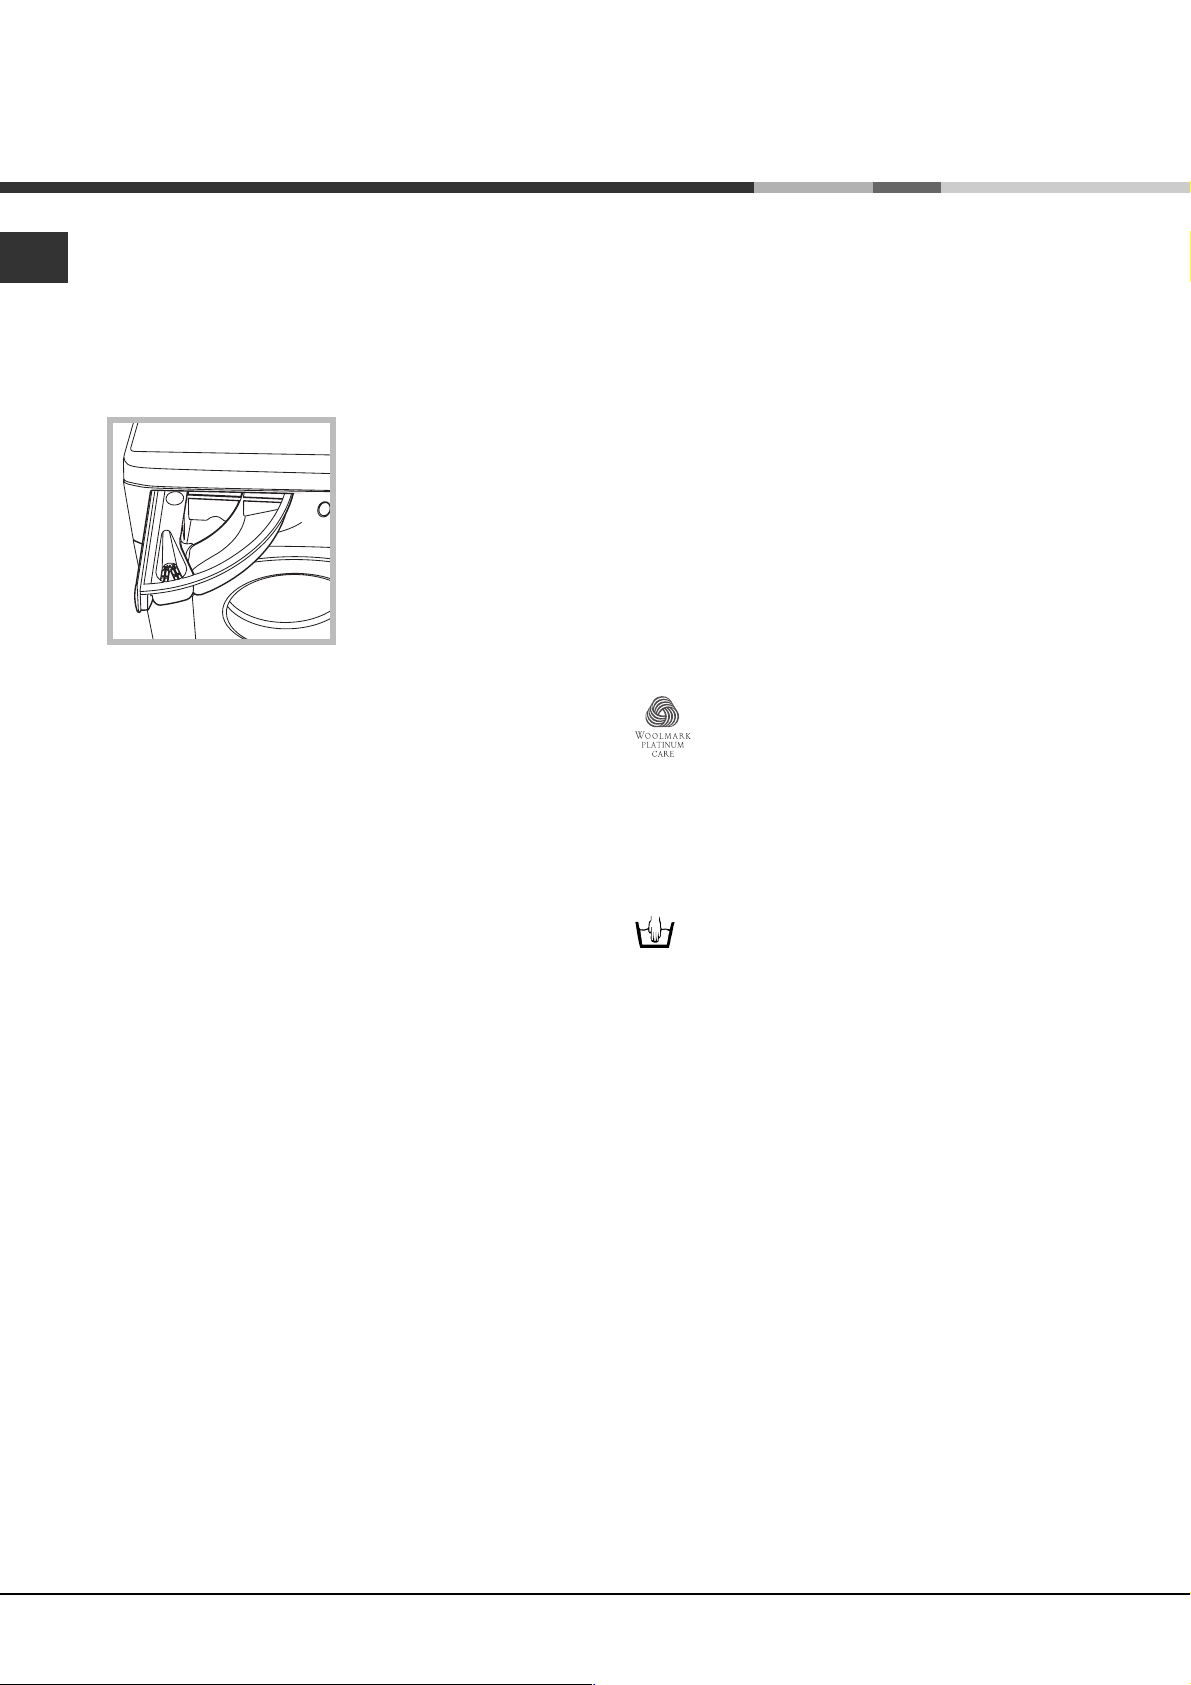
Open up the detergent
dispenser and pour in
the detergent and fabric
softener, as follows.
1
3
compartment 1: Detergent for pre-wash
(powder)
compartment 2: Detergent for the wash cycle
(powder or liquid)
Liquid detergent should only be poured in
immediately prior to the wash cycle start.
compartment 3: Additives (fabric softeners, etc.)
The fabric softener should not overflow from the grid.
Do not use hand wash detergent because it may
form too much foam.
2
Special items
Curtains: fold curtains and place them in a pillow
case or mesh bag. Wash them separately without
exceeding half the appliance load. Use programme
11 which excludes the spin cycle automatically.
Quilted coats and windbreakers: if they are
padded with goose or duck down, they can be
machine-washed. Turn the garments inside out and
load a maximum of 2-3 kg, repeating the rinse cycle
once or twice and using the delicate spin cycle.
Trainers: remove any mud. They can be washed
together with jeans and other tough garments, but
not with whites.
Wool: for best results, use a specific detergent,
taking care not to exceed a load of 1 kg.
Woolmark Platinum Care
As gentle as a hand wash.
Ariston sets a new standard of superior
performance that has been endorsed by
The Woolmark Company with the prestigious
Woolmark Platinum Care brand. Look for the
Woolmark Platinum Care logo on the washing
machine to ensure you can safely and effectively
wash wool garments labelled as "hand wash"
(M.00221):
Set programme 10 for all "Hand wash"
garments, using the appropriate detergent.
Preparing your laundry
Divide your laundry according to:
- the type of fabric/the symbol on the label.
- the colours: separate coloured garments from
whites.
Empty all pockets and check for loose buttons.
Do not exceed the weight limits stated below,
which refer to the weight when dry:
Sturdy fabrics: max 5 kg
Synthetic fabrics: max 2.5 kg
Delicate fabrics: max 2 kg
Wool: max 1 kg
How much does your laundry weigh?
1 sheet 400-500 g
1 pillow case 150-200 g
1 tablecloth 400-500 g
1 bathrobe 900-1,200 g
1 towel 150-250 g
20
Page 21
Precautions and advice
The washing machine was designed and built in
compliance with the applicable international safety
regulations. The following information is provided for
your safety and should consequently be read carefully.
General safety
This appliance has been designed for non-
professional, household use and its functions must
not be changed.
This washing machine should only be used by
adults and in accordance with the instructions
provided in this manual.
Never touch the washing machine when barefoot
or with wet or damp hands or feet.
Do not pull on the power supply cable to unplug
the appliance from the electricity socket. Pull the
plug out yourself.
Do not open the detergent dispenser while the
appliance is in operation.
Do not touch the drain water as it could reach
very high temperatures.
Never force the washing machine door: this could
damage the safety lock mechanism designed to
prevent any accidental openings.
In the event of a malfunction, do not under any
circumstances touch internal parts in order to
attempt repairs.
Always keep children well away from the
appliance while in operation.
The appliance door tends to get quite hot during
the wash cycle.
Should it have to be moved, proceed with the
help of two or three people and handle it with the
utmost care. Never try to do this alone, because
the appliance is very heavy.
Before loading your laundry into the washing
machine, make sure the drum is empty.
Disposal
Disposing of the packaging material:
observe local regulations, so the packaging can
be re-used.
Disposing of an old washing machine:
before scrapping your appliance, cut the power
supply cable and remove the appliance door.
Saving energy and respecting the
environment
Environmentally-friendly technology
If you only see a little water through your appliance
door, this is because thanks to the latest Ariston
technology, your washing machine only needs less
than half the amount of water to get the best
results: an objective reached to respect the
environment.
Saving on detergent, water,
energy and time
To avoid wasting resources, the washing machine
should be used with a full load. A full load instead
of two half loads allows you to save up to 50% on
energy.
The pre-wash cycle is only necessary on
extremely soiled garments. Avoiding it will save on
detergent, time, water and between 5 and 15%
energy.
Treating stains with a stain remover or leaving
them to soak before washing will cut down the
need to wash them at high temperatures. A
programme at 60°C instead of 90°C or one at
40°C instead of 60°C will save up to 50% on
energy.
Use the correct quantity of detergent depending
on the water hardness, how soiled the garments
are and the amount of laundry you have, to avoid
wastage and to protect the environment: despite
being biodegradable, detergents do contain
ingredients that alter the natural balance of the
environment. In addition, avoid using fabric
softener as much as possible.
If you use your washing machine from late in the
afternoon until the early hours of the morning, you
will help reduce the electricity board's peak load.
The Delay Timer option (see page 19) helps to
organise your wash cycles accordingly.
If your laundry has to be dried in a tumble dryer,
select a high spin speed. Having the least water
possible in your laundry will save you time and
energy in the drying process.
GB
ServiceTroubleshootingPrecautions CareProgrammes DetergentsInstallation Description
21
Page 22
Care and maintenance
GB
Cutting off the water or electricity
supply
Turn off the water tap after every wash. This will
limit the wear of your appliance's water system
and also prevent leaks.
Unplug your appliance when cleaning it and
during all maintenance operations.
Cleaning your appliance
The exterior and rubber parts of your appliance can
be cleaned with a soft cloth soaked in lukewarm
soapy water. Do not use solvents or abrasives.
Cleaning the detergent dispenser
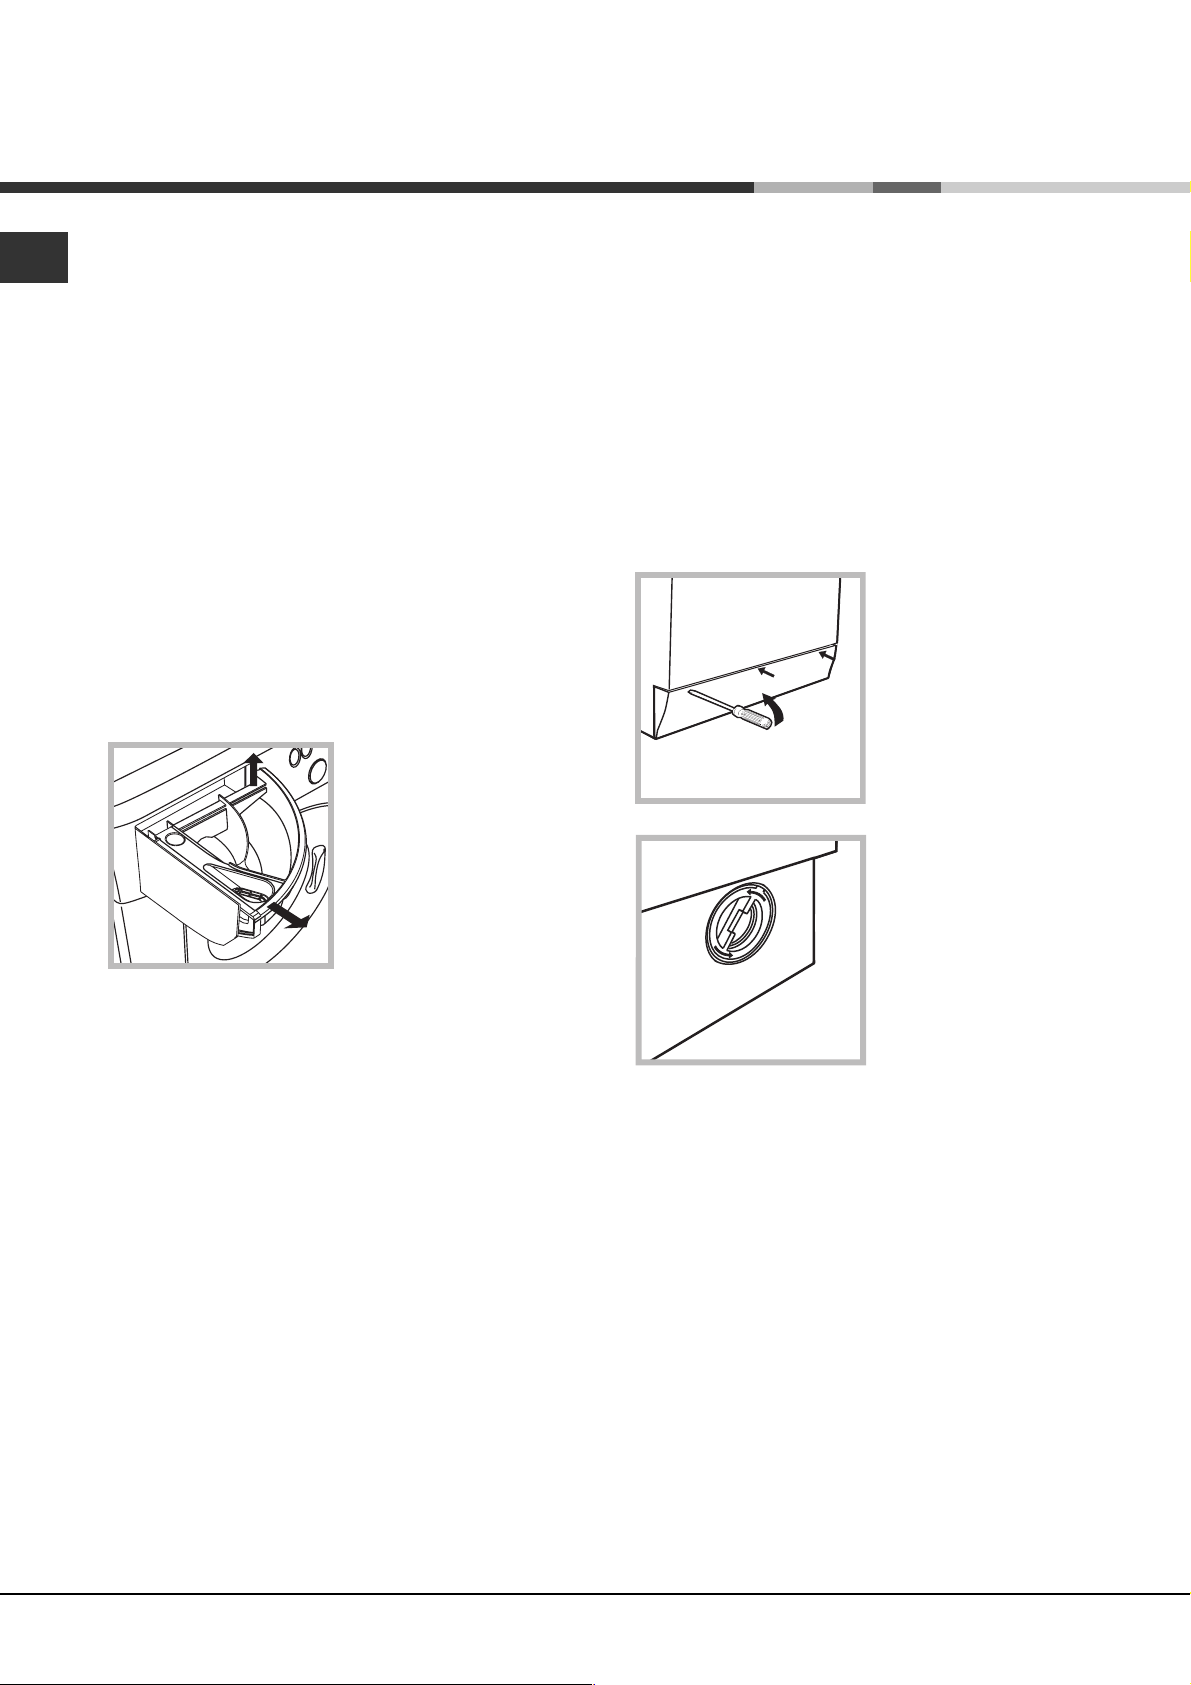
1
Remove the dispenser
by raising it and pulling it
out (see figure).
Wash it under running
water; this operation
should be repeated
frequently.
2
Cleaning the pump
The washing machine is fitted with a self-cleaning
pump that does not require any maintenance.
Sometimes, small items (such as coins or buttons)
may fall into the pre-chamber that protects the
pump, situated in the lower part of the same.
Make sure the wash cycle has ended and unplug
the appliance.
To access the pre-chamber:
1. using a screwdriver,
remove the cover panel
on the lower front of the
washing machine (see
figure);
2. unscrew the lid
rotating it anticlockwise (see figure):
a little water may trickle
out. This is perfectly
normal;
Caring for your appliance door and
drum
Always leave the appliance door ajar to prevent
unpleasant odours from forming.
3. clean the interior thoroughly;
4. screw the lid back on;
5. reposition the panel, making sure the hooks are
securely in place before you push it onto the
appliance.
Checking the water inlet hose
Check the water inlet hose at least once a year. If
you see any cracks, replace it immediately: during
the wash cycles, water pressure is very strong and
a cracked hose could easily split open.
Never use hoses that have already been used.
22
Page 23
Troubleshooting
Your washing machine could fail to work. Before calling for Assistance (see page 24), make sure the problem
can't easily be solved by consulting the following list.
Problem
The washing machine won't
start.
The wash cycle won't start.
The washing machine fails to
load water (The wording H2O is
displayed).
The washing machine
continuously loads and unloads
water.
Possible causes/Solution:
The appliance is not plugged into the socket, or not enough to
make contact.
There has been a power failure.
The appliance door is not shut properly (the word DOOR is
displayed).
The
The START/RESET button has not been pressed.
The water tap is not turned on.
A delayed start has been set (using the Delay Timer, see page 19).
The water inlet hose is not connected to the tap.
The hose is bent.
The water tap is not turned on.
There is a water shortage.
The water pressure is insufficient.
The START/RESET button has not been pressed.
The drain hose is not fitted between 65 and 100 cm from the floor
The free end of the hose is underwater (see page 15).
The wall drainage system doesn't have a breather pipe.
button has not been pressed.
(see page 15).
GB
The washing machine does not
drain or spin.
The washing machine vibrates
too much during the spin cycle.
The washing machine leaks.
There is too much foam.
If the problem persists even after these checks, turn off the water tap,
switch the appliance off and call for Assistance. If the dwelling is on one of
the upper floors of a building, there may be drain trap problems causing the
washing machine to load and unload water continuously. In order to avoid
such an inconvenience, special anti-drain trap valves are available in shops.
The programme does not foresee the draining: some programmes
require enabling the draining manually (see page 18).
The Easy iron option is enabled: to complete the programme, press
the START/RESET button (see page 19).
The drain hose is bent (see page 15).
The drain duct is clogged.
The drum was not unblocked correctly during installation (see page 14).
The washing machine is not level (see page 14).
The washing machine is closed in between furniture cabinets and
the wall (see page 14).
The water inlet hose is not screwed on correctly (see page 14).
The detergent dispenser is obstructed (to clean it, see page 22).
The drain hose is not secured properly (see page 15).
The detergent is not suitable for machine washing (it should bear
the definition "for washing machines" or "hand and machine wash",
or the like).
You used too much detergent.
ServiceTroubleshootingPrecautions CareProgrammes DetergentsInstallation Description
23
Page 24
Service
195047048.00
09 / 20 0 4 - Xerox Business Services
GB
Before calling for Assistance:
Check whether you can solve the problem on your own (see page 23);
Restart the programme to check whether the problem has been solved;
If this is not the case, contact an authorised Technical Service Centre on the telephone number
provided on the guarantee certificate.
Always request the assistance of authorised servicemen.
Notify the operator of:
the type of problem;
the appliance model (Mod.);
the serial number (S/N).
This information can be found on the data plate situated on the rear of the washing machine.
Service
24
 Loading...