

Page 1

Instruções para utilização
MÁQUINA DE LAVAR ROUPA
PT
Português,1
AVD 88 S
GB
English,13
Sumário
PT
Instalação, 2-3
Desembalar e nivelar, 2
Ligações hidráulicas e eléctricas, 2-3
Primeiro ciclo de lavagem, 3
Dados técnicos, 3
Descrição da máquina de lavar roupa, 4-5
Painel de comandos, 4
Display, 5
Início e Programas, 6
Como iniciar um programa, 6
Tabela dos programas, 6
Personalizações, 7
Regular a temperatura, 7
Regular a centrifugação, 7
Opções, 7
Detergentes e roupa, 8
Gaveta dos detergentes, 8
Ciclo para branquear, 8
Preparar a roupa, 8
Roupas especiais, 8
Cashmere Platinum, 8
Precauções e conselhos, 9
Segurança geral, 9
Eliminação, 9
Economizar e respeitar o meio ambiente, 9
Manutenção e cuidados, 10
Interromper a alimentação de água e de corrente eléctrica, 10
Limpar a máquina de lavar roupa, 10
Limpar a gaveta dos detergentes, 10
Cuidados com a porta de vidro e o tambor, 10
Limpar a bomba, 10
Verificar o tubo de alimentação de água, 10
Anomalias e soluções, 11
Assistência, 12
Antes de contactar a Assistência Técnica, 12
1
Page 2

Instalação
PT
É importante guardar este manual para poder
consultá-lo a qualquer momento. Se a máquina for
vendida, cedida ou transferida, certifique-se que este
manual permaneça com a máquina para informar o
novo proprietário acerca do seu funcionamento e das
respectivas advertências.
Leia com atenção estas instruções: contém
informações importantes acerca da instalação, da
utilização e da segurança.
Desembalar e nivelar
Desembalar
1. Tire a máquina de lavar roupa da embalagem.
2. Verifique se a máquina de lavar roupa sofreu
danos no transporte. Se estiver danificada não
efectue a sua ligação e contacte o revendedor.
3. Tire os quatro parafusos para protecção no
transporte e a
borrachinha com o
respectivo calço,
situados na parte
traseira (veja a figura).
Um cuidadoso nivelamento dá estabilidade à máquina e evita vibrações, ruídos e deslocamentos durante o funcionamento. Se tiver tapete ou alcatifa,
regule os pés de modo a que por baixo da máquina
de lavar roupa haja espaço suficiente para ventilação.
Ligações hidráulicas e eléctricas
Ligação do tubo de alimentação da água
1. Coloque a guarnição
A na ponta do tubo de
alimentação e atarraxe-o
a uma torneira de água
A
fria com bocal de rosca
de 3/4 (veja a figura).
Antes de realizar esta
ligação, deixe a água
escorrer até estar
límpida.
2. Ligue o tubo de
alimentação na máquina de lavar roupa
atarraxado no apropriado fornecimento da
água, na parte traseira,
em cima à direita (veja
a figura).
4. Tampe os furos com as tampas em plástico
fornecidas.
5. Tampe com a tampa os três furos onde estava a
ficha, situados na parte traseira, embaixo à direita.
6. Guarde todas as peças: se for necessário transportar a
máquina de lavar roupa, terão de ser montadas outra vez.
Embalagens não são brinquedos para as crianças.
Nivelamento
1. Instale a máquina de lavar roupa sobre um
pavimento plano e rígido, sem encostá-la a paredes,
móveis ou outros.
2. Se o pavimento não
for perfeitamente horizontal, para compensar
qualquer irregularidade,
desatarraxe ou atarraxe
os pés dianteiros (veja a
figura); o ângulo de
inclinação, medido no
plano de trabalho, não
deve ultrapassar 2°.
3. Tome cuidado para o tubo não ser dobrado nem
esmagado.
A pressão hídrica da torneira deve ser entre os
valores da tabela dos dados técnicas (veja a página
ao lado).
Se o comprimento do tubo de alimentação não for
suficiente, contacte uma oficina especializada ou um
técnico autorizado.
2
Page 3
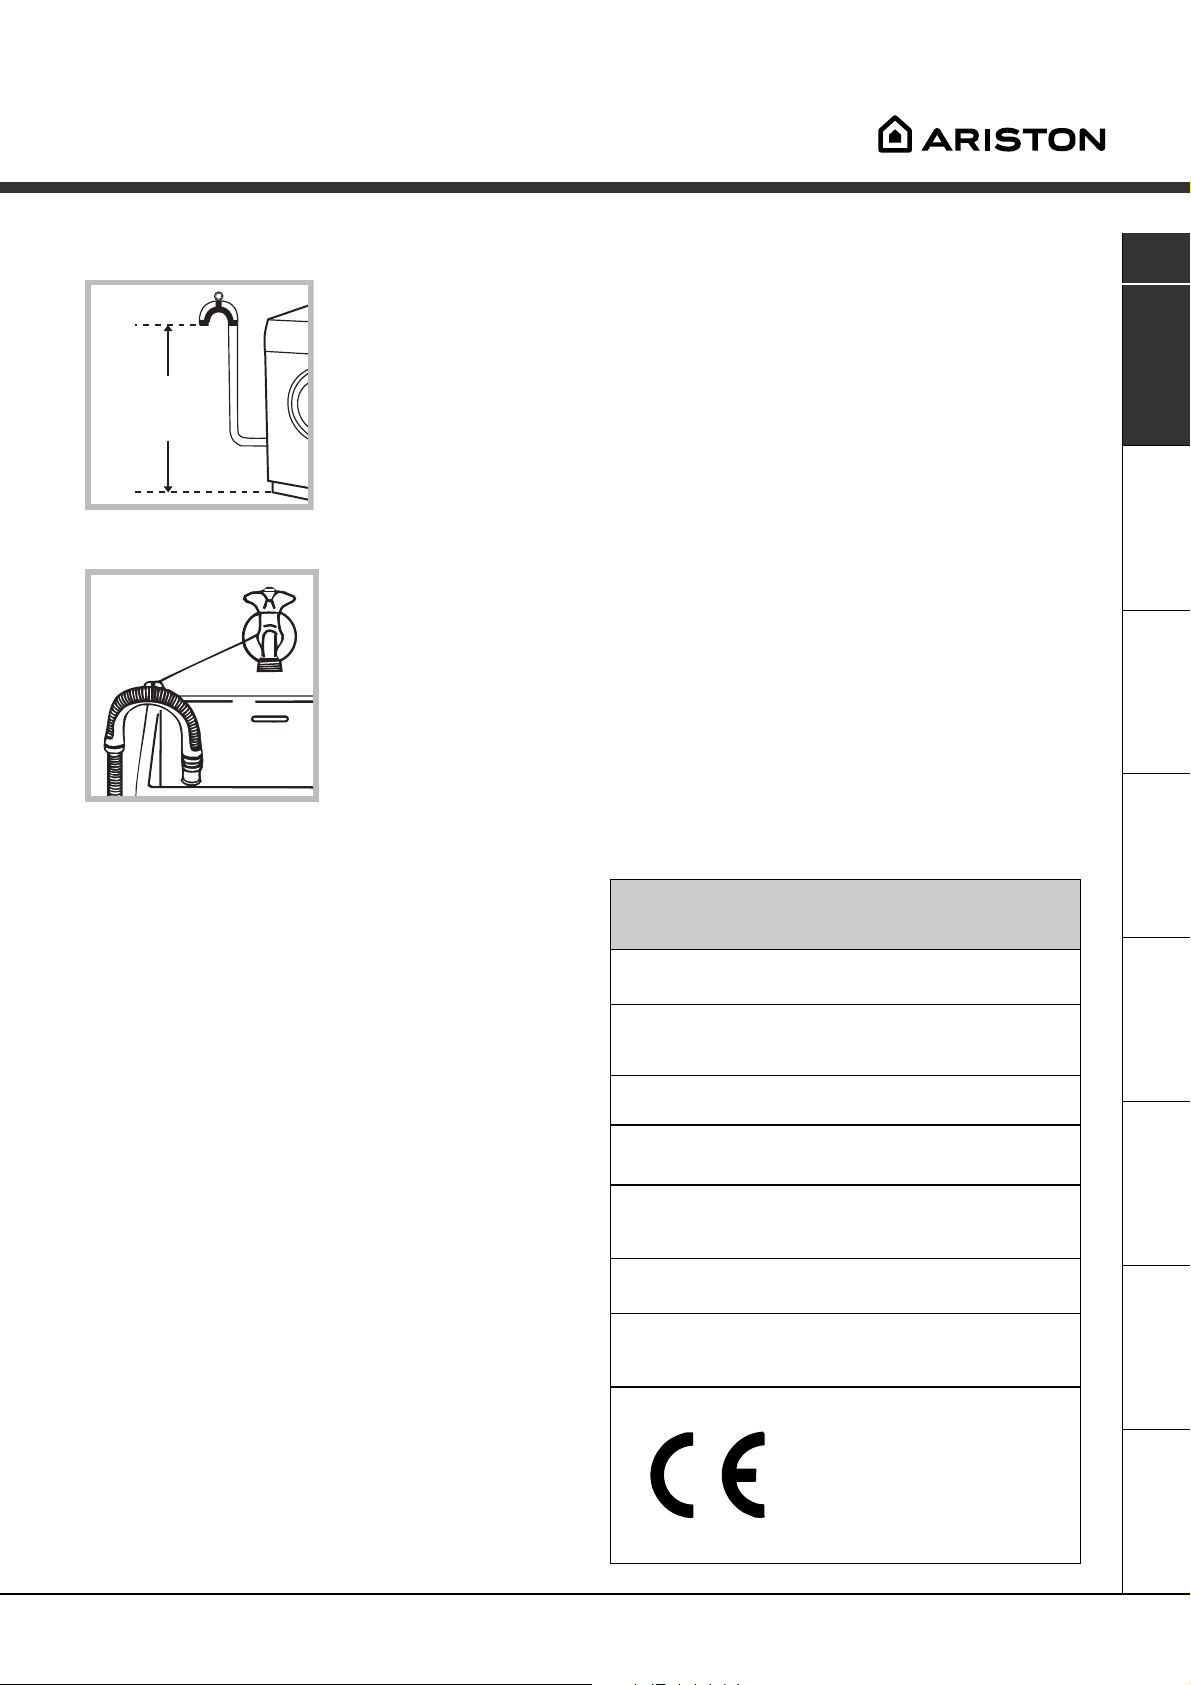
Ligação do tubo de descarga
65 - 100 cm
Ligue o tubo de descarga, sem dobrá-lo, a uma
conduta de descarga ou
a uma descarga na
parede situada entre 65
e 100 cm. de altura do
chão;
Não empregue extensões nem fichas múltiplas.
PT
O cabo não deve ser dobrado nem apertado.
O cabo de alimentação deve ser substituído somen-
te por técnicos autorizados.
Atenção! O fabricante declina toda a responsabilidade
se estas regras não forem respeitadas.
Primeiro ciclo de lavagem
ou coloque na beira de
um lavabo ou de uma
banheira, prenda na
torneira a guia fornecida
(veja a figura). A ponta
solta do tubo de descarga não deve permanecer emergida na água.
É desaconselhado empregar tubos de extensão;
mas se for indispensável, a extensão deve ter o
mesmo diâmetro do tubo original e não medir mais de
150 cm. de comprimento.
Ligação eléctrica
Ante de ligar a ficha na tomada eléctrica, certifiquese que:
a tomada tenha uma ligação à terra e que esteja
nos termos da legislação;
Depois da instalação, antes de usar, efectue um ciclo
de lavagem com detergente mas sem roupa, defina o
programa de 90°C sem pré-lavagem.
Dados técnicos
Modelo
Medidas
Capacidade
AVD 8 8 S
largura 59,5 cm.
altura 85 cm.
profundidade 53,5 cm.
de 1 a 5 kg.
a tomada tem capacidade para suportar a carga
máxima de potência da máquina, indicada na
tabela de dados técnicos (veja ao lado);
a tensão de alimentação seja entre os valores
indicados na tabela de dados técnicos (veja ao
lado);
a tomada seja compatível com a ficha da máqui-
na de lavar roupa. Se não for, substitua a tomada
ou a ficha.
Esta máquina de lavar roupa não deve ser instalada
ao ar livre, nem mesmo abrigada, porque é muito
perigoso deixá-la exposta à chuva e às tempestades.
Depois de ter instalado a máquina de lavar roupa,
o acesso à tomada eléctrica deve ser fácil.
Ligações
eléctricas
Ligações hídricas
Velocidade da
centrifugação
Programas de
controlo segundo
a norma IEC456
Tensão a 220/230 Volts 50 Hz
potência máxima absorvida 1850 W
pressão máxima 1 MPa (10 bars)
pressão mínima 0,05 MPa (0,5 bar)
capacidade do tambor 46 litros
até 800 rotações por minuto
programa 3; temperatura 60°C;
realizado com carga de 5 kg.
Esta aparelhagem é em
conformidade com as seguintes
Directivas Comunitárias:
- 73/23/CEE de 19/02/73 (Baixa
Tensão) e posteriores modificações
- 89/336/CEE dl 03/05/89
(Compatibilidade Electromagnética) e
posteriores modificações.
AssistênciaAnomaliasPrecauções ManutençãoProgramas DetergentesInstalação Descrição
3
Page 4
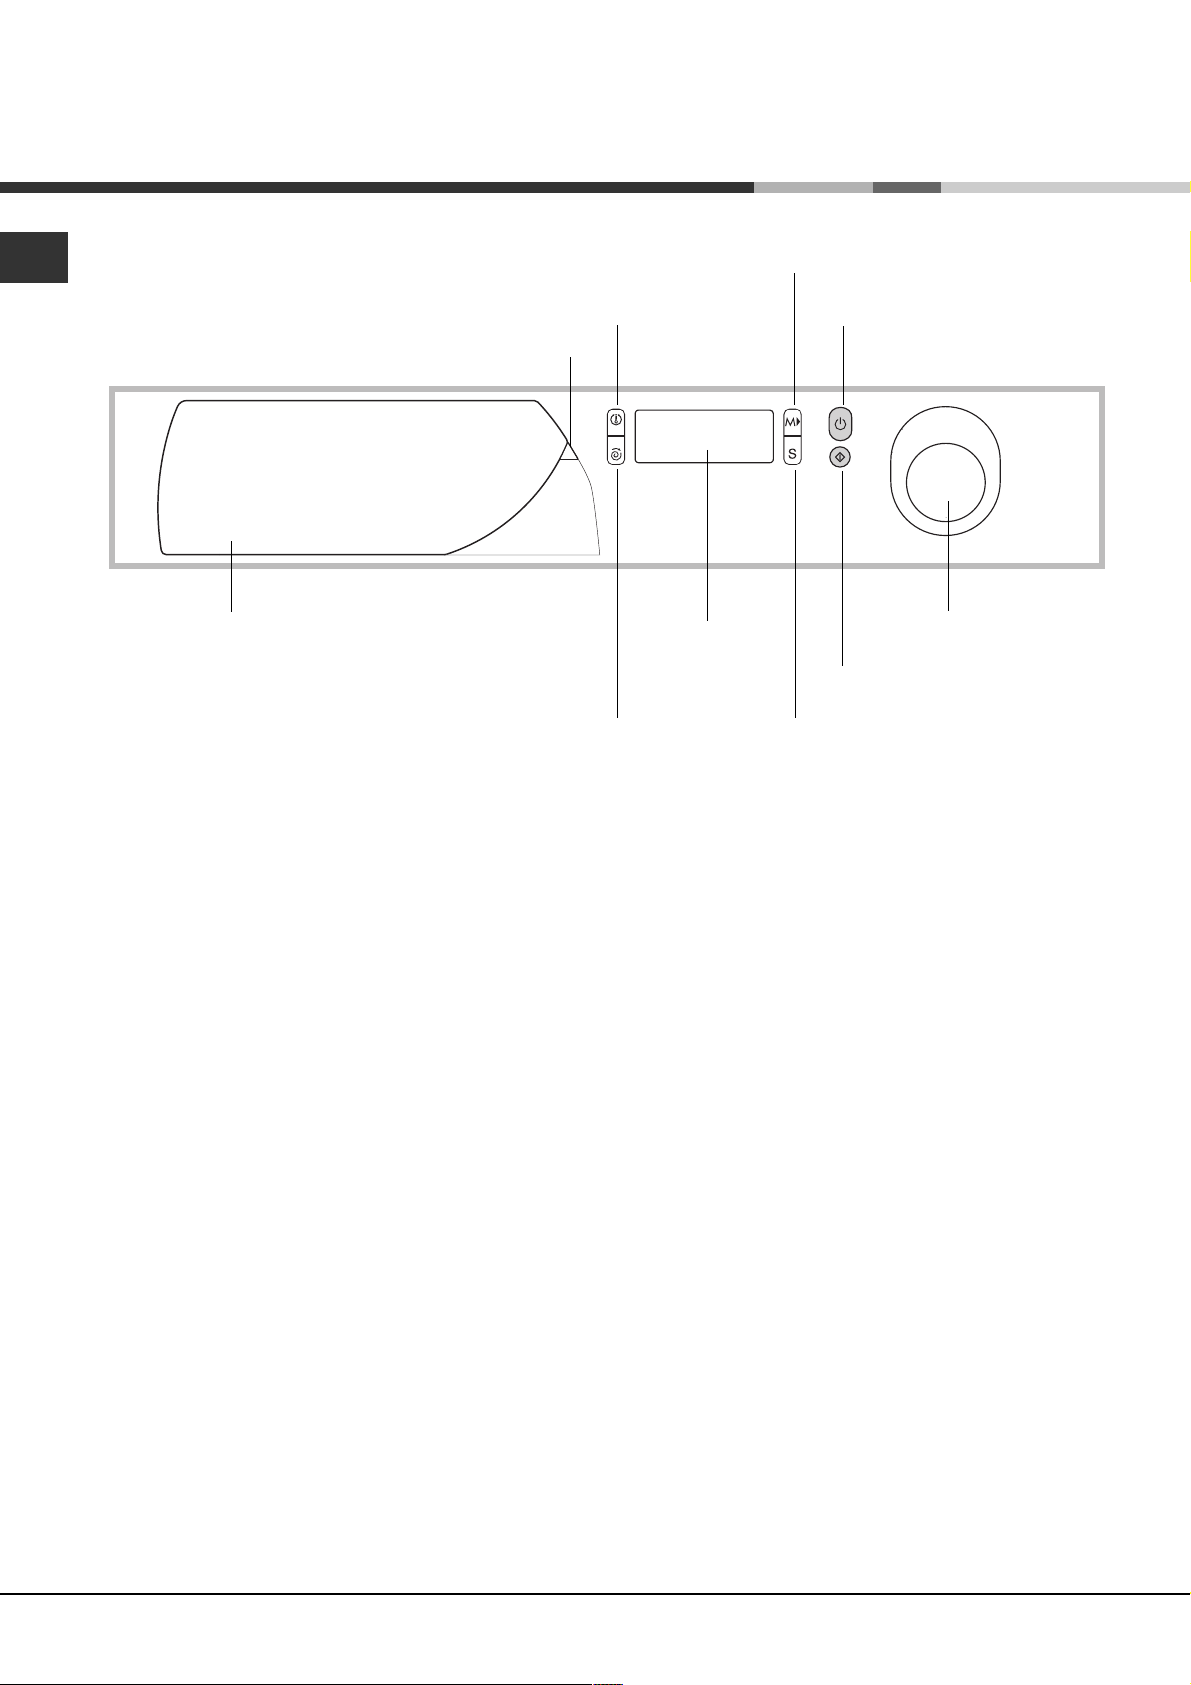
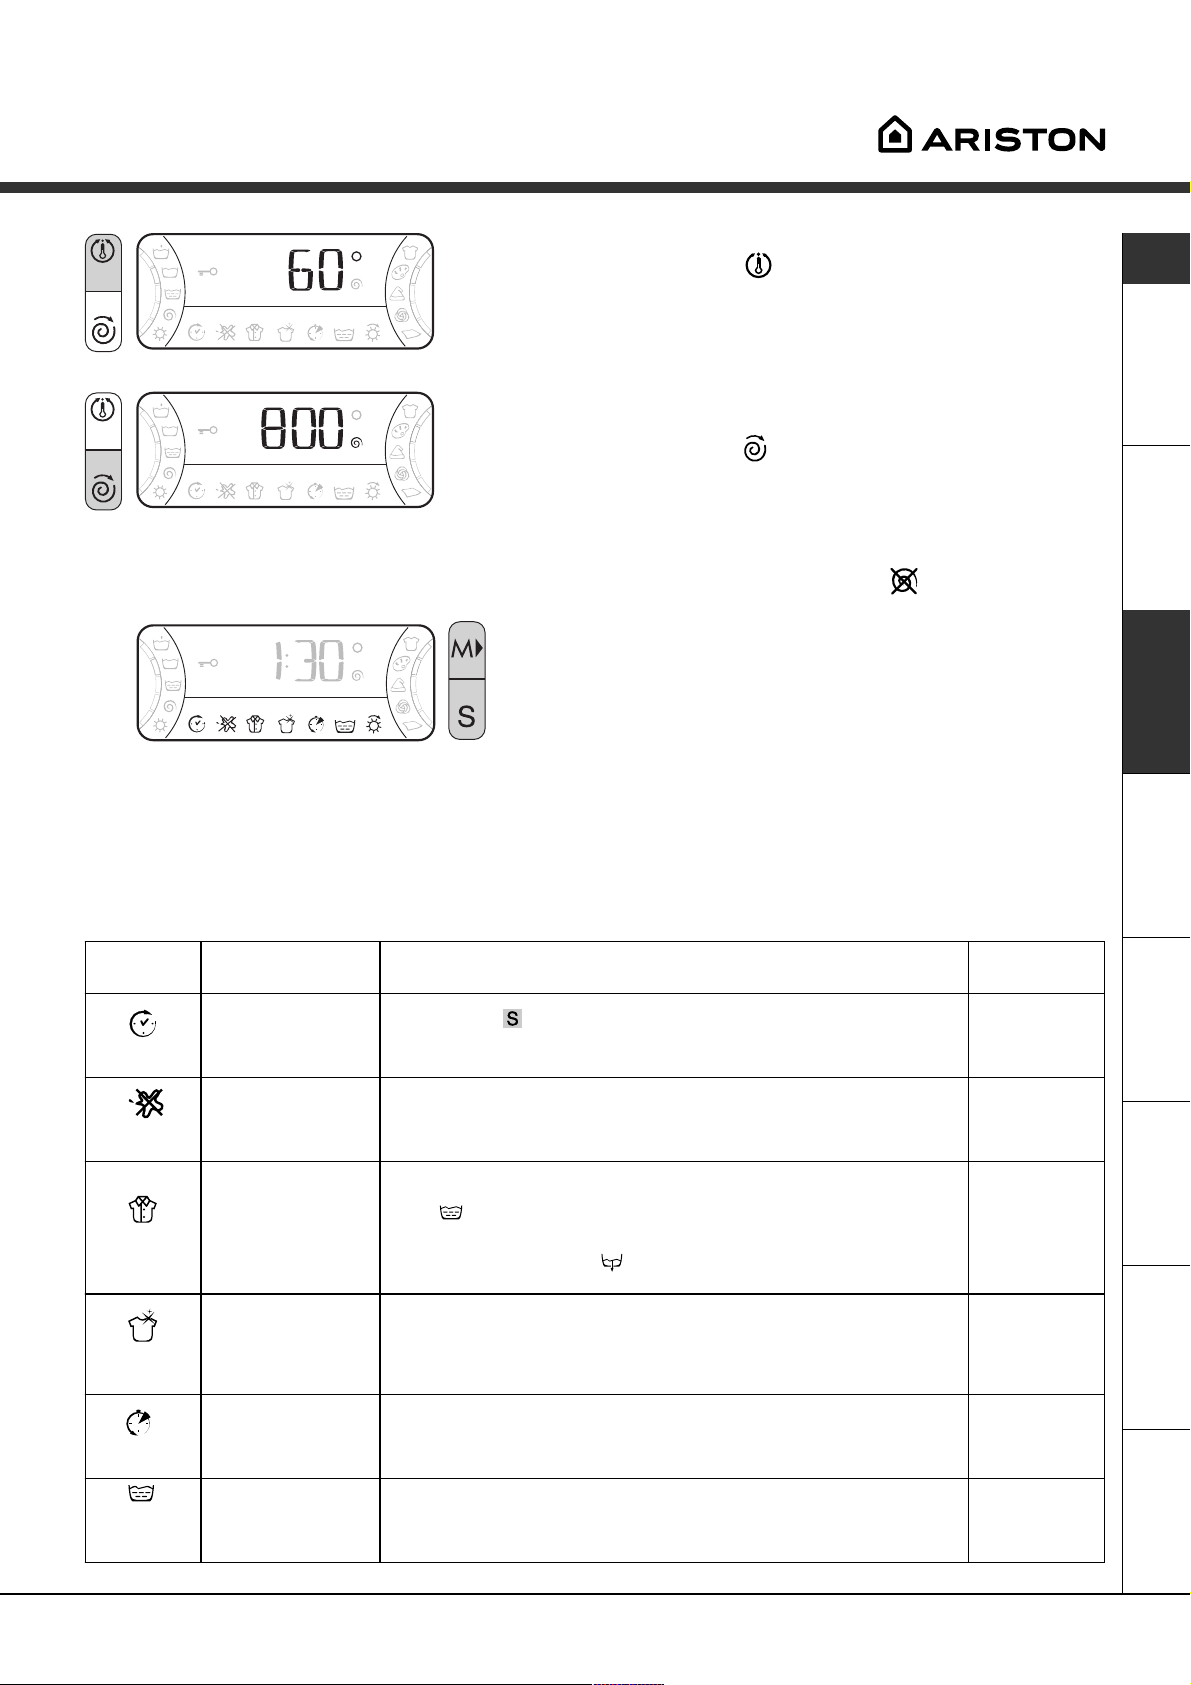
Descrição da máquina
de lavar roupa
PT
Painel de comandos
Mostrador de Programas
Gaveta dos detergentes
Gaveta dos detergentes para carregar detergen-
tes e aditivos (veja a pág. 8).
Tecla do
MODE
Tecla da
TEMPERATURA
Display
Tecla de
CENTRIFUGAÇÃO
Tecla MODE para escolher as opções de
personalização (veja a pág. 7).
Tecla de
LIGA/DESLIGA
Selector
Tecla de
START/RESET
Tecla de
SELECT
Mostrador de Programas para consulta a qualquer momento do esquema resumido dos programas: para abri-la, puxe a lingueta para fora.
Tecla da TEMPERATURA para seleccionar a
temperatura de lavagem (veja a pág. 7).
Tecla de CENTRIFUGAÇÃO para regular a velocidade
de centrifugação ou mesmo exclui-la (veja a pág. 7).
Display para programar a máquina de lavar roupa
e acompanhar o decorrer dos ciclos de lavagem
(veja a página ao lado).
Tecla de SELECT para programar as opções de
personalização (veja a pág. 7).
Tecla LIGA/DESLIGA para ligar e desligar a máquina
de lavar roupa.
Tecla de START/RESET para iniciar os programas
ou apagar programações erradas.
Selector para escolher os programas. Este selector
é embutido: Para extraí-lo pressione ligeiramente no
centro. Durante o programa o selector permanece
parado.
4
Page 5
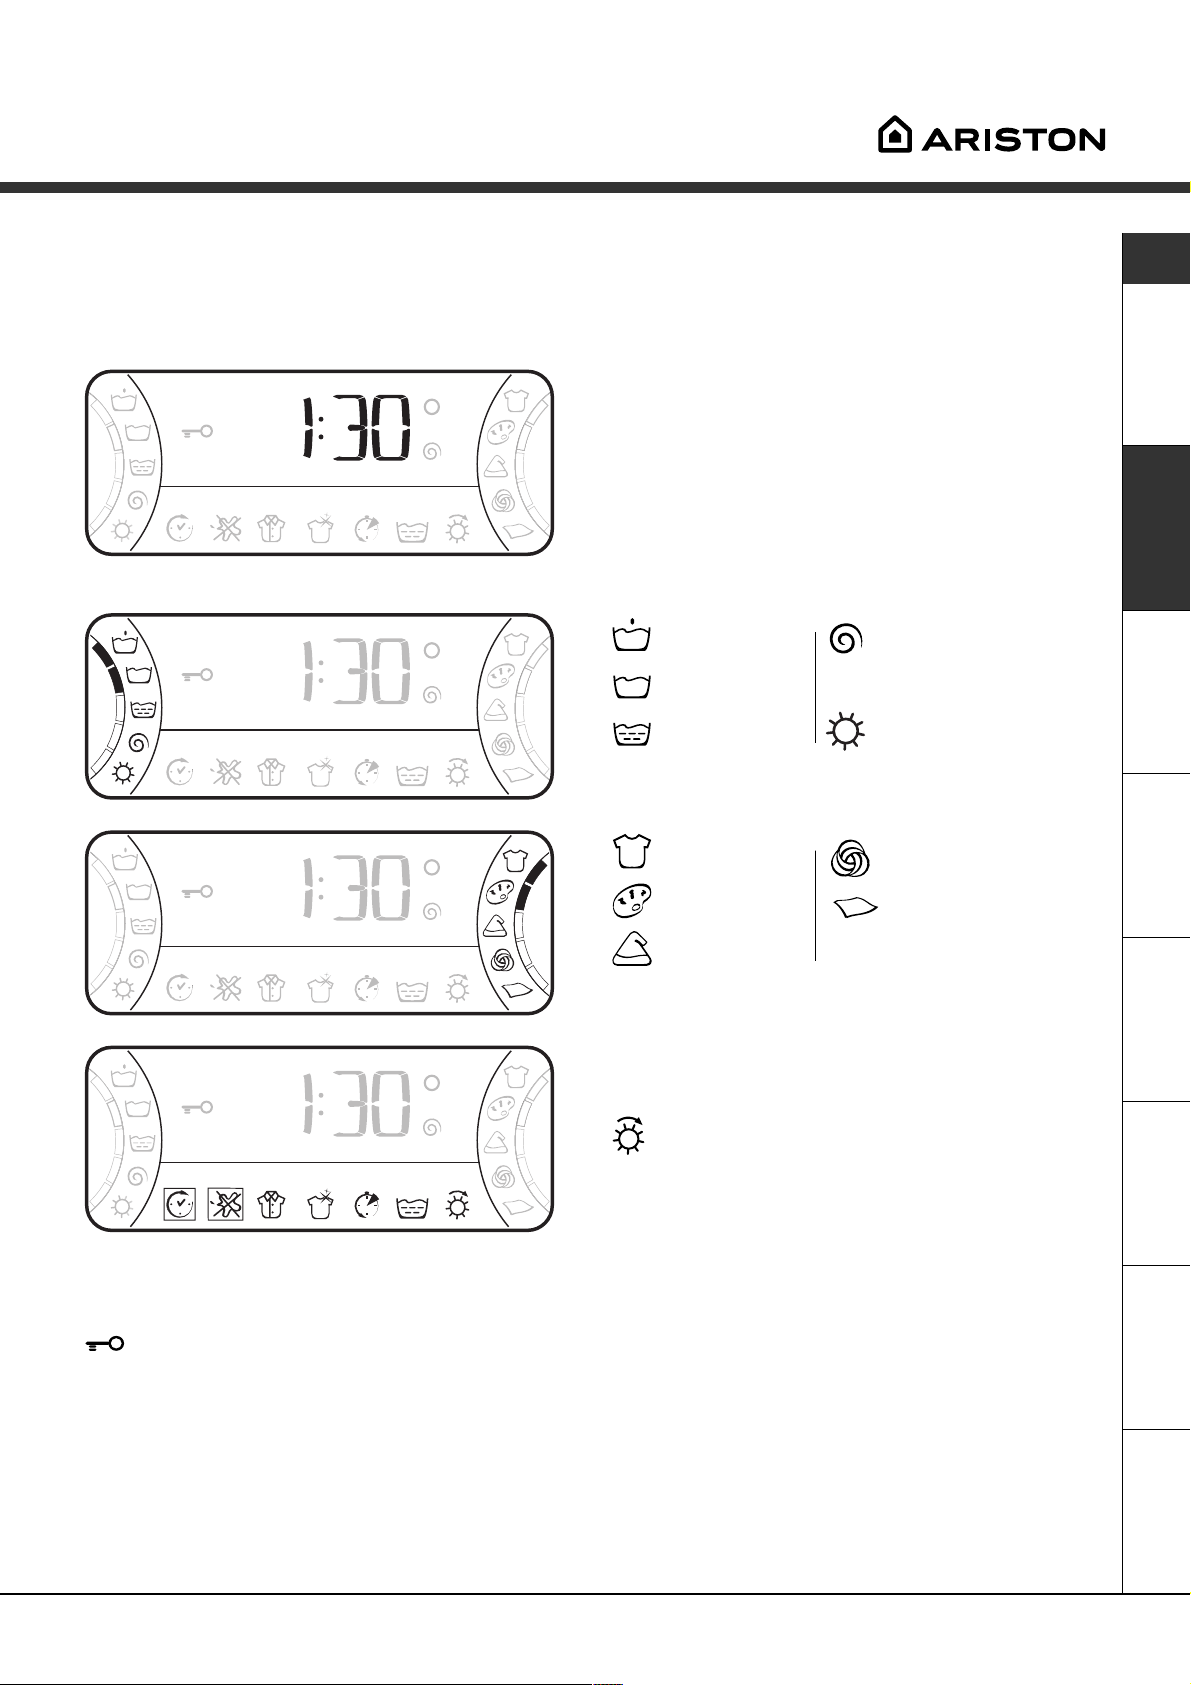
Display
Além de ser um instrumento útil na programação da máquina (veja a pág. 7), o display fornece informações
acerca do ciclo de lavagem e sua duração.
Depois de ter carregado na tecla START/RESET
para o início do programa o display mostra o tempo
que falta até ao final do ciclo. Se tiver programado a
hora de início da lavagem (Delay Timer, veja a pág 7),
o display indicará o tempo que falta até começar a
lavagem.
Durante o ciclo de lavagem serão mostrados:
Fase em curso:
Pré-lavagem Centrifugação
Lavagem
Enxaguamento Símbolo não activo.
Tecido seleccionado:
PT
Algodão Lã
Coloridos Seda
Sintéticos
Opções de personalização:
As opções activas podem ser visualizadas no display.
Veja na pág. 7 como se seleccionam as opções.
Opção não activada.
Porta bloqueada:
O símbolo aceso indica que a porta está bloqueada para impedir a sua abertura acidental. Para evitar danos é
necessário aguardar que o símbolo apague antes de abrir a porta de vidro.
Este modelo é equipado com um dispositivo que possibilita abrir a porta durante a primeira fase do programa.
Isto só será possível enquanto o símbolo não estiver aceso.
AssistênciaAnomaliasPrecauções ManutençãoProgramas DetergentesInstalação Descrição
No final do programa é visualizada a indicação END.
Se houver uma anomalia aparece um código de erro, por exemplo: F-01, neste caso deverá contactar a
Assistência Técnica (veja a pág. 12).
5
Page 6
ç
ç
ç
Início e Programas
PT
Como iniciar um programa
1. Para ligar a máquina de lavar roupa, carregue na
tecla
2. Coloque dentro a roupa e feche.
3. Seleccione através do selector, o programa que
desejar. No display será indicada uma previsão do
tempo de lavagem. A temperatura e a
centrifugação serão definidas automaticamente em
função do programa (para mudá-las veja a pág. 7).
.
4. Coloque o detergente e os aditivos (veja a pág. 8).
5. Para iniciar o programa carregue na tecla START/
RESET.
Para anular mantenha pressionada a tecla
START/RESET pelo menos 2 segundos.
6. No final do programa aparece escrito END. Tire a
roupa lavada de dentro e deixe a porta entreaberta para que o tambor seque.
7. Para desligar a máquina de lavar roupa, carregue
na tecla
.
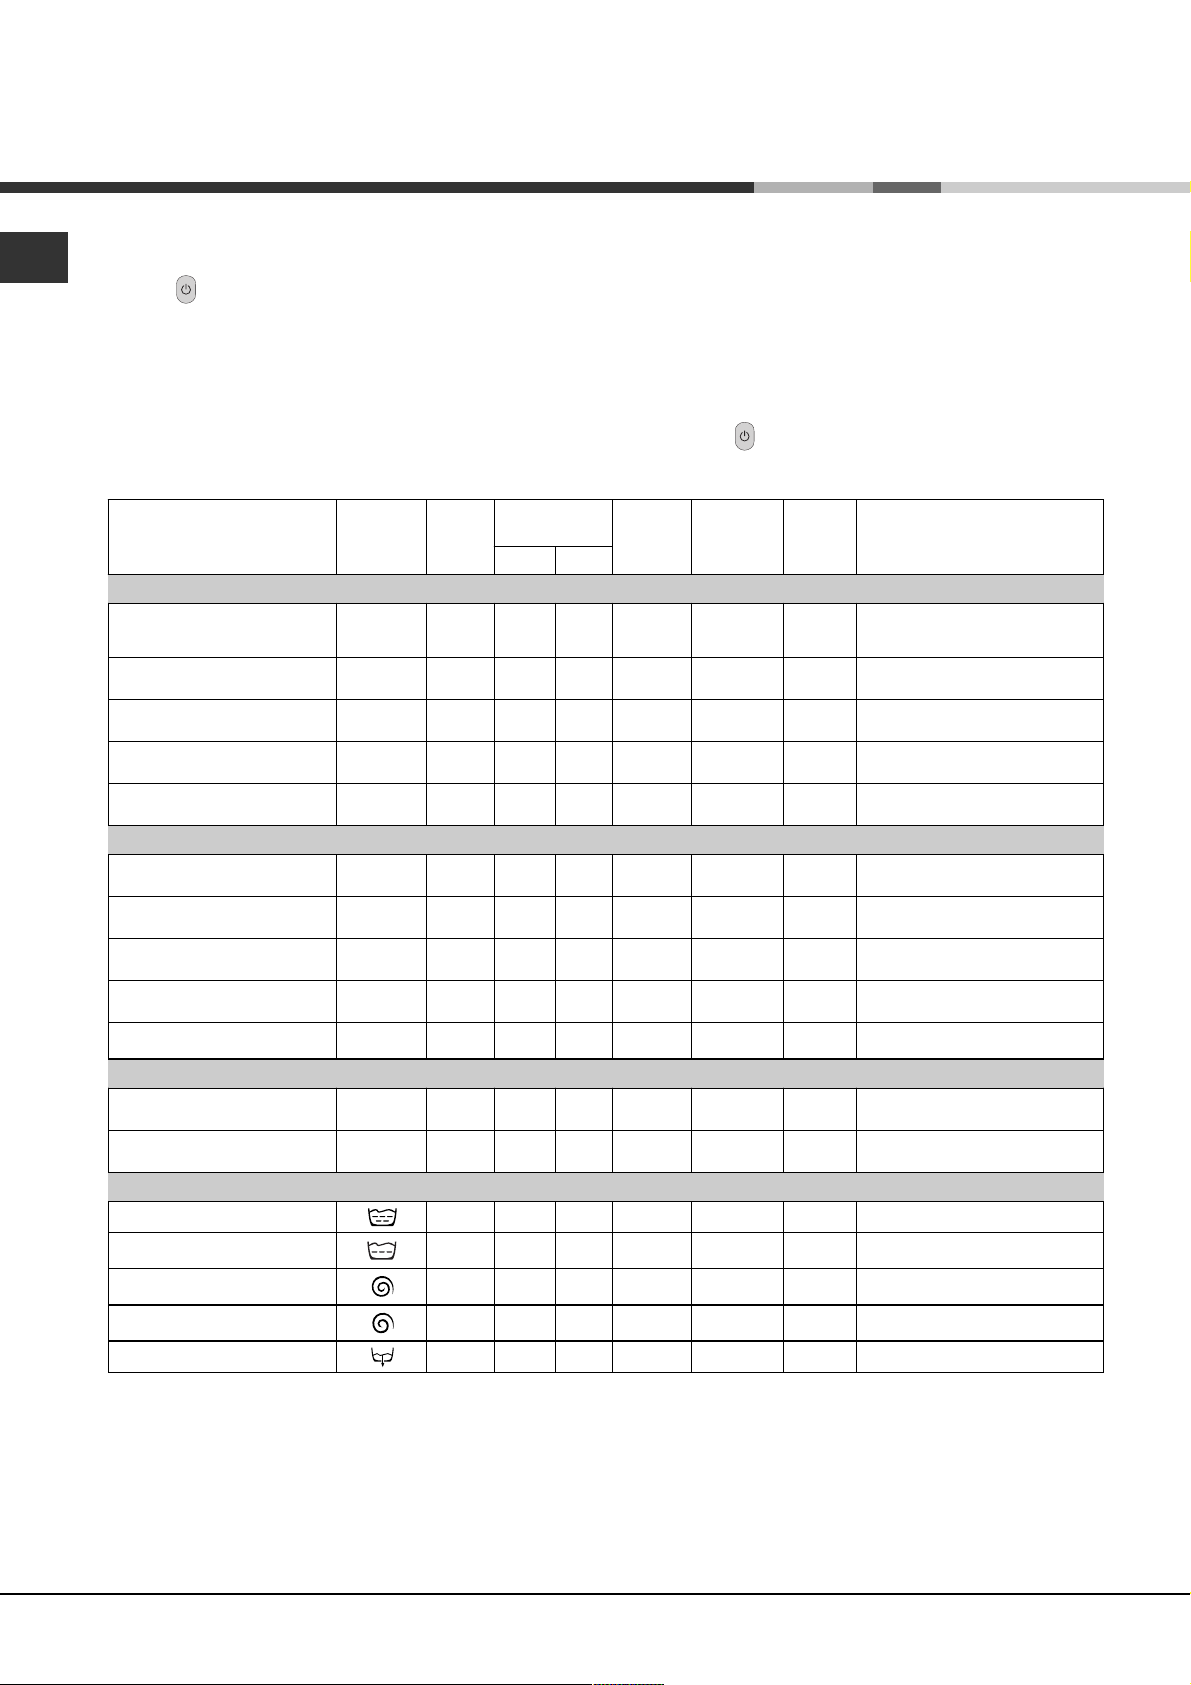
Tabela dos programas
ão
Natureza dos tecidos /
sujidade
Programas
Te m p e ratura
Detergente
Pré-lav. Lavag.
Amacia-
dor
Op
branquea-
dor/ Lixívia
Algodão
Brancos muito sujos
(lençóis, toalhas etc.)
Brancos muito sujos
(lençóis, toalhas etc.)
Brancos e coloridos
resistentes muito sujos
Brancos pouco sujos e cores
delicadas (camisas, camisol as etc.)
Coloridos delicados
pouco sujos
1
2
3
4
5
90°C 137
90°C
60°C
40°C
30°C
Delicada /
Tradicion al
Delicada /
Tradicion al
Delicada /
Tradicion al
Delicada /
Tradicion al
Sintéticos
Coloridos resistentes muito
sujos (roupas de bebé etc.)
Cores resistentes (roupas de
todos os tipos levemente suja)
Coloridos resistentes muito
sujos (roupas de bebé etc.)
Cores delicadas (roupas de
todos os tipos ligeiramente sujas)
Cores delicadas (roupas de
todos os tipos ligeiramente sujas)
6
6
7
8
9
60°C Delicada 77
40°C Delicada 62
50°C Delicada 73
40°C Delicada 58
30°C 30
Delicados
Lã
Tecidos muito delicados
(cortinas, seda, viscose etc.)
PROGRAMAS PARCIAIS
Enxagua
Enxagua
Centrifugação
Centrifugação delicada
Descarga Descarga
o Enxaguamentos e centrifugação
ment
o delicado
ment
10
11
40°C Delicada 50
30°C 45
ão
Dura
do ciclo
(minutos)
120
105
72
65
Descri
Pré-lavagem, lavagem,
enxagua
intermediárias e final
Lavagem, enxaguamentos,
centrifugações intermediárias e final
Lavagem, enxaguamentos,
centrifugações intermediárias e final
Lavagem, enxaguamentos,
centrifugações intermediárias e final
Lavagem, enxaguamentos,
centrifugações intermediárias e final
Lavagem, enxaguamentos, antirugas ou centrifugação delicada
Lavagem, enxaguamentos, antirugas ou centrifugação delicada
Lavagem, enxaguamentos, antirugas ou centrifugação delicada
Lavagem, enxaguamentos, antirugas ou centrifugação delicada
Lavagem, enxaguamentos e
cent
rifugação
Lavagem, enxaguamentos e
centrifugação delicada
Lavagem, enxaguamentos,
anti-rugas ou descarga
Enxaguamentos, anti-rugas ou
descarga
Descarga e centrifugação
enérgica
Descarga e centrifugação
delicada
ão do ciclo de lavagem
o, centrifugações
ment
delicada
Observações
Para seleccionar a opção anti-rugas: veja Engomar Fácil, na página ao lado. Os dados apresentados na tabela têm
valor indicativo.
Programa especial
Diário 30' (programa 9 para Sintéticos) foi estudado para lavar peças levemente sujas em pouco tempo; dura
apenas 30 minutos e, desta maneira, economiza energia e tempo. Se regular o programa (9 a 30°C) será
possível lavar juntos tecidos de natureza diferente (excepto lã e seda), com uma carga máxima de 3 Kg.
Aconselhamos a utilização de detergente líquido.
6
Page 7
Personalizações
Regular a temperatura
Se carregar na tecla será mostrada a máxima temperatura permitida para o programa definido. É possível
baixar a temperatura se carregar na tecla OFF, que indica
lavagem a frio.
Esta regulação da temperatura ficará activa em todos os
programas de lavagem.
Regular a centrifugação
Se carregar na tecla será mostrada a velocidade
velocidade de centrifugação permitida para o programa
definido. Se continuar a carregar na tecla os valores
baixam até OFF (desligado), ou seja, até à exclusão da
centrifugação (pressione mais uma vez para voltar ao valor
mais alto).
A exclusão é assinalada pelo símbolo
.
A regulação da centrifugação é possível em todos os
programas excepto o 11 e na descarga.
Opções
As várias funções de lavagem desta máquina de lavar roupa
possibilitam obter a limpeza e a brancura que desejar.
Para seleccionar as diversas opções deve sempre seguir o
seguinte processo?
1. Mediante a tecla MODE é possível percorrer as diversas opções disponíveis; o símbolo activo estará intermitente.
2. Para programar carregue na tecla SELECT, até aparecer no display a inscrição ON (ligado) (para a opção
Delay Timer aparecerá o tempo: veja a tabela seguinte).
3. Para confirmar a escolha, carregue outra vez na tecla MODE: no display o símbolo desta opção já não
estará intermitente.
As opções seleccionadas serão reconhecidas no display por estarem circundadas por um quadrado.
PT
Opção Efe ito Obser vaç õ es par a u t i lizaçã o
Del ay T imer
Bran q u ea do r
En g o ma r
Fáci l
Super
Lavagem
Rápi do
En x a g u a men t o
Ex t r a
Possibilita a
programação do
início da lavagem
até 24 horas.
Ciclo branqueador
adequado para
eliminar as nódoas
mais resistentes.
O tecido sairá
menos amarrotado
e mais fácil de
engomar.
Proporciona uma
limpeza impecável,
visivelmente mais
branco do padrão
da Classe A.
Diminuiu em cerca
de 30% o duração
do ciclo de
lavagem.
Aumenta a eficácia
do enxaguamento
Carregue em (tecla SELECT) várias vezes, até aparecer o tempo
de atraso que desejar.
OFF indica nenhum atraso, inícia de imediato.
Coloque lixívia na gaveta adicional 4 (veja a pág. 8).
Não é compatível com a opção ENGOMAR FÁCIL.
Se selecionar esta opção, nos programas 6, 7, 8, 11 e
Enxaguadmento delicado, a roupa ficará de molho (Anti-rugas) e o
ícone ficará intermitente:
- para completar o ciclo carregue na tecla START/RESET;
- para efectuar apenas uma descarga, coloque o selector no
correspondente símbolo e carregue na tecla START/RESET.
Não é compatível com a opção BRANQUEADOR
Não é compatível com a opção RÁPIDO .
Não é compatível com a opção SUPER LAVAGEM.
É aconselhável se a máquina de lavar roupa estiver muito cheia ou
com uma grande dose de detergente.
Po s s íve l n o s
pr ogra mas :
Tod o s
2, 3 , 4, 5 ,
6, 7 , 8, 1 0 ,
En x a g u a mentos
Tod o s
ex c epto
1, 2 , 9, 1 0
e d escarga.
1, 2 , 3, 4 ,
5, 6 , 7, 8
1, 2 , 3, 4 ,
5, 6 , 7, 8
1, 2 , 3, 4 ,
5, 6 , 7, 8 ,
En x a g u a mentos
AssistênciaAnomaliasPrecauções ManutençãoProgramas DetergentesInstalação Descrição
7
Page 8
Detergentes e roupa
PT
Gaveta dos detergentes
O bom resultado da lavagem depende também do
uso da dose certa de detergente: com excessos
não se lava melhor, e contribui-se quer para a
formação de incrostações nas peças internas da
máquina de lavar, quer para a poluição do meio
ambiente.
Tire a gaveta dos
4
AX
M
detergentes e deite o
detergente ou o aditivo
da seguinte maneira:
1
3
2
gaveta 1: Detergente para pré-lavagem
(em pó)
Antes de deitar detergente verifique se está lá
dentro a gaveta adicional 4.
gaveta 2: Detergente para lavagem
(em pó ou líquido )
O detergente líquido deve ser colocado depois da
máquina ter iniciado a lavagem.
gaveta 3: Aditivos (amaciador, etc.)
O amaciador não deve ultrapassar a rede.
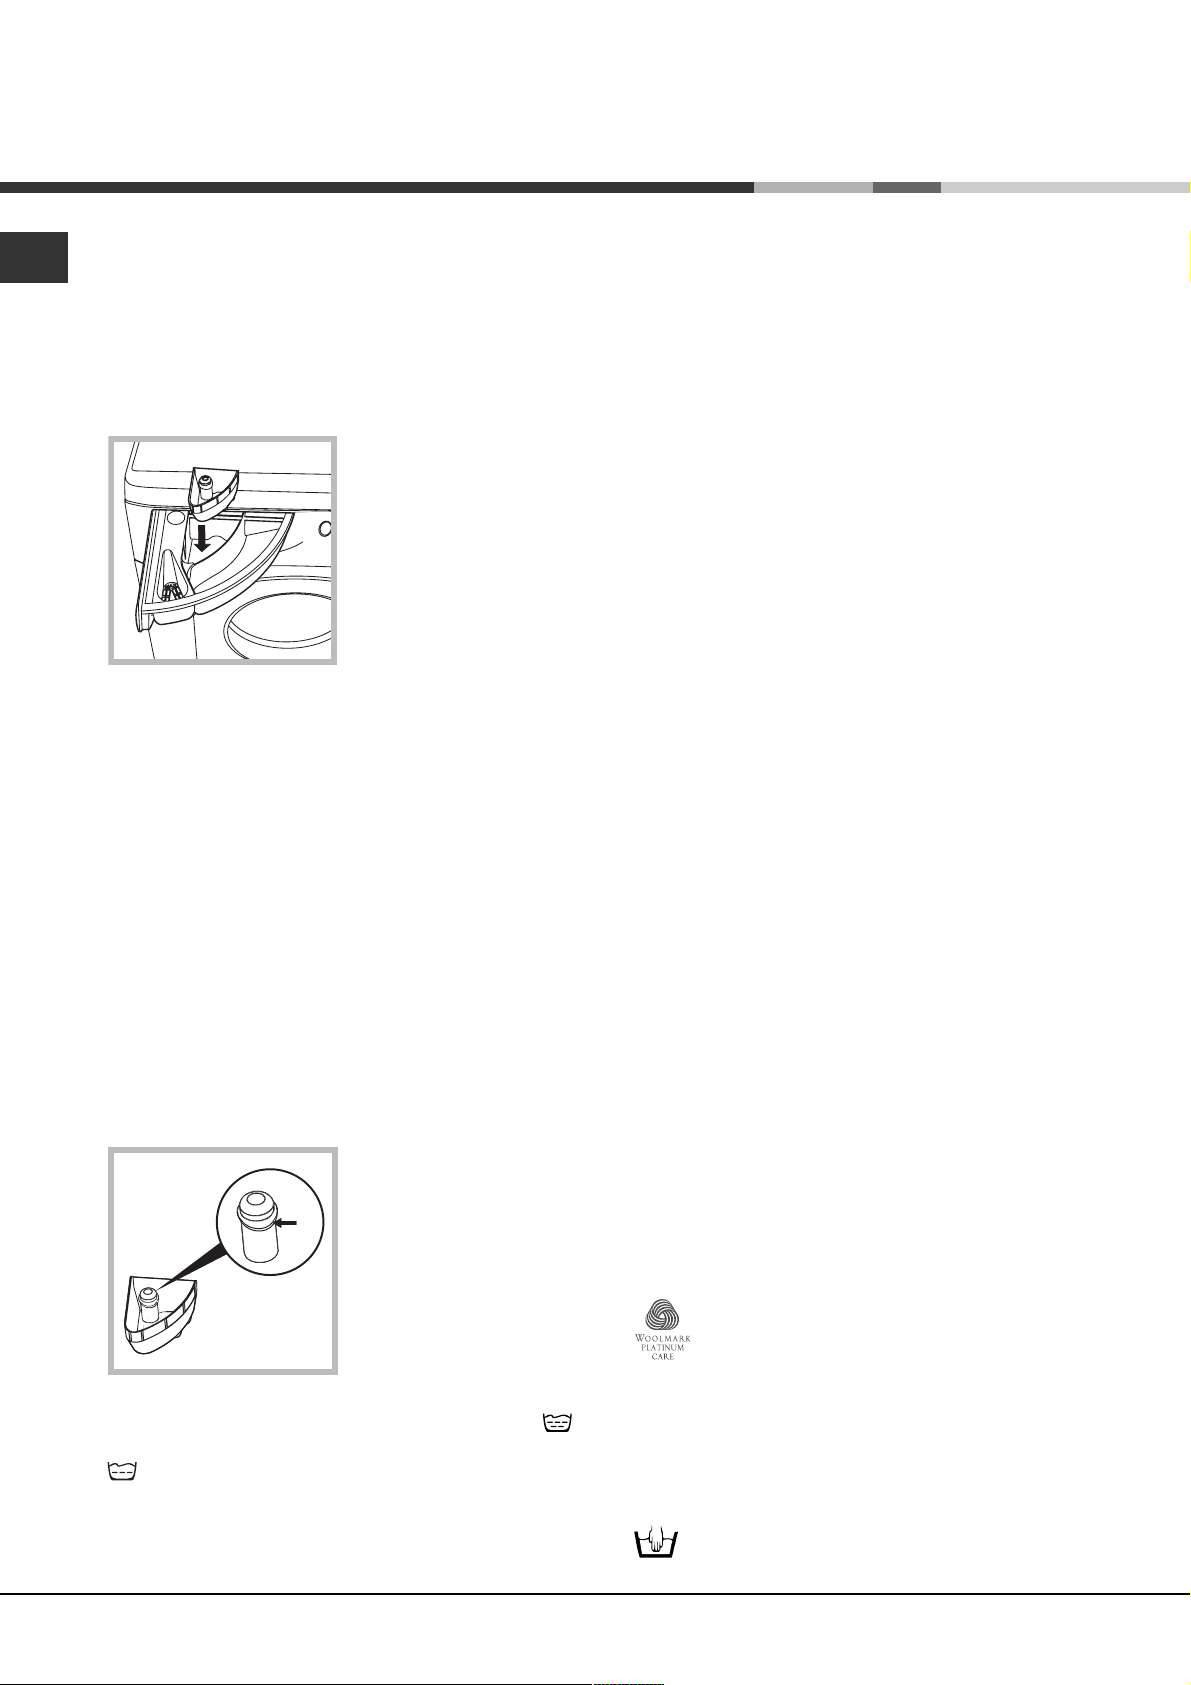
gaveta adicional 4: Lixívia
Não use detergentes para lavagem à mão, porque
fazem demasiada espuma.
Ciclo para branquear
A Lixívia tradicional pode ser utilizada para tecidos
resistentes brancos, enquanto que a delicada pode
ser utilizada para tecidos coloridos, sintéticos e para lã.
Coloque a gaveta
adicional 4, fornecida,
MAX
MAX
Para branquear somente, deite lixívia na gaveta
adicional 4 e escolha o programa Enxaguamento
(para tecidos de algodão) ou Enxaguamento delicado
(para tecidos sintéticos).
Para branquear durante a lavagem deite detergente
e os aditivos, defina o programa que desejar e seleccione a opção Branqueador (veja a pág. 7).
na gaveta 1.
Quando deitar a lixívia,
certifique-se de que não
ultrapasse o nível
"máx." indicado no pino
central (veja a figura).
Se utilizar a gaveta adicional 4 exclui-se a prélavagem.Não é possível branquear nos programas
11 (Seda) nem Diário 30' (veja a pág. 6).
Preparar a roupa
Separe a roupa em função:
- do tipo de tecido / do símbolo na etiqueta.
- as cores: separe as peças coloridas das brancas.
Esvazie as algibeiras e verifique se há botões soltos.
Não ultrapasse os valores indicados referentes ao
peso da roupa enxuta:
Tecidos resistentes: máx. 5 kg.
Tecidos sintéticos: máx. 2,5 kg.
Tecidos delicados: máx. 2 kg.
Lã máx. 1 kg.
Quanto pesa a roupa?
1 lençol 400 - 500 g.
1 fronha 150 - 200 g.
1 toalha de mesa 400 - 500 g.
1 roupão 900 - 1.200 g.
1 toalha de rosto 150 - 250 g.
Roupas especiais
Cortinas: dobre-as bem e coloque-as dentro de uma
fronha ou de um saquinho de rede. Lave-as separadas, sem ultrapassar a meia carga. Utilize o programa
11 que exclui automaticamente a centrifugação.
Edredões e anoraques: se forem acolchoadas com
penas de ganso ou pato, podem ser lavados na
máquina de lavar roupa. Vire as peças do avesso e
coloque no máximo de 2-3 kg., repita o
enxaguamento uma ou duas vezes e utilize a
centrifugação delicada.
Sapatilhas: Tire a lama e lave-as juntamente com
calças de ganga e peças resistentes (mas nunca com
peças brancas).
Lã: para obter os melhores resultados, utilize um
detergente específico e não ultrapasse 1 kg. de carga.
Cashmere Platinum
Delicado como lavagem a mão.
A Ariston lançou um novo padrão de
performances superiores reconhecidas pela
The Woolmark Company com o prestigioso selo de
Woolmark Platinum Care. Se a máquina de lavar
roupa tiver o logotipo Woolmark Platinum Care, quer
dizer que será possível lavar com resultados excelentes também peças em lã que tenham a etiqueta
"Lavar à mão" (M.00221):
Defina o programa 10 para todas as peças
com a etiqueta "Lavar à mão" e utilize
detergentes específicos.
8
Page 9

Precauções e conselhos
Esta máquina de lavar roupa foi projectada e
fabricada em conformidade com os regulamentos
internacionais de segurança. Estas advertências são
fornecidas por razões de segurança e devem ser
lidas com atenção.
Segurança geral
Esta máquina de lavar roupa deve ser utilizada
somente por pessoas adultas e conforme as
instruções apresentadas neste manual.
Não toque na máquina com os pés descalços
nem com as mãos ou os pés molhados ou húmidos.
Não puxe o cabo eléctrico para tirar a ficha da
tomada, pegue somente na ficha.
Não abra a gaveta dos detergentes enquanto a
máquina estiver a funcionar.
Não toque na água de descarga, pois poderá
estar muito quente.
Em nenhum caso force a porta para abri-la:
poderá danificar o mecanismo de segurança que
a protege contra aberturas acidentais.
Se houver avarias, não mexa em caso algum nos
mecanismos internos para tentar reparar.
Verifique sempre que as crianças não se aproxi-
mem da máquina em funcionamento.
Durante a lavagem a porta de vidro tende a aquecer.
Se for preciso deslocar a máquina, são precisas
pelo menos duas ou três pessoas, não tente
fazê-lo sozinho porque a máquina é muito pesada.
Economizar e respeitar o meio ambiente
PT
Tecnologia ao serviço do meio ambiente
Se pela porta de vidro notar pouca água é porque,
com a nova tecnologia Ariston, é suficiente menos
de metade da água para se obter a limpeza máxima: uma meta atingida para respeitar o meio ambiente.
Economizar detergente, água,
energia e tempo
Para não desperdiçar recursos, é necessário
utilizar a máquina de lavar roupa com a carga
máxima. Uma carga plena em vez de duas
cargas pela metade permite economizar até 50%
de energia.
A pré-lavagem só é necessária para roupa muito
suja. Evite-a para economizar detergente, tempo,
água e entre 5 e 15% de energia.
Trate as nódoas com um produto anti-nódoas ou
deixe de molho antes de lavar, desta maneira
diminui a necessidade de lavar com altas temperaturas. Um programa a 60°C em vez de 90°C ou a
40°C em vez de 60°C, economiza até 50% de
energia.
Se dosear bem o detergente em função da
dureza da água, do nível de sujidade e da quantidade de roupa, evitará desperdícios e protegerá o
meio ambiente: mesmo os detergentes
biodegradáveis contêm componentes que alteram
o equilíbrio da natureza.Evite sempre que possível
o uso de amaciador.
Lavar desde o fim da tarde até as primeiras horas
da manhã ajuda a diminuir a carga de absorção
das empresas eléctricas.
Com a opção Delay Timer (veja a pág. 7) pode
programar lavagens desta maneira.
Antes de colocar a roupa verifique se o tambor
está vazio.
Eliminação
Elimine a embalagem obedecendo aos regula-
mentos locais, de maneira a que as embalagens
possam ser reutilizadas.
Eliminação de um máquina de lavar roupa velha:
antes de eliminá-la, para torná-la inutilizável, corte
o cabo de alimentação eléctrica e desmonte a
porta de vidro.
Se for secar a roupa num secador, seleccione
uma velocidade de centrifugação mais alta. Se
houver pouca água na roupa economizará tempo
e energia no programa de secagem.
AssistênciaAnomaliasPrecauções ManutençãoProgramas DetergentesInstalação Descrição
9
Page 10

Manutenção e cuidados
PT
Interromper a alimentação de água e
de corrente eléctrica
Feche a torneira da água depois de cada lava-
gem. Desta maneira diminuiu-se o desgaste do
sistema hidráulico da máquina de lavar roupa e
elimina-se o risco de inundação.
Tire a ficha da tomada eléctrica quando for limpar
a máquina de lavar roupa e durante os trabalhos
de manutenção.
Limpar a máquina de lavar roupa
A parte externa e as peças em borracha podem ser
limpas com um pano molhado com água morna e
sabão. Não empregue solventes nem abrasivos.
Limpar a gaveta dos detergentes
1
Para tirar a gaveta,
erga-a e puxe-a para
fora (veja a figura).
Lave-a com água corrente; esta limpeza deve ser
efectuada frequentemente.
2
Limpar a bomba
Esta máquina de lavar roupa é equipada com uma
bomba com limpeza automática que não precisa de
operações de manutenção. Entretanto pode acontecer que pequenos objectos (moedas, botões)
caiam na pré-câmara que protege a bomba, situada
na parte inferior da mesma.
Certifique-se que o ciclo de lavagem tenha termi-
nado e tire a ficha da tomada.
Para obter acesso à pré-câmara:
1. tire o painel de
cobertura da parte
dianteira da máquina de
lavar roupa com ajuda
de uma chave de
fendas (veja a figura);
2. para desenroscar a
tampa gire-a na direcção
contrária aos ponteiros
do relógio (veja a figura):
é normal que perca um
pouco de água;
Cuidados com a porta de vidro e o tambor
Deixe a porta sempre entreaberta para evitar que
se formem odores desagradáveis.
3. limpe o interior com cuidado;
4. enrosque outra vez a tampa;
5. monte outra vez o painel, certifique-se, antes de
empurrar a máquina, que os ganchos foram colocados nas respectivas ranhuras.
Verificar o tubo de alimentação
de água
Verifique o tubo de alimentação pelo menos uma
vez por ano. Se houver rachas ou fendas, será
necessário substitui-lo: durante as lavagens as
fortes pressões podem dar origem a estas situações.
Nunca utilize tubos já usados.
10
Page 11

Anomalias e soluções
Pode acontecer que a máquina de lavar roupa não funcione. Antes de telefonar para a Assistência Técnica
(veja a pág. 12), verifique que não se trata de um problema fácil de resolver com ajuda da seguinte lista:
Anomalias:
A máquina de lavar
roupa não liga.
O ciclo de lavagem
não inicia.
A máquina de lavar roupa não
carrega água (No display aparece escrito H2O).
A máquina de lavar roupa carrega
e descarrega água continuamente.
Possíveis causas / Solução:
A ficha não está colocada na tomada eléctrica, ou não o suficiente
para haver contacto.
Em casa não há corrente.
A porta da máquina não está bem fechada (no display é mostrado
escrito DOOR).
A tecla
A tecla START/RESET não foi pressionada.
A torneira da água não está aberta.
Foi programado um início posterior (Delay Timer, veja a pág. 7).
O tubo de alimentação de água não está ligado à torneira.
O tubo está dobrado.
A torneira da água não está aberta.
Está a faltar água em casa.
Não há pressão suficiente.
A tecla START/RESET não foi pressionada.
O tubo de descarga não está instalado entre 65 e 100 cm. de
altura do chão (veja a pág. 3).
A ponta do tubo de descarga está emergida na água (veja a pág. 3).
A descarga na parede não tem ventilação de ar.
não foi pressionada.
PT
A máquina de lavar roupa não
descarrega ou nem realiza
centrifugação.
A máquina de lavar roupa vibra
muito durante a centrifugação.
Da máquina de lavar roupa está
a perder água.
Está a formar-se demasiada
espuma.
Se depois destas verificações o problema não for resolvido, feche a torneira
da água, desligue a máquina de lavar roupa e chame a assistência técnica.
Se a sua casa é nos últimos andares de um edifício, é possível que
aconteçam fenómenos de sifão, e por isso a máquina de lavar roupa
carrega e descarrega água continuamente. Para eliminar este inconveniente, há à venda no mercado válvulas apropriadas contra o efeito sifão.
O programa não faz a descarga: com alguns programas será
necessário iniciar a descarga manualmente (veja a pág. 6).
Está activada a opção Engomar Fácil: para completar o programa
carregue na tecla START/RESET (veja a pág. 7).
O tubo de descarga está dobrado (veja a pág. 3).
A conduta de descarga está entupida.
O tambor, no momento da instalação, não foi liberado correcta-
mente (veja a pág. 2).
A máquina de lavar roupa não está nivelada (veja a pág. 2).
A máquina de lavar roupa está apertada entre móveis e parede (veja a pág. 2).
O tubo de alimentação da água não está bem enroscado (veja a pág. 2).
O gaveta dos detergentes está entupida (para limpá-la veja a pág. 10).
O tubo de descarga não está bem preso (veja a pág. 3).
AssistênciaAnomaliasPrecauções ManutençãoProgramas DetergentesInstalação Descrição
O detergente não é específico para máquina de lavar roupa (deve haver a
escrita "para máquina de lavar", "à mão e para máquina de lavar" ou similares).
A dose de detergente foi excessiva.
11
Page 12

Assistência
PT
Antes de contactar a Assistência Técnica:
Verifique se consegue resolver a anomalia (veja a pág. 11);
Reinicie o programa para verificar se o inconveniente foi resolvido;
Em caso negativo, contacte a assistência técnica autorizada no número de telefone indicado no
certificado de garantia.
Nunca recorra a técnicos não autorizados.
Comunique:
o tipo de anomalia;
o modelo da máquina (Mod.);
o número de série (S/N).
Estas informações encontram-se na placa colocada na parte traseira da máquina de lavar roupa.
Assistência
12
Page 13

Instructions for use
WASHING MACHINE
GB
English
AVD 88 S
Contents
GB
Installation, 14-15
Unpacking and levelling, 14
Electric and water connections, 14-15
The first wash cycle, 15
Technical details, 15
Washing machine description, 16-17
Control panel, 16
Display, 17
Starting and Programmes, 18
Briefly: how to start a programme, 18
Programme table, 18
Personalisations, 19
Setting the temperature, 19
Setting the spin cycle, 19
Options, 19
Detergents and laundry, 20
Detergent dispenser, 20
Bleach cycle, 20
Preparing your laundry, 20
Special items, 20
Woolmark Platinum Care, 20
Precautions and advice, 21
General safety, 21
Disposal, 21
Saving energy and respecting the environment, 21
Care and maintenance, 22
Cutting off the water or electricity supply, 22
Cleaning your appliance, 22
Cleaning the detergent dispenser, 22
Caring for your appliance door and drum, 22
Cleaning the pump, 22
Checking the water inlet hose, 22
Troubleshooting, 23
Service, 24
Before calling for Assistance, 24
13
Page 14

Installation
GB
Keep this instruction manual in a safe place for
future reference. Should the appliance be sold,
transferred or moved, make sure the instruction
manual accompanies the washing machine to inform
the new owner as to its operation and features.
Read these instructions carefully: they contain vital
information on installation, use and safety.
Unpacking and levelling
Unpacking
1. Unpack the washing machine.
2. Check whether the washing machine has been
damaged during transport. If this is the case, do not
install it and contact your retailer.
3. Remove the four
protective screws and
the rubber washer with
the respective spacer,
situated on the rear of
the appliance (see
figure).
4. Seal the gaps using the plastic plugs provided.
5. Use the plug provided to seal the three holes
where the plug was housed, situated on the lower
right-hand side on the rear of your appliance.
6. Keep all the parts: you will need them again if the
washing machine needs to be moved to another
location.
Packaging materials are not children's toys.
Levelling
1. Install the washing machine on a flat sturdy floor,
without resting it up against walls, furniture cabinets
or other.
2. If the floor is not
perfectly level, compensate for any unevenness
by tightening or
loosening the adjustable
front feet (see figure);
the angle of inclination,
measured according to
the worktop, must not
exceed 2°.
Levelling your appliance correctly will provide it with
stability and avoid any vibrations, noise and shifting
during operation. If it is placed on a fitted or loose
carpet, adjust the feet in such a way as to allow
enough room for ventilation beneath the washing
machine.
Electric and water connections
Connecting the water inlet hose
1. Insert seal A into the
end of the inlet hose
and screw the latter
onto a cold water tap
A
3. Make sure there are no kinks or bends in the
hose.
The water pressure at the tap must be within the
values indicated in the Technical details table
(on the next page).
If the water inlet hose is not long enough, contact
a specialist store or an authorised serviceman.
with a 3/4 gas threaded
mouth (see figure).
Before making the
connection, allow the
water to run freely until
it is perfectly clear.
2. Connect the other end
of the water inlet hose to
the washing machine,
screwing it onto the
appliance's cold water
inlet, situated on the top
right-hand side on the
rear of the appliance
(see figure).
14
Page 15

Connecting the drain hose
65 - 100 cm
Connect the drain hose,
without bending it, to a
draining duct or a wall
drain situated between
65 and 100 cm from the
floor;
Do not use extensions or multiple sockets.
GB
The power supply cable must never be bent or
dangerously compressed.
The power supply cable must only be replaced by
an authorised serviceman.
Warning! The company denies all liability if and when
these norms are not respected.
The first wash cycle
alternatively, place it
over the edge of a
basin, sink or tub,
fastening the duct
supplied to the tap (see
figure). The free end of
the hose should not be
underwater.
We advise against the use of hose extensions; in
case of absolute need, the extension must have the
same diameter as the original hose and must not
exceed 150 cm in length.
Electric connection
Before plugging the appliance into the mains socket,
make sure that:
the socket is earthed and in compliance with the
applicable law;
the socket is able to sustain the appliance's
maximum power load indicated in the Technical
details table (on the right);
the supply voltage is included within the values i
ndicated on the Technical details table
(on the right);
Once the appliance has been installed, and before
you use it for the first time, run a wash cycle with
detergent and no laundry, setting the 90°C
programme without a pre-wash cycle.
Technical details
Model
Dimensions
Capacity
Electric
connections
Wat er
connections
Spin speed
AVD 8 8 S
59.5 cm wide
85 cm high
53,5 cm deep
from 1 to 5 kg
voltage 220/230 Volts 50 Hz
maximum absorbed power 1850 W
maximum pressure 1 MPa (10 bar)
minimum pressure 0.05 MPa (0.5 bar)
drum capacity 46 litres
up to 800 rpm
the socket is compatible with the washing
machine's plug. If this is not the case, replace the
socket or the plug.
The washing machine should not be installed in an
outdoor environment, not even when the area is
sheltered, because it may be very dangerous to
leave it exposed to rain and thunderstorms.
When the washing machine is installed, the mains
socket must be within easy reach.
Control
programmes
according to
IEC456 directive
programme 3; temperature 60°C;
run with a load of 5 kg.
This appliance is compliant with the
following European Community
Directives:
- 73/23/CEE of 19/02/73 (Low
Voltage) and subsequent amendments
- 89/336/CEE of 03/05/89
(Electromagnetic Compatibility) and
subsequent amendments
ServiceTroubleshootingPrecautions CareProgrammes DetergentsInstallation Description
15
Page 16

Washing machine description
Control panel
GB
MODE
button
Programme key
Detergent dispenser
Detergent dispenser to add detergent and fabric
softener (see page 20).
Programme key to consult a straightforward chart
of the different programmes available: pull the grey
tab outwards to open it.
TEMPERATURE button to adjust the wash tempe-
rature (see page 19).
SPIN button to adjust the spin speed or exclude it
altogether (see page 19).
Display to programme the washing machine and
follow the wash cycle progress (see opposite page).
TEMPERATURE
button
Display
SPIN
button
MODE button to choose the options for the
appliance personalisation (see page 19).
SELECT button to set the options for the appliance
personalisation (see page 19).
START/STOP button to turn the washing machine
on and off.
START/RESET button to start the programmes or
cancel any incorrect settings.
Control knob to select the wash programmes. The
retractable control knob: press the centre of the
knob for it to pop out. The knob stays still during the
cycle.
START/STOP
button
Control knob
START/RESET
button
SELECT
button
16
Page 17

Display
In addition to being a practical tool to programme your appliance (see page 19), the display provides useful
information concerning the wash cycle and status.
Once you have pressed the START/RESET button to
start the programme, the display will indicate the
amount of time left until the end of the wash cycle. If
a delayed start has been set (using the Delay Timer,
see page 19), the delay time will be indicated on the
display.
The following information is displayed during the
wash cycle:
Cycle phase under way:
Pre-wash Spin cycle
Wash cycle
Rinse Disabled symbol.
GB
Fabric selected:
Cotton Wool
Colours Silk
Synthetics
Personalisation options:
The enabled options are bordered by a frame.
To choose the options, see page 19.
Disabled symbol.
Door lock:
If the symbol is on, the washing machine door is locked to prevent it from being opened accidentally. To avoid
any damages, wait for the symbol to switch itself off before you open the appliance door.
This model is fitted with a device that allows you to open the appliance door during some of the programme
phases. This is possible when the symbol is not on.
At the end of the programme, the word END is displayed.
In the event of an anomaly, an error code will appear, such as: F-01, which should be communicated to the
Service Centre (see page 24).
ServiceTroubleshootingPrecautions CareProgrammes DetergentsInstallation Description
17
Page 18

Starting and Programmes
GB
Briefly: starting a programme
1. Turn the washing machine on by pressing button .
2. Load your laundry into the washing machine and
shut the appliance door.
3. Set the knob to the desired programme. The
estimated duration of the selected programme is
displayed. The temperature and spin speed are
automatically set according to the programme
(to change them, see page 19).
4. Add the detergent and any fabric softener
(see page 20).
5. Start he programme by pressing the START/RESET
button.
To cancel it, keep the START/RESET button
pressed for at least 2 seconds.
6. When the programme has ended, the word END is
displayed. Take out your laundry and leave the
appliance door ajar to allow the drum to dry
thoroughly.
7. Turn the washing machine off by pressing button
Programme table
Type of fabric and degree
of soil
Programmes
Wash
temp .
Detergent
Pre-
wash
Wash
Fabric
softener
Bleaching
option/
bleach
Cotton
Extremely soiled whites
(sheets, tablecloths, etc.)
Extremely soiled whites
(sheets, tablecloths, etc.)
Heavily soiled whites and
fast colours
Slightly soiled whites and
delicate colours (shirts,
jumpers, etc.)
Slightly soiled delicate
colours
1
2
3
4
5
90°C 137
90°C
60°C
40°C
30°C
Delicate/
Traditional
Delicate/
Traditional
Delicate/
Traditional
Delicate/
Traditional
Synthetics
Heavily soiled fast colours
(baby linen, etc.)
Fast colours (all types of
slightly soiled garments)
Heavily soiled fast colours
(baby linen, etc.)
Delicate colours (all types
of slightly soiled garments)
Delicate colours (all types
of slightly soiled garments)
6
6
7
8
9
60°C Delicate 77
40°C Delicate 62
50°C Delicate 73
40°C Delicate 58
30°C 30
Delicate
Wool
Very delicate fabrics
(curtains, silk, viscose, etc.)
PARTIAL PROGRAMMES
Rinse Rinse cycles and spin cycle
Delicate rinse cycle Rinse cycles, anti-crease or draining
Spin cycle Draining and heavy duty spin cycle
Delicate spin cycle Draining and delicate spin cycle
Draining Draining
10
11
40°C Delicate 50
30°C 45
Cycle
length
(minutes)
120
105
72
65
Description of wash cycle
Pre-wash, wash cycle, rinse cycles,
intermediate and final spin cycles
Wash cycle, rinse cycles,
intermediate and final spin cycles
Wash cycle, rinse cycles,
intermediate and final spin cycles
Wash cycle, rinse cycles,
intermediate and final spin cycles
Wash cycle, rinse cycles,
intermediate and final spin cycles
Wash cycle, rinse cycles, anticrease or delicate spin cycle
Wash cycle, rinse cycles, anticrease or delicate spin cycle
Wash cycle, rinse cycles, anticrease or delicate spin cycle
Wash cycle, rinse cycles, anticrease or delicate spin cycle
Wash cycle, rinse cycles and
delicate spin cycl
Wash cycle, rinse cycles and
delicate spin cycle
Wash cycle, rinse cycles, anticrease or draining cycle
.
Notes
For the anti-crease function: see Easy iron, opposite page. The information contained in the table is purely indicative.
Special programme
Daily 30' (programme 9 for Synthetics) is designed to wash lightly soiled garments in a short amount of time: it only
lasts 30 minutes and allows you to save on both time and energy. By setting this programme (9 at 30°C), you can
wash different fabrics together (except for woollen and silk items), with a maximum load of 3 kg.
We recommend the use of liquid detergent.
18
Page 19

Personalisations
Setting the temperature
Press button and the maximum temperature allowed for
the programme set will be displayed. Press the same button
to lower this temperature. OFF indicates a cold wash.
The temperature adjustment is enabled with all wash
programmes.
Setting the spin cycle
Press button and the maximum spin speed allowed for
the programme set will be displayed. Press the same
button to lower the value down to OFF, which indicates
that the spin cycle has been excluded altogether (press it
again to go back to the maximum value).
The spin cycle exclusion is indicated by symbol
The spin cycle setting is enabled with all the programmes
except for 11 and the Draining cycle.
Options
The various wash options available with this washing
machine will make for the desired results, every time.
To select the various options, the following procedure
should be followed at all times:
GB
.
1. Press the MODE button to scroll through the various options available; the enabled symbol will flash.
2. To select it, press the SELECT button, until the word ON is displayed (for the Delay Timer, the time will be
displayed: see table below).
3. Confirm your setting by pressing the MODE button again: the symbol for the option will stop flashing on the
display.
The selected options can be seen on the display, as they are bordered by a frame.
Option Effect Comments
Delay Timer
Bl each i ng
Eas y iron
Su per
Was h
Delays the start
of the wash by
up to 24 hours.
Bleaching cycle
designed to
remove the
toughest stains.
This option
reduces the
amount of
creasing on
fabrics, making
them easier to
iron.
Allows for an
impeccable wash,
visibly whiter than
a standard
wash.
A
Class
Press (SELECT button) repeatedly until the desired delay is
displayed. OF F indicates no delay has been set.
Please remember to pour the bleach into extra compartment 4
e page 20)
(se
option.
If you set this option, programmes 6, 7, 8, 11 and Delicate Rinse
will be suspended, leaving the laundry to soak (Anti-crease) and
icon will flash:
- to conclude the cycle, press the START/RESET button ;
- to run the draining cycle alone, set the knob to th e relative
symbol and press the START/RESET button. This option is
incompatible with the BLEACHING option.
This option is incompatible with the RAPID option.
. This option is incompatible with the EASY IRON
Enabled with
programmes:
All
2, 3, 4, 5,
6, 7, 8, 10,
Rinse cycles.
All
programmes
except for
1, 2, 9, 10
and Draining.
1, 2, 3, 4,
5, 6, 7, 8
Rapid
Extra Rin s e
Cuts the duration
of the wash cycle
by 30%.
Increases the
efficiency of the
rinse.
This option is incompatible with the SUPER WASH option.
Recommended when the appliance has a full load or with large
quantities of detergent.
1, 2, 3, 4,
5, 6, 7, 8
1, 2, 3, 4, 5,
6, 7, 8, and
Rinse cycles.
19
ServiceTroubleshootingPrecautions CareProgrammes DetergentsInstallation Description
Page 20

Detergents and laundry
GB
Detergent dispenser
Good washing results also depend on the correct
dose of detergent: adding too much detergent won't
necessarily make for a more efficient wash, and may
in fact cause build up on the interior of your
appliance and even pollute the environment.
Open up the detergent
4
MAX
1
3
compartment 1: Detergent for pre-wash
(powder)
Before pouring in the detergent, make sure that
extra compartment 4 has been removed.
compartment 2: Detergent for the wash cycle
(powder or liquid)
Liquid detergent should only be poured in
immediately prior to the wash cycle start.
compartment 3: Additives (fabric softeners, etc.)
The fabric softener should not overflow from the grid.
extra compartment 4: Bleach
2
dispenser and pour in
the detergent and fabric
softener, as follows.
Do not use hand wash detergent because it may
form too much foam.
Bleach cycle
Traditional bleach should be used on sturdy
white fabrics, and delicate bleach for coloured
fabrics, synthetics and for wool.
Place extra
compartment 4,
provided, into
MAX
MAX
To run the bleach cycle alone, pour the bleach into
extra compartment 4 and set the Rinse programme
(for Cotton fabrics) or delicate Rinse (for
Synthetic fabrics). To bleach during a wash cycle,
pour in the detergent and fabric softener, set the
desired programme and enable the Bleaching option
(see page 19).
compartment 1.
When pouring in the
bleach, be careful not to
exceed the "max" level
indicated on the central
pivot (see figure).
The use of extra compartment 4 excludes the
possibility of using the pre-wash cycle. In addition,
the bleach cycle cannot be run with programmes 11
(Silk) and Daily 30' (see page 18).
Preparing your laundry
Divide your laundry according to:
- the type of fabric/the symbol on the label.
- the colours: separate coloured garments from
whites.
Empty all pockets and check for loose buttons.
Do not exceed the weight limits stated below,
which refer to the weight when dry:
Sturdy fabrics: max 5 kg
Synthetic fabrics: max 2.5 kg
Delicate fabrics: max 2 kg
Wool: max 1 kg
How much does your laundry weigh?
1 sheet 400-500 g
1 pillow case 150-200 g
1 tablecloth 400-500 g
1 bathrobe 900-1,200 g
1 towel 150-250 g
Special items
Curtains: fold curtains and place them in a pillow
case or mesh bag. Wash them separately without
exceeding half the appliance load. Use programme
11 which excludes the spin cycle automatically.
Quilted coats and windbreakers: if they are
padded with goose or duck down, they can be
machine-washed. Turn the garments inside out and
load a maximum of 2-3 kg, repeating the rinse cycle
once or twice and using the delicate spin cycle.
Trainers: remove any mud. They can be washed
together with jeans and other tough garments, but
not with whites.
Wool: for best results, use a specific detergent,
taking care not to exceed a load of 1 kg.
Woolmark Platinum Care
As gentle as a hand wash.
Ariston sets a new standard of superior
performance that has been endorsed by
The Woolmark Company with the prestigious
Woolmark Platinum Care brand. Look for the
Woolmark Platinum Care logo on the washing
machine to ensure you can safely and effectively
wash wool garments labelled as "hand wash"
(M.00221):
Set programme 10 for all "Hand wash"
garments, using the appropriate detergent.
20
Page 21

Precautions and advice
The washing machine was designed and built in
compliance with the applicable international safety
regulations. The following information is provided for
your safety and should consequently be read carefully.
General safety
This washing machine should only be used by
adults and in accordance with the instructions
provided in this manual.
Never touch the washing machine when barefoot
or with wet or damp hands or feet.
Do not pull on the power supply cable to unplug
the appliance from the electricity socket. Pull the
plug out yourself.
Do not open the detergent dispenser while the
appliance is in operation.
Do not touch the drain water as it could reach
very high temperatures.
Never force the washing machine door: this could
damage the safety lock mechanism designed to
prevent any accidental openings.
In the event of a malfunction, do not under any
circumstances touch internal parts in order to
attempt repairs.
Always keep children well away from the
appliance while in operation.
The appliance door tends to get quite hot during
the wash cycle.
Should it have to be moved, proceed with the
help of two or three people and handle it with the
utmost care. Never try to do this alone, because
the appliance is very heavy.
Before loading your laundry into the washing
machine, make sure the drum is empty.
Disposal
Disposing of the packaging material:
observe local regulations, so the packaging can
be re-used.
Disposing of an old washing machine:
before scrapping your appliance, cut the power
supply cable and remove the appliance door.
Saving energy and respecting the
environment
Environmentally-friendly technology
If you only see a little water through your appliance
door, this is because thanks to the latest Ariston
technology, your washing machine only needs less
than half the amount of water to get the best
results: an objective reached to respect the
environment.
Saving on detergent, water,
energy and time
To avoid wasting resources, the washing machine
should be used with a full load. A full load instead
of two half loads allows you to save up to 50% on
energy.
The pre-wash cycle is only necessary on
extremely soiled garments. Avoiding it will save on
detergent, time, water and between 5 and 15%
energy.
Treating stains with a stain remover or leaving
them to soak before washing will cut down the
need to wash them at high temperatures. A
programme at 60°C instead of 90°C or one at
40°C instead of 60°C will save up to 50% on
energy.
Use the correct quantity of detergent depending
on the water hardness, how soiled the garments
are and the amount of laundry you have, to avoid
wastage and to protect the environment: despite
being biodegradable, detergents do contain
ingredients that alter the natural balance of the
environment. In addition, avoid using fabric
softener as much as possible.
If you use your washing machine from late in the
afternoon until the early hours of the morning, you
will help reduce the electricity board's peak load.
The Delay Timer option (see page 19) helps to
organise your wash cycles accordingly.
If your laundry has to be dried in a tumble dryer,
select a high spin speed. Having the least water
possible in your laundry will save you time and
energy in the drying process.
GB
ServiceTroubleshootingPrecautions CareProgrammes DetergentsInstallation Description
21
Page 22

Care and maintenance
GB
Cutting off the water or electricity
supply
Turn off the water tap after every wash. This will
limit the wear of your appliance's water system
and also prevent leaks.
Unplug your appliance when cleaning it and
during all maintenance operations.
Cleaning your appliance
The exterior and rubber parts of your appliance can
be cleaned with a soft cloth soaked in lukewarm
soapy water. Do not use solvents or abrasives.
Cleaning the detergent dispenser
1
Remove the dispenser
by raising it and pulling it
out (see figure).
Wash it under running
water; this operation
should be repeated
frequently.
2
Cleaning the pump
The washing machine is fitted with a self-cleaning
pump that does not require any maintenance.
Sometimes, small items (such as coins or buttons)
may fall into the pre-chamber that protects the
pump, situated in the lower part of the same.
Make sure the wash cycle has ended and unplug
the appliance.
To access the pre-chamber:
1. using a screwdriver,
remove the cover panel
on the lower front of the
washing machine (see
figure);
2. unscrew the lid
rotating it anticlockwise (see figure):
a little water may trickle
out. This is perfectly
normal;
Caring for your appliance door and
drum
Always leave the appliance door ajar to prevent
unpleasant odours from forming.
3. clean the interior thoroughly;
4. screw the lid back on;
5. reposition the panel, making sure the hooks are
securely in place before you push it onto the
appliance.
Checking the water inlet hose
Check the water inlet hose at least once a year. If
you see any cracks, replace it immediately: during
the wash cycles, water pressure is very strong and
a cracked hose could easily split open.
Never use hoses that have already been used.
22
Page 23

Troubleshooting
Your washing machine could fail to work. Before calling for Assistance (see page 24), make sure the problem
can't easily be solved by consulting the following list.
Problem
The washing machine won't
start.
The wash cycle won't start.
The washing machine fails to
load water (The wording H2O is
displayed).
The washing machine
continuously loads and unloads
water.
Possible causes/Solution:
The appliance is not plugged into the socket, or not enough to
make contact.
There has been a power failure.
The appliance door is not shut properly (the word DOOR is
displayed).
The
The START/RESET button has not been pressed.
The water tap is not turned on.
A delayed start has been set (using the Delay Timer, see page 19).
The water inlet hose is not connected to the tap.
The hose is bent.
The water tap is not turned on.
There is a water shortage.
The water pressure is insufficient.
The START/RESET button has not been pressed.
The drain hose is not fitted between 65 and 100 cm from the floor
The free end of the hose is underwater (see page 15).
The wall drainage system doesn't have a breather pipe.
button has not been pressed.
(see page 15).
GB
The washing machine does not
drain or spin.
The washing machine vibrates
too much during the spin cycle.
The washing machine leaks.
There is too much foam.
If the problem persists even after these checks, turn off the water tap,
switch the appliance off and call for Assistance. If the dwelling is on one of
the upper floors of a building, there may be drain trap problems causing the
washing machine to load and unload water continuously. In order to avoid
such an inconvenience, special anti-drain trap valves are available in shops.
The programme does not foresee the draining: some programmes
require enabling the draining manually (see page 18).
The Easy iron option is enabled: to complete the programme, press
the START/RESET button (see page 19).
The drain hose is bent (see page 15).
The drain duct is clogged.
The drum was not unblocked correctly during installation (see page 14).
The washing machine is not level (see page 14).
The washing machine is closed in between furniture cabinets and
the wall (see page 14).
The water inlet hose is not screwed on correctly (see page 14).
The detergent dispenser is obstructed (to clean it, see page 22).
The drain hose is not secured properly (see page 15).
The detergent is not suitable for machine washing (it should bear
the definition "for washing machines" or "hand and machine wash",
or the like).
You used too much detergent.
ServiceTroubleshootingPrecautions CareProgrammes DetergentsInstallation Description
23
Page 24

Service
195039345.00
06 /200 3 - Xerox Business Services
GB
Before calling for Assistance:
Check whether you can solve the problem on your own (see page 23);
Restart the programme to check whether the problem has been solved;
If this is not the case, contact an authorised Technical Service Centre on the telephone number
provided on the guarantee certificate.
Always request the assistance of authorised servicemen.
Notify the operator of:
the type of problem;
the appliance model (Mod.);
the serial number (S/N).
This information can be found on the data plate situated on the rear of the washing machine.
Service
24
 Loading...