

Page 1
Instructions for use
WASHING MACHINE
GB
English, 1
AV 52
AR
, 15
Contents
GB
Installation, 2-3-4-5
Unpacking and levelling, 2
Electric and water connections, 2-3
The first wash cycle, 4
Technical details, 5
Washing machine description, 6
Control panel, 6
Starting and Programmes, 7
Briefly: how to start a programme, 7
Programme table, 7
Personalisations, 8
Setting the temperature, 8
Functions, 8
Detergents and laundry, 9
Detergent dispenser, 9
Preparing your laundry, 9
Special items, 9
Precautions and advice, 10
General safety, 10
Disposal, 10
Saving energy and respecting the environment, 10
Care and maintenance, 11
Cutting off the water or electricity supply, 11
Cleaning your appliance, 11
Cleaning the detergent dispenser, 11
Caring for your appliance door and drum, 11
Cleaning the pump, 11
Checking the water inlet hose, 11
Troubleshooting, 12
Service, 13
Before calling for Assistance, 13
1
Page 2
Installation
GB
Keep this instruction manual in a safe place for
future reference. Should the appliance be sold,
transferred or moved, make sure the instruction
manual accompanies the washing machine to inform
the new owner as to its operation and features.
Read these instructions carefully: they contain vital
information on installation, use and safety.
Unpacking and levelling
Unpacking
1. Unpack the washing machine.
2. Check whether the washing machine has been
damaged during transport. If this is the case, do not
install it and contact your retailer.
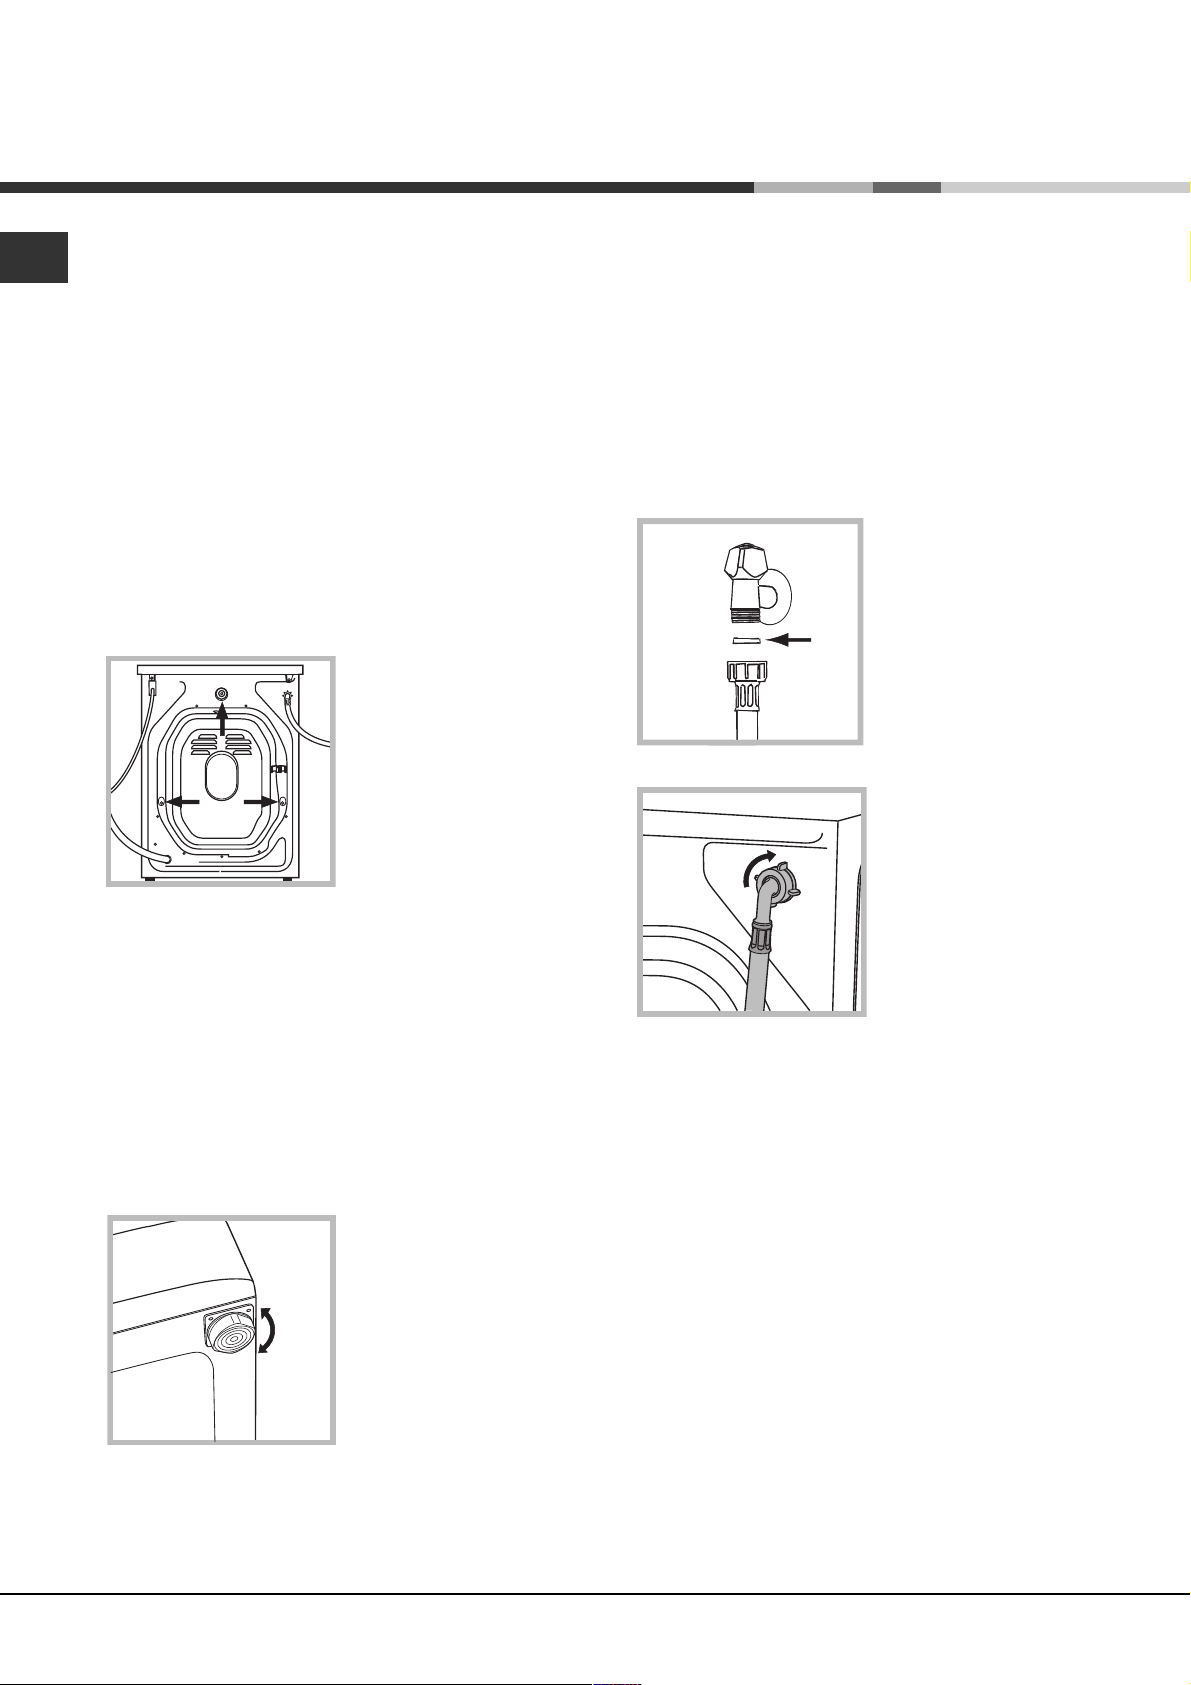
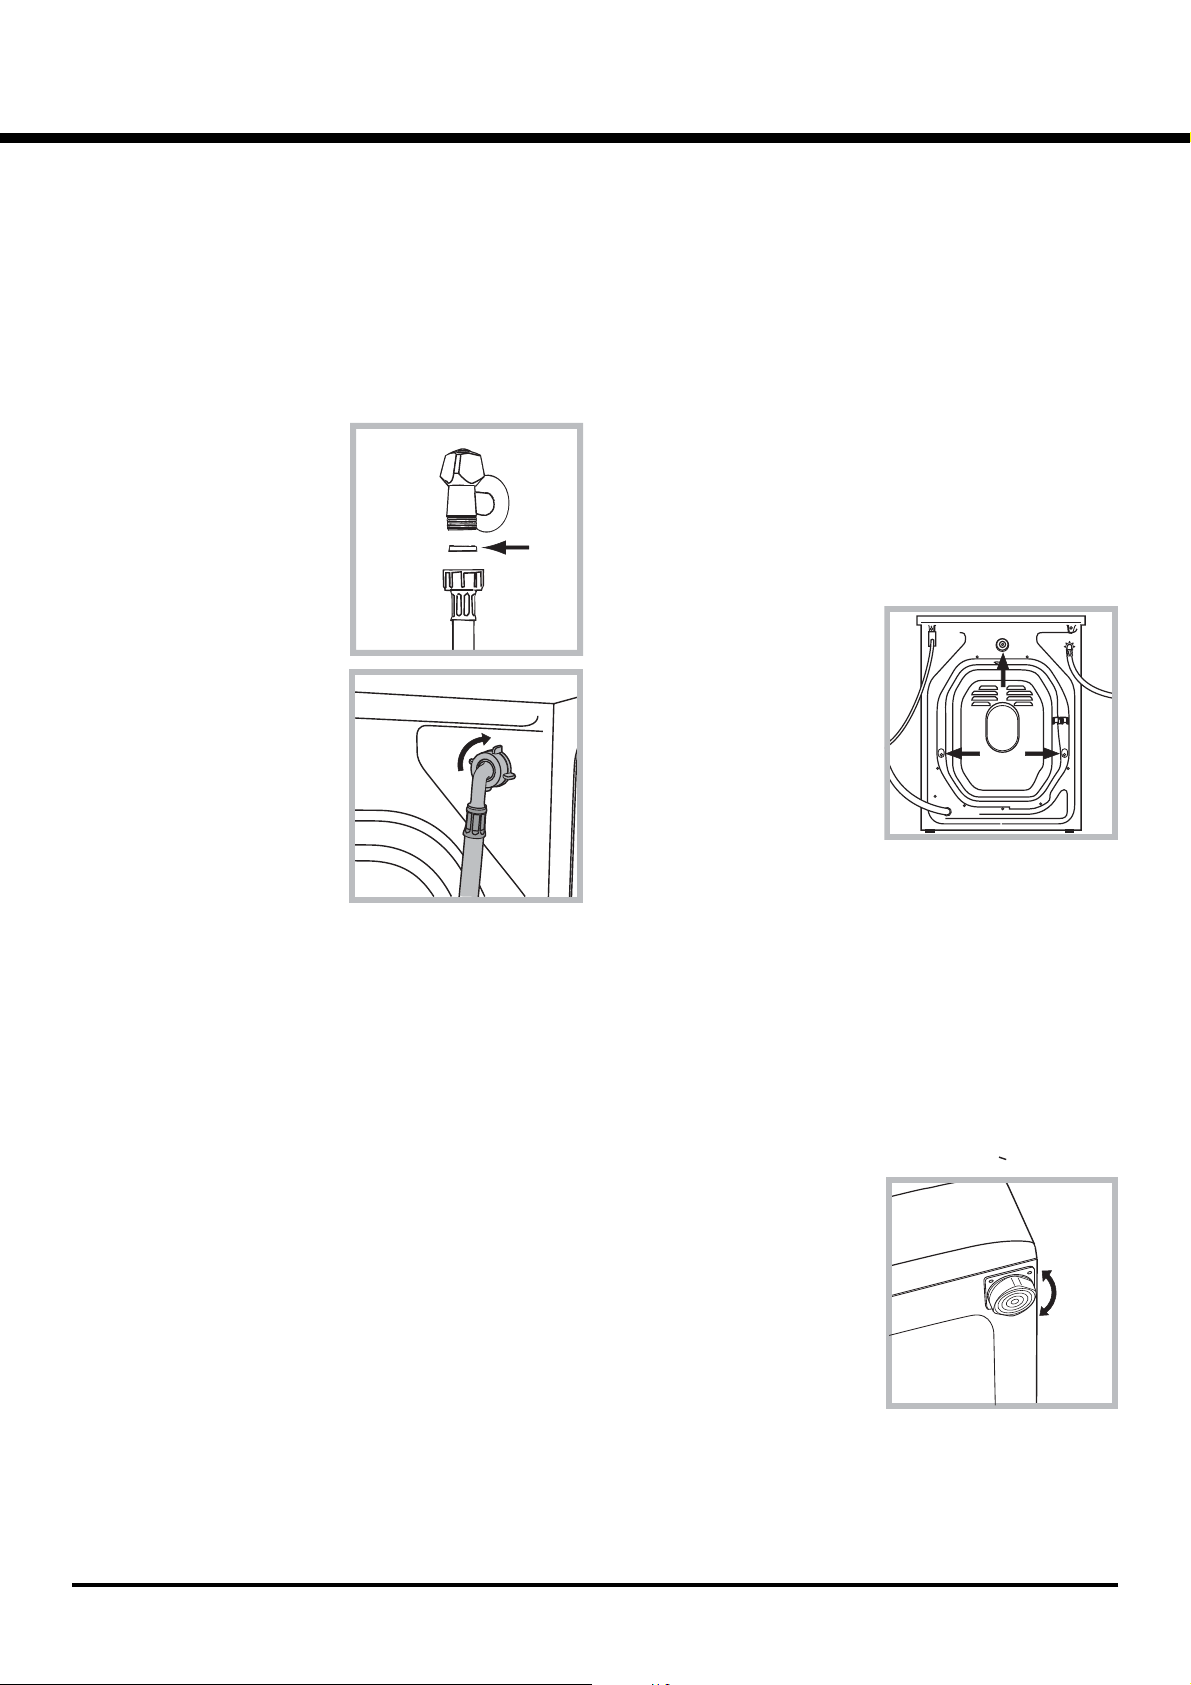
3. Remove the 3
protective screws and
the rubber washer with
the respective spacer,
situated on the rear of
the appliance (see
figure).
4. Seal the gaps using the plastic plugs provided.
5. Keep all the parts: you will need them again if the
washing machine needs to be moved to another
location.
Levelling your appliance correctly will provide it with
stability and avoid any vibrations, noise and shifting
during operation. If it is placed on a fitted or loose
carpet, adjust the feet in such a way as to allow
enough room for ventilation beneath the washing
machine.
Electric and water connections
Connecting the water inlet hose
1. Insert seal A into the
end of the inlet hose
and screw the latter
onto a cold water tap
A
with a 3/4 gas threaded
mouth (see figure).
Before making the
connection, allow the
water to run freely until
it is perfectly clear.
2. Connect the other end
of the water inlet hose to
the washing machine,
screwing it onto the
appliance's cold water
inlet, situated on the top
right-hand side on the
rear of the appliance
(see figure).
Packaging materials are not children's toys.
Levelling
1. Install the washing machine on a flat sturdy floor,
without resting it up against walls, furniture cabinets
or other.
2. If the floor is not
perfectly level, compensate for any unevenness
by tightening or
loosening the adjustable
front feet (see figure);
the angle of inclination,
measured according to
the worktop, must not
exceed 2°.
2
3. Make sure there are no kinks or bends in the
hose.
The water pressure at the tap must be within the
values indicated in the Technical details table
(on the next page).
If the water inlet hose is not long enough, contact
a specialist store or an authorised serviceman.
Page 3

Connecting the drain hose
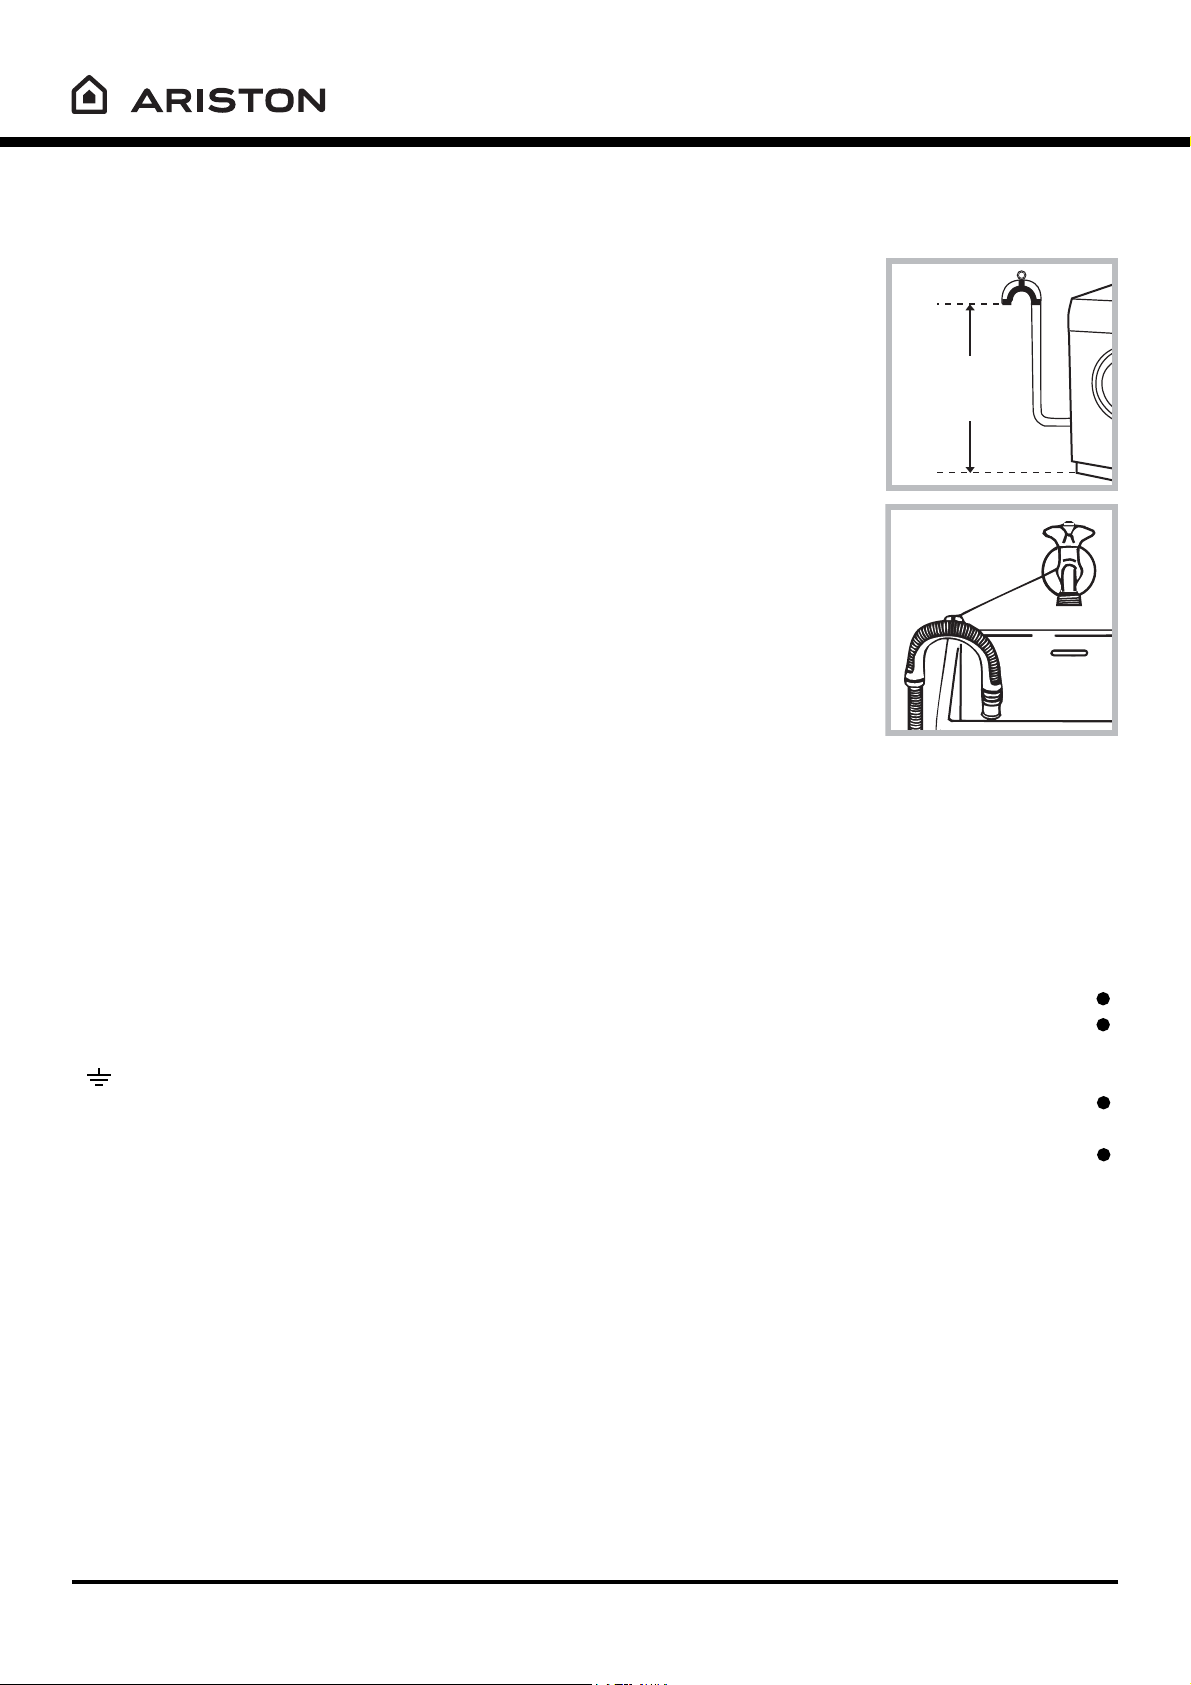
Connect the drain hose,
without bending it, to a
draining duct or a wall
drain situated between
65 and 100 cm from the
65 - 100 cm
floor;
alternatively, place it
over the edge of a
basin, sink or tub,
fastening the duct
supplied to the tap (see
figure). The free end of
the hose should not be
underwater.
We advise against the use of hose extensions; in
case of absolute need, the extension must have the
same diameter as the original hose and must not
exceed 150 cm in length.
Electric connection
Before plugging the appliance into the mains socket,
make sure that:
the socket is earthed and in compliance with the
applicable law;
the socket is able to sustain the appliance's
maximum power load indicated in the Technical
details table (see page 5);
the supply voltage is included within the values i
ndicated on the Technical details table
(see page 5);
the socket is compatible with the washing
machine's plug. If this is not the case, replace
the socket or the plug.
Your appliance is now supplied with a 13 amp fused
plug it can be plugged into a 13 amp socket for
immediate use. Before using the appliance please
read the instructions below.
WARNING - THIS APPLIANCE MUST BE EARTHED.
THE FOLLOWING OPERATIONS SHOULD BE
CARRIED OUT BY A QUALIFIED ELECTRICIAN.
Replacing the fuse:
When replacing a faulty fuse, a 13 amp ASTA
approved fuse to BS 1362 should always be used, and
the fuse cover re-fitted. If the fuse cover is lost, the
plug must not be used until a replacement is obtained.
Replacement fuse covers:
If a replacement fuse cover is fitted, it must be of the
correct colour as indicated by the coloured marking or
the colour that is embossed in words on the base of
the plug. Replacements can be obtained directly from
your nearest Service Depot.
Removing the plug:
If your appliance has a non-rewireable moulded plug
and you should wish to re-route the mains cable
through partitions, units etc., please ensure that
either:
the plug is replaced by a fused 13 ampere rewearable plug bearing the BSI mark of approval.
or:
the mains cable is wired directly into a 13 amp cable
outlet, controlled by a switch, (in compliance with
BS 5733) which is accessible without moving the
appliance.
Disposing of the plug:
Ensure that before disposing of the plug itself, you
make the pins unusable so that it cannot be
accidentally inserted into a socket.
Instructions for connecting cable to an alternative
plug:
Important: the wires in the mains lead are coloured
in accordance with the following code:
Green & Yellow Earth
Blue Neutral
Brown Live
As the colours of the wires in the lead may not
correspond with the coloured markings identifyng
the terminals in your plug, proceed as follows:
Connect Green & Yellow wire to terminal marked E
or coloured Green or Green & Yellow.
or
Connect Brown wire to terminal marked L or
coloured Red.
Connect Blue wire to terminal marked N or coloured
Black.
GB
ServiceTroubleshootingPrecautions CareProgrammes DetergentsInstallation Description
3
Page 4
If a 13 amp plug (BS 1363) is used it must be fitted
GB
with a
13 amp fuse, either in the plug or adaptor or at the
distribution board.
If you are in any doubt the electrical supply to your
machine, consult a qualified electrician before use.
How to connect an alternative plug:
The wires in this mains lead are coloured in
accordance with the following code:
BLUE NEUTRAL (N)
BROWN LIVE (L)
GREEN & YELLOW EARTH (E)
Disposing of the appliance:
When disposing of the appliance please remove the
plug by cutting the mains cable as close as possible
to the plug body and dispose of it as described
above.
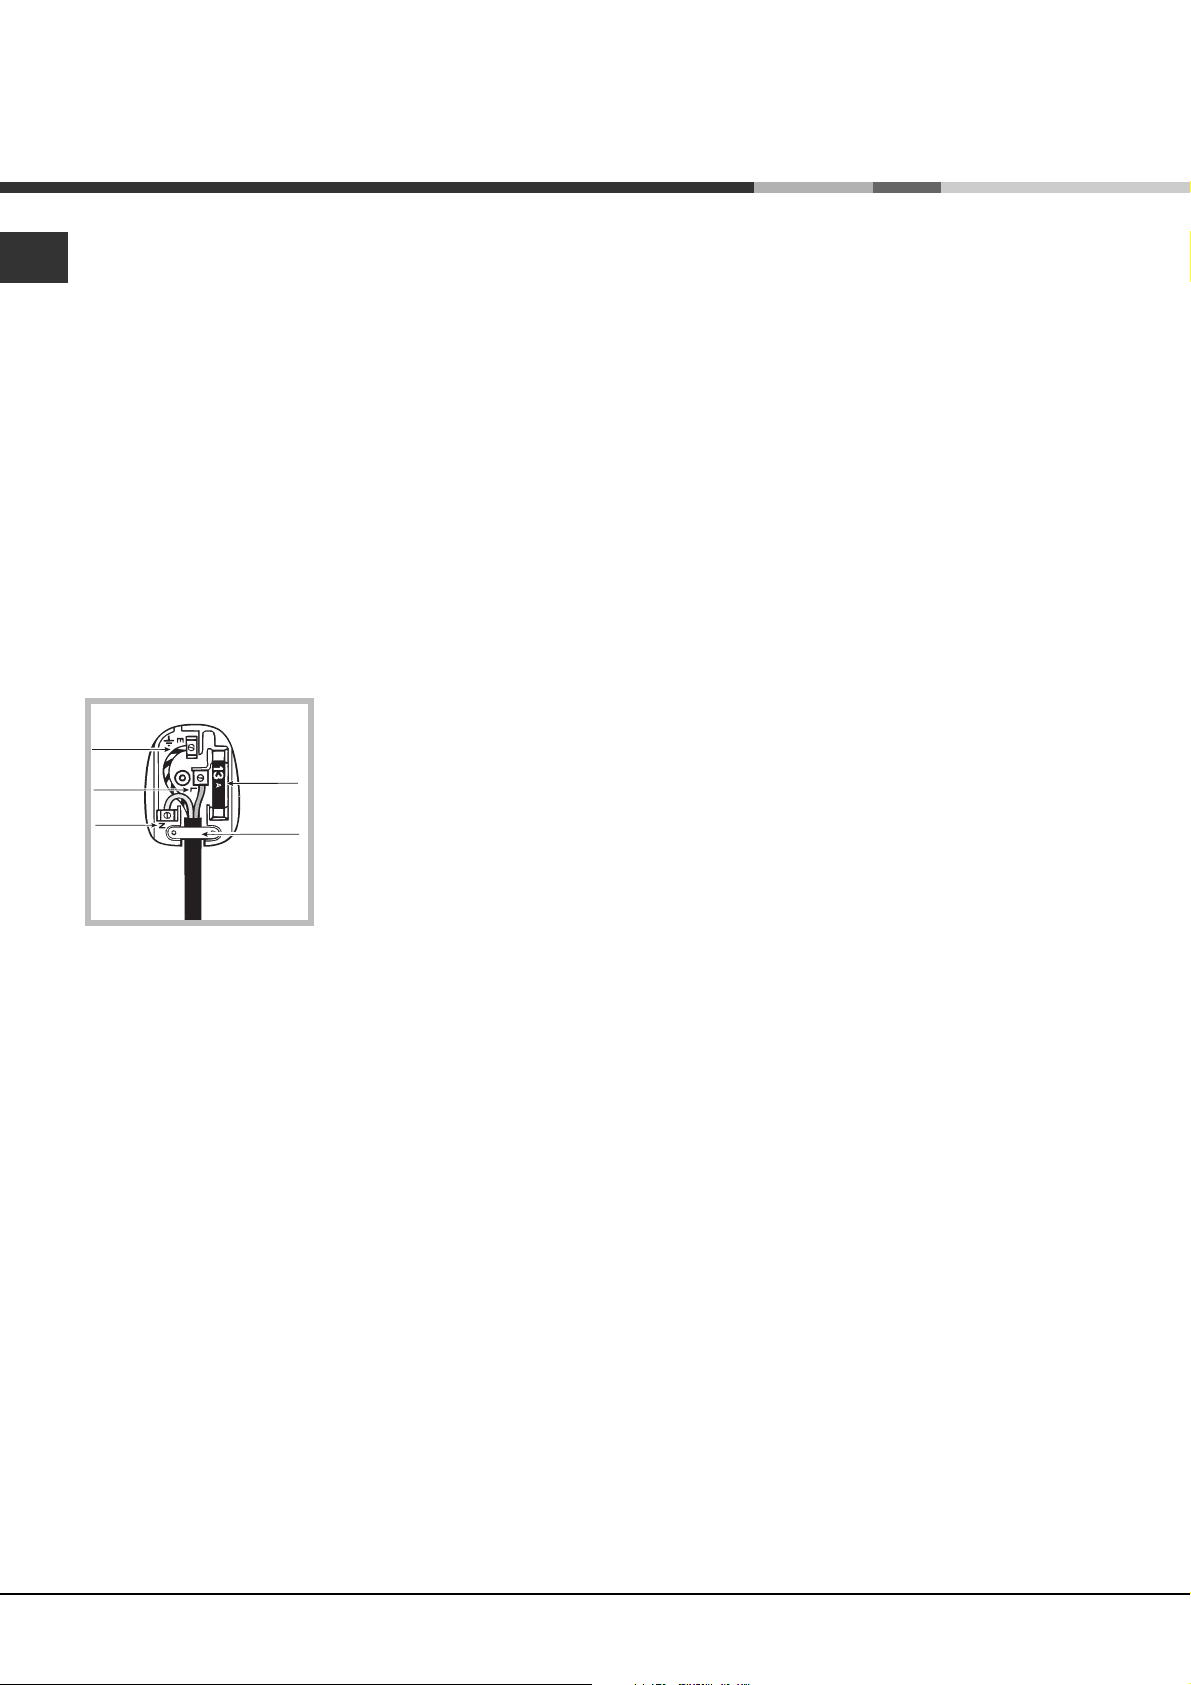
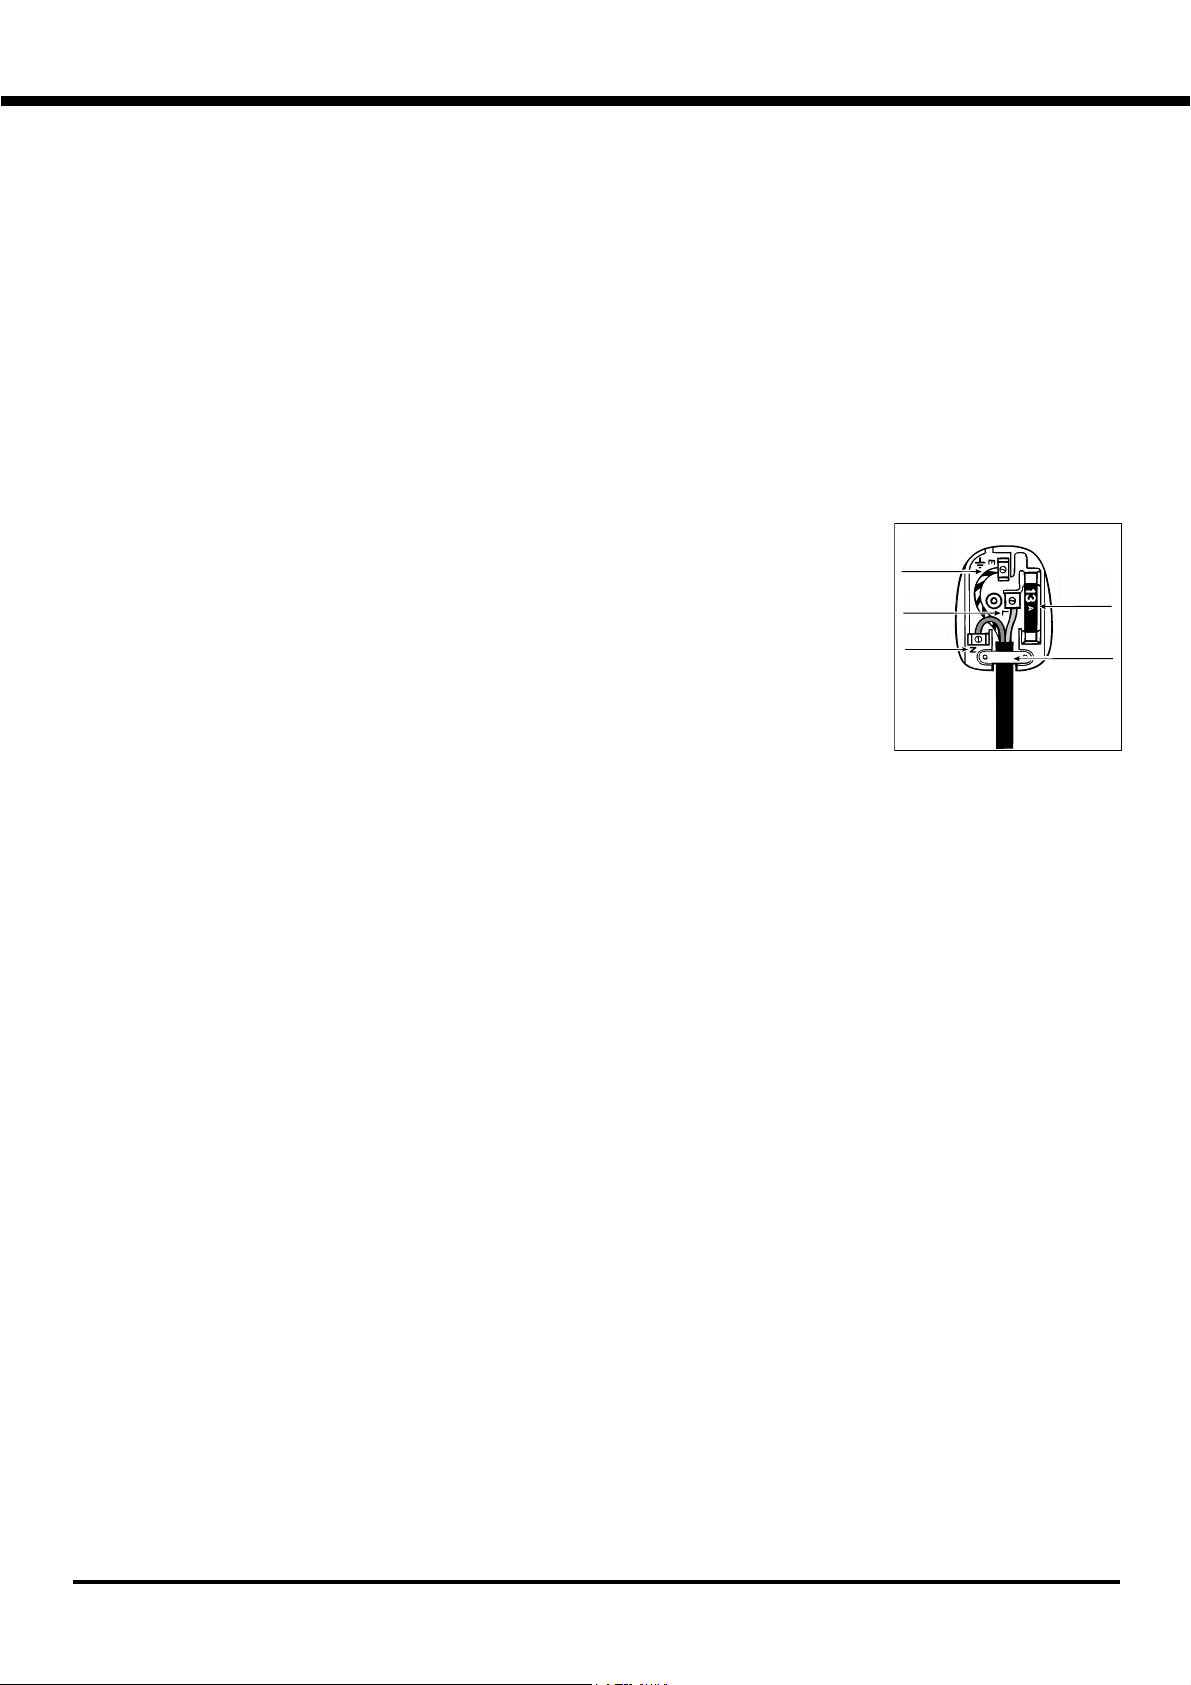
GREEN &
YELLOW
BROWN
BLUE
13 ampere fuse
CROSS-BAR
CORD GRIP
The first wash cycle
Once the appliance has been installed, and before
you use it for the first time, run a wash cycle with
detergent and no laundry, setting the 90°C
programme without a pre-wash cycle.
The washing machine should not be installed in an
outdoor environment, not even when the area is
sheltered, because it may be very dangerous to
leave it exposed to rain and thunderstorms.
When the washing machine is installed, the mains
socket must be within easy reach.
Do not use extensions or multiple sockets.
The power supply cable must never be bent or
dangerously compressed.
The power supply cable must only be replaced by
an authorised serviceman.
Warning! The company denies all liability if and when
these norms are not respected.
4
Page 5
Technical details
GB
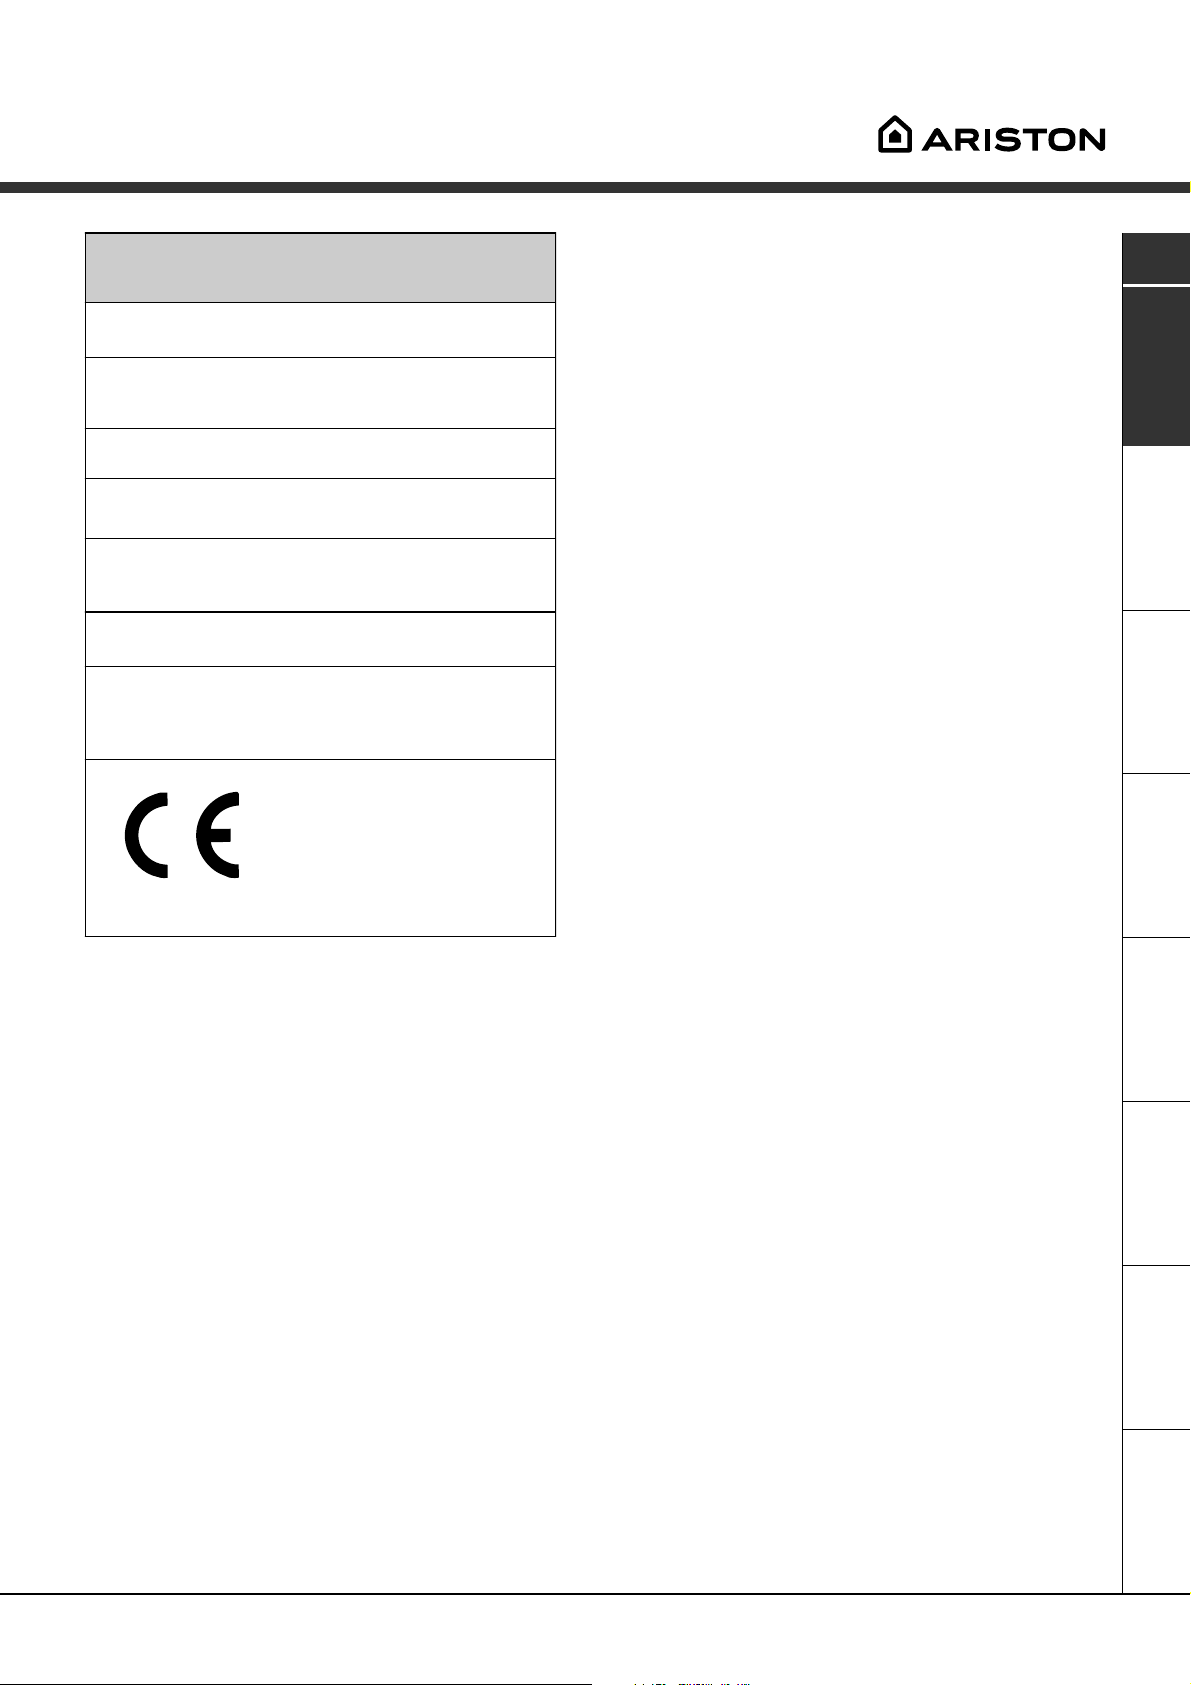
Model
Dimensions
Capacity
Electric
connections
Wat er
connections
Spin speed
Control
programmes
according to
IEC456 directive
AV 52
59.5 cm wide
85 cm high
52.5 cm deep
from 1 to 5 kg
voltage 220/230 Volts 50-60 Hz
maximum absorbed power 2000 W
maximum pressure 1 MPa (10 bar)
minimum pressure 0.05 MPa (0.5 bar)
drum capacity 40 litres
up to 500 rpm (60 Hz)
programme 2; temperature 60°C;
run with a load of 5 kg.
This appliance is compliant with the
following European Community
Directives:
- 73/23/CEE of 19/02/73 (Low
Voltage) and subsequent amendments
- 89/336/CEE of 03/05/89
(Electromagnetic Compatibility) and
subsequent amendments
ServiceTroubleshootingPrecautions CareProgrammes DetergentsInstallation Description
5
Page 6
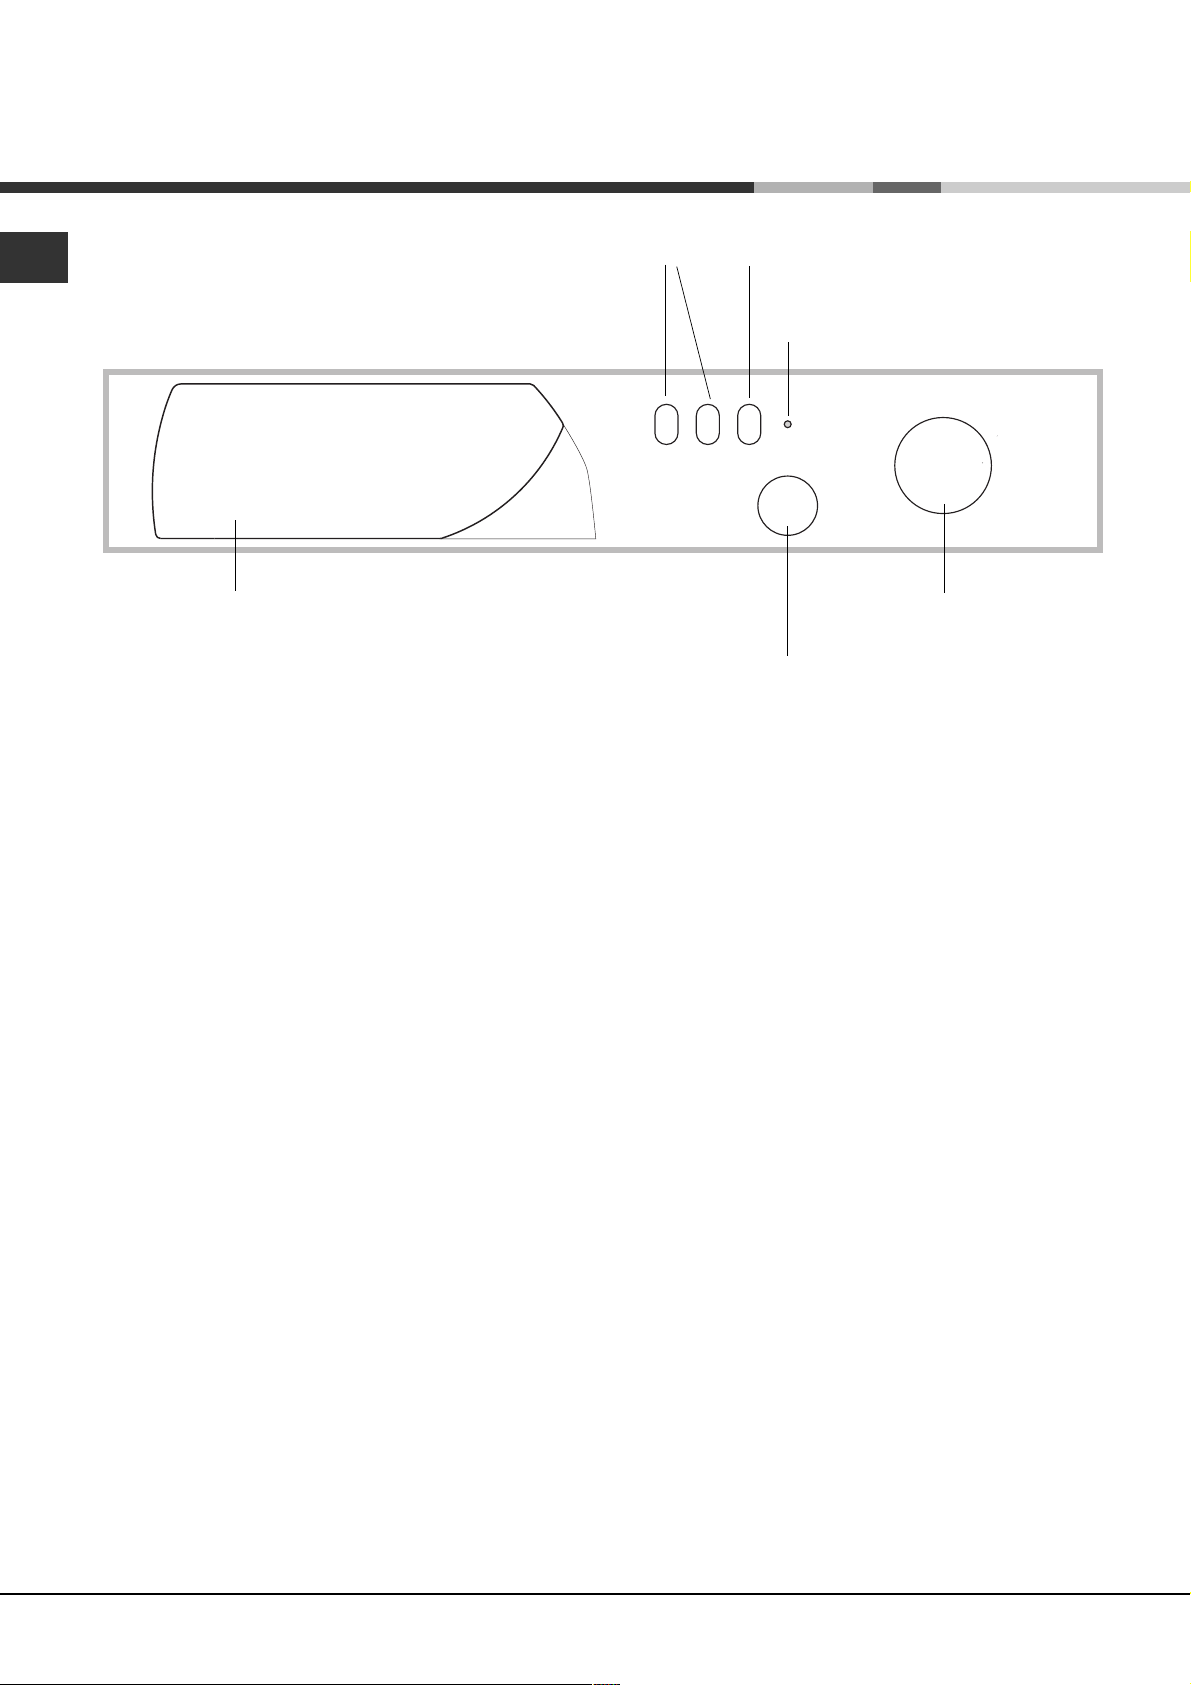
Washing machine description
GB
Control panel
Detergent dispenser
Detergent dispenser: to add detergent and fabric
softener (see page 9).
FUNCTION
Buttons
TEMPERATURE knob: to set the temperature or
the cold wash cycle (see page 8).
ON/OFF
Button
ON-OFF
Led
PROGRAMME
Knob
TEMPERATURE
Knob
FUNCTION buttons: to select the functions
available.
ON/OFF button: to turn the washing machine on
and off.
ON/OFF led, to find out whether the washing
machine is on.
PROGRAMME knob: to select the wash
programmes.
Remember that this dial should be turned in a
clockwise direction and only when the machine is
off.
6
Page 7
Starting and Programmes
Briefly: starting a programme
1. Set the desired programme.
2. Set the wash temperature (see page 8).
3. Load your laundry into the appliance and shut the door.
4. Add the detergent and any fabric softener (see page 9).
5. Turn the appliance on by pressing button ON/OFF.
6. At the end of the wash cycle wait approximately 3
minutes.
Then turn the washing machine off by pressing
ON/OFF button. You can now open the washing
machine door safely. After having removed the
freshly cleaned washing, leave the door open to
allow air circulation inside the drum.
Always disconnect electricity at the socket and
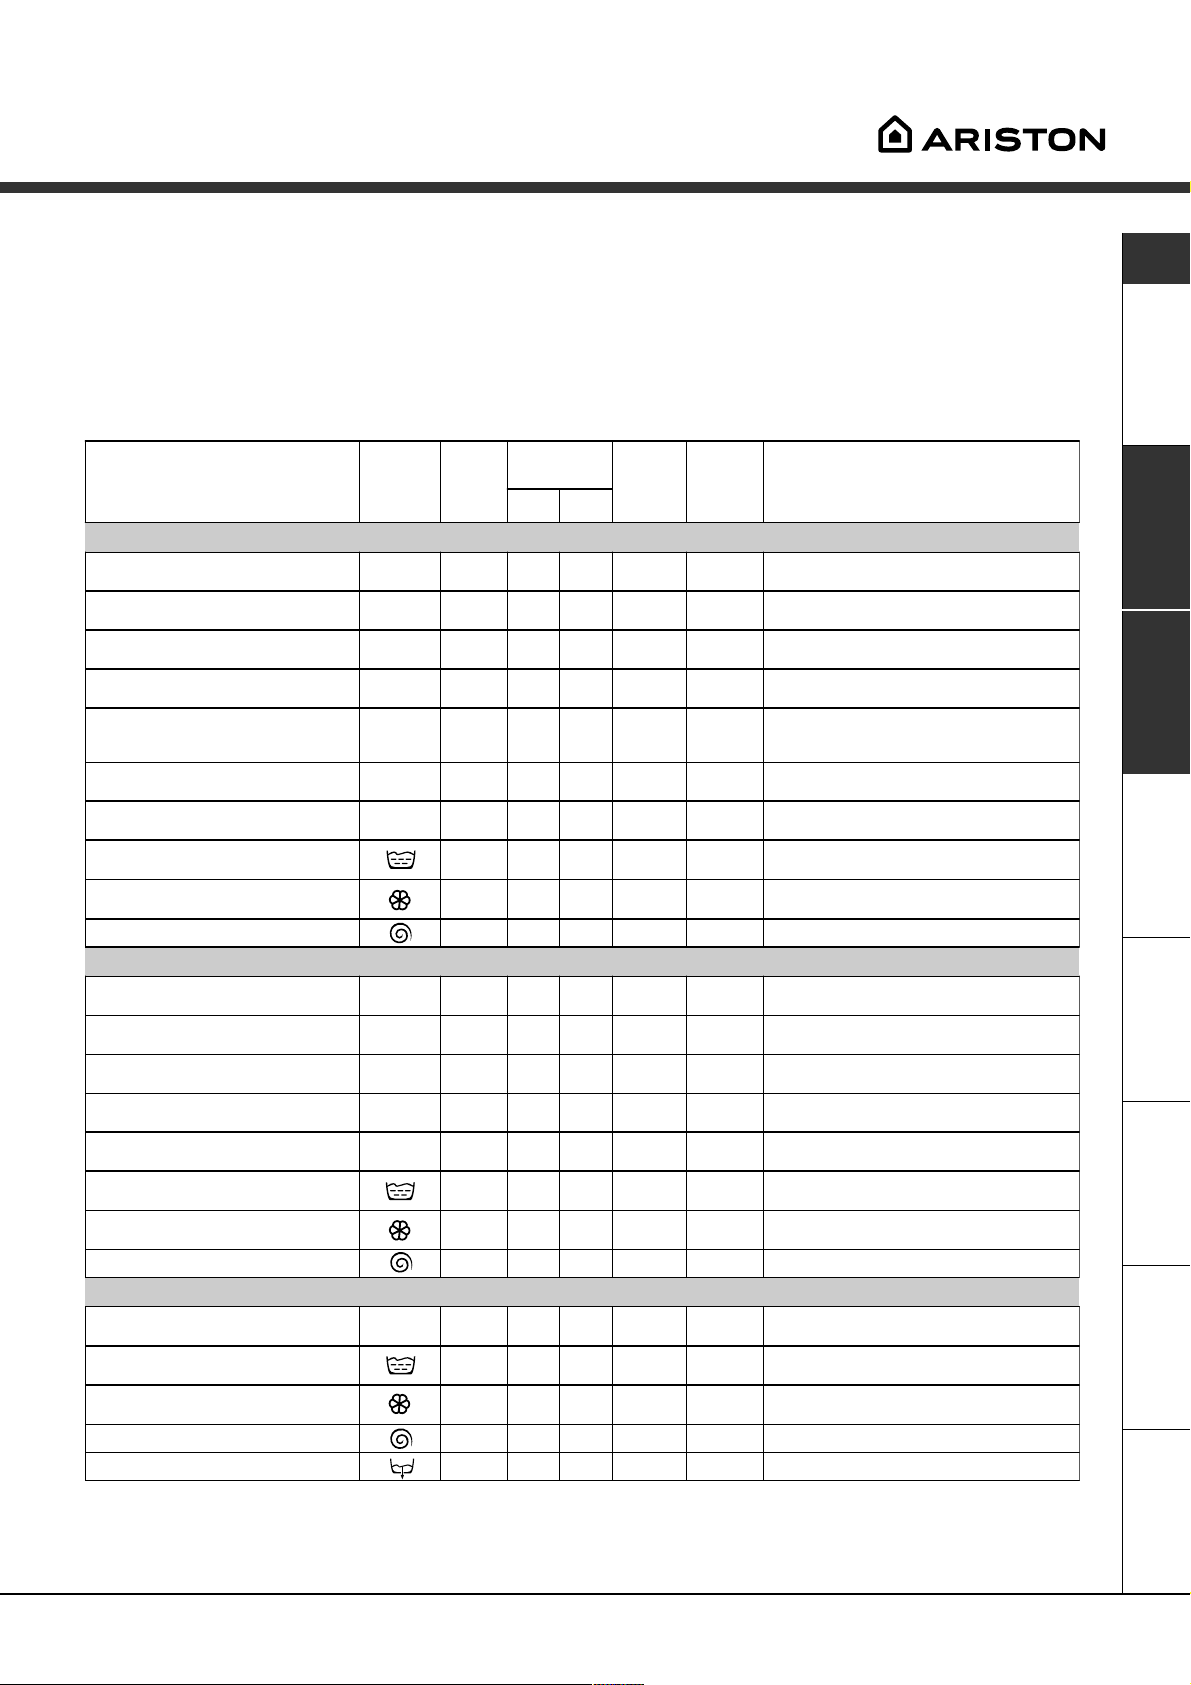
Programme table
Type of fabric and degree of soil
Programmes
Te m p e rature
Detergent
pre-
wash
wash
turn off the water supply.
Fabric
softener
Cycle
length
(minutes)
Description of wash cycle
Cotton
Extremely-soiled whites (sheets,
tablecloths, etc.)
Heavily-soiled whites (sheets,
tablecloths, etc.)
Heavily-soiled whites and resistant
colours
Heavily soiled whites and resistant
colours
Soiled whites and resistant colours
(coloured linen, dressing gowns,
jumpers, etc.)
Slightly-soiled whites and colours
Slightly-soiled whites and delicate
colours (shirts, jumpers, etc.)
Rinse
Treatment with softeners
Spin cycle Draining and final spin cycle
1
90°C
2
90°C
2
60°C
2
40°C
3
3
4
60°C
40°C
40°C
Pre-wash, wash cycle, rinse cycles,
150
intermediate and final spin cycles
Wash cycle, rinse cycles, intermediate
140
and final spin cycles
Wash cycle, rinse cycles, intermediate
140
and final spin cycles
Wash cycle, rinse cycles, intermediate
140
and final spin cycles
Wash cycle, rinse cycles, intermediate
115
and final spin cycles
Wash cycle, rinse cycles, intermediate
115
and final spin cycles
Wash cycle, rinse cycles, intermediate
95
and final spin cycles
Rinse cycles, intermediate and final spin
cycles
Rinse cycles with automatic softener
intake, intermediate and final spin cycles
Synthetics
Heavily-soiled resistant colours
(baby linen, etc.)
Heavily-soiled colour synthetics
Heavily-soiled delicate colour
synthetics
Soiled colour synthetics
Delicate colour synthetics
(all types of slightly soiled garments)
Rinse
Treatment with softeners
Spin cycle Draining and delicate spin cycle
5
5
5
6
7
60°C
50°C
40°C
50°C
40°C
Wash cycle, rinse cycles, anti-crease or
85
delicate spin cycle
Wash cycle, rinse cycles, anti-crease or
85
delicate spin cycle
Wash cycle, rinse cycles, anti-crease or
85
delicate spin cycle
Wash cycle, rinse cycles, anti-crease or
75
delicate spin cycle
Wash cycle, rinse cycles, anti-crease or
65
delicate spin cycle
Rinse cycles, anti-crease or delicate spin
cycle
Rinse cycles with automatic introduction of
softener, anti-crease or delicate spin cycle
Delicates
Wool (machine-washable)
Rinse
Treatment with softeners
Spin cycle Draining and delicate spin cycle
Draining Draining without spin cycle
8
40°C
Wash cycle, rinse cycles, anti-crease or
55
delicate spin cycle
Rinse cycles, anti-crease or delicate spin
cycle
Rinse cycles with automatic introduction of
softener, anti-crease or delicate spin cycle
GB
ServiceTroubleshootingPrecautions CareProgrammes DetergentsInstallation Description
Notes
for the description of the Anti-crease function, please see page 8. The information contained in the table is purely indicative.
7
Page 8
Personalisations
GB
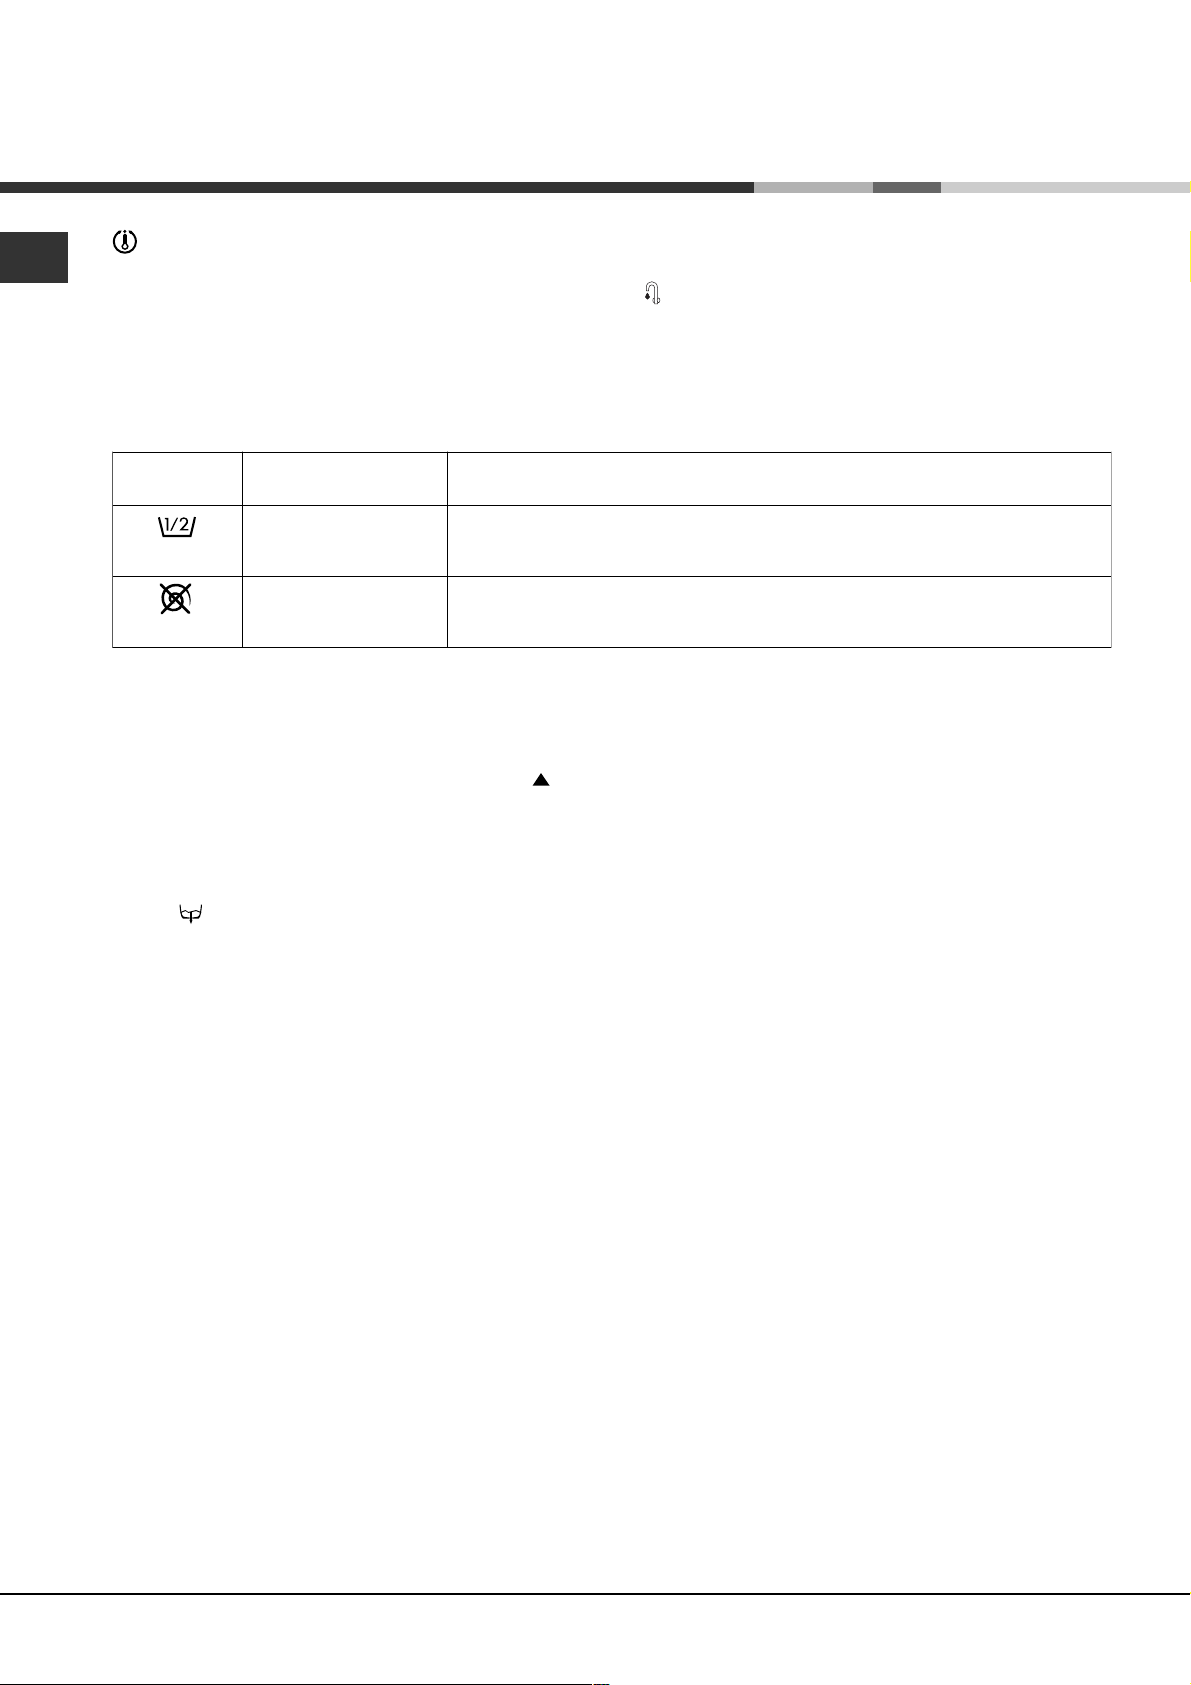
Setting the temperature
Turn the TEMPERATURE knob to set the wash temperature (see Programme table on page 7).
The temperature can be lowered, or even set to a cold wash (
).
Functions
To enable the functions, press the button corresponding to the desired function, according to the table below:
Function Effect Comments
Reduces water
Half load
No Spin
Anti-crease
This feature interrupts the wash cycle (position
is activated only during the wash cycles for synthetic materials and wool. This feature is very useful because it
prevents delicate and synthetic clothing from wrinkling (for example, when you are unable to remove the
laundry at the end of the wash cycle and it must remain in the machine for several hours). The wash program
can be completed with either a spin cycle or by draining the water without wringing. In the first case, simply
turn the knob PROGRAMME clokwise one click. In the second, turn the knob PROGRAMME to the drain
setting .
In both cases, the knob PROGRAMME must be turned when the machine is off.
consumption during
the rinse cycles.
Use this button to
exclude the spin
cycle.
We recommend that you use this function only with small laundry loads,
dosing the detergent proportionally.
We recommend that you use it when washing garments which are difficult
to iron.
), letting the laundry soak in the water before the spin cycle. It
8
Page 9

Detergents and laundry
Detergent dispenser
Good washing results also depend on the correct
dose of detergent: adding too much detergent won't
necessarily make for a more efficient wash, and may
in fact cause build up on the interior of your
appliance and even pollute the environment.
Open up the detergent
dispenser and pour in
the detergent and fabric
softener, as follows.
1
3
compartment 1: Detergent for pre-wash
(powder)
compartment 2: Detergent for the wash cycle
(powder or liquid)
Liquid detergent should only be poured in
immediately prior to the wash cycle start.
compartment 3: Additives (fabric softeners, etc.)
The fabric softener should not overflow from the grid.
Do not use hand wash detergent because it may
form too much foam.
2
Special items
GB
Curtains: fold curtains and place them in a pillow
case or mesh bag. Wash them separately without
exceeding half the appliance load.
Quilted coats and windbreakers: if they are
padded with goose or duck down, they can be
machine-washed. Turn the garments inside out and
load a maximum of 2-3 kg, repeating the rinse cycle
once or twice and using the delicate spin cycle.
Trainers: remove any mud. They can be washed
together with jeans and other tough garments, but
not with whites.
Wool: for best results, use a specific detergent,
taking care not to exceed a load of 1 kg.
Preparing your laundry
Divide your laundry according to:
- the type of fabric/the symbol on the label.
- the colours: separate coloured garments from
whites.
Empty all pockets and check for loose buttons.
Do not exceed the weight limits stated below,
which refer to the weight when dry:
Sturdy fabrics: max 5 kg
Synthetic fabrics: max 2.5 kg
Delicate fabrics: max 2 kg
Wool: max 1 kg
How much does your laundry weigh?
1 sheet 400-500 g
1 pillow case 150-200 g
1 tablecloth 400-500 g
1 bathrobe 900-1,200 g
1 towel 150-250 g
ServiceTroubleshootingPrecautions CareProgrammes DetergentsInstallation Description
9
Page 10
Precautions and advice
GB
The washing machine was designed and built in
compliance with the applicable international safety
regulations. The following information is provided for
your safety and should consequently be read
carefully.
General safety
This appliance has been designed for non-
professional, household use and its functions must
not be changed.
This washing machine should only be used by
adults and in accordance with the instructions
provided in this manual.
Never touch the washing machine when barefoot
or with wet or damp hands or feet.
Do not pull on the power supply cable to unplug
the appliance from the electricity socket. Pull the
plug out yourself.
Do not open the detergent dispenser while the
appliance is in operation.
Do not touch the drain water as it could reach
very high temperatures.
Never force the washing machine door: this could
damage the safety lock mechanism designed to
prevent any accidental openings.
In the event of a malfunction, do not under any
circumstances touch internal parts in order to
attempt repairs.
Always keep children well away from the
appliance while in operation.
Disposal
Disposing of the packaging material:
observe local regulations, so the packaging can
be re-used.
Disposing of an old washing machine:
before scrapping your appliance, cut the power
supply cable and remove the appliance door.
Saving energy and respecting the
environment
To avoid wasting resources, the washing machine
should be used with a full load. A full load instead
of two half loads allows you to save up to 50% on
energy.
The pre-wash cycle is only necessary on
extremely soiled garments. Avoiding it will save on
detergent, time, water and between 5 and 15%
energy.
Treating stains with a stain remover or leaving
them to soak before washing will cut down the
need to wash them at high temperatures. A
programme at 60°C instead of 90°C or one at
40°C instead of 60°C will save up to 50% on
energy.
Use the correct quantity of detergent depending
on the water hardness, how soiled the garments
are and the amount of laundry you have, to avoid
wastage and to protect the environment: despite
being biodegradable, detergents do contain
ingredients that alter the natural balance of the
environment. In addition, avoid using fabric
softener as much as possible.
The appliance door tends to get quite hot during
the wash cycle.
Should it have to be moved, proceed with the
help of two or three people and handle it with the
utmost care. Never try to do this alone, because
the appliance is very heavy.
Before loading your laundry into the washing
machine, make sure the drum is empty.
10
If you use your washing machine from late in the
afternoon until the early hours of the morning, you
will help reduce the electricity board's peak load.
If your laundry has to be dried in a tumble dryer,
select a high spin speed. Having the least water
possible in your laundry will save you time and
energy in the drying process.
Page 11
Care and maintenance
Cutting off the water or electricity
supply
Turn off the water tap after every wash. This will
limit the wear of your appliance's water system
and also prevent leaks.
Unplug your appliance when cleaning it and
during all maintenance operations.
Cleaning your appliance
The exterior and rubber parts of your appliance can
be cleaned with a soft cloth soaked in lukewarm
soapy water. Do not use solvents or abrasives.
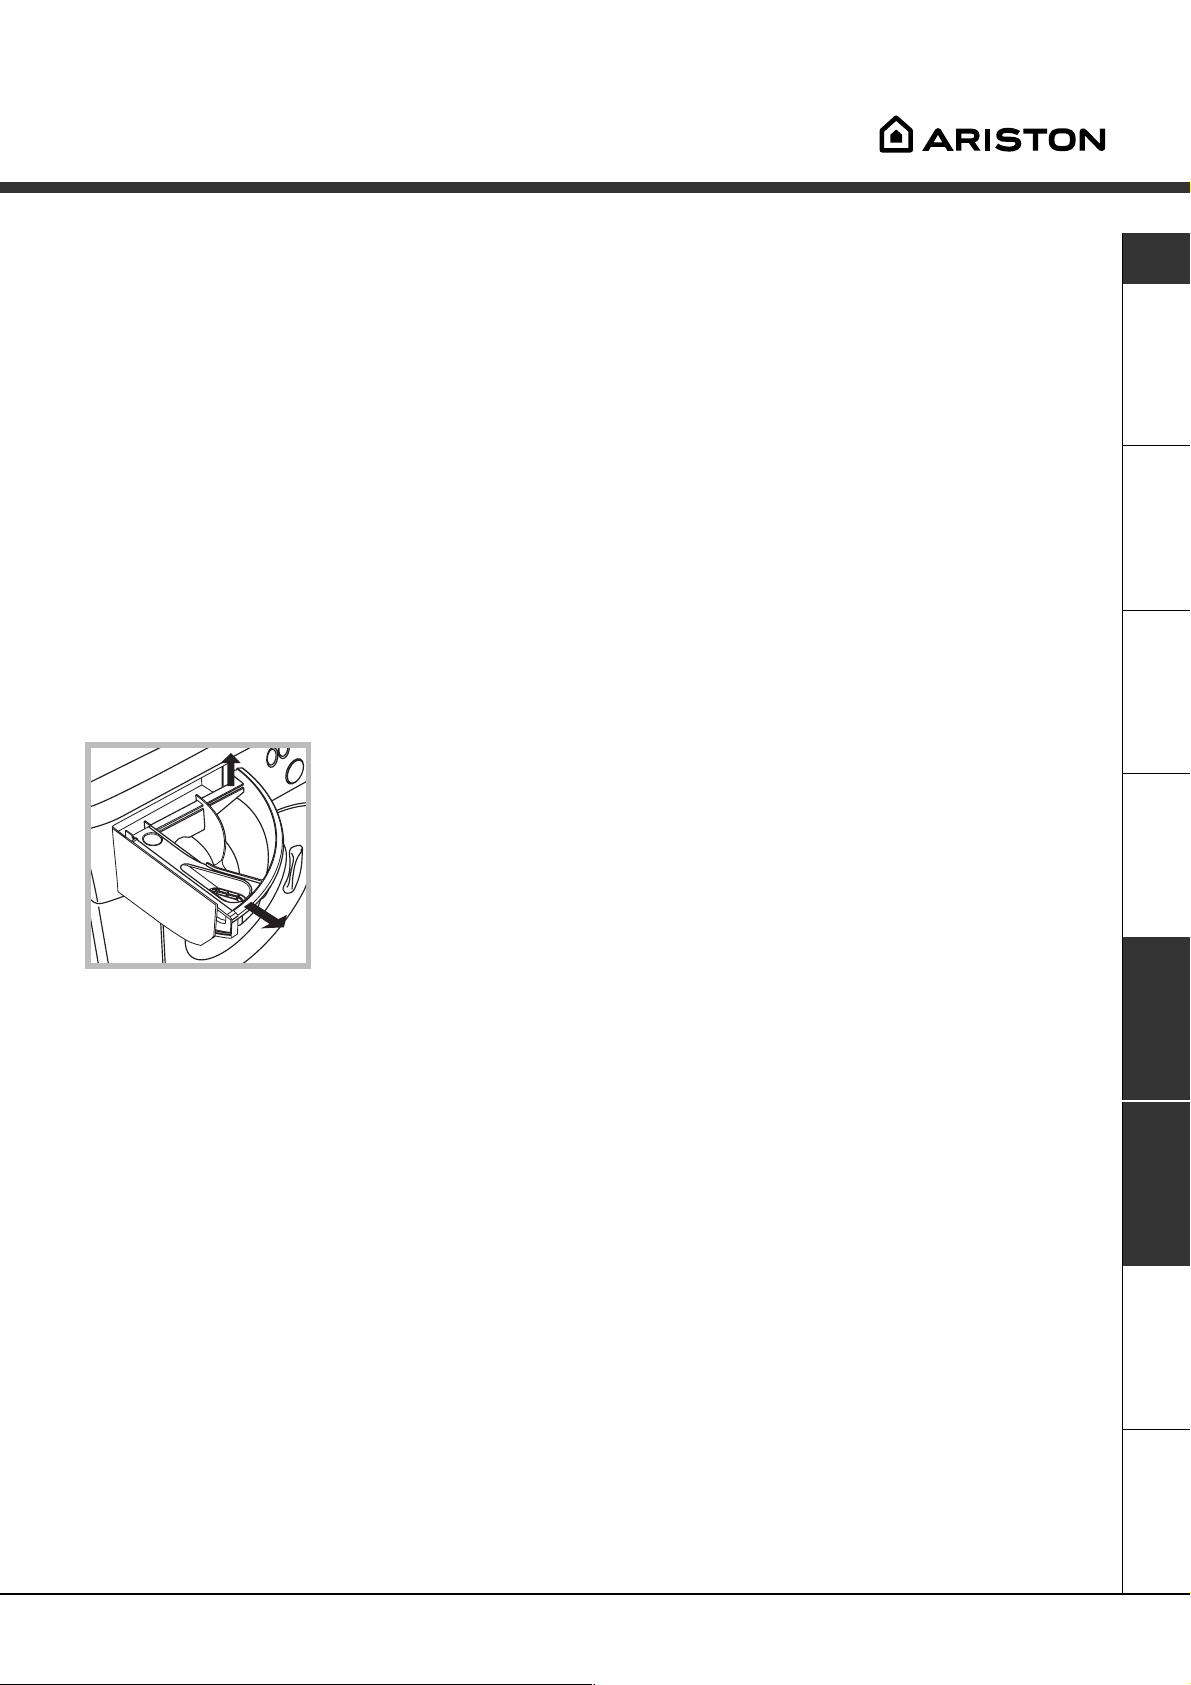
Cleaning the detergent dispenser
1
Remove the dispenser
by raising it and pulling it
out (see figure).
Wash it under running
water; this operation
should be repeated
frequently.
GB
2
Caring for your appliance door and
drum
Always leave the appliance door ajar to prevent
unpleasant odours from forming.
Cleaning the pump
The washing machine is fitted with a self-cleaning
pump that does not require any maintenance.
Checking the water inlet hose
Check the water inlet hose at least once a year. If
you see any cracks, replace it immediately: during
the wash cycles, water pressure is very strong and
a cracked hose could easily split open.
ServiceTroubleshootingPrecautions CareProgrammes DetergentsInstallation Description
Never use hoses that have already been used.
11
Page 12
Troubleshooting
GB
Your washing machine could fail to work. Before calling for Assistance (see page 13), make sure the problem
can't easily be solved by consulting the following list.
Problem
The washing machine won't
start.
The wash cycle won't start.
The washing machine fails to
load water.
The washing machine
continuously loads and unloads
water.
Possible causes/Solution:
The appliance is not plugged into the socket, or not enough to
make contact.
There has been a power failure.
The appliance door is not shut properly.
The ON/OFF button has not been pressed.
The water tap is not turned on.
The water inlet hose is not connected to the tap.
The hose is bent.
The water tap is not turned on.
There is a water shortage.
The water pressure is insufficient.
The drain hose is not fitted between 65 and 100 cm from the floor
(see page 3).
The free end of the hose is underwater (see page 3).
The wall drainage system doesn't have a breather pipe.
If the problem persists even after these checks, turn off the water tap,
switch the appliance off and call for Assistance. If the dwelling is on
one of the upper floors of a building, there may be drain trap problems
causing the washing machine to load and unload water continuously.
In order to avoid such an inconvenience, special anti-drain trap valves
are available in shops.
The washing machine does not
drain or spin.
The washing machine vibrates
too much during the spin cycle.
The washing machine leaks.
There is too much foam.
The programme does not foresee the draining: some programmes
require enabling the draining manually (see page 7).
The Anti-crease function is enabled (where available): This function
requires enabling the draining manually.
The drain hose is bent (see page 3).
The drain duct is clogged.
The drum was not unblocked correctly during installation (see page 2).
The washing machine is not level (see page 2).
The washing machine is closed in between furniture cabinets and
the wall (see page 2).
The water inlet hose is not screwed on correctly (see page 2).
The detergent dispenser is obstructed (to clean it, see page 11).
The drain hose is not secured properly (see page 3).
The detergent is not suitable for machine washing (it should bear
the definition "for washing machines" or "hand and machine wash",
or the like).
You used too much detergent.
12
Page 13
Service
Before calling for Assistance:
Check whether you can solve the problem on your own (see page 12);
Restart the programme to check whether the problem has been solved;
If this is not the case, contact an authorised Technical Service Centre on the telephone number
provided on the guarantee certificate.
Always request the assistance of authorised servicemen.
Notify the operator of:
the type of problem;
the appliance model (Mod.);
the serial number (S/N);
This information can be found on the data plate situated on the rear of the washing machine.
GB
13
ServiceTroubleshootingPrecautions CareProgrammes DetergentsInstallation Description
Page 14
GB
14
Page 15
ﺲﺑﻼﻣ ﺔﻟﺎﺴﻏ
لﺎﻤﻌﺘﺳ ﻻا ﻞﺟأ ﻦﻣ تﺎﻤﻴﻠﻌﺗ
ﻲﺑﺮﻋ
اﻟﻔﻬﺮس
19-18-17-16
16-17
18
19
اﻟﺘﺮآﻴﺐ
اﺧﺮاج اﻟﺠﻬﺎز ﻣﻦ ﺗﻐﻠﻴﻔﻪ و ﺗﺴﻮﻳﺔ اﻟﺠﻬﺎز، 16
ﺗﻮﺻﻴﻼ ت اﻟﻤﺎء واﻟﻜﻬﺮﺑﺎء،
أول دورة ﻏﺴﻴﻞ،
ﻣﻮاﺻﻔﺎت ﻓﻨﻴﺔ،
وﺻﻒ ﻏﺴﺎﻟﺔ اﻟﻤﻼ ﺑﺲ 20
ﻟﻮﺣﺔ اﻟﻘﻴﺎدة، 02
اﻟﺘﺸﻐﻴﻞ و اﻟﺒﺮﻣﺠﺔ، 12
ﺑﺒﺴﺎﻃﺔ: ﺗﺸﻐﻴﻞ ﺑﺮﻧﺎﻣﺞ، 12
ﻟﻮﺣﺔ اﻟﺒﺮاﻣﺞ، 12
ﻲﺑﺮﻋ
ﺗﺸﺨﻴﺺ، 22
وﺿﻊ درﺟﺔ اﻟﺤﺮارة؛ 22
وﻇﺎﺋﻒ، 22
ﻣﺴﺎﺣﻴﻖ ﻏﺴﻴﻞ و ﻣﻼ ﺑﺲ، 32
ﺣﻮض ﻣﺴﺎﺣﻴﻖ اﻟﻐﺴﻴﻞ، 32
ﺗﺤﻀﻴﺮ اﻟﻤﻼ ﺑﺲ ﻟﻠﻐﺴﻴﻞ، 32
أﻗﻤﺸﺔ ﺧﺎﺻﺔ، 32
ﺗﺤﺬﻳﺮات وﻧﺼﺎﺋﺢ، 42
أﻣﻦ ﻋﺎم، 42
اﻟﺘﺨﻠﺺ ﻣﻦ اﻟﻨﻔﺎﻳﺎت، 42
اﻻ ﻗﺘﺼﺎد و واﺣﺘﺮام اﻟﺒﻴﺌﺔ، 42
AV 52
ﺻﻴﺎﻧﺔ و ﺣﻤﺎﻳﺔ، 52
اﻏﻼ ق اﻟﻤﺎء و اﻟﺘﻴﺎر اﻟﻜﻬﺮﺑﺎﺋﻲ، 52
ﺗﻨﻈﻴﻒ ﻏﺴﺎﻟﺔ اﻟﻤﻼ ﺑﺲ، 52
ﺗﻨﻈﻴﻒ ﺣﻮض ﻣﺴﺎﺣﻴﻖ اﻟﻐﺴﻴﻞ، 52
ﺣﻤﺎﻳﺔ ﺑﺎب اﻟﻐﺴﺎﻟﺔ و ﺣﻮض ﻏﺴﻴﻞ اﻟﻐﺴﺎﻟﺔ، 52
2
2
ﺗﻨﻈﻴﻒ ﻣﻀﺨﺔ ﺗﻔﺮﻳﻎ اﻟﻐﺴﺎﻟﺔ ﻣﻦ اﻟﻤﺎء، 5
ﻓﺤﺺ ﺧﺮﻃﻮم ﺗﻐﺬﻳﺔ اﻟﻐﺴﺎﻟﺔ ﺑﺎﻟﻤﺎء، 5
ﺣﺼﻮل ﺑﻌﺾ اﻟﻤﺸﺎآﻞ وﺣﻠﻮل ﻟﻬﺎ، 62
اﻟﺼﻴﺎﻧﺔ اﻟﻔﻨﻴﺔ، 72
15
Page 16
لﺎﻤﻌﺘﺳ ﻻا ﻞﺟأ ﻦﻣ تﺎﻤﻴﻠﻌﺗ
وﺿـﻊ اﻟـﺠـﻬـﺎز ﺑـﺸـﻜـﻞ ﻣـﺴـﺘـﻮي ﺗـﻌـﻤـﻞ ﻋـﻠـﻰ ﺛـﺒـﺎت اﻟـﺠـﻬـﺎز ﺑـﻤـﻜـﺎﻧـﻪ وﻋـﺪم ذﺑـﺬﺑـﺘـﻪ، وﻋـﺪم
ﺳﻤﺎع اﺻﻮات ﻣﺰﻋﺠﺔ ﺧﻼ ل ﻋﻤﻞ اﻟﺠﻬﺎزأو ﺗﺤﺮك اﻟﺠﻬﺎز ﻣﻦ ﻣﻜﺎﻧﻪ ﺧﻼ ل ﻋﻤﻞ
اﻟﺠﻬﺎز، ﻓﻲ ﺣﺎﻟﺔ وﺟﻮد ﻣﻜﻴﺖ أو ﺳﺠﺎد ﻋﻠﻰ اﻷ رﺿﻴﺔ ﺗﺤﺖ اﻟﺠﻬﺎز ﻋﻴﺮوا اﻷ رﺟﻞ
ﺗﺤﺖ اﻟﺠﻬﺎز ﺑﺤﻴﺖ ﻳﺘﻢ ﺗﺮك ﻣﺴﺎﻓﺔ ﺑﻴﻦ اﻟﺠﻬﺎز واﻷ رﺿﻴﺔ ﺗﺤﺘﻪ وذﻟﻚ ﻟﺘﺮك ﺣﻴﺰ
ﻟﺪﺧﻮل اﻟﻬﻮاء ﻣﻦ أﺟﻞ اﻟﺘﻬﻮﻳﺔ.
ﺗﻮﺻﻴﻞ اﻟﻤﺎء واﻟﻜﻬﺮﺑﺎء ﺑﺎﻟﺠﻬﺎز
ﺗﻮﺻﻴﻞ ﺧﺮﻃﻮم ﺗﻐﺬﻳﺔ اﻟﺠﻬﺎز ﺑﺎﻟﻤﺎء
ﻣـﻦ اﻟـﻤـﻬـﻢ اﻟـﺤـﻔـﺎظ ﻋـﻠـﻰ هـﺬا اﻟـﻜـﺘـﻴـﺐ ﻟـﻴـﻤـﻜـﻨـﻜـﻢ اﻟـﻌـﻮدة اﻟـﻴـﻪ ﻋـﻨـﺪ اﻟـﺤـﺎﺟـﺔ اﻟـﻰ اﻟـﺘـﻌـﺮف
ﻋﻠﻰ ﻣﻌﻠﻮﻣﺎت ﻋﻦ اﻟﺠﻬﺎز ﻓﻲ أي ﻟﺤﻈﺔ، ﻓﻲ ﺣﺎﻟﺔ ﺑﻴﻊ اﻟﺠﻬﺎز أو اﻋﻄﺎءه آﻬﺪﻳﺔ أو
ﻋﻨﺪ ﻧﻘﻞ اﻟﺠﻬﺎز ﻣﻦ ﻣﻜﺎن ﻻ ﺧﺮ، ﺗﺄآﺪوا ﻣﻦ أن ﻳﺒﻘﻰ هﺬا اﻟﻜﺘﻴﺐ ﻣﻊ اﻟﺠﻬﺎز وذﻟﻚ
ـﺘـﻘـﺪﻳـ
ﻢ ﻣـﻌـﻠـﻮﻣـﺎت ﺗـﺘـﻌـﻠـﻖ ﺑـﺘـﺸـﻌـﻴـﻞ وﺑـﺮﻣـﺠـﺔ اﻟـﺠـﻬـﺎز ﺑـﺎﻻ ﺿـﺎﻓـﺔ اﻟـﻰ اﻟـﻨـﺼـﺎﺋـﺢ واﻟـﺘـﺤـﺬﻳـﺮ
ﻟ
ﻟﻠﻤﺎﻟﻚ اﻟﺠﺪﻳﺪ ﻟﻠﺠﻬﺎز.
ـ
ﺮؤوا ﺑـﺘـﻤـﻌـﻦ اﻟـﺘـﻌـﻠـﻴـﻤـﺎت: ﻓـﻲ داﺧـﻞ هـﺬا اﻟـﻜـﺘـﻴـﺐ ﻣـﻮﺟـﻮد ﻣـﻌـﻠـﻮﻣـﺎت هـﺎﻣـﺔ ﺗـﺘـﻌـﻠـﻖ
أﻗ
ﺑﺎﻟﺘﺮآﻴﺐ، اﻻ ﺳﺘﻌﻤﺎل، وأﻣﻦ اﻟﺠﻬﺎز.
اﺧﺮاج اﻟﺠﻬﺎز ﻣﻦ ﺗﻐﻠﻴﻔﻪ وﺗﺴﻮﻳﺔ اﻟﺠﻬﺎز
1. أدﺧﻠﻮا ﺣﻠﻘﺔ ﻋﺪم ﺗﺴﺮب اﻟﻤﺎء اﻟﻤﺸﺎر
ﻟﻬﺎ ﺑﺎﻟﺤﺮف A ﻓﻲ ﻧﻬﺎﻳﺔ ﺧﺮﻃﻮم وارﺑﻄﻮه
ـﻤـﺤـﺒـ
ﺲ اﻟـﻤـﺎء اﻟـﺒـﺎرد ﺑـﻔـﺘـﺤـﺔ ﻣـﺴـﻨـﻨـﻪ ﺑـﺴـﻦ
ﺑ
3/4 ﻏﺎز )اﻧﻈﺮ اﻟﻰ اﻟﺸﻜﻞ(
ﻗﺒﻞ وﺻﻠﻪ ﺑﺎﻟﺠﻬﺎز اﺗﺮآﻮا اﻟﻤﺎء ﻳﺨﺮج
ﻣﻦ اﻟﻤﺤﺒﺲ ﺣﺘﻰ ﺧﺮوج ﻣﺎء ﺻﺎﻓﻴﺔ ﻣﻦ
اﻟﻤﺤﺒﺲ.
2. اﺷﺒﻜﻮا اﻟﺨﺮﻃﻮم اﻟﺬي ﻳﻐﺬي اﻟﻐﺴﺎﻟﺔ
ﺑﺎﻟﻤﺎء وذﻟﻚ ﺑﺮﺑﻄﻪ ﺑﻤﺪﺧﻞ اﻟﻤﺎء اﻟﻤﻮﺟﻮد
ﻓﻲ ﻇﻬﺮ اﻟﻐﺴﺎﻟﺔ ﻣﻦ اﻟﺨﻠﻒ ﻓﻲ اﻟﻤﻨﻄﻘﺔ
اﻟﻌﻠﻴﺎ ﻋﻠﻰ اﻟﻴﻤﻴﻦ.)اﻧﻈﺮ اﻟﻰ اﻟﺸﻜﻞ(
A
ـﻠـﻌـ
ﻮا اﻟـﺜـﻼ ث ﺑـﺮاﻏـﻲ اﻟـﺘـﻲ ﺗـﺤـﻤـﻲ
3. اﺧ
اﻟﺠﻬﺎز ﺧﻼ ل ﻋﻤﻠﻴﺔ اﻟﻨﻘﻞ، وآﺬﻟﻚ اﺧﻠﻌﻮا
ـﻘـﻄـ
ﻊ اﻟـﻤـﻄـﺎﻃـﻴـﺔ وﻣـﺒـﺎﻋـﺪ آـﻞ واﺣـﺪة ﻣـﻦ
اﻟ
ـ
ﺬه، اﻟـﺘـﻲ ﺗـﻜـﻮن ﻣـﻮﺟـﻮدة ﻓـﻲ اﻟـﻤـﻨـﻄـﻘـﺔ
ه
اﻟﺨﻠﻔﻴﺔ ﻣﻦ اﻟﺠﻬﺎز )اﻧﻈﺮ اﻟﻰ اﻟﺸﻜﻞ(
ـ
ﺬوا ﺣـﺬرآـﻢ ﻣـﻦ ﻻ ﻳـﻜـﻮن اﻟـﺨـﺮﻃـﻮم ﻣـﻄـﻮي أو ﻣـﺨـﻨـﻮق ﻓـﻲ ﻣـﻜـﺎن ﻣـﺎ ﻋـﻠـﻰ
3. ﺧ
ﻃﻮل اﻣﺘﺪاده.
ﺿﻐﻂ ﺷﺒﻜﺔ اﻟﻤﺎء ﻳﺠﺐ أن ﺗﻜﻮن ﺑﺎﻟﻘﻴﻢ اﻟﺘﻲ ﺗﻜﻮن ﻣﻌﻄﻴﺔ وﻣﻜﺘﻮﺑﺔ ﻻ ﺋﺤﺔ اﻟﺨﺼﺎﺋﺺ
اﻟﻔﻨﻴﺔ ﻟﻠﺠﻬﺎز)اﻧﻈﺮ اﻟﻰ اﻟﺼﻔﺤﺔ اﻟﺠﺎﻧﺒﻴﺔ(
اﺧﺮاج اﻟﺠﻬﺎز ﻣﻦ ﺗﻐﻠﻴﻔﻪ
1. اﺧﺮﺟﻮا اﻟﻐﺴﺎﻟﺔ ﻣﻦ ﺗﻐﻠﻴﻔﻬﺎ
2. ﺗﺄآﺪوا ﻣﻦ اﻟﻐﺴﺎﻟﺔ ﻟﻢ ﻳﺤﺪث ﻟﻬﺎ أﺿﺮار ﺧﻼ ل ﺷﺤﻨﻬﺎ وﻧﻘﻠﻬﺎ ﻣﻦ ﻣﻜﺎن ﻻ ﺧﺮ،
ـ
ﺎن اﻟـﺠـﻬـﺎز ﻣـﻀـﺮر أو ﻣـﻀـﺮوب ﻓـﻲ ﻣـﻜـﺎن ﻣـﺎ ﻻ ﺗـﻘـﻮﻣـﻮا ﺑـﻌـﻤـﻠـﻴـﺔ ﺗـﻮﺻـﻴـﻠـﻪ أو
اذا آ
ﺗﺮآﻴﺒﻪ، واﺗﺼﻠﻮا ﺑﺎﻟﺒﺎﺋﻊ.
4. اﻏﻠﻘﻮا اﻟﺜﻘﻮب ﺑﻮاﺳﻄﺔ اﻷ ﻏﻄﻴﺔ اﻟﺒﻼ ﺳﺘﻴﻜﻴﺔ اﻟﺘﻲ ﺗﻜﻮن ﻣﺰودة ﻣﻊ اﻟﺠﻬﺎز.
ـﻠـﻘـ
ﻮا ﺑـﺎﻷ ﻏـﻄـﻴـﺔ اﻟـﺘـﻲ ﺗـﻜـﻮن ﻣـﺰودة ﻣـﻊ اﻟـﺠـﻬـﺎز اﻟـﺜـﻼ ث ﺛـﻘـﻮب ﺣـﻴـﺚ ﻳـﻜـﻮن
5. أﻏ
ﻣ
ـﻮﺿـ
ﻮع ﻗـﺎﺑـﺲ اﻟـﺘـﻴـﺎر اﻟـﻜـﻬـﺮﺑـﺎﺋـﻲ )اﻟـﺬآـﺮ( اﻟـﺬي ﻳـﻜـﻮن ﻣـﻮﺟـﻮد ﻓـﻲ ﺧـﻠـﻒ اﻟـﺠـﻬـﺎز
ﻣﻦ اﻷ ﺳﻔﻞ ﻋﻠﻰ اﻟﻴﻤﻴﻦ.
6. ﺣﺎﻓﻈﻮا ﻋﻠﻰ ﺟﻤﻴﻊ اﻟﻘﻄﻊ اﻟﺘﻲ ﺗﻢ ﻓﻜﻬﺎ: ﻋﻨﺪ ﻧﻘﻞ اﻟﺠﻬﺎز ﻣﻦ ﻣﻜﺎن ﻻ ﺧﺮ ﻳﺠﺐ
ﺗﺮآﻴﺐ هﺬه اﻟﻘﻄﻊ ﻣﻜﺎﻧﻬﺎ ﻣﻦ ﺟﺪﻳﺪ.
ﻳﺠﺐ ﻋﺪم ﺗﺮك اﻷ ﻃﻔﺎل اﻟﻠﻌﺐ ﺑﺘﻐﻠﻴﻒ اﻟﺠﻬﺎز.
اذا آﺎن ﻃﻮل ﺧﺮﻃﻮم ﺗﻐﺬﻳﺔ اﻟﻐﺴﺎﻟﺔ ﺑﺎﻟﻤﺎء ﻏﻴﺮ آﺎﻓﻲ اﺳﺘﻌﻴﻨﻮا ﺑﻘﺴﻢ اﻟﺼﻴﺎﻧﺔ اﻟﻔﻨﻴﺔ أو
اﻟﻤﺤﻼ ت اﻟﻤﺨﺘﺼﺔ أو ﻓﻨﻲ ﻣﺆهﻞ ﺑﺎﻟﻘﻴﺎم ﺑﻌﻤﻠﻴﺎت اﻟﺼﻴﺎﻧﺔ اﻟﻔﻨﻴﺔ.
ـﺎﻧـ
ﺖ اﻷ رﺿـﻴـﺔ ﻏـﻴـﺮ ﻣـﺴـﺘـﻮﻳـﺔ،
2. اذا آ
ـﻤـﻜـﻨـﻜـ
ﻢ اﻻ ﺳـﺘـﻌـﺎﻧـﺔ ﺑـﺎﻷ رﺟـﻞ اﻷ ﻣـﺎﻣـﻴـﺔ
ﻳ
اﻟﻤﺘﺤﺮآﺔ واﻟﺘﻲ ﻗﺎﺑﻠﺔ اﻟﺘﻌﺪﻳﻞ ﻓﻲ ارﺗﻔﺎﻋﻬﺎ
وذﻟﻚ ﻻ زاﻟﺔ ﻋﺪم اﺳﺘﻮاء اﻷ رﺿﻴﺔ )اﻇﺮ
اﻟﻰ اﻟﺸﻜﻞ(. زاوﻳﺔ اﻟﻤﻴﻼ ن اﻟﺘﻲ ﻳﻤﻜﻨﻜﻢ
ﻗﻴﺎﺳﺘﻬﺎ ﻋﻠﻰ اﻟﺴﻄﺢ اﻟﻌﻠﻮي ﻟﻠﺠﻬﺎز ﻳﺠﺐ
أن ﻻ ﻳﺰﻳﺪ ﻋﻦ 2 درﺟﺔ.
ﺗﺴﻮﻳﺔ اﻟﺠﻬﺎز
1. رآﺒﻮا ﻏﺴﺎﻟﺔ اﻟﻤﻼ ﺑﺲ ﻋﻠﻰ أرﺿﻴﺔ ﻣﺴﺘﻮﻳﺔ وﺻﻠﺒﺔ ﺑﺪون أرﺗﻜﺎزهﺎ ﻋﻠﻰ ﺣﺎﺋﻂ
أو ﻗﻄﻊ أﺛﺎث أو أي ﺷﻲء اﺧﺮ.
16
Page 17
ﺗﻐﻴﻴﺮ اﻟﻤﻨﺼﻬﺮة )اﻟﻔﻴﻮز(
ـﻨـ
ﺪ ﺗـﻐـﻴـﻴـﺮ اﻟـﻤـﻨـﺼـﻬـﺮة )اﻟـﻔـﻴـﻮز( اﻟـﻤـﻌـﻄـﻮب، اﺳـﺘـﺨـﺪﻣـﻮا داﺋـﻤـﺎ ﻣـﻨـﺼـﻬـﺮة 31 اﻣـﺒـﻴـﺮ
ﻋ
ATSA ﺧﺎﺿﻌﺔ ﻟﻠﻤﻘﻴﺎس 2631 SB وأﻋﻴﺪوا ﻏﻄﺎء اﻟﻤﻨﺼﻬﺮة اﻟﻰ ﻣﻜﺎﻧﻪ اﻟﺬي
آـﺎن ﻓـﻴـﻪ، ﻓـﻲ ﺣـﺎﻟـﺔ ﻓـﻘـﺪان هـﺬا اﻟـﻐـﻄـﺎء ﻻ ﺗـﺴـﺘـﺨـﺪﻣـﻮا اﻟـﻘـﺎﺑـﺲ ﺣـﺘـﻰ اﻟـﺤـﺼـﻮل ﻋـﻠـﻰ
هﺬا اﻟﻐﻄﺎء وﺗﺮآﻴﺒﻪ ﻓﻲ ﻣﻜﺎﻧﻪ.
ﺗﻐﻴﻴﺮ ﻏﻄﺎء اﻟﻤﻨﺼﻬﺮات )اﻟﻔﻴﻮزات(:
اذا ﺗﻢ ﺗﻐﻴﻴﺮ ﻏﻄﺎء اﻟﻔﻴﻮزات ﺗﺎآﺪوا ﻣﻦ أن ﻟﻮﻧﻪ هﻮ اﻟﻠﻮن اﻟﺼﺤﻴﺢ واﻟﻤﺸﺎر ﻟﻪ
ﺑﻮاﺳﻄﺔ اﻟﺮﻗﻢ أو اﻟﻜﺘﺎﺑﺔ اﻟﻤﻠﻮﻧﺔ اﻟﻤﻮﺟﻮدة ﻋﻠﻰ ﻗﺎﻋﺪة اﻟﻘﺎﺑﺲ، ﻟﻘﻄﻊ اﻟﻐﻴﺎر، اﺳﺘﻌﻴﻨﻮا
ﻣﺒﺎﺷﺮة ﺑﻘﺴﻢ اﻟﺼﻴﺎﻧﺔ اﻟﻔﻨﻴﺔ اﻟﻘﺮﻳﺐ ﻋﻠﻴﻜﻢ.
ﻓﻚ اﻟﻘﺎﺑﺲ )اﻟﺬآﺮ(:
ﻓﻲ ﺣﺎﻟﺔ أن ﻳﻜﻮن اﻟﺠﻬﺎز ﻣﺰود ﺑﻘﺎﺑﺲ )اﻟﺬآﺮ( ﻻ ﻳﻤﻜﻦ ﻓﻜﻪ ﻷ ﻧﻪ ﻣﺼﻬﻮر وﺗﺮﻳﺪون
ﺗﻤﺮﻳﺮ ﺳﻠﻚ اﻟﺘﻐﺬﻳﺔ اﻟﻜﻬﺮﺑﺎﺋﻴﺔ ﻣﻦ ﺧﻼ ل ﺛﻘﻮب أو ﻓﺘﺤﺎت ﺻﻐﻴﺮة ﻻ ﻳﻤﺮ ﻣﻦ ﺧﻼ ﻟﻬﺎ
اﻟﻘﺎﺑﺲ ﻗﻮﻣﻮا ﺑﺘﻐﻴﻴﺮ اﻟﻘﺎﺑﺲ اﻟﻤﺼﻬﻮر ﺑﻘﺎﺑﺲ ﻳﻤﻜﻦ ﻓﻜﻪ وﺗﺮآﻴﺒﻪ وﻗﺎدر ﻋﻠﻰ ﺗﺤﻤﻞ
31 أﻣﺒﻴﺮ وﻳﺤﻤﻞ اﻟﺸﻌﺎر ISB.
أو
وﺻـﻞ ﺳـﻠـﻚ اﻟـﺘـﻐـﺬﻳـﺔ اﻟـﻜـﻬـﺮﺑـﺎﺋـﻴـﺔ ﺑـﻤـﻨـﺒـﻊ اﻟـﺘـﻴـﺎر اﻟـﻜـﻬـﺮﺑـﺎﺋـﻲ ﺑـﻮاﺳـﻄـﺔ ﻣـﻔـﺘـﺎح ﻗـﺎدر ﻋـﻠـﻰ
ﺗـﺤـﻤـﻞ 31 أﻣـﺒـﻴـﺮ )وﺧـﺎﺿـﻊ ﻟـﻠـﻤـﻘـﻴـﺎس 3375 SB ( ﻳـﻤـﻜـﻦ اﻟـﻮﺻـﻮل اﻟـﻴـﻪ ﺑـﺪون
ﺗﺤﺮﻳﻚ اﻟﺠﻬﺎز ﻣﻦ ﻣﻜﺎﻧﻪ.
اوﺻﻠﻮا ﺧﺮﻃﻮم ﺗﻔﺮﻳﻎ اﻟﻤﺎء ﻣﻦ ﺣﻮض
ـﺴـﻴـ
ﻞ اﻟـﻐـﺴـﺎﻟـﺔ ﺑـﺪون ﻃـﻮﻳـﻪ، ﺑـﻤـﺎﺳـﻮرة
ﻏ
ﺻ
ـ
ﺮف ﻟـﻠـﻤـﺎء، أو ﺑـﻤـﺼـﺮف ﻣـﻮﺟـﻮد ﻓـﻲ
اﻟﺤﺎﺋﻂ ﻋﻠﻰ أن ﻳﻜﻮن ارﺗﻔﺎﻋﻪ ﻣﺎ ﺑﻴﻦ 56
و 001 ﺳﻨﺘﻤﺘﺮ ﻋﻦ ﺳﻄﺢ اﻷ رض
ـﻮﻣـ
ﻮا ﺑـﻮﺿـﻌـﻪ ﻋـﻠـﻰ ﺣـﺎﻓـﺔ ﻣـﻐـﺴـﻠـﺔ
أو ﻗ
ـ
ﻮض ﺣـﻤـﺎم، ارﺑـﻄـﻮا اﻟـﺨـﺮﻃـﻮم
أو ﺣ
ـﺤـﺎﻣـ
ﻞ اﻟـﺨـﺮﻃـﻮم اﻟـﺬي ﻳـﻜـﻮن ﻣـﺰود ﻣـﻊ
ﺑ
اﻟﺠﻬﺎزﺑﻤﺤﺒﺲ اﻟﻤﺎء )اﻧﻈﺮ اﻟﻰ اﻟﺸﻜﻞ(
اﻟﻄﺮف اﻟﺤﺮ ﻣﻦ اﻟﺨﺮﻃﻮم ﻳﺠﺐ أن ﻻ
ﻳﻜﻮن ﻣﻐﻤﻮر ﻓﻲ اﻟﻤﺎء.
65 - 100 cm
وﺻﻞ اﻧﺒﻮب ﺗﻔﺮﻳﻎ اﻟﻤﺎء ﻣﻦ ﺣﻮض ﻏﺴﻴﻞ اﻟﻐﺴﺎﻟﺔ
ازاﻟﺔ اﻟﻘﺎﺑﺲ )اﻟﺬآﺮ(:
ﻗﺒﻞ رﻣﻲ اﻟﻘﺎﺑﺲ اﺟﻌﻠﻮة ﻏﻴﺮ ﻗﺎﺑﻞ ﻟﻼ ﺳﺘﻌﻤﺎل وذﻟﻚ ﺑﻜﺴﺮ رؤوﺳﻪ ﺑﺤﻴﺚ ﻻ ﻳﻤﻜﻦ
ادﺧﺎﻟﻪ داﺧﻞ ﺛﻘﻮب ﻣﻘﺒﺲ )اﻻ ﻧﺜﻰ( ﺑﺸﻜﻞ ﻋﻔﻮي.
ﺗﻌﻠﻴﻤﺎت ﻣﻦ أﺟﻞ ﺗﻮﺻﻴﻞ ﺳﻠﻚ اﻟﺘﻐﺬﻳﺔ اﻟﻜﻬﺮﺑﺎﺋﻴﺔ ﺑﻘﺎﺑﺲ )اﻟﺬآﺮ(:
ﻣﻬﻢ: أﻟﻮان اﻷ ﺳﻼ ك اﻟﺘﻐﺬﻳﻪ اﻟﻜﻬﺮﺑﺎﺋﻴﺔ ﺗﺸﻴﺮ اﻟﻰ اﻟﺘﺎﻟﻲ:
أﺻﻔﺮ/أﺧﻀﺮ ﺧﻂ أرض
ازرق ﻣﺤﺎﻳﺪ )ﻧﻴﻮﺗﺮل(
ﺑﻨﻲ ﺗﻐﺬﻳﺔ
وﻷ ن أﻟـﻮان ﺳـﻠـﻚ اﻟـﺘـﻐـﺬﻳـﺔ اﻟـﻜـﻬـﺮﺑـﺎﺋـﻴـﺔ ﻳـﻤـﻜـﻦ أن ﻻ ﻳـﻄـﺎﺑـﻘـﻮا اﻻ ﺷـﺎرات اﻟـﻤـﻠـﻮﻧـﺔ اﻟـﺘـﻲ
ﺗﻌﺮف ﻣﺮاﺑﻂ اﻟﻘﺎﺑﺲ، اﺗﺒﻌﻮا اﻟﺨﻄﻮات اﻟﺘﺎﻟﻴﺔ:
أوﺻﻠﻮا اﻟﺴﻠﻚ اﻷ ﺻﻔﺮ/اﻷ ﺧﻀﺮ ﺑﺎﻟﻤﺮﺑﻂ اﻟﻤﺸﺎر ﻟﻪ ﺑﺎﻟﺤﺮف E أو ﺑﺎﻟﺸﻌﺎر أو
اﻟﻠﻮن اﻷ ﺧﻀﺮ أو اﻷ ﺻﻔﺮ/اﻷ ﺧﻀﺮ
أوﺻﻠﻮا اﻟﺴﻠﻚ اﻟﺒﻨﻲ ﺑﺎﻟﻤﺮﺑﻂ اﻟﻤﺸﺎر ﻟﻪ ﺑﺎﻟﺤﺮف L أو ﺑﺎﻟﻠﻮن اﻷ ﺣﻤﺮ.
أوﺻﻠﻮا اﻟﺴﻠﻚ اﻷ زرق ﺑﺎﻟﻤﺮﺑﻂ اﻟﻤﺸﺎر ﻟﻪ ﺑﺎﻟﺤﺮف N أو ﺑﺎﻟﻠﻮن اﻷ ﺳﻮد.
اذا اﺳﺘﺨﺪﻣﺘﻢ ﻗﺎﺑﺲ )اﻟﺬآﺮ( 31 أﻣﺒﻴﺮ )3631 SB( رآﺒﻮا ﻣﻨﺼﻬﺮة )ﻓﻴﻮز( 31
أﻣﺒﻴﺮ ﻓﻲ اﻟﻤﻘﺒﺲ أو ﻓﻲ اﻟﻤﻬﺎيْ أو ﻋﻠﻰ ﻟﻮﺣﺔ اﻟﺘﻮزﻳﻊ.
ﺔ ﻣـﻦ ﻗـﺒـﻞ اﻟـﺠـﻬـﺎزوﻳـﻜـﻮن ﻣـﺸـﺎر ﻟـﻬـﺎ ﻓـﻲ ﻻ ﺋـﺤـﺔ اﻟـﺨـﺼـﺎﺋـﺺ اﻟـﻔـﻨـﻴـﺔ ﻟـﻠـﺠـﻬـﺎز
ﻏﻴﺮ ﻣﻨﺼﻮح اﺳﺘﺨﺪام ﺧﺮاﻃﻴﻢ ﺗﻄﻮﻳﻞ ، اذا آﺎن ﻣﻦ اﻟﻀﺮوري اﺳﺘﺨﺪام ﺧﺮاﻃﻴﻢ
ـﺘـﻄـﻮﻳـ
ﻞ ﻳـﺠـﺐ أن ﻳـﻜـﻮن ﻗـﻄـﺮ هـﺬا اﻟـﺨـﺮﻃـﻮم ﻧـﻔـﺲ ﻗـﻄـﺮ اﻟـﺨـﺮﻃـﻮم اﻟـﺮﺋـﻴـﺴـﻲ وﻳـﺠـﺐ
اﻟ
أن ﻻ ﻳﺰﻳﺪ ﻃﻮﻟﻪ ﻋﻦ 051 ﺳﻨﺘﻤﺘﺮ.
اﻟﺘﻮﺻﻴﻞ ﺑﺸﺒﻜﺔ اﻟﺘﻴﺎر اﻟﻜﻬﺮﺑﺎﺋﻲ
ﻗﺒﻞ ادﺧﺎل ﻗﺎﺑﺲ اﻟﺘﻴﺎر اﻟﻜﻬﺮﺑﺎﺋﻲ )اﻟﺬآﺮ( ﺑﻤﻘﺒﺲ اﻟﺘﻴﺎر اﻟﻜﻬﺮﺑﺎﺋﻲ )اﻷ ﻧﺜﻰ( ﺗﺄآﺪوا
ﻣﻦ أن:
ﻣﻘﺒﺲ اﻟﺘﻴﺎر اﻟﻜﻬﺮﺑﺎﺋﻲ )اﻷ ﻧﺜﻰ( ﻟﻬﺎ ﺧﻂ أرض ﻓﻌﺎل وﺧﺎﺿﻊ اﻟﻰ اﻟﻘﻮاﻧﻴﻦ
ﻣـﻘـﺒـﺲ اﻟـﺘـﻴـﺎر اﻟـﻜـﻬـﺮﺑـﺎﺋـﻲ )اﻷ ﻧـﺜـﻰ( ﻗـﺎدر ﻋـﻠـﻰ ﺗـﺤـﻤـﻞ اﻟـﻘـﺪرة اﻟـﻜـﻬـﺮﺑـﺎﺋـﻴـﺔ اﻟـﻘـﺼـﻮى
اﻟ
ـﻤـﻤـﺘـﺼـ
)اﻧﻈﺮﺻﻔﺤﺔ 91(.
ﻓﺮق ﺟﻬﺪ ﺷﺒﻜﺔ اﻟﻜﻬﺮﺑﺎء ﻳﺠﺐ أن ﺗﻜﻮن ﻓﻲ اﻟﻘﻴﻢ اﻟﺘﻲ ﺗﻜﻮن ﻣﻮﺟﻮدة واﻟﻤﺸﺎر ﻟﻬﺎ
ﻓﻲ ﻻ ﺋﺤﺔ اﻟﺨﺼﺎﺋﺺ اﻟﻔﻨﻴﺔ ﻟﻠﺠﻬﺎز)اﻧﻈﺮﺻﻔﺤﺔ 91(.
ﻣﻘﺒﺲ اﻟﺘﻴﺎر اﻟﻜﻬﺮﺑﺎﺋﻲ )اﻷ ﻧﺜﻰ( ﻣﻼ ﺋﻢ ﻟﻘﺎﺑﺲ اﻟﺘﻴﺎر اﻟﻜﻬﺮﺑﺎﺋﻲ )اﻟﺬآﺮ( اﻟﻤﺰود ﻣﻊ
اﻟﻐﺴﺎﻟﺔ ﻓﻲ ﺣﺎﻟﺔ ﻋﺪم ﺗﻮاﻓﻘﻬﻢ ﻗﻮﻣﻮا ﺑﻌﻤﻠﻴﺔ ﺗﻐﻴﻴﺮ اﺣﺪاهﻤﺎ.
ﺟ
ـﻬـ
ﺎزآـﻢ اﻟـﻜـﻬـﺮﺑـﺎﺋـﻲ ﻣـﺰود ﺑـﻘـﺎﺑـﺲ )اﻟـﺬآـﺮ( ﻣـﺼـﻬـﻮر وﻗـﺎدرﻋـﻠـﻰ ﺗـﺤـﻤـﻞ ﺗـﻴـﺎر آـﻬـﺮﺑـﺎﺋـﻲ
31 أﻣﺒﻴﺮ وﻳﻤﻜﻨﻜﻢ ادﺧﺎل هﺬا اﻟﻘﺎﺑﺲ ﺑﻤﻘﺒﺲ )اﻻ ﻧﺜﻰ( ﻳﺘﻮاﻓﻖ ﻣﻌﺔ ﻟﻼ ﺳﺘﺨﺪام اﻟﻤﺒﺎﺷﺮ،
اﻗﺮؤوا اﻟﺘﻌﻠﻴﻤﺎت اﻟﺘﺎﻟﻴﺔ ﻗﺒﻞ اﺳﺘﺨﺪام اﻟﺠﻬﺎز اﻟﻜﻬﺮﺑﺎﺋﻲ.
اﻧـﺘـﺒـﺎه: اﻟـﺠـﻬـﺎز اﻟـﻜـﻬـﺮﺑـﺎﺋـﻲ ﻳـﺠـﺐ أن ﻳـﻜـﻮن ﻣـﻮﺻـﻮل ﺑـﺨـﻂ أرض ﻓـﻌـﺎل، اﻟـﻌـﻤـﻠـﻴـﺎت
اﻟﻤﺸﺮوﺣﺔ أدﻧﺎه هﻲ ﺗﻌﻠﻴﻤﺎت ﻣﻮﺟﻪ اﻟﻰ ﻓﻨﻲ آﻬﺮﺑﺎﺋﻲ ﻣﺨﺘﺺ.
17
Page 18
أول دورة ﻏﺴﻴﻞ
ﻓـﻲ ﺣـﺎﻟـﺔ اﻟـﺸـﻚ ﺑـﺎﻟـﺘـﻐـﺬﻳـﺔ اﻟـﻜـﻬـﺮﺑـﺎﺋـﻴـﺔ ﻟـﺠـﻬـﺎزآـﻢ اﺳـﺘـﺪﻋـﻮا ﻓـﻨـﻲ آـﻬـﺮﺑـﺎﺋـﻲ ﻣـﺨـﺘـﺺ ﻗـﺒـﻞ
وﺻﻞ اﻟﺠﻬﺎز ﺑﻤﻨﺒﻊ اﻟﺘﻴﺎر اﻟﻜﻬﺮﺑﺎﺋﻲ.
ﺑﻌﺪ اﻻ ﻧﺘﻬﺎء ﻣﻦ ﻋﻤﻠﻴﺔ ﺗﺮآﻴﺐ اﻟﺠﻬﺎز، وﻗﺒﻞ اﺳﺘﺨﺪاﻣﻪ، ﻗﻮﻣﻮا ﺑﻌﻤﻠﻴﺔ ﻏﺴﻴﻞ ﻣﺴﺘﺨﺪﻣﻴﻦ
ﻣﺴﺤﻮق ﻏﺴﻴﻞ وﺑﺪون ﻣﻼ ﺑﺲ داﺧﻞ اﻟﻐﺴﺎﻟﺔ، ﻣﺴﺘﺨﺪﻣﻴﻦ ﺑﺮﻧﺎﻣﺞ اﻟﻐﺴﻴﻞ ﻋﻠﻰ 09
درﺟﺔ ﻣﺌﻮﻳﺔ ﺑﺪون ﻋﻤﻠﻴﺔ ﻏﺴﻴﻞ ﺑﺪاﺋﻴﺔ.
وﺻﻞ ﻗﺎﺑﺲ )اﻟﺬآﺮ( ﺑﺪﻳﻞ:
أﻟﻮان اﻷ ﺳﻼ ك اﻟﺘﻐﺬﻳﻪ اﻟﻜﻬﺮﺑﺎﺋﻴﺔ ﺗﺸﻴﺮ اﻟﻰ اﻟﺘﺎﻟﻲ:
ازرق ﻣﺤﺎﻳﺪ )ﻧﻴﻮﺗﺮل( )N(
ﺑﻨﻲ ﺗﻐﺬﻳﺔ )L(
أﺻﻔﺮ/أﺧﻀﺮ ﺧﻂ أرض )E(
ازاﻟﺔ اﻟﺠﻬﺎز اﻟﻜﻬﺮﺑﺎﺋﻲ اﻟﺒﻴﺘﻲ:
ﻋﻨﺪ رﻣﻲ ﺟﻬﺎز آﻬﺮﺑﺎﺋﻲ ﺑﻴﺘﻲ، ﻳﺠﺐ ازاﻟﺔ ﻗﺎﺑﺲ اﻟﺘﻴﺎر اﻟﻜﻬﺮﺑﺎﺋﻲ )اﻟﺬآﺮ( وذﻟﻚ
ﺑـﻘـﺺ ﺳـﻠـﻚ اﻟـﺘـﻐـﺬﻳـﺔ اﻟـﻜـﻬـﺮﺑـﺎﺋـﻴـﺔ ﺑـﺄﻗـﺮب ﻧـﻘـﻄـﺔ ﻣـﻤـﻜـﻨـﺔ ﻣـﻦ اﻟـﻘـﺎﺑـﺲ وﻗـﻮﻣـﻮا ﺑـﺘـﺤـﻄـﻴـﻢ
رؤوس اﻟﻘﺎﺑﺲ آﻤﺎ ذآﺮ ﺳﺎﺑﻘﺎ.
أﺧﻀﺮ
VERDE &
أﺻﻔﺮ
GIALLO
ﺑﻨﻲ
MARRONE
أزرق
BLU
fusibile
أﻣﺒﻴﺮ
13 ampere
SERRAFILO
CROSSBAR
ﻣـﻨـﺼـﻬـﺮة 31
ﻣﺮﺑﻂ ﺳﻠﻚ
!اﻟﻐﺴﺎﻟﺔ ﻻ ﺗﻮﺿﻊ ﻓﻲ اﻟﺨﺎرج ﺣﺘﻰ ﻟﻮ آﺎن اﻟﻤﻜﺎن ﻣﻐﻄﻰ وذﻟﻚ ﻷ ﻧﻪ ﻣﻦ اﻟﺨﻄﺮ ﺗﺮك
اﻟﺠﻬﺎز ﺗﺤﺖ ﻋﻮاﻣﻞ اﻟﻄﻘﺺ ﻣﺜﻞ اﻟﻤﻄﺮ ﺑﺮق رﻋﺪ اﻟﻰ اﺧﺮه.
! ﺑ
ـﻌـ
ﺪ اﻻ ﻧـﻬـﺎء ﻣـﻦ ﺗـﺮآـﻴـﺐ اﻟـﺠـﻬـﺎز ﻳـﺠـﺐ أن ﻳـﻜـﻮن ﻣـﻦ اﻟـﺴـﻬـﻞ اﻟـﻮﺻـﻮل اﻟـﻰ ﻣـﻘـﺒـﺲ
اﻟﺘﻴﺎر اﻟﻜﻬﺮﺑﺎﺋﻲ )اﻷ ﻧﺜﻰ(.
! ﻻ ﺗﺴﺘﺨﺪﻣﻮا ﻣﻬﺎﻳﺌﺎت او ﻣﻘﺒﺲ ﻣﺘﻌﺪد اﻟﺜﻘﻮب أو اﺳﻼ ك ﺗﻄﻮﻳﻞ.
! ﺳﻠﻚ اﻟﺘﻐﺬﻳﺔ اﻟﻜﻬﺮﺑﺎﺋﻴﺔ ﻳﺠﺐ أن ﻻ ﻳﻜﻮن ﻣﻄﻮي أو ﻣﺤﺸﻮر ﺑﻴﻦ اﻷ ﺛﺎث.
!ﺳ
ـﻠـ
ﻚ اﻟـﺘـﻐـﺬﻳـﺔ اﻟـﻜـﻬـﺮﺑـﺎﺋـﻴـﺔ ﻳـﺠـﺐ أن ﻳـﺘـﻢ ﺗـﺒـﺪﻳـﻠـﻪ وﻗـﺖ اﻟـﺤـﺎﺟـﺔ ﻓـﻘـﻂ ﻣـﻦ ﻗـﺒـﻞ ﻓـﻨـﻲ ﻣـﺨـﺘـﺺ
وﻣﺆهﻞ ﻟﻠﻘﻴﺎم ﺑﻬﺬا.
اﻧﺘﺒﺎه: اﻟﺸﺮآﺔ اﻟﺼﺎﻧﻌﺔ ﺗﺴﻘﻂ ﻋﻦ ﻧﻔﺴﻬﺎ أي ﻣﺴﺆوﻟﻴﺔ ﻋﻦ أﺿﺮار ﻗﺪ ﺗﺤﺼﻞ ﻣﻦ
ﻋﺪم اﺗﺒﺎع واﺣﺘﺮام هﺬه ﻗﻮاﻋﺪ اﻷ ﻣﻦ.
18
Page 19
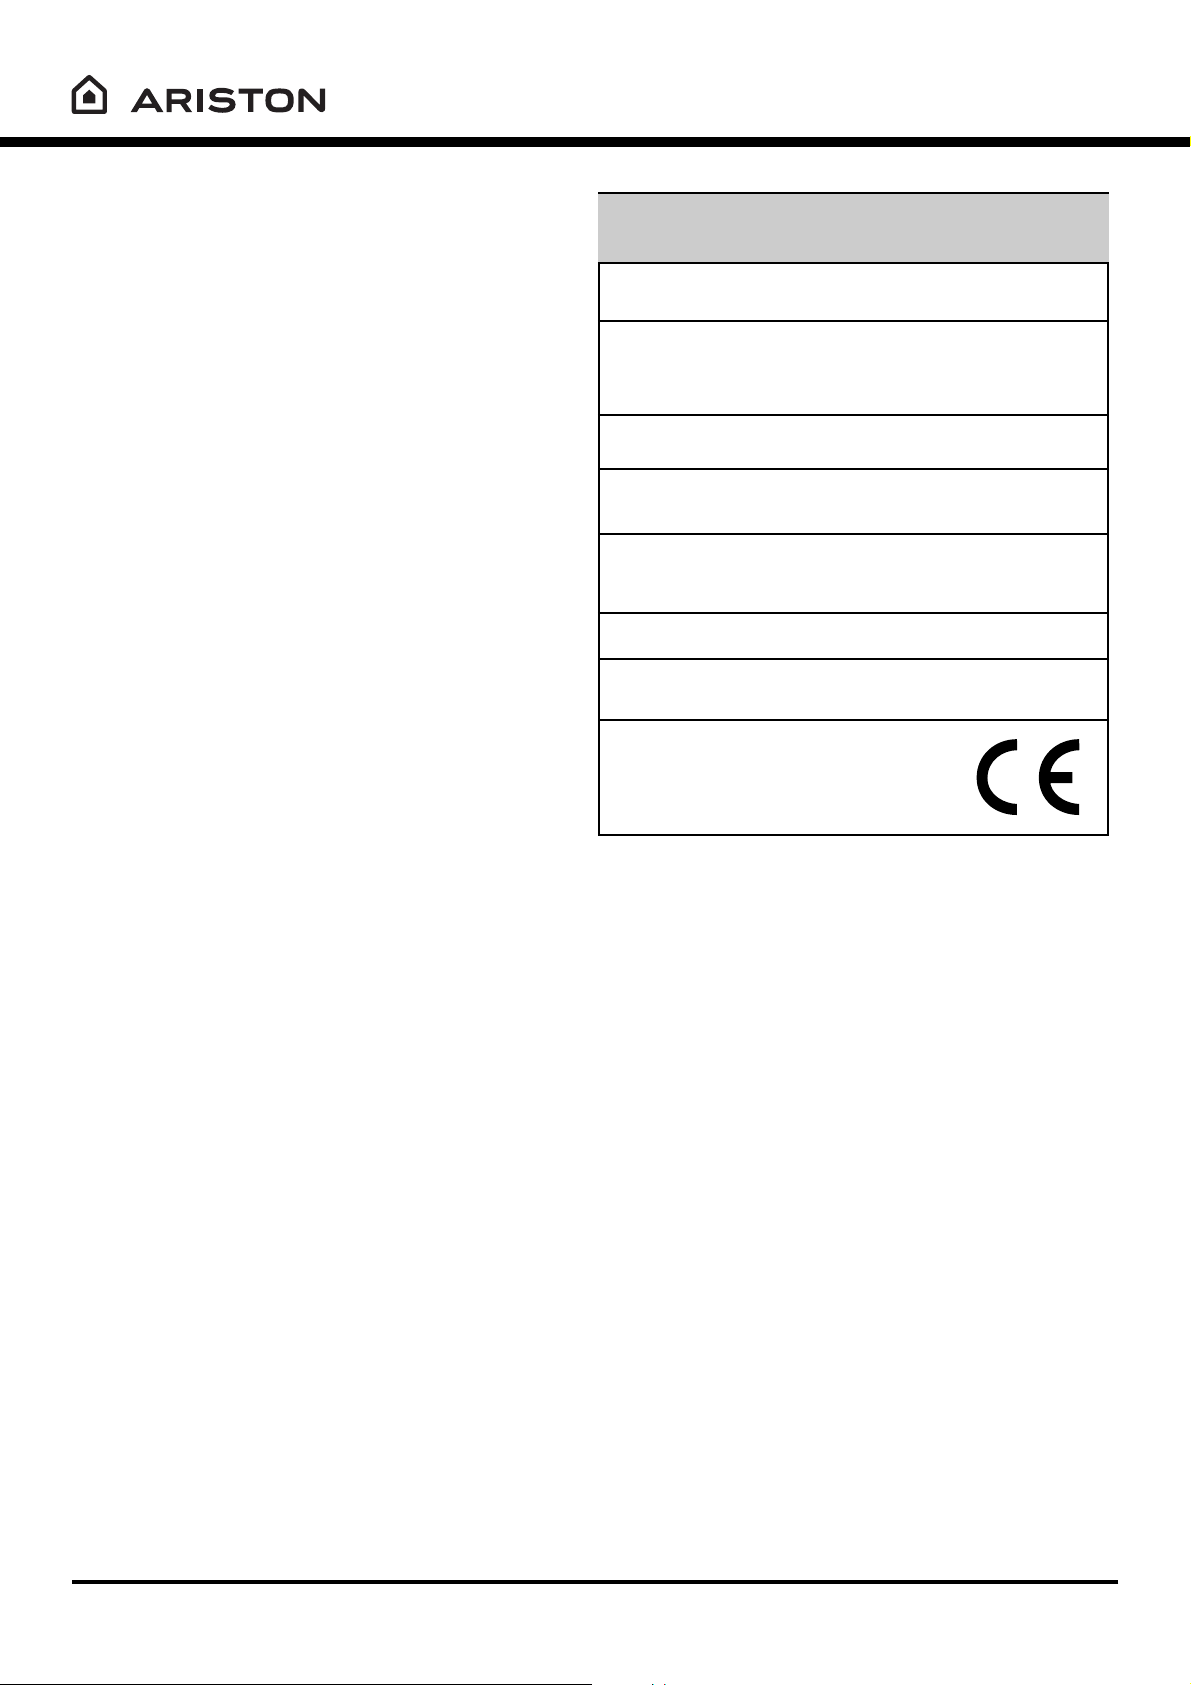
ﻣﻮاﺻﻔﺎت ﻓﻨﻴﺔ
25 VA
اﻟﻌﺮض 5.95 ﺳﻨﺘﻤﺘﺮ
اﻻ رﺗﻔﺎع 58 ﺳﻨﺘﻤﺘﺮ
اﻟﻌﻤﻖ 5.25 ﺳﻨﺘﻤﺘﺮ
ﻣﻦ 1 اﻟﻰ 5 آﻐﻢ
06
ﻓﺮق ﺟﻬﺪ 022/032 ﻓﻮﻟﺖ 0-5 هﻴﺮﺗﺰ
اﻟﻘﺪرة اﻟﻘﺼﻮى اﻟﻤﻤﺘﺼﺔ ﻣﻦ ﻗﺒﻞ اﻟﺠﻬﺎز 0002 واط
اﻟﻀﻐﻂ اﻟﻘﺼﻮى 1 ﻣﻠﺒﺴﻜﺎل )01 ﺑﺎر(
اﻟﻀﻐﻂ اﻟﺪﻧﻴﺎ 50.0 ﻣﻴﻠﻴﺒﺴﻜﺎل )5.0 ﺑﺎر(
ﻗﺪرة ﺣﻮض اﻟﻐﺴﻴﻞ 04 ﻟﺘﺮ
ﺣﺘﻰ 005 دورة ﻓﻲ اﻟﺪﻗﻴﻘﺔ )06 هﻴﺮﺗﺰ(
ﺑ
ـﺮﻧـﺎﻣـ
ﺞ 2، درﺟـﺔ ﺣـﺮارة 06 درﺟـﺔ ﻣـﺌـﻮﻳـﺔ، ﺗـﻤـﺖ اﻟـﺘـﺠـﺮﺑـﺔ
ﺑﺤﻤﻞ ﻏﺴﻴﻞ 5 آﻐﻢ
هﺬا اﻟﺠﻬﺎز ﻳﻄﺎﺑﻖ اﻟﻤﻮاﺻﻔﺎت اﻟﻤﻄﻠﻮﺑﺔ ﻣﻦ ﺳﻮق اﻟﺪول
اﻷ ورﺑﻴﺔ اﻟﻤﺸﺘﺮآﺔ:
- ﺑﻤﺎ ﻳﺘﻌﻠﻖ ﺑﻔﺮق ﺟﻬﺪ ﻣﻨﺨﻔﺾ
- ﺑﻤﺎ ﻳﺘﻌﻠﻖ اﻟﺘﻮاﻓﻖ اﻟﻜﻬﺮوﻣﻐﻨﺎﻃﻴﺴﻲ
اﻟﻤﺪﻳﻞ
اﻷ ﺑﻌﺎد
اﻟﻘﺪرة
اﻟﺘﻮﺻﻴﻼ ت اﻟﻜﻬﺮﺑﺎﺋﻴﺔ
اﻟﺘﻮﺻﻴﻼ ت اﻟﻬﻴﺪروﻟﻴﻜﻴﺔ
ﺳﺮﻋﺔ اﻟﻌﺼﺮ اﻟﺪوراﻧﻴﺔ
ﺑﺮاﻣﺞ ﺗﺠﺮﺑﺔ اﻟﺠﻬﺎز ﺣﺴﺐ
اﻟﻘﻮاﻋﺪ 654CEI
19
Page 20
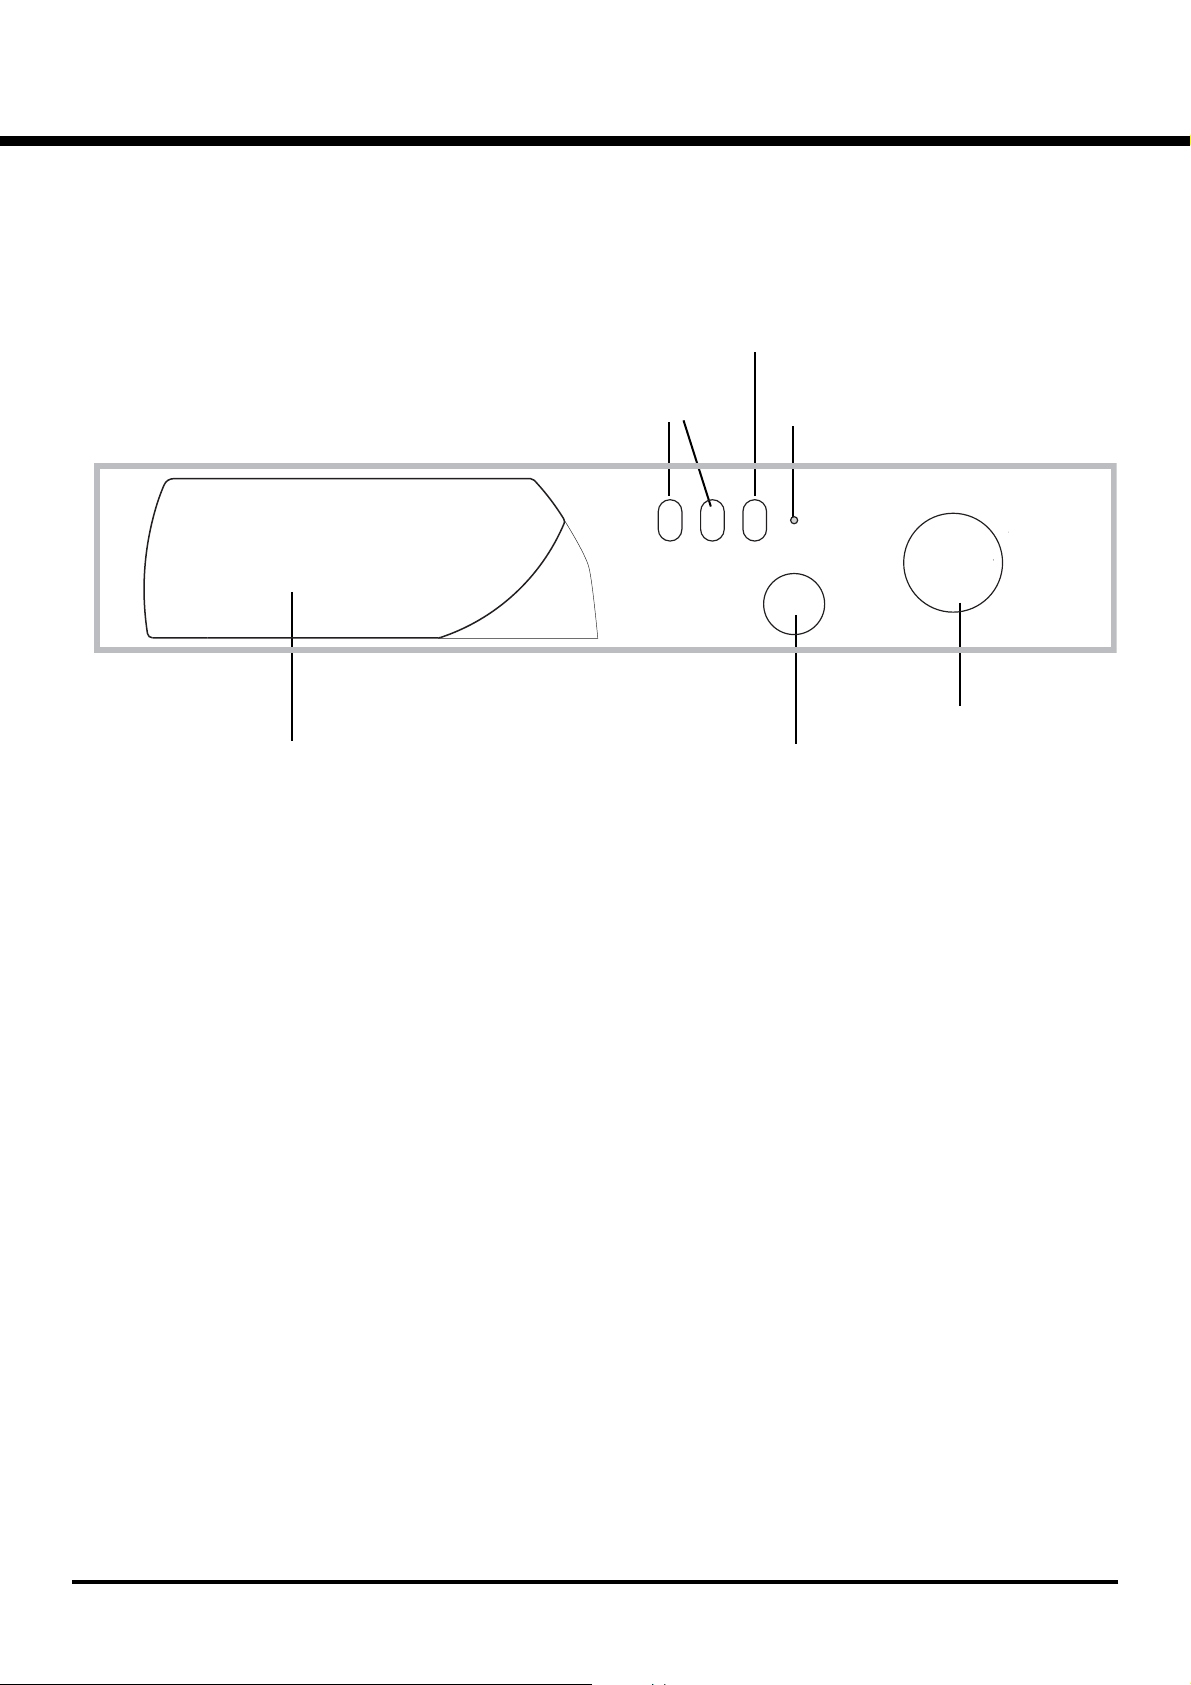
ﺲﺑ ﻼﻤﻟا ﺔﻟﺎﺴﻏ ﻒﺻو
ـ
ﺔ اﻟـﻘـﻴـﺎدة
زر
ﺗﺸﻐﻴﻞ/ اﻃﻔﺎء
ﻟـﻮﺣ
ﺣﻮض ﻣﺴﺎﺣﻴﻖ اﻟﻐﺴﻴﻞ
(21
(22
أزر
وﻇﺎﺋﻒ
ﻣﻘﺒﺾ
درﺟﺔ اﻟﺤﺮارة
ﻣﻘﺒﺾ درﺟﺔ اﻟﺤﺮارة ﻟﻮﺿﻊ درﺟﺔ ﺣﺮارة اﻟﻐﺴﻴﻞ أو اﻟﻘﻴﺎم ﺑﻌﻤﻠﻴﺔ اﻟﻐﺴﻴﻞ ﺑﻤﺎء
ﺑﺎرد )اﻧﻈﺮ اﻟﻰ ﺻﻔﺤﺔ
ﻣﻘﺒﺾ اﻟﺒﺮﻣﺠﺔ ﻟﻮﺿﻊ اﻟﺒﺮاﻣﺞ )اﻧﻈﺮ ﺻﻔﺤﺔ
ﻗﻮﻣﻮا ﺑﺘﺪوﻳﺮ هﺬا اﻟﻤﻘﺒﺾ ﻓﻘﻂ ﺑﺎﺗﺠﺎه دوران ﻋﻘﺎرب اﻟﺴﺎﻋﺔ واﻟﺠﻬﺎز ﻣﻄﻔﺄ
ﻣﺼﺒﺎح
ﺗﺸﻐﻴﻞ/ اﻃﻔﺎء
ﻣﻘﺒﺾ
اﻟﺒﺮاﻣﺠﺔ
ﺣﻮض ﻣﺴﺎﺣﻴﻖ اﻟﻐﺴﻴﻞ ﻟﻮﺿﻊ ﻣﺴﺎﺣﻴﻖ اﻟﻐﺴﻴﻞ واﻟﻤﺴﺎﺣﻴﻖ اﻻ ﺿﺎﻓﻴﺔ )اﻧﻈﺮ
(23
ﺻﻔﺤﺔ رﻗﻢ
أزرار اﻟﻮﻇﺎﺋﻒ ﻻ ﺧﺘﻴﺎر اﻟﻮﻇﺎﺋﻒ اﻟﺘﻲ ﺗﻜﻮن ﻣﺰودة ﺑﻬﺎ ﻏﺴﺎﻟﺔ اﻟﻤﻼ ﺑﺲ
زر ﺗﺸﻐﻴﻞ/اﻃﻔﺎء FFO/NO ﻟﺘﺸﻐﻴﻞ واﻃﻔﺎء ﻏﺴﺎﻟﺔ اﻟﻤﻼ ﺑﺲ.
20
ﻣﺼﺒﺎح اﻧﺬارﺑﺎب اﻟﻐﺴﺎﻟﺔ ﻣﻘﻔﻞ ﻟﻔﻬﻢ اذا ﻣﺎ آﺎﻧﺖ اﻟﻐﺴﺎﻟﺔ ﺗﻌﻤﻞ
Page 21
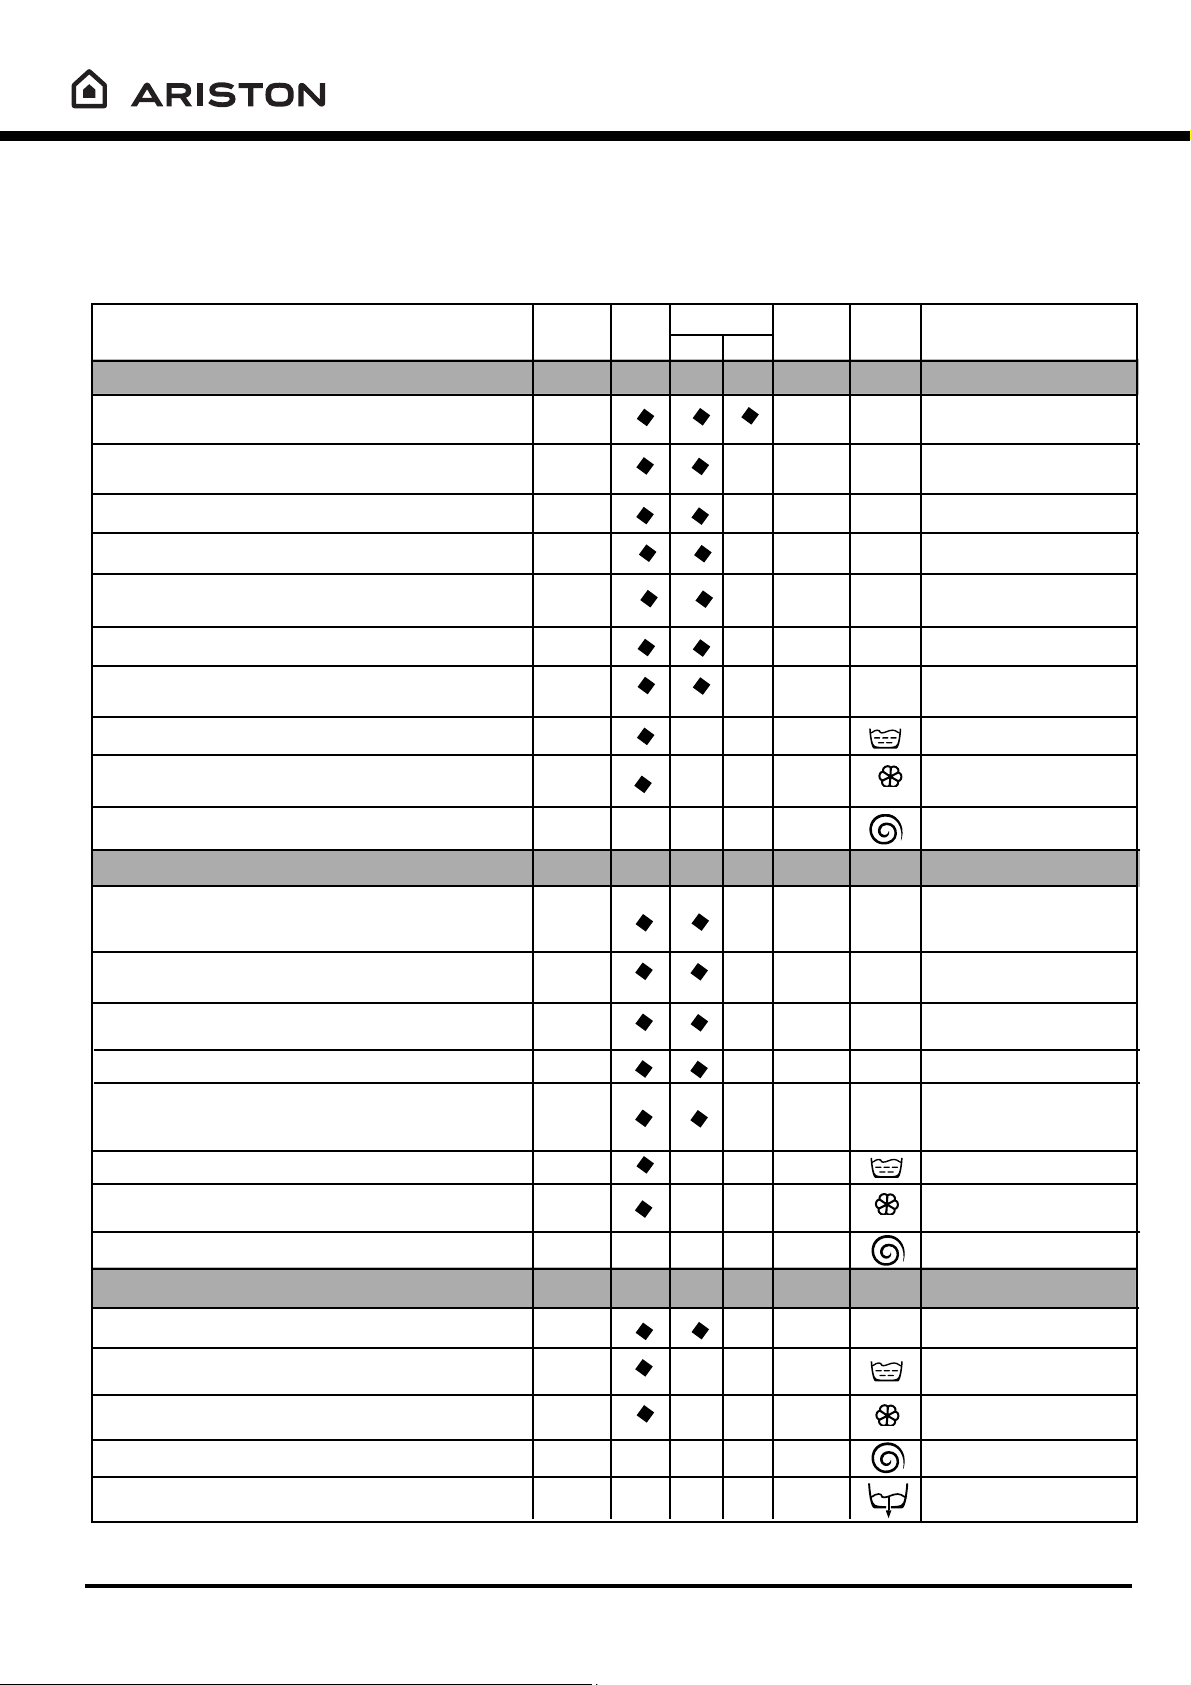
ﺗﺸﻐﻴﻞ اﻟﺒﺮاﻣﺞ
5. ﺷﻐﻠﻮا اﻟﻐﺴﺎﻟﺔ وذﻟﻚ ﺑﺎﻟﻀﻐﻂ ﻋﻠﻰ اﻟﺰر FFO/NO
6. ﻋﻨﺪ اﻧﺘﻬﺎء دورة اﻟﻐﺴﻴﻞ اﻧﺘﻈﺮوا ﺗﻘﺮﻳﺒﺎ ﺛﻼ ث دﻗﺎﺋﻖ. وﻣﻦ ﺛﻢ ﻗﻮﻣﻮا ﺑﺎﻃﻔﺎء اﻟﻐﺴﺎﻟﺔ وذﻟﻚ ﺑﺎﻟﻀﻐﻂ
ﻋﻠﻰ اﻟﺰر FFO/NO ﻓﻲ هﺬه اﻟﻠﺤﻈﺔ ﻳﻤﻜﻨﻜﻢ ﻓﺘﺢ ﺑﺎب اﻟﻐﺴﺎﻟﺔ ﺑﺄﻣﺎن، ﺑﻌﺪ اﺧﺮاﺟﻜﻢ اﻟﻤﻼ ﺑﺲ اﻟﺘﻲ ﺗﻢ
ﻏﺴﻠﻬﺎ ﻓﻲ اﻟﻐﺴﺎﻟﺔ اﺗﺮآﻮا ﺑﺎب اﻟﻐﺴﺎﻟﺔ ﻧﺼﻒ ﻣﻔﺘﻮح ﺑﺤﻴﺚ ﻳﻤﻜﻦ ﻟﻠﺮﻃﻮﺑﺔ اﻟﺘﺒﺨﺮ ﻣﻦ داﺧﻞ ﺣﻮض
ﻏﺴﻴﻞ اﻟﻐﺴﺎﻟﺔ، اﻏﻠﻘﻮا داﺋﻤﺎ ﻣﺤﺒﺲ اﻟﻤﺎء.
وﺻﻒ دورة اﻟﻐﺴﻴﻞﺑﺮﻧﺎﻣﺞ
ﻣﺘﻮﺳﻄﺔ وأﺧﺮي ﻧﻬﺎﺋﻴﺔ
ﻏﺴﻴﻞ ﻋﺎدي، ﻋﻤﻠﻴﺔ ﻓﻀﻔﻀﺔ، ﻋﻤﻠﻴﺔ ﻋﺼﺮ دوراﻧﻴﺔ ﻣﺘﻮﺳﻄﺔ وأﺧﺮي ﻧﻬﺎﺋﻴﺔ
ﻏﺴﻴﻞ ﻋﺎدي، ﻋﻤﻠﻴﺔ ﻓﻀﻔﻀﺔ، ﻋﻤﻠﻴﺔ ﻋﺼﺮ دوراﻧﻴﺔ ﻣﺘﻮﺳﻄﺔ وأﺧﺮي ﻧﻬﺎﺋﻴﺔ
ﻏﺴﻴﻞ ﻋﺎدي، ﻋﻤﻠﻴﺔ ﻓﻀﻔﻀﺔ، ﻋﻤﻠﻴﺔ ﻋﺼﺮ دوراﻧﻴﺔ ﻣﺘﻮﺳﻄﺔ وأﺧﺮي ﻧﻬﺎﺋﻴﺔ
ﻏﺴﻴﻞ ﻋﺎدي، ﻋﻤﻠﻴﺔ ﻓﻀﻔﻀﺔ، ﻋﻤﻠﻴﺔ ﻋﺼﺮ دوراﻧﻴﺔ ﻣﺘﻮﺳﻄﺔ وأﺧﺮي ﻧﻬﺎﺋﻴﺔ
ﻏﺴﻴﻞ ﻋﺎدي، ﻋﻤﻠﻴﺔ ﻓﻀﻔﻀﺔ، ﻋﻤﻠﻴﺔ ﻋﺼﺮ دوراﻧﻴﺔ ﻣﺘﻮﺳﻄﺔ وأﺧﺮي ﻧﻬﺎﺋﻴﺔ
ﻋﻤﻠﻴﺔ ﻓﻀﻔﻀﺔ، ﻋﻤﻠﻴﺔ ﻋﺼﺮ دوراﻧﻴﺔ ﻣﺘﻮﺳﻄﺔ وأﺧﺮي ﻧﻬﺎﺋﻴﺔ
ﻣﺪة اﻟﺒﺮﻧﺎﻣﺞ
)دﻗﺎﺋﻖ(
051ﻏـﺴـﻴـﻞ ﺑـﺪاﺋـﻲ، ﻏـﺴـﻴـﻞ ﻋـﺎدي، ﻋـﻤـﻠـﻴـﺔ ﻓـﻀـﻔـﻀـﺔ، ﻋـﻤـﻠـﻴـﺔ ﻋـﺼـﺮ دوراﻧـﻴـﺔ
041
041ﻏﺴﻴﻞ ﻋﺎدي، ﻋﻤﻠﻴﺔ ﻓﻀﻔﻀﺔ، ﻋﻤﻠﻴﺔ ﻋﺼﺮ دوراﻧﻴﺔ ﻣﺘﻮﺳﻄﺔ وأﺧﺮي ﻧﻬﺎﺋﻴﺔ
ﻣﻨﻌﻤﺎت
ﻣﺴﺤﻮق
ﻋﺎدي
ﺑﺪاﺋﻲ
(22
(23
ﺣﺮارة
09 درﺟﺔ
09 درﺟﺔ 041
06 درﺟﺔ
04 درﺟﺔ
06 درﺟﺔ 511
04 درﺟﺔ 511
04 درﺟﺔ 59
ﺑﺒﺴﺎﻃﺔ: ﺗﺸﻐﻴﻞ ﺑﺮﻧﺎﻣﺞ ﻏﺴﻴﻞ
1.اﺧﺘﺎر ﺑﻮاﺳﻄﺔ ﻣﻘﺒﺾ اﻟﺒﺮاﻣﺞ اﻟﺒﺮﻧﺎﻣﺞ اﻟﺬي ﺗﻮدون اﺳﺘﺨﺪاﻣﻪ،
2. ﺿﻌﻮا درﺟﺔ ﺣﺮارة اﻟﻐﺴﻴﻞ )اﻧﻈﺮ اﻟﻰ ﺻﻔﺤﺔ رﻗﻢ
3. اﻣﻠﻲء اﻟﻐﺴﺎﻟﺔ ﺑﺎﻟﻤﻼ ﺑﺲ اﻟﻤﺮاد ﻏﺴﻠﻬﺎ واﻏﻠﻖ ﺑﺎب اﻟﻐﺴﺎﻟﺔ
4. ﺻﺐ ﻣﺴﺤﻮق اﻟﻐﺴﻴﻞ واﻟﻤﺴﺎﺣﻴﻖ اﻻ ﺿﺎﻓﻴﺔ )اﻧﻈﺮ ﺻﻔﺤﺔ
ﻻ ﺋﺤﺔ اﻟﺒﺮاﻣﺞ
ﻃﺒﻴﻌﺔ اﻷ ﻧﺴﺠﺔ ودرﺟﺔ وﺳﺎﺧﺘﻬﺎ
أﻧﺴﺠﺔ ﻗﻄﻨﻴﺔ
ﺑ
ـﻴـﻀـ
1
2
2
2
3
3
4
ﺎء ﻓـﺎﺋـﻘـﺔ اﻟـﻮﺳـﺦ )ﺷـﺮاﺷـﻒ ﺗـﺨـﻮت،
ﺷﺮاﺷﻒ ﻃﺎوﻻ ت، اﻟﻰ آﺧﺮه.(
ﺑـﻴـﻀـﺎء آـﺜـﻴـﺮة اﻟـﻮﺳـﺦ )ﺷـﺮاﺷـﻒ ﺗـﺨـﻮت،
ﺷﺮاﺷﻒ ﻃﺎوﻻ ت، اﻟﻰ آﺧﺮه.(
ﺑﻴﻀﺎء وﻣﻠﻮﻧﺔ ﺑﺄﻟﻮان ﺛﺎﺑﺘﺔ آﺜﻴﺮة اﻟﻮﺳﺦ
ﺑﻴﻀﺎء وﻣﻠﻮﻧﺔ ﺑﺄﻟﻮان ﺛﺎﺑﺘﺔ آﺜﻴﺮة اﻟﻮﺳﺦ
ﺑﻴﻀﺎء وﻣﻠﻮﻧﺔ ﺑﺄﻟﻮان ﺛﺎﺑﺘﺔ ﻋﺎدﻳﺔ اﻟﻮﺳﺦ
)ﻣﻼ ﺑﺲ ﻣﻠﻮﻧﺔ، ﻗﻤﺼﺎن ﻧﻮم، ﺑﻼ ﻳﺰ، اﻟﺦ(
ﺑﻴﻀﺎء وﻣﻠﻮﻧﺔ ﻗﻠﻴﻠﺔ اﻟﻮﺳﺦ
ﺑﻴﻀﺎء ﻗﻠﻴﻠﺔ اﻟﻮﺳﺦ وﻣﻠﻮﻧﺔ ﺑﺄﻟﻮان ﺣﺴﺎﺳﺔ
)ﻗﻤﺼﺎن، ﺑﻼ ﻳﺰ، اﻟﻰ آﺧﺮه(
ﻓﻀﻔﻀﺔ
ﻋﻤﻠﻴﺔ ﻓﻀﻔﻀﺔ ﻣﻊ أﺧﺬ اﻟﻤﻨﻌﻢ ﺑﺸﻜﻞ اوﺗﻮﻣﺎﺗﻴﻜﻲ، ﻋﻤﻠﻴﺔ ﻋﺼﺮ دوراﻧﻴﺔ ﻣﺘﻮﺳﻄﺔ
وأﺧﺮي ﻧﻬﺎﺋﻴﺔ
ﺗﻔﺮﻳﻎ اﻟﻤﺎء ﻣﻦ ﺣﻮض ﻏﺴﻴﻞ اﻟﻐﺴﺎﻟﺔ وﻋﻤﻠﻴﺔ ﻋﺼﺮ دوراﻧﻴﺔ ﻧﻬﺎﺋﻴﺔ
ﻣﻌﺎﻣﻠﺔ اﻟﻤﻼ ﺑﺲ ﺑﺎﻟﻤﻨﻌﻤﺎت
ﻋﻤﻠﻴﺔ ﻋﺼﺮ دوراﻧﻴﺔ
أﻧﺴﺠﺔ ﻣﺴﺘﺨﺮﺟﺔ
58ﻏﺴﻴﻞ ﻋﺎدي، ﻋﻤﻠﻴﺔ ﻓﻀﻔﻀﺔ، ﺿﺪ اﻟﺠﻌﻠﻜﺔ أو ﻋﻤﻠﻴﺔ ﻋﺼﺮ دوراﻧﻴﺔ ﺣﺴﺎﺳﺔ
ﻏﺴﻴﻞ ﻋﺎدي، ﻋﻤﻠﻴﺔ ﻓﻀﻔﻀﺔ، ﺿﺪ اﻟﺠﻌﻠﻜﺔ أو ﻋﻤﻠﻴﺔ ﻋﺼﺮ دوراﻧﻴﺔ ﺣﺴﺎﺳﺔ
ﻏﺴﻴﻞ ﻋﺎدي، ﻋﻤﻠﻴﺔ ﻓﻀﻔﻀﺔ، ﺿﺪ اﻟﺠﻌﻠﻜﺔ أو ﻋﻤﻠﻴﺔ ﻋﺼﺮ دوراﻧﻴﺔ ﺣﺴﺎﺳﺔ
ﻏﺴﻴﻞ ﻋﺎدي، ﻋﻤﻠﻴﺔ ﻓﻀﻔﻀﺔ، ﺿﺪ اﻟﺠﻌﻠﻜﺔ أو ﻋﻤﻠﻴﺔ ﻋﺼﺮ دوراﻧﻴﺔ ﺣﺴﺎﺳﺔ
ﻋﻤﻠﻴﺔ ﻓﻀﻔﻀﺔ، ﺿﺪ اﻟﺠﻌﻠﻜﺔ أو ﻋﻤﻠﻴﺔ ﻋﺼﺮ دوراﻧﻴﺔ ﺣﺴﺎﺳﺔ
ﻋﻤﻠﻴﺔ ﻓﻀﻔﻀﺔ ﻣﻊ أﺧﺬ اﻟﻤﻨﻌﻢ، ﺿﺪ اﻟﺠﻌﻠﻜﺔ أو ﻋﻤﻠﻴﺔ ﻋﺼﺮ دوراﻧﻴﺔ ﺣﺴﺎﺳﺔ
ﻋـﻤـﻠـﻴـﺔ ﻓـﻀـﻔـﻀـﺔ ﻣـﻊ أﺧـﺬ اﻟـﻤـﻨـﻌـﻢ ﺑـﺸـﻜـﻞ اوﺗـﻮﻣـﺎﺗـﻴـﻜـﻲ، ﺿـﺪ اﻟـﺠـﻌـﻠـﻜـﺔ أو ﻋـﻤـﻠـﻴـﺔ ﻋـﺼـﺮ
دوراﻧﻴﺔ ﺣﺴﺎﺳﺔ
ﺗﻔﺮﻳﻎ اﻟﻤﺎء ﻣﻦ ﺣﻮض ﻏﺴﻴﻞ اﻟﻐﺴﺎﻟﺔ وﻋﻤﻠﻴﺔ ﻋﺼﺮ دوراﻧﻴﺔ ﺣﺴﺎﺳﺔ
5
06 درﺟﺔ
5
05 درﺟﺔ 58
5
04 درﺟﺔ 58
6
05 درﺟﺔ 57
7
04 درﺟﺔ 56
أﻟﻮان ﺛﺎﺑﺘﺔ آﺜﻴﺮة اﻟﻮﺳﺦ )ﻣﻼ ﺑﺲ اﻃﻔﺎل
رﺿﻊ، اﻟﻰ اﺧﺮه(
اﻧﺴﺠﺔ ﻣﺴﺘﺨﺮﺟﺔ ﻣﻠﻮﻧﺔ آﺜﻴﺮة اﻟﻮﺳﺦ
اﻧـﺴـﺠـﺔ ﻣـﺴـﺘـﺨـﺮﺟـﺔ ﺑـﺄﻟـﻮان ﺣـﺴـﺎﺳـﺔ آـﺜـﻴـﺮة
اﻟﻮﺳﺦ
اﻧﺴﺠﺔ ﻣﺴﺘﺨﺮﺟﺔ ﻣﻠﻮﻧﺔ ﻋﺎدﻳﺔ اﻟﻮﺳﺦ
ـﺴـﺠـ
ﺔ ﻣـﺴـﺘـﺨـﺮﺟـﺔ ﺑـﺄﻟـﻮان ﺣـﺴـﺎﺳـﺔ ﻗـﻠـﻴـﻠـﺔ
اﻧ
اﻟ
ـﻮﺳـ
ﺦ )ﻣـﻼ ﺑـﺲ ﻣـﻦ ﺟـﻤـﻴـﻊ اﻻ ﻧـﻮاع ﻗـﻠـﻴـﻠـﺔ
اﻟﻮﺳﺦ(
ﻓﻀﻔﻀﺔ
ﻣﻌﺎﻣﻠﺔ اﻟﻤﻼ ﺑﺲ ﺑﺎﻟﻤﻨﻌﻤﺎت
ﻋﻤﻠﻴﺔ ﻋﺼﺮ دوراﻧﻴﺔ
اﻧﺴﺠﺔ ﺣﺴﺎﺳﺔ
ﻏﺴﻴﻞ ﻋﺎدي، ﻋﻤﻠﻴﺔ ﻓﻀﻔﻀﺔ، ﺿﺪ اﻟﺠﻌﻠﻜﺔ أو ﻋﻤﻠﻴﺔ ﻋﺼﺮ دوراﻧﻴﺔ ﺣﺴﺎﺳﺔ
55
8
04 درﺟﺔ
ﺻﻮف )ﻳﻤﻜﻦ ﻏﺴﻠﻪ ﻓﻲ ﻏﺴﺎﻟﺔ(
21
ﻋﻤﻠﻴﺔ ﻓﻀﻔﻀﺔ، ﺿﺪ اﻟﺠﻌﻠﻜﺔ أو ﻋﻤﻠﻴﺔ ﻋﺼﺮ دوراﻧﻴﺔ ﺣﺴﺎﺳﺔ
ﻋـﻤـﻠـﻴـﺔ ﻓـﻀـﻔـﻀـﺔ ﻣـﻊ أﺧـﺬ اﻟـﻤـﻨـﻌـﻢ ﺑـﺸـﻜـﻞ اوﺗـﻮﻣـﺎﺗـﻴـﻜـﻲ، ﺿـﺪ اﻟـﺠـﻌـﻠـﻜـﺔ أو ﻋـﻤـﻠـﻴـﺔ ﻋـﺼـﺮ
دوراﻧﻴﺔ ﺣﺴﺎﺳﺔ
ﺗﻔﺮﻳﻎ اﻟﻤﺎء ﻣﻦ ﺣﻮض اﻟﻐﺴﺎﻟﺔ وﻋﻤﻠﻴﺔ ﻋﺼﺮ دوراﻧﻴﺔ ﺣﺴﺎﺳﺔ
ﻋﻤﻠﻴﺔ ﺗﻔﺮﻳﻎ اﻟﻤﺎء ﻣﻦ ﺣﻮض ﻏﺴﻴﻞ اﻟﻐﺴﺎﻟﺔ
22
ﻓﻀﻔﻀﺔ
ﻣﻌﺎﻣﻠﺔ اﻟﻤﻼ ﺑﺲ ﺑﺎﻟﻤﻨﻌﻤﺎت
ﻋﻤﻠﻴﺔ ﻋﺼﺮ دوراﻧﻴﺔ
ﺗﻔﺮﻳﻎ اﻟﻤﺎء ﻣﻦ ﺣﻮض اﻟﻐﺴﺎﻟﺔ
ﻣﻼ ﺣﻈﺔ
ﻟﻮﺻﻒ ﺿﺪ اﻟﺠﻌﻠﻜﺔ: اﻧﻈﺮ اﻟﻰ ﺻﻔﺤﺔ رﻗﻢ ، اﻟﻤﻌﻠﻮﻣﺎت اﻟﻤﻘﺪﻣﺔ ﻓﻲ اﻟﻼ ﺋﺤﺔ هﻲ أرﻗﺎم ﺗﻘﺮﻳﺒﻴﺔ.
Page 22
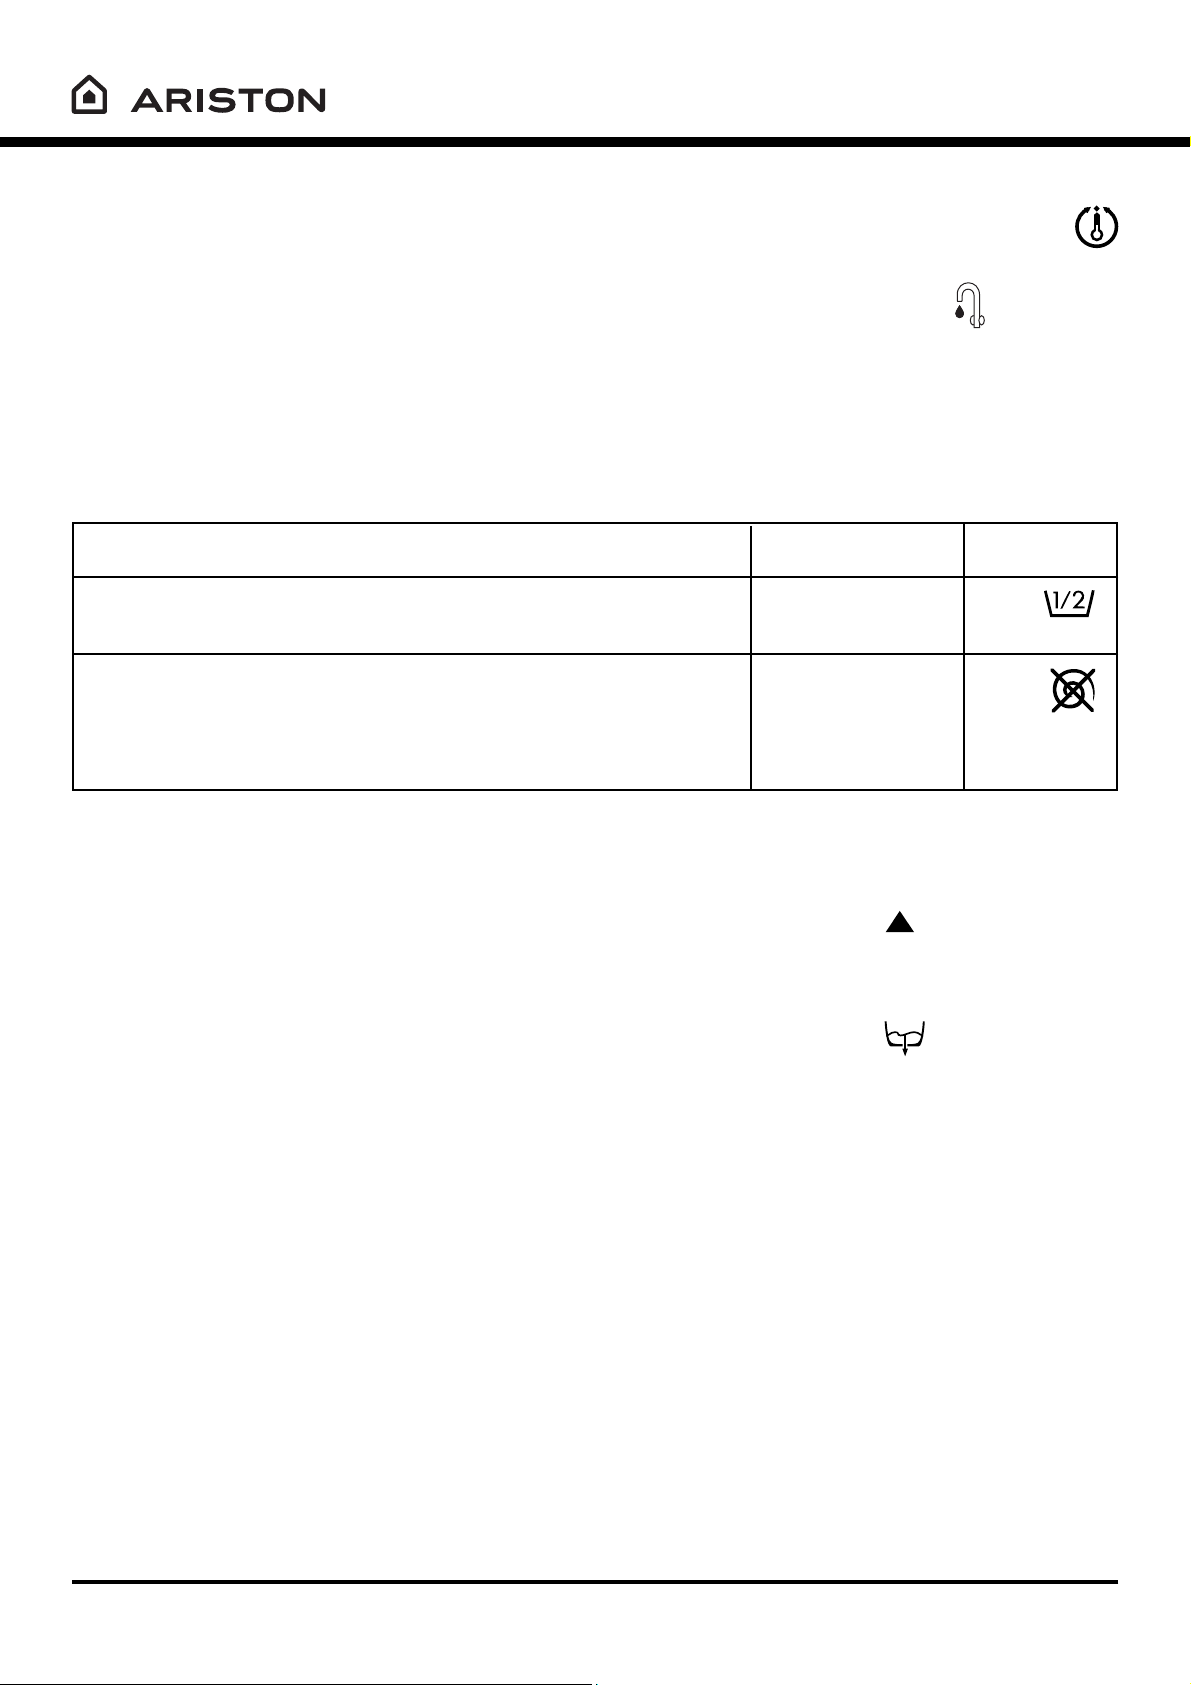
ﺗﺸﺨﻴﺺ اﻟﺒﺮاﻣﺞ
(21
وﺿﻊ درﺟﺔ اﻟﺤﺮارة
ﺑﺘﺪوﻳﺮ ﻣﻘﺒﺾ ﻣﻨﻈﻢ درﺟﺔ اﻟﺤﺮارة ﻳﺘﻢ وﺿﻊ درﺟﺔ ﺣﺮارة اﻟﻐﺴﻴﻞ )اﻧﻈﺮ اﻟﻰ ﻟﻮﺣﺔ اﻟﺒﺮاﻣﺞ ﻓﻲ ﺻﻔﺤﺔ ﻳﻤﻜﻦ ﺗﺨﻔﻴﺾ درﺟﺔ ﺣﺮارة اﻟﻐﺴﻴﻞ ﺣﺘﻰ اﻟﻮﺻﻮل
.
اﻟﻰ اﻟﻐﺴﻴﻞ ﺑﻤﺎء ﺑﺎرد
اﻟﻮﻇﺎﺋﻒ
اﻟﻮﻇﺎﺋﻒ اﻟﻤﺨﺘﻠﻔﺔ اﻟﺘﻲ ﻣﻦ اﻟﻤﻤﻜﻦ اﺳﺘﺨﺪاﻣﻬﺎ ﻋﻨﺪ ﻋﻤﻠﻴﺔ اﻟﻐﺴﻴﻞ وﻣﻮﻓﺮة ﻣﻦ ﻗﺒﻞ اﻟﻐﺴﺎﻟﺔ ﺗﺴﺎﻋﺪ ﻋﻠﻰ اﻟﺤﺼﻮل ﻋﻠﻰ ﻏﺴﻴﻞ أﻧﻈﻒ وﺑﻴﺎض ﻧﺎﺻﻊ ﻣﺜﻞ رﻏﺒﺘﻜﻢ، ﻻ ﺧﺘﻴﺎر
اﻟﻮﻇﺎﺋﻒ اﻟﻤﺨﺘﻠﻔﺔ اﺿﻐﻂ اﻟﺰر اﻟﺨﺎص ﺑﺎﻟﻮﻇﻴﻔﺔ اﻟﺘﻲ ﺗﻮدون اﺳﺘﺨﺪاﻣﻬﺎ ﺣﺴﺐ اﻟﻼ ﺋﺤﺔ اﻟﺘﺎﻟﻴﺔ:
ﻣﻼ ﺣﻈﺔ ﻟﻼ ﺳﺘﻌﻤﺎل
ﻳﻨﺼﺢ اﺳﺘﺨﺪاﻣﻪ ﻋﺪﻣﺎ ﻳﻜﻮن ﺣﻤﻞ اﻟﻐﺴﺎﻟﺔ ﻗﻠﻴﻞ وﻳﺠﺐ اﻟﺘﻘﻠﻴﻞ ﻣﻦ آﻮﻳﺔ ﻣﺴﺤﻮق اﻟﻐﺴﻴﻞ اﻟﻤﺴﺘﻌﻤﻞ ﺑﺎﻟﺘﻨﺎﺳﺐ
ﻣﻊ آﻤﻴﺔ اﻟﻤﻼ ﺑﺲ اﻟﻤﺮاد ﻏﺴﻠﻬﺎ
ﻳﻨﺼﺢ اﺳﺘﺨﺪام هﺬه اﻟﻮﻇﻴﻔﺔ ﻋﻨﺪ ﻏﺴﻞ ﻣﻼ ﺑﺲ ﺻﻌﺒﺔ اﻟﻜﻮي
ﺗﺄﺛﻴﺮهﺎ
ﻳ
ـﻘـﻠـ
ﻞ ﻣـﻦ ﻣـﺼـﺮوف اﻟـﻤـﺎء
ﺧﻼ ل ﻋﻤﻠﻴﺔ اﻟﻔﻀﻔﻀﺔ
ﻳﻠﺰم ﻋﻨﻤﺎ ﺗﺮﻳﺪون ﻓﺼﻞ
ﻋﻤﻠﻴﺔ اﻟﻌﺼﺮ اﻟﺪوراﻧﻴﺔ
اﻻ ﺿﺎﻓﺔ
ﻧﺼﻒ ﺣﻤﻞ
ﻓـﺼـﻞ ﻋـﻤـﻠـﻴـﺔ اﻟـﻌـﺼـﺮ
اﻟﺪوراﻧﻴﺔ
ﺿﺪ اﻟﺠﻌﻠﻜﺔ
هﺬه اﻟﻮﻇﻴﻔﺔ )اﻟﻤﺸﺎر ﻟﻬﺎ ﺑﺎﻟﺸﻌﺎر ( ﺗﻮﻗﻒ دورة اﻟﻐﺴﻴﻞ ﺗﺎرآﺔ اﻟﻤﻼ ﺑﺲ ﻓﻲ اﻟﻨﻘﻊ ﺑﺎﻟﻤﺎء ﻗﺒﻞ اﻟﻘﻴﺎم ﺑﻌﻤﻠﻴﺔ اﻟﻌﺼﺮ اﻟﺪوراﻧﻴﺔ، ﻳﻤﻜﻦ اﺳﺘﺨﺪام هﺬه اﻟﻮﻇﻴﻔﺔ ﻓﻘﻂ ﻓﻲ
اﻟﺒﺮاﻣﺞ اﻟﺤﺴﺎﺳﺔ ﻟﻸ ﻧﺴﺠﺔ اﻟﻤﺴﺘﺨﺮﺟﺔ واﻟﺼﻮف، اﻧﻬﺎ وﻇﻴﻔﺔ ﺛﻤﻴﻨﺔ ﻻ ﻧﻬﺎ ﺗﺠﻨﺐ اﻻ ﻧﺴﺠﺔ اﻟﺤﺴﺎﺳﺔ واﻟﻤﺴﺘﺨﺮﺟﺔ ﻣﻦ اﻟﺠﻌﻠﻜﺔ )ﻣﺜﻼ ﻳﻤﻜﻨﻜﻢ اﺧﺮاج اﻟﻤﻼ ﺑﺲ ﻣﻦ اﻟﻐﺴﺎﻟﺔ
ﺑﻌﺪ اﻧﺘﻬﺎء دورة اﻟﻐﺴﻴﻞ وﻟﻜﻦ ﻳﻤﻜﻨﻜﻢ اﺧﺮاﺟﻬﺎ ﺑﻌﺪ ﻣﻀﻲ ﻋﺪة ﺳﺎﻋﺎت(. هﺬا اﻟﺒﺮﻧﺎﻣﺞ ﻳﻤﻜﻦ اﺗﻤﺎﻣﻪ ﺑﻌﻤﻠﻴﺔ ﻋﺼﺮ دوراﻧﻴﺔ أو ﺑﻌﻤﻠﻴﺔ ﺗﻔﺮﻳﻎ اﻟﻤﺎء ﻣﻦ ﺣﻮض ﻏﺴﻴﻞ
اﻟﻐﺴﺎﻟﺔ ﺑﺪون اﻟﻘﻴﺎم ﺑﻌﻤﻠﻴﺔ اﻟﻌﺼﺮ. ﻓﻲ اﻟﺤﺎﻟﺔ اﻻ وﻟﻰ ﻳﻜﻔﻲ ﺗﺪوﻳﺮ ﻣﻘﺒﺾ اﻟﺒﺮاﻣﺞ ﺑﺎﺗﺠﺎه دوران ﻋﻘﺎرب اﻟﺴﺎﻋﺔ ﻗﻔﺰة واﺣﺪة، ﻓﻲ اﻟﺤﺎﻟﺔ اﻟﺜﺎﻧﻴﺔ ﻳﺠﺐ وﺿﻊ ﻣﻘﺒﺾ اﻟﺒﺮاﻣﺞ
.
ﻋﻠﻰ اﻟﻮﺿﻊ اﻟﻤﺸﺎر ﻟﻪ ﺑﺎﻟﺸﻌﺎر
ﻓﻲ آﻼ اﻟﺤﺎﻟﺘﻴﻦ ﻋﻤﻠﻴﺔ ﺗﺪوﻳﺮ ﻣﻘﺒﺾ اﻟﺒﺮاﻣﺞ ﻳﺠﺐ ان ﻳﺘﻢ واﻟﻐﺴﺎﻟﺔ ﻣﻄﻔﺄة.
22
Page 23
اﻟﻤﺴﺎﺣﻴﻖ واﻟﻤﻼ ﺑﺲ
اﻧﺴﺠﺔ ﺧﺎﺻﺔ
ﺑﺮادي: اﻃﻮي اﻟﺒﺮداﻳﺔ وﺿﻌﻬﺎ داﺧﻞ ﻏﻄﺎء وﺳﺎدة أو آﻴﺲ ﺷﺒﻜﺔ، اﻏﺴﻠﻮهﺎ ﻟﻮﺣﺪهﺎ
.
دون ﺗﻌﺪي وزن ﻧﺼﻒ ﺣﻤﻞ اﻟﻐﺴﺎﻟﺔ
ﻟﺤﻒ و ﺟﻜﻴﺘﺎت ﺿﺪ اﻟﻬﻮاء: اذا آﺎﻧﺖ ﺣﺸﻮة هﺬه رﻳﺶ ﺑﻂ أو ﺣﺒﺶ ﻳﻤﻜﻦ اﻟﻘﻴﺎم
ﺑﻌﻤﻠﻴﺔ ﻏﺴﻠﻬﺎ داﺧﻞ اﻟﻐﺴﺎﻟﺔ، اﻗﻠﺒﻮا هﺬه اﻟﻤﻼ ﺑﺲ وﻟﻴﻜﻮن اﻟﺤﻤﻞ اﻷ ﻗﺼﻰ ﻟﻠﻐﺴﺎﻟﺔ
ﻻ ﻳﺰﻳﺪ ﻋﻦ 2-3 آﻐﻢ ، اﻋﻴﺪوا دورة اﻟﻔﻀﻔﻀﺔ ﻣﺮة أو ﻣﺮﺗﻴﻦ ﻣﺴﺘﺨﺪﻣﻴﻦ ﻋﻤﻠﻴﺔ
اﻟﻌﺼﺮ اﻟﺤﺴﺎﺳﺔ.
ﺑﻮات رﻳﺎﺿﺔ: ﻧﻈﻒ ﺑﻮت اﻟﺮﻳﺎﺿﺔ ﻣﻦ اﻟﻮﺣﻞ، ﻳﻤﻜﻦ ﻏﺴﻠﻬﺎ ﻣﻊ اﻟﺠﻴﻨﺰ واﻟﻤﻼ ﺑﺲ
اﻟﻘﻮﻳﺔ، ﻻ ﺗﻐﺴﻠﻮهﺎ ﻣﻊ اﻟﻤﻼ ﺑﺲ اﻟﺒﻴﻀﺎء.
ﺻﻮف: ﻟﻠﺤﺼﻮل ﻋﻠﻰ أﻓﻀﻞ ﻧﺘﺎﺋﺞ ﻏﺴﻴﻞ اﻟﺼﻮف اﺳﺘﺨﺪﻣﻮا ﺳﻮاﺋﻞ أو ﻣﺴﺎﺧﻴﻖ
ﻏﺴﻴﻞ ﺧﺎص ﻟﻐﺴﻞ اﻟﺼﻮف وزن ﺣﻤﻞ اﻟﻐﺴﺎﻟﺔ ﻳﺠﺐ أن ﻻ ﻳﺘﻌﺪى 1 آﻐﻢ
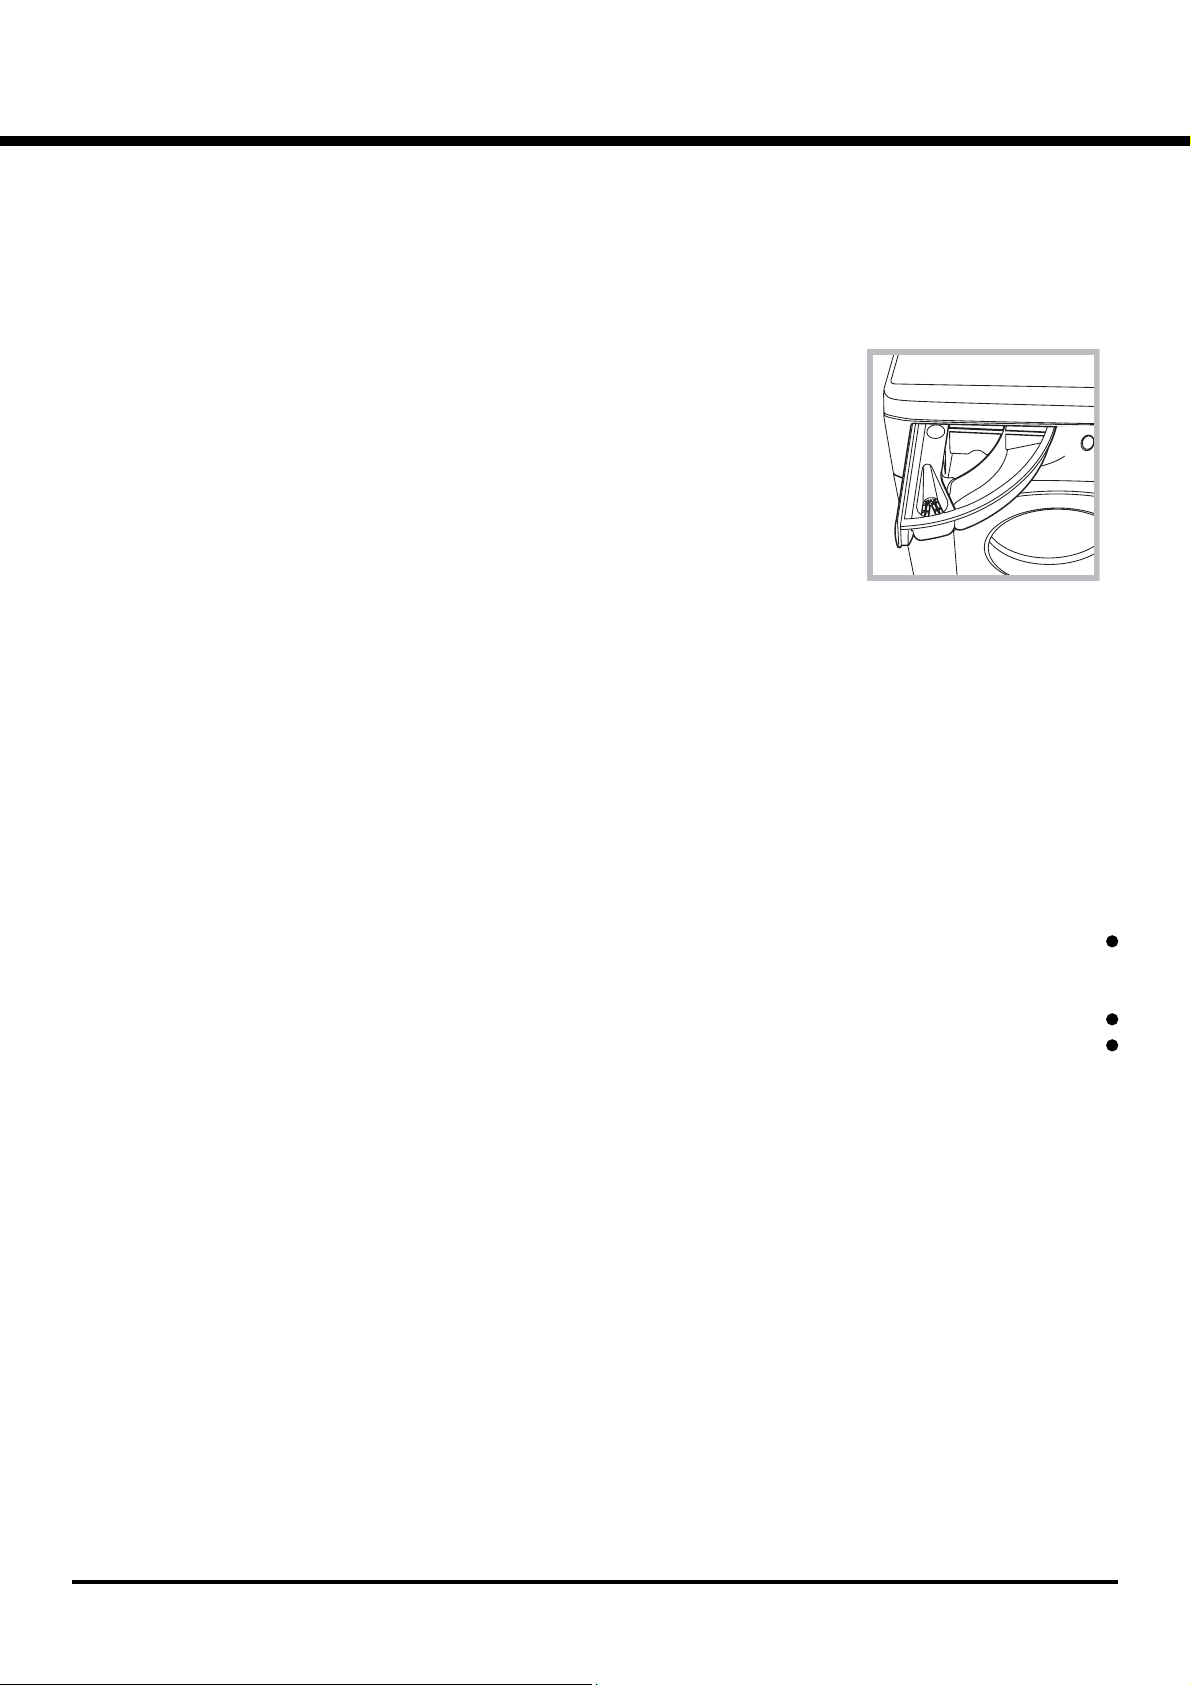
اﺧﺮج ﺣﻮض ﻣﺴﺎﺣﻴﻖ اﻟﻐﺴﻴﻞ ﻣﻦ
ﻣﻜﺎﻧﻪ وﺿﻊ ﻣﺴﺤﻮق اﻟﻐﺴﻴﻞ
واﻟﻤﺴﺎﺣﻴﻖ اﻻ ﺿﺎﻓﻴﺔ اﻟﺘﻲ ﺗﻮدون
اﺳﺘﺨﺪاﻣﻬﺎ ﺑﺎﻟﺸﻜﻞ اﻟﺘﺎﻟﻲ
1
3
2
ﺣﻮض ﻣﺴﺎﺣﻴﻖ اﻟﻐﺴﻴﻞ
اﻟﻨﺘﺎﺋﺞ اﻟﺠﻴﺪة ﻟﻌﻤﻠﻴﺔ اﻟﻐﺴﻴﻞ ﺗﻌﺘﻤﺪ أﻳﻀﺎ ﻋﻠﻰ آﻤﻴﺔ ﻣﺴﺤﻮق اﻟﻐﺴﻴﻞ اﻟﺼﺤﻴﺤﺔ،
ﻋﻨﺪ وﺿﻊ آﻤﻴﺔ أآﺜﺮ ﻣﻦ اﻟﺤﺎﺟﺔ ﻣﻦ ﻣﺴﺤﻮق اﻟﻐﺴﻴﻞ ﻻ ﺗﺘﻢ ﻋﻤﻠﻴﺔ اﻟﻐﺴﻴﻞ ﺑﺸﻜﻞ
ﻓﻌﺎل و ﺗﺴﺎﻋﺪ ﻋﻠﻰ ﺗﻜﻮن ﺗﺮﺳﺒﺎت داخ اﻟﻤﻨﺎﻃﻖ اﻟﺪاﺧﻠﻴﺔ ﻣﻦ اﻟﻐﺴﺎﻟﺔ ﺑﺎﻻ ﺿﺎﻓﺔ
اﻟﻰ ﺗﻠﻮث اﻟﺒﻴﺌﺔ.
اﻟﺤﻮض 1: ﻣﺴﺎﺣﻴﻖ اﻟﻐﺴﻴﻞ اﻻ ﺿﺎﻓﻲ )ﺑﻮدرة(
اﻟﺤﻮض 2: ﻣﺴﺎﺣﻴﻖ اﻟﻐﺴﻴﻞ اﻟﻌﺎدي )ﺑﻮدرة او ﺳﺎﺋﻞ(
اﻟﻤﻨﻈﻒ اﻟﺴﺎﺋﻞ ﻳﺘﻢ ﺻﺒﻪ ﻓﻘﻂ ﻗﺒﻞ ﺗﺸﻐﻴﻞ اﻟﻐﺴﺎﻟﺔ.
اﻟﺤﻮض 3: ﻣﺴﺎﺣﻴﻖ اﺿﺎﻓﻴﺔ )ﻣﻨﻌﻤﺎت، اﻟﻰ اﺧﺮه(
اﻟﺴﺎﺋﻞ اﻟﻤﻨﻌﻢ ﻳﺠﺐ أن ﻻ ﻳﺨﺮج ﺧﺎرج اﻟﺸﺒﻜﺔ
ﻻ ﺗﺴﺘﺨﺪﻣﻮا ﻣﺴﺎﺣﻴﻖ ﻏﺴﻴﻞ ﺧﺎﺻﺔ ﺑﺎﻟﻐﺴﻴﻞ ﻋﻠﻰ اﻟﻴﺪ ﻻ ﻧﻬﺎ ﺗﻜﻮن رﻏﻮة آﺜﻴﺮة.
ﺗﺤﻀﻴﺮ اﻟﻤﻼ ﺑﺲ ﻟﻠﻐﺴﻴﻞ
اﻓﺼﻠﻮا اﻟﻤﻼ ﺑﺲ اﻟﻤﺮاد ﻏﺴﻠﻬﺎ ﺣﺴﺐ:
- ﻧﻮع اﻷ ﻧﺴﺠﺔ/ اﻟﺸﻌﺎر ﻣﻮﺟﻮد ﻋﻠﻰ اﻟﻠﻮﺣﺔ اﻟﻤﺜﺒﺘﺔ ﻋﻠﻰ اﻟﻤﻼ ﺑﺲ
- اﻷ ﻟﻮان: اﻓﺼﻠﻮا اﻟﻤﻼ ﺑﺲ اﻟﻤﻠﻮﻧﺔ ﻋﻦ اﻟﻤﻼ ﺑﺲ اﻟﺒﻴﻀﺎء
ﻓﺮﻏﻮا اﻟﺠﻴﻮب ﻣﻦ ﻣﺤﺘﻮاﻳﺎﺗﻬﺎ وﺗﺄآﺪوا ﻣﻦ ﺛﺒﺎت اﻻ زرار
ﻻ ﺗﺘﻌﺪوا اﻟﻘﻴﻢ اﻟﻤﺸﺎر ﻟﻬﺎ، اﻟﺘﻲ ﺗﺘﻌﻠﻖ ﺑﻮزن اﻟﻤﻼ ﺑﺲ اﻟﻤﺮاد ﻏﺴﻠﻬﺎ وهﻲ ﺟﺎﻓﺔ:
اﻧﺴﺠﺔ ﻗﻮﻳﺔ : اﻗﺼﻰ ﺣﻤﻞ ﻟﻠﻐﺴﺎﻟﺔ 5 آﻐﻢ
اﻧﺴﺠﺔ ﻣﺴﺘﺨﺮﺟﺔ: اﻗﺼﻰ ﺣﻤﻞ ﻟﻠﻐﺴﺎﻟﺔ 5.2 آﻐﻢ
أﻧﺴﺠﺔ ﺣﺴﺎﺳﺔ: اﻗﺼﻰ ﺣﻤﻞ ﻟﻠﻐﺴﺎﻟﺔ 2 آﻐﻢ
ﺻﻮف: اﻗﺼﻰ ﺣﻤﻞ ﻟﻠﻐﺴﺎﻟﺔ 1 آﻐﻢ
آﻢ ﺗﺰن اﻟﻤﻼ ﺑﺲ؟
1 ﺷﺮﺷﻒ ﺗﺨﺖ 004-005 ﻏﺮام
1 ﻏﻄﺎء وﺳﺎدة 051-002 ﻏﺮام
1 ﺷﺮﺷﻒ ﻃﺎوﻟﺔ أآﻞ 004-005 ﻏﺮام
1 روب ﺣﻤﺎم 009-0021 ﻏﺮام
1 ﺑﺸﻜﻴﺮ 051-052 ﻏﺮام
23
Page 24
ﺗﺤﺬﻳﺮات وﻧﺼﺎﺋﺢ
اﻟﺘﺨﻠﺺ ﻣﻦ اﻟﻨﻔﺎﻳﺎت
اﻟﺘﺨﻠﺺ ﻣﻦ ﻣﻮاد اﻟﺘﻐﻠﻴﻒ :
اﺣﺘﺮم اﻟﻘﻮاﻧﻴﻦ اﻟﻤﺤﻠﻴﺔ، ﻷ ﻧﻪ ﻣﻦ اﻟﻤﻤﻜﻦ اﻻ ﺳﺘﻔﺎدة ﻣﻦ اﻟﺘﻐﻠﻴﻒ واﻋﺎدة ﺗﺼﻨﻴﻌﻪ
اﻟﺘﺨﻠﺺ ﻣﻦ اﻟﻐﺴﺎﻟﺔ اﻟﻘﺪﻳﻤﺔ :
ﻗ
ـﺒـ
ﻞ اﻟـﺘـﺨـﻠـﺺ ﻣـﻨـﻬـﺎ اﺟـﻌـﻠـﻬـﺎ ﻏـﻴـﺮ ﺻـﺎﻟـﺤـﺔ اﻻ ﺳـﺘـﻌـﻤـﺎل وذﻟـﻚ ﺑـﻘـﻄـﻊ ﺳـﻠـﻚ اﻟـﺘـﻐـﺬﻳـﺔ اﻟـﻜـﻬـﺮﺑـﺎﺋـﻴـﺔ
وﺑﺨﻠﻊ ﺑﺎب اﻟﻐﺴﺎﻟﺔ.
ﻏﺴﺎﻟﺔ اﻟﻤﻼ ﺑﺲ ﺗﻢ ﺗﺼﻤﻴﻤﻬﺎ وﺗﺼﻨﻴﻌﻬﺎ ﻟﺘﻜﻮن ﺧﺎﺿﻌﺔ ﻟﺠﻤﻴﻊ ﻗﻮاﻋﺪ اﻷ ﻣﻦ اﻟﻤﺘﻌﺎرف
ﻋﻠﻴﻬﺎ دوﻟﻴﺎ، هﺬه اﻟﺘﺤﺬﻳﺮات ﻣﻘﺪﻣﺔ ﻷ ﺳﺒﺎب أﻣﻨﻴﺔ وﻳﺠﺐ ﻗﺮاﺋﺘﻬﺎ ﺑﺘﻤﻌﻦ.
أﻣﻦ ﻋﺎم
هﺬا اﻟﺠﻬﺎز ﺗﻢ ﺗﺼﻤﻴﻤﺔ ﻓﻘﻂ ﻟﻼ ﺳﺘﻌﻤﺎل اﻟﺒﻴﺘﻲ.
ﻳـﺠـﺐ اﺳـﺘـﺨـﺪام اﻟـﻐـﺴـﺎﻟـﺔ اﻟـﻜـﻬـﺮﺑـﺎﺋـﻴـﺔ ﻣـﻦ ﻗـﺒـﻞ أﺷـﺨـﺎص ﺑـﺎﻟـﻐـﻴـﻦ وﺑـﺤـﺴـﺐ اﻟـﺘـﻌـﻠـﻴـﻤـﺎت
اﻟﻤﻮﺟﻮدة ﻓﻲ هﺬا اﻟﻜﺘﻴﺐ.
اﻻ ﻗﺘﺼﺎد واﺣﺘﺮام اﻟﺒﺌﺔ
ﻟـﻌـﺪم اﻟـﺘـﺒـﺬﻳـﺮ واﻻ ﺳـﺮاف ﻓـﻲ اﻟـﺪﺧـﻞ اﺳـﺘـﺨـﺪﻣـﻮا اﻟـﻐـﺴـﺎﻟـﺔ ﻋـﻨـﺪﻣـﺎ ﻳـﺘـﻮﻓـﺮ ﺣـﻤـﻠـﻬـﺎ اﻟـﻜـﺎﻣـﻞ،
ﺣﻤﻞ آﺎﻣﻞ ﻟﻠﻐﺴﺎﻟﺔ ﻣﻜﺎن ﺣﻤﻠﻴﻦ ﺑﻨﺼﻒ اﻟﻜﻤﻴﺔ ﻳﻮﻓﺮ 05% ﻣﻦ اﻟﻄﺎﻗﺔ.
ﻋـﻤـﻠـﻴـﺔ اﻟـﻐـﺴـﻴـﻞ اﻟـﺒـﺪاﺋـﻲ ﺿـﺮوري ﻓـﻘـﻂ ﻋـﻨـﺪﻣـﺎ ﺗـﻜـﺰن اﻟـﻤـﻼ ﺑـﺲ آـﺜـﻴـﺮة اﻟـﻮﺳـﺦ، ﺗـﺠـﻨـﺐ
ﻋﻤﻠﻴﺔ اﻟﻐﺴﻴﻞ اﻟﺒﺪاﺋﻲ ﻳﻮﻓﺮ ﻓﻲ ﻣﺴﺤﻮق اﻟﻐﺴﻴﻞ، اﻟﺰﻣﻦ، ﻣﺎء وﻣﺎ ﺑﻴﻦ 5 اﻟﻰ 51%
ﻣﻦ اﻟﻄﺎﻗﺔ اﻟﻤﺴﺘﻬﻠﻜﺔ.
اﺳـﺘـﺨـﺪام ﻣـﺰﻳـﻞ ﻟـﻠـﺒـﻘـﻊ أو ﺗـﺮك اﻟـﻤـﻼ ﺑـﺲ ﻓـﻲ اﻟـﻨـﻘـﻊ ﻗـﺒـﻞ اﻟـﻘـﻴـﺎم ﺑـﻌـﻤـﻠـﻴـﺔ اﻟـﻐـﺴـﻴـﻞ ﺗـﻘـﻠـﻞ ﻣـﻦ
ـ
ﺮورة اﻟـﻘـﻴـﺎم ﺑـﻌـﻤـﻠـﻴـﺔ اﻟـﻐـﺴـﻴـﻞ ﻋـﻠـﻰ درﺟـﺎت ﺣـﺮارة ﻋـﺎﻟـﻴـﺔ، ﺑـﺮﻧـﺎﻣـﺞ ﻋـﻠـﻰ 06 درﺟـﺔ
ﺿ
ـﺌـﻮﻳـ
ﺔ ﺑـﺪل ﻣـﻦ 09 درﺟـﺔ ﻣـﺌـﻮﻳـﺔ أو دورة ﻏـﺴـﻴـﻞ ﻋـﻠـﻰ 04 درﺟـﺔ ﻣـﺌـﻮﻳـﺔ ﺑـﺪل ﻣـﻦ 06
ﻣ
درﺟﺔ ﻣﺌﻮﻳﺔ ﺗﻮﻓﺮ ﺣﺘﻰ 05% ﻣﻦ اﻟﻄﺎﻗﺔ اﻟﻜﻬﺮﺑﺎﺋﻴﺔ .
ﻻ ﺗﻠﻤﺴﻮا اﻟﺠﻬﺎز واﻷ رﺟﻞ ﻋﺎرﻳﺔ أو اﻷ ﻳﺪي أو اﻷ رﺟﻞ ﻣﺒﻠﻮﻟﺔ أو رﻃﺒﺔ.
ﻻ ﺗـﻔـﺼـﻠـﻮا اﻟـﺠـﻬـﺎز ﻣـﻦ ﻣـﻨـﺒـﻊ اﻟـﺘـﻴـﺎر اﻟـﻜـﻬـﺮﺑـﺎﺋـﻲ وذﻟـﻚ ﺑـﺸـﺪ ﺳـﻠـﻚ اﻟـﺘـﻐـﺬﻳـﺔ اﻟـﻜـﻬـﺮﺑـﺎﺋـﻴـﺔ ﺑـﻞ
ﻗﻮﻣﻮا ﺑﺴﺤﺐ ﻗﺎﺑﺲ اﻟﺘﻴﺎر اﻟﻜﻬﺮﺑﺎﺋﻲ )اﻟﺬآﺮ( ﻣﻦ ﻣﻨﺒﻊ اﻟﻜﻬﺮﺑﺎء.
ﻻ ﺗﻔﺘﺤﻮا ﺣﻮض ﻣﺴﺎﺣﻴﻖ اﻟﻐﺴﻴﻞ ﺧﻼ ل ﻋﻤﻞ اﻟﺠﻬﺎز.
ﻻ ﺗﻠﻤﺴﻮا اﻟﻤﺎء اﻟﺬي ﻳﻔﺮغ ﻣﻦ اﻟﻐﺴﺎﻟﺔ ﻷ ﻧﺔ ﻗﺪ ﻳﺼﻞ اﻟﻰ درﺟﺎت ﺣﺮارة ﻋﺎﻟﻴﺔ.
ﻻ ﺗﺸﺪوا ﺑﻘﻮة ﺑﺄي ﺣﺎل ﻣﻦ اﻷ ﺣﻮال ﺑﺎب اﻟﻐﺴﺎﻟﺔ وهﻮ ﻣﺎ زال ﻣﻘﻔﻞ، ﻷ ﻧﻪ ﻣﻦ اﻟﻤﻤﻜﻦ
اﺗﻼ ف ﺟﻬﺎز اﻷ ﻣﻦ اﻟﺬي ﻳﻤﻨﻊ ﻓﺘﺢ ﺑﺎب اﻟﻐﺴﺎﻟﺔ ﺑﺸﻜﻞ ﻋﻔﻮي ﺧﻼ ل ﻋﻤﻞ اﻟﺠﻬﺎز.
اﺳـﺘـﺨـﺪم آـﻤـﻴـﺔ ﻣـﺴـﺤـﻮق اﻟـﻐـﺴـﻴـﻞ ﺑـﺎﻟـﺘـﻨـﺎﺳـﺐ ﻣـﻊ ﻗـﺴـﺎوة اﻟـﻤـﺎء اﻟـﻤـﺴـﺘـﺨـﺪم ﻓـﻲ ﻋـﻤـﻠـﻴـﺔ
ـﻐـﺴـﻴـ
ﻞ، وﻣـﻊ درﺟـﺔ وﺳـﺎﺧـﺔ اﻟـﻤـﻼ ﺑـﺲ وﻣـﻊ آـﻤـﻴـﺔ اﻟـﻤـﻼ ﺑـﺲ اﻟـﻤـﺮاد ﻏـﺴـﻠـﻬـﺎ، ﺗـﺠـﻨـﺐ
اﻟ
اﻻ ﺳ
ـ
ﺮاف واﺣـﻤـﻲ اﻟـﺒـﻴـﺌـﺔ، ﺣـﺘـﻰ ﻟـﻮ آـﺎن ﻣـﺴـﺤـﻮق اﻟـﻐـﺴـﻴـﻞ ﻗـﺎﺑـﻞ ﻟـﻠـﺘـﺤـﻠـﻞ، ﻻ اﻧـﺔ ﻳـﺤـﺘـﻮي
ﻋﻠﻰ ﻣﻮاد آﻴﻤﺎوﻳﺔ اﻟﺘﻲ ﺗﺘﻠﻒ اﻟﺘﻮازن اﻟﺒﺌﻲ، واﻳﻀﺎ ﺗﺠﻨﺒﻮا اﺳﺘﺨﺪام اﻟﻤﻨﻌﻤﺎت.
اﻟـﻘـﻴـﺎم ﺑـﻌـﻠـﻴـﺔ اﻟـﻐـﺴـﻴـﻞ ﺑـﻮاﺳـﻄـﺔ اﻟـﻐـﺴـﺎﻟـﺔ اﻟـﻜـﻬـﺮﺑـﺎﺋـﻴـﺔ ﻓـﻲ اﻟـﻤـﺴـﺎء ﺣـﺘـﻰ ﺳـﺎﻋـﺎت اﻟـﺼـﺒـﺎح
ـﻤـﺒـﻜـ
ﺮ ﺗـﺨـﻔـﻒ ﺣـﻤـﻞ اﻣـﻨـﺼـﺎص اﻟـﺘـﻴـﺎر اﻟـﻜـﻬـﺮﺑـﺎﺋـﻲ ﻋـﻠـﻰ ﺷـﺮآـﺔ اﻟـﻜـﻬـﺮﺑـﺎء ﺣـﻴـﺚ ﺗـﻜـﻮن
اﻟ
ﺗﻌﻤﻞ اﻟﻤﺼﺎﻧﻊ واﻟﺸﺮآﺎت.
اذا آـﺎن اﻟـﻐـﺴـﻴـﻞ ﻳـﺠـﺐ أن ﺗـﺘـﻢ ﻋـﻤـﻠـﻴـﺔ ﺗـﺠـﻔـﻴـﻔـﺔ ﺑـﻮاﺳـﻄـﺔ ﻣـﺠـﻔـﻔـﺔ آـﻬـﺮﺑـﺎﺋـﻴـﺔ، اﺳـﺘـﺨـﺪﻣـﻮا
أﻗ
ـﺼـ
ﻰ ﺳـﺮﻋـﺔ ﻋـﺼـﺮ دوراﻧـﻴـﺔ، ﻗـﻠـﺔ اﻟـﻤـﺎء اﻟـﻤـﻮﺟـﻮد ﻓـﻲ اﻟـﻤـﻼ ﺑـﺲ اﻟـﻤـﺮاد ﺗـﺠـﻔـﻴـﻔـﻬـﺎ ﺗـﻮﻓـﺮ
ﻋﻠﻴﻜﻢ زﻣﻦ وﻃﺎﻗﺔ ﻓﻲ ﺑﺮﻧﺎﻣﺞ اﻟﺘﻨﺸﻴﻒ.
ﻓـﻲ ﺣـﺎل ﺣـﺪوث ﺧـﻠـﻞ ﻓـﻲ اﻟـﺠـﻬـﺎز ﻻ ﺗـﺤـﺎول اﻟـﻮﺻـﻮل اﻟـﻰ اﻷ ﺟـﻬـﺰة اﻟـﺪاﺧـﻠـﻴـﺔ ﻟـﻤـﺤـﺎوﻟـﺔ
ﺗﺼﻠﻴﺢ اﻟﺠﻬﺎز.
ﺗﺄآﺪوا داﺋﻤﺎ ﻣﻦ ﻋﺪم ﺗﻘﺮب اﻷ ﻃﻔﺎل ﻣﻦ اﻟﺠﻬﺎز ﺧﻼ ل ﻋﻤﻠﻪ.
ﺧﻼ ل ﻋﻤﻠﻴﺔ اﻟﻐﺴﻴﻞ ﺑﺎب اﻟﻐﺴﺎﻟﺔ ﻗﺪ ﺗﺮﺗﻔﻊ درﺟﺔ ﺣﺮاﺗﻪ وﻳﺼﺒﺢ ﺳﺎﺧﻦ.
اذا أردﺗﻢ ﺗﺤﺮﻳﻚ أو ﻧﻘﻞ اﻟﺠﻬﺎز ﻣﻦ ﻣﻜﺎﻧﻪ اﺳﺘﻌﻦ ﺑﺸﺨﺺ أو ﺑﺸﺨﺼﻴﻦ وﺧﺬوا ﻓﺎﺋﻖ
اﻟﺤﺬر ﻷ ن اﻟﺠﻬﺰ ﺛﻘﻴﻞ وﻻ ﺗﺤﺎول اﻟﻘﻴﺎم ﺑﻬﺬا ﻟﻮﺣﺪك.
ﻗﺒﻞ ادﺧﺎل اﻟﻤﻼ ﺑﺲ داﺧﻞ ﺣﻮض ﻏﺴﻴﻞ اﻟﻐﺴﺎﻟﺔ ﺗﺄآﺪ ﻣﻦ ﺣﻮض اﻟﻐﺴﻴﻞ ﻓﺎرغ.
24
Page 25
ﺻﻴﺎﻧﺔ وﺣﻤﺎﻳﺔ
اﻓﺼﻠﻮا اﻟﻤﺎء واﻟﻄﺎﻗﺔ اﻟﻜﻬﺮﺑﺎﺋﻴﺔ
أﻏـﻠـﻘـﻮا ﻣـﺤـﺒـﺲ اﻟـﻤـﺎء ﺑـﻌـﺪ آـﻞ ﻋـﻤـﻠـﻴـﺔ ﻏـﺴـﻴـﻞ، ﺑـﻬـﺬا اﻟـﺸـﻜـﻞ ﻳـﺘـﻢ اﻟـﺘـﻘـﻠـﻴـﻞ ﻣـﻦ اﺳـﺘـﻬـﻼ ك
اﻟﺸﺒﻜﻪ اﻟﻬﺪﻳﻮروﻟﻴﻜﻲ ﻟﻐﺴﺎﻟﺔ اﻟﻤﻼ ﺑﺲ وﻳﺘﻢ ازاﻟﺔ ﺧﻄﺮ ﺗﺴﺮب اﻟﻤﺎء ﻣﻦ اﻟﺨﺮﻃﻮم.
اﻓـﺼـﻞ ﻗـﺎﺑـﺲ اﻟـﺘـﻴـﺎر اﻟـﻜـﻬـﺮﺑـﺎﺋـﻲ )اﻟـﺬآـﺮ( ﻣـﻦ ﻣـﻨـﺒـﻊ اﻟـﺘـﻴـﺎر اﻟـﻜـﻬـﺮﺑـﺎﺋـﻲ ﻋـﻨـﺪ اﻟـﻘـﻴـﺎم ﺑـﻌـﻤـﻠـﻴـﺔ
ﺗﻨﻈﻴﻒ اﻟﺠﻬﺎز وﺧﻼ ل ﻋﻤﻠﻴﺎت اﻟﺼﻴﺎﻧﺔ ﻟﻐﺴﺎﻟﺔ اﻟﻤﻼ ﺑﺲ.
ﺗﻨﻈﻴﻒ ﻏﺴﺎﻟﺔ اﻟﻤﻼ ﺑﺲ
اﻟﻤﻨﻄﻘﺔ اﻟﺨﺎرﺟﻴﺔ واﻟﻤﻨﺎﻃﻖ اﻟﻤﺼﻨﻮﻋﺔ ﻣﻦ اﻟﻜﻮﺷﻚ ﻳﻤﻜﻦ ﺗﻨﻈﻴﻔﻬﺎ ﺑﻮاﺳﻄﺔ ﻗﻄﻌﺔ
ﻗﻤﺎش ﻣﺒﻠﻮﻟﺔ ﺑﻤﺎء ﻓﺎﺗﺮ وﺻﺎﺑﻮن، ﻻ ﺗﺴﺘﺨﺪﻣﻮا ﻣﻮاد ﻣﺤﻠﻠﺔ أو ﺧﺎدﺷﺔ.
ﺗﻨﻈﻴﻒ ﺣﻮض ﻣﺴﺎﺣﻴﻖ اﻟﻐﺴﻴﻞ
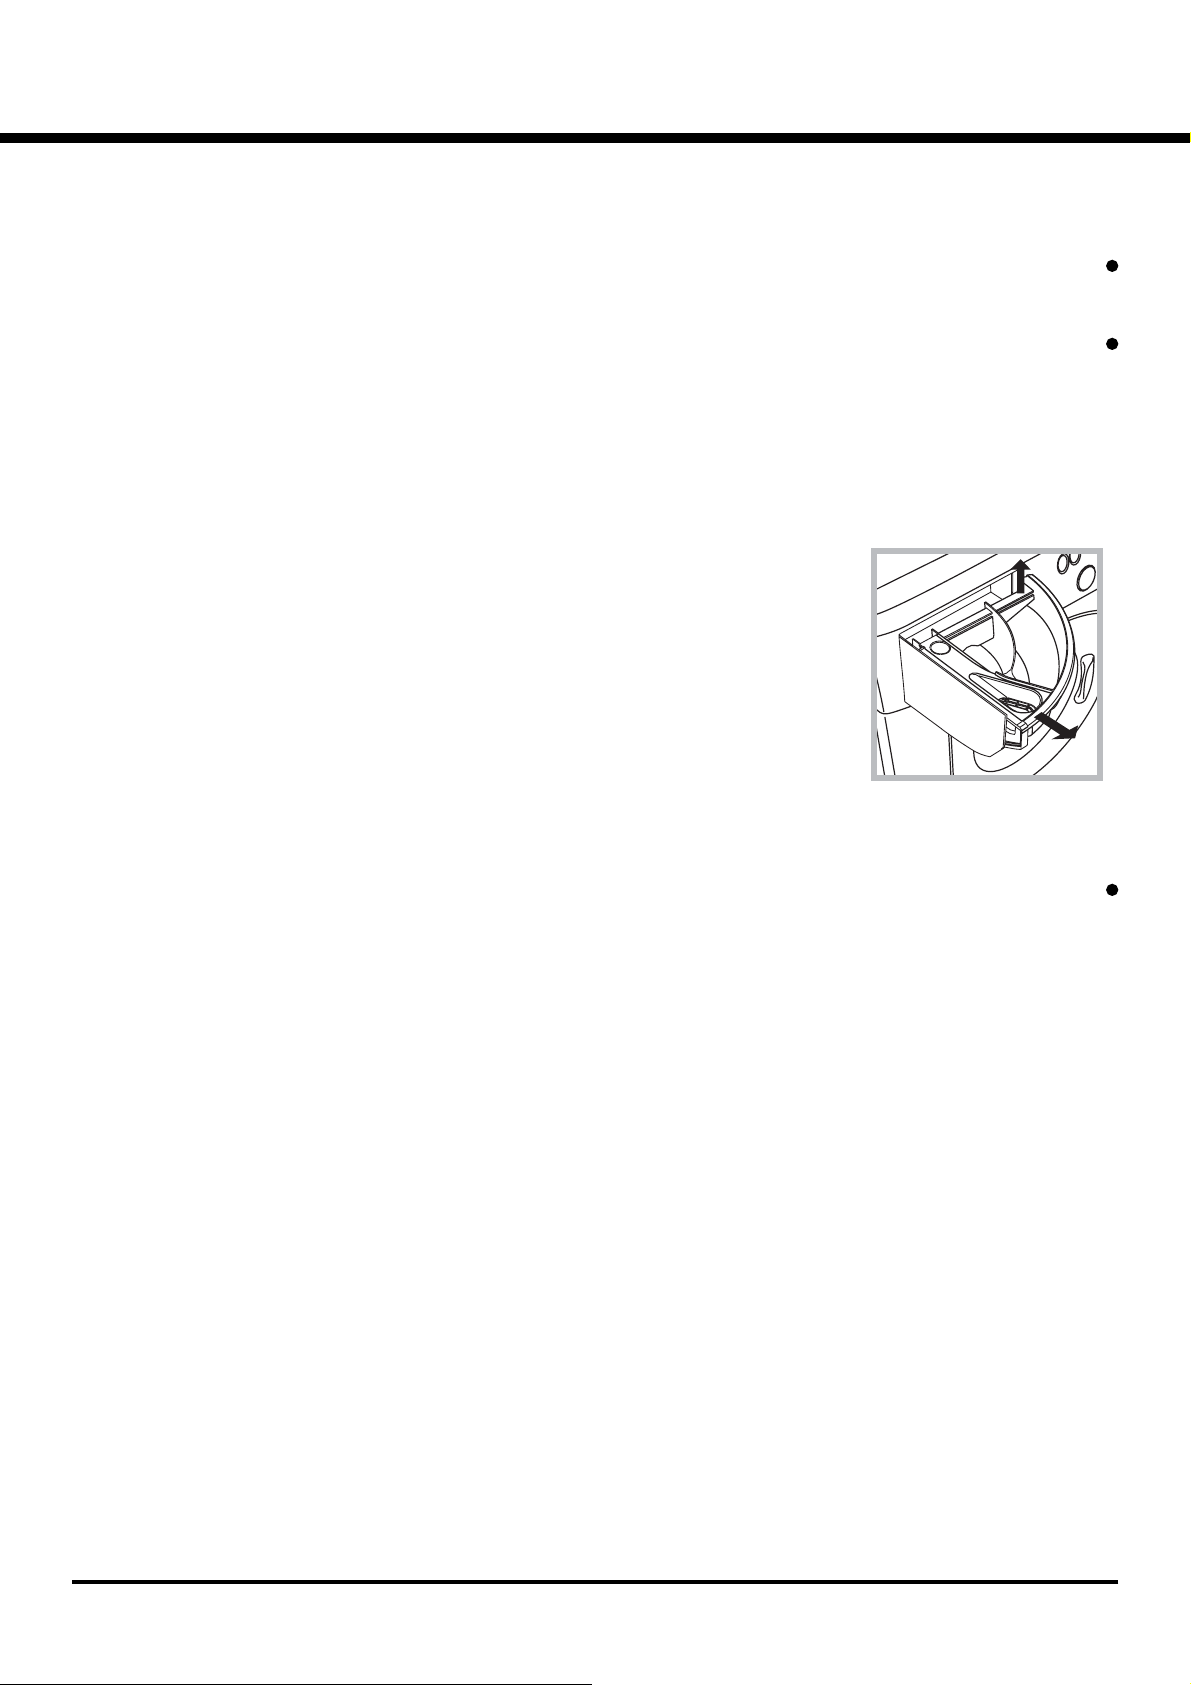
اﺧﺮج اﻟﺠﺎرور ﻣﻦ ﻣﻜﺎﻧﻪ وذﻟﻚ ﺑﺮﻓﻌﻪ
ﻗﻠﻴﻼ اﻟﻰ اﻷ ﻋﻠﻰ وﺑﺸﺪه اﻟﻰ اﻟﺨﺎرج
)اﻧﻈﺮ اﻟﺸﻜﻞ(.
اﻏﺴﻠﻪ ﺗﺤﺖ ﻣﺠﺮى ﻣﺎء، هﺬه ﻋﻤﻠﻴﺔ
اﻟﺘﻨﻈﻴﻒ ﻳﺠﺐ ﻋﻤﻠﻬﺎ ﺑﺎﺳﺘﻤﺮار
1
2
اﻟﺤﻔﺎظ ﻋﻠﻰ ﺑﺎب اﻟﻐﺴﺎﻟﺔ و ﺣﻮض ﻏﺴﻴﻞ اﻟﻐﺴﺎﻟﺔ
اﺗـﺮك داﺋـﻤـﺎ ﺑـﺎب اﻟـﻐـﺴـﺎﻟـﺔ ﻧـﺼـﻒ ﻣـﻔـﺘـﻮح وذﻟـﻚ ﻟـﺘـﺠـﻨـﺐ ﺗـﻜـﻮن رواﺋـﺢ آـﺮﻳـﻬـﺔ داﺧـﻞ
ﺣﻮض ﻏﺴﻴﻞ اﻟﻐﺴﺎﻟﺔ.
ﺗﻨﻈﻴﻒ ﻣﻀﺨﺔ ﺗﻔﺮﻳﻎ اﻟﻤﺎء ﻣﻦ اﻟﻐﺴﺎﻟﺔ
اﻟـﻐـﺴـﺎﻟـﺔ ﻣـﺰودة ﺑـﻤـﻀـﺨـﺔ ﺗـﻔـﺮﻳـﻎ اﻟـﻤـﺎء ﻣـﻦ اﻟـﻐـﺴـﺎﻟـﺔ ﻗـﺎدرة ﻋـﻠـﻰ ﺗـﻨـﻈـﻴـﻒ ﻧـﻔـﺴـﻬـﺎ ﺑـﻨـﻔـﺴـﻬـﺎ
وﻟﻴﺴﺖ ﺑﺤﺎﺟﺔ اﻟﻰ أﻳﻪ ﻋﻤﻠﻴﺔ ﺗﻨﻈﻴﻒ أو ﺻﻴﺎن‘،
اﻓﺤﺺ ﺧﺮﻃﻮم ﺗﻐﺬﻳﺔ اﻟﺠﻬﺎز ﺑﺎﻟﻤﺎء
اﻓﺤﺺ اﻟﺨﺮﻃﻮم اﻟﺬي ﻳﻐﺬي اﻟﺠﻬﺎز ﺑﺎﻟﻤﺎء ﻣﺮة ﻓﻲ اﻟﺴﻨﺔ ﻋﻠﻰ اﻷ ﻗﻞ، اذا آﺎن ﻇﺎهﺮا
ﻋﻠﻴﺔ ﺷﻘﻮق او أﻣﺎآﻦ ﺗﺎﻟﻔﺔ ﻳﺠﺐ اﻟﻘﻴﺎم ﺑﻌﻤﻠﻴﺔ ﺗﺒﺪﻳﻠﻪ، ﺧﻼ ل ﻋﻤﻠﻴﺔ اﻟﻐﺴﻴﻞ ﺿﻐﻂ اﻟﻤﺎء
اﻟﻌﺎﻟﻲ ﻣﻦ اﻟﻤﻤﻜﻦ أن ﻳﺴﻄﺢ هﺬا اﻟﺨﺮﻃﻮم.
ﻻ ﺗﺴﺘﺨﺪﻣﻮا أﺑﺪا ﺧﺮاﻃﻴﻢ ﻣﺴﺘﻌﻤﻠﺔ .
25
Page 26
ﻣﺸﺎآﻞ وﺣﻠﻮﻟﻬﺎ
(17
(27
(17
ﻣﻦ اﻟﻤﻤﻜﻦ أن ﻏﺴﺎﻟﺔ اﻟﻤﻼ ﺑﺲ ﻻ ﺗﺸﺘﻐﻞ، ﻗﺒﻞ اﻻ ﺗﺼﺎل ﺑﻘﺴﻢ اﻟﺼﻴﺎﻧﺔ اﻟﻔﻨﻴﺔ )اﻧﻈﺮ ﺻﻔﺤﺔ ﺗﺄآﺪ ﻣﻦ أﻧﻬﺎ ﻟﻴﺴﺖ ﻣﺸﻜﻠﺔ ﺳﻬﻠﺔ اﻟﺤﻞ،
ﻟﻨﺴﺘﻌﻴﻦ ﺑﻬﺬه اﻟﻼ ﺋﺤﺔ.
اﻷ ﺳﺒﺎب اﻟﻤﻤﻜﻨﺔ/ﺣﻠﻮل
ﻗـﺎﺑـﺲ اﻟـﺘـﻴـﺎر اﻟـﻜـﻬـﺮﺑـﺎﺋـﻲ )اﻟـﺬآـﺮ( ﻟـﻴـﺲ ﻣـﻮﺿـﻮع ﻓـﻲ ﻣـﻨـﺒـﻊ اﻟـﺘـﻴـﺎر اﻟـﻜـﻬـﺮﺑـﺎﺋـﻲ، أو ﻟـﻴـﺲ ﺑـﺎﻟـﻜـﻤـﻴـﺔ اﻟـﻜـﺎﻓـﻴـﺔ ﺣـﺘـﻰ ﻳـﺘـﻢ
اﻟﺘﻮﺻﻴﻞ.
ﻓﻲ اﻟﺒﻴﺖ ﻻ ﻳﻮﺟﺪ ﺗﻴﺎر آﻬﺮﺑﺎﺋﻲ
ﺑﺎب اﻟﻐﺴﺎﻟﺔ ﻏﻴﺮ ﻣﻐﻠﻖ ﺑﺸﻜﻞ آﺎﻣﻞ
اﻟﺰر FFO/NO ﻟﻴﺲ ﻣﻀﻐﻮط
ﻣﺤﺒﺲ اﻟﻤﺎء ﻏﻴﺮ ﻣﻔﺘﻮح
ﺧﺮﻃﻮم ﺗﻐﺬﻳﺔ اﻟﺠﻬﺎز ﺑﺎﻟﻤﺎء ﻏﻴﺮ ﻣﺮﺑﻮط ﺑﻤﺤﺒﺲ اﻟﻤﺎء
ﺧﺮﻃﻮم اﻟﻤﺎء ﻣﻄﻮي
ﻣﺤﺒﺲ اﻟﻤﺎء ﻏﻴﺮ ﻣﻔﺘﻮح
ﻓﻲ اﻟﺒﻴﺖ ﻻ ﻳﻮﺟﺪ ﻣﺎء
ﺿﻐﻂ ﺷﺒﻜﺔ اﻟﻤﺎء ﻏﻴﺮ آﺎﻓﻲ
ﺧﺮﻃﻮم ﺗﻔﺮﻳﻎ اﻟﻐﺴﺎﻟﺔ ﻣﻦ اﻟﻤﺎء ﻏﻴﺮ ﻣﻮﺿﻮع ﻋﻠﻰ ارﺗﻔﺎع ﻣﺎ ﺑﻴﻦ 56 و 001 ﺳﻨﺘﻤﺘﺮ ﻋﻦ ﺳﻄﺢ اﻷ رض )اﻧﻈﺮ
ﺻﻔﺤﺔ
ﺣﺮف ﺧﺮﻃﻮم اﺧﺮاج اﻟﻤﺎء ﻣﻦ اﻟﻐﺴﺎﻟﺔ ﻣﻐﻤﻮر ﻓﻲ اﻟﻤﺎء )اﻧﻈﺮ ﺻﻔﺤﺔ
ﻣﺼﺮف اﻟﻤﺎء اﻟﻤﻮﺟﻮد ﻓﻲ اﻟﺤﺎﺋﻂ ﻻ ﻳﻮﺟﺪ ﻟﻪ ﻣﻨﻔﺲ ﻟﻬﻮاء
اذا ﺑ
ـﻌـ
ﺪ آـﻞ هـﺬه اﻟـﻔـﺤـﻮﺻـﺎت اﻟـﻤـﺸـﻜـﻠـﺔ ﻟـﻢ ﺗـﺤـﻞ، اﻏـﻠـﻖ ﻣـﺤـﺒـﺲ اﻟـﻤـﺎء، اﻃـﻔـﻰء اﻟـﺠـﻬـﺎز، واﺳـﺘـﺪﻋـﻲ ﻗـﺴـﻢ اﻟـﺼـﻴـﺎﻧـﺔ اﻟـﻔـﻨـﻴـﺔ،
ـﺎﻧـ
ﺖ اﻟـﺸـﻘـﺔ ﻣـﻮﺟـﻮدة ﻓـﻲ اﺧـﺮ ﻃـﻮاﺑـﻖ اﻟـﺒـﻨـﺎء ﻣـﻦ اﻟـﻤـﻤـﻜـﻦ ﺣـﺪوث ﻇـﺎهـﺮة ﺷـﻔـﻂ ﻟـﻠـﻤـﺎء اﻟـﻤـﻮﺟـﻮد داﺧـﻞ اﻟـﻐـﺴـﺎﻟـﺔ ﻋـﻦ
اذا آ
ـﺮﻳـ
ﻖ اﻟـﻤـﺼـﺮف اﻟـﻤـﻮﺟـﻮد ﻓـﻲ اﻟـﺤـﺎﺋـﻂ، وﻟـﻬـﺬا اﻟـﻐـﺴـﺎﻟـﺔ ﺗـﺄﺧـﺬ اﻟـﻤـﺎء واﻟـﻤـﺼـﺮف ﻳـﻔـﺮﻏـﻪ ﻣـﻨـﻬـﺎ، ﻟـﺤـﻞ هـﺬه اﻟـﻤـﺸـﻜـﻠـﺔ ﻣـﻮﺟـﻮد
ﻃ
ﻓﻲ اﻷ ﺳﻮاق ﺻﻤﺎﻣﺎت ﺿﺪ ﺷﻔﻂ اﻟﻤﺼﺮف.
ﺷﺬوذ ﻓﻲ ﻋﻤﻞ اﻟﺠﻬﺎز
اﻟﻐﺴﺎﻟﺔ ﻻ ﺗﺸﺘﻐﻞ
دورة اﻟﻐﺴﻴﻞ ﻻ ﺗﺒﺪأ
اﻟﻐﺴﺎﻟﺔ ﻻ ﺗﺄﺧﺬ ﻣﺎء
اﻟﻐﺴﺎﻟﺔ ﺗﺄﺧﺬ اﻟﻤﺎء وﺗﻔﺮﻏﻪ ﺑﺎﺳﺘﻤﺮار
(25
(16
(16
(16
(17
(16
(17
(21
اﻟـﺒـﺮﻧـﺎﻣـﺞ ﻻ ﻳـﻘـﻮم ﺑـﻌـﻤـﻠـﻴـﺔ ﺗـﻔـﺮﻳـﻎ اﻟـﻤـﺎء، ﻓـﻲ ﺑـﻌـﺾ اﻟـﺒـﺮاﻣـﺞ ﻳـﺠـﺐ ﺗـﺸـﻐـﻴـﻞ اﻟـﺘـﻔـﺮﻳـﻎ وﻋـﻤـﻠـﻴـﺔ اﻟـﻌـﺼـﺮ ﻳـﺪوﻳـﺎ.)اﻧـﻈـﺮ اﻟـﻰ
ﺻﻔﺤﺔ
ﺗـﻌـﻤـﻞ اﻟـﻮﻇـﻴـﻔـﺔ ﺿـﺪ اﻟـﺠـﻌـﻠـﻜـﺔ )ﻓـﻲ اﻷ ﺟـﻬـﺰة اﻟـﺘـﻲ ﺗـﺤـﺘـﻮي ﻋـﻠـﻰ هـﺬه اﻟـﻮﻇـﻴـﻔـﺔ(: هـﺬه اﻟـﻮﻇـﻴـﻔـﺔ ﺗـﺤـﺘـﺎج اﻟـﻰ ﺗـﺸـﻐـﻴـﻞ ﻋـﻤـﻠـﻴـﺔ
اﻟﺘﻔﺮﻳﻎ ﻳﺪوﻳﺎ
ﺧﺮﻃﻮم ﺗﻔﺮﻳﻎ اﻟﻤﺎء ﻣﻦ اﻟﻐﺴﺎﻟﺔ ﻣﻄﻮي )اﻧﻈﺮ ﺻﻔﺤﺔ
ﻣﺎﺳﻮرة ﻣﺼﺮف اﻟﻤﺎء ﻣﺴﺪودة.
ﺣﻮض اﻟﻐﺴﻴﻞ ﻟﻢ ﻳﺘﻢ ﺗﺤﺮﻳﺮه ﻋﻨﺪ ﻋﻤﻠﻴﺔ ﺗﺮآﻴﺐ اﻟﺠﻬﺎز)اﻧﻈﺮ اﻟﻰ ﺻﻔﺤﺔ رﻗﻢ
ﻏﺴﺎﻟﺔ اﻟﻤﻼ ﺑﺲ ﻟﻴﺴﺖ ﻣﻮﺿﻮﻋﺔ ﻓﻲ ﻣﻜﺎن ﻣﺴﺘﻮي )اﻧﻈﺮ اﻟﻰ ﺻﻔﺤﺔ رﻗﻢ
اﻟﻐﺴﺎﻟﺔ ﻣﺤﺸﻮرة ﺑﻴﻦ اﻷ ﺛﺎث واﻟﺤﺎﺋﻂ )اﻧﻈﺮ اﻟﻰ ﺻﻔﺤﺔ رﻗﻢ
ﺧﺮﻃﻮم ﺗﻐﺬﻳﺔ اﻟﻐﺴﺎﻟﺔ ﺑﺎﻟﻤﺎء ﻟﻴﺲ ﻣﺸﺪود ﺑﺎﻟﺸﻜﻞ اﻟﻜﺎﻓﻲ )اﻧﻈﺮ اﻟﻰ ﺻﻔﺤﺔ رﻗﻢ
ﺣﻮض ﻣﺴﺎﺣﻴﻖ اﻟﻐﺴﻴﻞ ﻣﺴﺪود ﻣﻦ ﺑﻘﺎﻳﺎ ﻣﺴﺎﺣﻴﻖ اﻟﻐﺴﻴﻞ )ﻟﻠﻘﻴﺎم ﺑﻌﻤﻠﻴﺔ ﺗﻨﻈﻴﻔﻪ اﻧﻈﺮ ﺻﻔﺤﺔ
ﺧﺮﻃﻮم ﺗﻔﺮﻳﻎ اﻟﻤﺎء ﻣﻦ اﻟﻐﺴﺎﻟﺔ ﻟﻴﺲ ﻣﺜﺒﺖ ﺟﻴﺪأ )اﻧﻈﺮ اﻟﻰ ﺻﻔﺤﺔ رﻗﻢ
ﻣـﺴـﺤـﻮق اﻟـﻐـﺴـﻴـﻞ ﻏـﻴـﺮ ﺧـﺎص ﻟـﻐـﺴـﻴـﻞ ﺑـﻐـﺴـﺎﻟـﺔ آـﻬـﺮﺑـﺎﺋـﻴـﺔ )ﻳـﺠـﺐ أن ﻳـﻜـﻮن ﻣـﻜـﺘـﻮب ﻋـﻠـﻴـﺔ ﺧـﺎص ﺑـﻐـﺴـﺎﻟـﺔ آـﻬـﺮﺑـﺎﺋـﻴـﺔ أو
»ﻋﻠﻰ اﻟﻴﺪ وﻓﻲ ﻏﺴﺎﻟﺔ« أو اي ﺷﻲ ﻳﺸﻴﺮ اﻟﻰ اﻣﻜﺎﻧﻴﺔ اﺳﺘﺨﺪاﻣﻪ ﻟﻠﻐﺴﺎﻟﺔ(
اﻟﻜﻤﻴﺔ اﻟﻤﺴﺘﺨﺪﻣﺔ آﺒﻴﺮة
اﻟﻐﺴﺎﻟﺔ ﻻ ﺗﻔﺮغ اﻟﻤﺎء وﻻ ﺗﻘﻮم ﺑﻌﻤﻠﻴﺔ اﻟﻌﺼﺮ
اﻟﺪوراﻧﻴﺔ
ﻏﺴﺎﻟﺔ اﻟﻤﻼ ﺑﺲ ﺗﻬﺘﺰ آﺜﻴﺮا ﺧﻼ ل ﻋﻤﻠﻴﺔ اﻟﻌﺼﺮ
اﻟﺪوراﻧﻴﺔ
اﻟﻐﺴﺎﻟﺔ ﺗﻔﻘﺪ ﻣﺎء
ﻳﺘﻜﻮن آﻤﻴﺔ آﺒﻴﺮة ﻣﻦ اﻟﺮﻏﻮة
26
Page 27
اﻟﺼﻴﺎﻧﺔ اﻟﻔﻨﻴﺔ
ﻗﺒﻞ اﺳﺘﺪﻋﺎء اﻟﺼﻴﺎﻧﺔ اﻟﻔﻨﻴﺔ:
(26
ﺗﺄآﺪ ﻣﻦ اﻟﺨﺮاب أو اﻟﻌﻄﺐ ﻳﻤﻜﻦ ﺣﻞ هﺬة اﻟﻤﺸﻜﻠﺔ ﻟﻮﺣﺪآﻢ )اﻧﻈﺮ ﺻﻔﺤﺔ رﻗﻢ
أﻋﺪ ﺗﺸﻐﻴﻞ اﻟﻐﺴﺎﻟﺔ ﻟﺘﺄآﺪ ﻣﻦ اﻟﻌﻄﺐ ﺗﻢ ﺣﻠﻪ واﻟﻐﺴﺎﻟﺔ اﺷﺘﻐﻠﺖ ﺑﺎﻟﺸﻜﻞ اﻟﺼﺤﻴﺢ.
ﻓﻲ ﺣﺎﻟﺔ اﻟﻨﻔﻲ، اﺗﺼﻠﻮا ﺑﻘﺴﻢ اﻟﺼﻴﺎﻧﺔ اﻟﻔﻨﻴﺔ اﻟﻤﺨﻮﻟﺔ ﻣﻦ ﻗﺒﻞ اﻟﺸﺮآﺔ اﻟﺼﺎﻧﻌﺔ ﺑﺎﻟﻘﻴﺎم ﺑﻌﻤﻠﻴﺔ اﻟﺼﻴﺎﻧﺔ ﻋﻠﻰ رﻗﻢ اﻟﺘﻠﻔﻮن اﻟﻤﻮﺟﻮد ﻋﻠﻰ ﺷﻬﺎدة اﻟﻀﻤﺎن.
ﻻ ﺗﺴﺘﻌﻴﻨﻮا أﺑﺪا ﺑﻔﻨﻴﻴﻦ ﻏﻴﺮ ﻣﺨﻮﻟﻴﻦ ﻣﻦ ﻗﺒﻞ اﻟﺸﺮآﺔ اﻟﺼﺎﻧﻌﺔ ﺑﺎﻟﻘﻴﺎم ﺑﻌﻤﻠﻴﺔ اﻟﺼﻴﺎﻧﺔ.
أﻋﻄﻮا اﻟﻤﻌﻠﻮﻣﺎت اﻟﺘﺎﻟﻴﺔ:
ﻧﻮع اﻟﻌﻄﺐ
ﻣﺪﻳﻞ اﻟﺠﻬﺎز )doM(
رﻗﻢ اﻟﺘﺴﻠﺴﻠﻲ ﻟﻠﺠﻬﺎز )N/S(
هﺬه اﻟﻤﻌﻠﻮﻣﺎت ﺗﻜﻮن ﻣﻮﺟﻮدة ﻋﻠﻰ ﻟﻮﺣﺔ اﻟﻤﻮاﺻﻔﺎت اﻟﻔﻨﻴﺔ اﻟﻤﻠﺼﻘﺔ ﻋﻠﻰ اﻟﻤﻨﻄﻘﺔ اﻟﺨﻠﻔﻴﺔ ﻣﻦ ﻏﺴﺎﻟﺔ اﻟﻤﻼ ﺑﺲ.
27
Page 28
195044616.00
05/2004 - Xerox Business Services
&
 Loading...