

Page 1
Instruction booklet
TUMBLE DRYER
GB
English, 1
I
Italiano, 13
D
Deutsch, 37EEspañol, 49
NL
Nederlands, 73AArabic, 96
AS60V
F
Français, 25
P
Português, 61
Contents
Installation, 2-3
Where to put your dryer
Ventilation
Electrical connection
Before you start using your dryer
Dryer description, 4
The front
The back
Control panel
Start and programmes, 5-6
Choosing a programme
Table of programmes
Laundry, 7-8
Sorting your laundry
Wash care labels
Special clothing items
Drying times
Warnings and Suggestions, 9
General safety
Disposal
Saving energy and respecting the environment
GB
Maintenance and Care, 10
Switching off the electricity
Cleaning the filter after each cycle
Check the drum after each cycle
Cleaning the dryer
Troubleshooting, 11
Service, 12
Spare parts
1
Page 2
Installation
GB
! Keep this instruction booklet on hand in order to
refer to it when necessary. Take it with you when you
move, and, should you sell this appliance or pass it
on to another party, make sure that this booklet is
supplied along with the dryer so that the new owner
may be informed about warnings and suggestions on
how the dryer works.
! Read these instructions carefully; the following
pages contain important information on installation
and suggestions on how the appliance works.
Where to put your dryer
●
Place your dryer at a distance from gas ranges,
stoves, heaters, or cook tops because flames can
damage the appliance.
●
If you are going to install the appliance under a
work counter, be sure to leave a 10mm space
between the top and any other objects on or
above the machine and a 15mm space between
the sides and lateral furnishings or walls. This is
to ensure proper air circulation. Make sure that
the back vents are not obstructed.
! Ensure that the end of the tube is not directed toward
the air intake vent at the rear of the dryer.
! The vent tube should not exceed 2.4 metres in length
and should be kept free of any possible
accumulation of fluff, lint and water by shaking it out
frequently. Always ensure that the tube is not
squashed.
Permanent venting
In conjunction with the vent tube we recommend using
a Wall/Window Vent Kit, available at a retail location or
the nearest Spare Parts Dealer.
Wall mounting
1. Leave an opening in
the wall to the left of the
dryers proposed position.
2. Keep the tube as short
and straight as possible to
prevent condensed
moisture from backing up
into the dryer.
●
Make sure you put your dryer in an environment
that is not damp and has proper air circulation
throughout.
Ventilation
The Dryer dries your laundry by drawing in cool, clean
and relatively dry air, heating it, and then
distributing it through the clothes as they are gently
tumbled. For optimum performance, the moist air is
then blown out through a vent tube at the back of the
dryer.
When the dryer is in use, there has to be adequate
ventilation to avoid the back flow of gases into the
room from appliances burning other fuels, including
open fires.
Mobile venting
A vent tube must always be fitted when the dryer is
used in conjunction with Mobile Venting.
The tube must be fitted securely into the back of the
dryer (see Dryer Description). If possible, it is always
best to connect the tube to a permanent
outlet close to the dryer. If permanent installation is
not possible, the dryer will work just as well with the
tube passing through a partly-opened window.
3. Similarly, the duct in the
wall should slope
downwards towards the
outside.
Window mounting
1. With a stacked dryer
the hole in the window
should ideally be made
below the vent.
2. The tube should be
kept as short as possible.
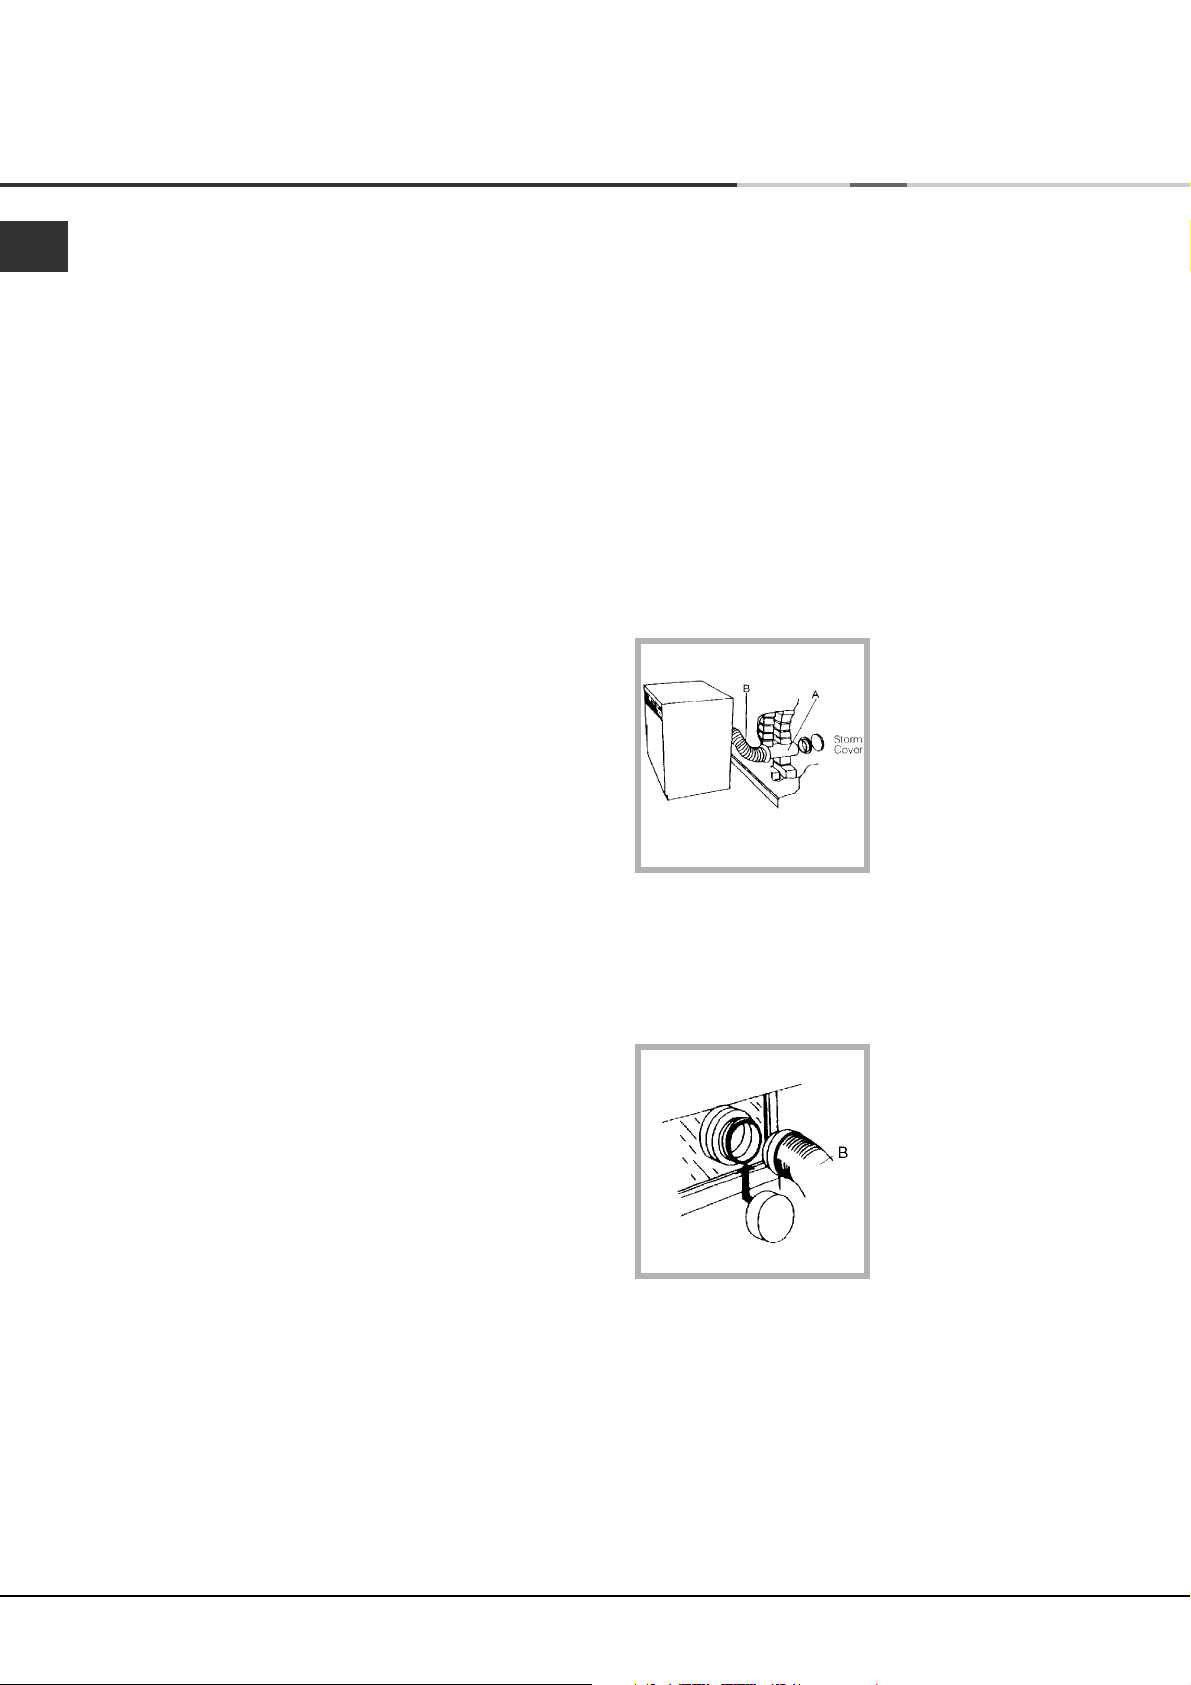
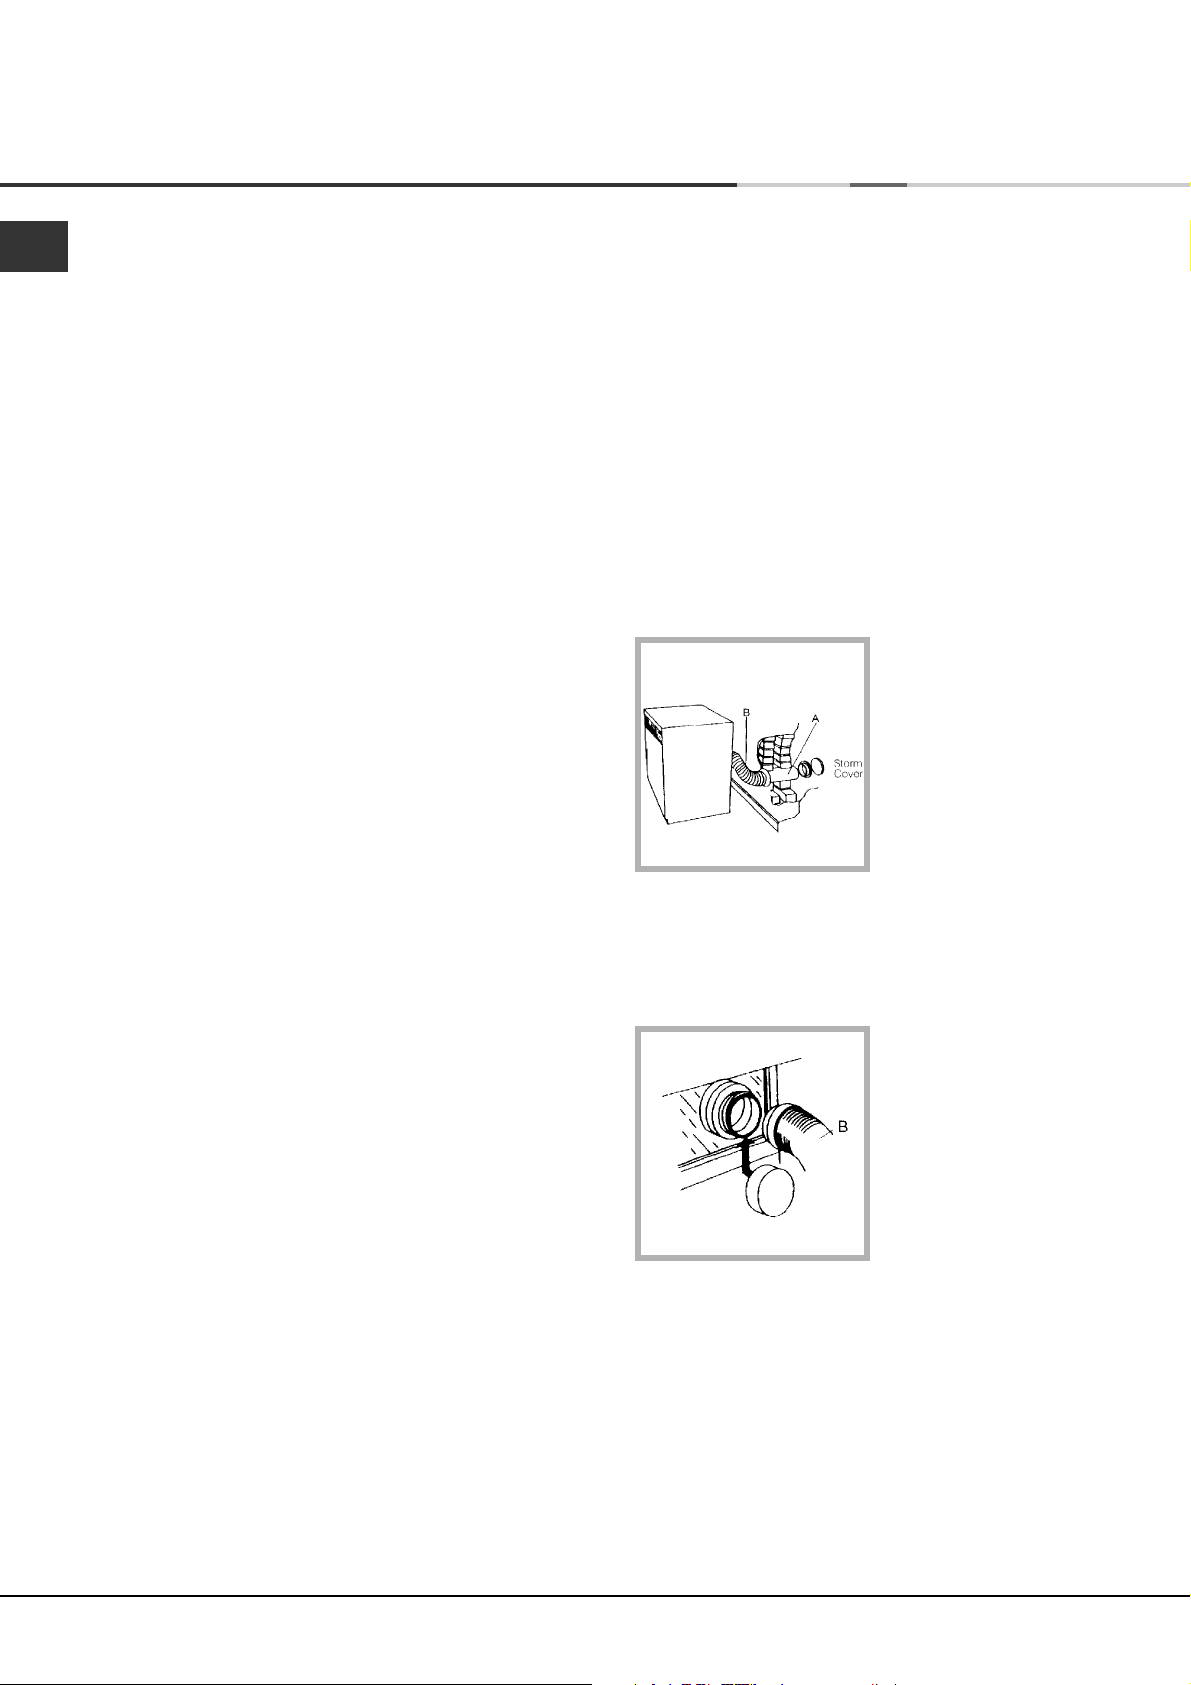
Depending on how often you use your dryer, it is
essential that areas A and B are checked periodically
to remove lint or debris.
The vent tube adaptor must be fitted securely thus
preventing any humid air from being emitted back into
the room.
! The Dryer should not be pushed so far back that the
tube adaptor is pulled out of position or the tube is
squashed or bent.
! The tube should be kept clear of the air intake vent
and kinks or ‘U’ bends must be avoided as these will
obstruct the tube or trap condensation.
2
Page 3

Open window venting
The end of the tube
should be directed
downwards, to prevent
warm moist air from
condensing in the room
or in the dryer.
! Do not use extension cords.
! The power cord must not be bent or squashed.
! The power supply cord should be checked periodically
and replaced by a cord specially prepared for this dryer
and fitted only by authorised technicians (see
Service). New or longer power cords are supplied at
an extra charge by authorised dealers..
GB
Installation
! Ensure that the dryer is adequately ventilated and
that the end of the vent tube is not directed towards
the air intake duct.
! The vent tube must always be fitted for optimum
performance.
! Make sure that the vent tube and air intake vents
are not obstructed or blocked.
! The dryer must not recycle exhaust air.
! Misusing a tumble dryer may create a fire hazard.
! Do not discharge exhaust air into a flue which is
used for exhaust fumes from other appliances that
burn gas or other fuels.
Electrical connections
Make sure of the following before you insert the plug
into the the electrical socket:
●
The socket must be grounded.
●
The socket must be able to sustain the machines
maximum power, which is indicated on the rating
label (see Dryer Description).
●
Power voltage must be within the values indicated
on the rating label (see Dryer Description).
! The manufacturer denies any responsibility should
any of these rules not be followed.
! If in doubt about any of the above consult a qualified
electrician.
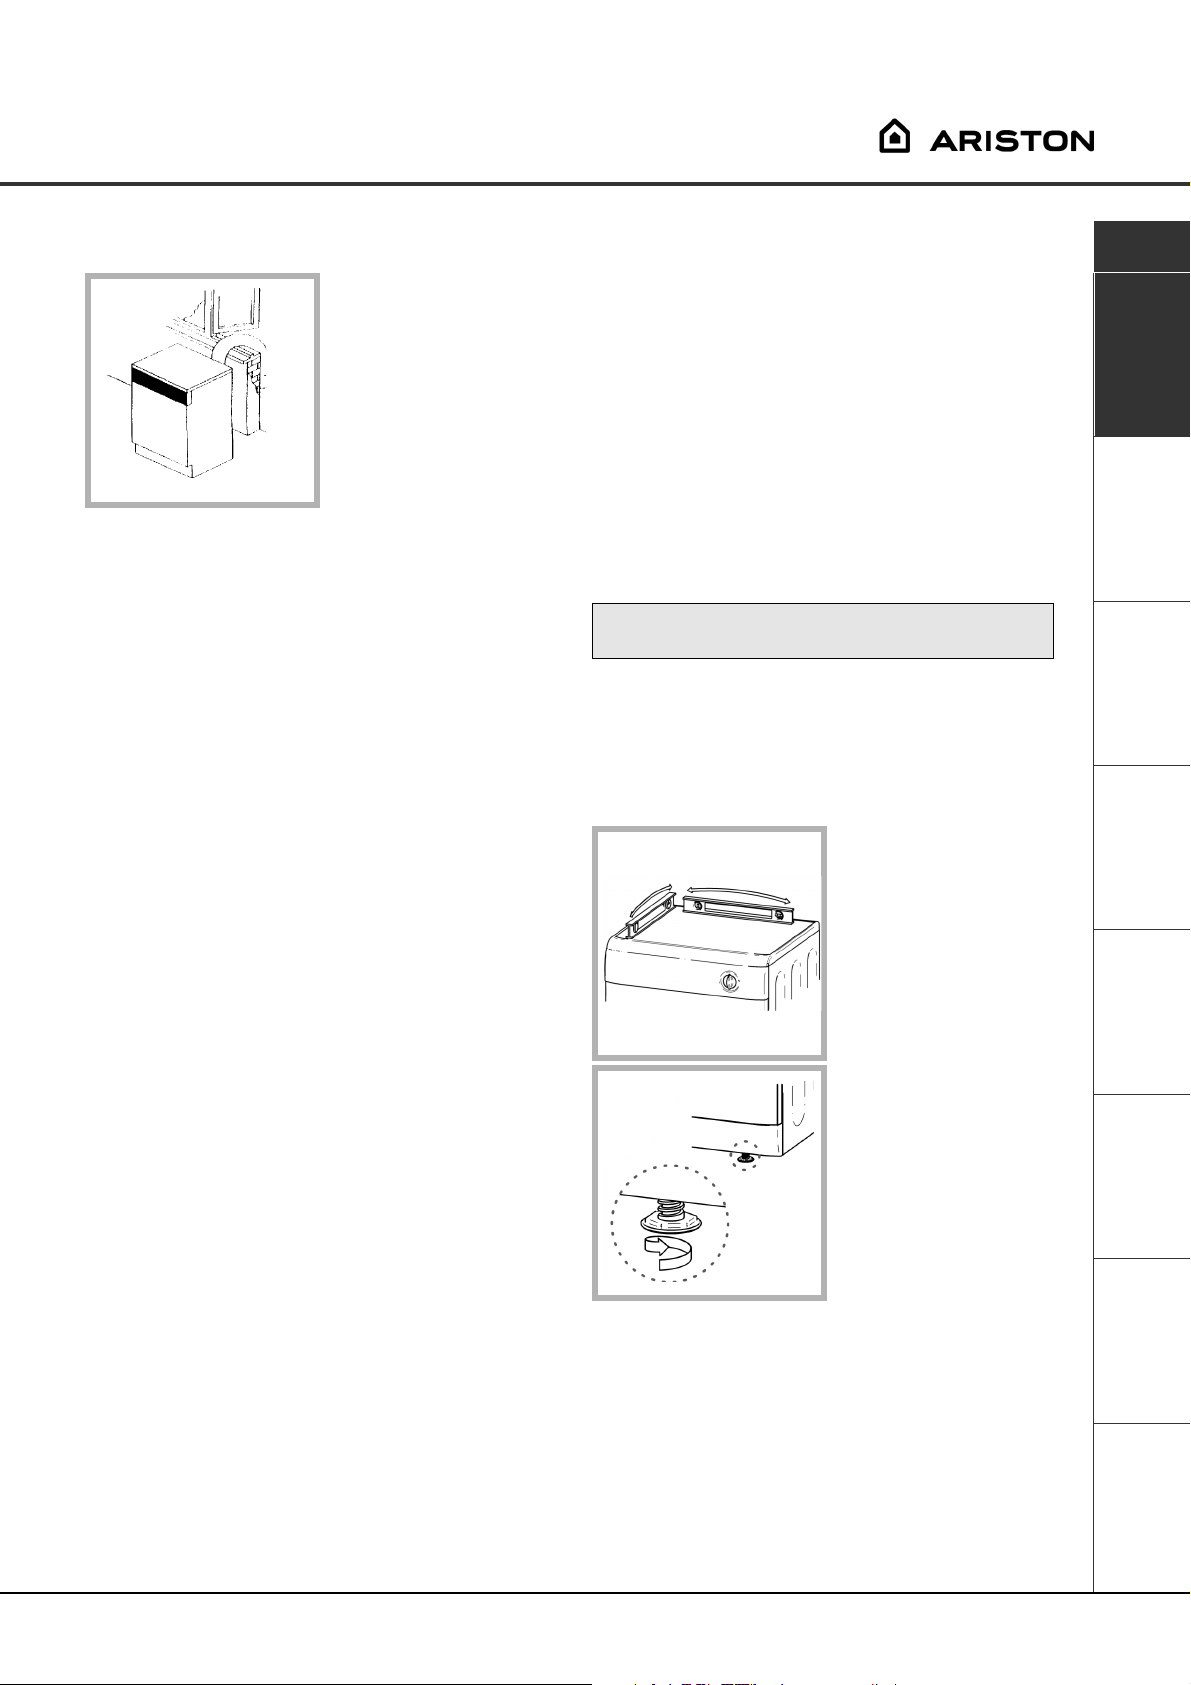
Levelling your dryer
The dryer must be installed level for correct operation.
When you have installed
your dryer in its final
location check that it is
level first side to side,
then front to back.
If the dryer is not level,
use a wooden block to
support it while adjusting
the two front legs up or
down, until your dryer is
level.
Description
Programmes Laundry
Start and
Warnings and
Suggestions
Maintenance and
Care Troubleshooting Service
●
The socket must be compatible with the dryers
plug. Should this not be the case, replace the
plug or the socket.
! The dryer must not be installed outdoors, even if
the space is sheltered. It can be very dangerous if it
is exposed to rain or storms.
! Once installed, the dryers electrical wire and plug
must be within easy reach.
Before you start using your dryer
Once you have installed your dryer and before you
use it, clean the inside of the drum to remove any
dust that could have accumulated during transport.
3
Page 4
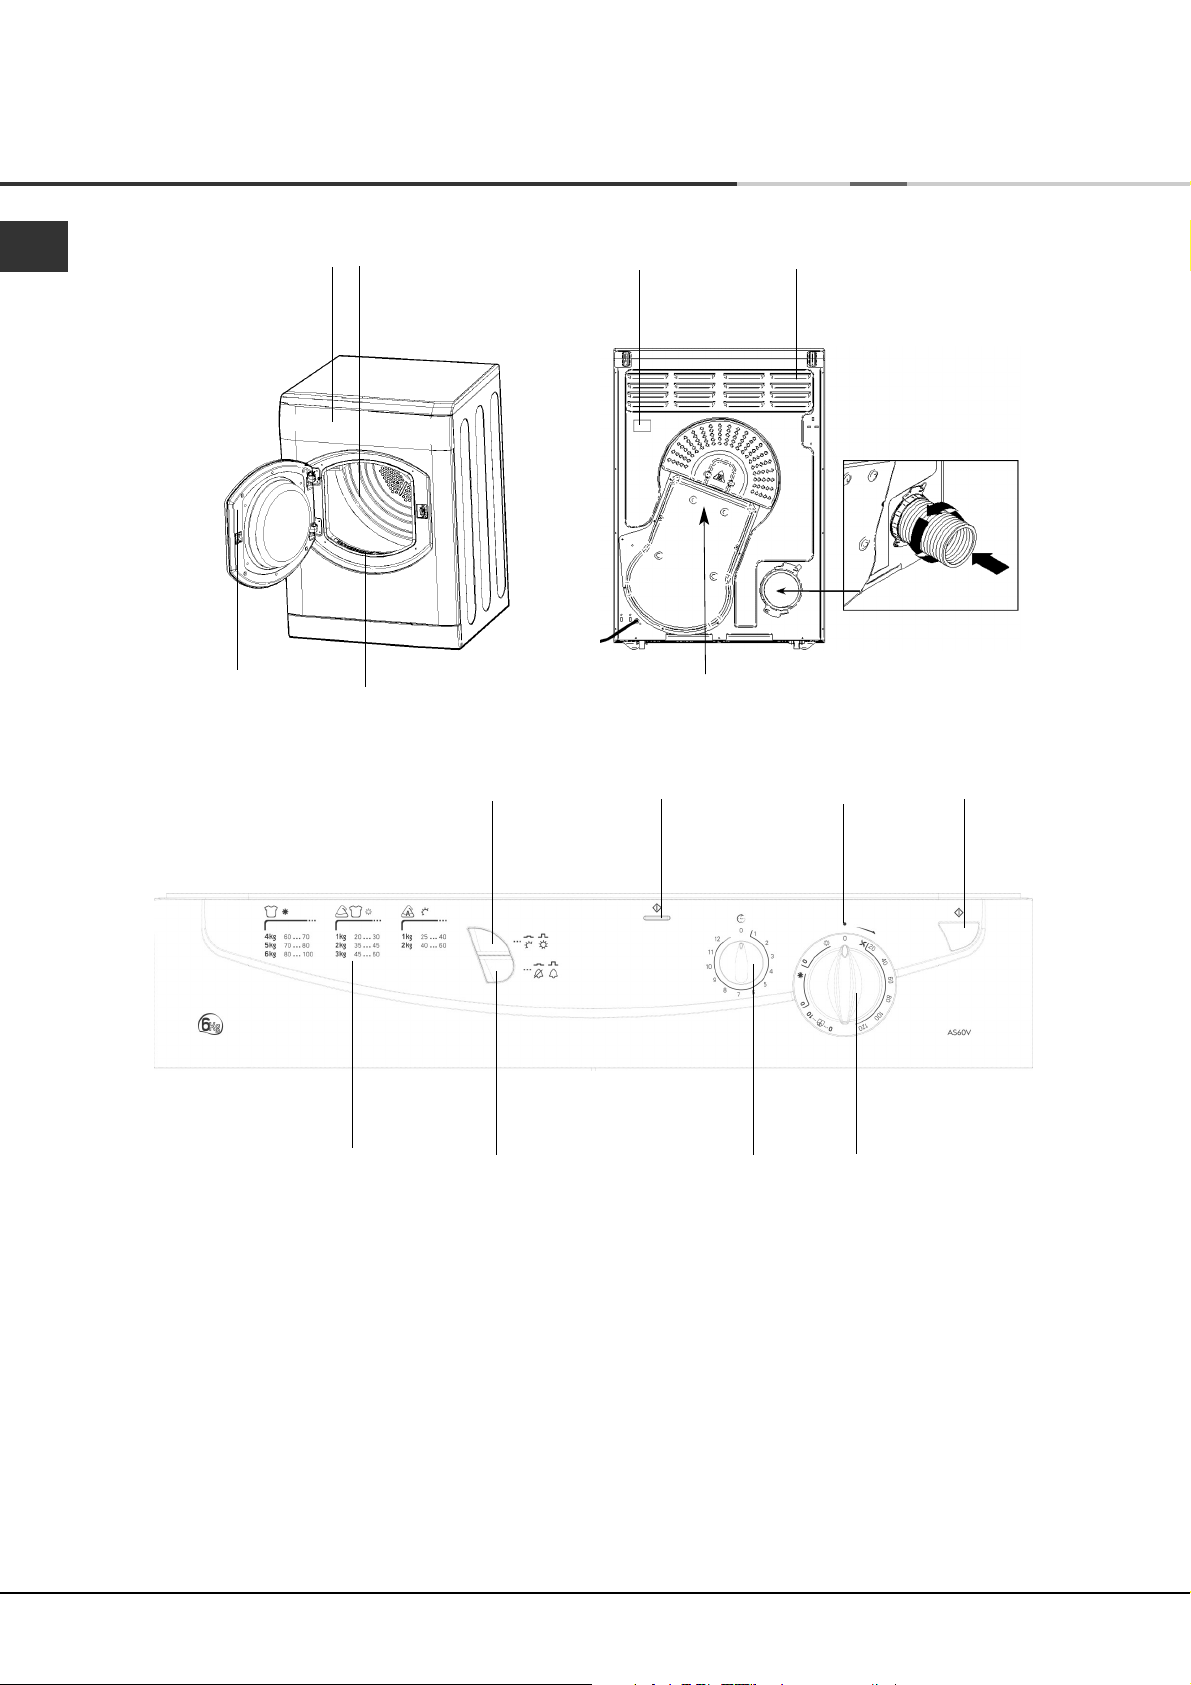
Dryer Description
GB
The front The back
Control Panel
Model & Serial
numbers
Drum
Filter
Rating plate
Caution: Hot!
Control panel
HEAT
Button
ACTIVE
Light
Air Intake Vent
Indicator
Vent Tube fitted here
START
Button
Drying Guide
The START button begins drying a selected
programme (see Start and Programmes).
The HEAT button selects drying temperature (see
Start and Programmes).
OUT: HIGH heat. IN: LOW heat.
The ALARM buzzer signals the end of a drying cycle.
OUT: Buzzer ON. IN: Buzzer OFF.
The ACTIVE indicator light signals that your dryer is in
use. This light will glow when the START button is
pressed. It will remain on until the door is opened or
the power is turned off. This light will be on during a
delayed start programme.
4
ALARM
Button
TIMER
Knob
The Drying Guide allows you to consult a user
friendly table of fabric types and load capacities.
The TIMER knob sets a delay on the dryer’s start time.
Rotate it clockwise until you reach the number of
hours you want to delay the start time: If you have
gone too far, turn the knob counter-clockwise (see
Start and Programmes).
The PROGRAMMES knob sets the programme: rotate
it clockwise, never counter-clockwise, until the
indicator is pointing to the programme you want to
select (see Start and Programmes).
PROGRAMMES
Knob
Page 5

Start and Programmes
Choosing a programme
1. Plug the dryer into the electrical socket.
2. Sort your laundry according to fabric type (see
Laundry).
3. Open the door and make sure the filter is clean
and in place (see Maintenance).
4. Load the machine and make sure items are not
in the way of the door seal. Close the door.
5. Choose the drying programme by checking the
Programmes table (see Programmes) as well as
the indications for each type of fabric (see
Laundry).
- Set the temperature with the HEAT button.
- Select a programme or drying time by rotating
the PROGRAMMES knob clockwise.
6. Set a delay time by using the TIMER knob if
necessary.
7. If you wish to eliminate the buzzer sound, press
the ALARM button.
8. Press the START button to begin. The DRYING
indicator light will turn on and will stay on, even
during the delay. The indicator light will remain
on until you open the dryer door.
During the drying programme, you can check on
your laundry and take out items that are dry
while others continue drying. When you close
the door again, press the START button in order
to resume drying.
9. About 10 minutes before the programme is
completed, it enters the final COOL TUMBLE
phase (fabrics are cooled), which should always
be allowed to complete.
10. The buzzer will warn you when drying is
complete. Open the door, take the laundry out,
clean the filter and replace it (see Maintenance).
11. Unplug the dryer.
GB
Installation
Description
Programmes Laundry
Start and
Warnings and
Suggestions
Maintenance and
Care Troubleshooting Service
5
Page 6

GB
Start and Programmes
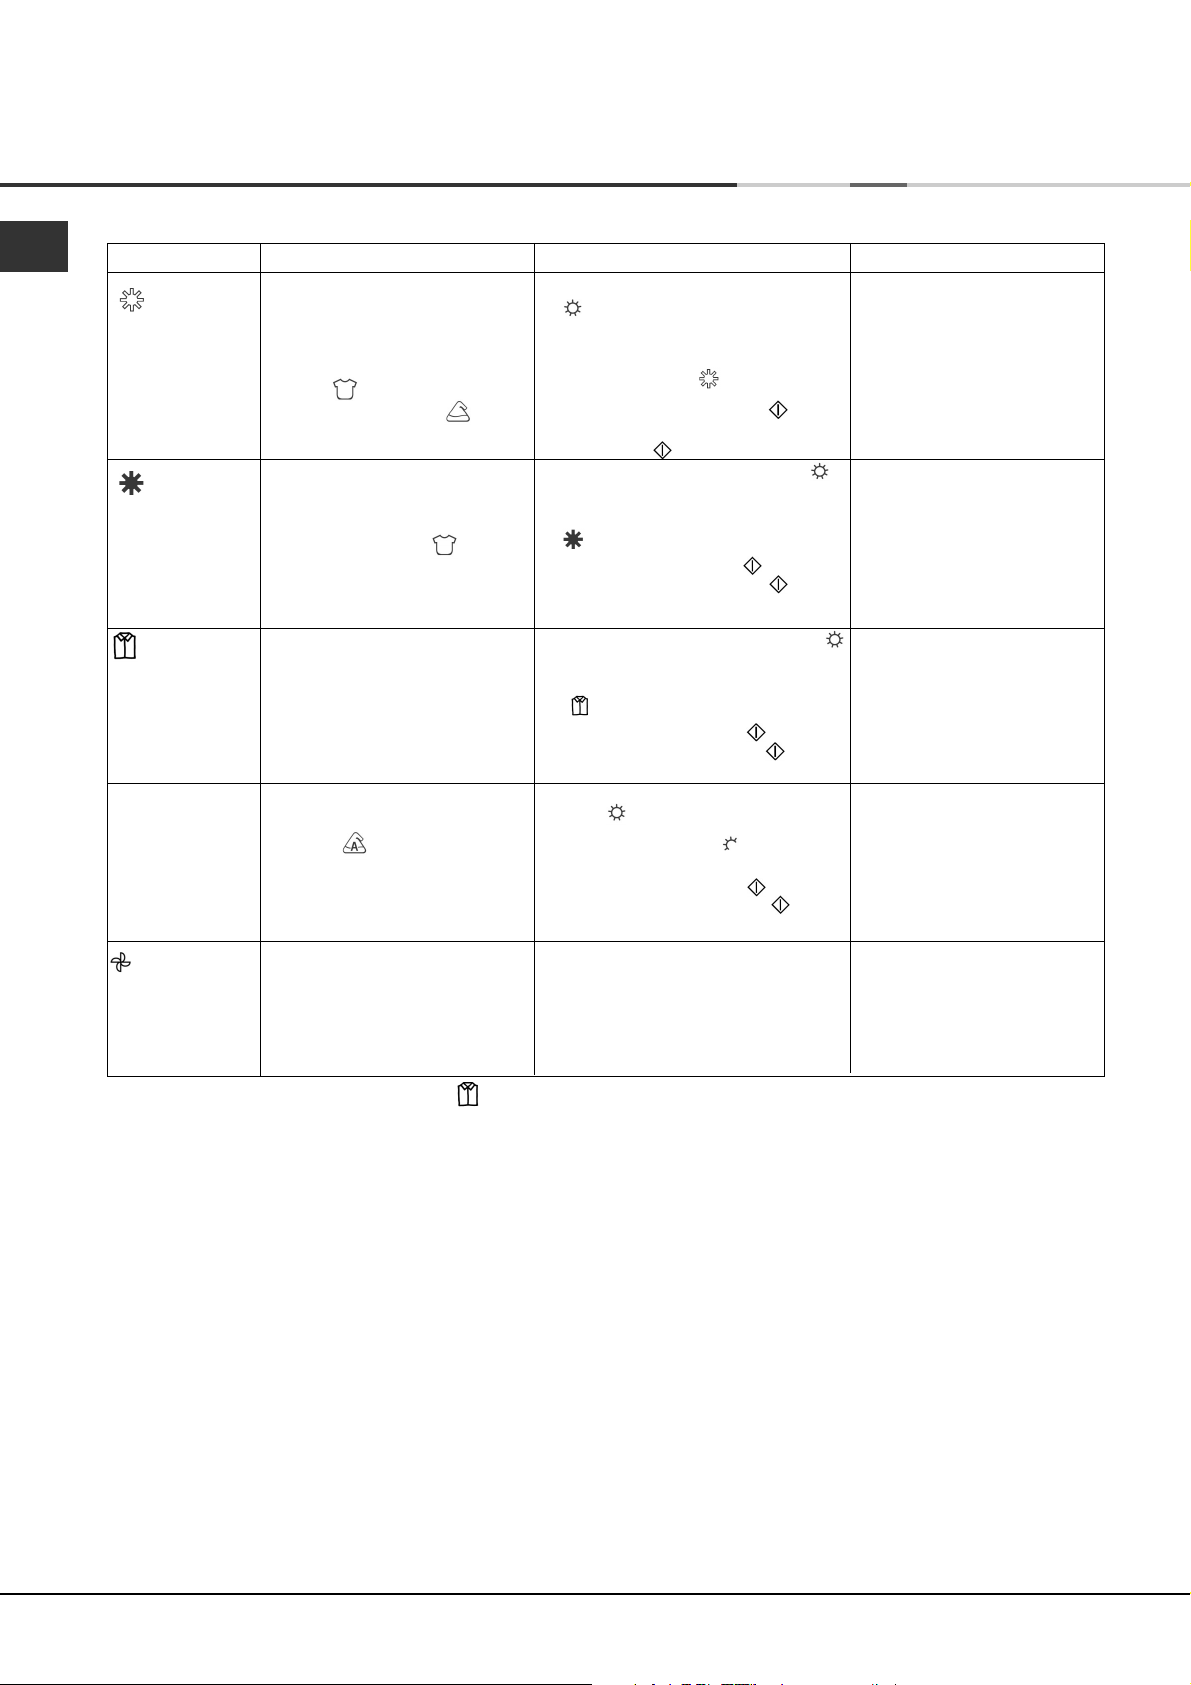
Programmes
Programme
Automatic
Drying
(average loads)
Automatic
Drying
(large loads)
Easy Iron
Timed Drying
up to 120 minutes
Cool Tumble
Phase
What it does... How to set it...
Dries completely:
your clothes are ready to be
worn. For average loads (from 1
to 3kg) of Cotton ,
polycotton or synthetics .
Dries completely:
your clothes are ready to be
worn. For large loads (from 3 to
6kg) of Cotton .
Brief programme (approximately
10 minutes) that softens fibres of
clothing that is ready for ironing.
Dries wet clothes that will be
ironed, Acrylic fibres , or
small loads (less than 1kg).
Heating elements turn
themselves off and clothing is
cooled down.
1. Select HIGH HEAT by pressing
the HEAT button.
2. Position the PROGRAMMES knob
on .
3. Press the START button , the
ACTIVE light will turn on.
1. Select HIGH HEAT by pressing
the HEAT button.
2. Position the PROGRAMMES knob
on .
3. Press the START button , the
ACTIVE light will turn on.
1. Select HIGH HEAT by pressing
the HEAT button.
2. Position the PROGRAMMES knob
on .
3. Press the START button , the
ACTIVE light will turn on.
1. Select required heat setting HIGH
HEAT or LOW HEAT by
pressing the HEAT button.
2. Position the PROGRAMMES knob
on the desired time.
3. Press the START button , the
ACTIVE light will turn on.
This is the programmes final phase.
Approximately 10 minutes before the
finish, the knob advances
automatically to the Cool Tumble
Phase. After the Buzzer will sound (if
selected) and the clothing is ready
to be taken out.
Note:
! If you select LOW HEAT,
this programme will not dry
your clothes. For Acrylic
fibres or small loads select
Timed Drying.
This programme can also be
used for large loads if you
require a slightly drier result.
! If you select LOW HEAT,
this programme will not dry
your clothes. For Acrylic
fibres or small loads select
Timed Drying.
This programme can also be
used for average loads if you
prefer a damper result.
! This is not a drying
programme (see below).
Consult suggested drying
times (see Laundry).
Always allow the dryer to
complete this phase.
Easy Iron Programme
‘Easy Iron’ is a short 10 minute programme (8 minutes of heat followed by a 2 minute cool tumble period) which
fluffs the fibres of clothing that have been left in the same position/location for an extended period of time. The cycle
relaxes the fibres and makes them easier to iron and fold.
! ‘Easy Iron’ is not a drying programme and should not be used for wet articles of clothing.
For best results:
1. Do not load more than the maximum capacity.
These numbers refer to the dry weight:
Fabric Maximum load
Cotton and Cotton mixtures 2.5kg
Synthetics 2kg
Denim 2kg
2. Unload the dryer immediately after the end of the programme, hang, fold or iron the articles and put
them away in the closet. Should this not be possible repeat the programme.
The ‘Easy Iron’ effect varies from one fabric to the next. It works well on traditional fabrics like Cotton or Cotton mix,
and less well on acrylic fibres and on materials such as Tencel®.
6
Page 7

Laundry
Sorting your laundry
●
Check symbols on clothing labels to make sure
that the articles can be tumble dried.
●
Sort laundry by fabric type.
●
Empty pockets and check buttons.
●
Close zippers and hooks and tie loose belts and
strings.
●
Wring out each item in order to eliminate as much
excess water as possible.
! Do not load dripping wet clothes into the dryer.
Maximum load size
Do not load more than maximum capacity.
These numbers refer to dry weight:
Natural fibres: 6kg max (13lb)
Synthetic fibres: 3kg max (6.6lb)
! DO NOT overload the dryer as this could result in
reduced drying performance.
Typical load
Clothes
Blouse Cotton 150g 5oz
Other 100g 3oz
Dress Cotton 500g 1lb 2oz
Other 350g 12oz
Jeans 700g 1lb 6oz
10 nappies 1000g 2lb 3oz
Shirt Cotton 300g 10oz
Other 200g 7oz
T-Shirt 125g 4oz
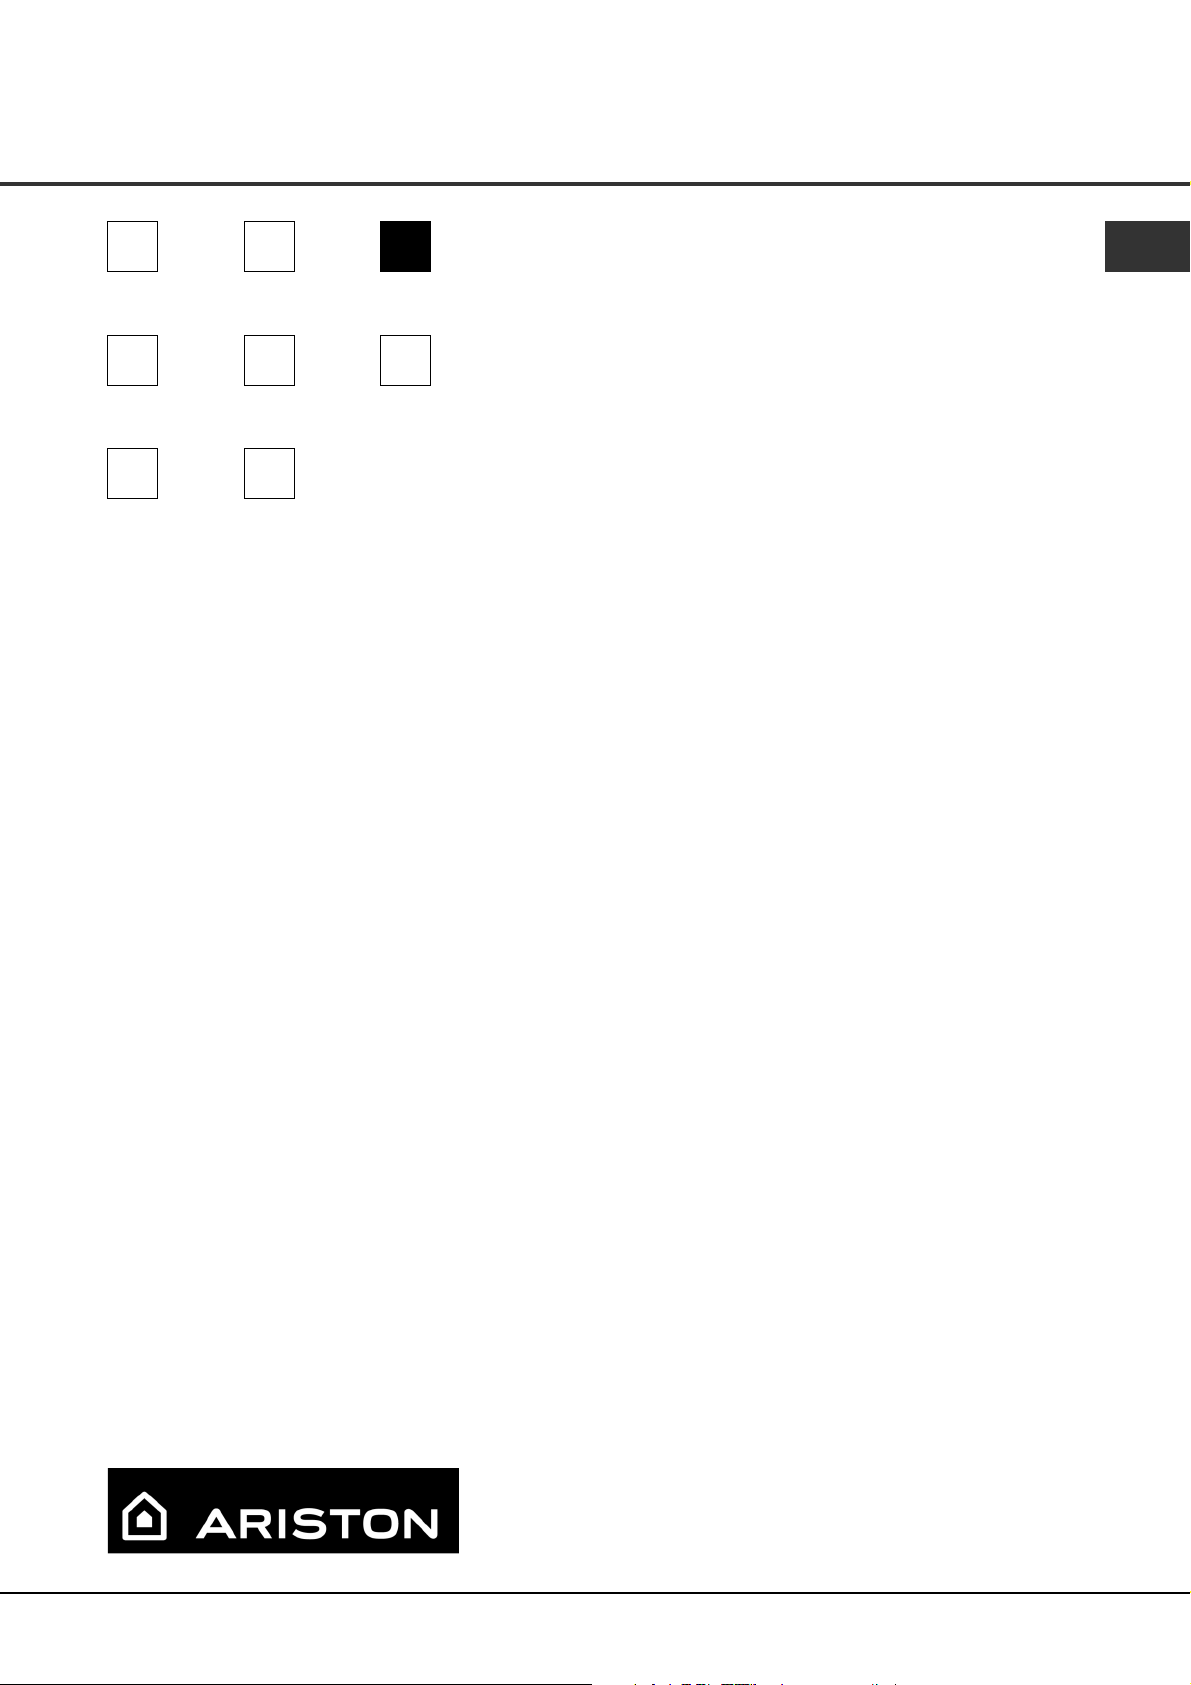
Wash Care Labels
Look at the labels on your garments, especially when
tumble drying for the first time. The following symbols
are the most common:
May be tumble dried
Do not tumble dry
Tumble dry at high heat setting
Tumble dry at low heat setting
Items not suitable for tumble drying
●
Articles that containing rubber or rubber-like
materials or plastic film (pillows, cushions, or PVC
rainwear), any other flammable articles or objects
that contain flammable substances (towels soiled
with hair spray).
●
Glass fibres (certain types of draperies)
●
Items which have been dry cleaned
●
Items with the ITCL Code (see Special
clothing items). These can be cleaned with special
at-home dry cleaning products. Follow instructions
carefully.
●
Large bulky items (quilts, sleeping bags, pillows,
cushions, large bedspreads etc). These expand
when drying and would prevent airflow through
the dryer.
GB
Installation
Description
Programmes Laundry
Start and
Warnings and
Suggestions
Maintenance and
Care Troubleshooting Service
Household Items
Duvet cover Cotton 1500g 3lb 5oz
(Double) Other 1000g 2lb3oz
Large Tablecloth 700g 1lb 6oz
Small Tablecloth 250g 9oz
Tea Towel 100g 3oz
Bath Towel 700g 1lb 6oz
Hand Towel 350g 12oz
Double Sheet 500g 1lb 2oz
Single Sheet 350g 12oz
At the end of a drying cycle, cottons could still be
damp if you grouped cottons and synthetics together.
If this happens simply give them an additional short
period of drying.
7
Page 8
Laundry
GB
Special clothing items
Blankets and Bedspreads: acrylic items (Acilan,
Courtelle, Orion, Dralon) must be dried with special
care on LOW heat setting. Avoid drying for a long
period of time.
Pleated or creased garments: read the manufacturer’s
drying instructions on the garment.
Starched articles: do not dry these with non-starched
items. Make sure that as much of the starch solution is
removed from the load as possible before placing it in
the dryer. Do not over-dry: the starch will become
powdery and leave your clothing limp, which defeats
the purpose of starch.
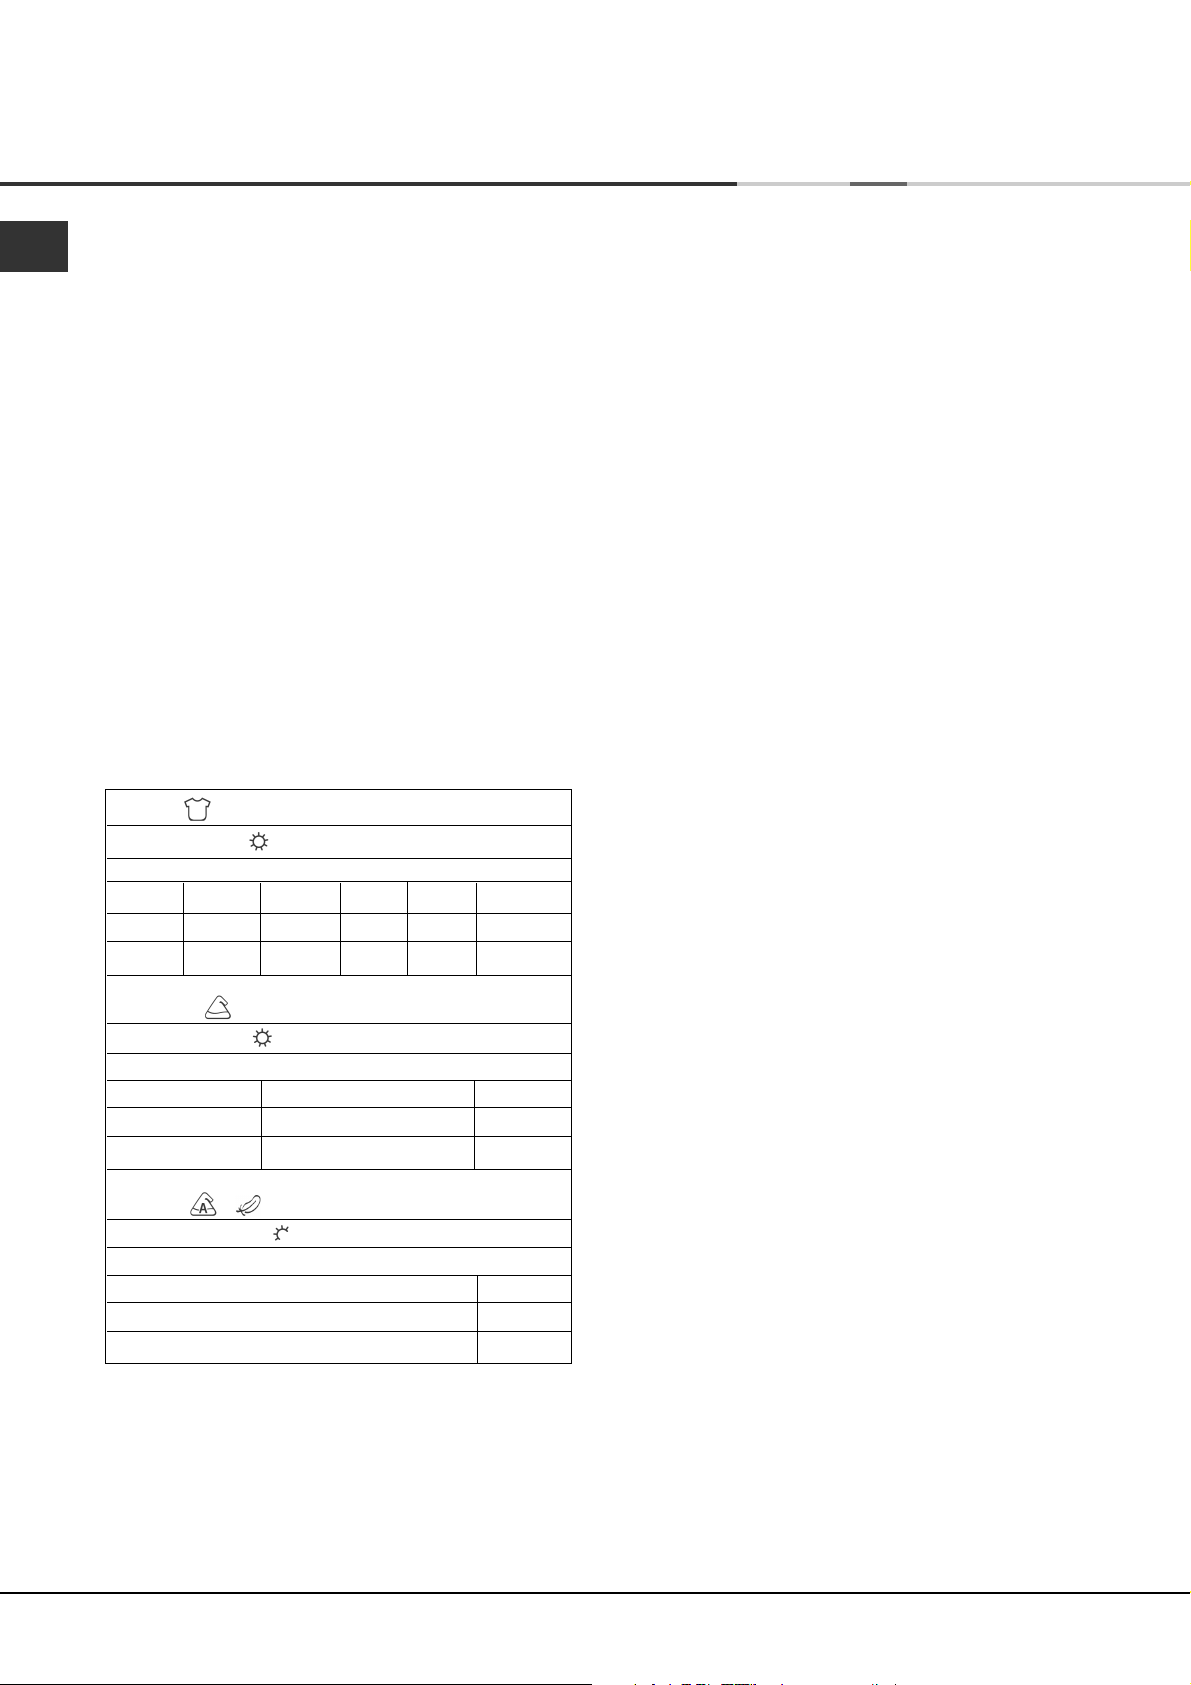
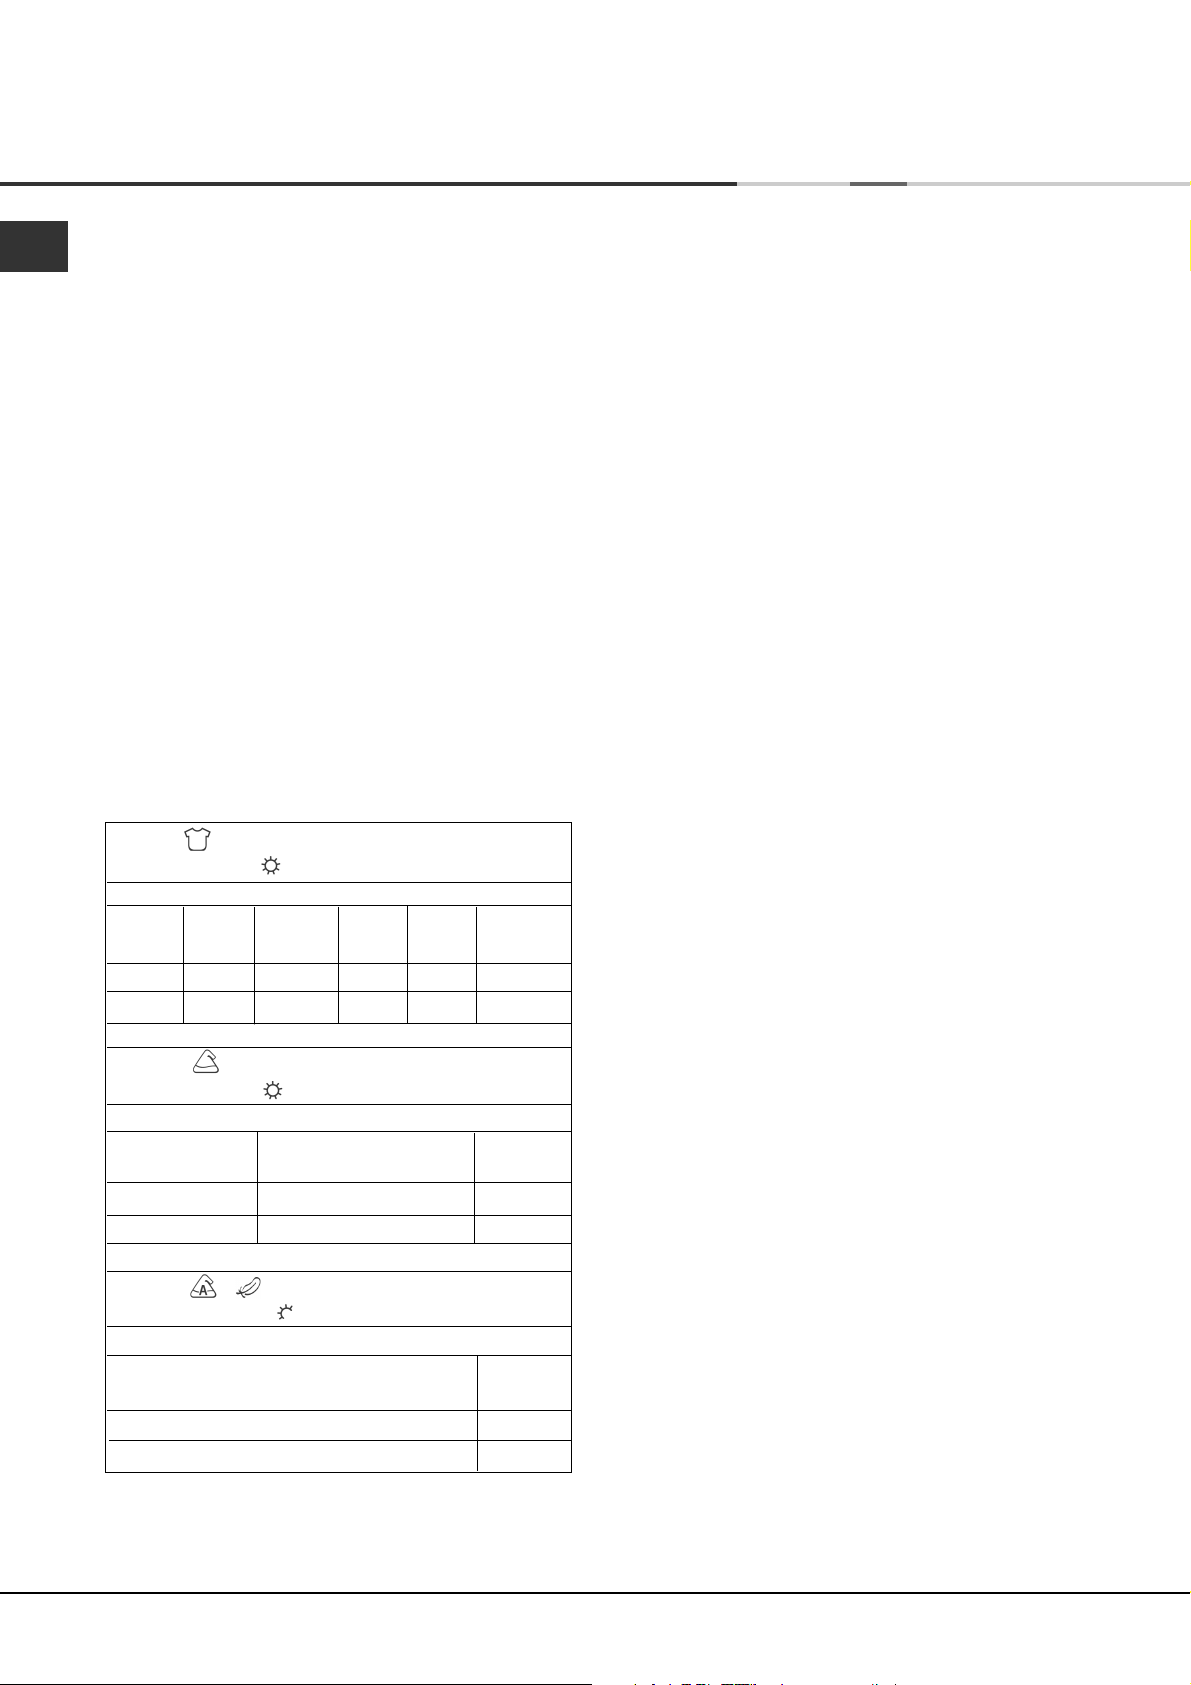
Drying times
The table below presents APPROXIMATE drying times
in minutes. Weights refer to dry garments:
Cottons
High (full) Heat
Drying times 800-1000rpm in washing machine
Half Load Full Load
1kg 2kg 3kg 4kg 5kg 6kg
20-30 35-45 45-60 60-70 70-80 80-100
Synthetics
High (full) Heat
Drying times on reduced spin in washing machine
Half Load Full Load
1kg 2kg 3kg
20-30 35-45 45-60
Times are approximate and can vary depending
upon:
●
Amount of water retained in clothes after spin
cycle: towels and delicates retain a lot of water.
●
Fabrics: items that are the same type of fabric but
different textures and thicknesses may not have
the same drying time.
●
Quantity of laundry: single items or small loads
may take longer to dry.
●
Dryness: If you are going to iron some of your
clothes, they can be taken out while still a bit
damp. Others can be left longer if you need them
to be completely dry.
●
Heat setting.
●
Room temperature: if the room where the dryer is
located is cold, it will take longer for the dryer to
dry your clothes.
●
Bulk: some bulky items can be tumble dried with
care. We suggest that you remove these items
several times, shake them out, and return them to
the dryer until finished.
! Do not over-dry your clothes.
All fabrics contain a little natural moisture, which
keeps them soft and fluffy.
Acrylics /
Low (gentle) Heat
Drying times on reduced spin in washing machine
Half Load Full Load
1kg 2kg
25-40 40-60
8
Page 9
Warnings and Suggestions
●
! The appliance has been designed and built
according to international safety standards.
These warnings are given for safety reasons and
must be read carefully.
This appliance conforms to the following
EEC Directives:
- 72/23/EEC and 93/68/EEC (Low Voltage Equipment)
- 89/336/EEC, 92/31/EEC and 93/68/EEC
(Electromagnetic Compatibility)
General safety
●
This tumble dryer has been designed for home,
and not professional use.
●
This dryer must be used by adults, and the
instructions in this booklet should be followed carefully.
●
Do not touch the appliance while barefoot or with
wet hands or feet.
●
Unplug the machine by pulling on the plug, not
the cord.
●
Children must not be in proximity of the dryer
when in use. After using the dryer, turn it off and
unplug it. Keep the door closed to make sure that
children do not use it as a toy.
●
The appliance must be installed correctly and
have proper ventilation. The air intake vents
behind the machine, the outlet vents and the vent
tube should never be obstructed (see Installation).
●
Never direct the vent tube outlet towards the air
intake at the back of the machine.
●
Never allow the tumble dryer to recycle exhaust air.
●
Never use the dryer on carpeting where the pile
height would prevent air from entering the dryer
from the base.
●
Check to see if the dryer is empty before loading it.
●
●
●
●
●
●
●
●
●
●
The back of the dryer could become very
hot. Never touch it while in use.
Do not use the dryer unless the filter is securely
in place (see Maintenance).
Do not use liquid fabric softeners in the dryer, add
it to the final rinse of your wash.
Do not overload the dryer (see Laundry) for
maximum loads.
Do not load items that are dripping wet.
Tumble dry items only if they have been washed
with detergent and water, rinsed and been through
the spin cycle. It is a fire hazard to dry items that
HAVE NOT been washed with water.
Carefully check all instructions on clothing labels
(see Laundry).
Do not dry garments that have been treated with
chemical products.
Never dry articles that are contaminated with
flammable substances (petrol, oil, paint, hair
spray, creams, cooking fat or oils).
Do not tumble dry rubber, foam rubber, plastic, plastic
foam, nappy pants or liners, polythene or paper.
Do not tumble dry large, very bulky items.
●
Do not tumble dry acrylic fibres at high temperatures.
●
Complete each programme with its Cool Tumble Phase.
●
Do not turn off the dryer when there are still warm
items inside.
●
Clean the filter after each use (see Maintenance).
●
Do not allow lint to collect around the dryer.
●
Never climb on top of the dryer. It could result in
damage.
●
Always follow electrical standards and requirements
(see Installation).
●
Always buy original spare parts and accessories
(see Service).
Recycling and disposal information
As part of our continued commitment to helping the
environment, we reserve the right to use quality recycled
components to keep down customer costs and minimise
material wastage.
●
Disposing of the packaging material: follow local
regulations, so the packaging can be recycled.
●
To minimise risk of injury to children, remove the
door and plug - then cut off mains cable, flush
with the appliance. Dispose of these parts separately
to ensure that the appliance can no longer be
plugged into a mains socket.
Disposal of old electrical appliances
The European Directive 2002/96/EC on Waste Electrical
and Electronic Equipment (WEEE), requires that old
household electrical appliances must not be disposed
of in the normal unsorted municipal waste stream.
Old appliances must be collected separately in order
to optimise the recovery and recycling of the materials
they contain and reduce the impact on human health
and the environment.
The crossed out “wheeled bin” symbol on
the product reminds you of your obligation,
that when you dispose of the appliance it
must be separately collected.
Consumers should contact their local authority or
retailer for information concerning the correct disposal
of their old appliance.
Saving energy and respecting the
environment
●
Wring out items to eliminate excess water before
tumble drying (if you use a washing machine first,
select a high spin cycle). Doing this will save time
and energy during drying.
●
Always dry full loads - you save energy: single
items or small loads take longer to dry.
●
Clean the filter after each use to contain energy
consumption costs (see Maintenance).
GB
Installation
Description
Programmes
Start and
Laundry
Warnings and
Suggestions
Maintenance and
Care Troubleshooting Service
9
Page 10
Maintenance and Care
GB
Switching off the electricity
Unplug your dryer when not using it, when cleaning it
and during all maintenance operations.
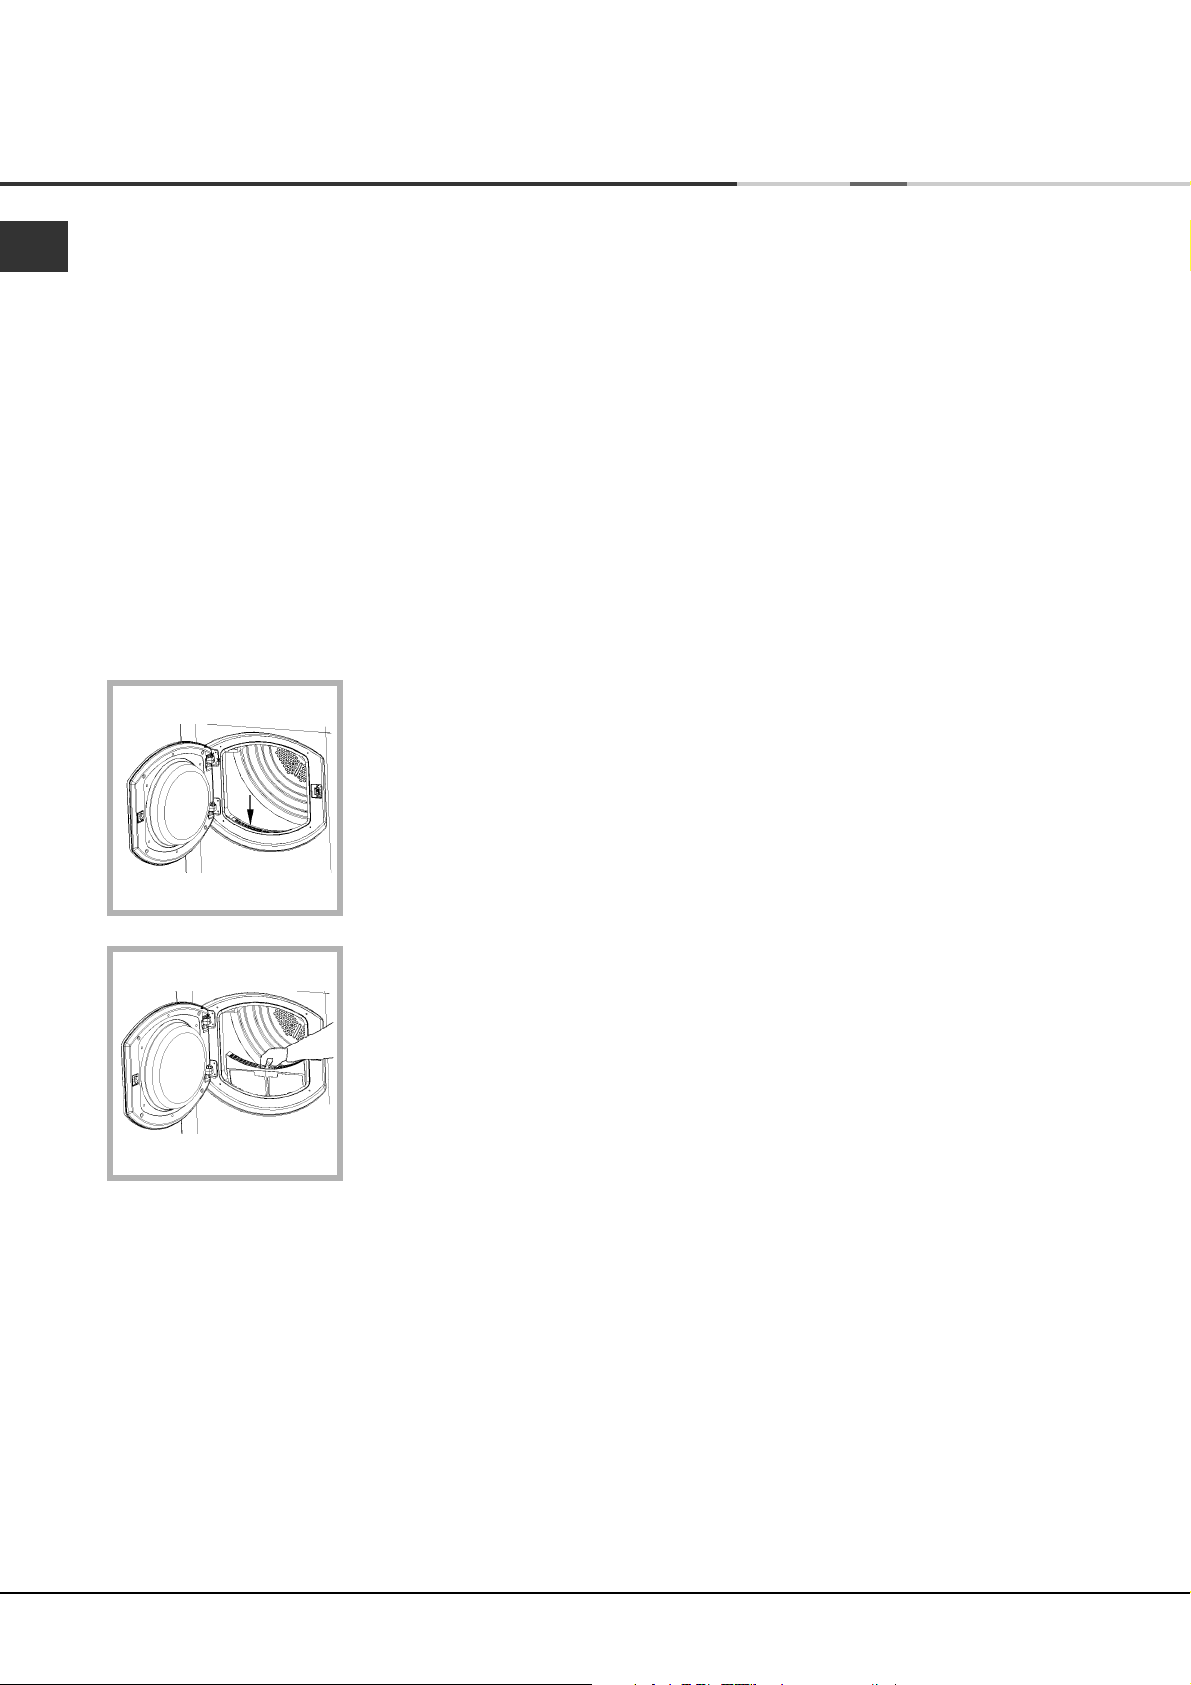
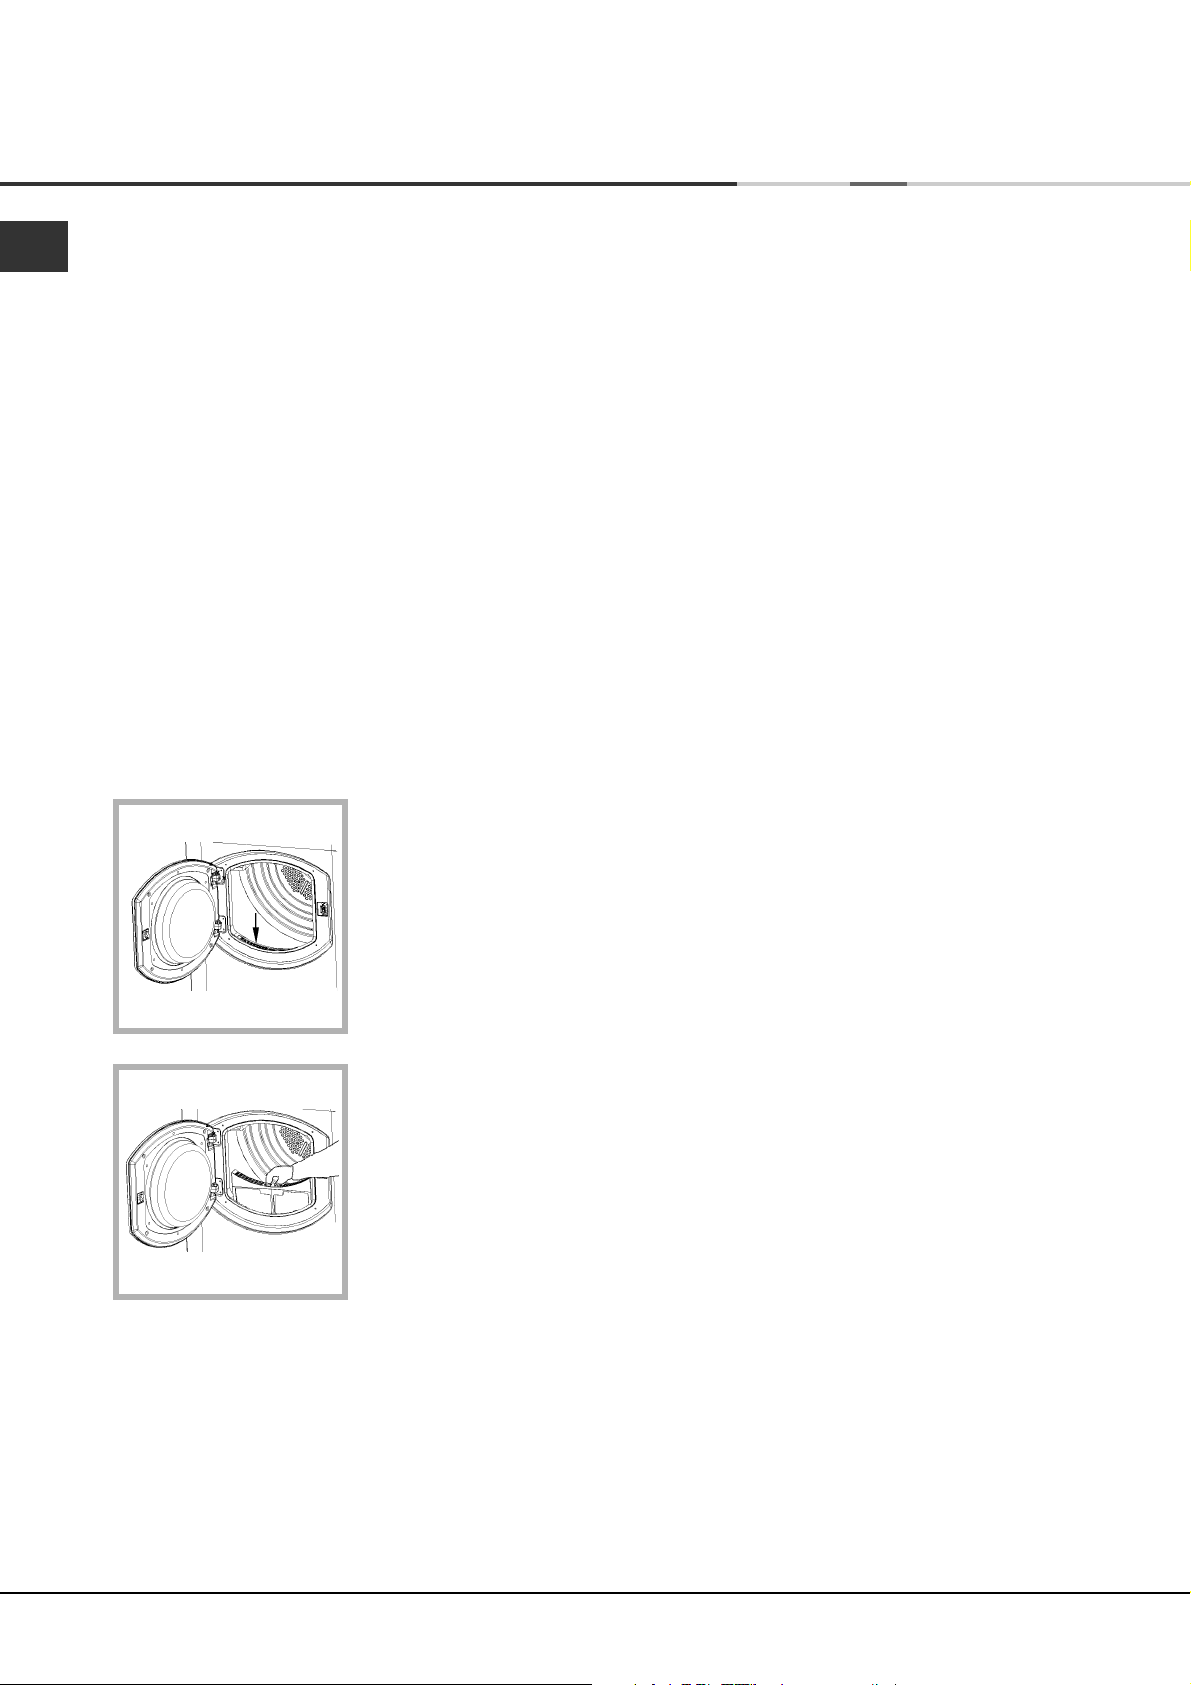
Clean the filter after each cycle
The filter is an important part of your dryer:
it accumulates lint and fluff that is formed while drying.
Small items could also become trapped in the filter.
When finished drying, therefore, clean the filter by
rinsing it under running water or with your vacuum
cleaner. Should the filter become clogged up, the airflow
inside the dryer will be seriously compromised: drying
times lengthen and you will consume more energy. It
may also damage your dryer.
The filter is found in front
of the dryer trim
(see diagram).
Check the drum after each cycle
Turn the drum manually in order to remove small items
(handkerchiefs) that could have been left behind.
Cleaning the drum
! Do not use abrasives, steel wool or stainless steel
cleaning agents to clean the drum.
A coloured film may start to appear on the stainless
steel drum, this may be caused by a combination of
water and, or cleaning agents such as fabric conditioner
from the wash. This coloured film will not affect the
dryer performance.
Cleaning
●
External parts in metal or plastic and rubber parts
can be cleaned with a damp cloth.
●
Periodically check the vent tube and any
permanent venting fixture to make sure that there
has been no accumulation of fluff or lint, and
remove it.
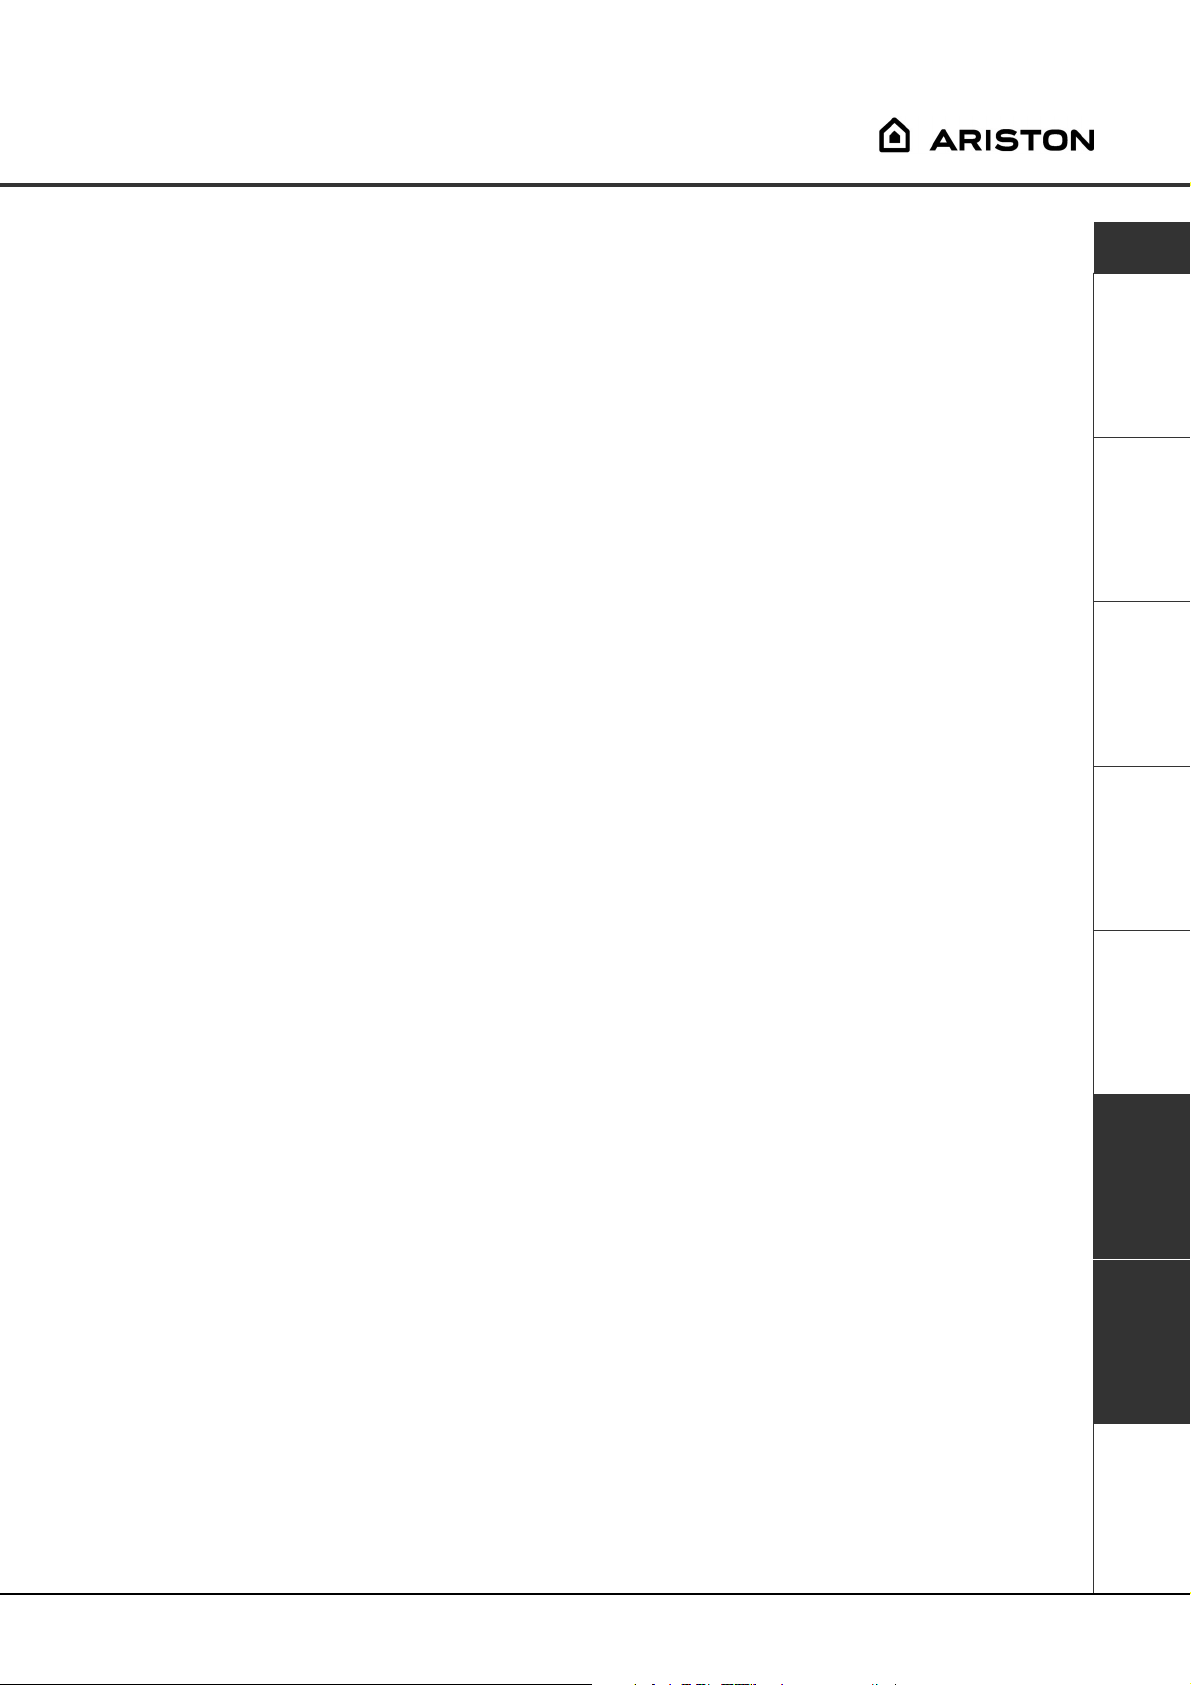
Removing the filter:
1. Pull the plastic grip of
the filter upwards (see
diagram).
2. Clean the filter and
replace it correctly.
Ensure the filter is fully
located flush into the
tumble dryer trim.
! Do not use the dryer without replacing the filter.
●
Remove lint that collects around the filter and the
outlet vents.
! Do not use solvents or abrasives.
! Your dryer uses special bearing components which
do not need lubrication.
! Have your dryer checked regularly by authorised
technicians to ensure electrical and mechanical safety
(see Service).
10
Page 11

Troubleshooting
One day your dryer seems not to be working. Before you call your Service Centre (see Service), go through the
following troubleshooting suggestions:
Problem:
The tumble dryer won’t start.
Possible causes / Solution:
●
The plug is not plugged into the socket, or not making contact.
●
There has been a power failure.
●
The fuse has blown. Try to plug another appliance into the socket.
●
You are using an extension cord? Try to plug the dryer’s power cord
directly into the socket.
●
The door is not closed securely?
●
The PROGRAMMES knob has not been set properly (see Start and
Programmes).
●
The START button has not been pressed (see Start and Programmes).
Drying cycle will not begin.
Its taking a long time to dry.
●
You have set a delayed time (see Start and Programmes).
●
The filter has not been cleaned (see Maintenance).
●
The temperature setting is not ideal for the type of fabric you are drying
(see Start and Programmes).
●
Auto Programmes require a HIGH temperature setting (see Start and
Programmes).
●
The correct programme has not been selected for the load (see Start
and Programmes).
●
The flexible vent tube is obstructed (see Installation).
●
The air intake vent is obstructed (see Installation).
●
The permanent ventilation flap on the storm cover is obstructed (see
Installation).
●
The items were too wet (see Laundry).
●
The dryer was overloaded (see Laundry).
GB
Installation Description
Programmes Laundry
Start and
Warnings and
Suggestions
Maintenance and
Care Troubleshooting Service
11
Page 12

Service
GB
Before calling the Service Centre:
●
Use the troubleshooting guide to see if you can
solve the problem yourself (see Troubleshooting).
●
If not, turn off the dryer and call the Service Centre
closest to you.
What to tell the Service Centre:
●
name, address and post code.
●
telephone number.
●
the type of problem.
●
the date of purchase.
●
the appliance model (Mod.).
●
the serial number (S/N).
This information can be found on the data label inside
the door of the machine.
Spare Parts
This dryer is a complex machine. Repairing it yourself
or having a non-authorised person try to repair it could
cause harm to one or more persons, could damage
the machine and could invalidate the spare parts
warranty.
Call an authorised technician if you experience problems
while using the machine.
The spare parts have been designed exclusively for
this appliance and not for other uses.
Service
12
Page 13
Libretto di istruzioni
ASCIUGATRICE
GB
English, 1
I
Italiano, 13
D
Deutsch, 37EEspañol, 49
NL
Nederlands, 73AArabic, 96
AS60V
F
Français, 25
P
Português, 61
Indice
Installazione, 14-15
Dove installare l’asciugatrice
Aerazione
Collegamento elettrico
Informazioni preliminari
Descrizione del prodotto, 16
Lato anteriore
Lato posteriore
Pannello di controllo
Avvio e programmi, 17-18
Scelta del programma
Tabella dei programmi
Bucato, 19-20
Controllo del bucato
Etichette con le istruzioni per il lavaggio
Tessuti particolari
Tempi di asciugatura
Avvertenze e suggerimenti, 21
Sicurezza
Smaltimento
Risparmio energetico e rispetto dell’ambiente
I
Cura e manutenzione, 22
Scollegamento dell’apparecchio dalla rete elettrica
Pulizia del filtro al termine di ogni ciclo
Controllo del cestello al termine di ogni ciclo
Pulizia dell’asciugatrice
Ricerca guasti, 23
Assistenza, 24
Ricambi
13
Page 14

Installazione
I
! Tenere a portata di mano il presente libretto, così da
poterlo consultare facilmente ad ogni evenienza.
Tenere il libretto sempre vicino all’asciugatrice; nel
caso in cui l’apparecchio venga venduto o ceduto ad
altre persone, ricordarsi di consegnare loro questo
libretto, così da permettere anche ai nuovi possessori
di conoscere le avvertenze e i suggerimenti sull’utilizzo
dell’asciugatrice.
! Leggere attentamente queste istruzioni: le pagine
che seguono contengono importanti informazioni
sull’installazione e utili suggerimenti sul funzionamento
dell’elettrodomestico.
! Fare attenzione a non rivolgere il tubo di aerazione
verso la presa d’aria, che si trova nel lato posteriore
dell’asciugatrice.
! Il tubo di aerazione non deve superare la lunghezza
massima di 2,4 metri; deve inoltre essere scosso con
frequenza per rimuovere eventuali depositi di laniccio,
polvere o acqua. Fare attenzione a non calpestare il tubo.
Sistema di aerazione fisso
Si consiglia di collegare il tubo di aerazione ad uno
dei sistemi di aerazione per finestra o porta, disponibili
presso il rivenditore da cui è stata acquistata
l’asciugatrice o presso il più vicino rivenditore di parti
di ricambio.
Dove installare l’asciugatrice
Foro di aerazione su parete
●
Le fiamme possono danneggiare l’asciugatrice che
deve pertanto essere installata lontano da cucine a
gas, stufe, termosifoni o piani di cottura.
●
Se l’elettrodomestico verrà installato sotto un banco
da lavoro, è necessario lasciare uno spazio vuoto
di almeno 10 mm sopra il pannello superiore
dell’elettrodomestico; i pannelli laterali dovranno
invece avere uno spazio libero intorno di almeno 15
mm. In questo modo sarà garantita la circolazione
dell’aria. Controllare che le prese d’aria del pannello
posteriore non siano ostruite.
●
Assicurarsi inoltre che l’ambiente in cui viene installata
l’asciugatrice non sia umido e che vi sia un
adeguato ricambio di aria.
3. Allo stesso modo, anche il foro nella parete deve essere
dritto e in discesa, così do non ostacolare il deflusso dell’aria
verso l’esterno.
1. Lasciare un’apertura
nella parete alla sinistra
del punto in cui verrà
installata l’asciugatrice.
2. Fare in modo che il
tubo sia quanto più
corto e dritto possibile,
così da evitare che
l’umidità, condensandosi,
possa rifluire
nell’asciugatrice.
Aerazione
Questo elettrodomestico asciuga il bucato
immettendo aria fredda, pulita e relativamente
asciutta, riscaldandola e facendola passare attraverso
i tessuti, che vengono così delicatamente asciugati.
Per agevolare l’asciugatura, l’aria umida viene espulsa
dalla parte posteriore attraverso un tubo di aerazione.
È importante che l’ambiente in cui si utilizza
l’asciugatrice sia sufficientemente aerato, così da
evitare il riciclo dei gas combusti da altri apparecchi.
Sistema di aerazione mobile
Quando si utilizza l’asciugatrice con il sistema di
aerazione mobile, è necessario collegare un tubo di
aerazione. Il tubo va fissato saldamente al foro di
ventilazione posteriore dell’asciugatrice (vedere la
sezione Descrizione del prodotto). Se possibile, si
consiglia di fissare il tubo ad uno scarico vicino
all’asciugatrice. Quando non può essere installata in
modo fisso, l’asciugatrice assicurerà comunque ottime
prestazioni facendo passare il tubo di aerazione
attraverso una finestra parzialmente aperta.
Foro di aerazione su finestra
1. In linea teorica, quando
l’asciugatrice è a pieno
carico, il foro di
aerazione dovrebbe
trovarsi direttamente
dietro la ventola.
2. È importante quindi
che il tubo sia il più
corto possibile.
Le aree A e B devono essere controllate frequentemente,
per prevenire il formarsi di laniccio o detriti, specialmente
nei casi di uso frequente dell’asciugatrice. L’adattatore
per il tubo di aerazione deve essere montato
correttamente, così da evitare che l’aria umida possa
rientrare nella stanza.
! Fare attenzione a non spingere troppo indietro l’asciugatrice,
perché in questo modo si rischia di schiacciare, piegare
o addirittura scollegare il tubo di aerazione.
! Il tubo non deve presentare tagli, strozzature o curve
a “U” che potrebbero ostruire la ventilazione o intrappolare
la condensa.
14
Page 15

Aerazione attraverso una finestra aperta
1. L’estremità del tubo
deve essere rivolto verso
il basso, così da evitare
che l’aria calda umida
possa condensarsi nella
stanza o
nell’asciugatrice.
! Non utilizzare prolunghe.
! Il cavo elettrico non deve essere tagliato né
calpestato.
! Controllare regolarmente il cavo elettrico e, se
necessario, farlo sostituire solo da tecnici qualificati
che installeranno un altro cavo specifico per questo
elettrodomestico (vedere la sezione Assistenza).
Presso i rivenditori autorizzati è possibile acquistare
cavi di ricambio e cavi più lunghi di quelli montati in
fabbrica.
I
Installazione
Descrizione
! Assicurarsi che l’asciugatrice sia sufficientemente
ventilata e che l’estremità del tubo di aerazione non
sia rivolto verso il condotto della presa d’aria posteriore.
! Per il corretto funzionamento dell’asciugatrice è
indispensabile montare sempre il tubo di aerazione.
! Controllare che il tubo di aerazione e i condotti
delle prese d’aria non siano ostruiti o intasati.
! Evitare che l’asciugatrice ricicli aria viziata.
! L’uso scorretto dell’asciugatrice può creare il pericolo
di incendio.
! Non scaricare l’aria emessa dall’asciugatrice nello
stesso canale in cui viene scaricato il fumo emesso
da altri apparecchi che bruciano gas o altri
combustibili.
Collegamento elettrico
Prima di inserire la spina nella presa elettrica,
verificare che:
●
la presa sia dotata di messa a terra
●
la presa sia in grado di supportare la potenza
massima prevista per l’asciugatrice, così come
indicata sull’etichetta che riporta le prestazioni di
esercizio (vedere la sezione Descrizione del
prodotto)
●
la tensione di alimentazione sia compresa nei valori
indicati dall’etichetta che riporta le prestazioni di
esercizio (vedere la sezione Descrizione del
prodotto)
●
la presa sia compatibile con il tipo di spina
dell’asciugatrice. In caso contrario, sostituire la
spina o la presa.
! L’asciugatrice non può essere installata in ambienti
all’aperto, anche se riparati. Può essere molto
pericoloso esporre questo elettrodomestico alla pioggia
o a un temporale.
! Dopo l’installazione dell’elettrodomestico, il cavo e
la spina elettrica devono rimanere a portata di mano.
! Il produttore declina ogni responsabilità nei casi in
cui le presenti regole non vengano rispettate.
! Se si nutrono dei dubbi a riguardo, consultare un
elettricista.
Livellamento dell’asciugatrice
L’asciugatrice deve essere installata in piano per
funzionare correttamente.
Dopo aver installato
l’asciugatrice nella
posizione definitiva,
controllare il suo livello
prima da lato a lato,
quindi da davanti a
dietro.
Se l’asciugatrice non è in
piano, utilizzare un
blocco di legno per
sostenerla mentre si
regolano i due piedini
anteriori in alto o in
basso, finché non si
posiziona in piano.
Informazioni preliminari
Una volta installata l’asciugatrice, prima di metterla in
funzione, pulire l’interno del cestello, così da
rimuovere lo sporco che può essersi accumulato
durante il trasporto.
programmi Bucato
Avvio e
suggerimenti
Avvertenze e
manutenzione Ricerca guasti Assistenza
Cura e
15
Page 16

Descrizione del prodotto
I
Lato anteriore Lato posteriore
Pannello di controllo
Numero di
serie e numero
di modello
Cestello
Filtro
alta temperaturan
Prestazioni di
esercizio
Attenzione,
Presa d’aria
Collegamento per
tubo di aerazione
Pannello di controllo
pulsante
TEMPERATURA
indicatore
luminoso
ATTIVO
Indicatore
pulsante
START
pulsante
Guida di asciugatura
Il pulsante START avvia il programma di asciugatura
selezionato (vedere la sezione Avvio e programmi).
Il pulsante TEMPERATURA consente di selezionare
la temperatura di asciugatura (vedere la sezione Avvio
e programmi).
FUORI: temperatura ALTA.
DENTRO: temperatura BASSA.
L’avvisatore acustico ALLARME segnala la fine di un
ciclo di asciugatura.
FUORI: avvisatore ACCESO.
DENTRO: avvisatore SPENTO.
L’indicatore luminoso ATTIVO segnala che
l’asciugatrice è in funzione. Premendo il pulsante
START, l’indicatore si illumina e resta attivo fino a
quando viene aperto lo sportello o viene spenta
l’asciugatrice. L’indicatore luminoso resterà attivo
anche in attesa di un avvio temporizzato.
16
ALLARME
manopola
TIMER
La Guida di asciugatura è una tabella di facile
comprensione che indica il rapporto tra i tipi di
tessuto e le capacità di carico.
La manopola TIMER imposta l’intervallo di tempo che
deve trascorrere prima dell’avvio del programma di
asciugatura. Ruotare la manopola in senso orario fino
a impostare il numero di ore che si desidera attendere
prima dell’avvio dell’asciugatrice; per tornare indietro,
basta ruotare la manopola in senso antiorario (vedere
la sezione Avvio e programmi).
La manopola PROGRAMMI consente di impostare il
programma desiderato: ruotarla in senso orario, mai in
senso antiorario, fino a quando l’indicatore si troverà
sul programma che si desidera selezionare (vedere la
sezione Avvio e programmi).
manopola
PROGRAMMI
Page 17

Avvio e programmi
Scelta del programma
1. Inserire la spina dell’asciugatrice nella presa di
alimentazione elettrica.
2. Selezionare il bucato in base al tipo di tessuto
(vedere la sezione Bucato).
3. Aprire lo sportello e controllare la corretta
posizione e la pulizia del filtro (vedere la sezione
Manutenzione).
4. Caricare l’elettrodomestico, facendo attenzione
ad evitare che qualche indumento possa
frapporsi tra lo sportello e la relativa guarnizione.
Chiudere lo sportello.
5. Scegliere il programma di asciugatura
controllando la tabella dei programmi (vedere la
sezione Programmi) e le indicazioni riportate per
i diversi tipi di tessuti (vedere la sezione Bucato).
- Impostare la temperatura mediante il pulsante
TEMPERATURA.
- Selezionare un programma o il tempo di
asciugatura, ruotando in senso orario la
manopola PROGRAMMI.
6. Se necessario, impostare un intervallo di tempo
mediante la manopola TIMER.
7. Se si desidera disattivare l’avvisatore acustico,
premere il pulsante ALLARME.
8. Premere il pulsante START per avviare il
programma. L’indicatore luminoso ATTIVO si
accende e resta acceso, anche durante
l’eventuale intervallo di tempo impostato con la
manopola TIMER. Questo indicatore si spegnerà
solo quando verrà aperto lo sportello.
Durante il funzionamento, è possibile aprire lo
sportello per estrarre i capi che nel frattempo si
sono asciugati e lasciare asciugare gli altri. Dopo
aver richiuso lo sportello, è necessario ripremere
il pulsante START, per mettere nuovamente in
funzione l’asciugatrice.
9. Circa 10 minuti prima della fine del programma,
viene attivata la fase di asciugatura finale ad aria
fredda, che consente di raffreddare i tessuti: si
consiglia di non estrarre il bucato prima del
completamento di questa fase.
10. La fine del ciclo di asciugatura viene segnalato
dall’avvisatore acustico. Aprire lo sportello,
estrarre il bucato, pulire il filtro e metterlo
nuovamente in posizione (vedere la sezione
Manutenzione).
11. Scollegare l’asciugatrice dalla rete elettrica.
I
Installazione
Descrizione
programmi Bucato
Avvio e
suggerimenti
Avvertenze e
manutenzione Ricerca guasti Assistenza
Cura e
17
Page 18
Avvio e programmi
Programmi
I
Programma
Asciugatura
automatica
(medio carico)
Asciugatura
automatica
(pieno carico)
Stiratura
facile
Asciugatura
temporizzata
fino a 120 minuti
Fase di
asciugatura
a freddo
Funzione Impostazione
Asciuga completamente: i
capi sono pronti per essere
indossati. Per medi carichi
(da 1 a 3 kg) di tessuti di
Cotone , Misto cotone e
poliestere o Sintetico .
Asciuga completamente: i capi
sono pronti per essere indossati.
Per il pieno carico (da 3 a 6 kg)
di tessuti di Cotone .
Programma breve (dura circa 10
minuti) che ammorbidisce le
fibre dei tessuti così da
agevolarne la stiratura.
Ideale per asciugare i capi
bagnati da stirare, le fibre
acriliche o i piccoli carichi
(meno di 1 kg).
Gli elementi che producono
calore si spengono, così da
consentire il raffreddamento
dei capi.
1. Selezionare TEMPERATURA ALTA
premendo il pulsante
TEMPERATURA.
2. Posizionare la manopola
PROGRAMMI su .
3. Premere il pulsante START :
l’indicatore luminoso ATTIVO si
accenderà .
1. Selezionare la TEMPERATURA ALTA
premendo il pulsante TEMPERATURA.
2. Posizionare la manopola PROGRAMMI su
.
3. Premere il pulsante START :
l’indicatore luminoso ATTIVO si
accenderà.
1. Selezionare la TEMPERATURA ALTA
premendo il pulsante TEMPERATURA.
2. Posizionare la manopola PROGRAMMI su
.
3. Premere il pulsante START :
l’indicatore luminoso ATTIVO si
accenderà.
1. Scegliere se impostare la TEMPERATURA
ALTA o, in alternativa, premere il
pulsante TEMPERATURA per impostare
la temperatura BASSA .
2. Posizionare la manopola PROGRAMMI
sul tempo desiderato.
3. Premere il pulsante START :
l’indicatore luminoso ATTIVO si
accenderà.
Questa è la fase conclusiva dei
programmi. Circa 10 minuti prima della
fine del ciclo di asciugatura, la manopola
si sposta automaticamente in questa
posizione. Dopo il suono dell’avvisatore
acustico (se selezionato), sarà possibile
estrarre i capi.
Note:
!
Impostando la TEMPERATURA
BASSA, questo programma non
riuscirà ad asciugare i capi. Per fibre
Acriliche o piccole quantità,
selezionare il programma
Asciugatura a tempo. Questo
programma può essere utilizzato
anche con carichi maggiori, se è
necessaria solo un’asciugatura di
base.
! Impostando la TEMPERATURA
BASSA, questo programma non
riuscirà ad asciugare i capi. Per
fibre Acriliche o piccole quantità,
selezionare il programma
Asciugatura a tempo. Questo
programma può essere utilizzato
anche con medio carico, se è
sufficiente un’asciugatura di base.
!
Non è un programma di
asciugatura (vedere di
seguito).
Leggere i tempi di
asciugatura consigliati
(vedere la sezione Bucato).
Attendere sempre il
completamento di questa
fase.
Programma di stiratura facile
“Stiratura facile” è un breve programma di 10 minuti (8 minuti di riscaldamento seguiti da 2 minuti di asciugatura a
freddo) che gonfia le fibre dei tessuti rimasti immobili per un lungo periodo di tempo. Il ciclo distende le fibre dei
capi in modo da agevolarne la stiratura e la piegatura.
! Questo non è un programma di asciugatura e non va quindi utilizzato con capi ancora bagnati.
Per risultati ottimali:
1. Non caricare il cestello oltre la capacità massima.
I seguenti valori si riferiscono al peso degli indumenti asciutti:
Tessuto Carico massimo
Cotone e Misto cotone 2,5 kg
Sintetico 2 kg
Denim 2 kg
2. Svuotare l’asciugatrice subito dopo la fine del programma; appendere, piegare o stirare i capi per poi
riporli nell’armadio. Se ciò non fosse possibile, ripetere il programma.
L’effetto prodotto dal programma “Stiratura facile” varia da tessuto a tessuto. I migliori effetti si ottengono su tessuti
tradizionali, quali Cotone o Misto cotone; invece, le caratteristiche di tessuti quali le fibre acriliche o il Tencel® non
consentono di ottenere gli stessi risultati.
18
Page 19

Bucato
Controllo del bucato
●
Controllare i simboli riportati sulle etichette dei vari
capi, per verificare se l’indumento può essere
introdotto nell’asciugatrice.
●
Distinguere il bucato in base al tipo di tessuto.
●
Svuotare la tasche e controllare i bottoni.
●
Chiudere le lampo e i ganci e allacciare senza
stringere cinture e lacci.
●
Strizzare gli indumenti per eliminare la maggior
quantità di acqua possibile.
! Non caricare l’asciugatrice con capi totalmente
pieni d’acqua.
Dimensioni massimi di carico
Non caricare il cestello oltre la capacità massima. I
seguenti valori si riferiscono al peso degli indumenti
asciutti:
Fibre naturali: massimo 6 kg
Fibre sintetiche: massimo 3 kg
! NON sovraccaricare l’asciugatrice perché ciò ridurrà
l’efficienza dell’elettrodomestico.
Carico tipo
Indumenti
Camicetta Cotone 150 g
Altro 100 g
Abito Cotone 500 g
Altro 350 g
Jeans 700 g
10 pannolini 1000 g
Camicia Cotone 300 g
Altro 200 g
T-Shirt 125 g
Etichette con le istruzioni per il lavaggio
Controllare con attenzione le etichette degli
indumenti, specialmente se si tratta della prima volta
che si introduce il capo in un’asciugatrice. Di seguito
sono riportati i simboli più comuni:
Può essere inserito nell’asciugatrice
Non inserire nell’asciugatrice
Asciugare ad alta temperatura
Asciugare a bassa temperatura
Indumenti non adatti al trattamento di
asciugatura
●
Capi che contengono parti in gomma o materiali
simili, membrane di plastica (cuscini, imbottiture o
impermeabili in PVC) e ogni tipo di tessuto
infiammabile o che contenga sostanze
infiammabili (asciugamani sporche di lacca).
●
Fibre di vetro (alcuni tipi di tendaggi)
●
Indumenti completamente asciutti
●
Tessuti contrassegnati con il simbolo
(vedere la sezione Tessuti particolari), che
possono essere puliti con prodotti speciali di pulizia
domestica. Seguire attentamente le istruzioni.
●
Elementi troppo voluminosi (piumoni, sacchi a
pelo, cuscini, imbottiture, copriletto e così via), che
si espandono durante l’asciugatura ed impediscono
così all’aria di circolare nell’asciugatrice.
I
Installazione
Descrizione
programmi Bucato
Avvio e
suggerimenti
Avvertenze e
manutenzione Ricerca guasti Assistenza
Cura e
Biancheria da casa
Coperta Cotone 1500 g
(Matrimoniale) Altro 1000 g
Tovaglia grande 700 g
Tovaglia piccola 250 g
Straccio da cucina 100 g
Telo da bagno 700 g
Asciugamano 350 g
Lenzuolo matrimoniale 500 g
Lenzuolo singolo 350 g
Se si mischiano i capi in tessuto sintetico con capi in
cotone, questi ultimi potrebbero risultare ancora
bagnati al termine del ciclo di asciugatura. In questo
caso, avviare un ulteriore breve ciclo di asciugatura.
19
Page 20
Bucato
I
Tessuti particolari
Coperte e copriletti: tessuti in acrilico (Acilan,
Courtelle, Orion, Dralon) devono essere asciugati
con estrema cura a temperatura BASSA. Non
impostare mai tempi di asciugatura lunghi.
Indumenti con pieghe o plissettati: leggere le
istruzioni di asciugatura fornite dal produttore.
Capi inamidati: non mischiare questi capi con altri
capi non inamidati. Rimuovere la maggiore quantità
possibile della soluzione iniziale prima di inserire i
capi nell’asciugatrice. Non asciugare questi capi per
troppo tempo: l’amido diverrebbe polvere lasciando
gli abiti troppo morbidi e venendo meno la sua stessa
funzione.
Tempi di asciugatura
La tabella riportata di seguito indica i tempi
APPROSSIMATIVI di asciugatura espressi in minuti. I
valori si riferiscono ad indumenti asciutti:
Cotone
Alta temperatura
Tempi di asciugatura dopo lavaggi in lavatrici da 800-1.000 giri al minuto
Mezzo carico Pieno carico
1 kg 2 kg 3 kg 4 kg 5 kg 6 kg
20-30 35-45 45-60 60-70 70-80 80-100
Sintetici
Alta temperatura
Tempi di asciugatura dopo lavaggi in lavatrici a velocità inferiori
Mezzo carico Pieno carico
I tempi sono approssimativi e possono variare in base a:
• Quantità di acqua trattenuta dai capi dopo la
centrifuga: le asciugamani e in genere i capi
delicati trattengono molta acqua.
• Tessuto: i capi dello stesso tessuto, ma con trama
e spessore differente, avranno sicuramente tempi
di asciugatura diversi.
• Quantità di bucato: capi singoli e piccoli carichi,
impiegano più tempo ad asciugarsi.
• Asciugatura: se i capi devono essere stirati, è
consigliabile estrarli dall’asciugatrice quando sono
ancora umidi. I capi che devono essere
completamente asciutti, possono invece essere
lasciati più a lungo.
• Temperatura impostata.
• Temperatura della stanza: più è bassa la
temperatura della stanza in cui si trova
l’asciugatrice, più tempo sarà necessario per
l’asciugatura degli indumenti.
• Volume: alcuni capi voluminosi richiedono
particolare cura nel processo di asciugatura. È
consigliabile rimuovere questi capi, scuoterli e
inserirli nuovamente nell’asciugatrice: questa
operazione deve essere ripetuta diverse volte
durante il ciclo di asciugatura.
! Non asciugare troppo gli indumenti.
L’umidità naturale contenuta nei tessuti serve a
conservarne la morbidezza e la vaporosità.
1 kg 2 kg 3 kg
20-30 35-45 45-60
Acrilico /
Bassa temperatura
Tempi di asciugatura dopo lavaggi in lavatrici a velocità inferiori
Mezzo carico Pieno carico
1 kg 2 kg
25-40 40-60
20
Page 21

Avvertenze e suggerimenti
! Questo elettrodomestico è stato progettato e realizzato
rispettando gli standard di sicurezza internazionale.
Le presenti avvertenze vengono fornite per ragioni di
sicurezza ed è importante leggerle con attenzione.
L’elettrodomestico è conforme alle seguenti
direttive CEE:
-72/23/CEE e 93/68/CEE sui dispositivi a bassa tensione
-89/336/CEE, 92/31/CEE e 93/68/CEE sulla
compatibilità elettromagnetica
Sicurezza
• Questa asciugatrice è stata progettata per uso
domestico e non professionale.
• L’asciugatrice deve essere utilizzata da persone
adulte, che dovranno rispettare scrupolosamente le
indicazioni fornite dal presente libretto di istruzioni.
• Non toccare l’elettrodomestico quando si è a
piedi nudi né con le mani o i piedi bagnati.
• Per scollegare l’elettrodomestico dalla rete di
alimentazione,bisogna tirare la spina: mai il cavo.
• Non lasciare avvicinare i bambini all’elettrodomestico
in funzione. Dopo l’uso, spegnere l’asciugatrice e
scollegarla dalla rete di alimentazione. Tenere lo
sportello chiuso, per evitare che i bambini
possano utilizzare l’asciugatrice come un gioco.
• L’elettrodomestico deve essere installato
correttamente e deve avere un’adeguata
aerazione. Le prese d’aria posteriore, i fori di
scarico e il tubo di aerazione non devono mai
essere ostruiti (vedere la sezione Installazione).
• Fare attenzione a non rivolgere mai l’estremità del
tubo di aerazione verso la presa d’aria posteriore.
• Evitare che l’asciugatrice ricicli aria viziata.
• Non utilizzare l’asciugatrice sulla moquette, nel caso
in cui l’altezza del pelo sia tale da impedire
l’ingresso dell’aria attraverso la base dell’asciugatrice.
• Verificare che l’asciugatrice sia vuota prima di
iniziare a caricarla.
• La parte posteriore dell’asciugatrice può
diventare molto calda. Evitare assolutamente di
toccarla durante il funzionamento dell’elettrodomestico.
• Non utilizzare l’asciugatrice se il filtro non è stato
correttamente installato (vedere la sezione
Manutenzione).
• Non utilizzare ammorbidente liquido per i tessuti
nell’asciugatrice; aggiungerlo all’ultimo risciacquo
del ciclo di lavaggio.
• Non sovraccaricare l’asciugatrice (vedere la
sezione Bucato per i vari limiti di carico).
• Non inserire capi completamente bagnati.
• Prima di essere caricati nell’asciugatrice, i capi
devono essere lavati con acqua e sapone,
risciacquati e infine centrifugati. L’asciugatura di
capi che NON siano stati precedentemente lavati
con acqua, determina il pericolo di incendio.
• Seguire sempre con attenzione tutte le istruzioni
riportate sulle etichette per il lavaggio dei capi
(vedere la sezione Bucato).
• Non caricare nell’asciugatrice capi
precedentemente trattati con prodotti chimici.
• Non introdurre mai indumenti che siano venuti a
contatto con sostanze infiammabili (petrolio, olio,
vernice, lacca, creme, oli o grassi da cucina).
• Non introdurre nell’asciugatrice gomma,
gommapiuma, plastica, plastica espansa,
pannolini o fodere per pannolini, polietilene o carta.
• Non introdurre nell’asciugatrice capi troppo voluminosi.
• Non asciugare fibre acriliche ad alte temperature.
• Completare ogni programma con la relativa fase
di Asciugatura a freddo.
• Non spegnere l’asciugatrice se vi sono ancora
capi caldi all’interno.
• Pulire il filtro al termine di ogni ciclo di
programma (vedere la sezione Manutenzione).
• Evitare l’accumulo di laniccio intorno all’asciugatrice.
• Non salire sul pannello superiore
dell’elettrodomestico, perché in questo modo si
potrebbe danneggiare gravemente l’asciugatrice.
• Rispettare sempre gli standard e le caratteristiche
elettriche (vedere la sezione Installazione).
• Acquistare solo accessori e parti di ricambio
originali (vedere la sezione Assistenza).
Smaltimento e Riciclaggio
Come parte del nostro costante impegno in difesa
dell’ambiente, ci riserviamo il diritto di utilizzare
componenti riciclati per diminuire i costi del cliente e
ridurre lo spreco di materiali.
• Smaltimento del materiale di imballaggio: seguire
le normative locali in tema di smaltimento, così da
permettere di riciclare l’imballaggio.
• Per ridurre i rischi di incidenti ai bambini, rimuovere
la porta e la spina, quindi tagliare il cavo di
alimentazione a filo con l’apparecchio. Smaltire
queste parti separatamente, per assicurarsi che
l’apparecchio non possa più essere collegato ad
una presa di corrente.
Dismissione degli elettrodomestici
La direttiva Europea 2002/96/CE sui rifiuti di
apparecchiature elettriche ed elettroniche (RAEE),
prevede che gli elettrodomestici non debbano essere
smaltiti nel normale flusso dei rifiuti solidi urbani. Gli
apparecchi dismessi devono essere raccolti
separatamente per ottimizzare il tasso di recupero e
riciclaggio dei materiali che li compongono ed
impedire potenziali danni per la salute e l’ambiente.
Il simbolo del cestino barrato è riportato su
tutti i prodotti per ricordare gli obblighi di
raccolta separata.
Per ulteriori informazioni, sulla corretta dismissione
degli elettrodomestici, i detentori potranno rivolgersi
al servizio pubblico preposto o ai rivenditori.
Risparmio energetico e rispetto dell’ambiente
Strizzare bene i capi per rimuovere tutta l’acqua possibile
•
prima di introdurli nell’asciugatrice (se si utilizza una
lavatrice, impostare un ciclo di centrifuga). In questo
modo si risparmieranno tempo ed energia durante
l’asciugatura.
• Ogni volta che si utilizza l’asciugatrice a pieno carico,
si risparmia energia: capi singoli e piccoli carichi,
impiegano più tempo ad asciugarsi.
• Pulire il filtro alla fine di ogni ciclo di asciugatura
così da contenere i costi connessi al consumo
energetico (vedere la sezione Manutenzione).
I
Installazione
Descrizione
programmi
Avvio e
Bucato
suggerimenti
Avvertenze e
manutenzione Ricerca guasti Assistenza
Cura e
21
Page 22
Cura e manutenzione
I
Scollegamento dell’apparecchio dalla
rete elettrica
L’asciugatrice deve essere sempre scollegata quando
non è in funzione, durante le operazioni di pulizia e
durante qualsiasi operazione di manutenzione.
Pulizia del filtro dopo ogni ciclo
Il filtro è un componente fondamentale
dell’asciugatrice: la sua funzione è quella di
raccogliere il laniccio e i nugoli che si formano
durante l’asciugatura. Il filtro consente inoltre di
raccogliere i piccoli oggetti che possono staccarsi dai
capi. Al termine di ogni ciclo di asciugatura, è quindi
importante pulire a fondo il filtro, sciacquandolo sotto
l’acqua corrente o pulendolo con l’aspirapolvere. Se il
filtro si intasa, il flusso dell’aria all’interno sarà
gravemente compromesso: I tempi di asciugatura si
allungheranno e così si consumerà molta più energia.
Potrebbero anche verificarsi danni all’asciugatrice.
Il filtro si trova vicino alla
guarnizione
(vedere a figura).
Pulizia del Tamburo
! Per la pulizia del tamburo non usare abrasivi, lana di
acciaio o agenti di pulizia di acciaio inossidabile.
Potrebbe formarsi una patina colorata sul tamburo di
acciaio inossidabile, questo potrebbe essere causato
da una combinazione di acqua e/o di agenti di pulizia,
come ammorbidente del lavaggio. Questa patina
colorata non avrà alcun effetto sulle prestazioni
dell’asciugatrice.
Pulizia
• Le parti esterne in metallo e plastica e le parti in
gomma possono essere pulite con un panno
umido.
• Controllare regolarmente il tubo di aerazione ed
eventuali impianti di aerazione fissa per verificare
che non si sia accumulato del laniccio ed,
eventualmente, rimuoverlo.
• Rimuovere il laniccio che potrebbe essersi
formato intorno al filtro e alle prese di aerazione.
! Non usare solventi o abrasivi.
Rimozione del filtro:
1. Tirare verso l’alto il
manico in plastica del
filtro (vedere a figura).
2. Pulire il filtro e
riposizionarlo
correttamente.
Assicurarsi che il filtro sia
inserito fino in fondo nel
relativo alloggiamento
dell’asciugatrice.
! Non utilizzare l’asciugatrice se il filtro non è stato
riposizionato.
Controllo del cestello al termine di ogni
ciclo
! L’asciugatrice utilizza dei componenti a sfera che
non necessitano di lubrificazione.
! Far controllare regolarmente l’asciugatrice da
personale tecnico qualificato per la sicurezza delle
parti elettriche e meccaniche (vedere la sezione
Assistenza).
Ruotare il cestello manualmente per rimuovere i
piccoli capi (fazzoletti) che potrebbero essere rimasti
all’interno dell’asciugatrice.
22
Page 23
Ricerca guasti
Potrebbe accadere che l’asciugatrice sembri fuori uso. Prima di contattare il centro di assistenza (vedere la
sezione Assistenza), analizzare i seguenti suggerimenti per la risoluzione dei problemi:
Problema:
L’asciugatrice non si accende.
Il ciclo di asciugatura non
viene avviato.
L’asciugatura impiega troppo
tempo.
Possibili cause / Soluzioni:
• La spina potrebbe non essere inserita oppure potrebbe non riuscire a
fare contatto.
• Potrebbe essersi verificata una mancanza di corrente.
• Il fusibile potrebbe esseri bruciato. Provare a collegare un altro
elettrodomestico alla stessa presa.
• Se si utilizza una prolunga, provare a inserire la spina dell’asciugatrice
direttamente nella presa.
• Lo sportello potrebbe non essere chiuso correttamente.
• La manopola PROGRAMMI potrebbe non essere stata impostata
correttamente (vedere la sezione Avvio e programmi).
• Potrebbe non essere stato premuto il pulsante START (vedere la sezione
Avvio e programmi).
• Potrebbe essere stato impostato un intervallo di tempo di attesa (vedere
la sezione Avvio e programmi).
• Il filtro potrebbe non essere stato pulito correttamente (vedere la sezione
Manutenzione).
• La temperatura impostata potrebbe non essere adatta al tipo di
tessuto da asciugare (vedere la sezione Avvio e programmi).
• I programmi automatici richiedono l’impostazione della temperatura ALTA
(vedere la sezione Avvio e programmi
• Potrebbe essere stato scelto un programma non adatto al carico (vedere
la sezione Avvio e programmi).
• Il tubo di aerazione flessibile potrebbe essere ostruito (vedere la sezione
Installazione).
• La presa di aria potrebbe essere ostruita (vedere la sezione
Installazione).
• L’aletta di aerazione fissa sulla copertura per temporali potrebbe essere
ostruita (vedere la sezione Installazione).
• Gli indumenti erano forse troppo bagnati (vedere la sezione Bucato).
• L’asciugatrice potrebbe essere sovraccarica (vedere la sezione Bucato).
I
Installazione Descrizione
programmi Bucato
Avvio e
suggerimenti
Avvertenze e
manutenzione Ricerca guasti Assistenza
Cura e
23
Page 24

Assistenza
I
Prima di chiamare il centro di
assistenza:
• Provare a risolvere il problema in modo autonomo
servendosi dei consigli della sezione Risoluzione
dei problemi.
• In caso contrario, spegnere l’asciugatrice e
chiamare il più vicino centro di assistenza.
Notizie da comunicare al centro di assistenza:
• nome, indirizzo e codice postale
• numero di telefono
• tipo di problema verificatosi
• data di acquisto
• modello dell’apparecchio (Mod.)
• numero di serie (S/N)
Queste informazioni sono riportate sull’etichetta dei
dati posta all’interno dello sportello dell’asciugatrice.
Ricambi
L’asciugatrice è un elettrodomestico complesso:
tentare di ripararlo da soli o farlo riparare da persone
non qualificate, oltre a poter provocare lesioni,
potrebbe anche danneggiare in modo grave
l’apparecchio e invalidare la garanzia sulle parti di
ricambio. Contattare sempre un tecnico qualificato nel
caso in cui si verifichi un malfunzionamento
dell’asciugatrice. Ogni ricambio è stato progettato
specificamente per quest’asciugatrice.
Assistenza
24
Page 25
Notice d’utilisation et installation
SÈCHE-LINGE
GB
English, 1
I
Italiano, 13
D
Deutsch, 37EEspañol, 49
NL
Nederlands, 73AArabic, 96
AS60V
F
Français, 25
P
Português, 61
Table des Matières
Installation, 26-27
Où installer votre sèche-linge
Ventilation
Connexions électrique
Avant de commencer à utiliser votre
sèche-linge
Description du sèche-linge, 28
Vue de face
Vue de l’arrière
Panneau de commandes
Démarrage et programmes, 29-30
Choisir un programme
Tableau des programmes
Linge, 31-32
Trier votre linge
Étiquettes d’entretien
Vêtements spéciaux
Temps de séchage
F
Avertissements et Suggestions, 33
Sécurité générale
Élimination
Économiser de l’énergie et respecter l’environnement
Entretien et Nettoyage, 34
Éteindre l’électricité
Nettoyer le filtre après chaque cycle
Vérifier le tambour après chaque cycle
Nettoyer le sèche-linge
Que faire en cas de panne, 35
Service Après-vente, 36
Pièces de rechange
25
Page 26
Installation
F
! Conservez cette notice d’utilisation et d’installation à
portée de main de manière à pouvoir vous y référer si
nécessaire. Emmenez-la avec vous si vous déménagez, et,
si vous vendez cet appareil ou que vous le donniez à un
tiers, faites en sorte que cette notice accompagne le
sèche-linge de manière à ce que le nouveau propriétaire
soit informé des avertissements et suggestions
concernant le fonctionnement de ce sèche-linge.
! Lisez attentivement ce mode d’emploi; les pages
suivantes contiennent des informations importantes
concernant l’installation et des suggestions relatives
au fonctionnement de cet appareil.
Où installer votre sèche-linge
●
Placez votre sèche-linge à une certaine distance
des cuisinières, fourneaux, radiateurs, ou plaques
de cuisson à gaz, car les flammes peuvent
endommager cet appareil.
●
Si vous installez cet appareil sous un plan de travail,
faites en sorte de laisser un espace de 10 mm
entre le dessus de l’appareil et tout autre objet sur
ou au-dessus de la machine, et un espace de 15
mm entre les côtés et les éléments d’ameublement
ou les murs latéraux. Ceci a pour objectif d’assurer
une ventilation convenable. Assurez-vous que les
orifices de ventilation situés à l’arrière ne soient pas
obstrués.
●
Faites en sorte d’installer votre sèche-linge dans un
environnement qui n’est pas humide et qui est doté
d’une bonne circulation d’air dans toute la pièce.
! Assurez-vous que l’extrémité du tuyau ne soit pas
dirigée vers l’orifice d’entrée d’air à l’arrière du sèchelinge.
! Le tuyau de ventilation ne doit pas dépasser 2,4
mètres de longueur et vous devez faire en sorte
d’éviter toute accumulation éventuelle de peluches et
d’eau en le secouant fréquemment. Assurez-vous
toujours que ce tuyau ne soit pas écrasé.
Ventilation permanente
Conjointement avec le tuyau de ventilation, nous vous
recommandons d’utiliser un Kit de Ventilation
Mur/Fenêtre, disponible dans le commerce ou chez
votre Revendeur de Pièces de Rechange le plus
proche.
Montage au mur
1. Laissez une ouverture
dans le mur à gauche
l’endroit où sera installé le
sèche-linge.
2. Faites en sorte que le
tuyau soit aussi court et
droit que possible pour
éviter que de l’humidité
condensée ne revienne
dans le sèche-linge.
3. De même, le conduit
dans le mur doit être
incliné vers le bas vers
l’extérieur.
Ventilation
Cet appareil sèche votre linge en aspirant de l’air frais,
propre et relativement sec, en le chauffant, et en le
distribuant ensuite parmi les vêtements qui sont brassés
doucement par la rotation du tambour. Pour une
performance optimale, l’air humide est ensuite expulsé à
travers un conduit de ventilation situé à l’arrière du
sèche-linge. Lorsque le sèche-linge est en marche, une
aération adéquate est nécessaire afin d’éviter le retour de
gaz dans la pièce, provenant de la combustion d’autres
combustibles par des appareils, y compris les feux de
cheminée.
Ventilation mobile
Un tuyau de ventilation doit toujours être installé lorsque
le sèche-linge est utilisé conjointement avec une
Ventilation Mobile. Ce tuyau doit être fixé solidement à
l’arrière du sèche-linge (voir la Description du Sèche-linge).
Si possible, il vaut toujours mieux connecter ce tuyau à une
sortie permanente située près du sèche-linge. Si une
installation permanente n’est pas possible, le sèche-linge
fonctionnera tout aussi bien en faisant passer le tuyau à
travers une fenêtre partiellement ouverte.
Montage à la fenêtre
1. Avec un sèche-linge
superposé, le trou dans la
fenêtre doit idéalement
être effectué au-dessous
de l’orifice de ventilation.
2. Le tuyau doit être aussi
court que possible.
En fonction de la fréquence à laquelle vous utilisez
votre sèche-linge, il est essentiel que les zones A et B
soient vérifiées périodiquement pour retirer les
peluches ou les débris. L’adaptateur du tuyau de
ventilation doit être installé solidement, ce qui évite
ainsi que de l’air humide ne soit ré-émis dans la pièce.
! Le sèche-linge ne doit pas être repoussé à une
distance telle que l’adaptateur du tuyau soit arraché
ou que le tube soit écrasé ou plié.
! Le tuyau doit être placé à l’écart de l’orifice d’entrée
d’air ne doit être ni entaillé, ni crasé, ni plié en forme
de ‘U’ afin d’évitér d’obstruer le tuyau et de bloquer la
condensation.
26
Page 27
Ventilation par fenêtre ouverte
! N’utilisez pas de rallonges.
F
1. L’extrémité du tuyau
doit être dirigée vers le
bas, de manière à éviter
que de l’air chaud
humide se condense
dans la pièce ou dans le
sèche-linge.
! Assurez-vous que le sèche-linge soit
convenablement ventilé et que l’extrémité du tuyau
de ventilation ne soit pas dirigée vers le conduit
d’entrée d’air.
! Le tuyau de ventilation doit toujours être installé de
manière optimale.
! Assurez-vous que le tuyau de ventilation et les
orifices d’entrée d’air ne soient pas obstrués ou
bloqués.
! Le sèche-linge ne doit pas recycler de l’air
d’évacuation.
! Une mauvaise utilisation d’un sèche-linge peut
entraîner un danger d’incendie.
! Ne pas expulser l’air d’évacuation dans un conduit
qui est utilisé pour les évacuations des émanations
provenant d’autres appareils à combustion de gaz ou
d’autres combustibles.
Connexions électriques
! Le cordon d’alimentation ne doit pas être courbé ou
écrasé.
! Le cordon d’alimentation électrique doit être vérifié
périodiquement et remplacé par un cordon préparé
spécialement pour ce sèche-linge, et installé
uniquement par des électriciens agréés (voir Service
Après-vente). Des cordons d’alimentation neufs ou
plus longs sont fournis par les revendeurs agréés
contre un supplément.
! Le fabricant rejète toute responsabilité en cas de
non-respect de toutes ou partie de ces règles.
! En cas de doute au sujet des points precedents,
consultez un electricien qualfie.
Caler votre sèche-linge
Pour un fonctionnement correct, votre sèche-linge
doit être à niveau.
Après avoir installé votre
sèche-linge dans son
emplacement définitif,
veillez à ce qu'il soit bien
à niveau tout d'abord
latéralement puis devant
et derrière.
Installation
Description
Démarrage et
programmes Linge
Avertissements et
Suggestions
Assurez-vous des points suivants avant de brancher
la fiche de l’appareil dans la prise de courant:
●
La prise de courant doit être reliée à la terre.
●
La prise de courant doit pouvoir supporter la
puissance maximale de la machine, qui est
indiquée sur la plaque signalétique de l’appareil
(voir la Description du Sèche-linge).
●
La tension électrique doit appartenir à la gamme
de valeurs indiquée sur la plaque signalétique de
l’appareil (voir la Description du Sèche-linge).
●
La prise de courant doit être compatible avec la
fiche du sèche-linge. Si ce n’est pas le cas,
remplacez la fiche ou la prise de courant.
! Le sèche-linge ne doit pas être utilisé à l’extérieur,
même si l’espace en question est abrité. Cela peut
être dangereux si l’appareil est exposé à la pluie ou
à des orages.
! Une fois installés, le cordon d’alimentation et la
fiche du sèche-linge doivent être d’accès facile.
Si le sèche-linge n'est
pas au niveau, utilisez un
bloc de bois pour le
soutenir pendant que
vous ajustez, vers le haut
ou vers le bas, les deux
pieds et ce, jusqu'à ce
que le sèche-linge soit
au niveau.
Avant de commencer à utiliser votre
sèche-linge
Une fois que vous avez installé votre sèche-linge, et
avant de l’utiliser, nettoyez l’intérieur du tambour pour
retirer les poussières qui pourraient s’y être
accumulées durant le transport.
Entretien et
Nettoyage
Que faire en cas
de panne
Après-vente
Service
27
Page 28
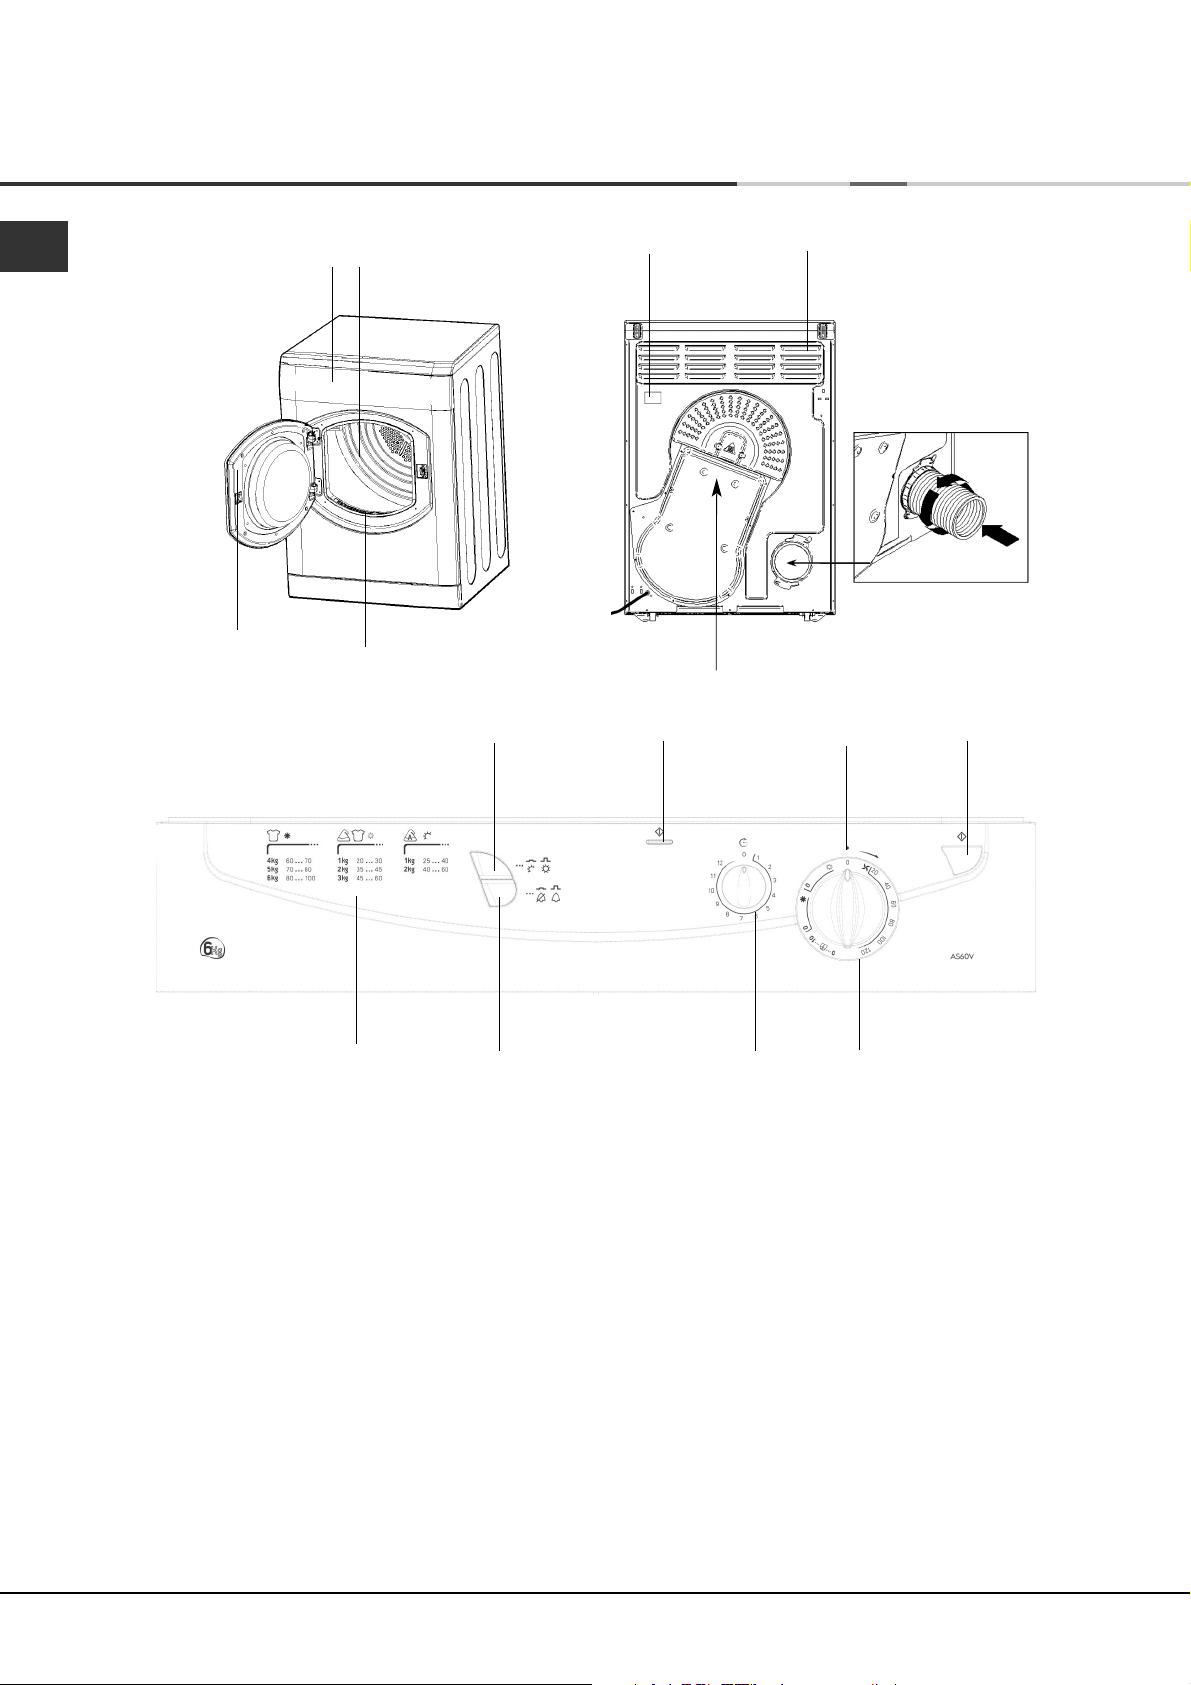
Description du sèche-linge
F
Vue de face Vue de l’arrière
Plaque
signalétique
Attention:
Chaud!
Numéro du
Modèle et
Numéro de
Série
Panneau de
commande
Tambour
Filtre
Orifice d’entrée
d’air
Tuyau de ventilation fixé ici
Panneau de commandes
bouton
TEMPÉRATURE
voyant lumineux
ACTIVITÉ
Indicateur
bouton
DÉPART
Guide de Séchage
Le bouton DÉPART commence le séchage selon un
programme sélectionné (voir Démarrage et
Programmes).
Le bouton TEMPÉRATURE sélectionne la
température de séchage (voir Démarrage et
Programmes).
Bouton SORTI: température ÉLEVÉE.
Bouton RENTRÉ: température DOUCE.
L’avertisseur d’ALARME signale la fin d’un cycle de
séchage.
Bouton SORTI: Avertisseur en MARCHE.
Bouton RENTRÉ: Avertisseur à l’ARRÊT.
Le voyant lumineux d’ACTIVITÉ indique que votre
sèche-linge est en cours d’utilisation. Ce voyant
lumineux sera éclairé lorsque vous appuierez sur le
bouton DÉPART. Il restera éclairé jusqu’à que la porte
soit ouverte ou que le courant soit coupé. Ce voyant
sera éclairé durant un programme à départ retardé.
bouton
d’ALARME
bouton de
MINUTERIE
Le Guide de Séchage vous permet de consulter un
tableau d’utilisation facile contenant les types de
tissus et les capacités de charges.
Le bouton de MINUTERIE permet de différer le
démarrage du sèche-linge. Tournez-le dans le sens
des aiguilles d’une montre jusqu’à atteindre l’’heure
de démarrage souhaitée. Si vous êtes allé trop loin,
tournez ce bouton dans le sens inverse des aiguilles
d’une montre (voir Démarrage et Programmes).
Le bouton des PROGRAMMES permet de choisir le
programme: tournez-le dans le sens des aiguilles
d’une montre, jamais dans le sens inverse des
aiguilles d’une montre, jusqu’à ce que l’indicateur
montre le programme que vous voulez sélectionner
(voir Démarrage et Programmes).
bouton des
PROGRAMMES
28
Page 29
Démarrage et Programmes
Choisir un programme
1. Branchez la fiche du sèche-linge dans la prise
électrique.
2. Triez votre linge en fonction du type de textiles
(voir Linge).
3. Ouvrez la porte et en assurant-vous que le filtre
soit propre et en place (voir Entretien).
4. Chargez la machine et assurez-vous que des
articles ne bloquent pas le joint de la porte.
Fermez la porte.
5. Choisissez le programme de séchage en vérifiant
le tableau des Programmes (voir Programmes)
ainsi que les indications pour chaque type de
textile (voir Linge).
- Réglez la température avec le bouton
TEMPÉRATURE.
- Sélectionnez un programme ou un temps de
séchage en faisant tourner le bouton des
PROGRAMMES dans le sens des aiguilles d’une
montre.
7. Si vous souhaitez éliminer le son de l’avertisseur
sonore, appuyez sur le bouton ALARME.
8. Appuyez sur le bouton DÉPART pour commencer.
Le voyant indicateur de SÉCHAGE s’illumine et
reste illuminé, même pendant le délai d’attente.
Ce voyant lumineux restera éclairé jusqu’à ce
que vous ouvriez la porte du sèche-linge. En
cours de programme de séchage, vous pouvez
vérifier votre linge et sortir les articles qui sont
secs pendant que les autres continuent à sécher.
Lorsque vous refermez la porte, appuyez sur le
bouton DÉPART afin de continuer le séchage.
9. 10 minutes environ avant que le programme ne
soit terminé, celui-ci entre dans la phase finale
de REFROIDISSEMENT (les textiles sont refroidis),
que vous devez toujours laisser se terminer.
10. L’avertisseur sonore vous préviendra lorsque le
séchage sera terminé. Ouvrez la porte, sortez
votre linge, nettoyez le filtre et remettez-le en
place (voir Entretien).
11. Débranchez le sèche-linge.
F
Installation
Description
Démarrage et
programmes Linge
6. Réglez un délai d’attente si nécessaire en utilisant
le bouton de MINUTERIE.
Avertissements et
Suggestions
Entretien et
Nettoyage
Que faire en cas
de panne
Après-vente
29
Service
Page 30

Démarrage et Programmes
Programmes
F
Programme
Séchage
Automatique
(charges
moyennes)
Séchage
Automatique
(charges
lourdes)
Repassage
Facile
Séchage Minuté
jusqu’à 120
minutes
Phase de
Refroidissement
Ce qu’il fait... Comment le régler...
Sèche entièrement :
vos vêtements sont prêts à être
portés. Pour les charges
moyennes (entre 1 et 3 kg) de
coton , polyester-coton ou
synthétiques .
Sèche entièrement vos
vêtements : vos vêtements sont
prêts à être portés. Pour les
charges lourdes (entre 3 et 6 kg)
de Coton .
Programme court (10 minutes
environ) qui adoucit les fibres
des vêtements qui sont prêts à
être repassés.
Sèche les vêtements mouillés
qui seront repassés, les fibres
acryliques , ou les petites
charges (moins de 1 kg).
Les éléments de chauffage
s’éteignent et les vêtements se
refroidissent.
1. Sélectionnez
en appuyant sur le bouton d’indication de
la
TEMPÉRATURE
2. Positionnez le bouton des PROGRAMMES
sur .
3. Appuyez sur le bouton de DÉPART , le
voyant de mise en ACTIVITÉ sera
éclairé.
1. Sélectionnez
en appuyant sur le bouton d’indication de
la
TEMPÉRATURE
2. Positionnez le bouton des PROGRAMMES
sur .
3. Appuyez sur le bouton de DÉPART , le
voyant de mise en ACTIVITÉ sera
éclairé.
1. Sélectionnez
en appuyant sur le bouton d’indication de
la
TEMPÉRATURE
2. Positionnez le bouton des PROGRAMMES
sur .
3. Appuyez sur le bouton de DÉPART , le
voyant de mise en ACTIVITÉ sera
éclairé.
1. Sélectionnez la
TEMPÉRATURE ÉLEVÉE ou
TEMPÉRATURE DOUCE en appuyant
sur le bouton d’indication de la
TEMPÉRATURE.
2. Positionnez le bouton des PROGRAMMES
sur le temps desiré.
3. Appuyez sur le bouton de DÉPART , le
voyant de mise en ACTIVITÉ sera
éclairé.
Il s’agit de la phase finale du programme. 10
minutes environ avant la fin, le bouton
avance automatiquement jusqu’à la Phase
de Refroidissement. Une fois celle-ci
achevée, l’Avertisseur Sonore retentit (si
vous l’avez sélectionné) et les vêtements
sont prêts à être retirés du sèche-linge.
TEMPÉRATURE
.
TEMPÉRATURE
.
TEMPÉRATURE
.
température
ÉLEVÉE
ÉLEVÉE
ÉLEVÉE
requise:
Programme de Repassage Facile
Remarque:
! Si vous sélectionnez
TEMPÉRATURE
programme ne sèchera pas vos
vêtements. Pour les fibres en acrylique
ou les petites charges, sélectionnez le
Séchage Minuté. Ce programme peut
aussi être utilisé pour les charges
lourdes si vous voulez obtenir un
résultat légèrement plus sec.
! Si vous sélectionnez
TEMPÉRATURE
programme ne sèchera pas vos
vêtements. Pour les fibres en
acrylique ou les petites charges,
sélectionnez le Séchage Minuté. Ce
programme peut aussi être utilisé pour
les charges moyennes si vous
préférez un résultat plus humide.
!
Ceci n’est pas un
DOUCE, ce
DOUCE, ce
programme de séchage (voir
ci-dessous).
Consultez les temps de
séchage suggérés (
voir
Linge).
Laissez toujours le sèchelinge compléter cette phase.
Le ‘Repassage Facile’ est un programme court de 10 minutes (8 minutes de chauffage suivies d’une période de
refroidissement de 2 minutes) qui ‘ébouriffe’ les fibres de vêtements qui ont été laissés dans la même position/le
même endroit pendant une durée de temps prolongée. Ce cycle relâche les fibres et les rend plus faciles à
repasser et à plier.
! ‘Repassage Facile’ n’est pas un programme de séchage et ne doit pas être utilisé pour des vêtements mouillés.
Pour des résultats impeccables:
1. Ne chargez pas plus que la capacité maximum.
Les chiffres suivants font référence au poids sec:
Textile Charge maximum
Coton et cotons mélangés 2,5 kg
Synthétiques 2 kg
Jeans 2 kg
2. Videz le sèche-linge aussitôt le programme terminé, suspendez, pliez ou repassez les articles et rangez-les dans
l’armoire. Si cela n’est pas possible, répétez le programme.
L’effet ‘Repassage Facile’ varie d’un textile à l’autre. Il fonctionne bien sur les textiles traditionnels comme le Coton
ou les Cotons mélangés, et moins bien sur les fibres acryliques et sur les matériaux comme le Tencel®.
30
Page 31

Linge
Trier votre linge
●
Vérifiez les symboles sur les étiquettes des vêtements
pour vous assurer que les articles peuvent être
passés au sèche-linge.
●
Triez votre linge par type de textile.
●
Videz les poches et vérifiez les boutons.
●
Fermez les fermetures Éclair et les crochets et
attachez les ceintures et les cordons.
●
Essorez chaque article de manière à éliminer
autant d’eau que possible.
! Ne chargez pas de vêtements mouillés qui
dégouttent dans le sèche-linge.
Taille maximale de la charge
Ne chargez pas plus que la capacité maximale.
Les chiffres suivants font référence au poids sec :
Fibres naturelles : 6 kg max.
Fibres synthétiques : 3 kg max
! NE surchargez PAS le sèche-linge car cela pourrait
réduire ses performances de séchage.
Charge typique
Vêtements
Chemisier en coton 150 g
Autre 100 g
Robe en coton 500 g
Autre 350 g
Jeans 700 g
10 couches lavables 1000 g
Chemise en coton 300 g
Autre 200 g
T-Shirt 125 g
Étiquettes d’Entretien
Regardez les étiquettes sur vos vêtements, en
particulier lorsque vous les séchez pour la première
fois au sèche-linge. Les symboles suivants sont les
plus courants:
Séchage en machine
Pas de séchage en machine
Séchage à température normale
Séchage à basse température
Articles ne convenant pas au séchage en machine
• Les article qui contiennent du caoutchouc ou des
matériaux similaires au caoutchouc ou ceux qui
contiennent un film plastique (oreillers, coussins,
ou vêtements de pluie en PVC), tous autres articles
ou objets inflammables ou contenant des
substances inflammables (serviettes éponge
imprégnées de laque à cheveux).
• Fibres de verre (certain types de tentures)
• Articles qui ont été nettoyés à sec
• Articles portant le Code ITCL (voir Vêtements
spéciaux). Ces derniers peuvent être nettoyés
avec des produits spéciaux de nettoyage à sec à
domicile. Suivez attentivement le mode d’emploi.
• Les gros articles volumineux (couettes, sacs de
couchage, oreillers, coussins, grands dessus de
lits etc.). Ceux-ci augmentent de volume lorsqu’ils
sèchent et cela empêcherait l’air de circuler à
travers le sèche-linge.
F
Installation
Description
Démarrage et
programmes Linge
Avertissements et
Suggestions
Entretien et
Nettoyage
Linge de maison
Housse de couette en coton 1500 g
(Double) Autre 1000 g
Grande nappe 700 g
Petite nappe 250 g
Torchon 100 g
Drap de bainl 700 g
Serviette éponge 350 g
Draps doubles 500 g
Draps 1 personne 350 g
À la fin d’un cycle de séchage, il se peut que les
cotons soient toujours humides si vous les avez
regroupés avec les synthétiques. Si cela se produit,
faites-leur simplement subir une petite période de
séchage supplémentaire.
Que faire en cas
de panne
Après-vente
Service
31
Page 32

Linge
F
Vêtements spéciaux
Les Couvertures et Dessus de lits : articles en
acrylique (Acilan, Courtelle, Orion, Dralon) doivent
être séchés avec des précautions particulières, à
BASSE température. Évitez de les sécher pendant
une durée prolongée.
Vêtements plissés ou froissés : lisez les instructions
de séchage du fabricant figurant sur le vêtement.
Articles amidonnés : ne séchez pas ces derniers
avec des articles non amidonnés. Faites en sorte de
retirer autant de solution d’amidonnage que possible
de la charge avant de placer celle-ci dans le sèchelinge. Ne séchez pas de façon excessive : l’amidon
pourrait devenir poudreux et laisser vos vêtements
sans tenue, ce qui irait à l’encontre du but recherché.
Temps de séchage
Le tableau ci-dessous présente les temps de séchage
APPROXIMATIFS en minutes. Les poids font référence
aux vêtements secs :
Ces temps sont approximatifs et peuvent varier en
fonction des paramètres suivants :
• La quantité d’eau retenue dans les vêtements
après le cycle d’essorage : les serviettes éponge
et les textiles délicats retiennent une quantité
importante d’eau.
• Les textiles : des articles qui sont constitué par le
même type de textile mais qui ont des textures et
des épaisseurs différentes peuvent ne pas avoir le
même temps de séchage.
• La quantité de linge : les articles uniques ou les
petites charges peuvent prendre plus longtemps à
sécher.
• La sécheresse : Si vous avez l’intention de
repasser certains de vos vêtements, vous pouvez
les sortir de la machine alors qu’ils sont encore un
peu humides. Les autres vêtements peuvent y
rester plus longtemps si vous voulez qu’ils en
sortent entièrement secs.
• Le réglage de la température.
Cotons
Température Élevée (normale)
Temps de séchage après 800-1000trs/mn dans la machine à laver
Demi-charge
1 kg 2 kg 3 kg 4 kg 5 kg 6 kg
20-30 35-45 45-60 60-70 70-80 80-100
Synthétiques
Température Élevée (normale)
Temps de séchage après essorage réduit dans la machine à laver
Demi-charge
1 kg 2 kg 3 kg
20-30 35-45 45-60
Acryliques /
Basse température (température douce)
Temps de séchage après essorage réduit dans la machine à laver
Demi-charge
1 kg 2 kg
25-40 40-60
Charge complète
Charge complète
Charge complète
• La température ambiante : si la pièce dans
laquelle le sèche-linge est installé est froide, cela
prendra plus longtemps à l’appareil pour sécher
vos vêtements.
• Le volume : certains articles volumineux peuvent
être séchés en machine avec quelques
précautions. Nous vous suggérons de retirer
plusieurs fois ces articles de la machine, de les
secouer et de les remettre dans le sèche-linge
jusqu’à ce que celui-ci ait terminé de les sécher.
! Ne séchez pas excessivement vos vêtements.
Tous les issus contiennent une certaine quantité
d’humidité naturelle, ce qui les rend doux et gonflants.
32
Page 33

Avertissements et Suggestions
●
! Cet appareil a été conçu et construit conformément
à des normes de sécurité internationales. Ces
avertissements sont donnés pour des raisons de
sécurité et doivent être lus attentivement.
Cet appareil est conforme aux Directives
Européennes suivantes:
-72/23/EEC et 93/68/EEC (Équipement Basse Tension)
-89/336/EEC, 92/31/EEC et 93/68/EEC (Compatibilité
Électromagnétique)
Sécurité Générale
●
Ce sèche-linge a été conçu pour un usage domestique,
et non professionnel.
●
Ce sèche-linge doit être utilisé par des adultes, et le mode
d’emploi contenu dans cette notice doit être bien respecté.
●
Ne touchez pas cet appareil lorsque vous êtes pieds nus
ou avec des mains ou des pieds humides.
●
Débranchez cette machine en tirant sur la fiche et non
sur le cordon.
●
Les enfants ne doivent pas se trouver à proximité du
sèche-linge lorsque celui-ci est en marche.
Après avoir utilisé ce sèche-linge, éteignez-le et
débranchez-le. Tenez la porte fermée pour assurer que
les enfants ne jouent pas avec.
●
Cet appareil doit être installé correctement et avoir une
ventilation convenable. Les orifices d’entrée d’air à
l’arrière de la machine, les orifices de sortie et le tuyau
de ventilation ne doivent jamais être obstrués (voir
Installation).
●
Ne dirigez jamais l’orifice de sortie du tuyau de
ventilation vers l’arrivée d’air à l’arrière de la machine.
●
Ne laissez jamais le sèche-linge recycler de l’air d’évacuation.
●
N’utilisez jamais le sèche-linge sur de la moquette où la
hauteur des poils empêcherait l’air d’entrer dans la
sèche-linge à partir de la base.
●
Vérifiez que le sèche-linge est bien vide avant de le charger.
●
●
●
●
●
●
●
●
●
●
L’arrière du sèche-linge peut devenir très chaud.
Ne le touchez jamais en cours d’utilisation.
N’utilisez le sèche-linge que si le filtre est solidement en
place (voir Entretien).
N’utilisez pas de liquide assouplissant pour le linge dans
le sèche-linge ; ajoutez-le au rinçage final de votre lavage.
Ne surchargez pas le sèche-linge (voir Linge) pour les
charges maximales.
Ne chargez pas d’articles qui dégouttent d’eau.
Ne séchez que des articles qui ont été lavés avec de
l’eau et un détergent, rincés et essorés. Le fait de sécher
des articles qui N’ONT PAS été lavés avec de l’eau
constitue un danger d’incendie.
Vérifiez avec soin toutes les instructions sur les étiquettes
des vêtements (voir Linge).
Ne séchez pas des vêtements qui ont été traités avec
des produits chimiques.
Ne séchez jamais des articles qui ont été contaminés
avec des substances inflammables (essence, pétrole,
peinture, laque à cheveux, crèmes, matières grasses ou
huiles de cuisson).
Ne séchez pas du caoutchouc sec, du caoutchouc
mousse, du plastique, de la mousse plastique, des
couches culottes ou des doublures pour couches
lavables, du polyéthylène ou du papier.
Ne séchez pas d’articles de grande taille, très volumineux.
●
Ne séchez pas de fibres acryliques à hautes températures.
●
Terminez chaque programme avec sa Phase de
Refroidissement.
●
N’éteignez pas le sèche-linge s’il contient encore des
articles chauds.
●
Nettoyez le filtre après chaque utilisation (voir Entretien).
●
Ne laissez pas s’accumuler de peluches autour du
sèche-linge.
●
Ne montez jamais sur le sèche-linge. Cela pourrait
l’endommager.
●
Respectez toujours les normes et exigences électriques
(voir Installation).
●
Achetez toujours des pièces de rechange et
accessoires d’origine (voir Service Après-vente).
Information recyclage et enlèvement
de nos produits
Dans le cadre de notre engagement envers la protection
de l’environnement, nous nous réservons le droit d’utiliser
des pièces recyclées de qualité afin de réduire les coûts
pour notre clientèle et de limiter les gaspillages de matières
premières.
●
Élimination du matériau d’emballage: respectez les
réglementations locales, de manière à ce que ’emballage
puisse être recyclé.
●
Pour éviter que des enfants se blessent, ôtez la porte et la
prise et puis coupez le câble secteur au ras de l’appareil.
Jetez ces pièces séparément de sorte que l’appareil ne
puisse plus être branché sur une prise de secteur.
Enlèvement des appareils ménagers usagés
La Directive Européenne 2002/96/EC sur les Déchets des
Equipements Electriques et Electroniques (DEEE), exige que
les appareils ménagers usagés ne soient pas jetés dans le
flux normal des déchets municipaux. Les appareils usagés
doivent être collectés séparément afin d’optimiser le taux
de récupération et le recyclage des matériaux qui les
composent et réduire l’impact sur la santé humaine et
l’environnement.
Le symbole de la ‘‘poubelle barrée’’ est apposée sur
tous les produits pour rappeler les obligations de
collecte séparée.
Les consommateurs devront contacter les autorités locales
ou leur revendeur concernant la démarche à suivre pour
l’enlèvement de leur vieil appareil.
Économiser de l’énergie et respecter
l’environnement
●
Essorez les articles pour éliminer l’eau en excès avant de
les passer au sèche-linge (si vous utilisez une machine
à laver, sélectionnez un cycle d’essorage à grande
vitesse). Ceci vous permettra d’économiser du temps et de
l’énergie durant le séchage.
●
Séchez toujours des charges complètes – vous
économiserez de l’énergie : les articles uniques ou les
petites charges prennent plus longtemps à sécher.
●
Nettoyez le filtre après chaque utilisation pour limiter les
coûts de consommation d’énergie (voir Entretien).
F
Installation
Description
Démarrage et
programmes
Linge
Avertissements et
Suggestions
Entretien et
Nettoyage
Que faire en cas
de panne
Après-vente
Service
33
Page 34

Entretien et Nettoyage
F
Éteignez l’électricité
Débranchez votre sèche-linge lorsque vous ne
l’utilisez pas, lorsque vous le nettoyez et durant toutes
les opérations d’entretien.
Nettoyez le filtre après chaque cycle
Le filtre est une pièce importante de votre sèche-linge:
il accumule des peluches qui se forment durant le
séchage. Des petits objets peuvent aussi être piégés
dans le filtre. Par conséquent, une fois le séchage
terminé, nettoyez le filtre en le rinçant sous l’eau
courante ou avec votre aspirateur. Si le filtre devient
bloqué, le flux d’air à l’intérieur du sèche-linge est
sérieusement compromis : les temps de séchage
sont allongés et vous consommez davantage
d’énergie. Cela peut aussi endommager votre sèchelinge.
Le filtre se trouve devant
la garniture du sèchelinge (voir le diagramme).
Nettoyage du tambour
! Pour nettoyer le tambour, ne pas utiliser d’abrasifs,
de laine d’acier ni de produits de nettoyage pour
acier inoxydable.
Un film coloré peut parfois apparaître à la surface du
tambour en acier inoxydable. Il peut être dû à une
combinaison de l’eau et/ou des produits de nettoyage
(ex. adoucissant textile provenant du lavage). Ce film
coloré n’affecte pas la performance du sèche-linge.
Nettoyage
●
Les parties externes en métal ou en plastique et les
pièces en caoutchouc peuvent être nettoyées avec
un chiffon humide.
●
Vérifiez périodiquement le tuyau de ventilation et
tout élément permanent de ventilation afin de vous
assurer qu’il n’y a pas eu d’accumulation de
peluches, et retirez-celles-ci.
●
Retirez les peluches qui s’accumulent autour du filtre
et des orifices de sortie.
Pour retirer le filtre :
1. Tirez la poignée en
plastique du filtre vers le
haut (voir le diagramme).
2. Nettoyez le filtre et
remettez-le correctement
en place. Assurez-vous
que le filtre soit bien
inséré à fond dans la
garniture du sèche-linge.
! N’utilisez pas le sèche-linge sans avoir remis le filtre
en place.
Vérifiez le tambour après chaque cycle
Tournez le tambour à la main afin de retirer les petits
articles (mouchoirs) qui pourraient y avoir été oubliés.
! N’utilisez pas de solvants ou d’abrasifs.
! Votre sèche-linge utilise des roulements spéciaux qui
n’ont pas besoin d’être lubrifiés.
! Faites vérifier régulièrement votre sèche-linge par
des techniciens agréés pour assurer une sécurité
électrique et mécanique (voir Service d’Entretien).
34
Page 35

Que faire en cas de panne
Votre sèche-linge semble ne pas fonctionner. Avant d’appeler votre Centre de Service d’Entretien (voir Service
d’Entretien), passez en revue les suggestions de dépannage suivantes :
Problème :
Le sèche-linge ne démarre
pas.
Causes possibles / Solution :
●
La fiche n’est pas branchée dans la prise de courant, ou ne fait pas contact.
●
Il y a eu une coupure de courant.
●
Le fusible a sauté. Essayez de brancher un autre appareil dans la prise
électrique.
●
Utilisez-vous une rallonge? Essayez de brancher le cordon d’alimentation
du sèche-linge directement dans la prise.
●
La porte n’est pas bien fermée?
●
Le bouton des PROGRAMMES n’a pas été convenablement réglé (voir
Démarrage et Programmes).
●
Le bouton DÉPART n’est pas enfoncé (voir Démarrage et Programmes).
●
Le cycle de séchage ne
démarre pas.
L’appareil met longtemps à
sécher.
Vous avez réglé l’appareil sur un temps de délai (voir Démarrage et
Programmes).
●
Le filtre n’a pas été nettoyé (voir Entretien).
●
La température choisie n’est pas idéale pour le type de textile que vous
séchez (voir Démarrage et Programmes).
●
Les Programmes Auto requièrent un réglage de HAUTE température (voir
Démarrage et Programmes).
●
Le programme correct n’a pas été sélectionné pour cette charge (voir
Démarrage et Programmes).
●
Le tuyau de ventilation flexible est bloqué (voir Installation).
●
Le tuyau d’arrivée d’air est bloqué (voir Installation).
●
Les volets de ventilation permanents sur la grille d’évacuation sont bloqués
(voir Installation).
●
Les articles étaient trop mouillés (voir Linge).
●
Le sèche-linge était surchargé (voir Linge).
F
Installation Description
Démarrage et
programmes Linge
Avertissements et
Suggestions
Entretien et
Nettoyage
Que faire en cas
de panne
Après-vente
Service
35
Page 36

Service Après-Vente
F
Avant d’appeler le Centre de Service
Après-Vente :
Pièces de Rechange
Ce sèche-linge est une machine complexe. Le réparer
●
Utilisez le guide de dépannage pour voir si vous
pouvez résoudre le problème vous-même (voir Que
faire en cas de panne).
●
Si non, éteignez le sèche-linge et appelez le Centre
de Service Après-Vente le plus proche.
vous-même ou essayer de le faire réparer par une
personne non agréée pourrait entraîner des
dommages corporels pour une ou plusieurs
personnes, cela pourrait endommager la machine et
cela pourrait rendre invalide la garantie des pièces de
rechange.
Appelez un technicien agréé si vous avez des
problèmes lors de l’utilisation de ce sèche-linge.
Les pièces de rechange ont été conçues
Quelles informations donner au Centre de Service
Après-Vente :
●
Vos nom, adresse et code postal.
●
Votre numéro de téléphone.
●
Le type de problème.
●
La date d’achat.
●
Le modèle de l’appareil (Mod.).
●
Le numéro de série (S/N).
exclusivement pour cet appareil et pour aucune autre
utilisation.
Vous trouverez ces informations sur la fiche
signalétique située à l’intérieur de la porte de la
machine.
Service
Après-Vente
36
Page 37

Bedienungsanleitung
WÄSCHETROCKNER
GB
English, 1
D
Deutsch, 37
I
Italiano, 13
E
Español, 49
NL
Nederlands, 73AArabic, 96
AS60V
F
Français, 25
P
Português, 61
Inhaltsverzeichnis
Installierung, 38-39
Aufstellung Ihres Wäschetrockners
Belüftung
Stromanschluss
Vor der Inbetriebsetzung Ihres Wäschetrockners
Beschreibung Ihres
Wäschetrockners, 40
Vorderseite
Rückseite
Bedienblende
Start und Programme, 41-42
Programmauswahl
Programmtabelle
Gewebeart, 43-44
Tipps zum Sortieren Ihrer Wäsche
Pflegeetiketten
Artikel, bei denen besondere Sorgfalt erforderlich ist
Trocknungszeiten
Warnhinweise und Empfehlungen, 45
Allgemeine Sicherheitshinweise
Entsorgung
Energiesparender Betrieb und Umweltschutz
D
Wartung und Pflege, 46
Stromversorgung abschalten
Filter nach jedem Zyklus reinigen
Trommelinspektion nach jedem Zyklus
Reinigung
Fehlersuche, 47
Kundendienst, 48
Ersatzteile
37
Page 38

Installierung
D
! Bewahren Sie diese Bedienungsanleitung an einem
sicheren Ort auf, um sie bei Bedarf als Bezug
verwenden zu können. Nehmen Sie sie bei einem
Umzug mit und stellen Sie bei einem Verkauf oder der
Weitergabe an eine andere Person sicher, dass diese
Bedienungsanleitung zusammen mit dem
Wäschetrockner abgegeben wird, damit sich der neue
Eigentümer ausreichend über die Bedienung und
mögliche Vorsichtsmaßnahmen bei der Verwendung
des Wäschetrockners informieren kann.
! Lesen Sie diese Bedienungsanleitung sorgfältig
durch. Die nachfolgenden Seiten enthalten wichtige
Informationen zur Installierung und Funktionsweise
dieser Gerätes.
Aufstellung des Wäschetrockners
●
Den Wäschetrockner so aufstellen, dass ausreichend
Abstand zu Gasherden, Öfen, Heizungen oder
Kochplatten vorhanden ist, da das Geräte
beschädigt werden könnte.
●
Wird der Wäschetrockner untergebaut, muss zwischen
der Geräteoberseite und der Arbeitsplatte (auch
andere Gegenstände) ein Mindestabstand von
10mm eingehalten werden. Um die Luftzirkulation
zu gewährleisten muss ferner zwischen den
Seitenwänden des Gerätes und den angrenzenden
Möbelschränken oder Wänden ein Mindestabstand
von 15mm berücksichtigt werden. Außerdem muss
darauf geachtet werden, dass die hinten an der
Geräterückseite befindlichen Entlüftungsvorrichtungen
nicht blockiert werden.
●
Es muss sichergestellt werden, dass der
Wäschetrockner in einem Raum mit nicht zu hoher
Luftfeuchtigkeit und ausreichender Luftzirkulation
aufgestellt wird.
Belüftung
Bei Inbetriebnahme des Wäschetrockners wird saubere
und relativ trockene Raumluft angesaugt, erhitzt und der
Wäsche bei Reversierung der Trommel zugeführt. Die
durch das Trocknen der Wäsche entstandene feuchte
Luft wird dann durch einen Abluftschlauch an der
Geräterückseite abgeleitet. Bei Inbetriebnahme muss
eine ausreichende Belüftung sichergestellt sein. Das
Gerät darf nicht in Räumlichkeiten betrieben werden in
denen leicht brennbare Substanzen, wie Gase,
Brennstoffe etc gelagagert werden und / oder offene
Flammen vorhanden sind.
Mobile Anbringung des Abluftschlauches
Bei Inbetriebnahme des Gerätes muss immer ein
Abluftschlauch verwendet werden, der sicher an der
Rückseite des Wäschetrockners angeschlossen ist
(siehe Beschreibung Ihres Wäschetrockners). Wenn
möglich, sollte der Schlauch an einen dauerhaften
Auslass angeschlossen sein, der sich in der Nähe des
Wäschetrockners befindet. Alternativ kann der
Schlauch auch durch ein leicht geöffnetes Fenster
nach außen geführt werden.
! Sicherstellen, dass der Abluftschlauche nicht die
Belüftungsschlitze an der Geräterückseite verdeckt.
! Der Abluftschlauch sollte höchstens 2,4 m lang sein
und muss frei von Flusen, Fasern oder Wasser
gehalten werden; dazu den Schlauch häufig
ausschütteln. Außerdem muss stets darauf geachtet
werden, dass der Schlauch nicht gequetscht wird.
Feste Anbringung des Abluftschlauches
Wir empfehlen die Verwendung eines Teleskop Mauerdurchführunskanals. Dieser Kanal ist im
Fachgeschäft für Lüftungsbau oder im
Ersatzteilhandel erhältlich.
Mauerdurchführung
1. Die Mauerdurchführung
ist links vom
Wäschetrockner aus
möglich.
2. Den Schlauch möglichst
kurz und gerade lassen,
um zu verhindern, dass
kondensierte Feuchtigkeit
in den Wäschetrockner
zurückströmt.
3. Die in der Wand
befindliche Durchführung solte mit leichtem Gefälle
nach draußen gerichtet sein.
Fensterbefestigung
1. Wird der
Wäschetrockner erhöht
aufgestellt, sollte sich die
Fensterdurchführung
unterhalb der
Abzugsöffnung des
Gerätes befinden.
2. Der Schlauch sollte
möglichst kurz sein.
Abhängig von der Verwendungshäufigkeit Ihres
Wäschetrockners müssen die Bereiche A und B
regelmäßig überprüft werden, um Flusen oder kleine
Schmutzansammlungen zu entfernen. Durch eine
ausreichende Sicherung des Abluftschlauchadapters
wird sichergestellt, dass feuchte Luft nicht zurück in
den Raum geleitet wird.
! Der Wäschetrockner darf nicht so weit nach hinten
geschoben werden, dass der Schlauchadapter
herausgezogen oder der Schlauch gequetscht oder
gebogen wird.
! Der Abluftschlauch darf die Belüftungsschlitze nicht
verdecken, nicht abgegeknickt oder zu stark gebogen
werden, da es ansonsten zu einer Blockierung und
Kondensatansammlung kommt.
38
Page 39

Entlüftung durch ein offenes Fenster
1. Das Schlauchende
sollte nach unten zeigen,
um verhindern zu
können, dass warme
feuchte Luft im Raum
oder Wäschetrockner
kondensiert.
! Kein Verlängerungskabel verwenden.
! Das Stromkabel darf keine Biege- oder
Quetschstellen aufweisen.
! Das Stromkabel der Gerätes muss regelmäßig
überprüft werden. Ein Austausch dieses darf nur von
einem konzessionierten Elektroinstallateur vorgenommen
werden (siehe Kundendienst). Neue oder längere
Stromkabel sind von konzessionierten Service Partnern erhältlich.
D
Installierung
Beschreibung
! Sicherstellen, dass eine ausreichende Belüftung für
den Trockner bereit steht und dass das
Schlauchende nicht die Belüftungsschlitze der
Geräterückwand verdecken
! Durch den Abluftschlauch wird eine optimale
Leistung sichergestellt.
! Sicherstellen, dass Abluftschlauch und
Belüftungsschlitze nicht behindert oder blockiert werden.
! Abluft darf vom Trockner nicht wieder aufgenommen
werden.
! Durch falsche Verwendung des Wäschetrockners
kann ein Brandrisiko entstehen.
! Den Abluftschlauch nicht in einen Abzuhskanal
führen der für Abgase anderen Geräte genutzt wird,
die Gase oder sonstige Brennstoffe etc verbrennen.
Stromanschluss
Stellen Sie folgende Punkte sicher, bevor Sie die
Maschine an die Steckdose anschließen:
●
Die Steckdose muss geerdet sein.
●
Die Steckdose muss die maximale
Leistungsaufnahme gemäß Typenschild
abgesichert sein (siehe Beschreibung Ihres
Wäschetrockners).
●
Die Netzspannung muss die dem Typenschild
entsprechen (siehe Beschreibung Ihres
Wäschetrockners).
●
Die Steckdose muss mit dem Stecker des
Wäschetrockners kompatibel sein. Sollte dies nicht
der Fall sein, muss entweder der Stecker oder die
Steckdose ausgetauscht werden.
! Der Hersteller übernimmt keinerlei Haftung, sollten
diese Regeln nicht genau beachtet werden.
! Sollten sie sich über einen der obigen Punkte nicht
ganz im klaren sein, dann ziehen sie bitte
einen qualifizeirten Elektriker zu Rate.
Nivellierung Ihres Trockners
Der Trockner muss für einen korrekten Betrieb beim
Aufstellen waagerecht ausgerichtet werden.
Nach der Installierung
Ihres Trockners diesen in
beide Richtungen
nivellieren – zuerst
seitlich, dann von vorne
nach hinten.
Wenn der Trockner nicht
waagerecht steht, muss
dieser mit einem
Holzblock gestützt
werden, während die
beiden Vorderfüße zur
korrekten Ausrichtung
des Trockners entweder
nach oben oder nach
unten verstellt werden.
Programme Gewebeart
Start und
Warnhinweise und
Empfehlungen
Wartung und
Pflege Fehlersuche Kundendienst
! Der Wäschetrockner darf nicht im Freien installiert
werden, selbst wenn der entsprechende Bereich
geschützt ist. Ein Wäschetrockner stellt eine
ernsthafte Gefahr dar, wenn er Regen oder starken
Winden ausgesetzt wird.
! Nach der Installierung müssen sich Kabel und
Stecker des Wäschetrockners leicht erreichen lassen
können.
Vor der Inbetriebsetzung Ihres
Wäschetrockners
Nach der Installierung des Wäschetrockners und vor
dessen Verwendung muss die Innenfläche der
Trommel gesäubert werden, um Staub, der sich
während des Transports angesammelt haben könnte,
zu entfernen.
39
Page 40

Beschreibung Ihres Wäschetrockners
D
Vorderseite Rückseite
Bedienblende
Modell- &
Seriennummer
Trommel
Filter
Typenschild
Vorsicht,heiß!
Belüftungsschlitze
Anschluss für
Abluftschlauch
Bedienblende
START-TasteAnzeigeBETRIEBSKONTROLL-Leuchte
TEMPERATURAUSWAHL-Taste
ALARM-Taste
Trocknungszeiten
Mit der START-Taste wird das ausgewählte Programm
gestartet (siehe Start und Programme).
Mit der TEMPERATURAUSWAHL-Taste wird die beim
Trocknen der Wäsche verwendete Temperatur
ausgewählt (siehe Start und Programme).
NICHT EINGEDRÜCKT: HOHE Temperatur.
EINGEDRÜCKT: NIEDRIGE Temperatur.
Mit dem ALARM-Summer wird das Ende eines
Trocknungszyklus gemeldet.
NICHT EINGEDRÜCKT: Summer ist EINGESCHALTET.
EINGEDRÜCKT: Summer ist AUSGESCHALTET.
Die BETRIEBSKONTROLL-Leuchte gibt an, ob sich
Ihr Wäschetrockner in Betrieb befindet und wird beim
Drücken der START-Taste eingeschaltet. Diese Lampe
bleibt so lange eingeschaltet, bis die Tür geöffnet
oder die Stromversorgung zum Trockner
ausgeschaltet wird. Die Lampe leuchtet auch bei der
Auswahl eines Programms mit verzögertem Start.
ZEITVORWAHL-Knopf
PROGRAMMWAHL-Knopf
Unter „Trocknungszeiten“ werden Informationen
über Gewebearten und Ladekapazitäten in einem
benutzerfreundlichen Tabellenformat bereitgestellt.
Mit dem ZEITVORWAHL-Knopf kann eine
Verzögerung für den Start eines Trocknerzyklus
eingestellt werden. Den Drehknopf dabei so weit im
Uhrzeigersinn drehen, bis die gewünschte Anzahl von
Stunden erreicht wird. Wenn der Knopf zu weit
gedreht wurde, kann er gegen den Uhrzeigersinn
zurückgedreht werden (siehe Start und Programme).
Mit dem PROGRAMMWAHL-Knopf kann das
gewünschte Programm ausgewählt werden. Dazu den
Drehknopf im Uhrzeigersinn – niemals gegen den
Uhrzeigersinn – so weit drehen, bis die Anzeige auf
das gewünschte Programm zeigt (siehe Start und
Programme).
40
Page 41

Start und Programme
Programmauswahl
1. Den Wäschetrockner an die Steckdose
anschließen.
2. Die Wäsche je nach Gewebeart sortieren (siehe
Gewebeart).
3. Die Tür öffnen und sicherstellen, dass der Filter
sauber ist und korrekt eingesetzt wurde (siehe
Wartung).
4. Die Maschine beladen und dabei sicherstellen,
dass keine Wäschestücke zu nah an der
Türdichtung sind. Die Tür schließen.
5. Das geeignete Trocknungsprogramm auswählen.
Beziehen Sie sich dazu auf die Programmtabelle
(siehe Programme) sowie auf die für die
verschiedenen Gewebearten angegebenen
Empfehlungen (siehe Gewebeart).
- Die Temperatur mit der
TEMPERATURAUSWAHL-Taste einstellen.
- Durch Drehen des PROGRAMMWAHL-Knopfs
im Uhrzeigersinn das gewünschte Programm
oder die Trocknungszeit auswählen.
7. Soll kein Summer ertönen, die ALARM-Taste
drücken.
8. Die START-Taste zur Inbetriebsetzung des
Wäschetrockners drücken. Die
BETRIEBSKONTROLL-Leuchte wird
eingeschaltet und bleibt an - selbst während
einer Verzögerungsphase. Die Kontrollleuchte
bleibt so lange eingeschaltet, bis die Trocknertür
geöffnet wird. Während eines Trocknungszyklus
kann die Wäsche überprüft und einzelne
Wäschestücke, die schon trocken sind,
entnommen werden. In diesem Fall muss nach
dem Schließen der Tür zum Fortsetzen des
Zyklus erneut die START-Taste gedrückt werden.
9. Ca. 10 Minuten vor Ende eines Programms
beginnt die ABKÜHL-Phase (Wäsche wird
abgekühlt). Diese Phase sollte immer vollständig
ausgeführt werden.
10. Durch den Summer werden Sie darüber
informiert, dass das Programm vollständig
ausgeführt wurde. Nun können Sie die Tür
öffnen, die Wäsche herausnehmen, den Filter
säubern und wieder einsetzen (siehe Wartung).
D
Installierung
Beschreibung
Programme Gewebeart
Start und
6. Bei Bedarf eine Verzögerungszeit mit dem
ZEITVORWAHL-Knopf einstellen.
11. Den Netzstecker aus der Steckdose ziehen.
Warnhinweise und
Empfehlungen
Wartung und
Pflege Fehlersuche Kundendienst
41
Page 42

Start und Programme
D
Programme
Programme
Automatisches
Trocknen
(durchschnittliche
Beladungsmenge)
Automatisches
Trocknen
(große
Beladungsmenge)
Leichtbügeln
Zeitgesteuerter
Trockenzyklus
bis zu 120
Minuten
Abkühlphase
Funktion Einstellung
Vollständiges Trocknen: macht
die Wäsche tragfertig. Für eine
Beladung von 1 - 3 kg).
Geeignet für Baumwolle ,
Baumwoll-Mischgewebe oder
Synthetik .
Vollständiges Trocknen: macht
die Wäsche tragfertig.
Für eine Beladung von 3 - 6 kg).
Geeignet für Baumwolle .
Kurzes Programm (ca. 10
Minuten), mit dem Stofffasern für
ein leichteres Bügel weich
gemacht werden.
Trocknet nasse Kleidung, die
danach gebügelt werden soll,
Acrylfasern oder kleine
Ladungen (weniger als 1 kg).
Heizelemente werden
abgeschaltet und die Wäsche
wird abgekühlt.
1. Durch Drücken der
TEMPERATURAUSWAHL-Taste HOHE
TEMPERATUR auswählen.
2. Den PROGRAMMWAHL-Knopf auf
einstellen.
3. Die START-Taste drücken. Nun wir
die BETRIEBSKONTROLL-Leuchte
eingeschaltet.
1. Durch Drücken der
TEMPERATURAUSWAHL-Taste HOHE
TEMPERATUR auswählen.
2. Den PROGRAMMWAHL-Knopf auf
einstellen.
3. Die START-Taste drücken. Nun wir
die BETRIEBSKONTROLL-Leuchte
eingeschaltet.
1. Durch Drücken der
TEMPERATURAUSWAHL-Taste HOHE
TEMPERATUR auswählen.
2. Den PROGRAMMWAHL-Knopf auf
einstellen.
3. Die START-Taste drücken. Nun wir
die BETRIEBSKONTROLL-Leuchte
eingeschaltet.
1. Durch Drücken der
TEMPERATURAUSWAHL-Taste HOHE
TEMPERATUR oder NIEDRIGE
TEMPERATUR auswählen.
2. Den PROGRAMMWAHL-Knopf auf die
gewünschte Zeit einstellen.
3. Die START-Taste drücken. Nun wir
die BETRIEBSKONTROLL-Leuchte
eingeschaltet.
Hierbei handelt es sich um die letzte
Programmphase. ca. 10 Minuten vor
Programmende wird der Drehknopf automatisch zur
Abkühlphase weitergedreht.
Nach vollständiger Ausführung des Programms
ertönt der Summer (falls ausgewählt), und Ihre
Wäsche kann herausgenommen werden.
Hinweis:
! Wird NIEDRIGE TEMPERATUR
ausgewählt, wird Ihre Wäsche nicht
getrocknet. Für Wäsche aus
Acrylfasern oder kleine Ladungen
einen zeitgesteuerter Trockenzyklus
auswählen. Dieses Programm kann
auch für größere Ladungen verwendet
werden, wenn die Wäsche etwas mehr
getrocknet werden muss.
!
Wird NIEDRIGE TEMPERATUR ausgewählt,
wird Ihre Wäsche nicht getrocknet. Für
Wäsche aus Acrylfasern oder kleine
Ladungen einen
Trockenzyklus
Programm kann auch für durchschnittlich
große Ladungen verwendet werden, wenn
die Wäsche noch etwas feucht bleiben soll.
!
Hierbei handelt es sich
zeitgesteuerter
auswählen. Dieses
nicht um ein
Trocknungsprogramm (siehe
unten).
Siehe vorgeschlagene
Trocknungszeiten (
siehe
Wäsche).
Diese Phase sollte immer
vollständig ausgeführt
werden.
Programm für ein Leichtbügeln
Beim Programm „Leichtbügeln“ handelt es sich um ein Kurzprogramm mit einer Dauer von ca. 10 Minuten (8
Minuten Hitze und 2 Minuten Abkühlung). Bereits getrocknete jedoch verknitterte Stoffe werden aufgelockert und
die Fasern werden geglättet. Sie lassen sich so leichter bügeln.
! Beim Programm „Leichtbügeln“ handelt es sich nicht um ein Trocknungsprogramm. Es soll deshalb nicht für
nasse Wäsche verwendet werden.
1. Die maximale Beladung darf nicht überschritten werden.
Die nachstehenden Gewichtsangaben beziehen sich auf reine Trockenwäsche:
Gewebeart Maximale Ladekapazität
Baumwolle und Baumwoll-Mischgewebe 2,5 kg
Synthetik 2 kg
Jeans 2 kg
2. Die Wäsche unmittelbar nach Abschluss eines Programms aus dem Trockner nehmen. Entsprechende
Wäschestücke aufhängen, falten oder bügeln und in den dafür vorgesehenen Schrank legen. Sollte dies
nicht möglich sein, das Programm wiederholen.
Das Programm „Leichtbügeln“ hat nicht bei jeder Gewebeart die gleiche Leistung. Es eignet sich am besten für
herkömmliche Gewebearten wie Baumwolle oder Baumwoll-Mischgewebe, und eignet sich weniger gut für
Acrylfasern und Materialien wie zum Beispiel Tencel®.
42
Page 43

Gewebeart
Tipps zum Sortieren Ihrer Wäsche
• Symbole auf den Etiketten überprüfen, um
sicherstellen zu können, dass die
entsprechenden Wäschestücke trocknergeeignet
sind.
• Die Wäsche nach Gewebearten sortieren.
• Taschen leeren und Knöpfe überprüfen.
• Reißverschlüsse und Haken schließen und lose
Gürtel und längere Schnüre zusammenbinden.
• Jedes Wäschestück auswringen, um schon im
Voraus möglichst viel Wasser zu entfernen.
! Keine tropfend nasse Wäsche in den Trockner
legen.
Maximale Beladungskapazität
Die maximale Beladungskapazität sollte nicht
überschritten werden. Die nachfolgenden Gewichte
beziehen sich auf Trockenwäsche.
Naturfasern: max. 6 kg
Kunststofffasern: max. 3 kg
! Den Trockner NICHT überladen, da dies die
Trocknungsleistung beeinträchtigt.
Typische Ladung
Kleidungsstücke
Bluse aus Baumwolle 150 g
Andere 100 g
Kleid aus Baumwolle 500 g
Andere 350 g
Jeans 700 g
10 Windeln 1000 g
Hemd aus Baumwolle 300 g
Andere 200 g
T-Shirt 125 g
Haushaltswaren
Bettüberzug aus Baumwolle 1500 g
(für Doppelbett) Andere 1000 g
Große Tischdecke 700 g
Kleine Tischdecke 250 g
Geschirrtuch 100 g
Badetuch 700 g
Handtuch 350 g
Bettlaken – Doppelbett 500 g
Bettlaken – Einzelbett 350 g
Pflegeetiketten
Prüfen Sie die Etiketten an Ihren Kleidungsstücken,
insbesondere dann, wenn für ein bestimmtes
Kleidungsstück das erste Mal im Trockner verwendet
wird. Typische Symbole sind:
Kann im Wäschetrockner getrocknet
werden
Nicht geeignet für Wäschetrockner
Bei hoher Temperatur im
Wäschetrockner trocknen
Bei niedriger Temperatur im
Wäschetrockner trocknen
Artikel, die sich nicht für den Wäschetrockner
eignen
• Artikel, die Gummi oder gummiähnliche
Materialien enthalten oder einen
Kunststoffüberzug umfassen (Kissen oder PVCRegenkleidung), andere leicht entzündbare Artikel
oder Gegenstände, die leicht entzündbare
Substanzen enthalten (wie zum Beispiel ein
Handtuch, auf dem sich etwas Haarspray
befindet).
• Glasfasern (z.B.manche Vorhangarten)
• Wäschestücke, die chemisch gereinigt wurden
• Mit dem ITCL Code gekennzeichnete
Wäschestücke (siehe Artikel, bei denen
besondere Sorgfalt erforderlich ist). Solche Artikel
können mit speziellen Produkten zu Hause
chemisch gereinigt werden. In diesem Fall die
Gebrauchsanweisung genau befolgen.
• Große und sperrige Artikel (Federbetten,
Schlafsäcke, Kissen, große Tagesdecken usw.).
Diese dehnen sich beim Trocknen aus und
würden dadurch eine ausreichende Luftzirkulation
im Trockner verhindern.
D
Installierung
Beschreibung
Programme Gewebeart
Start ubd
Warnhinweise und
Empfehlungen
Wartung und
Pflege Fehlersuche Kundendienst
Am Ende eines Trocknungszyklus kann Wäsche aus
Baumwolle noch feucht sein, falls Artikel aus
Baumwolle und Synthetik zusammen in den Trockner
gelegt wurden. In diesem Fall kann die Wäsche
einfach noch etwas mehr in der Maschine getrocknet
werden.
43
Page 44

Gewebeart
D
Artikel, bei denen besondere Sorgfalt
erforderlich ist
Decken und Bettüberwürfe: Artikel aus Acrylfasern
(Acilan, Courtelle, Orion, Dralon) müssen vorsichtig
bei NIEDRIGER Temperatur getrocknet werden.
Außerdem dürfen solche Artikel nicht zu lange
getrocknet werden.
Kleidungsstücke mit Falten oder plissierte
Kleidungsstücke: Die am Artikel angegebenen
Trocknungsanweisungen des Herstellers beachten.
Gestärkte Kleidungsstücke: Solche Artikel nicht
zusammen mit nicht gestärkten Wäschestücken
trocknen. Sicherstellen, dass möglichst viel der
Stärkelösung entfernt wurde, bevor die Artikel in den
Trockner gelegt werden. Die Wäsche nicht zu sehr
trocknen: die Stärke wird sonst zu Pulver und macht
die entsprechenden Kleidungsstücke schlaff, was
dem eigentlichen Zweck der Stärke entgegenwirkt.
Trocknungszeiten
In der nachfolgenden Tabelle werden UNGEFÄHRE
Trocknungszeiten in Minuten angegeben. Die
Gewichtsangaben beziehen sich dabei auf trockene
Wäsche:
Baumwollartikel
Hohe (volle) Temperatur
Trocknungszeiten - bei einem Schleudern mit 800-1000 Umdrehungen pro
Minute in der Waschmaschine
Halbe Ladung Volle Ladung
1 kg 2 kg 3 kg 4 kg 5 kg 6 kg
20-30 35-45 45-60 60-70 70-80 80-100
Synthetikartikel
Hohe (volle) Temperatur
Trocknungszeiten - bei reduziertem Schleudern in der Waschmaschine
Halbe Ladung Volle Ladung
1 kg 2 kg 3 kg
20-30 35-45 45-60
Hierbei handelt es sich nur um ungefähre
Zeitangaben, die von folgenden Faktoren abhängen
können:
• Menge des nach dem Schleudergang in der
Wäsche zurückbleibenden Wassers. In
Handtüchern und Feinwäsche bleibt zum Beispiel
mehr Wasser zurück.
• Stoffbeschaffenheit: Artikel aus derselben Qualität
jedoch mit anderer Beschaffenheit oder Dicke
können länger oder kürzer zum Trocknen
brauchen.
• Menge: Einzelne Wäschestücke oder kleine
Ladungen können unter Umständen länger zum
Trocknen brauchen.
• Trockenheit: Wenn die Wäsche später gebügelt
werden soll, kann sie in einem noch leicht feuchten
Zustand aus dem Trockner genommen werden.
Andere Wäschestücke können so lange im
Trockner bleiben, bis sie vollkommen trocken sind.
• Temperatureinstellung.
• Raumtemperatur: Wenn sich der Trockner in einem
kalten Raum befindet, dauert es länger, bis die
Wäsche trocken ist.
• Sperrige Artikel: Der Trockner kann auch für
sperrige Artikel verwendet werden. Dabei
empfiehlt es sich jedoch, diese mehrmals aus dem
Trockner zu nehmen und kräftig zu schütteln,
bevor der Trocknungszyklus fortgesetzt wird.
! Wäsche niemals übermäßig trocknen.
Alle Gewebe enthalten eine geringe Menge an
natürlicher Feuchtigkeit, wodurch sie weich und
flauschig bleiben.
Acrylfasern /
Niedrige (weniger gewebestrapazierende) Temperatur
Trocknungszeiten - bei reduziertem Schleudern in der Waschmaschine
Halbe Ladung Volle Ladung
1 kg 2 kg
25-40 40-60
44
Page 45

Warnhinweise und Empfehlungen
! Diese Maschine wurde gemäß internationaler
Sicherheitsnormen entworfen und hergestellt. Die
Warnhinweise dienen dazu, eine sichere Verwendung
Ihres Trockners zu gewährleisten. Bitte lesen Sie
diese sorgfältig durch.
Diese Maschine erfüllt folgende EG-Direktiven:
-72/23/EG und 93/68/EG
(Niederspannungsausrüstung)
-89/336/EG, 92/31/EG und 93/68/EG
(Elektromagnetische Störfreiheit)
Allgemeine Sicherheitshinweise
●
Dieser Wäschetrockner ist nur für den Privatgebrauch
vorgesehen.
●
Dieser Trockner darf nur von einem Erwachsenen verwendet
werden. Die in dieser Bedienungsanleitung gemachten
Angaben müssen genau beachtet werden.
●
Die Maschine nicht mit nassen Händen oder Füßen berühren.
●
Netzstecker nur per Hand von der Steckdose trennen und
nicht am Netzkabel ziehen.
●
Kinder dürfen sich während des Betriebs des Trockners
nicht in dessen Nähe aufhalten. Nach der Verwendung
des Trockners, diesen ausschalten und den Netzstecker
herausziehen. Die Tür nicht offen lassen, damit der
Trockner von Kindern nicht als Spielzeug verwendet
werden kann.
●
Die Maschine muss korrekt installiert werden und über
ausreichend Belüftung verfügen. Die hinten an der Maschine
befindlichen Belüftungsschlitze, die Auslassöffnungen und
der Abluftschlauch dürfen niemals auf irgendeine Weise
behindert oder blockiert werden (siehe Installierung).
●
Die Auslassöffnung des Abluftschlauchs darf niemals in
Richtung Lufteinlass an der Geräterückwand geführt
werden.
●
Es darf keine Abluft vom Wäschetrockner wieder
aufgenommen werden.
●
Den Trockner niemals auf einen Teppichboden stellen, bei
dem die Florhöhe verhindern würde, dass Luft von unten
in den Trockner einströmen kann.
●
Vor dem Beladen sicherstellen, dass der Trockner leer ist.
●
●
●
●
●
●
●
●
●
●
Die Rückseite des Trockners kann sehr heiß werden.
Deshalb diesen Bereich während des Betriebs
nicht berühren.
Den Trockner nur mit korrekt angebrachtem Filter
verwenden (siehe Wartung).
Im Trockner keinen flüssigen Weichspüler verwenden; diesen
beim letzten Spülgang Ihrer Waschmaschine hinzufügen.
Die maximale Ladekapazität des Trockners niemals
überschreiten (siehe Gewebeart).
Nicht tropfend nasse Artikel in den Trockner legen.
Nur solche Artikel in den Trockner legen, die mit Waschmittel
und Wasser gewaschen und danach gründlich gespült
und geschleudert wurden. Artikel, die NICHT mit Wasser
gewaschen wurden, stellen ein Brandrisiko dar.
Alle an den Pflegeetiketten gemachten Anweisungen genau
durchlesen (siehe Gewebeart).
Keine Wäsche trocknen, die mit Chemikalien
behandelt wurde.
Niemals Artikel trocknen, die mit leicht entzündbaren
Substanzen kontaminiert wurden (dazu gehört Benzin, Öl,
Lack, Haarspray, Cremes, Speisefett oder Öle).
Keine Artikel aus Gummi, Schaumgummi, Plastik,
Schaumkunststoff, PE, Papier, Windelhöschen
oder -einlagen im Wäschetrockner trocknen.
●
Den Trockner nicht für große und übermäßig sperrige
Artikel verwenden.
●
Acrylfasern nicht bei hoher Temperatur trocknen.
●
Jedes Programm mit einer Abkühlphase beenden.
●
Den Trockner nicht ausschalten, während die Artikel
darin noch warm sind.
●
Den Filter nach jeder Verwendung reinigen (siehe Wartung).
●
Die Ansammlung von Flusen im Trockner verhindern.
●
Niemals auf den Trockner steigen. Dies kann zu einer
Beschädigung führen.
●
Immer die für die Stromversorgung geltenden Normen und
Anforderungen erfüllen (siehe Installierung).
●
Nur originale Ersatzteile und Zubehöre verwenden (siehe
Kundendienst).
Recycling- & Entsorgungsinformationen
Aufgrund unseres fortwährenden Engagements für
Umweltschutz behalten wir uns das Recht vor, hochwertige
recycelte Komponenten zu verwenden, durch die die
Kosten für unsere Kunden sowie der Materialverbrauch
möglichst gering gehalten werden können.
●
Entsorgung des Verpackungsmaterials: Befolgen Sie
örtliche Vorschriften, damit das Verpackungsmaterial
recycelt werden kann.
●
Um das Verletzungsrisko für Kinder möglichst gering
halten zu können, sollten Tür und Stecker entfernt und
das Netzkabel bündig mit dem Gerät abgeschnitten
werden. Diese Teile sollten separat entsorgt werden, um
sicherstellen zu können, dass das Gerät nicht mehr an
die Stromversorgung angeschlossen werden kann.
Entsorgung von Elektroaltgeräten
Gemäß der Europäischen Richtlinie 2002/96/EC über Elektround Elektronik-Altgeräte (WEEE) dürfen ElektrohaushaltsAltgeräte nicht über den herkömmlichen Haushaltsmüllkreislauf
entsorgt werden. Altgeräte müssen separat gesammelt
werden, um die Wiederverwertung und das Recycling der
beinhalteten Materialien zu optimieren und die Einflüsse auf
die Umwelt und die Gesundheit zu reduzieren.
Das Symbol „durchgestrichene Mülltonne“ auf
jedem Produkt erinnert Sie an Ihre Verpflichtung,
dass Elektrohaushaltsgeräte gesondert entsorgt
werden müssen.
Endverbraucher können sich an Abfallämter der Gemeinden
wenden, um mehr Informationen über die korrekte
Entsorgung ihrer Elektrohaushaltsgeräte zu erhalten.
Energiesparender Betrieb und Umweltschutz
●
Wäsche auswringen, um überschüssiges Wasser vor dem
Beladen in den Trockner zu entfernen (wird zuerst eine
Waschmaschine verwendet, einen Zyklus mit hoher
Schleuderzahl auswählen). Dadurch kann während des
Trocknens nicht nur Zeit, sondern auch wertvolle Energie
gespart werden.
●
Um Energie sparen zu können, die Maschine möglichst
immer vollladen. Einzelne Artikel oder kleinere Ladungen
brauchen länger zum Trocknen.
●
Den Filter nach jeder Verwendung reinigen, um die
Energieverbrauchskosten möglichst gering halten zu
können (siehe Wartung).
D
Installierung
Beschreibung
Programme
Start und
Gewebeart
Warnhinweise und
Empfehlungen
Wartung und
Pflege Fehlersuche Kundendienst
45
Page 46

Wartung und Pflege
D
Stromversorgung abschalten
Den Trockner bei Nichtverwendung, während der
Reinigung und allen Wartungsarbeiten vom Stromnetz
trennen.
Filter nach jedem Zyklus reinigen
Der Filter stellt einen wichtigen Bestandteil Ihres
Trockners dar: Er nimmt Flusen und Fasern auf, die
sich während des Trocknens ansammeln. Außerdem
können kleine Gegenstände am Filter hängen bleiben.
Deshalb muss der Filter nach jedem Zyklus gereinigt
werden. Dazu den Filter unter laufendes Wasser
halten oder mit einem Staubsauger reinigen. Wenn
der Filter verstopft ist, wird sich dies in großem Maße
auf die Luftzirkulation im Trockner auswirken. Dies
bedeutet längere Trocknungszeiten und einen
höheren Energieverbrauch. Außerdem kann dies auch
zu einer Beschädigung des Trockners führen.
Der Filter befindet sich
vor der
Trocknerverkleidung
(siehe Diagramm).
Trommelreinigung
! Keine Scheuermittel, Stahlwolle oder
Edelstahlreiniger zum Säubern der Trommel verwenden.
An der Edelstahltrommel kann sich mit der Zeit ein
farbiger Film bilden. Dies kann durch Wasser
und/oder Waschmittel- oder Weichspülerrückstände
verursacht werden, beeinträchtigt jedoch auf keinerlei
Weise die Leistung des Trockners.
Reinigung
●
Externe Teile aus Metall oder Kunststoff sowie
Gummiteile können mit einem feuchten Tuch gereinigt
werden.
●
Den Abluftschlauch und jegliche permanente
Entlüftungsvorrichtungen regelmäßig überprüfen,
um sicherstellen zu können, dass sich keine Fasern
oder Flusen angesammelt haben. Diese entfernen.
●
Flusen um Filter und Auslassöffnungen entfernen.
! Keine Lösungs- oder Scheuermittel verwenden.
Filter herausnehmen:
1. Den Plastikgriff des
Filters nach oben ziehen
(siehe Diagramm).
2. Den Filter reinigen und
wieder korrekt einsetzen.
Dabei sicherstellen, dass
der Filter vollständig
bündig in der
Trocknerverkleidung
platziert ist.
! Den Trockner nicht ohne eingebauten Filter verwenden.
Trommelinspektion nach jedem Zyklus
Die Trommel mit der Hand drehen, um kleine Artikel,
die im Trockner zurückgeblieben sein können (wie
zum Beispiel Taschentücher) zu entfernen.
! Die in Ihrem Trockner befindlichen
Lagerkomponenten müssen nicht geschmiert werden.
! Den Trockner regelmäßig von einem zugelassenen
Monteur überprüfen lassen, um einen sicheren Betrieb
der Maschine in elektrischer und mechanischer
Hinsicht sicherstellen zu können (siehe Kundendienst).
46
Page 47

Fehlersuche
Bei einer Gerätestörung bitte zunächst folgende, mögliche Ursachen überprüfen, bevor Sie sich an unseren
autorisierten Kundendienst werden:
Problem:
Trockner startet nicht.
Mögliche Ursache / Lösung:
●
Der Netzstecker ist nicht eingesteckt oder es ist kein richtiger Kontakt
zwischen Netzstecker und der Steckdose vorhanden.
●
Stromausfall.
●
Durchgebrannte Sicherung. Schließen Sie ein anderes Gerät an die
Steckdose an.
●
Wird ein Verlängerungskabel verwendet? Versuchen Sie, das Stromkabel
des Trockners direkt an die Steckdose anzuschließen.
●
Ist die Tür nicht richtig zu?
●
Der PROGRAMMWAHL-Knopf wurde nicht richtig eingestellt (siehe Start
und Programme).
●
Die START-Taste wurde nicht gedrückt (siehe Start und Programme).
●
Trocknungszyklus startet
nicht.
Wäsche trocknet nur langsam.
Es wurde eine Startzeitverzögerung eingestellt (siehe Start und
Programme).
●
Der Filter wurde nicht gereinigt (siehe Wartung).
●
Die Temperatureinstellung eignet sich nicht für die zu trocknende
Gewebeart (siehe Start und Programme).
●
Für „Automatisches Trocknen“ ist eine HOHE Temperatureinstellung
erforderlich (siehe Start und Programme).
●
Es wurde kein für die Ladung korrektes Programm ausgewählt (siehe
Start und Programme).
●
Der flexible Abluftschlauch wird blockiert (siehe Installierung).
●
Die Lufteinlassöffnung wird blockiert (siehe Installierung).
●
Die am Gerätesockel befindliche permanente Lüftungsklappe wird
blockiert (siehe Installierung).
●
Die Wäsche war zu nass (siehe Gewebeart).
●
Der Trockner wurde überladen (siehe Gewebeart).
D
Installierung Beschreibung
Programme Gewebeart
Start und
Warnhinweise und
Empfehlungen
Pflege Fehlersuche Kundendienst
47
Wartung und
Page 48

Kundendienst
D
Bevor Sie den autorisierten
Kundendiens anrufen:
Ersatzteile
Wenn Sie versuchen, den Trockner selbst zu
●
Versuchen Sie, mit Hilfe der Fehlersuchtabelle das
Problem selbst zu lösen (siehe Fehlersuche).
●
Falls Sie das Problem nicht selbst lösen können,
schalten Sie den Trockner aus und rufen Sie den
Kundendienst in Ihrer Nähe an.
reparieren oder von einer nicht dafür autorisierten
Person reparieren zu lassen, kann dies zu
Verletzungen und einer Beschädigung des Gerätes
sowie zum Erliegen der Herstellergewährleistung
führen. Wenden Sie sich bei Störungen ausschließlich
an einen autorisierten Vertragskundendienst. Die
Ersatzteile wurden ausschließlich für dieses Gerät
entwickelt und sollten nicht für andere Zwecke
verwendet werden.
Vom Kundendienst benötigte
Information:
●
Name, Adresse und Postleitzahl
●
Telefonnummer
●
Kurze Beschreibung des Problems
●
Kaufdatum
●
Trocknermodell (Mod.)
●
Seriennummer (S/N)
Diese Informationen können Sie dem Typenschild an
der Türinnenseite der Maschine entnehmen.
Kundendienst
48
Page 49

Folleto de instrucciones
SECADORA
GB
English, 1
D
Deutsch, 37
I
Italiano, 13
E
Español, 49
NL
Nederlands, 73AArabic, 96
AS60V
F
Français, 25
P
Português, 61
Índice de materias
Instalación, 50-51
Dónde instalar la secadora
Ventilación
Conexiones eléctrica
Antes de empezar a utilizar la secadora
Descripción de la secadora, 52
La sección delantera
La sección trasera
El panel de control
Comienzo y programas, 53-54
Seleccionar un programa
Tabla de programas
La colada, 55-56
Clasificar la colada
Etiquetas de recomendaciones durante el lavado de la ropa
Prendas especiales
Tiempos de secado
Advertencias y recomendaciones, 57
Seguridad general
Disposición
Ahorro energético y respeto del medio ambiente
E
Mantenimiento y cuidados, 58
Desconectar la electricidad
Limpiar el filtro después de cada ciclo
Comprobar el tambor después de cada ciclo
Limpiar la secadora
Resolución de problemas, 59
Servicio, 60
Piezas de repuesto
49
Page 50

Instalación
E
¡Guarde este manual de instrucciones a mano a fin
de consultarlo cuando sea necesario. Llévelo con
usted cuando se traslade, y, si vendiera este
electrodoméstico o si lo pasa a terceros compruebe
que este manual se incluya con la secadora de forma
que el nuevo propietario quede informado acerca de las
advertencias y recomendaciones, además del
funcionamiento de la secadora.
¡Lea estas instrucciones detenidamente; las páginas
que aparecen a continuación contienen información
importante sobre la instalación, además de
recomendaciones sobre el funcionamiento del
electrodoméstico.
¡Compruebe que el extremo del tubo no esté orientado
hacia el respiradero de la entrada de aire en la parte
de atrás de la secadora.
¡El tubo de ventilación no debe superar 2,4 metros de
largo y debe permanecer libre de cualquier posible
acumulación de pelusas, hilos y agua, sacudiéndolo
con frecuencia. Asegúrese siempre que el tubo no
está aplastado.
Ventilación permanente
Junto con el tubo de ventilación, recomendamos
utilizar un juego de ventilación de pared/ventana,
disponible en cualquier comercio o del distribuidor de
piezas de repuesto más cercano.
Dónde instalar la secadora
Montaje en la pared
●
Instale la secadora lejos de estufas, calentadores o
cocinas, ya que las llamas pueden dañar el
electrodoméstico.
●
Si va a instalar el electrodoméstico debajo de una
encimera, asegúrese de dejar un espacio de 10
mm entre la parte superior y cualquier otro objeto
que vaya encima o sobre la máquina y un espacio
de 15 mm entre los costados y el mobiliario lateral o
paredes. Esto asegura la correcta circulación de
aire. Asegúrese que los respiraderos traseros no
estén obstruidos.
●
Asegúrese que coloca la secadora en un lugar que
no tenga humedad y con una circulación de aire
adecuada.
3. De manera similar, el conducto en la pared debe
estar orientado hacia el exterior.
1. Deje una abertura en la
pared, al lado izquierda
de la ubicación
propuesta para la
secadora.
2. Mantenga el tubo lo
más corto y recto
posible a fin de evitar
que la humedad
condensada se
introduzca en la
secadora.
Ventilación
La secadora seca la colada aspirando aire frío, limpio
y relativamente seco, calentándolo y luego
distribuyéndolo a través de la ropa a medida que la
colada da vueltas suavemente. Con objeto de ofrecer
el rendimiento más óptimo, el aire húmedo se extrae a
través de un tubo de ventilación ubicado en la parte
trasera de la secadora.
Cuando la secadora está en uso, debe haber una
ventilación adecuada a fin de evitar el flujo de retorno
de gases en la zona de electrodomésticos que queman
otros combustibles, incluyendo fuegos abiertos.
Ventilación móvil
Siempre debe ajustarse un tubo de ventilación cuando la
secadora se utiliza en combinación con la ventilación
móvil. El tubo debe instalarse de forma segura en la
parte trasera de la secadora (véase Descripción de la
secadora). A ser posible, siempre es mejor conectar
el tubo a una salida permanente cerca de la secadora. Si
no es posible realizar una instalación permanente, la
secadora funcionará igual de bien con el tubo fuera
de una ventana parcialmente abierta.
Montaje en una ventana
1. En el caso de una
secadora instalada en
columna, el orificio de
la ventana debería
hacerse debajo del
respiradero.
2. El tubo debe
mantenerse lo más
corto posible.
Dependiendo de la frecuencia con la que use la
secadora, es esencial que las áreas A y B se
comprueben periódicamente para retirar las pelusas o
la suciedad. El adaptador del tubo de ventilación debe
ajustarse de forma segura a fin de evitar que el aire
húmedo se distribuya por la habitación.
¡La secadora no se debería empujar muy al fondo para
evitar que le tubo de evacuación salga de su ubicación.
¡El tubo debe permanecer lejos del respiradero de la
entrada de aire y deben evitarse las dobleces o codos
en “U” ya que éstos obstruirán el tubo o atraparán
condensación.
50
Page 51

Ventilación mediante una ventana abierta
1. El extremo del tubo
debe orientarse hacia
abajo, a fin de evitar que
el aire húmedo y caliente
se condense en la
habitación o en la
secadora.
¡No utilice cables alargadores.
¡El cable de alimentación no debe estar ni doblado
ni torcido.
¡Debe comprobarse periódicamente el cable de la
fuente de alimientación y cambiarse con un cable
especialmente preparado para esta secadora e
instalarse únicamente por técnicos autorizados
(véase Servicio). Los cables de alimentación nuevos
o más largos pueden adquirirse adicionalmente de
distribuidores autorizados.
E
Instalación
Descripción
¡Compruebe que la secadora tenga la ventilación
adecuada y que el extremo del tubo de ventilación
no esté orientado hacia el conducto de entrada de
aire.
¡El tubo de ventilación siempre debe estar ajustado a
fin de ofrecer el rendimiento más óptimo.
¡Asegúrese que el tubo de ventilación y los
respiraderos de entrada de aire no estén obstruidos
o bloqueados.
¡La secadora no debe reciclar el aire de salida.
¡El mal uso de cualquier secadora tiene el riesgo de
que se produzcan incendios.
¡No expulsar el aire de salida a un conducto de
humos que se utilice para gases de salida de otros
electrodomésticos que quemen gas u otros
combustibles.
Conexiones eléctricas
Compruebe lo siguiente antes de introducir el
enchufe en la toma eléctrica:
●
El enchufe debe llevar conexión a tierra.
●
El enchufe debe tener la capacidad suficiente
para soportar la máxima potencia de los
electrodomésticos, lo que se indica en la matrícula
(véase Descripción de la secadora).
●
El voltaje de potencia debe encontarse dentro de
los valores indicados en la matrícula (véase
Descripción de la secadora).
¡El fabricante declina toda responsabilidad en caso
de no seguirse alguna de estas normas.
¡En caso de cualquier duda consulte con un
electricista cualificado.
Nivelación de la secadora
Para un funcionamiento correcto, la secadora debe
instalarse nivelada.
Cuando haya instalado
la secadora en su
ubicación definitiva, en
primer lugar, compruebe
que esté nivelada de
lado a lado y de
adelante a atrás.
Si la secadora no está
nivelada, utilice una
cuña de madera para
soportarla mientras
ajusta las patas hacia
arriba o abajo, hasta que
la secadora quede
nivelada.
Comienzo y
programas La colada
recomendaciones
Advertencias y
Mantenimiento y
cuidados
Resolución de
problemas Servicio
●
La toma debe ser compatible con el enchufe de la
secadora. Si este no es el caso, cambie el
enchufe o la toma.
¡La secadora no debe instalarse en el exterior,
incluso si el espacio destinado a estos efectos está
resguardado. Puede ser muy peligroso si está
expuesta a la lluvia o tormentas.
¡Una vez instalada, el cable eléctrico y el enchufe de
la secadora deben estar al alcance de la mano.
Antes de empezar a utilizar la secadora
Una vez haya instalado la secadora y antes de
utilizarla, limpie el interior del tambor para retirar el
polvo que haya podido acumularse durante el
transporte.
51
Page 52

Descripción de la secadora
E
La sección delantera La sección trasera
Panel de control
Modelo y
número de
serie
Tambor
Filtro
Matrícula
Precaución:
Respiradero de
entrada de aire
Tubo de ventilación
ajustado aquí
Caliente
Panel de control
TERMOSTATO
Luz de
ENCENDIDO
Indicador
Botón de
INICIO
Tabla de programas
de secado
El botón de INICIO comienza a secar un programa
seleccionado (véase Comienzo y Programas).
El TERMOSTATO selecciona la temperatura de
secado (véase Comienzo y Programas).
FUERA: MUCHO calor.
DENTRO: POCO calor.
El sonido de la ALARMA indica el fin del ciclo de
secado.
FUERA: Sonido encendido.
DENTRO: Sonido apagado.
El indicador de ENCENDIDO indica que se está
utilizando la secadora. Esta luz se iluminará cuando
se presionE el botón de ARRANQUE. Permanecerá
encendida hasta que se abra la puerta o se
desconecte la potencia. Esta luz permanecerá
encendida durante el programa de inicio retardado.
52
Botón de
ALARMA
TEMPORIZADOR
La Tabla de programas de secado le permite
consultar una tabla fácil de usar de tipos de tejido y
capacidades de carga.
El TEMPORIZADOR establece una demora en el
tiempo de inicio de la secadora. Girar hacia la
derecha hasta que llegue al número de horas que
desea demorar el tiempo de inicio. Si se ha pasado
del tiempo, gire el pomo hacia la izquierda (véase
Comienzo y Programas).
El PROGRAMADOR establece el programa: girarlo
hacia la derecha, nunca hacia la izquierda, hasta que
el indicador señale el programa que desea
seleccionar (véase Comienzo y Programas).
PROGRAMADOR
Page 53

Comienzo y Programas
Seleccionar un programa
1. Enchufar la secadora a la toma eléctrica.
2. Clasifique la colada según la clase de tejido
(véase La colada).
3. Abra la puerta y asegúrese que el filtro está
limpio y en posición (véase Mantenimiento).
4. Cargue la máquina y asegúrese que no haya
ninguna prenda atrapada en el cierre de la
puerta. Cierre la puerta.
5. Seleccione el programa de secado que desee,
comprobando la tabla de programas (véase
Programas) además de las indicaciones para
cada tipo de tejido (véase La colada).
- Ajuste la temperatura con el TERMOSTATO.
- Seleccione un programa o un tiempo de
secado, girando el PROGRAMADOR hacia la
derecha.
6. Ajuste un tiempo de demora utilizando el
TEMPORIZADOR, si fuera necesario.
7. Si desea suprimir el sonido que emite el, pulse
el botón de ALARMA.
8. Pulse el botón de INICIO para empezar.
El indicador de SECADO se iluminará y
permanecerá encendido, incluso durante el
tiempo de demora. El indicador permanecerá
encendido hasta que abra la puerta de la
secadora.
Durante el programa de secado, usted puede
comprobar la colada y sacar las prendas que ya
se han secado mientras el resto continúa
secándose. Cuando vuelva a cerrar la puerta,
pulse el botón de INICIO a fin de Empezar a
secar de nuevo.
9. Aproximadamente 10 minutos antes de que
finalice el programa, la secadora realiza una
secuencia de SECADO EN FRÍO (los tejidos se
enfrían), que siempre debe dejarse que termine.
10. El sonido de la alarma le alertará cuando se ha
terminado el tiempo de secado. Abra la puerta,
saque la ropa, limpie el filtro y vuelva a colocarlo
(véase Mantenimiento).
E
Instalación
Descripción
Comienzo y
programas La colada
11. Desenchufe la secadora.
recomendaciones
Advertencias y
Mantenimiento y
cuidados
Resolución de
problemas Servicio
53
Page 54

Comienzo y Programas
Programas
E
Programa
Secado
automático
(cargas
normales)
Secado
automático
(cargas
grandes)
Planchado
fácil
Secado
temporizado
hasta 120
minutos
Fase de
secado en
frío
Qué hace... Qué programa...
Seca la ropa totalmente: las
prendas están listas para usar.
Para cargas normales (de 1 a 3
kg) de algodón , polialgodón
o sintéticas .
Seca la ropa totalmente: las
prendas están listas para usar.
Para cargas más grandes (de 3
a 6 kg) de algodón .
Programa corto
(aproximadamente 10 minutos)
que suaviza las fibras de la
ropa, dejándola lista para
planchar.
Seca la ropa mojada que se
planchará, fibras acrílicas , o
cargas pequeñas (menos de 1
kg).
Los elementos térmicos se
apagan automáticamente, lo
que enfría la ropa.
Ésta es la fase final del
programa.
1. Seleccione MUCHO CALOR
presionando el TERMOSTATO.
2. Coloque el botón PROGRAMAS
en .
3. Pulse el botón de INICIO , se
iluminará la luz de ENCENDIDO
se iluminará .
1. Seleccione MUCHO CALOR
pulsando el TERMOSTATO.
2. Coloque el PROGRAMADOR en
posición de encendido .
3. Pulse el botón de INICIO , se
iluminará la luz de ENCENDIDO
se iluminará .
1. Seleccione MUCHO CALOR
pulsando el TERMOSTATO.
2. Coloque el PROGRAMADOR en
posición de encendido .
3. Pulse el botón de INICIO , se
iluminará la luz de ENCENDIDO
se iluminará .
1. Seleccione el ajuste de calor
deseado MUCHO CALOR o
POCO CALOR pulsando el
TERMOSTATO.
2. Coloque el PROGRAMADOR en el
tiempo deseado.
3. Pulse el botón de INICIO , se
iluminará la luz de ENCENDIDO
se iluminará .
Aproximadamente 10 minutos antes de
que acabe, la alarma avanza
automática-mente a la fase de secado
en frío. Después sonará la alarma (si se
ha seleccionado) lo que indicará que el
programa ha terminado y podrá sacarse
la ropa.
Nota:
¡Si selecciona POCO CALOR,
este programa no secará la
ropa. Para fibras acrílicas o
cargas pequeñas seleccione
Secado temporizado.
Este programa también
puede utilizarse para cargas
grandes si precisa un
resultado algo más seco.
¡Si selecciona POCO CALOR,
este programa no secará la
ropa. Para fibras acrílicas o
cargas pequeñas seleccione
Secado temporizado. Este
programa también puede
utilizarse para cargas
normales si desea un
resultado algo más húmedo.
¡Éste no es un programa de
secado (véase abajo).
Consulte tiempos de secado
recomendados (
Colada).
Deje siempre que la secadora
termine esta fase.
véase La
Programa de planchado fácil
“Planchado fácil” es un programa corto de 10 minutos (8 minutos de calor seguido de 2 minutos de secado en frío)
que ahueca las fibras de la ropa que se ha dejado en la misma posición/lugar durante un largo periodo de tiempo.
El ciclo relaja las fibras y facilita el planchado y el doblado de la ropa.
¡ “Planchado fácil” no es un programa de secado y no debe utilizarse para prendas mojadas.
Para obtener los mejores resultados:
1. No cargue más que la capacidad máxima.
Estos números se refieren al peso de la ropa en seco:
Tejido Carga máxima
Algodón y mezclas de algodón 2,5 kg
Sintéticos 2 kg
Dril de algodón 2 kg
2. Vacíe la secadora inmediatamente después de que haya finalizado el programa, cuelgue, doble o planche las
prendas y guárdelas en el armario. Si esto no es posible repita el programa.
El efecto de “planchado fácil” varía de un tejido a otro. Funciona bien con tejidos tradicionales como algodón o
mezclas de algodón, y menos bien con tejidos acrílicos y materiales como Tencel®.
54
Page 55

La colada
Clasificar la colada
• Compruebe los símbolos en las etiquetas de la
ropa a fin de asegurar que los artículos pueden
secarse con calor.
• Clasificar la colada por tipo de tejido.
• Vaciar los bolsillos y comprobar los botones.
• Cerrar las cremalleras y los corchetes y atar los
cinturones y cordones sueltos.
• Escurra las prendas a fin de eliminar la mayor
cantidad agua como sea posible.
¡ No meter ropas muy mojadas en la secadora.
Tamaño máximo de la carga
No cargue más que la capacidad máxima. Estos
números se refieren al peso de la ropa en seco:
Fibras naturales: 6 kg máx.
Fibras sintéticas: 3 kg máx.
¡ NO cargar demasiado la secadora ya que esto
podría dar como resultado un rendimiento de secado
reducido.
Carga típica
Ropa
Blusa de algodón 150 g
Otro 100 g
Vestido de algodón 500 g
Otro 350 g
Vaqueros 700 g
10 pañales 1000 g
Camisa de algodón 300 g
Otro 200 g
Camiseta 125 g
Etiquetas de recomendaciones durante el lavado
de la ropa
Lea siempre las etiquetas de la prenda, especialmente
cuando se sequen con calor por primera vez. Los
símbolos que aparecen a continuación son los más
comunes:
Puede secarse con calor
No secar con calor
Secar con calor a una temperatura alta
Secar con calor a una temperatura baja
Artículos que no son aptos para secarse con
calor
• Artículos que contienen goma o materiales
similares a la goma o películas plásticas
(almohadas, cojines, o prendas impermeables de
PVC), cualquier otro artículo inflamable u objetos
que contengan sustancias inflamables (toallas
manchadas de laca para el cabello).
• Fibras de vidrio (ciertos tipos de cortinas)
• Artículos que se han limpiado en seco
• Artículos con el código ITCL (véase Prendas
especiales). Éstas pueden limpiarse en casa con
productos especiales de limpieza en seco para
usar en casa. Siga las instrucciones
cuidadosamente.
• Artículos grandes y voluminosos (edredones,
sacos de dormir, almohadas, cojines, sobrecamas
grandes, etc). Éstos se agrandan cuando se
están secando y evitarán el flujo de aire por la
secadora.
E
Instalación
Descripción
Comienzo y
programas La colada
recomendaciones
Advertencias y
Mantenimiento y
cuidados
Artículos domésticos
Funda de duvet de algodón 1500 g
(Doble) Otro 1000 g
Mantel grande 700 g
Mantel pequeño 250 g
Paño de cocina 100 g
Toalla de baño 700 g
Toalla de mano 350 g
Sábana doble 500 g
Sábana individual 350 g
Al final de un ciclo de secado, es posible que las
prendas de algodón estén todavía húmedas si
agrupó algodones y sintéticos juntos. Si sucediese
esto, dele un tiempo corto de secado.
Resolución de
problemas Servicio
55
Page 56

La colada
E
Prendas especiales
Mantas y sobrecamas: Los artículos acrílicos (Acilan,
Courtelle, Orion, Dralón) deben secarse teniendo
especial cuidado y en ajuste POCO calor. Evite
secarlos durante mucho tiempo.
Prendas plisadas o arrugadas: lea las instrucciones
de secado del fabricante incluidas con la prenda.
Artículos almidonados: no seque estos artículos con
otras prendas no almidonadas. Asegúrese que se
retira la mayor cantidad posible de la solución de
almidón de la carga antes de introducir las prendas
en la secadora. No secar demasiado:
El almidón puede tener una apariencia polvorienta y
dejar la ropa sin vida, lo que hace inútil utilizar almidón.
Los tiempos son aproximados y pueden variar
dependiendo de:
• La cantidad de agua retenida en la ropa después
del ciclo de centrifugado: las toallas y las
prendas delicadas retienen mucha agua.
• Tejidos: las prendas del mismo tejido pero con
diferente textura y espesor es posible que no
tengan los mismos tiempos de secado.
• Cantidad de colada: las prendas sencillas o las
cargas pequeñas pueden tardar más tiempo en
secarse.
• Sequedad: Si va a planchar algunas de las
prendas, puede sacarlas mientras están un poco
húmedas. Otras pueden dejarse más tiempo si
necesita que se sequen completamente.
Tiempos de secado
• Ajuste de calor.
La tabla que aparece a continuación ofrece tiempos
de secado APROXIMADOS en minutos. Los pesos se
refieren a prendas secas:
Algodones
Mucho (máximo) calor
Tiempos de secado a 800-1000 rpm en la lavadora
Media carga Carga entera
1 kg 2 kg 3 kg 4 kg 5 kg 6 kg
20-30 35-45 45-60 60-70 70-80 80-100
Sintéticos
Mucho (máximo) calor
Tiempos de secado con centrifugado reducido en la lavadora
Media carga Carga entera
1 kg 2 kg 3 kg
20-30 35-45 45-60
• Temperatura de la habitación: Si la habitación en
la que se ha instalado la secadora es fría, la
secadora tardará más tiempo en secar la ropa.
• Volumen: algunos artículos voluminosos pueden
secarse con calor teniendo cuidado. Sugerimos
que saque estos artículos varias veces, los
sacuda y los vuelva a meter en la secadora hasta
que finalice el programa.
¡ No seque la ropa en exceso.
Todos los tejidos contienen una cantidad pequeña de
humedad natural, lo que los mantiene suaves y
huecos.
Acrílicos /
Poco (suave) calor
Tiempos de secado con centrifugado reducido en la lavadora
Media carga Carga entera
1 kg 2 kg
25-40 40-60
56
Page 57

Advertencias y recomendaciones
●
¡ El electrodoméstico ha sido diseñado y fabricado
según las normas internacionales de seguridad.
Estas advertencias se ofrecen por razones de
seguridad y deben leerse detenidamente.
Este electrodoméstico cumple las
siguientes directivas de la CEE:
- 72/23/CEE y 93/68/CEE (Equipos de bajo voltaje)
- 89/336/CEE, 92/31/CEE y 93/68/CEE (Compatibilidad
electromagnética)
Seguridad general
●
Esta secadora ha sido diseñada para uso doméstico
y no profesional.
●
Esta secadora debe ser utilizada por personas
adultas, y deben seguirse las instrucciones ofrecidas
en este manual detenidamente.
●
No tocar el electrodoméstico con los pies descalzos
o con las manos o pies mojados.
●
Desenchufar la máquina tirando del enchufe, no
del cable.
●
Los niños no deben encontrarse cerca de la
secadora mientras se está utilizando. Después de
utilizar la secadora, desenchúfela. Mantenga la
puerta cerrada a fin de asegurar que los niños no
puedan utilizarla como un juguete.
●
El electrodoméstico debe instalarse correctamente y
disponer de la ventilación adecuada. Los respiraderos
de la entrada de aire detrás de la máquina, los
respiraderos de salida y el tubo de ventilación
nunca deben estar obstruidos (véase Instalación).
●
Nunca oriente la salida del tubo de ventilación hacia
la entrada de aire en la parte de atrás de la máquina.
●
Nunca permita que la secadora recircule el aire
de salida.
●
Nunca utilice la secadora sobre alfombras en las
que la altura del pelo evitaría que el aire se introdujera
en la secadora por la base.
●
Compruebe que la secadora esté vacía antes de
cargar la colada.
●
●
●
●
●
●
●
●
●
La parte de atrás de la secadora puede
estar muy caliente. Nunca la toque mientras
está funcionando.
No utilice la secadora a menos que el filtro esté
correctamente instalado (véase Mantenimiento).
No utilice suavizante en la secadora; añada el
suavizante al último aclarado de la lavadora.
No cargue la secadora demasiado (véase La colada)
para las cargas máximas.
No cargue prendas que estén muy mojadas.
Seque las prendas únicamente si se han lavado con
detergente y agua, se han aclarado y centrifugado.
Existe el peligro de incendio si se secan artículos
que NO se han lavado con agua.
Compruebe detenidamente todas las instrucciones
que se ofrecen en las etiquetas de las prendas
(véase La colada).
No seque prendas que hayan sido tratadas con
productos químicos.
Nunca seque artículos contaminados con sustancias
inflamables (gasolina, aceite, pintura, laca para el
cabello, cremas, grasa o aceites de cocina).
No seque artículos de goma, goma espuma, plástico,
espuma plástica, braguitas o forros de pañales,
polietileno o papel.
●
No seque artículos grandes o muy voluminosos.
●
No seque fibras acrílicas a altas temperaturas.
●
Complete todos los programas con la fase de secado
en frío.
●
No desconecte la secadora cuando los artículos
en su interior están todavía calientes.
●
Limpie el filtro cada vez que use la secadora
(véase Mantenimiento).
●
No permita que se acumulen pelusas cerca de la
secadora.
●
Nunca suba encima de la secadora ya que podría
ocasionar daños.
●
Siga siempre las normas y los requerimientos
eléctricos (véase Instalación).
●
Compre siempre piezas de repuesto y accesorios
originales (véase Servicio).
Información sobre reciclado y disposición
Como parte de nuestro compromiso continuo por ser
responsables con el medio ambiente, nos reservamos
el derecho de utilizar componentes reciclados de
calidad para mantener los costes de nuestros
clientes bajos y reducir el desperdicio de materiales.
●
Desechar el material de embalaje: siga las normativas
locales, de forma que el embalaje pueda reciclarse.
●
Para reducir al mínimo el riesgo de lesiones
personales a los niños, quite la puerta y el enchufe y
a continuación corte el cable de alimentación al ras
con el electrodoméstico. Deshágase de estas piezas
por separado a fin de asegurar que el electrodoméstico
no pueda volverse a enchufar al suministro.
Eliminación del electrodoméstico viejo
En base a la Norma europea 2002/96/CE de Residuos
de aparatos Eléctricos y Electrónicos (RAEE), los
electrodomésticos viejos no pueden ser arrojados en
los contenedores municipales habituales; tienen que
ser recogidos selectivamente para optimizar la
recuperación y reciclado de los componentes y
materiales que los constituyen, y reducir el impacto
en la salud humana y el medioambiente.
El símbolo del cubo de basura tachado se
marca sobre todos los productos para recordar
al consumidor la obligación de separarlos para
la recogida selectiva.
El consumidor debe contactar con la autoridad local
o con el vendedor para informarse en relación a la
correcta eleminación de su electrodoméstico viejo.
Ahorro energético y respeto del medio ambiente
●
Escurrir las prendas para eliminar el exceso de agua
antes de secar con calor (si utiliza una lavadora
primero, seleccione un ciclo de centrifugado alto). Hacer
esto ahorrará tiempo y energía durante el secado.
●
Seque siempre cargas completas – de esta forma
ahorrará energía: una sola prenda o las cargas
pequeñas tardan más tiempo en secarse.
●
Limpie el filtro cada vez que utilice la secadora a fin
de reducir el gasto energético (véase Mantenimiento).
E
Instalación
Descripción
Comienzo y
programas
La colada
recomendaciones
Advertencias y
Mantenimiento y
cuidados
Resolución de
problemas Servicio
57
Page 58

Mantenimiento y cuidados
E
Desconectar la electricidad
Desenchufe la secadora mientras no la esté
utilizando, cuando la limpie y durante los trabajos de
mantenimiento.
Limpiar el filtro después de cada ciclo
El filtro es una pieza importante de la secadora:
acumula las pelusas y los hilos que se forman
mientras se seca la ropa. Las prendas pequeñas
también pueden quedar atrapadas en el filtro.
Cuando termine de secar, por lo tanto, limpie el filtro
aclarándolo debajo del grifo o con la aspiradora. Si el
filtro se obstruye, el flujo de aire en el interior de la
secadora se verá seriamente afectado: los tiempos de
secado se alargarán y consumirá más energía.
Asimismo, podría ocasionar daños a la secadora.
El filtro se encuentra
delante del remate de la
secadora (véase el
diagrama).
Limpieza del tambor
¡ No utilice productos de limpieza abrasivos, lana de
acero o acero inoxidable para limpiar el tambor.
Es posible que comience a formarse una capa de
color en el tambor de acero inoxidable, esto puede
deberse a la combinación de agua y, o, productos de
limpieza como suavizante de ropa. Esta capa de color
no afecta el rendimiento de la secadora.
Limpieza
●
Las piezas externas de metal, plástico o goma
pueden limpiarse con un paño húmedo.
●
Compruebe periódicamente el tubo de ventilación
y cualquier accesorio de ventilación permanente
con objeto de asegurar que no se hayan acumulado
pelusas o hilos, y retirarlos.
●
Retire los hilos que se recojan alrededor del filtro y
de los respiraderos de salida.
Quitar el filtro:
1. Tire del asa de
plástico del filtro hacia
arriba (véase el
diagrama).
2. Limpie el filtro y
vuélvalo a colocar
correctamente.
Asegúrese que el filtro se
ha colocado
completamente a ras con
el remate de la secadora.
¡ No utilice la secadora sin haber colocado el filtro.
Comprobar el tambor después de cada
ciclo
¡ No utilice disolventes ni abrasivos.
¡ La secadora utiliza cojinetes de componentes
especiales que no necesitan lubricarse.
¡ Revise la secadora periódicamente por técnicos
autorizados a fin de asegurar la seguridad eléctrica y
mecánica de la misma (véase Servicio).
Girar el tambor manualmente para retirar las prendas
pequeñas (pañuelos) que pudieran dejarse atrás.
58
Page 59

Resolución de problemas
Si un día la secadora deja de funcionar. Antes de llamar al Centro de Servicio Técnico (véase Servicio), realice
las siguientes comprobaciones:
Problema:
La secadora no se pone en
marcha.
Posibles causas / Solución:
●
El enchufe no está enchufado en la toma, o no hace contacto.
●
Ha habido un fallo de potencia.
●
El fusible se ha fundido. Pruebe a enchufar otro electrodoméstico en la
toma.
●
¿Está utilizando un cable alargador? Pruebe enchufar el cable de
alimentación directamente en la toma.
●
¿Está la puerta bien cerrada?
●
El PROGRAMADOR no se ha ajustado correctamente (véase Comienzo y
Programas).
●
No se ha pulsado el botón de INICIO (véase Comienzo y Programas).
●
No comienza el ciclo de
Ha ajustado un tiempo con demora (véase Comienzo y Programas).
secado.
●
Tarda mucho tiempo en secar.
No se ha limpiado el filtro (véase Mantenimiento).
●
El ajuste de temperatura no es ideal para el tipo de tejido que está
secando (véase Comienzo y Programas).
●
Los programas automáticos precisan un ajuste de temperatura de
MUCHO calor (véase Comienzo y Programas).
●
No se ha seleccionado el programa correcto para la carga (véase
Comienzo y Programas).
●
El tubo de ventilación flexible está obstruido (véase Instalación).
●
El respiradero de entrada de aire está obstruido (véase Instalación).
●
La portezuela de ventilación permanente en la cubierta está obstruida
(véase Instalación).
●
Las prendas no estaban mojadas (véase La colada).
●
La secadora está demasiado cargada (véase La colada).
E
Instalación Descripción
Comienzo y
programas La colada
recomendaciones
Advertencias y
Mantenimiento y
cuidados
Resolución de
problemas Servicio
59
Page 60

Servicio
E
Antes de llamar al centro de servicio
técnico:
Piezas de repuesto
Esta secadora es una máquina compleja. Si intenta
●
Utilice la guía de resolución de problemas para ver
si puede resolver el problema usted mismo (véase
Resolución de problemas).
●
Si no es así, desconecte la secadora y llame al
Centro de servicio técnico más cercano.
repararla usted mismo o una persona no autorizada
puede ocasionar daños a la secadora, además de
invalidar la garantía de piezas de repuesto. Llame a
un técnico autorizado si experimenta algún problema
cuando utilice la máquina. Las piezas de repuesto
han sido exclusivamente diseñadas para este
electrodoméstico y no para ningún otro uso.
Qué información debe facilitar al centro de servicio
técnico:
●
nombre, dirección y código postal.
●
número de teléfono.
●
el problema.
●
la fecha de compra.
●
el modelo del electrodoméstico (Mod.).
●
el número de serie (N/S).
Esta información puede encontrarse en la placa
identificativa en el interior de la puerta de la máquina.
Servicio
60
Page 61

Folheto de instruções
MÁQUINA DE SECAR ROUPA
GB
English, 1
I
Italiano, 13
D
Deutsch, 37EEspañol, 49
NL
Nederlands, 73AArabic, 96
AS60V
F
Français, 25
P
Português, 61
Índice
Instalação, 62-63
Onde colocar a sua máquina de secar roupa
Ventilação
Ligação eléctrica
Antes de iniciar a utilização da sua máquina
de secar roupa
Descrição da máquina, 64
Painel frontal
Painel traseiro
Painel de controlo
Arranque e programas, 65-66
Escolher um programa
Tabela de programas
Roupa, 67-68
Escolher a sua roupa
Etiquetas de cuidado na lavagem
Peças delicadas
Tempos de secagem
Avisos e Sugestões, 69
Segurança geral
Eliminação
Poupança de energia e respeito pelo ambiente
P
Manutenção e cuidado, 70
Desligar a electricidade
Limpar o filtro depois de cada ciclo
Verificar o tambor depois de cada ciclo
Limpar a máquina
Resolução de problemas, 71
Reparações, 72
Peças sobressalentes
61
Page 62

Instalação
P
! Tenha este folheto de instruções à mão para
consultá-lo sempre que necessário. Leve-o consigo
se mudar de casa e, caso venda este aparelho, passe o
folheto ao novo proprietário, de modo a certificar-se
de que este folheto permanece com o equipamento e
de que o novo proprietário pode estar informado acerca
dos avisos e sugestões sobre o respectivo
funcionamento.
! Leia cuidadosamente as instruções; as páginas que
se seguem contêm informações importantes acerca da
instalação, bem como sugestões sobre o funcionamento
da máquina.
Onde colocar a sua máquina
●
Instale a sua máquina a alguma distância de ligações
de gás, fogões, aquecedores e placas de cozinha,
uma vez que as chamas podem danificar o aparelho.
●
Se pretende instalar o aparelho por baixo de uma
bancada ou de um balcão, não se esqueça de
deixar um espaço de 10 mm entre a bancada e
quaisquer objectos ou acima do tampo da máquina e
um espaço de 15 mm entre as partes laterais da
máquina e mobiliário ou paredes. Assegura assim
a correcta circulação do ar. Certifique-se de que as
ventilações posteriores não ficam obstruídas.
●
Certifique-se de que coloca a sua máquina num
ambiente que não seja húmido e de que existe uma
ventilação adequada.
Ventilação
A Secadora seca a sua roupa sugando ar fresco,
limpo e relativamente seco para o interior,
aquecendo-o e, em seguida, distribuindo-o pelas
peças de roupa enquanto giram suavemente. Para
um melhor desempenho, o ar húmido é depois
expelido através de um tubo de ventilação no painel
traseiro da máquina. Quando a secadora estiver em
utilização, tem de existir uma ventilação adequada,
de modo a evitar o fluxo traseiro de gases no espaço
devido a gases de combustão de outros aparelhos,
incluindo chamas.
Ventilação móvel
Um tubo de ventilação deve ser sempre instalado
quando a secadora estiver a ser utilizada em conjunto
com a Ventilação Móvel. O tubo deve ser instalado no
painel traseiro da máquina (ver Descrição da máquina
de secar roupa). Se possível, é sempre melhor ligar o
tubo a uma saída permanente perto da secadora. Se
não for possível uma instalação permanente, a
secadora irá funcionar igualmente bem com o tubo a
passar por uma janela entreaberta.
! Certifique-se de que a extremidade do tubo não está
directamente voltada para a ventilação de entrada no
painel posterior da secadora.
! O tubo de ventilação não deve exceder os 2,4 metros
de comprimento, que deve manter-se isento de cotão,
restos de linho e água, o que pode fazer agitando o
tubo frequentemente. Certifique-se de que o tubo não
é esmagado/obstruído.
Ventilação permanente
Em conjunto com o tubo de ventilação, recomendamos a
utilização de um Kit de Ventilação de Parede/Janela, à
venda nas lojas da especialidade ou no Representante
de Peças Sobressalentes mais próximo.
Montagem de parede
1. Deixe uma abertura na
parede, à esquerda da
posição proposta para
a instalação da
secadora.
2. Mantenha o tubo o mais
curto e o mais direito
possível para evitar a
acumulação de
humidade condensada
na secadora.
3. De forma semelhante, a conduta de parede deve
estar inclinada para baixo, na direcção da saída.
Montagem de janela
1. Com uma secadora
empilhada, o orifício na
janela deve ser feito,
idealmente, por baixo
da ventilação.
2. O tubo deve ser o mais
curto possível.
Dependendo da frequência com que utiliza a sua
secadora, é essencial que as áreas A e B sejam
verificadas periodicamente para retirar restos de fibras
e resíduos. O adaptador do tubo de ventilação deve
ser encaixado firmemente, evitando assim que
qualquer ar húmido seja emitido no espaço onde está
instalada a máquina.
! A secadora não deve ser empurrada para trás de
forma a que o adaptador do tubo saia da sua posição
ou de forma a que o tubo seja esmagado ou dobrado.
! O tubo deve ficar desimpedido da entrada de ar e
devem evitar-se instalações dobradas ou em ‘U’, uma
vez que estas configurações provocam obstruções no
tubo e a condensação.
62
Page 63

Ventilação de janela aberta
1. A extremidade do
tubo deve ficar voltada
para baixo, para evitar a
condensação de ar
húmido quente no
espaço de instalação ou
na própria máquina.
! Não utilize cabos de extensão.
! O cabo de alimentação não deve ser dobrado ou
pisado.
! O fio de alimentação eléctrica deve ser verificado
periodicamente e substituído por um fio preparado
especialmente para esta secadora, apenas por técnicos
autorizados (ver Reparações). Fios de alimentação
novos ou mais longos são fornecidos sem custos
adicionais por representantes autorizados.
P
Instalação
Descrição
! Certifique-se de que a secadora está adequadamente
ventilada e de que a extremidade do tubo de ventilação
não está voltado na direcção da conduta de entrada.
! O tubo de ventilação deve ser sempre instalado de
modo a garantir um óptimo desempenho.
! Certifique-se de que o tubo de ventilação e as
entradas de ar não estão obstruídas ou bloqueadas.
! A secadora não deve reciclar ar de escape.
! A utilização indevida da secadora pode dar origem
aa incêndios.
! Não descarregue o ar de escape num tubo de
chaminé, que seja utilizado para o escape de fumos
de outros equipamentos que queimem gás ou outros
combustíveis.
Ligações eléctricas
Certifique-se do seguinte antes de introduzir a ficha
numa tomada de corrente eléctrica:
●
A tomada tem de ter ligação à terra.
●
A tomada deve ter capacidade para suster a
potência máxima de máquinas, que está indicada
na chapa de classificação (ver Descrição da
máquina de secar).
●
A tensão deve encontrar-se dentro dos valores
indicados na chapa de classificação (ver
Descrição da máquina de secar).
●
A tomada deve ser compatível com a ficha da
máquina. Se não for este o caso, substitua a ficha
ou a tomada.
! O fabricante recusa qualquer responsabilidade
caso estas regras não seja seguidas.
! Se tiver dúvidas sobre o mencionado acima consulte
um electricista qualificado.
Nivelar a sua secadora
A secadora deve ser instalada de forma nivelada
para que funcione correctamente.
Quando instalar a sua
secadora na localização
final, verifique se está
nivelada em cada um
dos lados e, depois, à
frente e atrás.
Se a secadora não
estiver nivelada, utilize
um bloco de madeira
para suportá-la enquanto
ajusta os dois pés da
frente para cima ou para
baixo até a secadora
estar nivelada.
Antes de iniciar a utilização da sua
máquina de secar roupa
Arranque e
programas Roupa
Sugestões
Avisos e
Manutenção e
cuidado
Resolução de
problemas Reparações
! A secadora não deve ser instalada ao ar livre, mesmo
que seja num espaço abrigado. Pode ser extremamente
perigosa a exposição à chuva ou tempestades.
! Depois de instalada, a cablagem eléctrica e ficha
da máquina deve estar facilmente alcançável.
Depois de instalar a sua máquina e antes de iniciar a
sua utilização, limpe o interior do tambor para
remover qualquer pó que se tenha acumulado
durante o transporte.
63
Page 64

Descrição da máquina de secar
P
Painel frontal Painel traseiro
Painel de controlo
Números de
modelo e de
série
Tambor
Filtro
Chapa de
classificação
Cuidado
Está Quente
Entrada de ar
Tubo de ventilação
encaixado aqui
Painel de controlo
botão
TEMPERATURA
Indicadorluz indicadora
ACTIVA
botão
INICIAR
Guia de Secagem
O botão INICIAR inicia a secagem num programa
seleccionado (ver Arranque e Programas).
O botão TEMPERATURA selecciona a temperatura
de secagem (ver Arranque e Programas).
PARA FORA: Temperatura ELEVADA
PARA DENTRO: Temperatura BAIXA
O indicador ALARME indica o fim de um ciclo de
lavagem.
PARA FORA: Alarme LIGADO
PARA DENTRO: Alarme DESLIGADO
A luz indicadora ACTIVA indica que a secadora está
em utilização. Esta luza acende-se quando o botão
INICIAR é pressionado. Permanece acesa até que a
porta seja aberta ou que a máquina seja desligada.
Esta luz acende-se durante um programa de
arranque atrasado.
64
botão
ALARME
botão rotativo
TEMPORIZADOR
O Guia de Secagem permite a consulta de uma
tabela de utilização fácil, com a descrição dos tipos
de tecidos e as capacidades de carga.
O botão rotativo TEMPORIZADOR define um atraso
no tempo de arranque da máquina. Rode-o da
esquerda para a direita até atingir o número de horas
que pretende atrasar a hora de arranque da máquina.
Se rodar o botão em demasia, rode o botão da direita
para a esquerda (ver Arranque e Programas).
O botão rotativo PROGRAMAS define o programa:
rode-o da esquerda para a direita e nunca da direita
para a esquerda, até que o indicador esteja a apontar
para o programa que pretende seleccionar (ver
Arranque e Programas).
botão rotativo
PROGRAMAS
Page 65

Arranque e Programas
Escolher um programa
1. Ligue a secadora a uma tomada de corrente
eléctrica.
2. Escolha a sua roupa de acordo com o tipo de
tecido (ver Roupa).
3. Abra a porta e certifique-se de que o filtro está
limpo e bem colocado (ver Manutenção).
4. Carregue a máquina e certifique-se de que
nenhuma peça fica presa no fecho da porta.
Feche a porta.
5. Escolha o programa de secagem após consulta
da tabela de Programas (ver Programas), bem
como as indicações para cada tecido (ver
Roupa).
- Defina a temperatura com o botão
TEMPERATURA.
- Seleccione um programa ou um tempo de
secagem rodando o botão PROGRAMAS da
esquerda para a direita.
7. Se pretende eliminar o sinal de alarme,
pressione o botão ALARME.
8. Pressione o botão INICIAR para começar. A luz
indicadora de SECAGEM acende-se e
permanece acesa, mesmo durante o atraso. A
luz indicador permanece acesa até abrir a porta
da secadora. Durante o programa de secagem,
pode verificar a sua roupa e retirar peças que já
estejam secas enquanto as restantes continuam
a secar. Quando fechar novamente a porta,
prima o botão INICIAR de modo a retomar a
secagem.
9. Cerca de 10 minutos antes do programa estar
concluído, entra na fase de ROTAÇÃO A FRIO
(os tecidos são arrefecidos), que deve ser
sempre concluída.
10. O alarme indica a conclusão da secagem. Abra
a porta, retire a roupa, limpe o filtro e coloque-o
novamente (ver Manutenção).
11. Desligue a secadora.
P
Instalação
Descrição
Arranque e
programas Roupa
6. Se necessário, defina um tempo de atraso
utilizando o botão TEMPORIZADOR.
Sugestões
Avisos e
Manutenção e
cuidado
Resolução de
problemas Reparações
65
Page 66

Arranque e Programas
Programas
P
Programa
Secagem
automática
(cargas
médias)
Secagem
automática
(cargas
grandes)
Engoma
fácil
Secagem
temporizada
até 120 minutos
Fase de
rotação a
frio
O que faz... Como defini-lo...
Seca completamente: as suas
roupas ficam prontas a vestir.
Para cargas médias (de 1 a 3
kg) de algodão , poli-algodão
ou sintéticos .
Seca completamente: as suas
roupas ficam prontas a vestir.
Para cargas grandes (de 3 a 6
kg) de Algodão .
Programa breve
(aproximadamente 10 minutos),
que suaviza as fibras prontas a
passar a ferro.
Seca roupas molhadas que
vão ser passadas a ferro,
fibras acrílicas ou cargas
pequenas (inferiores a 1 kg).
Os elementos de aquecimento
desligam-se automaticamente
e a roupa é arrefecida.
1. Seleccione TEMP. ELEVADA
premindo o botão
TEMPERATURA.
2. Posicione o botão PROGRAMAS
em .
3. Pressione o botão INICIAR , a
LUZ activa acende-se .
1. Seleccione TEMP. ELEVADA
premindo o botão
TEMPERATURA.
2. Posicione o botão PROGRAMAS
em .
3. Pressione o botão INICIAR , a
luz ACTIVA acende-se.
1. Seleccione TEMP. ELEVADA
premindo o botão
TEMPERATURA.
2. Posicione o botão PROGRAMAS
em .
3. Pressione o botão INICIAR , a
luz ACTIVA acende-se.
1. Seleccione a temperatura
pretendida, TEMP. ELEVADA
ou TEMP. BAIXA premindo o
botão TEMPERATURA.
2. Posicione o botão PROGRAMAS
no tempo pretendido.
3. Pressione o botão INICIAR , a
luz ACTIVA acende-se.
Esta é a fase final do programa.
Aproximadamente, 10 minutos antes
do fim, o botão avança
automaticamente para a Fase de
rotação a frio. Depois de soar o
alarme (se seleccionado), a roupa
está pronta e pode ser retirada.
Nota:
! Se seleccionar TEMP. BAIXA,
este programa não seca as suas
roupas. Para Fibras Acrílicas ou
pequenas cargas, seleccione
Secagem Temporizada.
Este programas também pode
ser utilizado para cargas maiores
se pretender um resultado
ligeiramente seco.
! Se seleccionar TEMP. BAIXA,
este programa não seca as suas
roupas. Para Fibras Acrílicas
ou pequenas cargas, seleccione
Secagem Temporizada. Este
programas também pode ser
utilizado para cargas maiores
se pretender um resultado
mais húmido.
! Este não é um programa de
secagem (ver em seguida).
Consulte os tempos de
secagem sugeridos (
Roupa).
Permita sempre que a secadora
complete esta fase.
ver
Programa Engoma fácil
O ‘Engoma fácil’ é um programa breve de 10 minutos (8 minutos de calor, seguidos de 2 minutos de um período de
rotação a frio), que ventila as fibras das roupas que foram deixadas na mesma posição/Local durante um período
de tempo prolongado. O ciclo relaxa as fibras e facilita a passagem a ferro.
! O ‘Engoma fácil’ não é um programa de secagem e não deve ser utilizado com peças de roupa molhadas.
Para obter os melhores resultados:
1. Não carregue mais do que a capacidade máxima.
Estes números referem-se ao peso em seco:
Tecido Carga máxima
Algodão e Misturas de algodão 2,5 kg
Sintéticos 2 kg
Gangas 2 kg
2. Descarregue a secadora imediatamente após o fim do programa, pendure, dobre ou engome as peças de
roupa e guarde-as no armário. Caso isto não seja possível, repita o programa.
O efeito ‘Engoma fácil’ varia de tecido para tecido. Funciona bem com tecidos tradicionais como algodão e
misturas de algodão e menos bem em fibras acrílicas e em materiais como Tencel®.
66
Page 67

Roupa
Escolher a sua roupa
• Consulte os símbolos nas etiquetas das roupas,
de modo a certificar-se de que os artigos podem
ser utilizados na secadora.
• Escolha a roupa por tipo de tecido.
• Esvazie os bolsos e verifique os botões.
• Feche os fechos de correr e desaperte cintos e
correias.
• Torça cada peça de modo a eliminar o máximo
de água possível.
! Não carregue peças a pingar na secadora.
Carga máxima
Não carregue mais do que a capacidade máxima.
Estes números referem-se ao peso em seco:
Fibras naturais: 6 kg máx.
Fibras sintéticas: 3 kg máx.
! NÃO sobrecarregue a máquina, uma vez que pode
resultar num desempenho de secagem reduzido.
Carga típica
Roupas
Blusa de algodão 150 g
Outros 100 g
Vestido de algodão 500 g
Outros 350 g
Calças de ganga 700 g
10 fraldas 1000 g
Camisa de algodão 300 g
Outros 200 g
T-Shirt 125 g
Etiquetas de cuidado na lavagem
Observe as etiquetas nas suas peças de roupa,
especialmente se está a utilizar a secadora pela
primeira vez. Os símbolos que se seguem são os
mais comuns:
Pode ser seco na máquina
Não pode ser seco na máquina
Seque com a temperatura máxima
Seque com a temperatura mínima
Peças não adequadas para secagem na máquina
• Artigos que contenham borracha ou materiais
tipo borracha ou películas de plástico (almofadas
ou material em PVC), quaisquer artigos
inflamáveis ou objectos que contenham
substâncias inflamáveis (toalhas vaporizadas com
laca de cabelo).
• Fibras de vidro (alguns tipos de reposteiros)
• Artigos que tenham sido limpos a seco
• Itens com o código ITCL (ver Peças
delicadas). Podem ser limpos com produtos de
limpeza a seco domésticos. Siga as instruções
cuidadosamente.
• Peças volumosas (colchas, sacos-cama,
almofadas, cobertas grandes, etc). Estes artigos
expandem-se e podem impedir o fluxo de ar no
interior da secadora.
P
Instalação
Descrição
Arranque e
programas Roupa
Sugestões
Avisos e
Manutenção e
cuidado
Peças domésticas
Capa de edredão em algodão 1500 g
(Duplo) Outros 1000 g
Toalha de mesa grande 700 g
Toalha de mesa pequena 250 g
Pano de cozinha 100 g
Toalhão de banho 700 g
Toalha de rosto 350 g
Lençol de banho 500 g
Lençol (solteiro) 350 g
No fim de um ciclo de secagem, os algodões ainda
devem estar húmidos caso tenha agrupado
algodões e sintéticos. Se isto acontecer, basta
aplicar mais um breve período de secagem.
problemas Reparações
67
Resolução de
Page 68

Roupa
P
Peças delicadas
Estes tempos são aproximados e podem variar
dependendo de:
Cobertores e cobertas de cama: artigos em acrílico
(Acilan, Courtelle, Orion, Dralon) devem ser secos
com especial cuidado com um TEMPERATURA
BAIXA. Evite secar por um longo período de tempo.
Peças pregueadas ou enrugadas: leia as instruções
de secagem do fabricante da peça.
• Quantidade de água mantida nas roupas após o
ciclo de centrifugação: as toalhas e peças
delicadas retêm muita água.
• Tecidos: artigos que sejam do mesmo tipo de
tecido, mas que sejam de texturas e espessuras
diferentes poderão não ter o mesmo tempo de
Artigos com goma: não seque estes artigos com
secagem.
peças sem goma. Certifique-se de que retira o
máximo da solução de goma da carga antes de
colocá-la na secadora. Não seque em demasiado: a
• Quantidade de roupa: artigos únicos ou pequenas
cargas podem demorar mais tempo a secar.
goma transforma-se em pó e deixa a sua roupa mole,
eliminando o propósito da goma.
• Secagem: Se pretender engomar algumas das
suas roupas, podem ser retiradas da máquina
ainda um pouco húmidas. As restantes poderão
Tempos de secagem
ficar mais tempo, se precisar delas
completamente secas.
O quadro que se segue apresenta os tempos de
secagem APROXIMADOS em minutos. Os pesos
• Definição de temperatura.
referem-se a artigos secos:
• Temperatura ambiente: se o espaço em que a
Algodões
Temperatura Máxima
Tempos de secagem de 800-1000rpm na máquina de lavar
Metade da Carga completa
carga
1 kg 2 kg 3 kg 4 kg 5 kg 6 kg
20-30 35-45 45-60 60-70 70-80 80-100
máquina está instalada estiver frio, poderá
demorar mais tempo a secar as suas roupas.
• Volumes: alguns artigos mais volumosos devem ser
secos na máquina com cuidado. Sugerimos que
remova estes artigos várias vezes, sacuda-os e
volte a colocá-los na máquina até que estejam
completamente secos.
Sintéticos
Temperatura Máxima
Tempos de secagem em centrifugação reduzida na máquina de lavar
Metade da Carga completa
carga
1 kg 2 kg 3 kg
20-30 35-45 45-60
Acrílicos /
Temperatura Baixa (suave)
Tempos de secagem em centrifugação reduzida na máquina de lavar
Metade da Carga completa
carga
1 kg 2 kg
25-40 40-60
! Não seque em demasiado as suas roupas.
Todos os tecidos contêm um pouco de humidade
natural, que os mantêm suaves e macios.
68
Page 69

Avisos e Sugestões
! O equipamento foi concebido e construído de
acordo com normas de segurança internacionais.
Estes avisos são apresentados por razões de
segurança e devem ser lidos cuidadosamente.
Este equipamento está em conformidade
com as seguintes directivas da UE:
- 72/23/EEC e 93/68/EEC (Equipamento de Baixa Tensão)
- 89/336/EEC, 92/31/EEC e 93/68/EEC
(Compatibilidade Electromagnética)
Segurança Geral
●
Esta secadora foi concebida para utilização
doméstica e não utilização profissional.
●
Esta secadora deve utilizada por adultos e as
instruções deste folheto devem ser seguidas
cuidadosamente.
●
Não toque no equipamento com os pés
descalços, nem com as mãos ou pés molhados.
●
Desligue a máquina retirando a ficha e não puxando
o fio.
●
As crianças não devem aproximar-se da secadora
durante a sua utilização. Depois da utilização da
secadora, desligue-a no botão e da corrente
eléctrica. Mantenha a porta fechada de modo que as
crianças não utilizem a máquina como um brinquedo.
●
O aparelho deve ser instalado correctamente
com a ventilação adequada. As entradas de ar
por trás da máquina, as ventilações de saída e o
tubo de ventilação nunca devem ser obstruídas
(ver Instalação).
●
Nunca dirija a saída do tubo de ventilação na direcção
da entrada de ar, na parte posterior da máquina.
●
Nunca permita que a secadora recicle o ar de escape.
●
Nunca utilize a secadora em carpetes, cuja altura
impeça o ar de entrar na secadora a partir da base.
●
Verifique se a secadora está vazia antes de
carregá-la.
●
●
●
●
●
●
●
●
●
●
●
O painel traseiro da secadora pode ficar
muito quente. Nunca toque neste painel
durante a utilização.
Não utilize a secadora sem que o filtro esteja
correctamente instalado (ver Manutenção).
Não utilize amaciador líquido na sua máquina de
secar; adicione-o ao enxaguamento final da sua
máquina de lavar.
Não sobrecarregue a secadora (ver Roupa) para
além das cargas máximas.
Não carregue peças que estejam a pingar.
Seque apenas artigos que tenham sido lavados com
água e detergente, enxaguados e centrifugados.
Existe um risco de incêndio se secar peças que
NÃO tenham sido lavadas com água.
Verifique cuidadosamente todas as instruções nas
etiquetas das roupas (ver Roupa).
Não seque peças de vestuário que tenham sido
tratadas com produtos químicos.
Nunca seque artigos que tenham sido contaminados
com substâncias inflamáveis (petróleo, óleo, tinta,
laca de cabelo, cremes, gordura de cozinha, etc.).
Não seque borracha, espuma, plástico, fraldas
descartáveis, politeno ou papel.
Não seque artigos grandes e muito volumosos.
●
●
●
●
●
●
●
●
Informações Acerca de Reciclagem e
Eliminação de Resíduos
Como parte do nosso continuado empenho em
ajudar o ambiente, reservamo-nos o direito de utilizar
componentes de qualidade, de modo a manter os
custos baixos para os clientes e minimizar o
desperdício de material.
●
●
Recolha dos electrodomésticos
A directiva Europeia 2002/96/CE referente à gestão de
resíduos de aparelhos eléctricos e electrónicos (RAEE),
prevê que os electrodomésticos não devem ser
escoados no fluxo normal dos resíduos sólidos urbanos.
Os aparelhos desactualizados devem ser recolhidos
separadamente para optimizar a taxa de recuperação e
reciclagem dos materiais que os compõem e impedir
potenciais danos para a saúde humana e para o
ambiente.
Os consumidores devem contactar as autoridades locais
ou os pontos de venda para solicitar informação
referente ao local apropriado onde devem depositar os
electrodomésticos velhos.
Poupar energia e respeitar o ambiente
●
●
●
Não seque fibras acrílicas a altas temperaturas.
Complete cada programa com a respectiva Fase
de rotação a frio.
Não desligue a máquina quando ainda existirem
artigos quentes no interior.
Limpe o filtro após cada utilização (ver Manutenção).
Não permita a acumulação de resíduos na secadora.
Nunca suba para cima da secadora. Pode
resultar em ferimentos.
Siga sempre as normas e requisitos eléctricos
(ver Instalação).
Compre sempre peças sobressalentes e acessórios
originais (ver Reparação).
Eliminação do material da embalagem: siga os
regulamentos locais, de modo que a embalagem
possa ser reciclada.
De modo a minimizar o risco de lesões para crianças,
remova a porta e a ficha e corte o fio eléctrico do
aparelho. Elimine estas peças separadamente a
fim de assegurar que o aparelho não possa mais
ser ligado a uma tomada eléctrica.
O símbolo constituído por um contentor de lixo
barrado com uma cruz deve ser colocado em
todos os produtos por forma a recordar a
obrigatoriedade de recolha separada.
Torça as peças de vestuário para eliminar o
excesso de água antes de colocá-las na máquina
de secar (se primeiro utilizar uma máquina de
lavar, seleccione um ciclo de centrifugação elevado).
Ao fazer isto, poupa tempo e energia durante a
secagem.
Seque sempre com cargas completas – assim,
poupa energia: artigos únicos ou pequenas
cargas podem demorar mais tempo a secar.
Limpe o filtro após cada utilização para cortar nos
custos de consumo de energia (ver Manutenção).
P
Instalação
Descrição
Arranque e
programas
Roupa
Sugestões
Avisos e
Manutenção e
cuidado
Resolução de
problemas Reparações
69
Page 70

Manutenção e Cuidado
P
Desligar a electricidade
Desligue a secadora quando não estiver em
utilização, durante tarefas de limpeza e durante todas
as operações de manutenção.
Limpar o filtro depois de cada ciclo
O filtro é uma parte importante da sua secadora:
acumula restos de fibras e resíduos que se formam
durante a secagem. Pequenos objectos também
podem ficar presos no filtro. Assim, após a secagem,
limpe o filtro, lavando-o debaixo de água corrente ou
limpe com o seu aspirador. Caso o filtro fique
entupido, o fluxo de ar no interior da secadora fica
seriamente comprometido: os tempos de secagem
prolongam-se e consome mais energia. Também
pode danificar a sua secadora.
O filtro encontra-se na
grelha frontal da
secadora (ver diagrama).
Limpar o tambor
! Não utilize agentes de limpeza de aço inoxidável ou
palha de aço, abrasivos, para limpar o tambor.
É possível que uma película colorida comece a
aparecer no tambor de aço inoxidável. Tal poderá ser
causado por uma combinação de água e/ou agentes
de limpeza como, por exemplo, amaciador de tecido
da lavagem. Esta película colorida não afectará o
desempenho do secador.
Limpeza
●
As partes externas de metal ou em plástico e
borracha podem ser limpas com um pano húmido.
●
Verifique periodicamente o tubo de ventilação e
qualquer ligação de ventilação permanente, de
modo a certificar-se de que não existe acumulação
de resíduos e remova-os.
●
Remova os resíduos que se acumulam em torno do
filtro e das ventilações de saída.
Remoção do filtro:
1. Puxe a pega de
plástico do filtro para
cima (ver diagrama).
2. Limpe o filtro e
coloque-o novamente
correctamente.
Certifique-se de que o
filtro está completamente
encaixado na grelha da
máquina.
! Não utilize a máquina sem colocar novamente o filtro.
Verificar o tambor depois de cada ciclo
Rode o tambor manualmente, de modo a remover
pequenos objectos (lenços) que podem ter ficado na
máquina.
! Não utilize solventes nem produtos abrasivos.
! A sua secadora utiliza componentes de rolamentos
especiais que não necessitam de lubrificação.
! Verifique a sua secadora regularmente por técnicos
autorizados, de modo a certificar-se da segurança
eléctrica e mecânica (ver Reparação).
70
Page 71

Resolução de problemas
Um dia a sua máquina parece não querer funcionar. Antes de contactar o seu Centro de Serviços (ver
Reparação), analise as seguintes sugestões de resolução de problemas:
Problema:
A secadora não inicia.
Causas possíveis / Solução:
●
A ficha não está ligada à tomada, ou não está a fazer contacto.
●
Ocorreu uma falha de energia.
●
Há um fusível queimado. Experimente ligar outro aparelho à tomada.
●
Está a utilizar um cabo de extensão? Experimente ligar o fio de
alimentação da secadora directamente à tomada.
●
A porta está bem fechada?
●
O botão PROGRAMAS não foi posicionado correctamente (ver Arranque
e Programas).
●
O botão INICIAR não foi posicionado correctamente (ver Arranque e
Programas).
●
O ciclo de secagem não
Definiu um atraso do tempo (ver Arranque e Programas).
inicia.
●
Demora muito tempo a secar
O filtro não foi limpo (ver Manutenção).
●
A definição de temperatura não é ideal para o tipo de tecido que está a
secar (ver Arranque e Programas).
●
Os programas automáticos requerem uma definição de temperatura
EVELADA (ver Arranque e Programas).
●
Não foi seleccionado o programa correcto para a carga (ver Arranque e
Programas).
●
O tubo de ventilação flexível está obstruído (ver Instalação).
●
O tubo de entrada de ar está obstruído (ver Instalação).
●
A portinhola de ventilação permanente está obstruída (ver Instalação).
●
As peças estavam demasiado molhadas (ver Roupa).
●
A secadora foi sobrecarregada (ver Roupa).
P
Instalação Descrição
Arranque e
programas Roupa
Sugestões
Avisos e
cuidado
problemas Reparações
71
Manutenção e
Resolução de
Page 72

Reparação
P
Antes de contactar o Centro de
Serviços:
Peças sobressalentes
Esta secadora é uma máquina complexa. Repará-la
●
Utilize o guia de resolução de problemas para ver
se consegue resolver o problema (ver Resolução
de problemas).
●
Caso contrário, desligue a secadora e contacte o
Centro de Serviço mais próximo.
sozinha ou através de um técnico não autorizado
pode provocar danos a uma ou mais pessoas, pode
danificar a máquina e pode invalidar a garantia das
peças sobressalentes. Contacte um técnico
autorizado se tiver problemas durante a utilização da
máquina. As peças sobressalentes foram concebidas
exclusivamente para este equipamento e não se
destinam a outras utilizações.
O que dizer ao Centro de Serviço:
●
nome, morada e código postal.
●
número de telefone.
●
o tipo de problema.
●
a data de compra.
●
o modelo do aparelho (Mod.).
●
o número de série (S/N).
Estas informações podem ser encontradas na
etiqueta de dados, no interior da porta da máquina.
Reparação
72
Page 73

Gebruiksaanwijzing
DROOGAUTOMAAT
GB
English, 1
I
Italiano, 13
D
Deutsch, 37EEspañol, 49
NL
Nederlands, 73
A
Arabic, 96
AS60V
F
Français, 25
P
Português, 61
Inhoud
Installatie, 74-75
Het plaatsen van de droger
Ventilatie
Elektrische aansluiting
Voor het eerste gebruik van de droger
Beschrijving van de droogautomaat, 76
De voorkant
De achterkant
Bedieningspaneel
Start en programma’s, 77-78
Een programma kiezen
Programmatabel
Wasgoed, 79-80
Het wasgoed sorteren
Droogsymbolen
Speciaal wasgoed
Droogtijden
Veiligheidsinstructies en
waarschuwingen, 81
Algemene veiligheid
Afdanken van het apparaat
Energiebesparing en respect voor het milieu
NL
Reiniging en onderhoud, 82
Haal de stekker uit het stopcontact
Reinig het pluizenfilter na elk gebruik
Controleer de trommel na elk gebruik
Het reinigen van de droger
Problemen oplossen, 83
Technische dienst, 84
Reserveonderdelen
73
Page 74

Installatie
NL
! Bewaar deze gebruiksaanwijzing zodat u haar indien
nodig kunt raadplegen. Neem de gebruiksaanwijzing
mee als u verhuist en mocht u dit apparaat verkopen
of aan iemand anders geven, geef dit boekje er dan bij,
zodat de volgende eigenaar ook kennis kan nemen
van de veiligheidsvoorschriften en aanbevelingen voor
gebruik.
! Lees de instructies aandachtig door; op de
volgende bladzijden vindt u belangrijke informatie
over de installatie en aanbevelingen voor het gebruik
van het apparaat.
Het plaatsen van de droogautomaat
●
Plaats de droogautomaat op voldoende afstand
van uw gasfornuis, kachel, verwarming of gasstel;
vlammen kunnen schade toebrengen aan het
apparaat.
●
Als u het apparaat onder een werkblad wilt plaatsen,
zorg er dan voor dat er tussen de onderkant van
het werkblad en eventuele andere voorwerpen op
of boven de machine een spleet van 10 mm zit en
laat minstens 15 mm ruimte vrij tussen de zijkanten
van de machine en zijwanden of muren. Zo kan er
voldoende lucht circuleren. Zorg dat er niets voor
de afvoeropeningen aan de achterkant zit.
●
Plaats de droger niet in een vochtige ruimte en
zorg ervoor dat er voldoende lucht kan circuleren.
! Zorg ervoor dat het uiteinde van de buis niet naar de
luchtinvoeropening aan de achterkant van de droger
wordt gericht.
! De ventilatiebuis mag niet langer zijn dan 2,4 meter
en er mag geen pluis, stof of water inzitten. Schud de
buis regelmatig uit. Zorg er altijd voor dat de buis niet
wordt platgedrukt.
Permanente ventilatie
Naast de ventilatiebuis raden we het gebruik van een
muur/raam-ventilatiepakket aan. Deze zijn verkrijgbaar
bij een verkooppunt of bij de dichtstbijzijnde leverancier
van reserveonderdelen.
Muurdoorvoering
1. Zorg voor een opening
in de muur links van
waar de droger
geplaatst wordt.
2. Houd de buis zo kort en
zo recht mogelijk om te
voorkomen dat
condensvocht terug in
de droger loopt.
3. Ook in de muur dient de
buis naar beneden
gericht te worden.
Ventilatie
De droogautomaat droogt uw wasgoed door koele,
schone en relatief droge lucht in de trommel te
zuigen, deze te verwarmen en door het wasgoed te
blazen terwijl de was voorzichtig wordt rondgedraaid.
Voor een optimaal resultaat wordt de vochtige lucht
vervolgens afgevoerd door een buis aan de
achterkant van de droger. Als de droger in gebruik is,
dient er voldoende ventilatie te zijn om terugstroming
te voorkomen van gassen van apparaten die andere
brandstoffen verbruiken en open vuur.
Mobiele ventilatie
Als er geen permanente ventilatie is, dient de
ventilatiebuis voor gebruik altijd te worden geplaatst.
De buis moet juist worden aangesloten op de
achterkant van de droger (zie Beschrijving van de
droogautomaat). Indien mogelijk is het het beste om
de buis aan te sluiten op een permanente opening
dichtbij de droger. Als een permanente installatie niet
mogelijk is, functioneert de droger even goed als de
buis door een deels geopend raam naar buiten wordt
gestoken.
Vensteraansluiting
1. Als uw droger gestapeld
is, is het het beste als
de vensteropening
lager is dan de uit
voervoeropening.
2. Houd de buis zo kort
mogelijk.
Afhankelijk van hoe vaak u de droger gebruikt, is het
zeer belangrijk om gebied A en B periodiek te controleren
op de aanwezigheid van pluis of afval. De adapter van
de luchtafvoerbuis moet goed worden vastgezet om te
voorkomen dat er vochtige lucht de kamer in wordt
geblazen.
! De droger mag niet zo ver terug worden geschoven
dat de adapter verschuift of dat de buis wordt platgedrukt
of gebogen.
! De buis moet weggehouden worden van de
luchtinvoeropening en bochten en U-bochten moeten
worden voorkomen; deze verminderen de doorgang of
houden condensvocht vast.
74
Page 75

Luchtafvoer door een open raam
1. Het uiteinde van de
buis moet naar beneden
worden gericht om te
voorkomen dat warme,
vochtige lucht
condenseert in de kamer
of in de droogautomaat.
! Gebruik geen verlengsnoeren.
! De stroomkabel mag niet worden gebogen of
platgedrukt.
! De stroomkabel dient periodiek gecontroleerd te
worden en mag alleen door erkende vakmensen worden
vervangen door een kabel die geschikt is voor deze
droger (zie Technische dienst). Nieuwe of langere
stroomkabels zijn tegen extra kosten verkrijgbaar bij
erkende dealers.
NL
Installatie
Beschrijving
! Zorg ervoor dat de droger voldoende geventileerd
wordt en dat het uiteinde van de buis niet naar de
luchtinvoeropening wordt gericht.
! U dient altijd de ventilatiebuis te gebruiken voor een
optimaal resultaat.
! Zorg ervoor dat de luchtafvoerbuis en
luchtinvoeropening niet afgedekt worden.
! De droger mag geen uitgestoten lucht hergebruiken.
! Verkeerd gebruik van de droogautomaat kan
brandgevaar opleveren.
! Laat uitgestoten lucht niet in een schoorsteenpijp
blazen die gebruikt wordt voor uitlaatgassen van
andere apparaten die gassen of andere brandstoffen
verbranden.
Elektrische aansluitingen
Controleer de volgende punten voor u de stekker in
het stopcontact steekt.
●
Het stopcontact moet geaard zijn.
●
Het stopcontact moet geschikt zijn voor de
maximale stroom van het apparaat; deze wordt
aangegeven op het typeplaatje (zie Beschrijving
van de droogautomaat).
●
Het voltage moet zich binnen de waarden bevinden
die op het typeplaatje zijn vermeld (zie Beschrijving
van de droogautomaat).
●
Het stopcontact moet geschikt zijn voor de stekker
van de droogautomaat. Als dit niet het geval is,
dient de stekker of het stopcontact te worden
vervangen.
! De fabrikant stelt zich niet aansprakelijk als deze
regels niet worden nageleefd.
! Als u niet zeker bent over de hierbovenvermelde
informatie raden wij u aan contact op te nemen
met een bevoegd elektricien.
Droger waterpas zetten
De droger moet waterpas worden geplaatst voor een
optimale werking.
Wanneer u de droger op
de uiteindelijke plek hebt
geïnstalleerd, controleer
dan eerst of de zijkanten
waterpas staan en doe
daarna hetzelfde met de
voor- en achterkant.
Als de droger niet
waterpas staat, zet u het
apparaat op een houten
blok terwijl u de twee
stelvoeten hoger of lager
draait totdat de droger
waterpas staat.
Voor het eerste gebruik
programma’s Wasgoed
Start en
Veiligheidsinstruct
Waarschuwingen
ies en
Reiniging en
onderhoud
Problemen
oplossen Technische dienst
! De droger mag niet buiten geplaatst worden, zelfs
niet als de plaats overdekt is. Het is zeer gevaarlijk
om het apparaat aan regen of storm bloot te stellen.
! De stroomkabel en de stekker moeten zich na de
installatie binnen handbereik bevinden.
Na het installeren van de droger en voor het eerste
gebruik dient de binnenkant van de trommel te worden
schoongemaakt om eventueel stof dat door het transport
is ontstaan te verwijderen.
75
Page 76

Beschrijving van de droogautomaat
NL
De voorkant De achterkant
Bedieningspaneel
Model- en
serienummers
Trommel
Pluizenfilter
Typeplaatje
Waarschuwing:
Heet
Bedieningspaneel
WARMTE
toets
lampje
Luchtinvoeropening
Luchtafvoerbuis hier
plaatsen
IndicatorACTIEF
START
toets
Droogtabel PROGRAMMA
Als u de START toets indrukt, begint de droogautomaat
met het geselecteerde programma (zie Start en
programma’s).
Met de WARMTE toets regelt u de droogtemperatuur
(zie Start en programma’s).
NIET INGEDRUKT: HOGE TEMPERATUUR
INGEDRUKT: LAGE TEMPERATUUR
Als u de ALARM toets indrukt, wordt het einde van de
droogcyclus aangegeven.
NIET INGEDRUKT: Zoemer
AAN. INGEDRUKT: Zoemer UIT.
Het indicatorlampje ACTIEF geeft aan dat de droger in
gebruik is. Dit lampje gaat branden als u op de START
toets drukt. Het blijft branden tot de deur wordt
geopend of de stroomtoevoer wordt verbroken. Het
lampje blijft branden tijdens een programma met latere
starttijd.
76
ALARM
toets
TIMER
knop
In de gebruiksvriendelijke Droogtabel vindt u
stofsoorten en beladingscapaciteiten.
Met de TIMER knop kunt u de droger op een later tijdstip
laten starten. Draai de knop met de klok mee tot deze
het aantal uur aangeeft dat u de starttijd wilt uitstellen.
Als u te ver hebt gedraaid, kunt u de knop tegen de
klok in terug draaien (zie Start en programma’s).
Met de PROGRAMMA keuzeschakelaar stelt u het
programma in: draai de knop met de klok mee, nooit
tegen de klok in, tot de indicator het gewenste
programma aanwijst (zie Start en programma’s).
keuzeschakelaar
Page 77

Start en programma’s
Een programma kiezen
1. Steek de stekker van de droogtrommel in het
stopcontact.
2. Sorteer het wasgoed op stofsoort (zie Wasgoed).
3. Doe de deur open en zorg ervoor dat het
pluizenfilter schoon is en op zijn plaats zit (zie
Reiniging en Onderhoud).
4. Vul de droogtrommel en zorg ervoor dat er geen
wasgoed tussen de deur zit. Sluit de deur.
5. Kies het droogprogramma met behulp van de
programmatabel (zie Programma’s) en de
indicatoren voor elke stofsoort (zie Wasgoed).
- Regel de temperatuur met de WARMTE toets.
- Kies een programma of droogtijd door de
PROGRAMMA keuzeschakelaar met de klok
mee te draaien.
6. Stel indien gewenst een latere starttijd in met de
TIMER knop.
7. Als u de zoemer wilt uitschakelen drukt u op de
ALARM toets.
8. Druk op de START toets om het drogen te
beginnen. Het indicatorlampje ACTIEF gaat
branden en blijft branden, zelfs tijdens als het
drogen later van start gaat. Het indicatorlampje
blijft branden tot u de deur van de droger opent.
Tijdens het droogprogramma kunt u het wasgoed
controleren en was die al droog is eruit halen
terwijl u de rest van de was verder droogt in de
machine. Sluit de deur weer en druk op de
START toets om verder te gaan met drogen.
9. Ongeveer 10 minuten voor het einde van het
programma start de KOUDE-LUCHTFASE (het
wasgoed wordt afgekoeld). Deze fase moet
altijd worden doorlopen.
10. De zoemer waarschuwt u dat het drogen is
beëindigd. Doe de deur open, haal het wasgoed
uit de droger, reinig het pluizenfilter en plaats
deze terug in de houder (zie Reiniging en
Onderhoud).
NL
Installatie
Beschrijving
programma’s Wasgoed
Start en
11. Haal de stekker uit het stopcontact.
Veiligheidsinstruct
Waarschuwingen
ies en
Reiniging en
onderhoud
Problemen
oplossen Technische dienst
77
Page 78

NL
Start en programma’s
Programmatabel
Programma
Automatisch
drogen
(gemiddelde
lading)
Automatisch
drogen
(grote ladingen)
Gemakkelijk
strijken
Wat het doet... Hoe in te stellen...
Droogt volledig: uw kleding kan
direct worden gedragen. Voor
gemiddelde ladingen (van 1 tot
3 kg) katoen , polykatoen of
synthetische stoffen .
Droogt volledig: uw kleding kan
direct worden gedragen. Voor
grote ladingen (van 3 tot 6 kg)
katoen .
Kort programma (ongeveer 10
minuten) dat de vezels verzacht
van kleding die gestreken gaat
worden.
1. Kies HOGE door te drukken
op de WARMTE toets.
2. Zet de PROGRAMMA
keuzeschakelaar op .
3. Druk op de START toets , het
ACTIEF lampje gaat branden.
1. Kies HOGE door te drukken
op de WARMTE toets.
2. Zet de PROGRAMMA
keuzeschakelaar op .
3. Druk op de START toets , het
ACTIEF lampje gaat branden.
1. Kies HOGE door te drukken
op de WARMTE toets.
2. Zet de PROGRAMMA
keuzeschakelaar op .
3. Druk op de START toets , het
ACTIEF lampje gaat branden.
Opmerkingen
! op LAGE droogt dit
programma uw kleding niet.
Voor acryl of kleine ladingen
kiest u Drogen voor een
bepaalde tijd.
U kunt dit programma ook
gebruiken voor grote ladingen
als u een iets droger resultaat
wenst.
! op LAGE droogt dit
programma uw kleding niet.
Voor acryl of kleine ladingen
kiest u Drogen voor een
bepaalde tijd.
U kunt dit programma ook
gebruiken voor grote ladingen
als u een iets vochtiger
resultaat wenst.
! Dit is geen droogprogramma
(zie onder).
Drogen voor
een bepaalde
tijd maximaal 120
minuten
Koudeluchtfase
Droogt natte kleren die daarna
gestreken worden, acryl ,
of kleine ladingen (minder dan
1 kg).
De verwarmingselementen
gaan uit en de kleding wordt
afgekoeld.
1. Selecteer HOGE of LAGE
met de WARMTE toets.
2. Stel de PROGRAMMA
keuzeschakelaar in op de
gewenste tijd.
3. Druk op de START toets , het
ACTIEF lampje gaat branden.
Dit is de laatste fase van de
programma’s. Ongeveer 10 minuten
voor het einde draait de knop
automatisch door naar de koudeluchtfase. Als u de zoemer hoort
(tenzij u deze hebt uitgezet), kunt u
de kleding uit de droger halen.
Raadpleeg de droogtabel
(
zie Wasgoed).
Laat de droger deze fase
altijd doorlopen.
Programma Gemakkelijk strijken
‘Gemakkelijk strijken’ is een kort programma van 10 minuten (8 minuten warmte, gevolgd door 2 minuten koude
lucht) dat de vezels van kleding verzacht die langer op dezelfde plek heeft gelegen. De cyclus ontspant de vezels
waardoor ze gemakkelijker te strijken en op te vouwen zijn.
! ‘Gemakkelijk strijken’ is geen droogprogramma en dient niet gebruikt te worden voor natte kleding.
Voor het beste resultaat
1. Overschrijd de maximale beladingscapaciteit niet.
Deze aantallen verwijzen naar het droge gewicht.
Stof Maximale belading
Katoen en katoenmengsels 2,5 kg
Synthetische stoffen 2 kg
Spijkerstof 2 kg
2. Haal de droger onmiddellijk na het einde van het programma leeg, hang het wasgoed op of vouw of strijk het en
berg het wasgoed op in de kast. Als dit niet mogelijk is het programma herhalen.
Het ‘Gemakkelijk strijken’ effect varieert per stof. Het werkt goed voor traditionele stoffen als katoen of
katoenmengsels en minder goed voor synthetische vezels en materialen als Tencel®.
78
Page 79

Wasgoed
Het wasgoed sorteren
• Controleer de droogsymbolen om te zien of de
artikelen in de droogtrommel gedroogd kunnen
worden.
• Sorteer het wasgoed per stofsoort.
• Leeg de zakken en controleer de knopen.
• Sluit ritsen en haakjes en bind losse riemen en
ceinturen vast.
• Wring elk artikel uit om zoveel mogelijk water kwijt
te raken.
! Doe geen druipnatte kleding in de droogautomaat.
Maximale belading
Overschrijd de maximale beladingscapaciteit niet.
Deze aantallen verwijzen naar droog gewicht:
Natuurlijke vezels: max. 6 kg
Synthetische vezels: max. 3 kg
! Doe NIET te veel wasgoed in de droger; dit kan het
droogresultaat beïnvloeden.
Normale belading
Kleding
Blouse Katoen 150 g
Anders 100 g
Jurk Katoen 500 g
Anders 350 g
Spijkerbroek 700 g
10 luiers 1000 g
Overhemd Katoen 300 g
Anders 200 g
T-Shirt 125 g
Droogsymbolen
Controleer de labels in uw kleding, vooral als u ze
voor het eerst droogt. De volgende symbolen worden
het meest gebruikt.
Drogen in de droogtrommel
Niet drogen in de droogtrommel
Droog op hoge stand
Droog op lage stand
Artikelen die niet geschikt zijn voor de droogtrommel
• Artikelen die rubber, rubberachtig materiaal of
plastic film bevatten (kussens of regenkleding met
PVC) of andere vlambare artikelen of artikelen die
vlambare stoffen bevatten (bijv. handdoeken met
haarspray erop).
• Glasvezel (bepaalde soorten gordijnen)
• Artikelen die chemisch gereinigd zijn
• Artikelen met code (zie Speciaal wasgoed).
Deze kunt u reinigen met speciale producten voor
chemisch reinigen met de droogautomaat. Volg
de instructies nauwkeurig op.
• Grote, dikke voorwerpen (quilts, slaapzakken,
kussens, grote dekbedden etc). Deze zetten uit
bij het drogen en zouden de circulatie van lucht in
de droger belemmeren.
NL
Installatie
Beschrijving
programma’s Wasgoed
Start en
Veiligheidsinstruct
Waarschuwingen
ies en
Reiniging en
onderhoud
Huishoudelijke artikelen
Dekbedovertrek Katoen 1500 g
(Tweepersoons) Anders 1000 g
Groot tafellaken 700 g
Klein tafellaken 250 g
Theedoek 100 g
Badlaken 700 g
Handdoek 350 g
Tweepersoonslaken 500 g
Eenpersoonslaken 350 g
Aan het einde van de droogcyclus kan katoen nog
vochtig zijn als het samen met synthetische stoffen is
gedroogd. Als dit gebeurt, laat het katoenen wasgoed
dan nog een korte periode drogen.
79
Problemen
oplossen Technische dienst
Page 80

Wasgoed
NL
Speciaal wasgoed
Dekens en spreien: artikelen van acryl (Acilan,
Courtelle, Orion, Dralen)
moeten voorzichtig gedroogd worden op LAGE.
Droog ze niet te lang.
Geplooide of rimpelde kleding: controleer de
droogsymbolen in de kleding.
Artikelen die met stijfsel zijn behandeld: droog
deze niet samen met artikelen die niet met stijfsel zijn
behandeld. Zorg ervoor dat zoveel mogelijk stijfsel is
opgelost voor u het wasgoed in de droger doet. Niet
te lang drogen: anders wordt het stijfsel poederachtig
en wordt uw kleding slap, wat het effect van het stijfsel
teniet doet.
Droogtijden
De onderstaande tabel geeft een RICHTLIJN van de
droogtijden in minuten. De gewichten verwijzen naar
droge kleding:
Deze tijden zijn richtlijnen en zijn afhankelijk van:
• Hoeveelheid water die zich na het centrifugeren
nog in de kleding bevindt: handdoeken en fijne
kleding houden veel water vast.
• Stof: artikelen van dezelfde soort stof maar met
verschillende textuur en dikte hebben mogelijk niet
dezelfde droogtijden.
• Hoeveelheid wasgoed: een kleine hoeveelheid
wasgoed of slechts een enkel kledingstuk heeft
vaak een langere droogtijd.
• Droogheid: als u kleding strijkt, kunt u het uit de
droogtrommel halen als het nog een beetje vochtig
is. Ander wasgoed kunt u in de droger laten tot
het helemaal droog is.
• Ingestelde warmte.
• Kamertemperatuur: als het koud is in de kamer
waar de droger staat, duurt het langer voor uw
kleding droog is.
Katoen
HOGE TEMPERATUUR
Droogtijden bij centrifugetoerental van 800-1000 omw/min.
Halve lading Hele lading
1 kg 2 kg 3 kg 4 kg 5 kg 6 kg
20-30 35-45 45-60 60-70 70-80 80-100
Synthetisch materiaal
HOGE TEMPERATUUR
Droogtijden bij minder snelle centrifuge
Halve lading Hele lading
1 kg 2 kg 3 kg
20-30 35-45 45-60
Acryl /
LAGE TEMPERATUUR
Droogtijden bij minder snelle centrifuge
Halve lading Hele lading
1 kg 2 kg
25-40 40-60
• Grote hoeveelheden: bepaalde dikke artikelen kunnen
voorzichtig in de droogautomaat gedroogd worden.
We raden u aan deze artikelen regelmatig uit de
droogtrommel te halen, ze uit te schudden en
terug in de droger te doen tot ze droog zijn.
! Droog uw kleding niet te lang.
Alle stoffen bevatten een klein beetje natuurlijk vocht
wat ze zacht en soepel houdt.
80
Page 81

Veiligheidsinstructies en
waarschuwingen
! Het apparaat voldoet aan internationale
veiligheidsvoorschriften. Deze waarschuwingen worden
om veiligheidsredenen gegeven en dienen aandachtig
te worden doorgelezen.
Dit apparaat voldoet aan de volgende EEC
richtlijnen:
- 72/23/EEC en 93/68/EEC (Richtlijn voor Lage Voltages)
- 89/336/EEC, 92/31/EEC en 93/68/EEC
(Electromagnetische compatibiliteit)
Algemene veiligheidsinstructies
●
Deze droogautomaat is ontworpen voor huishoudelijk
gebruik en niet voor professioneel gebruik.
●
Deze droogautomaat dient door volwassenen te
worden gebruikt en de instructies in deze
gebruiksaanwijzing dienen nauwkeurig te worden
opgevolgd.
●
Raak het apparaat niet aan als u geen schoeisel
draagt of natte handen of voeten hebt.
●
Wanneer u de stekker uit het stopcontact haalt, moet
u altijd aan de stekker te trekken, nooit aan het snoer.
●
Houd kinderen tijdens het drogen uit de buurt van
het apparaat. Zet het apparaat na gebruik uit en
haal de stekker uit het stopcontact. Houd de deur
gesloten om te voorkomen dat kinderen het apparaat
als speelgoed gebruiken.
●
Het apparaat moet correct geïnstalleerd worden en
voldoende geventileerd zijn. De luchtinvoeropening
aan de achterkant, de uit voeropeningen en de
luchtafvoerbuis mogen nooit worden afgedekt (zie
Installatie).
●
Richt de luchtafvoerbuis nooit naar de
luchtinvoeropening aan de achterkant van de machine.
●
De droger mag geen uitgestoten lucht hergebruiken.
●
Plaats de droger niet op tapijt als de poolhoogte
de luchtstroom onder het apparaat belemmert.
●
Controleer voor het vullen altijd eerst of de
droogautomaat leeg is.
●
●
●
●
●
●
●
●
●
●
De achterkant van de droger kan zeer heet
worden. U mag deze dan ook nooit aanraken
aan als de machine aanstaat.
Gebruik de droger niet als het pluizenfilter niet op
zijn plaats zit (zie Reiniging en Onderhoud).
Gebruik geen vloeibare wasverzachter in de
droogautomaat; giet vloeibare wasverzachter in
uw wasmachine vóór de spoelbeurt.
Overschrijd de maximale beladingscapaciteit niet
(zie Wasgoed).
Doe geen artikelen in de droger die druipnat zijn.
Droog alleen artikelen in de droogautomaat die
gewassen zijn met wasmiddel en water en die
vervolgens zijn afgespoeld en gecentrifugeerd.
Het drogen van artikelen die NIET met water zijn
gewassen kan brandgevaar opleveren.
Controleer de textielbehandelingssymbolen
zorgvuldig (zie Wasgoed).
Droog geen kleding die behandeld is met
chemische middelen.
Droog nooit artikelen die vervuild zijn door brandbare
substanties (benzine, olie, verf, haarspray, crèmes,
kookvet, of olie).
Droog geen rubber, schuimrubber, plastic,
schuimplastic, luierbroekjes of inlegdoekjes,
polytheen of papier in de droger.
●
Droog geen grote, zeer dikke artikelen in de droger.
●
Droog geen acrylvezel op hoge temperaturen.
●
Laat na elk programma de koude-luchtfase doorlopen.
●
Zet de droogtrommel niet uit als er nog warm
wasgoed in zit.
●
Reinig het pluizenfilter na elk gebruik (zie
Reiniging en Onderhoud).
●
Zorg dat er geen pluis ophoopt rondom de droger.
●
Klim nooit op de droger. Dit kan schade tot gevolg
hebben.
●
Houd u altijd aan de elektrische vereisten (zie
Installatie).
●
Koop altijd originele reserveonderdelen en
toebehoren (zie Technische dienst).
Informatie over recyclage en verwijdering
Als onderdeel van onze voortdurende toewijding aan
de bevordering van het milieu, behouden we ons het
recht voor om gerecycleerde kwaliteitsonderdelen te
gebruiken om de klantenkosten zo laag mogelijk te
houden en materiaalverspilling te minimaliseren.
●
Verpakkingsmateriaal: houd u aan de regels die
gelden voor uw gemeente, zodat het verpakkings
materiaal gerecycled kan worden.
●
Om het risico op verwondingen bij kinderen zoveel
mogelijk te beperken, moet de deur verwijderd worden
en dient het zichtbare deel van het netsnoer te
worden afgeknipt. Gooi deze delen afzonderlijk weg
om ervoor te zorgen dat de stekker van het toestel
niet langer in het stopcontact gestoken kan worden.
Vernietiging van oude electrische apparaten
De Europese Richtlijn 2002/96/EC over Vernietiging van
Electrische en Electronische Apparatuur (WEEE), vereist
dat oude huishoudelijke electrische apparaten niet
mogen vernietigd via de normale ongesorteerde
afvalstroom. Oude apparaten moeten apart worden
ingezameld om zo het hergebruik van de gebruikte
materialen te optimaliseren en de negatieve invloed op
de gezondheid en het milieu te reduceren.
Het symbool op het product van de “afvalcontainer
met een kruis erdoor” herinnert u aan uw
verplichting, dat wanneer u het apparaat vernietigt,
het apparaat apart moet worden ingezameld.
Consumenten moeten contact opnemen met de locale
autoriteiten voor informatie over de juiste wijze van
vernietiging van hun oude apparaat.
Energiebesparing en respect voor het milieu
●
Wring het wasgoed altijd eerst uit voor u het in de
droger doet (als u het wasgoed in een wasmachine
wast, centrifugeer het wasgoed dan op een hoog
toerental). Dit bespaart tijd en energie tijdens het
drogen.
●
Droog altijd hele ladingen - dit bespaart energie:
kleine ladingen of slechts een enkel kledingstuk
hebben vaak een langere droogtijd.
●
Reinig het pluizenfilter na elk gebruik om de
kosten van energieverbruik te beperken (zie
Reiniging en Onderhoud).
NL
Installatie
Beschrijving
programma’s
Start en
Wasgoed
Veiligheidsinstruct
Waarschuwingen
ies en
Reiniging en
onderhoud
Problemen
oplossen Technische dienst
81
Page 82

Reiniging en onderhoud
NL
Haal de stekker uit het stopcontact
Haal de stekker uit het stopcontact als u het apparaat
niet gebruikt, tijdens het schoonmaken ervan en tijdens
elk onderhoud.
Reinig het pluizenfilter na elk gebruik
Het pluizenfilter is een belangrijk onderdeel van uw
droger: het verzamelt pluis en stof dat ontstaat tijdens
het drogen. Daarnaast kunnen ook kleine voorwerpen
in het pluizenfilter terecht komen. Reinig het pluizenfilter
daarom na het drogen door hem af te spoelen onder
stromend water of met uw stofzuiger. Als het pluizenfilter
verstopt raakt, wordt de luchtstroom in de droger ernstig
gehinderd: droogtijden worden langer en u verbruikt
meer energie. Het kan uw droger ook schade
toebrengen.
Het pluizenfilter bevindt
zich in de deuropening
van de droger
(zie diagram).
Trommel reinigen
! Gebruik geen schuurmiddelen, staalwol of
reinigingsmiddelen voor roestvrij staal om de trommel
te reinigen.
De roestvrij stalen trommel kan verkleuren. Dit kan
veroorzaakt worden door een combinatie van water
en/of reinigingsmiddelen zoals wasverzachters.
Deze verkleuring heeft geen invloed op het
droogresultaat.
Het reinigen van de droger
●
Externe onderdelen van metaal of plastic en rubber
onderdelen kunnen worden schoongemaakt met
een vochtige doek.
●
Controleer de luchtafvoerbuis en de permanente
ventilatie periodiek om te voorkomen dat stof of
pluis ophoopt. Indien dit aanwezig is, verwijder het
dan.
●
Verwijder pluis dat zich rondom de filter en de
uitvoeropeningen bevindt.
Het pluizenfilter
verwijderen:
1. Trek het plastic handvat
van het pluizenfilter naar
boven (zie diagram).
2. Reinig het pluizenfilter
en plaats het correct
terug. Zorg ervoor dat
het filter helemaal naar
beneden in de houder
wordt geschoven.
! Gebruik de droger niet zonder het pluizenfilter terug
te plaatsen.
Controleer de trommel na elk gebruik
Draai de droogtrommel met de hand rond om klein
wasgoed (zakdoeken) uit de droger te halen dat
anders in de trommel zou kunnen achterblijven.
! Gebruik geen oplosmiddelen of schuurmiddelen.
! Uw droger gebruikt speciale lagercomponenten die
niet gesmeerd hoeven te worden.
! Laat uw droger regelmatig controleren door erkende
vakmensen om elektrische en mechanische veiligheid
te waarborgen (zie Technische dienst).
82
Page 83

Problemen oplossen
Mocht u problemen ondervinden met uw droger controleer dan eerst het volgende voor u de technische dienst
belt (zie Technische dienst):
Probleem:
Droger start niet.
Mogelijke oorzaken / Oplossing
●
De stekker zit niet in het stopcontact of maakt geen contact.
●
Er is een stroomstoring geweest.
●
De stop is gesprongen. Steek de stekker van een ander apparaat in het
stopcontact.
●
Gebruikt u een verlengsnoer? Probeer de stekker van de droger
rechtstreeks in het stopcontact te steken.
●
Is de deur niet helemaal afgesloten?
●
De PROGRAMMA keuzeschakelaar is niet helemaal juist ingesteld (zie
Start en programma’s).
●
De START toets is niet ingedrukt (zie Start en programma’s).
●
Droogcyclus start niet.
Het duurt lang voor het
wasgoed droog is.
U hebt een latere starttijd ingesteld (zie Start en programma’s).
●
Het pluizenfilter is niet gereinigd (zie Reiniging en Onderhoud).
●
De temperatuurinstelling is niet ideaal voor het soort stof dat u droogt (zie
Start en programma’s).
●
Bij automatische programma’s moet de temperatuur op HOGE worden
ingesteld (zie Start en programma’s).
●
U hebt niet het juiste programma ingesteld (zie Start en programma’s).
●
De flexibele luchtafvoerbuis is afgedekt (zie Installatie).
●
De luchtinvoeropening is afgedekt (zie Installatie).
●
De klep van het stormdeksel van de permanente ventilatiebuis is
afgedekt (zie Installatie).
●
Het wasgoed is te nat (zie Wasgoed).
●
De droger is te vol (zie Wasgoed).
NL
Installatie Beschrijving
programma’s Wasgoed
Start en
Veiligheidsinstruct
Waarschuwingen
ies en
onderhoud
oplossen Technische dienst
83
Reiniging en
Problemen
Page 84

Technische dienst
NL
Voor u de technische dienst belt:
●
gebruik de tabel van het onderdeel problemen
oplossen om te zien of u het probleem zelf kunt
verhelpen (zie Problemen oplossen).
●
Zo niet, zet de droger uit en bel de dichtstbijzijnde
technische dienst.
Informatie die de technische dienst nodig heeft:
●
uw naam, adres en postcode.
●
uw telefoonnummer.
●
het soort probleem.
●
de datum van aankoop.
●
het model van het apparaat (Mod.).
●
het serienummer (S/N).
Deze informatie vindt u op het etiket aan de binnenkant
van de deur van de machine
Reserveonderdelen
Deze droger is een gecompliceerd apparaat. Pogingen
dit apparaat zelf te repareren of onderhoud door hiervoor
niet erkende personen kan letsel toebrengen aan een
of meerdere personen, kan schade toebrengen aan de
machine en kan de garantie op reserveonderdelen
doen vervallen. Bel een erkende vakman als u problemen
ondervindt bij het gebruik van deze machine.
De reserveonderdelen zijn speciaal voor dit apparaat
ontworpen en zijn niet geschikt voor enig ander
gebruik.
Technische dienst
84
Page 85

A
85
Page 86

A
86
Page 87

A
87
Page 88

A
88
Page 89

A
89
Page 90

A
90
Page 91

A
91
Page 92

A
92
Page 93

A
93
Page 94

A
94
Page 95

A
95
Page 96

195042589.05 W
02/2006 - SIMLEX . Four Ashes, Wolverhampton
A
Français, 25
Português, 61EEspañol, 49
F
P
I
Italiano, 13
A
GB
English, 1
D
Deutsch, 37
NL
Nederlands, 73
AS60V
96
 Loading...