

Page 1

Kullanma Kýlavuzu
ÇAMAÞIR MAKÝNESÝ
TR
Türkçe,1
GB
English,13
ARXXF 106 S
Ýçindekiler
TR
Montaj, 2-3
Ambalajýn çýkartýlmasý ve seviye ayarý getirilmesi
Su ve elektrik baðlantýlarý
Ýlk yýkama
Teknik veriler
Çamaþýr makinesinin tanýmý ve
programlarýn çalýþtýrýlmasý, 4-5
Kontrol paneli
Iþýklý göstergeler
Bir programýn baþlatýlmasý
Programlar, 6
Program tablosu
Kiþisel ayarlar, 7
Sýcaklýk ayarý
Sýkma hýzý ayarý
Fonksiyonlar
Deterjan ve çamaþýr, 8
Deterjan haznesi
Beyazlatma iþlevi
Çamaºýrýn hazýrlanmasý
Özel çamaþýrlar
Yük dengeleme sistemi
Önlemler ve öneriler, 9
Genel güvenlik uyarýlarý
Atýklarýn tasfiye edilmesi
Cam kapaðýn açýlmasý
Bakým ve özen, 10
Su ve elektrik kesilmesi
Çamaþýr makinesin temizlenmesi
Deterjan haznesinin temizlenmesi
Kapak ve hazne bakýmý
Pompanýn temizlenmesi
Su besleme hortumunun kontrol edilmesi
Arýzalar ve onarýmlar, 11
Teknik Servis, 12
1
Page 2
Montaj
TR
Bu kitapçýðý gerektiði her an danýþabilmeniz için
özenle saklayýnýz. Çamaþýr makinesinin satýlmasý,
devri veya nakli durumlarýnda da, yeni sahibinin
faydalanabilmesi için bu kýlavuz makineyle beraber
saklanmalýdýr.
Talimatlarý dikkatlice okuyunuz; montaj, kullaným
ve güvenliðe iliþkin önemli bilgiler içermektedir.
Ambalajýn çýkartýlmasý ve ayný seviyeye
getirilmesi
Ambalajdan çýkartýlmasý
1. Çamaþýr makinesinin ambalajdan çýkartýlmasý.
2. Çamaþýr makinesinin taþýma esnasýnda hasar
görmemiþ olduðunu kontrol ediniz. Hasar görmüþ ise
monte etmeyiniz. Satýcýya baþvurunuz.
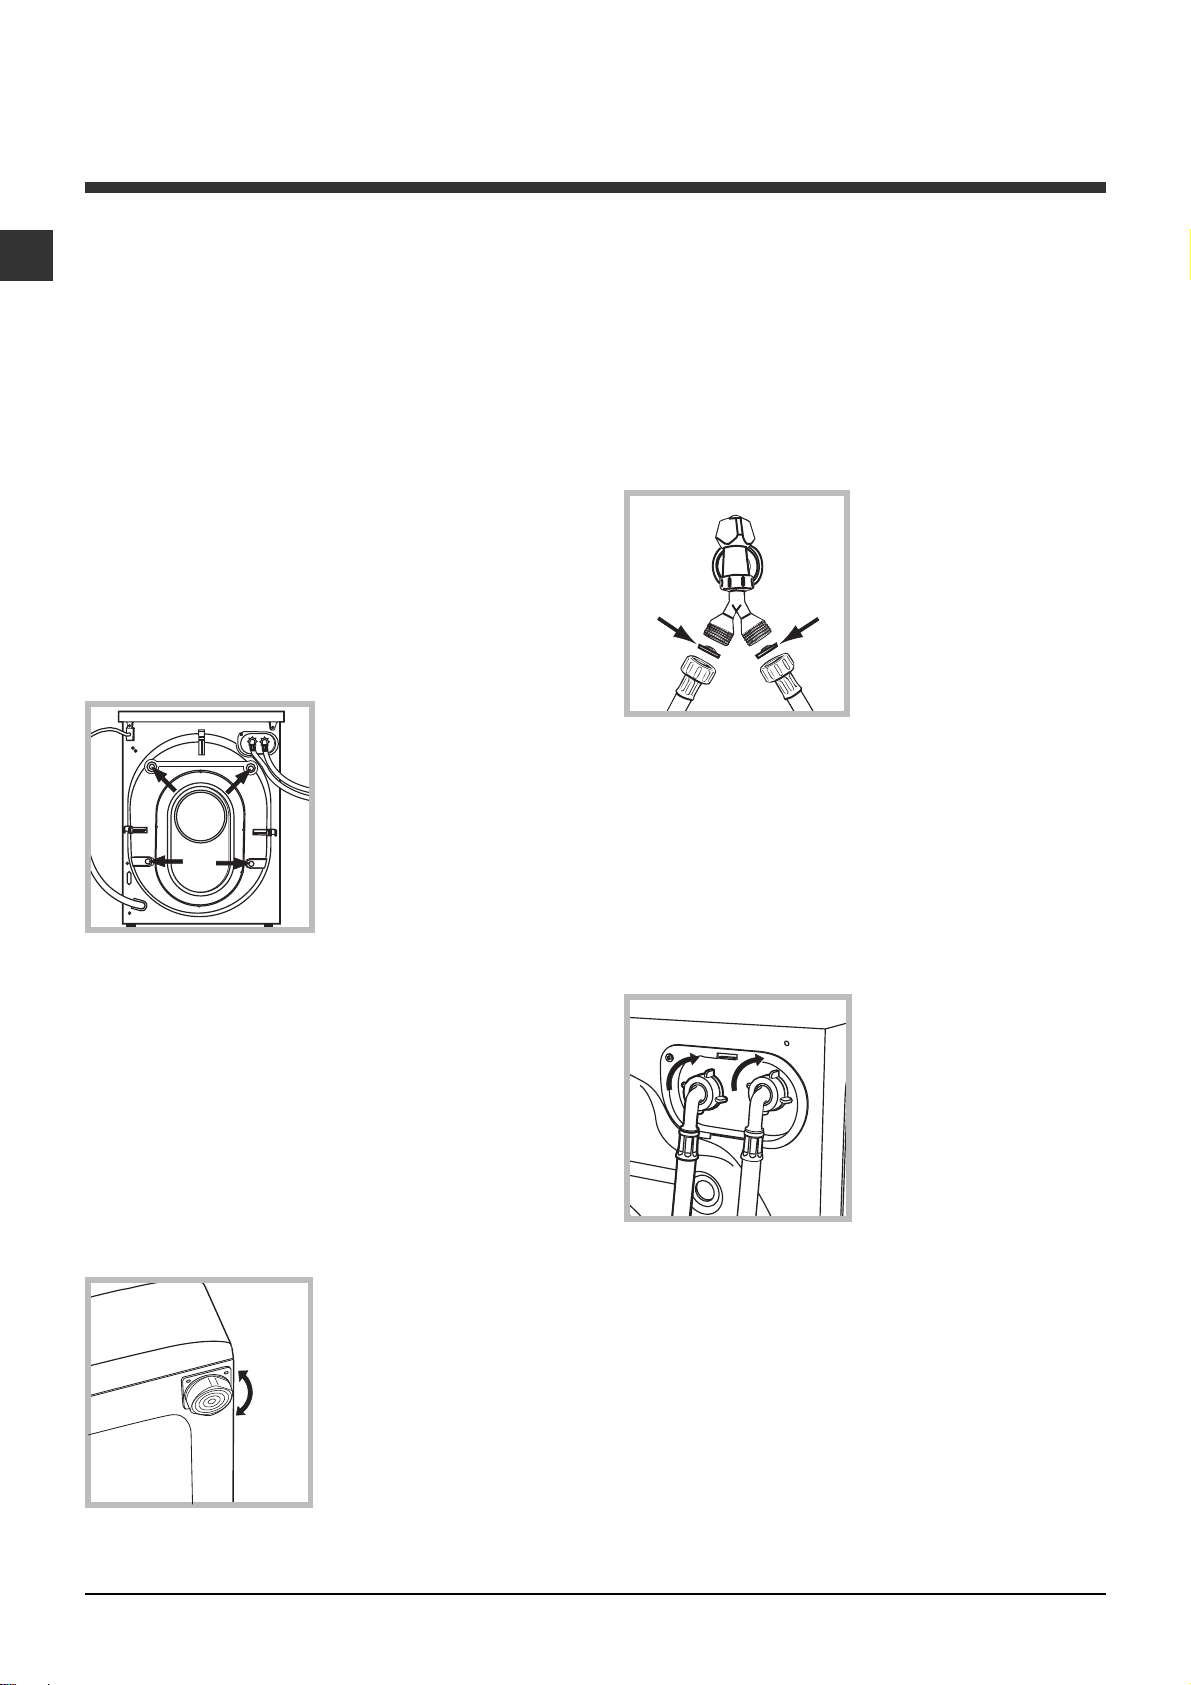
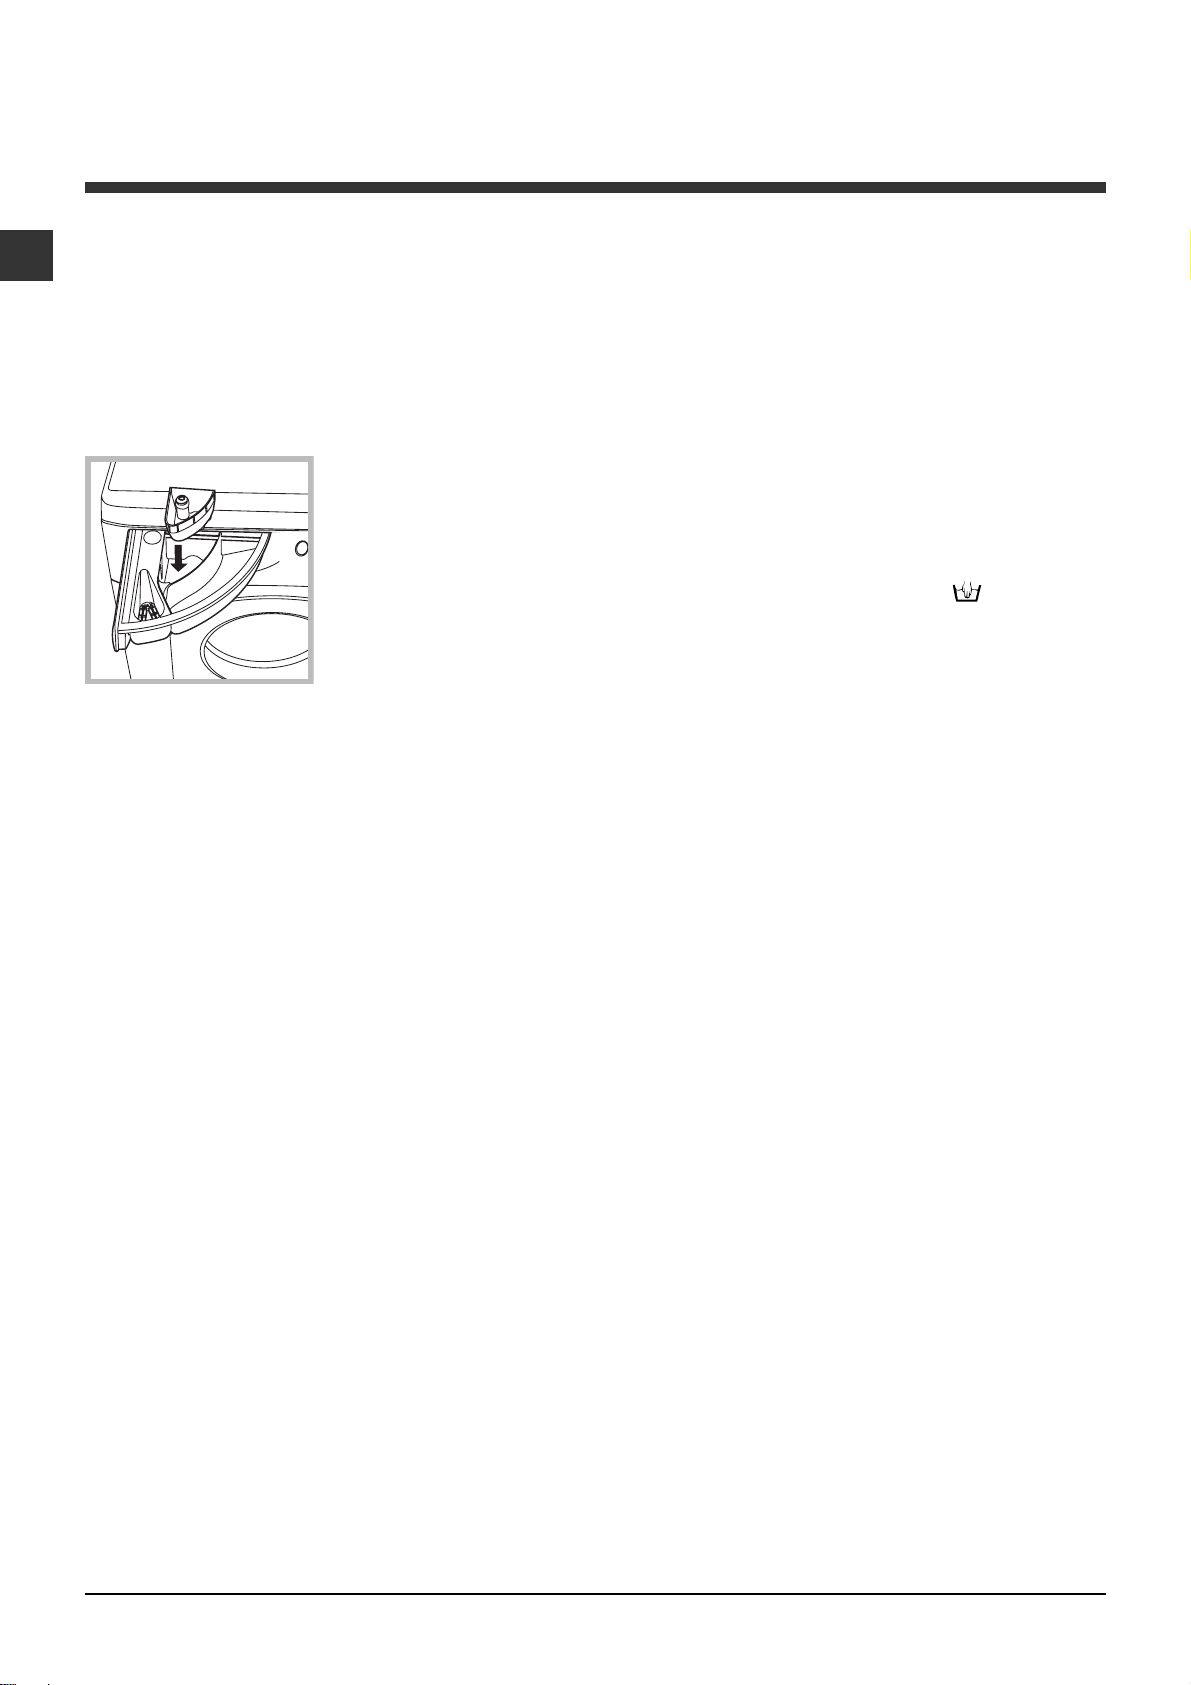
3. Taþýma sýrasýnda arka
tarafta bulunan 4 adet
koruyucu vidayý ve ara
parçasýyla birlikte
buradaki lastiði de
çýkartýnýz (bakýnýz þekil).
4. Delikleri ambalajda bulacaðýnýz plastik kapaklarla
kapayýnýz.
5. Tüm parçalarý muhafaza ediniz: çamaþýr
makinesinin nakli gerektiði takdirde takýlmalarý
gerekmektedir.
Ambalajlar çocuk oyuncaðý deðildir.
Cihazýn ayný seviyeye getirilmesi
Saðlýklý bir dengeleme, çamaþýr makinesine saðlam
bir duruþ kazandýracaðý gibi, çalýþmasý esnasýndaki
sarsýntý, gürültü ve hareketlilikleri de önleyecektir.
Zeminde moket veya halý olmasý halinde, ayarý
makinenin altýnda havalandýrma olabilecek þekilde
yapýnýz .
Su ve elektrik baðlantýlarý
Su besleme hortumunun takýlmasý
1. Hortumu, 3/4
ölçülerinde vidalý bir gaz
baþlýðý kullanmak
suretiyle, makinenin
ambalajýnda bulunan filtre
ve contayý da ilave
ederek, hortumun
musluða sabit bir þekilde
tesbit edildiðinden emin
olarak takýnýz. C harfiyle
iþaretlenmiþ olan su hortumunun soðuk su
musluðuna, H harfiyle iþaretlenmiþ olanýn da sýcak
su musluðuna takýlmasý gerekmektedir. Her iki
hortum da, makineyle beraber teslim edilen Y
þeklindeki öok baþlý ara ünite kullanýlmak suretiyle
soðuk su musluðuna takýlabilir (bkz. þekil).
Baðlantýyý yapmadan önce, suyu berraklaþana kadar
akýtýnýz.
Uyarý: Filtreleri düzenli olarak, suyun altýna tutarak
temizleyiniz.
2. Su besleme
hortumunu arka
kýsýmýnýn üst sað
köþesinde bulunan su
giriþine vidalayarak
makineye baðlayýnýz
(bkz. þekil).
1. çamaþýr makinesini düz ve sert bir zemine
yerleþtiriniz, duvar veya mobilyalara dayamayýnýz.
2. Yerleþtirilecek zemin
tam düz deðilse çamaþýr
makinesinin vidalý ön
ayaklarýný sýkarak veya
gevþeterek dengeyi
saðlayýnýz (bkz. þekil);
eðim açýsý, makinenin
üst tezgahýna göre 2°
den fazla olmamalýdýr.
2
3. Hortumda katlanma ve ezilme olmamasýna dikkat
ediniz.
Musluðun su basýncýnýn Teknik Veriler tabelasýnda
belirtildiði gibi olmasý gerekir (bkz. yan sayfa).
Besleme hortumunun boyu yetersizse yetkili bir
satýcý maðaza veya teknisyene baþvurunuz.
Kesinlikle daha önceden kullanýlmýþ hortum
kullanmayýnýz.
Makine ile birlikte verilen hortumlarý kullanýnýz.
Page 3
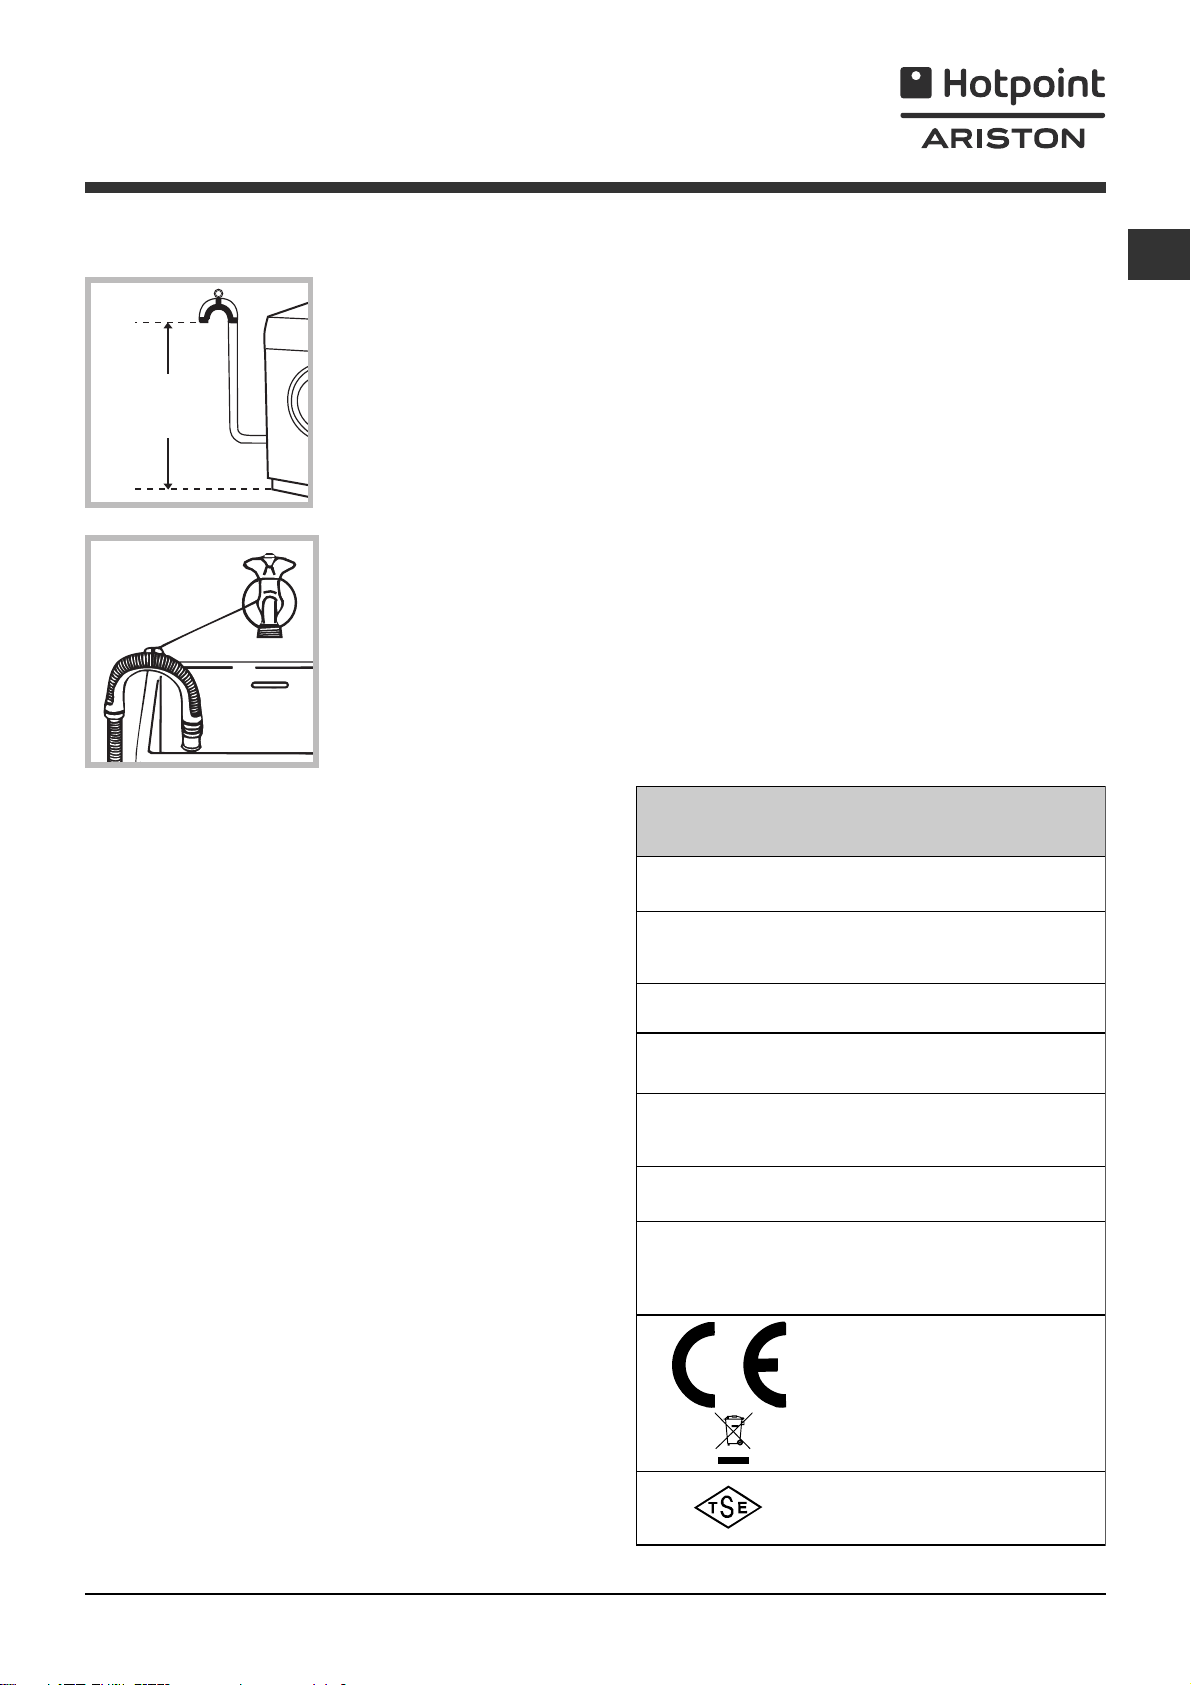
Tahliye hortumunun takýlmasý
65 - 100 cm
Tahliye hortumunu,
katlanmasýný önleyerek,
zemindeki veya yerden
65 ile 100 cm yükseklik
arasýndaki bir duvar
tahliyesine takýnýz
Uzatma kablosu ile çoklu prizler kullanmayýnýz.
TR
Kablonun ezilmemesi ve katlanmamasý gerekir.
Beslenme kablosunun yalnýzca yetkili teknisyenler
tarafýndan deðiþtirilmelidir.
Dikkat! Bu kurallara uyulmamasý halinde firma hiç bir
sorumluluk kabul etmemektedir.
Ýlk yýkama
veya mevcut olan
kýlavuzu çeþmeye
baðlayarak lavabo ya da
küvet kenarýna
yaslayýnýz (bkz. þekil).
Tahliye hortumunun
serbest ucunun suya
girmemesi gerekir.
Tahliye hortumu için ilave uzatma kullanýlmamasý
tavsiye olunur; aksi mümkün deðilse, uzatma
hortumunun çapýnýn da ayný olmasý ve 150 cm. den
uzun olmamasý gerekir.
Elektrik baðlantýsý
Fiþi prize takmadan evvel aþaðýdaki hususlara dikkat
ediniz:
prizin topraklamasýnýn yürürlükteki normlara uygun
olmasýna;
prizin, makinenin Teknik Veriler tabelasýnda
belirtilen, azami gücünü taþýyabilecek olmasýna
(bkz. yan taraf);
þebeke geriliminin, Teknik Veriler tabelasýnda
belirtilen deðerlere uygun olmasýna (bkz. yan
taraf);
prizin çamaþýr makinesinin fiþiyle uyumlu
olmasýna. Aksi takdirde fiþi veya prizi deðiþtiriniz.
Çamaþýr makinesi, muhafazalý olsa bile açýk
alanda monte edilemez, çünkü rüzgara ve yaðmura
maruz kalmasý çok tehlikelidir.
Monte edilen çamaþýr makinesinin fiþinin kolaylýkla
eriþilebilir olmasý gerekir.
Montajdan sonra, çamaþýr koymaksýzýn deterjanla
1. programý ayarlayarak yýkama yapýnýz.
Teknik bilgiler
Model
Ölçüler
Kapasite
Elektrik baðlantýlarý
Su baðlantýlarý
Sýkma hýzý
EN 60456
standartlarý
uyarýnca kontrol
programlarý
ARXXF 106 S
geniþlik 59,5 cm
yükseklik 85 cm
derinlik 53,5 cm
1 - 7 kg
makine üstünde takýlý olan teknik
veriler plakasýna bakýnýz.
max. su basýncý 1 MPa (10 bar)
min. su basýncý 0,05 MPa (0,5 bar)
tambur kapasitesi 52 litre
maksimum dakikada 1000 devire
kadar
program 6; 60°C sýcaklýkta;
7 kg çamaþýrla.
Bu makina aþaðýda belirtilen AB
normlarýna uygundur:
- 03/05/89 tarihli 89/336/CEE
(Elektromanyetik Uyum) ve daha
sonra yapýlan düzenlemeler
- 2002/96/CE
- 2006/95/CE (Alçak gerilim)
TS 2004 EN 60335-2-7
3
Page 4
Çamaþýr makinesinin tanýmý ve
programlarýn çalýþtýrýlmasý
TR
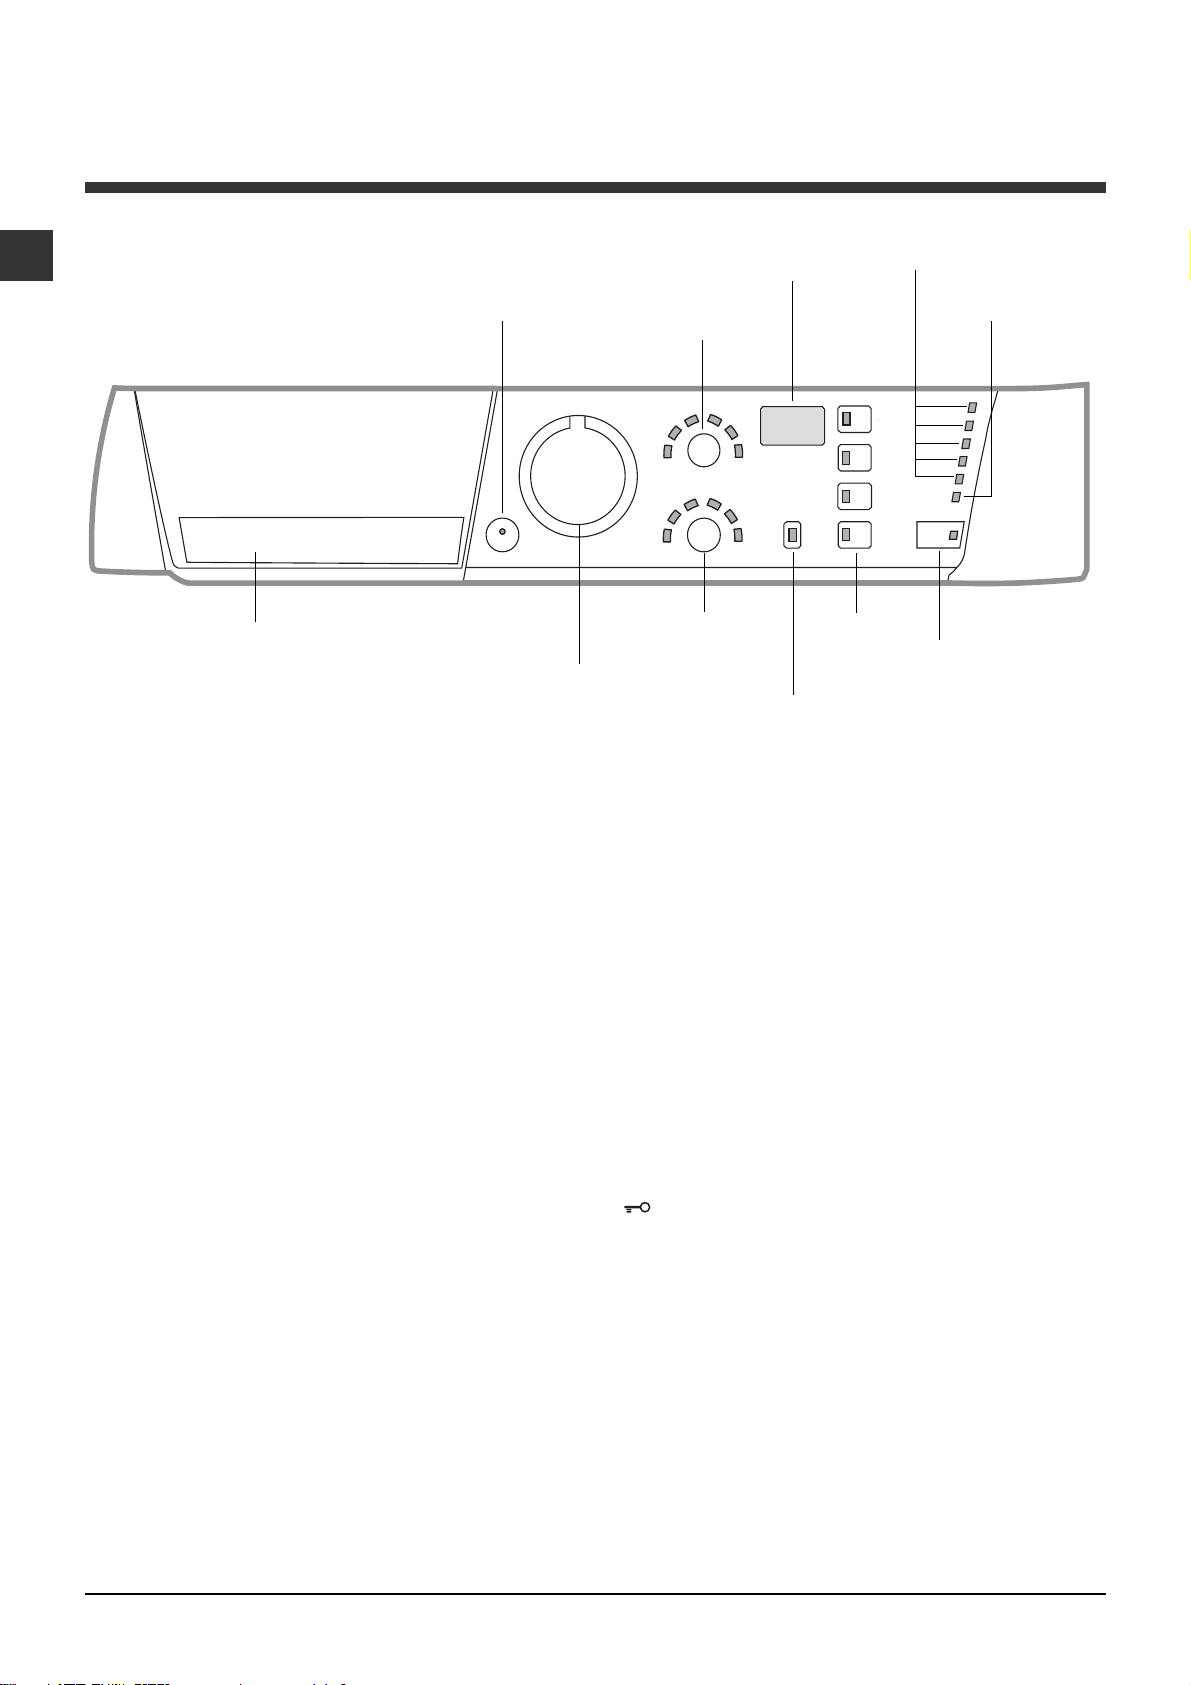
Kontrol paneli
AÇMA/KAPAMA
uyarý lambalý tuþ
Deterjan Bölmesi
PROGRAMLAR
düðmesi
SÝKMA HÝZÝ
AYARÝ
tuþu
SÝCAKLÝK AYARÝ
tuþu
EKRAN
FONKSÝYON
uyarý lambalý
tuþlarý
TUÞLAR
KÝLÝTLÝ
uyarý lambalý
tuþlarý
PROGRAM TAKÝP
uyarý lambasý
KAPAK
KÝLÝTLÝ
göstergesi
BAÞLAT/DURDUR
uyarý lambalý tuþ
Deterjan Bölmesi: ve diðer katkýlarý koyunuz
(Deterjanlar bölümüne bakýnýz).
AÇMA/KAPAMA tuþu ve uyarý lambasý. makineyi
çalýþtýrmak ve kapatmak için.
Yanan uyarý lambasý makinenin açýk olduðunu
gösterir.
PROGRAMLAR uyarý lambalý tuþlarý: programlarý
ayarlamak. Program esnasýnda düðme sabit kalýr.
SÝKMA HÝZÝ AYARÝ tuþu: sýkma çalýþtýrmak veya
durdurmak için (bkz. Kiþisel ayarlar bölümü).
SÝCAKLÝK AYARÝ tuþu: istenen sýcaklýðý veya soðuk
suyla yýkamayý ayarlamak için (bkz. Kiþisel ayarlar
bölümü).
EKRAN: Yýkamanýn bitmesine ne kadar süre
kaldýðýný ve gecikmeli baþlatma ayarlandýysa
yýkamanýn baþlamasýna ne kadar süre kaldýðýný
gösterir.
TUSLAR KILITLI tusu ve uyari lambasi kontrol
paneli açmak ya da kapatmak için.
FONKSÝYON düðmeleri: iþlev seçimi için. Seçilen
iþlev düðmesinde ýþýklý gösterge yanýk kalýr.
PROGRAM TAKÝP uyarý lambasý: yýkama programýnýn
aþamalarýný görmek için.
Uyarý lambasý makinenin açýk olduðunu gösterir.
KAPAK KÝLÝTLÝ göstergesi: çamaþýr makinesinin
kapaðýnýn açýlabilirliðini görmek için (bkz. yan sayfa).
BAÞLAT/DURDUR uyarý lambalý tuþ: programlarý
baþlatmak yada geçici olarak durdurmak için.
Not: devrede olan bir programýn beklemeye alýnmasý
için bu düðmeye basýnýz; turuncu renkli uyarý
lambasý yanýp sönecektir. MAKÝNE KAPAÐI KÝLÝTLÝ
uyarý lambasý kapalý ise, kapak açýlabilir.
Yýkama programýnýn kaldýðý yerden devam etmesi
için bu düðmeye tekrar basýnýz.
4
Page 5
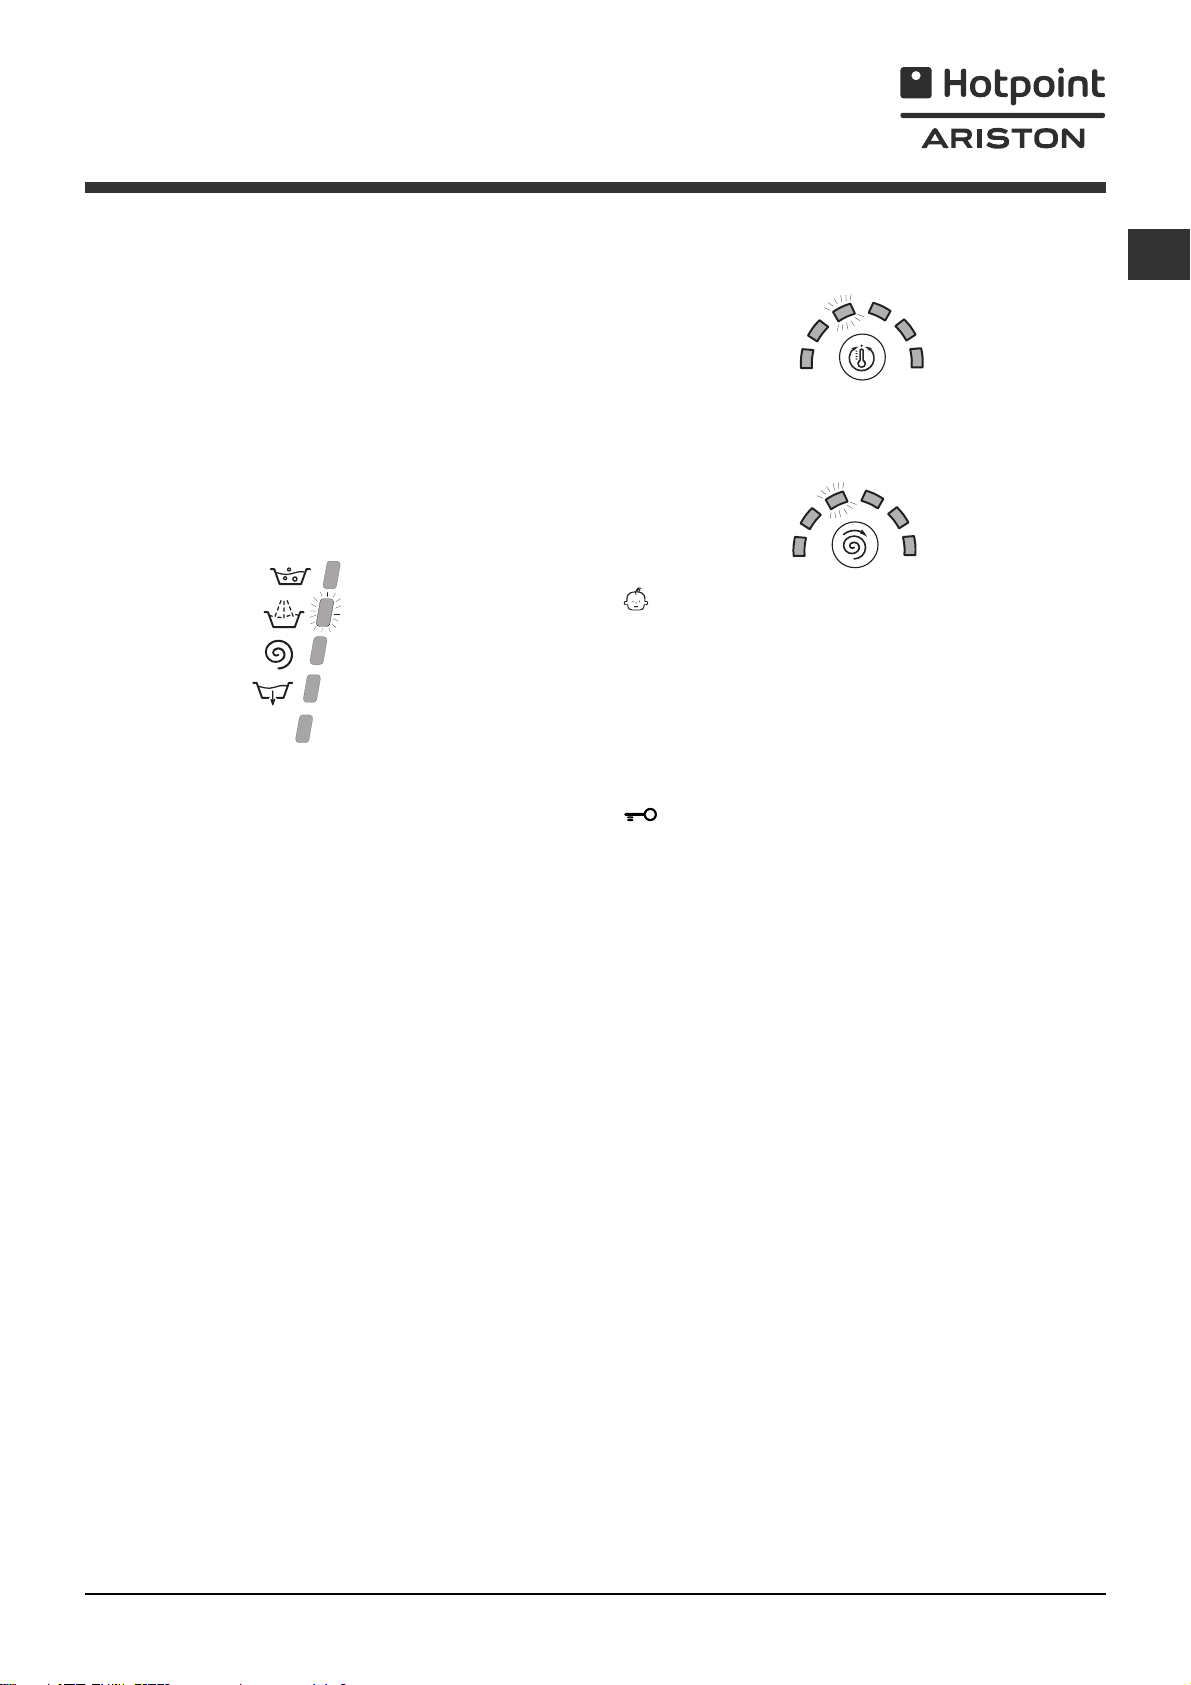
Iþýklý göstergeler
Iþýklý göstergeler önemli bilgiler verir.
Ýþte verdikleri bilgiler:
Program Takip uyarý lambasi
PROGRAMLAR düðmesini döndürdüðünüzde
seçtiðiniz programa göre uyarý lambalarý makinenin
hangi devrede olduðunu gösterecek þekilde
yanacaktýr.
Ýstenilen yýkama devresini seçtikten sonra çalýþma
esnasýnda ýþýklý göstergeler sürekli yanarak
yürütülmekte olan iþlemi gösterecektir.
Yýkama
Durulama
Sýkma
Su boþaltma
Yýkama sonu
FONKSÝYON tuþlarý ve ilgili uyarý lambalarý
Herhangi bir iþlem seçildiðinde ilgili gösterge
yanacaktýr.
Seçilen iþlem yürütülen programla uyumlu olmadýðý
takdirde, ilgili uyarý lambasý yanýp sönecek, sesli
sinyal duyulacak ve iþlem baþlamayacaktýr.
Daha önceden ayarlanmýþ olanla uyumsuz bir iþlem
seçildiði takdirde son seçilen iþlem geçerli olacaktýr.
Son
Sýcaklýk uyarý lambasý
Herhangi bir sýcaklýk deðeri seçildiðinde ilgili uyarý
lambasý yanacaktýr.
Sýkma hýzý ayarý uyarý lambasý
Herhangi bir santrifüj deðeri seçildiðinde ilgili uyarý
lambasý yanacaktýr.
Tuþ kilidi uyarý lambasý
kontrol paneli aktif hale getirmek için tuþu
yaklaþýk 2 saniye basýlý tutmanýz gerekir. Uyarý
lambasý açýk ise; kontrol panelinin kilitli olduðunu
gösterir. Böylece özellikle çocuklara sahip iseniz
programýn yanlýþlýkla deðiþtirilmesi engellenir.
kontrol paneli etkisiz hale getirmek için tuþu
yaklaþýk 2 saniye basýlý tutmanýz gerekir.
KAPAK KÝLÝTLÝ göstergesi
Iþýklý gösterge devamlý yanýyorsa, kapak istenmeyen
açýlmalara karþý kapalý demektir, açmak için
göstergenin sönmesini bekleyiniz.
Not: Zaman Ayarý iþlevi seçili ise makinenin
kapaðýný açmak mümkün deðildir. Kapaðý açabilmek
için BAÞLAT/DURDUR tuþuna basarak makineyi
beklemeye alýnýz.
TR
KAPAK KÝLÝTLÝ göstergesinin (turuncu olarak) iþlev
göstergesi ile ayný anda hýzlý þekilde yanýp sönmesi,
bir arýza göstergesidir (Arýzalar ve onarýmlar).
Bir programýn baþlatýlmasý
1. AÇMA/KAPAMA tuþuna basarak çamaºýr makinasýný çalýþtýrýnýz. Tüm göstergeler bir an için yanacak sonra
söneceklerdir.
2. Çamaþýrý yerleþtirip kapaðý kapatýnýz.
3. PROGRAMLAR düðmesiyle istenen programý seçiniz.
4. Yýkama suyu sýcaklýðýný seçiniz (bkz. Kiþisel ayarlar).
5. Sýkma hýz ayarýný seçiniz (bkz. Kiþisel ayarlar).
6. Deterjan ve diðer katkýlarý koyunuz (Bkz. Deterjanlar ve çamaþýrlar bölümü).
7. Ýstenilen iþlevleri seçin.
8. BAÞLAT/DURDUR düðmesine basmak suretiyle programý çalýþtýrýnýz ve ilgili gösterge yeþil renkte yanýk
kalacaktýr.
Seçilen programý iptal etmek için makineyi beklemeye aldýktan sonra BAÞLAT/DURDUR tuþunu basýlý tutarak
yeni bir program seçiniz.
9. Program bitiminde Son göstergesi yanmaya baþlayacaktýr. KAPAK KÝLÝTLÝ göstergesinin yanýp sönmesi
sona erecek, kapaðýn açýlabilir olduðunu gösterecektir. Çamaþýrý çýkarýnýz ve içerisinin kurumasý için kapaðý hafif
aralýk býrakýnýz. AÇMA/KAPAMA tuþuna basarak çamaþýr makinasýný kapatýnýz.
5
Page 6
Programlar
TR
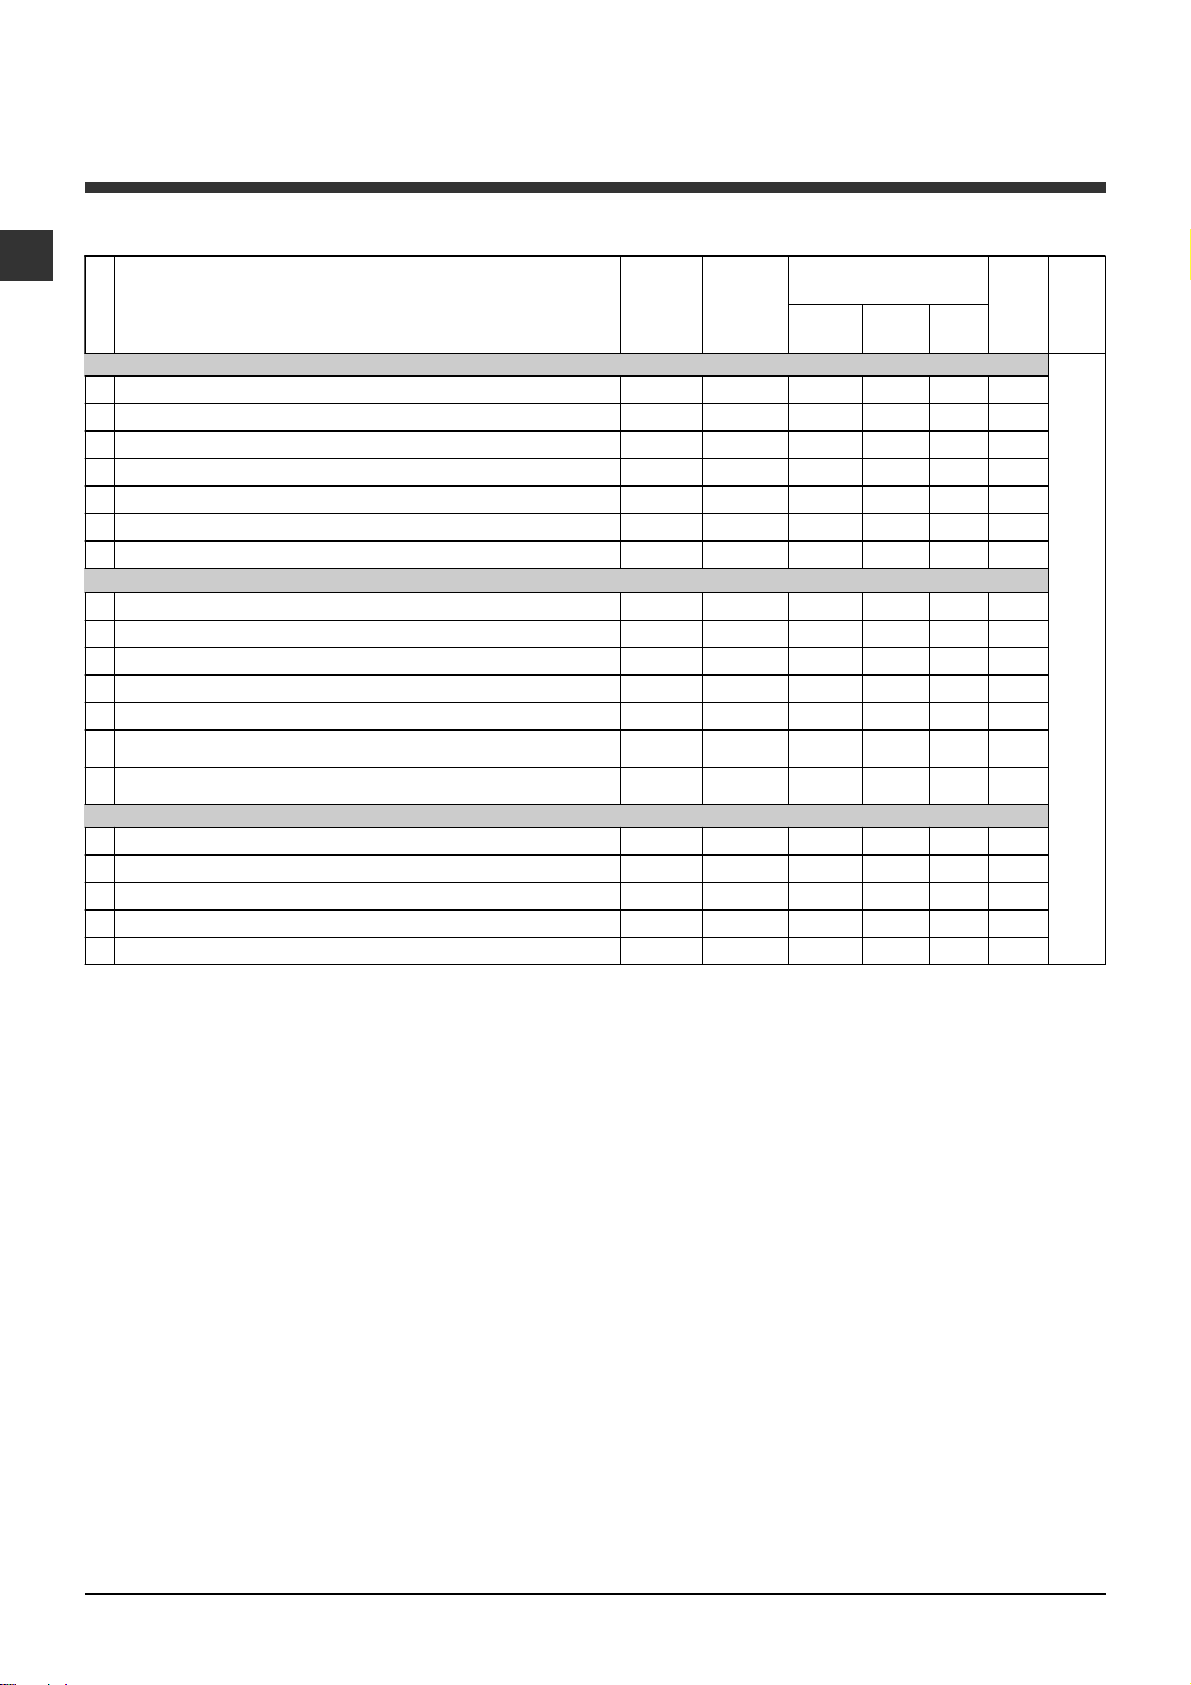
Program tablosu
Program açýklamasý
Programlar
Özel programlar
Hijyenik Yýkama: aþýrý kirli beyazlar.
6
Hijyenik Yýkama (1): çok kirli dayanýklý beyaz ve renkliler.
6
IYý Geceler: az kirli hassas renkli çamaþýrlar.
7
Bebek programý: çok kirli hassas renkli çamaþýrlar.
8
Gömlek programý
9
Ýpekliler/Perdeler: ýpekli, viskoz ve iç çamaþýrlar için kullanýlýr.
10
Yünlüler: yün ve kaþmir için kullanýlýr.
11
Günlük programlar
Pamuklular: çok kirli dayanýklý beyaz ve renkliler.
1
Pamuklular (2): çok kirli hassas renkli ve beyazlar.
1
Renklý Pamuklular (3): az kirli beyazlar ve nazik renkliler.
2
Sentetikler: çok kirli dayanýklý renkli çamaþýrlar.
3
Sentetikler: az kirli dayanýklý renkli çamaþýrlar.
3
Çeþitli 30 dak: az kirli çamaþýrlarý kýsa sürede yýkamak üzere
4
kullanýlýr (yünlü, ipekli, ve elde yýkanacak çamaþýrlara uygun deðildir).
Çeþitli 15 dak: az kirli çamaþýrlarý kýsa sürede yýkamak üzere
5
kullanýlýr (yünlü, ipekli, ve elde yýkanacak çamaþýrlara uygun deðildir).
Ek Programlar
Durulama
A
Hassas Durulama
B
Sýkma
C
Hassas Sýkma
D
Su Boþaltma
E
Maks. Isý
derecesi
(°C)
Maks Hýz
(Dakikada
devir)
90° 1000
60° 1000 -
40° 800 -
40° 800 -
40° 600 -
30° 0 -
40° 600 -
60° 1000
40° 1000
40° 1000
60° 800 -
40° 800 -
30° 800 -
30° 800 -
Deterjanlar
Çamaþýr
suyu
Yýkama
Yumu-
þatýcý
lll
ll
ll
ll
ll
ll
ll
lll
lll
lll
ll
ll
ll
ll
- 1000 - -
- 800 - -
- 1000 - - - 7
- 800 - - - 3
- 0 - - - 7
Maks
Devir
yük
süresi
(Kg)
7
Yýkama programalarýnýn süresi ekrandan kontrol edilebilir.
7
4
2
2
1
1,5
7
7
7
3
3
3
1,5
l
l
7
3
Çizelgede belirtilen veriler takribidir.
Tüm Test Enstitüleri için:
1) EN60456 standartlarý uyarýnca kontrol programlarý 60°C ye ve 6. programa ayarlayýnýz
2) Pamuklu uzun programý; 1 programda 40°Cye ayarlayýnýz.
3) Pamuklu kýsa programý; 2 programda 40°Cye ayarlayýnýz.
Özel programlar
Hijyenik Yýkama (6. program). Yüksek sýcaklýklarda çalýþan, 60°C üstünde çamaþýr suyunu kullanan bir
programdýr.
Aðartma iþlemini yapmak için mevcut olan ilgili haznelere çamaþýr suyu, deterjan ve katký maddeleri
dökünüz (bkz. Deterjan haznesi paraðrafý).
Ýyi geceler (7. program). Bu sessiz program elektrik enerjisi tarifesinin daha ucuz olduðu gece saatlerinde de
çalýþabilir. Program sentetik ve pamuklu ürünler için özel olarak tasarlanmýþtýr. Yýkama programý sonunda makina
haznesinde su mevcutken durur; santrifüj ve su tahliyesi yapmak için BAÞLAT/DURDUR tuþuna basýnýz, aksi halde 8
saat sonra makina santrifüj ve su taliye iþlemini otomatik olarak gerçekleþtirecektir.
Bebek programý (8. program). Bu program çocuklara ve bebeklere ait tipik kirleri yok ettiði gibi, bezlerde deterjan
kalmamasýný saðlar ve böylece bebeklerin hassas ciltlerine zarar vermez. Bu program, daha fazla miktarda su
kullanarak ve deterjana ilave edilen özel hijyen saðlayýcý katký maddelerinin etkisini optimize ederek bakteri oranýný
azaltmak amacýna yönelik tasarlanmýþtýr.
Yýkama sonunda makina kýrýþýklýklarýn oluþmasýný önlemek için sepeti yavaþça döndürecektir; programý sonlandýrmak
için BAÞLAT/DURDUR tuþuna basýnýz.
Çeþitli 30 dak (program 4) az kirli çamaþýrlarý kýsa sürede yýkamak üzere hazýrlanmýþtýr: sadece 30 dakika sürer ve
böylece zaman ve enerji tasarrufu saðlar. 4. programýn 30°C ye ayarlanmasýyla, azami 3 kg. olmak üzere muhtelif
kumaþlardaki (yün ve ipek hariç) çamaþýrlarý yýkamak
mümkündür.
Çeþitli 15 dak (program 5) az kirli çamaþýrlarý kýsa sürede yýkamak üzere hazýrlanmýþtýr: sadece 15 dakika sürer ve
böylece zaman ve enerji tasarrufu saðlar. 5. programýn 30°C ye ayarlanmasýyla, azami 1,5 kg. olmak üzere muhtelif
kumaþlardaki (yün ve ipek hariç) çamaþýrlarý yýkamak
mümkündür
.
6
Page 7
Kiþisel ayarlar
Sýcaklýk ayarý
Yýkama suyu ýsýsýný SÝCAKLÝK AYARI tuþu çevirerek seçiniz (bkz. Program tablosu).
sýcaklýk ayarý soðuk suyla yýkanacak seviyeye kadar düþürülebilir (
Makine, seçilen program için öngörülenin üzerinde bir yýkama ýsýsýný otomatik olarak uygulamayacaktýr.
).
Sýkma hýzý ayarý
Seçilen programýn SIKMA HIZI ayarý bu tuþu çevrilmesiyle yapýlýr.
Programlar için öngörülen azami süratler þöyledir:
Programlar Azami Sýkma hýzý
Pamuklular Dakikada 1000 devir
Sentetik kumaþlar Dakikada 800 devir
Yünlüler Dakikada 600 devir
Ýpekli sadece boþaltma
Sýkma sürati azaltýlabilir veya
Makine, her bir program için öngörülenin üzerinde bir sýkma hýzýný kabul etmez.
iþareti seçilerek devre dýþý býrakýlabilir.
Fonksiyonlar
Çamaþýr makinesince öngörülen muhtelif iþlemler arzu edilen temizlik ve beyazlýktaki yýkamalara olanak saðlar.
Ýþlevleri çalýþtýrmak için:
1. istediðiniz iþlev düðmesine basýnýz;
2. ilgili göstergenin yanmasý iþlevin baþladýðýný belirtir.
Not: göstergenin hýzlý bir þekilde yanýp sönmesi seçilen iþlevin yürütülmekte olan programa uygun olmadýðýnýn
iþaretidir.
TR
Zaman Ayarý
Secilmiþ olan programýn gecikmeli baþlamasýný ayarlamak için istenilen gecikme süresi (1 24 saat arasýndadýr)
görüntüleninceye kadar bir kaç kere tuþa basýnýz.
Ýþlevi devre dýþý býrakmak için ekranda
Not: BAÞLAT/DURDUR tuþuna bastýktan sonra süre ayarý ancak aþaðýya doðru ayarlanabilir.
yazýsý görüntüleninceye kadar tuþa basýnýz.
Tüm programlarla uygulanabilir.
Süper Beyaz
Devir baþlangýç fazýnda daha yüksek bir su miktarý ve daha uzun bir süre kullanýldýðý için bu iþlev yýkamada
yüksek performanslarý saðlar.
Bu programlarda uygulanamaz: 4, 5, 6, 10, 11, A, B, C, D, E.
Ýlave Durulama
Bu iþlev seçildiðinde durulamanýn verimliliði daha yüksek olur ve deterjandan tamamen temizlenmesi saðlanýr.
Hassasbir cilt tipine sahip kiþiler için önerilir.
Bu programlarda uygulanamaz: 4, 5, C, D, E.
Kolay Ütü
Bu iþlev seçildiðinde kýrýþýklarý önleyecek þekilde yýkama ve sýkma devrinin özellikleri deðiþtirilecektir. Program
bitiminde çamaþýr makinesi iç sepetini yavaþça döndürecektir, KOLAY ÜTÜ ve BAÞLAT/DURDUR uyarý
lambalarý turuncu renkte yanýp sönecek ve Son safhasýnýn lambasý yanýk kalacaktýr. Programý bitirmek için
BAÞLAT/DURDUR veya KOLAY ÜTÜ düðmesine basýnýz.
Ýpekli programda makine çamaþýrlarý durulama suyu içinde durduracaktýr ve KOLAY ÜTÜ ve BAÞLAT/DURDUR
uyarý lambalarý turuncu renkte yanýp sönecek ve DURULAMA safhasýnýn lambasý yanýk kalacaktýr. Su boþaltmak
için BAÞLAT/DURDUR ya da KOLAY ÜTÜ düðmesine basmanýz gerekir. ªimdi çamaþýrlarýnýzý alabilirsiniz.
Bu programlarda uygulanamaz: 4, 5, 6, 7, 8, 11, C, D, E.
7
Page 8
Deterjanlar ve çamaþýr
TR
Deterjan haznesi
Yýkamanýn iyi sonuç vermesi doðru dozda deterjan
kullanýlmasýna da baðlýdýr: aþýrý deterjan kullanmak
suretiyle daha temiz çamaþýrlar elde edilemeyeceði
gibi makinenin aksamýna zarar verilerek, çevre
kirliliðine sebebiyet verilir.
Elde yýkama deterjanlarý kullanmayýnýz, çünkü aþýrý
köpük yaparlar.
Deterjan haznesini
3
MAX
2
hazne 1: Yýkama için deterjan (toz veya likit)
Sývý deterjan, yalnýzca, makine çalýþtýrýlmadan
konulabilir.
hazne 2: Katký maddeleri (yumuþatýcý, vs.)
Yumuþatýcý ýzgara seviyesini aþmamalýdýr.
ilave hazne 3: Çamaþýr suyu
1
açýnýz ve deterjan ile
katký maddelerini
aþaðýdaki þekilde
koyunuz.
Beyazlatma iþlevi
Ayrýca, beyazlatma iþlevi 1., 2. ve 6.numaralý
programlarla birlikte uygulanabilir.
Çamaþýr suyunu 3 nolu ek kaba, deterjan ve
yumuþatýcýyý da kendilerine ait kaplara boþaltýnýz, ve
yukarýda belirtilen programlardan birini ayarlayýnýz.
Sadece çok kirli pamuklular içindir.
Özel çamaþýrlar
Gömlek: farklý dokumalý ve renkli gömlekler için
tasarlanmýþ olan 9. programýn kullanýlmasý tavsiye
edilir. Kýrýþýklarýn oluþmasýný önleyerek en yüksek
performanslarý saðlar.
Ýpekliler: ipekli tüm dokumalar için tasarlanmýþ olan
10. programýn kullanýlmasý tavsiye edilir. Hassas
dokumalar için özel bir deterjan kullanýlmasý önerilir.
Perdeler: katlayarak bir yastýk kýlýfý veya file
içerisine yerleþtiriniz. 10. programýn kullanýlmasý
önerilir.
Yünlüler: Hotpoint/Ariston The Woolmark Company
tarafýndan Woolmark Platinum Care ünlü lisansýný
alan tek çamaþýr makinesi üreticisidir. Woolmark
Platinum Care lisansý elde yýkama
taþýyan giysiler de dahil tüm yün giysilerin çamaþýr
makinesinde yýkanabileceðini belgeler. 11.
programýn kullanýlmasý çamaþýr makinesinde yünlü
çamaþýrlarýn yýkamasýnda en yüksek
performanslarýn elde edilmesini saðlar. 1,5 kg).
etiketi
Yük dengeleme sistemi
Aþýrý titremenin engellenmesi ve yükün düzenli
daðýlmasý için her sýkma devrinden önce iç sepet
normal yýkama hýzýndan biraz daha hýzlý döner.
Farklý þekillerde çamaþýrlarý makineye doldurduktan
sonra yük dengeli hale gelmediyse makine daha
yavaþ bir sýkma devrini uygular. Yük çok dengesiz
ise çamaþýr makinesi sýkma devrini
gerçekleþtirmeden çamaþýrlarý daðýtýr. Yükün daha
iyi yerleþtirilmesi ve dengeli olmasý için küçük
giysilerle büyük giysileri karýþtýrýnýz.
Çamaþýr hazýrlanmasý
Çamaþýrlarý aþaðýdaki gibi ayýrýnýz:
- kumaþ tipi / etiketteki iþaret.
- renkler: renkli çamaþýrlarý beyazlardan ayýrýnýz.
Ceplerini boþaltýnýz ve düðmeleri kontrol ediniz.
Çamaþýrýn kuru aðýrlýðýný esas alan deðerlerin
dýþýna çýkmayýnýz:
Dayanýklý kumaþlar: max 7 kg
Sentetik kumaþlar: max 3 kg
Hassas kumaþlar: max 2 kg
Yünlüler: max 1,5 kg
Çamaþýrlarýn aðýrlýðý nedir?
1 çarþaf 400-500 gr.
1 yastýk kýlýfý 150-200 gr.
1 masa örtüsü 400-500 gr.
1 bornoz 900-1.200 gr.
1 havlu 150-250 gr.
8
Page 9

Önlemler ve öneriler
Çamaþýr makinesi uluslararasý güvenlik
standartlarýna uygun olarak projelendirilmiþ ve
üretilmiþtir. Bu uyarýlar güvenlik amaçlý olup
dikkatlice okunmalýdýr.
Genel güvenlik uyarýlarý
Makine meskenlerde kullanýlmak üzere
tasarlanmýþ olup profesyonel kullaným amaçlý
deðildir.
Çamaþýr makinesi yalnýzca yetiþkin kiþiler
tarafýndan ve kullanma talimatýna uygun olarak
kullanýlmalýdýr.
Cihaza ayaklarýnýz çýplakken yada elleriniz veya
ayaklarýnýz ýslak yada nemliyken dokunmayýnýz.
Fiþi prizden çekerken kablosundan deðil fiþin
kendisinden tutarak çekiniz.
Makine çalýþýrken deterjan haznesini açmayýnýz.
Tahliye suyuna el sürmeyiniz, yüksek ýsýda olabilir.
Kapaðý, hiçbir þekilde zorlamayýnýz: istenmedik
açýlmalara karþý olan güvenlik mekanizmasý arýza
yapabilir.
Arýza halinde onarmak amacýyla iç mekanizmalarý
kurcalamayýnýz.
Çocuklarýn çalýþýr vaziyetteki makineye
yaklaþmalarýna mani olunuz.
Çalýþma esnasýnda kapak ýsýnabilir.
Taþýnmasý gerektiðinde, bu iþlemin, iki veya üç kiþi
tarafýndan, azami dikkatle yapýlmasý gerekir.
Kesinlikle tek baþýnýza yapmayýnýz, çünkü makine
çok aðýrdýr.
Çamaþýrlarý yerleþtirmeden evvel, sepetin boþ
olduðundan emin olunuz.
Cam kapaðýn açýlmasý
Elektrik kesildiðinde makine kapaðýný açamadýðýnýz
zaman çamaþýrlarý çýkarýp asmak istediðinizde
aþaðýdaki gibi yapýnýz:
1. fiþi prizden çekiniz.
2. makinenin içindeki su
seviyesinin makine
kapaðýndan daha alçak
20
olmasýný saðlayýnýz, aksi
takdirde A þeklinde
gösterildiði gibi bir kapta
toplanacak þekilde
boþaltma hortumu
vasýtasýyla içindeki suyu
gideriniz.
3. çamaþýr makinesinin ön
panelini, bir tornavida
vasýtasýyla, çýkartýnýz
(bkz. þekil).
TR
Atýklarýn tasfiye edilmesi
Ambalaj malzemelerinin tasfiye edilmesi: yerel
yasalara uyunuz, bu þekilde ambalajlarýn geri
dönüþümü mümkün olur.
Elektrik ve elektronik cihazlarýn atýklarýný
deðerlendirme 2002/96/CE sayýlý Avrupa Konseyi
direktifinde; beyaz eþyalarýn kentsel katý atýk
genel yöntemi ile tasfiye edilmemesi
öngörülmüþtür. Kullanýlmayan cihazlarýn, madde
geri kazaným ve geri dönüþüm oranýný en yüksek
seviyeye yükseltmek, çevre ve insan saðlýðýna
olasý zararlarý engellemek için ayrý ayrý toplanmasý
gerekir. Tüm ürünlerin üzerinde; ayrý toplama
hükümlerini hatýrlatmak amacýyla üstünde çarpý
iþareti olan sepet sembolü verilmiþtir.
Cihazlarýn tasfiye edilmesi konusunda daha geniþ
bilgi almak için cihaz sahiplerinin mevcut müþteri
hizmetine veya satýþ noktalarýna baþvurulmasý
gerekir.
4. þekilde gösterilen dilciðinden tutarak blokajýndan
çýkýncaya kadar dýþarýya doðru çekiniz; ayný anda
aºaðý doðru çekerek kapýyý açýnýz.
5. paneli takarken, tam yerleþtirmeden evvel,
kancalarýn yuvalara gelip gelmediðini kontrol ediniz.
9
Page 10

Bakým ve özen
TR
Su ve elektrik kesilmesi
Su musluðunu her yýkamadan sonra kapatýnýz.
Böylece çamaþýr makinesinin su tesisatýnýn
eskimesi engellenir, su kaçaðý tehlikesi ortadan
kalkar.
Bakým ve temizlik iþlemleri esnasýnda çamaþýr
makinesinin fiþini çekiniz.
Çamaþýr makinesinin temizlenmesi
Dýþ gövde ve plastik aksam ýlýk su ve sabunla
ýslatýlmýþ bir bez vasýtasýyla temizlenebilir. Çözücü
ve aþýndýrýcý maddeler kullanmayýnýz.
Deterjan haznesinin temizlenmesi
1
Hazneyi kaldýrarak,
dýþarýya doðru çekmek
suretiyle çýkartýnýz
(bkz. þekil).
Akar su altýnda
yýkayýnýz, bu
çekmecenin temizliði
sýk sýk yapýlmalýdýr.
2
Pompanýn temizlenmesi
Çamaþýr makinesinin pompasý kendini temizleyen bir
özelliðe sahip olup, ayrýca temizlik gerektirmez.
Ancak, bazý küçük cisimler (madeni para, düðme)
pompanýn alt kýsmýndaki koruyucu bölmeye
düþebilirler.
Yýkama devresinin bitmiþ olup olmadýðýný kontrol
ediniz ve fiþini çekiniz.
Pompa koruyucu bölgesine eriþebilmek için:
1. çamaþýr makinesinin
ön kapama panelini, bir
tornavida vasýtasýyla
çýkartýnýz (bkz. þekil);
2. makine kapaðýný
saatin ters yönünde
çevirerek sökünüz (bkz.
þekil). bir miktar su
gelmesi normaldir;
Kapak ve hazne bakýmý
Kötü kokularýn oluþmasýný engellemek için
kapaðý daima aralýk býrakýnýz.
3. içini dikkatlice temizleyiniz;
4. kapaðý vidalayýnýz;
5. paneli takarken, tam yerleþtirmeden evvel,
kancalarýn yuvalara gelip gelmediðini kontrol ediniz.
Su besleme hortumunun kontrol
edilmesi
Su besleme hortumunu, en azýndan senede bir defa
kontrol ediniz. Yarýk veya çatlaklar varsa deðiþtiriniz:
yýkama esnasýndaki yüksek basýnçlar ani
patlamalara yol açabilirler.
Kesinlikle daha önceden kullanýlmýþ hortum
kullanmayýnýz.
10
Page 11

Arýzalar ve onarýmlar
Çamaþýr makinesi çalýþmýyor olabilir. Teknik Servise baþvurmadan önce (Teknik Servis bölümüne bakýnýz)
aþaðýdaki liste yardýmýyla kolay çözülebilecek bir problem olup olmadýðýný kontrol ediniz.
Arýzalar:
Çamaþýr makinesi çalýþmýyor.
Yýkama iþlemi baþlamýyor.
Çamaþýr makinesi su almýyor (ilk
yýkama safhasýnýn gösterge
lambasý hýzlýca yanýp sönüyor).
Çamaþýr makinesi devamlý su alýp
veriyor.
Olasý nedenler / Çözümler:
Fiþ prize takýlý deðil veya tam temas etmiyor.
Evde elektrik yok.
Makinanýn kapaðý tam kapanmamýþ.
AÇMA/KAPAMA düðmesine basýlmamýþ.
BAÞLAT/DURDUR düðmesine basýlmamýþ.
Su musluðu açýk deðil.
Gecikmeli baþlatmada bir gecikme süresi ayarlanmýþ (bkz. Kiþisel
ayarlar).
Su besleme hortumu musluða takýlý deðil.
Hortum bükülmüþ.
Su musluðu açýk deðil.
Evde su kesik.
Basýnç yetersiz.
BAÞLAT/DURDUR düðmesine basýlmamýþ.
Tahliye hortumu yerden 65 ile 100 cm arasýnda yerleþtirilmemiþ (bkz.
Montaj).
Tahliye hortumunun baþý suya girmiþ (bkz. Montaj).
Duvardaki tahliyenin hava boþluðu yok.
Bu kontrollerden sonra olumlu sonuç alýnamazsa, musluðu ve kapatýp,
çamaþýr makinesini durdurarak Servise haber veriniz. Daire, binanýn üst
katlarýndaysa, sifon olayý meydana gelerek çamaþýr makinesi devamlý
su alýp, veriyor olabilir. Bu sorunun çözümü için piyasada sifon önleyici
valflar satýlmaktadýr.
TR
Çamaþýr makinesi su boþaltmýyor
veya santrifüj yapmýyor.
Çamaþýr makinesi santrifüj
esnasýnda aþýrý sarsýlýyor.
Çamaþýr makinesi su kaçýrýyor.
BAÞLAT/DURDUR uyarý lambasý
yanýp sönerse deviri bitirmek için
düðmeye basýnýz.
Aþýrý köpük oluþuyor.
Program su boþaltmayý öngörmüyor: bazý programlarda su boþaltma
iþlemini elle müdahale ederek baþlatmak gerekir.
Kolay Ütü iþlevi devrede: programý tamamlamak için BAÞLAT/
DURDUR düðmesine basýnýz (Kiþisel ayarlar).
Tahliye hortumu bükülmüþ (bkz. Montaj).
Tahliye kanalý týkalý.
Hazne, çamaþýr makinesinin montajý esnasýnda düzgün çözülmemiþ
(bkz. Montaj).
Çamaþýr makinesinin bulunduðu zemin düz deðil (bkz. Montaj).
Çamaþýr makinesi mobilyalarla duvar arasýnda sýkýþmýþ (bkz. Montaj).
Su giriþ hortumu tam sýkýlmamýþ (bkz. Montaj).
Deterjan haznesi týkanmýþ (temizlemek için bkz. Bakým ve özen).
Tahliye hortumu düzgün takýlmamýº (bkz. Montaj).
Makineyi kapatýnýz, prizden fiþi çekiniz ve 1 dakika sonra tekrar
açýnýz.
Arýza çözülmüyorsa Teknik Servisine baþvurunuz.
Deterjan çamaþýr makinesi için uygun deðil (çamaþýr makinesi için,
elde yýkama ve çamaþýr makinesi için veya benzer ibareler olmalýdýr).
Aþýrý doz kullanýldý.
11
Page 12

Teknik Servis
TR
Servise baþvurmadan önce:
Servise baþvurmadan çözülebilecek bir ariza olup olmadýðýný kontrol ediniz (Arýzalar ve onarýmlar
bölümüne bakýnýz);
Programý tekrar baþlatarak, sorunun çözülüp çözülmediðini görünüz;
Aksi takdirde, garanti belgesinde belirtilen telefon numaralarýndan teknik servisi arayýnýz.
Kesinlikle, yetkili olmayan tamircilere müracaat etmeyiniz.
Þunlarý bildiriniz:
arýza tipini;
cihazýn modeli (Mod.);
seri numarasý (S/N).
Bu bilgiler, çamaþýr makinesinin arkasýndaki plakada bulunurlar.
Cihazýn ömrü 10 yýldýr.
12
Page 13

Instructions for use
WASHING MACHINE
GB
English
ARXXF 106 S
Contents
GB
Installation, 14-15
Unpacking and levelling
Connecting the electricity and water supplies
The first wash cycle
Technical data
Description of the washing machine
and starting a wash cycle, 16-17
Control panel
Indicator lights
Starting a wash cycle
Wash cycles, 18
Table of wash cycles
Personalisation, 19
Setting the temperature
Setting the spin speed
Functions
Detergents and laundry, 20
Detergent dispenser drawer
Bleach cycle
Preparing the laundry
Garments requiring special care
Load balancing system
Precautions and tips, 21
General safety
Disposal
Opening the porthole door manually
Care and maintenance, 22
Cutting off the water or electricity supply
Cleaning the washing machine
Cleaning the detergent dispenser drawer
Caring for the door and drum of your appliance
Cleaning the pump
Checking the water inlet hose
Troubleshooting, 23
Service, 24
13
Page 14

Installation
GB
This instruction manual should be kept in a safe
place for future reference. If the washing machine is
sold, transferred or moved, make sure that the
instruction manual remains with the machine so that
the new owner is able to familiarise himself/herself
with its operation and features.
Read these instructions carefully: they contain vital
information relating to the safe installation and
operation of the appliance.
Unpacking and levelling
Unpacking
1. Remove the washing machine from its packaging.
2. Make sure that the washing machine has not been
damaged during the transportation process. If it has
been damaged, contact the retailer and do not
proceed any further with the installation process.
3. Remove the 4
protective screws (used
during transportation) and
the rubber washer with
the corresponding
spacer, located on the
rear part of the appliance
(see figure).
4. Close off the holes using the plastic plugs provided.
5. Keep all the parts in a safe place: you will need
them again if the washing machine needs to be
moved to another location.
Packaging materials should not be used as toys for
children.
Levelling
1. Install the washing machine on a flat sturdy floor,
without resting it up against walls, furniture cabinets
or anything else.
Levelling the machine correctly will provide it with
stability, help to avoid vibrations and excessive noise
and prevent it from shifting while it is operating. If it is
placed on carpet or a rug, adjust the feet in such a
way as to allow a sufficient ventilation space
underneath the washing machine.
Connecting the electricity and water
supplies
Connecting the water inlet hose
1. Connect the supply pipe
to the water mains using a
gas 3/4 attachment, fitting
the rubber gasket and the
filter supplied with the
appliance and ensuring that
they are fimly tightened to
the taps.
The water supply marked
C must be connected to
the cold water tap; the pipe marked H must be
connected to the hot water tap. Both pipes may be
connected to the cold water tap using the special Y
connection with multiple attachments, supplied with the
appliance (see figure).
Before making the connection, allow the water to run
freely until it is perfectly clear.
Warning: clean the filters regularly by rinsing it under
running water.
2. Connect the other end
of the water inlet hose to
the washing machine,
screwing it onto the
appliance's cold water
inlet, situated on the top
right-hand side on the
rear of the appliance
(see figure).
3. Make sure that the hose is not folded over or bent.
14
2. If the floor is not
perfectly level, compensate for any unevenness
by tightening or loosening
the adjustable front feet
(see figure); the angle of
inclination, measured in
relation to the worktop,
must not exceed 2°.
The water pressure at the tap must fall within the
values indicated in the Technical details table (see
next page).
If the inlet hose is not long enough, contact a
specialised shop or an authorised technician.
Never use second-hand hoses.
Use the ones supplied with the machine.
Page 15

Connecting the drain hose
65 - 100 cm
Connect the drain hose,
without bending it, to a
drainage duct or a wall
drain located at a height
between 65 and 100 cm
from the floor;
Do not use extension cords or multiple sockets.
GB
The cable should not be bent or compressed.
The power supply cable must only be replaced by
authorised technicians.
Warning! The company shall not be held responsible
in the event that these regulations are not respected.
The first wash cycle
alternatively, rest it on
the side of a washbasin
or bathtub, fastening the
duct supplied to the tap
(see figure). The free end
of the hose should not
be underwater.
We advise against the use of hose extensions; if it is
absolutely necessary, the extension must have the
same diameter as the original hose and must not
exceed 150 cm in length.
Electrical connections
Before plugging the appliance into the electricity
socket, make sure that:
the socket is earthed and complies with all
applicable laws;
the socket is able to withstand the maximum power
load of the appliance as indicated in the Technical
data table (see opposite);
the power supply voltage falls within the values
indicated in the Technical data table (see opposite);
Once the appliance has been installed, and before
you use it for the first time, run a wash cycle with
detergent and no laundry, using the wash cycle 1.
Technical data
Model
Dimensions
Capacity
Electrical
connections
Water connections
Spin speed
ARXXF 106 S
width 59.5 cm
height 85 cm
depth 53,5 cm
from 1 to 7 kg
please refer to the technical data
plate fixed to the machine
maximum pressure 1 MPa (10 bar)
minimum pressure 0.05 MPa (0.5 bar)
drum capacity 52 litres
up to 1000 rotations per minute
the socket is compatible with the plug of the
washing machine. If this is not the case, replace
the socket or the plug.
The washing machine must not be installed
outdoors, even in covered areas. It is extremely
dangerous to leave the appliance exposed to rain,
storms and other weather conditions.
When the washing machine has been installed, the
electricity socket must be within easy reach.
Energy rated
programmes
according to
regulation
EN 60456
programme 6; temperature 60°C;
using a load of 7 kg.
This appliance conforms to the
following EC Directives:
- 89/336/EEC dated 03/05/89
(Electromagnetic Compatibility) and
subsequent modifications
- 2002/96/EC
- 2006/95/EC (Low Voltage)
15
Page 16

Description of the washing machine
and starting a wash cycle
GB
Control panel
button with indicator
ON/OFF
light
Detergent dispenser drawer
WASH CYCLE
TEMPERATURE
SPIN SPEED
knob
WASH CYCLE PROGRESS
DISPLAY
button
button
CONTROL PANEL LOCK
button with indicator light
indicator lights
FUNCTION
buttons with
indicator lights
DOOR
LOCKED
indicator light
START/PAUSE
button with indicator
light
Detergent dispenser drawer: used to dispense
detergents and washing additives (see Detergents
and laundry).
ON/OFF button with indicator light: switches the
machine on and off.
If the indicator light is illuminated, this indicates that
the machine is switched on.
WASH CYCLE knob: programmes the wash cycles.
During the wash cycle, the knob does not move.
SPIN SPEED button: sets the spin speed or exclude
the spin cycle completely (see Personalisation).
TEMPERATURE button: sets the temperature or the
cold wash cycle (see Personalisation).
DISPLAY: indicates the time remaining for the
selected wash cycle and, if a delayed start has been
programmed, the time remaining until the start of the
wash cycle.
CONTROL PANEL LOCK button with indicator light:
activates or deactivates the control panel lock.
FUNCTION buttons with indicator light: used to
select the available functions. The indicator light
corresponding to the selected function will remain lit.
WASH CYCLE PROGRESS
monitor the progress of the wash cycle.
The illuminated indicator light shows which phase is in
progress.
DOOR LOCKED indicator light: indicates whether
the door may be opened or not (see next page).
START/PAUSE button with indicator light: starts or
temporarily interrupts the wash cycles.
N.B. To pause the wash cycle in progress, press this
button; the corresponding indicator light will flash
orange, while the indicator light for the current wash
cycle phase will remain lit in a fixed manner. If the
DOOR LOCKED
door may be opened.
To start the wash cycle from the point at which it was
interrupted, press this button again.
indicator light is switched off, the
indicator light
s: used to
16
Page 17

Indicator lights
The indicator lights provide important information.
This is what they can tell you:
Wash cycle phase indicator lights
As the WASH CYCLE knob is rotated, the indicator
lights illuminate, indicating the stages which will be
performed by the machine in accordance with the
selected wash cycle.
Once the desired wash cycle has been selected and
has begun, the indicator lights switch on one by one
to indicate which phase of the cycle is currently in
progress.
Temperature indicator light
When a temperature value is selected, the
corresponding indicator light will illuminate.
Spin indicator light
When a spin value is selected, the corresponding
indicator light will illuminate.
GB
Wash
Rinse
Spin
Drain
End of wash cycle
Function buttons and corresponding indicator
lights
When a function is selected, the corresponding
indicator light will illuminate.
If the selected function is not compatible with the
programmed wash cycle, the corresponding indicator
light will flash, a sound signal will be emitted and the
function will not be activated.
If a function which is incompatible with another
function selected previously, only the most recent
selection will remain active.
Son
Starting a wash cycle
Control panel lock indicator light
To activate the control panel lock, press and hold the
button for approximately 2 seconds. When the
indicator light is illuminated, the control panel is
locked. This means it is possible to prevent wash
cycles from being modified accidentally, especially
where there are children in the home.
To deactivate the control panel lock, press and hold
the button for approximately 2 seconds.
Door locked indicator light
If this indicator light is on, the appliance door is locked
to prevent it from being opened accidentally; to avoid
any damage, wait for the indicator light to switch off
before you open the appliance door.
N.B. If the DELAY TIMER function is activated, the door
cannot be opened; pause the machine by pressing the
START/PAUSE button if you wish to open it.
If the START/PAUSE indicator light (orange) flashes
rapidly at the same time as the function indicator
light, this indicates a problem has occurred (see
Troubleshooting).
1. Switch the washing machine on by pressing the ON/OFF button. All indicator lights will switch on for a few
seconds, then they will switch off and the START/PAUSE indicator light will pulse.
2. Load the laundry and close the door.
3. Set the WASH CYCLE knob to the desired programme.
4. Set the washing temperature (see Personalisation).
5. Set the spin speed (see Personalisation).
6. Measure out the detergent and washing additives (see Detergents and laundry).
7. Select the desired functions.
8. Start the wash cycle by pressing the START/PAUSE button and the corresponding indicator light will remain lit
in a fixed manner, in green.
To cancel the set wash cycle, pause the machine by pressing the START/PAUSE button and select a new cycle.
9. At the end of the wash cycle the Son (
will switch off, indicating that the door may be opened. Take out your laundry and leave the appliance door ajar to
make sure the drum dries completely. Switch the washing machine off by pressing the ON/OFF button.
) indicator light will switch on. The DOOR LOCKED indicator light
17
Page 18

Wash cycles
GB
Table of wash cycles
.
Max
Description of the wash cycle
Wash cycles
Special cycles
Sanitizing cyc le:
6
Sanitizing cycle (1):
6
Goodnigt cycle:
7
Baby cycle:
8
Shirts
9
Silk/Curtains:
10
Wool:
For wool, cashmere, etc.
11
1
1
2
3
3
4
5
A
B
C
D
E
Everyday wash cycl es (Daily)
Cotton:
Heavily soiled whites and resistant colours.
Cotton (2):
Coloured Cottons (3):
Synthetics resistents:
Synthetics delicates:
Mix 30':
To refresh lightly soiled garments quickly (not suitable for wool,
silk and clothes which require washing by hand).
Mix 15':
To refresh lightly soiled garments quickly (not suitable for wool,
silk and clothes which require washing by hand).
Partials wash cycles
Rinse - 1000 - Light Rinse - 800 - Spin - 1000 - - - 7
Light spin - 800 - - - 3
Drain no spin - 0 - - - 7
Extremely soiled whites.
Heavily soiled whites and resistant colours.
Lightly soiled delicate colours.
Heavily soiled delicate colours.
For garments in silk and viscose, lingerie.
Heavily soiled whites and delicate colours.
Lightly soiled whites and delicate colours.
Heavily soiled resistant colours.
Lightly soiled resistant colours.
temp.
Max.
speed
(°C)
(rpm)
90° 1000
60° 1000 40° 800 40° 800 40° 600 30° 0 40° 600 -
60° 1000
40° 1000
40° 1000
60° 800 40° 800 -
30° 800 -
30° 800 -
Detergents
Bleach Wash
Fabric
softener
ll l
ll
ll
ll
ll
ll
ll
ll l
ll l
ll l
ll
ll
ll
ll
Max.
load
(kg)
Cycle
duration
7
7
The duration of the wash cycles can be checked on the display.
4
2
2
1
1,5
7
7
7
3
3
3
1,5
l
l
7
3
The information contained in the table is intended as a guide only.
For all Test Institutes:
1) Test wash cycle in compliance with regulation EN 60456: set wash cycle 6 with a temperature of 60°C.
2) Long wash cycle for cottons: set wash cycle 1 with a temperature of 40°C.
3) Short wash cycle for cottons: set wash cycle 2 with a temperature of 40°C.
Special wash cycles
Sanitizing cycle (wash cycle 6). A high-temperature hygienic wash cycle (over 60°C) which requires the use of bleach.
Pour the bleach, the detergent and the additives into the relevant compartments (see paragraph entitled
Detergent dispenser drawer).
Goodnight cycle (wash cycle 7). This is a silent cycle which can be run at night, when the electricity prices are lower.
The wash cycle is designed for cottons and synthetics. At the end of the cycle the machine stops while there is still water
in the drum; to spin and drain the laundry press the START/PAUSE button; alternatively the machine will perform the spin
cycle and drain the water automatically after 8 hours.
Baby cycle (wash cycle 8). This wash cycle can be used to remove the soiling typically caused by babies, while ensuring
that all detergent is removed from nappies in order to prevent the delicate skin of babies from suffering allergies. The
cycle has been designed to reduce the amount of bacteria by using a greater quantity of water and optimising the effect
of special disinfecting additives added to the detergent.
At the end of the wash cycle, the machine will slowly rotate the drum to prevent the formation of creases; to end the cycle
press the START/PAUSE button.
Mix 30 (wash cycle 4) this wash cycle was designed to wash lightly soiled garments quickly: it lasts just 30 minutes and
therefore saves both energy and time. By selecting this wash cycle (4 at 30°C), it is possible to wash different fabrics
together (except for wool and silk items), with a maximum load of 3 kg.
Mix 15 (wash cycle 5) this wash cycle was designed to wash lightly soiled garments quickly: it lasts just 15 minutes and
therefore saves both energy and time. By selecting this wash cycle (5 at 30°C), it is possible to wash different fabrics
together (except for wool and silk items), with a maximum load of 1.5 kg.
18
Page 19

Personalisation
Setting the temperature
By pressing the TEMPERATURE button to set the wash temperature (see Table of wash cycles).
The temperature may be lowered, or even set to a cold wash (
The washing machine will automatically prevent you from selecting a temperature which is higher than the
maximum value set for each wash cycle.
).
Setting the spin speed
By pressing the SPIN SPEED button to set the spin speed for the selected wash cycle.
The maximum spin speeds available for each wash cycle are as follows:
Wash cycles Maximum spin speed
Cottons 1000 rpm
Synthetics 800 rpm
Wool 600 rpm
Silk drain only
The spin speed may be lowered, or the spin cycle can be excluded altogether by selecting the symbol
The washing machine will automatically prevent you from selecting a spin speed which is higher than the
maximum speed set for each wash cycle.
.
Functions
The various wash functions available with this washing machine will help to achieve the desired results, every time.
To activate the functions:
1. Press the button corresponding to the desired function;
2. the function is enabled when the corresponding indicator light is illuminated.
Note: If the indicator light flashes rapidly, this signals that this particular function may not be selected in
conjunction with the selected wash cycle.
GB
Delay timer
To set a delayed start for the selected wash cycle, press the button repeatedly until the desired delay time is
displayed (this may be between 1 hour and 24 hours).
To disable the function press the button until the text
N.B. Once you have pressed the START/PAUSE button, the delay time may only be decreased if you wish to modify it.
is displayed.
This option is enabled with all programmes.
Super Wash
Because a greater quantity of water is used in the initial phase of the cycle, and because of the increased cycle
duration, this function offers a high-performance wash.
This function may not be used in conjunction with wash cycles 4, 5, 6, 10, 11, A, B, C, D, E.
Extra rinse
By selecting this function, the efficiency of the rinse is increased and optimal detergent removal is guaranteed. It is
particularly useful for sensitive skin.
This function may not be used in conjunction with wash cycles 4, 5, C, D, E.
Easy iron
By selecting this function, the wash and spin cycles will be modified in order to reduce the formation of creases. At
the end of the cycle the washing machine will perform slow rotations of the drum; the EASY IRON and START/
PAUSE indicator lights will flash (orange) and the Son
cycle, press the START/PAUSE button or the EASY IRON button.
For the Silk wash cycle, the machine will end the cycle while the laundry is soaking, the EASY IRON and START/
PAUSE indicator lights will flash (orange) and the RINSE phase will remain lit in a fixed manner. To drain the water
so that the laundry may be removed, press the START/PAUSE button or the EASY IRON button.
( ) phase will remain lit in a fixed manner. To end the
This function may not be used in conjunction with wash cycles 4, 5, 6, 7, 8, 11, C, D, E.
19
Page 20

Detergents and laundry
GB
Detergent dispenser drawer
Good washing results also depend on the correct
dose of detergent: adding too much detergent will not
necessarily result in a more efficient wash, and may in
fact cause build up on the inside of your appliance
and contribute to environmental pollution.
Do not use hand washing detergents because these
create too much foam.
Open the detergent
3
MAX
2
compartment 1: Detergent for the wash cycle
(powder or liquid)
Liquid detergent should only be poured in immediately
prior to the start of the wash cycle.
compartment 2: Additives (fabric softeners, etc.)
The fabric softener should not overflow the grid.
extra compartment 3: Bleach
1
dispenser drawer and
pour in the detergent or
washing additive, as
follows.
Bleach cycle
How much does your laundry weigh?
1 sheet 400-500 g
1 pillow case 150-200 g
1 tablecloth 400-500 g
1 bathrobe 900-1200 g
1 towel 150-250 g
Garments requiring special care
Shirts: use special wash cycle 9 to wash shirts in
various fabrics and colours.
It guarantees maximum care is taken of the garments
and minimises the formation of creases.
Silk: use special wash cycle 10 to wash all silk
garments. We recommend the use of special
detergent which has been designed to wash delicate
clothes.
Curtains: fold curtains and place them in a pillow
case or mesh bag. Use wash cycle 10.
Wool: Hotpoint/Ariston is the only washing machine
manufacturer to have been awarded the prestigious
Woolmark Platinum Care endorsement (M.0508) by
the Woolmark Company, which means that all
woollen garments may be washed in the washing
machine, even those which state hand wash only
on the label. Wash cycle 11 therefore offers
complete peace of mind when washing woollen
garments in the washing machine (max. load 1,5 kg)
and guarantees optimal performance.
Bleaching may only be performed in conjunction with
wash cycles 1, 2, 6.
Pour the bleach into extra compartment 3; pour the
detergent and softener into the corresponding
compartments, then select one of the
abovementioned wash cycles.
This option is recommended only for very soiled
cotton garments.
Preparing the laundry
Divide the laundry according to:
- the type of fabric/the symbol on the label.
- the colours: separate coloured garments from
whites
Empty all garment pockets and check the buttons.
Do not exceed the listed values, which refer to the
weight of the laundry when dry:
Durable fabrics: max. 7 kg
Synthetic fabrics: max. 3 kg
Delicate fabrics: max. 2 kg
Wool: max. 1,5 kg
Load balancing system
Before every spin cycle, to avoid excessive vibrations
and to distribute the load in a uniform manner, the
drum rotates continuously at a speed which is slightly
greater than the washing rotation speed. If, after
several attempts, the load is not balanced correctly,
the machine spins at a reduced spin speed. If the
load is excessively unbalanced, the washing machine
performs the distribution process instead of spinning.
To encourage improved load distribution and balance,
we recommend small and large garments are mixed
in the load.
20
Page 21

Precautions and tips
This washing machine was designed and
constructed in accordance with international safety
regulations. The following information is provided for
safety reasons and must therefore be read carefully.
General safety
This appliance was designed for domestic use only.
The washing machine must only be used by adults, in
accordance with the instructions provided in this manual.
Do not touch the machine when barefoot or with
wet or damp hands or feet.
Do not pull on the power supply cable when
unplugging the appliance from the electricity
socket. Hold the plug and pull.
Do not open the detergent dispenser drawer while
the machine is in operation.
Do not touch the drained water as it may reach
extremely high temperatures.
Never force the porthole door. This could damage
the safety lock mechanism designed to prevent
accidental opening.
If the appliance breaks down, do not under any
circumstances access the internal mechanisms in
an attempt to repair it yourself.
Always keep children well away from the appliance
while it is operating.
The door can become quite hot during the wash cycle.
If the appliance has to be moved, work in a group
of two or three people and handle it with the utmost
care. Never try to do this alone, because the
appliance is very heavy.
Before loading laundry into the washing machine,
make sure the drum is empty.
Opening the porthole door manually
In the event that it is not possible to open the
porthole door due to a powercut, and if you wish to
remove the laundry, proceed as follows:
1. remove the plug from
the electrical socket.
2. make sure the water
level inside the machine is
20
lower than the door
opening; if it is not, remove
excess water using the
drain hose, collecting it in a
bucket as indicated in the
figure.
3. using a screwdriver,
remove the cover panel on
the lower front part of the
washing machine (see
figure).
GB
Disposal
Disposing of the packaging materials: observe local
regulations so that the packaging may be re-used.
The European Directive 2002/96/EC on Waste
Electrical and Electronic Equipment, requires that
old household electrical appliances must not be
disposed of in the normal unsorted municipal waste
stream. Old appliances must be collected
separately in order to optimise the recovery and
recycling of the materials they contain and reduce
the impact on human health and the environment.
The crossed out "wheeled bin" symbol on the
product reminds you of your obligation, that when
you dispose of the appliance it must be separately
collected.
Consumers should contact their local authority or
retailer for information concerning the correct
disposal of their old appliance.
4. pull outwards using the tab as indicated in the
figure, until the plastic tie-rod is freed from its stop
position; pull downwards and open the door at the
same time.
5. reposition the panel, making sure the hooks are
securely in place before you push it onto the
appliance.
21
Page 22

Care and maintenance
GB
Cutting off the water and electricity
supplies
Turn off the water tap after every wash cycle. This
will limit wear on the hydraulic system inside the
washing machine and help to prevent leaks.
Unplug the washing machine when cleaning it and
during all maintenance work.
Cleaning the washing machine
The outer parts and rubber components of the
appliance can be cleaned using a soft cloth soaked
in lukewarm soapy water. Do not use solvents or
abrasives.
Cleaning the detergent dispenser
drawer
1
Remove the dispenser
by raising it and pulling it
out (see figure).
Wash it under running
water; this operation
should be repeated
frequently.
2
Cleaning the pump
The washing machine is fitted with a self-cleaning
pump which does not require any maintenance.
Sometimes, small items (such as coins or buttons)
may fall into the pre-chamber which protects the
pump, situated in its bottom part.
Make sure the wash cycle has finished and unplug
the appliance.
To access the pre-chamber:
1. using a screwdriver,
remove the cover panel
on the lower front part of
the washing machine
(see figure);
2. unscrew the lid by
rotating it anti-clockwise
(see figure): a little water
may trickle out. This is
perfectly normal;
Caring for the door and drum of your
appliance
Always leave the porthole door ajar in order to
prevent unpleasant odours from forming.
3. clean the inside thoroughly;
4. screw the lid back on;
5. reposition the panel, making sure the hooks are
securely in place before you push it onto the
appliance.
Checking the water inlet hose
Check the inlet hose at least once a year. If there are
any cracks, it should be replaced immediately: during
the wash cycles, water pressure is very strong and a
cracked hose could easily split open.
Never use second-hand hoses.
22
Page 23

Troubleshooting
Your washing machine could fail to work. Before contacting the Technical Assistance Centre (see Assistance),
make sure that the problem cannot be not solved easily using the following list.
Problem:
The washing machine does not
switch on.
The wash cycle does not start.
The washing machine does not
take in water (the indicator light
for the first wash cycle stage
flashes rapidly).
The washing machine
continuously takes in and drains
water.
Possible causes / Solutions:
The appliance is not plugged into the socket fully, or is not making contact.
There is no power in the house.
The washing machine door is not closed properly.
The ON/OFF button has not been pressed.
The START/PAUSE button has not been pressed.
The water tap has not been opened.
A delayed start has been set (using the Delay Timer, see Personalisation).
The water inlet hose is not connected to the tap.
The hose is bent.
The water tap has not been opened.
There is no water supply in the house.
The pressure is too low.
The START/PAUSE button has not been pressed.
The drain hose is not fitted at a height between 65 and 100 cm from the
floor (see Installation).
The free end of the hose is under water (see Installation).
The wall drainage system is not fitted with a breather pipe.
If the problem persists even after these checks, turn off the water tap,
switch the appliance off and contact the Assistance Service. If the dwelling is
on one of the upper floors of a building, there may be problems relating to
water drainage, causing the washing machine to fill with water and drain
continuously. Special anti-draining valves are available in shops and help to
avoid this inconvenience.
GB
The washing machine does not
drain or spin.
The washing machine vibrates a
lot during the spin cycle.
The washing machine leaks.
The START/PAUSE indicator light
(orange) and the function
indicator lights flash rapidly.
There is too much foam.
The wash cycle does not include draining: some wash cycles require the
drain phase to be started manually.
The EASY IRON function has been activated: To complete the wash cycle,
press the START/PAUSE button (Personalisation).
The drain hose is bent (see Installation).
The drainage duct is clogged.
The drum was not unlocked correctly during installation (see Installation).
The washing machine is not level (see Installation).
The washing machine is trapped between cabinets and walls (see Installation).
The water inlet hose is not screwed on properly (see Installation).
The detergent dispenser drawer is blocked (for cleaning instructions, see Care
and maintenance).
The drain hose is not fixed properly (see Installation).
Switch off the machine and unplug it, wait for approximately 1 minute and
then switch it back on again.
If the problem persists, contact the Technical Assistance Service.
The detergent is not suitable for machine washing (it should display the text
for washing machines or hand and machine wash, or the like).
Too much detergent was used.
23
Page 24

Service
195069292.00
02/2008 - Xerox Business Services
GB
Before calling for Assistance:
Check whether you can solve the problem alone (see Troubleshooting);
Restart the programme to check whether the problem has been solved;
If this is not the case, contact an authorised Technical Assistance Centre using the telephone number
provided on the guarantee certificate.
Always request the assistance of authorised technicians.
Have the following information to hand:
the type of problem;
the appliance model (Mod.);
the serial number (S/N).
This information can be found on the data plate applied to the rear of the washing machine, and can also
be found on the front of the appliance by opening the door.
24
 Loading...