

Page 1

Instructions for use
WASHING MACHINE
GB
English,1
DK
Dansk,37
ARXL 169
SE
Svenska,13
NO
Norsk,49
FI
Suomi,25
Contents
GB
Installation, 2-3
Unpacking and levelling
Connecting the electricity and water supplies
The first wash cycle
Technical data
Description of the washing machine
and starting a wash cycle, 4-5
Control panel
Indicator lights
Starting a wash cycle
Wash cycles, 6
Table of wash cycles
Personalisation, 7
Setting the temperature
Setting the spin speed
Functions
Detergents and laundry, 8
Detergent dispenser drawer
Bleach cycle
Preparing the laundry
Garments requiring special care
Load balancing system
Precautions and tips, 9
General safety
Disposal
Opening the porthole door manually
Care and maintenance, 10
Cutting off the water or electricity supply
Cleaning the washing machine
Cleaning the detergent dispenser drawer
Caring for the door and drum of your appliance
Cleaning the pump
Checking the water inlet hose
Troubleshooting, 11
Service, 12
1
Page 2
Installation
GB
This instruction manual should be kept in a safe
place for future reference. If the washing machine is
sold, transferred or moved, make sure that the
instruction manual remains with the machine so that
the new owner is able to familiarise himself/herself
with its operation and features.
Read these instructions carefully: they contain vital
information relating to the safe installation and
operation of the appliance.
Unpacking and levelling
Unpacking
1. Remove the washing machine from its packaging.
2. Make sure that the washing machine has not been
damaged during the transportation process. If it has
been damaged, contact the retailer and do not
proceed any further with the installation process.
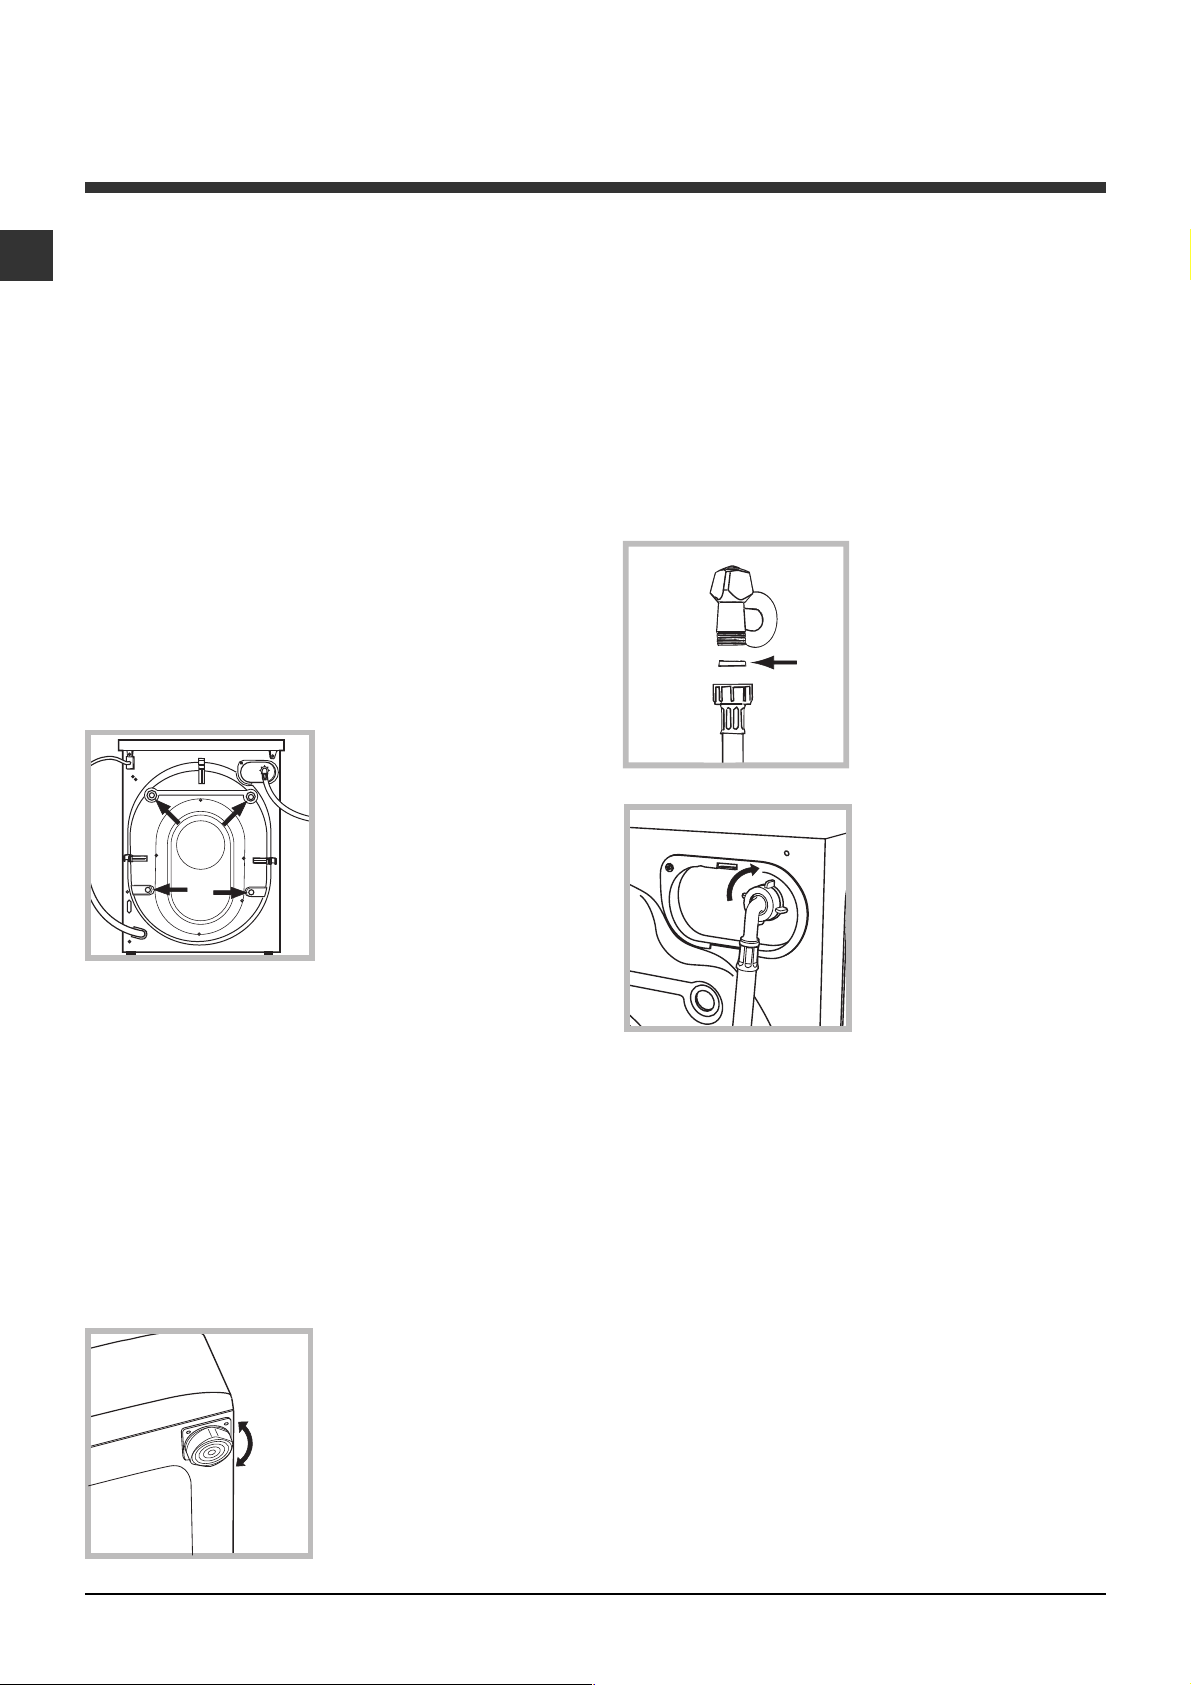
3. Remove the 4
protective screws (used
during transportation) and
the rubber washer with
the corresponding
spacer, located on the
rear part of the appliance
(see figure).
4. Close off the holes using the plastic plugs provided.
5. Keep all the parts in a safe place: you will need
them again if the washing machine needs to be
moved to another location.
Levelling the machine correctly will provide it with
stability, help to avoid vibrations and excessive noise
and prevent it from shifting while it is operating. If it is
placed on carpet or a rug, adjust the feet in such a
way as to allow a sufficient ventilation space
underneath the washing machine.
Connecting the electricity and water
supplies
Connecting the water inlet hose
1. Insert seal A into the
end of the inlet hose and
screw the latter onto a
cold water tap with a 3/4
A
3. Make sure that the hose is not folded over or bent.
gas threaded opening
(see figure).
Before performing the
connection, allow the
water to run freely until it
is perfectly clear.
2. Connect the inlet hose
to the washing machine
by screwing it onto the
corresponding water inlet
of the appliance, which is
situated on the top righthand side of the rear part
of the appliance (see
figure).
Packaging materials should not be used as toys for
children.
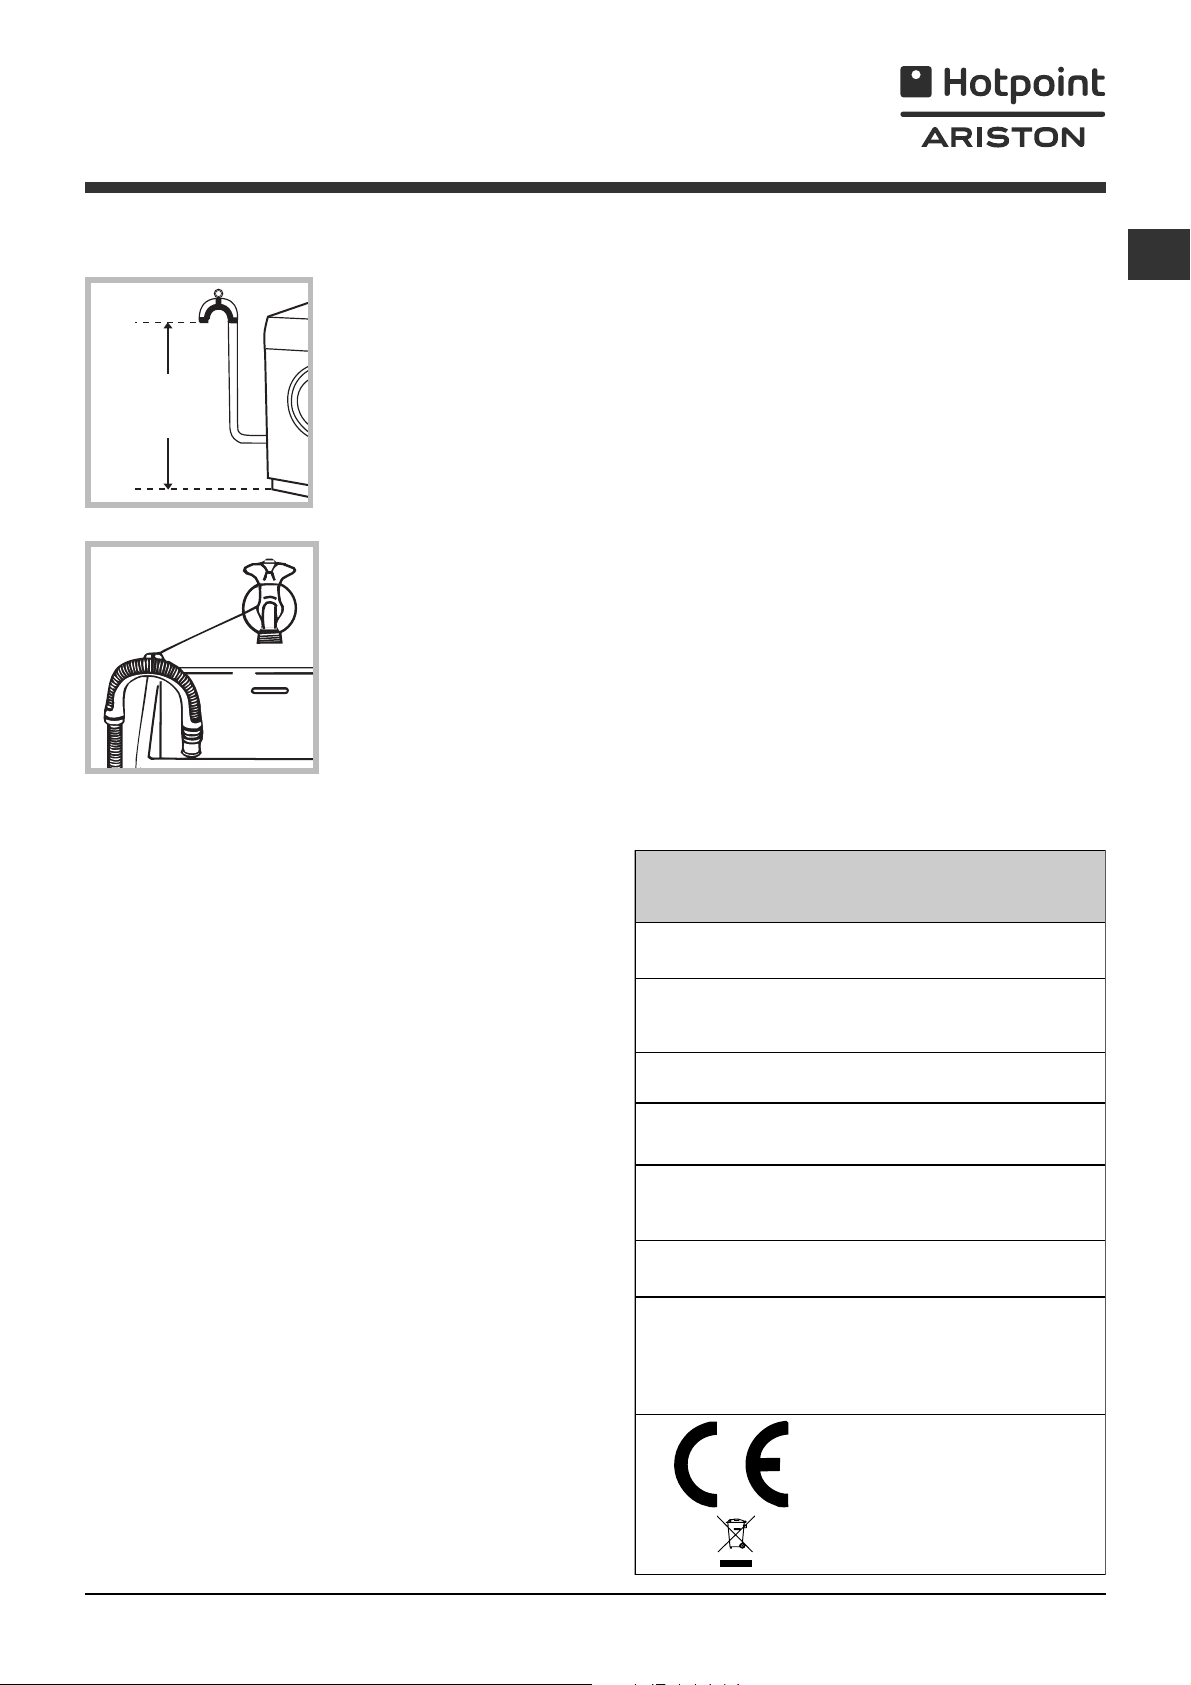
Levelling
1. Install the washing machine on a flat sturdy floor,
without resting it up against walls, furniture cabinets
or anything else.
2. If the floor is not
perfectly level, compensate for any unevenness
by tightening or loosening
the adjustable front feet
(see figure); the angle of
inclination, measured in
relation to the worktop,
must not exceed 2°.
2
The water pressure at the tap must fall within the
values indicated in the Technical details table (see
next page).
If the inlet hose is not long enough, contact a
specialised shop or an authorised technician.
Never use second-hand hoses.
Use the ones supplied with the machine.
Page 3
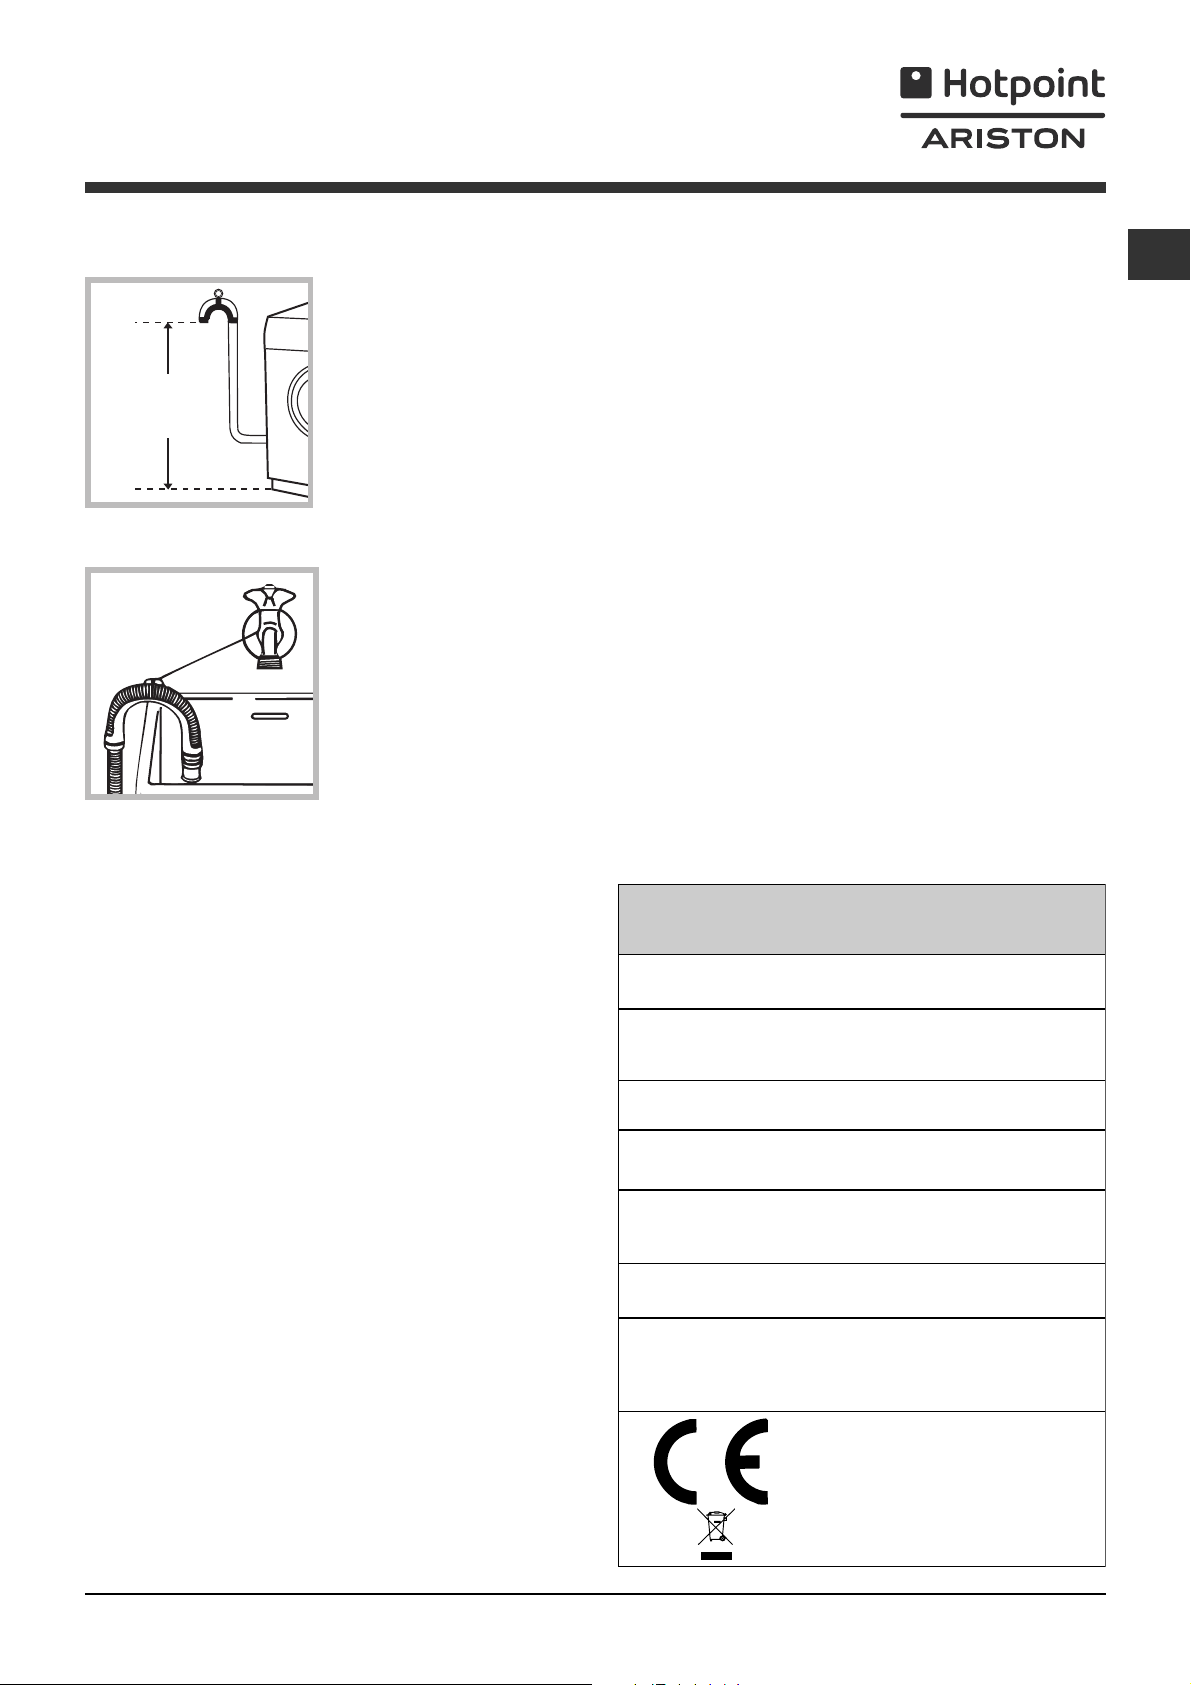
Connecting the drain hose
65 - 100 cm
Connect the drain hose,
without bending it, to a
drainage duct or a wall
drain located at a height
between 65 and 100 cm
from the floor;
Do not use extension cords or multiple sockets.
GB
The cable should not be bent or compressed.
The power supply cable must only be replaced by
authorised technicians.
Warning! The company shall not be held responsible
in the event that these regulations are not respected.
The first wash cycle
alternatively, rest it on
the side of a washbasin
or bathtub, fastening the
duct supplied to the tap
(see figure). The free end
of the hose should not
be underwater.
We advise against the use of hose extensions; if it is
absolutely necessary, the extension must have the
same diameter as the original hose and must not
exceed 150 cm in length.
Electrical connections
Before plugging the appliance into the electricity
socket, make sure that:
the socket is earthed and complies with all
applicable laws;
the socket is able to withstand the maximum power
load of the appliance as indicated in the Technical
data table (see opposite);
the power supply voltage falls within the values
indicated in the Technical data table (see opposite);
Once the appliance has been installed, and before
you use it for the first time, run a wash cycle with
detergent and no laundry, using the wash cycle 1.
Technical data
Model
Dimensions
Capacity
Electrical
connections
Water connections
Spin speed
ARXL 169
width 59.5 cm
height 85 cm
depth 53,5 cm
from 1 to 6 kg
please refer to the technical data
plate fixed to the machine
maximum pressure 1 MPa (10 bar)
minimum pressure 0.05 MPa (0.5 bar)
drum capacity 52 litres
up to 1600 rotations per minute
the socket is compatible with the plug of the
washing machine. If this is not the case, replace
the socket or the plug.
The washing machine must not be installed
outdoors, even in covered areas. It is extremely
dangerous to leave the appliance exposed to rain,
storms and other weather conditions.
When the washing machine has been installed, the
electricity socket must be within easy reach.
Energy rated
programmes
according to
regulation
EN 60456
programme 6; temperature 60°C;
using a load of 6 kg.
This appliance conforms to the
following EC Directives:
- 89/336/EEC dated 03/05/89
(Electromagnetic Compatibility) and
subsequent modifications
- 2006/95/EC Low Voltage)
- 2002/96/EC
3
Page 4
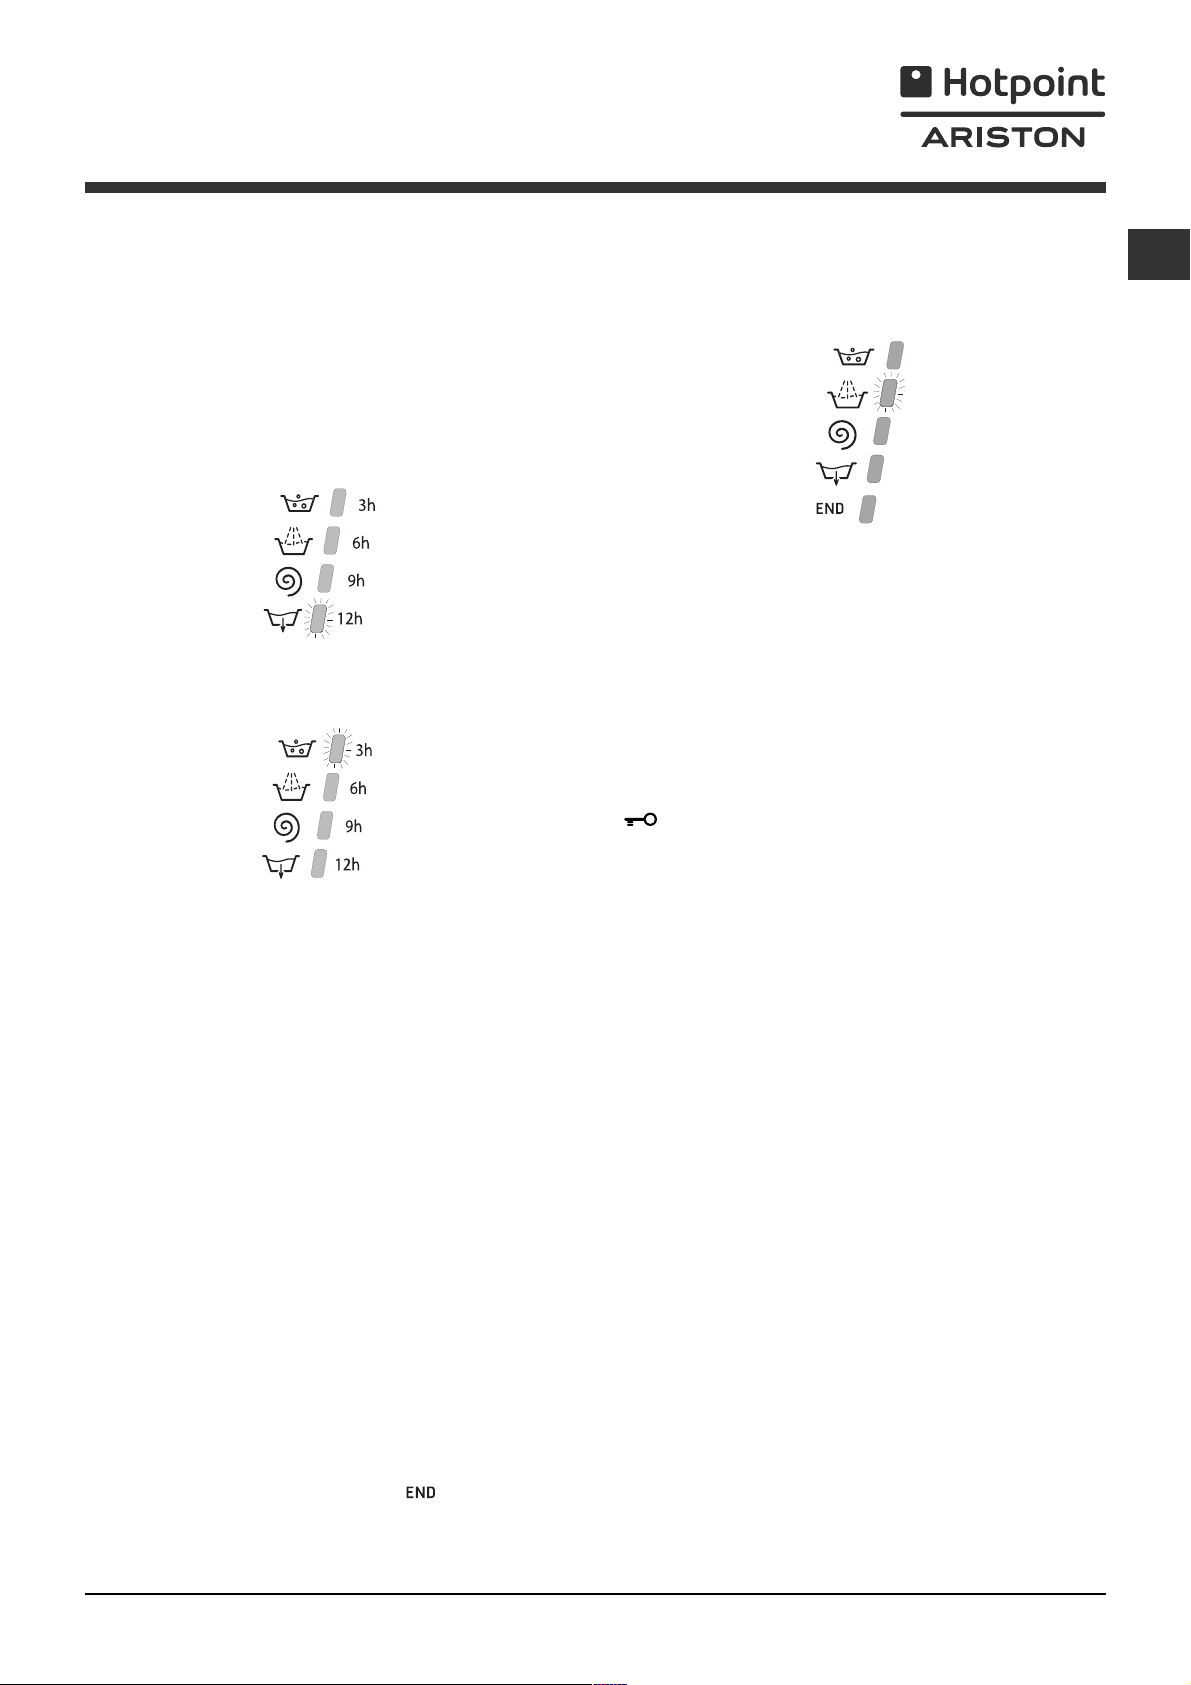
Description of the washing machine
and starting a wash cycle
GB
Control panel
ON/OFF
Detergent dispenser drawer
Detergent dispenser drawer: used to dispense
detergents and washing additives (see Detergents
and laundry).
There is a key which provides a summary of the
available wash cycles inside the detergent dispenser
drawer; this may be consulted at any time.
ON/OFF button: switches the washing machine on
and off.
WASH CYCLE knob: programmes the wash cycles.
During the wash cycle, the knob does not move.
FUNCTION buttons with indicator light: used to
select the available functions. The indicator light
corresponding to the selected function will remain lit.
TEMPERATURE knob: sets the temperature or the
cold wash cycle (see Personalisation).
SPIN SPEED knob: sets the spin speed or exclude
the spin cycle completely (see Personalisation).
button
WASH CYCLE
knob
TEMPERATURE
knob
WASH CYCLE PROGRESS/DELAY TIMER
indicator light
wash cycle.
The illuminated indicator light shows which phase is in
progress.
If the Delay Timer function has been set, the time
remaining until the wash cycle starts will be indicated
(see next page).
DOOR LOCKED indicator light: indicates whether
the door may be opened or not (see next page).
START/PAUSE button with indicator light: starts or
temporarily interrupts the wash cycles.
N.B. To pause the wash cycle in progress, press this
button; the corresponding indicator light will flash
orange, while the indicator light for the current wash
cycle phase will remain lit in a fixed manner. If the
DOOR LOCKED
door may be opened.
To start the wash cycle from the point at which it was
interrupted, press this button again.
WASH CYCLE PROGRESS/
DELAY TIMER
SPIN SPEED
knob
FUNCTION
buttons with
indicator lights
s: used to monitor the progress of the
indicator light is switched off, the
indicator lights
START/PAUSE
button with indicator
light
DOOR
LOCKED
indicator light
4
Page 5
Indicator lights
The indicator lights provide important information.
This is what they can tell you:
Wash cycle phase indicator lights
Once the desired wash cycle has been selected and has
begun, the indicator lights switch on one by one to
indicate which phase of the cycle is currently in progress.
GB
Delayed start
If the DELAY TIMER function has been activated (see
Personalisation), after the wash cycle has been
started the indicator light corresponding to the
selected delay period will begin to flash:
As time passes, the remaining delay will be displayed
and the corresponding indicator light will flash:
Once the set delay has elapsed, the flashing indicator
light will switch off and the selected wash cycle will
begin.
Wash
Rinse
Spin
Drain
End of wash cycle
Function buttons and corresponding indicator
lights
When a function is selected, the corresponding
indicator light will illuminate.
If the selected function is not compatible with the
programmed wash cycle, the corresponding indicator
light will flash and the function will not be activated.
If a function which is incompatible with another
function selected previously, only the most recent
selection will remain active.
Door locked indicator light
If this indicator light is on, the appliance door is locked
to prevent it from being opened accidentally; to avoid
any damage, wait for the indicator light to switch off
before you open the appliance door.
N.B. If the DELAY TIMER function is activated, the door
cannot be opened; pause the machine by pressing the
START/PAUSE button if you wish to open it.
If the START/PAUSE indicator light (orange) flashes
rapidly at the same time as the function indicator
light, this indicates a problem has occurred (see
Troubleshooting).
Starting a wash cycle
1. Switch the washing machine on by pressing the ON/OFF button. All indicator lights will switch on for a few
seconds, then they will switch off and the START/PAUSE indicator light will pulse.
2. Load the laundry and close the door.
3. Set the WASH CYCLE knob to the desired programme.
4. Set the washing temperature (see Personalisation).
5. Set the spin speed (see Personalisation).
6. Measure out the detergent and washing additives (see Detergents and laundry).
7. Select the desired functions.
8. Start the wash cycle by pressing the START/PAUSE button and the corresponding indicator light will remain lit
in a fixed manner, in green.
To cancel the set wash cycle, pause the machine by pressing the START/PAUSE button and select a new cycle.
9. At the end of the wash cycle the
off, indicating that the door may be opened. Take out your laundry and leave the appliance door ajar to make
sure the drum dries completely.
Switch the washing machine off by pressing the ON/OFF button.
indicator light will switch on. The DOOR LOCKED indicator light will switch
5
Page 6
Wash cycles
GB
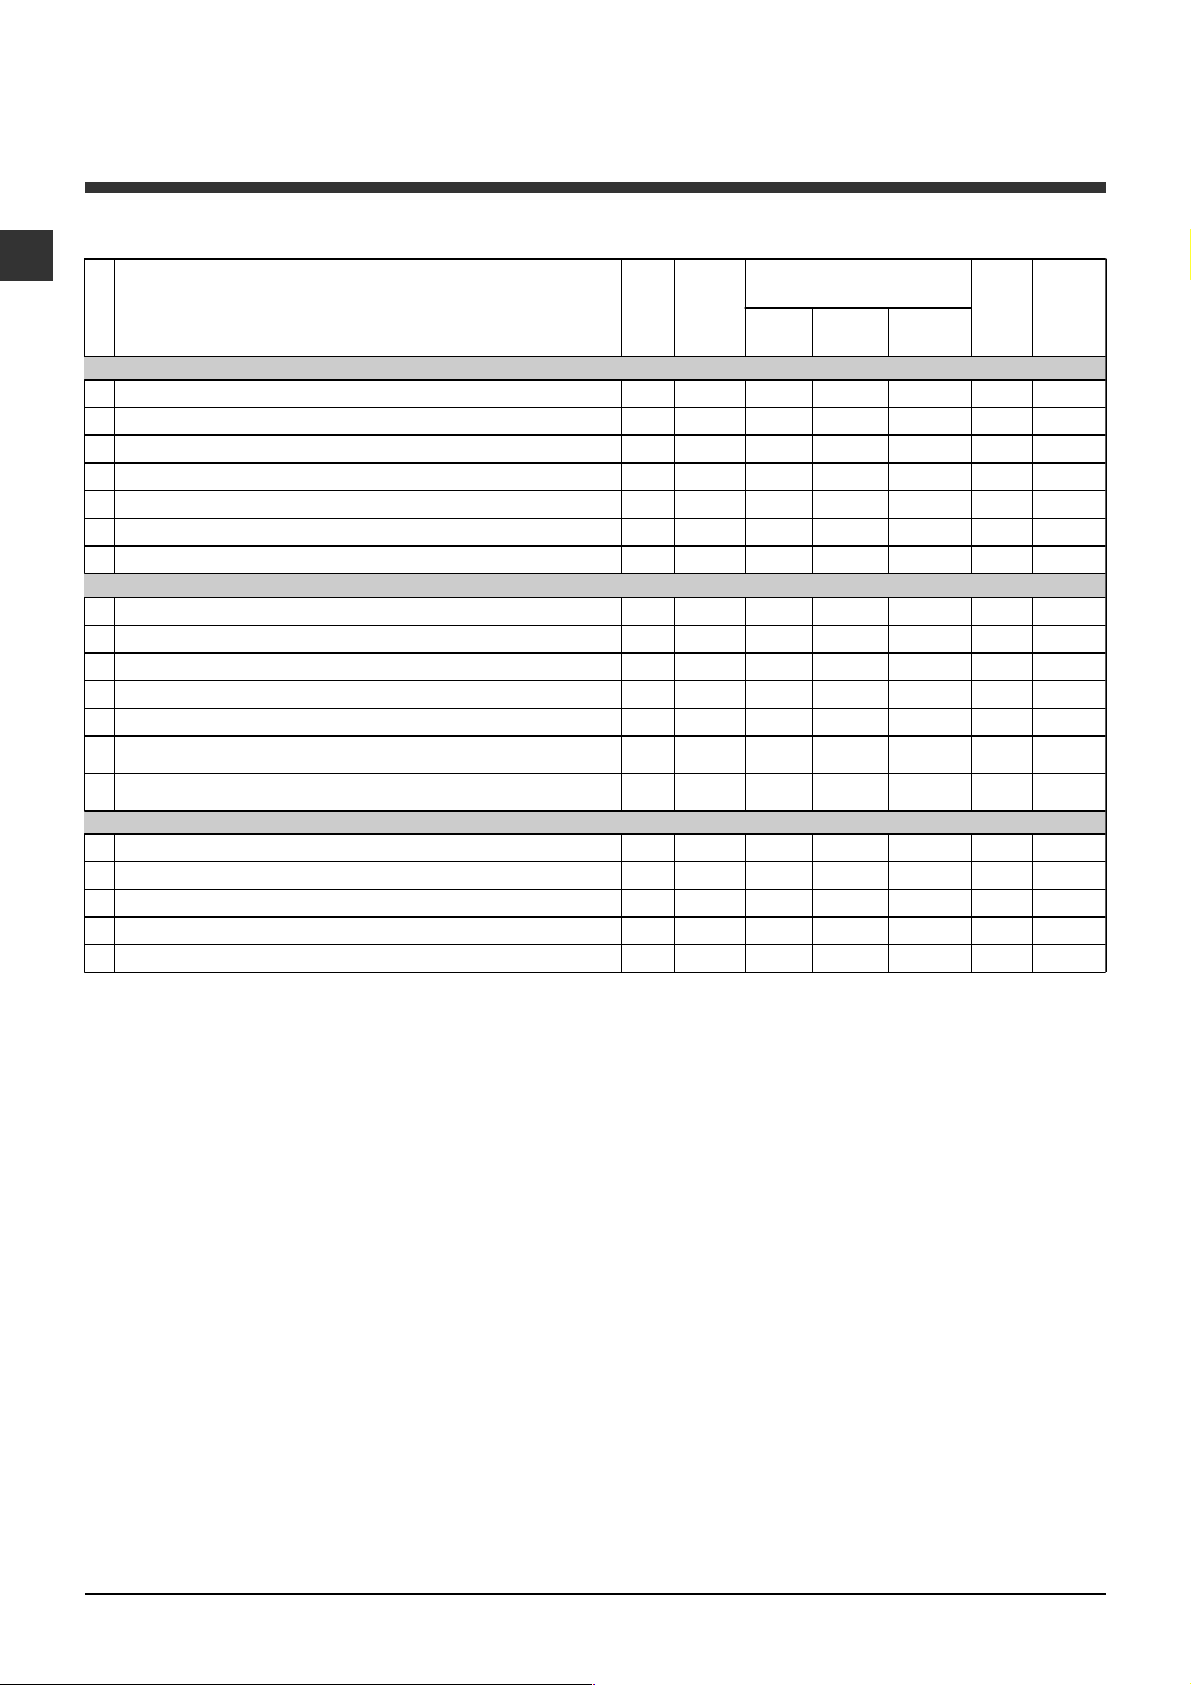
Table of wash cycles
Max
Description of the wash cycle
Wash cycles
Special cycles
Sanitizing cycle:
6
Sanitizing cycle (1):
6
Goodnigt cycle:
7
Baby cycle:
8
Shirts
9
Silk/Curtains:
10
Wool:
For wool, cashmere, etc.
11
1
1
2
3
3
4
5
A
B
C
D
E
Everyday wash cycles (Daily)
Cotton:
Heavily soiled whites and resistant colours.
Cotton (2):
Coloured Cottons (3):
Synthetics resistents:
Synthetics delicates:
Mix 30':
To refresh lightly soiled garments quickly (not suitable
for wool, silk and clothes which require washing by hand).
Mix 15':
To refresh lightly soiled garments quickly (not suitable
for wool, silk and clothes which require washing by hand).
Partial wash cycles
Rinse - 1600 - Light rinse - 800 - Spin - 1600 - - - 616
Light spin - 800 - - - 2,5 12
Drain no spin - 0 - - - 62
Extremely soiled whites.
Heavily soiled whites and resistant colours.
Lightly soiled delicate colours.
Heavily soiled delicate colours.
For garments in silk and viscose, lingerie.
Heavily soiled whites and delicate colours.
Lightly soiled whites and delicate colours.
Heavily soiled resistant colours.
Lightly soiled resistant colours.
temp.
Max.
speed
(°C)
(rpm )
Bleach Wash
90° 1600
60° 1600 40° 1600 40° 800 40° 600 30° 0 40° 600 -
60° 1600
40° 1600
40° 1600
60° 800 40° 800 -
30° 800 -
30° 800 -
Detergents
Fabric
softener
ll l
ll
ll
ll
ll
ll
ll
ll l
ll l
ll l
ll
ll
ll
ll
l
l
Max.
load
(kg)
Cycle
duration
6165
6 110
4290
2 120
270
155
1,5 55
6 122
6 115
685
2,5 85
2,5 70
330
1,5 15
636
2,5 31
The information contained in the table is intended as a guide only.
For all Test Institutes:
1) Test wash cycle in compliance with regulation EN 60456: set wash cycle 6 with a temperature of 60°C.
2) Long wash cycle for cottons: set wash cycle 1 with a temperature of 40°C.
3) Short wash cycle for cottons: set wash cycle 2 with a temperature of 40°C.
Specials wash cycles
Sanitizing cycle (wash cycle 6). A high-temperature hygienic wash cycle (over 60°C) which requires the use of bleach.
Pour the bleach, the detergent and the additives into the relevant compartments (see paragraph entitled
Detergent dispenser drawer).
Goodnigt cycle (wash cycle 7). This is a silent cycle which can be run at night, when the electricity prices are lower. The
wash cycle is designed for cottons and synthetics. At the end of the cycle the machine stops while there is still water in
the drum; to spin and drain the laundry press the START/PAUSE button; alternatively the machine will perform the spin
cycle and drain the water automatically after 8 hours.
Baby cycle (wash cycle 8). This wash cycle can be used to remove the soiling typically caused by babies, while ensuring
that all detergent is removed from nappies in order to prevent the delicate skin of babies from suffering allergies. The
cycle has been designed to reduce the amount of bacteria by using a greater quantity of water and optimising the effect
of special disinfecting additives added to the detergent.
At the end of the wash cycle, the machine will slowly rotate the drum to prevent the formation of creases; to end the cycle
press the START/PAUSE button.
Mix 30 (wash cycle 4) this wash cycle was designed to wash lightly soiled garments quickly: it lasts just 30 minutes and
therefore saves both energy and time. By selecting this wash cycle (4 at 30°C), it is possible to wash different fabrics
together (except for wool and silk items), with a maximum load of 3 kg.
Mix 15(wash cycle 5) this wash cycle was designed to wash lightly soiled garments quickly: it lasts just 15 minutes and
therefore saves both energy and time. By selecting this wash cycle (5 at 30°C), it is possible to wash different fabrics
together (except for wool and silk items), with a maximum load of 1.5 kg.
6
Page 7
Personalisation
Setting the temperature
Turn the TEMPERATURE knob to set the wash temperature (see Table of wash cycles).
The temperature may be lowered, or even set to a cold wash (
The washing machine will automatically prevent you from selecting a temperature which is higher than the
maximum value set for each wash cycle.
).
Setting the spin speed
Turn the SPIN SPEED knob to set the spin speed for the selected wash cycle.
The maximum spin speeds available for each wash cycle are as follows:
Wash cycles Maximum spin speed
Cottons 1600 rpm
Synthetics 800 rpm
Wool 600 rpm
Silk drain only
The spin speed may be lowered, or the spin cycle can be excluded altogether by selecting the symbol
The washing machine will automatically prevent you from selecting a spin speed which is higher than the
maximum speed set for each wash cycle.
.
Functions
The various wash functions available with this washing machine will help to achieve the desired results, every time.
To activate the functions:
1. Press the button corresponding to the desired function;
2. the function is enabled when the corresponding indicator light is illuminated.
Note: If the indicator light flashes rapidly, this signals that this particular function may not be selected in
conjunction with the selected wash cycle.
GB
Delay timer
This timer delays the start time of the wash cycle by up to 12 hours.
Press the button repeatedly until the indicator light corresponding to the desired delay time switches on. The fifth time
the button is pressed, the function will be disabled.
N.B. Once you have pressed the START/PAUSE button, the delay time may only be decreased if you wish to modify it.
This option is enabled with all programmes.
Easy iron
By selecting this function, the wash and spin cycles will be modified in order to reduce the formation of creases.
At the end of the cycle the washing machine will perform slow rotations of the drum; the EASY IRON and START/
PAUSE indicator lights will flash (orange) and the
the START/PAUSE button or the EASY IRON button.
For the Silk (10) wash cycle, the machine will end the cycle while the laundry is soaking and the EASY IRON and
START/PAUSE indicator lights will flash (orange) and the RINSE phase will remain lit in a fixed manner. To drain the
water so that the laundry may be removed, press the START/PAUSE button or the EASY IRON button.
phase will remain lit in a fixed manner. To end the cycle, press
This function may not be used in conjunction with wash cycles 4, 5, 6, 7, 8, 11, C, D, E.
Extra rinse
By selecting this function, the efficiency of the rinse is increased and optimal detergent removal is guaranteed. It is
particularly useful for sensitive skin.
This function may not be used in conjunction with wash cycles 4, 5, C, D, E.
Super Wash
Because a greater quantity of water is used in the initial phase of the cycle, and because of the increased cycle
duration, this function offers a high-performance wash.
This function may not be used in conjunction with wash cycles 4, 5, 6, 10, 11, A, B, C, D, E.
7
Page 8
Detergents and laundry
GB
Detergent dispenser drawer
Good washing results also depend on the correct
dose of detergent: adding too much detergent will not
necessarily result in a more efficient wash, and may in
fact cause build up on the inside of your appliance
and contribute to environmental pollution.
Do not use hand washing detergents because these
create too much foam.
Open the detergent
4
MAX
1
3
compartment 1: Pre-wash detergent (powder)
Before pouring in the detergent, make sure that extra
compartment 4 has been removed.
compartment 2: Detergent for the wash cycle
(powder or liquid)
Liquid detergent should only be poured in immediately
prior to the start of the wash cycle.
compartment 3: Additives (fabric softeners, etc.)
The fabric softener should not overflow the grid.
extra compartment 4: Bleach
2
dispenser drawer and
pour in the detergent or
washing additive, as
follows.
Bleach cycle
Bleaching may only be performed in conjunction with
wash cycles 1, 2, 6.
Pour the bleach into extra compartment 4; pour the
detergent and softener into the corresponding
compartments, then select one of the
abovementioned wash cycles.
This option is recommended only for very soiled
cotton garments.
Preparing the laundry
How much does your laundry weigh?
1 sheet 400-500 g
1 pillow case 150-200 g
1 tablecloth 400-500 g
1 bathrobe 900-1200 g
1 towel 150-250 g
Garments requiring special care
Shirts: use special wash cycle 9 to wash shirts in
various fabrics and colours.
It guarantees maximum care is taken of the garments
and minimises the formation of creases.
Silk: use special wash cycle 10 to wash all silk
garments. We recommend the use of special
detergent which has been designed to wash delicate
clothes.
Curtains: fold curtains and place them in a pillow
case or mesh bag. Use wash cycle 10.
Wool: Hotpoint/Ariston is the only washing machine
manufacturer to have been awarded the prestigious
Woolmark Platinum Care endorsement (M.0508) by
the Woolmark Company, which means that all
woollen garments may be washed in the washing
machine, even those which state hand wash only
on the label. Wash cycle 11 therefore offers
complete peace of mind when washing woollen
garments in the washing machine (max. load 1.5 kg)
and guarantees optimal performance.
Load balancing system
Before every spin cycle, to avoid excessive vibrations
and to distribute the load in a uniform manner, the drum
rotates continuously at a speed which is slightly greater
than the washing rotation speed. If, after several attempts, the load is not balanced correctly, the machine
spins at a reduced spin speed. If the load is excessively
unbalanced, the washing machine performs the distribution process instead of spinning. To encourage improved load distribution and balance, we recommend
small and large garments are mixed in the load.
Divide the laundry according to:
- the type of fabric/the symbol on the label
- the colours: separate coloured garments from
whites.
Empty all garment pockets and check the buttons.
Do not exceed the listed values, which refer to the
weight of the laundry when dry:
Durable fabrics: max. 6 kg
Synthetic fabrics: max. 2,5 kg
Delicate fabrics: max. 2 kg
Wool: max. 1.5 kg
8
Page 9
Precautions and tips
This washing machine was designed and
constructed in accordance with international safety
regulations. The following information is provided for
safety reasons and must therefore be read carefully.
General safety
This appliance was designed for domestic use only.
The washing machine must only be used by adults, in
accordance with the instructions provided in this manual.
Do not touch the machine when barefoot or with
wet or damp hands or feet.
Do not pull on the power supply cable when
unplugging the appliance from the electricity
socket. Hold the plug and pull.
Do not open the detergent dispenser drawer while
the machine is in operation.
Do not touch the drained water as it may reach
extremely high temperatures.
Never force the porthole door. This could damage
the safety lock mechanism designed to prevent
accidental opening.
If the appliance breaks down, do not under any
circumstances access the internal mechanisms in
an attempt to repair it yourself.
Always keep children well away from the appliance
while it is operating.
The door can become quite hot during the wash cycle.
If the appliance has to be moved, work in a group
of two or three people and handle it with the utmost
care. Never try to do this alone, because the
appliance is very heavy.
Before loading laundry into the washing machine,
make sure the drum is empty.
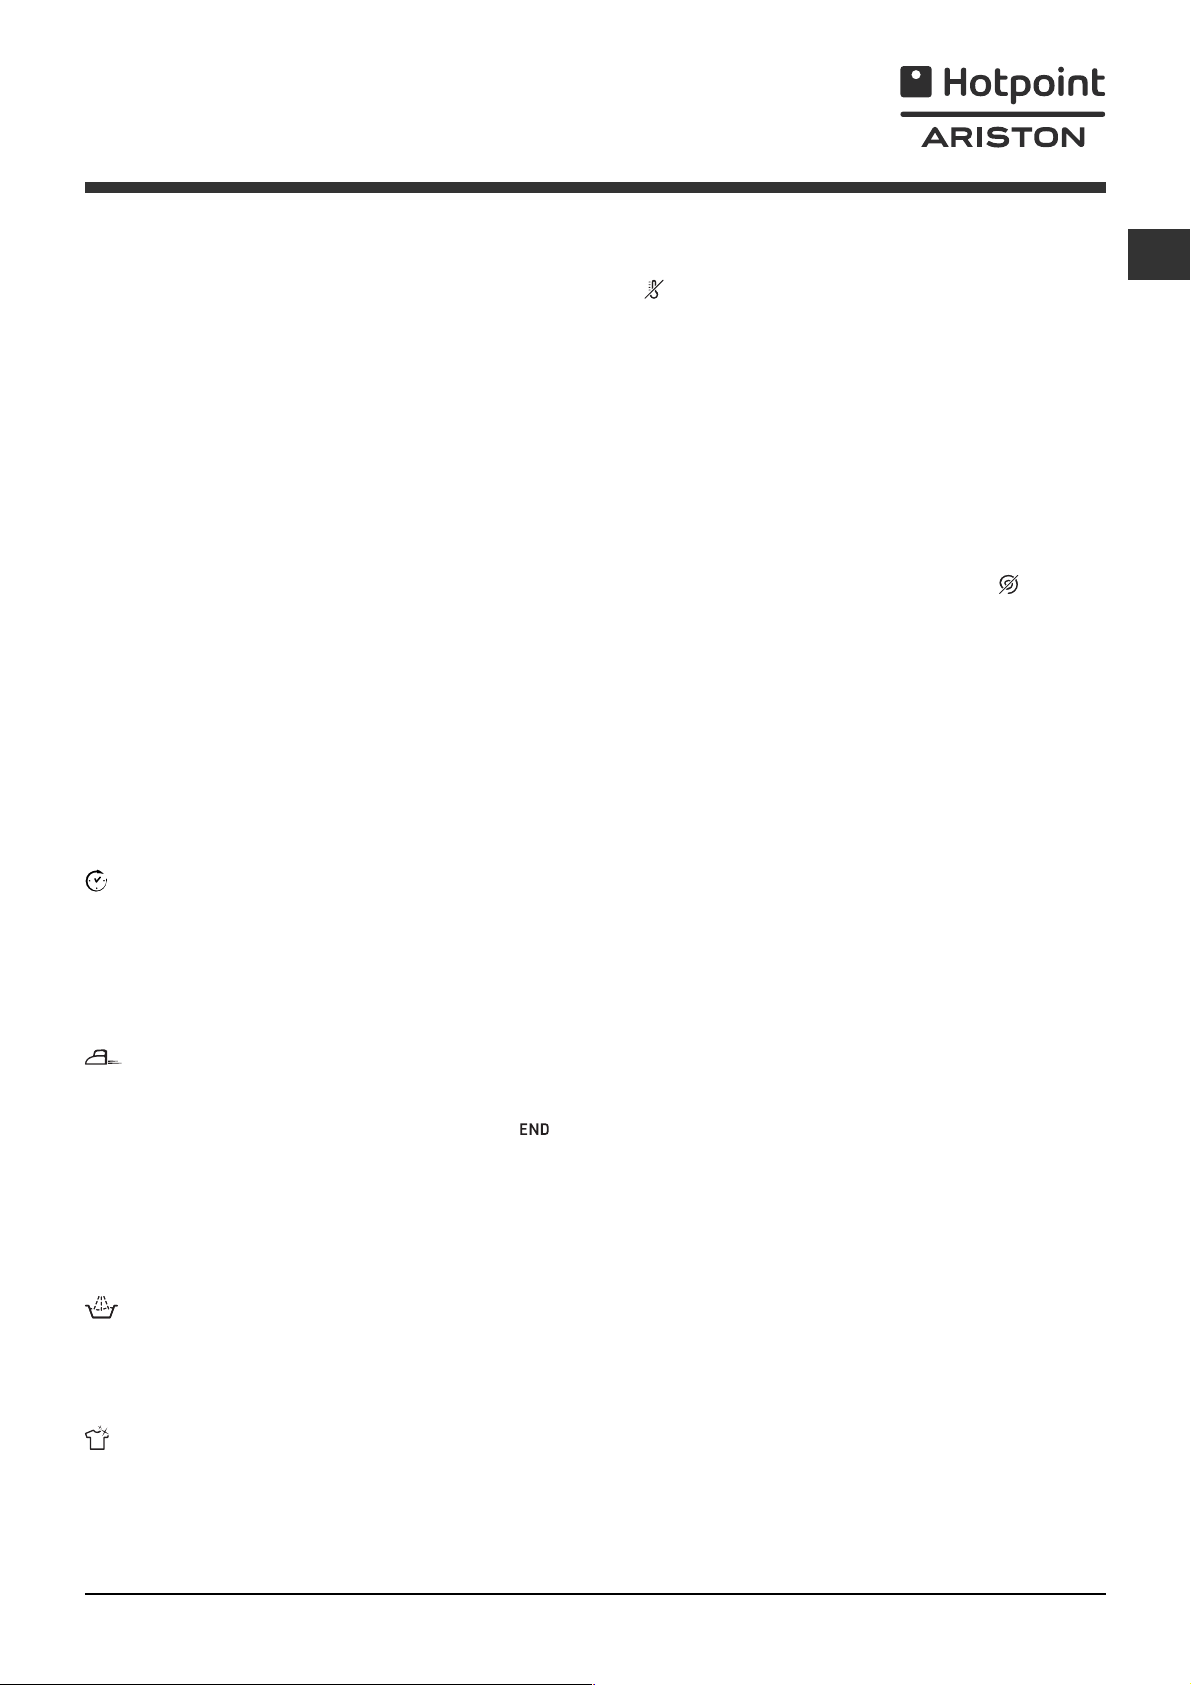
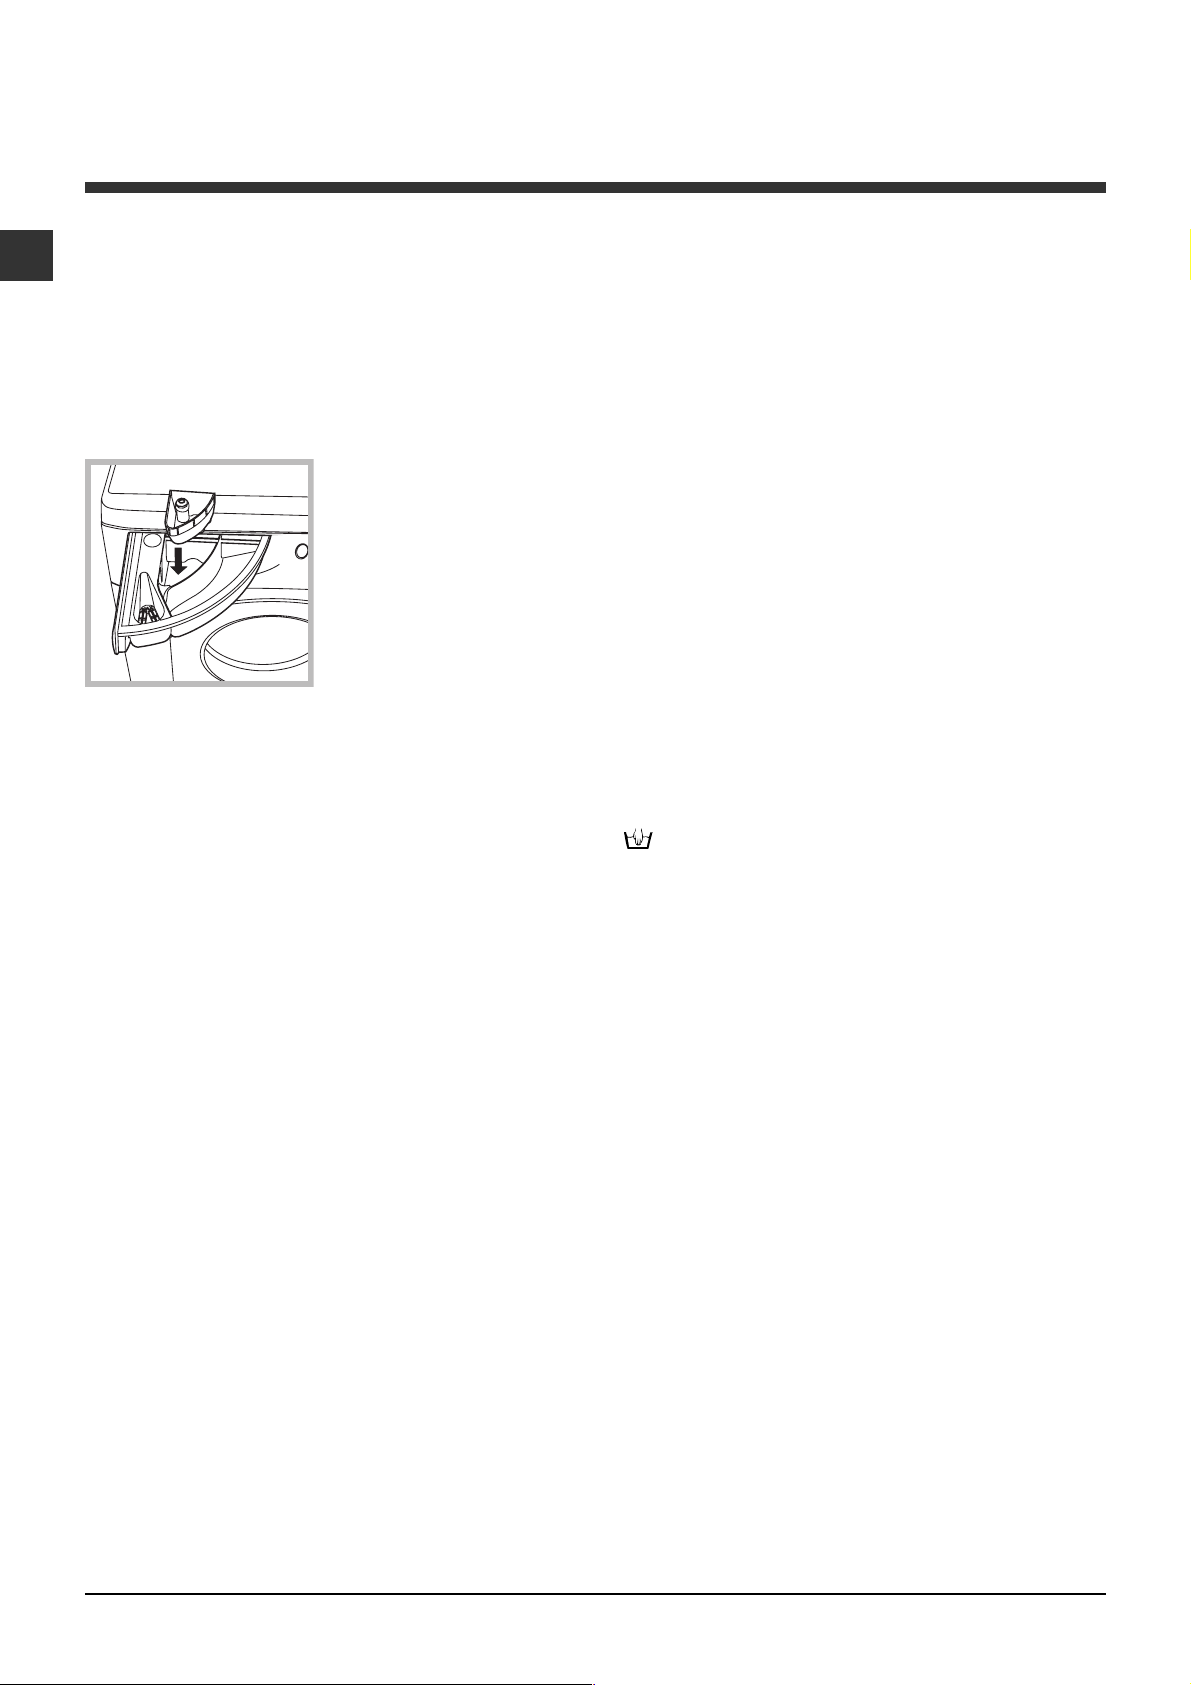
Opening the porthole door manually
In the event that it is not possible to open the
porthole door due to a powercut, and if you wish to
remove the laundry, proceed as follows:
1. remove the plug from
the electrical socket.
2. make sure the water
level inside the machine is
20
lower than the door
opening; if it is not, remove
excess water using the
drain hose, collecting it in a
bucket as indicated in the
figure.
3. using a screwdriver,
remove the cover panel on
the lower front part of the
washing machine (see
figure).
GB
Disposal
Disposing of the packaging materials: observe local
regulations so that the packaging may be re-used.
The European Directive 2002/96/EC on Waste
Electrical and Electronic Equipment, requires that
old household electrical appliances must not be
disposed of in the normal unsorted municipal waste
stream. Old appliances must be collected
separately in order to optimise the recovery and
recycling of the materials they contain and reduce
the impact on human health and the environment.
The crossed out "wheeled bin" symbol on the
product reminds you of your obligation, that when
you dispose of the appliance it must be separately
collected.
Consumers should contact their local authority or
retailer for information concerning the correct
disposal of their old appliance.
4. pull outwards using the tab as indicated in the
figure, until the plastic tie-rod is freed from its stop
position; pull downwards and open the door at the
same time.
5. reposition the panel, making sure the hooks are
securely in place before you push it onto the
appliance.
9
Page 10
Care and maintenance
GB
Cutting off the water and electricity
supplies
Turn off the water tap after every wash cycle. This
will limit wear on the hydraulic system inside the
washing machine and help to prevent leaks.
Unplug the washing machine when cleaning it and
during all maintenance work.
Cleaning the washing machine
The outer parts and rubber components of the
appliance can be cleaned using a soft cloth soaked
in lukewarm soapy water. Do not use solvents or
abrasives.
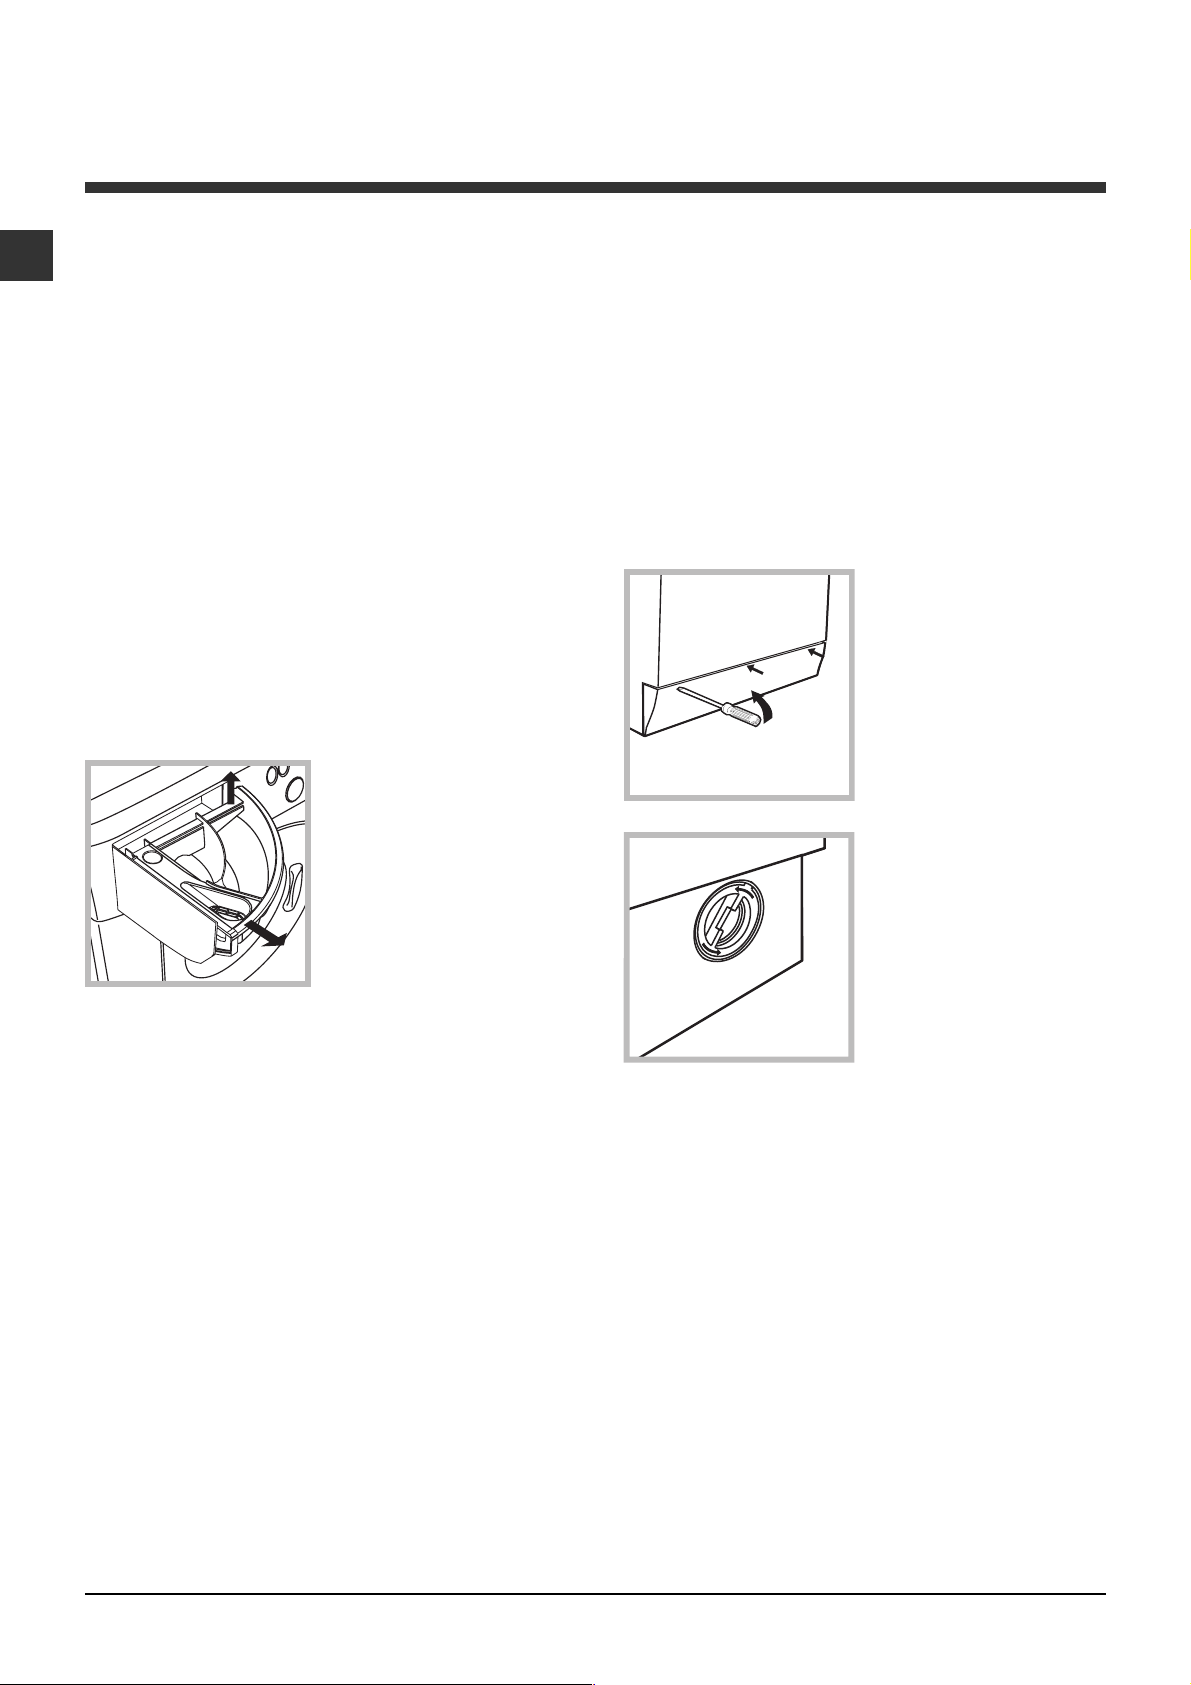
Cleaning the detergent dispenser
drawer
1
Remove the dispenser
by raising it and pulling it
out (see figure).
Wash it under running
water; this operation
should be repeated
frequently.
2
Cleaning the pump
The washing machine is fitted with a self-cleaning
pump which does not require any maintenance.
Sometimes, small items (such as coins or buttons)
may fall into the pre-chamber which protects the
pump, situated in its bottom part.
Make sure the wash cycle has finished and unplug
the appliance.
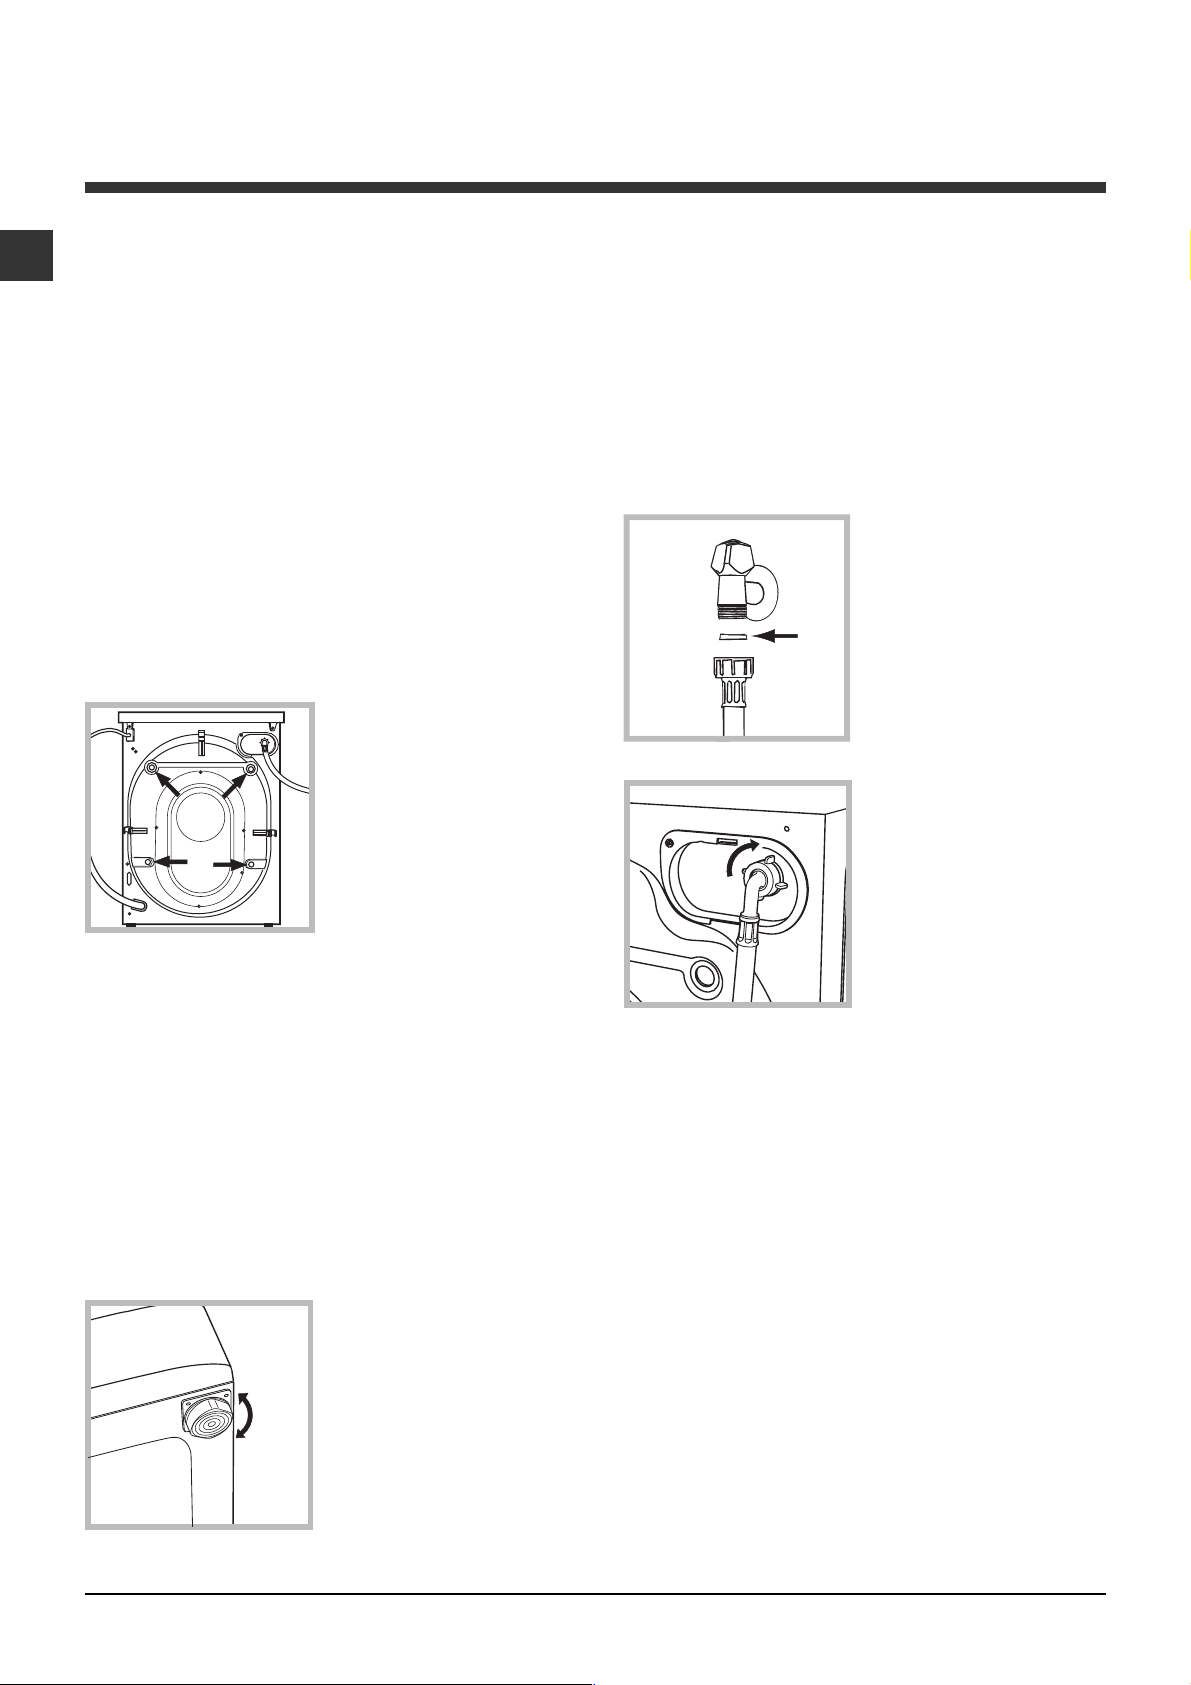
To access the pre-chamber:
1. using a screwdriver,
remove the cover panel
on the lower front part of
the washing machine
(see figure);
2. unscrew the lid by
rotating it anti-clockwise
(see figure): a little water
may trickle out. This is
perfectly normal;
Caring for the door and drum of your
appliance
Always leave the porthole door ajar in order to
prevent unpleasant odours from forming.
3. clean the inside thoroughly;
4. screw the lid back on;
5. reposition the panel, making sure the hooks are
securely in place before you push it onto the
appliance.
Checking the water inlet hose
Check the inlet hose at least once a year. If there are
any cracks, it should be replaced immediately: during
the wash cycles, water pressure is very strong and a
cracked hose could easily split open.
Never use second-hand hoses.
10
Page 11

Troubleshooting
Your washing machine could fail to work. Before contacting the Technical Assistance Centre (see Assistance),
make sure that the problem cannot be not solved easily using the following list.
Problem:
The washing machine does not
switch on.
The wash cycle does not start.
The washing machine does not
take in water (the indicator light
for the first wash cycle stage
flashes rapidly).
The washing machine
continuously takes in and drains
water.
Possible causes / Solutions:
The appliance is not plugged into the socket fully, or is not making contact.
There is no power in the house.
The washing machine door is not closed properly.
The ON/OFF button has not been pressed.
The START/PAUSE button has not been pressed.
The water tap has not been opened.
A delayed start has been set (see Personalisation).
The water inlet hose is not connected to the tap.
The hose is bent.
The water tap has not been opened.
There is no water supply in the house.
The pressure is too low.
The START/PAUSE button has not been pressed.
The drain hose is not fitted at a height between 65 and 100 cm from
the floor (see Installation).
The free end of the hose is under water (see Installation).
The wall drainage system is not fitted with a breather pipe.
If the problem persists even after these checks, turn off the water tap,
switch the appliance off and contact the Assistance Service. If the
dwelling is on one of the upper floors of a building, there may be problems
relating to water drainage, causing the washing machine to fill with water
and drain continuously. Special anti-draining valves are available in shops
and help to avoid this inconvenience.
GB
The washing machine does not
drain or spin.
The washing machine vibrates a
lot during the spin cycle.
The washing machine leaks.
The START/PAUSE indicator light
(orange) and the function
indicator lights flash rapidly.
There is too much foam.
The wash cycle does not include draining: some wash cycles require
the drain phase to be started manually.
The EASY IRON function has been activated: To complete the wash
cycle, press the START/PAUSE button (Personalisation).
The drain hose is bent (see Installation).
The drainage duct is clogged.
The drum was not unlocked correctly during installation (see Installation).
The washing machine is not level (see Installation).
The washing machine is trapped between cabinets and walls (see Installation).
The water inlet hose is not screwed on properly (see Installation).
The detergent dispenser drawer is blocked (for cleaning instructions, see
Care and maintenance).
The drain hose is not fixed properly (see Installation).
Switch off the machine and unplug it, wait for approximately 1 minute
and then switch it back on again.
If the problem persists, contact the Technical Assistance Service.
The detergent is not suitable for machine washing (it should display the
text for washing machines or hand and machine wash, or the like).
Too much detergent was used.
11
Page 12

Service
GB
Before calling for Assistance:
Check whether you can solve the problem alone (see Troubleshooting);
Restart the programme to check whether the problem has been solved;
If this is not the case, contact an authorised Technical Assistance Centre using the telephone number
provided on the guarantee certificate.
Always request the assistance of authorised technicians.
Have the following information to hand:
the type of problem;
the appliance model (Mod.);
the serial number (S/N).
This information can be found on the data plate applied to the rear of the washing machine, and can also
be found on the front of the appliance by opening the door.
12
Page 13

Bruksanvisning
TVÄTTMASKIN
SE
Svenska
ARXL 169
Innehållsförteckning
SE
Installation, 14-15
Uppackning och nivellering
Anslutningar av vatten och el
Första tvättcykeln
Tekniska data
Beskrivning av tvättmaskinen och
starta ett program, 16-17
Kontrollpanel
Kontrollampor
Starta ett program
Program, 18
Programtabell
Specialanpassningar, 19
Inställning av temperaturen
Inställning av centrifugeringen
Funktioner
Tvättmedel och tvättgods, 20
Tvättmedelsfack
Blekningscykel
Förbered tvättgodset
Särskilda plagg
Balanseringssystem för lasten
Råd och föreskrifter, 21
Säkerhet i allmänhet
Kassering
Manuell öppning av lucka
Underhåll och skötsel, 22
Avstängning av vatten och el
Rengöring av tvättmaskinen
Rengöring av tvättmedelslådan
Skötsel av luckan och trumman
Rengöring av pumpen
Kontrollera vatteninloppsslangen
Fel och åtgärder, 23
Service, 24
13
Page 14
Installation
SE
Det är viktigt att förvara denna bruksanvisning så att
den alltid finns till hands. Vid försäljning, överlåtelse
eller flytt ska du försäkra dig om att bruksanvisningen
förblir tillsammans med tvättmaskinen så att den nye
ägaren kan ta del av dess information och varningar.
Läs noggrant anvisningarna: Det finns viktig
information angående installation, användning och
säkerhet.
Uppackning och nivellering
Uppackning
1. Ta ur tvättmaskinen ur förpackningen.
2. Kontrollera att tvättmaskinen inte skadats under
transporten. Om det skulle finnas skador ska du inte
ansluta den utan kontakta återförsäljaren.
3. Ta bort de 4
skruvarna, som skyddat
maskinen under
transporten, samt
gummidelen med dess
avståndsbricka, som
sitter på bakstycket (se
figur).
En ordentligt utförd nivellering ger maskinen stabilitet
och hindrar uppkomsten av vibrationer, buller samt att
maskinen flyttar sig under användningen. Om golvet
har heltäckningsmatta eller en annan matta ska
fötterna justeras på så sätt att det finns tillräckligt
utrymme under tvättmaskinen för ventilationen.
Anslutningar av vatten och el
Anslutning av vatteninloppsslangen
1. För in packningen A i
inloppslangens ände och
skruva fast den till en
kallvattenkran som har en
A
öppning med 3/4
gasgänga (se figur).
Innan du ansluter slangen
ska du låta vattnet rinna
tills det är helt klart.
2. Anslut inloppsslangen
till tvättmaskinen genom
att skruva fast den till det
avsedda vattenuttaget i
den bakre delen uppe till
höger (se figur).
4. Stäng igen hålen med de medföljande
plastpluggarna.
5. Spar alla delar: Om tvättmaskinen måste flyttas
ska de monteras tillbaka.
Emballagematerialet ska inte användas som
leksaker för barn.
Nivellering
1. Installera tvättmaskinen på ett hårt och jämnt
underlag utan att stödja den mot väggar, möbler eller
annat.
2. Om golvet inte skulle
vara fullständigt plant kan
ojämnheten
kompenseras genom att
de främre fötterna dras åt
eller lossas (se figur).
Lutningsvinkeln, mätt på
arbetsplanet, får inte
överstiga 2°.
3. Se till att slangen inte har några veck eller är
hopklämd.
Kranens vattentryck måste befinna sig inom de
värden som finns i tabellen över Tekniska Data (se
sidan intill).
Om längden på inloppsslangen inte är tillräcklig ska
du vända dig till fackhandeln eller en auktoriserad
tekniker.
Använd aldrig begagnade slangar.
Använd slangarna som följer med maskinen.
14
Page 15
Anslutning av avloppsslang
65 - 100 cm
Anslut avloppsslangen,
utan att böja den, till en
avloppsledning eller ett
väggavlopp som är
placerat på en höjd
mellan 65 och 100 cm
från golvet,
Använd inte skarvsladdar eller grenuttag.
SE
Kabeln ska inte böjas eller klämmas.
Driftsladden får endast bytas ut av behöriga
tekniker.
OBS! Företaget avsäger sig allt ansvar om dessa
föreskrifter inte respekteras.
Första tvättcykeln
eller lägg den i ett
handfat eller ett badkar
och bind fast den
bifogade skenan på
kranen (se figur). Den fria
slangänden får inte vara
nedsänkt i vatten.
Vi avråder från att använda förlängningsslangar; om
det ändå skulle vara nödvändigt måste
förlängningsslangen ha samma diameter som
originalslangen och den får inte vara längre än 150 cm.
Elektrisk anslutning
Innan du sätter i kontakten i uttaget ska du försäkra
dig om att:
Vägguttaget är jordanslutet och i enlighet med
gällande standard.
Efter installationen, innan du börjar använda maskinen,
ska du köra en tvättcykel med tvättmedel men utan
tvättgods, genom att ställa in programmet 1.
Tekniska data
Modell
Mått
Kapacitet
ARXL 169
bredd 59,5 cm
höjd 85 cm
djup 53,5 cm
från 1 till 6 kg
Uttaget klarar maskinens maxeffekt som anges i
tabellen över Tekniska Data (se intill).
Spänningstillförseln befinner sig inom de värden som
anges i tabellen över Tekniska Data (se intill).
Uttaget passar ihop med tvättmaskinens
stickkontakt. Om det inte förhåller sig på detta vis
ska du byta ut uttaget eller kontakten.
Tvättmaskinen får inte installeras utomhus, inte ens
om installationsplatsen skyddas av ett tak, eftersom
det är mycket farligt att utsätta den för regn och
oväder.
När tvättmaskinen har installerats ska strömuttaget
vara lättåtkomligt.
Elanslutningar
Vattenanslutningar
Centrifugeringshastighet
Tvättprov har
utförts i enlighet
med standard
EN 60456
se märkskylten med tekniska
egenskaper som sitter på maskinen
Max. tryck 1 MPa (10 bar)
min. tryck 0,05 MPa (0,5 bar)
trummans kapacitet 52 liter
upp till 1600 varv/min
program 6; temperatur 60°C;
utförd med 6 kg last.
Denna utrustning är i enlighet med
följande EU-direktiv:
- 89/336/EU från 03/05/89
(elektromagnetisk kompatibilitet)
och följande ändringar
- 2006/95/CE (lågspänning)
- 2002/96/CE
15
Page 16

Beskrivning av tvättmaskinen
och starta ett program
SE
Kontrollpanel
TILL/FRÅN
Tvättmedelsfack
Knapp
TEMPERATURVRED
PROGRAMVRED
Kontrollampor
FÖRLOPP/STARTFÖRDRÖJNING
CENTRIFUGERINGSVRED
Knappar med
kontrollampor för
FUNKTION
FÖR PROGRAMMETS
Kontrollampa
LÅST
LUCKA
Knapp med
kontrollampa
START/
PAUS
Tvättmedelsfack för att fylla på tvättmedel och
tillsatser (se Tvättmedel och tvättgods).
Inuti tvättmedelsfacket finns informationsskivan som
när som helst kan konsulteras för att få en
sammanfattning av programmen.
Knapp TILL/FRÅN: För att sätta på och stänga av
tvättmaskinen.
PROGRAMVRED: För att ställa in programmen. Under
programmet förblir vredet stilla.
Knappar med kontrollampor för FUNKTION: För att
välja de funktioner som finns tillgängliga.
Kontrollampan för den valda funktionen förblir tänd.
CENTRIFUGERINGSVRED: För att aktivera eller
deaktivera centrifugeringen (se
Specialanpassningar).
TEMPERATURVRED: För att ställa in temperaturen
eller tvätt i kallt vatten (se Specialanpassningar).
Kontrollampaor FÖR PROGRAMMETS FÖRLOPP/
STARTFÖRDRÖJNING: För att följa framskridandet
av tvättprogrammet .
Tänd kontrollampa indikerar pågående fas.
Om Startfördröjning funktionen har ställts in visar de
hur lång tid som återstår innan programmet startas
(se sidan intill).
Kontrollampa för LÅST LUCKA: För att veta om
luckan kan öppnas (se sidan intill).
Knapp med kontrollampa START/PAUS: För att
starta eller avbryta programmen tillfälligt.
OBS! Tryck på denna knapp för att avbryta pågående
tvättning. Respektive kontrollampa blinkar orange och
kontrollampan för pågående fas lyser med fast sken.
Om kontrollampan LÅST LUCKAN
luckan öppnas.
Tryck åter på denna knapp för att återstarta
tvättningen från den punkt där den har avbrutits.
är släckt kan
16
Page 17
Kontrollampor
Kontrollamporna förser dig med viktig information.
De upplyser dig om:
Kontrollampor för pågående fas
När önskat tvättprogram har valts och startats, tänds
kontrollamporna successivt för att upplysa om hur
programmet framskrider.
SE
Startfördröjning
Om funktionen Startfördröjning (se
Specialanpassningar) har aktiverats efter att
programmet har startats, börjar kontrollampan för vald
fördröjning att blinka:
Efter en stund kommer kontrollampan att börja blinka
för att visa hur lång tid som återstår:
När den tid som ställts in för fördröjd start har förflutit
slocknar kontrollknappen och det program du ställt in
startar.
Tvätt
Sköljning
Centrifugering
Tömning
Avslutad tvätt
Funktionsknappar och respektive
kontrollampor
När en funktion väljs tänds respektive kontrollampa.
Om den funktion som valts inte är förenlig med det
inställda programmet, kommer respektive
kontrollampa att blinka och funktionen aktiveras inte.
Om du ställer in en funktion som inte är förenlig med
en funktion som tidigare valts, kommer endast det
sista valet att aktiveras.
Kontrollampa för låst lucka:
Tänd kontrollampa meddelar att luckan är låst för att
förhindra att den öppnas oavsiktligt. För att undvika
skador måste du vänta tills kontrollampan blinkar
innan du öppnar luckan.
OBS! Om funktionen Startfördröjning är aktiv kan
inte luckan öppnas. För att öppna luckan, ställ
maskinen i pausläge genom att trycka på knappen
START/PAUS.
Om kontrollampan START/PAUS (orange) blinkar
snabbt samtidigt med kontrollampan för funktioner har
ett fel uppstått (se Fel och åtgärder).
Starta ett program
1. Sätt på tvättmaskinen genom att trycka på knappen TILL/FRÅN. Under några sekunder tänds alla
kontrollampor för att därefter slockna och kontrollampan START/PAUS blinkar.
2. Lasta tvätten och stäng luckan.
3. Ställ in önskat program med PROGRAMVREDET.
4. Ställ in tvättemperaturen (se Specialanpassningar).
5. Ställ in centrifugeringshastigheten (se Specialanpassningar).
6. Fyll på tvättmedel och tillsatser (se Tvättmedel och tvättgods).
7. Välj önskade funktioner.
8. Starta programmet med knappen START/PAUS och respektive kontrollampa fortsätter att lysa med grönt fast sken.
Sätt maskinen i pausläge, tryck på knappen START/PAUS för att radera inställt program och välj ett nytt program.
9. I slutet av programmet tänds kontrollampan
kan öppnas. Ta ur tvätten och lämna luckan på glänt så att trumman torkar.
Stäng av tvättmaskinen genom att trycka på knappen TILL/FRÅN.
. Kontrollampan LÅST LUCKA släcks för att indikera att luckan
17
Page 18
Program
SE
Programtabell
Beskrivning av programmet
Program
Specialprogram
HYGIENISKT PROGRAM:
6
HYGIENISKT PROGRAM (1):
6
NATT PROGRAM:
7
BABYCYKEL:
8
TRÖJOR
9
SILKE/GARDINER:
10
YLLE:
11
1
1
2
3
3
4
5
A
B
C
D
E
för ylle, kashmir o.s.v.
Dagliga program
BOMULL:
BOMULL (2):
FÄRGAD BOMULL (3):
SYNTET:
SYNTET:
SNABBTVÄTT 30':
lämpligt för ylle, silke och plagg som ska handtvättas).
UPPFRÄSHNING 15':
lämpligt för ylle, silke och plagg som ska handtvättas).
Extra Tillval
Sköljning - 1600 - Finsköljning - 800 - Centrifugering - 1600 - - - 616
Skoncentrifugering - 800 - - - 2,5 12
Tömning - 0 - - - 62
ömtålig mycket smutsig kulörtvätt.
mycket smutsig tålig vit- och kulörtvätt.
mycket smutsig ömtålig vit- och kulörtvätt.
mycket smutsig tålig kulörtvätt.
lättsmutsad tålig kulörtvätt.
extremt smutsig vittvätt.
mycket smutsig tålig vit- och kulörtvätt.
ömtålig lättsmutsad kulörtvätt.
för plagg av silke, viskos och underkläder.
lätt smutsig vittvätt och ömtåliga färger.
för att snabbt fräscha upp lätt smutsade plagg (ej
för att snabbt fräscha upp lätt smutsade plagg (ej
Max.
temp.
(°C)
90° 1600
60° 1600 40° 800 40° 800 40° 600 30° 0 40° 600 -
60° 1600
40° 1600
40° 1600
60° 800 40° 800 -
30° 800 -
30° 800 -
Max.
hastighet
(varv/min)
Tvättmedel
Blek
ning
-
Tvätt
Skölj
medel
ll l
ll
ll
ll
ll
ll
ll
ll l
ll l
ll l
ll
ll
ll
ll
l
l
Max.
Program-
last
-
(kg)
6165
6 110
4290
2120
270
155
1,5 55
6122
6 115
685
2,5 85
2,5 70
330
1,5 15
636
2,5 31
mets
längd
De data som anges i tabellen är endast ungefärliga.
För alla Test Institutes:
1) Tvättprov har utförts i enlighet med standard EN 60456: Ställ in programmet 6 med en temperatur på 60 °C.
2) Långt bomullsprogram: Ställ in programmet 1med en temperatur på 40 °C.
3) Kort bomullsprogram: Ställ in programmet 2 med en temperatur på 40 °C.
Speciella program
Hygieniskt program (program 6). Ett hygieniserande program med höga temperaturer som förutser att blekmedel
används, med temperaturer över 60 °C.
För att bleka häll blekmedel, tvättmedel och tillsatser i respektive fack (se
avsnittet Tvättmedelsfack).
Natt program (program 7). Ett tyst program som kan köras på natten när energitaxan är lägre. Programmet har
utarbetats för syntetiska och bomullsplagg. När programmet är klart stannar maskinen med vatten i trumman.
Tryck på knappen START/PAUS för att starta centrifugeringen och tömningen. I annat fall startar maskinen
centrifugeringen och vattentömningen automatiskt efter 8 timmar.
Babycykel (program 8). Program som tvättar bort typiskt babysmuts samt garanterar att tvättmedlet försvinner
från tvätten, för att förhindra att allergier uppstår på barnens känsliga hud. Programmet har utarbetats för att
minska bakteriemängden genom att använda en större mängd vatten och optimera effekten från specifika
hygieniserande tillsatser som används tillsammans med tvättmedlet.
Programmet avslutas med att trumman roterar långsam för att undvika att veck bildas. Tryck på knappen START/
PAUS för att stänga av programmet.
Snabbtvätt 30 (program 4) har utarbetats för att tvätta lätt smutsade plagg på kort tid: Programmet tar bara 30
minuter och gör att du på så sätt spar energi och tid. Om du ställer in program (4 på 30 °C) går det att tvätta olika
material tillsammans (förutom ylle och silke) med en maxlast på 3 kg.
Uppfräshning 15 (program 5) har utarbetats för att tvätta lätt smutsade plagg på kort tid: Programmet tar bara
15 minuter och gör att du på så sätt spar energi och tid. Om du ställer in program (5 på 30 °C) går det att tvätta
olika material tillsammans (förutom ylle och silke) med en maxlast på 1,5 kg.
18
Page 19

Specialanpassningar
Inställning av temperatur
Tvättemperaturen ställs in när du vrider på TEMPERATURVREDET (se Programtabell).
Temperaturen kan sänkas ned till tvätt i kallvatten (
Maskinen förhindrar automatiskt att en högre temperatur än den som är den maximalt avsedd för varje program
ställs in.
).
Inställning av centrifugeringen
Centrifugeringshastigheten på det valda programmet ställs in när du vrider på CENTRIFUGERINGSVREDET.
Programmens maxhastigheter är:
Program Maxhastighet
Bomull 1600 varv/min
Syntet 800 varv/min
Ylle 600 varv/min
Silke endast tömning
Centrifugeringshastigheten kan sänkas eller uteslutas med hjälp av symbol
Maskinen förhindrar automatiskt att en kraftigare centrifugering än den som är den maximalt avsedda för varje
program körs.
.
Funktioner
Tvättmaskinens olika avsedda tvättfunktioner ser till att du alltid får en ren och vit tvätt.
För att aktivera funktionerna:
1. Tryck på knappen för önskad funktion.
2. Kontrollampan tänds för att meddela att funktionen är aktiv.
Notering: Om kontrollampan blinkar snabbt betyder det att respektive funktion inte går att välja för det program
som ställts in.
SE
Startfördröjning
Fördröjer starten av maskinen upp till 12 timmar.
Tryck på knappen flera gånger tills kontrollampan för önskad senare start tänds. Vid femte tryckningen på knappen
frånkopplas funktionen.
OBS! När knappen START/PAUS har tryckts ned, kan fördröjningen endast minskas.
Är aktiv för alla program.
Lättstruket
Genom att välja denna funktion ändras tvättningen och centrifugeringen på ett lämpligt sätt för att minska
skrynklor på tvätten. I slutet av tvättprogrammet roterar tvättmaskinens trumma långsamt. Kontrollampan för
funktionen LÄTTSTRUKET och START/PAUS blinkar (orange) och
avsluta programmet, tryck på knappen START/PAUS eller knappen LÄTTSTRUKET.
För programmet Silke avslutar maskinen programmet med tvätten i blöt och kontrollampan för funktionen
LÄTTSTRUKET och START/PAUS blinkar (orange) och SKÖLJNINGSFASEN fortsätter att lysa med fast sken. För
att tömma ut vattnet och för att ta ut tvätten, tryck på knappen START/PAUS eller knappen LÄTTSTRUKET.
fortsätter att lysa med fast sken. För att
Detta tillval kan inte aktiveras för programmen 4, 5, 6, 7, 8, 11, C, D, E.
Extra sköljning
Med denna funktion ökas sköljeffekten och tvättmedlet tas bort på bästa möjliga sätt. Detta program
rekommenderas för personer som har särskilt känslig hud.
Detta tillval kan inte aktiveras för programmen 4, 5, C, D, E.
Super Wash
Med hjälp av en stor mängd vatten i programmets inledande fas och längre tvättid, garanterar denna funktion en
tvättning med hög prestanda.
Detta tillval kan inte aktiveras för programmen 4, 5, 6, 10, 11, A, B, C, D, E.
19
Page 20

Tvättmedel och tvättgods
SE
Tvättmedelsfack
Ett gott tvättresultat beror även på att tvättmedlet
doseras korrekt: En överdriven dosering innebär inte
att tvätten blir renare utan orsakar istället att
tvättmaskinen får beläggningar och att miljön
förorenas.
Använd inte tvättmedel avsett för handtvätt
eftersom dessa bildar för mycket lödder.
Dra ut tvättmedelsfacket
4
MAX
1
3
Fack 1: Tvättmedel för förtvätt (pulver)
Kontrollera att inte tilläggsfacket 4 är isatt innan du
fyller på tvättmedel.
Fack 2: Tvättmedel (i pulver eller flytande
form)
Flytande tvättmedel får endast fyllas på innan start.
Fack 3: Tillsatser (sköljmedel, o.s.v.)
Sköljmedlet får inte rinna över gallret.
Tilläggsfack 4: Blekning
2
och fyll på tvättmedel och
tillsatser enligt följande.
Blekningscykel
Blekningen kan endast göras med programmen 1, 2, 6.
Häll blekmedlet i tilläggsfacket 4, tvättmedlet och
sköljmedlet i respektive fack. Ställ sedan in något av
ovannämnda program.
Denna cykel är endast avsedd för mycket smutsiga
bomullsplagg.
Förbered tvätten
Hur mycket väger tvätten?
1 lakan 400-500 g
1 örngott 150-200 g
1 bordsduk 400-500 g
1 morgonrock 900-1200 g
1 handduk 150-250 g
Särskilda plagg
Tröjor: Använd därtill avsett program 9 för att tvätta
skjortor av olika material och färger.
Detta program garanterar maximal försiktighet och
skrynklor på tvätten minskas.
Silke: Använd därtill avsett program 10 för att tvätta
alla typer av silkesplagg. Det rekommenderas att
använda ett särskilt tvättmedel för ömtåliga plagg.
Gardiner: vik ihop dem och lägg dem i ett örngott
eller en nätpåse. Använd programmet 10.
Ylle: Hotpoint/Ariston är den enda tvättmaskinen
som har erhållit den prestigefyllda Woolmark Platinum
Care-märkning (M.0508) av The Woolmark Company.
Denna märkning garanterar att alla plagg av ylle,
även de som är märkta med endast handtvätt
kan tvättas i maskinen. Med programmet 11 kan du
vara fullständigt trygg med att tvättmaskinen tvättar
alla ylleplagg (max. 1,5 kg) i tvättmaskinen med
garanterat utmärkt resultat.
Balanseringssystem för lasten
För att undvika överdrivna vibrationer fördelar
maskinen lasten på ett jämnt sätt före varje
centrifugering. Det sker genom att ett antal rotationer
utförs i följd med en hastighet som är något högre än
tvätthastigheten. Om lasten trots upprepade försök
inte fördelas perfekt, kör maskinen en centrifugering
med lägre hastighet än vad som var avsett. Vid
mycket stor obalans utför tvättmaskinen fördelningen
av tvätten i stället för centrifugeringen. För främja en
god fördelning av lasten och balansera den korrekt,
rekommenderas att blanda stora och små plagg.
Dela upp tvätten beroende på:
- Typ av material/symbolen på etiketten.
- Färgerna: Separera färgade plagg från vita.
Töm fickorna och kontrollera knapparna.
Överskrid inte de angivna värdena, som avser
vikten för torr tvätt:
Tåliga material: max. 6 kg
Syntetmaterial: max. 2,5 kg
Ömtåliga material: max. 2 kg
Ylle: max. 1,5 kg
20
Page 21

Säkerhetsföreskrifter
och råd
Tvättmaskinen har utarbetats och tillverkats i
överensstämmelse med internationell
säkerhetsstandard. Dessa säkerhetsföreskrifter
bifogas av säkerhetsskäl och ska läsas noggrant.
Säkerhet i allmänhet
Denna utrustning har tillverkats för att endast
användas i hemmet.
Maskinen får endast användas av vuxna och enligt
de instruktioner som finns i denna bruksanvisning.
Rör inte i tvättmaskinen om du är barfota eller med
fuktiga händer eller fötter.
Ta inte ut stickkontakten ur vägguttaget genom att
dra i elkabeln. Ta istället tag i stickkontakten.
Öppna inte tvättmedelsfacket när maskinen är
igång.
Rör inte avloppsvattnet eftersom det kan bli vara
mycket varmt.
Öppna aldrig luckan med våld:
säkerhetsmekanismen som skyddar mot att den
öppnas ofrivilligt kan skadas.
I händelse av fel ska du aldrig utföra ingrepp på inre
mekanismer för att utföra reparationer.
Kontrollera alltid att inga barn närmar sig maskinen
då den är igång.
Under tvättcykeln blir luckan varm.
Om tvättmaskinen måste flyttas ska detta ske med
försiktighet och av minst två eller tre personer.
Detta ska inte göras av en enda person eftersom
maskinen är mycket tung.
Innan du lägger in tvätten ska du kontrollera att
trumman är tom.
Manuell öppning av lucka
Om det inte går att öppna luckan på grund av
strömavbrott och du vill ta ut tvätten för att hänga
den, gör på följande sätt:
1. Dra ut stickkontakten ur
strömuttaget.
2. Kontrollera att
vattennivån i maskinen är
20
lägre än lucköppningen.
Töm i annat fall ut vattnet
genom avloppsslangen i en
hink, se figuren.
3. Ta bort skyddspanelen
på tvättmaskinens framsida
med hjälp av en
skruvmejsel (se figur).
SE
Kassering
Kassering av emballagematerial: Respektera
gällande lokala föreskrifter, på så sätt kan
emballaget återanvändas.
Det europeiska direktivet 2002/96/EC gällande
Waste Eelectrical and Electronic Equipment
(hantering av förbrukad elektrisk och elektronisk
utrustning), kräver att gammal hushållselektronik
INTE kasseras tillsammans med det vanliga
osorterade avfallet. Förbrukad utrustning måste
samlas ihop separat för att optimera
materialåtervinnandet samt att reducera negativ
inverkan på miljön och människors hälsa.
Symbolen av en överkryssad soptunna påminner
dig om din skyldighet att hantera den förbrukade
utrustningen separat.
Du kan kontakta din kommun eller lokala återförsäljare för ytterligare information gällande hantering
av förbrukad elektronisk utrustning.
4. Dra fliken som indikeras i figuren utåt tills
dragstången av plast lossnar från spärren. Dra sedan
dragstången nedåt tills ett klick hörs, som betyder
att luckan har lossats.
5. Montera tillbaka panelen, och försäkra dig om att
krokarna förts in i de avsedda hålen, innan du skjuter
den mot maskinen.
21
Page 22

Underhåll och skötsel
SE
Avstängning av vatten och el
Stäng av vattenkranen efter varje tvätt. På så sätt
begränsas slitaget av tvättmaskinens
vattensystem och risken för läckage undviks.
Ta ur kontakten ur uttaget när du gör rent
tvättmaskinen och under underhållsingreppen.
Rengöring av tvättmaskinen
De yttre delarna och gummidelarna kan göras rent
med en trasa indränkt med ljummen tvållösning.
Använd inte lösningsmedel eller slipmedel.
Rengöring av tvättmedelslådan
1
Dra ut facket genom att
lyfta upp det och dra
det utåt (se figur).
Tvätta det under
rinnande vatten. Denna
rengöring ska utföras
ofta.
2
Rengöring av pumpen
Tvättmaskinen är försedd med en självrengörande
pump som inte behöver något underhåll. Det kan
dock hända att små föremål (mynt, knappar) faller
ned i förkammaren, som skyddar pumpen, och som
är placerad i dess nedre del.
Försäkra dig om att tvättcykeln är avslutad och ta
ur kontakten.
För att komma åt förkammaren:
1. Ta bort skyddspanelen
på tvättmaskinens
framsida med hjälp av en
skruvmejsel (se figur).
2. Lossa locket genom
att vrida det moturs (se
figur): Det är normalt att
lite vatten rinner ut.
Skötsel av luckan och trumman
Lämna alltid luckan på glänt för att hindra att dålig
lukt bildas.
3. Gör rent insidan noggrant.
4. Skruva tillbaka locket.
5. Montera tillbaka panelen, och försäkra dig om att
krokarna förts in i de avsedda hålen, innan du skjuter
den mot maskinen.
Kontrollera vatteninloppsslangen
Kontrollera inloppsslangen minst en gång om året.
Om den har sprickor eller skåror ska den bytas ut:
Under tvättcyklerna kan plötsliga brott uppstå på
grund av det starka trycket.
Använd aldrig begagnade slangar.
22
Page 23

Fel och åtgärder
Den kan hända att maskinen inte fungerar. Innan du ringer till Kundservice (se Service) ska du kontrollera att det
inte rör sig om ett problem som kan åtgärdas på ett enkelt sätt med hjälp av följande lista.
Fel:
Tvättmaskinen går inte att sätta
på.
Tvättcykeln startar inte.
Tvättmaskinen tar inte in vatten
(kontrollampan för den första
tvättfasen blinkar snabbt).
Tvättmaskinen tar in och
tömmer ut vatten oavbrutet.
Möjliga orsaker/Åtgärd:
Kontakten är inte ordentligt isatt eller inte isatt alls i uttaget.
Det saknas ström i bostaden.
Luckan är inte ordentligt stängd.
Knappen ON/OFF har inte tryckts in.
Knappen START/PAUS har inte tryckts in.
Vattenkranen är inte öppen.
En senare starttid har ställts in (se Specialanpassningar).
Vatteninloppsslangen är inte ansluten till kranen.
Slangen är böjd.
Vattenkranen är inte öppen.
Det saknas vatten i bostaden.
Vattentrycket är inte tillräckligt.
Knappen START/PAUS har inte tryckts in.
Avloppsslangen har inte installerats på en höjd mellan 65 och 100 cm
från marken (se Installation).
Avloppsslangens ände är nedsänkt i vatten (se Installation).
Väggutloppet har inget luftutsläpp.
Om problemet kvarstår efter dessa kontroller ska du stänga av
vattenkranen och tvättmaskinen samt kontakta servicetjänsten. Om din
bostad ligger högst upp i ett hus kan häverteffekter uppstå som gör att
tvättmaskinen tar in och tömmer vatten oavbrutet. För att lösa detta
problem finns särskilda hävertventiler att köpa som förhindrar denna
effekt.
SE
Tvättmaskinen tömmer inte eller
centrifugerar inte.
Tvättmaskinen vibrerar mycket
under centrifugeringen.
Tvättmaskinen läcker vatten.
Kontrollampan START/PAUS
(orange) och kontrollampan för
funktionerna blinkar snabbt.
De bildas för mycket lödder.
Programmet saknar tömning: Med vissa program måste tömningen
startas manuellt (se Start och program).
Funktionen LÄTTSTRUKET är aktiv: Tryck på knappen START/PAUS för
att fullfölja programmet (Specialanpassningar).
Avloppslangen är böjd (se Installation).
Avloppsledningen är tilltäppt.
Trumman har inte lossats ordentligt vid installationen (se Installation).
Tvättmaskinen står inte plant (se Installation).
Tvättmaskinen är inträngd mellan möbler och väggar (se Installation).
Vatteninloppsslangen är inte ordentligt åtskruvad (se Installation).
Tvättmedelsfacket är igensatt (för rengöring se Underhåll och skötsel).
Avloppslangen är inte ordentligt fastsatt (se Installation).
Stäng av maskinen och dra ur stickkontakten ur vägguttaget. Vänta
cirka 1 minut och sätt sedan på maskinen igen.
Om felet kvarstår, ring teknisk assistans.
Tvättmedlet är inte avsett för maskintvätt (det måste vara märkt med
texten för tvättmaskin, för hand och i maskin, eller liknande).
För stor mängd tvättmedel har doserats.
23
Page 24

Service
SE
Innan du kallar på Servicetjänsten:
Kontrollera om du kan åtgärda felet på egen hand (se Fel och åtgärder);
Starta programmet igen för att kontrollera om problemet är löst;
Om det inte förhåller sig så ska du kontakta den auktoriserade Servicetjänsten på det telefonnummer
som finns på garantisedeln.
Anlita aldrig obehöriga tekniker.
Uppge:
Typ av fel;
Maskinmodell (Mod.);
Serienummer (S/N).
Denna information hittar du på typskylten som sitter på tvättmaskinens bakstycke och på framsidan efter
att luckan har öppnats.
24
Page 25

Käyttöohjeet
PESUKONE
FI
Suomi
ARXL 169
Yhteenveto
FI
Asennus, 26-27
Pakkauksen purkaminen ja vaaitus
Vesi- ja sähköliitännät
Ensimmäinen pesujakso
Tekniset tiedot
Pyykinpesukoneen kuvaus ja ohjelman
käynnistys 28-29
Ohjauspaneeli
Merkkivalot
Ohjelman käynnistys
Ohjelmat, 30
Ohjelmataulukko
Omavalintaiset toiminnot, 31
Lämpötilan asettaminen
Linkouksen asettaminen
Lisätoiminnot
Pesuaineet ja pyykit, 32
Pesuainelokerikko
Valkaisujakso
Pyykin valmistelu
Erityiset vaatekappaleet
Lastin tasapainottamisjärjestelmä
Varotoimet ja neuvot, 33
Yleinen turvallisuus
Hävittäminen
Luukkuoven manuaalinen avaaminen
Huolto ja hoito, 34
Veden ja sähkövirran pois sulkeminen
Pyykinpesukoneen puhdistaminen
Pesuainelokerikon puhdistaminen
Luukun ja rummun hoito
Pumpun puhdistaminen
Veden syöttöletkun tarkistaminen
Häiriöt ja korjaustoimet, 35
Huoltoapu, 36
25
Page 26

Asennus
FI
sitä voidaan tutkia tarvittaessa. Myytäessä,
luovutettaessa tai muuton yhteydessä varmista, että
se pysyy yhdessä pyykinpesukoneen kanssa, jotta
myös uusi omistaja voi tutustua toimintaan ja
vastaaviin varoituksiin.
Lue ohjeet huolellisesti: niissä on tärkeitä tietoja
On tärkeää säilyttää huolella tämä ohjekirjanen, jotta
asennuksesta, käytöstä ja turvallisuudesta.
Pakkauksen purkaminen ja vaaitus
Pakkauksen purkaminen
1. Poista pyykinpesukone pakkauksestaan.
2. Tarkista, että pyykinpesukone ei ole kärsinyt
vahinkoja kuljetuksen aikana. Jos siinä on
havaittavissa vaurioita, älä suorita liitäntöjä ja ota
yhteys jälleenmyyjään.
3. Poista 4 kuljetuksen
suojaruuvia sekä tiiviste
vastaavan välikappaleen
kanssa, jotka sijaitsevat
takaosassa (katso
kuvaa).
Huolellinen vaaitus antaa vakautta koneelle sekä
estää tärinää, meluisuutta ja sen liikkumista toiminnan
aikana. Mikäli asennat koneen kokolattiamaton tai
muun maton päälle, säädä tukijalat siten, että
pesukoneen alle jää riittävä tila tuulettumiselle.
Vesi- ja sähköliitännät
Veden syöttöletkun liittäminen
1. Työnnä tiiviste A
syöttöletkun päähän ja
kierrä letku kylmän veden
hanaan, jonka suutin on
A
¾ putkikierteitetty (katso
kuvaa).
Ennen liitäntää anna
veden juosta, kunnes se
kirkastuu.
2. Liitä syöttöletku
pyykinpesukoneeseen
ruuvaten se kiinni
asiaankuuluvaan koneen
takana oikeassa
yläosassa olevaan
vesiliittimeen (katso
kuvaa).
4. Sulje reiät toimitetuilla muovitapeilla.
5. Säilytä kaikki osat: mikäli pyykinpesukonetta tulee
kuljettaa, ne tulee asentaa takaisin.
Pakkaukset eivät ole lasten leluja.
Vaaitus
1. Asenna pyykinpesukone tasaiselle ja kovalle lattialle
siten, että se ei kosketa seiniin, huonekaluihin tai
muihin esineisiin.
2. Jos lattia ei ole täysin
tasainen, sen
epätasaisuudet tulee
tasoittaa ruuvaten kiinni
tai auki etujalkoja (katso
kuvaa); kallistuman kulma
työskentelytasolta
mitattuna ei saa olla yli
2°.
3. Ole varovainen, että letku ei taitu tai joudu
puristuksiin.
Hanan vedenpaineen tulee olla niiden arvojen
mukainen, jotka esitetään Teknisten tietojen
taulukossa (katso viereistä sivua).
Jos syöttöletkun pituus ei ole riittävä, käänny
erikoisliikkeen tai valtuutetun teknikon puoleen.
Älä käytä koskaan käytettyjä letkuja.
Käytä letkuja, jotka on toimitettu koneen mukana.
26
Page 27

Veden poistoletkun liittäminen
Liitä poistoletku
taittamatta sitä
lattiaviemäriin tai
seinäviemäriin, joka
sijaitsee 65 - 100 cm
65 - 100 cm
korkeudella maasta;
Älä käytä jatkojohtoja ja liitinkappaleita.
FI
Johtoa ei saa taittaa tai se ei saa joutua puristuksiin.
Syöttöjohdon vaihto tulee antaa tehtäväksi
ainoastaan valtuutetuille teknikoille.
Varoitus! Valmistaja ei vastaa vahingoista, jotka
johtuvat yllä olevien ohjeiden laiminlyönnistä.
Ensimmäinen pesujakso
tai aseta se pesualtaan
tai kylpyammeen laidalle
kiinnittäen toimitettu
ohjain hanaan (katso
kuvaa). Poistoletkun
vapaan pään ei tule
jäädä upoksiin veteen.
Ei suositella käyttämään jatkoletkuja; jos jatkoletkun
käyttö on välttämätöntä, sen tulee olla halkaisijaltaan
alkuperäisen kokoinen ja korkeintaan 150 cm pitkä.
Sähköliitäntä
Ennen pistokkeen työntämistä pistorasiaan varmista,
että:
pistorasia on maadoitettu ja että se on lain
vaatimusten mukainen;
pistorasia kestää koneen tehon
enimmäiskuormituksen, joka on annettu Teknisten
tietojen taulukossa (katso viereen);
syöttöjännite sisältyy arvoihin, jotka on annettu
Teknisten tietojen taulukossa (katso viereen);
Asennuksen jälkeen ennen varsinaista käyttöä tulee
suorittaa yksi pesujakso pesuaineen kanssa ilman
pyykkiä asettaen ohjelma 1.
Te k ni s e t t i e do t
Malli
Mitat
Täyttömäärä
Sähköliitännät
Vesiliitännät
ARXL 169
leveys cm 59,5
korkeus cm 85
syvyys cm 53,5
1 - 6 kg
katso koneessa olevaa teknisten
tietojen tietolaattaa
maks. Vedenpaine 1 MPa (10 bar)
min. vedenpaine 0,05 MPa (0,5 bar)
rummun tilavuus 52 litraa
pistorasia ja pesukoneen pistoke ovat
yhteensopivat. Päinvastaisessa tapauksessa vaihda
pistorasia tai pistoke.
Pesukonetta ei saa asentaa ulos edes silloin, kun
asennustila on suojattu katoksella, koska on hyvin
vaarallista jättää pesukone alttiiksi sateelle ja
ukkosenilmalle.
Pesukoneen asentamisen jälkeenkin pistorasian
tulee olla helposti saavutettavissa.
Linkousnopeus
Te s t i o h j e l m a t
normin EN 60456
mukaisesti
1600 kierr./min saakka
Ohjelma 6; lämpötila 60°C;
toteutettu 6 kg:n täyttömäärällä.
Tämä kodinkone on seuraavien
Euroopan yhteisön direktiivien
vaatimusten mukainen:
- 89/336 pvm. 03/05/89
(Sähkömagneettinen yhteensopivuus)
ja siihen myöhemmin tehdyt muutokset
- 2006/95/EY (Pienjännite)
- 2002/96/EY
27
Page 28

Pyykinpesukoneen kuvaus
ja ohjelman käynnistys
FI
Ohjauspaneeli
LINKOUKSELLE
Nappula
Näppäimet
merkkivaloilla
TOIMINNOILLE
KÄYNNISTYS/
SAMMUTUS
Pesuainelokerikko
Näppäin
LÄMPÖTILALLE
Nappula
OHJELMAT
Merkkivalot
ETENEMISELLE/AJASTIN
Nappula
JAKSON
Näppäin
merkkivalolla
START/
TAUKO
Merkkivalo
LUUKKU
LUKOSSA
Pesuainelokerikko: pesuaineiden ja lisäaineiden
lisäämiseksi (katso Pesuaineet ja pyykit).
Pesuainelokerikon sisältä löytyvät pikaohjeet, joiden
avulla voidaan milloin tahansa tarkistaa kaaviosta
valittavissa olevat ohjelmat.
Näppäin KÄYNNISTYS/SAMMUTUS:
pyykinpesukoneen käynnistämiseksi ja
sammuttamiseksi.
Nappula OHJELMAT: ohjelmien asettamiseksi. Pesun
aikana nappula pysyy paikoillaan.
Näppäimet merkkivaloilla TOIMINNOILLE: saatavilla
olevien toimintojen valitsemiseksi. Valittua toimintoa
vastaava merkkivalo jää palamaan.
Nappula LINKOUKSELLE: linkouksen asettamiseksi
tai pois sulkemiseksi (katso Omavalintaiset
toiminnot).
Nappula LÄMPÖTILALLE: pesulämpötilan tai
kylmäpesun asettamiseksi (katso Omavalintaiset
toiminnot).
Merkkivalot JAKSON ETENEMISELLE/AJASTIN:
jotta voidaan seurata pesuohjelman etenemistä.
Palava merkkivalo osoittaa käynnissä olevan vaiheen.
Jos on asetettu toiminto Ajastin, merkkivalot
osoittavat ajan, jonka kuluttua ohjelma käynnistyy
(katso viereistä sivua).
Merkkivalo LUUKKU LUKOSSA: näyttää, onko
luukku avattavissa (katso viereistä sivua).
Näppäin merkkivalolla START/TAUKO: ohjelmien
käynnistämiseksi tai niiden keskeyttämiseksi
väliaikaisesti.
HUOM.: käynnissä olevan ohjelman
keskeyttämiseksi, paina tätä näppäintä, vastaava
merkkivalo vilkkuu oranssina, kun taas käynnissä
olevan vaiheen merkkivalo palaa kiinteänä. Jos
merkkivalo LUUKKU LUKOSSA
avata luukkuovi.
Pesun käynnistämiseksi uudelleen pisteestä, johon se
oli keskeytetty, paina uudelleen tätä painiketta.
ei pala, voidaan
28
Page 29

Merkkivalot
Merkkivalot antavat tärkeitä tietoja.
Ne ilmoittavat muun muassa:
Käynnissä oleva vaiheen merkkivalot:
Sen jälkeen kun on valittu ja käynnistetty haluttu
pesuohjelma, merkkivalot syttyvät peräkkäisessä
järjestyksessä osoittaen etenemisvaiheen.
FI
Ajastin
Jos on kytketty päälle toimintoAjastin (katso
Omavalintaiset toiminnot), ohjelman käynnistämisen
jälkeen voidaan nähdä vilkkuva merkkivalo, joka vastaa
valittua viivästystä:
Ajan kuluessa ilmoitetaan jäljellä oleva viivästysaika
vastaavan merkkivalon vilkkumisella.
Valitun viivästysajan kuluttua umpeen vilkkuva
merkkivalo sammuu ja asetettu ohjelma käynnistyy.
Pesu
Huuhtelu
Linkous
Tyhjennys
Pesun loppu
Toimintojen näppäimet ja vastaavat
merkkivalot
Valittaessa jokin toiminto vastaava merkkivalo syttyy.
Jos valittu lisätoiminto ei sovi yhteen asetetun
ohjelman kanssa, merkkivalo vilkkuu ja toiminto ei
kytkeydy päälle.
Mikäli asetetaan lisätoiminto, joka ei sovi yhteen
aiemmin valitun toiminnon kanssa, kytkeytyy päälle
ainoastaan viimeksi valittu.
Merkkivalo luukku lukossa
Palava merkkivalo osoittaa luukun olevan lukossa,
jotta voidaan välttää vahingonomaiset avaamiset;
vahinkojen välttämiseksi tulee odottaa, että
merkkivalo sammuu ennen kuin avataan luukku.
HUOM.: jos on päällä toiminto Ajastin luukkua ei
voida avata, sen avaamiseksi laita kone taukotilaan
painaen näppäintä START/TAUKO.
Merkkivalon START/TAUKO (oranssi) nopea
vilkkuminen samanaikaisesti toimintojen merkkivalon
kanssa osoittaa häiriötilaa (katso Häiriöt ja
korjaustoimet).
Ohjelman käynnistys
1. Käynnistä pyykinpesukone painaen näppäintä KÄYNNISTYS/SAMMUTUS. Kaikki merkkivalot syttyvät
muutaman sekunnin ajaksi, sitten ne sammuvat ja merkkivalo START/TAUKO vilkkuu.
2. Laita pyykit pesukoneeseen ja sulje luukku.
3. Valitse nappulalla OHJELMAT haluttu pesuohjelma.
4. Aseta pesulämpötila (katso Omavalintaiset toiminnot).
5. Aseta linkousnopeus (katso Omavalintaiset toiminnot).
6. Lisää pesuaine ja lisäaineet (katso Pesuaineet ja pyykit).
7. Valitse halutut lisätoiminnot.
8. Käynnistä ohjelma painaen näppäintä START/TAUKO ja vastaava vihreä merkkivalo syttyy palamaan kiinteänä.
Asetetun jakson peruuttamiseksi laita kone taukotilaan painaen näppäintä START/TAUKO ja valitse uusi jakso.
9. Ohjelman lopuksi syttyy merkkivalo
avattavissa. Ota pois pyykit ja jätä luukku hieman auki rummun kuivattamiseksi.
Sammuta pyykinpesukone painaen näppäintä KÄYNNISTYS/SAMMUTUS.
. Merkkivalo LUUKKU LUKOSSA sammuu osoittaen, että luukku on
29
Page 30

Ohjelmat
FI
Ohjelman kuvaus
Ohjelmat
Erikois ohjelmat
PUHDISTUS-OHJELMA:
6
PUHDISTUS-OHJELMA (1):
6
HYVÄN YÖN OHJELMA:
7
VAUVAOHJELMA :
8
PAIDAT
9
SILKKI/VERHOT:
10
VILLA:
11
1
1
2
3
3
4
5
A
B
C
D
E
Kaikille testauslaitoksille:
1) Testiohjelma normin EN 60456 mukaisesti aseta ohjelma 6 ja lämpötilaksi 60°C.
2) Pitkä puuvillaohjelma: aseta ohjelma 1 ja lämpötilaksi 40°C.
3) Lyhyt puuvillaohjelma: aseta ohjelma 2 ja lämpötilaksi 40°C.
Villa-, cashmeretuotteet, jne.
Päivittäiset ohjelmat
PUUVILLA:
PUUVILLA (2):
VÄRILLINEN PUUVILLA (3):
Erittäin likainen kestävä kirjo- ja valkopyykki.
Erittäin likainen herkkä kirjo- ja valkopyykki.
kirjopyykki.
SYNTEETTISET:
SYNTEETTISET:
PIKAPESU 30':
Erittäin likainen kestävä kirjopyykki.
Hieman likainen kestävä kirjopyykki.
Vähän likaisten pyykkien nopeaan raikastamiseen (ei
sovi villalle, silkille tai käsin pestäville tuotteille).
RAIKASTUS 15':
Vähän likaisten pyykkien nopeaan raikastamiseen
(ei sovi villalle, silkille tai käsin pestäville tuotteille).
Lisäohjelmat
Huuhtelu - 1600 - Kevyt huuhtelu - 800 - Linkous - 1600 - - - 616
Kevyt linkous - 800 - - - 2,5 12
Tyhjennys - 0 - - - 62
Valkoiset erittäin likaiset.
Erittäin likainen kestävä valko- ja kirjopyykki.
Herkkä hieman likainen kirjopyykki.
Herkkä erittäin likainen kirjopyykki.
Silkki- ja viskoosituotteet, alusvaatteet.
Hieman likainen valkopyykki ja herkkä
Enimmäi-
slämpötila
Enimmäis-
nopeu s
(°C)
kierrosta/-
min.
Val ka is-
uaine
90° 1600
60° 1600 40° 800 40° 800 40° 600 30° 0 40° 600 -
60° 1600
40° 1600
40° 1600
60° 800 -
40° 800 -
30° 800 -
30° 800 -
Taulukon tiedot tulee ymmärtää suuntaa antavina.
Pesuaineet
Huuhtelu-
Pesu
aine
ll l
ll
ll
ll
ll
ll
ll
ll l
ll l
ll l
ll
ll
ll
ll
l
l
Enimm-
äistäyttö
(kg)
Jakson
kesto
6165
6110
4290
2120
270
155
1,5 55
6122
6115
685
2,5 85
2,5 70
330
1,5 15
636
2,5 31
Ohjelmataulukko
Erityisohjelmat
Puhdistus-ohjelma (ohjelma 6). Hygienisoiva ohjelma korkean lämpötilan kanssa, joka edellyttää valkaisuaineen
käyttöä yli 60°C lämpötiloissa.
Valkaisemiseksi kaada valkaisuaine, pesuaineet ja lisäaineet vastaaviin kaukaloihin
(katso kappale Pesuainelokerikko).
Hyvän yön ohjelma (ohjelma 7). Hiljainen pesujakso, jota voidaan käyttää yöllä halvan yösähkön kanssa. Ohjelma
on suunniteltu synteettisille ja puuvillaisille vaatteille. Jakson lopuksi kone pysähtyy veden kanssa; linkouksen ja
veden poiston suorittamiseksi paina näppäintä START/TAUKO, muuten 8 tunnin kuluttua kone suorittaa
automaattisesti veden poiston ja linkouksen.
Vauvaohjelma (ohjelma 8). Ohjelma, joka kykenee poistamaan lasten vaatteille tyypillisen likaisuuden ja joka takaa
pesuaineen huolellisen huuhtelun, jotta voidaan välttää allergiat lasten herkällä iholla. Jakso on suunniteltu
vähentämään bakteereja käyttämällä enemmän vettä ja optimoimalla erityisten pesuaineeseen lisättyjen
hygienisoivien aineiden vaikutusta.
Pesun lopuksi kone suorittaa hitaita rummun kiertoja, jotta vältetään ryppyjen muodostuminen; jakson
lopettamiseksi paina näppäintä START/TAUKO.
Pikapesu 30' (ohjelma 4) on suunniteltu hieman likaisten vaatteiden pesemiseksi nopeasti: se kestää ainoastaan
30 minuuttia mahdollistaen siten ajan ja energian säästön. Asettamalla ohjelma (4, 30°C:ssa) voidaan pestä
yhdessä eri tyyppisiä kankaita (villaa ja silkkiä lukuun ottamatta) enimmäistäyttömäärän ollessa 3 kg.
Raikastus 15' (ohjelma 5) on suunniteltu hieman likaisten vaatteiden pesemiseksi nopeasti: se kestää ainoastaan
15 minuuttia mahdollistaen siten ajan ja energian säästön. Asettamalla ohjelma (5, 30°C:ssa) voidaan pestä
yhdessä eri tyyppisiä kankaita (villaa ja silkkiä lukuun ottamatta) enimmäistäyttömäärän ollessa 1,5 kg.
30
Page 31

Omavalintaiset toiminnot
Lämpötilan asettaminen
Kiertäen nappulaa LÄMPÖTILA asetetaan pesulämpötila (katso Ohjelmataulukko).
Lämpötilaa voidaan alentaa aina kylmäpesuun (
Kone estää automaattisesti valitun ohjelman enimmäislämpötilaa korkeamman lämpötilan asettamisen.
) saakka.
Linkouksen asettaminen
Kiertäen nappulaa LINKOUS asetetaan valitun ohjelman linkousnopeus.
Seuraavassa ohjelmien sallimat enimmäisnopeudet:
Ohjelmat Enimmäisnopeus
Puuvilla 1600 kierrosta/min.
Synteettiset 800 kierrosta/min.
Villa 600 kierrosta/min.
Silkki vain veden poisto
Linkousnopeutta voidaan alentaa tai sulkea kokonaan pois valiten tunnus
Kone estää automaattisesti valitun ohjelman enimmäislinkousnopeutta suuremman linkousnopeuden suorittamisen.
.
Lisätoiminnot
Pesun eri lisätoiminnoilla pyykinpesukoneella saavutetaan halutut tulokset sekä puhtauden että valkaisun suhteen.
Toimintojen kytkemiseksi päälle:
1. paina haluttua lisätoimintaa vastaavaa näppäintä;
2. vastaavan merkkivalon syttyminen osoittaa, että lisätoiminto on päällä.
Huomaa: Merkkivalon nopea vilkkuminen osoittaa, että vastaava lisätoiminto ei ole valittavissa asetetulle
ohjelmalle.
FI
Ajastin
Viivästää käynnistystä jopa 12 tuntia.
Paina useampia kertoja näppäintä, kunnes haluttua viivästysaikaa vastaava merkkivalo syttyy. Näppäimen viidennellä
painalluksella lisätoiminto kytkeytyy pois päältä.
HUOM.: Sen jälkeen kun on painettu näppäintä START/TAUKO, viivästysaikaa voidaan ainoastaan vähentää.
Se on voimassa kaikkien ohjelmien kanssa.
Helppo silittää
Valittaessa tämä lisätoiminto, pesua ja linkousta muutetaan siten, että vähennetään ryppyjen muodostumista.
Jakson lopuksi pyykinpesukone suorittaa rummun hitaita kiertoliikkeitä, HELPPO SILITTÄÄ toiminnon merkkivalo
sekä START/TAUKO merkkivalo (oranssi) vilkkuvat ja
lopettamiseksi tulee painaa näppäintä START/TAUKO tai näppäintä HELPPO SILITTÄÄ.
Ohjelmassa Silkki kone jättää pyykit veteen jakson päättyessä, toiminnon HELPPO SILITTÄÄ merkkivalo ja
START/TAUKO -merkkivalo vilkkuvat (oranssina) ja "HUUHTELU" -vaiheen merkkivalo jää palamaan kiinteänä.
Jotta voidaan tyhjentää vesi ja poistaa pyykit tulee painaa näppäintä START/TAUKO tai näppäintä HELPPO
SILITTÄÄ.
-vaiheen merkkivalo palaa kiinteänä. Jakson
Lisätoimintoa ei voida käyttää ohjelmien 4, 5, 6, 7, 8, 11, C, D ja E kanssa.
Ylimääräinen huuhtelu
Valittaessa tämä lisätoiminto lisätään huuhtelun tehokkuutta ja varmistetaan pesuaineen paras mahdollinen
poistaminen. Tämä on tärkeää erityisesti herkkäihoisille.
Lisätoimintoa ei voida käyttää ohjelmien 4, 5, C, D ja E kanssa.
Super Wash
Kiitos jakson alkuvaiheessa käytettävän suuremman vesimäärän sekä pidemmän pesuajan, tämä lisätoiminto
takaa korkealaatuisen pesutuloksen.
Lisätoimintoa ei voida käyttää ohjelmien 4, 5, 6, 10, 11, A, B, C, D ja E kanssa.
31
Page 32

Pesuaineet ja pyykit
FI
Pesuainelokerikko
Hyvä pesutulos riippuu myös pesuaineen oikeasta
annostelusta: liioittelemalla pesuaineen käytössä ei
paranneta pesutulosta vaan aiheutetaan pesukoneen
sisäosien karstautumista ja saastutetaan ympäristöä.
Paljonko pyykit painavat?
1 lakana 400-500 gr.
1 tyynynpäällinen 150-200 gr.
1 pöytäliina 400-500 gr.
1 kylpytakki 900-1.200 gr.
1 pyyhe 150-250 gr.
Älä käytä käsinpesuun tarkoitettuja pesuaineita
niiden liiallisen vaahtoutumisen vuoksi.
Vedä ulos
4
MAX
1
3
kaukalo 1: Pesuaine esipesua varten
(jauheena)
Ennen pesuaineen kaatamista varmista, että
lisäkaukalo 4 ei ole pesuainelokerikossa.
kaukalo 2: Pesuaine varsinaista pesua varten
(jauheena tai nesteenä)
Nestemäinen pesuaine tulee kaataa juuri ennen
käynnistystä.
kaukalo 3: Lisäaineet (huuhteluaine, jne.)
Huuhteluaine ei saa tulla ulos ritilästä.
lisäkaukalo 4: Valkaisuaine
2
pesuainelokerikko ja laita
pesuaine tai lisäaine
seuraavasti.
Valkaisujakso
Valkaisu voidaan suorittaa ainoastaan ohjelmien 1, 2
ja 6 kanssa.
Kaada valkaisuaine lisäkaukaloon 4, pesuaine ja
huuhteluaine vastaaviin kaukaloihin ja sitten aseta yksi
yllä osoitetuista ohjelmista.
Jakso soveltuu ainoastaan erittäin likaisille
puuvillavaatteille.
Erityiset vaatekappaleet
Paidat: käytä erityistä ohjelmaa 9 eri tyyppisten ja
väristen paitojen pesuun.
Se takaa mahdollisimman huolellisen hoidon
muodostaen mahdollisimman vähän taitteita.
Silkki: käytä kyseistä ohjelmaa 10 kaikkien
silkkivaatteiden pesuun. Suositellaan käyttämään
erityistä herkkien tuotteiden pesuun soveltuvaa
pesuainetta.
Verhot: taita verhot ja laita ne tyynynpäällisen tai
verkkopussin sisälle. Käytä ohjelmaa 10.
Villa: Hotpoint/Ariston on ainoa pyykinpesukone, jolla
on arvokkaan The Woolmark Companyn myöntämä
Woolmark Platinum Care (M.0508) tunnustus, joka
vahvistaa pyykkikoneessa pesun kaikille villavaatteille,
myös niille, joiden tuoteselosteessa on merkintä vain
käsinpesuun
täysin rauhassa kaikki villatuotteet (enint. 1,5 kg)
saavuttaen parhaat tulokset.
. Ohjelmalla 11 voidaan siis pestä
Lastin tasapainottamisjärjestelmä
Ennen jokaista linkousta liiallisen tärinän välttämiseksi
ja lastin jakamiseksi tasaisesti rumpu suorittaa
muutamia kiertoja hieman tavallista pesua
nopeammin. Jos toistuvista yrityksistä huolimatta lasti
ei jakaudu riittävän tasaisesti, kone suorittaa
linkouksen oletettua hitaammalla nopeudella. Mikäli
epätasapaino on liiallinen, pyykinpesukone suorittaa
jakamisen linkouksen sijasta. Jotta edesautetaan
lastin jakautumista ja sen tasapainottumista oikein,
suositellaan sekoittamaan suuret ja pienet pyykit.
Pyykin valmistelu
Jaottele pyykit seuraavasti:
- kangastyyppi / merkki tuoteselosteessa.
- värit: erottele värilliset vaatteet valkoisista.
Tyhjennä taskut ja tarkista napit.
Älä ylitä osoitettuja arvoja, jotka viittaavat kuivaan
pyykkimäärään.
Kestävät kuidut: enintään 6 kg
Synteettiset kuidut: enintään 2,5 kg
Herkät kuidut: enintään 2 kg
Villa: enintään 1,5 kg
32
Page 33

Varotoimet ja neuvot
Pesukone on suunniteltu ja valmistettu kansainvälisiä
turvallisuusvaatimuksia vastaavaksi. Nämä varoitukset
toimitetaan turvallisuussyistä ja ne tulee lukea
huolellisesti.
Yleinen turvallisuus
Tämä laite on suunniteltu ainoastaan
kotitalouskäyttöön.
Ainoastaan aikuisten tulee käyttää tätä
pyykinpesukonetta noudattaen huolellisesti tämän
oppaan ohjeita.
Älä koske koneeseen avojaloin tai silloin, kun kätesi
tai jalkasi ovat märät tai kosteat.
Älä irrota pistoketta pistorasiasta johdosta vetämällä
vaan ota kiinni pistokkeesta.
Älä avaa pesuainelokerikkoa, mikäli pesukone on
käynnissä.
Älä kosketa pesukoneesta poistettavaan veteen,
koska se voi olla hyvin kuumaa.
Älä missään tapauksessa yritä avata luukkua
väkisin: vahingonomaisilta avaamisilta suojaava
turvamekanismi voi vahingoittua.
Vian tapauksessa älä milloinkaan yritä käsitellä
sisäisiä mekanismeja korjauksen suorittamiseksi.
Tarkista aina, että lapset eivät pääse toimivan
koneen läheisyyteen.
Pesun aikana luukku voi kuumentua.
Pesukoneen mahdollinen siirto on suoritettava
varovasti kahden tai kolmen henkilön voimin. Älä
yritä siirtää sitä yksin, sillä kone on erittäin painava.
Tarkista, että rumpu on tyhjä ennen kuin panet
pyykit pesukoneeseen.
Luukkuoven manuaalinen avaaminen
Mikäli ei ole mahdollista avata luukkuovea sähkövirran
puuttuessa ja haluat ripustaa pyykit, toimi seuraavasti:
1. poista pistoke
pistorasiasta.
2. tarkista, että veden taso
koneen sisällä on
20
alhaisempi kuin luukun
suu; päinvastaisessa
tapauksessa poista liiallinen
vesi tyhjennysletkun kautta
keräten se ämpäriin kuten
osoitettu kuvassa.
3. poista pesukoneen
etupuolella oleva
suojapaneeli ruuvimeisselin
avulla (katso kuva).
FI
Hävittäminen
Pakkaustarvikkeiden hävittäminen: noudata
paikallisia määräyksiä, siten pakkausmateriaalit
voidaan käyttää uudelleen.
Euroopan Direktiivi 2002/96/EC Waste Eelectrical
and Electronic Equipment (elektroniikka romulle),
vaatii vanhojen sähkölaitteiden romun erottamisen
normaali jätteiden kierrosta. Vanhat sähkölaitteet
tulee kerätä erikseen, jotta näin voidaan optimoida
laitteiden kierrätys ja näin ollen vähentää vaaran
aiheutumista ihmisille ja luonnolle. Merkkinä rasti
jäteastian päällä muistuttaa vastuustasi laitteiden
hävittämisestä erikseen.
Kuluttajien tulee ottaa yhteyttä paikallisiin viranomaisiin tai jälleenmyyjiin saadakseen tietoa
vanhojen laitteiden oikeasta kierrättämisestä.
4. kuvassa osoitettua kielekettä käyttäen vedä
ulospäin, kunnes vapautetaan muovinen vetonipukka
kiinnittimestä; sen jälkeen vedä sitä alaspäin ja
samanaikaisesti avaa luukku.
5. asenna suojapaneeli paikoilleen varmistaen ennen
sen työntämistä konetta kohden, että olet työntänyt
koukut asiaankuuluviin reikiin.
33
Page 34

Huolto ja hoito
FI
sulkeminen
Sulje vesihana jokaisen pesun jälkeen. Täten
vähennetään pesukoneen vesilaitteiden kulumista
ja estetään vuotovaara.
Irrota sähköpistoke konetta puhdistaessasi ja
huoltotoimenpiteiden ajaksi.
Veden ja sähkövirran pois
Pumpun puhdistaminen
Pyykinpesukone on varustettu itsestään puhdistuvalla
pumpulla, joka ei tarvitse huoltoa. Voi kuitenkin
tapahtua, että pienet esineet (rahat, napit) putoavat
pumppua suojaavaan eteiseen, joka sijaitsee tämän
alapuolella.
Varmista, että pesujakso on päättynyt ja irrota
pistoke.
Pyykinpesukoneen puhdistaminen
Eteisen saavuttamiseksi:
Ulkoiset ja kumiset osat voidaan puhdistaa rievulla,
joka huuhdellaan lämpimän veden ja saippuan
muodostamassa liuoksessa. Älä käytä liuottimia tai
hankaavia aineita.
1. poista pesukoneen
etupuolella oleva
suojapaneeli
ruuvimeisselin avulla
(katso kuvaa);
Pesuainelokerikon puhdistaminen
1
Irrota lokerikko nostaen
sitä ja vetäen sitä
ulospäin (katso kuvaa).
Pese se juoksevan
veden alla; tämä
puhdistus tulee suorittaa
säännöllisesti.
2
2. ruuvaa irti kansi
kiertäen sitä
vastapäivään (katso
kuvaa): on normaalia,
että tulee ulos hieman
vettä;
Luukun ja rummun hoito
Jätä luukku aina hieman auki, jotta vältetään
pahan hajun muodostuminen.
3. puhdista huolellisesti sisäpuoli;
4. ruuvaa kansi takaisin paikalleen;
5. asenna suojapaneeli paikoilleen varmistaen ennen
sen työntämistä konetta kohden, että olet työntänyt
koukut asiaankuuluviin reikiin.
Veden syöttöletkun tarkistaminen
Tarkista syöttöletku vähintään kerran vuodessa. Jos
siinä on havaittavissa halkeamia tai säröjä, se tulee
vaihtaa: pesujen aikana kova paine voi aiheuttaa
yllättävän halkeamisen.
Älä käytä koskaan käytettyjä letkuja.
34
Page 35

Häiriöt ja korjaustoimet
Pesukoneen toiminnassa voi joskus ilmetä ongelmia. Ennen Huoltoapuun soittamista (katso Huoltoapu), tarkista
seuraavan luettelon avulla, että kyseessä ei ole helposti ratkaistava ongelma.
Häiriöt:
Pesukone ei käynnisty.
Pesujakso ei aloita toimintaansa.
Pesukoneeseen ei tule vettä
(pesun ensimmäisen vaiheen
merkkivalo vilkkuu nopeasti).
Pesukone täyttää ja poistaa
vettä jatkuvasti.
Mahdolliset syyt / Ratkaisu:
Pistoketta ei ole työnnetty pistorasiaan tai se on työnnetty niin huonosti,
että ei muodostu kontaktia.
Kodissa on sähkökatkos.
Luukku ei ole kunnolla kiinni.
Näppäintä KÄYNNISTYS/SAMMUTUS ei ole painettu.
Näppäintä START/TAUKO ei ole painettu.
Vesihana ei ole auki.
On asetettu viivästys käynnistykseen (katso Omavalintaiset toiminnot).
Veden syöttöletkua ei ole liitetty vesihanaan.
Letku on taittunut.
Vesihana ei ole auki.
Kodista puuttuu vesi.
Vedenpaine ei ole riittävä
Painiketta START/TAUKO ei ole painettu.
Poistoletkua ei ole asennettu 65 100 cm:n korkeudelle maasta (katso Asennus).
Poistoletkun pää on veteen upotettuna (katso Asennus).
Seinäviemärissä ei ole ilma-aukkoa.
Jos näiden tarkistusten jälkeen ongelma ei ratkea, sulje vesihana,
sammuta pesukone ja soita huoltoapuun. Jos asunto on kerrostalon
ylimmissä kerroksissa voi esiintyä ns. lappoilmiöitä, joiden vuoksi
pesukone syöttää ja poistaa vettä jatkuvasti. Tämän häiriön
poistamiseksi on mahdollista ostaa tarkoitukseen sopiva lappoilmiön
estoventtiili.
FI
Pesukone ei poista vettä tai
linkoa.
Pesukone tärisee voimakkaasti
linkouksen aikana.
Pesukoneesta vuotaa vettä.
Merkkivalo START/TAUKO
(oranssi) ja lisätoimintojen
merkkivalot vilkkuvat nopeasti.
Vaahtoa muodostuu liikaa.
Ohjelmaan ei kuulu veden tyhjennys: joidenkin ohjelmien yhteydessä
tulee käynnistää se manuaalisesti (katso Käynnistys ja ohjelmat).
On kytketty päälle lisätoiminto HELPPO SILITTÄÄ: ohjelman loppuun
suorittamiseksi paina painiketta START/TAUKO (Omavalintaiset toiminnot).
Veden poistoletku on taittunut (katso Asennus).
Veden poistokanava on tukkeutunut.
Rumpua ei ole vapautettu kunnollisesti asennuksen yhteydessä (katso
Asennus).
Pesukone ei ole vaakatasossa (katso Asennus).
Pesukone on tiukassa huonekalujen ja seinän välissä (katso Asennus).
Veden syöttöletkua ei ole kiinnitetty kunnolla (katso Asennus).
Pesuainelokerikko on tukkeutunut (sen puhdistamiseksi katso Huolto ja hoito).
Veden poistoletkua ei ole kiinnitetty kunnolla (katso Asennus).
Sammuta kone ja poista pistoke pistorasiasta, odota noin 1 minuutti ja
käynnistä se uudelleen.
Jos häiriö on edelleen havaittavissa, soita huoltoapuun.
Pesuainetta ei ole tarkoitettu pesukoneille (siitä täytyy löytyä kirjoitus
pesukoneille, pesukoneille tai käsinpesuun, tai vastaava).
Annostelu on ollut liiallinen.
35
Page 36

Huoltoapu
FI
Ennen huoltoapuun soittamista:
Tarkista, voidaanko häiriö poistaa omin voimin (katso Häiriöt ja korjaustoimet);
Käynnistä ohjelma uudelleen tarkistaaksesi, onko ongelma jo ratkennut;
Kielteisessä tapauksessa ota yhteyttä valtuutettuun huoltoliikkeeseen, jonka puhelinnumero löytyy
takuutodistuksesta.
Älä koskaan käytä valtuuttamattomia teknikoita.
Ilmoita:
häiriön tyyppi;
koneen malli (Mod.);
sarjanumero (S/N).
Nämä tiedot löytyvät tietolaatasta, joka sijaitsee pyykinpesukoneen takapuolella sekä etupuolelta avaamalla
luukku.
36
Page 37

Brugervejledning
VASKEMASKINE
DK
Dansk
ARXL 169
Indholdsfortegnelse
DK
Installation, 38-39
Udpakning og planstilling
Tilslutning af vand og elektricitet
Første vaskecyklus
Tekniske oplysninger
Beskrivelse af vaskemaskinen, og start
af et program, 40-41
Betjeningspanel
Kontrollamper
Start af et program
Programmer, 42
Programoversigt
Personlige indstillinger, 43
Indstilling af temperaturen
Indstilling af centrifugeringen
Funktioner
Vaskemiddel og vasketøj, 44
Skuffe til vaskemiddel
Blegecyklus
Klargøring af vasketøjet
Specielt vasketøj
System til afbalancering af vasketøjet
Forholdsregler og råd, 45
Generelle sikkerhedsregler
Bortskaffelse
Manuel åbning af lågen
Vedligeholdelse, 46
Afbrydelse af vand og elektricitet
Rengøring af vaskemaskinen
Rengøring af skuffen til vaskemiddel
Behandling af låge og tromle
Rengøring af pumpen
Eftersyn af slangen til vandforsyning
Fejl og afhjælpning, 47
Servicetjeneste, 48
Page 38

Installation
DK
Det er vigtigt at opbevare denne vejledning til senere
opslag. Ved salg, overdragelse eller flytning skal man
sørge for, at brugervejledningen følger med
vaskemaskinen, samt oplyse den nye ejer om
funktionen og forholdsreglerne.
Læs venligst vejledningen omhyggeligt: den
indeholder vigtige oplysninger om installation, brug og
sikkerheden.
Udpakning og planstilling
Udpakning
1. Pak vaskemaskinen ud.
2. Undersøg, at vaskemaskinen ikke er blevet
beskadiget under transporten. Hvis den er
beskadiget, må den ikke tilsluttes, og man skal rette
henvendelse til forhandleren.
3. Fjern de 4 skruer til
beskyttelse under
transporten, samt
gummidelen og det
tilhørende afstandsstykke
anbragt bagpå (se
illustrationen).
Præcis planstilling giver maskinen større stabilitet og
forhindrer vibrationer, støj og flytning under funktionen.
Hvis gulvet er dækket af et tæppe, skal benene
justeres på en sådan måde, at der under
vaskemaskinen efterlades et rum, der er tilstrækkelig
stort til at sikre ventilation.
Tilslutning af vand og elektricitet
Tilslutning af slangen til vandforsyning
1. Indsæt pakning A i
enden af forsyningsslangen
og skru den på en hane
med koldt vand, udstyret
A
med gevindskåret
mundstykke på 3/4 gas
(se illustrationen).
Inden tilslutningen skal
vandet løbe, indtil det er
klart.
2. Skru forsyningsslangen
til vaskemaskinen på
vandindtaget øverst til
højre bagpå (se
illustrationen).
4. Luk hullerne med de medfølgende plastikpropper.
5. Gem alle delene. De skal genmonteres, hvis
vaskemaskinen skal transporteres.
Emballagen må ikke bruges som legetøj af børn.
Planstilling
1. Installer vaskemaskinen på et solidt og fladt gulv;
undgå at støtte den op ad mure, møbler eller andet.
2. Hvis gulvet ikke er helt
vandret, skal
uregelmæssigheden
udjævnes ved at
stramme eller slække de
forreste justeringsben (se
illustrationen).
Hældningsvinklen, der
måles på arbejdsfladen,
må ikke overskride 2°.
3. Sørg for at slangen hverken er bøjet eller klemt.
Vandtrykket fra hanen skal ligge inden for de
værdier, der kan ses på tabellen med tekniske
oplysninger (se modstående side).
Hvis forsyningsslangen ikke er tilstrækkelig lang, skal
man kontakte en specialforretning eller en autoriseret
tekniker.
Udskift aldrig med brugte slanger.
Brug de slanger, der følger med maskinen.
38
Page 39

Tilslutning af afløbsslangen
65 - 100 cm
Tilslut afløbsslangen,
uden at den bøjes, til et
afløbsrør eller et
vægmonteret afløb
anbragt mellem 65 og
100 cm over jorden,
Anvend aldrig forlængerledninger eller flerdobbelte
stikdåser.
Forsyningsledningen må ikke være bøjet eller
sammentrykket.
Forsyningsledningen må udelukkende udskiftes af
autoriserede teknikere.
Pas på! Fabrikanten kan ikke gøres ansvarlig for
skader, der opstår som følge af manglende
overholdelse af disse regler.
DK
eller lad den støtten på
kanten af en vask eller et
badekar, og fastgør den
medfølgende ledeskinne
til hanen (se
illustrationen). Den frie
ende af afløbsslangen må
ikke dækkes af vand.
Brug af forlængerstykker på slangen frarådes.
Såfremt dette ikke kan undgås, skal forlængerslangen
have samme diameter som den originale slange og
må ikke være længere end 150 cm.
Tilslutning af strøm
Inden stikket sættes i stikkontakten skal man sørge
for følgende:
at stikkontakten er udstyret med jordforbindelse og
overholder kravene i lovgivningen;
at stikkontakten tåler vaskemaskinens maksimale
effekt, der fremgår af tabellen med tekniske
oplysninger (se modstående side);
Første vaskecyklus
Efter installation, og inden brug bør man foretage en
vaskecyklus uden vasketøj, men med vaskemiddel,
efter at have indstillet programmet 1.
Tekniske oplysninger
Model
Mål
Kapacitet
Elektriske
tilslutninger
ARXL 169
bredde 59,5 cm
højde 85 cm
dybde 53,5 cm
fra 1 til 6 kg
se typeskiltet med tekniske
egenskaber på maskinen
at forsyningsspændingen er inden for værdierne, der
fremgår af tabellen med tekniske oplysninger (se
modstående side);
at stikkontakten passer til vaskemaskinens stik.
Hvis dette ikke er tilfældet skal stikkontakten eller
stikket udskiftes.
Vaskemaskinen må ikke installeres udendørs - dette
gælder også, selvom stedet er overdækket, da det er
meget farligt at udsætte vaskemaskinen for regn,
tordenvejr etc.
Når vaskemaskinen er installeret skal det være let at
få adgang til stikkontakten.
Tilslutning af
vand
Centrifugeringshastighed
Kontrolprogrammer iflg.
EN 60456
standarden
max tryk 1 MPa (10 bar)
min tryk 0,05 MPa (0,5 bar)
tromlens kapacitet 52 liter
max 1.600 omdr./min
program 6; temperatur 60°C;
udført med 6 kg vasketøj.
Apparatet opfylder kravene i
følgende EU-direktiver:
- 89/336/EØF af 03/05/89
(Elektromagnetisk kompatibilitet)
og senere ændringer
- 2006/95/CE (Lavspænding)
- 2002/96/CE
Page 40

Beskrivelse af vaskemaskinen,
og start af et program
DK
Betjeningspanel
Skuffe til vaskemiddel
Tasten
TÆND/
SLUK
PROGRAMMER
Knappen
CENTRIFUGERING
Knappen
TEMPERATUR
Knappen
Taster med
kontrollamper
for valg af
FUNTION
kontrollamper
VASKECYKLUS/
TIDSFORSINKET START
FOR
Kontrollampe for
BLOKERET
LÅGE
Tast med
kontrollampe for
START/
PAUSE
Skuffe til vaskemiddel Til ifyldning af vaskemiddel
og tilsætningsmidler (se Vaskemiddel og vasketøj).
Inden i vaskemiddelskuffen findes et skilt, hvor man til
enhver tid kan konsultere programoversigten.
Tasten TÆND/SLUK: Tænder og slukker for
vaskemaskinen.
Knappen PROGRAMMER: Til indstilling af
programmer. Under programmet bevæges knappen
ikke.
Taster med kontrollamper for valg af FUNKTION: Til
valg af de tilgængelige funktioner. Kontrollampen for
den valgte funktion vil være tændt.
Knappen CENTRIFUGERING: Til indstilling eller
afbrydelse af centrifugering (se Personlige
indstillinger).
Knappen TEMPERATUR: til indstilling af temperaturen
eller vask i koldt vand (se Personlige indstillinger).
Kontrollamper FOR VASKECYKLUS/
TIDSFORSINKET START: Giver mulighed for at se
på hvilket niveau vaskeprogrammet befinder sig.
Den tændte lampe angiver den igangværende fase.
Hvis funktionen Tidsforsinket start er indstillet, vises
den resterende tid til start af programmet (se
modsatte side).
Kontrollampe for BLOKERET LÅGE: Viser, om lågen
kan åbnes (se modsatte side).
Tast med kontrollampe for START/PAUSE: Til start af
programmer eller midlertidig afbrydelse.
N.B.: På denne knap kan man sætte vasken på
pause. Den pågældende lampe blinker orange, mens
lampen for den igangværende fase lyser konstant.
Hvis kontrollampen BLOKERET LÅGE
kan man åbne lågen.
For at genstarte vasken fra det punkt, hvor den blev
afbrudt, skal man trykke på tasten igen.
er slukket,
40
Page 41

Kontrollamper
Kontrollamperne giver vigtige oplysninger.
Deres betydning:
Fase under udførelse
Efter valg og start af vaskecyklussen tænder
kontrollamperne i trin for at vise det aktuelle
vaskeniveau.
DK
Tidsforsinket start
Hvis man har aktiveret funktionen for Tidsforsinket
start (se Personlige indstillinger), vil kontrollampen for
den valgte forsinkelse efter start begynde at blinke:
Som tiden skrider frem vises den resterende tid ved at
den pågældende lampe blinker.
Når den valgte forsinkelse er udløbet, slukkes
kontrollampen og det indstillede program begyndes.
Vask
Skylninger
Centrifugering
Tømning
Afslutning vask
Funktionstaster og kontrollamper
Når der vælges en funktion, tænder den pågældende
kontrollampe.
Hvis den valgte funktion ikke kan anvendes til det
indstillede program, blinker lampen og funktionen vil
ikke blive aktiveret.
Hvis der indstilles en funktion, der ikke kan anvendes
sammen med en tidligere valgt funktion, vil kun den
senest valgte funktion være aktiv.
Kontrollampe for blokeret låge
Kontrollampen tændes for at vise, at lågen er blokeret
til forebyggelse af utilsigtet åbning; for at undgå at
beskadige mekanismen, skal man vente indtil
kontrollampen slukker før lågen åbnes.
N.B.: Hvis funktionen Tidsforsinket start er slået til,
kan lågen ikke åbnes. For at åbne lågen skal
maskinen sættes på pause ved tryk på tasten START/
PAUSE.
Hvis kontrollampen for START/PAUSE (orange)
blinker hurtigt og kontrollampen for funktion, er det
tegn på en fejl (se Fejl og afhjælpning).
Start af et program
1. Tænd vaskemaskinen ved at trykke på tasten TÆND/SLUK. Alle kontrollamper tænder i nogle sekunder,
hvorefter de slukker igen og kontrollampen for START/PAUSE blinker.
2. Læg vasketøjet i vaskemaskinen og luk lågen.
3. Indstil PROGRAM-knappen på det ønskede program.
4. Indstil vasketemperaturen (se Personlige indstillinger).
5. Indstil centrifugeringshastigheden (se Personlige indstillinger).
6. Hæld vaskemiddel og tilsætningsmidler i (se Vaskemiddel og vasketøj).
7. Vælg de ønskede funktioner.
8. Start programmet ved at trykke på tasten START/PAUSE. Den pågældende kontrollampe lyser grønt.
For at annullere den indstillede vaskecyklus, skal man sætte maskinen på pause ved at trykke på tasten START/
PAUSE og vælge en ny vaskecyklus.
9. Når programmet er færdigt, tænder kontrollampen
at lågen kan åbnes. Tag vasketøjet ud og efterlad lågen på klem for at tørre tromlen.
Sluk for vaskemaskinen ved at trykke på tasten TÆND/SLUK.
. Kontrollampen for BLOKERET LÅGE slukker og angiver,
Page 42

Programmer
DK
Programoversigt
Programbeskrivelse
Programmer
Specialprogrammer
HYGIEJNEPROGRAM:
6
HYGIEJNEPROGRAM (1):
6
GODNAT VASK:
7
BABYPROGRAM:
8
SKJORTER
9
SILKE/GARDINER:
10
ULD:
11
1
1
2
3
3
4
5
A
B
C
D
E
Til uld, kashmir osv.
Hverdagsprogrammer
BOMULD :
BOMULD (2):
KULØRTE BOMULD (3):
SYNTETISK:
SYNTETISK:
HURTIGVASK 30':
Meget snavsede hvide og resistente kulørte tekstiler.
Meget snavsede hvide og sarte kulørte tekstiler.
Meget snavsede, resistente kulørte tekstiler.
Let snavsede, resistente kulørte tekstiler.
til uld, silke og tekstiler, der er beregnet til håndvask).
OPFRISKNING 15':
ikke til uld, silke og tekstiler, der er beregnet til håndvask).
Tilvalgsfunktioner
Skylninger - 1600 - Lette Skylninger - 800 - Centrifugering - 1600 - - - 616
Letcentrifugering - 800 - - - 2,5 12
Tømning - 0 - - - 62
Meget snavset hvidt vasketøj.
Meget snavsede hvide og resistente kulørte tekstiler.
Let snavsede, sarte kulørte tekstiler.
Meget snavsede, sarte kulørte tekstiler.
Til tekstiler i silke, viskose, lingeri.
Let snavset hvide og sarte kulørte tekstiler.
For hurtig opfriskning af let snavset tøj (anbefales ikke
For hurtig opfriskning af let snavset tøj (anbefales
Maks.
temp.
Maks.
hastighed
(omdr./
(°C)
min.)
90° 1600
60° 1600 40° 800 40° 800 40° 600 30° 0 40° 600 -
60° 1600
40° 1600
40° 1600
60° 800 40° 800 -
30° 800 -
30° 800 -
Vaskemiddel
Pletfjeme-
middel
Vask
Skyllemiddel
lll
ll
ll
ll
ll
ll
ll
lll
lll
lll
ll
ll
ll
ll
l
l
Maks.
mængde
Var ig-
(kg)
6165
6 110
4290
2120
270
155
1,5 55
6122
6 115
685
2,5 85
2,5 70
330
1,5 15
636
2,5 31
hed
Oplysningerne i tabellen er vejledende.
Til alle Test Institutes:
1) 1Kontrolprogrammer iht. EN 60456 standarden. Indstil programmet 6 ved en temperatur på 60° C.
2) Langt uldprogram: Indstil programmet 1ved en temperatur på 40° C.
3) Kort uldprogram: Indstil programmet 2 ved en temperatur på 40° C.
Særprogrammer
Hygiejneprogram (program 6). Et sanitært program ved høje temperaturer, der kræver brug af blegemiddel ved
temperaturer over 60° C.
For blegning hældes blegemiddel, vaskemiddel og tilsætningsmidler i de pågældende rum
(se afsnittet Skuffe til vaskemiddel).
Godnat vask (program 7). En støjsvag vaskecyklus, der kan kører om natten, når energitaksterne er lavere.
Programmet er beregnet til syntetiske tekstiler og bomuld. Efter endt vask standser maskinen med vand i tromlen.
Centrifugering og tømning udføres ved at trykke på tasten START/PAUSE, ellers udfører maskinen automatisk
centrifugering og tømning af vandet efter 8 timer.
Babyprogram (program 8). Program til vask af babytekstiler, som sikrer, at alt vaskemiddel fjernes for at undgå
allergiske reaktioner på børnenes sarte hud. Vaskecyklussen er beregnet til at mindske bakterievækst ved at bruge
en større mængde vand og således optimere effekten fra de særlige sanitære tilsætningsmidler til vaskemidlet.
Efter endt vask udfører maskinen langsomme omdrejninger af tromlen, så tøjet ikke krøller. For at afslutte vasken
skal man trykke på tasten START/PAUSE.
Hurtigvask 30 (program 4) er beregnet til hurtig vask af let snavset tøj. Programmet varer kun 30 minutter og
sparer således både energi og tid. Ved at indstille programmet (4 på 30° C) er det muligt at vaske forskellige slags
tekstiler (med undtagelse af uld og silke) med en samlet vægt på maks. 3 kg samtidigt.
Opfriskning 15 (program 5) er beregnet til hurtig vask af let snavset tøj. Programmet varer kun 15 minutter og
sparer således både energi og tid. Ved at indstille programmet (5 på 30° C) er det muligt at vaske forskellige slags
tekstiler (med undtagelse af uld og silke) med en samlet vægt på maks. 1,5 kg samtidigt.
42
Page 43

Personlige indstillinger
Indstilling af temperaturen
Ved drejning af TEMPERATUR-knappen indstilles vasketemperaturen (se Programoversigten).
Temperaturen kan sænkes ned til vask med koldt vand (
Maskinen forhindrer automatisk, at man kan indstille en højere temperatur end beregnet for hvert enkelt program.
).
Indstilling af centrifugeringen
Ved drejning af CENTRIFUGERINGS-knappen indstilles centrifugeringshastigheden for det valgte program.
Der findes følgende maks. hastigheder:
Programmer Maks. hastighed
Bomuld 1600 omdr./min.
Syntetiske tekstiler 800 omdr./min.
Uld 600 omdr./min.
Silke kun tømning
Centrifugeringshastigheden kan sænkes, eller helt afbrydes ved valg af symbolet
Maskinen forhindrer automatisk, at der udføres hurtigere centrifugering end beregnet for hvert enkelt program.
.
Funktioner
De forskellige vaskefunktioner på vaskemaskinen giver mulighed for at få den ønskede renhed og hvidt vasketøj.
Aktivering af funktionerne:
1. Tryk på tasten for den ønskede funktion.
2. Den pågældende kontrollampe tænder og angiver, at funktionen er slået til.
Bemærk: Hvis kontrollampen blinker hurtigt, er det tegn på, at den pågældende funktion ikke kan vælges til det
indstillede program.
DK
Tidsforsinket start
Forsinker start af vaskemaskinen med op til 12 timer.
Tryk flere gange på tasten, indtil kontrollampen for den ønskede forsinkelse tændes. Ved det femte tryk på tasten slås
funktionen fra.
N.B.: Når man har trykket på tasten START/PAUSE, kan forsinkelsestiden kun ændres med reducering.
Den er aktiv med alle programmer.
Strygelet
Ved valg af denne funktion ændres vasken og centrifugeringen, så tøjet bliver mindre krøllet. Efter endt vask
udfører vaskemaskinen langsomme omdrejninger af tromlen. Kontrollampen for funktionen STRYGELET og lampen
for START/PAUSE blinker (orange), og lampen for
tasten START/PAUSE eller tasten STRYGELET.
I programmet Silke afslutter maskinen vasken med tøjet i blød, og kontrollampen for funktionen STRYGELET og
lampen for START/PAUSE blinker (orange), og lampen for SKYLNINGER lyser fast. For at tømme vandet ud og
tage tøjet ud skal man trykke på tasten START/PAUSE eller på tasten STRYGELET.
lyser fast. For at afslutte cyklussen skal man trykke på
Funktionen kan ikke anvendes med programmerne 4, 5, 6, 7, 8, 11, C, D, E.
Ekstra skylning
Ved valg af denne funktion øges skylleeffektiviteten, hvilket sikrer, at al vaskemiddel skylles ud. Denne funktion er
især nyttig til særligt sarte skindtyper.
Funktionen kan ikke anvendes med programmerne 4, 5, C, D, E.
Super Wash
Takket være brugen af en større mængde vand i den begyndende fase af vaskecyklussen samt en længere
vaskecyklus, sikrer denne tilvalgsfunktion en optimal vask.
Funktionen kan ikke anvendes med programmerne 4, 5, 6, 10, 11, A, B, C, D, E.
Page 44

Vaskemiddel og vasketøj
DK
Skuffe til vaskemiddel
Et godt vaskeresultat afhænger også af korrekt
dosering af vaskemidlet. Hvis man bruger for meget
får man ikke et bedre vaskeresultat, og man
forårsager skorpedannelse på vaskemaskinens
inderside og medvirker til forurening af naturen.
Benyt aldrig vaskemidler til vask i hånden, idet de
danner for meget skum.
Træk skuffen til
4
AX
M
1
3
Beholder 1: Vaskemiddel til forvask (pulver)
Inden ifyldning skal man kontrollere, at beholderen til
tilsætningsmiddel 4 ikke er indsat.
Beholder 2: Vaskemiddel til vask (pulver eller
flydende)
Flydende vaskemiddel skal først hældes i umiddelbart
inden start af vaskemaskinen.
Beholder 3: Tilsætningsmidler (skyllemiddel,
etc.)
Skyllemidlet må ikke flyde ud over risten.
Beholder til tilsætningsmiddel 4: Pletfjememiddel
2
vaskemiddel ud og fyld
vaskemiddel eller
tilsætningsmiddel i ved at
følge nedenstående
fremgangsmåde:
Blegecyklus
Blegning kan kun udføres med programmerne 1, 2, 6.
Hæld blegemidlet i beholderen til tilsætningsmiddel 4,
hæld vaskemiddel og skyllemiddel i de pågældende
beholdere, og start et af de ovennævnte programmer.
Funktionen anbefales kun til meget snavsede
bomuldstekstiler.
Hvor meget vejer vasketøjet?
1 lagen 400-500 g.
1 pudebetræk 150-200 g.
1 dug 400-500 g.
1 badekåbe 900-1.200 g.
1 håndklæde 150-250 g.
Specielt vasketøj
Skjorter: brug program 9 til vask af skjorter af
forskellige type og farve.
Programmet vasker skånsomt og gør tøjet mindre
krøllet.
Silke: brug det passende program 10 til vask af alle
silketekstiler. Det anbefales at bruge et særligt
vaskemiddel til sarte tekstiler.
Gardiner: fold dem omhyggeligt og læg dem i et
pudebetræk eller i en netpose. Brug programmet 10.
Uld: Hotpoint/Ariston er den eneste vaskemaskine,
der har fået den prestigefyldte anerkendelse
Woolmark Platinum Care (M.0508) fra The Woolmark
Company, som gør det muligt at vaske alle typer
uldtekstiler i maskinen, også dem, der bærer mærket
vask i hånden
således roligt vaske alle former for uldtekstiler i
vaskemaskine (maks. 1,5 kg) med garanti for den
bedst mulige vask.
. Med program 11 kan man
System til afbalancering af vasketøjet
Inden centrifugeringen udfører tromlen nogle
omdrejninger ved en hastighed, der er lidt højere end
under vask, for at undgå vibrationer og for at fordele
tøjet ligeligt. Hvis tøjet efter gentagne forsøg stadig
ikke af korrekt afbalanceret, foretager maskinen
centrifugeringen ved en lavere hastighed end normalt.
Hvis uligevægten er for stor, fordeler vaskemaskinen
tøjet frem for at udføre centrifugeringen. For at opnå
en bedre fordeling af tøjet og en korrekt
afbalancering, tilrådes det at blande store og små
stykker tøj.
Klargøring af vasketøjet
Sorter vasketøjet på grundlag af:
- tekstiltypen/symbolet på etiketten.
- farverne: vask kulørte tekstiler adskilt fra hvide
tekstiler.
Tøm lommer og undersøg, at knapperne sidder fast.
Overskrid aldrig de anførte mængder, der henviser
til vægten på det tørre vasketøj:
Robuste tekstiler: maks. 6 kg
Syntetiske tekstiler: maks. 2,5 kg
Sarte tekstiler: maks. 2 kg
Uld: maks. 1,5 kg
44
Page 45

Forholdsregler og råd
Vaskemaskinen er udviklet og bygget i
overensstemmelse med de internationale
sikkerhedsstandarder. Disse advarsler gives af hensyn til
sikkerheden, og der henstilles til, at de læses omhyggeligt.
Generelle sikkerhedsregler
Dette apparat er udviklet udelukkende til brug i
hjemmet.
Vaskemaskinen må kun anvendes af voksne i
overensstemmelse med oplysningerne i denne
brugervejledning.
Undgå at røre ved maskinen, hvis man er barfodet
eller har våde hænder eller fødder.
Træk aldrig stikket ud fra stikkontakten v.h.a.
ledningen; tag derimod fat i stikket.
Træk aldrig skuffen til vaskemiddel ud, mens
vaskemaskinen er i funktion.
Rør aldrig afløbsvandet, da vandet kan nå meget
høje temperaturer.
Bryd under ingen omstændigheder lågen op:
sikkerhedsmekanismen til beskyttelse mod utilsigtet
åbning kan blive ødelagt.
I tilfælde af fejlfunktioner må man aldrig skaffe sig
adgang til de interne mekanismer for at forsøge at
reparere dem.
Sørg altid for, at børn ikke kommer i nærheden af
maskinen mens den er i funktion.
Under vask har lågen tendens til at blive varm.
Hvis vaskemaskinen skal flyttes, skal flytningen
udføres af 2-3 personer, og der skal udvises stor
forsigtighed. Forsøg aldrig at flytte vaskemaskinen
alene, da den er meget tung.
Kontroller, at tromlen er tom, inden der lægges tøj i
vaskemaskinen.
Manuel åbning af lågen
I tilfælde af at det ikke er muligt at åbne døren på
grund af strømsvigt eller hvis man ønsker at tage
vasketøjet ud, skal man gøre følgende:
1. Træk stikket ud af
stikkontakten.
2. Kontroller, at
vandniveauet inden i
20
lade det løbe ned i en spand, som vist i illustrationen.
maskinen ikke når op over
lågens kant. Er dette
tilfældet, skal man tømme
maskinen for eventuelt
overskydende vand ved
hjælp af en afløbsslange og
3. Fjern tildækningspanelet
på forsiden af
vaskemaskinen ved hjælp
af en skruetrækker (se
illustrationen).
DK
Bortskaffelse
Bortskaffelse af emballagematerialet: Overhold den
lokale lovgivning, således at emballagen kan genbruges.
Det Europæiske Direktiv 2002/96/EC angående Waste
Eelectrical and Electronic Equipment (Affaldshåndtering
af Elektriske og Elektroniske udstyr), kræver at når
gamle elektronisk husholdningsudstyr skal udskilles må
dette ikke ske på en usorteret måde. Gamle
elektroniske apperater skal indsamles seperat for at
optimere genbrugligheden af de materialer apperaterne
besidder. Derved reduceres den skadelig påvirkning på
mennesker og miljø mest mulig. Symbolet med krydset
over skallespanden på produktet, vil påminde dig om dit
ansvar til at indsamle disse produkter seperat. Det
opfordres stærkt, at man tager kontakt til sin lokale
kommune eller forhandler for yderligere information
angående affaldshåndteringen af gamle elektroniske
apperater.
4. Træk fligen, som vist i illustrationen, ud ad for at
frigøre plastikstangen fra holderen. Træk den herefter
ned ad og åbn samtidig lågen.
5. Genmonter panelet efter først at have sørget for, at
krogene er indsat i åbningerne, inden panelet
skubbes mod maskinen.
Page 46

Vedligeholdelse
DK
Afbrydelse af vand og elektricitet
Luk vandhanen efter hver vask. På denne måde
begrænses sliddet på vaskemaskinens vandanlæg,
og man fjerner faren for lækage.
Træk stikket ud fra stikkontakten, når
vaskemaskinen rengøres og under
vedligeholdelse.
Rengøring af vaskemaskinen
Vaskemaskinens yderside og gummidele kan
rengøres med en klud, der er fugtet med lunkent
vand og sæbe. Anvend aldrig opløsningsmidler eller
slibemidler.
Rengøring af skuffen til vaskemiddel
1
Træk skuffen ud ved at
løfte opad og trække
udad (se illustrationen).
Vask skuffen under
rindende vand; denne
rengøring skal udføres
med jævne mellemrum.
2
Rengøring af pumpen
Vaskemaskinen er forsynet med en selvrensende
pumpe, der ikke kræver nogen form for
vedligeholdelse. Det kan dog hænde, at små
genstande (mønter, knapper) falder ned i forkammeret
til beskyttelse af pumpen; dette forkammer er
placeret inde i selve pumpen.
Kontrollér, at vaskecyklussen er afsluttet, og træk
stikket ud.
Adgang til forkammeret:
1. Fjern
tildækningspanelet på
forsiden af
vaskemaskinen ved hjælp
af en skruetrækker (se
illustrationen).
2. Skru låget af ved at
dreje det venstre om (se
illustrationen): det er
normalt, at der løber lidt
vand ud.
Behandling af låge og tromle
Lågen skal altid efterlades på klem, således at der
ikke opstår dårlig lugt.
3. Rengør indersiden omhyggeligt.
4. Skru låget på igen.
5. Genmonter panelet efter først at have sørget for, at
krogene er indsat i åbningerne, inden panelet
skubbes mod maskinen.
Eftersyn af slangen til vandforsyning
Kontrollér forsyningsslangen mindst én gang om året.
Hvis slangen er revnet eller har fordybninger skal den
udskiftes. Under vask kan de kraftige tryk medføre
pludselige brud.
Udskift aldrig med brugte slanger.
46
Page 47

Fejl og afhjælpning
Det kan hænde, at vaskemaskinen ikke fungerer. Inden der ringes til servicetjenesten (se Servicetjeneste), skal
man kontrollere, at det ikke drejer sig om et problem, der nemt kan løses ved hjælp af nedenstående oversigt.
Fejl:
Vaskemaskinen tændes ikke.
Vaskecyklussen starter ikke.
Vaskemaskinen tager ikke vand
ind (kontrollampen for første
vaskefase blinker hurtigt).
Vaskemaskinen tager vand ind
og tømmer vand ud samtidigt.
Mulige årsager / Løsning:
Stikket er ikke sat i stikkontakten, eller er ikke sat helt ind.
Der er strømsvigt i huset.
Lågen er ikke lukket rigtigt.
Der er ikke trykket på tasten TÆND/SLUK.
Der er ikke trykket på tasten START/PAUSE.
Vandhanen er ikke åben.
Der er indstillet forsinket start (se Personlige indstillinger).
Slangen til vandforsyning er ikke tilsluttet vandhanen.
Slangen er bøjet.
Vandhanen er ikke åben.
Der er ingen vandforsyning i huset.
Der er ikke tilstrækkeligt tryk.
Der er ikke trykket på tasten START/PAUSE.
Afløbsslangen er ikke monteret mellem 65 og 100 cm fra gulvet (se
Installation).
Den frie ende af afløbsslangen er dækket af vand (se Installation).
Afløbet i væggen er ikke forsynet med udluftningshul.
Hvis problemet ikke er blevet løst efter denne kontrol, skal vandhanen
lukkes og vaskemaskinen slukkes. Ring til servicecenteret. Hvis boligen
ligger på en høj etage, er der risiko for, at der opstår hævert-forstyrrelser,
således at vaskemaskinen tager vand ind og tømmer vand ud samtidigt.
Denne form for forstyrrelse afhjælpes ved montering af specielle antihævertventiler, der kan købes i almindelig handel.
DK
Vaskemaskinen tømmer ikke
vandet ud og centrifugerer ikke.
Vaskemaskinen vibrerer kraftigt
under centrifugeringen.
Der kommer vand ud fra
vaskemaskinen.
Kontrollampen for START/PAUSE
(orange) og funktionslamperne
blinker hurtigt.
Der dannes for meget skum.
Programmet medfører ikke udtømning af vandet. På nogle programmer
skal dette gøres manuelt (se Start og programmer).
Funktionen STRYGELET er aktiveret. Tryk på tasten START/PAUSE for
at fuldføre programmet (se Personlige indstillinger).
Afløbsslangen er bøjet (se Installation).
Afløbsrørforbindelsen er tilstoppet.
Tromlen er ikke blevet frigivet korrekt i forbindelse med installering af
vaskemaskinen (se Installation).
Maskinen står ikke plant (se Installation).
Maskinen står for tæt op ad møbler og væg (se Installation).
Slangen til vandforsyning er ikke korrekt strammet (se Installation).
Skuffen til vaskemiddel er tilstoppet (for rengøring se Vedligeholdelse).
Afløbsslangen er ikke fastgjort korrekt (se Installation).
Sluk for maskinen, tag stikket ud af stikkontakten, vent i ca. 1 minut og
tænd den igen.
Hvis fejlen varer ved, skal man kontakte servicetjenesten.
Vaskemidlet er ikke egnet til vaskemaskiner (der skal stå til
maskinvask, til vask i hånden eller maskinvask eller tilsvarende).
Der er fyldt for meget vaskemiddel i.
Page 48

Servicetjeneste
DK
Inden der ringes til Servicetjenesten:
Kontrollér, om du selv kan udbedre fejlen (se Fejl og afhjælpning);
Start programmet igen for at undersøge om fejlen er blevet udbedret;
Hvis dette ikke er tilfældet, bedes man ringe til servicecenteret på telefonnummeret anført på garantibeviset.
Tilkald aldrig uautoriserede teknikere.
Oplys venligst:
Type af fejl;
Maskinmodellen (Mod.);
Serienummeret (S/N).
Disse oplysninger finder man på typeskiltet, der sidder bag på vaskemaskinen og nederst foran, hvis man åbner
lågen.
48
Page 49

Bruksanvisning
VASKEMASKIN
NO
Norsk
ARXL 169
Innhold
NO
Installering, 50-51
Utpakking og nivellering
Tilkopling til strøm og vannforsyning
Den første vaskesyklusen
Tekniske data
Beskrivelse av vaskemaskinen og
start av en vaskesyklus, 52-53
Kontrollpanel
Indikatorlamper
Starte en vaskesyklus
Programmer, 54
Tabell over vaskesykluser
Enkelttilfeller, 55
Stille temperaturen
Innstilling av sentrifugeringshastigheten
Funksjoner
Vaskemidler og vask, 56
Såpeskuff
Blekesyklus
Klargjøre vasken
Plagg som krever spesialbehandling
Laste balansesystem
Forholdsregler og tips, 57
Generell sikkerhet
Skroting
Åpne porthulldøren manuelt
Pleie og vedlikehold, 58
Stenge forsyningen av vann og strøm
Rengjøring av vaskemaskinen
Rengjøre såpeskuffen
Ta vare på døren og trommelen til apparatet
Rengjøring av pumpen
Kontrollere vanninntaksslangen
Feilsøking, 59
Hjelp, 60
49
Page 50

Installering
NO
Lagre denne brukerveiledningen på et trygt sted for
fremtidig bruk. Hvis vaskemaskinen selges, overføres
eller flyttes, se til at instruksene medfølger maskinen,
slik at den nye eieren kan bli kjent med bruk av
maskinen og funksjonene.
Les disse instruksjonene nøye: Disse inneholder
viktig informasjon om sikker installering og drift av
apparatet.
Utpakking og nivellering
Utpakking
1. Fjern maskinen fra innpakningen.
2. Se til at vaskemaskinen ikke har blitt skadet under
transporten. Hvis den er skadet, ta kontakt med
forhandleren, og ikke fortsett med
installasjonsprosessen.
3. Fjern 4
beskyttelsesskruer (som
brukes under transport)
og gummitetningen med
tilhørende
avstandsstykke, som
befinner seg på baksiden
av apparatet (se figur).
Riktig nivellering av maskinen gir stabilitet, hjelp til å
unngå vibrasjoner og unødig støy, samt forhindre den
fra å forskyve seg under drift. Hvis den plasseres på
et teppe eller løper, skal føttene justeres slik at det er
nok ventilasjonsplass under vaskemaskinen.
Tilkopling til strøm og vannforsyning.
Kople til vanninntaksslangen
1. Sett pakningen inn i
eden av inntaksslangen,
og skru denne fast på et
kaldtvannsuttak med 3/4
A
gass gjenget åpning (se
figur).
Før gjennomføring av
tilkoplingen skal vannet
renne fritt inntil det er helt
klart.
2. Tilkople inntaksslangen
til vaskemaskinen ved å
skru den på tilhørende
vanninntak på apparatet,
som befinner seg øverst
til høyre på apparatets
bakside (se figur).
4. Lukk hullene ved bruk av plastpluggene som
medfølger.
5. Oppbevar alle delene på et trygt sted: Du vil ha
behov for disse igjen hvis maskinen må flyttes til et
annet sted.
Pakkematerialer er ikke leketøy for barn.
Nivellering
1. Installer vaskemaskinen på et flatt, stødig underlag,
uten å sette den opp mot vegger, møbelskap eller
noe annet.
2. Hvis gulvet ikke er
helt flatt, skal denne
ujevnheten kompenseres
for ved å trekke til eller
løsne de justerbare
frontføttene (se figur);
hellingsvinkelen målt i
forhold til arbeidsbenken
skal ikke overstige 2°.
3. Se til at slangen ikke knekkes eller bøyes.
Vanntrykket ved kranen må være innenfor de
verdiene som er indikert i tabellen over tekniske data
(se neste side).
Hvis inngangsslangen ikke er lang nok, ta kontakt
med en spesialbutikk eller en autorisert tekniker.
Bruk aldri brukte slanger.
Bruk de som medfølger maskinen.
50
Page 51

Tilkopling av tømmeslangen
65 - 100 cm
Tilkople tømmeslangen,
uten å bøye den, for å
tømme et rør eller
veggavløp som befinner
seg i en høyde på mellom
65 og 100 cm fra gulvet,
Ikke bruk flerstikksinnretninger eller skjøteledninger.
NO
Ledningen skal ikke være bøyd eller under trykk.
Strømledningen skal kun skiftes av autoriserte
teknikere.
Advarsel! Selskapet skal ikke holdes ansvarlig hvis
disse reglene ikke respekteres.
Den første vaskesyklusen
eller legg den i en
utslagsvask eller et
badekar og fest
medfølgende kanal som
medfølger til kranen ( se
figur). Den fri enden av
slagen skal ikke være
under vann.
Vi advarer mot bruk av slangeforlengelser, men hvis
det er absolutt nødvendig, må forlengelsen ha samme
diameter som den opprinnelige slangen og skal ikke
være lenger enn 150 cm.
Elektriske tilkoplinger
Før apparatet tilkoples strømuttaket, se til at:
uttaket er jordet og oppfyller alle gjeldende lover;
uttaket er i stand til å motstå maks.
strømbelastning fra apparatet slik som indikert i
tabellen over tekniske data (se neste side);
strømforsyningsspenningen faller innenfor de
verdiene som finnes i tabellen over tekniske data
(se neste side);
Når apparatet er installert og før du bruker det for
første gang, kjør en vaskesyklus med vaskemiddel og
ingen vask, ved bruk av vaskesyklus 1.
Tekniske data
Modell
Mål
Kapasitet
Elektrisk tilkopling
Vanntilkopling
ARXL 169
bredde 59,5 cm
høyde 85 cm
dybde 53,5 cm
1 til 6 kg
se merkeskiltet med tekniske
egenskaper som er plassert på
maskinen
maksimumstrykk 1 MPa (10 bar)
minimumstrykk 0,05 MPa (0,5 bar)
trommelens kapasitet 52 liter
uttaket er kompatibelt med støpselet på
vaskemaskinen. Hvis dette ikke er tilfelle, skal
uttaket eller støpselet skiftes.
Vaskemaskinen skal ikke installeres utendørs, selv
på tildekkede steder. Det er ekstremt farlig å la
apparatet utsettes for regn, stormer og andre
værforhold.
Når vaskemaskinen er installert, må strømuttaket
være innen lett rekkevidde.
Sentrifugehastighet
Kontrollprogrammer
i henhold til
EN 60456
standarden
opp til 1600 omdreininger i minuttet
program 6; temperatur 60 °C;
utført med 6 kg tøy.
Dette apparatet er i
overensstemmelse med følgende
europeiske direktiver:
- EU-89/336 av den 03.05.89
(Elektromagnetiske kompatibilitet)
og etterfølgende endringer
- 2006/95/CE (Lavspenning)
- 2002/96/CE
51
Page 52

Beskrivelse av vaskemaskinen
og start av en vaskesyklus
NO
Kontrollpanel
Såpeskuff
PÅ/AV
-knapp
VASKESYKLUS
-bryter
SENTRIFUGEHASTIGHET
-bryter
TEMPERATUR
-bryter
FUNKSJON
-knappermed
indikatorlamper
VASKESYKLUSFORLØP/
UTSATT START
indikatorlamper
DØR LÅST
-indikatorlampe
START/
PAUSE
-knapp med
indikatorlampe
Såpeskuff: brukes til å lagre vaskemiddel og
tilsetninger (se Vaskemidler og vask).
Dette er en nøkkel som gir en oppsummering over
tilgjengelige vaskesykluser inne i såpeskuffen, denne
kan brukes når som helst.
PÅ/AV -knapp: Slår vaskemaskinen på og av.
VASKESYKLUS -bryter: Programmerer
vaskesyklusene. I løpet av vaskesyklusen beveger ikke
bryteren seg.
FUNKSJON- knappermed indikatorlamper: brues til
å velge tilgjengelige funksjoner. Indikatorllyset som
tilhører valgt funksjon vil være tent.
SENTRIFUGEHASTIGHET -bryter: stiller inn
sentrifugehastigheten eller utelukker sentrifugeringen
helt (se enkelttilfeller).
TEMPERATUR -bryter: stiller inn temperaturen eller
kald vaskesyklus (se enkelttilfeller).
VASKESYKLUSFORLØP/UTSATT START
indikatorlamper: brukes til å overvåke forløpet av
vaskesyklusen.
Den tente indikatorlampen viser hvilken fase som
pågår.
Hvis forsinkelsestimeren er stilt inn, vil gjenstående tid
inntil vaskesyklusen starter indikeres (se neste side).
DØR LÅST indikatorlys: indikerer om døren kan
åpnes eller ikke (se neste side).
START/PAUSE -knapp med indikatorlampe: starter
eller stopper vaskesyklusen midlertidig.
N.B.: For å stanse vaskesyklusen midlertidig under
vasking, trykkes denne knappen. Den tilhørende
indikatorlampen vil blinke oransje mens indikatorlyset
for aktuell vaskesyklus vil forbli tent. Hvis indikatoren
DØR LÅST
For å starte vaskesyklusen fra det punket den ble
avbrutt, trykker du på denne knappen enda en gang.
slukker, kan døren åpnes.
52
Page 53

Indikatorlamper
Indikatorlampene gir viktig informasjon.
Dette er hva de kan fortelle deg:
Indikatorlamper for vaskesyklusfase
Når den ønskede vaskesyklusen har blitt valgt og har
begynt, bytter indikatorlampene en etter en til å indikere
hvilken fase av syklusen som for tiden er i gang.
NO
Utsatt start
Hvis Utsatt start -funksjon har blitt aktivert (se
enkelttilfeller), etter at vaskesyklusen har blitt
startet, vil indikatorlampen til tilhører valgt
forsinkelsestid begynne å blinke:
Etter som tiden går, vil gjenstående forsinkelse vises,
og tilhørende indikatorlampe vil blinke:
Når innstilt forsinkelsestid er utløpt, vil
blinkeindikatorlyset slås av, og valgt vaskesyklus vil
begynne.
Starte en vaskesyklus
Vask
Skyllinger
Sentrifugering
Tømming
Slutten av en
vaskesyklus
Funksjonsknapper og tilhørende
indikatorlamper
Når en funksjon velges, vil det tilhørende indikatorlyset
tennes.
Hvis den valgte funksjonen ikke er kompatibel med
programmert vaskesyklus, vil det tilhørende
indikatorlyset blinke, og så vil funksjonen vil ikke bli
aktivert.
Hvis en funksjon som ikke er kompatibel med en
annen funksjon som tidligere er valgt, vil kun det
nyeste valget gjelde.
indikatorlampe for låst dør
Hvis indikatoren er på, er døren til apparatet låst for å
forhindre utilsiktet åpning av døren, for å unngå
skade, vent til indikatorlampen slås av før du åpner
døren på apparatet.
N.B.: Hvis Utsatt start-funksjonen er aktivert,kan
døren ikke åpnes, sett maskinen på pause ved å
trykke på START/PAUSE-knappen hvis du ønsker å
åpne den.
Hvis START/PAUSE-indikatorlampen (oransje) blinker
hurtig samtidig som funksjonsindikatorlampen, viser
dette at det har oppstått et problem (se Feilsøking).
1. Slå av maskinen ved å trykke på PÅ/AV-knappen. Alle indikatorlampene vil slås på i noen sekunder, så vil de
slukke, og START/PAUSE-indikatoren vil blinke.
2. Legg inn vasken og lukk døren.
3. Still VASKESYKLUS-knotten på ønsket program.
4. Stiller inn vasketemperaturen (se enkelttilfeller).
5. Stiller inn sentrifugehastigheten (se enkelttilfeller).
6. Mål vaskemiddel og vasketilsetninger (se Vaskemidler og vask).
7. Velg ønskede funksjoner.
8. Start vaskesyklusen ved å trykke på START/PAUSE-knappen, og tilhørende indikatorlampe vil bli varig tent, i
grønt. For å avbryte innstilt vaskesyklus, still maskinen på pause ved å trykke på START/PAUSE-knappen og velge
en ny syklus.
9. På slutten av vaskesyklusen vil
døren kan åpnes. Ta ut vasken og la apparatets dør stå på gløtt og se til at trommelen tørker fullstendig.
Slå av maskinen ved å trykke på PÅ/AV-knappen.
-indikatoren tennes. Indikatoren DØR LÅST vil slukke, og dette betyr at
53
Page 54

Vaskesykluser
NO
Tabell over vaskesykluser
Beskrivelse av vaskesyklusen
Vaskesykluser
Spesialprogram
HYGIENE PROGRAM:
6
HYGIENE PROGRAM (1):
6
GOD NATT SYKLUS :
7
BABY PROGRAM:
8
SKJORTER
9
SILKE/GARDINER:
10
ULL:
11
1
1
2
3
3
4
5
A
B
C
D
E
For ull, kashmir osv.
Hverdagsprogram
BOMULL:
BOMU LL (2):
FARGED E BOMULL (3):
SYNTETISK:
SYNTETISK:
HURTIGVASK 30':
ull, silke og klær som krever håndvask).
OPPFRISKE TØY 15':
for ull, silke og klær som krever håndvask).
Delprogram
Skyllinger
Skånsom skyllinger
Sentrifugering
Skånsom sentrifugering
Tømming
Svært skitten hvitvask og resistente farger.
Svært skitten hvitvask og delikate farger.
Svært skitten holdbar kulørtvask
Lett skitten holdbar kulørtvask.
Ekstremt tilsølt hvitvask.
Svært skitten hvitvask og resistente farger.
Lett skitten kulørtvask.
Svært skitten kulørtvask.
For plagg i silke og viskose, pent undertøy.
Lett skitten hvitvask og delikate farger.
For å friske opp lett skitne plagg hurtig (egner seg ikke for
For å friske opp lett skitne plagg hurtig (egner seg ikke
(°C)
Maks.
hastighet
(omdrein-
inger per
minutt)
Maks.
temp.
90° 1600
60° 1600
40° 800
40° 800
40° 600
30° 0
40° 600
60° 1600
40° 1600
40° 1600
.
60° 800
40° 800
30° 800
30° 800
-
1600
-
800
-
1600
-
800
-
0
Vaskemidler
Bleke-
Hoved-
middel
vask
Tøymy-
kner
ll l
ll
-
ll
-
ll
-
ll
-
ll
-
ll
-
ll l
ll l
ll l
ll
-
ll
-
ll
-
ll
-
- -
- -
l
l
- - -
- - -
- - -
Maks.
Sykl us-
last
vari ghet
(kg)
6165
6 110
4290
2120
270
155
1,5 55
6122
6 115
685
2,5 85
2,5 70
330
1,5 15
636
2,5 31
616
2,5 12
62
Informasjonen i tabellen er kun ment som en veiledning.
For alle testinstituter:
1) Testvaskesykluse i overensstemmelse med bestemmelse EN 60456: Still inn vaskesyklus 6, med en temperatur på 60°C.
2) Lang vaskesyklus for bomullstoffer: Still inn vaskesyklus 1, med en temperatur på 40°C.
3) Kort vaskesyklus for bomullstoffer: Still inn vaskesyklus 2, med en temperatur på 40°C.
Spesielle vaskesykluser
Hygiene program (vaskesyklus 6). En hygienisk vaskesyklus med høy temperatur (over 60°C) som krever bruk av
blekemiddel. Hell blekemiddel, vaskemiddel og tilsetninger i riktige deler av skuffen (se avsnittet som kalles Såpeskuff).
God natt syklus (vaskesyklus 7). Dette er en stille syklus som kan kjøres over natten, når strømprisene er lavere.
Vaskesyklusen er designet for bomullstoffer og syntetiske stoffer. På slutten av syklusen stopper maskinen, mens det fortsatt
er vann i trommelen, for å sentrifugere og tømme ut vannet, trykkes START/PAUSE-knappen; ellers vil maskinen gjennomføre
sentrifugeringen og tømmingen automatisk etter 8 timer.
Baby program (vaskesyklus 8). Denne vaskesyklusen kan brukes til å fjerne flekkene som typisk sett forårsakes av babyer,
samtidig som det sikres at alt vaskemiddel fjernes fra bleier for å forhindre at den delikate babyhuden utvikler allergiske
reaksjoner. Syklusen har blitt designet for å redusere bakteriemengden ved å bruke mer vann og optimere virkningen av
spesielle desinfiserende tilsetninger i vaskemiddelet.
På slutten av en vaskesyklus vil maskinen sakte rotere trommelen for å forhindre at klærne krølles, for å avslutte syklusen
trykkes START/PAUSE-knappen.
Hurtigvask 30 (vaskesyklus 4) denne vaskesyklusen ble utviklet for å vaske lett skittent tøy hurtig: Det varer kun 30 minutter
og sparer dermed både energi og tid. Ved å velge denne vaskesyklusen (4 ved 30°C), er det mulig å vaske ulike stoffer
sammen (unntatt for ull- og silkeplagg), med en maksimal last på 3 kg.
Oppfriske Tøy 15 (vaskesyklus 5) denne vaskesyklusen ble utviklet for å vaske lett skittent tøy hurtig: Det varer kun 15
minutter og sparer dermed både energi og tid. Ved å velge denne vaskesyklusen (5 ved 30°C), er det mulig å vaske ulike
stoffer sammen (unntatt for ull- og silkeplagg), med en maksimal last på 1,5 kg.
54
Page 55

Enkelttilfeller
Stille temperaturen
Vri TEMPERATUR-bryteren for å stille inn vasketemperaturen (se Tabell for vaskesykluser).
Temperaturen kan senkes eller stilles til kald vask (
Vaskemaskinen vil automatisk forhindre at du velger en temperatur som er høyere enn maks. verdi som er innstilt
for hver vaskesyklus.
).
Innstilling av sentrifugeringshastigheten
Vri bryteren SENTRIFUGEHASTIGHET for å stille inn sentrifugehastighet for valgt vaskesyklus.
Maks. sentrifugehastighet som er tilgjengelig for hver vaskesyklus er som følger:
Vaskesykluser Maksimal sentrifugehastighet
Bomullstoffer 1600 o/min
Syntetiske stoffer 800 o/min
Ull 600 o/min
Kun silketømming
Sentrifugehastigheten kan senkes, eller sentrifugesyklusen kan utelukkes helt ved å velge symbolet
Vaskemaskinen vil automatisk forhindre at du velger en sentrifugehastighet som er høyere enn maks. hastighet
som er innstilt for hver vaskesyklus.
.
Funksjoner
De ulike vaskefunksjonene som er tilgjengelige med denne vaskemaskinen vil hjelpe til å oppnå ønskede resultater,
hver gang.
For å aktivere funksjonene:
1. Trykk på knappen som tilsvarer den ønskede funksjonen.
2. Funksjonen er aktivert når det tilhørende indikatorlyset lyser.
Merk: Hvis indikatorlampen blinker hurtig, signaliserer dette at den bestemte funksjonen ikke kan velges i
forbindelse med valgt vaskesyklus.
NO
Utsatt start
Denne timeren forsinker starttiden på vaskesyklusen med inntil 12 timer.
Trykk gjentatte ganger på knappen inntil indikatorlampen som tilsvarer ønsket forsinkelsestid tennes. Den femte
gangen knappen trykkes, vil funksjonen deaktiveres.
N.B.: Når du har trykket på knappen START/PAUSE, kan forsinkelsen kun reduseres hvis du ønsker å endre den.
Dette alternativet er aktivert med alle programmer.
Strykelett
Ved å velge denne funksjonen vil vaske- og sentrifugeringssyklusene endres for å redusere krølling av klærne. På
slutten av syklusen vil vaskemaskinen utføre sakte rotasjoner av trommelen; og indikatorlampene for STRYKELETT
og START/PAUSE vil blinke (oransje), og fasen
STRYKELETT for å avslutte syklusen.
For vaskesyklusen Silke, vil maskinen ende syklusen mens vasken er søkkvåt, og indikatorlampene for
STRYKELETT og START/PAUSE vil blinke (oransje), og fasen SKYLLINGER vil være tent kontinuerlig. For å tømme
vannet slik at vasken kan tas ut, trykk på START/PAUSE-knappen eller STRYKELETT.
vil være tent kontinuerlig. Trykk på START/PAUSE-knappen eller
Denne funksjonen kan ikke brukes i forbindelse med vaskesyklusene 4, 5, 6, 7, 8, 11, C, D, E.
Ekstra skylling
Ved å velge denne funksjonen økes effektiviteten til skyllingen, og optimal fjerning av vaskemiddel garanteres. Det
er spesielt nyttig for sensitiv hud.
Denne funksjonen kan ikke brukes i forbindelse med vaskesyklusene 4, 5, C, D, E.
Supervask
Siden en større vannmengde brukes i startfasen av syklusen, og på grunn av den økte syklusvarigheten, tilbyr
denne funksjonen en høyytelsesvask.
Denne funksjonen kan ikke brukes i forbindelse med vaskesyklusene 4, 5, 6, 10, 11, A, B, C, D, E.
55
Page 56

Vaskemidler og vask
NO
Såpeskuff
Gode vaskeresultater avhenger også av riktig
dosering på vaskemiddel: hvis det tilsettes for mye
vaskemiddel, betyr ikke dette nødvendigvis at
effektiviteten på vaskingen blir bedre, men kan tvert i
mot forårsake avleiring på innsiden av maskinen og
før til miljøforurensning.
Ikke bruk vaskemidler for håndvask, siden disse
skaper for mye skum.
Åpne såpeskuffen, og
4
MAX
1
3
del 1: Vaskemiddel til forvask (pulver)
Før vaskemiddel fylles på, se til at det ekstra huset 4
har blitt fjernet.
del 2: Vaskemiddel til vaskesyklusen (pulver
eller flytende)
Flytende vaskemidler skal kun påfylles straks før
starten av vaskesyklusen.
del 3: Skyllemiddel (tøymyknere osv.)
Tøymykneren skal ikke flyte over.
ekstra del 4: Blekemiddel
2
tilsett vaskemiddel eller
tilsetninger på følgende
måte.
Blekesyklus
Bleking kan kun utføres i forbindelse med
vaskesykluser 1, 2, 6.
Hell blekemiddelet ned i ekstralommen 4; fyll på
vaskemiddel og tøymykner i tilhørende deler, og velg
derettet en av vaskesyklusene som er oppgitt
ovenfor.
Dette alternativet anbefales kun for svært skitne
bomullsplagg.
Hvor mye veier vasken?
1 laken 400-500 g
1 putevar 150-200 g
1 duk 400-500 g
1 badekåpe 900-1.200 g
1 håndkle 150-250 g
Plagg som krever spesialbehandling
Skjorter: bruk en spesiell vaskesyklus 9 til å vaske
skjorter i ulike stoffer og farger.
Dette garanterer at plaggene tas godt vare på og
minimerer krølling.
Silke: bruk spesiell vaskesyklus 10 til å vaske alle
silkeplagg. Vi anbefaler bruk av spesialvaskemiddel
som er laget til å vaske delikate klær.
Gardiner: brett dem sammen og legg dem inni et
putetrekk eller en nettpose. Bruk vaskesyklus 10.
Ull: Hotpoint/Ariston er den eneste
vaskemaskinprodusenten som har blitt tildelt den
prestisjefylte Woolmark Platinum Care-utmerkelsen
(M.0508) av Woolmark Company, noe som betyr at
alle ullklær kan vaskes i vaskemaskinen, også de som
er merket med bare håndvask
tilbyr derfor bekymringsfri vask av ullplagg i
vaskemaskinen (maks. last 1,5 kg) og garanterer
optimal ytelse.
. Vaskesyklus 11
Laste balansesystem
Før hver sentrifugering roterer trommelen kontinuerlig
ved en hastighet som er litt høyere enn
vaskeroteringshastigheten for å unngå for mye
vibrasjon før hver sentrifugering og fordele lasten jevnt.
Hvis lasten etter flere forsøk ikke er balansert riktig, vil
maskinen sentrifugere ved redusert
sentrifugehastighet. Hvis lasten er svært ubalansert,
utfører vaskemaskinen fordelingsprosessen i stedet for
å sentrifugere. For å oppmuntre forbedret lastfordeling
og balanse anbefaler vi at små og større plagg
blandes i lasten.
Klargjøre vasken
Del opp vasken etter:
- stofftypen/symbolet på merkelappen.
- fargene: separer kulørttøy fra hvitvask.
Tøm lommene i alle plagg og kontroller knappene.
Ikke overstig opplistede verdier som henviser til
vekt på vasken når den er tørr:
Varige stoffer: maks. 6 kg
Syntetiske stoffer: maks. 2,5 kg
Delikate stoffer: maks. 2 kg
Ull: maks. 1,5 kg
56
Page 57

Forholdsregler og tips
Denne vaskemaskinen ble designet og konstruert i
overensstemmelse med internasjonale
sikkerhetsforskrifter. Følgende informasjon er gitt av
sikkerhetsmessige årsaker og skal derfor leses
omhyggelig.
Generell sikkerhet
Dette apparatet er designet kun for hjemmebruk.
Vaskemaskinen må kun brukes av voksne, i
overensstemmelse med instruksene som finnes i
denne veiledningen.
Ikke rør maskinen når du er barfot eller med våte
eller fuktige hender eller føtter.
Ikke kople fra strømmen ved å trekke i
strømledningen når apparatet frakoples
strømuttaket. Hold i støpselet og trekk.
Ikke åpne såpeskuffen mens maskinen er i bruk.
Ikke rør det uttømte vannet, siden dette kan nå
ekstremt høye temperaturer.
Ikke bruk makt på porthulldøren. Dette kan skade
sikkerhetslåsemekanismen som er designet til å
forhindre utilsiktet åpning.
Hvis apparatet svikter, skal du ikke under noen
omstendighet gå inn i de indre mekanismene i et
forsøk på å reparere apparatet selv.
Hold alltid barn på avstand fra apparatet når det er
i bruk.
Døren kan bli svært varm i løpet av vaskesyklusen.
Hvis apparatet må flyttes, jobb i en gruppe på to
eller tre personer og håndter det ytterst forsiktig.
Prøv aldri å gjøre dette alene, da apparatet er
svært tungt.
Før det legges inn vask i vaskemaskinen, se til at
trommelen er tom.
Skroting
Deponering av pakkematerialene: Overhold lokale
forskrifter, slik at pakkematerialene kan gjenbrukes.
Det europeiske direktivet 2002/96/EC i forbindelse
med elektrisk og elektronisk avfallsutstyr (WEEE)
erklærer at husholdningsapparater ikke skal kastes
med annet vanlig husholdningsavfall. Utslitte
apparater skal samles separat for å optimere
kostnaden av gjenbruk og resirkulering av
materialene inne i maskinen, mens potensiell skade
på atmosfæren og offentlig helse forhindres. Den
utkryssede papirkurven finnes på alle produkter for
å minne eieren om pliktene vedrørende separert
avfallshåndtering.
For mer informasjon om riktig avfallshåndtering av
husholdningsapparater, skal eierne kontakte de
lokale myndighetene eller apparatets forhandler.
Åpne porthulldøren manuelt
I tilfelle det ikke er mulig å åpne porthulldøren pga. et
strømbrudd, og hvis du ønsker å ta ut vasken, gå
frem på følgende måte:
1. Trekk ut støpselet fra
strømuttaket.
2. Se til at vannivået inne i
maskinen er lavere enn
20
4. Trekk utover ved bruk av tappen, slik som indikert
på figuren, inntil plastfestet er frigjort fra
stopposisjonen, trekk nedover og åpne døren
samtidig.
5. Plasser panelet igjen, og se til at krokene er sikkert
på plass før du skyver dem på apparatet.
døråpningen, hvis ikke,
fjernes overflødig vann ved
bruk av tømmeslangen ved
å samle det i en bøtte som
vist på figuren.
3. Ved bruk av en
skrutrekker, fjernes panelet
på nedre forside av
vaskemaskinen (se figur).
NO
57
Page 58

Pleie og vedlikehold
NO
Stenge forsyningen av vann og strøm
Slå av vannkranen etter hver vaskesyklus. Dette
vil begrense slitasjen på hydraulikksystemet inne i
vaskemaskinen og hjelpe til med å forhindre
lekkasjer.
Trekk ut vaskemaskinen ved rengjøring og under
alt vedlikeholdsarbeid.
Rengjøring av vaskemaskinen
De ytre delene og gummikomponentene på
apparatet skal rengjøres ved bruk av en myk klut
bløtgjort i lunkent såpevann. Ikke bruk løsemidler
eller skuremidler.
Rengjøre såpeskuffen
1
Fjern skuffen ved å løfte
den og så trekke den
rett ut (se figuren).
Vask den under
rennende vann. Dette
skal gjøres ofte.
2
Rengjøring av pumpen
Vaskemaskinen er montert med en selvrensende
pumpe som ikke krever noe vedlikehold. Noen ganger
kan små gjenstander (f.eks. mynter eller knapper) falle
inn i forkammeret som beskytter pumpen, plassert i
nedre del.
Se til at vaskesyklusen er ferdig, og trekk ut
støpselet fra strømuttaket.
For å nå forkammeret:
1. Ved bruk av en
skrutrekker, fjernes
panelet på nedre forside
av vaskemaskinen (se
figur);
2. Skru løs lokket ved å
rotere det mot venstre
(se figur): litt vann kan
renne ut. Dette er
normalt;
Ta vare på døren og trommelen til
apparatet
La alltid døren stå på gløtt for å forhindre
ubehagelige lukter fra å dannes.
3. Rengjør innsiden grundig;
4. Skru på lokket igjen;
5. Plasser panelet igjen, og se til at krokene er sikkert
på plass før du skyver dem på apparatet.
Kontrollere vanninntaksslangen
Kontroller vanninntaksslangen minst én gang årlig.
Hvis det er noen sprekker, skal den straks skiftes ut: I
løpet av vaskesyklusene er vanntrykket svært høyt,
og en sprukket slange kan lett eksplodere.
Bruk aldri brukte slanger.
58
Page 59

Feilsøking
Det kan hende at vaskemaskinen slutter å virke. Før du tar kontakt med teknisk støttesenter (se Hjelp), se til at
problemet ikke bare kan løses lett ved å bruke følgende liste.
Problem:
Vaskemaskinen slås ikke på.
Vaskesyklusen starter ikke.
Vaskemskinen tar ikke inn vann
(indikatorlyset for første
vaskesyklus blinker hurtig).
Vaskemaskinen tar inn og
tømmer ut vann kontinuerlig.
Mulige årsaker / Løsninger:
Apparatet er ikke plugget helt inn i kontakten, eller har ingen kontakt.
Det er ikke noen strøm i huset.
Vaskemaskinens dør er ikke skikkelig lukket.
PÅ/AV-knappen har ikke blitt trykket.
START/PAUSE-knappen har ikke blitt trykket.
Vannkranen er ikke åpnet.
En forsinket start har blitt innstilt (ved bruk av forsinkelsestimeren, se
Enkelttilfeller).
Vanninntaksslangen er ikke tilkoplet kranen.
Slangen er bøyd.
Vannkranen er ikke åpnet.
Det er ikke noen vannforsyning i huset.
Trykket er for lavt.
START/PAUSE-knappen har ikke blitt trykket.
Tømmeslangen er ikke montert i en høyde mellom 65 og 100 cm fra
gulvet (se Installering).
Den fri enden av slangen er under vann (se Installering).
Veggtømmingssystemet er ikke montert med ventilatorrør.
Hvis problemet fortsetter seg etter disse kontrollene, slå av vannkranen,
slå av apparatet og ta kontakt med hjelpetjenesten. Hvis husværet ligger i
en av de øvre etasjene i en bygning, kan det være problemer som er
forbundet med vanntømming, slik at vaskemaskinen fylles med vann og
tømmer kontinuerlig. Spesielle anti-tømmingsventiler er tilgjengelige i
butikker og hjelper til med å unngå denne kjedelige hendelsen.
NO
Vaskemaskinen kvitter seg ikke
med vannet og sentrifugerer
ikke.
Vaskemaskinen vibrerer mye
under sentrifugeringen.
Vaskemaskinen lekker.
START/PAUSE-indikatorlampen
(oransje) og
funksjonsindikatorlysene blinker
hurtig.
Det er for mye skum.
Vaskesyklusen inkluderer ikke tømming: Noen vaskesykluser krever at
tømmefasen startes manuelt (se Starte en vaskesyklus).
STRYKELETT-funksjonen har blitt aktivert.: For å fullføre vaskesyklusen,
trykk på START/PAUSE-knappen (Enkelttilfeller.)
Slangen er bøyd (se Installering).
Tømmekanalen er tilstoppet.
Trommelen ble ikke låst opp riktig under installering (se Installering).
Vaskemaskinen er ikke nivellert (se Installering).
Vaskemaskinen står fast mellom skap og vegger (se Installering).
Vanninntaksslangen er ikke skrudd på skikkelig (se Installering).
Såpeskuffen er tilstoppet (for rengjøringsinstrukser, se Pleie og vedlikehold).
Slangen er ikke festet riktig (se Installering).
Slå av maskinen og trekk ut støpselet, vent i ca. 1 minutt og slå den
på igjen.
Dersom problemet vedvarer, bør du kontakte Teknisk hjelpesenter om
problemet.
Vaskemiddelet er ikke egnet for maskinvask (det skal vise teksten For
vaskemaskiner eller Håndvask og maskinvask eller lignende).
59
Page 60

Hjelp
195067604.00
11 /2007 - Xerox Business Services
NO
Før du ringer for hjelp:
Kontroller om du kan løse problemet selv (se Feilsøking);
Start programmet på nytt for å kontrollere om problemet er løst;
Hvis dette ikke er tilfelle, ta kontakt med et autorisert hjelpesenter ved bruk av telefonnumrene som finnes
på garantibeviset.
Be alltid om hjelp fra autoriserte teknikere.
Ha følgende informasjon klar:
Problemtype;
Apparatets modell (Mod.);
Serienummeret (S/N).
Denne informasjonen kan finnes på dataskiltet som befinner seg på baksiden av vaskemaskinen og kan også
finnes foran på apparatet ved å åpne døren.
60
 Loading...