

Page 1

Instructions for use
WASHER DRYER
GB
English,1
Românã,13
CIS
Русский,37
ЕЛЛЗНЙКБ,49
ARMXXL 105
GR
BGRO
БЪЛГАРСКИ,25
Contents
GB
Installation, 2-3
Unpacking and levelling
Connecting the electricity and water supplies
The first wash cycle
Technical data
Description of the washer-dryer and
starting a wash cycle, 4-5
Control panel
Indicator lights
Starting a wash cycle
Wash cycles, 6
Table of wash cycles
Personalisation, 7
Setting the temperature
Setting the drying cycle
Functions
Detergents and laundry, 8
Detergent dispenser drawer
Bleach cycle
Preparing the laundry
Garments requiring special care
Load balancing system
Precautions and tips, 9
General safety
Disposal
Opening the porthole door manually
Care and maintenance, 10
Cutting off the water or electricity supply
Cleaning the washer-dryer
Cleaning the detergent dispenser drawer
Caring for the door and drum of your appliance
Cleaning the pump
Checking the water inlet hose
Troubleshooting, 11
Service, 12
1
Page 2
Installation
GB
This instruction manual should be kept in a safe
place for future reference. If the washer-dryer is sold,
transferred or moved, make sure that the instruction
manual remains with the machine so that the new
owner is able to familiarise himself/herself with its
operation and features.
Read these instructions carefully: they contain vital
information relating to the safe installation and
operation of the appliance.
Unpacking and levelling
Unpacking
1. Remove the washer-dryer from its packaging.
2. Make sure that the washer-dryer has not been
damaged during the transportation process. If it has
been damaged, contact the retailer and do not
proceed any further with the installation process.
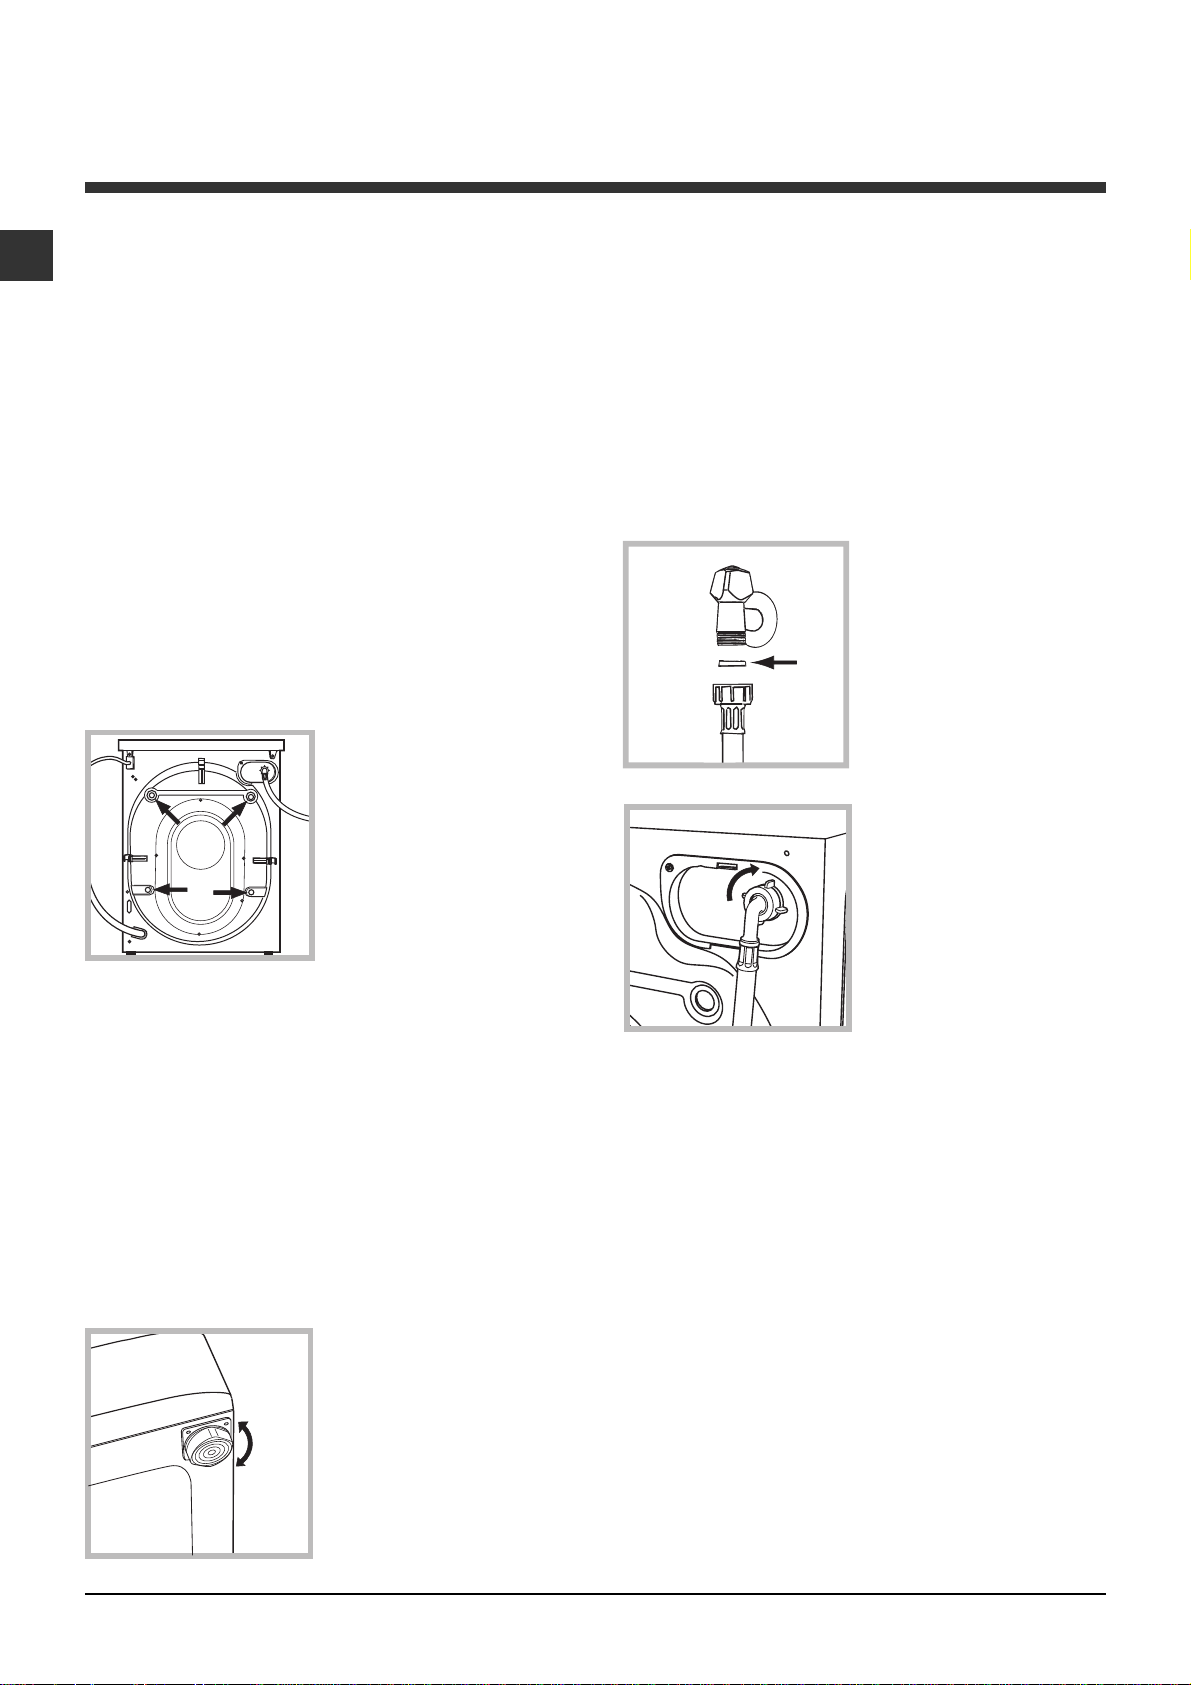
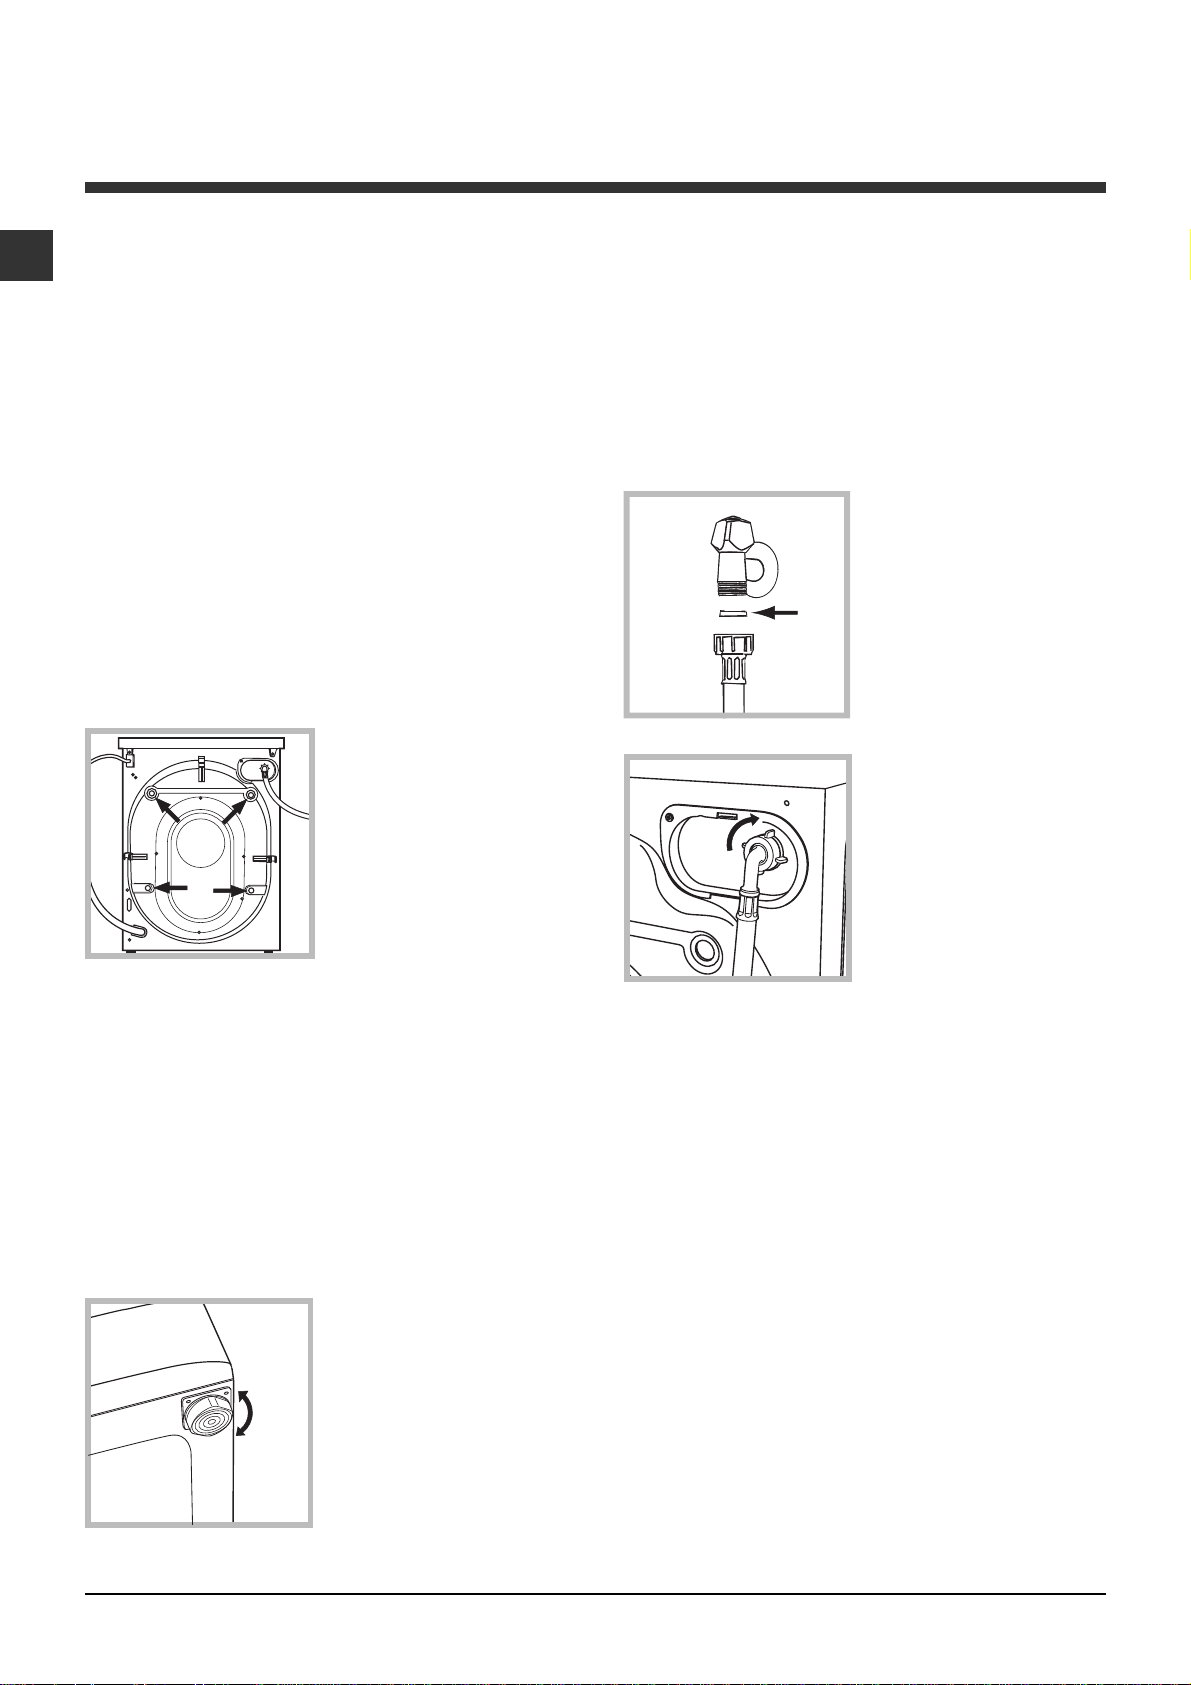
3. Remove the 4
protective screws (used
during transportation) and
the rubber washer with
the corresponding
spacer, located on the
rear part of the appliance
(see figure).
4. Close off the holes using the plastic plugs provided.
5. Keep all the parts in a safe place: you will need
them again if the washer-dryer needs to be moved to
another location.
Levelling the machine correctly will provide it with
stability, help to avoid vibrations and excessive noise
and prevent it from shifting while it is operating. If it is
placed on carpet or a rug, adjust the feet in such a
way as to allow a sufficient ventilation space
underneath the washer-dryer.
Connecting the electricity and water
supplies
Connecting the water inlet hose
1. Insert seal A into the
end of the inlet hose and
screw the latter onto a
cold water tap with a 3/4
A
3. Make sure that the hose is not folded over or bent.
gas threaded opening
(see figure).
Before performing the
connection, allow the
water to run freely until it
is perfectly clear.
2. Connect the inlet hose
to the washer-dryer by
screwing it onto the
corresponding water inlet
of the appliance, which is
situated on the top righthand side of the rear part
of the appliance (see
figure).
Packaging materials should not be used as toys for
children.
Levelling
1. Install the washer-dryer on a flat sturdy floor,
without resting it up against walls, furniture cabinets
or anything else.
2. If the floor is not
perfectly level, compensate for any unevenness
by tightening or loosening
the adjustable front feet
(see figure); the angle of
inclination, measured in
relation to the worktop,
must not exceed 2°.
2
The water pressure at the tap must fall within the
values indicated in the Technical details table (see
next page).
If the inlet hose is not long enough, contact a
specialised shop or an authorised technician.
Never use second-hand hoses.
Use the ones supplied with the machine.
Page 3
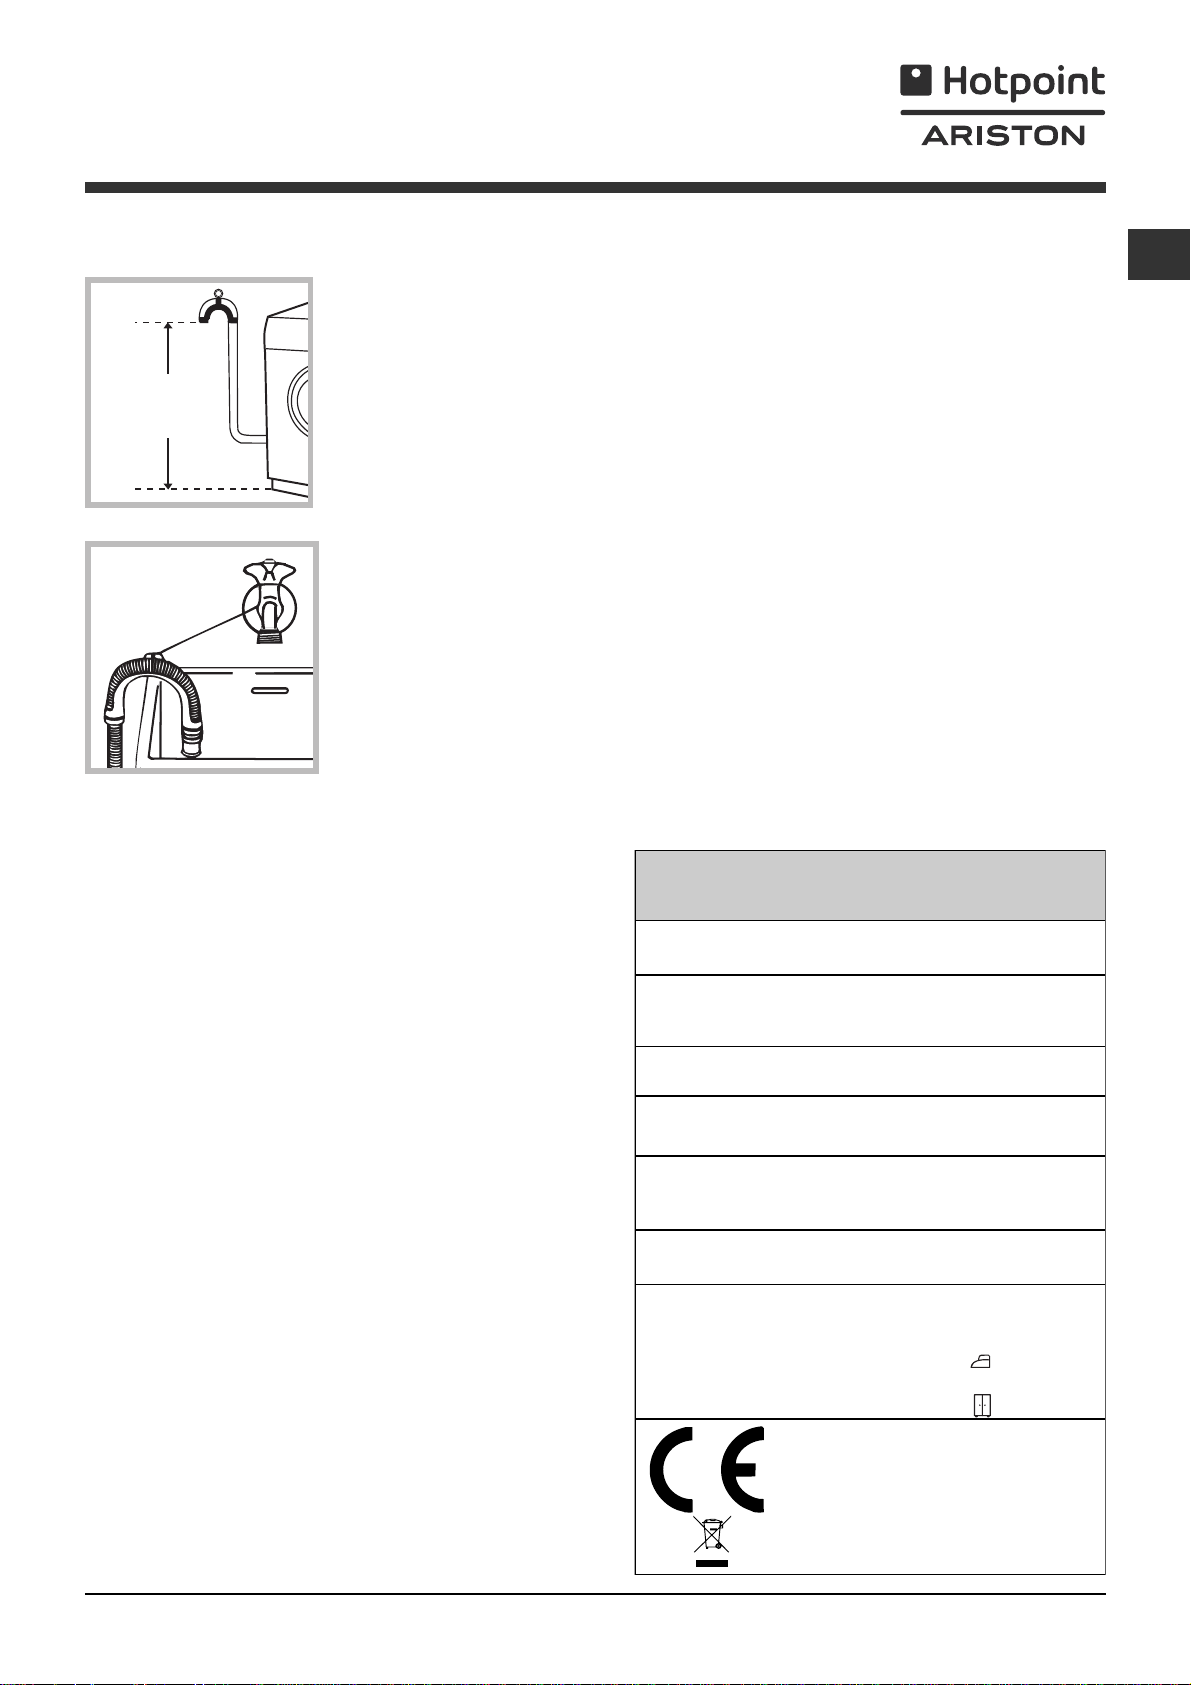
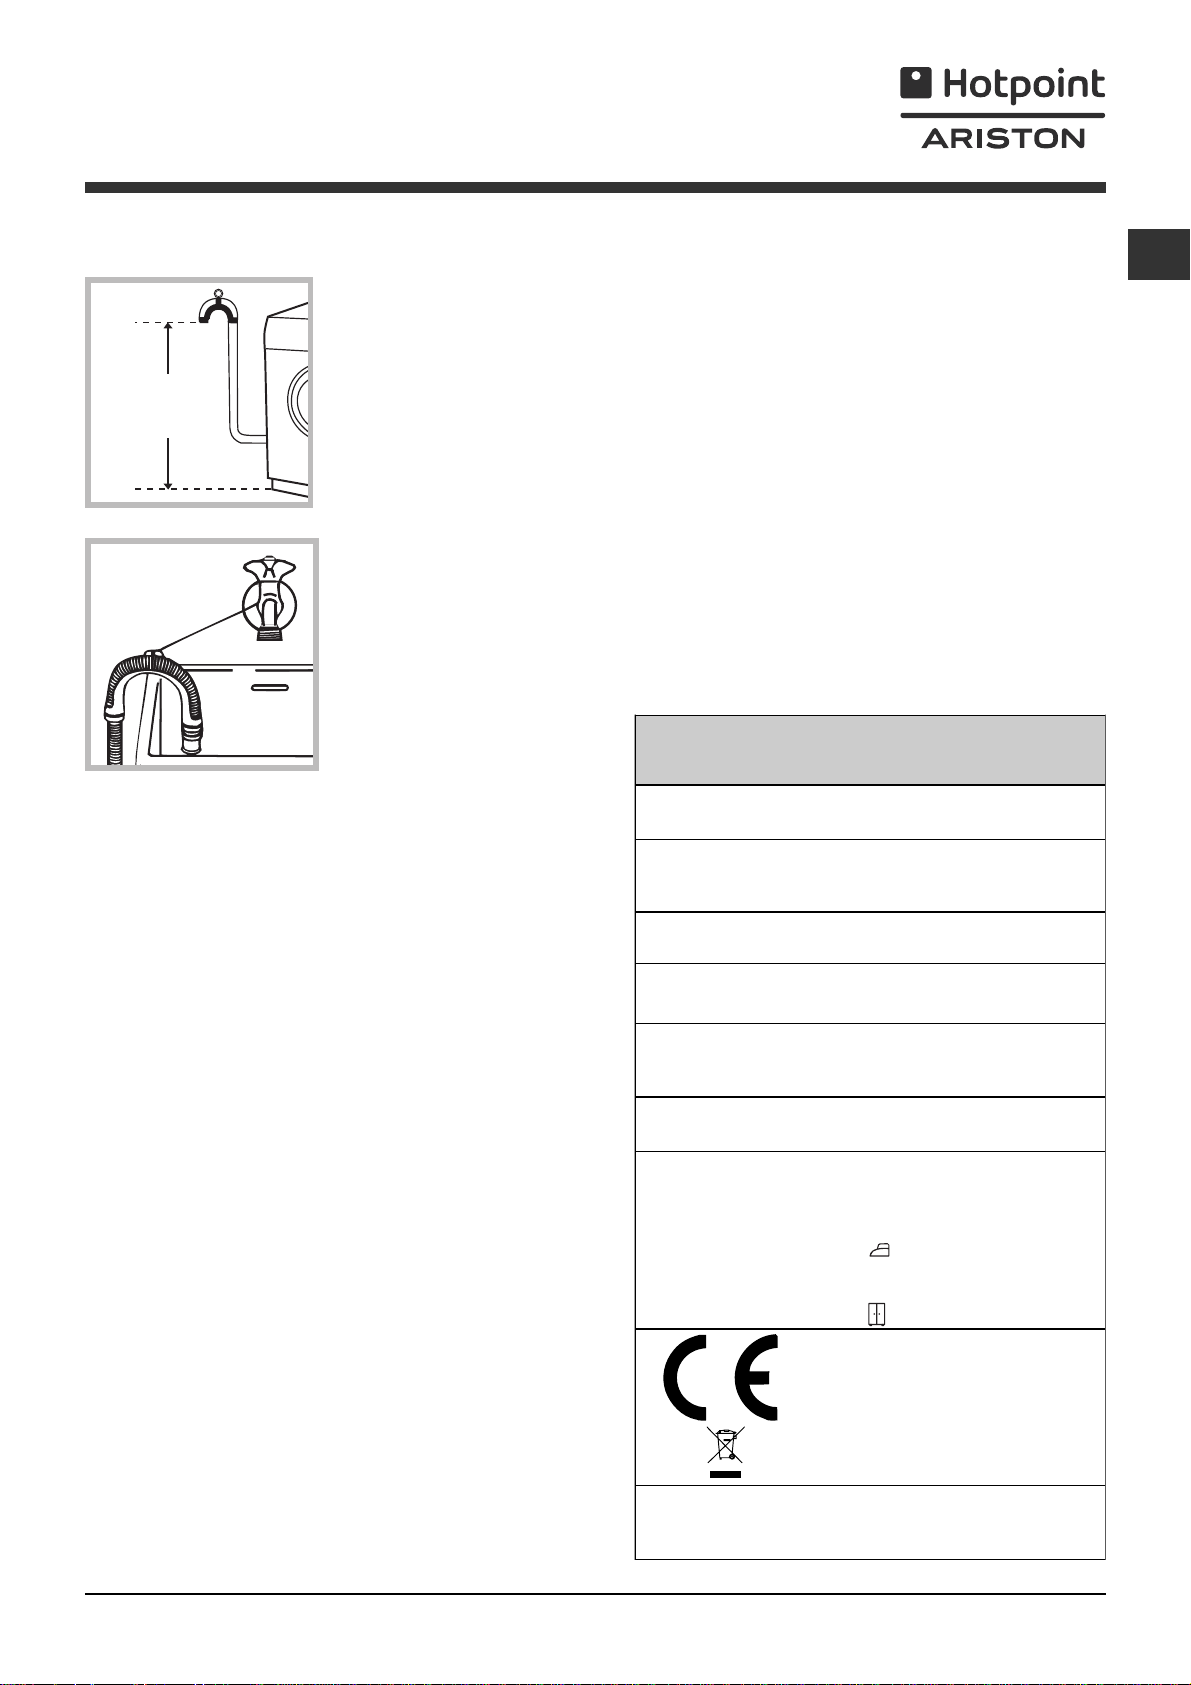
Connecting the drain hose
65 - 100 cm
Connect the drain hose,
without bending it, to a
drainage duct or a wall
drain located at a height
between 65 and 100 cm
from the floor;
Do not use extension cords or multiple sockets.
GB
The cable should not be bent or compressed.
The power supply cable must only be replaced by
authorised technicians.
Warning! The company shall not be held responsible
in the event that these regulations are not respected.
The first wash cycle
alternatively, rest it on
the side of a washbasin
or bathtub, fastening the
duct supplied to the tap
(see figure). The free end
of the hose should not
be underwater.
We advise against the use of hose extensions; if it is
absolutely necessary, the extension must have the
same diameter as the original hose and must not
exceed 150 cm in length.
Electrical connections
Before plugging the appliance into the electricity
socket, make sure that:
the socket is earthed and complies with all
applicable laws;
the socket is able to withstand the maximum power
load of the appliance as indicated in the Technical
data table (see opposite);
the power supply voltage falls within the values
indicated in the Technical data table (see opposite);
the socket is compatible with the plug of the
washer-dryer. If this is not the case, replace the
socket or the plug.
The washer-dryer must not be installed outdoors,
even in covered areas. It is extremely dangerous to
leave the appliance exposed to rain, storms and other
weather conditions.
When the washer-dryer has been installed, the
electricity socket must be within easy reach.
Once the appliance has been installed, and before
you use it for the first time, run a wash cycle with
detergent and no laundry, using the wash cycle 1.
Technical data
Model
Dimensions
Capacity
Electrical
connections
Wat er
connections
Spin speed
Energy rated
programmes
according to
EN 50229
ARMXXL 105
width 59.5 cm
height 85 cm
depth 53,5 cm
from 1 to 7 kg for the wash programme;
from 1 to 5 kg for the drying programme
please refer to the technical data plate
fixed to the machine
maximum pressure 1 MPa (10 bar)
minimum pressure 0.05 MPa (0.5 bar)
drum capacity 52 litres
up to 1000 rotations per minute
Wash: programme 6; temperature 60°C;
using a load of 7 kg.
first drying cycle performed with a
Drying:
2 kg load, by selecting the dryness level.
The second drying cycle is performed with a
5 kg load, by selecting the dryness level.
This appliance conforms to the following
EC Directives:
- 89/336/EEC dated 03/05/89
(Electromagnetic Compatibility) and
subsequent modifications
- 2006/95/EC (Low Voltage)
- 2002/96/EC
3
Page 4
Description of the washer-dryer and
starting a wash cycle
GB
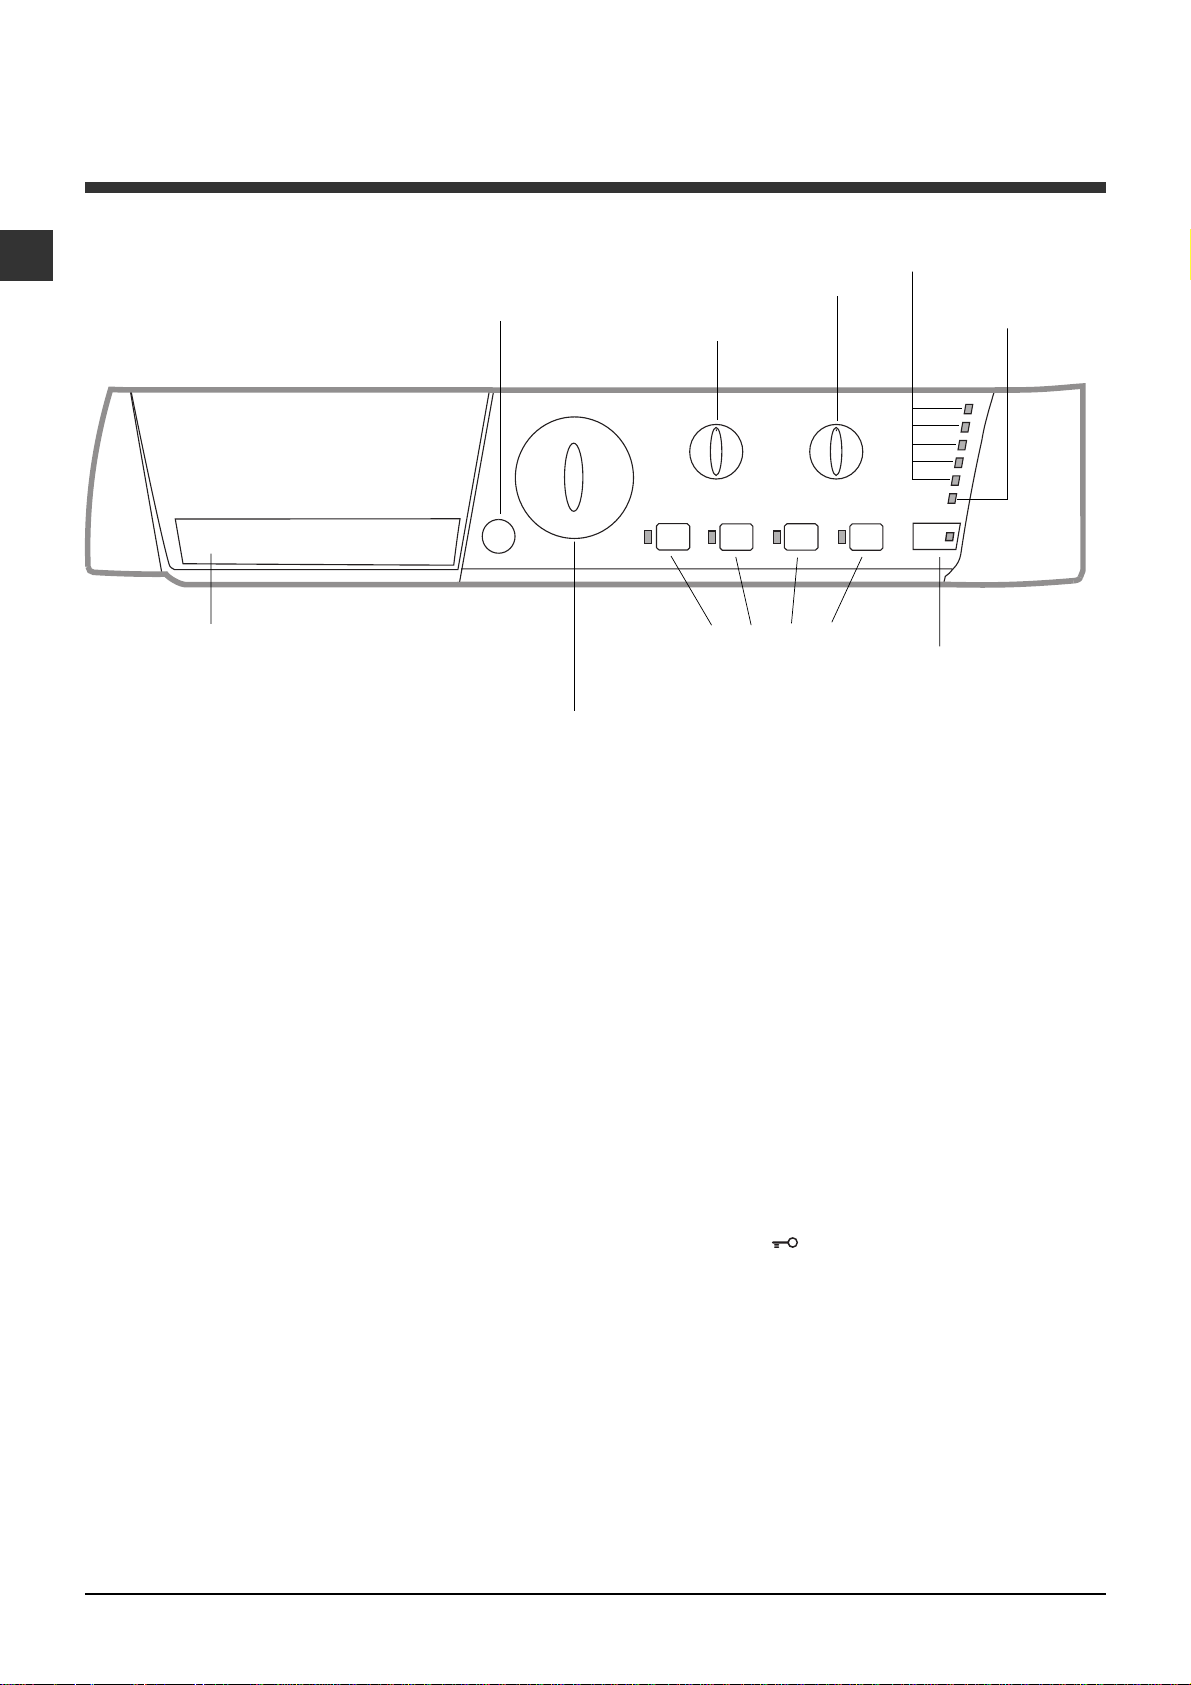
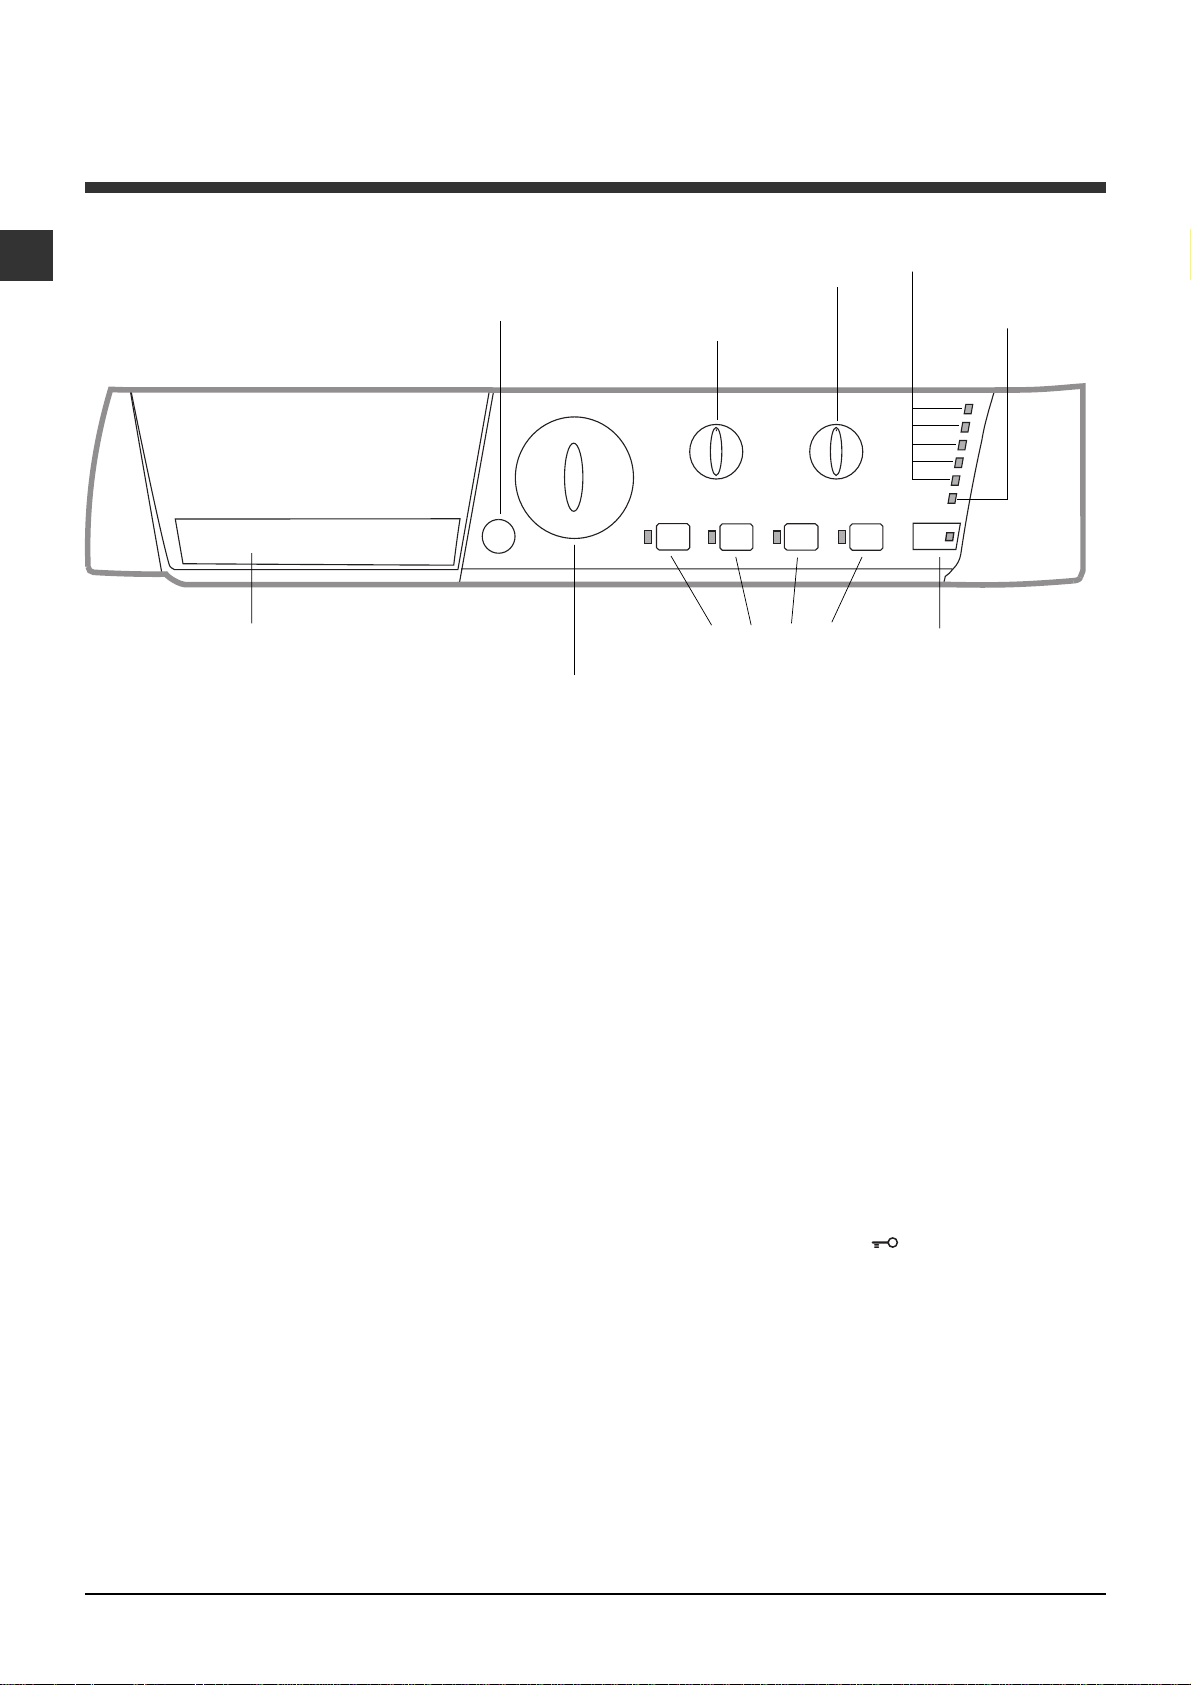
Control panel
ON/OFF
Detergent dispenser drawer
Detergent dispenser drawer: used to dispense
detergents and washing additives (see Detergents
and laundry).
There is a key which provides a summary of the
available wash cycles inside the detergent dispenser
drawer; this may be consulted at any time.
ON/OFF button: switches the washer-dryer on and
off.
WASH CYCLE knob: programmes the wash cycles.
During the wash cycle, the knob does not move.
FUNCTION buttons with indicator light: used to
select the available functions. The indicator light
corresponding to the selected function will remain lit.
TEMPERATURE knob: sets the temperature or the
cold wash cycle (see Personalisation).
DRYING knob: used to set the desired drying
programme (see Personalisation).
button
WASH CYCLE
knob
TEMPERATURE
knob
WASH CYCLE PROGRESS/DELAY TIMER
indicator light
wash cycle.
The illuminated indicator light shows which phase is in
progress.
If the Delay Timer function has been set, the time
remaining until the wash cycle starts will be indicated
(see next page).
DOOR LOCKED indicator light: indicates whether
the door may be opened or not (see next page).
START/PAUSE button with indicator light: starts or
temporarily interrupts the wash cycles.
N.B. To pause the wash cycle in progress, press this
button; the corresponding indicator light will flash
orange, while the indicator light for the current wash
cycle phase will remain lit in a fixed manner. If the
DOOR LOCKED
door may be opened.
To start the wash cycle from the point at which it was
interrupted, press this button again.
WASH CYCLE PROGRESS/
DELAY TIMER
DRYING
knob
FUNCTION
buttons with
indicator lights
s: used to monitor the progress of the
indicator light is switched off, the
indicator lights
START/PAUSE
button with indicator
light
DOOR
LOCKED
indicator light
4
Page 5
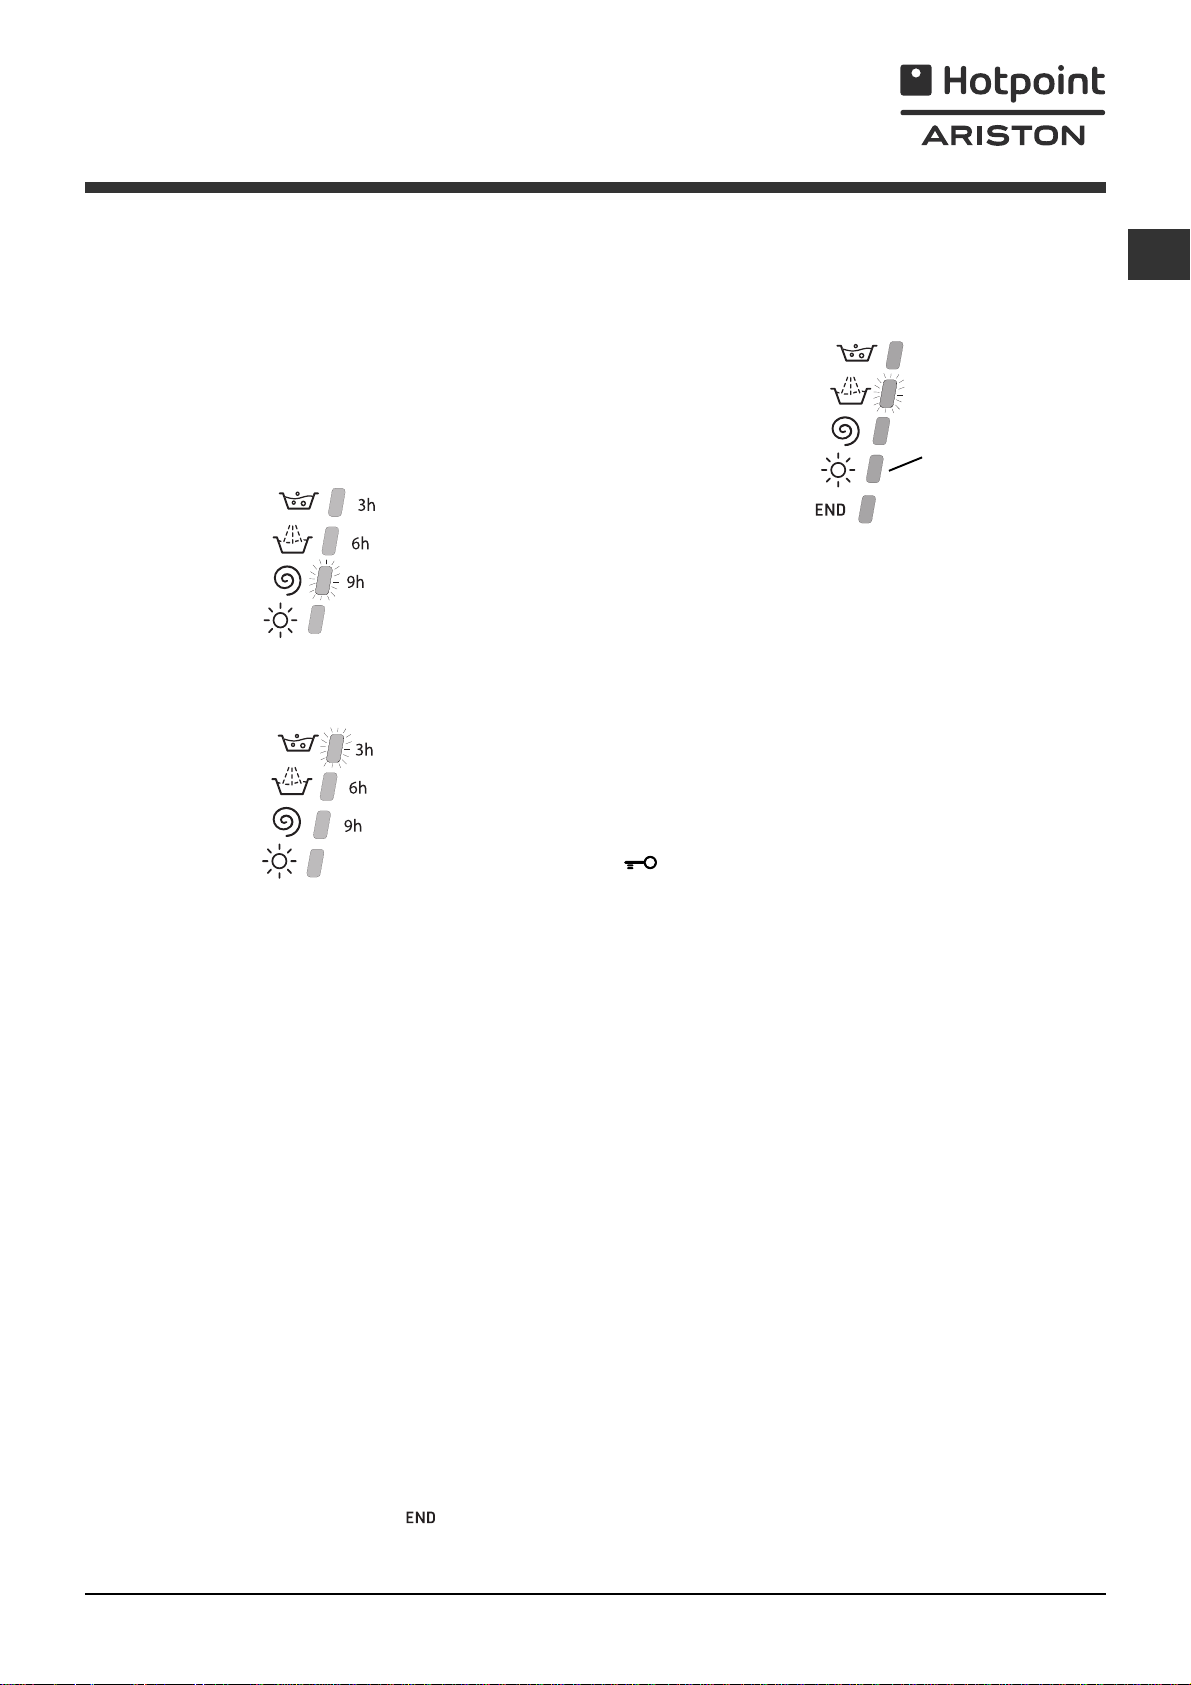
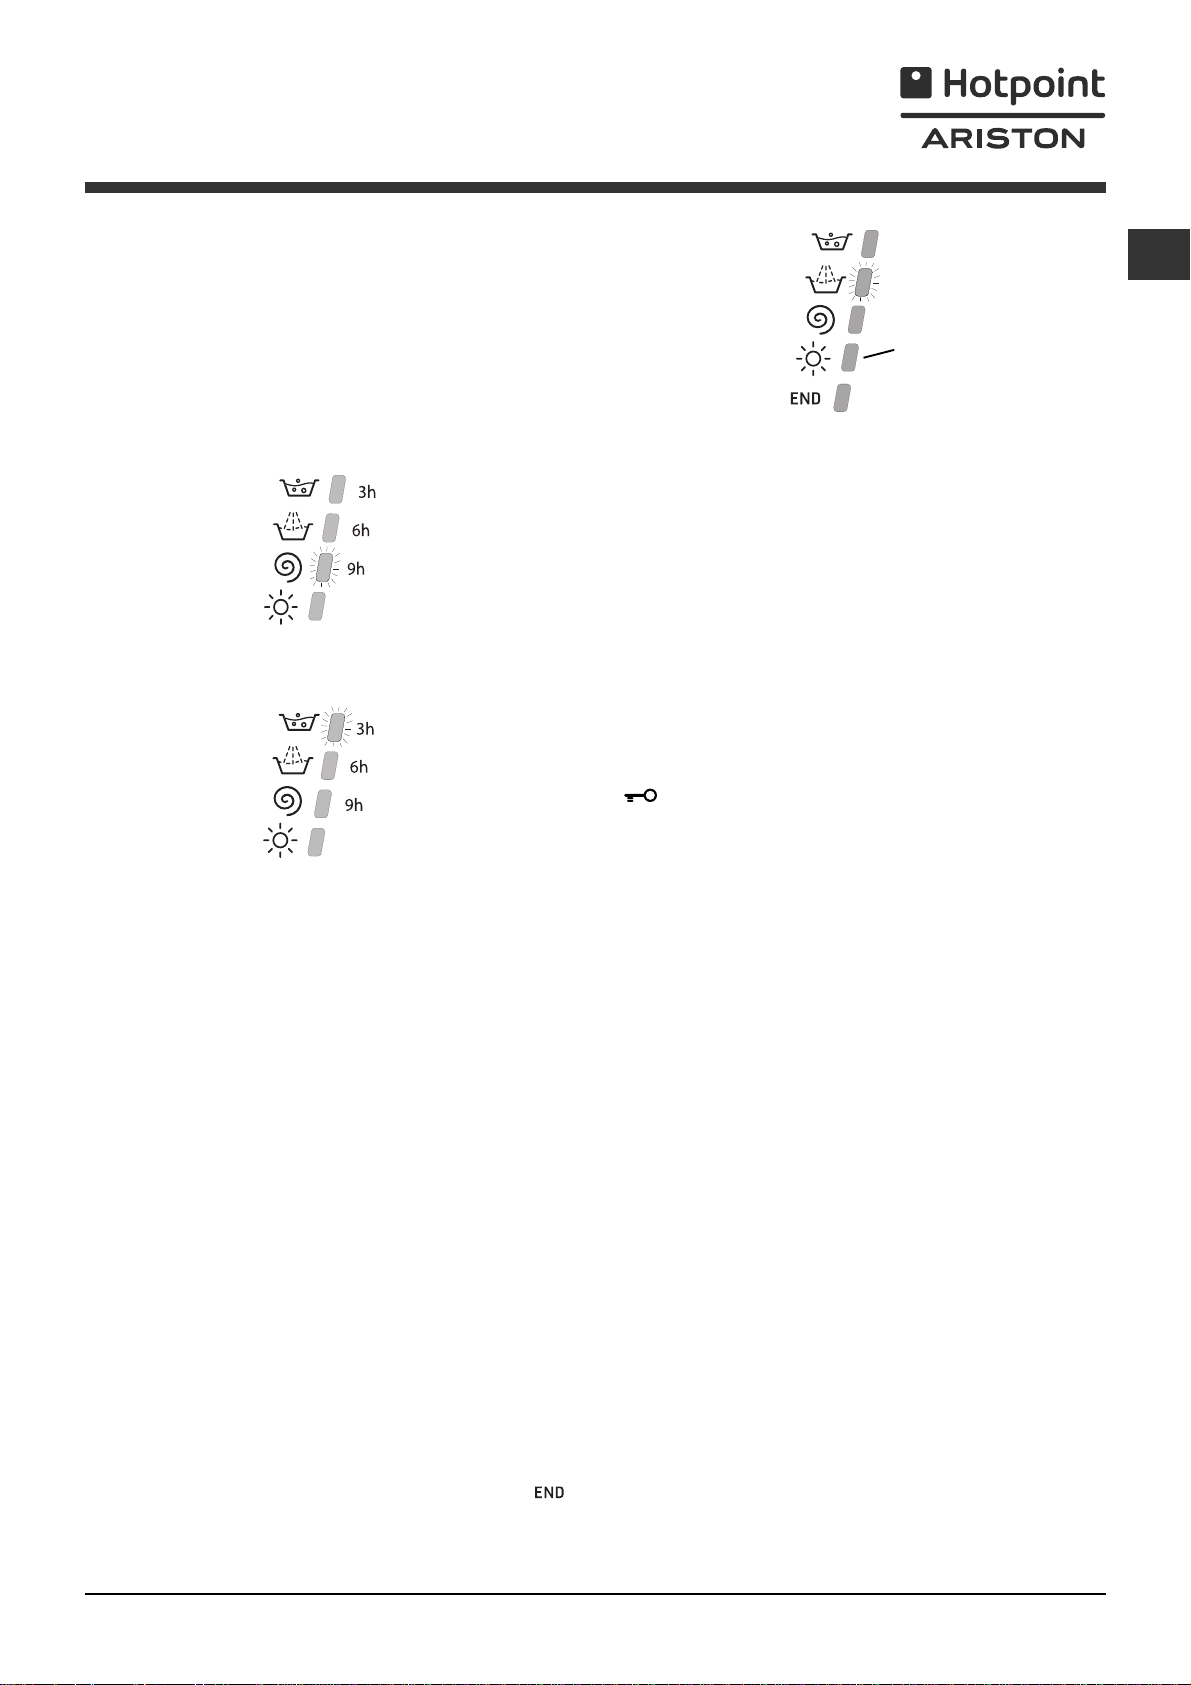
Indicator lights
The indicator lights provide important information.
This is what they can tell you:
Wash cycle phase indicator lights
Once the desired wash cycle has been selected and has
begun, the indicator lights switch on one by one to
indicate which phase of the cycle is currently in progress.
GB
Delayed start
If the DELAY TIMER function has been activated (see
Personalisation), after the wash cycle has been
started the indicator light corresponding to the
selected delay period will begin to flash:
As time passes, the remaining delay will be displayed
and the corresponding indicator light will flash:
Once the set delay has elapsed, the flashing indicator
light will switch off and the selected wash cycle will
begin.
Wash
Rinse
Note: as soon as a drying
Spin
Dry
End of wash cycle
level or time period has been
set, this indicator light
illuminates to indicate that
the selected wash cycle will
be followed by a drying
phase.
Note: during the "Drain" phase, the indicator light
corresponding to the "Spin" cycle phase will illuminate.
Function buttons and corresponding indicator lights
When a function is selected, the corresponding
indicator light will illuminate.
If the selected function is not compatible with the
programmed wash cycle, the corresponding indicator
light will flash and the function will not be activated.
If a function which is incompatible with another
function selected previously, only the most recent
selection will remain active.
Door locked indicator light
If this indicator light is on, the appliance door is locked
to prevent it from being opened accidentally; to avoid
any damage, wait for the indicator light to switch off
before you open the appliance door.
N.B. If the DELAY TIMER function is activated, the door
cannot be opened; pause the machine by pressing the
START/PAUSE button if you wish to open it.
If the START/PAUSE indicator light (orange) flashes
rapidly at the same time as the function indicator
light, this indicates a problem has occurred (see
Troubleshooting).
Starting a wash cycle
1. Switch the washer-dryer on by pressing the ON/OFF button. All indicator lights will switch on for a few
seconds, then they will switch off and the START/PAUSE indicator light will pulse.
2. Load the laundry and close the door.
3. Set the WASH CYCLE knob to the desired programme.
4. Set the washing temperature (see Personalisation).
5. Set the drying cycle if necessary (see Personalisation).
6. Measure out the detergent and washing additives (see Detergents and laundry).
7. Select the desired functions.
8. Start the wash cycle by pressing the START/PAUSE button and the corresponding indicator light will remain lit
in a fixed manner, in green. To cancel the set wash cycle, pause the machine by pressing the START/PAUSE
button and select a new cycle.
9. At the end of the wash cycle the
off, indicating that the door may be opened. Take out your laundry and leave the appliance door ajar to make
sure the drum dries completely. Switch the washer-dryer off by pressing the ON/OFF button.
indicator light will switch on. The DOOR LOCKED indicator light will switch
5
Page 6
Wash cycles
GB
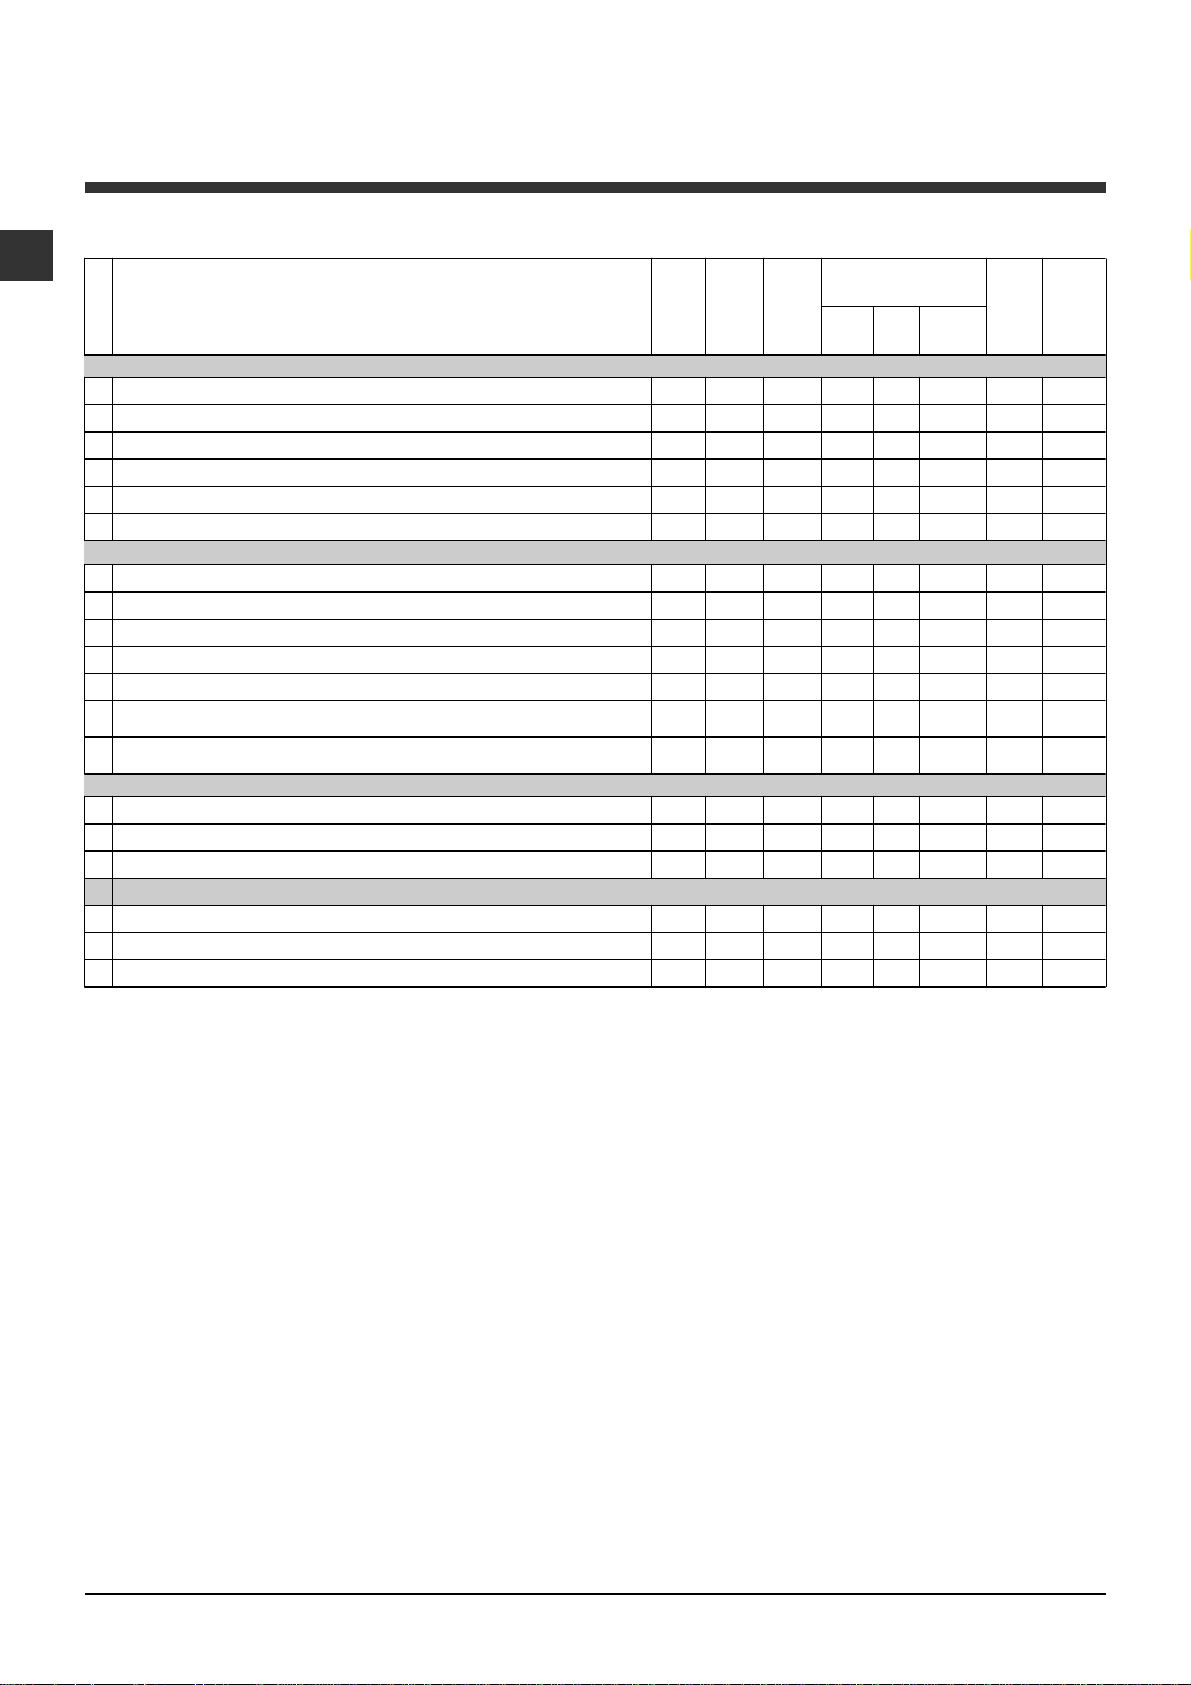
Table of wash cycles
.
Max
Description of the wash cycle
Wash cycles
Specials cycles
Sanitizing cycle:
6
Sanitizing cycle (1):
6
Goodnigt cycle:
7
Baby cycle:
8
Sil k/Curtains:
9
Wool:
For wool, cashmere, etc.
10
2
3
3
4
5
A
B
C
11
12
13
Daily wash cycles
Cotton:
1
1
Heavily soiled whites and resistant colours.
Cotton (2):
Coloured Cottons (3):
Synthetics resistents:
Synthetics resistents:
Mix 30':
To refresh lightly soiled garments quickly (not suitable for wool,
silk and clothes which require washing by hand).
Mix 15':
silk and clothes which require washing by hand).
Partials wash cycl es
Rinse - 1000
Spin - 1000
Drain no spin - 0 - - - - 72
Drying cycles
Cotton drying - Synthetics drying - Wool drying - -
Extremely soiled whites.
Heavily soiled whites and resistant colours.
Lightly soiled delicate colours.
Heavily soiled delicate colours.
For garments in silk and viscose, lingerie.
Heavily soiled whites and delicate colours.
Lightly soiled whites and delicate colours.
Heavily soiled resistant colours.
Lightly soiled resistant colours.
To refresh lightly soiled garments quickly (not suitable for wool,
The information contained in the table is intended as a guide only.
Max.
temp.
speed
(°C)
90° 1000
60° 1000
40° 1000
40° 800
Drying
(rpm)
llll
l
l
l
30° 0 - 40° 800
60° 1000
40° 1000
40° 1000
60° 800
40° 800
30° 800
30° 800
l
llll
llll
llll
l
l
l
l
l
l
l
l
l
For all Test Institutes:
1) Test wash cycle in compliance with regulation EN 50229: set wash cycle 6 with a temperature of 60°C.
2) Long wash cycle for cottons: set wash cycle 1 with a temperature of 40°C.
3) Short wash cycle for cottons: set wash cycle 2 with a temperature of 40°C.
Specials wash cycles
Sanitizing cycle (wash cycle 6). A high-temperature hygienic wash cycle (over 60°C) which requires the use of bleach.
Pour the bleach, the detergent and the additives into the relevant compartments (see paragraph entitled
Detergent dispenser drawer).
Goodnigt cycle (wash cycle 7). This is a silent cycle which can be run at night, when the electricity prices are lower. The
wash cycle is designed for cottons and synthetics. At the end of the cycle the machine stops while there is still water in
the drum; to spin and drain the laundry press the START/PAUSE button; alternatively the machine will perform the spin
cycle and drain the water automatically after 8 hours.
Baby cycle (wash cycle 8). This wash cycle can be used to remove the soiling typically caused by babies, while ensuring
that all detergent is removed from nappies in order to prevent the delicate skin of babies from suffering allergies. The
cycle has been designed to reduce the amount of bacteria by using a greater quantity of water and optimising the effect
of special disinfecting additives added to the detergent.
At the end of the wash cycle, the machine will slowly rotate the drum to prevent the formation of creases; to end the cycle
press the START/PAUSE button.
Mix 30(wash cycle 4) this wash cycle was designed to wash lightly soiled garments quickly: it lasts just 30 minutes and
therefore saves both energy and time. By selecting this wash cycle (5 at 30°C), it is possible to wash different fabrics
together (except for wool and silk items), with a maximum load of 3 kg.
Mix 15(wash cycle 5) this wash cycle was designed to wash lightly soiled garments quickly: it lasts just 15 minutes and
therefore saves both energy and time. By selecting this wash cycle (5 at 30°C), it is possible to wash different fabrics
together (except for wool and silk items), with a maximum load of 1.5 kg.
Detergents
Bleach Wash
Fabri c
softener
Max.
load
(kg)
Cycle
duration
7170
ll
-
ll
-
ll
-
ll
ll
-
7 153
4290
2118
155
1,5 55
7 122
7115
785
ll
-
ll
-
ll
-
ll
-
- -
l
385
370
330
1,5 15
736
- - - 716
- - - 5 -
- - - 3 -
- - - 1,5 -
6
Page 7
Personalisation
Setting the temperature
Turn the TEMPERATURE knob to set the wash temperature (see Table of wash cycles).
The temperature may be lowered, or even set to a cold wash (
The washer-dryer will automatically prevent you from selecting a temperature which is higher than the maximum
value set for each wash cycle.
Setting the drying cycle
Turn the DRYING knob to set the desired drying type.
Two options are available:
A - Based on time: from 40 to 180 minutes.
B - Based on the how damp the clothes are once they have
been dried:
Iron
Hanger
Cupboard
and bathrobes.
If your laundry load to be washed and dried is much greater than the maximum stated load (see adjacent table),
perform the wash cycle, and when the cycle is complete, divide the garments into groups and put some of them
back in the drum. At this point, follow the instructions provided for a "Drying only" cycle. Repeat this procedure
for the remainder of the load.
N.B: When the drying is complete there is a cooling period, even though the DRYING knob is in the
Drying only
Turn the WASH CYCLE knob to one of the drying settings (11-12-13) according to the type of fabric, then select
the desired drying duration using the DRYING knob.
: slightly damp clothes, easy to iron.
: dry clothes to put away.
: very dry clothes, recommended for towelling
).
Table of Drying times (guideline values)
Fabr ic
type
Cotton Clothing of different
Synthetics
Wool Knitwear, Pullovers, etc.
Load type Max.
sizes, Terry towels
Sheets, Shirts, Pyjamas,
socks, etc.
load
(kg)
5 180 170 160
3 180 170 160
1,5 150 140 130
Cupboard
dry
Henger
dry
position.
Iron
dry
GB
Functions
The various wash functions available with this washer-dryer will help to achieve the desired results, every time.
To activate the functions:
1. Press the button corresponding to the desired function;
2. the function is enabled when the corresponding indicator light is illuminated.
Note: If the indicator light flashes rapidly, this signals that this particular function may not be selected in
conjunction with the selected wash cycle.
Delay timer
This timer delays the start time of the wash cycle by up to 9 hours.
Press the button repeatedly until the indicator light corresponding to the desired delay time switches on. The fifth time
the button is pressed, the function will be disabled.
N.B. Once you have pressed the START/PAUSE button, the delay time may only be decreased if you wish to modify it.
This option is enabled with all programmes.
Extra rinse
By selecting this function, the efficiency of the rinse is increased and optimal detergent removal is guaranteed. It is
particularly useful for sensitive skin.
This function may not be used in conjunction with wash cycles 4, 5, 11, 12, 13, B, C.
Super Wash
Because a greater quantity of water is used in the initial phase of the cycle, and because of the increased cycle
duration, this function offers a high-performance wash.
This function may not be used in conjunction with wash cycles 4, 5, 6, 9, 10, 11, 12, 13, A, B, C.
1000-500
By selecting this function, reduces the spin speed.
This function may not be used in conjunction with wash cycles 9, C, 11, 12, 13.
7
Page 8
Detergents and laundry
GB
Detergent dispenser drawer
Good washing results also depend on the correct
dose of detergent: adding too much detergent will not
necessarily result in a more efficient wash, and may in
fact cause build up on the inside of your appliance
and contribute to environmental pollution.
Do not use hand washing detergents because these
create too much foam.
Open the detergent
4
MAX
1
3
compartment 1: Pre-wash detergent (powder)
Before pouring in the detergent, make sure that extra
compartment 4 has been removed.
compartment 2: Detergent for the wash cycle
(powder or liquid)
Liquid detergent should only be poured in immediately
prior to the start of the wash cycle.
compartment 3: Additives (fabric softeners, etc.)
The fabric softener should not overflow the grid.
extra compartment 4: Bleach
2
dispenser drawer and
pour in the detergent or
washing additive, as
follows.
Bleach cycle
Bleaching may only be performed in conjunction with
wash cycles 1, 2, 6.
Pour the bleach into extra compartment 4; pour the
detergent and softener into the corresponding
compartments, then select one of the
abovementioned wash cycles.
This option is recommended only for very soiled
cotton garments.
Preparing the laundry
Divide the laundry according to:
- the type of fabric/the symbol on the label
- the colours: separate coloured garments from
whites.
Empty all garment pockets and check the buttons.
Do not exceed the listed values, which refer to the
weight of the laundry when dry:
Durable fabrics: max. 7 kg
Synthetic fabrics: max. 3 kg
Delicate fabrics: max. 2 kg
Wool: max. 1.5 kg
How much does your laundry weigh?
1 sheet 400-500 g
1 pillow case 150-200 g
1 tablecloth 400-500 g
1 bathrobe 900-1200 g
1 towel 150-250 g
Garments requiring special care
Silk: use special wash cycle 9 to wash all silk
garments. We recommend the use of special
detergent which has been designed to wash delicate
clothes.
Curtains: these should be folded and placed inside
the bag provided. Use wash cycle 9.
Wool: Hotpoint/Ariston is the only washer-dryer
manufacturer to have been awarded the prestigious
Woolmark Platinum Care endorsement (M.0508) by
the Woolmark Company, which means that all
woollen garments may be washed in the washerdryer, even those which state hand wash only
on the label. Wash cycle 10 therefore offers complete
peace of mind when washing woollen garments in the
washer-dryer (max. load 1.5 kg) and guarantees
optimal performance.
Load balancing system
Before every spin cycle, to avoid excessive vibrations
and to distribute the load in a uniform manner, the
drum rotates continuously at a speed which is slightly
greater than the washing rotation speed. If, after
several attempts, the load is not balanced correctly,
the machine spins at a reduced spin speed. If the
load is excessively unbalanced, the washer-dryer
performs the distribution process instead of spinning.
To encourage improved load distribution and balance,
we recommend small and large garments are mixed
in the load.
Anti-crease
This function interrupts the wash programme, and the
washing is left to soak in water before the appliance
is drained.
It can only be used with programme 9 (Silk/Curtains)
and helps to prevent the formation of creases.
To complete the cycle press the START/PAUSE
button.
8
Page 9

Precautions and tips
This washer-dryer was designed and constructed in
accordance with international safety regulations. The
following information is provided for safety reasons
and must therefore be read carefully.
General safety
This appliance was designed for domestic use only.
The washer-dryer must only be used by adults, in
accordance with the instructions provided in this manual.
Do not touch the machine when barefoot or with
wet or damp hands or feet.
Do not pull on the power supply cable when
unplugging the appliance from the electricity
socket. Hold the plug and pull.
Do not open the detergent dispenser drawer while
the machine is in operation.
Do not touch the drained water as it may reach
extremely high temperatures.
Never force the porthole door. This could damage
the safety lock mechanism designed to prevent
accidental opening.
If the appliance breaks down, do not under any
circumstances access the internal mechanisms in
an attempt to repair it yourself.
Always keep children well away from the appliance
while it is operating.
The door can become quite hot during the wash cycle.
If the appliance has to be moved, work in a group
of two or three people and handle it with the utmost
care. Never try to do this alone, because the
appliance is very heavy.
Before loading laundry into the washer-dryer, make
sure the drum is empty.
During the drying phase, the door tends to get
quite hot.
separately in order to optimise the recovery and
recycling of the materials they contain and reduce
the impact on human health and the environment.
The crossed out "wheeled bin" symbol on the
product reminds you of your obligation, that when
you dispose of the appliance it must be separately
collected.
Consumers should contact their local authority or
retailer for information concerning the correct
disposal of their old appliance.
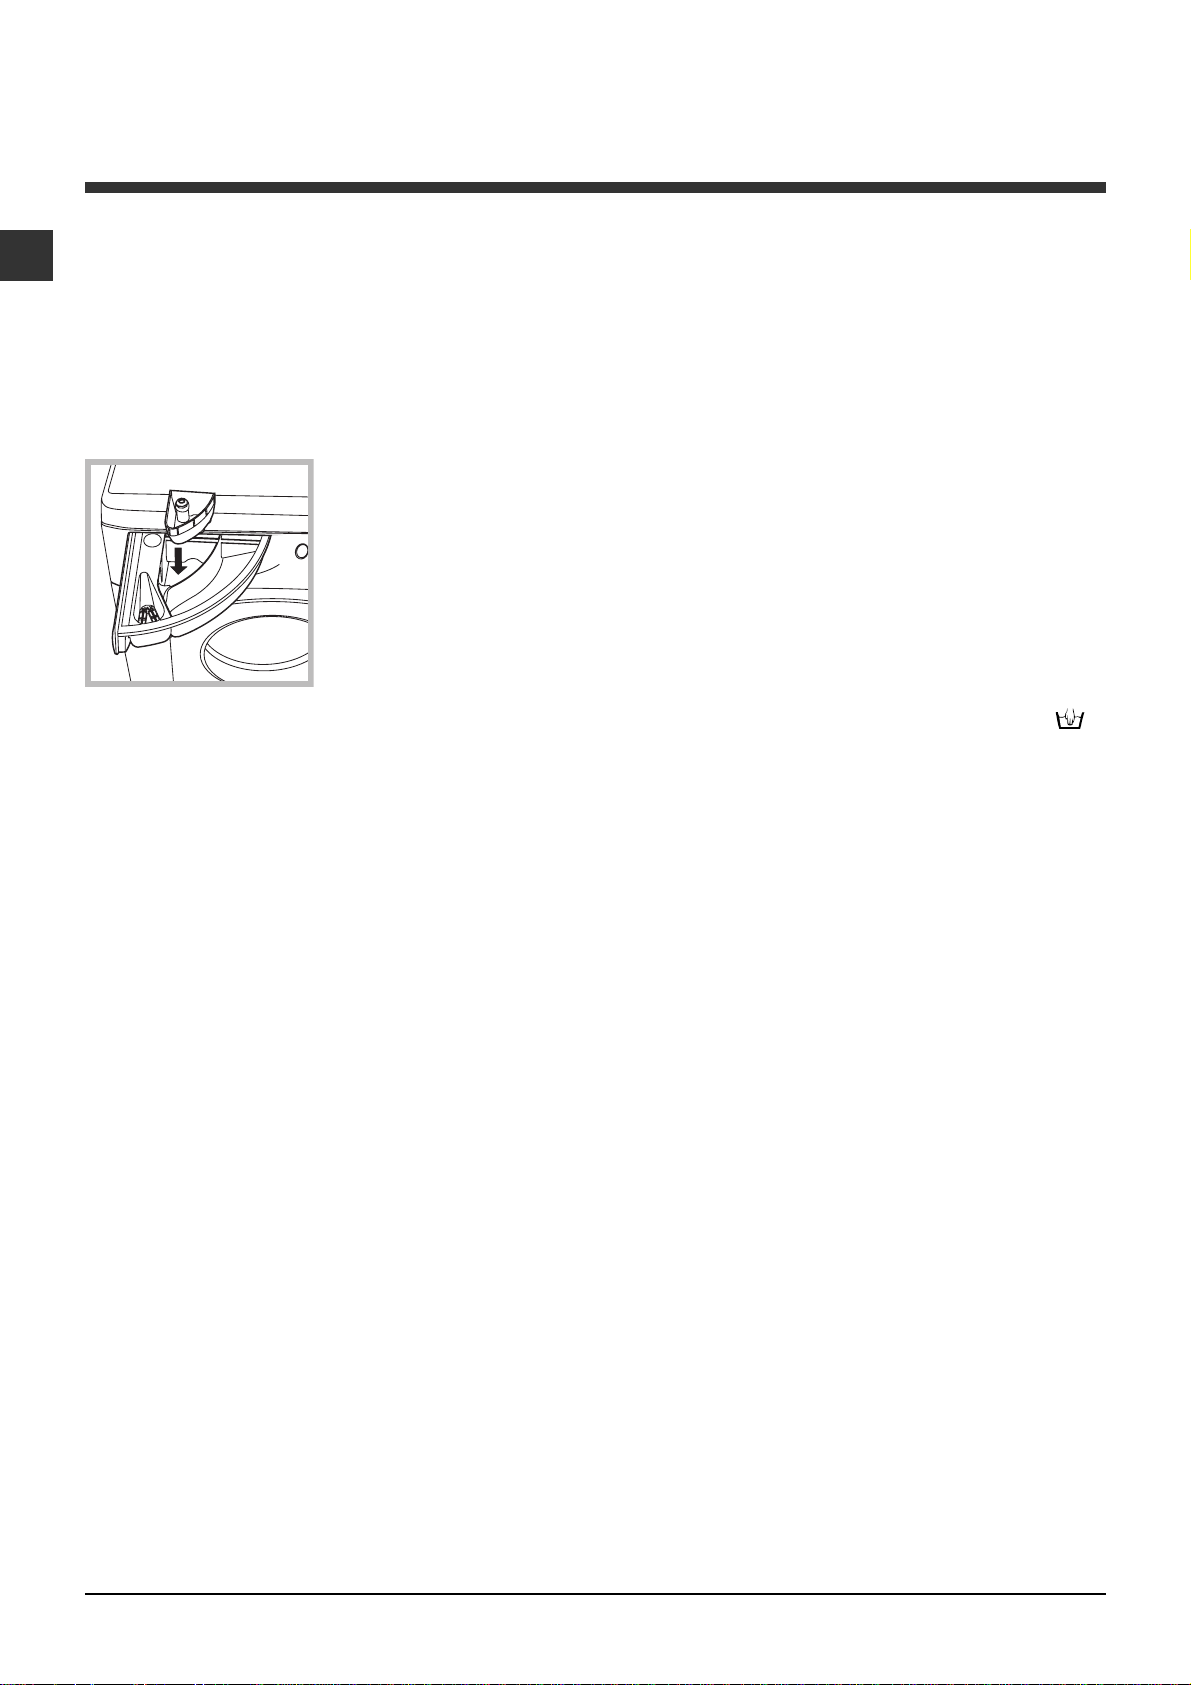
Opening the porthole door manually
In the event that it is not possible to open the
porthole door due to a powercut, and if you wish to
remove the laundry, proceed as follows:
1. remove the plug from
the electrical socket.
2. make sure the water
level inside the machine is
20
lower than the door
opening; if it is not, remove
excess water using the
drain hose, collecting it in a
bucket as indicated in the
figure.
3. using a screwdriver,
remove the cover panel on
the lower front part of the
washer-dryer (see figure).
GB
Do not use the appliance to dry clothes that have
been washed with flammable solvents (e.g.
trichlorethylene).
Do not use the appliance to dry foam rubber or
similar elastomers.
Make sure that the water tap is turned on during
the drying cycles.
Disposal
Disposing of the packaging materials: observe local
regulations so that the packaging may be re-used.
The European Directive 2002/96/EC on Waste
Electrical and Electronic Equipment, requires that
old household electrical appliances must not be
disposed of in the normal unsorted municipal waste
stream. Old appliances must be collected
4. pull outwards using the tab as indicated in the
figure, until the plastic tie-rod is freed from its stop
position; pull downwards and open the door at the
same time.
5. reposition the panel, making sure the hooks are
securely in place before you push it onto the
appliance.
9
Page 10
Care and maintenance
GB
Cutting off the water and electricity
supplies
Turn off the water tap after every wash cycle. This
will limit wear on the hydraulic system inside the
washer-dryer and help to prevent leaks.
Unplug the washer-dryer when cleaning it and
during all maintenance work.
Cleaning the washer-dryer
The outer parts and rubber components of the
appliance can be cleaned using a soft cloth soaked
in lukewarm soapy water. Do not use solvents or
abrasives.
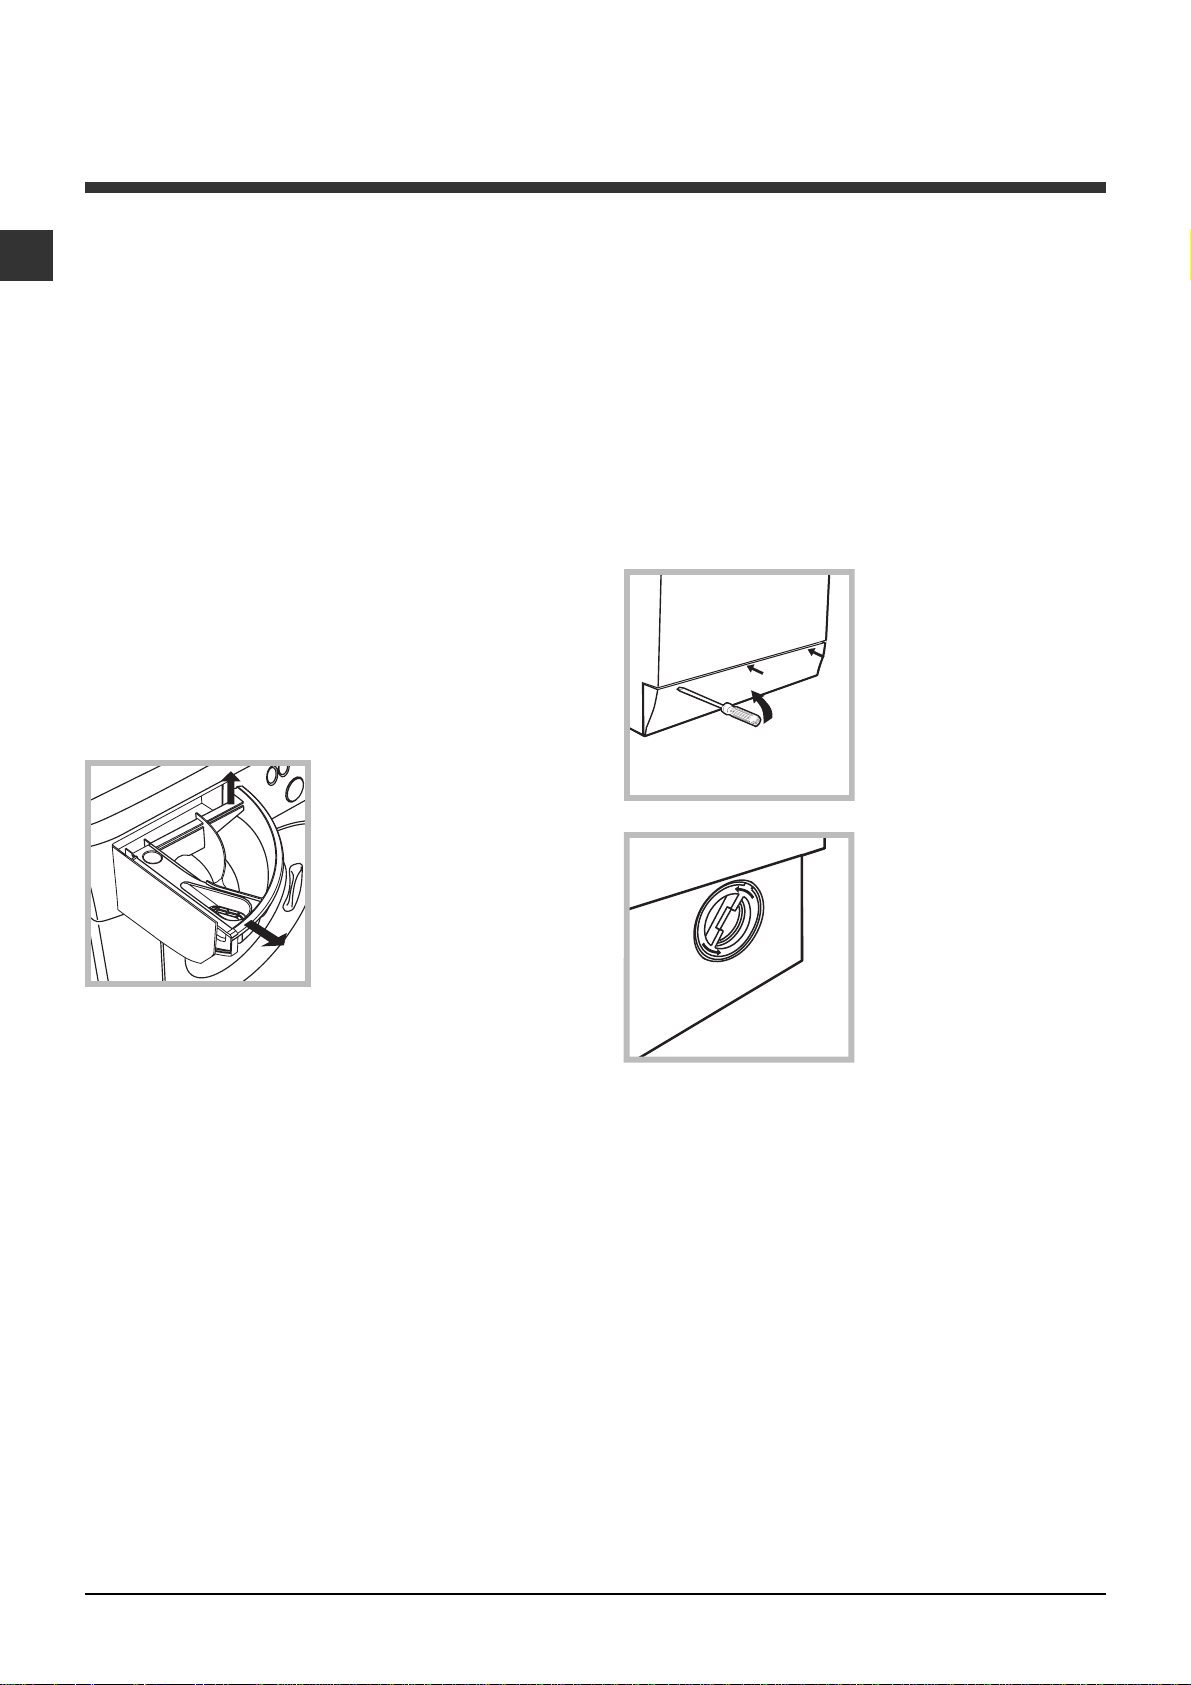
Cleaning the detergent dispenser
drawer
1
Remove the dispenser
by raising it and pulling it
out (see figure).
Wash it under running
water; this operation
should be repeated
frequently.
2
Cleaning the pump
The washer-dryer is fitted with a self-cleaning pump
which does not require any maintenance. Sometimes,
small items (such as coins or buttons) may fall into the
pre-chamber which protects the pump, situated in its
bottom part.
Make sure the wash cycle has finished and unplug
the appliance.
To access the pre-chamber:
1. using a screwdriver,
remove the cover panel
on the lower front part of
the washer-dryer (see
figure);
2. unscrew the lid by
rotating it anti-clockwise
(see figure): a little water
may trickle out. This is
perfectly normal;
Caring for the door and drum of your
appliance
Always leave the porthole door ajar in order to
prevent unpleasant odours from forming.
3. clean the inside thoroughly;
4. screw the lid back on;
5. reposition the panel, making sure the hooks are
securely in place before you push it onto the
appliance.
Checking the water inlet hose
Check the inlet hose at least once a year. If there are
any cracks, it should be replaced immediately: during
the wash cycles, water pressure is very strong and a
cracked hose could easily split open.
Never use second-hand hoses.
10
Page 11

Troubleshooting
Your washer-dryer could fail to work. Before contacting the Technical Assistance Centre (see Assistance), make
sure that the problem cannot be not solved easily using the following list.
Problem:
The washer-dryer does not
switch on.
The wash cycle does not start.
The washer-dryer does not take
in water (the indicator light for
the first wash cycle stage
flashes rapidly).
The washer-dryer continuously
takes in and drains water.
Possible causes / Solutions:
The appliance is not plugged into the socket fully, or is not making contact.
There is no power in the house.
The washer-dryer door is not closed properly.
The ON/OFF button has not been pressed.
The START/PAUSE button has not been pressed.
The water tap has not been opened.
A delayed start has been set (see Personalisation).
The water inlet hose is not connected to the tap.
The hose is bent.
The water tap has not been opened.
There is no water supply in the house.
The pressure is too low.
The START/PAUSE button has not been pressed.
The drain hose is not fitted at a height between 65 and 100 cm from
the floor (see Installation).
The free end of the hose is under water (see Installation).
The wall drainage system is not fitted with a breather pipe.
If the problem persists even after these checks, turn off the water tap,
switch the appliance off and contact the Assistance Service. If the
dwelling is on one of the upper floors of a building, there may be problems
relating to water drainage, causing the washer-dryer to fill with water and
drain continuously. Special anti-draining valves are available in shops and
help to avoid this inconvenience.
GB
The washer-dryer does not drain
or spin.
The washer-dryer vibrates a lot
during the spin cycle.
The washer-dryer leaks.
The START/PAUSE indicator light
(orange) and the function
indicator lights flash rapidly.
There is too much foam.
The washer-dryer does not dry.
The wash cycle does not include draining: some wash cycles require
the drain phase to be started manually.
The ANTI-CREASE function has been activated: To complete the wash
cycle, press the START/PAUSE button (Personalisation).
The drain hose is bent (see Installation).
The drainage duct is clogged.
The drum was not unlocked correctly during installation (see Installation).
The washer-dryer is not level (see Installation).
The washer-dryer is trapped between cabinets and walls (see Installation).
The water inlet hose is not screwed on properly (see Installation).
The detergent dispenser drawer is blocked (for cleaning instructions, see
Care and maintenance).
The drain hose is not fixed properly (see Installation).
Switch off the machine and unplug it, wait for approximately 1 minute
and then switch it back on again.
If the problem persists, contact the Technical Assistance Service.
The detergent is not suitable for machine washing (it should display the
text for washer-dryers or hand and machine wash, or the like).
Too much detergent was used.
The appliance is not plugged into the socket, or not enough to make contact.
There has been a power failure.
The appliance door is not shut properly.
A delayed start has been set.
The DRYING knob is on the
setting.
11
Page 12

Service
GB
Before calling for Assistance:
Check whether you can solve the problem alone (see Troubleshooting);
Restart the programme to check whether the problem has been solved;
If this is not the case, contact an authorised Technical Assistance Centre using the telephone number
provided on the guarantee certificate.
Always request the assistance of authorised technicians.
Have the following information to hand:
the type of problem;
the appliance model (Mod.);
the serial number (S/N).
This information can be found on the data plate applied to the rear of the washer-dryer, and can also be
found on the front of the appliance by opening the door.
12
Page 13

Instrucþiuni de folosire
MAªINÃ DE SPÃLAT ªI USCAT
RO
Românã
ARMXXL 105
Sumar
RO
Instalare, 14-15
Despachetare ºi punere la nivel
Racorduri hidraulice ºi electrice
Primul ciclu de spãlare
Date tehnice
Descrierea maºinii de spãlat ºi activarea
unui program, 16-17
Panoul de control
Indicatoare luminoase
Activarea unui program
Programe, 18
Tabel de programe
Personalizare, 19
Reglarea temperaturii
Alegerea programului de uscare
Funcþii
Detergenþi ºi rufe albe, 20
Compartimentul pentru detergenþi
Ciclu de albire
Pregãtirea rufelor
Articole delicate
Sistemul de echilibrare a încãrcãturii
Precauþii ºi sfaturi, 21
Norme de protecþie ºi siguranþã generale
Aruncarea reziduurilor
Deschiderea manualã a uºii
Întreþinere ºi curãþare, 22
Întreruperea alimentãrii cu apã ºi curent electric
Curãþarea maºinii de spãlat
Curãþarea compartimentului pentru detergent
Îngrijirea uºii ºi a tamburului
Curãþarea pompei
Controlarea furtunului de alimentare cu apã
Anomalii ºi remedii, 23
Asistenþã, 24
13
Page 14
Instalare
RO
Este important sã pãstraþi acest manual pentru a-l
putea consulta în orice moment. În caz de vânzare,
de cesiune sau de schimbare a locuinþei, acesta
trebuie sã rãmânã împreunã cu maºina de spãlat
pentru a informa noul proprietar cu privire la
funcþionare ºi la respectivele avertismente.
Citiþi cu atenþie instrucþiunile: veþi gãsi informaþii
importante cu privire la instalare, la folosire ºi la
siguranþã.
Despachetare ºi punere la nivel
Despachetare
1. Scoaterea din ambalaj a maºinii de spãlat.
2. Controlaþi ca maºina de spãlat sã nu fi fost
deterioratã în timpul transportului. Dacã este
deterioratã nu o conectaþi ºi luaþi legãtura cu
vânzãtorul.
3. Scoateþi cele 4
ºuruburi de protecþie
pentru transport ºi
cauciucul cu respectivul
distanþier, situate în
partea posterioarã
(a se vedea figura).
O nivelare precisã conferã stabilitate maºinii ºi evitã
vibraþii, zgomote ºi deplasãri pe timpul funcþionãrii.
În cazul mochetelor sau a unui covor, reglaþi
picioruºele astfel încât sã menþineþi sub maºina de
spãlat un spaþiu suficient pentru ventilare.
Racorduri hidraulice ºi electrice
Racordarea furtunului de alimentare cu apã
1. Introduceþi garnitura A
în extremitatea tubului de
alimentare ºi înºurubaþi-l
la un robinet de apã rece
A
cu gura filetatã (a se
vedea figura).
Înainte de conectare,
lãsaþi apa sã curgã pânã
când nu a devine
limpede.
2. Conectaþi tubul de
alimentare la maºina de
spãlat, înºurubându-l la
sursa de apã respectivã,
amplasatã în partea
posterioarã, sus în
dreapta (a se vedea
figura).
4. Închideþi orificiile cu dopurile din plastic aflate în
dotare.
5. Pãstraþi toate piesele: pentru cazul în care
maºina de spãlat va trebui sã fie transportatã,
piesele vor trebui montante din nou.
Ambalajele nu sunt jucãrii pentru copii!
Punere la nivel
1. Instalaþi maºina de spãlat pe o suprafaþã planã ºi
rigidã, fãrã a o sprijini de ziduri, mobilã sau altceva.
2. Dacã podeaua nu este
perfect orizontalã,
compensaþi
neregularitãþile
deºurubând sau
înºurubând picioruºele
anterioare (a se vedea
figura); unghiul de
înclinare, mãsurat pe
planul de lucru, nu trebuie
sã depãºeascã 2°.
3. Fiþi atenþi ca furtunul sã nu fie nici pliat nici îndoit.
Presiunea apei de la robinet trebuie sã fie cuprinsã
în valorile din tabelul Date tehnice (a se vedea
pagina alãturatã).
Dacã lungimea furtunului de alimentare nu este
suficientã, adresaþi-vã unui magazin specializat sau
unui instalator autorizat.
Nu folosiþi niciodatã tuburi folosite deja.
Utilizaþi tuburile furnizate împreunã cu maºina.
14
Page 15
Conectarea furtunului de golire
65 - 100 cm
Conectaþi furtunul de
golire - fãrã a-l îndoi - la
canalizare sau la
racordul de golire
prevãzut pe perete, la o
înãlþime de 65 - 100 cm
de sol;
Nu folosiþi prelungitoare ºi prize multiple.
RO
Cablul nu trebuie sã fie îndoit sau comprimat.
Cablul de alimentare trebuie sã fie înlocuit doar de
tehnicieni autorizaþi ai centrului de service ce apare
scris pe certificatul de garantie emis de producator.
Atenþie! Producãtorul îºi declinã orice
responsabilitate în cazul în care aceste norme nu se
respectã.
Sprijiniþi-l de marginea
cãzii sau chiuvetei ºi
racordaþi ºina de ghidare
din dotare la robinet (a
se vedea figura).
Capãtul liber al
furtunului de golire nu
trebuie sã rãmânã
cufundat în apã.
Nu se recomandã folosirea furtunurilor
prelungitoare; dacã este indispensabil, acestea
trebuie sã aibã acelaºi diametru ca ºi furtunul
original ºi nu trebuie sã depãºeascã 150 cm
lungime.
Racordarea electricã
Înainte de a introduce stecherul în prizã, asiguraþi-vã ca:
priza sã fie cu împãmântare ºi conform
prevederilor legale;
priza sã poatã suporta sarcina maximã de putere
a maºinii, indicatã în tabelul Date Tehnice
(a se vedea alãturi);
tensiunea de alimentare sã fie cuprinsã în valorile
indicate în tabelul Date Tehnice (a se vedea
alãturi);
priza sã fie compatibilã cu stecherul maºinii de
spãlat. În caz contrar înlocuiþi stecherul.
Maºina de spãlat nu trebuie instalatã afarã, nici
chiar în cazul în care spaþiul este adãpostit,
deoarece este foarte periculoasã expunerea maºinii
la ploi ºi furtuni.
Primul ciclu de spãlare
Dupã instalare, înainte de folosire, efectuaþi un ciclu
de spãlare cu detergent ºi fãrã rufe, selectând
programul 1.
Date tehnice
Model
Dimensiuni
Capacitate
Legãturi electrice
Legãturi hidrice
Turaþia de
centrifugare
Programe de control
în baza normei
EN 50229
ARMXXL 105
lãrgime: 59,5 cm
înãlþime: 85 cm
profunzime: 53,5 cm
De la 1 la 7 kg pentru spãlare
De la 1 la 5 kg pentru uscare
vezi eticheta cu caracteristicile tehnice,
aplicatã pe maºinã
presiune maximã: 1 MPa (10 bari)
presiune minimã: 0,05 MPa (0,5 bari)
capacitatea cuvei: 52 litri
pânã la 1000 de rotaþii pe minut
: programul 6; temperatura
Spãlare
efectuatã cu 7 kg de rufe.
60°
C;
: prima uscare se efectueazã cu
Uscare
kg de rufe ºi selectorul de USCARE în
2
poziþia ;
a doua uscare se efectueazã cu 5 kg de
rufe ºi selectorul de USCARE în
poziþia .
Acest aparat este conform cu
urmãtoarele Directive Comunitare:e
- 89/336/CEE din data de 03/05/89
(Compatibilitate Electromagneticã) ºi
modificãri succesive
- 2006/95/CE (Tensiuni Joase)
- 2002/96/CE
Dupã instalarea maºinii de spãlat, priza de curent
trebuie sã fie uºor accesibilã.
Zgomot
(dB(A) re 1 pW)
Spãlare: 66
Turaþie de centrifugare: 76
15
Page 16
Descrierea maºinii de spãlat ºi
activarea unui program
RO
Panoul de control
Sertarul detergenþilor
PORNIRE/OPRIRE
Tasta
PROGRAME
TEMPERATURÃ
Selector
Selector
Indicatoare
DESFêURARE CICLU/
PORNIRE ÎNTÂRZIATÃ
Selector
USCARE
Indicator
UªÃ
BLOCATÃ
Tastã cu led
START/PAUZÃ
Taste cu led
FUNCÞII
Sertarul detergenþilor: pentru a introduce
detergenþi sau aditivi (a se vedea Detergenþi ºi rufe
albe).
În interiorul sertarului pentru detergenþi este
amplasat un suport pe care se aflã schema
programelor.
Tasta PORNIRE/OPRIRE: pentru a porni ºi opri
maºina.
Selector PROGRAME: pentru a selecta programele.
Pe durata desfãºurãrii programului selectorul rãmâne
în aceeaºi poziþie.
Taste cu led FUNCÞII: pentru a selecta funcþiile
disponibile. Indicatorul corespunzãtor funcþiei alese
va rãmâne aprins.
Selector USCARE: pentru a regla uscarea doritã
(a se vedea Personalizare).
Selector TEMPERATURÃ: pentru a selecta temperatura sau spãlarea la rece (a se vedea Personalizare).
Indicatoare DESFêURARE CICLU/PORNIRE
ÎNTÂRZIATÃ: pentru a putea urmãri avansarea
programului de spãlare.
Indicatorul aprins aratã faza în curs de desfãºurare.
Dacã a fost selectatã funcþia Pornire întârziatã, va
fi indicat timpul care lipseºte pânã la pornirea
programului (a se vedea pag. alãturatã).
Indicator UªÃ BLOCATÃ: pentru a înþelege dacã uºa
se poate deschide sau nu (a se vedea pag.
alãturatã).
Tastã cu led START/PAUZÃ: pentru a activa / opri
momentan programele.
N.B.: pentru a întrerupe momentan un ciclu apãsaþi
aceastã tastã; ledul se va aprinde intermitent
(culoare portocalie) în timp ce ledul corespunzãtor
fazei în curs de desfãºurare va rãmâne aprins. Dacã
indicatorul UªÃ BLOCATÃ
se poate deschide.
Pentru a continua spãlarea, de unde a fost
întreruptã, apãsaþi din nou tasta.
este stins, atunci uºa
16
Page 17
Indicatoare luminoase
Ledurile furnizeazã informaþii importante.
Iatã ce indicã:
Pornire întârziatã
Dacã a fost activatã funcþia Pornire întârziatã (a se
vedea Personalizare), dupã activarea programului, se
va aprinde intermitent ledul corespunzãtor
întârzieriiselectate:
Cu trecerea timpului, se va vizualiza întârzierea
restantã, prin aprinderea intermitentã a ledului
respectiv.
La expirarea întârzierii selectate, indicatorul luminos
se va stinge ºi programul selectat va intra în
funcþiune.
Indicatoare de fazã
Dupã alegerea ºi activarea ciclului dorit, indicatoarele
luminoase se vor aprinde unul dupã altul, ceea ce vã
indicã starea de avansare a programului:
Spãlare
Clãtire
Notã: Imediat dupã alegerea
Centrifugã
Uscare
Sfârºit Spãlare
unui nivel sau a unei durate
de uscare, acest indicator
se va aprinde, ceea ce vã
aratã cã ciclul de spãlare
selectat va fi urmat de o
fazã de uscare.
Notã: în timpul fazei de Evacuare se va aprinde
indicatorul corespunzãtor cu Centrifugã.
Tastele de funcþii ºi ledurile corespunzãtoare
Alegerea unei funcþii implicã aprinderea ledului
corespunzãtor.
Dacã funcþia selectatã nu este compatibilã cu
programul ales, ledul corespunzãtor se va aprinde
intermitent iar funcþia nu se va activa.
În cazul în care va fi selectatã o funcþie
incompatibilã cu alta selectatã anterior, se va activa
doar ultima funcþie aleasã.
Indicator uºã blocatã:
Indicatorul luminos aprins indicã faptul cã uºa este
blocatã, ceea ce evitã deschiderea accidentalã;
pentru a evita orice daunã, este necesar sã se
aºtepte stingerea ledului, înainte de a deschide uºa.
N.B.: dacã funcþia Pornire întârziatã este activã,
uºa nu se poate deschide; pentru a o deschide,
apãsaþi tasta START/PAUZÃ pentru a întrerupe
momentan programarea.
Aprinderea intermitentã rapidã a indicatorului
START/PAUZÃ (culoare portocalie) concomitent cu
un alt led indicã apariþia unei anomalii (a se vedea
Anomalii ºi remedii).
RO
Activarea unui program
1. Porniþi maºina de spãlat apãsând pe tasta PORNIRE/OPRIRE. Toate indicatoarele se aprind câteva secunde,
apoi se sting; indicatorul START/PAUZÃ se va aprinde intermitent.
2. Introduceþi rufele ºi închideþi uºa.
3. Selectaþi programul dorit cu ajutorul selectorului de PROGRAME.
4. Reglaþi temperatura de spãlare (a se vedea Personalizare).
5. Selectaþi uscarea dacã este necesar (a se vedea Personalizare).
6. Adãugaþi detergentul ºi aditivii (a se vedea Detergenþi ºi rufe).
7. Alegeþi funcþiile dorite.
8. Activaþi programul apãsând tasta START/PAUZÃ; indicatorul luminos se va aprinde (culoare verde).
Pentru a anula un ciclu selectat, apãsaþi tasta START/PAUZÃ pentru a întrerupe momentan ciclul ºi alegeþi un
nou program.
9. La încheierea programului, indicatorul luminos
ceea ce vã aratã cã uºa poate fi deschisã. Scoateþi rufele ºi lãsaþi uºa întredeschisã pentru a se putea usca
cuva si tamburul.
Opriti maºina de spãlat apãsând pe tasta PORNIRE/OPRIRE.
se va aprinde. Indicatorul UªÃ BLOCATà se va stinge,
17
Page 18
RO
Programe
Tabel de programe
Descrierea Programului
Programe
Programe Speciale
6
STERILIZARE:
STERILIZAR E (1):
6
murdare.
CICLU DE SPÃLARE NOCTURNÃ:
7
delicate puþin murdare.
8
CICLU BABY:
MÃTASE /PERDELE:
9
mãtase, viscozã, lenjerie.
10
LÂNÃ:
Programe zilnice
RUFE ALBE BUMBAC:
1
foarte murdare.
RUFE ALBE BUMBA C (2):
1
foarte murdare.
COLORATE BUMBAC (3):
2
ºi colorate delicate.
SINTETICE REZISTENTE:
3
foarte murdare.
SINTETICE DELICATE:
3
puþin murdare.
MIX 30’:
4
murdare (nu este indicat pentru lânã, mãtase ºi
articole de spãlat cu mâna).
MIX 15':
5
puþin murdare (nu este indicat pentru lânã,
mãtase ºi articole de spãlat cu mâna).
Programe parþiale
A
CLÃTIRE - 1000 - -
B
CENTRIFUGARE - 1000 - - -
C
EVACUARE - 0 - - - - 7 2
Programe de uscare
11
USCARE
12
USCARE
13
USCARE
Rufe albe foarte murdare.
Albe ºi colorate rezistente foarte
Colorate
Colorate delicate foarte murdare.
Pentru articolele din
Pentru articole din lânã, caºmir.
Albe ºi colorate rezistente
Albe ºi colorate delicate
Albe puþin murdare
Colorate rezistente
Colorate rezistente
Pentru a spãla rapid articolele puþin
Pentru a împrospãta rapid articolele
Bumbac
Sintetice
Lânã
Temp.
Viteza max.
max.
(rotaþii pe
(°C)
90° 1000
60° 1000 -
40° 800 -
40° 800 -
30° 0 -
40° 800 -
60° 1000
40° 1000
40° 1000
60° 800 -
40° 800 -
30° 800 -
30° 800 -
minut)
- - - - -
- - - - -
- - - - -
Decolorant Spãlare
•
•
•
•
Pentru toate Instituþiile de Testare:
1) Programul de control conform normei EN 50229: selectaþi programul 6 ºi temperatura de 60°C.
2) Program pentru bumbac, prelungit: selectaþi programul 1 ºi temperatura de 40°C.
3) Program
pentru
bumbac, rapid: selectaþi programul 2 ºi temperatura de 40°C.
Detergenþi
•
•
•
•
•
•
•
•
•
•
•
•
•
Sarcina
Max.
(Kg)
•
•
•
•
-
•
•
•
•
•
•
•
•
•
•
•
•
•
1,5
1,5 15
1,5 -
rufe
•
•
•
•
•
•
•
•
•
•
•
•
•
•
Uscare
Balsam
Datele specificate în tabel au valoare indicativã.
Durata ciclului de
7
7
4
2
1
7 122
7 115
7 85
3 85
3 70
3 30
7 36
7 16
5 -
3 -
spãlare
170
153
290
118
55
55
Programe speciale
STERILIZARE (programul 6). Un program de igienizare la temperaturã ridicatã, care presupune folosirea
decolorantului (temperatura este peste 60°C).
Pentru a decolora rufele, turnaþi decolorantul, detergentul ºi
aditivii în sertarele corespunzãtoare (a se vedea paragraful Compartimentul pentru detergenþi).
CICLU DE SPALARE NOCTURNA (programul 7). Este un ciclu cu zgomot redus, care vã permite folosirea
maºinii pe timp de noapte. Programul a fost conceput pentru articolele sintetice ºi din bumbac. La încheierea
ciclului, maºina se opreºte cu apã în cuvã; pentru a stoarce rufele ºi a goli apa apãsaþi tasta START/PAUZÃ,
daca nu, dupã 8 ore maºina comandã automat stoarcerea ºi evacuarea apei.
CICLU BABY (programul 8). Programul îndepãrteazã eficient atât mizeria care pãteazã în mod obiºnuit hainele
copiilor cât ºi detergentul, în scopul de a evita apariþia unor alergii pe pielea delicatã a celor mici. Ciclul a fost
conceput pentru a diminua încãrcarea bacterianã prin folosirea unei cantitãþi de apã mai mari ºi prin optimizarea
aditivilor speciali de igienizare, adãugati la detergent.
La încheierea ciclului de spãlare, maºina efectueazã o rotaþie lentã a cuvei, pentru a limita ºifonarea; pentru a
termina ciclul, apãsaþi tasta START/PAUZÃ.
MIX 30' (programul 4) a fost studiat pentru a spãla articolele puþin murdare, în mod rapid: dureazã doar 30 de
minute ceea ce economiseºte energie ºi timp. Selectând programul (4 la 30°C) este posibilã spãlarea
articolelor din materiale diferite (excluse lâna ºi mãtasea) cu o greutate maximã de 3 kg.
MIX 15' (programul 5) a fost studiat pentru a spãla articolele foarte puþin murdare, în mod rapid: dureazã doar 15
de minute ceea ce economiseºte energie ºi timp. Selectând programul (5 la 30°C) este posibilã spãlarea
articolelor din materiale diferite (excluse lâna ºi mãtasea) cu o greutate maximã de 1,5 kg.
18
Page 19

Personalizare
Reglarea temperaturii
Rotind selectorul de TEMPERATURÃ se fixeazã temperatura de spãlare (a se vedea Tabelul programelor).
Temperatura poate fi redusã pânã la spãlarea la rece (
Maºina va împiedica în mod automat de a alege o temperaturã mai mare decât maxima admisã pentru fiecare program.
Alegerea programului de uscare
Rotind selectorul USCARE se determinã modalitatea de
uscare doritã. Sunt prevãzute douã posibilitãþi:
A - În funcþie de duratã: de la 40 la 180 de minute.
B - În funcþie de umiditatea rufelor:
Cãlcare
Uscate
Dulap
halate de baie.
Dacã, în mod excepþional, cantitatea de rufe de spãlat ºi uscat este superioarã cantitãþii maxime prevãzute (vezi
tabelul programelor), efectuaþi spãlarea, iar la terminarea programului, împãrþiþi cantitatea de rufe în mai multe pãrþi ºi
uscaþi-le separat.
Urmaþi apoi instrucþiunile prevãzute pentru efectuare programului Doar uscare.
Repetaþi aceleaºi operaþiuni pentru rufele rãmase.
N.B: Dupã încheierea programului de uscare, maºina va efectua o rãcire, chiar dacã selectorul de USCARE este
adus în poziþia
Doar uscare
Rotiþi selectorul de PROGRAME într-una din poziþiile de uscare (11-12-13) disponibile, în funcþie de tipul de
material; selectaþi apoi modalitatea de uscare doritã, cu ajutorul selectorului de USCARE.
: rufe puþin umede, uºor de cãlcat.
: rufe uscate de pus în dulap.
: rufe foarte uscate, indicatã pentru prosoape ºi
.
).
Tabel Duratã Uscare (valori indicative)
Tipul
þesãturii
Bumbac Rufe de diverse dimensiuni,
Sintetice C earºaf, Cãmãºi, Pijamale,
Lânã 1,5 150 140 130
Tipul sarcinii Sarcinã
Prosoape din bumbac eponjat
ºosete, ecc.
max (kg)
5 180 170 160
3 180 170 160
Dulap Uscate Cãlcare
RO
Funcþii
Diferitele funcþii de spãlare prevãzute pentru maºina de spãlat, permit obþinerea unor rufe curate ºi albe, dupã dorinþã.
Pentru a activa funcþiile:
1. apãsaþi tasta corespunzãtoare funcþiei dorite;
2. aprinderea ledului respectiv indicã activarea funcþiei.
Notã: Semnalul luminos intermitent, rapid, indicã faptul cã funcþia respectivã nu este compatibilã cu programul ales.
Pornirea întârziatã
Întârzie pornirea maºinii cu pânã la 9 de ore.
Apãsaþi de mai multe ori pânã la aprinderea butonului cu întârzierea doritã. La a cincea apãsare a tastei, funcþia se
va dezactiva.
N.B.: Dupã apãsarea tastei START/PAUZÃ, se va putea modifica întârzierea doar diminuând-o.
Se poate activa pe toate programele.
Clãtire suplimentarã
Selectând aceastã opþiune, clãtirea va fi mai eficientã, ceea ce asigurã eliminarea totalã a detergentului din
rufe. Este recomandatã cu precãdere persoanelor cu pielea sensibilã.
Nu poate fi activatã pe programele 4, 5, 11, 12, 13, B, C.
Super spãlare
Mulþumitã utilizãrii unei cantitãþi mai mari de apã în faza iniþialã a ciclului ºi duratei de timp îndelungate,
aceastã funcþie garanteazã o spãlare de mare performanþã.
Nu poate fi activatã pe programele 4, 5, 6, 9, 10, 11, 12, 13, A, B, C.
1000-500
Apãsând aceastã tastã se reduce viteza de stoarcere.
Nu poate fi activatã pe programele 9, C, 11, 12, 13.
19
Page 20

Detergenþi ºi rufe albe
RO
Compartimentul pentru detergenþi
Un rezultat bun la spãlare depinde ºi de dozarea
corectã a detergentului: excesul de detergent nu
garanteazã o spãlare mai eficientã, ci contribuie la
deteriorarea pãrþilor interne ale maºinii de spãlat ºi
la poluarea mediului înconjurãtor.
Nu introduceþi în maºinã detergenþii pentru
spãlarea manualã deoarece formeazã prea multã
spumã.
Deschideþi
4
MAX
1
3
compartiment 1: Detergent pentru prespãlare
(sub formã de praf)
Înainte de a adãuga detergentul verificaþi ca sertarul
adiþional 4 sã nu fie introdus.
compartiment 2: Detergent pentru spãlare
(sub formã de praf sau lichid)
Detergentul lichid trebuie vãrsat doar înainte de pornire.
compartiment 3: Aditivi
(soluþie de înmuiat, balsam rufe etc.)
Soluþia de înmuiat nu trebuie sã iasã deasupra
grãtarului.
compartiment adiþional 4: Decolorant (Inãlbitor)
2
compartimentul pentru
detergenþi ºi introduceþi
detergentul sau aditivul
dupã cum urmeazã:
Ciclu de albire
Albirea poate fi efectuatã numai cu programele 1, 2,6.
Turnaþi decolorantul în compartimentul adiþional 4, iar
detergentul ºi balsamul de rufe în compartimentele
corespunzãtoare, apoi alegeþi unul din ciclurile descrise
mai sus. Este indicat numai pentru articole din bumbac
foarte murdare.
Pregãtirea rufelor
Sortaþi rufele în funcþie de:
- tipul de material / simbolul de pe etichetã.
- culori: separaþi rufele colorate de cele albe.
Goliþi buzunarele ºi controlaþi nasturii.
Nu depãºiþi valorile indicate, referitoare la
greutatea rufelor uscate:
Þesãturi rezistente: max 7 kg
Materiale sintetice: max 3 kg
Þesãturi delicate: max 2 kg
Lânã: max 1,5 kg
Cât cântãresc rufele?
1 cearceaf 400-500 g.
1 faþã de pernã 150-200 g.
1 faþã de masã 400-500 g.
1 halat de baie 900-1.200 g.
1 prosop 150-250 g.
Articole delicate
Mãtase: utilizaþi programul special 9 pentru spãlarea
articolelor din mãtase. Se recomandã folosirea unui
detergent special pentru articole delicate.
Perdele:
sau într-un sac de tip plasã. Utilizaþi programul 9.
Lânã: Hotpoint/Ariston este unica maºinã de spãlat
recunoscutã de Woolmark Company, care i-a acordat
Woolmark Platinum Care (M.0508), ca garanþie a
calitãþii de spãlare cu maºina a tuturor articolelor de
lânã, inclusiv a celor care au pe etichetã menþiunea a
se spãla manual
spãla la maºinã, în cea mai mare siguranþã, toate
articolele din lânã (max. 1,5 kg) cu garanþia de a
obþine cele mai performante rezultate.
împãturiþi-le ºi aºezaþi-le într-o faþã de pernã
. Cu programul 10 puteþi deci
Sistemul de echilibrare a încãrcãturii
Pentru a evita trepidaþiile excesive, înainte de
stoarcere, cuva maºinii va distribui cantitatea de rufe
în mod uniform, centrifuga efectuând câteva rotaþii la
o vitezã mai mare decât viteza de spãlare. Dacã,
dupã numeroase încercãri, maºina nu reuºeºte sã
echilibreze greutatea, stoarcerea rufelor se va face
la o vitezã mai micã decât cea prevãzutã în program.
Dacã instabilitatea este prea mare, maºina va
distribui greutatea în locul centrifugei. Pentru a
favoriza o mai bunã repartizare a rufelor ºi
echilibrarea corectã a maºinii, se recomandã sã
introduceþi în maºinã atât articole mari cât ºi mici.
Antiºifonare
Aceastã funcþie întrerupe programul de spãlare
menþinând rufele la înmuiat în apã înainte de golirea
maºinii.
Poate fi activatã numai cu programul 9 (Mãtase/
Perdele) ºi serveºte la evitarea formãrii pliurilor.
Pentru a termina ciclul, apãsaþi tasta START/
PAUZÃ.
20
Page 21

Precauþii ºi sfaturi
Maºina de spãlat a fost proiectatã ºi construitã
conform normelor internaþionale de protecþie. Aceste
avertizãri sunt furnizate din motive de siguranþã ºi
trebuie sã fie citite cu atenþie.
Norme de protecþie ºi siguranþã generale
Acest aparat a fost conceput exclusiv pentru
utilizarea în locuinþe unifamiliale.
Maºina de spãlat trebuie sã fie folositã doar de
persoane adulte care respectã instrucþiunile din acest
manual.
Nu atingeþi maºina când sunteþi desculþi sau cu
mâinile sau picioarele ude sau umede.
Nu scoateþi stecherul din prizã trãgând de cablu.
Nu deschideþi compartimentul pentru detergent în
timp ce maºina se aflã în funcþiune.
Nu atingeþi apa golitã din maºinã: poate avea o
temperaturã ridicatã.
Nu forþaþi în nici un caz uºa: s-ar putea deteriora
mecanismul de siguranþã care evitã deschiderea
accidentalã.
În caz de defecþiune, nu umblaþi în nici un caz la
mecanismele din interior ºi nu încercaþi sã o reparaþi
singuri.
Controlaþi mereu ca în apropierea maºinii aflate în
funcþiune, sã nu se afle copii.
Pe durata spãlãrii uºa se poate încãlzi.
Dacã trebuie sã deplasaþi maºina, cereþi ajutor unei
alte (sau 2) persoane ºi fiþi foarte atenþi. Niciodatã nu
deplasaþi maºina singuri deoarece aceasta este
foarte grea.
Înainte de a introduce rufele, controlaþi cuva sã fie
goalã.
În timpul uscãrii, uºa maºinii de spãlat se
încãlzeºte.
Nu uscaþi rufele pe care le-aþi spãlat cu solvenþi
inflamabili (de ex. trielinã).
Nu uscaþi rufele cu aplicaþii din cauciuc sintetic sau
elastomeri asemãnãtori.
Fiþi atenþi ca pe durata fazelor de uscare robinetul
de apã sã fie deschis.
evita pericolele care pot duce la dãunarea sãnãtãþii
omului sau poluarea mediului înconjurãtor. Simbolul
tomberonului tãiat care apare pe toate produsele vã
aminteºte tocmai obligaþia de a le colecta separat.
Pentru informaþii suplimentare cu privire la scoaterea
din uz a electrocasnicelor, deþinãtorii acestora pot
apela la centrele de colectare a deºeurilor sau la
vânzãtorii de la care au achiziþionat produsele
respective.
Deschiderea manualã a uºii
Dacã nu este posibil sã deschideþi uºa din cauza
întreruperii curentului electric ºi doriþi totuºi sã
întindeþi rufele, procedaþi dupã cum urmeazã:
1. scoateþi stecherul din
prizã.
2. verificaþi ca nivelul de
apã din maºinã sã fie sub
20
marginea uºii; în caz
contrar, scoateþi apa în
exces cu ajutorul
furtunului de golire,
punând-o într-un vas, dupã
indicaþiile din figura.
3. scoateþi panoul de
acoperire din partea din
faþã a maºinii de spãlat
folosind o ºurubelniþã
(a se vedea figura).
RO
Aruncarea reziduurilor
Eliminarea ambalajelor: respectaþi normele locale, în
acest fel ambalajele vor putea fi utilizate din nou.
Directiva Europeanã 2002/96/CE cu privire la deºeurile
care provin de la aparatura electricã sau electronicã
prevede ca aparatele electrocasnice sã nu fie colectate
împreunã cu deºeurile urbane solide, obiºnuite.
Aparatele scoase din uz trebuie sã fie colectate
separat atât pentru a optimiza rata de recuperare ºi de
reciclare a materialelor componente cât ºi pentru a
4. utilizând dispozitivul indicat în figurã, trageþi spre
dumneavoastrã pânã când eliberaþi tirantul de plastic
din opritor; trageþi apoi în jos ºi, în acelaºi timp,
deschideþi uºa.
5. montaþi din nou panoul verificând, înainte de a-l
împinge spre maºinã, de a fi introdus cârligele în
orificiile respective.
21
Page 22

Întreþinere ºi curãþare
RO
Întreruperea alimentãrii cu apã ºi
curent electric
Închideþi robinetul de apã dupã fiecare spãlare.
Se limiteazã astfel uzura instalaþiei hidraulice a
maºinii de spãlat ºi se eliminã pericolul
scurgerilor.
Scoateþi stecherul din priza de curent atunci
când curãþaþi maºina de spãlat ºi când se
efectueazã lucrãri de întreþinere.
Curãþarea maºinii de spãlat
Partea externã ºi pãrþile din cauciuc pot fi curãþate
cu o lavetã înmuiatã în apã cãlduþã ºi sãpun. Nu
folosiþi solvenþi sau substanþe abrazive.
Curãþarea compartimentului pentru
detergent
1
Trageti afara
compatimentul
ridicându-l si tragându-l
spre exterior (a se
vedea figura).
Spãlaþi-l sub un jet de
apã; aceastã operaþie
trebuie efectuatã cât
2
mai des posibil.
Curãþarea pompei
Maºina de spãlat este dotatã cu o pompã de
autocurãþare care nu are nevoie de întreþinere. Se
poate întâmpla însã ca unele obiecte mici (monede,
nasturi) sã cadã în anticamera care protejeazã
pompa, situatã în partea inferioarã a acesteia.
Verificaþi ca ciclul de spãlare sã fie încheiat ºi
scoateþi stecherul din prizã.
Pentru a avea acces la anticamerã:
1. scoateþi panoul de
acoperire din partea din
faþã a maºinii de spãlat
folosind o ºurubelniþã
(a se vedea figura);
2. deºurubaþi capacul
rotindu-l în sens invers
acelor de ceasornic (a
se vedea figura). Este
normal sã iasã puþinã
apã;
Îngrijirea uºii ºi a tamburului
Lãsaþi mereu uºa întredeschisã pentru a evita
formarea de mirosuri neplãcute.
22
3. curãþaþi cu grijã interiorul;
4. înºurubaþi la loc capacul;
5. montaþi din nou panoul verificând, înainte de a-l
împinge spre maºinã, de a fi introdus cârligele în
orificiile respective.
Controlarea furtunului de alimentare cu apã
Controlaþi tubul de alimentare cel puþin o datã pe an.
Dacã prezintã crãpãturi sau fisuri trebuie înlocuit: pe
parcursul spãlãrilor, presiunea puternicã ar putea
provoca crãpãturi neaºteptate.
Nu folosiþi niciodatã tuburi folosite deja.
Page 23

Anomalii ºi remedii
Se poate întâmpla ca maºina de spãlat sã nu funcþioneze. Înainte de a apela serviciul de Service
(a se vedea Asistenþã), verificaþi dacã nu este vorba de o problemã uºor de rezolvat:
Anomalii:
Maºina de spãlat nu porneºte.
Ciclul de spãlare nu porneºte.
Maºina de spãlat nu se
alimenteazã cu apã (ledul primei
faze de spãlare se aprinde
intermitent ºi rapid).
Maºina de spãlat încarcã ºi
descarcã apã continuu.
Maºina de spãlat nu se goleºte
sau nu stoarce.
Cauze posibile / Rezolvare:
Stecherul nu este introdus în priza de curent, sau nu face contact.
Aveþi o panã de curent la domiciliu.
Uºa nu este bine închisã.
Tasta PORNIRE/OPRIRE nu a fost apãsatã.
Tasta START/PAUZÃ nu a fost apãsatã.
Robinetul de apã nu este deschis.
A fost fixatã o întârziere de pornire (a se vedea Personalizare).
Furtunul de alimentare cu apã nu este racordat la robinet.
Furtunul este îndoit.
Robinetul de apã nu este deschis
Apa la domiciliul dumneavoastrã.
Apa nu are presiune suficientã.
Tasta START/PAUZÃ nu a fost apãsatã.
Furtunul de golire nu a fost instalat la o înãlþime cuprinsã între 65 ºi
100 cm de pãmânt (a se vedea Instalare).
Capãtul furtunului de evacuare este cufundat în apã (a se vedea Instalare).
Evacuarea din perete nu are rãsuflare pentru aer.
Dacã dupã aceste verificãri problema nu se rezolvã, închideþi robinetul de apã,
opriþi maºina de spãlat ºi chemaþi Service-ul. Dacã locuinþa se aflã la ultimele
etaje ale unui edificiu, este posibil sã aibã loc fenomene de sifonare, motiv
pentru care maºina de spãlat încarcã ºi descarcã apã încontinuu. Pentru a
elimina acest inconvenient, se gãsesc în comerþ supape anti-sifonare.
Programul nu prevede golirea apei: în cazul anumitor programe, este
necesarã activarea manualã.
Funcþia Antiºifonare este activã: pentru a încheia programul, apãsaþi
tasta START/PAUZÃ.
Furtunul de golire este îndoit (a se vedea Instalare).
Conducta de descãrcare este înfundatã.
RO
Maºina de spãlat vibreazã foarte
mult în timpul stoarcerii.
Maºina de spãlat pierde apã.
Ledul START/PAUZÃ (portocaliu) ºi
ledurile funcþiilor se aprind
intermitent.
Se formeazã prea multã spumã.
Maºina de spãlat ºi uscat nu
usucã.
Cuva, în momentul instalãrii, nu a fost deblocatã în mod
corespunzãtor (a se vedea Instalare).
Maºina de spãlat este în pantã (a se vedea Instalare).
Maºina de spãlat este prea aproape de pereþi ºi mobilier (a se vedea Instalare).
Furtunul de alimentare cu apã nu este bine înºurubat (a se vedea Instalare).
Compartimentul de detergenþi este înfundat (pentru a-l curãþa a se vedea
Întreþinere ºi curãþare).
Furtunul de golire nu este bine fixat (a se vedea Instalare).
Opriþi maºina ºi scoateþi stecherul din prizã; aºteptaþi aproximativ 1
minut înainte de a o reaprinde. Dacã nu obþineþi nici un rezultat,
apelaþi Centrul de service pentru asistenþã.
Detergentul nu este compatibil cu maºina de spãlat (trebuie sã fie scris pentru
maºina de spãlat, de mânã sau în maºina de spãlat, sau ceva asemãnãtor).
Dozajul a fost excesiv.
Stecherul nu este introdus în priza de curent, sau nu face contact.
Aveþi o panã de curent la domiciliu.
Uºa nu este bine închisã.
A fost fixatã o întârziere de pornire (a se vedea Personalizare).
Selectorul de USCARE este în poziþia
.
23
Page 24

Asistenþã
RO
Înainte de a lua legãtura cu Service-ul:
Verificaþi dacã puteþi rezolva singuri problema (a se vedea Anomalii ºi remedii);
Porniþi din nou programul pentru a controla dacã inconvenientul a fost eliminat;
În caz negativ, luaþi legãtura cu asistenþa tehnicã autorizatã la numãrul telefonic indicat pe certificatul de
garanþie.
Nu apelaþi niciodatã la persoane neautorizate.
Comunicaþi:
tipul de anomalie;
modelul maºinii (Mod.);
numãrul de serie (S/N).
Aceste informaþii sunt specificate pe plãcuþa cu date tehnice, lipitã în partea din spate a maºinii de spãlat
precum ºi în partea anterioarã, dupã ce deschideþi uºa.
24
Page 25

Инструкции за ползване
Пералня със сушилня
BG
Български
ARMXXL 105
Съдържание
BG
Монтиране, 26-27
Разопаковане и нивелиране
Хидравлични и електрически връзки
Първо пране
Технически данни
Описание на пералната машина и
пускането на дадена програма, 28-29
Табло за управление
Светлинни индикатори
Включване на програма
Програми, 30
Таблица с програмите
Персонализирания, 31
Задаване на температурата
Задаване на сушенето
Функции
Перилни препарати и дрехи за пране, 32
Чекмедже за перилните препарати
Цикъл на избелване
Подготвяне на прането
Специфично пране
Система за измерване на товара
Мерки за безопасност и препоръки, 33
Общи предохранителни мерки
Рециклиране
Ръчно отваряне на люка
Поддръжка и почистване, 34
Спиране на водата и изключване на
електрозахранването
Почистване на пералната машина
Почистване на чекмеджето за перилните препарати
Поддръжка на люка и на барабана
Почистване на помпата
Проверка на маркуча за студената вода
Проблеми и мерки за отстраняването им,35
Сервизно обслужване, 36
25
Page 26

Монтиране
BG
Важно е да съхранявате инструкциите, за да
можете да правите допълнителни справки по всяко
време. В случай че пералната машина се продаде,
преотстъпи или премести, трябва да се погрижите
инструкциите винаги да я придружават, за да се
предостави информация на новия собственик за
работата и съответните предупреждения.
Прочетете внимателно инструкциите: защото
съдържат важна информация за монтажа,
използването и безопасността.
Разопаковане и нивелиране
Разопаковане
1. Разопаковайте пералната машина.
2. Проверете дали пералната машина не е
повредена при транспортирането. Ако е повредена,
не я свързвайте, а се обърнете към продавача.
3. Свалете 4-те винта
за предпазване при
транспорт и гумичката
със съответната втулка,
поставени от задната
страна (âèæ
показаното на
фигурата).
Точното нивелиране позволява машината да бъде
стабилна и да се избягват вибрациите, шумът и
преместването й по време на работа. Когато
настилката е мокет или килим, регулирайте така
крачетата, че под пералната машина да остане
достатъчно място за вентилация.
Хидравлични и електрически връзки
Свързване на маркуча към водопроводната мрежа
1. Поставете
уплътнението А в края на
маркуча за студената
вода и го завийте към
A
крана за студената вода с
накрайник с газова резба
3/4 (виж фигурата).
Преди да го свържете,
източете водата, докато
се избистри.
2. Свържете маркуча за
студената вода към
пералната машина,
като го завиете към
специалния щуцер,
разположен от задната
страна, горе вдясно
(виж фигурата).
4. Затворете отворите с предоставените
пластмасови капачки.
5. Съхранете всички части: за да се монтират
отново при необходимост пералната машина да
бъде транспортирана.
Опаковъчният материал не е детска играчка.
Нивелиране
1. Монтирайте пералната машина на равен и твърд
под, без да я опирате в стени, мебели и др.
2. Ако подът не е
идеално хоризонтален,
компенсирайте
неравностите, като
отвиете или завиете
предните крачета (âèæ
фигурата); ъгълът на
наклона, измерен върху
работната повърхност,
не трябва да
надвишава 2°.
3. Внимавайте маркуча да не се прегъва и
притиска.
Налягането по водопроводната мрежа трябва да
бъде в границите, указани в таблицата
Технически данни (вж. следващата страница).
Ако дължината на захранващия маркуч не е
достатъчна, се обърнете към специализиран
магазин или към оторизиран техник.
Никога не използвайте вече употребяван
маркуч.
Използвайте тези, което са доставени с
пералната машина.
26
Page 27

Свързване на маркуча за мръсната вода
Свържете маркуча за
мръсната вода, без да
го прегъвате, към
канализационната
тръба или към тръбата
65 - 100 cm
за отвеждане в
стената, разположени
на височина между 65
и 100 см от пода, или го
подпрете на ръба на
мивката или ваната,
свързвайки доставения
водач към крана (âæ.
фигурата).
Свободният край на
маркуча за мръсната
вода не трябва да
бъде потопен във
водата.
Не се препоръчва използването на удължителни
маркучи. Ако е необходимо, удължителят трябва
да има същия диаметър като оригиналния и да не
надвишава 150 см.
Свързване към електрическата мрежа
Преди да свържете щепсела в контакта,
проверете дали:
контактът е заземен съгласно действащите
стандарти;
контактът може да поеме максималната
мощност на натоварване на машината, указана
в таблицата с техническите данни (âèæ
следващата страница);
захранващото напрежение е в границите на
указаното в таблицата с техническите данни
(виж следващата страница);
контактът отговаря на щепсела на пералната
машина. В противен случай заменете щепсела
или контакта.
Пералната машина не се монтира на открито,
дори под навес, защото е много опасно да се
остави на влиянието на атмосферните условия.
За монтираната перална машина електрическият
контакт трябва да бъде лесно достъпен.
Не използвайте удължители или разклонители.
Кабелът не трябва да бъде огънат или
сплескан.
Захранващият кабел трябва да се подменя
само от оторизирани техници.
Внимание! Фирмата отхвърля всякаква
отговорност в случаите, в които тези норми не
се спазват.
Първо пране
След инсталиране и преди употреба включете
един цикъл на изпиране с перилен препарат, но
без дрехи, задавайки програма 1.
Технически данни
Ìîäå ë
Размери
Вместимос т
Електрическо
çàõð àí â àí å
Захранване с
вода
Скорост на
центрофугата
Прогр ами за
проверка
съгласно норма
EN 50229
ARMXXL 105
ширин а 59 , 5 с м
височина 85 см
дълбочина 53,5 см
От 1 до 7 кг за пране
От 1 до 5 кг за сушене
Виж табелката с характеристиките,
пос тав ена н а машината
макс имал но наляг ане 1 МРа (10 bar)
ми н имално налягане 0,05 МРа (0,5 bar)
обем на казана 52 литра
до 1000 оборота/минута
Основ н о пран е
температура 60°; извършена с 7 кг
пране.
Сушене
2
СУШЕНЕ е поставен на позиция .
повторно сушене при 5 кг пране, като
програматорът СУШЕНЕ е поставен на
позиция .
Пералната машина съответства на
следните Европейски директиви:
- 89/336/СЕЕ от 03/05/89 (за
електромагнитна съв местимост) и
последващите изменения
- 2006/95/CE (за ниско напрежение)
- 2 0 02 /9 6 / CE
: първонач ално сушене п ри
кг пране, като програматорът
: програма 6;
BG
27
Page 28

Описание на пералната машина и
пускането на дадена програма
BG
Табло за управление
Чекмедже за
перилните
препарати
ВКЛЮЧВАНЕ/
Бутон
ИЗКЛЮЧВАНЕ
Програматор
ПРОГРАМИ
Програматор
ТЕМПЕРАТУРА
Бутони със светлинни
индикатори
ФУНКЦИЯ
Светлинни ИНДИКАТОРИ ЗА ХОД
НА ЦИКЪЛ/ЗАБАВЕНО
ВКЛЮЧВАНЕ
Програматор
СУШЕНЕ
Бутон със светлинен
индикатор
СТАРТ/ПАУЗА
Светлинен
индикатор
БЛОКИРАН
ЛЮК
Чекмедже за перилните препарати: за
дозиране на перилните препарати и добавките
(вж. Перилни препарати и дрехи за пране).
Вътре в чекмеджето за перилните препарати има
джоб за пластмасовата схема на програмите, с
която да може да се направи справка по всяко
време.
Бутон ВКЛЮЧВАНЕ/ИЗКЛЮЧВАНЕ: за включване
и изключване на пералнята.
Програматор ПРОГРАМИ: за задаване на
програмите. По време на изпълнение на
програмата ключът остава неподвижен.
Бутони със светлинни индикатори ФУНКЦИЯ: за
селектиране на възможните функции. Светлинният
индикатор за избраната функция ще продължи да
свети.
Програматор СУШЕНЕ: за задаване на желаното
сушене (вж. Персонализирания).
Програматор ТЕМПЕРАТУРА: за задаване на
температура или пране със студена вода (âæ.
Персонализирания).
Светлинни ИНДИКАТОРИ ЗА ХОД НА ЦИКЪЛ/
ЗАБАВЕНО ВКЛЮЧВАНЕ: за да следвате хода на
изпълнение на програмата за пране.
Включеният светлинен индикатор показва, че се
извършва определена фаза от цикъла.
Ако е зададена функцията Забавено включване,
ще се посочва времето, оставащо до
стартирането на програмата (вж. съседната
страница).
Светлинен индикатор БЛОКИРАН ЛЮК: за да се
разбере дали люкът може да се отвори (âæ.
съседната страница).
Бутон със светлинен индикатор СТАРТ/ПАУЗА: за
стартиране на програмите или временното им
прекъсване.
Забележка: за задаване на пауза в прането
натиснете отново бутона - индикаторът ще мига
с оранжева светлина, докато светлинният
индикатор, указващ изпълнение на фаза, ще
свети непрекъснато. Ако светлинният индикатор
БЛОКИРАН ЛЮК
отвори вратата на люка.
За продължаване на цикъла пране от мястото, в
което е бил прекъснат, натиснете отново този
бутон.
е угаснал, ще може да се
28
Page 29

Светлинни индикатори
Следящите светлинни индикатори дават важна
информация.
Ето какво казват:
Отложен старт
Ако е активирана функцията Забавено
включване (вж. Персонализирания), след
пускане на програмата ще светне индикаторът за
избраното забавяне:
В течение на времето ще се визуализира
оставащото забавяне чрез мигане на съответния
светлинен индикатор:
Светлинни индикатори за текущите фази
След като е избран и стартиран желаният цикъл
на пране, светлинните индикатори ще светват
един след друг, за да указват хода на цикъла:
Пране
Изплакване
Центрофуга
Сушене
Край на прането
Бележка: Веднага след
задаването на ниво или
време на сушене този
индикатор светва, за да
покаже, че избраният
цикъл на пране ще бъде
последван от фаза на
сушене.
Бележка: по време на фаза Изпомпване ще
светне съответният светлинен индикатор за фаза
Центрофуга.
Бутони за функция и съответни светлинни
индикатори
При избор на функция съответният светлинен
индикатор ще светне. Ако избраната функция не е
съвместима със зададената програма, съответният
светлинен индикатор ще мига и функцията няма да
се активира. В случай на задаване на функция,
несъвместима с друга, зададена преди нея
функция, остава активен само последният избор.
BG
Светлинен индикатор блокиран люк
Светещият индикатор показва, че люкът е блокиран, за
да се предотвратят случайни отваряния; за избягване на
щети е необходимо да се изчака изгасването на
След като изтече времето за отлагане на
изпълнението, примигващият светлинен
индикатор ще угасне и избраната програма ще се
стартира.
светлинния индикатор, преди да се отвори люкът.
Забележка: ако е активирана функцията Забавено
включване, люкът не може да се отвори, за отварянето
му е необходимо пералната машина да се постави в
пауза чрез натискане на бутон СТАРТ/ПАУЗА.
Бързото мигане на светлинния индикатор
СТАРТ/ПАУЗА (оранжев) заедно с индикатора за
функциите е сигнал за неизправност (âæ.
Неизправности и отстраняването им).
Включване на програма
1. Включете пералнята, като натиснете бутона ВКЛЮЧВАНЕ/ИЗКЛЮЧВАНЕ. Всички индикатори ще се включат и
ще светят в продължение на няколко секунди, след което ще угаснат и ще свети с пулсираща светлина
индикаторът СТАРТ/ПАУЗА.
2. Заредете дрехите за пране и затворете люка.
3. Задайте желаната програма с ключа ПРОГРАМИ.
4. Задайте температурата на пране (вж. Персонализирания).
5. Задаване на сушенето, ако е необходимо (вж. Персонализирания).
6. Поставете перилен препарат и добавки вж. Перилни препарати и дрехи за пране.
7. Избиране на желаните функции.
8. Включете програмата, като натиснете бутона СТАРТ/ПАУЗА, съответният светлинен индикатор ще свети
постоянно в зелен цвят. За да отмените зададения цикъл, поставете машината в пауза, като натиснете бутона
СТАРТ/ПАУЗА, и изберете новия цикъл.
9. Когато програмата свърши, ще светне индикаторът
указвайки, че люкът може да бъде отварян. Извадете прането и оставете люка притворен, за да изсъхне
барабанът. Изключете пералнята, като натиснете бутона ВКЛЮЧВАНЕ/ИЗКЛЮЧВАНЕ.
. Светлинният индикатор за БЛОКИРАН ЛЮК ще угасне,
29
Page 30

Програми
BG
Таблица с програмите
Ìàêñ.
Опис ани е на пр огр амата
Програми
Специални програми
ПРОГРAMA ДЕЗИНФЕKЦИЯ: Бели, изключително замърсени.
6
ПРОГРAMA ДЕЗИНФЕKЦИЯ (1): Бели и цветни, устойчиви,
6
силно замърсени.
ЛЕKА НОЩ: Неустойчиви цветни, леко замърсени.
7
ПРОГ РA MA ЪЕЪЕ: Неустойчиви цветни, много замърсени.
8
KОПРИНА /ПЕР ДЕТА : За дрехи от коприна, в искоза, ф ино бе льо.
9
ВЪЛНЕНИ ТЪ KАНИ: За в ълна, кашмир и т.н.
10
Прогр ам и за вс еки ден
ПАМУ K: Бели и цветни, устойчиви, силно замърсени.
1
ПАМУ K (2): Бели и цветни, неустойчиви, силно замърсени.
1
ПАМУ KЦВЕТНИ (3): Бели, малко замърсени, и цветни, неус тойчиви.
2
СИНТЕТИЧНИ: Цветни, устойчиви, много замърсени.
3
ДЕЛИKАТНИ СИНТЕТИЧНИ: Цветни, устойч иви, мног о замърсени.
3
БЪРЗО ПРАНЕ 30': За бързо освежаване на не много замърсени
дрехи (не се препоръчва за вълн а, коприна и дрехи, които трябв а
4
да се перат на ръка).
ОСВЕЖА ВАНЕ15': За бързо освежаване на не много замърсени
дрехи (не се препоръчва за вълн а, коприна и дрехи, които трябв а
5
да се перат на ръка).
Частични програми
ИЗПЛАKВАНЕ
A
ЦЕНТРОФ УГА
B
ИЗПОMПВАНЕ
C
Прогр ами за с ушене
Сушене Памук
11
Сушене Синтетични тъкани
12
Сушене Вълна
13
темпе ратура
(°C)
90° 1000
60° 1000
40° 800
40° 800
30° 0 - -
40° 800
60° 1000
40° 1000
40° 1000
60° 800
40° 800
30° 800
30° 800
За всички Test Institutes:
1) Програма за проверка съгласно стандарт EN 50229: задайте програма 6 с температура 60 °C.
2) Дълга програма за памук; задайте програма 1 с температура 40 °C.
3) Кратка програма за памук; задайте програма 2 с температура 40 °C.
Специални програми
ПРОГРAMA ДЕЗИНФЕKЦИЯ (програма 6) Хигиенизираща програма, която предвижда използването на
белина при температури, надвишаващи 60 °C. За избелване поставете белината, перилните препарати и
добавките (вж. параграф Чекмедже за перилните препарати).
ËÅKÀ ÍÎÙ (програма 7). Това е безшумен цикъл, който може да се извършва през нощта при по-ниска
тарифа на електроенергията. Програмата е създадена за синтетични и памучни дрехи. В края на цикъла
машината спира, когато в барабана все още има вода; за да изпълни центрофугиране и източване , натиснете
бутон СТАРТ/ПАУЗА, в противен случай след 8 часа пералната машина автоматично ще центрофугира и ще
източи водата.
ПРОГРAMA ЪЕЪЕ (програма 8). Програма, която е в състояние да извлече типичното замърсяване от
детските дрехи, гарантирайки отстраняване на перилния препарат от тях, за да се избегне алергична реакция
от деликатната детска кожа. Цикълът е създаден за елиминиране на бактериите чрез използване на по-голямо
количество вода и оптимизиране на ефекта от специфичните хигиенизиращи добавки към перилния препарат.
При завършване на прането пералнята прави бавни завъртания на барабана, за да избегне образуването на
гънки; за приключване на цикъла се натиска бутон СТАРТ/ПАУЗА.
БЪРЗО ПРАНЕ 30' (програма 4) е създадена за пране на леко замърсени дрехи за кратко време: трае само
30 минути и по този начин пести време и средства. Със задаването на програмата (4 на 30 °C) може да перете
едновременно тъкани от различен вид (с изключение на вълна и коприна) с максимално тегло до 3 кг.
ОСВЕЖАВАНЕ15' (програма 5) е създадена за пране на леко замърсени дрехи за кратко време: трае само 15
минути и по този начин пести енергия и време. Със задаването на програмата (5 на 30 °C) може да перете
едновременно тъкани от различен вид (с изключение на вълна и коприна) с максимално тегло до 1,5 кг.
Ìàêñ .
скорост
(îáîð îòè
в минута)
- 1000
- 1000
- 0 - - - - 72
- -
- -
- -
Cушене
Ïåð èëí è ïðå ïàð àòè
Îñí îâ íî
Белина
ll ll
l
l
l
l
ll ll
ll ll
ll ll
l
l
l
l
l
l
l
l
l
Данните приведени в таблицата са указателни.
пране
-
-
-
-
-
-
-
-
- -
- - - 716
- - - 5 -
- - - 3 -
- - - 1,5 -
ll
ll
ll
ll
ll
ll
ll
ll
ll
Омеко-
тител
l
Зареждане
ìaêñ.
(êã)
7 170
7 153
4 290
2 118
155
1,5 55
7 122
7 115
785
385
370
330
1,5 15
736
Ïðîä úëæ-
ителност
на цикъла
30
Page 31

Персонализирания
Задаване на температурата
Завъртайки ключа ТЕМПЕРАТУРА, се задава температурата на пране (вж. Таблица на програмите).
Температурата може да се понижи до пране със студена вода (
Пералнята автоматично ще попречи да се зададе температура, която е по-висока от максималната
температура, предвидена за всяка програма.
Задаване на сушенето
Със завъртане на програматора за СУШЕНЕ се задава
Таблица с време за изсушаване (Указателни стойности)
Вид
тъкан
желаният вид сушене. Предвидени са две възможности:
A - Въз основа на времето: от 40 äî 180 минути.
Памук Дрехи с различни
B - Въз основа на степента на влажност на изсушените дрехи:
Гладене
Закачалка
Гардероб
се за хавлиени кърпи и халати.
: леко влажни дрехи, лесни за гладене.
: изсушени за окачване дрехи.
: много добре изсушени дрехи, препоръчва
Синтетични
Вълна 1,5 150 140 130
Ако по изключение прането, което трябва да бъде изпрано
и изсушено, надхвърля предвиденото максимално количество (вж. таблицата на програмите), извършете
изпирането и след като програмата е завършила, разделете прането и върнете една част в барабана.
На този етап следвайте указанията за извършване на Само сушене.
Повторете същите операции за останалата част от прането.
Забележка: На края на сушенето следва период на охлаждане, независимо че програматорът СУШЕНЕ е
поставен на позиция
.
Само сушене
Завъртете ПРОГРАМАТОРА на една от позициите за сушене (11-12-13) въз основа на вида тъкан, след
което изберете желания вид сушене с програматора за СУШЕНЕ.
).
Тип на прането Макси-
размери, Хавлиени
кърпи
Хавл иени кърпи,
Чаршафи, фанели
мални
êã.
5180170160
3180170160
Гардероб Закачалка Гладене
BG
Функции
Допълните функции за пране, предвидени в пералната машина, дават възможност за постигане на
желаното бяло и чисто пране:
За активиране на възможните функции;
1. натиснете бутона, съответстващ на желаната функция;
2. светването на съответния индикатор показва, че функцията е избрана.
Бележка: Бързото мигане на индикатора показва, че съответната функцията не може да бъде избрана за
зададената програма.
Отложен Старт
Забавя пускането на машината до 9 часа.
Натиснете многократно бутона, докато светне индикаторът, съответстващ на желаната стойност за време на
забавяне. При петото натискане на бутона функцията няма да е активна.
Забележка: След натискане на бутона СТАРТ/ПАУЗА стойността на забавянето може да се променя само като
се намалява.
Валидна с всички програми.
Допълнително изплакване
С избора на тази функция се увеличава ефикасността на изплакването и се гарантира максимално
отстраняване на перилния препарат. Подходяща е за особено чувствителна кожа.
Не може да се активира с програмите 4, 5, 11, 12, 13, B, C.
Супер изпиране
Благодарение на използваното по-голямо количество вода в началната фаза на цикъла и на по-дългото
време на пране тази функция гарантира висококачествено изпиране.
Не може да се активира с програмите 4, 5, 6, 9, 10, 11, 12, 13, A, B, C.
1000-500
С натискането на този бутон се намалява скоростта на центрофугата.
Не може да се активира с програмите 9, C, 11, 12, 13.
31
Page 32

Перилни препарати и
дрехи за пране
BG
Чекмедже за перилните препарати
Добрият резултат от прането зависи и от
правилното дозиране на перилните препарати. с
предозиране не се пере по-ефикасно, а това
води до отлагане на налепи по вътрешната
страна на пералната машина и до замърсяване
на околната среда.
Не използвайте препарати за ръчно пране,
защото образуват много пяна.
Изтеглете чекмеджето
4
MAX
1
3
отделение 1: Препарат за предпране (на прах)
Преди да изсипете препарата, проверете дали не
е поставено допълнителното отделение 4.
отделение 2: Препарат за пране (на прах или
течен)
Течният препарат се изсипва преди включването на
машината.
отделение 3: Допълнителни препарати
(омекотител и др.)
Омекотителят не трябва да излиза извън решетката.
допълнително отделение 4: Белина
2
за перилните
препарати и изсипете
праха за пране и
допълните препарати
по следния начин.
Цикъл на избелване
Избелването може да се извършва само с
програмите 1, 2, 6.
Поставете белината в допълнителното отделение
4, перилния препарат и омекотителя - в
съответните отделения, след това задайте една
от горепосочените програми.
Препоръчва се само за много замърсени памучни
дрехи.
Подготвяне на прането
Разпределете прането съобразно:
- типа на тъканите/символа върху етикета.
- цветовете: отделете цветните от белите
дрехи.
Изпразнете джобовете и проверете копчетата.
Не надвишавайте указните стойности за
теглото на сухото пране:
Устойчиви тъкани: максимално 7 кг
Синтетични тъкани: максимално 3 кг
Фини тъкани: максимално 2 кг
Вълнени тъкани: максимално 1,5 кг
Колко тежат дрехите за пране?
1 чаршаф 400-500 г
1 калъфка 150-200 г
1 покривка 400-500 г
1 хавлия 900-1200 г
1 кърпа 150-250 г
Специфично пране
Коприна: използвайте специалната програма 9 çà
пране на всички дрехи от коприна. За
деликатните тъкани се препоръчва използването
на специален вид перилен препарат.
Пердета: сгънете ги и ги поставете в калъфка или
мрежеста торба. Използвайте програма 9.
Вълнени тъкани: Hotpoint/Аriston е единствената
пералня, получила престижното признание
Woolmark Platinum Care (M.0508) от компанията
Woolmark , която дава сертификат за пране на
всички вълнени дрехи, дори носещите етикет
само ръчно пране
може абсолютно спокойно да се перат в пералня
всички вълнени дрехи (1,5 кг) с гаранция за найдобро изпълнение.
. Така че с програмата 10
Система за измерване на товара
Преди всяко центрофугиране, с цел избягване на
прекалени вибрации и за равномерно
разпределяне на товара, барабанът се завърта с
малко по-висока от тази при прането скорост. Ако
след направените последователни опити товарът
все още не е перфектно разпределен, машината
извършва центрофугиране при скорост, по-ниска
от предвидената. При наличие на прекален
дебалансиране пералнята извършва
разпределението вместо центрофугата. За
улесняване на по-доброто разпределение на
товара и правилното му балансиране се
препоръчва да се смесват дрехи за пране с
големи и малки размери.
Без намачкване
Тази функция прекъсва програмата за пране, като
остава дрехите накиснати, преди да се източи
водата.
Активна е само в програма 9 (Коприна/Пердета) и
служи за избягване образуването на гънки.
За да завършите цикъла, натиснете бутона
СТАРТ/ПАУЗА.
32
Page 33

Мерки за безопасност
и препоръки
Пералната машина е проектирана и произведена в
съответствие с международните норми за безопасност.
Предупрежденията тук са продиктувани по причини за
безопасност и трябва да се четат внимателно.
Общи предохранителни мерки
Този уред е предназначен изключително за
домашна употреба.
Пералната машина трябва да се използва само от
възрастни хора съгласно инструкциите,
предоставени в тази книжка.
Не докосвайте машината, когато сте боси или с
мокри или влажни ръце или крака.
Изключвайте от контакта, като хващате за
щепсела, а не като дърпате кабела.
Не отваряйте чекмеджето с перилните препарати,
докато пералната машина работи.
Не докосвайте маркуча за мръсната вода, защото
може да достигне високи температури.
Никога не отваряйте люка със сила, защото може
да се повреди механизма за безопасност, който
предпазва от случайно отваряне.
В случай на повреда по никакъв повод не достигайте
до вътрешните механизми в опити за ремонт.
Винаги контролирайте децата да не се доближават
до работещата машина.
По време на изпирането люкът се нагрява.
Преместването да се извършва внимателно от
двама или трима души. Никога от сам човек,
защото пералната машина тежи много.
Преди да заредите машината, проверете дали
барабанът е празен.
По време на сушенето люкът се нагрява.
Не сушете дрехи, които са прани със запалими
разредители (напр. триелин).
Не сушете гумирани якета или аналогични
еластомерни тъкани.
Проверете дали по време на сушенето кранът
за вода е отворен.
задължителното разделно събиране.
За допълнителна информация относно правилното
изваждане от употреба на домакинските електроуреди,
интересуващите се могат да се обърнат към службата
за събиране на отпадъци или към дистрибуторите.
Ръчно отваряне на люка
В случай че е невъзможно да се отвори вратата
на люка поради прекъсване на електрическата
енергия и искате да прострете прането,
процедирайте по следния начин:
1. извадете щепсела от
контакта за
електрически ток.
2. уверете се, че нивото
20
на водата в пералнята е
по-ниско от отвора на
люка; в противен случай
отстранете излишната
вода чрез маркуча за
мръсна вода, като я
съберете в кофа, както е
посочено нафигура.
3. свалете долния панел
в предната част на
пералната машина с
помощта на отвертка
(вж. фигура).
BG
Рециклиране
Унищожаване на опаковъчния материал: спазвайте
местните норми по този начин опаковъчният
материал може да се рециклира.
Европеиската директива 2002/96/CE за отпадъците
от електрическо и електронно оборудване предвижда
домакинските електроуреди да не се изхвърлят
заедно с обичайните твърди градски отпадъци.
Извадените от употреба уреди трябва да бъдат
събирани отделно с цел да бъде увеличен делът на
подлежащите на повторна употреба и рециклиране
материали, от които са направени, както и да бъдат
избегнати евентуални вреди за здравето и околната
среда. Символът зачеркнато кошче е поставен
върху всички продукти, за да напомня за
4. като използвате езичето, посочено на фигурата,
дръпнете навън до освобождаване на
пластмасовия изтегляч от неподвижно
положение; след това го издърпайте надолу и
едновременно с това отворете вратата.
5. затворете отново панела, като, преди да го
избутате към пералнята, се уверите, че сте
поставили правилно закрепващите куки в
специалните водачи.
33
Page 34

Поддръжка и почистване
BG
Спиране на водата и изключване на
електрозахранването
Затваряйте крана за вода след всяко
изпиране. По този начин се ограничава
износването на хидравличната инсталация на
пералната машина и се ограничава опасността
от течове.
Изключвайте щепсела от електрическото
захранване, когато почиствате пералната
машина и по време на работи по поддръжката.
Почистване на пералната машина
Външната част и гумените части могат да се
почистват с кърпа с хладка вода и сапун. Не
използвайте разтворители или абразивни
препарати.
Почистване на чекмеджето за
перилните препарати
Почистване на помпата
Пералната машина е окомплектована със
самопочистваща се помпа, която няма нужда от
поддръжка. Възможно е обаче малки предмети
(монети, копчета) да попаднат във филтъра,
който предпазва помпата и се намира в долната
й част.
Уверете се, че цикълът на пране е завършил, и
изключете щепсела от контакта.
За достъп до филтъра:
1. свалете панела в
предната част на
пералната машина с
помощта на отвертка
(вж. фигура);
1
Извадете чекмеджето
с повдигане и
изтегляне навън (âèæ
фигурата).
Измийте го под
течаща вода. Това
почистване трябва да
се извършва често.
2
Поддръжка на люка и на барабана
Оставяйте люка винаги открехнат за
избягване образуването на неприятни
миризми.
2. отвийте капачката,
като я завъртите в
посока, обратна на
часовниковата стрелка
(виж фигура):
нормално е да изтече
малко вода;
3. почистете внимателно отвътре;
4. завийте отново капачката;
5. затворете отново панела, като, преди да го
избутате към пералнята, се уверите, че сте
поставили правилно закрепващите куки в
специалните водачи.
Проверка на маркуча за студената
вода
Проверявайте маркуча за студената вода поне
веднъж годишно. Да се замени, ако е напукан и
нацепен, защото по време на изпиране голямото
налягане може да предизвика внезапно спукване.
34
Никога не използвайте вече употребяван
маркуч.
Page 35

Проблеми и мерки за
отстраняването им
Възможно е пералната машина да откаже да работи. Преди да се обадите в сервиза за техническа поддръжка и ремонт (вж.
Сервизно обслужване), проверете дали не става въпрос за лесно решим проблем, като си помогнете със следващия списък.
Проблеми:
Пералната машина не се
включва.
Цикълът на изпиране не
започва.
Пералната машина не се пълни
с вода (бързо мига светлинният
индикатор за първата фаза на
пране).
Пералнята непрекъснато се
пълни и източва.
Пералната не се източва или не
центрофугира.
Пералната вибрира много по
време на центрофугиране.
Пералната има теч.
Светлинният индикатор СТАРТ/
ПАУЗА (оранжев) и светлинните
индикатори за функции мигат бързо.
Възможни причини / Мерки за отстраняването им:
Щепселът не е включен към електрически контакт или не е добре
включен, за да прави контакт.
Нямате ток вкъщи.
Люкът не е затворен добре.
Бутонът ВКЛЮЧВАНЕ/ИЗКЛЮЧВАНЕ не е бил натиснат.
Бутонът СТАРТ/ПАУЗА не е бил натиснат.
Кранът за вода не е отворен.
Зададено е забавяне, което се е насложило върху времето за
пускане (вж. Персонализирания).
Маркучът за студената вода не е свързан към крана.
Маркучът е прегънат.
Кранът за вода не е отворен.
Няма вода по водопроводната мрежа.
Налягането е недостатъчно.
Бутонът СТАРТ/ПАУЗА не е бил натиснат.
Маркучът за мръсната вода не е монтиран между 65 и 100 см от
земята (вж. Монтиране).
Краят на маркуча за мръсната вода е потопен във вода (вж. Монтиране).
Канализационната тръба в стената няма отдушник.
Ако след тези проверки проблемът не се реши, затворете крана за
водата, изключете пералната машина и позвънете в сервиза. Ако
жилището ви се намира на последните етажи на сградата, налягането на
студената вода може да е ниско, поради което пералната машина
непрекъснато се пълни и източва. За избягване на това неудобство в
търговската мрежа се предлагат подходящи възвратни клапани.
Програмата не предвижда източване: с някои програми трябва да
се извършва ръчно.
Включена е функцията Без намачкване: за завършване на
програмата се натиска бутон СТАРТ/ПАУЗА (вж. Персонализирания).
Маркучът за мръсната вода е притиснат (вж. Монтиране).
Канализационната тръба е запушена.
При монтажа барабанът не е бил отблокиран правилно (вж. Монтиране).
Пералната машина не е нивелирана (вж. Монтиране).
Пералната машина е притисната между мебели и стена (вж. Монтиране).
Маркучът за студената вода не е добре свързан (вж. Монтиране).
Чекмеджето за перилните препарати е запушено (за почистването му
вж. Поддръжка и почистване).
Маркучът за мръсната вода не е фиксиран добре (вж. Монтиране).
Изключете машината и извадете щепсела от контакта, изчакайте
около 1 минута и я включете отново. Ако неизправността не може
да се отстрани, потърсете услугите на Сервиза.
BG
Образува се твърде много пяна.
Комбинираната пералня със
сушилня не суши.
Перилният препарат не е за автоматична перална (трябва да има
надпис за автоматична перална, за пране на ръка и за
автоматична перална или подобен надпис).
Дозирането е било твърде голямо.
Щепселът не е включен към електрически контакт или не е добре
включен, за да прави контакт.
Нямате ток вкъщи.
Люкът не е затворен добре.
Зададено е забавяне, което се е насложило върху времето за
пускане (вж. Персонализирания).
програматорът СУШЕНЕ е поставен на позиция
.
35
Page 36

Сервизно обслужване
BG
Преди да се свържете с техническия сервиз:
Проверете дали можете да решите сами проблема (вж. Проблеми и мерки за отстраняването им);
Включете отново програмата, за да проверите дали неизправността е отстранена;
В противен случай се обърнете към оторизирания технически сервиз на телефонния номер, указан на
гаранционната карта.
Никога не ползвайте услугите на неоторизирани техници.
Съобщете:
типа на проблема;
модела на машината (Mod.);
серийния номер (S/N).
Тази информация се намира на фабричната табелка, разположена на задната страна на пералната
машина и в предната част, след като се отвори люкът.
36
Page 37

Руководство по
эксплуатации
CIS
Русский
ARMXXL 105
СТИРАЛЬНАЯ МАШИНА C CУШKOЙ
Содержание
Установка 38-39
Распаковка и нивелировка
Подключение к водопроводу и электричеству
Первый цикл стирки
Технические характеристики
Описание стиральной машины и
порядка запуска программы, 40-41
Панель управления
Индикаторы
Порядок запуска программы
Программы, 42
Таблица программ
Персонализированные настройки, 43
Регулировка температуры
Программирование сушки
Дополнительные функции
CIS
Моющие средства и типы белья, 44
Распределитель моющих средств
Отбеливание
Подготовка белья
Изделия, требующие деликатной стирки
Система балансировки белья
Предосторожности и рекомендации, 45
Общие требования к безопасности
Утилизация
Аварийное открытие люка
Техническое обслуживание и уход, 46
Отключение воды и электрического тока
Уход за стиральной машиной
Уход за распределителем моющих средств
Уход за люком и барабаном
Уход за насосом
Проверка водопроводного шланга
Поиск неисправностей и методы их
устранения, 47
Сервисное обслуживание, 48
37
Page 38

Установка
Важно сохранить данное руководство для его
CIS
последующего использования случае продажи,
передачи или переезда на новую квартиру необходимо
проверить, чтобы руководство оставалось вместе со
стиральной машиной, чтобы ее новый владелец мог
ознакомиться с порядком ее функционирования и
соответствующими предупреждениями.
Внимательно прочитайте инструкции: в них
содержатся важные сведения об установке изделия,
его эксплуатации и безопасности.
Распаковка и нивелировка
Снятие упаковки
1. Снимите с машины упаковку.
2. Проверьте, чтобы стиральная машина не была
повреждена в процессе перевозки. В случае
обнаружения повреждений немедленно обратитесь к
поставщику, не подключая машину.
3. Снимите 4
транспортировочных
болта, предохраняющие
машину в процессе
перевозки, и резиновую
заглушку с
соответствующей
распорной шайбой,
расположенные в задней
части стиральной
машины (см. схему).
4. Закройте отверстия прилагающимися
пластиковыми заглушками.
5. Сохраните все детали: они должны быть
установлены на стиральную машину в случае ее
перевозки.
Не разрешайте детям играть с упаковочными
материалами.
Нивелировка
1. Установите стиральную машину на ровном и
прочном полу, не прислоняя ее к стенам, мебели и
прочим предметам.
2. Если пол не является
идеально
горизонтальным,
необходимо
компенсировать
неровность,
отрегулировав по высоте
передние ножки (ñì.
схему). Уклон,
измеренный при помощи
уровня, установленного
на поверхность машины,
не должен превышать 2°.
Точная нивелировка обеспечивает стабильность
стиральной машины, помогает избежать ее вибраций
и смещений в процессе функционирования. В случае
установки машины на ковер или ковролин
отрегулируйте ножки таким образом, чтобы под
стиральной машиной оставался достаточный зазор
для вентиляции.
Подключение к водопроводу и
электричеству
Порядок подключения к водопроводному шлангу
1. Вставьте прокладку А в
конец водопроводного
шланга и привинтите его к
водопроводному крану
холодной воды с
A
3. Проверьте, чтобы водопроводный шланг не был
заломлен или сжат.
Давление воды в водопроводном кране должно
быть в пределах значений, указанных в таблице
Технические данные (см. страницу рядом).
Если длина водопроводного шланга будет
недостаточной, следует обратиться в
специализированный магазин или в уполномоченный
сервисный центр.
Никогда не пользуйтесь б/у шлангами.
Используйте шланги, прилагающиеся к машине.
резьбовым отверстием
3/4 газ (см. схему).
Перед подсоединением
откройте водопроводный
кран до тех пор, пока из
него не потечет чистая
вода.
2. Подсоедините
водопроводный шланг к
машине, привинтив его к
специальному
водопроводному крану,
расположенному в
задней верхней части
справа (см. схему).
38
Page 39

Подсоединение сливного шланга
Подсоедините сливной
шланг, не перегибая его,
к сливной трубе или к
настенному сливному
отверстию,
65 - 100 cm
распложенному на
высоте от 65 до 100 см от
пола,
Не используйте удлинители и тройники.
Сетевой кабель изделия не должен быть согнут
èëè ñæàò.
Замена сетевого кабеля может осуществляться
только уполномоченными сервисными центрами.
Внимание! Фирма снимает с себя всякую
ответственность в случае несоблюдения
вышеописанных правил.
Первый цикл стирки
CIS
или поместите шланг в
раковину или в ванну,
закрепив
прилагающуюся
направляющую к крану
(см. схему). Свободный
конец сливного шланга
не должен быть погружен
в воду.
Не рекомендуется использовать удлинительные
шланги. При необходимости удлинение должно иметь
такой же диаметр, что и оригинальный шланг, и его
длина не должна превышать 150 см.
Подключение к электросети
Перед включением изделия к розетке электросети
неоюходимо проверить следующее:
розетка электросети должна быть соединена с
заземлением и соответствовать нормативам;
розетка электросети должна быть расчитана на
максимальную мощность стиральной машины,
указанную в таблице Технические данные (ñì.
таблицу сбоку);
напряжение электросети должно соответствовать
значениям, указанным в таблице Технические
данные (см. таблицу сбоку);
электрическая розетка должна подходить к
штепсельной вилке стиральной машины. В
противном случае необходимо заменить розетку.
Запрещается устанавливать стиральную машину на
улице, даже под навесом, так как опасно подвергать
ее воздействию дождя и грозы.
Стиральная машина должна быть расположена
таким образом, чтобы доступ к розетке электросети
оставался свободным.
По завершении установки, перед началом
эксплуатации необходимо произвести один цикл
стирки со стиральным порошком, но без белья, по
программе 1.
Технические характеристики
Ìîäå ë ü
Размеры
Загрузка
Электрические
параметры
Гидравлические
параметры
Скорость
отжима
Kонтрольные
программы
согласно
нормативу
EN 50229
ARMXXL 105
ши ри н а 5 9, 5 с м
высота 85 см
глубина 53,5 см
От 1 до 7 кг белья для цикла стирки
От 1 до 5 кг белья для цикла сушки
cмотрите паспортную табличку с
техническими характеристиками на
машине
max давление 1 Мпа (10 бар)
min давление 0,05 Мпа (0,5 бар)
объем барабана 52 л
äî 1000 îá/ìèí
Ñòèð êà:
60°C; загрузка 7 кг белья.
Сушка:
2
положении минут ;
вторая сушка с загрузкой 5 кг белья,
рукоятка СУШ А стоит в положении
минут .
Машина соответствует следующим
Директивам Европейского
Экономического сообщества:
- 89/336 /ЕЕС от 03.05.89 (электромагнитной совместимости) и
последующие модификации
- 2 006/95/CE (низкого напряжения
- 2 002 / 96/ CE
программа 6; температура
первая сушка с заг рузкой
кг белья, рукоятка СУШ А стоит в
39
Page 40

Описание стиральной машины и
порядка запуска программы
Панель управления
CIS
Кнопка
ÂÊË/ÂÛÊË
Распределитель моющих
средств
Рукоятка выбора
ПРОГРАММА
ТЕМПЕРАТУРЫ
Рукоятка
Индикаторы ВЫПОЛНЕНИЯ ФАЗ
ЦИКЛА/ТАЙМЕР ОТСРОЧКИ
Рукоятка
СУШКА
Кнопки с
индикаторами
дополнительных
ФУНКЦИЙ
Индикатор
БЛОКИРОВКИ
ЛЮКA
Кнопка с
индикатором
ПУСК/ПАУЗА
Распределитель моющих средств: для
загрузки стиральных веществ и добавок
(см. «Моющие средства и типы белья»).
Внутри распределителя моющих средств имеется
краткий перечень программ.
Кнопка ÂÊË/ÂÛÊË: служит для включения и
выключения стиральной машины.
Рукоятка выбора ПРОГРАММА: служит для
выбора программ. В процессе выполнения
программы рукоятка не вращается.
Кнопки с индикаторами дополнительных
ФУНКЦИЙ: служат для выбора имеющихся
дополнительных функций. Индикатор,
соответствующий выбранной функции, останется
включенным.
Рукоятка СУШКА: для выбора нужного цикла
сушки (см «Персонализированные настройки»).
Рукоятка ТЕМПЕРАТУРЫ: служит для настройки
температуры или для стирки в холодной воде
(см. «Персонализированные настройки»).
индикаторы ВЫПОЛНЕНИЯ ФАЗ ЦИКЛА/ТАЙМЕР
ОТСРОЧКИ: показывают последовательность
выполнением программы стирки. Включенный
индикатор соответствует текущей фазе.
Если была включена функция Таймер отсрочки,
индикаторы будут показывать время, остающееся
до запуска программы (см. страницу сбоку).
Индикатор БЛОКИРОВКИ ЛЮКA: показывает,
можно ли открыть люк (см. страницу сбоку).
Кнопка с индикатором ПУСК/ПАУЗА: служит для
запуска или для временного прерывания
программы.
ПРИМЕЧАНИЕ: для временного прерывания
текущего цикла стирки нажмите эту кнопку.
Соответствующий индикатор замигает
оранжевымцветом, а индикатор текущей фазы
стирки будет гореть, не мигая. Если индикатор
БЛОКИРОВКИ ЛЮКA
люк.
Для возобновления цикла стирки с момента, когда
он был прерван, вновь нажмите ПУСК/ПАУЗА.
погас, можно открыть
40
Page 41

Индикаторы
Индикаторы сообщают пользователю важные
сведения. Значение индикаторов:
Таймер отсрочки
Если была включена функция Таймер отсрочки
(см. «Персонализированные настройки»), после
запуска программы начнет мигать индикатор,
соответствующий заданному времени задержки:
По мере отсчета времени будет показываться
остающееся время вместе с миганием
соответствующего индикатора.
По прошествии заданного времени задержки
мигающий индикатор погаснет, и запустится заданная
программа.
Индикаторы текущей фазы цикла:
После выбора и запуска цикла стирки индикаторы
будут загораться один за другим, показывая
последовательность выполнения программы:
Cтирка
Полоскание
Отжим
Сушка
Конец цикла
Примечание: После
настройки мощности и
продолжительности
сушки загорается данный
индикатор, показывая,
что по завершении
выбранного цикла стирки
будет выполнен цикл
сушки.
Примечание: в процессе фазы «Слив» загорится
индикатор, соответствующий фазе «Отжим».
Кнопки дополнительный функций и
соответствующие индикаторы
При выборе функции загорается соответствующая
кнопка. Если выбранная функция является
несовместимой с заданной программой,
соответствующий индикатор будет мигать, и такая
функция не будет включена. Если будет выбрана
функция, несовместимая с другой, ранее выбранной
функцией, останется включенной только последняя
выбранная функция.
Индикатор блокировки люка:
Включенный индикатор означает, что люк
заблокирован во избежание его случайного
открывания. Во избежание его повреждения
необходимо дождаться, когда индикатор погаснет,
перед тем как открыть люк.
ПРИМЕЧАНИЕ: если включена функция Таймер
отсрочки, люк открыть нельзя. Для этого необходимо
переключить машину в режим паузы при помощи
кнопки ПУСК/ПАУЗА.
Быстрое мигание индикатора ПУСК/ПАУЗА
(оранжевый) одновременно с индикатором функций
означает неисправность (см. «Неисправности и
методы их устранения»).
CIS
Порядок запуска программы
1. Включите стиральную машину, нажав кнопку ВКЛ/ВЫКЛ. Все индикаторы загорятся на несколько секунд,
затем погаснут, останется мигать индикатор ПУСК/ПАУЗА.
2. Загрузите белье в барабан и закройте люк.
3. Задайте рукояткой ПРОГРАММА нужную программу.
4. Задайте температуру стирки (см. «Персонализированные настройки»).
5. При необходимости запрограммируйте цикл сушки (см. «Персонализированные настройки»).
6. Поместите моющие средства и добавки (см. «Стиральные вещества и типы белья»).
7. Включите нужные дополнительные функции.
8. Запустите программу при помощи кнопки ПУСК/ПАУЗА, соответствующий индикатор загорится зеленым цветом.
Для отмены заданного цикла переключите машину в режим паузы при помощи кнопки ПУСК/ПАУЗА и выберите новый цикл.
9. По завершении программы загорится индикатор
что теперь можно открыть люк. Выньте белье и оставить люк полуоткрытым для сушки барабана.
Выключите стиральную машину, нажав кнопку ВКЛ/ВЫКЛ.
. Индикатор БЛОКИРОВКИ ЛЮКA погаснет, показывая,
41
Page 42

Программы
Таблица программ
CIS
Îïèñ àíèå ïð îãð àììû
Программы
Специальные программы
ЦИKЛ АНТИБАKТЕРИЯ: сильнозагрязненное белое белье.
6
ЦИKЛ АНТИБАKТЕРИЯ (1): сильнозагрязненное белое и прочное
6
цветное белье.
НОЧНОЙ ЦИKЛ: слабозагрязненное деликатное цветное белье.
7
ДЕТСKОЕ БЕЛЬЕ: сильнозагрязненное деликатное цветное белье.
8
ШЕЛK/ЗАНАВЕСKИ: Дл я изделий из шелка, вис козы и н ижнего бель я.
9
ØÅ Ð Ñ Ò Ü : Д ля шерсти , кашемира и т. д.
10
Ежедневные программы
ХЛОПОK: сильнозагрязненное белое и прочное цветное белье.
1
ХЛОПОK (2): сильнозагрязненное белое и деликатное цветное белье.
1
ХЛОПОK (3): сильнозагрязненное белое и цветное деликатное белье.
2
СИНТЕТИKА: Сильнозаягрязненное белье прочное цветное белье.
3
СИНТЕТИKА: Слабозагрязненное прочное цветное белье.
3
MÈKÑ 30': Для быстрого освежения малогрязного белья (не для
4
шерс ти, шелка и изделия ручной стирки).
MÈKÑ 15': Для быстрого освежения малогрязного белья (не для
5
шерс ти, шелка и изделия ручной стирки).
Дoполнительные программы
Ïîë îñê àí èå
A
Отжим
B
Ñëèâ
C
Прогр аммы сушки
Сушка ХЛОПKА
11
Сушка СИНТЕТИKА
12
Сушка ШЕРСТЬ
13
Ìàêñ
òåìï.
Для всех институтов тестирования:
1) Программы управления в соответствии с Директивой EN 50229: задайте программу 6 с температурой 60°C.
2) Длинная программа для х/б белья: задайте программу 1 с температурой 40°C.
3) Короткая программа для х/б белья: задайте программу 2 с температурой 40°C.
Ìàêñ .
скорость
(°C)
(îá./ìèí.)
90° 1000
60° 1000
40° 800
40° 800
30° 0 - -
40° 800
60° 1000
40° 1000
40° 1000
60° 800
40° 800
30° 800
30° 800
- 1000
- 1000
- 0 - - - - - 2
- -
- -
- -
Cóøêà
Приведенные в таблице значения являются примерными.
Стир ал ьны е средства
Отбел-
иватель
ll l l
l
l
l
l
ll l l
ll l l
ll l l
l
l
l
l
l
l
l
l
l
Стирка Ополаски-
ll
-
ll
-
ll
-
ll
ll
-
ll
-
ll
-
ll
-
ll
-
- -
- - - 716
- - -
- - -
- - -
ватель
l
Ìàêñ .
çàãð óçêà
Продол-
(êã)
1,5 55
1,5 15
3,5
1,5
житть
цикла
7170
7153
4290
2118
155
7122
7115
785
385
370
330
736
5
-
-
-
Специальные программы
ЦИKЛ АНТИБАKТЕРИЯ
использование отбеливателя при температуре выше 60°C.
(программа 6). Дезинфецирующая программа с высокой температурой, предусматривающая
Для отбеливания залейте отбеливатель, моющее средство
и добавки в соответствующие ячейки (см параграф «Распределитель моющих средств»).
НОЧНОЙ ЦИKЛ
(программа 7). Это бесшумный цикл, который можно включить ночью, экономя электроэнергию.
Данная программа расчитана на стирку синтетических и х/б вещей. По завершении цикла машина останавливается с
водой в барабане; для слива и отжима нажмите кнопку ПУСК/ПАУЗА, в противном случае по прошествии 8 часов
машина автоматически произведет слив воды и отжим.
ДЕТСKОЕ БЕЛЬЕ
(программа 8). Программа удаляет типичные загрязнения детской одежды, гарантируя удаление
моющего средства из ткани во избежание аллергии чувствительной детской кожи. Данный цикл расчитан на
сокращение количества бактерий благодаря использованию большего объема воды и оптимизируя воздействие
специальных дезинфицирующих добавок старильного вещества.
По завершении стирки машина продолжит медленно вращать барабан во избежание сминания белья. Для остановки
цикла нажмите кнопку ПУСК/ПАУЗА.
MÈKÑ 30'
(программа 4) предназначена для быстрой стирки слабозагрязненного белья цикл длится всего 30 минут,
что позволяет сэкономить время и электроэнергию. По этой программе (4, 30°C) можно стирать вместе белье из
разных тканей (за исключением шерсти и шелка) с максимальной загрузкой 3 кг.
MÈKÑ 15'
(программа 5) предназначена для быстрой стирки слабозагрязненного белья цикл длится всего 15 минут,
что позволяет сэкономить время и электроэнергию. По этой программе (5, 30°C) можно стирать вместе белье из
разных тканей (за исключением шерсти и шелка) с максимальной загрузкой 1,5 кг.
42
Page 43

Персонализированные
настройки
Регулировка температуры
Настройка температуры стирки производится при помощи регулятора ТЕМПЕРАТУРЫ (см.Таблицу программ).
Значение температуры может быть уменьшено вплоть до стирки в холодной воде (
Машина автоматически не допускает выбор температуры, превышающийs максимальное значение,
предусмотренное для каждой прораммы.
Программирование сушки
При помощи регулятора СУШКА можно выбрать нужный
Таблица продолжительности сушки (примерные значения)
Тип
ткани
Çàêð óçêà
режим сушки. Машина предусматривает два режима:
A - Временной режим: от 40 äî 180 минут.
B - Режим сушки в зависимости от степени влажности белья:
Сушка под утюг
: слегка влажное белье для более легкой
глажки.
Стандартная
Extra сушка
: сухое белье, которое можно убрать в шкаф.
: совершенно сухое белье рекомендуется
Хлопок Белье разного
Cинтетика
Шерсть Свитера, полуверы 1,5 150 140 130
разме ра, Махр ов ые
полотенца
Про с ты ни, Р уб ашки ,
Пижамы, носки и т.д.
для махровых полотенец и халатов.
В случае, если вес белья, предназначенного для стирки и сушки, превышает максимальную допустимую загрузку
(смотрите таблицу программ), выполните цикл стирки, и по его завершении, разделите белье на части и производите
его сушку частями.
Следуйте инструкциям, описывающим функцию «Только сушка».
Повторите те же операции для сушки оставшегося белья.
ПРИМЕЧАНИЕ: По завершении сушки производится цикл охлаждения, даже если регулятор СУШКИ установлен в
положение
.
Только сушка
Поверните регулятор ПРОГРАММА в одно из положений сушки (11-12-13) в зависимости от типа белья, затем
выберите нужный вам режим сушки при помощи регулятора СУШКА.
).
Extra
Ìàêñ .
çàãð ó çêà
(êã)
5180 170 160
3180 170 160
Станд артная Сушка
сушка
ïîä
óòþã
CIS
Дополнительные функции
Различные функции стирки машины позволяют достичь желаемой чистоты и белизны вашего белья.
Порядок выбора функций:
1. нажмите кнопку нужной вам функции;
2. включение соответствующего индикатора означает, что функция включена.
Примечание: Частое мигание индикатора означает, что данная функция не может быть выбрана для заданной программы.
Таймер отсрочки
Задерживает запуск цикла вплоть до 9 часов.
Нажмите кнопку несколько раз вплоть до включения индикатора, соответствующего нужному значению задержки.
При пятом нажатии кнопки функция отключается.
ПРИМЕЧАНИЕ: После нажатия кнопки ПУСК/ПАУЗА, можно изменить значение задержки только в сторону
уменьшения.
Эта функция совместима с любой программой.
Дополнительное Полоскание
При выборе этой функции повышается эффективность ополаскивания, обеспечивая максимальное удаление
моющего вещества. Эта функция особенно удобна для людей с кожей, чувствительной к стиральным веществам.
Эта функция несовместима с программами 4, 5, 11, 12, 13, B, C.
Суперстирка
Обеспечивает оптимальную стирку благодаря использованию большего объема воды в начале цикла и большей
продолжительности цикла.
Эта функция несовместима с программами 4, 5, 6, 9, 10, 11, 12, 13, A, B, C.
1000-500
При помощи этой кнопки сокращается скорость отжима.
Эта функция несовместима с программами 9, C, 11, 12, 13.
43
Page 44

Моющие средства и типы белья
Распределитель моющих средств
CIS
Хороший результат стирки зависит также от
правильной дозировки стирального вещества:
избыток стирального вещества не гарантирует более
эффективную стирку, напротив, способствует
образованию налетов внутри стиральной машины и
загрязнению окружающей среды.
Не используйте моющие средства для ручной
стирки, так как они образуют слишком много пены.
Выньте распределитель и
4
MAX
1
3
отделение 1: моющее средство для
предварительной стирки (порошок)
Перед засыпкой стирального порошка необходимо
проверить, чтобы не был установлен дополнительный
отделение 4.
отделение 2: Моющее средство для стирки
(порошок или жидкое)
Моющее средство для стирки заливается
непосредственно перед запуском машины.
отделение 3: Добавки (ополаскиватель и т.д.)
Не наливайте ополаскиватель выше решетки
отделения.
дополнительное отделение 4: Отбеливатель
2
поместите в него
моющее средство или
добавку в следующем
порядке.
Сколько весит белье?
1 простыня 400-500 гр.
1 наволочка 150-200 гр.
1 скатерть 400-500 гр.
1 халат 900-1200 гр.
1 полотенце 150-250 гр.
Изделия, требующие деликатной
стирки
Øåëê: используйте специальную программу 9 äëÿ
стирки всех шелковых вещей. Рекомендуется
использовать специальное стиральное вещество
для деликатных тканей.
Занавески: сверните и положите в наволочку или в
сетчатый мешочек. Используйте программу 9.
Шерсть: Стиральная машина марки Hotpoint/Ariston
единственная получила престижный знак Woolmark
Platinum Care (M.0508) от Компании The Woolmark
Company, который сертифицирует машинную стирку
всех шерстяных изделий, даже тех, на этикетках
которых указано «только ручная стирка»
выборе программы 10 вы можете надежно и
эффективно стирать любые шерстяные изделия
(макс. 1,5 кг) с гарантированным лучшими
результатами.
. Ïðè
Система балансировки белья
Перед каждым отжимом во избежание чрезмерных
вибраций и для равномерного распределения белья
в барабане машина производит вращения со
скоростью, слегка превышающей скорость стирки.
Если после нескольких попыток белье не будет
правильно сбалансировано, машина произведет
отжим на меньшей скорости по сравнению с
предусмотренной.
Отбеливание
Отбеливание производится только с программами
1, 2, 6.
Поместите отбеливатель в дополнительный отделение
4, моющее средство и ополаскиватель в
соответствующие отделения, затем выберите одну из
вышеуказанных программ.
Рекомендуется только для очень грязного х/б белья.
Подготовка белья
Разделите белье по следующим признакам:
- тип ткани / обозначения на этикетке.
- цвет: отделите цветное белье от белого.
Выньте из карманов все предметы и проверьте пуговицы.
Не превышайте максимальную загрузку барабана,
указанную для сухого белья:
Прочные ткани: макс. 7 кг
Синтетические ткани: макс. 3 кг
Деликатные ткани: макс. 2 кг
Шерсть: макс. 1,5 кг
44
Легкая глажка
Данная функция прерывает программу стирки,
оставляя белье замоченным в воде перед
сливом.
Функция включается только с программой 9
(Шелк/Занавески) и служит для меньшего
сминания белья.
Для завершения цикла нажмите кнопку ПУСК/ПАУЗА.
Page 45

Предосторожности и
рекомендации
Стиральная машина спроектирована и изготовлена в
соответствии с международными нормативами по
безопасности. Необходимо внимательно прочитать
настоящие предупреждения, составленные в целях
вашей безопасности.
Общие требования к безопасности
Данное изделие предназначено исключительно для
домашнего использования.
Стиральной машиной должны пользоваться только
взрослые лица, соблюдающие инструкции,
приведенные в данном техническом руководстве.
Не прикасайтесь к изделию влажными руками,
босиком или во влажной одежде.
Не тяните за сетевой кабель для отсоединения
изделия из электро розетки, возьмитесь за вилку
рукой.
Не открывайте распределитель порошка в процессе
стирки.
Избегайте контактов со сливаемой водой, так как
она может быть очень горячей.
Категорически запрещается открывать люк силой:
это может привести к повреждению защитного
механизма, предохраняющего от случайного
открытия машины.
В случае неисправности категорически
запрещается открывать внутренние механизмы
изделия с целью их самостоятельного ремонта.
Избегайте контактов детей с работающей
стиральной машиной.
В процессе стирки люк стиральной машины может
нагреться.
При необходимости переместить стиральную
машину следует выполнять эту операцию вдвоем
или втроем с предельной осторожностью. Никогда
не перемещайте машину в одиночку, так как
машина очень тяжелая.
Перед загрузкой в стиральную машину белья
проверьте, чтобы барабан был пуст.
В процессе сушки люк стиральной машины
может нагреться.
Не подвергайте автоматической сушке белье,
выстиранное с применением возгораемых
растворителей (например, триелина).
Не сушите в автоматической сушке паралоновые
изделия или подобные эластомеры.
В процессе сушки проверьте, чтобы
водопроводный кран был открыт.
мусором. Выведенные из строя приборы должны
собираться отдельно для оптимизации их утилизации и
рекуперации составляющих их материалов, а также
для безопасности окружающей среды и здоровья.
Символ зачеркнутая мусорная корзинка, имеющийся
на всех приборах, служит напоминанием об их
отдельной утилизации.
За более подробной информацией о правильной
утилизации бытовых электроприборов пользователи
могут обратиться в специальную государственную
организацию или в магазин.
Аварийное открытие люка
Если по причине отключения электроэнергии
невозможно открыть люк машины, чтобы выгрузить
чистое белье, действуйте следующим образом:
1. выньте штепсельную
вилку машины из электро
розетки.
2. проверьте, чтобы
20
уровень воды в машине
был ниже отверстия люка.
В противном случае слейте
излишек воды через
сливную трубу в ведро, как
показано на схеме.
3. снимите переднюю
панель стиральной
машины при помощи
отвертки (см. схему).
CIS
Утилизация
Уничтожение упаковочных материалов: соблюдайте
местные нормативы с целью повторного
использования упаковочных материалов.
Согласно Европейской Директиве 2002/96/СЕ
касательно утилизации электронных и электрических
электроприборов электроприборы не должны
выбрасываться вместе с обычным городским
4. потяните наружу язычок, показанный на схеме,
вплоть до освобождения пластикового
блокировочного винта. Затем потяните его вниз и
одновременно откройте люка.
5. установите на место переднюю панель, проверив
перед ее прикреплением к машине, чтобы крюки
вошли в соответствующие петли.
45
Page 46

Техническое обслуживание и уход
Отключение воды и электрического
CIS
òîêà
Перекрывайте водопроводный кран после
каждой стирки. Таким образом сокращается
износ водопроводной системы машины и
сокращается риск утечек.
Выньте штепсельную вилку из электро розетки
в процессе чистки и технического
обслуживания стиральной машины.
Уход за стиральной машиной
Для чистки наружных и резиновых частей
стиральной машины используйте тряпку,
смоченную теплой водой с мылом. Не
используйте растворители или абразивные
чистящие средства.
Уход за распределителем моющих
средств
Уход за насосом
Стиральная машина оснащена самочистящимся
насосом, не нуждающимся в техническом
обслуживании. Тем не менее мелкие предметы
(монеты, пуговицы) могут упасть за кожух,
предохраняющий насос, расположенный в его
нижней части.
Проверьте, чтобы цикл стирки завершился, и
выньте штепсельную вилку из сетевой розетки.
Для доступа к кожуху:
1. снимите переднюю
панель стиральной
машины при помощи
отвертки (ñì. схему);
1
Выньте
распределитель,
приподняв ее и
потянув наружу (ñì.
схему).
Промойте
распределитель теплой
водой. Эта операция
2
должна выполняться
регулярно.
Уход за люком и барабаном
После использования стиральной машины
всегда следует оставлять люк полуоткрытым
во избежание образования неприятных
запахов в барабане.
2. отвинтите крышку,
повернув ее против
часовой стрелки (ñì.
схему): небольшая
утечка воды является
нормальным явлением;
3. тщательно прочистите внутри кожуха;
4. завинтите крышку на место;
5. установите на место переднюю панель,
проверив перед ее прикреплением к машине,
чтобы крюки вошли в соответствующие петли.
Проверка водопроводного шланга
Проверяйте шланг подачи воды не реже одного
раза в год. При обнаружении трещин или
разрывов шланга замените его: в процессе стирки
сильное воды в водопроводе давление может
привести к внезапному отсоединению шланга.
46
Никогда не пользуйтесь б/у шлангами.
Page 47

Поиск неисправностей и
методы их устранения
Если ваша стиральная машина не работает. Прежде чем обратиться в Центр Сервисного обслуживания (см. Сервисное
обслуживание), проверьте, можно ли устранить неисправность, следуя рекомендациям, приведенным в следующем перечне.
Неисправности:
Стиральная машина не
включается.
Цикл стирки не запускается.
Стиральная машина не заливает
воду (часто мигает индикатор
первой фазы стирки).
Машина непрерывно заливает и
сливает воду.
Возможные причины / Методы устранения:
Штепсельная вилка не соединена с электро розеткой или отходит и не
обеспечивает контакта.
В доме отключено электричество.
Люк машины закрыт неплотно.
Не была нажата кнопка ВКЛ/ВЫКЛ.
Не была нажата кнопка ПУСК/ПАУЗА.
Перекрыт водопроводный кран.
Была запрограммирована задержка запуска цикла (Таймер отсрочки,
(см. «Персонализированные настройки»).
Водопроводный шланг не подсоединен к крану.
Шланг согнут.
Перекрыт водопроводный кран.
В доме нет воды.
Недостаточное водопроводное давление.
Не была нажата кнопка ПУСК/ПАУЗА.
Сливной шланг не находится на высоте 65 100 см. от пола (см. «Установка»).
Конец сливного шланга погружен в воду (см. «Установка»).
Настенное сливное отверстие не оснащено вантузом для выпуска воздуха.
Если после вышеперечисленных проверок неисправность не будет
устранена, следует перекрыть водопроводный кран, выключить
стиральную машину и обратиться в Центр Сервисного Обслуживания.
Если ваша квартира находится на последних этажах здания, могут
наблюдаться явления сифона, поэтому стиральная машина производит
непрерывный залив и слив воды. Для устранения этой аномалии в
продаже имеются специальные клапаны против явления сифона.
CIS
Стиральная машина не сливает
воду и не отжимает белье.
Стиральная машина сильно
вибрирует в процессе отжима.
Утечки воды из стиральной
машины.
Индикатор ПУСК/ПАУЗА
(оранжевый) и индикаторы
функций часто мигают.
В процессе стирки образуется
слишком обильная пена.
Стиральная машина не
производит сушку
Выбранная программа не предусматривает слив воды: для некоторых
программ необходимо включить слив вручную.
Включена функция ЛЕГКАЯ ГЛАЖКА: для завершения программы
нажмите кнопку ПУСК/ПАУЗА.
Сливной шланг согнут (см. «Установка»).
Засорен сливной трубопровод.
В момент установки стиральной машины барабан был разблокирован
неправильно (см. «Установка»).
Стиральная машина установлена неровно (см. «Установка»).
Машина зажата между стены и мебелью (см. «Установка»).
Плохо прикручен водопроводный шланг (см. «Установка»).
Засорен распределитель моющего средства (порядок его чистки ñì. â
параграфе «Техническое обслуживание и уход»).
Сливной шланг плохо закреплен (см. «Установка»).
Выключите машину и выньте штепсельную вилку из сетевой розетки,
подождите 1 минуту и вновь включите машину.
Если неисправность не устраняется, обратитесь в Сервисную Службу.
Моющее средство непригодно для стирки в стиральной машине (на
упаковке должно быть указано «для стирки в стиральной машине»,
«для ручной и машинной стирки» или подобное).
В распределитель было помещено чрезмерное количество моющего средства.
Штепсельная вилка не соединена с электро розеткой или отходит и не
обеспечивает контакта.
В доме отключено электричество.
Люк машины закрыт неплотно.
Была запрограммирована задержка запуска цикла (Таймер отсрочки,
(см. «Персонализированные настройки»).
регулятор СУШКИ находится в положении
.
47
Page 48

Сервисное
обслуживание
CIS
Перед тем как обратиться в Службу Сервиса:
Проверьте, нельзя ли устранить неисправность самостоятельно (см. «Неисправности и
методы их устранения»);
Вновь запустите программу для проверки исправности машины;
В протвном случае обратиться в Авторизованный Сервисный Центр по телефонам, указанным в
гарантийном таллоне.
Никогда не обращайтесь к неавторизованным сервисным центрам.
При обращении в Сервисную Службу необходимо сообщить:
тип неисправности;
модель изделия (Мод.);
номер тех. паспорта (серийный ¹).
Серийный номер и модель указаны на паспортной табличке, расположенной на задней панели и
спереди люка стиральной машины.
48
Page 49

ПдзгЯет чсЮузт
РлхнфЮсйп ме УфегнщфЮсйп
GR
ЕллзнйкЬ
ARMXXL 105
Ресйечьменб
GR
ЕгкбфЬуфбуз, 50-51
БрпухукехбуЯб кбй псйжпнфЯщуз
ХдсбхлйкЭт кбй злекфсйкЭт ухндЭуейт
Рсюфпт кэклпт рлхуЯмбфпт
ФечнйкЬ уфпйчеЯб
РесйгсбцЮ фпх рлхнфзсЯпх кбй еккЯнзуз
еньт рспгсЬммбфпт, 52-53
РЯнбкбт елЭгчпх
ЕндейкфйкЬ цщфЬкйб
ЕккЯнзуз еньт рспгсЬммбфпт
РспгсЬммбфб, 54
РЯнбкбт фщн РспгсбммЬфщн
Еобфпмйкеэуейт, 55
ИЭуфе фз иесмпксбуЯб
ИЭуфе фп уфЭгнщмб
ЛейфпхсгЯет
БрпссхрбнфйкЬ кбй мрпхгЬдб, 56
ИЮкз брпссхрбнфйкюн
Кэклпт леэкбнузт
РспефпймбуЯб фзт мрпхгЬдбт
ЕйдйкЬ спэчб
Уэуфзмб йупуфЬимйузт фпх цпсфЯпх
РспцхлЬоейт кбй ухмвпхлЭт, 57
ГенйкЮ буцЬлейб
ДйЬиеуз
Чейспнбкфйкь Ьнпйгмб фзт рьсфбт
УхнфЮсзуз кбй цспнфЯдб, 58
Брпклейумьт неспэ кбй злекфсйкпэ сеэмбфпт
Кбибсйумьт фпх рлхнфзсЯпх
Кбибсйумьт фпх ухсфбсйпэ брпссхрбнфйкюн
ЦспнфЯдб фзт рьсфбт кбй фпх кЬдпх
Кбибсйумьт фзт бнфлЯбт
¸легчпт фпх ущлЮнб фспцпдпуЯбт фпх неспэ
БнщмблЯет кбй лэуейт, 59
ХрпуфЮсйоз, 60
49
Page 50

ЕгкбфЬуфбуз
GR
ЕЯнбй узмбнфйкь нб дйбфзсЮуефе фп егчейсЯдйп бхфь
гйб нб мрпсеЯфе нб фп ухмвпхлеэеуфе прпйбдЮрпфе
уфйгмЮ. Уе ресЯрфщуз рюлзузт, рбсбчюсзузт Ю
мефбкьмйузт, вевбйщиеЯфе ьфй рбсбмЭней мбжЯ ме фп
рлхнфЮсйп гйб нб рлзспцпсеЯ фпн нЭп йдйпкфЮфз гйб
фз лейфпхсгЯб кбй фйт учефйкЭт рспейдпрпйЮуейт.
ДйбвЬуфе рспуекфйкЬ фйт пдзгЯет: хрЬсчпхн
узмбнфйкЭт рлзспцпсЯет гйб фзн егкбфЬуфбуз, фз
чсЮуз кбй фзн буцЬлейб.
БрпухукехбуЯб кбй псйжпнфЯщуз
БрпухукехбуЯб
1. БрпухукехЬуфе фп рлхнфЮсйп.
2. ЕлЭгофе бн фп рлхнфЮсйп Эчей хрпуфеЯ жзмйЭт кбфЬ
фз мефбцпсЬ. Бн Эчей хрпуфеЯ жзмйЭт мзн фп
ухндЭефе кбй ерйкпйнщнЮуфе ме фпн мефбрщлзфЮ.
3. БцбйсЭуфе фйт 4 вЯдет
рспуфбуЯбт гйб фз
мефбцпсЬ кбй фп
лбуфйчЬкй ме фп учефйкь
дйбчщсйуфйкь, рпх
всЯукпнфбй уфп рЯущ
мЭспт (влЭре ейкьнб).
Мйб цспнфйумЭнз псйжпнфЯщуз рспудЯдей уфбиесьфзфб
уфз мзчбнЮ кбй брпупвеЯ дпнЮуейт, ипсэвпхт кбй
мефбфпрЯуейт кбфЬ фз лейфпхсгЯб. Уе ресЯрфщуз
мпкЭфбт Ю фЬрзфб, схимЯуфе фб рпдбсЬкйб Эфуй юуфе
нб хцЯуфбфбй кЬфщ брь фп рлхнфЮсйп бскефьт чюспт
гйб фпн бесйумь.
ХдсбхлйкЭт кбй злекфсйкЭт ухндЭуейт
Уэндеуз фпх ущлЮнб фспцпдпуЯбт фпх неспэ
1. ЕйуЬгефе фзн фуймпэчб
A уфп Ьксп фпх ущлЮнб
фспцпдпуЯбт кбй вйдюуфе
фз уе Энб кспхнь ксэпх
A
неспэ ме уфьмйп
урейсюмбфпт 3/4 gas
(влЭре ейкьнб).
Рсйн фз уэндеуз, бцЮуфе
нб фсЭоей фп несь мЭчсй
нб гЯней дйбхгЭт.
2. УхндЭуфе фп ущлЮнб
фспцпдпуЯбт уфп
рлхнфЮсйп вйдюнпнфЬт
фпн уфзн бнфЯуфпйчз
еЯупдп неспэ, уфп рЯущ
мЭспт ерЬнщ деойЬ
(влЭре ейкьнб).
4. КлеЯуфе фйт прЭт ме фб рлбуфйкЬ рюмбфб рпх убт
рбсЭчпнфбй.
5. ДйбфзсеЯуфе кбй фб фсЯб фемЬчйб: бн фп рлхнфЮсйп
чсейбуфеЯ нб мефбцесиеЯ, иб рсЭрей нб
обнбмпнфбсйуфпэн.
Пй ухукехбуЯет ден еЯнбй рбйчнЯдйб гйб мйксЬ
рбйдйЬ.
ЕхихгсЬммйуз
1. ЕгкбфбуфЮуфе фп рлхнфЮсйп уе Энб дЬредп
ерЯредп кбй бниекфйкь, чщсЯт нб фп бкпхмрЮуефе уе
фпЯчпхт, Эрйрлб Ю Ьллп.
2. Бн фп дЬредп ден еЯнбй
брьлхфб псйжпнфйщмЭнп,
бнфйуфбимЯуфе фйт
бнщмблЯет вйдюнпнфбт Ю
оевйдюнпнфбт фб рсьуийб
рпдбсЬкйб (влЭре
ейкьнб). З гщнЯб клЯузт,
мефсзмЭнз уфзн
ерйцЬнейб есгбуЯбт, ден
рсЭрей нб оереснЬей фйт
2°.
3. РспуЭофе юуфе уфп ущлЮнб нб мзн хрЬсчпхн
пэфе рфхчюуейт, пэфе уфенюуейт.
З рЯеуз неспэ фпх кспхнпэ рсЭрей нб кхмбЯнефбй
мефбоэ фщн фймюн фпх рЯнбкб ФечнйкЬ уфпйчеЯб
(влЭре уелЯдб дЯрлб).
Бн фп мЮкпт фпх ущлЮнб фспцпдпуЯбт ден
ербскеЯ, брехихниеЯфе уе Энб ейдйкехмЭнп
кбфЬуфзмб Ю уе Энб еопхуйпдпфзмЭнп фечнйкь.
Мз чсзуймпрпйеЯфе рпфЭ чсзуймпрпйзмЭнпхт
ущлЮнет.
ЧсзуймпрпйеЯфе екеЯнпхт рпх убт рбсЭчпнфбй ме
фз мзчбнЮ.
50
Page 51

Уэндеуз фпх ущлЮнб бдейЬумбфпт
УхндЭуфе бдейЬумбфпт,
чщсЯт нб фпн дйрлюуефе,
уе Энбн бгщгь
еккЭнщузт Ю уе мйб
ерйфпЯчйб брпчЭфехуз уе
65 - 100 cm
брьуфбуз брь 65 Эщт
100 cm брь фп Эдбцпт.
Мз чсзуймпрпйеЯфе рспекфЬуейт кбй рплэрсйжб.
GR
Фп кблюдйп ден рсЭрей нб цЭсей рфхчЭт Ю нб еЯнбй
ухмрйеумЭнп.
Фп кблюдйп фспцпдпуЯбт рсЭрей нб бнфйкбиЯуфбфбй
мьнп брь еопхуйпдпфзмЭнпхт фечнйкпэт.
РспупчЮ! З ерйчеЯсзуз брпрпйеЯфбй кЬие ехиэнзт
уе ресЯрфщуз рпх ден фзспэнфбй бхфпЯ пй кбньнет.
ДйбцпсефйкЬ брпиЭуфе
фпн уфп чеЯлпт еньт
нйрфЮсб Ю мйбт лекЬнзт,
дЭнпнфбт фпн пдзгь рпх
убт рбсЭчефбй
уфпнкспхнь (влЭре
ейкьнб). Фп елеэиесп
Ьксп фпх ущлЮнб
бдейЬумбфпт ден рсЭрей
нб рбсбмЭней
вхийумЭнп уфп несь.
Ден ухнйуфЬфбй з чсЮуз рспекфЬуещн ущлЮнщн.
Бн брбйфеЯфбй, з рспЭкфбуз рсЭрей нб Эчей фзн Ядйб
дйЬмефсп фпх бсчйкпэ ущлЮнб кбй нб мзн оереснЬей
фб 150 cm.
ЗлекфсйкЮ уэндеуз
Рсйн ейуЬгефе фп вэумб уфзн злекфсйкЮ рсЯжб,
вевбйщиеЯфе ьфй:
з рсЯжб дйбиЭфей геЯщуз кбй фзсеЯ фйт ек фпх ньмпх
рспдйбгсбцЭт.
З рсЯжб нб еЯнбй уе иЭуз нб хрпцЭсей фп мЭгйуфп
цпсфЯп йучэпт фзт мзчбнЮт, рпх бнбцЭсефбй уфпн
рЯнбкб Фечнйкюн уфпйчеЯщн (влЭре дЯрлб).
З фЬуз фспцпдпуЯбт нб кхмбЯнефбй мефбоэ фщн
фймюн рпх бнбцЭспнфбй уфпн рЯнбкб Фечнйкюн
уфпйчеЯщн (влЭре дЯрлб).
З рсЯжб нб еЯнбй ухмвбфЮ ме фп вэумб фпх
рлхнфзсЯпх. Уе бнфЯиефз ресЯрфщуз,
бнфйкбфбуфЮуфе фзн рсЯжб Ю фп вэумб.
Фп рлхнфЮсйп ден егкбиЯуфбфбй уе бнпйчфь чюсп,
бкьмз кбй бн п чюспт еЯнбй кблхммЭнпт, дйьфй еЯнбй
рплэ ерйкЯндхнп нб фп бцЮнефе екфеиеймЭнп уе
вспчЮ кбй кбкпкбйсЯб.
Ме фзн егкбфЬуфбуз фпх рлхнфзсЯпх, з рсЯжб
сеэмбфпт рсЭрей нб еЯнбй еэкплб рспувЬуймз.
Рсюфпт кэклпт рлхуЯмбфпт
МефЬ фзн егкбфЬуфбуз, рсйн фз чсЮуз, дйенесгЮуфе
Энб кэклп рлхуЯмбфпт ме брпссхрбнфйкь кбй чщсЯт
спэчб иЭфпнфбт фп рсьгсбммб 1.
ФечнйкЬ уфпйчеЯб
МпнфЭлп
ДйбуфЬуейт
Чщсзфйкьфзфб
ЗлекфсйкЭт
ухндЭуейт
УхндЭуейт неспэ
Фбчэфзфб
уфхшЯмбфпт
РспгсЬммбфб
елЭгчпх уэмцщнб
ме фпн кбнпнйумь
EN 50229
ARMXXL 105
рлЬфпт cm 59,5
эшпт cm 85
вЬипт cm 53,5
брь 1 Эщт 7 kg гйб фп рлэуймп кбй
брь 1 Эщт 5 kg гйб фп уфЭгнщмб
ВлЭре фзн рйнбкЯдб
чбсбкфзсйуфйкюн ерЯ фзт мзчбнЮт
мЭгйуфз рЯеуз 1 MPa (10 bar)
ЕлЬчйуфз рЯеуз 0,05 MPa (0,5 bar)
чщсзфйкьфзфб фпх кЬдпх 52 лЯфсб
мЭчсй 1000 уфспцЭт фп лерфь
рлэуймп:
иесмпксбуЯб 60°C; екфелпэменп
ме 7 kg мрпхгЬдбт.
уфЭгнщмб:
дйенесгпэменп ме 2 kg цпсфЯпх
ерйлЭгпнфбт фп ерЯредп
уфегнюмбфпт ;
Деэфесп уфЭгнщмб дйенесгпэменп
ме 5 kg цпсфЯпх ерйлЭгпнфбт фп
ерЯредп уфегнюмбфпт .
З ухукехЮ бхфЮ еЯнбй уэмцщнз
ме фйт бкьлпхиет пйнпфйкЭт
ПдзгЯет:
- 89/336/CEE фзт 03/05/89
(ЗлекфспмбгнзфйкЮ Ухмвбфьфзфб)
кбй мефбгенЭуфесет фс прпрпйЮуейт
- 2006/95/CE (ЧбмзлЮ ФЬуз)
- 2002/96/CE
рсьгсбммб 6;
рсюфп уфЭгнщмб
51
Page 52

РесйгсбцЮ фпх рлхнфзсЯпх кбй
еккЯнзуз еньт рспгсЬммбфпт
GR
РЯнбкбт елЭгчпх
ИЮкз брпссхрбнфйкюн
БНБММБФПУ/
КпхмрЯ
УВЗУЙМБФПУ
РСПГСБММБФЩН
ЕрйлпгЭбт
ИЕСМПКСБУЙБ
ЕрйлпгЭбт
ЕНДЕЙКФЙКБ ЦЩФБКЙБ
РСПЩИЗУЗУ КХКЛПХ/
КБИХУФЕСЗМЕНЗУ
ЕККЙНЗУЗУ
ЕрйлпгЭбт
УФЕГНЩМБ
Кпхмрй Ь ме ендейкфйкЬ
цщфЬкйб
ЛЕЙФПХСГЙБУ
Ендейкфйкь цщфЬкй
РПСФБ
БУЦБЛЙУМЕНЗ
КпхмрЯ ме
ендейкфйкь цщфЬкй
ЕККЙНЗУЗ/
РБХУЗ
ИЮкз брпссхрбнфйкюн: гйб фзн рспуиЮкз
брпссхрбнфйкюн кбй рсьуиефщн (влЭре
«БрпссхрбнфйкЬ кбй мрпхгЬдб»).
Уфп еущфесйкь фзт иЮкзт брпссхрбнфйкюн всЯукефбй
фп бнбльгйп, уфп прпЯп мрпсеЯфе, бнЬ рЬуб уфйгмЮ,
нб ухмвпхлехфеЯфе Энб ухниефйкь учЭдйп фщн
рспгсбммЬфщн.
КпхмрЯ БНБММБФПУ/УВЗУЙМБФПУ: Гйб нб
бнЬшефе Ю нб увЮуефе фп рлхнфЮсйп.
ЕрйлпгЭбт РСПГСБММБФЩН: гйб нб иЭуефе фб
рспгсЬммбфб. КбфЬ фз дйЬскейб фпх рспгсЬммбфпт п
ерйлпгЭбт рбсбмЭней бкЯнзфпт.
Кпхмрй Ь ме ендейкфйкЬ цщфЬкйб ЛЕЙФПХСГЙБУ: гйб
нб ерйлЭоефе фйт дйбиЭуймет лейфпхсгЯет. Фп учефйкь
ме фзн ерйлегеЯуб лейфпхсгЯб ендейкфйкь цщфЬкй иб
рбсбмеЯней бнбммЭнп.
ЕрйлпгЭбт ИЕСМПКСБУЙБ: гйб нб иЭуефе фз
иесмпксбуЯб Ю фп рлэуймп уе ксэп несь (влЭре
«Еобфпмйкеэуейт»).
ЕрйлпгЭбт УФЕГНЩМБ: гйб фз сэимйуз фпх
ерйихмзфпэ уфегнюмбфпт (влЭре «Еобфпмйкеэуейт»).
ЕНДЕЙКФЙКБ ЦЩФБКЙБ РСПЩИЗУЗУ КХКЛПХ/
КБИХУФЕСЗМЕНЗУ ЕККЙНЗУЗУ: ãéá íá
бкплпхиеЯфе фзн кбфЬуфбуз рспьдпх фпх
рспгсЬммбфпт рлхуЯмбфпт.
Фп бнбммЭнп ендейкфйкь цщфЬкй деЯчней фзн уе еоЭлйоз
цЬуз.
Бн фЭизке з лейфпхсгЯб КбихуфесзмЭнз еккЯнзуз,
иб деЯчнпхн фпн чсьнп рпх хрплеЯрефбй гйб фзн
Энбсоз фпх рспгсЬммбфпт (влЭре уелЯдб дЯрлб).
Ендейкфйкь цщфЬкй РПСФБ БУЦБЛЙУМЕНЗ: гйб нб
кбфблЬвефе бн з рьсфб бнпЯгей (влЭре уелЯдб
дЯрлб).
КпхмрЯ ме ендейкфйкь цщфЬкй ЕККЙНЗУЗ/РБХУЗ: гйб
фзн еккЯнзуз фщн рспгсбммЬфщн Ю фзн рспущсйнЮ
дйбкпрЮ фпхт.
УЗМЕЙЩУЗ: гйб нб иЭуефе уе рбэуз фп уе еоЭлйоз
рлэуймп, рйЭуфе фп кпхмрЯ бхфь, фп учефйкь
ендейкфйкь цщфЬкй иб бнЬшей ме рпсфпкблЯ чсюмб
еню екеЯнп фзт уе еоЭлйозт цЬузт иб еЯнбй ухнечют
бнбммЭнп. Бн фп ендейкфйкь цщфЬкй РПСФБ
БУЦБЛЙУМЕНЗ
фзн рьсфб.
Гйб нб оекйнЮуей рЬлй фп рлэуймп брь фп узмеЯп
дйбкпрЮт, рбфЮуфе ек нЭпх фп кпхмрЯ бхфь.
увЮуей, мрпсеЯфе нб бнпЯоефе
52
Page 53

ЕндейкфйкЬ цщфЬкйб
Фб ендейкфйкЬ цщфЬкйб рбсЭчпхн узмбнфйкЭт
рлзспцпсЯет.
Нб фй мбт лЭне:
КбихуфесзмЭнз еккЯнзуз
Бн енесгпрпйЮизке з лейфпхсгЯб КбихуфесзмЭнз
еккЯнзуз (влЭре Еобфпмйкеэуейт), бцпэ еккйнЮуефе
фп рсьгсбммб, иб бсчЯуей нб бнбвпувЮней фп
ендейкфйкь цщфЬкй фп учефйкь ме фзн ерйлегмЭнз
кбихуфЭсзуз:
Ме фп рЭсбумб фпх чсьнпх иб брейкпнЯжефбй з
хрплейрьменз кбихуфЭсзуз, ме фп учефйкь
ендейкфйкь цщфЬкй нб бнбвпувЮней.
ЕндейкфйкЬ цщфЬкй цЬузт уе еоЭлйоз
КбфЬ фпн ерйихмзфь кэклп рлхуЯмбфпт, фб ендейкфйкЬ
цщфЬкйб иб бнЬшпхн рсппдехфйкЬ гйб нб деЯопхн фзн
кбфЬуфбуз рспюизузт:
Рлэуймп
ОЭвгблмб
Уфэшймп
Уфегнщмбфпу
ФЭлпт РлхуЯмбфпт
РбсбфЮсзуз: кбфЬ фз цЬуз «БдейЬумбфпт» иб
РбсбфЮсзуз: мьлйт
феиеЯ Энб ерЯредп Ю
Энбт чсьнпт
уфегнюмбфпт фп
цщфЬкй бхфь цщфЯжефбй
деЯчнпнфбт ьфй п
кэклпт рлхуЯмбфпт иб
ухнечйуфеЯ ме мйб цЬуз
уфегнюмбфпт.
цщфйуфеЯ фп ендейкфйкь цщфЬкй рпх учефЯжефбй ме фз
цЬуз «УфхшЯмбфпт».
КпхмрйЬ лейфпхсгЯбт кбй учефйкЬ ендейкфйкЬ цщфЬкйб
ЕрйлЭгпнфбт мйб лейфпхсгЯб фп учефйкь ендейкфйкь цщфЬкй
иб цщфйуфеЯ. Бн з ерйлегмЭнз лейфпхсгЯб ден еЯнбй
ухмвбфЮ ме фп феиЭн рсьгсбммб фп учефйкь ендейкфйкь
цщфЬкй иб бнбвпувЮней кбй з лейфпхсгЯб ден иб
енесгпрпйзиеЯ. Уфзн ресЯрфщуз рпх феиеЯ мйб лейфпхсгЯб
мз ухмвбфЮ ме мйб Ьллз рпх ерйлЭчизке рспзгпхмЭнщт
иб рбсбмеЯней енесгЮ мьнп з фелехфбЯб ерйлпгЮ.
GR
Ендейкфйкь цщфЬкй буцблйумЭнзт рьсфбт
Фп бнбммЭнп ендейкфйкь цщфЬкй деЯчней ьфй з рьсфб
еЯнбй буцблйумЭнз гйб фзн рбсемрьдйуз фхчбЯщн
бнпйгмЬфщн. Гйб фзн брпцхгЮ жзмйюн рсЭрей нб
Бцпэ дйбнхиеЯ з ерйлегеЯуб кбихуфЭсзуз фп
ендейкфйкь цщфЬкй рпх бнбвпувЮней иб увЮуей кбй
иб бсчЯуей фп феиЭн рсьгсбммб.
ресймЭнефе нб увЮуей фп ендейкфйкь цщфЬкй рсйн фп
Ьнпйгмб фзт рьсфбт.
УЗМЕЙЩУЗ: бн еЯнбй енесгЮ з лейфпхсгЯб
КбихуфесзмЭнз еккЯнзуз з рьсфб ден мрпсеЯ нб
бнпЯоей, гйб нб фзн бнпЯоефе иЭуфе фз мзчбнЮ уе рбэуз
рйЭжпнфбт фп кпхмрЯ ЕККЙНЗУЗ/РБХУЗ.
Фп фбчэ бнбвпувЮуймп фпх цщфьт ЕККЙНЗУЗ/РБХУЗ
(рпсфпкблЯ) фбхфьчспнб ме екеЯнп фщн лейфпхсгйюн
ерйузмбЯней мйб бнщмблЯб (влЭре БнщмблЯет кбй лэуейт).
ЕккЯнзуз еньт рспгсЬммбфпт
1. БнЬшфе фп рлхнфЮсйп рйЭжпнфбт фп кпхмрЯ БНБММБ/УВЗУЙМП. ¼лб фб ендейкфйкЬ цщфЬкй иб бнЬшпхн месйкЬ
дехфесьлерфб, мефЬ иб увЮупхн кбй иб рЬллефбй фп ендейкфйкь цщфЬкй ЕККЙНЗУЗ/РБХУЗ.
2. Цпсфюуфе фз мрпхгЬдб кбй клеЯуфе фзн рьсфб.
3. ИЭуфе ме фпн ерйлпгЭб РСПГСБММБФЩН фп ерйихмзфь рсьгсбммб.
4. ИЭуфе фз иесмпксбуЯб рлхуЯмбфпт (влЭре «Еобфпмйкеэуейт»).
5. ИЭуфе фп уфЭгнщмб бн чсейбуфеЯ (влЭре «Еобфпмйкеэуейт»).
6. Чэуфе брпссхрбнфйкь кбй рсьуиефб (влЭре «БрпссхрбнфйкЬ кбй мрпхгЬдб»).
7. ЕрйлЭоефе фйт дйбиЭуймет лейфпхсгЯет.
8. ЕккйнЮуфе фп рсьгсбммб рйЭжпнфбт фп кпхмрЯ ЕККЙНЗУЗ/РБХУЗ кбй фп учефйкь ендейкфйкь цщфЬкй иб рбсбмеЯней
бнбммЭнп ухнечют ме рсЬуйнп чсюмб. Гйб нб бкхсюуефе фпн феиЭнфб кэклп иЭуфе фз мзчбнЮ уе рбэуз рйЭжпнфбт фп кпхмрЯ
ЕККЙНЗУЗУ/РБХУЗУ кбй ерйлЭофе Энб нЭп кэклп.
9. Уфп фЭлпт фпх рспгсЬммбфпт иб цщфйуфеЯ фп ендейкфйкь цщфЬкй
увЮуей деЯчнпнфбт ьфй з рьсфб мрпсеЯ нб бнпЯоей. ВгЬлфе фз мрпхгЬдб кбй бцЮуфе фзн рьсфб мйуьклейуфз гйб нб
уфегнюуей п кЬдпт. УвЮуфе фп рлхнфЮсйп рйЭжпнфбт фп кпхмрЯ БНБММБ/УВЗУЙМП.
. Фп ендейкфйкь цщфЬкй РПСФБ БУЦБЛЙУМЕНЗ иб
53
Page 54

РспгсЬммбфб
GR
РЯнбкбт фщн РспгсбммЬфщн
РесйгсбцЮ фпх РспгсЬµµбфпт
РспгсЬммбфб
ЕйдйкЬ РспгсЬµµбфб
KХKЛПУ БРПУФЕЙСЩУЗУ:
6
KХKЛПУ БРПУФЕЙСЩУЗУ (1
6
бниекфйкЬ, рплэ лесщµЭнб.
БЛЗНХЧФБ:
7
ÐAÕÓÇ ÃÉÁ ÌÙÑÁ:
8
МЕФБОЩФБ/KПХСФЙНЕУ
9
М¢ЛЛЙНБ:
10
РспгсЬµµбфб гйб ьлет фйт µЭсет
ВБМВБKЕС¢:
1
ëåñùµÝíá.
ВБМВБKЕС¢: (2):
1
ëåñùµÝíá.
ВБМВБKЕС¢ ЧСЩМБФЙУФ¢ (3):
2
ехбЯуизфб чсюµбфб.
УХНИЕФЙKБ:
3
УХНИЕФЙKБ 40°:
3
ЦСЕУKБСЙУМБ 30':
елбцсЬ лесщµЭнщн (ден ендеЯкнхфбй гйб µЬллйнб, µефбощфЬ
4
кбй спэчб рпх рлЭнпнфбй уфп чЭсй).
ЦСЕУKБСЙУМБ 15':
елбцсЬ лесщµЭнщн (ден ендеЯкнхфбй гйб µЬллйнб, µефбощфЬ
5
кбй спэчб рпх рлЭнпнфбй уфп чЭсй).
ЕрЯ µЭспхт рспгсЬµµбфб
ОЕВГБ ЛМ Б ВБМВБKЕСБ
A
УФХШЙМП БНИЕKФЙKБ
B
БМПЧЕФЕХУЗ НЕСПХ
C
РспгсЬммбфб уфегнюмбфпт
УфЭгнщмб «ВбмвбкесЬ»
11
УфЭгнщмб «УхниефйкЬ»
12
УфЭгнщмб «МЬллйнб»
13
ЧсщµбфйуфЬ ехбЯуизфб лЯгп лесщµЭнб.
Гйб µЬллйнб , cachemire, клр.
ЛехкЬ кбй чсщµбфйуфЬ бниекфйкЬ, рплэ
ЛехкЬ кбй чсщµбфйуфЬ ехбЯуизфб, рплэ
ЧсщµбфйуфЬ бниекфйкЬ, рплэ лесщµЭнб.
ЧсщµбфйуфЬ бниекфйкЬ, лЯгп лесщµЭнб.
ЛехкЬ еобйсефйкЬ лесщµЭнб.
): ЛехкЬ кбй чсщµбфйуфЬ
ЧсщµбфйуфЬ ехбЯуизфб лЯгп лесщµЭнб.
: Гйб µефбощфЬ с пэчб, вйукьжз, лйнЬ.
ЛехкЬ лЯгп лесщµЭнб кбй
Гйб фп гсЮгпсп цсеукЬсйуµб спэчщн
Гйб фп гсЮгпсп цсеукЬсйуµб спэчщн
(°C)
МЭгйуфз
фбчэфзфб
(уфс пцЭт
áíÜ
лерфь)
МЭгйуфз
èåñµïêñ.
90° 1000
60° 1000
40° 800
40° 800
30° 0
40° 800
60° 1000
40° 1000
40° 1000
60° 800
40° 800
30° 800
30° 800
1000
-
1000
-
-
0
--
--
--
ÓôÝã íùìá
llll
l
l
l
--
l
llll
llll
llll
l
l
l
l
l
l
----
l
l
l
БрпссхрбнфйкЬ
Лехкбн-
Рлэуйµп Мблбкфйкь
ôéêü
-
-
-
ll
ll
ll
ll
ll
-
ll
-
ll
-
ll
-
ll
-
--
-- -
-- -
-- -
-- -
Фб уфпйчеЯб рпх бнбцЭспнфбй уфпн рЯнбкб еЯнбй ендейкфйкЬ.
Ãéá üëá ôá Test Institutes:
1) Рсьгсбммб елЭгчпх уэмцщнб ме фзн рспдйбгсбцЮ EN 50229: иЭуфе фп рсьгсбммб 6 уе мйб иесмпксбуЯб 60°C.
2) Рсьгсбммб вбмвбкесюн мбксэ: иЭуфе фп рсьгсбммб 1 уе мйб иесмпксбуЯб 40°C.
3) Рсьгсбммб вбмвбкесюн уэнфпмп: иЭуфе фп рсьгсбммб 2 уе мйб иесмпксбуЯб 40°C.
ЕйдйкЬ рспгсЬммбфб
KХKЛПУ БРПУФЕЙСЩУЗУ (рсьгсбммб 6). ¸нб еохгйбнфйкь рсьгсбммб уе хшзлЭт иесмпксбуЯет рпх рспвлЭрей фз чсЮуз
лехкбнфйкпэ уе иесмпксбуЯет бнюфесет фщн 60°C.
Гйб фз леэкбнуз чэуфе фп лехкбнфйкь, фб брпссхрбнфйкЬ кбй фб рсьуиефб
уфб учефйкЬ дйбмесЯумбфб (влЭре рбсЬгсбцп УхсфЬсй фщн брпссхрбнфйкюн).
БЛЗНХЧФБ (рсьгсбммб 7). ЕЯнбй Энбт биьсхвпт кэклпт рпх мрпсеЯ нб дпхлеэей фз нэчфб ьфбн фп фймпльгйп фпх
злекфсйкпэ еЯнбй мейщмЭнп. Фп рсьгсбммб мелефЮизке гйб ухниефйкЬ кбй вбмвбкесЬ фпэчб. Уфп фЭлпт фпх кэклпх з
мзчбнЮ уфбмбфЬей ме фп несь уфз лекЬнз. Гйб фп уфэшймп кбй фп Ьдейбумб рйЭуфе фп кпхмрЯ ЕККЙНЗУЗ/РБХУЗ,
дйбцпсефйкЬ мефЬ брь 8 юсет з мзчбнЮ иб кЬней бхфьмбфб фп уфэшймп кбй фп Ьдейбумб фпх неспэ.
ÐAÕÓÇ ÃÉÁ ÌÙÑÁ (рсьгсбммб 8). Рсьгсбммб йкбнь нб брпмбксэней фпхт лекЭдет фхрйкпэт фщн мщсюн,
дйбуцблЯжпнфбт фзн брпмЬксхнуз фпх брпссхрбнфйкпэ брь фб спэчб гйб фзн брпцхгЮ бллесгйюн уфп ехбЯуизфп
дЭсмб фщн мщсюн. П кэклпт мелефЮизке гйб нб мейюней фп вбкфзсйдйбкь цпсфЯп чсзуймпрпйюнфбт мйксьфесз рпуьфзфб
неспэ кбй велфйуфпрпйюнфбт фзн ерЯдсбуз фщн ейдйкюн еохгйбнфйкюн рсьуиефщн уфп брпссхрбнфйкь.
Уфп фЭлпт фпх рлхуЯмбфпт з мзчбнЮ дйенесгеЯ бсгЭт ресйуфспцЭт фпх кЬдпх гйб фзн брпцхгЮ дзмйпхсгЯбт рфхчюуещн.
Гйб нб фелейюуей п кэклпт рйЭуфе фп кпхмрЯ ЕККЙНЗУЗ/РБХУЗ.
ЦСЕУKБСЙУМБ 30' (рсьгсбммб 4) мелефЮизке гйб фп рлэуймп спэчщн елбцсЬ лесщмЭнщн уе уэнфпмп чсьнп: дйбскеЯ
мьнп 30 лерфЬ кбй убт еопйкпнпмеЯ чсьнп кбй енЭсгейб. ИЭфпнфбт фп рсьгсбммб (4 уе 30°C) мрпсеЯфе нб рлэнефе мбжЯ
хцЬумбфб дйбцпсефйкЮт цэузт (екфьт мЬллйнщн кбй мефбощфюн) ме Энб мЭгйуфп цпсфЯп 3 kg.
ЦСЕУKБСЙУМБ 15' (рсьгсбммб 5) мелефЮизке гйб фп рлэуймп спэчщн елбцсЬ лесщмЭнщн уе уэнфпмп чсьнп: дйбскеЯ
мьнп 15 лерфЬ кбй убт еопйкпнпмеЯ чсьнп кбй енЭсгейб. ИЭфпнфбт фп рсьгсбммб (5 уе 30°C) мрпсеЯфе нб рлэнефе мбжЯ
хцЬумбфб дйбцпсефйкЮт цэузт (екфьт мЬллйнщн кбй мефбощфюн) ме Энб мЭгйуфп цпсфЯп 1,5 kg.
МЭгйуфп
ЦпсфЯп.
(Kg)
ДйЬскейб
кэклпх
7170
7153
4290
2118
155
1,5 55
7122
7115
785
385
370
330
1,5 15
l
736
716
72
5
3
1,5
-
-
-
54
Page 55

Еобфпмйкеэуейт
ИЭуфе фз иесмпксбуЯб
УфсЭцпнфбт фпн ерйлпгЭб ИЕСМПКСБУЙБ фЯиефбй з иесмпксбуЯб рлхуЯмбфпт (влЭре РЯнбкб рспгсбммЬфщн).
З иесмпксбуЯб мрпсеЯ нб мейщиеЯ мЭчсй фп рлэуймп уе ксэп несь (
Фп мзчЬнзмб иб рбсемрпдЯуей бхфьмбфб фз иЭуз иесмпксбуЯбт мегблэфесзт фзт мЭгйуфзт рспвлерьмензт гйб
кЬие рсьгсбммб.
РЯнбкбт чсьнщн Уфегнюмбфпт (фймЭт ендейкфйкЭт)
ИЭуфе фп уфЭгнщмб
УфсЭцпнфбт фпн ерйлпгЭб УФЕГНЩМБ фЯиефбй п ерйихмзфьт
фэрпт уфегнюмбфпт. РспвлЭрпнфбй дэп дхнбфьфзфет:
A - Ме вЬуз фп чсьнп: Брь 40 Ýùò 180 лерфЬ.
B - Ме вЬуз фп вбимь хгсбуЯбт фщн уфегнщмЭнщн спэчщн:
УЙДЕСЩМБ : спэчб елбцсЬ хгсЬ, ехкплпуйдЭсщфб.
КСЕМБУМБ : спэчб уфегнЬ гйб фбкфпрпЯзуз.
НФПХЛБРБ : спэчб рплэ уфегнЬ, ухнйуфЬфбй гйб
Фэрпт
хцЬумбфпт
ВбмвбкесЬ Бурсьспхчб
УхниефйкЬ Уенфьнйб, РпхкЬмйуб,
МЬллйнб
мрпхснпэжйб кбй рефуефЭ.
Бн, еобйсефйкЬ, фп цпсфЯп спэчщн гйб рлэуймп кбй уфЭгнщмб еЯнбй мегблэфесп фпх рспвлерьменпх (влЭре
РЯнбкбт чсьнщн Уфегнюмбфпт), дйенесгЮуфе фп рлэуймп, кбй ме фп рЭсбт фпх рспгсЬммбфпт, чщсЯуфе фп цпсфЯп
кбй обнбвЬлфе Энб мЭспт уфпн кЬдп. Уфп узмеЯп бхфь бкплпхиЮуфе фйт пдзгЯет гйб нб екфелЭуефе «Ìüíï
уфЭгнщмб». ЕрбнЬлбве фйт Ядйет енЭсгейет гйб фп хрьлпйрп цпсфЯп.
РбсбфЮсзуз: Уфп фЭлпт фпх уфегнюмбфпт дйенесгеЯфбй мйб ресЯпдпт шэозт бкьмз кй бн п ерйлпгЭбт
УФЕГНЩМБ Эсией уфз иЭуз
.
Мьнп уфЭгнщмб
УфсЭшфе фпн ерйлпгЭб РСПГСБММБФБ уе мЯб брь фйт иЭуейт уфегнюмбфпт (11-12-13) ме вЬуз фпн фэрп фпх
хцЬумбфпт, кбфьрйн ерйлЭофе фзн ерйихмзфЮ дйЬскейб фпх кэклпх уфегнюмбфпт ме фпн ерйлпгЭб УФЕГНЩМБ.
).
Фэрпт мрпхгЬдбт Ìax
дйбцьсщн дйбуфЬуещн,
РефуЭфет рефуефЭ
РхжЬмет, кЬлфует, клр.
НФПХЛБРБ СЕМБУМБ УЙДЕСЩМБ
цпсфЯп
(kg)
5 180 170 160
3 180 170 160
1,5 150 140 130
GR
ЛейфпхсгЯет
Пй дйЬцпсет лейфпхсгЯет рлхуЯмбфпт рпх рспвлЭрпнфбй брь фп рлхнфЮсйп ерйфсЭрпхн фзн ерЯфехоз фпх
кбибсйумпэ кбй фпх лехкпэ рпх ерйихмеЯфе.
Гйб фзн енесгпрпЯзуз фщн лейфпхсгйюн:
1. рйЭуфе фп рлЮкфсп фп учефйкь ме фзн ерйлегмЭнз лейфпхсгЯб.
2. Фп Ьнбммб фпх ендейкфйкпэ цщфьт ерйузмбЯней ьфй з лейфпхсгЯб еЯнбй енесгЮ.
РбсбфЮсзуз: Фп гсЮгпсп бнбвпувЮуймп фпх ендейкфйкпэ цщфьт деЯчней ьфй з учефйкЮ лейфпхсгЯб ден мрпсеЯ нб
ерйлегеЯ гйб фп феиЭн рсьгсбммб.
КбихуфесзмЭнз еккЯнзуз
КбихуфесеЯ фзн еккЯнзуз фпх мзчбнЮмбфпт мЭчсй 9 юсет.
РйЭуфе рпллЭт цпсЭт фп рлЮкфсп мЭчсй нб бнЬшей фп ендейкфйкь цщфЬкй фп учефйкь ме фзн ерйихмзфЮ кбихуфЭсзуз.
Уфзн рЭмрфз цпсЬ рпх иб рйЭуефе фп кпхмрЯ з лейфпхсгЯб иб бренесгпрпйзиеЯ.
УЗМЕЙЩУЗ: Бцпэ рбфзиеЯ фп рлЮкфсп ЕККЙНЗУЗ/РБХУЗ, мрпсеЯфе нб бллЬоефе фзн фймЮ кбихуфЭсзузт мьнп
мейюнпнфЬт фзн.
ЕЯнбй енесгь ме ьлб фб рспгсЬммбфб.
¸офсб ОЭвгблмб
ЕрйлЭгпнфбт фз дхнбфьфзфб бхфЮ бхоЬнефбй з брпфелеумбфйкьфзфб фпх оевгЬлмбфпт кбй еобуцблЯжефбй з
мЭгйуфз брпмЬксхнуз фпх брпссхрбнфйкпэ. ЕЯнбй чсЮуймп гйб ерйдесмЯдет йдйбЯфесб ехбЯуизфет.
Ден еЯнбй енесгь уфб рспгсЬммбфб 4, 5, 11, 12, 13, B, C.
Super Wash
ЧЬсз уфз чсЮуз мегблэфесзт рпуьфзфбт неспэ уфзн бсчйкЮ цЬуз фпх кэклпх кбй уфз чсЮуз ресйууьфеспх
чсьнп, з дхнбфьфзфб бхфЮ еобуцблЯжей Энб рлэуймп хшзлюн ерйдьуещн.
Ден еЯнбй енесгь уфб рспгсЬммбфб 4, 5, 6, 9, 10, 11, 12, 13, A, B, C.
1000-500
Мейюней фзн фбчэфзфб уфхшЯмбфпт
Ден еЯнбй енесгь уфб рспгсЬммбфб 9, C, 11, 12, 13.
55
Page 56

БрпссхрбнфйкЬ кбй мрпхгЬдб
GR
ИЮкз брпссхрбнфйкюн
Фп кбль брпфЭлеумб фпх рлхуЯмбфпт еобсфЬфбй ерЯузт
кбй брь фз ущуфЮ дпуплпгЯб фпх брпссхрбнфйкпэ:
хресвЬллпнфбт ден рлЭнпхме брпфелеумбфйкьфесб кбй
ухнфелпэме уфз дзмйпхсгЯб кспэуфбт уфб еущфесйкЬ
мЭсз фпх рлхнфзсЯпх кбй уфз мьлхнуз фпх
ресйвЬллпнфпт.
Мз чсзуймпрпйеЯфе брпссхрбнфйкЬ гйб рлэуймп уфп
чЭсй, дйьфй рбсЬгпхн рплэ бцсь.
ВгЬлфе фз иЮкз
4
MAX
1
3
иЮкз 1: Брпссхрбнфйкь гйб рсьрлхуз
(уе укьнз)
Рсйн чэуефе фп брпссхрбнфйкь елЭгофе бн Эчей
ейубчиеЯ з рсьуиефз лекбнЯфуб 4.
иЮкз 2: Брпссхрбнфйкь гйб рлэуймп
(уе укьнз Ю хгсь)
Фп хгсь брпссхрбнфйкь чэнефбй мьнп рсйн фзн
еккЯнзуз.
иЮкз 3: Рсьуиефб (мблбкфйкь, клр.)
Фп мблбкфйкь ден рсЭрей нб дйбцеэгей брь фп рлЭгмб.
иЮкз рсьуиефз 4: Лехкбнфйкь
2
брпссхрбнфйкюн кбй
ейуЬгефе фп
брпссхрбнфйкь Ю фп
рсьуиефп щт еоЮт.
Кэклпт леэкбнузт
З леэкбнуз мрпсеЯ нб дйенесгзиеЯ мьнп ме фб
рспгсЬммбфб 1, 2, 6.
Чэуфе фп лехкбнфйкь уфзн рсьуиефз лекбнЯфуб 4, фп
брпссхрбнфйкь кбй фп мблбкфйкь уфйт учефйкЭт
лекбнЯфует, кбфьрйн иЭуфе Энб брь фб
рспбнбцесиЭнфб рспгсЬммбфб.
ЕндеЯкнхфбй мьнп гйб спэчб вбмвбкесЬ рплэ
лесщмЭнб.
РспефпймбуЯб фзт мрпхгЬдбт
ЧщсЯуфе фз мрпхгЬдб бнЬлпгб:
- ме фп еЯдпт фпх хцЬумбфпт/ фп уэмвплп фзт ефйкЭфбт.
- фб чсюмбфб: чщсЯуфе фб чсщмбфйуфЬ спэчб брь фб
лехкЬ.
Еккенюуфе фйт фуЭрет кбй елЭгофе фб кпхмрйЬ.
Мзн оереснЬфе фйт хрпдейкнхьменет фймЭт, уе учЭуз
ме фп вЬспт фзт уфегнЮт мрпхгЬдбт:
БниекфйкЬ хцЬумбфб: max 7 kg
УхниефйкЬ хцЬумбфб: max 3 kg
ЕхбЯуизфб хцЬумбфб: max 2 kg
МЬллйнб: max 1,5 kg
Рьуп жхгЯжей з мрпхгЬдб;
1 уенфьнй 400-500 gr.
1 мбойлбспиЮкз 150-200 gr.
1 фсбрежпмЬнфйлп 400-500 gr.
1 мрпхснпэжй 900-1.200 gr.
1 рефуЭфб 150-250 gr.
ЕйдйкЬ спэчб
МефбощфЬ: чсзуймпрпйЮуфе фп бнфЯуфпйчп
рсьгсбммб 9 гйб нб рлэнефе ьлб фб мефбощфЬ
спэчб. УхнйуфЬфбй з чсЮуз еньт ейдйкпэ
брпссхрбнфйкпэ гйб ехбЯуизфб спэчб.
КпхсфЯнет: дйрлюуфе фйт мЭуб уе Энб мбойлЬсй Ю уе
Энб дйкфхщфь убкпэлй. ЧсзуймпрпйЮуфе фп
рсьгсбммб 9.
МЬллйнб: Фп Hotpoint/Ariston еЯнбй фп мпнбдйкь
рлхнфЮсйп рпх кбфЭкфзуе фз узмбнфйкЮ бнбгнюсйуз
Woolmark Platinum Care (M.0508) ек мЭспхт фзт
The Woolmark Company, рпх рйуфпрпйеЯ фп рлэуймп
уфп рлхнфЮсйп ьлщн фщн мЬллйнщн спэчщн кбиют кбй
екеЯнщн рпх цЭспхн фзн ефйкЭфб мьнп рлэуймп уфп
чЭсй
брьлхфз вевбйьфзфб нб рлЭнефе уфп рлхнфЮсйп ьлб
фб мЬллйнб спэчб (max. 1,5 kg) ме фзн еггэзуз фщн
кблэфесщн ерйдьуещн.
. Ме фп рсьгсбммб 10 Эчефе ухнерют
Уэуфзмб йупуфЬимйузт фпх цпсфЯпх
Рсйн брь кЬие уфэшймп, гйб нб брпцэгефе дпнЮуейт
хресвплйкЭт кбй гйб нб кбфбнеЯмефе пмпйьмпсцб фп
цпсфЯп, п кЬдпт дйенесгеЯ ресйуфспцЭт уе мйб
фбчэфзфб елбцсЬ бнюфесз екеЯнзт фпх рлхуЯмбфпт.
Бн уфп фЭлпт фщн дйбдпчйкюн рспурбиейюн фп цпсфЯп
ден Эчей бкьмз еойупсспрзиеЯ ущуфЬ з мзчбнЮ
дйенесгеЯ фп уфэшймп уе мйб фбчэфзфб чбмзльфесз
фзт рспвлерьмензт. РбспхуЯб хресвплйкЮт
буфЬиейбт, фп рлхнфЮсйп дйенесгеЯ фзн кбфбнпмЮ бнфЯ
фпх уфхшЯмбфпт. Гйб нб ехнпзиеЯ кблэфесз кбфбнпмЮ
фпх цпсфЯпх кбй фзт ущуфЮт еойупссьрзузт
ухнйуфЬфбй з бнЬмйоз спэчщн мегЬлщн кбй мйксюн
дйбуфЬуещн.
ЧщсЯт уфэшймп
З лейфпхсгЯб бхфЮ дйбкьрфей фп рсьгсбммб
рлхуЯмбфпт дйбфзсюнфбт фз мрпхгЬдб уе мпэлйбумб
рсйн фп Ьдейбумб фпх неспэ.
ЕЯнбй енесгЮ мьнп уфп рсьгсбммб 9 (МефбощфЬ/
КпхсфЯнет) кбй чсзуймеэей гйб фзн брпцхгЮ
учзмбфйумпэ фублбкщмЬфщн.
Гйб фзн плпклЮсщуз фпх кэклпх рбфЮуфе фп кпхмрЯ
ЕККЙНЗУЗ/РБХУЗ.
56
Page 57

РспцхлЬоейт кбй
ухмвпхлЭт
Фп рлхнфЮсйп учедйЬуфзке кбй кбфбукехЬуфзке
уэмцщнб ме фпхт дйеинеЯт кбньнет буцблеЯбт. БхфЭт
пй рспейдпрпйЮуейт рбсЭчпнфбй гйб льгпхт буцблеЯбт
кбй рсЭрей нб дйбвЬжпнфбй рспуекфйкЬ.
ГенйкЮ буцЬлейб
З ухукехЮ бхфЮ учедйЬуфзке брпклейуфйкЬ гйб
пйкйбкЮ чсЮуз.
Фп рлхнфЮсйп рсЭрей нб чсзуймпрпйеЯфбй мьнп брь
енЮлйкб Ьфпмб кбй уэмцщнб ме фйт пдзгЯет рпх
бнбцЭспнфбй уфп рбсьн егчейсЯдйп.
Мзн бггЯжефе фп мзчЬнзмб ме гхмнЬ рьдйб Ю ме фб
чЭсйб Ю фб рьдйб всегмЭнб.
Мзн вгЬжефе фп вэумб брь фзн злекфсйкЮ рсЯжб
фсбвюнфбт фп кблюдйп, бллЬ нб рйЬнефе фзн рсЯжб.
Мзн бнпЯгефе фп ухсфбсЬкй брпссхрбнфйкюн еню фп
мзчЬнзмб еЯнбй уе лейфпхсгЯб.
Мзн бггЯжефе фп несь бдейЬумбфпт, бцпэ мрпсеЯ нб
цфЬуей уе хшзлЭт иесмпксбуЯет.
Мзн жпсЯжефе уе кбмЯб ресЯрфщуз фзн рьсфб: иб
мрпспэуе нб чблЬуей п мзчбнйумьт буцблеЯбт рпх
рспуфбфеэей брь фхчбЯб бнпЯгмбфб.
Уе ресЯрфщуз влЬвзт, уе кбмЯб ресЯрфщуз нб мзн
еремвбЯнефе уфпхт еущфесйкпэт мзчбнйумпэт
рспурбиюнфбт нб фзн ерйукехЬуефе.
Нб елЭгчефе рЬнфб фб рбйдйЬ нб мзн рлзуйЬжпхн
уфп мзчЬнзмб уе лейфпхсгЯб.
КбфЬ фп рлэуймп з рьсфб феЯней нб иесмбЯнефбй.
Бн рсЭрей нб мефбфпрйуфеЯ, ухнесгбуфеЯфе дэп Ю фсЯб
Ьфпмб ме фз мЭгйуфз рспупчЮ. РпфЭ мьнпй убт гйбфЯ
фп мзчЬнзмб еЯнбй рплэ вбсэ.
Рсйн ейуЬгефе фз мрпхгЬдб елЭгофе бн п кЬдпт еЯнбй Ьдейпт.
З рьсфб кбфЬ фп уфЭгнщмб феЯней нб иесмбЯнефбй.
Мз уфегнюнейт спэчб рлхмЭнб ме еэцлекфпхт
дйблэфет (р.ч. фсйелЯнз).
Мз уфегнюнейт бцсюдз ухниефйкЬ Ю бнЬлпгб елбуфпмесЮ.
Вевбйюупх ьфй кбфЬ фйт цЬуейт фпх уфегнюмбфпт
п кспхньт фпх неспэ еЯнбй бнпйчфьт.
Пй кбфбнблщфЭт иб рсЭрей нб брехиэнпнфбй уфйт фпрйкЭт
бсчЭт Ю уфб кбфбуфЮмбфб лйбнйкЮт гйб рлзспцпсЯет рпх
бцпспэн фз ущуфЮ дйЬиеуз фщн рблбйюн злекфсйкюн
ухукехюн.
Чейспнбкфйкь Ьнпйгмб фзт рьсфбт
Уфзн ресЯрфщуз бдхнбмЯбт бнпЯгмбфпт фзт рьсфбт ео
бйфЯбт брпхуЯбт злекфсйкЮт енЭсгейбт еню иЭлефе нб
брлюуефе фзн мрпхгЬдб, рспчщсЮуфе щт бкплпэищт:
1. вгЬлфе фп вэумб брь
фзн злекфсйкЮ рсЯжб.
2. вевбйщиеЯфе ьфй з уфЬимз
фпх неспэ уфп еущфесйкь фзт
20
ухллЭгпнфЬт фп уе Энб кпхвЬ ьрщт цбЯнефбй уфзнейкьнб.
мзчбнЮт еЯнбй чбмзльфесз уе
учЭуз ме фп Ьнпйгмб фзт
рьсфбт. Уе бнфЯиефз
ресЯрфщуз бцбйсЭуфе фп уе
ресЯууейб несь мЭущ фпх
ущлЮнб бдейЬумбфпт
3. бцбйсЭуфе фп фбмрль
кЬлхшзт уфп рсьуийп
рлехсь фпх рлхнфзсЯпх ме
фз впЮиейб еньт
кбфубвйдйпэ (влЭре ейкьнб).
GR
ДйЬиеуз
ДйЬиеуз фпх хлйкпэ ухукехбуЯбт: фзсеЯфе фпхт
фпрйкпэт кбнпнйумпэт, юуфе пй ухукехбуЯет нб
мрпспэн нб ербнбчсзуймпрпйзипэн.
З ехсщрбъкЮ пдзгЯб 2002/96/EK гйб фб Брьвлзфб
Злекфсйкпэ кбй Злекфспнйкпэ Еопрлйумпэ, брбйфеЯ ьфй пй
рблбйЭт пйкйбкЭт злекфсйкЭт ухукехЭт ден рсЭрей нб
брпвЬлпнфбй мбжЯ ме фб хрьлпйрб брьвлзфб фпх дзмпфйкпэ
дйкфэпх. Пй рблбйЭт ухукехЭт рсЭрей нб ухллечипэн
чщсйуфЬ рспкеймЭнпх нб велфйуфпрпйзипэн з брпкбфЬуфбуз
кбй з бнбкэклщуз фщн хлйкюн рпх ресйЭчпхн кбй ме укпрь
фз меЯщуз фщн влбвесюн ерйрфюуещн уфзн бнисюрйнз хгеЯб
кбй фп ресйвЬллпн. Фп уэмвплп ме фп дйегсбммЭнп дпчеЯп
брпвлЮфщн уфп рспъьн хренихмЯжей уе убт фзн хрпчсЭщуЮ
убт, рщт ьфбн ерйихмеЯфе нб рефЬоефе фз ухукехЮ ,рсЭрей
нб ухллечиеЯ чщсйуфЬ.
4. чсзуймпрпйюнфбт фз глщууЯфуб рпх цбЯнефбй уфзн
ейкьнб фсбвЮофе рспт фб Эощ мЭчсй нб елехиесюуефе фп
рлбуфйкь брь фп уфпр. ФсбвЮофе фп бкплпэищт рспт
фб кЬфщ кбй фбхфьчспнб бнпЯофе фзн рьсфб.
5. обнбмпнфЬсефе фп рЬнел ьнфбт уЯгпхспй, рсйн фп
урсюоефе рспт фз мзчбнЮ, ьфй Эчефе ейуЬгей фб
гбнфжЬкйб уфйт бнфЯуфпйчет еупчЭт.
57
Page 58

УхнфЮсзуз кбй цспнфЯдб
GR
Брпклейумьт неспэ кбй злекфсйкпэ
сеэмбфпт
КлеЯнефе фпн кспхнь фпх неспэ мефЬ брь кЬие
рлэуймп. ¸фуй ресйпсЯжефбй з ципсЬ фзт
хдсбхлйкЮт егкбфЬуфбузт фпх рлхнфзсЯпх кбй
брпупвеЯфбй п кЯндхнпт брщлейюн.
Нб вгЬжефе фп вэумб брь фп сеэмб ьфбн
кбибсЯжефе фп мзчЬнзмб кбй кбфЬ фйт есгбуЯет
ухнфЮсзузт.
Кбибсйумьт фпх рлхнфзсЯпх
Фп еощфесйкь мЭспт кбй фб лбуфйчЭнйб мЭсз
мрпспэн нб кбибсЯжпнфбй ме Энб рбнЯ всегмЭнп
ме члйбсь несь кбй убрпэнй. Мз чсзуймпрпйеЯфе
дйблэфет Ю брпохуфйкЬ.
Кбибсйумьт фпх ухсфбсйпэ
брпссхрбнфйкюн
1
ФсбвЮофе фп ухсфЬсй
бнбузкюнпнфЬт фп кбй
фсбвюнфбт фп рспт фб
Эощ (влЭре ейкьнб).
РлЭнефЭ фп кЬфщ брь
фсечпэменп несь. П
кбибсйумьт бхфьт
дйенесгеЯфбй ухчнЬ.
2
Кбибсйумьт фзт бнфлЯбт
Фп рлхнфЮсйп дйбиЭфей мйб бнфлЯб бхфпкбибсйжьменз
рпх ден чсейЬжефбй ухнфЮсзуз. МрпсеЯ, ьмщт, нб
фэчей нб рЭупхн мйксЬ бнфйкеЯменб (кЭсмбфб,
кпхмрйЬ) уфпн рспиЬлбмп рпх рспуфбфеэей фзн
бнфлЯб, рпх всЯукефбй уфп кЬфщ мЭспт бхфЮт.
ВевбйщиеЯфе ьфй п кэклпт рлхуЯмбфпт Эчей
фелейюуей кбй вгЬлфе фп вэумб.
Гйб нб Эчефе рсьувбуз уфпн рспиЬлбмп:
1. бцбйсЭуфе фп фбмрль
кЬлхшзт уфп рсьуийп
рлехсь фпх рлхнфзсЯпх
ме фз впЮиейб еньт
кбфубвйдйпэ
(влЭре ейкьнб).
2. Оевйдюуфе фп кбрЬкй
уфсЭцпнфЬт фп
бсйуфесьуфспцб
(влЭре ейкьнб): еЯнбй
цхуйкь нб вгбЯней лЯгп
несь.
ЦспнфЯдб фзт рьсфбт кбй фпх кЬдпх
Нб бцЮнефе рЬнфб мйуьклейуфз фзн рьсфб гйб нб
мзн рбсЬгпнфбй дхупумЯет.
58
3. кбибсЯуфе ерймелют фп еущфесйкь.
4. обнбвйдюуфе фп кбрЬкй.
5. обнбмпнфЬсефе фп рЬнел ьнфбт уЯгпхспй, рсйн фп
урсюоефе рспт фз мзчбнЮ, ьфй Эчефе ейуЬгей фб
гбнфжЬкйб уфйт бнфЯуфпйчет еупчЭт.
¸легчпт фпх ущлЮнб фспцпдпуЯбт фпх
неспэ
ЕлЭгчефе фп ущлЮнб фспцпдпуЯбт фпхлЬчйуфпн мйб
цпсЬ ефзуЯщт. Бн рбспхуйЬжей укбуЯмбфб кбй
учйумЭт бнфйкбиЯуфбфбй: кбфЬ фб рлхуЯмбфб пй
йучхсЭт рйЭуейт иб мрпспэубн нб рспкблЭупхн
бнбрЬнфечб урбуЯмбфб.
Мз чсзуймпрпйеЯфе рпфЭ чсзуймпрпйзмЭнпхт
ущлЮнет.
Page 59

БнщмблЯет кбй лэуейт
МрпсеЯ нб ухмвеЯ фп рлхнфЮсйп нб мз лейфпхсгеЯ. Рсйн фзлецщнЮуефе уфзн ХрпуфЮсйоз (влЭре ХрпуфЮсйоз),
елЭгофе бн ден рськейфбй гйб рсьвлзмб рпх ерйлэефбй еэкплб ме фз впЮиейб фпх бкьлпхипх кбфбльгпх.
БнщмблЯет:
Фп рлхнфЮсйп ден бнЬвей.
П кэклпт рлхуЯмбфпт ден оекйнЬей.
Фп рлхнфЮсйп ден цпсфюней несь
(бнбвпувЮней гсЮгпсб фп
ендейкфйкь цщфЬкй фзт рсюфзт
цЬузт рлэузт).
Фп рлхнфЮсйп цпсфюней кбй бдейЬжей
несь ухнечют.
ДхнбфЬ бЯфйб / Лэуз:
Фп вэумб ден Эчей ейубчиеЯ уфзн злекфсйкЮ рсЯжб Ю фпхлЬчйуфпн ьчй бскефЬ
гйб нб кЬней ербцЮ.
Уфп урЯфй ден хрЬсчей сеэмб.
З рьсфб ден клеЯней кблЬ.
Фп кпхмрЯ БНБММБ/УВЗУЙМП ден рбфЮизке.
Фп кпхмрЯ ЕККЙНЗУЗ/РБХУЗ ден рбфЮизке.
З всэуз фпх неспэ ден еЯнбй бнпйчфЮ.
ФЭизке мйб кбихуфЭсзуз уфпн чсьнп еккЯнзузт (влЭре «Еобфпмйкеэуейт»).
П ущлЮнбт фспцпдпуЯбт фпх неспэ ден еЯнбй ухндедемЭнпт уфпн кспхнь.
П ущлЮнбт еЯнбй дйрлщмЭнпт.
З всэуз фпх неспэ ден еЯнбй бнпйчфЮ.
Уфп урЯфй леЯрей фп несь.
Ден хрЬсчей бскефЮ рЯеуз.
Фп кпхмрЯ ЕККЙНЗУЗ/РБХУЗ ден рбфЮизке.
П ущлЮнбт бдейЬумбфпт ден Эчей егкбфбуфбиеЯ мефбоэ 65 кбй 100 cm брь фп
Эдбцпт (влЭре «ЕгкбфЬуфбуз»).
Фп Ьксп фпх ущлЮнб бдейЬумбфпт еЯнбй вхийумЭнп уфп несь (влЭре ЕгкбфЬуфбуз).
Фп ерйфпЯчйп Ьдейбумб ден Эчей брбЭсщуз.
Бн мефЬ брь бхфпэт фпхт елЭгчпхт фп рсьвлзмб ден лэнефбй, клеЯуфе фз всэуз
фпх неспэ, увЮуфе фп рлхнфЮсйп кбй кблЭуфе фзн хрпуфЮсйоз. Бн з кбфпйкЯб
всЯукефбй уфпхт фелехфбЯпхт псьцпхт еньт кфйсЯпх, мрпсеЯ нб дйбрйуфщипэн
цбйньменб уйцщнйумпэ, прьфе фп рлхнфЮсйп цпсфюней кбй бдейЬжей несь ухнечют.
Гйб фзн бнфймефюрйуз фпх рспвлЮмбфпт дйбфЯиенфбй уфп емрьсйп кбфЬллзлет
вблвЯдет бнфй-уйцщнйумпэ.
GR
Фп рлхнфЮсйп ден цпсфюней Ю ден
уфэвей.
Фп рлхнфЮсйп дпнеЯфбй рплэ кбфЬ
фп уфэшймп.
Фп рлхнфЮсйп чЬней несь.
Фп ендейкфйкь цщфЬкй ЕККЙНЗУЗ/
РБХУЗ (рпсфпкблЯ) кбй фб ендейкфйкЬ
цщфЬкйб бнбвпувЮнпхн гсЮгпсб.
УчзмбфЯжефбй рплэт бцсьт.
Фп РлхнфЮсйп ме УфегнщфЮсйп ден
уфегнюней.
Фп рсьгсбммб ден рспвлЭрей фп Ьдейбумб: ме псйумЭнб рспгсЬммбфб
рсЭрей нб фп еккйнЮуефе чейспнбкфйкЬ.
ЕЯнбй енесгЮ з лейфпхсгЯб ЧщсЯт уфэшймп: гйб фзн плпклЮсщуз фпх
рспгсЬммбфпт рйЭуфе фп кпхмрЯ ЕККЙНЗУЗ/РБХУЗ («Еобфпмйкеэуейт»).
П ущлЮнбт бдейЬумбфпт еЯнбй дйрлщмЭнпт (влЭре «ЕгкбфЬуфбуз»).
П бгщгьт еккЭнщузт еЯнбй впхлщмЭнпт.
П кЬдпт, фз уфйгмЮ фзт егкбфЬуфбузт, ден оемрлькбсе ущуфЬ (влЭре ЕгкбфЬуфбуз).
Фп рлхнфЮсйп ден еЯнбй псйжпнфйщмЭнп (влЭре ЕгкбфЬуфбуз).
Фп рлхнфЮсйп еЯнбй рплэ уфенЬ мефбоэ фпЯчпх кбй ерЯрлщн (влЭре ЕгкбфЬуфбуз).
П ущлЮнбт фспцпдпуЯбт фпх неспэ ден еЯнбй кблЬ вйдщмЭнпт (влЭре ЕгкбфЬуфбуз).
З иЮкз фщн брпссхрбнфйкюн еЯнбй впхлщмЭнз (гйб нб фзн кбибсЯуефе влЭре
УхнфЮсзуз кбй цспнфЯдб).
П ущлЮнбт бдейЬумбфпт ден Эчей уфесещиеЯ кблЬ (влЭре «ЕгкбфЬуфбуз»).
УвЮуфе фз мзчбнЮ кбй вгЬлфе фп вэумб брь фзн рсЯжб, ресймЭнефе ресЯрпх
1 лерфь мефЬ обнбнЬшфе фз.
Бн з бнщмблЯб ерймЭней, кблЭуфе фзн ХрпуфЮсйоз.
Фп брпссхрбнфйкь ден еЯнбй ейдйкь гйб рлхнфЮсйп (рсЭрей нб хрЬсчей з Эндейоз
гйб рлхнфЮсйп, гйб рлэуймп уфп чЭсй кбй уфп рлхнфЮсйп, Ю рбсьмпйб).
З дпуплпгЯб хрЮсое хресвплйкЮ.
Фп вэумб ден Эчей ейубчиеЯ уфзн злекфсйкЮ рсЯжб, Ю фпхлЬчйуфпн ьчй
бскефЬ гйб нб кЬней ербцЮ.
Уфп урЯфй ден хрЬсчей сеэмб.
З рьсфб ден еЯнбй кблЬ клейуфЮ.
ФЭизке мйб кбихуфЭсзуз уфпн чсьнп еккЯнзузт.
п ерйлпгЭбт УФЕГНЩМБ еЯнбй уфз иЭуз
.
59
Page 60

ХрпуфЮсйоз
195068048.00
11/2007 - Xerox Business Services
GR
Рсйн ерйкпйнщнЮуефе ме фзн ХрпуфЮсйоз:
ЕлЭгофе бн з бнщмблЯб мрпсеЯфе нб фзн бнфймефщрЯуефе мьнпй убт (влЭре БнщмблЯет кбй лэуейт);
ЕрбнеккйнЮуфе фп рсьгсбммб гйб нб елЭгоефе бн фп рсьвлзмб бнфймефщрЯуфзке;
Уе бснзфйкЮ ресЯрфщуз, ерйкпйнщнЮуфе ме фзн еопхуйпдпфзмЭнз ФечнйкЮ ХрпуфЮсйоз уфпн фзлецщнйкь бсйимь
рпх хрЬсчей уфп рйуфпрпйзфйкь еггэзузт.
Мзн кбфбцеэгефе рпфЭ уе мз еопхуйпдпфзмЭнпхт фечнйкпэт.
ГнщуфпрпйЮуфе:
фп еЯдпт фзт бнщмблЯбт;
фп мпнфЭлп фпх мзчбнЮмбфпт (Mod.);
фпн бсйимь уейсЬт (S/N).
Пй рлзспцпсЯет бхфЭт всЯукпнфбй уфзн фбмрелЯфуб рпх хрЬсчей уфп рЯущ мЭспт фпх рлхнфзсЯпх кбй уфп
рсьуийп мЭспт бнпЯгпнфбт фзн рьсфб.
60
 Loading...