

Hotpoint ARGD 169 User Manual

Instructions for use
WASHING MACHINE
GB
English,1
DK
Dansk,37
ARGD 169
SE
Svenska,13
NO
Norsk,49
FI
Suomi,25
Contents
GB
Installation, 2-3
Unpacking and levelling
Connecting the electricity and water supplies
The first wash cycle
Technical data
Description of the washing machine, 4-5
Control panel
Display
Running a wash cycle, 6
Wash cycles and functions, 7
Table of wash cycles
Wash functions
Detergents and laundry, 8
Detergent dispenser drawer
Preparing the laundry
Special wash cycles
Load balancing system
Precautions and tips, 9
General safety
Disposal
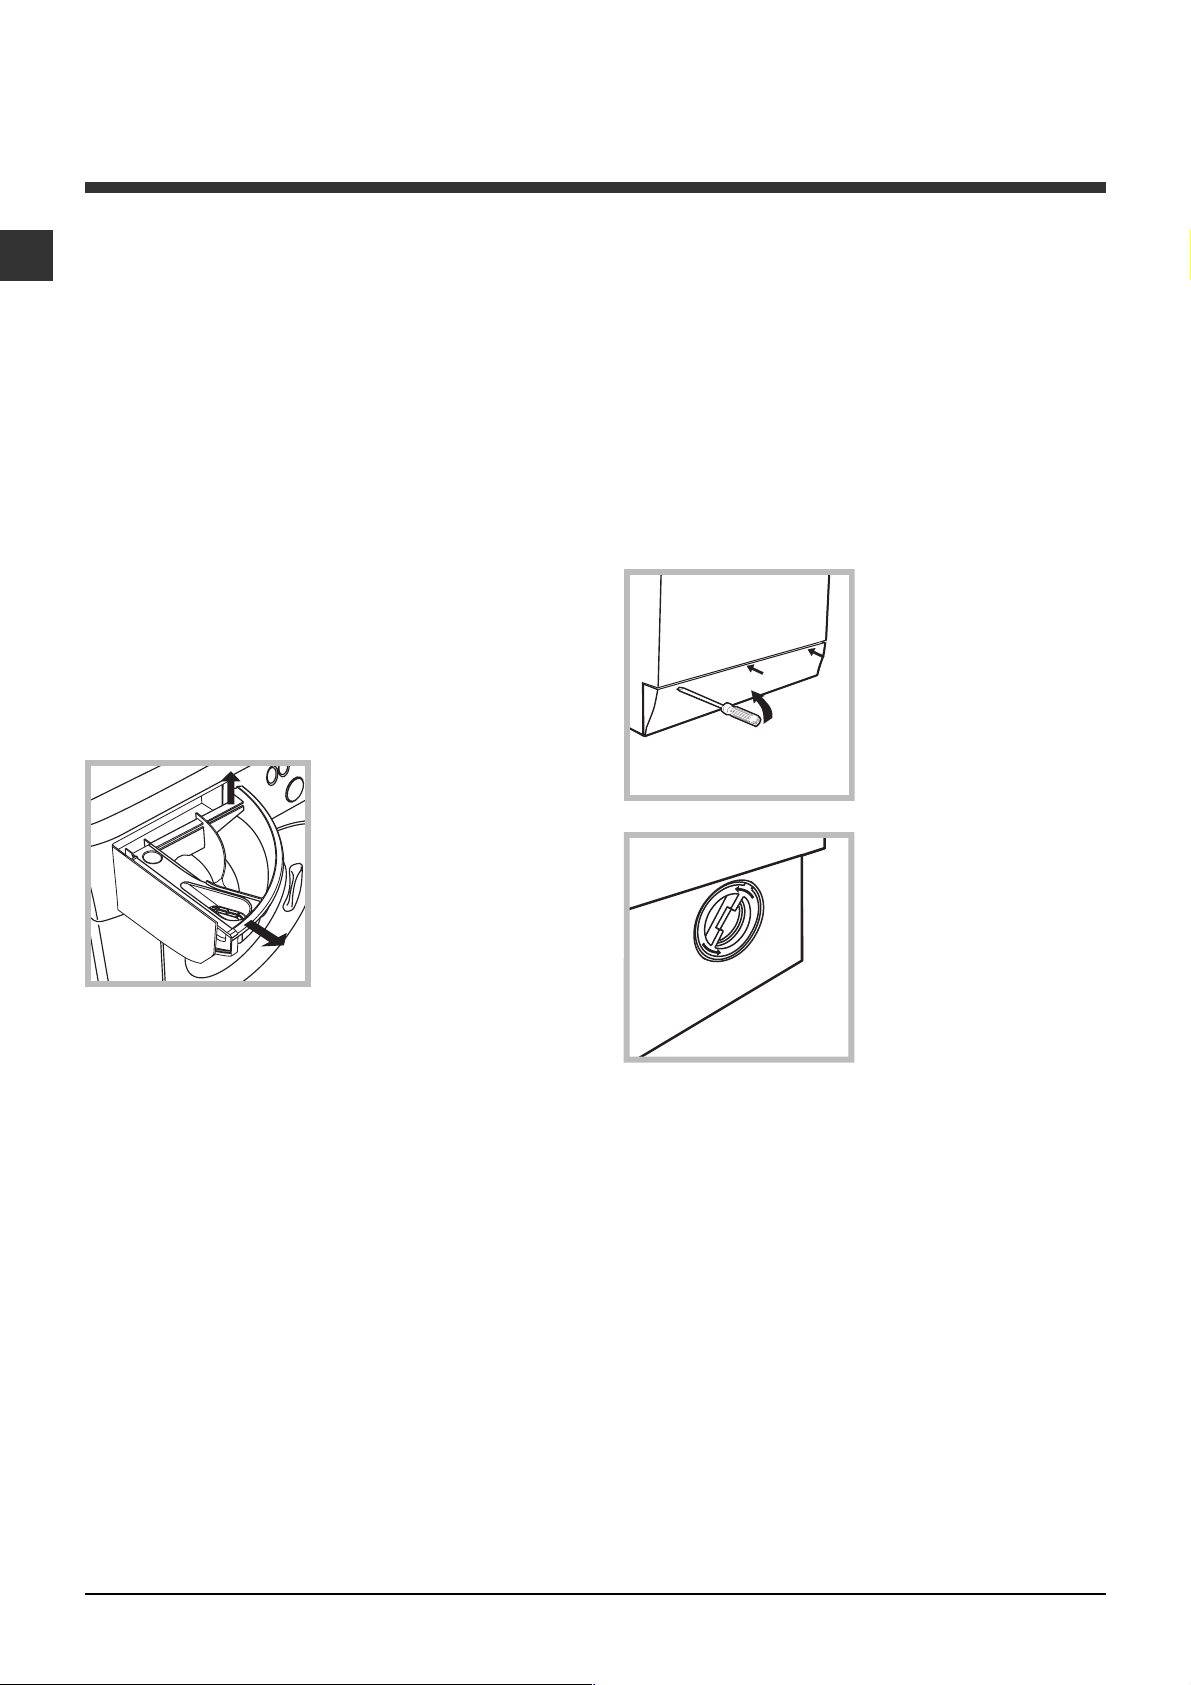
Opening the porthole door manually
Care and maintenance, 10
Cutting off the water or electricity supply
Cleaning the washing machine
Cleaning the detergent dispenser drawer
Caring for the door and drum of your appliance
Cleaning the pump
Checking the water inlet hose
Troubleshooting, 11
Service, 12
1
Installation
GB
This instruction manual should be kept in a safe
place for future reference. If the washing machine is
sold, transferred or moved, make sure that the
instruction manual remains with the machine so that
the new owner is able to familiarise himself/herself
with its operation and features.
Read these instructions carefully: they contain vital
information relating to the safe installation and
operation of the appliance.
Unpacking and levelling
Unpacking
1. Remove the washing machine from its packaging.
2. Make sure that the washing machine has not been
damaged during the transportation process. If it has
been damaged, contact the retailer and do not
proceed any further with the installation process.
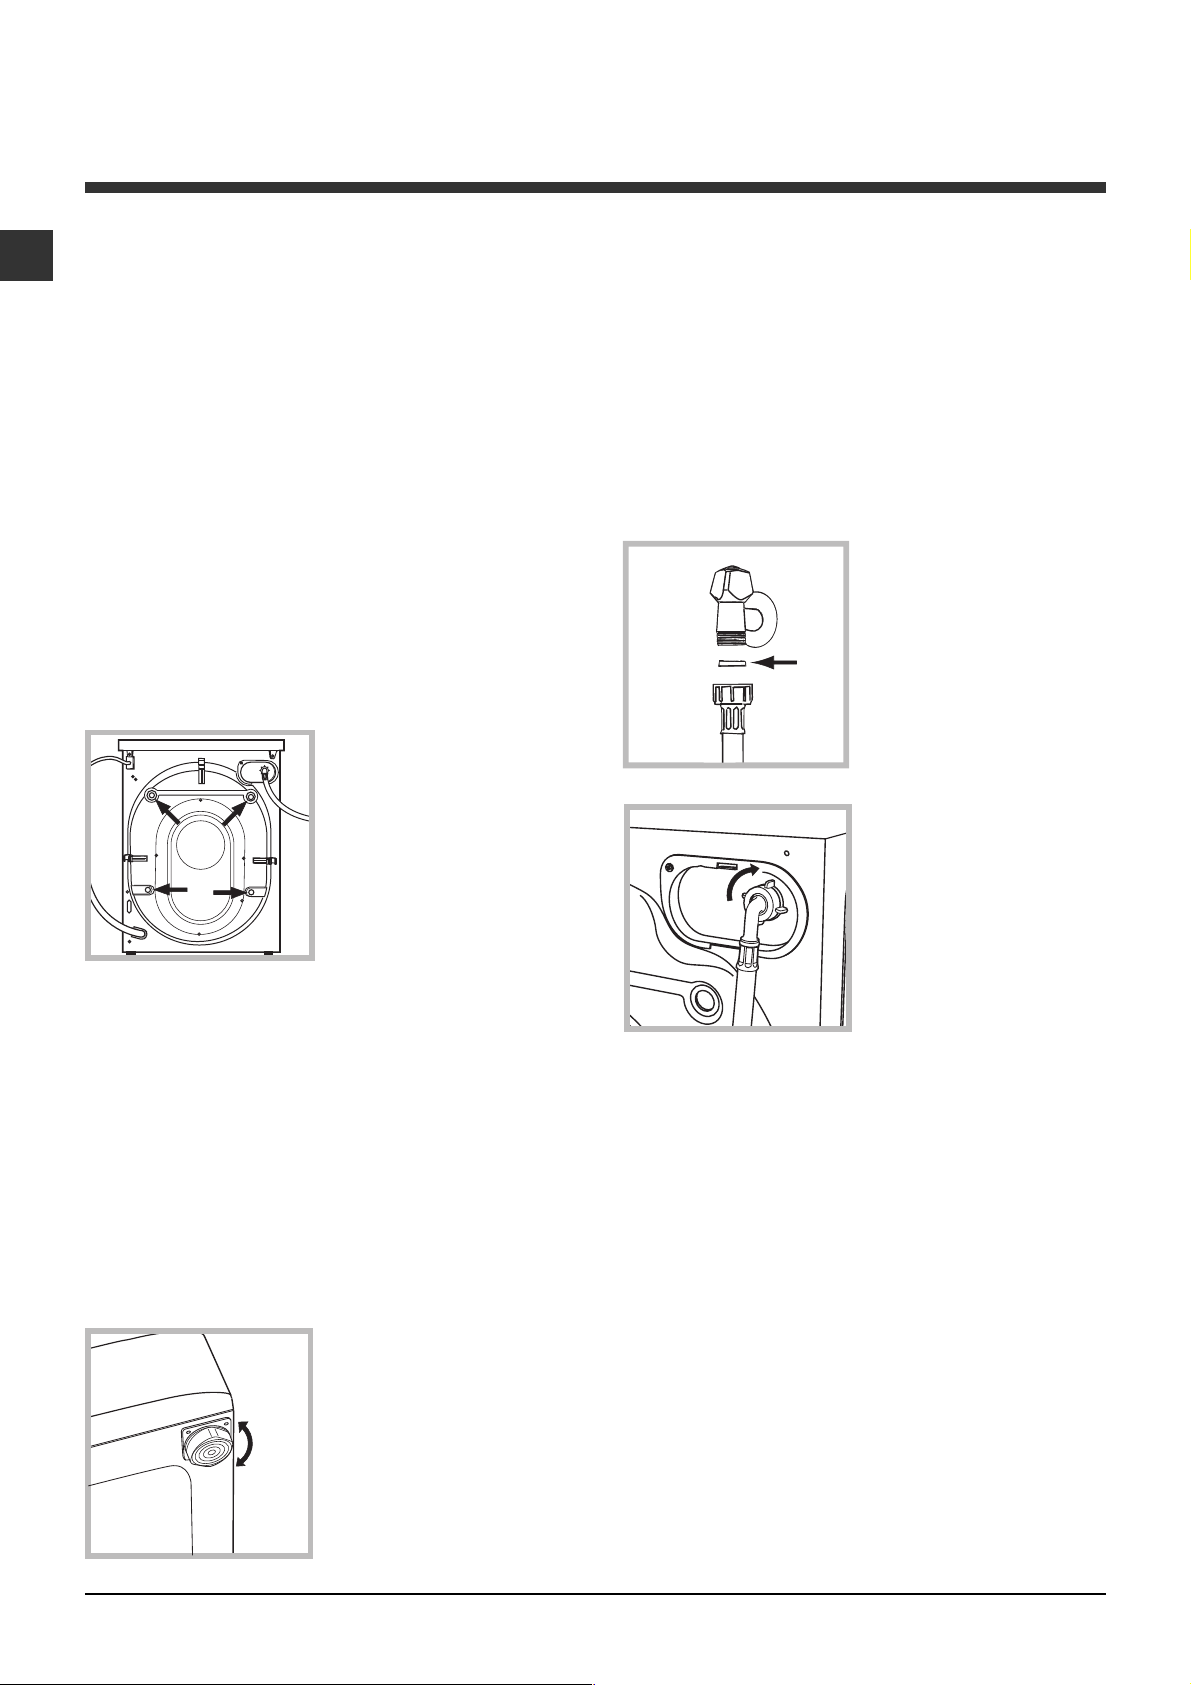
3. Remove the 4
protective screws (used
during transportation) and
the rubber washer with
the corresponding
spacer, located on the
rear part of the appliance
(see figure).
4. Close off the holes using the plastic plugs provided.
5. Keep all the parts in a safe place: you will need
them again if the washing machine needs to be
moved to another location.
Levelling the machine correctly will provide it with
stability, help to avoid vibrations and excessive noise
and prevent it from shifting while it is operating. If it is
placed on carpet or a rug, adjust the feet in such a
way as to allow a sufficient ventilation space
underneath the washing machine.
Connecting the electricity and water
supplies
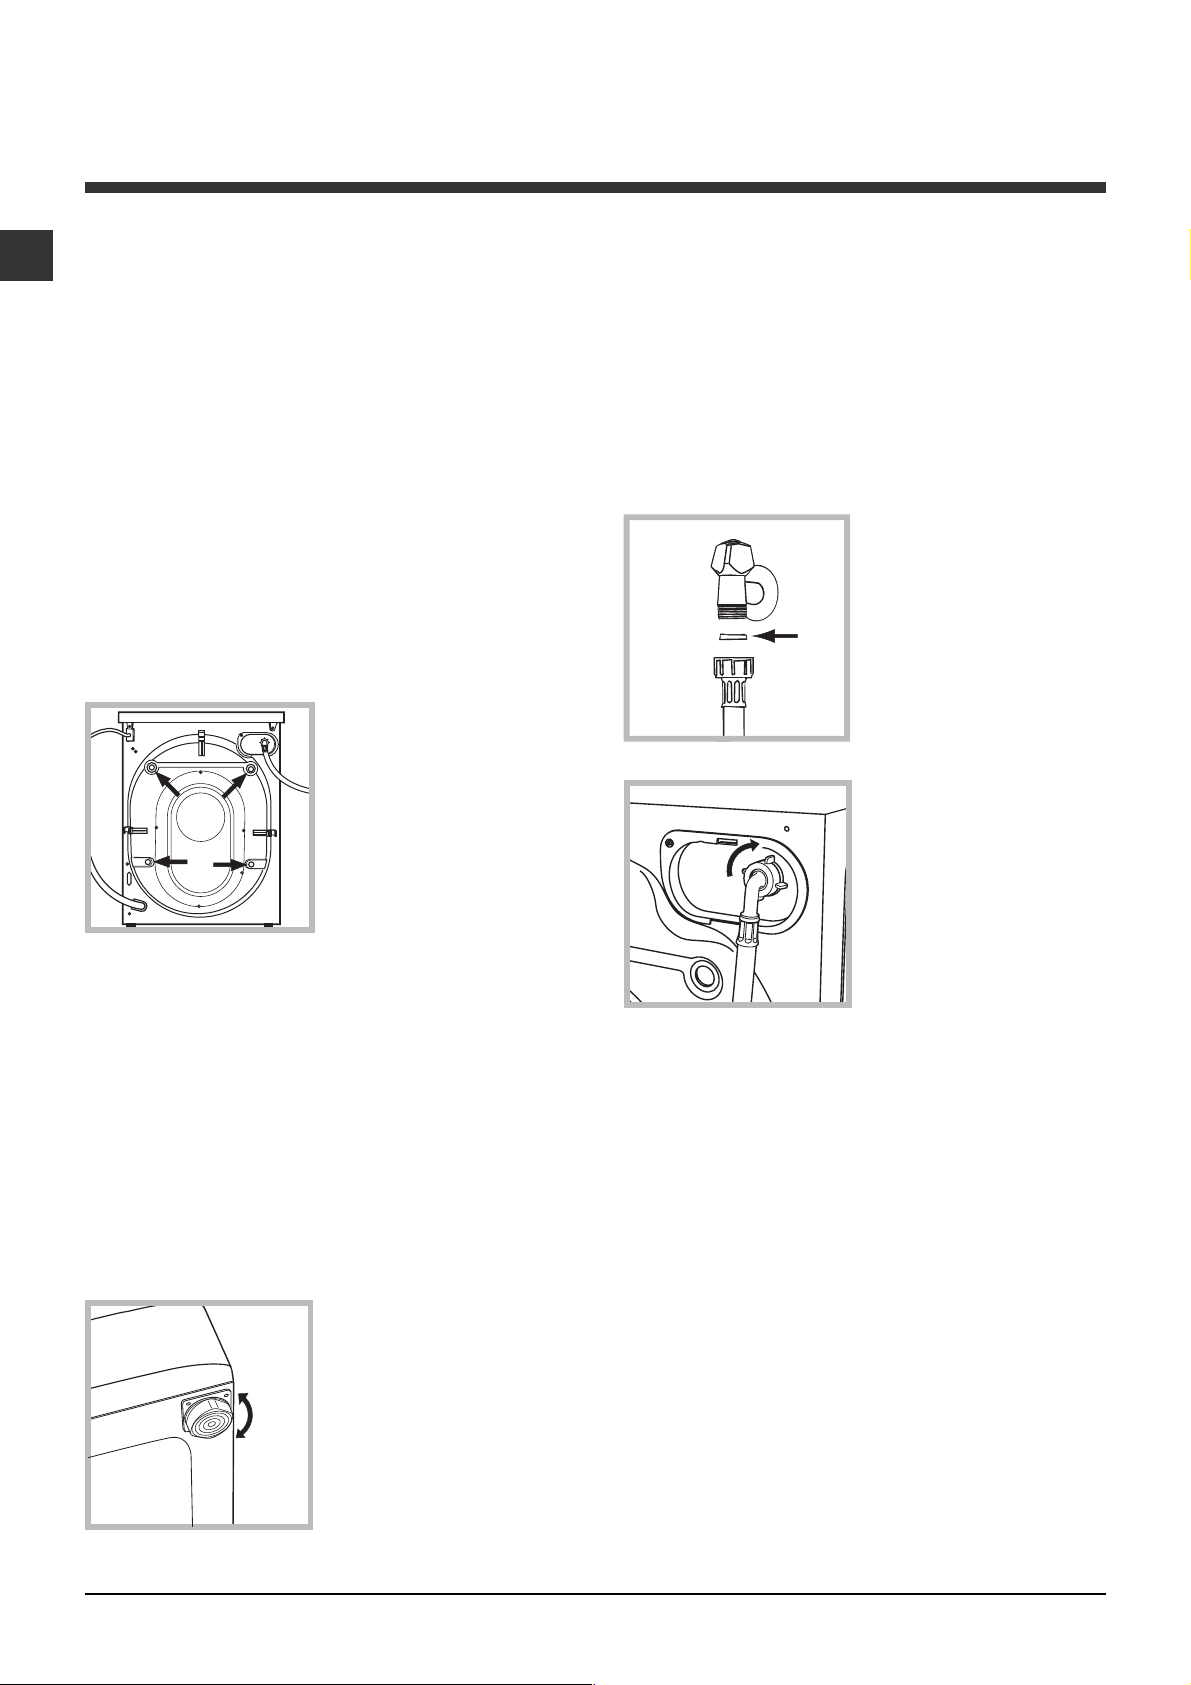
Connecting the water inlet hose
1. Insert seal A into the
end of the inlet hose and
screw the latter onto a
cold water tap with a 3/4
A
3. Make sure that the hose is not folded over or bent.
gas threaded opening
(see figure).
Before performing the
connection, allow the
water to run freely until it
is perfectly clear.
2. Connect the inlet hose
to the washing machine
by screwing it onto the
corresponding water inlet
of the appliance, which is
situated on the top righthand side of the rear part
of the appliance (see
figure).
Packaging materials should not be used as toys for
children.
Levelling
1. Install the washing machine on a flat sturdy floor,
without resting it up against walls, furniture cabinets
or anything else.
2. If the floor is not
perfectly level, compensate for any unevenness
by tightening or loosening
the adjustable front feet
(see figure); the angle of
inclination, measured in
relation to the worktop,
must not exceed 2°.
2
The water pressure at the tap must fall within the
values indicated in the Technical details table (see
next page).
If the inlet hose is not long enough, contact a
specialised shop or an authorised technician.
Never use second-hand hoses.
Use the ones supplied with the machine.
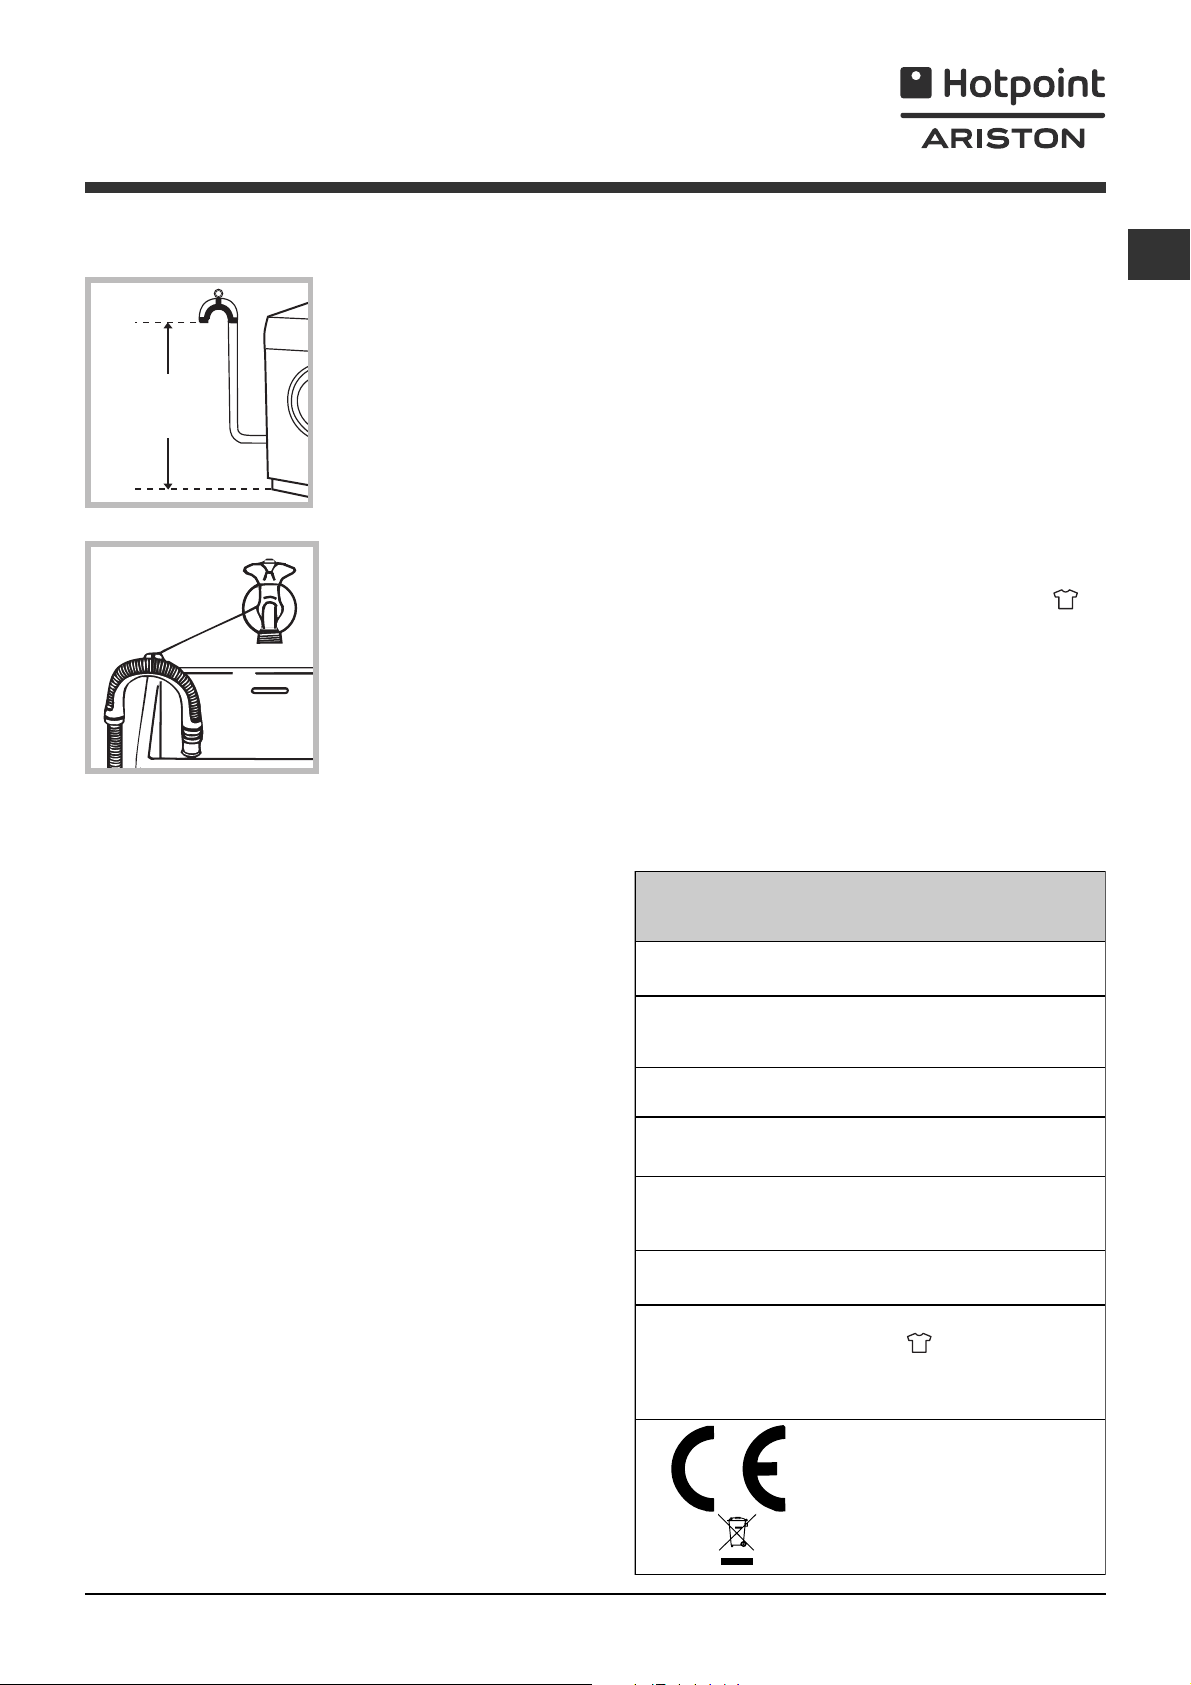
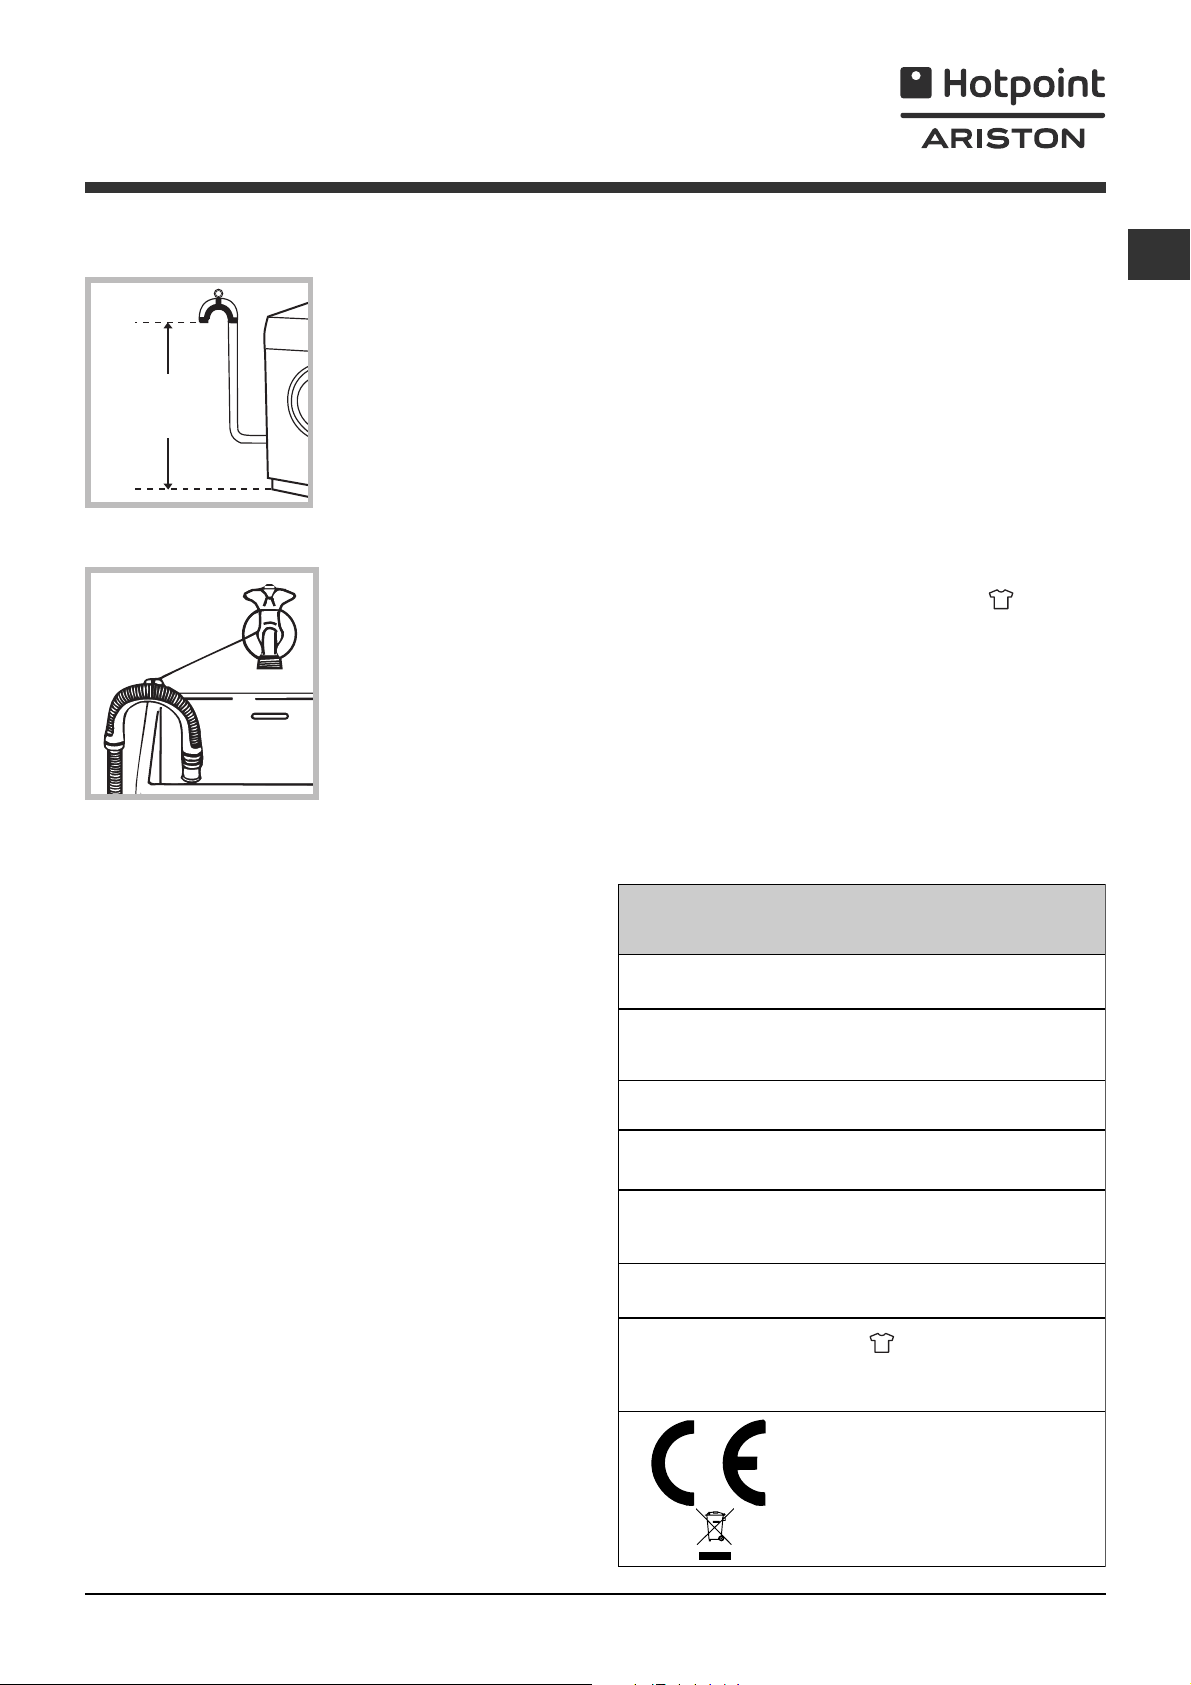
Connecting the drain hose
65 - 100 cm
Connect the drain hose,
without bending it, to a
drainage duct or a wall
drain located at a height
between 65 and 100 cm
from the floor;
Do not use extension cords or multiple sockets.
GB
The cable should not be bent or compressed.
The power supply cable must only be replaced by
authorised technicians.
Warning! The company shall not be held responsible
in the event that these regulations are not respected.
The first wash cycle
alternatively, rest it on
the side of a washbasin
or bathtub, fastening the
duct supplied to the tap
(see figure). The free end
of the hose should not
be underwater.
We advise against the use of hose extensions; if it is
absolutely necessary, the extension must have the
same diameter as the original hose and must not
exceed 150 cm in length.
Electrical connections
Before plugging the appliance into the electricity
socket, make sure that:
the socket is earthed and complies with all
applicable laws;
the socket is able to withstand the maximum power
load of the appliance as indicated in the Technical
data table (see opposite);
the power supply voltage falls within the values
indicated in the Technical data table (see opposite);
Once the appliance has been installed, and before
you use it for the first time, run a wash cycle with
detergent and no laundry, using the wash cycle
Technical data
Model
Dimensions
Capacity
Electrical
connections
Water connections
Spin speed
ARGD 169
width 59.5 cm
height 85 cm
depth 60 cm
from 1 to 8 kg
please refer to the technical data
plate fixed to the machine
maximum pressure 1 MPa (10 bar)
minimum pressure 0.05 MPa (0.5 bar)
drum capacity 62 litres
up to 1600 rotations per minute
.
the socket is compatible with the plug of the
washing machine. If this is not the case, replace
the socket or the plug.
The washing machine must not be installed
outdoors, even in covered areas. It is extremely
dangerous to leave the appliance exposed to rain,
storms and other weather conditions.
When the washing machine has been installed, the
electricity socket must be within easy reach.
Energy rated
programmes
according to
regulation
EN 60456
programme (1
button); temperature 60°C;
using a load of 8 kg.
This appliance conforms to the
following EC Directives:
- 89/336/EEC dated 03/05/89
(Electromagnetic Compatibility) and
subsequent modifications
- 2002/96/EC
- 2006/95/EC (Low Voltage)
st
press of the
3
Description of the washing
machine
GB
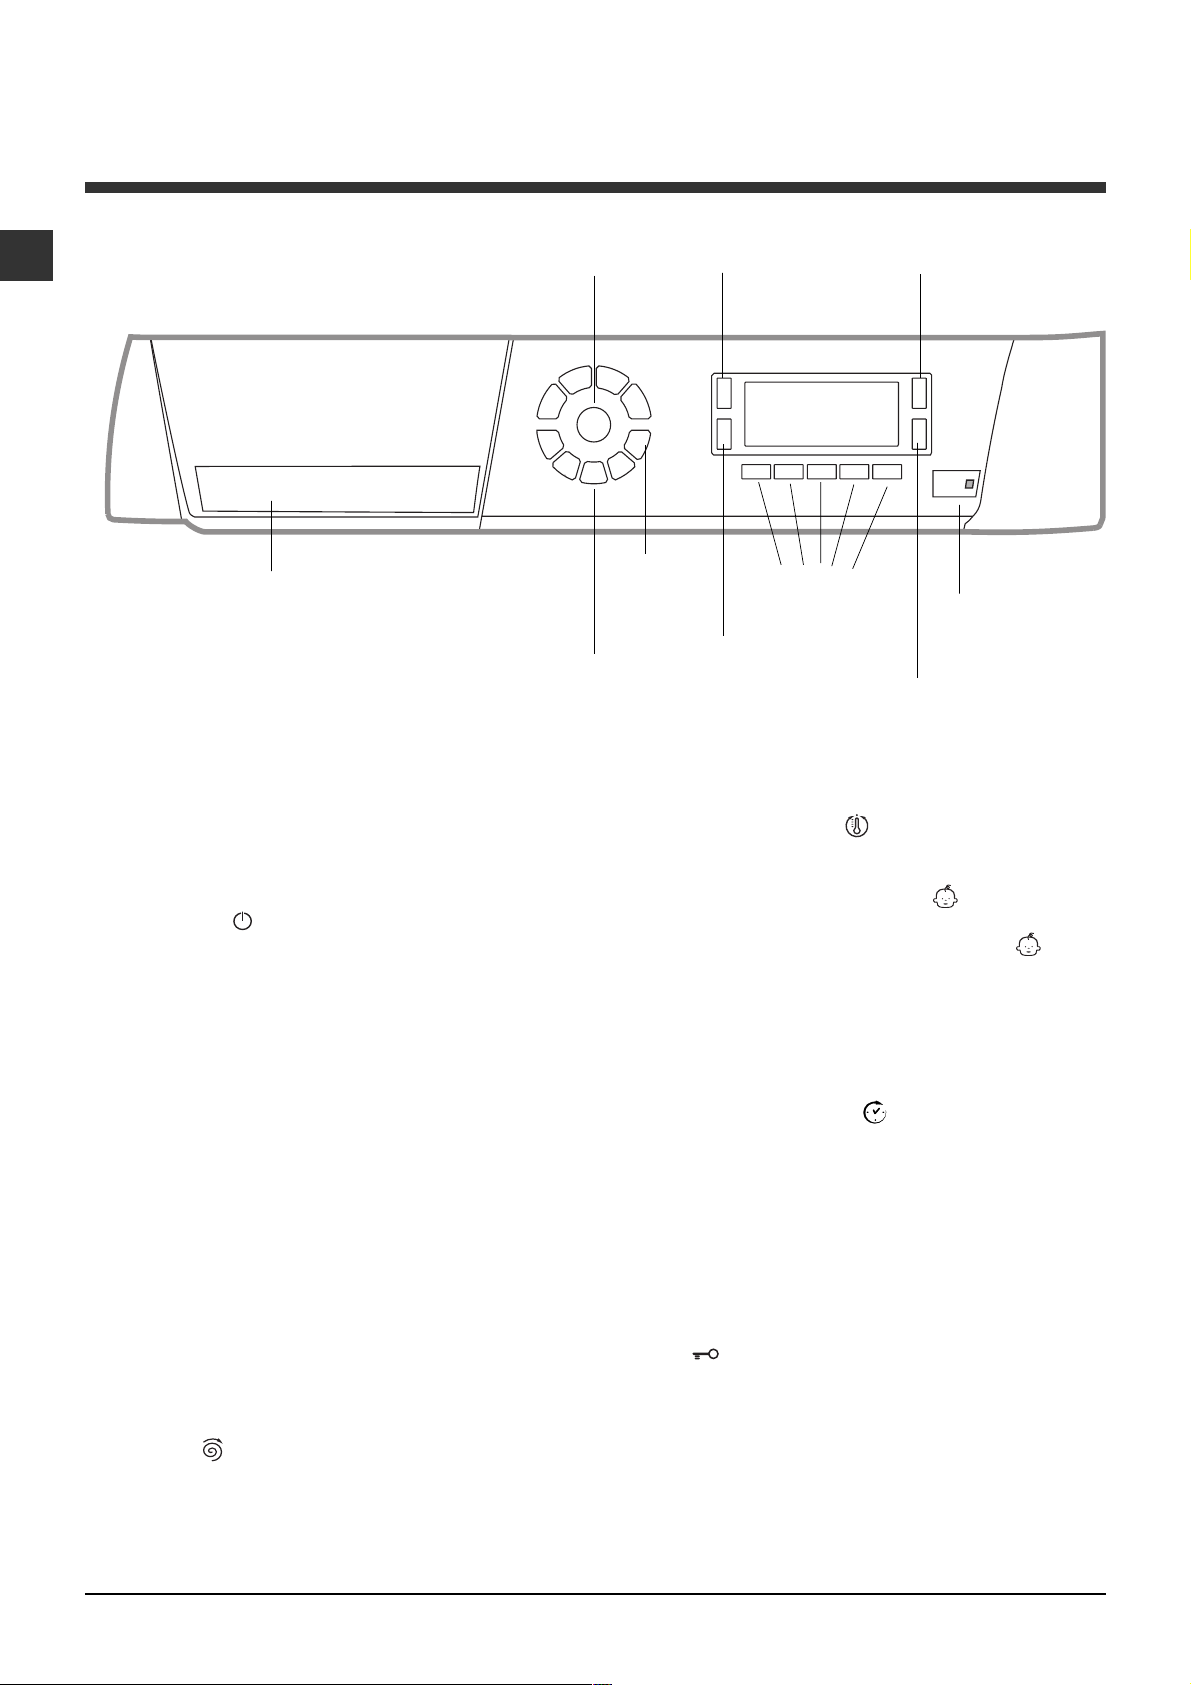
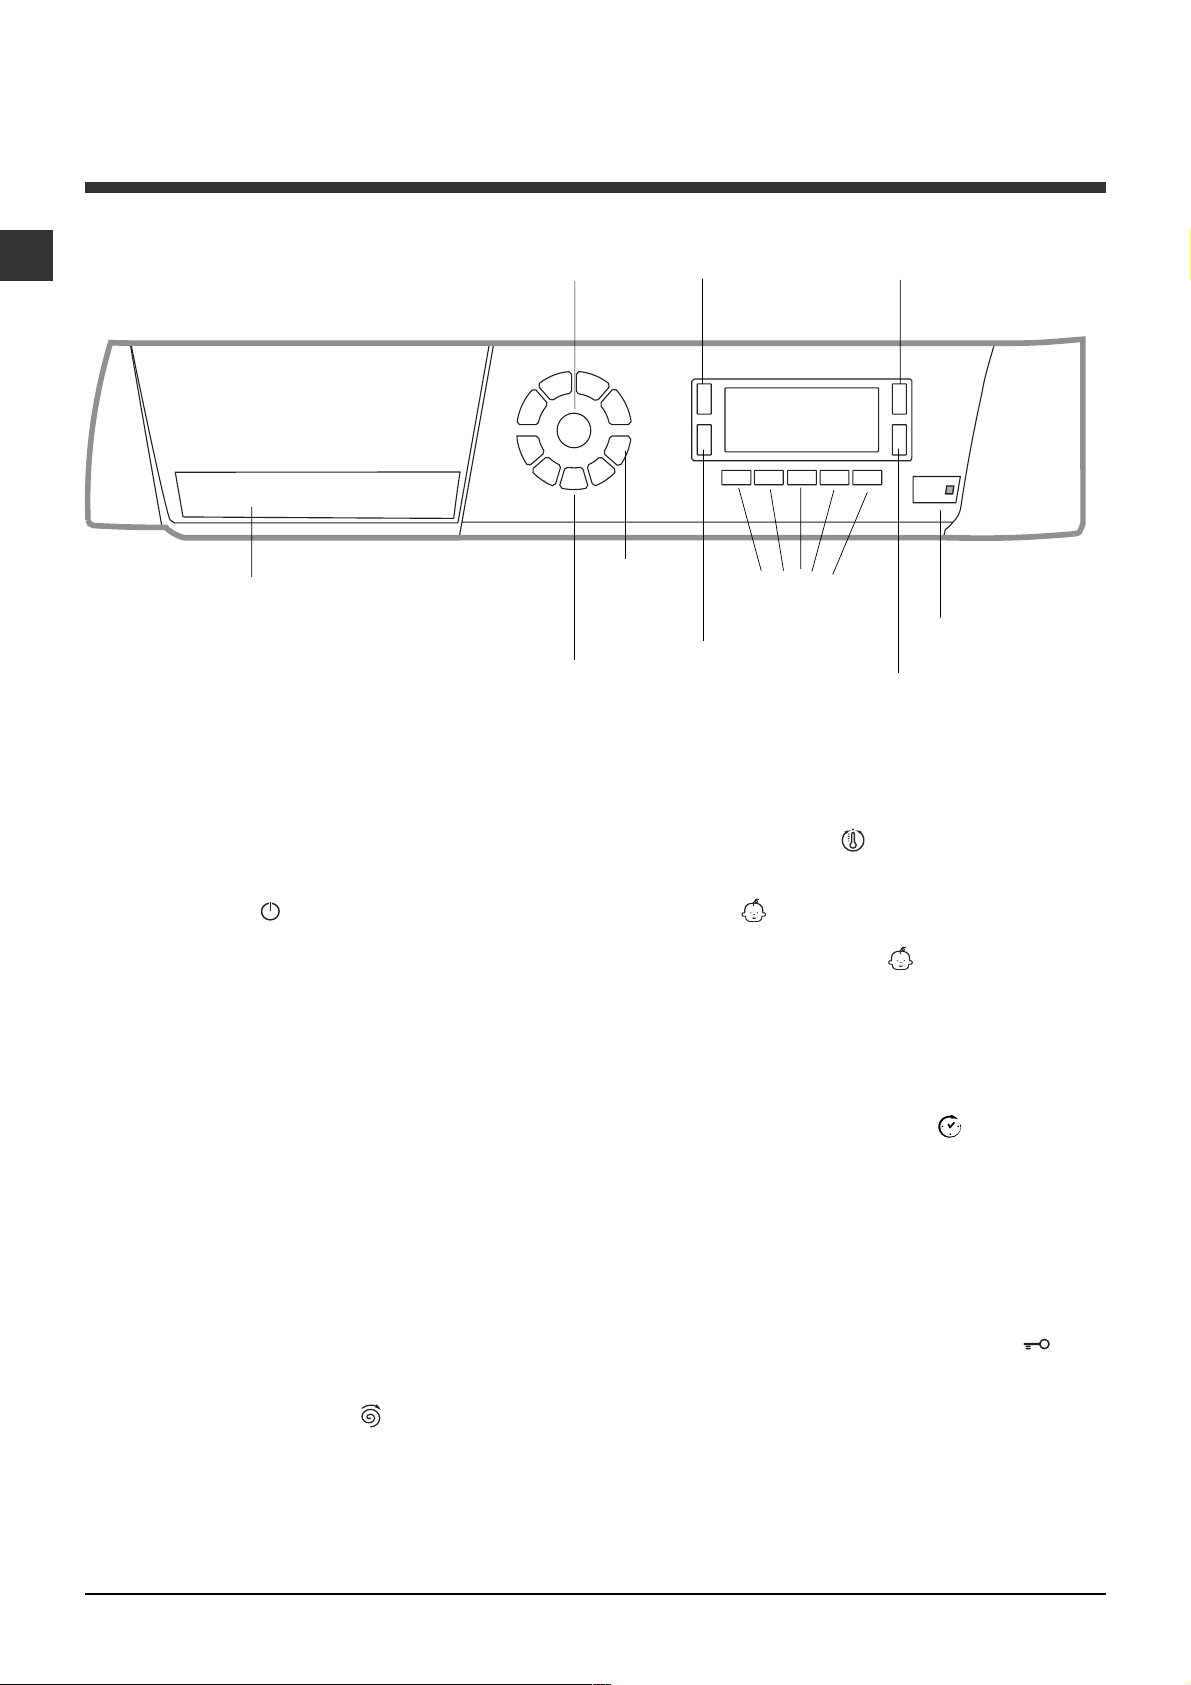
Control panel
Detergent dispenser
drawer
ON/OFF
button
WASH
CYCLE
SELECTOR
Buttons
MEMORY
Button
DELAYED
START
CONTROL
PANEL
LOCK
Button
DISPLAY
FUNCTION
buttons
Button
SPIN SPEED
Button
START/
PAUSE
button with
indicator light
TEMPERATURE
Button
Detergent dispenser drawer: used to dispense
detergents and washing additives (see Detergents
and laundry).
ON/OFF button
machine on or off. The START/PAUSE indicator light,
which flashes slowly in a green colour shows that the
machine is switched on. To switch off the washing
machine during the wash cycle, press and hold the
button for approximately 2 seconds; if the button is
pressed briefly or accidentally the machine will not
switch off. If the machine is switched off during a
wash cycle, this wash cycle will be cancelled.
WASH CYCLE SELECTOR buttons: used to set the
desired wash cycle (see "Table of wash cycles").
MEMORY button: press and hold the button to store
a cycle with your own set of preferences in the
memory of the machine. To recall a previously stored
cycle, press the MEMO button.
FUNCTION buttons: press the button to select the
desired function. The corresponding indicator light on
the display will switch on.
: press this briefly to switch the
TEMPERATURE button
temperature: the value will be shown on the display.
CONTROL PANEL LOCK button
control panel lock, press and hold the button for
approximately 2 seconds. When the symbol
illuminated, the control panel is locked. This means it
is possible to prevent wash cycles from being modified
accidentally, especially where there are children in the
home. To deactivate the control panel lock, press
and hold the button for approximately 2 seconds.
DELAYED START button
start time for the selected wash cycle. The delay time
will be shown on the display.
START/PAUSE button with indicator light: when the
green indicator light flashes slowly, press the button to
start a wash cycle. Once the cycle has begun the
indicator light will remain lit in a fixed manner. To
pause the wash cycle, press the button again; the
indicator light will flash in an orange colour. If the
symbol
opened. To start the wash cycle from the point at
which it was interrupted, press the button again.
is not illuminated, the door may be
: press to decrease the
: to activate the
is
: press to set a delayed
SPIN button
exclude the spin cycle - the value is indicated on the
display.
4
: press to reduce or completely
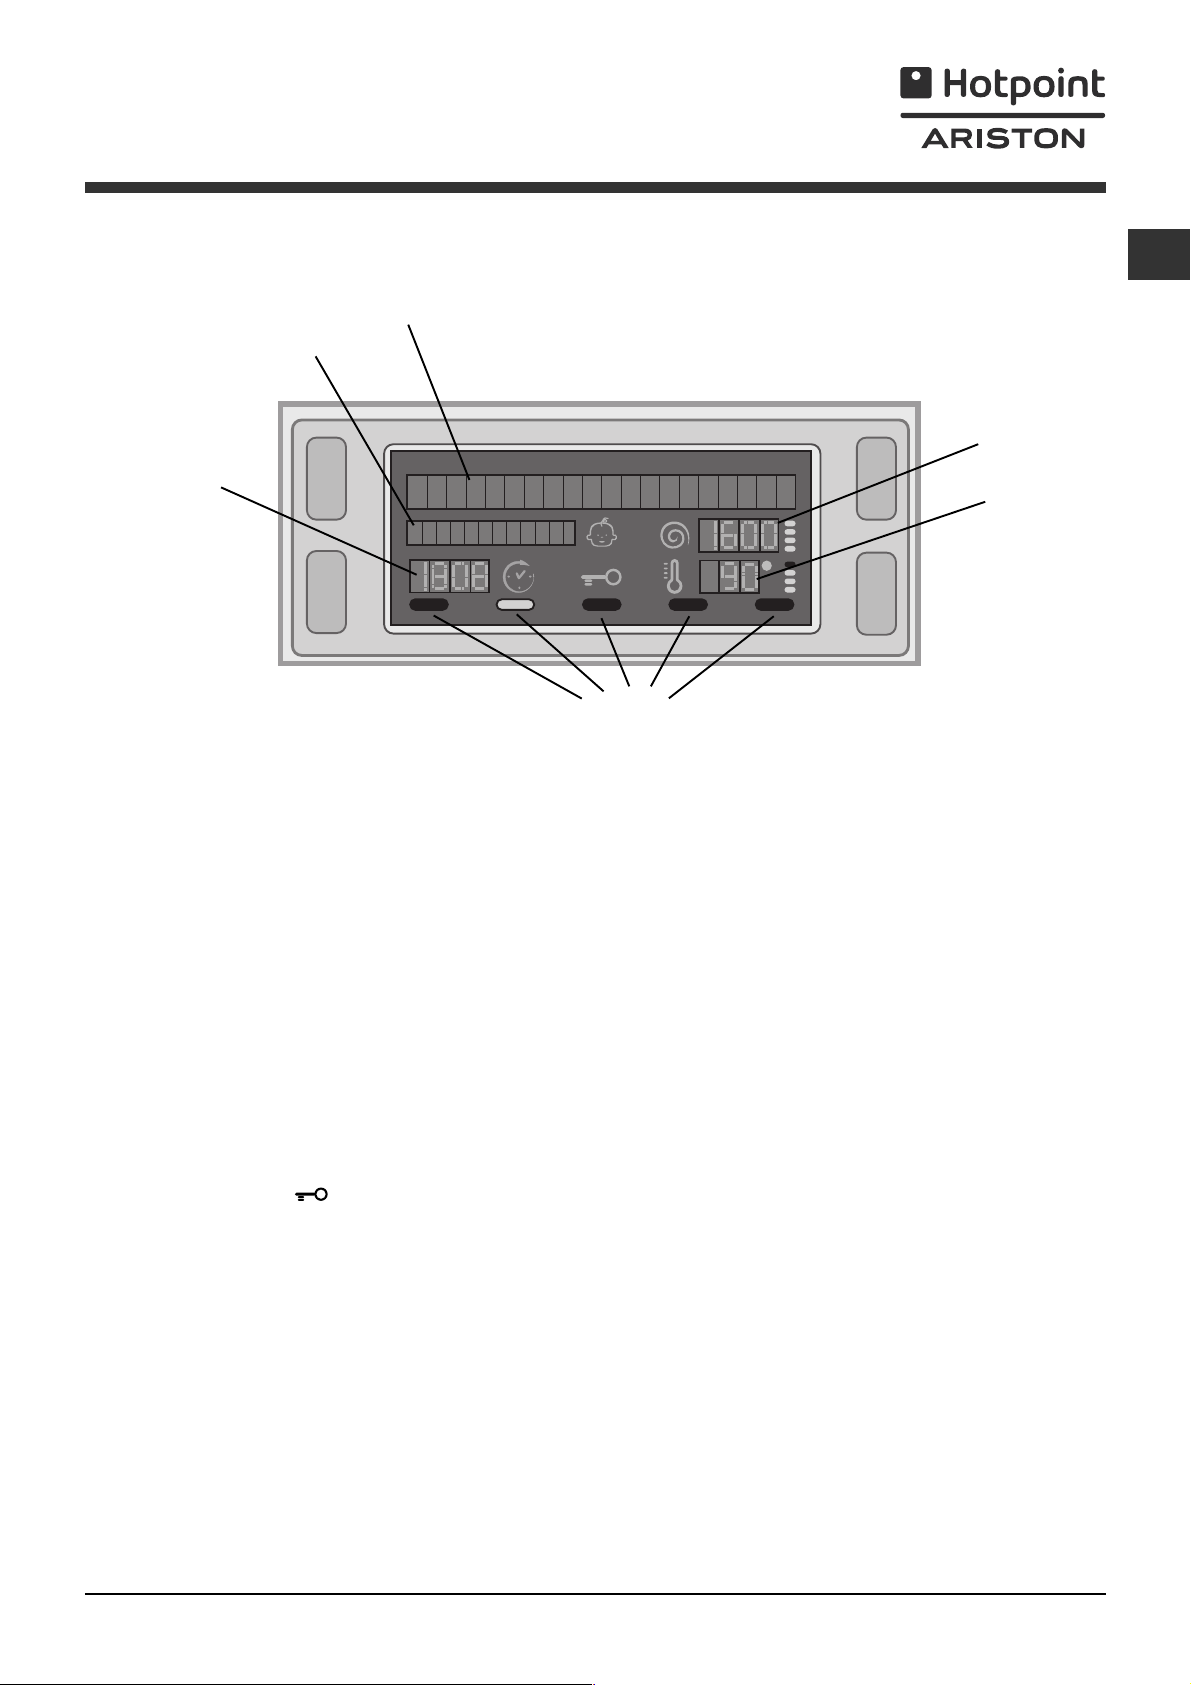
Display
GB
A
B
D
C
E
F
The display is useful when programming the machine and provides a great deal of information.
The two upper strings A and B provide details of the wash cycle selected, the wash cycle phase in progress and
all information relating to the progress status of the wash cycle.
String C shows the time remaining until the end of the wash cycle in progress and, if a DELAYED START has been
set, the time remaining until the start of the selected wash cycle.
String D shows the maximum spin speed value (this depends on the selected wash cycle); if the wash cycle does
not include a spin cycle, the string remains unused.
String E shows the maximum temperature value which may be selected (this depends on the wash cycle used); if
the temperature of the wash cycle cannot be modified, the string remains unused.
Indicator lights F correspond to the functions and light up when the selected function is compatible with the set
wash cycle.
Door locked symbol
If the symbol is lit, this indicates that the washing machine door is blocked to prevent it from being opened
accidentally. To prevent any damage from occurring, wait for the symbol to switch itself off before opening the
appliance door.
N.B.: if the DELAYED START function has been activated, the door cannot be opened; pauses the machine by
pressing the START/PAUSE button if you wish to open it.
The first time the machine is switched on, you will be asked to select the language and the display will
automatically show the language selection menu.
To select the desired language press the TEMPERATURE and SPIN buttons; to confirm the selection press the
CONTROL PANEL LOCK button.
If you wish to select another language, press and hold the CONTROL PANEL LOCK + TEMPERATURE + SPIN
buttons simultaneously for 5 seconds, then repeat the steps listed above.
5
Running a wash cycle
GB
1. SWITCH THE MACHINE ON. Press the
button; the text WELCOME will appear on the
display and the START/PAUSE indicator light will
flash slowly in a green colour.
2. LOAD THE LAUNDRY. Open the porthole door.
Load the laundry, making sure you do not exceed
the maximum load value indicated in the table of
programmes on the following page.
3. MEASURE OUT THE DETERGENT. Pull out the
detergent dispenser drawer and pour the detergent
into the relevant compartments as described in
"Detergents and laundry".
4. CLOSE THE DOOR.
5. SELECT THE WASH CYCLE. Press one of the
WASH CYCLE SELECTOR buttons to select the
required wash cycle; the name of the wash cycle
will appear on the display. A temperature and spin
speed is set for each wash cycle; these may be
adjusted. The duration of the cycle will appear on
the display.
6. CUSTOMISE THE WASH CYCLE. Use the
relevant buttons:
Modifying the temperature and/or spin
speed. The machine automatically selects the
maximum temperature and spin speed set for the
selected wash cycle; these values cannot therefore
be increased. The temperature can be decreased
by pressing the
"OFF" setting is reached. The spin speed may be
progressively reduced by pressing the
until it is completely excluded (the "OFF" setting). If
these buttons are pressed again, the maximum
values are restored.
Setting a delayed start.
To set a delayed start for the selected programme,
press the corresponding button repeatedly until the
required delay period has been reached. When this
option is enabled, the
display. To remove the delayed start function press
the button until the text "OFF" appears on the
display.
button, until the cold wash
button,
symbol lights up on the
If the selected function is not compatible with
another function which has been selected
previously, the indicator light corresponding to the
first function selected will flash and only the second
function will be activated; the indicator light
corresponding to the enabled function will remain lit.
The functions may affect the recommended load
value and/or the duration of the cycle.
7. START THE PROGRAMME. Press the START/
PAUSE button. The corresponding indicator light will
become green, remaining lit in a fixed manner, and
the door will be locked (the DOOR LOCKED
symbol will be on). During the wash cycle, the
name of the phase in progress will appear on the
display. To change a wash cycle while it is in
progress, pause the washing machine using the
START/PAUSE button (the START/PAUSE indicator
light will flash slowly in an orange colour); then
select the desired cycle and press the START/
PAUSE button again.
To open the door while a cycle is in progress, press
the START/PAUSE button; if the DOOR LOCKED
symbol is switched off the door may be
opened. Press the START/PAUSE button again to
restart the wash cycle from the point at which it
was interrupted.
8. THE END OF THE WASH CYCLE. This will be
indicated by the text "END OF CYCLE" on the
display; when the DOOR LOCKED
switches off the door may be opened. Open the
door, unload the laundry and switch off the
machine.
symbol
If you wish to cancel a cycle which has already
begun, press and hold the
stopped and the machine will switch off.
button. The cycle will be
Modifying the cycle settings.
Press the button to enable the function; the
indicator light corresponding to the button will
switch on.
Press the button again to disable the function;
the indicator light will switch off.
If the selected function is not compatible with the
programmed wash cycle, the indicator light will
flash and the function will not be activated.
6
Wash cycles and functions
Table of wash cycles
Detergents
Bleach Wash
lll l
lll l
lll l
lll l
lll l
ll
ll
ll l
ll
ll l
l
-
Description of the wash cycle
Wash cycles
Eve ryday wash cycles (Daily)
Cotton (*)
Cotton
Cotton
Synthetics
Synthetics
Mix 30'
(not suitable for wool, silk and clothes which require washing by hand).
Mix 15'
suitable for wool, silk and clothes which require wash ing by hand).
Special cycles / Memory
Baby cycle:
Memory:
M
Silk/Curtains:
Wool:
Partial wash cycles
Fast Spin
Slow spin
Rinse cottons
Pump out
For all Test Institutes:
(1st press o f the butto n)
(2nd press of th e button )
(3rd press of the button)
(1st press of the button )
(2nd press of the button)
(1st press o f the butto n)
(2nd press of th e button )
heavily soiled delicate colou rs.
allows for any wash cycle to be stored.
for garments in silk and viscose, lingerie.
for w ool, cas hmere, etc.
(1st press o f the butto n)
(2nd press o f the butto n)
(1st press o f the butto n)
(2nd press o f the butto n)
extremely soiled whites.
:
:
heavily soiled whites and resistant colours.
:
heavily soiled whites and delicate colours.
:
heavily soiled resistant colours.
:
ligh tly so iled resistant colours.
:
to refresh lightly soiled garments quickly
:
to refresh lightly soiled garments quickly (not
.
Max
tem p.
Max.
speed
(°C)
(rp m)
90° 1600
60° 1600
40° 1600
60° 800
40° 800
30° 800 - -
30° 800 - -
40° 800 -
30° 0 - 40° 600 -
- 1600 - - - - 8 -
- 800 - - - - 3,5 -
- 1600 -
- 0 - - - - 8 -
Pre-
wash
* Test wash cycle in compliance with regulation EN 60456: set wash cycle with a temperature of 60°C.
Fabric
softener
l
Max.
Max.
Normal
load
load
(kg)
(kg)
Mini
Load
84
84
84
3,5 1,5
3,5 1,5
3 -
1,5 -
21
21
21
84
GB
Cycle
duration
The duration of the wash cycles can be checked
on the display.
Wash functions
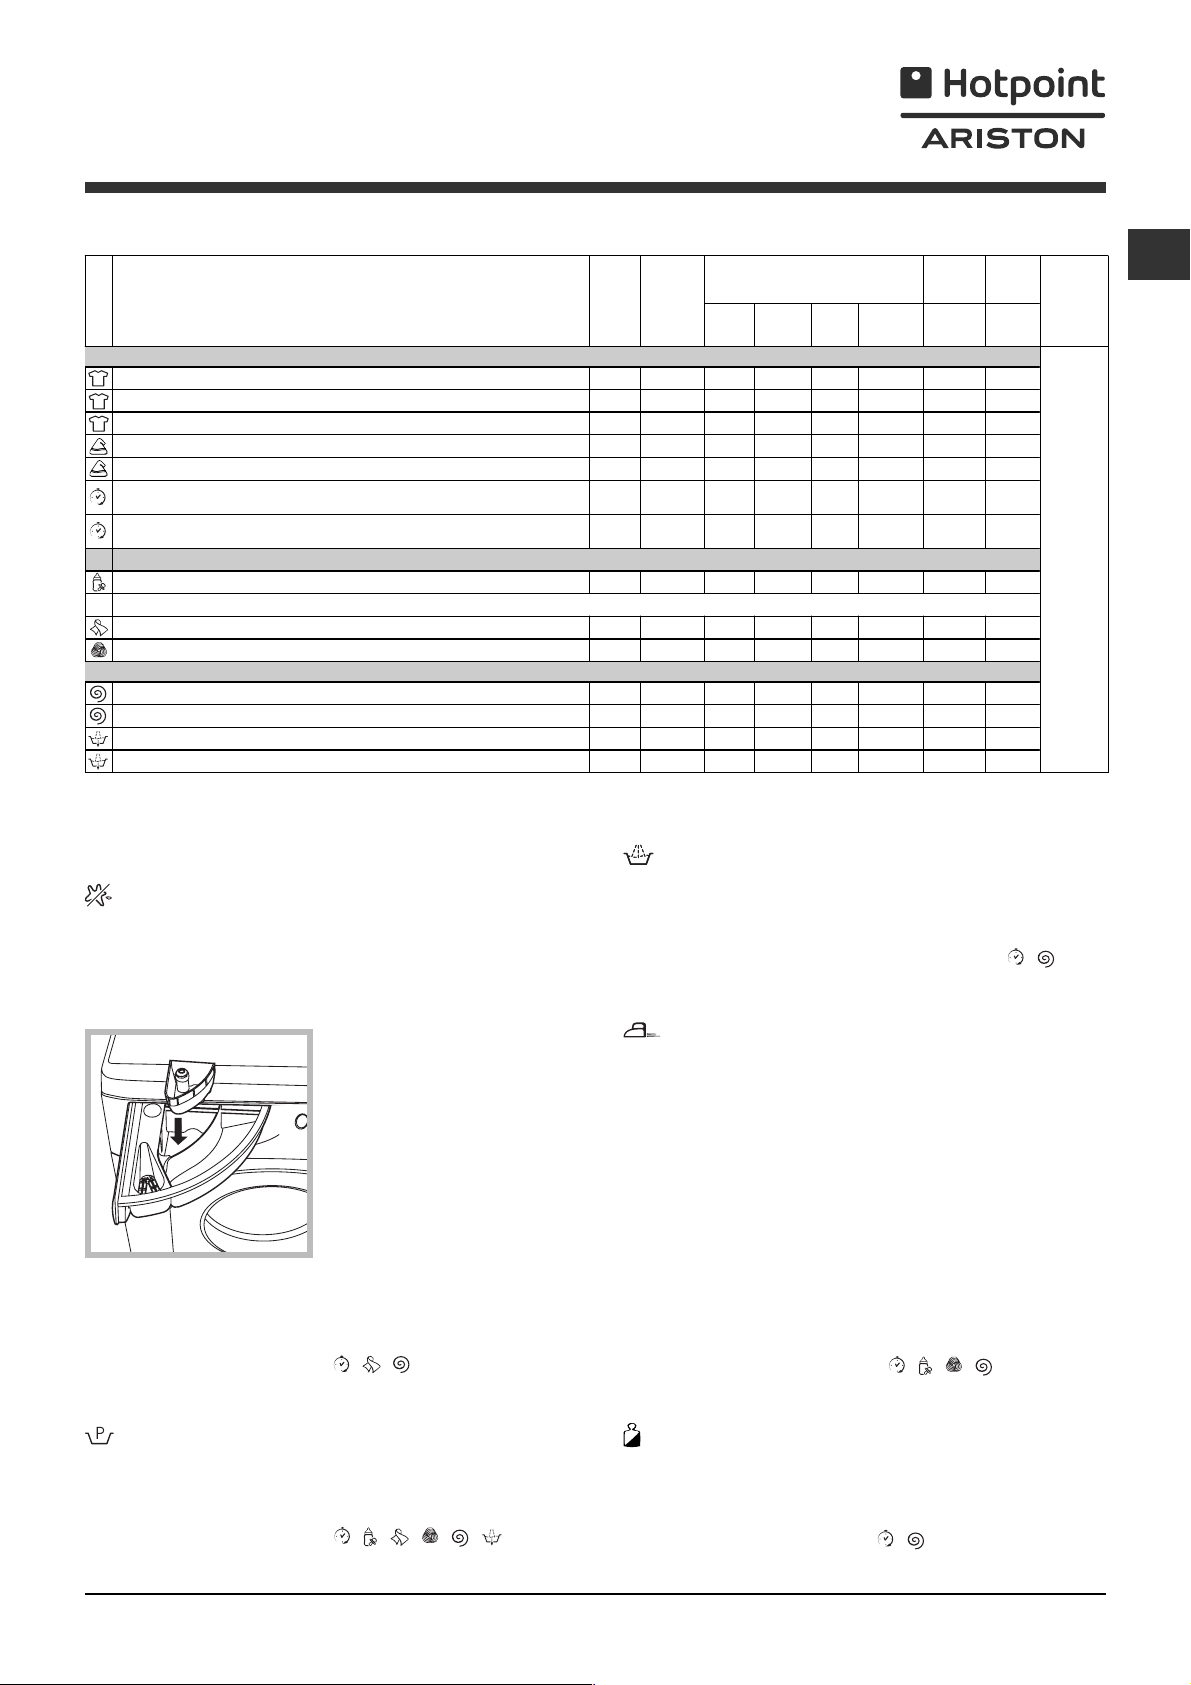
Stain removal
This function is particularly useful for the removal of
stubborn stains. Place extra compartment 4 (supplied)
into compartment 1. When pouring in the bleach, be
careful not to exceed the "max" level marked on the
central pivot (see figure).
To run the bleach cycle on
4
MAX
1
3
2
cycle and enable the "Stain removal" function.
The use of extra compartment 4 excludes the
Pre-wash function.
It cannot be used with the , , and Pump out
programmes.
its own, pour the bleach
into extra compartment 4,
set the "Rinse"
programme and activate
the "Stain removal"
programme. To bleach
during a wash cycle, pour
in the detergent and any
fabric softener you wish to
use, set the desired wash
Extra rinse
By selecting this option, the efficiency of the rinse is
increased and optimal detergent removal is
guaranteed. It is particularly useful for sensitive skin.
It cannot be used in conjunction with the , and
Pump out programmes.
Easy iron
By selecting this function, the wash and spin cycles will be
modified in order to reduce the formation of creases. At the
end of the cycle the washing machine will perform slow
rotations of the drum; the EASY IRON and START/PAUSE
indicator lights will flash (orange) and the text "END OF
CYCLE" will appear on the display. To end the cycle, press
the START/PAUSE button or the EASY IRON button.
The "silk" wash cycle ends with the laundry being left to
soak in the machine; the EASY IRON and START/PAUSE
indicator lights will flash (orange) and the text "STOP
WITH WATER" will appear on the display. To drain the
water so that the laundry may be removed, press the
START/PAUSE button or the EASY IRON button.
It may not be used with the , , , and Pump
out programmes.
Prewash
If this function is selected, the pre-wash cycle will run;
this is useful for removing stubborn stains.
N.B.: put the detergent in the relevant compartment.
It cannot be used with the , , , , ,
programmes.
Mini load
This function is recommended for when the load of
laundry is equal to half, or less than half, of the maximum
recommended load (see Table of wash cycles).
It cannot be used with the , and Pump out
programmes.
7
Detergents and laundry
GB
Detergent dispenser drawer
Good washing results also depend on the correct
dose of detergent: adding too much detergent will not
necessarily result in a more efficient wash, and may in
fact cause build up on the inside of your appliance
and contribute to environmental pollution.
Do not use hand washing detergents because these
create too much foam.
Open the detergent
4
MAX
1
3
compartment 1: Pre-wash detergent (powder)
Before pouring in the detergent, make sure that extra
compartment 4 has been removed.
compartment 2: Detergent for the wash cycle
(powder or liquid)
Liquid detergent should only be poured in immediately
prior to the start of the wash cycle.
compartment 3: Additives (fabric softeners, etc.)
The fabric softener should not overflow the grid.
extra compartment 4: Bleach
2
dispenser drawer and
pour in the detergent or
washing additive, as
follows.
Preparing the laundry
Divide the laundry according to:
- the type of fabric/the symbol on the label
- the colours: separate coloured garments from
whites.
Empty all garment pockets and check the buttons.
Do not exceed the listed values, which refer to the
weight of the laundry when dry:
Durable fabrics: max. 8 kg
Synthetic fabrics: max. 3,5 kg
Delicate fabrics: max. 2 kg
Wool: max. 2 kg
Silk: max. 2 kg
How much does your laundry weigh?
1 sheet 400-500 g
1 pillow case 150-200 g
1 tablecloth 400-500 g
1 bathrobe 900-1200 g
1 towel 150-250 g
Special wash cycles
Mix 30: this wash cycle was designed to wash
lightly soiled garments quickly: it lasts just 30 minutes
and therefore saves both energy and time. By
selecting this wash cycle (
wash different fabrics together (except for wool and
silk items), with a maximum load of 3 kg.
Mix 15: this wash cycle was designed to wash
lightly soiled garments quickly: it lasts just 15 minutes
and therefore saves both energy and time. By
selecting this wash cycle (
wash different fabrics together (except for wool and
silk items), with a maximum load of 1.5 kg.
Baby cycle: this wash cycle can be used to remove
the soiling typically caused by babies, while ensuring
that all detergent is removed from nappies in order to
prevent the delicate skin of babies from suffering
allergies. The cycle
the amount of bacteria by using a greater quantity of
water and optimising the effect of special disinfecting
additives added to the detergent.
At the end of the wash cycle, the machine will slowly
rotate the drum to prevent the formation of creases;
to end the cycle press the START/PAUSE button.
Silk: use special wash cycle
garments. We recommend the use of special
detergent which has been designed to wash delicate
clothes.
Curtains: fold curtains and place them in a pillow
case or mesh bag. Use wash cycle
Wool: Hotpoint/Ariston is the only washing machine
manufacturer to have been awarded the prestigious
Woolmark Platinum Care endorsement (M.0508) by
the Woolmark Company, which means that all
woollen garments may be washed in the washing
machine, even those which state hand wash only
on the label. Wash cycle therefore offers
complete peace of mind when washing woollen
garments in the washing machine (max. load 2 kg)
and guarantees optimal performance.
at 30°C), it is possible to
at 30°C), it is possible to
has been designed to reduce
to wash all silk
.
Load balancing system
Before every spin cycle, to avoid excessive vibrations
and to distribute the load in a uniform manner, the
drum rotates continuously at a speed which is slightly
greater than the washing rotation speed. If, after
several attempts, the load is not balanced correctly,
the machine spins at a reduced spin speed. If the
load is excessively unbalanced, the washing machine
performs the distribution process instead of spinning.
To encourage improved load distribution and balance,
we recommend small and large garments are mixed
in the load.
8
Precautions and tips
This washing machine was designed and
constructed in accordance with international safety
regulations. The following information is provided for
safety reasons and must therefore be read carefully.
General safety
This appliance was designed for domestic use only.
The washing machine must only be used by adults, in
accordance with the instructions provided in this manual.
Do not touch the machine when barefoot or with
wet or damp hands or feet.
Do not pull on the power supply cable when
unplugging the appliance from the electricity
socket. Hold the plug and pull.
Do not open the detergent dispenser drawer while
the machine is in operation.
Do not touch the drained water as it may reach
extremely high temperatures.
Never force the porthole door. This could damage
the safety lock mechanism designed to prevent
accidental opening.
If the appliance breaks down, do not under any
circumstances access the internal mechanisms in
an attempt to repair it yourself.
Always keep children well away from the appliance
while it is operating.
The door can become quite hot during the wash cycle.
If the appliance has to be moved, work in a group
of two or three people and handle it with the utmost
care. Never try to do this alone, because the
appliance is very heavy.
Before loading laundry into the washing machine,
make sure the drum is empty.
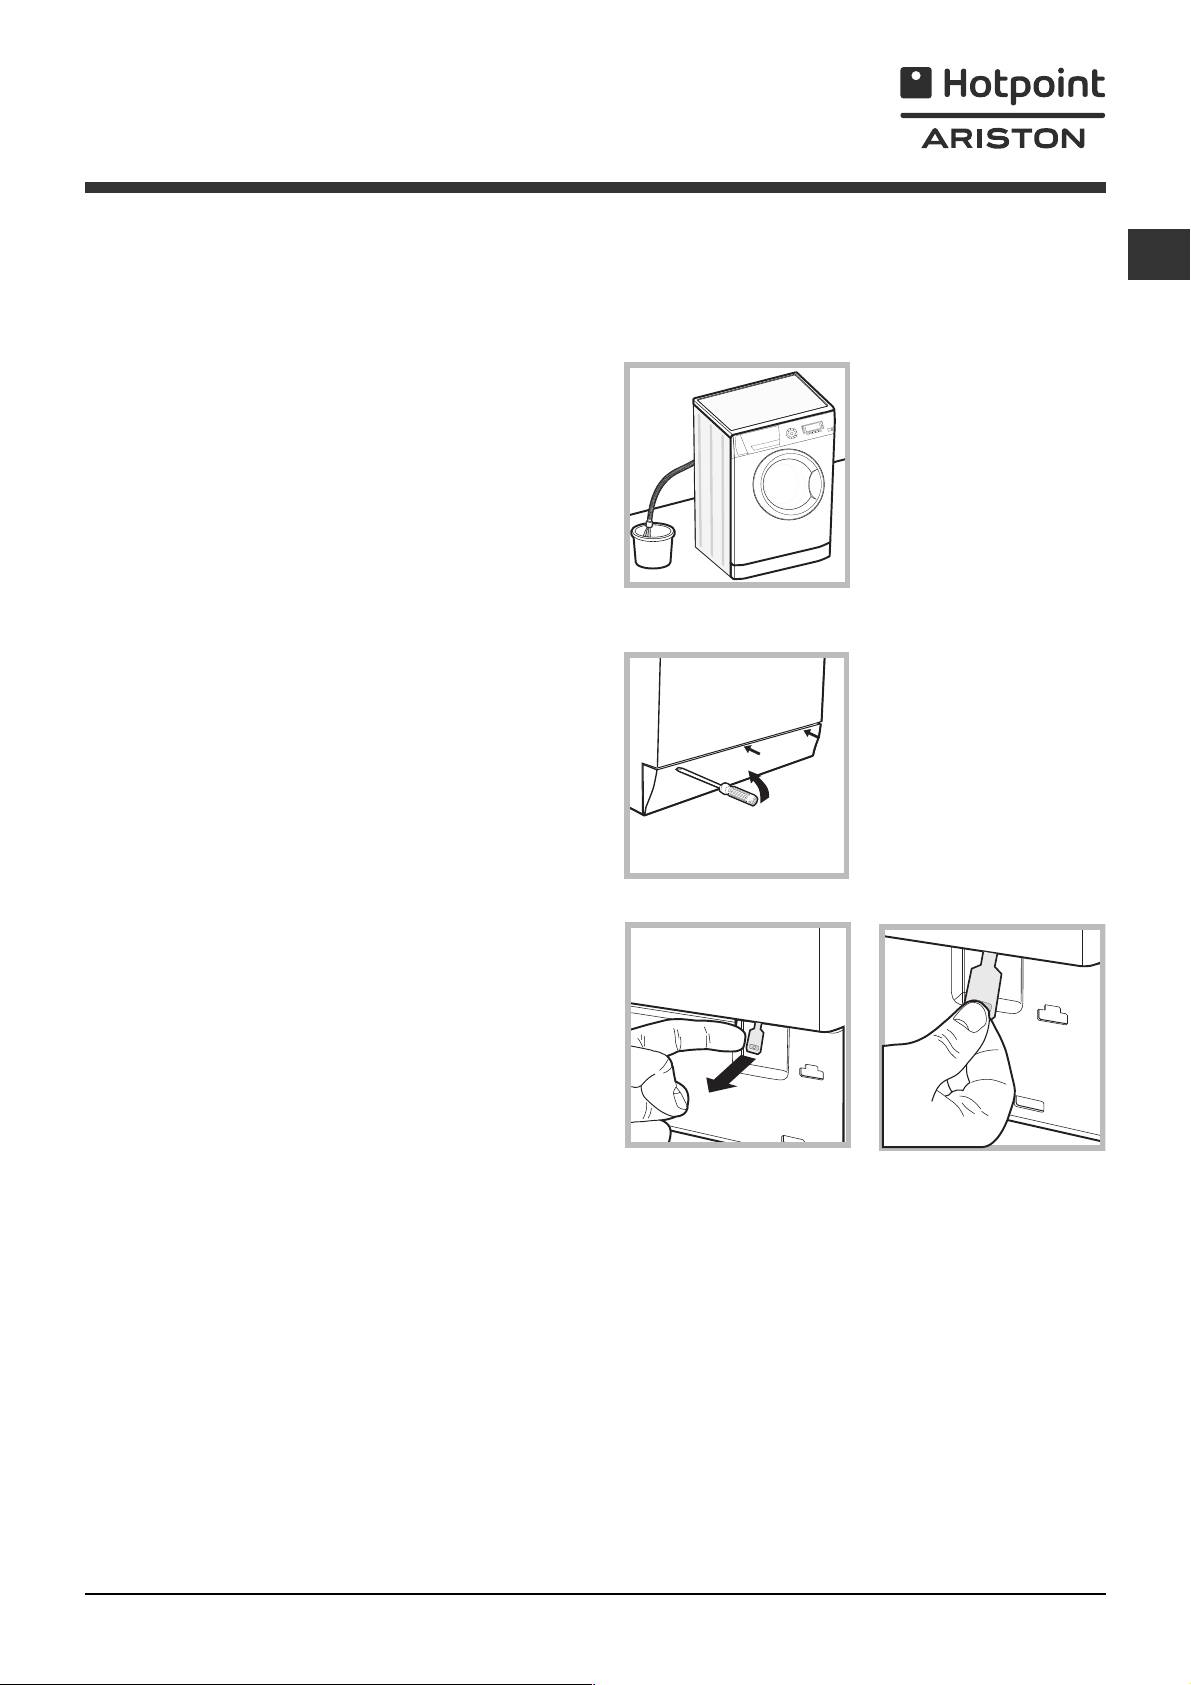
Opening the porthole door manually
In the event that it is not possible to open the
porthole door due to a powercut, and if you wish to
remove the laundry, proceed as follows:
1. remove the plug from
the electrical socket.
2. make sure the water
level inside the machine is
20
lower than the door
opening; if it is not, remove
excess water using the
drain hose, collecting it in a
bucket as indicated in the
figure.
3. using a screwdriver,
remove the cover panel on
the lower front part of the
washing machine (see
figure).
GB
Disposal
Disposing of the packaging materials: observe local
regulations so that the packaging may be re-used.
The European Directive 2002/96/EC on Waste
Electrical and Electronic Equipment, requires that
old household electrical appliances must not be
disposed of in the normal unsorted municipal waste
stream. Old appliances must be collected
separately in order to optimise the recovery and
recycling of the materials they contain and reduce
the impact on human health and the environment.
The crossed out "wheeled bin" symbol on the
product reminds you of your obligation, that when
you dispose of the appliance it must be separately
collected.
Consumers should contact their local authority or
retailer for information concerning the correct
disposal of their old appliance.
4. pull outwards using the tab as indicated in the
figure, until the plastic tie-rod is freed from its stop
position; pull downwards and open the door at the
same time.
5. reposition the panel, making sure the hooks are
securely in place before you push it onto the
appliance.
9
Care and maintenance
GB
Cutting off the water and electricity
supplies
Turn off the water tap after every wash cycle. This
will limit wear on the hydraulic system inside the
washing machine and help to prevent leaks.
Unplug the washing machine when cleaning it and
during all maintenance work.
Cleaning the washing machine
The outer parts and rubber components of the
appliance can be cleaned using a soft cloth soaked
in lukewarm soapy water. Do not use solvents or
abrasives.
Cleaning the detergent dispenser
drawer
1
Remove the dispenser
by raising it and pulling it
out (see figure).
Wash it under running
water; this operation
should be repeated
frequently.
2
Cleaning the pump
The washing machine is fitted with a self-cleaning
pump which does not require any maintenance.
Sometimes, small items (such as coins or buttons)
may fall into the pre-chamber which protects the
pump, situated in its bottom part.
Make sure the wash cycle has finished and unplug
the appliance.
To access the pre-chamber:
1. using a screwdriver,
remove the cover panel
on the lower front part of
the washing machine
(see figure);
2. unscrew the lid by
rotating it anti-clockwise
(see figure): a little water
may trickle out. This is
perfectly normal;
Caring for the door and drum of your
appliance
Always leave the porthole door ajar in order to
prevent unpleasant odours from forming.
3. clean the inside thoroughly;
4. screw the lid back on;
5. reposition the panel, making sure the hooks are
securely in place before you push it onto the
appliance.
Checking the water inlet hose
Check the inlet hose at least once a year. If there are
any cracks, it should be replaced immediately: during
the wash cycles, water pressure is very strong and a
cracked hose could easily split open.
Never use second-hand hoses.
10

Troubleshooting
Your washing machine could fail to work. Before contacting the Technical Assistance Centre (see Assistance),
make sure that the problem cannot be not solved easily using the following list.
Problem:
The washing machine does not
switch on.
The wash cycle does not start.
The washing machine does not
take in water (the text "NO
WATER, CHECK SUPPLY"
appears on the display).
The washing machine
continuously takes in and
drains water.
Possible causes / Solutions:
The appliance is not plugged into the socket fully, or is not making contact.
There is no power in the house.
The washing machine door is not closed properly.
The ON/OFF button has not been pressed.
The START/PAUSE button has not been pressed.
The water tap has not been opened.
A delayed start has been set (see Running a wash cycle).
The water inlet hose is not connected to the tap.
The hose is bent.
The water tap has not been opened.
There is no water supply in the house.
The pressure is too low.
The START/PAUSE button has not been pressed.
The drain hose is not fitted at a height between 65 and 100 cm from
the floor (see Installation).
The free end of the hose is under water (see Installation).
The wall drainage system is not fitted with a breather pipe.
If the problem persists even after these checks, turn off the water tap,
switch the appliance off and contact the Assistance Service. If the
dwelling is on one of the upper floors of a building, there may be problems
relating to water drainage, causing the washing machine to fill with water
and drain continuously. Special anti-draining valves are available in shops
and help to avoid this inconvenience.
GB
The washing machine does not
drain or spin.
The washing machine vibrates a
lot during the spin cycle.
The washing machine leaks.
The machine is locked and the
display flashes, indicating an
error code (e.g. F-01, F-..).
There is too much foam.
The wash cycle does not include draining: some wash cycles require the
drain phase to be started manually (see Wash cycles and functions).
The EASY IRON function has been activated: To complete the wash
cycle, press the START/PAUSE button (see Wash cycles and functions).
The drain hose is bent (see Installation).
The drainage duct is clogged.
The drum was not unlocked correctly during installation (see Installation).
The washing machine is not level (see Installation).
The washing machine is trapped between cabinets and walls (see Installation).
The water inlet hose is not screwed on properly (see Installation).
The detergent dispenser drawer is blocked (for cleaning instructions, see Care
and maintenance).
The drain hose is not fixed properly (see Installation).
Switch off the machine and unplug it, wait for approximately 1 minute
and then switch it back on again.
If the problem persists, contact the Technical Assistance Service.
The detergent is not suitable for machine washing (it should display the
text for washing machines or hand and machine wash, or the like).
Too much detergent was used.
11

Service
GB
Before calling for Assistance:
Check whether you can solve the problem alone (see Troubleshooting);
Restart the programme to check whether the problem has been solved;
If this is not the case, contact an authorised Technical Assistance Centre using the telephone number
provided on the guarantee certificate.
Always request the assistance of authorised technicians.
Have the following information to hand:
the type of problem;
the appliance model (Mod.);
the serial number (S/N).
This information can be found on the data plate applied to the rear of the washing machine, and can also
be found on the front of the appliance by opening the door.
12

Bruksanvisning
TVÄTTMASKIN
SE
Svenska
ARGD 169
Innehållsförteckning
SE
Installation, 14-15
Uppackning och nivellering
Anslutningar av vatten och el
Första tvättcykeln
Tekniska data
Beskrivning av tvättmaskinen, 16-17
Kontrollpanel
Display
Hur ett tvättprogram startas, 18
Program och funktioner, 19
Programtabell
Tvättfunktioner
Tvättmedel och tvättgods, 20
Tvättmedelsfack
Förbered tvättgodset
Speciella program
Balanseringssystem för lasten
Råd och föreskrifter, 21
Säkerhet i allmänhet
Kassering
Manuell öppning av lucka
Underhåll och skötsel, 22
Avstängning av vatten och el
Rengöring av tvättmaskinen
Rengöring av tvättmedelslådan
Skötsel av luckan och trumman
Rengöring av pumpen
Kontrollera vatteninloppsslangen
Fel och åtgärder, 23
Service, 24
13
Installation
SE
Det är viktigt att förvara denna bruksanvisning så att
den alltid finns till hands. Vid försäljning, överlåtelse
eller flytt ska du försäkra dig om att bruksanvisningen
förblir tillsammans med tvättmaskinen så att den nye
ägaren kan ta del av dess information och varningar.
Läs noggrant anvisningarna: Det finns viktig
information angående installation, användning och
säkerhet.
Uppackning och nivellering
Uppackning
1. Ta ur tvättmaskinen ur förpackningen.
2. Kontrollera att tvättmaskinen inte skadats under
transporten. Om det skulle finnas skador ska du inte
ansluta den utan kontakta återförsäljaren.
3. Ta bort de 4
skruvarna, som skyddat
maskinen under
transporten, samt
gummidelen med dess
avståndsbricka, som
sitter på bakstycket (se
figur).
En ordentligt utförd nivellering ger maskinen stabilitet
och hindrar uppkomsten av vibrationer, buller samt att
maskinen flyttar sig under användningen. Om golvet
har heltäckningsmatta eller en annan matta ska
fötterna justeras på så sätt att det finns tillräckligt
utrymme under tvättmaskinen för ventilationen.
Anslutningar av vatten och el
Anslutning av vatteninloppsslangen
1. För in packningen A i
inloppslangens ände och
skruva fast den till en
kallvattenkran som har en
A
öppning med 3/4
gasgänga (se figur).
Innan du ansluter slangen
ska du låta vattnet rinna
tills det är helt klart.
2. Anslut inloppsslangen
till tvättmaskinen genom
att skruva fast den till det
avsedda vattenuttaget i
den bakre delen uppe till
höger (se figur).
4. Stäng igen hålen med de medföljande
plastpluggarna.
5. Spar alla delar: Om tvättmaskinen måste flyttas
ska de monteras tillbaka.
Emballagematerialet ska inte användas som
leksaker för barn.
Nivellering
1. Installera tvättmaskinen på ett hårt och jämnt
underlag utan att stödja den mot väggar, möbler eller
annat.
2. Om golvet inte skulle
vara fullständigt plant kan
ojämnheten
kompenseras genom att
de främre fötterna dras åt
eller lossas (se figur).
Lutningsvinkeln, mätt på
arbetsplanet, får inte
överstiga 2°.
3. Se till att slangen inte har några veck eller är
hopklämd.
Kranens vattentryck måste befinna sig inom de
värden som finns i tabellen över Tekniska Data (se
sidan intill).
Om längden på inloppsslangen inte är tillräcklig ska
du vända dig till fackhandeln eller en auktoriserad
tekniker.
Använd aldrig begagnade slangar.
Använd slangarna som följer med maskinen.
14
Anslutning av avloppsslang
65 - 100 cm
Anslut avloppsslangen,
utan att böja den, till en
avloppsledning eller ett
väggavlopp som är
placerat på en höjd
mellan 65 och 100 cm
från golvet,
Använd inte skarvsladdar eller grenuttag.
SE
Kabeln ska inte böjas eller klämmas.
Driftsladden får endast bytas ut av behöriga
tekniker.
OBS! Företaget avsäger sig allt ansvar om dessa
föreskrifter inte respekteras.
Första tvättcykeln
eller lägg den i ett
handfat eller ett badkar
och bind fast den
bifogade skenan på
kranen (se figur). Den fria
slangänden får inte vara
nedsänkt i vatten.
Vi avråder från att använda förlängningsslangar; om
det ändå skulle vara nödvändigt måste
förlängningsslangen ha samma diameter som
originalslangen och den får inte vara längre än 150 cm.
Elektrisk anslutning
Innan du sätter i kontakten i uttaget ska du försäkra
dig om att:
Vägguttaget är jordanslutet och i enlighet med
gällande standard.
Efter installationen, innan du börjar använda maskinen,
ska du köra en tvättcykel med tvättmedel men utan
tvättgods, genom att ställa in programmet
.
Tekniska data
Modell
Mått
Kapacitet
ARGD 169
bredd 59,5 cm
höjd 85 cm
djup 60 cm
från 1 till 8 kg
Uttaget klarar maskinens maxeffekt som anges i
tabellen över Tekniska Data (se intill).
Spänningstillförseln befinner sig inom de värden som
anges i tabellen över Tekniska Data (se intill).
Uttaget passar ihop med tvättmaskinens
stickkontakt. Om det inte förhåller sig på detta vis
ska du byta ut uttaget eller kontakten.
Tvättmaskinen får inte installeras utomhus, inte ens
om installationsplatsen skyddas av ett tak, eftersom
det är mycket farligt att utsätta den för regn och
oväder.
När tvättmaskinen har installerats ska strömuttaget
vara lättåtkomligt.
Elanslutningar
Vattenanslutningar
Centrifugeringsh-
astighet
Tvättprov har
utförts i enlighet
med standard
EN 60456
se märkskylten med tekniska
egenskaper som sitter på maskinen
Max. tryck 1 MPa (10 bar)
min. tryck 0,05 MPa (0,5 bar)
trummans kapacitet 62 liter
upp till 1600 varv/min
program
temperatur 60°C;
utförd med 8 kg last.
Denna utrustning är i enlighet med
följande EU-direktiv:
- 89/336/EU från 03/05/89
(elektromagnetisk kompatibilitet)
och följande ändringar
- 2002/96/CE
- 2006/95/CE (lågspänning)
(1° nedtryckningen);
15
Beskrivning av tvättmaskinen
SE
Kontrollpanel
Tvättmedelsfack
TILL/FRÅN
Knapp
Knappar för
PROGRAMVAL
MINNE
Knapp
Knapp för
SENARELAGD
START
KNAPPLÅS
DISPLAY
FUNKTIONSKNAPPAR
CENTRIFUGERINGSKNAPP
Knapp med
kontrollampa
START/
PAUS
TEMPERATURKNAPP
Tvättmedelsfack för att fylla på tvättmedel och
tillsatser (se Tvättmedel och tvättgods).
TILL/FRÅN knapp
sätta på eller stänga av maskinen. Kontrollampan
START/PAUS som blinkar långsamt grönt indikerar att
maskinen är tillslagen. För att stänga av
tvättmaskinen under tvättprogrammet, tryck ned
knappen en längre stund (cirka 2 sek.). Maskinen
stängs inte av om knappen trycks ned kort eller av
misstag. Om maskinen stängs av under pågående
tvättning, annulleras tvättningen.
Knappar för PROGRAMVAL: för att ställa in önskat
program (se "Programtabell").
MINNE knapp: håll ned knappen för att spara ett
program och önskade inställningar. För att hämta ett
tidigare sparat program, tryck på knappen MINNE.
FUNKTIONSKNAPPAR: tryck på knappen för att
välja önskad funktion. På displayen tänds respektive
kontrollampa.
CENTRIFUGERINGSKNAPP
knapp för att minska eller utesluta centrifugeringen
fullständigt. Värdet visas på displayen.
: tryck kort på knappen för att
: Tryck på denna
TEMPERATURKNAPP
att sänka temperaturen: Värdet visas på displayen.
KNAPPLÅS
sekunder för att aktivera blockeringen av
kontrollpanelen. Tänd symbol
kontrollpanelen är blockerad. På detta sätt förhindras
att programmen ändras av misstag, användbart om
det finns barn i hemmet. Tryck ned knappen i cirka 2
sekunder för att deaktivera blockeringen av
kontrollpanelen.
Knapp för SENARELAGD START
denna knappen för att ställa in en senarelagd start för
valt program. Senareläggningen visas på displayen.
Knapp med kontrollampa START/PAUS: När den
gröna kontrollampan blinkar långsamt, tryck på
knappen för att starta en tvättning. När programmet
har startat lyser kontrollampan med fast sken. För att
avbryta tvättprogrammet, tryck åter på knappen.
Kontrollampan blinkar orange. Om symbolen
är tänd kan luckan öppnas. Tryck åter på knappen för
att återstarta tvättningen från den punkt där den har
avbrutits.
: tryck ned knappen i cirka 2
: tryck på denna knapp för
indikerar att
: tryck på
inte
16

Display
SE
A
B
D
C
E
F
Displayen är användbar när maskinen programmeras och ger mycket information.
På de två övre raderna A och B visas valt tvättprogram, pågående tvättfas och all information om programmets
förlopp.
På raden C visas återstående tid för pågående tvättcykel och om en SENARELAGD START har ställts in visas hur
lång tid som återstår innan programmet startas.
På raden D visa max. centrifugeringsvarvtal för maskinen, baserat på inställt program. Om ingen centrifugering
kan köras för programmet är raden släckt.
På raden E visa max. temperatur för maskinen, baserat på inställt program. Om temperaturen inte kan ställas in
för programmet är raden släckt.
Kontrollamporna F varierar beroende på funktion och tänds när vald funktion kan användas för inställt program.
Symbol för låst lucka
Tänd kontrollampa meddelar att luckan är blockerad för att förhindra att luckan öppnas av misstag. För att
undvika skador är det nödvändigt att symbolen slocknar innan luckan öppnas.
OBS! Om funktionen SENARELAGD START är aktiv kan inte luckan öppnas. För att öppna luckan, ställ maskinen
i pausläge genom att trycka på knappen START/PAUS.
När maskinen startas första gången ombeds du välja språk och displayen visar automatiskt menyn för att välja
språk.
Tryck på knapparna TEMPERATUR och CENTRIFUG för att välja önskat språk. Bekräfta valet med knappen
KNAPPLÅS.
Om du vill välja ett annat språk, tryck samtidigt på knapparna KNAPPLÅS + TEMPERATUR + CENTRIFUG i 5
sekunder. Upprepa sedan föregående procedur.
17

Hur ett tvättprogram startas
SE
1. SÄTTA PÅ MASKINEN. Tryck på knappen
och på displayen visas texten VÄLKOMMEN.
Kontrollampan START/PAUS blinkar långsamt
grönt.
2. LÄGG I TVÄTTEN. Öppna luckan. Lägg i tvätten.
Se till att inte överskrida mängden tvätt som
anges i programtabellen på nästa sida.
3. DOSERA TVÄTTMEDLET. Dra ut
tvättmedelsfacket och häll i tvättmedlet i de därtill
avsedda facken, som beskrivs i "Tvättmedel och
tvättgods".
4. STÄNG LUCKAN.
5. VÄLJA PROGRAM. Tryck på en av knapparna
för PROGRAMVAL för att välja önskat program.
Programnamnet visas på displayen och
programmet är förknippat med en temperatur och
en centrifugeringshastighet som kan ändras. På
displayen visas programmets tidslängd.
6. GÖRA ÄNDRINGAR I TVÄTTPROGRAMMET.
Tryck på därtill avsedda knappar:
Om vald funktion inte är kompatibelt med ett
tidigare valt tillval, blinkar kontrollampan för det
första tillvalet som har valts och endast det andra
tillvalet aktiveras. Kontrollampan för det aktiverade
tillvalet tänds.
Rekommenderad last och/eller programmets
tidslängd kan variera för de olika funktionerna.
7. STARTA PROGRAMMET. Tryck på knappen
START/PAUS. Respektive kontrollampa lyser med
grönt fast sken och luckan låses (symbolen LÅST
LUCKA
på aktuell fas på displayen. För att ändra ett
tvättprogram under pågående tvättprogram, avbryt
tvättprogrammet med knappen START/PAUS
(kontrollampan START/PAUS blinkar långsamt
orange). Välj sedan önskat program och tryck åter
på knappen START/PAUS.
För att öppna luckan under pågående
tvättprogram, tryck på knappen START/PAUS. Om
symbolen LÅST LUCKA
öppnas. Tryck åter på knappen START/PAUS för
att återstarta programmet från den punkt där det
har avbrutits.
visas). Under tvättningen visas namnet
inte visas kan luckan
Ändra temperaturen och/eller
centrifugeringen. Maskinen väljer automatiskt
max. temperatur och centrifugering för inställt
program och kan därför inte ökas. Tryck på
knappen
ned till kallt vatten "OFF". Tryck på knappen
för att stegvis minska centrifugeringen tills den
stängs av "OFF". Om knapparna trycks ned ännu
en gång återgår värdena till maximivärdena.
Inställning av en senarelagd start.
För att ställa in en senarelagd start för valt
program, tryck på denna knapp tills önskad
fördröjningstid visas. När detta tillval är aktivt visas
symbolen
senarelagda starten, tryck på knappen tills texten
OFF visas på displayen.
Ändra programmets
inställningar.
Tryck på denna knapp för att aktivera
funktionen. Knappens kontrollampa tänds.
Tryck åter på knappen för att koppla från
funktionen och respektive kontrollampa släcks.
för att stegvis minska temperaturen
på displayen. För att ta bort den
Om den funktion som valts inte är förenlig med
det inställda programmet, kommer kontrollampan
att blinka och funktionen aktiveras inte.
8. PROGRAMMETS SLUT. Texten
"PROGRAMSLUT" visas på displayen. När
symbolen LUCKLÅS
öppnas. Öppna luckan, töm ut tvätten och stäng
av maskinen.
inte visas kan luckan
Om du vill stänga av ett tvättprogram som redan
har startats, tryck länge på knappen
avbryts och maskinen stängs av.
. Programmet
18
 Loading...