

Hotpoint AQXXL 109 User Manual

Instruction booklet
WASHING MACHINE
EN
English,1
AQXXL 109
Contents
EN
Installation, 2-3
Unpacking and levelling
Connecting the cold water and electricity supplies
Technical data
Description of the machine, 4-5
Control panel
Running a wash cycle, 6
Programmes and options, 7
Table of Programmes
Wash options
Detergents and laundry, 8
Detergent
Preparing the laundry
Washing advice
Load-balancing system
Precautions and tips, 9
General safety
Disposal
Opening the door manually
Care and maintenance, 10
Turning off the water and electricity supplies
Cleaning the machine
Cleaning the detergent dispenser
Drum maintenance
Cleaning the pump
Checking the water inlet hose
Troubleshooting, 11
Assistance, 12
1
Installation
Keep this instruction manual in a safe place for
GB
future reference. If the appliance is sold, given away
or moved, please ensure the manual remains with the
machine so that the new owner may benefit from the
advice contained within it.
Please read this instruction manual carefully it
contains important information regarding the safe
installation, use and maintenance of the appliance.
You will find the guarantee and other details relating to
the installation process in the bag containing this booklet.
Unpacking and levelling
Unpacking
1. Once the washing machine has been removed
from the packaging, check that it has not been
damaged during transportation.
If it has been damaged, contact the retailer and do
not proceed any further with the installation process.
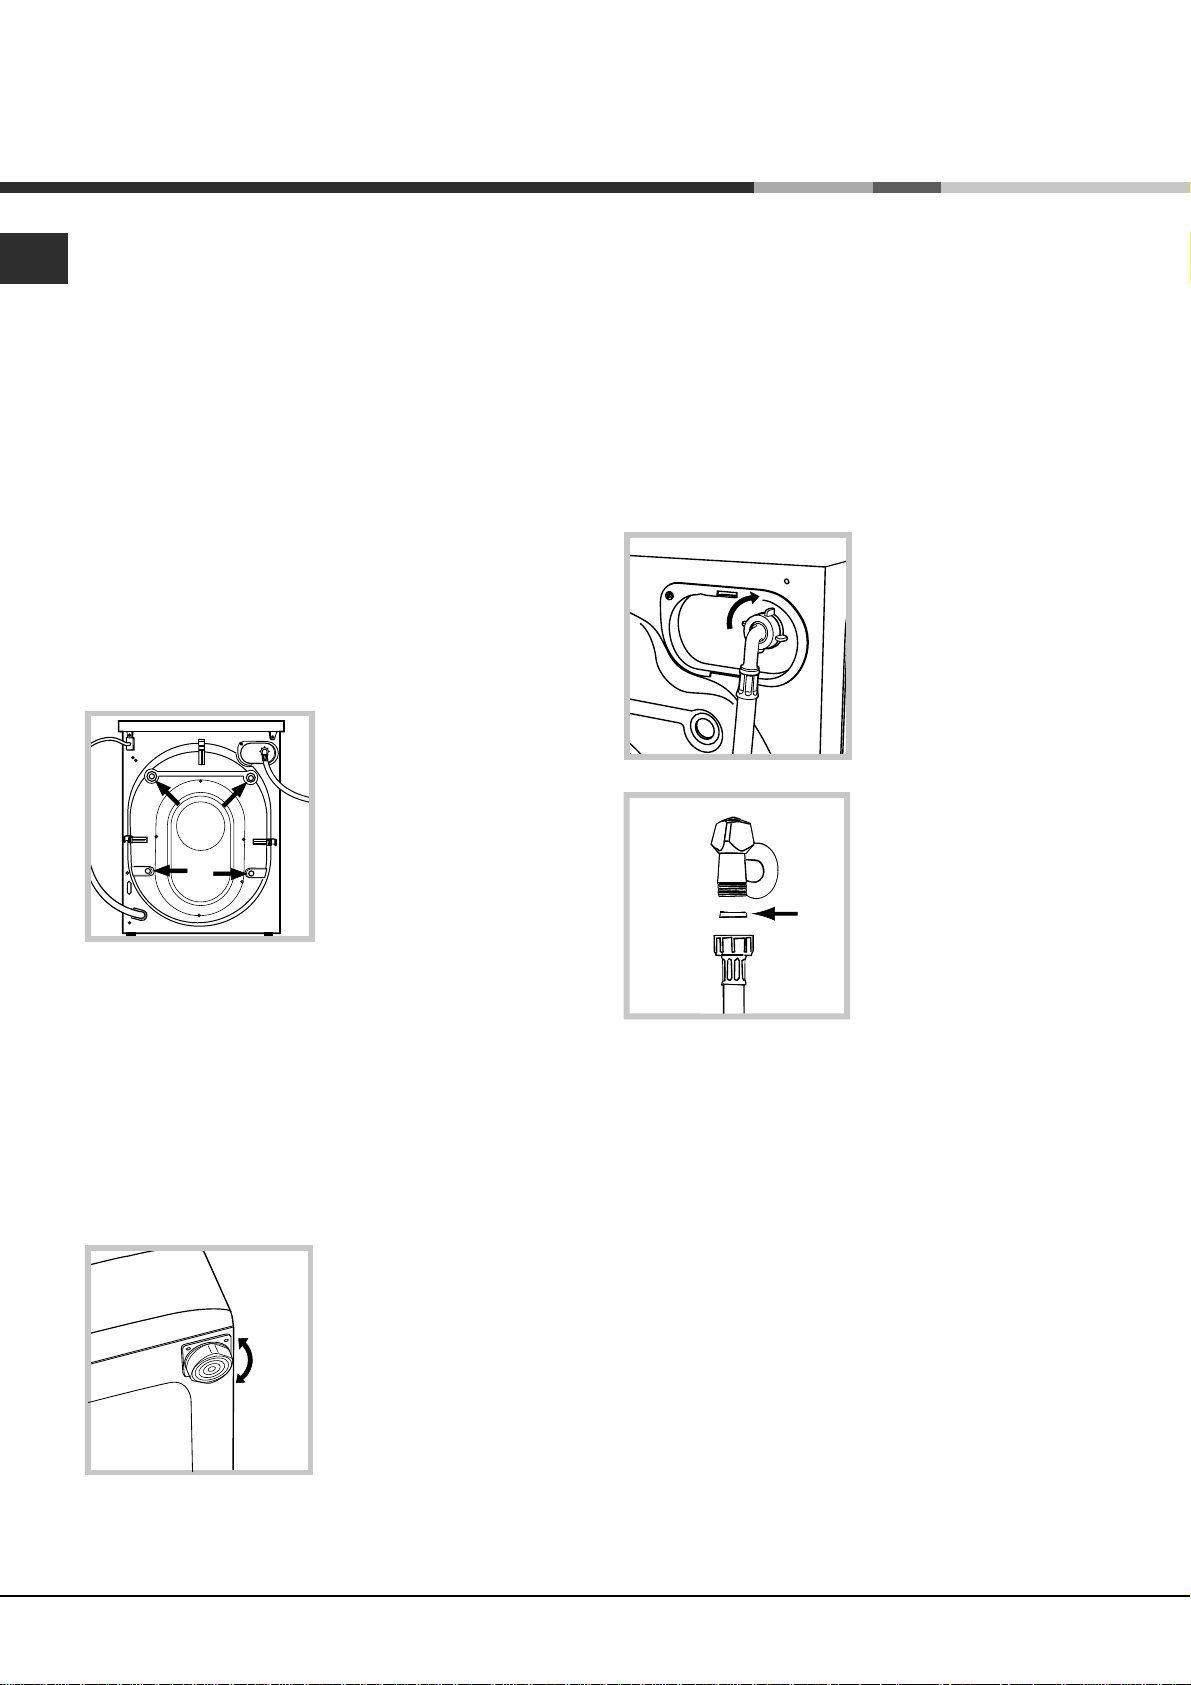
2. Remove the 4 transit
bolts used during
transportation and the
corresponding spacers
on the back of the
machine (see figure).
3. Having removed the 4 bolts use the 4 plastic
blanking plates to cover the 4 holes.
4. Keep all the pieces; if the washing machine is
transported in future, the transit bolts and spacers will
have to be replaced in order to avoid damaging the
inside of the machine.
Packaging materials should not be used as toys by children.
Levelling
1. Position the washing machine on a level and sturdy
floor, without resting it against walls or cabinets.
2. If the floor is uneven,
the feet of the appliance
may be adjusted until it
reaches a perfectly
horizontal position (the
angle of inclination must
not exceed 2 degrees).
If positioned on a fitted carpet or a rug, adjust the
feet in such a way as to allow room for air to circulate
and provide ventilation beneath the washing machine.
Connecting the cold water and
electricity supplies
Connecting the water inlet hose
Before connecting the inlet hose to the cold water supply,
allow the water to flow from the tap until it runs clear.
1. Connect the inlet hose
to the machine, by
screwing it into the cold
water inlet on the upper
right hand side of the
back of the machine (see
figure).
2. Place the seal A
(provided in the bag) on
the end of the inlet hose
and screw it to a cold
A
3. Make sure there are no kinks or bends in the inlet hose.
The water pressure at the tap must fall within the values
indicated in the Technical data table (see next page).
If the water inlet hose is not long enough, contact a
specialist store or an authorised technician.
Always use the new water inlet hoses supplied with
the machine.
water tap with a 3/4 BSP
threaded connection (see
figure).
If the appliance is levelled correctly it will be more
stable and much less likely to cause vibrations and
noise during the spin cycle.
2
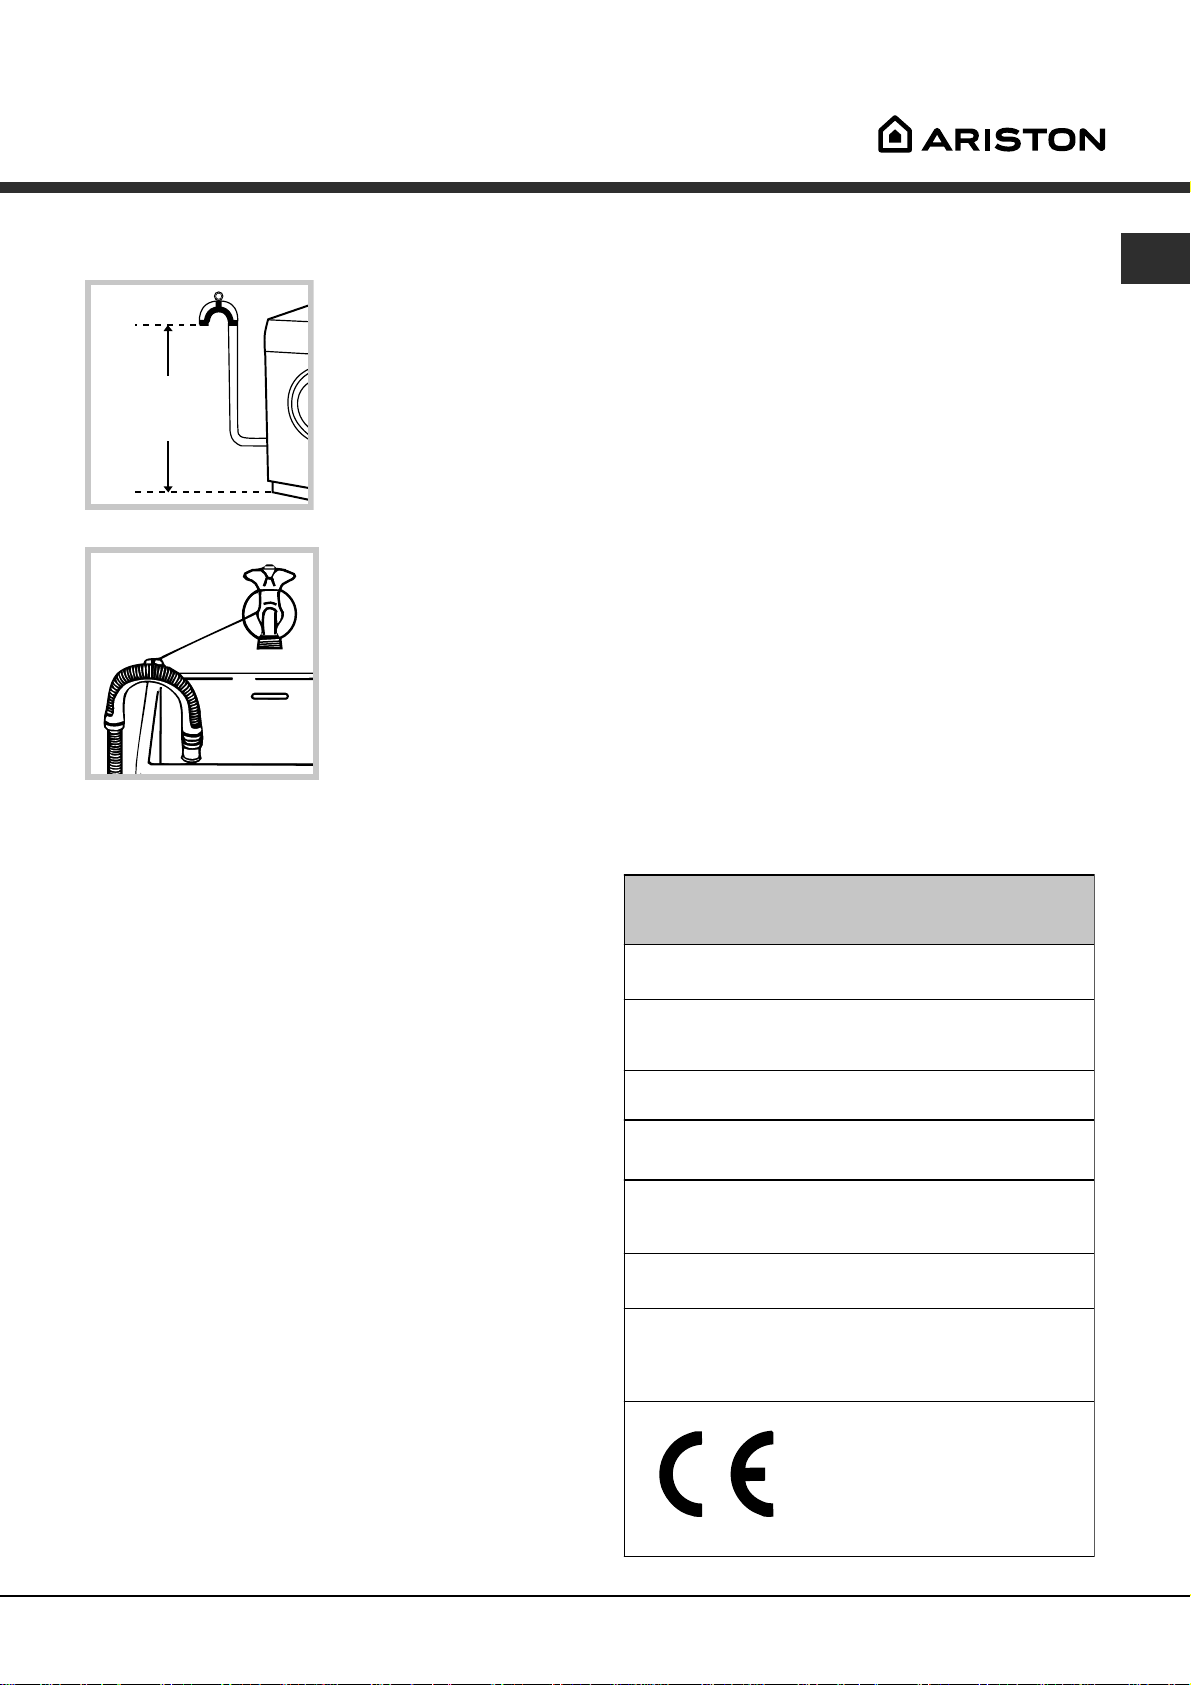
Drainage Connection
Connect the outlet hose
to a draining duct or a
stand pipe at a height
between 65 and 100 cm
from the floor. Do not
65 - 100 cm
bend it under any
circumstances.
Alternatively, place the
end of the hose over the
edge of a washbasin or
tub, fastening the hose
supplied to the tap (see
figure).
The free end of the hose
should not remain
immersed in water.
We advise against the use of hose extensions; if
absolutely necessary, the length of the extension
must not exceed 150 cm and its diameter must be
the same as the original hose.
Electrical connection
The cable should be replaced only by authorised
technicians.
Warning! The company shall not be held responsible
for any incidents that occur if these regulations are
not observed.
Technical data
EN
Before inserting the plug into the electrical socket,
make sure that:
the socket is earthed and complies with current
regulations;
the socket can withstand the maximum load of the
appliance, which is indicated in the Technical data
table (see opposite);
the power supply voltage falls within the values
indicated in the Technical data table (see opposite);
the socket is compatible with the plug of the
appliance. If this is not the case, either the socket
or the plug must be replaced.
The machine must not be installed outdoors, even in
covered areas. It is extremely dangerous to leave the
appliance exposed to rain, storms and other weather
conditions.
Once the machine has been installed, the electricity
socket should be easily accessible.
Do not use extension cables or multiple sockets.
The cable should not be bent or compressed.
Model
Dimensions
Capacity
Electrical
connections
Water connections
Spin speed
Energy rated
programmes
according to
AS/NZS 2040.2
AQXXL 109
width 59.5 cm
height 85 cm
depth 64.5 cm
from 1 to 8 kg
voltage 220-240 V 50 Hz
maximum absorbed power 2100 W
maximum pressure 1 MPa (10 bar)
minimum pressure 0.05 MPa (0.5 bar)
drum capacity 62 litres
up to 1000 rotations per minute
COTTON WHITES program,
temperature 60°C, Super Wash;
using a load of 8 kg.
This appliance conforms to the
following EC Directives:
- 72/23/EEC dated 19/02/73 (Low
Voltage) and subsequent modifications
- 89/336/EEC dated 03/05/89
(Electromagnetic Compatibility) and
subsequent modifications
3
Description of the machine
EN
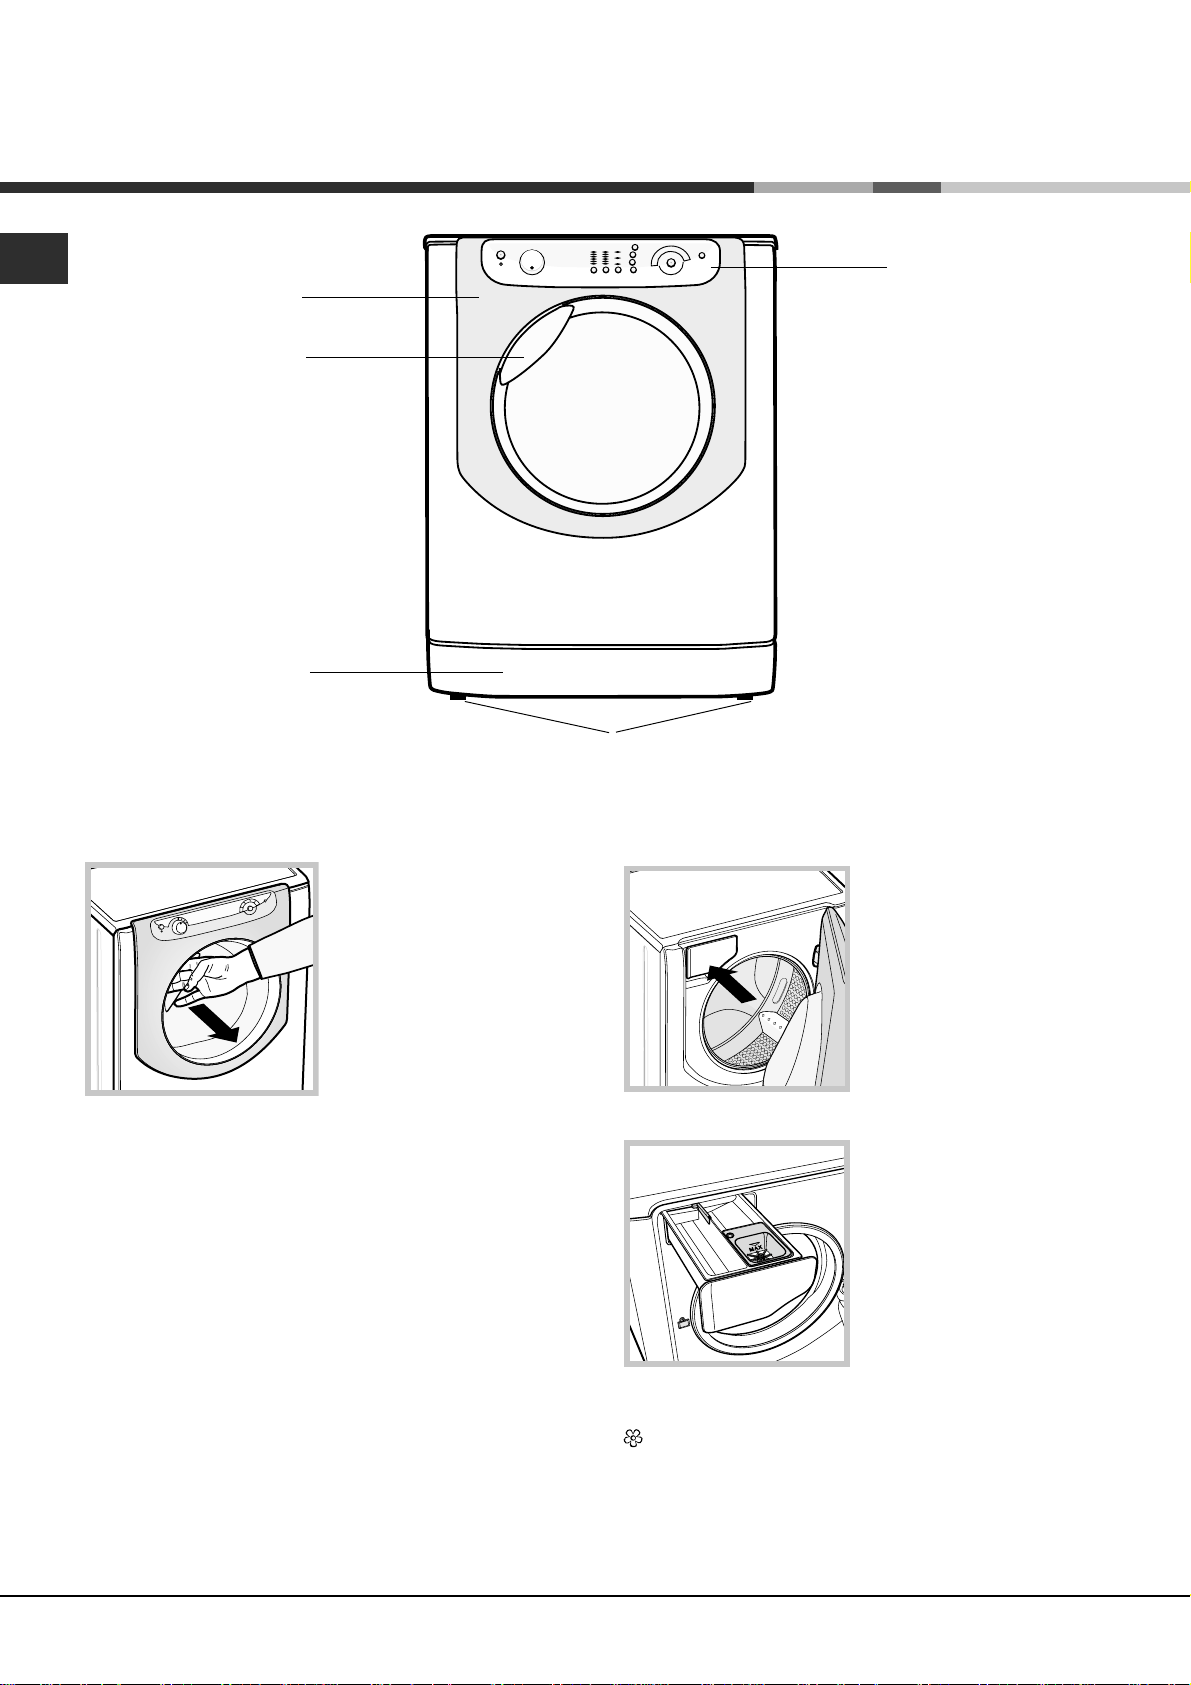
DOOR
DOOR
DOOR
HANDLE
KICK STRIP
CONTROL
PANEL
ADJUSTABLE FEET
DETERGENT DISPENSER:
Always use the handle to
open the door (see
figure).
20
1
2
compartment immediately before the wash cycle is
started.
compartment for additives: for fabric softener or
other liquid washing additives. Do not exceed the
maximum level indicated by the grille, and dilute
concentrated fabric softeners.
This is inside the machine
and may be accessed by
opening the door.
For information relating to
detergents, please refer
to the chapter entitled
Detergents and laundry.
1. pre-wash
compartment: use
powder detergent.
2. main wash
compartment: use
powder or liquid
detergent. If you intend to
use liquid detergent, we
recommend that it is
poured into the
Detergents and additives must be specific to front-
loading machines.
4
 Loading...