

Page 1
Instructions for
installation and use
This symbol reminds you to read this instruction manual.
EN
English,1
ES
Español,15
AR
, 29
Contents
Installation, 2-3-4-5
Unpacking and levelling
Connecting the electricity and water supplies
Technical data
Description of the machine, 6-7
Control panel
How to run a wash cycle or a drying
cycle, 8
Wash cycles and options, 9
Table of wash cycles
Wash options
WASHER-DRYER
EN
AQUALTIS
AQM9F 09 U
Detergents and laundry, 10
Detergent
Preparing the laundry
Washing recommendations
Load balancing system
Precautions and advice, 11
General safety
Disposal
Opening the porthole door manually
Care and maintenance, 12
Cutting off the water and electricity supplies
Cleaning the machine
Cleaning the detergent dispenser drawer
Caring for your appliance drum
Cleaning the pump
Checking the water inlet hose
Trouble shooting, 13
Assistance, 14
1
Page 2
Installation
EN
This instruction manual should be kept in a safe place
for future reference. If the washer-dryer is sold, given
away or moved, please ensure the manual is kept with
the machine, so that the new owner may benefit from
the advice contained within it.
Read these instructions carefully: they contain vital
information relating to the safe installation and operation
of the appliance.
Inside the pack containing this manual, you will also
find the guarantee and all the details necessary for
installation.
Unpacking and levelling
Unpacking
1. Once you have removed all the packaging from the
washer-dryer, make sure it has not been damaged
during transportation.
If it has been damaged, contact the retailer and do not
proceed any further with the installation process.
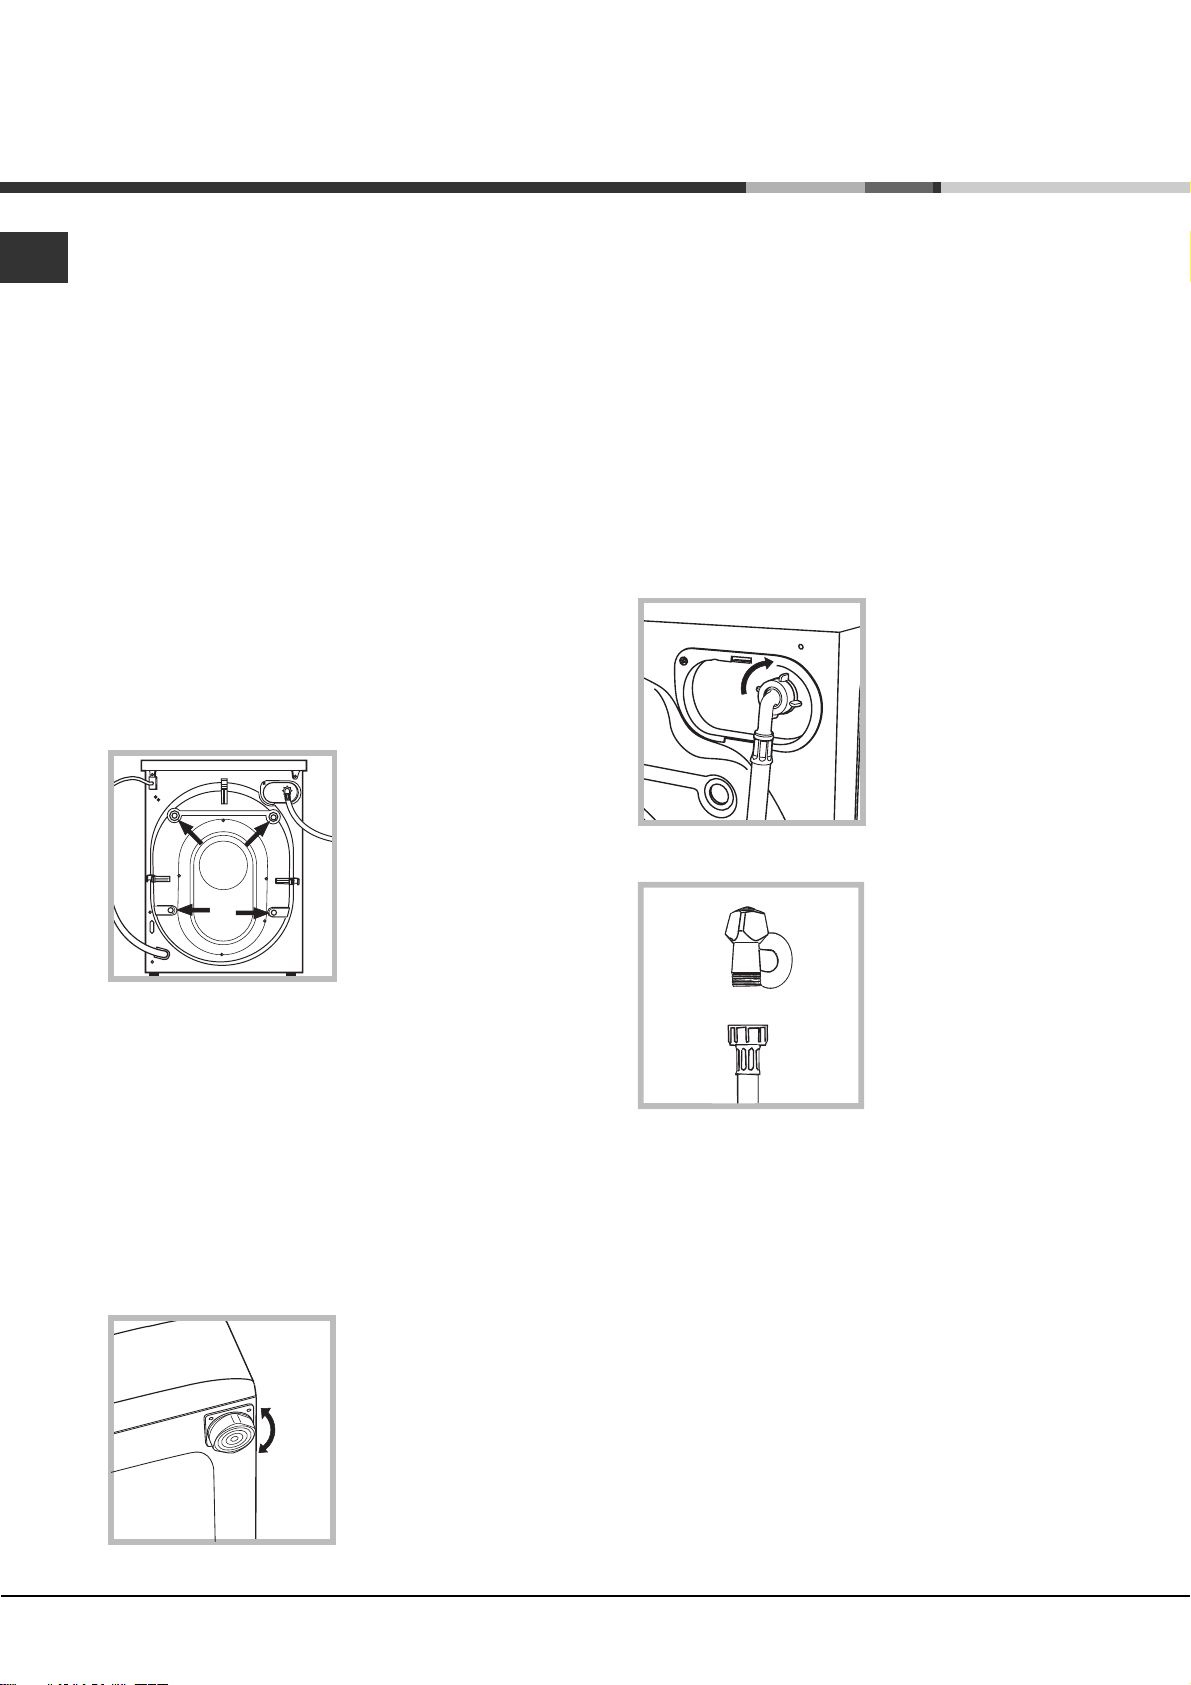
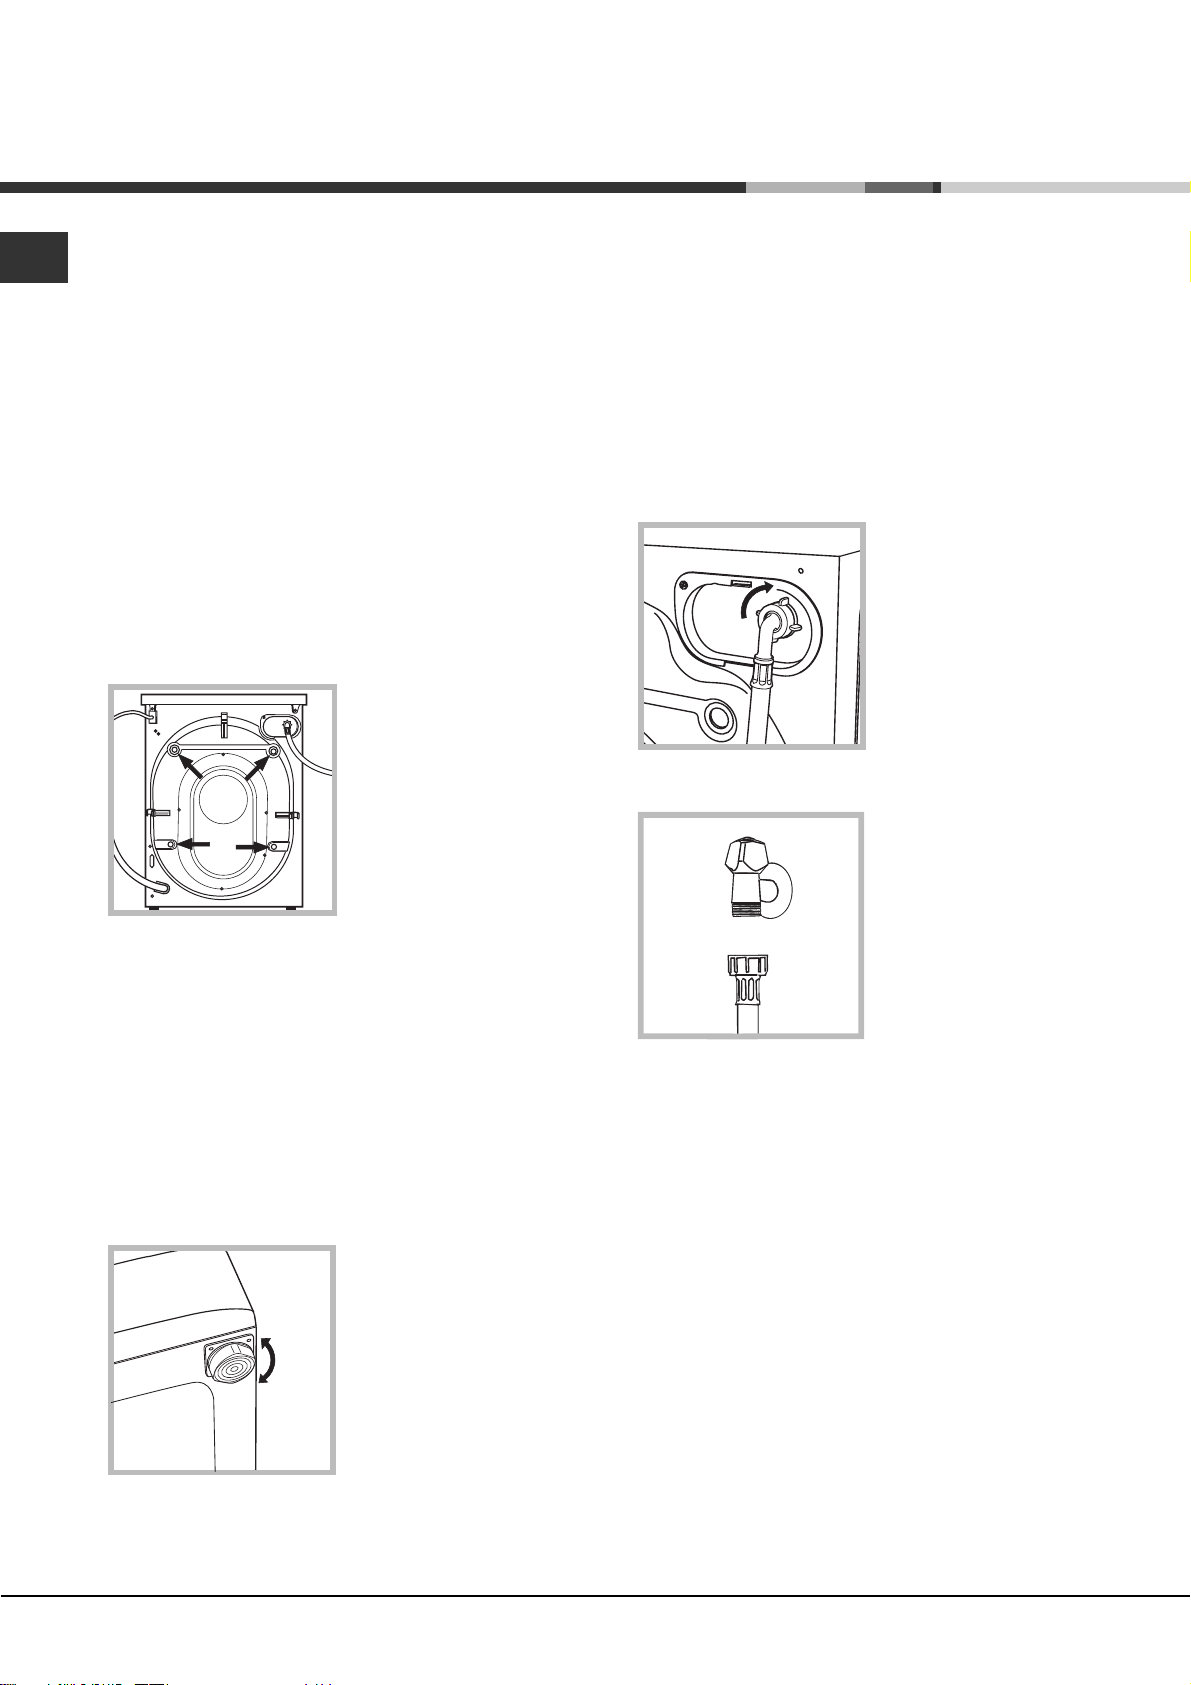
2. Remove the 4
protective screws (used
during transportation) and
the corresponding spacer,
located on the rear part of
the appliance (see figure).
If the appliance is levelled correctly, it will be more
stable and much less likely to cause vibrations and noise
while it is operating, particularly during the spin cycle.
If it is placed on carpet or a rug, adjust the feet in such
a way as to allow a sufficient ventilation space
underneath the washer-dryer.
Connecting the electricity and water
supplies
Connecting the water inlet hose
Before connecting the inlet hose to the water supply,
run the water until it is perfectly clear.
1. Connect the inlet hose
to the machine by
screwing it onto the cold
water inlet of the
appliance, which is
situated on the top righthand side of the rear part
of the appliance (see
figure).
2. Connect the inlet hose
by screwing it to a cold
water tab using a 3/4 gas
threaded connection (see
figure).
3. Close off the holes using the plastic plugs supplied in
the pack.
4. Keep all the parts in a safe place; they will be needed
again if the washer-dryer is moved to another location,
to prevent the inside of the appliance being damaged.
Packaging materials should not be used as toys for
children.
Levelling
1. Place the washer-dryer on a flat sturdy floor, without
resting it up against walls or cabinets.
2. If the floor is uneven,
the front feet of the
machine may be adjusted
until it reaches a horizontal
position (the angle of
inclination must not
exceed 2 degrees).
3. Make sure that the hose is not folded over or bent.
The water pressure at the tap must fall within the
values indicated in the Technical data table (see next
page).
If the inlet hose is not long enough, contact a
specialised shop or an authorised technician.
Never use second-hand or old inlet hoses; use the
products supplied with the machine.
2
Page 3
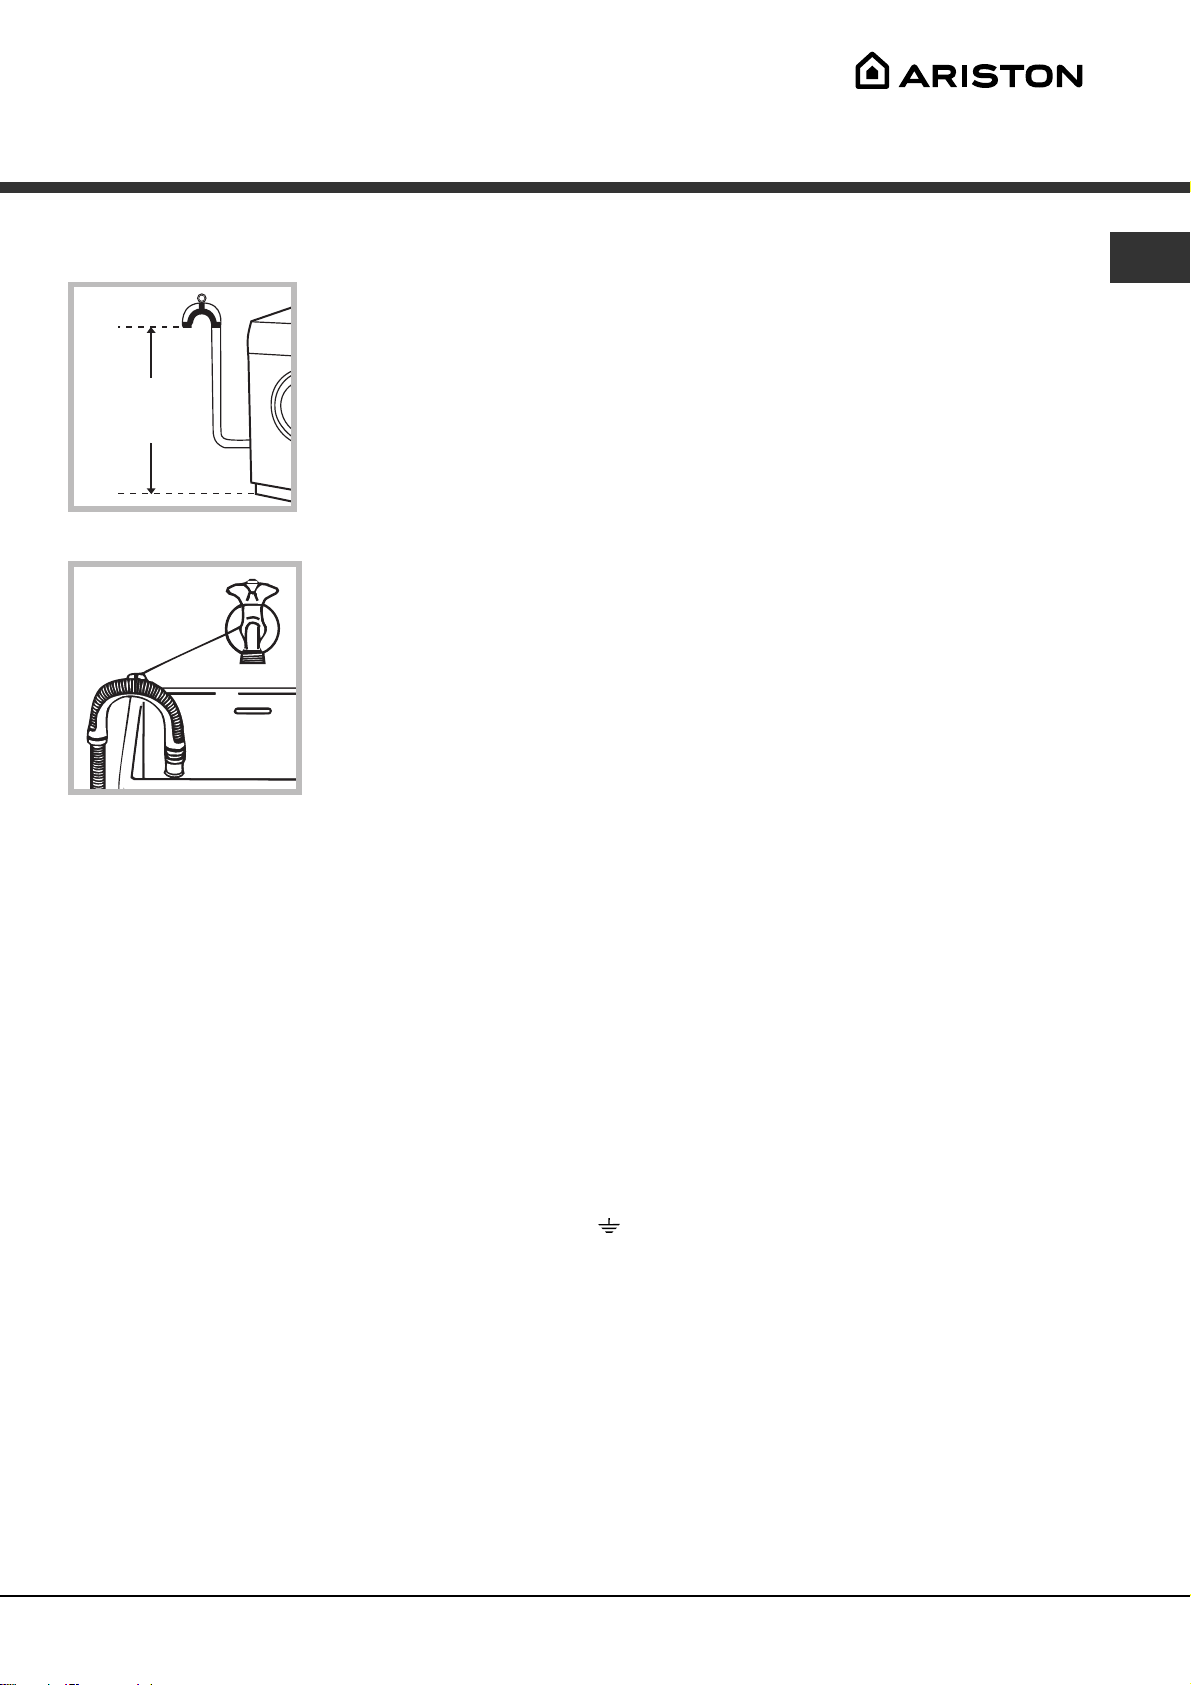
Connecting the drain hose
Connect the drain hose,
without bending it, to a
draining duct or a wall
drain situated between 65
and 100 cm from the floor;
65 - 100 cm
alternatively, place it over
the edge of a basin, sink
or tub, fastening the duct
supplied to the tap (see
figure). The free end of
the hose should not be
underwater.
We advise against the use of hose extensions; in case
of absolute need, the extension must have the same
diameter as the original hose and must not exceed 150
cm in length.
Electric connection
Before plugging the appliance into the mains socket,
make sure that:
the socket is earthed and in compliance with the
applicable law;
WARNING - THIS APPLIANCE MUST BE EARTHED.
THE FOLLOWING OPERATIONS SHOULD BE
CARRIED OUT BY A QUALIFIED ELECTRICIAN.
Replacing the fuse:
When replacing a faulty fuse, a 13 amp ASTA approved
fuse to BS 1362 should always be used, and the fuse
cover re-fitted. If the fuse cover is lost, the plug must
not be used until a replacement is obtained.
Replacement fuse covers:
If a replacement fuse cover is fitted, it must be of the
correct colour as indicated by the coloured marking or
the colour that is embossed in words on the base of the
plug. Replacements can be obtained directly from your
nearest Service Depot.
Removing the plug:
If your appliance has a non-rewireable moulded plug
and you should wish to re-route the mains cable
through partitions, units etc., please ensure that either:
the plug is replaced by a fused 13 ampere re-wearable
plug bearing the BSI mark of approval.
or:
the mains cable is wired directly into a 13 amp cable
outlet, controlled by a switch, (in compliance with BS
5733) which is accessible without moving the appliance.
Disposing of the plug:
Ensure that before disposing of the plug itself, you make
the pins unusable so that it cannot be accidentally
inserted into a socket.
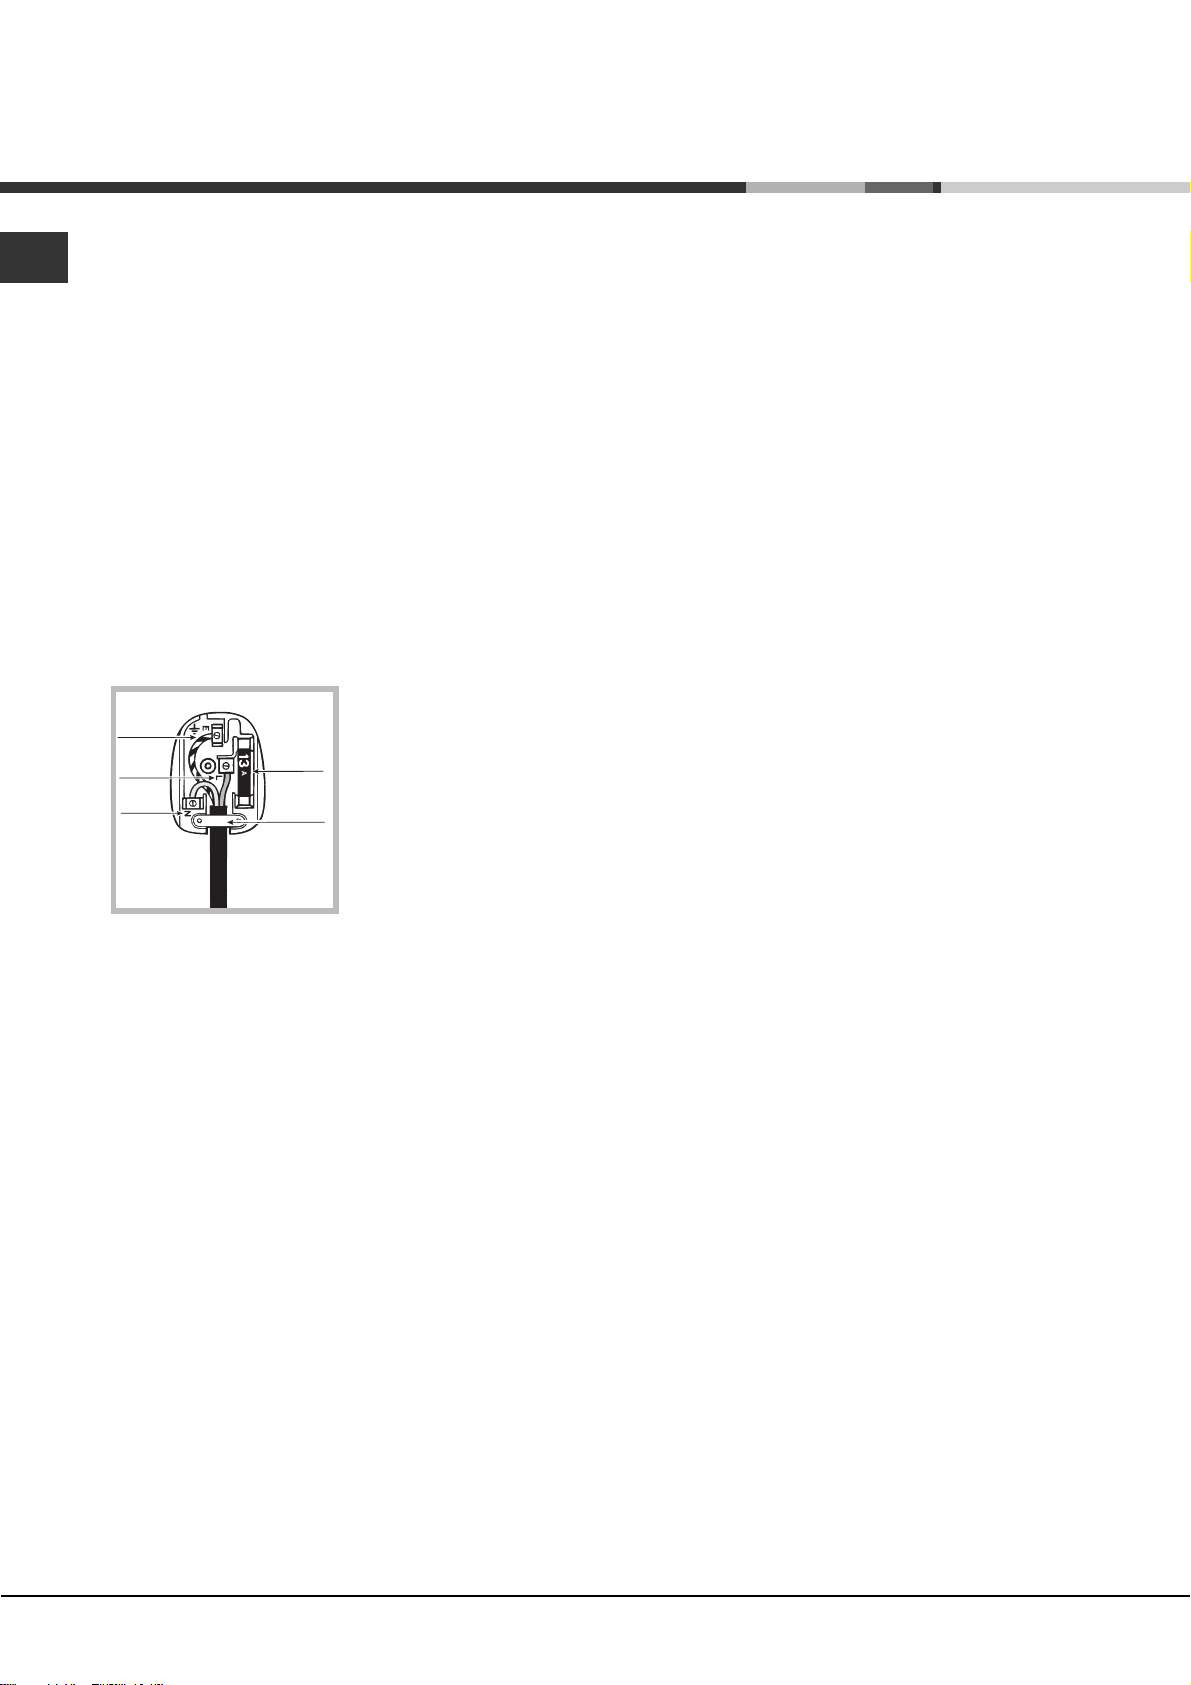
Instructions for connecting cable to an alternative plug:
Important: the wires in the mains lead are coloured in
accordance with the following code:
Green & Yellow Earth
Blue Neutral
Brown Live
EN
the socket is able to sustain the appliance's
maximum power load indicated in the Technical
details table (see page 5);
the supply voltage is included within the values i
ndicated on the Technical details table
(see page 5);
the socket is compatible with the washing
machine's plug. If this is not the case, replace
the socket or the plug.
Your appliance is now supplied with a 13 amp fused plug
it can be plugged into a 13 amp socket for immediate
use. Before using the appliance please read the
instructions below.
As the colours of the wires in the lead may not
correspond with the coloured markings identifyng the
terminals in your plug, proceed as follows:
Connect Green & Yellow wire to terminal marked E or
or coloured Green or Green & Yellow.
Connect Brown wire to terminal marked L or coloured
Red.
Connect Blue wire to terminal marked N or coloured
Black.
3
Page 4
EN
If a 13 amp plug (BS 1363) is used it must be fitted with
a
13 amp fuse, either in the plug or adaptor or at the
distribution board.
If you are in any doubt the electrical supply to your
machine, consult a qualified electrician before use.
How to connect an alternative plug:
The wires in this mains lead are coloured in accordance
with the following code:
BLUE NEUTRAL (N)
BROWN LIVE (L)
GREEN & YELLOW EARTH (E)
Disposing of the appliance:
When disposing of the appliance please remove the plug
by cutting the mains cable as close as possible to the
plug body and dispose of it as described above.
GREEN &
YELLOW
BROWN
BLUE
13 ampere fuse
CROSS-BAR
CORD GRIP
The washing machine should not be installed in an
outdoor environment, not even when the area is
sheltered, because it may be very dangerous to leave it
exposed to rain and thunderstorms.
When the washing machine is installed, the mains
socket must be within easy reach.
Do not use extensions or multiple sockets.
The power supply cable must never be bent or
dangerously compressed.
The power supply cable must only be replaced by an
authorised serviceman.
Warning! The company denies all liability if and when
these norms are not respected.
4
Page 5
Technical data
EN
Model
Dimensions
Capacity
Electrical
connections
Water connections
Spin speed
Energy rated
programmes
according to
regulation
EN 50229
AQM9F 09 U
width 59,5 cm
height 85 cm
depth 64,5 cm
from 1to 9 kg for wash programme
from 1 to 6 kg for the drying programme
please refer to the technical data
plate fixed to the machine
maximum pressure 1 MPa (10 bar)
minimum pressure 0.05 MPa (0.5 bar)
drum capacity 62 litres
up to 1000 rotations per minute
Wash: programme ; temperature
60°C; using a load of 9 kg.
Drying: first drying cycle performed
with a 3 kg load, by selecting the
drying level "L1";
Second drying cycle performed with a
6 kg load, selecting the maximum
drying level "L4".
This appliance conforms to the
following EC Directives:
- 89/336/EEC dated 03/05/89
(Electromagnetic Compatibility) and
subsequent modifications
- 2006/95/EC (Low Voltage)
- 2002/96/EC
5
Page 6
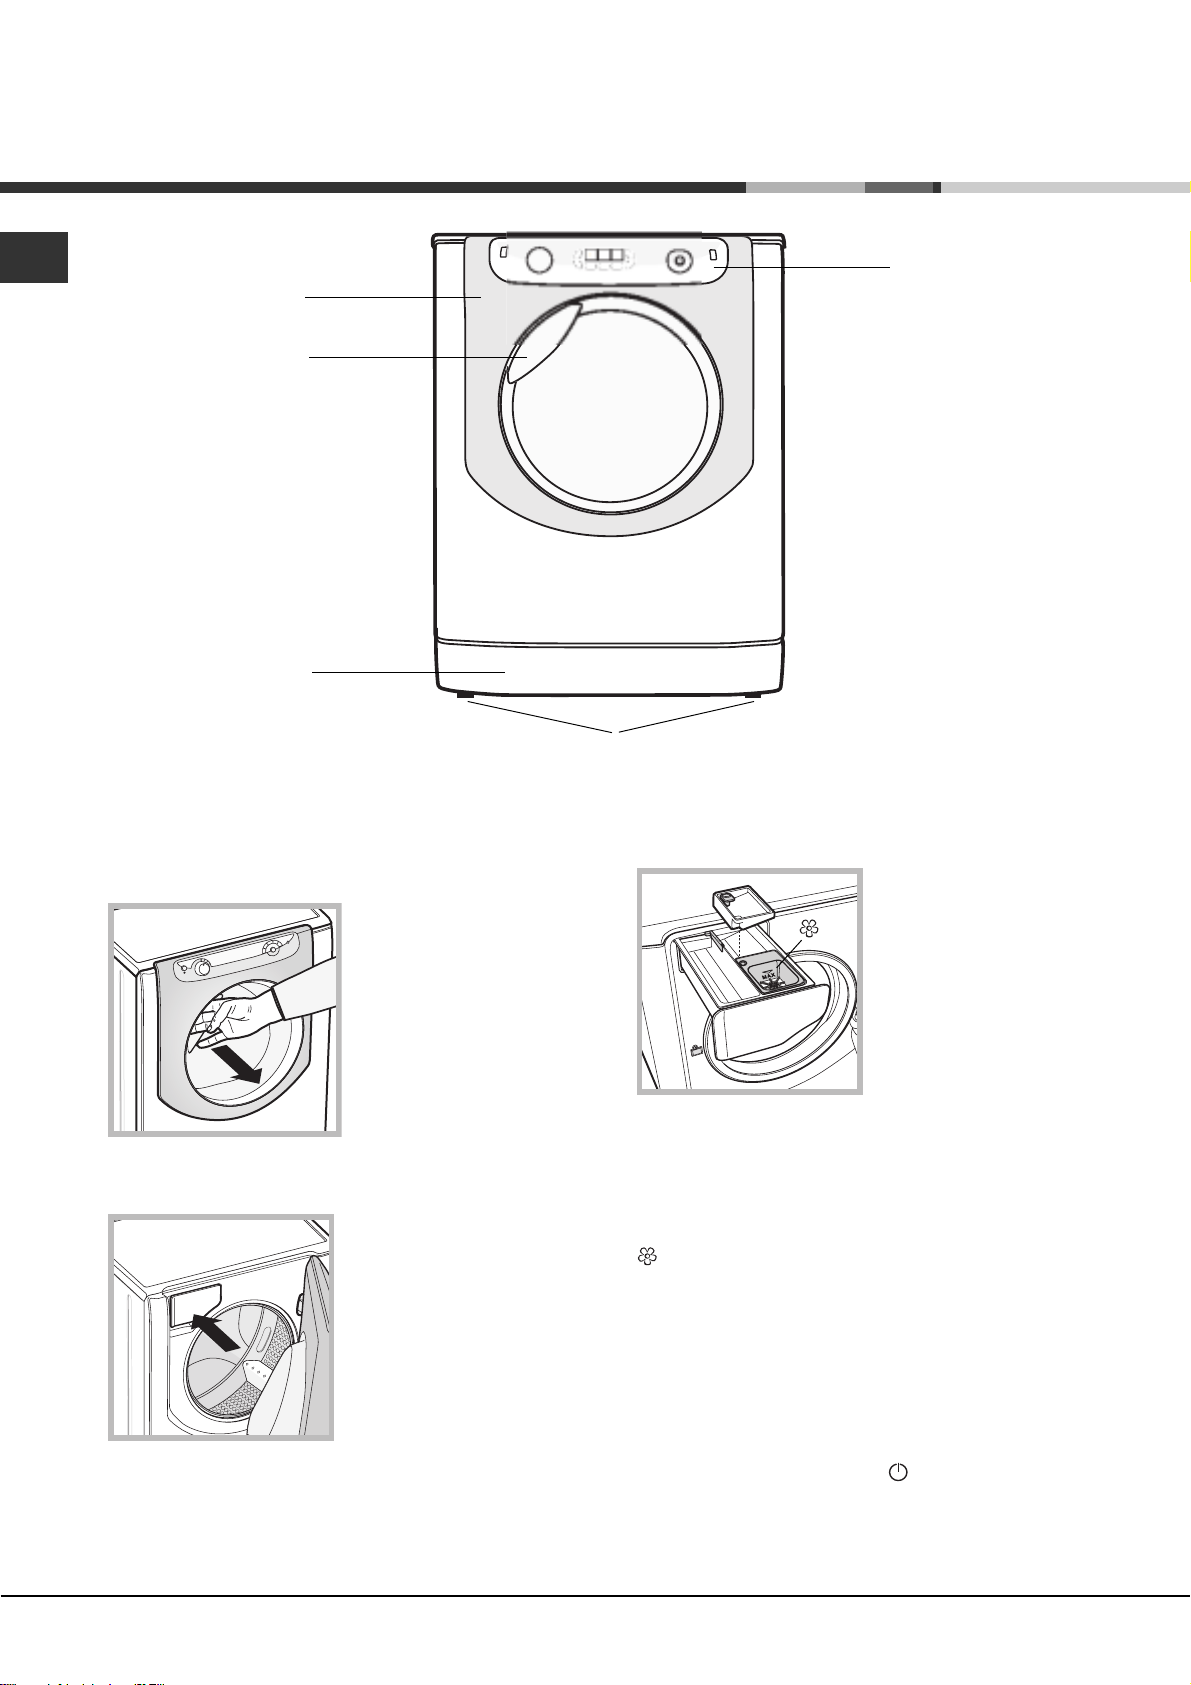
Description of the machine
EN
PORTHOLE DOOR
PORTHOLE DOOR
HANDLE
KICK STRIP
CONTROL
PANEL
ADJUSTABLE FEET
PORTHOLE DOOR
Always use the handle to
open the porthole door (see
figure).
DETERGENT DISPENSER DRAWER
The detergent dispenser
drawer is located inside the
machine and can be
accessed by opening the
door.
For more information on
detergent measures, please
refer to the chapter entitled
Detergents and laundry.
Note: stick the label showing
the wash cycle descriptions and options on the front of
the detergent dispenser drawer. You will find the sticker
in the pack containing this manual.
1. pre-wash compartment:
3
1
2
the drawer immediately before you start the washerdryer.
3. extra compartment: Bleach
The use of extra compartment 3 excludes the prewash function.
washing additives compartment: for fabric softener or
liquid additives. We recommend that the maximum level
indicated by the grille is not exceeded, and that
concentrated fabric softeners are diluted.
Standby mode
This washer-dryer, in compliance with new energy saving
regulations, is fitted with an automatic standby system
which is enabled after about 30 minutes if no activity is
detected. Press the ON-OFF
for the machine to start up again.
use powder detergent.
Before pouring in the
detergent, make sure that
extra compartment 3 has
been removed.
2. main wash compartment:
use powder or liquid
detergent. If using the latter
type of detergent, we
recommend it is poured into
button briefly and wait
6
Page 7
Control panel
WASH CYCLE
SELECTOR knob
TEMPERATURE
OPTION buttons with
indicator lights
display
DRYING
display
DELAYED START/CYCLE
DURATIONdisplay
ECO indicator light
OPTION buttons with
indicator lights
EN
WASH
CYCLE
PHASE
icons
START/PAUSE
button with indicator
light
Button withON/OFF
indicator light
TEMPERATURE button
DRYING
Button with ON/OFF indicator light: press this briefly
to switch the machine on or off. The green indicator light
indicates that the machine is switched on. To switch off
the washer-dryer during the wash cycle, press and hold
the button for approximately 3 seconds; if the button is
pressed briefly or accidentally the machine will not
switch off. If the machine is switched off during a wash
cycle, this wash cycle will be cancelled.
WASH CYCLE SELECTOR knob: may be turned in
either direction. To select the most suitable wash cycle,
please refer to the Table of wash cycles.
The knob will not move during the wash cycle.
TEMPERATURE
button: press to modify or exclude
the temperature setting; the value selected will appear
on the display above (see "How to run a wash cycle or a
drying cycle").
DRYING button
: press to decrease or exclude drying;
the selected drying level or time will appear on the display
(see "How to run a wash cycle or a drying cycle").
DELAYED START
button: press to set a delayed
start for the selected wash cycle; the set delay time will
appear on the display above (see "How to run a wash
cycle or a drying cycle").
OPTION buttons with indicator lights: press to select the
available options. The indicator light corresponding to the
selected option will remain lit (see "How to run a wash
cycle or a drying cycle").
button
DELAYED
START
button
DOOR LOCKED
indicator light
CONTROL PANEL
LOCK button with
indicator light
WASH CYCLE PHASE icons: these illuminate to
indicate the progress of the wash cycle (Wash
Rinse
Spin/Drain Drying ). The text
lights up when the cycle is complete.
START/PAUSE button with indicator light: when the
green indicator light flashes slowly, press the button to
start a wash cycle. Once the cycle has begun the
indicator light will remain lit in a fixed manner. To pause
the wash cycle, press the button again; the indicator
light will flash in an orange colour. If the Door locked
indicator light is switched off, the door may be
opened. To start the wash cycle from the point at which
it was interrupted, press the button again.
DOOR LOCKED
indicator light: indicates that the
porthole door is locked. To open the door, pause the
wash cycle (see "How to run a wash cycle or a drying
cycle").
CONTROL PANEL LOCK
button with indicator
light: to activate or deactivate the control panel lock,
press and hold the button for approximately 2 seconds.
when the indicator light is illuminated, the control panel is
locked. This means it is possible to prevent wash cycles
from being modified accidentally, especially where there
are children in the home.
ECO indicator light: the
icon lights up when, after
altering the washing parameters, an energy saving of at
least 10% is made. Furthermore, before the machine
enters Standby mode, the icon will light up for a few
seconds; when the machine is switched off the
estimated energy saving will be around the 80% mark.
7
Page 8
How to run a wash cycle or a
drying cycle
EN
WARNING: before you use the washer-dryer for the first
time, run a wash cycle with detergent and no laundry,
using the 90° cottons cycle without pre-wash.
1. SWITCH THE MACHINE ON. Press the
All the indicator lights will illuminate for 1 second; the
indicator light corresponding to the
remain lit in a fixed manner and the START/PAUSE
indicator light will flash slowly.
2. LOAD THE LAUNDRY. Open the porthole door.
Load the laundry, making sure you do not exceed the
maximum load value indicated in the table of wash
cycles on the following page.
3. MEASURE OUT THE DETERGENT. Pull out the
detergent dispenser drawer and pour the detergent
into the relevant compartments as described in
Description of the machine.
4. CLOSE THE PORTHOLE DOOR.
5. SELECT THE PROGRAMME. Turn the WASH CYCLE
SELECTOR KNOB right or left, until you have selected
the desired wash cycle. A temperature and spin speed is
set for each wash cycle; these may be adjusted.
6. CUSTOMISE THE WASH CYCLE. Use the
relevant buttons on the control panel:
Modify the temperature.
The machine automatically displays the maximum
temperature values set for the selected cycle, or the
most recently-used settings if they are compatible
with the selected cycle. The temperature can be
decreased by pressing the
wash (
pressed again, the maximum values are restored.
Exception: if the Cottons programme is selected, the
temperature can be increased up to a value of 90°C.
Setting the drying cycle
The first time the button
will automatically select the maximum drying cycle
which is compatible with the selected wash cycle.
Subsequent presses will decrease the drying level and
then the drying time, until the cycle is excluded
completely (
the maximum values are restored.
Drying may be set as follows:
A - Based on a set time period: between 20 and 180
minutes.
B- Based on the desired laundry dryness level:
Iron (L1): suitable for clothes which will need ironing
afterwards. the remaining dampness softens creases,
making them easier to remove.
Hanger (L2): ideal for clothes which do not need to be
dried fully.
Cupboard (L3): suitable for laundry which can be put
back in a cupboard without being ironed.
Extra (L4): suitable for garments which need to be
dried completely, such as sponges and bathrobes.
If your laundry load to be washed and dried is much
greater than the maximum stated load (see adjacent
table), perform the wash cycle, and when the cycle is
complete, divide the garments into groups and put
some of them back in the drum. At this point, follow
the instructions provided for a "Drying only" cycle.
) setting is reached. If these buttons are
). If these buttons are pressed again,
button, until the cold
is pressed, the machine
button will then
button.
Repeat this procedure for the remainder of the load. A
cooling-down period is always added to the end of
each drying cycle.
Drying only
Use the cycle selector knob to select a drying cycle
(
- - ) in accordance with the type of fabric. The
desired drying level or time may also be set using the
DRYING button
Set a delayed start.
Press the button until you have reached the desired
delay time. During the setting process, the delay time
is shown on the display and the
After selecting a delayed start time, the fixed
symbol and the cycle duration will appear on the
display. Press the button once to display the selected
delay time. To remove the delayed start option, press
the button until the display shows the text OFF; the
symbol will disappear.
Once the START/PAUSE button has been pressed,
the time delay may only be decreased.
Modify the cycle settings.
Press the OPTION buttons to customise the wash
cycle in accordance with your own requirements.
Press the button to activate the option; the
corresponding indicator light will switch on.
Press the button again to disable the option; the
indicator light will switch off.
If the selected option is not compatible with the
selected wash cycle, this incompatibility will be
signalled by the flashing of the indicator light and a
sound alert (3 beeps); the option will not be activated.
If the selected option is not compatible with another
option that has been selected previously, the indicator
light corresponding to the first option selected will flash
and only the second option will be activated; the
indicator light corresponding to the button will remain
lit in a constant manner.
7. START THE PROGRAMME. Press the START/
PAUSE button. The corresponding indicator light
remains lit in a fixed manner and the porthole door
locks (the
illuminates). The icons corresponding to the wash
cycle phases will light up during the cycle to indicate
which phase is currently in progress.
To change a wash cycle once it has already started,
pause the washer-dryer by pressing the START/
PAUSE button; then select the desired cycle and
press the START/PAUSE button again. To open the
door during a wash cycle, press the START/PAUSE
button; if the DOOR LOCKED
switched off you may open the door. Press the
START/PAUSE button again to restart the wash cycle
from the point at which it was interrupted.
8. THE END OF THE WASH CYCLE. This is indicated
by the illuminated text END. The porthole door may be
opened immediately. If the START/PAUSE indicator light
is flashing, press the button to end the cycle. Open the
door, unload the laundry and switch off the machine.
If you wish to cancel a cycle which has already begun,
press and hold the
the machine switches off.
.
symbol flashes.
DOOR LOCKED indicator light
indicator light is
button until the cycle stops and
8
Page 9
Wash cycles and options
Table of wash cycles
Icon Description of the wash cycle
Cottons wash cycles
Cottons
(Add detergent to the relevant compartment).
Cottons (1):
Cottons (2):
Coloured
Jeans
Special cycles
Baby:
Mix 30':
for wool, silk and clothes which require washing by hand)
Durable
Silk:
Wool:
Drying cycles
Wash&Dry 30° 1000
Drying Cotton - Drying Synthetic - Drying Wool - -
Partials wash cycles
Rinse - 1000
Spin - 1000
Drain - 0 - - - - 9
(*) Note: 10 minutes after the START, the machine will recalculate the time remaining until the end of the wash cycle on the basis of the load inside it; this
value will then be shown on the display.
For all Test Institutes:
1) Test wash cycle in compliance with regulation EN 50229: set wash cycle
2) Long wash cycle for cottons: set wash cycle
3) Short wash cycle for cottons: set wash cycle
with pre-wash
heavily soiled whites and resistant colours.
heavily soiled whites and delicate colours.
Cottons (3)
heavily soiled delicate colours
to refresh lightly soiled garments quickly (not suitable
Synthetics
for garments in silk and viscose, lingerie.
for wool, cashmere, etc.
with a temperature of 40°C.
with a temperature of 40°C.
Max.
temp.
(°C)
90° 1000
60°
(Max. 90°)
40° 1000
40° 1000
40° 800
40° 800
30° 800
60° 800
30° 0 -
40° 800
with a temperature of 60°C.
Wash options
Super Wash
This option offers a high-performance wash due to the
greater quantity of water used in the initial phase of the
cycle, and due to the increased wash cycle duration, is
particularly useful for the
3
1
2
carrying out a full wash cycle, pour the bleach into the
extra compartment 3, select the "Rinse" cycle
activate the "Super Wash" option
It cannot be used in conjunction with
, , , , , .
Easy Iron
By selecting this option, the wash and spin cycles will be
modified in order to reduce the formation of creases.
At the end of the cycle the washer-dryer drum
will rotate slowly; the Easy Iron and START/PAUSE
removal of stubborn stains.
It can be used with or
without bleach. If you desire
bleaching, insert the extra
tray compartment (3) into
compartment 1. When
pouring in the bleach, be
careful not to exceed the
max level marked on the
central pivot (see figure).
To bleach laundry without
and
.
, , , , ,
Max.
speed
Drying
(rpm)
1000
indicator lights will flash. To end the cycle press the
START/PAUSE button or the Easy Iron button.
For the Silk
cycle while the laundry is soaking and the Easy
Iron indicator light will flash. To drain the water so that
the laundry may be removed, press the START/PAUSE
button or the Easy Iron button.
It cannot be used in conjunction with
, , , .
Note: If you also want to run the drying cycle, this option is
enabled only if combined with level Iron (L1).
Time Saver
If you select this option, the wash cycle duration will be
reduced by 30%-50%, depending on the selected cycle,
thereby guaranteeing simultaneous water and energy
saving. Use this cycle for lightly soiled garments.
It cannot be used in conjunction with
, , , , , .
Extra rinse
By selecting this option, the efficiency of the rinse is
increased and optimal residual detergent removal is
guaranteed. It is particularly useful for skin which is
sensitive to detergents. We recommend this option is
used with a full load of washing, or when a large amount
of detergent is required.
It cannot be used in conjunction with
, .
Detergent and additives
Wash
ll l
ll l l
ll l l
ll l l
ll l
ll l l
ll l
ll l l
ll l
ll l
l
l
l
l
l
Fabric
softener
ll
- - - 6
- - - 4
- - - 1,5
-
- - - 9
Bleach
ll
Max.
load
(kg)
- 9
9
9
9
- 4
4
- 3,5
4
- 2
- 2
- 1
9
wash cycle, the machine will end the
, , , , ,
, , , , ,
, , , , ,
Cycle
duration
on the display.
EN
(*) The duration of the wash cycles can be checked
9
Page 10

Detergents and laundry
EN
Detergent
The type and quantity of detergent required depend on
the type of fabric you are washing (cotton, wool, silk,
etc.), as well as its colour, the washing temperature, the
level of soiling and the hardness of the water in the area.
Measuring out the detergent carefully will avoid wastage
and help to protect the environment: although they are
biodegradable, detergents still contain ingredients which
alter the balance of nature.
We recommend the following:
use powder detergents for white cotton garments and
pre-washing.
use liquid detergents for delicate cotton garments and
for all low-temperature wash cycles.
use gentle liquid detergents for wool and silk
garments.
The detergent should be poured into the relevant
compartment - or the dispenser placed directly inside
the drum - before the wash cycle begins. In the latter
case, it will not be possible to select the Cottons with
pre-wash cycle.
Do not use hand washing detergents because these
create too much foam.
Preparing the laundry
Shake out the garments before loading them into the
machine.
Divide the laundry according fabric type (symbol on the
washing instruction label) and colour, making sure you
separate the coloured garments from the white ones;
Empty all pockets and check the buttons;
Do not exceed the values listed in the Table of wash
cycles, which refer to the weight of the laundry when dry.
How much does your laundry weigh?
1 sheet 400-500 g
1 pillowcase 150-200 g
1 tablecloth 400-500 g
1 bathrobe 900-1200 g
1 towel 150-250 g
1 pair of jeans 400-500 g
1 shirt 150-200 g
Curtains: use the Silk
and place them in a pillow case or mesh bag.
Wool: Ariston is the only washer-dryer brand to have
been awarded the prestigious Woolmark Platinum Care
endorsement (M.0508) by the Woolmark Company,
which means that all woollen garments may be washed
in the washer-dryer, even those which state hand wash
only
used to wash all woollen garments in the washer-dryer
while guaranteeing optimum performance.
Bedlinen and towels: use the Bed & Bath
to wash laundry from all over the house; this optimises
fabric softener performance and helps you save time and
energy. We recommend the use of powder detergent.
Stubborn stains: it is wise to treat stubborn stains with
solid soap before washing, and to use the Cottons with
pre-wash cycle.
Wash & Dry
soiled garments quickly. This cycle may be used to wash
and dry a laundry load of up to 1 kg in just 60 minutes.
To achieve optimum results, use liquid detergent and pretreat cuffs, collars and stains.
on the label. The Wool wash cycle can be
was designed to wash and dry lightly
wash cycle. Fold curtains
cycle
Load balancing system
Before every spin cycle, to avoid excessive vibrations
before every spin and to distribute the load in a uniform
manner, the drum rotates continuously at a speed which
is slightly greater than the washing rotation speed. If,
after several attempts, the load is not balanced
correctly, the machine spins at a reduced spin speed. If
the load is excessively unbalanced, the washer-dryer
performs the distribution process instead of spinning. To
encourage improved load distribution and balance, we
recommend small and large garments are mixed in the
load.
Washing recommendations
Jeans: use the special Jeans wash cycle for all
denim garments; turn inside out before washing and use
a liquid detergent.
Baby: use the special Baby
the remove the soiling typically caused by babies, while
removing all traces of detergent from nappies in order to
prevent the delicate skin of babies from suffering allergic
reactions. The cycle has been designed to reduce the
amount of bacteria by using a greater quantity of water
and optimising the effect of special disinfecting additives
added to the detergent. At the end of the wash cycle,
the machine will slowly rotate the drum; to end the cycle
press the START/PAUSE button.
Silk: use the special Silk
garments. We recommend the use of special detergent
which has been designed to wash delicate clothes.
10
wash cycle to remove
wash cycle to wash all silk
Page 11
Precautions and tips
The machine was designed and constructed in
accordance with international safety regulations. The
following information is provided for safety reasons and
must therefore be read carefully.
General safety
This appliance is not intended for use by persons
(including children) with reduced physical, sensory or
mental capabilities, or lack of experience and
knowledge, unless they have been given supervision
or instruction concerning use of the appliance by a
person responsible for their safety.
Children should be supervised to ensure that they do
not play with the appliance.
Do not dry unwashed items in the tumble dryer.
Items that have been soiled with substances such
as cooking oil, acetone, alcohol, petrol, kerosene,
spot removers, turpentine, waxes and wax removers
should be washed in hot water with an extra amount
of detergent before being dried in the tumble dryer.
Items such as foam rubber (latex foam), shower
caps, waterproof textiles, rubber backed articles and
clothes or pillows fitted with foam rubber pads should
not be dried in the tumble dryer.
Fabric softeners, or similar products, should be used
as specified by the fabric softener instructions.
The final part of a tumble dryer cycle occurs without
heat (cool down cycle) to ensure that the items are
left at a temperature that ensures that the items will
not be damaged.
WARNING: Never stop a tumble dryer before the end
of the drying cycle unless all items are quickly
removed and spread out so that the heat is
dissipated.
This appliance was designed for domestic use only.
Do not touch the machine when barefoot or with wet
or damp hands or feet.
Do not pull on the power supply cable when
unplugging the appliance from the electricity socket.
Hold the plug and pull.
Do not touch the drained water as it may reach
extremely high temperatures.
Never force the porthole door. This could damage the
safety lock mechanism designed to prevent
accidental opening.
If the appliance breaks down, do not under any
circumstances access the internal mechanisms in an
attempt to repair it yourself.
Always keep children well away from the appliance
while it is operating.
If it must be moved, proceed with the help of two or
three people and handle it with the utmost care.
Never try to do this alone, because the appliance is
very heavy.
Before loading laundry into the washer dryer, make
sure the drum is empty.
During the drying phase, the door tends to get
quite hot.
Do not use the appliance to dry clothes that have
been washed with flammable solvents (e.g.
trichlorethylene).
Do not use the appliance to dry foam rubber or
similar elastomers.
Make sure that the water tap is turned on during
the drying cycles.
Disposal
Disposing of the packaging materials: observe local
regulations so that the packaging may be re-used.
The European Directive 2002/96/EC relating to Waste
Electrical and Electronic Equipment (WEEE) states
that household appliances should not be disposed of
using the normal solid urban waste cycle. Exhausted
appliances should be collected separately in order to
optimise the cost of re-using and recycling the
materials inside the machine, while preventing
potential damage to the atmosphere and to public
health. The crossed-out dustbin is marked on all
products to remind the owner of their obligations
regarding separated waste collection.
For more information relating to the correct disposal of
household appliances, owners should contact their
local authorities or appliance dealer.
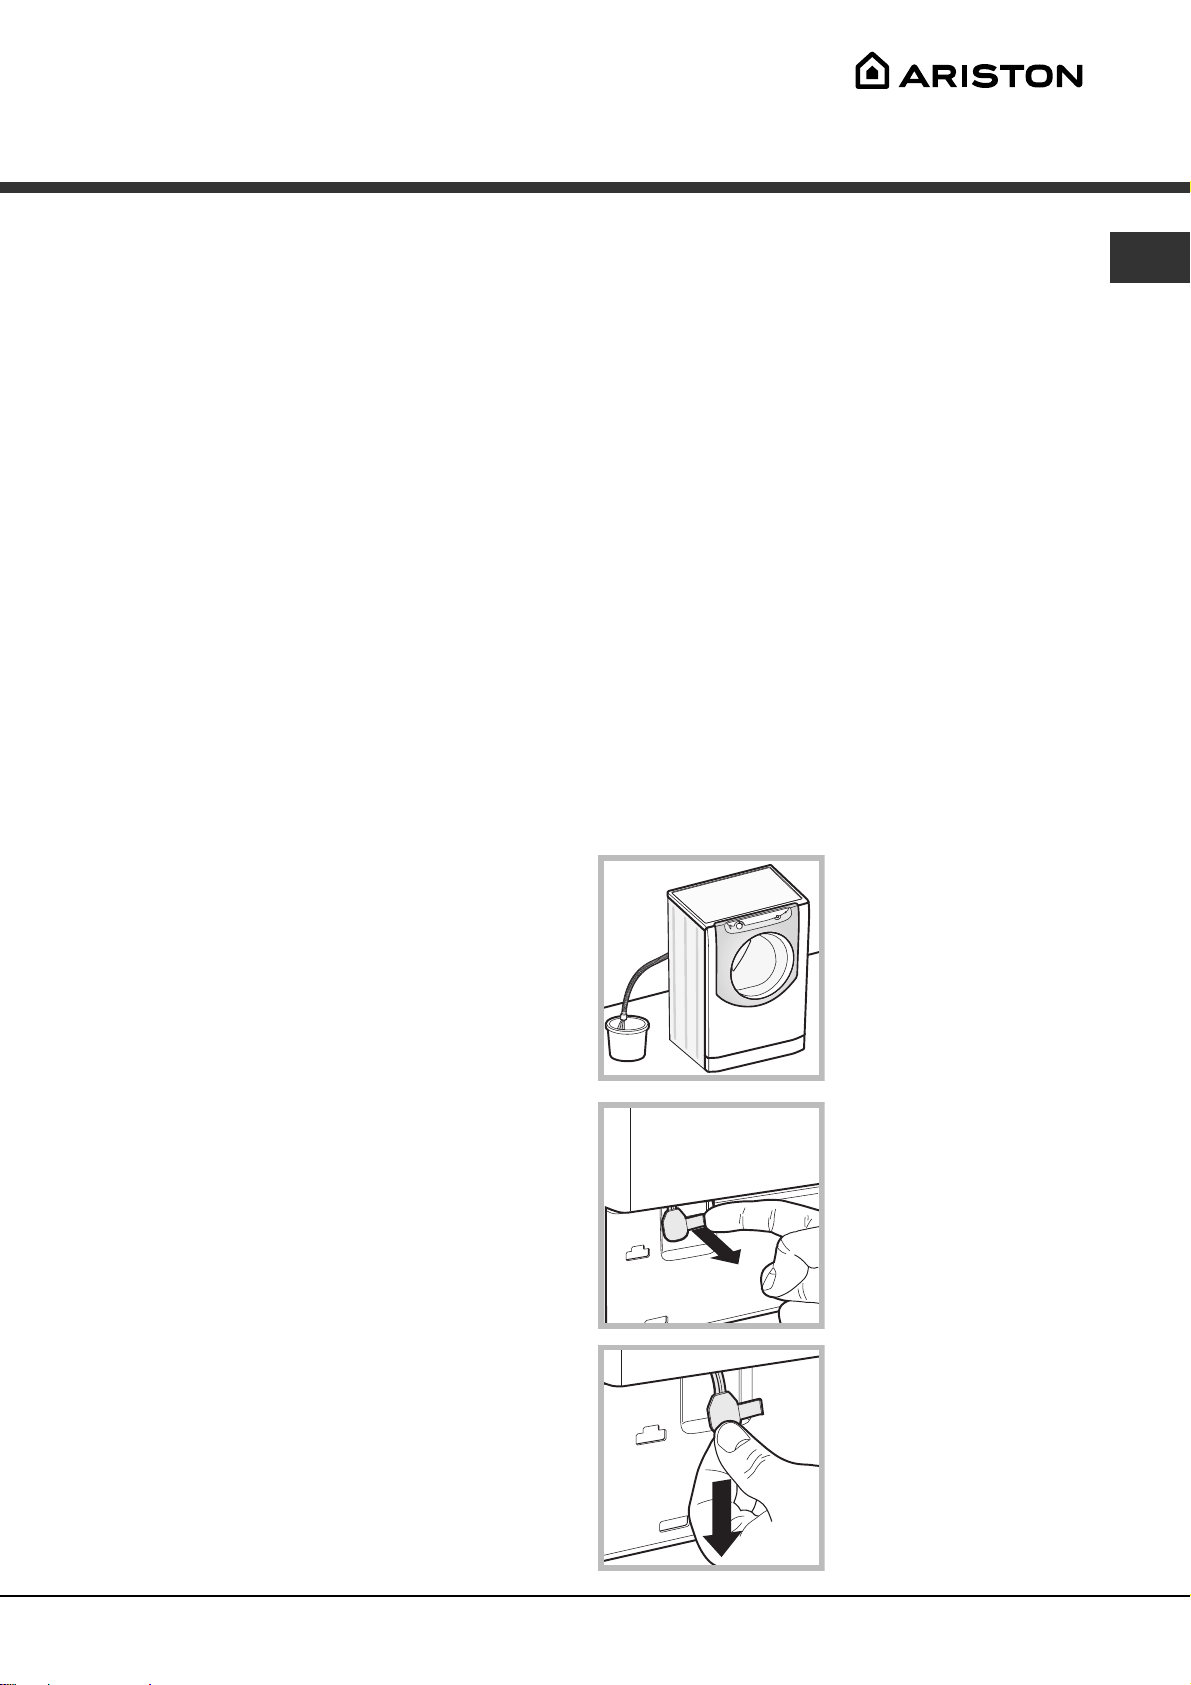
Opening the porthole door manually
In the event that it is not possible to open the porthole
door due to a powercut, and if you wish to remove the
laundry, proceed as follows:
1. remove the plug from the
electrical socket.
2. make sure the water level
inside the machine is lower
than the door opening; if it is
not, remove excess water
using the drain hose,
collecting it in a bucket as
indicated in the figure.
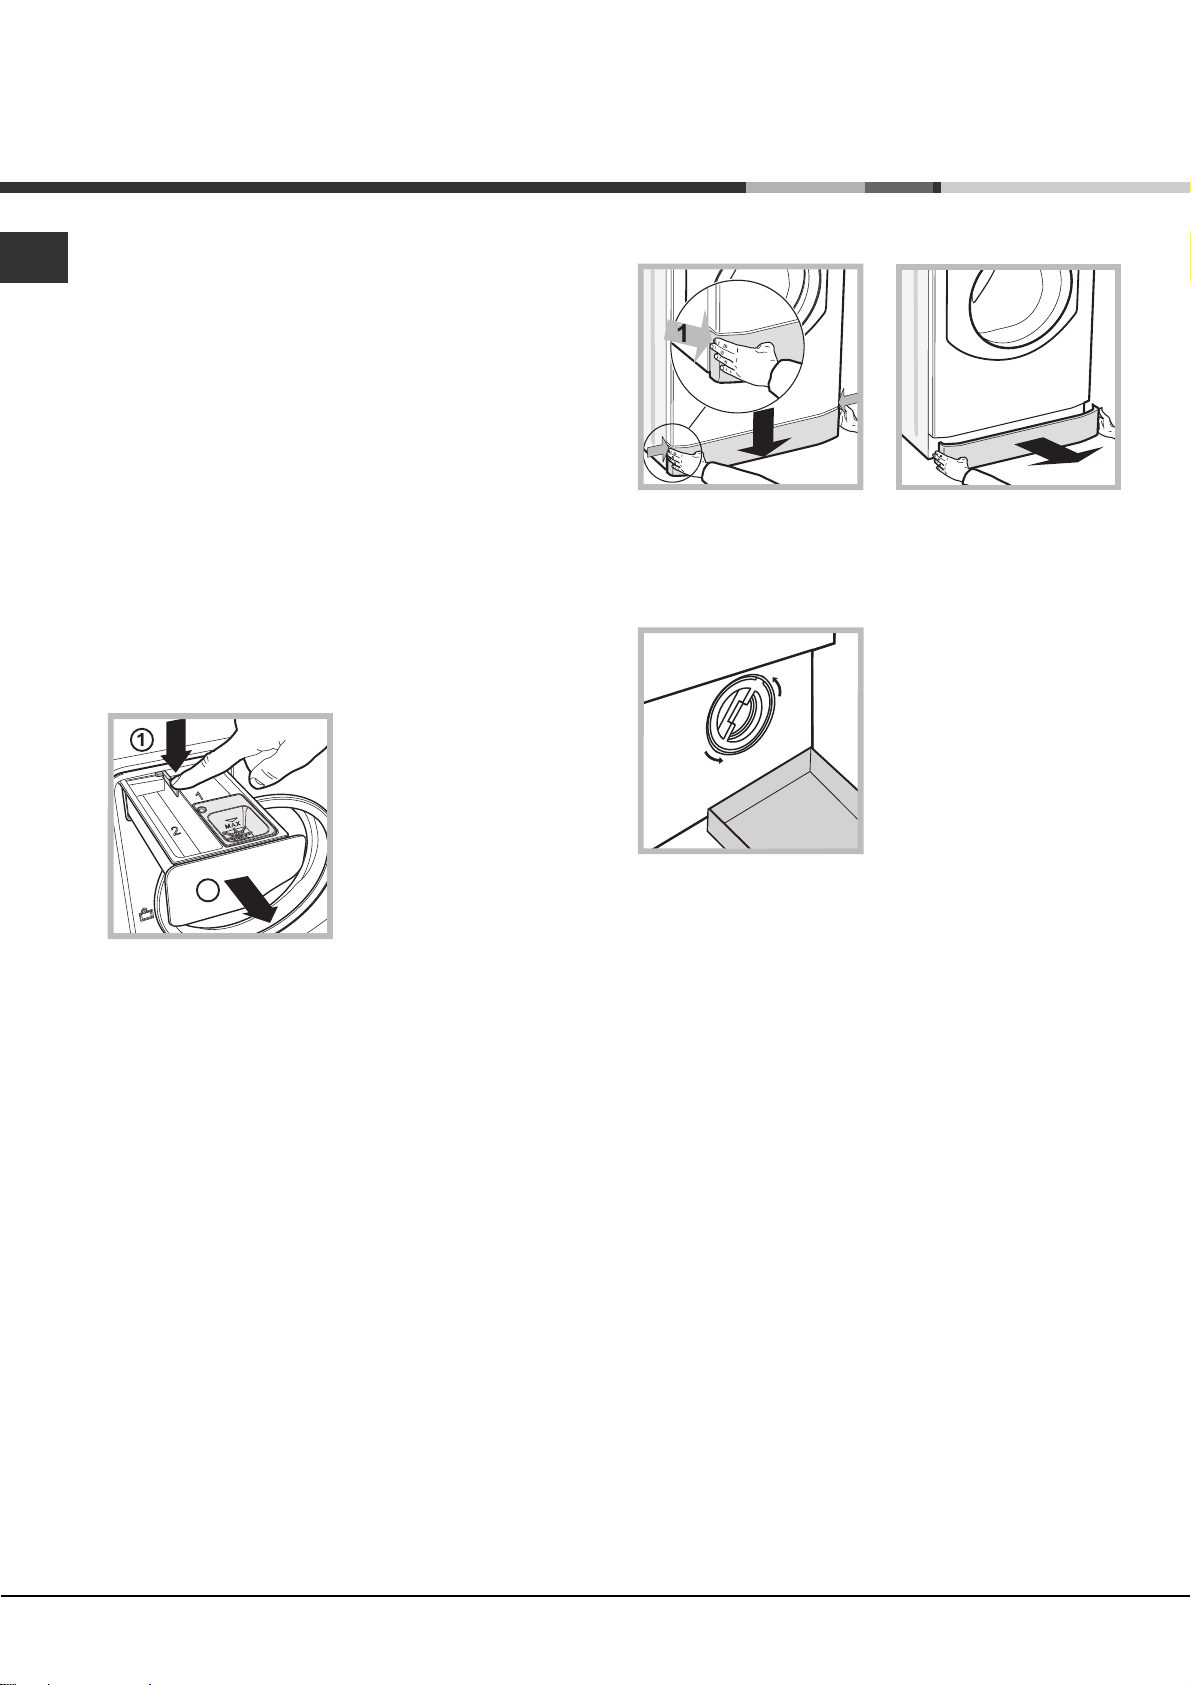
3. remove the cover panel
on the lower front part of the
washer dryer (see overleaf).
4. pull outwards using the
tab as indicated in the figure,
until the plastic tie-rod is
freed from its stop position;
pull downwards until you
hear a click, which
indicates that the door is
now unlocked.
5. open the door; if this is
still not possible repeat the
procedure.
6. reposition the panel,
making sure the hooks are
securely in place before you
push it onto the appliance.
EN
11
Page 12
Care and maintenance
EN
Cutting off the water and electricity
supplies
Turn off the water tap after every wash cycle. This will
limit wear on the hydraulic system in the machine and
help to prevent leaks.
Unplug the appliance when cleaning it and during all
maintenance work.
Cleaning the machine
The outer parts and rubber components of the appliance
can be cleaned using a soft cloth soaked in lukewarm
soapy water. Do not use solvents or abrasives.
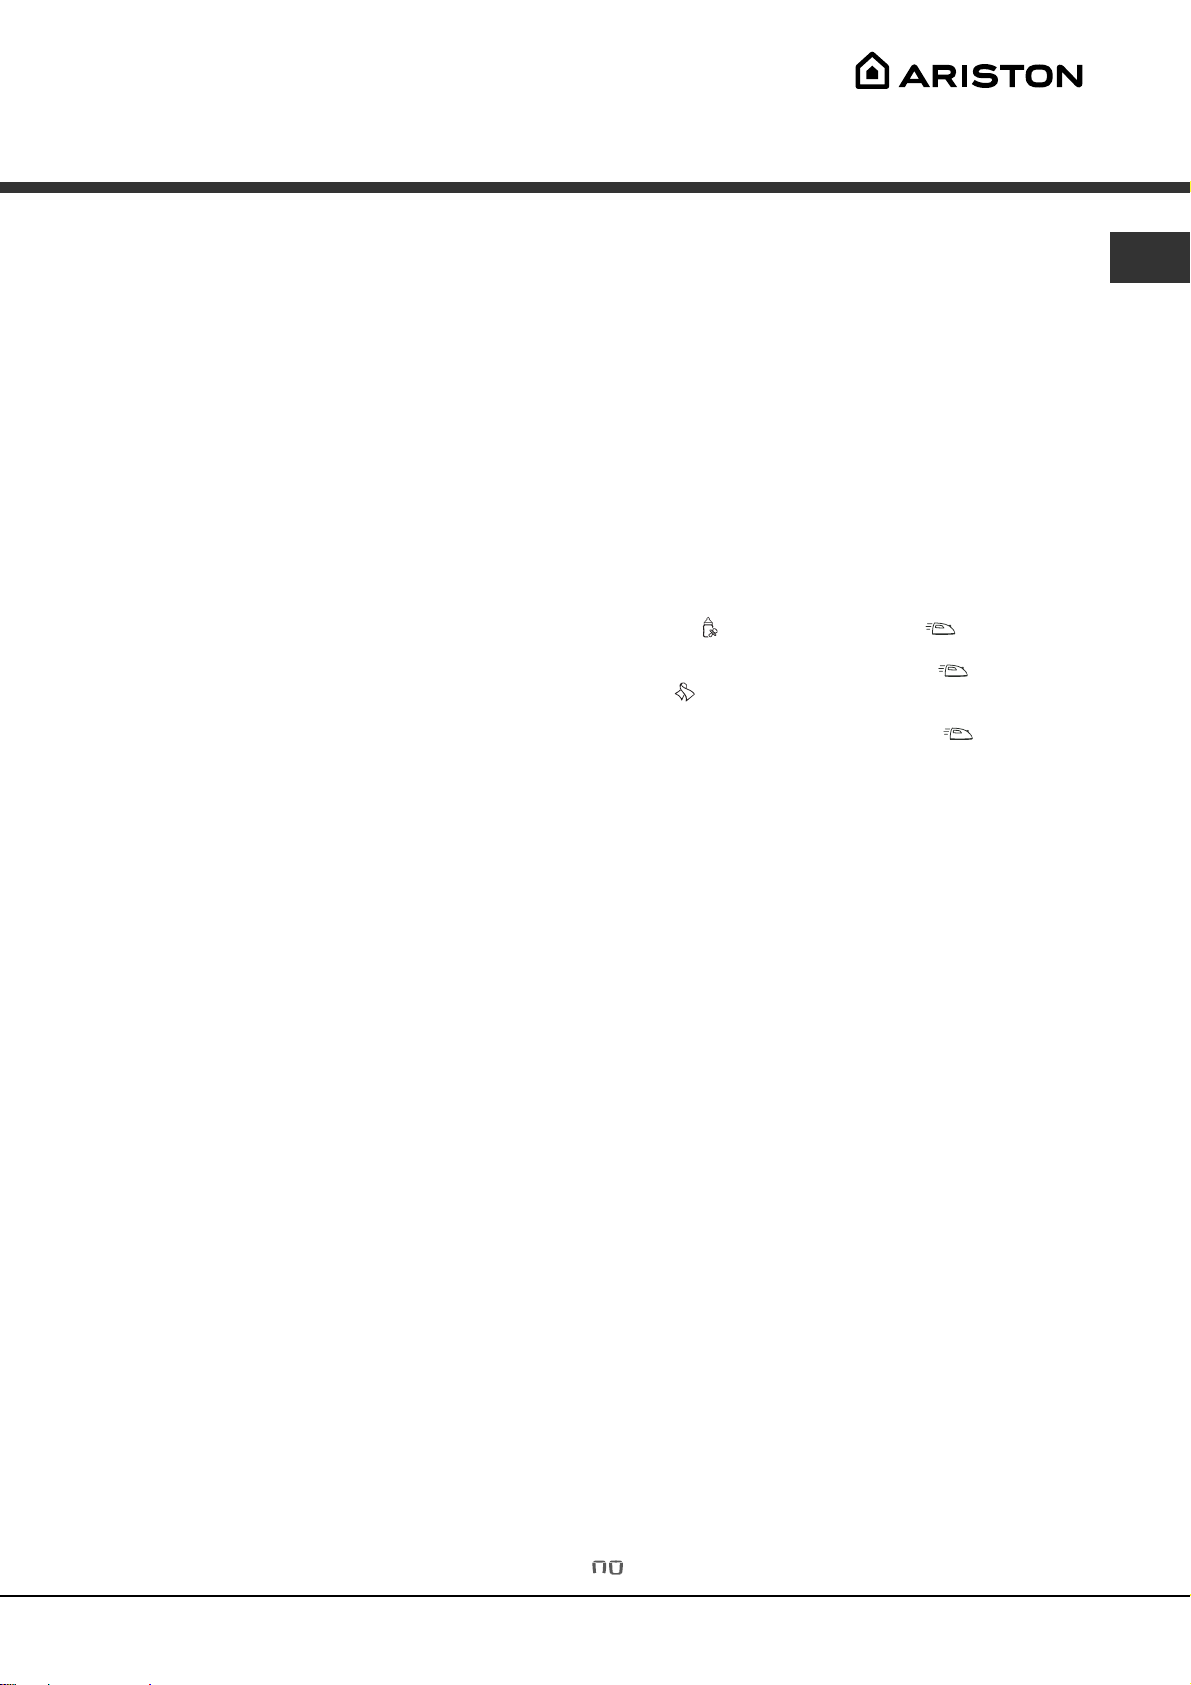
Cleaning the detergent dispenser
drawer
To remove the drawer, press
lever (1) and pull the drawer
outwards (2) (see figure).
Wash it under running
water; this procedure should
be repeated frequently.
To access the pre-chamber:
2
1. take off the cover panel on the front of the machine
by first pressing it in the centre and then pushing
downwards on both sides until you can remove it (see
figures);
2. position a container so
that it will collect the water
which flows out
(approximately 1.5 l) (see
figure);
3. unscrew the lid by
rotating it in an anticlockwise direction (see
figure);
Caring for your appliance drum
Always leave the door ajar to prevent unpleasant
odours from forming.
Cleaning the pump
The washer-dryer is fitted with a self-cleaning pump
which does not require any maintenance. Sometimes,
small items (such as coins or buttons) may fall into the
protective pre-chamber at the base of the pump.
Make sure the wash cycle has finished and unplug the
appliance.
4. clean the inside thoroughly;
5. screw the lid back on;
6. reposition the panel, making sure the hooks are
securely in place before you push it onto the appliance.
Checking the water inlet hose
Check the inlet hose at least once a year. If there are
any cracks, it should be replaced immediately: during
the wash cycles, water pressure is very strong and a
cracked hose could easily split open.
12
Page 13
Trouble shooting
Your washer-dryer could occasionally fail to work. Before contacting the Technical Assistance Centre
(see Assistance), make sure that the problem cannot be not solved easily using the following list.
Problem:
The washer-dryer does not switch on.
The wash cycle does not start.
The washer-dryer does not fill
with water.
The washer-dryer door remains
locked.
The machine continuously fills
with water and drains.
The washer-dryer does not drain
or spin.
The machine vibrates a lot during
the spin cycle.
The washer-dryer leaks.
The icons corresponding to the
Phase in progress flash rapidly
at the same time as the ON/OFF
Possible causes / Solutions:
The appliance is not plugged into the socket fully, or not enough to make contact.
There is no power in the house.
The door is not closed properly.
The START/PAUSE button has not been pressed.
The water tap has not been opened.
A delayed start has been set.
The water inlet hose is not connected to the tap.
The hose is bent.
The water tap has not been opened.
There is no water supply in the house.
The pressure is too low.
The START/PAUSE button has not been pressed.
If you have selected the Baby
the wash cycle has finished the machine will slowly rotate the drum; to end
the cycle press the START/PAUSE button or the Easy iron
you have selected the Silk
while the laundry is soaking; to drain the water so that the laundry may be
removed, press the START/PAUSE button or the Easy iron
The drain hose is not fitted at a height between 65 and 100 cm from the
floor (see Installation).
The free end of the hose is under water (see Installation).
If the dwelling is on one of the upper floors of a building, there may be
problems relating to water drainage, causing the washer-dryer to fill with
water and drain continuously. Special anti-draining valves are available in
shops and help to prevent this inconvenience.
The wall drainage system is not fitted with a breather pipe.
The wash cycle does not include draining: Some wash cycles require the
drain phase to be started manually (see Wash cycles and options).
The Easy iron option is enabled: to complete the wash cycle, press the
START/PAUSE button (Wash cycles and options).
The drain hose is bent (see Installation).
The drainage duct is clogged.
The drum was not unlocked correctly during installation (see Installation).
The machine is not level (see Installation ).
The machine is trapped between cabinets and walls (see Installation).
The load is unbalanced (see Detergents and laundry).
The water inlet hose is not screwed on properly (see Installation).
The detergent dispenser is blocked (to clean it, see Care and maintenance).
The drain hose is not fixed in place properly (see Installation).
Switch off the machine and unplug it, wait for approximately 1 minute and
then switch it back on again. If the problem persists, contact the Technical
Assistance Service.
cycle or the Easy iron option, when
wash cycle, the machine will end the cycle
indicator light.
EN
button. If
button.
There is too much foam.
The washer-dryer door remains locked.
The washer-dryer does not dry.
The detergent is not suitable for machine washing (it should display the text
for washer-dryers or hand and machine wash, or the like).
Too much detergent was used.
Perform the manual unlocking procedure (see Precautions and tips).
The appliance is not plugged into the socket, or not enough to make contact.
There has been a power failure.
The appliance door is not shut properly.
A DELAY TIMER has been set.
DRYING is in the
position.
13
Page 14

Assistance
EN
Before calling for Assistance:
Check whether you can solve the problem by yourself (see Trouble shooting);
Restart the wash cycle to check whether the problem has been solved;
If it has not, contact the Authorised Technical Assistance Service.
If the washer-dryer has been installed or used incorrectly, you will have to pay for the call-out service.
Always request the assistance of authorised technicians.
Please have the following information to hand:
the type of problem;
the appliance model (Mod.);
the serial number (S/N).
The above information can be found on the data plate located on the appliance itself.
Note: To exit Demo mode, press and hold the two ON/OFF and START/PAUSE buttons simultaneously for 3 seconds.
14
Page 15

Instrucciones para la
instalación y el uso
! Este símbolo te recuerda que debes leer este manual de
instrucciones.
ES
Sumario
Español
Instalación, 16-17-18-19
Desembalaje y nivelación
Conexiones hidráulicas y eléctricas
Datos técnicos
Descripción de la máquina, 20-21
Panel de control
Cómo efectuar un ciclo de lavado o de
secado, 22
Programas y opciones, 23
Tabla de Programas
AQUALTIS
Opciones de lavado
LAVASECADORA
ES
AQM9F 09 U
Detergentes y ropa, 24
Detergente
Preparar la ropa
Consejos sobre el lavado
Sistema de equilibrado de la carga
Precauciones y consejos, 25
Seguridad general
Eliminación
Apertura manual de la puerta
Mantenimiento y cuidados, 26
Interrumpir el agua y la corriente eléctrica
Limpiar la máquina
Limpiar el contenedor de detergentes
Cuidar el cesto
Limpiar la bomba
Controlar el tubo de alimentación de agua
Anomalías y soluciones, 27
Asistencia, 28
15
Page 16
Instalación
ES
Es importante conservar este manual para poder
consultarlo en cualquier momento. En el caso de venta,
cesión o traslado, controle que permanezca junto con la
lavasecadora.
Lea atentamente las instrucciones: ellas contienen
importante información sobre la instalación, el uso y la
seguridad.
En el sobre que contiene este manual encontrará,
además de la garantía, piezas que servirán para la
instalación.
Desembalaje y nivelación
Desembalaje
1. Una vez desembalada la lavasecadora, controle que
no haya sufrido daños durante el traslado.
Si estuviera dañada no la conecte y llame al revendedor.
2. Quite los 4 tornillos de
protección para el
transporte y el
correspondiente
distanciador, ubicados en
la parte posterior (ver la
figura).
Cuando se instala sobre moquetas o alfombras, regule
las patas para que, debajo de la lavasecadora, quede un
espacio suficiente para la ventilación.
Conexiones hidráulicas y eléctricas
Conexión del tubo de alimentación de agua
Antes de conectar el tubo de alimentación a la red
hídrica, haga correr agua hasta que sea límpida.
1. Conecte el tubo de
alimentación a la máquina
enroscándolo en la toma
de agua correspondiente
ubicada en la parte
posterior derecha (arriba)
(ver la figura).
2. Conecte el tubo de
alimentación enroscándolo
a un grifo de agua fría con
la boca roscada de 3/4 gas
(ver la figura).
3. Cierre los orificios con los tapones de plástico
contenidos en el sobre.
4. Conserve todas las piezas porque si la lavasecadora
tuviera que ser trasladada nuevamente, se deberían
volver a colocar para evitar daños internos.
Los embalajes no son juguetes para los niños.
Nivelación
1. Instale la lavasecadora sobre un piso plano y rígido,
sin apoyarla en las paredes ni en los muebles.
2. Compense las
irregularidades
desenroscando o
enroscando las patas
hasta que la máquina
quede en posición
horizontal (no debe estar
inclinada más de 2
grados).
Una cuidadosa nivelación brinda estabilidad y evita
vibraciones y ruidos, sobre todo durante el centrifugado.
3. Controle que en el tubo no hayan pliegues ni
estrangulaciones.
La presión de agua del grifo debe estar comprendida
dentro de los valores contenidos en la tabla de Datos
técnicos (ver la página correspondiente).
Si la longitud del tubo de alimentación no es la
suficiente, diríjase a un negocio especializado o a un
técnico autorizado.
No utilice nunca tubos de carga usados o viejos, utilice
siempre los suministrados con la máquina.
16
Page 17

Conexión del tubo de descarga
Conecte el tubo de
descarga a una tubería de
descarga o a una
descarga de pared
ubicadas a una distancia
65 - 100 cm
No se aconseja utilizar tubos de prolongación, si fuera
indispensable hacerlo, la prolongación debe tener el
mismo diámetro del tubo original y no superar los 150
cm.
del piso comprendida entre
65 y 100 cm., evitando
siempre plegarlo.
Una alternativa es apoyar
el tubo de descarga en el
borde de un lavamanos o
de una bañera, uniendo la
guía suministrada con el
aparato, al grifo (ver la
figura).
El extremo libre del tubo
de descarga no debe
permanecer sumergido en
el agua.
Conexión eléctrica
Antes de enchufar el aparato, verifique que:
la toma tenga la conexión a tierra y haya sido hecha
según las normas legales;
la toma sea capaz de soportar la carga máxima de
potencia de la máquina indicada en la tabla de Datos
técnicos (ver la página 19);
ATENCIÓN - EL ELECTRODOMÉSTICO DEBE ESTAR
CONECTADO A TIERRA.
LAS ACTIVIDADES QUE SE DESCRIBEN A
CONTINUACIÓN DEBEN SER REALIZADAS POR UN
ELECTRICISTA ESPECIALIZADO.
Sustitución del fusible:
Cuando sustituya un fusible defectuoso, utilice siempre
fusibles de 13 ampere ASTA que cumplan con el
estándar BS1362 y luego coloque la tapa del fusible. Si
la tapa del fusible se hubiera perdido, no utilice el
enchufe hasta que no se haya encontrado la pieza o se
sustituya con una nueva.
Tapas de fusibles:
Si se sustituye la tapa del fusible, verifique que el color
sea el que se indica en la codificación o en la inscripción
de color que se encuentra en la base del enchufe. Para
conseguir los repuestos, llame directamente al centro de
asistencia técnica más cercano.
Desmontaje del enchufe:
Si el electrodoméstico posee un enchufe incorporado
que no puede ser nuevamente cableado y sea
necesario hacer pasar el cable a través de divisiones,
unidades, etc., verifique que:
el enchufe se sustituya con otro que se pueda cablear,
de 13 ampere y que posea la marca BSI
o
el cable de red esté conectado directamente a la toma
de 13 ampere, controlada por un interruptor (que
cumpla con la norma BS 5733) al que se pueda acceder
sin tener que desplazar el electrodoméstico.
Eliminación del enchufe:
Antes de eliminar el enchufe, inutilice las patitas, de
modo que no pueda ser introducido accidentalmente en
una toma.
Instrucciones para la conexión del cable a un enchufe
alternativo:
Importante: el color de los cables de la red respeta la
siguiente codificación:
ES
la tensión de alimentación esté comprendida dentro
de los valores indicados en la tabla de Datos técnicos
(ver la página 19);
la toma sea compatible con el enchufe de la
máquina. Si no es así, sustituya la toma o el enchufe.
Su electrodoméstico dispone ahora de un enchufe con
fusible de 13 ampere que se puede introducir en una
toma compatible para un uso inmediato. Lea las
siguientes instrucciones antes de utilizar el
electrodoméstico.
Amarillo/Verde Tierra
Azul Neutro
Marrón Cargado
conecte el cable amarillo/verde al borne marcado con E
o
o de color verde o amarillo/verde;
conecte el cable marrón al borne marcado con L o de
color rojo;
conecte el cable azul al borne marcado con N o de
color negro.
17
Page 18

ES
Si se utiliza un enchufe de 13 ampere (BS 1363), instale
un fusible de 13 ampere en el enchufe, en el adaptador
o en la placa de distribución.
En caso de dudas sobre la alimentación eléctrica de su
electrodoméstico, llame a un electricista especializado
antes del uso.
Conexión de un enchufe alternativo:
El color de los cables de la red respeta la siguiente
codificación:
AZUL NEUTRO (N)
MARRÓN CARGADO (L)
AMARILLO/VERDE TIERRA (E)
Eliminación del electrodoméstico:
Cuando elimine el electrodoméstico, quite el enchufe
cortando el cable de alimentación lo más cerca posible
del mismo y elimínelo como se describió
precedentemente.
GREEN &
YELLOW
BROWN
BLUE
13 ampere fuse
CROSS-BAR
CORD GRIP
La máquina no debe ser instalada al aire libre, ni
siquiera si el lugar está protegido, ya que es muy
peligroso dejarla expuesta a la lluvia o a las tormentas.
Una vez instalada la máquina, la toma de corriente
debe ser fácilmente accesible.
No utilice prolongaciones ni conexiones múltiples.
El cable no debe estar plegado ni sufrir compresiones.
El cable de alimentación y el enchufe deben ser
sustituidos sólo por técnicos autorizados.
¡Atención! La empresa fabricante declina toda
responsabilidad en caso de que estas normas no sean
respetadas.
18
Page 19

Datos técnicos
ES
Modelo
Dimensiones
Capacidad
Conexiones
eléctricas
Conexiones
hídricas
Velocidad de
centrifugado
Programas de
control según la
norma EN 50229
AQM9F 09 U
ancho 59,5 cm.
altura 85 cm.
profundidad 64,5 cm.
de 1 a 9 kg para el lavado
de 1 a 6 kg para el secado.
ver la placa de características
técnicas aplicada en la máquina
presión máxima 1 MPa (10 bar)
presión mínima 0,05 MPa (0,5 bar)
capacidad del cesto 62 litros
máxima 1000 r.p.m.
lavado: programa ; temperatura
60ºC; efectuado con 9 kg. de carga.
secado: primer secado realizado
con 3 kg de carga seleccionando el
nivel de secado "L1";
Segundo secado realizado con 6 kg.
de carga seleccionando el nivel de
secado "L4".
Esta máquina cumple con lo
establecido por las siguientes
Directivas de la Comunidad:
- 89/336/CEE del 03/05/89
(Compatibilidad Electromagnética) y
sucesivas modificaciones
- 2002/96/CE
- 2006/95/CE (Baja Tensión)
19
Page 20

Descripción de la máquina
ES
PUERTA
MANIJA DE
LA PUERTA
ZÓCALO
PANEL DE
CONTROL
PATAS REGULABLES
PUERTA
Para abrir la puerta utilice
siempre la manija
correspondiente (ver la
figura).
CONTENEDOR DE DETERGENTE
El contenedor de
detergentes se encuentra
en el interior de la máquina y
se accede a él abriendo la
puerta.
Para la dosificación de
detergente, ver el capítulo
Detergentes y ropa.
Nota: adhiera al contenedor
de detergente el adhesivo
con la descripción de los
programas y las opciones. El adhesivo se encuentra en
el sobre que contiene este manual.
1. cubeta para el prelavado:
3
1
2
en marcha de la lavasecadora.
3. cubeta adicional: Blanqueador
utilice detergente en polvo.
Antes de verter el
detergente, verifique que no
esté colocada la cubeta
adicional 3.
2. cubeta para el lavado:
utilice detergente en polvo o
líquido. En este último caso
se recomienda verterlo un
instante antes de la puesta
El uso de la cubeta adicional 3 excluye el
prelavado.
cubeta para aditivos: para suavizante o aditivos
líquidos. Se recomienda no superar nunca el nivel
máximo indicado por la rejilla y diluir los suavizantes
concentrados.
Modalidad de stand by
Esta lavasecadora está en conformidad con las nuevas
normativas vinculadas al ahorro energético. Está dotada
de un sistema de auto-apagado (stand by) que, en caso
de no funcionamiento, se activa pasados
aproximadamente 30 minutos. Presionar brevemente el
botón ON/OFF
y esperar que la máquina se active.
20
Page 21

Panel de control
Mando de
PROGRAMAS
Pantalla TEMPERATURA
Botones con Pilotos
OPCIONES
Pantalla
SECADO
Pantalla COMIENZO RETRASADO/
DURACIÓN DEL CICLO
Botón con piloto
Botones con
Pilotos
Piloto
ECO
START/PAUSE
OPCIONES
ES
Iconos FASES
DE LAVADO
Botón con piloto
ON/OFF
Botón con piloto ON/OFF: presione brevemente el
botón para encender o apagar la máquina. El piloto
verde indica que la máquina está encendida. Para
apagar la lavasecadora durante el lavado, es necesario
mantener presionado el botón durante más tiempo,
aproximadamente 3 seg.; si se presiona en forma más
breve o accidental, la máquina no se apagará. Si la
máquina se apaga durante un lavado en curso, dicho
lavado se anulará.
Mando de PROGRAMAS: se puede girar en ambas
direcciones. Para elegir el programa más apropiado,
consulte la Tabla de programas.
Durante el lavado, el mando no se mueve.
Botón
excluir la temperatura; el valor elegido está indicado en
la pantalla que se encuentra encima (ver Cómo
efectuar un ciclo de lavado o de secado).
Botón SECADO
secado; el nivel o el tiempo de secado seleccionado se
indica en el visor (ver Cómo efectuar un ciclo de lavado
o de secado).
Botón
fijar el comienzo retrasado del programa elegido; el valor
del retraso elegido está indicado en la pantalla que se
encuentra encima (ver Cómo efectuar un ciclo de
lavado o de secado).
Botones con Pilotos OPCIONES: presiónelos para
seleccionar las opciones disponibles. El piloto
correspondiente a la opción seleccionada permanecerá
encendido (ver Cómo efectuar un ciclo de lavado o de
secado).
TEMPERATURA: presiónelo para modificar o
COMIENZO RETRASADO: presiónelo para
Botón TEMPERATURA
Botón SECADO
: presionar para reducir o excluir el
Botón COMIENZO
RETRASADO
Piloto BLOQUEO
Botón con piloto
BLOQUEO DE
BOTONES
DE LA PUERTA
Iconos FASES DE LAVADO: se iluminan para indicar el
avance del ciclo (Lavado
Centrifugado/Desagüe Secado ).
El mensaje
Botón con piloto START/PAUSE: cuando el piloto verde
centellea lentamente, presione el botón para que
comience el lavado. Una vez que el ciclo ha
comenzado, el piloto se mantiene fijo. Para poner en
pausa el lavado, presione nuevamente el botón; el piloto
centelleará con un color anaranjado. Si el piloto
Bloqueo de la puerta
la puerta.
Para que el lavado se reanude a partir del momento en
el cual fue interrumpido, presione nuevamente el botón.
Piloto
puerta está bloqueada. Para abrir la puerta es necesario
poner el ciclo en pausa (ver Cómo efectuar un ciclo de
lavado o de secado).
Botón con piloto
activar o desactivar el bloqueo del panel de control,
mantenga presionado el botón durante 2 segundos
aproximadamente. El piloto encendido indica que el
panel de control está bloqueado. De este modo, se
evitan modificaciones accidentales de los programas,
sobre todo si en la casa hay niños.
Piloto ECO: el ícono
modificando los parámetros de lavado, se obtenga un
ahorro de energía del 10% como mínimo. Además,
antes que la máquina entre en la modalidad "Stand by",
el icono se encenderá unos pocos segundos; con la
máquina apagada la recuperación energética estimada
será de aprox. el 80%.
se ilumina cuando ha finalizado el ciclo.
BLOQUEO DE LA PUERTA: indica que la
BLOQUEO DE BOTONES: para
Aclarado
está apagado, se podrá abrir
se encenderá cuando,
21
Page 22

Cómo efectuar un ciclo de lavado
o de secado
ES
NOTA: la primera vez que se utiliza la lavasecadora,
realice un ciclo de lavado sin ropa pero con detergente,
seleccionando el programa algodón 90º sin prelavado.
1. ENCENDER LA MÁQUINA. Presione el botón
Todos los pilotos se encenderán durante 1 segundo y
luego permanecerá encendido en forma fija el piloto del
botón
2. CARGAR LA ROPA. Abra la puerta. Cargue la ropa,
cuidando no superar la cantidad de carga indicada en
la tabla de programas de la página siguiente.
3. DOSIFICAR EL DETERGENTE. Extraiga el
contenedor y vierta el detergente en las cubetas
correspondientes como se explica en Descripción de
la máquina.
4. CERRAR LA PUERTA.
5. ELEGIR EL PROGRAMA. Gire el MANDO DE
PROGRAMAS hacia la derecha o hacia la izquierda
hasta seleccionar el programa deseado; se asociarán
al mismo, una temperatura y una velocidad de
centrifugado que luego se pueden modificar.
6. PERSONALIZAR EL CICLO DE LAVADO. Utilice
los botones correspondientes del panel de control:
La máquina muestra automáticamente la temperatura
previstas para el programa fijado o las últimas
seleccionadas si son compatibles con el programa
elegido. Presionando el botón
progresivamente la temperatura hasta llegar al lavado
en frío (
se volverá a los valores máximos previstos.
, el piloto START/PAUSE centelleará lentamente.
Modifique la temperatura.
se disminuye
). Si se presionan una vez más los botones,
.
Excepción: cuando se selecciona el programa
ALGODÓN, la temperatura se puede aumentar hasta 90°.
Programar el secado
Con la primera presión del botón
automáticamente el nivel de secado máximo compatible
con el programa seleccionado. Las siguientes presiones
disminuyen el nivel y el tiempo de secado hasta llegar a la
exclusión
se volverá a los valores máximos previstos.
Es posible programar el secado:
A - En base al tiempo: de 20 a 180 minutos.
B - En función del nivel de secado deseado
Planchar (L1): especial para prendas que después deben
plancharse. El nivel de humedad residual atenúa las arrugas
y facilita su eliminación.
Colgar (L2): ideal para aquellas prendas que no requieren el
secado completo.
Doblar (L3): se adapta para la ropa que se coloca en el
armario sin necesidad de planchar.
Extra (L4): especial para las prendas que necesitan un
secado completo como toallas o albornoces.
Si excepcionalmente la carga de ropa para lavar y secar es
superior al máximo previsto (ver la Tabla de programas),
realice el lavado, y una vez finalizado el programa, divida la
carga y coloque una parte en el cesto. A partir de ese
momento, siga las instrucciones para efectuar "Sólo el
secado". Repita las mismas operaciones para la carga
restante. Al finalizar el secado continúa siempre un período
de enfriamiento.
( ). Si se presionan una vez más los botones,
la máquina selecciona
Sólo el secado
Seleccionar con el mando de programas el secado
adecuado (
también el nivel o el tiempo de secado deseado utilizando el
botón SECADO
Seleccionar el comienzo retrasado.
Presione el botón correspondiente hasta alcanzar el
valor del retraso deseado. Durante la selección se
visualiza el tiempo de retraso junto con el símbolo
que centellea. Después de haber seleccionado el
comienzo retrasado, la pantalla visualizará el símbolo
fijo y la duración del ciclo. Presionando el botón
una vez, se visualiza el retraso seleccionado.
Para anular el comienzo retrasado, presione el botón
hasta que en la pantalla aparezca la palabra OFF; el
símbolo
Una vez presionado el botón START/PAUSE el valor
del retraso se podrá modificar sólo disminuyéndolo.
Modificar las características del ciclo.
Presione los botones OPCIONES para personalizar el
lavado según sus exigencias.
Presione el botón para activar la opción; se
encenderá el piloto correspondiente.
Presione nuevamente el botón para desactivar la
opción; el piloto se apagará.
Si la opción seleccionada no es compatible con el
programa elegido, la incompatibilidad se indicará con
el centelleo del piloto y una señal sonora (3 sonidos) y
la opción no se activará.
Si la opción elegida no es compatible con otra
seleccionada precedentemente, el piloto
correspondiente a la primera opción seleccionada
centelleará y quedará activada sólo la segunda, el
piloto del botón permanecerá fijo.
7. PONER EN MARCHA EL PROGRAMA. Presione el
botón START/PAUSE. El piloto correspondiente
quedará fijo y la puerta se bloqueará (piloto
BLOQUEO DE LA PUERTA
iconos correspondientes a las fases de lavado se
iluminarán durante el ciclo para indicar la fase en
curso. Para cambiar un programa mientras un ciclo
se está ejecutando, ponga la lavasecadora en pausa
presionando el botón START/PAUSE; luego
seleccione el ciclo deseado y presione nuevamente el
botón START/PAUSE. Para abrir la puerta mientras un
ciclo se está ejecutando, presione el botón START/
PAUSE; si el piloto BLOQUEO DE LA PUERTA
está apagado, será posible abrir la puerta. Presione
nuevamente el botón START/PAUSE para reanudar el
programa a partir del momento en el que se había
interrumpido.
8. FIN DEL PROGRAMA. Se indica con la palabra
END encendida. La puerta se podrá abrir
inmediatamente. Si el piloto START/PAUSE centellea,
presione el botón para terminar el ciclo. Abra la
puerta, descargue la ropa y apague la máquina.
Si desea anular un ciclo que ya ha comenzado,
mantenga presionado el botón
interrumpa y la máquina se apague.
- - ) al tipo de tejido. Se puede programar
.
se apagará.
encendido). Los
hasta que el ciclo se
22
Page 23

Programas y opciones
Tabla de programas
Icono Descripción del Programa
Programas Algodón
Algodón
(Agregue el detergente en el compartimento correspondiente).
Algodón (1)
Algodón (2):
Algodón de color (3)
Vaq ueros
Programas especiales
Baby:
Mix 30':
aconseja utilizarlo para lana, seda y prendas para lavar a mano).
Sintético re siste nte s
Seda:
Lana:
Programas de Secado
"Lava y seca" 30° 1000
Secado "Algodón" - Secado" Sintético" - Secado "Lana" - -
Programas parciales
Aclarado - 1000
Centrifugado - 1000
Desagüe - 0 - - - - 9
(*) Nota: después de aproximadamente 10 minutos del START, en base a la carga efectuada, la máquina recalculará y visualizará el tiempo que falta para la
finalización del programa.
Para todos los Test Institutes:
1) Programa de control según la norma EN 50229: seleccione el programa
2) Programa algodón largo: seleccione el programa
3) Programa algodón corto: seleccione el programa
con prelavado
: blancos y colores resistentes muy sucios.
blancos y colores delicados muy sucios.
colores delicados muy sucios.
para refrescar rápidamente prendas poco sucias (no se
para prendas de seda, viscosa, lencería.
para lana, cachemira, etc.
con una temperatura de 40ºC.
con una temperatura de 40ºC.
Te m p .
max.
(Max. 90°)
con una temperatura de 60ºC.
Opciones de lavado
Super Lavado
Gracias al uso de una mayor
3
1
2
en dotación, en la cubeta 1. Al dosificar el blanqueador, no
supere el nivel max indicado en el perno central (ver la figura).
Para realizar sólo el blanqueo, sin realizar un lavado
completo, verter el blanqueador en la cubeta adicional 3,
seleccionar el programa "Aclarado"
"Super Lavado"
.
No se puede activar con los programas
, , , , , .
Fácil Planchado
Cuando se selecciona esta opción, el lavado y el centrifugado
se modificarán oportunamente para disminuir la formación de
arrugas. Al finalizar el ciclo, la lavasecadora realizará giros
lentos del cesto; los pilotos Fácil Planchado y START/
cantidad de agua en la fase
inicial del ciclo y a la mayor
duración del programa, esta
opción garantiza un lavado con
óptimos resultados, es útil
para eliminar las manchas más
resistentes.
Puede emplearse con o sin
lejía. Si se desea efectuar
también el blanqueado
introducir la cubeta adicional 3
y activar la opción
, , , , ,
Velocidad
máx.
(°C)
90° 1000
60°
40° 1000
40° 1000
40° 800
40° 800
30° 800
60° 800
30° 0 -
40° 800
(r.p.m.)
Secado
1000
PAUSE centellearán. Para terminar el ciclo, presione el botón
START/PAUSE o el botón Fácil Planchado. En el programa
Seda
la máquina terminará el ciclo dejando la ropa en
remojo y el piloto Fácil Planchado centelleará. Para
descargar el agua y poder sacar la ropa, es necesario
presionar el botón START/PAUSE o el botón Fácil
Planchado.
No se puede activar con los programas
, , , .
Note: Si desea realizar también el secado, este botón
funciona sólo conjuntamente con el nivel L1.
Ahorro de tiempo
Seleccionando esta opción se disminuye la duración del
programa en un 30%-50% en base al ciclo elegido,
garantizando al mismo tiempo un ahorro de agua y energía.
Utilice este ciclo para prendas no excesivamente sucias.
No se puede activar con los programas
, , , , .
Extra Aclarado
Al elegir esta opción aumentará la eficacia del aclarado y se
asegurará la máxima eliminación de los residuos de
detergente. Es útil para pieles particularmente sensibles a los
detergentes. Se aconseja el uso de esta opción cuando la
lavasecadora funciona a plena carga o utilizando elevadas
dosis de detergente.
No se puede activar con los programas
, .
Detergentes y aditivos
Suavi-
Lavado
lll
llll
llll
llll
lll
llll
lll
llll
ll
lll
lll
l
l
l
l
l
- - - 6
- - - 3,5
- - - 1,5
-
- - - 9
Blanqu-
zante
ll
Carga
eador
- 9
- 4
- 3,5
- 2
- 2
- 1
, , , , ,
, , , , , ,
, , , , ,
max.
(Kg)
9
9
9
4
4
9
Duración
del ciclo
lavado en la pantalla.
ES
(*) Se puede controlar la duración de los programas de
23
Page 24

Detergentes y ropa
ES
Detergente
El tipo y la cantidad de detergente dependen del tipo de
tejido (algodón, lana, seda...), del color, de la
temperatura de lavado, del grado de suciedad y de la
dureza del agua.
Dosificar bien el detergente evita derroches y protege el
medio ambiente: aún siendo biodegradables, los
detergentes contienen elementos que alteran el equilibrio
de la naturaleza.
Se aconseja:
usar detergentes en polvo para prendas de algodón
blancas y para el prelavado.
usar detergentes líquidos para prendas delicadas de
algodón y para todos los programas a baja
temperatura.
usar detergentes líquidos delicados para lana y seda.
El detergente se debe verter antes del comienzo del
lavado en la cubeta correspondiente, o en el dosificador
que se coloca directamente en el cesto. En este último
caso, no se puede seleccionar el ciclo Algodón con
prelavado.
No use detergentes para lavar a mano porque
producen demasiada espuma.
Preparar la ropa
Abra bien las prendas antes de cargarlas.
Divida la ropa según el tipo de tejido (símbolo en la
etiqueta de la prenda) y el color, separando las
prendas de color de las blancas;
Vacíe los bolsillos y controle los botones;
No supere los valores indicados en la Tabla de
Programas referidos al peso de la ropa seca.
¿Cuánto pesa la ropa?
1 sábana 400-500 gr.
1 funda 150-200 gr.
1 mantel 400-500 gr.
1 albornoz 900-1200 gr.
1 toalla 150-250 gr.
1 jeans 400-500 gr.
1 camisa 150-200 gr.
Cortinas: utilice el programa Seda
colóquelas dentro de una funda o de una bolsa de red.
Lana: Ariston es la única lavasecadora que ha obtenido
el prestigioso reconocimiento Woolmark Platinum Care
(M.0508) otorgado por The Woolmark Company que
certifica el lavado en lavasecadora de todas las prendas
de lana, incluidas aquellas que contienen la etiqueta sólo
lavado a mano
lavar en lavasecadora todas las prendas de lana con la
garantía de obtener los mejores resultados.
Manchas difíciles: es una buena costumbre tratar las
manchas difíciles con jabón sólido antes del lavado y
utilizar el programa Algodón con prelavado.
Lava y Seca
prendas ligeramente sucias y en poco tiempo:
Seleccionando este ciclo se puede lavar y secar hasta
1 kg de ropa en sólo 60 minutos.
Para alcanzar los mejores resultados utilizar detergente
líquido; pre-tratar puños, cuellos y manchas.
. Con el programa Lana, se pueden
: ha sido estudiado para lavar y secar
. Pliéguelas y
Sistema de equilibrado de la carga
Antes de cada centrifugado, para evitar vibraciones
excesivas y para distribuir la carga de modo uniforme, el
cesto realiza rotaciones a una velocidad ligeramente
superior a la del lavado. Si después de varios intentos, la
carga todavía no está correctamente equilibrada, la
máquina realiza el centrifugado a una velocidad inferior a
la prevista. Cuando existe un excesivo desequilibrio, la
lavasecadora realiza la distribución antes que el
centrifugado. Para obtener una mejor distribución de la
carga y su correcto equilibrado, se aconseja mezclar
prendas grandes y pequeñas.
Consejos sobre el lavado
Vaqueros: utilice el programa correspondiente
Vaqueros
voltee las prendas antes del lavado y utilice un
detergente líquido.
Baby: utilice el programa correspondiente Baby
quitar la suciedad típica de los niños y eliminar el
detergente de las prendas evitando reacciones alérgicas
en la piel delicada de los mismos. Este ciclo ha sido
estudiado para disminuir la carga bacteriana utilizando
una mayor cantidad de agua y optimizando el efecto de
aditivos específicos higienizantes agregados al detergente.
Al finalizar el lavado, la máquina realizará lentas
rotaciones del cesto; para terminar el ciclo, presione el
botón START/PAUSE.
Seda: utilice el programa correspondiente Seda
para lavar todas las prendas de seda. Se aconseja el
uso de un detergente específico para prendas delicadas.
24
para todas las prendas de tejido Denim;
para
Page 25

Precauciones y consejos
La máquina fue proyectada y fabricada en conformidad
con las normas internacionales de seguridad. Estas
advertencias se suministran por razones de seguridad y
deben ser leídas atentamente.
Seguridad general
El aparato no debe ser empleado por personas (niños
incluidos) con capacidades físicas, sensoriales o mentales
reducidas y con experiencias y conocimientos
insuficientes, a menos que dicho uso no se realice bajo la
supervisión o las instrucciones de una persona
responsable de su seguridad. Los niños deben ser
vigilados para asegurarse que no jueguen con el aparato.
- No secar prendas no lavadas.
- Las prendas sucias con sustancias como aceite de
cocina acetona, alcohol, gasolina, kerosén, quitamanchas,
trementina, cera o sustancias para quitarlas, deben lavarse
con agua caliente con una cantidad mayor de detergente
antes de secarlas en la secadora.
- Objetos como la goma expandida (látex), las gorras de
ducha, los materiales textiles impermeables, los artículos
con un lado de goma y las prendas o cojines que tienen
partes de látex no deben secarse en la secadora.
- Suavizantes o productos similares deben emplearse
de acuerdo con las instrucciones del fabricante.
- La parte final de un ciclo de la secadora se realiza
sin calor (ciclo de enfriamiento) para garantizar que los
artículos no se dañen.
ATENCIÓN: Nunca detener una secadora antes que
finalice el programa de secado. En este caso, sacar
con rapidez todas las prendas y colgarlas para
enfriarlas con celeridad.
Este aparato ha sido fabricado para un uso de tipo
doméstico exclusivamente.
No toque la máquina con los pies desnudos ni con las
manos o los pies mojados o húmedos.
No desenchufe la máquina tirando el cable, sino
tomando el enchufe.
No toque el agua de descarga porque puede alcanzar
temperaturas elevadas.
Nunca fuerce la puerta: podría dañarse el mecanismo
de seguridad que la protege de aperturas
accidentales.
En caso de avería, no acceda nunca a los
mecanismos internos para intentar una reparación.
Controle siempre que los niños no se acerquen a la
máquina cuando está en funcionamiento.
Si debe ser trasladada, deberán intervenir dos o más
personas, procediendo con el máximo cuidado. La
máquina no debe ser desplazada nunca por una sola
persona ya que es muy pesada.
Antes de introducir la ropa controle que el cesto esté
vacío.
Durante el secado la puerta tiende a calentarse.
No seque ropa lavada con solventes inflamables
(por ej. tricloroetileno).
No seque gomaespuma o elastómeros análogos.
Verifique que, durante las fases de secado, el grifo de
agua esté abierto.
Eliminación
Eliminación del material de embalaje: respete las
normas locales, de ese modo, los embalajes podrán
volver a ser utilizados.
La norma Europea 2002/96/CE sobre la eliminación
de aparatos eléctricos y electrónicos, indica que los
electrodomésticos no deben ser eliminados de la
misma manera que los desechos sólidos urbanos. Los
aparatos en desuso se deben recoger
separadamente para optimizar el porcentaje de
recuperación y reciclaje de los materiales que los
componen e impedir potenciales daños para la salud
y el medio ambiente. El símbolo de la papelera
tachada se encuentra en todos los productos para
recordar la obligación de recolección separada.
Para mayor información sobre la correcta eliminación
de los electrodomésticos, los poseedores de los
mismos podrán dirigirse al servicio público responsable
o a los revendedores.
Apertura manual de la puerta
Si desea sacar la ropa de la lavasecadora y no es
posible abrir la puerta debido a un corte de energía
eléctrica, proceda del siguiente modo:
1. desenchufe la máquina.
2. verifique que el nivel de
agua en el interior de la
máquina sea inferior al
hueco de la puerta; si no es
así, extraiga el agua en
exceso utilizando el tubo de
descarga y recogiéndola en
un balde como se indica en
la figura.
3. quite el panel de
cobertura delantero de la
lavasecadora (ver la página
siguiente).
4. utilizando la lengüeta
indicada en la figura, tire
hacia fuera hasta liberar la
varilla de plástico del retén;
tire posteriormente hacia
abajo hasta sentir un breve
sonido que indica que la
puerta está desbloqueada.
5. abra la puerta; si todavía
no es posible, repita la
operación.
6. vuelva a montar el panel
verificando, antes de
empujarlo hacia la máquina,
que los ganchos se hayan
introducido en las
correspondientes ranuras.
ES
25
Page 26

Mantenimiento y cuidados
ES
Interrumpir el agua y la corriente
eléctrica
Cierre el grifo de agua después de cada lavado. De
este modo se limita el desgaste de la instalación
hidráulica de la máquina y se elimina el peligro de
pérdidas.
Desenchufe la máquina cuando la debe limpiar y
durante los trabajos de mantenimiento.
Limpiar la máquina
La parte externa y las partes de goma se pueden limpiar
con un paño empapado en agua tibia y jabón. No use
solventes ni productos abrasivos.
Limpiar el contenedor de detergentes
Para extraer el contenedor,
presione la palanca (1) y tire
hacia afuera (2) (ver la
figura).
Lávelo debajo del agua
corriente, esta limpieza se
debe realizar
frecuentemente.
Cuidar el cesto
Para acceder a la precámara:
2
1. quite el panel de cobertura delantero de la máquina
presionando hacia el centro, luego empuje hacia abajo
desde ambos costados y extráigalo (ver las figuras).
2. coloque un recipiente
para recoger el agua que se
verterá (aproximadamente
1,5 lt.) (ver la figura);
3. desenrosque la tapa
girándola en sentido
antihorario (ver la figura);
4. limpie con cuidado el interior;
5. vuelva a enroscar la tapa;
6. vuelva a montar el panel verificando, antes de
empujarlo hacia la máquina, que los ganchos se hayan
introducido en las correspondientes ranuras.
Deje siempre semicerrada la puerta para evitar que se
formen malos olores.
Limpiar la bomba
La máquina posee una bomba autolimpiante que no
necesita mantenimiento. Pero puede suceder que
objetos pequeños (monedas, botones) caigan en la
precámara que protege la bomba, situada en la parte
inferior de la misma.
Verifique que el ciclo de lavado haya terminado y
desenchufe la máquina.
26
Controlar el tubo de alimentación de
agua
Controle el tubo de alimentación al menos una vez al
año. Si presenta grietas o rajaduras debe ser sustituido:
durante los lavados, las fuertes presiones podrían
provocar roturas imprevistas.
Page 27

Anomalías y soluciones
Puede suceder que la máquina no funcione. Antes de llamar al Servicio de Asistencia Técnica (ver Asistencia
Técnica), controle que no se trate de un problema de fácil solución utilizando la siguiente lista.
Anomalías:
La máquina no se enciende.
El ciclo de lavado no comienza.
La máquina no carga agua.
La puerta de la máquina
permanece bloqueada.
La máquina carga y descarga
agua continuamente.
La máquina no descarga o no
centrífuga.
La máquina vibra mucho durante
la centrifugación.
La máquina pierde agua.
Los iconos correspondientes a
la Fase en curso centellean
velozmente junto con el piloto
Posibles causas / Solución:
El enchufe no está introducido en la toma de corriente, o no hace contacto.
En la casa no hay corriente.
La puerta no está bien cerrada.
El botón START/PAUSE no fue presionado.
El grifo de agua no está abierto.
Se fijó un retraso de la hora de puesta en funcionamiento.
El tubo de alimentación de agua no está conectado al grifo.
El tubo está plegado.
El grifo de agua no está abierto.
En la casa no hay agua.
No hay suficiente presión.
El botón START/PAUSE no fue presionado.
Seleccionando el ciclo Baby
el ciclo, la lavasecadora realizará lentas rotaciones del cesto; para terminar el
ciclo, presione el botón START/PAUSE o el botón Fácil Planchado
Seleccionando el ciclo Seda
remojo; para descargar el agua y poder quitar la ropa, es necesario presionar
el botón START/PAUSE o el botón Fácil Planchado
El tubo de descarga no está instalado entre los 65 y 100 cm. del suelo (ver Instalación).
El extremo del tubo de descarga está sumergido en el agua (ver Instalación).
Si la vivienda se encuentra en uno de los últimos pisos de un edificio, es posible
que se verifiquen fenómenos de sifonaje, por ello la máquina carga y descarga
agua de modo continuo. Para eliminar este inconveniente se encuentran
disponibles en el comercio válvulas especiales que permiten evitar el sifonaje.
La descarga de pared no posee un respiradero.
El programa no prevé la descarga: con algunos programas es necesario
ponerla en marcha manualmente (ver Programas y opciones).
La opción Fácil Planchado está activa: para completar el programa, presione
el botón START/PAUSE (ver Programas y opciones).
El tubo de descarga está plegado (ver Instalación).
El conducto de descarga está obstruido.
El cesto, en el momento de la instalación, no fue desbloqueado correctamente
(ver Instalación).
La máquina no está instalada en un lugar plano (ver Instalación).
Existe muy poco espacio entre la máquina, los muebles y la pared (ver Instalación).
La carga está desequilibrada (ver Detergentes y ropa).
El tubo de alimentación de agua no está bien enroscado (ver Instalación).
El contenedor de detergentes está obstruido (para ver Mantenimiento y cuidados).
El tubo de descarga no está bien fijado (ver Instalación).
Apague la máquina y desenchúfela, espere aproximadamente 1 minuto y
luego vuelva a encenderla. Si la anomalía persiste, llame al Servicio de
Asistencia Técnica.
o la opción Fácil Planchado , al finalizar
la máquina terminará el ciclo con la ropa en
.
ON/OFF.
ES
.
Se forma demasiada espuma.
La puerta de la máquina
permanece bloqueada.
La Lavasecadora no seca.
El detergente no es específico para la lavasecadora (debe contener algunas de
las frases para lavasecadora, a mano o en lavasecadora o similares).
La dosificación fue excesiva.
Realice el procedimiento de desbloqueo manual (ver Precauciones y consejos).
El enchufe no está introducido en la toma de corriente, o no hace contacto.
En la casa no hay corriente.
La puerta no está bien cerrada.
Se fijó un retraso de la hora de puesta en funcionamiento.
El SECADO está en la posición ( ).
27
Page 28

Asistencia
ES
Antes de llamar al Servicio de Asistencia Técnica:
Verifique si la anomalía la puede resolver Ud. solo (ver Anomalías y Soluciones);
Vuelva a poner en marcha el programa para controlar si el inconveniente fue resuelto;
Si no es así, llame al Servicio de Asistencia Técnica Autorizado.
En el caso de una instalación errónea o un uso incorrecto de la lavasecadora, la intervención de asistencia
técnica deberá ser pagada.
No recurra nunca a técnicos no autorizados.
Comunique:
el tipo de anomalía;
el modelo de la máquina (Mod.);
el número de serie (S/N ).
Esta última información se encuentra en la placa de características colocada en el aparato.
La siguiente información es válida solo para España.
Para otros países de habla hispana consulte a su vendedor.
Ampliación de garantía
Llame al 902.363.539 y le informaremos sobre el fantástico plan de ampliación de garantía hasta 5 años.
Consiga una cobertura total adicional de
Piezas y componentes
Mano de obra de los técnicos
Desplazamiento a su domicilio de los técnicos
Y NO PAGUE AVERIAS NUNCA MAS
Servicio de asistencia técnica (SAT)
Llame al 902.133.133 y nuestros técnicos intervendrán con rapidez y eficacia, devolviendo el electrodoméstico a
sus condiciones óptimas de funcionamiento.
En el SAT encontrará recambios, accesorios y productos específicos para la limpieza y mantenimiento de su
electrodoméstico a precios competitivos.
ESTAMOS A SU SERVICIO
Nota: para salir del Demo Mode presione simultáneamente durante 3 seg. los dos botones ON/OFF y START/PAUSE .
28
Page 29

لﺎﻤﻌﺘﺳﻻاو ﺐﻴآﺮﺘﻟا تﺎﻤﻴﻠﻌﺗ ﺐّﻴﺘآ
ﺔﻟﺎﺴﻏ– ﺔﻓﺎﺸﻧ
! تﺎﻤﻴﻠﻌﺘﻟا ﺐﻴﺘآ ةءاﺮﻘﺑ كﺮﻴآﺬﺘﻟ ﻮه ﺰﻡﺮﻟا اﺬه
تﺎیﻮﺘﺤﻤﻟا
ﺐﻴآﺮﺘﻟا،
ﺔﻳﻮﺴﺘﻟاو ﻚﻔﻟا
ﻩﺎﻴﻤﻟاو ﺔﻴﺋﺎﺑﺮﻬﻜﻟا تاداﺪﻣﻹﺎﺑ ﻞﺻﻮﻟا
ﺔّﻴﻨﻘﺕ تﺎﻣﻮﻠﻌﻣ
،ﺔﻟﻵا ﻒﺻو
ﻢﻜﺤﺘﻟا رارزأ ﺔﺣﻮﻟ
ﻒﻴﻔﺠﺗ وأ ﻞﻴﺴﻏ ةرود ﻞﻴﻐﺸﺗ AQUALTIS
AQM9F 09 U
تارﺎﻴﺘﺧﻻاو ﻞﻴﺴﻐﻟا تارود
ﻞﻴﺴﻐﻟا تارود لوﺪﺟ
ﻞﻴﺴﻐﻟا تارﺎﻴﺘﺧا
ﻞﻴﺴﻐﻟاو ﻒﻴﻈﻨﺘﻟا داﻮﻡ
ﻒﻴﻈﻨﺘﻟا داﻮﻣ
ﻞﻴﺴﻐﻟا ﺮﻴﻀﺤﺕ
ﻞﻴﺴﻐﻟا تﺎﻴﺻﻮﺕ
ﺔﻟﻮﻤﺤﻟا نزاﻮﺕ مﺎﻈﻧ
وتاﺮیﺬﺤﺘﻟا
ﺢﺋﺎﺼﻨﻟا
ﺔﻣﺎﻌﻟا ﺔﻣﻼﺴﻟا
ﻒﻳﺮﺼﺘﻟا
ًﺎ ﻳ و ﺪ ﻳ بﺎﺒﻟا ﺢﺘﻓ
ﺔﻥﺎﻴﺼﻟاو ﺔیﺎﻨﻌﻟا
ﻩﺎﻴﻤﻟاو ءﺎﺑﺮﻬﻜﻟا ﻞﺼﻓ ﺔﻟﻵا ﻦﻋ
ﺔﻟﺎﺴﻐﻟا ﻒﻴﻈﻨﺕ
ﻒﻴﻈﻨﺘﻟا داﻮﻣ ءﺎﻋو ﻒﻴﻈﻨﺕ
ﺔﻟﻵا ضﻮﺤﺑ ﺔﻳﺎﻨﻌﻟا
ﺔﺨﻀﻤﻟا ﻒﻴﻈﻨﺕ
ﻩﺎﻴﻤﻟا ﻞﺧﺪﻣ مﻮﻃﺮﺧ ﺪﻘﻔﺕ
ﻪﺡﻼﺻإو ﻞﻠﺨﻟا
ةﺪﻋﺎﺴﻤﻟا
29
Page 30

ﻦﻴﺘﺟرّﺪﻟا راﺪﺤﻧﻻا ﺔﻳواز ىّﺪﻌﺘﺕ نأ ﺐﺠﻳ.(
!،ﺐﺱﺎﻨﻤﻟا ىﻮﺘﺴﻤﻟا ﻲﻓ ﺔﻟﻵا ﻊﺽو ﺪﻨﻋ
يأ ﻚﻟﺬﺑ ىدﺎﻔﺘﺕو تﺎﺒﺜﻟا ﻚﻟذ ﺎﻬﻟ ﻦﻣﺆﻴﺱ
ًﺎﺻﻮﺼﺧو ﻞﻴﻐﺸﺘﻟا ﺪﻨﻋ ﺔﺠﺽ وأ تﺎﺟﺎﺠﺕرا
.
ناروﺪﻟا لﻼﺧ
وأ ﺔﺘﺑﺎﺙ ةدﺎﺠﺱ ﻰﻠﻋ ﺔﻟﻵا ﻊﺽو ﻢﺕ لﺎﺣ ﻲﻓ
ﺔﺋﻮﻬﺘﺑ ﺢﻤﺴﺕ ﺔﻘﻳﺮﻄﺑ ﻢﺋاﻮﻘﻟا لﺪﻋ ،ﺔﺘﺑﺎﺙ ﺮﻴﻏ
ﺔﻟﺎﺴﻐﻟا ﺖﺤﺕ ﺔﺒﺱﺎﻨﻣ.
ﻩﺎﻴﻤﻟاو ﺔﻴﺋﺎﺑﺮﻬﻜﻟا تاداﺪﻡﻹﺎﺑ ﻞﺻﻮﻟا
ﻩﺎﻴﻤﻟا لﺎﺧدإ بﻮﺒﻥأ ﻞﺻو
!
ﺒﻗ كﺮﺕا ،ﻩﺎﻴﻤﻟا رﺪﺼﻤﺑ بﻮﺒﻧﻷا ﻞﺻو ﻞ
ًﺎﻣﺎﻤﺕ ﺔﻴﻘﻧ ﺢﺒﺼﺕ ﻰﺘﺣ يﺮﺠﺕ ﻩﺎﻴﻤﻟا.
1- ﻞﺻﻮﺑ ﻢﻗ
ﻩﺎﻴﻤﻟا لﺎﺧدإ بﻮﺒﻧأ
لﻼﺧ ﻦﻣ ﺔﻟﺎّﺴﻐﻟﺎﺑ
بﻮﺒﻧﺄﺑ ﻪﻠﺻو
ﻩﺎﻴﻤﻟا لﺎﺧدإ
دﻮﺟﻮﻤﻟا ةدرﺎﺒﻟا
ﺐﻧﺎﺠﻟا ﻰﻠﻋأ ﻲﻓ
ﺔﻬﺠﻟا ﻲﻓ ﻦﻤﻳﻷا
ةرﻮﺼﻟا ﻊﺟار
.(
2- ﻞﺻﻮﺑ ﻢﻗ
ﻩﺎﻴﻤﻟا ﺔﻴﻔﻨﺤﺑ بﻮﺒﻧﻷا
ﺎﺒﻟا ﺔﻄﺱاﻮﺑ ةدر
ﺔﺒﻟﻮﻠﻣ زﺎﻏ ﺔﻠﺻو
ﻊﺟار
وأ ًﺎﻴﻨﺜﻣ ﺲﻴﻟ بﻮﺒﻧﻷا
ﺔﻴﻨﻘﺘﻟا تﺎﻣﻮﻠﻌﻤﻟا ﺔﺣﻮﻟ ﻲﻓ ﺎﻬﻴﻟإ رﺎﺸﻤﻟا ﻢﻴﻘﻟا
سﺎﻴﻗ3/4 )
.(
ةرﻮﺼﻟا
3- نأ ﻦﻣ ﺪآﺄﺕ
.(
ﺔﻟﻶﻟ ﺔﻴﻔﻠﺨﻟا)
ًﺎ ﻳ ﻮ ﺘ ﻠ ﻣ .
ﺔﻴﻟﺎﺘﻟا ﺔﺤﻔﺼﻟا ﻲﻓ
! ،ﺔﻳﺎﻔآ ًﻼ ﻳ ﻮ ﻃ ﻩﺎﻴﻤﻟا بﻮﺒﻧأ ﻦﻜﻳ ﻢﻟ لﺎﺣ ﻲﻓ
ﺘﻤﺑ ﻞﺼﺕا ﺔﻣﺪﺧ ﻞﻣﺎﻋ وأ ﺺﺼﺨﺘﻣ ﺮﺠ
ﻪﻟ حﺮﺼﻣ.
ﺐﻴآﺮﺘﻟا
! ﻪﻴﻟإ ةدﻮﻌﻠﻟ ﻦﻣﺁ نﺎﻜﻣ ﻲﻓ ﺐﻴﺘﻜﻟا اﺬﻬﺑ ﻆﻔﺘﺣا
دﻮﺟو ﻦﻣ ﺪّآﺄﺘﻟا ءﺎﺟﺮﻟا ،ﺎﻬﻠﻘﻧ ﻲﻜﻟ ﺎﻬﻌﻣ ﺐّﻴﺘﻜﻟا
ﻪﻴﻓ ةدﻮﺟﻮﻤﻟا ﺢﺋﺎﺼﻨﻟا ﻦﻣ ﺪﻳﺪﺠﻟا ﻚﻟﺎﻤﻟا ﺪﻴﻔﺘﺴﻳ.
ﺔﻘﻳﺮﻃ ﻦﻋ ﺔّﻤﻬﻣ تﺎﻣﻮﻠﻌﻣ ﻰﻠﻋ يﻮﺘﺤﺕ
ﻞﻴﻐﺸﺘﻟاو ﻦﻣﻵا ﺐﻴآﺮّﺘﻟا.
ﺔﻣزﻼﻟا ﻞﻴﺻﺎﻔﺘﻟا ﺔﻓﺎآو ﺔﻟﺎﻔآ ،ﺐﻴﺘﻜﻟا
!
لﻼﺧ رﺮﻀﺘﺕ ﻢﻟ ﺎﻬﻧأ ﻦﻣ ﺪآﺄﺕ ،ﺔﻓﺎﺸﻨﻟا ﺔﻟﺎﺴﻐﻟا
2- ﺮﻴﻣﺎﺴﻤﻟا عﺰﻧا
ﻊﺑرﻷا ﺔﻴﺋﺎﻤﺤﻟا
)ﻞﻘﻨﻟا لﻼﺧ ﺔﻠﻤﻌﺘﺴﻤﻟا (
ﻲﻓ دﻮﺟﻮﻤﻟا ﻞﺻﺎﻔﻟاو
ﻊﺟار
ﺔﻟﻵا ةﺮﺧﺆﻣ)
.(
ﺔﻟﺎّﺴﻐﻟا ﻞﻘﻧ ﻰﻟإ ﺖﺠﺘﺣا لﺎﺣ ﻲﻓ ًا د ﺪ ﺠ ﻣ ﺎﻬﻴﻟإ
ﻞﺧاد رﺮﻀﺕ يدﺎﻔﺘﻟ ﺮﺧﺁ ﻊﻗﻮﻣ ﻰﻟإ ﺔﻓﺎﺸﻨﻟا
! ﻦﻤﺽ ﺔﻴﻔﻨﺤﻟا ﻲﻓ ﻩﺎﻴﻤﻟا ﻂﻐﺽ نﻮﻜﻳ نأ ﺐﺠﻳ
نارﺪﺠﻟا ﻰﻠﻋ ﺎهدﺎﻨﺱإ نود ﻦﻣ ﺔﻨﻴﺘﻣ ﺔﺤﻄﺴﻣ
)
ﺮﻴﻏ ضرﻷا
ﻦﻜﻤُﻳ ،ﺔﺤﻄﺴﻣ
ﻢﺋاﻮﻘﻟا ﻞﻳﺪﻌﺕ
ﻰﻟإ ﺔﻟﻶﻟ ﺔّﻴﻣﺎﻣﻷا
ﻲﻓ ﺢﺒﺼﺕ نأ
ﻲﻘﻓأ ىﻮﺘﺴﻣ) ﻻ
ٍض ر أ ﻰﻠﻋ
اةرﻮﺼﻟ
2- ﺖﻧﺎآ اذإ
ﻖﺣﻻ ﺖﻗو ﻲﻓ . وأ ﺎﻬﺤﻨﻣ وأ ﺔﻟﻵا ﻊﻴﺑ ﺪﻨﻋ
!ﺔﻗﺪﺑ تﺎﻤﻴﻠﻌﺘﻟا ﻩﺬه ةءاﺮﻗ ءﺎﺟﺮﻟا : ﻲﻬﻓ
! اﺬه ﻰﻠﻋ يﻮﺘﺤﺕ ﻲﺘﻟا ﺔﺒﻠﻌﻟا ﻞﺧاد ًﺎ ﻀ ﻳ أ ﺪﺠﺕ
ﺐﻴآﺮﺘﻠﻟ.
اﺔیﻮﺴﺘﻟا و ﻚﻔﻟ
ﻚﻔﻟا
1 - ﻦﻋ ﻒﻴﻠﻐﺘﻟا قاروأ ﺔﻓﺎآ عﺰﻨﺕ نإ ﺎﻣ
ﻞﻘﻨﻟا . ﻞﺼﺕاو ﺎﻬﺒﻴآﺮﺘﺑ ﻢﻘﺕ ﻻ ،ترﺮﻀﺕ اذإ
ﺔﺋﺰﺠﺘﻟﺎﺑ ﻊﺋﺎﺒﻟﺎﺑ.
3- ﺔﻴﻜﻴﺘﺱﻼﺒﻟا تاداﺪﺴﻟا ًﻼﻤﻌﺘﺴﻣ تاﻮﺠﻔﻟا ﻞﻔﻗا
ﺔﻟﻵا ﻊﻣ ةدوﺰﻤﻟا.
4- ﻦﻣﺁ نﺎﻜﻣ ﻲﻓ ﻊﻄﻘﻟا ﺔﻓﺎﻜﺑ ﻆﻔﺘﺣا : جﺎﺘﺤﺕ ﺪﻗ
ﺔﻟﻵا.
!لﺎﻔﻃﻸﻟ ﺎﺑﺎﻌﻟأ ﺖﺴﻴﻟ ﻒﻴﻠﻐﺘﻟا داﻮﻣ.
ﺔیﻮﺴﺘﻟا
1- ﺑ ﻢﻗﺔﻓﺎﺸﻨﻟا ﺔﻟﺎﺴﻐﻟا ﺐﻴآﺮﺘ
ﻦﺋاﺰﺨﻟا وأ .
30
Page 31

ﺮیﺬﺤﺗ : ﺐﺠیضرﻷﺎﺑ ﺔﻟﻮﺻﻮﻡ ﺔﻟﻵا نﻮﻜﺗ نأ .
ﻲﻨﻘﺗ ﻞﺒﻗ ﻦﻡ ﺔﻴﻟﺎﺘﻟا تاﻮﻄﺨﻟﺎﺑ مﺎﻴﻘﻟا ﺐﺠی
ﺺﺼﺨﺘﻡ.
مﺎﻤﺼﻟا ﻞﻳﺪﺒﺕ:
مﺎﻤﺻ لﺎﻤﻌﺘﺱا ﺐﺠﻳ ،ﺐﺋﺎﺵ مﺎﻤﺻ ﻞﻳﺪﺒﺕ ﺪﻨﻋ
ASTA ًﻻ ﻮ ﺻ و
BS ﺐﻴآﺮﺕ ةدﺎﻋإ ﺐﺠﻳ ﺎﻤآ ًﺎ ﻣ و د
ﻦﻣ13 ﻦﻣ ﻪﻴﻠﻋ ﻖﻓاﻮﻣ ﺮﺒﻣﺁ
ﻰﻟإ1362
مﺎﻤﺼﻟا ءﺎﻄﻏ . ،مﺎﻤﺼﻟا ءﺎﻄﻏ عﺎﻴﺽ لﺎﺣ ﻲﻓ
لﺎﻤﻌﺘﺱا ﺐﺠﻳ ﻻ اﺬه لاﺪﺒﺘﺱا ﻞﺒﻗ مﺎﻤﺼﻟا
ءﺎﻄﻐﻟا .
لاﺪﺒﺘﺱﻻا مﺎﻤﺻ ءﺎﻄﻏ:
نﻮﻜﻳ نأ ﺐﺠﻳ ،ﻞﻳﺪﺑ مﺎﻤﺻ ﺐﻴآﺮﺕ ﻢﺕ لﺎﺣ ﻲﻓ
ﻰﻠﻋ رﻮآﺬﻣ ﻮه ﺎﻤآ ﺐﺱﺎﻨﻤﻟا نﻮﻠﻟا ﻦﻣ
فﺮﺣﻷﺎﺑ شﻮﻘﻨﻤﻟا نﻮﻠﻟا وأ ﺔﻧﻮﻠﻤﻟا تﺎﻣﻼﻌﻟا
ﺲﺑﺎﻘﻟا ةﺪﻋﺎﻗ ﻰﻠﻋ . ﻞﻳﺪﺒﻟا ﻰﻠﻋ لﻮﺼﺤﻟا ﻦﻜﻤﻳ
ﺔﻣﺪﺧ عدﻮﺘﺴﻣ بﺮﻗأ ﻦﻣ ةﺮﺵﺎﺒﻣ.
ﺲﺑﺎﻘﻟا ﺔﻟازإ:
ﺣ ﻲﻓ ﻞﺑﺎﻗ ﺐﻟﻮﻘﻣ ﺲﺑﺎﻘﺑ ةدوﺰﻣ ﺔﻟﻵا ﺖﻧﺎآ لﺎ
ﻪﻴﺟﻮﺕ ةدﺎﻋﺈﺑ ﺐﻏﺮﺕو ةﺪﻳﺪﺟ كﻼﺱﺄﺑ ﺪﻳوﺰﺘﻠﻟ
تﺎﻤﻴﺴﻘﺘﻟا لﻼﺧ ﻦﻣ ﺔﻴﺴﻴﺋﺮﻟا تاداﺪﻣﻹا ﻚﻠﺱ
ﺦﻟا تاﺪﺣﻮﻟاو ... ﺲﺑﺎﻘﻟا نأ ﻦﻣ ﺪآﺄﺘﻟا ءﺎﺟﺮﻟا
كﻼﺱﺄﺑ ﺪﻳوﺰﺘﻠﻟ ﻞﺑﺎﻗ ﺐﻟﻮﻘﻣ ﺲﺑﺎﻘﺑ لﺪﺒﺘﺴﻣ
BSI ﺔﻘﻓاﻮﻤﻠﻟ .
ﻦﻣ ةﺪﻳﺪﺟ13 ﺔﻣﻼﻋ ﻞﻤﺤﻳ ﺮﺒﻣﺁ
اﺪﻣﻹا ﻚﻠﺱ ﺮﺵﺎﺒﻣ ﻞﻜﺸﺑ لﻮﺻﻮﻣ ﺔﻴﺴﻴﺋﺮﻟا تاد
ﻦﻣ ﺲﺒﻘﻣ ﻲﻓ13 ﺔﻄﺱاﻮﺑ ﻪﺑ ﻢﻜﺤﺘﻟا ﻦﻜﻤﻳ ﺮﺒﻣﺁ
BS 5733 ( ﻦﻜﻤﻳ
ﻲﺋﺎﺑﺮﻬآ حﺎﺘﻔﻣ) ﻊﻣ ﻖﻓاﻮﺘﻳ
ﺔﻟﻵا ﻚﻳﺮﺤﺕ نود ﻦﻣ ﻪﻴﻟإ لﻮﺻﻮﻟا.
ﺲﺑﺎﻘﻟا ﻦﻣ ﺺﻠﺨﺘﻟا:
ﺮﻴﻣﺎﺴﻤﻟا ﻞﻌﺟ ﻦﻣ ﺲﺑﺎﻘﻟا ﻦﻣ ﺺﻠﺨﺘﻟا ﻞﺒﻗ ﺪآﺄﺕ
ﻞﻜﺸﺑ ﺎﻬﻌﺽو ﻢﺘﻳ ﻻ ﻲآ لﺎﻤﻌﺘﺱﻼﻟ ﺔﻠﺑﺎﻗ ﺮﻴﻏ
ﻌﺽو ﻪﻴﻓ ﻦﻜﻤﻳﺔﻴﺽﺮﻋ ﺔﻘﻳﺮﻄﺑ ﺲﺒﻘﻣ ﻲﻓ ﺎﻬ.
ﻢﻬﻣ : ﺔﻧﻮﻠﻣ ﺔﻴﺴﻴﺋﺮﻟا تاداﺪﻣﻹا ﻲﻓ كﻼﺱﻷا
ﻲﻟﺎﺘﻟا ﺰﻣﺮﻟا ﺐﺴﺤﺑ:
ﺮﻔﺻأو ﺮﻀﺧأ ضرأ
قرزأ يدﺎﻴﺡ
ﻲﻨﺑ ﺮﺵﺎﺒﻡ
ﻻ ﺪﻗ ﻲﺴﻴﺋﺮﻟا ﻚﻠﺴﻟا ﻲﻓ كﻼﺱﻷا ناﻮﻟأ نأ ﺎﻤﺑ
فاﺮﻃﻷ ﺔﻓﺮﻌﻤﻟا ﺔﻧﻮﻠﻤﻟا تﺎﻣﻼﻌﻟا ﻊﻣ ﺐﺱﺎﻨﺘﺕ
،ﺲﺑﺎﻘﻟاﻲﻟﺎﺘﻟﺎﺑ ﻢﻗ:
! ﺔﻤﻳﺪﻗ وأ ﺔﻠﻤﻌﺘﺴﻣ ﺐﻴﺑﺎﻧأ ًا ﺪ ﺑ أ ﻞﻤﻌﺘﺴﺕ ﻻ
ﺔﻟﻵا ﻊﻣ ةدوﺰﻤﻟا تﺎﺠﺘﻨﻤﻟا ﻞﻤﻌﺘﺱاو.
ﻒیﺮﺼﺘﻟا مﻮﻃﺮﺧ ﻞﺻو
مﻮﻃﺮﺧ ﻞﺻﻮﺑ ﻢﻗ
نود ﻦﻣ ﻒﻳﺮﺼﺘﻟا
ﻒﻳﺮﺼﺕ ىﺮﺠﻤﺑ ﻪﻴﻨﺙ
ﻊﻘﻳ ﻒﻳﺮﺼﺕ ﻂﺋﺎﺣ وأ
ﻦﻴﺑ65 و100
ضرﻷا ﻦﻣ ﺮﺘﻤﺘﻨﺱ.
ﻊﺽ ،ﻞﻳﺪﺑ ﻞﺤآ
ﻒﻳﺮﺼﺘﻟا بﻮﺒﻧأ
ﺣ ﻰﻠﻋ ضﻮﺤﻟا ﺔﻓﺎ
ﻞﺻو ،ﺔﻠﺴﻐﻤﻟا وأ
دوﺰﻤﻟا بﻮﺒﻧﻷا
ﻊﺟار
ﺔﻴﻔﻨﺤﻟﺎﺑ)
.( ﺐﺠﻳ ﻻ
ةرﻮﺼﻟا
ﺖﺤﺕ فﺮﻃ نﻮﻜﻳ نأ
ءﺎﻤﻟا.
! ﺪﻨﻋ ؛ﺐﻴﺑﺎﻧﻸﻟ تاداﺪﻣإ لﺎﻤﻌﺘﺱﺎﺑ ﺢﺼﻨﻧ ﻻ
تاداﺪﻣﻹا نﻮﻜﺕ نأ ﺐﺠﻳ ،ىﻮﺼﻘﻟا ةروﺮﻀﻟا
ىﺪﻌﺘﺕ ﻻأ ﺐﺠﻳو ﻲﻠﺻﻷا بﻮﺒﻧﻸﻟ ﻪﻨﻴﻋ ﺮﻄﻘﻟﺎﺑ
وأ:
150 ًﻻ ﻮ ﻃ ﻢﺱ.
ﻲﺋﺎﺑﺮﻬﻜﻟا ﻞﺻﻮﻟا
ﻦﻣ ﺪآﺄﺕ ﻲﻓ ﺔﻟﻵا ﻊﺽو ﻞﺒﻗ ﺔﻴﻟﺎﺘﻟا رﻮﻣﻷا
ءﺎﺑﺮﻬﻜﻟا ﺲﺒﻘﻣ:
• ضرﻷﺎﺑ ًﻻ ﻮ ﺻ ﻮ ﻣ نﻮﻜﻳ نأ ﺲﺒﻘﻤﻟا ﻰﻠﻋ
؛ﻖﺒﻄﻤﻟا نﻮﻧﺎﻘﻠﻟ ًﺎ ﻘ ﻓ و و
• ىﻮﺼﻘﻟا ﺔﻟﻵا ةﻮﻗ ﻞﻤﺤﺘﻳ نأ ﺲﺒﻘﻤﻟا ﻰﻠﻋ
ﺔﻴﻨﻘﺘﻟا تﺎﻣﻮﻠﻌﻤﻟا ﺔﺣﻮﻟ ﻰﻠﻋ ةرﻮآﺬﻤﻟا
ﻩﺎﻧدأ ﻊﺟار
.(
ﻞﻳﺪﺑ ﺲﺑﺎﻘﺑ ﻚﻠﺴﻟا ﻞﺻﻮﻟ تﺎﻤﻴﻠﻌﺕ:
)
• ﻢﻴﻘﻟا ﻦﻤﺽ نﻮﻜﺕ نأ ﺔﻴﻄﻠﻔﻟا ةﻮﻗ ﻰﻠﻋ
ﺘﻟا تﺎﻣﻮﻠﻌﻤﻟا ﺔﺣﻮﻟ ﻰﻠﻋ ةرﻮآﺬﻤﻟا ﺔﻴﻨﻘ
ﻩﺎﻧدأ
.(
ﺲﺒﻘﻤﻟا وأ ﺲﺑﺎﻘﻟا لﺪﺒﺘﺱا ،ﺲﻜﻌﻟا ﺪﻨﻋ.
)ﻊﺟار
• ﺔﻟﻵا ﺲﺑﺎﻗ ﻊﻣ ًﺎﺒﺱﺎﻨﺘﻣ نﻮﻜﻳ نأ ﺲﺒﻘﻤﻟا ﻰﻠﻋ .
ﻦﻣ ﺔﻣﺎﻤﺼﺑ دوﺰﻣ ﺲﺒﻘﺑ نﻵا ةدوﺰﻣ ﺔﻟﻵا نإ
13 ﻦﻣ ﺲﺑﺎﻘﺑ ﻪﻠﺻو ﻦﻜﻤﻳ ﺮﺒﻣﺁ13 ﺮﺒﻣﺁ
يرﻮﻔﻟا لﺎﻤﻌﺘﺱﻼﻟ . ءﺎﺟﺮﻟا ،ﺔﻟﻵا لﺎﻤﻌﺘﺱا ﻞﺒﻗ
ﺔﻴﻟﺎﺘﻟا تﺎﻤﻴﻠﻌﺘﻟا ةءاﺮﻗ.
31
Page 32

ﻮه ﺎﻤآ ﻪﻨﻣ ﺺﻠﺨﺕو ﺲﺑﺎﻘﻟا ﻦﻣ ﻦﻜﻤﻣ ﻞﻜﺵ
ﻩﻼﻋأ رﻮآﺬﻣ.
! ﻮﻟو ﻰﺘﺣ جرﺎﺨﻟا ﻲﻓ ﺔﻟﻵا ﺐﻴآﺮﺕ ﺐﺠﻳ ﻻ
ًﺎﻓﻮﻘﺴﻣ نﺎﻜﻤﻟا نﺎآ . ﺎﻬﻀﻳﺮﻌﺕ ًا ﺪ ﺟ ﺮﻴﻄﺨﻟا ﻦﻣ
ﻒﺻاﻮﻌﻟا وأ ﺮﻄﻤﻠﻟ.
!ﻳ ،ﺔﻟﻵا ﺐﻴآﺮﺕ ﻢﺕ ﻰﺘﻣ ﻰﻟإ لﻮﺻﻮﻟا ﺐﺠ
ﺔﻟﻮﻬﺴﺑ ﺔﻴﺱﺎﺱﻷا ﺔﻴﺋﺎﺑﺮﻬﻜﻟا ﺲﺑﺎﻘﻤﻟا.
سوؤﺮﻟا.
! ﺎﻬﻴﻠﻋ ﻂﻐﻀﻟا وأ كﻼﺱﻷا ﻲﻨﺙ ﺐﺠﻳ ﻻ
ةﺮﻴﻄﺧ ﺔﻘﻳﺮﻄﺑ.
! ﻦﻣ تﻼﺻﻮﻟا كﻼﺱأ لاﺪﺒﺘﺱا ﻢﺘﻳ نأ ﺐﺠﻳ
ﻪﻟ حﺮﺼﻣ ﺔﻣﺪﺧ ﻞﻣﺎﻋ ﻞﺒﻗ.
ﺮیﺬﺤﺗ ! ﻲﻓ ﺔﻴﻟوﺆﺴﻣ يأ ﻞﻤﺤﺘﺕ ﻻ ﺔآﺮﺸﻟا نإ
ﻢﻟ لﺎﺣ ﺪﻋاﻮﻘﻟا ﻩﺬه ىﺪﺣﺈﺑ ﺪّﻴﻘﺘﻟا ﻢﺘﻳ.
ﻢﻠﻌﻤﻟا فﺮﻄﻟﺎﺑ ﺮﻔﺻﻷاو ﺮﻀﺧﻷا ﻚﻠﺴﻟا ﻞﺻ
E وأ ﺮﻀﺧﻷا وأ ﺮﻀﺧﻷﺎﺑ نﻮﻠﻤﻟا وأ
ﺮﻔﺻﻷاو.
L نﻮﻠﻤﻟا وأ
ﻢﻠﻌﻤﻟا فﺮﻄﻟﺎﺑ ﻲﻨﺒﻟا ﻚﻠﺴﻟا ﻞﺻ
ﺮﻤﺣﻷا.
N وأ
ﻢﻠﻌﻤﻟا فﺮﻄﻟﺎﺑ قرزﻷا ﻚﻠﺴﻟا ﻞﺻ
دﻮﺱﻷﺎﺑ نﻮﻠﻤﻟا.
BS 1363( ،
ﻦﻣ ﺲﺑﺎﻗ لﺎﻤﻌﺘﺱا ﺪﻨﻋ13 ﺮﺒﻣﺁ)
ﻦﻣ مﺎﻤﺼﺑ ﻪﻠﺻو ﺐﺠﻳ13 ﺁ ﻲﻓ ءاﻮﺱ ﺮﺒﻣ
ﻊﻳزﻮﺘﻟا ﺔﺣﻮﻟ ﺪﻤه وأ ﻒﻴﻜﻤﻟا وأ ﺲﺒﻘﻤﻟا.
ﺮﺸﺘﺱا ،ﺔﻟﻶﻟ ﻲﺋﺎﺑﺮﻬﻜﻟا داﺪﻣﻹا ﻲﻓ ﻚﺸﻟا ﺪﻨﻋ
لﺎﻤﻌﺘﺱﻻا ﻞﺒﻗ ﺺﺼﺨﺘﻣ ﻲﻨﻘﺕ .
! ةدﺪﻌﺘﻣ ﺲﺑﺎﻘﻣ وأ تﻼﺻو كﻼﺱأ ﻞﻤﻌﺘﺴﺕ ﻻ
ﻞﻳﺪﺑ ﺲﺑﺎﻗ ﻞﺻو ﺔﻴﻔﻴآ:
ﺰﻣﺮﻟا ﺐﺴﺤﺑ ﺔﻧﻮﻠﻣ ﺔﻴﺴﻴﺋﺮﻟا تﻼﺻﻮﻟا ﻚﻠﺱ
ﻲﻟﺎﺘﻟا:
N(
L(
E(
ﺮﻔﺻأو ﺮﻀﺧأ ضرأ)
قرزأ يدﺎﻴﺡ)
ﻲﻨﺑ ﺮﺵﺎﺒﻡ)
ﻟﻵا ﻦﻣ ﺺﻠﺨﺘﻟاﺔ:
ﻦﻣ ﺲﺑﺎﻘﻟا ﺔﻟازإ ءﺎﺟﺮﻟا،ﺔﻟﻵا ﻦﻣ ﺺﻠﺨﺘﻟا ﺪﻨﻋ
بﺮﻗﺄﺑ ﺔﻴﺴﻴﺋﺮﻟا تﻼﺻﻮﻟا ﻚﻠﺱ ﻊﻄﻗ لﻼﺧ
32
Page 33

AQM9F 09 U
آ
ضﺮﻌﻟا59.5 ﺮﺘﻤﺘﻨﺱ
عﺎﻔﺕرﻻا85 ﺮﺘﻤﺘﻨﺱ
ﻖﻤﻌﻟا64،5ﺮﺘﻤﺘﻨﺱ
ﻦﻣ1 ﻰﻟإ ﻎﻠآ9 ﻞﻴﺴﻐﻟا ﺞﻣﺎﻧﺮﺒﻟ ﻎﻠآ
6ﻒﻴﻔﺠﺘﻟا ﺞﻣﺎﻧﺮﺒﻟ ﻎﻠآ
ﻦﻣ1ﻰﻟإ ﻎﻠ
تﺎﻣﻮﻠﻌﻤﻟا ﺔﺣﻮﻟ ﺔﻌﺟاﺮﻣ ءﺎﺟﺮﻟا ﻰﻠﻋ ﺔﺘﺒﺜﻤﻟا ﺔﻴﻨﻘﺘﻟا
ﺔﻟﻵا
ﻰﺼﻗﻷا ﻂﻐﻀﻟا1 Mpa (10 bar)
ﻰﻧدﻷا ﻂﻐﻀﻟا0.05 Mpa (0.5 bar)
ضﻮﺤﻟا ﺔﻌﺱ62ﺮﺘﻴﻟ
ﺔﻳﺎﻐﻟ1000ةرود/ﺔﻘﻴﻗﺪﻟﺎﺑ
ةراﺮﺤﻟا ؛60 ؛ﺔﻳﻮﺌﻣ ﺔﺟرد
ﻞﻴﺴﻐﻟا : ﺞﻣﺎﻧﺮﺑ
ﺔﻟﻮﻤﺣ ًﻼﻤﻌﺘﺴﻣ9 ﻎﻠآ
ﻒﻴﻔﺠﺘﻟا : ﻦﻣ ﺔﻟﻮﻤﺣ ﻦﻣ ﻰﻟوﻷا ﻒﻴﻔﺠﺘﻟا ةرود3 ﻎﻠآ
ﻒﻴﻔﺠﺘﻟا ىﻮﺘﺴﻣ رﺎﻴﺘﺧا لﻼﺧ ﻦﻣ"1L"؛
ﻦﻣ ﺔﻟﻮﻤﺣ ﻦﻣ ﺔﻴﻧﺎﺜﻟا ﻒﻴﻔﺠﺘﻟا ةرود6 لﻼﺧ ﻦﻣ ﻎﻠآ
ﻒﻴﻔﺠﺘﻟا ىﻮﺘﺴﻣ رﺎﻴﺘﺧا"4L"؛
ﻲﻟﺎﺘﻟا ﻲﺑوروﻷا ﻊﻤﺘﺠﻤﻟا تﺎﻤﻴﻠﻌﺕ ﻊﻣ ﺔﻟﻵا ﻩﺬه ﻰﺵﺎﻤﺘﺕ
ﻲﺋﺎﺑﺮﻬﻜﻟا (ﺔﻴﻟﺎﺘﻟا تﻼﻳﺪﻌﺘﻟاو
ﺔﻴﻨﻘﺘﻟا تﺎﻡﻮﻠﻌﻤﻟا
جذﻮﻤﻨﻟا
مﺎﺠﺡﻷا
ﺔﻌﺴﻟا
ءﺎﺑﺮﻬﻜﻟا ﻞﺻو
ءﺎﻤﻟا ﻞﺻو
ﻊیﺮﺴﻟا ناروﺪﻟا ﺔﻋﺮﺳ
ﺐﺴﺤﺑ ﺔﻗﺎﻄﻟا ﺞﻡاﺮﺑ
تﺎﻤﻴﻠﻌﺗEN 50229
:
- 89/336/EEC ﻲﻓ3/5/89 )ﻨﻐﻤﻟا ﻖﺑﺎﻄﺘﻟا ﻲﺴﻴﻃﺎ
- 2006/95/EC )ﺔﻴﻧﺪﺘﻤﻟا ﺔﻴﻄﻠﻔﻟا(
- 2002/96/
33
Page 34

ﺔﻟﻵا ﻒﺻو
ﺔﺤﺘﻔﻟا بﺎﺑ ﺔﻜﺴﻣ
ﻦﻣ قاو ﻂﻳﺮﺵ
ﺔﺤﺘﻔﻟا بﺎﺑ
مﺪﻘﻟا تﺎﻣﺪآ
ﻞﻳﺪﻌﺘﻠﻟ ﺔﻠﺑﺎﻘﻟا ماﺪﻗﻷا
ﻢﻜﺤﺘﻟا ﺔﺣﻮﻟ
34
Page 35

ةردﻮﺑ ﻞﻜﺵ ﻰﻠﻋ ﻒﻴﻈﻨﺘﻟا داﻮﻣ ﻞﻤﻌﺘﺱا.
! ةﺮﻴﺠﺤﻟا نأ ﻦﻣ ﺪآﺄﺕ ،ﻒﻴﻈﻨﺘﻟا داﻮﻣ ﺐﻜﺱ ﻞﺒﻗ
ﺔﻴﻓﺎﺽﻹا3 ﺎﻬﺘﻟازإ ﻢﺕ ﺪﻗ.
ﻲﺱﺎﺱﻷا ﻞﺴﻐﻟا ةﺮﺠﺣ
:
ﻞﺋﺎﺱ وأ ةردﻮﺑ ﻞﻜﺵ ﻰﻠﻋ ﻒﻴﻈﻨﺘﻟا داﻮﻣ ﻞﻤﻌﺘﺱا . ﺪﻨﻋ
ﻞﺒﻗ ًا ر ﻮ ﻓ ﻪﺒﻜﺴﺑ ﺢﺼﻨﻧ ،ﻒﻴﻈﻨﺘﻟا ﻞﺋﺎﺱ لﺎﻤﻌﺘﺱا
ﻞﺴﻐﻟا ﺔﻟﺁ ﻞﻴﻐﺸﺕ.
ﺔﻴﻓﺎﺽﻹا ةﺮﺠﺤﻟا
: ﺾﻴﻴﺒﺘﻟا
ﻞﻴﺴﻐﻟا.
ﻞﻴﺴﻐﻠﻟ ﺔﻓﺎﻀﻤﻟا داﻮﻤﻟا ةﺮﺠﺣ
وأ ﺔﺠﺴﻧﻷا ﻢﻌﻨﻤﻟ
ﻢﺘﻳ نأو لوﺪﺠﻟا ﻲﻓ ﻪﻴﻟإ رﺎﺸﻤﻟا ﻰﺼﻗﻷا ىﻮﺘﺴﻤﻟا
ﻲﻜﻴﺕﺎﻣﻮﺕوأ دﺎﻤﺘﻋا مﺎﻈﻨﺑ ةﺰﻬﺠﻣ ﺔﻓﺎﺸﻨﻟا ﺔﻟﺎﺴﻐﻟا نإ
ﺪﻌﺑ ﻞﻤﻌﻳ ةﺪﻳﺪﺠﻟا ﺔﻗﺎﻄﻟا ﺮﻴﻓﻮﺕ ﺔﻤﻈﻧأ ﻊﻣ ﻖﺑﺎﻄﺘﻳ ﺎﻤﺑ
طﺎﺸﻧ يأ ﻂﺒﺽ ﻢﺘﻳ ﻢﻟ لﺎﺣ ﻲﻓ ةﺪﻳﺪﻋ ﻖﺋﺎﻗد . ﻂﻐﺽا
:
ﺔﻠﺋﺎﺴﻟا ﺔﻓﺎﻀﻤﻟا داﻮﻤﻟا
. زوﺎﺠﺕ ﻢﺘﻳ ﻻﺄﺑ ﺢﺼﻨﻧ
ةﺰآﺮﻤﻟا ﺔﺠﺴﻧﻷا تﺎﻤﻌﻨﻣ ﺔﺑاذإ.
ﻞﻴﻐﺸﺘﻟا رز ﻰﻠﻋ/ءﺎﻔﻃﻹا نأ ﺮﻈﺘﻧاو ةﺰﻴﺟو ةﺮﺘﻔﻟ
ًا د ﺪ ﺠ ﻣ ﺔﻟﻵا ﻞﻤﻌﺕ.
ﺔﻐﻴﺻ دﺎﻤﺘﻋﻻا
ﺢﺘﻔﻟ ﺔﻜﺴﻤﻟا ًﺎ ﻤ ﺋ ا د ﻞﻤﻌﺘﺱا
ةرﻮﺼﻟا ﻊﺟار
(
2-
3-
! ﺔﻴﻓﺎﺽﻹا ةﺮﺠﺤﻟا لﺎﻤﻌﺘﺳا3 ﻞﺒﻗ ﺎﻡ ﺔﻔﻴﻇو ﻲﻨﺜﺘﺴی
ﻒﻴﻈﻨﺘﻟا داﻮﻡ ءﺎﻋو
ﻒﻴﻈﻨﺘﻟا داﻮﻣ ءﺎﻋو ﻊﻘﻳ
ﻦﻜﻤﻳو ﺔﻟﻵا ﻞﺧاد
لﻼﺧ ﻦﻣ ﻪﻴﻟإ لﻮﺻﻮﻟا
تﺎﻣﻮﻠﻌﻤﻟا ﻦﻣ ﺪﻳﺰﻤﻠﻟ
داﻮﻣ ﺮﻴﻳﺎﻌﻣ لﻮﺣ
ءﺎﺟﺮﻟا ،ﻒﻴﻈﻨﺘﻟا
نﻮﻨﻌﻤﻟا ﻞﺼﻔﻟا ﺔﻌﺟاﺮﻣ
بﺎﺒﻟا)
ﺢﺘﻓ بﺎﺒﻟا.
."
ﺔﺤﺘﻔﻟا بﺎﺑ
ﻞﻴﺴﻐﻟاو ﻒﻴﻈﻨﺘﻟا
”داﻮﻣ
ﺔﻈﺡﻼﻡ: ةرود ﻒﺻو ﺮﻬﻈﺕ ﻲﺘﻟا ﺔﻌﻗﺮﻟا ﻖﺼﻟأ
ءﺎﻋو ﻦﻣ ﺔﻴﻣﺎﻣﻷا ﺔﻬﺠﻟا ﻰﻠﻋ تارﺎﻴﺘﺧﻻاو ﻞﻴﺴﻐﻟا
ﻒﻴﻈﻨﺘﻟا داﻮﻣ . يﻮﺤﺕ ﻲﺘﻟا ﺔﺒﻠﻌﻟا ﻲﻓ ﻖﺼﻠﻤﻟا نوﺪﺠﺕ
ﺐﻴﺘﻜﻟا اﺬه.
1-
:
ﺠﺣﻞﻴﺴﻐﻟا ﻞﺒﻗ ﺎﻣ ةﺮ
35
Page 36

ﻢﻜﺤﺘﻟا رارزأ ﺔﺡﻮﻟ
ﻞﻴﻐﺸﺘﻟا ﺔﺵﺎﺵ
ﺘﻟا ﺔﺵﺎﺵﻒﻴﻔﺠ
ةراﺮﺤﻟا ﺔﺵﺎﺵ
ﺮﺧﺄﺘﻤﻟا /ةروﺪﻟا ةﺪﻣ
ﺮﺵﺆﻣ ءﻮﺽ
ﺮﻴﻓﻮﺘﻟا
ﺔﻠﺣﺮﻣ زﻮﻣر
ﻞﻴﺴﻐﻟا ةرود
ﻞﻴﺴﻐﻟا ةرود رﺎﻴﺘﺧا رز
ﻞﻴﻐﺸﺘﻟا ﺮﺵﺆﻣ ءﻮﺽ ﻊﻣ رز
ءﺎﻔﻃﻹاو
ﻊﻣ تارﺎﻴﺘﺧﻻا رارزأ
تاﺮﺵﺆﻤﻟا ءاﻮﺽأ
ةراﺮﺤﻟا رز
ﻒﻴﻔﺠﺘﻟا رز
ﺮﻬﻈﻴﺱ ؛ﻒﻴﻔﺠﺘﻟا دﺎﻌﺒﺘﺱا وأ ﺾﻴﻔﺨﺘﻟ ﻂﻐﺽا
ﺖﻗﻮﻟا وأ رﺎﺘﺨﻤﻟا ﻒﻴﻔﺠﺘﻟا ىﻮﺘﺴﻣ ﺔﺵﺎﺸﻟا ﻰﻠﻋ
ﻒﻴﻔﺠﺕ ةرود وأ ﻞﻴﺴﻏ ةرود ﻞﻴﻐﺸﺕ ﻊﺟار
.(
: ﻞﻴﻐﺸﺕ ﻂﺒﻀﻟ ﻂﻐﺽا
ﺮﺧﺄﺘﻤﻟا ﻞﻴﻐﺸﺘﻟا رز
ﺖﻗو ﺮﻬﻈﻴﺱ ،ةرﺎﺘﺨﻤﻟا ﻞﻴﺴﻐﻟا ةروﺪﻟ ﺮﺧﺄﺘﻣ
ﻊﺟار
ﻩﻼﻋأ ﺔﺵﺎﺸﻟا ﻰﻠﻋ ﻪﻄﺒﺽ ﻢﺕ يﺬﻟا ﺮﻴﺧﺄﺘﻟا)
.(
ﻒﻴﻔﺠﺕ ةرود وأ ﻞﻴﺴﻏ ةرود ﻞﻴﻐﺸﺕ
تاﺮﺵﺆﻤﻟا ءاﻮﺽأ ﻊﻡ تارﺎﻴﺘﺧﻻا رارزأ : ﻂﻐﺽا
ةﺮﻓاﻮﺘﻤﻟا تارﺎﻴﺘﺧﻻا رﺎﻴﺘﺧﻻ . ﺮﺵﺆﻤﻟا ءﻮﺽ نإ
ا رﺎﻴﺘﺧﻼﻟ ﺐﺱﺎﻨﻤﻟا ءﺎﻀﻣ ﻰﻘﺒﻴﺱ ﻩؤﺎﻘﺘﻧا ﻢﺕ يﺬﻟ
ﻒﻴﻔﺠﺕ ةرود وأ ﻞﻴﺴﻏ ةرود ﻞﻴﻐﺸﺕ ﻊﺟار
.(
ﻞﻴﺴﻐﻟا ةرود ﺔﻠﺡﺮﻡ زﻮﻡر : زﻮﻣﺮﻟا ﻩﺬه ءﺎﻀﺕ
-
ﻞﻴﺴﻐﻟا ةرود مﺪﻘﺕ ﻰﻟإ ةرﺎﺵﻺﻟ) ﻞﺴﻐﻟا
ﻊﻣ تارﺎﻴﺘﺧﻻا رارزأ
تاﺮﺵﺆﻤﻟا ءاﻮﺽأ
ﻞﻴﻐﺸﺘﻟا رز
ﺮﺧﺄﺘﻤﻟا
ﺮﺵﺆﻣ ءﻮﺽ
بﺎﺒﻟا لﺎﻔﻗإ
ﻞﻴﻐﺸﺘﻟا رز/فﺎﻘﻳﻹا
ﺮﺵﺆﻤﻟا ءﻮﺽ ﻊﻣ
ﻢﻜﺤﺘﻟا ﺔﺣﻮﻟ ﻞﻔﻗ رز
ﻊﻣ ﺮﺵﺆﻤﻟا ءﻮﺽ
:
)
وأ ﺔﻟﻵا ﻞﻴﻐﺸﺘﻟ رﺰﻟا اﺬه ﻰﻠﻋ ًﻼ ﻴ ﻠ ﻗ ﻂﻐﺽا
ﻞﻴﻐﺸﺘﻟا ﺮﺵﺆﻡ ءﻮﺽ ﻊﻡ رز/ءﺎﻔﻃﻹا
ﺎﻬﺋﺎﻔﻃإ . نأ ﻰﻟإ ﺮﻀﺧﻷا ﺮﺵﺆﻤﻟا ءﻮﺽ ﺮﻴﺸﻳ
ﺔﻠﻐﺸﻣ ﺔﻟﻵا . ةرود لﻼﺧ ﺔﻓﺎﺸﻨﻟا ﺔﻟﺎﺴﻐﻟا ءﺎﻔﻃﻹ
ةﺪﻤﻟ رﺰﻟا ﻰﻠﻋ ﻂﻐﺽا ،ﻞﻴﺴﻐﻟا3 لﺎﺣ ﻲﻓ ؛ناﻮﺙ
ﺽﺮﻋ وأ ًﻼ ﻴ ﻠ ﻗ رﺰﻟا ﻰﻠﻋ ﻂﻐﻀﻟا ﻢﺕ ﺊﻔﻄﺕ ﻦﻟ ،ًﺎﻴ
ﺔﻟﻵا . ،ﻞﻴﺴﻐﻟا ةرود لﻼﺧ ﺔﻟﻵا ءﺎﻔﻃإ ﻢﺕ لﺎﺣ ﻲﻓ
ﻩﺬه ﻞﻴﺴﻐﻟا ةرود ءﺎﻐﻟإ ﻢﺘﻴﺱ.
ﻞﻴﺴﻐﻟا ةرود رﺎﻴﺘﺧا رز:
ﻦﻴهﺎﺠﺕﻻا ﻲﻠآ ﻲﻓ ﻪﺕرادإ ﻦﻜﻤﻳ . ةرود رﺎﻴﺘﺧﻻ
)
لوﺪﺟ
ﺔﻌﺟاﺮﻣ ءﺎﺟﺮﻟا ،ﺔﻤﺋﻼﻣ ﺮﺜآﻷا ﻞﻴﺴﻐﻟا"
." ةرود ءﺎﻨﺙأ كﺮﺤﺘﻳ ﻦﻟ رﺰﻟا نإ
ﻞﻴﺴﻐﻟا تارود
ﻞﻴﺴﻐﻟا.
- ناروﺪﻟا / ﻒﻳﺮﺼﺘﻟا - ﻒﻴﻔﺠﺘﻟا
ﻒﻴﻄﺸﺘﻟا
.( ﺔﻤﻠآ ءﺎﻀﺕ ةروﺪﻟا لﺎﻤﺘآا ﺪﻨﻋ.
ﻞﻴﻐﺸﺘﻟا رز/ﺵﺆﻤﻟا ءﻮﺽ ﻊﻡ فﺎﻘیﻹاﺮ: ﺎﻣﺪﻨﻋ
ﻂﻐﺽا ،ءﻂﺒﺑ ﺮﻀﺧﻷا ﺮﺵﺆﻤﻟا ءﻮﺽ ﺾﻣﻮﻳ
ﻞﻴﺴﻏ ةرود ﻞﻴﻐﺸﺘﻟ رﺰﻟا ﻰﻠﻋ . ،ةروﺪﻟا تأﺪﺑ ﻰﺘﻣ
: دﺎﻌﺒﺘﺱا وأ ﻞﻳﺪﻌﺘﻟ ﻪﻴﻠﻋ ﻂﻐﺽا
لﻼﺧ ﻦﻣ ةرﺎﺘﺨﻤﻟا ﺔﻤﻴﻘﻟا ﺮﻬﻈﺘﺱ ؛ةراﺮﺤﻟا ﻂﺒﺽ
ﻞﻴﺴﻏ ةرود ﻞﻴﻐﺸﺕ ﻊﺟار
.(
ﺎﻬﻗﻮﻓ ﺮﺵﺆﻤﻟا ءﻮﺽ)
:
ﻒﻴﻔﺠﺘﻟا ةرود
36
ﺮﺤﻟا رز ةرا
Page 37

ﻔﻗإ ءﺎﻔﻃإ وأ ﻞﻴﻐﺸﺘﻟ ﻰﻠﻋ ﻂﻐﺽا ،ﻢﻜﺤﺘﻟا ﺔﺣﻮﻟ لﺎ
ﻦﻴﺘﻴﻧﺎﺙ ﻲﻟاﻮﺤﻟ رﺰﻟا . نﻮﻜﻳ ،ءﻮﻀﻟا ءﺎﻀﻳ ﺎﻣﺪﻨﻋ
ﻢﻜﺤﺘﻟا ﺔﺣﻮﻟ لﺎﻔﻗإ ﻢﺕ ﺪﻗ . ﻦﻜﻤﻤﻟا ﻦﻣ ﻪﻧا ﻲﻨﻌﻳ ﻚﻟذ
،ًﺎﻴﺽﺮﻋ ﻞﻴﺴﻐﻟا تارود ﻞﻳﺪﻌﺕ ﻢﺘﻳ نأ ﺐﻨﺠﺕ
لﺰﻨﻤﻟا ﻲﻓ دﻻوأ كﺎﻨه نﻮﻜﻳ ﺎﻣﺪﻨﻋ ًﺎﺻﻮﺼﺧ.
ECO : ﺰﻣر ءﺎﻀﻳECO
دﺎﺼﺘﻗﻻا ﺮﺵﺆﻡ ءﻮﺽ
ﻗﺎﻄﻟا ﺮﻴﻓﻮﺕ ﻢﺘﻳ ﺎﻣﺪﻨﻋ ﺔﺒﺴﻨﺑ ﺔ10 % ،ﻞﻗﻷا ﻰﻠﻋ
ﻞﻴﺴﻐﻟا ﻢﻴﻗ ﺮﻴﻴﻐﺕ ﺪﻌﺑ . نأ ﻞﺒﻗ ،ﻚﻟذ ﻰﻟإ ﺔﻓﺎﺽﻹﺎﺑ
ﺔﻟﻵا ﻞﺧﺪﺕ"دﺎﻤﺘﻋﻻا ﺔﻐﻴﺻ" ﺰﻣﺮﻟا ءﺎﻀﻴﺱ ،
ناﻮﺙ ﻊﻀﺒﻟ . ﺮﻴﻓﻮﺕ نﻮﻜﻳ ،ﺔﻟﻵا ﺊﻔﻄﺕ ﺎﻣﺪﻨﻋ
ﺔﻣﻼﻋ برﺎﻘﻳ رﺪﻘﻤﻟا ﺔﻗﺎﻄﻟا80.%
ﺔﺘﺑﺎﺙ ﺔﻘﻳﺮﻄﺑ ءﺎﻀﻣ ﺮﺵﺆﻤﻟا ءﻮﺽ ﻰﻘﺒﻴﺱ .
رﺰﻟا ﻰﻠﻋ ﻂﻐﺽا ،ًﺎﺘﻗﺆﻣ ﻞﻴﺴﻐﻟا ةرود فﺎﻘﻳﻹ
ﻲﻟﺎﻘﺕﺮﺒﻟا نﻮﻠﻟﺎﺑ ﺮﺵﺆﻤﻟا ءﻮﺽ ﺾﻣﻮﻴﺱ ؛ًادﺪﺠﻣ .
ﺮﺵﺆﻣ ءﻮﺽ نﺎآ لﺎﺣ ﻲﻓ"بﺎﺒﻟا لﺎﻔﻗإ "
ﻓ ﻦﻜﻤﻳ ،ﺄﻔﻄﻣبﺎﺒﻟا ﺢﺘ . ﻦﻣ ﻞﻴﺴﻐﻟا ةرود ءﺪﺒﻟ
ًادﺪﺠﻣ رﺰﻟا ﻰﻠﻋ ﻂﻐﺽا ،ﺖﻔﻗﻮﺕ ﺚﻴﺣ.
: بﺎﺒﻟا نأ ﻰﻟإ ﺮﻴﺸﻳ
بﺎﺒﻟا لﺎﻔﻗإ ﺮﺵﺆﻡ ءﻮﺽ
ًﻼﻔﻘﻣ . ًﺎ ﺘ ﻗ ﺆ ﻣ ﻞﻴﺴﻐﻟا ةرود فﺎﻘﻳﺈﺑ ﻢﻗ ،بﺎﺒﻟا ﺢﺘﻔﻟ
ﻒﻴﻔﺠﺕ ةرود وأ ﻞﻴﺴﻏ ةرود ﻞﻴﻐﺸﺕ ﻊﺟار
.(
)
ﺮﺵﺆﻤﻟا ءﻮﺽ ﻊﻡ :
ﻢﻜﺤﺘﻟا ﺔﺡﻮﻟ لﺎﻔﻗإ رز
37
Page 38

ب . بﻮﻠﻄﻤﻟا ﻞﻴﺴﻐﻟا ﻒﻴﻔﺠﺕ ىﻮﺘﺴﻣ ﺐﺴﺤﺑ :
ﻲﻜﻟا) ىﻮﺘﺴﻤﻟا1( : جﺎﺘﺤﺕ ﻲﺘﻟا ﺲﺑﻼﻤﻠﻟ ﺐﺱﺎﻨﻣ
ﻞﻴﺴﻐﻟا ﺪﻌﺑ ﻲﻜﻟا ﻰﻟإ . ﻢﻌﻨﺕ ﺔﻴﻘﺒﺘﻤﻟا ﺔﺑﻮﻃﺮﻟا
ﻟاﻦﻣ ﻞﻌﺠﺕو تاﺪﻌﺠﺘ ﺎﻬﺘﻟازإ ﻞﻬﺴﻟا.
ﻖﻴﻠﻌﺘﻟا) ىﻮﺘﺴﻤﻟا2( : ﻻ ﻲﺘﻟا ﺲﺑﻼﻤﻠﻟ ﻞﺱﺎﻨﻣ
ﻞﻣﺎآ ﻒﻴﻔﺠﺕ ﻰﻟإ جﺎﺘﺤﺕ.
ﺐﻀﻟا) ىﻮﺘﺴﻤﻟا3( : ﻦﻜﻤﻳ يﺬﻟا ﻞﻴﺴﻐﻠﻟ ﺐﺱﺎﻨﻣ
ﻪﻳﻮآ نود ﻦﻣ ﺔﻧاﺰﺨﻟا ﻰﻟإ ﻪﺕدﺎﻋإ.
ﻲﻓﺎﺽإ) ىﻮﺘﺴﻤﻟا4( : ﻲﺘﻟا ضاﺮﻏﻸﻟ ﺐﺱﺎﻨﻣ
تاءادرو تﺎﺠﻨﻔﺱﻹﺎآ ﻞﻣﺎآ ﻒﻴﻔﺠﺕ ﻰﻟإ جﺎﺘﺤﺕ
مﺎﻤﺤﻟا.
ﻞﻴﺴﻏ ﻰﻟإ جﺎﺘﺤﺕ ﻲﺘﻟا ﺔﻟﻮﻤﺤﻟا نﺎآ لﺎﺣ ﻲﻓ
ةرﻮآﺬﻤﻟا ﺔﻟﻮﻤﺤﻟا ﻦﻣ ﺮﺒآأ ﻒﻴﻔﺠﺕو) ﻊﺟار
لوﺪﺠﻟا( ﺎﻬﺋﺎﻬﺘﻧا ﺪﻨﻋو ﻞﻴﺴﻐﻟا ةرود ﻞﻴﻐﺸﺘﺑ ﻢﻗ ،
ﻰﻟإ ﺎﻬﻨﻣ ًﺎ ﻀ ﻌ ﺑ ﺪﻋأو تﺎﻋﻮﻤﺠﻣ ﻰﻟإ ﻞﻴﺴﻐﻟا ﻢّﺴﻗ
ضﻮﺤﻟا . تﺎﻤﻴﻠﻌﺘﻟا ﻊﺒﺕا ،ﺔﻠﺣﺮﻤﻟا ﻩﺬه ﻲﻓ
ةروﺪﺑ ﺔﺻﺎﺨﻟا"ﻂﻘﻓ ﻒﻴﻔﺠﺘﻟا ." ﻩﺬه رﺮآ
ا ﺔﻟﻮﻤﺤﻠﻟ ةﻮﻄﺨﻟاﺔﻴﻘﺒﺘﻤﻟ . ﺪﻳﺮﺒﺕ ةﺮﺘﻓ ﺔﻓﺎﺽإ ﻢﺘﻳ
ﻒﻴﻔﺠﺕ ةرود ﻞآ ﺔﻳﺎﻬﻧ ﻲﻓ ًﺎ ﻤ ﺋ ا د.
ﻂﻘﻓ ﻒﻴﻔﺠﺘﻟا
ﻒﻴﻔﺠﺕ ةرود رﺎﻴﺘﺧﻻ ةروﺪﻟا رﺎﻴﺘﺧا رز ﻞﻤﻌﺘﺱا
شﺎﻤﻘﻟا عﻮﻧ ﻊﻣ مءﻼﺘﺕ . ﻂﺒﺽ ﻦﻜﻤﻳ ﺎﻤآ
رز ﺔﻄﺱاﻮﺑ ﺖﻗﻮﻟا وأ بﻮﻠﻄﻤﻟا ﻒﻴﻔﺠﺘﻟا ىﻮﺘﺴﻣ
.
ﻒﻴﻔﺠﺘﻟا
ﺮﺧﺄﺘﻤﻟا ﻞﻴﻐﺸﺘﻟا ﻂﺒﺽ
ﻟإ ﻞﺼﺕ نأ ﻰﻟإ رﺰﻟا ﻰﻠﻋ ﻂﻐﺽا ﺮﺧﺄﺘﻤﻟا ﺖﻗﻮﻟا ﻰ
بﻮﻠﻄﻤﻟا . ﺖﻗﻮﻟا ﺮﻬﻈﻳ ،ﻂﺒﻀﻟا ﺔﻠﺣﺮﻣ لﻼﺧ
. ﺪﻌﺑ
ﺰﻣﺮﻟا ﺾﻣﻮﻳو ﺔﺵﺎﺸﻟا ﻰﻠﻋ ﺮﺧﺄﺘﻤﻟا
ﺰﻣﺮﻟا ﺮﻬﻈﻴﺱ ،بﻮﻠﻄﻤﻟا ﺮﺧﺄﺘﻤﻟا ﺖﻗﻮﻟا رﺎﻴﺘﺧا
ﺔﺵﺎﺸﻟا ﻰﻠﻋ ةروﺪﻟا ةﺪﻣو . ﻰﻠﻋ ﻂﻐﺽا
ﺖﺑﺎﺜﻟا
بﻮﻠﻄﻤﻟا ﺮﺧﺄﺘﻤﻟا ﺖﻗﻮﻟا رﺎﻬﻇﻹ ةﺪﺣاو ةﺮﻣ رﺰﻟا .
إ رﺰﻟا ﻰﻠﻋ ﻂﻐﺽا ،رﺎﻴﺘﺧﻻا ﻩﺬه ﺔﻟازﻹ نأ ﻰﻟ
ﺮﺧﺄﺘﻤﻟا ﺖﻗﻮﻟا ﺾﻴﻔﺨﺕ ﻂﻘﻓ ﻦﻜﻤﻳ .
ﺔﻤﻠآ ﺔﺵﺎﺸﻟا ﻰﻠﻋ ﺮﻬﻈﻳOFF . ﺰﻣر ﻲﻔﺘﺨﻴﺱ
ﺔﺵﺎﺸﻟا ﻦﻋ.
ﻒﻴﻔﺠﺗ ةرود وأ ﻞﻴﺴﻏ ةرود ﻞﻴﻐﺸﺗ
ﺮیﺬﺤﺗ :ﻟ ﺔﻓﺎﺸﻨﻟا ﺔﻟﺎﺴﻐﻟا لﺎﻤﻌﺘﺱا ﻞﺒﻗ ةﺮﻤﻠ
ﻒﻴﻈﻨﺕ داﻮﻣ ﻊﻣ ﻞﻴﺴﻏ ةرود ﻞﻴﻐﺸﺘﺑ ﻢﻗ ،ﻰﻟوﻷا
ﻰﻠﻋ تﺎﻴﻨﻄﻘﻟا ةرود لﺎﻤﻌﺘﺱﺎﺑ ،ﻞﻴﺴﻏ نود ﻦﻣ
90 ﻞﻴﺴﻐﻟا ﻞﺒﻗ ﺎﻣ ةرود نود ﻦﻣ ﺔﻳﻮﺌﻣ ﺔﺟرد.
. ءﺎﻀﺘﺱ
ةﺪﺣاو ﺔﻴﻧﺎﺜﻟ ﺮﺵﺆﻤﻟا ءاﻮﺽأ ﺔﻓﺎآ . ءﻮﺽ ﻰﻘﺒﻴﺱ
ﺔﺘﺑﺎﺙ ةرﻮﺼﺑ ءﺎﻀﻣ
رﺰﻟ ﺐﺱﺎﻨﻤﻟا ﺮﺵﺆﻤﻟا
ﺾﻣﻮﻴﺱوﻞﻴﻐﺸﺘﻟا ﺮﺵﺆﻣ ءﻮﺽ/ءﻂﺒﺑ فﺎﻘﻳﻹا.
ﺎﻬﻴﻟإ رﺎﺸﻤﻟا ىﻮﺼﻘﻟا ﺔﻟﻮﻤﺤﻟا زوﺎﺠﺘﺕ ﻢﻟ ﻚﻧأ ﻦﻣ
ﺔﻴﻟﺎﺘﻟا ﺔﺤﻔﺼﻟا ﻲﻓ ﻞﻴﺴﻐﻟا تارود لوﺪﺟ ﻲﻓ .
ﻒﻴﻈﻨﺘﻟا ةدﺎﻣ ﺐﻜﺱاو ﻒﻴﻈﻨﺘﻟا داﻮﻣ ءﺎﻋو ﺐﺤﺱا
ﻒﺻو
ةرود رﺎﻴﺘﺧا ﻢﺘﻳ نأ ﻰﻟإ رﺎﺴﻴﻟا وأ ﻦﻴﻤﻴﻟا ﻰﻟإ
ىﻮﺼﻘﻟا ةراﺮﺤﻟا ﻢﻴﻗ ًﺎ ﻴ ﺋ ﺎ ﻘ ﻠ ﺕ ﺔﺵﺎﺸﻟا ﻰﻠﻋ ﺮﻬﻈﺕ
ﺮﺜآﻷا تارﺎﻴﺘﺧﻹا وأ ةرﺎﺘﺨﻤﻟا ةروﺪﻠﻟ ةدﺪﺤﻤﻟا
ةروﺪﻟا ﻊﻣ ﺐﺱﺎﻨﺘﺕ ﺖﻧﺎآ لﺎﺣ ﻲﻓ ًا ﺮ ﺧ ﺆ ﻣ ًﻻﺎﻤﻌﺘﺱا
ىﻮﺼﻘﻟا ﻢﻴﻘﻟا ﻂﺒﺽ ةدﺎﻋإ ﻢﺘﻳ ،ًادﺪﺠﻣ رارزﻷا.
! ﻞﻴﻐﺸﺘﻟا رز ﻰﻠﻋ ﻂﻐﻀﻟا ﻢﺕ ﻰﺘﻣ / ،ءﺎﻔﻃﻹا
ﺒﻣ ﻮه ﺎﻤآ ﺔﺒﺱﺎﻨﻤﻟا تاﺮﻴﺠﺤﻟا ﻲﻓ ﻲﻓ ﻦﻴ"
ﺔﺑﻮﻠﻄﻤﻟا ﻞﻴﺴﻐﻟا . ﺔﻋﺮﺱو ةراﺮﺣ ﻂﺒﺽ ﻢﺘﻳ
ﺎﻤﻬﻴﻟﺪﻌﺕ ﻦﻜﻤﻳو ﻞﻴﺴﻏ ةرود ﻞﻜﻟ نارود .
ﺤﺘﻟا ﺔﺣﻮﻟ ﻰﻠﻋﻢﻜ:
ﻂﺒﺽ ﻰﻟإ لﻮﺻﻮﻟا ﻢﺘﻳ نأ ﻰﻟإ
رز ﻰﻠﻋ
.ﺕ لﺎﺣ ﻲﻓ ﻩﺬه ﻰﻠﻋ ﻂﻐﻀﻟا ﻢ
ﻲﻟﺎﺘﻟﺎآ ﻒﻴﻔﺠﺘﻟا ﺪﻳﺪﺤﺕ ﻦﻜﻤﻳ:
درﺎﺒﻟا ﻞﻴﺴﻐﻟا
1- ﺔﻟﻵا ﻞﻴﻐﺸﺘﺑ ﻢﻗ .رز ﻰﻠﻋ ﻂﻐﺽا
2- ﻞﻴﺴﻐﻟا ﻊﺽو .ﻞﻴﺴﻐﻟا ﻊﺽو بﺎﺒﻟا ﺢﺘﻓا . ﺪآﺄﺕ
3- ﻒﻴﻈﻨﺘﻟا داﻮﻡ راﺪﻘﻡ
."
ﺔﻟﻵا
4- بﺎﺒﻟا ﻖﻠﻏأ.
5- ﺞﻡﺎﻥﺮﺒﻟا ﺮﺘﺧا . ﻞﻴﺴﻐﻟا ةرود رﺎﻴﺘﺧا رز ردا
6- ﻞﻴﺴﻐﻟا ةرود لّﺪﻋ . ﺔﺒﺱﺎﻨﻤﻟا رارزﻷا ﻞﻤﻌﺘﺱا
ةراﺮﺤﻟا ﻞیﺪﻌﺗ
ةرﺎﺘﺨﻤﻟا . ﻂﻐﻀﻟا لﻼﺧ ﻦﻣ ةراﺮﺤﻟا ﺾﻔﺧ ﻦﻜﻤﻳ
أ . ﺖﻗﻮﻟا ﻦﻣ ﺔﻴﻨﻌﻣ ةﺮﺘﻓ ﺐﺴﺤﺑ : ﻦﻴﺑ20
و180 ﺔﻘﻴﻗد.
38
Page 39

ﻰﻟإ ةرﺎﺵﻺﻟ ةروﺪﻟا لﻼﺧ تاروﺪﻟا ﻞﺣاﺮﻣ ﻰﻟإ
ًﺎ ﻴ ﻟ ﺎ ﺣ مﺪﻘﺘﺕ ﺔﻠﺣﺮﻣ يأ.
ﻢﻗ ،تأﺪﺑ ﺪﻗ نﻮﻜﻳ نأ ﺪﻌﺑ ﻞﻴﺴﻏ ةرود ﺮﻴﻴﻐﺘﻟ
رز ﻰﻠﻋ ﻂﻐﻀﻟا لﻼﺧ ﻦﻣ ﺔﻓﺎﺸﻨﻟا ﺔﻟﺎﺴﻐﻟا فﺎﻘﻳﺈﺑ
ﻞﻴﻐﺸﺘﻟا/فﺎﻘﻳﻹا .ﺘﺧا ﻢﺙ ﺔﺑﻮﻠﻄﻤﻟا ةروﺪﻟا ﺮ
ﻞﻴﻐﺸﺘﻟا رز ﻰﻠﻋ ﻂﻐﺽاو/ًادﺪﺠﻣ فﺎﻘﻳﻹا . ﺢﺘﻔﻟ
رز ﻰﻠﻋ ﻂﻐﺽا ،ﻞﻴﺴﻏ ةرود لﻼﺧ بﺎﺒﻟا
ﻞﻴﻐﺸﺘﻟا/فﺎﻘﻳﻹا . لﺎﻔﻗإ ﺮﺵﺆﻣ ءﻮﺽ نﺎآ لﺎﺣ ﻲﻓ
بﺎﺒﻟا ﺢﺘﻓ ﻦﻜﻤﻳ ،ﺄﻔﻄﻣ . ﻰﻠﻋ ﻂﻐﺽا
بﺎﺒﻟا
ﻞﻴﻐﺸﺘﻟا رز/ ةرود ﻞﻴﻐﺸﺕ ةدﺎﻋﻹ ًادﺪﺠﻣ فﺎﻘﻳﻹا
ﺖﻔﻗﻮﺕ ﺚﻴﺣ ﻦﻣ ﻞﻴﺴﻐﻟا.
ةءﺎﻀﻤﻟا ةرﺎﺒﻌﻟاEND .ًا ر ﻮ ﻓ بﺎﺒﻟا ﺢﺘﻓ ﻦﻜﻤﻳ .
ﻞﻴﻐﺸﺘﻟا ﺮﺵﺆﻣ ءﻮﺽ نﺎآ لﺎﺣ ﻲﻓ/ فﺎﻘﻳﻹا
ةروﺪﻟا ءﺎﻬﻧﻹ رﺰﻟا ﻰﻠﻋ ﻂﻐﺽا ،ﺾﻣﻮﻳ . ﺢﺘﻓا
ﺔﻟﻵا ءﻰﻔﻃاو ﻞﻴﺴﻐﻟا جﺮﺧاو بﺎﺒﻟا.
! ،تأﺪﺑ ﺪﻗ نﻮﻜﺕ ةرود ءﺎﻐﻟﺈﺑ ﺖﺒﻏر لﺎﺣ ﻲﻓ
ﻨﺕو ةروﺪﻟا ﻒﻗﻮﺘﺕ نأ ﻰﻟإ ﺊﻔﻄ
رز ﻰﻠﻋ ﻂﻐﺽا
ﺔﻟﻵا.
ةروﺪﻟا ﻂﺒﺽ ﻞیﺪﻌﺗ
ةرود ﻞﻳﺪﻌﺘﻟ تارﺎﻴﺘﺧﻻا رارزأ ﻰﻠﻋ ﻂﻐﺽا
ﻚﺕﺎﺒﻠﻄﺘﻣ ﺐﺴﺤﺑ ﻞﻴﺴﻐﻟا.
• ءﺎﻀﻴﺱ ؛رﺎﻴﺘﺧﻻا ﻞﻴﻐﺸﺘﻟ رﺰﻟا ﻰﻠﻋ ﻂﻐﺽا
ﺮﺵﺆﻤﻟا ءﻮﺽ ﺐﺱﺎﻨﻤﻟا.
• رﺎﻴﺘﺧﻻا اﺬه ءﺎﻐﻟﻹ ًادﺪﺠﻣ رﺰﻟا ﻰﻠﻋ ﻂﻐﺽا :
ﺐﺱﺎﻨﻤﻟا ﺮﺵﺆﻤﻟا ءﻮﺽ ﺊﻔﻄﻨﻴﺱ .
! ًﺎ ﺒ ﺱ ﺎ ﻨ ﻣ ﻪﻄﺒﺽ ﻢﺕ يﺬﻟا رﺎﻴﺘﺧﻻا ﻦﻜﻳ ﻢﻟ لﺎﺣ ﻲﻓ
ﻦﻣ ﻚﻟذ ﻰﻟإ رﺎﺸﻳ ،ةرﺎﺘﺨﻤﻟا ﻞﻴﺴﻐﻟا ةرود ﻊﻣ
ﻲﺕﻮﺼﻟا راﺬﻧﻹاو ﺮﺵﺆﻤﻟا ءﻮﺽ ﺾﻴﻣو لﻼﺧ
)تﺎّﻧر ثﻼﺙ(رﺎﻴﺘﺧﻻا ﻞﻴﻐﺸﺕ ﻢﺘﻳ ﻦﻟ ،.
8- ةرود ﺔیﺎﻬﻥﻞﻴﺴﻐﻟا . لﻼﺧ ﻦﻣ ﺎﻬﻴﻟإ رﺎﺸﻳ
ءﻮﺽ ﺾﻣﻮﻴﺱ ،ًﺎﻘﺑﺎﺱ ﻩرﺎﻴﺘﺧا ﻢﺕ ﺮﺧﺁ رﺎﻴﺘﺧا ﻊﻣ
!ﻦﻜﻳ ﻢﻟ لﺎﺣ ﻲﻓ ًﺎ ﺒ ﺱ ﺎ ﻨ ﻣ ﻪﻄﺒﺽ ﻢﺕ يﺬﻟا رﺎﻴﺨﻟا
ﻞﻴﻐﺸﺕ ﻢﺘﻴﺱو لوﻷا رﺎﻴﺘﺧﻼﻟ ﺪﺋﺎﻌﻟا ﺮﺵﺆﻤﻟا
ﻲﻧﺎﺜﻟا رﺎﻴﺘﺧﻻا . ﺐﺱﺎﻨﻤﻟا ﺮﺵﺆﻤﻟا ءﻮﺽ ﻰﻘﺒﻴﺱ
ﺔﺘﺑﺎﺙ ﺔﻘﻳﺮﻄﺑ ءﺎﻀﻣ رﺰﻠﻟ.
7- ﺞﻡﺎﻥﺮﺒﻟا ﻞﻴﻐﺸﺗ. رز ﻰﻠﻋ ﻂﻐﺽا
ﻞﻴﻐﺸﺘﻟا/فﺎﻘﻳﻹا . ﺐﺱﺎﻨﻤﻟا ﺮﺵﺆﻤﻟا ءﻮﺽ ﻰﻘﺒﻳ
ًء ﺎ ﻀ ﻣ بﺎﺒﻟا لﺎﻔﻗإ ﻢﺘﻳو ﺔﺘﺑﺎﺙ ﺔﻘﻳﺮﻄﺑ) ءﺎﻀﻳ
بﺎﺒﻟا لﺎﻔﻗإ ﺮﺵﺆﻣ ءﻮﺽ( . ةﺪﺋﺎﻌﻟا زﻮﻣﺮﻟا ءﺎﻀﺕ
39
Page 40

تارﺎﻴﺘﺧﻻاو ﻞﺴﻐﻟا تارود
ﻞﻴﺴﻐﻟا تارود لوﺪﺝ
روﺪﻟا ةﺪﻡة
ىﻮﺼﻘﻟا)ﻎﻠآ(
ﺾﻴﻴﺒﺘﻟا
ﻢﻌﻨﻡ
ﺔﺸﻤﻗﻷا
ﻞﺴﻐﻠﻟ
ﻒﻴﻔﺠﺘﻟا ﺔﻓﺎﻀﻤﻟا داﻮﻤﻟاو ﻒﻴﻈﻨﺘﻟا داﻮﻡ ﺔﻟﻮﻤﺤﻟا
ﻒﻴﻈﻨﺗ داﻮﻡ
ﺔﻋﺮﺴﻟا
ىﻮﺼﻘﻟا
ﺔﻘﻴﻗﺪﻟا(
)ﺔیﻮﺌﻡ ﺔﺝرد(
) ﻲﻓ ةرود
ﺰﻡﺮﻟا ﻞﻴﺴﻐﻟا ةرود ﻒﺻو ىﻮﺼﻘﻟا ةراﺮﺤﻟا
(*) ﻰﻠﻋ ﻞﻴﺴﻐﻟا تارود ةﺪﻣ ﻦﻣ ﻖﻘﺤﺘﻟا ﻦﻜﻤﻳ
تﺎﻴﻨﻄﻘﻠﻟ ﻞﺴﻐﻟا تارود
90 1000 • • • - 9
تﺎﻴﻨﻄﻗ ﻞﺒﻗ ﺎﻣ ﻊﻣ
ﻞﻴﺴﻐﻟا
) ﻒﻴﻈﻨﺘﻟا داﻮﻡ ﻒﺽأ
(*)ﺔﺵﺎﺸﻟا ﻰﻠﻋ ﻞﻴﺴﻐﻟا تارود ةﺪﻣ ﻦﻣ ﻖﻘﺤﺘﻟا ﻦﻜﻤﻳ
1000• • • • 9
60
40 1000• • • • 9
40 1000• • • • 9
40 800 • • • - 4
ﺔﺒﺳﺎﻨﻤﻟا ةﺮﺠﺤﻟا ﻰﻟإ.(
ناﻮﻟﻷاو ًا ﺪ ﺟ ﺔﺨﺴﺘﻤﻟا
) ﻰﺼﻗأ ﺪﺣ90(
ناﻮﻟﻷاو ًا ﺪ ﺟ ﺔﺨﺴﺘﻤﻟا
ﺔﻥﻮﻠﻡ تﺎﻴﻨﻄﻗ)3(
تﺎﻴﻨﻄﻗ)1 :( تﺎﺽﺎﻴﺒﻟا
ﻘﻤﻟا ﺔﻣوﺎ
تﺎﻴﻨﻄﻗ)2 :( تﺎﺽﺎﻴﺒﻟا
ﺔﻘﻴﻗﺮﻟا
ﺰﻨﻴﺝ
ﺔﺻﺎﺧ ﺞﻣاﺮﺑ
40 800 • • • • 4
30 800 • • • - 3.5
ًﻼ ﻴ ﻠ ﻗ ﺔﺨﺴﺘﻤﻟا ﺲﺑﻼﻤﻟا
ﺮﻳﺮﺤﻟاو فﻮﺼﻠﻟ
ﺐﻠﻄﺘﺕ ﻲﺘﻟا ﺲﺑﻼﻤﻟاو
ﺔﻴﻋﺎﻨﻄﺻا ﺔﺸﻤﻗأ ﺔﻨﻴﺘﻣ60 800 • • • • 4
30 0 - • • - 2
زﻮﻜﺴﻴﻔﻟاو ﺮﻳﺮﺤﻟا
ﺔﻴﺘﺤﺕ ﺲﺑﻼﻣو
40 800 • • • - 2
لﺎﻔﻃأ : ﺔﻘﻴﻗد ناﻮﻟأ
ًا ﺪ ﺟ ﺔﺨﺴﺘﻣ
ﺔﻄﻠﺘﺨﻡ30 : شﺎﻌﻧﻹ
ﺔﻋﺮﺴﺑ) ﺔﺒﺱﺎﻨﻣ ﺖﺴﻴﻟ
ًﺎ ﻳ و ﺪ ﻳ ًﻼ ﺴ ﻏ(
ﺮیﺮﺡ: ﻦﻣ ﺲﺑﻼﻣ
فﻮﺻ : فﻮﺼﻟا
ﺸﻜﻟاﺦﻟا ،ﺮﻴﻤ
ﻒﻴﻔﺠﺘﻟا تارود
تﺎﻴﻨﻄﻘﻟا ﻒﻴﻔﺠﺕ
ﺔﻴﺋﺰﺟ ﻞﻴﺴﻏ تارود
ﻒﻴﻔﺠﺕو ﻞﻴﺴﻏ 30 1000
ﺔﺸﻤﻗﻷا ﻒﻴﻔﺠﺕ
ﺔﻴﻋﺎﻨﻄﺻﻻا
فﻮﺼﻟا ﻒﻴﻔﺠﺕ
ﻒﻴﻄﺸﺘﻟا
ﻊﻳﺮﺴﻟا ناروﺪﻟا
ﻒﻳﺮﺼﺘﻟا
• • • - 1
- • - - - 6
- • - - - 4
ﺔﺵﺎﺸﻟا
• - • • 9
- • - - - 1.5
1000
1000 • - - - 9
0 - - - - 9
-
-
-
-
-
-
40
Page 41

(*)ﺔﻈﺡﻼﻡ : ﺪﻌﺑ10 ﺎﻬﺘﻟﻮﻤﺡ سﺎﺳأ ﻰﻠﻋ ﻞﻴﺴﻐﻟا ةرود ﺔیﺎﻬﻥ ﺔیﺎﻐﻟ ﻲﻘﺒﺘﻤﻟا ﺖﻗﻮﻟا بﺎﺴﺘﺡا ﺔﻟﻵا ﺪﻴﻌﺘﺳ ،ﻞﻴﻐﺸﺘﻟا ﻦﻡ ﻖﺋﺎﻗد . ﻩﺬه ﺮﻬﻈﺘﺳ
ﺔﺵﺎﺸﻟا ﻰﻠﻋ ةﺪﻤﻟا .
رﺎﺒﺘﺧﻻا تﺎﺴﺳﺆﻡ ﺔﻓﺎﻜﻟ:
مﺎﻈﻨﻠﻟ ًﺎ ﻘ ﻓ وEN 50229 :ﻞﻴﺴﻐﻟا ةرود ﻂﺒﻀﺑ ﻢﻗ ﻰﻠﻋ60 ﺔیﻮﺌﻡ ﺔﺝرد.
ﻰﻠﻋ40 ﺔیﻮﺌﻡ ﺔﺝرد .
ﻰﻠﻋ40 ﺔیﻮﺌﻡ ﺔﺝرد.
1 (ﻞﻴﺴﻐﻟا ةرود رﺎﺒﺘﺧا
2 (تﺎﻴﻨﻄﻘﻠﻟ ﺔﻠیﻮﻄﻟا ﻞﻴﺴﻐﻟا ةرود : ﻞﻴﺴﻐﻟا ةرود ﻂﺒﻀﺑ ﻢﻗ
3 (تﺎﻴﻨﻄﻘﻠﻟ ةﺮﻴﺼﻘﻟا ﻞﻴﺴﻐﻟا ةرود : ﻞﻴﺴﻐﻟا ةرود ﻂﺒﻀﺑ ﻢﻗ
41
Page 42

ﺽاﻞﻴﻐﺸﺘﻟا رز ﻰﻠﻋ ﻂﻐ/ ﻲﻜﻟا رز وأ فﺎﻘﻳﻹا
ﻞﻬﺴﻟا .
ةروﺪﻟا ﺔﻟﺎﺴﻐﻟا ﻲﻬﻨﺘﺱ ،
ﺮﺵﺆﻣ ءﻮﺽ ﺾﻣﻮﻴﺱو ﻞﻴﺴﻐﻟا ﻊﻘﻧ ﻢﺘﻳ ﺎﻤﻨﻴﺑ
ﻞﻴﻐﺸﺘﻟا رز ﻰﻠﻋ ﻂﻐﺽا ،ﻞﻴﺴﻐﻟا/ وأ فﺎﻘﻳﻹا
.
ﻊﻣ ﻦﻣاﺰﺘﻟﺎﺑ ﻂﻘﻓ ﺔﻔﻴﻇﻮﻟا ﻩﺬه ﻞﻐﺸﺕ ﻢﺘﻳ ،ﻒﻴﻔﺠﺕ
ةﺪﻣ ﺾﻴﻔﺨﺕ ﻢﺘﻴﺱ ،ﺔﻔﻴﻇﻮﻟا ﻩﺬه تﺮﺘﺧا لﺎﺣ ﻲﻓ
.
ﺔﻴﻟﺎﻌﻓ ةدﺎﻳز ﻢﺘﻳ ،ﺔﻔﻴﻇﻮﻟا ﻩﺬه رﺎﻴﺘﺧا ﺪﻨﻋ
ﻞﻜﺸﺑ ﻒﻴﻈﻨﺘﻟا داﻮﻣ ﺔﻟازإ ﻦﻤﻀﺕو ﻒﻴﻄﺸﺘﻟا
ﻟا داﻮﻣ ﻰﻠﻋ ﺔﺱﺎﺴﺤﻟا ةﺮﺸﺒﻟاﻒﻴﻈﻨﺘ . ﺢﺼﻨﻧ
ﻦﻣ ﺔﻠﻣﺎآ ﺔﻟﻮﻤﺣ ﻊﻣ ﺔﻔﻴﻇﻮﻟا ﻩﺬه لﺎﻤﻌﺘﺱﺎﺑ
داﻮﻣ ﻦﻣ ةﺮﻴﺒآ ﺔﻴﻤآ ﺐﻠﻄﺕ ﺪﻨﻋ وأ ﻞﻴﺴﻐﻟا
ﺮﻳﺮﺤﻟا ﻞﻴﺴﻏ ةروﺪﻟ
ﻞﻬﺴﻟا ﻲﻜﻟا . جاﺮﺧإ ﻢﺘﻳ ﻲآ ﻩﺎﻴﻤﻟا ﻒﻳﺮﺼﺘﻟ
ﻞﻬﺴﻟا ﻲﻜﻟا رز.
ﺖﻗﻮﻟا ﺮﻓﻮﻡ
ﻰﻟإ ﻞﻴﺴﻐﻟا ةرود30-50 % ةروﺪﻟا ﺐﺴﺤﺑ
ﻲﻓﺎﺽﻹا ﻒﻴﻄﺸﺘﻟا
ﺔﻈﺡﻼﻡ : ةرود ﻞﻴﻐﺸﺕ ًﺎ ﻀ ﻳ أ تدرأ لﺎﺣ ﻲﻓ
ىﻮﺘﺴﻣ"ﻲﻜﻟا) " ىﻮﺘﺴﻤﻟا1.(
ةرﺎﺘﺨﻤﻟا . ﺖﻗﻮﻠﻟ ﻦﻣاﺰﺘﻣ ﺮﻴﻓﻮﺕ ﻦﻤﻀﺕ ﻲﻟﺎﺘﻟﺎﺑو
ﺔﻗﺎﻄﻟاو. ﺔﺨﺴﺘﻤﻟا ﺲﺑﻼﻤﻠﻟ ةروﺪﻟا ﻩﺬه ﻞﻤﻌﺘﺱا
ًﻼ ﻴ ﻠ ﻗ.
! ﻊﻣ ﻦﻣاﺰﺘﻟﺎﺑ ﺔﻔﻴﻇﻮﻟا ﻩﺬه لﺎﻤﻌﺘﺱا ﻦﻜﻤﻳ ﻻ
تاروﺪﻟا
ﻞﻀﻓأ . يوﺬﻟ صﻮﺼﺨﻟا ﻪﺟو ﻰﻠﻋ ةﺪﻴﻔﻣ ﻲه
ﻒﻴﻈﻨﺘﻟا.
! ﻊﻣ ﻦﻣاﺰﺘﻟﺎﺑ ﺔﻔﻴﻇﻮﻟا ﻩﺬه لﺎﻤﻌﺘﺱا ﻦﻜﻤﻳ ﻻ
ﻞﻴﺴﻐﻟا تارﺎﻴﺘﺧا
ﻖﺋﺎﻔﻟا ﻞﻴﺴﻐﻟا
ﻞﻀﻔﺑ لﺎﻋ ءادأ وذ ﻞﺴﻏ رﺎﻴﺘﺧﻻا اﺬه مﺪﻘﻳ
ﺔﻠﺣﺮﻤﻟا ﻲﻓ ﺔﻠﻤﻌﺘﺴﻤﻟا ﻩﺎﻴﻤﻟا ﻦﻣ ﺮﺒآأ ﺔﻴﻤآ
ﻦﻣ ةﺪﻳاﺰﺘﻣ ةﺪﻣ ﻞﻀﻔﺑو ةروﺪﻟا ﻦﻣ ﺔﻴﻟوﻷا
!ﻣ ﻦﻣاﺰﺘﻟﺎﺑ ﺔﻔﻴﻇﻮﻟا ﻩﺬه لﺎﻤﻌﺘﺱا ﻦﻜﻤﻳ ﻻ ﻊ
نود ﺾّﻴﺒﻣ . ﻲﻓ
ﺖﺒﻏر لﺎﺣ
،ﺾّﻴﺒﻣ ﺔﻓﺎﺽﺈﺑ
ﻊﺽ ةﺮﻴﺠﺤﻟا
ﺐﻜﺴﺕ ﺎﻣﺪﻨﻋ
ىﺪﻌﺘﺕ ﻻ ،ﺾﻴﺒﻤﻟا
يﺰآﺮﻤﻟا رﻮﺤﻤﻟا ﻰﻠﻋ ﻦﻴﺒﻤﻟا ﻰﺼﻗﻷا ّﺪ ﺤ ﻟ ا
ﻞﻴﺴﻏ ةروﺪﺑ مﺎﻴﻘﻟا نود ﻦﻡ ﻞﻴﺴﻐﻟا ﺾﻴﻴﺒﺘﻟ
تارود ﻞﻳﺪﻌﺕ ﻢﺘﻴﺱ ،ﺔﻔﻴﻇﻮﻟا ﻩﺬه رﺎﻴﺘﺧا ﺪﻨﻋ
ﺾﻴﻔﺨﺕ ﻞﺟا ﻦﻣ ﻊﻳﺮﺴﻟا ناروﺪﻟاو ﻞﻴﺴﻐﻟا
تاﺮﺵﺆﻣ ءاﻮﺽأ ﺾﻣﻮﺘﺱو ءﻂﺒﺑ ضﻮﺤﻟا
ﺔﻴﻓﺎﺽﻹا)3 ( ﻲﻓ
ةﺮﻴﺠﺤﻟا)1 .(
ﻞﻴﻐﺸﺘﺑ ﻢﻗو
.
.
ﻞﻴﻐﺸﺘﻟاو ﻞﻬﺴﻟا ﻲﻜﻟا/فﺎﻘﻳﻹا . ،ةروﺪﻟا ءﺎﻬﻧﻹ
ﻞﻴﺴﻐﻟا ةرود . صﻮﺼﺨﻟا ﻪﺟو ﻰﻠﻋ ﺪﻴﻔﻣ ﻮه
ةﺪﻴﻨﻌﻟا ﻊﻘﺒﻟا ﺔﻟازﻹ . ﻞﻤﻌﺘﺴﻳ نأ ﻦﻜﻤﻳﻊﻡ وأ ﻦﻡ
ةرﻮﺼﻟا ﻊﺟار
.(
ﻖﺋﺎﻔﻟا ﻞﺴﻐﻟا رﺎﻴﺘﺧا
ﻞﻬﺴﻟا ﻲﻜﻟا
ﺪﻴﻋﺎﺠﺘﻟا نّﻮﻜﺕ . روﺪﻴﺱ ،ةروﺪﻟا ﺔﻳﺎﻬﻧ ﺪﻨﻋ
)
،ﺔﻠﻡﺎآ ﺔﻴﻓﺎﺽﻹا ةﺮﻴﺠﺤﻟا ﻲﻓ ﺾﻴﺒﻤﻟا ﺐﻜﺱا
3 ﻒﻴﻄﺸﺘﻟا ةرود ﺮﺘﺧا ،
! ﻊﻣ ﻦﻣاﺰﺘﻟﺎﺑ ﺔﻔﻴﻇﻮﻟا ﻩﺬه لﺎﻤﻌﺘﺱا ﻦﻜﻤﻳ ﻻ
.
ﻞﻴﺴﻐﻟا ﻞﺒﻗ ﺎﻤﻟو ءﺎﻀﻴﺒﻟا ﺔﻴﻨﻄﻘﻟا.
ﻰﻠﻋ ﻞﺴﻐﻟا تارود ﺔﻓﺎﻜﻟو ﺔﻘﻴﻗﺪﻟا ﺔﻴﻨﻄﻘﻟا
ﻞﺴﻐﻟا تارود
ﻲﻟﺎﺘﻟﺎﺑ ﺢﺼﻨﻧ:
ﺔﻀﻔﺨﻨﻣ ةراﺮﺣ.
ﺮﻳﺮﺤﻟاو.
ﻞﻴﺴﻐﻟا و ﻒﻴﻈﻨﺘﻟا داﻮﻡ
ﻒﻴﻈﻨﺘﻟا داﻮﻡ
ﻰﻠﻋ ﺔﺑﻮﻠﻄﻤﻟا ﻒﻴﻈﻨﺘﻟا داﻮﻣ ﺔﻴﻤآو عﻮﻧ ﺪﻤﺘﻌﻳ
• ﺲﺑﻼﻤﻠﻟ ةردﻮﺒﻟا ﻒﻴﻈﻨﺘﻟا داﻮﻣ لﺎﻤﻌﺘﺱا
• ﺲﺑﻼﻤﻠﻟ ﺔﻠﺋﺎﺴﻟا ﻒﻴﻈﻨﺘﻟا داﻮﻣ لﺎﻤﻌﺘﺱا
• فﻮﺼﻠﻟ ﺔﻠﺋﺎﺴﻟا ﻒﻴﻈﻨﺘﻟا داﻮﻣ لﺎﻤﻌﺘﺱا
ﻲﻓ ﻩﺎﻴﻤﻟا ةوﺎﺴﻗو خﺎﺴﺕﻻا ىﻮﺘﺴﻣو ﻞﻴﺴﻐﻟا
ﺔﺌﻴﺒﻟا ﺔﻳﺎﻤﺣ ﻲﻓ ﺪﻋﺎﺴﺕو رﺪﻬﻟا : ﻦﻣ ﻢﻏﺮﻟا ﻰﻠﻋ
يﻮﺘﺤﺕ ﻲﻬﻓ ،ًﺎﻴﺟﻮﻟﻮﻴﺑ ﺔﻠﻠﺤﺘﻣ ﻒﻴﻈﻨﺘﻟا داﻮﻣ نأ
ﺰﻴﻣ ﻲﻓ لﺪﻌﺕ تﺎﻧﻮﻜﻣ ﻰﻠﻋﺔﻌﻴﺒﻄﻟا نا.
يﺬﻟا شﺎﻤﻘﻟا عﻮﻧ ﻪﻠﺴﻐﺑ مﻮﻘﺕ) ،ﺮﻳﺮﺤﻟا ،ﻦﻄﻘﻟا
ﺦﻟا ،فﻮﺼﻟا ( ةراﺮﺣو ﻪﻧﻮﻟ ﻰﻟإ ﺔﻓﺎﺽﻹﺎﺑ
ﺔﻘﻄﻨﻤﻟا . ىدﺎﻔﺘﺘﺱ ،ﺔﻳﺎﻨﻌﺑ ﻒﻴﻈﻨﺘﻟا داﻮﻣ سﺎﻴﻘﺑ
Page 43

ﺮیﺮﺤﻟا: ﻴﺴﻐﻟا ةرود ﻞﻤﻌﺘﺱا ﺮﻳﺮﺤﻠﻟ ﺔﺻﺎﺨﻟا ﻞ
ﺔﻳﺮﻳﺮﺤﻟا ﺲﺑﻼﻤﻟا ﺔﻓﺎآ ﻞﺴﻐﻟ . ﺢﺼﻨﻧ
ﺖﻤﻤﺻ ﺪﻗ نﻮﻜﺕ ﺔﺻﺎﺧ ﻒﻴﻈﻨﺕ داﻮﻣ لﺎﻤﻌﺘﺱﺎﺑ
ﺔﻘﻴﻗﺪﻟا ﺲﺑﻼﻤﻟا ﻞﻴﺴﻐﻟ.
. ﻢﻗ
ﻲﻓ ﺎﻬﻌﺽو ﺮﺋﺎﺘﺴﻟا ﻲﻄﺑ ةﺪﺨﻣ ءﺎﻄﻏ ﺔﺒﻴﻘﺣ وأ
ﻲﻓ ﺔﻴﻓﻮﺼﻟا ﺲﺑﻼﻤﻟا ﺔﻓﺎآ ﻞﺴﻏ ﻦﻜﻤﻳ ﻪﻧا
ةرﺎﺒﻋ ﺎﻬﻴﻠﻋ ﻲﺘﻟا ﻚﻠﺕ ﻰﺘﺣ ﺔﻓﺎﺸﻨﻟا ﺔﻟﺎﺴﻐﻟا
ﺔﻌﻗﺮﻟا ﻰﻠﻋ . ﻦﻤﻳ
ضاﺮﻏﻷا ﺔﻓﺎآ ﻞﺴﻐﻟ ةروﺪﻟا ﻩﺬه لﺎﻤﻌﺘﺱا
دأ ﻞﻀﻓأ ﻰﻠﻋ لﻮﺼﺤﻟا نﺎﻤﻀﺑ ﺔﻴﻓﻮﺼﻟاءا.
ﻒﺵﺎﻨﻤﻟاو ﺮیﺮﺴﻟا تﺎﺽﺎﻴﺑ : ةرود ﻞﻤﻌﺘﺱا
لﺰﻨﻤﻟا ﻞﻴﺴﻏ ﺔﻓﺎآ ﻞﺴﻐﻟ .
مﺎﻤﺤﻟاو ﺮﻳﺮﺴﻟا
تﺎﻤﻌﻨﻤﻟ ءادأ ﻞﻀﻓأ ﻰﻠﻋ لﻮﺼﺤﻟا ﻦﻤﻀﻳ اﺬﻬﻓ
ﺔﻗﺎﻄﻟاو ﺖﻗﻮﻟا ﺮﻴﻓﻮﺕ ﻰﻠﻋ ﺪﻋﺎﺴﻳو شﺎﻤﻘﻟا .
ةردﻮﺑ ﻒﻴﻈﻨﺕ داﻮﻣ لﺎﻤﻌﺘﺱﺎﺑ ﺢﺼﻨﻧ.
ﻠﺼﻟا نﻮﺑﺎﺼﻟا ﺔﻄﺱاﻮﺑ لﺎﻤﻌﺘﺱاو ﺎﻬﻠﺴﻏ ﻞﺒﻗ ﺐ
ﻞﻴﺴﻐﻟا ﻞﺒﻗ ﺎﻣو تﺎﻴﻨﻄﻘﻟا ةرود .
: ةروﺪﻟا ﻩﺬه ﻢﻴﻤﺼﺕ ﻢﺕ
ﻒﻴﻔﺠﺘﻟاو ﻞﻴﺴﻐﻟا
ًﻼ ﻴ ﻠ ﻗ ﺔﺨﺴﺘﻤﻟا ضاﺮﻏﻷا ﻒﻴﻔﺠﺕو ﻞﻴﺴﻐﻟ
ﻰﻟإ ﻞﺼﺕ ﺔﻟﻮﻤﺣ ﻒﻴﻔﺠﺕو1 ﻲﻓ ﻎﻠآ60 ﺔﻘﻴﻗد
ﺴﻟا ﻒﻴﻈﻨﺘﻟا داﻮﻣ تﺎﻗﺎﻴﻟاو مﺎﻤآﻷا ﺞﻟﺎﻋو ﺔﻠﺋﺎ
ﺔﻟﻮﻤﺤﻟا نزاﻮﺗ مﺎﻈﻥ
تازاﺰﺘهﻻا يدﺎﻔﺘﻟ ،ﻊﻳﺮﺱ نارود ةرود ﻞآ ﻞﺒﻗ
،ةﺪﺣﻮﻣ ﺔﻘﻳﺮﻄﺑ ﺔﻟﻮﻤﺤﻟا ﻊﻳزﻮﺘﻟو ﺔﻃﺮﻔﻤﻟا
عﺮﺱأ ﺔﻋﺮﺴﺑ ﻞﺻاﻮﺘﻣ ﻞﻜﺸﺑ ضﻮﺤﻟا روﺪﻳ
ﻞﻴﺴﻐﻟا نارود ﺔﻋﺮﺱ ﻦﻣ ﻞﻴﻠﻘﺑ . ﻢﺘﻳ ﻢﻟ لﺎﺣ ﻲﻓ
تﻻوﺎﺤﻣ ﺪﻌﺑ ﺢﻴﺤﺻ ﻞﻜﺸﺑ ﺔﻟﻮﻤﺤﻟا نزاﻮﺕ
،ﺮﻴﺒآ ﻞﻜﺸﺑ ﺔﻧزاﻮﺘﻣ ﺮﻴﻏ ﺔﻟﻮﻤﺤﻟا ﺖﻧﺎآ لﺎﺣ
ناروﺪﻟا ﻦﻣ لﺪﺑ ﻊﻳزﻮﺘﻟا ﺔﻴﻠﻤﻌﺑ ﺔﻟﺎﺴﻐﻟا مﻮﻘﺕ
ةﺮﻴﻐﺼﻟا ضاﺮﻏﻷا جﺰﻤﺑ ﺢﺼﻨﻧ ،ﺎﻬﻧزاﻮﺕ
ﺔﻟﻮﻤﺤﻟا ﻲﻓ ةﺮﻴﺒﻜﻟاو.
ﺮﺋﺎﺘﺴﻟا: ﺮﻳﺮﺤﻠﻟ ﻞﻴﺴﻐﻟا ةرود ﻞﻤﻌﺘﺱا
ﺔﻜﺒﺸﻣ .
فﻮﺼﻟا : ةﺪﻴﺣﻮﻟا ﺔﻓﺎﺸﻨﻟا ﺔﻟﺎﺴﻐﻟا ﻲه نﻮﺘﺴﻳرﺁ
ﺤﻨﻣ ﻢﺕ ﻲﺘﻟا مﻮﻨﻴﺕﻼﺑ كرﺎﻤﻟوو ﺔﻳﺎﻨﻋ ﺔﻗدﺎﺼﻣ ﺎﻬ
ةﺪﻴﻨﻌﻟا ﻊﻘﺒﻟا : ةﺪﻴﻨﻌﻟا ﻊﻘﺒﻟا ﺔﺠﻟﺎﻌﻣ ﻞﻀﻓﻷا ﻦﻣ
ﺔﻋﺮﺴﺑ . ﻞﻴﺴﻐﻟ ةروﺪﻟا ﻩﺬه لﺎﻤﻌﺘﺱا ﻦﻜﻤﻳ
ﻂﻘﻓ . ﻞﻤﻌﺘﺱا ،ﺞﺋﺎﺘﻨﻟا ﻞﻀﻓأ ﻰﻠﻋ لﻮﺼﺤﻠﻟ
ﻊﻘﺒﻟاو.
وﺪﺕ ،ةﺪﻋﺾﻔﺨﻨﻣ ﻊﻳﺮﺱ نارود ﺔﻟﻵا ر . ﻲﻓ
ﻊﻳﺮﺴﻟا . و ﺔﻟﻮﻤﺤﻟا ﻊﻳزﻮﺕ ﻦﻴﺴﺤﺕ ةﺪﻋﺎﺴﻤﻟ
ﻞﺧاد ﻒﻴﻈﻨﺘﻟا داﻮﻣ ﺐﻜﺱ ﺐﺠﻳ ةﺮﺠﺤﻟا
ﻞﺧاد ةﺮﺵﺎﺒﻣ عﻮﺽﻮﻤﻟا ءﺎﻋﻮﻟا وأ ﺔﺒﺱﺎﻨﻤﻟا
ضﻮﺤﻟا– ﻞﻴﺴﻐﻟا ةرود ءﺪﺑ ﻞﺒﻗ . ﺔﻟﺎﺤﻟا ﻲﻓ
ﺞﻣﺎﻧﺮﺑ رﺎﻴﺘﺧا ﻦﻜﻤﻤﻟا ﻦﻣ نﻮﻜﻳ ﻦﻟ ،ةﺮﻴﺧﻷا
ﻞﻴﺴﻐﻟا ﻞﺒﻗ ﺎﻣ ةرود ﻊﻣ تﺎﻴﻨﻄﻘﻟا.
! ﺎﻬﻧﻷ ﻦﻳﺪﻴﻟا ﻞﺴﻏ ﻒﻴﻈﻨﺕ داﻮﻣ ﻞﻤﻌﺘﺴﺕ ﻻ
ةﻮﻏﺮﻟا ﻦﻣ ﺮﻴﺜﻜﻟا ﺐﺒﺴﺕ.
ﻞﻴﺴﻐﻟا ﺮﻴﻀﺤﺗ
)M.0508 (كرﺎﻤﻟوو ﺔآﺮﺵ ﻞﺒﻗ ﻦﻣ . ﻲﻨﻌﻳ اﺬه
ﻞﻴﺴﻐﻟا تﺎﻤﻴﻠﻌﺕ ﺔﻌﻗر ﻰﻠﻋ ( ﺪآﺄﺕو نﻮﻠﻟاو
"ﻂﻘﻓ يوﺪﻴﻟا ﻞﺴﻐﻠﻟ "
ﺲﺑﻼﻤﻟا ﻦﻋ ﺔﻧﻮﻠﻤﻟا ﺲﺑﻼﻤﻟا ﻞﺼﻓ ﻦﻣ
ءﺎﻀﻴﺒﻟا.
رارزﻷا.
لوﺪﺟ
" نزو ﻰﻟإ ﺮﻴﺸﺕ ﻲﺘﻟا
ﻞﻴﺴﻐﻟا تارود
فﺎﺠﻟا ﻞﻴﺴﻐﻟا.
ﺪﺣاو ءﺎﻄﻏ 400-500 غ
ﺪﺣاو ةدﺎﺱو ءﺎﻄﻏ 150-200 غ
ةﺪﺋﺎﻤﻠﻟ ﺪﺣاو ءﺎﻄﻏ 400-500 غ
ﺔﻠﺋﺎﺱ ﻒﻴﻈﻨﺕ داﻮﻣ.
ﻞﻴﻐﺸﺘﻟا رز ﻰﻠﻋ/فﺎﻘﻳﻹا.
ةﺪﺣاو ﺔﻔﺸﻨﻣ 150-250غ
ﺪﺣاو ﺺﻴﻤﻗ 150-200 غ
ﻞﻴﺴﻐﻟا ﺢﺋﺎﺼﻥ
ﺎﻬﺒﺒﺴﻳ ﻲﺘﻟا خﺎﺱوﻷا ﺔﻟازﻹ
ةدﺎﻋ لﺎﻔﻃﻷا . ﻒﻴﻈﻨﺘﻟا داﻮﻣ رﺎﺙﺁ ﻊﻴﻤﺟ لزأو
ﺪﺣاو ﺲﻧﺮﺑ 900-1200غ
ﺪﺣاو ﺰﻨﻴﺟ 400-500 غ
لﺎﻔﻃﻷﺎﺑ
ﻞﻤﻌﺘﺱاو ﺎﻬﻠﺴﻏ ﻞﺒﻗ جرﺎﺨﻟا ﻰﻟإ ﻞﺧاﺪﻟا ﻦﻣ
ةﺮﺸﺑ ﻲﻧﺎﻌﺕ نأ نود لوﺆﺤﻠﻟ تﺎﺽﺎﻔﺤﻟا ﻦﻣ
ﺔﻴﺱﺎﺴﺤﻟا ﻦﻣ ﺔﺱﺎﺴﺤﻟا لﺎﻔﻃﻷا. ﻢﻴﻤﺼﺕ ﻢﺕ
لﻼﺧ ﻦﻣ ﺎﻳﺮﺘﻜﺒﻟا ﺔﻴﻤآ ﺾﻴﻔﺨﺘﻟ ةروﺪﻟا
لﻮﻌﻔﻣ ةدﺎﻳزو ﻩﺎﻴﻤﻟا ﻦﻣ ﺮﺒآا ﺔﻴﻤآ لﺎﻤﻌﺘﺱا
داﻮﻣ ﻰﻟإ ﺔﻓﺎﻀﻤﻟا ﺔﺻﺎﺨﻟا ةﺮﻬﻄﻤﻟا داﻮﻤﻟا
ﻂﻐﺽا ةروﺪﻟا ءﺎﻬﻧﻹ ؛ءﻂﺒﺑ ضﻮﺤﻟا ةرادﺈﺑ
• ﻌﺽو ﻞﺒﻗ ﻞﻴﺴﻐﻟا ﺾﻔﻧاﺔﻟﻵا ﻞﺧاد ﻪ.
• شﺎﻤﻘﻟا عﻮﻧ ﺐﺴﺤﺑ ﻞﻴﺴﻐﻟا ﻢّﺴﻗ) ﺰﻣﺮﻟا
• ﻦﻣ ﻖﻘﺤﺕو ﺲﺑﻼﻤﻟا بﻮﻴﺟ ﺔﻓﺎآ غﺮﻓأ
• ﻲﻓ ةرﻮآﺬﻤﻟا ﻢﻴﻘﻟا زوﺎﺠﺘﺕ ﻻ"
ی ﻢآ؟ﻚﻠﻴﺴﻏ نﺰ
ﺰﻨﻴﺠﻟا : ﺰﻨﻴﺠﻠﻟ ﺔﺻﺎﺨﻟا ﻞﻴﺴﻐﻟا ةرود ﻞﻤﻌﺘﺱا
ﺔﻋﻮﻨﺼﻤﻟا ﺲﺑﻼﻤﻟا ﺔﻓﺎﻜﻟ ﺎﻬﺒﻠﻗا ،ﻢﻴﻧﺪﻟا ﻦﻣ
لﺎﻔﻃﻷا: ﺔﺻﺎﺨﻟا ﻞﻴﺴﻐﻟا ةرود ﻞﻤﻌﺘﺱا
ﻒﻴﻈﻨﺘﻟا . ﺔﻟﻵا مﻮﻘﺕ ،ﻞﻴﺴﻐﻟا ةرود ﺔﻳﺎﻬﻧ ﺪﻨﻋ
43
Page 44

ﻘﻟا ﺔﻴﻟﻵ ًا ر ﺮ ﺽ يدﺎﻔﺘﻟ ﺔﻤﻤﺼﻤﻟا ﺔﻨﻣﻵا ﻞﻔ
ﺔﻴﺽﺮﻋ تﺎﺤﺘﻓ يأ.
ﻦﻣ ﺔﻴﻠﺧاﺪﻟا ﻊﻄﻘﻟا فوﺮﻈﻟا ﻦﻣ فﺮﻇ
ﻚﺴﻔﻨﺑ ﺎﻬﺣﻼﺻإ ﺔﻟوﺎﺤﻣ ﻞﺟأ.
ﻞﻤﻌﺕ ﺎﻣﺪﻨﻋ.
ىﻮﺼﻗ ﺔﻳﺎﻨﻌﺑ ﺎﻬﻜﺴﻣاو ﺔﺙﻼﺙ وأ . ﻻ لوﺎﺤﺕ
ًا ﺪ ﺟ ﺔﻠﻴﻘﺙ ﺔﻟﻵا نﻻ كﺪﺣو ﻚﻟﺬﺑ مﺎﻴﻘﻟا ًا ﺪ ﺑ أ.
غرﺎﻓ ضﻮﺤﻟا نأ.
ًا ﺪ ﺟ ًﺎ ﻨ ﺧ ﺎ ﺱ.
لﺎﻌﺘﺵﻼﻟ ﺔﻠﺑﺎﻗ ﻒﻴﻈﻨﺕ داﻮﻤﺑ ﺎﻬﻠﺴﻏ) ًﻼ ﺜ ﻣ
ﻦﻴﻠﺘﻳرﻮﻠﻜﻳﺮﺕ.(
ﻦﻣ ﺔﻋﻮﻨﺼﻤﻟا ﺔﻬﺑﺎﺸﻤﻟا ضاﺮﻏﻷا وأ
طﺎﻄﻤﻟا.
ﻒﻴﻔﺠﺘﻟا.
ﻒیﺮﺼﺘﻟا
فﻼﻐﻟا لﺎﻤﻌﺘﺱا ةدﺎﻋإ ﻢﺘﻴﻟ ﺔﻴﻠﺤﻤﻟا.
ﻬﻜﻟا تاﺪﻌﻤﻟا ﻦﻣ ﺺﻠﺨﺘﻟا لﻮﺣ ﺔﻴﺋﺎﺑﺮ
مﺪﻋ بﻮﺟو ﻰﻠﻋ ﺺﻨﺕ ﺔﻴﻧوﺮﺘﻜﻟﻹاو
ﺔﻴﻟﺰﻨﻤﻟا ﺔﻴﺋﺎﺑﺮﻬﻜﻟا تاﺪﻌﻤﻟا ﻦﻣ ﺺﻠﺨﺘﻟا
تﺎﻳﺎﻔﻧ ﻦﻣ ﺺﻠﺨﺘﻠﻟ ﺔﻳدﺎﻌﻟا ﺔﻘﻳﺮﻄﻟﺎﺑ
ﺔﻳﺪﻠﺒﻟا . ﻞﻜﺸﺑ ﺔﻤﻳﺪﻘﻟا تﻻﻵا ﻊﻤﺟ ﺐﺠﻳ
ﺮﻳوﺪﺕو لﺎﻤﻌﺘﺱا ةدﺎﻋإ ﻞﻀﻓﻷ ﻞﺼﻔﻨﻣ
ﻰﻠﻋ ﺎهﺮﺙأ ﻒﻴﻔﺨﺕو ﺎﻬﻳﻮﺘﺤﺕ ﻲﺘﻟا داﻮﻤﻟا
ﺔﺌﻴﺒﻟا و نﺎﺴﻧﻹا ﺔﺤﺻ . ﺔﻳوﺎﺣ ﺰﻣر نإ
ﺎﻔﻨﻟا ﺔﻓﺎآ ﻰﻠﻋ ﺮﻬﻈﺕ ﺔﺑﻮﻄﺸﻤﻟا تﺎﻳ
ﻊﻴﻤﺠﺕ لﻮﺣ ﻚﺕﺎﺒﺟاﻮﺑ كﺮﻴآﺬﺘﻟ تﺎﺠﺘﻨﻤﻟا
ﻞﺼﺘﻳ نأ ﻚﻠﻬﺘﺴﻤﻟا ﻰﻠﻋ
تﺎﻣﻮﻠﻌﻤﻟ ﺔﺋﺰﺠﺘﻟا ﻊﺋﺎﺑ
ﻞﺼﻔﻨﻤﻟا تﺎﻳﺎﻔﻨﻟا .
وأ ﺔﻴﻠﺤﻤﻟا تﺎﻄﻠﺴﻟﺎﺑ
تاﺪﻌﻤﻟا ﻦﻣ ﺺﻠﺨﺘﻟا ﺔﻴﻔﻴآ لﻮﺣ ﺔﻴﻓﺎﺽإ
ﺔﻤﻳﺪﻘﻟا.
تاﺮیﺬﺤﺘﻟاو ﺢﺋﺎﺼﻨﻟا
• ﺐﺒﺴﻳ ﺪﻗ اﺬﻬﻓ ةﻮﻘﺑ بﺎﺒﻟا ﻰﻠﻋ ﻂﻐﻀﺕ ﻻ
ﺔﻴﻤﻟﺎﻌﻟا ﺔﻣﻼﺴﻟا . ﻦﻣ ﺔﻴﻟﺎﺘﻟا تﺎﻣﻮﻠﻌﻤﻟا ﺪﻳوﺰﺕ ﻢﺕ
ﺔﻳﺎﻨﻌﺑ ﺎﻬﺕءاﺮﻗ ﻲﻟﺎﺘﻟﺎﺑ ﺐﺠﻳو ﺔﻣﻼﺴﻟا ﻞﺟا.
• يأ ﻲﻓ ﺲﻤﻠﺕ ﻻ ،ﺔﻟﻵا ﺖﻠﻄﻌﺕ لﺎﺣ ﻲﻓ
ﺔﻡﺎﻌﻟا ﺔﻡﻼﺴﻟا
• ﺔﻟﻵا ﻦﻋ ﻦﻳﺪﻴﻌﺑ ًﺎ ﻤ ﺋ ا د لﺎﻔﻃﻷا ءﺎﻘﺑإ ﺐﺠﻳ
صﺎﺨﺵأ)لﺎﻔﻃﻷا ﻚﻟذ ﻲﻓ ﺎﻤﺑ ( تاذ
ﺔﻴﺴﻔﻨﻟاو ﺔﻴﺴﺤﻟاو ﺔﻳﺪﺴﺠﻟا تارﺪﻘﻟا
• ﻦﻴﺼﺨﺵ ةﺪﻋﺎﺴﻤﺑ ﻚﻟﺬﺑ ﻢﻗ ،ﺔﻟﻵا ﻞﻘﻧ ﺪﻨﻋ
ﺮﺒﺨﻟا ﻰﻟإ نوﺮﻘﺘﻔﻳ ﻦﻳﺬﻟا وأ ﺔﻀﻔﺨﻨﻤﻟا ة
ﻢﻬﺋﺎﻄﻋإ وأ ﻢﻬﺘﺒﻗاﺮﻣ ﻢﺘﻳ ﻢﻟ ﺎﻣ ﺔﻓﺮﻌﻤﻟاو
ﺺﺨﺵ ﻞﺒﻗ ﻦﻣ ﺎﻬﻟﺎﻤﻌﺘﺱا لﻮﺣ تﺎﻤﻴﻠﻌﺕ
• ﻦﻣ ﺪآﺄﺕ ،ﻞﻴﺴﻐﻟا ﺔﻟﺁ ﻲﻓ ﻚﻠﻴﺴﻏ ﻊﺽو ﻞﺒﻗ
ﻢﻬﺘﻣﻼﺱ ﻦﻋ لوﺆﺴﻣ. ﺔﺒﻗاﺮﻣ ﺐﺠﻳ
ﺔﻟﻵﺎﺑ نﻮﺒﻌﻠﻳ ﻻ ﻢﻬﻧأ ﻦﻣ ﺪآﺄﺘﻠﻟ لﺎﻔﻃﻷا.
• ﺢﺒﺼﻴﻟ بﺎﺒﻟا ﻞﻴﻤﻳ ،ﻒﻴﻔﺠﺘﻟا ﺔﻠﺣﺮﻣ لﻼﺧ
ضﻮﺤﻟا.
• ﻢﺕ ﻲﺘﻟا ﺲﺑﻼﻤﻟا ﻒﻴﻔﺠﺘﻟ ﺔﻟﻵا ﻞﻤﻌﺘﺴﺕ ﻻ
تﺎﺠﺘﻨﻣ ،ﻦﻴﺱوﺮﻴآ ،ﻂﻔﻧ ،لﻮﺤآ ،نﻮﺘﻴﺱأ
• ﻞﻤﻌﺘﺴﺕ ﻻ يﻮﻏﺮﻟا طﺎﻄﻤﻟا ﻒﻴﻔﺠﺘﻟ ﺔﻟﻵا
ﻦﻣ ﺔﻴﻓﺎﺽإ ﺔﻴﻤآ ع ﺔﻨﺧﺎﺱ ﻩﺎﻴﻤﺑ ﺎﻬﻠﺴﻏ
ﺎﻬﻔﻴﻔﺠﺕ ﻞﺒﻗ ﻒﻴﻈﻨﺘﻟا داﻮﻣ.
• تارود لﻼﺧ ﺔﺣﻮﺘﻔﻣ ﺔﻴﻔﻨﺤﻟا نأ ﻦﻣ ﺪآﺄﺕ
ضاﺮﻏﻷا ،ءﺎﻤﻠﻟ ﺔﻣوﺎﻘﻤﻟا ﺔﺸﻤﻗﻷا
وأ ﺲﺑﻼﻤﻟاو طﺎﻄﻤﻟا ﻦﻣ ﺔﻋﻮﻨﺼﻤﻟا
ﺔﻴﻃﺎﻄﻣ ﺔﻴﺵﺎﺤﺑ ةدوﺰﻤﻟا تادﺎﺱﻮﻟا
• ﻒﻴﻠﻐﺘﻟا داﻮﻣ ﻦﻣ ﺺﻠﺨﺘﻟا : ﺔﻤﻈﻧﻷا ﻊﺒﺕا
• ﺔﻴﺑوروﻷا تﺎﻤﻴﻠﻌﺘﻟا نإ2002/96/EC
ةراﺮﺣ نود ﻦﻣ)ﺪﻳﺮﺒﺕ ةرود ( نأ ﻦﻣ ﺪآﺄﺘﻠﻟ
ﺔﻳﻮﻏر.
مﺪﻋ ﻦﻤﻀﺕ ةراﺮﺣ ﺪﻨﻋ ﺔﻴﻘﺑ ضاﺮﻏﻷا
ﺎهرﺮﻀﺕ.
ﺔﻓﺎآ ﺔﻟازإ ﺖﻤﺕ اذإ ﻻإ ﻒﻴﻔﺠﺘﻟا ةرود ةرود
ةراﺮﺤﻟا دﺪﺒﺘﺕ ﻰﺘﺣ ﺎهﺮﺸﻧ ﻢﺕو ضاﺮﻏﻷا.
ﻦﻴﻠﻠﺒﻣ ﻦﻴﻣﺪﻗ وأ ﻦﻳﺪﻴﺑ وأ.
ﻞﺒﺤﻟا ﺲﻴﻟو ﺲﺑﺎﻘﻟا.
ًا ﺪ ﺟ ﺔﻴﻟﺎﻋ ةراﺮﺣ ﺔﺟرد.
!ﺴﻐﻟا ﻩﺬه ﻊﻴﻨﺼﺕو ﻢﻴﻤﺼﺕ ﻢﺕ ﺔﻤﻈﻧﻷ ًﺎ ﻘ ﻓ و ﺔﻟﺎ
• ﻞﺒﻗ ﻦﻣ ﺔﻓﺎّﺸﻨﻟا ﻩﺬه لﺎﻤﻌﺘﺱا ﺐﺠﻳ ﻻ
- ﻲﻓ ﺎﻬﻠﺴﻏ ﻢﺘﻳ ﻢﻟ ًﺎ ﺽ ا ﺮ ﻏ أ ﻒﻔﺠﺕ ﻻ
- ،ﺦﺒﻄﻟا ﺖﻳﺰآ داﻮﻤﺑ ﺔﺨﺱﻮﻤﻟا ضاﺮﻏﻷا
ﻟازإ ﺐﺠﻳ ﻊﻤﺸﻟا ،ﻦﻴﺘﻨﺑﺮﺘﻟا ﺖﻳز ،ﻊﻘﺒﻟا ﺔ
- طﺎﻄﻤﻟﺎآ ضاﺮﻏﻷا ﻒﻴﻔﺠﺕ ﺐﺠﻳ ﻻ
)ﺲﻜﺘﻳﻻ ةﻮﻏر( ،مﺎﻤﺤﺘﺱﻻا تﺎﻌﺒﻗ ،
- أﺪﺒﺕ ﻒﻴﻔﺠﺘﻟا ةرود ﻦﻣ ةﺮﻴﺧﻷا ﺔﻠﺣﺮﻤﻟا
ﺮیﺬﺤﺗ : ﺔﻳﺎﻬﻧ ﻞﺒﻗ ًا ﺪ ﺑ أ ﻒﻴﻔﺠﺘﻟا نارود ﻒﻗﻮﺕ ﻻ
• ﻵا ﻩﺬه ﻢﻴﻤﺼﺕ ﻢﺕ ﻲﻟﺰﻨﻤﻟا لﺎﻤﻌﺘﺱﻼﻟ ﺔﻟ
ﻂﻘﻓ .
• ﻦﻴﻣﺪﻘﻟا ﻲﻓﺎﺣ نﻮﻜﺕ ﺎﻣﺪﻨﻋ ﺔﻟﺎﺴﻐﻟا ﺲﻤﻠﺕ ﻻ
• ﺐﺤﺱ لﻼﺧ ﻦﻣ ءﺎﺑﺮﻬﻜﻟا ﻦﻣ ﺔﻟﻵا ﻞﺼﻓا
• ﻰﻟإ ﻞﺼﺕ ﺪﻗ ذإ ﻒﻳﺮﺼﺘﻟا ﻩﺎﻴﻣ ﺲﻤﻠﺕ ﻻ
Page 45

ًﺎ ی و ﺪ ی بﺎﺒﻟا ﺢﺘﻓ
ﻲﻓ عﺎﻄﻘﻧا ﺐﺒﺴﺑ بﺎﺒﻟا ﺢﺘﻓ ﻚﻴﻠﻋ رﺬﻌﺕ لﺎﺣ ﻲﻓ
ﺑﺮﻬﻜﻟا ﺮﺵﺎﺑ ﻞﻴﺴﻐﻟا ﺔﻟازﺈﺑ ﺐﻏﺮﺕ ﺖﻨآو ءﺎ
ﻲﻟﺎﺘﻟﺎﺑ:
ﻲﺋﺎﺑﺮﻬﻜﻟا ﺲﺑﺎﻘﻟا ﻦﻣ ﺲﺒﻘﻤﻟا لزأ.
نأ ﻦﻣ ﺪآﺄﺕ
2-
ﻩﺎﻴﻤﻟا ىﻮﺘﺴﻣ
ﺔﻟﻵا ﻞﺧاد
ﺔﺤﺘﻓ ﻦﻣ ﻰﻧدأ
بﺎﺒﻟا . ﺪﻨﻋ
ﻢﻗ ،ﺲﻜﻌﻟا
ﻩﺎﻴﻤﻟا ﺔﻟازﺈﺑ
ةﺪﺋاﺰﻟا
ًﻼﻤﻌﺘﺴﻣ
ﻒﻳﺮﺼﺘﻟا بﻮﺒﻧأ . ﻮه ﺎﻤآ ﻮﻟد ﻲﻓ ﺎﻬﻌﻤﺟا
ةرﻮﺼﻟا
.
ﺔﻗرﻮﻟا ﺮﻬﻇ ﻊﺟار
.(
ﺾﺒﻘﻤﻟا ًﻼﻤﻌﺘﺴﻣ
ﻪﻴﻟإ رﺎﺸﻤﻟا ﺮﻴﻐﺼﻟا
ﺔﻳﺎﻐﻟ ،ةرﻮﺼﻟا ﻲﻓ
ﺐﻴﻀﻗ رﺮﺤﺘﻳ نأ
ﻦﻣ ﻲﻜﻴﺘﺱﻼﺒﻟا ﺪﺸﻟا
فﺎﻘﻳﻹا ﻊﺽﻮﻣ :
ﻞﻔﺱﻷا ﻰﻟإ ﺐﺤﺱا
نأ ﻰﻟإ ﺮﻴﺸﻳ ﺎﻣ ﺔﻘﻃ تﻮﺻ ﻊﻤﺴﺕ نأ ﺔﻳﺎﻐﻟ
نﻵا ﻞﻔﻘﻣ ﺮﻴﻏ ﺢﺒﺻأ بﺎﺒﻟا.
رﺮآ ،ًﺎﻨﻜﻤﻣ ﻚﻟذ ﻦﻜﻳ
ةﻮﻄﺨﻟا .
ﻚﺑﺎﺸﻤﻟأ نأ ﻦﻣ ﺪآﺄﺕو
ﻰﻟإ ﺎﻬﻌﻓﺪﺕ نأ ﻞﺒﻗ ﺎﻬﻧﺎﻜﻣ ﻲﻓ نﺎﻣﺄﺑ ﺔﻋﻮﺽﻮﻣ
ﻲﻓ ﻪﻴﻟإ رﺎﺸﻣ
ا ﻦﻣ ءﺎﻄﻐﻟا حﻮﻟ ﺔﻟازﺈﺑ ﻢﻗ ﺔﻴﻣﺎﻣﻷا ﺔﻬﺠﻟ
ﺔﻟﺎﺴﻐﻠﻟ ﻰﻠﻔﺴﻟا)
4- جرﺎﺨﻟا ﻰﻟإ ﻪﺒﺤﺱا
5- بﺎﺒﻟا ﺢﺘﻓا : ﻢﻟ لﺎﺣ ﻲﻓ
6- ﻪﻧﺎﻜﻣ ﻰﻟإ حﻮﻠﻟا ﺪﻋا
ﺔﻟﻵا ﻞﺧاد.
1-
3-
45
Page 46

ءﺎﺑﺮﻬﻜﻟا ﻦﻋ ﺔﻟﻵا.
ﺔﻴﻣﺎﻣﻷا ةﺮﺠﺤﻟا ﻰﻟإ لﻮﺻﻮﻟا ﻞﺟأ ﻦﻣ:
ﻢﺙ ﻂﺱﻮﻟا ﻲﻓ ﻂﻐﻀﻟا لﻼﺧ ﻦﻣ ﺔﻟﺎﺴﻐﻟا
ﺎﻬﺘﻟازﻹ ﻦﻴﺒﻧﺎﺠﻟا ﻦﻣ ﻞﻔﺱﻷا ﻮﺤﻧ ﺎﻬﺒﺤﺱا
رﻮﺼﻟا ﻊﺟار
.(
ةرﻮﺼﻟا ﻊﺟار
.(
ةرﻮﺼﻟا ﻊﺟار
.(
ﻦﻣﺁ ﻞﻜﺸﺑ ﺎﻬﻧﺎﻜﻣ ﻲﻓ ﺔﻋﻮﺽﻮﻣ ﻚﺑﺎﺸﻤﻟا
ﺔﻟﻵا ﻲﻓ ﺎﻬﻌﻀﺕ نأ ﻞﺒﻗ.
ﻩﺎﻴﻤﻟا لﺎﺧدإ بﻮﺒﻥأ ﺪﻘﻔﺗ
ﻰﻠﻋ ﺔﻨﺴﻟا ﻲﻓ ةﺮﻣ ﻩﺎﻴﻤﻟا لﺎﺧدإ بﻮﺒﻧأ ﺪﻘﻔﺕ
ﺔﻟﻮﻬﺴﺑ ﺦﺴﻔﻨﻳ ﺪﻗ عﺪﺼﺘﻣ بﻮﺒﻧأ يأو ًا ﺪ ﺟ ًﺎ ﻳ ﻮ ﻗ.
)
) ﻲﻟاﻮﺣ1.5 ﺮﺘﻴﻟ) (
ﺔﻋﺎﺴﻟا)
ﻞﻗﻷا . ﻪﻟﺪﺒﺘﺱا ،تﺎﻋﺪﺼﺕ يأ ﺖﻳأر لﺎﺣ ﻲﻓ
ًا ر ﻮ ﻓ :ﻐﻟا تارود ءﺎﻨﺙأ ﻩﺎﻴﻤﻟا ﻂﻐﺽ نﻮﻜﻳ ،ﻞﻴﺴ
ﺔﻥﺎﻴﺼﻟا و ﺔیﺎﻨﻌﻟا
! ﻞﺼﻓأو ﺖﻬﺘﻧا ﺪﻗ ﻞﻴﺴﻐﻟا ةرود نأ ﻦﻣ ﺪآﺄﺕ
1- ﻦﻣ ﺔﻴﻣﺎﻣﻷا ﺔﻬﺠﻟا ﻲﻓ ءﺎﻄﻐﻟا ﺔﺣﻮﻟ ﻚﻓ
ﻴﻤﻟا مﺎﻈﻧ كﻼﻬﺘﺱا ﻦﻣ ّﺪ ﺤ ﻴ ﺱ ﻚﻟﺬﻓ ﻲﻓ ﻩﺎ
ﺔﻴﺟرﺎﺨﻟاو ﺔﻴﻃﺎﻄﻤﻟا ﻊﻄﻘﻟا ﻒﻴﻈﻨﺕ ﻦﻜﻤﻳ
ﺔﻋﻮﻘﻨﻣ ﺔﻤﻋﺎﻧ شﺎﻤﻗ ﺔﻌﻄﻗ ﺔﻄﺱاﻮﺑ ﺔﻟﺎﺴﻐﻠﻟ
ﺔﻌﻓاﺮﻟا ﻰﻠﻋ)1 (
ﻰﻟإ جرﺪﻟا ﺐﺤﺱاو
ﻊﺟار
2- بﺮﺴﺘﺕ ﻲﺘﻟا ﻩﺎﻴﻤﻟا ﻊﻤﺠﻳ ﻲﻜﻟ ءﺎﻋو ﻊﺽ
3- برﺎﻘﻋ ﺲﻜﻌﺑ ﻪﺕرادإ لﻼﺧ ﻦﻣ ءﺎﻄﻐﻟا ﻚﻓ
4- مﺎﺕ ﻞﻜﺸﺑ ﻞﺧاﺪﻟا ﻒﻈﻧ.
5- ًا د ﺪ ﺠ ﻣ ءﺎﻄﻐﻟا ﺖﺒﺙ.
6- نأ ﻦﻣ ﺪآﺄﺕو ﻪﻧﺎﻜﻣ ﻰﻟإ ءﺎﻄﻐﻟا ﺪﻋا
.( ﻪﻠﺴﻏا
،ﺔﻳرﺎﺟ ﻩﺎﻴﻣ ﺖﺤﺕ
ﻩﺬه راﺮﻜﺕ ﺐﺠﻳ
ﺔﻴﺕاذ ﺔﺨﻀﻤﺑ ةدوﺰﻣ ﺔﻓﺎﺸﻨﻟا ﺔﻟﺎﺴﻐﻟا نإ
ﺎﻬﻨﻣ ﻞﻔﺱﻷا ﻢﺴﻘﻟا ﻲﻓ ﺔﻌﻗاﻮﻟا ﺔﺨﻀﻤﻟا ﻲﻤﺤﺕ.
ﺔﻟﻵا ﻦﻋ ﻩﺎﻴﻤﻟاو ءﺎﺑﺮﻬﻜﻟا ﻞﺼﻓ
• ﻞﻴﺴﻏ ةرود ﻞآ ﺪﻌﺑ ﻩﺎﻴﻤﻟا ﺔﻴﻔﻨﺣ ﻖﻠﻏأ
تﺎﺑﺮﺴﺘﻟا ﻊﻨﻤﻳو ﺔﻟﺎﺴﻐﻟا.
• ﺪﻨﻋ ﻲﺋﺎﺑﺮﻬﻜﻟا ﺲﺒﻘﻤﻟا ﻦﻣ ﺔﻟﻵا ﻞﺼﻓا
ﺎﻬﺘﻧﺎﻴﺻو ﺎﻬﻔﻴﻈﻨﺕ.
ﺔﻟﺎﺴﻐﻟا ﻒﻴﻈﻨﺗ
ةﺮﺕﺎﻓ ﺔﻴﻧﻮﺑﺎﺻ ﻩﺎﻴﻤﺑ . وأ تﺎﺒﻳﺬﻣ ﻞﻤﻌﺘﺴﺕ ﻻ
ﺔﻄﺵﺎآ داﻮﻣ .
ﻒﻴﻈﻨﺘﻟا داﻮﻡ ءﺎﻋو ﻒﻴﻈﻨﺗ
زﻹ ﻂﻐﺽا ،جرﺪﻟا ﺔﻟا
جرﺎﺨﻟا)2 ()
ةرﻮﺼﻟا
ًاراﺮﻣ ﺔﻴﻠﻤﻌﻟا.
ﺔﻟﻵا ضﻮﺤﺑ ﺔیﺎﻨﻌﻟا
• نﻮﻜﺕ يدﺎﻔﺘﻟ ًﺎ ﻴ ﺋ ﺰ ﺟ ًﺎ ﺣ ﻮ ﺘ ﻔ ﻣ بﺎﺒﻟا كﺮﺕا
ﺔﻬﻳﺮﻜﻟا ﺢﺋاوﺮﻟا.
ﺔﺨﻀﻤﻟا ﻒﻴﻈﻨﺗ
ﺘﻟاﺔﻧﺎﻴﺻ يأ ﻰﻟإ جﺎﺘﺤﺕ ﻻ ﻒﻴﻈﻨ . ﺾﻌﺑ ﻲﻓ
ةﺮﻴﻐﺻ ضاﺮﻏأ ﻊﻘﺕ ﺪﻗ ،نﺎﻴﺣﻷا) ﻊﻄﻘﻟا ﻞﺜﻣ
رارزﻷا وأ ﺔﻳﺪﻘﻨﻟا ( ﻲﺘﻟا ﺔﻴﻣﺎﻣﻷا ةﺮﻴﺠﺤﻟا ﻲﻓ
46
Page 47

ةﺪﻋﺎﺴﻤﻟا ﻊﺟار
•
•
•
•
•
ر
( نأ ﻦﻣ ﺪآﺄﺕ ،
ﻪﺡﻼﺻإ و ﻞﻠﺨﻟا
ًﺎ ﻧ ﺎ ﻴ ﺣ أ ﺔﻓﺎﺸﻨﻟا ﺔﻟﺎﺴﻐﻟا ﻞﻄﻌﺘﺕ ﺪﻗ . ﺔﻴﻨﻘﺘﻟا ةﺪﻋﺎﺴﻤﻟا ﺰآﺮﻤﺑ لﺎﺼﺕﻻا ﻞﺒﻗ)
ﺔﻴﻟﺎﺘﻟا ﺔﺤﺋﻼﻟا ﻰﻟإ ةدﻮﻌﻟا لﻼﺧ ﻦﻣ ﺔﻟﻮﻬﺴﺑ ﺎﻬﻠﺣ ﻦﻜﻤﻳ ﻻ ﺔﻠﻜﺸﻤﻟا:
ﻠﻜﺸﻤﻟاﺔ ﺔﻠﻤﺘﺤﻤﻟا بﺎﺒﺳﻷا /ﻞﺤﻟا
ﺔﻳﺎﻔآ ﻪﺑ ﻚﺘﺤﻳ ﻻ وأ ﻞﻣﺎﻜﻟﺎﺑ ﺲﺒﻘﻤﻟﺎﺑ ًﻻ ﻮ ﺻ ﻮ ﻣ ﺲﻴﻟ ﺲﺑﺎﻘﻟا.
• ءﺎﺑﺮﻬﻜﻟا ﻲﻓ عﺎﻄﻘﻧا ﺔﻤﺙ
روﺪﺗ ﻻ ﺔﻟﺎﺴﻐﻟا
ﻞﻬﺴﻟا ﻲﻜﻟا ةرود وأ
ضﻮﺤﻟا ةرادﺈﺑ ﺔﻟﻵا مﻮﻘﺕ ،ﻞﻴﺴﻐﻟا ةرود ﻲﻬﺘﻨﺕ ﺎﻣﺪﻨﻋ ،
. ﺮﻳﺮﺤﻟا ﻞﻴﺴﻏ ةرود تﺮﺘﺧا لﺎﺣ ﻲﻓ
ﻞﻬﺴﻟا ﻲﻜﻟا رز
ﻞﻴﺴﻐﻟا ﻊﻘﻧ ﻢﺘﻳ ﺎﻤﻨﻴﺑ ةروﺪﻟا ﺔﻟﻵا ﻲﻬﻨﺕ ، . ﻩﺎﻴﻤﻟا ﻒﻳﺮﺼﺘﻟ
،ﻞﻴﺴﻐﻟا جاﺮﺧﻹﻞﻴﻐﺸﺘﻟا رز ﻰﻠﻋ ﻂﻐﺽا/ رز وأ فﺎﻘﻳﻹا
ﺢﻴﺤﺻ ﻞﻜﺸﺑ ًﺎ ﻘ ﻠ ﻐ ﻣ ﺲﻴﻟ ﺔﻟﻵا بﺎﺑ
• ﻰﻠﻋ ﻂﻐﻀﻟا ﻢﺘﻳ ﻢﻟ ﻞﻴﻐﺸﺘﻟا رﺰﻟا/ءﺎﻔﻃﻹا
• ﺔﺣﻮﺘﻔﻣ ﺖﺴﻴﻟ ﻩﺎﻴﻤﻟا ﺔﻴﻔﻨﺣ نإ
• ﻣ ﻞﻴﻐﺸﺕ ﻂﺒﺽ ﻢﺕ ﺮﺧﺄﺘ
ﺔﺌﺒﻌﺘﺑ مﻮﻘﺗ ﻻ ﺔﻓﺎﺸﻨﻟا ﺔﻟﺎﺴﻐﻟا
ﺔﻴﻔﻨﺤﻟﺎﺑ ًﻻ ﻮ ﺻ ﻮ ﻣ ﺲﻴﻟ ﻩﺎﻴﻤﻟا لﺎﺧدإ مﻮﻃﺮﺧ
• يﻮﻠﻣ مﻮﻃﺮﺨﻟا
• ﺔﺣﻮﺘﻔﻣ ﺖﺴﻴﻟ ﻩﺎﻴﻤﻟا ﺔﻴﻔﻨﺣ
• لﺰﻨﻤﻟا ﻲﻓ ﻩﺎﻴﻣ ﺪﺟﻮﻳ ﻻ
• ًﺎ ﻴ ﻓ ﺎ آ ﺲﻴﻟ ﻩﺎﻴﻤﻟا ﻂﻐﺽ
• ﻞﻴﻐﺸﺘﻟا رز ﻰﻠﻋ ﻂﻐﻀﻟا ﻢﺘﻳ ﻢﻟ/فﺎﻘﻳﻹا
ﻰﻘﺒی ﺔﻓﺎﺸﻨﻟا ﺔﻟﺎﺴﻐﻟا بﺎﺑ
• د تﺮﺘﺧا لﺎﺣ ﻲﻓ لﺎﻔﻃﻷا ةرو
ءﻂﺒﺑ .ﻞﻴﻐﺸﺘﻟا رز ﻰﻠﻋ ﻂﻐﺽا ،ةروﺪﻟا ءﺎﻬﻧﻹ/ وأ فﺎﻘﻳﻹا
أﺪﺒﺗ ﻻ ﻞﻴﺴﻐﻟا ةرود
ﻩﺎﻴﻤﻟا
ًﻼﻔﻘﻡ
ﻞﻬﺴﻟا ﻲﻜﻟا
ﻦﻴﺑ ﻩﺎﻴﻤﻟا مﻮﻃﺮﺧ ﺔﻳﻮﺴﺕ ﻢﺘﻳ ﻢﻟ65 و100 ضرﻷا ﻦﻣ ﻢﺱ
ﺐﻴآﺮﺘﻟا ﻊﺟار
(
ﺐﻴآﺮﺘﻟا ﻊﺟار
(
راﺮﻤﺘﺱﺎﺑ ﻩﺎﻴﻤﻠﻟ ﺔﻟﺎﺴﻐﻟا . ﻲﻓ ﺪﺟﻮﻳ ،ﺮﻣﻷا اﺬه ﻞﺜﻣ يدﺎﻔﺘﻟ
ﻒﻳﺮﺼﺘﻠﻟ ةدﺎﻀﻣ ﺔﺻﺎﺧ تﺎﻣﺎﻤﺻ تﻼﺤﻤﻟا
تارود ﻊﺟا
ًﺎ ﻳ و ﺪ ﻳ ﻒﻳﺮﺼﺘﻟا ﺔﻠﺣﺮﻣ ﻞﻴﻐﺸﺕ ﻞﻴﺴﻐﻟا)
47
)
ﻣ كﺎﻨه ﻎﻳﺮﻔﺕو ﺔﺌﺒﻌﺘﺑ ﺐﺒﺴﺕ ﻩﺎﻴﻤﻟا ﻒﻳﺮﺼﺕ ﻲﻓ ﻞآﺎﺸ
ﻒﻳﺮﺼﺘﻟا ﻦﻤﻀﺘﺕ ﻻ ﻞﻴﺴﻐﻟا ةرود :ﺾﻌﺑ ﺐﻠﻄﺘﺕ تارود
ﻩﺎﻴﻤﻟا غﺮﻔﺗو ﺊﺒﻌﺗ ﺔﻟﺎﺴﻐﻟا
راﺮﻤﺘﺳﺎﺑ
• ﻩﺎﻴﻤﻟا ﺖﺤﺕ مﻮﻃﺮﺨﻠﻟ ﺮﺤﻟا فﺮﻄﻟا)
• نﻮﻜﻳ ﺪﻗ ،ﻰﻨﺒﻤﻟا ﻦﻣ ﺎﻴﻠﻌﻟا ﻖﺑاﻮﻄﻟا ﻲﻓ لﺰﻨﻤﻟا نﺎآ لﺎﺣ ﻲﻓ
• ﺲﻔﻨﺘﻣ بﻮﺒﻧأ راﺪﺠﻟا ﻲﻓ ﻒﻳﺮﺼﺘﻟا مﺎﻈﻧ ﻲﻓ ﺪﺟﻮﻳ ﻻ
فﺮﺼﺗ ﻻ ﺔﻓﺎﺸﻨﻟا ﺔﻟﺎﺴﻐﻟا
روﺪﺗ ﻻو ﻩﺎﻴﻤﻟا
Page 48

ﻞﻴﺴﻐﻟا تارود ﻊﺟار
•
•
•
•
•
•
ﺐﻴآﺮﺘﻟا ﻊﺟار
(
تارﺎﻴﺘﺧﻻاو ﻞﻴﺴﻐﻟا
(
ﻞﻴﻐﺸﺘﻟا رز ﻰﻠﻋ/ فﺎﻘﻳﻹا)
(
تارﺎﻴﺘﺧﻻاو
• ﻞﻬﺴﻟا ﻲﻜﻟا ﺔﻔﻴﻇو ﻞﻴﻐﺸﺕ ﻢﺕ : ﻂﻐﺽا ،ﻞﻴﺴﻐﻟا ةرود لﺎﻤآﻹ
• يﻮﻠﻣ ﻒﻳﺮﺼﺘﻟا مﻮﻃﺮﺧ)
• ةدوﺪﺴﻣ ﻒﻳﺮﺼﺘﻟا ةﺎﻨﻗ
ﻊﺟار
ﻊﺟار
ﻞﻴﺴﻐﻟاو ﻒﻴﻈﻨﺘﻟا داﻮﻣ ﻊﺟار
(
ﻊﺟار
ﺔﻳﺎﻨﻌﻟا ﻊﺟار
ﺐﻴآﺮﺘﻟا ﻊﺟار
(
ﺐﻴآﺮﺘﻟا ﻊﺟار
(
ﺐﻴآﺮﺘﻟا لﻼﺧ ﺢﻴﺤﺻ ﻞﻜﺸﺑ ضﻮﺤﻟا ﻚﻓ ﻢﺘﻳ ﻢﻟ)
(
ﺐﻴآﺮﺘﻟا
• ﺔﻟﺎﺴﻐﻟا ﺔﻳﻮﺴﺕ ﻢﺘﻳ ﻢﻟ)
• ﻂﺋﺎﺤﻟاو تﺎﺵوﺮﻔﻤﻟا ﻦﺋاﺰﺧ ﻦﻴﺑ ﺔﻘﻟﺎﻋ ﺔﻟﺎﺴﻐﻟا)
(
ﺐﻴآﺮﺘﻟا
• ﺔﻧزاﻮﺘﻣ ﺮﻴﻏ ﺔﻟﻮﻤﺤﻟا)
ﺒﻧأ ﺢﻴﺤﺻ ﻞﻜﺸﺑ ﺖﺒﺜﻣ ﺲﻴﻟ ﻩﺎﻴﻤﻟا لﺎﺧدإ بﻮ)
(
ﺐﻴآﺮﺘﻟا
(
ﺔﻧﺎﻴﺼﻟاو
ءﺎﺑﺮﻬﻜﻟا ﻦﻋ ﺎﻬﻠﺼﻓأ و ﺔﻟﻵا ءﺎﻔﻃﺈﺑ ﻢﻗ . ةﺪﺣاو ﺔﻘﻴﻗد ﺮﻈﺘﻧا
ًادﺪﺠﻣ ﺎﻬﻠﻴﻐﺸﺕ ﻞﺒﻗ ًﺎﺒﻳﺮﻘﺕ . ﻞﺼﺕا ،ﺔﻠﻜﺸﻤﻟا تﺮﻤﺘﺱا لﺎﺣ ﻲﻓ
ﺔﻴﻨﻘﺘﻟا ﺔﻳﺎﻨﻌﻟا ﺰآﺮﻤﺑ
ﻞﻴﺴﻐﻠﻟ ﻢﺋﻼﺕ ﻻ ﻒﻴﻈﻨﺘﻟا داﻮﻣ) ةرﺎﺒﻋ ﻞﻤﺤﺕ نأ ﺎﻬﻴﻠﻋ
"تﺎﻓﺎﺸﻨﻟا تﻻﺎﺴﻐﻠﻟ " وأ"ﻲﻟﻵا وأ يوﺪﻴﻟا ﻞﺴﻐﻠﻟ " ﺎﻣ وأ
ﻚﻟذ ﻪﺑﺎﺵ(
ﻩﺎﻴﻤﻟا بﺮﺴﺗ ﺔﻓﺎﺸﻨﻟا ﺔﻟﺎﺴﻐﻟا
• دوﺪﺴﻣ ﻒﻴﻈﻨﺘﻟا داﻮﻣ ءﺎﻋو) ،ﻪﻔﻴﻈﻨﺘﻟ
• مﺎﻜﺣﺈﺑ ًﺎﺘﺒﺜﻣ ﺲﻴﻟ ﻒﻳﺮﺼﺘﻟا مﻮﻃﺮﺧ)
مﺪﻘﺘﺗ ﻲﺘﻟا ﺔﻠﺡﺮﻤﻟا زﻮﻡر
ءﻮﺽ ﻊﻡ ﺔﻋﺮﺴﺑ ﺾﻡﻮﺗ
• ﻦﻣ ﺮﻴﺜﻜﻟا لﺎﻤﻌﺘﺱا ﻢﺕ ﻒﻴﻈﻨﺘﻟا داﻮﻣ
ًا ﺮ ﻴ ﺜ آ ﺰﺘﻬﺗ ﺔﻟﺎﺴﻐﻟا ةرود لﻼﺧ
ﻊیﺮﺴﻟا ناروﺪﻟا
ﻞﻴﻐﺸﺘﻟا ﺮﺵﺆﻡ/ءﺎﻔﻃﻹا.
ةﻮﻏﺮﻟا ﻦﻡ ﺮﻴﺜﻜﻟا كﺎﻨه
ﻰﻘﺒی ﺔﻓﺎﺸﻨﻟا ﺔﻟﺎﺴﻐﻟا بﺎﺑ
تاﺮﻳﺬﺤﺘﻟاو ﺢﺋﺎﺼﻨﻟا ﻊﺟار
(
48
يوﺪﻴﻟا ﺢﺘﻔﻟﺎﺑ ﻢﻗ)
ﻪﺑ ﻚﺘﺤﺕ ﻻ وأ ﺲﺑﺎﻘﻟﺎﺑ ﺔﻟﻮﺻﻮﻣ ﺮﻴﻏ ﺔﻟﻵا
• ءﺎﺑﺮﻬﻜﻟا ﻲﻓ عﺎﻄﻘﻧا ﺔﻤﺙ
• مﺎﻜﺣﺈﺑ ﻖﻠﻐﻣ ﺮﻴﻏ ﺔﻟﻵا بﺎﺑ
• ﺮﺧﺄﺘﻣ ﺖﻗو ﻂﺒﺽ ﻢﺕ
• ﺔﻴﻌﺽﻮﻟا ﻲﻓ ﻒﻴﻔﺠﺘﻟا
ﻒﻔﺠﺗ ﻻ ﺔﻓﺎﺸﻨﻟا ﺔﻟﺎﺴﻐﻟا
ًﻼﻔﻘﻡ
Page 49

ﻪﺣﻼﺻإو ﻞﻠﺨﻟا ﻊﺟار
(
ﺔﻟﺎﺴﻐﻟا ﻰﻠﻋ ةدﻮﺟﻮﻤﻟا تﺎﻣﻮﻠﻌﻤﻟا ﺔﺣﻮﻟ ﻰﻠﻋ تﺎﻣﻮﻠﻌﻤﻟا ﻩﺬه دﺎﺠﻳإ ﻦﻜﻤﻳ.
ﺴﻤﻟاةﺪﻋﺎ
ةﺪﻋﺎﺴﻤﻠﻟ ًﺎ ﺒ ﻠ ﻃ لﺎﺼﺗﻻا ﻞﺒﻗ:
• ﻚﺴﻔﻨﺑ ﺔﻠﻜﺸﻤﻟا ﻞﺣ ﻚﺘﻋﺎﻄﺘﺱﺎﺑ نﺎآ اذإ ﺎﻣ ﺪآﺄﺕ)
• ﺔﻠﻜﺸﻤﻟا ﻞﺣ ﻢﺕ اذإ ﺎﻣ ﺪآﺄﺘﻠﻟ ﻞﻴﺴﻐﻟا ةرود ﻞﻴﻐﺸﺕ ﺪﻋأ
• ﺺﺧﺮﻤﻟا ﺔﻴﻨﻘﺘﻟا ةﺪﻋﺎﺴﻤﻟا ﺰآﺮﻤﺑ ﻞﺼﺕا ،ﺲﻜﻌﻟا ﺪﻨﻋ
!ﻴﻌﺘﻳ ،ﺊﻃﺎﺧ ﻞﻜﺸﺑ ﺔﻓﺎﺸﻨﻟا ﺔﻟﺎﺴﻐﻟا لﺎﻤﻌﺘﺱا وأ ﺐﻴآﺮﺕ ﻢﺕ لﺎﺣ ﻲﻓ ﻲﺘﻟا ﺔﻣﺪﺨﻟا ﻊﻓﺪﺑ مﻮﻘﺕ نأ ﻚﻴﻠﻋ ﻦ
ﻒﺕﺎﻬﻟا ﺮﺒﻋ ﺎﻬﺘﺒﻠﻃ .
!ﻦﻴﺼﺧﺮﻣ ﻦﻴﻴﻨﻘﺕ ةﺪﻋﺎﺴﻣ ًﺎ ﻤ ﺋ ا د ﺐﻠﻃا.
ﺔﻴﻟﺎﺘﻟا تﺎﻡﻮﻠﻌﻤﻟا ﺪیوﺰﺗ ءﺎﺝﺮﻟا:
• ﺔﻠﻜﺸﻤﻟا عﻮﻧ
• ﺔﻟﻵا جذﻮﻤﻧ)Mod(
• ﻲﻠﺴﻠﺴﺘﻟا ﻢﻗﺮﻟا)S/N(
ﺔﻈﺡﻼﻡ :جوﺮﺨﻠﻟ ﻦﻳرﺰﻟا ﻰﻠﻋ ﻂﻐﺽا ،ضﺮﻌﻟا ﺔﻐﻴﺻ ﻦﻣ و ةﺪﻤﻟ ًﺎ ﻌ ﻣ3 ناﻮﺙ.
49
Page 50

###
Page 51

Page 52

195079979.00
09/2009 - Xerox Fabriano
 Loading...